EMPLOYEE SELF–SERVICE USER GUIDE FEBRUARY 2016

Welcome message from author
This document is posted to help you gain knowledge. Please leave a comment to let me know what you think about it! Share it to your friends and learn new things together.
Transcript

EMPLOYEE SELF–SERVICE
USER GUIDE
FEBRUARY 2016

1
Contents Note: If using this guide electronically the contents are hyperlinked to each section.
Introduction .....................................................................................................................................3
Using This Manual ........................................................................................................................3
Signing in to Workday ..................................................................................................................3
Workday Icons .............................................................................................................................4
Screen Elements ...........................................................................................................................5
Task Elements ..............................................................................................................................6
Home Page .......................................................................................................................................7
Home Page ...................................................................................................................................7
Configure Home Page ..................................................................................................................8
Inbox, Actions and Archive ..........................................................................................................9
Notifications .............................................................................................................................. 11
Personal Information .................................................................................................................... 12
Contact Information .................................................................................................................. 12
Emergency and Urgent Contacts .............................................................................................. 13
Photo ......................................................................................................................................... 16
Legal Name................................................................................................................................ 17
Employee Profile ........................................................................................................................... 18
Employee Profile ....................................................................................................................... 18
Change Password ...................................................................................................................... 19
Time Off ........................................................................................................................................ 20
View Time Off............................................................................................................................ 20
Request Time Off ...................................................................................................................... 21
Correct Time Off........................................................................................................................ 23
Time Entry ..................................................................................................................................... 24
Benefits ......................................................................................................................................... 25
Add/Enroll Dependents to Benefit Plan.................................................................................... 25
Change Dependents .................................................................................................................. 29
Add Beneficiaries ...................................................................................................................... 30
Change Beneficiary Information ............................................................................................... 32

2
Viewing Benefit Elections ......................................................................................................... 33
Pay ................................................................................................................................................. 34
Payment Elections – Direct Deposit Changes ........................................................................... 34
Federal Withholding Elections .................................................................................................. 37
State Withholding Elections ...................................................................................................... 39
View Payslips ............................................................................................................................. 40
Workday Mobile ........................................................................................................................... 41
Workday Mobile App Download and Sign-in ............................................................................ 41
Mobile PIN Sign-on ................................................................................................................... 42
Mobile App Notification ............................................................................................................ 43
Mobile Worklets and Dashboard .............................................................................................. 44

3
Introduction Using This Manual Welcome to the Workday Employee Self-Service User Guide. You are about to discover exciting
technology that is designed for efficient Employee Self-Service (ESS) functions.
Workday provides you with 24/7 interactive access to your information and your team’s
information. You will have easy access to employee data, all in one place.
This manual will teach you how to navigate Workday. It also provides a detailed, step-by-step
guide for the most common activities you will perform in Workday (e.g., adding and changing
your contact information, viewing benefit elections and requesting time off).
Signing in to Workday
Open a browser window
Type: www.WorkdayatEnsign.com
Click on the Sign in to Workday button
Enter User Name (Employee ID) and Password and click Sign In.
4
Workday Icons
Icons in Workday are called Worklets. They are located on the Home page, allowing you to
access and manage important information. Review the chart below to become familiar with the
Worklets on the Home page:
Icon Explanation
The Personal Information Worklet allows you easy access to add and change
your contacts, email and personal addresses.
The Pay Worklet allows you to update your withholding and payment elections
and view pay slips and payment history.
The Benefits Worklet allows you to view and manage important information
regarding benefits and how to make benefit changes.
The Time Worklet allows you to enter time several ways, view your time clock
history and correct unmatched clock events.
The Time Off Worklet allows you to request time off and view your time off
balances. Workday. The Archive tab is where you can view the status of your
processes.
The Support/Help Worklet allows you to view external links for information
and Workday educational materials.
The Directory Worklet provides access to co-workers contact information and
multiple ways to view and search for workers within the organization.

5
Screen Elements
The elements listed below are common throughout Workday.
Icon Explanation
Blue text Any blue text that becomes underlined when hovering over it is an actionable link
to view object details.
Related Actions allow you to view additional information and take action.
Filter data based on any column.
View the page information as a graph or chart.
View the page information as a PDF file, allowing you to determine what
information to include and print.
Export the page information as an Excel file.
More at the bottom of a menu indicates there are additional selections available.
The yellow alert message warns you that the process has possible errors, but
allows you to proceed.
The red error message is a hard stop. You will not be able to proceed to the next
screen until the issue is resolved.

6
Task Elements
These elements are available as you complete processes and change information in Workday.
Link Explanation
Required field that needs information entered before submitting the page.
The Prompt icon displays a drop-down menu of available choices.
Use the Pencil icon to edit existing information.
Remove the item from the area.
Delete the current row.
Add a new row.
Click to cancel the changes entered.
Submit to confirm changes and move the item to the next step in the review process.
Save the change for later, but submit nothing. You can return to the task to complete
at any time.
Approve the change and move the task on to the next step.
Deny any changes and return the task to the individual who initiated the change.
Send back to have the task initiator revise the information submitted.
Exit the screen to close the view.

7
Home Page Home Page The default page in Workday is known as your Home page. It contains Worklets and
maintenance functions. The upper right-hand corner provides access to your employee profile
link, which includes a drop-down menu to navigate the system. The upper left-hand corner
provides access to the Search function and Home button.
Both the Workday and Home buttons will return you to your Home page from anywhere in the
system.

8
Configure Home Page The Home page includes default Worklets (Required Worklets). Workday users can select
optional Worklets to include on their Home page.
To add a Worklet (e.g., Reports Worklet) to your Home page, click the
Gear icon.
Click the Plus sign to add a row, then click the Prompt icon then All.
Select a Worklet to be added to your home page.
Repeat steps 2 and 3 to add additional Worklets.
Click OK, then Done (located at the bottom of the next page).

9
Inbox, Actions and Archive Your Inbox separates your Actions and Archive in Workday. The Actions tab indicates items
that require your attention. Once you complete an Action item, it will be stored in your
Archives. The Archive tab allows you to view the details and processes of past actions. If you
begin a process in Workday but do not complete it, you will access that process through your
Inbox.
To access your Inbox, click your name in the upper right-hand corner of
your Home page and then click Inbox. The orange circle next to the
photo placeholder (Cloud) or your photo (if you have added one)
indicates how many items are in the Inbox.
Click the down arrow next to Viewing and Sort By to control what type
or how information appears in your Inbox.
As a best practice, check
your Workday Inbox daily.

10
Inbox, Archive (continued)
Click the Archive tab. The right side of the screen will display details of the highlighted
item in the left column.
Click the Process tab (right side of screen) to view the Process History; what has been
completed and any remaining processes (and due dates).
Click Remaining Process to see what steps are upcoming for this action.

11
Notifications Notifications are records of actions recently taken. They are informational items only. You do
not need to perform any Workday actions on these entries. You will receive a notification when
a process you initiated is complete.
Click your name in the upper right-hand corner of your Home page,
then select Notifications. Note: The grey circle with a number
indicates the number of unread notifications. Click the item to view.
Click the down arrow next to Sort By to control how your
notifications will appear. Click the open circle on the right side of
the task to mark as read. Note: Once the notification has been
marked as read, it will remain in your notification box but will no
longer be highlighted.

12
Personal Information Contact Information Use the Personal Information Worklet to access, change, and view your contact information in
Workday.
Open the Personal Information Worklet and select Contact
Information under the Change column.
Click Edit to change your Home or Work Contact Information.
Click the Pencil icon to edit existing information. Click Add to add new
information. After all information has been entered, click Submit and
Done.

13
Emergency and Urgent Contacts Use the Personal Information Worklet to access, change and view your primary and alternate
emergency contact information in Workday.
Open the Personal Information Worklet and select Emergency Contacts under
the Change column.
Click Add to enter your emergency contact. Enter the Legal Name and
Relationship. Note: Emergency contacts must have at least one primary phone
number or email address. Click Submit and Done.
Click Edit to change a Primary Emergency Contact and/or add an Alternative
Emergency Contact. When all required fields (*) have been entered, click Submit
and Done.
14
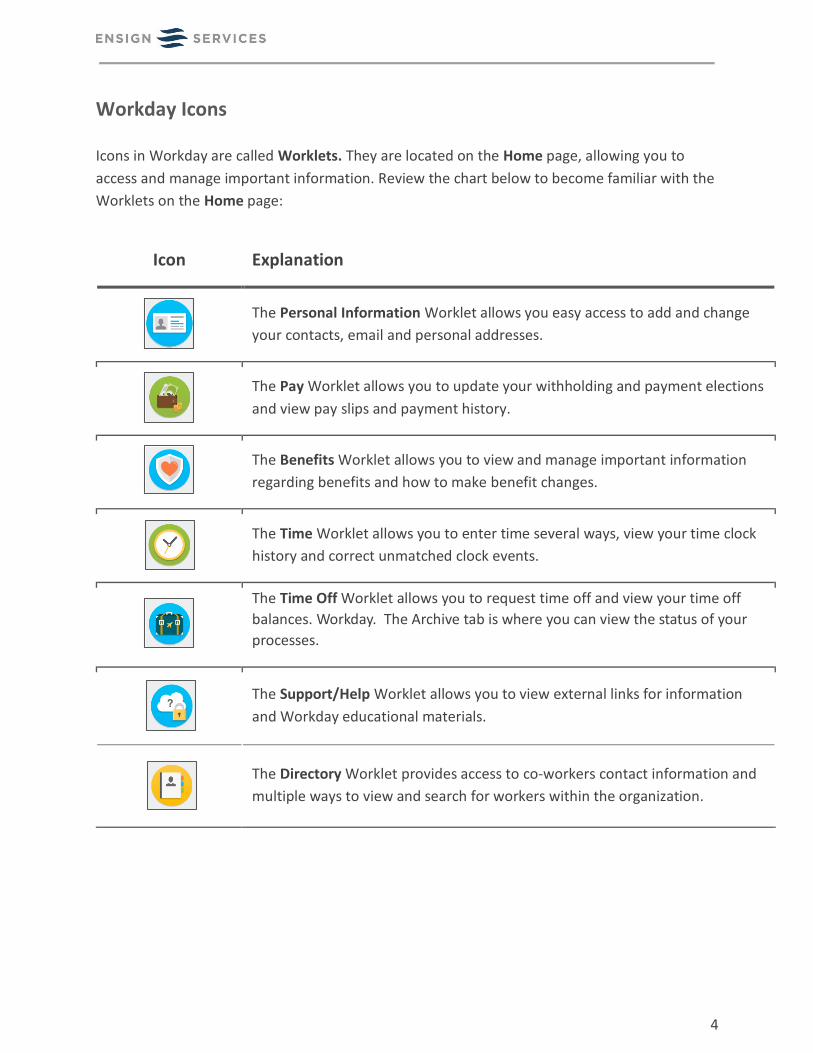
Emergency and Urgent Contacts (continued)
Select the Pencil icon to edit existing information. Select Add button to add new
information. Note: Add a Primary Address and a Primary Phone number.

15
Emergency Contacts (continued)
Enter any Alternate Emergency Contacts by clicking the Add button. These
contacts are assigned Priority 2. Use the Pencil icon to change any previously
entered alternate contacts.
When all changes have been made, click Submit, then Done.

16
Photo Use the Personal Information Worklet to add or update your profile photo in Workday.
1. Open the Personal Information Worklet and select Photo under the
Change column.
2. Click the Paperclip icon to upload a recent business appropriate headshot
of yourself, then click Submit and Done.

17
Legal Name Use the Personal Information Worklet to update your legal name in Workday.
Open the Personal Information Worklet and select Legal Name under
the Change column.
Complete all required fields (*) then click the paperclip icon to attach
documentation as proof of your legal name change. Enter Legal name
Change in the category field and then click Submit and Done. Note: Legal
Name change will be forwarded to payroll for review.

18
Employee Profile Employee Profile Your Profile provides access to personal data, worker history, payment elections, compensation
and professional information.
Click your name located in the upper right corner of your Home page.
Click View Profile under employee name.
Click any of the tabs to view, add or change your profile information.

19
Change Password
Click your name in the upper right corner of the Home page. Click My Account.
Select Change Password.
Enter Current Password, New Password and Verify New Password. Click OK.
Your new password must not be the
same as your current password or user
name. Minimum number of characters
required: 8. The following character
types must be represented: alphabetic
characters, uppercase characters,
lowercase characters, Arabic numerals 0
- 9, special characters !"#$%&'()*+,-
./:;=>?@[\]^_`{|}~. The password must
not have been used within the following
number of last passwords: 4.

20
Time Off
View Time Off The Time Off Worklet allows you to request time off and view your balance(s). Available
Balances as of the current date are listed in the lower left corner of the screen.
Under the View column, click Time Off Balance to see all time off
balances as of a particular date.
Enter the As Of date to view available balances
for a specific date, then click OK. Click the Printer
icon to print your time off balances or click the
Spreadsheet icon to export to Excel.
21
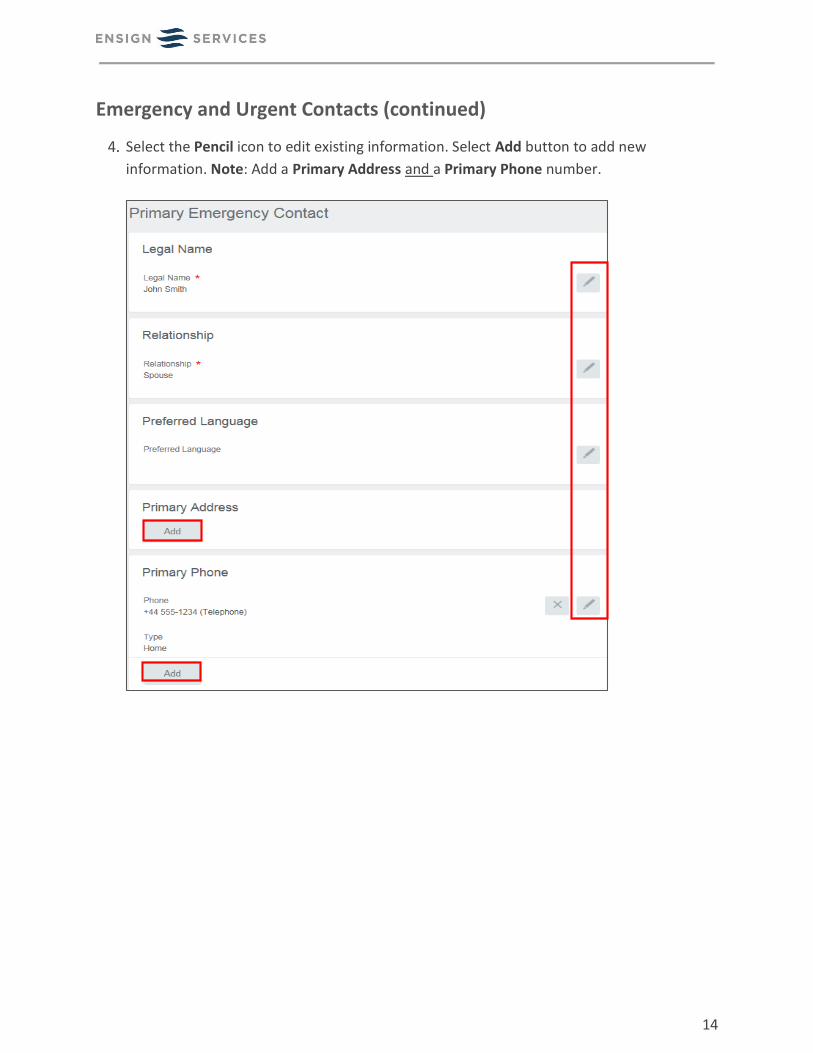
Request Time Off Use the Time Off worklet to initiate the time-off request process.
Open the Time Off Worklet and click Time Off under the Request column.
Click the calendar date to highlight the day(s) being requested. If you
want multiple days off, click and drag the mouse over the days you are
requesting. The days will be highlighted in blue.
Select the Request Time Off button to continue.

22
Request Time Off (continued)
Enter the total hours you are requesting per day in the Daily Quantity field, (e.g.,
8 for the entire day). Unit of Time auto-populates based on the type of time off
requested. Click Submit.
Your time off request will appear on the calendar view. A grey check mark means
the time off request is pending manager approval. A green check mark indicates the
time off request has been approved.
Employees will
receive a
notification in
their Inbox of
approval/denials,
etc.

23
Correct Time Off
Open the Time Off Worklet and select Time Off Correction under the
Request column.
Enter the correct time in the Correction to Requested field and enter a
comment. To delete a day, change the Correction to Requested hours
to 0. Click Submit after all time corrections have been made, then click
Done. Note: the time off correction will be forwarded to your manager
for approval.
Employees will
receive a notification
in their Inbox of
approval/denials, etc.

24
Time Entry Time is logged in many ways (i.e., physical time clock, Workday Clock In/Out, or Time Calendar).
Through physical time clocks, employees will finger-punch to clock in
and out. Employees will need to submit any TARFs (Time
Adjustment Request Forms) to their manager for approval. Note: the
HR/Payroll Representative will enter these adjustments in Workday.
Hourly employees who do not use the physical time clock, will enter time using the Workday
Time Worklet found on their Workday Home page, also available through the Workday Mobile
Application. Employees will need to submit any TARFs (Time Adjustment Request Forms) to
their manager for approval. Note: the HR/Payroll Representative will enter these adjustments
in Workday.
Salaried employees may choose to record their time in the Time Calendar for reporting
purposes only. Time Off requests for full days off can be requested through the Time Off
Worklet.
Most employees will fall into one of the
above scenarios. Contact your Time
Administrator if you have any questions.

25
Benefits The Benefits Worklet allows you to view your benefit plans and coverage. Workday will also
display the date your coverage began, your dependents, and your beneficiaries.
Add/Enroll Dependents to Benefit Plan If there is a life event, i.e. a birth or adoption during the year, follow the steps below to enroll
dependents to the benefit plan.
If you are processing a Divorce Event (to remove a spouse from your benefit plan), you must
first go to your Dependents page, click Edit and change the dependent relationship from
"Spouse" to "Ex-Spouse". See page 28 for steps to change dependents.
From the Benefits Worklet, click Benefits under the Change column.
Click the down arrow to select the Benefit Event Type (i.e., Birth/Adoption).
Enter the Benefit Event Date, attach any relevant documents, and then click
Submit.
Benefit
Changes will be
forwarded to
the Benefits
Administrator
for approval.
26
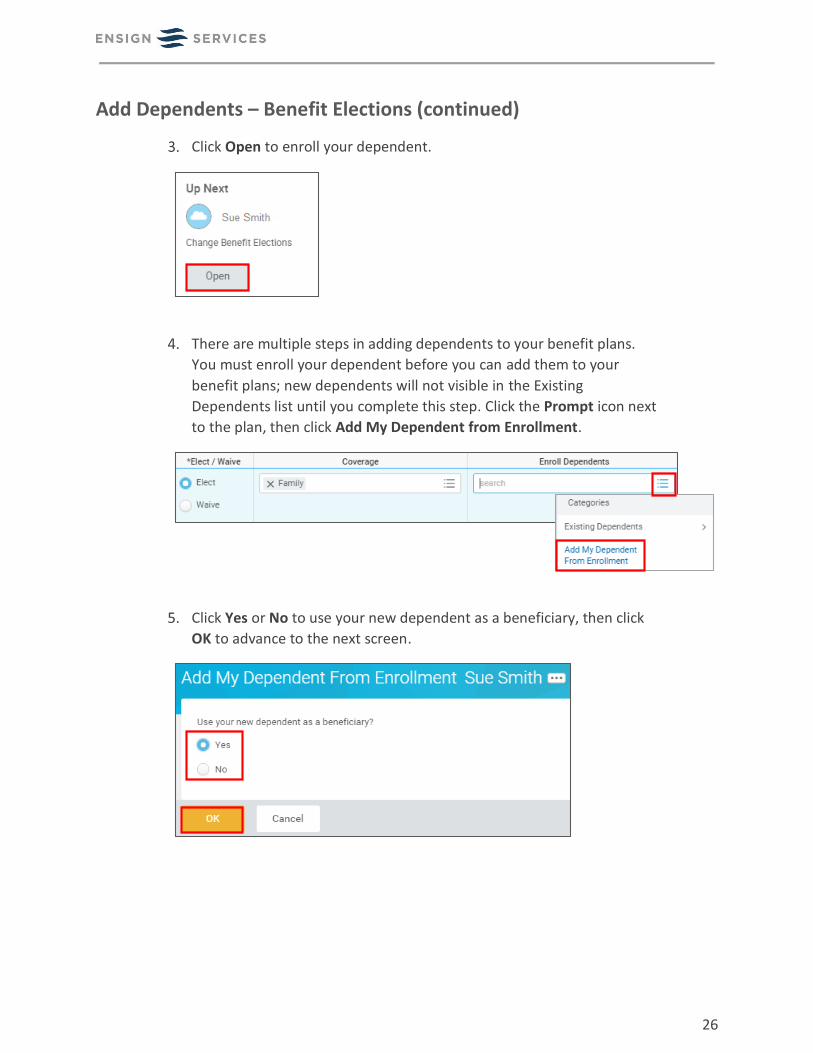
Add Dependents – Benefit Elections (continued)
Click Open to enroll your dependent.
There are multiple steps in adding dependents to your benefit plans.
You must enroll your dependent before you can add them to your
benefit plans; new dependents will not visible in the Existing
Dependents list until you complete this step. Click the Prompt icon next
to the plan, then click Add My Dependent from Enrollment.
Click Yes or No to use your new dependent as a beneficiary, then click
OK to advance to the next screen.

27
Add Dependents – Benefits Elections (continued)
To add a dependent, enter First and Last Name and all other required
fields (*).
Enter the dependent’s Social Security Number by clicking Add.
Enter the Address and click OK.

28
Add Dependents – Benefits Elections (continued)
There are multiple steps in the benefit election process. The number of
steps may vary depending on the life event chosen and is shown at the
top of each screen. Enter information in all required (*) fields on each
screen. Click the Continue button at the bottom of each page to
advance through the screens.
After you have entered or updated your dependents’ benefit elections,
click I Agree to provide your Electronic Signature. Click Submit to
continue the enrollment process. Note: Be sure to review all selections
thoroughly prior to clicking submit as all elections are considered
finalized.
Click Print for a paper copy of your Benefit Elections, then click Done.
Your name and Password are considered your “Electronic
Signature” and will serve as your confirmation of the
accuracy of the information being submitted. Benefit Changes will be
forwarded to the
Benefits Administrator
for approval.

29
Change Dependents
From the Benefits Worklet,
click Dependents under the
Change column. to change
your dependent(s).
Click Edit to change your dependent(s).
Click the Pencil icons to open fields for editing. Make all changes and
click Submit and Done.
30
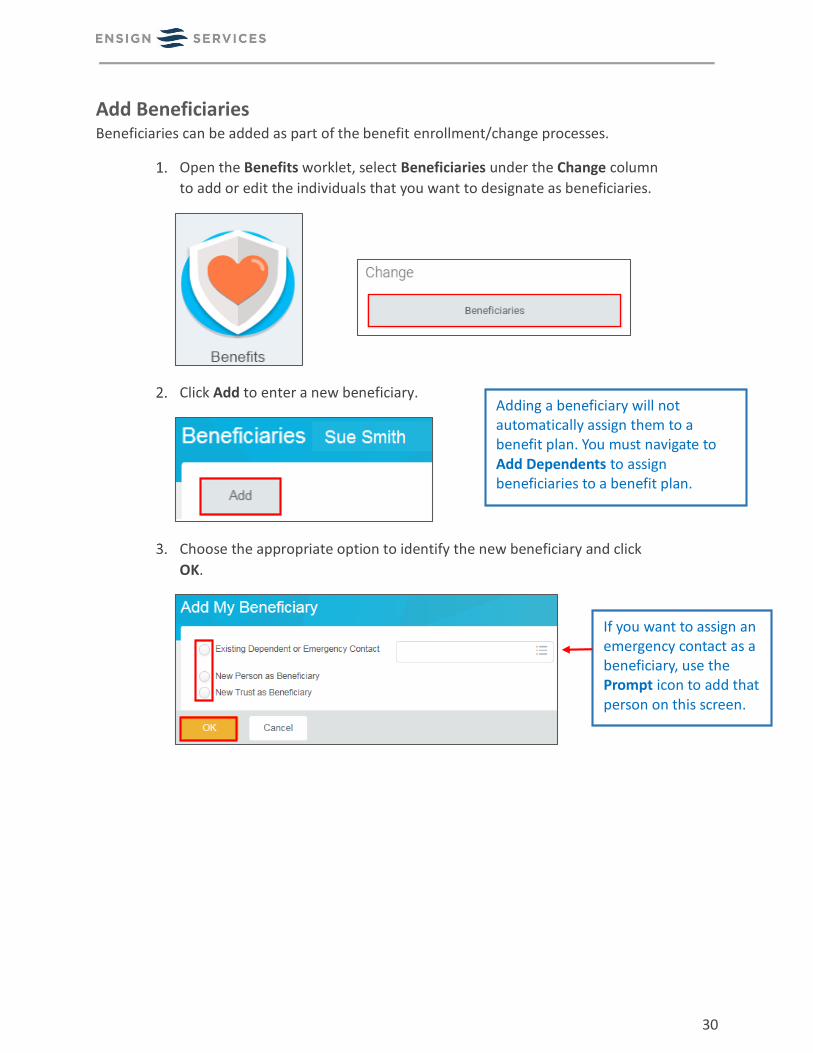
Add Beneficiaries Beneficiaries can be added as part of the benefit enrollment/change processes.
Open the Benefits worklet, select Beneficiaries under the Change column
to add or edit the individuals that you want to designate as beneficiaries.
Click Add to enter a new beneficiary.
Choose the appropriate option to identify the new beneficiary and click
OK.
Adding a beneficiary will not automatically assign them to a benefit plan. You must navigate to Add Dependents to assign beneficiaries to a benefit plan.
If you want to assign an emergency contact as a beneficiary, use the Prompt icon to add that person on this screen.

31
Add Beneficiaries (continued)
Click the Pencil icon next to Legal Name to open the screen to enter the
name and Relationship. Enter any additional information available.
Click Add under Primary
Address (located under the
Contact Information
section) to enter your
beneficiary’s address.
Complete all required
fields (*).
Click Submit and then Done.
Beneficiaries or dependents must have at least one address.

32
Change Beneficiary Information
In the Benefits Worklet, click Beneficiaries under the Change column.
Click Edit to make changes to an existing Beneficiary’s information.
Click the Pencil icon to open the fields to make changes. After all edits
have been made, click Submit and then Done to submit the changes.

33
Viewing Benefit Elections
To view your current elections, select Benefit Elections from the View
column.
You have the ability to view your benefits plan and coverage. Workday will also display the date
your coverage began, your dependents, and your beneficiaries. Note: You can view your
Benefits Elections report, print it, or export it to Excel.
Current Cost displays the semi-monthly payroll deduction for elected benefits. Amounts vary based upon your benefit elections. Note: If you are on a weekly or bi-weekly payroll schedule, your deductions per paycheck may look different.

34
Pay The Pay Worklet will allow you update your Withholding and Payment Elections as well as view
your Payslips.
Payment Elections – Direct Deposit Changes Workday gives users the power to control direct deposit information. This allows you to quickly
and easily dictate where your money is deposited.
From the Pay worklet, click Payment Elections under the Actions column.
You can Change Account to make changes to current accounts, Delete
Account to remove an account you will not use again or Add Account to
set up additional accounts.

35
Payment Elections – Direct Deposit Changes (continued) Add account information for use when electing direct deposit for payments.
Assign the account a nickname for easy identification later. Choose the
Account Type. Each field is required and drives the direct deposit
transaction. Enter the Bank Name, Routing Number and Account
Number (see sample check above for the location of this information on
your checks). Click OK.

36
Payment Elections – Direct Deposit Changes (continued)
Change Election (under the Payment Elections section) will allow you to designate how to
receive payments. For direct deposit, you must first set up your bank accounts. Note: If an
account is not available, return to page 34 of this guide and follow the steps to add it to the list
of valid accounts.
Using the Prompt icon, select the Country (United States of America),
Currency (USD), Payment Type (Check or Direct Deposit), Account and
Balance/Amount/Percent. Click OK and Done.
If multiple payment elections are chosen,
designate the Order and distribution of
payments. Choosing Balance for the last
account will ensure that, no matter what
changes occur in your paycheck, money will
always be distributed 100%.

37
Federal Withholding Elections Workday empowers users to quickly and easily change federal tax withholding elections. The
change is immediate and real time.
From the Pay worklet, select Withholding Elections from the Actions column.
Click Update to maintain your federal withholding information. Note: You are
required to update each tab one at a time. Depending on your location, you may
or may not have Local Elections or Tax Allocations. Verify the Company and
Effective Date and click OK to open the form.

38
Federal Withholding Elections (continued)
Update your Marital Status, the Number of Allowances and/or any
Additional Amounts. Click the Exempt box to claim exemption from
withholding if applicable.
Read the Legal Notice and click the I Agree box, then click OK.

39
State Withholding Elections
Click Update to maintain your state withholding information. Note: You are
required to update each tab one at a time. Depending on your location, you may
or may not have Local Elections or Tax Allocations. Verify the Company, Effective
Date and State. Click OK to open the form.
Using the Prompt icon, enter the Withholding Allowance and Number of
Allowances. Read the Legal Notice and then click I Agree. Click OK.

40
View Payslips View allows you to scroll through all the details on your Payslip.
Open the Pay worklet and click Payslips under the View column to
display all information pertaining to a specific pay period and YTD
totals.
Note: The first page of Payslips provides a high level summary of your pay. Click to View details
or Print from this page. Print creates a PDF of your Payslip.

41
Workday Mobile Workday Mobile App Download and Sign-in Workday provides an intuitive mobile application experience. You will be able to access
Workday directly from your mobile device to complete tasks and request time off. The current
supported devices are the iPhone, iPad and the android devices. Note: not all functionality on
the website is available on the mobile app.
Load the app on your device
Enter your Tenant Name: Ensign
Enter your Ensign User Name (Employee ID) and Password
Click Sign In
User

42
Mobile PIN Sign-on
You can now sign into your Workday Mobile app using a simple PIN (between 6 and 8 digits)
instead of keying lengthy username and password combinations every time.
To Set Up/Change PIN
Click the menu/gear button
Scroll down and click Settings
Click Set Up/Change PIN
Note: If you are unsuccessful at entering your PIN after 3 attempts, you must sign in with your
Workday username and password.
User
Once you have created
your Workday PIN, you will
enter that PIN and click the
checkmark to access
Workday Mobile.

43
Mobile App Notification
To receive a notification on your mobile app:
Click the Gear icon
Select the General option
Select the Notifications option
Slide Notifications to on
User

44
Mobile Worklets and Dashboard
Click into each Worklet to view the available information. See the sample Dashboard below for
viewing reports.
User
Related Documents