Embroidery & Machine Basics

Welcome message from author
This document is posted to help you gain knowledge. Please leave a comment to let me know what you think about it! Share it to your friends and learn new things together.
Transcript

Embroidery & Machine Basics
Table of Contents
Table of Contents Chapter 1 – Embroidery Basics ............................................................................1
Threads.................................................................................................................2 Types of cones ............................................................................................................ 2
Types of Threads..................................................................................................3 Thread Weights.....................................................................................................6 Needles.................................................................................................................7
The Anatomy of a Needle ........................................................................................... 7 How a Stitch is Formed............................................................................................... 8
Types of Needles Available and Their Characteristics..........................................9 Needle Composition.................................................................................................... 9 Point Styles ................................................................................................................. 9 Needle Styles .............................................................................................................. 9 Needle Sizes.............................................................................................................. 10
Backings and Toppings.......................................................................................11 Types of Backing ...................................................................................................... 12 Topping ..................................................................................................................... 12
Putting It All Together: A Needle / Thread / Backing Usage Chart......................13 Bobbins...............................................................................................................14
Commercial vs. Hand Wound Bobbins .................................................................... 14 Tension Considerations ......................................................................................15
Bobbin Test............................................................................................................... 15 Exercise ..............................................................................................................18
Working with Bobbins.............................................................................................. 18 Basic Hooping Techniques .................................................................................20
Tips when hooping a cap .......................................................................................... 21 Tips when hooping garments .................................................................................... 21
Embroidery Placement Chart ..............................................................................22
Chapter 2 – Machine Basics ...............................................................................23
Let’s Embroider!..................................................................................................24 Basic Steps ................................................................................................................ 24
The Operation Units............................................................................................25 Operation Unit Functions ....................................................................................26 Loading the Design .............................................................................................33
Verify or Select Basic Settings ................................................................................. 34 Set the Colors in your Design ................................................................................... 35 Change color while sewing:...................................................................................... 35 Spool Order............................................................................................................... 36 Trace the Design ....................................................................................................... 37 Sew the Design ......................................................................................................... 38 Clearing a Design That’s Sewing ............................................................................. 38
i
Table of Contents
Opening up Your Machine ..................................................................................39 Component Identification ....................................................................................40 Threading Your Machine.....................................................................................41 Setting Tension...................................................................................................46 Exercise ..............................................................................................................47
Working with Bobbins.............................................................................................. 47 Basic Maintenance..............................................................................................49
Changing from Flats to Caps .................................................................................... 49 Replacing a Needle.............................................................................................50 Oiling Your Machine............................................................................................51 Greasing Your Machine ......................................................................................52 Cleaning Your Machine.......................................................................................53 Non-Warranty Items............................................................................................53 Additional Resources ..........................................................................................54
ii
Chapter 1 – Embroidery Basics
Chapter 1 – Embroidery Basics
1

Chapter 1 – Embroidery Basics
Threads
Types of cones
1,000 Meter Cone
Appx. 200,000 stitches
5,000 Meter Cone
Appx. 1 million stitches
Bobbin Cone
6,000 yards
2

Chapter 1 – Embroidery Basics
Types of Threads
Type Characteristics Pros/Cons
Rayon
High sheen Softer feel Heat resistant Lower elasticity Breaks easier than polyester Was preferred type of thread
Pro – Works on soft, delicate fabrics Con – Is not colorfast; cannot be bleached Con – May experience more frequent thread breaks Con - May require tension change
Notes:
Polyester
Higher elasticity Strong Has greater volume than rayon Resistant to chemicals SWF recommends the use of ACKERMANN threads in all models of machines
Pro – Handles harsh laundering Pro – Colorfast Pro – Resists thread breaks Con – may not shine as brilliantly Con – Dense stitch design may cause puckering when subjected to high laundering temperatures
Notes:
3

Chapter 1 – Embroidery Basics
Type Characteristics Pros/Cons
Cotton
Matte finish Natural fibers
Pro – Non-shiny; military usage Con – Thread shrinkage may occur
Notes:
Metallic
Nylon core, metallic foil wound around the core May include an emulsifier to cut down on static electricity May include a finishing rinse or conditioner to make thread easier to use
Pro – Exquisite finish Con – Special digitizing considerations Con – Static electricity may develop Con – May require slower stitch speeds and a needle change Con – Chlorine, acids, may have adverse effect on thread
Notes:
4

Chapter 1 – Embroidery Basics
Type Characteristics Pros/Cons
SolarActive
UV-sensitive thread; changes color when exposed to sunlight Standard 40 weight thread Made from polypropylene Tested to withstand high stitch counts (1200spm test)
Create Interesting designs Con – More delicate than polyester thread (washing consideration) Con – Color changing ability may not last forever Con – Cannot iron directly over embroidery
Notes:
Other
Wool Blends – Accent thread; does not work well for small stitches Glow in the Dark – Slick feel; can be stitched at 55% normal density (thicker than regular threads) Nylon – Very flame resistant; used for racecar drivers, firefighters, etc. Should not be used at a high speed stitch setting
Con – Since needles create a penetration point in the fabric, tperson wearing the garment could be burned where the penetration points are.
he
Notes:
5

Chapter 1 – Embroidery Basics
Thread Weights
Thread is available in different weights, or thickness. The most common thread weight in use today is No. 40. However, the thread weight range varies from No. 6 to No. 60. The thicker the thread, the less stitches needed to fill a given area. This may be useful when you need to change the size of a design but you cannot change the design’s density. To make the image smaller, use a thinner thread; conversely, if the design needs to be enlarged, use a thicker thread. The table below lists the common threads and available weights. There are three different measures used to gauge the thickness of thread: Denier, Euro, and Tex. The table below lists only the Euro (20, 30, 40, etc) weights for threads.
Weight Available thread types Uses
#60 Rayon; Polyester #50 All Purpose Cotton
Used for fine stitching (lettering, etc.) Higher stitch count, better coverage
#40 Rayon, Polyester, Polypropylene 1
All purpose thread you will use 99 % of the time
#30 Rayon, Polyester 2 All purpose thread #20 None currently available (?) #12 Rayon, Polyester #6 Rayon, Polyester (thread is
floss; has no twist)
Used for lower stitch count with more coverage (floor mats, towels, etc)
Thinnest
Thickest
Note: A No. 30 thread is approximately 20% thicker than a No. 40 thread Tex measurements are used for metallic and cotton threads. The table below lists common Tex gauges.
Weight Available thread types
18Tex Metallic 26Tex Metallic 30Tex Metallic 40Tex Cotton
Thinnest
Thickest
1 #40 is the most recommended size for everyday sewing in your SWF Embroidery Machine 2 Leather uses fewer needle penetration points. A thicker thread like #30 or #12 is recommended.
6

Chapter 1 – Embroidery Basics
Needles The Anatomy of a Needle It is important to understand the sections of a commercial embroidery machine needle. Their configuration varies from needle type to needle type. The diagram below lists the major sections of the needle.
Sharf
Shank Front Groove
Eye
Point
Needle Part Description
Shank Top part of the needle that is inserted into the embroidery machine.
Shaft The body of the needle that sits below the shank. The thickness of the shaft determines the needle size.
Front Groove The groove that runs vertically down the front of the needle guides the thread as it travels into the fabric.
Point The tip of the needle. This penetrates the fabric and passes thread to the bobbin hook so a stitch can be formed. The shape varies with the needle type (described on page 8)
Sharf The indentation on the back of the needle. A long scarf helps to eliminate skipped stitches by allowing the bobbin hook to loop the thread more easily.
Eye The hole in the end of the needle that thread passes through. The needle size and type determine the size and shape of the eye.
7
Chapter 1 – Embroidery Basics
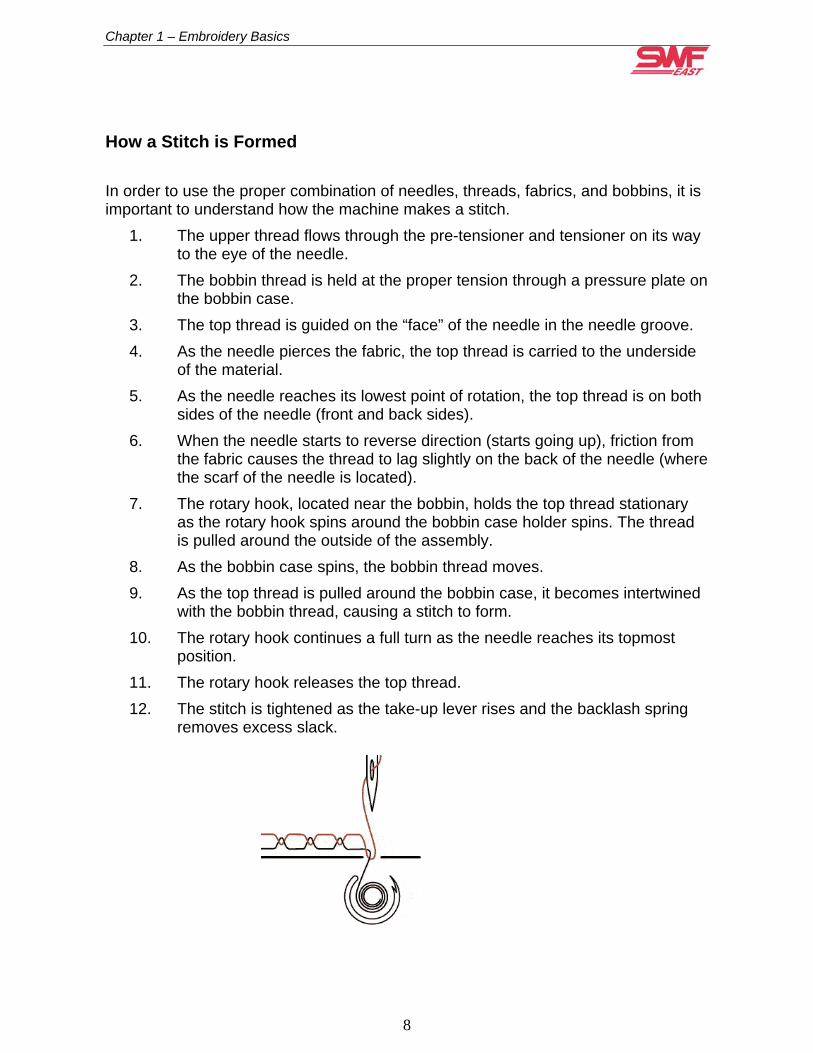
How a Stitch is Formed
In order to use the proper combination of needles, threads, fabrics, and bobbins, it is important to understand how the machine makes a stitch.
1. The upper thread flows through the pre-tensioner and tensioner on its way to the eye of the needle.
2. The bobbin thread is held at the proper tension through a pressure plate on the bobbin case.
3. The top thread is guided on the “face” of the needle in the needle groove. 4. As the needle pierces the fabric, the top thread is carried to the underside
of the material. 5. As the needle reaches its lowest point of rotation, the top thread is on both
sides of the needle (front and back sides). 6. When the needle starts to reverse direction (starts going up), friction from
the fabric causes the thread to lag slightly on the back of the needle (where the scarf of the needle is located).
7. The rotary hook, located near the bobbin, holds the top thread stationary as the rotary hook spins around the bobbin case holder spins. The thread is pulled around the outside of the assembly.
8. As the bobbin case spins, the bobbin thread moves. 9. As the top thread is pulled around the bobbin case, it becomes intertwined
with the bobbin thread, causing a stitch to form. 10. The rotary hook continues a full turn as the needle reaches its topmost
position. 11. The rotary hook releases the top thread. 12. The stitch is tightened as the take-up lever rises and the backlash spring
removes excess slack.
8
Chapter 1 – Embroidery Basics
Types of Needles Available and Their Characteristics
There is a dizzying array of needle characteristics and sizes available on the market. This section contains a basic discussion of needles.
Needle Composition Needles are all made of metal, right? Well yes, but there are different types of metals used in the creation of a needle. In addition, the “point” of the needle is shaped differently to meet the needs of the fabric.
• Chrome needles – Good quality, all-purpose needle.
• Stainless Steel needles – Good quality, all-purpose needle.
• Titanium needles – Strong needle, more expensive. Titanium needles have a gold coloring and can last up to five times longer than ordinary needles. Not usually necessary in most production environments using SWF machines.
• Teflon coated needles – Also known as “cool-sew,” used to embroider through heat sensitive materials or through materials with an adhesive backing. Teflon resists heat buildup on the material. Example: DBxK5 CS
Point Styles The two most common types of points are ball and sharp. Basically, use ball points for knits and sharp points for woven fabrics.
• Sharp points – Used when embroidering on woven fabrics. This needle type slices through the fabric. Designated by RG if Groz Beckert or R if Organ.
• Ball points – Used when embroidering on knit fabrics. This needle type pushes through the fabric rather than cutting the fibers. This is the style of needle recommended by SWF for use in its machines. Designated by FFG/SES if Groz Beckert or BP if Organ.
• Wedge points – Used on leather and other “membrane” materials. A hole is cut into the material; therefore, a much lower density is required. Example: DBxK5SS
• Large eye – Used when embroidering with metallic threads. Larger eye allows thread to feed through needle more effectively. Example: DBx7ST
Needle Styles • DBxK5 – Medium point and a larger eye.
• “ST” suffix – Designates a larger eye than the DBxK5. Used when embroidering with metallic threads. Example: DBx7ST
9

Chapter 1 – Embroidery Basics
Needle Sizes A common needle used in the industry has the designation 75/11. But what does this number mean to you? The number is the result of combining the European and US needle system. The European (metric) measurement is determined by the width of the blade multiplied by 100. Example: a needle width of .75mm equals a 75 needle in the European system. The American system has a nominal number system designated by 11, 12, etc and has been in use for a long time. The first number, 75, is the European designation; the second number, 11, is the US needle size.
75 / 11
European American
The table below lists and describes the common needle sizes available to the commercial embroiderer.
Size Thread weight / type Stitch Quality Notes
60/8 50 Cotton 60 Rayon
Very fine detail; small lettering
Fragile needle; sharp will not cut knit fabric
65/9 50 Cotton 60 Rayon 40 Rayon (some)
Fine detailed designs
Delicate needle Good needle for silks
70/10 40 Rayon and above Good detail; 3/8” lettering
Needles may break over thick seams
75/11** 40 Rayon and above Some 30 Rayon
Commercial detail; ¼” lettering
Best All-Around Needle
80/12 All thread weights listed above
Commercial detail Canvas, thinner leathers (recommend Teflon) Good needle for hats
90/14 30s for fill areas Large eye
Coarse, poor detail Canvas, belts. Very stiff needle
100/16 30s and above Large eye; large hole in material
Very coarse Stiff canvas, ghee belts
** SWF machines are delivered with 75/11 RG (sharps)
10
Chapter 1 – Embroidery Basics
Backings and Toppings
Backing (also known as a stabilizer) is used for several reasons:
• To support the weight of the embroidery on the fabric
• To control shrinkage
• To reduce the tendency if the material to shift underneath the embroidery during laundering
• To aid in the hooping of small items
• To add crispness to small lettering
• To improve the design registration
• To ease the removal of embroidery stitches if mistakes were made (wrong color, incorrect placement, etc.)
• To repair a fabric “snip”
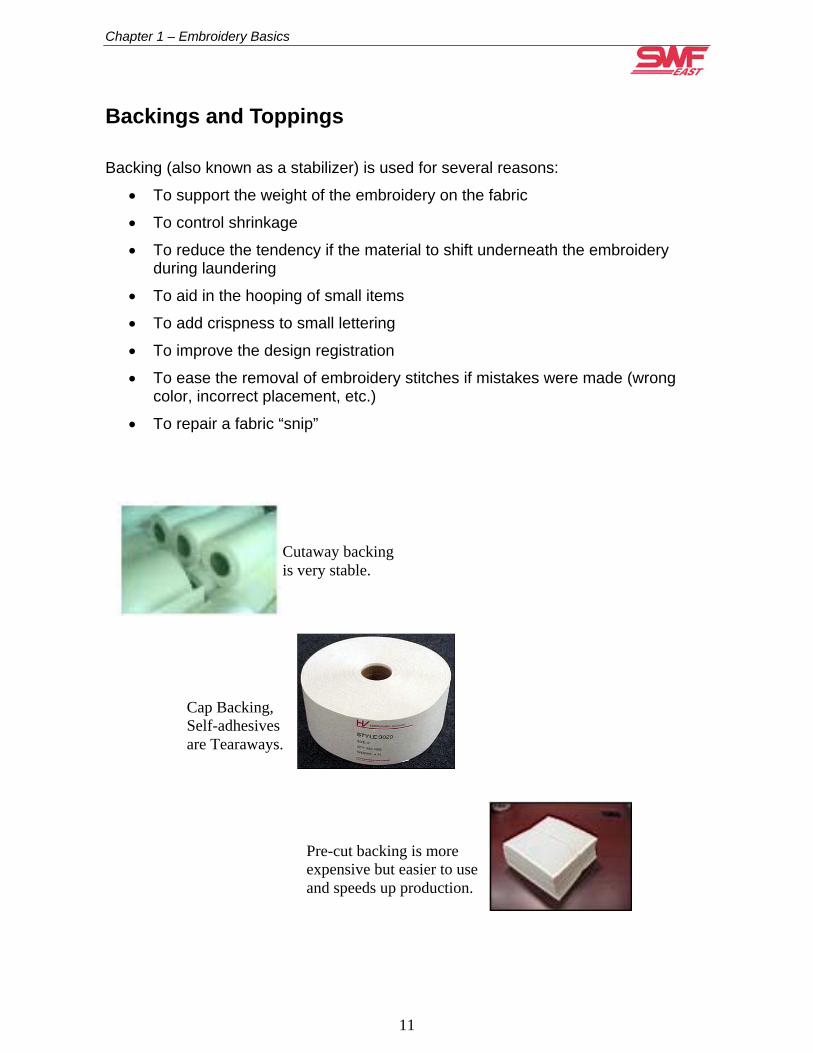
Cutaway backing is very stable.
Cap Backing, Self-adhesives are Tearaways.
Pre-cut backing is more expensive but easier to use and speeds up production.
11

Chapter 1 – Embroidery Basics
Types of Backing As you discuss the various types of backings available to the user, hand out samples and let them see and feel the difference. The table below lists and describes the common backing in use today.
Type Characteristics Use
Tearaway Backing that can be removed by hand (torn) from the fabric Can trim much closer to the stitches Will wash away
Hats Strong and stable fabrics Back of towels & robes
Cutaway Much stronger than tearaway Excess backing must be removed with scissors Most common form of backing Most common weights are 2 ½ oz. And 3 ¼ oz.
Shirts Left chest designs Jackets Denim Lightweight t-shirts (use 3 ¼ oz.)
Polymesh Thin cutaway Semi-translucent
White or light colored knit shirts Delicate fabrics
Fusable Polymesh or Iron-On
Heat-set adhesive May be placed on back of embroidery after design is complete to cover stitches
Cover metallic thread Cover rough stitches for sensitive skin
Hydrostick Self-Adhesive
Adhesive is applied to one side of the fabric
Used with Fast Frames to hold patches or other uniquely shaped items
Topping Typically, a water-soluble film or a thin sheet of plastic used on towels or other “nappy” materials. Topping smoothes the surface of the fabric being embroidered and inhibits stitches from “falling through” the weave of the fabric. Some loosely woven pique fabrics may also benefit from the use of toppings. If a quick-melt variety of topping is used, care must be taken when removing the topping from the finished piece. Melt away topping, when removed by an iron, can also melt a synthetic fabric.
12
13
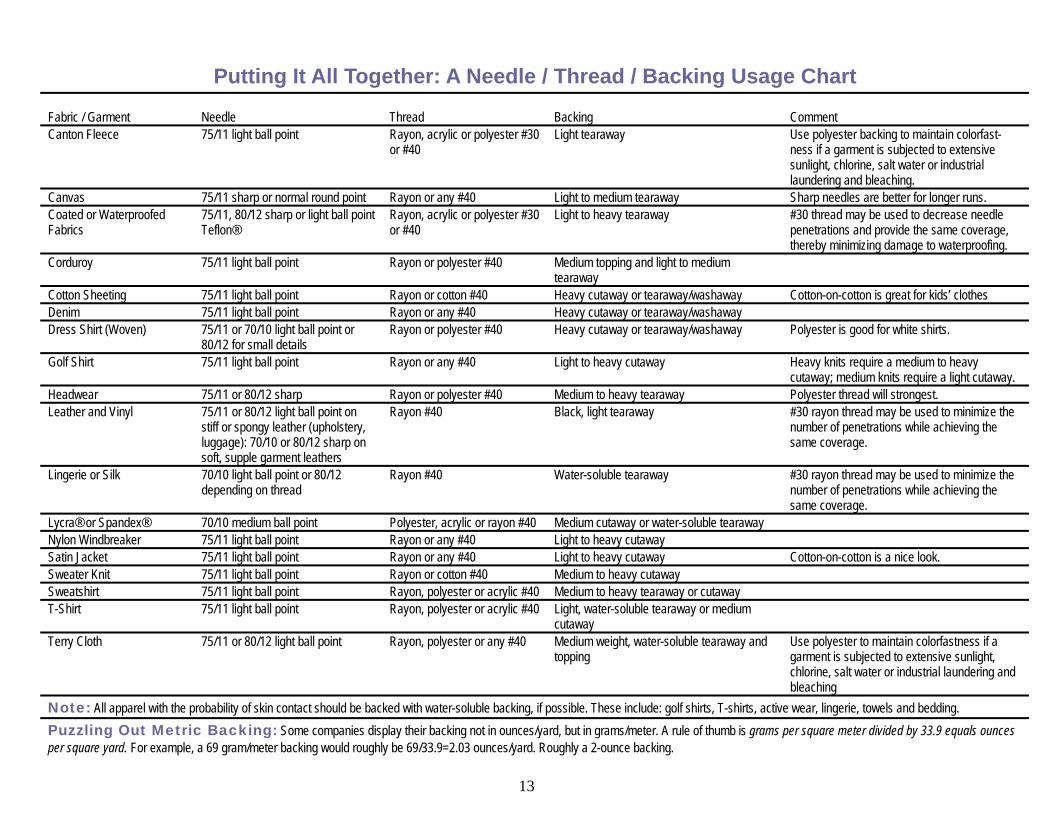
Putting It All Together: A Needle / Thread / Backing Usage Chart Fabric / Garment Needle Thread Backing Comment Canton Fleece 75/11 light ball point Rayon, acrylic or polyester #30
or #40 Light tearaway Use polyester backing to maintain colorfast-
ness if a garment is subjected to extensive sunlight, chlorine, salt water or industrial laundering and bleaching.
Canvas 75/11 sharp or normal round point Rayon or any #40 Light to medium tearaway Sharp needles are better for longer runs. Coated or Waterproofed Fabrics
75/11, 80/12 sharp or light ball point Teflon®
Rayon, acrylic or polyester #30 or #40
Light to heavy tearaway #30 thread may be used to decrease needle penetrations and provide the same coverage, thereby minimizing damage to waterproofing.
Corduroy 75/11 light ball point Rayon or polyester #40 Medium topping and light to medium tearaway
Cotton Sheeting 75/11 light ball point Rayon or cotton #40 Heavy cutaway or tearaway/washaway Cotton-on-cotton is great for kids’ clothes Denim 75/11 light ball point Rayon or any #40 Heavy cutaway or tearaway/washaway Dress Shirt (Woven) 75/11 or 70/10 light ball point or
80/12 for small details Rayon or polyester #40 Heavy cutaway or tearaway/washaway Polyester is good for white shirts.
Golf Shirt 75/11 light ball point Rayon or any #40 Light to heavy cutaway Heavy knits require a medium to heavy cutaway; medium knits require a light cutaway.
Headwear 75/11 or 80/12 sharp Rayon or polyester #40 Medium to heavy tearaway Polyester thread will strongest. Leather and Vinyl 75/11 or 80/12 light ball point on
stiff or spongy leather (upholstery, luggage): 70/10 or 80/12 sharp on soft, supple garment leathers
Rayon #40 Black, light tearaway #30 rayon thread may be used to minimize the number of penetrations while achieving the same coverage.
Lingerie or Silk 70/10 light ball point or 80/12 depending on thread
Rayon #40 Water-soluble tearaway #30 rayon thread may be used to minimize the number of penetrations while achieving the same coverage.
Lycra® or Spandex® 70/10 medium ball point Polyester, acrylic or rayon #40 Medium cutaway or water-soluble tearaway Nylon Windbreaker 75/11 light ball point Rayon or any #40 Light to heavy cutaway Satin Jacket 75/11 light ball point Rayon or any #40 Light to heavy cutaway Cotton-on-cotton is a nice look. Sweater Knit 75/11 light ball point Rayon or cotton #40 Medium to heavy cutaway Sweatshirt 75/11 light ball point Rayon, polyester or acrylic #40 Medium to heavy tearaway or cutaway T-Shirt 75/11 light ball point Rayon, polyester or acrylic #40 Light, water-soluble tearaway or medium
cutaway
Terry Cloth 75/11 or 80/12 light ball point Rayon, polyester or any #40 Medium weight, water-soluble tearaway and topping
Use polyester to maintain colorfastness if a garment is subjected to extensive sunlight, chlorine, salt water or industrial laundering and bleaching
Note: All apparel with the probability of skin contact should be backed with water-soluble backing, if possible. These include: golf shirts, T-shirts, active wear, lingerie, towels and bedding. Puzzling Out Metric Backing: Some companies display their backing not in ounces/yard, but in grams/meter. A rule of thumb is grams per square meter divided by 33.9 equals ounces per square yard. For example, a 69 gram/meter backing would roughly be 69/33.9=2.03 ounces/yard. Roughly a 2-ounce backing.

Chapter 1 - Embroidery Basics
Bobbins Commercial vs. Hand Wound Bobbins In many situations, you will want to hand wind bobbins for specialty items where the use of a white bobbin thread is undesirable. For example, many shops that specialize in monogrammed towels prefer to wind color-coordinated bobbins using their SWF bobbin winder. Hand wound bobbins are used whenever the reverse side of the embroidery will be viewed, giving the item a very finished, professional look. However, you may not want to wind all your bobbins manually. White, spun polyester bobbins are available and recommended for use in your SWF machine. When you find a bobbin manufacturer that you like, we recommended you stick with it. Each type of bobbin requires a different tension setting (due to its thread construction). The table below lists and describes the common types of commercial bobbins available to you.
Bobbin Type Characteristics Notes
Spun Polyester
Most economical May cause lint-like buildup in bobbin case; however, routine cleaning will easily manage the lint May be wound on clear sided or paper sided bobbins
Requires less plate pressure (tension spring) Known as Astra, L-120 **Recommended for use in SWF machines
Filament Polyester
Stronger than spun polyester More expensive than spun polyester May be wound on clear sided or paper sided bobbins
Requires greater plate pressure (tension spring) Known as V-15, Trusew
Nylon
Side-less bobbin - Although more thread is wound on a side-less bobbin, thread may become unwound and jam in bobbin case. May be coated with a waxy film May cause waxy buildup
Cotton Not as strong Not recommended on commercial machines
14

Chapter 1 - Embroidery Basics
Tension Considerations A common way to express thread tension on an embroidery machine is “tug of war.” There is a delicate balance of tensions that must exist between the bobbin thread and your top thread. Of course, the question of the hour is, “If there is a tug of war occurring between the top thread and the bobbin thread, how do I know which is causing my stitch problems?” Nine times out of ten, the bobbin thread or case is the culprit. Check the bobbin case for dirt, lint, etc.
Bobbin Test Perform an “H” or other tension test (some embroiderers use a Z H X test or a capital I test). Ensure that your letters are 1” high. For best results, create a test pattern that uses every needle on your machine. Look at the reverse side of the piece to determine if your tension needs to be adjusted. Your letter should be 1/3 color, 1/3 bobbin thread, and then 1/3 color again. We recommend performing this test once a month.
1/3 color thread 1/3 bobbin thread 1/3 color thread
Proper Bobbin Tension (reverse side of garment)
15
Chapter 1 - Embroidery Basics
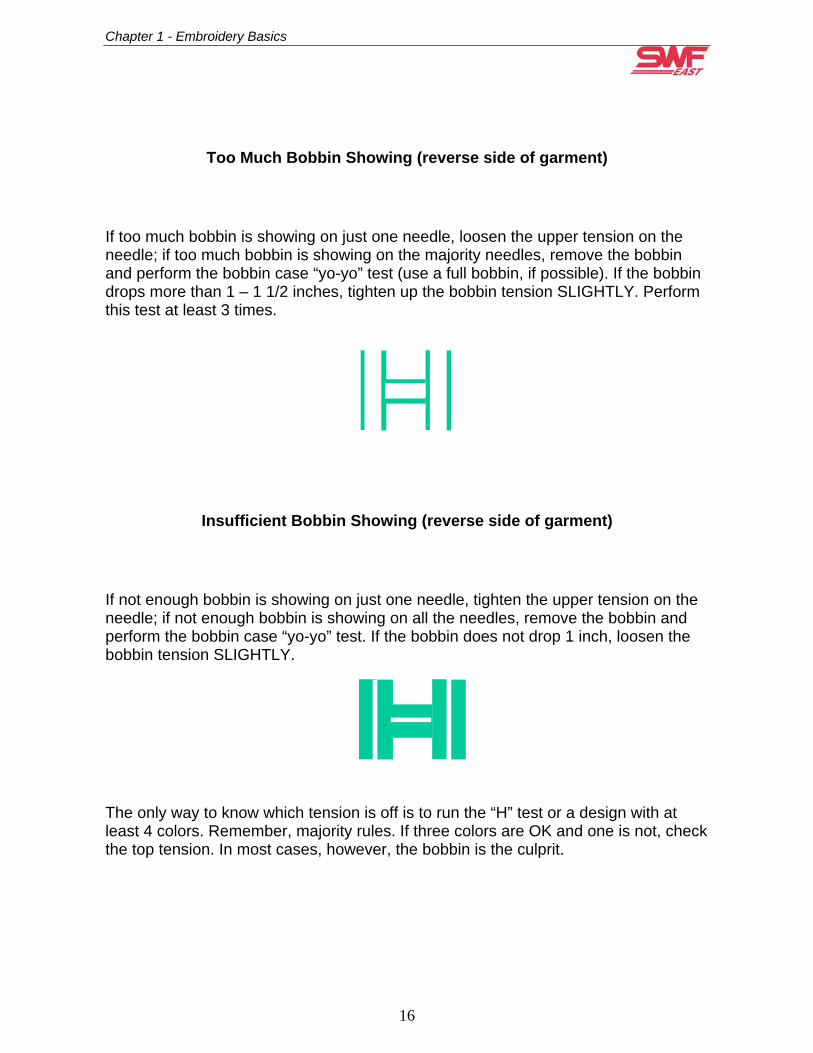
Too Much Bobbin Showing (reverse side of garment)
too much bobbin is showing on just one needle, loosen the upper tension on the
n
Insufficient Bobbin Showing (reverse side of garment)
not enough bobbin is showing on just one needle, tighten the upper tension on the
he only way to know which tension is off is to run the “H” test or a design with at ck
Ifneedle; if too much bobbin is showing on the majority needles, remove the bobbin and perform the bobbin case “yo-yo” test (use a full bobbin, if possible). If the bobbidrops more than 1 – 1 1/2 inches, tighten up the bobbin tension SLIGHTLY. Perform this test at least 3 times.
Ifneedle; if not enough bobbin is showing on all the needles, remove the bobbin and perform the bobbin case “yo-yo” test. If the bobbin does not drop 1 inch, loosen the bobbin tension SLIGHTLY. Tleast 4 colors. Remember, majority rules. If three colors are OK and one is not, chethe top tension. In most cases, however, the bobbin is the culprit.
16
Chapter 1 - Embroidery Basics
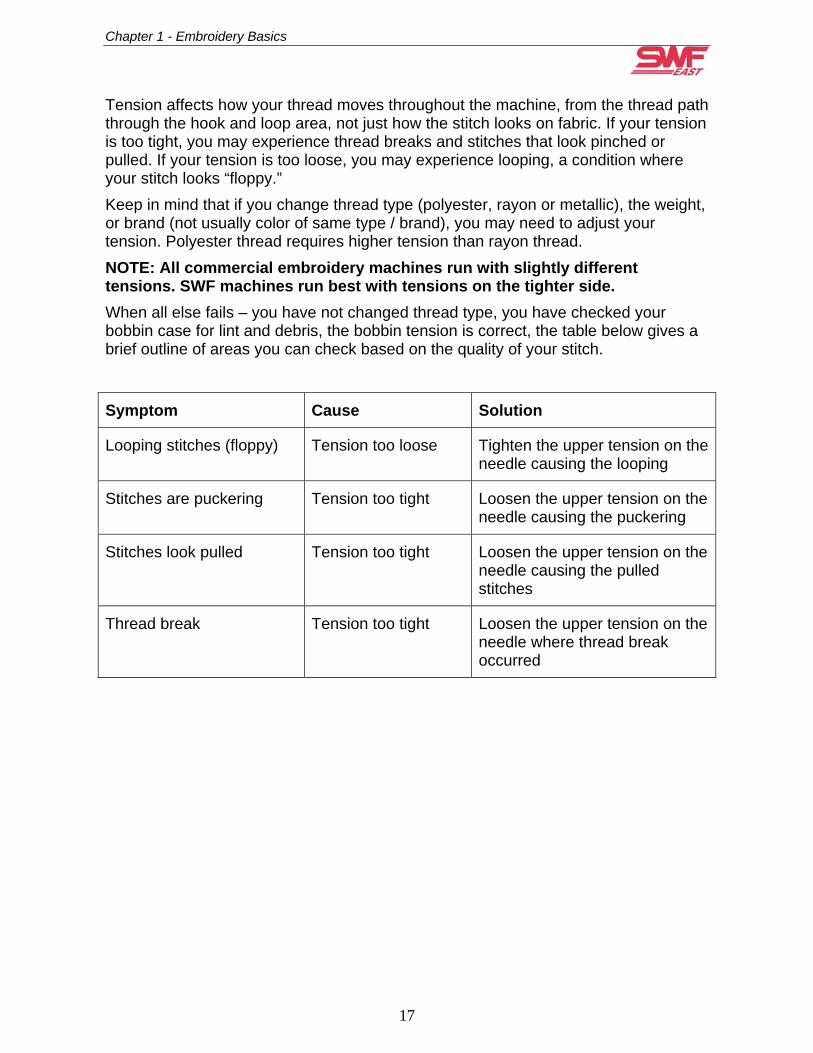
Tension affects how your thread moves throughout the machine, from the thread path through the hook and loop area, not just how the stitch looks on fabric. If your tension is too tight, you may experience thread breaks and stitches that look pinched or pulled. If your tension is too loose, you may experience looping, a condition where your stitch looks “floppy.” Keep in mind that if you change thread type (polyester, rayon or metallic), the weight, or brand (not usually color of same type / brand), you may need to adjust your tension. Polyester thread requires higher tension than rayon thread. NOTE: All commercial embroidery machines run with slightly different tensions. SWF machines run best with tensions on the tighter side. When all else fails – you have not changed thread type, you have checked your bobbin case for lint and debris, the bobbin tension is correct, the table below gives a brief outline of areas you can check based on the quality of your stitch.
Symptom Cause Solution
Looping stitches (floppy) Tension too loose Tighten the upper tension on the needle causing the looping
Stitches are puckering Tension too tight Loosen the upper tension on the needle causing the puckering
Stitches look pulled Tension too tight Loosen the upper tension on the needle causing the pulled stitches
Thread break Tension too tight Loosen the upper tension on the needle where thread break occurred
17
Chapter 1 - Embroidery Basics
Exercise Working with Bobbins Follow the steps below to gain an understanding about how a bobbin is inserted and how to set the bobbin tension.
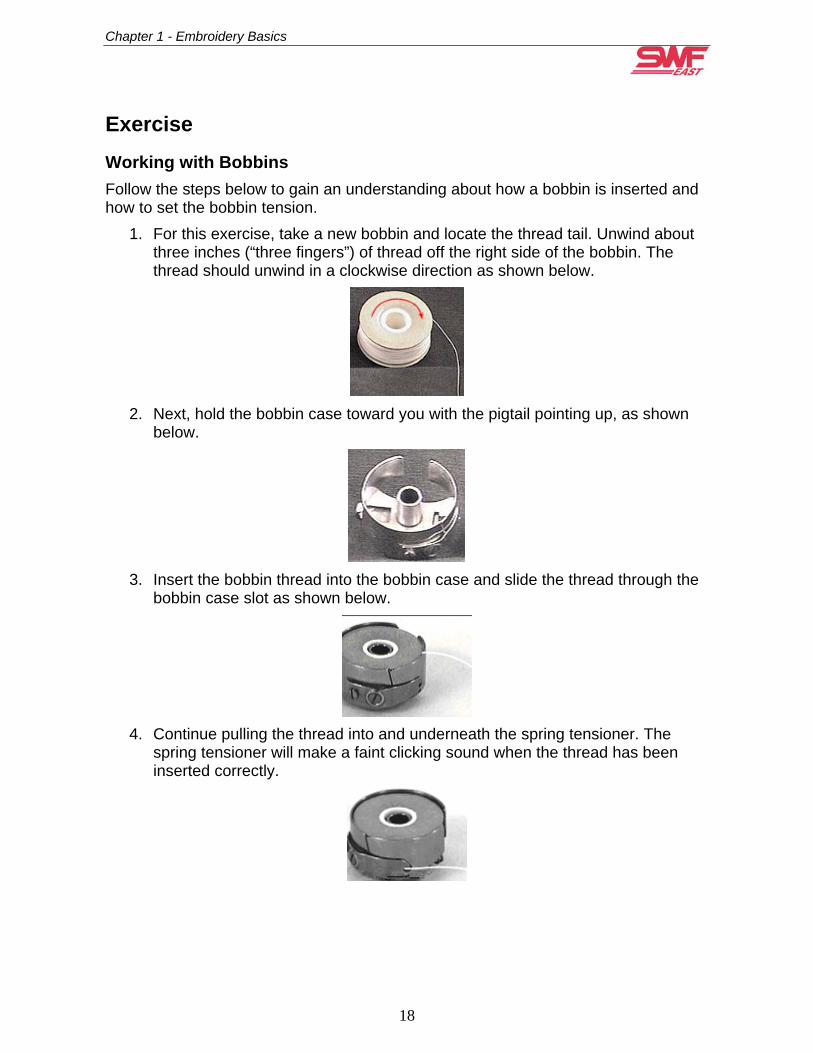
1. For this exercise, take a new bobbin and locate the thread tail. Unwind about three inches (“three fingers”) of thread off the right side of the bobbin. The thread should unwind in a clockwise direction as shown below.
2. Next, hold the bobbin case toward you with the pigtail pointing up, as shown
below.
3. Insert the bobbin thread into the bobbin case and slide the thread through the
bobbin case slot as shown below.
4. Continue pulling the thread into and underneath the spring tensioner. The
spring tensioner will make a faint clicking sound when the thread has been inserted correctly.
18

Chapter 1 - Embroidery Basics
5. Do a Yo-Yo test .
Set the bobbin tension by lifting the bobbin case by the thread and lightly bouncing the case. The case should drop 1 – 1 ½ inches each time it is bounced. If the bobbin does not drop correctly, adjust the spring tensioner screw shown below.
6. Notice that the arrow is pointing to the LARGER of the two screws. If the bobbin drops more than 3 inches, turn the screw clockwise (this action tightens the spring). If the bobbin does not drop at least 1½ inches, turn the screw counter clockwise, causing the spring to loosen.
7. Once you have set the tension on the bobbin, run the thread through the pigtail as shown below.
8. Leave a small amount of thread, 2 to 3 inches, hanging free and insert the
bobbin case into the machine until it snaps into place. DO NOT USE THE “HANDLE” to insert the bobbin case! If the thread tail is too short, it may not be picked up in the formation of a stitch; if the thread tail is too long, it may cause a bird’s nest of thread.
19
Chapter 1 - Embroidery Basics
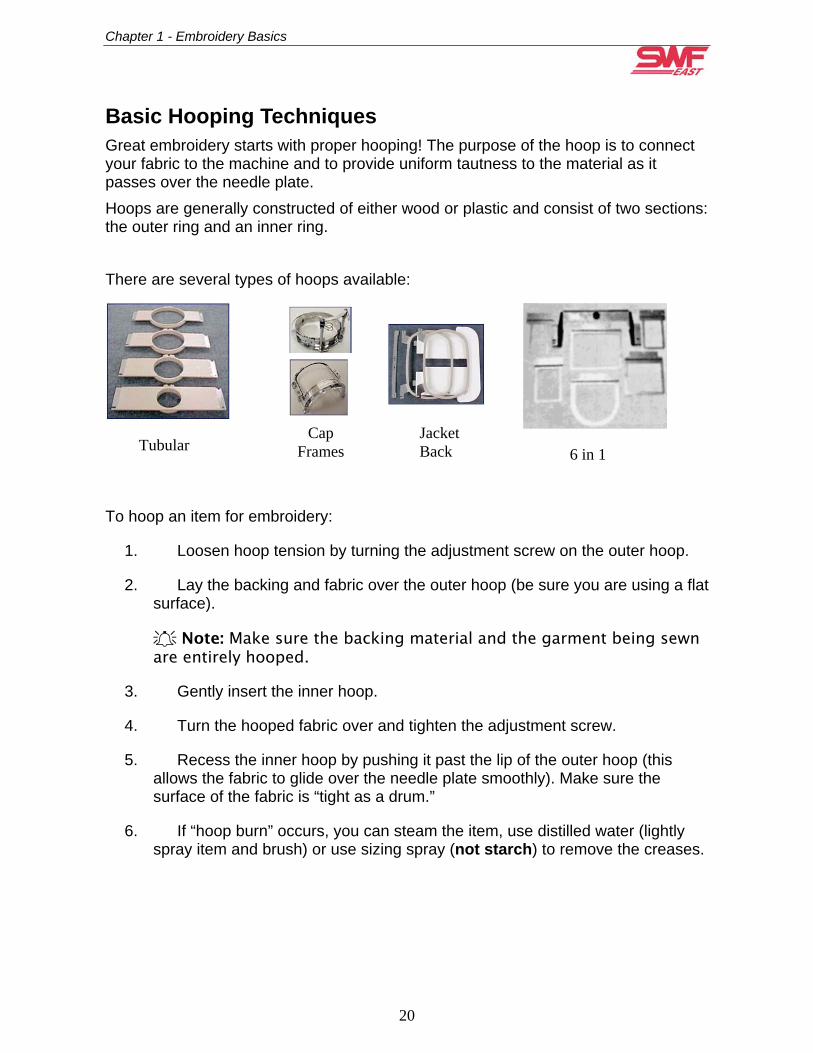
Basic Hooping Techniques Great embroidery starts with proper hooping! The purpose of the hoop is to connect your fabric to the machine and to provide uniform tautness to the material as it passes over the needle plate. Hoops are generally constructed of either wood or plastic and consist of two sections: the outer ring and an inner ring. There are several types of hoops available:
Cap Frames
Jacket Back
Tubular 6 in 1 To hoop an item for embroidery:
1. Loosen hoop tension by turning the adjustment screw on the outer hoop.
2. Lay the backing and fabric over the outer hoop (be sure you are using a flat surface).
Note: Make sure the backing material and the garment being sewn are entirely hooped.
3. Gently insert the inner hoop.
4. Turn the hooped fabric over and tighten the adjustment screw.
5. Recess the inner hoop by pushing it past the lip of the outer hoop (this allows the fabric to glide over the needle plate smoothly). Make sure the surface of the fabric is “tight as a drum.”
6. If “hoop burn” occurs, you can steam the item, use distilled water (lightly spray item and brush) or use sizing spray (not starch) to remove the creases.
20
Chapter 1 - Embroidery Basics
Tips when hooping a cap Show the class how to hoop a cap, and then have each team hoop a cap; they will use this hooped cap when they begin to sew. Inspect each hooped cap and check for proper use of backing, and overall hoop quality.
• Remove any cardboard stiffener in the cap (do not sew through!)
• Always use a backing for stability; tearaway is recommended for caps
• If your design is stitched on the sides of the cap, ensure your backing extends past your sewing area.
• Ensure the cap sides are smooth (no bunching)!
• Ensure the sweatband is out of the stitch area
• If you are using a 270 (wide) cap frame, double-check that the “teeth” of the frame are gripping the seam of the bill.
• Verify that the cap frame itself is tight on the cap; if the cap frame is loose, adjust as necessary
• Ensure the clip handles are facing inward (if the clip handles are facing out, they may hit the pressure foot and damage the machine)
Tips when hooping garments • Ensure the stitching will be placed in the proper location! Two inches down
from the seam may work on a child’s garment, but may be unsuitable for an XL adult shirt.
• For consistent results and to speed up production, consider purchasing a hooping station such as the Hoopmaster.
21
Chapter 1 - Embroidery Basics
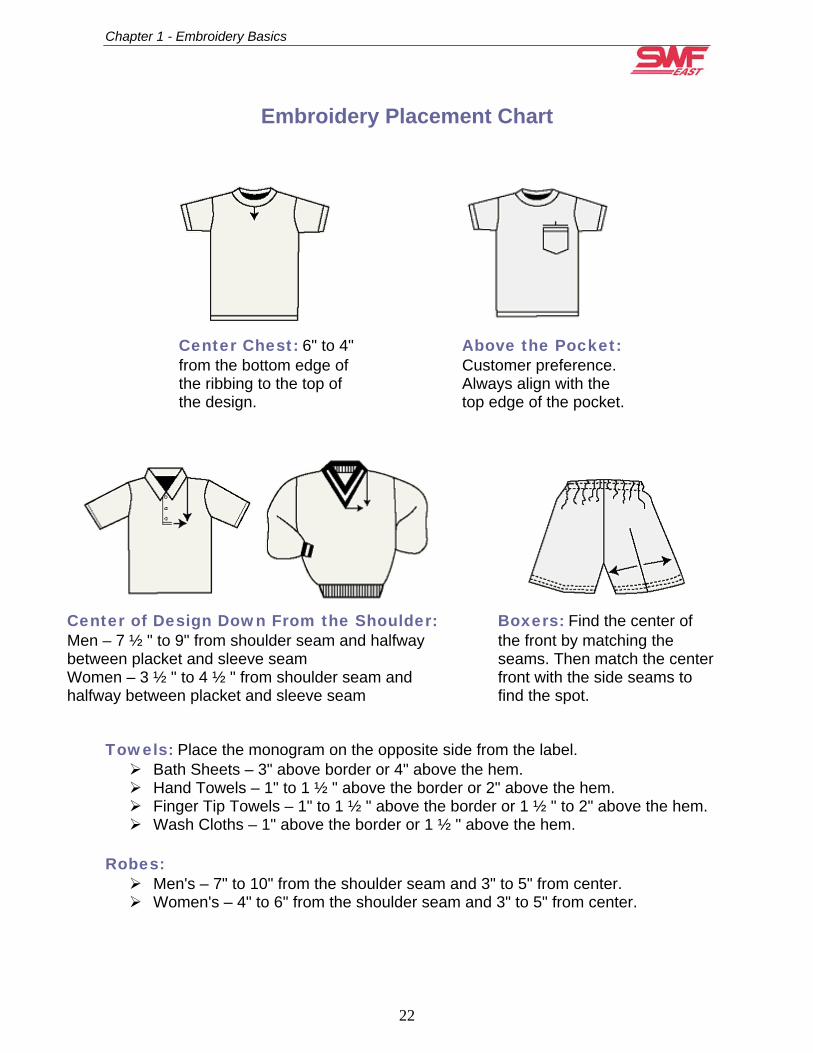
Embroidery Placement Chart
Above the Pocket: Customer preference. Always align with the top edge of the pocket.
Towels:
Ba Ha Fin Wa
Robes:
Me Wo
Center Chest: 6" to 4"from the bottom edge of the ribbing to the top of the design.
Boxers: Find the center of the front by matching the seams. Then match the center front with the side seams to find the spot.
Center of Design Down From the Shoulder: Men – 7 ½ " to 9" from shoulder seam and halfway between placket and sleeve seam Women – 3 ½ " to 4 ½ " from shoulder seam and halfway between placket and sleeve seam
Place the monogram on the opposite side from the label. th Sheets – 3" above border or 4" above the hem. nd Towels – 1" to 1 ½ " above the border or 2" above the hem. ger Tip Towels – 1" to 1 ½ " above the border or 1 ½ " to 2" above the hem. sh Cloths – 1" above the border or 1 ½ " above the hem.
n's – 7" to 10" from the shoulder seam and 3" to 5" from center. men's – 4" to 6" from the shoulder seam and 3" to 5" from center.
22

Chapter 2 – Machine Basics
Chapter 2 – Machine Basics
23

Chapter 2 – Machine Basics
24
Let’s Embroider!
Basic Steps
These are the basic steps you need to follow to sew any and all designs: 1. Load the design – Select your design from a floppy disk or memory 2. Verify or select basic settings – Set angle or check other basic settings 3. Set the colors in your design – Specify needle sequence 4. Center the design (off the #1 needle) 5. Center the hoop
6. Trace the design – Use the hoop you will be sewing on and make sure design fits in hoop
a. Design Trace: this gives you a general idea. The machine traces a box
b. Optimize Trace: this trace follows the exact outline of your design.
7. Sew the design

Chapter 2 - Machine Basics
25
The Operation Units
1 Up Down Keys 2 Display 3 Keypad 4 Pantograph Direction5 Sew Speed 6 Function Keys
12
3
4
5
5
1
6
Compact
2
3
4
Standard 6
Chapter 2 - Machine Basics
26
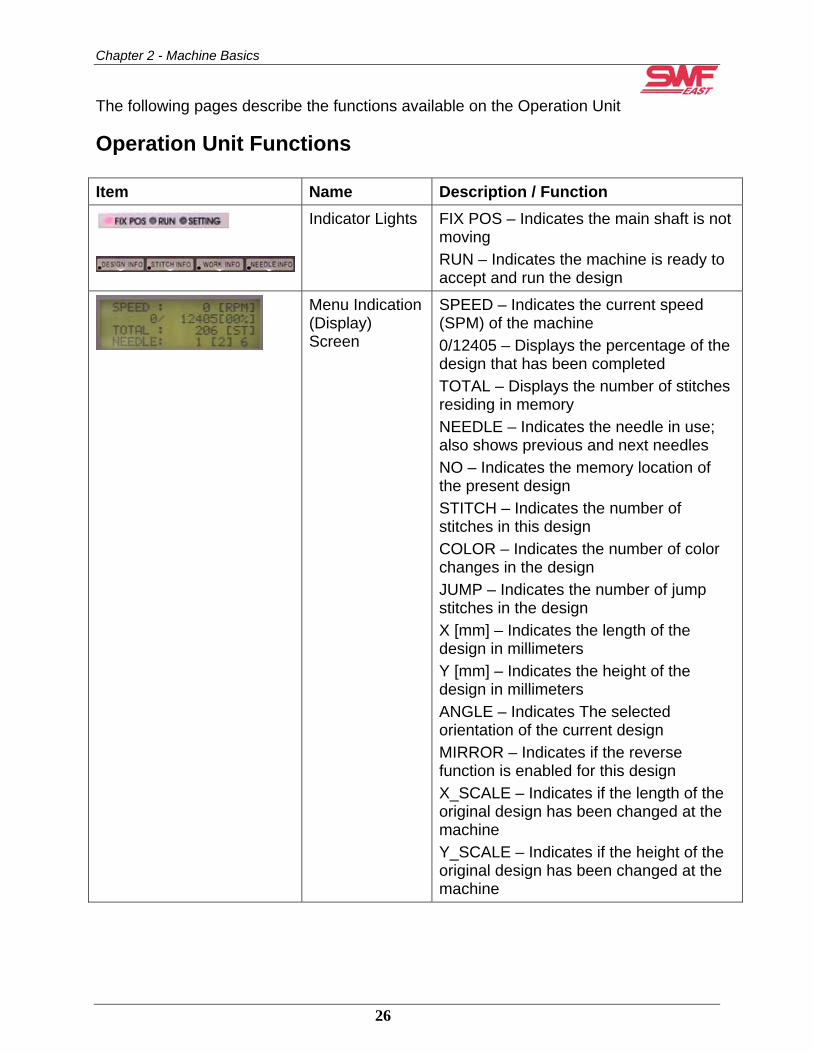
The following pages describe the functions available on the Operation Unit
Operation Unit Functions Item Name Description / Function
Indicator Lights FIX POS – Indicates the main shaft is not moving RUN – Indicates the machine is ready to accept and run the design
Menu Indication (Display) Screen
SPEED – Indicates the current speed (SPM) of the machine 0/12405 – Displays the percentage of the design that has been completed TOTAL – Displays the number of stitches residing in memory NEEDLE – Indicates the needle in use; also shows previous and next needles NO – Indicates the memory location of the present design STITCH – Indicates the number of stitches in this design COLOR – Indicates the number of color changes in the design JUMP – Indicates the number of jump stitches in the design X [mm] – Indicates the length of the design in millimeters Y [mm] – Indicates the height of the design in millimeters ANGLE – Indicates The selected orientation of the current design MIRROR – Indicates if the reverse function is enabled for this design X_SCALE – Indicates if the length of the original design has been changed at the machine Y_SCALE – Indicates if the height of the original design has been changed at the machine
Chapter 2 - Machine Basics
27
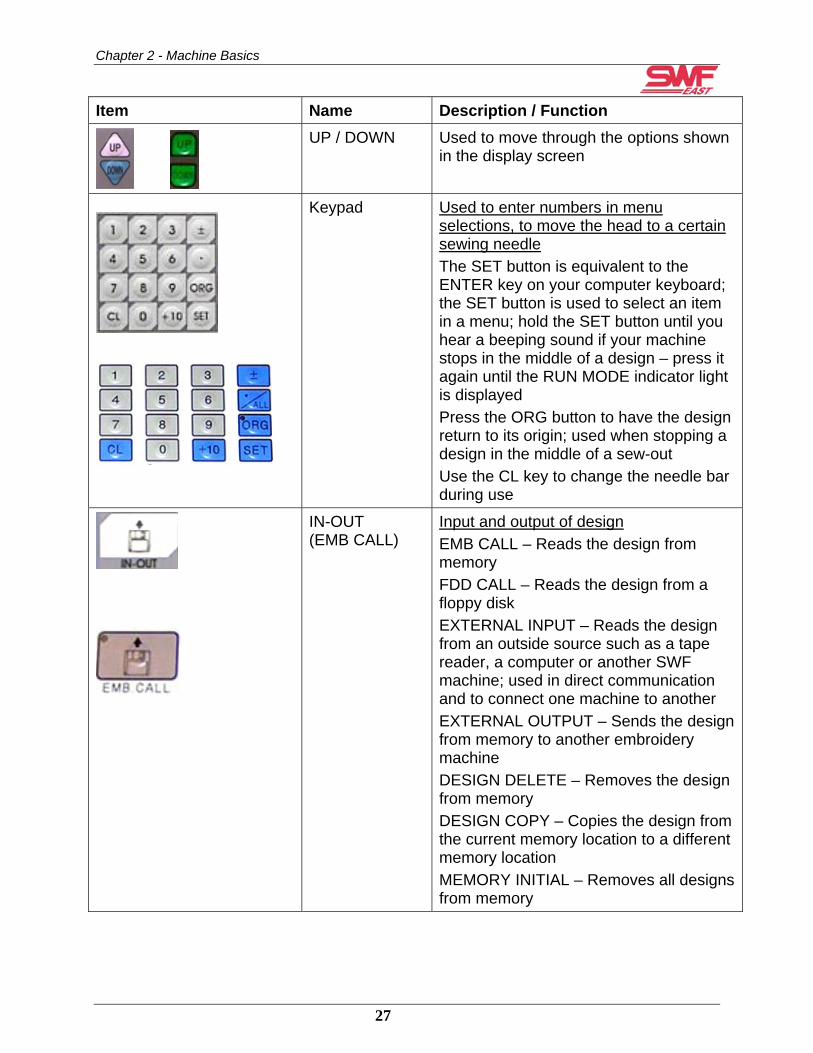
Item Name Description / Function
UP / DOWN Used to move through the options shown in the display screen
Keypad Used to enter numbers in menu selections, to move the head to a certain sewing needle The SET button is equivalent to the ENTER key on your computer keyboard; the SET button is used to select an item in a menu; hold the SET button until you hear a beeping sound if your machine stops in the middle of a design – press it again until the RUN MODE indicator light is displayed Press the ORG button to have the design return to its origin; used when stopping a design in the middle of a sew-out Use the CL key to change the needle bar during use
IN-OUT (EMB CALL)
Input and output of design EMB CALL – Reads the design from memory FDD CALL – Reads the design from a floppy disk EXTERNAL INPUT – Reads the design from an outside source such as a tape reader, a computer or another SWF machine; used in direct communication and to connect one machine to another EXTERNAL OUTPUT – Sends the design from memory to another embroidery machine DESIGN DELETE – Removes the design from memory DESIGN COPY – Copies the design from the current memory location to a different memory location MEMORY INITIAL – Removes all designs from memory

Chapter 2 - Machine Basics
28
Item Name Description / Function
SETTING Basic setup functions X SCALE –Reduces or enlarges the length of the selected design (does not affect total # of stitches in design) Y SCALE – Reduces or enlarges the height of the selected design (does not affect total # of stitches in design) ANGLE –Changes the orientation of the original design on the garment. For example, angle is always set to 180 when embroidering on caps. MIRROR – Enables the design to be reversed in the X axis, Y axis, or both START ST – Indicates where in the design you want the machine to start. Normally, this option is set to 0, indicating you want the design to start on the first stitch in the design. X SATIN – Changes the width of the stitch from left to right. If the width of the stitch is set to .15, you can adjust the length of the stitch. Y SATIN – Changes the height of the satin stitch.
NEEDLE Used to indicate the sequence of colors in the design. Up to 99 color changes can be entered for a single design. To enter a needle number greater than 9, press 10 on the keypad and the digit that corresponds to the second digit in the needle number. For example, to indicate needle # 14 on a 15-needle machine, push 10 and then 4 on the keypad. For needle # 10, push +10 button and then 0 on the keypad. To delete a number from the sequence, push 0 on the keypad.

Chapter 2 - Machine Basics
29
Item Name Description / Function
SUB WORK Used before the start of embroidery BOBBIN WIDING – Winds the bobbin thread if the optional bobbin winder is installed DESIGN TRACE – Performs a perimeter trace to ensure the design fits within hoop– used for hooped items LENGTH MEASURE – Measures the length between two points OPTIMIZE TRACE – Traces the outline of the design to ensure it fits within the hoop– especially helpful for tracing caps
REPEAT Used when sewing repetitive designs (such as a patches) X REPEAT – Enter the number of times the design will be repeated lengthwise Y REPEAT – Enter the number of times the design will be repeated widthwise X DESIGN INTERVAL – Enter the distance (in mm) between start of each item repeated lengthwise; use + to indicate right, - to indicate left Y DESIGN INTERVAL – Enter the distance between the bottom (or top) of one item to the bottom (or top) of the next item; Use + to indicate the new design is sewn above the previous item, - to indicate the design is sewn below the previous itemX/Y PRIORITY – Indicates if the design is sewn from right-left-bottom-top or bottom-top-right-left DESIGN INTERVAL – Indicates how the machine will move from one design to the next
Chapter 2 - Machine Basics
30
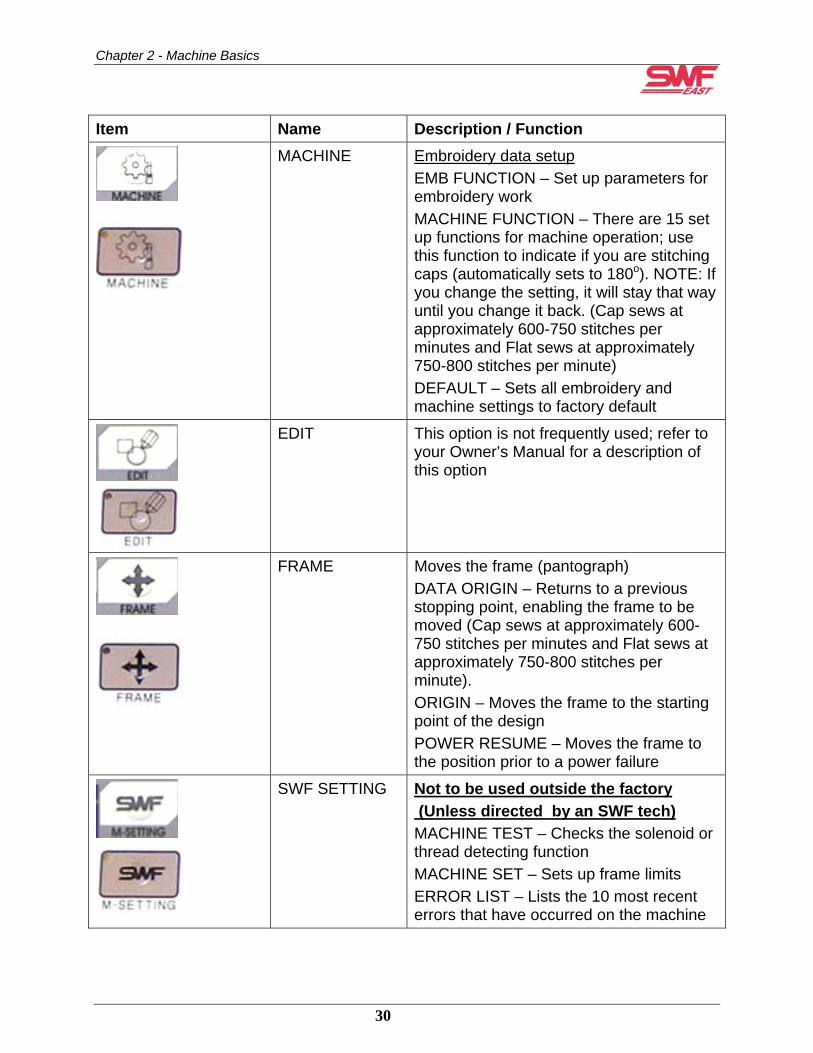
Item Name Description / Function
MACHINE Embroidery data setup EMB FUNCTION – Set up parameters for embroidery work MACHINE FUNCTION – There are 15 set up functions for machine operation; use this function to indicate if you are stitching caps (automatically sets to 180o). NOTE: If you change the setting, it will stay that way until you change it back. (Cap sews at approximately 600-750 stitches per minutes and Flat sews at approximately 750-800 stitches per minute) DEFAULT – Sets all embroidery and machine settings to factory default
EDIT This option is not frequently used; refer to your Owner’s Manual for a description of this option
FRAME Moves the frame (pantograph) DATA ORIGIN – Returns to a previous stopping point, enabling the frame to be moved (Cap sews at approximately 600-750 stitches per minutes and Flat sews at approximately 750-800 stitches per minute). ORIGIN – Moves the frame to the starting point of the design POWER RESUME – Moves the frame to the position prior to a power failure
SWF SETTING Not to be used outside the factory (Unless directed by an SWF tech) MACHINE TEST – Checks the solenoid or thread detecting function MACHINE SET – Sets up frame limits ERROR LIST – Lists the 10 most recent errors that have occurred on the machine
Chapter 2 - Machine Basics
31
Item Name Description / Function
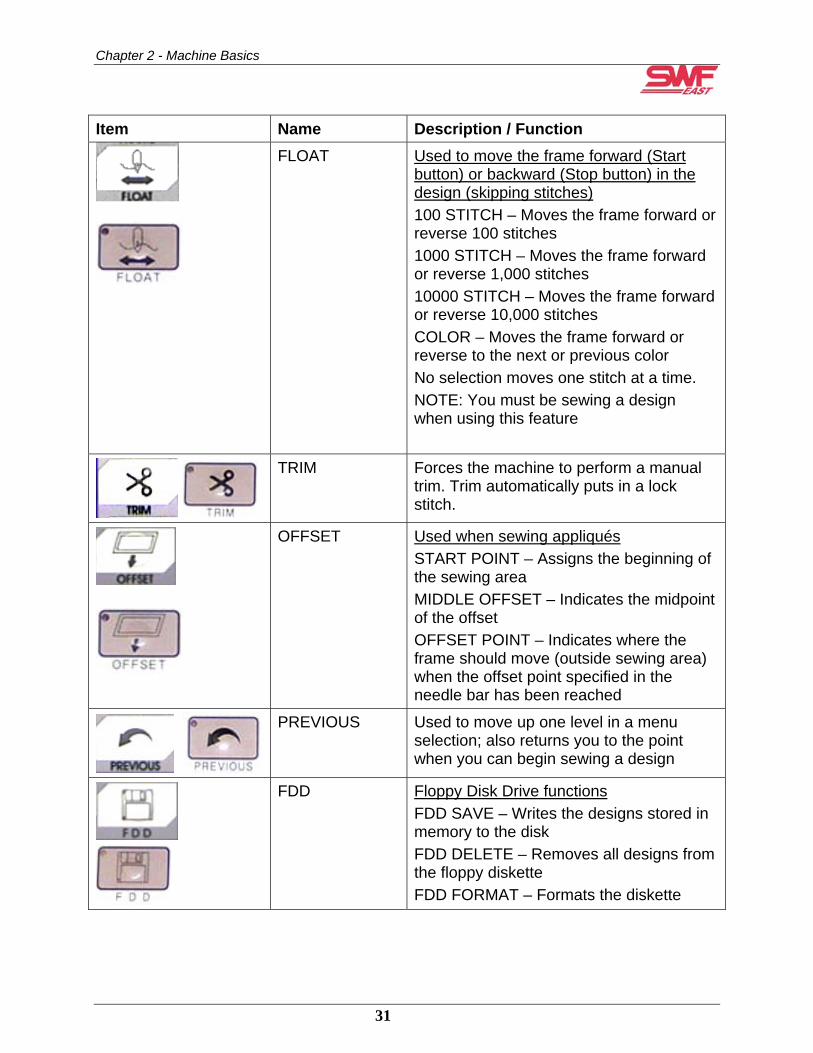
FLOAT Used to move the frame forward (Start button) or backward (Stop button) in the design (skipping stitches) 100 STITCH – Moves the frame forward or reverse 100 stitches 1000 STITCH – Moves the frame forward or reverse 1,000 stitches 10000 STITCH – Moves the frame forward or reverse 10,000 stitches COLOR – Moves the frame forward or reverse to the next or previous color No selection moves one stitch at a time. NOTE: You must be sewing a design when using this feature
TRIM Forces the machine to perform a manual trim. Trim automatically puts in a lock stitch.
OFFSET Used when sewing appliqués START POINT – Assigns the beginning of the sewing area MIDDLE OFFSET – Indicates the midpoint of the offset OFFSET POINT – Indicates where the frame should move (outside sewing area) when the offset point specified in the needle bar has been reached
PREVIOUS Used to move up one level in a menu selection; also returns you to the point when you can begin sewing a design
FDD Floppy Disk Drive functions FDD SAVE – Writes the designs stored in memory to the disk FDD DELETE – Removes all designs from the floppy diskette FDD FORMAT – Formats the diskette

Chapter 2 - Machine Basics
32
Item Name Description / Function
Frame movement / Frame speed buttons
Use the , , , and buttons to move the frame – this is used to set the initial position Use the orange button in the middle to change the rate of speed at which the frame moves – set the frame speed to S for small movements (slow speed)
Main Shaft Speed
Use these buttons to increase ( ) or decrease ( ) the number of stitches sewn per minute
START Causes the machine to begin sewing, in conjunction with the Float button, floats forward.
STOP Used to cease sewing – pushing in and holding this button causes the machine to back up, allowing you to repair stitch errors, and in conjunction with the Float button, floats backward.
EMERGENCY STOP
Halts sewing IMMEDIATELY when pushed in; must be turned to the right and pulled out to reset.
Chapter 2 - Machine Basics
33
Loading the Design 1. Make sure your design is a .DST format; no other format will work in your
machine. 2. Power on the machine. The display on the operation unit should read “Loading
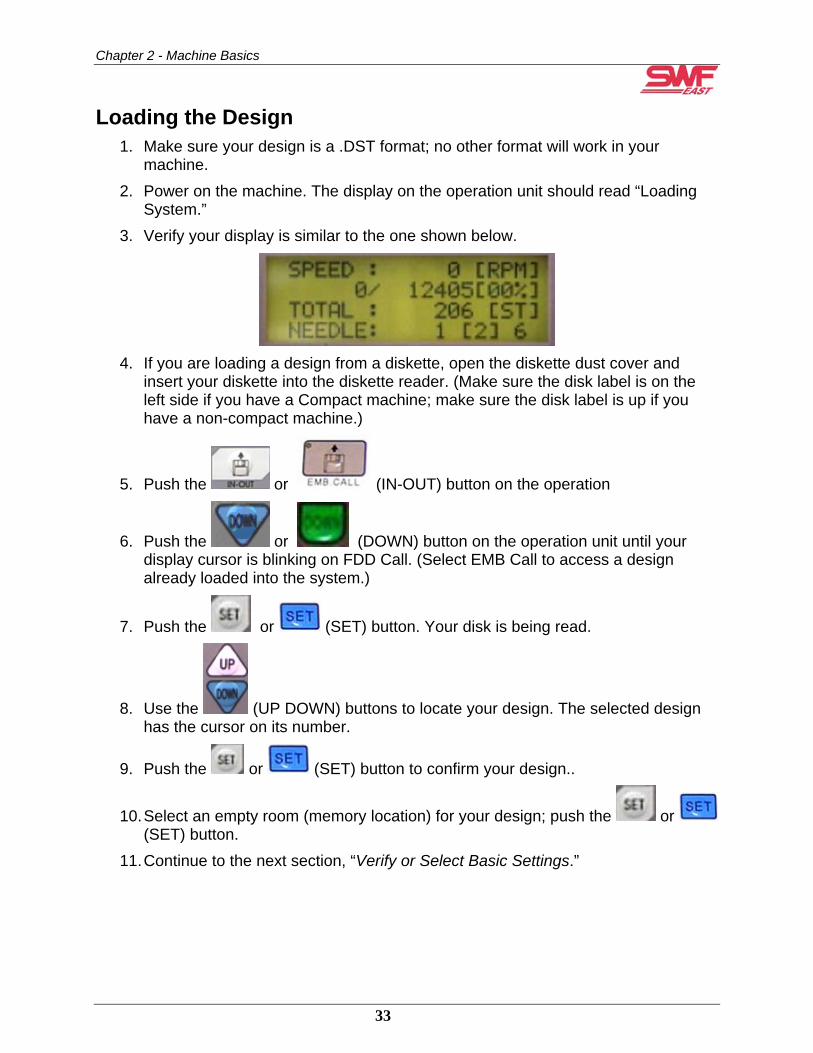
System.” 3. Verify your display is similar to the one shown below.
4. If you are loading a design from a diskette, open the diskette dust cover and
insert your diskette into the diskette reader. (Make sure the disk label is on the left side if you have a Compact machine; make sure the disk label is up if you have a non-compact machine.)
5. Push the or (IN-OUT) button on the operation
6. Push the or (DOWN) button on the operation unit until your display cursor is blinking on FDD Call. (Select EMB Call to access a design already loaded into the system.)
7. Push the or (SET) button. Your disk is being read.
8. Use the (UP DOWN) buttons to locate your design. The selected design has the cursor on its number.
9. Push the or (SET) button to confirm your design..
10. Select an empty room (memory location) for your design; push the or (SET) button.
11. Continue to the next section, “Verify or Select Basic Settings.”

Chapter 2 - Machine Basics
34
Verify or Select Basic Settings
1. Select “1. Basic Setting” in the display and push the or (SET) button (If you are only working with the function keys on the operation unit, push the
or (SETTING) button).
2. Verify that “3. Angle” is set correctly.
For caps, the angle should be set to 180.
3. Push the or (PREVIOUS) button on the operation unit. Now we need to set the needle colors.
Chapter 2 - Machine Basics
35
Set the Colors in your Design
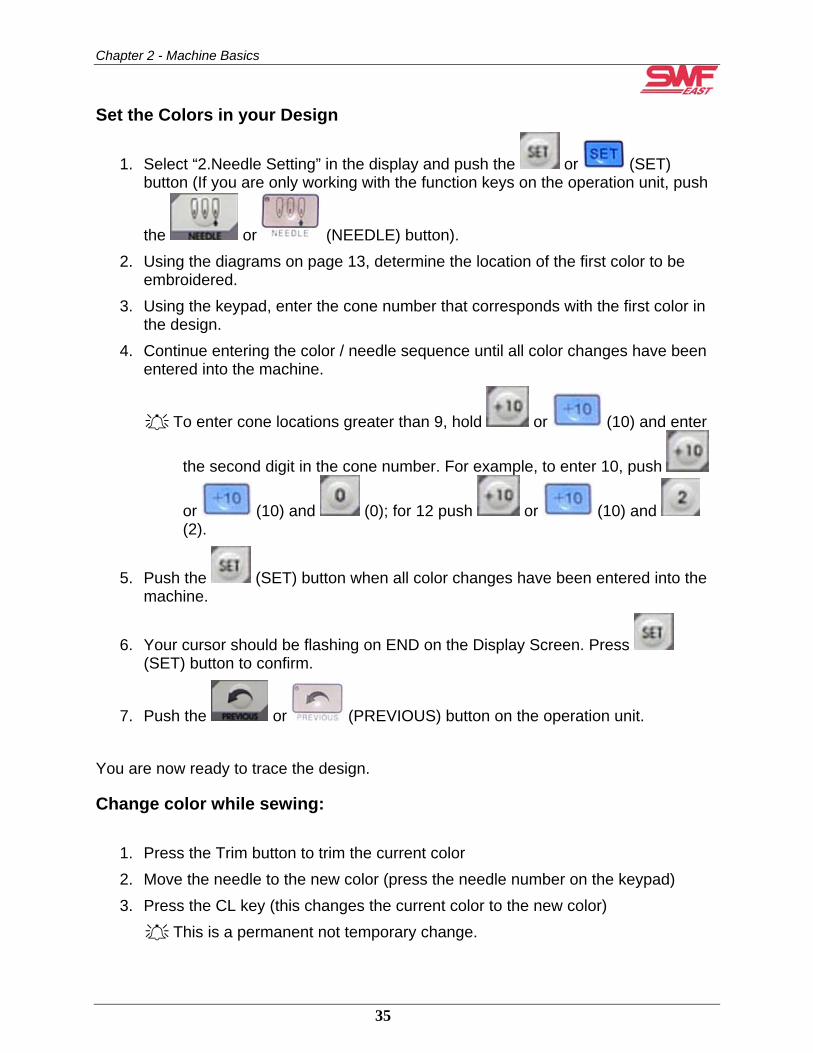
1. Select “2.Needle Setting” in the display and push the or (SET) button (If you are only working with the function keys on the operation unit, push
the or (NEEDLE) button). 2. Using the diagrams on page 13, determine the location of the first color to be
embroidered. 3. Using the keypad, enter the cone number that corresponds with the first color in
the design. 4. Continue entering the color / needle sequence until all color changes have been
entered into the machine.
To enter cone locations greater than 9, hold or (10) and enter
the second digit in the cone number. For example, to enter 10, push
or (10) and (0); for 12 push or (10) and (2).
5. Push the (SET) button when all color changes have been entered into the machine.
6. Your cursor should be flashing on END on the Display Screen. Press (SET) button to confirm.
7. Push the or (PREVIOUS) button on the operation unit. You are now ready to trace the design.
Change color while sewing:
1. Press the Trim button to trim the current color 2. Move the needle to the new color (press the needle number on the keypad) 3. Press the CL key (this changes the current color to the new color)
This is a permanent not temporary change.

Chapter 2 - Machine Basics
36
Spool Order 1 6 4
5
3
2
601 C Spool Layout
1
6
4
5
3
2
9
10
12
11
7
8
1201 C Spool Layout
1
4
3
2
6
5
9
10
11
7
8 15
12
13
14
1501 C Spool Layout
1
6
4
5
3
2
12
13
15
14
10
11
7 9
8
1501 Standard Spool Layout
Chapter 2 - Machine Basics
37
Trace the Design 1. Hoop your garment and place it on the machine.
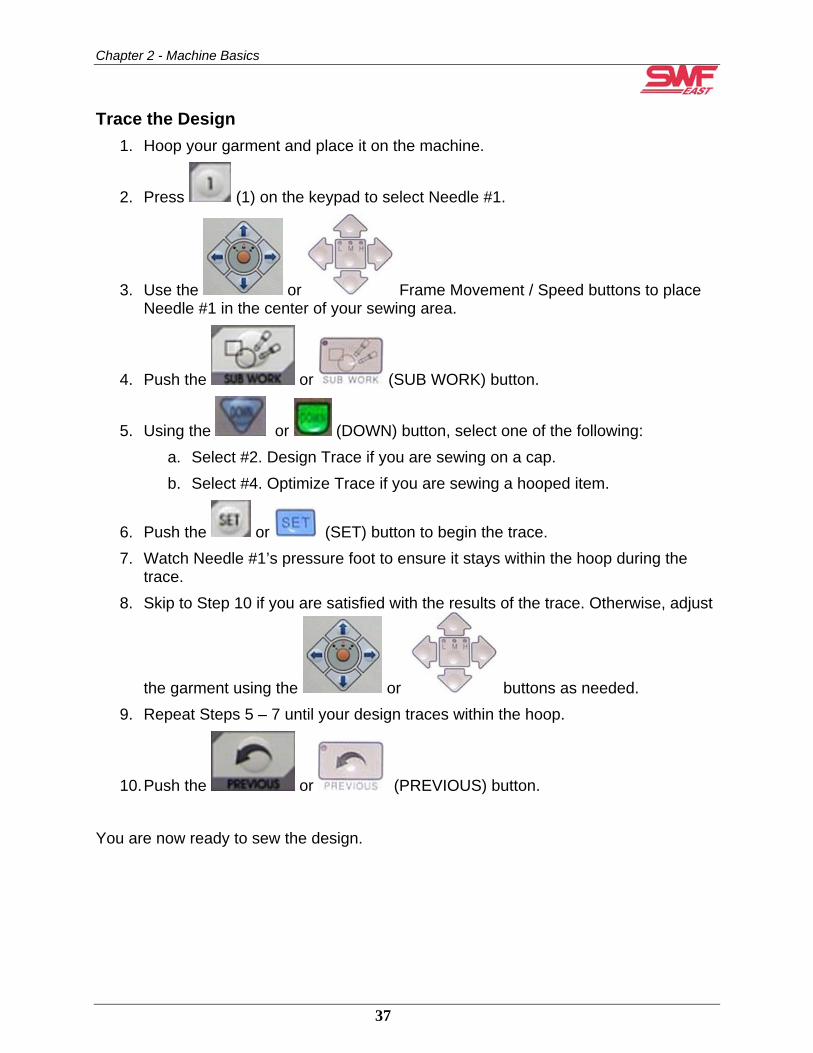
2. Press (1) on the keypad to select Needle #1.
3. Use the or Frame Movement / Speed buttons to place Needle #1 in the center of your sewing area.
4. Push the or (SUB WORK) button.
5. Using the or (DOWN) button, select one of the following: a. Select #2. Design Trace if you are sewing on a cap. b. Select #4. Optimize Trace if you are sewing a hooped item.
6. Push the or (SET) button to begin the trace. 7. Watch Needle #1’s pressure foot to ensure it stays within the hoop during the
trace. 8. Skip to Step 10 if you are satisfied with the results of the trace. Otherwise, adjust
the garment using the or buttons as needed. 9. Repeat Steps 5 – 7 until your design traces within the hoop.
10. Push the or (PREVIOUS) button. You are now ready to sew the design.
Chapter 2 - Machine Basics
38
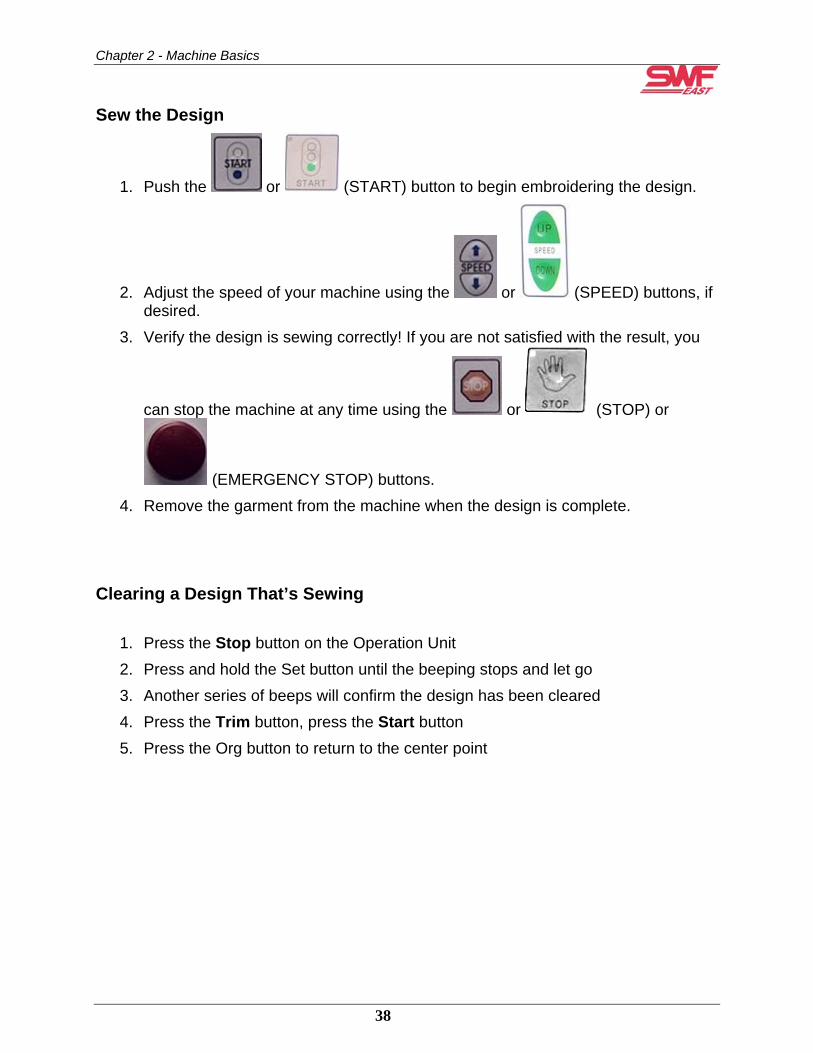
Sew the Design
1. Push the or (START) button to begin embroidering the design.
2. Adjust the speed of your machine using the or (SPEED) buttons, if desired.
3. Verify the design is sewing correctly! If you are not satisfied with the result, you
can stop the machine at any time using the or (STOP) or
(EMERGENCY STOP) buttons. 4. Remove the garment from the machine when the design is complete.
Clearing a Design That’s Sewing
1. Press the Stop button on the Operation Unit 2. Press and hold the Set button until the beeping stops and let go 3. Another series of beeps will confirm the design has been cleared 4. Press the Trim button, press the Start button 5. Press the Org button to return to the center point

Chapter 2 - Machine Basics
39
Opening up Your Machine Note: Everything on an SWF machine is expressed in Metric terms (hoop dimensions, hardware sizes, etc). When your machine first arrives, it will be wrapped in a protective plastic film. There will be a few boxes tucked under the stand. Take a few moments to open these boxes first. They contain your toolbox, manuals, hoops, control unit, and other important information. Blue Toolbox – The toolbox contains, in addition to the most common tools you will need to complete routine maintenance, several bags of parts. It is recommended that you look through the bags and locate the needle plate packages. These items will be used on a regular basis. Hoops – You will usually receive two hoops for each head on your machine. However, only one large tubular frame, one small tubular frame, and one table top is included for each head on your machine. You can use the checklist (and manual) to verify that all your items were shipped. Control Box / Operations Unit – If you purchased a Compact machine, a separate box is included that contains your control box. This box is typically placed on the bottom shelf of the stand. Three cables are used to connect the Control Box to the embroidery machine. If you purchased a 15-needle machine, your Operations Unit contains the FDD. It is not connected to the machine when it is shipped; there are cables that can be connected in only one way. In addition, if you purchased a 15-needle machine, the thread rack is not connected to the machine. Refer to your manual for detailed illustrations to aid you in assembling the rack. Accessory Box – This box contains thread, scissors, backing, and extra needles. If you have purchased a 601 or 1201 Compact machine, a very informative training CD is usually included with your software. It is recommended that you watch the CD to gain helpful information about the setup and operation of your new machine. Also included on the CD is a rewritten version of the SWF manual. Also available is an emergency kit that contains commonly requested items. Included in this kit is an extra bobbin case set, needle bar, upper thread catcher, pressure foot set, rotary hook set, and the appropriate reciprocator for your machine. For more information about this emergency kit, contact your account representative.
Chapter 2 - Machine Basics
40
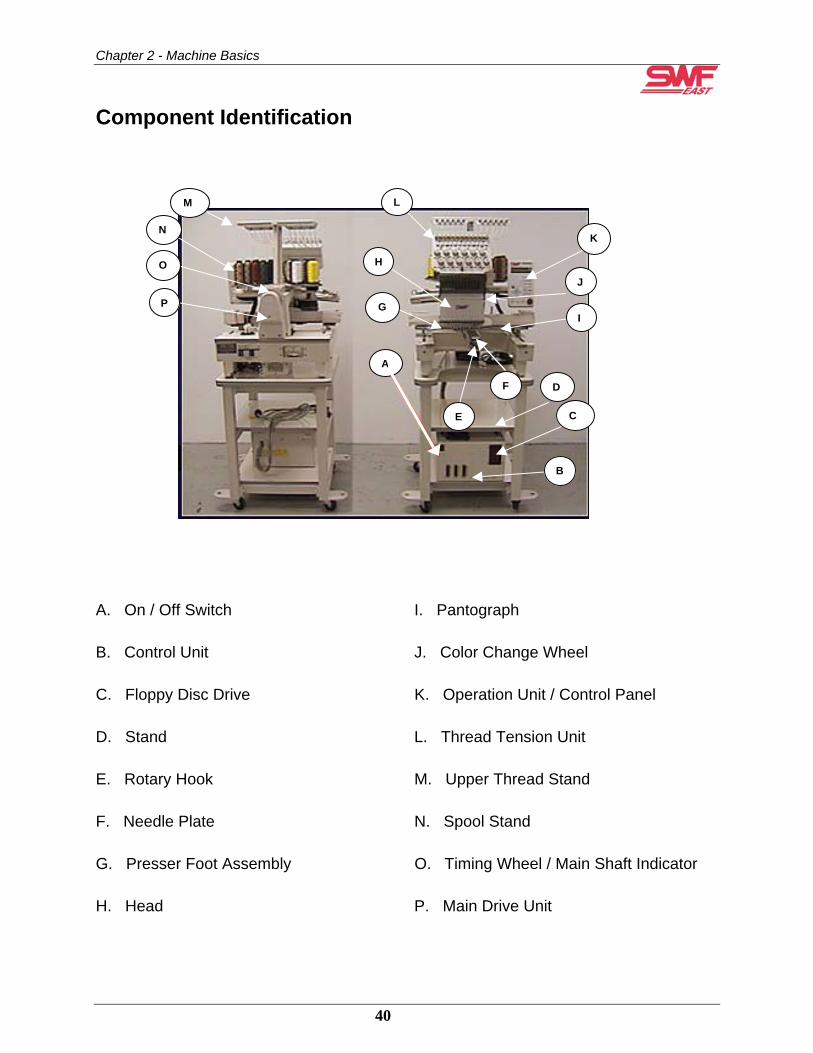
Component Identification
A
N
L
H
GP
C
K
I
D
E
F
J
B
O
M
A. On / Off Switch I. Pantograph
B. Control Unit J. Color Change Wheel
C. Floppy Disc Drive K. Operation Unit / Control Panel
D. Stand L. Thread Tension Unit
E. Rotary Hook M. Upper Thread Stand
F. Needle Plate N. Spool Stand
G. Presser Foot Assembly O. Timing Wheel / Main Shaft Indicator
H. Head P. Main Drive Unit

Chapter 2 - Machine Basics
41
Threading Your Machine Eventually, you will need to change that thread on your machine! There are three basic ways to thread your machine:
• “Piggy backing” the new thread to the old by tying a square knot into the existing thread and pulling it through the machine (including the eye of the needle if you are really good at tying a small square knot),
• Threading the machine completely by hand.
• A combination of the first two methods.
Thread Break Detection Wheel Thread Guide
The diagrams and steps on the following pages can assist you when threading your machine from the thread cone to the eye of the needle.
Chapter 2 - Machine Basics
42
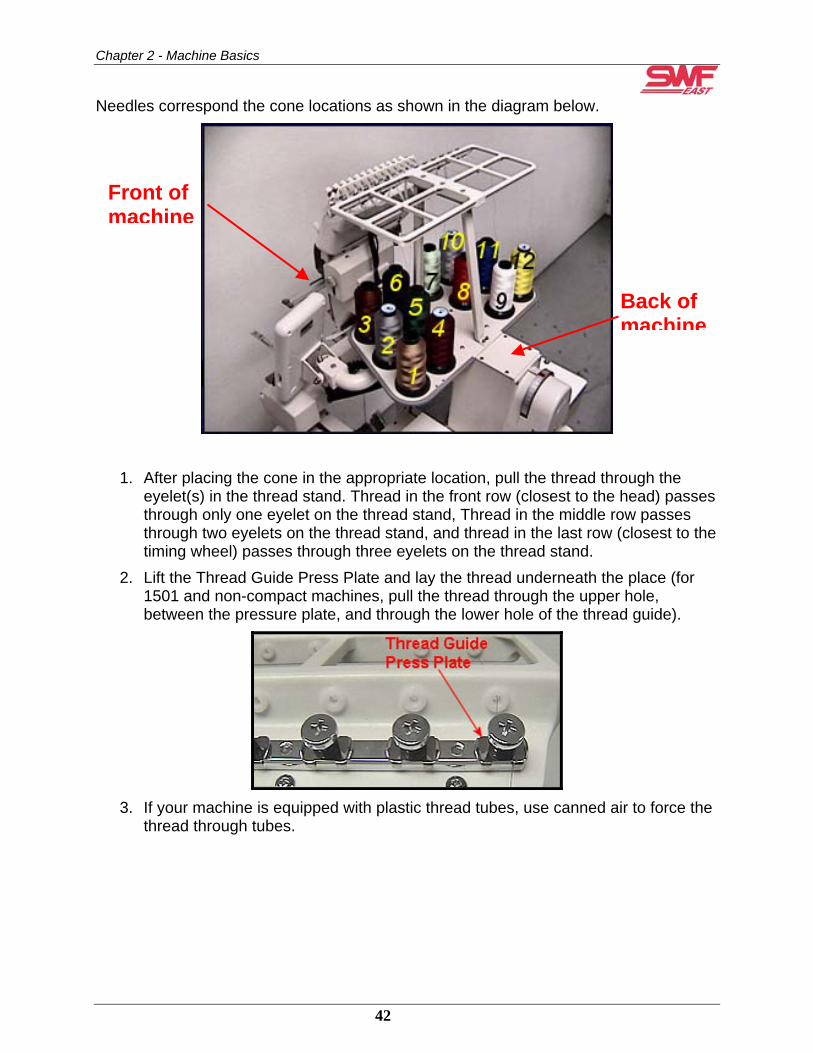
Needles correspond the cone locations as shown in the diagram below.
1. After placing the cone in the appropriate location, pull the thread th
eyelet(s) in the thread stand. Thread in the front row (closest to thethrough only one eyelet on the thread stand, Thread in the middle rthrough two eyelets on the thread stand, and thread in the last rowtiming wheel) passes through three eyelets on the thread stand.
2. Lift the Thread Guide Press Plate and lay the thread underneath th1501 and non-compact machines, pull the thread through the uppebetween the pressure plate, and through the lower hole of the threa
3. If your machine is equipped with plastic thread tubes, use canned a
thread through tubes.
Back of machine
Front of machine
rough the head) passes ow passes (closest to the
e place (for r hole, d guide).
ir to force the
Chapter 2 - Machine Basics
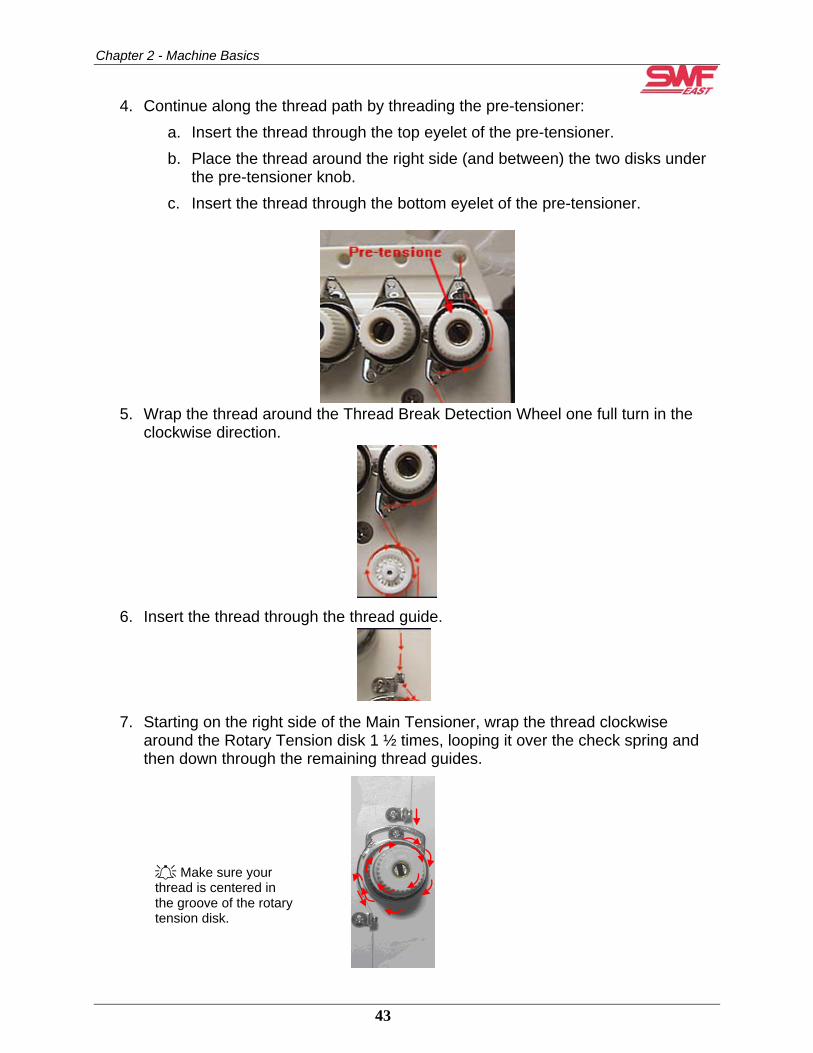
4. Continue along the thread path by threading the pre-tensioner: a. Insert the thread through the top eyelet of the pre-tensioner. b. Place the thread around the right side (and between) the two disks under
the pre-tensioner knob. c. Insert the thread through the bottom eyelet of the pre-tensioner.
r
5. Wrap the thread around the Thread Break Detection Wheel one full turn in the clockwise direction.
6. Insert the thread through the thread guide.
7. Starting on the right side of the Main Tensioner, wrap the thread clockwise around the Rotary Tension disk 1 ½ times, looping it over the check spring and then down through the remaining thread guides.
Make sure your thread is centered in the groove of the rotary tension disk.
43
Chapter 2 - Machine Basics
44
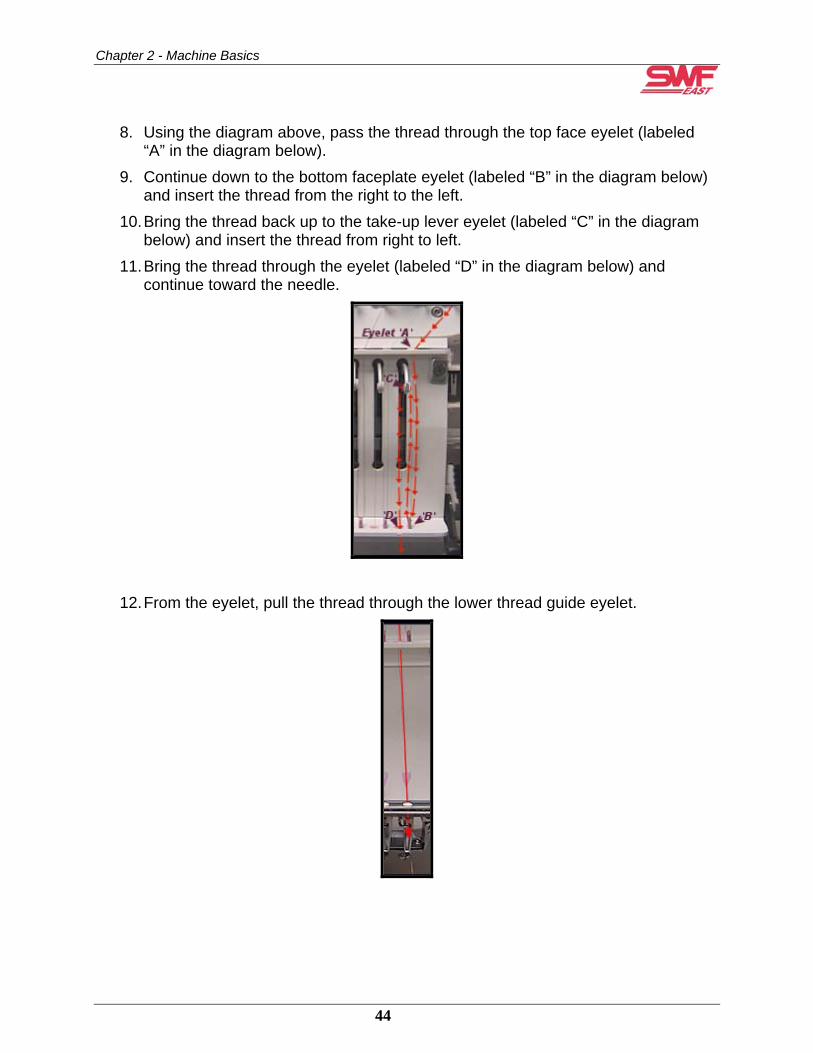
8. Using the diagram above, pass the thread through the top face eyelet (labeled
“A” in the diagram below). 9. Continue down to the bottom faceplate eyelet (labeled “B” in the diagram below)
and insert the thread from the right to the left. 10. Bring the thread back up to the take-up lever eyelet (labeled “C” in the diagram
below) and insert the thread from right to left. 11. Bring the thread through the eyelet (labeled “D” in the diagram below) and
continue toward the needle.
12. From the eyelet, pull the thread through the lower thread guide eyelet.

Chapter 2 - Machine Basics
45
13. Pull the thread through the back of the final thread guide, 14. Insert the thread into the eye of the needle from front to back. 15. Pull the thread through the bottom of the pressure foot to complete threading.
Spring Rod
Pressure Foot When you have finished threading the machine, secrod.
Thread Direction
ure the tail thread into the spring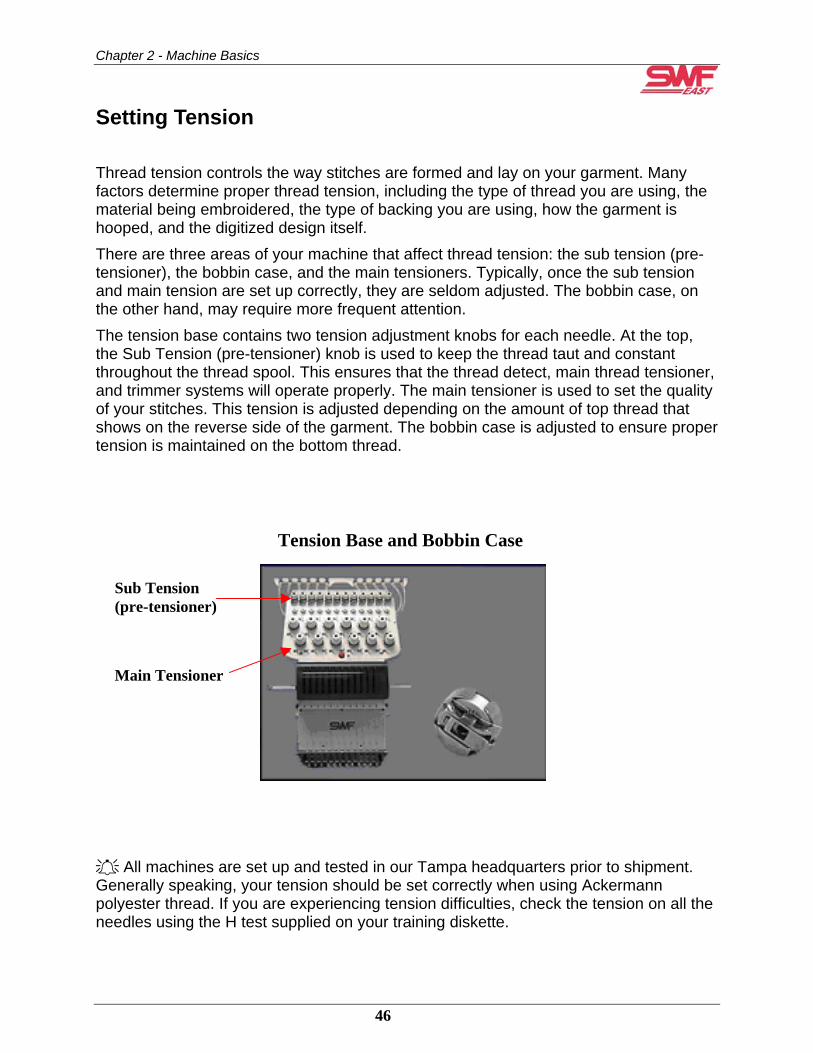
Chapter 2 - Machine Basics
46
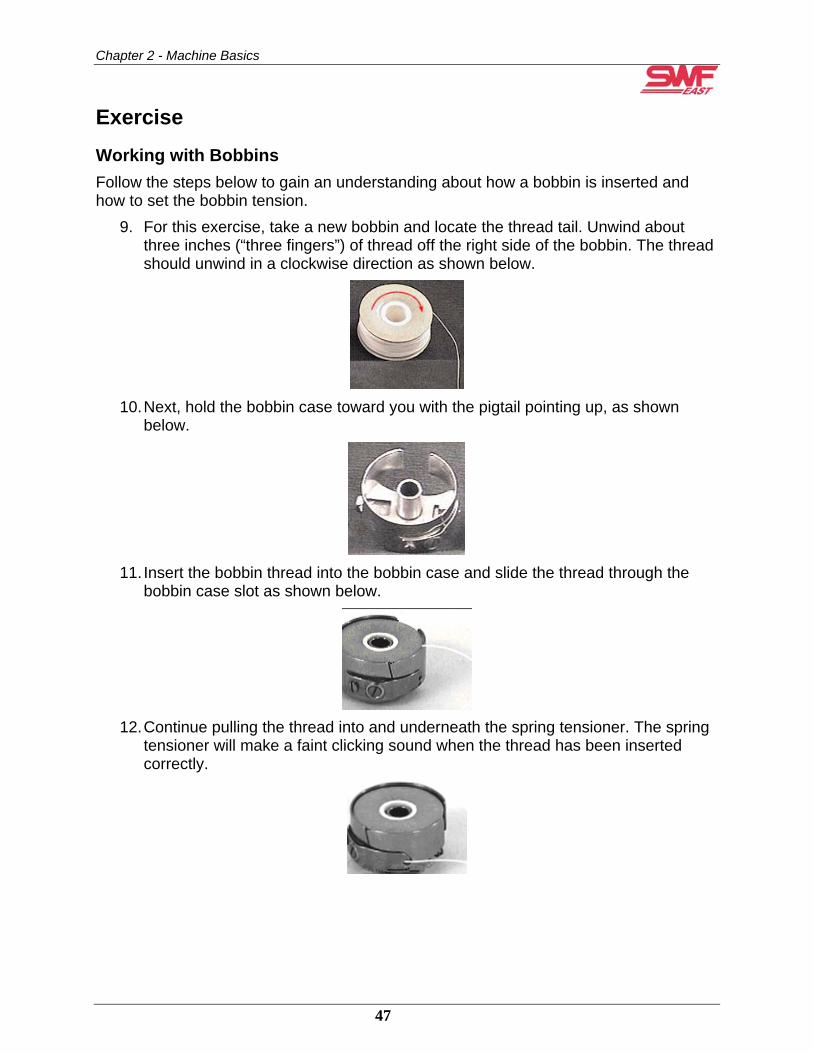
Setting Tension Thread tension controls the way stitches are formed and lay on your garment. Many factors determine proper thread tension, including the type of thread you are using, the material being embroidered, the type of backing you are using, how the garment is hooped, and the digitized design itself. There are three areas of your machine that affect thread tension: the sub tension (pre-tensioner), the bobbin case, and the main tensioners. Typically, once the sub tension and main tension are set up correctly, they are seldom adjusted. The bobbin case, on the other hand, may require more frequent attention. The tension base contains two tension adjustment knobs for each needle. At the top, the Sub Tension (pre-tensioner) knob is used to keep the thread taut and constant throughout the thread spool. This ensures that the thread detect, main thread tensioner, and trimmer systems will operate properly. The main tensioner is used to set the quality of your stitches. This tension is adjusted depending on the amount of top thread that shows on the reverse side of the garment. The bobbin case is adjusted to ensure proper tension is maintained on the bottom thread.
Tension Base and Bobbin Case
Sub Tension (pre-tensioner)
Main Tensioner
All machines are set up and tested in our Tampa headquarters prior to shipment.
Generally speaking, your tension should be set correctly when using Ackermann polyester thread. If you are experiencing tension difficulties, check the tension on all the needles using the H test supplied on your training diskette.
Chapter 2 - Machine Basics
47
Exercise Working with Bobbins Follow the steps below to gain an understanding about how a bobbin is inserted and how to set the bobbin tension.
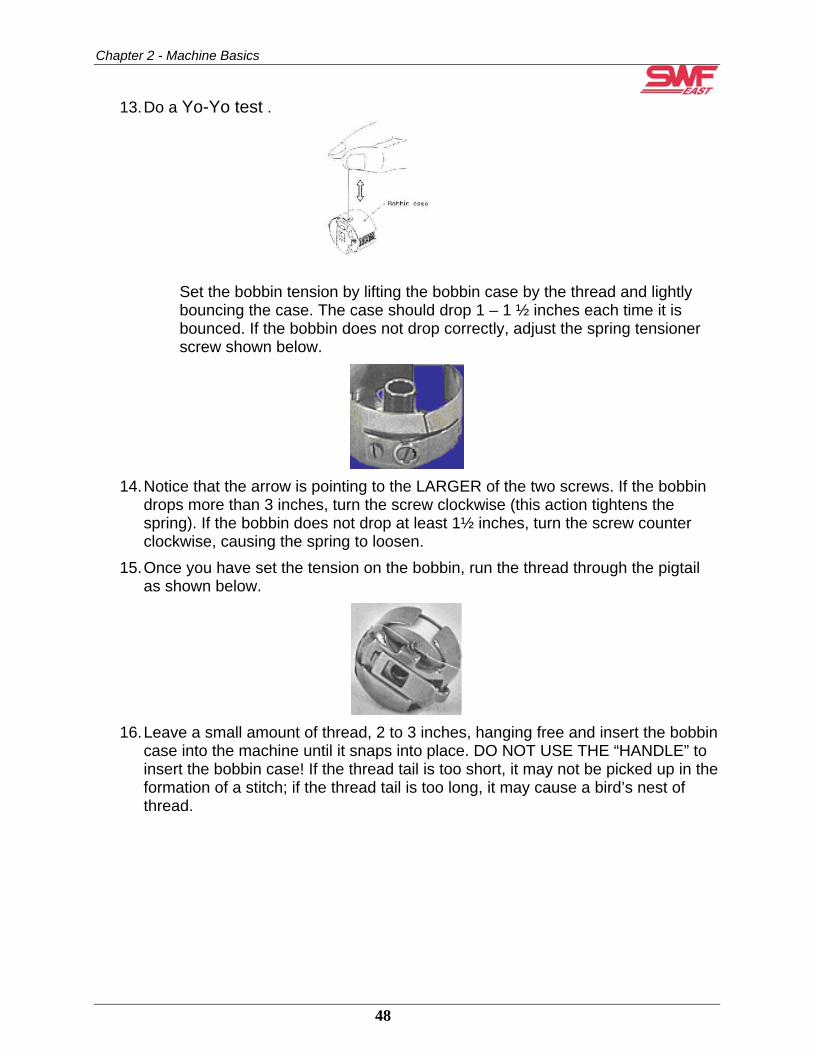
9. For this exercise, take a new bobbin and locate the thread tail. Unwind about three inches (“three fingers”) of thread off the right side of the bobbin. The thread should unwind in a clockwise direction as shown below.
10. Next, hold the bobbin case toward you with the pigtail pointing up, as shown
below.
11. Insert the bobbin thread into the bobbin case and slide the thread through the
bobbin case slot as shown below.
12. Continue pulling the thread into and underneath the spring tensioner. The spring
tensioner will make a faint clicking sound when the thread has been inserted correctly.
Chapter 2 - Machine Basics
48
13. Do a Yo-Yo test .
Set the bobbin tension by lifting the bobbin case by the thread and lightly bouncing the case. The case should drop 1 – 1 ½ inches each time it is bounced. If the bobbin does not drop correctly, adjust the spring tensioner screw shown below.
14. Notice that the arrow is pointing to the LARGER of the two screws. If the bobbin
drops more than 3 inches, turn the screw clockwise (this action tightens the spring). If the bobbin does not drop at least 1½ inches, turn the screw counter clockwise, causing the spring to loosen.
15. Once you have set the tension on the bobbin, run the thread through the pigtail as shown below.
16. Leave a small amount of thread, 2 to 3 inches, hanging free and insert the bobbin
case into the machine until it snaps into place. DO NOT USE THE “HANDLE” to insert the bobbin case! If the thread tail is too short, it may not be picked up in the formation of a stitch; if the thread tail is too long, it may cause a bird’s nest of thread.
Chapter 2 - Machine Basics
49
Basic Maintenance Changing from Flats to Caps In this exercise, you will remove the flat frame and install the cap frame. Use the rest of this page for any notes you may want to take during this exercise.

Chapter 2 - Machine Basics
50
Replacing a Needle The following steps will guide you through needle replacement.
1. Loosen the screw in the needle clamp just enough to remove the needle. Do not remove the screw!!
2. Pull the old needle straight down through the pressure foot.
3. Insert the new needle, making sure that you push it up as far as it will go. 4. Align the new needle with the groove facing forward and the eye of the needle
facing straight out. Use a toothpick or other non-metallic item to align the needle and hold it into place by placing the item in the eye of the needle.
5. Re-tighten the screw in the needle clamp.

Chapter 2 - Machine Basics
51
Oiling Your Machine Every 4 hours of operation, oil the race of the rotary hook as shown below. Place only one drop of oil in the race. In addition to your rotary hook, there are additional areas of your machine that require oiling. All SWF Compact machines are equipped with an automatic wicking system. There are two basic types of wicking system in use today; the diagrams below illustrate both variations. Once a week (or more often if the machine is used frequently), place 8 – 10 drops of oil on the top of the machine.
Type I
Type II

Chapter 2 - Machine Basics
52
Greasing Your Machine Every three months, your machine will require a light coating of grease applied to several areas. Refer to your Owner’s Guide and the diagrams below when greasing the moving parts of your machine.
Color Change Guide Grease Points
Color Change Cam Grease Point
X-Axis and Y-Axis Pantograph

Chapter 2 - Machine Basics
53
Cleaning Your Machine There are several areas where lint and debris can accumulate, causing stitch degradation and intermittent problems.
• Any time you change your bobbin, clean out the bobbin case area. Check to ensure there is no lint in the bobbin case tension spring. Loosen with a screwdriver until you see daylight. Use a business card or canned air to clean (Do Not use metal or wood).
It’s a good idea to have a couple of spare bobbin cases.
• Once a week, remove the needle plate and blow out any debris using canned air.
Non-Warranty Items SWF provides one of the best warranties in the industry. However, there are a few items that we are simply unable to cover. These items include:
Upper Thread Catcher Rotary Hook Assembly
Bobbin Cases Needles
Pressure Foot (Feet) Moving Mes
Needle Bar Fixed Mes
Reciprocator Under Thread Holder
All non-warranty parts are available from SWF East; additionally, an Emergency Kit is available from us.
Chapter 2 - Machine Basics
54
Additional Resources
• Training CD
• Owner’s Manual
• Parts Book
• SWF East Service Department
• SWF East Web Site (www.swfeast.com)
• SWF Owner’s Group (accessed through Yahoo.com after you open a free yahoo mail account)
• SWF Machine Group (accessed through Yahoo.com after you open a free yahoo mail account)
• Industry Links on the SWF East Web Site
• Embroidery Extravaganzas and Industry Trade Shows
Related Documents