Excerpt from “Object-Oriented Programming in Python” by Michael H. Goldwasser and David Letscher CHAPTER 4 Elementary Control Structures 4.1 For Loops 4.2 Case Study: DNA to RNA Transcription 4.3 Case Study: Drawing a Pyramid 4.4 Conditional Statements 4.5 List Comprehension 4.6 Chapter Review The order in which commands are executed by a program is its flow of control. By default, statements are executed in the order in which they are given. However, a different execution order can be specified using what is known as a control structure. In this chapter we introduce two of Python’s most widely used control structures. The first, known as a for loop, is used to repeat a series of commands upon each element of a given sequence. The second control structure introduced in this chapter is a conditional statement (also known as an if statement). This allows a programmer to specify a group of commands that are only to be executed when a certain condition is true. We will explain the basic syntax and semantics for these two control structures and show how they can be combined with each other to accomplish a variety of tasks. One common goal is to take an original list and produce a new list that is based upon a selection of elements from the first list that meet a certain criterion. This can be accomplished using a combination of the two control structures, yet Python supports a more concise syntax termed list comprehension. This chapter serves to introduce these elementary control structures. We continue in Chapter 5 by introducing several more control structures. As a collective group, these provide great flexibility in designing code that is more elegant, robust, and maintainable. 4.1 For Loops We often need to repeat a series of steps for each item of a sequence. Such a repetition is called iteration and expressed using a control structure known as a for loop. A for loop always begins with the syntax for identifier in sequence: followed by a block of code we call the body of the loop. The general schema of a for loop is diagrammed in Figure 4.1. As an example, we can print the name of each person from a guest list, one per line, with the following syntax. 125

Welcome message from author
This document is posted to help you gain knowledge. Please leave a comment to let me know what you think about it! Share it to your friends and learn new things together.
Transcript

Excerpt from “Object-Oriented Programming in Python” by Michael H. Goldwasser and David Letscher
C H A P T E R 4
Elementary Control Structures
4.1 For Loops
4.2 Case Study: DNA to RNA Transcription
4.3 Case Study: Drawing a Pyramid
4.4 Conditional Statements
4.5 List Comprehension
4.6 Chapter Review
The order in which commands are executed by a program is its flow of control. By
default, statements are executed in the order in which they are given. However, a different
execution order can be specified using what is known as a control structure. In this chapter
we introduce two of Python’s most widely used control structures. The first, known as a
for loop, is used to repeat a series of commands upon each element of a given sequence.
The second control structure introduced in this chapter is a conditional statement (also
known as an if statement). This allows a programmer to specify a group of commands that
are only to be executed when a certain condition is true.
We will explain the basic syntax and semantics for these two control structures and
show how they can be combined with each other to accomplish a variety of tasks. One
common goal is to take an original list and produce a new list that is based upon a selection
of elements from the first list that meet a certain criterion. This can be accomplished using
a combination of the two control structures, yet Python supports a more concise syntax
termed list comprehension.
This chapter serves to introduce these elementary control structures. We continue
in Chapter 5 by introducing several more control structures. As a collective group, these
provide great flexibility in designing code that is more elegant, robust, and maintainable.
4.1 For Loops
We often need to repeat a series of steps for each item of a sequence. Such a repetition is
called iteration and expressed using a control structure known as a for loop. A for loop
always begins with the syntax for identifier in sequence: followed by a block of code we
call the body of the loop. The general schema of a for loop is diagrammed in Figure 4.1.
As an example, we can print the name of each person from a guest list, one per line, with
the following syntax.
125

Excerpt from “Object-Oriented Programming in Python” by Michael H. Goldwasser and David Letscher
126 Chapter 4 Elementary Control Structures
for identifier in sequence :
body
FIGURE 4.1: General form of a for loop.
for person in guests:
print person
The identifier (i.e., person) is used like any other identifier in the language. Informally, we
call this the loop variable; its name should suggest its meaning. The sequence (i.e., guests)
can be any object that represents a sequence of elements, usually a list, string, or tuple. It
can be specified with a literal, an identifier, or an expression that results in a sequence. At
the end of that first line we use a colon (:) to designate the forthcoming body. The body
itself (i.e., print person) specifies the command or commands that are to be executed for
each iteration of the loop. This body is indented, although the precise amount of indenta-
tion is up to the programmer.
The semantics of a for loop is as follows. The identifier is assigned to the first item
in the sequence and the body of the loop is executed. Then the identifier is reassigned to
the next item of the sequence and again the loop body is executed. This iteration continues
through the entire list. As a concrete example, consider the following loop, which might
be used to generate name tags for a party:
guests = ['Carol', 'Alice', 'Bob']
for person in guests:
print 'Hello my name is', person
The changing value of identifier person during this iteration is diagrammed in Figure 4.2.
When Python executes this loop, the actual flow of control is equivalent to the following
series of statements:
person = 'Carol'
print 'Hello my name is', person
person = 'Alice'
print 'Hello my name is', person
person = 'Bob'
print 'Hello my name is', person
Of course, the advantage of the for loop syntax is that it allows us to express this repetition
succinctly and for a general sequence of elements, rather than specifically for 'Carol',
'Alice', and 'Bob'.

Excerpt from “Object-Oriented Programming in Python” by Michael H. Goldwasser and David Letscher
Section 4.1 For Loops 127
list
'Alice'
str
'Bob'
str
'Carol'
str
guests
person
list
'Alice'
str
'Bob'
str
'Carol'
str
guests
person
list
'Alice'
str
'Bob'
str
'Carol'
str
guests
person
FIGURE 4.2: The assignment of person during three iterations of a for loop.
Although a for loop can technically iterate upon an empty sequence, the body of
the loop is never executed; there are no elements.

Excerpt from “Object-Oriented Programming in Python” by Michael H. Goldwasser and David Letscher
128 Chapter 4 Elementary Control Structures
As a more interesting application, suppose that a bank keeps a chronological log of
all transactions for an individual’s account. We model this as a list of numbers, with a pos-
itive entry representing a deposit into the account and a negative entry, a withdrawal. With
this representation, the bank can perform many common tasks. For example, the overall
balance for the account is simply the sum of all transactions (keeping in mind that “adding”
a withdrawal decreases the balance). This sum can be computed as follows:
balance = 0 # initial balance
for entry in transactions:
balance = balance + entry
print 'Your balance is', balance
Figure 4.3 shows the progression of this code on a simple example. The top drawing rep-
resents our state immediately before the loop is reached. Notice that balance is explicitly
initialized to zero prior to the loop. The three remaining diagrams show the state at the
end of each of the three passes of the loop. By the final configuration, we have calculated
the true balance. The print statement is not part of the body of the loop because it is not
indented. So that command is only executed once, after the loop is complete.
We use this example as a demonstration, but we can simplify our code by taking
better advantage of Python. First, Python supports an operator += that adds a value to a
running total. So the body of our loop could be expressed as
balance += entry
rather than as balance = balance + entry. Corresponding shorthands exist for other arith-
metic operators (e.g., −=, *=, /=, //=, %=). More importantly, computing the sum of a list of
numbers is such a common task, there exists a built-in function sum(transactions), which
returns the sum (presumably by performing just such a loop internally).
As our next example, let ['milk', 'cheese', 'bread', 'cereal'] represent
the contents of list groceries. Our goal is to output a numbered shopping list, as
1. milk
2. cheese
3. bread
4. cereal
We can generate this output using the following code fragment:
count = 1
for item in groceries:
print str(count) + '. ' + item
count += 1
Unlike our earlier examples, the body of this loop consists of multiple statements. Python
relies upon the indentation pattern for designating the loop body. Since the command
count += 1 is indented accordingly, it is part of the body.

Excerpt from “Object-Oriented Programming in Python” by Michael H. Goldwasser and David Letscher
Section 4.1 For Loops 129
list
200
int
−50
int
100
int
0
int
transactions
balance
list
200
int
−50
int
100
intentry
200
int
transactions
balance
list
200
int
−50
int
100
int
150
int
transactions
balanceentry
list
200
int
−50
int
100
int
250
int
transactions
balanceentry
FIGURE 4.3: The changing state of variables as we compute the sum of a list. The top
picture shows the state just before the loop. Subsequent pictures show the state at the
end of each iteration.

Excerpt from “Object-Oriented Programming in Python” by Michael H. Goldwasser and David Letscher
130 Chapter 4 Elementary Control Structures
Specifying loops from the interpreter prompt
We typically execute code that has been saved in a file. Yet it is possible to designate a
loop as part of an interactive session with the Python interpreter. Try the following:
>>> guests = ['Carol', 'Alice', 'Bob']
>>> for person in guests :
...
After entering the second line, Python does not immediately present its usual >>> prompt.
The interpreter recognizes the beginning of a control structure that is not yet complete.
Instead, it presents the ... prompt (or if using IDLE, that next line is automatically indented
to await our command). If we continue by specifying the indented command print person
we find the following response:
>>> guests = ['Carol', 'Alice', 'Bob']
>>> for person in guests :
... print person
...
The interpreter still does not execute the for loop. Since a loop body might have more than
one statement, the interpreter cannot yet be sure whether the body is complete. For this
reason, the end of a body is designated by a separate empty line when working interac-
tively. Only then does the loop execute, as seen in the following:
>>> guests = ['Carol', 'Alice', 'Bob']
>>> for person in guests :
... print person
...
Carol
Alice
Bob
>>>
Notice that a new >>> prompt is presented at the very end, once the loop has executed.
Although a mix of tabs and spaces may appear to be equivalent indentation to you,
they are not considered identical to the Python interpreter. You must be consistent
in your usage or avoid tabs altogether. Some editors will automatically convert
tabs to spaces for this reason.
Excerpt from “Object-Oriented Programming in Python” by Michael H. Goldwasser and David Letscher
Section 4.1 For Loops 131
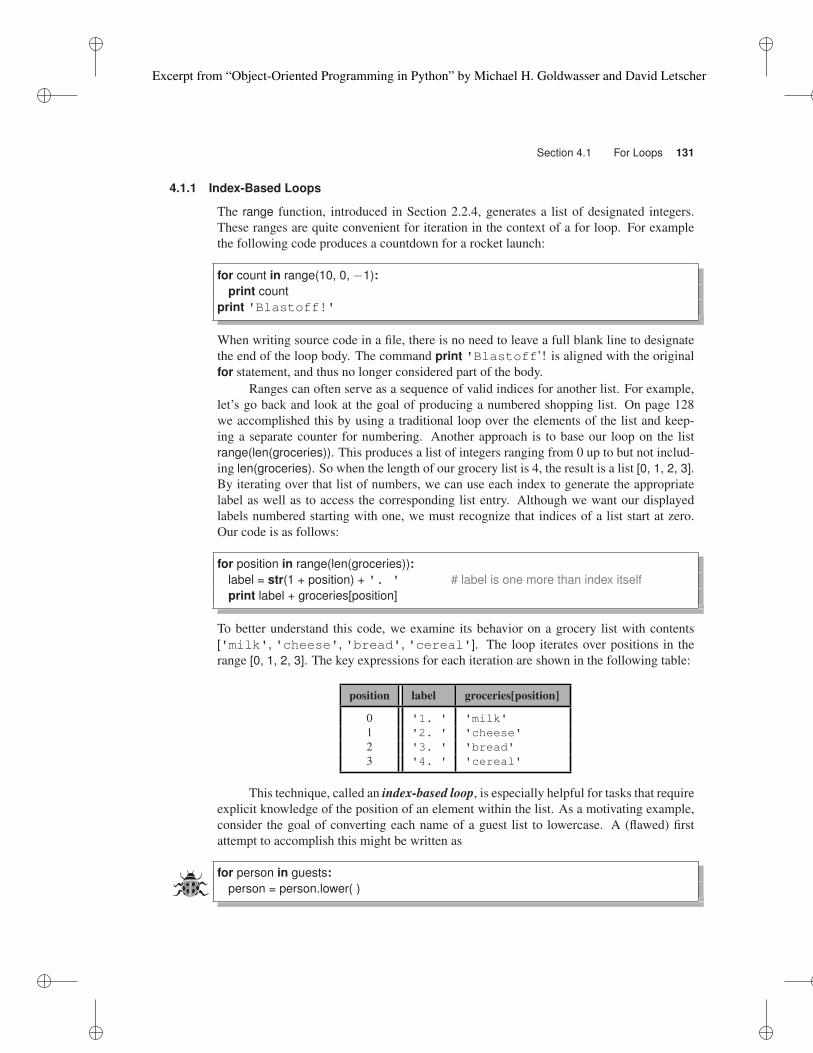
4.1.1 Index-Based Loops
The range function, introduced in Section 2.2.4, generates a list of designated integers.
These ranges are quite convenient for iteration in the context of a for loop. For example
the following code produces a countdown for a rocket launch:
for count in range(10, 0, −1):
print count
print 'Blastoff!'
When writing source code in a file, there is no need to leave a full blank line to designate
the end of the loop body. The command print 'Blastoff’! is aligned with the original
for statement, and thus no longer considered part of the body.
Ranges can often serve as a sequence of valid indices for another list. For example,
let’s go back and look at the goal of producing a numbered shopping list. On page 128
we accomplished this by using a traditional loop over the elements of the list and keep-
ing a separate counter for numbering. Another approach is to base our loop on the list
range(len(groceries)). This produces a list of integers ranging from 0 up to but not includ-
ing len(groceries). So when the length of our grocery list is 4, the result is a list [0, 1, 2, 3].
By iterating over that list of numbers, we can use each index to generate the appropriate
label as well as to access the corresponding list entry. Although we want our displayed
labels numbered starting with one, we must recognize that indices of a list start at zero.
Our code is as follows:
for position in range(len(groceries)):
label = str(1 + position) + '. ' # label is one more than index itself
print label + groceries[position]
To better understand this code, we examine its behavior on a grocery list with contents
['milk', 'cheese', 'bread', 'cereal']. The loop iterates over positions in the
range [0, 1, 2, 3]. The key expressions for each iteration are shown in the following table:
position label groceries[position]
0 '1. ' 'milk'
1 '2. ' 'cheese'
2 '3. ' 'bread'
3 '4. ' 'cereal'
This technique, called an index-based loop, is especially helpful for tasks that require
explicit knowledge of the position of an element within the list. As a motivating example,
consider the goal of converting each name of a guest list to lowercase. A (flawed) first
attempt to accomplish this might be written as
for person in guests:
person = person.lower( )

Excerpt from “Object-Oriented Programming in Python” by Michael H. Goldwasser and David Letscher
132 Chapter 4 Elementary Control Structures
list
'Alice'
str
'Bob'
str
'Carol'
str
guests
person
list
'Alice'
str
'Bob'
str
'Carol'
str
guests
person
'carol'
str
FIGURE 4.4: The effect of the command person = person.lower( ) in the context of a
for loop.
Unfortunately, this code does not work as intended. Before suggesting a fix, let’s make
sure that we understand the shortcomings of the attempt. The issue working against
us is that we have a list of strings, yet strings are immutable objects. The command
person = person.lower( ) generates a new string that is a lowercase version of the origi-
nal, and then reassigns identifier person to that result. This has no effect on the original
element in the list. Figure 4.4 diagrams the first iteration of this loop. When the second
iteration of the loop begins, the identifier person will be reassigned to the second element
of the list, but the execution of the body produces another auxiliary string.
Going back to our goal, since we cannot mutate the original elements of the list we
must mutate the list itself. We can replace one entry of a list with a new value using a
syntax such as guests[i] = newValue, but this requires knowledge of the element’s index
within the list. We use an index-based loop as a solution.
for i in range(len(guests)):
guests[i] = guests[i].lower( )

Excerpt from “Object-Oriented Programming in Python” by Michael H. Goldwasser and David Letscher
Section 4.1 For Loops 133
As before, the right-hand side of the expression guests[i] = guests[i].lower( ) evaluates to a
new lowercase string. But this time, the assignment statement has the effect of altering the
list composition. With practice, the choice between traditional loops and index-based loops
will become more clear. The index-based form is generally used when the behavior of the
loop body depends upon the location of an item within the list; otherwise, the traditional
form is preferred.
4.1.2 Nested Loops
We have already seen examples where the body of the loop includes several statements. In
fact, the body can even include another loop. The technique of using one control structure
within the body of another is called nesting. As a first example, consider the following
code fragment:
1 for chapter in ('1', '2'):
2 print 'Chapter ' + chapter
3 for section in ('a', 'b', 'c'):
4 print ' Section ' + chapter + section
5 print 'Appendix'
To understand the behavior of this code, we view the nesting hierarchically. Line 1 defines
a loop, which we will refer to as the outer loop. The body of this loop consists of lines 2–4.
We recognize this because an indentation level is established at line 2, and the code remains
indented at least this much until line 5. Since line 5 is back to the original level of inden-
tation, it is not part of the outer loop body. In essence, the indentation allows us to abstract
the high-level structure of the code as follows.
We gave an example of a for loop that iterates through an underlying list while
mutating that list. However, the mutation was a one-for-one replacement of an
element of that list and so the overall structure of the list remained intact.
The behavior of a for loop is unpredictable if the underlying list is mutated
in a way that alters its overall structure. In the following example, we remove
and reinsert elements as the loop is executing. Can you guess how it will behave?
original = ['A', 'B', 'C', 'D', 'E', 'F']
for entry in original:
print entry
original.remove(entry)
original.append(entry)

Excerpt from “Object-Oriented Programming in Python” by Michael H. Goldwasser and David Letscher
134 Chapter 4 Elementary Control Structures
1 for chapter in ('1', '2'):
2 # the loop body
3 # will be repeated
4 # for each chapter
5 print 'Appendix'
Although we are blurring over the details of the loop body, we can already see that the
body will be executed with chapter set to '1', then re-executed with chapter set to '2',
and finally the word 'Appendix' printed at the conclusion of the loop. Now, let’s focus
narrowly on the body.
2 print 'Chapter ' + chapter
3 for section in ('a', 'b', 'c'):
4 print ' Section ' + chapter + section
In isolation, this block of code is straightforward. Assuming that the identifier chapter
is well defined, line 2 prints out a single statement, and lines 3–4 comprise a loop. For
example, if someone told us that chapter was set to '1', then it would be easy to see that
this block of code produces the following output:
Chapter 1
Section 1a
Section 1b
Section 1c
We could similarly determine the output that would be produced if chapter were set to
'2'. Going back to the original version, we can put all the pieces together to predict the
following output:
Chapter 1
Section 1a
Section 1b
Section 1c
Chapter 2
Section 2a
Section 2b
Section 2c
Appendix
The use of nested control structures can lead to many interesting behaviors. We
demonstrate one such example as part of the case study in Section 4.3 in the context of
drawing graphics. We will see many more examples of nested control structures as we
implement more complex behaviors.

Excerpt from “Object-Oriented Programming in Python” by Michael H. Goldwasser and David Letscher
Section 4.2 Case Study: DNA to RNA Transcription 135
4.2 Case Study: DNA to RNA Transcription
A strand of DNA is composed of a long sequence of molecules called nucleotides or bases.
Only four distinct bases are used: adenine, cytosine, guanine, and thymine, which are
respectively abbreviated as A, C, G, and T. An organism uses DNA as a model when
constructing a complementary structure called RNA. This process of creating RNA from
DNA is known as transcription. The RNA is then used to create proteins.
RNA also consists of four nucleotides, three of them being A, C, and G, and a fourth
one uracil, which is abbreviated as U. Transcription creates an RNA sequence by matching
a complementary base to each original base in the DNA, using the following substitutions:
DNA RNA
A U
C G
G C
T A
In this case study, we develop a program that asks the user to enter a DNA sequence and
returns the transcribed RNA. An example session will look like
Enter a DNA sequence : AGGCTACGT
Transcribed into RNA : UCCGAUGCA
Our complete program is in Figure 4.5. The strings established in lines 1 and 2
encode the substitution rules for transcription. Those letters are intentionally ordered to
give the proper mapping from DNA to RNA. Since the dna string entered by the user is
itself a sequence, we use the for loop starting at line 6 to iterate through each individual
DNA character. Line 7 finds the index of the DNA character within the dnaCodes. That
index determines a corresponding RNA base from rnaCodes at line 8, which is then added
to an auxiliary list rnaList at line 9. The overall RNA string is compiled at line 10, as the
join of rnaList.
1 dnaCodes = 'ACGT'
2 rnaCodes = 'UGCA'
3
4 dna = raw_input('Enter a DNA sequence: ')
5 rnaList = [ ]
6 for base in dna:
7 whichPair = dnaCodes.index(base) # index into dnaCodes
8 rnaLetter = rnaCodes[whichPair] # corresponding index into rnaCodes
9 rnaList.append(rnaLetter)
10 rna = ''.join(rnaList) # join on empty string
11 print 'Transcribed into RNA:', rna
FIGURE 4.5: Transcribing DNA to RNA.

Excerpt from “Object-Oriented Programming in Python” by Michael H. Goldwasser and David Letscher
136 Chapter 4 Elementary Control Structures
(a) (b)
FIGURE 4.6: Two versions of a pyramid. In (a) each level is a single rectangle; in (b) each
level comprises a series of squares.
4.3 Case Study: Drawing a Pyramid
In this case study, we develop two different programs for drawing a picture of a pyramid.
In the first version a level is drawn as a single rectangle, while in the second a level is
composed of individual squares. An example of each style is shown in Figure 4.6.
We begin by examining the first style. Our goal is not simply to draw the exact pic-
ture of Figure 4.6(a), but to develop a more general program that allows us to easily adjust
the number of levels and the relative size of the drawing. To aid in the development of our
code, we begin by assigning meaningful identifiers to two key measures: the number of
levels and the desired height of each individual level.
numLevels = 8 # number of levels
unitSize = 12 # the height of one level
The unitSize serves as the height of each level and indirectly as a factor in determining the
width of a level. For example, when setting the overall width and height of the canvas,
we do not use numeric literals, but instead the expression unitSize * (numLevels + 1). This
provides enough space for all of the levels, together with a small amount of margin around
the pyramid.
screenSize = unitSize * (numLevels + 1)
paper = Canvas(screenSize, screenSize)
By writing the rest of our program to depend upon these named variables rather than the
actual numbers, it becomes easy to later change the proportions of our pyramid.
Next, we must construct the levels of the pyramid. The biggest challenge is to get the
details of the geometry correct. Although the levels are not identical to each other, there
is clearly a repetitive pattern. We build the pyramid level by level, using a for loop that
begins as follows.

Excerpt from “Object-Oriented Programming in Python” by Michael H. Goldwasser and David Letscher
Section 4.3 Case Study: Drawing a Pyramid 137
FIGURE 4.7: Geometric sketch for a 4-level pyramid. The dotted lines mark units in the
coordinate system. The solid rectangles represent the levels of the pyramid, with each
dot highlighting the desired center point for a level.
for level in range(numLevels):
With this convention, level will iterate over values [0, 1, 2, 3, 4, 5, 6, 7] for the case of eight
levels. For convenience, we build the pyramid starting at the topmost level. Therefore
level 0 is at the top, level 1 is the one under that, and so on (yes, we realize that in real
life, it helps to build the bottom of the pyramid first!). In designing the rest of the code,
we must determine the inherent geometric pattern. Each rectangle in our figure must be
defined with a specific width, height, and center point. Sometimes it helps to sketch a small
example by hand to determine the pattern. Figure 4.7 provides such a sketch for a 4-level
pyramid. From this sketch, we can develop the following table of values, remembering
that the origin of the screen is at the top left corner:
(measured in multiples of unitSize)
level width height centerX centerY
0 1 1 2.5 1
1 2 1 2.5 2
2 3 1 2.5 3
3 4 1 2.5 4
We see both similarities and differences among the levels. Each level has the same height,
namely the unitSize, yet the width varies. Examining the table, we see that the width of
a level is precisely one more than the level number (as level 0 has width 1, level 1 has
width 2, and so on). So within each iteration of the loop, we compute the proper width and
construct a new rectangle as follows:
width = (level + 1) * unitSize # width varies by level
block = Rectangle(width, unitSize) # height is always unitSize
Placing each rectangle requires an understanding of the pattern from our sample
geometry. The center x-coordinate is the same for each level, in fact it is precisely half of
the screenSize. Since this value is the same for all levels, we can compute it once before
the loop begins, rather than recomputing within the body of the loop. On the other hand,

Excerpt from “Object-Oriented Programming in Python” by Michael H. Goldwasser and David Letscher
138 Chapter 4 Elementary Control Structures
1 from cs1graphics import *2
3 numLevels = 8 # number of levels
4 unitSize = 12 # the height of one level
5 screenSize = unitSize * (numLevels + 1)
6 paper = Canvas(screenSize, screenSize)
7 centerX = screenSize / 2.0 # same for all levels
8
9 # create levels from top to bottom
10 for level in range(numLevels):
11 width = (level + 1) * unitSize # width varies by level
12 block = Rectangle(width, unitSize) # height is always unitSize
13 centerY = (level + 1) * unitSize
14 block.move(centerX, centerY)
15 block.setFillColor('gray')
16 paper.add(block)
FIGURE 4.8: Code for drawing a pyramid made of rectangles.
the y-coordinate varies between levels so we recompute it within the body of the loop.
Fortunately, we see a familiar pattern with level 0 having a value of 1, level 1 a value of 2,
and so on. Our complete code is given in Figure 4.8. Notice that the central x-coordinate is
computed only once, prior to the loop at line 7. The individual y-coordinates are computed
within the body of the loop at line 13, and then assigned to the rectangle at line 14. Line 16
adds each block to the canvas.
In conclusion, we wish to emphasize the advantage of relying upon the named vari-
ables numLevels and unitSize. By simply altering lines 3 and 4, we can reconfigure the
pyramid’s geometry. No other lines of code need to be changed. As a simple exercise,
you could prompt the user for those key parameters. Another amusing modification is to
make an animation of the process. By importing the time module and then inserting the
command sleep(1.0) within the body of the loop, the visual construction of the pyramid
will proceed level by level.
Pyramid made of squares
We next turn our attention to the second goal, a version of the pyramid made entirely from
squares rather than rectangles, as shown in Figure 4.6(b). The general idea is quite similar;
in fact the first ten lines of the code are identical. We create a screen of the appropriate
size, and then begin a loop to create the pyramid, one level at a time. The difference in
our two versions involves the body of the loop, since that determines how each level of
the pyramid is built. In our first version, this body creates a single rectangle. In our next
version, we use a nested loop to create and position a series of squares that comprise the
level. Again, it helps to graph a small example. We find the general pattern is that level k
is comprised of (k + 1) unit squares. All of the squares on a given level are centered with
the same y-coordinate. In fact, this is the same coordinate that we used when centering

Excerpt from “Object-Oriented Programming in Python” by Michael H. Goldwasser and David Letscher
Section 4.3 Case Study: Drawing a Pyramid 139
the rectangle in our first version. In this case, we compute it at line 12, prior to the inner
loop. What differs among those squares is the x-coordinate. We approach the design by
first considering where the leftmost square should be centered. By considering the width
of the level, we determine the following equation:
leftmostX = centerX − unitSize * level / 2.0
As a check, notice that the leftmost square of level 0 will be placed precisely at the center
of the diagram. The leftmost square of level 1 will be one-half a unit to the left of center,
and so on. With that knowledge, we place all of the squares of the level using an inner loop
that begins as follows:
for blockCount in range(level + 1):
block = Square(unitSize)
block.move(leftmostX + unitSize * blockCount, centerY)
Based on the selected range, we view the blocks of our level numbered from left to right,
so that the leftmost is block 0, the one after that block 1, and so on. The x-coordinate of
each block is set based upon an offset from the leftmost x-coordinate. So block 0 is the
leftmost, block 1 is centered one full unit to the right of that, and so on. The complete
second version of our code is given in Figure 4.9.
1 from cs1graphics import *2
3 numLevels = 8 # number of levels
4 unitSize = 12 # the height of one level
5 screenSize = unitSize * (numLevels + 1)
6 paper = Canvas(screenSize, screenSize)
7 centerX = screenSize / 2.0 # same for all levels
8
9 # create levels from top to bottom
10 for level in range(numLevels):
11 # all blocks at this level have same y-coordinate
12 centerY = (level + 1) * unitSize
13 leftmostX = centerX − unitSize * level / 2.0
14 for blockCount in range(level + 1):
15 block = Square(unitSize)
16 block.move(leftmostX + unitSize * blockCount, centerY)
17 block.setFillColor('gray')
18 paper.add(block)
FIGURE 4.9: Code for drawing a pyramid made of squares.

Excerpt from “Object-Oriented Programming in Python” by Michael H. Goldwasser and David Letscher
140 Chapter 4 Elementary Control Structures
if condition :
body
FIGURE 4.10: Schema of a simple conditional statement.
4.4 Conditional Statements
Our next control structure is known as a conditional statement or, more commonly, an if
statement. It allows us to specify one or more instructions that are only to be executed
when a certain condition is true. This is an extremely valuable tool as it allows execution
to vary depending upon values that are not known until the program is running, such as
input received from a user, data read from a file, or other forms of information that cannot
be determined at the time the software is being written. A very simple example using a
conditional statement is the following:
1 dinner = raw_input('What would you like for dinner? ')
2 if dinner == 'pizza':
3 print 'Great!'
4 print 'I love pepperoni and black olives.'
The first line gets input from the user. The conditional construct is on lines 2–4. It begins
with the keyword if followed by a boolean expression which we call the condition. That
condition is followed by a colon and then an indented body. This format is shown in
Figure 4.10. The semantics of a conditional statement is quite natural. If the condition
evaluates to True, the body is executed; if the condition evaluates to False, the body is
bypassed. This flow of control of an if statement is portrayed graphically in Figure 4.11.
The condition
The condition (e.g., dinner == 'pizza') can be an arbitrary boolean expression, as intro-
duced in Section 2.8.2. This may be a single variable of type bool, or a more complex
expression that evaluates to a boolean. The challenge for a programmer is crafting a con-
dition that captures the desired semantics. Consider the following rule:
if len(groceries) > 15 or 'milk' in groceries:
print 'Go to the grocery store'
With this condition, we go to the store whenever we need lots of things or whenever we
need more milk (even if few other things). This is very different from the following:
if len(groceries) > 15 and 'milk' in groceries:
print 'Go to the grocery store'
In this case, we only go to the store when we need lots of things including milk.

Excerpt from “Object-Oriented Programming in Python” by Michael H. Goldwasser and David Letscher
Section 4.4 Conditional Statements 141
False True
body
condition
FIGURE 4.11: Flowchart for an if statement.
The body
Following the statement of the condition is the body of the conditional. As is the case with
the for loop, the first statement of the body establishes a level of indentation for the rest of
the body. The body can be as simple as one line, or more generally a larger block of code.
We can even nest one conditional within the body of another. Consider the scenario
of a person approaching the site of a party, with someone guarding the door. The response
of the guard may depend on whether the party has started and whether the person is on the
guest list. Here is a reasonable behavior for the guard:
if partyStarted:
if person in guests:
print 'Welcome'
First, the guard checks to see if the party has started. If the party has started, then the
guard must test the second condition to see whether this individual is invited. It is only in
the case where both conditions succeed that the actual print statement is executed. Notice
that when the party has not started, the guard does not even bother checking the guest list.
The result of such a check is irrelevant and performing the test could be time consuming
for a large party. Interestingly, this nested logic is identical to the evaluation of a single
compound conditional.
if partyStarted and person in guests:
print 'Welcome'
The outcome is clearly the same; the print statement executes only when both conditions
are true. Yet the evaluation mechanism is similar as well. Python uses a technique known
as short circuiting, where a partial evaluation of a boolean expression suffices as soon as

Excerpt from “Object-Oriented Programming in Python” by Michael H. Goldwasser and David Letscher
142 Chapter 4 Elementary Control Structures
Although we suggested that a condition must be a boolean expression, Python
actually allows many other data types to be used as a condition. For example,
when a sequence serves as the condition, the body of the statement is executed if
that sequence is nonempty. Thus we may write
if waitlist:
as a compact shorthand for the actual boolean expression
if len(waitlist) > 0:
The same style can be used to differentiate between empty strings and nonempty
strings. For example, the following code demonstrates a common technique for
prompting the user for information while providing a default value when the user
presses the enter key without typing any other characters.
dinner = raw_input('What would you like for dinner? ')
if not dinner: # empty string entered by user
dinner = 'pizza'
Based on the condition not dinner, the body will be executed only when dinner is
an empty string (i.e., when it does not have length greater than zero).
The use of a nonboolean object as a condition allows experienced program-
mers to make code more concise. However, there are pitfalls for a beginner who
accidentally uses a nonboolean object. Consider the following code, which is
syntactically legal but tragically flawed:
response = raw_input('Shall we play a game? ')
if response == 'y' or 'yes':
# play the game
The condition is treated as if it were parenthesized as follows:
if (response == 'y') or ('yes'):
Since the right-hand operand of the or is a nonempty string, the overall condition
will be treated as True, regardless of the actual response value. Of course, this
can be a very nasty bug to uncover, as the condition will seem to be satisfied even
when the user types 'Definitely not'.
By the way, one way to express the intended logic is with the condition
response == 'y'or response == 'yes'. An even more concise form uses a
containment check on a tuple, with the condition response in ('y', 'yes').

Excerpt from “Object-Oriented Programming in Python” by Michael H. Goldwasser and David Letscher
Section 4.4 Conditional Statements 143
the outcome can be properly determined. When the left-hand side of the and operator fails
(in this case partyStarted), it reports False as the overall result without bothering to check
the second condition. A similar optimization is used when the first clause of an or operator
is True.
As another illustration of nested control structures, we return to the example of a
list of bank account transactions. We used a for loop to calculate the overall sum of the
transactions, and thus the final balance. Yet for a series of transactions to be legitimate, the
intermediate balance should remain nonnegative throughout the process. Here is a variant
of our original code that uses a conditional to check for such inconsistencies.
balance = 0
for entry in transactions:
balance += entry
if balance < 0:
print 'Overdraft warning'
4.4.1 if-else Syntax
In its simplest form, a conditional is used to specify instructions that are executed when a
given expression is True. An alternate set of steps can be expressed as anelse clause, to be
performed when the condition is False. Consider the following:
dinner = raw_input('What would you like for dinner? ')
if dinner == 'pizza':
print 'Great!'
print 'I love pepperoni and black olives.'
else:
print 'How about pizza?'
The general syntax of an if-else statement is given in Figure 4.12. The associated seman-
tics are shown by the flowchart in Figure 4.13. If the condition is True, the first body will
be executed; otherwise the second body will be executed. As a more elaborate example,
the following code computes separate totals for the deposits and withdrawals of a list of
transactions (rather than the overall sum).
else:
if condition :
body2
body1
FIGURE 4.12: Schema of an if-else statement.

Excerpt from “Object-Oriented Programming in Python” by Michael H. Goldwasser and David Letscher
144 Chapter 4 Elementary Control Structures
False Truecondition
body2 body1
FIGURE 4.13: Flowchart for an if-else statement.
depositTotal = 0
withdrawalTotal = 0
for entry in transactions:
if entry > 0:
depositTotal += entry
else:
withdrawalTotal += entry
For each individual entry, we add it to one side of the ledger or the other based upon
whether it is a positive value.
4.4.2 if-elif Syntax
Next, we revisit our rule for buying groceries, as originally given on page 140. By that
logic, we make a trip to the grocery store whenever we need lots of things or whenever we
run out of milk. With nested conditionals, we can define the following more intricate rule:
if len(groceries) > 15:
print 'Go to the grocery store'
else:
if 'milk' in groceries:
print 'Go to the convenience store'
When we need lots of things we will make a trip to the grocery store, but we do not bother
going to the grocery store when our list is short. Instead, we consider making a quick trip
to the convenience store based upon a second condition, namely that we need milk. A
flowchart for this logic is given in Figure 4.14. There are three possible paths through this
chart: we might go to the grocery store, we might go to the convenience store, or we might

Excerpt from “Object-Oriented Programming in Python” by Michael H. Goldwasser and David Letscher
Section 4.4 Conditional Statements 145
len(groceries) > 15True
True
Grocery Store
Convenience Store
False'milk' in groceries
False
FIGURE 4.14: Flowchart for an if-elif statement.
do neither. However, we will never go to both stores. Notice that when we need lots of
things, it is irrelevant whether milk is on the list; we will be going to the grocery store. The
need for milk only comes into play once we have ruled out a full trip to the grocery store.
len(groceries) > 15 'milk' in groceries Action
True True Grocery Store
True False Grocery Store
False True Convenience Store
False False (nothing)
Placing a second conditional within the body of an else clause is so common, Python
supports a convenient shorthand using the keyword elif (short for “else if”), followed by a
secondary boolean expression. Thus the above example could be rewritten as
if len(groceries) > 15:
print 'Go to the grocery store'
elif 'milk' in groceries:
print 'Go to the convenience store'
The distinction may seem slight in this first example, but an advantage is that we avoid
increasing the level of indentation when there are additional conditions.

Excerpt from “Object-Oriented Programming in Python” by Michael H. Goldwasser and David Letscher
146 Chapter 4 Elementary Control Structures
More generally, we can chain together multiple elif clauses and optionally a final
else clause. To demonstrate this use, we consider the following biological application.
Recall from the case study of Section 4.2 that DNA strands are often represented as long
character strings over the bases A, C, G, and T. A simple computational task is to count
the number of occurrences of each individual base within a string dna. We can accomplish
this using the following implementation:
numA = numC = numG = numT = 0
for base in dna:
if base == 'A':
numA += 1
elif base == 'C':
numC += 1
elif base == 'G':
numG += 1
else: # presumably a T
numT += 1
The first line initializes four separate counters to zero (see page 67 for a similar use of
operator chaining). The for loop is then used to consider each individual base, with the
compound if statement used to distinguish between the possibilities. The final else clause
executes if all of the earlier conditions have failed. In this context, if we assume that the
DNA data is legitimate, then if a base is not an A, C, or G, it must be a T.
The convenience of the elif syntax in this example is more significant. If we had
been forced to nest multiple if-else constructs, this code must be formatted as
numA = numC = numG = numT = 0
for base in dna:
if base == 'A':
numA += 1
else:
if base == 'C':
numC += 1
else:
if base == 'G':
numG += 1
else: # presumably a T
numT += 1

Excerpt from “Object-Oriented Programming in Python” by Michael H. Goldwasser and David Letscher
Section 4.4 Conditional Statements 147
The DNA example brings up another interesting lesson, beyond the syntactic
issues. A careful reader may recall from Section 2.3.1 that the suite of methods
supported by the str class includes a count method that calculates the number of
occurrences of a specified substring. Therefore, we could accomplish our goal
with the following approach.
numA = dna.count('A')
numC = dna.count('C')
numG = dna.count('G')
numT = dna.count('T')
The question is whether one approach is clearly superior to the other. The code
on this page is much simpler to develop and perhaps more intuitive to read.
Efficiency becomes a significant issue when working on a large strand of
DNA (for example the human genome has roughly 3 billion bases). The fact that
code appears simpler syntactically does not actually mean it is more efficient. In
some respect, the work is shifted behind the scene into the count method. We
might suspect the approach on this page to be slower, as the four separate calls to
count probably cause four separate passes through the original data, as opposed
to the single loop in our earlier approach.
Interestingly, if we run our own tests on large DNA strands, we find that the
approach on this page is actually significantly faster than that of page 146 (roughly
5 times faster on our system). The primary reason for this discrepancy is that the
implementation of the built-in count method is optimized to take advantage of the
internal representation of a string. A conclusion we can draw from this example
is that there is a strong argument to be made for using existing tools rather than
reinventing them, especially if the tools are well suited and presumably optimized.
Of course this is only a guideline; there are many ways to destroy the efficiency
of a program by relying on tools that are not well suited for a task (such as using
a screwdriver to drive nails).

Excerpt from “Object-Oriented Programming in Python” by Michael H. Goldwasser and David Letscher
148 Chapter 4 Elementary Control Structures
4.5 List Comprehension
In Section 4.1.1 we considered the goal of mutating a list of guests to convert all names
to lowercase. A closely related task is that of creating a new list with lowercase versions
while leaving the original unchanged. This is easily accomplished with the following code:
auxiliary = [ ]
for person in guests:
auxiliary.append(person.lower( ))
This approach uses a general pattern in which we create a new empty list and then populate
the new list by adding a corresponding entry for each item of the original list. While this
implementation is straightforward, Python supports an even simpler syntax for such tasks
known as list comprehension. This syntax resembles a list literal, but allows us to generate
contents for a new list based upon entries of an existing list. As an example, the preceding
code fragment can be replaced by the single command
auxiliary = [ person.lower( ) for person in guests ]
This syntax provides a compact way of designating the four key components in the above
example, using the form result = [ expression for identifier in sequence ]. In evaluating
this statement, Python iterates the for loop, appending the given expression to the new
result during each pass. Notice that the expression person.lower( ) is allowed to depend
upon the loop variable person.
There is a more general form of list comprehension with a condition that must be true
in order for a corresponding entry to be appended to the result during each given iteration.
That form is expressed using the syntax
result = [ expression for identifier in sequence if condition]
This statement is evaluated similarly to the following nested control structures:
result = [ ]
for identifier in sequence:
if condition:
result.append(expression)
For example, suppose we want to scan a list of transactions and produce a supple-
mental list of all deposits from that original list. This can be done using the following list
comprehension:
deposits = [entry for entry in transactions if entry > 0]

Excerpt from “Object-Oriented Programming in Python” by Michael H. Goldwasser and David Letscher
Section 4.6 Chapter Review 149
4.6 Chapter Review
4.6.1 Key Points
For Loops
• A for loop is used to repeat a series of steps for each item of a sequence (e.g., a list, string,
tuple).
• The general syntax of a for loop is the following:
for identifier in sequence:
body
• For each element of an original sequence, the for loop identifier is assigned to that element
and then the body is executed.
• The body of a loop can be an arbitrarily long block of code. The first line of the body
establishes an indentation level. When the indentation returns to that of the word for, it is
no longer considered to be part of the loop body.
• The body of the loop may contain an additional nested control structure.
• The list produced by the range function is a convenient sequence for iteration.
• An index-based loop is one that iterates over a list of indices of a list rather than over the
original list, for example, for i in range(len(guests)).
Conditionals
• A conditional construct is used to specify commands that are only to be executed when a
certain condition is met. The basic syntax of a conditional is the following:
if condition:
body
When the condition evaluates to True the body will be executed; otherwise the body is
bypassed. The condition can be an arbitrarily complex boolean expression.
• An if statement can be followed by an else clause using the following syntax:
if condition:
body1
else:
body2
With this syntax, either the first or the second body will be executed (but not both).
• An if statement can be followed by one or more elif clauses to express subsequent condi-
tions to be checked should the first one fail.
if condition1:
body1
elif condition2:
body2
• An if-elif construct can optionally be followed by a final else clause that will be performed
if all earlier conditions have failed.

Excerpt from “Object-Oriented Programming in Python” by Michael H. Goldwasser and David Letscher
150 Chapter 4 Elementary Control Structures
List Comprehension
• Python offers a convenient syntax for creating a new list that has contents based upon the
entries of an original list. The general form,
result = [ expression for identifier in sequence if condition]
produces a result equivalent to that of
result = [ ]
for identifier in sequence:
if condition:
result.append(expression)
4.6.2 Glossary
body A block of (indented) code used within the context of a control structure.
conditional statement A control structure that specifies one or more blocks of code to
be executed only if certain conditions are true.
control structure A command that describes the order in which some other instructions
are executed.
flow of control The order in which a series of statements is executed.
for loop A control structure used to iterate a block of code for each item of a sequence.
if statement See conditional statement.
index-based loop A loop that iterates over a range of integers representing indices of a
list, rather than iterating directly over the elements of that list.
iteration The process of repeating a step for each item in a sequence.
list comprehension A syntax for creating a new list that is populated based upon the con-
tents of an existing list, as in deposits = [entry for entry in transactions if entry > 0 ].
loop variable An identifier that is assigned to each element of the sequence during the
execution of a for loop.
nesting A technique in which one control structure is placed within the body of another.
short circuiting A technique used by the computer in evaluating compound boolean
expressions, whereby a partial evaluation suffices as soon as the outcome can be
properly determined.
4.6.3 Exercises
For loops
Practice 4.1: Consider the following program:
foods = ['eggs', 'broccoli', 'peas', 'salt', 'steak']
for ingredient in foods:
print ingredient[1]
Predict the output that results when this code is executed.

Excerpt from “Object-Oriented Programming in Python” by Michael H. Goldwasser and David Letscher
Section 4.6 Chapter Review 151
Practice 4.2: Given the string original create a new string dramatic that has two consecu-
tive copies of each letter from the original string. For example, the dramatic version
of 'argh' appears as 'aarrgghh'.
Practice 4.3: Given an original list of integers intList create a list strList that contains the
associated string representations of those integers. For example, when starting with
intList = [4004, 8080, 6502, 8086, 68000, 80486], the resulting list of strings should
be ['4004', '8080', '6502', '8086', '68000', '80486'].
Practice 4.4: Write a program that draws an n-level staircase made of rectangles, such as
the example for n = 4 shown here.
Exercise 4.5: Consider the following program:
t = 0
for k in range(5):
t += k
print k, t
Predict the output that results when this code is executed.
Exercise 4.6: Write a short program that uses a for loop to animate a circle moving across
a canvas.
Exercise 4.7: Rewrite the program for drawing a pyramid in Figure 4.8 so that it prompts
the user for the number of levels and the overall height of the pyramid.
Exercise 4.8: Assume that word is a string, for example 'slice'. Write code to print
out the following pattern for the given word:
s
sl
sli
slic
slice
Exercise 4.9: Write a program that prints an n-level staircase made of text, such as the
example for n = 4 shown here.
*
* *
* * *
* * * *

Excerpt from “Object-Oriented Programming in Python” by Michael H. Goldwasser and David Letscher
152 Chapter 4 Elementary Control Structures
Exercise 4.10: Write a program that draws an n-level staircase made of squares, such as
the example for n = 4 shown here.
Exercise 4.11: Write a program that draws an n-level staircase as a single polygon, such
as the example for n = 4 shown here.
Exercise 4.12: Assume that people is a list of names, each represented as a string using the
format 'firstName lastName'. Print out the names one per line, yet alpha-
betized by last name.
Exercise 4.13: Given a positive integer k, write a program that calculates the factorial of
k, defined as
k! = k · (k−1) · (k−2) · · ·2 ·1.
Exercise 4.14: The mathematical constant e, which serves as the base of the natural loga-
rithm, is an irrational number with value approximately 2.718281828459. The pre-
cise value of this constant is equal to the following infinite series:
e =∞
∑k=0
1
k!
Although we cannot compute the entire infinite series, we get a good approximation
of the value by computing the beginning of such a sequence. Write a program that
approximates e by computing the sum of the first n terms, for some n.
Exercise 4.15: The syntax int('314') converts the string of numerals to the correspond-
ing (base ten) number. However, Python also allows you to interpret strings in
a nonstandard base, specified as an optional parameter. For example the syntax
int('314', 5) returns the decimal value 84. If viewed as a base five number, the
string '314' represents (3× 52) + (1× 51) + (4× 50) and thus equivalent to the
(base ten) value 84. Your goal is to convert such strings from scratch, without rely-
ing on the optional parameter form of Python’s int( ) conversion. Write a program
that asks the user for the original string as well as the designated base (you may
assume that the base is at most ten). Your program should compute and print the
associated (base ten) value.
Exercise 4.16: In A Word of Warning on page 133, we consider the effect of a for loop
body that mutates the structure of the list over which it is iterating. Run that code on

Excerpt from “Object-Oriented Programming in Python” by Michael H. Goldwasser and David Letscher
Section 4.6 Chapter Review 153
your computer and report the output that you see. Give a hypothesis, consistent with
your observations, as to what is happening behind the scene.
Exercise 4.17: Starting on page 146 of Section 4.4.2, we use conditionals to count the
number of occurrences of each base type in a DNA strand. Show how to accomplish
this task using a for loop, yet without any conditionals (nor use of str.count). Hint:
maintain a list of four counters, indexing that list using a technique similar to the
Case Study of Section 4.2.
Conditionals
Practice 4.18: Lists support a method to count the number of times that a specified value
appears in a list. Show that you can compute such a count without relying upon that
method. Specifically, assume that you have a list collection and a target value. You
are to compute the number of times that the value appears in the given collection.
Practice 4.19: Write a block of code that does the following. Assuming that words is a
list of strings, generate a new list shortWords that includes all of the original strings
with length 3 or less.
Practice 4.20: Carefully consider the following program:
for x in range(20):
if x % 9 == 0:
print x, 'is divisible by 9'
elif x % 3 == 0:
print x, 'is divisible by 3'
Predict the output that results when this code is executed.
Practice 4.21: Carefully consider the following program:
x = int(raw_input('Enter a value for x: '))
y = int(raw_input('Enter a value for y: '))
if x > 5:
if y <= 3 and x > 8:
print 'answer is A'
else:
print 'answer is B'
elif y > 6 or x < 2:
print 'answer is C'
else:
print 'answer is D'
(a) Predict the output if the user enters 4 and then 4.
(b) Predict the output if the user enters 9 and then 4.
(c) Predict the output if the user enters 1 and then 9.
(d) Predict the output if the user enters 6 and then 2.

Excerpt from “Object-Oriented Programming in Python” by Michael H. Goldwasser and David Letscher
154 Chapter 4 Elementary Control Structures
Exercise 4.22: Carefully consider the following program:
x = int(raw_input('Enter a value for x: '))
y = int(raw_input('Enter a value for y: '))
if y >= 7:
print 'answer is A'
elif x < 4:
if y > 4:
print 'answer is B'
else:
print 'answer is C'
else:
print 'answer is D'
(a) Predict the output if the user enters 4 and then 4.
(b) Predict the output if the user enters 2 and then 4.
(c) Predict the output if the user enters 1 and then 9.
(d) Predict the output if the user enters 2 and then 6.
Exercise 4.23: Consider the following program:
foods = ['eggs', 'broccoli', 'peas', 'salt', 'steak']
for k in range(len(foods) − 1):
if len(foods[k]) < len(foods[k+1]):
print k
Predict the output that results when this code is executed.
Exercise 4.24: Carefully consider the following program:
answer = 1
if greeting.count('a') == 1:
if 'o' in greeting:
if greeting.endswith('o'):
answer = 2
else:
answer = 3
elif len(greeting) < 6:
answer = 4
print answer, greeting
For each of the following greeting values, predict the output that would result.

Excerpt from “Object-Oriented Programming in Python” by Michael H. Goldwasser and David Letscher
Section 4.6 Chapter Review 155
(a) 'adieu' (h) 'hallo'
(b) 'aloha' (i) 'hola'
(c) 'bonjour' (j) 'jambo'
(d) 'ciao' (k) 'shalom'
(e) 'dia duit' (l) 'salaam'
(f) 'goeie dag' (m) 'terve'
(g) 'guten dag' (n) 'zdravo'
Exercise 4.25: Assume that we have a list of strings named indonesian. Give a sequence
of commands that alters the list so as to replace each occurrence of the value 'java'
with the value 'python' in its place.
Exercise 4.26: Write a code fragment that processes a list items and prints out all values
that occur more than once on the list. Take care to only print out each such value
once. For example, given the list
items = ['apple', 'grapes', 'kiwi', 'kiwi', 'pear',
'grapes', 'kiwi', 'strawberry']
your program should print
grape
kiwi
(or kiwi, grape; either order will suffice).
Exercise 4.27: On page 141 we show how the short-circuit evaluation of the boolean oper-
ator and is equivalent to a nested conditional statement. The evaluation of the oper-
ator or also relies upon short-circuiting semantics. When the first condition is satis-
fied, there is no need to test the second condition; the compound condition is already
satisfied. Give a nested conditional statement with semantics equivalent to
if weather == 'rainy' or day == 'Monday':
down = True
Exercise 4.28: Starting on page 144, we gave code to compute separate totals for the
deposits and withdrawals on a list of transaction. That code used a single for loop
with a nested if-else statement. Give an alternate implementation that achieves the
same end results using a single for loop and a single if statement (without use of an
else or elif clause).
Exercise 4.29: The precise value of the mathematical constant π is equal to the following
infinite series:
π = 4 ·
(
1
1−
1
3+
1
5−
1
7+ · · ·
)
Although we cannot compute the entire infinite series, we get an approximation to
the value by computing the beginning of such a sequence. Write a program that
approximates π by computing the first n terms, for some n.

Excerpt from “Object-Oriented Programming in Python” by Michael H. Goldwasser and David Letscher
156 Chapter 4 Elementary Control Structures
Exercise 4.30: In Exercise 4.15 we examined the conversion of a numeric string from a
nonstandard base back to decimal. In that problem, we assumed that the original
base was at most ten. For a base larger than ten, the issue is that we need a differ-
ent symbol for each possible value from 0 to (base − 1). The standard convention
in computer science is to begin using alphabet symbols, with A representing ten,
B representing eleven, and so on. As an example, int('FAB4', 16) evaluates to
64180 = (15×163)+(10×162)+(11×161)+(4×160).Update your earlier program to allow for the conversion for bases up to 36.
When considering an alphabet character from the original string, you can determine
whether it is a true digit using the str.isdigit method. When it is not a true digit,
you can compute the appropriate value (such as 15 for 'F') by taking advantage of
ASCII encoding with the following formula: value = 10 + ord(symbol) − ord('A').
List Comprehension
Practice 4.31: Redo Practice 4.2 taking advantage of list comprehension. Note that string
comprehension can be used to iterate upon a string, but the result is always a list.
Practice 4.32: Redo Practice 4.3 using list comprehension.
Practice 4.33: Redo Practice 4.19 using list comprehension.
Exercise 4.34: Use list comprehension to create the list of values
[1, 2, 4, 8, 16, 32, 64, 128, 256, 512].
Exercise 4.35: Use list comprehension to generate the list of floating-point numbers
[1.5, 2.5, 3.5, 4.5, 5.5, 6.5, 7.5, 8.5, 9.5]
Exercise 4.36: The range function is only able to produce a list of integers. Given floating-
point values start, stop, and step, show how to create a list of floating-point values,
starting at start, taking steps of size step, going up to but not including or passing
stop. For example with start = 3.1, stop = 4.6, and step = 0.3, the result should be
the list [3.1, 3.4, 3.7, 4.0, 4.3].
Exercise 4.37: In the Case Study of Section 4.2 we used a for loop to create the rnaList
base by base. Show how lines 5–9 could be replaced by a single list comprehension
statement.
Exercise 4.38: Given a list orig, possibly containing duplicate values, show how to use list
comprehension to produce a new list uniq that has all values from the original but
with duplicates omitted. Hint: look for indices at which the leftmost occurrence of a
value occurs.
Projects
Exercise 4.39: Write a program that uses loops to generate an n × n multiplication table
for positive integer n. As a model, here is a 4 × 4 version of the desired format.
| 1 2 3 4
---+----------------
1 | 1 2 3 4
2 | 2 4 6 8
3 | 3 6 9 12
4 | 4 8 12 16

Excerpt from “Object-Oriented Programming in Python” by Michael H. Goldwasser and David Letscher
Section 4.6 Chapter Review 157
Hint: to properly line up the columns, you may rely upon the rjust method to right
justify strings. For example, the expression str(value).rjust(3) produces a string of
three characters with necessary leading spaces. For an n × n table, the maximum
number of characters needed for one entry will be len(str(n*n)).
Exercise 4.40: Use the graphics library to create an image of a checkerboard with pieces
placed in their initial configuration, as shown here.
Exercise 4.41: Animate a ball moving across a canvas under the effect of gravity. You
should maintain the position and velocity of the ball. During each iteration of the
animation, the velocity should be used to update the position of the ball, and gravity
should have a downward effect on the vertical component of the velocity.
Related Documents