ELECTRONIC I‐9REFERENCE GUIDE 1 st Edition Table of Contents THINGS TO REMEMBER ................................................................................................................................................. 2 PREPARATION FOR I‐9 COMPLETION ............................................................................................................................. 2 CREATING AN I‐9 FORM................................................................................................................................................. 3 LOGGING ON TO START THE FORM I‐9 ........................................................................................................................... 3 COMPLETING THE PREPARER/TRANSLATOR CERTIFICATION .......................................................................................... 9 PLACING THE FORM ON HOLD PRIOR TO COMPLETING SECTION 2 ............................................................................... 11 PRINTING SIGNATORY RECEIPTS .................................................................................................................................. 12 SECTION 2: EMPLOYER OR AUTHORIZED REPRESENTATIVE REVIEW AND VERIFICATION ............................................... 13 COMPLETING AN I‐9 FORM THAT WAS PUT ON HOLD .................................................................................................. 19 SECTION 3 UPDATE I‐9 FORM....................................................................................................................................... 20 VIEW AN I‐9 FORM ...................................................................................................................................................... 20 CORRECTION OF SECTIONS 1 & 2 OF THE I‐9 FORM ...................................................................................................... 21 CORRECTING A TEMPORARY PAYROLL NUMBER .......................................................................................................... 23 PRINTING AN I‐9 .......................................................................................................................................................... 25 ADDITIONAL VISA HANDLING ...................................................................................................................................... 28 MULTIPLE SECTION 3 ................................................................................................................................................... 31 UPDATING FOR RECEIPTS ............................................................................................................................................ 31 LISTING OF RECEIPTS ................................................................................................................................................... 34 DEFINITIONS ............................................................................................................................................................... 34 DOCUMENT ATTACHMENTS ........................................................................................................................................ 35

Welcome message from author
This document is posted to help you gain knowledge. Please leave a comment to let me know what you think about it! Share it to your friends and learn new things together.
Transcript

ELECTRONICI‐9REFERENCEGUIDE
1stEdition
TableofContents
THINGS TO REMEMBER ................................................................................................................................................. 2
PREPARATION FOR I‐9 COMPLETION ............................................................................................................................. 2
CREATING AN I‐9 FORM ................................................................................................................................................. 3
LOGGING ON TO START THE FORM I‐9 ........................................................................................................................... 3
COMPLETING THE PREPARER/TRANSLATOR CERTIFICATION .......................................................................................... 9
PLACING THE FORM ON HOLD PRIOR TO COMPLETING SECTION 2 ............................................................................... 11
PRINTING SIGNATORY RECEIPTS .................................................................................................................................. 12
SECTION 2: EMPLOYER OR AUTHORIZED REPRESENTATIVE REVIEW AND VERIFICATION ............................................... 13
COMPLETING AN I‐9 FORM THAT WAS PUT ON HOLD .................................................................................................. 19
SECTION 3 UPDATE I‐9 FORM ....................................................................................................................................... 20
VIEW AN I‐9 FORM ...................................................................................................................................................... 20
CORRECTION OF SECTIONS 1 & 2 OF THE I‐9 FORM ...................................................................................................... 21
CORRECTING A TEMPORARY PAYROLL NUMBER .......................................................................................................... 23
PRINTING AN I‐9 .......................................................................................................................................................... 25
ADDITIONAL VISA HANDLING ...................................................................................................................................... 28
MULTIPLE SECTION 3 ................................................................................................................................................... 31
UPDATING FOR RECEIPTS ............................................................................................................................................ 31
LISTING OF RECEIPTS ................................................................................................................................................... 34
DEFINITIONS ............................................................................................................................................................... 34
DOCUMENT ATTACHMENTS ........................................................................................................................................ 35

1/2017 Page 2 of 35
ThingstoRemember The electronic I‐9 is located in the HR side of Oracle, a.k.a PeopleSoft.
Updates to the I‐9 must be sent to Human Resources for processing.
Temporary I‐551 stamp is treated like a receipt and must be verified within 90 days with a Permanent Resident card.
A social security card must be presented within 90 days of hire when the social security receipt is used for the purpose of the I‐9.
Do not complete an additional I‐9 on an employee who is transferring between departments with no break in service.
A brand new I‐9 is required regardless of the length of time of the break in service.
A Social Security card must not have any type of restriction. If there is a restriction, it cannot be accepted for the purpose of the I‐9.
Only attach those documents that are used for the purpose of the I‐9.
All documents must be copied front and back, with some exceptions:
o Driver’s License
o Social Security Card
o Copies of passports must clearly show
Picture Most current expiration date Passport number
o F‐1 and J‐1 work authorizations (I‐20 and DS‐2019) must have copies of pages 1‐3, if applicable.
PreparationforI‐9Completion
Ensure New Employee Has Active Login
In order for an employee to electronically sign the I‐9, he/she must have an active user ID and password.
Ensure New Employee Has Employment Documents
In order to complete Section 2 of the I‐9, the employee must present a document or set of documents that verify identity and work eligibility.
Section 1 must be completed prior to or on the first day of hire. The I‐9 allows the employee to complete Section 1 and then place on hold until the employee’s documents can be presented for completion of Section 2, if not presented on the first day of hire.

1/2017 Page 3 of 35
Section 2 must be completed within 3 business days after the hire date. For example, if an employee starts on Monday, Section 2 must be completed no later than Thursday.
CreatinganI‐9FormTo begin the shared I‐9 process, the following individuals must be present:
The New Employee – must have user ID and password created and available for use.
The Employer Representative – the employer representative is the one who will log into Oracle, navigate to the I‐9, and begin the I‐9 process.
The Preparer/Translator (if applicable) – someone acting as preparer/translator must also have a user ID and password. This is due to government regulations around digital signatures.
LoggingOntoStarttheFormI‐9
Navigation
To begin an I‐9, the employer representative must navigate to the I‐9 & E‐Verify Home Page.
(Navigation: Main Menu > Department Self Service > I‐9 & E‐Verify Home Page)
Click on the Create an I‐9 Form link.
New Employee Search
The Employee Search page opens. The employer representative should search for the employee by using his/her employee ID. Enter it the employee ID in the Empl ID and search.
Completing Section 1 Employee Information
The employer representative should verify that the name and employee ID at the top of the form match the employee he/she is trying to process. If not, search again to find the correct employee.

1/2017 Page 4 of 35
Hyperlinks
The hyperlinks circled in the picture below can be used as references when completing the form.
If the user clicks on the Instructions link, the current I‐9 instructions will be displayed for review. The Acceptable Documents link provides listing of acceptable identification and work authorization documents. The Handbook for Employers link provides a full I‐9 handbook (M‐274).
If the name and employee ID are correct, the employee should be given control of the computer to complete Section 1 and electronically sign the form. Section 1 Names
Last Name: Enter the employee’s full legal last name. The last name is the family name or surname. If the employee has two last names or a hyphenated last name, include both names in this field. If the employee only has one name, enter the name in this field, then enter “Unknown” in the First Name field. The employee may not enter “Unknown” in both this field and the First Name field.
First Name: Enter the employee’s full legal first name. The first name is the given name. If the employee only has one name, enter that name in the Last Name field, then enter “Unknown” in this field. The employee may not enter “Unknown” in both this field and the Last Name field.
Middle Initial: The middle initial is the first letter of the employee’s second given name, or the first letter of the employee’s middle name, if any. If the employee has more than one middle name, enter the first letter of the first middle name. If the employee does not have a middle name, enter “N/A” in this field.
Other Last Names Used: Provide all other last names used by the employee, such as maiden name. Enter “N/A” in the field of Other Last Names Used if the employee has not been known by any other last name(s).

1/2017 Page 5 of 35
Section 1 Address
Address (Street Number and Name): Enter the street name and number of the current address of the employee’s residence. An employee’s PO Box may be entered.
Apartment Number (Apt. Number): Enter the number(s) or letter(s) that identify(ies) the employee’s apartment. If there is no apartment number, enter “N/A.”
City or Town: Enter the employee’s city, town, or village. Do not abbreviate in this field. For example, do not abbreviate Oklahoma City with OKC.
State: Enter the abbreviation of the employee’s state or territory.
ZIP Code: Enter your 5‐digit ZIP code in this field.
Section 1 Other Information
Date of Birth (mm/dd/yyyy): Enter the employee’s date of birth as a 2‐digit month, 2‐digit day, 4‐digit year. The electronic form should format the date as required.
U.S. Social Security Number: Providing the employee’s Social Security Number is required because the Univeristy participates in E‐Verify.
If the employee has a temporary payroll number (TPN), which is provided by the Payroll Office and starts with “900,” enter the TPN in the U.S. Social Security Number field. The system is designed to recognize “900” numbers as temporary, and will not send the information to E‐Verify.
Once the actual Social Security card is received, the I‐9 will need to be corrected and E‐Verify ran manually. For more information on replacing the TPN with the actual social security number (SSN), go to Correcting a Temporary Payroll Number.
Employee’s Email Address: Providing an email address is optional. If entered, it’s intended to give the Department of Homeland Security (DHS) an ability to communicate with the employee in case of potential mismatches between the information provided and the information in government records. If not provided, leave blank.
Employee’s Telephone Number: Providing the employee’s number is optional. If entered, provide the 10‐digit phone number. If not provided, leave blank.

1/2017 Page 6 of 35
Section 1 Citizenship Status
After completing the personal data in Section 1, the employee must attest to his/her citizenship or immigration status.
A citizen of the United States: Includes those born in the United States or have become a naturalized citizen.
A noncitizen national of the United States: An individual born in American Samoa, certain former citizens of the former Trust Territory of the Pacific Islands, and certain children of noncitizen nationals born abroad.
A lawful permanent resident: An individual who is not a U.S. citizen and who resides in the United States under legally recognized and lawfully recorded permanent residence as an immigrant. This term includes conditional residents. Asylees and refugees should not select this status, but should instead select “An Alien authorized to work” below.
If the employee selects “lawful permanent resident,” enter his/her 9 digit Alien Registration Number or USCIS Number. At this time, the USCIS Number is the same as the A‐number without the “A” prefix. Indicate which type of number is used on the I‐9.
USCIS Number: No “A” Number
Alien Number: When choosing “Alien Number,” the system will automatically enter the “A” in front of the number provided.
An alien authorized to work: An individual who is not a citizen or national of the United States, or a lawful permanent resident, but is authorized to work in the United States.
When the box is checked, the field to enter the expiration date of the employee’s employment authorization appears. The employee must enter the date his/her employment authorization expires, if any.

1/2017 Page 7 of 35
Employees who choose “An alien authorized to work,” must provide one of the following:
Alien Registration Number/USCIS Number: At this time, the USCIS Number is the same as the A‐number without the “A” prefix. Indicate which type of number is used on the I‐9.
USCIS Number: No “A” Number
Alien Number: When choosing “Alien Number,” the system will automatically enter the “A” in front of the number provided.
Form I‐94 Admission Number: This is an 11‐digit admission number.
Foreign Passport Number: After the passport number is entered, tab out of the field to trigger the Country of Issuance field to appear.
Signing and Completing Section 1
After the employee declares his/her residential status, click the ‘‘Click to Sign” button.
If the employee has not completed all of the required fields, including I‐9 eligibility, the system will display error messages identifying those fields that need to be completed. In this instance, the employee did not indicate his/her citizenship status.

1/2017 Page 8 of 35
Click ‘‘OK’‘ to complete the section that has not been completed, and then click the ‘‘Click to Sign’‘ button.
When all required fields are complete, then the employee’s signature page opens. The employee should enter his/her user ID and password then click the ‘‘Sign’‘ button.
If the employee enters his/her user ID and/or password incorrectly, or the employee does not have an active user ID in the system, a message will display. If issues continue with the signature page, please contact the IT Service Desk.
If the user ID and password are correct, the system will display Section 1 with the employee’s electronic signature and the date signed.
The employee’s section is now complete.
The employer representative should click the ‘‘Next’‘ button at the bottom of the page to proceed to Section 2.

1/2017 Page 9 of 35
The user will be prompted with the question: ‘‘Was any part of Section 1 completed by a person other than the employee?’‘ Choose “Yes” or “No” then click the “OK” button.
If the employee had assistance in completing the form including a translator or a typist, click ‘‘Yes’‘ and proceed to Completing the Preparer/Translator Certification section of this document.
Otherwise, click ‘‘No” to move on.
If the user indicates that there was not a translator, the user will be prompted with the question: “Would you like to continue to Section 2, Employer Review and Verification, of the Form I‐9?”
If the employer representative wishes to complete Section 2, Employer Review and Verification, click ‘‘Yes’‘ to proceed. See Section 2: Employer or Authorized Representative Review and Verification. If the Employer representative wishes to complete Section 2 at a later date, click ‘‘No.’‘ See section Placing the Form on Hold Prior to Completing Section 2.
CompletingthePreparer/TranslatorCertificationIf the employee used a preparer/translator to assist with in completing Section 1 of the I‐9, the Preparer and/or Translator Certification section will need to be completed.
After the employee signs Section 1 and the “Next” button is clicked, a question will pop up that asks: “Was any part of Section 1 completed by a person other than the employee?” Choose “Yes” and the number of people that helped with completing Section 1, and click “OK.”

1/2017 Page 10 of 35
The preparer/translator can be someone other than the Employer representative. If someone else is used, that someone must have a user ID and password within Oracle in order to sign.
After the preparer/translator has completed the above fields, click the ‘‘Click to Sign’‘ button.
If the prepare/translator has not completed all of the required fields, the system will display an error message identifying the fields that need to be completed.
If all required fields are complete, the preparer/translator’s signature page opens to enter his/her user ID and password then click the ‘‘Sign’‘ button.,
Once the preparer/translator certification is complete, and the employer representative should click the ‘‘Next’‘ button at the bottom of the page to move to the next section by answering the following question: ‘‘Would you like to continue to Section 2, Employer Review and Verification….’‘

1/2017 Page 11 of 35
If the employer representative wishes to complete Section 2, Employer or Authorized Representative Review and Verification, click ‘‘Yes’‘ to proceed. See Section 2: Employer or Authorized Representative Review and Verification. If the employer representative wishes to complete Section 2 at a later date, click ‘‘No” and then the “Hold” button.
Remember that this section must be completed before the I‐9 can be considered complete (and before an E‐Verify case can be created, if applicable.) See section Placing the Form on Hold Prior to Completing Section 2.
PlacingtheFormonHoldPriortoCompletingSection2The I‐9 can be placed on hold after either Section 1 or Section 2 is complete.
After completing Section 1, if the employer presentative selects ‘‘No’‘ when asked if he/she would like to continue to Section 2, the Finalize page appears from which the I‐9 can be placed on ‘‘Hold.’‘
Once put on hold, the Form Finalized page will appear. From this point, the user can navigate out of the I‐9, and come back later to complete.

1/2017 Page 12 of 35
After completing Section 2, and if there is a reason the employer representative is not ready to send the I‐9 information to E‐Verify, the I‐9 can be placed on hold by clicking the ‘‘Hold’‘ button.
Once put on hold, the Form Finalized page will appear. From this point, the user can navigate out of the I‐9, and come back later to complete.
For information on how to complete an I‐9 that has been put on hold, see section Completing an I‐9 Form that was Put on Hold.
PrintingSignatoryReceiptsIf the employee or the preparer/translator would like printed confirmation of their signature, the Employer representative must click the Print Signatory Receipts link to print the electronic signatures page.

1/2017 Page 13 of 35
The page of applicable signatory receipts will pop up.
To print the receipt, click the ‘‘Print’‘ button toward the bottom of the page and then follow the browser’s print instructions.
To return to the form after printing, scroll down to the bottom of the receipt page and click the ‘‘Return’‘ button.
Section2:EmployerorAuthorizedRepresentativeReviewandVerificationIf the employer representative clicked ‘‘Yes’‘ in response to the question about continuing to Section 2, the Employer Review and Verification will appear on the screen.
Selecting Section 2 Documentation
The employer representative must use the acceptable document(s) that the employee has provided to complete Section 2.
List A, B and C have look up lists that are smart coded to only display the valid document types for the citizenship status that the employee selected in Section 1.

1/2017 Page 14 of 35
To complete this step, the employer representative must complete each applicable list section in the following way:
1. Select the lookup icon to search for the document title under the applicable list heading (List A, or List B and List C).
2. The lookup will display the valid document titles.
Select a document title by clicking on the link. In this example, Foreign Passport with I‐94 or I‐94A is chosen.
The employer representative must choose the Visa Type of the employee. In this example, J‐1 is chosen. Then click ‘‘OK.’‘ For more information on visa types, go to Additonal Visa Handling.

1/2017 Page 15 of 35
Depending on the visa type chosen, section 2 will render the types of documents that are required. For example, the J‐1 requires three documents: Foreign passport, I‐94, and DS‐2019. For those documents that only have one Issuing Authority, the field is prepopulated.
The Issuing Authority will be the issuing country of the passport. To search for the country, select the
lookup icon .
The lookup will display valid codes for the country of issuances. Enter the three character code to find the country, and hit the “Look Up” button. If the exact code is not known, the Country of Issuances field can be changed from ‘begins with’ to ‘contains’ to broaden the search spectrum.

1/2017 Page 16 of 35
Complete all additional information. In instances where the I‐94 states ‘‘D/S’‘ or “Duration of Stay,” leave the expiration date of the I‐94 blank.
Finalizing Section 2
The employer representative must enter the hire date in the Certification section. The name, title, and company address will pre‐populate for the Employer representative. Click the ‘‘Click to Sign’‘ button.
If all required fields are complete, the employer’s signature page opens. If not, messages will display indicating what fields need to be completed or to confirm that a field was initially left blank, for example . . .
In this instance, the message asks the employer representative to verify that the I‐94 expiration date was intentionally left blank. If “Yes” is chosen, the system will allow the user to continue. If “No” is chosen, a date will be required in the expiration date field before continuing.
1/2017 Page 17 of 35
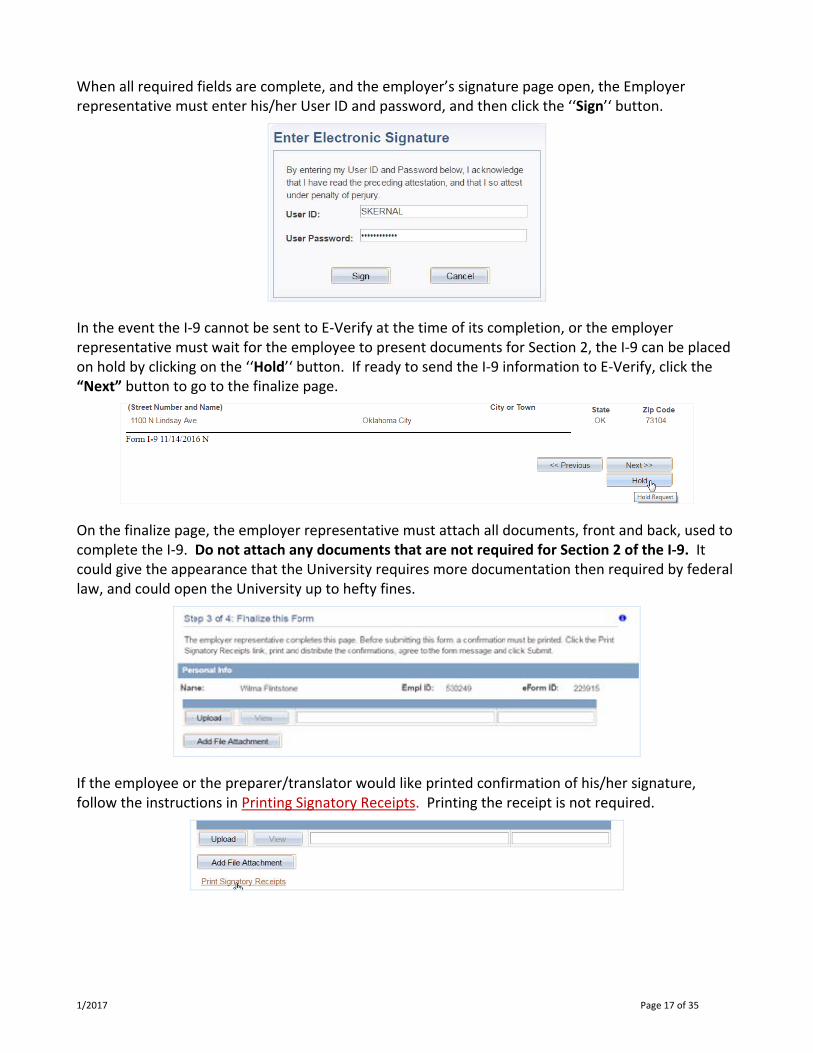
When all required fields are complete, and the employer’s signature page open, the Employer representative must enter his/her User ID and password, and then click the ‘‘Sign’‘ button.
In the event the I‐9 cannot be sent to E‐Verify at the time of its completion, or the employer representative must wait for the employee to present documents for Section 2, the I‐9 can be placed on hold by clicking on the ‘‘Hold’‘ button. If ready to send the I‐9 information to E‐Verify, click the “Next” button to go to the finalize page.
On the finalize page, the employer representative must attach all documents, front and back, used to complete the I‐9. Do not attach any documents that are not required for Section 2 of the I‐9. It could give the appearance that the University requires more documentation then required by federal law, and could open the University up to hefty fines.
If the employee or the preparer/translator would like printed confirmation of his/her signature, follow the instructions in Printing Signatory Receipts. Printing the receipt is not required.

1/2017 Page 18 of 35
The E‐Verify Indicatior will display whether or not the information on the I‐9 will be sent to E‐Verify at the time the I‐9 is submitted. Click on the “Submit” button.
The I‐9 information will not be sent to E‐Verify when a Temporary Payroll Number (TPN) is used in place of the SSN. The E‐Verify Indicator will show No. Click on the “Submit” button to save.
When the actual SSN is received by the employee and presented to the employer representative, the I‐9 must be corrected and the E‐Verify completed manually. For more information on replacing the TPN with the actual SSN, go to Correcting a Temporary Payroll Number.
When the “Submit” button is clicked, a ‘‘Submit this form?’‘ message will display. Click the ‘‘Yes’‘ button to confirm.
The system will display the Form Finalized page and confirm that the I‐9 has been successfully completed, and display the status of E‐Verify.
123456
Employment Authorized

1/2017 Page 19 of 35
CompletinganI‐9FormthatwasPutonHoldIf the employer representative must navigate to the link below to complete an I‐9 in hold status.
Navigation
To complete an I‐9 form, the employer representative should navigate to the I‐9 & E‐Verify Home Page.
(Navigation: Main Menu > Department Self Service > I‐9 & E‐Verify Home Page)
Click the Complete an I‐9 Form on Hold link to go to the search page.
The I‐9 can be found by searching with the employee ID, the I‐9’s eForm ID, or any of the other fields listed. If too much information, a ‘‘No matching values were found’‘ may be rendered.
In most cases, the employer representative should enter the employee ID (be sure it is in the appropriate field, marked ‘‘Empl ID’‘) and click the ‘‘Search’‘ button.
If there is more than one I‐9 on hold, choose the desired I‐9 to complete.
Before the I‐9 is displayed, the employer representative will need to read the compliance notification and click the ‘‘Proceed’‘ button.

1/2017 Page 20 of 35
When the form is retrieved, the employer representative will see Section 1 with the information the new employee entered.
The employer representative should scroll to the bottom of the page and click the ‘‘Next’‘ button until Section 2, Employer Review and Verification is reached. Follow the steps outlined in Section 2: Employer or Authorized Representative Review and Verification.
Section3UpdateI‐9FormHuman Resources is responsible for updating section 3 of the I‐9. Please send all documents for updating section 3 of the I‐9 to Human Resources.
ViewanI‐9FormOnce the I‐9 form has been finalized it can be viewed by authorized users. DHS recommends that each time the form is viewed that a log be maintained. When an I‐9 is clicked on to be viewed, a notification regarding a log of access will appear.
Navigation
To view the I‐9, the employer representative must navigate to the I‐9 & E‐Verify Home Page.
(Navigation: Main Menu > Department Self Service > I‐9 & E‐Verify Home Page)
Click the View I‐9 link.
Enter the eForm ID or employee ID in the search fields, and then click the ‘‘Search’‘ button.
1/2017 Page 21 of 35
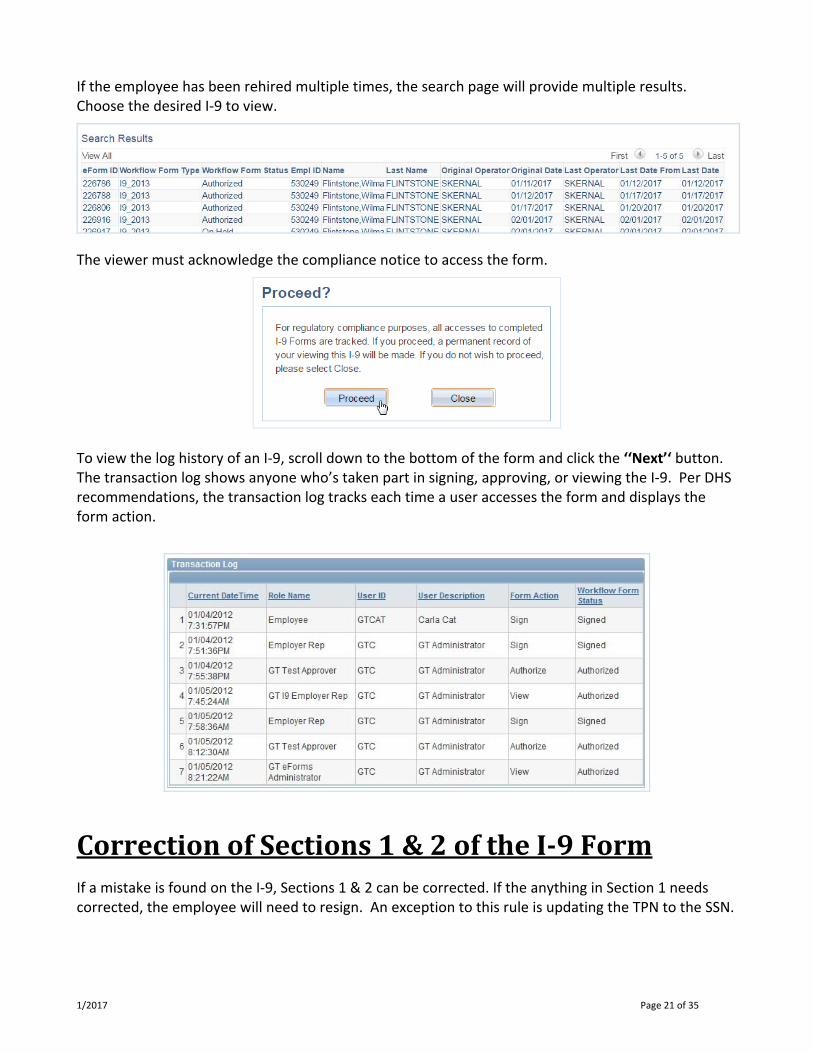
If the employee has been rehired multiple times, the search page will provide multiple results. Choose the desired I‐9 to view.
The viewer must acknowledge the compliance notice to access the form.
To view the log history of an I‐9, scroll down to the bottom of the form and click the ‘‘Next’‘ button. The transaction log shows anyone who’s taken part in signing, approving, or viewing the I‐9. Per DHS recommendations, the transaction log tracks each time a user accesses the form and displays the form action.
CorrectionofSections1&2oftheI‐9FormIf a mistake is found on the I‐9, Sections 1 & 2 can be corrected. If the anything in Section 1 needs corrected, the employee will need to resign. An exception to this rule is updating the TPN to the SSN.

1/2017 Page 22 of 35
Navigation
To submit a correction to Sections 1 & 2 of an existing I‐9, the employer representative must navigate to the I‐9 & E‐Verify Home Page.
(Navigation: Main Menu > Department Self Service > I‐9 & E‐Verify Home Page)
Click the Correct I‐9 Sections 1 & 2 link.
Enter eForm ID or employee ID in the search fields then click the ‘‘Search’‘ button. If the search returns multiple rows, select the employee from the list by clicking on the link.
The employer representative must acknowledge the compliance notification to access the form.
After clicking on “Proceed,” Section 1 will display with open fields to allow for correction of any field that is incorrect. If corrections are not required in Section 1, click the “Next” button at the bottom of the screen until the desired section is reached.

1/2017 Page 23 of 35
Once all corrections are made, click the ‘‘Next’‘ button at the bottom of the page until the last page, where the “Correct” button is located, is reached.
Enter a comment if desired, but it is not necessary. The system will track all changes/corrections made and note those changes/corrections in Comment History upon saving. When finished, click the ‘‘Correct’‘ button; this will save the changes/corrections.
In the event the I‐9 has to be printed, a history regarding the I‐9 is also printed. The system automatically tracks the changes that have been made along with the person that made the changes with a time stamp. If the I‐9 were to be printed, the correction that was made would appear as below.
CorrectingaTemporaryPayrollNumberThe employer representative is allowed to correct/change a TPN to the SSN in Section 1 of the existing electronic I‐9. This is the only instance in which the employer representative is allowed to correct anything in Section 1 that will not require the employee to resign Section 1.
Navigation
To correct a TPN, the employer representative must navigate to the I‐9 & E‐Verify Home Page.
(Navigation: Main Menu > Department Self Service > I‐9 & E‐Verify Home Page)

1/2017 Page 24 of 35
Click the Correct I‐9 Sections 1 & 2 link.
Enter eForm ID or employee ID in the search fields then click the ‘‘Search’‘ button. If the search returns multiple rows, select the desired I‐9 by clicking on the link.
The Employer representative must acknowledge the compliance notification to access the form.

1/2017 Page 25 of 35
Section 1 of the I‐9 will load with open fields. Delete the TPN currently in the field, and replace with the actual Social Security Number.
Scroll to the bottom of the page and continue to click the ‘‘Next’‘ button on each page until the final page, with the “Correct” button, is reached. Enter a comment if desired, but it is not necessary. The system will track the change made and note the change in Comment History upon saving. Click the ‘‘Correct’‘ button to save the change.
Once the TPN has been replaced with the SSN, a manual E‐Verify will have to be completed. To do this, click on the E‐Verify I‐9 Form link located on the I‐9 & E‐Verify Home Page.
PrintinganI‐9 Printing the I‐9
There are three options to print the I‐9:

1/2017 Page 26 of 35
Option 1: Print using the link Print I‐9 Form after the I‐9 has been finalized.
The form to be printed will load in a PDF in a separate window. Use the browser’s print functionality to print the pages. Be sure to print all pages as Comment History will be found on a separate page.
In order to print the attachment(s), click the “View” button to open the attachment(s). Use the browser’s print functionality to print the pages.
Employment Authorized

1/2017 Page 27 of 35
Option 2: From the I‐9 & E‐Verify Homepage, click the link View I‐9, and search by either employee ID or eForm ID.
The employer representative must acknowledge the compliance notification to access the form.
Scroll to the bottom of the page and click the link Print I‐9 Form. Refer to Option 1 for further instructions.
Option 3: From the I‐9 & E‐Verify Homepage, click the link Print a single I‐9, and search by either employee ID or eForm ID.

1/2017 Page 28 of 35
The employer representative must acknowledge the compliance notification to access the form.
Refer to Option 1 for further instructions.
Printing an I‐9 with Section 3
Whether Section 3 has been updated once or multiple times, the print procedure is the same as other I‐9s.
Follow the steps for Printing an I‐9. When printing the document, be sure to print all pages.
AdditionalVisaHandlingAdditional visa handling has been added to the I‐9 product in order to provide flexibility for situations in which visas may need to be ported or may need to have additional List A documentation for other reasons. For a list of additional documents that are required, please go to Document Attachments. For explanations of H1B porting and non‐porting, go to Definitions.

1/2017 Page 29 of 35
Note that all of these Additional Visa Handling features are for the citizenship type of ‘‘An alien authorized to work’‘.
Example of Visa Porting
This is an example of an I‐9 with Visa Porting. Also known as AC‐21 which stands for The American Competitiveness in the Twenty‐First Century Act.
After the employee signs Section 1, the employer representative completes Section 2.
In this example, the employee provided a foreign passport with I‐94 or I‐94A for Section 2. This is selected as a List A document. Click the magnify glass to open up the list of document options

1/2017 Page 30 of 35
When the Foreign Passport with I‐94 or I‐94A is selected, the user is taken to a secondary page to choose the Visa Type from the drop down menu. In this instance, H1B Porting has been selected which triggers an additional field to populate.
The Visa Port Date (Visa Port DT) is the Received Date located on the I‐797C. Ensure the University of Oklahoma Health Sciences Center, or some form of the it, is indicated on the I‐797C as shown below. Enter the Received Date in the open field, and click the ‘‘OK’‘ button.
The employer representative is taken back to the main screen for Section 2 completion. From this point onward, the steps are the same as described in Section 2: Employer or Authorized Representative Review and Verification.

1/2017 Page 31 of 35
MultipleSection3I‐9 updates via Section 3 of an I‐9 form can occur multiple times. To update Section 3, follow the steps outlined in Section 3 Update I‐9 Form.
UpdatingforReceiptsNavigation
To update Section 2 with the actual document for which the receipt was initially presented, the employer representative must navigate to the I‐9 & E‐Verify Home Page.
(Navigation: Main Menu > Department Self Service > I‐9 & E‐Verify Home Page)
Click the Correct I‐9 Sections 1 & 2 link.
Enter eForm ID or employee ID in the search fields then click the ‘‘Search’‘ button.
The employer representative must acknowledge the compliance notification to access the form.

1/2017 Page 32 of 35
Section 1 of the I‐9 form will load with open fields. Unless there is something that needs corrected, scroll to the bottom of the form and click the ‘‘Next’‘ button until Section 2 is reached. Locate the
field with the receipt, and click on the next to the Document Title to choose the appropriate document.
Fill in the appropriate remaining fields and click the ‘‘Next’‘ button.
Attach a copy of the document, front and back.

1/2017 Page 33 of 35
Enter a comment if desired, but it is not necessary. The system will track the changes/corrections made and note the changes/corrections in Comment History upon saving. Click the ‘‘Correct’‘ button to save the changes/corrections.
After the receipt is replaced, E‐Verify will have to be done manually by clicking on the link E‐Verify I‐9 Form located on the I‐9 & E‐Verify Home Page.

1/2017 Page 34 of 35
ListingofReceipts
DefinitionsH1B Port – New employee with an H1B status that was previously working for another employer, and is porting over to OUHSC. H1B Non‐Port – New employee with an H1B status that has OUHSC listed as the employer on the I‐797A. Visa Port Date – the date USCIS received the I‐797C receipt notice.

1/2017 Page 35 of 35
DocumentAttachments
Status Items Documented on I‐9 Additional Attachments
Additional Information
H1B Continued Employment Write ‘‘240 Day Ext’‘ and the date the I‐797C was received by USCIS in the margin next to section 2.
In the event the I‐797C is not received at the time the I‐9 is completed, the Form I‐129, proof of payment for filing a new I‐129, and evidence that the I‐129 was mailed to USCIS can be attached to the I‐9 in lieu of the I‐797C.
Asylee EAD Card or List B and List C SSN must be unrestricted; I‐94 with refugee admission stamp is List C document and serves as receipt for 90 days. Update with EAD Card.
F‐1 Unexpired Foreign PPT, I‐94, I‐20 specific to OUHSC
F‐1 CPT (Cirricular Practical Training)
Unexpired Foreign PPT, I‐94, I‐20 w/DSO endorsement on pg. 3
F‐1 OPT (Optional Practical Training)
Unexpired EAD Card
F‐1 OPT STEM (Science, Technology, Engineering, Math)
Unexpired EAD Card
F‐1 OPT STEM Extension Expired EAD Card, I‐20 w/DSO endorsement on pg 3.
Expiration of EAD + 180 days=new expiration date. Re‐verify within 180 with new EAD card.
H1‐B Portability
Unexpired Foreign PPT, I‐94 of previous employer. Write ‘‘AC‐21’‘ in the margin in section 2 and record the date the Form I‐797C was submitted underneath it.
In the event the I‐797C is not received at the time the I‐9 is completed, the Form I‐129, proof of payment for filing a new I‐129, and evidence that the I‐129 was mailed to USCIS can be attached to the I‐9 in lieu of the I‐797C.
H1‐B Non Porting
Unexpired Foreign PPT, I‐94 specific to OUHSC
J‐1 Unexpired Foreign PPT, I‐94, DS‐2019 specific to OUHSC
J‐1 Practical Training Unexpired Foreign PPT, I‐94, DS‐2019
Letter from DSO giving student permission to work at OUHSC for specific period of time.
J‐2 Unexpired EAD Card
M‐1 Unexpired EAD Card
Refugee List A: I‐94 w/ Refugee Admission Stamp‐Receipt
Update with EAD Card.
Temporary I‐551 Stamp Must be reverified with Permanent Resident Card within 90 days.
M‐2 Not eligible to work
F‐2 Not eligible to work
Related Documents