PART B. FIELDWORK PROCEDURES Hanna Tolonen (editor) EHES Manual Motivation of participants Blood pressure Height EHES Questionnaire Coordination of the fieldwork Data management Waist circumference Weight Quality control Interviewing Checking questionnaires Informed consent Blood samples An updated version of this publication is available at http://urn.fi/URN:ISBN:978-952-302-701-5

Welcome message from author
This document is posted to help you gain knowledge. Please leave a comment to let me know what you think about it! Share it to your friends and learn new things together.
Transcript

PART B. FIELDWORK PROCEDURES
Hanna Tolonen (editor)
EHES Manual
Motivation of participants
Blood pressure
Height
EHES Questionnaire
Coordination of the fieldwork
Data management
Waist circumference
Weight
Quality control
Interviewing
Checking questionnaires
Informed consent
Blood samples
An updated version of this publication is available athttp://urn.fi/URN:ISBN:978-952-302-701-5


Edited by
Hanna Tolonen
EHES MANUALPART B.
FIELDWORK PROCEDURES
Helsinki 2013
Directions 2013_002

The EHES Pilot Project received funding from the European Commission/DG Sanco. The views ex-peressed here are those of the authors and they do not represent the Commission’s official position.
Layout: Hanna Tolonen
Cover: Hanna Tolonen
Graphics:
Chapter 6: Ari Haukijärvi
All other Chapters: Hanna Tolonen
Photos: Hanna Tolonen
Copyright European Commission, DG Sanco
Publisher National Institute for Health and Welfare
PO Box 30, FI-00271 Helsinki, FINLAND
http://www.thl.fi
ISBN (pdf) 978-952-245-843-8
ISSN (pdf) 2323-4172
http://urn.fi/URN:ISBN:978-952-245-843-8
Helsinki, Finland 2013
Reference:
Tolonen H (Ed.) EHES Manual. Part B. Fieldwork procedures. National Institute for Health and Welfare, 2013. Directions 2013_002. URN:ISBN:978-952-245-843-8, URL: http://urn.fi/URN:ISBN:978-952-245-843-8

ContentsIntroduction 1
1. Coordination of the fieldwork 3 1.1 Division of tasks and responsibilities 3 1.1.1. Central office 5 1.1.2. Fieldwork team 5 1.1.2.1 Structure and division of the tasks 5 1.1.2.2. Absences 6 1.1.2.3 Supervision 6 1.1.2.4 Internal communication 7 1.2 Safety issues 8 1.2.1 Moving to the examination site 8 1.2.2 Setting up the examination site 9 1.2.3 Safety of the measurements 9 1.2.4 Safety of fieldwork staff 9 1.2.5 Reporting of the threatening situations and injuries 10 1.3 Organizing the fieldwork site 10 1.4 Scheduling appointments with the participants 11 1.5 Logistics of transfer of survey materials and traveling of the fieldwork staff 12 References 13
2. Instructions to participants and motivating participants 15 2.1. Instructions to participants 15 2.2. Motivating participation 16 References 19 Appendix. FAQ - Sampling & participation 19 3. Obtaining informed consent 23 3.1. Key elements when obtaining informed consent 24 3.2. Procedures for obtaining informed consent 24 3.3. Quality assurance of obtaining informed consent 26 References 26
4. Interviewing and checking questionnaires 27 4.1 Interviewing 27 4.2 Checking the self administered questionnaires 29 4.3 Quality assurance 29 References 30
5. Core measurements 31 5.1 Blood pressure 31 5.1.1 Rationale 31 5.1.2 Equipment 33 5.1.2.1 Measurement by the mercury sphygmomanometer 33 5.1.2.2 Measurement by an automated blood

pressure monitoring device 34 5.1.2.3 Selection of cuffs for the survey 35 5.1.3 Exclusion criteria 36 5.1.4 Measurement procedures 36 5.1.4.1 Setting up the measurement site 36 5.1.4.2 Preparation for the measurement 37 5.1.4.2.1 General issues 37 5.1.4.2.2 Instructions to the participants 37 5.1.4.2.3 Position of the subject 38 5.1.4.2.4 Position of the arm 38 5.1.4.2.5 Selection of the cuff for the participant 38 5.1.4.3 Number of measurements 39 5.1.4.4 Measurement protocol 39 5.1.4.4.1 Mercury sphygmomanometer 39 5.1.4.5.2 Automated blood pressure measurement device 41 5.1.5 Special issues when the measurement is taken at home of the participant 43 5.1.6 Information to be recorded 43 5.1.7 Feedback to participants 43 5.1.8 Safety 43 5.1.9 Quality assurance 44 5.1.9.1 Training of the measurers 45 5.1.9.2 Checking the equipment and regular calibration of the devices 45 5.1.9.2.1 Daily checks or when new examination place is set up 45 5.1.9.2.2 Weekly checks or when a new examination site is set up 46 5.1.9.3 Quality control by coordinating office during the fieldwork 47 References 48 5.2 Height 50 5.2.1 Rationale 50 5.2.2 Measurement protocol 50 5.2.2.1 Equipment 50 5.2.2.2 Setting up the measurement site 50 5.2.2.3 Exclusion criteri a 51 5.2.2.4 Measuring height 51 5.2.3 Quality assurance 52 5.2.3.1 Training of the measurers 53 5.2.3.2 Checking and calibration of the equipment 53 5.2.3.3 Quality control by coordinating office during the fieldwork 54 5.3 Weight 55

5.3.1 Rationale 55 5.3.2 Measurement protocol 55 5.3.2.1 Equipment 55 5.3.2.2 Setting up the measurement site 56 5.3.2.3 Exclusion criteria 56 5.3.2.4 Measuring weight 56 5.3.3 Quality assurance 58 5.3.3.1 Training of the measurers 58 5.3.3.2 Calibration and checking the equipment 59 5.3.3.3 Quality control by coordinating office during the fieldwork 60 5.4 Waist circumference 61 5.4.1 Rationale 61 5.4.2 Measurement protocol 61 5.4.2.1 Equipment 61 5.4.2.2 Setting up the measurement site 61 5.4.2.3 Exclusion criteria 61 5.4.2.4 Measuring waist circumference 62 5.4.3 Quality assurance 63 5.4.3.1 Training of the measurers 63 5.4.3.2 Checking and calibration of the equipment 64 5.4.3.3 Quality control by coordinating office during the field work 64 5.5 Laboratory instructions for blood samples 66 5.5.1 Rationale 66 5.5.2 Equipment and apparatus 66 5.5.2.1 Equipment for drawing of blood samples 66 5.5.2.2 Other equipment 67 5.5.2.3 Apparatus 68 5.5.3 Exclusion criteria 69 5.5.4 Blood drawing procedures 69 5.5.4.1 Setting up the blood drawing site 69 5.5.4.2 Preparing for the blood drawing 71 5.5.4.2.1 General information 71 5.5.4.2.2 Fasting 71 5.5.4.2.3 Posture of the subject and arm to be used 71 5.5.4.2.4 Use of a tourniquet 71 5.5.4.3 Blood samples drawing protocol 72 5.5.3 Labels 76 5.5.3.1 Requirements for the labels 76 5.5.3.2 Labeling of storage boxes 77 5.5.4 Blood sample processing 78 5.5.4.1 Centrifugation 78 5.5.4.2 Sample handling after centrifugation 79 5.5.4.3 Labeling of storage tubes 80

5.5.4.4 Handling blood collection tubes with gel 81 5.5.4.5 Hemolysed samples 82 5.5.4.6 Transfer of tubes into boxes and freezer 82 5.5.4.7 Sample shipment 83 5.5.4.7.1 To the NHES Lab 83 5.5.4.7.2 To EHES RL 83 5.5.5 Maintenance of quality at the laboratory site 84 5.5.5.1 Laboratory personnel 84 5.5.5.2 Work 84 5.5.5.3 Actions at the laboratory site and feedback 84 5.5.5.4 Instructions/manual 85 5.5.6 Safety issues 85 5.5.6.1 Laboratory work on the field 85 5.5.6.2 Exposure to contaminated blood 86 5.5.6.3 Handling of dry ice 87 5.5.6.4 Vaccination of fieldwork staff 88 5.5.7 Ergonomics 88 5.5.8 Waste disposal 88 5.6 Recording forms for measurements, laboratory and quality control 90 5.6.1 Measurement recording forms 90 5.6.2 Laboratory recording forms 91 5.6.3 Quality control log books 91 5.6.4 Material transfer log books 92 Appendix 5.6a Anthropometric recording form 93 Appendix 5.6b Blood pressure recording form 95 Appendix 5.6c Blood sample collection recording form 97 Appendix 5.6d Blood sample handling recording form 98 5.7 EHES questionnaire 99 5.7.1 Core questionnaire items 100 5.7.2 Diseases and chronic conditions 103 5.7.3 European Health Care Module 105 5.7.4 European Health Determinant module 109 5.7.5 Background Module / Core Social Variables114 References 120 Appendix 5.7 EHES questionnaire 122 5.8 Feedback to the participants 125 5.8.1 Ways to provide feedback 125 5.8.2 Example of feedback 126 5.8.2.1 Blood pressure 126 5.8.2.2 Anthropometric measurements 127 5.8.2.3 Cholesterol 128 5.8.2.4 Glucose 129 References 129

6. Data management 131 6.1 Central office 131 6.1.1 Arranging computer equipment and network(s) 132 6.1.2 Training, responsibilities and support of the fieldwork teams 132 6.1.3 Coordinating the fieldwork data management 133 6.2. Fieldwork team 133 6.3 Data management in the field 134 6.3.1 Recording of the data 134 6.3.2 Identification - the follow-up of participants through the survey 135 6.3.3 Data error checking 136 6.3.4 Correcting and documenting the data 137 6.3.5 Data confidentiality and security 137 6.3.5.1 Paper forms 137 6.3.5.2 Data in electronic format 138 6.3.6 Backing up the data 138
7. Quality control 139 7.1 Calibration of measurement devices and data checking 140 7.2 Data and material transfer 141 7.3 Audit visits 141 7.4 Re-training and duplicate measurements 142


PART B
EHES Manualhttp://www.ehes.info/manuals/EHES_manual/EHES_manual.htm
A - 1
Version: 28 January 2013
The European Health Examination Survey (EHES) Manual pro-vides guidelines and specifies the requirements for the imple-mentation of standardized national health examination surveys (HES) in the European countries. Recommendations based on past experiences from national and international surveys were prepared by the Feasibility of a European Health examination Survey (FEHES) Project (Tolonen 2008). The EHES manual builds on these recommendations and on further experience obtained during the EHES Pilot Project in 2009-2012. The EHES Manual has three parts:
A. Planning and preparation of the surveyB. Fieldwork proceduresC. European level coordination
The EHES Manual is maintained by the EHES Reference Centre, and the plan is to update it with further clarifications and addi-tional relevant topics. The latest version of the EHES Manual is available in the Internet at www.ehes.info.
This is Part B of the EHES Manual. It provides guidelines for the fieldwork procedures of a HES, including the European stand-ard protocols for the different HES measurements. Some of the measurements are so called Core measurements, which should be included in all national HESs (see Chapter 5). The countries can also include a varying number of additional measurement in their HESs. In the beginning, agreed European standards are available only for some additional measurements. When standards for new measurements have been agreed on, they will be added to the EHES Manual. Meanwhile, if a country plans to include a meas-urement for which there is no European standard procedure, it should keep in contact with the EHES Reference Centre and other countries planning to include a similar measurement. A more detailed description of the criteria for HES measurements and the procedure for adopting new European standard procedures is given Chapter 5 of Part A of the EHES Manual.
Introduction

B - 2
As part of the planning of a national HES, each country has to prepare a national HES Manual. The procedures described in the national manual should follow the European standards specified in the EHES Manual. The national manual should be specific also in issues where the EHES manual can only give alternatives or general guidelines. The EHES manual is unspecific in situations where the national circumstances vary and there is no common procedure which could be reasonably followed in all countries. When the European recommendation differs from the procedure used in earlier national surveys, the procedure to be adapted in the new national HES needs to be considered carefully. Some-times there may be need to compromise between European com-parability and the possibility to follow national trends from the past. The countries should prepare the national manuals in col-laboration with the EHES Reference Centre.References
• Tolonen H, Koponen P, Aromaa A, et al. (Eds.) Recommendations for the Health Examination Surveys in Europe. B21/2008, Publications of the National Public Health Institute, Helsinki 2008. Available http://urn.fi/URN:ISBN:978-951-740-838-7

PART B
EHES Manualhttp://www.ehes.info/manuals/EHES_manual/EHES_manual.htm
B - 3
Version:
The fieldwork organization usually consists of a Central office and one or several fieldwork teams. The Central office has responsi-bility for the overall coordination of the fieldwork. At the fieldwork team level, the team supervisor (team leader) is responsible for the daily coordination of the fieldwork. The specific responsibili-ties and division of tasks between the Central office and fieldwork team supervisors vary depending on the local survey organiza-tion. We provide here some guidelines for the division of tasks and responsibilities. This chapter considers aspects that need to be defined in the national HES manuals on
• Division of tasks and responsibilities between the Cen-tral office and the fieldwork team supervisors;
• Safety issues;• Preparations at the field work sites;• Appointment scheduling for the participants; and• Logistics in transfer of the survey materials and travel-
ling of the fieldwork staff.
1.1 Division of tasks and responsibili-tiesFigure 1.1 provides an example of the structure of the fieldwork organization. In the first example, the laboratory (National HES laboratory) is part of the Central office (at the same organiza-tion), but it can also be a separate outsourced laboratory. In this example, the different teams cover different survey sites. Close coordination of the work is needed between the laboratory, Cen-
1. Coordination of the fieldwork
Sanna Ahonen1, Päivikki Koponen1, Hanna Tolonen1
1 National Institute for Health and Welfare (THL), Helsinki, Finland
07 June 2012

B - 4
tral office and fieldwork team supervisors (Figure 1.2). This may be challenging when the laboratory is in a different organization. When examinations are carried out by home visits, the fieldwork supervisor is often responsible for the staff at several fieldwork locations.
Figure 1.1. Structure of the fieldwork organization. Example 1
Figure 1.2. Structure of the fieldwork organization. Example 2

B - 5
1.1.1. Central office
The Central office coordinates the overall fieldwork of the survey:
• Coordinating and supervising all fieldwork activities (national fieldwork coordinator).
• Survey quality control and fieldwork monitoring, with additional external auditors, if needed.
• Sending survey invitations and scheduling appoint-ments. (This may be done partly by the Fieldwork teams.)
• Selecting and agreeing on examination centres in the regions/local municipalities (if needed).
• Receiving and processing survey data from the Field-work teams.
• Receiving, storing and analyzing blood and other sam-ples from the Fieldwork Teams (This may be managed by an organization separate from the Central office, if the laboratory services are outsourced.).
• Keeping in contact with relevant regional/local adminis-tration and health services of the fieldwork sites. (This may be done partly by the Fieldwork teams.)
• Population level communication to raise awareness of the survey and its purposes to increase the response rate.
1.1.2. Fieldwork team
1.1.2.1 Structure and division of the tasks
Selection of the fieldwork staff is described in Part A, Chapter 9. The composition of the fieldwork teams depends on the type of the examination site (home visit/ local examination centre/ mobile examination unit), the measurements and possible addi-tional national requirements. We provide here general principles related to the fieldwork teams and examples in specific survey settings.
Each team should have a named Fieldwork team supervisor, and his/her deputy. Depending on the number of fieldwork teams and geographical coverage, several local/regional team supervisors may be needed. They need to work in close collaboration with the national fieldwork coordinator. The tasks of the field team supervisor(s) include

B - 6
• Coordinating the work of the fieldwork team, consult-ing, solving problems and specifying guidelines when needed;
• Organizing substitutes for the fieldwork team members in case of sick leave and other absences;
• Keeping in regular contact with the national survey co-ordination/Central office;
• Checking daily appointment schedules, checking ques-tionnaires (if needed e.g. if built-in computer pro-grammes not used for all data collection);
• Organizing and taking care of transfer of data and ma-terials as well as traveling of staff members (when needed).
Depending of the organization of the fieldwork, the Field team supervisor may also carry out certain measurements.
The tasks of the members of the Fieldwork teams should be clearly defined and documented in the national Manual.
1.1.2.2. Absences
Sick leave and other absences must be taken into account when estimating the number of survey personnel for the fieldwork (see more details in Part A, Chapter 9). There should be a specified protocol how to cover absences (expected and unexpected) dur-ing the survey fieldwork. The ways how to inform fieldwork team supervisor and/or Central office about the absences needs to be defined. Also instructions for who and how will organize substi-tutes for the team members needs to be defined in the national manual.
1.1.2.3 Supervision
The fieldwork supervision has two levels;
1. The national coordinator at the Central office has an overall responsibility of the fieldwork teams and field-work activities. She/he should visit the survey sites regularly. These visits are especially important at the beginning of the fieldwork to see how plans are work-ing in practice. Regular visits from the Central office are also important to support and motivate the field-work staff as well as for quality control (see Part B, Chapter 7).
2. The fieldwork team supervisors should meet or other-wise keep in contact regularly with the Central office to share up to date information from the site. The field-

B - 7
work team supervisors also bring information from the central office back to their teams, e.g. feedback from quality control. They are responsible for monitoring that team members carry out their tasks well day-to-day. If there are problems that cannot be solved within the team, the supervisors should contact the central office and issues should be sorted out as soon as possi-ble. It is important that the fieldwork team supervisors receive support from the central office and do not have to deal with problems alone.
Staff satisfaction is an important issue for maintaining the quality of the work. The national survey coordinator and fieldwork team supervisor have an important role in creating a positive work en-vironment which affects staff satisfaction. A good leader should be visible, consult with staff, and provide praise and recognition (Duffield et al. 2010).
1.1.2.4 Internal communication
Sharing information between the central office and fieldwork teams as well as between and within fieldwork teams is impor-tant for the success of the work. Communication between the central office and fieldwork teams should include as a minimum issues relating to the progress of the work and to possible chang-es in the procedures or personnel. Sharing experiences between the fieldwork teams is an important part of internal communica-tion. Within the fieldwork teams, communication is often focused on daily activities such as division of tasks, absences, moving to new location, etc.
Internal communication can be organized in many different ways: face-to-face meetings, video meetings, telephone meet-ings, extranet and internet sites, newsletters, SMS text messag-ing, instant messaging like Skype and Windows Messenger or even through social media. The key of communication is to make sure that every member of the team gets relevant information in timely manner.
Formal meetings are useful for disseminating important informa-tion and for making decisions. Informal meetings such as coffee breaks give the possibility to share instant issues.
It is important that the personnel are able to share their thoughts with colleagues and get advice if needed. The fieldwork staff may need extra support after unexpected incidents at the survey field site. Group discussions are usually useful and increase the feel-ing of belonging and support among the fieldwork personnel.

B - 8
1.2 Safety issues Safety issues during fieldwork should be considered both from the perspective of the participants and the staff. Safety issues related to each measurement should be covered in the national manual under the instructions for each measurement (see Part B, Chapter 5). Here we focus on general safety issues for the staff and for the participants. The employer and employee are both responsible for the work safety. We list here some issues relating to safely regarding the survey fieldwork but many issues depend on the survey setting. National legislation may also affect instructions required at a national level (e.g. laws on occupa-tional health and safety).
In general, the employer is responsible for providing
• a safe work place and equipment;• safe work processes;• protective equipment where needed; and• information, instructions and training.
The employee is responsible for
• following the provided safety instructions;• using protective equipment and clothing in a correct
manner;• informing either the fieldwork team supervisor or the
national fieldwork coordinator about hazards and inju-ries, and
• taking part to the safety training provided.
Safety instructions should include guidelines for each step of the survey fieldwork: moving to a new examination site, setting up the examination site, the measurements themselves, and per-sonal safety of the fieldwork team members.
1.2.1 Moving to the examination site
Depending on the survey setting, these instructions should in-clude issues relating to the moving of the survey equipment as well as travel of survey personnel. If equipment is moved by survey team members, special attention should be paid to the packing of the equipment properly both for moving containers and moving them to a vehicle, how to lift heavy equipment, and how to protect equipment from theft.

B - 9
1.2.2 Setting up the examination site
For setting up the examination site, safety instructions should deal again with how to lift heavy equipment, how to place equip-ment at the site so that they do not cause danger to anyone, safe storage of materials, and how to make the examination place accessible for participants in a safe way. The last point may, for example, include instructions on how to make sure that the side-walks to the examination site and floors at the building are not slippery.
1.2.3 Safety of the measurements
Each fieldwork site must have at least one person trained in first aid who is present at all times. All survey staff should be trained to make an emergency call if needed. These issues should be in-cluded in training. The safety of additional measurements must be checked (with additional health related questions), especially if there are physical fitness tests that may be too demanding for elderly persons or persons with health problems. Some par-ticipants, e.g. those with reduced mobility, may require help to ensure their safety. This requires extra effort from the fieldwork personnel.
1.2.4 Safety of fieldwork staff
Safety of the fieldwork staff has several aspects: how to ensure a safe working environment, how to handle unexpected situations with participants, and how to get help when needed.
When the fieldworkers come to the new examination site, they should check the location of the fire exits, where to find fire ex-tinguishers and what emergency procedures are possible. The location of the first aid kit should be checked. Local police officers should be informed about the survey, if the participants want to confirm with them e.g. whether it is safe to let the staff members enter their homes.
Instructions for the ergonomics at work should be provided for the fieldwork team for both measurements and when working on computer. Everyone should keep their working area clean. If liquids or other materials are spilled on the floor, they should be cleaned up immediately.
Unexpected situations may occur at the examination site or dur-ing a home visit. Even though in most cases participants are co-operating and safety issues do not seem to be a main concern, safety instructions should be offered to the fieldwork teams. A difficult situation may come up with a participant who is not co-

B - 10
operating (e.g. is aggressive) or who is under the influence of alcohol or drugs. The fieldwork team members should be advised how to act in these situations. In threatening or otherwise dif-ficult situations, the examination has to be stopped or cancelled. The fieldwork member should report these incidents to the team supervisor and the central office. Then it must be considered whether or not it is relevant to offer a new examination time. If the participant was not co-operating or seemed to be intoxicated, it should always be recorded, as with other observations relevant to the survey.
During a home visit, it is recommended that the fieldwork team members carry a mobile phone, so that it is possible to con-tact colleagues in case advice is needed. The fieldwork personnel should also be advised to dress appropriately (Cottrell, McKenzie 2011). Also the possibility of pairing two fieldwork members for home visits can be considered if it is needed for cultural reasons or as a precaution. It is important that fieldwork personnel feel safe and know how to act in different situations.
1.2.5 Reporting of the threatening situations and injuries
Safety instructions should also include instructions on how and to whom staff should report threatening or risky situations or inju-ries. Also verbal abuse of the fieldwork team members should be taken seriously and reported.
1.3 Organizing the fieldwork siteWhen the examinations will be carried out at clinic settings, ei-ther temporary clinics or in the premises of existing health care services, the following issues should be covered in the national manual:
• Part B, Chapter 5 provides instructions for each meas-urement on how the measurement site should be set up.
• How to ensure privacy during the examination.• Where to place instructions for coming to the examina-
tion site (stands, posters with logo and arrows, etc.).• Depending on available rooms, which may vary be-
tween locations, how to set up reception and different measurements, e.g. which measurements can be taken in the same room, where a separate room is needed, how to organize a waiting area for the participants.

B - 11
• The number of rooms needed for the reception, meas-urements and a waiting room.
• General requirements for the rooms:• Easy access for the participants.• Privacy for the participant.• Quiet surroundings (e.g. no noise affecting blood
pressure measurements).
In addition, collaboration with the local health care organizations and professionals need to be specified. For home visits, the field work personnell should be instructed on how to select the room and place where the examination is carried out.
1.4 Scheduling appointments with the participantsWhich appointment times are offered for the participants may vary depending on the survey setting. The rules and principles for the appointment scheduling need to be specified in the na-tional manual: time of the day and weekdays to be used, and time needed for the examination of one participant.
When scheduling appointments, the following issues should be considered:
• Fasting needed for the blood samples: for glucose (8 hours for the EHES core measurements).
• Flexibility and easy access for the participants, e.g. possibility to change and re-schedule appointments.
• Working time of the fieldwork staff.
The appointment scheduling system can be organized in many ways depending on local needs. A computerized system, which in ideal case is shared either through the internet or an external server, makes it possible to book appointments from different locations simultaneously. This is a useful feature, since appoint-ments can be assigned or changed by the Central office and field-work teams.
In any case, the appointment scheduling system should be built so that the history of the scheduled, changed and cancelled ap-pointment times for each participant can be followed up. This is important information when analysing the recruitment process and timing of the examinations.

B - 12
1.5 Logistics of transfer of survey ma-terials and traveling of the fieldwork staffLogistics is the management of the flow of materials, information and other resources between the fieldwork site, the Central office and laboratory, and between different fieldwork sites.
The following issues need to be specified in the national manual:
• Routing of measurement sites; depends on the number of fieldwork staff members and teams, and number of selected measurement sites. It needs to be specified which sites each team or staff member will cover. A system for circulation of teams or staff members be-tween regions may be considered to minimize meas-urer effect on the results.• This routing plan will specify the number of days
needed per site, the number of days needed for moving, and distances to be moved. It will also specify how the equipment will be moved from one site to another (by team members or hiring a spe-cial company to take care of the transport)
• How will the field work staff travel (using private cars, public transportation etc).
• How completed questionnaires and data are trans-ferred (see Part B, Chapter 6 on Data management on the field).
• How samples are transferred (see Part B, Section 5.6.3. on blood samples).
• Log book of sent and received equipment, question-naires, data, samples etc.
• Possible permits needed for transfer of materials (e.g. blood samples and mercury sphygmomanometers) for example by air within the country.
Many of these issues will require different arrangements when the examinations are organized at temporary clinics, regular health care facilities or by home visits. When the fieldwork is or-ganized at temporary clinics, the challenges in logistics lie espe-cially in arranging the rooms and equipment when moving from one location to another. When the examinations are carried out in the regular health care settings, the challenges lie in the specific standardization requirements of the survey as compared with the regular practices. When the fieldwork is organized by home vis-

B - 13
its, the challenges lie in the transfer of questionnaires, data and especially transfer of blood samples.
References• Christine M Duffield, Michael A Roche, Nicole Blay, Helen Stasa. Nursing
unit managers, staff retention and the work environment. Journal of Clini-cal Nursing Volume 20, Issue 1-2, pages 23-33, January 2011
• Mindell J, Becares L, Aresu M, Tolonen H. The right time for a survey? Socio-demographic variation in survey responses by time of day and day of week. Eur J Public Health. doi: 10.1093/eurpub/ckr093
• Randall R. Cottrell, James F. McKenzie: Health promotion and education re-search methods, Using the Five-Chapter Thesis/Dissertation Model. 2011; p. 204. Jones and Barttlet Publishers, California

B - 14
PART B
EHES Manualhttp://www.ehes.info/manuals/EHES_manual/EHES_manual.html
B - 15
Version:
2.1. Instructions to participantsThe letter of invitation can include instructions for the partici-pants. If the invitation and the appointment are made during a phone call or home visit, the instructions can be discussed. How-ever, it is still recommended that a paper leaflet or invitation with some key issues is also left or sent by mail to the participant. E-mails and text messages can also be used as reminders of ap-pointments and instructions, if feasible, e.g. after a first phone contact. The instructions can also be mailed to the participant with a letter, which is sent to confirm the appointment for the ex-amination. The following participant information and instructions should be adapted according to the survey setting such as home or clinic visit.
• Contact information: Name of the contact person, and their telephone number, address, and e-mail ad-dress are given so that the participant is able to re-schedule or cancel the appointment, or ask further in-formation on the survey.
• Fasting: Relates to the fasting glucose measurement, which should be done at least for those examined in the mornings. The minimum fasting time for the EHES core measurements is 8 hours, but the fasting should not exceed 14 hours. The participant can drink some water and take his/her regular medicines in the morn-ing before the visit. For those examined in the after-noon, 4 hours fasting is recommended.
• Identification: Everybody will be asked for a valid identification (with a picture). It may be useful to ex-
2. Instructions to participants and
motivating participantsSanna Ahonen1, Päivikki Koponen1, Hanna Tolonen1
1 National Institute for Health and Welfare (THL), Helsinki, Finland
07 June 2012

B - 16
plain that a substitute for the participant is not accept-ed (e.g. family member or a friend).
• Smoking: The participant should abstain from smok-ing for one hour before the examination (it affects blood pressure measurements).
• Vigorous physical exercise: The participant should abstain from vigorous physical exercise for one hour before the examination (it affects blood pressure meas-urements and blood samples).
• Travel expenses: Rules for getting reimbursements should be specified, if they are available and needed.
• Other incentives and rules for getting these should be explained, if they are used.
• Presence of family members, significant others, interpreters: Their presence can be allowed if needed e.g. in case of problems with understanding the lan-guage, speaking, hearing or cognitive capacity.
• Other information on what will be done in the home environment, or the possibility of home visits or visits to institutions, if these are offered for persons who are unable to attend a clinic visit, or when home visits are offered to all participants.
• Medication: If the use of medicines will be checked and recorded during the visit, boxes of medicines/pre-scriptions should be taken along to the examination visit.
• At least in the northern countries and during the winter season, instructions on clothing may also be useful: For the EHES core measurements, light clothing is recommended. If outer layers of clothing are needed, these should be easy to take off. In some cultures undressing may be considered intimate, and mentioning this may decrease participation rates.
Adherence to these instructions should be recorded for each par-ticipant at the beginning of the examination visit, or during the measurements which are affected by the person’s behaviour.
2.2. Motivating participationSelected persons will participate only if they have enough moti-vation. This is why several factors in the recruitment process fo-cus on motivation, such as communicating the importance of the survey, being flexible about schedules, and by providing incen-tives to participants. These issues are covered in Part A, Chapter 13. Recruitment and Chapter 14. Dissemination and publicity.

B - 17
An important issue is how to motivate those who hesitate to par-ticipate. Answers to the most common questions about the sur-vey or reasons for not participating should be provided in national manuals to ensure that all staff members are able to give prop-er answers to potential participants. A list of Frequently Asked Questions and the appropriate answers may also be useful on the survey website. The following examples will help to provide quick responses for the staff recruiting participants. Additional examples are given in the Appendix at the end of this Chapter.
I’m too busy to participate.
• I can understand that you are busy, but we could or-ganize the examination for the time most suitable for you. How about evening or weekend times … (suggest days/times)?
• It is really important for the study to be able to also include busy people like yourself, so that we can get representative information about the entire population of (specify your country).
• If the full appointment seems too time consuming, a short version with a non-respondent questionnaire and only the core measurements should be offered.
I don’t want to tell you my private issues, I am worried about the confidentiality of the information I have to pro-vide.
• The information you provide will be treated in strict confidence. In the survey data, no names and ID-in-formation are used, your data will be linked to you only for the purpose of sending you feedback on your per-sonal results, such as the blood values.
• If there are any questions/measurements which you feel to be too personal, you have no obligation to an-swer them.
Why have you selected me?
• You have been selected by random from … (provide sampling frame here). It is important that we include all kinds of people in the survey. This way it will most accurately represent the population of the country (specify you country).
I’m too sick to participate.

B - 18
• We are interested in obtaining information from healthy and sick individuals. To be able to get a good picture of the health status and health determinants of (specify your country), it is really important to examine those with ill health, too.
• If you feel that you are not well enough to come to the examination site, could we come to you and do the examinations at your home? We will not carry out any measurement that would include any risk to your health and well-being. You have the right to refuse any measurements that you feel as too exhausting.
I don’t need to do the health survey because I’m really healthy.
• We are interested in obtaining information from healthy and sick individuals. To be able to get a good picture of the health status and health determinants of (specify your country), it is really important to examine also those with good health.
I see my doctor all the time; I don’t want to talk about my health again. I have just recently had a health check at my GP.
• The survey is not just about health but also about life-styles and other factors affecting your health.
• We cannot obtain your health information from your doctor (medical records).
• Even though there is not much personal benefit for you, we ask you to offer your information to the research and health monitoring purposes, which are needed to plan health services and other health promotion ac-tions for future generations.
Motivation of the participants should be an ongoing process throughout the survey. Therefore, in addition to the recruitment process, motivation is also important during the examination vis-it to get as complete data as possible from all participants. Issues that increase motivation during the examination visit are (Clarke et al. 1990):
• An atmosphere that makes participants feel welcome and appreciated;
• The opportunity to ask questions and raise personal concerns that are taken into account and answers are given;

B - 19
• Comfortable facilities e.g. privacy is important;• Fluent change between measurements (no waiting
times or minimal waiting), if the measurements are carried out by different team members. All team mem-bers should introduce themselves and welcome the participant.
• However, rushed attention may create negative feel-ings.
Finally, the importance of keeping promises (e.g. giving realistic information on when the laboratory results will be mailed) and having the possibility of asking questions also after the appoint-ment and adjusting to different situations (e.g. taking into ac-count any special needs of the participants) are also important issues for motivation. A disappointment or frustration may ac-cumulate unwanted attitudes towards the survey and even to fu-ture surveys. In many cultures and communities negative expe-riences are shared with neighbours and friends more often than positive.
References• Clarke R.M., Allen G., McBay S., Heaney S. Improving the quality of com-
munity health surveys and community health promotion campaigns by feedback from the community: Experience from the Wallsend Community and Health Project. Community Health Studies 1990;14(1):27-34.
Appendix. FAQ - Sampling & participa-tionWhy was I selected for the survey?
• We have drawn a representative sample of people from all over the country. It is sheer luck that you are one of them.
But I’m not representative?• No one is representative on their own. All people are
different. It is the entire sample that should be repre-sentative for the entire population, not each partici-pant.
How did you select me? Why did I receive an invitation?• The answer here may differ somewhat among coun-
tries depending on what kind of sampling frame was used, but can be like: “We used a population register/postal address file/... and selected places and people at random. We first selected places and then people

B - 20
living at the places we selected. This is a scientifically correct way of doing it.”
• For this study a sample has been drawn from the .... population aged ...to .... years. By chance, your name was part of that sample. A total of .....are invited from ... municipalities.
Why do you select participants at random? How can you get a representative sample that way?
• Believe it or not, selecting at random is the only way we can get a representative sample, not biased by our own prejudice.
How can you learn how the health is for the entire country without asking everyone?
• It is like an opinion poll. We don’t get exactly correct numbers but good enough to get a useful picture.
I’m too busy to participate. Can you ask my husband/neighbour/someone else instead?
• No. If we replace non-participants we end up with a sample of only people who can and want to participate. That will not be a representative sample any more. Therefore your participation is very important and we will be very pleased if you do.
But in opinion polls they replace people?• Yes, but this is a scientific survey and we have to use
correct scientific methods. In commercial opinion polls that is not so important.
I’m too sick/unable to participate.• Here each country must decide what can be offered
people who are too sick or unable to attend the ex-amination. Home visits have been recommended in the EHES manual (Part A, Section 13.5). It is very impor-tant having also sick/disabled people participating. If not, it can severely bias the results.
I have bad health, so I don’t think you’d want me to par-ticipate.
• We are not only interested in people with good health. Then we would get a wrong picture of people’s general health. Therefore we would be very happy if you can participate.Q: What do I get in return for participating?
• The answers here may differ as different countries al-low different rewards.

B - 21
How many people have been invited to participate in the survey?
• We have invited ... persons from all over the country, ... persons from your community (name of town/ mu-nicipality)
How will all documents be handled?• (Needs to be adapted to local systems). All forms and
data are stored encrypted, i.e. just using participant number, without any information that can be linked to your personal data. Only on the Informed Consent Form, signed by the participant, is the name of the participant mentioned. These forms are kept in locked cabinets at the research location and later on at (name of the Institute responsible for the survey). Data on the Informed Consent Forms are handled internally and not stored digitally. In the electronic files only the respondent number, examination date and the answers to the questions are listed.
What can I expect when participating?• (Needs to be adapted as describing survey practices).
Joining the surveys means filling in a questionnaire and participating in a physical examination of about half an hour (... hours). You can fill out the questionnaire at home. The physical examination takes place at a re-search location in your area (or in your home).
I cannot visit the research facility but I want to partici-pate, what to do?
• (Needs to be adapted). If you are physically unable to come to the examination site, please fill in your contact information on the reply card and send it back. We will contact you to make an appointment for a home visit.
What will be done with the results?• Immediately after the physical examination you will re-
ceive the results of your measurements (height, weight and waist circumference) and your blood pressure. You will receive the results of the blood test by post. The results are then separated from your personal informa-tion. Anonymized data from the study, where no per-sons can be identified, will be used for health monitor-ing and in scientific research on public health.
Do I need to confirm not-participating? Should I reply also when I don’t want to participate?

B - 22
• Yes, please inform us. You received a personal invita-tion and we hope that you will participate. If we don’t hear anything from you, we will send you a reminder.
Why is this survey needed?• We don’t have recent figures on how common health
problems are or will become in the near future in the people living in/residents of (name of the country). Do we exercise enough? How are our cholesterol levels? How many people have diabetes? These data are very important for improving health care in the country. Therefore, we are performing this nationwide survey at the request of (name of the national authority e.g. the Ministry of Health).
Why should I participate?• We hope that you will participate, the more people par-
ticipating in this study, the more we know about the health situation in the country. It also gives you the chance to get more information about your own health.
How I can respond to the invitation?• (Needs to be adapted). If you received an invitation you
can sign in using the form on this website. Your login information is given in the invitation letter. You can also register by returning the reply card you received, in the enclosed envelope. A stamp is not required.
I did not receive an invitation, can I participate anyway?• No sorry, you can’t. Only people who received an in-
vitation can participate in this study. It is a personal invitation and not transferable. This method is the only way to collect representative data.
I cannot make it to the appointment, what should I do?• You can make a new appointment by calling our staff:
(e.g. toll free number).
Whom should I contact with other (later) questions?• Is your question not mentioned here? Then call one of
the employee(s) of the study. They are available on (add days/times) at phone number ...(e.g. toll free number) or send your question by an e-mail to....

PART B
EHES Manualhttp://www.ehes.info/manuals/EHES_manual/EHES_manual.htm
B - 23
Version:
The process of obtaining informed consent starts from the first contact with the survey participant (Figure 3.1). All fieldwork staff and persons working on data collection, processing or analysis need to be well informed as to why informed consent is needed, and that it is both a legal and an ethical obligation. They should also know which issues are covered in the informed consent ma-terial and why these issues are important (Manual Part A, Chap-ter 4 on Legal and ethical aspects).
Figure 3.1. Process of obtaining informed consent
3. Obtaining informed consent
Päivikki Koponen1, Susanna Conti2, Hanna Tolonen1
1 National Institute for Health and Welfare (THL), Helsinki, Finland2 Istituto Superiore di Sanità (ISS), Rome, Italy
03 June 2012

B - 24
3.1. Key elements when obtaining in-formed consentKey elements that must be assured when obtaining the informed consent are: information, understanding, competence and volun-tariness (Caughlin et all 2009, Länsimies-Antikainen, 2009).
• Information: All the information material that the participant has received concerning the study (includ-ing the invitation letter, the information notice or leaf-let), personal communication and media campaigns are important and they should be provided in linguistic style that is easy to understand.
• Understanding: To ensure understanding, the infor-mation should be provided both in writing and by per-sonal communication.
• Competence: The participant’s competence should also be evaluated, to make sure that he/she has ad-equate decision-making capacity.
• Voluntariness: Voluntary participation should be ex-plicit. All participants should be able to choose freely and their decision to participate should not be influ-enced by coercion, manipulation or pressure. Partici-pants should also be made aware of their right to with-draw from the study at any time and to refuse any measurement. The participants should also understand the uses of the data and the measures taken to en-sure data confidentiality, so that they do not refuse to provide personal information or undergo some meas-urements because they fear violations of their privacy. Both their personal gains and the public health inter-ests should be explained. For example taking part in measurements which do not provide any information of personal interest (e.g. measuring blood lipids when these have recently been checked during a GP visit) is important to get valid results at the population level. For decision making, the participants need time to read the information in peace and to think about it before speaking with the field work staff and giving informed consent, whether verbal or signing a consent form, as required.
3.2. Procedures for obtaining informed consentInformed consent is a process of active communication between the fieldwork staff and the participant. The process consists of

B - 25
providing information and answering any questions that may arise. The consent should be obtained before carrying out any measurements. The participants should have the opportunity to ask questions at any time during the survey visit. They also need to be informed whom they can contact for further questions, even after the examination visit.
The fieldwork staff should explain to the participants the legal as-pects of the informed consent in simple words, ask them to read the information notice (or check that they have read it previous-ly) and ensure that they have understood the key contents. Be-fore signing the informed consent form, the participants could be asked to describe in their own words the purpose of the survey. This will ensure that they have adequately understood the in-formation provided. A copy of the signed informed consent form may be given to the participants, to be read again later at home.
The participants may include severely ill, mentally impaired, de-mented or otherwise frail persons. The exclusion of such persons due to difficulties in obtaining informed consent or ability to take part in all measurements or to fill in the questionnaires, would lead to biased results. Thus there may be a need to identify an appropriate proxy to answer selected key questions. Also a sur-rogate decision maker or legal guardian may be needed for the consent. During the fieldwork, questions may arise as to how to define whether a person is competent to provide the informed consent or to take part in all measurements. This problem is expected to be more common among elderly persons, especially among those who are institutionalized. In case of any concern, the fieldwork staff should be encouraged to contact their super-visor, the national fieldwork coordinator, the project leader, or other persons who are responsible for addressing issues related to informed consent for the survey.
Standard tests of cognitive function have been used in health surveys. However, there is no consensus on the utility of such tests in the informed consent process. Moreover, there is no gold standard for formally assessing the capacity to provide informed consent in health surveys. However, there may be national rules of ethical conduct and national laws (e.g. the Mental Capacity Act in England) that need to be taken into account. In defining the fieldwork practices for persons with cognitive impairment, the national legislation has to be considered and the practices must be approved by the ethics committee. Adequate instructions also need to be given in the national fieldwork manuals. For example if a nurse sees that a participant is clearly not competent to sign the informed consent or to give accurate answers, the nurse can ask the participant if he/she has somebody who normally helps him/her with official issues (e.g. bank accounts or insurance) and another visit can be arranged with the presence of this person.

B - 26
Since there are typically no major risks in health surveys, the evaluation of the competence of the person may be considered less formally than in clinical trials (GEP/IEA 2007, CIOMS 2008). If only minor doubts concerning cognitive capacity arise and the individual is clearly willing to take part in the examination, he/she can be asked to sign the consent and the examination may be carried out.
3.3. Quality assurance of obtaining informed consentThe quality of the informed consent process is related to the qual-ity of the information provided to the participant. The quality of the consent process can be assured by including both theoretical and practical training in the national training programme for the fieldwork staff. It should also be considered that the communica-tion skills of the fieldwork staff may lead to differences in the pro-cess of obtaining informed consent. These skills can be observed during audit visits (see Part B, Chapter 7). Feedback sessions during the fieldwork should also be organized to share experi-ences in obtaining informed consent, and problems encountered. Examples of answers to frequently asked questions concerning participation and data confidentiality, and specific explanations why the participants need to sign the informed consent, can be developed and given to all fieldwork staff to ensure that they understand the importance of informed consents and are able to provide adequate answers. If direct feedback from the survey participants can be obtained, they can be asked such questions as: Have you received adequate information, allowing you to un-derstand the aims of the study? During audit visits, a few par-ticipants could be asked what they remember of the information provided to them before they signed the informed consent form.
References• Caughlin SS, Beauchamp TL, Week DL. Ethics and Epidemiology (2nd edi-
tion). Oxford University Press, New York, 2009.• Good Epidemiological Practice (GEP) IEA Guidelines for proper conduct in
epidemiologic research. November 2007. Available at http://www.ieaweb.org. Accessed on 22 June 2011
• International Ethical Guidelines for Epidemiological Studies. Prepared by the International Organization of Medical Sciences (CIOMS) in collabora-tion with the World Health Organzation (WHO), February 2008. Available at http://www.cioms.ch/frame_ethical_guidelines_2009.htm. Accessed on 22 June 2011
• Länsimies-Antikainen H. Realization of Informed Consent in Health Re-search. Kuopio University Publications E. Social Sciences 177, 2009. Avail-able at http://urn.fi/URN:ISBN:978-951-27-1307-3. Accessed on 22 June 2011

PART B
EHES Manualhttp://www.ehes.info/manuals/EHES_manual/EHES_manual.htm
B - 27
Version:
The general principles for questionnaire administration are pre-sented in Part A, Chapter 8. This chapter will focus on the field-work practices of carrying out interviews and checking self-ad-ministered questionnaires. The fieldwork personnel should be familiar with the background and meaning of the questions (see instructions for the interviewers in the EHES questionnaire, Part B, Section 5.7). The personnel should also know how their inter-action with the participants and different interviewing techniques affect the reliability and quality of the data. These issues should be described during the training and specified in the local manual.
As hearing the results of the clinical measurements may affect the responses, the EHES core questions should be asked before carrying out the measurements. This allows the evaluation of differences between self-reports and measurements (e.g. height and weight). Some questions, e.g. those related to chronic dis-eases or conditions, medicine use and preventive care as well as questions on marital status and education, may be asked from proxies if the participant has severe problems in communication or cognitive capacity. However, subjective items (such as self perceived health) should not be asked from proxies.
4.1 InterviewingWhen carrying out the interviews, follow these principles (Czaja et al 2005, Groves et al 2004):
1. Read the survey questions and response categories ex-actly as they are written. If the participant does not seem to understand the question, repeat the question. If the respondent needs clarification, give additional
4. Interviewing and checking questionnaires
Päivikki Koponen1, Johanna Mäki-Opas1, Hanna Tolonen1
1 National Institute for Health and Welfare (THL), Helsinki, Finland
28 January 2013

B - 28
information in a standardized way. If the participant is still unable to answer, you can give additional clarifica-tions according to the specific instructions for the ques-tion. Where there are long lists of response categories or other complicated questions, the interview may be supported by show-cards or other visual aids.
2. Follow the order of the questions in the questionnaire: when the respondent starts talking about topics which come later in the questionnaire, instruct him/her kindly to listen to the next question.
3. Don’ t comment on the responses or express any criti-cism (e.g. regarding participant’s lifestyles).
4. Clarify inadequate answers in a standardized and non directive way, so that you do not affect the choice of answer categories.
5. Explain to the participant the possibility of stopping the interview at any time if he/she feels uncomfortable, the interview takes too much time or the participant does not wish to continue for any other reason. Stop the interview if the participant loses the ability to con-centrate (e.g. is very tired or drunk) or if there are too many disturbing factors, such as the presence of family members or other persons. Also, if you notice severe problems in the participant’s communication skills, cognitive ability or hearing, stop the interview. If the interview is interrupted, explore the possibility of continuing later to finish the interview. This may re-quire using a proxy or carrying out the interview with proxy assistance.
6. Record the answers carefully and if open ended ques-tions are included, record the answers verbatim.
7. Record the answers so that the participant does not focus on observing what you are writing.
8. Keep an active contact with the participant to build trust in face-to-face interviews. If computer assisted interviews are conducted, you need to keep frequent eye contact with the participant and show that you are listening and not just recording the answers by looking only at the computer.
9. It is essential that you give positive feedback at the end of the interview, so that the participant feels that his/her responses and time spent with the interview were valued.
10. At the end of the interview, record all problems en-countered during the interview: e.g. problems in com-munication skills, cognitive ability, hearing or reading, as well as the use of a proxy or the presence of family

B - 29
members and significant others during the interviews.This information can be used in the evaluation of the interviews.
4.2 Checking the self administered questionnairesIf the EHES core questions are included in self administered ques-tionnaires, which are mailed to the respondents before the ex-amination, they should be checked by the fieldwork staff before the physical measurements. Any additional questionnaires (with additional questions) that are filled in during the examination visit, may be checked later, at the end of the examination visit.
When checking the questionnaires:
1. Be non directive. Make sure that you will not affect the response, e.g. so that the respondent is not giving only socially desirable answers.
2. Don’ t comment on the responses or express any criti-cism (e.g. regarding participant’s lifestyles).
3. Try to fill in missing items: If the respondent has not filled in all the questions because he/she has had prob-lems in understanding the question or in choosing the answer, give further explanations. If the respondent has left the question open as he/she did not want to give an answer (e.g. finds the question too intimate), record this.
4. Correct items where the respondent has selected sev-eral options in questions where only one option is al-lowed: ask the subject to choose the one that applies most/corresponds best to his/her situation.
5. Correct if jump rules have not been followed: help the respondent to clarify the situation.
In case of computer assisted data collection (web questionnaires, CASI) these can be dealt within the computer program, e.g. al-lowing extra clarifications in wording, not allowing the respond-ent to select more than one option, not violating jump rules etc.
4.3 Quality assuranceQuality assurance of the interviews should include training for all interviewers with practical exercises, adequate supervision and feedback. If feasible, additional interviews and repeated ques-tions may be considered, as well as audit observations by field-work supervisors or coordinators. Data from the interviews and

B - 30
self-administered questionnaires should be checked at regular intervals during the fieldwork to monitor item response and iden-tify missing data for key items. The use of response categories such as “don’t know” or “refusal”, should be kept to a minimum. The data also needs to be checked for logical errors. In com-puter assisted data collection, logical checks as well as checks for the completeness of data (answers to all key questions) can be included in the data entry program, allowing immediate cor-rections.
References• Czaja R, Blair J (2005) Designing surveys. A guide to decisions and proce-
dures. 2nd edition. Sage Publications, Inc.• Davidsson G, Demarest S, Tolonen H, De Vitiis C, Primatesta P, Agafitei L.
European Health Interview survey Task Force II. Report on guidelines and quality criteria for population health survey design and methods. Eurostat, 2009. Available at https://circabc.europa.eu/sd/d/0d4d38ff-fb62-
• 4bf6-ba53-ed64063fc193/Task%20Force%20II%20report%20on%20• survey%20design%20%28November%202009%29.pdf. Accessed on 28
January 2013• Groves RM, Fowler FJ Jr., Couper MP, Lepkowski JM, Singer E, Tourangeau
R (2004) Survey methodology. Wiley.

PART B
EHES Manualhttp://www.ehes.info/manuals/EHES_manual/EHES_manual.htm
B - 31
Version:
5.1 Blood pressureHanna Tolonen1, Päivikki Koponen1
1 National Institute for Health and Welfare (THL), Helsinki, Finland
5.1.1 Rationale
Both the measurers and the participants should understand the rationale of the blood pressure measurement to motivate them to take part and carry out the measurements following the pro-tocol. A simple explanation is that blood pressure is the pressure exerted by circulating blood upon the walls of blood vessels. The blood pressure varies during day for each individual. When blood pressure results are presented, two values are given; systolic and diastolic blood pressure. Systolic blood pressure, higher of the two values, represents the pressure while the heart contracts to pump blood to the body and diastolic blood pressure, lower of the two values, represents the pressure when the heart relaxes between beats.
Elevated blood pressure is one of the key risk factors for cardio-vascular diseases, dementia and some kidney diseases. Popula-tion level measurement of blood pressure is used to estimate prevalence of hypertension and to monitor changes in the blood pressure levels in the population. The proportion of the popula-tions who’s blood pressure has been measured during the past year had been 68% in Austria (Steiner 2011) and 71% in Finland (Peltonen 2008). Also awareness of high/elevated blood pressure varies considerably between countries in Europe from less than 20% up to 80% (Pereira 2009).
5. Core measurements
28 January 2013

B - 32
Traditionally, blood pressure has been measured with the mer-cury sphygmomanometers. Recently, the banning of use of mer-cury devices in some European countries as well as EU level ini-tiatives to ban them in all EU countries, and the development of automated devices has increased their use also in health surveys. Also, due to toxicity of mercury, the purchase and use of mercury sphygmomanometers has become difficult in some countries. For the countries which have population level blood pressure trends based on mercury sphygmomanometer readings, it is important to maintain the same instrument or at least perform a validation study to see how comparable readings with the mercury sphyg-momanometer and the selected automated device are.
The standardization of the blood pressure measurement proce-dure is important to obtain as valid readings as possible. There are many issues that affect the blood pressure levels (Table 5.1).
Table 5.1 Activities affecting the blood pressure level and the average mag-nitude of the effect on systolic and diastolic blood pressure
Activity Systolic blood pressure (mmHg)
Diastolic blood pressure (mmHg)
Full bladder (Handler 2009, Campbell 1994)
Increases 10 to 15 mmHg, in case of uncomfortably dis-tended bladder up
to 50 mmHg
Increases 10 mmHg, in case of uncomfortably dis-tended bladder up
to 40 mmHg Not resting 3 to 5 minutes before measurement (Campbell 1999)
Increases 10 to 20 mmHg Increases 14 mmHg
Back/feet unsupported (Han-dler 2009)
Increases 5 to 15 mmHg Increases 6 mmHg
Supine posture instead of sitting posture (Netea 2003, Jameison 1990)
Increases 3 to 10 mmHg
Decreases 1 to 5 mmHg
Legs crossed (Keele-Smith 2001)
Increases 5 to 8 mmHg
Increases 3 to 5 mmHg
Participant talking during the measurement (Handler 2009, Schulze 2002)
Increases 10 to 15 mmHg
Increases 6 to 10 mmHg
Arm below heart level (O’Brien 2003, Netea 2003, Netea 1999)
Increases up to 10 mmHg
Increases up to 10mmHg
Arm above heart level (O’Brien 2003, Netea 2003, Netea 1999)
Decreases up to 10 mmHg
Decreases up to 10 mmHg
Physical exercise (Campbell 1999)
Increases up to 22 mmHg
Increases 7 to 8 mmHg
Left arm instead of right arm (Gould 1985)
Decreases 1 to 3 mmHg Increases 1 mmHg
Diaphragm of the stethoscope instead of bell (Mauro 1988) Decreases 2 mmHg Decreases 0 to 2
mmHg

B - 33
Cuff too small (O’Brien 2003, Handler 2009)
Increases 3 to 12 mmHg, in obese persons up to 30
mmHg
Increases 2 to 8 mmHg, in obese persons up to 30
mmHg
Cuff too large (O’Brien 2003) Decreases 10 to 30 mmHg
Decreases 10 to 30 mmHg
Cuff over clothing (Handler 2009)
Increases up to 5 mmHg
Arm unsupported during the measurement (O’Brien 2003, Handler 2009)
Increases 1 to 7 mmHg
Increases 5 to 11 mmHg
Some persons have tendency to have higher blood pressure lev-els when the blood pressure is measured in the physician’s office than at home, or when measured by a physician rather than by a nurse. This is called “white coat hypertension”.
5.1.2 Equipment
This Manual provides the measurement procedures for both the simple mercury sphygmomanometer and an automated device country, as the choice needs to be done in each country.
5.1.2.1 Measurement by the mercury sphyg-momanometer
Figure 5.1.1 Devices when measured by mercury sphygmomanometer

B - 34
Required devices are (see Figure 5.1.1):
• Simple mercury sphygmomanometer• Stethoscope• 3-4 cuffs of different sizes: small, medium and large
cuffs. Ideally also an extra large cuff (cuff for leg) should be available for obese persons.
• Non-elastic measurement tape• Stopwatch, digital wrist watch or watch with second
hand• Thermometer• Watch (for recording the time of the measurement)
5.1.2.2 Measurement by an automated blood pressure monitoring device
Figure 5.1.2 Devices when measured by automated device

B - 35
Required devices are (see Figure 5.1.2):
• An automated blood pressure monitoring device, which has passed the validation either based on the Interna-tional protocol (O’Brien 2002), Association for the Ad-vancement of Medical Instrumentation (AAMI) protocol (AAMI 1993) or the British Hypertension Society proto-col (O’Brien 1993). From the British Hypertension So-ciety web site (http://www.bhsoc.org/bp-monitors/bp-monitors/) can be found a list of validated automated blood pressure measurement devices with reference to the published validation results.
• 3-4 cuffs of different sizes: small, medium and large cuffs. Ideally also extra large cuff (cuff for leg) should be available for obese persons.
• Non-elastic measurement tape• Thermometer• Watch (for recording the time of the measurement)
5.1.2.3 Selection of cuffs for the survey
A set of 3 to 4 cuffs should be made available for the blood pres-sure measurement, to ensure as accurate measurement as pos-sible. The width of the bladder of the cuff should be at least 40% of the arm circumference and the length of the bladder at least 80% of the arm circumference. Each local manual should have a table listing which cuffs are used for specific arm circumferences.
Manufacturers have different cuff sizes on the market and espe-cially for the automated devices, often only the device specific cuffs can be used. Therefore, providing specific widths for the bladder of the cuffs is difficult. The British Hypertension Society (O’Brien 1997) recommends to use 3 cuffs:
• a small cuff: bladder size 12 x 18 cm• a standard cuff: bladder size 12 x 26 cm• a large cuff: bladder size 12 x 40 cm
and the American Heart Association (Perloff 1993) recommends to use 4 cuffs:
• a small adult cuff: bladder size 10 x 24 cm, arm cir-cumference 22-26 cm
• an adult cuff: bladder size 13 x 30 cm, arm circumfer-ence 27-34 cm

B - 36
• a large adult cuff: bladder size 16x38 cm, arm cir-cumference 35-44 cm
• an adult thigh cuff: bladder size 20 x 42 cm, arm circumference 45-52 cm.
Important is that the cuffs are used for correct arm circumfer-ence. This can be calculated as follows:
1. Number selected cuffs as 1 = narrowest cuff, 2 = 2nd narrowest cuff, ...
2. Measure the width of the bladder of cuffs. Let them be CUFF1, CUFF2, ...
3. Calculate the optimal arm circumference (OACi) for each cuff as: OACi=CUFFi/0.4
4. Calculate the mid-point of each pair of adjacent cuff sized (MPij): MPij=(OACi+OACj)/2
5. Use the mid-points of cut points for selection of differ-ent cuffs
Cuff 1 2 3 Cuff width cuff1 cuff2 cuff3
Arm circumference <=MP12 MP12<arm cir-
cumference (cm) < MP23
>=MP23
5.1.3 Exclusion criteria
Blood pressure should be measured from all participants except if a person has
• amputation of both arms,• cast on both arms,• open wounds/sores on both arms,• rash on both arms,• malformation of both arms preventing to place the cuff,
or• lymph node malfunction affecting both arms and pre-
venting to place the cuff properly.
5.1.4 Measurement procedures
5.1.4.1 Setting up the measurement site
The measurement site should be selected so that the room in which the blood pressure is measured is quiet and has a comfort-

B - 37
able temperature. The room temperature should be recorded for each participant. If there is any disturbance during the measure-ment, this should be noted on the recording form.
The measurement device should be placed on the table in front of the measurer so that she/he has a clear view on the device but that the participant cannot see the result from the device. If the mercury sphyg-momanometer is used, the mercury column of the device should be at the eye level of the measurer. As the mercury is moving on bar, looking at it from different angles (down verse or up verse) will provide different reading.
For the participant, there should be a chair which has a backrest. For the short partici-pants, a support for their feet should be available. The table or armrest of the chair should be on the right hand side of the participant.
5.1.4.2 Preparation for the measurement
5.1.4.2.1 General issues
Each blood pressure measurement device used in the survey should have an individual number. This number should be re-corded with each measurement.
Each measurer should have an individual identification, which is recorded with each measurement.
5.1.4.2.2 Instructions to the participants
Before coming to the examination, participants should be in-structed to abstain from eating, drinking (except water), smok-ing, and heavy exercise for one hour before the measurement. The participants should also be instructed to empty their bladder before the measurement as a full bladder affects blood pressure.
The subject should remove outer garments and all other tight clothing. Sleeves should be rolled up so that the upper arm is bare. The remaining garments should not be constrictive, and the blood pressure cuff should not be placed over any garment.

B - 38
5.1.4.2.3 Position of the subject
The participant should be in a sitting po-sition so that the arm and back are sup-ported. The participant’s feet should be resting firmly on the floor, not dangling. If the participant’s feet do not reach the floor, a platform should be used to sup-port them. If the participant cannot sit and the measurement is taken in su-pine posture, this should be recorded.
5.1.4.2.4 Position of the arm
The measurements should be taken on the right arm whenever possible. If not possi-ble, e.g. the arm has been amputated or has rashes, adhesive dressing, casts, open sores, hematomas, wounds, arterovenous shunt or any other intravenous access de-vice, or if axillary lymph nodes have been removed, the left arm should be used. The use of left arm and reason for this should be recorded.
The arm should be resting on the desk so that the antecubi-tal fossa (a triangular cavity of the elbow joint that contains a tendon of the biceps, the me-dial nerve, and the brachial artery) is at the level of the heart and palm is facing up. To achieve this position, either the chair should be adjusted or the arm on the desk should be raised, e.g. by using a pillow. The participant must always feel relaxed and comfortable.
5.1.4.2.5 Selection of the cuff for the participant
The greatest circumference of the upper arm is meas-ured using a non-elastic tape, with the arm relaxed and in the normal blood pressure measurement po-sition. The measurement should be read to the near-est centimeter and recorded. Select the correct cuff size

B - 39
for the arm circumference and record the size of the selected cuff.
Select the correct cuff size for the arm circumference and record the size of the selected cuff.
5.1.4.3 Number of measurements
Three measurements should be taken, one minute apart.
5.1.4.4 Measurement protocol
5.1.4.4.1 Mercury sphygmomanometer
1. The participant is asked to sit still for 5 minutes before starting the measurement. At this time the measure-ment procedure should be explained for the participant and emphasized that he/she should not move during and between measurements as that will increase the blood pressure.
2. The participant is asked not to talk during the meas-urements. It should be explained that talking during or between measurement will increase the blood pres-sure.
3. The arm circumference is measured and correct cuff size selected.
4. The cuff is placed on the right arm so that its bottom edge is 2-3 cm above the antecubital fossa. The top edge of the cuff should not be restricted by clothing. Make sure that the tubes from the cuff are not under the arm or otherwise tided up.
5. The radial pulse is palpated and the pulse rate is count-ed for 60 seconds, measured by a stop watch, a digi-tal wrist watch or watch with a sec-ond hand.

B - 40
6. Record 60-second pulse count and whether or not the pulse was regular.
7. Determine the peak inflation level:• The mercury column has to be at 0 level• The participant’s radial pulse is again palpated.• The cuff is inflated and the level of the top of the me-
niscus of the mercury column is noted at the point when the radial pulse disappears. The cuff is im-mediately deflated by completely opening the valve.
• The peak inflation level is determined by adding 30 mm to the pressure where the radial pulse disap-peared.
8. The venous blood pool in the forearm is normalized by waiting at least 30 seconds or by raising the arm for 5-6 seconds.
9. The brachial pulse is lo-cated and the bell of the stethoscope is placed imme-diately below the cuff at the point of maximal pulsation. If it is not possible to feel the brachial pulse, the bell of the stethoscope should be placed over the area of the upper arm immediately inside the bicep muscle tendon. The bell should not touch the cuff, rubber or clothing.
10. The cuff is rapidly inflated to the peak inflation lev-el and then deflated at a rate of 2 mmHg per second.
11. The pressure should be reduced steadily at this rate until the occurrence of the systolic level at the first ap-pearance of a clear repetitive tapping sound (Korotkoff Phase I) and the diastolic level at the disappearance of the repetitive sounds (Phase 5) have been observed. The cuff should then be rapidly deflated by fully open-ing the valve of the inflation bulb. Note: There may be a brief period (auscultatory gap) between systolic and diastolic pressure, when no Korotkoff sounds are heard. Thus the 2 mmHg/second deflation should be continued until the diastolic blood pressure is definitely established. If Korotkoff sounds persist until the cuff is completely deflated, a diastolic blood pressure of 0 is recorded.
12. The measurement is recorded to the nearest 2 mmHg. If the top of the meniscus falls halfway between

B - 41
two markings, the marking immediately above is cho-sen. The participant is not told his/her blood pressure at this point.
13. After waiting one minute to allow for the redistri-bution of blood in the forearm, a second measurement is made by repeating steps 9 to 11. The participant should not change position during this wait.
14. After another minute, the third measurement is made by repeating steps 10 to 12.
5.1.4.5.2 Automated blood pressure measurement device
The detailed measurement protocol for the automated blood pressure measurement devices is type specific and should be adjusted for the instructions provided by the manufacturer of the specific device. Here is the generic measurement protocol.
1. The participant is asked to sit still for 5 minutes before starting the measurement. At this time the measure-ment procedure should be explained for the participant and emphasized that he/she should not move during and between measurements as that will increase the blood pressure.
2. The participant is asked not to talk during the meas-urements. It should be explained that talking during or between measurement will increase the blood pres-sure.
3. The arm circumference is measured and correct cuff size selected.
4. Attach the air tube of the cuff to the air jack of the ma-chine. The cuff must be airless.
5. Make sure that the batteries are inserted or that the adapter is on.
6. The radial pulse is pal-pated and the pulse rate is counted for 60 seconds, measured by a stop watch, a digital wrist watch or watch with a second hand.
7. Record 60-second pulse count and whether or not the pulse was regular.
8. Press the “ON” button: all the symbols on the display will light up in order to check the display. Note: in some

B - 42
models, pressing “ON” will start the measurement. In case you are using such a device, omit steps 9 and 10.
9. All the symbols then disappear and the air release sym-bol begins to flash.
10. The cuff is placed on the right arm so that its bot-tom edge is 2-3 cm above the antecubital fossa. The top edge of the cuff should not be restricted by clothing. Make sure that the tubes from the cuff are not under arm or otherwise tide up.
11. Push the “START” button: the device automatically determines the correct level of inflation pressure.
12. When the target inflation values are reached, the air is automatically released. The value in the display counts downwards.
13. As soon as the monitor detects the pulse, the symbol begins to flash.
14. When the monitor no longer detects the pulse while the cuff pressure is dropping, the systolic and diastolic pressure are displayed.
15. The measurement is recorded as shown in the dis-play. In case the device gives an error code, this is recorded. The participant is not told his/her blood pres-sure at this point.
16. After one minute, the second measurement is made by repeating steps 11-15. The participant should not change position during this wait. Note: some automat-ed devices can be programmed to take 2 or 3 meas-urements automatically with one minute between the measurements. If device like that is used, measurer does not need to repeat steps 11-15 manually.
17. After another minute, the third measurement is made by repeating steps 11-15.

B - 43
5.1.5 Special issues when the measure-ment is taken at home of the participant
If the blood pressure is measured during the home visit, all the same requirements and procedures apply than for the meas-urements conducted at the specific examination site. Attention should be given to find a quiet place with optimal position for the participant and the measurer. All compromises in the setting and position should be recorded.
5.1.6 Information to be recorded
The information which should be recorded for each participant about their blood pressure measurement includes issues relating to the measurement situation: posture of the subject, activities just prior to the measurement, measurement setting and to the actual measurement. Specified issues to be recorded are given in the recording form (see Part B, Section 5.6).
5.1.7 Feedback to participants
The participant should be informed about his/her blood pressure levels and if their blood pressure needs to be controlled. They should receive a copy of their recordings with written instruc-tions, when needed. An example of the feedback form is given in Part B, Section 5.8.
5.1.8 Safety
When the mercury sphygmomanometer is used, special attention should be paid to handling of the device. It should be made sure that the manometer will not be dropped or treated in any way that could result in damage of the manometer.
In case of mercury spillage:
• Never use a vacuum cleaner, mob or broom to clean up a mercury spill.
• Evacuate the room and ventilate the room until the spill is cleaned up.
• When cleaning the spilled mercury• Remove your watch and all other jewelry to prevent
mercury from bonding to the medal;• Use rubber gloves, protect your shoes and when
ever possible use face mask and protective eye-wear;

B - 44
• Collect all the small droplets of mercury into a con-tainer (an eyedropper can be used to collect the smallest peaces), which can be sealed;
• Use the flashlight to look all around in the areas of the spill. The light will reflect off the shiny mercury beads and make it easier to see them.
• You can wrap tape around your fingers to collect small pieces of mercury.
• Sprinkle sulfur powder on the spill area after clean-ing up beads of mercury; a color change from yel-low to brown indicates that mercury is still present and more cleanup is needed;
• Sprinkle zinc flakes or copper flakes to amalgam-ate (clump together) any small amounts of mercury that remain.
• Back all the materials used to collect the mercury and the container with mercury into zip-lock plastic bag marked with mercury waste. Dispose properly.
• Wash your hands after cleaning the mercury.• Continue ventilating the room.
It is recommended that each room, where the mercury sphyg-momanometer is used has a mercury spill kit. These kits can be self made or bought. The mercury spill kit usually includes:
• Rubber gloves• Face mask• Protective eye-wear• Container, which can be sealed• Eyedropper• Tape• Plastic bag with zip-lock• Flashlight• Sulfur powder• Zinc or copper flakes
5.1.9 Quality assurance
Quality assurance of blood pressure measurements includes the following components:
• Training of the personnel.

B - 45
• Checking the equipment and regular calibration of the devices.
• Audit visits and evaluation of the measurement data during the field work
5.1.9.1 Training of the measurers
Training of the blood pressure measurers should include:
1. Theory • Why it is important to measure in population• Why blood pressure measurement has to be stand-
ardized.• What are the implications of the changes in the pro-
cedure to the blood pressure levels.2. Practical training ideally with people with different
blood pressure levels, and in the presence of a super-visor who gives feedback.
5.1.9.2 Checking the equipment and regular cali-bration of the devices
All equipments need to be checked regularly. Each check and its outcome is recorded to the log book. If any problems are ob-served during the checks, the device in question is replaced and also this is recorded to the log book.
5.1.9.2.1 Daily checks or when new examination place is set up
Every day, before starting the examinations, or when the exami-nation site is set up in new place, the following issues from the equipment are checked:
• From the mercury sphygmomanometer:• The shape of the meniscus (top of the column of
mercury) is a smooth, well-defined curve.• Check that the mercury raises easily in the tubing
and the mercury does not bounce noticeably when inflated.
• Disconnect the inflation system from the cuff and confirm that the meniscus of the mercury in the glass manometer tube is zero.
• Check for cracks in the glass tube.

B - 46
• Check the screw at the top of the calibrated glass tube to make sure it is securely in place.
• Check the coiled air tube for cracks, tears.• From an automated device:
• Make sure that the AC adapter cord of the device unit is securely plugged in or in case the device is operated by batteries that batteries have power.
• Check the air tube for cracks, and confirm that the tube is securely attached to the device.
5.1.9.2.2 Weekly checks or when a new examination site is set up
Every week, or when ever the examination site is set up in new place, the following issues from the equipment is checked:
• From cuffs: • Cuff material is clean, intact.• Rubber tubing and inflation bulb (in mercury sphyg-
momanometer) is smooth, has no cracks or tears.• Pressure control valve opens and closes smoothly
without sticking (mercury sphygmomanometer).• From stethoscopes (mercury sphygmomanometer)
• Stethoscope has no cracks in the tubing.• Earpieces of the stethoscope are securely attached.• Head of the stethoscope is securely attached to tub-
ing.• Diaphragm is secure, no cracks.
• From mercury sphygmomanometer• Test inflation system for air leaks:
• Connect each cuff size to the inflation system and wrap it around the corresponding calibration cylinder;
• Inflate to 250 mmHg;• Open valve and deflate to 200 mmHg and close
valve; and• Wait for 10 seconds; if mercury column drops
more than 10 mmHg, there is an air leak in the system; and
• If a leak is detected, change the cuff, check the coiled tubing and repeat the test.

B - 47
5.1.9.3 Quality control by coordinating office during the fieldwork
Quality control during the fieldwork includes actions to be carried out in the field by measurers regularly and keeping the log book of the regular checks as well as actions conducted by the coordi-nating office.
The coordinating office/fieldwork coordinators/supervisors should carry out audit visits to the fieldwork site to monitor the meas-urements. In addition to the monitoring of the measurement practice, the coordinating office should monitor the quality of the measurements by checking the data. In regular intervals, which are dependent on the number of measurements conducted daily, the following should be checked from the data:
A) When the mercury sphygmomanometer is used for each meas-urer:
1. The distribution of terminal digits for systolic and dias-tolic measurements (separately) should be checked, to determine if• some measurers tend to prefer some digits over
others (for example, zero preference), indicating unreliable detection of Korotkoff sounds;
• some measurers use odd digits which, according to the protocol, should not be used.
2. The mean and standard deviation of the systolic and diastolic blood pressure measurement should be checked, to determine if the measurers are producing readings that are systematically lower or higher than the team average.
3. The proportion of identical measurements for the same participants (systolic and diastolic separately), to de-termine if the measurers are really doing all 3 meas-urements for each subject.
b) When an automated device is used:
1. For each device, the mean and standard deviation of the systolic and diastolic blood pressure measurements should be checked, to determine if a device produces systematically lower or higher readings than the aver-age.
2. For each measurer, the proportion of identical meas-urements for same participants (systolic and diastolic

B - 48
separately), to determine if the measurers are really doing all 3 measurements for each subject.
3. The mean and standard deviation of the systolic and diastolic blood pressure measurement should be checked, to determine if the measurers are producing readings that are systematically lower or higher than the team average. Measurer effect is also possible with automated devices: the nurses can e.g. have differ-ences in how they make the subjects feel relaxed and comfortable.
References• AAMI. Electronic or automated sphygmomanometers. Association for the
Advancement of Medical Instrumentation, 1993• Campbell NRC, McKay DW, Chockalingam A, Fodor JG. Errors in assess-
ment of blood pressure: patient factors. Revue Canadienne de Santé Pub-lique 1994;85(Suppl 2): S12-S17
• Campbell NRC, McKay DW. Accurate blood pressure measurement: Why does it matter? CMAJ 1999; 161(3):277-279
• Gould BA, Hornung RS, Kieso HA, Altman DG, Raftery EB. Is the blood pressure the same in both arms? Clin. Cardiol. 1985; 8: 423-426
• Handler J. The importance of accurate blood pressure measurement. The Permanente Journal 2009; 13(3): 51-54
• Jamieson MJ, Webster J, Seren P, Jeffer TA, Scott AK, Robb OJ, Lovell HG, Petrie J. The measurement of blood pressure: sitting or supine, once or twice? Journal of Hypertension 1990: 8; 635-640
• Keele-Smith R, Price-Danie C. Effects of crossing legs on blood pressure measurement. Clinical nursing research 2001; 10(2): 202-213
• Mauro AMP. Effects of bell versus diaphragm on indirect blood pressure measurement. Heart & Lung 1988; 17: 489-94
• Netea RT, Lender JWM, Smits P, Thien T. Arm position is important for blood pressure measurement. Journal of Human Hypertension 1999; 13: 105-109
• Netea RT, Lender JWM, Smots P, Thien Th. Both body and arm position significantly influence blood pressure measurement. Journal of Human Hy-pertension 2003; 17: 459-462
• O’Brien E, Petrie J, Little W, de Swiet M, Padfield PL et al. The British Hy-pertension Society protocol for the evaluation of blood pressure measuring devices. Journal of Hypertension 1993; 11(Suppl 2): S43-S62
• O’Brien E, Petrie J, Littler WA, de Swiet M et al. Blood pressure measure-ment: recommendations of the British Hypertension Society, 3rd edn. Lon-don: BMJ Publishing Group; 1997
• O’Brien E, Pickering T, Asmar R, Myers M, et al. Working group on blood pressure monitoring of the European Society of Hypertension Internation-al protocol for validation of blood pressure measuring devices in adults. Blood Pressure Monitoring 2002; 7: 3-17
• O’Brien E, Asmar R, Beilin L et al. European Society of Hypertension rec-ommendations for conventional, ambulatory and home blood pressure measurement. Journal of Hypertension 2003; 21: 821,848
• Peltonen M, Harald K, Männistö S, Saarikoski L et al. Kansallinen FINRISKI 2007-terveystutkimus. Tutkimuksetn toteutus ja tulokset: taulukkoliite. Publications of the National Institute for Public Health 2008; B35/2008

B - 49
• Pereira M, Lunet N, Azevedo A, Barros H. Differences in prevalence, aware-ness, treatment and control of hypertension between developing and de-veloped countries. Journal of Hypertension 2009; 27: 963-975
• Perloff D, Grim C, Flack J et al. Human blood pressure determination by sphygmomanometry. Circulation 1993; 88: 2460-2470
• Schulze MB, Kroke A, Saracci R, Boeing H. The effect of difference in meas-urement procedure on the comparability of blood pressure estimates in multi-centre studies. Blood Pressure Monitoring 2002; 7: 95- 104
• Steiner S, Dorner TE, Fodor JG, Kunze M, Rieder A. Blood pressure aware-ness in Austria: Lessons from a 30 years horizon. American Journal of Hypertension 2011; 24(4): 408-414

B - 50
5.2 HeightJohanna Mäki-Opas1, Päivikki Koponen1, Hanna Tolonen1
1 National Institute for Health and Welfare (THL), Helsinki, Finland
5.2.1 Rationale
It is important to explain to the participant the rationale and im-portance of the height measurement. This will motivate him/her to take part in this particular measurement. It can be stressed that the measurement takes only a minute. Height will be used when calculating Body Mass Index (BMI), which is a widely used way to measure obesity. BMI is defined as the individual’s body weight divided by the square of their height. Obesity is a known risk factor for many chronic diseases. There is a clear association between obesity and type 2 diabetes, hypertension and dyslipi-demia. BMI is needed to estimate the prevalence of the obesity in the population. Time-trends can be followed by repeated sur-veys with standardized methods.
5.2.2 Measurement protocol
5.2.2.1 Equipment
• Stadiometer (portable or fixed)
• Steps• Carpenter's level• Standardized length rods
(i.e. 100 cm and 200 cm)
5.2.2.2 Setting up the measurement site
The measurement site should be private.
The fixed stadiometer or height rule is attached vertically to a hard flat wall surface with the base at floor level. A carpenter’s level is used to check the vertical placement of the rule. If the height rule does not have a fixed rod, it is recommended to mark with tape or a marker the straight line for the rule down to the floor.

B - 51
When a portable, stand-alone stadiom-eter is used, the device is assembled based on the instructions of the device. A carpenter’s level is used to check the vertical and horizontal placement of the stadiometer. If needed, the portable stadiometer is also fixed to the floor or wall, so that it will not move when par-ticipant steps on and off.
The floor surface under the height rule must be hard. If no such floor is avail-able, a hard wooden platform should be placed under the base of the height rule.
5.2.2.3 Exclusion criteria
Height should be measured from all participants, except if a per-son:
• is immobile or in a wheelchair;• has difficulties in standing straight;• has a hairstyle or head gear (e.g. turban) which pre-
vents the proper measurement;• is taller than the maximum height of the stadiometer;• refuses.
The reason for the exclusion should be recorded.
5.2.2.4 Measuring height
1. Ask the participant to remove his/her shoes, heavy outer garments, and hair ornaments and head dress, where culturally acceptable.
2. Ask the participant to stand with his/her back to the height rule or to the wall.
3. Check that the back of the head, shoulder blades, but-tocks and heels are touching or in line with the stadiom-eter or the wall.
4. Ask the participant to stand in a natural straight standing

B - 52
position, weight evenly on both feet and arms hanging loosely by his/her side.
5. Ask the participant to look straight ahead. The head should be positioned so that the Frankfort Plane is horizontal: the top of the external auditory meatus (ear canal) is in line with the inferior margin of the bony orbit (cheek bone).
6. Ask the participant to keep his/her eyes focused ahead, to breathe in deeply and to stretch to his/her full height.
7. Check the standing position from the front in order to verify that the participant is standing straight and in the middle of the stadiometer.
8. Lower the head piece of the stadiometer or the sliding part of the measuring rod so that the hair is pressed flat.
9. When the participant is taller than you are, use steps so that you can read the height rule properly.
10. Record the number of the device, and the height to the resolution of the stadiometer, preferably to the nearest mil-limeter. Record also, when needed, all issues affecting the measurement results (e.g. hair style).
11. Tell the participant his/her height and record it on his/her feedback form.
When the measurement is performed at the participant’s home, the same proto-col should be followed as closely as pos-sible. The position of the device and the participant should be carefully checked. Any deviations from the protocol should be recorded.
5.2.3 Quality assurance
Quality assurance of height measurement includes the following components:

B - 53
• Training of the personnel;• Checking the equipment and reg-
ular calibration of the devices;• Audit visits and evaluation of the
measurement data during the field work.
5.2.3.1 Training of the measurers
See Part A, Chapter 15. on this Manual for more detailed information about the training.
Main points in the training are:
• Each measurer should have enough time to practice before field work, and she/he should receive supervi-sion and feedback.
• If the survey is prolonged or when deviations are ob-served, refresher sessions about the measurement should be organized, at least at three monthly inter-vals.
• There should be explicit, detailed guidelines at the sur-veys site for performing the measurement.
5.2.3.2 Checking and calibration of the equipment
All equipment should be checked regularly. Each check and its outcome is recorded in the log book. If any problems are ob-served during the checks, the device is replaced and this is re-corded in the log book.
Daily checks or when new examination site is set up
The following issues should be checked:
• The horizontal and vertical placement of the height rule is checked daily by using the Carpenter’s level.
• The height of the rule is checked by using the stand-ardized length rod when setting up a new examination site.
During the fieldwork
If the portable stadiometer can be moved during the day, the ver-tical and horizontal placement of the device should be checked at

B - 54
regular intervals, depending on the device. If it is possible that a fixed height rule moves during the day (for example it is taped on the wall) it should be checked with standardized rod at regu-lar intervals and corrected if the error is greater than 2 mm. The results of calibration and the checking should be recorded in the survey log book.
5.2.3.3 Quality control by coordinating office during the fieldwork
Quality control during the fieldwork includes actions to be carried out in the field by measurers regularly and keeping the log book of the regular checks as well as actions conducted by the coordi-nating office.
The coordinating office will do audit visits to the field to monitor the measurements. Additional to the monitoring of actual meas-urements, the coordinating office will monitor the quality of the measurements based on data:
• distribution of terminal digit of the height measure-ment by measurer;
• mean and standard deviation of the height measure-ment by measurer;
• reasons why measurements were not done;• daily work load (number of measurements per day by
measurer).

B - 55
5.3 WeightJohanna Mäki-Opas1, Päivikki Koponen1, Hanna Tolonen1
1 National Institute for Health and Welfare (THL), Helsinki, Finland
5.3.1 Rationale
It is important to explain to the participant the rationale and im-portance of the weight measurement. This will motivate him/her to take part in this particular measurement. It can be stressed that the measurement takes only a few minutes. Weight will be used when calculating Body Mass Index (BMI), which is a widely used to measure obesity. BMI is defined as the individual’s body weight divided by the square of their height. Obesity is a known risk factor for many chronic diseases and there is a clear asso-ciation between obesity and type 2 diabetes, hypertension and dyslipidemia. BMI from all participants is needed to estimate the prevalence of obesity in the population. Time-trends can be fol-lowed after repeated surveys with standardized measurements.
5.3.2 Measurement protocol
5.3.2.1 Equipment
• Balanced beam scale or an electronic scale (with EC type-examination cer-tificate for medical use) or a validated bioimped-ance (body composition) scale. The scale should comply with the direc-tive 93/43/ECC June 14 1993 (http://eur-lex.europa.eu/LexUriServ/LexUriServ.do?uri=CONSLEG:1993L0042:20071011:en:PDF), updated in 2007/47*EC Septem-ber 2007 (http://eur-lex.europa.eu/LexUriServ/LexUriServ.do?uri=OJ:L:2007:247:0021:0055:en:PDF). There should be a a sticker at the bottom of the scale with a code and symbol to specify that the

B - 56
device complies with these di-rectives (CE 09 CE 0109) and marking of precision class III, specifying that the device has been calibrated according to the EC directive.• Calibration weights (e.g. 10 kg up to 100kg)• A carpenter’s level (if the scale does not include an in-
built level) 5.3.2.2 Setting up the measurement site
The measurement site should be private.
The scales should be placed on a hard floor surface. The floor should not be carpeted or otherwise covered with soft mate-rial. If there is not such floor available, a hard wooden platform should be placed under the scale.
A carpenter’s level (portable or included in the scales) should be used to verify that the scale is horizontal.
Device-specific instructions for setting up the scales should be followed.
5.3.2.3 Exclusion criteria
Weight should be measured from all participants, except if a per-son
• is immobile or in a wheelchair,• has severe difficulties in standing steady,• is heavier than the upper limit of the scale,• refuses.
The reason for exclusion should be recorded. If the participant is pregnant, pregnancy weeks should be recorded, and self-report-ed weight before pregnancy should be recorded separately from the measured weight.
5.3.2.4 Measuring weight
Ask the participant to undress to his/her underwear. If the par-ticipant refuses or feels uncomfortable undressing, ask him/her to take off the shoes, heavy garments such as jacket, pullover,

B - 57
belts, heavy jewellery and to empty his/her pockets. Record the clothing worn during the measurement.
Balanced beam scale
1. Ask the participant to stand in the centre of the plat-form, arms hanging loosely at his/her sides.
2. Check that the weight is distributed evenly on both feet.
3. Ask the participant to stand still facing ahead (not look-ing down).
4. Move the weights until the beam balances, meaning that the arrows are aligned.
5. Record weight to the reso-lution of the scales.
Electronic scale
1. Follow the device specific instructions for turning on the scales.
2. Ask the participant is asked to stand in the cent-er of the platform arms hanging loosely at his/her sides.
3. Check that the weight is distributed evenly on both feet. For most persons this means a small gap between the heels.
4. Ask the participant to stand still facing ahead (not looking down).
5. For the weight measurement, follow the device-specific instructions.
6. Record the weight to the resolution of the scales.

B - 58
Bioimpedance device
1. Follow the device-specific instructions, check the posi-tion of the participant (see above).
2. Record the weight to the resolution of the scales.
Weight is also written on the participant’s feedback form. The measurer can have a table (or this can be in the computerized data entry program) where she/he can check the BMI for the participant. The measurer can explain for example: “Your BMI means that you are underweight, normal, little overweight or obese etc.”
When the measurement is performed at the participant’s home, the same protocol should be followed. The position of the device and participant should be carefully checked. Any deviations from the protocol should be recorded.
5.3.3 Quality assurance
The quality assurance of weight meas-urement includes the following compo-nents:
• Training of the personnel,• Checking the equipment and
regular calibration of the de-vices,
• Audit visits and evaluation of the measurement data dur-ing the field work.
5.3.3.1 Training of the measurers
See Part A, Chapter 15 of the EHES Manual for more information about training.
Main points in training:
• Each measurer should have enough time to practice with adequate supervision and feedback before taking actual measurements.
• If the survey is prolonged or if any deviations from the protocol are observed, refresher sessions about tak-ing the measurements should be organized at three monthly intervals or more frequently.

B - 59
• There should be explicit guidelines at the survey site for performing the measurement.
5.3.3.2 Calibration and checking the equipment
All equipment needs to be checked regularly. Each check and its outcome is recorded in the log book. If any problems are observed during the checks, the device is replaced and this is recorded to the log book.
Daily checks or when new examination site is set up
Balanced beam scale
• Check that the scale is horizontal (by carpenters level or level in the device)
• Balance with both sliding weights at zero and the bal-ance bar aligned.
• Use calibration weights to check the scale when setting up the examination site. 10 kg weights are placed one by one on the scale up to 100 kg and checked that the scale works properly. If the error is greater than 0.2 kg the scale should be corrected or changed.
Electronic scale
• Check that the scale is horizontal (by carpenters level or level in the device)
• If the scale is operated on batteries, check that there is voltage on the batteries and that spare ones are on hand. Many of the electronic scales automatically in-form when the voltage of the batteries is running low. Follow the device-specific instructions on this.
• If the scale is operated via a power cord, check that the power cord is properly attached to the device.
• Check the zero level of the scale.• Use calibration weights to check the scale when setting
up the examination site. 10 kg weights are place one by one on the scale up to 100 kg and checked that the scale works properly. If the error is greater than 0.2 kg the scale should be corrected or changed.
Note: Standardized weights should be used to check the scale whenever it is feasible, both during the fieldwork and when meas-urements are conducted in home setting. It should be done at regular intervals (weekly or monthly) depending on the survey setting and the length of the fieldwork period.

B - 60
5.3.3.3 Quality control by coordinating office during the fieldwork
Quality control during the fieldwork includes actions to be carried Quality control during the fieldwork includes actions to be carried out in the field by measurers regularly and keeping the log book of the regular checks as well as actions conducted by the coordi-nating office.
The coordinating office will do audit visits to the field to monitor the measurements. Additional to the monitoring of actual meas-urements, the coordinating office will monitor the quality of the measurements based on data. At regular intervals, the following should be checked from the data:
• The distribution of the terminal digit of the measure-ment by measurer;
• The distribution of the terminal digits for full kilograms by measurer;
• Mean and standard deviation of the measurement by measurer;
• Reasons why measurements were not done;• Daily work load (number of measurements per day) by
measurer.

B - 61
5.4 Waist circumferenceJohanna Mäki-Opas1, Päivikki Koponen1, Hanna Tolonen1
1 National Institute for Health and Welfare (THL), Helsinki, Finland
5.4.1 Rationale
It is important to explain to the participant the rationale and importance of the waist circumference measurement. This will motivate him/her to take part to this particular measurement. It can be stressed that the measurement takes only a few minutes. Waist circumference is used as an indicator of abdominal obesity. It is significantly associated with the risk of CVD incidence and type 2 diabetes. By measuring waist circumferences from all par-ticipants it is possible to estimate the prevalence of abdominal obesity in the population and to follow time-trends after repeated surveys with standardized measurements.
5.4.2 Measurement protocol
5.4.2.1 Equipment
• Non-elastic measurement tapes (200cm and 250cm)
• The full body length mirror, when ever feasible
5.4.2.2 Setting up the measurement site
The measurement site should be private.
If a mirror is used, it is placed against the wall or if the mirror stands on its own feet, it is placed next to the measurement place. The measurer should have a chair with wheels to sit on when checking the correct position of the tape.
5.4.2.3 Exclusion criteria
he waist circumference should be measured from all participants, except when the person:
• is immobile or in a wheelchair,• has difficulties standing straight,• pregnant women (over 20 pregnancy weeks) may be
excluded.

B - 62
• has a hernia, a colostomy or ileostomy (wears a stoma bag/ostomy bag), recent abdominal surgery or other problems/devices which prevent the proper measure-ments,
• refuses.
The reason for exclusion and pregnancy status (in weeks) should be recorded.
5.4.2.4 Measuring waist circumference
1. Ask the participant to reveal the waist, by loosening the belt, lowering the pants/skirt and lifting the shirt. Nothing should strain the waist. The measurement is done on bare skin. If the participant feels uncomfort-able or refuses to undress, take the measurement over light clothing and record this.
2. Ask the participant to stand in front of you, while you are sit-ting. If a mirror is used, you should have a clear view of it.
3. Ask the participant to stand with their weight evenly bal-anced on both legs, a small gap between the legs.
4. Check that the participant’s hands are hanging loosely beside the body.5. Palpate the waist to find the right measurement place: midway between the lower rib margin and the iliac crest. Check the position from both the right and left sides of the body.6. Position the measuring tape at the participant’s waist or ask him/her to pass
the tape around.7. Check that the measuring tape is horizontal for example by moving with the chair to see to the back of the participant, asking the participant to turn around or checking from the mirror. 8. Hold the measuring tape firmly, ensuring the horizontal position is maintained. The tape

B - 63
should not be too tight or too loose.You should be able to place one finger between the tape and the subject’s body.
9. Ask the participant to breathe normally; take the reading at the end of light exhalation.
10. Record the waist circum-ference to the nearest mil-limeter.
11. Also record the waist cir-cumference also on the par-ticipant’s feedback form. The recommended maximum waist circumference for men and women can also be given.
In some cultures and for some persons undressing may not be acceptable. This should be respected, but no tight garments in-tended to alter the shape of the body should be kept on. The waist circumference can be measured over light underwear, like a thin shirt. Any exceptions on dressing should be recorded.
When the measurement is performed at the participant’s home, the protocol should be followed as closely as possible. Any devia-tions from the protocol should be recorded.
Self-reported waist circumference is not acceptable.
5.4.3 Quality assurance
The quality assurance of waist circumference measurement in-cludes the following components:
• Training of the personnel;• Checking the equipment and regular calibration of the
devices;• Audit visits and evaluation of the measurement data
during the field work.
5.4.3.1 Training of the measurers
All measurers should receive training before the fieldwork. The main points in the training are:

B - 64
• Each measurer should have enough time to practice, including with overweight and obese persons, and with adequate supervision and feedback.
• If the survey is prolonged or when deviations from the standards are observed, refresher sessions about the measurement should be organized, e.g. at three monthly interval.
For more detailed information, see Part A, Chapter 15. Training programme.
5.4.3.2 Checking and calibration of the equip-ment
All equipment needs to be checked regularly. Each check and its outcome is recorded in the log book. If any problems are ob-served during the checks, the tape is replaced and this is also recorded in the log book.
Daily checks and when a new examination site is set up
• the condition of the measurement tape is checked vis-ually. If there are cracks or the tape is torn, it should be replaced.
Monthly checks
• The length of the measurement tape should be meas-ured by using calibrated length rods. If the measuring tape is stretched, it should be replaced.
5.4.3.3 Quality control by coordinating office during the field work
Quality control during the fieldwork includes actions to be car-ried out in the field by measurers regularly and keeping the log book of the regular checked as well as actions conducted by the coordinating office.
The coordinating office will do audit visits to the field to moni-tor the measurements. In addition to monitoring actual meas-urements, the coordinating office will monitor the quality of the measurements based on data:
• The distribution of terminal digit of the measurements by measurer.
• Mean and standard deviation of the measurements by measurer.

B - 65
• Reasons why measurements are not done.• Daily work load (number of measurement per day by
measurer).

B - 66
5.5 Laboratory instructions for blood samplesGeorg Alfthan1, Hanna Tolonen1, Laura Lund1 and Jouko Sundvall1
1 National Institute for Health and Welfare (THL), Helsinki, Finland
5.5.1 Rationale
The purpose of a European health survey is to collect data and biological samples from a random population. The main goal is made up of the core measurements but additional measurements will probably be done at a later phase. Therefore special atten-tion is paid to pre-analytical conditions more demanding than perhaps are needed for the core measurements.
• The core measurements are serum total cholesterol, HDL-cholesterol and plasma glucose.
• Potential additional measurements covered by this manual are whole blood HbA1c and DNA extraction from whole blood.
• All serum and plasma aliquots as well as the whole blood tubes are frozen at site.
Generally one nurse/laboratory technician/phlebotomist is need-ed per site. Laboratory work comprises two phases:drawing of blood and the processing of blood samples. Sample processing also includes transferring storage tubes into the storage boxes and their freezing.
• All serum and plasma aliquots in storage tubes as well as whole blood collection tubes are transferred directly after processing into a -20ºC freezer. Frozen samples are sent in one or more batches in dry ice to the NHES laboratory, where they are stored long term at a minu-mum temperature of -70ºC. The time from phlebotomy to the long term storage should not exceed 1-2 months.
5.5.2 Equipment and apparatus
5.5.2.1 Equipment for drawing of blood samples
The blood sampling tubes should all be evacuated and provided by the same national supplier. This is to ensure that the tubes, needles and holders/adapters are compatible with each other.

B - 67
Equipment
• Blood sampling vacuum tubes• Needle for vacuum tubes• Needleholder/adapter into which the needle is pushed.
It may contain an easy mechanism to release the nee-dle.
• Needle disposal container• Stasis• Disinfection solution• Swabs, gauze pads• Skin tape• Disposable gloves, latex and nitrite• Centrifuge tubes for use in case of incomplete clotting
of sera and re-centrifugation.• Thin glass or plastic rods to manipulate an incomplete
blood clot
Also if possible, the chair on which participant sits during the blood drawing should have arm rests and no wheels. Arm rests help to place the arm for blood drawing but also they will support participant (prevent falling side ways) in case he/she faints.
5.5.2.2 Other equipment
Blood collection tubes
• Serum evacuated tubes containing gel (10/8 ml) or plain serum tubes (10/9 ml)
• Fluoride-citrate plasma tube (5/2 or 5/3 ml)• EDTA plasma tube (5/3 or 5/4 ml)• EDTA plasma tubes (10/9 ml)
Storage tubes
• Cryotube 1.5 ml for -70 °C storage• Plastic tube 3 ml for -20 °C storage• Tube for pooling serum 15 ml
Storage boxes
• storage box for 1.5 ml cryotubes• storage box for 3 ml plastic tubes

B - 68
• storage box for small whole blood tubes• storage box for large whole blood tubes
Pipets
• Pipet with disposable tip for transferring 1.5 ml. Also spare pipet should be available.
• Disposable tips• Disposable Pasteur- pipets
5.5.2.3 Apparatus
Centrifuge
Adjusting speed
• Blood tubes, either with or without gel should be cen-trifuged using 2000-2200 g RCF.
• Depending on the centrifuge, allow 1 min extra time for it to reach maximal rate and 1 additional min for brak-ing, together 12 min.
• The centrifuge manual should be available at the labo-ratory site.In case samples of several subjects are cen-trifuged at the same time, it must be ensured that the time from phlebotomy to centrifugation remains be-tween 30-60 min for all tubes. Care must be taken that tubes will not get mixed by mistake.
Have a few empty blood sampling tubes ready to be used as counterbalances in case you have to centrifuge an odd number of tubes. Use tap water for balancing.Calculation of rpm
, where
• rpm = rotations per minute • RCF = relative centrifugal force (g) • r = radius (cm) from the bottom of a test tube to the
centre of the rotor
A spare centrifuge should be available at site or arranged in ad-vance with a health care centre, hospital etc.

B - 69
Figure 5.5.1. Blood sampling tubes from one subject are awaiting centrifu-gation on the right side and the tube rack on the left is awaiting centrifuged tubes.
Freezer
• The temperature of the freezer is measured with a calibrated min-max thermometer. The temperature is documented daily on a form. If the temperature rises above -15 ºC and remains there for several hours, the freezer must be replaced. The samples stored at an incorrect temperature must be documented.
• The temperature forms are returned to the NHES Lab after the survey
• The nominal temperature of the freezer should be set at -20 to -22ºC.
5.5.3 Exclusion criteria
Blood samples should be collected from all participants, except if a person has
• a chronic illness which restricts taking of all or part of the blood samples according to the protocol,
• anemia (Hb below 100 g/l),• doubts about the blood volume to be taken.
Also if a person refuses by any reason from blood sample collec-tion, the wish of the participant must be honored.
5.5.4 Blood drawing procedures
5.5.4.1 Setting up the blood drawing site
The blood tubes are arranged in the designated tube rack accord-ing to the sampling chart, Figure 5.5.3. The tube rack is to be

B - 70
used for tubes intended for only one subject. Blood tubes should not be labelled before venipuncture as tubes may have to be re-placed due to vacuum failure or other defect. It is advisable to have some extra tubes available if replacing is needed.
Figure 5.5.2. Site of blood drawing
Figure 5.5.3. Blood sampling chart
A personal label sheet is reserved for each participant by the nurse/lab technician. The laboratory form is for documenting all events relating to blood sampling and processing, see Part B, Section 5.6 of the EHES Manual.

B - 71
5.5.4.2 Preparing for the blood drawing
5.5.4.2.1 General information
Each person participating in the health survey is expected to give blood samples at least for the core measurements including se-rum and plasma (two blood tubes) and one whole blood for DNA, three blood tubes altogether.
During the entire survey, the blood withdrawal, processing, stor-age and transport are to be maintained as uniform as possible by adhering to the manual and instructions. This ensures that the role of pre-analytical factors are as small as possible. For exam-ple, the order and type of blood tubes are to be taken for each subject according to the blood sampling chart, Figure 5.5.3.
5.5.4.2.2 Fasting
The serum samples for total cholesterol and HDL cholesterol can be taken at any time of the day, with the subject non-fasting. If measuring fasting glucose, lipoprotein fractions and triglycerides, the samples should be collected after a fasting period of at least 8 hours and at most 14 hours (excessively long fasting causes major changes in energy metabolism, with implications for blood triglycerides). In practice, this means that fasting must be over-night and that the samples can only be taken in the morning and can only be expected from persons who are invited to undergo the examination in the morning. In all cases the length of time from the last meal in full hours should be recorded to the sample collection form.
5.5.4.2.3 Posture of the subject and arm to be used
All blood samples should be drawn with the subject in a sitting position preceded by a 10-15 min rest. In case participant tells that he/she easily faints during the blood collection, the sample can be taken on supine posture due to safety of the participant. This exception should be recorded on sample collection form.
Preferably, blood should not be collected from the arm that is used for blood pressure measurement, (i.e., blood should usually be drawn from the left arm).
5.5.4.2.4 Use of a tourniquet
Prolonged venous occlusion can cause changes in concentrations of blood constituents. Therefore, the use of a tourniquet should be minimized. If a tourniquet is used to search for a vein, it should be released before withdrawal of blood begins. In any
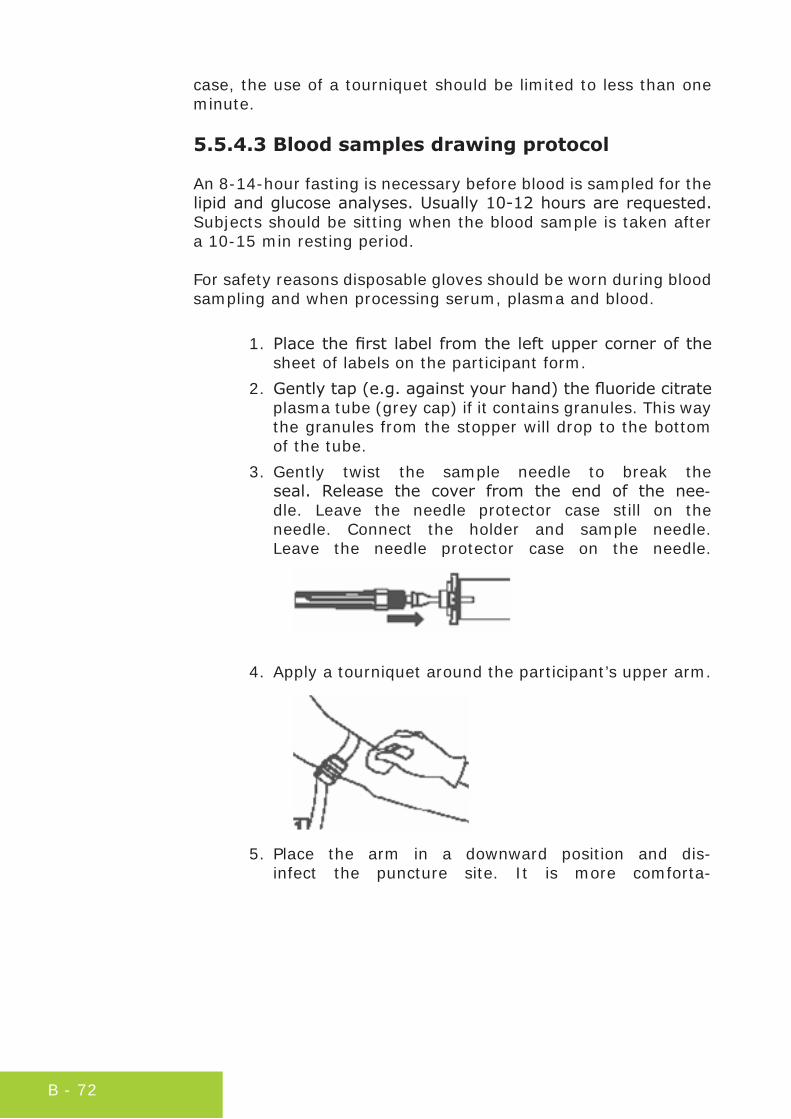
B - 72
case, the use of a tourniquet should be limited to less than one minute.
5.5.4.3 Blood samples drawing protocol
An 8-14-hour fasting is necessary before blood is sampled for the lipid and glucose analyses. Usually 10-12 hours are requested. Subjects should be sitting when the blood sample is taken after a 10-15 min resting period.
For safety reasons disposable gloves should be worn during blood sampling and when processing serum, plasma and blood.
1. Place the first label from the left upper corner of the sheet of labels on the participant form.
2. Gently tap (e.g. against your hand) the fluoride citrate plasma tube (grey cap) if it contains granules. This way the granules from the stopper will drop to the bottom of the tube.
3. Gently twist the sample needle to break the seal. Release the cover from the end of the nee-dle. Leave the needle protector case still on the needle. Connect the holder and sample needle. Leave the needle protector case on the needle.
4. Apply a tourniquet around the participant’s upper arm.
5. Place the arm in a downward position and dis-infect the puncture site. It is more comforta-

B - 73
ble for the participant if the arm rests on a pillow.
6. Remove the protector case from the needle.
7. Perform the venipuncture using the accepted technique.
Figure 5.5.4. Collection of blood (gel serum tube is be-ing filled and an EDTA-plasma tube awaits filling).
8. Collect blood first into the 2 plain serum tubes (red cap). Press the tube at the bottom of the holder that the needle will puncture the stop-

B - 74
per and start filling. Support the tube during filling.
9. Remove the tourniquet when the bloodstream runs.
10. When the bloodstream stops, take the tube out of the holder. Check that the tube is filled to the accurate volume.
11. Immediately after taking the plain serum tube out of the holder it should be adequately mixed 5 times by in-verting the tube completely top-down. The tubes should be stored in a vertical position until sample handling.

B - 75
12. Next, introduce and fill the fluo-ride-citrate plasma (grey cap) tube.
13. Immediately after taking the fluoride-citrate tube out of the holder it should be adequately mixed 15 times by inverting the tube completely top-down. The tubes should be stored in a vertical position until sample handling.
14. Next introduce and fill the 3 EDTA tubes (violet cap).
15. Immediately after taking the EDTA tube out of the holder it should be adequately mixed 5 times by in-verting completely top-down. The tubes should be stored in a vertical position until sample handling.
16. Remove the needle from the vein. Immediately apply pressure on the puncture site with a gauze pad until bleeding stops.

B - 76
17. Label the successfully filled blood sampling tubes ac-cording to the sampling chart, Figure x.
18. All material contaminated with blood should be con-sidered hazardous. All needles and other sharps must be discarded into a needle dispose container and all other material into a biological waste container.
NOTE! The last 2 EDTA tubes should not be centrifuged nor the caps removed!! The HbA1c analysis is made from whole blood and blood for DNA extraction may become contaminated.
5.5.3 Labels
5.5.3.1 Requirements for the labels
The quality of labels is of utmost importance. They have to fulfill several criteria:
• The glue must have special properties to adhere on dif-ferent surfaces and keep tight in a cold (-70 oC) and damp environment
• The label ink should be water resistant and possibly also to liquid nitrogen
• Use of bar codes is recommended, as most clinical chemistry analyzers use bar codes to identify samples in the automatic process
One sheet of labels per subject is recommended. This sheet con-tains bar code labels for:
• Participant form• Laboratory form• Blood sampling tubes• Pooling tube• Storage tubes• Storage boxes• Tube rack

B - 77
The abbreviation of the survey name with the country code.
• The box shows type of sample or form or question-naire.
• The secondary key=unique person ID number\ For sur-vey and subject identification, this number can be gen-erated, see Section 12.2, EHES Manual Part A.
• The (bar)code with its numerical value=primary key. Each storage tube is given a unique number.
Figure 5.5.5. Unique number on storage tubes.
• Labels from the sheet are transfered on the blood col-lection tubes and storage tubes according to the blood sampling chart. The remaining blank labels are spare labels.
In case a designated label is destroyed or misplaced, blank labels should be available. The primary and secondary key numbers and sample type or other descriptor should be written in water resistant ink.
5.5.3.2 Labeling of storage boxes
The boxes should be labeled before placing them in the freezer. Otherwise the labels will not stick on a damp or icy surface.
Labels contain the following information:
• survey code-country code, eg. EHES-FI• type of sample: S, P, B• number of the box in bar code and numerical form.
The box label sheet contains 2 identical labels: one is placed on the front of the box and the other on the lid. Both labels should be visible when the lid is in place, see Figure 5.5.6.

B - 78
Figure 5.5.6. Bar code labels placed on the lid and box
5.5.4 Blood sample processing
Sample processing includes centrifugation of blood tubes, label-ling of storage tubes, pipetting aliquots into storage tubes and transferring storage tubes into freezers at the earliest conveni-ence.
It is strongly recommended to wear protective gloves while open-ing the centrifuged blood tubes as well as during further handling of the blood samples!
5.5.4.1 Centrifugation
Before centrifugation, make sure that the blood has clotted in the plain serum tube (red cap).
Centrifugation of the clotted blood to obtain serum should be per-formed after making sure that the blood has clotted. The waiting for the blood to be clotted is at least 30 minutes at room temper-ature, 20-22 °C. Do not prolong the waiting for over 60 minutes.
Immediately after the waiting period the plain serum tube (red cap), the fluoride-citrate (grey cap) and the 1st EDTA (violet cap) plasma tubes are centrifuged.
The last two EDTA tubes designated for HbA1c and DNA extraction must not be centrifuged!

B - 79
1. Place the plain serum tube (red cap) and fluoride-cit-rate (grey tube) and the 1st EDTA (violet cap) plasma tubes in the centrifuge. Don’t remove the caps from the tubes. Before centrifugation is started check that all tubes are resting on the bottom of the centrifuge rack. The tubes may not hang on the cap as this might result in separation of the tube and cap and spilled blood and the cap will then swirl in the centrifuge head and cause severe damage. Always check that the cen-trifuge rotor is in balance.
2. Centrifuge the tubes 2000 g for 10 minutes at room temperature. The relative centrifugal force (RCF) can be calculated by using an empirical equation or by us-ing a nomogram for converting RCF to rpm.
5.5.4.2 Sample handling after centrifugation
Immediately after centrifugation, the caps must be removed ex-cept from the last two EDTA tubes. The samples are distributed as follows:
1. Place the bar code labels properly. The code must be upright or else the reading with bar-code reader is impossible, see Figure 5.5.7.
Figure 5.5.7. Correct labelling of cryotubes
2. If a bar code label is damaged, replace it with an extra label (empty ones on the sheet) and copy the bar code number and the sample type from the damaged label to the extra label with a water resistant pen.
3. Pour the serum from the 2 serum collection tubes into the pooling tube, mix gently by swirling the contents.

B - 80
4. Pipette 2 x 1.5 ml serum from the pooling serum tube into the 3 ml plastic tube and 1.5 ml aliquots into the 1.5 ml storage cryotubes. Check that the serial num-ber (person ID) is the same in the label of the se-rum collection tube and the labels of the cryotubes.
5. Pipette 2 x 1.5 ml from the fluoride-citrate plasma tube into two 1.5 ml cryotubes.
6. Pipette 2 x 1.5 ml from the EDTA tube into two 1.5 ml cryotubes.
7. The last two EDTA tubes are not centrifuged nor are the caps removed.
8. Close the cryotubes with caps and freeze the tubes at once. When frozen, the tubes must be kept in an up-right position. Take special care in closing the tubes in order to prevent evaporation. Some tubes may be stored for decades before use.
9. Put the frozen samples in their respective boxes in the freezer to wait for the shipment. Fill an entire box be-fore taking a new one.
10. All sheets of labels, both used and unused, should be returned to the NHES Lab at the end of the study.
Note! It is important to pipet no more than 1.5 ml into cryotubes since serum ans plasma will expand during freezing. The right volume can be checked from the scale on the tube wall.
5.5.4.3 Labeling of storage tubes
• The storage tubes are labeled according to a labeling scheme.
• Place the storage tubes in a tube rack according to the pipetting scheme. Place a label on the tube rack, see Figure 5.5.8.
• Remove the test tube caps a short time before pipet-ting, for instance when the blood tubes are being cen-trifuged.
• Opening of the caps with one hand is easier if the rack contains a stopper at the bottom of the tube well.
• There is no need to label all tubes if the blood collection is incomplete.

B - 81
Figure 5.5.8. Caps of the storage tubes are removed in advance at the site of sample preparation. In the background is the pipetting scheme and in the foreground the label sheet in which the spare labels are left.
Note! Place the bar code labels on the tubes in an upright direc-tion, see Figure 5.5.7, and so that the scale marks remain vis-ible.
5.5.4.4 Handling blood collection tubes with gel
The temperature during centrifugation should be at least 20-22 oC. At lower temperature the viscosity of the gel will result in in-complete separation of serum and cells.
Because separation of serum in a gel tube is complete, the serum can be poured directly into a pooling tube in case of several blood tubes.The gel tube should be inspected after centrifugation for the fol-lowing:
• The surface of the gel should be horizontal• The serum and cell layers should be separated clearly• No red cells on top of the gel should be visible• There should be no fibrin strands in the serum• The serum should not be clotted, it should appear as a
liquid. Blood in a gel tube can be centrifuged only once due to red cell contamination of the serum. If any red cell streaks are seen in the serum, transfer the serum into an empty centrifuge tube and re-centrifuge.

B - 82
5.5.4.5 Hemolysed samples
• If one serum sample is hemolysed, this tube should not be pooled with non-hemolysed serum samples. Hemo-lysed and non-hemolysed samples are pipetted into aliquots separately. Only the non-hemolysed samples are pooled.
• If more than one serum sample is hemolysed, they may be both pooled.
• The hemolysed aliquots (primary key number) are doc-umented on the laboratory sheet.
• For standardised documentation of the degree of he-molysis, each lab technician should have a color guide available for estimating the hemolysis, eg. 0, +, ++, +++. See Figure 5.5.9 for an example on hemolysis grade of serum/plasma.
Figure 5.5.9. Example of the hemolysis grade of the samples
5.5.4.6 Transfer of tubes into boxes and freezer
To ensure a high quality of the samples, the tubes should be placed without delay into their boxes awaiting them in the freez-

B - 83
er. The boxes must be prelabelled before placing them into the freezer. Mark the boxes according to the sample type, see Figure 5.5.10.
To avoid misplacing or misreading in the future, a common filling order of tubes should be used at all laboratory sites, eg. from left to right and down.
Figure 5.5.10. Aliquots in their storage boxes and at the back of each box a paper dlip showing type of sample
5.5.4.7 Sample shipment
5.5.4.7.1 To the NHES Lab
The frozen samples in their respective storage boxes should be sent packed in dry ice in one or a few batches at the end of the fieldwork period to the NHES Laboratory. The sample boxes should be packed in leak proof secondary packaging. Enough ab-sorbent material must be placed in the secondary packaging. Adhere to the national regulations concerning transport/mailing of biological samples.
5.5.4.7.2 To EHES RL
A certified transport company/courier able to arrange the ship-ment of the samples to the EHES RL (Helsinki) should be contact-ed in advance. Contact details should be found in in an Appendix to the Manual.
The courier will collect the samples at the NHES Lab and will provide insulated rigid outer packaging and an adequate amount

B - 84
of dry ice. The company will also help you take care of the pa-perwork. The shipment has to be packed according to the IATA (International Air Transport Association) regulations. The pack-ing should be done according to Packing Instruction 650 for Di-agnostic specimens. The specific regulations should also be fol-lowed for dry ice.
Before the courier arrives, please make sure that the amount of storage boxes you will be shipping is known so that the amount of dry ice supplied is sufficient for the samples to stay frozen. To make sure that the samples are kept frozen and are in good con-dition when arriving at the EHES RL, one tube should be placed upside down in every box.
Before sending the samples to either laboratory, please inform the contact persons by email about the sending details (date, mode of transport and the courier). This ensures that the trans-port will be documented for future checking.
5.5.5 Maintenance of quality at the laboratory site
5.5.5.1 Laboratory personnel
• The key factor of quality lies in the training of the per-sonnel. Each person is responsible for his/her work quality.
• The personnel must be trained in advance. Supervisors are responsible for their training according to the Na-tional HES Manual.
5.5.5.2 Work
• Problems arising during practical work are discussed with the assigned contact persons for laboratory work. Their contact information is found in the field work manual.
• All tasks of the day are to be finalized during that day, no loose ends!
5.5.5.3 Actions at the laboratory site and feed-back
The field personnel are obliged to document all deviations from the manual in a diary and report these to the NHES Laboratory. After completion of the survey the diaries and other documents

B - 85
are to be returned to the NHES Laboratory. Feedback to the NHES Laboratory in the form of email and SMS are also saved.
5.5.5.4 Instructions/manual
All personnel should have the same version of the laboratory instructions including attachments. Each examination site has access to the laboratory manual which contains the following in-structions:
• Information on the contact persons• Instructions on actions to take if a technician gets stuck
by a blood contaminated needle (see Part B, Section 5.5.6.2)
• List of supplies• Centrifuge manual• Safety procedures for handling dry ice (see Part B, Sec-
tion 5.5.6.3)• Chart on grade of hemolysis (see Figure 5.5.9)• One copy of a complete laboratory manual should be
found at the site including operation procedures and information on contact persons, in order for checking in case the personal instructions are lost.
5.5.6 Safety issues
5.5.6.1 Laboratory work on the field
Following safety issues should be taken into account when plan-ning the laboratory work on the field and they also need to be addressed during the training of the fieldwork staff:
• It is prohibited to eat or drink in the laboratory area!
• Wearing protective clothing is not allowed outside the laboratory area, like in the recreation room or cafete-ria.
• Table surfaces are disinfected by wiping with a 70 % ethanol solution at the end of the day. Any surface or object which is contaminated with blood or other hu-man specimen must be desinfected immediately.
• During blood withdrawal protective gloves should be used if the nurse is used to working with gloves. New gloves should be worn for each new subject.

B - 86
• If the nurse does not wear protective gloves, he/she should disinfect the hands with a disinfectant between each new subject.
• Disposable gloves must be used throughout during handling of blood samples!
• The sampling needle is removed directly into the needlebox from the adapter/holder without touching the needle.
• If the subject is suspected/has informed of HIV, hepa-titis or other contagious disease, the technician should use nitrile rubber gloves. The stasis and adapter are disposed of in the biological waste container as well as the gloves.
5.5.6.2 Exposure to contaminated blood
An accidental exposure to blood contaminated with HIV, hepatitis or other contagious disease can occure:
• by needle stick• from handling blood contaminated broken glass or oth-
er sharp object• in case blood splashes in the eye or mouth• if blood gets on an area of the skin having eczema or
an unhealed wound.
In case of accident, immediate actions are needed:
• Make sure that the accident will not be repeated. In case of broker tube, collect the pieces of broken glass by tongs or a pan and brush. Do not pick up pieces with your hands.
• Save the sample tube with its identification codes in order for the source of the possible contamination to be determined if needed.
• Let the blood flow freely from the wound and rinse with copious amounts of water, for about 5 minutes.
• Do not apply pressure on the wound.• If there is blood on eczemic area of the the skin, an un-
healed wound or cut, apply a (> 70%) ethanolic com-press on the area for at least 2 minutes.
• Rinse the eye(s) with clear (tap) water or a specific eyewash solution.

B - 87
Contact immediately your supervisor and a medical centre or hospital. Field supervisors should be equipped with necessary telephone numbers and addresses of the nearest medical pro-fessionals in order to act swiftly if accidents occur. For each in-cidence of exposure to contaminated blood an incidence report should be prepared.
Depending on country, there are local occupational laws and reg-ulations as well as insurance issues to take into consideration. It is recommended that the national manual has information on legislative and occupational matters relating to accidents in the laboratory.
5.5.6.3 Handling of dry ice
Save handling of dry ice requires that following issues are taken into account.
Handling
Solid carbon dioxide=dry ice is extremely cold -78.5°C. Always handle dry ice with care and wear protective cloth or leather gloves whenever touching it. If touched briefly it is harmless, but prolonged contact (>5 sec) with the skin will cause injury similar to a burn.
If handled incorrectly indoors carbon dioxide will replace oxygen-ated air and will cause suffocation. Signs of a high content of car-bon dioxide in the air are headache, nausea and unconciousness. If exposed, move the person into an area with fresh air.
Storage
Store dry ice in an insulated container. Do not store dry ice in a completely airtight container as carbon dioxide gas (CO2) is evolved from dry ice. Take care of proper air ventilation wherever dry ice is stored and handled. Carbon dioxide gas is heavier than air and will sink first to low areas and replace oxygenated air. Do not store dry ice in a freezer because it may cause the freezer to turn off.
Transport
Dry ice sublimates at 10% or 2-5 kg per 24 hours. It should be transported in a styrofoam box with a lid which allows gas to escape. Do not fix the lid gastight with eg. tape. The thicker the walls of the box, the better, 2 cm to 5 cm. Mark the box: DRY ICE.

B - 88
When transporting dry ice in a car, be sure to ventilate it con-stantly. Mailing and courier companies have special instructions for transporting dry ice containers. When sending dry ice by air, be sure to contact the flight company or a courier company for instructions.
Burn treatment
Treat dry ice burns the same as a regular heat burns. See a doc-tor if the skin blisters or comes off. Otherwise if only red it will heal in time as any other burn. Apply antibiotic ointment to pre-vent infection and bandage only if the burned skin area needs to be protected.
Disposal
Unwrap and leave dry ice at room temperature in a well-ventilat-ed restricted area. It will sublimate from a solid to a gas.
5.5.6.4 Vaccination of fieldwork staff
The fieldwork staff working with needles and blood samples should be vaccinated for hepatitis B. The person responsible for ensuring that the staff is immunized should be documented to the national manual and checked before start of the fieldwork.
5.5.7 Ergonomics
The correct posture and equipment are important issues for maintaining the long term well-being of the staff. Some recom-mendations to enhance work ergonomics:
• Keep your hand below your elbow level when taking blood samples, pipetting and using the computer
• Adjust the height of the chair to enable a correct pos-ture
• In case the height of the chair is too high for your feet to rest on the floor, use a foot rest
• If the lighting in the room is not sufficient, use a port-able spot light
• The nurse’s chair should not be equipped with wheels, but should have arm rests.
5.5.8 Waste disposal
• Waste of human origin generated during blood with-drawal and blood processing, like blood-containing

B - 89
tubes, disposable gloves, paper wipes, table top pro-tective sheets etc. are disposed of in the biological waste container.
• The biological waste is disposed of according to the lo-cal facility regulations.
• Full and sealed needle disposal containers are dis-posed of according to the local facility regulations or sent to the NHES Laboratory.
• Biological risk waste (subject has informed of hav-ing HIV, hepatitis or other contagious disease) should be sent to the NHES Laboratory according to its guide-lines.

B - 90
5.6 Recording forms for measure-ments, laboratory and quality controlHanna Tolonen1, Johanna Mäki-Opas1, Päivikki Koponen1
1 National Institute for Health and Welfare (THL), Helsinki, Finland
On the field there are several different recording forms:
• measurement recording forms,• laboratory recording forms including sample collec-
tion and handling forms,• quality control log books, and• material transfer log books.
The recording forms can be paper forms or electronic forms. In addition detailed recording of information on participation and all contacts with selected persons is needed either in computerized logistics programmes or paper forms.
5.6.1 Measurement recording forms
Actual measurement results as well as circumstances on which the measurements are taken and other issues possibly affecting the measurements are recorded in the measure recording forms in a pre-defined format. Depending on the organization of the fieldwork, there may be one measurement form which includes all the measurements of the survey or each measurement may have its’ own recording form.
In each measurement form, the participants identification code has to be the first item or a bar code label on top of the form, if paper forms are used.
Specification of issues which should be recorded for each EHES core measurement are listed under specific measurement proto-cols:
• Blood pressure measurement (Part B, Section 5.1)• Height measurement (Part B, Section 5.2)• Weight measurement (Part B, Section 5.3)• Waist circumference measurement (Part B, Section
5.4)
An example of the EHES core measurements recording form for anthropometric measurements (height, weight and waist circum-

B - 91
ference) and blood pressure are in the Appendix 5.6a and Ap-pendix 5.6b.
It should be noted, that if for example the information on room temperature is needed for more than one measurement and measurements are conducted in different rooms, there should be a place for room temperature in the recording form for each measurement for which this information is needed. If all meas-urements are conducted in the same room, it is enough to have one place for the room temperature in the recording form.
5.6.2 Laboratory recording forms
Laboratory recording forms include sample collection and other pre-analytic factors before sample drawing and the sample han-dling on the field before samples are sent to the central labora-tory for the analysis.
In the sample collection form, the participants identification code has to be the first item or a bar code label on top of the form, if paper forms are used. Specification of issues which should be recorded for blood sample collection are listed under Part B, Sec-tion 5.5.
An example of the sample collection recording form is in the Ap-pendix 5.6c.
The sample handling form includes issues relating to the pro-cessing of the samples on the field (centrifugation, division to the alliguates, storage before transfer etc.). The specification of the issues that should be recorded for blood sample handling are listed under Part B, Section 5.5.
An example of the sample handling recording form is in the Ap-pendix 5.6d.
5.6.3 Quality control log books
The documentation of the quality control actions taken on the field (see Part B, Chapter 7), require quality control log books. In the quality control log books, all quality control actions should be recorded with date and time when action was taken, who did it, and what was the outcome. Also possible correction actions has to be recorded.
The quality control log book should include at least following is-sues.
Log book for daily quality control

B - 92
• Height rule checked with standardized rod• Error less than 2 mm• Error greater than 2 mm.• If error greater than 2 mm, specify actions taken
• Vertical placement of the height rule should be checked with carpenter’s level• In line• Out of line, actions taken:
• Checking the weight scale using the standardized weights daily if digital devices are used, if balanced beam scales are used, weekly• Error less than 0.2 kg• Error greater than 0,2, specify actions taken
• Checking of the horizontal placement of the weight scale• In line• Out of line, actions taken:
• Checking of the zero level of the balanced beam scale• In line• Out of line, specify actions taken
• Checking the waist measurement tape• No disruptions or other visible faults• Faults detected, tape changed
• Checking the length of the waist measurement tape (frequency depending of the number of measurements)
5.6.4 Material transfer log books
Every time when material (questionnaires, devices, samples, etc.) is transferred from one location to other, type of the mate-rial, quantity, serial numbers of devices or samples, data of dis-patch and person sending material out should be recorded. On the other end, the sample information should also be recorded by person receiving the material. This way it can be checked that no material is lost during the transfer.

B - 93
If participant is women, is she pregnant No Yes, pregnancy weeks:
Reason if not measured at all Weelchair bound or immobile Unsteady stand Weight exceeds the upper limit of the scale. Specify, the upper limit of the scale: kg Refusal Other, specify:
Weight measurementNumber of the measurement device:Weight kg
Measurement was done in Light underwear Without heavy outer garments Other, specify:
Other observations by measurer affecting the measurement results:
Measurement timeDate of the measurement(dd.mm.yyyy):Time of the day (hh:mm):
Reason if not measured at all Hairstyle or head dress prevents mesurement (not possible to undress) Wheelchair bound or immobile Unsteady stand Height exceeds the upper limit of the stadiometer. Specify, the upper limit of the stadiometer: cm Refusal Other, specify:
Height measurementNumber of the measurement device: Height (cm)
Observations by measurer affecting the meaurement result:
Anthropometricrecording form
Participant id:
Measurer id:
Height Weight
Appendix 5.6a Anthropometric recording form

B - 94
Waist circumference measurementWaist circumference (cm)
Measurement was done over Bare skin Light underwear Without thick outer garments Other, specify:
Other observations by measurer affecting the measurement results:
Reason if not measured at all Wheelchair bound or immobile or cannot stand Unsteady stand Circumference exceeds the maximum length of the tape. Specify, the maximum lenght of the tape: Large hernia, stomage bag or other device on measurement area Refusal Other, specify:
Waist circumference

B - 95
Appendix 5.6b Blood pressure recording form
Type of the measurement device Mercury sphygmomanometer Automated device Other, specify:
Number of the measurement device
Arm used for the measurement Right Left
Reason for use of left arm Medical reason Paralized and/or spastic right arm Amputation of right arm Cast on right arm Rash on right arm Intravenous access device on right arm Malformation of right arm preventing to place the cuff Lymph node malfunction in right arm, e.g. caused by breast cancer and preventing to place the cuff Other, specify:
Posture of the subject during the measurement Sitting Supine
Measurement time and room temperatureDate of the measurement(dd.mm.yyyy):Time of the day (hh:mm):Room temperature (oC):
Has participant done on hour before measurementVigorous physical exercise Yes No Smoked Yes NoEaten Yes No Drank anything else than water Yes NoEmptied his/her bladder Yes No
Reason if not measured at all Medical reason preventing the measurements Amputation of both arms Cast on both arms Open wounds/sores on both arms Rash on both arms Malformation of both arms preventing to place the cuff Lymph node malfunction in both arms, e.g. caused by breast cancer and preventing to place the cuff Other Refusal Other, specify:
Blood pressurerecording form
Participant id:
Measurer id:

B - 96
Reason for supine posture Bed driven Other, specify
Selection of the cuffArm circumference (cm):
Used cuff size: Small (arm circumference 17-21 cm) Medium (arm circumference 22-31 cm) Large (arm circumference 32-41 cm) Extra large (arm circumference 42- cm)
Blood pressure measurement results
1st 2nd 3rd
measurement measurement measurementSystolic blood pressure (mmHg)Diastolic blood pressure (mmHg)
Error code of the device Observations by measurer
Pulse rate (60 sec.)
Was the pulse regular? Yes No

B - 97
Appendix 5.6c Blood sample collection re-cording form
Arm used for blood collection Left Right
Reason for use of right arm No vein found on left arm No left arm/amputation of left arm Cast on left arm Other, specify:
Number of tubes collected All Only tubes None
Number of haemolysed sample tubes
Time and room temperature of the sample collectionDate of the sample collection(dd.mm.yyyy):Time of the day (hh:mm):Room temperature (oC):
Reason if blood sample not collected at all Vein could not be found/difficult to take a blood sample Refused Other, specify:
Has person fasted at least 8 hours Yes No
When the participant has eaten his/her last meal or drank a sweetened drink (hh:mm)
Posture of the subject during the blood collection Sitting Supine
Reason for supine posture Fainting Bed driven Other, specify:
Blood sample collectionrecording form
Participant id:
ID of the person drawing the blood sample:

B - 98
Appendix 5.6d Blood sample handling re-cording form
Time of the sample handling in the laboratory
Date of freezing samples to at least -70 oC(dd.mm.yyyy)
Date of lipid analysis (dd.mm.yyyy)
Date of glucose analysis (dd.mm.yyyy)
Time of the sample handling on the fieldDate of centrifuging samples(dd.mm.yyyy):Time of the day when samples were centrifuged (hh:mm):
Date of freezing samples to at least -20 oC (dd.mm.yyyy)Time of the day when samples were frozen to at least -20 oC (hh:mm)
Blood sample handlingrecording form
Participant id:
ID of the person handling the blood sample:

B - 99
5.7 EHES questionnaireJohanna Mäki-Opas1, Kari Kuulasmaa1, Päivikki Koponen1
1 National Institute for Health and Welfare (THL), Helsinki, Finland
This questionnaire was developed in parallel with Eurostat activi-ties in revising the EHIS questionnaire in 2011-2012. Due to the forthcoming national HESs, there was a need to finalize the EHES questionnaire earlier. Therefore the draft of January 2012 of the EHIS questionnaire was used as the reference. This EHES ques-tionnaire was reviewed by the EHES Joint Action Partners before it was adopted for the EHES Manual.
This chapter describes the EHES core questionnaire. These ques-tions should be included in every national HES. They supplement the information collected through the physical measurements and biological samples.
There has been an intention to stick to EHIS questions when-ever possible in order to improve comparability between these two surveys, and to facilitate the combination of EHES and EHIS if a country wishes to carry out these jointly. The EHES ques-tionnaire also includes questions which are not in EHIS. Some of such questions are modifications of EHIS questions. Many of the non-EHIS questions come from the EHRM recommendations (Tolonen et al 2002). The source is indicated for each question. The reference to EHIS questions is from the EHIS draft question-naire, January 2012. More information about the selection of the questions and questionnaire administration can be found in Part A, Chapter 5. “Selecting the measurements” and Part B, Chapter 8. “Questionnaire design and administration”. More information on the use of questionnaire data in EHES reporting can be found in Part C, Chapter 4. “Indicators”.
Most of the questions in the EHES questionnaire are recommend-ed to be administered by interviewers. However, EHIS recom-mends self-administration for the smoking questions and this should be considered, if feasible, also for the national HES. Some countries may use self-administration for the entire question-naire. The order of the questions should be the same as in the EHES questionnaire, even if the national questionnaire includes additional questions. In some questions, the interviewer can use a show card with response options for the respondent. If the respondent has vision problems or finds it difficult to read, the interviewer can read these to the respondent, making a short pause between them.

B - 100
The questions and their order are given here. The layout of the actual questionnaire will need to be planned separately for each survey. The layout depends on whether the questionnaire is ad-ministered as an interview or self-completion and, in both cases, on whether paper forms or direct entry onto a computer is used. If the questionnaire is by interview, we advise including answer alternatives ‘refusal’ and ‘don’t know’ for use by the interviewer but these should not be read or shown to the respondent. Also some changes in question wording for a few questions may be needed for self-administration, e.g. not using the “introductions” given before the actual question, or specifying the household members.
Under each question there are instructions for translation and cultural adaptation, as well as for the interviewer. For self-admin-istered questionnaires the interviewer’s instructions can be used while checking the questionnaires.
5.7.1 Core questionnaire items
Minimum European Health Module (MEHM)
Introduction:
“I would now like to talk to you about your health.”
Q1. How is your health in general? Is it… |__| very good |__| good |__| fair |__| bad |__| very bad?
Indicator
EHES/ECHI indicator: Self-perceived health
Instructions for translation and cultural adaptation
The reference is to health in general rather than the present state of health, as the question is not intended to measure temporary health problems. It is expected to include different dimensions of health, i.e. physical, social and emotional function, and biomedi-cal signs and symptoms.
Answer category “fair”: this intermediate category should be translated into an appropriately neutral term, keeping in mind cultural interpretations in the various languages.

B - 101
Instructions for the interviewer
This question refers to the participant’s own assessment and should not be interpreted or assessed by anyone else, wheth-er an interviewer, health care professional or relative. Self-per-ceived health is influenced by impressions or opinions from oth-ers, but these impressions should be processed by the individual in relation to his/her own beliefs and attitudes. Thus the question should not be presented to a proxy. Respondents should not be asked to compare their health with others of the same age or with their own previous or future health state.
Source
EHIS HS1 (Draft January 2012)
Q2. Do you have any longstanding illness or longstand-ing health problem? By longstanding I mean illnesses or health problems which have lasted, or are expected to last, for 6 months or more. |__| Yes |__| No
Indicator
EHES indicator: Prevalence of people with longstanding illness
ECHI indicator: Self-reported chronic morbidity
Instructions for translation and cultural adaptation
The wording should be chosen based on language and culture, choosing terms ‘chronic’ and/or ‘longstanding’ according to what is best understood. It is intended to ask if people ‘have’ a chron-ic condition, not if they really suffer from it. However, in some countries/languages ‘suffer’ means the same as ‘have’. ‘Health problem’ may not to be understood in some countries/languages and therefore ‘illness or condition’ is the alternative.The main characteristics of a chronic condition is that it is permanent and may be expected to require a long period of monitoring and/or care.
“Longstanding or chronic”: illnesses or health problems should have lasted or are expected to last for 6 months or more; tem-porary problems are not of interest.
“Illness or health problem”: conditions, not only diseases, in-clude e.g. pain.

B - 102
The words “disability, handicap or impairment” should not be in-cluded in the question.
Instructions for the interviewer
For consequences of injuries/accidents and of congenital condi-tions, birth defects, etc. the answer is ‘yes’.
If needed, the interviewer can explain that the question refers to all longstanding health problems and illnesses, not only those diagnosed by a doctor.
In case the respondent has had a longstanding disease that doesn’t/didn’t bother him/her or it is kept under control with medication, the interviewer should record answer ‘Yes’. For in-stance, for a person with a high blood pressure or diabetes with-out current symptoms, the answer is ‘Yes’. Problems that are intermittent are included, even when they are symptomatic for less than six months at a time, e.g. allergy.
Source
EHIS HS2 (Draft January 2012)
Q3. For at least the past 6 months, to what extent have you been limited because of a health problem in activities people usually do? Would you say you have been … |__| severely limited |__| limited but not severely or |__| not limited at all?
Indicator
EHES indicator: Prevalence of people with longstanding restric-tions in daily activities
ECHI indicator: Long-term activity limitations
Instructions for translation and cultural adaptation
The purpose of the question is to measure the presence of chron-ic or longstanding limitations.
“Activity limitations”: difficulties the individual experiences in performing an activity, task or action
“In activities people usually do”: The question should clearly show that the reference is to the activities people usually do and not to the activities the respondent actually does. Neither a list with examples of activities nor a reference to the age group of

B - 103
the subject is included in the question. This question gives no restrictions by culture, age, gender or the subjects own ambition.
“Severely limited”: an extremely difficult situation to perform or accomplish activities that people usually do.
Specification of health concepts (e.g. physical and mental health) should be avoided.
Instructions for the interviewer
The question refers to person’s own assessment of whether he/she is hampered in at least one daily activity, because of any cur-rent physical or mental health problem, illness or disability. This can also be reported by a proxy who is well aware of the subject’s limitations in daily activities. People with longstanding limitations due to health problems have adapted, and may have reduced their activities. The activity limitations are assessed against a generally accepted population standard, relative to cultural and social expectations by referring to activities people usually do.
The question aims to measure longstanding limitations. The time period refers to the duration of the activity limitation and not of the health problem. New limitations which have not yet lasted 6 months are not considered, even though they they are expected to continue for more than 6 months. E.g. if the subject has re-cently been diagnosed having, e.g., diabetes, he/she knows that it is not curable, so it is long-standing and it may be controlled or not, and it might have consequences or not, but this is not known yet. The questions refers to the individual’s experience, whether his or her diabetes has had longstanding disabling consequences. The answer should be based on this past experience, being ‘yes’ (1 or 2) if the person is currently limited and has been limited in activities for at least the last 6 months.
The question refers only to health-related problems or accidents as it is not meant to measure limitations due to financial, cultural or other non health-related causes. Limitations due to injuries, accidents, congenital conditions and birth defects etc., shall be considered.
Source
EHIS HS3 (Draft January 2012)
5.7.2 Diseases and chronic conditions
Introduction
“Here is a list of chronic diseases or conditions”.

B - 104
Q4. Do you have or have you ever had any of the follow-ing diseases or conditions, diagnosed by a medical doc-tor? Myocardial infarction |__| Yes |__| No Coronary heart disease or angina pectoris |__| Yes |__| No High blood pressure (hypertension) |__| Yes |__| No Elevated blood cholesterol |__| Yes |__| No Stroke (cerebral haemorrhage, cerebral thrombosis) |__| Yes |__| No Diabetes |__| Yes |__| No
Indicators
EHES indicators: Prevalence of self reported myocardial infarc-tion, Prevalence of self reported coronary heart disease, Prev-alence of self reported high blood pressure, Prevalence of self reported elevated blood cholesterol, Prevalence of self reported diabetes. Furthermore, information on these diseases and condi-tions are needed for CVD risk estimates.
ECHI indicator: Diabetes, self reported prevalence.
Instructions for translation and cultural adaptation
The list can be expanded by other diseases and conditions from the EHIS questionnaire or additional diseases and conditions of national interest. A show card of the list of diseases and condi-tions can be used.
“Medical doctor”: any physician who conducts medical exami-nation and makes diagnosis, prescribes medication and gives treatment for diagnosed illnesses, disorders or injuries, gives specialized medical or surgical treatment for particular types of illnesses, disorders or injuries, and or gives advice and applies other methods for preventive medicine.
Instructions for the interviewer
This question refers to diagnosed diseases or conditions, i.e. a medical doctor has told that the subject has the disease or condi-tion. Diseases or conditions that the subjects assumes to have, but which have not been confirmed by a medical doctor are not considered.
“Coronary heart disease or angina pectoris”: heart related chest pain.
“Diabetes”: excluding gestational diabetes, i.e. high blood sugar values during pregnancy.

B - 105
Source
Modified from EHIS CD1 (Draft January 2012): The EHIS ques-tion refers to “during the past 12 months” and does not specify that the disease or condition would be “diagnosed by a medical doctor”. In the EHIS question there are 10 other diseases/condi-tions, but not “Elevated blood cholesterol”.
5.7.3 European Health Care Module
Medicine Use
Introduction
“I’d now like to ask about your use of medicines in the past two weeks.”
Q5. During the past two weeks, have you used any medi-cines that were prescribed for you by a doctor? |__| Yes |__| No
Indicators
Introduction to more specific questions (see Q6).
Instructions for translation and cultural adaptation
The question refers to any medicines prescribed by a medical doctor or a dentist. Medicines recommended by a pharmacist, nurse etc. are not included.
Instructions for the interviewer
“Medicine”: any product including tablets, liquids, creams etc, that is used to alleviate symptoms, to prevent illness, or to im-prove poor health, and which is ordinarily purchased from a phar-macy.
“Doctor”: refers to any medical doctor (physician) or dentist.
“During the past two weeks”: the preceding period of 14 days.
“Prescribed”: medicines which were written on a prescription by a doctor. Here are also included the medicines which were origi-nally prescribed by a doctor even though the respondent has not recently visited the doctor to renew the prescription. Medicines that have been prescribed but have not been used during the past two weeks are not recorded.

B - 106
Source
EHIS MD1 (Draft January 2012)
Q6. Were the medicines for … ? (Asked if Q5 = “Yes”) High blood pressure |__| Yes |__| No Lowering the blood cholesterol level|__| Yes |__| No Diabetes |__| Yes |__| No
Indicator
EHES indicators: Prevalence of anti/hypertensive drug treatment in the population, Prevalence of lipid lowering drug treatment in the population, Prevalence of diabetes drug treatment in the population. Also used for Effectiveness of anti-hypertensive dug treatment, Effectiveness of cholesterol treatment and Effective-ness of diabetes treatment, as well as for Prevalence of actual or potential hypertension, Prevalence of actual or potential elevated non-HDL cholesterol, Prevalence of actual or potential diabetes in the population.
Instructions for translation and cultural adaptation
Use of medicines for specific health conditions related to EHES measurements are included in the core question. The list can be expanded by other medication for diseases and conditions in the EHIS questionnaire or additional medication of national interest. A show card of the list of medicines can be used.
In addition to this question, it is recommended to collect the names of all currently used prescribed medicines. These provide additional information on medication and diseases and condi-tions. It is possible that data using anatomical therapeutic chem-ical (ATC) classification will be collected to the central database at the EHES RC in the future.
Instructions for the interviewer
Ask the respondent to specify if he/she took the medicine(s) for the listed health conditions. Show card may be used.
Source
EHIS MD2 (Draft January 2012): The EHIS question includes 9 other reasons for medication, as well as an additional question MD3 on 6 additional types of medicines.

B - 107
Preventive services
Introduction:
“Now I would like to ask about your blood pressure.”
Q7. When was the last time that your blood pressure was measured by a health professional? |__| Within the past 12 moths |__| 1-5 years ago |__| Not within the past 5 years
Indicator
EHES indicators: Proportion of the population with blood pres-sure measurement within the past 12 months, Proportion of the population with blood pressure measurement within the past 5 years.
Instructions for translation and cultural adaptation
“Measured by a health professional” included in the question wording, because measurements by lay persons or self monitor-ing should not be included.
Instructions for the interviewer
“Health professional”: a medical doctor, nurse, health visitor, midwife or other trained health professionals. Measurements by lay persons or measurements carried out by the person him-/herself are not included here.
Source
Modified from EHIS PA2 (Draft January 2012): EHIS response al-ternatives: 2-5 different (“1 to less than 3 years”, “3 to less than 5 years”, “more than 5 years”, “never”)
Introduction:
“Now I would like to ask about your blood cholesterol.”
Q8. When was the last time that your blood cholesterol was measured by a health professional |__| Within the past 12 moths |__| 1-5 years ago |__| Not within the past 5 years

B - 108
Indicator
EHES indicators: Proportion of the population with cholesterol measurement within the past 12 months, Proportion of the popu-lation with cholesterol measurement within the past 5 years.
Instructions for translation and cultural adaptation
“Measured by a health professional”: Referral and analysis by a health professional is expected and this is included in the ques-tion wording, because tests by lay persons or self monitoring should not be included.
Instructions for the interviewer
“Measured by a health professional”: referral or analysis by a medical doctor, nurse or other trained health professionals. The samples may be taken in a laboratory (fasting or non-fasting) or by using test strips. Tests by lay persons or self monitoring are not included here.
Source
Modified from EHIS PA3 (Draft January 2012): EHIS response al-ternatives: 2-5 different (“1 to less than 3 years”, “3 to less than 5 years”, “more than 5 years”, “never”)
Introduction:
“Now I would like to ask you about your blood sugar.”
Q9. When was the last time that your blood sugar was measured by a health professional? |__| Within the past 12 moths |__| 1-5 years ago |__| Not within the past 5 years
Indicator
EHES indicators: Proportion of the population with blood glucose measurement within the past 12 months, Proportion of the popu-lation with blood glucose measurement within the past 5 years.Instructions for translation and cultural adaptation
“Measured by a health professional”: Referral and analysis by a health professional is expected and this is included in the ques-tion wording, because tests by lay persons or self monitoring should not be included.

B - 109
Instructions for the interviewer
“Measured by a health professional”: Referral and analysis by a health professional, a medical doctor, nurse or other trained health professionals. The samples may be taken in a laboratory (fasting or non-fasting) or by using test strips. Tests by lay per-sons or self monitoring are not included here.
Source
Modified from EHIS PA4 (Draft January 2012): EHIS response al-ternatives: 2-5 different (“1 to less than 3 years”, “3 to less than 5 years”, “more than 5 years”, “never”)
5.7.4 European Health Determinant mod-ule
Height and weight
Height and weight are needed to calculate BMI. Even though height and weight will be measured in the HES, they should also be asked. For some persons the questionnaire will be the only data source. This enables for example the analysis of non-par-ticipant’s BMI in a case that the subject has only filled in the questionnaire but does not want to take part to the physical ex-aminations. Asking height and weight prior to the measurement also enables comparison of measured and self-reported height and weight (reporting bias).
Introduction:
“Now I’m going to ask you about your height and weight.”
Q10. How tall are you without shoes? (in cm) |_|_| cm
Indicators
EHES indicators: Self reported height, Self reported BMIInstructions for translation and cultural adaptationSpecification “without shoes” is needed in the question.
Instructions for the interviewer
“Full height without shoes”: measured when the person has bare feet or light socks. An estimate can be asked when the respond-ent indicates that she/he doesn’t know the exact answer.

B - 110
Source
EHIS BM1 (Draft January 2012)
Q11. How much do you weight without clothes and shoes? (in kg) |_||_||_| kg
Indicators
EHES indicators: Self reported weight, Self reported BMIInstructions for translation and cultural adaptationIf this is asked in a self administered questionnaire, an instruc-tion for women to record weight before pregnancy can be added. As an alternative, a specific question on pregnancy status may be included and both current weight and weight before pregnancy recorded.
Instructions for the interviewer
“Weight without clothes and shoes”: body weight measured when the person is undressed or in underwear. For pregnant women weight before pregnancy should be recorded. An estimate can be asked when the respondent indicates that she/he doesn’t know the exact answer.
Source
EHIS BM2 (Draft January 2012)
Smoking
Questions on smoking are recommended to be included in a self-completion form.
Q12. Do you smoke? |__| Yes, daily |__| Yes, occasionally |__| Not at all
Indicator
EHES indicator: Prevalence of daily smokers, Prevalence of oc-casional smokers
ECHI indicator: Regular smokers

B - 111
Instructions for translation and cultural adaptation
“Do you smoke”: whether the respondent currently/actually smokes, regardless of the amount or frequency.
“To smoke”: breathing in and out of the smoke of tobacco prod-ucts (manufactured cigarettes, hand rolled cigarettes, cigars, pipes, etc.). Smokeless tobacco products (e.g. snuff) and nico-tine inhalers are not included.
“Daily” includes almost daily
Instructions for the interviewer
“Smoking”: all kinds of tobacco products (manufactured ciga-rettes, hand rolled cigarettes, cigars, pipes, etc.) are included. Smokeless tobacco products (e.g. snuff) and nicotine inhalers are not included.
Record “Yes, daily” also if the person smokes almost daily.
Source
EHIS SK1 (Draft January 2012)
Q13. On average, how many times do you smoke per day (= number of cigarettes, cigars, pipefulls of tobacco etc.)? (asked if Q12 = “Yes daily” or “yes occasionally”) |_|_| times
Indicator
EHES indicators: Number of times smoked per day among daily smokers, Number of times smoked per day in population
Instructions for translation and cultural adaptation
Use the term “average”, not generally or usually. As some per-sons do not consider themselves as daily smokers even though they smoke a couple of times on most days, this is asked also from occasional smokers. In the analysis only daily smokers are included for the first indicator.
Instructions for the interviewer
“Per day”: regardless of the time, e.g. also after midnight. For occasional smokers it is the average over all days, i.e. not only over the days when they smoke. If the average is less than 0,5, code “0”.

B - 112
“Pipefull”: the full content of the pipe, even when smoked with intervals.
Source
EHRM (Tolonen 2002). EHIS SK3 “On average, how many ciga-rettes do you smoke each day?” (Draft January 2012)
Q14. Which of the products do you frequently smoke? (Asked if Q12 = “Yes, daily”) Manufactured cigarettes |__| Yes |__| No Self-rolled cigarettes |__| Yes |__| No Pipe |__| Yes |__| No Cigars |__| Yes |__| No
Indicator
EHES indicators: Prevalence of manufactured cigarette smoking among daily smokers, Prevalence of self rolled cigarette smok-ing among daily smokers, Prevalence of pipe smoking among daily smokers, Prevalence of cigar smoking among daily smokers
Instructions for translation and cultural adaptation
“Frequently”: regularly.
Instructions for the interviewer
“Frequently”: regular use, not including occasional, rare use, e.g. one occasional cigar on a specific day
Source
EHRM (Tolonen 2002) EHIS SK2 “What kind of tobacco product do you consume”, response categories the same, except “Pipe tobacco” and additional option “other” (Draft January 2012)
Q15. Have you ever smoked cigarettes, cigars or pipes daily or almost every day for at least one year? |__| Yes |__| No
Indicator
Prevalence of ex daily smokers
Instructions for translation and cultural adaptation
“Ever”: past lifetime

B - 113
Asked to identify past smoking that is clearly more than just try-ing a couple of times as an experiment.
Instructions for the interviewer
“Ever smoked daily, or almost daily, for at least one year”: refers to a period of at least about a year while smoking daily or almost daily, regardless of the daily amount.
Source
EHRM (Tolonen 2002)
Q16. For how many years have you smoked daily? Count all separate periods of smoking daily. If you don’t remem-ber the exact number of years, please give an estimate. |_|_| years
Indicator
EHES indicators: Number of years smoked among daily smokers, Prevalence of years smoked daily in population.
Instructions for translation and cultural adaptation
“Daily”: includes almost daily
Instructions for the interviewer
If a person has smoked daily for 10 years, then he/she stopped smoking for 2 years after which he/she started to smoke occa-sionally for another 5 years followed by 2 years of daily smoking then the number of years of daily smoking is 12.
If a person started smoking daily less than a year ago record ‘0’ as the number of years.
Source
EHES (Tolonen 2002). Not in EHIS.
Q17. When did you stop smoking daily? (If you have quit smoking several times, give the time when you last stopped smoking daily?) (Asked if Q15 = “YES” ) |__| Within the past week |__| 1 week - less than 1 month ago |__| 1 month - less than 1 year ago |__| 1 - 5 years ago |__| More than 5 years ago

B - 114
Indicator
To be used in additional analyses to (a) characterize the differ-ence between daily and past smoking and (b) to provide informa-tion on the non-smoking period since daily smoking.
Instructions for translation and cultural adaptation
Needed for the CVD risk estimates. Those who have stopped smoking daily less than a year ago can be included in current smokers.
Instructions for the interviewer
Refers to the latest time when stopped smoking or started smok-ing less than daily, may include occasional smoking.
Source
EHRM (Tolonen 2002).
5.7.5 Background Module / Core Social Variables
Q18. Sex of respondent |__| Male |__| Female
Instructions for translation and cultural adaptation
The biological sex of the respondent. Information may be ob-tained from the sampling frame, and may not need to be asked.
Instructions for the interviewer
In order not to embarrass the respondent, the interviewer can record the sex of the respondent without asking her/him.
Source
EHIS SEX (Draft June 2011)
Q19. What is your date of birth? |__|__| |__|__| |__|__|__|__| DD MM YYYY

B - 115
Indicator
Only the year of birth and age in full years at the time of the ex-amination will be transferred to EHES RC.
Instructions for translation and cultural adaptation
The information may be obtained from the sampling frame, but this may need to be verified with the respondent. In case the ex-act date of birth (as above) cannot be collected (due to national data protection rules), year of birth and month of birth should be considered.
If none of the above is possible, then age at last birthday should be asked in the questionnaire.
Instructions for the interviewer
Date of birth as recorded in the ID card of the respondent, pref-erably checked from the ID card.
If age is asked, “Age at last birthday” means age in completed years, i.e. age expressed as the number of birthday anniversa-ries passed on the date of reference.
Q20. Are you living with someone as a couple? |__| Yes |__| No
Indicator
Living as a couple
Instructions for translation and cultural adaptation
De facto arrangement indicating social support.
Instructions for the interviewer
Including those who are legally married, living in consensual un-ion or registered partnership.
Source
FEHES (Tolonen 2008)
Q21. How many years have you spent at school or in full-time study? |_|_| years

B - 116
Indicator
One of the indicators of socioeconomic status.
Instructions for translation and cultural adaptation
This will be used to classify the respondents to thirds of years of education, which is an indicator of socioeconomic status.
Instructions for the interviewer
Includes basic education as well as occupational and academic training in full years. The instructions for the interviewer may include examples of average length of studies for different levels of education, to be used when needed to assist in calculating the full years.
Source
EHRM (Tolonen 2002)
Q22. What is the highest level of education or training successfully completed (Based on ISCED-2011 classifica-tion) (EHIS HATLEVEL) |__| ISCED0 – early childhood development, pre-primary education |__| ISCED1 - primary education |__| ISCED 2 - lower secondary education |__| ISCED 3 - upper secondary education |__| ISCED 4 - post-secondary but non-tertiary education |__| ISCED 5 - tertiary education; short-cycle |__| ISCED 6 - tertiary education; bachelor level or equivalent |__| ISCED 7 - tertiary education; master level or equivlent |__| ISCED 8 - tertiary education; doctoral level or equivalent
Instructions for translation and cultural adaptation
Each country should prepare its own response categories ac-cording to the educational system of the country. The response categories should be compatible with the ISCED classification. (http://www.uis.unesco.org/Education/Pages/international-standard-classification-of-education.aspx)
Instructions for the interviewer
“Highest level of education completed”: level successfully com-pleted and associated with obtaining a certificate or a diploma.

B - 117
When determining the highest level, both general and vocational education should be taken into consideration. Persons should be coded according to the highest level they have completed. Per-sons still in education have to indicate their last level of educa-tion successfully finished.
Please include any work-based training. Any qualification which has been achieved in connection with work should be taken into account regardless of the type of qualification, regardless of who payed for the education or whether the education took place in the premises of the company or not.
Source
EHIS HATLEVEL (Draft June 2011)
Q23. How would you define your current labour status? |__| Carrying out a job or profession, including unpaid work for a family business or holding, including an apprenticeship or paid traineeship, etc. |__| Unemployed |__| Pupil, student, further training, unpaid work experience |__| In retirement or early retirement or has given up business |__| Permanently disabled |__| In compulsory military or community service |__| Fulfilling domestic tasks |__| Other inactive person
Instructions for translation and cultural adaptation
“Current labour status”: people’s own perception of their main status differs from the strict definitions used in the ILO defini-tions. For instance, many people who would regard themselves as full-time students or homemakers may be classified as ILO-employed if they have a part-time job. Similarly, some people who consider themselves ‘unemployed’ may not meet the strict ILO criteria of taking active steps to find work and being imme-diately available.
“In compulsory military or community service”: this code might not be relevant in some countries
Instructions for the interviewer
“Current”: The situation at of the time of the interview should be recorded. For instance, if a person has recently lost a job or has retired recently, or the activity status has changed otherwise in a definitive manner, the person’s own perception of his/her main

B - 118
activity at present is recorded. No other specific reference period should be considered.
If the participant is e.g. a student who is also working, the labour status is determined on the basis of the most time spent.
Source
EHIS MAINSTAT (Draft June 2011)
Q24. How many persons live in the household, including yourself? |_|_| persons
Q25. How many of them are aged less than 14 years? (Asked if more that 1 person lives in the household) |_|_| persons
Indicator
The total number household members and the number persons aged under 14 is needed to calculate the household’s equivalised disposable income. These numbers will be transferred to EHES RC. In case more detailed information on household members is needed for the sampling frame, more questions may be added.
Instructions for translation and cultural adaptation
It is sufficient to count those in the household who share expens-es with the respondent. However, if household sampling is used, it may be necessary to count all who live in the same address.Whichever definition is used, Q26 should use the same definition.
Instructions for the interviewer
The following persons, if they share household expenses with the respondent shall be regarded as household members (Note: the preceding sentence and the following list should be adapted to the actual definition used for a household in the survey):
• persons usually resident and related to other house-hold members;
• persons usually resident, not related to other house-hold members;
• resident boarders, lodgers, tenants, etc., with no pri-vate address elsewhere, actual/intended stay one year or more;
• visitors, with no private address elsewhere, actual/in-tended stay one year or more;

B - 119
• live-in domestic servants, au-pairs, etc. , with no pri-vate address elsewhere, actual/intended stay one year or more;
• persons usually resident but temporarily absent (for reasons of holiday travel, work, education or similar), with no private address elsewhere and actual/intended absence less than one year;
• children of household members being educated away from home, with no private address elsewhere, con-tinuing to retain close ties with the household;
• persons absent for long periods but having household ties (eg. persons working away from home), child or partner of other household member, with no private address elsewhere, continuing to retain close ties with the household;
• persons temporarily absent but having household ties (eg. persons in hospital, nursing homes or other in-stitutions), with clear financial ties to the household, actual/prospective absence less than one year;
A person shall be considered ‘usually resident’ if he/she spends most of his/her daily rest there evaluated over the past one year. Persons forming new households or joining existing households shall normally be considered as members at their new location if there is an intention to stay for more than one year. Similarly, those leaving to live elsewhere shall no longer be considered as members of their original household.
A child who alternates between two households (for instance af-ter his or her parents have divorced) should be considered in the household where he or she spends the majority of the time. Where an equal amount of time is spent with both parents the place of usual residence should be the place where the child is at the time of the survey.
Source
EHIS HHNBPERS (June 2011)

B - 120
Q26. Which group represents your household’s total net monthly income from all the sources (income from work, unemployment benefits, old-age or survivor’s benefits, sickness or disability benefits, family/children related al-lowances, housing allowances, education-related allow-ance, other regular benefits) after deductions for income tax, national insurance, etc. |__| Below 1st decile |__| Between 1st decile and 2nd decile |__| Between 2nd decile and 3rd decile |__| Between 3rd decile and 4th decile |__| Between 4th decile and 5th decile |__| Between 5th decile and 6th decile |__| Between 6th decile and 7th decile |__| Between 7th decile and 8th decile |__| Between 8th decile and 9th decile |__| Aboved 9th decile
Instructions for translation and cultural adaptation
The net monthly income of the household. The term “household” should refer to the same definition as used in Q24.
The deciles for each country could be taken from a national sur-vey on income, such as EU-SILC survey, with suitable rounding. The number of categories does not need to be exactly 10. This question, together with Questions 24 and 25 can be used to cal-culate the so called “Equalized household’s total net monthly in-come” (modified OECD scale, which is used in EUROSTAT).
Instructions for the interviewer
If the respondent doesn’t know the exact or approximate amount for their household, he/she should be requested to indicate the income range corresponding to the total household net income per month.
Source
Questionnaire item to provide data for EHIS HHINCOME
References• European Health Interview Survey (EHIS). 1st round 2007-2088. Back-
ground and rationale of the questions. European Commission. Avail-able at https://circabc.europa.eu/sd/d/150a71c0-7a17-407d-8d20-2fdc284b0bf7/EHIS%20-%201st%20round%202007-2008%20-%20Background%20and%20rationale%20of%20the%20questions.pdf. Ac-cessed on 22 January 2013
• European Health Interview Survey (EHIS). 1st round 2007-2008. Con-ceptual translation cards and guidelines. European Commission. Available

B - 121
at https://circabc.europa.eu/sd/d/671d5958-7928-471c-a7b9-0194c34b-9cb8/EHIS%20conceptual%20card%20and%20guidelines.pdf. Accessed on 22 January 2013
• Tolonen H, Kuulasmaa K, Laatikainen T, Wolf H. Recommendations for in-dicators, international collaboration, protocol and manual of operations for chronic disease risk factor surveys. EHRM Project. 2002 [cited 4 Janu-ary 2011]; Available from: http://www.thl.fi/publications/ehrm/product2/title.htm
• Tolonen H, Koponen P, Aromaa A, Conti S et al (eds.) Recommendations for the Health Examination Surveys in Europe. Publications of the Na-tional Health Institute, Helsinki 2008. B21/2008. Available athttp://urn.fi/URN:ISBN:978-951-740-838-7. Accessed on 22 January 2013

B - 122
Appendix 5.7 EHES questionnaire
Q1. How is your health in general? Is it… very good good fair bad very bad?
Q2. Do you have any longstanding illness or (longstanding) health problem? (Long-standing means illnesses or health problems which have lasted, or are expected to last, for 6 months or more) Yes No
Q3. For at least the past 6 months, to what extent have you been limited because of a health problem in activities people usually do? Would you say you have been … severely limited limited but not severely or not limited at all?
Q4. Do you have or have you ever had any of the following diseases or conditions, diag-nosed by a medical doctor?Myocardial infarction Yes NoCoronary heart disease (angina pectoris) Yes NoHigh blood pressure (hypertension) Yes NoElevated blood cholesterol Yes NoStroke (cerebral haemorrhage, cerebralthrombosis) Yes NoDiabetes Yes No
EHES questionnaireParticipant id:
Health Status ModuleQ5. During the past two weeks, have you used any medicines (including dietary supplements such as herbal medicines or vitamins) that were prescribed for you by a doctor (for women, exclude contraceptive pills or other hormones)? Yes No a Go to Q7
Q6. Were they medicines for … ? high blood pressure Yes Nolowering the blood cholesterol level Yes Nodiabetes Yes No
Q7. When was the last time that your blood pressure was measured by a health profes-sional? Within the past 12 moths 1-5 years ago Not within the past 5 years
Q8. When was the last time that your blood cholesterol was measured (by a health pro-fessional) Within the past 12 moths 1-5 years ago Not within the past 5 years
Q9. When was the last time that your blood sugar (glucose) was measured by a health professional? Within the past 12 moths 1-5 years ago Not within the past 5 years
Health Care Module

B - 123
Q10. How tall are you without shoes? in cm cm
Q11. How much do you weight without clothes and shoes? in kg kg
Q12. Do you smoke? Yes, daily Yes, occasionally a Go to Q15 Not at all a Go to Q15
Q13. On average, how many times do you smoke per day (= number of cigarettes, cigars, pipefuls of tobacco etc.)? times
Q14. Which of the products do you fre-quently smoke? Manufactured cigarettes Yes NoSelf-rolled cigarettes Yes NoPipe Yes NoCigars Yes No
Q15. Have you ever smoked daily (= almost every day for at least one year)? Yes No
Q16. For how many years have you smoked daily? Count all separate periods of smok-ing daily. If you don’t remember the exact number of years, please give an estimate. years
Q17. When did you stop smoking daily? (If you have quit smoking several times, give the time when you last stopped smoking daily?) Within the past week 1 week - less than 1 month ago 1 month - less than 1 year ago 1 - 5 years ago More than 5 years ago
Q18. Sex of respondent Male Female
Q19. What is your date of birth? (dd mm yyyy)
Q20. In which country were you born Native-born In another EU Member State In a non-EU country
Q21. What is your legal marital status Never married and never in a registered partnership Married or in a registered partnership Widowed or with registered partnership that ended with death of partner (not remarried or in new registered partnership) Divorced or with registered partnership that was legally dissolved (not remarried or in new registered partnership)
Q22. Are you living with someone as a couple? Yes No
Q23. How many years have you spent at school or in full-time study? years
Health Determinants Social Variables

B - 124
Q24. What is the highest level of education or training successfully completed early childhood development, pre-primary education primary education lower secondary education upper secondary education post-secondary but non-tertiary education tertiary education; short-cycle tertiary education; bachelor level or equivalent tertiary education; master level or equivalent tertiary education; doctoral level or equivalent
Q25. How would you define your current labour status? Carry out a job or profession, including unpaid work for a family business or holding, including an apprenticeship or paid traineeship, etc. Unemployed Pupil, student, further training, unpaid work experience In retirement or early retirement or has given up business Permanently disabled In compulsory military or community service Fulfillingdomestictasks Other inactive person
Q26. How many persons live in the house-hold, including yourself? persons
Q27. How many of them are aged less than 14 years? persons
Q28. Which group represents your house-hold’s total net monthly income from all the sources (income from work, unemployment benefits, old-age or survivor’s benefits, sick-ness or disability benefits, family/children related allowances, housing allowances, education-related allowance, other regular benefits) after deductions for income tax, national insurance, etc. Below 1st decile Between 1st decile and 2nd decile Between 2nd decile and 3rd decile Between 3rd decile and 4th decile Between 4th decile and 5th decile Between 5th decile and 6th decile Between 6th decile and 7th decile Between 7th decile and 8th decile Between 8th decile and 9th decile Aboved 9th decile

B - 125
5.8 Feedback to the participantsHanna Tolonen1, Päivikki Koponen1
1 National Institute for Health and Welfare (THL), Helsinki, Finland
Feedback to participants is an important factor in motivating participants. For many participants, getting new information on one’s own health is an important reason to participate. Guide-lines for giving feedback need to be included in the training of the fieldwork staff and in the national manual. The contents of the feedback and ways to give it have to be based on the following issues, depending on national circumstances:
• acceptable for the participants and their own health care providers (e.g. GPs),
• the survey setting and competence of the fieldwork staff, and
• national regulations and medical and/or nursing prac-tice guidelines.
5.8.1 Ways to provide feedback
The feedback on anthropometric measurements and blood pres-sure can be provided to the participants right after the measure-ments. Results of the blood analysis usually need more time and cannot be provided at the same visit when blood samples are collected. There are several ways in which the feedback can be provided. Here are a few options:
1. Results are given and explained after the measure-ments are completed and before the participant leaves the survey site or, in the case of a home visit, before the nurse leaves. • Results are written on a form which is then given to
the participant. The form does not include interpre-tation of the results. Results are explained verbally to the participant and they have an opportunity to ask questions.
• Results are written on a form which also has a short, basic interpretation of them (e.g. reference values). This form is then given to the participant and results are also explained to them verbally.
2. No results are given in written form to the participant during the visit (they may be only explained verbally)

B - 126
but they are mailed to the participant later, e.g. when all laboratory values are available. The letter including the results also includes short, basic interpretations of the results.
3. Results are not provided directly to the participant, but they are mailed to the general practitioner (GP) of the participant. It is expected that the GP explains the re-sults to the participant.
4. In cases where the laboratory analyses indicate acute need for medical attention, personal contact (such as a phone call by the survey physician) should be consid-ered instead of only a mailed letter.
When results are explained verbally to the participants, the field work staff should be provided with a few formulated model sen-tences which can be used. It has to be emphasized always that the survey measurements or samples, taken at one time, can not be used for diagnostic purposes. In case of any abnormal results, these have to be confirmed by repeated measurements, possibly with other additional tests and interpreted by a physician. The measurement results will also depend on adherence to instruc-tions before the measurement (e.g. smoking or fasting), and these need to taken into account. During the examination visit, important information on the participant’s health status may be lacking, which is why all interpretations and comments should be made with caution.
Regardless of the way in which the actual measurement results are given to the participant, additional health promotion material may be available. This material may include leaflets or instruc-tions to consult reliable websites (e.g. NHS 2011) about smok-ing, obesity, hypertension, etc.
5.8.2 Example of feedback
When explaining the measurement results to the participant, the following phrases are examples of comments that can be used both in written or verbal communication. They need to be adapted to the criteria, thresholds and reference values used in national guidelines.
5.8.2.1 Blood pressure
”Systolic blood pressure should be below 130 mmHg and dias-tolic blood pressure below 85 mmHg. Your blood pressure was __ mmHg / __ mmHg. This means that your blood pressure is...”

B - 127
• if within normal range: “... normal, but it is recom-mended that you should check your blood pressure (e.g. once a year)”;
• if systolic blood pressure is 130-139 mmHg and/or diastolic blood pressure 85-89 mmHg: “... mildly raised and you should pay attention to your lifestyle which may affect the blood pressure. Heavy use of salt and alcohol, as well as overweight and sed-entary lifestyle are known to increase blood pres-sure. Additional information on these can be found from... You should also check your blood pressure regularly, at least once a year”
• if systolic blood pressure is 140-159 mmHg and/or diastolic blood pressure is 90-99 mmHg: “... raised and you should see your doctor/a nurse for follow-up of your blood pressure. It is also recommended to change your lifestyle to help to decrease your blood pressure”;’
• if systolic blood pressure is over 160 mmHg and/or diastolic blood pressure is over 100 mmHg: “...considerably raised and your should contact your doctor so that the need for treatment can be as-sessed and regular follow-up of your blood pressure can be started”.
5.8.2.2 Anthropometric measurements
The phrases need to be considered carefully, not to burden the participants if they have problems with their weight, e.g. the term obese may be considered insulting. For some people, e.g. active sportsmen, the BMI can be raised without any indication of obesity. For height and weight measurements, the following phrases can be used:
• ”Body mass index (BMI) can be used to check if you have health risks. BMI is calculated by dividing the weight (in kilos) by the squared height (in metres). The BMI is a measure of whether your weight is within recommended values related to your height. The rec-ommended BMI should be below 25. Your BMI was ___ kg/m2. This means that your values can be classified as ...” • if BMI is 18.5-24.9: “... normal weight”;• if BMI is 25-27: “... overweight. I recommend that
you consider losing some weight. You could consult your healthcare provider to receive advice and sup-port. That would help to prevent many diseases like diabetes”;

B - 128
• if BMI is 28 or over: “... obese. I recommend that you consider losing some weight. You could consult your healthcare provider to receive advice and sup-port. That would help to prevent many diseases like diabetes”;
For waist circumference measurement, the following phrases can be used:
• ”The waist circumference tells us about abdominal fat. Your waist circumference was ___ cm. This is ...” • if women have waist circumference below 90 cm or
men have waist circumference below 100 cm: “... considered normal.”;
• if women have waist circumference above 90 cm or men have waist circumference above 100 cm: “... considered to be above recommended. This is known to be related to the increased risk several chronic diseases, like diabetes.”
5.8.2.3 Cholesterol
For total cholesterol, the following phrases can be used:
• ”Total cholesterol is a known risk factor for cardiovas-cular diseases. Total cholesterol should be below 5.0 mmol/l. Your total cholesterol was ___ mmol/l. This means that your total cholesterol is ...” • if total cholesterol is below 5.0 mmol/l: “... normal.”;• if total cholesterol is 5.0-6.5 mmol/l: “... elevated
and it is recommended you change your diet so that you decrease the use of butter, pastries, fatty meat and meat products, etc. If you are overweight, loos-ing some weight could help to lower your total cho-lesterol level”;
• if total cholesterol is 6.5 - 8.0 mmol/l: “... elevated and should be controlled by your doctor within three months. If you have other diseases like elevated blood pressure, diabetes, overweight or you smoke, it is recommended to consult your doctor to check if you need repeated/additional measurements”;
• if total cholesterol is over 8.0 mmol/l: “... raised and if you are not under treatment for elevated choles-terol, you should contact your doctor without delay so that he can assess the need for further treat-ment.”

B - 129
• ”HDL-cholesterol is so-called ‘good cholesterol’. The HDL-cholesterol should be over 1.0 mmol/l. Your HDL-cholesterol was ___ mmol/l. This means that your HDL-cholesterol is ...” • if HDL-cholesterol is below 1.0 mmol/l: “... low. You
can increase your HDL-cholesterol by increasing physical activity and if you are overweight, by losing some weight. Also stopping smoking will increase HDL-cholesterol”;
• if HDL-cholesterol is over 1.0 mmol/l: “... in a good range.”
5.8.2.4 Glucose
For fasting glucose, the following phrases can be used:
• Fasting glucose is raised in diabetes or if the sample is taken within 1-3 hours of latest meal. If the sample was taken after fasting at least 4 hours, and • if fasting glucose is below 6.0 mmol/l: “... normal.”;• if fasting glucose is more than 6.0 mmol/l but less
than 7.8 mmol/l: “... impaired and should be con-trolled by your doctor, especially if you haven’t been diagnosed by a medical doctor to have diabetes and if you are not under control.”
• if fasting glucose is 7.8 mmol/l or higher: “... ele-vated and should be controlled by your doctor soon, especially if you haven’t been diagnosed by a medi-cal doctor to have diabetes and if you are not under control.”
Reference• NHS (2011) BMI health weight calculator. Available at: http://www.nhs.uk/
Tools/Pages/Healthyweightcalculator.aspx. Date accessed: 4 May 2011

B - 130

PART B
EHES Manualhttp://www.ehes.info/manuals/EHES_manual/EHES_manual.htm
B - 131
Version:
As described in Part B, Chapter 1 Coordination of the fieldwork, the fieldwork organization usually consists of a Central Office and one or several fieldwork teams. Regarding data management the aspects that need to be defined in the national HES manual are:
• Dividing the tasks between the Central Office and the fieldwork teams;
• Preparations at the fieldwork sites;• Scheduling of appointments for participants (see Part
A, Section 12.3.1.3 and Part B, Section 1.6);• Collecting the survey data (see Part A, Section 12.3.2)
on• questionnaires and interviews,• physical measurements,• laboratory tests and samples;
• Error checking, correction and documentation of the data (see Part A, Section 12.4);
• Transfer and storage of the data (see Part A, Section 12.5).
6.1 Central officeThe Central Office should take care of the overall data manage-ment preparation as well as coordination during the fieldwork, such as:
• Recruiting necessary staff for data management;
6. Data management
Ari Haukijärvi1
1 National Institute for Health and Welfare (THL), Helsinki, Finland
15 January 2013

B - 132
• Arranging computer equipment and network(s) for the fieldwork teams (if computerized data collection is used);
• Arranging the responsibilities, training and support of the fieldwork teams;
• Coordinating the fieldwork data management;• Processing the survey data received from the fieldwork
teams.
6.1.1 Arranging computer equipment and network(s)
In arranging computer equipment and network at least the fol-lowing things need to be considered:
• Planning the structure of the compurer network and equipment needed;
• Establishing and customizing the network connections;• Installing the software needed for the survey;• Planning of software updates during the fieldwork;• Establishing communication practises between each
fieldwork team and the Central office, including• email practises (email accounts needed, policies for
reliability and encryption of confidential email),• possible remote/VPN connections and• mobile connections;
Testing the equipment as well as data transfer and storage sys-tems should be done extensively prior to the training of the field-work personnel. Time is also needed for analysing the test expe-riences.
6.1.2 Training, responsibilities and support of the fieldwork teams
From the data management’s point of view the training, sharing responsibilities and support of the fieldworkers should include the following issues:
• Providing fieldworkers with necessary skills to use his/hers data recording equipment and software. A special attention should to be paid to the correctness of infor-mation and data confidentiality and security;

B - 133
• Issuing responsibilities to team members. If local (tem-porary) computer networks will be established for the teams, each fieldwork team should have a named per-son responsible for data management issues, and his/hers deputy. They can be in charge of putting up/re-moving the equipment and network connections need-ed on the field and assist and give advice in basic data management issues;
• Providing an instruction manual regarding the survey software and computer equipment needed in the field-work;
• All fieldwork teams need support and supervision from the Central Office. There should be a helpdesk avail-able to serve the teams during the fieldwork.
6.1.3 Coordinating the fieldwork data man-agement
During the fieldwork phase database(s) maintained in the Central Office can be used to monitor and control the fieldwork logistics in the areas of:
• Scheduling of appointments;• Creating invitations, lists of appointment schedules,
calendars, etc. for each fieldwork group;• Storing fieldwork inventory data regarding interview
questionnaires (e.g. the numbers of completed survey forms), health examination data and laboratory sam-ples;
• Generating feedback letters and forms.
6.2. Fieldwork teamThe structure and division of tasks in the fieldwork teams are dis-cussed in Part B, Section 1.1.2. The additional things that need to be considered from the data management’s point of view are:
• The skills needed when setting up the equipment and network connections if these are needed at the field-work site and removing these after the fieldwork phase;
• Basic technical knowledge in using the equipment and software that are used in data collection;
• The responsibilities and practices in backing up and transferring the data to the Central Office can be given to named person(s) or to all members of the team.

B - 134
Regarding technical details the issues that need to be considered and specified in the national manual are questions “who does”, “when”, and “how”.
6.3 Data management in the field
6.3.1 Recording of the data
The primary sources of the data are questionnaires and inter-views, physical measurements, and laboratory tests and samples. There are different approaches for recording the survey data on the field, depending on the data system which is established for the fieldwork (see Part A, Section 12.3.2):
• The data are recorded on paper forms;• The data are recorded on computers, from which data
files are regularly copied to a server located in the local (fieldwork team’s) network;
• The data are recorded directly to the local (fieldwork team’s) network’s data storage;
• The data are recorded directly to the central database in the Central Office.
The software which is used to record the survey data should be able to function even if the local network is out of action. If no network connection is available, the survey data exists only in (portable) workstation computers, in which case a frequent rou-tine backup procedure to an extarnal device is necessary. Alter-natively, paper forms can be used.
Figure 6.1 Example of a HES data management

B - 135
If the data are recorded on paper forms these may need to be transformed to electronic format before further processing. If this is done by the fieldwork team by typing the data manually to computer the process will be thenceforth in accordance with the last three cases. If this procedure is done in the Central office, also optical character recognition could be used.
6.3.2 Identification - the follow-up of par-ticipants through the survey
To prevent loss or mix-up of the data records, it will be important that each subject is identified correctly at all stages. The purpose of the follow-up of participants is
• to make sure that correct data corresponds to each participant, and
• to monitor in which phase of the survey each partici-pant is.
The primary means both for identifying the survey participants and for monitoring the progress of the survey are:
• Unique subject ID code;• The subject records in EHES are identified by using
four-level codes specified in Part A, Chapter 12.2. The Serial number is assigned by the national survey or-ganizer and is given to all who are selected to the sam-ple. This can be used to identify the subject throughout the survey.
• Barcode;• Barcodes with a reference to the subject identifica-
tion code can be used to facilitate the identification of the participants throughout physical examina-tions. (When printed on survey forms these can be checked in the beginning of each examination.)
• Laboratory samples (i.e. blood and storage tubes and storage boxes) should be labelled with bar codes with a reference to the subject identification code.
• Data logs of examinations with a reference to the sub-ject identification code;
• The integrity of the data can be ensured by using con-trol files (including e.g. serial number, birthdate or age, date of examination, etc.) and by comparing informa-tion from different data sources.

B - 136
Logistic database(s) maintained in the Central office can be used to gather data from the field and to monitor and co-ordinate the progress of examination on the field.
6.3.3 Data error checking
In order to reach the aims of data management during the field-work, i.e.
• complete data records;• no errors;• no lost or mixed-up records;
routine data checking procedures should exist for the examina-tion forms and the data. These routine procedures include:
• visual checking of key items at the examination site;• automatic software checks in computer-assisted data
collection at the examination site;• extensive checking for all computerized data in the
Central Office.
Optimally the detection of errors should be done when the sub-ject is still at the interview or examination site.
A formal check should be done to verify that there are only al-lowed data values (e.g. withing specified ranges), and that the structure of the data is logical. The checking criteria should pick out two kinds of situations:
• Data values that are illegal. These may be undefined values of single data items or contradictions between the values of several data items. Such situations al-ways require a correction.
• Unusual data values. These are data values which are possible but uncommon, and should be checked for correctness.
For computerized data, data checks and transformations can be run automatically. Here an online data connection from the field-work site to the Central Office may prove itself useful. An exten-sive data check with proper feedback could be run immediately on the grounds of data checking routines of the central database.

B - 137
6.3.4 Correcting and documenting the data
To ensure a uniform approach to all changes, changing the data should be done according to pre-defined documented rules for data verification and correction. These rules need to be specified in the national manual.
The documentation ensures transparency, consistency, repeat-ability and correctability of data corrections. Using specific codes for the missing data makes it easier to separate accidental in-complete values within the data (blanks) from reported missing data.
The persons making changes and corrections to the data should receive proper training for the task.
All changes to the original data should be logged. Whenever the original survey data is changed or corrected, the old data should be backed up and there will be a new version of the data. Accord-ingly, the following information need to be documented:
• The version of the data• What was changed• Reason for the change• Time of the change
By these means no data will be lost and the history of the data can be traced. In this process the original raw data should be backed up and kept separate, unchanged.
6.3.5 Data confidentiality and security
6.3.5.1 Paper forms
To ensure confidentiality and security of the data the responsibili-ties in collecting and storing the data need to be clarified. This means that person(s) appointed to the task should ensure that all survey documents - i.e. questionnaires, consents, measure-ment sheets, etc. will be collected and stored safely. Sealed con-tainers can be used here, also during data shipments.
The paper forms should not be left for unauthorized persons to see or get lost. The confidentiality of the data can be further enforced by anonymity; It is recommended not to include any personal identification in the documents when this can be avoid-ed, and to use subject ID code or barcode (see Section 6.3.2) instead.

B - 138
6.3.5.2 Data in electronic format
When not used, the computers and servers should to be locked so that only authorized persons can access them. This involves using encrypted hard disks, especially in all portable computers to ensure that the survey data is secure even if a computer is missing or stolen. It is also necessary to have a safe place where survey laptops are kept between the working period.
No survey data should be kept or archived in personal user direc-tories or preserved long periods at local computer’s hard drive. It is equally important that the personal identification data of sur-vey subjects is encrypted and available only for those who have authorized access to such data. Encrypted transfer for comput-erized data is equivalent to the sealed containers for the paper forms.
6.3.6 Backing up the data
The data need to be backed up regularly on an external storage device in order to minimize losses of data in case of equipment malfunction, software errors or theft. This can be external hard drive, another computer, optical disk, etc. Also direct transfer of encrypted data to the Central Office is one way to organize the backup of the data.
The backups should be stored separately from the original data source (such as laptops). A full backup on external device should be taken in the end of each working phase.
After completion of the fieldwork phase all workstations need to undergo a routine inspection, in which the survey data is backed up and the data directories are emptied.

PART B
EHES Manualhttp://www.ehes.info/manuals/EHES_manual/EHES_manual.htm
B - 139
Version:
Quality assurance refers to the measures taken to ensure good quality of the survey. Quality assurance in general is considered in Part A, Chapter 11.
Quality control is a part of quality assurance. It includes monitor-ing of the correctness and completeness of the measurements and the data, and the actions taken to correct the observed short-comings. The objective is to detect all quality problems as early as possible, and to fix them before they will bias the results of the surveys. Quality control is particularly relevant for the field-work phase of the survey.
Here we focus specifically on the quality control and other qual-ity assurance during the fieldwork. Proper training and setting up the examination site are prerequisites for good quality of the fieldwork. These need to be complemented by quality control, which should address the entire process of data collection includ-ing the questionnaires, interviews, physical measurements and biological samples, as well as transfer of materials from one loca-tion to the other. In addition to the actual data collection, quality control during the fieldwork should also address issues related to contacting selected persons and participation rates. Regular checking of participation rates in different survey sites and by the fieldwork staff members who contact selected persons may reveal differences in practices. These should be evaluated to as-sure that best practices are used by all staff members and at each survey site.
7. Quality control
Hanna Tolonen1, Kari Kuulasmaa1, Päivikki Koponen1
1 National Institute for Health and Welfare (THL), Helsinki, Finland
04 June 2012

B - 140
7.1 Calibration of measurement devic-es and data checkingFor each measurement, the calibration of the measurement de-vices needs to be checked routinely. Depending on the device, this should be done before each measurement, daily, or weekly. For the EHES core measurements, these measurement-specific quality control procedures are described in Part B of the EHES Manual:
• blood pressure: Part B, Section 5.1• height measurement: Part B, Section 5.2• weight measurement: Part B, Section 5.3• waist circumference measurement: Part B, Section 5.4• collection and handling of blood samples: Part B, Sec-
tion 5.5.
Collected data can reveal many quality problems. Therefore, the questionnaire data and the measurement data should be re-viewed regularly for
• frequencies or means and standard deviation of the variables,
• outliers, and• possible technical notes, and other comments attached
to the data.
For many measurements, consistency checking and other spe-cific data checking can also be performed. For example, it should be checked that persons who report not having diabetes (Q4 in EHES core questionnaire) have not reported use of medicines for diabetes (Q6). Another example of a specific check concerns the last digit preference of blood pressure measurements.
For each EHES core measurements, the issues which should be checked regularly from the data are described under each meas-urement protocol in Part B of the EHES Manual.
The detected errors should be corrected whenever the correct data values can be recovered. When this is not possible, the un-certain data should be coded as “missing data” They should not be replaced by a guess or ‘likely’ but uncertain information. If computer-assisted data collection is used, consistency checking can be built into the programs, allowing immediate checking of correct answers and values during the data collection.

B - 141
7.2 Data and material transferWhen data and materials, such as paper questionnaires or blood samples, are transferred from one place to another, such as from the examination site to the national data centre or laboratory, it should be ensured that everything that was collected on the field is received at the other end. Log books can be used to record sufficient details of the shipments, and to provide a prompt in-ventory and acknowledgement by those at the receiving end (see Part B, Section 5.6).
7.3 Audit visitsThe measurement procedures in the field should be monitored routinely by the fieldwork team coordinators. In addition, audit visits to the fieldwork site by a person outside the fieldwork team who knows the standard procedures well are recommended.
Issues to be checked during the audit visit depend on the exami-nation setting (clinic or home measurement), organization of the fieldwork, and the measurements included. In general, the fol-lowing issues should be checked during the audit visit:
• How the examination rooms are set up. In the case of home visits, how the staff member selects the place in the house/appartment where the measurements are conducted.
• How the equipment is set up for the measurements.• The tidiness of the examination site (not relevant for
home visits).• Privacy during the measurements.• Daily checking and calibration of the equipment.• Are the equipment calibrated correctly?• How staff members interact and collaborate with each
other.• How staff members interact with participants.• How informed consents are obtained.• Are standardized interviewing techniques followed (if
interviews are part of the examination)?• Are standardized measurement protocols followed
when conducting measurements?• What happens between measurements, especially if
the participant has to change examination room be-tween measurements (e.g. instructions to participants, waiting times).

B - 142
• How the information obtained is stored in the field (e.g. is data protection assured?).
• How materials are prepared for transfer.• How the materials are transferred.
It is important that the findings of the audit visit are processed with the team. Positive feedback is important: do not address only those issues where something needs to be improved or cor-rected.
7.4 Re-training and duplicate measurementsIf the fieldwork last several months or years, the fieldwork staff gets used to doing the measurements routinely. This is good, but to avoid possible wrong routines, which may unintentionally de-velop over time, the re-training of the measurers and re-fresher sessions are needed. During these re-training and/or re-fresher sessions, the standardized measurement protocols are reviewed and measurements should be done on real subjects under super-vision. There should also be the opportunity to discuss problems encountered during field work.
Also, duplicate measurements by so called “gold standard” meas-urers or devices can be carried out as an additional quality con-trol procedure, when feasible.


ISBN (pdf) 978-952-245-843-8
ISSN (pdf) 2323-4172
http://urn.fi/URN:ISBN:978-952-245-843-8
http://www.ehes.info
Reference:
Tolonen H (Ed.) EHES Manual. Part B. Fieldwork procedures. National Institute for Health and Welfare. 2013. Directions 2013_002. URN:ISBN:978-952-245-843-8, URL: http://urn.fi/URN:ISBN:978-952-245-843-8
Related Documents