ECOWISE ® EW20/1 EW30/1 The Ultimate Smart Grid Solution INSTRUCTION MANUAL

Welcome message from author
This document is posted to help you gain knowledge. Please leave a comment to let me know what you think about it! Share it to your friends and learn new things together.
Transcript
ECOWISE®
EW20/1EW30/1
The UltimateSmart Grid
Solution
INSTRUCTIONMANUAL

Welcome! Congratulations on selecting the ECOWISE® unit to manage your en-ergy supply needs. ECOWISE® units reduce the amount of electric en-ergy your home or commercial establishment needs to run efficiently and save on your electric bill.
For more information on this and other products from THE TECHNOWISE GROUP™, please visit our website at: www.technowisegroup.com.
How does it work? The ECOWISE® unit modifies and reconstructs the AC waveforms at a more efficient power level without adding undesirable harmonic distor-tion. ECOWISE® units optimize voltages used by consumers, thereby reducing the amount of wasted energy consumed by appliances, lights and other electrical devices.
The unit manages the voltage provided by your utility company to an op-timum level which allows appliances and other electrical devices to op-erate more efficiently. The result is a lower electric bill, less maintenance on appliances, and the availability of more energy for additional homes and commercial establishments without the need to add additional elec-tric power infrastructure.
1

Before Installing the Unit Before installing the ECOWISE® unit, the following actions must be tak-en into account to validate the warranty:
• Use a qualified, licensed electrical contractor. • Have the ECOWISE® Site Survey completed and available. • Establish adequate grounding for the home or commercial establishment. • The ECOWISE® unit must be fed from the utility through a cir- cuit braker or fuse sized to the proper value upstream of the ECOWISE® unit. This circuit braker or fuse is required to prot- ect the home or commercial establishment against the unlikely event of an internal short circuit.
A qualified, licensed electrical contractor will set up a pre-installation site survey to evaluate the maximum power of the home or commercial establishment and the maximum power the utility company is delivering. This survey will help determine the correct ECOWISE® model to be installed.
Next, the survey will determine if an upstream circuit braker or fuse is present and the proper grounding exists for the home or commercial es-tablishment. The ECOWISE® unit must be installed with proper ground-ing present.
Finally, for ease of installation and safety, the ECOWISE® unit needs to be installed only by a qualified, licensed electrician according to the local electrical codes.
Warning
A ground connection is mandatory to ensure safe operation in the home or commercial establishment before instal-lation.
2
Warning
ECOWISE® units must only be installed by a qualified, licensed electrician. Failure to follow these instructions can cause elec-trocution, severe injury, death or property damage.
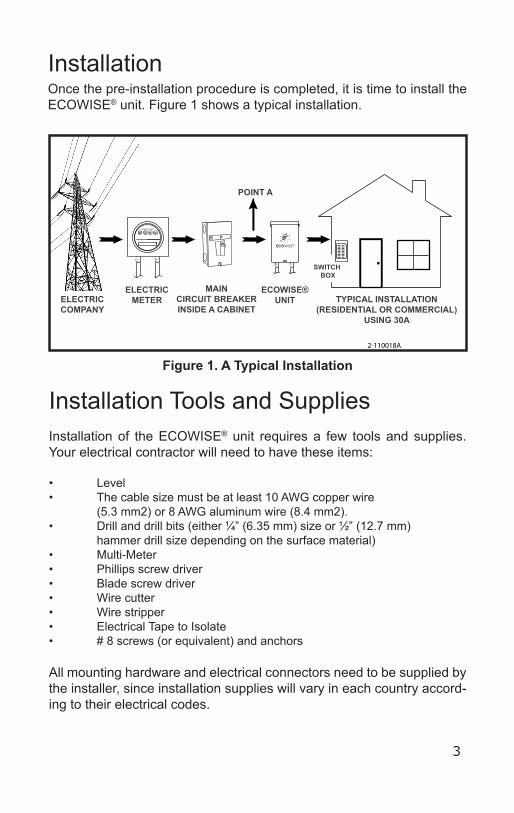
Installation Once the pre-installation procedure is completed, it is time to install the ECOWISE® unit. Figure 1 shows a typical installation.
3
Installation Tools and Supplies Installation of the ECOWISE® unit requires a few tools and supplies. Your electrical contractor will need to have these items: • Level • The cable size must be at least 10 AWG copper wire (5.3 mm2) or 8 AWG aluminum wire (8.4 mm2). • Drill and drill bits (either ¼” (6.35 mm) size or ½” (12.7 mm) hammer drill size depending on the surface material) • Multi-Meter • Phillips screw driver • Blade screw driver • Wire cutter • Wire stripper • Electrical Tape to Isolate • # 8 screws (or equivalent) and anchors All mounting hardware and electrical connectors need to be supplied by the installer, since installation supplies will vary in each country accord-ing to their electrical codes.
KILOWATTHOURS
®
ELECTRICCOMPANY
ELECTRICMETER
MAINCIRCUIT BREAKERINSIDE A CABINET
ECOWISE®UNIT TYPICAL INSTALLATION
(RESIDENTIAL OR COMMERCIAL)USING 30A
POINT A
SWITCH BOX
30
2-110018A
Figure 1. A Typical Installation
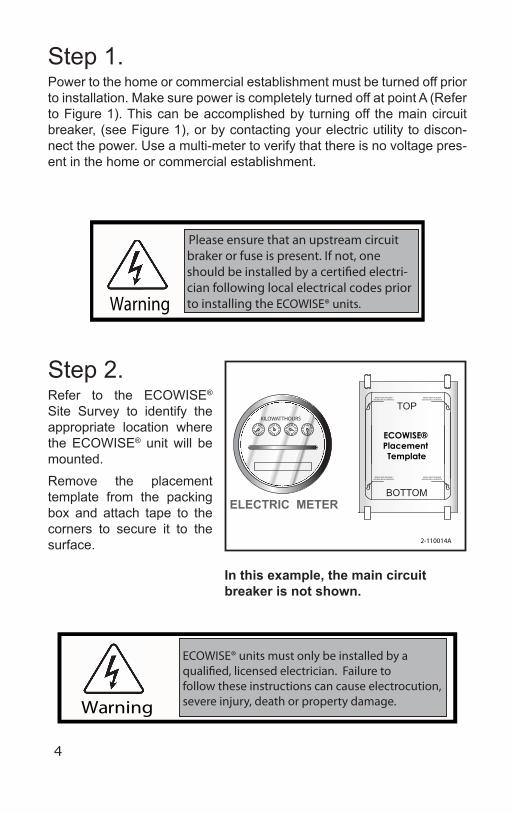
Step 1.Power to the home or commercial establishment must be turned off prior to installation. Make sure power is completely turned off at point A (Refer to Figure 1). This can be accomplished by turning off the main circuit breaker, (see Figure 1), or by contacting your electric utility to discon-nect the power. Use a multi-meter to verify that there is no voltage pres-ent in the home or commercial establishment.
Step 2.Refer to the ECOWISE® Site Survey to identify the appropriate location where the ECOWISE® unit will be mounted.Remove the placement template from the packing box and attach tape to the corners to secure it to the surface.
ECOWISE® Placement Template
BOTTOM
TOP
ELECTRIC METER
KILOWATTHOURS
MARCA PARA TALADRARAGUJERO EN LA SUPERFICIE
MARCA PARA TALADRARAGUJERO EN LA SUPERFICIE
MARCA PARA TALADRARAGUJERO EN LA SUPERFICIE
MARCA PARA TALADRARAGUJERO EN LA SUPERFICIE
2-110014A
4
Warning
ECOWISE® units must only be installed by a qualified, licensed electrician. Failure to follow these instructions can cause electrocution, severe injury, death or property damage.
In this example, the main circuit breaker is not shown.
Warning
Please ensure that an upstream circuit braker or fuse is present. If not, one should be installed by a certified electri-cian following local electrical codes prior to installing the ECOWISE® units.
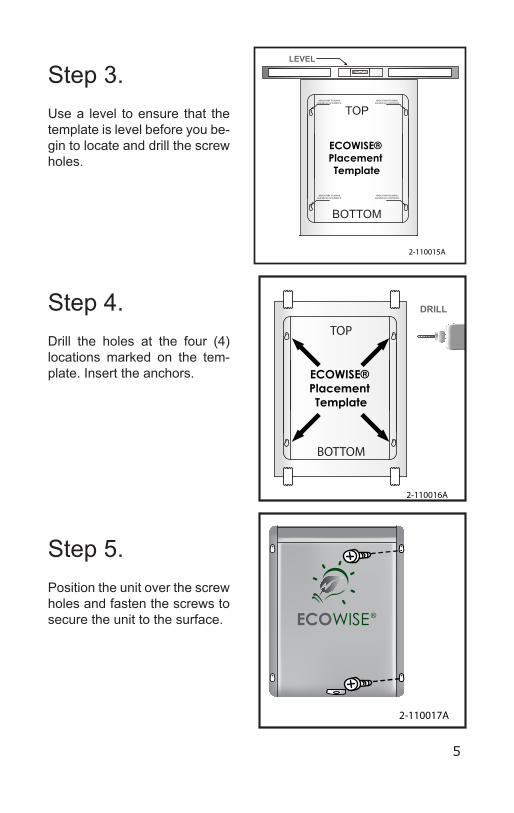
Step 3.Use a level to ensure that the template is level before you be-gin to locate and drill the screw holes.
LEVEL
2-110015A
ECOWISE® Placement Template
BOTTOM
TOPMARCA PARA TALADRAR
AGUJERO EN LA SUPERFICIEMARCA PARA TALADRAR
AGUJERO EN LA SUPERFICIE
MARCA PARA TALADRARAGUJERO EN LA SUPERFICIE
MARCA PARA TALADRARAGUJERO EN LA SUPERFICIE
Step 4.Drill the holes at the four (4) locations marked on the tem-plate. Insert the anchors.
DRILL
ECOWISE® Placement Template
BOTTOM
TOP
2-110016A
Step 5.Position the unit over the screw holes and fasten the screws to secure the unit to the surface. ®
2-110017A
5
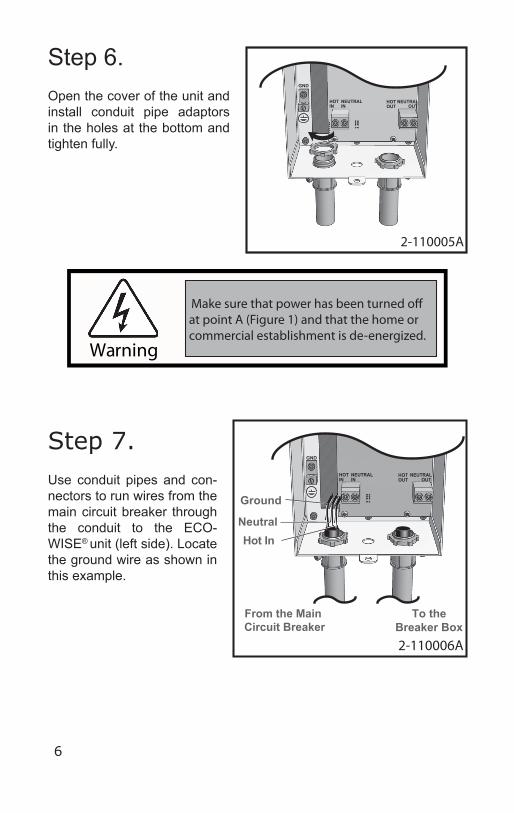
Step 6.Open the cover of the unit and install conduit pipe adaptors in the holes at the bottom and tighten fully.
Warning
Make sure that power has been turned off at point A (Figure 1) and that the home or commercial establishment is de-energized.
Step 7.Use conduit pipes and con-nectors to run wires from the main circuit breaker through the conduit to the ECO-WISE® unit (left side). Locate the ground wire as shown in this example.
6
GND
HOTIN
NEUTRALIN
HOTOUT
NEUTRAL OUT
2-110005A
HOTIN
GND
NEUTRALIN
HOTOUT
NEUTRAL OUT
Ground
NeutralHot In
2-110006A
From the Main Circuit Breaker
To theBreaker Box
GND
HOTIN
NEUTRALIN
HOTOUT
NEUTRAL OUT
2-110021A
GroundNeutral
Hot In
Ground
NeutralHot Out
From the MainCircuit Breaker
To theBreaker Box
HOTIN
NEUTRALIN
HOTOUT
NEUTRAL OUT
2-110008A
Ground
NeutralHot In
Ground
NeutralHot Out
From the MainCircuit Breaker
To theBreaker Box
HOTIN
GND
NEUTRALHOTOUT NEUTRAL
2-110009A
GroundNeutral Neutral
Hot In Hot Out
Ground
From the MainCircuit Breaker
To theBreaker Box
7
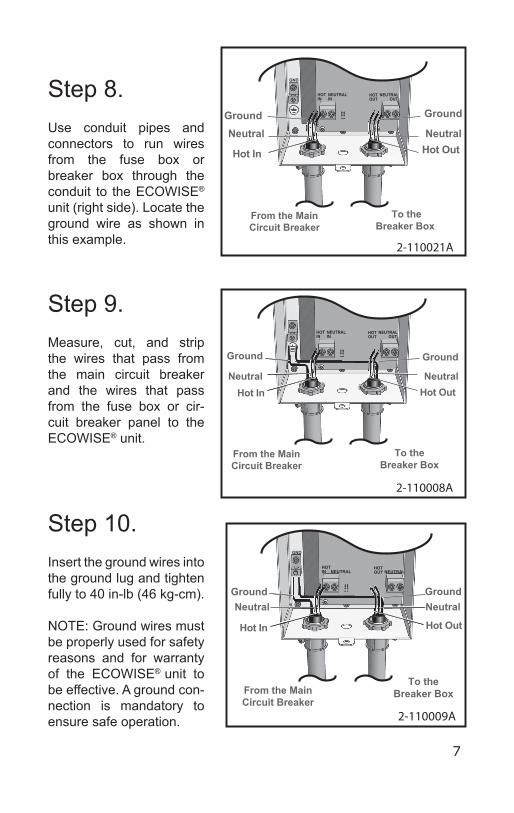
Step 8.Use conduit pipes and connectors to run wires from the fuse box or breaker box through the conduit to the ECOWISE® unit (right side). Locate the ground wire as shown in this example.
Step 9.Measure, cut, and strip the wires that pass from the main circuit breaker and the wires that pass from the fuse box or cir-cuit breaker panel to the ECOWISE® unit.
Step 10.Insert the ground wires into the ground lug and tighten fully to 40 in-lb (46 kg-cm).
NOTE: Ground wires must be properly used for safety reasons and for warranty of the ECOWISE® unit to be effective. A ground con-nection is mandatory to ensure safe operation.
GND
2-110010A
HOTIN
NEUTRALIN
HOTOUT
NEUTRAL OUT
Ground GroundNeutral Neutral
Hot In Hot Out
From the MainCircuit Breaker
To theBreaker Box
HOTIN
GND
NEUTRALHOTOUT NEUTRAL
2-110011A
Ground Ground
NeutralHot In
Hot Out
From the MainCircuit Breaker
To theBreaker Box
Neutral
8
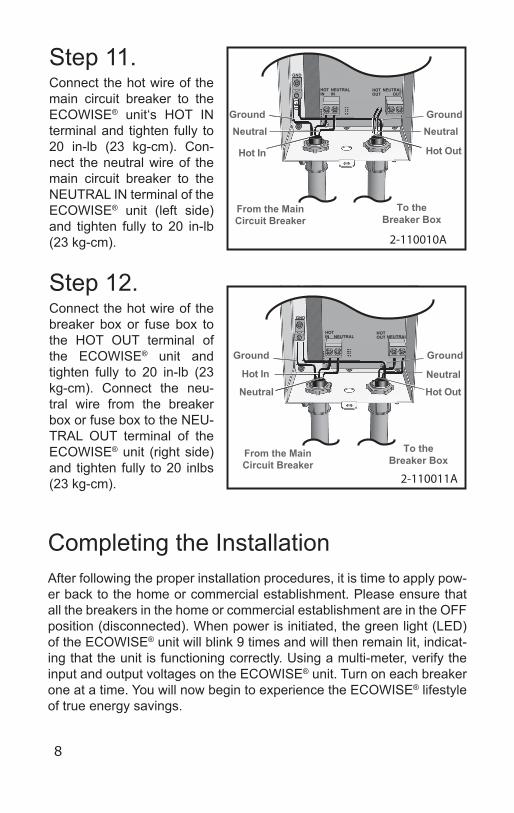
Step 11.Connect the hot wire of the main circuit breaker to the ECOWISE® unit‘s HOT IN terminal and tighten fully to 20 in-lb (23 kg-cm). Con-nect the neutral wire of the main circuit breaker to the NEUTRAL IN terminal of the ECOWISE® unit (left side) and tighten fully to 20 in-lb (23 kg-cm).
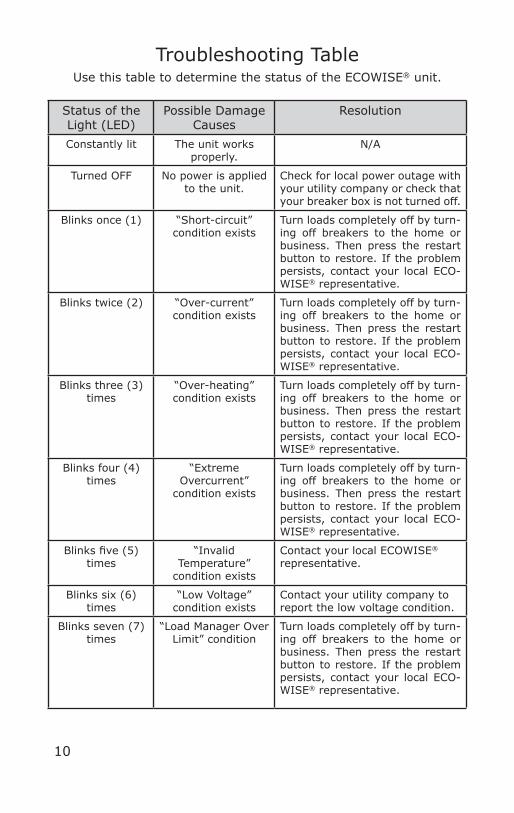
Step 12.Connect the hot wire of the breaker box or fuse box to the HOT OUT terminal of the ECOWISE® unit and tighten fully to 20 in-lb (23 kg-cm). Connect the neu-tral wire from the breaker box or fuse box to the NEU-TRAL OUT terminal of the ECOWISE® unit (right side) and tighten fully to 20 inlbs (23 kg-cm).
Completing the Installation After following the proper installation procedures, it is time to apply pow-er back to the home or commercial establishment. Please ensure that all the breakers in the home or commercial establishment are in the OFF position (disconnected). When power is initiated, the green light (LED) of the ECOWISE® unit will blink 9 times and will then remain lit, indicat-ing that the unit is functioning correctly. Using a multi-meter, verify the input and output voltages on the ECOWISE® unit. Turn on each breaker one at a time. You will now begin to experience the ECOWISE® lifestyle of true energy savings.

9
Reset Button andStatus LED.
2-110013A
TroubleshootingECOWISE® has been designed for trouble-free operation. However, in the unlikely event of a malfunction, please follow the subsequent steps to determine the cause of the failure. (See the troubleshooting chart on page 10) The ECOWISE® unit has built-in safety features that prevent damage to your appliances, such as short circuits, overcurrents, power failures, etc. The green LED light blinks at certain intervals to indicate the status of the unit. The reset switch with an integrated LED light is located in the bottom of the unit (See Figure 2), continually monitors the unit’s status. The reset switch can be used to clear any fault once the corrective ac-tion has been taken.
Should you ever experience an interruption in your electrical service, always check the breaker box first. A tripped breaker could be the cause of interruption of power. If none of the breakers are tripped, please look at the LED at the bottom of the unit to see its status. The blinking light will indicate the cause of the problem by the number of times it blinks as indicated on the Troubleshooting Chart, on page 10.
When power to your home or commercial establishment is interrupted, please note the number of times that the light (LED) blinks and refer to the Troubleshooting Chart for more information and corrective actions. Once you verify the LED status, contact your ECOWISE® representative to determine which corrective actions to take, or if you have any ques-tions.
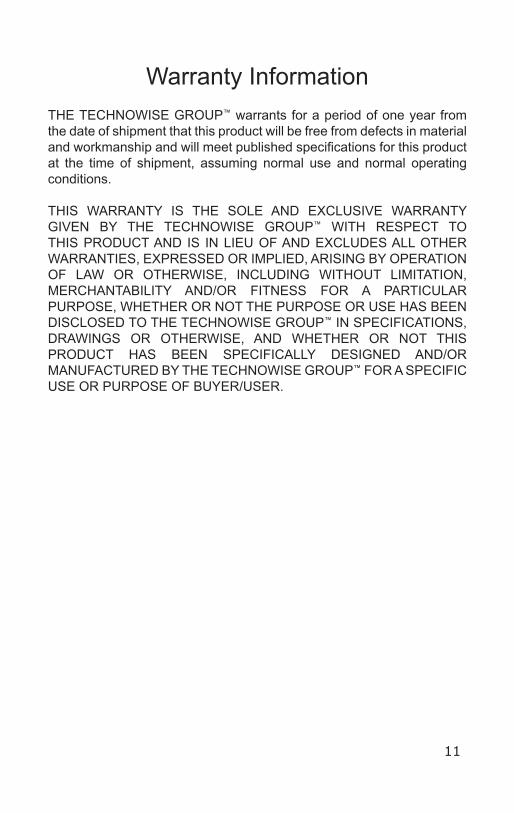
Troubleshooting TableUse this table to determine the status of the ECOWISE® unit.
Status of the Light (LED)
Possible Damage Causes
Resolution
Constantly lit The unit works properly.
N/A
Turned OFF No power is applied to the unit.
Check for local power outage with your utility company or check that your breaker box is not turned off.
Blinks once (1) “Short-circuit” condition exists
Turn loads completely off by turn-ing off breakers to the home or business. Then press the restart button to restore. If the problem persists, contact your local ECO-WISE® representative.
Blinks twice (2) “Over-current” condition exists
Turn loads completely off by turn-ing off breakers to the home or business. Then press the restart button to restore. If the problem persists, contact your local ECO-WISE® representative.
Blinks three (3) times
“Over-heating” condition exists
Turn loads completely off by turn-ing off breakers to the home or business. Then press the restart button to restore. If the problem persists, contact your local ECO-WISE® representative.
Blinks four (4) times
“Extreme Overcurrent”
condition exists
Turn loads completely off by turn-ing off breakers to the home or business. Then press the restart button to restore. If the problem persists, contact your local ECO-WISE® representative.
Blinks five (5) times
“Invalid Temperature”
condition exists
Contact your local ECOWISE®
representative.
Blinks six (6) times
“Low Voltage”condition exists
Contact your utility company toreport the low voltage condition.
Blinks seven (7) times
“Load Manager Over Limit” condition
Turn loads completely off by turn-ing off breakers to the home or business. Then press the restart button to restore. If the problem persists, contact your local ECO-WISE® representative.
10
11
Warranty InformationTHE TECHNOWISE GROUP™ warrants for a period of one year from the date of shipment that this product will be free from defects in material and workmanship and will meet published specifications for this product at the time of shipment, assuming normal use and normal operating conditions. THIS WARRANTY IS THE SOLE AND EXCLUSIVE WARRANTY GIVEN BY THE TECHNOWISE GROUP™ WITH RESPECT TO THIS PRODUCT AND IS IN LIEU OF AND EXCLUDES ALL OTHER WARRANTIES, EXPRESSED OR IMPLIED, ARISING BY OPERATION OF LAW OR OTHERWISE, INCLUDING WITHOUT LIMITATION, MERCHANTABILITY AND/OR FITNESS FOR A PARTICULAR PURPOSE, WHETHER OR NOT THE PURPOSE OR USE HAS BEEN DISCLOSED TO THE TECHNOWISE GROUP™ IN SPECIFICATIONS, DRAWINGS OR OTHERWISE, AND WHETHER OR NOT THIS PRODUCT HAS BEEN SPECIFICALLY DESIGNED AND/OR MANUFACTURED BY THE TECHNOWISE GROUP™ FOR A SPECIFIC USE OR PURPOSE OF BUYER/USER.
Disclaimer and Limitation of LiabilityTHE SOLE AND EXCLUSIVE REMEDY FOR BREACH OF ANYWARRANTY COVERING ANY PRODUCT SOLD BY THE TECHNOWISEGROUP™, INC. IS THE REPAIR, CORRECTION OR REPLACEMENT, FORSUCH PRODUCT. THE TECHNOWISE GROUP™SHALL NOT BE LIABLEFOR DAMAGES CAUSED BY DELAY IN PERFORMANCE AND THEREMEDY SET FORTH IN THE PREVIOUS SENTENCE IS EXCLUSIVE. INNO EVENT, REGARDLESS OF THE FORM OF THE CLAIM OR THECAUSE OF THE ACCIDENT OR THE FAULT OF THE TECHNOWISEGROUP™ (WHETHER BASED IN CONTRACT, INFRINGEMENT,NEGLIGENCE, STRICT LIABILITY, OTHER TORT OR OTHERWISE),SHALL THE TECHNOWISE GROUP™’S LIABILITY TO BUYER/USER AND/OR ITS CUSTOMERS EXCEED THE PRICE PAID BY BUYER/USER FOR THE SPECIFIC PRODUCT PROVIDED BY THE TECHNOWISE GROUP™ GIVING RISE TO THE CLAIM OR CAUSE OF ACTION. BUYER/USER AGREES THAT IN NO EVENT SHALL THE TECHNOWISE GROUP™’S LIABILITY TO BUYER/USER AND/OR ITS CUSTOMERS INCLUDE INCIDENTAL, CONSEQUENTIAL OR PUNITIVE DAMAGES.
The term “consequential damages” shall include, but not be limited to, loss of anticipated profits, business interruption, loss of use, revenue, reputation and data, costs incurred, including without limitation, for capital, fuel, power and loss or damage to property or equipment. It is expressly understood that any technical advice furnished by THETECHNOWISE GROUP™ with respect to the use of the product is given without charge, and THE TECHNOWISE GROUP™ assumes no obligation or liability for the advice given, or the results obtained, all such advice being given and accepted at the Buyer’s/User’s risk.
12

ECOWISE® and THE TECHNOWISE GROUP designs, and logos are registered marks in the US Patent andTrademark Office and are used under, licensed
and owned by The PowerWise Group, Inc.
ECOWISE® is protected by multiple Patents and Patents Pending in The U.S. and around the world.
www.technowisegroup.com
ECOWISE®
EW20/1EW30/1
Input Voltage: 127 V~ Nominal Current: 30 A Nominal Frequency: 60Hz
9310-0055 Rev C
Related Documents