EasyCoder® PD42 Printer User’s Guide

Welcome message from author
This document is posted to help you gain knowledge. Please leave a comment to let me know what you think about it! Share it to your friends and learn new things together.
Transcript

EasyCoder® PD42 Printer
User’s Guide

ii EasyCoder PD42 Printer User’s Guide
Intermec Technologies CorporationWorldwide Headquarters6001 36th Ave.W.Everett, WA 98203U.S.A.www.intermec.comThe information contained herein is provided solely for the purpose of allowing customers to operate and service Intermec-manufactured equipment and is not to be released, reproduced, or used for any other purpose without written permission of Intermec Technologies Corporation.Information and specifications contained in this document are subject to change without prior notice and do not represent a commitment on the part of Intermec Technologies Corporation.© 2007 by Intermec Technologies Corporation. All rights reserved.The word Intermec, the Intermec logo, Norand, ArciTech, Beverage Routebook, CrossBar, dcBrowser, Duratherm, EasyADC, EasyCoder, EasySet, Fingerprint, INCA (under license), i-gistics, Intellitag, Intellitag Gen2, JANUS, LabelShop, MobileLAN, Picolink, Ready-to-Work, RoutePower, Sabre, ScanPlus, ShopScan, Smart Mobile Computing, SmartSystems, TE 2000, Trakker Antares, and Vista Powered are either trademarks or registered trademarks of Intermec Technologies Corporation.There are U.S. and foreign patents as well as U.S. and foreign patents pending.

ContentsBefore You Begin. . . . . . . . . . . . . . . . . . . . . . . . . . . . . . . . . . . . . . . . . . . . . . . . . . . . vii
Safety Information . . . . . . . . . . . . . . . . . . . . . . . . . . . . . . . . . . . . . . . . . . . viiGlobal Services and Support . . . . . . . . . . . . . . . . . . . . . . . . . . . . . . . . . . . . vii
Warranty Information . . . . . . . . . . . . . . . . . . . . . . . . . . . . . . . . . viiWeb Support . . . . . . . . . . . . . . . . . . . . . . . . . . . . . . . . . . . . . . . viiiTelephone Support . . . . . . . . . . . . . . . . . . . . . . . . . . . . . . . . . . viii
Who Should Read This Manual . . . . . . . . . . . . . . . . . . . . . . . . . . . . . . . . . ixRelated Documents . . . . . . . . . . . . . . . . . . . . . . . . . . . . . . . . . . . . . . . . . . ix
1 Using the Printer. . . . . . . . . . . . . . . . . . . . . . . . . . . . . . . . . . . . . . . . . . . . . . . . 1
Introducing the EasyCoder PD42 Printer . . . . . . . . . . . . . . . . . . . . . . . . . . . . . . . . . . 2
Features of the Printer . . . . . . . . . . . . . . . . . . . . . . . . . . . . . . . . . . . . . . . . . . . . . . . . . 2Front View of the Printer . . . . . . . . . . . . . . . . . . . . . . . . . . . . . . . . . . . . . . . 2Back View of the Printer. . . . . . . . . . . . . . . . . . . . . . . . . . . . . . . . . . . . . . . . 3Media Compartment and Print Mechanism . . . . . . . . . . . . . . . . . . . . . . . . . 4Firmware . . . . . . . . . . . . . . . . . . . . . . . . . . . . . . . . . . . . . . . . . . . . . . . . . . . 5
Working With the Print Button and LED Indicators . . . . . . . . . . . . . . . . . . . . . . . . . 6
Working With the Display and the Soft Keys . . . . . . . . . . . . . . . . . . . . . . . . . . . . . . . 7
2 Installing the Printer . . . . . . . . . . . . . . . . . . . . . . . . . . . . . . . . . . . . . . . . . . . 9
Connecting the Printer to Your System . . . . . . . . . . . . . . . . . . . . . . . . . . . . . . . . . . . 10Connecting the Printer Through the USB Interface . . . . . . . . . . . . . . . . . . 10Connecting the Printer Through the Serial Port . . . . . . . . . . . . . . . . . . . . . 11Connecting the Printer Through the Parallel Port. . . . . . . . . . . . . . . . . . . . 11Connecting the Printer to a Network . . . . . . . . . . . . . . . . . . . . . . . . . . . . . 11
Connecting Peripherals Through USB Host . . . . . . . . . . . . . . . . . . . . . . . . . . . . . . . 12Connecting a Mass Storage Device . . . . . . . . . . . . . . . . . . . . . . . . . . . . . . . 12Connecting a Keyboard . . . . . . . . . . . . . . . . . . . . . . . . . . . . . . . . . . . . . . . 12Connecting a Bar Code Scanner . . . . . . . . . . . . . . . . . . . . . . . . . . . . . . . . . 13Connecting a USB Hub . . . . . . . . . . . . . . . . . . . . . . . . . . . . . . . . . . . . . . . 14
Loading Media . . . . . . . . . . . . . . . . . . . . . . . . . . . . . . . . . . . . . . . . . . . . . . . . . . . . . 14Loading Media for Tear-Off (Straight-Through) Operation . . . . . . . . . . . . 14Loading Media for Peel-Off (Self-Strip) Operation . . . . . . . . . . . . . . . . . . . 17
EasyCoder PD42 Printer User’s Guide iii
Loading Thermal Transfer Ribbon. . . . . . . . . . . . . . . . . . . . . . . . . . . . . . . . . . . . . . 19
Plugging in the Printer. . . . . . . . . . . . . . . . . . . . . . . . . . . . . . . . . . . . . . . . . . . . . . . 22
Printing Test Labels . . . . . . . . . . . . . . . . . . . . . . . . . . . . . . . . . . . . . . . . . . . . . . . . . 23
Creating and Printing a Label . . . . . . . . . . . . . . . . . . . . . . . . . . . . . . . . . . . . . . . . . 24
3 Configuring the Printer . . . . . . . . . . . . . . . . . . . . . . . . . . . . . . . . . . . . . . 25
Understanding Printer States . . . . . . . . . . . . . . . . . . . . . . . . . . . . . . . . . . . . . . . . . . 26
Understanding the Printer Startup Sequence . . . . . . . . . . . . . . . . . . . . . . . . . . . . . . 30
Changing Configuration Settings. . . . . . . . . . . . . . . . . . . . . . . . . . . . . . . . . . . . . . . 31Changing Configuration Settings From the Display . . . . . . . . . . . . . . . . . 31Changing Configuration Settings With PrintSet 4. . . . . . . . . . . . . . . . . . . 33Changing Configuration Settings From the Printer Home Page . . . . . . . . 33Changing Configuration Settings Using the Command Line. . . . . . . . . . . 33
Running Testmode and Extended Testmode . . . . . . . . . . . . . . . . . . . . . . . . . . . . . . 34Running Testmode . . . . . . . . . . . . . . . . . . . . . . . . . . . . . . . . . . . . . . . . . . 34Running Extended Testmode . . . . . . . . . . . . . . . . . . . . . . . . . . . . . . . . . . 36
Upgrading the Firmware . . . . . . . . . . . . . . . . . . . . . . . . . . . . . . . . . . . . . . . . . . . . . 38
4 Troubleshooting and Maintaining the Printer . . . . . . . . . . . 39
Printer Operation Problems . . . . . . . . . . . . . . . . . . . . . . . . . . . . . . . . . . . . . . . . . . . 40
Print Quality Problems . . . . . . . . . . . . . . . . . . . . . . . . . . . . . . . . . . . . . . . . . . . . . . 44
Troubleshooting Communication Problems. . . . . . . . . . . . . . . . . . . . . . . . . . . . . . . 45Using the Line Analyzer (Fingerprint) . . . . . . . . . . . . . . . . . . . . . . . . . . . . 45Using Dumpmode (IPL) . . . . . . . . . . . . . . . . . . . . . . . . . . . . . . . . . . . . . . 46
Contacting Product Support . . . . . . . . . . . . . . . . . . . . . . . . . . . . . . . . . . . . . . . . . . 47
Adjusting the Printer . . . . . . . . . . . . . . . . . . . . . . . . . . . . . . . . . . . . . . . . . . . . . . . . 47Preventing Ribbon Wrinkling . . . . . . . . . . . . . . . . . . . . . . . . . . . . . . . . . . 47Clearing Media Jams . . . . . . . . . . . . . . . . . . . . . . . . . . . . . . . . . . . . . . . . . 49Adjusting the Printhead. . . . . . . . . . . . . . . . . . . . . . . . . . . . . . . . . . . . . . . 49
Adjusting Printhead Balance . . . . . . . . . . . . . . . . . . . . . . . . . . . . 50Adjusting Printhead Pressure . . . . . . . . . . . . . . . . . . . . . . . . . . . 51
iv EasyCoder PD42 Printer User’s Guide
Adjusting Printhead Dot Line . . . . . . . . . . . . . . . . . . . . . . . . . . . 51Adjusting the Label Gap Sensor . . . . . . . . . . . . . . . . . . . . . . . . . . . . . . . . . 53
Maintaining the Printer. . . . . . . . . . . . . . . . . . . . . . . . . . . . . . . . . . . . . . . . . . . . . . . 56Cleaning the Printhead . . . . . . . . . . . . . . . . . . . . . . . . . . . . . . . . . . . . . . . . 57Cleaning the Media Compartment . . . . . . . . . . . . . . . . . . . . . . . . . . . . . . . 58Cleaning the Exterior of the Printer . . . . . . . . . . . . . . . . . . . . . . . . . . . . . . 58
A Specification, Interfaces, and Options . . . . . . . . . . . . . . . . . . . . . 59
Printer Specifications. . . . . . . . . . . . . . . . . . . . . . . . . . . . . . . . . . . . . . . . . . . . . . . . . 60
Interfaces . . . . . . . . . . . . . . . . . . . . . . . . . . . . . . . . . . . . . . . . . . . . . . . . . . . . . . . . . 63RS-232 Serial Interface . . . . . . . . . . . . . . . . . . . . . . . . . . . . . . . . . . . . . . . . 63
Protocol . . . . . . . . . . . . . . . . . . . . . . . . . . . . . . . . . . . . . . . . . . . . 63Interface Cable . . . . . . . . . . . . . . . . . . . . . . . . . . . . . . . . . . . . . . . 63
USB Interface . . . . . . . . . . . . . . . . . . . . . . . . . . . . . . . . . . . . . . . . . . . . . . . 64USB Host Interface . . . . . . . . . . . . . . . . . . . . . . . . . . . . . . . . . . . . . . . . . . 65EasyLAN Ethernet Interface . . . . . . . . . . . . . . . . . . . . . . . . . . . . . . . . . . . . 65Parallel IEEE 1284 Interface. . . . . . . . . . . . . . . . . . . . . . . . . . . . . . . . . . . . 66
Interface Cable . . . . . . . . . . . . . . . . . . . . . . . . . . . . . . . . . . . . . . . 66
Options. . . . . . . . . . . . . . . . . . . . . . . . . . . . . . . . . . . . . . . . . . . . . . . . . . . . . . . . . . . 66EasyLAN Ethernet Interface . . . . . . . . . . . . . . . . . . . . . . . . . . . . . . . . . . . . 66Parallel IEEE 1284 Interface. . . . . . . . . . . . . . . . . . . . . . . . . . . . . . . . . . . . 67Cutter Kit. . . . . . . . . . . . . . . . . . . . . . . . . . . . . . . . . . . . . . . . . . . . . . . . . . 67Internal Rewinder. . . . . . . . . . . . . . . . . . . . . . . . . . . . . . . . . . . . . . . . . . . . 67Printhead Kit . . . . . . . . . . . . . . . . . . . . . . . . . . . . . . . . . . . . . . . . . . . . . . . 67Real Time Clock. . . . . . . . . . . . . . . . . . . . . . . . . . . . . . . . . . . . . . . . . . . . . 67
B Media Specifications . . . . . . . . . . . . . . . . . . . . . . . . . . . . . . . . . . . . . . . . . . 69
Media Roll Sizes . . . . . . . . . . . . . . . . . . . . . . . . . . . . . . . . . . . . . . . . . . . . . . . . . . . . 70Core . . . . . . . . . . . . . . . . . . . . . . . . . . . . . . . . . . . . . . . . . . . . . . . . . . . . . . 70Internal Roll . . . . . . . . . . . . . . . . . . . . . . . . . . . . . . . . . . . . . . . . . . . . . . . . 70Ribbon Size . . . . . . . . . . . . . . . . . . . . . . . . . . . . . . . . . . . . . . . . . . . . . . . . 71
Paper Types and Sizes . . . . . . . . . . . . . . . . . . . . . . . . . . . . . . . . . . . . . . . . . . . . . . . . 72Non-Adhesive Strip . . . . . . . . . . . . . . . . . . . . . . . . . . . . . . . . . . . . . . . . . . 72Self-Adhesive Strip . . . . . . . . . . . . . . . . . . . . . . . . . . . . . . . . . . . . . . . . . . . 73Self-Adhesive Labels . . . . . . . . . . . . . . . . . . . . . . . . . . . . . . . . . . . . . . . . . . 74Tickets With Gaps . . . . . . . . . . . . . . . . . . . . . . . . . . . . . . . . . . . . . . . . . . . 76Tickets With Black Mark . . . . . . . . . . . . . . . . . . . . . . . . . . . . . . . . . . . . . . 78
EasyCoder PD42 Printer User’s Guide v
C Setup Parameters (Fingerprint) . . . . . . . . . . . . . . . . . . . . . . . . . . . . 81
Setup Description . . . . . . . . . . . . . . . . . . . . . . . . . . . . . . . . . . . . . . . . . . . . . . . . . . 82
Navigating the Setup Tree . . . . . . . . . . . . . . . . . . . . . . . . . . . . . . . . . . . . . . . . . . . . 82
Serial Communication Setup . . . . . . . . . . . . . . . . . . . . . . . . . . . . . . . . . . . . . . . . . . 87
Com Setup . . . . . . . . . . . . . . . . . . . . . . . . . . . . . . . . . . . . . . . . . . . . . . . . . . . . . . . 89
Emulation Setup . . . . . . . . . . . . . . . . . . . . . . . . . . . . . . . . . . . . . . . . . . . . . . . . . . . 89
Feed Adjust Setup . . . . . . . . . . . . . . . . . . . . . . . . . . . . . . . . . . . . . . . . . . . . . . . . . . 90
Media Setup . . . . . . . . . . . . . . . . . . . . . . . . . . . . . . . . . . . . . . . . . . . . . . . . . . . . . . 91
Print Defs Setup . . . . . . . . . . . . . . . . . . . . . . . . . . . . . . . . . . . . . . . . . . . . . . . . . . . 96
Network Setup. . . . . . . . . . . . . . . . . . . . . . . . . . . . . . . . . . . . . . . . . . . . . . . . . . . . . 97
D Setup Parameters (IPL) . . . . . . . . . . . . . . . . . . . . . . . . . . . . . . . . . . . . . . 99
Setup Description . . . . . . . . . . . . . . . . . . . . . . . . . . . . . . . . . . . . . . . . . . . . . . . . . 100
Printing Test Labels With IPL Commands. . . . . . . . . . . . . . . . . . . . . . . . . . . . . . . 100
Navigating the Setup Tree . . . . . . . . . . . . . . . . . . . . . . . . . . . . . . . . . . . . . . . . . . . 100
Serial Communication Setup . . . . . . . . . . . . . . . . . . . . . . . . . . . . . . . . . . . . . . . . . 104
Com Setup . . . . . . . . . . . . . . . . . . . . . . . . . . . . . . . . . . . . . . . . . . . . . . . . . . . . . . 106
Test/Service Setup . . . . . . . . . . . . . . . . . . . . . . . . . . . . . . . . . . . . . . . . . . . . . . . . . 107
Media Setup . . . . . . . . . . . . . . . . . . . . . . . . . . . . . . . . . . . . . . . . . . . . . . . . . . . . . 109
Configuration Setup . . . . . . . . . . . . . . . . . . . . . . . . . . . . . . . . . . . . . . . . . . . . . . . 112
Network Setup. . . . . . . . . . . . . . . . . . . . . . . . . . . . . . . . . . . . . . . . . . . . . . . . . . . . 113
Returning to Factory Default Setup . . . . . . . . . . . . . . . . . . . . . . . . . . . . . . . . . . . . 113
vi EasyCoder PD42 Printer User’s Guide

Before You Begin
Before You BeginThis section provides you with safety information, technical support information, and sources for additional product information.
Safety Information Your safety is extremely important. Read and follow all warnings and cautions in this document before handling and operating Intermec equipment. You can be seriously injured, and equipment and data can be damaged if you do not follow the safety warnings and cautions.
This section explains how to identify and understand warnings, cautions, and notes that are in this document.
Global Services and SupportWarranty InformationTo understand the warranty for your Intermec product, visit the Intermec web site at www.intermec.com and click Service & Support > Warranty.
A warning alerts you of an operating procedure, practice, condition, or statement that must be strictly observed to avoid death or serious injury to the persons working on the equipment.
A caution alerts you to an operating procedure, practice, condition, or statement that must be strictly observed to prevent equipment damage or destruction, or corruption or loss of data.
Note: Notes either provide extra information about a topic or contain special instructions for handling a particular condition or set of circumstances.
EasyCoder PD42 Printer User’s Guide vii
Before You Begin
Disclaimer of warranties: The sample code included in this document is presented for reference only. The code does not necessarily represent complete, tested programs. The code is provided “as is with all faults.” All warranties are expressly disclaimed, including the implied warranties of merchantability and fitness for a particular purpose.
Web SupportVisit the Intermec web site at www.intermec.com to download our current manuals (in PDF). To order printed versions of the Intermec manuals, contact your local Intermec representative or distributor.
Visit the Intermec technical knowledge base (Knowledge Central) at intermec.custhelp.com to review technical information or to request technical support for your Intermec product.
Telephone SupportThese services are available from Intermec.
Services Description
In the USA and Canada call 1-800-755-5505 and choose this option
Order Intermec products
• Place an order.• Ask about an existing
order.
1 and then choose 2
Order Intermec media
Order printer labels and ribbons.
1 and then choose 1
Order spare parts
Order spare parts. 1 or 2 and then choose 4
Technical Support
Talk to technical support about your Intermec product.
2 and then choose 2
viii EasyCoder PD42 Printer User’s Guide

Before You Begin
Outside the U.S.A. and Canada, contact your local Intermec representative. To search for your local representative, from the Intermec web site, click Contact.
Who Should Read This ManualThis user’s guide is for the person who is responsible for installing, using, configuring, and maintaining the PD42 printer.
This document provides you with information about the features of the PD42, and how to install, configure, operate, maintain, and troubleshoot it.
Related DocumentsThis table contains a list of related Intermec documents and their part numbers.
The Intermec web site at www.intermec.com contains our documents (as PDF files) that you can download for free.
Service • Get a return authorization number for authorized service center repair.
• Request an on-site repair technician.
2 and then choose 1
Service contracts
• Ask about an existing contract.
• Renew a contract.• Inquire about repair billing
or other service invoicing questions.
1 or 2 and then choose 3
Services Description
In the USA and Canada call 1-800-755-5505 and choose this option
Document Title Part Number
Intemec Fingerprint Programmer’s Reference Manual 937-005-xxxIPL Programmer’s Reference Manual 066396-xxxEasyLAN User’s Guide 1-960590-xx
EasyCoder PD42 Printer User’s Guide ix
Before You Begin
To download documents
1 Visit the Intermec web site at www.intermec.com.
2 Click Service & Support > Manuals.
3 In the Select a Product field, choose the product whose documentation you want to download.
To order printed versions of the Intermec manuals, contact your local Intermec representative or distributor.
x EasyCoder PD42 Printer User’s Guide

1
Using the PrinterThis chapter includes the following sections:
• Introducing the EasyCoder PD42 Printer
• Features of the Printer
• Working With the Print Button and LED Indicators
• Working With the Display and the Soft Keys
EasyCoder PD42 Printer User’s Guide 1
Chapter 1 — Using the Printer
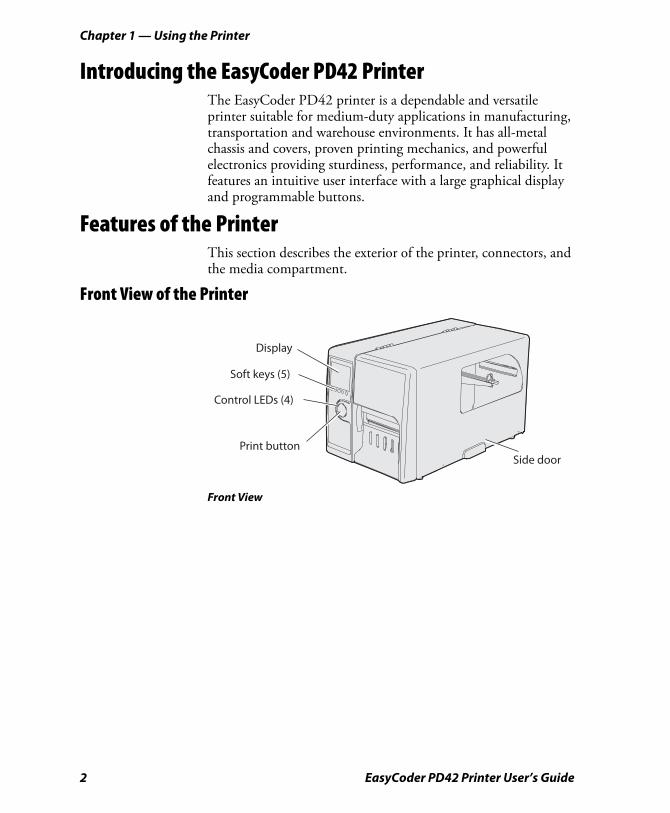
Introducing the EasyCoder PD42 PrinterThe EasyCoder PD42 printer is a dependable and versatile printer suitable for medium-duty applications in manufacturing, transportation and warehouse environments. It has all-metal chassis and covers, proven printing mechanics, and powerful electronics providing sturdiness, performance, and reliability. It features an intuitive user interface with a large graphical display and programmable buttons.
Features of the PrinterThis section describes the exterior of the printer, connectors, and the media compartment.
Front View of the Printer
Front View
Side door
Control LEDs (4)
Print button
Soft keys (5)
Display
2 EasyCoder PD42 Printer User’s Guide
Chapter 1 — Using the Printer
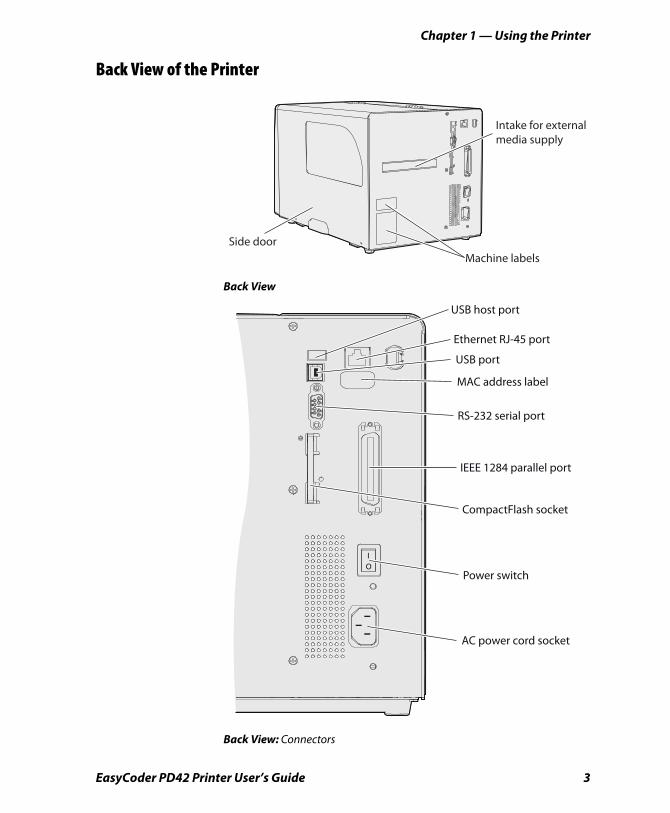
Back View of the Printer
Back View
Back View: Connectors
Side door
Intake for externalmedia supply
Machine labels
IO
Ethernet RJ-45 port
USB port
MAC address label
RS-232 serial port
IEEE 1284 parallel port
CompactFlash socket
Power switch
AC power cord socket
USB host port
EasyCoder PD42 Printer User’s Guide 3
Chapter 1 — Using the Printer
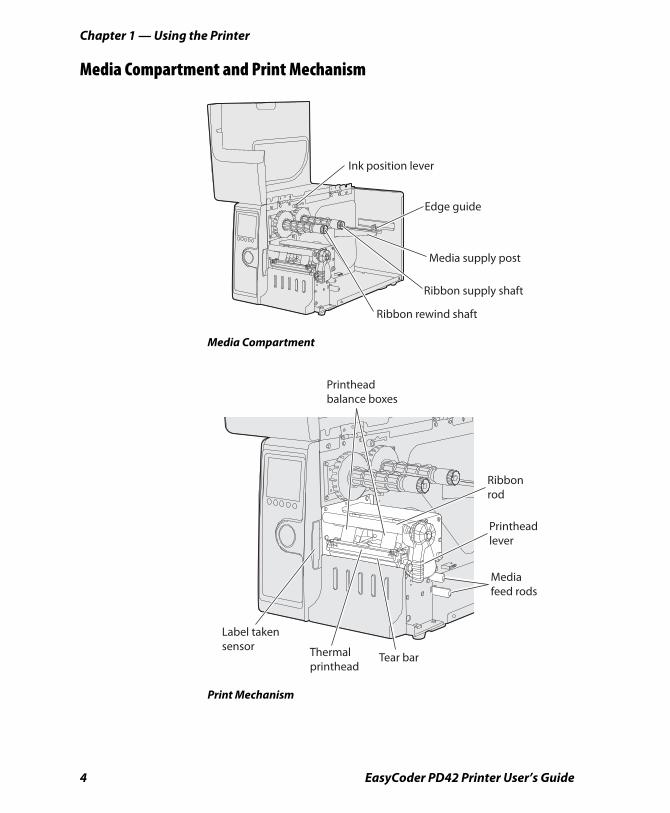
Media Compartment and Print Mechanism
Media Compartment
Print Mechanism
Ink position lever
Edge guide
Media supply post
Ribbon supply shaft
Ribbon rewind shaft
Printheadlever
Mediafeed rods
Thermalprinthead
Ribbonrod
Tear bar
Label takensensor
Printheadbalance boxes
4 EasyCoder PD42 Printer User’s Guide
Chapter 1 — Using the Printer
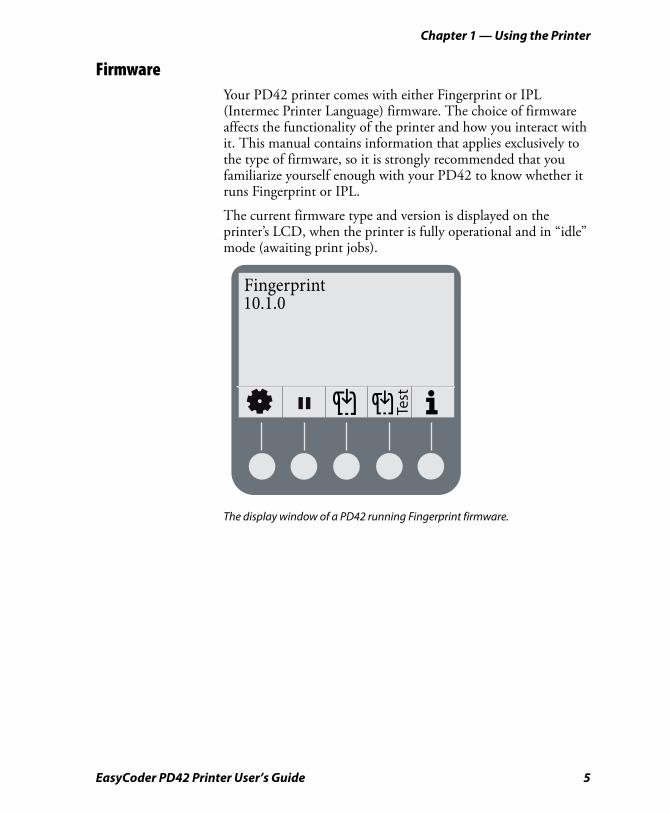
FirmwareYour PD42 printer comes with either Fingerprint or IPL (Intermec Printer Language) firmware. The choice of firmware affects the functionality of the printer and how you interact with it. This manual contains information that applies exclusively to the type of firmware, so it is strongly recommended that you familiarize yourself enough with your PD42 to know whether it runs Fingerprint or IPL.
The current firmware type and version is displayed on the printer’s LCD, when the printer is fully operational and in “idle” mode (awaiting print jobs).
The display window of a PD42 running Fingerprint firmware.
Test
Fingerprint10.1.0
EasyCoder PD42 Printer User’s Guide 5

Chapter 1 — Using the Printer
Working With the Print Button and LED IndicatorsThe blue button on the front panel is the Print button. The primary function of the Print button is to feed media and pause print jobs. However, the functionality varies depending on which state the printer is in, and which firmware it is running. All this is explained in detail in “Understanding Printer States” on page 26.
There are four LEDs (Light Emitting Diodes) surrounding the Print button.
LEDs and the Print Button
The four LED indicators are on, off, or flashing depending on which state the printer is in. The Power LED ( ) is always on for all states except Power Off.
Control LEDs
Symbol LED Color Function
Power Green Power indicator
Ready/Data Green Printer ready
Error Red Error indicator
Ready-to-Work™ Blue Intermec Ready-to-Work™ indicator
6 EasyCoder PD42 Printer User’s Guide
Chapter 1 — Using the Printer
The blue Ready-to-Work LED ( )shows the operational status of the printer. In simple terms, it is turned on when the printer is operational. The indicator is set to flash when the printer is receiving data or under certain “mild” error conditions, for example when the printer is awaiting an IP address from the network, when the printhead is lifted, or when media is loaded incorrectly. It also flashes when the printer is in Setup mode, Testmode, and Extended Testmode (see Chapter 3, “Configuring the Printer.”).
When more serious errors occur, the indicator turns off completely, and the red Error LED ( ) turns on or flashes. There are a number of conditions that can cause this behavior; for help, see Chapter 4, “Troubleshooting and Maintenance.”
The green Ready/Data LED ( ) turns on, off, or flashes depending on the current state of the printer. A more thorough description of this behavior can be found in “Understanding Printer States” on page 26.
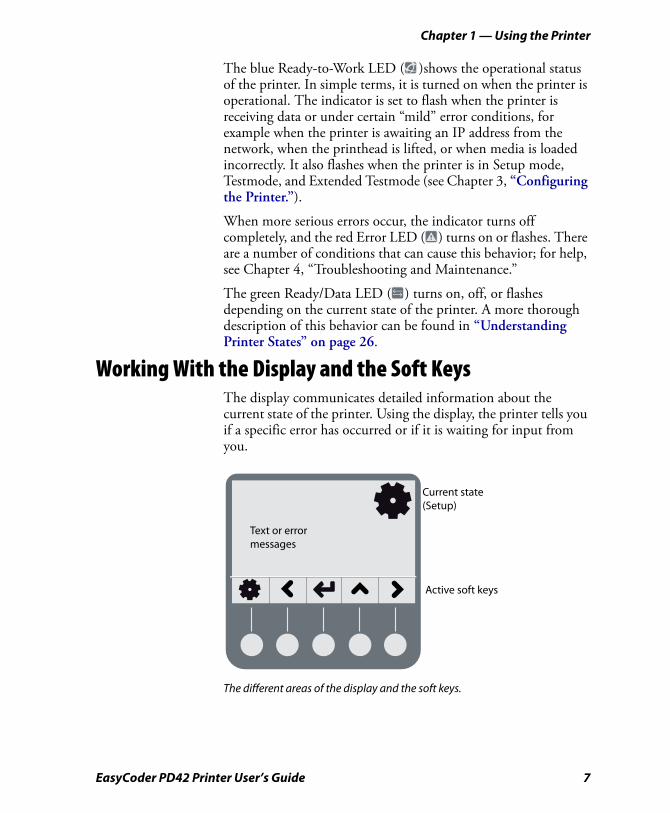
Working With the Display and the Soft KeysThe display communicates detailed information about the current state of the printer. Using the display, the printer tells you if a specific error has occurred or if it is waiting for input from you.
The different areas of the display and the soft keys.
Current state(Setup)
Active soft keys
Text or error messages
EasyCoder PD42 Printer User’s Guide 7
Chapter 1 — Using the Printer
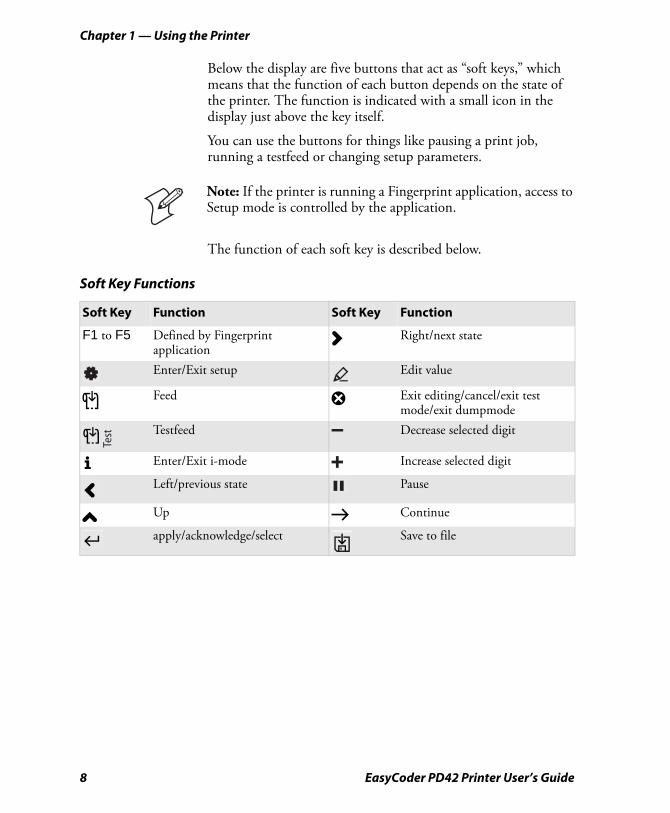
Below the display are five buttons that act as “soft keys,” which means that the function of each button depends on the state of the printer. The function is indicated with a small icon in the display just above the key itself.
You can use the buttons for things like pausing a print job, running a testfeed or changing setup parameters.
The function of each soft key is described below.
Note: If the printer is running a Fingerprint application, access to Setup mode is controlled by the application.
Soft Key Functions
Soft Key Function Soft Key Function
F1 to F5 Defined by Fingerprint application
Right/next state
Enter/Exit setup Edit value
Feed Exit editing/cancel/exit test mode/exit dumpmode
Testfeed Decrease selected digit
Enter/Exit i-mode Increase selected digit
Left/previous state Pause
Up Continue
apply/acknowledge/select Save to file
Test
8 EasyCoder PD42 Printer User’s Guide
2
Installing the PrinterThis chapter contains the following sections:
• Connecting the Printer to Your System
• Connecting Peripherals Through USB Host
• Loading Media
• Loading Thermal Transfer Ribbon
• Plugging in the Printer
• Printing Test Labels
• Creating and Printing a Label
EasyCoder PD42 Printer User’s Guide 9
Chapter 2 — Installing the Printer
Connecting the Printer to Your SystemThere are a number of ways you can connect the PD42 to your system. As a standard, the printer is equipped with:
• one USB Type B connector for the USB interface port.
• one USB Type A connector for the USB host interface port.
• one 9-pin D-style subminiature (DB9) socket for the RS-232 serial interface port.
Optional interfaces include:
• one 36-pin socket for the parallel (IEEE 1284) port.
• one RJ-45 socket for the Ethernet network connection.
Information on the socket and connector types can be found in Appendix A, “Specification, Interfaces, and Options.”
There are advantages and disadvantages associated with each of these interfaces, which are described in the following sections. Your current system setup will most likely tell you what connection method is most suitable.
Connecting the Printer Through the USB InterfaceTo use the USB connection, you need to install the Intermec InterDriver software on your computer. To ensure you get the latest version, check the Intermec web site first. This software can also be found on the PrinterCompanion CD along with instructions on how to install it. The USB interface is not suitable for terminal connections and thus not for programming.
Note: USB and Parallel IEEE 1284 cannot be used at the same time. Select the active interface in Setup (see “Changing Configuration Settings” on page 31).
10 EasyCoder PD42 Printer User’s Guide
Chapter 2 — Installing the Printer
Connecting the Printer Through the Serial PortYou can use the serial connection with either LabelShop or the Intermec InterDriver. You can also use it to send commands directly to the printer through a terminal connection, for instance with Telnet. The printer’s default serial communication settings are: baud rate 9600, 8 data bits, no parity, 1 stop bit and no flow control. Appendixes C and D contain information about serial communication setup parameters for IPL and Fingerprint, respectively.
Connecting the Printer Through the Parallel PortYou can use the parallel connection with LabelShop or the Intermec InterDriver. The parallel port supports Windows plug-n-play and additional status reporting through IEEE 1284 nibble ID mode. Cable is not included with the kit.
Connecting the Printer to a NetworkWith an optional EasyLAN Ethernet card installed in your PD42, you can set it up as a network printer. The printer is set to automatically retreive an IP number from the network (DHCP) once it is turned on. You can use the network connection either with LabelShop or the Intermec InterDriver. You can also use it to directly send commands to the printer through a terminal connection (Telnet), or you can send instructions via FTP. For terminal connections, it utilizes the Raw TCP protocol through port 9100.
To connect the PD42 to your network
1 Plug a connected Ethernet cable into the Ethernet port in the rear of the printer.
2 Turn the printer on. Wait for the blue Ready-to-Work LED to stop blinking, and for the message “IP configuration error” to disappear from the screen.
3 Enter i-mode by pressing ( ).
i-mode cycles through the interfaces installed on the printer in five-second intervals and displays them on the screen. The IP address is displayed under net1: in Fingerprint and net in IPL.
EasyCoder PD42 Printer User’s Guide 11

Chapter 2 — Installing the Printer
4 Enter the printer’s IP address in the address field of your web browser (for example http://255.255.255.001). This brings up the printer’s home page, where it is possible to check and modify various printer settings. Modifying settings requires a login name and a password: by default, these are set to “admin” and “pass” respectively.
Please refer to the EasyLAN User’s Guide (P/N 1-960590-xx) for more information on how to set up and operate the PD42 in your network environment.
If your network does not assign IP numbers automatically, or the Ready-to-Work indicator is flashing to indicate a network error, you can use PrintSet 4 (available on the PrinterCompanion CD) to correct the network settings. Alternatively, set up a terminal connection through the serial interface and use the Fingerprint Setup command. See “Changing Configuration Settings” on page 31, or refer to the Intermec Fingerprint Programmer’s Reference Manual (P/N 937-005-xxx).
Connecting Peripherals Through USB HostThe USB host interface supports the following external devices:
• Mass storage device
• Keyboard
• Bar code scanner
• USB hub
Connecting a Mass Storage DeviceYou can use a USB mass storage device (the “thumbdrive” or “dongle” type) to store additional fonts and images. You can also use the device to upgrade your firmware (see “Upgrading the Firmware” on page 38).
Connecting a KeyboardYou can use an external USB keyboard to:
• input data in Fingerprint applications. Some applications may require more complex input from users than the simple push of a button.
12 EasyCoder PD42 Printer User’s Guide
Chapter 2 — Installing the Printer
• manage setup in Fingerprint/Direct Protocol and IPL. In the installed keyboard layouts, the arrow keys on the keyboard are mapped to the up/down/right/left functions in the Setup menu. The five function keys F1-F5 correspond to the five soft keys on the front panel, starting from the left. The Enter key will have the same apply/acknowledge function.
The printer comes with four keyboard layouts installed (US, Swedish, French, and German).
To change keyboard layout
1 Plug your USB-keyboard into the USB connector in the back of the printer.
2 Turn the printer on.
3 Press Setup ( ).
4 Navigate to COM > USB KEYBOARD.
5 Choose a keyboard layout.
6 Exit Setup by pressing ( ).
Fingerprint users can create their own custom keyboard layouts. For help, see the Fingerprint Programmer’s Reference Manual (P/N 937-005-xxx).
Connecting a Bar Code Scanner
You can connect a bar code scanner of HID (Human Interface Device) type to the printer. The scanner will send data to the “console:” device in the same way as a USB keyboard. This data can then be used in a Fingerprint application.
The keyboard map chosen in setup (see above) applies for connected scanners as well.
Note: Only printers running Fingerprint firmware can use a bar code scanner.
EasyCoder PD42 Printer User’s Guide 13
Chapter 2 — Installing the Printer
Connecting a USB HubA USB hub makes it possible to connect several USB devices to the printer at the same time.
Loading MediaThe EasyCoder PD42 can print on labels, tickets, tags, and continuous stock in various formats. Refer to Appendix B, “Media Specifications” for more detailed information about media types, media dimensions and other media specifications.
Loading Media for Tear-Off (Straight-Through) OperationThis section describes the case when media is torn off manually against the printer’s tear bar. This method is also known as “straight-through” printing. You can use different types of media in Tear-Off operation:
• Non-adhesive continuous stock
• Self-adhesive continuous stock with liner
• Self-adhesive labels with liner
• Tickets with gaps, with or without perforations
• Tickets with black marks, with or without perforations
To load media for tear-off operation
1 Open the printer’s side door.
Note: Only one of the devices connected to the USB hub can be a mass storage device, and only one device can be a Human Interface Device (keyboard or bar code scanner).
14 EasyCoder PD42 Printer User’s Guide
Chapter 2 — Installing the Printer
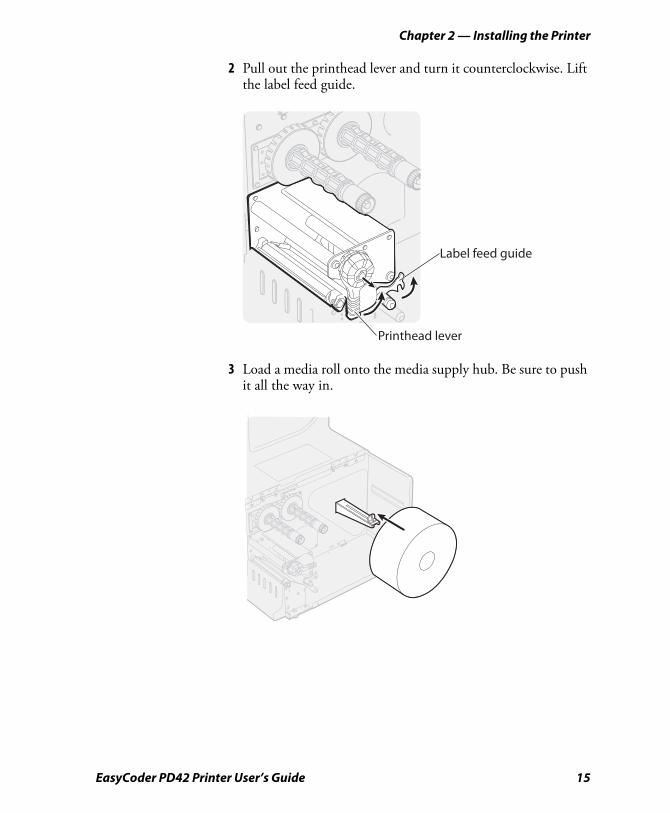
2 Pull out the printhead lever and turn it counterclockwise. Lift the label feed guide.
3 Load a media roll onto the media supply hub. Be sure to push it all the way in.
Label feed guide
Printhead lever
EasyCoder PD42 Printer User’s Guide 15
Chapter 2 — Installing the Printer
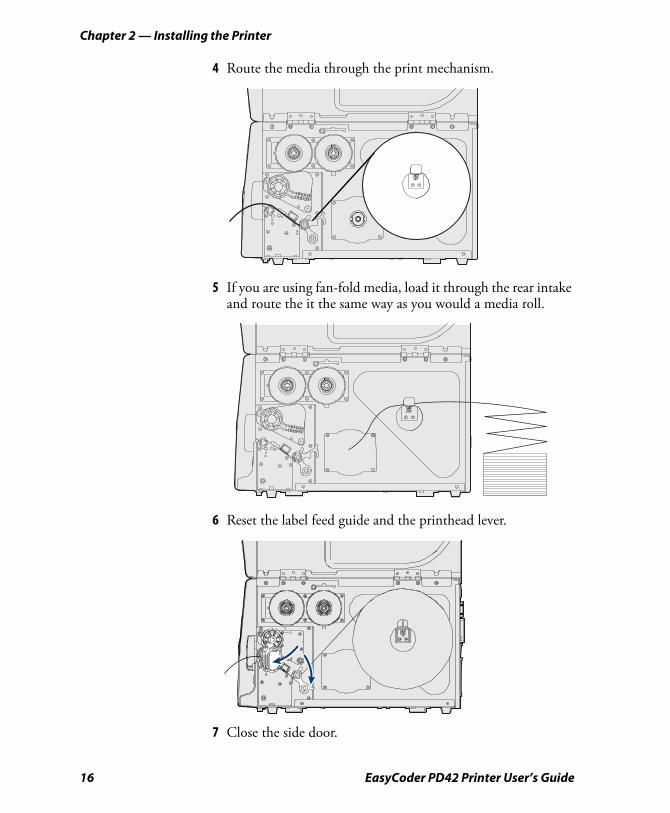
4 Route the media through the print mechanism.
5 If you are using fan-fold media, load it through the rear intake and route the it the same way as you would a media roll.
6 Reset the label feed guide and the printhead lever.
7 Close the side door.
16 EasyCoder PD42 Printer User’s Guide

Chapter 2 — Installing the Printer
8 Press the Print button to advance the media (“Feed”). If you are switching to a new type of media, for instance going from tickets with gaps to ticket with black marks, you must run a “Testfeed” ( ) to calibrate the printer’s sensors.
Loading Media for Peel-Off (Self-Strip) OperationThis section describes the case when self-adhesive labels are separated from the liner immediately after printing. This method is also known as self-strip operation. The label-taken sensor can hold the printing of the next label in a batch until the present label has been removed. You can only use self-adhesive labels with liner in peel-off operation. Use the same procedure when installing media for Batch Takeup, with the difference that both label and liner is rewound, and the label-taken sensor is not used.
To load media for peel-off operation
1 Remove the thumbscrew to remove the front cover.
2 Open the side door, mount the media roll, and route the media through the media feed rods (refer to Steps 1-4 in “To load media for tear-off operation” on page 14).
Test
Note: These modes of operation require an internal rewinder unit, for more information see Appendix A, “Specification, Interfaces, and Options.”
EasyCoder PD42 Printer User’s Guide 17
Chapter 2 — Installing the Printer
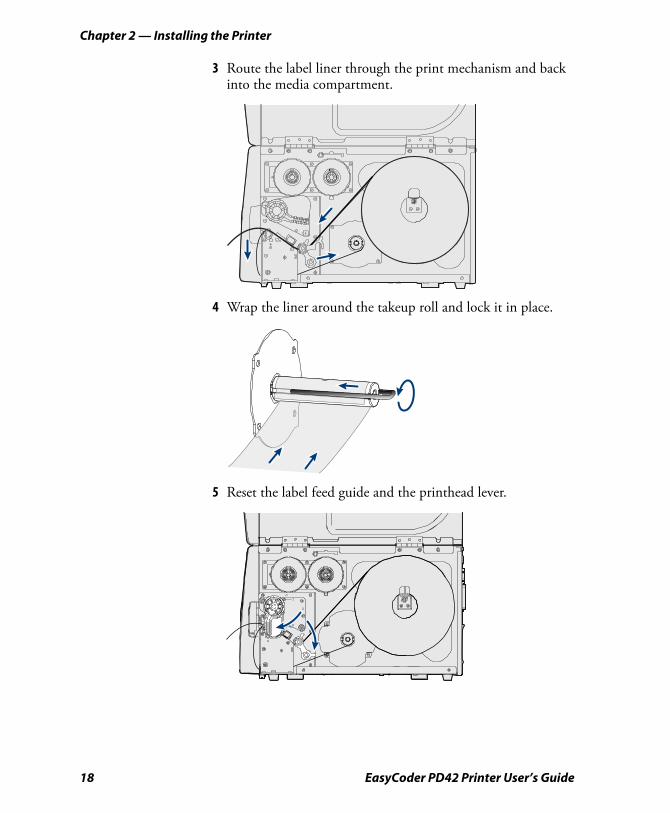
3 Route the label liner through the print mechanism and back into the media compartment.
4 Wrap the liner around the takeup roll and lock it in place.
5 Reset the label feed guide and the printhead lever.
18 EasyCoder PD42 Printer User’s Guide
Chapter 2 — Installing the Printer
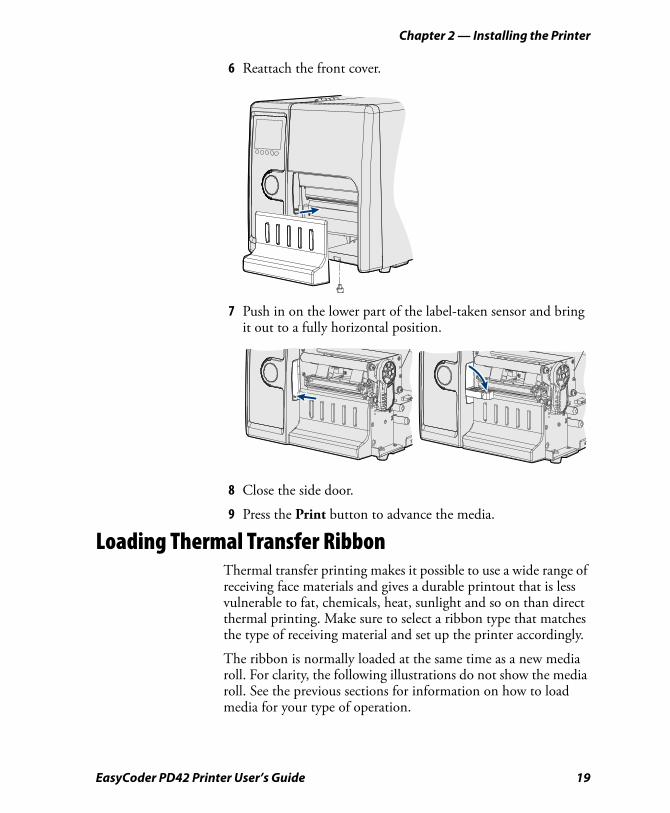
6 Reattach the front cover.
7 Push in on the lower part of the label-taken sensor and bring it out to a fully horizontal position.
8 Close the side door.
9 Press the Print button to advance the media.
Loading Thermal Transfer RibbonThermal transfer printing makes it possible to use a wide range of receiving face materials and gives a durable printout that is less vulnerable to fat, chemicals, heat, sunlight and so on than direct thermal printing. Make sure to select a ribbon type that matches the type of receiving material and set up the printer accordingly.
The ribbon is normally loaded at the same time as a new media roll. For clarity, the following illustrations do not show the media roll. See the previous sections for information on how to load media for your type of operation.
EasyCoder PD42 Printer User’s Guide 19
Chapter 2 — Installing the Printer
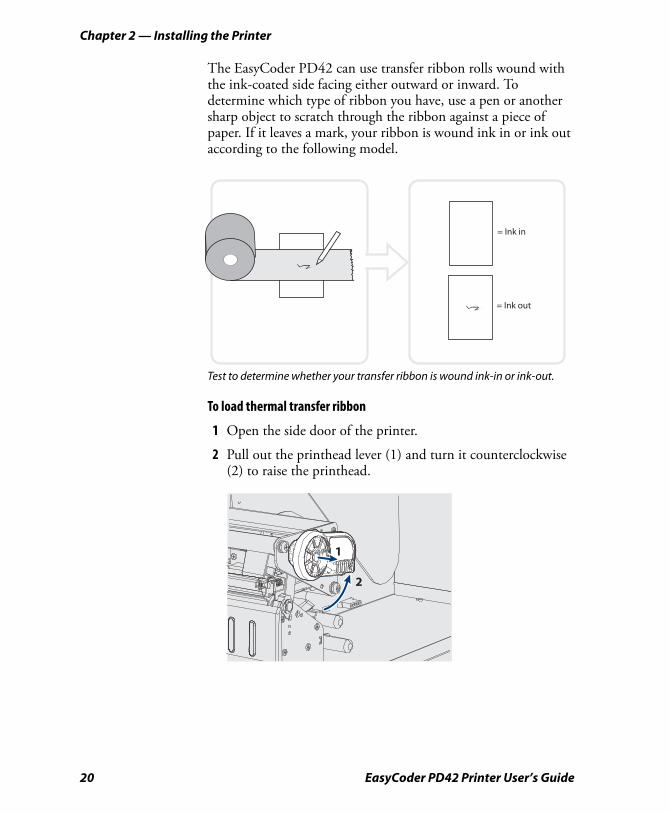
The EasyCoder PD42 can use transfer ribbon rolls wound with the ink-coated side facing either outward or inward. To determine which type of ribbon you have, use a pen or another sharp object to scratch through the ribbon against a piece of paper. If it leaves a mark, your ribbon is wound ink in or ink out according to the following model.
Test to determine whether your transfer ribbon is wound ink-in or ink-out.
To load thermal transfer ribbon
1 Open the side door of the printer.
2 Pull out the printhead lever (1) and turn it counterclockwise (2) to raise the printhead.
= Ink out
= Ink in
2
1
20 EasyCoder PD42 Printer User’s Guide
Chapter 2 — Installing the Printer
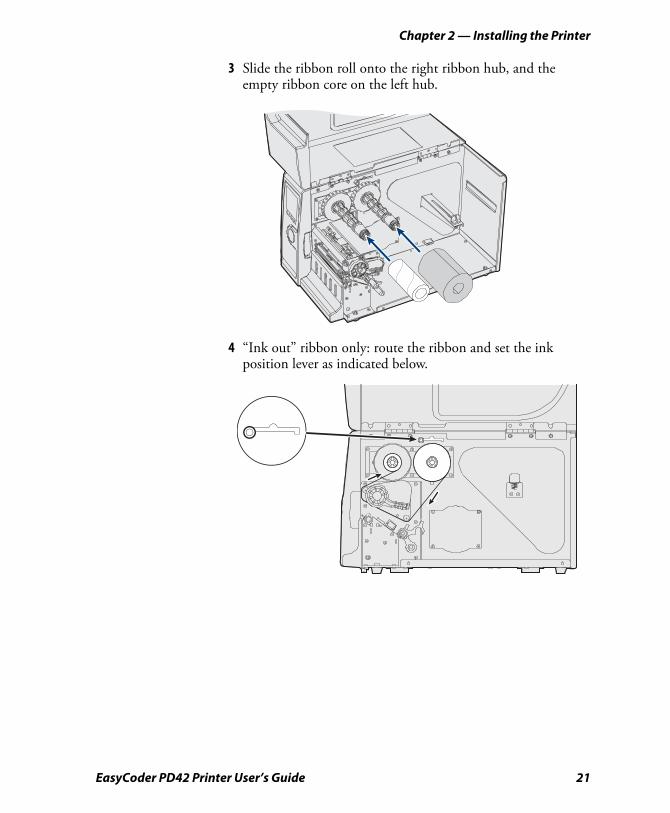
3 Slide the ribbon roll onto the right ribbon hub, and the empty ribbon core on the left hub.
4 “Ink out” ribbon only: route the ribbon and set the ink position lever as indicated below.
EasyCoder PD42 Printer User’s Guide 21

Chapter 2 — Installing the Printer
5 “Ink in” ribbon only: route the ribbon and set the ink position lever as indicated below.
6 Load media in the printer, if you have not already done so.
7 Restart the printer and print test labels (See “Printing Test Labels” on page 23).
Plugging in the Printer1 Make sure the Power switch is turned off.
2 Connect the power cable to the printer.
3 Plug the power cable into your electrical outlet.
22 EasyCoder PD42 Printer User’s Guide

Chapter 2 — Installing the Printer
Printing Test LabelsIn order to verify that the printer is fully functional and to obtain its current configuration, you can print test labels for the various printer functions (for instance ,hardware and software configuration).
To print a set of test labels from startup
1 Make sure the printer is turned off.
2 Load media as described in “Loading Media” on page 14.
3 Press and hold the blue Print button.
4 Keep the Print button pressed down, and turn on the power switch. After approximately ten seconds the printer enters Testmode and three of the front LEDs start flashing one at a time.
The display window lights up, and the printer runs a media setup routine.
5 Continue to press the Print button until the printer starts cycling through the selectable media types (Gap/Mark/Continuous). For help, see Appendix B, “Media Specifications.”
6 Select your media type by releasing the Print button at the appropriate time.
The printer will print several test labels containing the printer’s setup parameters. It will then enter Dumpmode.
SELECT MEDIA
GAP
SELECT MEDIA
MARK
SELECT MEDIA
CONTINUOUS
EasyCoder PD42 Printer User’s Guide 23
Chapter 2 — Installing the Printer
7 Press the Print button once, or press Cancel ( ) to exit Dumpmode.
Creating and Printing a LabelThere are many different ways you can create a label and send it to your printer. You can design labels in Fingerprint or IPL, use dedicated label design tools (such as LabelShop and XMLLabel), or use word processing software like Microsoft Word. Your choice of design tool will likely be influenced by your system setup and communication interface (Ethernet, USB, serial or parallel). Please refer to the manual of each respective tool for information on how to create and print labels.
24 EasyCoder PD42 Printer User’s Guide
3
Configuring the PrinterThis chapter contains the following sections:
• Understanding Printer States
• The Printer Startup Sequence
• Changing Configuration Settings
• Running Testmode and Extended Testmode
• Upgrading the Firmware
EasyCoder PD42 Printer User’s Guide 25

Chapter 3 — Configuring the Printer
Understanding Printer StatesThe PD42 printer can enter a number of different states, which in turn indicate its current mode of operation. Information about the state of the printer is provided via the LEDs and the display.
PD42 Printer States
State Explanation
Power OffUpgrading Firmware is being upgraded.TestMode See page 34.Extended TestMode See page 36.Setup Mode Setup mode is accessed from the display
(this may require a password if the printer is running a Fingerprint application). In Setup mode, you can change various printer settings.
i-mode i-mode is accessed from the display when the printer is idle. In i-mode the printer will cycle through the various interfaces with 5 second intervals.
PUP Power-UP (starting up)Idle The printer is operational and is waiting for
print jobs.Application running The printer is running a (Fingerprint)
applicationPrintingPrinting (wait for LTS) Waiting for Label Taken Sensor to indicate
that label has been taken.Paused Paused during print jobError Error stateDumpmode In Dumpmode, the printer listens on all
communication ports and prints incoming characters.
26 EasyCoder PD42 Printer User’s Guide
Chapter 3 — Configuring the Printer
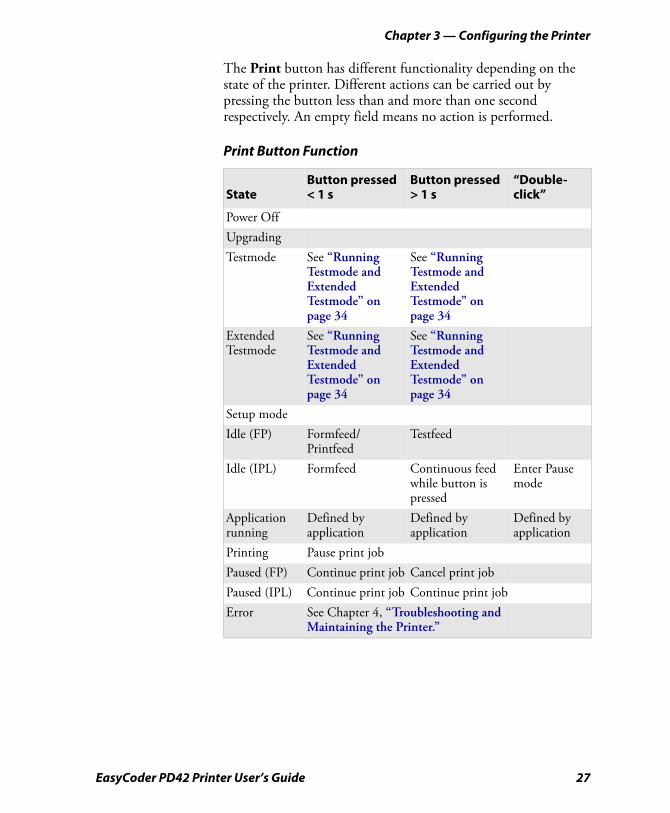
The Print button has different functionality depending on the state of the printer. Different actions can be carried out by pressing the button less than and more than one second respectively. An empty field means no action is performed.
Print Button Function
StateButton pressed < 1 s
Button pressed > 1 s
“Double-click”
Power OffUpgradingTestmode See “Running
Testmode and Extended Testmode” on page 34
See “Running Testmode and Extended Testmode” on page 34
Extended Testmode
See “Running Testmode and Extended Testmode” on page 34
See “Running Testmode and Extended Testmode” on page 34
Setup modeIdle (FP) Formfeed/
PrintfeedTestfeed
Idle (IPL) Formfeed Continuous feed while button is pressed
Enter Pause mode
Application running
Defined by application
Defined by application
Defined by application
Printing Pause print jobPaused (FP) Continue print job Cancel print jobPaused (IPL) Continue print job Continue print jobError See Chapter 4, “Troubleshooting and
Maintaining the Printer.”
EasyCoder PD42 Printer User’s Guide 27

Chapter 3 — Configuring the Printer
The behavior of the green Data/Ready LED and red Error LED in various states is shown in the table below.
Footnotes:
Ready/Data and Error LED Behavior
State Ready/Data LED Error LED
Power Off Off OffUpgrading LEDs turned on one after the other.Testmode See Chapter 5 for description.Extended Testmode See Chapter 5 for description.PUP On OffIdle On/Flash1 OffApplication running On OffPrinting On/Flash1 OffPrinting (wait for LTS) Quick flashes2 OffPaused Flash3 OffError Off On / Flash4
1 Flashing with 50% duty cycle, 0.8 second period when receiving data, synchronized with Ready-to-Work LED.
2 Two fast flashes, 1.6 second period.3 Flashing with 50% duty cycle, 0.8 second period, not synchronized
with Ready-to-Work LED.4 Error LED will be lit for these conditions: Out of Paper, Out of
Ribbon, Head Lifted, Cutter Error, and Testfeed not Done. Will flash as (2), when thermal printhead is too hot. Will flash as (3) for other error conditions caught by the Direct Protocol error handler.
28 EasyCoder PD42 Printer User’s Guide
Chapter 3 — Configuring the Printer
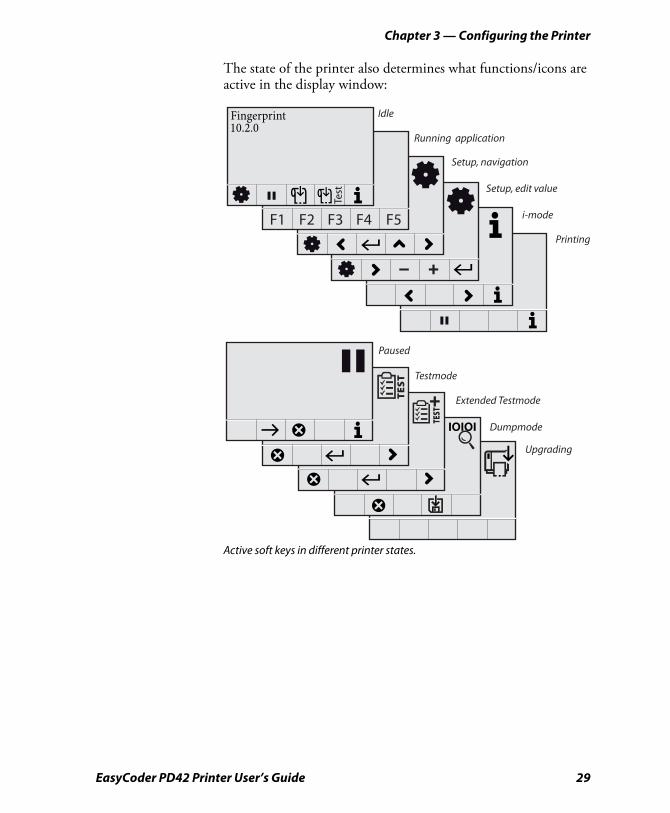
The state of the printer also determines what functions/icons are active in the display window:
Active soft keys in different printer states.
TEST
Testmode
TES
T
F1 F2 F3 F4 F5
Test
Fingerprint10.2.0
Setup, navigation
Running application
Setup, edit value
Printing
Idle
i-mode
Paused
Extended Testmode
Dumpmode
Upgrading
EasyCoder PD42 Printer User’s Guide 29
Chapter 3 — Configuring the Printer
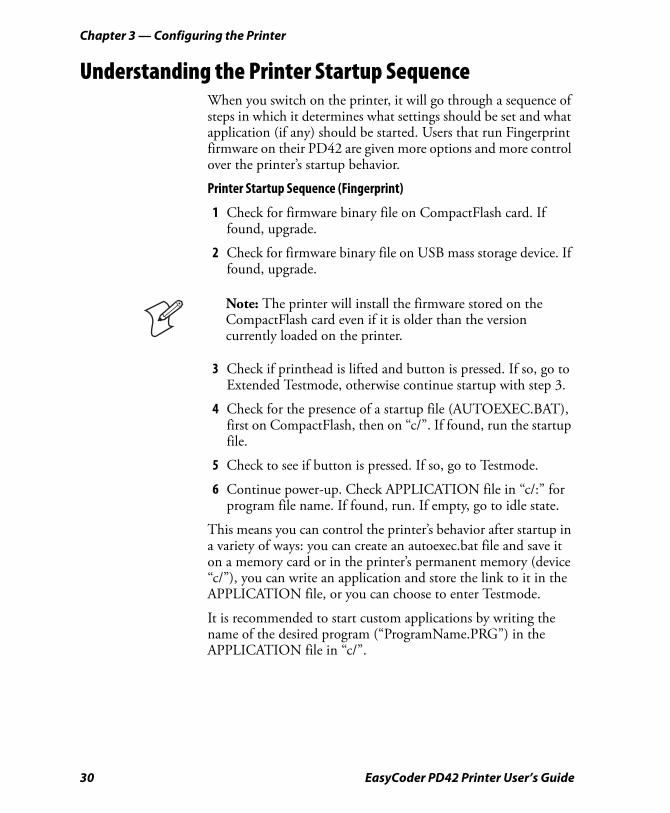
Understanding the Printer Startup SequenceWhen you switch on the printer, it will go through a sequence of steps in which it determines what settings should be set and what application (if any) should be started. Users that run Fingerprint firmware on their PD42 are given more options and more control over the printer’s startup behavior.
Printer Startup Sequence (Fingerprint)
1 Check for firmware binary file on CompactFlash card. If found, upgrade.
2 Check for firmware binary file on USB mass storage device. If found, upgrade.
3 Check if printhead is lifted and button is pressed. If so, go to Extended Testmode, otherwise continue startup with step 3.
4 Check for the presence of a startup file (AUTOEXEC.BAT), first on CompactFlash, then on “c/”. If found, run the startup file.
5 Check to see if button is pressed. If so, go to Testmode.
6 Continue power-up. Check APPLICATION file in “c/:” for program file name. If found, run. If empty, go to idle state.
This means you can control the printer’s behavior after startup in a variety of ways: you can create an autoexec.bat file and save it on a memory card or in the printer’s permanent memory (device “c/”), you can write an application and store the link to it in the APPLICATION file, or you can choose to enter Testmode.
It is recommended to start custom applications by writing the name of the desired program (“ProgramName.PRG”) in the APPLICATION file in “c/”.
Note: The printer will install the firmware stored on the CompactFlash card even if it is older than the version currently loaded on the printer.
30 EasyCoder PD42 Printer User’s Guide
Chapter 3 — Configuring the Printer
Starting a custom application can also be done by creating a startup file (autoexec.bat) which will execute on startup. This file must contain Fingerprint commands that are interpreted immediately. Normal commands are LOAD and RUN. See the Intermec Fingerprint Programmer’s Reference Manual (P/N 937-005-xxx) to learn how to create and save such a file to the printer.
Printer Startup Sequence (IPL)
1 Check for firmware binary on CompactFlash card. If found, upgrade.
2 Check for firmware binary on USB mass storage device. If found, upgrade.
3 Check if printhead is lifted and button is pressed. If so, go to Extended Testmode, otherwise continue startup with step 3.
4 Check to see if button is pressed. If so, go to Testmode.
5 Continue power-up. Run a testfeed.
The process of entering and using Testmode and Extended Testmode is described later in this chapter.
Changing Configuration SettingsThere are several different ways you can change the configuration settings of the printer. You can do it directly from the display, or remotely from the host PC using a USB, serial or ethernet connection.
Refer to Appendixes C and D for a detailed view of the Setup tree in Fingerprint and IPL, and for more extensive information about the various setup parameters.
Changing Configuration Settings From the DisplayIn order to change configuration settings, you need to enter Setup mode. Access Setup mode from the display by pressing Setup ( ).
Note: The printer will install the firmware stored on the CompactFlash card or USB mass storage device even if it is older than the version currently loaded on the printer.
EasyCoder PD42 Printer User’s Guide 31
Chapter 3 — Configuring the Printer
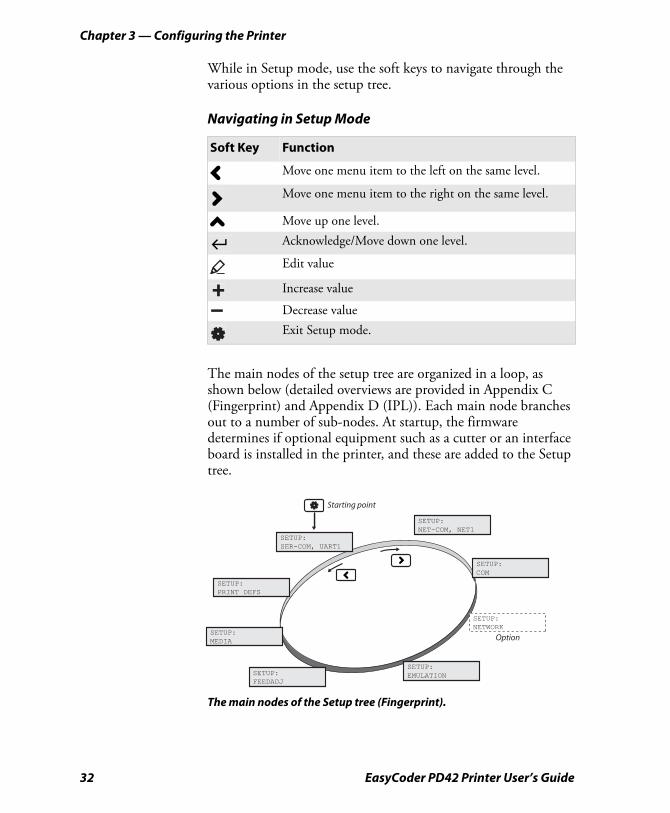
While in Setup mode, use the soft keys to navigate through the various options in the setup tree.
The main nodes of the setup tree are organized in a loop, as shown below (detailed overviews are provided in Appendix C (Fingerprint) and Appendix D (IPL)). Each main node branches out to a number of sub-nodes. At startup, the firmware determines if optional equipment such as a cutter or an interface board is installed in the printer, and these are added to the Setup tree.
The main nodes of the Setup tree (Fingerprint).
Navigating in Setup Mode
Soft Key Function
Move one menu item to the left on the same level.
Move one menu item to the right on the same level.
Move up one level.Acknowledge/Move down one level.
Edit value
Increase value
Decrease valueExit Setup mode.
SETUP:SER-COM, UART1
SETUP:PRINT DEFS
SETUP:MEDIA
SETUP:FEEDADJ
SETUP:NETWORK
Option
Starting point
SETUP:COM
SETUP:EMULATION
SETUP:NET-COM, NET1
32 EasyCoder PD42 Printer User’s Guide
Chapter 3 — Configuring the Printer
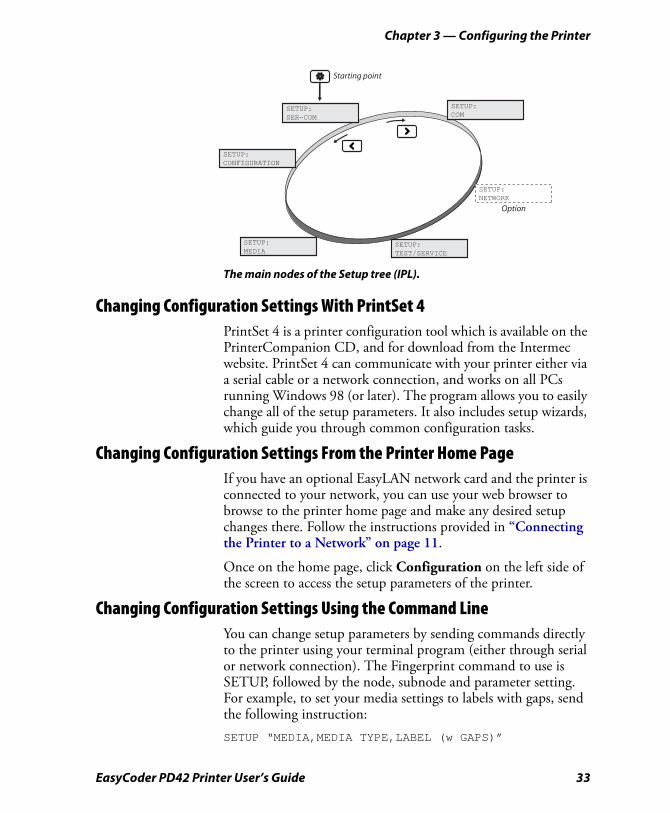
The main nodes of the Setup tree (IPL).
Changing Configuration Settings With PrintSet 4PrintSet 4 is a printer configuration tool which is available on the PrinterCompanion CD, and for download from the Intermec website. PrintSet 4 can communicate with your printer either via a serial cable or a network connection, and works on all PCs running Windows 98 (or later). The program allows you to easily change all of the setup parameters. It also includes setup wizards, which guide you through common configuration tasks.
Changing Configuration Settings From the Printer Home PageIf you have an optional EasyLAN network card and the printer is connected to your network, you can use your web browser to browse to the printer home page and make any desired setup changes there. Follow the instructions provided in “Connecting the Printer to a Network” on page 11.
Once on the home page, click Configuration on the left side of the screen to access the setup parameters of the printer.
Changing Configuration Settings Using the Command LineYou can change setup parameters by sending commands directly to the printer using your terminal program (either through serial or network connection). The Fingerprint command to use is SETUP, followed by the node, subnode and parameter setting. For example, to set your media settings to labels with gaps, send the following instruction:SETUP “MEDIA,MEDIA TYPE,LABEL (w GAPS)”
SETUP:SER-COM
SETUP:CONFIGURATION
SETUP:MEDIA
SETUP:TEST/SERVICE
SETUP:NETWORK
Option
Starting point
SETUP:COM
EasyCoder PD42 Printer User’s Guide 33
Chapter 3 — Configuring the Printer
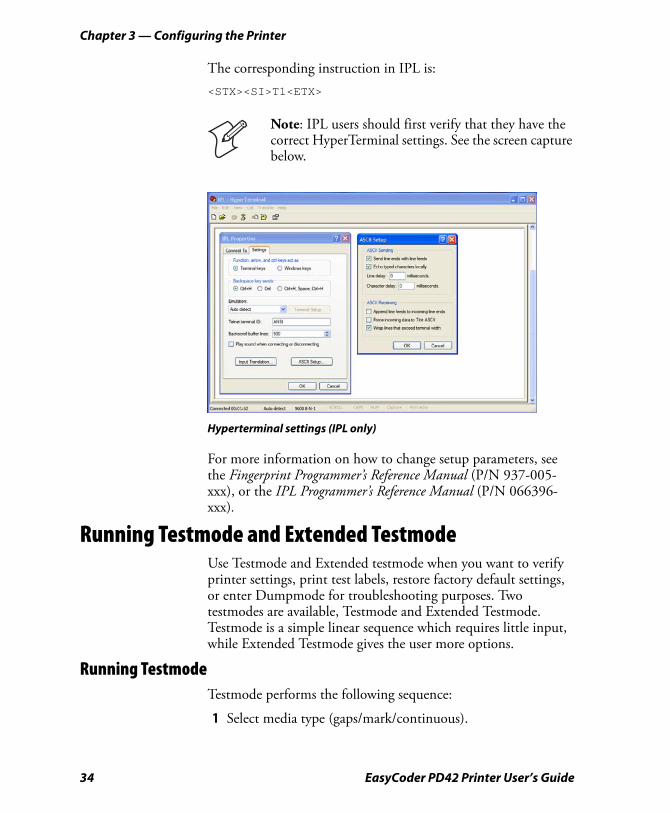
The corresponding instruction in IPL is: <STX><SI>T1<ETX>
Hyperterminal settings (IPL only)
For more information on how to change setup parameters, see the Fingerprint Programmer’s Reference Manual (P/N 937-005-xxx), or the IPL Programmer’s Reference Manual (P/N 066396-xxx).
Running Testmode and Extended TestmodeUse Testmode and Extended testmode when you want to verify printer settings, print test labels, restore factory default settings, or enter Dumpmode for troubleshooting purposes. Two testmodes are available, Testmode and Extended Testmode. Testmode is a simple linear sequence which requires little input, while Extended Testmode gives the user more options.
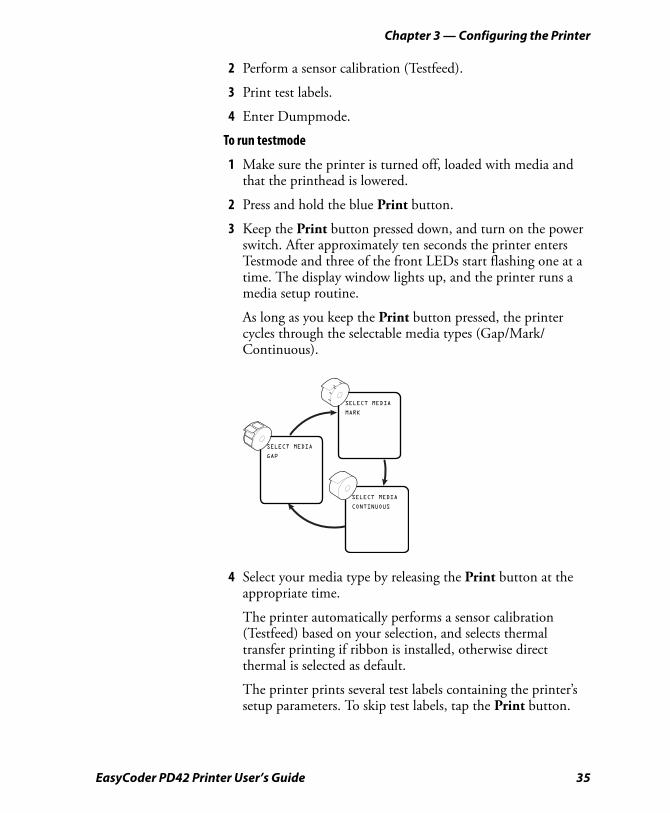
Running TestmodeTestmode performs the following sequence:
1 Select media type (gaps/mark/continuous).
Note: IPL users should first verify that they have the correct HyperTerminal settings. See the screen capture below.
34 EasyCoder PD42 Printer User’s Guide
Chapter 3 — Configuring the Printer
2 Perform a sensor calibration (Testfeed).
3 Print test labels.
4 Enter Dumpmode.
To run testmode
1 Make sure the printer is turned off, loaded with media and that the printhead is lowered.
2 Press and hold the blue Print button.
3 Keep the Print button pressed down, and turn on the power switch. After approximately ten seconds the printer enters Testmode and three of the front LEDs start flashing one at a time. The display window lights up, and the printer runs a media setup routine.
As long as you keep the Print button pressed, the printer cycles through the selectable media types (Gap/Mark/Continuous).
4 Select your media type by releasing the Print button at the appropriate time.
The printer automatically performs a sensor calibration (Testfeed) based on your selection, and selects thermal transfer printing if ribbon is installed, otherwise direct thermal is selected as default.
The printer prints several test labels containing the printer’s setup parameters. To skip test labels, tap the Print button.
SELECT MEDIA
GAP
SELECT MEDIA
MARK
SELECT MEDIA
CONTINUOUS
EasyCoder PD42 Printer User’s Guide 35

Chapter 3 — Configuring the Printer
The printer is now in Dumpmode and scans the communication ports. Any characters received on the communication ports will be printed on a label when Dumpmode is exited.
5 Press the Print button once to exit Dumpmode.
You also have the option to save the dump by pressing Save ( )
For more information about Dumpmode, see “Troubleshooting Communication Problems” on page 45
The printer will start as on rebooted status. Once operational, the Data/Ready and Ready-to-Work LEDs light up.
Running Extended TestmodeExtended Testmode can be used to run additional tests. This includes the option to print test labels, running a testfeed in slow mode, entering Dumpmode, and resetting to factory defaults.
To run Extended Testmode
1 Make sure the printer is turned off, loaded with media, and that the printhead is lifted.
2 Press and hold the blue Print button.
3 Keep the Print button pressed down, and turn on the power switch. After approximately ten seconds the printer enters Extended Testmode.
All three LEDs flash rapidly four times to signal that Extended testmode is activated.
4 Release the Print button.
5 Lower the printhead.
6 You are now in Extended Testmode. Press Right ( ) to cycle through the different options.
To select a test function, press Acknowledge ( ).
To exit Extended Testmode, press Cancel ( ).
36 EasyCoder PD42 Printer User’s Guide
Chapter 3 — Configuring the Printer
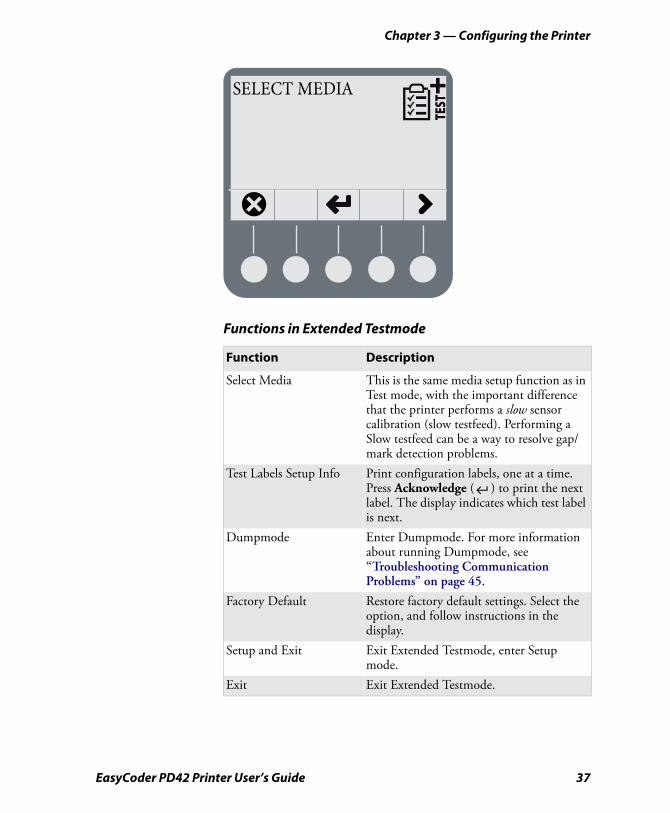
Functions in Extended Testmode
Function Description
Select Media This is the same media setup function as in Test mode, with the important difference that the printer performs a slow sensor calibration (slow testfeed). Performing a Slow testfeed can be a way to resolve gap/mark detection problems.
Test Labels Setup Info Print configuration labels, one at a time. Press Acknowledge ( ) to print the next label. The display indicates which test label is next.
Dumpmode Enter Dumpmode. For more information about running Dumpmode, see “Troubleshooting Communication Problems” on page 45.
Factory Default Restore factory default settings. Select the option, and follow instructions in the display.
Setup and Exit Exit Extended Testmode, enter Setup mode.
Exit Exit Extended Testmode.
TEST
SELECT MEDIA
EasyCoder PD42 Printer User’s Guide 37

Chapter 3 — Configuring the Printer
Upgrading the FirmwareThe latest firmware and software is always available for download from the Intermec web site at www.intermec.com.
To download firmware updates
1 Visit the Intermec web site at www.intermec.com.
2 Click Service & Support > Downloads.
3 In the Select a Product field, choose the EasyCoder PD42 and you will be presented with the latest software available.
4 Download the latest firmware version to your computer.
5 Extract the zip file to a folder on your computer. Normally, three versions of the firmware are included with the following differences and naming conventions:
• No suffix: Normal firmware upgrade.
• FD suffix: Firmware upgrade resetting Factory Default. Only applicable when upgrading through a CompactFlash card.
• NU suffix: Boots with new firmware, yet printer returns to previous firmware version on reboot (No Upgrade). Only applicable when upgrading through a Compact Flash card.
To upgrade your printer with new firmware
• Use PrintSet 4 and follow the firmware upgrade procedure.
• If you have a network connection, browse to the printer’s home page (see “Connecting the Printer to a Network” on page 11), and select Maintenance. Upload the firmware file.
• Copy the firmware binary file to a CompactFlash card. Turn the printer off, insert the card into the printer’s CompactFlash socket and switch on the printer. The printer will be upgraded automatically.
• Copy the firmware binary file to a USB mass storage device. Put the firmware binary file in a directory named /d/upgrade, and the printer will use that file to upgrade unless the printer is already running that firmware. The printer will look for a file named FIRMWARE.BIN first. If there is no such file, it will look for any firmware file.
38 EasyCoder PD42 Printer User’s Guide

4
Troubleshooting and Maintaining the PrinterThis chapter covers the following topics:
• Printer Operation Problems
• Print Quality Problems
• Troubleshooting Communication Problems
• Contacting Product Support
• Adjusting the Printer
• Maintaining the Printer
EasyCoder PD42 Printer User’s Guide 39
Chapter 4 — Troubleshooting and Maintaining the Printer
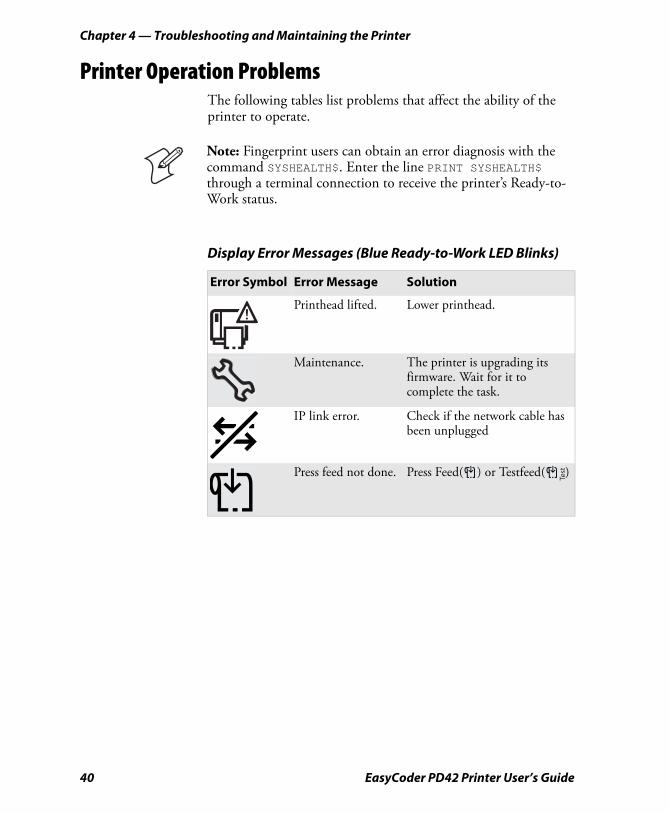
Printer Operation ProblemsThe following tables list problems that affect the ability of the printer to operate.
Note: Fingerprint users can obtain an error diagnosis with the command SYSHEALTH$. Enter the line PRINT SYSHEALTH$ through a terminal connection to receive the printer’s Ready-to-Work status.
Display Error Messages (Blue Ready-to-Work LED Blinks)
Error Symbol Error Message Solution
Printhead lifted. Lower printhead.
Maintenance. The printer is upgrading its firmware. Wait for it to complete the task.
IP link error. Check if the network cable has been unplugged
Press feed not done. Press Feed( ) or Testfeed( )Test
40 EasyCoder PD42 Printer User’s Guide

Chapter 4 — Troubleshooting and Maintaining the Printer
Label not taken. Printing has been halted because a label is obstructing the LTS sensor.Remove label to resume printing.
LSS too high, LSS too low.
These errors can occur when you run a testfeed without any media installed, or if you have incorrect media settings.Load the printer with media (see “Loading Media” on page 14). Restart the printer in Test mode (see “Running Testmode” on page 34) and select the appropriate media type.
IP Configuration Error.
The printer is trying to acquire an IP address from the network. Wait for it to complete the task.
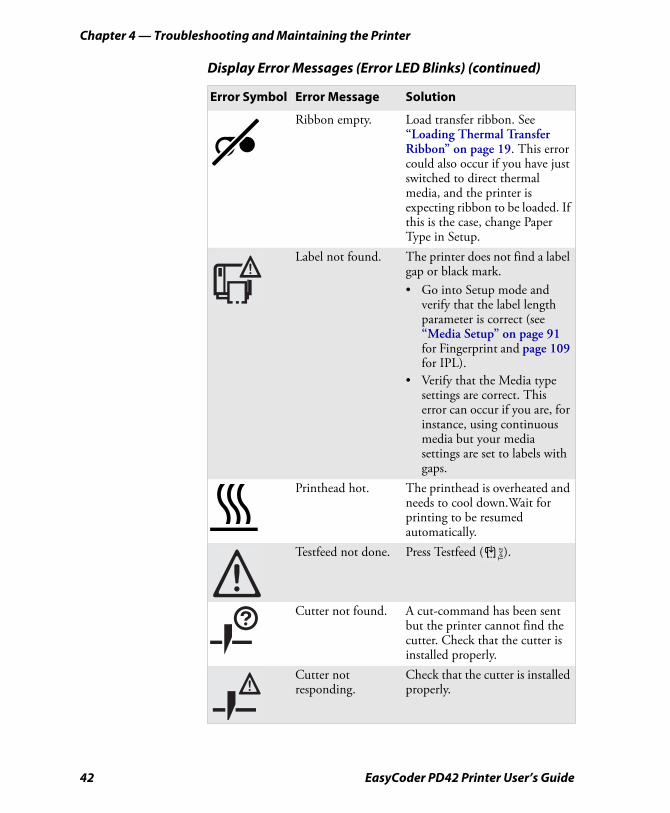
Display Error Messages (Error LED Blinks)
Error Symbol Error Message Solution
Field out of label. You are attempting to print in an area that extends beyond the “print window.” See appendices C (Fingerprint) and D (IPL) information on how to set the media parameters.
Out of media. Load media in printer. See “Loading Media” on page 14.
Display Error Messages (Blue Ready-to-Work LED Blinks)
Error Symbol Error Message Solution
EasyCoder PD42 Printer User’s Guide 41
Chapter 4 — Troubleshooting and Maintaining the Printer
Ribbon empty. Load transfer ribbon. See “Loading Thermal Transfer Ribbon” on page 19. This error could also occur if you have just switched to direct thermal media, and the printer is expecting ribbon to be loaded. If this is the case, change Paper Type in Setup.
Label not found. The printer does not find a label gap or black mark.• Go into Setup mode and
verify that the label length parameter is correct (see “Media Setup” on page 91 for Fingerprint and page 109 for IPL).
• Verify that the Media type settings are correct. This error can occur if you are, for instance, using continuous media but your media settings are set to labels with gaps.
Printhead hot. The printhead is overheated and needs to cool down.Wait for printing to be resumed automatically.
Testfeed not done. Press Testfeed ( ).
Cutter not found. A cut-command has been sent but the printer cannot find the cutter. Check that the cutter is installed properly.
Cutter not responding.
Check that the cutter is installed properly.
Display Error Messages (Error LED Blinks) (continued)
Error Symbol Error Message Solution
Test
42 EasyCoder PD42 Printer User’s Guide

Chapter 4 — Troubleshooting and Maintaining the Printer
Other Printing Operation Problems
Problem Solution / Reason
The Power control LED is not lit when power is switched on.
Check that the power cable is correctly connected to the printer and electrical outlet.
Error LED is turned on after printing.
• Check if printer is out of media or ribbon.
• Check if media is jammed or tangled.• Check that the print mechanism is
locked and closed correctly.• Check the cutter.• Check application.
Label is jammed after printing.
Clear the media jam (see “Clearing Media Jams” on page 49). If the label is stuck on the thermal printhead, clean the printhead (see “Cleaning the Printhead” on page 57).
When printing, labels are skipped.
• Run a new testfeed (press ( )).• Check if label gap sensor is disturbed
by dust or foreign particles (see “Adjusting the Label Gap Sensor” on page 53).
When using cutter, label is not cut straight.
• Check whether the media thickness exceeds 0.25mm (9.8 mils).
• Check that the media is loaded correctly. Check that the media runs as close to the center section of the printer as possible, and that the paper path is straight.
When using cutter, label cannot feed or abnormal cutting occurs.
• Check that the cutter is installed properly.
• Check if paper feed rods are sticky. Clean if needed (see “Cleaning the Media Compartment” on page 58).
When using internal rewinder, abnormal function occurs.
Check that media is loaded correctly.
Printer keeps printing or feeding when it should stop.
• Check media settings.• Check label gap sensor position.• Clean if sensors need cleaning.
Printing is slow. Check application.
Test
EasyCoder PD42 Printer User’s Guide 43
Chapter 4 — Troubleshooting and Maintaining the Printer
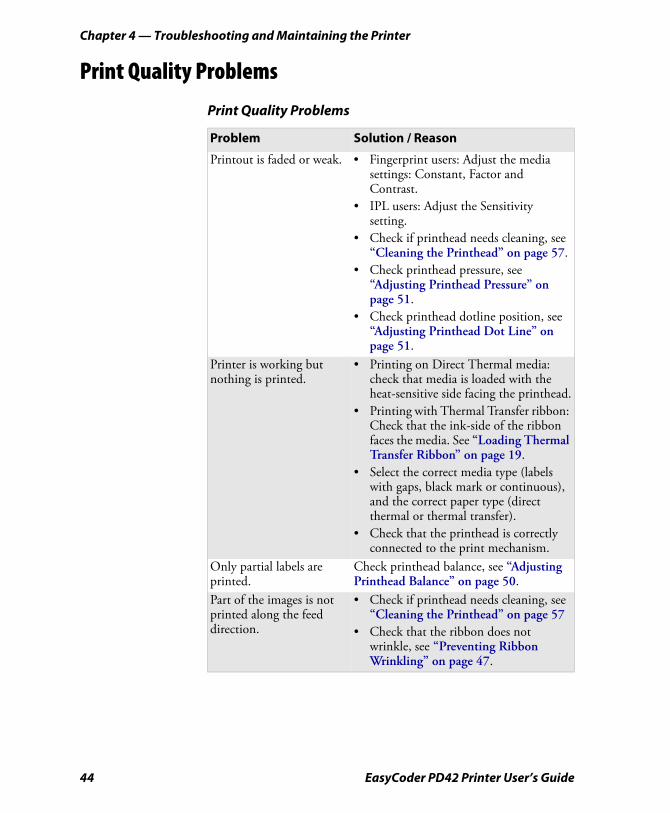
Print Quality Problems
Print Quality Problems
Problem Solution / Reason
Printout is faded or weak. • Fingerprint users: Adjust the media settings: Constant, Factor and Contrast.
• IPL users: Adjust the Sensitivity setting.
• Check if printhead needs cleaning, see “Cleaning the Printhead” on page 57.
• Check printhead pressure, see “Adjusting Printhead Pressure” on page 51.
• Check printhead dotline position, see “Adjusting Printhead Dot Line” on page 51.
Printer is working but nothing is printed.
• Printing on Direct Thermal media: check that media is loaded with the heat-sensitive side facing the printhead.
• Printing with Thermal Transfer ribbon: Check that the ink-side of the ribbon faces the media. See “Loading Thermal Transfer Ribbon” on page 19.
• Select the correct media type (labels with gaps, black mark or continuous), and the correct paper type (direct thermal or thermal transfer).
• Check that the printhead is correctly connected to the print mechanism.
Only partial labels are printed.
Check printhead balance, see “Adjusting Printhead Balance” on page 50.
Part of the images is not printed along the feed direction.
• Check if printhead needs cleaning, see “Cleaning the Printhead” on page 57
• Check that the ribbon does not wrinkle, see “Preventing Ribbon Wrinkling” on page 47.
44 EasyCoder PD42 Printer User’s Guide

Chapter 4 — Troubleshooting and Maintaining the Printer
Troubleshooting Communication ProblemsUse Dumpmode to verify that the printer is receiving data from the host correctly.
Using the Line Analyzer (Fingerprint)In Dumpmode, the printer runs a Fingerprint program called Line Analyzer. As the name implies, the Line Analyzer captures incoming characters on the communication ports and prints them on one or more labels. Line Analyzer uses “autohunt” which means the program scans all applicable ports for data.
The easiest way to enter Dumpmode is through Testmode or Extended Testmode (see “Running Testmode and Extended Testmode” on page 34)
When Dumpmode has been entered, the Printer will tell you this by printing “DumpMode entered” on a label. The display shows the Dumpmode icon, and the printer is ready to receive data.
Printout darkness is uneven across media path.
• Check printhead balance, see “Adjusting Printhead Balance” on page 50.
• Check printhead pressure, see “Adjusting Printhead Pressure” on page 51.
Printout is not in desired position.
• Check for errors in software application.
• Check if label gap sensor is disturbed by media, dust or ribbon.
• Check the lateral position of label gap sensor.
• Check the edge guide and media guide.• Check the media (insufficient
transparency, interfering preprint lines in black mark operation, and so on).
• Check if platen roller needs cleaning or replacement.
Print Quality Problems (continued)
Problem Solution / Reason
EasyCoder PD42 Printer User’s Guide 45
Chapter 4 — Troubleshooting and Maintaining the Printer
While the printer is receiving data, the Ready/Data LED blinks. There is a half-second timeout which means that if no more characters have been received after 0.5 seconds, the program considers the transmission terminated and prints out a label.
Printable characters are printed in black-on-white, whereas control characters and space characters (ASCII 000–032 dec) are printed in white-on-black.
As long as a continuous string of characters is being received, the program wraps the lines until the label is full and then starts to print another label. After each character transmission, the following information is printed:
• Page number
• Number of characters printed on the label
• Total number of characters received so far
Before you exit Dumpmode, you can choose to save the dump in the printer’s internal memory. The printer prints a label with the location of the saved file (the maximum size of the saved file is 128 kB).
When you exit Dumpmode, a final label with the text “Exit from Dump Mode” is printed.
Using Dumpmode (IPL)When Dumpmode is activated, the printer captures incoming characters on the communication ports and prints them on one or more labels.
Users that run IPL firmware on their printer can access Dumpmode in two different ways, which produce slightly different results:
• Access Dumpmode through Testmode or Extended Testmode and you will receive printouts that look exactly as those produced with the Line Analyzer program on Fingerprint-operated machines. See “Using the Line Analyzer (Fingerprint)” on page 45 for information on how to interpret the labels.
• Access Dumpmode from Setup, and characters will be printed on a continuous line, along with corresponding hexadecimal numbers.
46 EasyCoder PD42 Printer User’s Guide
Chapter 4 — Troubleshooting and Maintaining the Printer
To enter Dumpmode from Setup
1 Enter Setup by pressing ( ).
2 Navigate to Test/Service > Data Dump.
3 Select Yes.
4 To exit Dumpmode, reboot the printer.
Contacting Product SupportIf you cannot find the answer to your problem in the “Troubleshooting and Maintaining the Printer” section, you can visit the Intermec technical knowledge base (Knowledge Central) at intermec.custhelp.com to review technical information or to request technical support. If you still need help after visiting Knowledge Central, you may need to call Product Support. To talk to an Intermec Product Support representative in the U.S.A. or Canada, call:
1-800-755-5505
Outside the U.S.A. and Canada, contact your local Intermec representative.
Before you call Intermec Product Support, make sure you have information about your printer model ready.
The machine and serial number labels are attached to the printer’s rear plate, and contain information on type, model and serial number as well as AC voltage and frequency.
Adjusting the PrinterThis section describes some of the adjustments you can perform to solve problems related to printout quality.
Preventing Ribbon WrinklingIf you have problems with transfer ribbon getting wrinkled, you can attempt to adjust ribbon tension or ribbon shield.
To adjust ribbon tension
1 Push the knob on the ribbon supply hub.
2 Rotate it clockwise to increase breaking force or counterclockwise to decrease breaking force.
EasyCoder PD42 Printer User’s Guide 47
Chapter 4 — Troubleshooting and Maintaining the Printer
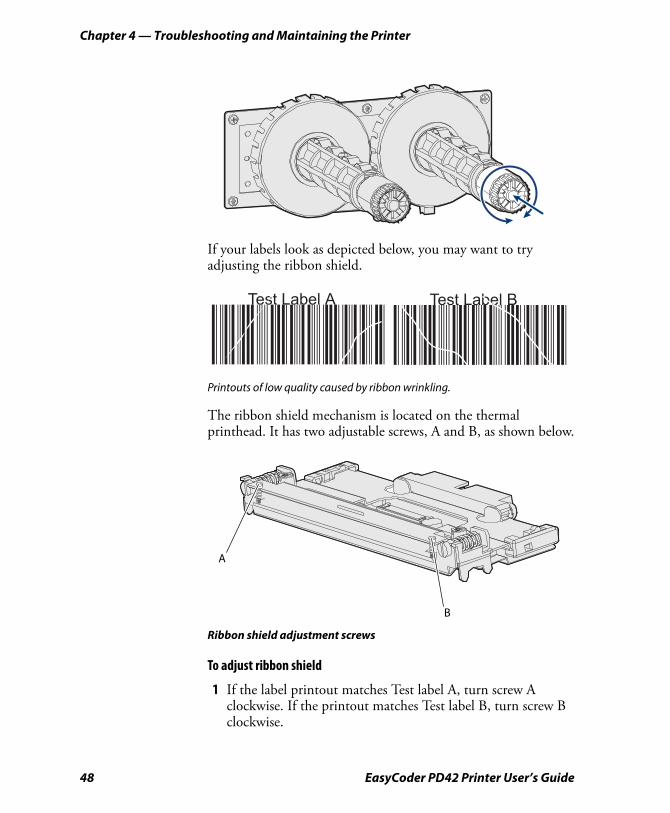
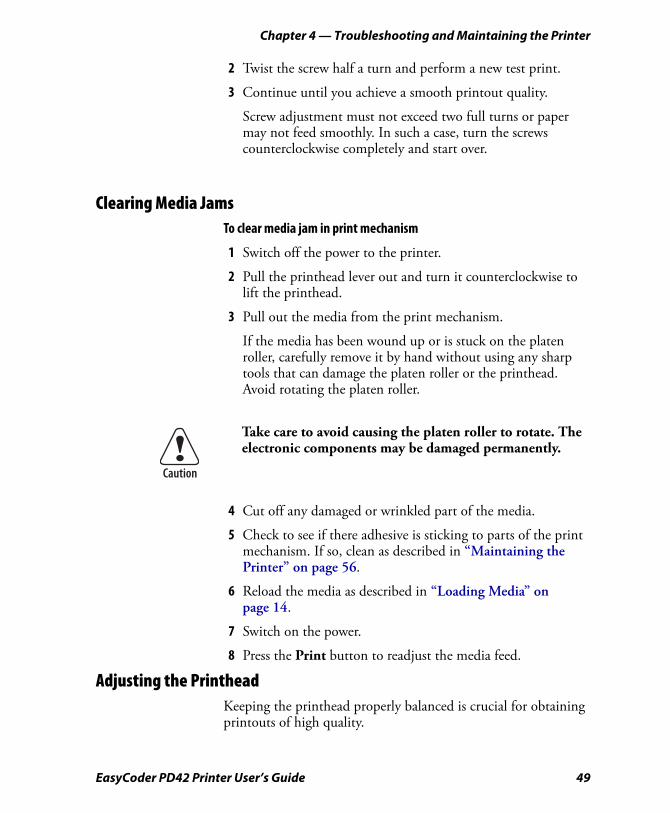
If your labels look as depicted below, you may want to try adjusting the ribbon shield.
Printouts of low quality caused by ribbon wrinkling.
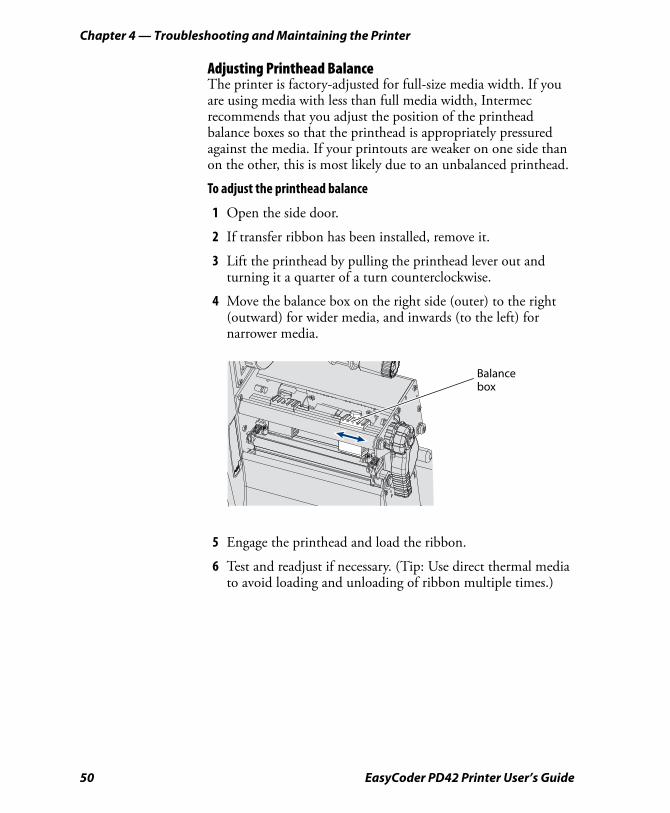
The ribbon shield mechanism is located on the thermal printhead. It has two adjustable screws, A and B, as shown below.
Ribbon shield adjustment screws
To adjust ribbon shield
1 If the label printout matches Test label A, turn screw A clockwise. If the printout matches Test label B, turn screw B clockwise.
1234567890Test Label A
1234567890Test Label B
B
A
48 EasyCoder PD42 Printer User’s Guide
Chapter 4 — Troubleshooting and Maintaining the Printer
2 Twist the screw half a turn and perform a new test print.
3 Continue until you achieve a smooth printout quality.
Screw adjustment must not exceed two full turns or paper may not feed smoothly. In such a case, turn the screws counterclockwise completely and start over.
Clearing Media JamsTo clear media jam in print mechanism
1 Switch off the power to the printer.
2 Pull the printhead lever out and turn it counterclockwise to lift the printhead.
3 Pull out the media from the print mechanism.
If the media has been wound up or is stuck on the platen roller, carefully remove it by hand without using any sharp tools that can damage the platen roller or the printhead. Avoid rotating the platen roller.
4 Cut off any damaged or wrinkled part of the media.
5 Check to see if there adhesive is sticking to parts of the print mechanism. If so, clean as described in “Maintaining the Printer” on page 56.
6 Reload the media as described in “Loading Media” on page 14.
7 Switch on the power.
8 Press the Print button to readjust the media feed.
Adjusting the PrintheadKeeping the printhead properly balanced is crucial for obtaining printouts of high quality.
Take care to avoid causing the platen roller to rotate. The electronic components may be damaged permanently.
EasyCoder PD42 Printer User’s Guide 49
Chapter 4 — Troubleshooting and Maintaining the Printer
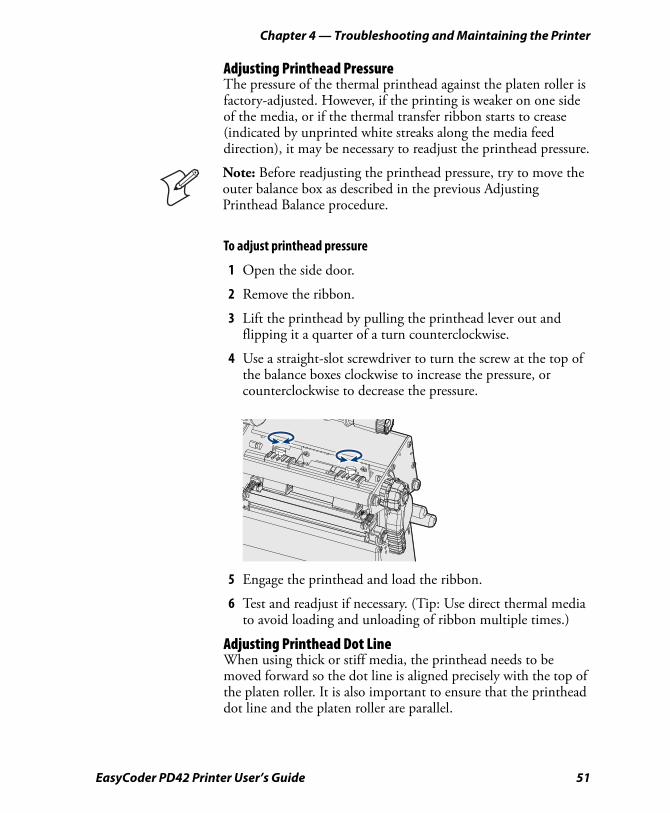
Adjusting Printhead BalanceThe printer is factory-adjusted for full-size media width. If you are using media with less than full media width, Intermec recommends that you adjust the position of the printhead balance boxes so that the printhead is appropriately pressured against the media. If your printouts are weaker on one side than on the other, this is most likely due to an unbalanced printhead.
To adjust the printhead balance
1 Open the side door.
2 If transfer ribbon has been installed, remove it.
3 Lift the printhead by pulling the printhead lever out and turning it a quarter of a turn counterclockwise.
4 Move the balance box on the right side (outer) to the right (outward) for wider media, and inwards (to the left) for narrower media.
5 Engage the printhead and load the ribbon.
6 Test and readjust if necessary. (Tip: Use direct thermal media to avoid loading and unloading of ribbon multiple times.)
Balancebox
50 EasyCoder PD42 Printer User’s Guide
Chapter 4 — Troubleshooting and Maintaining the Printer
Adjusting Printhead PressureThe pressure of the thermal printhead against the platen roller is factory-adjusted. However, if the printing is weaker on one side of the media, or if the thermal transfer ribbon starts to crease (indicated by unprinted white streaks along the media feed direction), it may be necessary to readjust the printhead pressure.
To adjust printhead pressure
1 Open the side door.
2 Remove the ribbon.
3 Lift the printhead by pulling the printhead lever out and flipping it a quarter of a turn counterclockwise.
4 Use a straight-slot screwdriver to turn the screw at the top of the balance boxes clockwise to increase the pressure, or counterclockwise to decrease the pressure.
5 Engage the printhead and load the ribbon.
6 Test and readjust if necessary. (Tip: Use direct thermal media to avoid loading and unloading of ribbon multiple times.)
Adjusting Printhead Dot LineWhen using thick or stiff media, the printhead needs to be moved forward so the dot line is aligned precisely with the top of the platen roller. It is also important to ensure that the printhead dot line and the platen roller are parallel.
Note: Before readjusting the printhead pressure, try to move the outer balance box as described in the previous Adjusting Printhead Balance procedure.
EasyCoder PD42 Printer User’s Guide 51

Chapter 4 — Troubleshooting and Maintaining the Printer
To adjust printhead dot line
1 Open the side door.
2 Remove the ribbon and engage the printhead.
3 Use a straight-slot screwdriver to turn the two screws at the top of the printhead bracket counterclockwise a single turn.
4 Lift the printhead by pulling the printhead lever and flipping it counterclockwise a quarter of a turn.
5 Carefully turn both screws at the front of the printhead clockwise a quarter of a turn at a time (a full turn corresponds to 0.55 mm, which is a lot). Make sure to make identical adjustments on both screws. If you are unsure, tighten both screws completely by turning them counterclockwise as far as they go and start over.
6 Engage the printhead and lock it by tightening the two screws at the top of the printhead bracket, that is, the reverse action of Step 3.
52 EasyCoder PD42 Printer User’s Guide
Chapter 4 — Troubleshooting and Maintaining the Printer
7 Load the ribbon (if any).
8 Test and readjust if necessary. (Tip: Use direct thermal media to avoid loading and unloading of ribbon multiple times.)
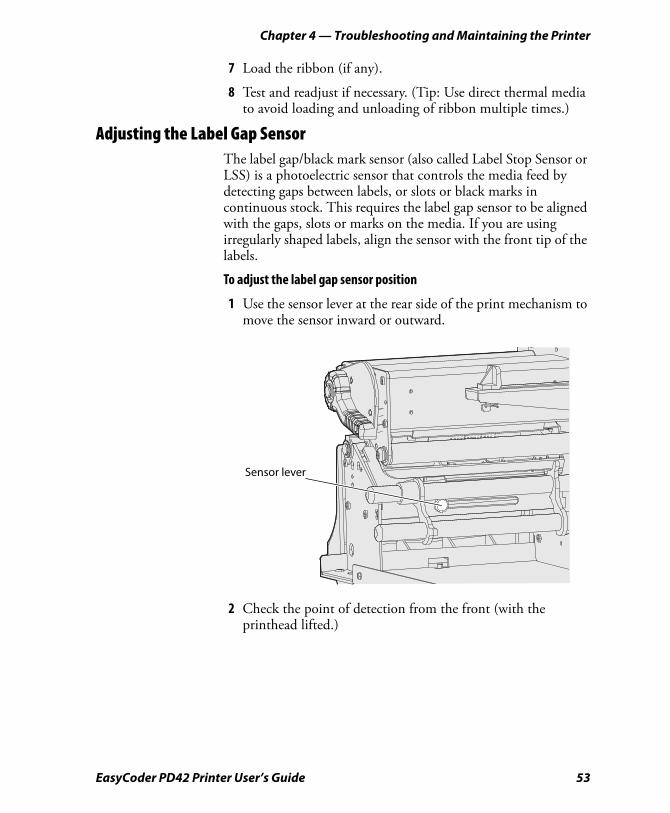
Adjusting the Label Gap SensorThe label gap/black mark sensor (also called Label Stop Sensor or LSS) is a photoelectric sensor that controls the media feed by detecting gaps between labels, or slots or black marks in continuous stock. This requires the label gap sensor to be aligned with the gaps, slots or marks on the media. If you are using irregularly shaped labels, align the sensor with the front tip of the labels.
To adjust the label gap sensor position
1 Use the sensor lever at the rear side of the print mechanism to move the sensor inward or outward.
2 Check the point of detection from the front (with the printhead lifted.)
Sensor lever
EasyCoder PD42 Printer User’s Guide 53
Chapter 4 — Troubleshooting and Maintaining the Printer
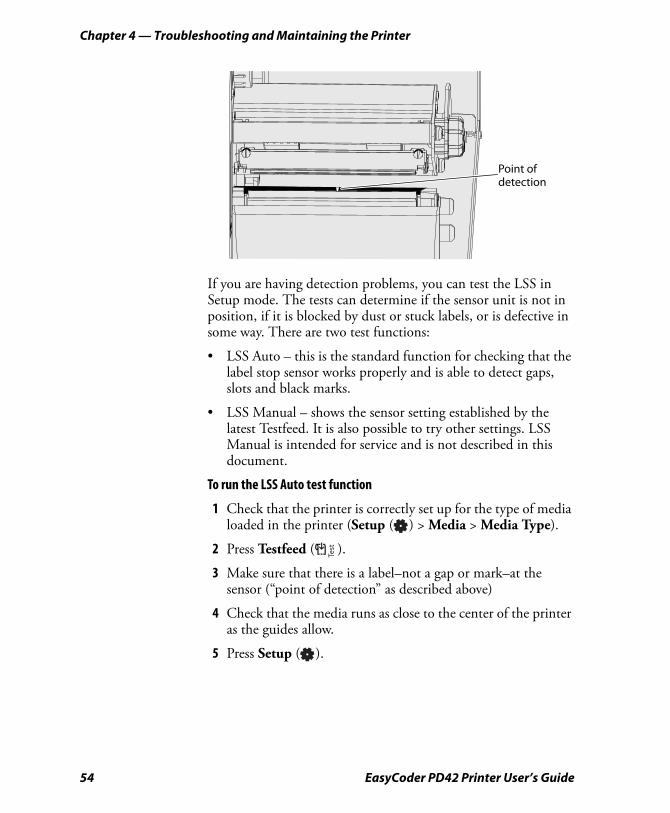
If you are having detection problems, you can test the LSS in Setup mode. The tests can determine if the sensor unit is not in position, if it is blocked by dust or stuck labels, or is defective in some way. There are two test functions:
• LSS Auto – this is the standard function for checking that the label stop sensor works properly and is able to detect gaps, slots and black marks.
• LSS Manual – shows the sensor setting established by the latest Testfeed. It is also possible to try other settings. LSS Manual is intended for service and is not described in this document.
To run the LSS Auto test function
1 Check that the printer is correctly set up for the type of media loaded in the printer (Setup ( ) > Media > Media Type).
2 Press Testfeed ( ).
3 Make sure that there is a label–not a gap or mark–at the sensor (“point of detection” as described above)
4 Check that the media runs as close to the center of the printer as the guides allow.
5 Press Setup ( ).
Point of detection
Test
54 EasyCoder PD42 Printer User’s Guide

Chapter 4 — Troubleshooting and Maintaining the Printer
6 Navigate to Print Defs > LSS Test > LSS Auto. The cursor should be placed in the center, as below.
7 Gap or slot detection: Lift the printhead and slowly pull out the media (in the media feed direction). When the LSS detects a gap or a detection slot, the cursor moves to the right.
8 Black mark detection: Lift the printhead and slowly pull out the media (in the media feed direction). When the LSS detects a black mark, the cursor moves to the left.
9 If the cursor behaves as decribed in Steps 7 and 8, the LSS is working and is properly aligned with the gaps, slots or black marks.
10 If the cursor does not react on a gap, slot or black mark, control the following:
• Is the LSS laterally aligned with the slots or black marks?
LSS AUTO
LSS AUTO
LSS AUTO
EasyCoder PD42 Printer User’s Guide 55
Chapter 4 — Troubleshooting and Maintaining the Printer
• Is the transfer ribbon properly loaded so it does not interfere with the LSS? (see “Loading Thermal Transfer Ribbon” on page 19).
• Are the LSS guides clean, or are there partial labels or residue stuck on them? If so, clean as described in the next section.
• Does the media have some kind of preprint that can make detection harder?
• Is there too little difference between the black marks and the surrounding areas?
• Is the label liner not transparent enough?
• Does the LSS work with another type of media? (Remember to change the Media Type setup and perform a new Testfeed.)
Maintaining the PrinterIn order to attain high productivity and a long life for your printer, Intermec recommends that you regularly inspect the printer and its environment to ensure that it is operated under optimal conditions.
Keep the printer in a dry area, away from larger electrical motors, welders and similar which might affect printer operation.
Clean your printer regularly, as described in the procedures below, in order to maintain the quality of your labels and extend the life of your printer.
If you open the electronics cover, you will void the warranty and may cause damage to the internal components. Opening the electronics cover exposes the user to shock hazards which may result in injury or death.
Always unplug the power cord before cleaning the printer.
56 EasyCoder PD42 Printer User’s Guide

Chapter 4 — Troubleshooting and Maintaining the Printer
Cleaning the Printhead Cleaning the printhead on a regular basis prolongs the life of the printhead and ensures you maintain high printout quality. You should clean the printhead with cleaning cards or a cotton swab moistened with isopropyl alcohol. Ideally, you should do this every time you load a new supply of transfer ribbon.
To clean the printhead
1 Open the side door.
2 Remove the media and ribbon.
3 Pull out the printhead lever and flip it counterclockwise a quarter of turn.
4 Use a cleaning card or a soft cotton swab moistened with isopropyl alcohol to dissolve any contamination on the line of heat-emitting dots at the front/bottom of the printhead.
5 Wait 30 seconds and carefully rub off any contamination. Repeat if necessary.
6 Allow the printhead to dry for a minute or more before loading a new supply of media and ribbon.
Isopropyl alcohol [(CH3)2CHOH] is a highly flammable, moderately toxic, and mildly irritating substance.
Never use any hard or sharp tools to peel away stuck labels or similar,. The printhead is delicate and can easily be damaged.
EasyCoder PD42 Printer User’s Guide 57

Chapter 4 — Troubleshooting and Maintaining the Printer
Cleaning the Media CompartmentRegular cleaning of the printer’s media compartment ensures smoother printing operation and avoids problems with media jams.
Use a soft cloth moistened with isopropyl alcohol to clean the inside of the printer. Be sure to keep the following parts clean:
• Drive roller and tear bar
• Media edge guides and media path
• Label sensors
If there are stuck labels, or adhesive residue from labels, peel as much as possible with your fingers, and then use isopropyl alcohol to dissolve the remaining adhesive.
Cleaning the Exterior of the PrinterMake sure to keep the exterior of the printer clean, this will reduce the risk of dust or foreign particles reaching the inside of the printer and affect printer functionality.
Use a soft cloth, possibly moistened with water or a mild detergent when cleaning the printer externally. Make sure to keep the surface surrounding the printer clean as well.
Isopropyl alcohol [(CH3)2CHOH;CAS67-63-0] is a highly flammable, moderately toxic, and mildly irritating substance.
If the printer is used in an environment where the premises are cleaned by a water hose or steam, move the printer to another room or cover it very carefully with a plastic sheet and make sure that the power cord is unplugged.
58 EasyCoder PD42 Printer User’s Guide

A
Specification, Interfaces, and OptionsThis appendix contains a general technical specification, as well as information about the printer interfaces and available options.
EasyCoder PD42 Printer User’s Guide 59

Appendix A — Specification, Interfaces, and Options
Printer Specifications
Printer Specifications
Physical Dimensions
Dimensions (WxLxH) 276 x 454.4 x 283.0 mm(10.9 x 17.9 x 11.2 in)
Weight (excl. media) 13 kg (28.7 pounds)
Power Supply
Input rating ~100-240V 2-1A 50/60 HzPower consumption • Stand-by: 12 W
• Normal operation/printing: 80 W• Peak: 250 inW
Printing
Print technique Direct Thermal/Thermal TransferPrinthead resolutions 8 dots/mm (203.2 dpi) or
11.8 dots/mm (300 dpi)Print speed 8 dots/mm (203 dpi)11.8 dots/mm (300dpi)
50.8 to 152.4 mm/sec (2 to 6 in/sec)50.8 to 101.6 mm/sec (2 to 4 in/sec)
Print Width Max.8 dots/mm (203 dpi)11.8 dots/mm (300dpi)
104 mm (4.1 in)105.7 mm (4.2 in)
Print Length Max.8 dots/mm (203 dpi)11.8 dots/mm (300dpi)
Fingerprint1270 mm (50 in)558.2 mm (22 in)
IPL600 mm (23 in)406.4 mm (16 in)
Modes of Operation
Tear-off (straight-through)
Yes
Cut-off Option with cutterPeel-off (self-strip) Option with internal
rewinder
Firmware (Fingerprint)
Operating system Fingerprint v10.x.x Includes Direct Protocol
60 EasyCoder PD42 Printer User’s Guide
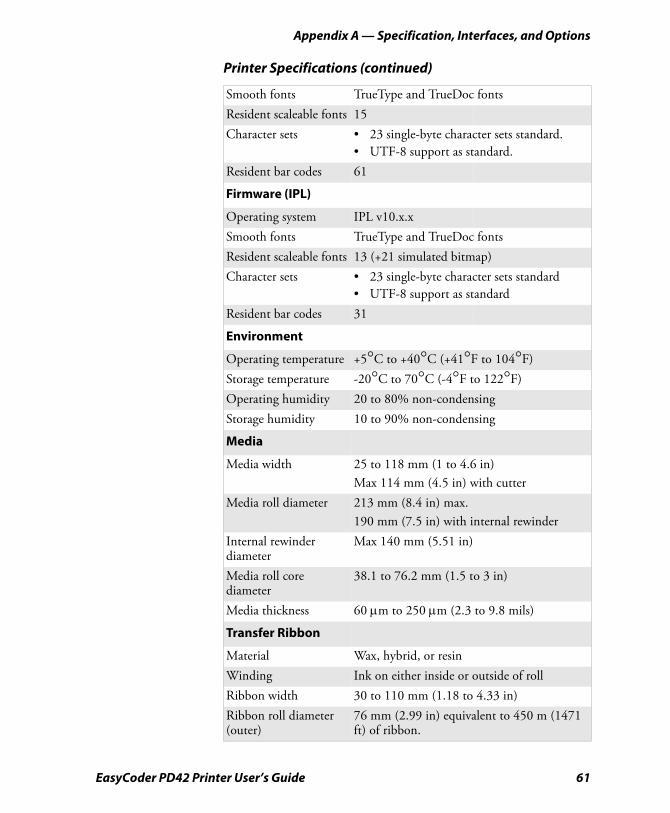
Appendix A — Specification, Interfaces, and Options
Smooth fonts TrueType and TrueDoc fontsResident scaleable fonts 15Character sets • 23 single-byte character sets standard.
• UTF-8 support as standard.Resident bar codes 61
Firmware (IPL)
Operating system IPL v10.x.xSmooth fonts TrueType and TrueDoc fontsResident scaleable fonts 13 (+21 simulated bitmap)Character sets • 23 single-byte character sets standard
• UTF-8 support as standardResident bar codes 31
Environment
Operating temperature +5°C to +40°C (+41°F to 104°F)Storage temperature -20°C to 70°C (-4°F to 122°F)Operating humidity 20 to 80% non-condensingStorage humidity 10 to 90% non-condensing
Media
Media width 25 to 118 mm (1 to 4.6 in)Max 114 mm (4.5 in) with cutter
Media roll diameter 213 mm (8.4 in) max.190 mm (7.5 in) with internal rewinder
Internal rewinder diameter
Max 140 mm (5.51 in)
Media roll core diameter
38.1 to 76.2 mm (1.5 to 3 in)
Media thickness 60 μm to 250 μm (2.3 to 9.8 mils)
Transfer Ribbon
Material Wax, hybrid, or resinWinding Ink on either inside or outside of rollRibbon width 30 to 110 mm (1.18 to 4.33 in)Ribbon roll diameter (outer)
76 mm (2.99 in) equivalent to 450 m (1471 ft) of ribbon.
Printer Specifications (continued)
EasyCoder PD42 Printer User’s Guide 61

Appendix A — Specification, Interfaces, and Options
Inner core diameter 25.2 to 25.6 mm (1 in)
Sensors
Label gap/black mark/out of media
Yes
Printhead lifted YesLabel taken YesRibbon end Yes
Controls
Graphical display LCD, 240*160 pixels with LED backlightLED indicators Power, Data/Ready, Error, Ready-to-Work™Keys 1 Print Button + 5 Soft Keys
Electronics
Microprocessor ARM 9Standard memory 8 MB flash, 16 MB SDRAM.
Interfaces
RS-232 serial YesUSB YesEthernet OptionIEEE 1284 parallel OptionCompactFlash YesUSB host Yes
Accessories and Options
Internal rewinder and batch takeupCutterPrinthead 203/300 dpiEasyLAN ethernet interfaceParallel IEEE 1284 interfaceReal time clock
Printer Specifications (continued)
62 EasyCoder PD42 Printer User’s Guide
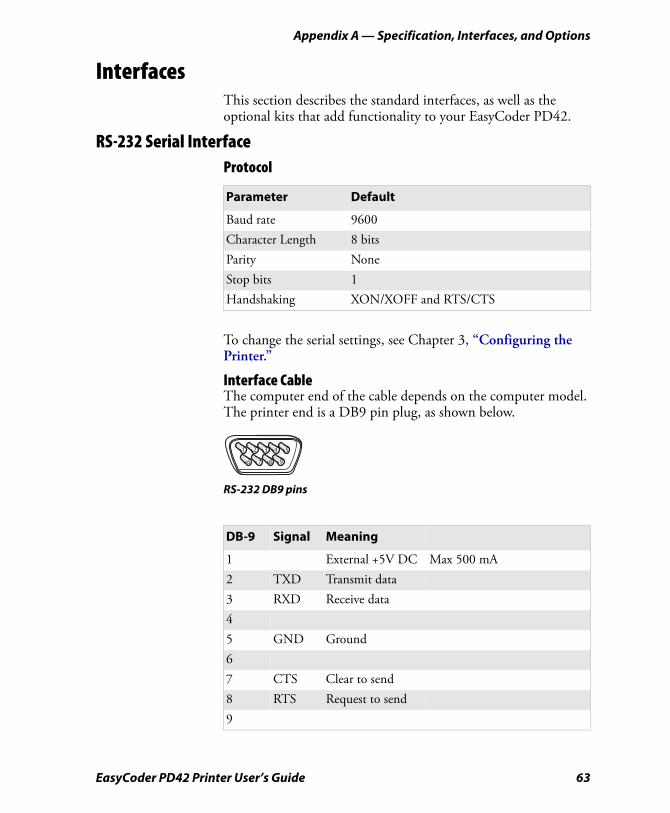
Appendix A — Specification, Interfaces, and Options
InterfacesThis section describes the standard interfaces, as well as the optional kits that add functionality to your EasyCoder PD42.
RS-232 Serial InterfaceProtocol
To change the serial settings, see Chapter 3, “Configuring the Printer.”
Interface CableThe computer end of the cable depends on the computer model. The printer end is a DB9 pin plug, as shown below.
RS-232 DB9 pins
Parameter Default
Baud rate 9600Character Length 8 bitsParity NoneStop bits 1Handshaking XON/XOFF and RTS/CTS
1 2 3 4 5
6 7 8 9
DB-9 Signal Meaning
1 External +5V DC Max 500 mA2 TXD Transmit data3 RXD Receive data45 GND Ground67 CTS Clear to send8 RTS Request to send9
EasyCoder PD42 Printer User’s Guide 63
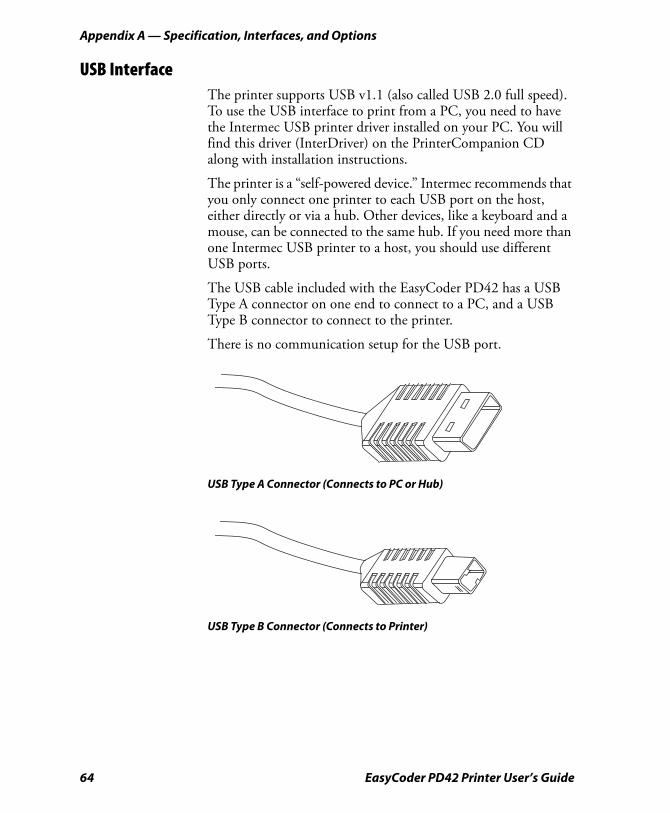
Appendix A — Specification, Interfaces, and Options
USB InterfaceThe printer supports USB v1.1 (also called USB 2.0 full speed). To use the USB interface to print from a PC, you need to have the Intermec USB printer driver installed on your PC. You will find this driver (InterDriver) on the PrinterCompanion CD along with installation instructions.
The printer is a “self-powered device.” Intermec recommends that you only connect one printer to each USB port on the host, either directly or via a hub. Other devices, like a keyboard and a mouse, can be connected to the same hub. If you need more than one Intermec USB printer to a host, you should use different USB ports.
The USB cable included with the EasyCoder PD42 has a USB Type A connector on one end to connect to a PC, and a USB Type B connector to connect to the printer.
There is no communication setup for the USB port.
USB Type A Connector (Connects to PC or Hub)
USB Type B Connector (Connects to Printer)
64 EasyCoder PD42 Printer User’s Guide
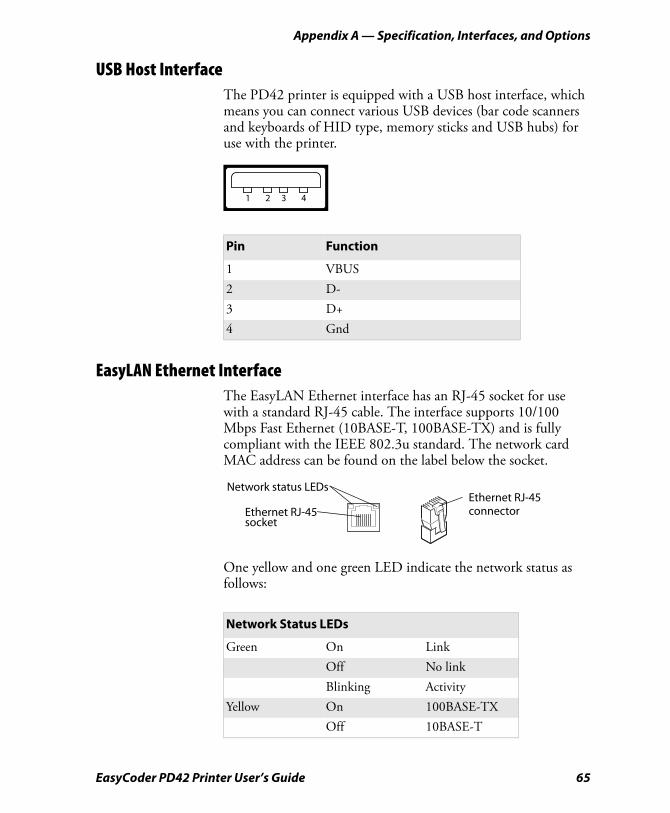
Appendix A — Specification, Interfaces, and Options
USB Host InterfaceThe PD42 printer is equipped with a USB host interface, which means you can connect various USB devices (bar code scanners and keyboards of HID type, memory sticks and USB hubs) for use with the printer.
EasyLAN Ethernet InterfaceThe EasyLAN Ethernet interface has an RJ-45 socket for use with a standard RJ-45 cable. The interface supports 10/100 Mbps Fast Ethernet (10BASE-T, 100BASE-TX) and is fully compliant with the IEEE 802.3u standard. The network card MAC address can be found on the label below the socket.
One yellow and one green LED indicate the network status as follows:
Pin Function
1 VBUS2 D-3 D+4 Gnd
Network Status LEDs
Green On LinkOff No linkBlinking Activity
Yellow On 100BASE-TXOff 10BASE-T
Ethernet RJ-45Ethernet RJ-45connector
socket
Network status LEDs
EasyCoder PD42 Printer User’s Guide 65
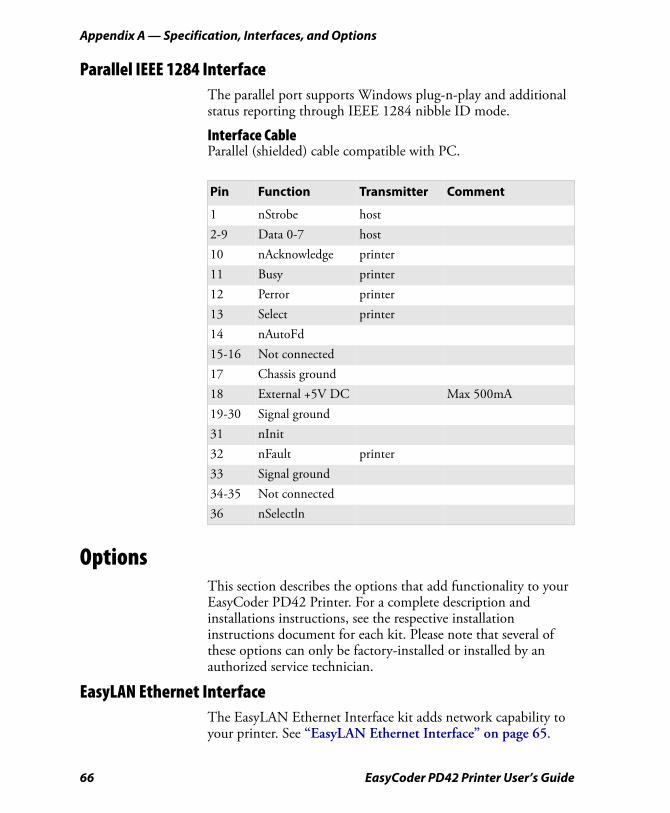
Appendix A — Specification, Interfaces, and Options
Parallel IEEE 1284 InterfaceThe parallel port supports Windows plug-n-play and additional status reporting through IEEE 1284 nibble ID mode.
Interface CableParallel (shielded) cable compatible with PC.
OptionsThis section describes the options that add functionality to your EasyCoder PD42 Printer. For a complete description and installations instructions, see the respective installation instructions document for each kit. Please note that several of these options can only be factory-installed or installed by an authorized service technician.
EasyLAN Ethernet InterfaceThe EasyLAN Ethernet Interface kit adds network capability to your printer. See “EasyLAN Ethernet Interface” on page 65.
Pin Function Transmitter Comment
1 nStrobe host2-9 Data 0-7 host10 nAcknowledge printer11 Busy printer12 Perror printer13 Select printer14 nAutoFd15-16 Not connected17 Chassis ground18 External +5V DC Max 500mA19-30 Signal ground31 nInit32 nFault printer33 Signal ground34-35 Not connected36 nSelectln
66 EasyCoder PD42 Printer User’s Guide
Appendix A — Specification, Interfaces, and Options
Parallel IEEE 1284 InterfaceThis kit adds a Parallel IEEE 1284 port to your printer. See “Parallel IEEE 1284 Interface” on page 66.
Cutter KitThe cutter is designed to cut off continuous paper-based stock or liner between labels. The paper cutter can be controlled using the instructions CUT, CUT ON and CUT OFF in Fingerprint (and Direct Protocol).
Internal RewinderThe Internal Rewinder (and Batch Takeup) kit is an optional device for peel-off (self-strip) operation, which means that the labels are separated from the liner (backing paper) after printing and the liner is wound up on an internal hub (See “Loading Media for Peel-Off (Self-Strip) Operation” on page 17.). It can also be used to roll up complete batches of label rolls. The unit also includes a guide shaft.
Printhead KitThe printer can be fitted with either a 203 dpi or 300 dpi printhead. These printheads use different PCBs (Printed Circuit Board). The printhead kit is available as a replacement kit (printhead only), or as a complete kit (printhead plus PCB).
Real Time ClockThe Real time clock circuit (RTC) relieves the operator or the host from having to set the clock/calendar using the Intermec Fingerprint instructions DATE$ and TIME$ after each power up. The RTC has its own backup battery that will last 10 years or more.
EasyCoder PD42 Printer User’s Guide 67
Appendix A — Specification, Interfaces, and Options
68 EasyCoder PD42 Printer User’s Guide
B
Media SpecificationsThis appendix explains the different media types the EasyCoder PD42 can operate with, and states the allowed dimensions of the paper, ribbon and rolls. This appendix covers the following topics:
• Media Roll Sizes
• Paper Types and Sizes
EasyCoder PD42 Printer User’s Guide 69

Appendix B — Media Specifications
Media Roll SizesThe media roll must comply with the following dimensions:
Media Roll Dimensions
Core
Internal Roll
Thicker media may be used, but print quality will be reduced. the stiffness is also important, and must be balanced against thickness to maintain print quality.
Diameters: 38 to 76.2 mm (1.5 to 3 inches)Width: Must not protrude outside the media.
Max. diamater 212 mm 8.35 inchesMax diameter with internal rewinder
190 mm 7.5 inches
Max. width 118 mm 4.65 inchesMax. width with cutter 114 mm 4.49 inchesMin. width 25 mm 1.00 inchesThickness 60 to 250 μm 2.3 to 9.8 mils
70 EasyCoder PD42 Printer User’s Guide

Appendix B — Media Specifications
The media supply must not be exposed to sand, dust, grit etc. Any hard particles, no matter how small, can damage the printhead.
Ribbon SizeThe core of the ribbon must be 25.2-25.6 mm (1 inch), as the empty ribbon core included in the box. The outer dimensions of the ribbon roll may be:
Max. diameter 76 mm 2.99 inchesMax. width 110 mm 4.33 inchesMin. width 30 mm 1.18 inches
EasyCoder PD42 Printer User’s Guide 71
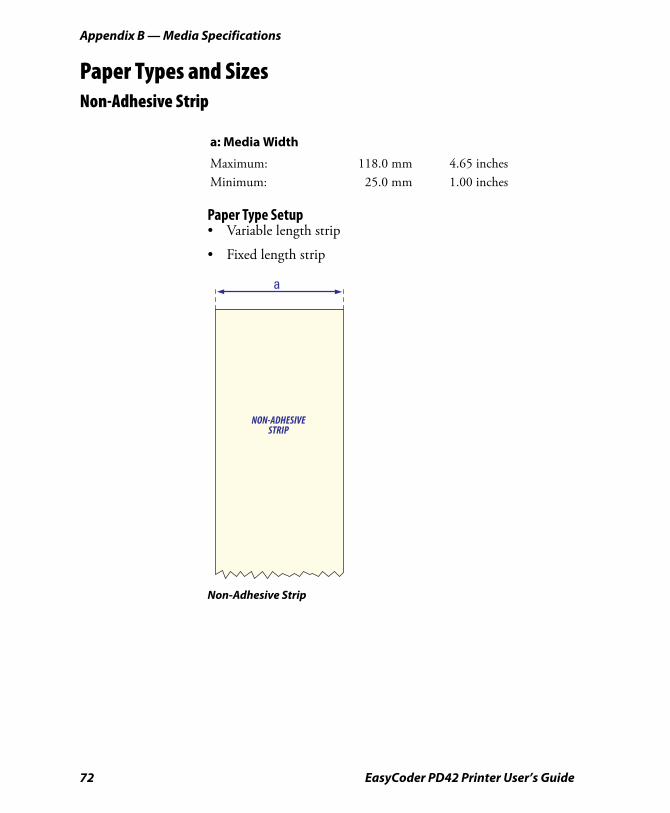
Appendix B — Media Specifications
Paper Types and SizesNon-Adhesive Strip
Paper Type Setup• Variable length strip
• Fixed length strip
Non-Adhesive Strip
a: Media Width
Maximum: 118.0 mm 4.65 inchesMinimum: 25.0 mm 1.00 inches
NON-ADHESIVESTRIP
72 EasyCoder PD42 Printer User’s Guide
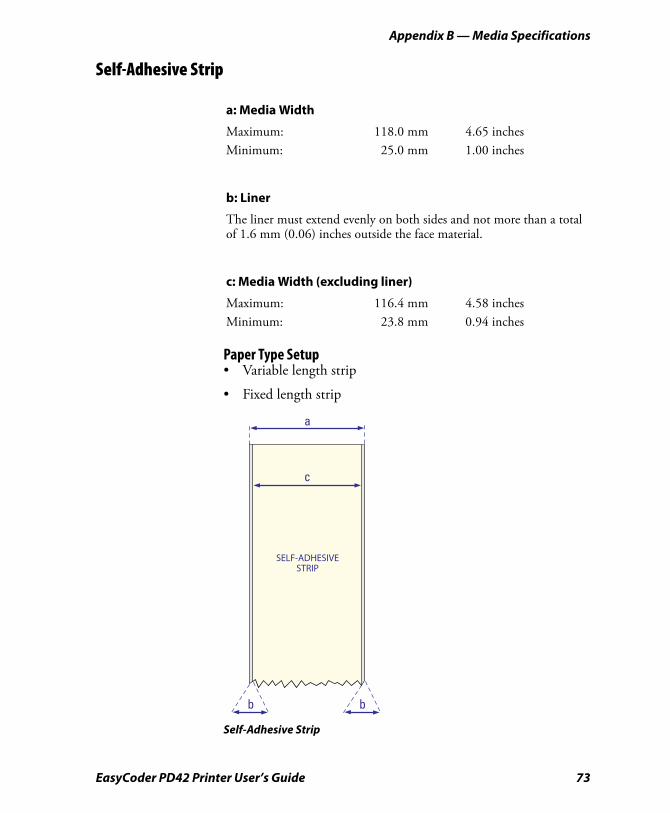
Appendix B — Media Specifications
Self-Adhesive Strip
Paper Type Setup• Variable length strip
• Fixed length strip
Self-Adhesive Strip
a: Media Width
Maximum: 118.0 mm 4.65 inchesMinimum: 25.0 mm 1.00 inches
b: Liner
The liner must extend evenly on both sides and not more than a total of 1.6 mm (0.06) inches outside the face material.
c: Media Width (excluding liner)
Maximum: 116.4 mm 4.58 inchesMinimum: 23.8 mm 0.94 inches
SELF-ADHESIVESTRIP
EasyCoder PD42 Printer User’s Guide 73

Appendix B — Media Specifications
Self-Adhesive Labels
* This is the print length limit set by memory constraints.
The Label Gap sensor must be able to detect the front edges of the labels. It can be moved 0 to 57 mm (0 to 2.24 inches) from the inner edge of the media.
Paper Type Setup• Labels with Gaps
a: Media Width
Maximum: 118.0 mm 4.65 inchesMinimum: 25.0 mm 1.00 inches
b: Liner
The liner must extend evenly on both sides and not more than a total of 1.6 mm (0.06) inches outside the face material.
c: Label Width (Excluding Liner)
Maximum: 116.4 mm 4.58 inchesMinimum: 23.8 mm 0.94 inches
d: Label Length Fingerprint IPL
8 dots/mm (203 dpi) Maximum: 1270 mm (50 in.)* 600 mm (23 in.)Minimum: 6 mm (0.2 in.) 6 mm (0.2 in.)11.81 dots/mm (300 dpi)Maximum: 558.8 mm (22 in.)* 406.4 mm (16 in.)Minimum: 6 mm (0.2 in.) 6 mm (0.2 in.)
e: Label Gap
Maximum: 26.0 mm 1.02 inchesMinimum: 1.2 mm 0.05 inchesRecommended: 3.0 mm 0.12 inches
74 EasyCoder PD42 Printer User’s Guide

Appendix B — Media Specifications
Self-Adhesive Labels
a
b
c
e
SELF-ADHESIVELABELS
b
d
FEEDDIRECTION
EasyCoder PD42 Printer User’s Guide 75
Appendix B — Media Specifications
Tickets With Gaps
* This is the print length limit set by memory constraints.
Paper Type Setup• Tickets with Gaps
a: Media Width
Maximum: 118.0 mm 4.65 inchesMinimum: 25.0 mm 1.00 inches
b: Copy Length Fingerprint IPL
8 dots/mm (203 dpi) Maximum: 1270 mm (50 in.)* 600 mm (23 in.)Minimum: 6 mm (0.2 in.) 6 mm (0.2 in.)11.81 dots/mm (300 dpi)Maximum: 558.8 mm (22 in.)* 406.4 mm (16 in.)Minimum: 6 mm (0.2 in.) 6 mm (0.2 in.)
c: Detection Position
Variable: 0 to 57 mm 0 to 2.24 inches
d: Detection Slit Length
The length of the detection slit (excluding corner radius) must be minimum 2.5 mm (0.10 inches) on either side of the detection position.
e: Detection Slit Height
Maximum: 26.0 mm 1.02 inchesMinimum: 1.2 mm 0.05 inchesRecommended: 3.0 mm 0.12 inches
Note: Do not allow any perforation to break the edge of the media as this may cause the media to split and jam the printer.
76 EasyCoder PD42 Printer User’s Guide

Appendix B — Media Specifications
Tickets With Gaps
a
TICKETS & TAGS
FEEDDIRECTION
b
ed
c
EasyCoder PD42 Printer User’s Guide 77

Appendix B — Media Specifications
Tickets With Black Mark
* This is the print length limit set by memory constraints.
Paper Type Setup• Tickets with Mark
a: Media Width
Maximum: 118.0 mm 4.65 inchesMinimum: 25.0 mm 1.00 inches
b: Copy Length Fingerprint IPL
8 dots/mm (203 dpi) Maximum: 1270 mm (50 in.)* 600 mm (23 in.)Minimum: 6 mm (0.2 in.) 6 mm (0.2 in.)11.81 dots/mm (300 dpi)Maximum: 558.8 mm (22 in.)* 406.4 mm (16 in.)Minimum: 6 mm (0.2 in.) 6 mm (0.2 in.)
c: Detection Position
Variable: 0 to 57 mm 0 to 2.24 inches
d: Black Mark Width
The detectable width of the black mark should be at least 5.0 mm (0.2 inches) on either side of the Label Gap Sensor detection point.
e: Black Mark Length
Maximum: 25.0 mm 0.98 inchesMinimum: 3 mm 0.12 inchesCommon: 5 mm 0.2 inches
f: Black Mark Y-Position
It is recommended that you place the black mark as close to the front edge of ticket as possible and use a negative Stop Adjust value to control the media feed, so the tickets can be properly torn off.
78 EasyCoder PD42 Printer User’s Guide

Appendix B — Media Specifications
Tickets With Black Mark
Note: Preprint that may interfere with the detection of the black mark should be avoided.
Note: The black mark should be non-reflective carbon black on a white or near-white background. Do not allow any perforations to break the edge of the media as this may cause the media to split and jam the printer.
a
TICKETS WITH MARKS
c
FEEDDIRECTION
e
d f
b
EasyCoder PD42 Printer User’s Guide 79
Appendix B — Media Specifications
80 EasyCoder PD42 Printer User’s Guide

C
Setup Parameters (Fingerprint)This appendix lists all of the setup parameters that you can configure to fit your operating environment. This appendix covers the following topics:
• Setup Description
• Navigating the Setup Tree
• Serial Communication Setup
• Com Setup
• Emulation Setup
• Feed Adjust Setup
• Media Setup
• Print Defs Setup
• Network Setup
EasyCoder PD42 Printer User’s Guide 81

Appendix C — Setup Parameters (Fingerprint)
Setup DescriptionThe printer’s Setup parameters control the way the printer operates. The setup parameters can be accessed and changed in a variety of ways, see “Changing Configuration Settings” on page 31 for more information.
Navigating the Setup TreeThis section provides an overview of the branches and nodes in the setup tree, as it is presented in the display window.
Note: The recommended way to set your printer’s configuration parameters is to use the PrintSet 4 program, which is included on the PrinterCompanion CD. PrintSet 4 can communicate with your printer either via a serial cable or a network connection.
Note: The setup tree is shown as it exists in Fingerprint 10.2.0.
Dotted boxes indicate features that are only available on printers equipped with optional equipment.
Boxes with thick frames indicate default settings.
Values inside brackets can be modified to any value specified by the user.
82 EasyCoder PD42 Printer User’s Guide

Appendix C — Setup Parameters (Fingerprint)
Setup Mode: Serial Communication (Ser-com, Uart1)
NEW LINE:CR
NEW LINE:LF
DATA TO HOST:ENABLE
DATA FROM HOST:ENABLE
BAUDRATE;4800
BAUDRATE;2400
BAUDRATE;1200
BAUDRATE;600
BAUDRATE;300
BAUDRATE;115200
BAUDRATE;57600
BAUDRATE;38400
BAUDRATE;19200
PARITY:SPACE
PARITY:MARK
PARITY:ODD
PARITY:EVEN
CHAR LENGTH7
STOP BITS:2
ENQ/ACK:ENABLE
SETUP:SER-COM, UART1
SER-COM, UART1:BAUDRATE
SER-COM, UART1:CHAR LENGTH
SER-COM, UART1:PARITY
SER-COM, UART1:STOP BITS
SER-COM, UART1:FLOWCONTROL
BAUDRATE;9600
CHAR LENGTH8
PARITY:NONE
STOP BITS:1
FLOW CONTROL:RTS/CTS
FLOW CONTROL:ENQ/ACK
ENQ-ACK:DISABLEENQ/ACK:
ENABLE
RTS/CTS:DISABLE
FLOW CONTROL:XON/XOFF
SER-COM, UART1:NEW LINE
NEW LINE:CR/LF
XON/XOFF:DATA TO HOST
XON/XOFF:DATA FROM HOST
DATA TO HOST:DISABLE
DATA FROM HOST:DISABLE
SER-COM, UART1:REC BUF
REC BUF:[1024]:
SER-COM, UART1:TRANS BUF
TRANS BUF:[1024]:
Scroll forwardScroll back
Scroll forwardScroll back
Scroll forwardScroll back
Scroll forwardScroll back
Scroll forwardScroll back
Scroll forwardScroll back
Scroll forwardScroll back
Scroll forwardScroll back
EasyCoder PD42 Printer User’s Guide 83

Appendix C — Setup Parameters (Fingerprint)
Setup Mode: Net-com, Net1
Setup Mode: Com
Setup Mode: Emulation
Setup Mode: Feedadjust
NEW LINE:LF
BAUDRATE;CR
SETUP:NET-COM, NET1
NET-COM, NET1NEW LINE
NEW LINE:CR/LF
USB KEYBOARD:GERMAN
USB KEYBOARD:FRENCH
USB KEYBOARD:SWEDISH
BAUDRATE;IEEE 1284
SETUP:COM
COM:INTERFACE
INTERFACE:USB DEVICE
COM:USB KEYBOARD
USB KEYBOARD:US
Scroll forwardScroll back
ADJUST:STOP (mmX10)
BAUDRATE;E4
SETUP:EMULATION
EMULATION:MODE
MODE:DISABLED
EMULATION:ADJUST
ADJUST:BASE (mmX10)
SETUP:FEEDADJ
FEEDADJ:STARTADJ
FEEDADJ:STOPADJ
STARTADJ:[0]:
STOPADJ:[0]:
84 EasyCoder PD42 Printer User’s Guide

Appendix C — Setup Parameters (Fingerprint)
Setup Mode: Media
TESTFEED MODE:SLOW
CONTRAST:-2%
CONTRAST:-4%
CONTRAST:-6%
CONTRAST:-8%
CONTRAST:-10%
CONTRAST:+10%
CONTRAST:+8%
CONTRAST:+6%
CONTRAST:+4%
CONTRAST:+2%
MEDIA TYPE:VAR LENGTH STRIP
MEDIA TYPE:FIX LENGTH STRIP
MEDIA TYPE:TICKET (w GAPS)
MEDIA TYPE:TICKET (w MARK)
SETUP:MEDIA
MEDIA:MEDIA SIZE
MEDIA:MEDIA TYPE
MEDIA SIZE:XSTART
MEDIA SIZE:WIDTH
MEDIA SIZE:LENGTH
MEDIA TYPE:LABEL (w GAPS)
XSTART:[0]:
WIDTH:[832]:
LENGTH:[1243]:
MEDIA:PAPER TYPE
PAPER TYPE:TRANSFER
TRANSFER:RIBBON CONSTANT
TRANSFER:RIBBON FACTOR
TRANSFER:LABEL OFFSET
RIBBON CONSTANT:[90]:
RIBBON FACTOR:[25]:
LABEL OFFSET:[0]:
MEDIA:CONTRAST
PAPER TYPE:DIRECT THERMAL
CONTRAST:+0%
DIRECT THERMAL:LABEL CONSTANT
DIRECT THERMAL:LABEL FACTOR
LABEL CONSTANT[85]:
LABEL FACTOR:[40]:
MEDIA:TESTFEED
TESTFEED:[26 28 0 10]
Press <Enter> to per-form a testfeed. Values are read-only.
Scroll forwardScroll back
Scroll forwardScroll back
MEDIA:TESTFEED MODE
TESTFEED MODE:FAST
Scroll forwardScroll back
MEDIA:LEN (SLOW MODE)
LEN (SLOW MODE):[0]:
EasyCoder PD42 Printer User’s Guide 85

Appendix C — Setup Parameters (Fingerprint)
Setup Mode: Print Defs
Setup Mode: Network (Option)
CLIP DEFAULT:ON
TESTPRINT:NETWORK INFO
Only displayed if anoptional EasyLAN boardis installed.
Scroll forwardScroll back
<Enter> to print<?> for error info
TESTPRINT:HARDWARE INFO
TESTPRINT:SETUP INFO
TESTPRINT:BAR CODES #2
TESTPRINT:BAR CODES #1
TESTPRINT:CHESS
SETUP:PRINT DEFS
PRINT DEFS:CLIP DEFAULT
PRINT DEFS:TESTPRINT
PRINT DEFS:PRINT SPEED
PRINT SPEED:[100]:
PRINT DEFS:LSS TEST
LSS TEST:LSS AUTO
LSS TEST:LSS MANUAL
LSS AUTO: �
LSS [G: 2]D: 6 �
Toggle betweengain (G) and drive(D)
Decrease/increasevalue insidebrackets
TESTPRINT:DIAMONDS
CLIP DEFAULT:OFF
86 EasyCoder PD42 Printer User’s Guide
Appendix C — Setup Parameters (Fingerprint)
Serial Communication SetupThe serial communication parameters control the communication between the printer and the connected computer or other devices on the standard serial port, referred to as "uart1:".
For the serial communication channel ("uart1:"), the following parameters can be set. Make sure they match the setup of the connected device or vice versa. If the setup of the printer and the setup of the host do not match, the response from the printer to host will be garbled.
Baud RateThe baud rate is the transmission speed in bits per second. There are 10 options:
• 300
• 600
• 1200
• 2400
• 4800
• 9600 (default)
• 19200
• 38400
• 57600
• 115200
Character LengthThe character length specifies the number of bits that will define a character. Eight bits are recommended, since that option allows more special characters and characters that are used exclusively in foreign languages. Refer to the Intermec Fingerprint Programmer’s Reference Manual (P/N 937-005-xxx) for more information. There are two options:
• 7 (Characters ASCII 000 to 127 decimal)
• 8 (Characters ASCII 000 to 255 decimal) (default)
EasyCoder PD42 Printer User’s Guide 87

Appendix C — Setup Parameters (Fingerprint)
ParityThe parity decides how the firmware will check for transmission errors. There are five options:
• None (default)
• Even
• Odd
• Mark
• Space
Stop BitsThe number of stop bits specifies how many bits will define the end of a character. There are two options:
• 1 (default)
• 2
Flow ControlRTS/CTS is a protocol in which communication is controlled via currents through separate lines in a cable that are set either to HIGH or LOW. By default, this option is disabled.
CTS on the Printer is connected to RTS on the PC and vice versa. CTS HIGH from the printer indicates that the unit is ready to receive data.
CTS LOW from the printer indicated that the receive buffer is full (see XON/XOFF). In some computer programs, for example Microsoft Windows HyperTerminal, RTS/CTS is designated “Hardware.”
XON/XOFF is a protocol in which communication is controlled by the control characters XON (ASCII 17 dec.) and XOFF (ASCII 19 dec.) transmitted on the same line as the data. XON/XOFF can be enabled/disabled separately for data received from the host by the printer (printer sends XON/XOFF) and for data transmitted to the host from the printer (host sends XON/XOFF).
New LineSelects the character or characters transmitted from the printer to indicate a new line. There are three options:
• CR/LFASCII 13 + 10 dec. (default)
88 EasyCoder PD42 Printer User’s Guide

Appendix C — Setup Parameters (Fingerprint)
• LFASCII 10 dec.
• CRASCII 13 dec.
Receive BufferThe Receive buffer stores the input data before processing. The size is 8192 bytes and cannot be changed.
Transmit BufferThe transmit buffer stores the input data before processing. Default size is 8192 bytes and this value cannot be changed.
Com SetupThe parameters under the Com node control interface and external keyboard use.
InterfaceIf you have an optional Parallel IEEE 1284 interface installed in the printer, it cannot be used at the same time as the USB Device interface. In this menu, you can choose which interface is active.
USB KeyboardYou can choose between a number of different keyboard layouts, that can be applied to an external USB keyboard connected to the printer through the USB host interface.
Emulation SetupIt is possible to run the PD42 printer as an E4 printer through software emulation.
ModeSwitch between these options:
• Disabled (default)
• E4
In E4 mode, the following commands are available:
BARFONTSLANTBARFONTSIZEFONTDSLANTFONTDSIZEFONTDFONTSLANTFONTSIZE
EasyCoder PD42 Printer User’s Guide 89

Appendix C — Setup Parameters (Fingerprint)
Refer to the EasyCoder E4 Direct Protocol Programmer’s Reference Manual (P/N 1-960419-xx) for more information about the commands, syntax, etc.
AdjustThe user can modify the Base and Stop parameters, which are functionally similar to Start Adjust and Stop Adjust as described under “Feed Adjust Setup” on page 90. The unit is different however; instead of being given in dots, Base and Stop values are defined as the distance in millimeters multiplied by 10:
• Base (mmX10)
Default value is +88, which equals a distance of 8.8 mm or roughly 0.35 inches.
• Stop (mmX10)
Default value is +55, which equals a distance of 5.5 mm or roughly 0.22 inches.
Feed Adjust SetupThe Feed adjust part of Setup Mode controls how much of the media is fed out or pulled back before and/or after the actual printing. These settings are global and will be effected regardless of which program is run.
Start AdjustThe Start Adjust value is given as a positive or negative number of dots. The default value is 0, which places the origin a certain distance back from the front edge of the copy:
• A positive start adjustment means that the specified length of media will be fed out before the printing starts. Thus, the origin is moved further back from the forward edge of the copy.
• A negative start adjustment means that the specified length of media will be pulled back before the printing starts. Thus, the origin is moved towards the forward edge of the copy.
Note: The firmware uses the front edges of labels with gaps, the ends of detection slots, and the forward edges of black marks for detection, all seen in relation to the feed direction.
90 EasyCoder PD42 Printer User’s Guide
Appendix C — Setup Parameters (Fingerprint)
Stop AdjustThe Stop Adjust value is given as a positive or negative number of dots. The default value is 0, which stops the media feed in a position suitable for tear off operation:
• A positive stop adjustment means that the normal media feed after the printing is completed will be increased by the specified value.
• A negative stop adjustment means that the normal media feed after the printing is completed will be decreased by the specified value.
Media SetupThe media parameters tell the firmware the characteristics of the media that will be used, so that the printout will be positioned correctly and attain the highest possible quality.
Media SizeThe size of the printable area is defined by three parameters; X-Start, Width, and Length.
X-StartSpecifies the position of the origin along the dots on the printhead.
The default X-start value prevents printing outside the labels when the liner is slightly wider than the labels. If you want to maximize the print width, reset the X-start value to its default value 0.
By increasing the value for the X-start parameter, the origin will be moved outwards, away from the inner edge of the media path. In other words, the larger X-start value, the wider inner margin and the less available print width.
WidthSpecifies the width of the printable area in number of dots from the origin. Thus, the sum of the X-start and width values gives the outer margin of the printable area. The width should be set to prevent printing outside the media, which may harm the printhead.
EasyCoder PD42 Printer User’s Guide 91

Appendix C — Setup Parameters (Fingerprint)
LengthSpecifies the length of the printable area in number of dots from the origin along the Y-coordinate and allocates memory space for two identical image buffers in the printer’s temporary memory.
The size of each buffer can be calculated using this formula:
Buffer size (bits) = [Print length in dots] x [Printhead width in dots]
• The length setup also decides the amount of media feed when using “fix length strip.”
• The length setup creates an emergency stop, which works when the printer is set up for “Label (w gaps)”, “Ticket (w mark)”, or “Ticket (w gaps).” If the label stop sensor has not detected a gap or mark within 150% of the set length, the media feed is automatically stopped to avoid feeding out a whole roll of media, due to sensor malfunction.
By setting up the X-start, the Width, and the Length, you will create a print window inside which printing can be performed. Any object or field extending outside the print window in any direction will either be clipped or cause an error condition (Error 1003 “Field out of label”), see Intermec Fingerprint Programmer’s Reference Manual (P/N 937-005-xxx).
92 EasyCoder PD42 Printer User’s Guide

Appendix C — Setup Parameters (Fingerprint)
Print Window: 8 dots/mm standard printhead
Media TypeThe Media Type parameter controls how the label stop sensor (LSS) and the media feed work. There are five media type options, see also Appendix B, “Media Specifications”:
• Label (w gaps) is used for adhesive labels mounted on liner.
• Ticket (w mark) is used for labels, tickets, or continuous stock provided with black marks at the back.
• Ticket (w gaps) is used for tickets and tags with detection slits.
• Fix length strip is used for continuous stock where the length of the print window decides the length of media to be fed out.
• Var length strip is used for continuous stock. The size of the print images decides the length of each copy.
FEEDDIRECTIONDot #0
Dot-lineon printhead
X-start Width (1-832 dots)
Origin
Length
Dot #831
14 mm (0.55 in)
PRINTPRINTWINDOWWINDOW
PRINTWINDOW
max. 104.0 mm (4.095 in)
25-118 mm (1-4.65 in)
EasyCoder PD42 Printer User’s Guide 93
Appendix C — Setup Parameters (Fingerprint)
It is important to select the correct media type, so the printer can communicate the following error:
• Error 1005 “Out of paper” indicates that the last ordered copy could not be printed because of an empty media stock.
• Error 1031 “Next label not found” indicates that the last ordered label or ticket was successfully printed, but no more labels/tickets can be printed because of an empty media stock.
Paper TypeThe Paper Type parameters control the heat emitted from the printhead to the direct thermal media or, optionally, the transfer ribbon in order to produce the dots that make up the printout image.
Labels, tickets, tags, strip, and ribbons for various types of application are available from Intermec. To attain optimal printout quality and extending the life of the printhead, use Intermec supplies.
As a general rule, high energy and/or high print speed will shorten the life of the printhead. Never use incorrect paper type settings or higher print speed settings than necessary for obtaining an acceptable printout quality and throughput speed.
If the ambient temperature is lower than +15°C (+59°F), decrease the print speed by 50 mm/sec.
Start by choosing between two alternatives:
• Direct Thermal printing (option)
• Thermal Transfer printing (default)
Your choice will decide which parameters to enter next:
Direct Thermal Printing• Label Constant (range 50 to 115). Default is 85.
• Label Factor (range 10 to 50). Default is 40.
Note: It is highly recommended to use PrintSet 4 to set the Paper Type setup parameters. PrintSet 4 includes a Print Quality Wizard that guides you through the process of improving printout quality.
94 EasyCoder PD42 Printer User’s Guide
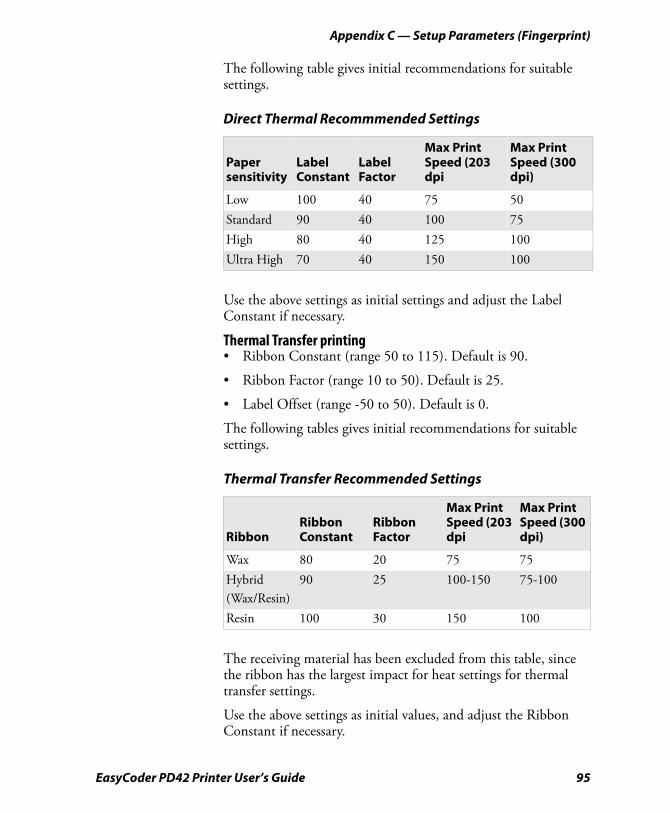
Appendix C — Setup Parameters (Fingerprint)
The following table gives initial recommendations for suitable settings.
Use the above settings as initial settings and adjust the Label Constant if necessary.
Thermal Transfer printing• Ribbon Constant (range 50 to 115). Default is 90.
• Ribbon Factor (range 10 to 50). Default is 25.
• Label Offset (range -50 to 50). Default is 0.
The following tables gives initial recommendations for suitable settings.
The receiving material has been excluded from this table, since the ribbon has the largest impact for heat settings for thermal transfer settings.
Use the above settings as initial values, and adjust the Ribbon Constant if necessary.
Direct Thermal Recommmended Settings
Paper sensitivity
Label Constant
Label Factor
Max Print Speed (203 dpi
Max Print Speed (300 dpi)
Low 100 40 75 50Standard 90 40 100 75High 80 40 125 100Ultra High 70 40 150 100
Thermal Transfer Recommended Settings
RibbonRibbon Constant
Ribbon Factor
Max Print Speed (203 dpi
Max Print Speed (300 dpi)
Wax 80 20 75 75Hybrid(Wax/Resin)
90 25 100-150 75-100
Resin 100 30 150 100
EasyCoder PD42 Printer User’s Guide 95
Appendix C — Setup Parameters (Fingerprint)
ContrastUse the contrast parameter to make minor adjustments of the blackness of the printout, for example to adapt the printer to variations in quality between different batches of the same media. The options are values between -10% to 10% in steps of 2. Default value is 0%. The contrast is reset to the default value whenever a new paper type is specified, regardless which method has been used.
TestfeedThe Testfeed is a read-only parameter that indicates internal parameters for the Label Stop Sensor. These are automatically set when running a Testfeed. It is very important to run a testfeed when switching from one media type to another.
Testfeed ModeIn certain unusual cases, a Testfeed may have been unable to succesfully identify gaps or marks in the media. It is thus possible to set the Testfeed mode to Slow to allow the Label Stop Sensor to more easily identify media gaps/marks. The options are Slow and Fast (default).
LEN (Slow Mode)When the Testfeed mode is set to slow, the printer will sample the media length plus 10mm. You can change the sample length by specifying the number of dots in LEN(Slow Mode), the minimum being the number of dots corresponding to 10mm. The default (media length plus 10 mm) is specified by the value 0.
Print Defs SetupClip defaultThe Clip Default parameter determines whether text, bar codes, images, lines and box fields that extend outside the print window (see page 93) should be printed or not.
• OFF (default). If any objects are found to extend outside the print window, printing will be stopped and error 1003 “Field out of label” is issued.
• ON. This disables Error 1003, and partial objects can be printed.
96 EasyCoder PD42 Printer User’s Guide
Appendix C — Setup Parameters (Fingerprint)
TestprintThe test labels ”Diamonds”, “Chess”, “Bar Codes #1”, and “Bar Codes #2” are used to check the printout quality and facilitate adjustment of the printhead pressure, see “Adjusting the Printer” on page 47. The test labels “Setup Info” and “Hardware Info” list the printer’s current setup and the installed electronic devices. Test label “Network Info” is only printed if the printer has an optional EasyLAN interface board. If the information does not fit on one label, two or more labels will be printed.
Print SpeedThe Print Speed is specified in mm/second. Allowed values are 50-150 mm/s (2-6 ips) for the 203dpi printhead and 50-100 mm/s (2-4 ips) for the 300 dpi printhead. Default is 100 mm/s (4 ips) and 75 mm/s (3 ips) for 203 and 300 dpi printheads respectively.
LSS TestThe function on the label stop sensor (LSS) can be tested automatically or manually as described in “Adjusting the Label Gap Sensor” on page 53.
Network SetupPlease refer to the EasyLAN User’s Guide (P/N 1-960590-xx) for information on the network setup parameters.
EasyCoder PD42 Printer User’s Guide 97
Appendix C — Setup Parameters (Fingerprint)
98 EasyCoder PD42 Printer User’s Guide

D
Setup Parameters (IPL)This appendix lists all of the setup parameters that you can configure to fit your operating environment. This appendix covers the following topics:
• Setup Description
• Printing Test Labels With IPL Commands
• Navigating the Setup Tree
• Serial Communication Setup
• Com Setup
• Test/Service Setup
• Media Setup
• Configuration Setup
• Network Setup
• Returning to Factory Default Setup
EasyCoder PD42 Printer User’s Guide 99

Appendix D — Setup Parameters (IPL)
Setup DescriptionThe printer’s setup parameters control the way the printer operates. The setup parameters can be accessed and changed in a variety of ways, see “Changing Configuration Settings” on page 31 for more information.
Printing Test Labels With IPL CommandsTest labels that give detailed information about the printer’s software, hardware and network settings can be printed in testmode or extended testmode, but also by sending commands through the terminal window. For example, the following commands print a software configuration label, and then returns the printer to print mode:<STX><ESC>T;s;R;<ETX>
Please refer to the IPL Programmer’s Reference Manual (P/N 066396-xxx) for more information on how to print test labels.
Navigating the Setup TreeThis section provides an overview of the branches and nodes in the setup tree, as it is presented in the display window.
Note: The recommended way to set your printer’s configuration parameters is to use the PrintSet 4 program, which is included on the PrinterCompanion CD. PrintSet 4 can communicate with your printer either via a serial cable or a network connection.
Note: The setup tree is shown as it exists in IPL 10.2.0.
Dotted boxes indicate features that are only available on printers equipped with optional equipment.
Boxes with thick frames indicate default settings.
Values inside brackets can be modified to any value specified by the user.
100 EasyCoder PD42 Printer User’s Guide

Appendix D — Setup Parameters (IPL)
Setup Mode: Ser-Com
Setup Mode: Com
ENQ/ACK:STANDARD
BAUDRATE;4800
BAUDRATE;2400
BAUDRATE;1200
BAUDRATE;115200
BAUDRATE;57500
BAUDRATE;38400
BAUDRATE;19200
PARITY:SPACE
PARITY:ODD
PARITY:EVEN
CHAR LENGTH7
STOP BITS:2
SETUP:SER-COM
SER-COM:BAUDRATE
SER-COM:DATA BITS
SER-COM:PARITY
SER-COM:STOP BITS
SER-COM:PROTOCOL
BAUDRATE:9600
DATA BITS:8
PARITY:NONE
STOP BITS:1 ENQ/ACK:
XON/XOFF+STATUS
PROTOCOL:XON_XOFF
Scroll forwardScroll back
Scroll forwardScroll back
Scroll forwardScroll back Scroll forward
Scroll back
USB KEYBOARD:GERMAN
USB KEYBOARD:FRENCH
USB KEYBOARD:SWEDISH
BAUDRATE;IEEE 1284
SETUP:COM
COM:INTERFACE
INTERFACE:USB DEVICE
COM:USB KEYBOARD
USB KEYBOARD:US
Scroll forwardScroll back
EasyCoder PD42 Printer User’s Guide 101
Appendix D — Setup Parameters (IPL)
Setup Mode: Test/Service
TEST LABELS:PRINT QUALITYCONFIG:
NETWORK
CONFIG:HW
SETUP:TEST/SERVICE
TEST/SERVICE:TESTPRINT
TESTPRINT:CONFIG
TESTPRINT:FORMAT
CONFIG:SW
FORMAT:ALL
ALL:PRINT FORMATS
TESTPRINT:TEST LABELS
TEST LABELS:PITCH
TESTPRINT:PAGE
PAGE:ALL
ALL:PRINT PAGES
TESTPRINT:UDC
UDC:ALL
ALL:PRINT UDCs
TESTPRINT:FONT
Scroll forward Scroll back
Scroll forward Scroll back
CONFIG:YES
TEST/SERVICE:DATA DUMP
DATA DUMP:NO
Scroll forward Scroll back
CONFIG:CONFIGURATION
TEST/SERVICE:MEMORY RESET
MEMORY RESET:ALL
Scroll forward Scroll back
TEST/SERVICE:LSS TEST
LSS TEST:LSS AUTO
LSS AUTO: �
FONT:ALL
ALL:PRINT UDFs
102 EasyCoder PD42 Printer User’s Guide
Appendix D — Setup Parameters (IPL)
Setup Mode: Media
Setup Mode: Configuration
Setup Mode: Network (Option)
TESTFEED MODE:SLOWCONFIG:
CONTINUOUS
CONFIG:MARK
SETUP:MEDIA
MEDIA :MEDIA TYPE
MEDIA TYPE:GAP
MEDIA :PAPER TYPE
Scroll forward Scroll back
CONFIG:TTR
PAPER TYPE:DT
MEDIA :LBL LENGTH DOTS
LBL LENGTH DOTS:1200
Scroll forward Scroll back
Scroll forwardScroll back
Scroll forwardScroll back
MEDIA :SENSITIVITY
SENSITIVITY:420
Scroll forwardScroll back
MEDIA :DARKNESS
DARKNESS:0
Scroll forwardScroll back
MEDIA :LBL REST POINT
LBL REST POINT:0
MEDIA :FORM ADJ DOTS X
FORM ADJ DOTS X:0
MEDIA :FORM ADJ DOTS Y
FORM ADJ DOTS Y:0
100/200/400/800/1200/1600/2000/2500/3000/3600/4200/4800
120/130/140/160/170/180/222/226/236/238/366/369/420/440/450/460/470/480/513/527/533/563/565/567/623/627/633/647/673/677/687/720/854/864
0/1/2/3/4/5/6/7/8/9/10/-10/-9/-8/-7/-6/-5/-4/-3/-2/-1
0/2/4/6/8/10/15/20/25/30/-30/-25/-20/-15/-10/-8/-6/-4/-2
Scroll forwardScroll back
0/2/4/6/8/10/15/20/25/30/-30/-25/-20/-15/-10/-8/-6/-4/-2
Scroll forwardScroll back
0/2/4/6/8/10/15/20/25/30/-30/-25/-20/-15/-10/-8/-6/-4/-2
MEDIA :TESTFEED MODE
TESTFEED MODE:FAST
Scroll forwardScroll back
PRINT SPPED:6 IN/SEC
PRINT SPPED:5 IN/SEC
PRINT SPEED:4 IN/SEC
PRINT SPEED:3 IN/SEC
SETUP:CONFIGURATION
CONFIGURATION:PWRUP EMULATION
CONFIG:DISABLE
CONFIG:ENABLE
CUTTER:NOT INSTALLED
Scroll forward Scroll back
CONFIG:86XX-15MIL
CONFIG:86XX-10MIL
PWRUP EMULATION:NONE
Scroll forward Scroll back
CONFIGURATION:PRINT SPEED
PRINT SPEED:2 IN/SEC
CONFIGURATION:CUTTER
Scroll forwardScroll back
PARITY:BOOTP
PARITY:DHCP
PARITY:MANUAL
SETUP:NETWORK
NETWORK:IP SELECTION
NETWORK:IP ADDRESS
NETWORK:NETMASK
NETWORK:DEFAULT ROUTER
NETWORK:NAMESERVER
IP SELECTION:DHCP+BOOTP
IP ADDRESS:0.0.0.0
NETMASK:0.0.0.0
DEFAULT ROUTER:0.0.0.0
NAMESERVER:0.0.0.0
NETWORK:MAC ADDRESS
MAC ADDRESS:nnnnnnnnnnnn
These menus will only be displayed when an optional EasyLAN interface board is installed.
EasyCoder PD42 Printer User’s Guide 103
Appendix D — Setup Parameters (IPL)
Serial Communication SetupThe serial communication parameters control the communication between the printer and the connected computer or other devices on the standard serial port.
Make sure the printer’s communication parameters match the setup of the connected device or vice versa. If the setup of the printer and the setup of the host do not match, the response from the printer to host will be garbled.
Baud RateThe baud rate is the transmission speed in bits per second. There are eight options:
• 1200
• 2400
• 4800
• 9600 (default)
• 19200
• 38400
• 57600
• 115200
Data BitsThe Data Bits parameter specifies the number of bits that will define a character. Eight bits are recommended, since this option allows more special characters and characters that are used exclusively in foreign languages. Refer to the IPL Programmer’s Reference Manual (P/N 066396-xxx) for more information.
• 7 (Characters ASCII 000 to 127 decimal)
• 8 (Characters ASCII 000 to 255 decimal) (default)
ParityThe parity decides how the firmware will check for transmission errors. There are five options:
• None (default)
• Even
• Odd
104 EasyCoder PD42 Printer User’s Guide

Appendix D — Setup Parameters (IPL)
• Space
Stop BitsThe number of stop bits specifies how many bits will define the end of a character. There are two options:
• 1 (default)
• 2
Protocol• XON/XOFF (default)
In the XON/XOFF protocol, data fl ow control is achieved by using XON (DC1) and XOFF (DC3) characters. Message blocks are not required to be bracketed by the Start of Text (STX) and End of Text (ETX) characters. However, at power up or after a reset all characters except ENQ or VT will be ignored until an STX is detected. The message length in this protocol is unrestricted. That is, the printer processes information as it is being downloaded and stops when there is no more information.
XON/XOFF protocol conforms to generally accepted industry standards. No end-of-message response is sent to the host other than XOFF. An XON will be sent on power up.
Since DC1 and DC3 are used for data flow control, the printer status characters are different than those of the Standard Protocol. If the host ignores the printer’s XOFF, the printer will resend an XOFF after receiving every 15 characters from the host.
Condition Character
Buffer already full GSPrinthead raised USRibbon fault USNo label stock EMBuffer now full DC4Printhead hot SILabel at strip pin FSLabel skipping DC2Printing DC2
EasyCoder PD42 Printer User’s Guide 105
Appendix D — Setup Parameters (IPL)
• XON/XOFF+Status
• Intermec Standard Protocol
The Intermec Printer Standard Protocol is a half-duplex protocol. All data transmissions to the printer consist of status inquiry (ENQ), status dump (VT), or message blocks. Each message block starts with the Start of Text (STX) character and ends with the End of Text (ETX) character. Each message block must be 255 characters or less, including the STX and ETX characters. The printer responds to each status inquiry or message block with the printer status. The host should check the printer status before downloading a message block to the printer. ENQ causes the printer to transmit its highest priority status, while VT instructs the printer to transmit all status that applies in the order of their priority. The next table lists the possible printer status in descending priorities are
Com SetupThe parameters under the Com node control interface and external keyboard use.
InterfaceIf you have an optional Parallel IEEE 1284 interface installed in the printer, it cannot be used at the same time as the USB Device interface. In this menu, you can choose which interface is active.
Condition Character
Buffer already full GSPrinthead raised USRibbon fault USNo label stock EMBuffer now full DC3Printhead hot SILabel at strip pin FSLabel skipping DC1Ready DC1Printing DC1
106 EasyCoder PD42 Printer User’s Guide
Appendix D — Setup Parameters (IPL)
USB KeyboardYou can choose between a number of different keyboard layouts, that can be applied to an external USB keyboard connected to the printer through the USB Host interface.
Test/Service SetupTestprint
This part of the Setup Mode allows you to print various types of test labels.
ConfigChoose between software (SW), hardware (HW), and Network test labels (Network is only available if the printer is equipped with an EasyLAN Network card).
The Software Configuration Label contains this information:
• Current configuration parameters stored in the printer’s memory
• Defined pages
• Defined formats
• Defined graphics
• Defined fonts
• Any installed printer options
The Hardware Configuration Label contains this information:
• Printer memory information
• Printer mileage
• Printhead settings
• Firmware checksum, program, and version number
The Network Configuration Label contains this information:
• WINS Name
• MAC Address
• IP Selection
• IP Address
• Netmask
EasyCoder PD42 Printer User’s Guide 107

Appendix D — Setup Parameters (IPL)
• Default Router
• Name Server
• Mail Server
• Primary WINS Server
• Secondary WINS Server
• Network Statistics
Test LabelsChoose between Pitch and Print Quality:
• The Pitch label contains an even pattern of small dots that reveals failing printhead dots and variations of printout darkness because of uneven printhead pressure or poor energy distribution to the printhead.
• The Print Quality label contains number of bar codes with different characteristics and useful information on printer model, program version, print speed, and media sensitivity setup.
FormatThe Format Label contains a single format that you can use to evaluate the print quality of a particular format. This option prints labels for all the formats stored in the printer’s memory.
PageThe Page Label tests the ability of the printer to receive and print single or multiple pages of label data that is sent from the host. This option prints labels for all the pages stored in the printer’s memory.
UDCThe UDC Label tests the ability of the printer to receive and print single or multiple user-defined characters (bitmap graphics) that are sent fromthe host. This option prints labels for all the UDCs stored in the printer’s memory.
FontThe Font Label contains all the characters in a single font. This option prints labels for all the user-defined fonts (UDF) stored in the printer’s memory.
108 EasyCoder PD42 Printer User’s Guide
Appendix D — Setup Parameters (IPL)
Data DumpIf data dump is enabled by selecting the “Yes” option, the printer listens on all ports and prints all data and protocol characters received. An ASCII and hexadecimal representation of each character is printed.
Memory ResetThis feature allows you to reset the factory default settings of the printer. There are two options:
• All. Select this option to reset the entire memory.
• Configuration. Select this option to reset the Configuration part of the memory only.
LSS TestThis function allows you to test that the Label Gap Sensor (also referred to as Label Stop Sensor, or LSS) is working properly. Please see “Adjusting the Label Gap Sensor” on page 53.
Media SetupThe media parameters tell the firmware the characteristics of the media that will be used, so the printout will be positioned correctly with optimal quality.
Media TypeThe Media Type parameters control how the label stop sensor (LSS) and the media feed work. There are three media type options:
• Gap is used for adhesive labels mounted on liner (backing paper) or continuous paper stock with detection slots. Default.
• Mark is used for labels, tickets, or strip provided with black marks at the back.
• Continuous is used for continuous stock without any detection slots or black marks.
EasyCoder PD42 Printer User’s Guide 109

Appendix D — Setup Parameters (IPL)
Paper TypeThe Paper Type parameters control how the transfer ribbon mechanism and the ribbon sensor work. There are two paper type options:
• DT (Direct Thermal) is used for heat-sensitive media without any need for a thermal transfer ribbon. Default.
• TTR (Thermal Transfer) is used for non heat-sensitive receiving face materials in combination with a thermal transfer ribbon.
Testfeed ModeIn certain unusual cases, a Testfeed may have been unable to succesfully identify gaps or marks in the media. It is thus possible to set the Testfeed Mode to Slow to allow the Label Stop Sensor to more easily identify media gaps/marks. The options are Slow and Fast (default).
Label Length DotsThe Label Length setup specifies the length in dots of each copy along the media feed direction (X-coordinate). This is used for “label-out” detection.
Sensitivity (Media Sensitivity Number)This setup parameter specifies the characteristics of the direct thermal media or combination of receiving face material and thermal transfer ribbon, so the printer’s firmware can optimize the heating of the printhead and the print speed. Standard supplies from Intermec are labeled with a 3-digit media sensitivity number which is used to specify the media grade. Look for the media sensitivity number on:
• the side of the media roll. Use the last three digits of the 15-digit number stamped on the roll for the media sensitivity number.
• a small label attached to the roll of media.
• a small label attached to the plastic bag of your ribbon roll.
110 EasyCoder PD42 Printer User’s Guide
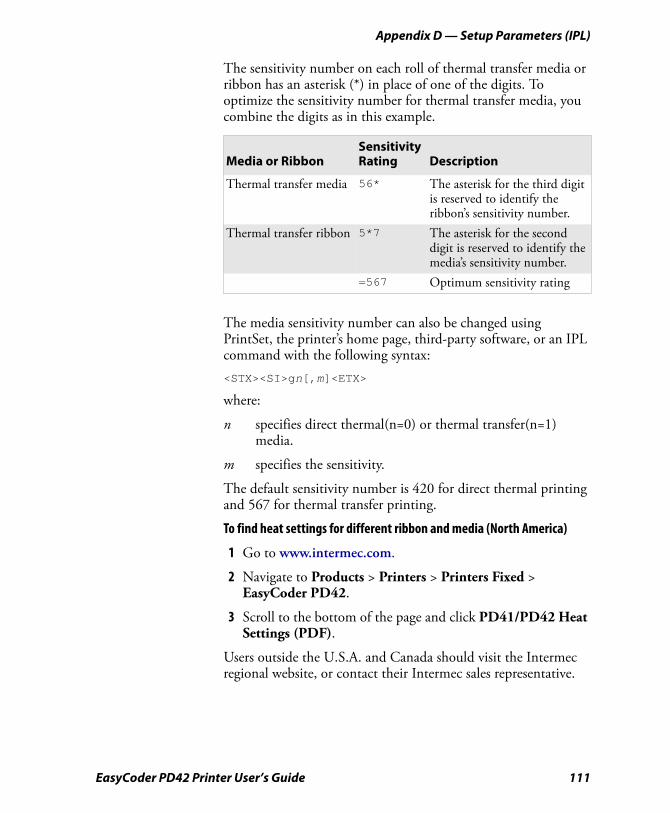
Appendix D — Setup Parameters (IPL)
The sensitivity number on each roll of thermal transfer media or ribbon has an asterisk (*) in place of one of the digits. To optimize the sensitivity number for thermal transfer media, you combine the digits as in this example.
The media sensitivity number can also be changed using PrintSet, the printer’s home page, third-party software, or an IPL command with the following syntax:<STX><SI>gn[,m]<ETX>
where:
n specifies direct thermal(n=0) or thermal transfer(n=1) media.
m specifies the sensitivity.
The default sensitivity number is 420 for direct thermal printing and 567 for thermal transfer printing.
To find heat settings for different ribbon and media (North America)
1 Go to www.intermec.com.
2 Navigate to Products > Printers > Printers Fixed > EasyCoder PD42.
3 Scroll to the bottom of the page and click PD41/PD42 Heat Settings (PDF).
Users outside the U.S.A. and Canada should visit the Intermec regional website, or contact their Intermec sales representative.
Media or RibbonSensitivity Rating Description
Thermal transfer media 56* The asterisk for the third digit is reserved to identify the ribbon’s sensitivity number.
Thermal transfer ribbon 5*7 The asterisk for the second digit is reserved to identify the media’s sensitivity number.
=567 Optimum sensitivity rating
EasyCoder PD42 Printer User’s Guide 111
Appendix D — Setup Parameters (IPL)
DarknessUse this parameter to make minor adjustments of the blackness in the printout, for example to adapt the printer to variations in quality between different batches of the same media type. The value can be set within the range -10% to +10% where -10 is the lightest and 10 is the darkest. Default value is 0%.
Label Rest PointSpecifies where labels stop for removal. Use this for peel-off (self-strip) applications. Allowed range is -30 (furthest back) to 30 (furthest forward). Default is 0. Also available as an IPL command (<SI>fn).
Form Adj Dots XSpecifies where the X-position of the origin should be placed on the label. Allowed range is -30 (closest to the leading edge) to 30 (furthest from the leading edge). Default is 0.
Form Adj Dots YSpecifies where the Y-position of the origin should be placed on the label. Allowed range is -30 (closest to the center section) to 30 (furthest from the center section). Default is 0.
Configuration SetupPower-Up EmulationEmulation mode lets you print bar code labels that were originally designed on an 86XX printer in multiples of 10 or 15 mil. When the printer is working in emulation mode, not all IPL commands are supported. For a complete list of commands available during emulation mode, see the the IPL Programmer’s Reference Manual (P/N 066396-xxx).
Default emulation mode is “none”.
Print SpeedYou can select the print speed from 2 in./sec. (50 mm/sec.) to 6 in./sec.(100 mm/sec.) with an interval of 1 in./sec. The higher the print speed, the more wear on the printhead, so do not use a higher print speed than necessary. For some direct thermal media or ribbon/media combinations, setting the highest print speed may reduce print quality significantly.
112 EasyCoder PD42 Printer User’s Guide
Appendix D — Setup Parameters (IPL)
Cutter (option)Once a cutter has been installed in the printer, it must also be enabled in the firmware. IPL commands are used to enable/disable the cutter in configuration mode:
<STX>R<ETX> Enter print/configuration mode
<STX><SI>c1<ETX> Enable cutter
<STX><SI>c0<ETX> Disable cutter
Network Setup Please refer to the EasyLAN User’s Guide (P/N 1-960590-xx) for information on the network setup parameters.
Returning to Factory Default SetupYou can restore all the printer’s default settings in Extended testmode (see page 36), or by using the Factory Default Wizard in PrintSet 4.
EasyCoder PD42 Printer User’s Guide 113
Appendix D — Setup Parameters (IPL)
114 EasyCoder PD42 Printer User’s Guide

Worldwide Headquarters6001 36th Avenue WestEverett, Washington 98203U.S.A.
tel 425.348.2600
fax 425.355.9551
www.intermec.com
EasyCoder PD42 Printer User’s Guide
*934-009-002*P/N 934-009-002
Related Documents