EasyCode Pillars Walkthrough EasyCode Pillars uses fun, engaging project-based lessons to teach students core concepts in Python including variables, loops, if statements, lists, functions, and events. Here’s how you will access EasyCode Pillars curriculum, beginning at the log in page: Go to login.learning.com Enter your username, password, and district. If your school or district uses Clever, click the 'Login with Clever' button to begin the login process. You can learn how to log in through Clever here. Open the EasyCode Pillars tile in your Library. Click on a lesson title to view the details tab, lesson plan, categories, and standards.

Welcome message from author
This document is posted to help you gain knowledge. Please leave a comment to let me know what you think about it! Share it to your friends and learn new things together.
Transcript

EasyCode Pillars Walkthrough
EasyCode Pillars uses fun, engaging project-based lessons to teach students core concepts in Python including variables, loops, if statements, lists, functions, and events.
Here’s how you will access EasyCode Pillars curriculum, beginning at the log in page:
Go to login.learning.com
Enter your username, password, and district.
If your school or district uses Clever, click the 'Login with Clever' button to begin the login process.
You can learn how to log in through Clever here.
Open the EasyCode Pillars tile in your Library.
Click on a lesson title to view the details tab, lesson plan, categories, and standards.

EasyCode Pillars Walkthrough
In each Codesters lesson, students are guided through the completion of a project through a series of small activities. In the last activity of the project, students use the skills learned to complete a project that allows them to apply their own personality and identity to the work.
Click the ‘Assign’ button to add to your class.
PLEASE NOTE: you must have your class open in the left side bar to successfully assign curriculum.
Assigned curriculum will appear in the class assignment list on the left side bar.
Click the ‘Edit’ button to remove an item or reorder the assignment list.
When a student clicks on the lesson in their assignment list, it will take them to that specific lesson in their Codesters student dashboard.
However, once in the Codesters platform, students can use the drop-down in the upper left-hand corner to navigate to any Codesters lesson that you, as the teacher, have given students access to through the Codesters dashboard.
Student progress in EasyCode Pillars can be viewed only in the Teacher Dashboard on the Codesters platform.
All activities will auto-score except the final project, which must be manually graded. (Final project grades can be manually entered in the Learning.com gradebook if desired.)

EasyCode Pillars Walkthrough
To navigate to your Teacher Dashboard in Codesters, click on a lesson title and click the ‘View’ button:
A student landing page will appear:
Select ‘Exit Student Mode’ in the upper right corner of the landing page.
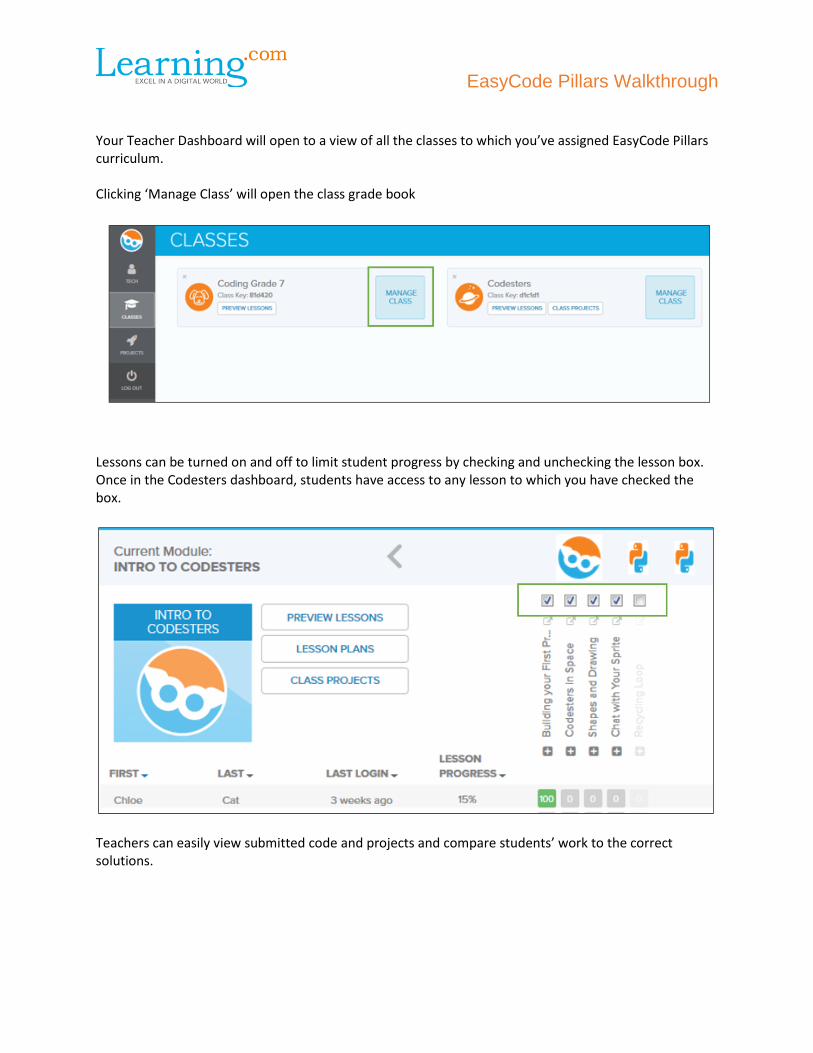
EasyCode Pillars Walkthrough Your Teacher Dashboard will open to a view of all the classes to which you’ve assigned EasyCode Pillars curriculum. Clicking ‘Manage Class’ will open the class grade book
Lessons can be turned on and off to limit student progress by checking and unchecking the lesson box. Once in the Codesters dashboard, students have access to any lesson to which you have checked the box.
Teachers can easily view submitted code and projects and compare students’ work to the correct solutions.

EasyCode Pillars Walkthrough To see sample answers for the activities, click on the preview buttons:
From the student roster click on the plus + button to track student progress.

EasyCode Pillars Walkthrough When you click on one of the green, yellow, or red circular icons in the student’s progress bar, the student’s code will appear in a new pop up window.
***Please note that if there is a yellow caution symbol or red exclamation mark in the progress bar, this means the student did not correctly answer the question and should revisit their code.
Select the teacher solution button (‘A’) to show the code editor. Select the ‘Answer’ tab to show an example coding solution.
The lightbulb icon links to the Codesters How To webpage.

EasyCode Pillars Walkthrough
If we revisit the Teacher dashboard, we can select the ‘Class Projects’ button to view student-submitted final projects:
Or we can select the ‘Projects’ tab to view student-featured and public examples:

EasyCode Pillars Walkthrough
What should teachers and/or students do if they have a question while working on a project?
Click on the ‘Support’ tab in the lower left-hand corner of the screen.
Questions submitted from a teacher account will be sent to Learning.com’s Customer Support email address.
Questions submitted from a student account will be emailed to the teacher. Students are required to enter an email address, but they can enter the teacher’s email if the student does not have one.
Stay Connected with other educators:
Visit the Codesters Professional Learning Community!
This forum is available to those using Codesters in the classroom to come together to ask each other questions, share best-practices, and talk about their experiences in teaching coding in the classroom.
You can find more educator resources in the EasyCode Pillars tile in your Learning.com Library and on our Support site.
Related Documents