Earthbag Options for Nepal: Draft Guidelines for Reinforcement. Patti Stouter May 21, 2015 Build Simple Inc., www.BuildSimple.org Sustainable earthen buildings are strong in compression, but need help against tension or bending stresses. The barbed wire and vertical rebar in earthbag add important tensile strength. More than 50 earthbag buildings in Nepal have recently survived 0.5- >0.7g of earthquake motion. Most mud block buildings don’t survive 0.3 g forces. The forces in Nepal destroyed poorly reinforced as well as unreinforced masonry buildings around the earthbag structures, mud block and brick alike. But earthbag is not magic. Standard earthbag construction has its limits. Adobe reinforcements that have performed well in New Zealand’s >2 g seismic risk show us what earthbag needs to be ready for future quakes. Here are three new options for building stronger earthbag, with medium levels for Nepal’s 1g to 1.8 g risk areas. Owen Geiger and Kelly Hart of www.NaturalBuildingBlog.com have helped to develop these guidelines. We welcome more comments and help, including engineering advice to identify risk levels for each technique. Appropriate Non-Engineered Buildings: In earthquake regions people need buildings, and earthquakes don’t happen all that often. It is a difficult decision how strong to build. Check to see the level of earthquake risk for your building site, to make an informed decision. Appendix A has a sketch map for Nepal and links to better information. These guidelines only apply to single story buildings of 300 m²/ 3300 sf maximum area. The longest side must be no more than 2.5x the length of shortest side. The roof must be light-weight; no clay tile, slate or earth. Roof spans must be 5.5 m/ 18’ or less. Gable walls or chimneys above the bond beam level must be built of light- weight materials. Small houses with rooms of 3 m/ 10’ maximum may be safe in higher risk areas than shown for each reinforcement type by these guidelines. High wall density (square area of walls/ overall building area) is strong. Soil Conditions Earthbag buildings weigh much more than concrete block or brick. Where subsoil is easy to dig, talk to an engineer. You may need wider footings, and you may need to greatly increase the strength of the building. If your building is located on bedrock, or shallow firm soil above bedrock, it may receive less quake vibrations than normal soils in your area. This can reduce quake risk levels as much as 20- 25%. Bracing Walls Bracing walls or buttresses are perpendicular to longer building walls. Interior earthbag walls function as braces if their doorways are at least 1.2 m/ 4’ away from the corner. BUILDERS AROUND THE WORLD NEED BETTER EARTHBAG INFORMATION. Build Simple Inc. needs help testing and planning guidelines. Together we can provide safer answers for cheap, sustainable shelter to the world.

Welcome message from author
This document is posted to help you gain knowledge. Please leave a comment to let me know what you think about it! Share it to your friends and learn new things together.
Transcript

Earthbag Options for Nepal:
Draft Guidelines for Reinforcement. Patti Stouter May 21, 2015
Build Simple Inc., www.BuildSimple.org
Sustainable earthen buildings are strong in compression, but need
help against tension or bending stresses. The barbed wire and
vertical rebar in earthbag add important tensile strength.
More than 50 earthbag buildings in Nepal have recently survived 0.5- >0.7g of earthquake motion. Most mud
block buildings don’t survive 0.3 g forces. The forces in Nepal destroyed poorly reinforced as well as
unreinforced masonry buildings around the earthbag structures, mud block and brick alike.
But earthbag is not magic. Standard earthbag construction has its limits. Adobe reinforcements that have
performed well in New Zealand’s >2 g seismic risk show us what earthbag needs to be ready for future quakes.
Here are three new options for building stronger earthbag, with medium levels for Nepal’s 1g to 1.8 g risk areas.
Owen Geiger and Kelly Hart of www.NaturalBuildingBlog.com have helped to develop these guidelines. We
welcome more comments and help, including engineering advice to identify risk levels for each technique.
Appropriate Non-Engineered Buildings: In earthquake regions people need buildings, and earthquakes don’t happen all that often. It is a difficult
decision how strong to build. Check to see the level of earthquake risk for your building site, to make an
informed decision. Appendix A has a sketch map for Nepal and links to better information.
These guidelines only apply to single story buildings of 300 m²/ 3300 sf maximum area. The longest side must be
no more than 2.5x the length of shortest side. The roof must be light-weight; no clay tile, slate or earth. Roof
spans must be 5.5 m/ 18’ or less. Gable walls or chimneys above the bond beam level must be built of light-
weight materials.
Small houses with rooms of 3 m/ 10’ maximum may be safe in higher risk areas than shown for each
reinforcement type by these guidelines. High wall density (square area of walls/ overall building area) is strong.
Soil Conditions
Earthbag buildings weigh much more than concrete block or brick. Where subsoil is easy to dig, talk to an
engineer. You may need wider footings, and you may need to greatly increase the strength of the building.
If your building is located on bedrock, or shallow firm soil above bedrock, it may receive less quake vibrations
than normal soils in your area. This can reduce quake risk levels as much as 20- 25%.
Bracing Walls
Bracing walls or buttresses are perpendicular to longer building walls. Interior earthbag walls function as braces
if their doorways are at least 1.2 m/ 4’ away from the corner.
BUILDERS AROUND THE WORLD
NEED BETTER EARTHBAG
INFORMATION.
Build Simple Inc. needs help testing
and planning guidelines. Together
we can provide safer answers for
cheap, sustainable shelter to the
world.

Don’t build buttresses sticking out more than 1.2 m/ 4’ from any wall. Walls are strongest in earthquakes when
attached to other walls at both ends.
Materials
Bags: strong, new or not exposed to sunlight, 46 x 76 cm/ 18” x 30”. Long bags are much easier to overlap. Options: Tubes may be used for foundations, or the lower half of curving walls with separate roofs. Smaller bags of 38 x 60 cm/ 15 x 27” may be used for Type D construction.
Barbed wire: 12.5 gage, 4 point
Rebar: deformed type steel
Earthen fill: Must be damp when tamped. Fill must contain enough clay, lime or cement stabilizer to harden into
a solid block after tamping in bags or tubes. Cure several test bags and remove the bag. Soil should be solid and
not deeply cracked.
Portland cement: high quality mix and clean water and aggregate. Shake or vibrate so concrete settles well
around reinforcement. Always cover reinforcing steel by 1” minimum.
Construction Methods
This booklet introduces several new reinforcement techniques. More complete instructions for building Type B,
Type C, or Type D will be posted online as soon as available.
Some limited information about basic earthbag construction
methods is included in Appendix B. The reinforcement level
descriptions are based on these basic methods.
For short visual introductions to building with earthbag see Build
Simple’s Earthbag Info series, found online at
http://buildsimple.org/earthbag.php.
BSI also highly recommends Owen Geiger’s Youtube video clips on his
naturalhouses channel and his ebook Earthbag Building Guide:
Vertical Walls Step by Step. See more information at
http://www.naturalbuildingblog.com/owens-book-dvd/.
The print books about earthbag building by builders Hunter and
Kiffmeyer and by architect Wojciechowska are also excellent. But
keep in mind that reinforcing earthbag for seismic risk is a brand-new
field. Build Simple specializes in these innovations and posts the most
accurate information as it becomes known.

How Much More Does Better Reinforcement Cost? Our model building is 4m x 6m/ 13’ x 19’8”, with an interior space of 23.2 square meters (250 sf).
Materials Units Type A
Standard*
Type B
Medium
Type C
High
Type D
Extra Amount Local
Cost
Amount Local
Cost
Amount Local
Cost
Amount Local
Cost
Solid poly bags each 890 990 930 860
Solid poly tubes 38/ 15” meters 130 130 110
Barbed wire (4 point) meters 820 1100 1010 940
Earthen fill (bags, floor) meter³ 24 27 25 19**
D12/ #4 half inch rebar meters 110 160 130 180
D9 /#3 3/8 inch rebar meters 32
Bags of Portland cement
for building and stucco
43 kg/
94 lb ea
4 bags 23 bags 41 bags 39 bags
Other materials Wood
for
lintels
Some
mesh,
wire
Geo-
mesh 2
courses,
wire
*Type A calculated with 2.7 m high walls although taller are shown in sketches that follow.
**Type D is calculated with thinner 33 cm/ 13” thick walls.
Reducing Costs
Where rebar is too costly, it may be possible to build Type C or D with exterior vertical bamboo. Wire ties should
be used, and closer vertical spacing. Bamboo can decay, and should always be left exposed between panels of
lime or earth plaster so it is obvious when it needs replacement.
BSI prefers to recommend sustainable earthen and lime plasters instead of cement stucco. But for high seismic
risk areas, the added strength of cement stucco may be critical. Until we know more, we recommend cement.
Interior plaster mesh and cement stucco for reinforcement can be delayed if the concrete is too costly. A thin
stabilized earth can protect the surface until the mesh and cement stucco can be added in future. This would
save 7 bags of Portland cement for Type B, and 15 bags for Type C and D.
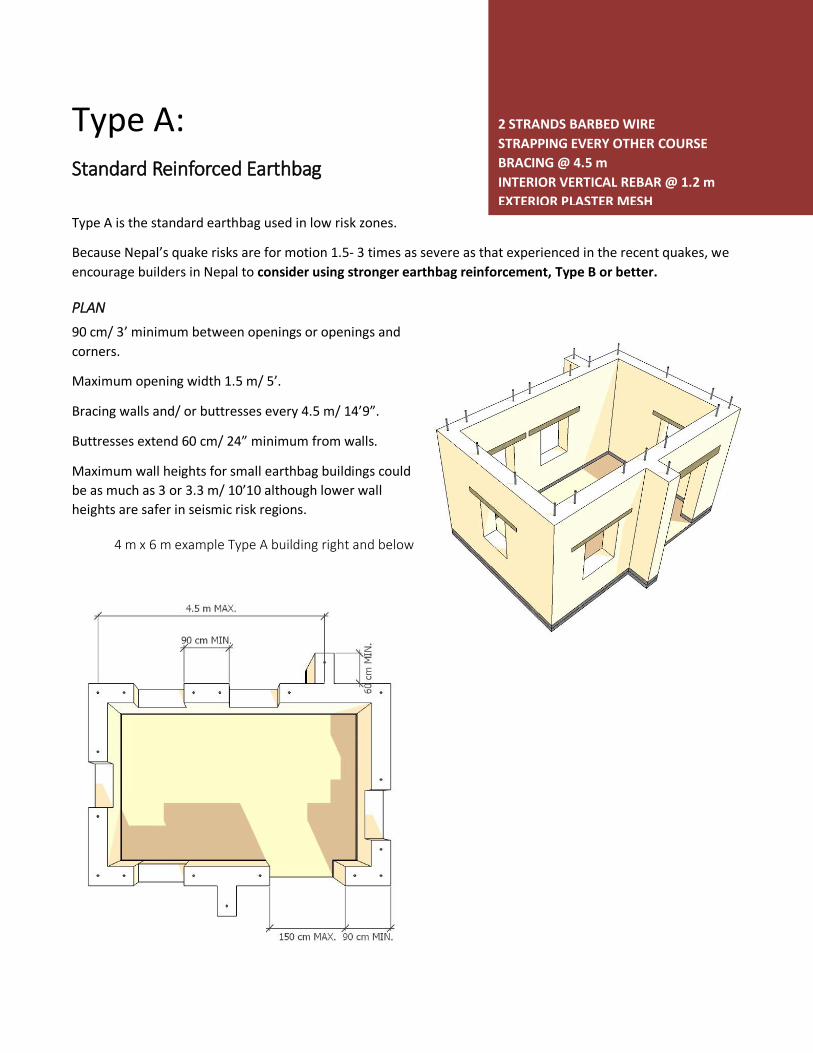
Type A:
Standard Reinforced Earthbag
Type A is the standard earthbag used in low risk zones.
Because Nepal’s quake risks are for motion 1.5- 3 times as severe as that experienced in the recent quakes, we
encourage builders in Nepal to consider using stronger earthbag reinforcement, Type B or better.
PLAN
90 cm/ 3’ minimum between openings or openings and
corners.
Maximum opening width 1.5 m/ 5’.
Bracing walls and/ or buttresses every 4.5 m/ 14’9”.
Buttresses extend 60 cm/ 24” minimum from walls.
Maximum wall heights for small earthbag buildings could
be as much as 3 or 3.3 m/ 10’10 although lower wall
heights are safer in seismic risk regions.
4 m x 6 m example Type A building right and below
2 STRANDS BARBED WIRE
STRAPPING EVERY OTHER COURSE
BRACING @ 4.5 m
INTERIOR VERTICAL REBAR @ 1.2 m
EXTERIOR PLASTER MESH
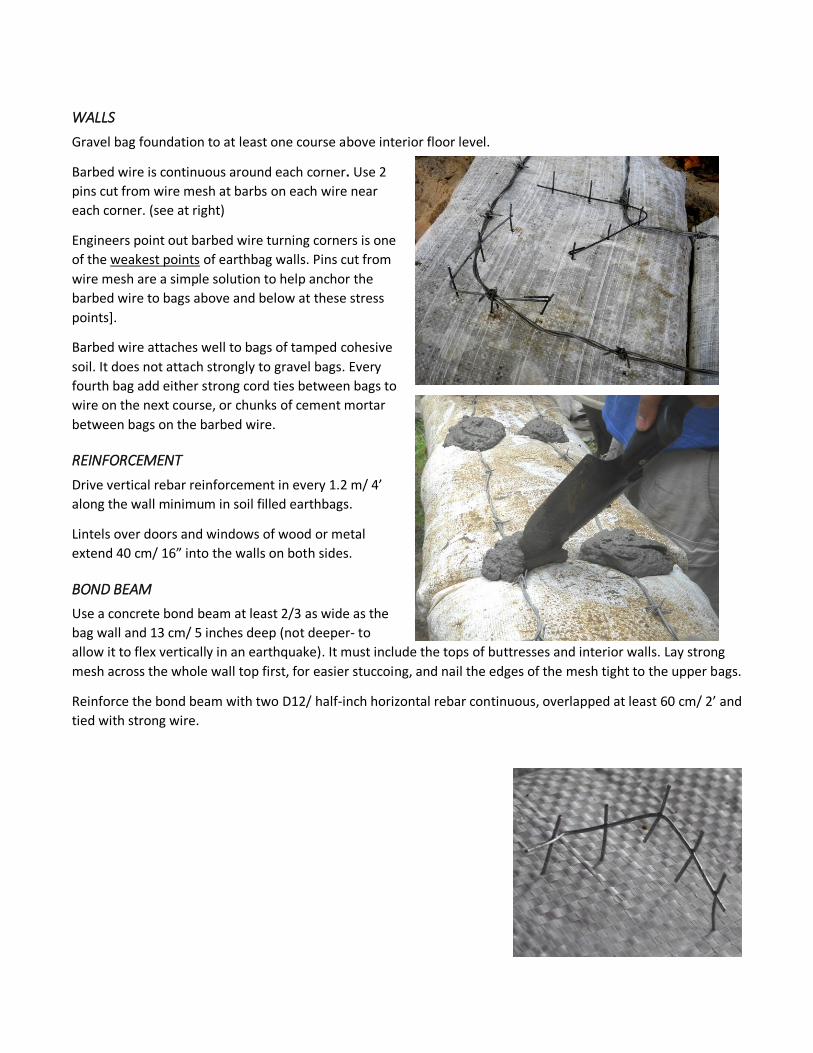
WALLS
Gravel bag foundation to at least one course above interior floor level.
Barbed wire is continuous around each corner. Use 2
pins cut from wire mesh at barbs on each wire near
each corner. (see at right)
Engineers point out barbed wire turning corners is one
of the weakest points of earthbag walls. Pins cut from
wire mesh are a simple solution to help anchor the
barbed wire to bags above and below at these stress
points].
Barbed wire attaches well to bags of tamped cohesive
soil. It does not attach strongly to gravel bags. Every
fourth bag add either strong cord ties between bags to
wire on the next course, or chunks of cement mortar
between bags on the barbed wire.
REINFORCEMENT
Drive vertical rebar reinforcement in every 1.2 m/ 4’
along the wall minimum in soil filled earthbags.
Lintels over doors and windows of wood or metal
extend 40 cm/ 16” into the walls on both sides.
BOND BEAM
Use a concrete bond beam at least 2/3 as wide as the
bag wall and 13 cm/ 5 inches deep (not deeper- to
allow it to flex vertically in an earthquake). It must include the tops of buttresses and interior walls. Lay strong
mesh across the whole wall top first, for easier stuccoing, and nail the edges of the mesh tight to the upper bags.
Reinforce the bond beam with two D12/ half-inch horizontal rebar continuous, overlapped at least 60 cm/ 2’ and
tied with strong wire.
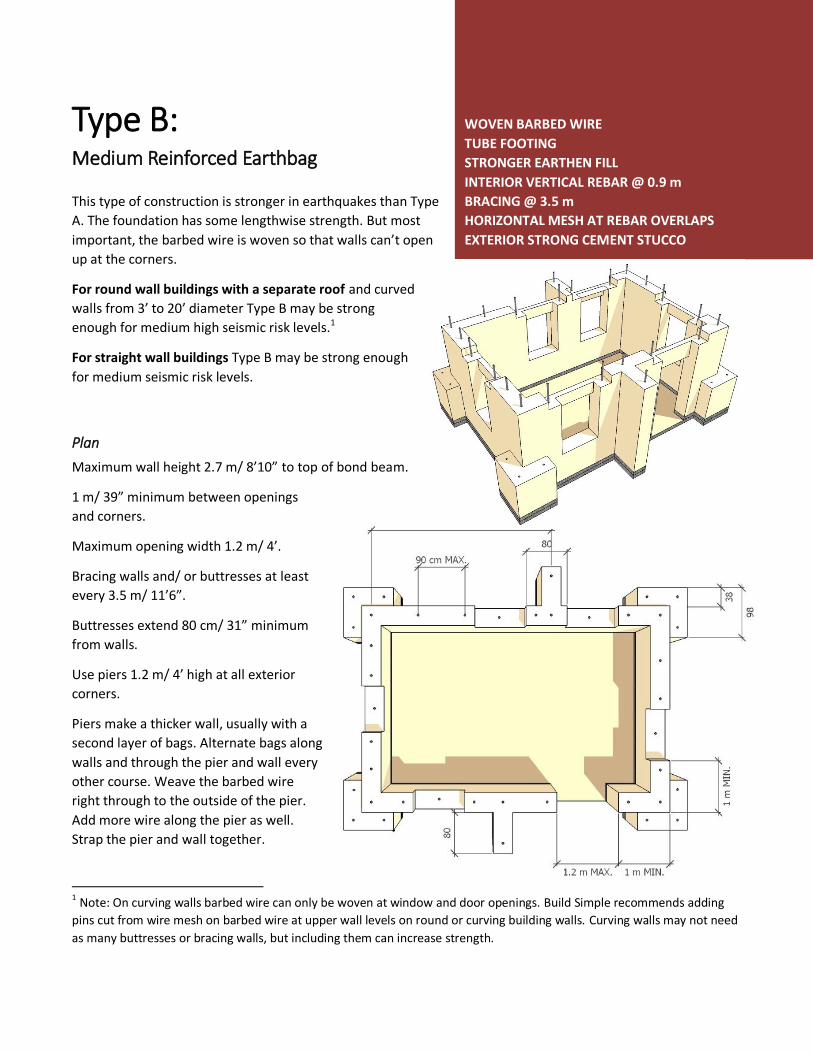
Type B: Medium Reinforced Earthbag
This type of construction is stronger in earthquakes than Type
A. The foundation has some lengthwise strength. But most
important, the barbed wire is woven so that walls can’t open
up at the corners.
For round wall buildings with a separate roof and curved
walls from 3’ to 20’ diameter Type B may be strong
enough for medium high seismic risk levels.1
For straight wall buildings Type B may be strong enough
for medium seismic risk levels.
Plan
Maximum wall height 2.7 m/ 8’10” to top of bond beam.
1 m/ 39” minimum between openings
and corners.
Maximum opening width 1.2 m/ 4’.
Bracing walls and/ or buttresses at least
every 3.5 m/ 11’6”.
Buttresses extend 80 cm/ 31” minimum
from walls.
Use piers 1.2 m/ 4’ high at all exterior
corners.
Piers make a thicker wall, usually with a
second layer of bags. Alternate bags along
walls and through the pier and wall every
other course. Weave the barbed wire
right through to the outside of the pier.
Add more wire along the pier as well.
Strap the pier and wall together.
1 Note: On curving walls barbed wire can only be woven at window and door openings. Build Simple recommends adding
pins cut from wire mesh on barbed wire at upper wall levels on round or curving building walls. Curving walls may not need
as many buttresses or bracing walls, but including them can increase strength.
WOVEN BARBED WIRE
TUBE FOOTING
STRONGER EARTHEN FILL
INTERIOR VERTICAL REBAR @ 0.9 m
BRACING @ 3.5 m
HORIZONTAL MESH AT REBAR OVERLAPS
EXTERIOR STRONG CEMENT STUCCO

Foundation
Gravel Tube Footing
Give the wall a wider first course that is level with the finished grade.
20- 25 cm/ 8- 10” wider than the walls will let the walls above safely
move a little.
Use tubes to hold this layer together from corner to corner. Stagger the
overlaps at 1.2 m/ 4’ or more from corners. Strap rows together firmly.
Add another layer of straps under the inside tubes to attach the
foundation wall above to this footing.
1- Double row of doubled solid poly tubes OR
2- Triple row of plastic mesh ‘wattle’ tubes (see photo and sketch at left)
Mesh tubes are used in the developed world filled with straw or wood chips for erosion control wattles.
Wattle mesh is usually UV resistant and does not need to be doubled to contain gravel. It can be sewn tube to tube with strong cord. Ties and plaster mesh for courses above can also be woven into the mesh at the correct location. When this mesh is covered with cement stucco it forms a strong reinforced cement layer.
Walls
Mix earthen fill strong enough to pass the 50 cm/ 20” drop test:
A cured bag dropped from 50 cm/ 20” height onto a hard
surface on its corner does not split in half or lose more than 10
cm/ 4” off a corner. Some added clay (or added sand) will
increase strength.
Weave barbed wire at all corners:
Extend both strands of barbed wire 60 cm/ 2’ past the end of
wall or buttress. Pull straight. (see at upper right)
Weave barbed wire back into wall end above next course (see
below right).
Use 4 strong tie wires at each place where the wires cross. Use
nails through these wire ties to attach the wire more firmly to
the earthbag at stress points.
Tie woven barbed wire around gravel bags:
Extend barbed wire 70 cm/ 27.5” past corners of gravel bags. Because bags do not conatin cohesive clay
to anchor barbs securely, place first bag of the next course at the corner or end, then pull barbed wire
over that bag. Tie the barbed wire end to the still exposed barbed wire on the lower course with wire.
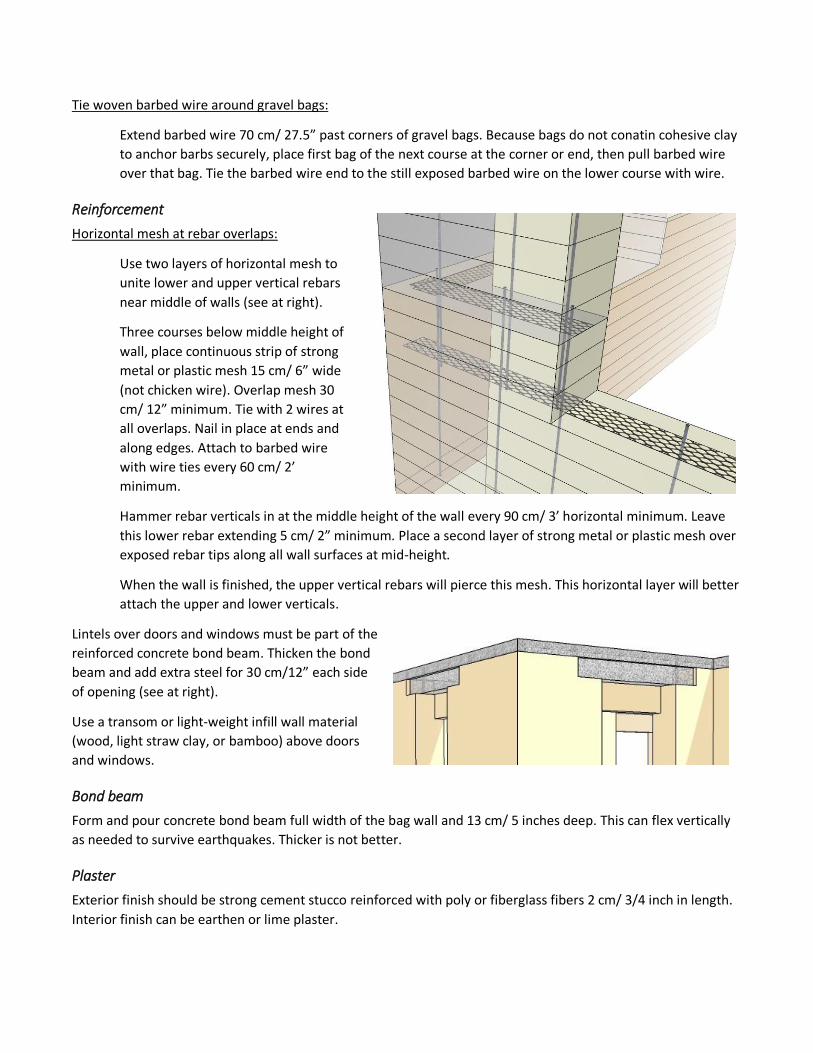
Reinforcement
Horizontal mesh at rebar overlaps:
Use two layers of horizontal mesh to
unite lower and upper vertical rebars
near middle of walls (see at right).
Three courses below middle height of
wall, place continuous strip of strong
metal or plastic mesh 15 cm/ 6” wide
(not chicken wire). Overlap mesh 30
cm/ 12” minimum. Tie with 2 wires at
all overlaps. Nail in place at ends and
along edges. Attach to barbed wire
with wire ties every 60 cm/ 2’
minimum.
Hammer rebar verticals in at the middle height of the wall every 90 cm/ 3’ horizontal minimum. Leave
this lower rebar extending 5 cm/ 2” minimum. Place a second layer of strong metal or plastic mesh over
exposed rebar tips along all wall surfaces at mid-height.
When the wall is finished, the upper vertical rebars will pierce this mesh. This horizontal layer will better
attach the upper and lower verticals.
Lintels over doors and windows must be part of the
reinforced concrete bond beam. Thicken the bond
beam and add extra steel for 30 cm/12” each side
of opening (see at right).
Use a transom or light-weight infill wall material
(wood, light straw clay, or bamboo) above doors
and windows.
Bond beam
Form and pour concrete bond beam full width of the bag wall and 13 cm/ 5 inches deep. This can flex vertically
as needed to survive earthquakes. Thicker is not better.
Plaster
Exterior finish should be strong cement stucco reinforced with poly or fiberglass fibers 2 cm/ 3/4 inch in length.
Interior finish can be earthen or lime plaster.

Type C: High Reinforced Earthbag
This type of construction is stronger in earthquakes than Type B.
For straight wall buildings Type C may be strong
enough for medium high seismic risk levels.
Plan
Maximum wall height 2.5 m/ 8’2” maximum
including bond beam.
1.1 m/ 43” between all openings or openings and
corners.
Maximum opening width 1.1 m/ 43”.
Bracing walls and/ or buttresses every 3 m/ 9’10”
minimum.
Buttresses extend 90
cm/ 36” min. from
walls.
Piers to 0.9 m/ 3’
height at all exterior
corners.
Vertical rebar are
located at exterior
corners and
openings in line
with barbed wire.
All barbed wire is
attached directly to
the rebar for
greater strength.
ANCHORED TUBE FOOTING
STRONGER EARTHEN FILL
CORNER VERTICAL REBAR TIED TO
BARBED WIRE
BRACING @ 3 m
STUCCO EXTERIOR & INTERIOR

Foundation
Use gravel tube footings as in Type B. But add a
low concrete post under the floor level at each
corner. Wires are wrapped from these posts
around the flexible gravel tube base to limit
the distance of motion.
Right: Rebar and formed low concrete post
Add gravel bags to above interior floor level.
Walls
Pour a full-width reinforced concrete grade beam on the top course of gravel bags. All of the exterior vertical
rebar must be seated in this grade beam.
D12/ half inch vertical rebars are located 28 cm/ 11” from every exterior corner and centered on the ends of
buttresses and opposite walls. Use two D12/ half inch verticals each side of doorways.
Tie vertical rebar together through the wall with strong wire every fourth course. At doorways tie together every
other course.
Mix earthen fill strong enough to pass the 76 cm/ 30” drop test:
A cured bag dropped from 76 cm/ 30” height onto a hard surface on its corner does not split in half or
lose more than 10 cm/ 4” off a corner.
Attach barbed wire to rebar at all corners and wall ends:
Extend both strands of barbed wire past the end of the wall
opening (see at right). Twist barbed wire around rebar and
bind with strong tie wire.
Attach at corners as shown below and on next page.

The outer strands of barbed wire at
corners bend up to attach to the
opposite rebar at the top of the next
course. Use pliers and 18 gage wire.
(Red attachments shown at left
represent wire binding.)
Buttresses have only 1 barbed wire strand tied to rebar at each end.
But tie all buttress wires to normal course barbed wire at each
crossing.
Horizontal mesh at window-sill level:
On the window-sill course, lay a 25 cm/ 10” wide strip of
strong mesh on top of walls under areas planned for inserted rebar. Use two ties and overlap 15 cm/ 6”
minimum. Nail it at ends and sides. Attach to barbed wire with wire ties.
Hammer short verticals through the mesh into the center of each window sill.
Then hammer two D9/ 3/8 inch rebars at each side of the window opening to receive upper wall barbed
wires. (see below)
Continue with your bag wall to half height and
repeat a second mesh strip. Hammer in lower
inserted rebars at least every 90 cm/ 3’ between
the corner, buttress, and window opening rebar
on the outside of the walls.
Bond Beam
Bend exterior rebar in and tie to bond beam
horizontals.
Use a full wall width reinforced concrete bond
beam with integrated lintels as per Type B.
Plaster
Both interior and exterior wall surfaces should receive a strong cement stucco with fibers.
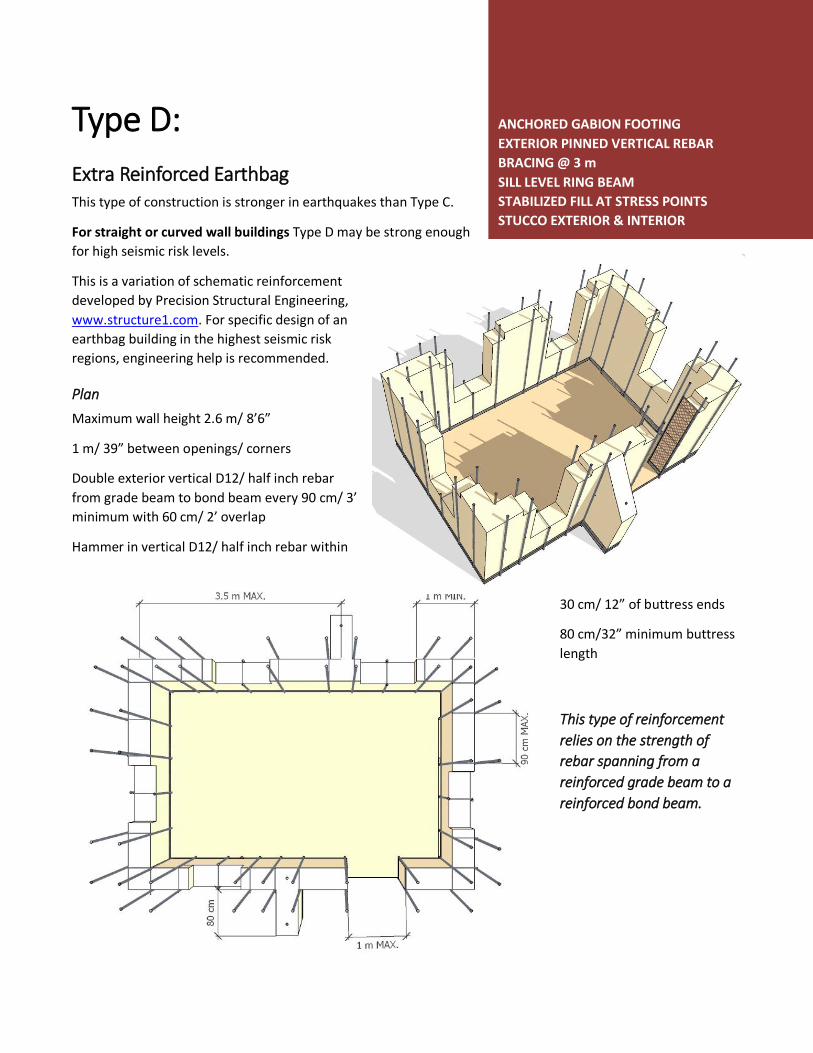
Type D:
Extra Reinforced Earthbag This type of construction is stronger in earthquakes than Type C.
For straight or curved wall buildings Type D may be strong enough
for high seismic risk levels.
This is a variation of schematic reinforcement
developed by Precision Structural Engineering,
www.structure1.com. For specific design of an
earthbag building in the highest seismic risk
regions, engineering help is recommended.
Plan
Maximum wall height 2.6 m/ 8’6”
1 m/ 39” between openings/ corners
Double exterior vertical D12/ half inch rebar
from grade beam to bond beam every 90 cm/ 3’
minimum with 60 cm/ 2’ overlap
Hammer in vertical D12/ half inch rebar within
30 cm/ 12” of buttress ends
80 cm/32” minimum buttress
length
This type of reinforcement
relies on the strength of
rebar spanning from a
reinforced grade beam to a
reinforced bond beam.
ANCHORED GABION FOOTING
EXTERIOR PINNED VERTICAL REBAR
BRACING @ 3 m
SILL LEVEL RING BEAM
STABILIZED FILL AT STRESS POINTS
STUCCO EXTERIOR & INTERIOR

Foundation
Although PSE’s original design began with a reinforced concrete
footing, BSI believes that foundation walls of gravel or small
stones provide needed vibration damping in earthquakes.
Either use the anchored gravel tube footing and gravel bag
foundation recommended for Type C, or use heavy mesh to
create a rock-filled gabion foundation wall. Gabions are metal
mesh boxes originally used to stabilize steep slopes or stream
banks. They contain rocks and strong rubble. Above: Gabion wall by Isedlak in the Czech Republic
Wall
This earth wall with exterior rebar pinning every 90 cm/ 3’ or closer provides enough reinforcement that a
narrower earthen wall may be stable. Narrower walls reduce the weight under stress, and are quicker to build.
Use 38 x 60 cm/ 15 x 27” bags to make a 31- 33 cm/ 12- 13” thick earthen wall.
Above the interior floor level, pour a full-width grade beam similar to Type C. Carefully locate all D12/ half inch
verticals before pouring. Reinforce with 2 D12/ half inch rebar horiz continuous.
Mix earthen fill strong enough to pass the 76 cm/ 30” drop test as per Type C.
Option: Use a stronger earth fill for bags at stress points
(with extra clay or possibly cement and lime). These
include the two or three bags at each end of the lowest
earth courses on walls, and the upper course. Drive rebar
or other anchors in immediately when using stabilized fill.
Reinforcement
Heavy ties are needed every third course through the wall
between all the opposite rebar.
At doorways the ladder-type ties will be exposed, against the curving bag ends. Add strong mesh tied to the
verticals. When embedded in a strong cement stucco, this will become a reinforced concrete doorframe with a
strong waffled back side.
Use integral reinforced concrete lintels at door or window openings. At the wall tops, bend rebar in and tie to
the bond beam reinforcement.
Bond Beam
Same as for Type C.
Plaster
Use strong fibered cement stucco for interior and
exterior. All external rebar must be covered with
2 cm/ ¾ inch of strong concrete or cement stucco.
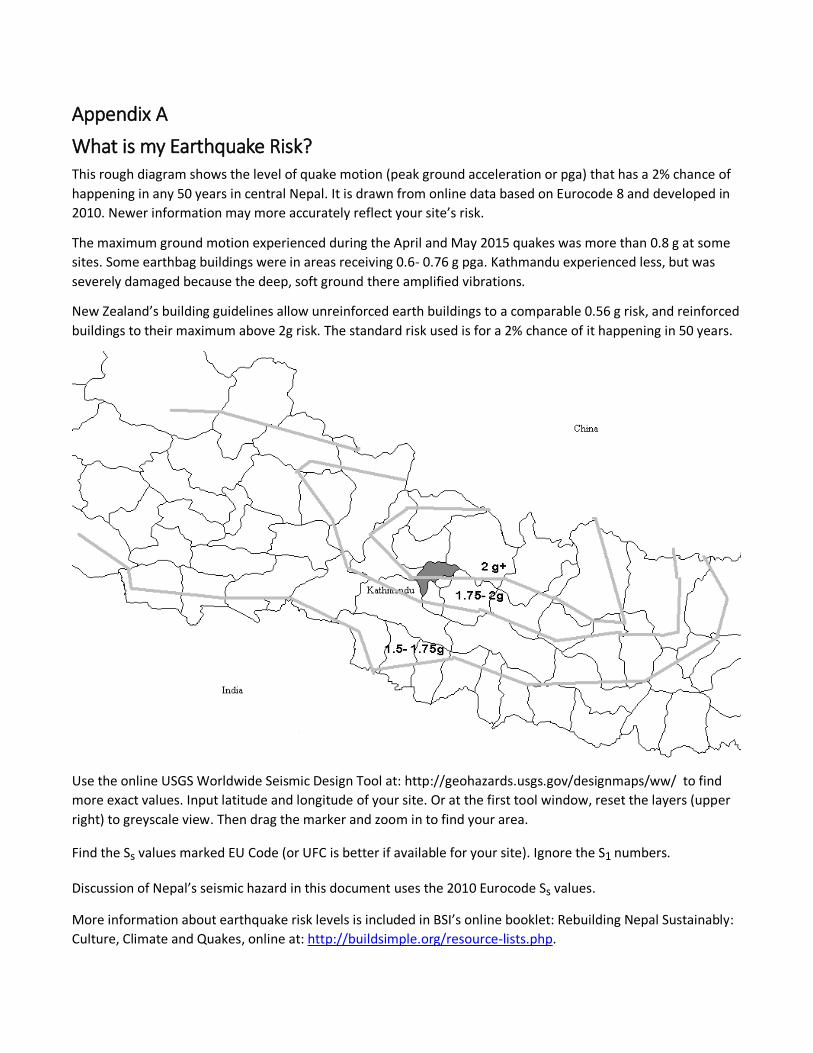
Appendix A
What is my Earthquake Risk? This rough diagram shows the level of quake motion (peak ground acceleration or pga) that has a 2% chance of
happening in any 50 years in central Nepal. It is drawn from online data based on Eurocode 8 and developed in
2010. Newer information may more accurately reflect your site’s risk.
The maximum ground motion experienced during the April and May 2015 quakes was more than 0.8 g at some
sites. Some earthbag buildings were in areas receiving 0.6- 0.76 g pga. Kathmandu experienced less, but was
severely damaged because the deep, soft ground there amplified vibrations.
New Zealand’s building guidelines allow unreinforced earth buildings to a comparable 0.56 g risk, and reinforced
buildings to their maximum above 2g risk. The standard risk used is for a 2% chance of it happening in 50 years.
Use the online USGS Worldwide Seismic Design Tool at: http://geohazards.usgs.gov/designmaps/ww/ to find
more exact values. Input latitude and longitude of your site. Or at the first tool window, reset the layers (upper
right) to greyscale view. Then drag the marker and zoom in to find your area.
Find the Ss values marked EU Code (or UFC is better if available for your site). Ignore the S1 numbers.
Discussion of Nepal’s seismic hazard in this document uses the 2010 Eurocode Ss values.
More information about earthquake risk levels is included in BSI’s online booklet: Rebuilding Nepal Sustainably:
Culture, Climate and Quakes, online at: http://buildsimple.org/resource-lists.php.
Appendix B
Construction Methods:
Foundation
Start with a trench for rock and rubble, dug deeper than local frost depth. Fill it to 5” below grade. In poorly
drained soil or very wet climates rubble trenches must drain to ground surface.
If frost is deeper than 90 cm/36” below grade, use gravel bags or gabions for the below-grade foundation wall.
Rubble trenches and gravel bags or gabions can absorb earthquake vibrations and thus may reduce the stress on
the building above by 15- 30%. They also allow expansive clay to expand into the footing air spaces with less
displacement and damage.
Reinforced concrete footings cannot flex much and will transmit more vibration to the building. For higher
seismic risk levels (Type C and D) buildings can include a reinforced concrete grade beam on top of the gravel
foundation walls.
Lay short wire ties or longer 1.7 m/ 5’7” strapping cords under each gravel bag to strap 3 courses together.
Always double solid poly bags before filling with gravel.
Bag Walls
Lay individual gravel bags and earthbags in overlapping running bond patterns. Overlap 20 cm/ 8” minimum. Do
not locate short bags at wall ends, or directly above each other in the wall.
Build piers and buttresses and wall intersections continuous with walls. Overlap carefully, so at least every other
course of bags in the buttress extends through the wall.
Lay two parallel strands of barbed wire along the top of every course. Pull straight. Tie strapping cord to barbed
wire every other course. Do not end wires within 1.2 m/ 4’ of corners. Overlap barbed wire strands 60 cm/ 2’
minimum and attach together with tie wire.
On top of every other course tie 1.7 m/ 5’7” long strapping cords to the barbed
wire, one per each bag. Electrician’s poly pull cord may be strong enough.
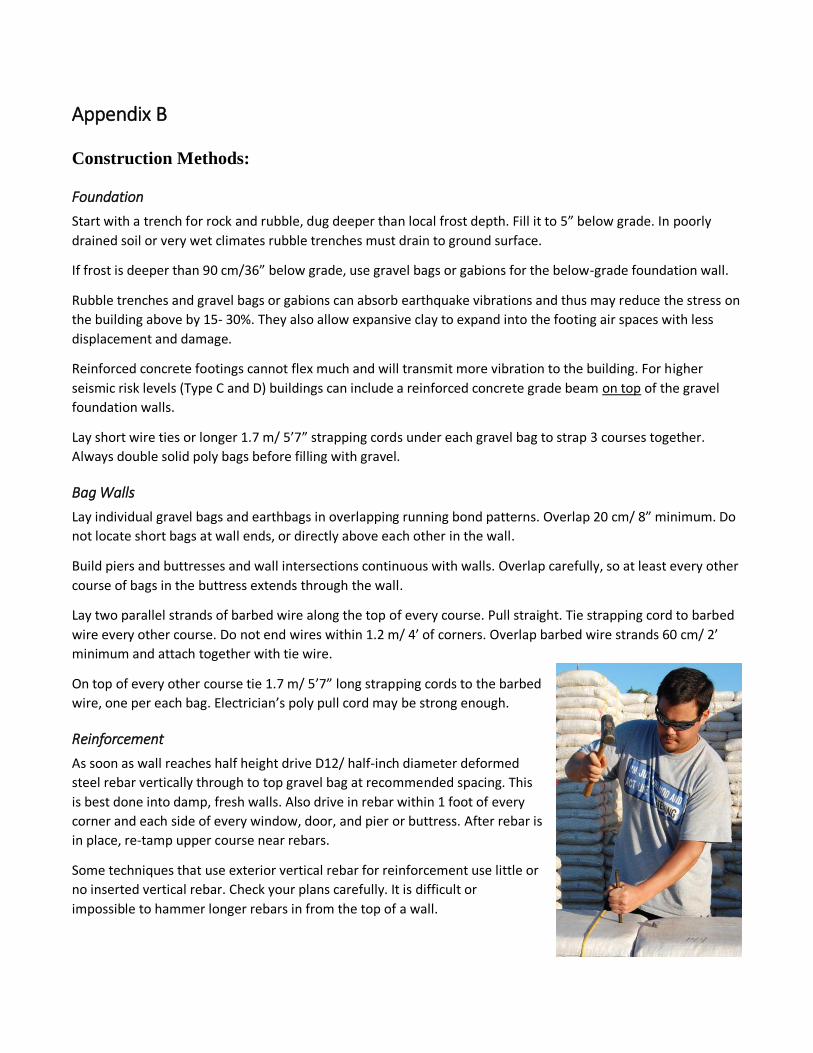
Reinforcement
As soon as wall reaches half height drive D12/ half-inch diameter deformed
steel rebar vertically through to top gravel bag at recommended spacing. This
is best done into damp, fresh walls. Also drive in rebar within 1 foot of every
corner and each side of every window, door, and pier or buttress. After rebar is
in place, re-tamp upper course near rebars.
Some techniques that use exterior vertical rebar for reinforcement use little or
no inserted vertical rebar. Check your plans carefully. It is difficult or
impossible to hammer longer rebars in from the top of a wall.

At full wall height pound additional vertical rebar in similar locations so that they overlap the lower vertical
rebar by at least 60 cm/ 2’. Let the upper rebar extend above the upper bags by 30 cm/ 12”. Bend ends of rebar
horizontal and attach to bond beam rebar. Re-tamp upper course of bags near rebars.
Pound 60 cm/ 2’ long rebar pins of D12/ half inch steel at alternating angles into top of wall between other
rebar, every 60 cm/ 2’ minimum. Leave 10 cm/ 4” showing above bags. Also place roof anchors to be embedded
in the bond beam.
Plaster
Use strong plaster mesh, not weak chicken wire. Plastic mesh will survive well in lime plaster or alkaline cement
stuccos that destroy metals. Tie plaster mesh firmly to structural members. Overlap plaster mesh by 15 cm/ 6”
minimum and tie layers together well. Nail mesh into partially tamped earthbag at alternating angles to allow
thinner plaster coating (nails do not add to structural strength).
For Type A- C construction, tie mesh to strapping that is tied to barbed wire.
For Type D, apply mesh under exterior rebar reinforcement and tie with strong cord or wire every 60 cm/ 2’.
Use water-resistant exterior plaster of cement or lime. Apply strong clay plaster containing fibers to the nooks
between courses, leaving strapping cord and/ or ties exposed. Attach wire or plastic mesh to both sides of the
wall before the cover coat of plaster. Mesh should wrap around the corners by at least 1 m/ 3’3”.
Related Documents