e-Sword ToolTip NT User's Guide Version 2.10 ToolTip NT 2.10 By: Brent Hildebrand

Welcome message from author
This document is posted to help you gain knowledge. Please leave a comment to let me know what you think about it! Share it to your friends and learn new things together.
Transcript
e-Sword ToolTip NT User's Guide Version 2.10
ToolTip NT 2.10 By: Brent Hildebrand
P a g e ii ToolTip NT User’s Guide, Copyright © 2013 by BibleSupport.com
e-Sword ToolTip NT
Copyright (c) 2013 Brent Hildebrand
Version 2.10
e-Sword® is a registered trademark of Rick Meyers. iPad® and iPhone® are trademarks of Apple Inc. All
rights reserved. All other trademarks cited in this documentation are the property of their respective
owners.
You may freely copy and distribute this documentation as long as you do not make any changes or use
the documentation commercially, including charging, in any way, for it’s use, reading or distribution.
This document was prepared to assist e-Sword ToolTip NT users; its contents may not
be used for any other purpose without prior written permission. The material contained herein is supplied
without representation or warranty of any kind and is based on typical use. Any unusual use may produce
unpredictable results. e-Sword, BibleSupport.com, Brent Hildebrand,, and Rick Meyers, therefore, assume
no responsibility and shall have no liability of any kind arising from the supply or use of this document or
the material contained herein. The information in this document is furnished for informational use only
and is subject to change without notice.
Permission to use, copy, modify, and distribute this software for any non-commercial purpose without fee
is hereby granted, provided that the above copyright notice and this permission notice appear in all
copies.
THE SOFTWARE IS PROVIDED "AS IS" AND THE AUTHOR DISCLAIMS ALL WARRANTIES WITH REGARD TO
THIS SOFTWARE INCLUDING ALL IMPLIED WARRANTIES OF MERCHANTABILITY AND FITNESS. IN NO
EVENT SHALL THE AUTHOR BE LIABLE FOR ANY SPECIAL, DIRECT, INDIRECT, OR CONSEQUENTIAL
DAMAGES OR ANY DAMAGES WHATSOEVER RESULTING FROM LOSS OF USE, DATA OR PROFITS,
WHETHER IN AN ACTION OF CONTRACT, NEGLIGENCE OR OTHER TORTIOUS ACTION, ARISING OUT OF
OR IN CONNECTION WITH THE USE OR PERFORMANCE OF THIS SOFTWARE.
P a g e iii ToolTip NT User’s Guide, Copyright © 2013 by BibleSupport.com
Table of Contents
About this User’s Guide ........................................................................................................................................... 1
About ToolTip NT ....................................................................................................................................................... 1
Chapter 1: Getting to Know ToolTip ........................................................................................... 2
What are e-Sword Modules? ................................................................................................................................. 3
What Module Types does ToolTip NT Support? ............................................................................................ 3
ToolTip NT Interface Overview .............................................................................................................................. 4
Configuring the Toolbars .................................................................................................................................. 5
Common Tasks Menu ......................................................................................................................................... 5
Frequently Used Shortcut/Hotkey Combinations .................................................................................... 6
Chapter 2: ToolTip NT is a Word Processor ................................................................................ 9
File Operations ......................................................................................................................................................... 10
Managing Multiple Documents ................................................................................................................... 10
Working with Text ................................................................................................................................................... 11
Converting Roman Numerals to Digits ..................................................................................................... 11
Converting Text Case ....................................................................................................................................... 11
Inserting a Hyperlink and Creating a Bookmark .................................................................................. 12
Managing and Locating Hyperlinks ........................................................................................................... 12
Remove Line Feed Characters ...................................................................................................................... 13
Convert Soft Breaks to Hard Breaks / Hard Breaks to Soft Breaks ................................................. 13
Remove Book References ............................................................................................................................... 13
Font Selection and Size ................................................................................................................................... 14
Selecting a Font Color .................................................................................................................................... 15
Bold (CTRL-B), Italic (CTRL-I), Underline (CTRL-U) ............................................................................... 15
Align Left, Align Right, Align Center, Justify .......................................................................................... 15
Numbering and Bullets .................................................................................................................................. 16
TABLE OF CONTENTS
P a g e iv ToolTip NT User’s Guide, Copyright © 2013 by BibleSupport.com
Bullets and Numbering Formatting ............................................................................................................ 16
Indent Paragraph and Outdent Paragraph ........................................................................................... 16
Show/Hide Formatting Symbols ................................................................................................................ 16
Text Headings and Styles ..................................................................................................................................... 17
Defining Headings ............................................................................................................................................ 17
Applying Headings ........................................................................................................................................... 17
Paragraph Styles ................................................................................................................................................ 17
Character Styles ................................................................................................................................................. 18
Formatting Paragraphs ........................................................................................................................................ 19
Alignment ............................................................................................................................................................. 19
Frame and Page Breaks ................................................................................................................................... 20
Working with Tables .............................................................................................................................................. 20
Creating a New Table ...................................................................................................................................... 20
Dragging Table Boundaries ........................................................................................................................... 21
Table Properties (Table Settings) ................................................................................................................ 21
Adding and Deleting Rows and Columns ................................................................................................ 23
Convert Tabbed Text To Table ..................................................................................................................... 23
Working with Images ............................................................................................................................................. 25
Topic Preview ...................................................................................................................................................... 25
Inserting an Image ............................................................................................................................................ 25
Image Attributes ................................................................................................................................................ 25
Chapter 3: How to Turn Text into e-Sword Modules .............................................................. 28
Understanding ToolTip NT Marks ..................................................................................................................... 29
Changing the Mark Definition ...................................................................................................................... 29
Before Getting Started: Helpful Hints About Module Making ............................................................... 30
Test Sample Sections of Your Work in e-Sword .................................................................................... 30
File Size Limitations .......................................................................................................................................... 30
Always Save Your Source Document ......................................................................................................... 30
You Can Use Other Word Processors ........................................................................................................ 30
Activate “Do Not Tooltip Marked References” ....................................................................................... 31
TABLE OF CONTENTS
P a g e v ToolTip NT User’s Guide, Copyright © 2013 by BibleSupport.com
Tooltip Marks Are Just Division Signs ....................................................................................................... 31
Curly Brackets {} Mean Something Different in ToolTip NT .............................................................. 31
Don’t Re-Type Data .......................................................................................................................................... 31
Font Specifics in ToolTip NT and e-Sword ............................................................................................... 31
e-Sword Modules are “Hot Swappable” ................................................................................................... 32
RTF Features .............................................................................................................................................................. 33
Include RTF Header .......................................................................................................................................... 33
Use Old RTF Code ............................................................................................................................................. 33
View RTF / View Text ........................................................................................................................................ 33
Non-English Windows Installations ................................................................................................................. 34
Changing the Mark Definition ...................................................................................................................... 34
Compatibility Change to the Symbols Setting ....................................................................................... 34
Let’s Speak Greek and Hebrew (Unicode Fixup) ......................................................................................... 35
Other Languages ............................................................................................................................................... 35
Greek/Hebrew Font Color .............................................................................................................................. 36
Removing the Unicode Fixup........................................................................................................................ 36
e-Sword HD (iPad) /LT (iPhone) Modules ...................................................................................................... 37
About HD / LT Modules .................................................................................................................................. 37
Enabling HD/LT Functionality ....................................................................................................................... 37
Creating HD / LT Modules ............................................................................................................................. 37
Topics (Books) Modules........................................................................................................................................ 38
Topic Preview: Images in Topic Modules ................................................................................................. 38
Creating a Topic Module ................................................................................................................................ 38
Viewing the Topic Module ............................................................................................................................. 40
“Save TOPX File” versus “Save TOPX File – Remove Titles from Text Body” ............................... 41
Introduction to Topic Numbering ............................................................................................................... 41
Automatically Numbering Topics: The Basics ......................................................................................... 42
Automatically Numbering Topics: Style of Numbering ...................................................................... 43
Automatically Numbering Topics: Starting Number............................................................................ 44
Allowing for Front Matter When Automatically Numbering ............................................................ 45
Defining a Specific Prefix When Using Topic Numbering ................................................................. 46
TABLE OF CONTENTS
P a g e vi ToolTip NT User’s Guide, Copyright © 2013 by BibleSupport.com
Commentary Modules ........................................................................................................................................... 47
Creating a Commentary Module ................................................................................................................. 47
Viewing the Commentary Module .............................................................................................................. 49
Drop Reference When Saving ...................................................................................................................... 50
Adding Book and Chapter Comments ...................................................................................................... 51
Applying Comments to Verse Ranges and Overlapping Verses ..................................................... 52
Applying Comments to Multiple Verse References ............................................................................. 53
Applying Comments to All References in the First Paragraph ......................................................... 54
Applying Comments Across Chapter Boundaries in a Singular Reference ................................. 55
Fill-In Commentary Module .......................................................................................................................... 56
Bible Modules ........................................................................................................................................................... 57
Creating a Bible Module ................................................................................................................................. 57
Viewing the Bible Module .............................................................................................................................. 60
Save Bible File - Unicode Text ...................................................................................................................... 60
Handling One Verse Across Multiple Lines ............................................................................................. 60
Creating a Red Letter Bible ............................................................................................................................ 61
Dictionary Modules ................................................................................................................................................ 62
Creating a Dictionary Module ...................................................................................................................... 62
Viewing the Dictionary Module ................................................................................................................... 64
Linking a Commentary, Bible, or Topic/Reference Book to a Dictionary ..................................... 65
Devotional Modules ............................................................................................................................................... 67
Creating a Devotional Module ..................................................................................................................... 67
Viewing the Devotional Module .................................................................................................................. 69
Graphics Modules ................................................................................................................................................... 70
Creating a Graphics Module ......................................................................................................................... 70
Viewing the Graphics Module ...................................................................................................................... 72
Bible Reading Plan Modules ............................................................................................................................... 73
Creating a Bible Reading Plan Module ..................................................................................................... 73
Viewing the Bible Reading Plan Module .................................................................................................. 75
Verse List Modules.................................................................................................................................................. 76
Creating a Verse List Module ........................................................................................................................ 76
TABLE OF CONTENTS
P a g e vii ToolTip NT User’s Guide, Copyright © 2013 by BibleSupport.com
Viewing the Verse List Module..................................................................................................................... 76
Study Notes Modules ............................................................................................................................................ 77
Creating a Study Notes Module .................................................................................................................. 77
Reference Only A Marked Line ..................................................................................................................... 78
Viewing the Study Notes Module ............................................................................................................... 78
Add/Remove Navigation Links ..................................................................................................................... 79
Harmony Modules .................................................................................................................................................. 80
Creating a Harmony Module ........................................................................................................................ 80
Viewing the Harmony Module ..................................................................................................................... 82
Chapter 4: Formatting Scripture and Strong’s References ..................................................... 83
What is Tooltipping? .............................................................................................................................................. 84
ToolTip NT Automatically Tooltips References ...................................................................................... 85
Configuring Scripture Tooltip Formatting Options .................................................................................... 86
Do Not Tooltip Marked Reference ............................................................................................................. 86
Changing the Scripture Tooltip Color ....................................................................................................... 87
Changing The Scripture Tooltip Highlight Color ................................................................................... 87
Bolding, Italicizing, and Underlining Scripture References................................................................ 87
Chapter Tooltipping Options ........................................................................................................................ 88
Color Book References { } ............................................................................................................................... 91
Skip Book Refs { } ............................................................................................................................................... 92
Stealth Scripture References ......................................................................................................................... 92
Bible Book Abbreviation List ......................................................................................................................... 93
English/Spanish Bible Book Abbreviations .............................................................................................. 94
How to Tooltip Scripture References - Basic ................................................................................................ 95
How to Tooltip Scripture References – Advanced ...................................................................................... 96
Verse Syntax Flexibility .................................................................................................................................... 96
Book Name Abbreviations ............................................................................................................................. 97
Chapter Tooltips ................................................................................................................................................ 97
Tooltipping Exclusions ..................................................................................................................................... 97
Scripture List Window ........................................................................................................................................... 98
P a g e viii ToolTip NT User’s Guide, Copyright © 2013 by BibleSupport.com
Invalid Verse References ................................................................................................................................. 99
Viewing All References and Chapter References in a Document .................................................... 99
Push Verse List .................................................................................................................................................... 99
Markup References ............................................................................................................................................... 100
Validate References .............................................................................................................................................. 100
Full Book Name: How to “Un-Tooltip” a Document ................................................................................ 101
Unformat Chapter References .......................................................................................................................... 101
Managing Sequential References ................................................................................................................... 102
Tooltipping Existing e-Sword Modules ........................................................................................................ 103
Scripture Fill-In Toolbar ...................................................................................................................................... 104
Fill-In Field / Add Fill In ................................................................................................................................. 105
Beginning of Selected Paragraphs / Beginning of Selected Lines ................................................ 106
Fill-In Implicit Reference (#:#) by Paragraph (Selected Text) .......................................................... 107
Verse Fill-In Commands Introduction ...................................................................................................... 108
Find / Preview / Do Verse Fill-Ins .............................................................................................................. 109
Preview / Do Verse Fill-Ins Using Marked Verses (Commentary Only)....................................... 110
CMTX Mark Fill-In Introduction (Commentary Only) ......................................................................... 112
How to Tooltip Strong’s Numbers .................................................................................................................. 115
Configuring Strong’s Formatting .............................................................................................................. 115
Chapter 5: Working with e-Sword Modules ........................................................................... 117
Tooltipping Existing e-Sword Modules ........................................................................................................ 118
Importing e-Sword Modules into Tooltip .................................................................................................... 119
Combining/Sorting Multiple Modules into One Module ...................................................................... 120
Splitting an an e-Sword Module ..................................................................................................................... 121
How ToolTip NT Divides the Module ...................................................................................................... 121
Location of Split Modules ............................................................................................................................ 121
Creating a Self Installing Module .................................................................................................................... 122
■ About this User’s Guide
The goal of this documentation is to explain how to make e-Sword modules using ToolTip NT.
Not all features in ToolTip NT are documented. Some features are unrelated to making e-Sword
modules. Others are complicated, one-time-only-features created to solve a specific problem
that would make little sense to the general public. A few features are not documented because
only the developer uses them, such as Tools > Macros.
This documentation uses informal, conversational English.
■ About ToolTip NT
Brent Hildebrand began writing ToolTip for his personal module making. When he discovered a
demand for a what-you-see-is-what-you-get e-Sword module authoring tool, he began sharing
his software with others. Brent spent hundreds of hours making ToolTip NT the flagship e-
Sword authoring tool it is today.
If BibleSupport.com is a “vehicle” for e-Sword modules, then ToolTip NT is the gasoline the
“vehicle” burns. Brent Hildebrand’s ToolTip NT makes our ministry possible!
BibleSupport.com is run independently of e-Sword and ToolTip NT by a community of
volunteers.
P a g e 2 ToolTip NT User’s Guide, Copyright © 2013 by BibleSupport.com
Chapter 1: Getting to Know ToolTip
ToolTip NT is a word processor that allows you to create e-Sword modules. You do not need
advanced technical knowledge to use ToolTip NT. As a word processor, ToolTip NT behaves
similar to Microsoft Word, Windows WordPad, WordPerfect, and e-Sword's internal editor.
If you have the technical skills to type and send an email, you have the technical skills to use
ToolTip!
Many first time users open ToolTip NT and are intimidated by its many options and
commands. Remember, you need not know everything about ToolTip NT to use it. Many
commands are not frequently used but exist because they are invaluable when they are needed.
The best approach is to learn about the features only as you need them, rather than trying
to memorize each menu item.
CHAPTER 1: GETTING TO KNOW TOOLTIP
P a g e 3 ToolTip NT User’s Guide, Copyright © 2013 by BibleSupport.com
■ What are e-Sword Modules?
e-Sword Modules, or e-Sword Resources, contain content for use in e-Sword.
For example, an e-Sword Bible module contains the Bible verses visible when viewing the
module in the e-Sword Bibles window. Similarly, an e-Sword commentary module contains the
verse comments visible when viewing the commentary module in the e-Sword Commentaries
window.
ToolTip NT lets you create a Bible module of a new Bible translation or a commentary module
of the verse comments you prefer.
TIP: Technical savvy users will benefit from knowing that e-Sword Modules are SQLite
databases. You can use any SQLite database utility to view the records in the database.
■ What Module Types does ToolTip NT Support?
ToolTip NT supports the following e-Sword module types:
Topics (Books)
Study Notes
Journal Notes (read only)
Commentary
Bible
Dictionary
Devotional
Maps and Graphics
Harmony
Bible Reading Plan
Verse List
CHAPTER 1: GETTING TO KNOW TOOLTIP
P a g e 4 ToolTip NT User’s Guide, Copyright © 2013 by BibleSupport.com
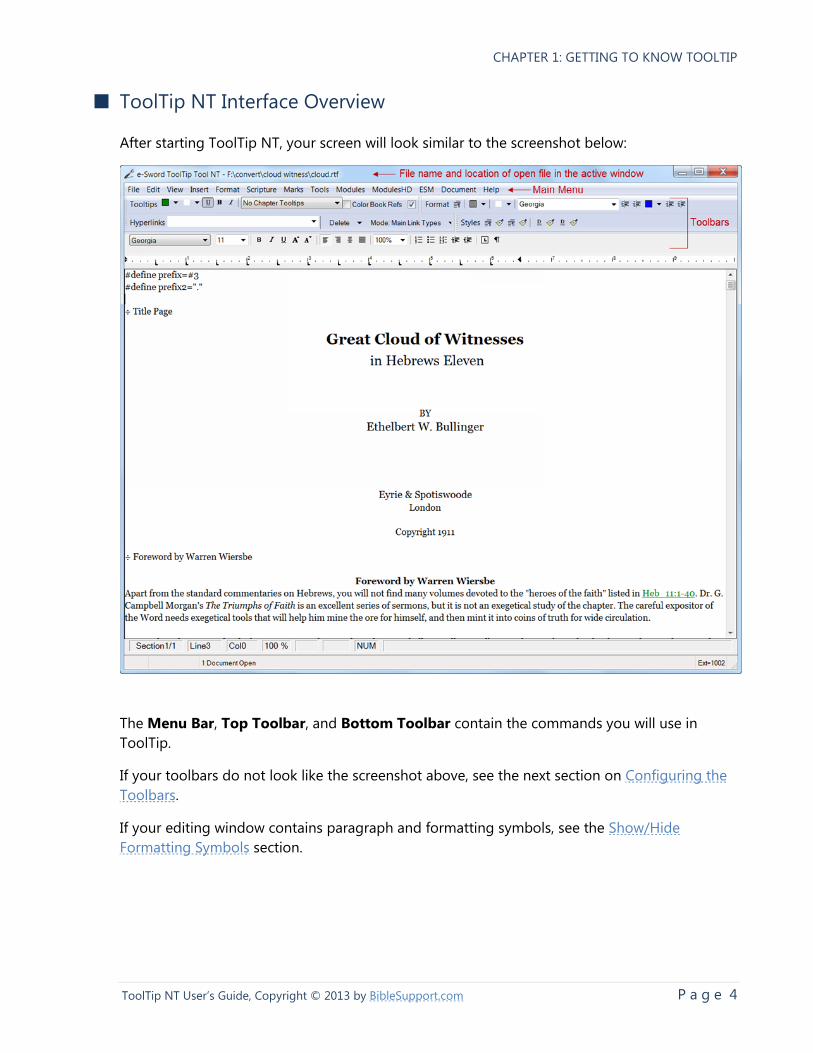
■ ToolTip NT Interface Overview
After starting ToolTip NT, your screen will look similar to the screenshot below:
The Menu Bar, Top Toolbar, and Bottom Toolbar contain the commands you will use in
ToolTip.
If your toolbars do not look like the screenshot above, see the next section on Configuring the
Toolbars.
If your editing window contains paragraph and formatting symbols, see the Show/Hide
Formatting Symbols section.
CHAPTER 1: GETTING TO KNOW TOOLTIP
P a g e 5 ToolTip NT User’s Guide, Copyright © 2013 by BibleSupport.com
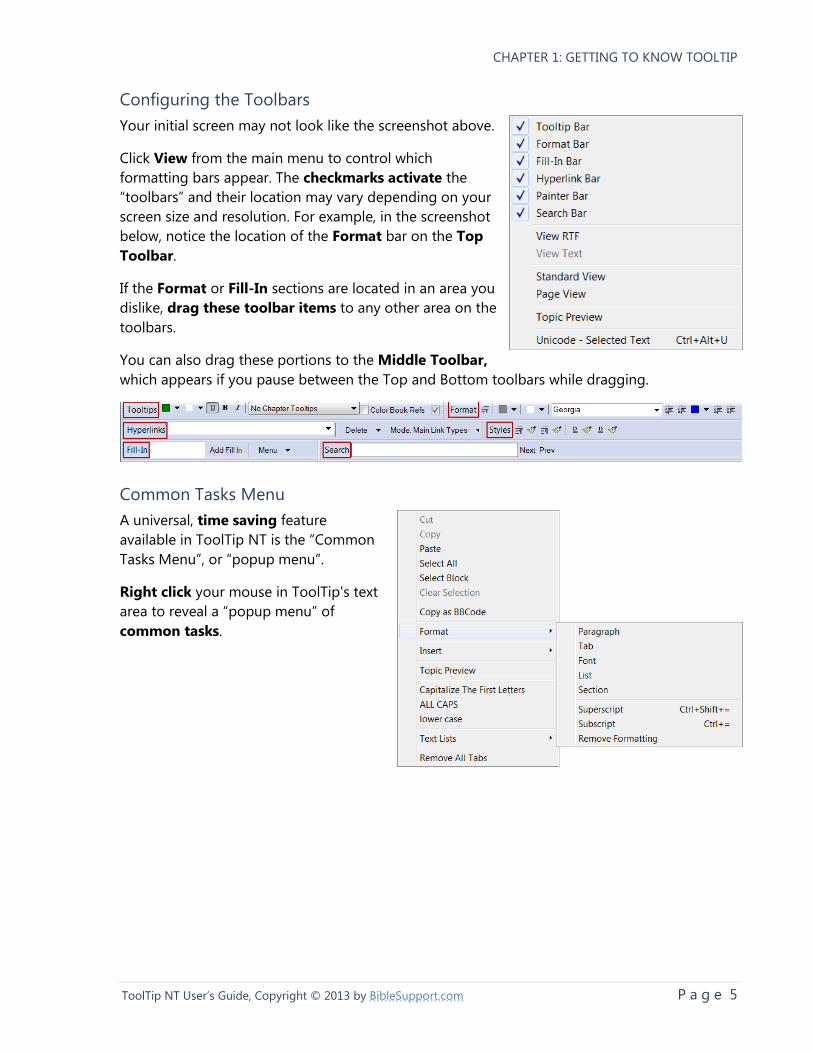
Configuring the Toolbars
Your initial screen may not look like the screenshot above.
Click View from the main menu to control which
formatting bars appear. The checkmarks activate the
“toolbars” and their location may vary depending on your
screen size and resolution. For example, in the screenshot
below, notice the location of the Format bar on the Top
Toolbar.
If the Format or Fill-In sections are located in an area you
dislike, drag these toolbar items to any other area on the
toolbars.
You can also drag these portions to the Middle Toolbar,
which appears if you pause between the Top and Bottom toolbars while dragging.
Common Tasks Menu
A universal, time saving feature
available in ToolTip NT is the “Common
Tasks Menu”, or “popup menu”.
Right click your mouse in ToolTip's text
area to reveal a “popup menu” of
common tasks.
CHAPTER 1: GETTING TO KNOW TOOLTIP
P a g e 6 ToolTip NT User’s Guide, Copyright © 2013 by BibleSupport.com
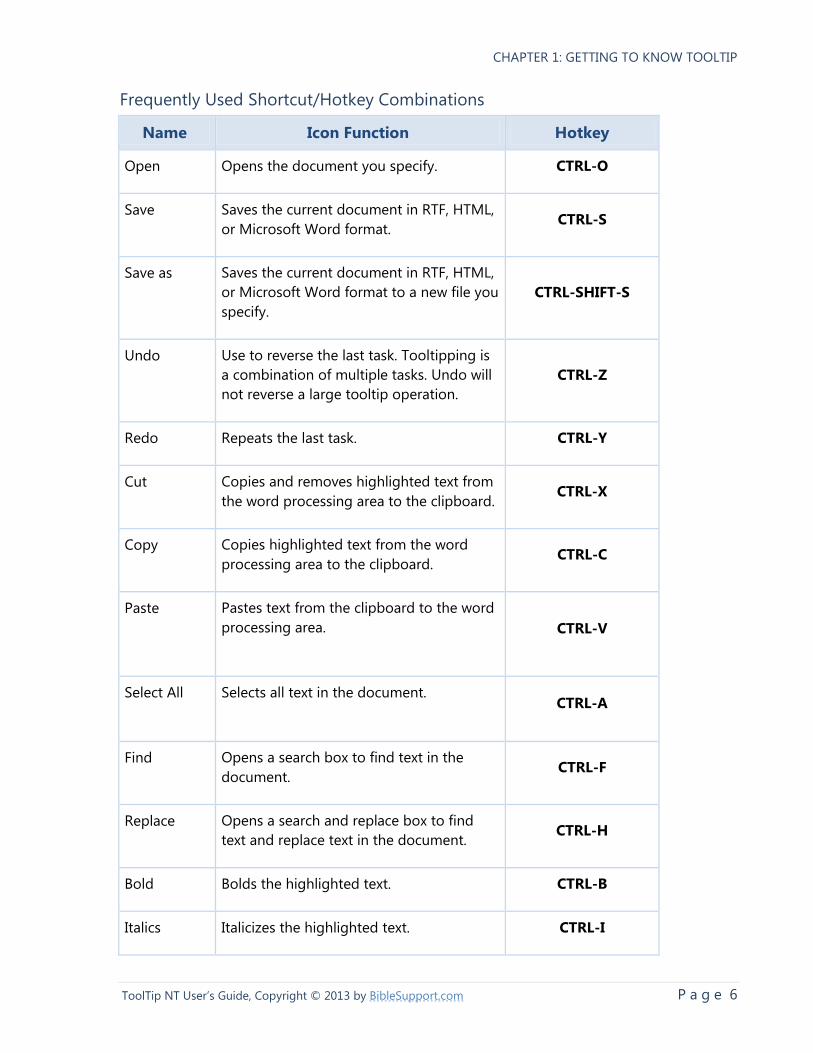
Frequently Used Shortcut/Hotkey Combinations
Name Icon Function Hotkey
Open Opens the document you specify. CTRL-O
Save Saves the current document in RTF, HTML,
or Microsoft Word format. CTRL-S
Save as Saves the current document in RTF, HTML,
or Microsoft Word format to a new file you
specify.
CTRL-SHIFT-S
Undo Use to reverse the last task. Tooltipping is
a combination of multiple tasks. Undo will
not reverse a large tooltip operation.
CTRL-Z
Redo Repeats the last task. CTRL-Y
Cut Copies and removes highlighted text from
the word processing area to the clipboard. CTRL-X
Copy Copies highlighted text from the word
processing area to the clipboard. CTRL-C
Paste Pastes text from the clipboard to the word
processing area.
CTRL-V
Select All Selects all text in the document.
CTRL-A
Find Opens a search box to find text in the
document. CTRL-F
Replace Opens a search and replace box to find
text and replace text in the document. CTRL-H
Bold Bolds the highlighted text. CTRL-B
Italics Italicizes the highlighted text. CTRL-I
CHAPTER 1: GETTING TO KNOW TOOLTIP
P a g e 7 ToolTip NT User’s Guide, Copyright © 2013 by BibleSupport.com
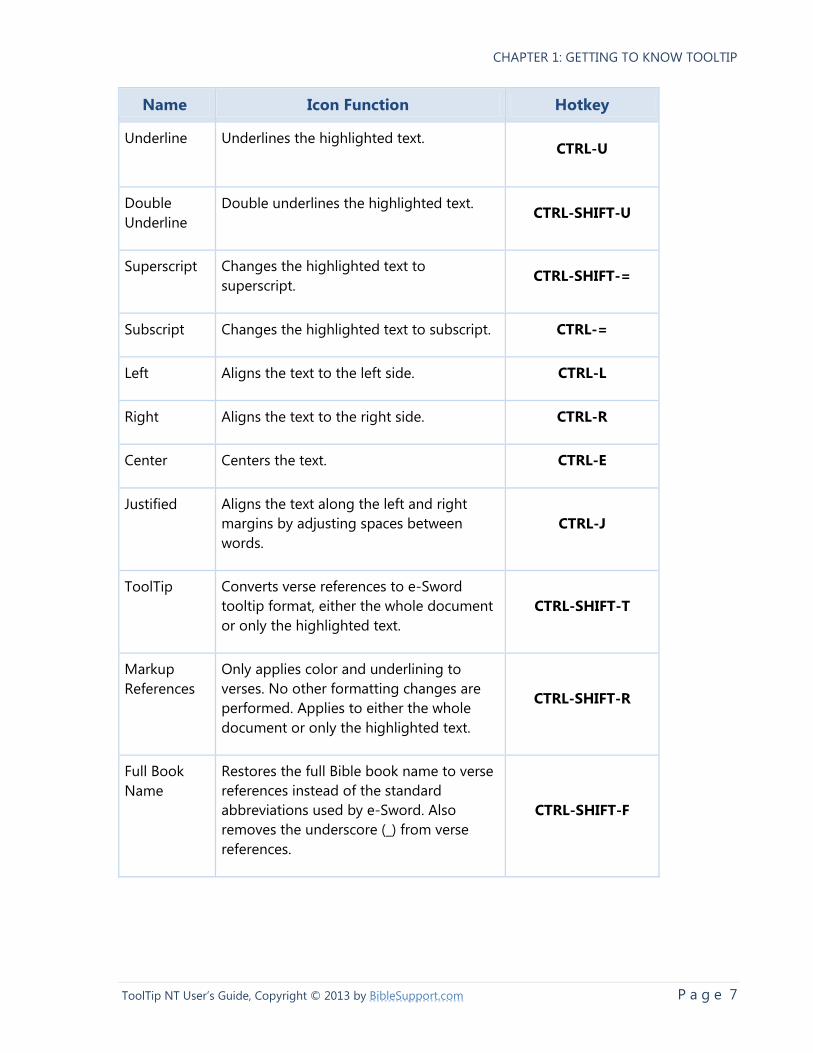
Name Icon Function Hotkey
Underline Underlines the highlighted text.
CTRL-U
Double
Underline
Double underlines the highlighted text. CTRL-SHIFT-U
Superscript Changes the highlighted text to
superscript. CTRL-SHIFT-=
Subscript Changes the highlighted text to subscript. CTRL-=
Left Aligns the text to the left side. CTRL-L
Right Aligns the text to the right side. CTRL-R
Center Centers the text. CTRL-E
Justified Aligns the text along the left and right
margins by adjusting spaces between
words.
CTRL-J
ToolTip Converts verse references to e-Sword
tooltip format, either the whole document
or only the highlighted text.
CTRL-SHIFT-T
Markup
References
Only applies color and underlining to
verses. No other formatting changes are
performed. Applies to either the whole
document or only the highlighted text.
CTRL-SHIFT-R
Full Book
Name
Restores the full Bible book name to verse
references instead of the standard
abbreviations used by e-Sword. Also
removes the underscore (_) from verse
references.
CTRL-SHIFT-F
CHAPTER 1: GETTING TO KNOW TOOLTIP
P a g e 8 ToolTip NT User’s Guide, Copyright © 2013 by BibleSupport.com
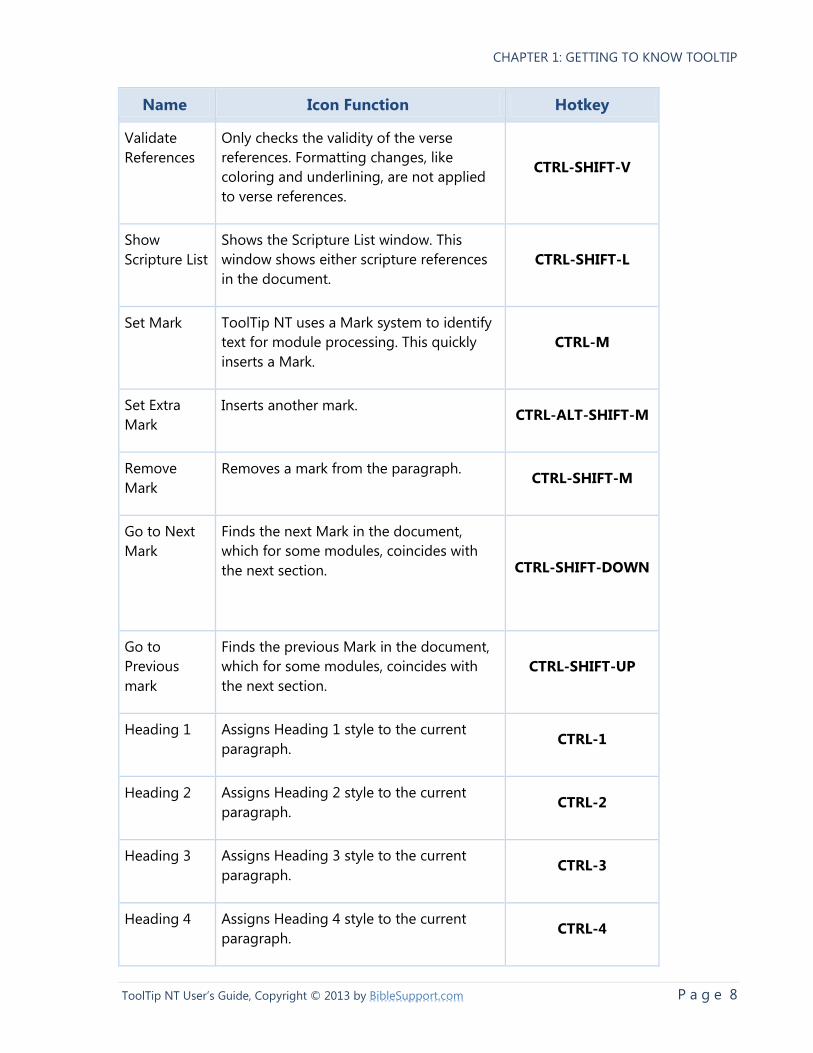
Name Icon Function Hotkey
Validate
References
Only checks the validity of the verse
references. Formatting changes, like
coloring and underlining, are not applied
to verse references.
CTRL-SHIFT-V
Show
Scripture List
Shows the Scripture List window. This
window shows either scripture references
in the document.
CTRL-SHIFT-L
Set Mark ToolTip NT uses a Mark system to identify
text for module processing. This quickly
inserts a Mark.
CTRL-M
Set Extra
Mark
Inserts another mark. CTRL-ALT-SHIFT-M
Remove
Mark
Removes a mark from the paragraph. CTRL-SHIFT-M
Go to Next
Mark
Finds the next Mark in the document,
which for some modules, coincides with
the next section.
CTRL-SHIFT-DOWN
Go to
Previous
mark
Finds the previous Mark in the document,
which for some modules, coincides with
the next section.
CTRL-SHIFT-UP
Heading 1 Assigns Heading 1 style to the current
paragraph. CTRL-1
Heading 2 Assigns Heading 2 style to the current
paragraph. CTRL-2
Heading 3 Assigns Heading 3 style to the current
paragraph. CTRL-3
Heading 4 Assigns Heading 4 style to the current
paragraph. CTRL-4
P a g e 9 ToolTip NT User’s Guide, Copyright © 2013 by BibleSupport.com
Chapter 2: ToolTip NT is a Word Processor
Most of the interaction between you and ToolTip NT is word processing. ToolTip NT can save
documents in the following formats: RTF, HTML, PDF, and Microsoft Word.
ToolTip’s word processing features are divided into:
File operations
Text
Paragraphs
Tables
Images
You can modify the properties of text, paragraphs, tables, and images using two methods, both
described below. This User’s Guide may reference either method in the step by step instructions.
To access the formatting options for these objects:
1. Right click the object and choose Format from the popup menu.
2. Or, click Format from the main menu and choose the object to modify.
CHAPTER 2: TOOLTIP NT IS A WORD PROCESSOR
P a g e 10 ToolTip NT User’s Guide, Copyright © 2013 by BibleSupport.com
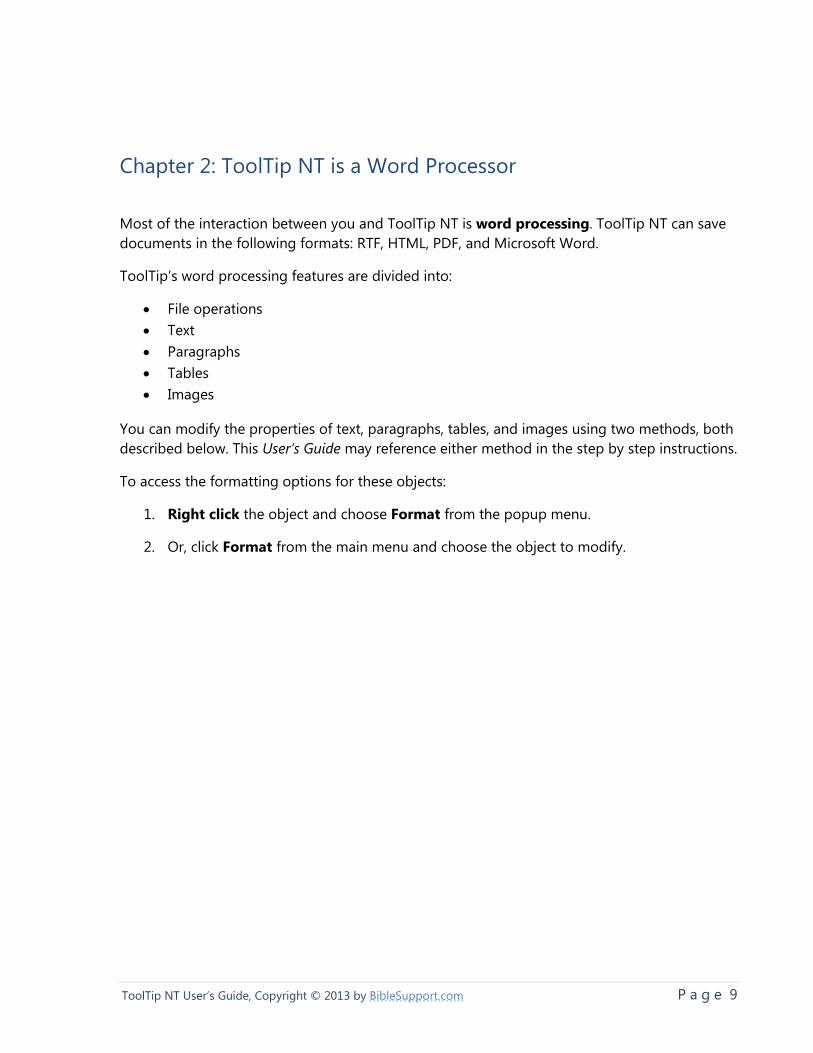
■ File Operations
Basic file operations under File on the main menu
work in ToolTip NT like most other software.
File, New, Save, and Save As function in ToolTip NT as
you would expect.
A few other file operations are not as common:
Add: Adds the file you select to the end of the current
document.
Insert: Inserts the file you select at the location of your
cursor.
Save Selection As: Saves the currently highlighted text
to a new file.
HTML, Trace, Debug: Are not used for e-Sword
module making.
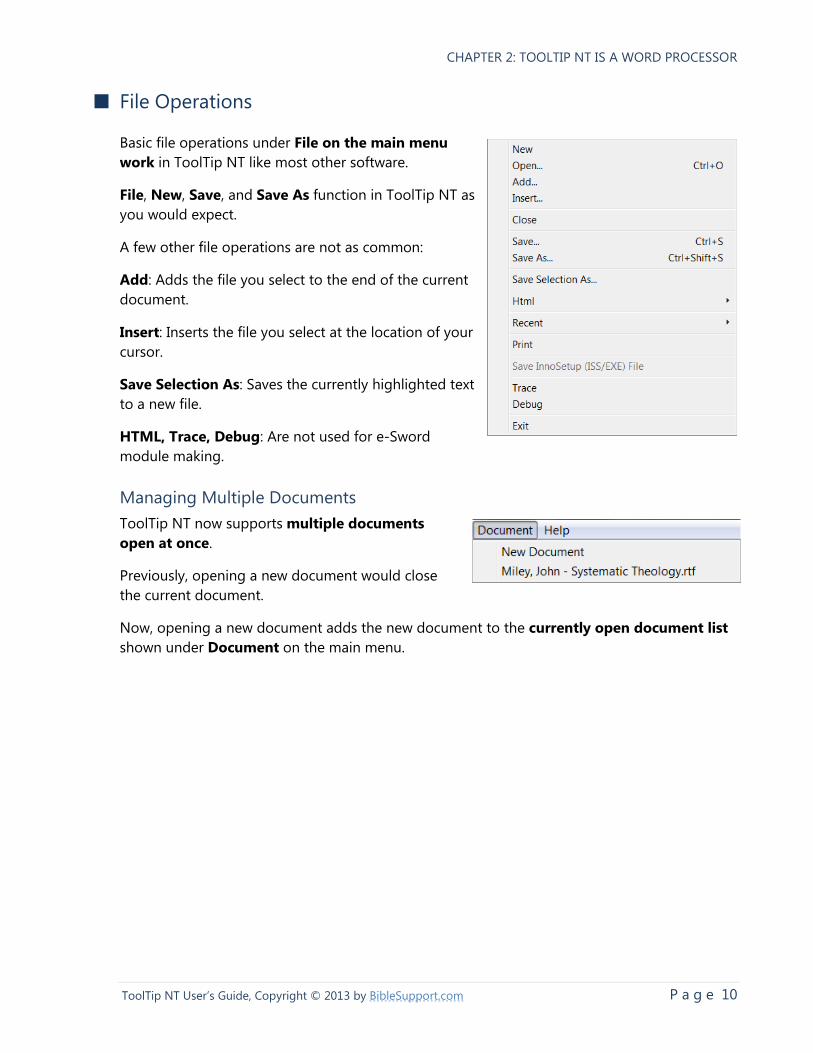
Managing Multiple Documents
ToolTip NT now supports multiple documents
open at once.
Previously, opening a new document would close
the current document.
Now, opening a new document adds the new document to the currently open document list
shown under Document on the main menu.
CHAPTER 2: TOOLTIP NT IS A WORD PROCESSOR
P a g e 11 ToolTip NT User’s Guide, Copyright © 2013 by BibleSupport.com
■ Working with Text
Working with text in ToolTip NT is much like other word processors, with a few exceptions. The
exceptions, or more unique features, are discussed first in the pages that follow. The standard
word processing features found in other word processors are examined later in this chapter.
TIP: The Font Selection and Size and Selecting a Font Color sections discuss the unique
way ToolTip NT and e-Sword handle your font and color selections.
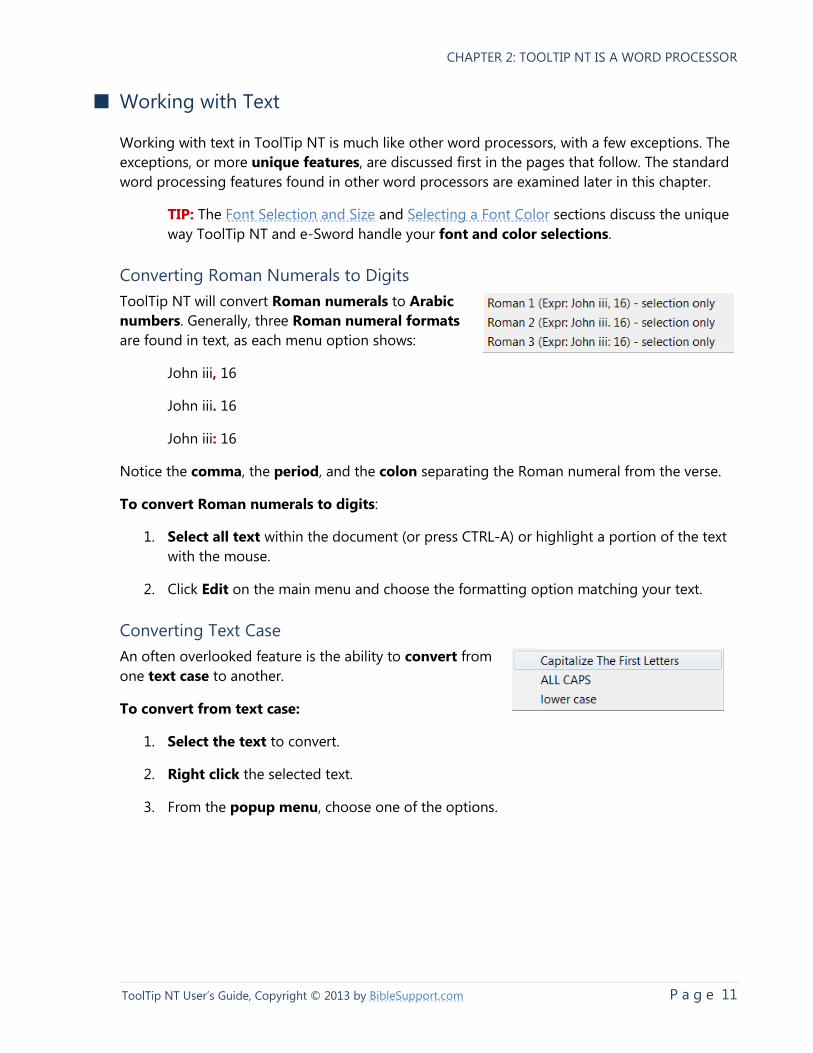
Converting Roman Numerals to Digits
ToolTip NT will convert Roman numerals to Arabic
numbers. Generally, three Roman numeral formats
are found in text, as each menu option shows:
John iii, 16
John iii. 16
John iii: 16
Notice the comma, the period, and the colon separating the Roman numeral from the verse.
To convert Roman numerals to digits:
1. Select all text within the document (or press CTRL-A) or highlight a portion of the text
with the mouse.
2. Click Edit on the main menu and choose the formatting option matching your text.
Converting Text Case
An often overlooked feature is the ability to convert from
one text case to another.
To convert from text case:
1. Select the text to convert.
2. Right click the selected text.
3. From the popup menu, choose one of the options.
CHAPTER 2: TOOLTIP NT IS A WORD PROCESSOR
P a g e 12 ToolTip NT User’s Guide, Copyright © 2013 by BibleSupport.com
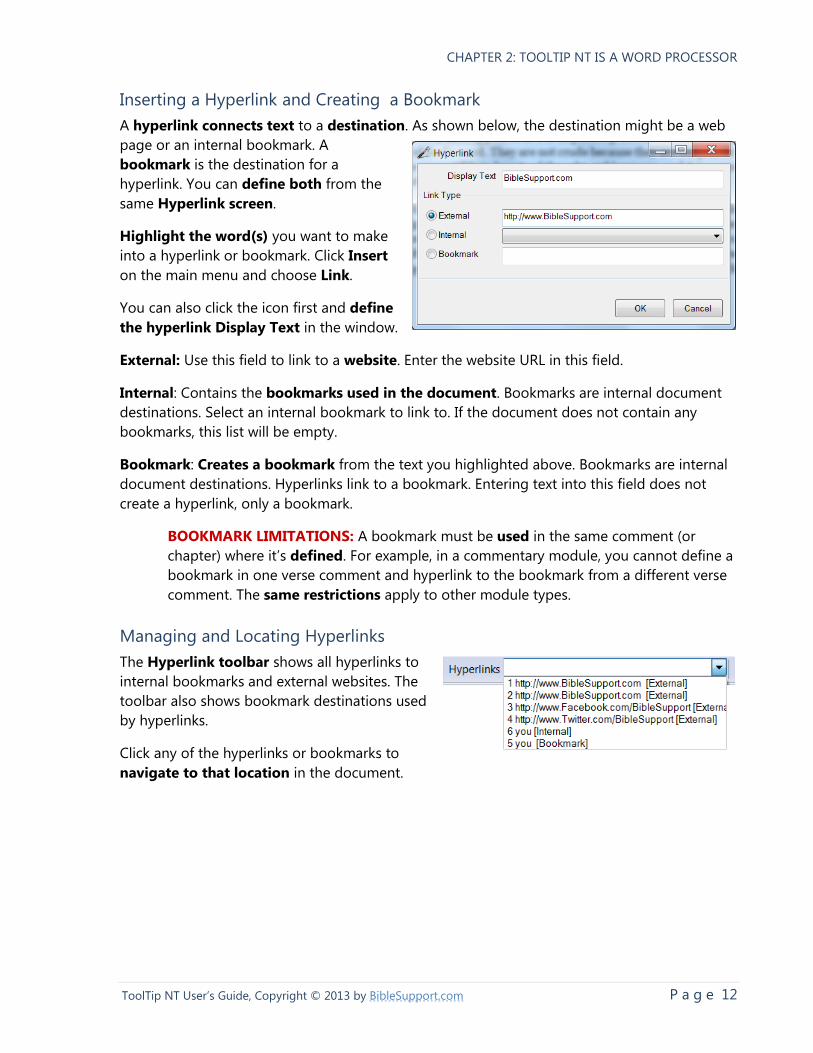
Inserting a Hyperlink and Creating a Bookmark
A hyperlink connects text to a destination. As shown below, the destination might be a web
page or an internal bookmark. A
bookmark is the destination for a
hyperlink. You can define both from the
same Hyperlink screen.
Highlight the word(s) you want to make
into a hyperlink or bookmark. Click Insert
on the main menu and choose Link.
You can also click the icon first and define
the hyperlink Display Text in the window.
External: Use this field to link to a website. Enter the website URL in this field.
Internal: Contains the bookmarks used in the document. Bookmarks are internal document
destinations. Select an internal bookmark to link to. If the document does not contain any
bookmarks, this list will be empty.
Bookmark: Creates a bookmark from the text you highlighted above. Bookmarks are internal
document destinations. Hyperlinks link to a bookmark. Entering text into this field does not
create a hyperlink, only a bookmark.
BOOKMARK LIMITATIONS: A bookmark must be used in the same comment (or
chapter) where it’s defined. For example, in a commentary module, you cannot define a
bookmark in one verse comment and hyperlink to the bookmark from a different verse
comment. The same restrictions apply to other module types.
Managing and Locating Hyperlinks
The Hyperlink toolbar shows all hyperlinks to
internal bookmarks and external websites. The
toolbar also shows bookmark destinations used
by hyperlinks.
Click any of the hyperlinks or bookmarks to
navigate to that location in the document.
CHAPTER 2: TOOLTIP NT IS A WORD PROCESSOR
P a g e 13 ToolTip NT User’s Guide, Copyright © 2013 by BibleSupport.com
Remove Line Feed Characters
ToolTip NT allows for the removal of line feed characters. A line feed character is defined as
hard return, caused by pressing the
enter key on the keyboard.
A line feed character is represented as
the paragraph symbol. See the
Show/Hide Formatting Symbols section
for more information.
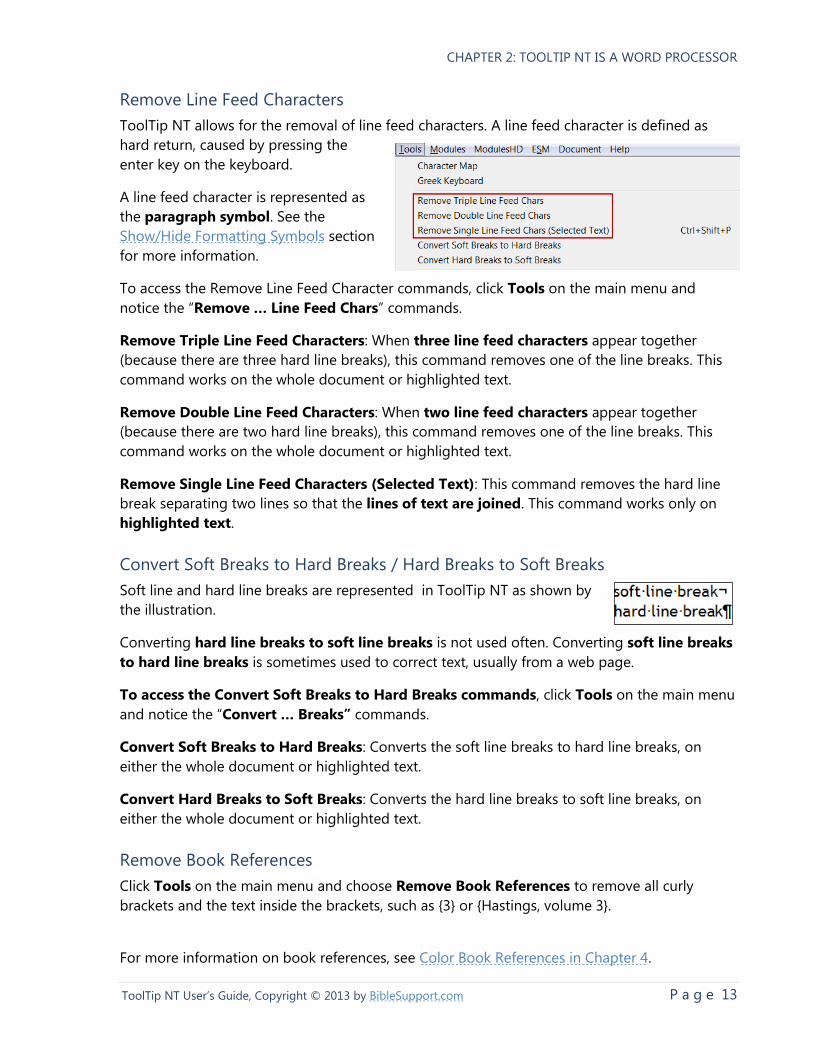
To access the Remove Line Feed Character commands, click Tools on the main menu and
notice the “Remove … Line Feed Chars” commands.
Remove Triple Line Feed Characters: When three line feed characters appear together
(because there are three hard line breaks), this command removes one of the line breaks. This
command works on the whole document or highlighted text.
Remove Double Line Feed Characters: When two line feed characters appear together
(because there are two hard line breaks), this command removes one of the line breaks. This
command works on the whole document or highlighted text.
Remove Single Line Feed Characters (Selected Text): This command removes the hard line
break separating two lines so that the lines of text are joined. This command works only on
highlighted text.
Convert Soft Breaks to Hard Breaks / Hard Breaks to Soft Breaks
Soft line and hard line breaks are represented in ToolTip NT as shown by
the illustration.
Converting hard line breaks to soft line breaks is not used often. Converting soft line breaks
to hard line breaks is sometimes used to correct text, usually from a web page.
To access the Convert Soft Breaks to Hard Breaks commands, click Tools on the main menu
and notice the “Convert … Breaks” commands.
Convert Soft Breaks to Hard Breaks: Converts the soft line breaks to hard line breaks, on
either the whole document or highlighted text.
Convert Hard Breaks to Soft Breaks: Converts the hard line breaks to soft line breaks, on
either the whole document or highlighted text.
Remove Book References
Click Tools on the main menu and choose Remove Book References to remove all curly
brackets and the text inside the brackets, such as {3} or {Hastings, volume 3}.
For more information on book references, see Color Book References in Chapter 4.
CHAPTER 2: TOOLTIP NT IS A WORD PROCESSOR
P a g e 14 ToolTip NT User’s Guide, Copyright © 2013 by BibleSupport.com
Font Selection and Size
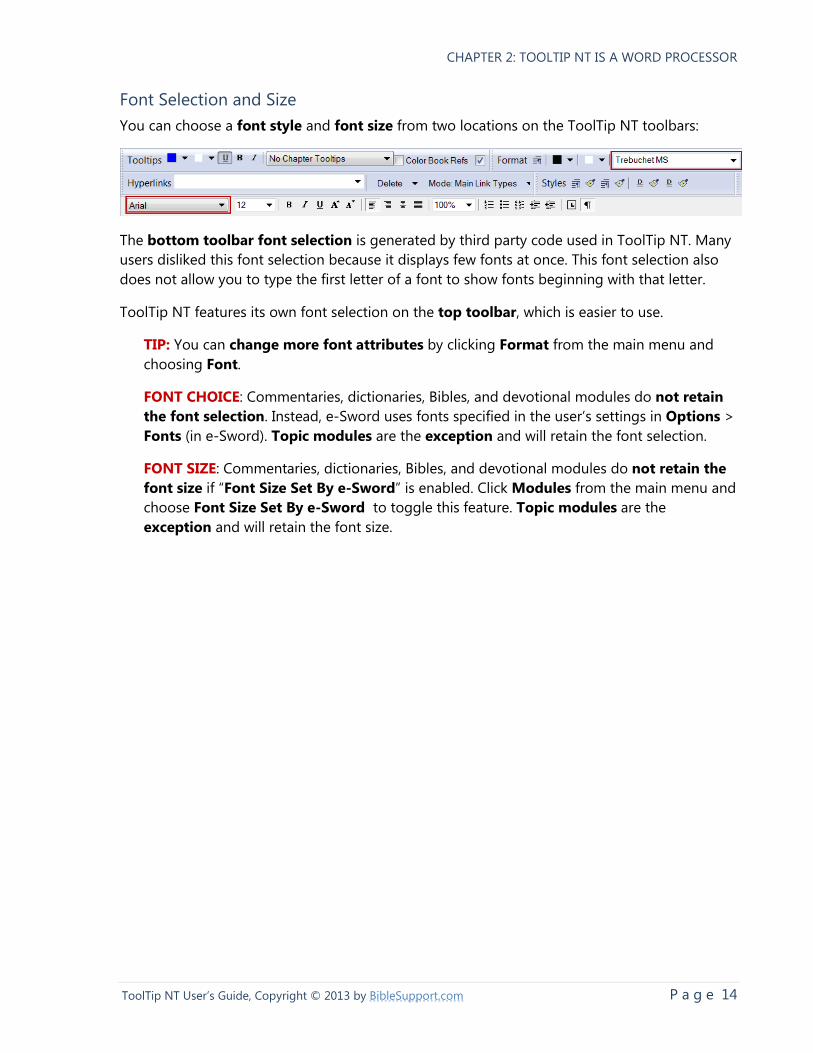
You can choose a font style and font size from two locations on the ToolTip NT toolbars:
The bottom toolbar font selection is generated by third party code used in ToolTip NT. Many
users disliked this font selection because it displays few fonts at once. This font selection also
does not allow you to type the first letter of a font to show fonts beginning with that letter.
ToolTip NT features its own font selection on the top toolbar, which is easier to use.
TIP: You can change more font attributes by clicking Format from the main menu and
choosing Font.
FONT CHOICE: Commentaries, dictionaries, Bibles, and devotional modules do not retain
the font selection. Instead, e-Sword uses fonts specified in the user’s settings in Options >
Fonts (in e-Sword). Topic modules are the exception and will retain the font selection.
FONT SIZE: Commentaries, dictionaries, Bibles, and devotional modules do not retain the
font size if “Font Size Set By e-Sword” is enabled. Click Modules from the main menu and
choose Font Size Set By e-Sword to toggle this feature. Topic modules are the
exception and will retain the font size.
CHAPTER 2: TOOLTIP NT IS A WORD PROCESSOR
P a g e 15 ToolTip NT User’s Guide, Copyright © 2013 by BibleSupport.com
Selecting a Font Color
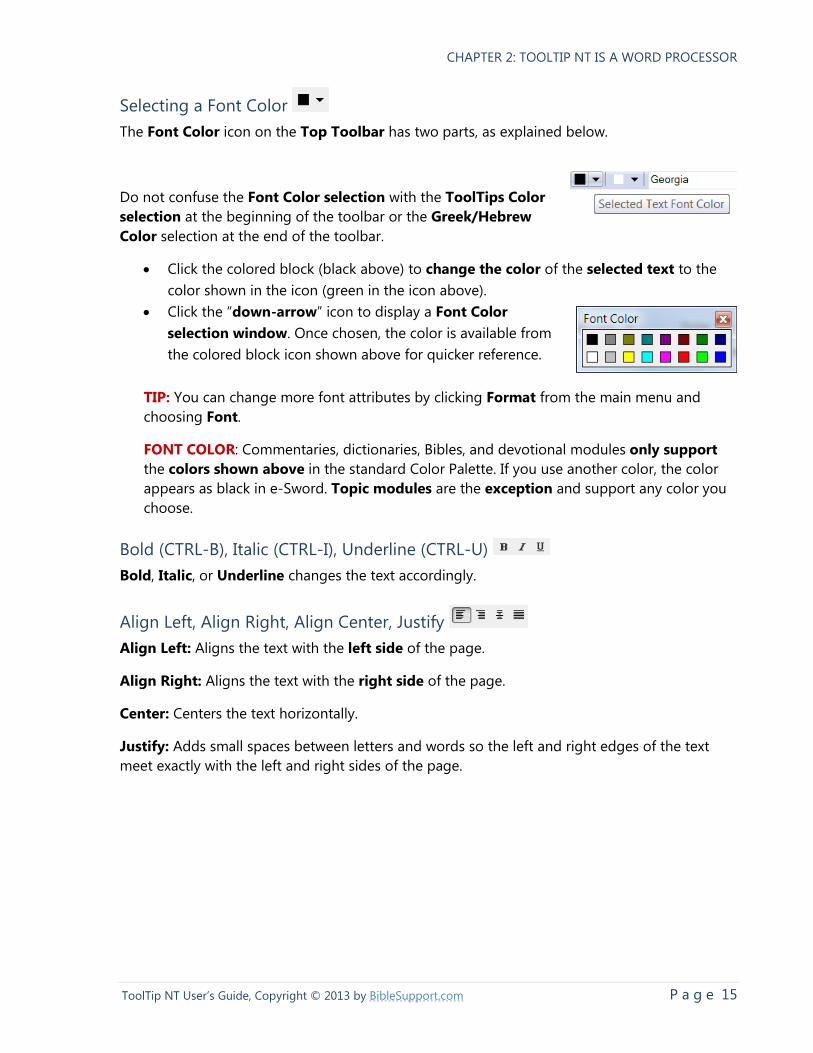
The Font Color icon on the Top Toolbar has two parts, as explained below.
Do not confuse the Font Color selection with the ToolTips Color
selection at the beginning of the toolbar or the Greek/Hebrew
Color selection at the end of the toolbar.
Click the colored block (black above) to change the color of the selected text to the
color shown in the icon (green in the icon above).
Click the “down-arrow” icon to display a Font Color
selection window. Once chosen, the color is available from
the colored block icon shown above for quicker reference.
TIP: You can change more font attributes by clicking Format from the main menu and
choosing Font.
FONT COLOR: Commentaries, dictionaries, Bibles, and devotional modules only support
the colors shown above in the standard Color Palette. If you use another color, the color
appears as black in e-Sword. Topic modules are the exception and support any color you
choose.
Bold (CTRL-B), Italic (CTRL-I), Underline (CTRL-U)
Bold, Italic, or Underline changes the text accordingly.
Align Left, Align Right, Align Center, Justify
Align Left: Aligns the text with the left side of the page.
Align Right: Aligns the text with the right side of the page.
Center: Centers the text horizontally.
Justify: Adds small spaces between letters and words so the left and right edges of the text
meet exactly with the left and right sides of the page.
CHAPTER 2: TOOLTIP NT IS A WORD PROCESSOR
P a g e 16 ToolTip NT User’s Guide, Copyright © 2013 by BibleSupport.com
Numbering and Bullets
You can use the Numbering and Bullets icons in two ways:
Select one or more lines of text and click the Numbering or Bullet icon to convert
the lines to numbers or bullets.
Do not select any lines of text before clicking the Numbering or Bullet icon. A
numbered or bullet list will begin at your cursor location. Each time you press enter, a
new line number or bullet appears.
To stop the insertion of numbers or bullets, press the Backspace key to erase the unwanted
number or bullet.
Bullets and Numbering Formatting
To change the formatting of a numbered or bullet list, right click the list, choose Format,
and then select List.
Indent Paragraph and Outdent Paragraph
Indent Paragraph or Outdent Paragraph moves the paragraph text to the right one tab stop
or to the left one tab stop. Indent is a useful formatting feature when showing a hierarchy of
information.
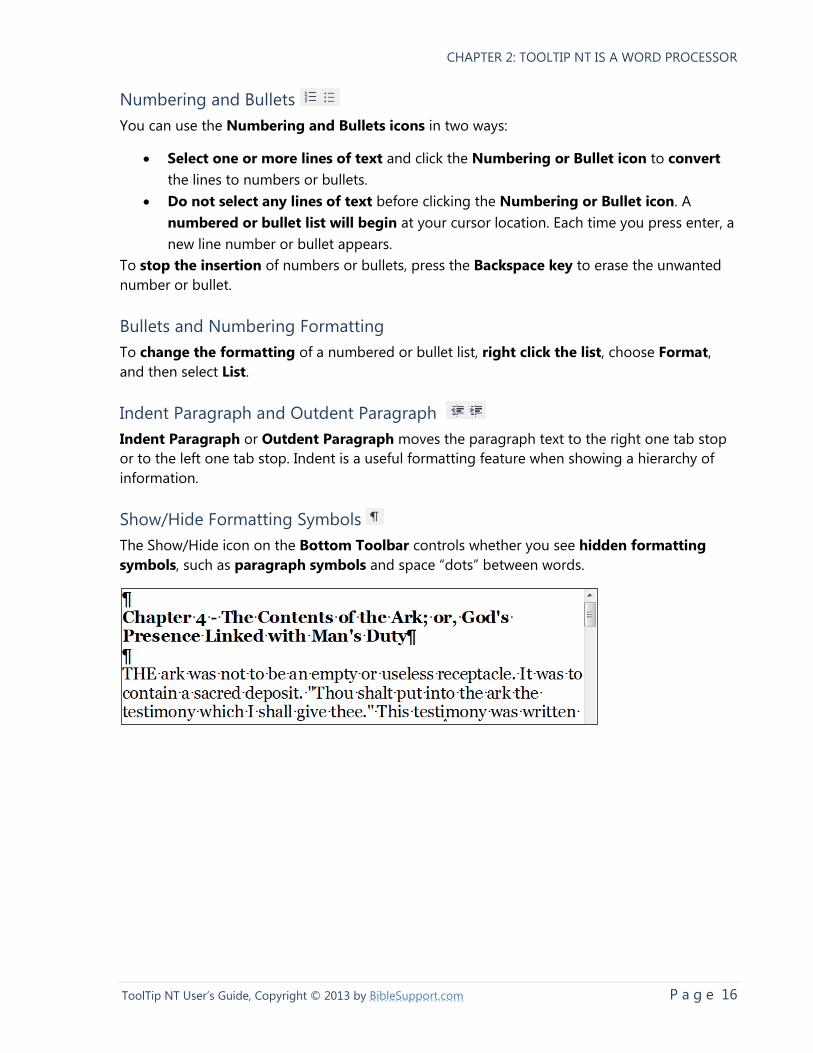
Show/Hide Formatting Symbols
The Show/Hide icon on the Bottom Toolbar controls whether you see hidden formatting
symbols, such as paragraph symbols and space “dots” between words.
CHAPTER 2: TOOLTIP NT IS A WORD PROCESSOR
P a g e 17 ToolTip NT User’s Guide, Copyright © 2013 by BibleSupport.com
■ Text Headings and Styles
ToolTip NT supports four Headings, two character styles, and two paragraph styles.
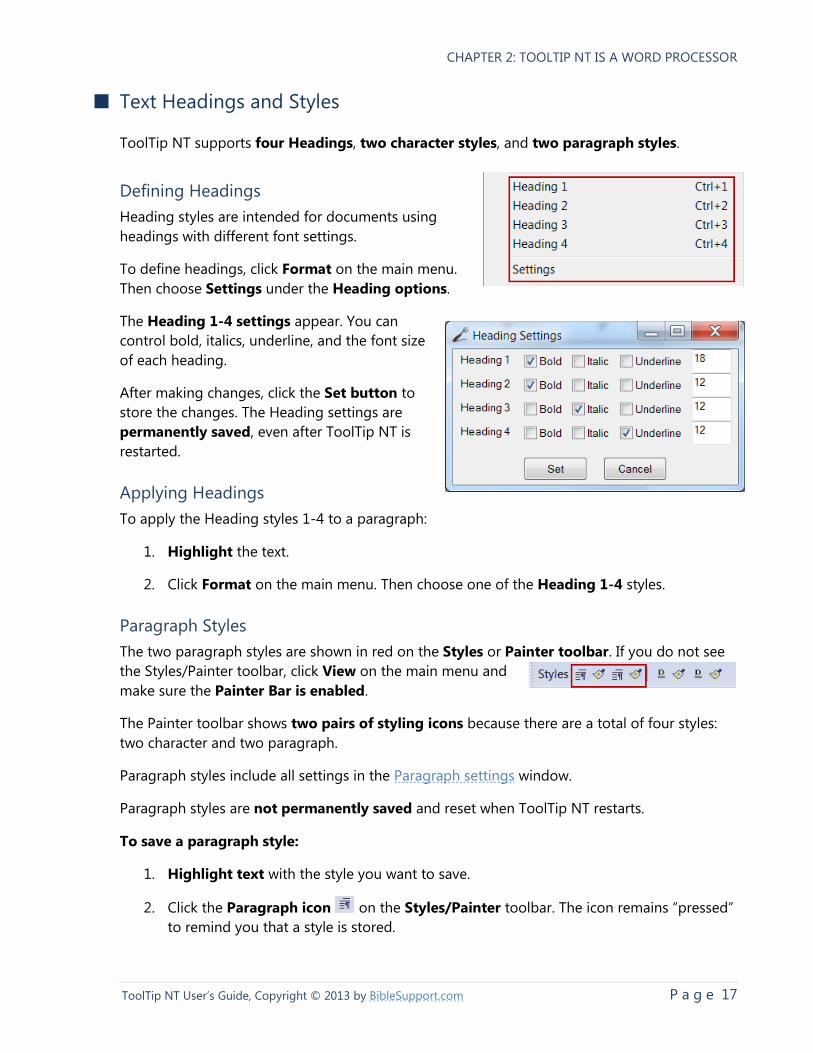
Defining Headings
Heading styles are intended for documents using
headings with different font settings.
To define headings, click Format on the main menu.
Then choose Settings under the Heading options.
The Heading 1-4 settings appear. You can
control bold, italics, underline, and the font size
of each heading.
After making changes, click the Set button to
store the changes. The Heading settings are
permanently saved, even after ToolTip NT is
restarted.
Applying Headings
To apply the Heading styles 1-4 to a paragraph:
1. Highlight the text.
2. Click Format on the main menu. Then choose one of the Heading 1-4 styles.
Paragraph Styles
The two paragraph styles are shown in red on the Styles or Painter toolbar. If you do not see
the Styles/Painter toolbar, click View on the main menu and
make sure the Painter Bar is enabled.
The Painter toolbar shows two pairs of styling icons because there are a total of four styles:
two character and two paragraph.
Paragraph styles include all settings in the Paragraph settings window.
Paragraph styles are not permanently saved and reset when ToolTip NT restarts.
To save a paragraph style:
1. Highlight text with the style you want to save.
2. Click the Paragraph icon on the Styles/Painter toolbar. The icon remains “pressed”
to remind you that a style is stored.
CHAPTER 2: TOOLTIP NT IS A WORD PROCESSOR
P a g e 18 ToolTip NT User’s Guide, Copyright © 2013 by BibleSupport.com
To apply (or paint) a paragraph style:
1. Place the cursor in the paragraph you want to change.
2. Click the Paint Brush icon next to the Paragraph icon on the Styles/Painter
toolbar.
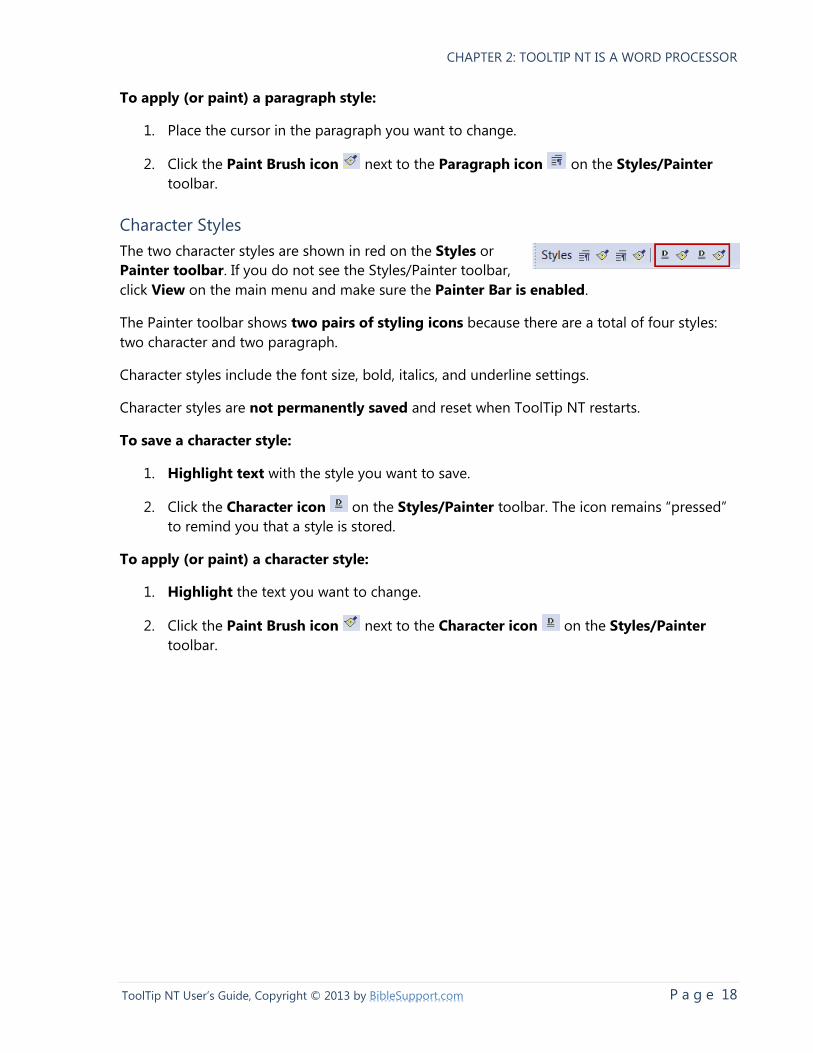
Character Styles
The two character styles are shown in red on the Styles or
Painter toolbar. If you do not see the Styles/Painter toolbar,
click View on the main menu and make sure the Painter Bar is enabled.
The Painter toolbar shows two pairs of styling icons because there are a total of four styles:
two character and two paragraph.
Character styles include the font size, bold, italics, and underline settings.
Character styles are not permanently saved and reset when ToolTip NT restarts.
To save a character style:
1. Highlight text with the style you want to save.
2. Click the Character icon on the Styles/Painter toolbar. The icon remains “pressed”
to remind you that a style is stored.
To apply (or paint) a character style:
1. Highlight the text you want to change.
2. Click the Paint Brush icon next to the Character icon on the Styles/Painter
toolbar.

CHAPTER 2: TOOLTIP NT IS A WORD PROCESSOR
P a g e 19 ToolTip NT User’s Guide, Copyright © 2013 by BibleSupport.com
■ Formatting Paragraphs
The settings in this window apply to the whole paragraph, not just to text you have selected.
Alignment
Align Left: Aligns the text to the left side
of the page.
Center: Centers the text horizontally.
Align Right: Aligns the text with the right
side of the page.
Justify: Adds small spaces between letters
and words so the left and right edges of the
text meet exactly with the left and right
sides of the page.
Line Spacing: Selects the distance
between lines
Indents Left/Right: Controls the indent for
the left and right sides of paragraph.
Special: Selects between a First Line indent and a Hanging Indent. The hanging line is not
indented but subsequent lines are indented. The By field controls the amount of the indent.
Distances
Spacing Before/After: Controls the amount of space before and after a paragraph to avoid
entering blank lines with the enter key.
CHAPTER 2: TOOLTIP NT IS A WORD PROCESSOR
P a g e 20 ToolTip NT User’s Guide, Copyright © 2013 by BibleSupport.com
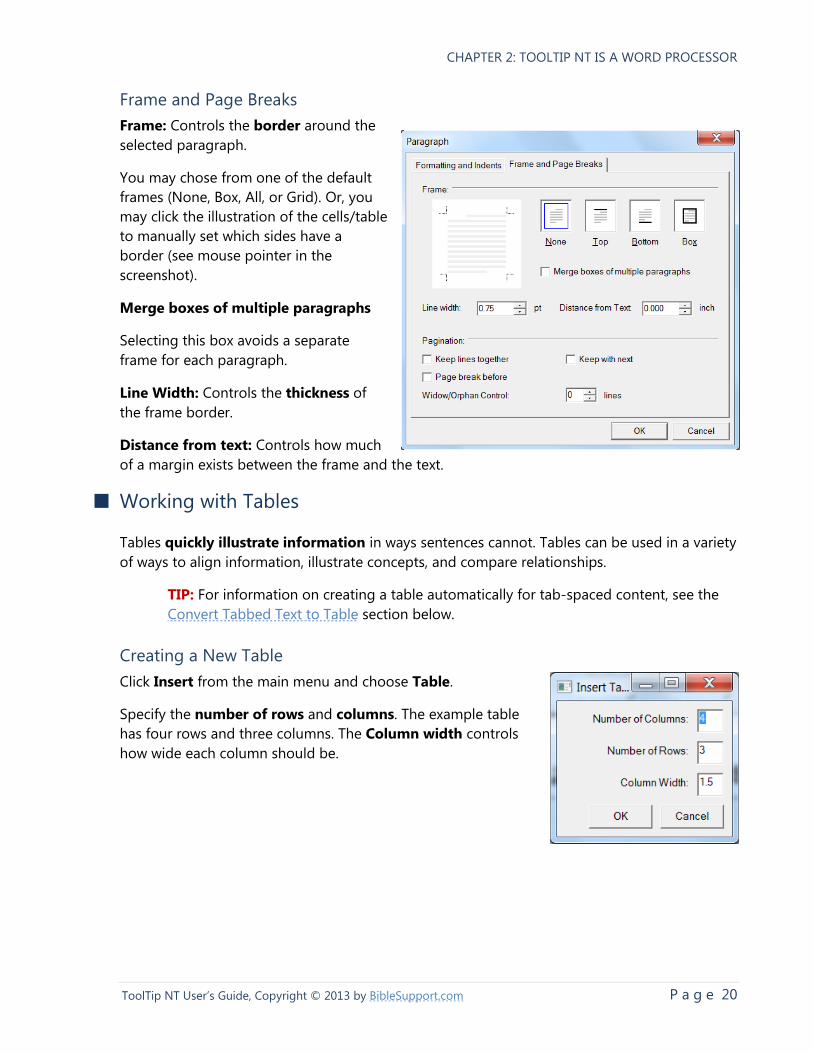
Frame and Page Breaks
Frame: Controls the border around the
selected paragraph.
You may chose from one of the default
frames (None, Box, All, or Grid). Or, you
may click the illustration of the cells/table
to manually set which sides have a
border (see mouse pointer in the
screenshot).
Merge boxes of multiple paragraphs
Selecting this box avoids a separate
frame for each paragraph.
Line Width: Controls the thickness of
the frame border.
Distance from text: Controls how much
of a margin exists between the frame and the text.
■ Working with Tables
Tables quickly illustrate information in ways sentences cannot. Tables can be used in a variety
of ways to align information, illustrate concepts, and compare relationships.
TIP: For information on creating a table automatically for tab-spaced content, see the
Convert Tabbed Text to Table section below.
Creating a New Table
Click Insert from the main menu and choose Table.
Specify the number of rows and columns. The example table
has four rows and three columns. The Column width controls
how wide each column should be.
CHAPTER 2: TOOLTIP NT IS A WORD PROCESSOR
P a g e 21 ToolTip NT User’s Guide, Copyright © 2013 by BibleSupport.com
Dragging Table Boundaries
To change the size of the table or
of any cell in the table:
1. Position the mouse pointer
over the table or cell
boundary.
2. The pointer turns from an
arrow pointer into an
adjustment pointer (see
example table).
3. Drag the pointer in the direction necessary to change the table or cell size.
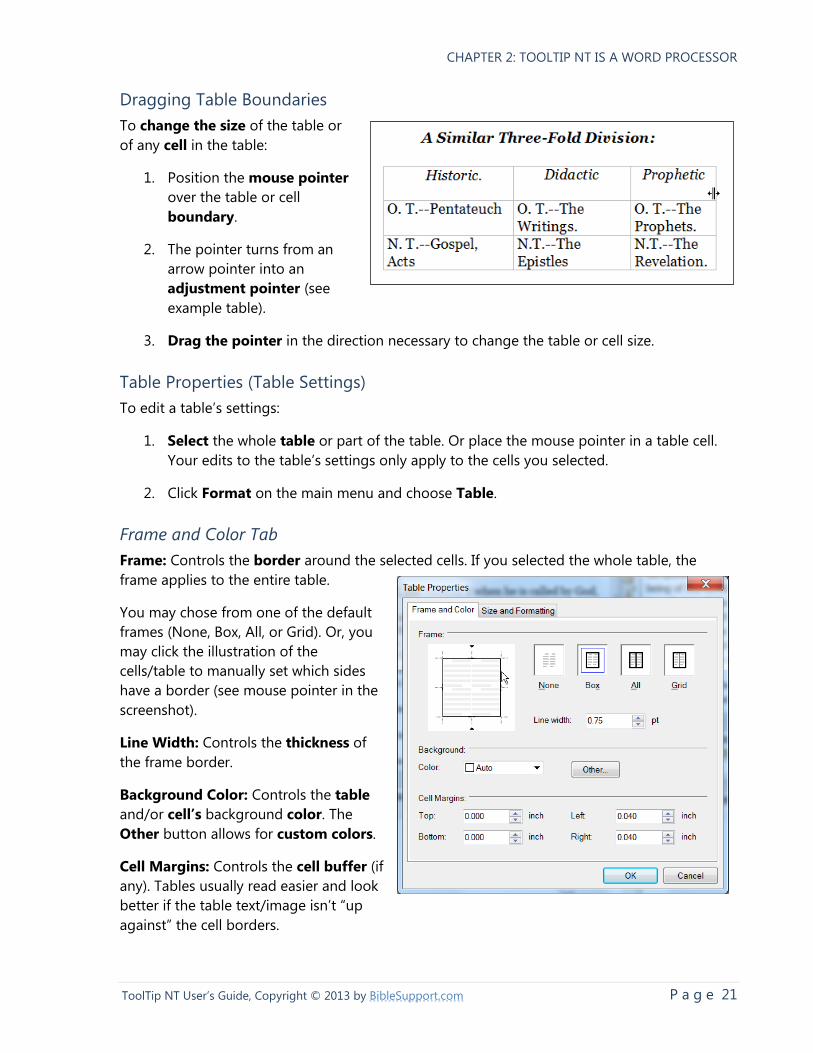
Table Properties (Table Settings)
To edit a table’s settings:
1. Select the whole table or part of the table. Or place the mouse pointer in a table cell.
Your edits to the table’s settings only apply to the cells you selected.
2. Click Format on the main menu and choose Table.
Frame and Color Tab
Frame: Controls the border around the selected cells. If you selected the whole table, the
frame applies to the entire table.
You may chose from one of the default
frames (None, Box, All, or Grid). Or, you
may click the illustration of the
cells/table to manually set which sides
have a border (see mouse pointer in the
screenshot).
Line Width: Controls the thickness of
the frame border.
Background Color: Controls the table
and/or cell’s background color. The
Other button allows for custom colors.
Cell Margins: Controls the cell buffer (if
any). Tables usually read easier and look
better if the table text/image isn’t “up
against” the cell borders.
CHAPTER 2: TOOLTIP NT IS A WORD PROCESSOR
P a g e 22 ToolTip NT User’s Guide, Copyright © 2013 by BibleSupport.com
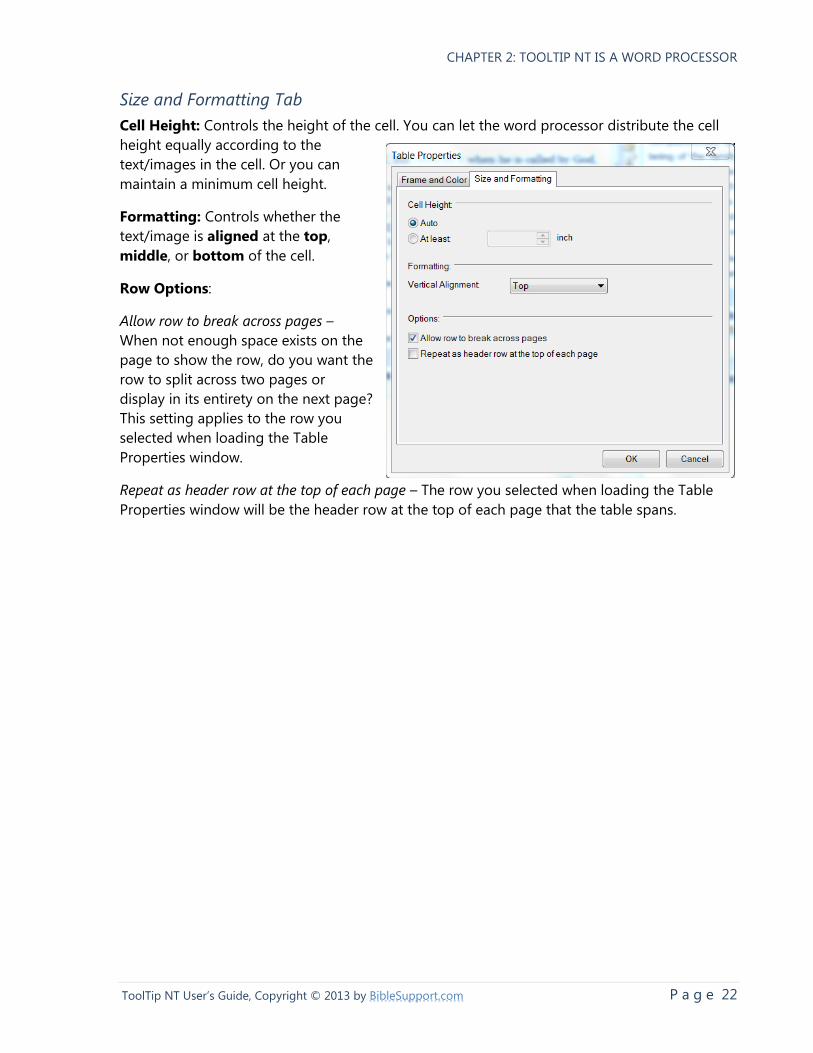
Size and Formatting Tab
Cell Height: Controls the height of the cell. You can let the word processor distribute the cell
height equally according to the
text/images in the cell. Or you can
maintain a minimum cell height.
Formatting: Controls whether the
text/image is aligned at the top,
middle, or bottom of the cell.
Row Options:
Allow row to break across pages –
When not enough space exists on the
page to show the row, do you want the
row to split across two pages or
display in its entirety on the next page?
This setting applies to the row you
selected when loading the Table
Properties window.
Repeat as header row at the top of each page – The row you selected when loading the Table
Properties window will be the header row at the top of each page that the table spans.
CHAPTER 2: TOOLTIP NT IS A WORD PROCESSOR
P a g e 23 ToolTip NT User’s Guide, Copyright © 2013 by BibleSupport.com
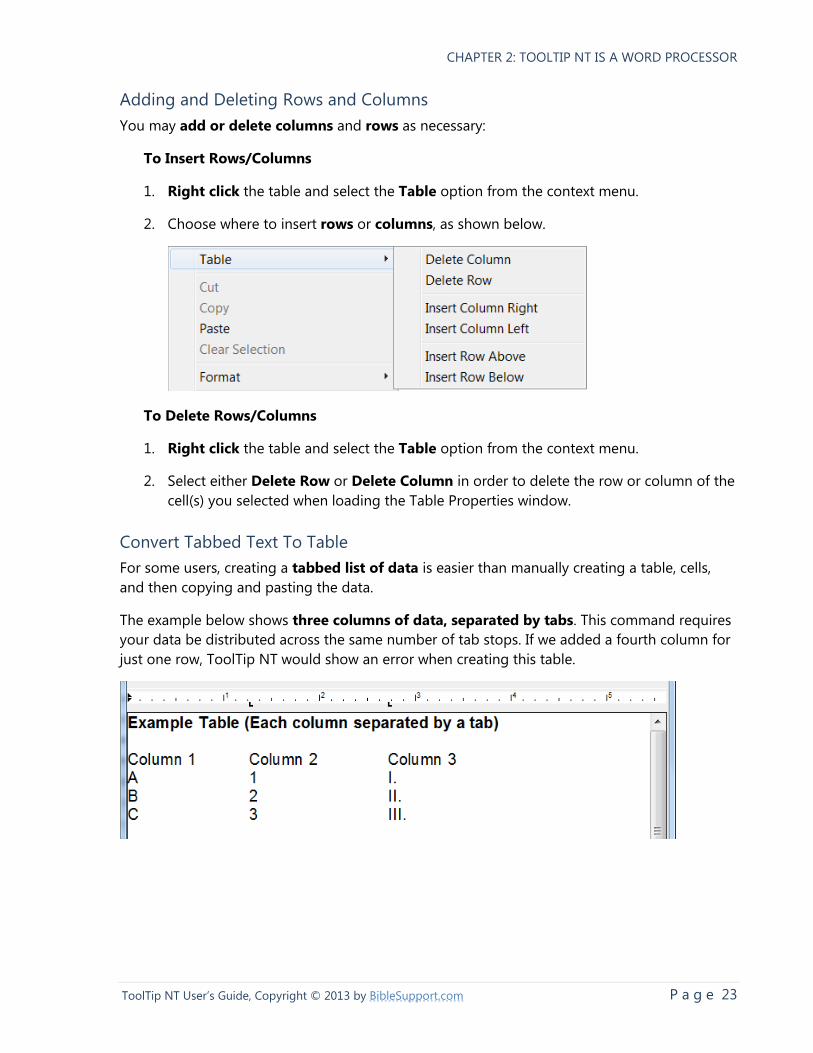
Adding and Deleting Rows and Columns
You may add or delete columns and rows as necessary:
To Insert Rows/Columns
1. Right click the table and select the Table option from the context menu.
2. Choose where to insert rows or columns, as shown below.
To Delete Rows/Columns
1. Right click the table and select the Table option from the context menu.
2. Select either Delete Row or Delete Column in order to delete the row or column of the
cell(s) you selected when loading the Table Properties window.
Convert Tabbed Text To Table
For some users, creating a tabbed list of data is easier than manually creating a table, cells,
and then copying and pasting the data.
The example below shows three columns of data, separated by tabs. This command requires
your data be distributed across the same number of tab stops. If we added a fourth column for
just one row, ToolTip NT would show an error when creating this table.
CHAPTER 2: TOOLTIP NT IS A WORD PROCESSOR
P a g e 24 ToolTip NT User’s Guide, Copyright © 2013 by BibleSupport.com
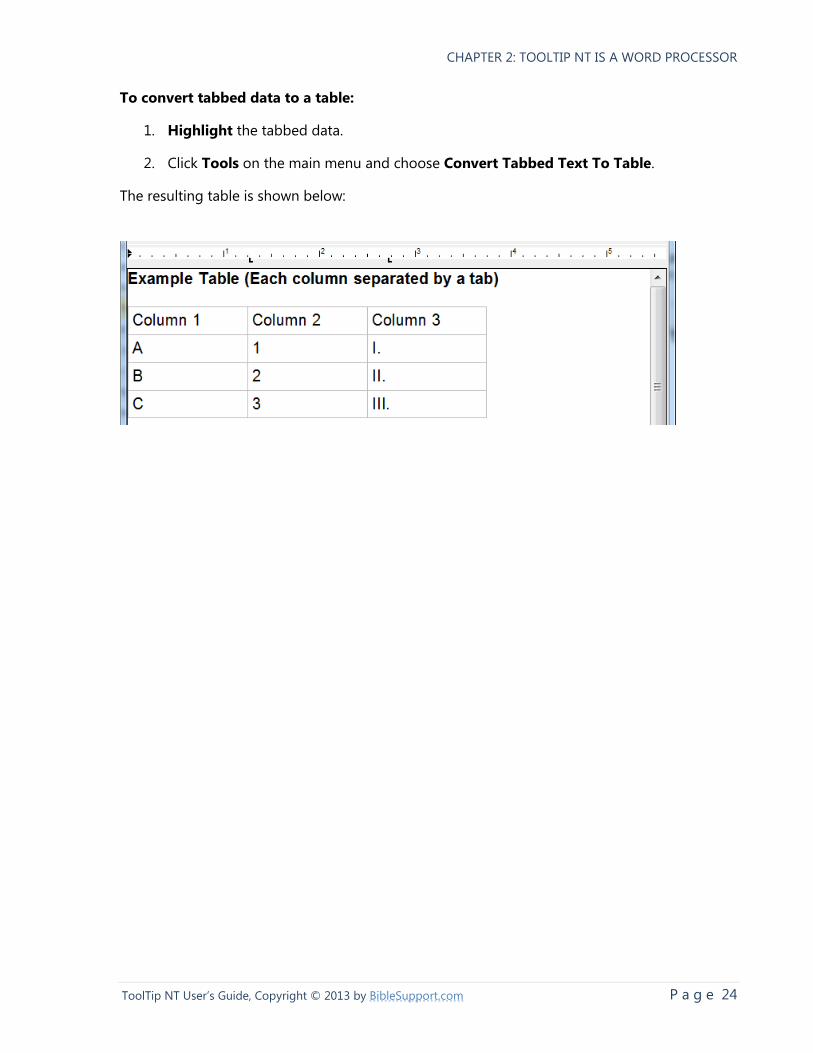
To convert tabbed data to a table:
1. Highlight the tabbed data.
2. Click Tools on the main menu and choose Convert Tabbed Text To Table.
The resulting table is shown below:
CHAPTER 2: TOOLTIP NT IS A WORD PROCESSOR
P a g e 25 ToolTip NT User’s Guide, Copyright © 2013 by BibleSupport.com
■ Working with Images
ToolTip NT handles images like most other word processors, as described in the subsections
below. The substantial difference in Tooltip’s handling of images is discussed next.
Topic Preview
When working with a Topic module, an image cannot be the last object in the document.
You must include text after the image or the image will not appear in the generated e-Sword
Topic module.
To avoid confusion on whether an image will appear in the e-Sword module, ToolTip NT
includes a Topic Preview feature. Click View from the main menu and choose Topic Preview
to see how e-Sword will display the image.
Inserting an Image
You may insert an image in two ways:
1. Click the Insert from the main menu and then choose Image.
2. Copy (CTRL-C) an image elsewhere and paste (CTRL-V) the image into the e-Sword
editor.
Image Attributes
Right click an image to adjust the image’s settings.
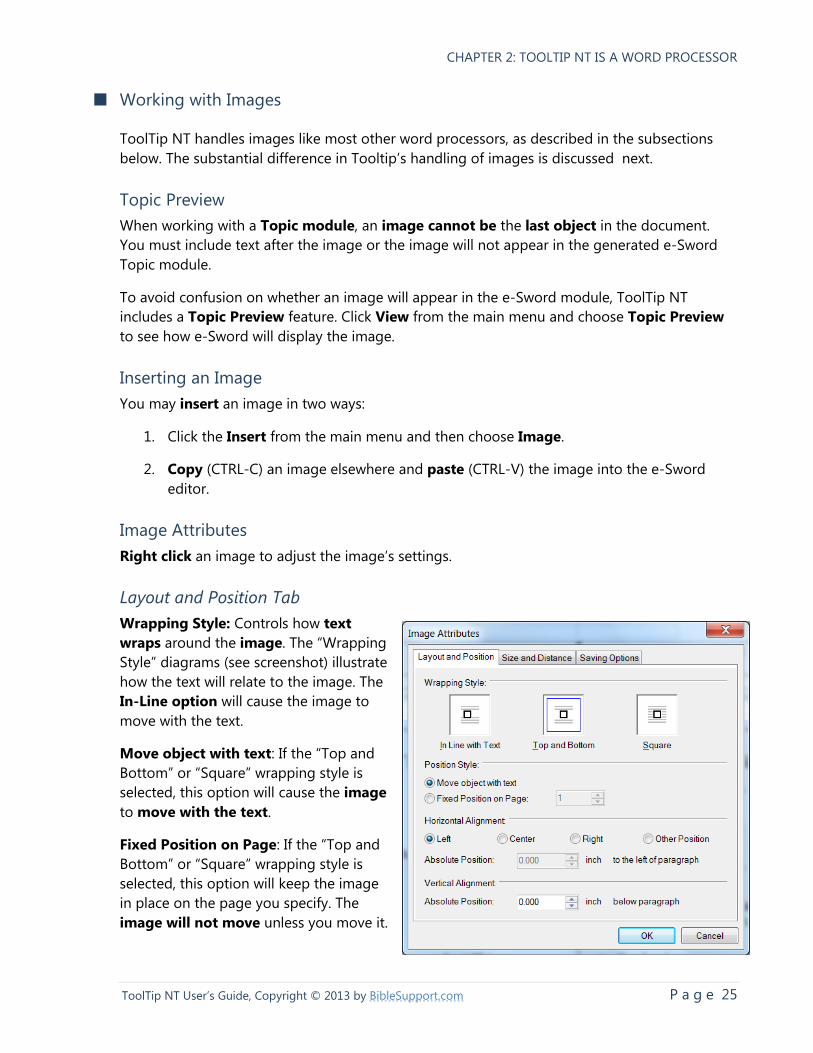
Layout and Position Tab
Wrapping Style: Controls how text
wraps around the image. The “Wrapping
Style” diagrams (see screenshot) illustrate
how the text will relate to the image. The
In-Line option will cause the image to
move with the text.
Move object with text: If the “Top and
Bottom” or “Square” wrapping style is
selected, this option will cause the image
to move with the text.
Fixed Position on Page: If the “Top and
Bottom” or “Square” wrapping style is
selected, this option will keep the image
in place on the page you specify. The
image will not move unless you move it.
CHAPTER 2: TOOLTIP NT IS A WORD PROCESSOR
P a g e 26 ToolTip NT User’s Guide, Copyright © 2013 by BibleSupport.com
Horizontal Alignment: If the “Top and Bottom” or “Square” wrapping style is selected, this
option controls the image’s horizontal position.
Absolute Position: If “Other Position” is chosen, you can control how many inches (or
fractions of an inch) the image stays to the left of the paragraph.
Vertical Alignment: If the “Top and Bottom” or “Square” wrapping style is selected, this option
controls the image’s vertical position.
Absolute Position: If the “Top and Bottom” or “Square” wrapping style is selected, you
can control how many inches (or fractions of an inch) the image stays below the
paragraph.
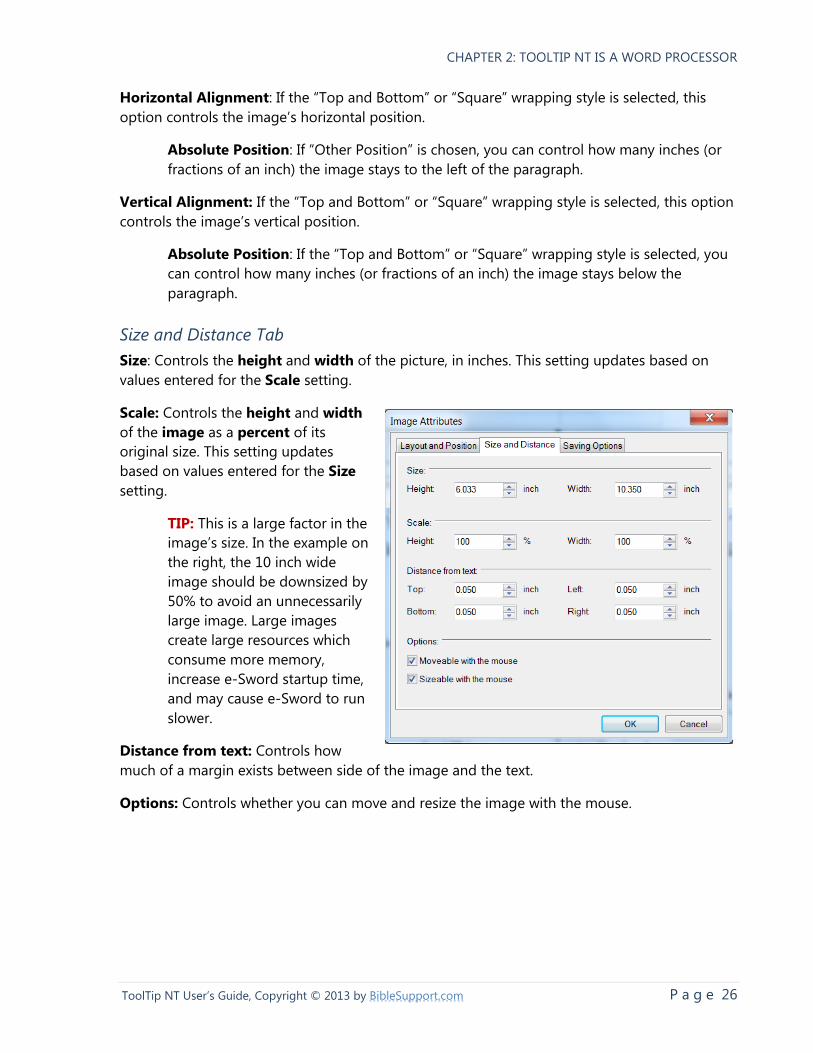
Size and Distance Tab
Size: Controls the height and width of the picture, in inches. This setting updates based on
values entered for the Scale setting.
Scale: Controls the height and width
of the image as a percent of its
original size. This setting updates
based on values entered for the Size
setting.
TIP: This is a large factor in the
image’s size. In the example on
the right, the 10 inch wide
image should be downsized by
50% to avoid an unnecessarily
large image. Large images
create large resources which
consume more memory,
increase e-Sword startup time,
and may cause e-Sword to run
slower.
Distance from text: Controls how
much of a margin exists between side of the image and the text.
Options: Controls whether you can move and resize the image with the mouse.
CHAPTER 2: TOOLTIP NT IS A WORD PROCESSOR
P a g e 27 ToolTip NT User’s Guide, Copyright © 2013 by BibleSupport.com
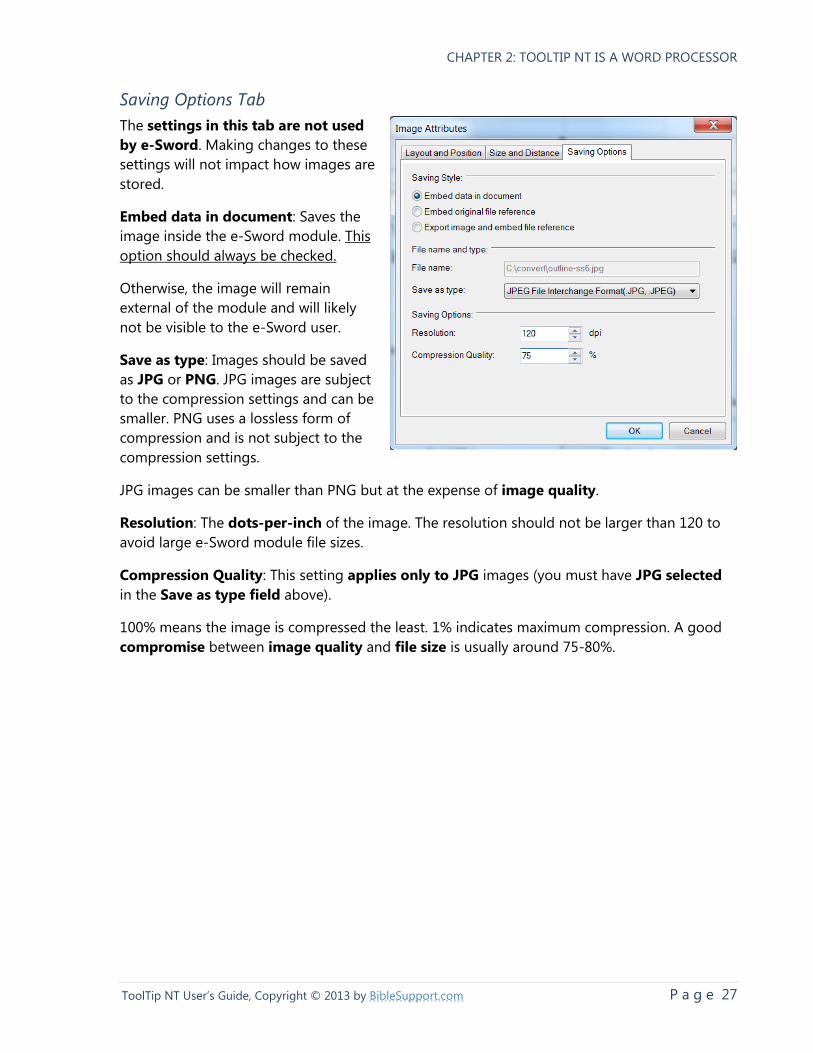
Saving Options Tab
The settings in this tab are not used
by e-Sword. Making changes to these
settings will not impact how images are
stored.
Embed data in document: Saves the
image inside the e-Sword module. This
option should always be checked.
Otherwise, the image will remain
external of the module and will likely
not be visible to the e-Sword user.
Save as type: Images should be saved
as JPG or PNG. JPG images are subject
to the compression settings and can be
smaller. PNG uses a lossless form of
compression and is not subject to the
compression settings.
JPG images can be smaller than PNG but at the expense of image quality.
Resolution: The dots-per-inch of the image. The resolution should not be larger than 120 to
avoid large e-Sword module file sizes.
Compression Quality: This setting applies only to JPG images (you must have JPG selected
in the Save as type field above).
100% means the image is compressed the least. 1% indicates maximum compression. A good
compromise between image quality and file size is usually around 75-80%.

P a g e 28 ToolTip NT User’s Guide, Copyright © 2013 by BibleSupport.com
Chapter 3: How to Turn Text into e-Sword Modules
ToolTip NT supports the creation of the following e-Sword module types:
Topics (Books)
Commentary
Bible
Dictionary
Devotional
Maps and Graphics
Harmony
Bible Reading Plan
Verse List
Study Notes
The tutorials that follow provide step-by-step instructions for creating each module type. Each
tutorial’s subsections are intended to be read together to form the “big picture” of making
each module type.
CHAPTER 3: HOW TO TURN TEXT INTO E-SWORD MODULES
P a g e 29 ToolTip NT User’s Guide, Copyright © 2013 by BibleSupport.com
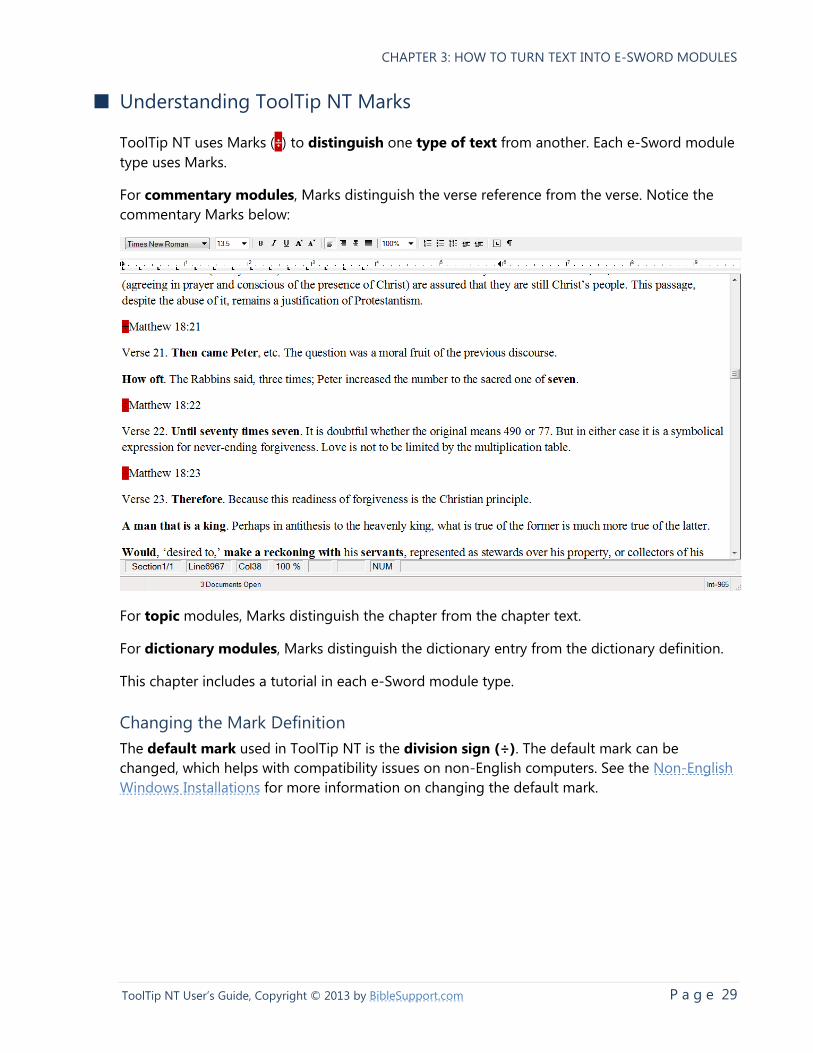
■ Understanding ToolTip NT Marks
ToolTip NT uses Marks (÷) to distinguish one type of text from another. Each e-Sword module
type uses Marks.
For commentary modules, Marks distinguish the verse reference from the verse. Notice the
commentary Marks below:
For topic modules, Marks distinguish the chapter from the chapter text.
For dictionary modules, Marks distinguish the dictionary entry from the dictionary definition.
This chapter includes a tutorial in each e-Sword module type.
Changing the Mark Definition
The default mark used in ToolTip NT is the division sign (÷). The default mark can be
changed, which helps with compatibility issues on non-English computers. See the Non-English
Windows Installations for more information on changing the default mark.
CHAPTER 3: HOW TO TURN TEXT INTO E-SWORD MODULES
P a g e 30 ToolTip NT User’s Guide, Copyright © 2013 by BibleSupport.com
■ Before Getting Started: Helpful Hints About Module Making
This section could also be entitled, “Questions We’ve Answered The Most”. Many ToolTip NT
users found the following hints and tips very useful:
Test Sample Sections of Your Work in e-Sword
Before spending many hours formatting a 4,000 page document, it’s wise to create a test
module, especially if you are new to module making. Format a small portion of the text and
test the sample module in e-Sword.
Even for experienced module makers, this is also very helpful when dealing with a feature
you’ve never tried before or when formatting text in a different way. Don’t make assumptions
that can cost you labor and time!
File Size Limitations
ToolTip NT sometimes produces errors when opening files over 10-15 megabytes. When
creating a larger resource, consider creating smaller modules and then combining the
modules into one.
Always Save Your Source Document
When creating an e-Sword module, it’s always a good idea to save your final source
document. ToolTip NT supports file saving, like all word processors. ToolTip NT saves in a file
format called RTF, a format supported by most word processors. By saving your RTF file, you
can easily re-create an e-Sword module should you need to make a change. ToolTip NT can
also save in HTML, PDF, and Microsoft Word formats.
You should also save a backup copy of your document before tooltipping the document,
since you cannot “undo” the tooltipping process.
You Can Use Other Word Processors
After you become familiar with ToolTip NT and the module creation process, you can use
Microsoft Word, Word Perfect, or any other word processor that can save a file in RTF format.
After saving the file in the word processor of your choice, ToolTip NT will open your saved RTF
file. From there, you can create your module in ToolTip NT.
Using Microsoft Word allows you to dramatically speed up the module making process. With
Word, you can “massage” data to automatically insert tooltip marks. You will learn more
about ToolTip’s Mark system as you read the tutorials that follow.
CHAPTER 3: HOW TO TURN TEXT INTO E-SWORD MODULES
P a g e 31 ToolTip NT User’s Guide, Copyright © 2013 by BibleSupport.com
Activate “Do Not Tooltip Marked References”
This setting prevents a marked passage reference from being tooltipped. This is critical for
the inclusion of passage comments spanning more than one chapter. For more information on
this very important setting, see the Do Not Tooltip Marked Reference and Applying Comments
Across Chapter Boundaries in a Single Reference sections.
Tooltip Marks Are Just Division Signs
ToolTip NT uses Marks (÷) to distinguish one type of text from another. Each e-Sword module
type uses marks. For example, in a commentary module, marks distinguish a verse comment
from the verse reference . The tutorials that follow reference Marks and the ToolTip NT
commands to insert marks.
However, the color of the Marks and how they are inserted does not matter. You are welcome
to insert marks using other word processors. A tooltip Mark is simply a division symbol “÷”.
Your word processor may support various ways to insert a division symbol. One way is to press
ALT-0247.
Curly Brackets {} Mean Something Different in ToolTip NT
Curly Brackets identify Book References. If you use curly brackets to show editor’s notes or
parenthetical notes, you must either change the use of curly brackets or disable Color Book
References during the tooltipping process.
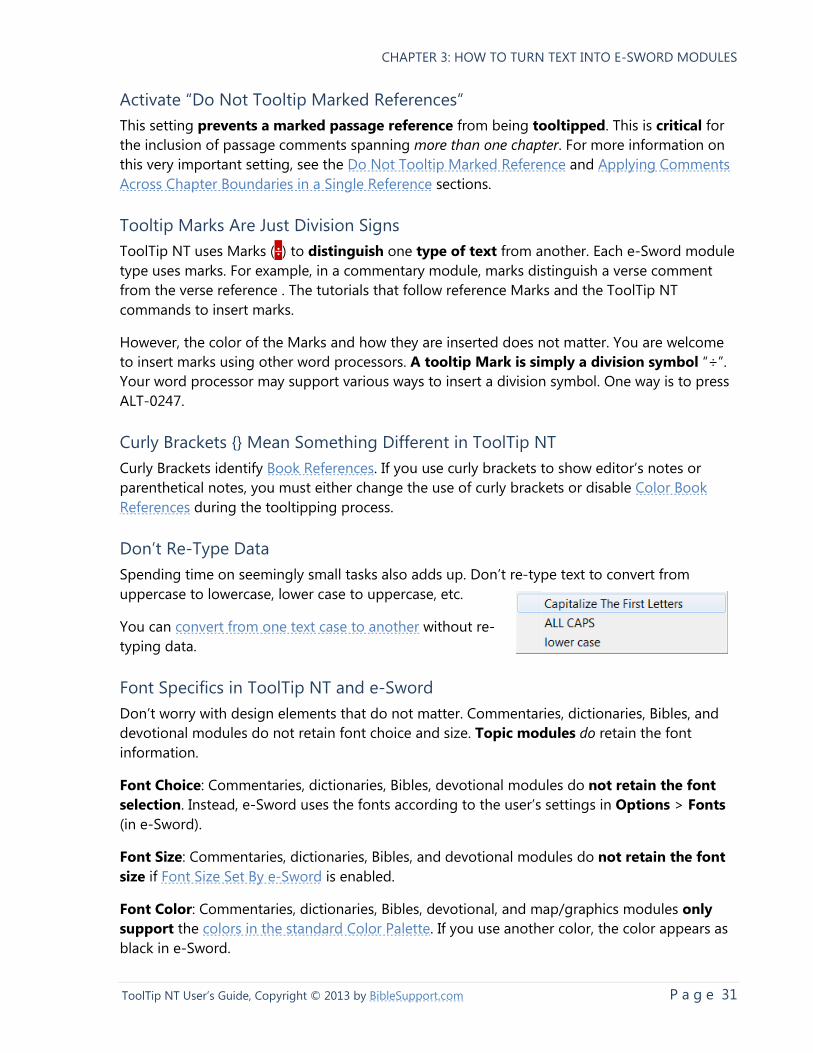
Don’t Re-Type Data
Spending time on seemingly small tasks also adds up. Don’t re-type text to convert from
uppercase to lowercase, lower case to uppercase, etc.
You can convert from one text case to another without re-
typing data.
Font Specifics in ToolTip NT and e-Sword
Don’t worry with design elements that do not matter. Commentaries, dictionaries, Bibles, and
devotional modules do not retain font choice and size. Topic modules do retain the font
information.
Font Choice: Commentaries, dictionaries, Bibles, devotional modules do not retain the font
selection. Instead, e-Sword uses the fonts according to the user’s settings in Options > Fonts
(in e-Sword).
Font Size: Commentaries, dictionaries, Bibles, and devotional modules do not retain the font
size if Font Size Set By e-Sword is enabled.
Font Color: Commentaries, dictionaries, Bibles, devotional, and map/graphics modules only
support the colors in the standard Color Palette. If you use another color, the color appears as
black in e-Sword.
CHAPTER 3: HOW TO TURN TEXT INTO E-SWORD MODULES
P a g e 32 ToolTip NT User’s Guide, Copyright © 2013 by BibleSupport.com
e-Sword Modules are “Hot Swappable”
After you create a module, you can copy the module to your e-Sword Resource folder, and start
(or restart e-Sword) to view the module. If the module needs tweaking, you can generate a new
module, copy the module to your e-Sword Resource folder again, and view the changes to your
module without restarting e-Sword! You will need to refresh the current view in your module.
For example, if you are viewing a commentary on John 1:1 and you changed that part of the
module, you could click the Next Comment or Previous Comment icon to refresh the John 1:1
text. The same applies to Dictionaries, Bibles, Reference Books, Devotionals, and most other
module types. Click on another tab, or another part of the resource to refresh the current view
to see your changes. This is a huge time saver!
CHAPTER 3: HOW TO TURN TEXT INTO E-SWORD MODULES
P a g e 33 ToolTip NT User’s Guide, Copyright © 2013 by BibleSupport.com
■ RTF Features
ToolTip NT supports several rarely used RTF features. RTF refers to Rich Text Format, the
markup syntax used for the creation of e-Sword modules. Just as HTML code presents and
formats web content on web pages, RTF presents and formats content in e-Sword.
Include RTF Header
Access this setting by clicking Modules on the main menu. Note that Include RTF Header is
either checked or unchecked. This feature should generally remain disabled. It’s unchecked
by default.
e-Sword wraps module content with its own RTF header. This controls the standard font colors,
font sizes, and font styles.
Enabling Include RTF Header prevents the e-Sword user from controlling the font size, link
colors, and font styles. This is the reason this feature should generally not be used.
Include RTF Header should only be used if you have a document with Greek or Hebrew that
uses a legacy font instead of Unicode. This preserves the legacy font usage if you distribute
the legacy font with the module.
Use Old RTF Code
Access this setting by clicking Modules on the main menu. Note that when Use Old RTF Code
is unchecked, the “New RTF Code” is used. Old RTF Code is disabled (unchecked) by default.
The Old RTF Code does not support images or hyperlinks. Also, for all module types except
Bible, the “New RTF Code” presents content more reliably for technical reasons.
Old RTF Code should be used for Bible modules. Using the “New RTF Code” with Bible
modules creates problems viewing the Bible module in e-Sword’s Parallel Mode.
View RTF / View Text
Access this command by clicking View on the main menu. Then choose View RTF. Select View
Text to return to the normal text view.
View RTF reveals the raw RTF code. Advanced users will find value in being able to manually
change the RTF code, such as removing unwanted background colors from text or tweaking
text display.
The majority of users lack the technical skills to use this feature.
If you wish to experiment with this feature, do so with a backup of the file. Do not attempt to
make changes to the RTF code of an original file since making a mistake could destroy the
integrity of the text.
CHAPTER 3: HOW TO TURN TEXT INTO E-SWORD MODULES
P a g e 34 ToolTip NT User’s Guide, Copyright © 2013 by BibleSupport.com
■ Non-English Windows Installations
Foreign language users sometimes have conflicts with the tooltip mark (÷), where non-English
language characters interfere with the tooltipping process.
Changing the Mark Definition
The default Mark used in ToolTip NT is the division sign (÷). This User’s Guide references the
division sign (÷) in all examples.
Foreign language users sometimes have
language conflicts with the division sign. A
suitable replacement might be: <mark> or
any other unique combination of
characters.
Choose unique characters so that normal
text patterns do not interfere with the
mark ToolTip NT recognizes.
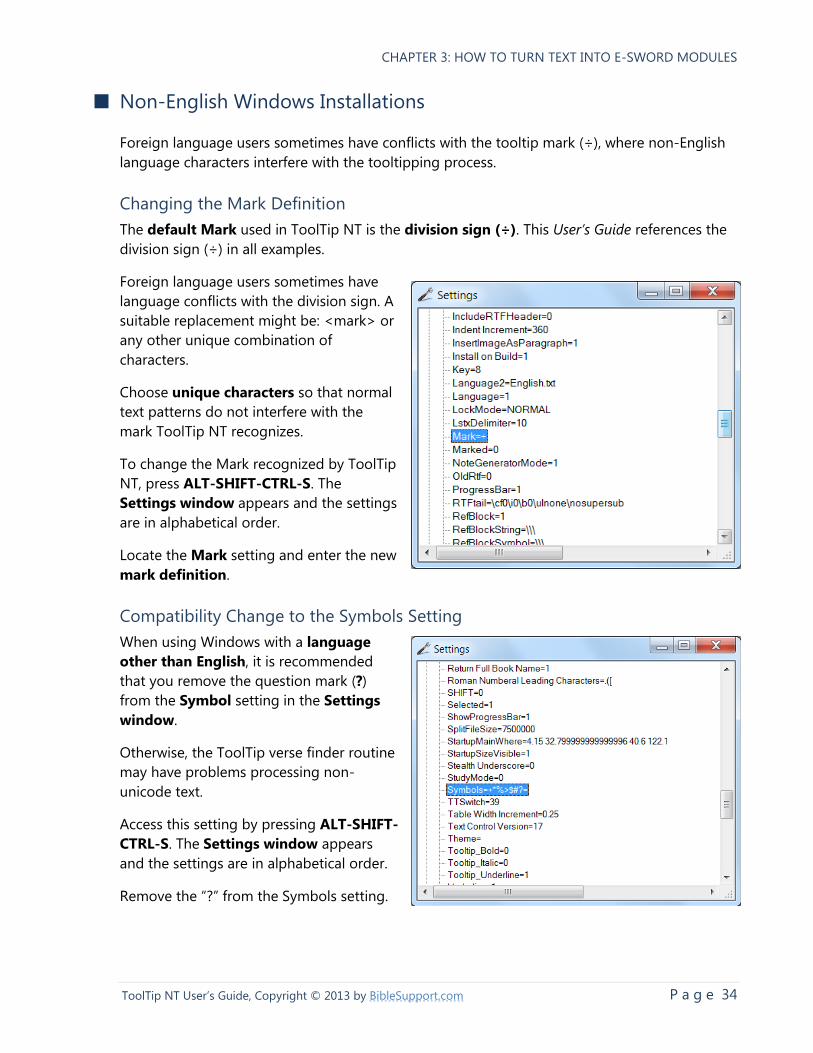
To change the Mark recognized by ToolTip
NT, press ALT-SHIFT-CTRL-S. The
Settings window appears and the settings
are in alphabetical order.
Locate the Mark setting and enter the new
mark definition.
Compatibility Change to the Symbols Setting
When using Windows with a language
other than English, it is recommended
that you remove the question mark (?)
from the Symbol setting in the Settings
window.
Otherwise, the ToolTip verse finder routine
may have problems processing non-
unicode text.
Access this setting by pressing ALT-SHIFT-
CTRL-S. The Settings window appears
and the settings are in alphabetical order.
Remove the “?” from the Symbols setting.
CHAPTER 3: HOW TO TURN TEXT INTO E-SWORD MODULES
P a g e 35 ToolTip NT User’s Guide, Copyright © 2013 by BibleSupport.com
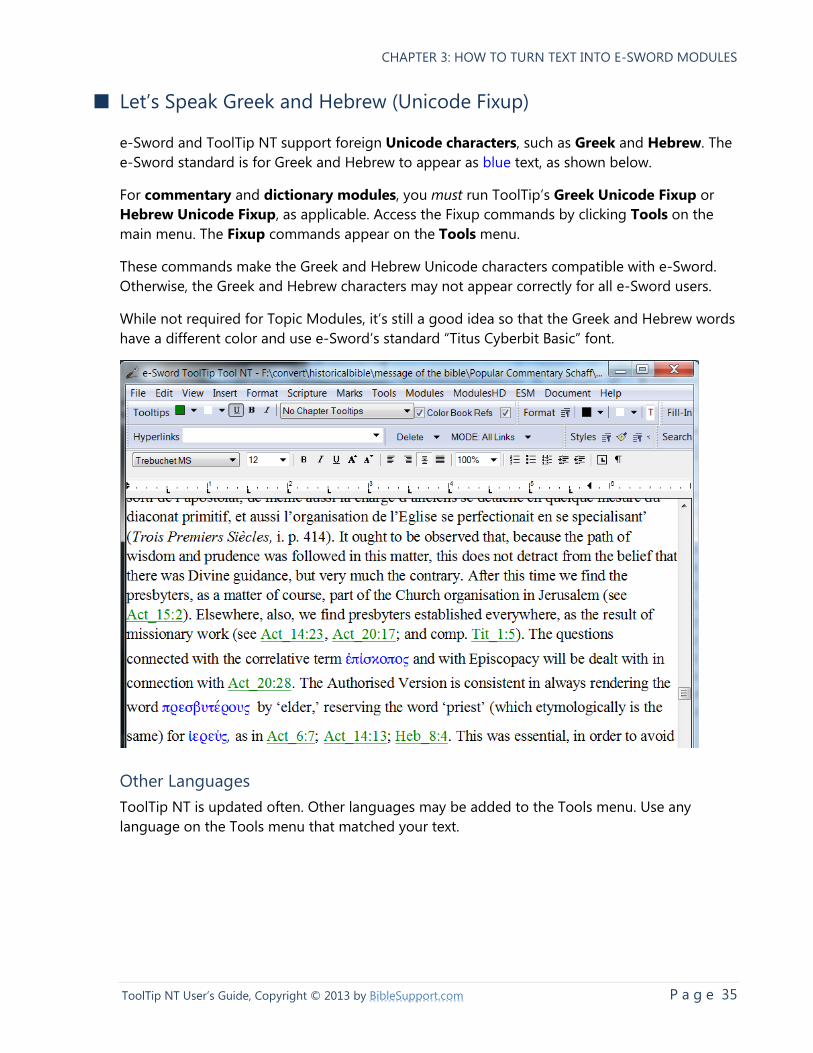
■ Let’s Speak Greek and Hebrew (Unicode Fixup)
e-Sword and ToolTip NT support foreign Unicode characters, such as Greek and Hebrew. The
e-Sword standard is for Greek and Hebrew to appear as blue text, as shown below.
For commentary and dictionary modules, you must run ToolTip’s Greek Unicode Fixup or
Hebrew Unicode Fixup, as applicable. Access the Fixup commands by clicking Tools on the
main menu. The Fixup commands appear on the Tools menu.
These commands make the Greek and Hebrew Unicode characters compatible with e-Sword.
Otherwise, the Greek and Hebrew characters may not appear correctly for all e-Sword users.
While not required for Topic Modules, it’s still a good idea so that the Greek and Hebrew words
have a different color and use e-Sword’s standard “Titus Cyberbit Basic” font.
Other Languages
ToolTip NT is updated often. Other languages may be added to the Tools menu. Use any
language on the Tools menu that matched your text.
CHAPTER 3: HOW TO TURN TEXT INTO E-SWORD MODULES
P a g e 36 ToolTip NT User’s Guide, Copyright © 2013 by BibleSupport.com
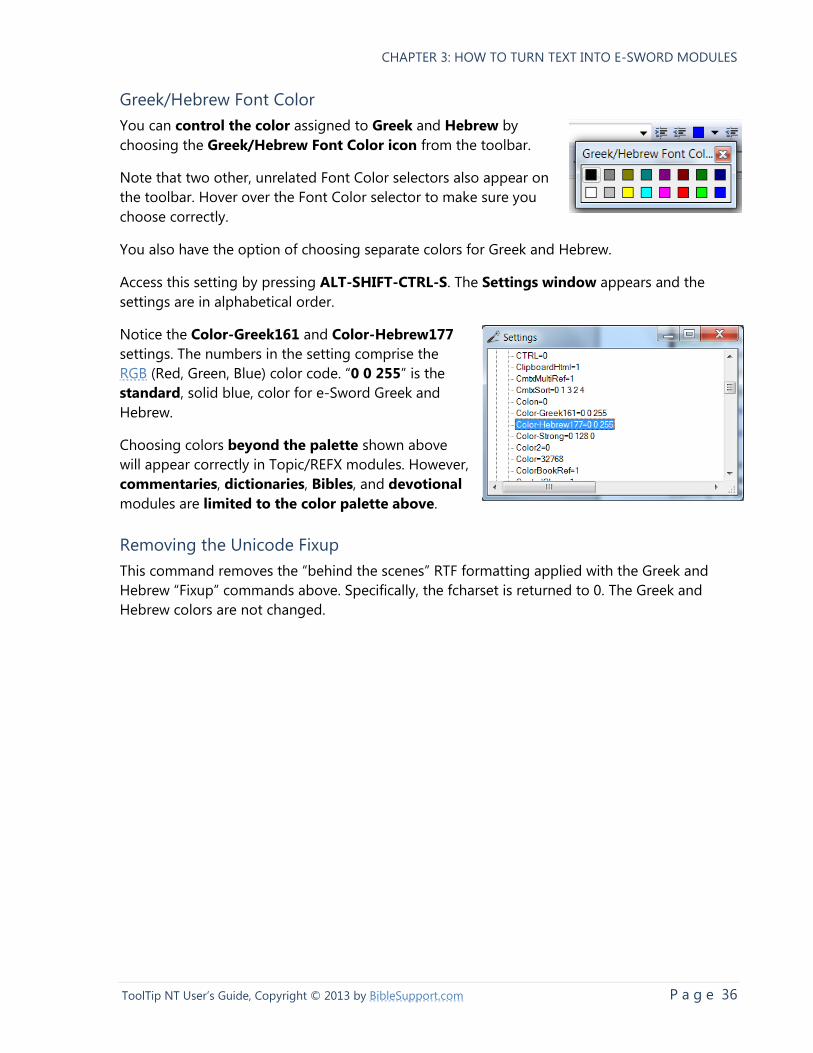
Greek/Hebrew Font Color
You can control the color assigned to Greek and Hebrew by
choosing the Greek/Hebrew Font Color icon from the toolbar.
Note that two other, unrelated Font Color selectors also appear on
the toolbar. Hover over the Font Color selector to make sure you
choose correctly.
You also have the option of choosing separate colors for Greek and Hebrew.
Access this setting by pressing ALT-SHIFT-CTRL-S. The Settings window appears and the
settings are in alphabetical order.
Notice the Color-Greek161 and Color-Hebrew177
settings. The numbers in the setting comprise the
RGB (Red, Green, Blue) color code. “0 0 255” is the
standard, solid blue, color for e-Sword Greek and
Hebrew.
Choosing colors beyond the palette shown above
will appear correctly in Topic/REFX modules. However,
commentaries, dictionaries, Bibles, and devotional
modules are limited to the color palette above.
Removing the Unicode Fixup
This command removes the “behind the scenes” RTF formatting applied with the Greek and
Hebrew “Fixup” commands above. Specifically, the fcharset is returned to 0. The Greek and
Hebrew colors are not changed.
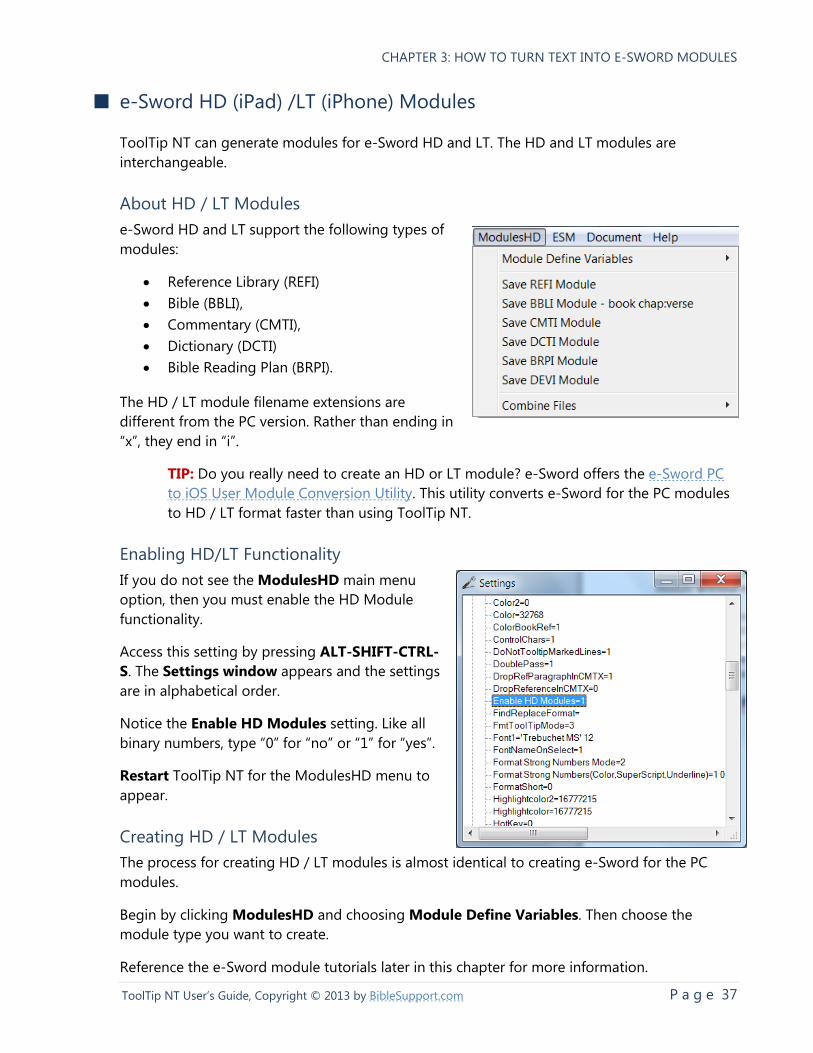
CHAPTER 3: HOW TO TURN TEXT INTO E-SWORD MODULES
P a g e 37 ToolTip NT User’s Guide, Copyright © 2013 by BibleSupport.com
■ e-Sword HD (iPad) /LT (iPhone) Modules
ToolTip NT can generate modules for e-Sword HD and LT. The HD and LT modules are
interchangeable.
About HD / LT Modules
e-Sword HD and LT support the following types of
modules:
Reference Library (REFI)
Bible (BBLI),
Commentary (CMTI),
Dictionary (DCTI)
Bible Reading Plan (BRPI).
The HD / LT module filename extensions are
different from the PC version. Rather than ending in
“x”, they end in “i”.
TIP: Do you really need to create an HD or LT module? e-Sword offers the e-Sword PC
to iOS User Module Conversion Utility. This utility converts e-Sword for the PC modules
to HD / LT format faster than using ToolTip NT.
Enabling HD/LT Functionality
If you do not see the ModulesHD main menu
option, then you must enable the HD Module
functionality.
Access this setting by pressing ALT-SHIFT-CTRL-
S. The Settings window appears and the settings
are in alphabetical order.
Notice the Enable HD Modules setting. Like all
binary numbers, type “0” for “no” or “1” for “yes”.
Restart ToolTip NT for the ModulesHD menu to
appear.
Creating HD / LT Modules
The process for creating HD / LT modules is almost identical to creating e-Sword for the PC
modules.
Begin by clicking ModulesHD and choosing Module Define Variables. Then choose the
module type you want to create.
Reference the e-Sword module tutorials later in this chapter for more information.
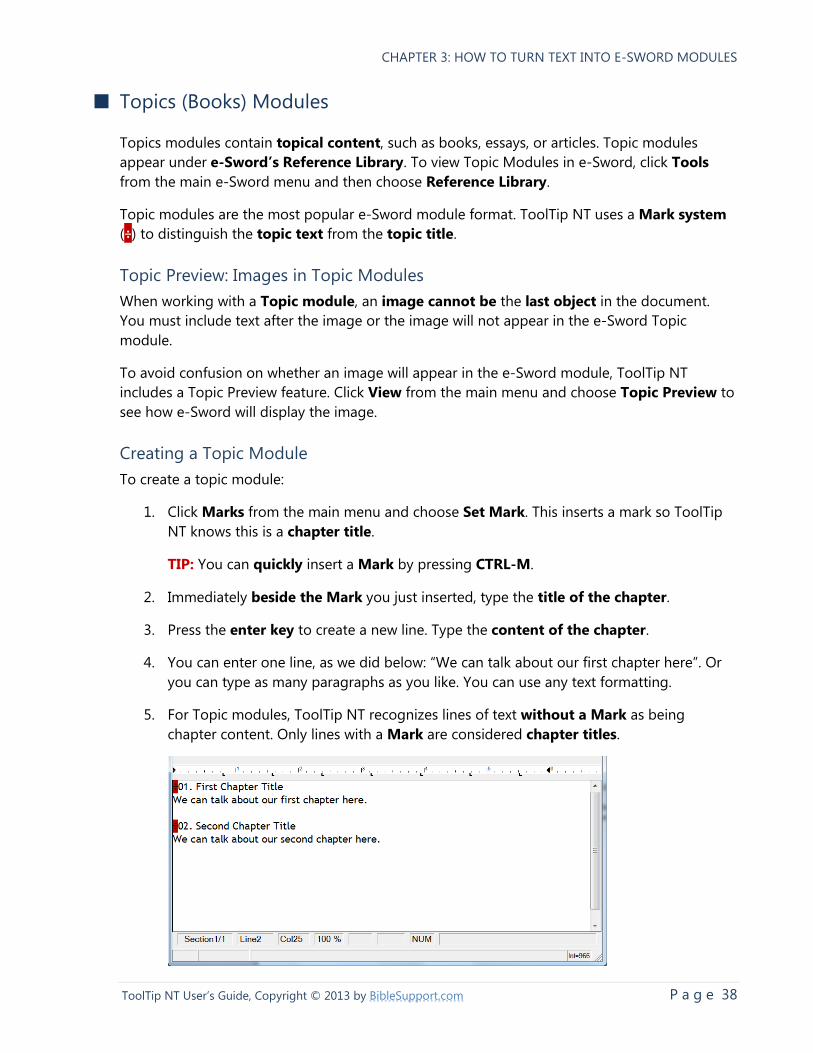
CHAPTER 3: HOW TO TURN TEXT INTO E-SWORD MODULES
P a g e 38 ToolTip NT User’s Guide, Copyright © 2013 by BibleSupport.com
■ Topics (Books) Modules
Topics modules contain topical content, such as books, essays, or articles. Topic modules
appear under e-Sword’s Reference Library. To view Topic Modules in e-Sword, click Tools
from the main e-Sword menu and then choose Reference Library.
Topic modules are the most popular e-Sword module format. ToolTip NT uses a Mark system
(÷) to distinguish the topic text from the topic title.
Topic Preview: Images in Topic Modules
When working with a Topic module, an image cannot be the last object in the document.
You must include text after the image or the image will not appear in the e-Sword Topic
module.
To avoid confusion on whether an image will appear in the e-Sword module, ToolTip NT
includes a Topic Preview feature. Click View from the main menu and choose Topic Preview to
see how e-Sword will display the image.
Creating a Topic Module
To create a topic module:
1. Click Marks from the main menu and choose Set Mark. This inserts a mark so ToolTip
NT knows this is a chapter title.
TIP: You can quickly insert a Mark by pressing CTRL-M.
2. Immediately beside the Mark you just inserted, type the title of the chapter.
3. Press the enter key to create a new line. Type the content of the chapter.
4. You can enter one line, as we did below: “We can talk about our first chapter here”. Or
you can type as many paragraphs as you like. You can use any text formatting.
5. For Topic modules, ToolTip NT recognizes lines of text without a Mark as being
chapter content. Only lines with a Mark are considered chapter titles.
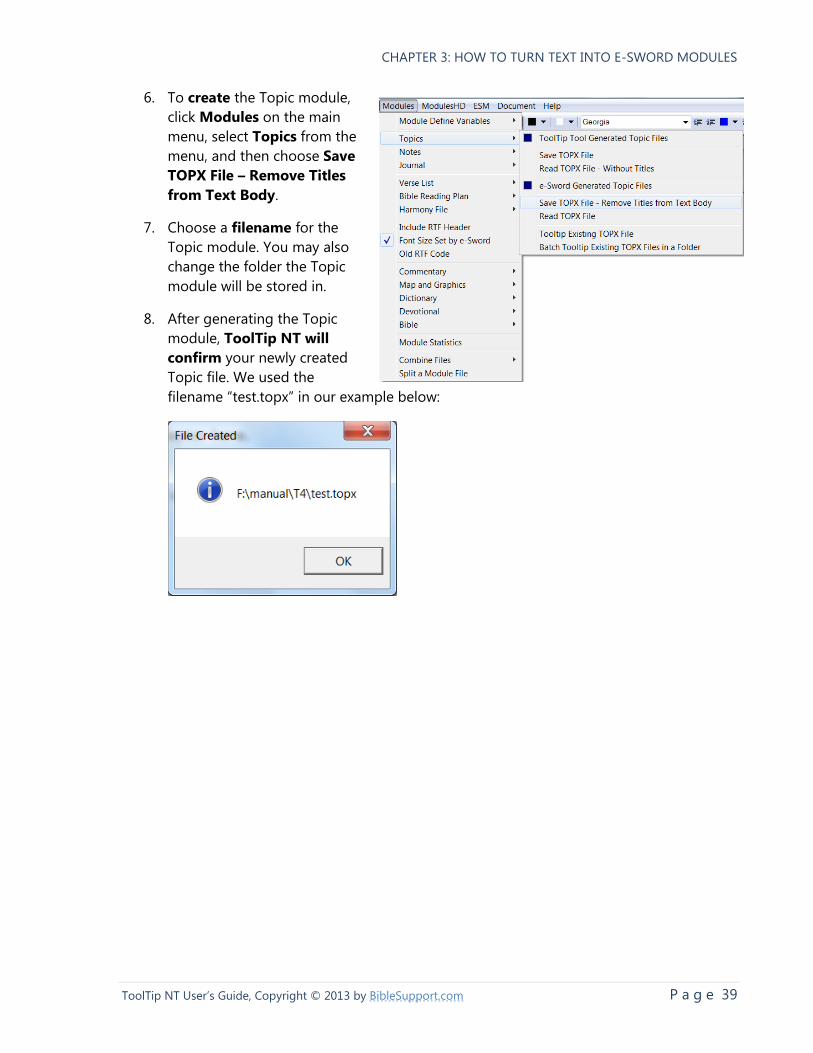
CHAPTER 3: HOW TO TURN TEXT INTO E-SWORD MODULES
P a g e 39 ToolTip NT User’s Guide, Copyright © 2013 by BibleSupport.com
6. To create the Topic module,
click Modules on the main
menu, select Topics from the
menu, and then choose Save
TOPX File – Remove Titles
from Text Body.
7. Choose a filename for the
Topic module. You may also
change the folder the Topic
module will be stored in.
8. After generating the Topic
module, ToolTip NT will
confirm your newly created
Topic file. We used the
filename “test.topx” in our example below:
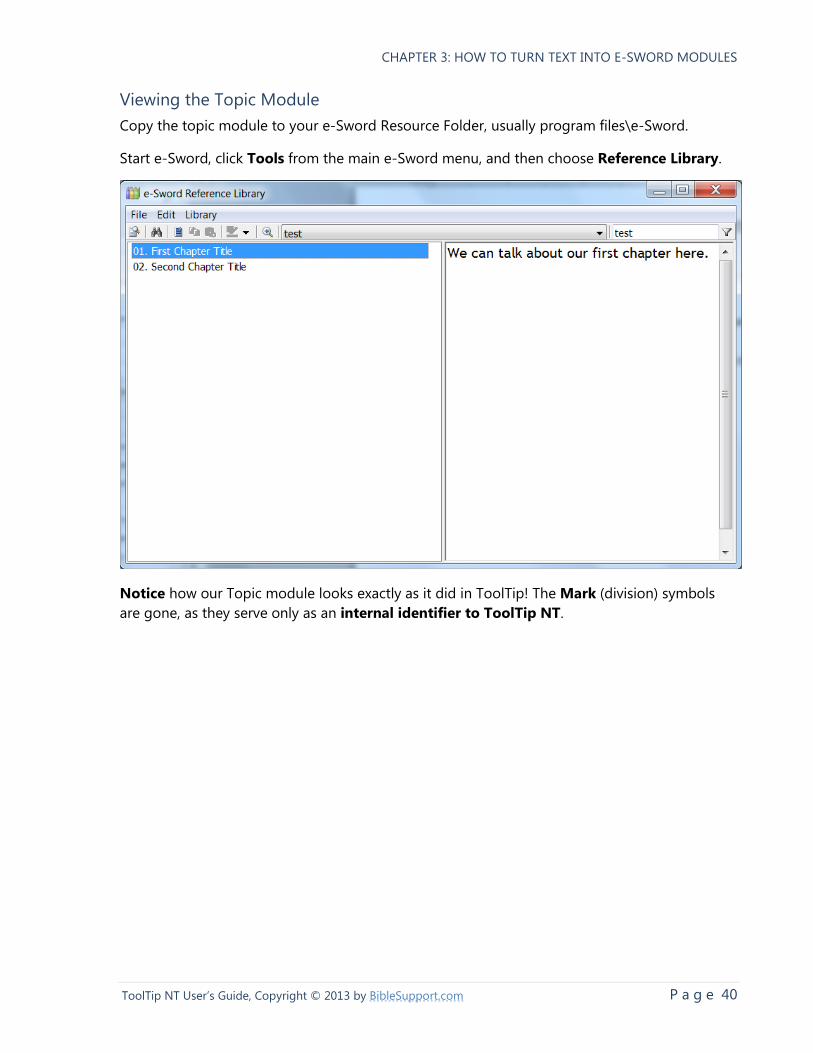
CHAPTER 3: HOW TO TURN TEXT INTO E-SWORD MODULES
P a g e 40 ToolTip NT User’s Guide, Copyright © 2013 by BibleSupport.com
Viewing the Topic Module
Copy the topic module to your e-Sword Resource Folder, usually program files\e-Sword.
Start e-Sword, click Tools from the main e-Sword menu, and then choose Reference Library.
Notice how our Topic module looks exactly as it did in ToolTip! The Mark (division) symbols
are gone, as they serve only as an internal identifier to ToolTip NT.
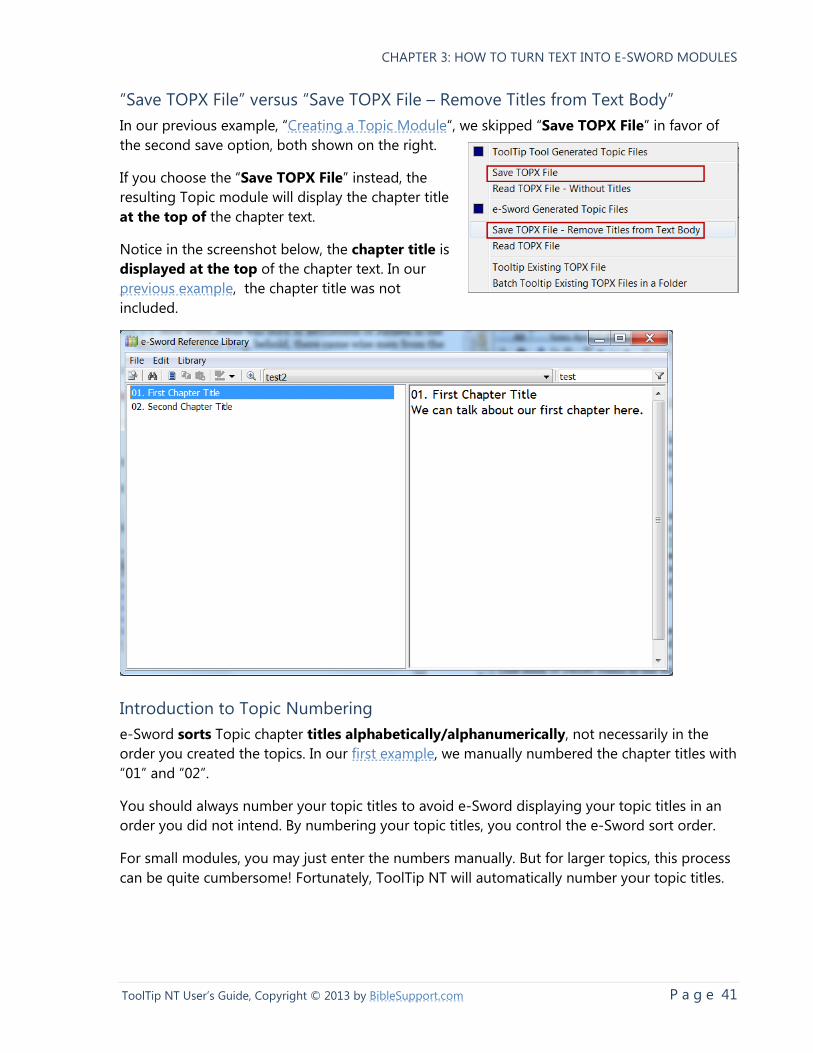
CHAPTER 3: HOW TO TURN TEXT INTO E-SWORD MODULES
P a g e 41 ToolTip NT User’s Guide, Copyright © 2013 by BibleSupport.com
“Save TOPX File” versus “Save TOPX File – Remove Titles from Text Body”
In our previous example, “Creating a Topic Module“, we skipped “Save TOPX File” in favor of
the second save option, both shown on the right.
If you choose the “Save TOPX File” instead, the
resulting Topic module will display the chapter title
at the top of the chapter text.
Notice in the screenshot below, the chapter title is
displayed at the top of the chapter text. In our
previous example, the chapter title was not
included.
Introduction to Topic Numbering
e-Sword sorts Topic chapter titles alphabetically/alphanumerically, not necessarily in the
order you created the topics. In our first example, we manually numbered the chapter titles with
“01” and “02”.
You should always number your topic titles to avoid e-Sword displaying your topic titles in an
order you did not intend. By numbering your topic titles, you control the e-Sword sort order.
For small modules, you may just enter the numbers manually. But for larger topics, this process
can be quite cumbersome! Fortunately, ToolTip NT will automatically number your topic titles.
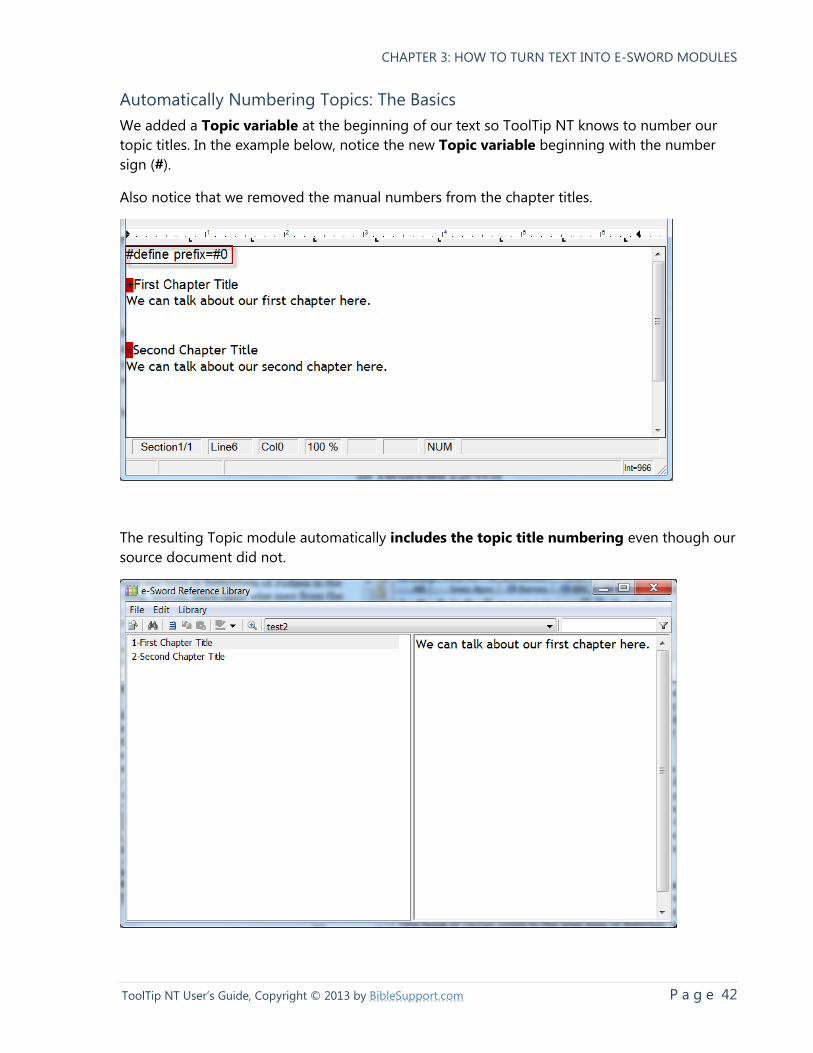
CHAPTER 3: HOW TO TURN TEXT INTO E-SWORD MODULES
P a g e 42 ToolTip NT User’s Guide, Copyright © 2013 by BibleSupport.com
Automatically Numbering Topics: The Basics
We added a Topic variable at the beginning of our text so ToolTip NT knows to number our
topic titles. In the example below, notice the new Topic variable beginning with the number
sign (#).
Also notice that we removed the manual numbers from the chapter titles.
The resulting Topic module automatically includes the topic title numbering even though our
source document did not.

CHAPTER 3: HOW TO TURN TEXT INTO E-SWORD MODULES
P a g e 43 ToolTip NT User’s Guide, Copyright © 2013 by BibleSupport.com
Automatically Numbering Topics: Style of Numbering
In the example on the previous page, notice a dash appears between the number and the
start of the chapter title text. If you need to control which characters appear between the
number and the start of the chapter title, you may add a second Topic variable:
The character(s) inside the quotation marks will be added between the chapter title number
and the chapter title text. In this example, a dot and a space will be added because of the red
highlighted line above.
The resulting Topic module now appears with the new characters (a dot and space) instead of
the dash:
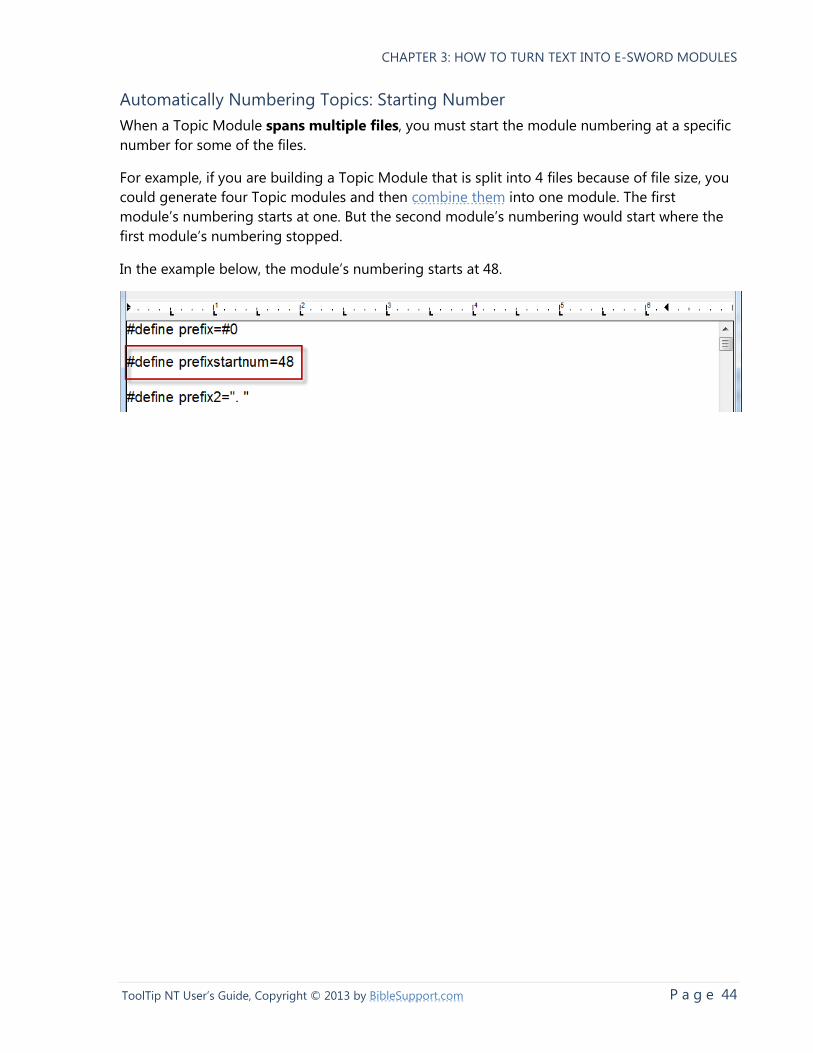
CHAPTER 3: HOW TO TURN TEXT INTO E-SWORD MODULES
P a g e 44 ToolTip NT User’s Guide, Copyright © 2013 by BibleSupport.com
Automatically Numbering Topics: Starting Number
When a Topic Module spans multiple files, you must start the module numbering at a specific
number for some of the files.
For example, if you are building a Topic Module that is split into 4 files because of file size, you
could generate four Topic modules and then combine them into one module. The first
module’s numbering starts at one. But the second module’s numbering would start where the
first module’s numbering stopped.
In the example below, the module’s numbering starts at 48.
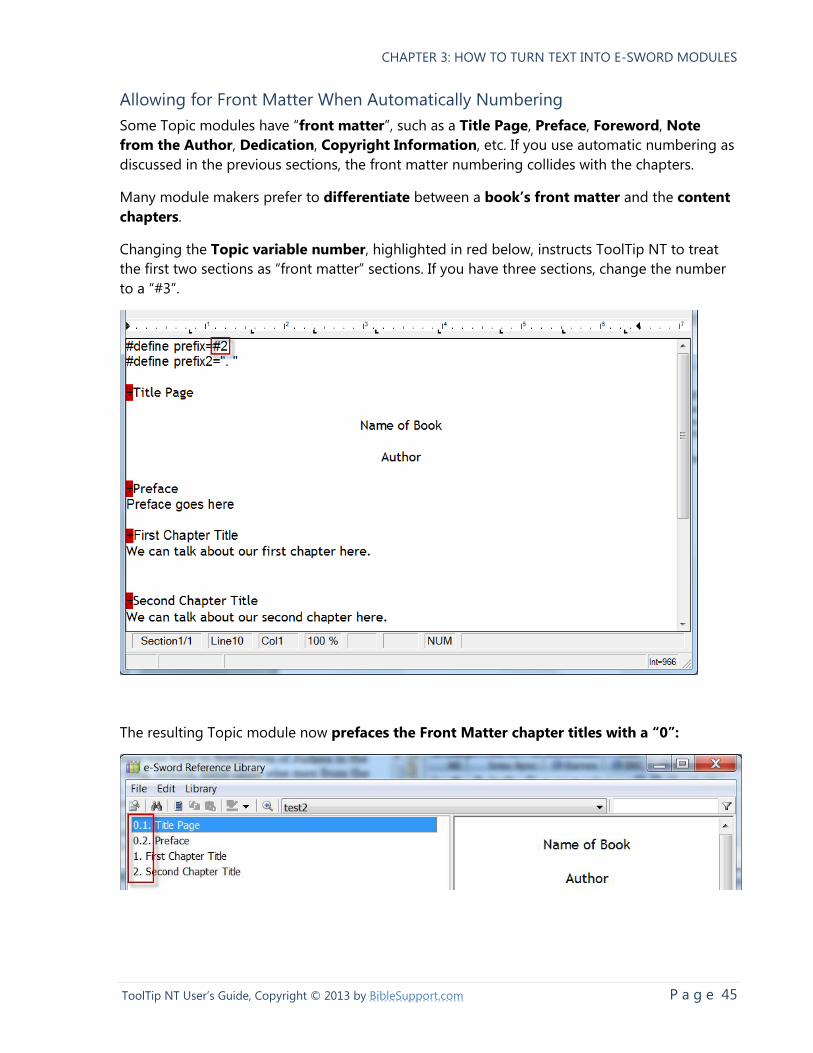
CHAPTER 3: HOW TO TURN TEXT INTO E-SWORD MODULES
P a g e 45 ToolTip NT User’s Guide, Copyright © 2013 by BibleSupport.com
Allowing for Front Matter When Automatically Numbering
Some Topic modules have “front matter”, such as a Title Page, Preface, Foreword, Note
from the Author, Dedication, Copyright Information, etc. If you use automatic numbering as
discussed in the previous sections, the front matter numbering collides with the chapters.
Many module makers prefer to differentiate between a book’s front matter and the content
chapters.
Changing the Topic variable number, highlighted in red below, instructs ToolTip NT to treat
the first two sections as “front matter” sections. If you have three sections, change the number
to a “#3”.
The resulting Topic module now prefaces the Front Matter chapter titles with a “0”:
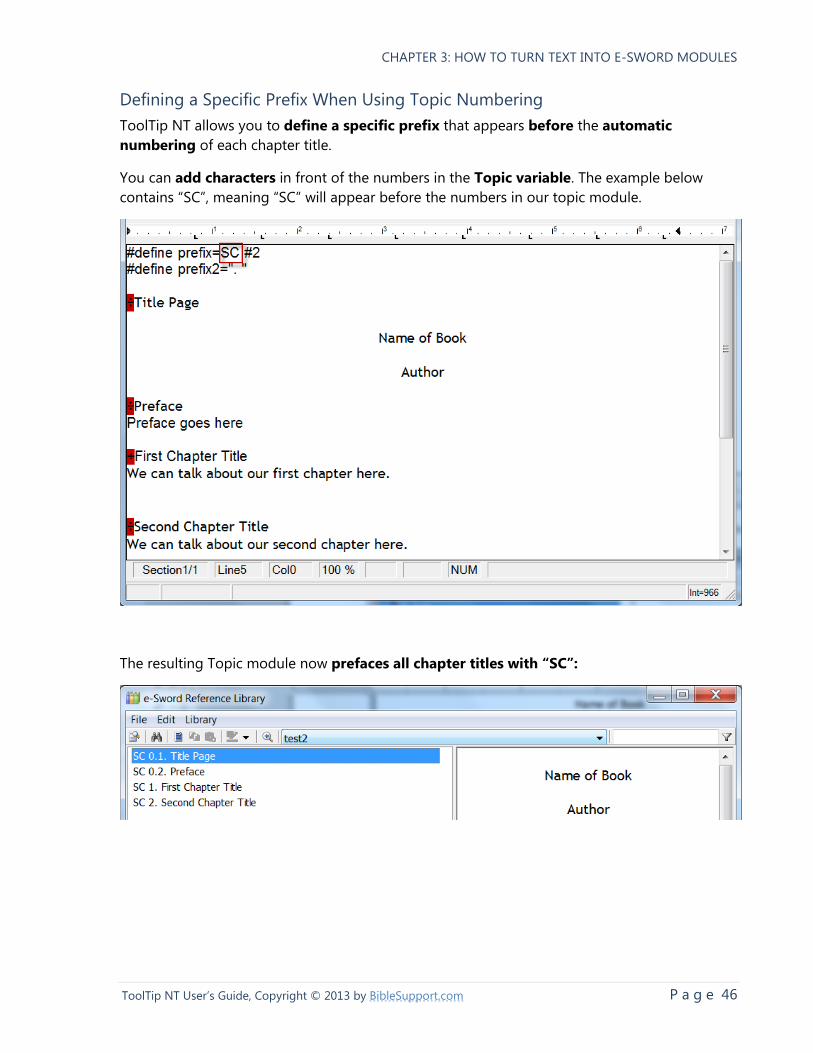
CHAPTER 3: HOW TO TURN TEXT INTO E-SWORD MODULES
P a g e 46 ToolTip NT User’s Guide, Copyright © 2013 by BibleSupport.com
Defining a Specific Prefix When Using Topic Numbering
ToolTip NT allows you to define a specific prefix that appears before the automatic
numbering of each chapter title.
You can add characters in front of the numbers in the Topic variable. The example below
contains “SC”, meaning “SC” will appear before the numbers in our topic module.
The resulting Topic module now prefaces all chapter titles with “SC”:
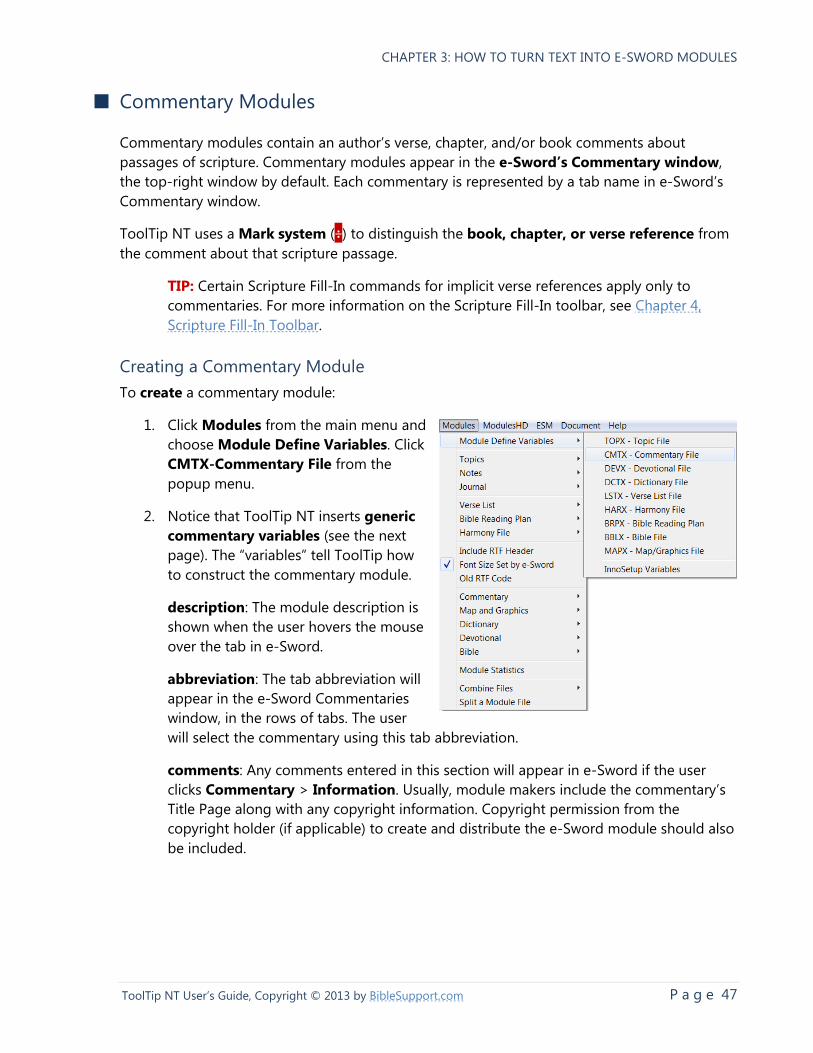
CHAPTER 3: HOW TO TURN TEXT INTO E-SWORD MODULES
P a g e 47 ToolTip NT User’s Guide, Copyright © 2013 by BibleSupport.com
■ Commentary Modules
Commentary modules contain an author’s verse, chapter, and/or book comments about
passages of scripture. Commentary modules appear in the e-Sword’s Commentary window,
the top-right window by default. Each commentary is represented by a tab name in e-Sword’s
Commentary window.
ToolTip NT uses a Mark system (÷) to distinguish the book, chapter, or verse reference from
the comment about that scripture passage.
TIP: Certain Scripture Fill-In commands for implicit verse references apply only to
commentaries. For more information on the Scripture Fill-In toolbar, see Chapter 4,
Scripture Fill-In Toolbar.
Creating a Commentary Module
To create a commentary module:
1. Click Modules from the main menu and
choose Module Define Variables. Click
CMTX-Commentary File from the
popup menu.
2. Notice that ToolTip NT inserts generic
commentary variables (see the next
page). The “variables” tell ToolTip how
to construct the commentary module.
description: The module description is
shown when the user hovers the mouse
over the tab in e-Sword.
abbreviation: The tab abbreviation will
appear in the e-Sword Commentaries
window, in the rows of tabs. The user
will select the commentary using this tab abbreviation.
comments: Any comments entered in this section will appear in e-Sword if the user
clicks Commentary > Information. Usually, module makers include the commentary’s
Title Page along with any copyright information. Copyright permission from the
copyright holder (if applicable) to create and distribute the e-Sword module should also
be included.
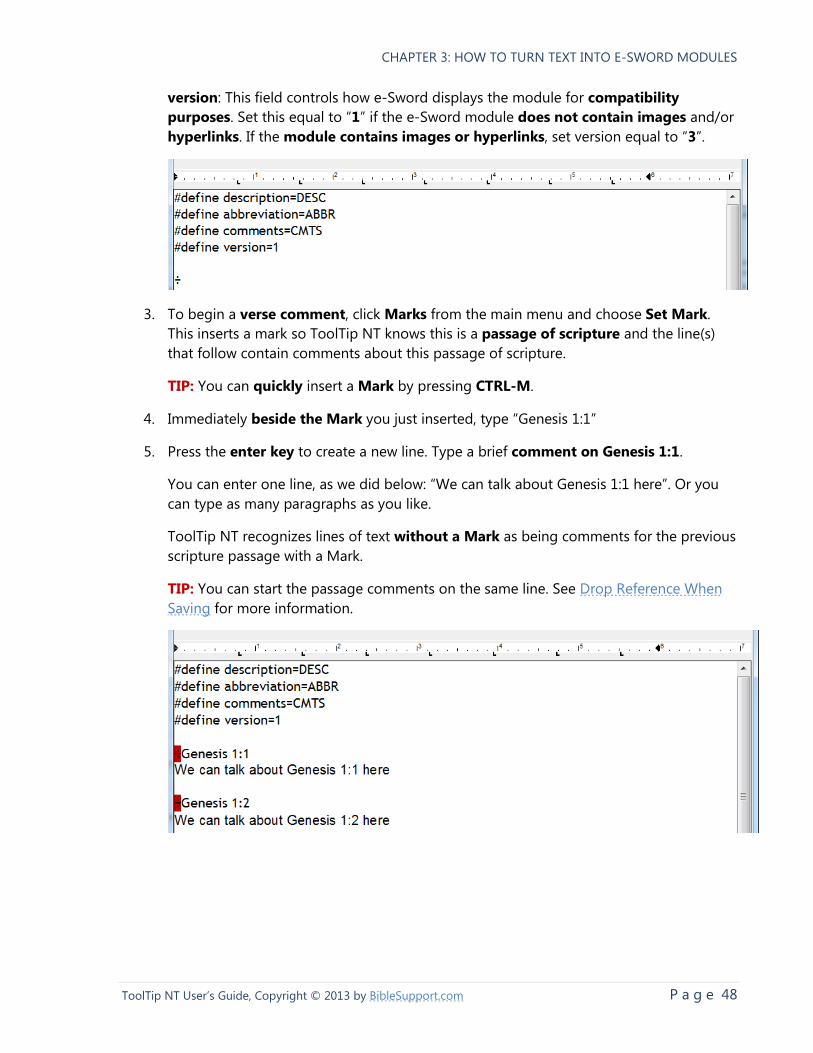
CHAPTER 3: HOW TO TURN TEXT INTO E-SWORD MODULES
P a g e 48 ToolTip NT User’s Guide, Copyright © 2013 by BibleSupport.com
version: This field controls how e-Sword displays the module for compatibility
purposes. Set this equal to “1” if the e-Sword module does not contain images and/or
hyperlinks. If the module contains images or hyperlinks, set version equal to “3”.
3. To begin a verse comment, click Marks from the main menu and choose Set Mark.
This inserts a mark so ToolTip NT knows this is a passage of scripture and the line(s)
that follow contain comments about this passage of scripture.
TIP: You can quickly insert a Mark by pressing CTRL-M.
4. Immediately beside the Mark you just inserted, type “Genesis 1:1”
5. Press the enter key to create a new line. Type a brief comment on Genesis 1:1.
You can enter one line, as we did below: “We can talk about Genesis 1:1 here”. Or you
can type as many paragraphs as you like.
ToolTip NT recognizes lines of text without a Mark as being comments for the previous
scripture passage with a Mark.
TIP: You can start the passage comments on the same line. See Drop Reference When
Saving for more information.
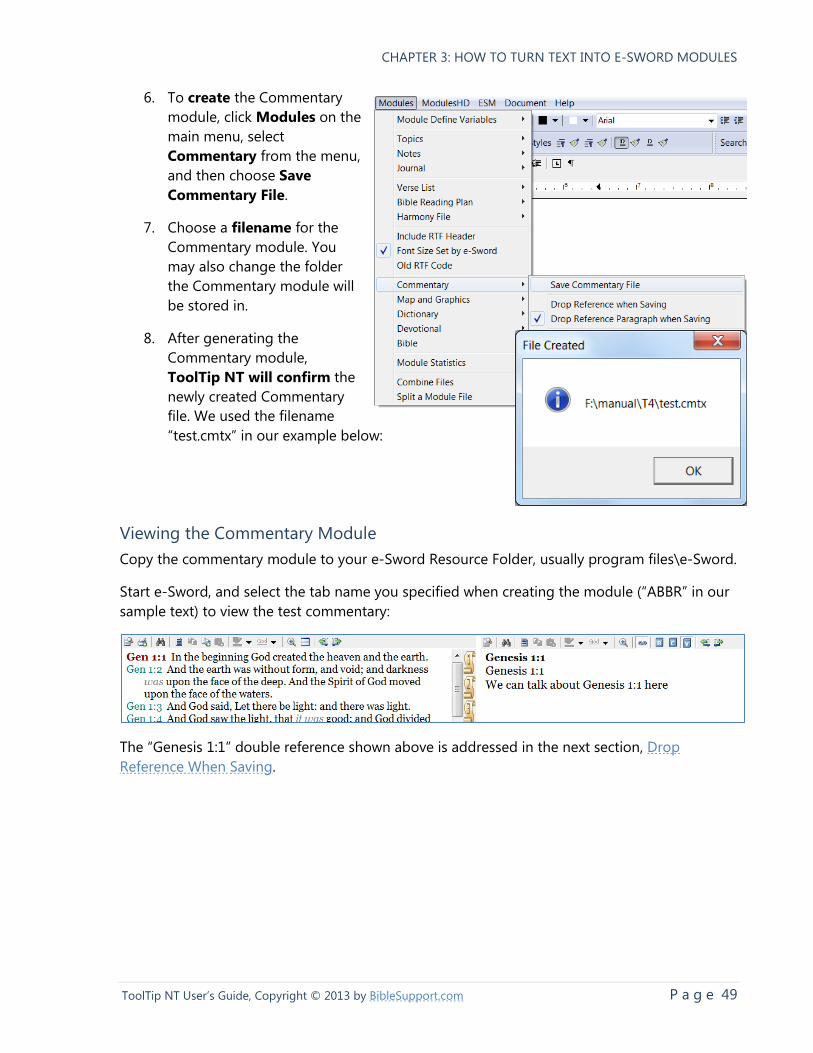
CHAPTER 3: HOW TO TURN TEXT INTO E-SWORD MODULES
P a g e 49 ToolTip NT User’s Guide, Copyright © 2013 by BibleSupport.com
6. To create the Commentary
module, click Modules on the
main menu, select
Commentary from the menu,
and then choose Save
Commentary File.
7. Choose a filename for the
Commentary module. You
may also change the folder
the Commentary module will
be stored in.
8. After generating the
Commentary module,
ToolTip NT will confirm the
newly created Commentary
file. We used the filename
“test.cmtx” in our example below:
Viewing the Commentary Module
Copy the commentary module to your e-Sword Resource Folder, usually program files\e-Sword.
Start e-Sword, and select the tab name you specified when creating the module (“ABBR” in our
sample text) to view the test commentary:
The “Genesis 1:1” double reference shown above is addressed in the next section, Drop
Reference When Saving.
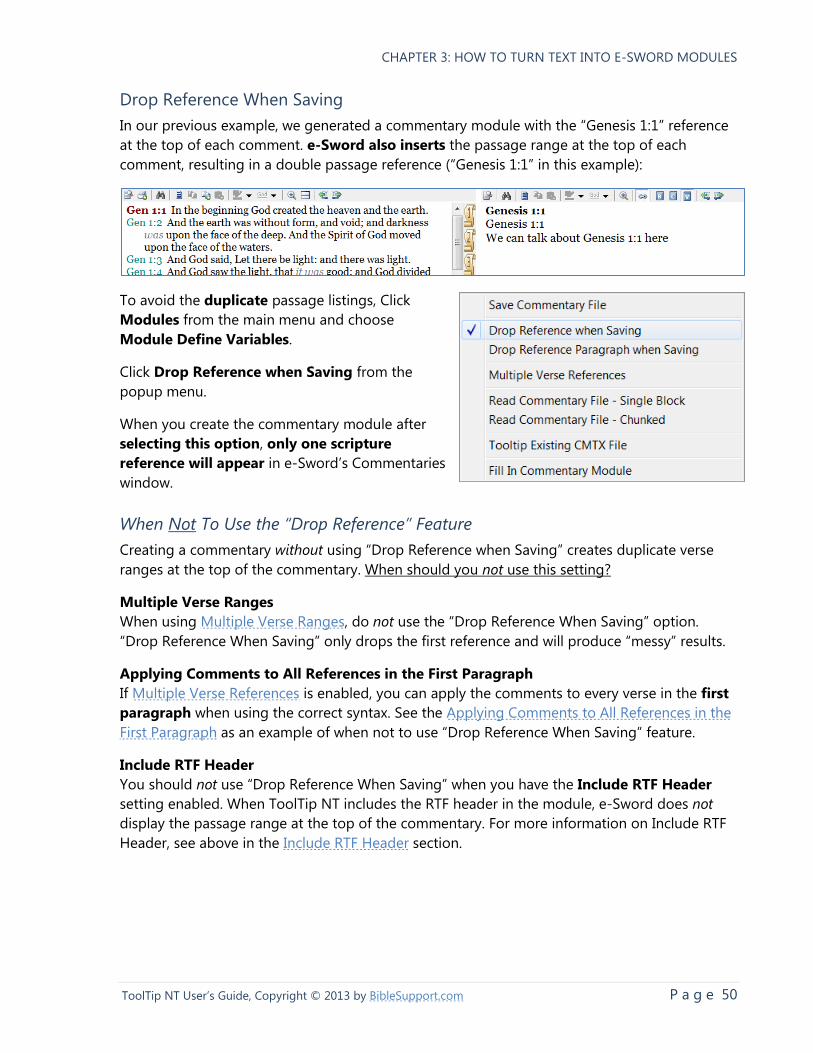
CHAPTER 3: HOW TO TURN TEXT INTO E-SWORD MODULES
P a g e 50 ToolTip NT User’s Guide, Copyright © 2013 by BibleSupport.com
Drop Reference When Saving
In our previous example, we generated a commentary module with the “Genesis 1:1” reference
at the top of each comment. e-Sword also inserts the passage range at the top of each
comment, resulting in a double passage reference (“Genesis 1:1” in this example):
To avoid the duplicate passage listings, Click
Modules from the main menu and choose
Module Define Variables.
Click Drop Reference when Saving from the
popup menu.
When you create the commentary module after
selecting this option, only one scripture
reference will appear in e-Sword’s Commentaries
window.
When Not To Use the “Drop Reference” Feature
Creating a commentary without using “Drop Reference when Saving” creates duplicate verse
ranges at the top of the commentary. When should you not use this setting?
Multiple Verse Ranges
When using Multiple Verse Ranges, do not use the “Drop Reference When Saving” option.
“Drop Reference When Saving” only drops the first reference and will produce “messy” results.
Applying Comments to All References in the First Paragraph
If Multiple Verse References is enabled, you can apply the comments to every verse in the first
paragraph when using the correct syntax. See the Applying Comments to All References in the
First Paragraph as an example of when not to use “Drop Reference When Saving” feature.
Include RTF Header
You should not use “Drop Reference When Saving” when you have the Include RTF Header
setting enabled. When ToolTip NT includes the RTF header in the module, e-Sword does not
display the passage range at the top of the commentary. For more information on Include RTF
Header, see above in the Include RTF Header section.
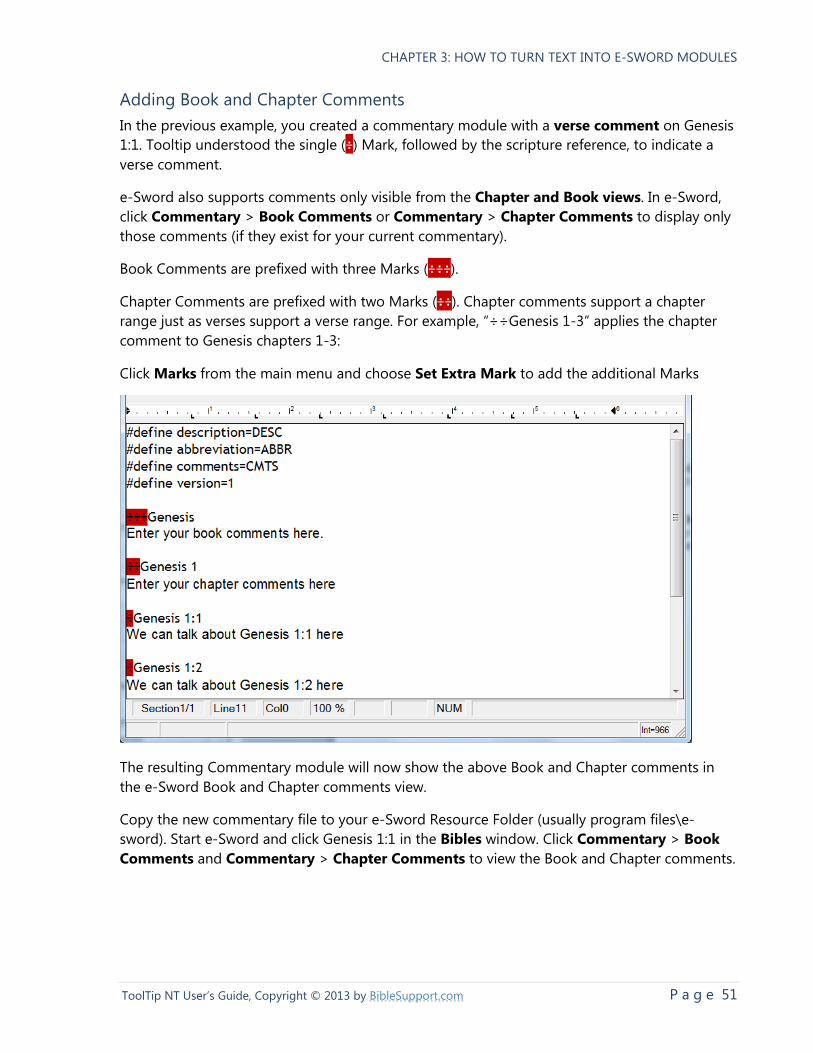
CHAPTER 3: HOW TO TURN TEXT INTO E-SWORD MODULES
P a g e 51 ToolTip NT User’s Guide, Copyright © 2013 by BibleSupport.com
Adding Book and Chapter Comments
In the previous example, you created a commentary module with a verse comment on Genesis
1:1. Tooltip understood the single (÷) Mark, followed by the scripture reference, to indicate a
verse comment.
e-Sword also supports comments only visible from the Chapter and Book views. In e-Sword,
click Commentary > Book Comments or Commentary > Chapter Comments to display only
those comments (if they exist for your current commentary).
Book Comments are prefixed with three Marks (÷÷÷).
Chapter Comments are prefixed with two Marks (÷÷). Chapter comments support a chapter
range just as verses support a verse range. For example, “÷÷Genesis 1-3” applies the chapter
comment to Genesis chapters 1-3:
Click Marks from the main menu and choose Set Extra Mark to add the additional Marks
The resulting Commentary module will now show the above Book and Chapter comments in
the e-Sword Book and Chapter comments view.
Copy the new commentary file to your e-Sword Resource Folder (usually program files\e-
sword). Start e-Sword and click Genesis 1:1 in the Bibles window. Click Commentary > Book
Comments and Commentary > Chapter Comments to view the Book and Chapter comments.
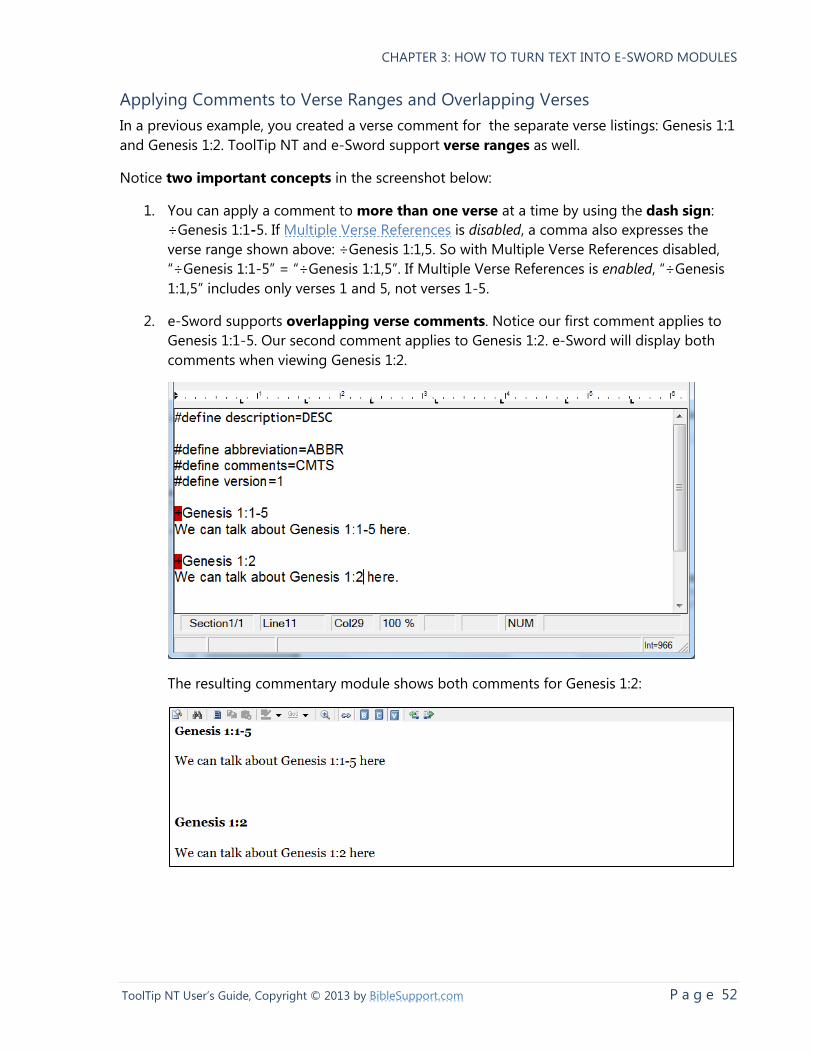
CHAPTER 3: HOW TO TURN TEXT INTO E-SWORD MODULES
P a g e 52 ToolTip NT User’s Guide, Copyright © 2013 by BibleSupport.com
Applying Comments to Verse Ranges and Overlapping Verses
In a previous example, you created a verse comment for the separate verse listings: Genesis 1:1
and Genesis 1:2. ToolTip NT and e-Sword support verse ranges as well.
Notice two important concepts in the screenshot below:
1. You can apply a comment to more than one verse at a time by using the dash sign:
÷Genesis 1:1-5. If Multiple Verse References is disabled, a comma also expresses the
verse range shown above: ÷Genesis 1:1,5. So with Multiple Verse References disabled,
“÷Genesis 1:1-5” = “÷Genesis 1:1,5”. If Multiple Verse References is enabled, “÷Genesis
1:1,5” includes only verses 1 and 5, not verses 1-5.
2. e-Sword supports overlapping verse comments. Notice our first comment applies to
Genesis 1:1-5. Our second comment applies to Genesis 1:2. e-Sword will display both
comments when viewing Genesis 1:2.
The resulting commentary module shows both comments for Genesis 1:2:

CHAPTER 3: HOW TO TURN TEXT INTO E-SWORD MODULES
P a g e 53 ToolTip NT User’s Guide, Copyright © 2013 by BibleSupport.com
Applying Comments to Multiple Verse References
ToolTip NT also supports multiple verse references for a single comment. Don’t confuse this
functionality with Applying Comments Across Chapter Boundaries in a Singular Reference. In
the screenshot below, we apply the same comment to Genesis 1:1-3 and Genesis 1:10-12.
This saves tedious copying and pasting! The text occurs only once but can be applied to
multiple passages of scripture.
COMMA VERSUS DASH: If Multiple Verse References is enabled, the comments for
“÷Genesis 1:1,5” apply only to verses 1 and 5, not verses 1-5. If Multiple Verse
References is disabled, the comma causes the comments to apply to verses 1-5, not
verses 1 and 5. So with Multiple Verse References disabled, “÷Genesis 1:1-5” =
“÷Genesis 1:1,5”.
WARNING: Unfortunately, you cannot use the Drop Reference When Saving option
when using Multiple Verse Comments. “Drop Reference When Saving” only drops the
first reference and will produce “messy” results. The two features are not designed to
work together.
This warning largely negates the use of Multiple Verse Comments, except in connection
with the next section, Applying Comments to All References in the First Paragraph.
Since “Drop Reference When Saving” is disallowed, you will have double passage
references at the beginning of each commentary note.
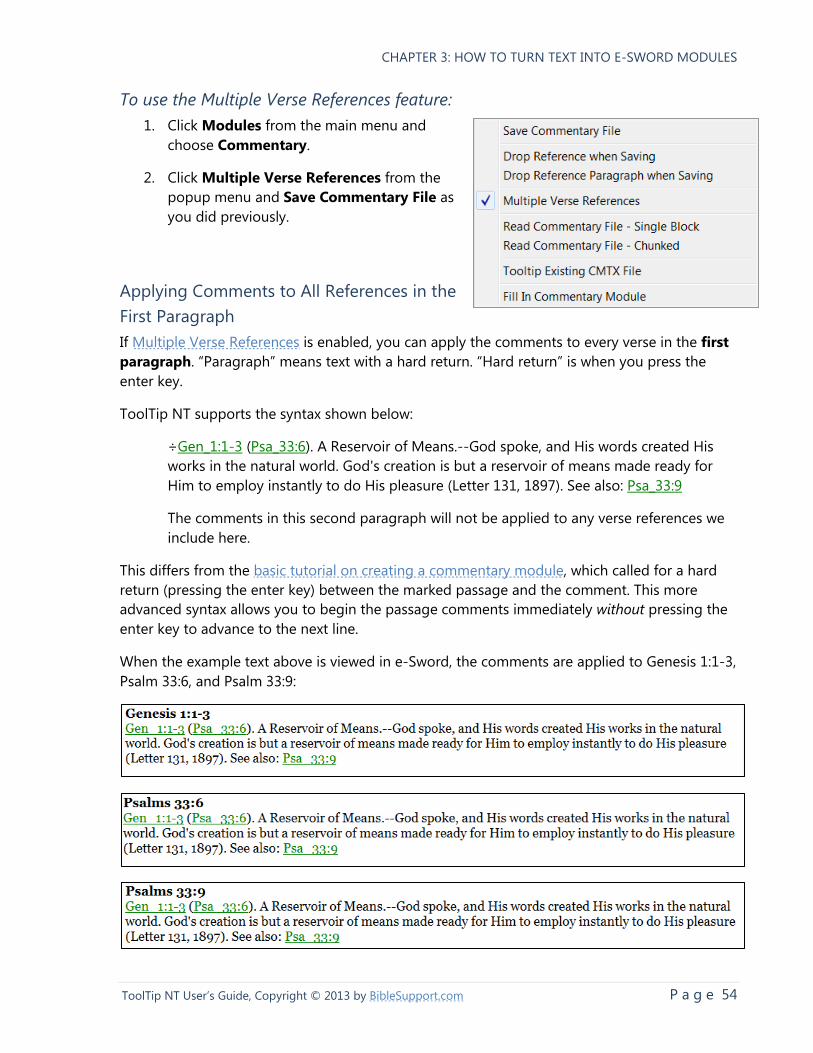
CHAPTER 3: HOW TO TURN TEXT INTO E-SWORD MODULES
P a g e 54 ToolTip NT User’s Guide, Copyright © 2013 by BibleSupport.com
To use the Multiple Verse References feature:
1. Click Modules from the main menu and
choose Commentary.
2. Click Multiple Verse References from the
popup menu and Save Commentary File as
you did previously.
Applying Comments to All References in the
First Paragraph
If Multiple Verse References is enabled, you can apply the comments to every verse in the first
paragraph. “Paragraph” means text with a hard return. “Hard return” is when you press the
enter key.
ToolTip NT supports the syntax shown below:
÷Gen_1:1-3 (Psa_33:6). A Reservoir of Means.--God spoke, and His words created His
works in the natural world. God's creation is but a reservoir of means made ready for
Him to employ instantly to do His pleasure (Letter 131, 1897). See also: Psa_33:9
The comments in this second paragraph will not be applied to any verse references we
include here.
This differs from the basic tutorial on creating a commentary module, which called for a hard
return (pressing the enter key) between the marked passage and the comment. This more
advanced syntax allows you to begin the passage comments immediately without pressing the
enter key to advance to the next line.
When the example text above is viewed in e-Sword, the comments are applied to Genesis 1:1-3,
Psalm 33:6, and Psalm 33:9:
CHAPTER 3: HOW TO TURN TEXT INTO E-SWORD MODULES
P a g e 55 ToolTip NT User’s Guide, Copyright © 2013 by BibleSupport.com
Applying Comments Across Chapter Boundaries in a Singular Reference
ToolTip NT will apply a single comment across chapter boundaries if just one marked
passage reference exists and the passage reference is not tooltipped.
Notice the marked passage reference, “John 1:1-3:2”, below is not tooltipped:
÷John 1:1-3:2
Your comments here
The reference spans chapter boundaries: John 1, John 2, and John 3. But the range is singular—
there are not any breaks forming more than one physical reference.
What Happens if John 1:1-3:2 Above Is Tooltipped?
The tooltipped reference becomes:
÷Joh_1:1-51; Joh_2:1-25; Joh_3:1-2
Notice the reference is no longer singular. Now, more than one physical reference exists. If you
create a module from the above text, the comment will only apply to John 1:1-51, not the other
two passages! If you must have the references in this format (multiple physical references), you
must use Multiple Verse References for the comments to apply to each reference.
SYNTAX WARNING: ToolTip NT recognizes our above example, “÷John 1:1-3:2”.
ToolTip NT also recognizes “÷John 1-3”. However, ToolTip NT will not recognize “÷John
1-3:2”.
You cannot include a verse on one side of the chapter reference without also including a
verse on the other side. Thus, while “÷John 1-3:2” is not valid, “John 1:1-3:2” is valid.
Unfortunately, if you use “÷John 1-3:2”, ToolTip NT will not show an error. The
comments for the passage will simply not be inserted properly into the database!
Preventing Marked Passage References From Being Tooltipped
The key to applying comments across chapter boundaries is to prevent the marked passage
reference from being tooltipped.
ToolTip NT offers three options to prevent a marked passage reference from being tooltipped:
Enable Do Not Tooltip Marked Reference during tooltipping
Enable No Chapter Tooltips during tooltipping
Manually insert three backslashes between the book name and the chapter.
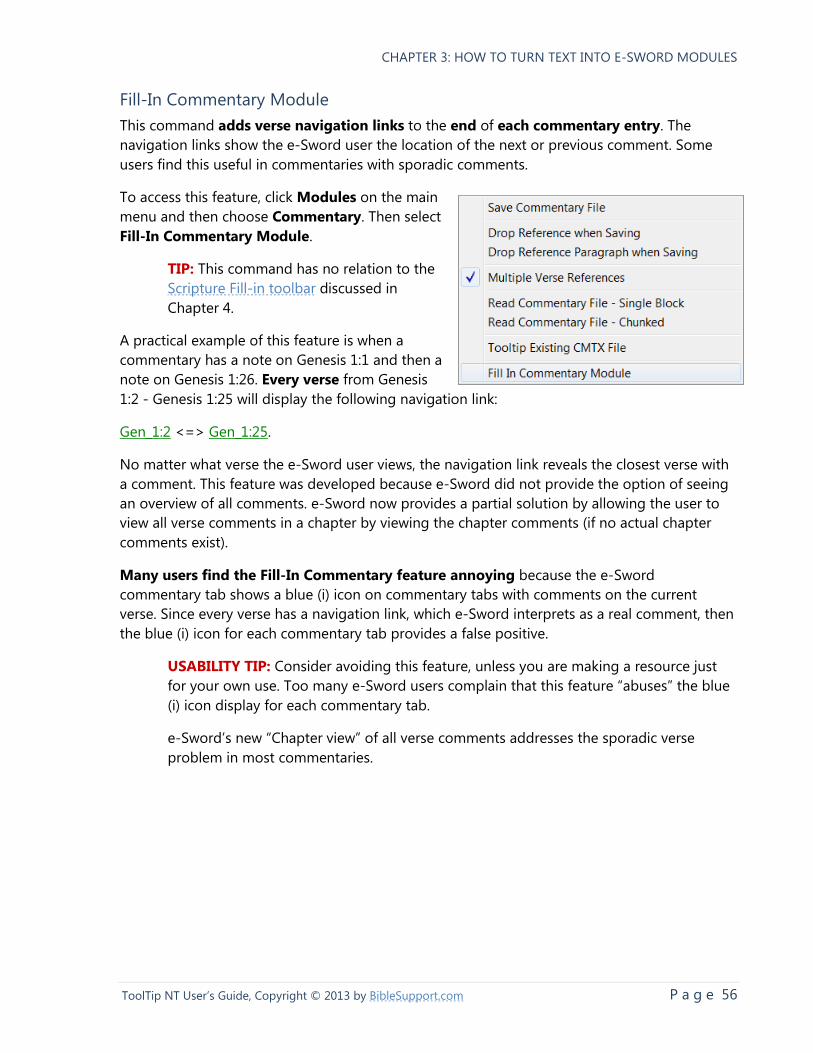
CHAPTER 3: HOW TO TURN TEXT INTO E-SWORD MODULES
P a g e 56 ToolTip NT User’s Guide, Copyright © 2013 by BibleSupport.com
Fill-In Commentary Module
This command adds verse navigation links to the end of each commentary entry. The
navigation links show the e-Sword user the location of the next or previous comment. Some
users find this useful in commentaries with sporadic comments.
To access this feature, click Modules on the main
menu and then choose Commentary. Then select
Fill-In Commentary Module.
TIP: This command has no relation to the
Scripture Fill-in toolbar discussed in
Chapter 4.
A practical example of this feature is when a
commentary has a note on Genesis 1:1 and then a
note on Genesis 1:26. Every verse from Genesis
1:2 - Genesis 1:25 will display the following navigation link:
Gen_1:2 <=> Gen_1:25.
No matter what verse the e-Sword user views, the navigation link reveals the closest verse with
a comment. This feature was developed because e-Sword did not provide the option of seeing
an overview of all comments. e-Sword now provides a partial solution by allowing the user to
view all verse comments in a chapter by viewing the chapter comments (if no actual chapter
comments exist).
Many users find the Fill-In Commentary feature annoying because the e-Sword
commentary tab shows a blue (i) icon on commentary tabs with comments on the current
verse. Since every verse has a navigation link, which e-Sword interprets as a real comment, then
the blue (i) icon for each commentary tab provides a false positive.
USABILITY TIP: Consider avoiding this feature, unless you are making a resource just
for your own use. Too many e-Sword users complain that this feature “abuses” the blue
(i) icon display for each commentary tab.
e-Sword’s new “Chapter view” of all verse comments addresses the sporadic verse
problem in most commentaries.
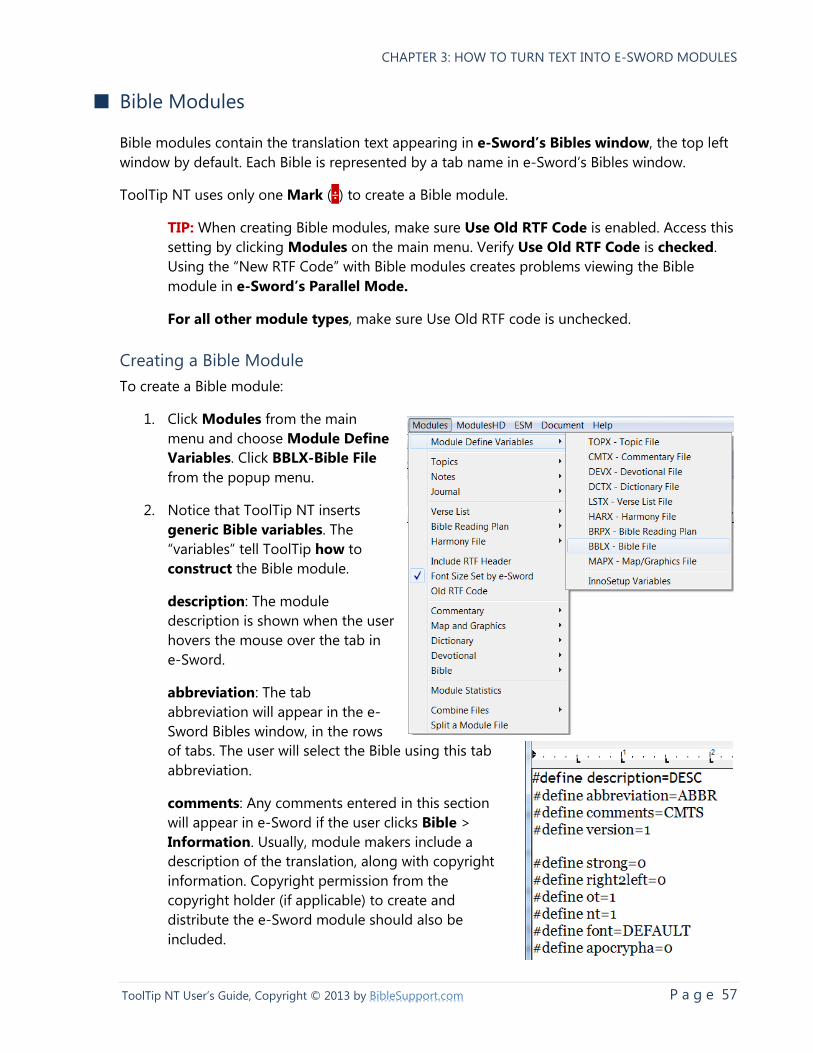
CHAPTER 3: HOW TO TURN TEXT INTO E-SWORD MODULES
P a g e 57 ToolTip NT User’s Guide, Copyright © 2013 by BibleSupport.com
■ Bible Modules
Bible modules contain the translation text appearing in e-Sword’s Bibles window, the top left
window by default. Each Bible is represented by a tab name in e-Sword’s Bibles window.
ToolTip NT uses only one Mark (÷) to create a Bible module.
TIP: When creating Bible modules, make sure Use Old RTF Code is enabled. Access this
setting by clicking Modules on the main menu. Verify Use Old RTF Code is checked.
Using the “New RTF Code” with Bible modules creates problems viewing the Bible
module in e-Sword’s Parallel Mode.
For all other module types, make sure Use Old RTF code is unchecked.
Creating a Bible Module
To create a Bible module:
1. Click Modules from the main
menu and choose Module Define
Variables. Click BBLX-Bible File
from the popup menu.
2. Notice that ToolTip NT inserts
generic Bible variables. The
“variables” tell ToolTip how to
construct the Bible module.
description: The module
description is shown when the user
hovers the mouse over the tab in
e-Sword.
abbreviation: The tab
abbreviation will appear in the e-
Sword Bibles window, in the rows
of tabs. The user will select the Bible using this tab
abbreviation.
comments: Any comments entered in this section
will appear in e-Sword if the user clicks Bible >
Information. Usually, module makers include a
description of the translation, along with copyright
information. Copyright permission from the
copyright holder (if applicable) to create and
distribute the e-Sword module should also be
included.
CHAPTER 3: HOW TO TURN TEXT INTO E-SWORD MODULES
P a g e 58 ToolTip NT User’s Guide, Copyright © 2013 by BibleSupport.com
version: This internal version number is not shown to the e-Sword user but is included
in the e-Sword module.
strong: Does the Bible include references to Strong’s numbers. Type “0” for “no” or “1”
for “yes”.
right2left: Does the text in the Bible read from the right to the left, instead of the
default left to right. Hebrew, for example, reads right to left. Type “0” for “no” or “1” for
“yes”.
ot: Does the Bible include the Old Testament? Type “0” for “no” or “1” for “yes”.
nt: Does the Bible include the New Testament? Type “0” for “no” or “1” for “yes”.
font: What font should ToolTip NT use when saving the Bible module? Enter “DEFAULT”
to use the e-Sword user’s default font (best choice). To override the reader’s font, enter
the font name.
apocrypha: Does the Bible Apocrypha books? Type “0” for “no” or “1” for “yes”.
3. To begin the Bible, click Marks from the main menu and choose Set Mark. This inserts a
mark so ToolTip NT knows this is the beginning of the Bible text. (This step is
unnecessary if a division symbol is already present.)
TIP: You can quickly insert a Mark by pressing CTRL-M.
4. Immediately beside the Mark you just inserted, type “Genesis 1:1” or “Gen 1:1”
5. Hit the spacebar and paste the text of Genesis 1:1
6. Only the first verse has a Mark. Each remaining verse appears on a new line by
pressing the Enter key (hard line break), as shown in step 7 below.
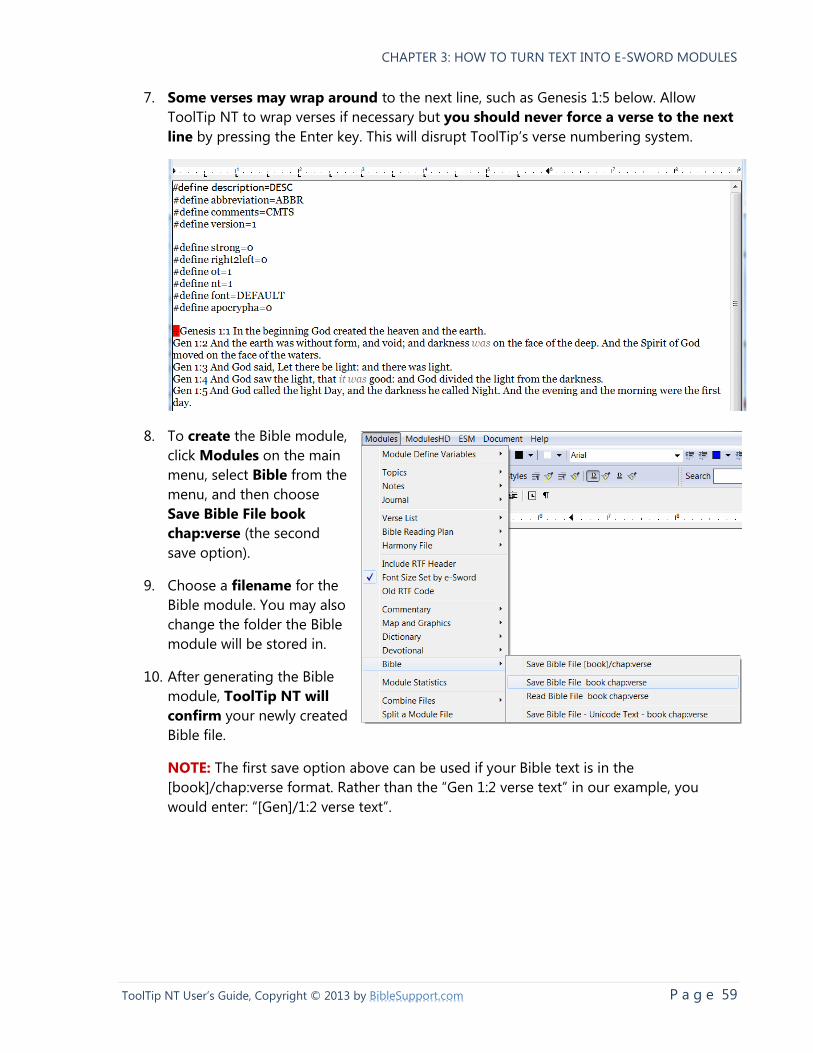
CHAPTER 3: HOW TO TURN TEXT INTO E-SWORD MODULES
P a g e 59 ToolTip NT User’s Guide, Copyright © 2013 by BibleSupport.com
7. Some verses may wrap around to the next line, such as Genesis 1:5 below. Allow
ToolTip NT to wrap verses if necessary but you should never force a verse to the next
line by pressing the Enter key. This will disrupt ToolTip’s verse numbering system.
8. To create the Bible module,
click Modules on the main
menu, select Bible from the
menu, and then choose
Save Bible File book
chap:verse (the second
save option).
9. Choose a filename for the
Bible module. You may also
change the folder the Bible
module will be stored in.
10. After generating the Bible
module, ToolTip NT will
confirm your newly created
Bible file.
NOTE: The first save option above can be used if your Bible text is in the
[book]/chap:verse format. Rather than the “Gen 1:2 verse text” in our example, you
would enter: “[Gen]/1:2 verse text”.
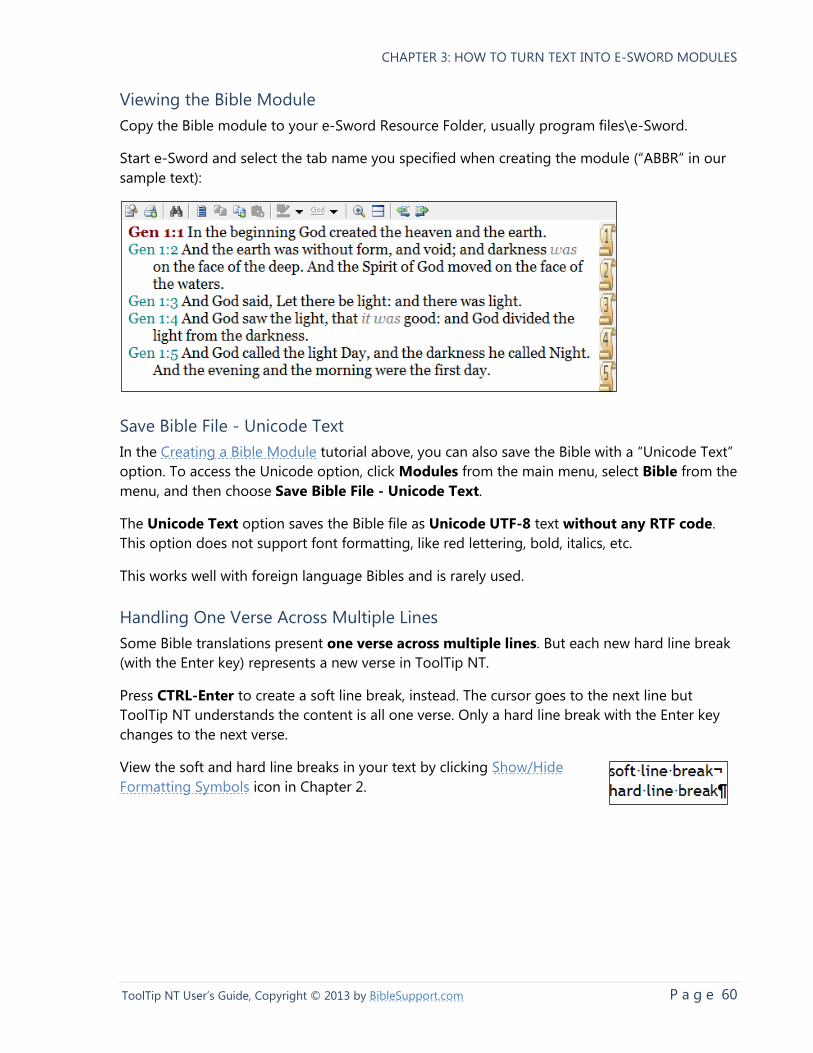
CHAPTER 3: HOW TO TURN TEXT INTO E-SWORD MODULES
P a g e 60 ToolTip NT User’s Guide, Copyright © 2013 by BibleSupport.com
Viewing the Bible Module
Copy the Bible module to your e-Sword Resource Folder, usually program files\e-Sword.
Start e-Sword and select the tab name you specified when creating the module (“ABBR” in our
sample text):
Save Bible File - Unicode Text
In the Creating a Bible Module tutorial above, you can also save the Bible with a “Unicode Text”
option. To access the Unicode option, click Modules from the main menu, select Bible from the
menu, and then choose Save Bible File - Unicode Text.
The Unicode Text option saves the Bible file as Unicode UTF-8 text without any RTF code.
This option does not support font formatting, like red lettering, bold, italics, etc.
This works well with foreign language Bibles and is rarely used.
Handling One Verse Across Multiple Lines
Some Bible translations present one verse across multiple lines. But each new hard line break
(with the Enter key) represents a new verse in ToolTip NT.
Press CTRL-Enter to create a soft line break, instead. The cursor goes to the next line but
ToolTip NT understands the content is all one verse. Only a hard line break with the Enter key
changes to the next verse.
View the soft and hard line breaks in your text by clicking Show/Hide
Formatting Symbols icon in Chapter 2.
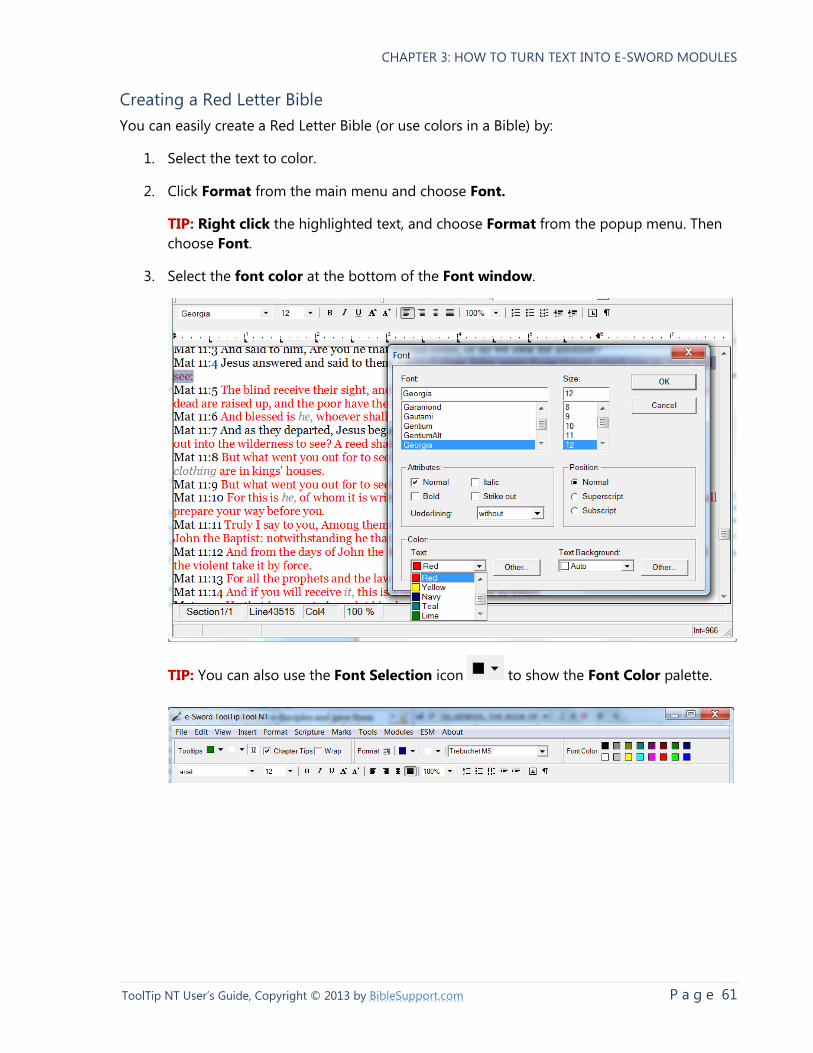
CHAPTER 3: HOW TO TURN TEXT INTO E-SWORD MODULES
P a g e 61 ToolTip NT User’s Guide, Copyright © 2013 by BibleSupport.com
Creating a Red Letter Bible
You can easily create a Red Letter Bible (or use colors in a Bible) by:
1. Select the text to color.
2. Click Format from the main menu and choose Font.
TIP: Right click the highlighted text, and choose Format from the popup menu. Then
choose Font.
3. Select the font color at the bottom of the Font window.
TIP: You can also use the Font Selection icon to show the Font Color palette.
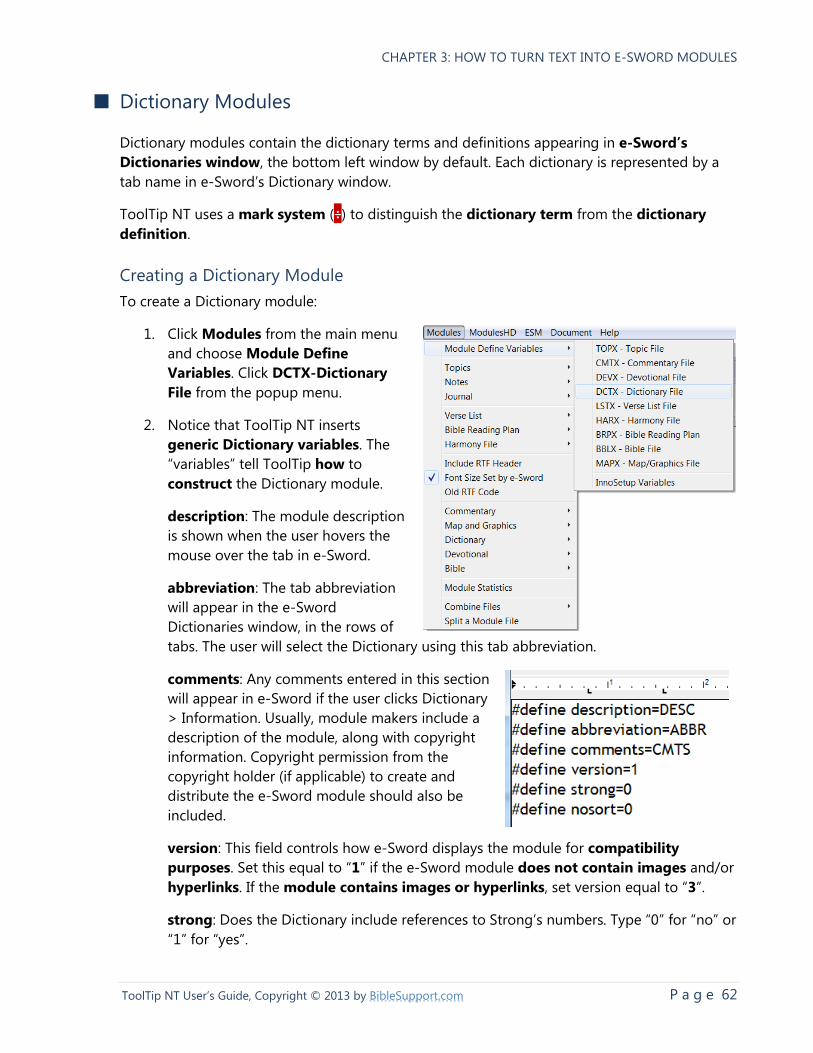
CHAPTER 3: HOW TO TURN TEXT INTO E-SWORD MODULES
P a g e 62 ToolTip NT User’s Guide, Copyright © 2013 by BibleSupport.com
■ Dictionary Modules
Dictionary modules contain the dictionary terms and definitions appearing in e-Sword’s
Dictionaries window, the bottom left window by default. Each dictionary is represented by a
tab name in e-Sword’s Dictionary window.
ToolTip NT uses a mark system (÷) to distinguish the dictionary term from the dictionary
definition.
Creating a Dictionary Module
To create a Dictionary module:
1. Click Modules from the main menu
and choose Module Define
Variables. Click DCTX-Dictionary
File from the popup menu.
2. Notice that ToolTip NT inserts
generic Dictionary variables. The
“variables” tell ToolTip how to
construct the Dictionary module.
description: The module description
is shown when the user hovers the
mouse over the tab in e-Sword.
abbreviation: The tab abbreviation
will appear in the e-Sword
Dictionaries window, in the rows of
tabs. The user will select the Dictionary using this tab abbreviation.
comments: Any comments entered in this section
will appear in e-Sword if the user clicks Dictionary
> Information. Usually, module makers include a
description of the module, along with copyright
information. Copyright permission from the
copyright holder (if applicable) to create and
distribute the e-Sword module should also be
included.
version: This field controls how e-Sword displays the module for compatibility
purposes. Set this equal to “1” if the e-Sword module does not contain images and/or
hyperlinks. If the module contains images or hyperlinks, set version equal to “3”.
strong: Does the Dictionary include references to Strong’s numbers. Type “0” for “no” or
“1” for “yes”.
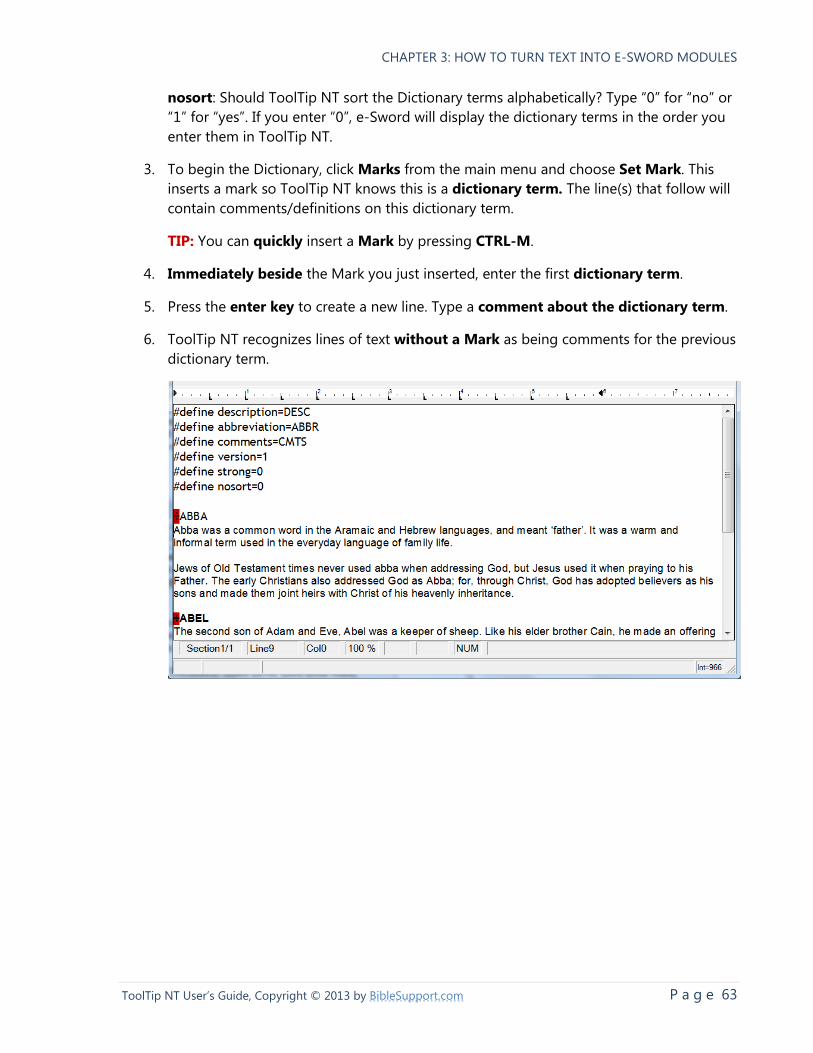
CHAPTER 3: HOW TO TURN TEXT INTO E-SWORD MODULES
P a g e 63 ToolTip NT User’s Guide, Copyright © 2013 by BibleSupport.com
nosort: Should ToolTip NT sort the Dictionary terms alphabetically? Type “0” for “no” or
“1” for “yes”. If you enter “0”, e-Sword will display the dictionary terms in the order you
enter them in ToolTip NT.
3. To begin the Dictionary, click Marks from the main menu and choose Set Mark. This
inserts a mark so ToolTip NT knows this is a dictionary term. The line(s) that follow will
contain comments/definitions on this dictionary term.
TIP: You can quickly insert a Mark by pressing CTRL-M.
4. Immediately beside the Mark you just inserted, enter the first dictionary term.
5. Press the enter key to create a new line. Type a comment about the dictionary term.
6. ToolTip NT recognizes lines of text without a Mark as being comments for the previous
dictionary term.
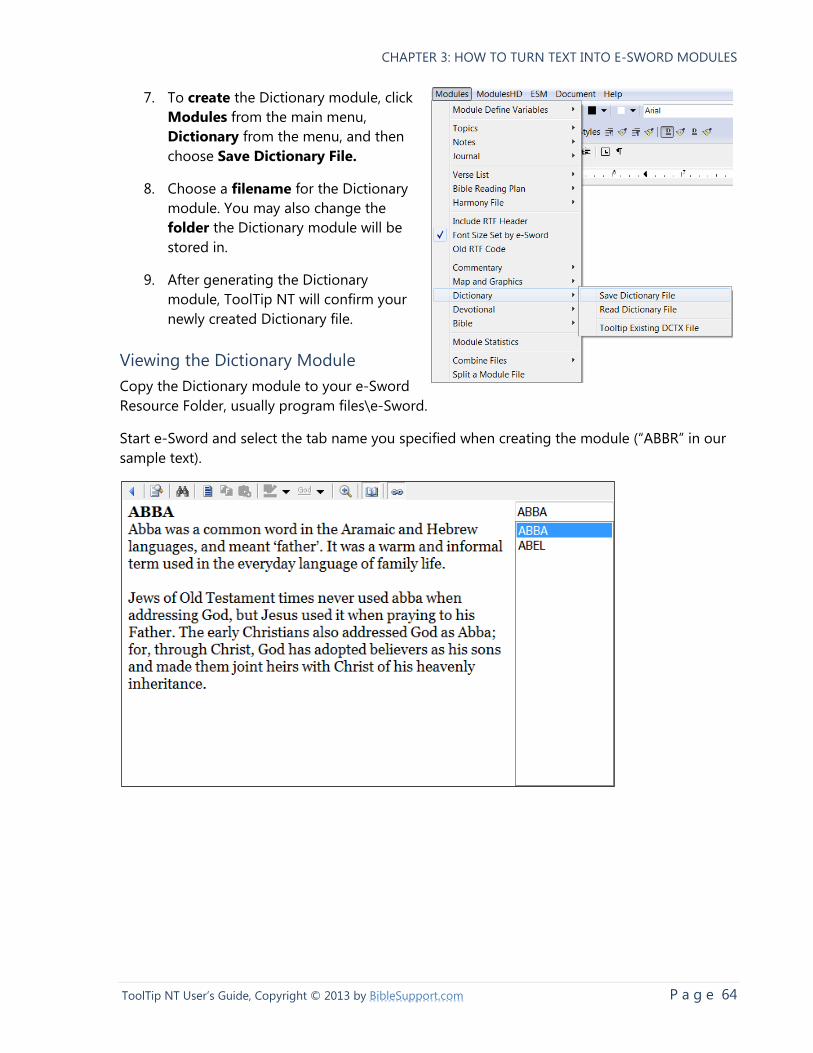
CHAPTER 3: HOW TO TURN TEXT INTO E-SWORD MODULES
P a g e 64 ToolTip NT User’s Guide, Copyright © 2013 by BibleSupport.com
7. To create the Dictionary module, click
Modules from the main menu,
Dictionary from the menu, and then
choose Save Dictionary File.
8. Choose a filename for the Dictionary
module. You may also change the
folder the Dictionary module will be
stored in.
9. After generating the Dictionary
module, ToolTip NT will confirm your
newly created Dictionary file.
Viewing the Dictionary Module
Copy the Dictionary module to your e-Sword
Resource Folder, usually program files\e-Sword.
Start e-Sword and select the tab name you specified when creating the module (“ABBR” in our
sample text).
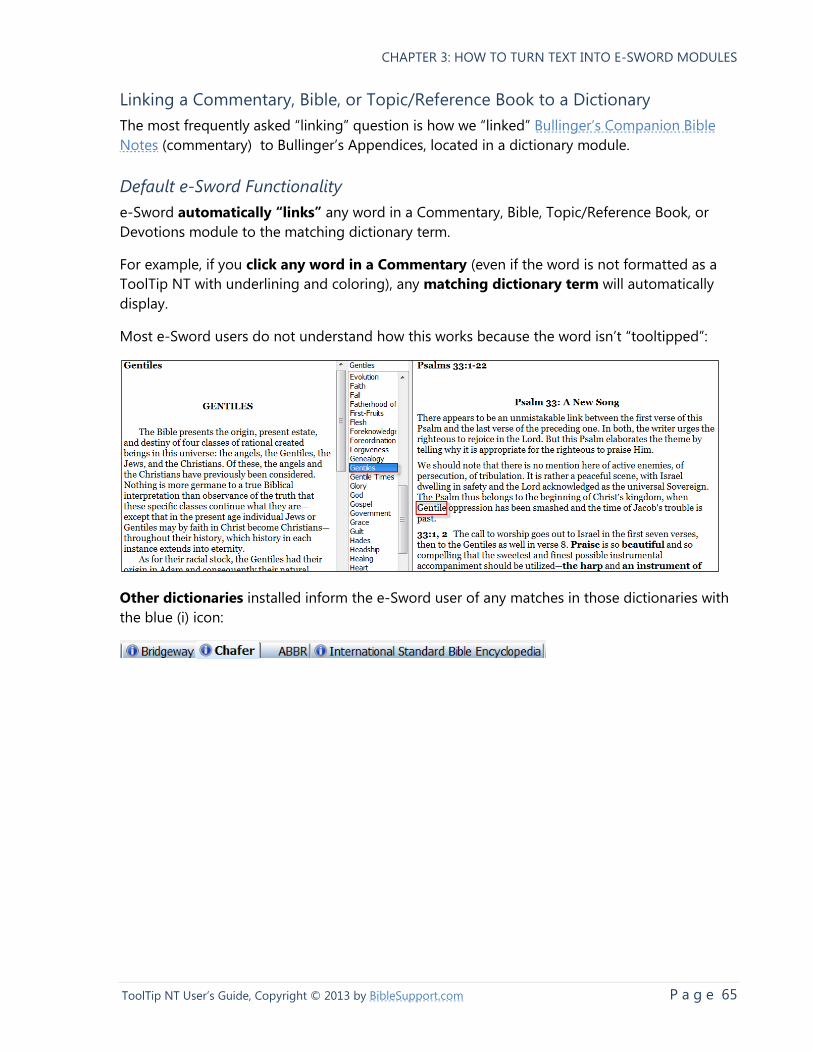
CHAPTER 3: HOW TO TURN TEXT INTO E-SWORD MODULES
P a g e 65 ToolTip NT User’s Guide, Copyright © 2013 by BibleSupport.com
Linking a Commentary, Bible, or Topic/Reference Book to a Dictionary
The most frequently asked “linking” question is how we “linked” Bullinger’s Companion Bible
Notes (commentary) to Bullinger’s Appendices, located in a dictionary module.
Default e-Sword Functionality
e-Sword automatically “links” any word in a Commentary, Bible, Topic/Reference Book, or
Devotions module to the matching dictionary term.
For example, if you click any word in a Commentary (even if the word is not formatted as a
ToolTip NT with underlining and coloring), any matching dictionary term will automatically
display.
Most e-Sword users do not understand how this works because the word isn’t “tooltipped”:
Other dictionaries installed inform the e-Sword user of any matches in those dictionaries with
the blue (i) icon:
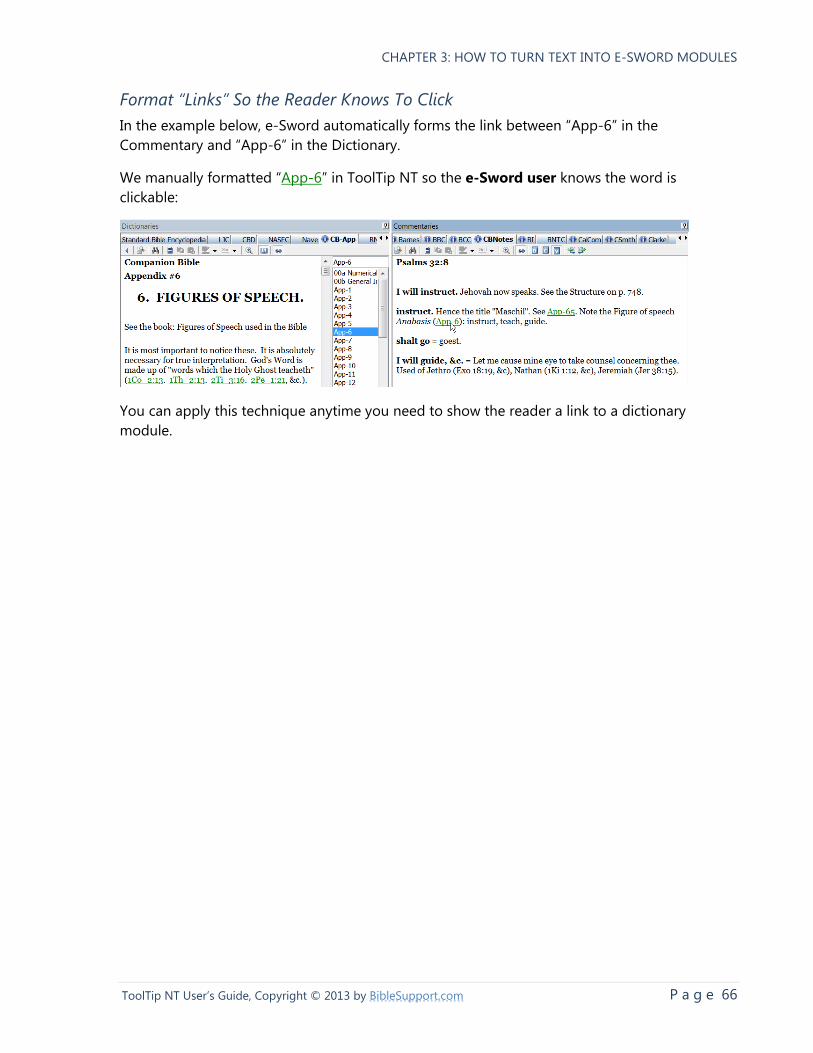
CHAPTER 3: HOW TO TURN TEXT INTO E-SWORD MODULES
P a g e 66 ToolTip NT User’s Guide, Copyright © 2013 by BibleSupport.com
Format “Links” So the Reader Knows To Click
In the example below, e-Sword automatically forms the link between “App-6” in the
Commentary and “App-6” in the Dictionary.
We manually formatted “App-6” in ToolTip NT so the e-Sword user knows the word is
clickable:
You can apply this technique anytime you need to show the reader a link to a dictionary
module.
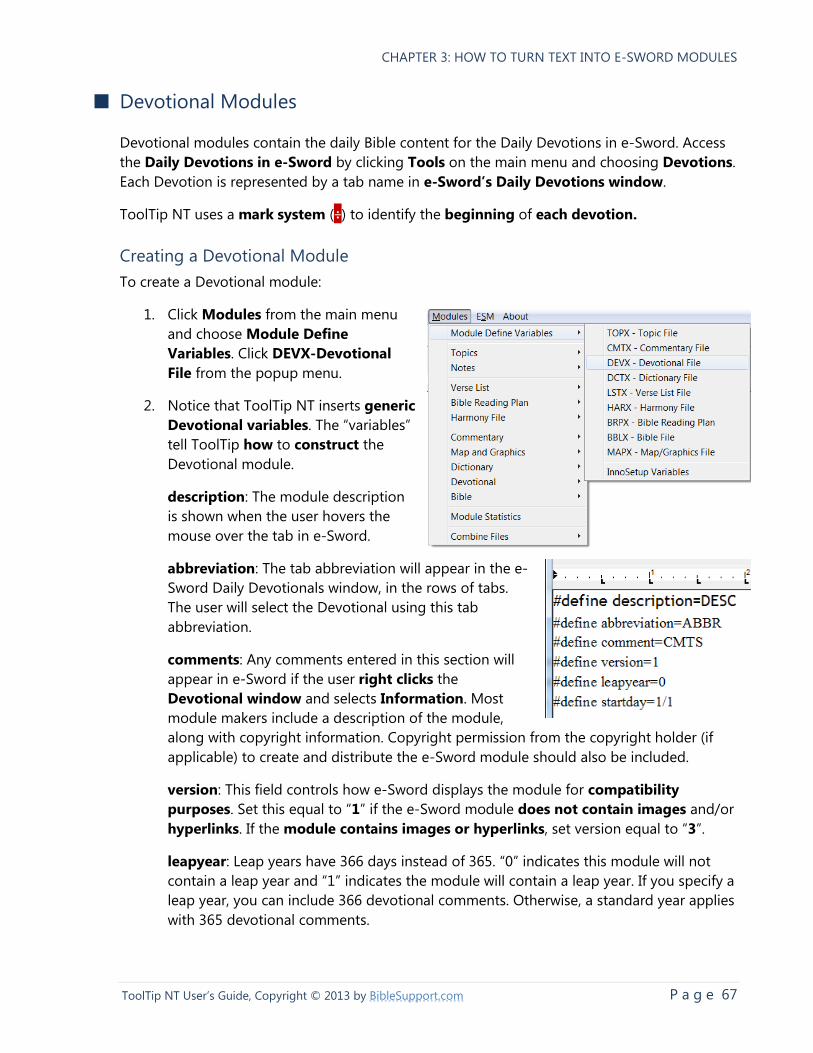
CHAPTER 3: HOW TO TURN TEXT INTO E-SWORD MODULES
P a g e 67 ToolTip NT User’s Guide, Copyright © 2013 by BibleSupport.com
■ Devotional Modules
Devotional modules contain the daily Bible content for the Daily Devotions in e-Sword. Access
the Daily Devotions in e-Sword by clicking Tools on the main menu and choosing Devotions.
Each Devotion is represented by a tab name in e-Sword’s Daily Devotions window.
ToolTip NT uses a mark system (÷) to identify the beginning of each devotion.
Creating a Devotional Module
To create a Devotional module:
1. Click Modules from the main menu
and choose Module Define
Variables. Click DEVX-Devotional
File from the popup menu.
2. Notice that ToolTip NT inserts generic
Devotional variables. The “variables”
tell ToolTip how to construct the
Devotional module.
description: The module description
is shown when the user hovers the
mouse over the tab in e-Sword.
abbreviation: The tab abbreviation will appear in the e-
Sword Daily Devotionals window, in the rows of tabs.
The user will select the Devotional using this tab
abbreviation.
comments: Any comments entered in this section will
appear in e-Sword if the user right clicks the
Devotional window and selects Information. Most
module makers include a description of the module,
along with copyright information. Copyright permission from the copyright holder (if
applicable) to create and distribute the e-Sword module should also be included.
version: This field controls how e-Sword displays the module for compatibility
purposes. Set this equal to “1” if the e-Sword module does not contain images and/or
hyperlinks. If the module contains images or hyperlinks, set version equal to “3”.
leapyear: Leap years have 366 days instead of 365. “0” indicates this module will not
contain a leap year and “1” indicates the module will contain a leap year. If you specify a
leap year, you can include 366 devotional comments. Otherwise, a standard year applies
with 365 devotional comments.
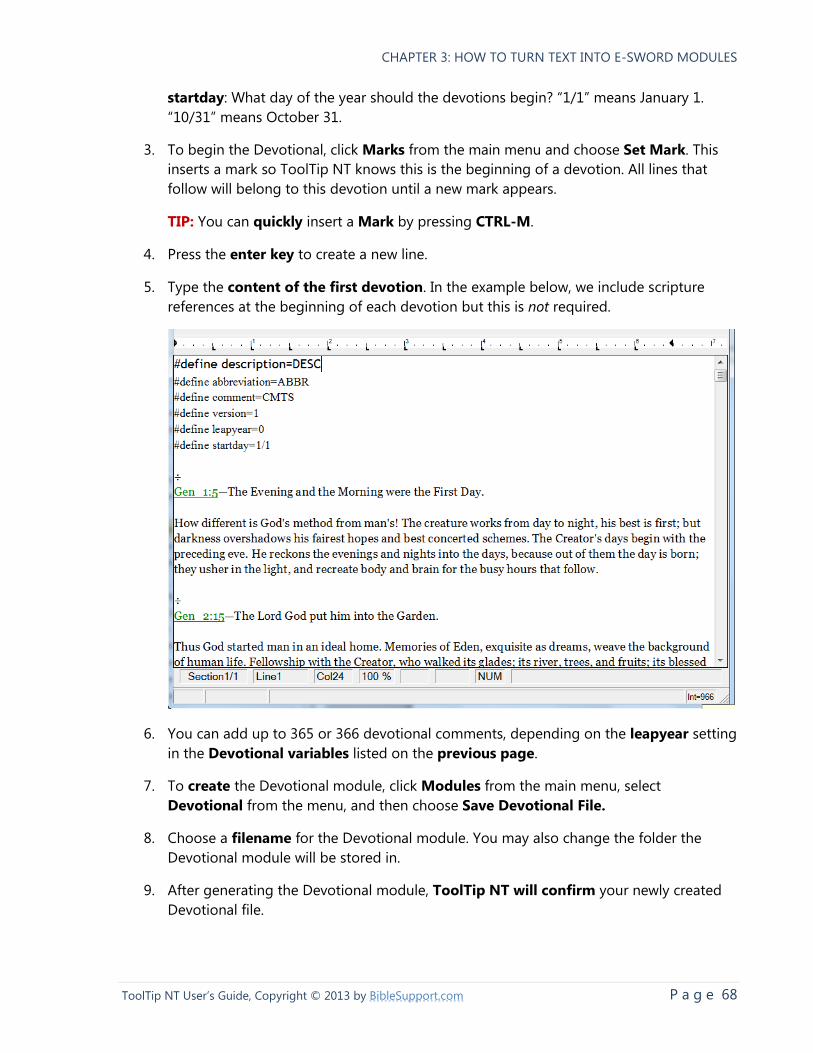
CHAPTER 3: HOW TO TURN TEXT INTO E-SWORD MODULES
P a g e 68 ToolTip NT User’s Guide, Copyright © 2013 by BibleSupport.com
startday: What day of the year should the devotions begin? “1/1” means January 1.
“10/31” means October 31.
3. To begin the Devotional, click Marks from the main menu and choose Set Mark. This
inserts a mark so ToolTip NT knows this is the beginning of a devotion. All lines that
follow will belong to this devotion until a new mark appears.
TIP: You can quickly insert a Mark by pressing CTRL-M.
4. Press the enter key to create a new line.
5. Type the content of the first devotion. In the example below, we include scripture
references at the beginning of each devotion but this is not required.
6. You can add up to 365 or 366 devotional comments, depending on the leapyear setting
in the Devotional variables listed on the previous page.
7. To create the Devotional module, click Modules from the main menu, select
Devotional from the menu, and then choose Save Devotional File.
8. Choose a filename for the Devotional module. You may also change the folder the
Devotional module will be stored in.
9. After generating the Devotional module, ToolTip NT will confirm your newly created
Devotional file.
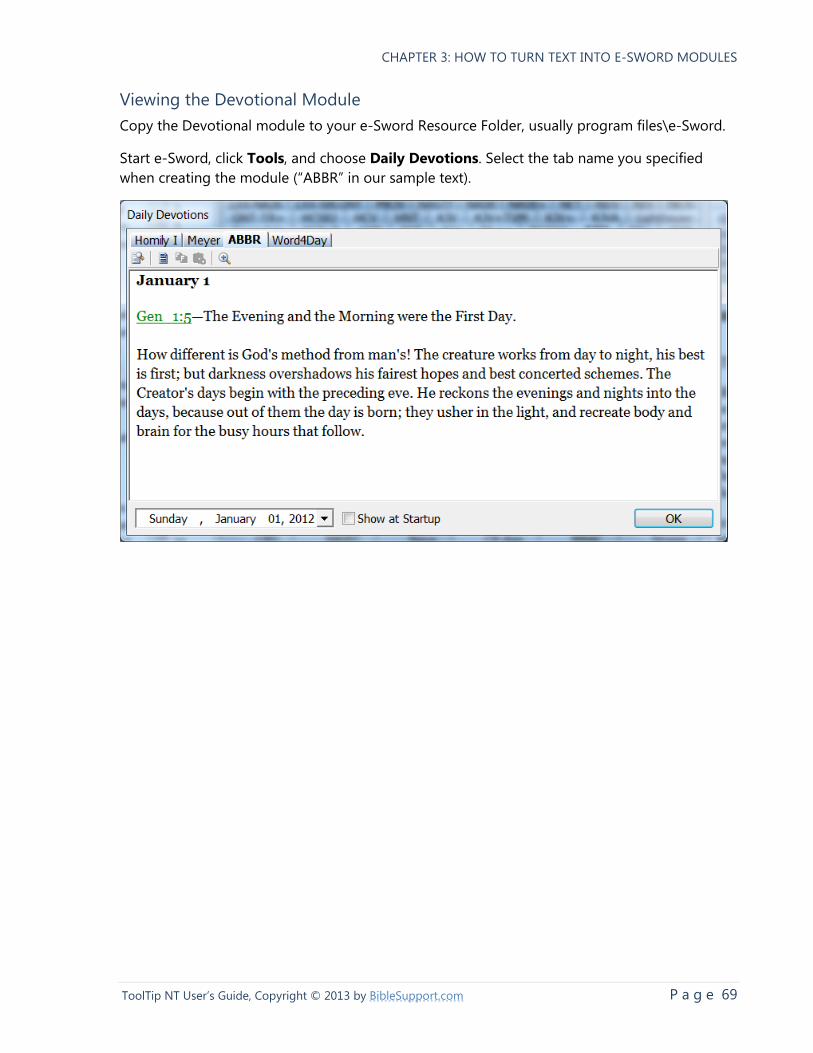
CHAPTER 3: HOW TO TURN TEXT INTO E-SWORD MODULES
P a g e 69 ToolTip NT User’s Guide, Copyright © 2013 by BibleSupport.com
Viewing the Devotional Module
Copy the Devotional module to your e-Sword Resource Folder, usually program files\e-Sword.
Start e-Sword, click Tools, and choose Daily Devotions. Select the tab name you specified
when creating the module (“ABBR” in our sample text).
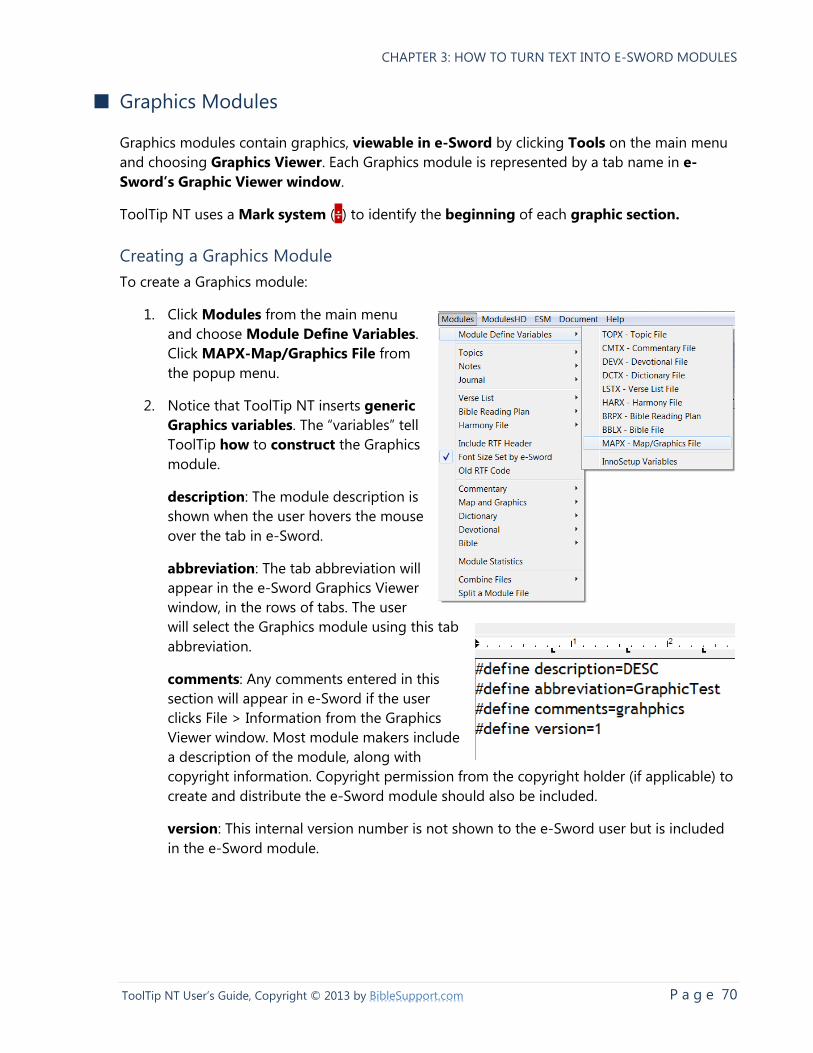
CHAPTER 3: HOW TO TURN TEXT INTO E-SWORD MODULES
P a g e 70 ToolTip NT User’s Guide, Copyright © 2013 by BibleSupport.com
■ Graphics Modules
Graphics modules contain graphics, viewable in e-Sword by clicking Tools on the main menu
and choosing Graphics Viewer. Each Graphics module is represented by a tab name in e-
Sword’s Graphic Viewer window.
ToolTip NT uses a Mark system (÷) to identify the beginning of each graphic section.
Creating a Graphics Module
To create a Graphics module:
1. Click Modules from the main menu
and choose Module Define Variables.
Click MAPX-Map/Graphics File from
the popup menu.
2. Notice that ToolTip NT inserts generic
Graphics variables. The “variables” tell
ToolTip how to construct the Graphics
module.
description: The module description is
shown when the user hovers the mouse
over the tab in e-Sword.
abbreviation: The tab abbreviation will
appear in the e-Sword Graphics Viewer
window, in the rows of tabs. The user
will select the Graphics module using this tab
abbreviation.
comments: Any comments entered in this
section will appear in e-Sword if the user
clicks File > Information from the Graphics
Viewer window. Most module makers include
a description of the module, along with
copyright information. Copyright permission from the copyright holder (if applicable) to
create and distribute the e-Sword module should also be included.
version: This internal version number is not shown to the e-Sword user but is included
in the e-Sword module.
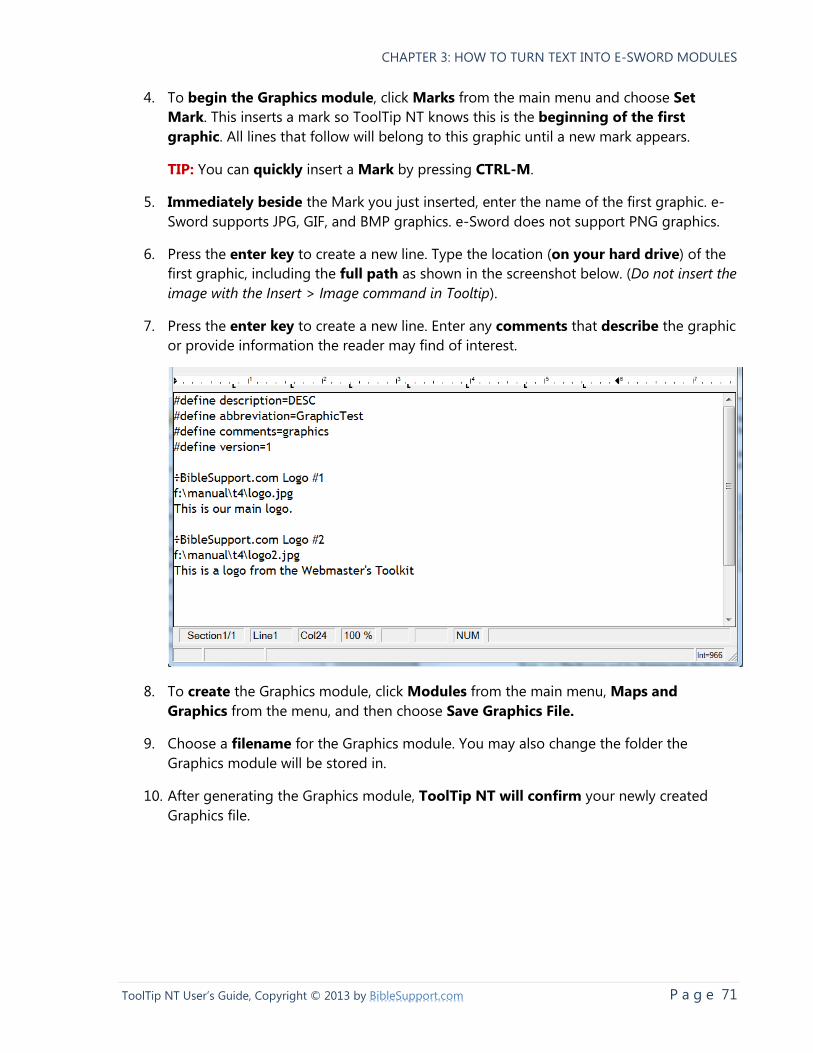
CHAPTER 3: HOW TO TURN TEXT INTO E-SWORD MODULES
P a g e 71 ToolTip NT User’s Guide, Copyright © 2013 by BibleSupport.com
4. To begin the Graphics module, click Marks from the main menu and choose Set
Mark. This inserts a mark so ToolTip NT knows this is the beginning of the first
graphic. All lines that follow will belong to this graphic until a new mark appears.
TIP: You can quickly insert a Mark by pressing CTRL-M.
5. Immediately beside the Mark you just inserted, enter the name of the first graphic. e-
Sword supports JPG, GIF, and BMP graphics. e-Sword does not support PNG graphics.
6. Press the enter key to create a new line. Type the location (on your hard drive) of the
first graphic, including the full path as shown in the screenshot below. (Do not insert the
image with the Insert > Image command in Tooltip).
7. Press the enter key to create a new line. Enter any comments that describe the graphic
or provide information the reader may find of interest.
8. To create the Graphics module, click Modules from the main menu, Maps and
Graphics from the menu, and then choose Save Graphics File.
9. Choose a filename for the Graphics module. You may also change the folder the
Graphics module will be stored in.
10. After generating the Graphics module, ToolTip NT will confirm your newly created
Graphics file.
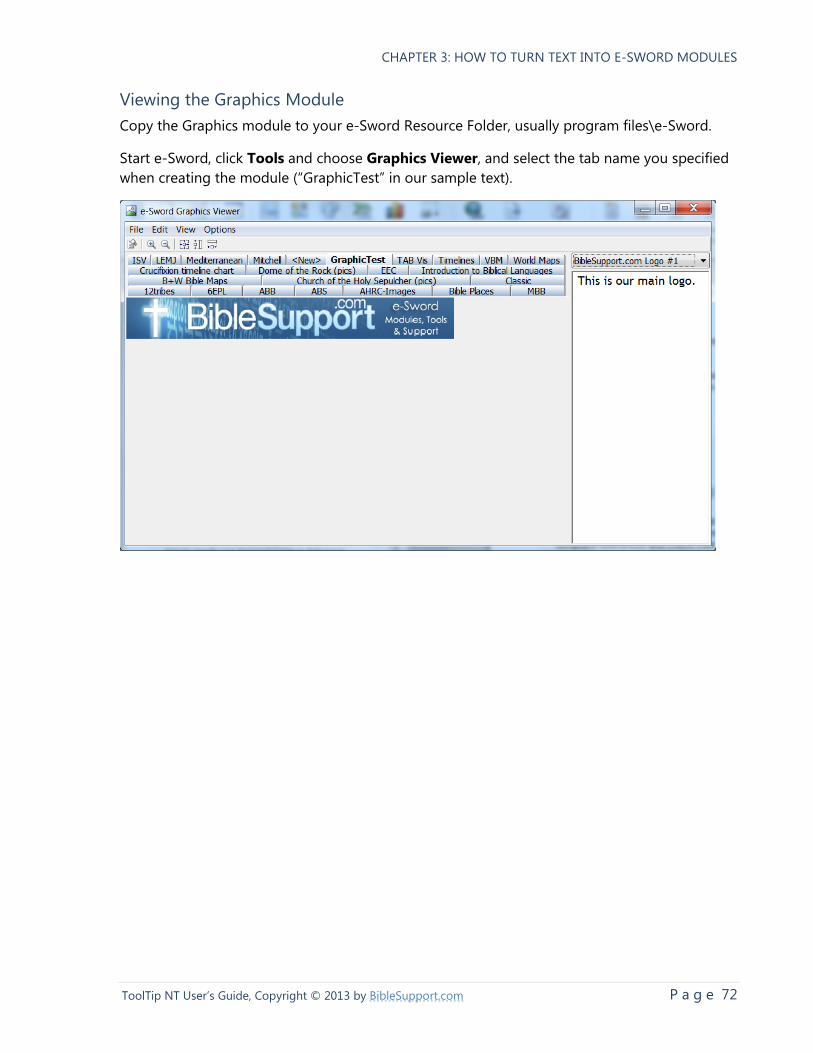
CHAPTER 3: HOW TO TURN TEXT INTO E-SWORD MODULES
P a g e 72 ToolTip NT User’s Guide, Copyright © 2013 by BibleSupport.com
Viewing the Graphics Module
Copy the Graphics module to your e-Sword Resource Folder, usually program files\e-Sword.
Start e-Sword, click Tools and choose Graphics Viewer, and select the tab name you specified
when creating the module (“GraphicTest” in our sample text).
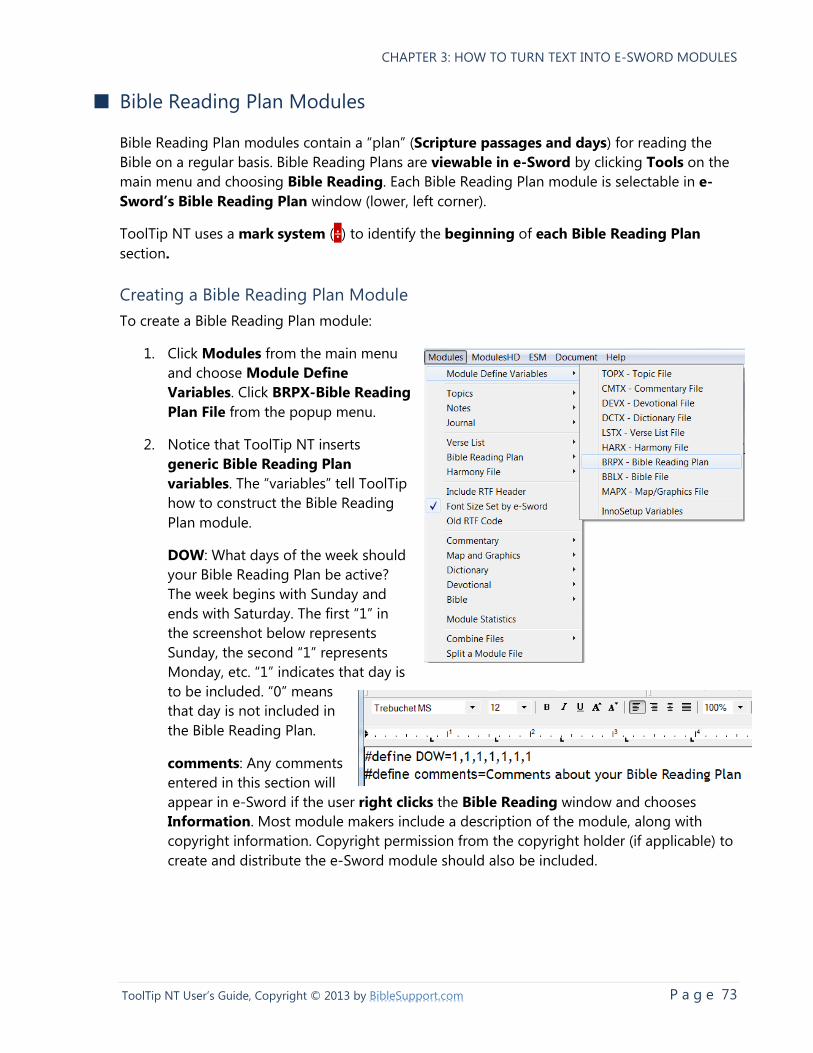
CHAPTER 3: HOW TO TURN TEXT INTO E-SWORD MODULES
P a g e 73 ToolTip NT User’s Guide, Copyright © 2013 by BibleSupport.com
■ Bible Reading Plan Modules
Bible Reading Plan modules contain a “plan” (Scripture passages and days) for reading the
Bible on a regular basis. Bible Reading Plans are viewable in e-Sword by clicking Tools on the
main menu and choosing Bible Reading. Each Bible Reading Plan module is selectable in e-
Sword’s Bible Reading Plan window (lower, left corner).
ToolTip NT uses a mark system (÷) to identify the beginning of each Bible Reading Plan
section.
Creating a Bible Reading Plan Module
To create a Bible Reading Plan module:
1. Click Modules from the main menu
and choose Module Define
Variables. Click BRPX-Bible Reading
Plan File from the popup menu.
2. Notice that ToolTip NT inserts
generic Bible Reading Plan
variables. The “variables” tell ToolTip
how to construct the Bible Reading
Plan module.
DOW: What days of the week should
your Bible Reading Plan be active?
The week begins with Sunday and
ends with Saturday. The first “1” in
the screenshot below represents
Sunday, the second “1” represents
Monday, etc. “1” indicates that day is
to be included. “0” means
that day is not included in
the Bible Reading Plan.
comments: Any comments
entered in this section will
appear in e-Sword if the user right clicks the Bible Reading window and chooses
Information. Most module makers include a description of the module, along with
copyright information. Copyright permission from the copyright holder (if applicable) to
create and distribute the e-Sword module should also be included.
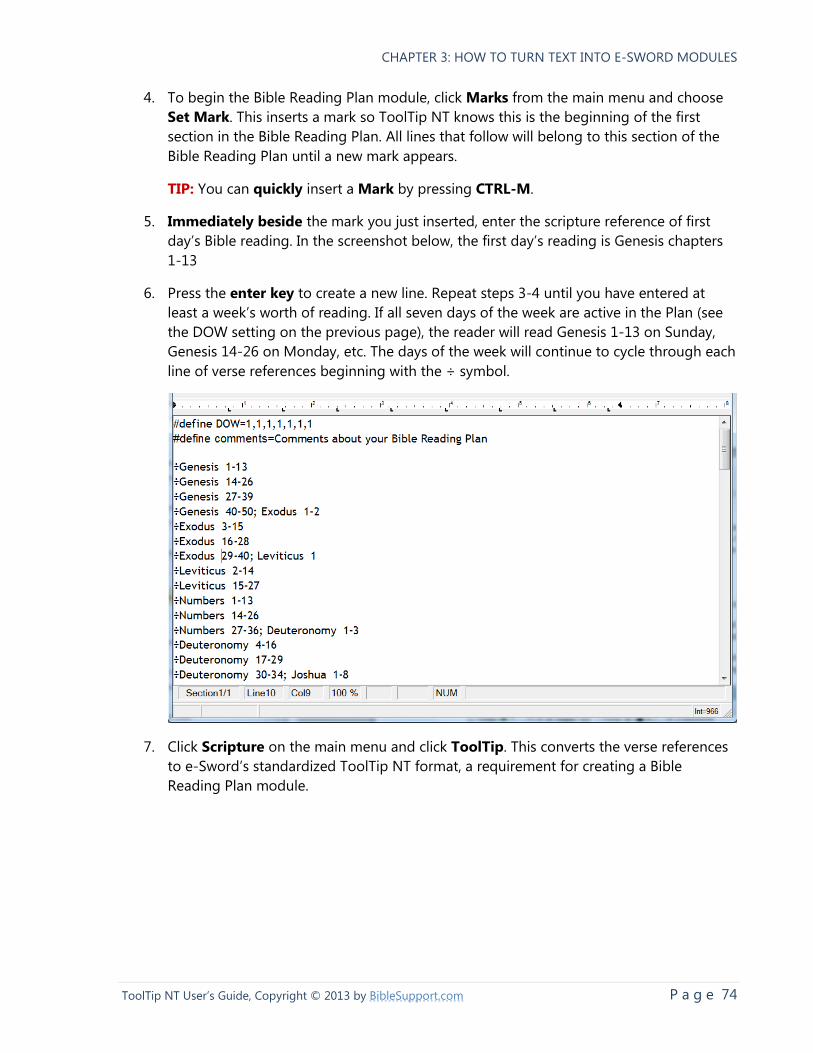
CHAPTER 3: HOW TO TURN TEXT INTO E-SWORD MODULES
P a g e 74 ToolTip NT User’s Guide, Copyright © 2013 by BibleSupport.com
4. To begin the Bible Reading Plan module, click Marks from the main menu and choose
Set Mark. This inserts a mark so ToolTip NT knows this is the beginning of the first
section in the Bible Reading Plan. All lines that follow will belong to this section of the
Bible Reading Plan until a new mark appears.
TIP: You can quickly insert a Mark by pressing CTRL-M.
5. Immediately beside the mark you just inserted, enter the scripture reference of first
day’s Bible reading. In the screenshot below, the first day’s reading is Genesis chapters
1-13
6. Press the enter key to create a new line. Repeat steps 3-4 until you have entered at
least a week’s worth of reading. If all seven days of the week are active in the Plan (see
the DOW setting on the previous page), the reader will read Genesis 1-13 on Sunday,
Genesis 14-26 on Monday, etc. The days of the week will continue to cycle through each
line of verse references beginning with the ÷ symbol.
7. Click Scripture on the main menu and click ToolTip. This converts the verse references
to e-Sword’s standardized ToolTip NT format, a requirement for creating a Bible
Reading Plan module.
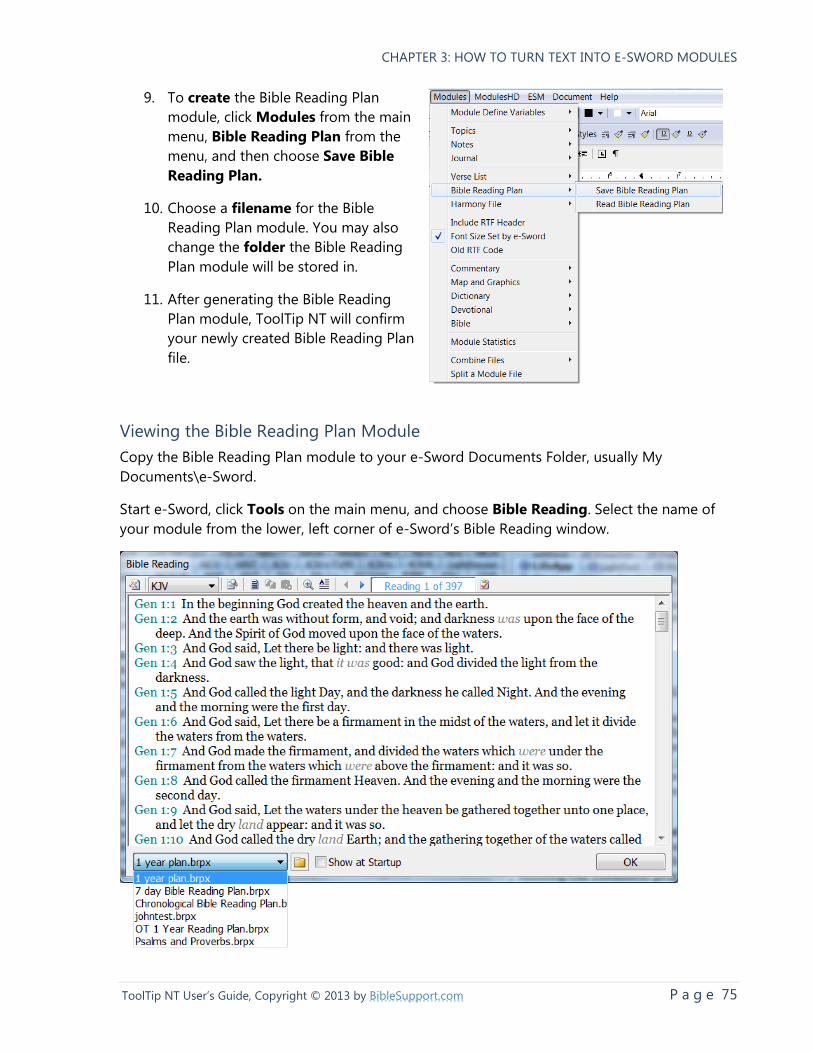
CHAPTER 3: HOW TO TURN TEXT INTO E-SWORD MODULES
P a g e 75 ToolTip NT User’s Guide, Copyright © 2013 by BibleSupport.com
9. To create the Bible Reading Plan
module, click Modules from the main
menu, Bible Reading Plan from the
menu, and then choose Save Bible
Reading Plan.
10. Choose a filename for the Bible
Reading Plan module. You may also
change the folder the Bible Reading
Plan module will be stored in.
11. After generating the Bible Reading
Plan module, ToolTip NT will confirm
your newly created Bible Reading Plan
file.
Viewing the Bible Reading Plan Module
Copy the Bible Reading Plan module to your e-Sword Documents Folder, usually My
Documents\e-Sword.
Start e-Sword, click Tools on the main menu, and choose Bible Reading. Select the name of
your module from the lower, left corner of e-Sword’s Bible Reading window.
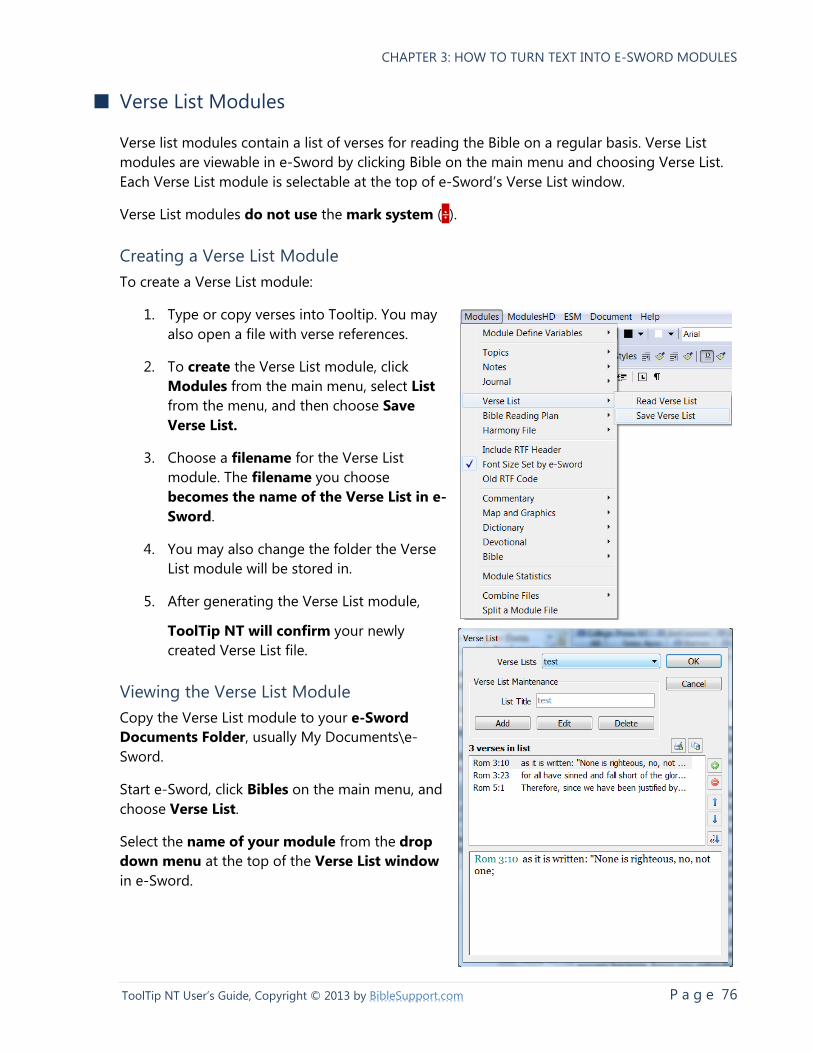
CHAPTER 3: HOW TO TURN TEXT INTO E-SWORD MODULES
P a g e 76 ToolTip NT User’s Guide, Copyright © 2013 by BibleSupport.com
■ Verse List Modules
Verse list modules contain a list of verses for reading the Bible on a regular basis. Verse List
modules are viewable in e-Sword by clicking Bible on the main menu and choosing Verse List.
Each Verse List module is selectable at the top of e-Sword’s Verse List window.
Verse List modules do not use the mark system (÷).
Creating a Verse List Module
To create a Verse List module:
1. Type or copy verses into Tooltip. You may
also open a file with verse references.
2. To create the Verse List module, click
Modules from the main menu, select List
from the menu, and then choose Save
Verse List.
3. Choose a filename for the Verse List
module. The filename you choose
becomes the name of the Verse List in e-
Sword.
4. You may also change the folder the Verse
List module will be stored in.
5. After generating the Verse List module,
ToolTip NT will confirm your newly
created Verse List file.
Viewing the Verse List Module
Copy the Verse List module to your e-Sword
Documents Folder, usually My Documents\e-
Sword.
Start e-Sword, click Bibles on the main menu, and
choose Verse List.
Select the name of your module from the drop
down menu at the top of the Verse List window
in e-Sword.

CHAPTER 3: HOW TO TURN TEXT INTO E-SWORD MODULES
P a g e 77 ToolTip NT User’s Guide, Copyright © 2013 by BibleSupport.com
■ Study Notes Modules
Study Notes modules contain personal study notes on specific verses. Whereas Topic notes are
topic or subject based, Study Notes are verse based.
Study Notes modules appear in e-Sword’s Editor’s window.
Study Notes are normally created in e-Sword’s Editor window. When large or numerous
changes are necessary, working in e-Sword one verse at a time can be cumbersome. Some
users prefer to read their Study Notes module into ToolTip NT when making many changes or
when they want to publish their notes outside of e-Sword. See Chapter 5, Importing e-Sword
modules into ToolTip for more information.
Like Commentaries, Study Notes uses a Mark system (÷) to distinguish the verse reference
from the study note about the verse reference.
Creating a Study Notes Module
To create a Study Notes module:
1. Click Marks from the main menu and choose Set Mark. This inserts a mark so ToolTip
NT knows this is a passage of scripture and the line(s) that follow will contain study
notes about this passage of scripture.
TIP: You can quickly insert a Mark by pressing CTRL-M.
2. Immediately beside the Mark you just inserted, type “Genesis 1:1”
3. Press the enter key to create a new line. Type a brief comment on Genesis 1:1.
4. You can enter one line, as we did above: “We can talk about Genesis 1:1 here”. Or you
can type as many paragraphs as you like.
ToolTip NT recognizes lines of text without a mark as being comments for the previous
scripture passage with a mark.
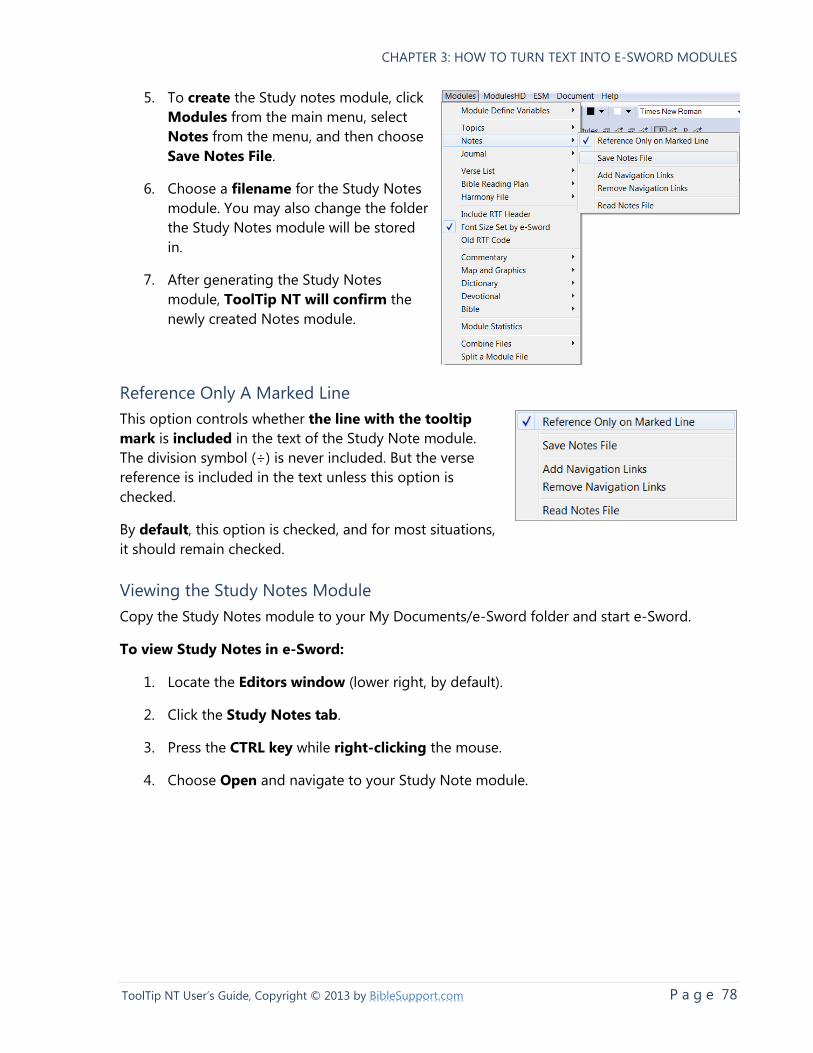
CHAPTER 3: HOW TO TURN TEXT INTO E-SWORD MODULES
P a g e 78 ToolTip NT User’s Guide, Copyright © 2013 by BibleSupport.com
5. To create the Study notes module, click
Modules from the main menu, select
Notes from the menu, and then choose
Save Notes File.
6. Choose a filename for the Study Notes
module. You may also change the folder
the Study Notes module will be stored
in.
7. After generating the Study Notes
module, ToolTip NT will confirm the
newly created Notes module.
Reference Only A Marked Line
This option controls whether the line with the tooltip
mark is included in the text of the Study Note module.
The division symbol (÷) is never included. But the verse
reference is included in the text unless this option is
checked.
By default, this option is checked, and for most situations,
it should remain checked.
Viewing the Study Notes Module
Copy the Study Notes module to your My Documents/e-Sword folder and start e-Sword.
To view Study Notes in e-Sword:
1. Locate the Editors window (lower right, by default).
2. Click the Study Notes tab.
3. Press the CTRL key while right-clicking the mouse.
4. Choose Open and navigate to your Study Note module.
CHAPTER 3: HOW TO TURN TEXT INTO E-SWORD MODULES
P a g e 79 ToolTip NT User’s Guide, Copyright © 2013 by BibleSupport.com
Add/Remove Navigation Links
Add Navigation Links adds verse navigation links to the end of each Study Note. e-Sword
lacks the ability to scroll from one verse note to the next. The Navigation Link feature in ToolTip
NT adds text based navigation links into the Study Note module
For example, the navigation link added to the end of the Genesis 1:26 study note is: Gen_1:25
<=> Gen_1:27
After creating the module, the user use the links in e-Sword to navigate from study note to
study note.
Remove Navigation Links removes the links shown above.
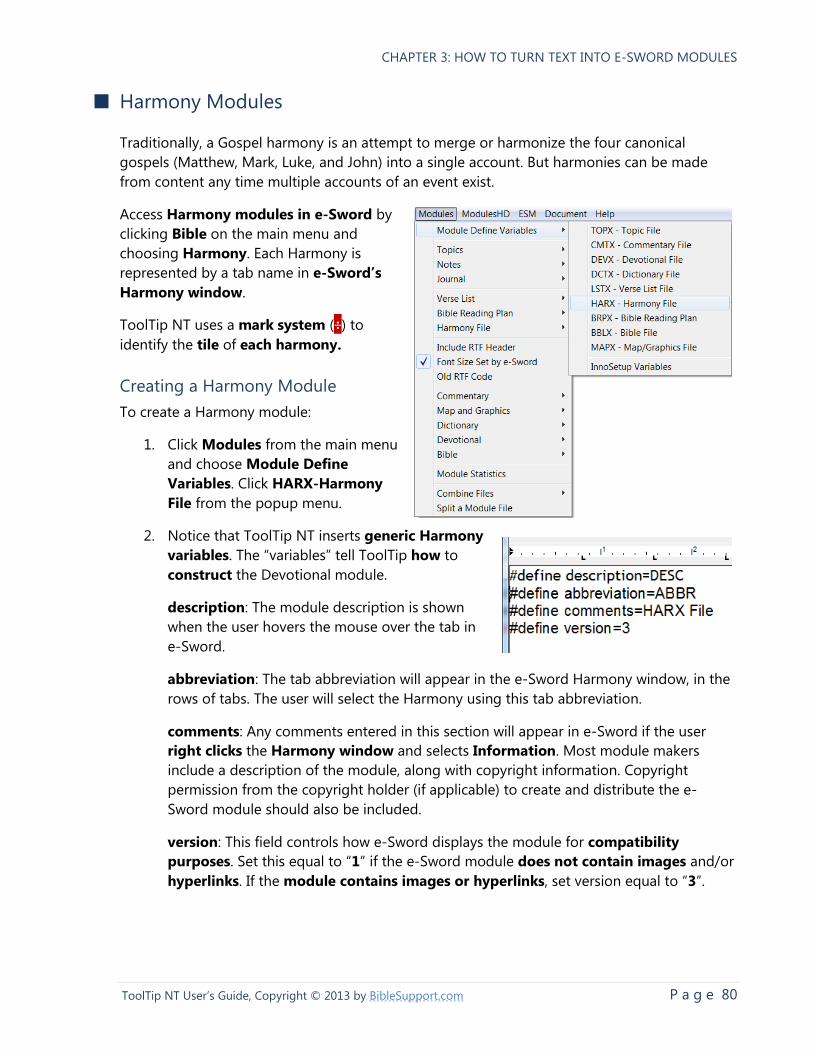
CHAPTER 3: HOW TO TURN TEXT INTO E-SWORD MODULES
P a g e 80 ToolTip NT User’s Guide, Copyright © 2013 by BibleSupport.com
■ Harmony Modules
Traditionally, a Gospel harmony is an attempt to merge or harmonize the four canonical
gospels (Matthew, Mark, Luke, and John) into a single account. But harmonies can be made
from content any time multiple accounts of an event exist.
Access Harmony modules in e-Sword by
clicking Bible on the main menu and
choosing Harmony. Each Harmony is
represented by a tab name in e-Sword’s
Harmony window.
ToolTip NT uses a mark system (÷) to
identify the tile of each harmony.
Creating a Harmony Module
To create a Harmony module:
1. Click Modules from the main menu
and choose Module Define
Variables. Click HARX-Harmony
File from the popup menu.
2. Notice that ToolTip NT inserts generic Harmony
variables. The “variables” tell ToolTip how to
construct the Devotional module.
description: The module description is shown
when the user hovers the mouse over the tab in
e-Sword.
abbreviation: The tab abbreviation will appear in the e-Sword Harmony window, in the
rows of tabs. The user will select the Harmony using this tab abbreviation.
comments: Any comments entered in this section will appear in e-Sword if the user
right clicks the Harmony window and selects Information. Most module makers
include a description of the module, along with copyright information. Copyright
permission from the copyright holder (if applicable) to create and distribute the e-
Sword module should also be included.
version: This field controls how e-Sword displays the module for compatibility
purposes. Set this equal to “1” if the e-Sword module does not contain images and/or
hyperlinks. If the module contains images or hyperlinks, set version equal to “3”.
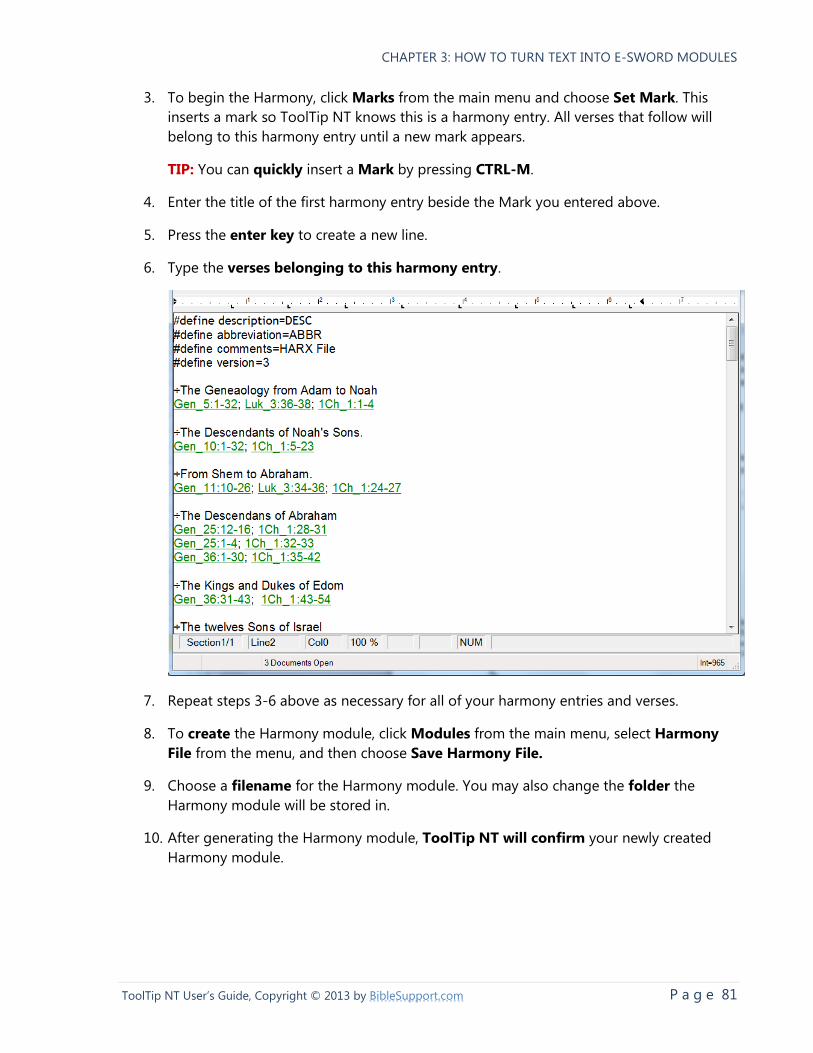
CHAPTER 3: HOW TO TURN TEXT INTO E-SWORD MODULES
P a g e 81 ToolTip NT User’s Guide, Copyright © 2013 by BibleSupport.com
3. To begin the Harmony, click Marks from the main menu and choose Set Mark. This
inserts a mark so ToolTip NT knows this is a harmony entry. All verses that follow will
belong to this harmony entry until a new mark appears.
TIP: You can quickly insert a Mark by pressing CTRL-M.
4. Enter the title of the first harmony entry beside the Mark you entered above.
5. Press the enter key to create a new line.
6. Type the verses belonging to this harmony entry.
7. Repeat steps 3-6 above as necessary for all of your harmony entries and verses.
8. To create the Harmony module, click Modules from the main menu, select Harmony
File from the menu, and then choose Save Harmony File.
9. Choose a filename for the Harmony module. You may also change the folder the
Harmony module will be stored in.
10. After generating the Harmony module, ToolTip NT will confirm your newly created
Harmony module.

CHAPTER 3: HOW TO TURN TEXT INTO E-SWORD MODULES
P a g e 82 ToolTip NT User’s Guide, Copyright © 2013 by BibleSupport.com
Viewing the Harmony Module
Copy the Harmony module to your e-Sword Resource Folder, usually program files\e-Sword.
Start e-Sword, click Bible, and choose Harmony. Select the tab name you specified when
creating the module (“ABBR” in our sample text).
P a g e 83 ToolTip NT User’s Guide, Copyright © 2013 by BibleSupport.com
Chapter 4: Formatting Scripture and Strong’s References
This chapter explains how to format Bible verses so e-Sword will recognize the text as
“popup” scripture references instead of normal text. This allows the reader to hover the mouse
over the verse to view the verse text. This chapter also explains how to tooltip Strong’s
numbers, the numbering system that represents each Greek and Hebrew word in the Bible.
ToolTip NT includes powerful, time saving tools to format scripture references and check their
validity. ToolTip NT also includes formatting features helpful for documents not used by e-
Sword.
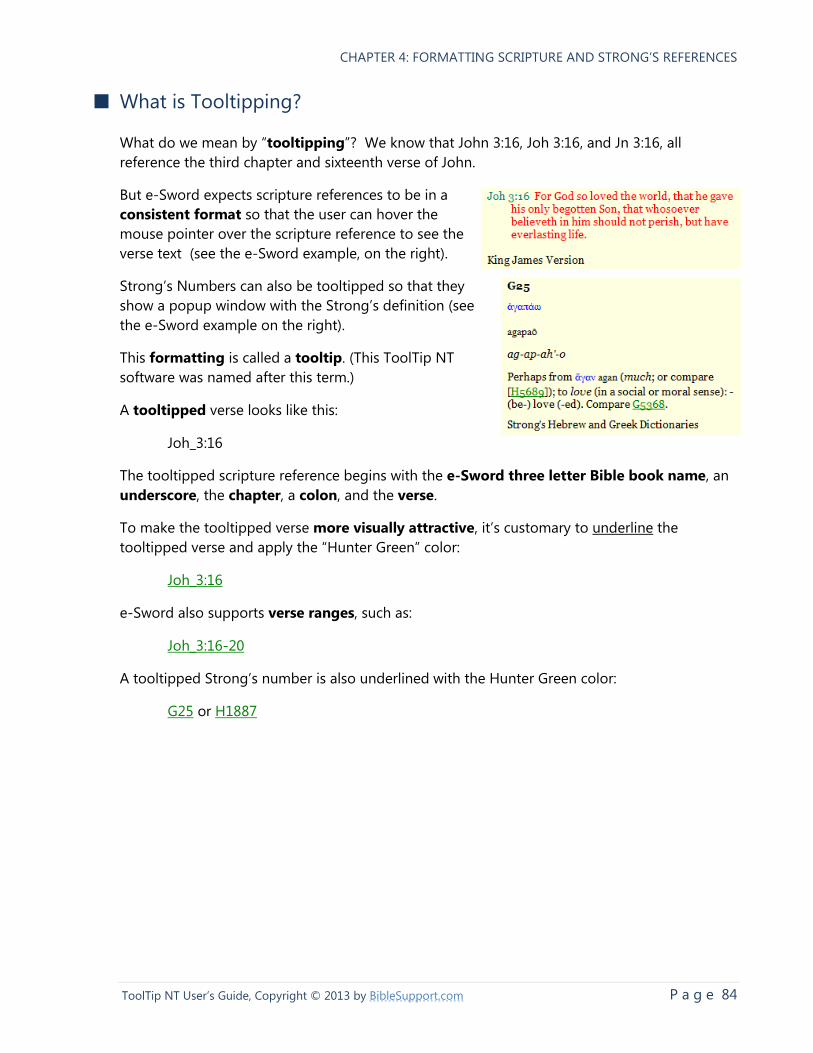
CHAPTER 4: FORMATTING SCRIPTURE AND STRONG’S REFERENCES
P a g e 84 ToolTip NT User’s Guide, Copyright © 2013 by BibleSupport.com
■ What is Tooltipping?
What do we mean by “tooltipping”? We know that John 3:16, Joh 3:16, and Jn 3:16, all
reference the third chapter and sixteenth verse of John.
But e-Sword expects scripture references to be in a
consistent format so that the user can hover the
mouse pointer over the scripture reference to see the
verse text (see the e-Sword example, on the right).
Strong’s Numbers can also be tooltipped so that they
show a popup window with the Strong’s definition (see
the e-Sword example on the right).
This formatting is called a tooltip. (This ToolTip NT
software was named after this term.)
A tooltipped verse looks like this:
Joh_3:16
The tooltipped scripture reference begins with the e-Sword three letter Bible book name, an
underscore, the chapter, a colon, and the verse.
To make the tooltipped verse more visually attractive, it’s customary to underline the
tooltipped verse and apply the “Hunter Green” color:
Joh_3:16
e-Sword also supports verse ranges, such as:
Joh_3:16-20
A tooltipped Strong’s number is also underlined with the Hunter Green color:
G25 or H1887
CHAPTER 4: FORMATTING SCRIPTURE AND STRONG’S REFERENCES
P a g e 85 ToolTip NT User’s Guide, Copyright © 2013 by BibleSupport.com
ToolTip NT Automatically Tooltips References
The original version of ToolTip was really created for tooltipping scripture references. Later, the
ability to tooltip Strong’s numbers was added. Before ToolTip NT, people spent many hours
tooltipping verses or they spent many hours creating scripts and macros to accomplish this
task.
A book may contain hundreds of verse references and a commentary may include thousands
of verse references. ToolTip NT will automatically format scripture and Strong’s references to
e-Sword tooltips in a matter of seconds or minutes, depending on the size of your document
and the number of references.
The rest of this chapter explains how to use ToolTip NT to format scripture and Strong’s
references for e-Sword.
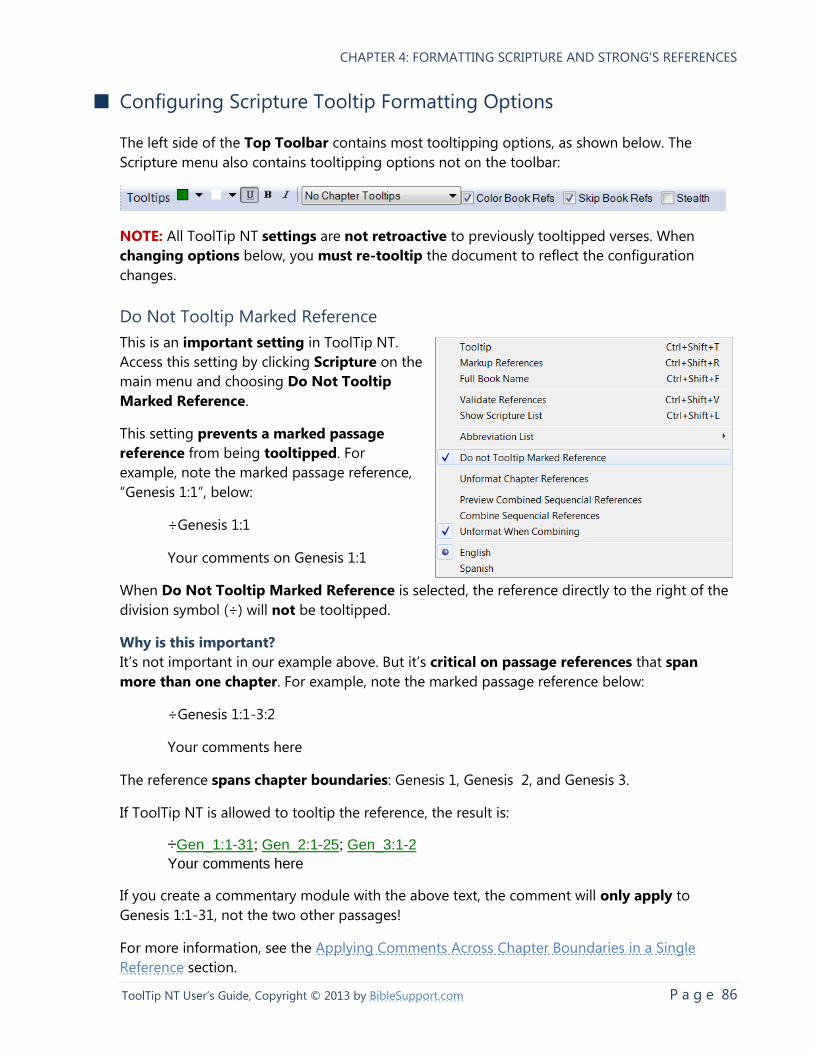
CHAPTER 4: FORMATTING SCRIPTURE AND STRONG’S REFERENCES
P a g e 86 ToolTip NT User’s Guide, Copyright © 2013 by BibleSupport.com
■ Configuring Scripture Tooltip Formatting Options
The left side of the Top Toolbar contains most tooltipping options, as shown below. The
Scripture menu also contains tooltipping options not on the toolbar:
NOTE: All ToolTip NT settings are not retroactive to previously tooltipped verses. When
changing options below, you must re-tooltip the document to reflect the configuration
changes.
Do Not Tooltip Marked Reference
This is an important setting in ToolTip NT.
Access this setting by clicking Scripture on the
main menu and choosing Do Not Tooltip
Marked Reference.
This setting prevents a marked passage
reference from being tooltipped. For
example, note the marked passage reference,
“Genesis 1:1”, below:
÷Genesis 1:1
Your comments on Genesis 1:1
When Do Not Tooltip Marked Reference is selected, the reference directly to the right of the
division symbol (÷) will not be tooltipped.
Why is this important?
It’s not important in our example above. But it’s critical on passage references that span
more than one chapter. For example, note the marked passage reference below:
÷Genesis 1:1-3:2
Your comments here
The reference spans chapter boundaries: Genesis 1, Genesis 2, and Genesis 3.
If ToolTip NT is allowed to tooltip the reference, the result is:
÷Gen_1:1-31; Gen_2:1-25; Gen_3:1-2
Your comments here
If you create a commentary module with the above text, the comment will only apply to
Genesis 1:1-31, not the two other passages!
For more information, see the Applying Comments Across Chapter Boundaries in a Single
Reference section.
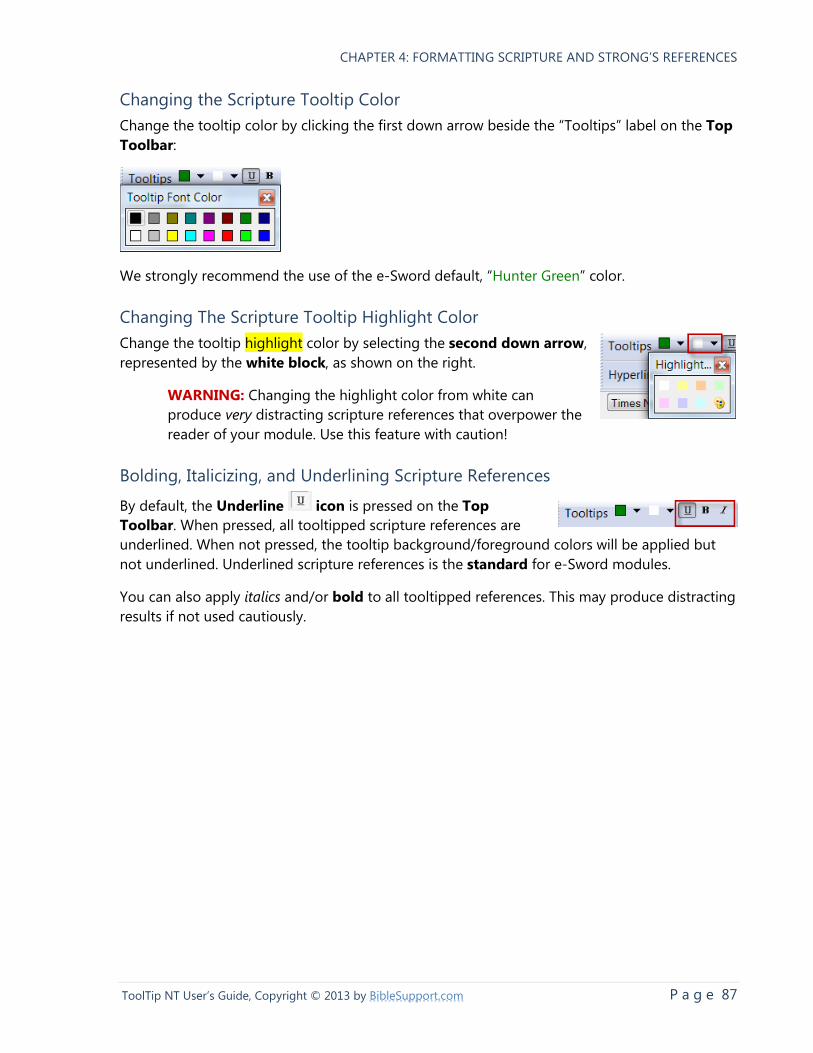
CHAPTER 4: FORMATTING SCRIPTURE AND STRONG’S REFERENCES
P a g e 87 ToolTip NT User’s Guide, Copyright © 2013 by BibleSupport.com
Changing the Scripture Tooltip Color
Change the tooltip color by clicking the first down arrow beside the “Tooltips” label on the Top
Toolbar:
We strongly recommend the use of the e-Sword default, “Hunter Green” color.
Changing The Scripture Tooltip Highlight Color
Change the tooltip highlight color by selecting the second down arrow,
represented by the white block, as shown on the right.
WARNING: Changing the highlight color from white can
produce very distracting scripture references that overpower the
reader of your module. Use this feature with caution!
Bolding, Italicizing, and Underlining Scripture References
By default, the Underline icon is pressed on the Top
Toolbar. When pressed, all tooltipped scripture references are
underlined. When not pressed, the tooltip background/foreground colors will be applied but
not underlined. Underlined scripture references is the standard for e-Sword modules.
You can also apply italics and/or bold to all tooltipped references. This may produce distracting
results if not used cautiously.
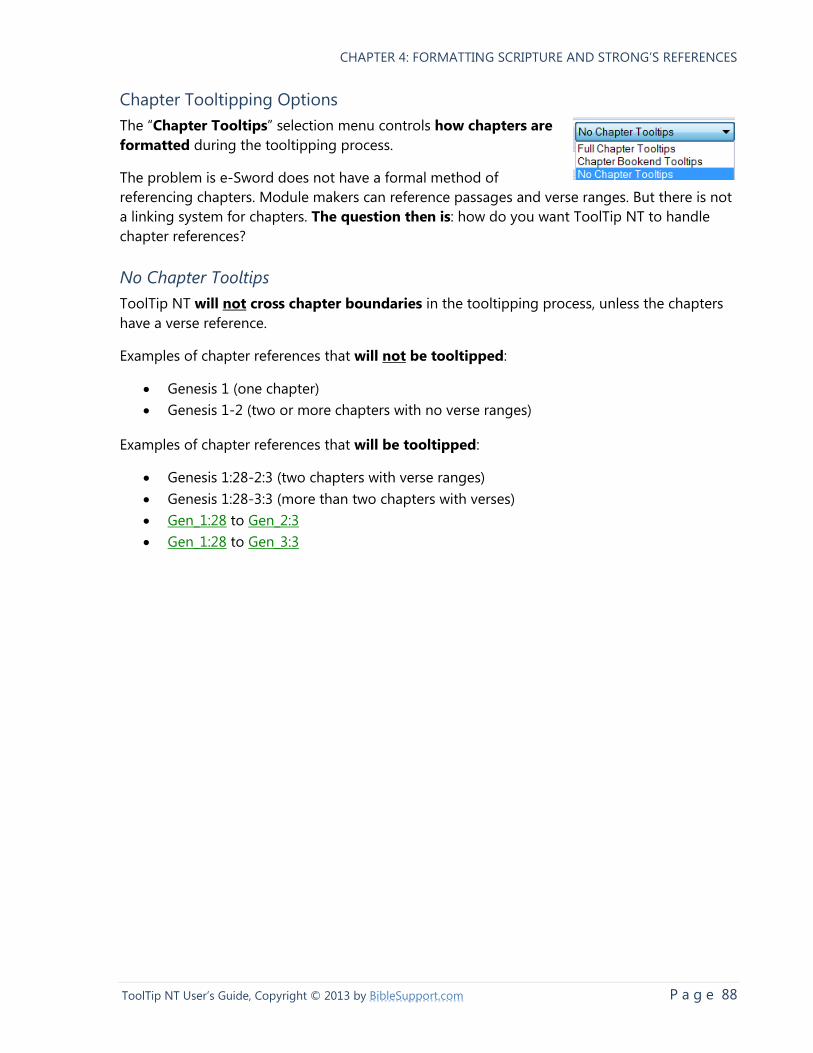
CHAPTER 4: FORMATTING SCRIPTURE AND STRONG’S REFERENCES
P a g e 88 ToolTip NT User’s Guide, Copyright © 2013 by BibleSupport.com
Chapter Tooltipping Options
The “Chapter Tooltips” selection menu controls how chapters are
formatted during the tooltipping process.
The problem is e-Sword does not have a formal method of
referencing chapters. Module makers can reference passages and verse ranges. But there is not
a linking system for chapters. The question then is: how do you want ToolTip NT to handle
chapter references?
No Chapter Tooltips
ToolTip NT will not cross chapter boundaries in the tooltipping process, unless the chapters
have a verse reference.
Examples of chapter references that will not be tooltipped:
Genesis 1 (one chapter)
Genesis 1-2 (two or more chapters with no verse ranges)
Examples of chapter references that will be tooltipped:
Genesis 1:28-2:3 (two chapters with verse ranges)
Genesis 1:28-3:3 (more than two chapters with verses)
Gen_1:28 to Gen_2:3
Gen_1:28 to Gen_3:3
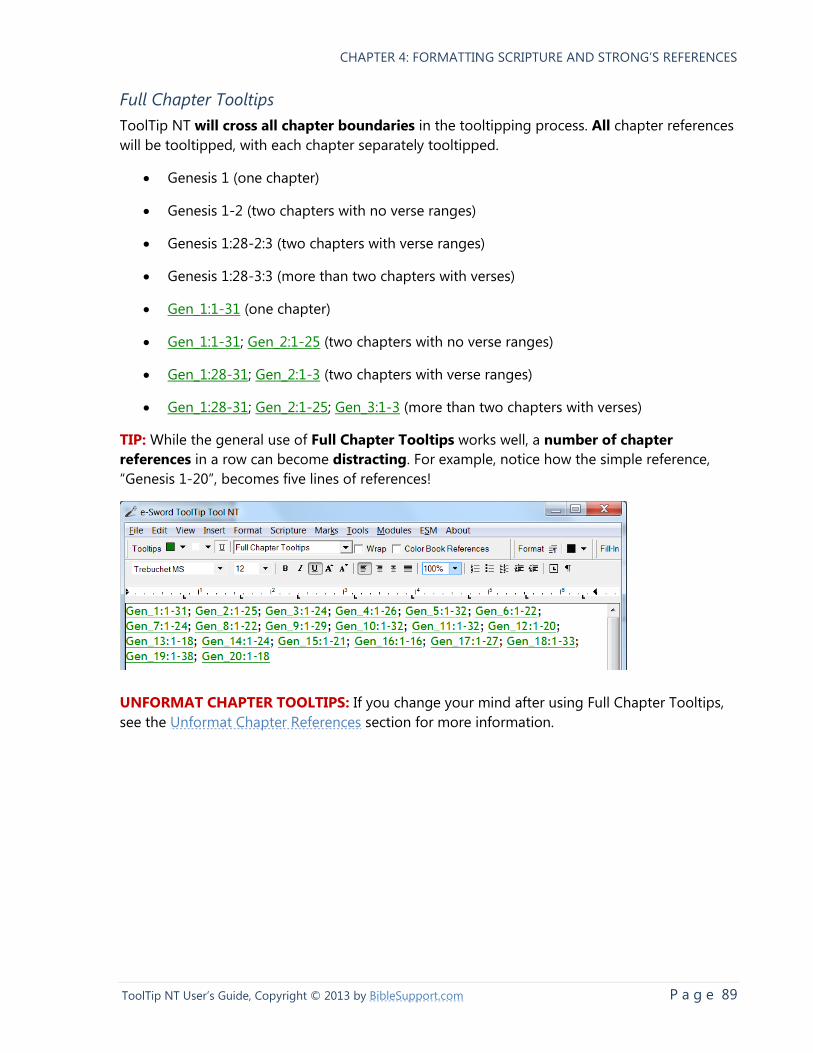
CHAPTER 4: FORMATTING SCRIPTURE AND STRONG’S REFERENCES
P a g e 89 ToolTip NT User’s Guide, Copyright © 2013 by BibleSupport.com
Full Chapter Tooltips
ToolTip NT will cross all chapter boundaries in the tooltipping process. All chapter references
will be tooltipped, with each chapter separately tooltipped.
Genesis 1 (one chapter)
Genesis 1-2 (two chapters with no verse ranges)
Genesis 1:28-2:3 (two chapters with verse ranges)
Genesis 1:28-3:3 (more than two chapters with verses)
Gen_1:1-31 (one chapter)
Gen_1:1-31; Gen_2:1-25 (two chapters with no verse ranges)
Gen_1:28-31; Gen_2:1-3 (two chapters with verse ranges)
Gen_1:28-31; Gen_2:1-25; Gen_3:1-3 (more than two chapters with verses)
TIP: While the general use of Full Chapter Tooltips works well, a number of chapter
references in a row can become distracting. For example, notice how the simple reference,
“Genesis 1-20”, becomes five lines of references!
UNFORMAT CHAPTER TOOLTIPS: If you change your mind after using Full Chapter Tooltips,
see the Unformat Chapter References section for more information.
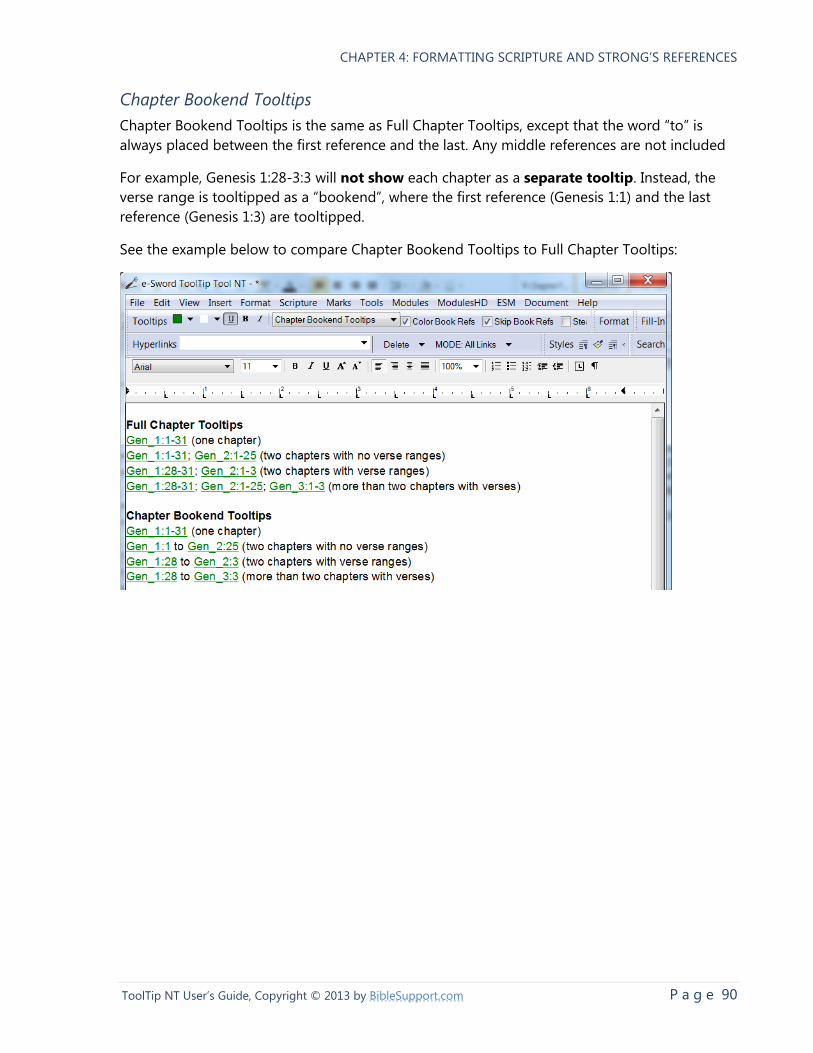
CHAPTER 4: FORMATTING SCRIPTURE AND STRONG’S REFERENCES
P a g e 90 ToolTip NT User’s Guide, Copyright © 2013 by BibleSupport.com
Chapter Bookend Tooltips
Chapter Bookend Tooltips is the same as Full Chapter Tooltips, except that the word “to” is
always placed between the first reference and the last. Any middle references are not included
For example, Genesis 1:28-3:3 will not show each chapter as a separate tooltip. Instead, the
verse range is tooltipped as a “bookend”, where the first reference (Genesis 1:1) and the last
reference (Genesis 1:3) are tooltipped.
See the example below to compare Chapter Bookend Tooltips to Full Chapter Tooltips:
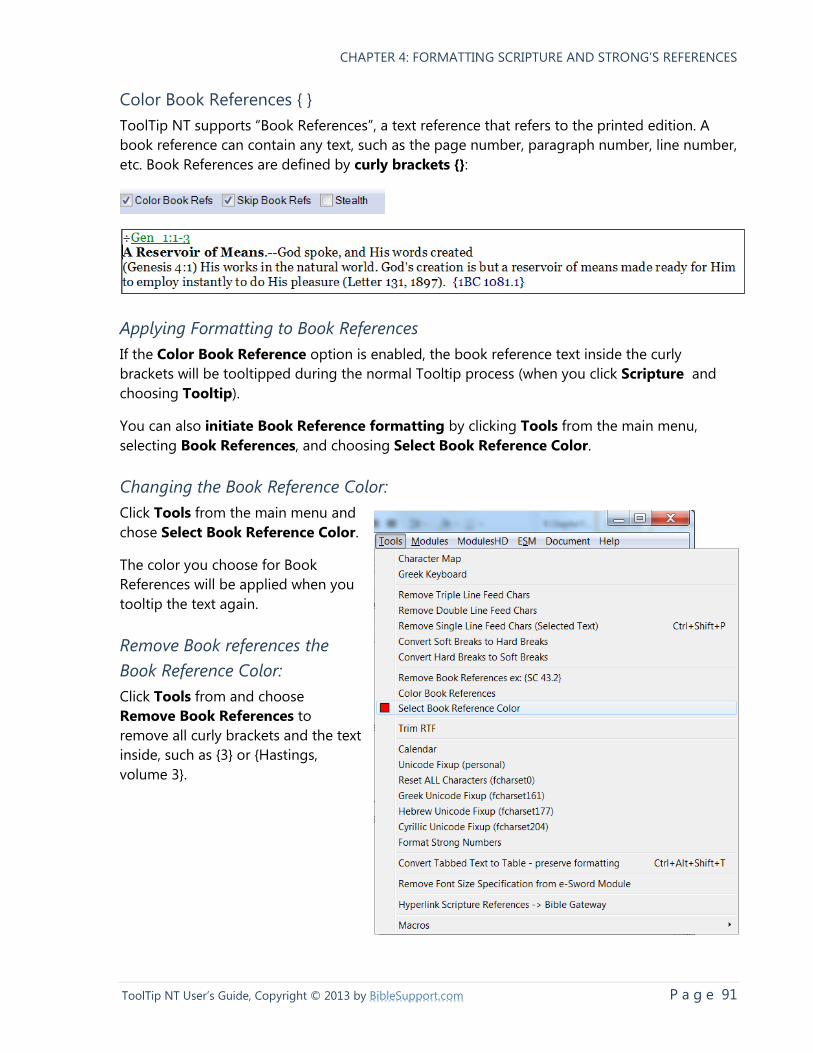
CHAPTER 4: FORMATTING SCRIPTURE AND STRONG’S REFERENCES
P a g e 91 ToolTip NT User’s Guide, Copyright © 2013 by BibleSupport.com
Color Book References { }
ToolTip NT supports “Book References”, a text reference that refers to the printed edition. A
book reference can contain any text, such as the page number, paragraph number, line number,
etc. Book References are defined by curly brackets {}:
Applying Formatting to Book References
If the Color Book Reference option is enabled, the book reference text inside the curly
brackets will be tooltipped during the normal Tooltip process (when you click Scripture and
choosing Tooltip).
You can also initiate Book Reference formatting by clicking Tools from the main menu,
selecting Book References, and choosing Select Book Reference Color.
Changing the Book Reference Color:
Click Tools from the main menu and
chose Select Book Reference Color.
The color you choose for Book
References will be applied when you
tooltip the text again.
Remove Book references the
Book Reference Color:
Click Tools from and choose
Remove Book References to
remove all curly brackets and the text
inside, such as {3} or {Hastings,
volume 3}.
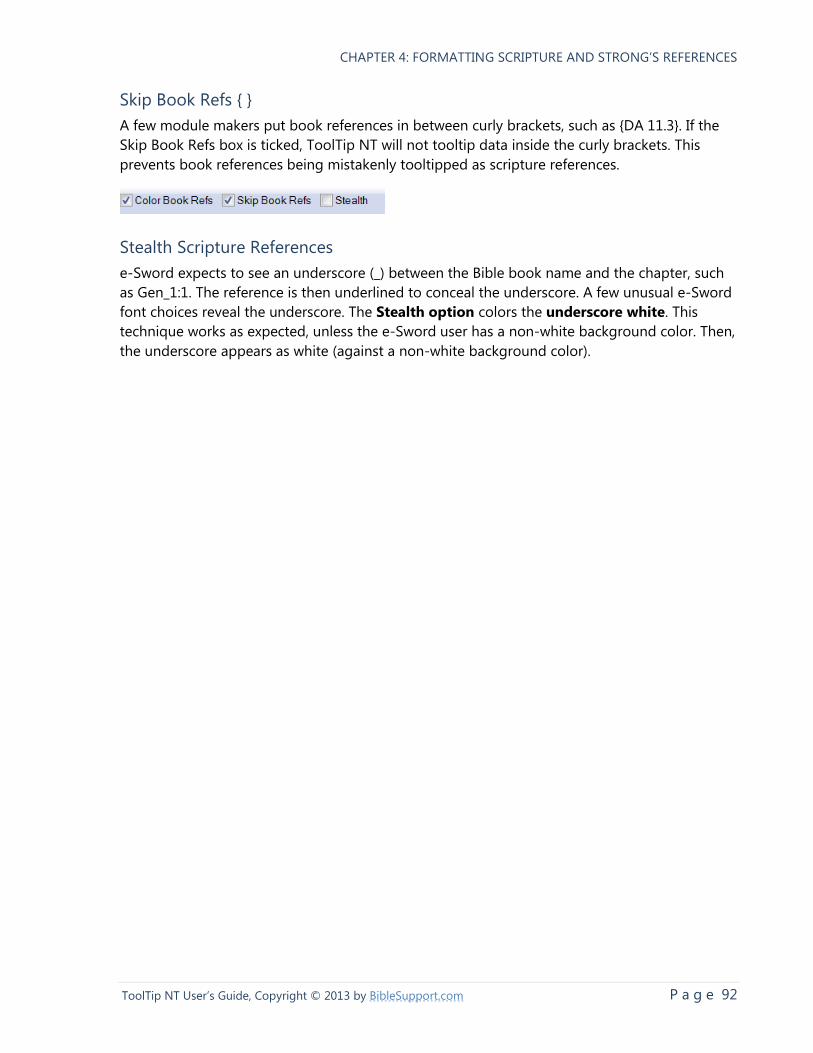
CHAPTER 4: FORMATTING SCRIPTURE AND STRONG’S REFERENCES
P a g e 92 ToolTip NT User’s Guide, Copyright © 2013 by BibleSupport.com
Skip Book Refs { }
A few module makers put book references in between curly brackets, such as {DA 11.3}. If the
Skip Book Refs box is ticked, ToolTip NT will not tooltip data inside the curly brackets. This
prevents book references being mistakenly tooltipped as scripture references.
Stealth Scripture References
e-Sword expects to see an underscore (_) between the Bible book name and the chapter, such
as Gen_1:1. The reference is then underlined to conceal the underscore. A few unusual e-Sword
font choices reveal the underscore. The Stealth option colors the underscore white. This
technique works as expected, unless the e-Sword user has a non-white background color. Then,
the underscore appears as white (against a non-white background color).
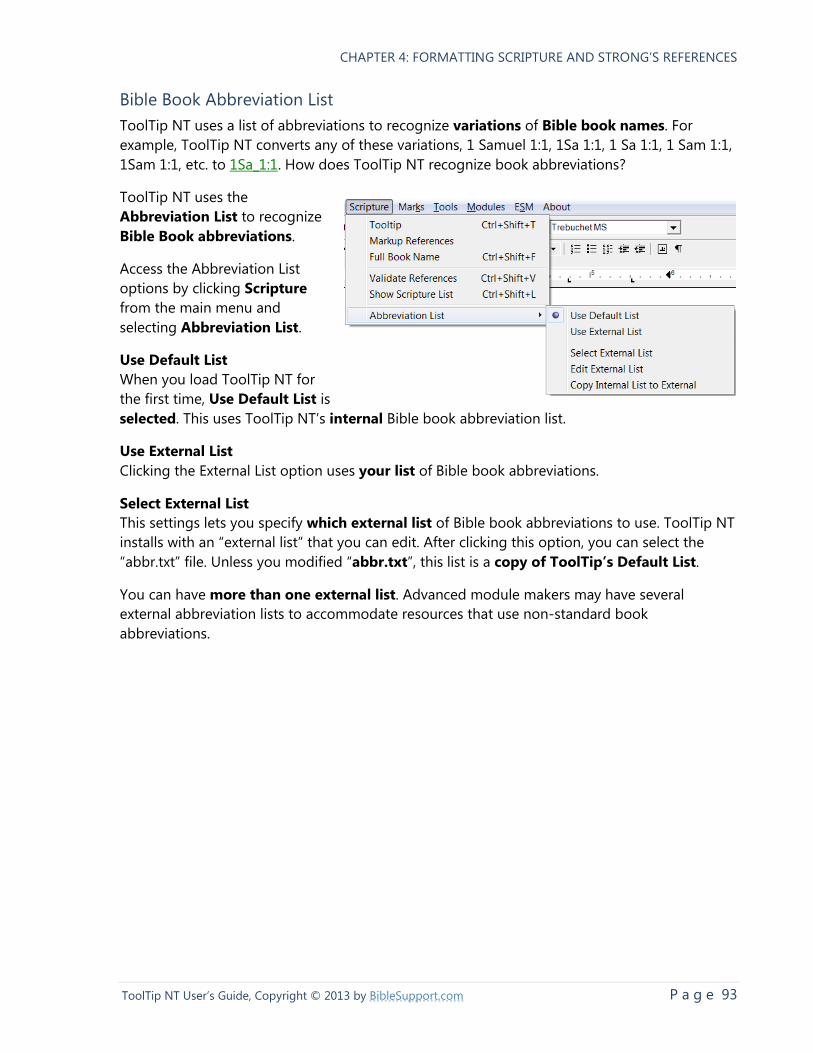
CHAPTER 4: FORMATTING SCRIPTURE AND STRONG’S REFERENCES
P a g e 93 ToolTip NT User’s Guide, Copyright © 2013 by BibleSupport.com
Bible Book Abbreviation List
ToolTip NT uses a list of abbreviations to recognize variations of Bible book names. For
example, ToolTip NT converts any of these variations, 1 Samuel 1:1, 1Sa 1:1, 1 Sa 1:1, 1 Sam 1:1,
1Sam 1:1, etc. to 1Sa_1:1. How does ToolTip NT recognize book abbreviations?
ToolTip NT uses the
Abbreviation List to recognize
Bible Book abbreviations.
Access the Abbreviation List
options by clicking Scripture
from the main menu and
selecting Abbreviation List.
Use Default List
When you load ToolTip NT for
the first time, Use Default List is
selected. This uses ToolTip NT’s internal Bible book abbreviation list.
Use External List
Clicking the External List option uses your list of Bible book abbreviations.
Select External List
This settings lets you specify which external list of Bible book abbreviations to use. ToolTip NT
installs with an “external list” that you can edit. After clicking this option, you can select the
“abbr.txt” file. Unless you modified “abbr.txt”, this list is a copy of ToolTip’s Default List.
You can have more than one external list. Advanced module makers may have several
external abbreviation lists to accommodate resources that use non-standard book
abbreviations.
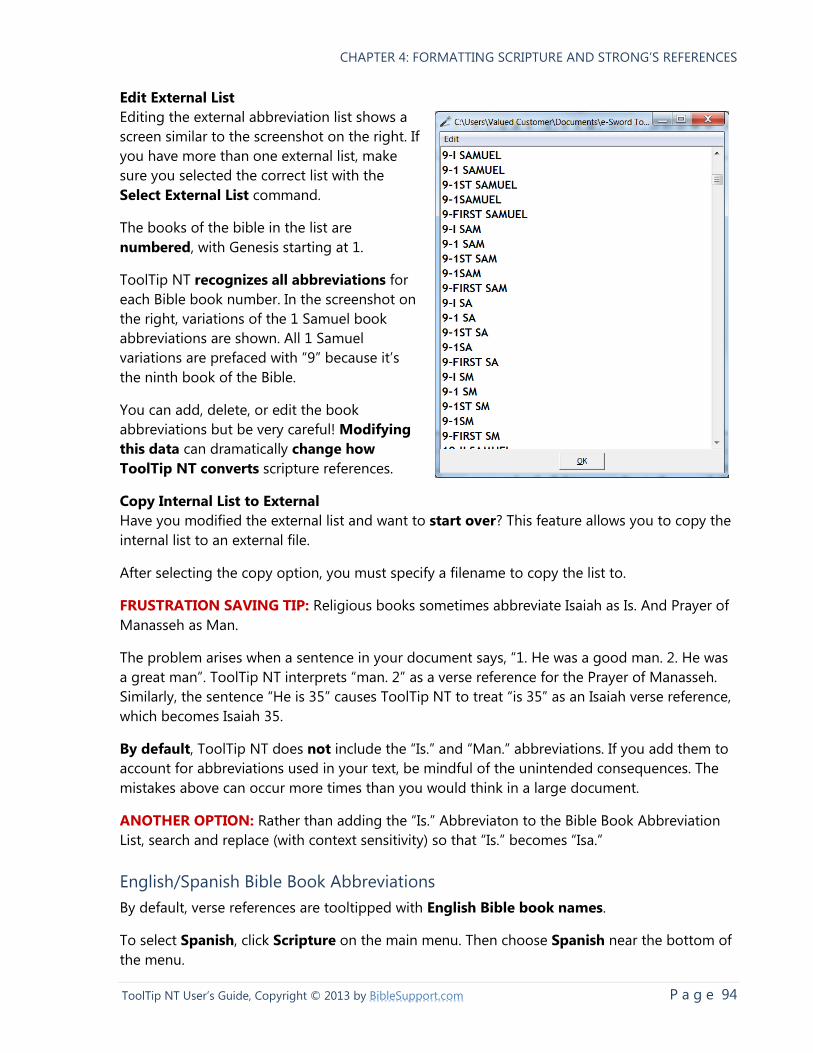
CHAPTER 4: FORMATTING SCRIPTURE AND STRONG’S REFERENCES
P a g e 94 ToolTip NT User’s Guide, Copyright © 2013 by BibleSupport.com
Edit External List
Editing the external abbreviation list shows a
screen similar to the screenshot on the right. If
you have more than one external list, make
sure you selected the correct list with the
Select External List command.
The books of the bible in the list are
numbered, with Genesis starting at 1.
ToolTip NT recognizes all abbreviations for
each Bible book number. In the screenshot on
the right, variations of the 1 Samuel book
abbreviations are shown. All 1 Samuel
variations are prefaced with “9” because it’s
the ninth book of the Bible.
You can add, delete, or edit the book
abbreviations but be very careful! Modifying
this data can dramatically change how
ToolTip NT converts scripture references.
Copy Internal List to External
Have you modified the external list and want to start over? This feature allows you to copy the
internal list to an external file.
After selecting the copy option, you must specify a filename to copy the list to.
FRUSTRATION SAVING TIP: Religious books sometimes abbreviate Isaiah as Is. And Prayer of
Manasseh as Man.
The problem arises when a sentence in your document says, “1. He was a good man. 2. He was
a great man”. ToolTip NT interprets “man. 2” as a verse reference for the Prayer of Manasseh.
Similarly, the sentence “He is 35” causes ToolTip NT to treat “is 35” as an Isaiah verse reference,
which becomes Isaiah 35.
By default, ToolTip NT does not include the “Is.” and “Man.” abbreviations. If you add them to
account for abbreviations used in your text, be mindful of the unintended consequences. The
mistakes above can occur more times than you would think in a large document.
ANOTHER OPTION: Rather than adding the “Is.” Abbreviaton to the Bible Book Abbreviation
List, search and replace (with context sensitivity) so that “Is.” becomes “Isa.”
English/Spanish Bible Book Abbreviations
By default, verse references are tooltipped with English Bible book names.
To select Spanish, click Scripture on the main menu. Then choose Spanish near the bottom of
the menu.
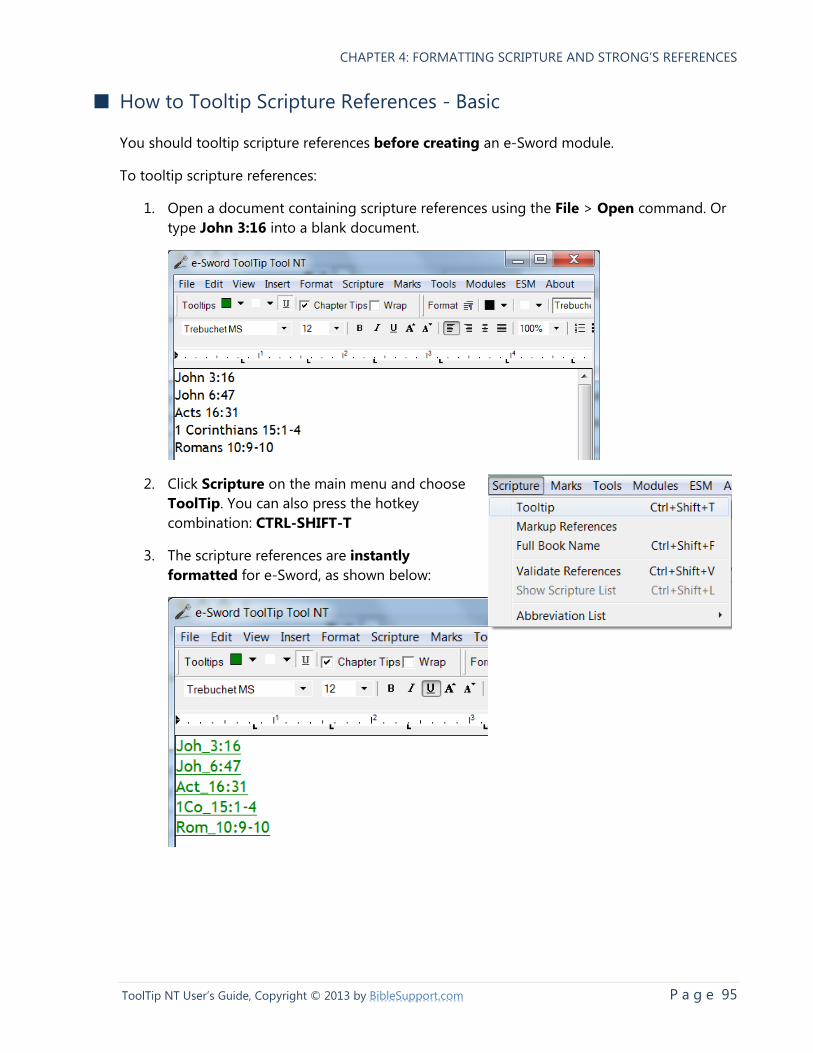
CHAPTER 4: FORMATTING SCRIPTURE AND STRONG’S REFERENCES
P a g e 95 ToolTip NT User’s Guide, Copyright © 2013 by BibleSupport.com
■ How to Tooltip Scripture References - Basic
You should tooltip scripture references before creating an e-Sword module.
To tooltip scripture references:
1. Open a document containing scripture references using the File > Open command. Or
type John 3:16 into a blank document.
2. Click Scripture on the main menu and choose
ToolTip. You can also press the hotkey
combination: CTRL-SHIFT-T
3. The scripture references are instantly
formatted for e-Sword, as shown below:
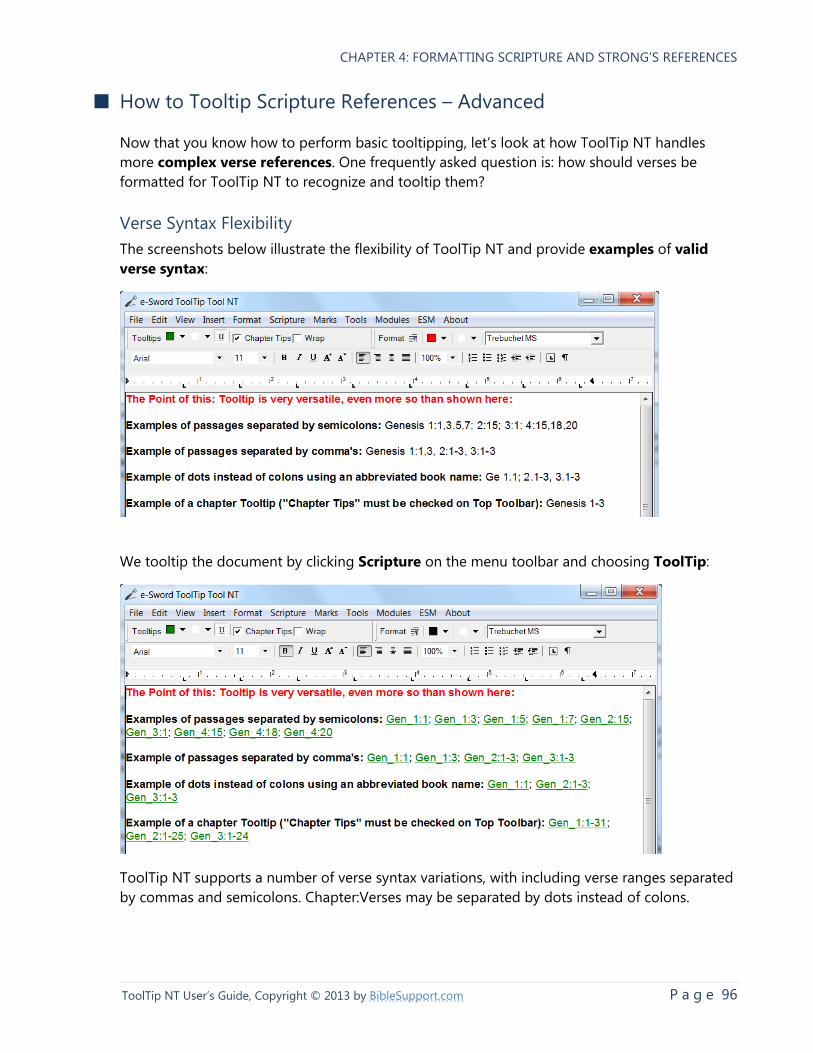
CHAPTER 4: FORMATTING SCRIPTURE AND STRONG’S REFERENCES
P a g e 96 ToolTip NT User’s Guide, Copyright © 2013 by BibleSupport.com
■ How to Tooltip Scripture References – Advanced
Now that you know how to perform basic tooltipping, let’s look at how ToolTip NT handles
more complex verse references. One frequently asked question is: how should verses be
formatted for ToolTip NT to recognize and tooltip them?
Verse Syntax Flexibility
The screenshots below illustrate the flexibility of ToolTip NT and provide examples of valid
verse syntax:
We tooltip the document by clicking Scripture on the menu toolbar and choosing ToolTip:
ToolTip NT supports a number of verse syntax variations, with including verse ranges separated
by commas and semicolons. Chapter:Verses may be separated by dots instead of colons.
CHAPTER 4: FORMATTING SCRIPTURE AND STRONG’S REFERENCES
P a g e 97 ToolTip NT User’s Guide, Copyright © 2013 by BibleSupport.com
As shown above, ToolTip NT treats semicolons as a new verse range. Genesis 1:1,3; 2:1-3
should obviously be treated as a separate verse passage beginning with the semicolon:
Gen_1:1; Gen_1:3; Gen_2:1-3
Let’s examine a situation with odd spacing. Genesis 1:1 2. ToolTip NT treats the space between
“1” and “2” as erroneous. ToolTip NT removes the space and tooltips the verse as: Gen_1:12
Book Name Abbreviations
Book Name abbreviations are easily configured in ToolTip. If your document uses unrecognized
book abbreviations, ToolTip NT will not tooltip the verse reference.
For example, if your document says, “Genes 1:1”, ToolTip NT would not tooltip the verse
reference unless you added “Genes” to the Book Name abbreviation list for Genesis.
Chapter Tooltips
The Chapter Tooltips selection menu controls how chapters are handled during the tooltipping
process.
Using Full Chapter Tooltips, note that Genesis 1-19 tooltips as:
Gen_1:1-31; Gen_2:1-25; Gen_3:1-24; Gen_4:1-26; Gen_5:1-32; Gen_6:1-22;
Gen_7:1-24; Gen_8:1-22; Gen_9:1-29; Gen_10:1-32; Gen_11:1-32; Gen_12:1-20;
Gen_13:1-18; Gen_14:1-24; Gen_15:1-21; Gen_16:1-16; Gen_17:1-27; Gen_18:1-33;
Gen_19:1-38;
This can be very distracting to a reader. You can configure Chapter Tooltips or see the next
section on Tooltipping Exclusions.
Tooltipping Exclusions
You can exclude scripture from the tooltipping process with three backslashes: \\\
Genesis \\\1:1 will not ToolTip. Similarly, even if Full Chapter Tooltips is enabled, Genesis \\\1-10
will not tooltip.
The backslashes are removed from the text when you generate the e-Sword module, not during
the tooltipping process. This way, you can tooltip the document multiple times without losing
the backslashes.
WARNING: Generating the module will remove the backslashes, both from the module and
the source document open in ToolTip NT. If you save your source file after generating the
module, the backslashes will be lost! It’s best to make a backup copy first.
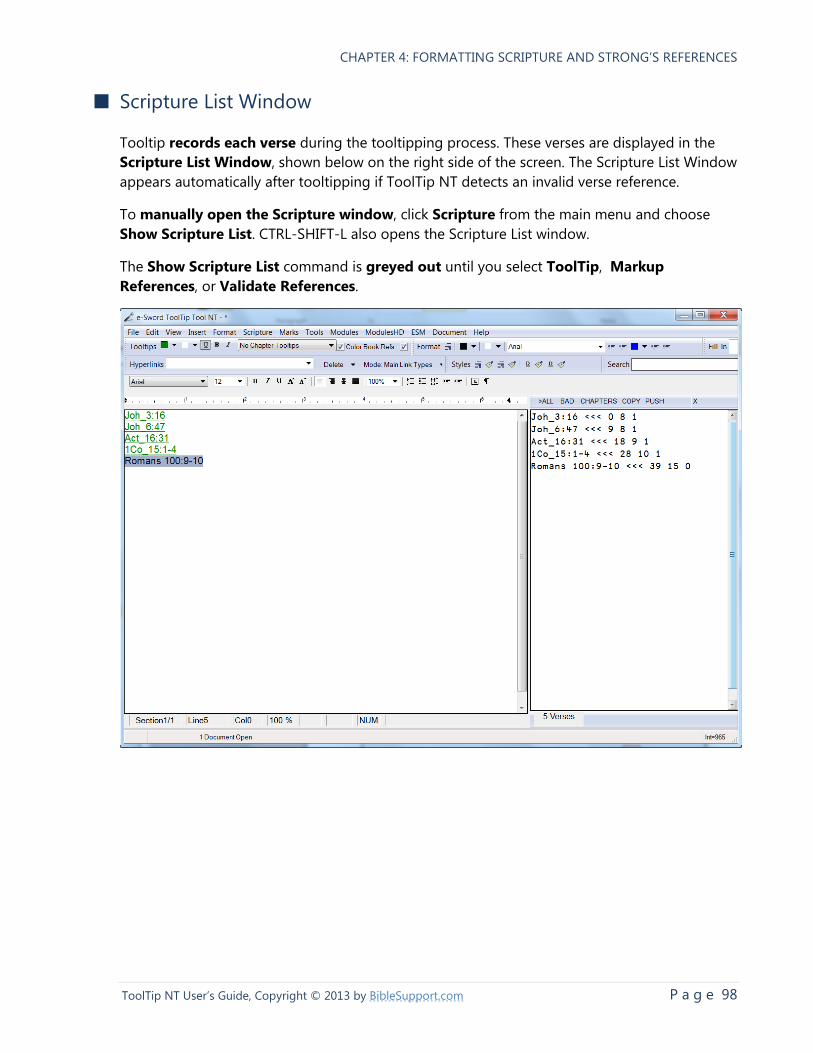
CHAPTER 4: FORMATTING SCRIPTURE AND STRONG’S REFERENCES
P a g e 98 ToolTip NT User’s Guide, Copyright © 2013 by BibleSupport.com
■ Scripture List Window
Tooltip records each verse during the tooltipping process. These verses are displayed in the
Scripture List Window, shown below on the right side of the screen. The Scripture List Window
appears automatically after tooltipping if ToolTip NT detects an invalid verse reference.
To manually open the Scripture window, click Scripture from the main menu and choose
Show Scripture List. CTRL-SHIFT-L also opens the Scripture List window.
The Show Scripture List command is greyed out until you select ToolTip, Markup
References, or Validate References.
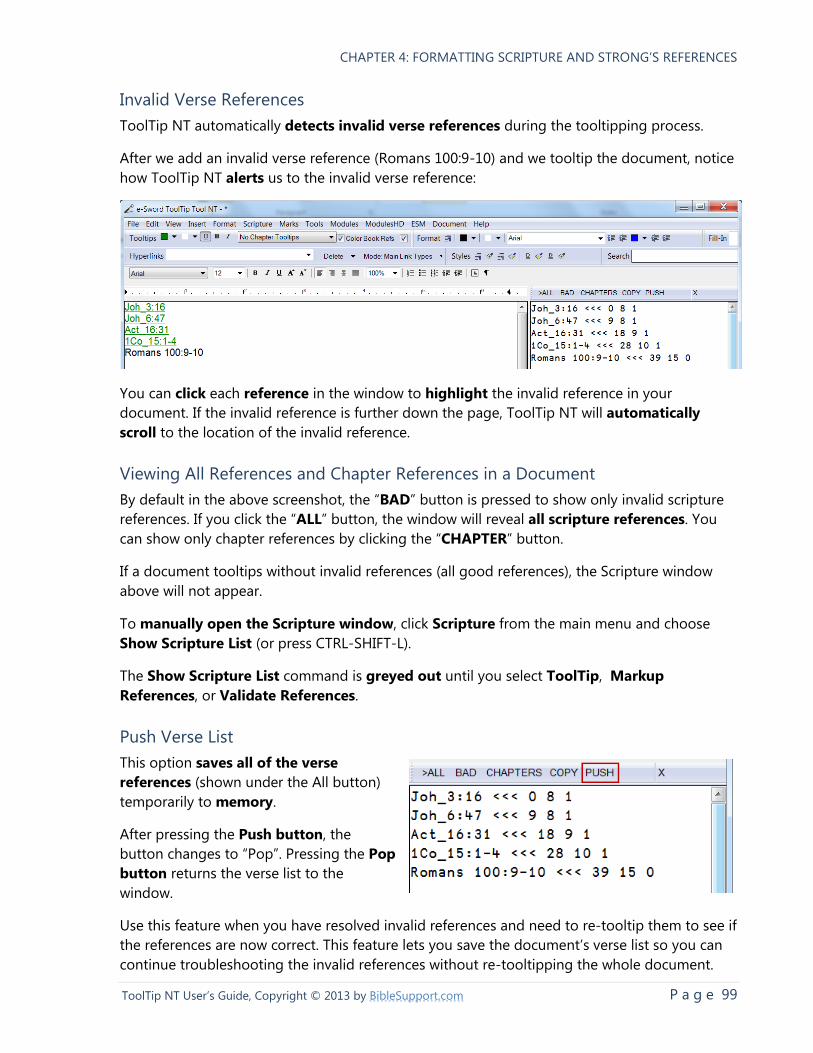
CHAPTER 4: FORMATTING SCRIPTURE AND STRONG’S REFERENCES
P a g e 99 ToolTip NT User’s Guide, Copyright © 2013 by BibleSupport.com
Invalid Verse References
ToolTip NT automatically detects invalid verse references during the tooltipping process.
After we add an invalid verse reference (Romans 100:9-10) and we tooltip the document, notice
how ToolTip NT alerts us to the invalid verse reference:
You can click each reference in the window to highlight the invalid reference in your
document. If the invalid reference is further down the page, ToolTip NT will automatically
scroll to the location of the invalid reference.
Viewing All References and Chapter References in a Document
By default in the above screenshot, the “BAD” button is pressed to show only invalid scripture
references. If you click the “ALL” button, the window will reveal all scripture references. You
can show only chapter references by clicking the “CHAPTER” button.
If a document tooltips without invalid references (all good references), the Scripture window
above will not appear.
To manually open the Scripture window, click Scripture from the main menu and choose
Show Scripture List (or press CTRL-SHIFT-L).
The Show Scripture List command is greyed out until you select ToolTip, Markup
References, or Validate References.
Push Verse List
This option saves all of the verse
references (shown under the All button)
temporarily to memory.
After pressing the Push button, the
button changes to “Pop”. Pressing the Pop
button returns the verse list to the
window.
Use this feature when you have resolved invalid references and need to re-tooltip them to see if
the references are now correct. This feature lets you save the document’s verse list so you can
continue troubleshooting the invalid references without re-tooltipping the whole document.
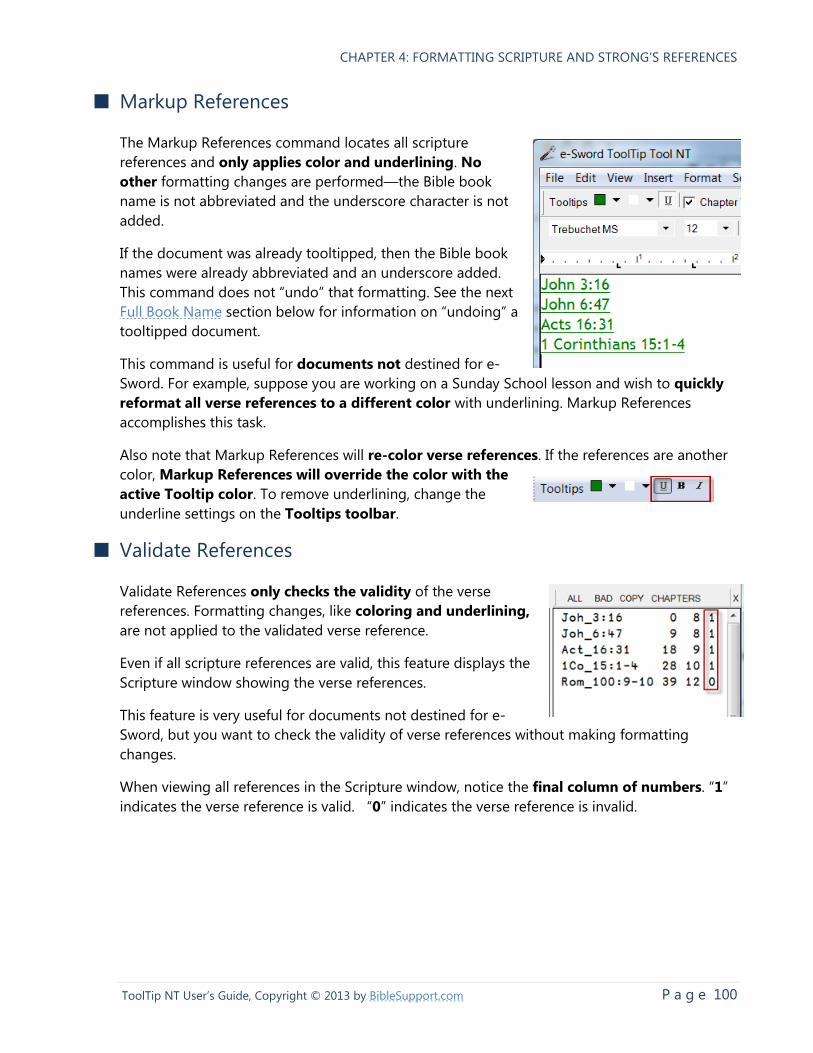
CHAPTER 4: FORMATTING SCRIPTURE AND STRONG’S REFERENCES
P a g e 100 ToolTip NT User’s Guide, Copyright © 2013 by BibleSupport.com
■ Markup References
The Markup References command locates all scripture
references and only applies color and underlining. No
other formatting changes are performed—the Bible book
name is not abbreviated and the underscore character is not
added.
If the document was already tooltipped, then the Bible book
names were already abbreviated and an underscore added.
This command does not “undo” that formatting. See the next
Full Book Name section below for information on “undoing” a
tooltipped document.
This command is useful for documents not destined for e-
Sword. For example, suppose you are working on a Sunday School lesson and wish to quickly
reformat all verse references to a different color with underlining. Markup References
accomplishes this task.
Also note that Markup References will re-color verse references. If the references are another
color, Markup References will override the color with the
active Tooltip color. To remove underlining, change the
underline settings on the Tooltips toolbar.
■ Validate References
Validate References only checks the validity of the verse
references. Formatting changes, like coloring and underlining,
are not applied to the validated verse reference.
Even if all scripture references are valid, this feature displays the
Scripture window showing the verse references.
This feature is very useful for documents not destined for e-
Sword, but you want to check the validity of verse references without making formatting
changes.
When viewing all references in the Scripture window, notice the final column of numbers. “1”
indicates the verse reference is valid. “0” indicates the verse reference is invalid.
CHAPTER 4: FORMATTING SCRIPTURE AND STRONG’S REFERENCES
P a g e 101 ToolTip NT User’s Guide, Copyright © 2013 by BibleSupport.com
■ Full Book Name: How to “Un-Tooltip” a Document
By selecting Scripture from the main menu and choosing Full Book Name, you can “un-
Tooltip” a document.
This feature will convert e-Sword verse references to their full book name rather than the e-
Sword abbreviation. The underscore added during the tooltip process is also removed. This
result is useful for documents that you wish to use outside of e-Sword. For example, Joh_3:16
becomes John 3:16.
TIP: If you wish to use a document outside of e-Sword and also want to remove all
tooltip marks (the division symbols), click Marks from the main menu and choose
Remove All Marks.
You may also remove all Book References, the text inside curly brackets {}. Click Tools from the
main menu, choose Book References, and select Remove Book References.
SEE ALSO: See also the next section, Unformat Chapter References, for more options on
un-tooltipping chapter references.
■ Unformat Chapter References
As discussed in the Chapter Tooltipping Options section, chapters can be tooltipped. When a
document is tooltipped with Full Chapter Tooltips, the text:
John 3; John 4; John 5
becomes
Joh_3:1-36; Joh_4:1-54; Joh_5:1-47
Unformatting Chapter References returns the tooltipped chapter references above to the
original, unformatted chapter references: John 3; John 4; John 5.
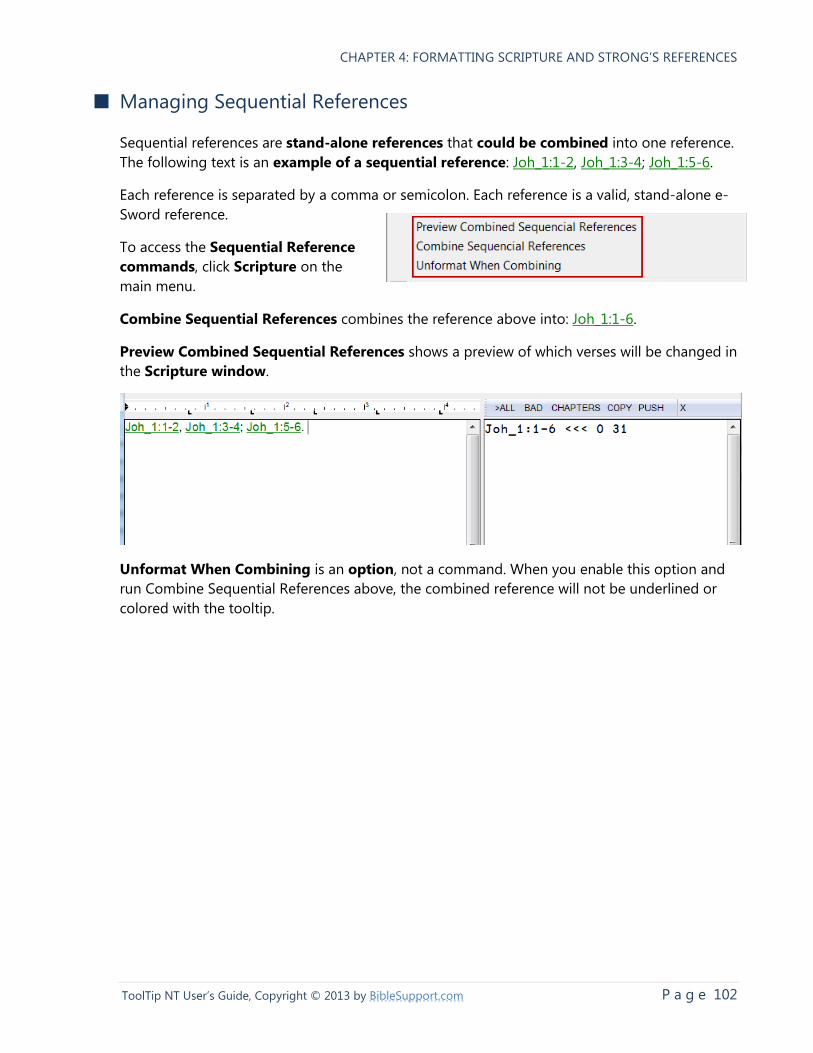
CHAPTER 4: FORMATTING SCRIPTURE AND STRONG’S REFERENCES
P a g e 102 ToolTip NT User’s Guide, Copyright © 2013 by BibleSupport.com
■ Managing Sequential References
Sequential references are stand-alone references that could be combined into one reference.
The following text is an example of a sequential reference: Joh_1:1-2, Joh_1:3-4; Joh_1:5-6.
Each reference is separated by a comma or semicolon. Each reference is a valid, stand-alone e-
Sword reference.
To access the Sequential Reference
commands, click Scripture on the
main menu.
Combine Sequential References combines the reference above into: Joh_1:1-6.
Preview Combined Sequential References shows a preview of which verses will be changed in
the Scripture window.
Unformat When Combining is an option, not a command. When you enable this option and
run Combine Sequential References above, the combined reference will not be underlined or
colored with the tooltip.

CHAPTER 4: FORMATTING SCRIPTURE AND STRONG’S REFERENCES
P a g e 103 ToolTip NT User’s Guide, Copyright © 2013 by BibleSupport.com
■ Tooltipping Existing e-Sword Modules
You can tooltip existing e-Sword modules, such as commentaries, dictionaries, and topics.
WARNING: Tooltipping an existing e-Sword module will not allow you to review any
tooltipping errors or verse mistakes that arise. You will also not know whether any
tooltipping errors occurred.
To tooltip an existing e-Sword module:
1. Click Modules from the main menu, choose the module type to tooltip, and select
Tooltip Existing [CMTX/TOPX/DCTX] File.
2. Select the module to tooltip.
3. ToolTip NT will generate a copy of your module with a “-tt” extension. If your module
was named “topic.topx”, ToolTip NT will generate a new module named “topic-
tt.topx”.
4. WARNING: Under Modules > Topics, notice a command called, “Batch Tooltip
Existing TOPX Files in Folder”. This command does exactly what it says—it tooltips all
TOPX files in a folder.
5. However, this command does not create a new file, as described above. This command
will overwrite your existing modules.
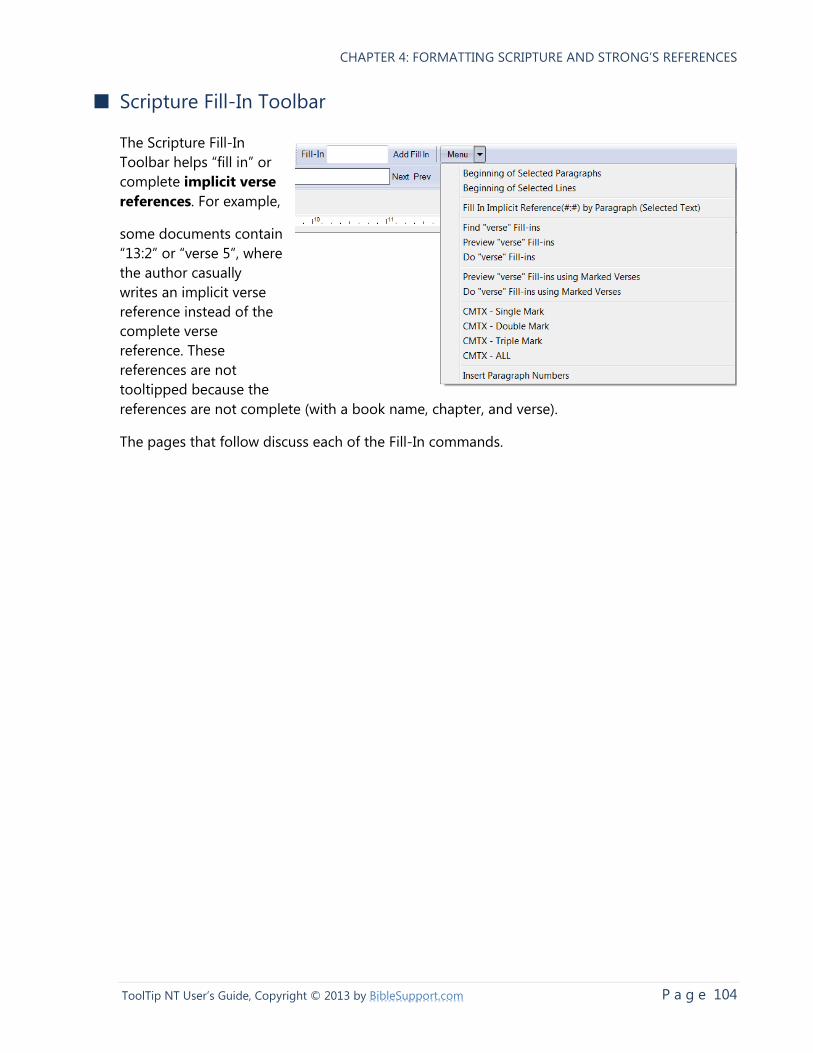
CHAPTER 4: FORMATTING SCRIPTURE AND STRONG’S REFERENCES
P a g e 104 ToolTip NT User’s Guide, Copyright © 2013 by BibleSupport.com
■ Scripture Fill-In Toolbar
The Scripture Fill-In
Toolbar helps “fill in” or
complete implicit verse
references. For example,
some documents contain
“13:2” or “verse 5”, where
the author casually
writes an implicit verse
reference instead of the
complete verse
reference. These
references are not
tooltipped because the
references are not complete (with a book name, chapter, and verse).
The pages that follow discuss each of the Fill-In commands.
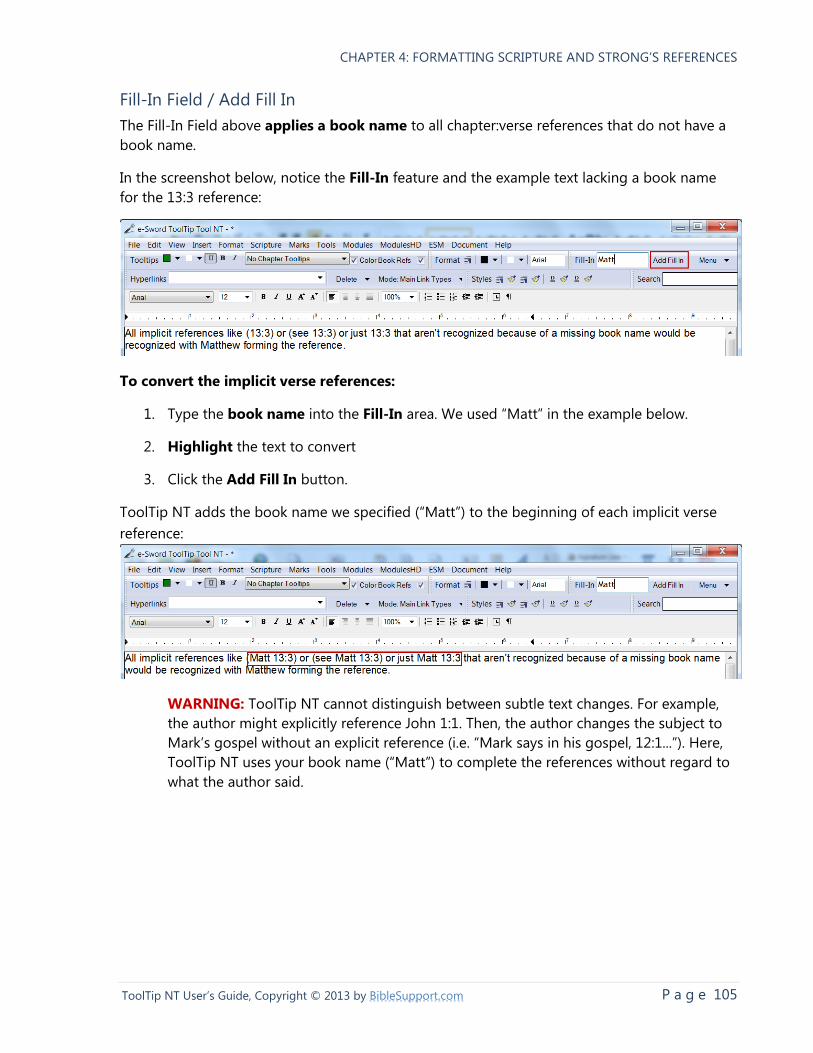
CHAPTER 4: FORMATTING SCRIPTURE AND STRONG’S REFERENCES
P a g e 105 ToolTip NT User’s Guide, Copyright © 2013 by BibleSupport.com
Fill-In Field / Add Fill In
The Fill-In Field above applies a book name to all chapter:verse references that do not have a
book name.
In the screenshot below, notice the Fill-In feature and the example text lacking a book name
for the 13:3 reference:
To convert the implicit verse references:
1. Type the book name into the Fill-In area. We used “Matt” in the example below.
2. Highlight the text to convert
3. Click the Add Fill In button.
ToolTip NT adds the book name we specified (“Matt”) to the beginning of each implicit verse
reference:
WARNING: ToolTip NT cannot distinguish between subtle text changes. For example,
the author might explicitly reference John 1:1. Then, the author changes the subject to
Mark’s gospel without an explicit reference (i.e. “Mark says in his gospel, 12:1...”). Here,
ToolTip NT uses your book name (“Matt”) to complete the references without regard to
what the author said.
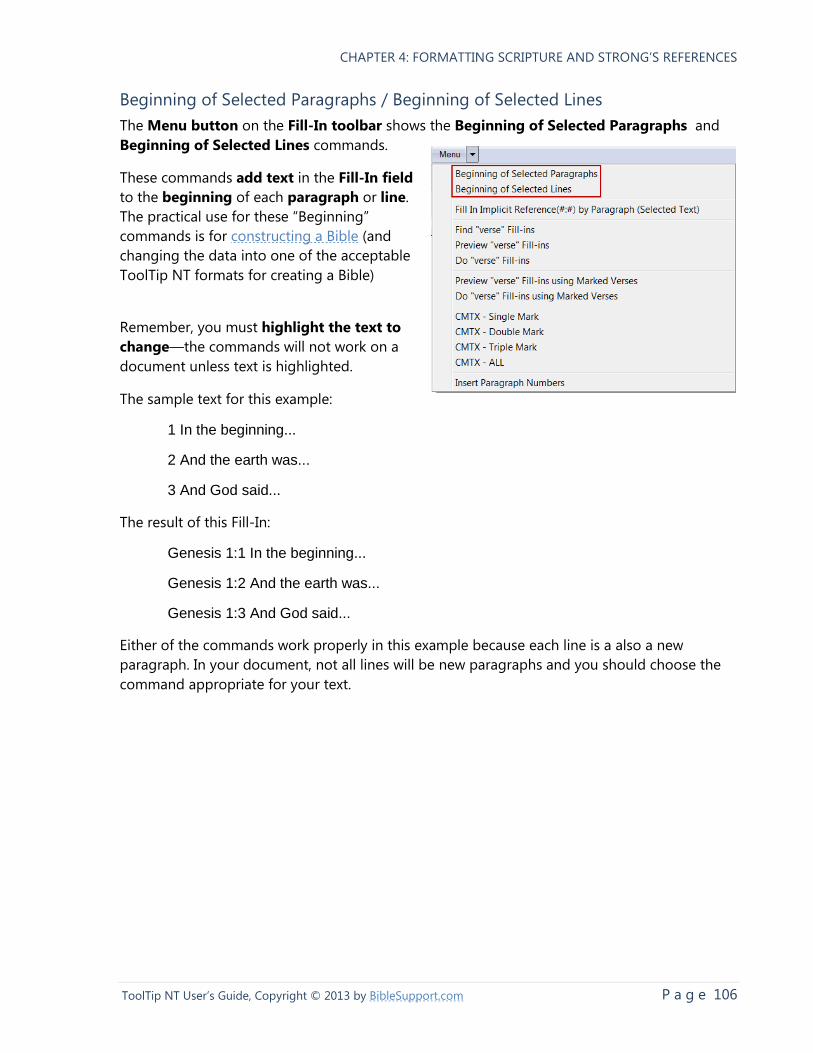
CHAPTER 4: FORMATTING SCRIPTURE AND STRONG’S REFERENCES
P a g e 106 ToolTip NT User’s Guide, Copyright © 2013 by BibleSupport.com
Beginning of Selected Paragraphs / Beginning of Selected Lines
The Menu button on the Fill-In toolbar shows the Beginning of Selected Paragraphs and
Beginning of Selected Lines commands.
These commands add text in the Fill-In field
to the beginning of each paragraph or line.
The practical use for these “Beginning”
commands is for constructing a Bible (and
changing the data into one of the acceptable
ToolTip NT formats for creating a Bible)
Remember, you must highlight the text to
change—the commands will not work on a
document unless text is highlighted.
The sample text for this example:
1 In the beginning...
2 And the earth was...
3 And God said...
The result of this Fill-In:
Genesis 1:1 In the beginning...
Genesis 1:2 And the earth was...
Genesis 1:3 And God said...
Either of the commands work properly in this example because each line is a also a new
paragraph. In your document, not all lines will be new paragraphs and you should choose the
command appropriate for your text.
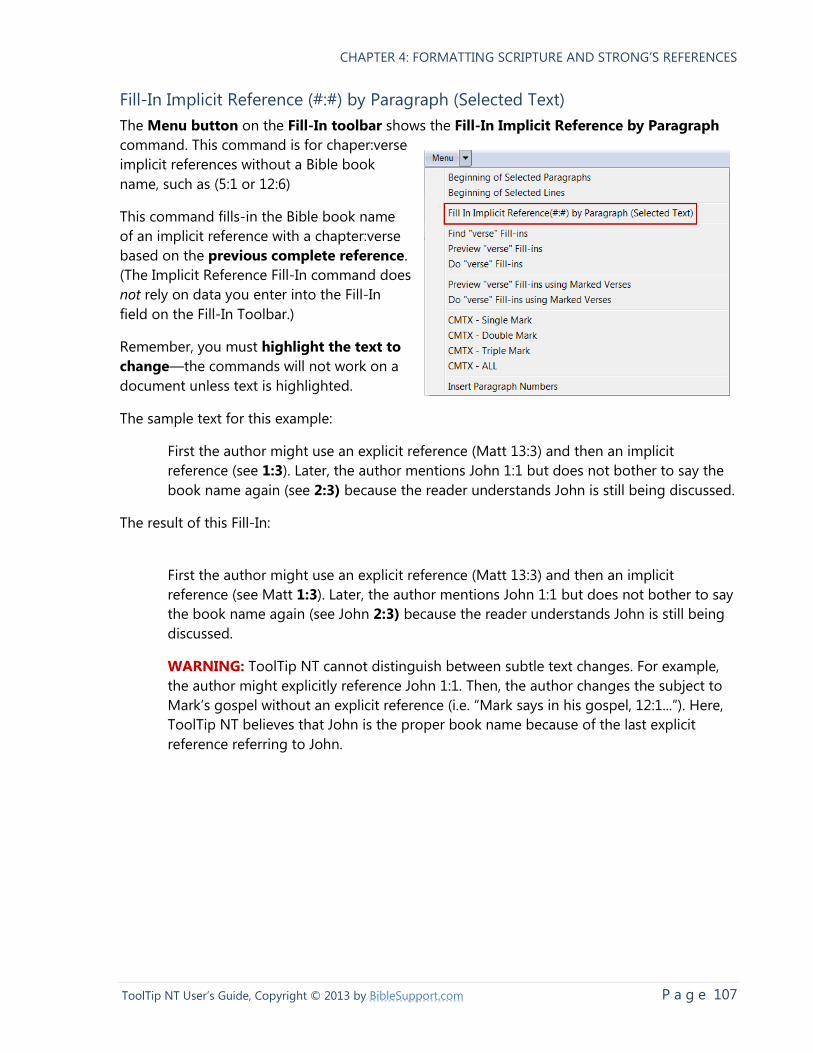
CHAPTER 4: FORMATTING SCRIPTURE AND STRONG’S REFERENCES
P a g e 107 ToolTip NT User’s Guide, Copyright © 2013 by BibleSupport.com
Fill-In Implicit Reference (#:#) by Paragraph (Selected Text)
The Menu button on the Fill-In toolbar shows the Fill-In Implicit Reference by Paragraph
command. This command is for chaper:verse
implicit references without a Bible book
name, such as (5:1 or 12:6)
This command fills-in the Bible book name
of an implicit reference with a chapter:verse
based on the previous complete reference.
(The Implicit Reference Fill-In command does
not rely on data you enter into the Fill-In
field on the Fill-In Toolbar.)
Remember, you must highlight the text to
change—the commands will not work on a
document unless text is highlighted.
The sample text for this example:
First the author might use an explicit reference (Matt 13:3) and then an implicit
reference (see 1:3). Later, the author mentions John 1:1 but does not bother to say the
book name again (see 2:3) because the reader understands John is still being discussed.
The result of this Fill-In:
First the author might use an explicit reference (Matt 13:3) and then an implicit
reference (see Matt 1:3). Later, the author mentions John 1:1 but does not bother to say
the book name again (see John 2:3) because the reader understands John is still being
discussed.
WARNING: ToolTip NT cannot distinguish between subtle text changes. For example,
the author might explicitly reference John 1:1. Then, the author changes the subject to
Mark’s gospel without an explicit reference (i.e. “Mark says in his gospel, 12:1...”). Here,
ToolTip NT believes that John is the proper book name because of the last explicit
reference referring to John.
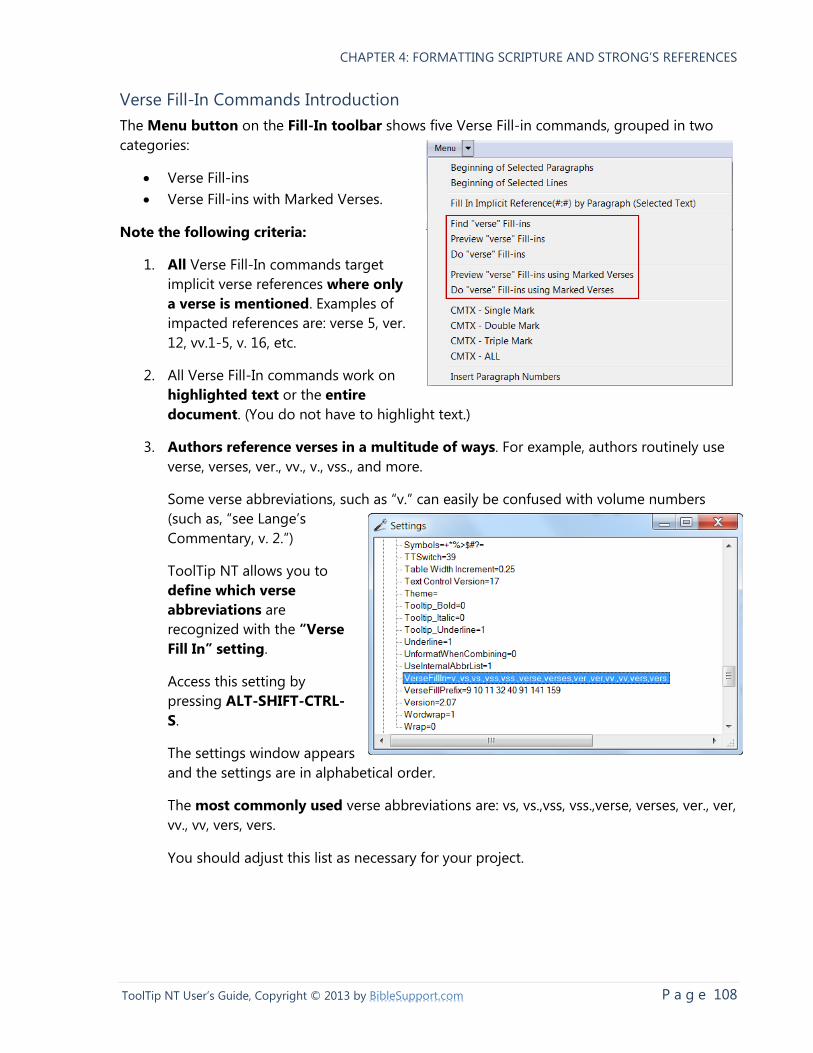
CHAPTER 4: FORMATTING SCRIPTURE AND STRONG’S REFERENCES
P a g e 108 ToolTip NT User’s Guide, Copyright © 2013 by BibleSupport.com
Verse Fill-In Commands Introduction
The Menu button on the Fill-In toolbar shows five Verse Fill-in commands, grouped in two
categories:
Verse Fill-ins
Verse Fill-ins with Marked Verses.
Note the following criteria:
1. All Verse Fill-In commands target
implicit verse references where only
a verse is mentioned. Examples of
impacted references are: verse 5, ver.
12, vv.1-5, v. 16, etc.
2. All Verse Fill-In commands work on
highlighted text or the entire
document. (You do not have to highlight text.)
3. Authors reference verses in a multitude of ways. For example, authors routinely use
verse, verses, ver., vv., v., vss., and more.
Some verse abbreviations, such as “v.” can easily be confused with volume numbers
(such as, “see Lange’s
Commentary, v. 2.”)
ToolTip NT allows you to
define which verse
abbreviations are
recognized with the “Verse
Fill In” setting.
Access this setting by
pressing ALT-SHIFT-CTRL-
S.
The settings window appears
and the settings are in alphabetical order.
The most commonly used verse abbreviations are: vs, vs.,vss, vss.,verse, verses, ver., ver,
vv., vv, vers, vers.
You should adjust this list as necessary for your project.
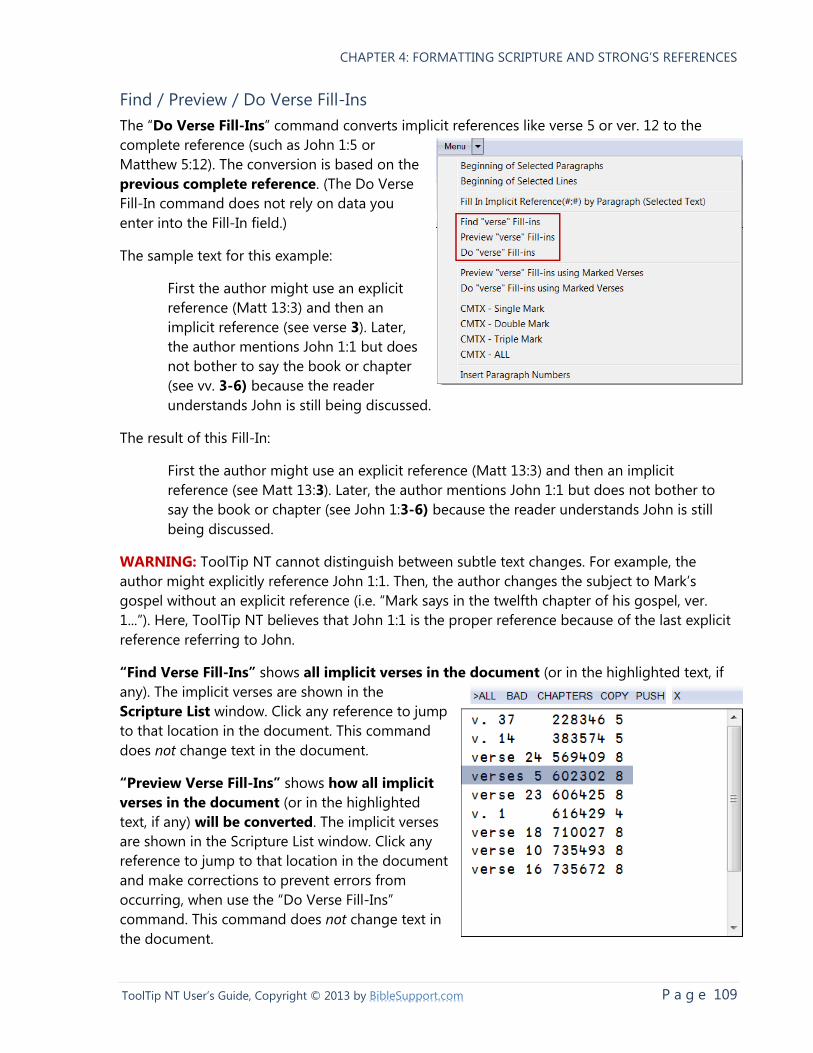
CHAPTER 4: FORMATTING SCRIPTURE AND STRONG’S REFERENCES
P a g e 109 ToolTip NT User’s Guide, Copyright © 2013 by BibleSupport.com
Find / Preview / Do Verse Fill-Ins
The “Do Verse Fill-Ins” command converts implicit references like verse 5 or ver. 12 to the
complete reference (such as John 1:5 or
Matthew 5:12). The conversion is based on the
previous complete reference. (The Do Verse
Fill-In command does not rely on data you
enter into the Fill-In field.)
The sample text for this example:
First the author might use an explicit
reference (Matt 13:3) and then an
implicit reference (see verse 3). Later,
the author mentions John 1:1 but does
not bother to say the book or chapter
(see vv. 3-6) because the reader
understands John is still being discussed.
The result of this Fill-In:
First the author might use an explicit reference (Matt 13:3) and then an implicit
reference (see Matt 13:3). Later, the author mentions John 1:1 but does not bother to
say the book or chapter (see John 1:3-6) because the reader understands John is still
being discussed.
WARNING: ToolTip NT cannot distinguish between subtle text changes. For example, the
author might explicitly reference John 1:1. Then, the author changes the subject to Mark’s
gospel without an explicit reference (i.e. “Mark says in the twelfth chapter of his gospel, ver.
1...”). Here, ToolTip NT believes that John 1:1 is the proper reference because of the last explicit
reference referring to John.
“Find Verse Fill-Ins” shows all implicit verses in the document (or in the highlighted text, if
any). The implicit verses are shown in the
Scripture List window. Click any reference to jump
to that location in the document. This command
does not change text in the document.
“Preview Verse Fill-Ins” shows how all implicit
verses in the document (or in the highlighted
text, if any) will be converted. The implicit verses
are shown in the Scripture List window. Click any
reference to jump to that location in the document
and make corrections to prevent errors from
occurring, when use the “Do Verse Fill-Ins”
command. This command does not change text in
the document.
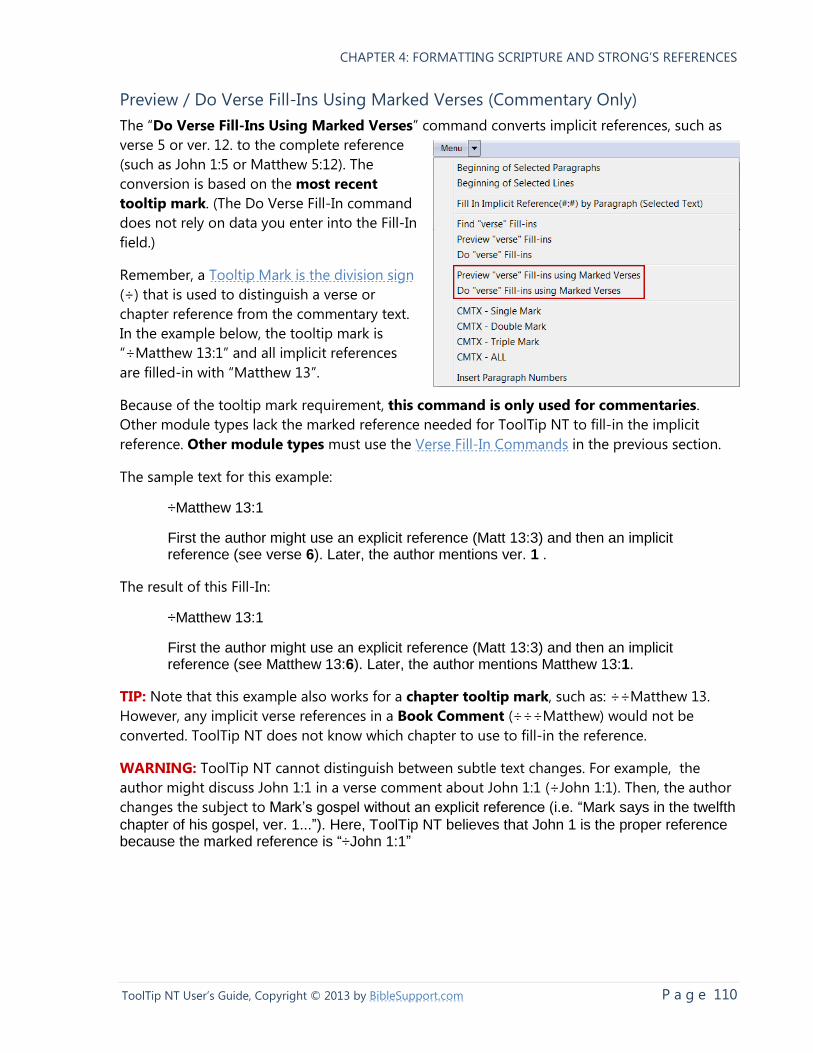
CHAPTER 4: FORMATTING SCRIPTURE AND STRONG’S REFERENCES
P a g e 110 ToolTip NT User’s Guide, Copyright © 2013 by BibleSupport.com
Preview / Do Verse Fill-Ins Using Marked Verses (Commentary Only)
The “Do Verse Fill-Ins Using Marked Verses” command converts implicit references, such as
verse 5 or ver. 12. to the complete reference
(such as John 1:5 or Matthew 5:12). The
conversion is based on the most recent
tooltip mark. (The Do Verse Fill-In command
does not rely on data you enter into the Fill-In
field.)
Remember, a Tooltip Mark is the division sign
(÷) that is used to distinguish a verse or
chapter reference from the commentary text.
In the example below, the tooltip mark is
“÷Matthew 13:1” and all implicit references
are filled-in with “Matthew 13”.
Because of the tooltip mark requirement, this command is only used for commentaries.
Other module types lack the marked reference needed for ToolTip NT to fill-in the implicit
reference. Other module types must use the Verse Fill-In Commands in the previous section.
The sample text for this example:
÷Matthew 13:1
First the author might use an explicit reference (Matt 13:3) and then an implicit reference (see verse 6). Later, the author mentions ver. 1 .
The result of this Fill-In:
÷Matthew 13:1
First the author might use an explicit reference (Matt 13:3) and then an implicit reference (see Matthew 13:6). Later, the author mentions Matthew 13:1.
TIP: Note that this example also works for a chapter tooltip mark, such as: ÷÷Matthew 13.
However, any implicit verse references in a Book Comment (÷÷÷Matthew) would not be
converted. ToolTip NT does not know which chapter to use to fill-in the reference.
WARNING: ToolTip NT cannot distinguish between subtle text changes. For example, the
author might discuss John 1:1 in a verse comment about John 1:1 (÷John 1:1). Then, the author
changes the subject to Mark’s gospel without an explicit reference (i.e. “Mark says in the twelfth
chapter of his gospel, ver. 1...”). Here, ToolTip NT believes that John 1 is the proper reference because the marked reference is “÷John 1:1”
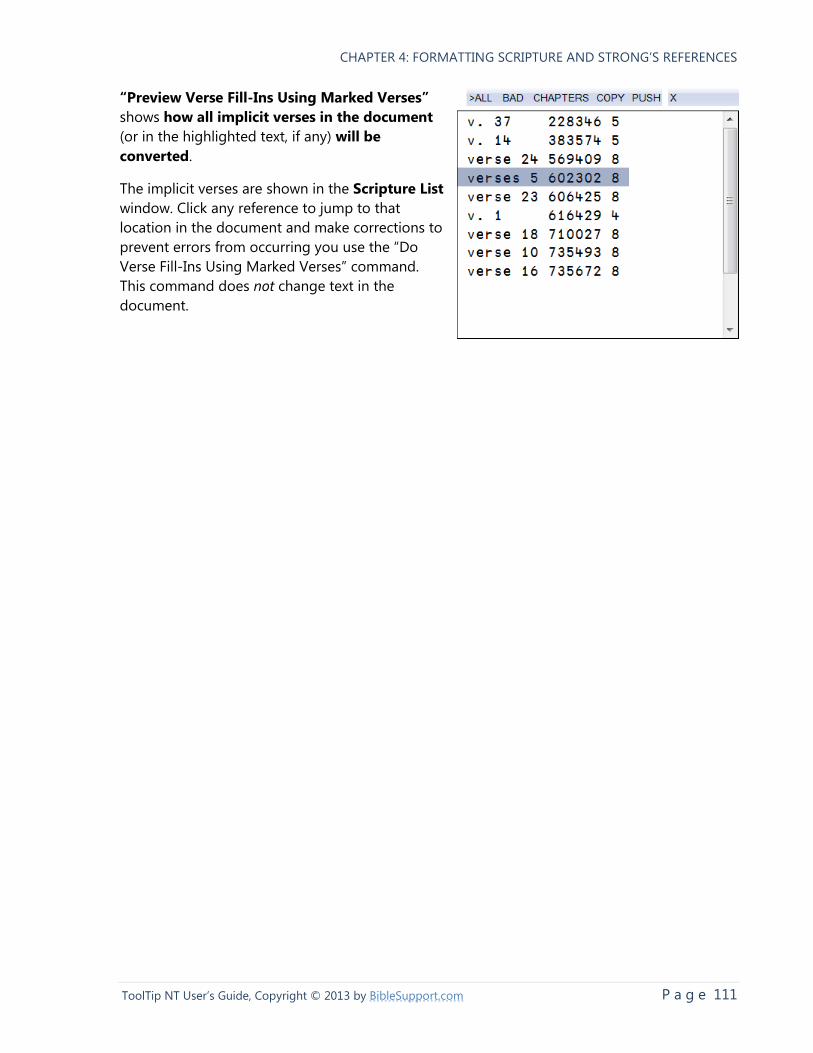
CHAPTER 4: FORMATTING SCRIPTURE AND STRONG’S REFERENCES
P a g e 111 ToolTip NT User’s Guide, Copyright © 2013 by BibleSupport.com
“Preview Verse Fill-Ins Using Marked Verses”
shows how all implicit verses in the document
(or in the highlighted text, if any) will be
converted.
The implicit verses are shown in the Scripture List
window. Click any reference to jump to that
location in the document and make corrections to
prevent errors from occurring you use the “Do
Verse Fill-Ins Using Marked Verses” command.
This command does not change text in the
document.
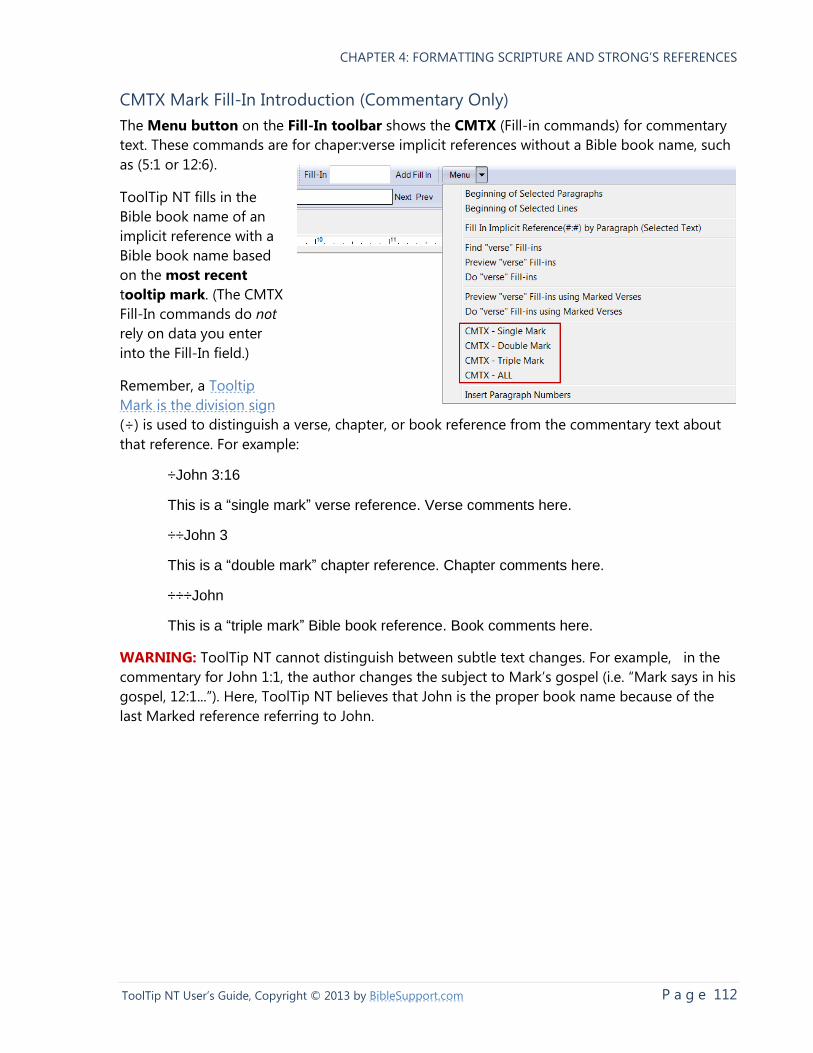
CHAPTER 4: FORMATTING SCRIPTURE AND STRONG’S REFERENCES
P a g e 112 ToolTip NT User’s Guide, Copyright © 2013 by BibleSupport.com
CMTX Mark Fill-In Introduction (Commentary Only)
The Menu button on the Fill-In toolbar shows the CMTX (Fill-in commands) for commentary
text. These commands are for chaper:verse implicit references without a Bible book name, such
as (5:1 or 12:6).
ToolTip NT fills in the
Bible book name of an
implicit reference with a
Bible book name based
on the most recent
tooltip mark. (The CMTX
Fill-In commands do not
rely on data you enter
into the Fill-In field.)
Remember, a Tooltip
Mark is the division sign
(÷) is used to distinguish a verse, chapter, or book reference from the commentary text about
that reference. For example:
÷John 3:16
This is a “single mark” verse reference. Verse comments here.
÷÷John 3
This is a “double mark” chapter reference. Chapter comments here.
÷÷÷John
This is a “triple mark” Bible book reference. Book comments here.
WARNING: ToolTip NT cannot distinguish between subtle text changes. For example, in the
commentary for John 1:1, the author changes the subject to Mark’s gospel (i.e. “Mark says in his
gospel, 12:1...”). Here, ToolTip NT believes that John is the proper book name because of the
last Marked reference referring to John.
CHAPTER 4: FORMATTING SCRIPTURE AND STRONG’S REFERENCES
P a g e 113 ToolTip NT User’s Guide, Copyright © 2013 by BibleSupport.com
CMTX All
The CMTX All command fills-in all implicit chapter:verse references with the last marked
reference.
The sample text for this example:
÷Matthew 13:1
First the author might use an explicit reference (Matt 13:3) and then an implicit
reference (see 13:3).
The result of the CMTX All fill-in:
÷Matthew 13:1
First the author might use an explicit reference (Matt 13:3) and then an implicit
reference (see Matthew 13:3).
CMTX - Single Mark
The CMTX - Single Mark command fills-in all implicit chapter:verse references in verse
comments with the last marked verse reference.
Implicit references in double mark entries (such as ÷÷John 3) and the triple mark entries (such
as ÷÷÷John) are skipped. Only the implicit verses in single mark entries (such as ÷John 3:16)
are converted.
See the CMTX All command for introductory information.
CMTX - Double Mark
The CMTX - Double Mark command fills-in all implicit chapter:verse references in chapter
comments with the last Marked chapter reference.
Implicit references in single mark entries (such as ÷John 3:16) and the triple mark entries (such
as ÷÷÷John) are skipped. Only the implicit verses in double mark entries (such as ÷÷John 3)
are converted.
See the CMTX All command for introductory information.
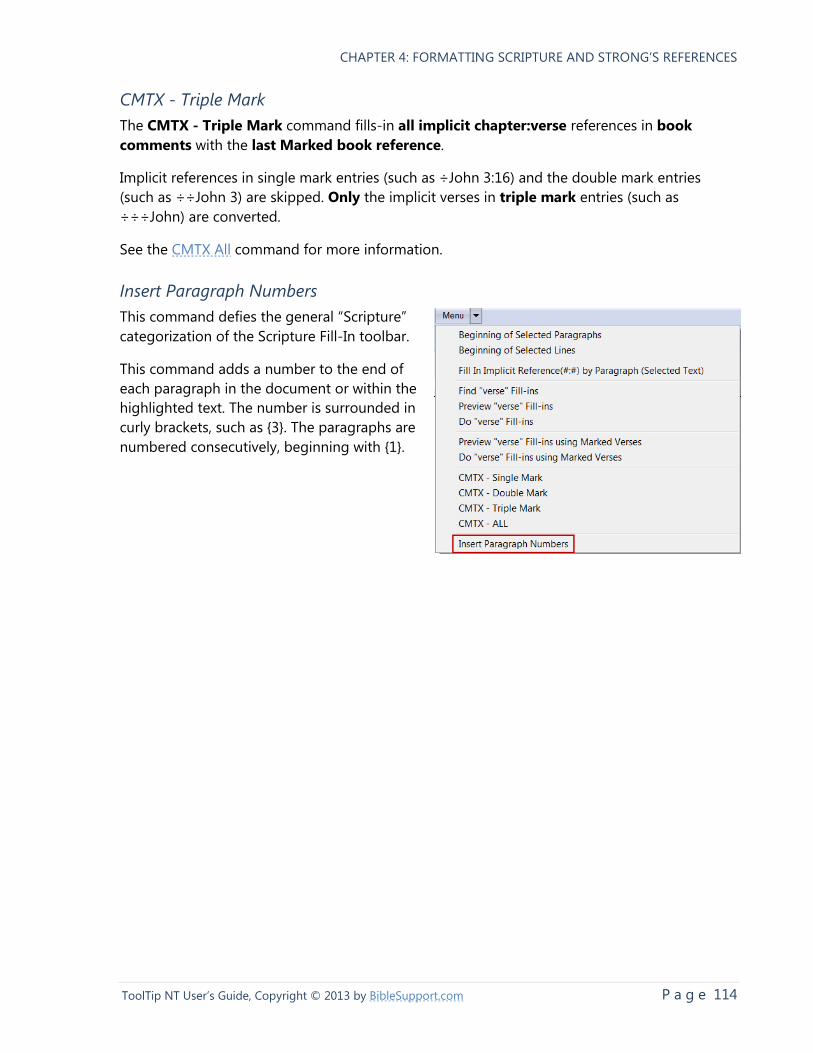
CHAPTER 4: FORMATTING SCRIPTURE AND STRONG’S REFERENCES
P a g e 114 ToolTip NT User’s Guide, Copyright © 2013 by BibleSupport.com
CMTX - Triple Mark
The CMTX - Triple Mark command fills-in all implicit chapter:verse references in book
comments with the last Marked book reference.
Implicit references in single mark entries (such as ÷John 3:16) and the double mark entries
(such as ÷÷John 3) are skipped. Only the implicit verses in triple mark entries (such as
÷÷÷John) are converted.
See the CMTX All command for more information.
Insert Paragraph Numbers
This command defies the general “Scripture”
categorization of the Scripture Fill-In toolbar.
This command adds a number to the end of
each paragraph in the document or within the
highlighted text. The number is surrounded in
curly brackets, such as {3}. The paragraphs are
numbered consecutively, beginning with {1}.
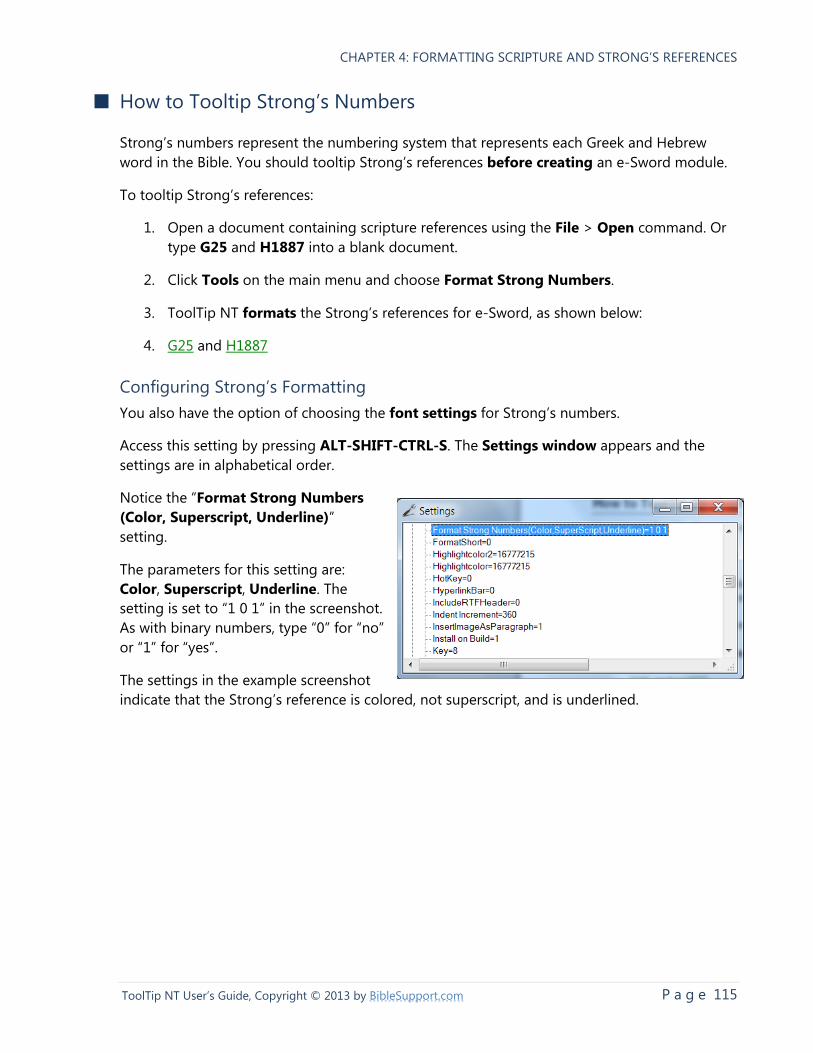
CHAPTER 4: FORMATTING SCRIPTURE AND STRONG’S REFERENCES
P a g e 115 ToolTip NT User’s Guide, Copyright © 2013 by BibleSupport.com
■ How to Tooltip Strong’s Numbers
Strong’s numbers represent the numbering system that represents each Greek and Hebrew
word in the Bible. You should tooltip Strong’s references before creating an e-Sword module.
To tooltip Strong’s references:
1. Open a document containing scripture references using the File > Open command. Or
type G25 and H1887 into a blank document.
2. Click Tools on the main menu and choose Format Strong Numbers.
3. ToolTip NT formats the Strong’s references for e-Sword, as shown below:
4. G25 and H1887
Configuring Strong’s Formatting
You also have the option of choosing the font settings for Strong’s numbers.
Access this setting by pressing ALT-SHIFT-CTRL-S. The Settings window appears and the
settings are in alphabetical order.
Notice the “Format Strong Numbers
(Color, Superscript, Underline)”
setting.
The parameters for this setting are:
Color, Superscript, Underline. The
setting is set to “1 0 1” in the screenshot.
As with binary numbers, type “0” for “no”
or “1” for “yes”.
The settings in the example screenshot
indicate that the Strong’s reference is colored, not superscript, and is underlined.
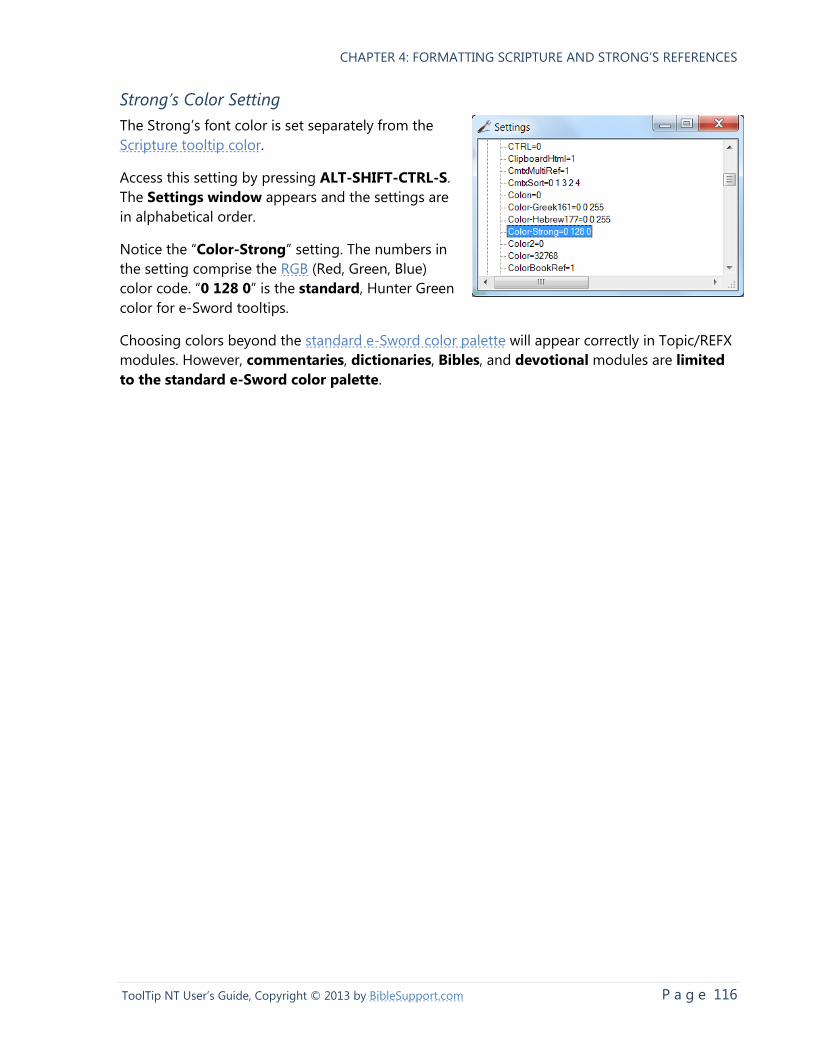
CHAPTER 4: FORMATTING SCRIPTURE AND STRONG’S REFERENCES
P a g e 116 ToolTip NT User’s Guide, Copyright © 2013 by BibleSupport.com
Strong’s Color Setting
The Strong’s font color is set separately from the
Scripture tooltip color.
Access this setting by pressing ALT-SHIFT-CTRL-S.
The Settings window appears and the settings are
in alphabetical order.
Notice the “Color-Strong” setting. The numbers in
the setting comprise the RGB (Red, Green, Blue)
color code. “0 128 0” is the standard, Hunter Green
color for e-Sword tooltips.
Choosing colors beyond the standard e-Sword color palette will appear correctly in Topic/REFX
modules. However, commentaries, dictionaries, Bibles, and devotional modules are limited
to the standard e-Sword color palette.
P a g e 117 ToolTip NT User’s Guide, Copyright © 2013 by BibleSupport.com
Chapter 5: Working with e-Sword Modules
Up until this chapter, we’ve focused on ToolTip NT as a tool that creates e-Sword modules.
ToolTip NT also contains helpful features for already created modules.
This chapter focuses on tooltipping existing e-Sword modules, importing modules into ToolTip
NT for editing, combining multiple modules into one, splitting modules into smaller databases,
and creating a self installing module.
CHAPTER 5: WORKING WITH E-SWORD MODULES
P a g e 118 ToolTip NT User’s Guide, Copyright © 2013 by BibleSupport.com
■ Tooltipping Existing e-Sword Modules
You can Tooltip existing e-Sword modules, such as commentaries, dictionaries, and topics.
WARNING: Tooltipping an existing e-Sword module will not allow you to review any
tooltipping errors or verse mistakes that arise. You will also not know whether any
tooltipping errors occurred.
To tooltip an existing e-Sword module:
1. Click Modules from the main menu, choose the module type to tooltip, and select
Tooltip Existing [CMTX/TOPX/DCTX] File.
2. Select the module to tooltip.
3. Tooltip will generate a copy of your module with a “-tt” extension. If your module was
named “topic.topx”, Tooltip will generate a new module named “topic-tt.topx”.
WARNING: Under Modules > Topics, notice a command called, “Batch Tooltip
Existing TOPX Files in Folder”. This command does exactly what it says—it tooltips all
TOPX files in a folder. However, this command does not create a new file, as described
above. This command will overwrite your existing modules.
CHAPTER 5: WORKING WITH E-SWORD MODULES
P a g e 119 ToolTip NT User’s Guide, Copyright © 2013 by BibleSupport.com
■ Importing e-Sword Modules into Tooltip
ToolTip NT will import existing e-Sword modules into ToolTip NT so you can edit and then
re-create the module.
TIP: If ToolTip NT shows an error, it’s probably because the module is too large to
import. Use the Split a Module File command to split the module into smaller modules.
To import an e-Sword Module into ToolTip NT:
1. Click Modules from the main menu, choose the module type to import, and select Read
Tooltip [Commentary/Dictionary/Topic/etc.] File. Not all module types are supported.
2. Select the module to import.
3. Tooltip will not interact with you while the text is imported. Larger modules may take
a few minutes to import!
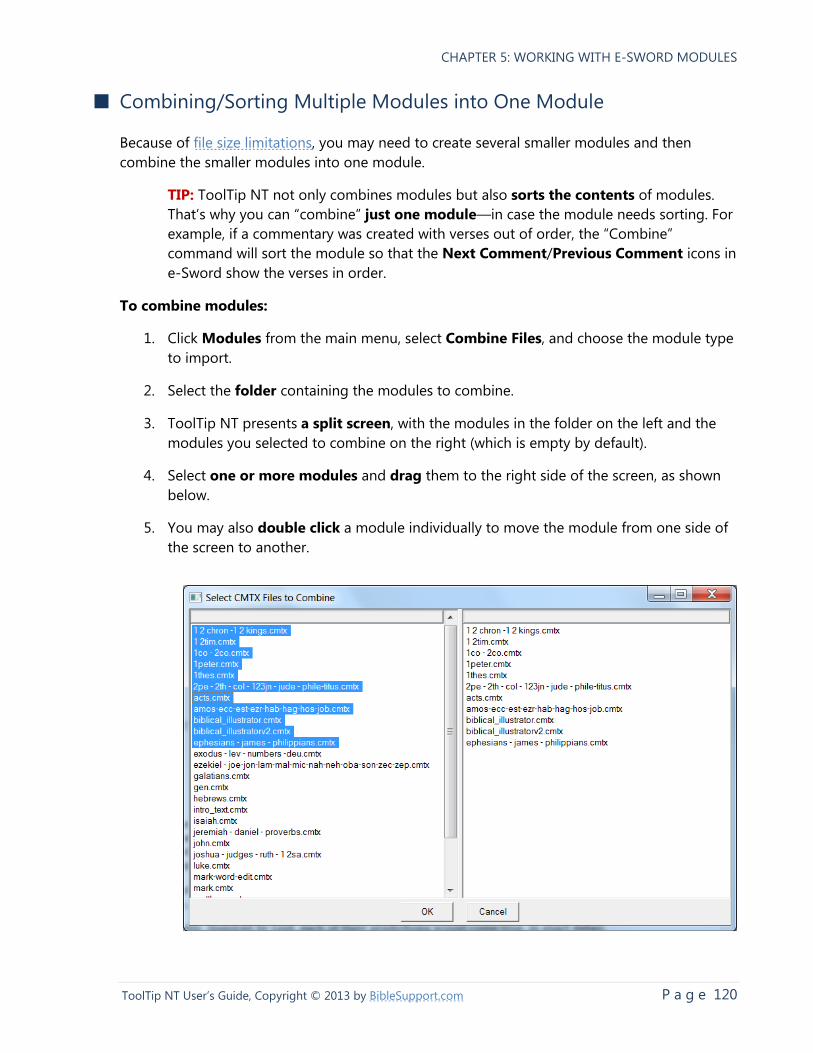
CHAPTER 5: WORKING WITH E-SWORD MODULES
P a g e 120 ToolTip NT User’s Guide, Copyright © 2013 by BibleSupport.com
■ Combining/Sorting Multiple Modules into One Module
Because of file size limitations, you may need to create several smaller modules and then
combine the smaller modules into one module.
TIP: ToolTip NT not only combines modules but also sorts the contents of modules.
That’s why you can “combine” just one module—in case the module needs sorting. For
example, if a commentary was created with verses out of order, the “Combine”
command will sort the module so that the Next Comment/Previous Comment icons in
e-Sword show the verses in order.
To combine modules:
1. Click Modules from the main menu, select Combine Files, and choose the module type
to import.
2. Select the folder containing the modules to combine.
3. ToolTip NT presents a split screen, with the modules in the folder on the left and the
modules you selected to combine on the right (which is empty by default).
4. Select one or more modules and drag them to the right side of the screen, as shown
below.
5. You may also double click a module individually to move the module from one side of
the screen to another.
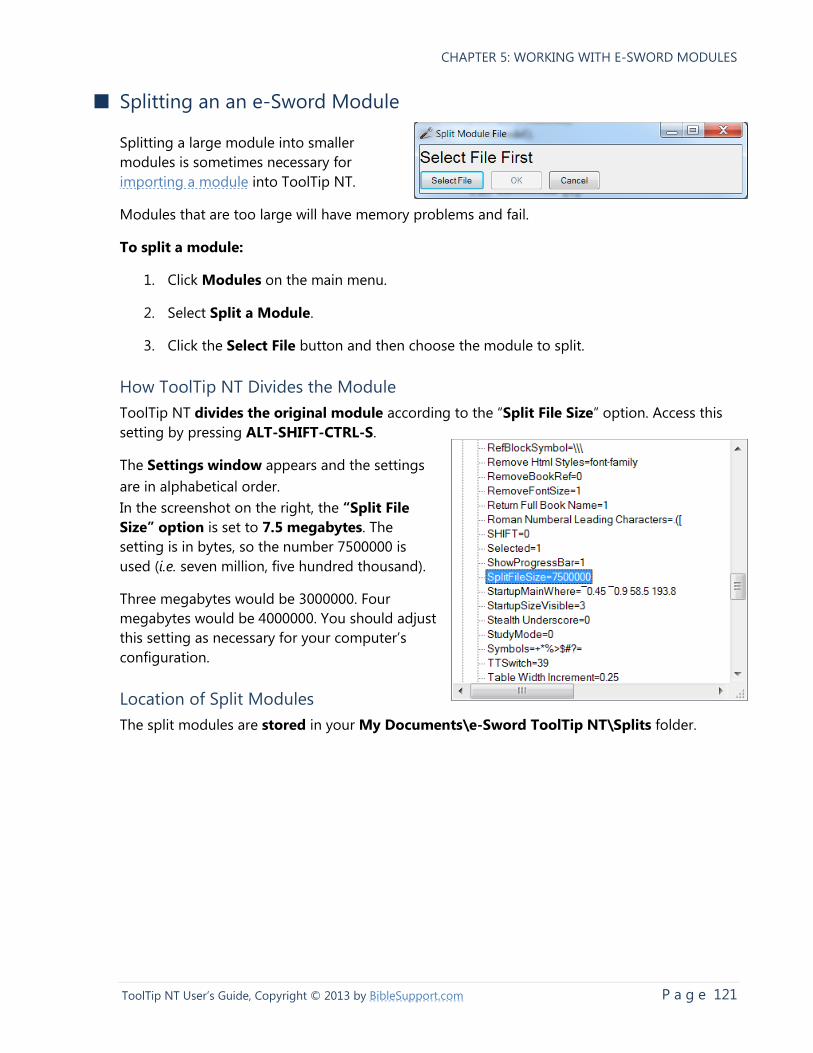
CHAPTER 5: WORKING WITH E-SWORD MODULES
P a g e 121 ToolTip NT User’s Guide, Copyright © 2013 by BibleSupport.com
■ Splitting an an e-Sword Module
Splitting a large module into smaller
modules is sometimes necessary for
importing a module into ToolTip NT.
Modules that are too large will have memory problems and fail.
To split a module:
1. Click Modules on the main menu.
2. Select Split a Module.
3. Click the Select File button and then choose the module to split.
How ToolTip NT Divides the Module
ToolTip NT divides the original module according to the “Split File Size” option. Access this
setting by pressing ALT-SHIFT-CTRL-S.
The Settings window appears and the settings
are in alphabetical order.
In the screenshot on the right, the “Split File
Size” option is set to 7.5 megabytes. The
setting is in bytes, so the number 7500000 is
used (i.e. seven million, five hundred thousand).
Three megabytes would be 3000000. Four
megabytes would be 4000000. You should adjust
this setting as necessary for your computer’s
configuration.
Location of Split Modules
The split modules are stored in your My Documents\e-Sword ToolTip NT\Splits folder.
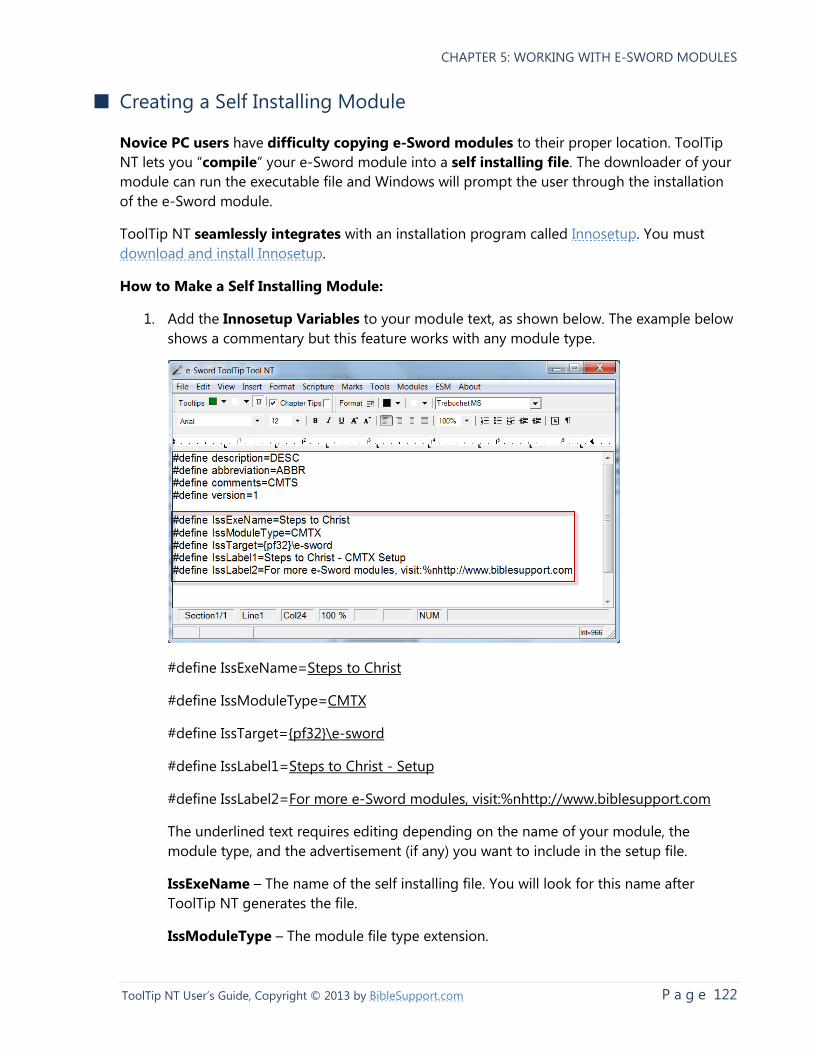
CHAPTER 5: WORKING WITH E-SWORD MODULES
P a g e 122 ToolTip NT User’s Guide, Copyright © 2013 by BibleSupport.com
■ Creating a Self Installing Module
Novice PC users have difficulty copying e-Sword modules to their proper location. ToolTip
NT lets you “compile” your e-Sword module into a self installing file. The downloader of your
module can run the executable file and Windows will prompt the user through the installation
of the e-Sword module.
ToolTip NT seamlessly integrates with an installation program called Innosetup. You must
download and install Innosetup.
How to Make a Self Installing Module:
1. Add the Innosetup Variables to your module text, as shown below. The example below
shows a commentary but this feature works with any module type.
#define IssExeName=Steps to Christ
#define IssModuleType=CMTX
#define IssTarget={pf32}\e-sword
#define IssLabel1=Steps to Christ - Setup
#define IssLabel2=For more e-Sword modules, visit:%nhttp://www.biblesupport.com
The underlined text requires editing depending on the name of your module, the
module type, and the advertisement (if any) you want to include in the setup file.
IssExeName – The name of the self installing file. You will look for this name after
ToolTip NT generates the file.
IssModuleType – The module file type extension.
CHAPTER 5: WORKING WITH E-SWORD MODULES
P a g e 123 ToolTip NT User’s Guide, Copyright © 2013 by BibleSupport.com
IssTarget – CMTX, DCTX, REFX, TOPX, HARX, MAPX, DEVX and BBLX should use “{pf32}”.
BRPX, LSTX, and NOTX should use “{userdocs}\e-sword”
IssLabel1 – The top heading shown to the user during the install process.
IssLabel2 – The second heading shown to the user during the install process.
2. To generate the self installing module, click File on the main menu and choose Save
Innosetup (ISS/EXE) File.
3. The resulting executable will be named according to the definition of the IssExename
variable above. ToolTip NT places the file in the same folder as the saved ToolTip NT
document.
TIP: The Save Innosetup (ISS/EXE) File option is greyed out until you save the Tooltip
document.
Related Documents


