FSU-1 FRONT SUSPENSION E SUSPENSION CONTENTS C D F G H I J K L M SECTION FSU A B FSU Revision: February 2007 2006 Pathfinder PRECAUTIONS ......................................................... 2 Precautions for Supplemental Restraint System (SRS) “AIR BAG” and “SEAT BELT PRE-TEN- SIONER” ................................................................. 2 Precautions ............................................................. 2 PREPARATION .......................................................... 3 Special Service Tools .............................................. 3 Commercial Service Tools ....................................... 3 NOISE, VIBRATION, AND HARSHNESS (NVH) TROUBLESHOOTING ............................................... 4 NVH Troubleshooting Chart .................................... 4 FRONT SUSPENSION ASSEMBLY .......................... 5 Components ............................................................ 5 ON-VEHICLE SERVICE ............................................ 6 Front Suspension Parts ........................................... 6 Front Wheel Alignment ............................................ 6 PRELIMINARY INSPECTION .............................. 6 GENERAL INFORMATION AND RECOMMEN- DATIONS ............................................................. 6 THE ALIGNMENT PROCESS ............................. 7 CAMBER AND CASTER ...................................... 7 TOE-IN ................................................................. 8 FRONT WHEEL TURNING ANGLE .................... 9 COIL SPRING AND SHOCK ABSORBER .............. 10 Removal and Installation ....................................... 10 REMOVAL .......................................................... 10 INSTALLATION .................................................. 10 Disassembly and Assembly .................................. 10 DISASSEMBLY .................................................. 10 INSPECTION AFTER DISASSEMBLY .............. 10 ASSEMBLY ......................................................... 11 STABILIZER BAR .................................................... 12 Removal and Installation ....................................... 12 REMOVAL .......................................................... 12 INSPECTION AFTER REMOVAL ...................... 12 INSTALLATION .................................................. 12 UPPER LINK ............................................................ 13 Removal and Installation ....................................... 13 REMOVAL .......................................................... 13 INSPECTION AFTER REMOVAL ...................... 13 INSTALLATION .................................................. 13 LOWER LINK ........................................................... 14 Removal and Installation ....................................... 14 REMOVAL .......................................................... 14 INSPECTION AFTER REMOVAL ...................... 14 INSTALLATION .................................................. 14 UPPER BALL JOINT AND LOWER BALL JOINT ... 15 Removal and Installation ....................................... 15 Inspection .............................................................. 15 SWINGING FORCE ........................................... 15 TURNING FORCE ............................................. 15 VERTICAL END PLAY ....................................... 16 KNUCKLE ................................................................ 17 On-Vehicle Inspection and Service ........................ 17 Removal and Installation ....................................... 17 REMOVAL .......................................................... 17 INSPECTION AFTER REMOVAL ...................... 18 INSTALLATION .................................................. 19 SERVICE DATA AND SPECIFICATIONS (SDS) ..... 20 General Specifications (Front) ............................... 20 Spring Free Height ................................................ 20 Wheel Alignment (Unladen*1)*6 ............................ 20 Ball Joint ................................................................ 21 Wheelarch Height (Unladen* 1 ) ............................. 21

Welcome message from author
This document is posted to help you gain knowledge. Please leave a comment to let me know what you think about it! Share it to your friends and learn new things together.
Transcript

FSU-1
FRONT SUSPENSION
E SUSPENSION
CONTENTS
C
D
F
G
H
I
J
K
L
M
SECTION FSUA
B
FSU
Revision: February 2007 2006 Pathfinder
PRECAUTIONS .......................................................... 2Precautions for Supplemental Restraint System (SRS) “AIR BAG” and “SEAT BELT PRE-TEN-SIONER” .................................................................. 2Precautions .............................................................. 2
PREPARATION ........................................................... 3Special Service Tools ............................................... 3Commercial Service Tools ........................................ 3
NOISE, VIBRATION, AND HARSHNESS (NVH) TROUBLESHOOTING ................................................ 4
NVH Troubleshooting Chart ..................................... 4FRONT SUSPENSION ASSEMBLY ........................... 5
Components ............................................................. 5ON-VEHICLE SERVICE ............................................. 6
Front Suspension Parts ............................................ 6Front Wheel Alignment ............................................. 6
PRELIMINARY INSPECTION ............................... 6GENERAL INFORMATION AND RECOMMEN-DATIONS .............................................................. 6THE ALIGNMENT PROCESS .............................. 7CAMBER AND CASTER ....................................... 7TOE-IN .................................................................. 8FRONT WHEEL TURNING ANGLE ..................... 9
COIL SPRING AND SHOCK ABSORBER ............... 10Removal and Installation ........................................ 10
REMOVAL ........................................................... 10INSTALLATION ................................................... 10
Disassembly and Assembly ................................... 10DISASSEMBLY ................................................... 10INSPECTION AFTER DISASSEMBLY ............... 10ASSEMBLY ..........................................................11
STABILIZER BAR ..................................................... 12Removal and Installation ........................................ 12
REMOVAL ........................................................... 12INSPECTION AFTER REMOVAL ....................... 12INSTALLATION ................................................... 12
UPPER LINK ............................................................. 13Removal and Installation ........................................ 13
REMOVAL ........................................................... 13INSPECTION AFTER REMOVAL ....................... 13INSTALLATION ................................................... 13
LOWER LINK ............................................................ 14Removal and Installation ........................................ 14
REMOVAL ........................................................... 14INSPECTION AFTER REMOVAL ....................... 14INSTALLATION ................................................... 14
UPPER BALL JOINT AND LOWER BALL JOINT ... 15Removal and Installation ........................................ 15Inspection ............................................................... 15
SWINGING FORCE ............................................ 15TURNING FORCE .............................................. 15VERTICAL END PLAY ........................................ 16
KNUCKLE ................................................................. 17On-Vehicle Inspection and Service ......................... 17Removal and Installation ........................................ 17
REMOVAL ........................................................... 17INSPECTION AFTER REMOVAL ....................... 18INSTALLATION ................................................... 19
SERVICE DATA AND SPECIFICATIONS (SDS) ...... 20General Specifications (Front) ................................ 20Spring Free Height ................................................. 20Wheel Alignment (Unladen*1)*6 ............................. 20Ball Joint ................................................................. 21
Wheelarch Height (Unladen*1 ) .............................. 21

FSU-2
PRECAUTIONS
Revision: February 2007 2006 Pathfinder
PRECAUTIONS PFP:00001
Precautions for Supplemental Restraint System (SRS) “AIR BAG” and “SEAT BELT PRE-TENSIONER” EES002BN
The Supplemental Restraint System such as “AIR BAG” and “SEAT BELT PRE-TENSIONER”, used alongwith a front seat belt, helps to reduce the risk or severity of injury to the driver and front passenger for certaintypes of collision. This system includes seat belt switch inputs and dual stage front air bag modules. The SRSsystem uses the seat belt switches to determine the front air bag deployment, and may only deploy one frontair bag, depending on the severity of a collision and whether the front occupants are belted or unbelted.Information necessary to service the system safely is included in the SRS and SB section of this Service Man-ual.WARNING:� To avoid rendering the SRS inoperative, which could increase the risk of personal injury or death
in the event of a collision which would result in air bag inflation, all maintenance must be per-formed by an authorized NISSAN/INFINITI dealer.
� Improper maintenance, including incorrect removal and installation of the SRS, can lead to per-sonal injury caused by unintentional activation of the system. For removal of Spiral Cable and AirBag Module, see the SRS section.
� Do not use electrical test equipment on any circuit related to the SRS unless instructed to in thisService Manual. SRS wiring harnesses can be identified by yellow and/or orange harnesses orharness connectors.
Precautions EES0022O
� When installing the rubber bushings, the final tightening must be done under unladen condition and withthe tires on level ground. Oil will shorten the life of the rubber bushings, so wipe off any spilled oil immedi-ately.
� Unladen condition means the fuel tank, engine coolant and lubricants are at the full specification. Thespare tire, jack, hand tools, and mats are in their designated positions.
� After installing suspension components, check the wheel alignment.� Lock nuts are not reusable. Always use new lock nuts for installation. New lock nuts are pre-oiled, do not
apply any additional lubrication.

PREPARATION
FSU-3
C
D
F
G
H
I
J
K
L
M
A
B
FSU
Revision: February 2007 2006 Pathfinder
PREPARATION PFP:00002
Special Service Tools EES0022P
The actual shapes of Kent-Moore tools may differ from those of special service tools illustrated here.
Commercial Service Tools EES0022Q
Tool number(Kent-Moore No.)Tool name
Description
ST29020001(J-24319-01)Gear arm puller
Removing ball joint for knucklea: 34 mm (1.34 in)b: 6.5 mm (0.256 in)c: 61.5 mm (2.421 in)
HT72520000(J-25730-A)Ball joint remover
Removing tie-rod outer end
NT694
NT146
Tool name Description
Attachment wheel alignment Measuring wheel alignmenta: Screw M24 x 1.5 pitchb: 35 mm (1.38 in) dia.c: 65 mm (2.56 in) dia.d: 56 mm (2.20 in)e: 12 mm (0.47 in)
Spring compressor Removing and installing coil spring
Power tool Loosening bolts and nuts
NT148
NT717
PBIC0190E

FSU-4
NOISE, VIBRATION, AND HARSHNESS (NVH) TROUBLESHOOTING
Revision: February 2007 2006 Pathfinder
NOISE, VIBRATION, AND HARSHNESS (NVH) TROUBLESHOOTING PFP:00003
NVH Troubleshooting Chart EES0022R
Use the chart below to help you find the cause of the symptom. Repair or replace parts as necessary.
x: Applicable
Reference page
FS
U-5
FS
U-1
0
FS
U-5
FS
U-5
FS
U-2
1
FS
U-6
FS
U-6
FS
U-6
FAX
-4, "
NV
H T
roub
lesh
ootin
g C
hart
"
FF
D-6
, "N
VH
Tro
uble
shoo
ting
Cha
rt"
FAX
-4, "
NV
H T
roub
lesh
ootin
g C
hart
"
WT-
4, "
NV
H T
roub
lesh
ootin
g C
hart
"
WT-
4, "
NV
H T
roub
lesh
ootin
g C
hart
"
BR
-5, "
NV
H T
roub
lesh
ootin
g C
hart
"
PS
-5, "
NV
H T
roub
lesh
ootin
g C
hart
"
Possible Cause andSUSPECTED PARTS
Impr
oper
inst
alla
tion,
loos
enes
s
Sho
ck a
bsor
ber
defo
rmat
ion,
dam
age
or d
efle
ctio
n
Bus
hing
or
mou
ntin
g de
terio
ratio
n
Par
ts in
terf
eren
ce
Spr
ing
fatig
ue
Sus
pens
ion
loos
enes
s
Inco
rrec
t whe
el a
lignm
ent
Sta
biliz
er b
ar fa
tigue
DR
IVE
SH
AF
T
DIF
FE
RE
NT
IAL
WH
EE
L H
UB
AN
D B
EA
RIN
G
TIR
ES
RO
AD
WH
EE
L
BR
AK
ES
ST
EE
RIN
G
Symptom
Noise × × × × × × × × × × × × ×
Shake × × × × × × × × × × ×
Vibration × × × × × × × × ×
Shimmy × × × × × × × × × ×
Shudder × × × × × × × ×
Poor quality ride or handling × × × × × × × × × ×

FRONT SUSPENSION ASSEMBLY
FSU-5
C
D
F
G
H
I
J
K
L
M
A
B
FSU
Revision: February 2007 2006 Pathfinder
FRONT SUSPENSION ASSEMBLY PFP:54010
Components EES0022S
1. Dust cover 2. Shock absorber 3. Upper link
4. Steering knuckle 5. Cotter pin 6. Washer
7. Jounce bumper 8. Bolt 9. Lower link
10. Connecting rod 11. Stabilizer bar bushing 12. Stabilizer bar bracket
13. Stabilizer bar 14. Coil spring 15. Dust cover cap
16. Upper spring seat 17. Spacer 18. Shock absorber mounting insulator
19. Spacer 20. Washer 21. Cap
⇐ Front
WEIA0151E

FSU-6
ON-VEHICLE SERVICE
Revision: February 2007 2006 Pathfinder
ON-VEHICLE SERVICE PFP:00000
Front Suspension Parts EES0022T
Check front suspension parts for excessive play, cracks, wear andother damage.� Shake each front wheel to check for excessive play. If looseness
is noted:– inspect wheel bearing end play. Refer to FAX-5, "WHEEL
BEARING INSPECTION" .– check ball joint end play. Refer to FSU-15, "Inspection" .� Make sure that the cotter pin is inserted in drive shaft end (4WD
only).� Retighten all nuts and bolts to the specified torque.
� Check shock absorber for oil leakage and other damage.� Check suspension ball joint for grease leakage and ball joint
dust cover for cracks and other damage.
Front Wheel Alignment EES0022U
PRELIMINARY INSPECTIONWARNING:Always adjust the alignment with the vehicle on a flat surface.NOTE:If alignment is out of specification, inspect and replace any damaged or worn rear suspension parts beforemaking any adjustments.1. Check and adjust the wheel alignment with the vehicle under unladen conditions. “Unladen conditions”
means that the fuel, coolant, and lubricant are full; and that the spare tire, jack, hand tools and mats are intheir designated positions.
2. Check the tires for incorrect air pressure and excessive wear.3. Check the wheels for run out and damage. Refer to WT-5, "Inspection" .4. Check the wheel bearing axial end play. Refer to FAX-5, "WHEEL BEARING INSPECTION" .5. Check the shock absorbers for leaks or damage.6. Check each mounting point of the suspension components for any excessive looseness or damage.7. Check each link, arm, and the suspension member for any damage.
8. Check the vehicle height. Refer to FSU-21, "Wheelarch Height (Unladen*1 )" .
GENERAL INFORMATION AND RECOMMENDATIONS1. A Four-Wheel Thrust Alignment should be performed.
� This type of alignment is recommended for any NISSAN vehicle.� The four-wheel “thrust” process helps ensure that the vehicle is properly aligned and the steering wheel
is centered.� The alignment machine itself should be capable of accepting any NISSAN vehicle.� The alignment machine should be checked to ensure that it is level.
2. Make sure the alignment machine is properly calibrated.
Suspension component torques : Refer to FSU-5, "Components" .
SMA525A
SFA392B

ON-VEHICLE SERVICE
FSU-7
C
D
F
G
H
I
J
K
L
M
A
B
FSU
Revision: February 2007 2006 Pathfinder
� Your alignment machine should be regularly calibrated in order to give correct information.� Check with the manufacturer of your specific alignment machine for their recommended Service/Cali-
bration Schedule.
THE ALIGNMENT PROCESSIMPORTANT: Use only the alignment specifications listed in this Service Manual. Refer to FSU-20, "WheelAlignment (Unladen*1)*6" .1. When displaying the alignment settings, many alignment machines use “indicators”: (Green/red, plus or
minus, Go/No Go). Do NOT use these indicators.� The alignment specifications programmed into your alignment machine that operate these indicators
may not be correct.� This may result in an ERROR.
2. Some newer alignment machines are equipped with an optional “Rolling Compensation” method to “com-pensate” the sensors (alignment targets or head units). Do NOT use this “Rolling Compensation”method.� Use the “Jacking Compensation” method. After installing the alignment targets or head units, raise the
vehicle and rotate the wheels 1/2 turn both ways.� See Instructions in the alignment machine you are using for more information.
CAMBER AND CASTER1. Measure camber and caster of both the right and left wheels
with a suitable alignment gauge and adjust as necessary tospecification.
NOTE:Some vehicles may be equipped with straight (non-adjustable)lower link bolts and washers. In order to adjust camber andcaster on these vehicles, first replace the lower link bolts andwashers with adjustable (cam) bolts and washers.
2. If outside of the specified value, adjust camber and caster usingthe adjusting bolts in the front lower link.CAUTION:After adjusting the camber then check the toe-in.NOTE:Camber changes about 3' (0.05°) minutes with each graduationof one adjusting bolt. Refer to table below for examples of lowerlink adjusting bolt effect on camber and caster.
3. Tighten the adjusting bolt nuts to specification. Refer to FSU-5, "Components" .
Camber : Refer to FSU-6, "Front Wheel Alignment" .
SRA096A
WEIA0115E
Rear adjusting bolt
1 In 1 Out 1 In 1 Out 0 0 1 In 1 Out
Front adjusting bolt
1 Out 1 In 1 In 1 Out 1 In 1 Out 0 0
CamberDegree minute (Decimal degree)
0 (0) 0 (0) 7' (0.12°) - 7' (-0.12°) 3' (0.05°) - 3' (-0.05°) 3' (0.05°) - 3' (-0.05°)
CasterDegree minute (Decimal degree)
- 12' (-0.20°) 12' (0.20°) 0 (0) 0 (0) 6' (0.10°) - 6' (-0.10°) - 6' (-0.10°) 6' (0.10°)

FSU-8
ON-VEHICLE SERVICE
Revision: February 2007 2006 Pathfinder
TOE-INWARNING:� Always perform the following procedure on a flat surface.� Make sure that no person is in front of the vehicle before pushing it.1. Bounce the front of vehicle up and down to stabilize the vehicle height (posture).2. Push the vehicle straight ahead about 5 m (16 ft).3. Put a mark on base line of the tread (rear side) of both front tires
at the same height as hub center as shown. These marks aremeasuring points.
4. Measure the distance “A” on the rear side of the front tires asshown.
5. Push the vehicle slowly ahead to rotate the wheels 180°degrees (1/2 a turn).CAUTION:If the wheels have rotated more than 180° degrees (1/2turn), start this procedure again from the beginning. Neverpush the vehicle backward.
6. Measure the distance “B” on the front side of the front tires at thesame marks as shown. Total toe-in is calculated as “A” – “B”.
7. Adjust the toe-in by varying the length of the steering outer tie-rods.
a. Loosen the outer tie-rod lock nuts.b. Adjust the toe-in by screwing the outer tie-rods in or out.
c. Tighten the outer tie-rod lock nuts to specification.
AFA050
Total toe-in : Refer to FSU-20, "Wheel Alignment (Unladen*1)*6" .
SFA234AC
Standard length “L” : Refer to PS-15, "POWER STEERING GEAR AND LINK-AGE" .
Lock nut : Refer to PS-15, "Removal and Installation" .
SFA486A

ON-VEHICLE SERVICE
FSU-9
C
D
F
G
H
I
J
K
L
M
A
B
FSU
Revision: February 2007 2006 Pathfinder
FRONT WHEEL TURNING ANGLENOTE:Check front wheel turning angle after the toe-in inspection.1. Place front wheels on turning radius gauges in straight ahead
position and rear wheels on stands so that vehicle can be level.Check the maximum inner and outer wheel turning angles for LHand RH road wheels.
2. Start engine and run at idle, turn steering wheel all the way rightand left, measure the turning angle.
� Any turning angles are not adjustable. If any of steeringangles are out of the specification, check if the following partsare worn or damaged.
– Steering gear– Steering column– Front suspension components
If found that they are worn or damaged, replace them with new ones.
Wheel turning angle (full turn)
: Refer to FSU-20, "Wheel Alignment (Unladen*1)*6" .
SFA439BA

FSU-10
COIL SPRING AND SHOCK ABSORBER
Revision: February 2007 2006 Pathfinder
COIL SPRING AND SHOCK ABSORBER PFP:56210
Removal and Installation EES0022V
REMOVAL1. Remove the wheel and tire using power tool.2. Support the lower link using a suitable jack.3. Remove connecting rod upper joints from stabilizer bar using power tool. Refer to FSU-5, "Components" .
� Swing stabilizer bar down, repositioning it out of the way to access shock absorber lower mount.4. Remove the shock absorber lower bolt and nut using power tool.5. Remove the three shock absorber upper mounting nuts using
power tool.6. Remove the coil spring and shock absorber assembly.
� Turn steering knuckle out to gain enough clearance forremoval.
INSTALLATIONInstallation is in the reverse order of removal.� The step in the strut assembly lower seat faces outside of vehicle.� Tighten all nuts and bolts to specification. Refer to FSU-5, "Components" .� When installing wheel and tire, refer to WT-7, "Rotation" .
Disassembly and Assembly EES0022W
DISASSEMBLY1. Set the shock absorber in a vise, then loosen (without removing)
the piston rod lock nut as shown.CAUTION:Do not remove piston rod lock nut at this time.
2. Compress the coil spring using commercial service tool until theshock absorber mounting insulator can be turned by hand.WARNING:Make sure that the pawls of the two spring compressors arefirmly hooked on the coil spring. The spring compressorsmust be tightened alternately and evenly so as not to tilt thecoil spring.
3. Remove the piston rod lock nut.� Discard the piston rod lock nut, use a new nut for assembly.
4. Remove the components from the shock absorber.� Keep the coil spring compressed in the commercial service
tool if reusing it for assembly.
INSPECTION AFTER DISASSEMBLYShock Absorber Assembly� Check for smooth operation through a full stroke, both compression and extension.� Check for oil leakage on welded or gland packing portions.� Check piston rod for cracks, deformation or other damage and replace if necessary.
WEIA0116E
SSU002
SSU003

COIL SPRING AND SHOCK ABSORBER
FSU-11
C
D
F
G
H
I
J
K
L
M
A
B
FSU
Revision: February 2007 2006 Pathfinder
Mounting Insulator and Rubber PartsCheck cemented rubber-to-metal portion for separation or cracks. Check rubber parts for deterioration andreplace if necessary.
Coil Spring� Check for cracks, deformation or other damage and replace if necessary.� Check the coil spring free height.
ASSEMBLY1. When installing coil spring on strut, it must be positioned as
shown.
2. Install the shock absorber mounting insulator as shown in linewith lower shock mount and step in lower seat.� The step in the strut assembly lower seat faces outside of
vehicle.3. Tighten the new piston rod lock nut to specification. Refer to
FSU-5, "Components" .� Use a new piston rod lock nut for assembly.
4. Remove commercial service tool.
Front coil spring free height
2WD : 345.4 mm (13.6 in)
4WD : 356 mm (14.0 in)
SFA508A
WEIA0117E

FSU-12
STABILIZER BAR
Revision: February 2007 2006 Pathfinder
STABILIZER BAR PFP:54611
Removal and Installation EES0022X
REMOVAL1. Remove the front valance center.2. Remove engine undercover using power tool.3. Remove connecting rod nuts using power tool.4. Loosen top bolts for stabilizer bar brackets, then remove lower
bolts from brackets and remove stabilizer bar.5. Remove bushings from stabilizer bar.
INSPECTION AFTER REMOVAL� Check stabilizer bar for twist and deformation. Replace if necessary.� Check rubber bushing for cracks, wear and deterioration. Replace if necessary.
INSTALLATIONInstallation is in the reverse order of removal.� Tighten all nuts and bolts to specification. Refer to FSU-5, "Components" .
WEIA0118E
UPPER LINK
FSU-13
C
D
F
G
H
I
J
K
L
M
A
B
FSU
Revision: February 2007 2006 Pathfinder
UPPER LINK PFP:54524
Removal and Installation EES0022Y
REMOVAL1. Remove the wheel and tire using power tool.2. Support the lower link using a suitable jack.3. For the LH side only, remove the bolt from the lower joint of the
lower joint shaft, then reposition the lower joint shaft out of theway.CAUTION:� Do not damage the lower joint.
4. Remove cotter pin and nut from upper link ball joint.5. Separate upper link ball joint stud from steering knuckle using
Tool.
6. Remove upper link bolts and nuts.
INSPECTION AFTER REMOVALUpper LinkCheck for deformation and cracks. Replace if necessary.
Upper Link Ball JointCheck for distortion and damage. Replace if necessary.
INSTALLATIONInstallation is in the reverse order of removal.� Tighten all nuts and bolts to specification. Refer to FSU-5, "Components" .
CAUTION:Always replace drive shaft lock nut and cotter pin.
� When installing wheel and tire, refer to WT-7, "Rotation" .� After installation, check that the front wheel alignment is within specification. Refer to FSU-6, "Front
Wheel Alignment" .
LGIA0029E
Tool number : ST29020001 (J-24319-01)
WEIA0119E
WEIA0120E

FSU-14
LOWER LINK
Revision: February 2007 2006 Pathfinder
LOWER LINK PFP:55020
Removal and Installation EES0022Z
REMOVAL1. Remove the wheel and tire using power tool.2. Remove lower shock absorber bolt and nut using power tool.3. Remove stabilizer bar connecting rod lower nut using power tool, then separate connecting rod from lower
link. Refer to FSU-12, "Removal and Installation" .4. For 4WD models, remove the drive shaft. Refer to FFD-14, "Removal and Installation" .5. Remove pinch bolt from steering knuckle using power tool, then
separate lower link ball joint from steering knuckle.
6. Remove lower link adjusting bolts and nuts, then the lower link.NOTE:Some vehicles may be equipped with straight (non-adjustable)lower link bolts and washers. In order to adjust camber andcaster on these vehicles, first replace the lower link bolts andwashers with adjustable (cam) bolts and washers.
7. Remove the jounce bumper from the lower link.
INSPECTION AFTER REMOVALLower LinkCheck for deformation and cracks. Replace if necessary.
Lower Link BushingCheck for distortion and damage. Replace if necessary.
INSTALLATIONInstallation is in the reverse order of removal.� Tighten all nuts and bolts to specification. Refer to FSU-5, "Components" .� When installing wheel and tire, refer to WT-7, "Rotation" .� After installation, check that the front wheel alignment is within specification. Refer to FSU-6, "Front
Wheel Alignment" .
LEIA0097E
WEIA0115E

UPPER BALL JOINT AND LOWER BALL JOINT
FSU-15
C
D
F
G
H
I
J
K
L
M
A
B
FSU
Revision: February 2007 2006 Pathfinder
UPPER BALL JOINT AND LOWER BALL JOINT PFP:40110
Removal and Installation EES00230
The ball joints are part of the upper and lower links. Refer to FSU-13, "Removal and Installation" (upper link),FSU-14, "Removal and Installation" (lower link).
Inspection EES00231
� Check the ball joint for excessive play. Replace the upper or lower link assembly if any of the followingexists:
– Ball joint stud is worn.– Ball joint is hard to swing.– Ball joint play in axial directions or end play is excessive.
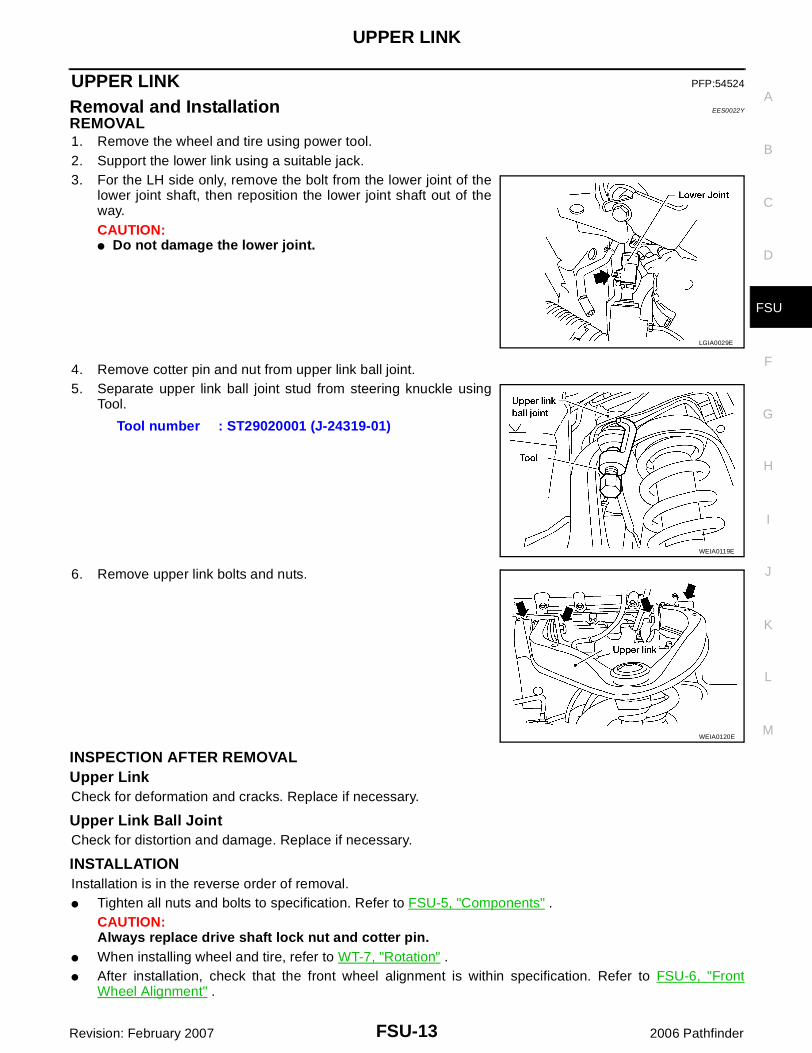
SWINGING FORCE NOTE:Before checking the axial forces and end play, turn the lower ball joint at least 10 revolutions so that the balljoint is properly broken in.1. Measure the ball joint swinging force using a suitable tool.
� Measure at the cotter pin hole for upper ball joint as shown.� Measure at the groove for lower ball joint as shown.
2. Verify the ball joint swinging force is within specification.
TURNING FORCENOTE:Before checking the axial forces and end play, turn the lower ball joint at least 10 revolutions so that the balljoint is properly broken in.
WEIA0076E
Swinging force “A” (Measurement point at either cot-ter pin hole or groove of ball stud)
Upper : 8.1 - 79 N (0.83 - 8.1 kg-f, 1.82 - 17.8 lb-f) at hole
Lower : 11.4 - 145.5 N (1.16 - 14.84 kg-f, 2.56 - 32.71 lb-f) at groove
SFA858A
Turning torque “B”
Upper : 0.5 - 4.9 N·m (0.05 - 0.49 kg-m, 5 - 43 in-lb)
Lower : 0.5 - 6.4 N·m (0.05 - 0.65 kg-m, 5 - 56 in-lb)
SFA858A

FSU-16
UPPER BALL JOINT AND LOWER BALL JOINT
Revision: February 2007 2006 Pathfinder
VERTICAL END PLAYCheck dust cover for damage. Replace it and the cover clamp if necessary.NOTE:Before checking the axial forces and end play, turn the lower balljoint at least 10 revolutions so that the ball joint is properly broken in.
Vertical end play “C” : 0 mm (0 in)
SFA858A

KNUCKLE
FSU-17
C
D
F
G
H
I
J
K
L
M
A
B
FSU
Revision: February 2007 2006 Pathfinder
KNUCKLE PFP:40014
On-Vehicle Inspection and Service EES00232
Make sure the mounting conditions (looseness, backlash) of each component and component status (wear,damage) are within specifications. Refer to FSU-21, "Ball Joint" .
Removal and Installation EES00233
REMOVAL1. Remove wheel and tire from vehicle using power tool.2. Without disassembling the hydraulic lines, remove brake caliper using power tool. Reposition it aside with
wire. Refer to BR-25, "Removal and Installation of Brake Caliper and Disc Rotor" .NOTE:Avoid depressing brake pedal while brake caliper is removed.
3. Put alignment marks on disc rotor and wheel hub and bearingassembly, then remove disc rotor.
4. Disconnect wheel sensor and remove bracket from steering knuckle.CAUTION:Do not pull on wheel sensor harness.
5. On 4WD models, remove cotter pin, then remove lock nut from drive shaft using power tool. Refer to FAX-7, "Removal and Installation" .
6. Remove steering outer socket cotter pin at steering knuckle, then loosen nut using power tool. Refer toPS-15, "Removal and Installation" .
1. Disc rotor 2. Wheel hub and bearing assembly 3. Wheel stud
4. Splash guard 5. Steering knuckle 6. Wheel sensor bracket
WDIA0228E
WDIA0044E

FSU-18
KNUCKLE
Revision: February 2007 2006 Pathfinder
7. Disconnect steering outer socket from steering knuckle usingTool. Be careful not to damage outer socket boot.
CAUTION:To prevent damage to threads and to prevent Tool fromcoming off suddenly, temporarily tighten nut.
8. Remove wheel hub and bearing assembly bolts using power tool.9. Remove splash guard and wheel hub and bearing assembly from steering knuckle.
CAUTION:Do not pull on wheel sensor harness.
10. Remove cotter pin and nut from upper link ball joint.11. Separate upper link ball joint from steering knuckle using Tool.
12. Remove pinch bolt from steering knuckle using power tool, thenseparate lower link ball joint from steering knuckle.
13. Remove steering knuckle from vehicle.
INSPECTION AFTER REMOVALCheck for deformity, cracks and damage on each part, replace if necessary.� Perform ball joint inspection. Refer to FSU-15, "Inspection" .
Tool number : HT72520000 (J-25730-A)
SDIA1434E
Tool number : ST29020001 (J-24319-01)
WEIA0119E
LEIA0097E

KNUCKLE
FSU-19
C
D
F
G
H
I
J
K
L
M
A
B
FSU
Revision: February 2007 2006 Pathfinder
INSTALLATIONInstallation is in the reverse order of removal.� For 4WD models, refer to FAX-7, "Removal and Installation" for drive shaft lock nut tightening torque.
CAUTION:Always replace drive shaft lock nut and cotter pin.
� Refer to PS-15, "Removal and Installation" for outer socket nut tightening torque.� Refer to FSU-5, "Components" for front suspension tightening torques.� When installing disc rotor on wheel hub and bearing assembly,
align the marks.NOTE:When not using the alignment mark, refer to BR-37, "Front DiscBrake" .
� When installing wheel and tire, refer to WT-7, "Rotation" .� Perform wheel alignment. Refer to FSU-6, "Front Wheel Align-
ment" .
WDIA0044E

FSU-20
SERVICE DATA AND SPECIFICATIONS (SDS)
Revision: February 2007 2006 Pathfinder
SERVICE DATA AND SPECIFICATIONS (SDS) PFP:00030
General Specifications (Front) EES00234
Spring Free Height EES002BR
Unit: mm (in)
Wheel Alignment (Unladen*1)*6 EES00235
*1: Fuel, radiator coolant and engine oil full. Spare tire, jack, hand tools and mats in designated positions.*2: Target value 35° 26′ (35.43°)*3: Target value 31° 22′ (31.37°)*4: Target value 35° 33′ (35.55°)*5: Target value 31° 38′ (31.63°)*6: Some vehicles may be equipped with straight (non-adjustable) lower link bolts and washers. In order to adjust camber and caster onthese vehicles, first replace the lower link bolts and washers with adjustable (cam) bolts and washers.
Suspension type Independent double wishbone coil over shock
Shock absorber type Double-acting hydraulic
Stabilizer Standard equipment
Drive type 2WD 4WD
Front spring free height 345.4 (13.6) 356 (14.0)
Drive type 2WD 4WD
CamberDegree minute (decimal degree)
Minimum -0° 30′ (-0.50°) -0° 15′ (-0.25°)
Nominal 0° 15′ (0.25°) 0° 30′ (0.50°)
Maximum 1° 00′ (1.00°) 1° 15′ (1.25°)
Cross camber 0° 45′ (0.75°) or less 0° 45′ (0.75°) or less
CasterDegree minute (decimal degree)
Minimum 2° 15′ (2.25°) 2° 00′ (2.00°)
Nominal 3° 0′ (3.00°) 2° 45′ (2.75°)
Maximum 3° 45′ (3.75°) 3° 30′ (3.50°)
Cross caster 0° 45′ (0.75°) or less 0° 45′ (0.75°) or less
Kingpin inclinationDegree minute (decimal degree)
Nominal 13° 0′ (13.00°) 12° 45′ (12.75°)
Total toe-in
Distance (A − B)
Minimum 2.1 mm (0.08 in) 2.1 mm (0.08 in)
Nominal 3.1 mm (0.12 in) 3.1 mm (0.12 in)
Maximum 4.1 mm (0.16 in) 4.1 mm (0.16 in)
Angle (left wheel or right wheel)Degree minute (decimal degree)
Minimum 0° 5′ (0.08°) 0° 5′ (0.08°)
Nominal 0° 7′ (0.12°) 0° 7′ (0.12°)
Maximum 0° 9′ (0.15°) 0° 9′ (0.15°)
Wheel turning angle (full turn)
Inside Degree minute (Decimal degree)
33° 26′ – 35° 26′ *2
(33.43° – 35.43°)33° 33′ – 35° 33′ *4
(33.60° – 35.60°)
OutsideDegree minute (Decimal degree)
29° 22′ – 31° 22′ *3
(29.37° – 31.37°)29° 38′ – 31° 38′ *5
(29.73° – 31.73°)
SFA234AC
SERVICE DATA AND SPECIFICATIONS (SDS)
FSU-21
C
D
F
G
H
I
J
K
L
M
A
B
FSU
Revision: February 2007 2006 Pathfinder
Ball Joint EES00236
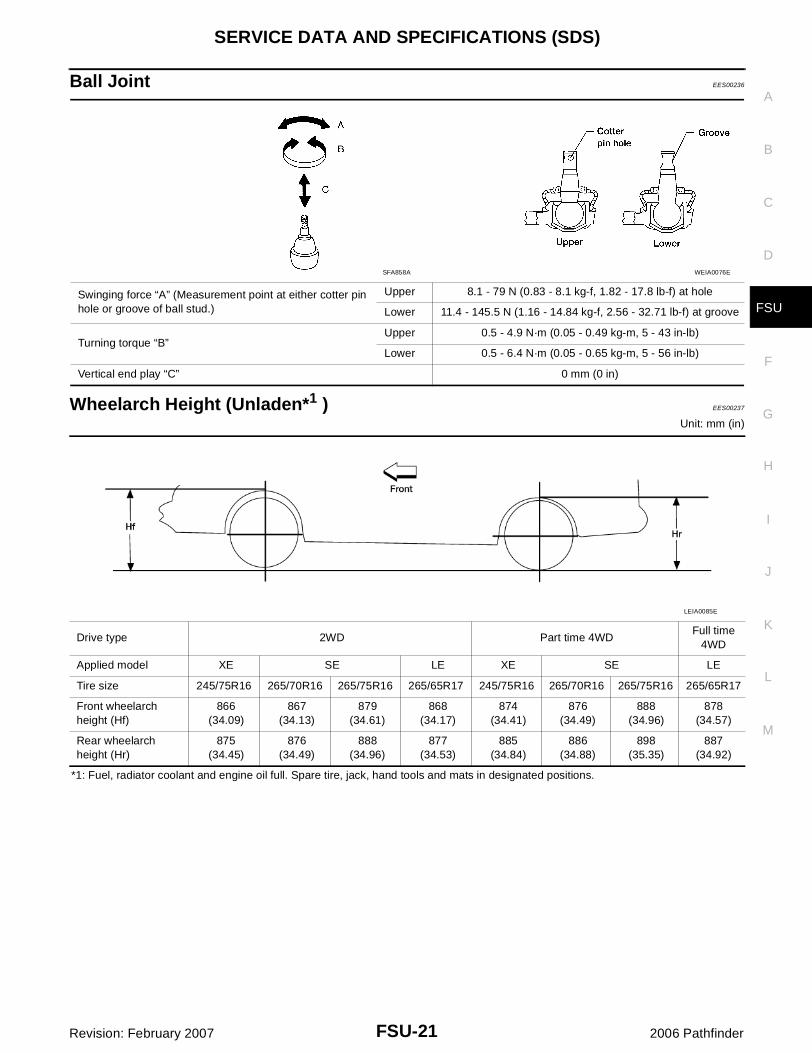
Wheelarch Height (Unladen*1 ) EES00237
Unit: mm (in)
*1: Fuel, radiator coolant and engine oil full. Spare tire, jack, hand tools and mats in designated positions.
Swinging force “A” (Measurement point at either cotter pin hole or groove of ball stud.)
Upper 8.1 - 79 N (0.83 - 8.1 kg-f, 1.82 - 17.8 lb-f) at hole
Lower 11.4 - 145.5 N (1.16 - 14.84 kg-f, 2.56 - 32.71 lb-f) at groove
Turning torque “B”Upper 0.5 - 4.9 N·m (0.05 - 0.49 kg-m, 5 - 43 in-lb)
Lower 0.5 - 6.4 N·m (0.05 - 0.65 kg-m, 5 - 56 in-lb)
Vertical end play “C” 0 mm (0 in)
SFA858A WEIA0076E
Drive type 2WD Part time 4WDFull time
4WD
Applied model XE SE LE XE SE LE
Tire size 245/75R16 265/70R16 265/75R16 265/65R17 245/75R16 265/70R16 265/75R16 265/65R17
Front wheelarch height (Hf)
866(34.09)
867(34.13)
879(34.61)
868 (34.17)
874(34.41)
876(34.49)
888(34.96)
878(34.57)
Rear wheelarch height (Hr)
875(34.45)
876(34.49)
888(34.96)
877(34.53)
885(34.84)
886(34.88)
898(35.35)
887(34.92)
LEIA0085E

FSU-22
SERVICE DATA AND SPECIFICATIONS (SDS)
Revision: February 2007 2006 Pathfinder
Related Documents