Datasheet The Sure Cross ® wireless system is a radio frequency network with integrated I/O that operates in most environments to eliminate the need for wiring runs. Wireless networks are formed around a Gateway, which acts as the wireless network master device, and one or more Nodes. Do not open this device. This M-GAGE ships from the factory sealed and does not contain any serviceable parts. Opening this M-GAGE invalidates the manufacturer's warranty. • Internal three-axis magnetoresisve-based technology senses three-dimensional changes to the Earth’s magnec field caused by the presence of ferrous objects • Designed to minimize the effects of temperature changes and destabilizing magnec fields • Sensor learns ambient background and stores sengs in non-volale memory • Powered by a lithium baery pack integrated into the housing • Frequency Hopping Spread Spectrum (FHSS) technology and Time Division Mulple Access (TDMA) control architecture ensure reliable data delivery within the unlicensed Industrial, Scienfic, and Medical (ISM) band • Transceivers provide bidireconal communicaon between the Gateway and Node, including fully acknowledged data transmission • Lost RF links are detected and relevant outputs set to user-defined condions • Fully poed and sealed housing contains the power source, sensor, and antenna for a completely wireless soluon WARNING: Not To Be Used for Personnel Protecon Never use this device as a sensing device for personnel protecon. Doing so could lead to serious injury or death. This device does not include the self-checking redundant circuitry necessary to allow its use in personnel safety applicaons. A sensor failure or malfuncon can cause either an energized or de-energized sensor output condion. Models Models Power Frequency Inputs DX80N9X1W0P0ZTA Lithium baery pack integrated into the housing 900 MHz ISM Band Internal M-GAGE ™ DX80N2X1W0P0ZTA 2.4 GHz ISM Band M-GAGE Overview The M-GAGE ™ sensor uses a passive sensing technology to detect large ferrous objects. The sensor measures the change in the Earth’s natural magnec field (ambient magnec field) caused by the introducon of a ferromagnec object. The M-GAGE provides a direct replacement for inducve loop systems and needs no external frequency box. Its unique design allows quick installaon within a core hole. For best performance, mount the sensor below-grade, in the center of the traffic lane. Because the M-GAGE uses an internal baery, the device ships from the factory in a "deep sleep" mode. While in "deep sleep" mode, the M-GAGE does not aempt to transmit to a parent radio and remains in deep sleep unl an LED light at the receiving window wakes it up. To wake the device: 1. Point the opcal commissioning device at the receiver. 2. Click and hold the buon unl the red/green LED in the center of the M-GAGE lights up, about five seconds. When the device wakes up, the LEDs flash according to the LED table. To return the M-GAGE back to its "deep sleep" mode, click and hold the buon unl the red LED in the center of the M-GAGE stops blinking, about five seconds. The sensor uses three mutually perpendicular magnetoresisve transducers, with each transducer detecng magnec field changes along one axis. Incorporang three sensing elements produces maximum sensor sensivity. A ferrous object alters the local (ambient) magnec field surrounding the object, as shown. The magnitude of this magnec field change depends both on the object (size, shape, Sure Cross ® DX80 M-GAGE Traffic Node Original Document 157693 Rev. C 21 November 2017 157693

Welcome message from author
This document is posted to help you gain knowledge. Please leave a comment to let me know what you think about it! Share it to your friends and learn new things together.
Transcript

DatasheetThe Sure Cross® wireless system is a radio frequency network with integrated I/O that operates in most environments to eliminate theneed for wiring runs. Wireless networks are formed around a Gateway, which acts as the wireless network master device, and one ormore Nodes.
Do not open this device. This M-GAGEships from the factory sealed and doesnot contain any serviceable parts.Opening this M-GAGE invalidates themanufacturer's warranty.
• Internal three-axis magnetoresistive-based technology senses three-dimensionalchanges to the Earth’s magnetic field caused by the presence of ferrous objects
• Designed to minimize the effects of temperature changes and destabilizing magneticfields
• Sensor learns ambient background and stores settings in non-volatile memory• Powered by a lithium battery pack integrated into the housing• Frequency Hopping Spread Spectrum (FHSS) technology and Time Division Multiple
Access (TDMA) control architecture ensure reliable data delivery within theunlicensed Industrial, Scientific, and Medical (ISM) band
• Transceivers provide bidirectional communication between the Gateway and Node,including fully acknowledged data transmission
• Lost RF links are detected and relevant outputs set to user-defined conditions• Fully potted and sealed housing contains the power source, sensor, and antenna for
a completely wireless solution
WARNING: Not To Be Used for Personnel ProtectionNever use this device as a sensing device for personnel protection. Doing so could lead to serious injury or death.This device does not include the self-checking redundant circuitry necessary to allow its use in personnel safetyapplications. A sensor failure or malfunction can cause either an energized or de-energized sensor outputcondition.
ModelsModels Power Frequency Inputs
DX80N9X1W0P0ZTALithium battery pack integrated into the housing
900 MHz ISM BandInternal M-GAGE™
DX80N2X1W0P0ZTA 2.4 GHz ISM Band
M-GAGE OverviewThe M-GAGE™ sensor uses a passive sensing technology to detect large ferrous objects. The sensor measures the change in the Earth’snatural magnetic field (ambient magnetic field) caused by the introduction of a ferromagnetic object.The M-GAGE provides a direct replacement for inductive loop systems and needs no external frequency box. Its unique design allowsquick installation within a core hole. For best performance, mount the sensor below-grade, in the center of the traffic lane.
Because the M-GAGE uses an internal battery, the device ships from the factory in a "deepsleep" mode. While in "deep sleep" mode, the M-GAGE does not attempt to transmit to aparent radio and remains in deep sleep until an LED light at the receiving window wakes it up.To wake the device:
1. Point the optical commissioning device at the receiver.2. Click and hold the button until the red/green LED in the center of the M-GAGE lights
up, about five seconds.When the device wakes up, the LEDs flash according to the LED table. To return the M-GAGEback to its "deep sleep" mode, click and hold the button until the red LED in the center of theM-GAGE stops blinking, about five seconds.
The sensor uses three mutually perpendicular magnetoresistive transducers, with each transducer detecting magnetic field changesalong one axis. Incorporating three sensing elements produces maximum sensor sensitivity. A ferrous object alters the local (ambient)magnetic field surrounding the object, as shown. The magnitude of this magnetic field change depends both on the object (size, shape,
Sure Cross® DX80 M-GAGE Traffic Node
Original Document157693 Rev. C
21 November 2017
157693

orientation, and composition) and on the ambient magnetic field strength and orientation. During a simple programming procedure, theM-GAGE sensor measures the ambient magnetic field. When a large ferrous object alters that magnetic field, the sensor detects themagnetic field changes (anomalies). When the degree of magnetic field change reaches the sensor’s threshold, the device reports achange of state.
Figure 1. Field A: Baseline magnetic field with slight disturbancescaused by permanent ferrous-metal objects within or near the sensor.
Figure 2. Field B: After a large object is introduced, the magnetic fieldchanges. The sensor detects the changes in the field’s strength and
orientation between the ambient field and Field B. If the differential isgreater than the sensitivity threshold, the device reports a change of state.
The sensor range depends upon three variables:• The local magnetic environment (including nearby ferrous material)• The magnetic properties of the object to be sensed• Sensor settings
The sensor detects changes in the ambient magnetic field in all directions. As with other sensors, the range depends upon the target.The strong disturbance of a large ferrous object decreases as distance from the sensor increases; the magnitude and shape of thedisturbance depends upon the object’s shape and content. The sensor can be programmed to react to magnetic field disturbances ofgreater or lesser intensity, using three adjustments: baseline, threshold, and hysteresis.
Note: The sensor continues to sense a vehicle in its sensing field even when the vehicle is stopped.
Gateway Optimization for M-GAGE NodesAny SureCross Gateway transmitting at 150 mW or 250 mW works with the M-GAGE Nodes. To optimize the communications betweenthe Gateway and M-GAGE radios and maximize the M-GAGE battery life, use the User Configuration Tool (UCT) to configure theGateway to use heartbeat mode and to define the network size.
1. In the System Parameters > Heartbeat Config screen, set the Node Heartbeat Interval to five minutes (300 seconds), and setthe Number of Misses to 32.
2. Click Send to send the changes to the Gateway.3. Use the System Parameters > Network Size screen in the UCT to set the network size to 47 Nodes.4. Click Send to send the changes to the Gateway.
Baseline FunctionThe baseline function of the M-GAGE Node stores the ambient magnetic field values of the X, Y, and Z axes as a baseline reading. Oncethis baseline is established, any deviation in the magnetic field will be reflected in the M-GAGE register. The more disruption in themagnetic field, the larger the M-GAGE register value.For a host-connected system using standard Gateways, set the baseline magnetic field by writing to a Modbus register. Sending thevalue of 4096 (0x1000) to the Node’s I/O point 15 (Control Message) triggers the M-GAGE to read the existing magnetic field as the newbaseline.For non-host connected systems, use one of the two special M-GAGE Gateways to set the baseline:
• The inputs of the DIP switch M-GAGE Gateway (model DX80G*M6*6P6ZP) are mapped to the M-GAGE Node’s I/O point 14.Activating the Gateway’s input for at least five seconds triggers the M-GAGE to use the existing magnetic field as the newbaseline.
• The special M-GAGE Gateway (model DX80G*M6*6P6Z) uses special mapping to baseline up to six M-GAGE Nodes.
Using the LED LightThe LED flashlight is used to set device modes, such as entering binding mode.
Sure Cross® DX80 M-GAGE Traffic Node
2 www.bannerengineering.com - Tel: +1-763-544-3164 P/N 157693 Rev. C

Click and Hold. Click and hold the LED light at the receiving window to wake a wireless device from"deep sleep." If your device is not in "deep sleep," clicking and holding the LED light will put it into"deep sleep." While in "deep sleep" mode, the device does not attempt to transmit to a parentradio and remains in deep sleep until an LED light at the receiving window wakes it up.Three clicks. Triple clicking at the receiving window puts the device into binding mode. The devicebinds to the Device ID the master radio is set to. Before putting the device into binding mode, verifythe master radio's rotary dials are set to ensure the device will be binding to the correct device ID.If the device is in binding mode, double click the LED light to exit binding mode.
Model Number: BWA-MGFOB-001
Setting Up Your Wireless NetworkTo set up and install your wireless network, follow these steps.Disconnect the power from your Sure Cross devices.
1. Configure the DIP switches of all devices.2. If your device has I/O, connect the sensors to the Sure Cross devices. If your device does not have I/O, skip this step.3. Refer to the wiring diagrams to apply power to all devices.
• For two LED models, the Gateway's LED 1 is solid green and the Node's LED 2 flashes red to indicate there is no radio link tothe Gateway.
• For one LED models, the Gateway's LED is solid green and the Node's LED flashes red to indicate there is no radio link to theGateway.
4. Form the wireless network by binding the Nodes to the Gateway. If the binding instructions are not included in the datasheet,refer to the product manual for binding instructions.
5. Observe the LED behavior to verify the devices are communicating with each other.• For two LED models, the Gateway's LED 1 is solid green and the Node's LED 1 flashes green to indicate it is communicating
with the Gateway.• For one LED models, the Gateway's LED is solid green and the Node's LED flashes green to indicate it is communicating with
the Gateway.6. Configure any I/O points to use the sensors connected to the Sure Cross devices.7. Conduct a site survey between the Gateway and Nodes. If the site survey instructions are not included in this datasheet, refer
to the product manual for detailed site survey instructions.8. Install your wireless sensor network components. If installation instructions are not included in this datasheet, refer to the
product manual for detailed installation instructions.
For additional information, including installation and setup, weatherproofing, device menu maps, troubleshooting, and a list ofaccessories, refer to one of the following product manuals.
• Sure Cross® Quick Start Guide: 128185• Sure Cross® Wireless I/O Network Instruction Manual: 132607• Web Configurator Instruction Manual (used with "Pro" and DX83 models): 134421• Host Controller Systems Instruction Manual: 132114
Binding Radios to Form Networks (M-GAGE Optical Commissioning models)Verify the Gateway is set to use Extended Addressing Mode (DIP switch 1 ON) before binding the Node to the Gateway. (Refer to theSetting DIP Switches section of the datasheet for instructions on accessing the DIP switches.) The Gateway and Node must both bepowered to run binding mode.Before using the M-GAGE devices, you must bind them to the Gateway and assign a Node address using the Gateway’s rotary dials.There are no physical switches or dials on the M-GAGE Node. To bind and address an M-GAGE, follow these steps.
1. Put the Gateway into binding mode.• If your Gateway has buttons, triple-click button 2 to enter binding mode.• If your Gateway does not have buttons, remove the rotary dial access cover and set both the right and left rotary dials to 0,
then set both the right and left rotary dials to F. Note that both rotary dials must be changed to F after applying power, notbefore applying power.
The red LEDs flash alternately when the Gateway is in binding mode. Any Node entering binding mode will bind to thisGateway.
2. Using the Gateway's rotary dials, select the Node address to assign to the M-GAGE. Use the left rotary dial for the left digit andthe right rotary dial for the right digit.For example, to assign your M-GAGE to Node 10, set the left dial to 1 and the right dial to 0. (Device ID 00 is reserved for theGateway. Nodes assigned to 00 will not bind to a Gateway.)
Sure Cross® DX80 M-GAGE Traffic Node
P/N 157693 Rev. C www.bannerengineering.com - Tel: +1-763-544-3164 3

3. On the M-GAGE Node, place the optical commissioning device in contact with the clear plastic housing and pointed directly atthe configuration port indicated by the label.
4. Click the button on the optical commissioning device three times to place the Node into binding mode.(If the Node is in its "slow scan" mode, this will wake up the Node as well as begin binding mode.)If binding doesn’t occur within 60 seconds, the Node exits binding mode. After entering binding mode, the M-GAGE LEDs blinkslowly, alternating between red and green. After the M-GAGE receives a valid binding code from the Gateway, the red andgreen LEDs are both illuminated continuously, resulting in a slightly orange light.
5. Click the button on the optical commissioning device three times to accept the binding code and return to RUN mode.If the binding code is not accepted within 60 seconds, the Node exits binding mode. The red and green LEDs simultaneouslyflash four times to indicate that the M-GAGE accepts the binding code. The M-GAGE enters RUN mode. Note: If the M-GAGE isin binding mode and the user does not accept the binding code with a triple click from the optical commissioning device, the M-GAGE automatically exits binding mode after one hour and returns to the previous binding code.
6. Write the Node address on the Node’s label.7. Repeat steps 3 through 6) for as many M-GAGE Nodes are you need to bind. When using this addressing system, up to 47
Nodes may be addressed by a single Gateway.8. Exit binding mode on the Gateway.
• If your Gateway has buttons, single-click either button 1 or button 2 to exit binding mode and reboot.• If your Gateway does not have buttons, change the Gateway’s rotary dials to a valid Network ID. Valid Network IDs are 01
through 32, in decimal, established using both rotary dials. The left dial may be set to 0, 1, 2, or 3. The right dial may be setfrom 0 to 9 when the left dial is at 0, 1, or 2; or set to 0 through 2 when the left dial is at 3. (Positions A through F are invalidnetwork ID numbers.)
A few seconds after exiting binding mode, the M-GAGE Node’s LED blinks green, indicating it is synchronized to the Gateway.The Gateway enters standard operating mode with the LCD autoscrolling through the menu options.
If two Nodes are accidentally assigned the same Node address, rerun the binding procedure on one of the Nodes to reassign theaddress. The binding sequence may be run on a Node as many times as necessary.
M-GAGE LEDsOne two-color LED under the clear lid indicates the M-GAGE status.Green blinking (1 per second). The M-GAGE is synchronized with the DX80 Gateway.Green blinking (slow). The M-GAGE is synchronized with the DX80 Gateway in power-saving heartbeat mode. The slow blink is onceevery two seconds for 2.4 GHz models and once every four seconds for 900 MHz models.Red blinking (every 3 seconds). The M-GAGE is attempting to synchronize with the DX80 Gateway.No light. The M-GAGE is attempting to synchronize with the Gateway and it is in slow scan mode or hibernate/storage mode.Alternating red and green blinking. The M-GAGE has entered binding mode.Red and green on at the same time (looks orange). The M-GAGE has received the binding code.Red and green flash simultaneously four times (looks orange). The M-GAGE has accepted the binding code and has entered RUNmode.Slow scan mode occurs when the M-GAGE is out of synchronization with the Gateway for more than 15 minutes. After the M-GAGEenters slow scan mode, the M-GAGE may still synchronize with a Gateway, but the scanning period is longer. After the M-GAGE issynchronizes to the Gateway, the M-GAGE returns to standard operating mode.
Configuration Instructions
Modbus Register Table (M-GAGE)I/O # Modbus Holding Register I/O Type
Gateway Any Node
1 1 1 + (Node# × 16) M-GAGE
...
7 7 7 + (Node# × 16) Reserved
8 8 8 + (Node# × 16) Device Message
...
13 13 13 + (Node# × 16) Configuration Message
14 14 14 + (Node# × 16) Baseline Command
Sure Cross® DX80 M-GAGE Traffic Node
4 www.bannerengineering.com - Tel: +1-763-544-3164 P/N 157693 Rev. C

I/O # Modbus Holding Register I/O Type
Gateway Any Node
15 15 15 + (Node# × 16) Control Message
16 16 16 + (Node# × 16) Reserved
There are sixteen Modbus holding registers for each device. Calculate the holding register number for each device using the equation:Register number = I/O# + (Node# × 16).Because the Gateway is always device 0, the Gateway’s holding registers are registers 1 through 16. Registers for Node 1 are 17 through32. Using the equation, the register number for I/O point 15 for Node 7 is 127.The M-GAGE value in I/O 1 is the deviation between the total measured magnetic field in the X, Y, and Z axes and the stored baseline.To send configuration messages, use the Node’s I/O point 13. To create a baseline command, use a control message or use the Node’sI/O point 14. For more instructions, refer to the Baseline section.
Configuring M-GAGE Parameters Using the UCTThe Device Parameters screen of the User Configuration Tool (UCT) is used to configure the M-GAGE parameters listed below.
M-GAGE ParametersM-GAGE Baseline Threshold/Filter. Under normal conditions, the ambient magnetic field fluctuates. When the magnetic field readingsdrift below a threshold setting, the baseline or drift filter uses an algorithm to slowly match the radio device’s baseline to the ambientmagnetic field.The baseline threshold/filter parameter sets a baseline threshold and filter activation time on M-GAGE devices. When M-GAGE inputreadings are below the selected baseline threshold setting, the filter algorithm slowly lowers the magnetic baseline reading to zero toremove small changes in the magnetic field over time. Setting options include the following values: (Parameter number 0x13).
Filter Threshold 30, 2 hour Two hours after the M-GAGE reading of the ambient magnetic field (baseline) has dropped below 30,the algorithm begins to slowly lower the magnetic baseline reading to zero.
Filter Threshold 30, 8 hour Eight hours after the M-GAGE reading of the ambient magnetic field (baseline) has dropped below 30,the algorithm begins to slowly lower the magnetic baseline reading to zero.
M-GAGE Baseline Filter (unrestricted). An M-GAGE only parameter, the baseline filter parameter sets the coefficient value of thebaseline filter algorithm. (Parameter number 0x15).M-GAGE Low Pass Filter. The filters T0 through T6 are parameter settings that define the degree of input digital signal filtering foranalog inputs. T0 is the least amount of filtering. T6 is the highest filter setting and has the least amount of fluctuation betweenreadings. (Parameter number 0x12).M-GAGE Report Rate (Inputs) . The report rate defines how often the Node communicates the I/O status to the Gateway. ForFlexPower® applications, setting the report rate to a slower rate extends the battery life. (Parameter number 0x04).M-GAGE Sample High and M-GAGE Sample Low. For analog inputs, the sample high parameter defines the number of consecutivesamples the input signal must be above the threshold before a signal is considered active. Sample low defines the number ofconsecutive samples the input signal must be below the threshold minus hysteresis before a signal is considered deactivated. Thesample high and sample low parameters are used to avoid unwanted input transitions.This parameter can be applied to a discrete input or a analog input using the threshold parameter. (Sample high parameter number0x06, Sample low parameter number: 0x07).
Sure Cross® DX80 M-GAGE Traffic Node
P/N 157693 Rev. C www.bannerengineering.com - Tel: +1-763-544-3164 5

M-GAGE Sample Rate. The sample interval, or rate, defines how often the Sure Cross device samples the input. For battery-poweredapplications, setting a slower rate extends the battery life. (Parameter number 0x03).M-GAGE Threshold and M-GAGE Hysteresis. Threshold and hysteresis work together to establish the ON and OFF points of an analoginput. The threshold defines a trigger point or reporting threshold (ON point) for a sensor input. Setting a threshold establishes an ONpoint. Hysteresis defines how far below the threshold the analog input is required to be before the input is considered OFF. A typicalhysteresis value is 10% to 20% of the unit’s range.The M-GAGE Node’s threshold and hysteresis ranges are 0 to 65,535. The factory default threshold setting is 100 and default hysteresisis 30 (the sensor detects an OFF condition at threshold minus hysteresis, or 100 - 30 = 70). With the default settings, once the magneticfield reading is above 100, an ON or “1” is stored in the lowest significant bit (LSB) in the Modbus register. When the M-GAGE readingdrops below the OFF point (threshold minus hysteresis), the LSB of the Modbus register is set to “0.” To determine your threshold, takeM-GAGE readings of the test objects at the distance they are likely to be from the sensor. For example, if a car reads 100, a bicycle 15,and a truck reads 200, setting the threshold to 150 will detect only trucks of a specific size. Magnetic field fluctuations vary based on theamount of ferrous metal present and the distance from the sensor.If the threshold parameter is 0, there is no threshold and the analog input will report based on the delta rate. Value range: 0 (disable,default) through 65535 (two-byte value). (Threshold parameter number 0x08; Hysteresis parameter number 0x09).
Configuring the M-GAGE Using Register 13A host system can configure the M-GAGE Node by setting I/O 13 on the M-GAGE Node. Writing a defined value to the Modbus registersets the M-GAGE operation immediately. The following parameters can be configured by writing to the M-GAGE Node Modbus register13. The host system must resend the configuration settings if power is cycled to the wireless system.
Modbus Register 13 [15:8]
Low Pass Filter Sample High/Sample Low Counter Report Rate
Device Settings 15 14 13 12 11 10 9 8
No Change 0 0 0
No Low Pass Filter 0 0 1
Low Pass Filter T0 0 1 0
Low Pass Filter T1 0 1 1
Low Pass Filter T2 1 0 0
Low Pass Filter T3 1 0 1
Low Pass Filter T4 1 1 0
Low Pass Filter T6 1 1 1
No Change 0 0 0
1 0 0 1
2 0 1 0
3 0 1 1
4 1 0 0
8 1 0 1
16 1 1 0
32 1 1 1
No Change 0 0
On Change of State 0 1
16 seconds 1 0
Sample Rate 1 1
Modbus Register 13 [7:0]
Sample Rate Baseline Filter Threshold and Hysteresis
Device Settings 7 6 5 4 3 2 1 0
No Change 0 0 0
62.5 milliseconds 0 0 1
Sure Cross® DX80 M-GAGE Traffic Node
6 www.bannerengineering.com - Tel: +1-763-544-3164 P/N 157693 Rev. C

Modbus Register 13 [7:0]
Sample Rate Baseline Filter Threshold and Hysteresis
Device Settings 7 6 5 4 3 2 1 0
125 milliseconds 0 1 0
250 milliseconds 0 1 1
500 milliseconds 1 0 0
1 second 1 0 1
31 milliseconds 1 1 0
20 milliseconds 1 1 1
No Change 0 0
Filter Off 0 1
Filter Threshold 30, 2 hour 1 0
Filter Threshold 30, 8 hour 1 1
No Change 0 0 0
Threshold: 50, Hysteresis: 15 0 0 1
Threshold: 100, Hysteresis: 30 0 1 0
Threshold: 150, Hysteresis: 30 0 1 1
Threshold: 200, Hysteresis: 30 1 0 0
Threshold: 300, Hysteresis: 40 1 0 1
Threshold: 500, Hysteresis: 50 1 1 0
Threshold: 800, Hysteresis: 60 1 1 1
Sending the Configuration Message to Register 13Modbus command 06 (write single holding register) is used in this example to set the parameter values for the M-GAGE Node. A sampleconfiguration message for Node 1:
Low Pass Filter Sample High Counter Report Rate Sample Rate Baseline Filter Threshold andHysteresis
Bits 15 14 13 12 11 10 9 8 7 6 5 4 3 2 1 0
Values 0 0 0 0 1 0 1 1 0 1 0 0 1 1 0 1
Hex 0 B 4 D
Sending this configuration message to register 13 sets the low pass filter to “no change;” the sample high counter to 2; the report rateand sample rate to 125 milliseconds; the baseline filter to 0, 15; the threshold to 300; and the hysteresis to 40.The complete Modbus command, in hexidecimal, is:
Slave ID# ModbusCommand
Register Number Configuration Value
01 06 00 1C 0B 4D CRC CRC
Sure Cross® DX80 M-GAGE Traffic Node
P/N 157693 Rev. C www.bannerengineering.com - Tel: +1-763-544-3164 7

M-GAGE Installation
M-GAGE
M-GAGE
2.5 m(8.0')
2.0 m(6.4')
1.5 m(4.8')
1.0 m(3.2')
0.5 m(1.6')
00
100
200
300
400
500
600
700
800
DISTANCE FROM VEHICLE SIDEM-
GAGE
REA
DING
(default)
Outp
ut O
N
Threshold
Outp
ut O
FF
Distancefrom vehicle
Sensor orientationis not a factor
Figure 3. M-GAGE Reading when installed 1 meter above the ground.
0.25 m[0.8']
1.2 m[4']
−1.2 m[−4']
−2.4 m[−8'] 0
M-GAGE
M-GAGE
6 m [19']
0.6 m(2')
-0.6 m(-2')
1.2 m(4')
-1.2 m(-4')
1.8 m(6')
-1.8 m(-6')
2.4 m(8')
-2.4 m(-8')
3.1 m(10')
3.7 m(12')
4.3 m(14')
4.9 m(16')
5.5 m(18')
6.1 m(20')
6.7 m(22')
7.3 m(24')
0 m
0
100
200
300
400
500
600
Outp
ut O
FF
VEHICLE FRONT BUMPER POSITION
M-GA
GE R
EADI
NG
Outp
ut O
N
(default)
Threshold
Figure 4. M-GAGE Reading when installed underground.
Placing the M-GAGE for Best Results
Figure 5. Optimum placement of M-GAGE
When the sensor is positioned in the middle of the traffic lane, it can beconfigured to a threshold level to detect vehicles only in the lane of interest.This is known as lane separation, or not detecting a vehicle in an adjacentlane.A threshold level also aids the sensor in vehicle separation – detecting abreak between the back bumper of a leading vehicle and the front bumperof the next vehicle. With proper placement and configuration, the M-GAGEcan achieve vehicle separation with distances of 24 inches or less.
Sure Cross® DX80 M-GAGE Traffic Node
8 www.bannerengineering.com - Tel: +1-763-544-3164 P/N 157693 Rev. C
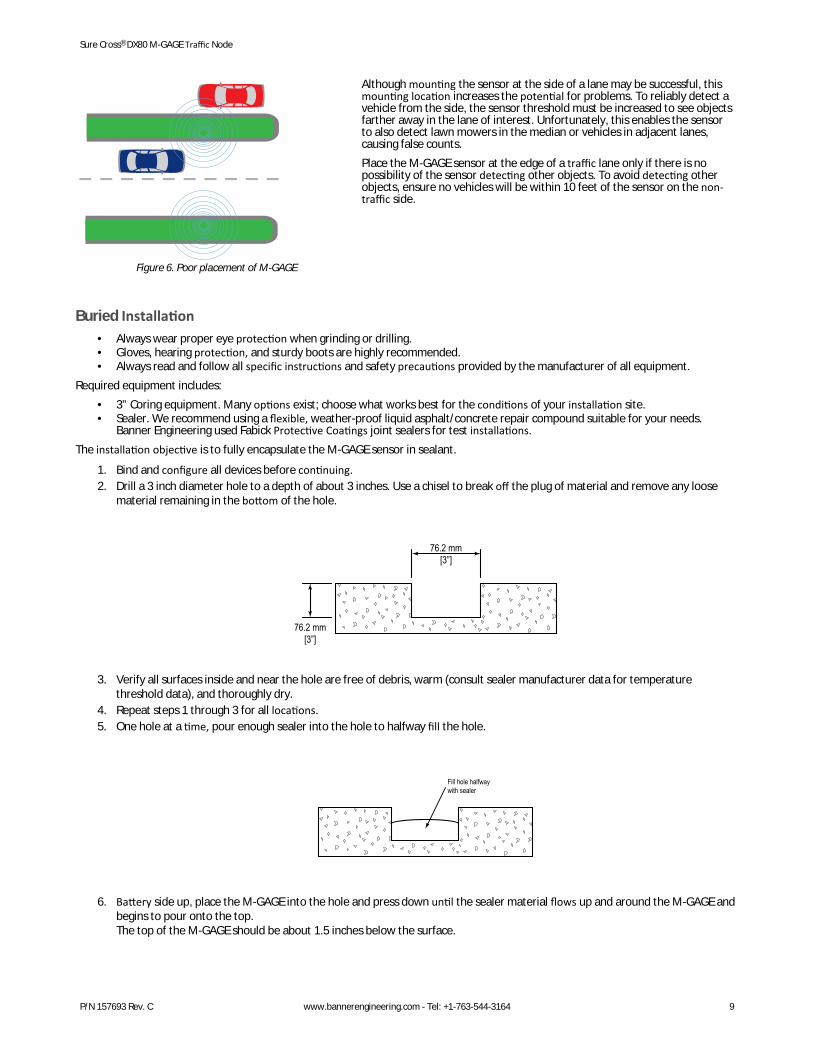
Figure 6. Poor placement of M-GAGE
Although mounting the sensor at the side of a lane may be successful, thismounting location increases the potential for problems. To reliably detect avehicle from the side, the sensor threshold must be increased to see objectsfarther away in the lane of interest. Unfortunately, this enables the sensorto also detect lawn mowers in the median or vehicles in adjacent lanes,causing false counts.Place the M-GAGE sensor at the edge of a traffic lane only if there is nopossibility of the sensor detecting other objects. To avoid detecting otherobjects, ensure no vehicles will be within 10 feet of the sensor on the non-traffic side.
Buried Installation• Always wear proper eye protection when grinding or drilling.• Gloves, hearing protection, and sturdy boots are highly recommended.• Always read and follow all specific instructions and safety precautions provided by the manufacturer of all equipment.
Required equipment includes:• 3” Coring equipment. Many options exist; choose what works best for the conditions of your installation site.• Sealer. We recommend using a flexible, weather-proof liquid asphalt/concrete repair compound suitable for your needs.
Banner Engineering used Fabick Protective Coatings joint sealers for test installations.The installation objective is to fully encapsulate the M-GAGE sensor in sealant.
1. Bind and configure all devices before continuing.2. Drill a 3 inch diameter hole to a depth of about 3 inches. Use a chisel to break off the plug of material and remove any loose
material remaining in the bottom of the hole.
76.2 mm[3”]
76.2 mm[3”]
3. Verify all surfaces inside and near the hole are free of debris, warm (consult sealer manufacturer data for temperature
threshold data), and thoroughly dry.4. Repeat steps 1 through 3 for all locations.5. One hole at a time, pour enough sealer into the hole to halfway fill the hole.
Fill hole halfwaywith sealer
6. Battery side up, place the M-GAGE into the hole and press down until the sealer material flows up and around the M-GAGE and
begins to pour onto the top.The top of the M-GAGE should be about 1.5 inches below the surface.
Sure Cross® DX80 M-GAGE Traffic Node
P/N 157693 Rev. C www.bannerengineering.com - Tel: +1-763-544-3164 9

7. Immediately fill the spaces surrounding the device with sealer. Completely fill the hole with sealer to avoid leaving a recess thatcollects water and dirt.
Sealer
M-GAGEbattery
SpecificationsRadio Range
300 m (1000 ft)1
Radio Transmit Power900 MHz: 20 dBm (100 mW) conducted2.4 GHz, 65 mW: 18 dBm (65 mW) conducted, less than or equal to 20 dBm(100 mW) EIRP
900 MHz ComplianceFCC ID TGUDX80 - This device complies with FCC Part 15, Subpart C, 15.247IC: 7044A-DX8009
2.4 GHz ComplianceFCC ID UE300DX80-2400 - This device complies with FCC Part 15, Subpart C,15.247ETSI EN 300 328 V1.8.1 (2012-06)IC: 7044A-DX8024
Spread Spectrum TechnologyFHSS (Frequency Hopping Spread Spectrum)
Link TimeoutGateway: Configurable via User Configuration Tool (UCT) softwareNode: Defined by Gateway
HousingABSWeight: 0.14 kg (0.3 lbs)
Power RequirementsLithium battery integrated into the housing
InterfaceOne bi-color LED indicator
M-GAGE InputsInput: Internal MagnetometerSample Rate: 250 millisecondsReport Rate: On Change of StateAmbient Temperature Effect: Less than 0.5 milligauss/°CSensing Range: See figures on previous pages
Environmental RatingIEC IP67; NEMA 6
Operating Conditions–40 °C to +85 °C (–40 °F to +185 °F)95% maximum relative humidity (non-condensing)
Radiated Immunity HF10 V/m (EN 61000-4-3)
Shock and VibrationIEC 68-2-6 and IEC 68-2-27Shock: 30g, 11 millisecond half sine wave, 18 shocksVibration: 0.5 mm p-p, 10 to 60 Hz
Certifications
Banner Engineering Corp. Limited WarrantyBanner Engineering Corp. warrants its products to be free from defects in material and workmanship for one year following the date of shipment. Banner Engineering Corp. will repair orreplace, free of charge, any product of its manufacture which, at the time it is returned to the factory, is found to have been defective during the warranty period. This warranty does not coverdamage or liability for misuse, abuse, or the improper application or installation of the Banner product.THIS LIMITED WARRANTY IS EXCLUSIVE AND IN LIEU OF ALL OTHER WARRANTIES WHETHER EXPRESS OR IMPLIED (INCLUDING, WITHOUT LIMITATION, ANY WARRANTY OFMERCHANTABILITY OR FITNESS FOR A PARTICULAR PURPOSE), AND WHETHER ARISING UNDER COURSE OF PERFORMANCE, COURSE OF DEALING OR TRADE USAGE.This Warranty is exclusive and limited to repair or, at the discretion of Banner Engineering Corp., replacement. IN NO EVENT SHALL BANNER ENGINEERING CORP. BE LIABLE TO BUYER OR ANYOTHER PERSON OR ENTITY FOR ANY EXTRA COSTS, EXPENSES, LOSSES, LOSS OF PROFITS, OR ANY INCIDENTAL, CONSEQUENTIAL OR SPECIAL DAMAGES RESULTING FROM ANY PRODUCTDEFECT OR FROM THE USE OR INABILITY TO USE THE PRODUCT, WHETHER ARISING IN CONTRACT OR WARRANTY, STATUTE, TORT, STRICT LIABILITY, NEGLIGENCE, OR OTHERWISE.Banner Engineering Corp. reserves the right to change, modify or improve the design of the product without assuming any obligations or liabilities relating to any product previouslymanufactured by Banner Engineering Corp. Any misuse, abuse, or improper application or installation of this product or use of the product for personal protection applications when theproduct is identified as not intended for such purposes will void the product warranty. Any modifications to this product without prior express approval by Banner Engineering Corp will void theproduct warranties. All specifications published in this document are subject to change; Banner reserves the right to modify product specifications or update documentation at any time.Specifications and product information in English supersede that which is provided in any other language. For the most recent version of any documentation, refer to: www.bannerengineering.com.
Exporting Sure Cross® RadiosExporting Sure Cross® Radios. It is our intent to fully comply with all national and regional regulations regarding radio frequency emissions. Customers who want to re-export this product to acountry other than that to which it was sold must ensure the device is approved in the destination country. A list of approved countries appears in the Radio Certifications section of theproduct manual. The Sure Cross wireless products were certified for use in these countries using the antenna that ships with the product. When using other antennas, verify you are notexceeding the transmit power levels allowed by local governing agencies. Consult with Banner Engineering Corp. if the destination country is not on this list.
1 Radio range depends on the environment and line of sight and is lower when buried.
Sure Cross® DX80 M-GAGE Traffic Node
© Banner Engineering Corp. All rights reserved
Related Documents


