لبناءة تراخيص ا إدارة دبي بلدي[email protected] – Dubai Engineering Qualification System Individuals Services 4.5

Welcome message from author
This document is posted to help you gain knowledge. Please leave a comment to let me know what you think about it! Share it to your friends and learn new things together.
Transcript

بلدية دبيإدارة تراخيص البناء
–
Dubai Engineering Qualification System
Individuals Services
4.5

Contents 1. Overview ...................................................................................................................................... 4
1.1 About Dubai Engineering Qualifications System - Individual services............................. 4
2. Signing in to Your Account ........................................................................................................... 5
2.1 Sign in using UAE PASS ..................................................................................................... 5
2.2 Sign up to Dubai Engineering Qualification System......................................................... 6
2.3 Sign in to Dubai Engineering Qualification System .......................................................... 9
.3 Dashboard for Dubai Engineering Qualification System Users ................................................. 11
3.1 Dashboard ...................................................................................................................... 12
3.2 My Requests................................................................................................................... 12
3.3 My Accreditations .......................................................................................................... 12
3.3.1 Details..................................................................................................................... 13
3.3.2 Documents ............................................................................................................. 14
3.3.3 Accredited Activity ................................................................................................. 14
3.3.4 Exams ..................................................................................................................... 15
3.4 My Exams ....................................................................................................................... 15
3.4.1 Details..................................................................................................................... 16
3.4.2 Documents ............................................................................................................. 17
3.4.3 Payments................................................................................................................ 17
3.4.4 Preparation............................................................................................................. 18
3.5 Profile ............................................................................................................................. 19
.4 Individuals Services .................................................................................................................... 22
4.1 Add New Education Record ........................................................................................... 22
4.2 Add New Experience Record.......................................................................................... 23
4.3 Add New Accreditation Request .................................................................................... 25
4.4 Cancel Accreditation Request ........................................................................................ 31
4.5 Reschedule an Exam....................................................................................................... 32
4.6 Cancel Exam ................................................................................................................... 34
4.7 Perform Electronic Exam................................................................................................ 35
NOC Issue Local Branch for Corporate from Another Emirate .......................................... 40
NOC Issue New Foreign Branch Request ........................................................................... 45
NOC Issue New Corporate Request ................................................................................... 51
Change Email...................................................................................................................... 56
2

Change Mobile Number ..................................................................................................... 58
4.8 Modify Account Details .................................................................................................. 60
4.9 Change Password ........................................................................................................... 61
3

1. Overview
1.1 About Dubai Engineering Qualifications System - Individual
services
Within the framework of the responsibilities of the consultants and contractors’
qualification section towards individuals and establishments working in the
construction sector, the Dubai Engineering Qualifications system provides many
services to technical staff, consultancy offices, contracting corporates, and
manufacturers & suppliers of building materials operating in the emirate to improve
the level of engineering works, and ensure the highest quality of projects. You can learn
how to sign in to the account and know how to perform Individual services and the
functions of the Dashboard for your personal account.
4

2. Signing in to Your Account
You can sign in to your account either through the Dubai ID account, or through your
account that you created in the system using OTP message.
2.1 Sign in using UAE PASS
If you have an account registered with UAE PASS, you can use it to enter the Dubai
Engineering Qualification System. This happens in the following cases:
1. You do not have an account in the Dubai Engineering Qualification System, and there
are no similar data between you and any of the system users. In this case, the system
will fill in all your data via the link with UAE PASS system and create an account for
you in the Dubai Engineering Qualification System.
2. You already have an account in the Dubai Engineering Qualification system, but you
tried to sign in using the UAE PASS, one of these two situations will happen:
If the UAE PASS data matches your data in the DEQ system, the system signs
you into the Home page.
If some of the UAE PASS data are similar to the data of an existing DEQ system
user, the system opens the "Create an Account" pages to modify these identical
data, and then signs you into the Home page.
To sign to your account with your UAE PASS, perform the following steps:
1. After opening the system Home page, in the Sign In section by selecting UAE PASS.
2. Enter the Email, Mobile Number or the Emirati ID used with the UAE PASS and click
the Sign In button.
5

3. The system displays the Home page of your profile .
2.2 Sign up to Dubai Engineering Qualification System
To sign in using your DEQ account, perform the following steps:
4. After opening the system Home page, in the Sign in section, select the DEQ radio
button.
6
Enter Mobile Number then press Next
OTP will be sent once by SMS on mobile number specified in the previous step.
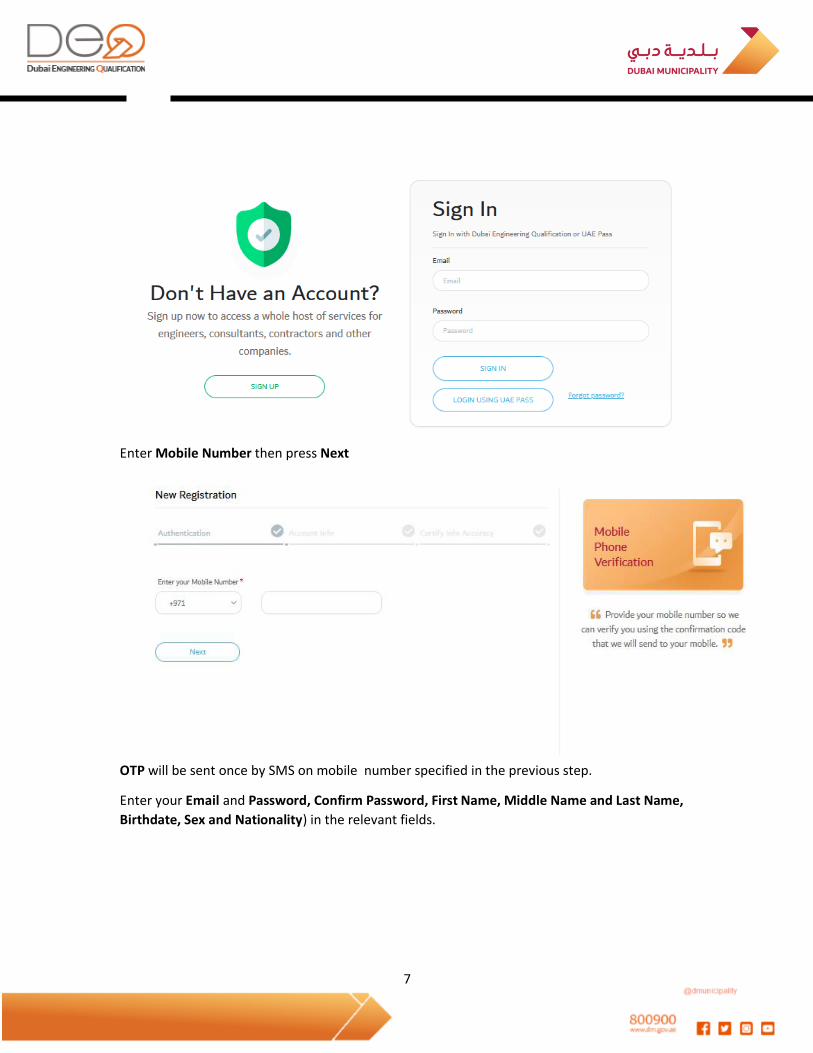
Enter your Email and Password, Confirm Password, First Name, Middle Name and Last Name,
Birthdate, Sex and Nationality) in the relevant fields.
7
A. In case you select Emeriti Nationality, this requires ID Details. If you press Next,
you go to the Dashboard.
B. In case you are Non-Emeriti, you need to answer the following question: Are you
Emeriti Resident?
a. If you have residency, you need to enter the following information (Emirates
ID no., Passport Number, and Residency File Number). Press Next to go to
the Dashboard.
8

b. If you are not a resident, you need to enter Passport number. Press Next to
go to the Dashboard.
2.3 Sign in to Dubai Engineering Qualification System
5. and then click the Sign In button.
9

6. The system displays the Dashboard in the Home page of your personal profile.
10

3. Dashboard for Dubai Engineering Qualification System
Users
Through this chapter, you will learn about the Dashboard, which displays everything
related to individual services. Use it to view your data that you entered during the
creation of the account, or by linking with other entities (UAE PASS, MOE, General
Directorate of Residency and Foreigners Affairs (DNRD), Society of Engineers (SOE).
The sections displayed on the left side of the Dashboard vary depending on the
transactions you have performed. For example, if you apply for requests, My Requests
section will display with the request details.
If you have a specific accreditation, My Accreditations section displays with some of
its details.
At the top left side of the dashboard, the following sections display:
Dashboard
My Requests
My Accreditations
My Exams
Profile
In the next chapter, a detailed explanation will be provided for each one of these
sections.
11

3.1 Dashboard
The dashboard components differ - as mentioned previously - depending on the
requests for which you applied.
3.2 My Requests
This section displays all the requests that you have applied for with their dates and
statuses.
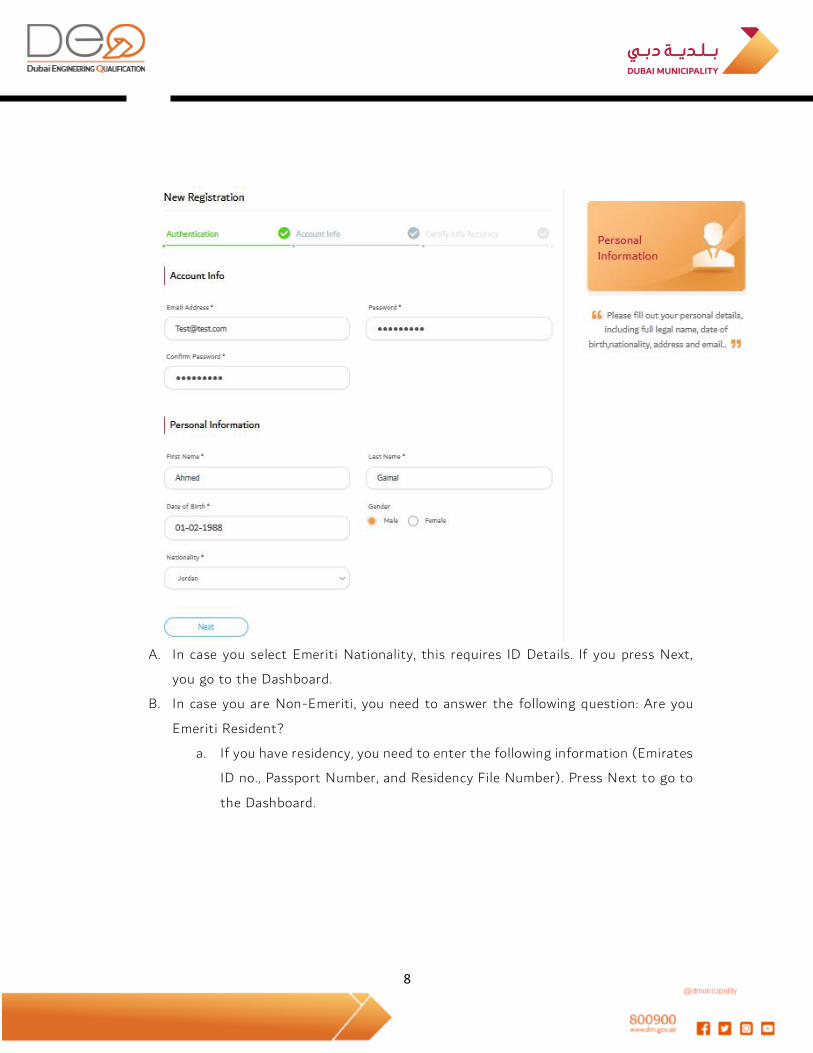
3.3 My Accreditations
The My Accreditations section is one of the most important section through which
you can apply for a new accreditation, and you will be able to follow up your
accreditation requests if you previously applied for them.
12
To view the details of any of the previous accreditations, just click the View Details
button. The page consists of four sections (Details, Documents, Accredited Activity,
and Exams):
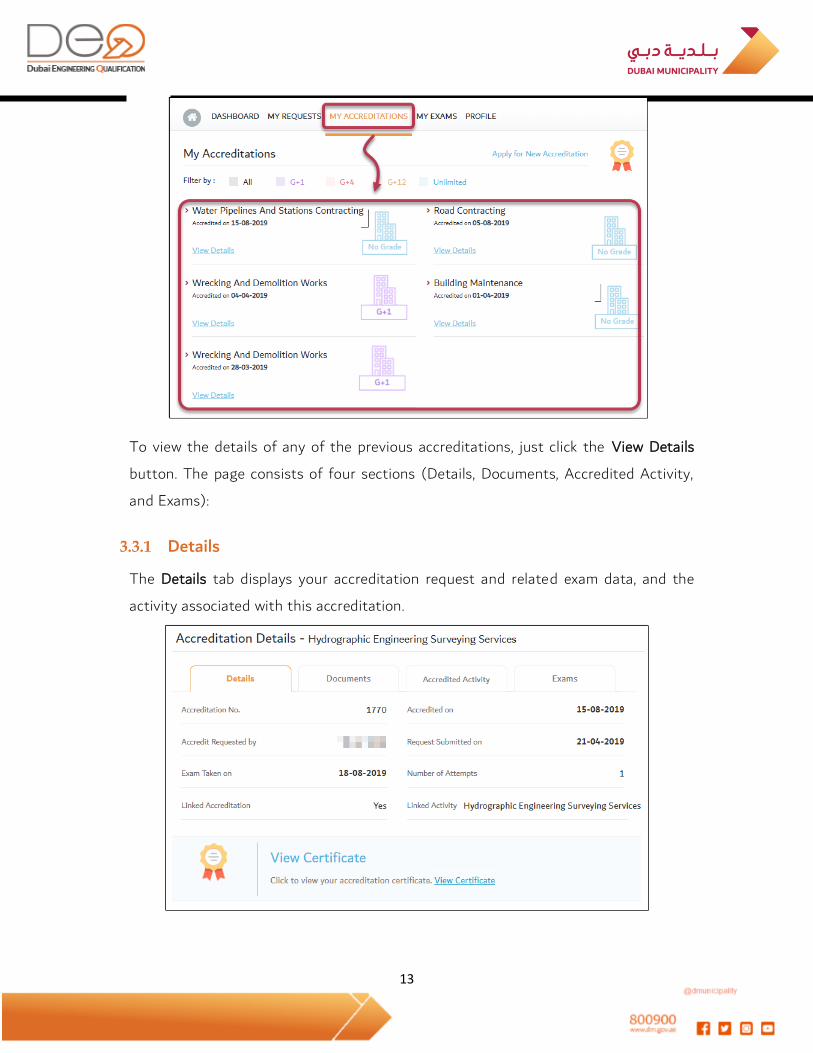
3.3.1 Details
The Details tab displays your accreditation request and related exam data, and the
activity associated with this accreditation.
13
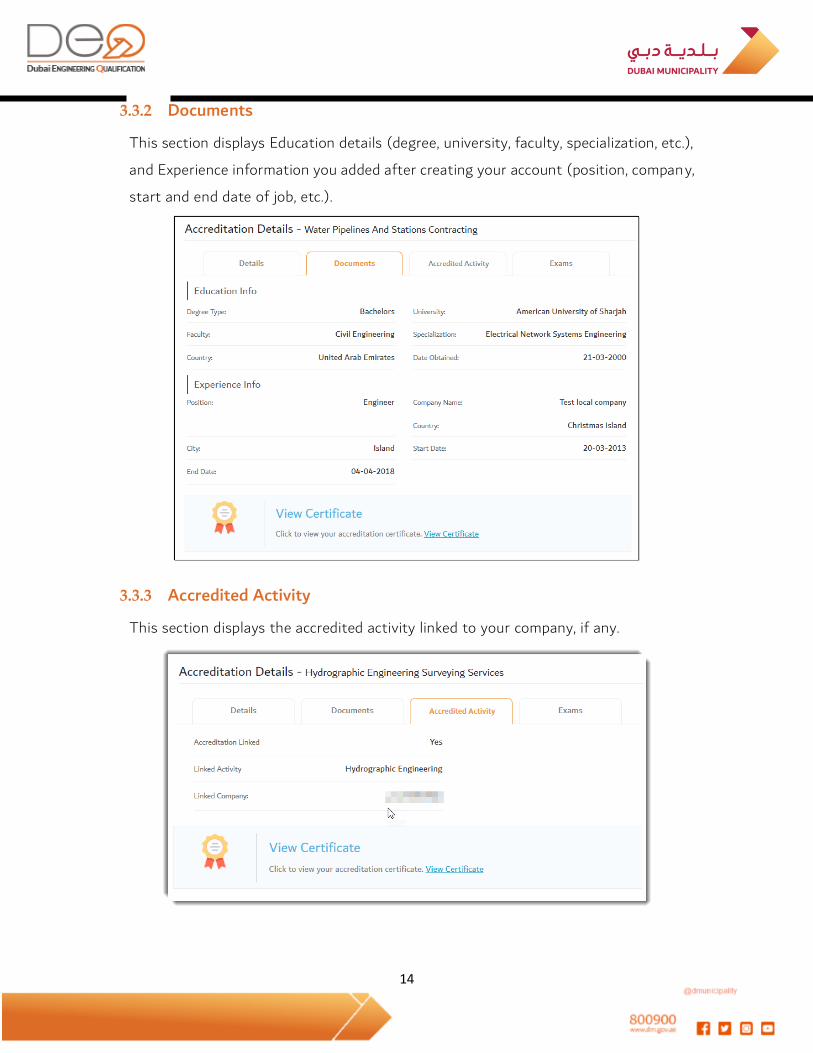
3.3.2 Documents
This section displays Education details (degree, university, faculty, specialization, etc.),
and Experience information you added after creating your account (position, company,
start and end date of job, etc.).
3.3.3 Accredited Activity
This section displays the accredited activity linked to your company, if any.
14
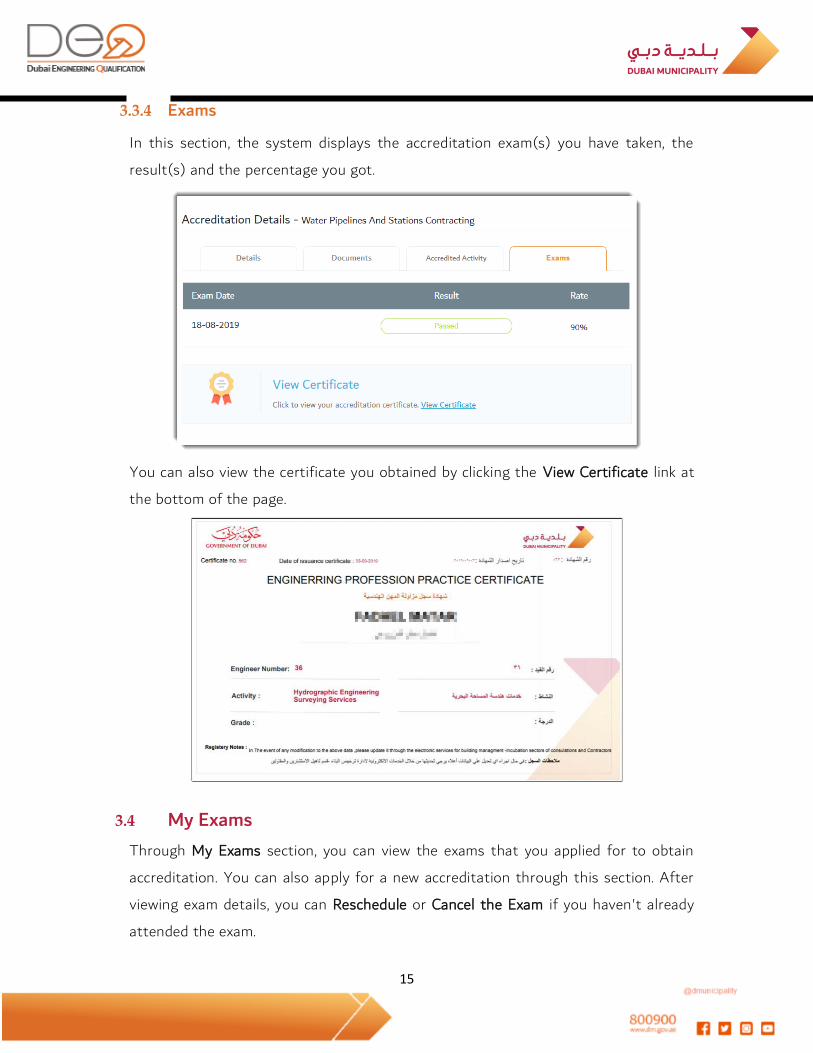
3.3.4 Exams
In this section, the system displays the accreditation exam(s) you have taken, the
result(s) and the percentage you got.
You can also view the certificate you obtained by clicking the View Certificate link at
the bottom of the page.
3.4 My Exams
Through My Exams section, you can view the exams that you applied for to obtain
accreditation. You can also apply for a new accreditation through this section. After
viewing exam details, you can Reschedule or Cancel the Exam if you haven't already
attended the exam.
15
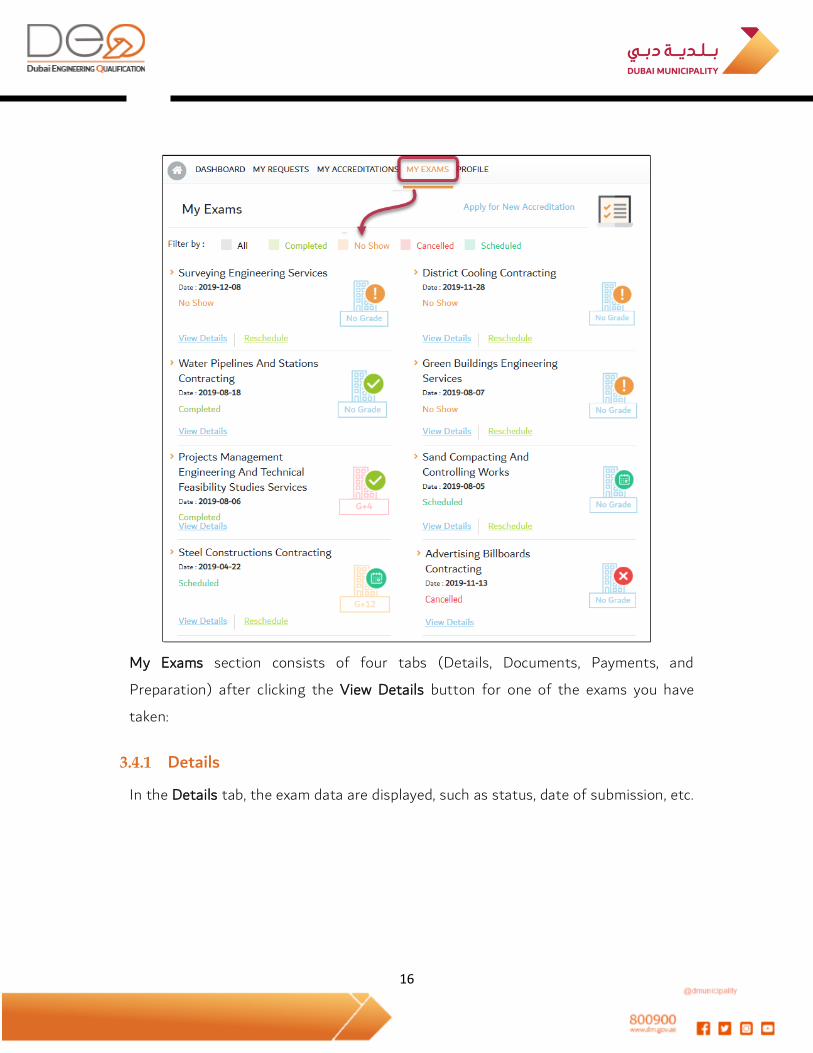
My Exams section consists of four tabs (Details, Documents, Payments, and
Preparation) after clicking the View Details button for one of the exams you have
taken:
3.4.1 Details
In the Details tab, the exam data are displayed, such as status, date of submission, etc.
16
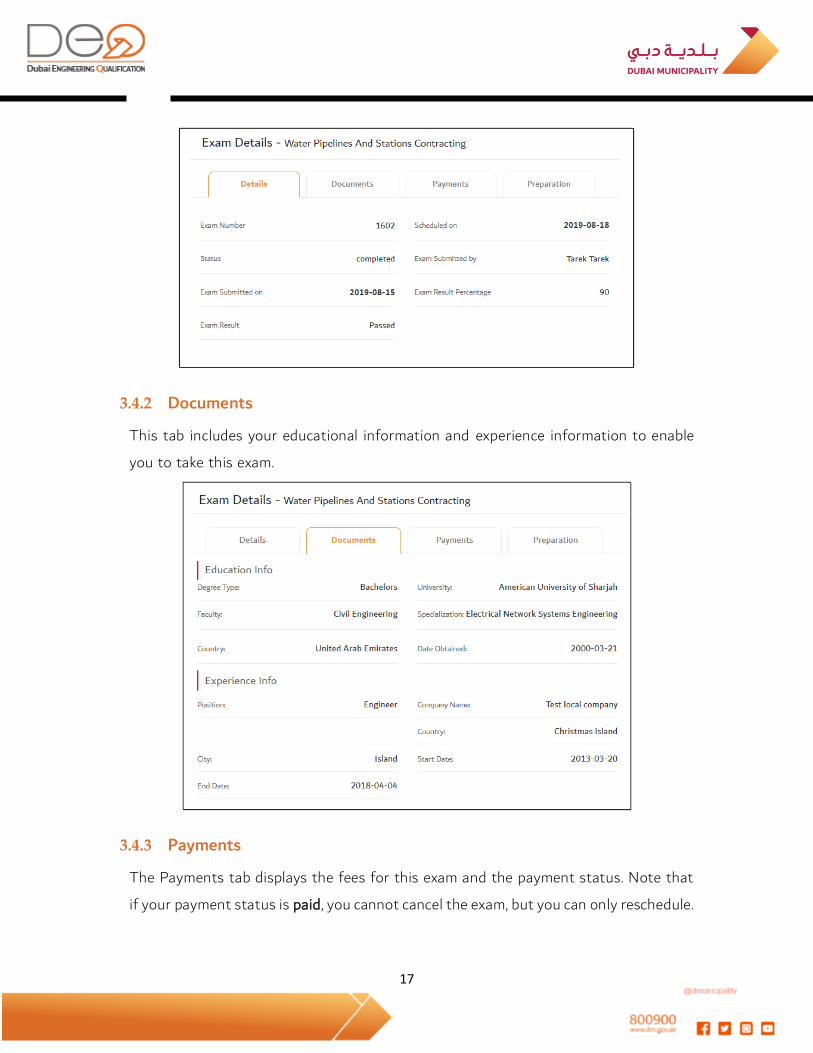
3.4.2 Documents
This tab includes your educational information and experience information to enable
you to take this exam.
3.4.3 Payments
The Payments tab displays the fees for this exam and the payment status. Note that
if your payment status is paid, you cannot cancel the exam, but you can only reschedule.
17

3.4.4 Preparation
The Preparation tab displays the possibility to Take Trial Exam before taking the actual
one. You can also download the exam material to read it before the exam, in addition
to reschedule or cancel the exam.
If you click the Take Trial Exam, link, the page changes to show you Username and
Password to be able to log in to the Exams system, then click the Take the Exam
button.
After entering the trial exam, the system sends a message to your registered email
with the exam result. If you pass the exam, the system sends you a link in the mail to
view the certificate details.
18
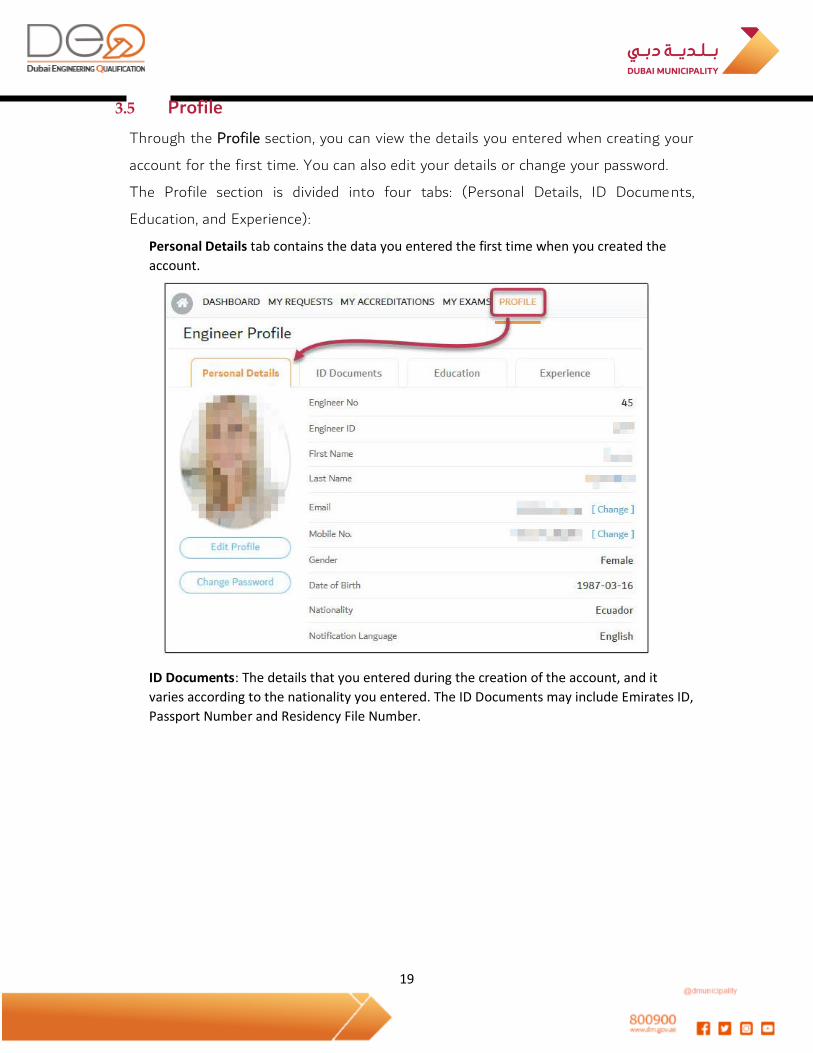
3.5 Profile
Through the Profile section, you can view the details you entered when creating your
account for the first time. You can also edit your details or change your password.
The Profile section is divided into four tabs: (Personal Details, ID Documents,
Education, and Experience):
Personal Details tab contains the data you entered the first time when you created the
account.
ID Documents: The details that you entered during the creation of the account, and it
varies according to the nationality you entered. The ID Documents may include Emirates ID,
Passport Number and Residency File Number.
19
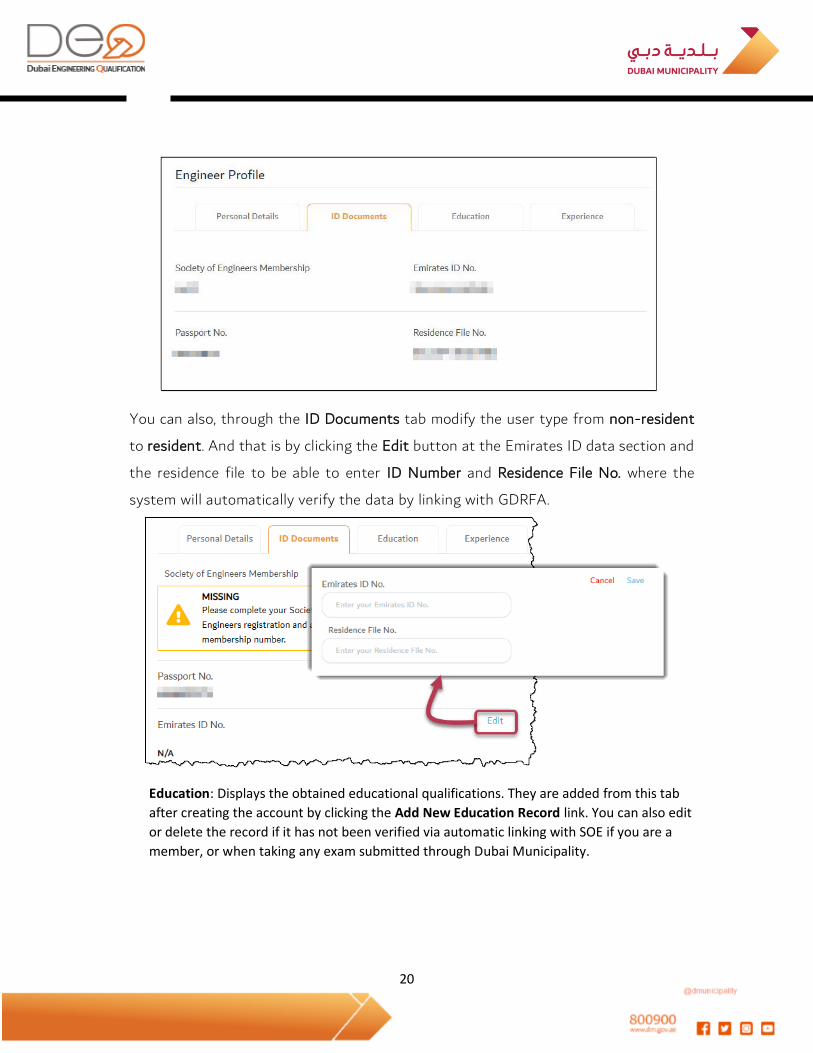
You can also, through the ID Documents tab modify the user type from non-resident
to resident. And that is by clicking the Edit button at the Emirates ID data section and
the residence file to be able to enter ID Number and Residence File No. where the
system will automatically verify the data by linking with GDRFA.
Education: Displays the obtained educational qualifications. They are added from this tab
after creating the account by clicking the Add New Education Record link. You can also edit
or delete the record if it has not been verified via automatic linking with SOE if you are a
member, or when taking any exam submitted through Dubai Municipality.
20

Experience: This tab displays the experience certificates you obtained, and adding a new
experience record. You can also Edit or Delete the record if it has not been verified when
performing any exam submitted by Dubai Municipality.
21

4. Individuals Services
Through this chapter, you will learn about the procedures you can perform after signing
in to your account. These procedures include:
Add New Education Record
Add New Experience Record
Apply for New Accreditation
Cancel Accreditation Request
Reschedule Exam Date
Cancel Exam
Perform Electronic Exam
NOC Issue Local Branch for Corporate from Another Emirate
NOC Issue New Foreign Branch Request
NOC Issue New Corporate Request
Change Email
Change Mobile Number
Modify Account Details
Change Password
4.1 Add New Education Record
After creating the account, you can add a new education record from the profile
section. To add a new record,
perform the following steps:
7. From the top section of the screen, click the Profile section.
8. In the Profile screen, select the Education tab, then click the Add New Education Record
link at the top of the page.
22
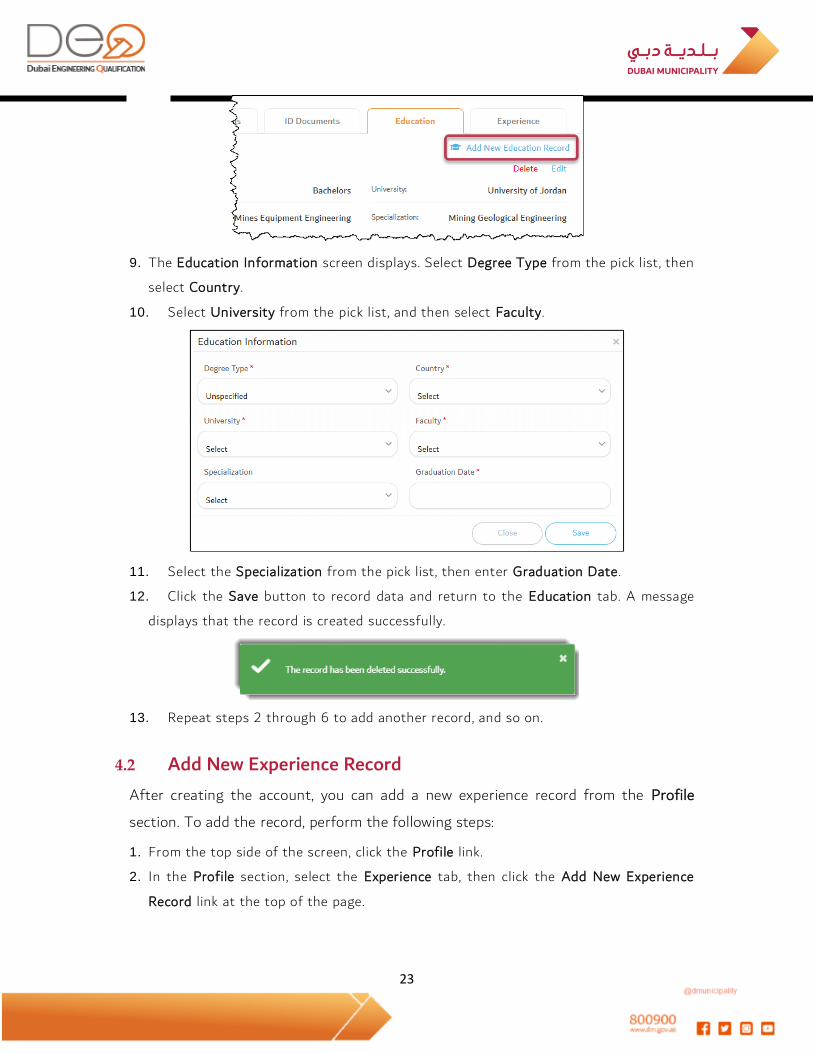
9. The Education Information screen displays. Select Degree Type from the pick list, then
select Country.
10. Select University from the pick list, and then select Faculty.
11. Select the Specialization from the pick list, then enter Graduation Date.
12. Click the Save button to record data and return to the Education tab. A message
displays that the record is created successfully.
13. Repeat steps 2 through 6 to add another record, and so on.
4.2 Add New Experience Record
After creating the account, you can add a new experience record from the Profile
section. To add the record, perform the following steps:
1. From the top side of the screen, click the Profile link.
2. In the Profile section, select the Experience tab, then click the Add New Experience
Record link at the top of the page.
23
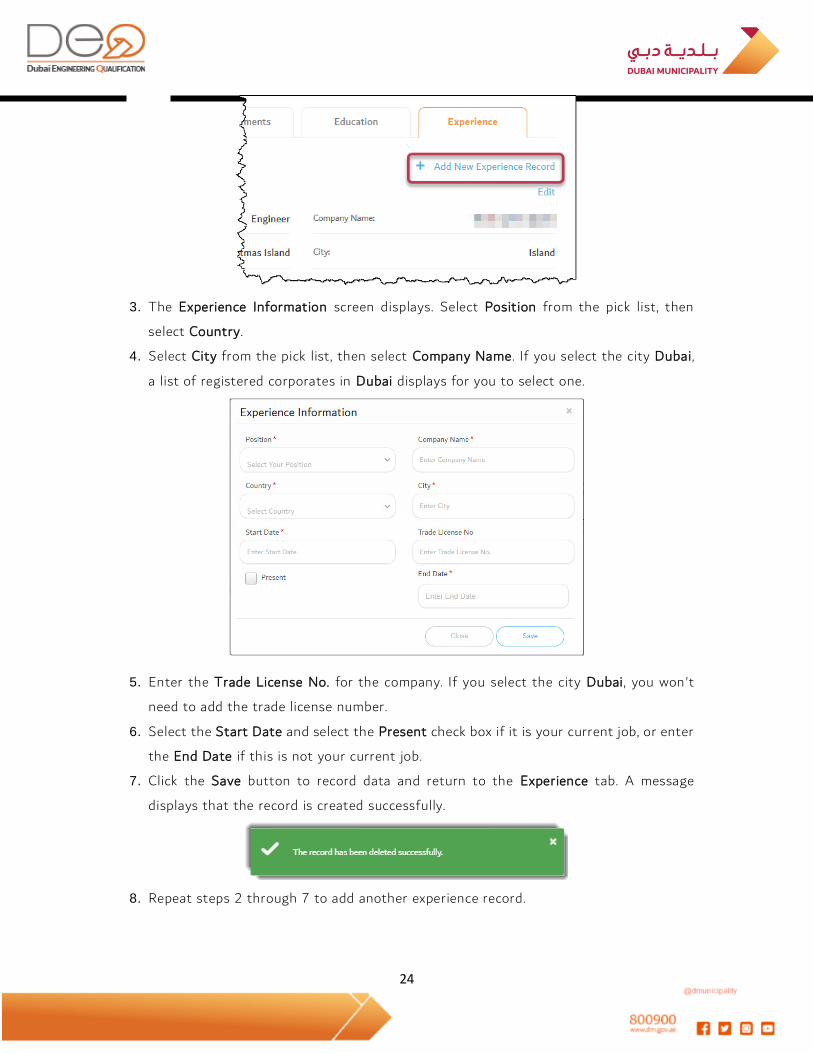
3. The Experience Information screen displays. Select Position from the pick list, then
select Country.
4. Select City from the pick list, then select Company Name. If you select the city Dubai,
a list of registered corporates in Dubai displays for you to select one.
5. Enter the Trade License No. for the company. If you select the city Dubai, you won't
need to add the trade license number.
6. Select the Start Date and select the Present check box if it is your current job, or enter
the End Date if this is not your current job.
7. Click the Save button to record data and return to the Experience tab. A message
displays that the record is created successfully.
8. Repeat steps 2 through 7 to add another experience record.
24
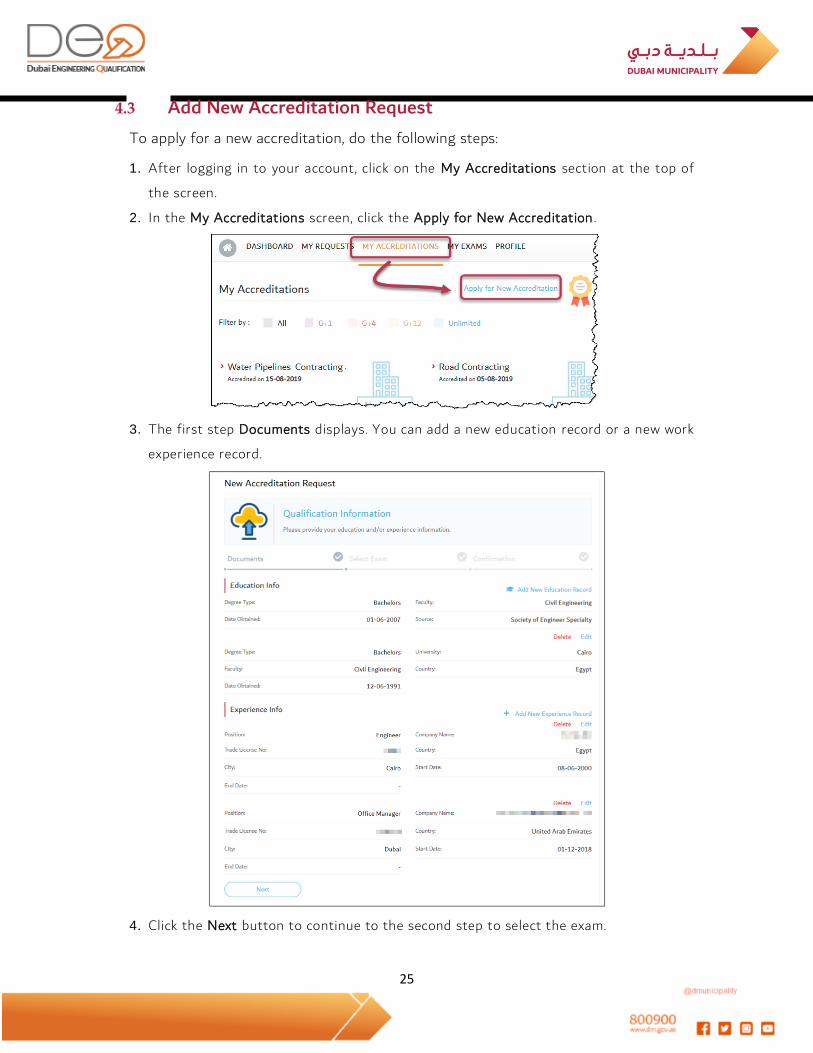
4.3 Add New Accreditation Request
To apply for a new accreditation, do the following steps:
1. After logging in to your account, click on the My Accreditations section at the top of
the screen.
2. In the My Accreditations screen, click the Apply for New Accreditation.
3. The first step Documents displays. You can add a new education record or a new work
experience record.
4. Click the Next button to continue to the second step to select the exam.
25

5. Select the accreditation that you want to get from the available list, or you can select
one of the categories above the options (Consulting , Contracting, etc.), then click the
Next button.
6. The Confirmation step displays. Select the check box I certify that all provided
information are accurate and correct.
7. Click the Next button. to proceed to the next step.
26
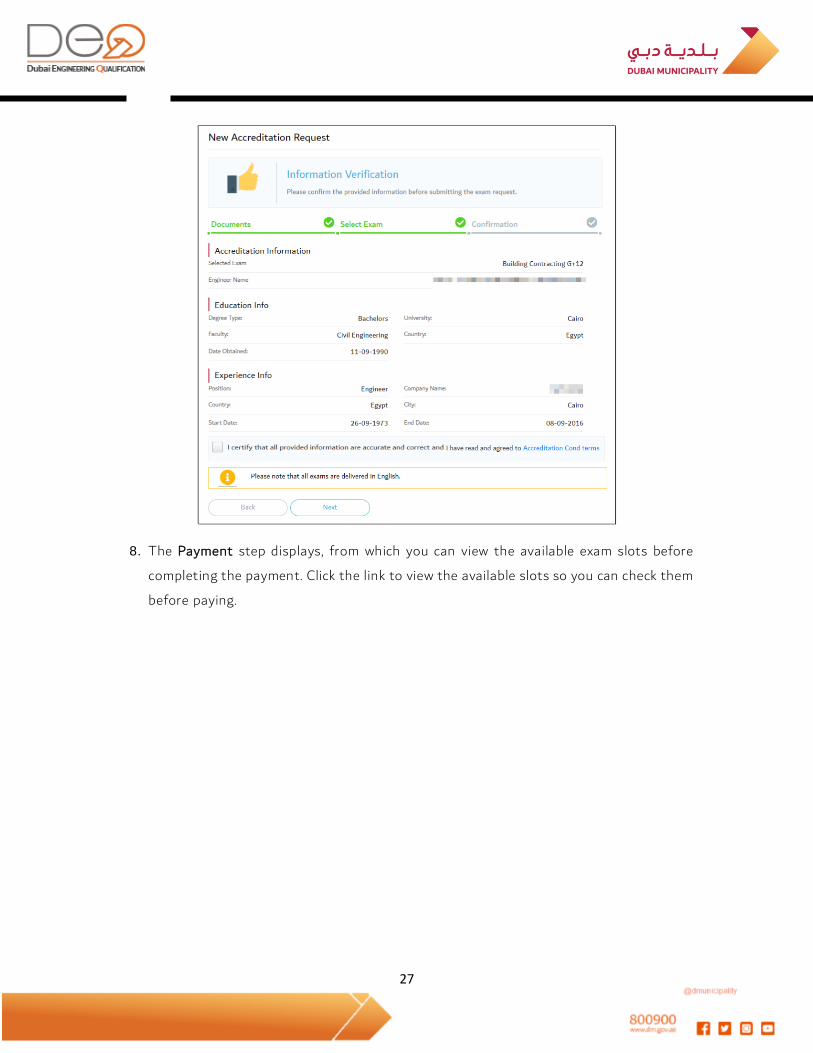
8. The Payment step displays, from which you can view the available exam slots before
completing the payment. Click the link to view the available slots so you can check them
before paying.
27
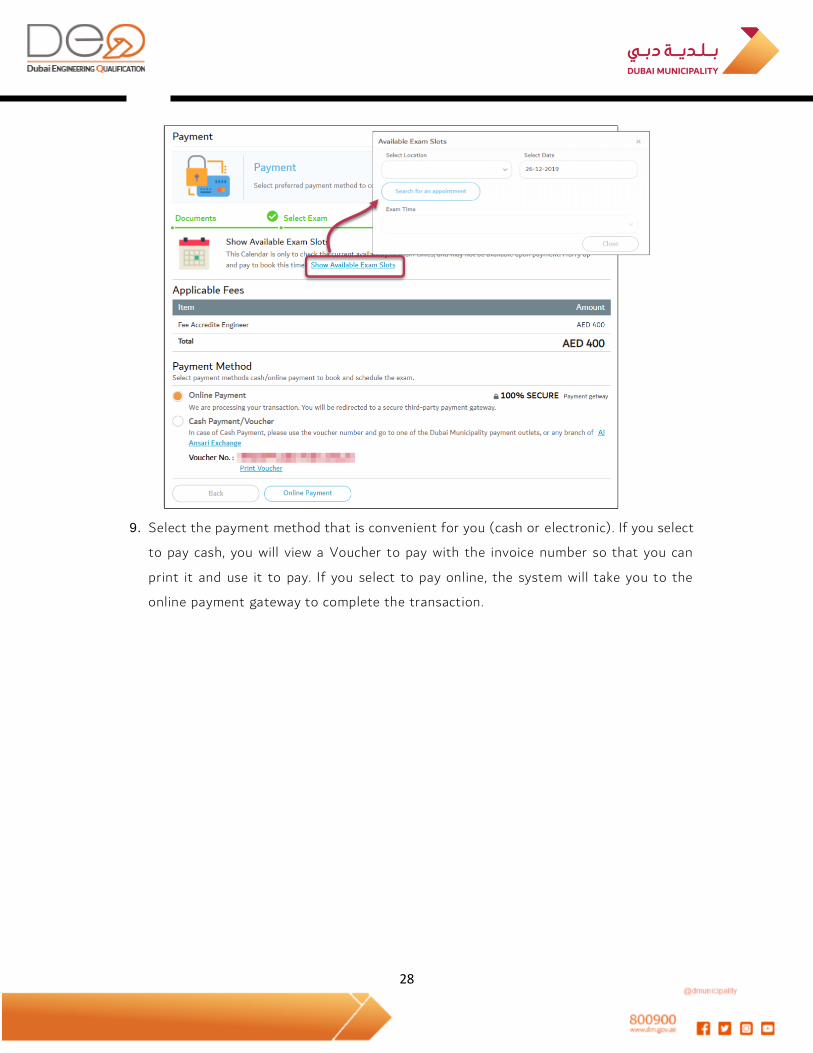
9. Select the payment method that is convenient for you (cash or electronic). If you select
to pay cash, you will view a Voucher to pay with the invoice number so that you can
print it and use it to pay. If you select to pay online, the system will take you to the
online payment gateway to complete the transaction.
28
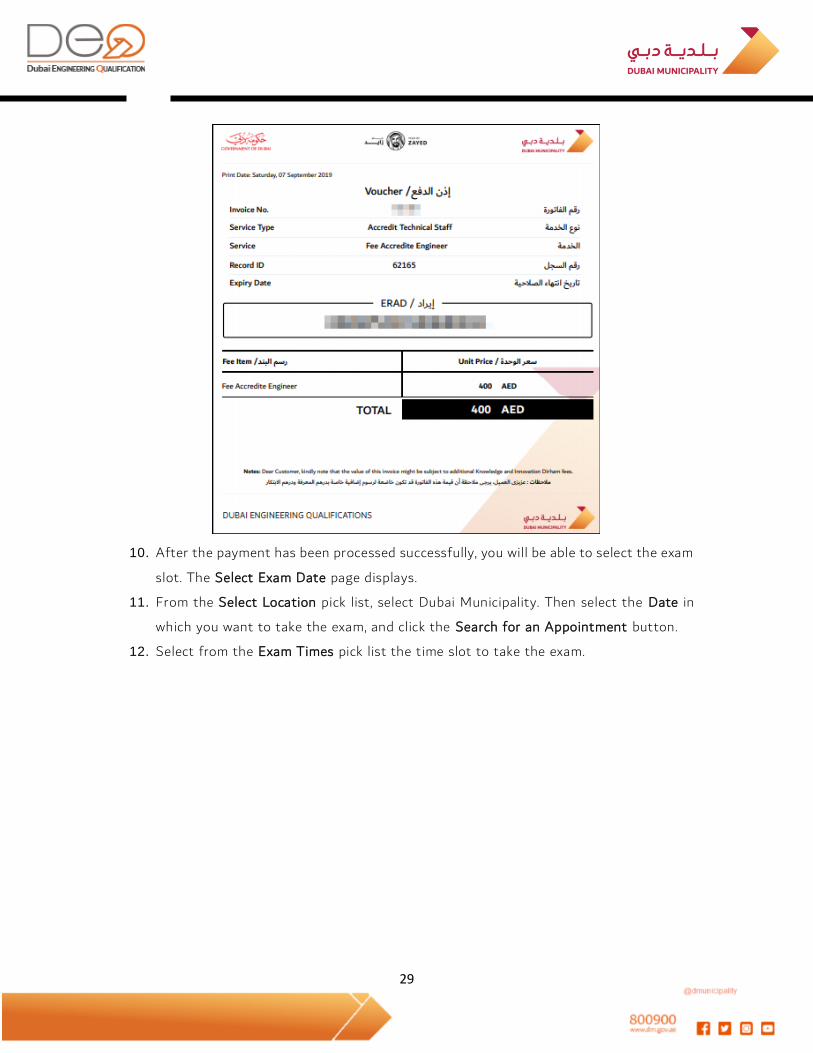
10. After the payment has been processed successfully, you will be able to select the exam
slot. The Select Exam Date page displays.
11. From the Select Location pick list, select Dubai Municipality. Then select the Date in
which you want to take the exam, and click the Search for an Appointment button.
12. Select from the Exam Times pick list the time slot to take the exam.
29
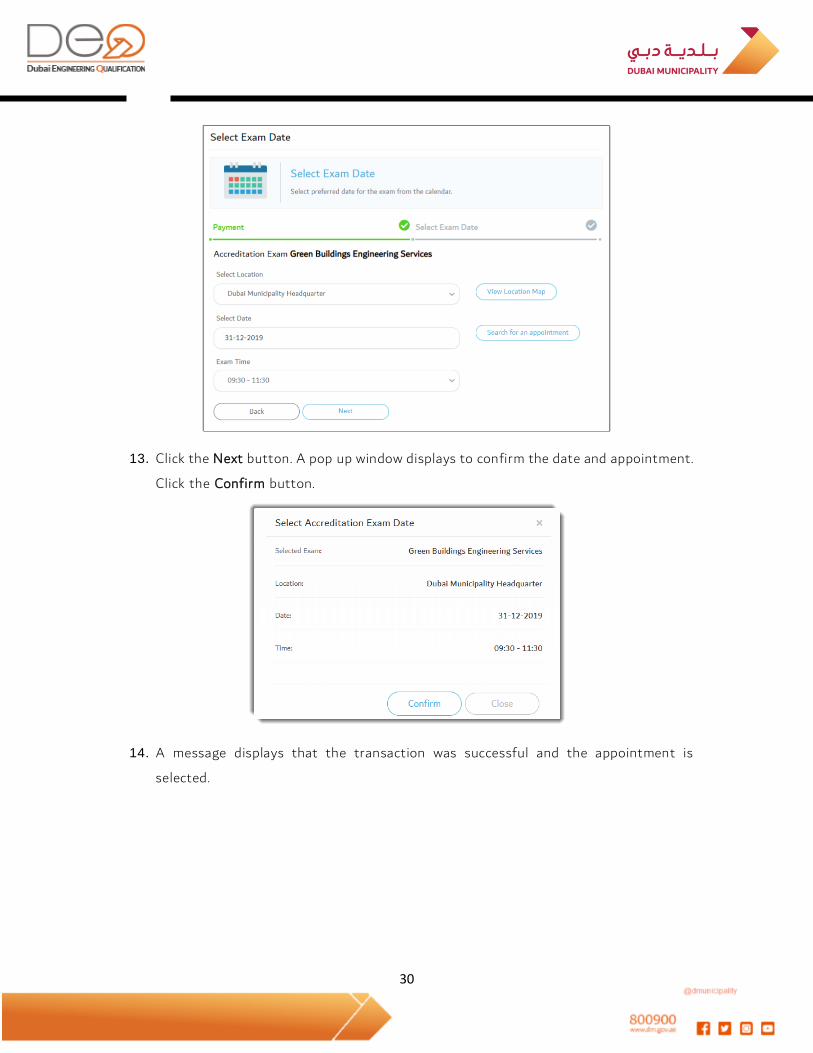
13. Click the Next button. A pop up window displays to confirm the date and appointment.
Click the Confirm button.
14. A message displays that the transaction was successful and the appointment is
selected.
30
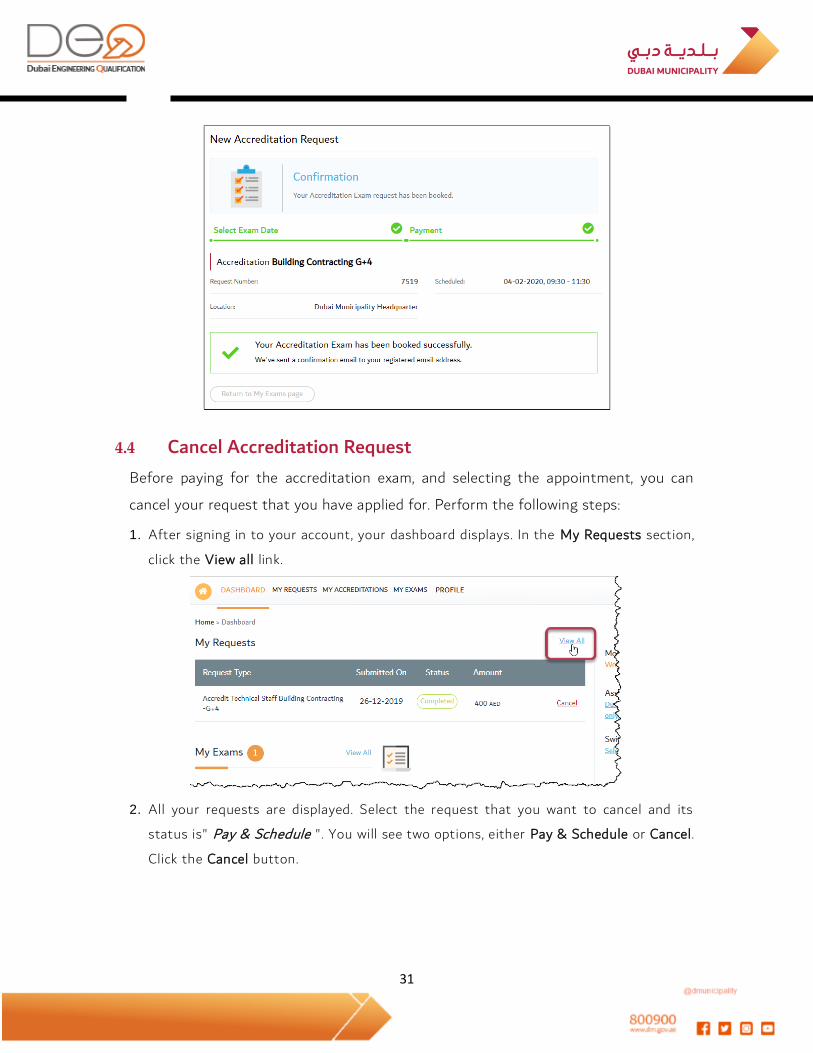
4.4 Cancel Accreditation Request
Before paying for the accreditation exam, and selecting the appointment, you can
cancel your request that you have applied for. Perform the following steps:
1. After signing in to your account, your dashboard displays. In the My Requests section,
click the View all link.
2. All your requests are displayed. Select the request that you want to cancel and its
status is" Pay & Schedule ". You will see two options, either Pay & Schedule or Cancel.
Click the Cancel button.
31
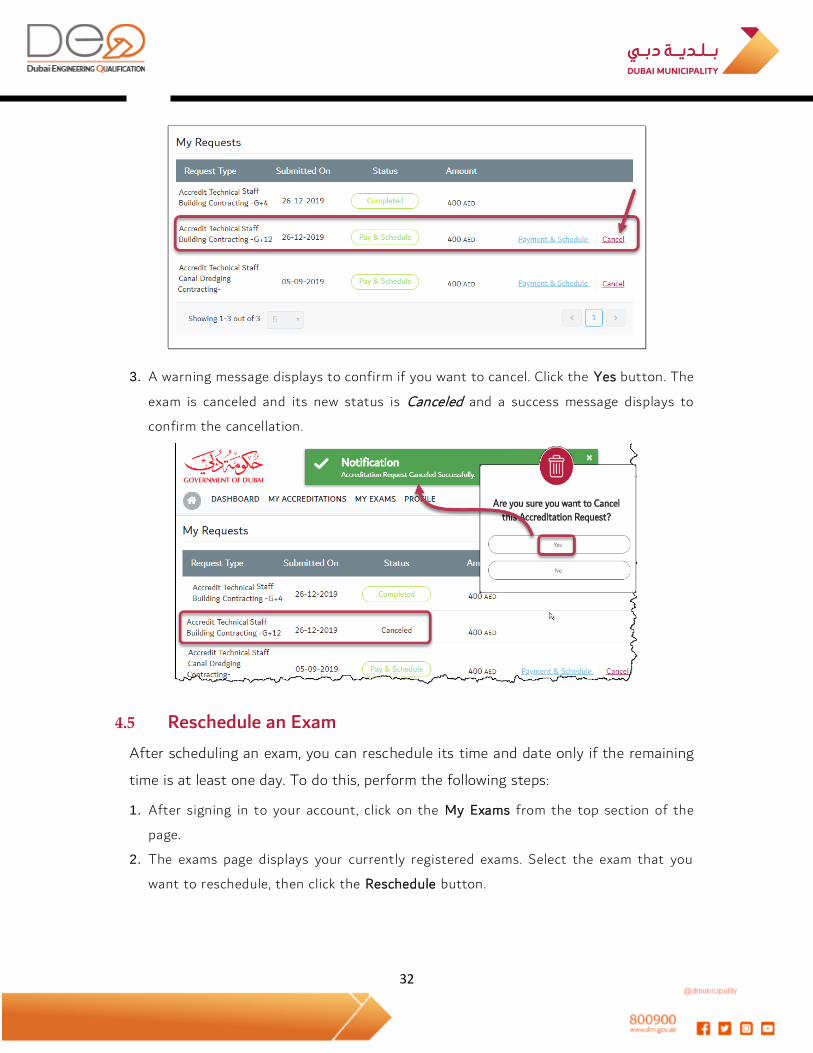
3. A warning message displays to confirm if you want to cancel. Click the Yes button. The
exam is canceled and its new status is Canceled and a success message displays to
confirm the cancellation.
4.5 Reschedule an Exam
After scheduling an exam, you can reschedule its time and date only if the remaining
time is at least one day. To do this, perform the following steps:
1. After signing in to your account, click on the My Exams from the top section of the
page.
2. The exams page displays your currently registered exams. Select the exam that you
want to reschedule, then click the Reschedule button.
32
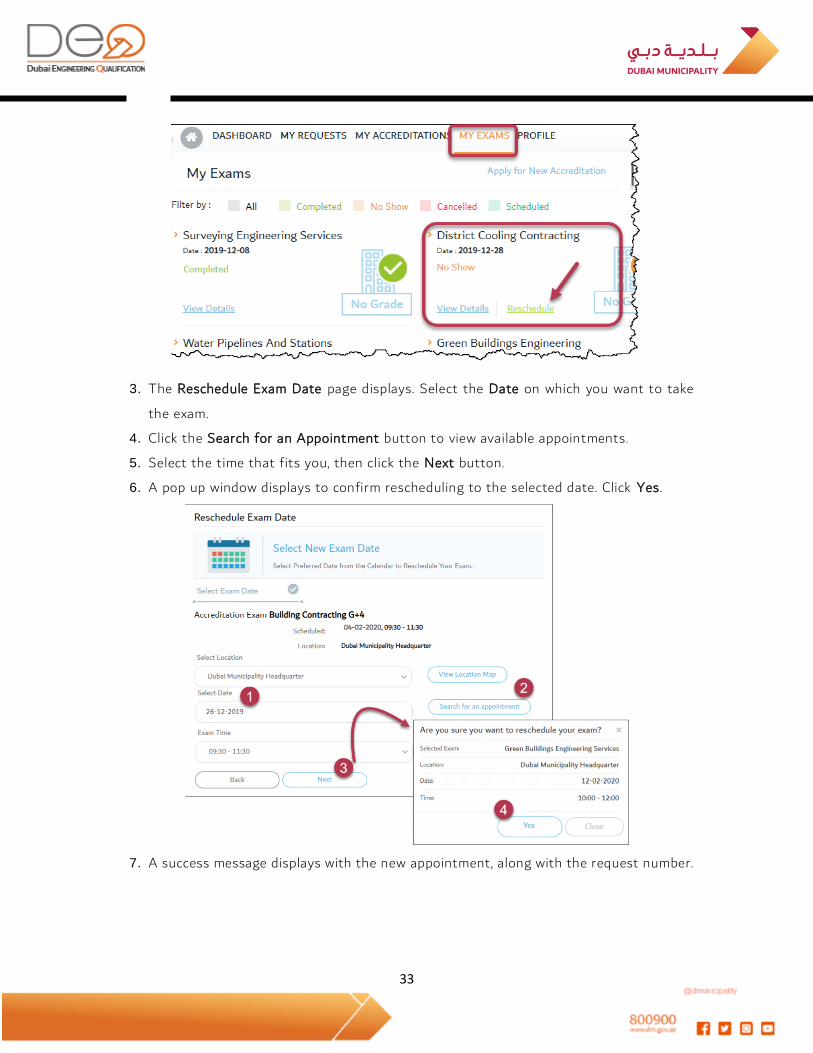
3. The Reschedule Exam Date page displays. Select the Date on which you want to take
the exam.
4. Click the Search for an Appointment button to view available appointments.
5. Select the time that fits you, then click the Next button.
6. A pop up window displays to confirm rescheduling to the selected date. Click Yes.
7. A success message displays with the new appointment, along with the request number.
33

4.6 Cancel Exam
You can cancel the exam after scheduling and paying for it, yet, you will not be able to
get a refund. To do this, perform the following steps:
1. After signing in to your account, click on the My Exams from the top section of the
page.
2. The exams page displays your currently registered exams. Select the exam that you
want to cancel, then click the View Details button.
3. The Exam details page displays. Click the Cancel Exam button.
4. A pop up message displays to confirm if you want to cancel. Click the Yes button. The
exam is canceled and its status changes in My Exams page.
34

4.7 Perform Electronic Exam
After applying for accreditation, you will be able to take the exam by going to the Dubai
Municipality location, then submitting your identification papers, and then taking the
exam in one of the available rooms according to the date you applied for.
Perform the following steps:
1. On the day of the exam, go to the selected location, and head to the front desk. Submit
your Emirates ID or your passport to the receptionist to confirm your identity, and
register your name on the list of attendees for the exam.
2. The receptionist will guide you to the waiting area. After verificati on of your data, the
system will automatically add you to the Exam Applicants List. And when it's your turn,
your name will automatically appear on the Waiting Room screen.
3. Now, you can present the graduation certificate, and the experience certificates to the
employee for verification, and you will be given a locker to keep your personal
belongings.
4. The employee will provide you with username and password created by the system in
order for you to start the exam.
5. On the computer that will be assigned to you, you will find the login screen to enter
the provided username and password. Enter them in the relevant fields, then click the
Login button.
35
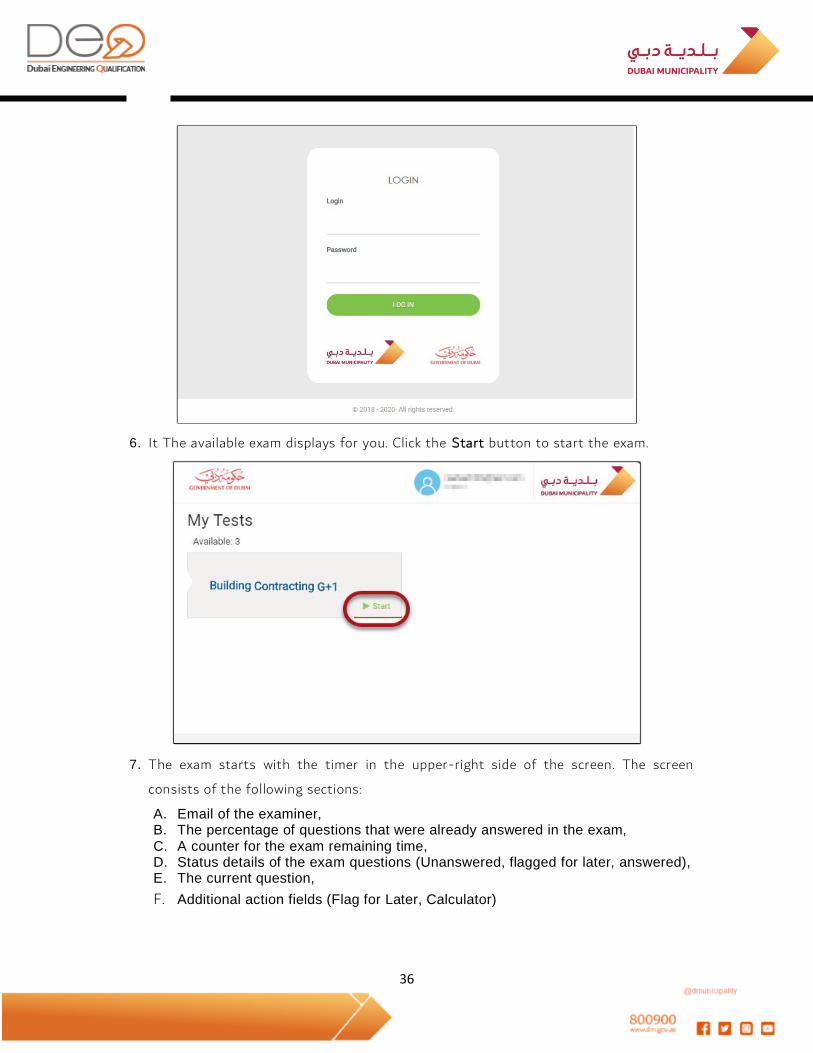
6. It The available exam displays for you. Click the Start button to start the exam.
7. The exam starts with the timer in the upper-right side of the screen. The screen
consists of the following sections:
A. Email of the examiner, B. The percentage of questions that were already answered in the exam, C. A counter for the exam remaining time, D. Status details of the exam questions (Unanswered, flagged for later, answered), E. The current question,
F. Additional action fields (Flag for Later, Calculator)
36

8. Start answering the questions, and you can use a calculator if you need it by clicking
the Calculator button.
9. Continue with the exam until you have completed all the questions. Note the progress
bar in the upper left side of the screen, showing you the percentage of your completion.
37

10. When you are finished with all questions, click the End Test button to end the exam
and close the screen.
11. The result shown the number of correct and wrong answers and the percentage you
have received. Click the Finish & Close button.
38

12. The next time you sign in to the DEQ system, you will be able to view the exam result
in My Exams section if you pass or fail, depending on the percentage required to pass
this type of accreditation.
13. If you pass the exam successfully, you will be able to view your certificate through
My Accreditations tab. Select the exam that you performed, and then click the View
Details button.
14. The Accreditation Details page displays. You can now view the certificate by clicking
the View Certificate at the bottom of the page.
39
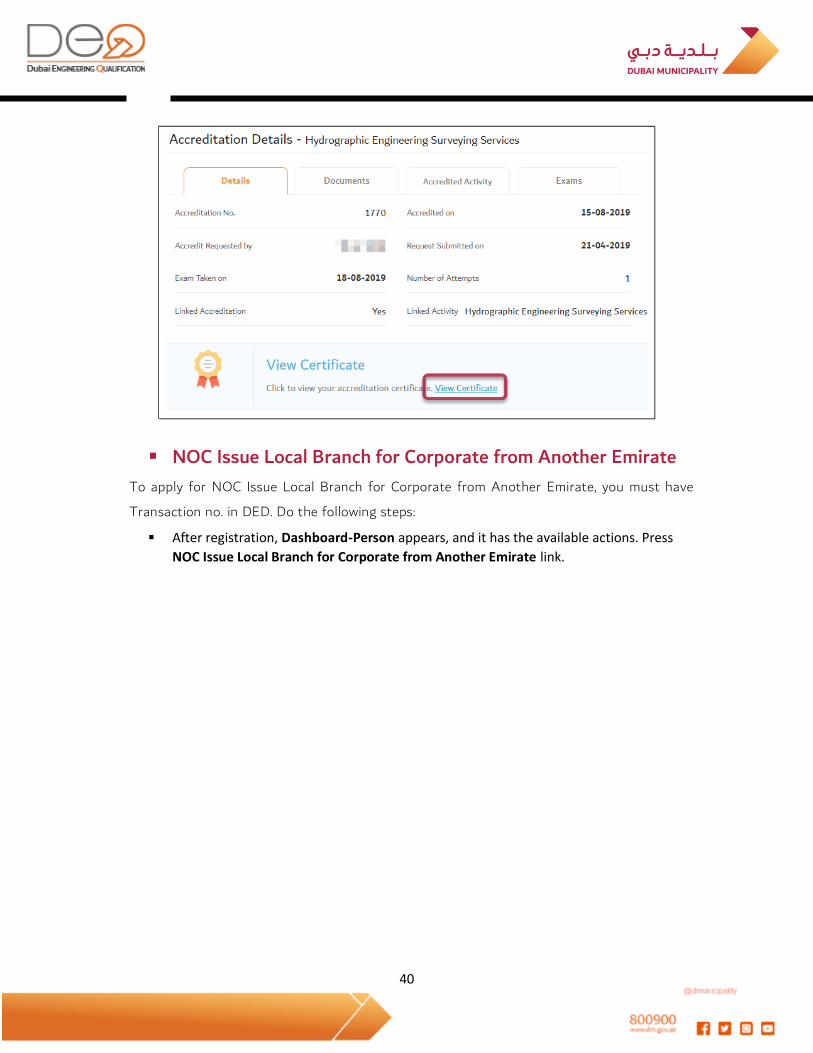
NOC Issue Local Branch for Corporate from Another Emirate
To apply for NOC Issue Local Branch for Corporate from Another Emirate, you must have
Transaction no. in DED. Do the following steps:
After registration, Dashboard-Person appears, and it has the available actions. Press
NOC Issue Local Branch for Corporate from Another Emirate link.
40
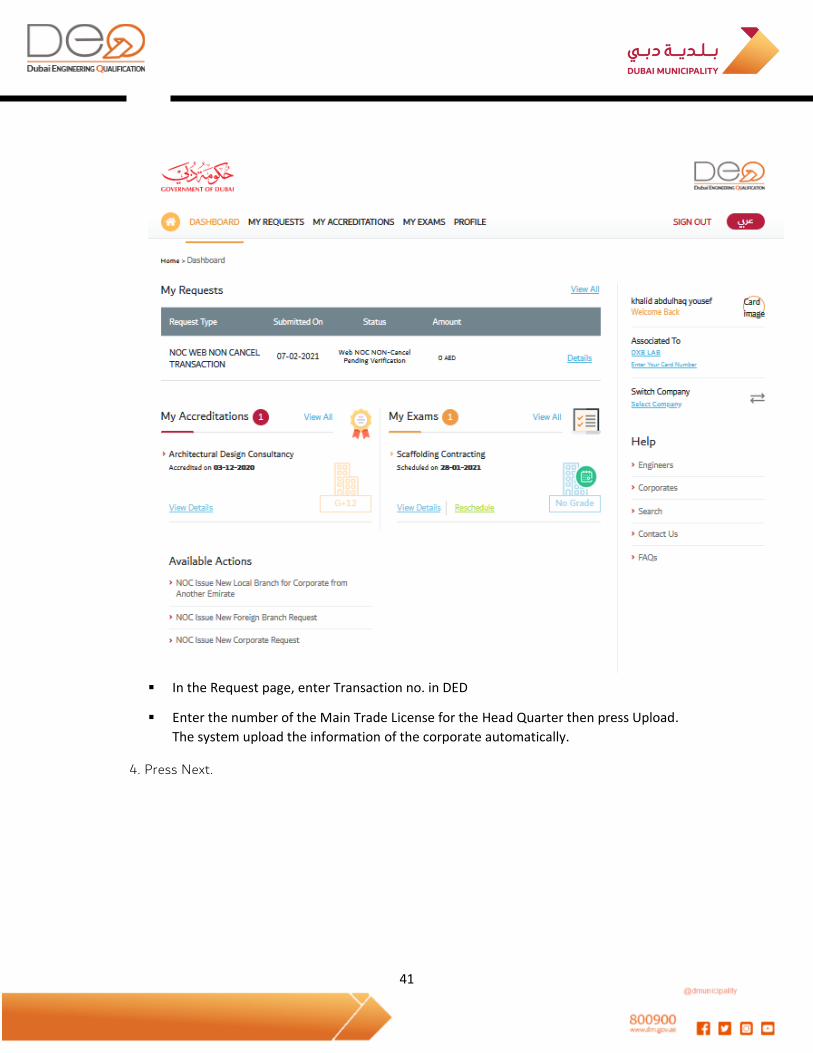
In the Request page, enter Transaction no. in DED
Enter the number of the Main Trade License for the Head Quarter then press Upload.
The system upload the information of the corporate automatically.
4. Press Next.
41

5. In the next step, Members' details are displayed. Each member is shown associated with the
type of his membership. Press Next.
6. Confirmation Step appears. Select I have read and agreed to the terms and conditions. Press
Next.
42
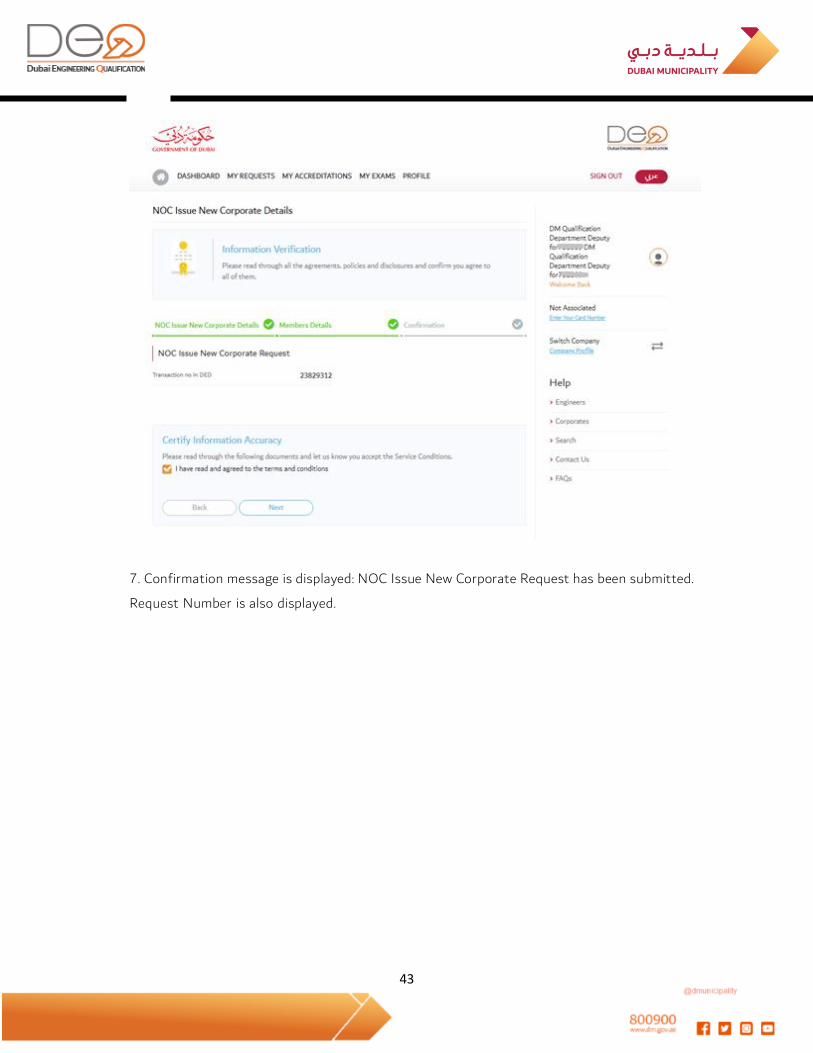
7. Confirmation message is displayed: NOC Issue New Corporate Request has been submitted.
Request Number is also displayed.
43

44
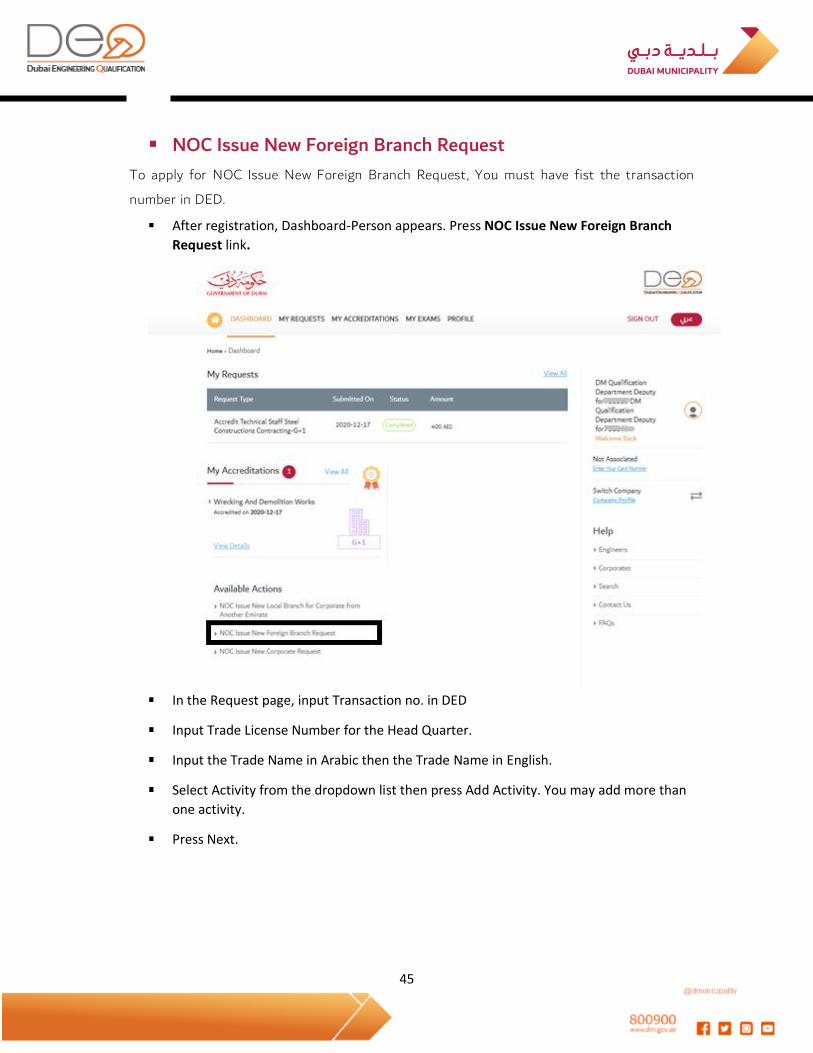
NOC Issue New Foreign Branch Request
To apply for NOC Issue New Foreign Branch Request, You must have fist the transaction
number in DED.
After registration, Dashboard-Person appears. Press NOC Issue New Foreign Branch
Request link.
In the Request page, input Transaction no. in DED
Input Trade License Number for the Head Quarter.
Input the Trade Name in Arabic then the Trade Name in English.
Select Activity from the dropdown list then press Add Activity. You may add more than
one activity.
Press Next.
45

The next step displays Members’ details. Press Add Member.
46

Popup window appears to add Member’s information. You may add a person or a
corporate.
8.1 To add Person information, select Nationality (If Emeriti, Emirates ID is required. But,
if non-Emeriti, Passport number and Passport Place are required.
8.2 Add Name in Arabic and Name in English.
8.3 Add Mobile number. Then, select Legal Type.
8.4 To add Corporate information, select Body Corporate. Then, Add, Trade License.
8.5 Add Corporate Name in Arabic and Corporate Name in English.
8.6 Add Mobile Number.
47
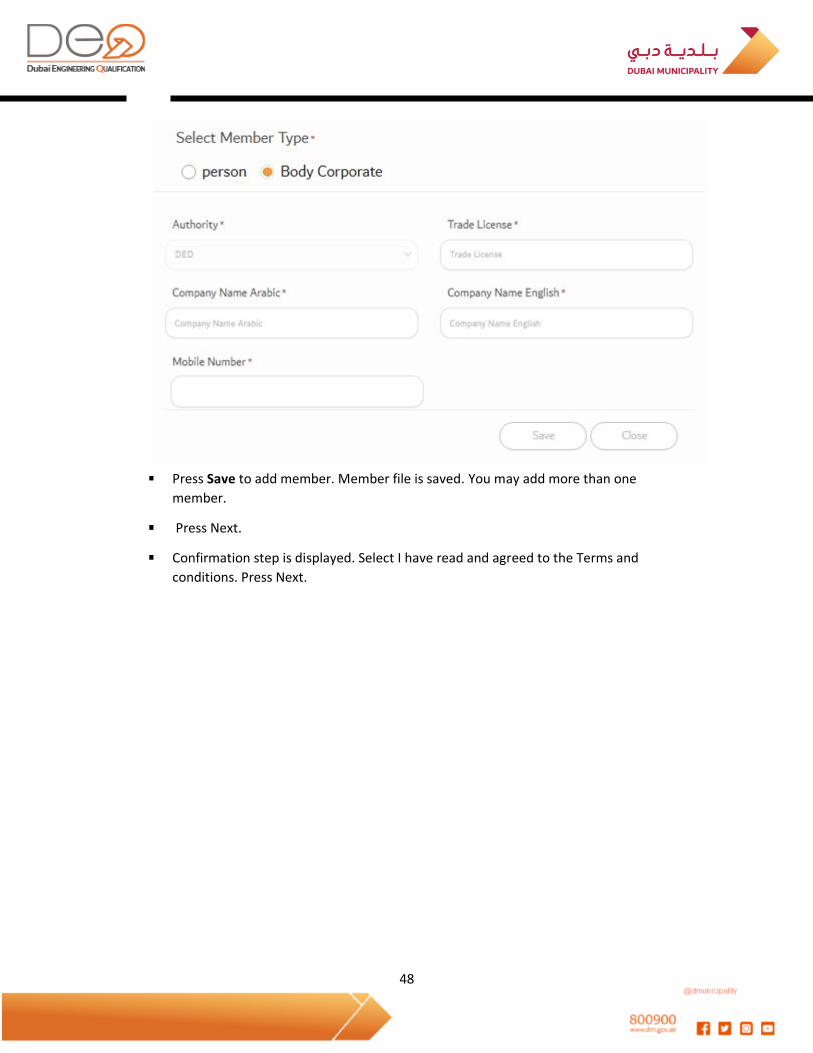
Press Save to add member. Member file is saved. You may add more than one
member.
Press Next.
Confirmation step is displayed. Select I have read and agreed to the Terms and
conditions. Press Next.
48

Confirmation verification is displayed. Request Number is also displayed.
49

50

NOC Issue New Corporate Request
To apply for NOC Issue New Corporate Request, you have to have Transaction no. in DED. Do
the following steps:
After registration, Dashboard-Person appears and it has the available actions. Press
NOC Issue New Corporate Request link.
2. In the Request page, enter Transaction no. in DED
3. Enter the Trade Name in Arabic then the Trade Name in English.
4. Select Activity from the dropdown list. Then, press Add Activity. You may add more than
one activity.
5. Press Next.
51

6. Member details page is displayed. Press Add Member.
52

7. Popup window I displayed to add member’s information. You may add a person or a
corporate.
7.1 To add Person information, select Nationality (If Emeriti, Emirates ID is required. But,
if non-Emeriti, Passport number and Passport Place are required.
7.2 Add Name in Arabic and Name in English.
7.3 Add Mobile number. Then, select Legal Type.
8.4 To add Corporate information, select Body Corporate. Then, Add, Trade License.
8.5 Add Corporate Name in Arabic and Corporate Name in English.
8.6 Add Mobile Number.
53

Press Save to add member. Member file is saved. You may add more than one
member.
Press Next.
Confirmation step is displayed. Select I have read and agreed to the Terms and
conditions. Press Next.
54

Confirmation verification is displayed. Request Number is also displayed.
55
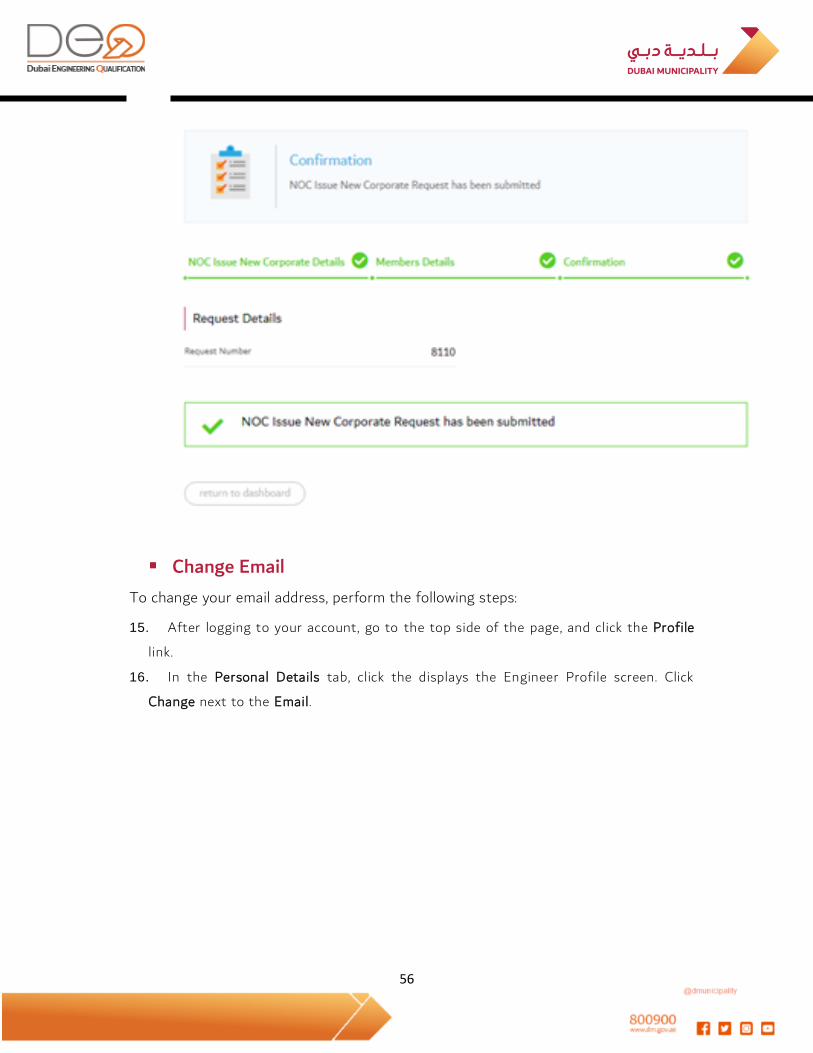
Change Email
To change your email address, perform the following steps:
15. After logging to your account, go to the top side of the page, and click the Profile
link.
16. In the Personal Details tab, click the displays the Engineer Profile screen. Click
Change next to the Email.
56
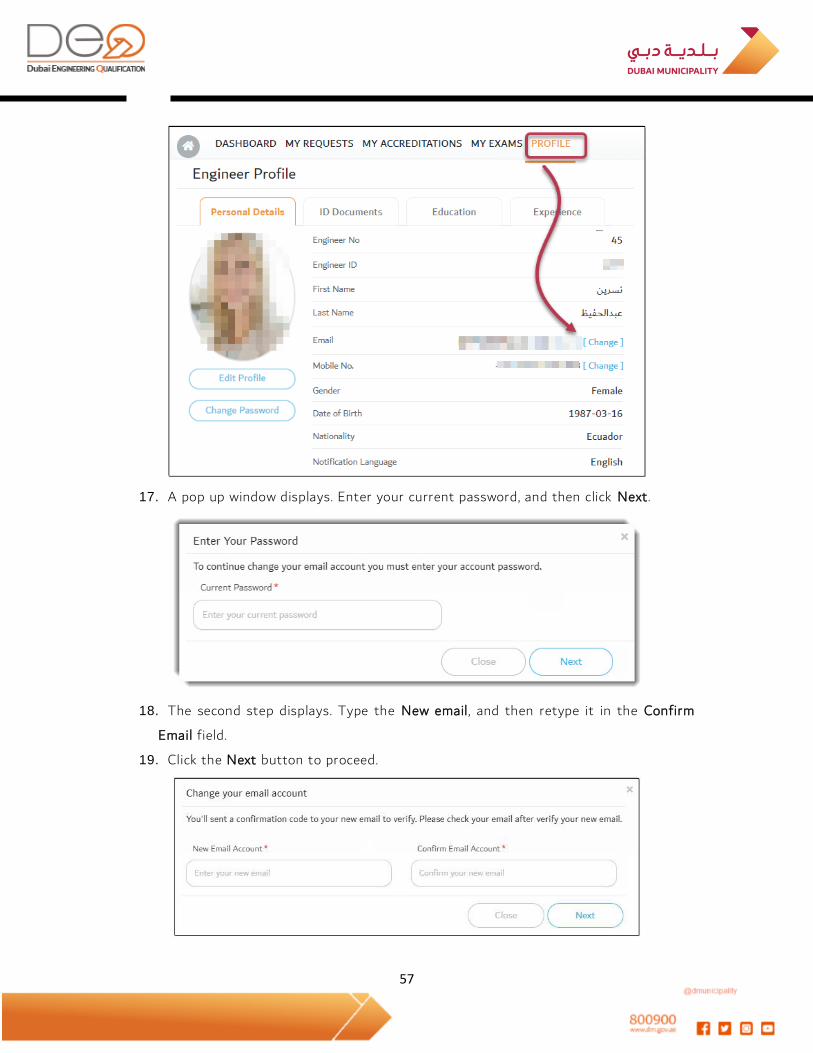
17. A pop up window displays. Enter your current password, and then click Next.
18. The second step displays. Type the New email, and then retype it in the Confirm
Email field.
19. Click the Next button to proceed.
57
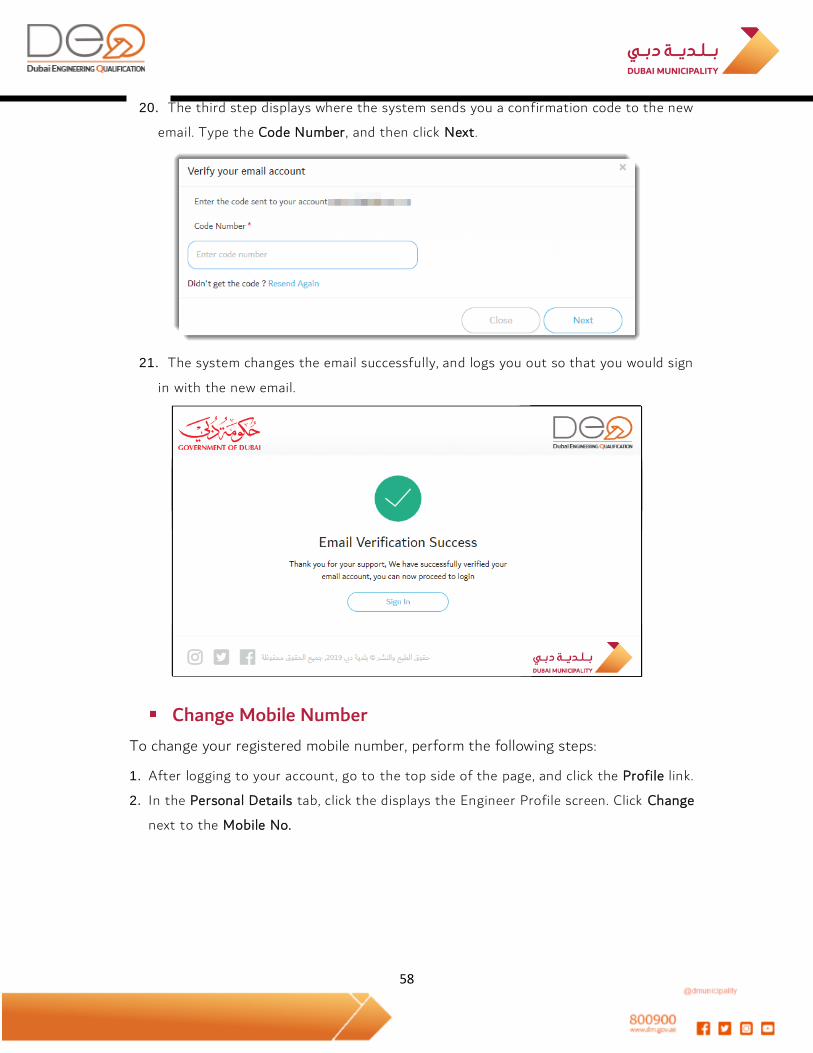
20. The third step displays where the system sends you a confirmation code to the new
email. Type the Code Number, and then click Next.
21. The system changes the email successfully, and logs you out so that you would sign
in with the new email.
Change Mobile Number
To change your registered mobile number, perform the following steps:
1. After logging to your account, go to the top side of the page, and click the Profile link.
2. In the Personal Details tab, click the displays the Engineer Profile screen. Click Change
next to the Mobile No.
58

3. A pop up window displays to modify the mobile number. Select the Country Code and
enter the new mobile number, .and then click Generate Code.
4. The second step displays, where the system send a confirmation code to the new
mobile. Type the Code, and then click Verify.
5. A message displays to confirm change of mobile number successfully.
59
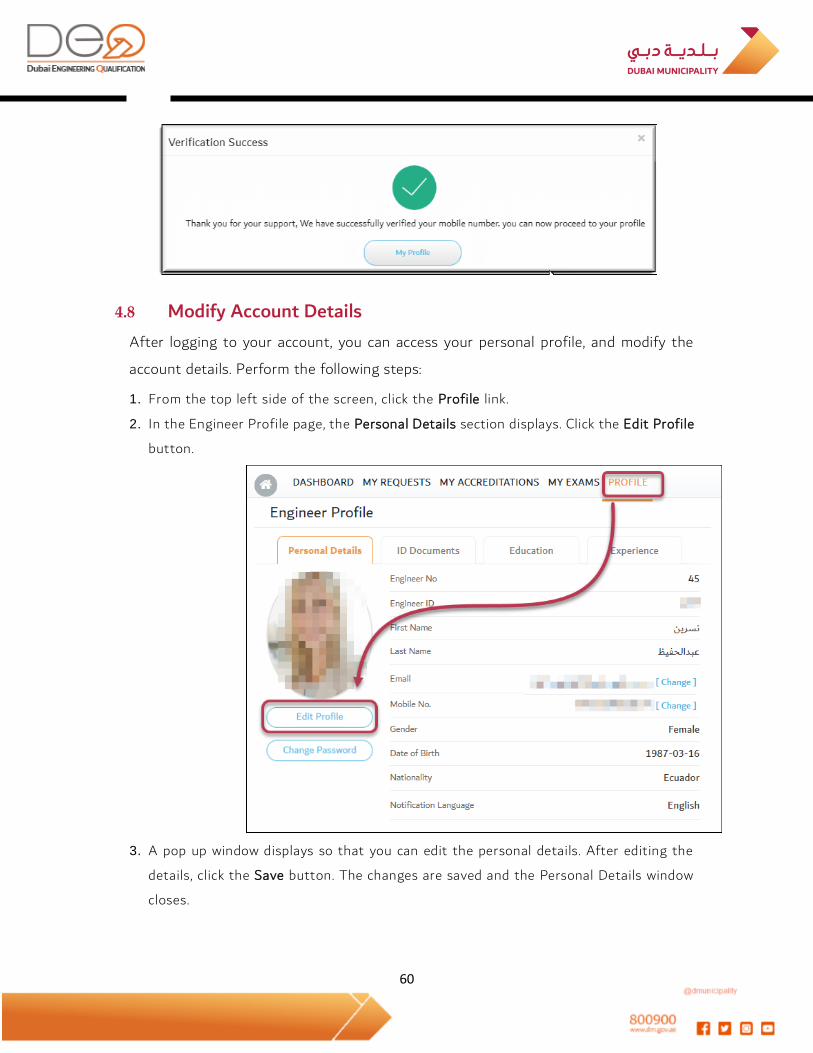
4.8 Modify Account Details
After logging to your account, you can access your personal profile, and modify the
account details. Perform the following steps:
1. From the top left side of the screen, click the Profile link.
2. In the Engineer Profile page, the Personal Details section displays. Click the Edit Profile
button.
3. A pop up window displays so that you can edit the personal details. After editing the
details, click the Save button. The changes are saved and the Personal Details window
closes.
60

4.9 Change Password
After logging to your personal account, you can access your personal profile, and
change the password. Perform the following steps:
1. From the top left side of the screen, click the Profile link.
2. The Personal Details section displays in the Engineer Profile page. Click the Change
Password button.
61
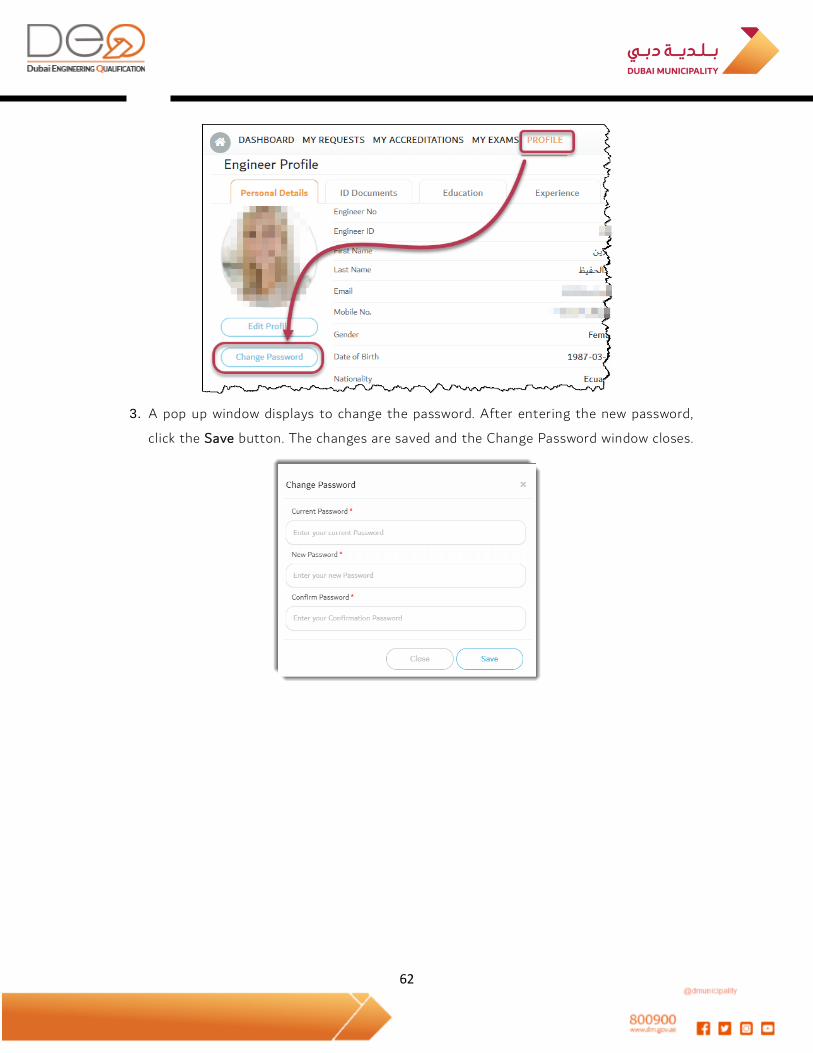
3. A pop up window displays to change the password. After entering the new password,
click the Save button. The changes are saved and the Change Password window closes.
62
Related Documents