DSpace Installation and Systems Administration Guide http://www.dspace.org/ Version: 4.0 Author: Richard Jones ([email protected]) DSpace Version: 1.3.2 This work is licensed under the Creative Commons Attribution-NonCommercial-ShareAlike License. To view a copy of this license, visit http://creativecommons.org/licenses/by-nc-sa/2.5/ or send a letter to Creative Commons, 559 Nathan Abbott Way, Stanford, California 94305, USA.

Welcome message from author
This document is posted to help you gain knowledge. Please leave a comment to let me know what you think about it! Share it to your friends and learn new things together.
Transcript
DSpace Installation and SystemsAdministration Guide
http://www.dspace.org/
Version: 4.0Author: Richard Jones ([email protected])DSpace Version: 1.3.2
This work is licensed under the Creative Commons AttributionNonCommercialShareAlikeLicense. To view a copy of this license, visit http://creativecommons.org/licenses/byncsa/2.5/
or send a letter to Creative Commons, 559 Nathan Abbott Way, Stanford, California 94305,USA.

1 Introduction...........................................................................................................................31.1 General Information........................................................................................................31.2 Notation and Fonts for this Document.............................................................................31.3 Short Hand for this Document.........................................................................................31.4 System Users.................................................................................................................4
2 Full Installation Overview......................................................................................................63 PostgreSQL...........................................................................................................................7
3.1 Installing PosgreSQL from Source..................................................................................73.2 Configuration...................................................................................................................83.3 Starting and Stopping PostgreSQL.................................................................................83.4 PostgreSQL Cron Jobs...................................................................................................83.5 Backing up and restoring PostgreSQL Data....................................................................9
4. DSpace...............................................................................................................................104.1 Installing DSpace from Source......................................................................................104.2 DSpace Cron Jobs........................................................................................................114.3 Updating a DSpace Instance........................................................................................114.4 Updating DSpace Configurations..................................................................................124.5 Installing new configuration files....................................................................................134.6 Identifying Problems with DSpace.................................................................................134.7 Recovering from an Unknown Error..............................................................................14
5 DSpace Configuration..........................................................................................................155.1 LDAP............................................................................................................................155.2 Custom Item View.........................................................................................................165.3 Search Indexing............................................................................................................165.4 Custom submission forms.............................................................................................175.5 Statistics.......................................................................................................................18
6 Tomcat................................................................................................................................216.1 Tomcat Configuration as Standalone WebServer........................................................216.2 Starting and Stopping Tomcat.......................................................................................22
7 SSL Certificates..................................................................................................................237.1 Generating SSL Certificates with OpenSSL..................................................................237.2 Creating a SelfSigned Certificate with OpenSSL.........................................................237.3 Creating a SelfSigned Certificate with the Java Keytool..............................................247.4 Importing the Signed Certificate using the Java Keytool...............................................24
8 Handle Server......................................................................................................................258.1 Handle Server Configuration.........................................................................................258.2 Starting and Stopping the Handle Server......................................................................26
9 Data Import.........................................................................................................................279.1 Taking the Data from a Source DSpace........................................................................279.2 Installing the Data in a Target DSpace..........................................................................28
2
1 Introduction
1.1 General Information
Required Ports
• 80 – HTTP• 22 – SSH• 443 – HTTPS• 5432 – PostgreSQL port• 8080 – Tomcat HTTP• 8443 – Tomcat HTTPS• 2461 – Handle Server native• 8000 – Handle Server HTTP
Operating System: Red Hat Enterprise System 3
Java Version: 1.5.0_06
Ant Version: 1.6.2
PostgreSQL Version: 7.4.2
DSpace Version: 1.3.2
1.2 Notation and Fonts for this Document
Normal SansSerif Font The main body of the text of this document
Italic SansSerif Font Notes that should be paid attention to.
FixedWidth Font Examples of commands or items that you might see on the computerscreen. For example, directory and file names as well as installation commands.
Italic FixedWidth Font The user that you should be logged in as when performing tasks.You should always be logged in as the user most recently specified on the lefthandside of the page in the current section.
1.3 Short Hand for this Document
3

The following shorthand notations are used throughout this document to represent certaintypes of information. When these are encountered in the main text they should always bereplaced with the values found/inserted in this section.
[postgres] = The location of the PostgreSQL installation
[dspace] =
The location of the DSpace installation
[dspace-source] =
The location of the source code used to create the DSpace installation
[dspace-home] =
The dspace user's home directory on the system
[database-pw] =
The dspace database password for the dspace user
[admin-email] =
The email address of the system administrator who will receive all administrative requests andemails from the site.
[admin-fn] =
The First Name of the administrator's account
[admin-ln] =
The Last Name of the administrator's account
[admin-pw] =
The DSpace administrator's login password
[handle] =
The Handle Prefix given to the organisation by CNRI
[tomcat] =
The installation directory of the Tomcat webserver
[handle-server] =
The installation directory of the Handle Server
[machine-ip] =
The IP address of the machine on which your DSpace installation is going
1.4 System Users
Users that will have to exist on the machine onto which DSpace is to be installed are asfollows:
• root the superuser for the machine.
4

• dspace the user who will be the default DSpace user, and will own the tomcatinstance etc. This is the most used user.
• postgres the user who will own the database software
The user you need to be logged in as when performing the actions laid out in this documentwill be given on the left hand side of the page before the set of actions which this user needsto perform. For example:
postgres
1. Create the database using: createdb U dspace dspace
indicates that before executing instruction (1), you should be logged in as the postgres user.
5

2 Full Installation OverviewThis section details the order in which things ought to be done in order to have a fully workingDSpace with Tapir in the form of the Edinburgh Research Archive.
1. Before starting the installation ensure that the machine has the prerequisitesoftware for DSpace installed:
a. Operating Systemb. Tomcat 5.5.9c. Java 1.5.0_06d. Ant 1.6.5
The installation and configuration of this software is outside the scope of this document.
2. Install PostgreSQL as per the section Installing PosgreSQL from Source (3.1).Once this has been done you should configure it as per the section PostgreSQLConfiguration (3.2) before starting the database server as per the sectionStarting and Stopping PostgreSQL (3.3).
3. Set up the PostgreSQL cron job as per the section PostgreSQL Cron Jobs (3.4).
4. Install DSpace as per the section Installing DSpace from Source (4.1).
5. Generate and install a Signed SSL Certificate with OpenSSL. To use a selfsigned certificate, see the section Creating a SelfSigned Certificate withOpenSSL (9.4).
6. Configure Tomcat to use the SSL Certificate as per the section ConfiguringTomcat SSL (8.4)
7. Configure the preinstalled handle server as per the section Handle ServerConfiguration (10.1) then start it as per the section Starting and Stopping theHandle Server (10.2).
8. Test that the new OAI interface is working correctly as per the sectionConfiguring the OAI Interface (11.1).
9. Import the data from another instance of DSpace as per the section Data Import(12).
6
3 PostgreSQL
3.1 Installing PosgreSQL from Source
1. Download the postgres source from www.postgres.org
postgres
2. Unzip and Untar postgres source
tar –zxvf postgresql-source.tar
3. Configure PostgreSQL for installation:
In [postgres]/postgressource:
./configure --with-java –-prefix=[postgres]
4. Build the PostgreSQL source code. In [postgres]/postgressource:
gmake
5. Check that this build has worked
gmake check
6. Install PostgreSQL
gmake install
7. Add PostgreSQL to the PATH variable for all users. In /etc/profile add the line
PATH = PATH:[postgres]/bin
8. Initialise the database
[postgres]/bin/initdb –D [postgres]/data
9. Place the postgres.jar file produced by the build process into the [dspace]/libdirectory.
7

3.2 Configuration
The following settings need to be entered in the file [postgres]/data/postgresql.conf:
1. tcpip_socket = true
To allow PostgreSQL to be accessed via TCP/IP
2. max_connections = 400
To allow 400 connections to be opened to the database
3. shared_buffers = 3000
To provide normal usage in a live environment
Note that if these values have to go any larger then the value of the system variable SHMMAXwhich limits segment size must be increased.
3.3 Starting and Stopping PostgreSQL
postgres
• Start the database server (in the background):
[postgres]/bin/postmaster –D [postgres]/data &
• Stop the database server:
pg_ctl stop -m fast -D [postgres]/data
or (only if above fails):
kill `cat [postgres]/data/postmaster.pid`
3.4 PostgreSQL Cron Jobs
postgres
1. Check that the file mycron exists in the directory [postgreshome] to contain all thecron information for the postgres user. If not, create it.
2. Add the following lines into the mycron file:
8

#vacuum full analyze the database every night
0 2 * * * [postgres]/bin/vacuumdb f z
3. Export the new cron job to the postgres user's crontab:
crontab mycron
3.5 Backing up and restoring PostgreSQL Data
postgres
• Backup the data to a plain text file:
pg_dump dspace > postgres-backup
• Restore the data to Postgres:
psql dspace < postgres-backup
9

4. DSpace
4.1 Installing DSpace from Source
1. Download the DSpace source from http://sourceforge.net/projects/dspace
dspace
2. Create source directory: [dspacesource], and insert the uncompressed source fromhttp://sourceforge.net/projects/dspace
3. Create the target installation directory [dspace]
4. Ensure the the additional postgres library is in [dspacesource]/lib
5. Create a dspace database user for PostgreSQL (the database server must be runningin order for these commands to work). In the directory [postgres]/bin
./createuser –U postgres –d –A –P dspace
Password: [databasepw]
6. Create the database to be used by dspace
./createdb –U dspace -E unicode dspace
7. Prepare the configuration files for build in [dspacesource]/config. There are moredetails in the section DSpace Configuration (5)
8. Compile and install the code. In [dspacesource]
ant fresh_install
9. Copy the dspace.war and dspace-oai.war files, which are created in the directory[dspacesource]/build into the tomcat webapps directory: [tomcat]/webapps
10. Create the dspace system administrator. In [dspace]/bin
./create-administrator
Using the values
email: [admin-email]
10
First Name: [admin-fn]
Last Name: [admin-ln]
Password: [admin-pw]
11. Set up Tomcat as the webserver as per the section Configuration Tomcat as aStandalone WebServer (8.1)
12. Start Tomcat as per the section Starting and Stopping Tomcat (8.2)
13. Set up the cron jobs associated with DSpace as per the section DSpace Cron Jobs(4.3)
4.2 DSpace Cron Jobs
dspace
1. Check that the file mycron exists in the directory [dspacehome] to contain all the croninformation for the dspace user. If not, create it.
2. Add the following lines into the mycron file:
JAVA_OPTS=-Xmx512M -Xms64M -Dfile.encoding=UTF-8
PATH=/usr/java/j2sdk1.4.2_01/bin
JAVA_HOME=/usr/java/j2sdk1.4.2_01
10 00 * * * /dspace/bin/index-all
30 00 * * * /dspace/bin/filter-media
00 03 * * * /dspace/bin/stat-monthly
10 03 * * * /dspace/bin/stat-report-monthly
30 03 * * * /dspace/bin/stat-general
00 04 * * * /dspace/bin/stat-report-general
00 07 * * * /dspace/bin/sub-daily
3. Export the new cron job to the dspace user's crontab:
crontab mycron
4.3 Updating a DSpace Instance
dspace
1. In [dspacesource] run the update:
11

ant update
2. Move the new dspace.war and dspaceoai.war files into [tomcat]/webapps, replacing theones there already.
3. Remove the directories (and their contents): 1. [tomcat]/webapps/dspace2. [tomcat]/webapps/dspaceoai3. [tomcat]/work/Catalina/localhost/dspace4. [tomcat]/work/Catalina/localhost/dspaceoai
If you wish to regularly build instances of DSpace then another ant build script can be createdto run a full update in one process. The contents of that file (mybuild.xml) should be:
<project name="dspace-builder" default="deploy" basedir=".">
<property name="tomcat" value="/opt/tomcat/webapps" />
<property name="source" value="/opt/dspace" />
<property name="v" value="dspace-source" />
<property name="n" value="dspace" />
<target name="deploy" description="deploy the dspace instance">
<copy file="${source}/${v}/build/dspace.war"
tofile="${tomcat}/${n}.war" overwrite="true" />
<copy file="${source}/${v}/build/dspace-oai.war"
tofile="${tomcat}/${n}-oai.war" overwrite="true" />
<delete dir="${tomcat}/${n}" failonerror="false" />
<delete dir="${tomcat}/${n}-oai" failonerror="false" />
</target>
</project>
This can then be called just using:
ant -buildfile mybuild.xml
It can also be used to rename the war files as they are deployed by passing a new value of nto the script:
ant -buildfile mybuild.xml -Dn=newname
4.4 Updating DSpace Configurations
dspace
1. Edit the live DSpace config file [dspace]/config to meet your new criteria (you shouldensure that your backup copy is kept in sync)
3. Restart tomcat as per the section Starting and Stopping Tomcat (8.3)
12
4.5 Installing new configuration files
If a DSpace instance requires new configuration files (for example for new modules) it isnecessary to manually copy them into [dspace]/config.
4.6 Identifying Problems with DSpace
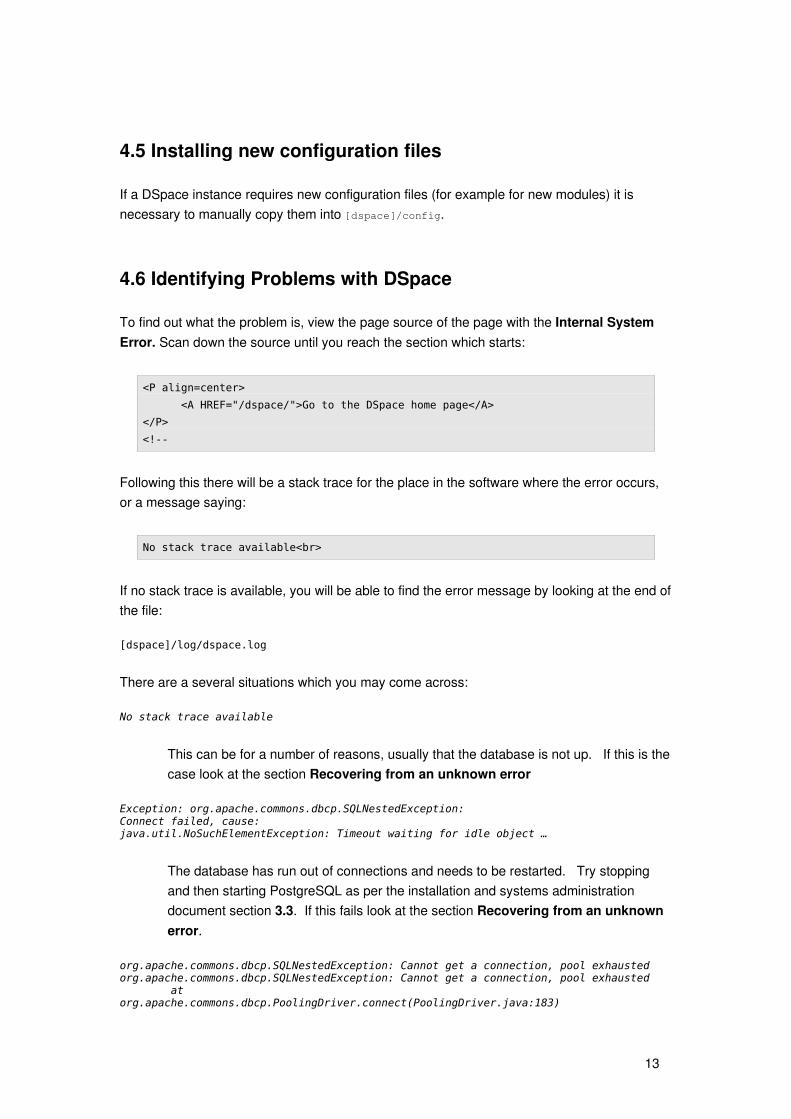
To find out what the problem is, view the page source of the page with the Internal SystemError. Scan down the source until you reach the section which starts:
<P align=center>
<A HREF="/dspace/">Go to the DSpace home page</A>
</P>
<!--
Following this there will be a stack trace for the place in the software where the error occurs,or a message saying:
No stack trace available<br>
If no stack trace is available, you will be able to find the error message by looking at the end ofthe file:
[dspace]/log/dspace.log
There are a several situations which you may come across:
No stack trace available
This can be for a number of reasons, usually that the database is not up. If this is thecase look at the section Recovering from an unknown error
Exception: org.apache.commons.dbcp.SQLNestedException:Connect failed, cause: java.util.NoSuchElementException: Timeout waiting for idle object …
The database has run out of connections and needs to be restarted. Try stoppingand then starting PostgreSQL as per the installation and systems administrationdocument section 3.3. If this fails look at the section Recovering from an unknownerror.
org.apache.commons.dbcp.SQLNestedException: Cannot get a connection, pool exhaustedorg.apache.commons.dbcp.SQLNestedException: Cannot get a connection, pool exhausted atorg.apache.commons.dbcp.PoolingDriver.connect(PoolingDriver.java:183)
13

The database connection pool has run out of spaces for new connections – there aretoo many users accessing the system simultaneously. Stopping and starting tomcatas per the section 8.2 will fix the problem initially, but will throw users out of thesystem. For a long term fix, increase the db.maxconnections parameter in [dspace]/config/dspace.cfg then restart tomcat.
Any other errorMost errors that can happen at the moment are due to either database failure of webserver failure. These should all be solvable by following the steps laid out inRecovering from an unknown error (4.9).
4.7 Recovering from an Unknown Error
Most problems that you may encounter can be remedied either by restarting postgres orrestarting the web server (tomcat).
First try restarting postgres, by following the instructions in the dspace installation andsystems administration manual section 3.3
If restarting postgres then <shift>+reload of the page does not get rid of the error then restartthe web server as per the dspace installation and systems administration manual section 5.3Logged in as dspace you should be able to issue the commands starttomcat andstoptomcat from anywhere in the shell. Leave approximately 10 seconds in betweenstopping and starting to ensure that the restart is clean.
14

5 DSpace ConfigurationThis section deals with the advanced configuration of DSpace. Most of the standardconfiguration options are well documented in the dspace.cfg file, and will not be discussedhere.
5.1 LDAP
If you are using LDAP for authenticating your institution's users, you can instruct DSpace touse the same authentication database. If LDAP is enabled then new users will be able toregister simply by entering their username and password. It does not mean that users withoutLDAP details cannot register as before, though.
First, you must enable the ldap registration process
ldap.enable = true
You must also specify the location of the LDAP server (whether to include o=myu.edu willdepend on the configuration of the server:
ldap.provider_url = ldap://ldap.myu.edu/o=myu.edu
To allow the system to correctly query the LDAP server, you must set the object and searchcontexts. Again, these are specific to each LDAP implementation, although they are likely ofthe form as follows:
ldap.object_context = ou=people,o=myu.edu
ldap.search_context = ou=people
Finally, we can set the fields that the LDAP code should look in in order to populate the userobject. These are the userid, email, surname, given name and telephone number fields:
ldap.id_field = uid
ldap.email_field = mail
ldap.surname_field = sn
ldap.givenname_field = givenName
ldap.phone_field = telephoneNumber
If you wish your LDAP users to be automatically registered when they first log in(recommended), you can specify:
webui.ldap.autoregister = true
15

5.2 Custom Item View
This configuration allows you to choose how you would like your items displayed in the simpleitem view mode. You can choose which fields you wish to display, and gives you some smallcontrol over how they are displayed.
The form of the configuration line is:
<schema>.<element>[.<qualifier>|.*][(date)|(link)], ... [all other fields]
For example:
# Dublin Core element 'title' (unqualified)
dc.title
# DC element 'title', qualifier 'alternative'
dc.title.alternative
#All fields with Dublin Core element 'title' (any or no qualifier)
dc.title.*
# DC identifier.uri, render as a link
dc.identifier.uri(link)
#DC date.issued, render as a date
dc.date.issued(date)
The full example configuration is then given as (where \ is inserted to indicate that although aline break is present, the following line should be appended to the end of the current):
webui.itemdisplay.default = dc.title, dc.title.alternative, dc.contributor.*, \
dc.subject, dc.date.issued(date), dc.publisher, \
dc.identifier.citation,dc.relation.ispartofseries,\
dc.description.abstract, dc.description, \
dc.identifier.govdoc, dc.identifier.uri(link), \
dc.identifier.isbn, dc.identifier.issn, \
dc.identifier.ismn, dc.identifier
This would then produce an item listing presenting each of those elements in order, withdate.issued formatted as a date, and identifier.uri rendered as a link to the value of thatfield.
5.3 Search Indexing
If you are customising your metadata intake at all, it is also wise to customise your indexingdata. This is done by providing configuration lines of the form:
16

search.index.<number> = <field>:element.[<qualifier>|*]
This will modify the way that the contents of the database are indexed for searching (notbrowsing). If you wish to change the advanced search system to reflect these changes it isnecessary to modify the UI. The default configuration for DSpace is as follows:
search.index.1 = author:contributor.*
search.index.2 = author:creator.*
search.index.3 = title:title.*
search.index.4 = keyword:subject.*
search.index.5 = abstract:description.abstract
search.index.6 = author:description.statementofresponsibility
search.index.7 = series:relation.ispartofseries
search.index.8 = abstract:description.tableofcontents
search.index.9 = mime:format.mimetype
search.index.10 = sponsor:description.sponsorship
search.index.11 = id:identifier.*
This gives you the possibilities of searching on author, title, keyword, abstract, series,mimetype, sponsor and identifier, with more than one metadata element tied to some of thesefields (e.g. author is contributor.*, creator.* and description.statementofresponsibility.
5.4 Custom submission forms
To customise how your submission forms look, you can modify the inputforms.xml file topresent the relevant information.
The input forms submission process definitions are structured as follows:
<form-definitions>
<form name="[name]">
<page number="[number]">
<field>
<dc-element>element</dc-element>
<dc-qualifier>qualifier</dc-qualifier>
<repeatable>true | false</repeatable>
<label>Label</label>
<input-type>type</input-type>
<hint>Some hint</hint>
<required></required>
</field>
</page>
</form>
</form-definitions>
The submission can have any number of pages, and each page number should be defined inthe number=”[number]” attribute. These will be presented in order. Each field in thesubmission should then be defined using the values here. Most are self explanatory, and
17
extensive documentation is provided with DSpace to describe how each of these fields isdefined. Note that the presence of <required></required> does not indicate that the field isrequired. A field is only taken to be required when this tag pair contain a value, which is thevalue to print to the screen if the form is submitted without completing this field.
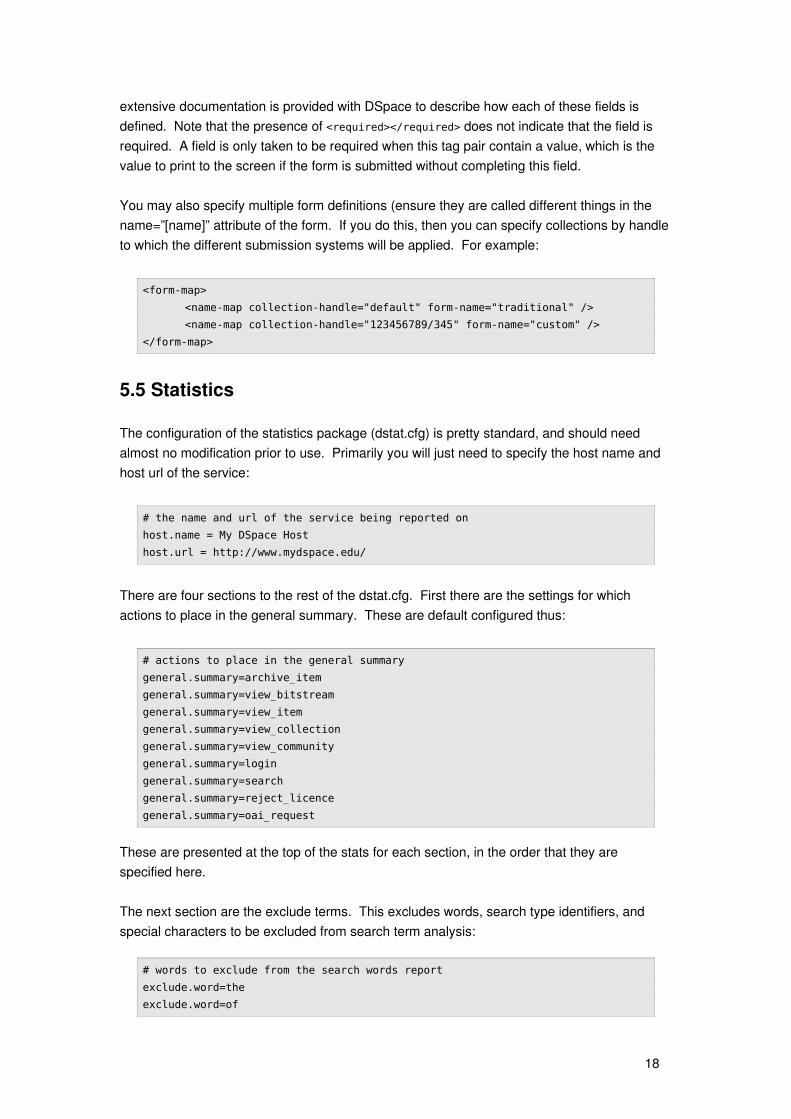
You may also specify multiple form definitions (ensure they are called different things in thename=”[name]” attribute of the form. If you do this, then you can specify collections by handleto which the different submission systems will be applied. For example:
<form-map>
<name-map collection-handle="default" form-name="traditional" />
<name-map collection-handle="123456789/345" form-name="custom" />
</form-map>
5.5 Statistics
The configuration of the statistics package (dstat.cfg) is pretty standard, and should needalmost no modification prior to use. Primarily you will just need to specify the host name andhost url of the service:
# the name and url of the service being reported on
host.name = My DSpace Host
host.url = http://www.mydspace.edu/
There are four sections to the rest of the dstat.cfg. First there are the settings for whichactions to place in the general summary. These are default configured thus:
# actions to place in the general summary
general.summary=archive_item
general.summary=view_bitstream
general.summary=view_item
general.summary=view_collection
general.summary=view_community
general.summary=login
general.summary=search
general.summary=reject_licence
general.summary=oai_request
These are presented at the top of the stats for each section, in the order that they arespecified here.
The next section are the exclude terms. This excludes words, search type identifiers, andspecial characters to be excluded from search term analysis:
# words to exclude from the search words report
exclude.word=the
exclude.word=of
18

exclude.word=what
exclude.word=and
exclude.word=in
exclude.word=on
exclude.word=to
exclude.word=as
exclude.word=for
exclude.word=were
exclude.word=be
exclude.word=his
exclude.word=all
exclude.word=or
# search types that DSpace supports which should be excluded from the search
# words report
exclude.type=title:
exclude.type=author:
exclude.type=keyword:
exclude.type=indentifier:
exclude.type=abstract:
exclude.type=series:
# characters to exclude from the search words report.
exclude.character=)
exclude.character="
exclude.character=(
exclude.character='
exclude.character=,
exclude.character=*
exclude.character=+
exclude.character=-
exclude.character=.
exclude.character=?
exclude.character=/
You may need to localise these for your language, and monitor the search results for anyterms or characters which slip through unwanted.
The statistics system will also analyse the current archive contents, and is capable of breakingdown the contents based on keywords specified in the config. The default is:
# The item types in the archive that you need number breakdowns on
item.type=Thesis or Dissertation
item.type=Preprint
item.type=Research Paper
This will provide a list of item types and the numbers of them that appear in the archive at thetime of the report.
Finally, there are the floor values. These tell the system when to stop counting items fordisplay. That is, when an item has been viewed fewer than, say, 20 times, it will not be
19
presented as part of the statistics, for purposes of keeping the statistics as short as isreasonable. The same functionality exists for presenting search word analyses. A carefulbalance should be made so that the floor value works well for both the general listings pageand the monthly listings page, as the same value is used in each (which could do with beingfixed):
# floor values (don't display things that have been activated fewer times
# than this) for the reports
item.floor=20
search.floor=5
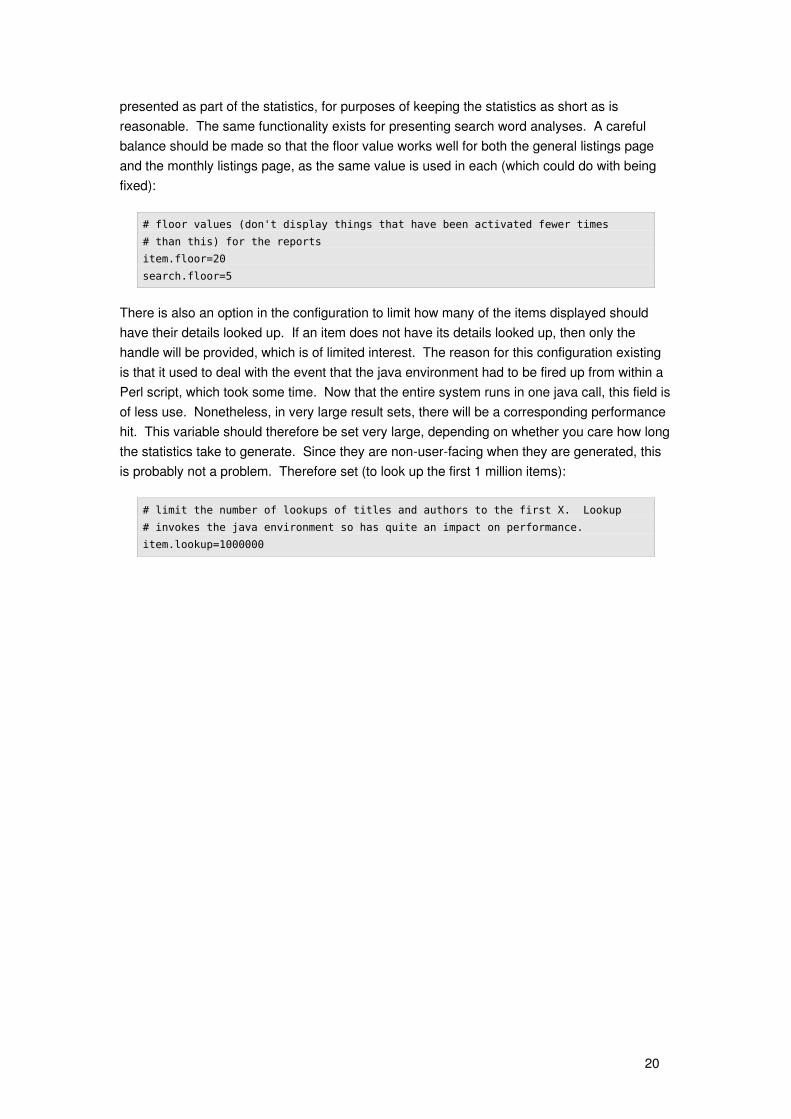
There is also an option in the configuration to limit how many of the items displayed shouldhave their details looked up. If an item does not have its details looked up, then only thehandle will be provided, which is of limited interest. The reason for this configuration existingis that it used to deal with the event that the java environment had to be fired up from within aPerl script, which took some time. Now that the entire system runs in one java call, this field isof less use. Nonetheless, in very large result sets, there will be a corresponding performancehit. This variable should therefore be set very large, depending on whether you care how longthe statistics take to generate. Since they are nonuserfacing when they are generated, thisis probably not a problem. Therefore set (to look up the first 1 million items):
# limit the number of lookups of titles and authors to the first X. Lookup
# invokes the java environment so has quite an impact on performance.
item.lookup=1000000
20
6 Tomcat
6.1 Tomcat Configuration as Standalone WebServerroot
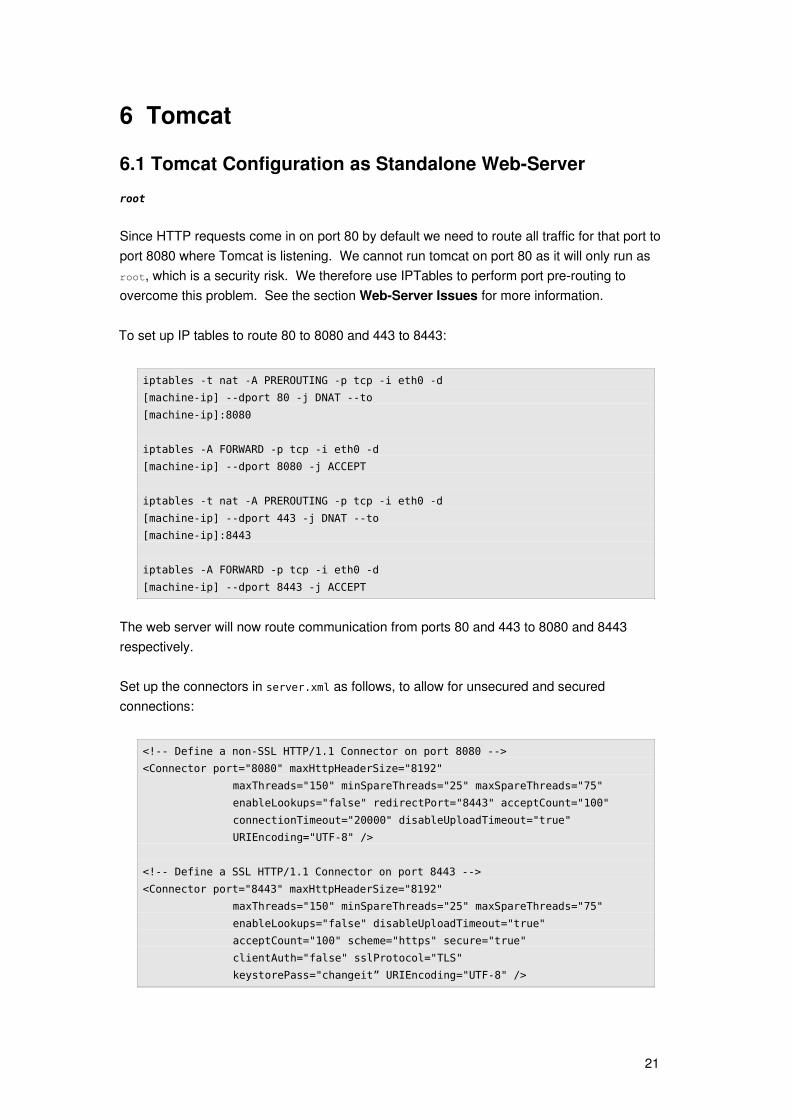
Since HTTP requests come in on port 80 by default we need to route all traffic for that port toport 8080 where Tomcat is listening. We cannot run tomcat on port 80 as it will only run asroot, which is a security risk. We therefore use IPTables to perform port prerouting toovercome this problem. See the section WebServer Issues for more information.
To set up IP tables to route 80 to 8080 and 443 to 8443:
iptables -t nat -A PREROUTING -p tcp -i eth0 -d
[machine-ip] --dport 80 -j DNAT --to
[machine-ip]:8080
iptables -A FORWARD -p tcp -i eth0 -d
[machine-ip] --dport 8080 -j ACCEPT
iptables -t nat -A PREROUTING -p tcp -i eth0 -d
[machine-ip] --dport 443 -j DNAT --to
[machine-ip]:8443
iptables -A FORWARD -p tcp -i eth0 -d
[machine-ip] --dport 8443 -j ACCEPT
The web server will now route communication from ports 80 and 443 to 8080 and 8443respectively.
Set up the connectors in server.xml as follows, to allow for unsecured and securedconnections:
<!-- Define a non-SSL HTTP/1.1 Connector on port 8080 -->
<Connector port="8080" maxHttpHeaderSize="8192"
maxThreads="150" minSpareThreads="25" maxSpareThreads="75"
enableLookups="false" redirectPort="8443" acceptCount="100"
connectionTimeout="20000" disableUploadTimeout="true"
URIEncoding="UTF-8" />
<!-- Define a SSL HTTP/1.1 Connector on port 8443 -->
<Connector port="8443" maxHttpHeaderSize="8192"
maxThreads="150" minSpareThreads="25" maxSpareThreads="75"
enableLookups="false" disableUploadTimeout="true"
acceptCount="100" scheme="https" secure="true"
clientAuth="false" sslProtocol="TLS"
keystorePass="changeit” URIEncoding="UTF-8" />
21

6.2 Starting and Stopping Tomcat
dspace
Before starting or stopping tomcat for the first time, create shell scripts to do the job for you,as this will be much quicker.
1. In the directory [dspace-home]/bin create a file called starttomcat containing the line:
[tomcat]/bin/startup.sh
2. In the directory [dspacehome]/bin create a file called stoptomcat containing the line:
[tomcat]/bin/shutdown.sh
3. In the directory [dspacehome]/bin you need to make the files starttomcat andstoptomcat executable. To do this use:
chmod 764 starttomcat stoptomcat
4. Place this directory in the dspace user’s PATH environment variable so that they can berun from anywhere on the system. In the file [dspacehome]/.bash_profile add theline:
PATH=$PATH:$HOME/bin
You can now start and stop tomcat from anywhere on the system by issuing one of thecommands:
#> starttomcat
#> stoptomcat
Note that it is worth restarting tomcat after every system change as otherwise updates maynot be reflected.
22
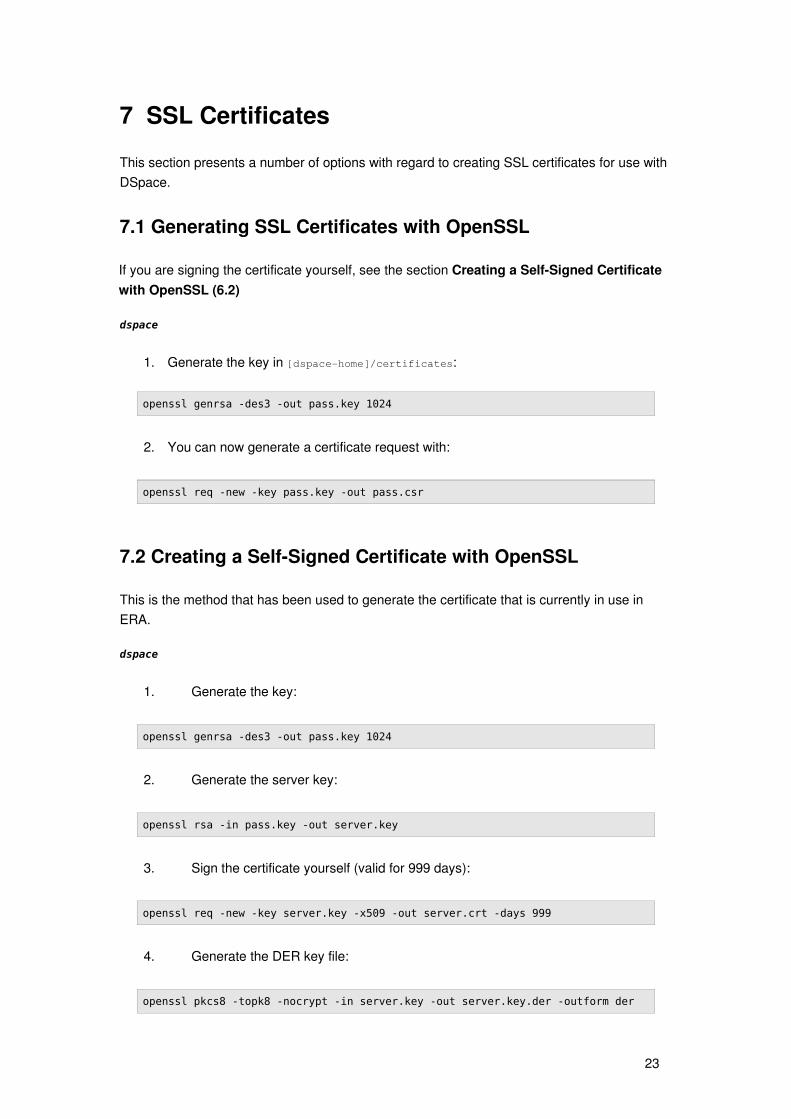
7 SSL CertificatesThis section presents a number of options with regard to creating SSL certificates for use withDSpace.
7.1 Generating SSL Certificates with OpenSSL
If you are signing the certificate yourself, see the section Creating a SelfSigned Certificatewith OpenSSL (6.2)
dspace
1. Generate the key in [dspacehome]/certificates:
openssl genrsa -des3 -out pass.key 1024
2. You can now generate a certificate request with:
openssl req -new -key pass.key -out pass.csr
7.2 Creating a SelfSigned Certificate with OpenSSL
This is the method that has been used to generate the certificate that is currently in use inERA.
dspace
1. Generate the key:
openssl genrsa -des3 -out pass.key 1024
2. Generate the server key:
openssl rsa -in pass.key -out server.key
3. Sign the certificate yourself (valid for 999 days):
openssl req -new -key server.key -x509 -out server.crt -days 999
4. Generate the DER key file:
openssl pkcs8 -topk8 -nocrypt -in server.key -out server.key.der -outform der
23
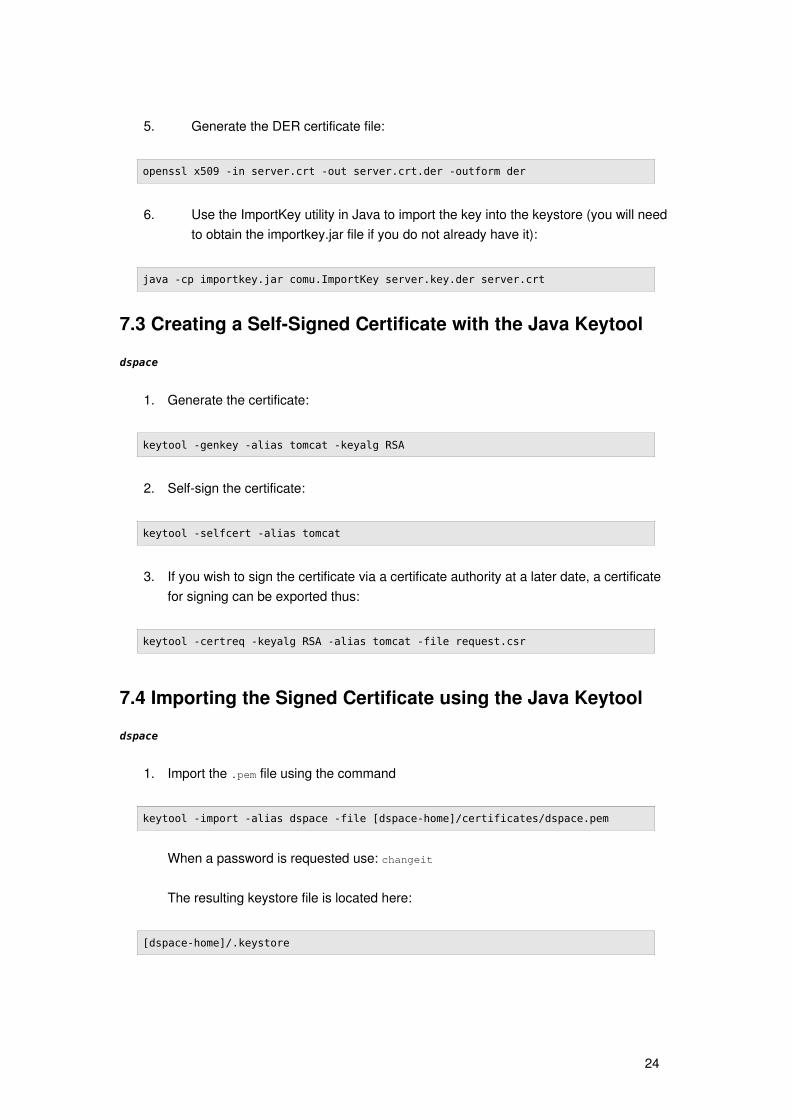
5. Generate the DER certificate file:
openssl x509 -in server.crt -out server.crt.der -outform der
6. Use the ImportKey utility in Java to import the key into the keystore (you will needto obtain the importkey.jar file if you do not already have it):
java -cp importkey.jar comu.ImportKey server.key.der server.crt
7.3 Creating a SelfSigned Certificate with the Java Keytool
dspace
1. Generate the certificate:
keytool -genkey -alias tomcat -keyalg RSA
2. Selfsign the certificate:
keytool -selfcert -alias tomcat
3. If you wish to sign the certificate via a certificate authority at a later date, a certificatefor signing can be exported thus:
keytool -certreq -keyalg RSA -alias tomcat -file request.csr
7.4 Importing the Signed Certificate using the Java Keytool
dspace
1. Import the .pem file using the command
keytool -import -alias dspace -file [dspace-home]/certificates/dspace.pem
When a password is requested use: changeit
The resulting keystore file is located here:
[dspace-home]/.keystore
24

8 Handle Server
8.1 Handle Server Configuration
dspace
1. Make the handle server with the DSpace native commands. In [dspace]/bin:
./make-handle-config
Note: This may fail with an error like "Warning: data not encrypted". In this case it isnecessary to do the installation directly:
./dsrun net.handle.server.SimpleSetup [handle-server]
2. The following are the answers to the questions that should be given during handleserver setup:
Caching or Regular: 1
Primary Server: y
IP Address: [your host name]
Port Number: 2641
HTTP Port: 8000
Log all access: y
Version/Serial No: 1
Description: [your description]
Disable UDP: y
Server Key: n
Admin Key: n
3. This generates a number of files, including a setup file that needs to be sent to CNRI.Find the file:
[handle-server]/sitebndl.zip
and email to CNRI quoting the identifier number registered
4. While waiting for the site bundle to be applied we need to perform the local handleserver configuration. In the file [handleserver]/config.dct
Find the section server_config and do the following updates:
"storage_type" = "CUSTOM"
"storage_class" = "org.dspace.handle.HandlePlugin"
25

In addition, replace all instances of YOUR_NAMING_AUTHORITY with [handle] for the wholefile.
5. Now start the handle server as per the section Starting and Stopping the HandleServer (10.2)
6. Note that the handle server caches previous settings for a while, so it is necessary towait for 24 hours or so before changes noticeably take effect.
8.2 Starting and Stopping the Handle Server
dspace
To start the handle server, in [dspace]/bin use the command:
./start-handle-server
To stop the handle server it is necessary to use the unix command kill. Get the process IDfor the line starting:
/bin/sh /u01/dspace/bin/dsrun -Dlog4j.configuration
=log4j-handle-plugin.properties net.handle.server.Main ...
and use:
kill <process id>
26

9 Data ImportThis section describes how we move data from one instance of DSpace on one machine toanother instance on another machine. This process should be adaptable to most import orupgrade tasks.
This procedure assumes similar structure on each machine, and notation is relative to themachine in question.
9.1 Taking the Data from a Source DSpace
dspace
1. Shut down Tomcat to prevent any further changes to the data or the database.
2. In [dspace] bundle up the assetstore for moving:
tar -zcvf assetstore.tar assetstore/
This produces a file called assetstore.tar.gz which contains all of the archivedfiles. This file can be very large (approximately 5Mb for each item in the archive)
postgres
3. Back up the contents and structure of the database. In [dspace] run:
pg_dump dspace > data
This produces a file called data which contains all of the database. This file isgenerally of reasonable size (approximately 13Kb for each item in the archive).
dspace
4. Compress the data file for convenience:
gzip -v9 data
5. Backup assetstore.tar.gz and data.gz to another machine (ideally not the sourceor the target machines).
6. You can now restart Tomcat. Changes made after this will not be reflected in thetarget machine, and this procedure must be performed again for new updates.
27
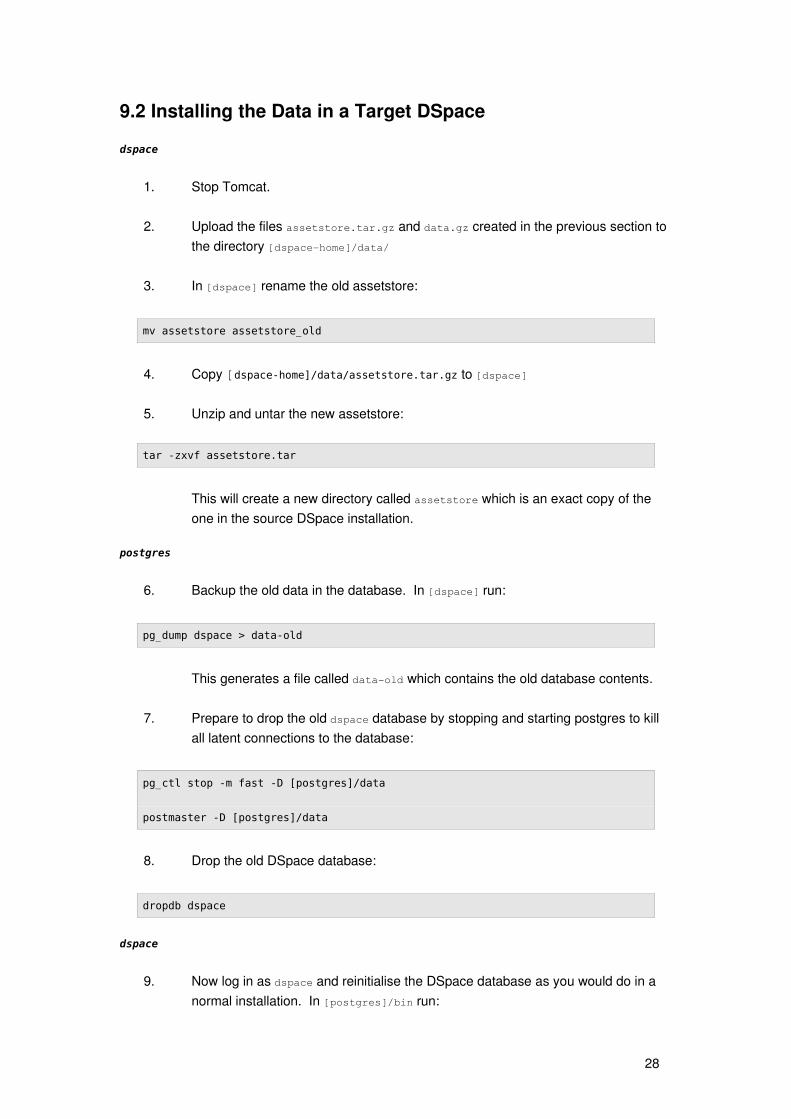
9.2 Installing the Data in a Target DSpace
dspace
1. Stop Tomcat.
2. Upload the files assetstore.tar.gz and data.gz created in the previous section tothe directory [dspacehome]/data/
3. In [dspace] rename the old assetstore:
mv assetstore assetstore_old
4. Copy [dspace-home]/data/assetstore.tar.gz to [dspace]
5. Unzip and untar the new assetstore:
tar -zxvf assetstore.tar
This will create a new directory called assetstore which is an exact copy of theone in the source DSpace installation.
postgres
6. Backup the old data in the database. In [dspace] run:
pg_dump dspace > data-old
This generates a file called dataold which contains the old database contents.
7. Prepare to drop the old dspace database by stopping and starting postgres to killall latent connections to the database:
pg_ctl stop -m fast -D [postgres]/data
postmaster -D [postgres]/data
8. Drop the old DSpace database:
dropdb dspace
dspace
9. Now log in as dspace and reinitialise the DSpace database as you would do in anormal installation. In [postgres]/bin run:
28

./createdb -U dspace -E unicode dspace
postgres
10. Prepare to import the data into the DSpace database. Copy [dspacehome]/data/data.gz to [postgres]
11. Unzip the data.gz file:
gunzip data.gz
12. Import the data into the DSpace database:
psql dspace < data
This will create the database as an exact replica of the source installation'sdatabase.
13. You can now restart Tomcat.
29
Related Documents


