Disaster Recovery Grant Reporting (DRGR) System Grantee User Manual | Version 2.0 August 2017

Welcome message from author
This document is posted to help you gain knowledge. Please leave a comment to let me know what you think about it! Share it to your friends and learn new things together.
Transcript
Disaster Recovery Grant Reporting (DRGR) System Grantee User Manual | Version 2.0
August 2017
User Manual – Section 1 Introduction to DRGR and Basic Navigation
Version 2.0 – August 2017 Page i
Introduction to DRGR and Basic Navigation
1. Introduction to DRGR and Basic Navigation ................................................................................... 1-1 1.1 Organization of User Manual ...................................................................................... 1-1
1.1.1 Notices Regarding User Manual ......................................................................... 1-1 1.2 System Overview ........................................................................................................ 1-2 1.3 System Technical Summary ......................................................................................... 1-2
1.3.1 DRGR Data Flows ................................................................................................ 1-2 1.3.1.1 Grant & Activity Setup / Funding ...................................................... 1-3 1.3.1.2 Activity Obligation & Drawdown ...................................................... 1-4 1.3.1.3 Quarterly Reporting .......................................................................... 1-4
1.4 User Access Levels ...................................................................................................... 1-4 1.4.1 Authorizations and Permissions ......................................................................... 1-6
1.5 Login and Logout of DRGR System............................................................................... 1-6 1.5.1 DRGR Login Requirements and Conditions ......................................................... 1-7 1.5.2 DRGR Login Procedures ...................................................................................... 1-8 1.5.3 Logging Out of the DRGR System ........................................................................ 1-9 1.5.4 Login Issues ......................................................................................................... 1-9
1.6 DRGR Basic Navigation and System Modules .............................................................. 1-9 1.6.1 DRGR Basic Navigation ...................................................................................... 1-10 1.6.2 DRGR System Modules ..................................................................................... 1-11
1.7 Accessing Other CPD Systems ................................................................................... 1-12 1.8 DRGR Frequently Asked Questions (FAQ) .................................................................. 1-12 1.9 DRGR Resources and Technical Assistance ................................................................ 1-12
1.9.1 HUD Exchange Resources ................................................................................. 1-12 1.10 References ................................................................................................................ 1-13
Appendix A: Key Terms ................................................................................................................... 1-15 Appendix B: DRGR System Configuration ........................................................................................ 1-17
User Manual – Section 2 Home Screen
Version 2.0 – August 2017 Page i
Home Screen
2. Home Screen ................................................................................................................................. 2-1 2.1 Home Screen .............................................................................................................. 2-1
2.1.1 Accessing the Home Screen ................................................................................ 2-1 2.2 Updates/News Section ............................................................................................... 2-1
2.2.1 View Updates/News ........................................................................................... 2-2 2.2.1.1 Procedure: Viewing Updates/News ................................................. 2-2
2.3 My Action Items (To-Do List) ....................................................................................... 2-2 2.3.1 View Action Items ............................................................................................... 2-4
2.3.1.1 Procedure: Viewing Action Items ..................................................... 2-4 2.4 Managing Flags ........................................................................................................... 2-4
2.4.1 Purpose and Function of Flags ............................................................................ 2-4 2.4.2 Flags Relationship to Action Plans and QPRs ...................................................... 2-5 2.4.3 Grantee Users vs. HUD Users .............................................................................. 2-5 2.4.4 Flag Criteria ......................................................................................................... 2-5 2.4.5 Accessing Flags .................................................................................................... 2-6
2.4.5.1 Procedure: Basic Search for Flagged Items ...................................... 2-6 2.4.5.2 Procedure: Advanced Search for Flagged Items ............................... 2-7
2.4.6 Resolving vs. Remediating Flags ......................................................................... 2-8 2.4.6.1 Procedure: Resolving Active Flags .................................................... 2-9 2.4.6.2 Procedure: Remediating Active Flags ............................................. 2-10
2.4.7 Updating Flag Status ......................................................................................... 2-11 2.4.7.1 Procedure: Updating Selected Flags Status .................................... 2-12
User Manual – Section 3 Admin Module
Version 2.0 - August 2017 Page i
Admin Module
3. Admin Module ........................................................................................................................ 3-1 3.1 Purpose and Function of Admin Module ..................................................................... 3-1 3.2 Accessing the Admin Module ...................................................................................... 3-1 3.3 User Admin Functions ................................................................................................. 3-2
3.3.1 Edit Grantee Contact Admin (FO) ....................................................................... 3-2 Procedure: Edit Grantee Contact ..................................................... 3-2
3.3.2 Grantee User Admin (GA) ................................................................................... 3-3 Procedure: Assign Users to Grant ..................................................... 3-3
3.3.3 Certify and Activate Users .................................................................................. 3-5 Procedure: Certify and Activate Grantee Administrators (FO) ........ 3-5 Procedure: Certify and Activate Grantee Users (GA) ....................... 3-6 Procedure: Certify and Activate HUD Office Users (HUD Managers
and Superusers) ................................................................................ 3-8 3.3.4 Manage Grantee User Accounts ....................................................................... 3-12
Procedure: New User Request ....................................................... 3-12 Procedure: Deactivate and Edit User Requests .............................. 3-15 Procedure: Grantee User Request Approvals................................. 3-16
3.3.4.3.1 Procedure: HUD Supervisory Approval ...................... 3-17 3.3.4.3.2 Procedure: HUD HQ Admin User Account Approvals 3-19
Procedure: User Request Status Report ......................................... 3-20 3.3.5 Manage Subordinate Grantees (GA) ................................................................. 3-21
Procedure: Associate Responsible Organization as a Subordinate Grantee ........................................................................................... 3-21
Procedure: Assign Roles to Subordinate users ............................... 3-22 Procedure: View Subordinate users ............................................... 3-22
3.3.6 Monitoring/Audit/TA Event (Add/Edit) (GA) (Search/View) (GA, FO) .............. 3-22 Procedure: Add/Edit Monitoring Event (GA) .................................. 3-24
3.3.6.1.1 Procedure: Add/Edit a Finding ................................... 3-27 3.3.6.1.2 Procedure: Add/Edit a Concern ................................. 3-30
Procedure: Add/Edit Audit Topic (GA) ............................................ 3-31 Procedure: Add/Edit Technical Assistance (TA) Event (GA) ........... 3-35 Procedure: Search Monitoring/Audit/TA Event (GA, FO) ............... 3-38 Procedure: View All Monitoring/Audit/TA (GA, FO) ....................... 3-39 Procedure: Search Event Topics (GA, FO) ....................................... 3-40
3.4 Sub-Grant (GA) ......................................................................................................... 3-41 3.4.1 Procedure: Add Sub-Grant ................................................................................ 3-41
User Manual – Section 4 Action Plans Module
Version 2.0 – August 2017 Page i
Action Plans Module
4. Action Plans Module ............................................................................................................... 4-1 4.1 Action Plans ................................................................................................................ 4-1
4.1.1 Initial Steps.......................................................................................................... 4-2 4.1.2 Add / Edit / View Action Plan .............................................................................. 4-2
4.1.2.1 Procedure: Adding an Action Plan for the first time ........................ 4-2 4.1.2.2 Procedure: Editing an Action Plan .................................................... 4-5 4.1.2.3 Procedure: Viewing an Action Plan .................................................. 4-7 4.1.2.4 Procedure: Download PDF / Print Action Plan ................................. 4-8
4.1.3 Action Plan Review Tools and Submission .......................................................... 4-9 4.1.3.1 Procedure: Accessing Review Tools ................................................ 4-10 4.1.3.2 Procedure: Reviewing Active Flags ................................................. 4-12 4.1.3.3 Procedure: Displaying Changes from Prior Approved Review ....... 4-13 4.1.3.4 Procedure: Viewing/Downloading Action Plan Review Checklist .. 4-14 4.1.3.5 Procedure: Submitting an Action Plan ........................................... 4-15
4.1.4 HUD Review of Action Plan ............................................................................... 4-18 4.1.4.1 Procedure: Accessing Review Screen and Review Tools ................ 4-19 4.1.4.2 Procedure: Reviewing Active Flags ................................................. 4-21 4.1.4.3 Procedure: Displaying Changes from Prior Approved Review ....... 4-21 4.1.4.4 Procedure: Completing Action Plan Review Checklist .................... 4-22 4.1.4.5 Procedure: Approving/Rejecting Action Plans ............................... 4-24 4.1.4.6 Procedure: Viewing Action Plan Review History ............................ 4-24
4.2 Projects and Activities ............................................................................................... 4-25 4.2.1 DRGR Project versus Activities .......................................................................... 4-25 4.2.2 Add / Edit Projects ............................................................................................ 4-26
4.2.2.1 Procedure: Adding a Project ........................................................... 4-26 4.2.2.2 Procedure: Editing a Project ........................................................... 4-28
4.2.3 Add / Edit Activity ............................................................................................. 4-30 4.2.3.1 Procedure: Adding / Editing an Activity – Page 1 ........................... 4-31 4.2.3.2 Procedure: Adding / Editing an Activity – Page 2 ........................... 4-35
4.2.3.2.1 Direct Benefit Activities ................................................... 4-40 4.2.3.2.2 Area Benefit Activities - Census ....................................... 4-43 4.2.3.2.3 Area Benefit Activities – Survey ...................................... 4-49
4.2.3.3 Procedure: Editing an Activity ........................................................ 4-52 4.2.3.4 Procedure: Edit Activity – Delete .................................................... 4-54 4.2.3.5 Procedure: Edit Activity – Move/Reassign to a New Project ......... 4-55 4.2.3.6 Procedure: Edit Activity – Change Activity Type ............................ 4-56
4.3 Responsible Organizations ........................................................................................ 4-57 4.3.1 Add/Search Responsible Organization ............................................................. 4-57
4.3.1.1 Procedure: Add Responsible Organization ..................................... 4-57 4.3.1.2 Procedure: System for Award Management (SAM) ....................... 4-59 4.3.1.3 Procedure: Search Responsible Organization (GA, FO, SU) ............ 4-63
User Manual – Section 5 Drawdown Module
Version 2.0 - August 2017 Page i
Drawdown Module
5. Drawdown Module ................................................................................................................. 5-1 5.1 Overview of Drawdown Module ................................................................................. 5-1
5.1.1 Overview of the Voucher Process ................................................................. 5-1 5.1.2 Glossary of Drawdown Module Terms .......................................................... 5-2
5.2 Grantee User Tasks ..................................................................................................... 5-4 5.2.1 Grantee Roles .............................................................................................. 5-4 5.2.2 Maintaining Obligations ............................................................................... 5-4
5.2.2.1 Procedure: Obligating Funds to an Activity ...................................... 5-4 5.2.3 Maintaining Vouchers .................................................................................. 5-7
5.2.3.1 Procedure: Creating a Voucher ........................................................ 5-7 5.2.3.2 Procedure: Searching for a Voucher ............................................... 5-15 5.2.3.3 Procedure: Viewing a Voucher or Voucher Line Item (All Users) ... 5-17 5.2.3.4 Procedure: Cancelling a Voucher Line Item ................................... 5-18 5.2.3.5 Procedure: Revising a Voucher Line Item ....................................... 5-19 5.2.3.6 Procedure: Approving or Rejecting a Voucher Line Item ............... 5-22 5.2.3.7 Procedure: Revoking Approval of a Voucher Line Item .................. 5-24
5.2.4 Other Drawdown Related Functions ........................................................... 5-26 5.2.4.1 Procedure: Blocking an Activity from Drawdowns ......................... 5-26 5.2.4.2 Procedure: Classification of Returned Funds ................................. 5-28
5.2.5 Managing Program Income ........................................................................ 5-31 5.2.5.1 Procedure: Creating Receipts ......................................................... 5-31 5.2.5.2 Procedure: Search and Edit Receipts .............................................. 5-32 5.2.5.3 Procedure: Associating Receipts .................................................... 5-33 5.2.5.4 Program Income Accounts Overview ............................................. 5-36 5.2.5.5 Procedure: Adding Program Income Accounts .............................. 5-38 5.2.5.6 Procedure: Search/Edit Program Income Account ......................... 5-39
5.3 HUD User Tasks......................................................................................................... 5-39 5.3.1 Voucher Functions ..................................................................................... 5-40
5.3.1.1 Procedure: Searching for a Voucher ............................................... 5-40 5.3.1.2 Procedure: Viewing a Voucher or Voucher Line Item .................... 5-40 5.3.1.3 Procedure: Approving or Rejecting a Voucher Line Item ............... 5-41 5.3.1.4 Procedure: Revoking Approval of a Voucher Line Item .................. 5-43
5.3.2 Other Drawdown Related Functions ........................................................... 5-44 5.3.2.1 Procedure: Setting a Drawdown Approval Threshold .................... 5-44 5.3.2.2 Procedure: Blocking a Grant Drawdown ........................................ 5-48 5.3.2.3 Procedure: Blocking a Grantee Drawdown .................................... 5-50 5.3.2.4 Procedure: HUD Block Project and Activity Drawdowns ................ 5-51
5.3.3 Program Income Functions ......................................................................... 5-52 5.3.3.1 Procedure: Search/View Receipt .................................................... 5-52 5.3.3.2 Procedure: Search/View Program Income Accounts ..................... 5-53
Appendix 1 View Voucher Line Item – description of information ......................................... 5-55
User Manual – Section 6 Quarterly Performance Report Module
Version 2.0 – August 2017 Page i
Quarterly Performance Report (QPR) Module
6. Quarterly Performance Report (QPR) Module ......................................................................... 6-1 6.1 QPR Overview ............................................................................................................. 6-1
6.1.1 QPRs and Action Plans Interrelationship ............................................................ 6-1 6.1.2 DRGR Rules for the Action Plans / QPRs Process ................................................ 6-2 6.1.3 QPR Due Dates .................................................................................................... 6-2 6.1.4 Submit QPR Roles ............................................................................................... 6-2 6.1.5 Subordinate Grantees ......................................................................................... 6-2
6.2 QPR Functions ................................................................................................................... 6-2 6.2.1 Add QPR .............................................................................................................. 6-3
6.2.1.1 Procedure: Add QPR ......................................................................... 6-3 6.2.1.2 Procedure: Add Missing QPR ............................................................ 6-6
6.2.2 Edit QPR .............................................................................................................. 6-7 6.2.2.1 Procedure: Edit QPR – Edit Activity screen....................................... 6-7 6.2.2.2 Procedure: Edit QPR – Direct Benefit Activities ............................... 6-9 6.2.2.3 Procedure: Edit QPR – Area Benefit activities ................................ 6-15 6.2.2.4 Procedure: Prior Period Corrections .............................................. 6-17
6.2.3 QPR Submission ................................................................................................ 6-20 6.2.3.1 Procedure: Accessing Review Tools ................................................ 6-21 6.2.3.2 Procedure: Reviewing Active QPR Flags ......................................... 6-23 6.2.3.3 Procedure: Viewing/Downloading QPR Review Checklist .............. 6-24 6.2.3.4 Procedure: Submitting a QPR ......................................................... 6-26
6.2.4 HUD Review of QPR .......................................................................................... 6-29 6.2.4.1 Procuedure: Accessing Review Screen and Review Tools .............. 6-30 6.2.4.2 Procuedure: Reviewing Active QPR Flags ....................................... 6-34 6.2.4.3 Procuedure: Completing QPR Review Checklist ............................. 6-34 6.2.4.4 Procedure: Approving/Rejecting QPR ............................................ 6-35
6.2.5 View / Download / Print QPR ........................................................................... 6-36 6.2.5.1 Procedure: View QPR ..................................................................... 6-36 6.2.5.2 Procedure: Download / Print QPR .................................................. 6-39
6.2.6 Additional Function - Maintain Address(s) ....................................................... 6-40 6.2.6.1 Procedure: Add Address ................................................................. 6-40 6.2.6.2 Procedure: Move Address across Performance Reports ................ 6-41 6.2.6.3 Procedure: Add Post Closeout Address Support Info ..................... 6-43
Appendix 1 – Closeout Checklists .......................................................................................... 6-45 Entering Review Checklists ............................................................................... 6-45 Approving Review Checklist .............................................................................. 6-49 View Reviewer Checklist ................................................................................... 6-49
User Manual – Section 7 Report Module
Version 2.0 - August 2017 Page i
Report Module
7. Report Module ........................................................................................................................ 7-1 7.1 Report Module Overview ............................................................................................ 7-1
7.1.1 Accessing the Reports Module ........................................................................... 7-1 7.1.2 Navigating within MicroStrategy ........................................................................ 7-2 7.1.3 Navigating Across Folders ................................................................................... 7-2
7.1.3.1 Shared Reports ................................................................................. 7-3 7.1.3.2 My Reports ....................................................................................... 7-3 7.1.3.3 History List ........................................................................................ 7-3 7.1.3.4 My Subscriptions .............................................................................. 7-4
7.1.4 Folder Views........................................................................................................ 7-4 7.2 Public Reports ............................................................................................................. 7-4 7.3 Standard Reports ........................................................................................................ 7-5 7.4 Modifying and Saving Standard Reports ...................................................................... 7-6
7.4.1 Standard Report Menus and Options ................................................................. 7-6 7.4.2 Moving and Sorting Columns .............................................................................. 7-7
7.4.2.1 Procedure: Cataloging Data at the Report Level (Page-by Axis) ...... 7-7 7.4.2.2 Procedure: Changing Column Order ................................................ 7-9 7.4.2.3 Procedure: Changing the Row Sort Order ...................................... 7-10 7.4.2.4 Procedure: Inverting Rows and Columns ....................................... 7-11
7.4.3 Undoing Changes .............................................................................................. 7-12 7.4.4 Accessing Other Report Format Options .......................................................... 7-12
7.4.4.1 Procedure: Presentation Format .................................................... 7-12 7.4.4.2 Procedure: Outline Function .......................................................... 7-13 7.4.4.3 Procedure: Display Graphs ............................................................. 7-13
7.4.5 Exporting Reports ............................................................................................. 7-14 7.4.5.1 Procedure: Export Report to Excel ................................................. 7-15 7.4.5.2 Procedure: Export Report to PDF ................................................... 7-16
7.4.6 Saving and Subscribing to Reports .................................................................... 7-16 7.4.6.1 Procedure: Saving Modified Versions of Reports ........................... 7-16 7.4.6.2 Procedure: Saving Reports to the History List ................................ 7-17 7.4.6.3 Procedure: Subscribing to Reports in the History List .................... 7-18
User Manual – Section 9 Data Uploads
Version 2.0 - August 2017 Page i
Data Uploads Overview
9. Data Uploads Overview ........................................................................................................... 9-1 9.1 Data Upload Types ............................................................................................................. 9-1 9.2 DRGR Upload – Process Overview ...................................................................................... 9-2 9.3 DRGR Upload Templates .................................................................................................... 9-3 9.4 Uploading the Data into DRGR ........................................................................................... 9-4
9.4.1 Navigating to the Data Upload Screen ............................................................... 9-5 9.4.2 Selecting the Upload Type and Uploading the Data Template ........................... 9-7 9.4.3 Verifying Results of Data Upload ........................................................................ 9-8
Appendix A: Template and Sample Values ........................................................................................ 9-9 Appendix B: Error Messages ............................................................................................................ 9-10
User Manual – Section 10 Public Data Portal
Version 2.0 - August 2017 Page i
Public Data Portal Overview
10. Public Data Portal Overview .................................................................................................. 10-1 10.1 DRGR Public Data Portal At-A-Glance ........................................................................ 10-2 10.2 DRGR Public Data Portal Main Features .................................................................... 10-2
10.2.1 Grantee and Responsible Organization Search ................................................ 10-3 10.2.2 Data Downloads ................................................................................................ 10-6 10.2.3 Reports .............................................................................................................. 10-7 10.2.4 Data Visualizations ............................................................................................ 10-8
10.2.4.1 Interactive Grantee and Responsible Organization Data ............... 10-9 10.3 Other Features of DRGR Public................................................................................ 10-10
10.3.1 About .............................................................................................................. 10-10 10.3.2 Contact Us ....................................................................................................... 10-11
10.4 Report Management of DRGR Public ....................................................................... 10-11 10.4.1 Manage DRGR Public from MicroStrategy ...................................................... 10-11 10.4.2 Manage DRGR Public from DRGR ................................................................... 10-13
User Manual – Section 1 Introduction to DRGR and Basic Navigation
Version 2.0 – August 2017 Page 1-1
Introduction to DRGR and Basic Navigation
This section contains a general overview of this User Manual (UM) and the Disaster Recovery Grant Reporting (DRGR) System. It also contains information on the technical aspects of the DRGR system, points of contact, available resources, and references.
1.1 Organization of User Manual
The primary purpose of this UM is to provide DRGR users with a step-by-step guide on how to navigate the DRGR System and properly utilize the different components of the DRGR System. The following sections of this UM provide a description of the purpose, functions, and grant management capabilities of the DRGR System for communities and organizations that received a grant for disaster recovery from the U.S. Department of Housing and Urban Development (HUD):
• Section 1: Introduction to DRGR and Basic Navigation: This section contains a general overview and technical aspects of the DRGR System, logging into and out of DRGR system, navigating the DRGR system, points of contact, available resources, and references.
• Section 2: Home Screen: This section contains information about navigating the DRGR System Home Screen, Updates/News, Action Items and flags.
• Section 3: Admin Module: This section contains procedures for adding/editing User Accounts, Sub-Grantees, and Monitoring/Audit/TA Events.
• Section 4: Action Plans Module: This section contains procedures for adding/editing Action Plans, Projects, Activities, and Responsible Organizations.
• Section 5: Drawdown Module: This section contains procedures for adding/editing Obligations, Drawdowns, and Program Income.
• Section 6: Quarterly Performance Reports (QPR) Module: This Section contains procedures for adding, editing and submitting Quarterly Performance Reports (QPRs).
• Section 7: Reports Module: This Section contains information about navigating and utilizing MicroStrategy DRGR reports.
• Section 8: Headquarters and Super Users: This section contains information on HUD HQ Admin and HUD HQ Super User functions.
• Section 9: Data Uploads: This section describes how to upload various data elements into DRGR.
• Section 10: Public Data Portal Overview: This section contains information on the DRGR Public Data Portal, and the various DRGR reports and information available to the public.
1.1.1 Notices Regarding User Manual Users of this UM should note the following:
• Unless this UM has already been cleared for publication and made available to the public by CPD, it may not be disclosed to the public or published for three (3) months following the acceptance of the UM final version, unless the CPD office has given written permission.
• The CPD office does not endorse products or manufacturers. Trade or manufacturers’ names appear herein solely because they are considered essential to the objective of this UM. Any copyrighted material in this UM is copyright protected. HUD requests that, if a commercial publisher intends to reprint portions of this UM, the publisher must make no changes to the material.
User Manual – Section 1 Introduction to DRGR and Basic Navigation
Version 2.0 – August 2017 Page 1-2
1.2 System Overview
The U.S. Department of Housing and Urban Development (HUD) provides flexible grants to help cities, counties, and states recover from Presidentially declared disasters, subject to availability of supplemental appropriations. In response to Presidentially declared disasters, Congress may appropriate additional funding for the Community Development Block Grant (CDBG) program as Disaster Recovery grants to rebuild the affected areas and provide funds aid in the recovery process. Since CDBG Disaster Recovery (CDBG-DR) assistance may fund a broad range of recovery activities, HUD can help communities and neighborhoods that otherwise might not recover due to limited resources.
HUD requires recipients of CDBG-DR grants (“Grantees”) to submit an Action Plan detailing the projected use of funds and to report on their accomplishments. The DRGR System is used to submit these plans and quarterly reports, and is also used to drawdown disaster recovery funds from HUD. The DRGR System is managed under the auspices of HUD’s Community Planning and Development (CPD).
The types of organizations that receive disaster recovery funds include the same large communities and states that are eligible to receive CDBG funding as well as smaller communities which have been directly affected by a disaster. The communities and states may receive a minimum disaster grant of $200,000. Recent examples of such grants include:
• FY 2016 – $2.3 billion to assist recovery from Louisiana Floods
• FY 2013 - $16 billion to assist recovery from Hurricane Sandy
• FY 2008 - $6.5 billion to assist recovery from Hurricanes Ike and Gustav and Midwest floods
HUD collects information from the DRGR System to comply with Congressional reporting requirements with respect to the use of CDBG-DR funds awarded under the HUD Disaster Recovery Initiative, and for other program management purposes. The use of DRGR for reporting purposes is mandatory, and information submitted to HUD via the DRGR System is public.
1.3 System Technical Summary
The DRGR System is an online-based system used to gather, package, and provide access to a central database containing a wide body of information about Grantees and their projects. Using a secure user ID and password, users access the DRGR System via a Web browser interface.
The DRGR System allows reporting across an integrated set of information. Data can be aggregated and analyzed in a number of forms convenient to HUD management. This, in turn, allows for comprehensive report generation and provides an accurate picture of the program when reporting to Congress. The system also provides a common format for capturing, storing, searching, and reporting DRGR System information while also providing a consistent data archive of historical information on program performance. Review Appendix B for DRGR System Configuration.
1.3.1 DRGR Data Flows Figure 1-1 provides a high-level overview diagram of the data flow process in the DRGR System.

User Manual – Section 1 Introduction to DRGR and Basic Navigation
Version 2.0 – August 2017 Page 1-3
1.3.1.1 Grant & Activity Setup / Funding
Some of the key steps for grant and activity set-up include:
1. HUD HQ staff load grant and grantee profiles into DRGR.
2. Ft. Worth CFO staff load account information after the grant agreement is signed.
3. Grantees request user accounts with appropriate roles to CPD field staff (via DRGR).
4. After DRGR accounts are created, DRGR grantee system administrators authorize access to each grant for all non-administrative user accounts.
5. DRGR grantee users create a DRGR Action Plan by:
a. Entering overall narratives.
b. Entering projects to group activities.
c. Entering activities with budgets and performance measures and assigning activities to a project.
6. DRGR grantee users submit the Action Plan once it is complete. Repeat steps 5a - 5c above when new activities have to be added or changes need to be made to existing activities.
7. HUD users review the DRGR Action Plan. If edits are needed, they reject the plan so the grantee users can edit it. If acceptable, they approve the plan and it is used as a template for the QPR.
Figure 1-1: DRGR Data Flow Process
User Manual – Section 1 Introduction to DRGR and Basic Navigation
Version 2.0 – August 2017 Page 1-4
1.3.1.2 Activity Obligation & Drawdown
Authorized grantees user can create and approve vouchers to draw funds after Step 1 to Step 5c are completed and grantee users with draw authority have updated the activity obligations in the drawdown module. See the Drawdown User Manual for additional information.
1.3.1.3 Quarterly Reporting
DRGR automatically includes any activities in the DRGR QPR if any funds were drawn down or obligated for those activities during the report period. Grantee users create each DRGR QPR by:
1. Adding the QPR for the upcoming due date.
2. Entering overall narrative to describe accomplishments across programs and projects.
3. Entering information on activities with activity progress narratives, addresses assisted (as applicable), performance accomplishments, and financial updates.
4. DRGR grantee users submit the QPR once it is complete. QPR submissions are typically due within 30 days after the end of each fiscal year quarter.
1.4 User Access Levels
• HUD users access DRGR using their approved User ID and password obtained through the HUD HQ System Administrator (HHQ Admin). Only users with valid User IDs and passwords are able to access the DRGR System.
• DRGR also provides the Public Data Portal that does not require a DRGR user account. See the Public Data Portal Manual for more detail.
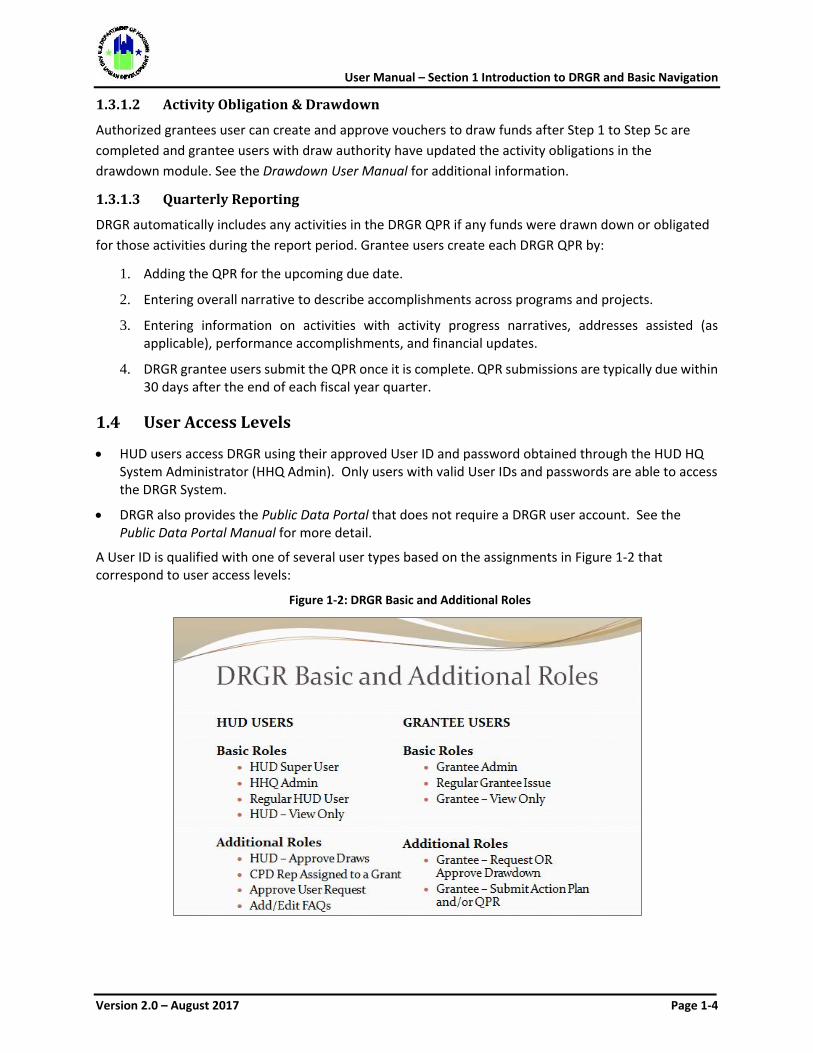
A User ID is qualified with one of several user types based on the assignments in Figure 1-2 that correspond to user access levels:
Figure 1-2: DRGR Basic and Additional Roles

User Manual – Section 1 Introduction to DRGR and Basic Navigation
Version 2.0 – August 2017 Page 1-5
User groups include eligible grantees as well as HUD users who must manage users, Activity Plans, QPRs, and/or drawdowns. The authorized roles are able to perform the functions listed in Figure 1-3:
Figure 1-3: DRGR User Roles
Grantee User Roles
HUD User Roles
Basic Roles Additional Roles
Regular HUD User HUD – View Only HUD Field Manager HUD Contact Assigned to Grant
HUD Approve Draw
Certify Grantee Admin Users X X
Certify HUD Field Office Users X
View Action Plans X X X X X
Review Action Plans X X X X
Search/View Vouchers X X X X X
Approve Vouchers over Threshold X
Block Activities from Drawdowns X
View Receipts X X X X X
View Program Income Accounts X X X X X
View QPRs X X X X X
Approve QPRs X X X X
View Microstrategy Reports X X X X X
User Manual – Section 1 Introduction to DRGR and Basic Navigation
Version 2.0 – August 2017 Page 1-6
1.4.1 Authorizations and Permissions The following uses of the DRGR System are authorized:
• Only users with authorized IDs and passwords can access the DRGR System. Each user is required to obtain a valid User ID and password from the HUD Headquarters (HQ) System Administrators (HHQ Admin).
• Any unauthorized use of the DRGR System or copying of DRGR System data, software, reports or documents is not permitted as designated by the Office of Community Planning and Development (CPD). Anyone in violation of these acts can be prosecuted to the fullest extent of the law.
• Unless the CPD office has already made DRGR reports available to the public, those entities in a cooperative relationship (grantees and holders of cooperative agreements) cannot publish reports for sixty (60) days after the acceptance of the full report unless written permission has been given by the grant or cooperative-agreement officer.
• Any or all uses of the DRGR System and all files on this system may be intercepted, monitored, recorded, copied, audited, inspected, and disclosed to authorized site, HUD, and law enforcement personnel, as well as authorized officials of other agencies, both domestic and foreign. By using this system, the user consents to such interception, monitoring, recording, copying, auditing, inspection, and disclosure at the discretion of authorized site or HUD personnel.
• Unauthorized or improper use of this system may result in administrative disciplinary action and civil and criminal penalties. By continuing to use this system, users indicate their awareness of, and consent to, these terms and conditions of use. LOG OFF IMMEDIATELY if the user does not agree to the conditions stated in this warning.
1.5 Login and Logout of DRGR System
This section provides the user with functional and operational tips for using the Disaster Recovery Grant Reporting (DRGR) System. It also provides instructions on how to log into and out of DRGR, and gives examples of the basic DRGR screen interface design.
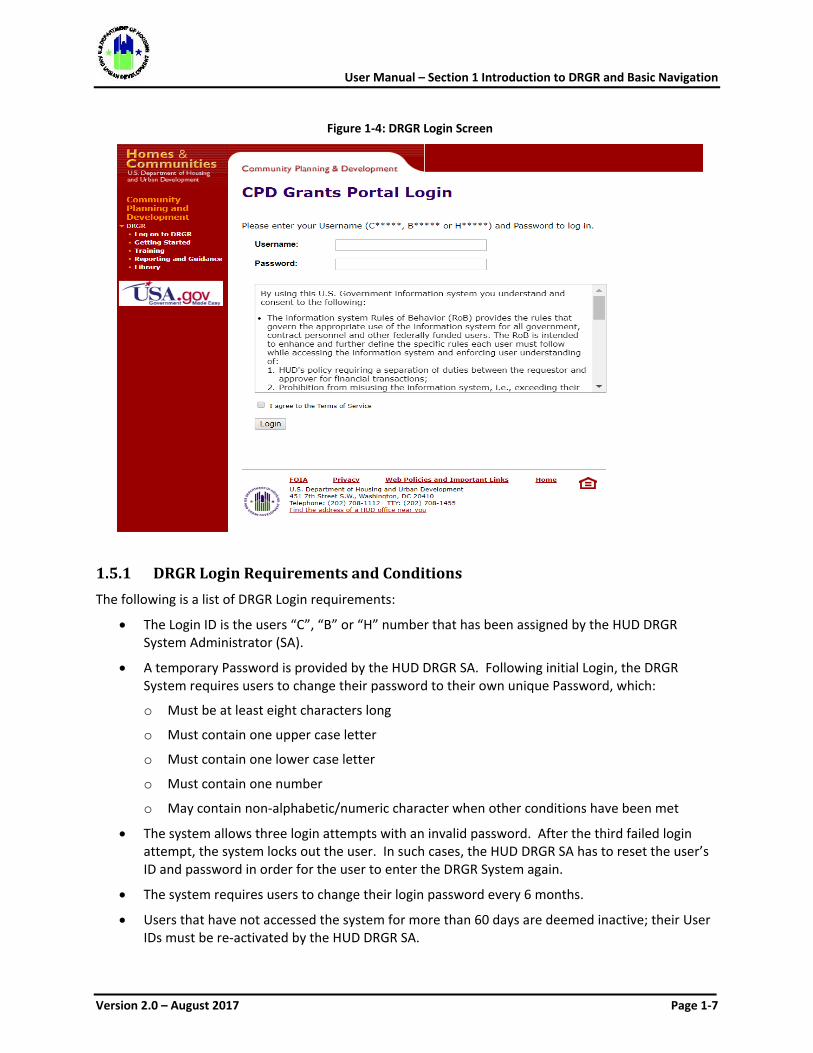
Using an Internet browser, enter the URL for the DRGR System https://drgr.hud.gov/DRGRWeb. The DRGR Login screen is displayed (Figure 1-4).
Notice to HUD Employee Computer Users
HUD Employees have available for use a Federal computer system computer, which is property of the United States Government. The computer is for authorized use only.
Users (authorized or unauthorized) have no explicit or implicit expectation of privacy.
User Manual – Section 1 Introduction to DRGR and Basic Navigation
Version 2.0 – August 2017 Page 1-7
Figure 1-4: DRGR Login Screen
1.5.1 DRGR Login Requirements and Conditions The following is a list of DRGR Login requirements:
• The Login ID is the users “C”, “B” or “H” number that has been assigned by the HUD DRGR System Administrator (SA).
• A temporary Password is provided by the HUD DRGR SA. Following initial Login, the DRGR System requires users to change their password to their own unique Password, which:
o Must be at least eight characters long
o Must contain one upper case letter
o Must contain one lower case letter
o Must contain one number
o May contain non-alphabetic/numeric character when other conditions have been met
• The system allows three login attempts with an invalid password. After the third failed login attempt, the system locks out the user. In such cases, the HUD DRGR SA has to reset the user’s ID and password in order for the user to enter the DRGR System again.
• The system requires users to change their login password every 6 months.
• Users that have not accessed the system for more than 60 days are deemed inactive; their User IDs must be re-activated by the HUD DRGR SA.
User Manual – Section 1 Introduction to DRGR and Basic Navigation
Version 2.0 – August 2017 Page 1-8
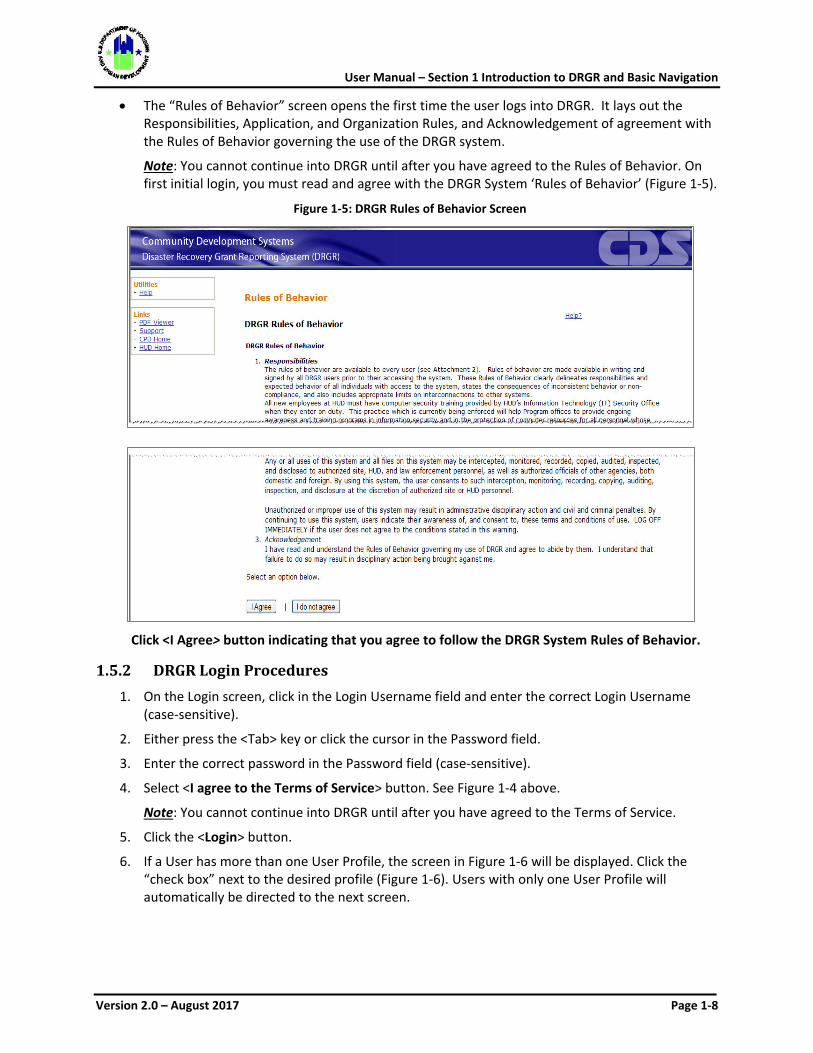
• The “Rules of Behavior” screen opens the first time the user logs into DRGR. It lays out the Responsibilities, Application, and Organization Rules, and Acknowledgement of agreement with the Rules of Behavior governing the use of the DRGR system.
Note: You cannot continue into DRGR until after you have agreed to the Rules of Behavior. On first initial login, you must read and agree with the DRGR System ‘Rules of Behavior’ (Figure 1-5).
Figure 1-5: DRGR Rules of Behavior Screen
Click <I Agree> button indicating that you agree to follow the DRGR System Rules of Behavior.
1.5.2 DRGR Login Procedures 1. On the Login screen, click in the Login Username field and enter the correct Login Username
(case-sensitive).
2. Either press the <Tab> key or click the cursor in the Password field.
3. Enter the correct password in the Password field (case-sensitive).
4. Select <I agree to the Terms of Service> button. See Figure 1-4 above.
Note: You cannot continue into DRGR until after you have agreed to the Terms of Service.
5. Click the <Login> button.
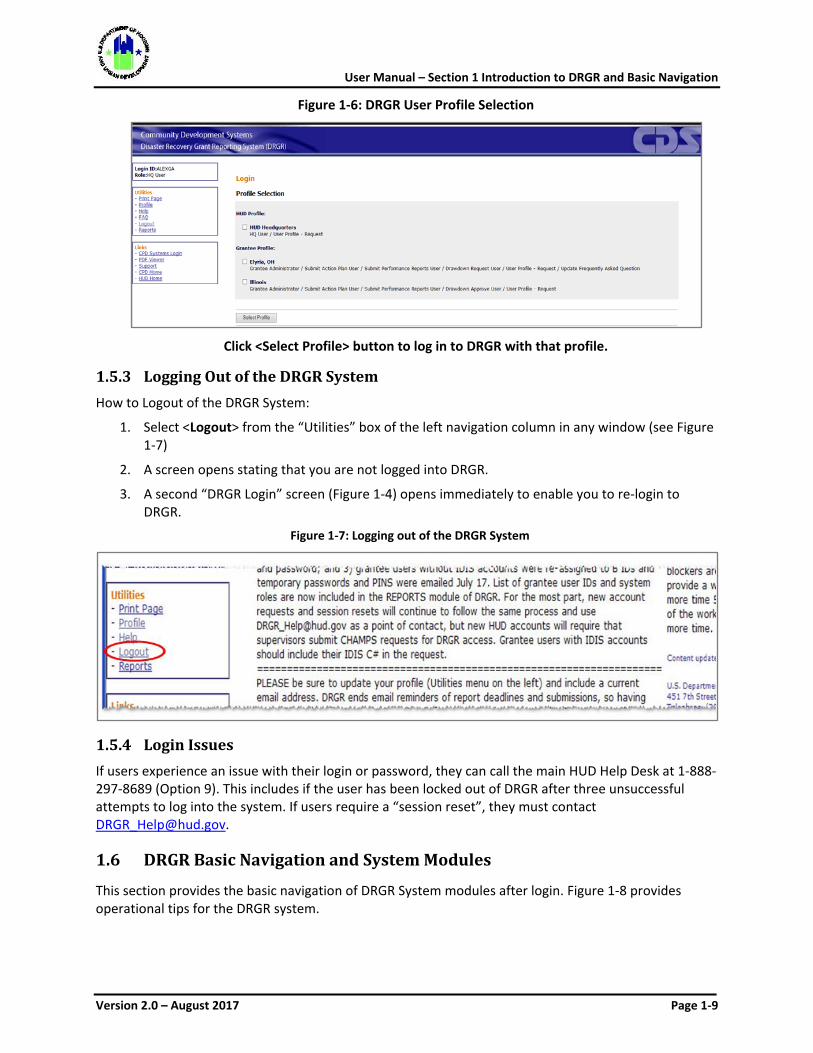
6. If a User has more than one User Profile, the screen in Figure 1-6 will be displayed. Click the “check box” next to the desired profile (Figure 1-6). Users with only one User Profile will automatically be directed to the next screen.
User Manual – Section 1 Introduction to DRGR and Basic Navigation
Version 2.0 – August 2017 Page 1-9
Figure 1-6: DRGR User Profile Selection
Click <Select Profile> button to log in to DRGR with that profile.
1.5.3 Logging Out of the DRGR System How to Logout of the DRGR System:
1. Select <Logout> from the “Utilities” box of the left navigation column in any window (see Figure 1-7)
2. A screen opens stating that you are not logged into DRGR.
3. A second “DRGR Login” screen (Figure 1-4) opens immediately to enable you to re-login to DRGR.
Figure 1-7: Logging out of the DRGR System
1.5.4 Login Issues If users experience an issue with their login or password, they can call the main HUD Help Desk at 1-888-297-8689 (Option 9). This includes if the user has been locked out of DRGR after three unsuccessful attempts to log into the system. If users require a “session reset”, they must contact [email protected].
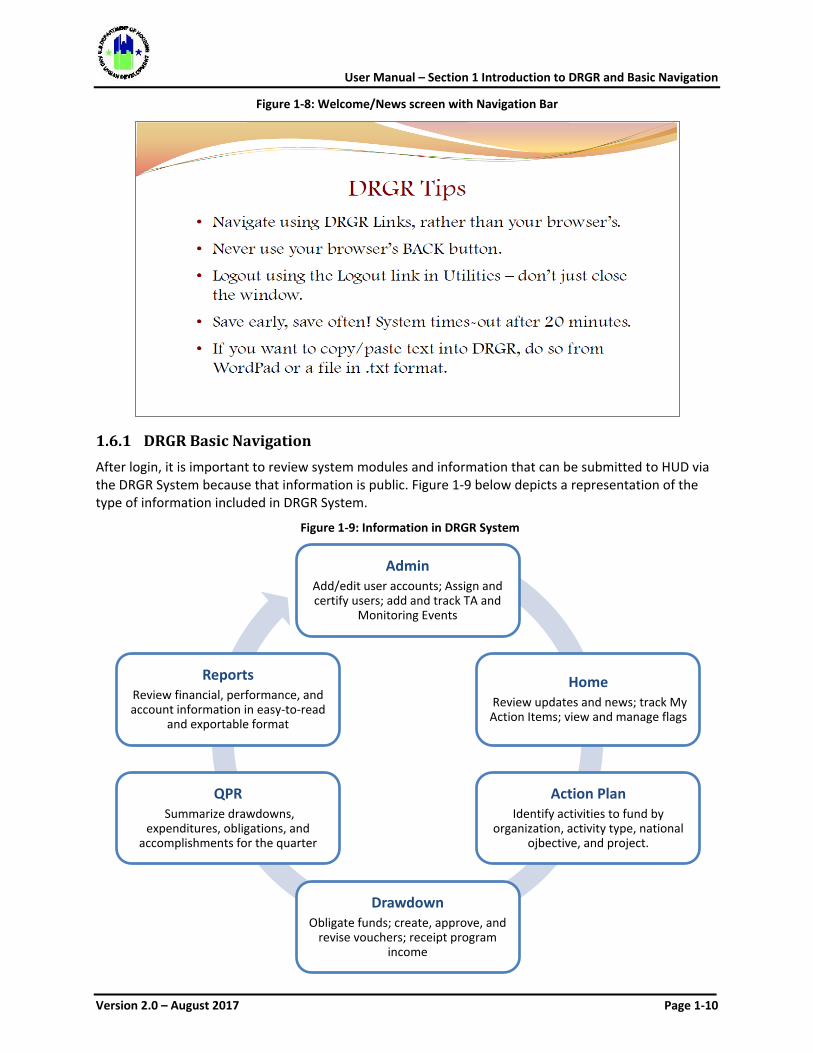
1.6 DRGR Basic Navigation and System Modules
This section provides the basic navigation of DRGR System modules after login. Figure 1-8 provides operational tips for the DRGR system.
User Manual – Section 1 Introduction to DRGR and Basic Navigation
Version 2.0 – August 2017 Page 1-10
Figure 1-8: Welcome/News screen with Navigation Bar
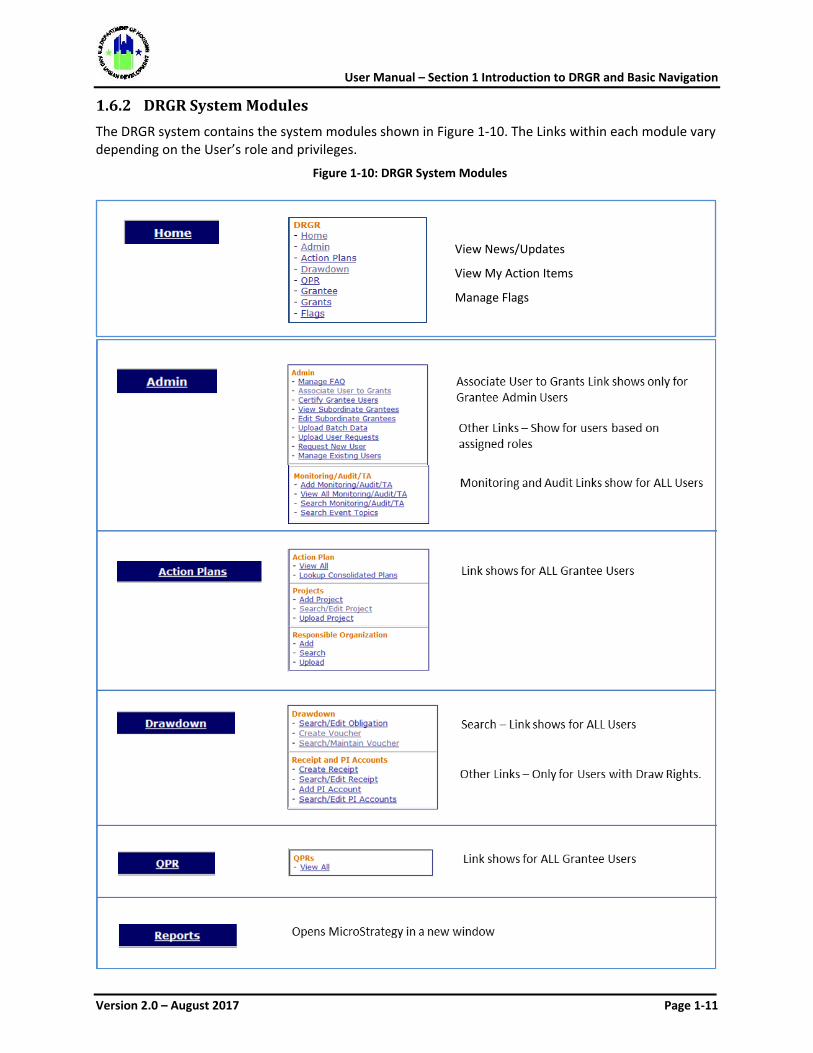
1.6.1 DRGR Basic Navigation After login, it is important to review system modules and information that can be submitted to HUD via the DRGR System because that information is public. Figure 1-9 below depicts a representation of the type of information included in DRGR System.
Figure 1-9: Information in DRGR System
AdminAdd/edit user accounts; Assign and certify users; add and track TA and
Monitoring Events
HomeReview updates and news; track My Action Items; view and manage flags
Action PlanIdentify activities to fund by
organization, activity type, national ojbective, and project.
Drawdown Obligate funds; create, approve, and
revise vouchers; receipt program income
QPRSummarize drawdowns,
expenditures, obligations, and accomplishments for the quarter
ReportsReview financial, performance, and account information in easy-to-read
and exportable format
User Manual – Section 1 Introduction to DRGR and Basic Navigation
Version 2.0 – August 2017 Page 1-11
1.6.2 DRGR System Modules The DRGR system contains the system modules shown in Figure 1-10. The Links within each module vary depending on the User’s role and privileges.
Figure 1-10: DRGR System Modules
View News/Updates
View My Action Items
Manage Flags
User Manual – Section 1 Introduction to DRGR and Basic Navigation
Version 2.0 – August 2017 Page 1-12
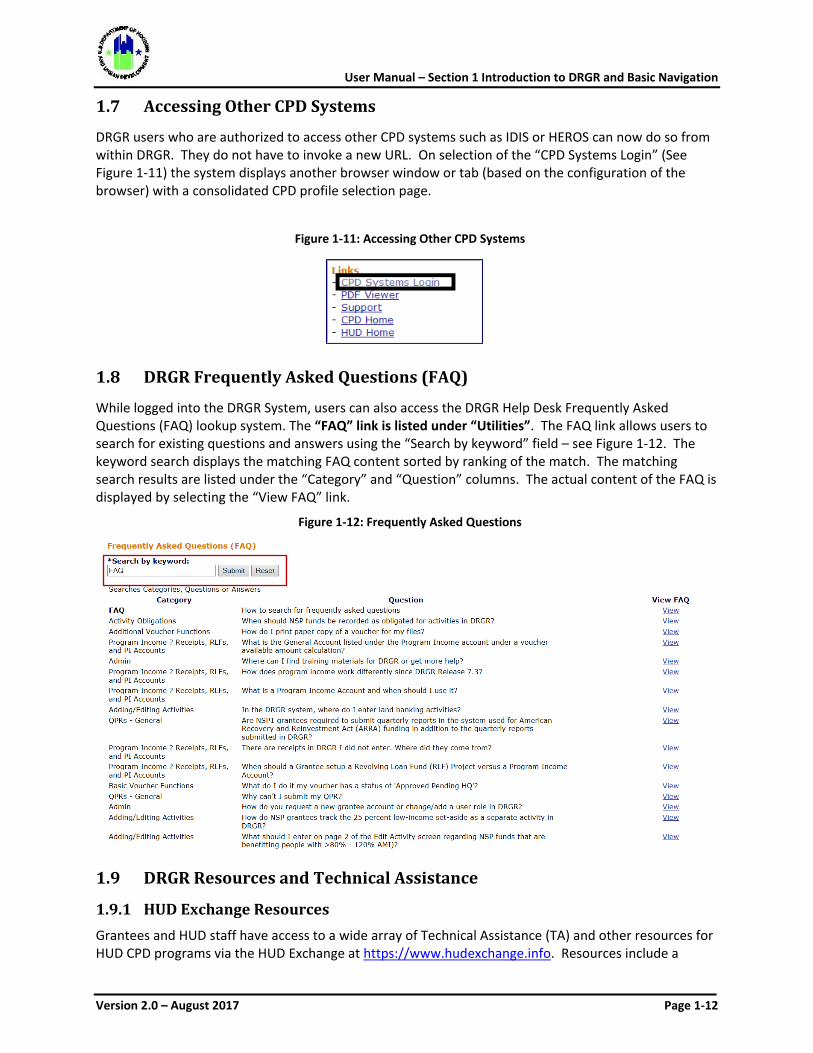
1.7 Accessing Other CPD Systems
DRGR users who are authorized to access other CPD systems such as IDIS or HEROS can now do so from within DRGR. They do not have to invoke a new URL. On selection of the “CPD Systems Login” (See Figure 1-11) the system displays another browser window or tab (based on the configuration of the browser) with a consolidated CPD profile selection page.
Figure 1-11: Accessing Other CPD Systems
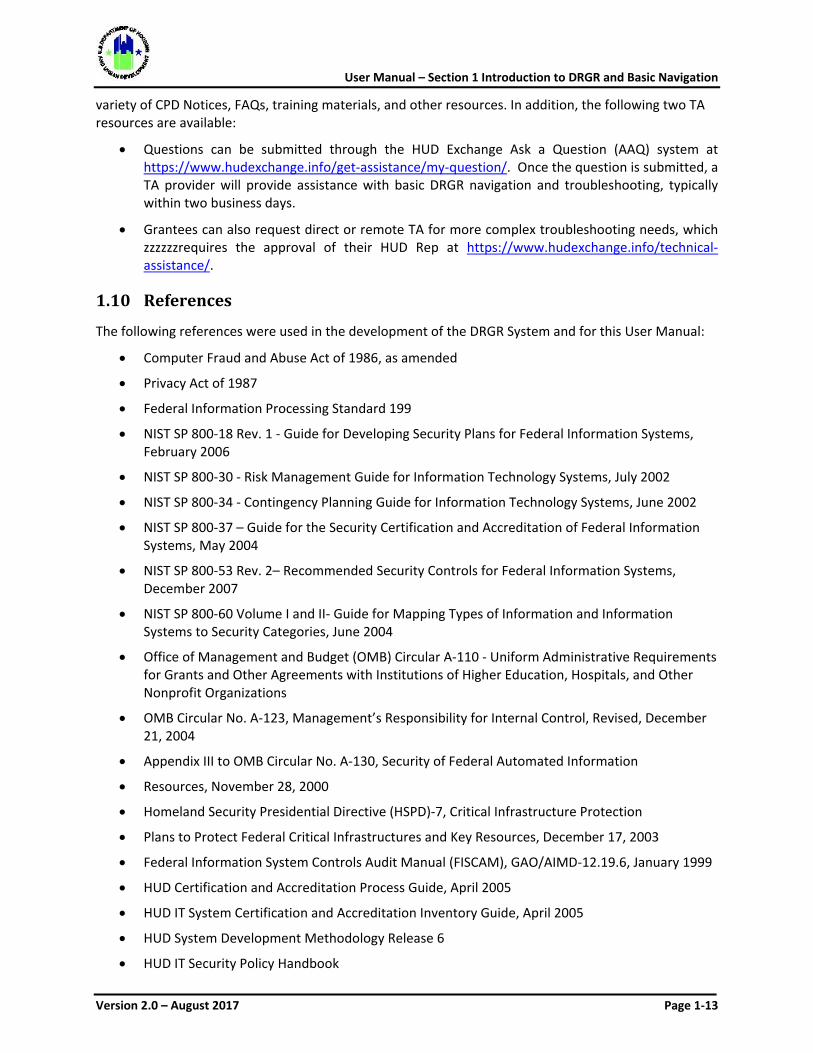
1.8 DRGR Frequently Asked Questions (FAQ)
While logged into the DRGR System, users can also access the DRGR Help Desk Frequently Asked Questions (FAQ) lookup system. The “FAQ” link is listed under “Utilities”. The FAQ link allows users to search for existing questions and answers using the “Search by keyword” field – see Figure 1-12. The keyword search displays the matching FAQ content sorted by ranking of the match. The matching search results are listed under the “Category” and “Question” columns. The actual content of the FAQ is displayed by selecting the “View FAQ” link.
Figure 1-12: Frequently Asked Questions
1.9 DRGR Resources and Technical Assistance
1.9.1 HUD Exchange Resources Grantees and HUD staff have access to a wide array of Technical Assistance (TA) and other resources for HUD CPD programs via the HUD Exchange at https://www.hudexchange.info. Resources include a
User Manual – Section 1 Introduction to DRGR and Basic Navigation
Version 2.0 – August 2017 Page 1-13
variety of CPD Notices, FAQs, training materials, and other resources. In addition, the following two TA resources are available:
• Questions can be submitted through the HUD Exchange Ask a Question (AAQ) system at https://www.hudexchange.info/get-assistance/my-question/. Once the question is submitted, a TA provider will provide assistance with basic DRGR navigation and troubleshooting, typically within two business days.
• Grantees can also request direct or remote TA for more complex troubleshooting needs, which zzzzzzrequires the approval of their HUD Rep at https://www.hudexchange.info/technical-assistance/.
1.10 References
The following references were used in the development of the DRGR System and for this User Manual:
• Computer Fraud and Abuse Act of 1986, as amended
• Privacy Act of 1987
• Federal Information Processing Standard 199
• NIST SP 800-18 Rev. 1 - Guide for Developing Security Plans for Federal Information Systems, February 2006
• NIST SP 800-30 - Risk Management Guide for Information Technology Systems, July 2002
• NIST SP 800-34 - Contingency Planning Guide for Information Technology Systems, June 2002
• NIST SP 800-37 – Guide for the Security Certification and Accreditation of Federal Information Systems, May 2004
• NIST SP 800-53 Rev. 2– Recommended Security Controls for Federal Information Systems, December 2007
• NIST SP 800-60 Volume I and II- Guide for Mapping Types of Information and Information Systems to Security Categories, June 2004
• Office of Management and Budget (OMB) Circular A-110 - Uniform Administrative Requirements for Grants and Other Agreements with Institutions of Higher Education, Hospitals, and Other Nonprofit Organizations
• OMB Circular No. A-123, Management’s Responsibility for Internal Control, Revised, December 21, 2004
• Appendix III to OMB Circular No. A-130, Security of Federal Automated Information
• Resources, November 28, 2000
• Homeland Security Presidential Directive (HSPD)-7, Critical Infrastructure Protection
• Plans to Protect Federal Critical Infrastructures and Key Resources, December 17, 2003
• Federal Information System Controls Audit Manual (FISCAM), GAO/AIMD-12.19.6, January 1999
• HUD Certification and Accreditation Process Guide, April 2005
• HUD IT System Certification and Accreditation Inventory Guide, April 2005
• HUD System Development Methodology Release 6
• HUD IT Security Policy Handbook
User Manual – Section 1 Introduction to DRGR and Basic Navigation
Version 2.0 – August 2017 Page 1-14
• HUD Acquisition Regulation (48 CFR Part 24)
• HUD System Development Methodology (SDM)
• HUD SDM Documentation Templates and Checklists
• HUD Handbook 2210.3 Rev 9, Procurement Policies and Procedures
• HUD Handbook 2400.25 Version 1, HUD Computer Security Policy Handbook
• Department of Veterans Affairs, HUD, and Independent Agencies Appropriation Act of 1999
• Federal Acquisition Regulation (Code of Federal Regulations 48 (48 CFR) Chapter 1)
• General Accounting Office (GAO) Federal Information Systems Controls Audit Manual GAO/AIMD-12.19.6 Vol.1
User Manual – Section 1 Introduction to DRGR and Basic Navigation
Version 2.0 – August 2017 Page 1-15
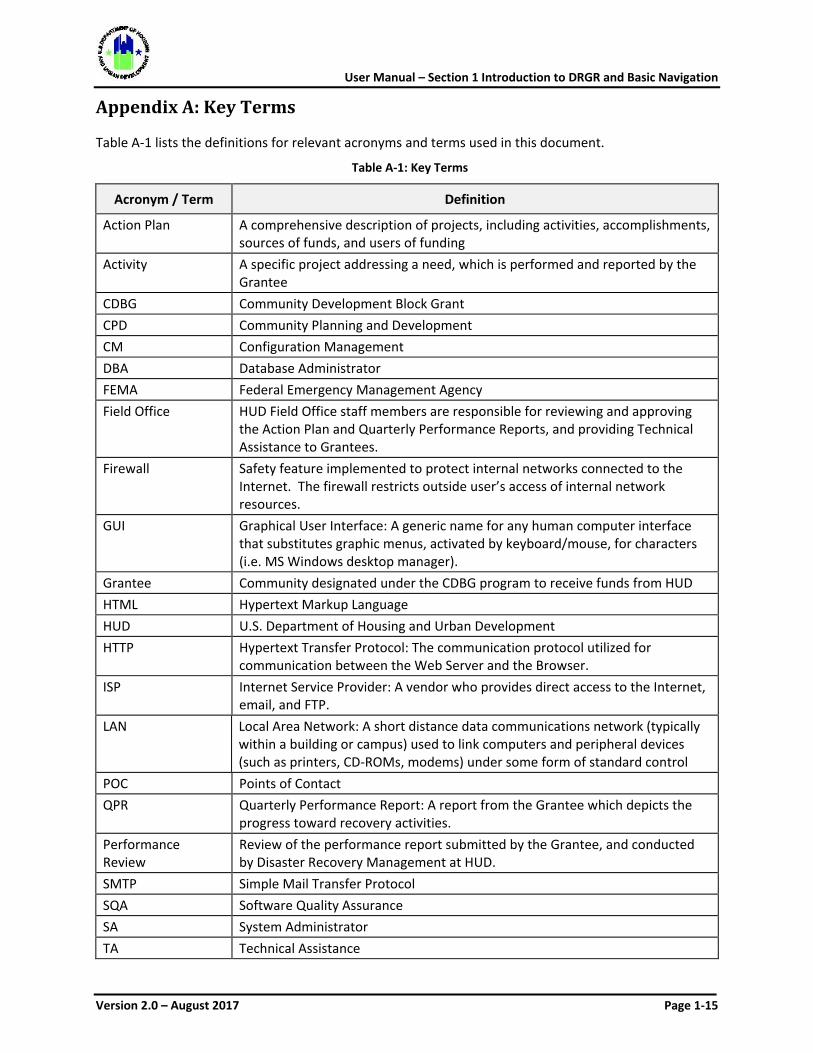
Appendix A: Key Terms
Table A-1 lists the definitions for relevant acronyms and terms used in this document.
Table A-1: Key Terms
Acronym / Term Definition
Action Plan A comprehensive description of projects, including activities, accomplishments, sources of funds, and users of funding
Activity A specific project addressing a need, which is performed and reported by the Grantee
CDBG Community Development Block Grant CPD Community Planning and Development CM Configuration Management DBA Database Administrator FEMA Federal Emergency Management Agency Field Office HUD Field Office staff members are responsible for reviewing and approving
the Action Plan and Quarterly Performance Reports, and providing Technical Assistance to Grantees.
Firewall Safety feature implemented to protect internal networks connected to the Internet. The firewall restricts outside user’s access of internal network resources.
GUI Graphical User Interface: A generic name for any human computer interface that substitutes graphic menus, activated by keyboard/mouse, for characters (i.e. MS Windows desktop manager).
Grantee Community designated under the CDBG program to receive funds from HUD HTML Hypertext Markup Language HUD U.S. Department of Housing and Urban Development HTTP Hypertext Transfer Protocol: The communication protocol utilized for
communication between the Web Server and the Browser. ISP Internet Service Provider: A vendor who provides direct access to the Internet,
email, and FTP. LAN Local Area Network: A short distance data communications network (typically
within a building or campus) used to link computers and peripheral devices (such as printers, CD-ROMs, modems) under some form of standard control
POC Points of Contact QPR Quarterly Performance Report: A report from the Grantee which depicts the
progress toward recovery activities. Performance Review
Review of the performance report submitted by the Grantee, and conducted by Disaster Recovery Management at HUD.
SMTP Simple Mail Transfer Protocol SQA Software Quality Assurance SA System Administrator TA Technical Assistance
User Manual – Section 1 Introduction to DRGR and Basic Navigation
Version 2.0 – August 2017 Page 1-16
Acronym / Term Definition
TCP/IP Transmission Control Protocol/Internet Protocol: Two popular protocols that provide communication across interconnected networks between computers with diverse hardware architectures and various operating systems.
UITP Unit and Integration Test Plan WAN Wide Area Network: A data network typically extending a LAN (local area
network) outside the building, over telephone common carrier lines to link to other LANs in remote buildings in possibly remote cities. The WAN uses common-carrier lines. The jump between a LAN and a WAN is made through a bridge/router.
Workstation A personal computer connected to the LAN.
User Manual – Section 1 Introduction to DRGR and Basic Navigation
Version 2.0 – August 2017 Page 1-17
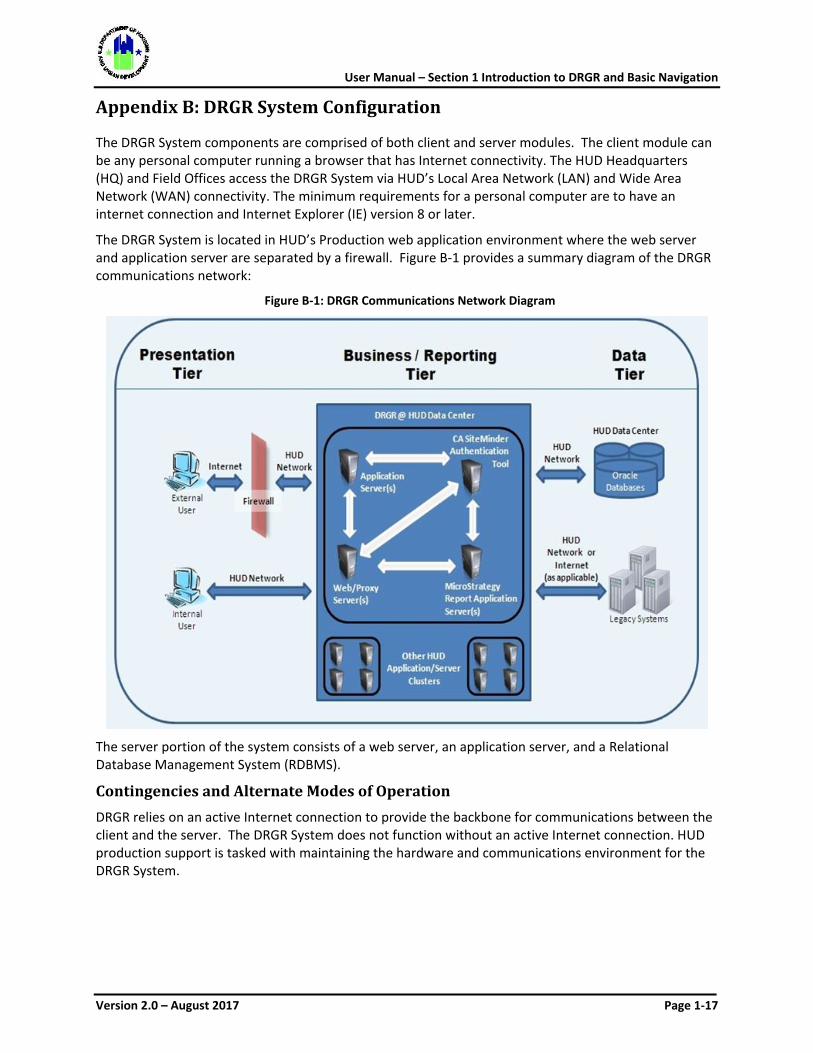
Appendix B: DRGR System Configuration
The DRGR System components are comprised of both client and server modules. The client module can be any personal computer running a browser that has Internet connectivity. The HUD Headquarters (HQ) and Field Offices access the DRGR System via HUD’s Local Area Network (LAN) and Wide Area Network (WAN) connectivity. The minimum requirements for a personal computer are to have an internet connection and Internet Explorer (IE) version 8 or later.
The DRGR System is located in HUD’s Production web application environment where the web server and application server are separated by a firewall. Figure B-1 provides a summary diagram of the DRGR communications network:
Figure B-1: DRGR Communications Network Diagram
The server portion of the system consists of a web server, an application server, and a Relational Database Management System (RDBMS).
Contingencies and Alternate Modes of Operation
DRGR relies on an active Internet connection to provide the backbone for communications between the client and the server. The DRGR System does not function without an active Internet connection. HUD production support is tasked with maintaining the hardware and communications environment for the DRGR System.

User Manual – Section 1 Introduction to DRGR and Basic Navigation
Version 2.0 – August 2017 Page 1-18
Points of Contact: Information Table A-1 lists the points of contact for any questions related to this UM.
Table B-1: Points of Contact
Contact Name Organization Position Telephone Number/Email
George H. Eakin GMBS Customer Relationship Coordinator
(202) 402-6236 [email protected]
Howard Hong OCRPM Project Leader, OCIO (202) 402-3575 [email protected]
Jessie H. Kome OBGA Deputy Director System Owner
(202) 708-3587 [email protected]
Valerie D. Coleman SDED Director (202) 402-4389 [email protected]
Mandie Staley CACI Program Manager (703) 739-5528 [email protected]
Mark Galletta CACI Project Manager (703) 739-5914 [email protected]
Coordination The following organizations have oversight of various aspects of DRGR:
• Office of Information Technology (OIT)
• Office of Community Planning and Development (CPD)
• Office of Departmental Policy and Oversight Support (ODPOS)
• Change Control Board (CCB)
• Computer Services, Operations, and Maintenance Group (CSOMG)
• Office of the Chief Information Officer (OCIO)
• Office of the Chief Financial Officer (OCFO)
• Systems Integrity Quality Assurance Division (SIQAD)
User Manual – Section 2 Home Screen
Version 2.0 – August 2017 Page 2-1
2. Home Screen
This section provides information on the purpose and function of the Home Screen.
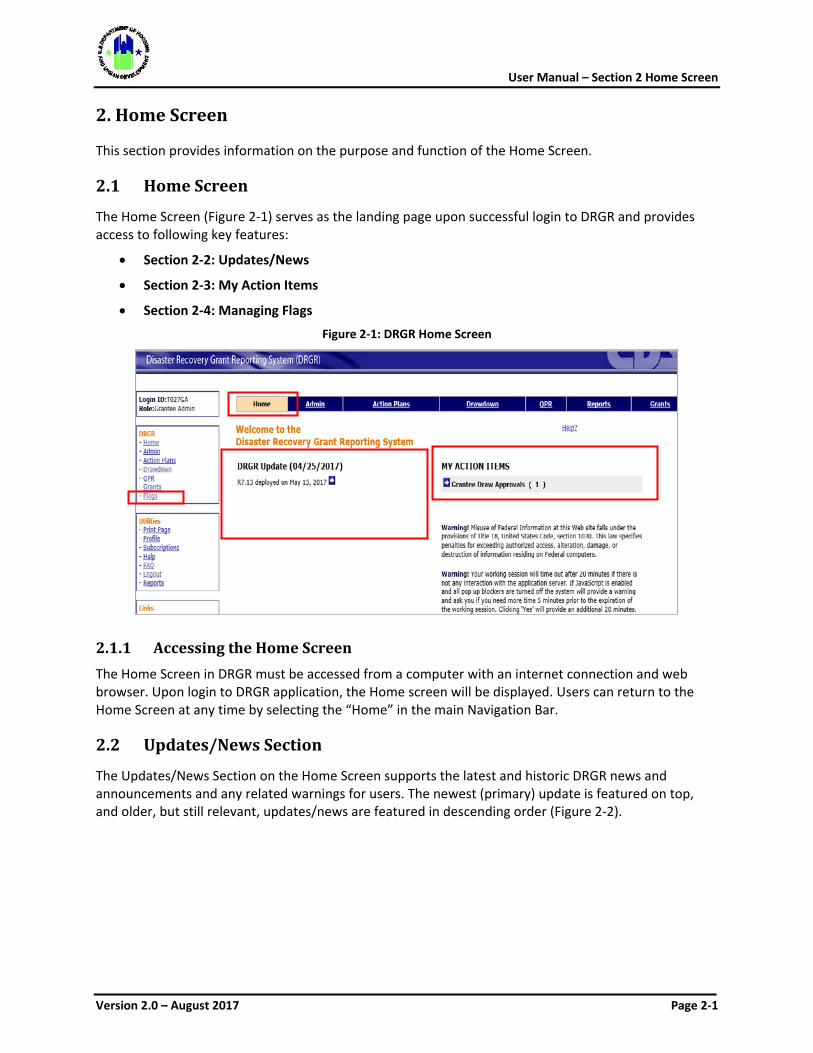
2.1 Home Screen
The Home Screen (Figure 2-1) serves as the landing page upon successful login to DRGR and provides access to following key features:
• Section 2-2: Updates/News
• Section 2-3: My Action Items
• Section 2-4: Managing Flags
Figure 2-1: DRGR Home Screen
2.1.1 Accessing the Home Screen The Home Screen in DRGR must be accessed from a computer with an internet connection and web browser. Upon login to DRGR application, the Home screen will be displayed. Users can return to the Home Screen at any time by selecting the “Home” in the main Navigation Bar.
2.2 Updates/News Section
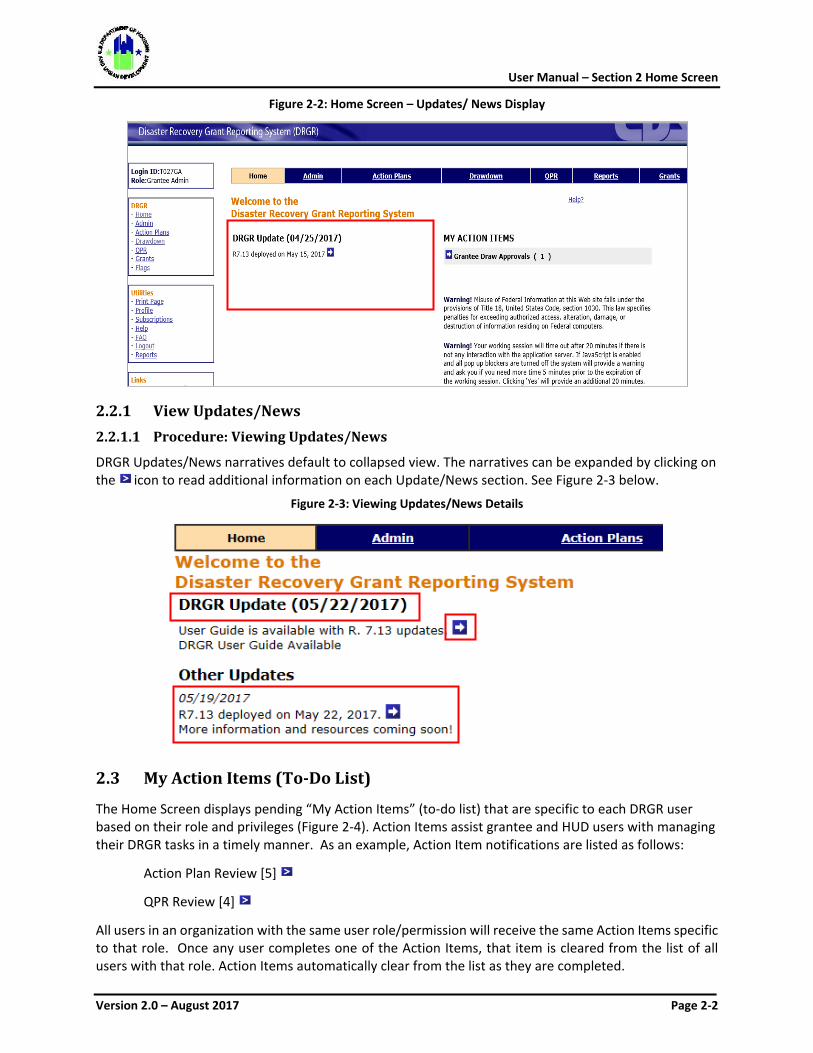
The Updates/News Section on the Home Screen supports the latest and historic DRGR news and announcements and any related warnings for users. The newest (primary) update is featured on top, and older, but still relevant, updates/news are featured in descending order (Figure 2-2).
User Manual – Section 2 Home Screen
Version 2.0 – August 2017 Page 2-2
Figure 2-2: Home Screen – Updates/ News Display
2.2.1 View Updates/News 2.2.1.1 Procedure: Viewing Updates/News
DRGR Updates/News narratives default to collapsed view. The narratives can be expanded by clicking on the icon to read additional information on each Update/News section. See Figure 2-3 below.
Figure 2-3: Viewing Updates/News Details
2.3 My Action Items (To-Do List)
The Home Screen displays pending “My Action Items” (to-do list) that are specific to each DRGR user based on their role and privileges (Figure 2-4). Action Items assist grantee and HUD users with managing their DRGR tasks in a timely manner. As an example, Action Item notifications are listed as follows:
Action Plan Review [5]
QPR Review [4]
All users in an organization with the same user role/permission will receive the same Action Items specific to that role. Once any user completes one of the Action Items, that item is cleared from the list of all users with that role. Action Items automatically clear from the list as they are completed.

User Manual – Section 2 Home Screen
Version 2.0 – August 2017 Page 2-3
Figure 2-4: Home Screen – My Action Items
Table 2-1 shows which Action Items will displayed based on DRGR user roles. HUD can add/edit/remove My Action Items at any time without a DRGR Release.
Table 2-1: DRGR User Roles
Action Item
DRGR User Role
HUD Grantee HQ
Admin CPD Rep FO/HQ Manager
Voucher Approver Admin User
Request Drawdown Approver
Drawdown Requester
Action Plan Review
QPR Review
Drawdown Approval
Revision Approval
Collection / Adjustment Revision
Collection / Adjustment Approval
New User Requests Approval
User Update Request Approval
User Deactivation Request Approval
Active Flags
Certification Pending
User Manual – Section 2 Home Screen
Version 2.0 – August 2017 Page 2-4
2.3.1 View Action Items 2.3.1.1 Procedure: Viewing Action Items
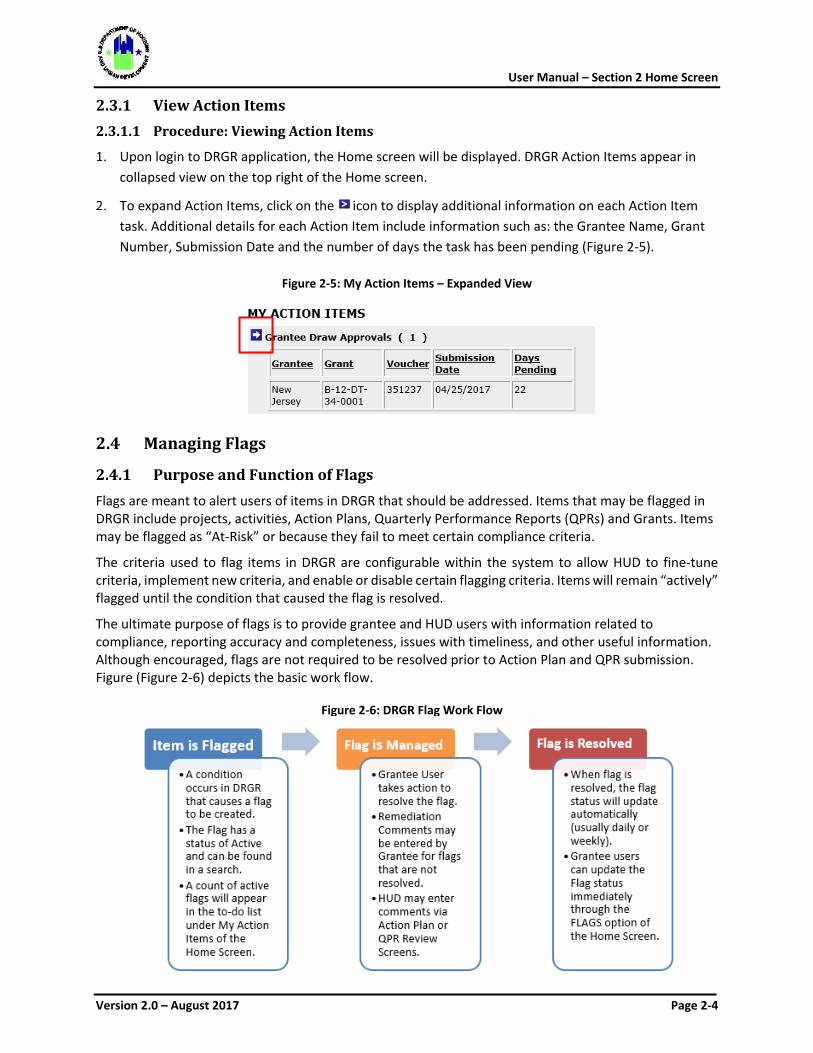
Upon login to DRGR application, the Home screen will be displayed. DRGR Action Items appear in collapsed view on the top right of the Home screen.
To expand Action Items, click on the icon to display additional information on each Action Item task. Additional details for each Action Item include information such as: the Grantee Name, Grant Number, Submission Date and the number of days the task has been pending (Figure 2-5).
2.4 Managing Flags
2.4.1 Purpose and Function of Flags Flags are meant to alert users of items in DRGR that should be addressed. Items that may be flagged in DRGR include projects, activities, Action Plans, Quarterly Performance Reports (QPRs) and Grants. Items may be flagged as “At-Risk” or because they fail to meet certain compliance criteria.
The criteria used to flag items in DRGR are configurable within the system to allow HUD to fine-tune criteria, implement new criteria, and enable or disable certain flagging criteria. Items will remain “actively” flagged until the condition that caused the flag is resolved.
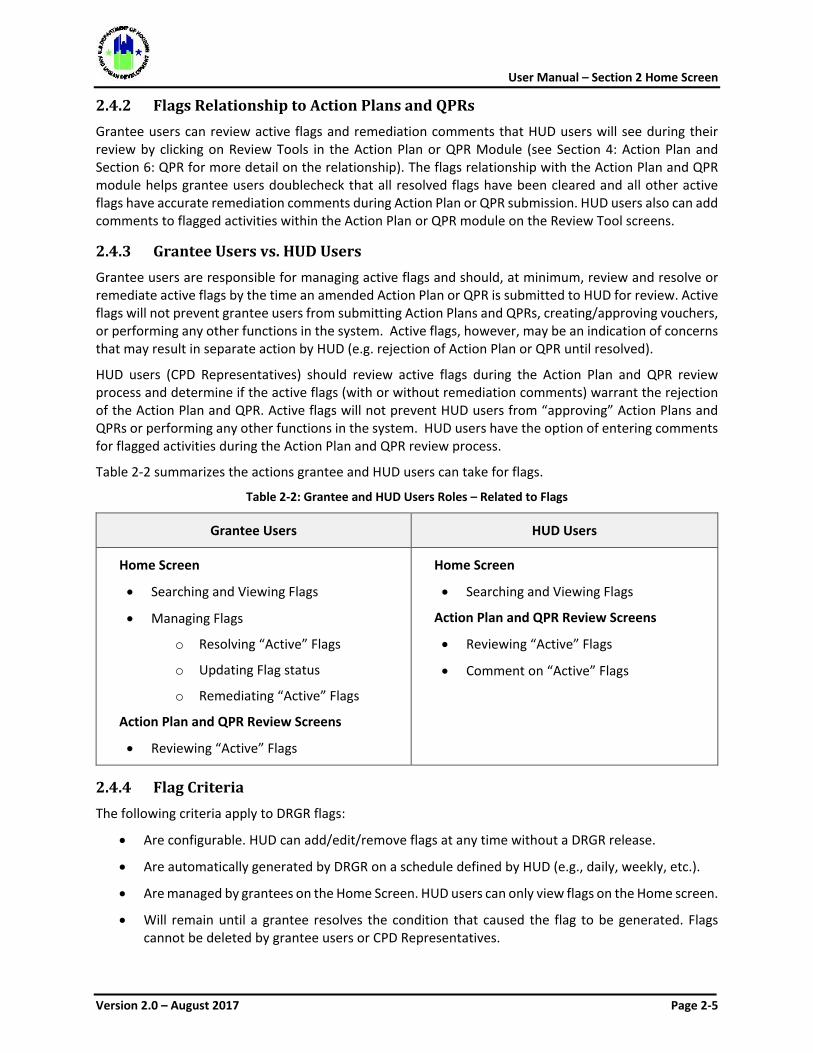
The ultimate purpose of flags is to provide grantee and HUD users with information related to compliance, reporting accuracy and completeness, issues with timeliness, and other useful information. Although encouraged, flags are not required to be resolved prior to Action Plan and QPR submission. Figure (Figure 2-6) depicts the basic work flow.
Figure 2-5: My Action Items – Expanded View
Figure 2-6: DRGR Flag Work Flow
User Manual – Section 2 Home Screen
Version 2.0 – August 2017 Page 2-5
2.4.2 Flags Relationship to Action Plans and QPRs Grantee users can review active flags and remediation comments that HUD users will see during their review by clicking on Review Tools in the Action Plan or QPR Module (see Section 4: Action Plan and Section 6: QPR for more detail on the relationship). The flags relationship with the Action Plan and QPR module helps grantee users doublecheck that all resolved flags have been cleared and all other active flags have accurate remediation comments during Action Plan or QPR submission. HUD users also can add comments to flagged activities within the Action Plan or QPR module on the Review Tool screens.
2.4.3 Grantee Users vs. HUD Users Grantee users are responsible for managing active flags and should, at minimum, review and resolve or remediate active flags by the time an amended Action Plan or QPR is submitted to HUD for review. Active flags will not prevent grantee users from submitting Action Plans and QPRs, creating/approving vouchers, or performing any other functions in the system. Active flags, however, may be an indication of concerns that may result in separate action by HUD (e.g. rejection of Action Plan or QPR until resolved).
HUD users (CPD Representatives) should review active flags during the Action Plan and QPR review process and determine if the active flags (with or without remediation comments) warrant the rejection of the Action Plan and QPR. Active flags will not prevent HUD users from “approving” Action Plans and QPRs or performing any other functions in the system. HUD users have the option of entering comments for flagged activities during the Action Plan and QPR review process.
Table 2-2 summarizes the actions grantee and HUD users can take for flags.
Table 2-2: Grantee and HUD Users Roles – Related to Flags
Grantee Users HUD Users
Home Screen
• Searching and Viewing Flags
• Managing Flags
o Resolving “Active” Flags
o Updating Flag status
o Remediating “Active” Flags
Action Plan and QPR Review Screens
• Reviewing “Active” Flags
Home Screen
• Searching and Viewing Flags
Action Plan and QPR Review Screens
• Reviewing “Active” Flags
• Comment on “Active” Flags
2.4.4 Flag Criteria The following criteria apply to DRGR flags:
• Are configurable. HUD can add/edit/remove flags at any time without a DRGR release.
• Are automatically generated by DRGR on a schedule defined by HUD (e.g., daily, weekly, etc.).
• Are managed by grantees on the Home Screen. HUD users can only view flags on the Home screen.
• Will remain until a grantee resolves the condition that caused the flag to be generated. Flags cannot be deleted by grantee users or CPD Representatives.
User Manual – Section 2 Home Screen
Version 2.0 – August 2017 Page 2-6
• Should be resolved or remediated by the grantee before Action Plan or QPR submission (recommended, but not required).
• Are viewable by HUD and grantees on the Action Plan and QPR Review Tool screens.
2.4.5 Accessing Flags Grantees and HUD users can access flags from the Home Screen.
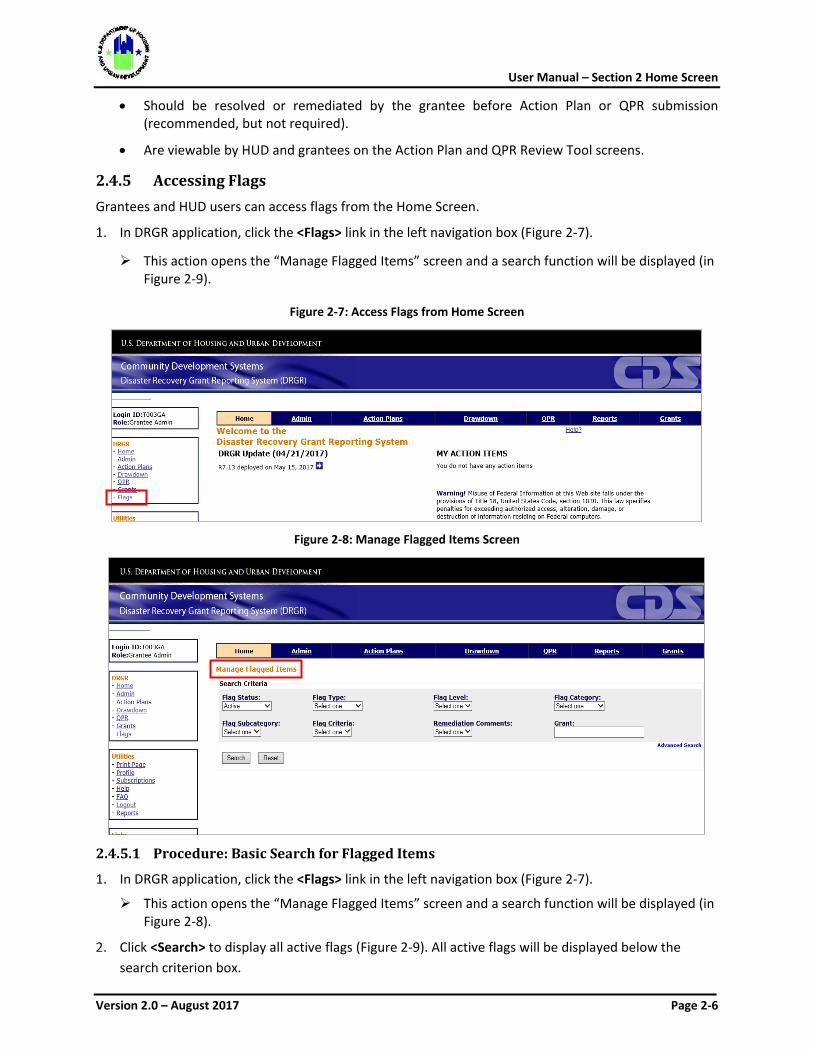
In DRGR application, click the <Flags> link in the left navigation box (Figure 2-7).
This action opens the “Manage Flagged Items” screen and a search function will be displayed (in Figure 2-9).
Figure 2-7: Access Flags from Home Screen
Figure 2-8: Manage Flagged Items Screen
2.4.5.1 Procedure: Basic Search for Flagged Items
1. In DRGR application, click the <Flags> link in the left navigation box (Figure 2-7).
This action opens the “Manage Flagged Items” screen and a search function will be displayed (in Figure 2-8).
Click <Search> to display all active flags (Figure 2-9). All active flags will be displayed below the search criterion box.
User Manual – Section 2 Home Screen
Version 2.0 – August 2017 Page 2-7
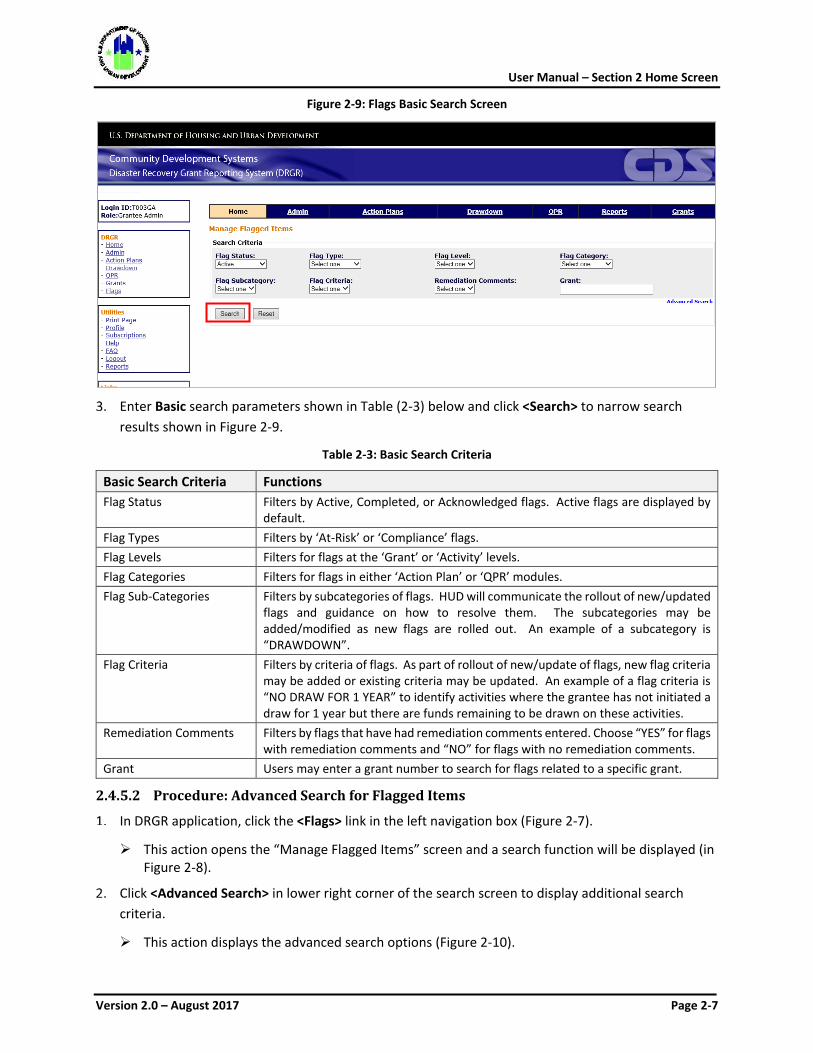
Figure 2-9: Flags Basic Search Screen
Enter Basic search parameters shown in Table (2-3) below and click <Search> to narrow search
results shown in Figure 2-9.
Table 2-3: Basic Search Criteria
Basic Search Criteria Functions Flag Status Filters by Active, Completed, or Acknowledged flags. Active flags are displayed by
default. Flag Types Filters by ‘At-Risk’ or ‘Compliance’ flags. Flag Levels Filters for flags at the ‘Grant’ or ‘Activity’ levels. Flag Categories Filters for flags in either ‘Action Plan’ or ‘QPR’ modules. Flag Sub-Categories Filters by subcategories of flags. HUD will communicate the rollout of new/updated
flags and guidance on how to resolve them. The subcategories may be added/modified as new flags are rolled out. An example of a subcategory is “DRAWDOWN”.
Flag Criteria Filters by criteria of flags. As part of rollout of new/update of flags, new flag criteria may be added or existing criteria may be updated. An example of a flag criteria is “NO DRAW FOR 1 YEAR” to identify activities where the grantee has not initiated a draw for 1 year but there are funds remaining to be drawn on these activities.
Remediation Comments Filters by flags that have had remediation comments entered. Choose “YES” for flags with remediation comments and “NO” for flags with no remediation comments.
Grant Users may enter a grant number to search for flags related to a specific grant.
2.4.5.2 Procedure: Advanced Search for Flagged Items
In DRGR application, click the <Flags> link in the left navigation box (Figure 2-7).
This action opens the “Manage Flagged Items” screen and a search function will be displayed (in Figure 2-8).
Click <Advanced Search> in lower right corner of the search screen to display additional search criteria.
This action displays the advanced search options (Figure 2-10).
User Manual – Section 2 Home Screen
Version 2.0 – August 2017 Page 2-8
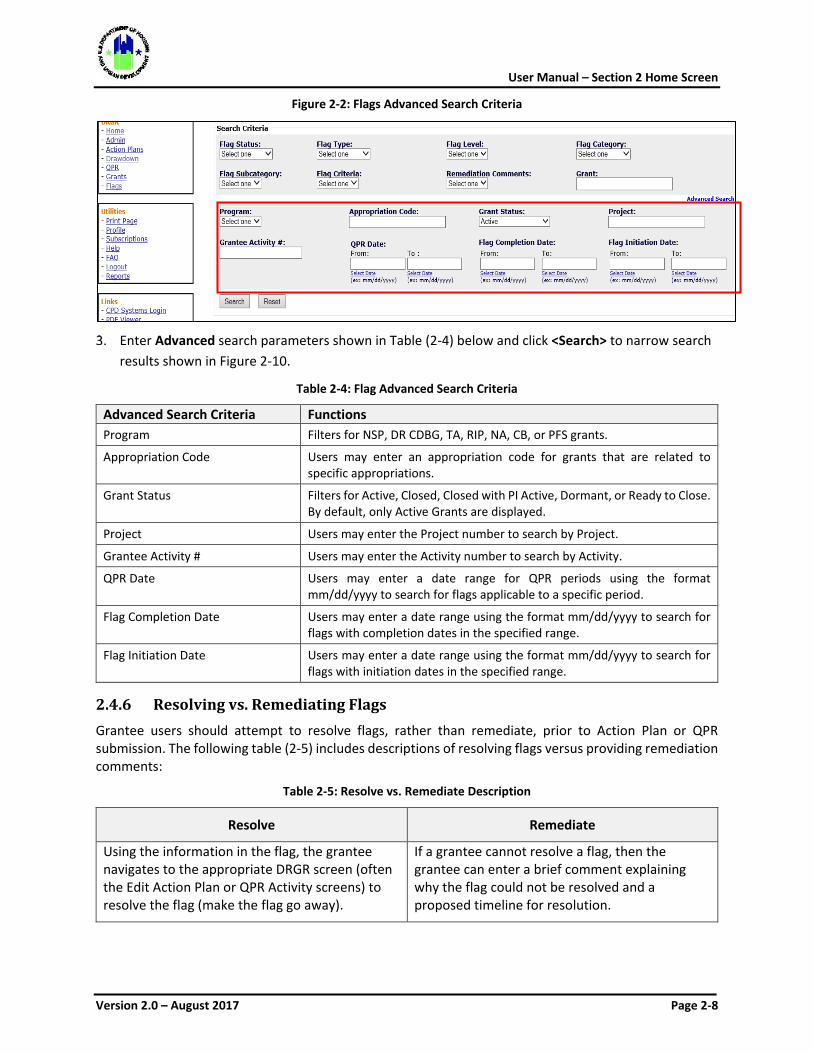
Figure 2-2: Flags Advanced Search Criteria
Enter Advanced search parameters shown in Table (2-4) below and click <Search> to narrow search results shown in Figure 2-10.
Table 2-4: Flag Advanced Search Criteria
Advanced Search Criteria Functions Program Filters for NSP, DR CDBG, TA, RIP, NA, CB, or PFS grants.
Appropriation Code Users may enter an appropriation code for grants that are related to specific appropriations.
Grant Status Filters for Active, Closed, Closed with PI Active, Dormant, or Ready to Close. By default, only Active Grants are displayed.
Project Users may enter the Project number to search by Project.
Grantee Activity # Users may enter the Activity number to search by Activity.
QPR Date Users may enter a date range for QPR periods using the format mm/dd/yyyy to search for flags applicable to a specific period.
Flag Completion Date Users may enter a date range using the format mm/dd/yyyy to search for flags with completion dates in the specified range.
Flag Initiation Date Users may enter a date range using the format mm/dd/yyyy to search for flags with initiation dates in the specified range.
2.4.6 Resolving vs. Remediating Flags Grantee users should attempt to resolve flags, rather than remediate, prior to Action Plan or QPR submission. The following table (2-5) includes descriptions of resolving flags versus providing remediation comments:
Table 2-5: Resolve vs. Remediate Description
Resolve Remediate
Using the information in the flag, the grantee navigates to the appropriate DRGR screen (often the Edit Action Plan or QPR Activity screens) to resolve the flag (make the flag go away).
If a grantee cannot resolve a flag, then the grantee can enter a brief comment explaining why the flag could not be resolved and a proposed timeline for resolution.
User Manual – Section 2 Home Screen
Version 2.0 – August 2017 Page 2-9
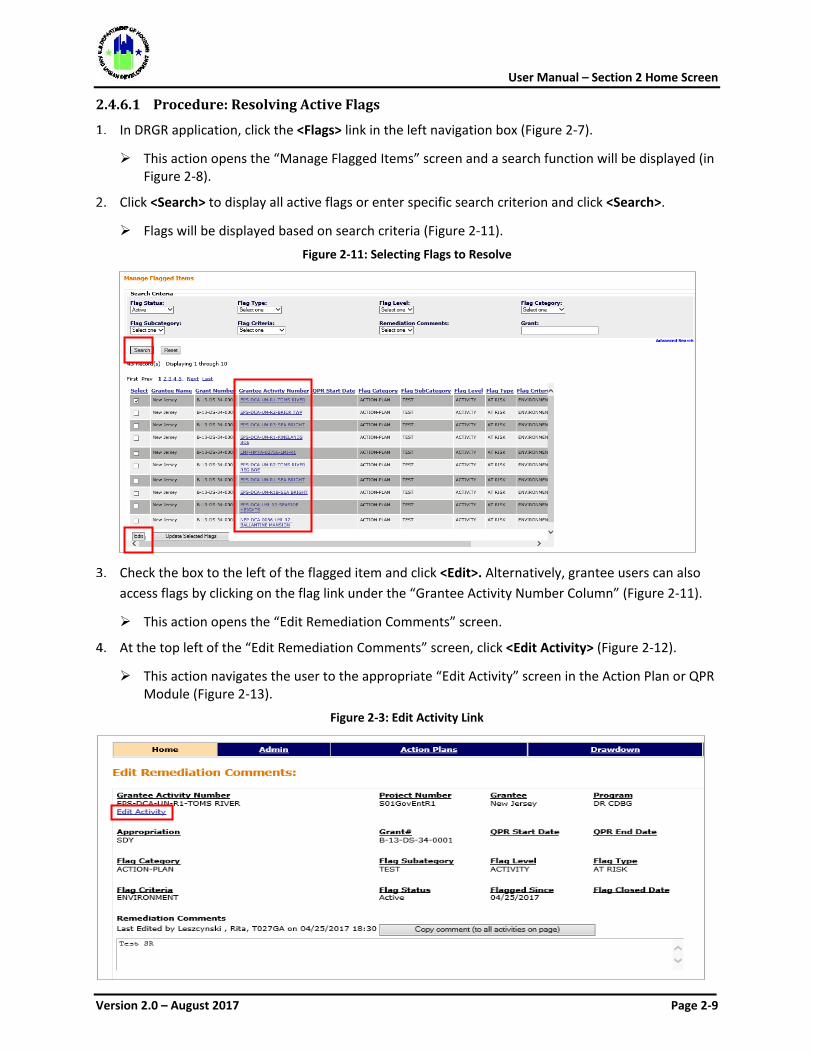
2.4.6.1 Procedure: Resolving Active Flags
In DRGR application, click the <Flags> link in the left navigation box (Figure 2-7).
This action opens the “Manage Flagged Items” screen and a search function will be displayed (in Figure 2-8).
Click <Search> to display all active flags or enter specific search criterion and click <Search>.
Flags will be displayed based on search criteria (Figure 2-11).
Figure 2-11: Selecting Flags to Resolve
Check the box to the left of the flagged item and click <Edit>. Alternatively, grantee users can also
access flags by clicking on the flag link under the “Grantee Activity Number Column” (Figure 2-11).
This action opens the “Edit Remediation Comments” screen.
At the top left of the “Edit Remediation Comments” screen, click <Edit Activity> (Figure 2-12).
This action navigates the user to the appropriate “Edit Activity” screen in the Action Plan or QPR Module (Figure 2-13).
Figure 2-3: Edit Activity Link
User Manual – Section 2 Home Screen
Version 2.0 – August 2017 Page 2-10
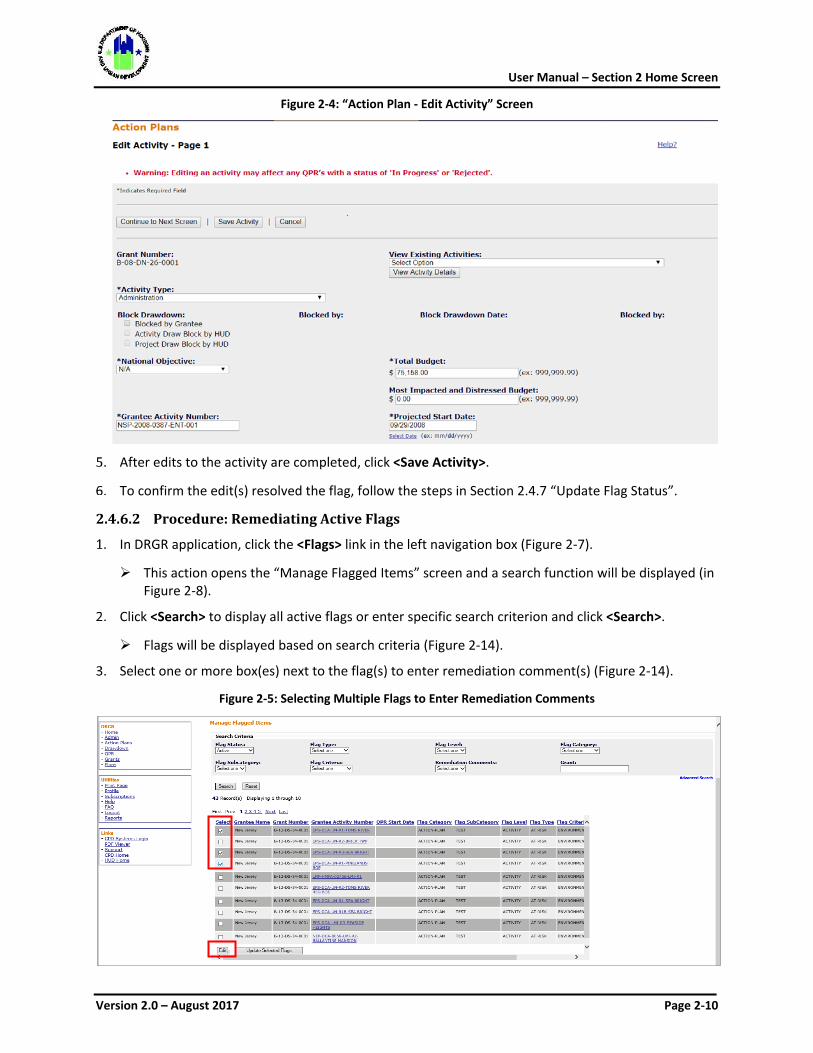
Figure 2-4: “Action Plan - Edit Activity” Screen
After edits to the activity are completed, click <Save Activity>.
To confirm the edit(s) resolved the flag, follow the steps in Section 2.4.7 “Update Flag Status”.
2.4.6.2 Procedure: Remediating Active Flags
In DRGR application, click the <Flags> link in the left navigation box (Figure 2-7).
This action opens the “Manage Flagged Items” screen and a search function will be displayed (in Figure 2-8).
Click <Search> to display all active flags or enter specific search criterion and click <Search>.
Flags will be displayed based on search criteria (Figure 2-14).
Select one or more box(es) next to the flag(s) to enter remediation comment(s) (Figure 2-14).
Figure 2-5: Selecting Multiple Flags to Enter Remediation Comments
User Manual – Section 2 Home Screen
Version 2.0 – August 2017 Page 2-11
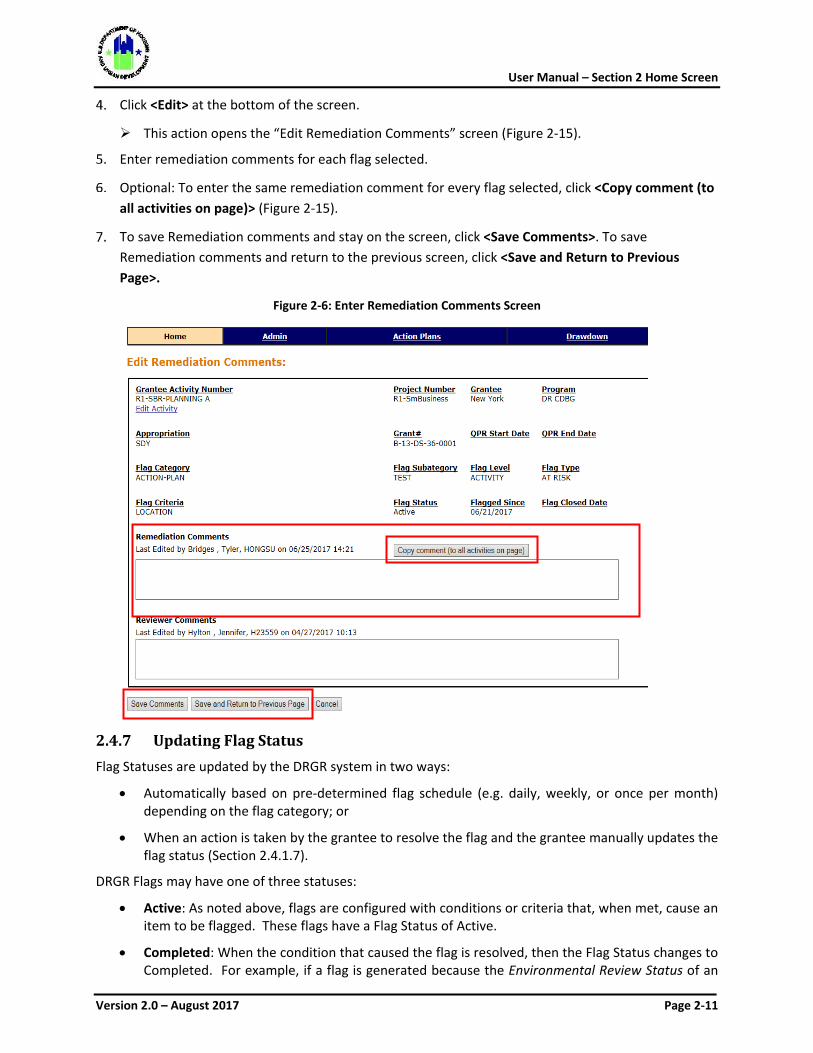
Click <Edit> at the bottom of the screen.
This action opens the “Edit Remediation Comments” screen (Figure 2-15).
Enter remediation comments for each flag selected.
Optional: To enter the same remediation comment for every flag selected, click <Copy comment (to all activities on page)> (Figure 2-15).
To save Remediation comments and stay on the screen, click <Save Comments>. To save Remediation comments and return to the previous screen, click <Save and Return to Previous Page>.
Figure 2-6: Enter Remediation Comments Screen
2.4.7 Updating Flag Status Flag Statuses are updated by the DRGR system in two ways:
• Automatically based on pre-determined flag schedule (e.g. daily, weekly, or once per month) depending on the flag category; or
• When an action is taken by the grantee to resolve the flag and the grantee manually updates the flag status (Section 2.4.1.7).
DRGR Flags may have one of three statuses:
• Active: As noted above, flags are configured with conditions or criteria that, when met, cause an item to be flagged. These flags have a Flag Status of Active.
• Completed: When the condition that caused the flag is resolved, then the Flag Status changes to Completed. For example, if a flag is generated because the Environmental Review Status of an
User Manual – Section 2 Home Screen
Version 2.0 – August 2017 Page 2-12
activity is not selected, the Flag Status will change from “Active” to “Completed” once the Environmental Review Status for that activity is selected.
• Acknowledged: A third Flag Status of Acknowledged is only applicable to QPR based flags. An Active QPR flag is automatically changed to Acknowledged when the QPR is approved. No action is necessary for flags with a Acknowledged status.
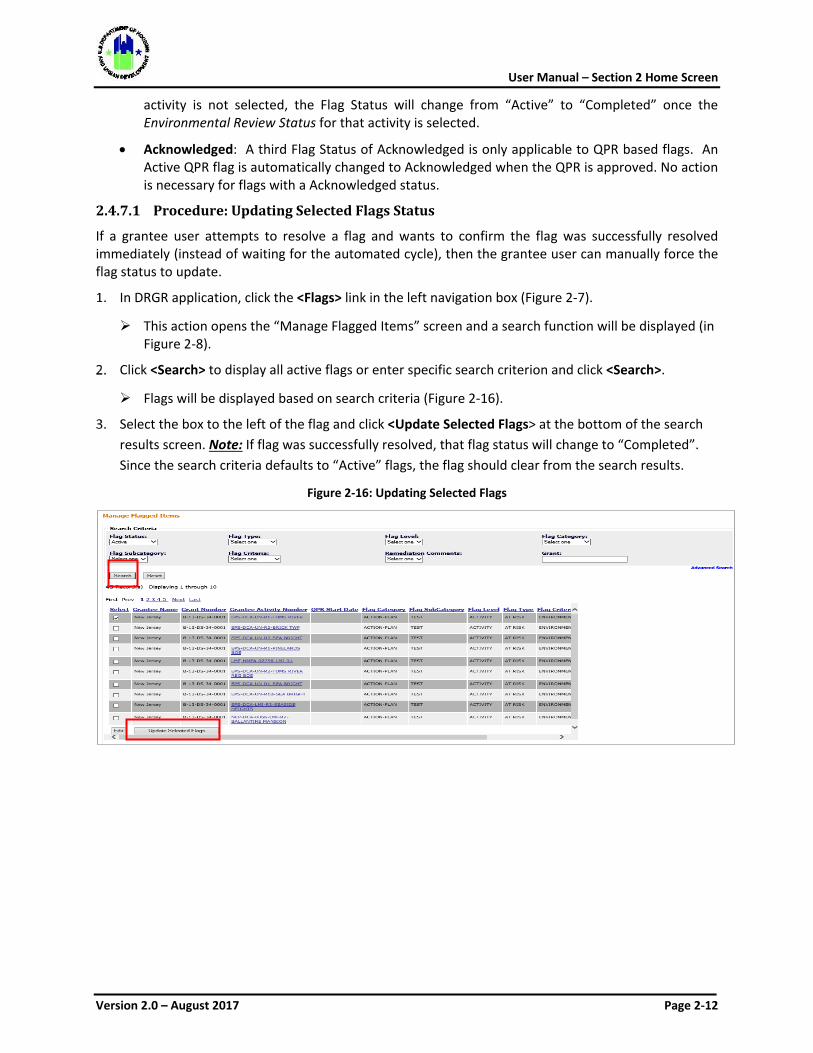
2.4.7.1 Procedure: Updating Selected Flags Status
If a grantee user attempts to resolve a flag and wants to confirm the flag was successfully resolved immediately (instead of waiting for the automated cycle), then the grantee user can manually force the flag status to update.
In DRGR application, click the <Flags> link in the left navigation box (Figure 2-7).
This action opens the “Manage Flagged Items” screen and a search function will be displayed (in Figure 2-8).
Click <Search> to display all active flags or enter specific search criterion and click <Search>.
Flags will be displayed based on search criteria (Figure 2-16).
Select the box to the left of the flag and click <Update Selected Flags> at the bottom of the search results screen. Note: If flag was successfully resolved, that flag status will change to “Completed”. Since the search criteria defaults to “Active” flags, the flag should clear from the search results.
Figure 2-16: Updating Selected Flags
User Manual – Section 3 Admin Module
Version 2.0 - August 2017 Page 3-1
3. Admin Module
This section provides information on the purpose and function of the Admin Module. It explains how to access the Admin Module, and the contents of the module. Specific procedures are outlined for the Grantee Admin, Field Office, and Super User roles to carry out essential Grant and Grantee Admin functions.
3.1 Purpose and Function of Admin Module
The Admin Module allows users to carry-out the following functions:
• Manage Users
o Assign Users to Grants
o Certify and Activate Users
o Add/Modify/Delete User Accounts
o Modify User Roles and Privileges
• Manage Subordinate Grantees
• Record Monitoring/Audit/TA Events
• Upload Data (see Section 9 of this User Manual)
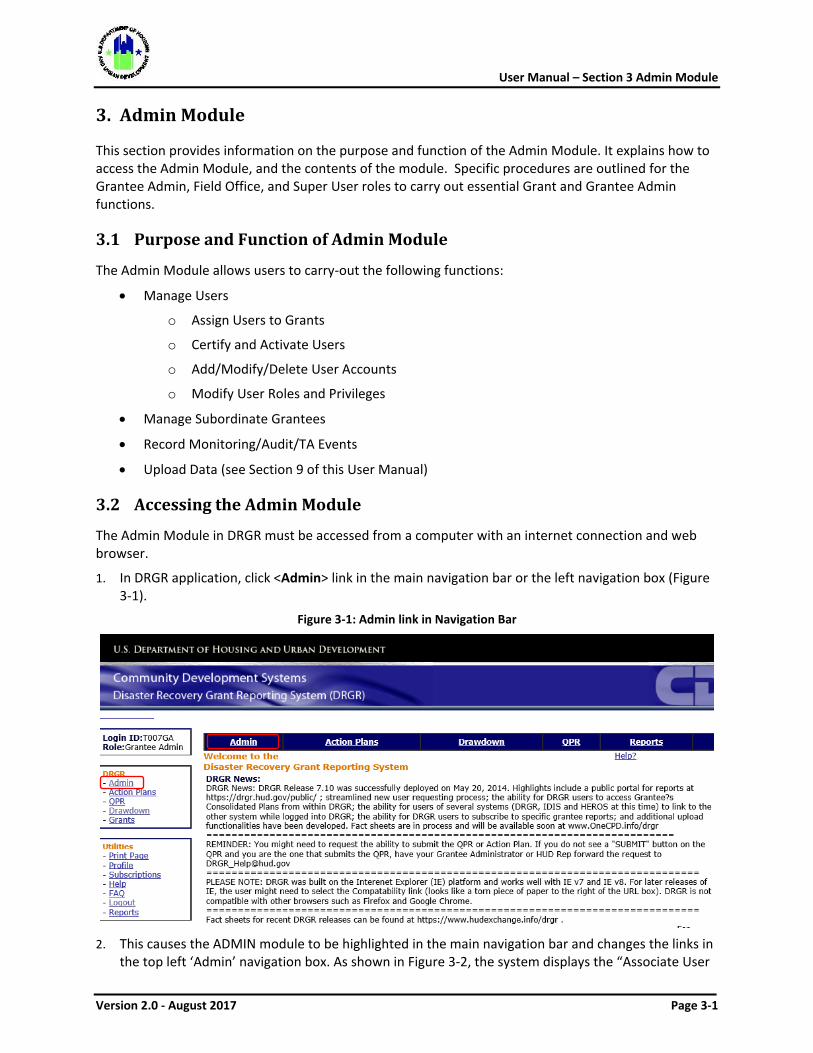
3.2 Accessing the Admin Module
The Admin Module in DRGR must be accessed from a computer with an internet connection and web browser.
1. In DRGR application, click <Admin> link in the main navigation bar or the left navigation box (Figure 3-1).
Figure 3-1: Admin link in Navigation Bar
2. This causes the ADMIN module to be highlighted in the main navigation bar and changes the links in
the top left ‘Admin’ navigation box. As shown in Figure 3-2, the system displays the “Associate User
User Manual – Section 3 Admin Module
Version 2.0 - August 2017 Page 3-2
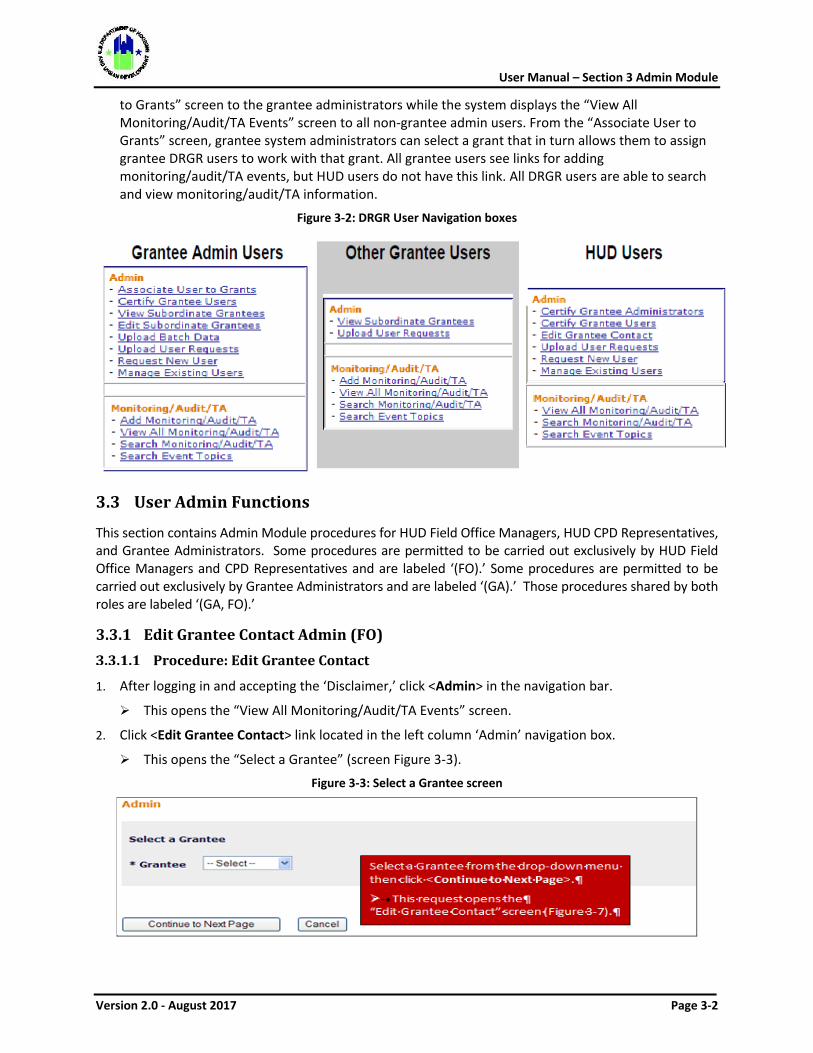
to Grants” screen to the grantee administrators while the system displays the “View All Monitoring/Audit/TA Events” screen to all non-grantee admin users. From the “Associate User to Grants” screen, grantee system administrators can select a grant that in turn allows them to assign grantee DRGR users to work with that grant. All grantee users see links for adding monitoring/audit/TA events, but HUD users do not have this link. All DRGR users are able to search and view monitoring/audit/TA information.
Figure 3-2: DRGR User Navigation boxes
3.3 User Admin Functions
This section contains Admin Module procedures for HUD Field Office Managers, HUD CPD Representatives, and Grantee Administrators. Some procedures are permitted to be carried out exclusively by HUD Field Office Managers and CPD Representatives and are labeled ‘(FO).’ Some procedures are permitted to be carried out exclusively by Grantee Administrators and are labeled ‘(GA).’ Those procedures shared by both roles are labeled ‘(GA, FO).’
3.3.1 Edit Grantee Contact Admin (FO) Procedure: Edit Grantee Contact
1. After logging in and accepting the ‘Disclaimer,’ click <Admin> in the navigation bar.
This opens the “View All Monitoring/Audit/TA Events” screen.
2. Click <Edit Grantee Contact> link located in the left column ‘Admin’ navigation box.
This opens the “Select a Grantee” (screen Figure 3-3).
Figure 3-3: Select a Grantee screen
User Manual – Section 3 Admin Module
Version 2.0 - August 2017 Page 3-3
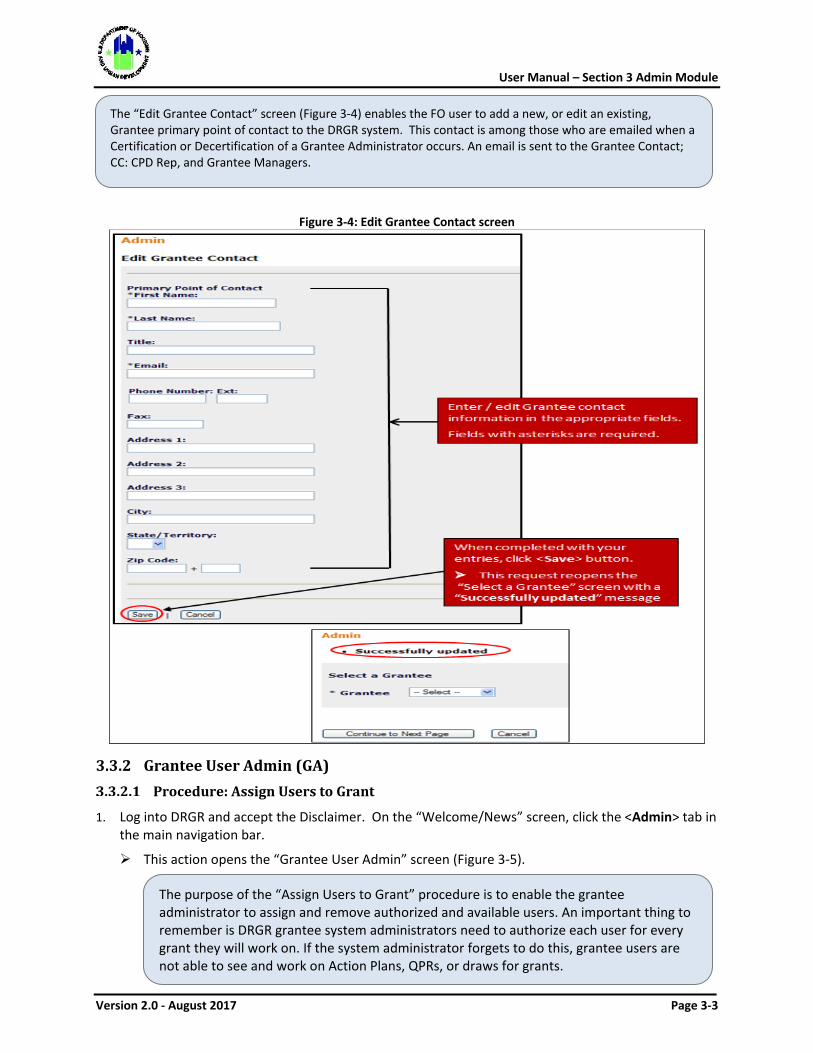
Figure 3-4: Edit Grantee Contact screen
3.3.2 Grantee User Admin (GA) Procedure: Assign Users to Grant
1. Log into DRGR and accept the Disclaimer. On the “Welcome/News” screen, click the <Admin> tab in the main navigation bar.
This action opens the “Grantee User Admin” screen (Figure 3-5).
The “Edit Grantee Contact” screen (Figure 3-4) enables the FO user to add a new, or edit an existing, Grantee primary point of contact to the DRGR system. This contact is among those who are emailed when a Certification or Decertification of a Grantee Administrator occurs. An email is sent to the Grantee Contact; CC: CPD Rep, and Grantee Managers.
The purpose of the “Assign Users to Grant” procedure is to enable the grantee administrator to assign and remove authorized and available users. An important thing to remember is DRGR grantee system administrators need to authorize each user for every grant they will work on. If the system administrator forgets to do this, grantee users are not able to see and work on Action Plans, QPRs, or draws for grants.
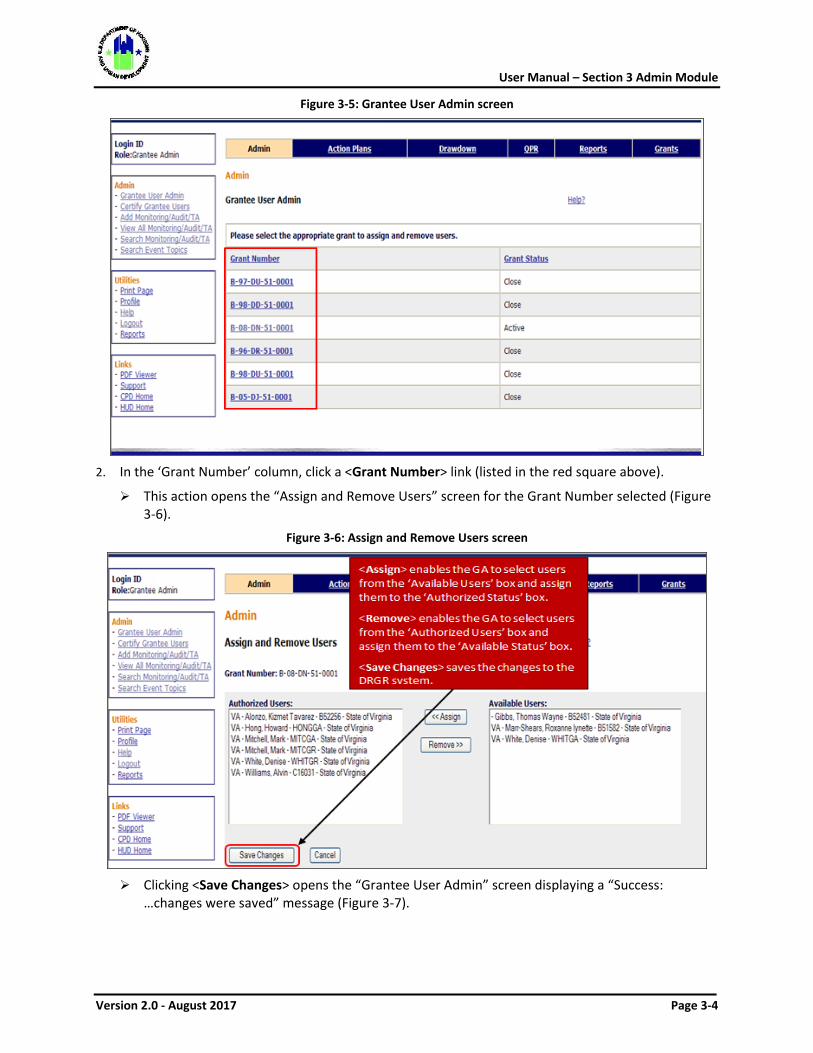
User Manual – Section 3 Admin Module
Version 2.0 - August 2017 Page 3-4
Figure 3-5: Grantee User Admin screen
2. In the ‘Grant Number’ column, click a <Grant Number> link (listed in the red square above).
This action opens the “Assign and Remove Users” screen for the Grant Number selected (Figure 3-6).
Figure 3-6: Assign and Remove Users screen
Clicking <Save Changes> opens the “Grantee User Admin” screen displaying a “Success:
…changes were saved” message (Figure 3-7).
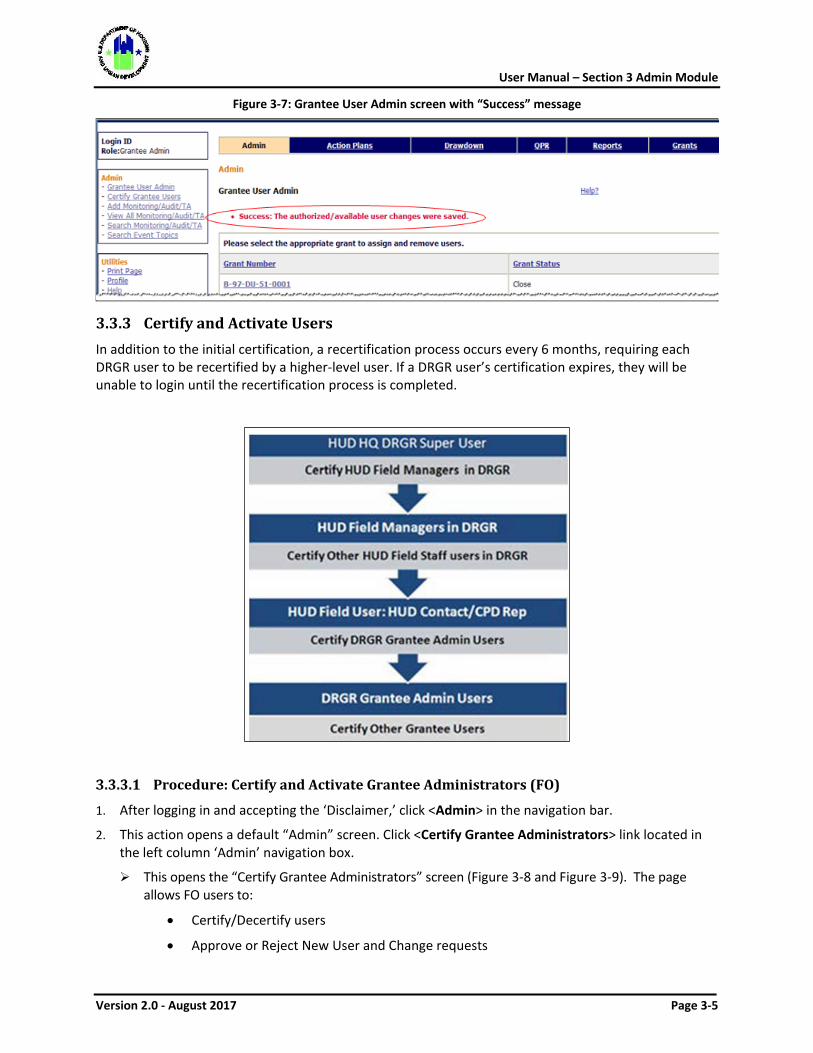
User Manual – Section 3 Admin Module
Version 2.0 - August 2017 Page 3-5
Figure 3-7: Grantee User Admin screen with “Success” message
3.3.3 Certify and Activate Users In addition to the initial certification, a recertification process occurs every 6 months, requiring each DRGR user to be recertified by a higher-level user. If a DRGR user’s certification expires, they will be unable to login until the recertification process is completed.
Procedure: Certify and Activate Grantee Administrators (FO)
1. After logging in and accepting the ‘Disclaimer,’ click <Admin> in the navigation bar.
2. This action opens a default “Admin” screen. Click <Certify Grantee Administrators> link located in the left column ‘Admin’ navigation box.
This opens the “Certify Grantee Administrators” screen (Figure 3-8 and Figure 3-9). The page allows FO users to:
• Certify/Decertify users
• Approve or Reject New User and Change requests
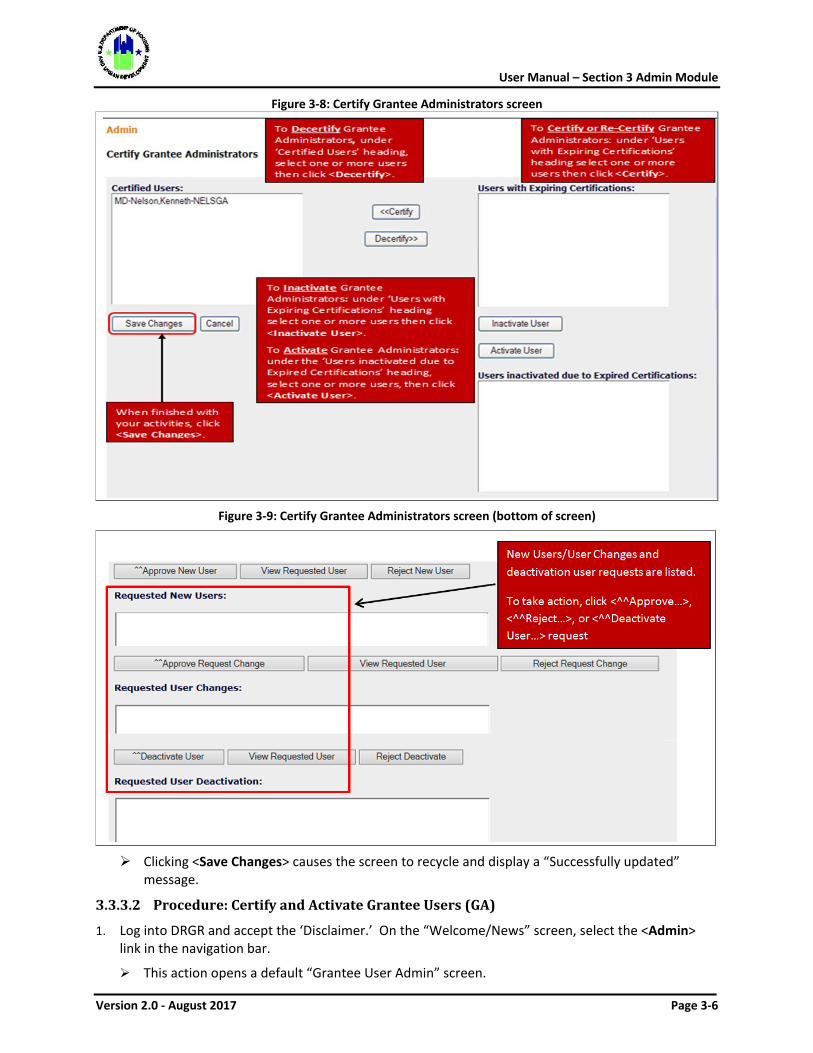
User Manual – Section 3 Admin Module
Version 2.0 - August 2017 Page 3-6
Figure 3-8: Certify Grantee Administrators screen
Figure 3-9: Certify Grantee Administrators screen (bottom of screen)
Clicking <Save Changes> causes the screen to recycle and display a “Successfully updated”
message.
Procedure: Certify and Activate Grantee Users (GA)
1. Log into DRGR and accept the ‘Disclaimer.’ On the “Welcome/News” screen, select the <Admin> link in the navigation bar.
This action opens a default “Grantee User Admin” screen.
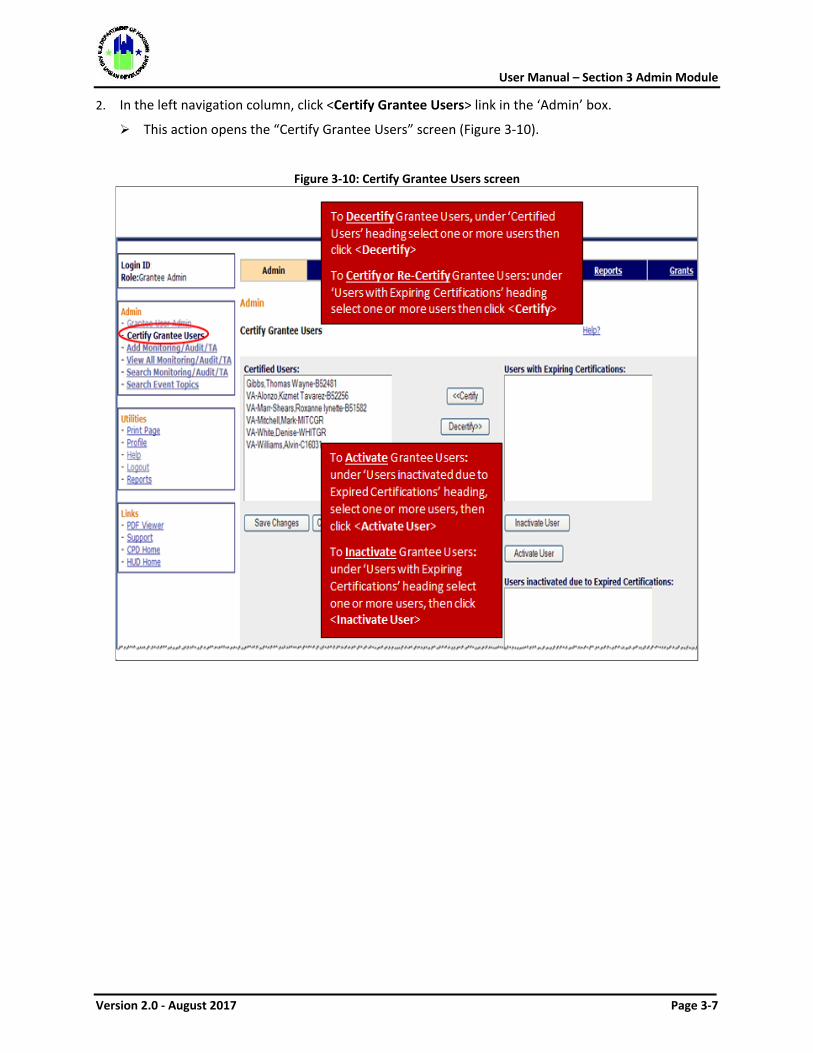
User Manual – Section 3 Admin Module
Version 2.0 - August 2017 Page 3-7
2. In the left navigation column, click <Certify Grantee Users> link in the ‘Admin’ box.
This action opens the “Certify Grantee Users” screen (Figure 3-10).
Figure 3-10: Certify Grantee Users screen
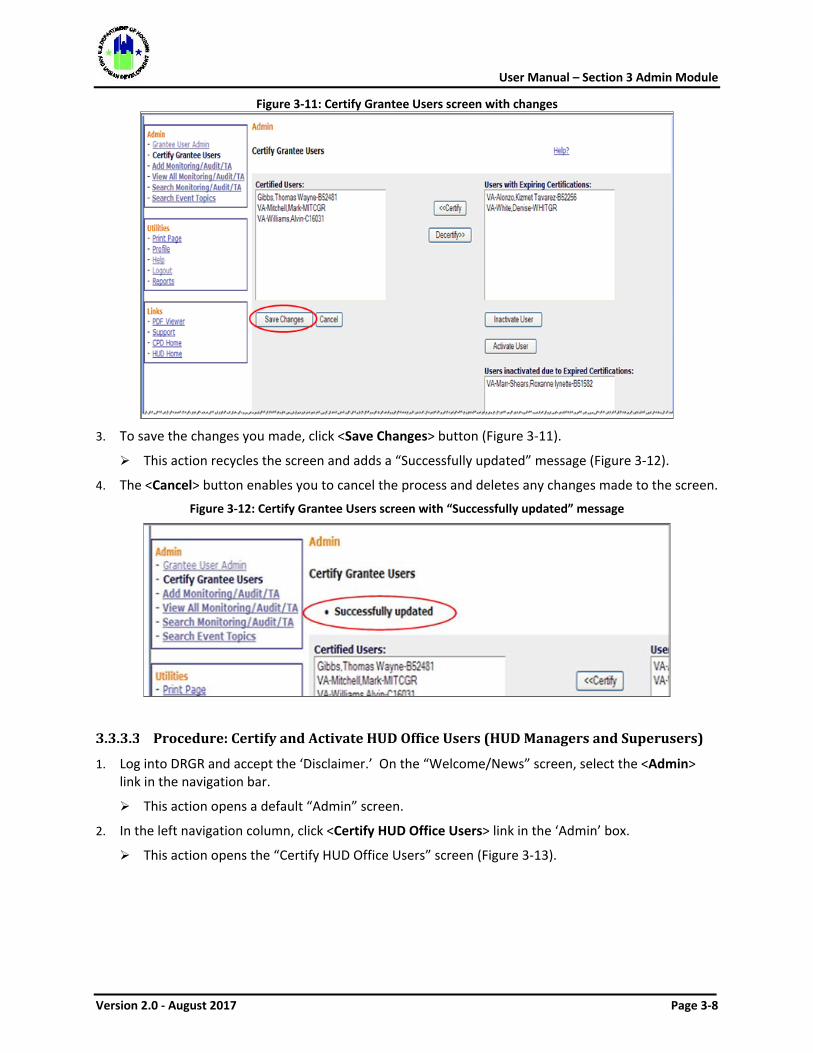
User Manual – Section 3 Admin Module
Version 2.0 - August 2017 Page 3-8
Figure 3-11: Certify Grantee Users screen with changes
3. To save the changes you made, click <Save Changes> button (Figure 3-11).
This action recycles the screen and adds a “Successfully updated” message (Figure 3-12).
4. The <Cancel> button enables you to cancel the process and deletes any changes made to the screen.
Figure 3-12: Certify Grantee Users screen with “Successfully updated” message
Procedure: Certify and Activate HUD Office Users (HUD Managers and Superusers)
1. Log into DRGR and accept the ‘Disclaimer.’ On the “Welcome/News” screen, select the <Admin> link in the navigation bar.
This action opens a default “Admin” screen.
2. In the left navigation column, click <Certify HUD Office Users> link in the ‘Admin’ box.
This action opens the “Certify HUD Office Users” screen (Figure 3-13).
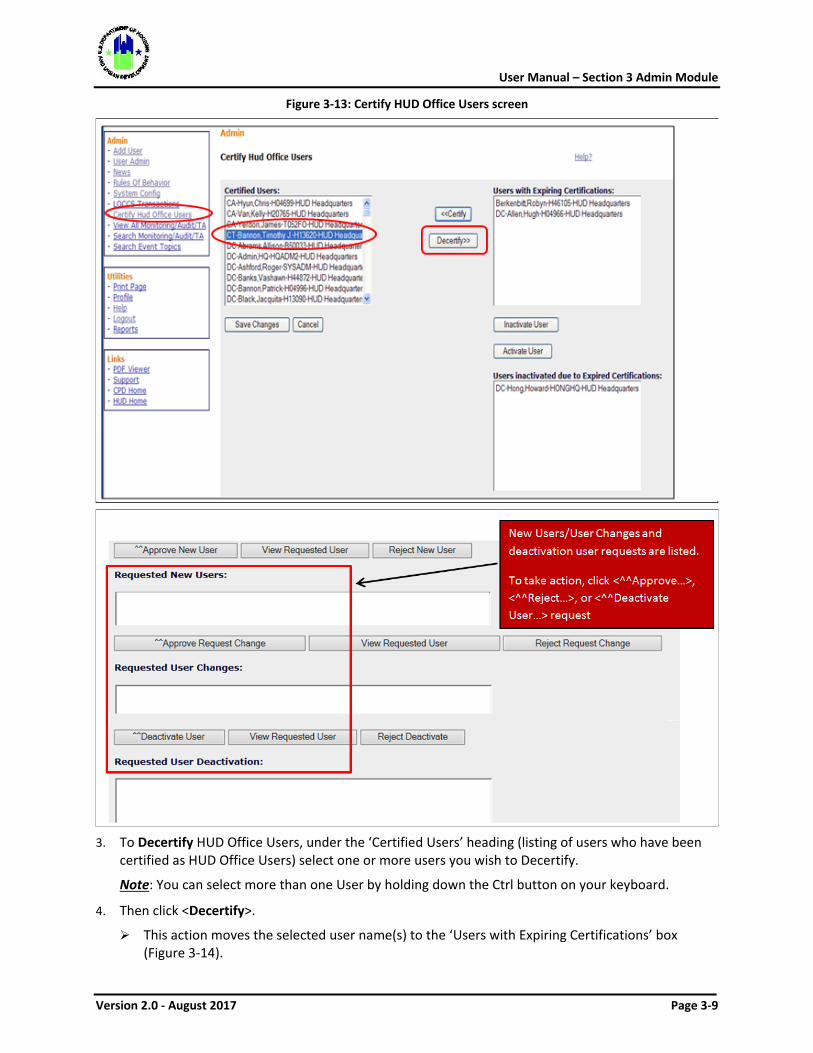
User Manual – Section 3 Admin Module
Version 2.0 - August 2017 Page 3-9
Figure 3-13: Certify HUD Office Users screen
3. To Decertify HUD Office Users, under the ‘Certified Users’ heading (listing of users who have been
certified as HUD Office Users) select one or more users you wish to Decertify.
Note: You can select more than one User by holding down the Ctrl button on your keyboard.
4. Then click <Decertify>.
This action moves the selected user name(s) to the ‘Users with Expiring Certifications’ box (Figure 3-14).
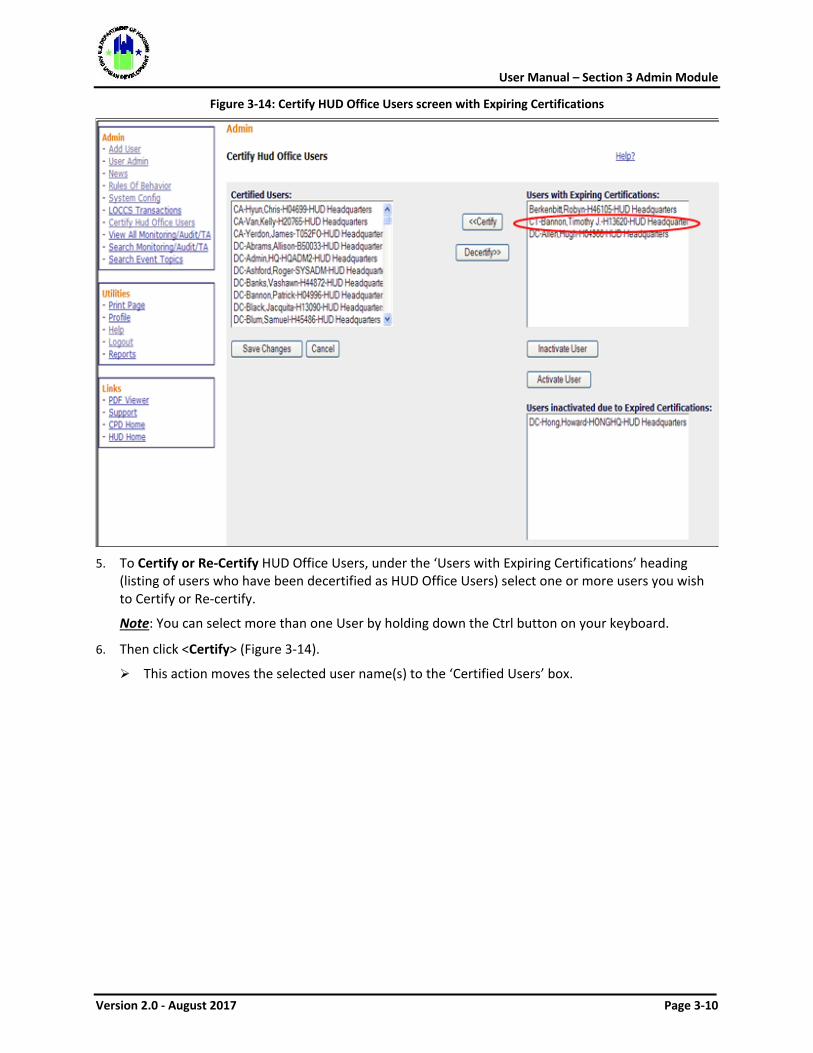
User Manual – Section 3 Admin Module
Version 2.0 - August 2017 Page 3-10
Figure 3-14: Certify HUD Office Users screen with Expiring Certifications
5. To Certify or Re-Certify HUD Office Users, under the ‘Users with Expiring Certifications’ heading
(listing of users who have been decertified as HUD Office Users) select one or more users you wish to Certify or Re-certify.
Note: You can select more than one User by holding down the Ctrl button on your keyboard.
6. Then click <Certify> (Figure 3-14).
This action moves the selected user name(s) to the ‘Certified Users’ box.
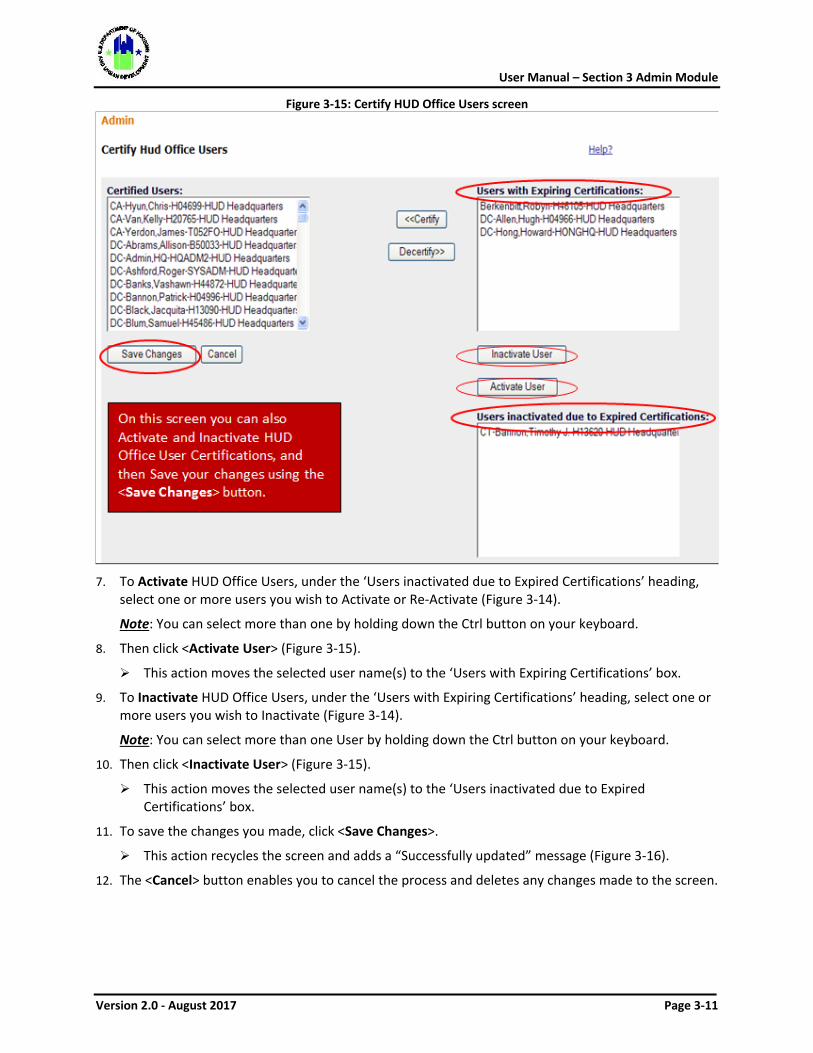
User Manual – Section 3 Admin Module
Version 2.0 - August 2017 Page 3-11
Figure 3-15: Certify HUD Office Users screen
7. To Activate HUD Office Users, under the ‘Users inactivated due to Expired Certifications’ heading,
select one or more users you wish to Activate or Re-Activate (Figure 3-14).
Note: You can select more than one by holding down the Ctrl button on your keyboard.
8. Then click <Activate User> (Figure 3-15).
This action moves the selected user name(s) to the ‘Users with Expiring Certifications’ box.
9. To Inactivate HUD Office Users, under the ‘Users with Expiring Certifications’ heading, select one or more users you wish to Inactivate (Figure 3-14).
Note: You can select more than one User by holding down the Ctrl button on your keyboard.
10. Then click <Inactivate User> (Figure 3-15).
This action moves the selected user name(s) to the ‘Users inactivated due to Expired Certifications’ box.
11. To save the changes you made, click <Save Changes>.
This action recycles the screen and adds a “Successfully updated” message (Figure 3-16).
12. The <Cancel> button enables you to cancel the process and deletes any changes made to the screen.
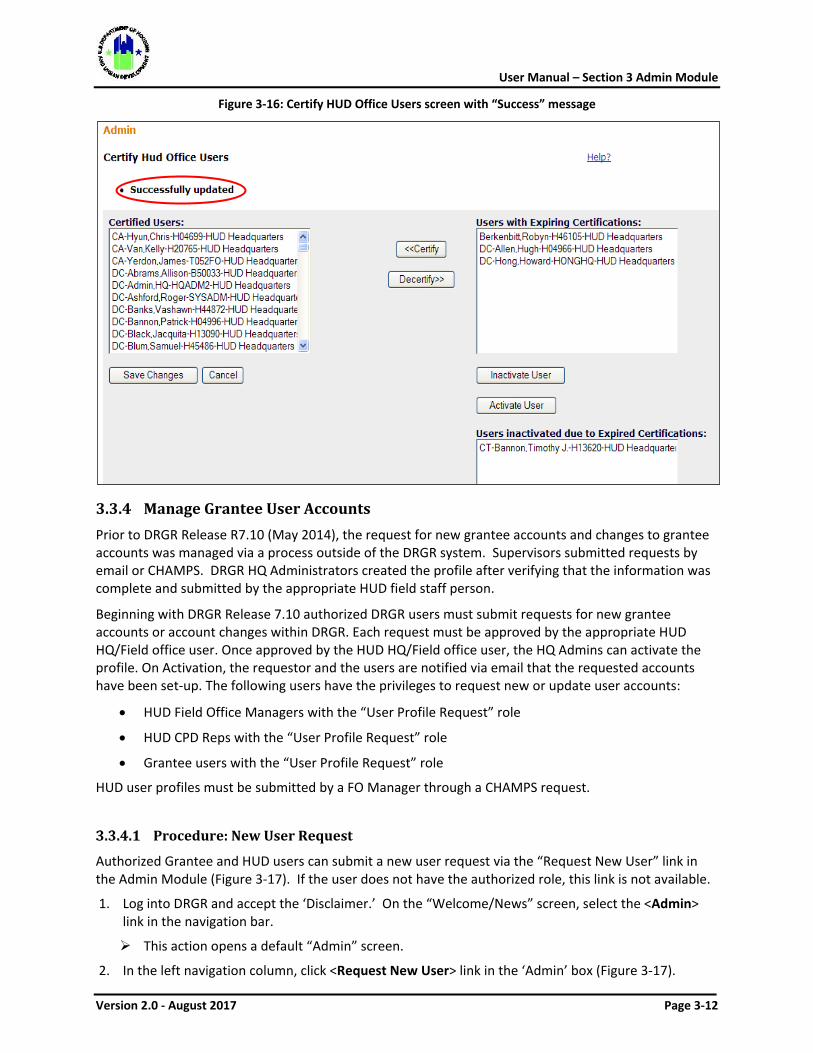
User Manual – Section 3 Admin Module
Version 2.0 - August 2017 Page 3-12
Figure 3-16: Certify HUD Office Users screen with “Success” message
3.3.4 Manage Grantee User Accounts Prior to DRGR Release R7.10 (May 2014), the request for new grantee accounts and changes to grantee accounts was managed via a process outside of the DRGR system. Supervisors submitted requests by email or CHAMPS. DRGR HQ Administrators created the profile after verifying that the information was complete and submitted by the appropriate HUD field staff person.
Beginning with DRGR Release 7.10 authorized DRGR users must submit requests for new grantee accounts or account changes within DRGR. Each request must be approved by the appropriate HUD HQ/Field office user. Once approved by the HUD HQ/Field office user, the HQ Admins can activate the profile. On Activation, the requestor and the users are notified via email that the requested accounts have been set-up. The following users have the privileges to request new or update user accounts:
• HUD Field Office Managers with the “User Profile Request” role
• HUD CPD Reps with the “User Profile Request” role
• Grantee users with the “User Profile Request” role
HUD user profiles must be submitted by a FO Manager through a CHAMPS request.
Procedure: New User Request
Authorized Grantee and HUD users can submit a new user request via the “Request New User” link in the Admin Module (Figure 3-17). If the user does not have the authorized role, this link is not available.
1. Log into DRGR and accept the ‘Disclaimer.’ On the “Welcome/News” screen, select the <Admin> link in the navigation bar.
This action opens a default “Admin” screen.
2. In the left navigation column, click <Request New User> link in the ‘Admin’ box (Figure 3-17).
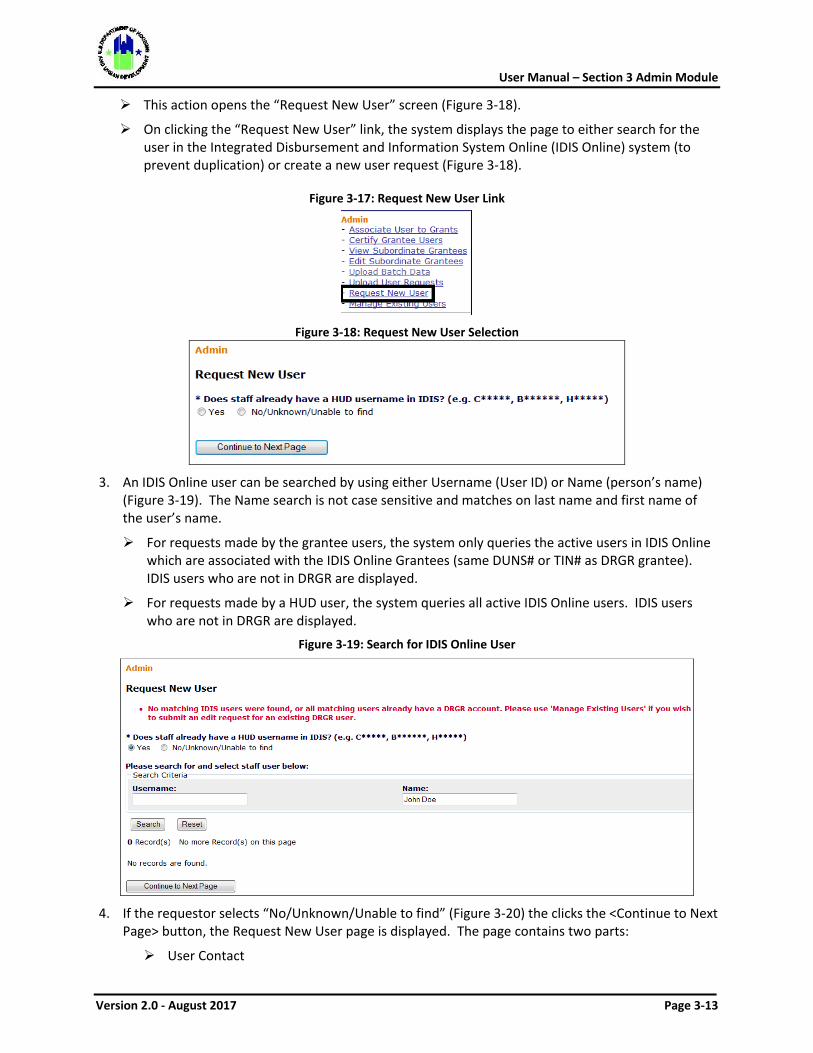
User Manual – Section 3 Admin Module
Version 2.0 - August 2017 Page 3-13
This action opens the “Request New User” screen (Figure 3-18).
On clicking the “Request New User” link, the system displays the page to either search for the user in the Integrated Disbursement and Information System Online (IDIS Online) system (to prevent duplication) or create a new user request (Figure 3-18).
Figure 3-17: Request New User Link
Figure 3-18: Request New User Selection
3. An IDIS Online user can be searched by using either Username (User ID) or Name (person’s name)
(Figure 3-19). The Name search is not case sensitive and matches on last name and first name of the user’s name.
For requests made by the grantee users, the system only queries the active users in IDIS Online which are associated with the IDIS Online Grantees (same DUNS# or TIN# as DRGR grantee). IDIS users who are not in DRGR are displayed.
For requests made by a HUD user, the system queries all active IDIS Online users. IDIS users who are not in DRGR are displayed.
Figure 3-19: Search for IDIS Online User
4. If the requestor selects “No/Unknown/Unable to find” (Figure 3-20) the clicks the <Continue to Next
Page> button, the Request New User page is displayed. The page contains two parts:
User Contact
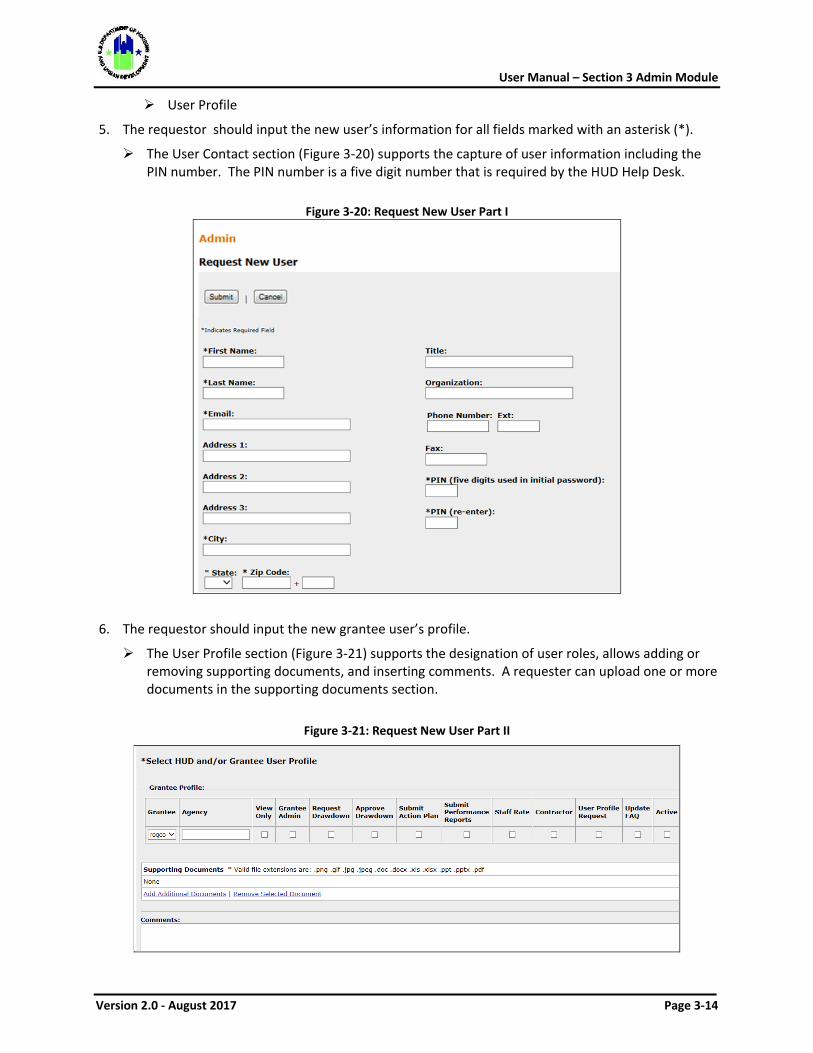
User Manual – Section 3 Admin Module
Version 2.0 - August 2017 Page 3-14
User Profile
5. The requestor should input the new user’s information for all fields marked with an asterisk (*).
The User Contact section (Figure 3-20) supports the capture of user information including the PIN number. The PIN number is a five digit number that is required by the HUD Help Desk.
Figure 3-20: Request New User Part I
6. The requestor should input the new grantee user’s profile.
The User Profile section (Figure 3-21) supports the designation of user roles, allows adding or removing supporting documents, and inserting comments. A requester can upload one or more documents in the supporting documents section.
Figure 3-21: Request New User Part II
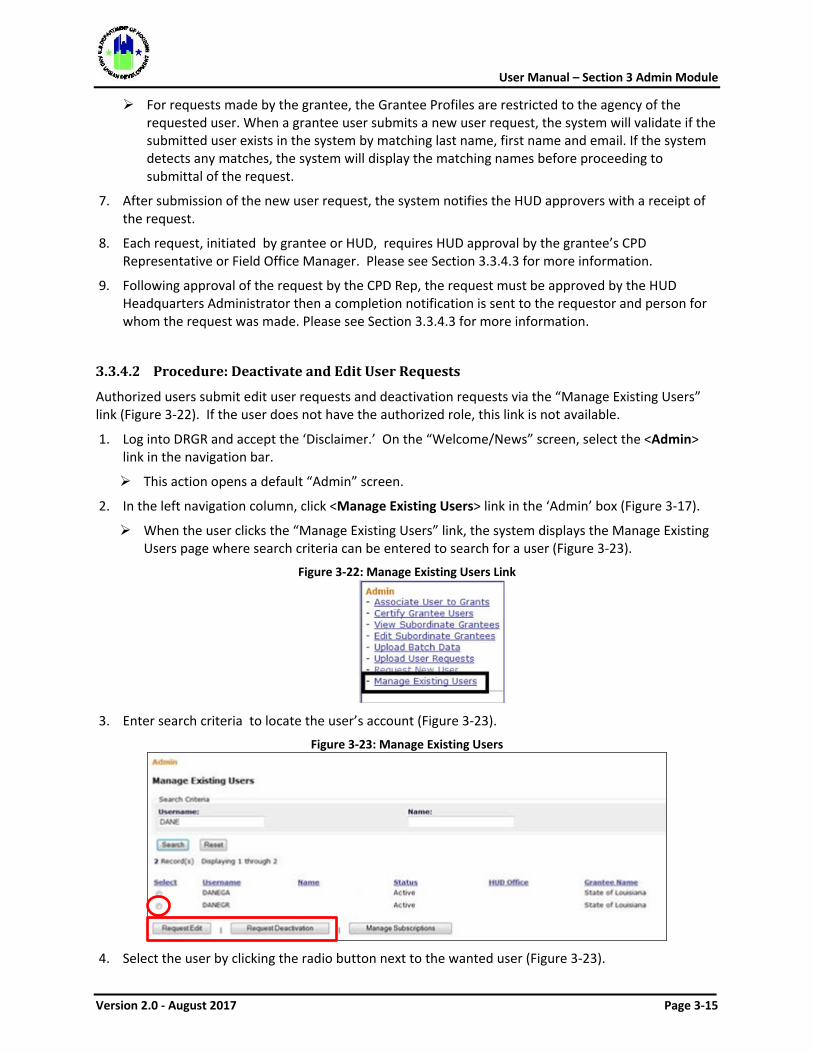
User Manual – Section 3 Admin Module
Version 2.0 - August 2017 Page 3-15
For requests made by the grantee, the Grantee Profiles are restricted to the agency of the requested user. When a grantee user submits a new user request, the system will validate if the submitted user exists in the system by matching last name, first name and email. If the system detects any matches, the system will display the matching names before proceeding to submittal of the request.
7. After submission of the new user request, the system notifies the HUD approvers with a receipt of the request.
8. Each request, initiated by grantee or HUD, requires HUD approval by the grantee’s CPD Representative or Field Office Manager. Please see Section 3.3.4.3 for more information.
9. Following approval of the request by the CPD Rep, the request must be approved by the HUD Headquarters Administrator then a completion notification is sent to the requestor and person for whom the request was made. Please see Section 3.3.4.3 for more information.
Procedure: Deactivate and Edit User Requests
Authorized users submit edit user requests and deactivation requests via the “Manage Existing Users” link (Figure 3-22). If the user does not have the authorized role, this link is not available.
1. Log into DRGR and accept the ‘Disclaimer.’ On the “Welcome/News” screen, select the <Admin> link in the navigation bar.
This action opens a default “Admin” screen.
2. In the left navigation column, click <Manage Existing Users> link in the ‘Admin’ box (Figure 3-17).
When the user clicks the “Manage Existing Users” link, the system displays the Manage Existing Users page where search criteria can be entered to search for a user (Figure 3-23).
Figure 3-22: Manage Existing Users Link
3. Enter search criteria to locate the user’s account (Figure 3-23).
Figure 3-23: Manage Existing Users
4. Select the user by clicking the radio button next to the wanted user (Figure 3-23).
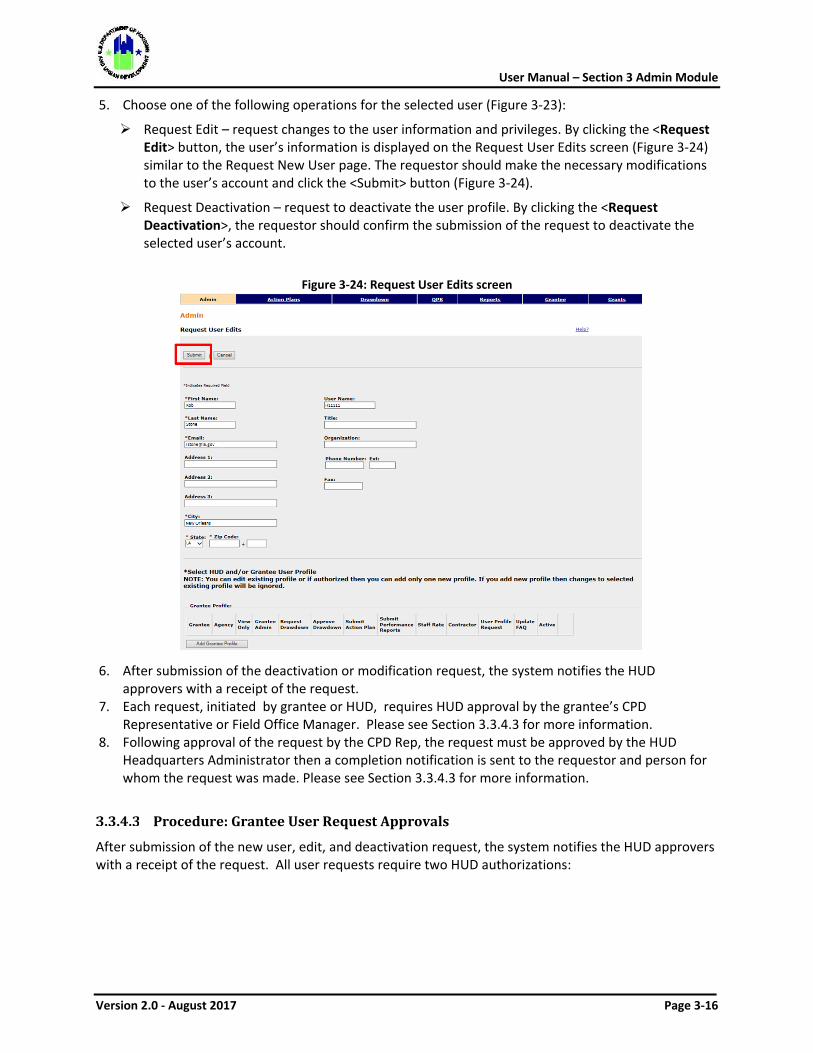
User Manual – Section 3 Admin Module
Version 2.0 - August 2017 Page 3-16
5. Choose one of the following operations for the selected user (Figure 3-23):
Request Edit – request changes to the user information and privileges. By clicking the <Request Edit> button, the user’s information is displayed on the Request User Edits screen (Figure 3-24) similar to the Request New User page. The requestor should make the necessary modifications to the user’s account and click the <Submit> button (Figure 3-24).
Request Deactivation – request to deactivate the user profile. By clicking the <Request Deactivation>, the requestor should confirm the submission of the request to deactivate the selected user’s account.
Figure 3-24: Request User Edits screen
6. After submission of the deactivation or modification request, the system notifies the HUD
approvers with a receipt of the request. 7. Each request, initiated by grantee or HUD, requires HUD approval by the grantee’s CPD
Representative or Field Office Manager. Please see Section 3.3.4.3 for more information. 8. Following approval of the request by the CPD Rep, the request must be approved by the HUD
Headquarters Administrator then a completion notification is sent to the requestor and person for whom the request was made. Please see Section 3.3.4.3 for more information.
Procedure: Grantee User Request Approvals
After submission of the new user, edit, and deactivation request, the system notifies the HUD approvers with a receipt of the request. All user requests require two HUD authorizations:
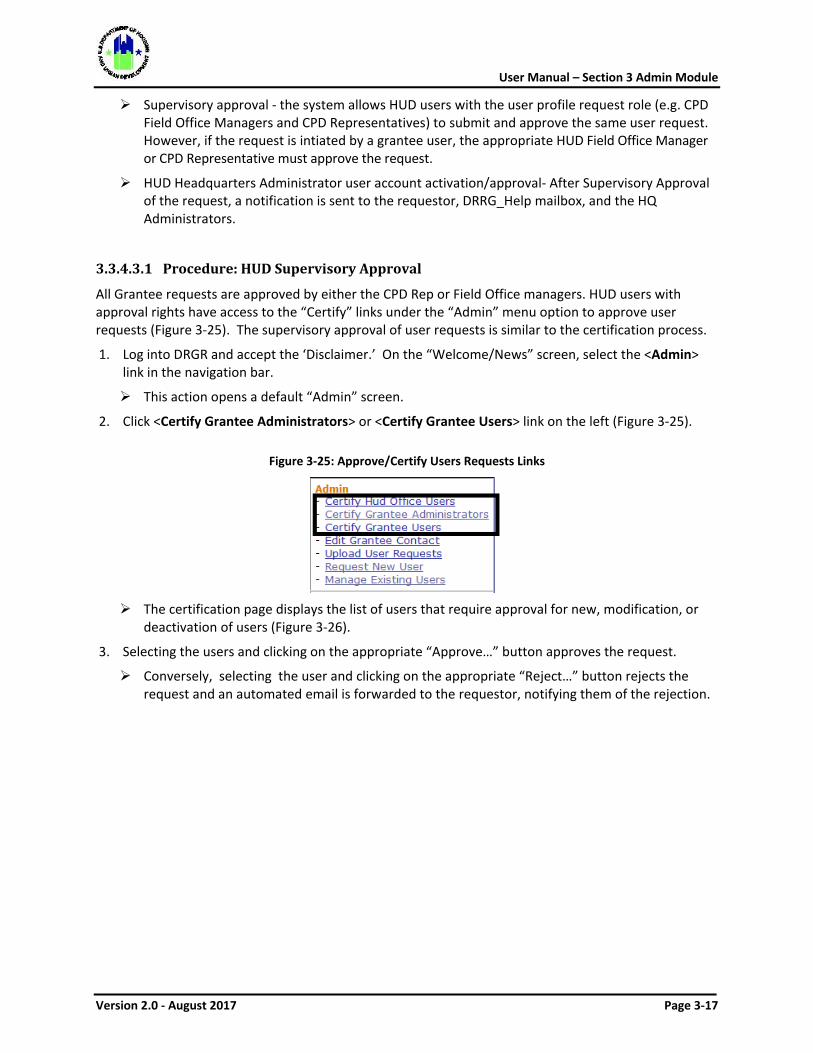
User Manual – Section 3 Admin Module
Version 2.0 - August 2017 Page 3-17
Supervisory approval - the system allows HUD users with the user profile request role (e.g. CPD Field Office Managers and CPD Representatives) to submit and approve the same user request. However, if the request is intiated by a grantee user, the appropriate HUD Field Office Manager or CPD Representative must approve the request.
HUD Headquarters Administrator user account activation/approval- After Supervisory Approval of the request, a notification is sent to the requestor, DRRG_Help mailbox, and the HQ Administrators.
3.3.4.3.1 Procedure: HUD Supervisory Approval
All Grantee requests are approved by either the CPD Rep or Field Office managers. HUD users with approval rights have access to the “Certify” links under the “Admin” menu option to approve user requests (Figure 3-25). The supervisory approval of user requests is similar to the certification process.
1. Log into DRGR and accept the ‘Disclaimer.’ On the “Welcome/News” screen, select the <Admin> link in the navigation bar.
This action opens a default “Admin” screen.
2. Click <Certify Grantee Administrators> or <Certify Grantee Users> link on the left (Figure 3-25).
Figure 3-25: Approve/Certify Users Requests Links
The certification page displays the list of users that require approval for new, modification, or
deactivation of users (Figure 3-26).
3. Selecting the users and clicking on the appropriate “Approve…” button approves the request.
Conversely, selecting the user and clicking on the appropriate “Reject…” button rejects the request and an automated email is forwarded to the requestor, notifying them of the rejection.
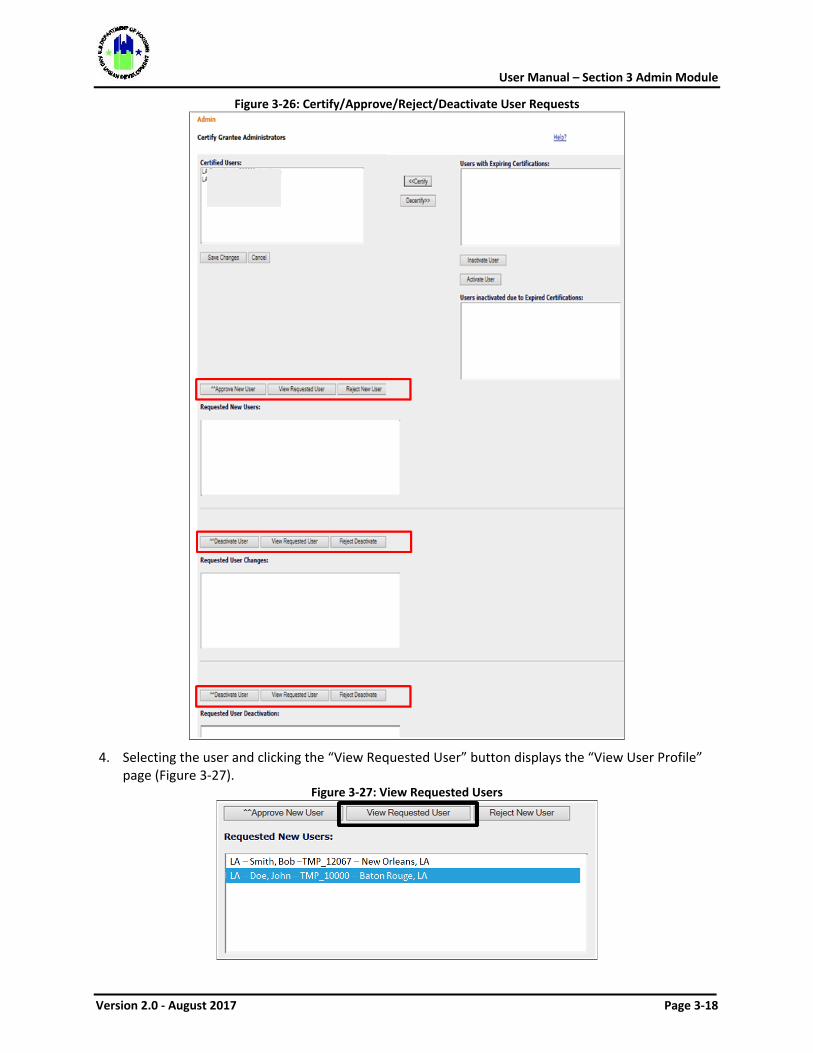
User Manual – Section 3 Admin Module
Version 2.0 - August 2017 Page 3-18
Figure 3-26: Certify/Approve/Reject/Deactivate User Requests
4. Selecting the user and clicking the “View Requested User” button displays the “View User Profile”
page (Figure 3-27). Figure 3-27: View Requested Users
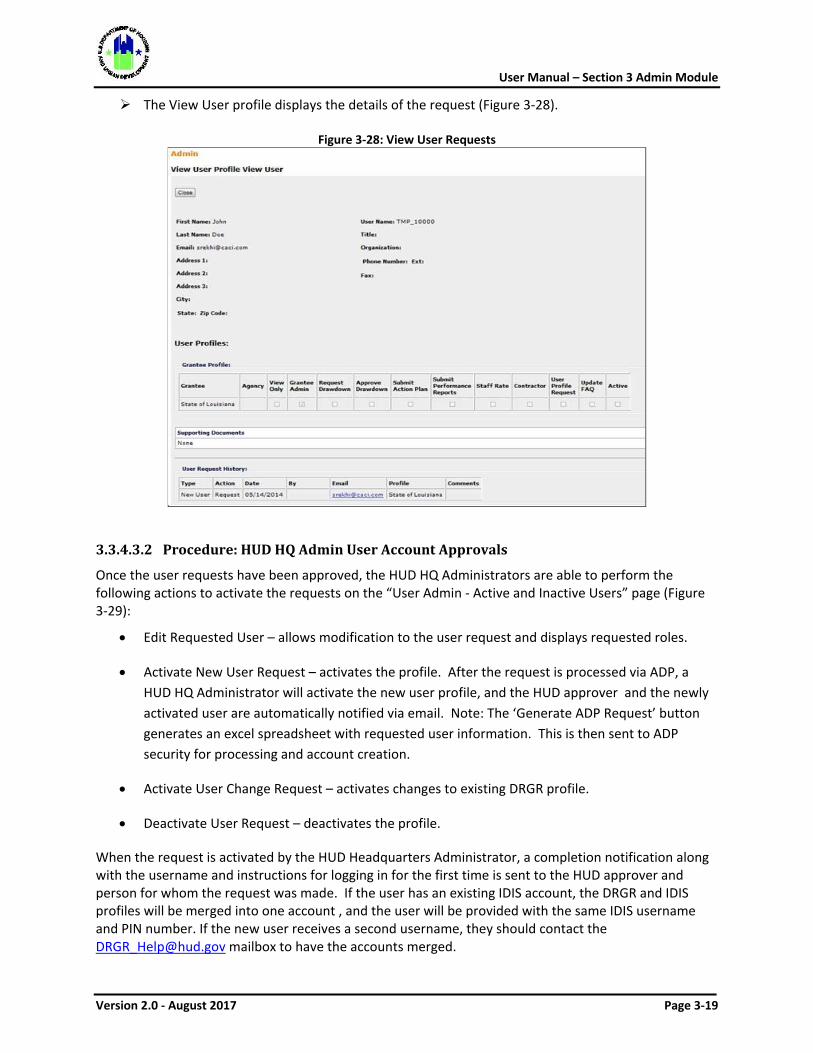
User Manual – Section 3 Admin Module
Version 2.0 - August 2017 Page 3-19
The View User profile displays the details of the request (Figure 3-28).
Figure 3-28: View User Requests
3.3.4.3.2 Procedure: HUD HQ Admin User Account Approvals
Once the user requests have been approved, the HUD HQ Administrators are able to perform the following actions to activate the requests on the “User Admin - Active and Inactive Users” page (Figure 3-29):
• Edit Requested User – allows modification to the user request and displays requested roles.
• Activate New User Request – activates the profile. After the request is processed via ADP, a HUD HQ Administrator will activate the new user profile, and the HUD approver and the newly activated user are automatically notified via email. Note: The ‘Generate ADP Request’ button generates an excel spreadsheet with requested user information. This is then sent to ADP security for processing and account creation.
• Activate User Change Request – activates changes to existing DRGR profile.
• Deactivate User Request – deactivates the profile.
When the request is activated by the HUD Headquarters Administrator, a completion notification along with the username and instructions for logging in for the first time is sent to the HUD approver and person for whom the request was made. If the user has an existing IDIS account, the DRGR and IDIS profiles will be merged into one account , and the user will be provided with the same IDIS username and PIN number. If the new user receives a second username, they should contact the [email protected] mailbox to have the accounts merged.
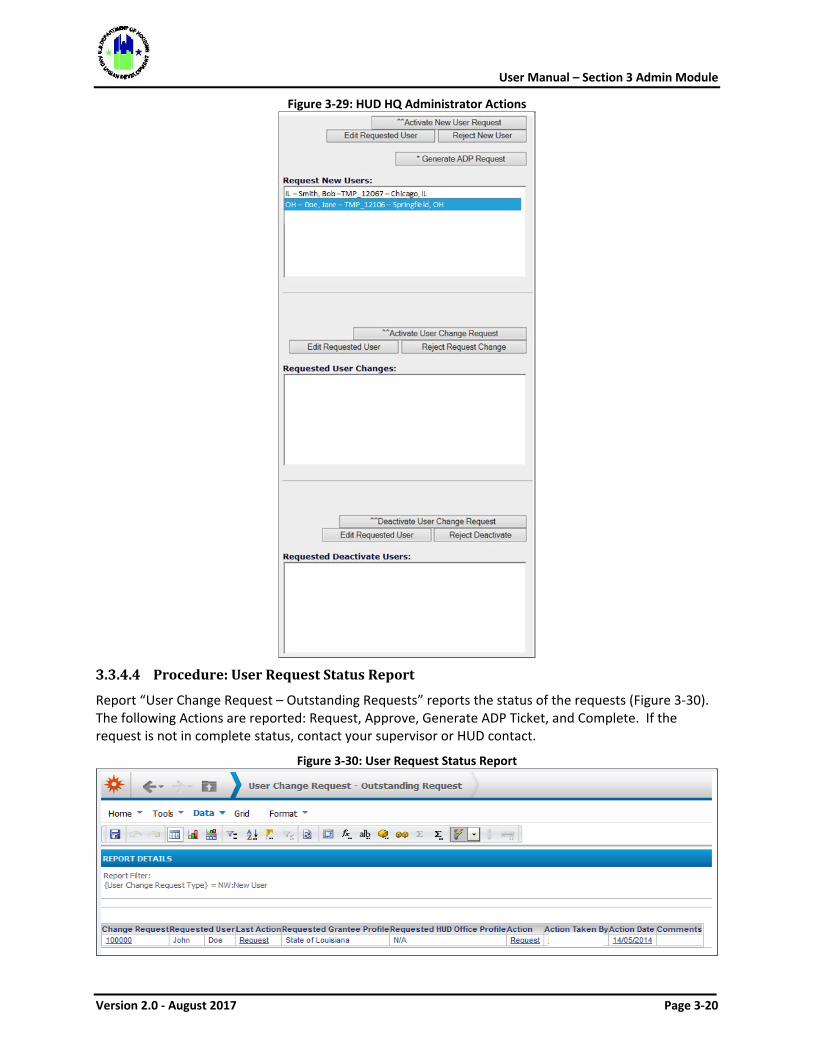
User Manual – Section 3 Admin Module
Version 2.0 - August 2017 Page 3-20
Figure 3-29: HUD HQ Administrator Actions
Procedure: User Request Status Report
Report “User Change Request – Outstanding Requests” reports the status of the requests (Figure 3-30). The following Actions are reported: Request, Approve, Generate ADP Ticket, and Complete. If the request is not in complete status, contact your supervisor or HUD contact.
Figure 3-30: User Request Status Report
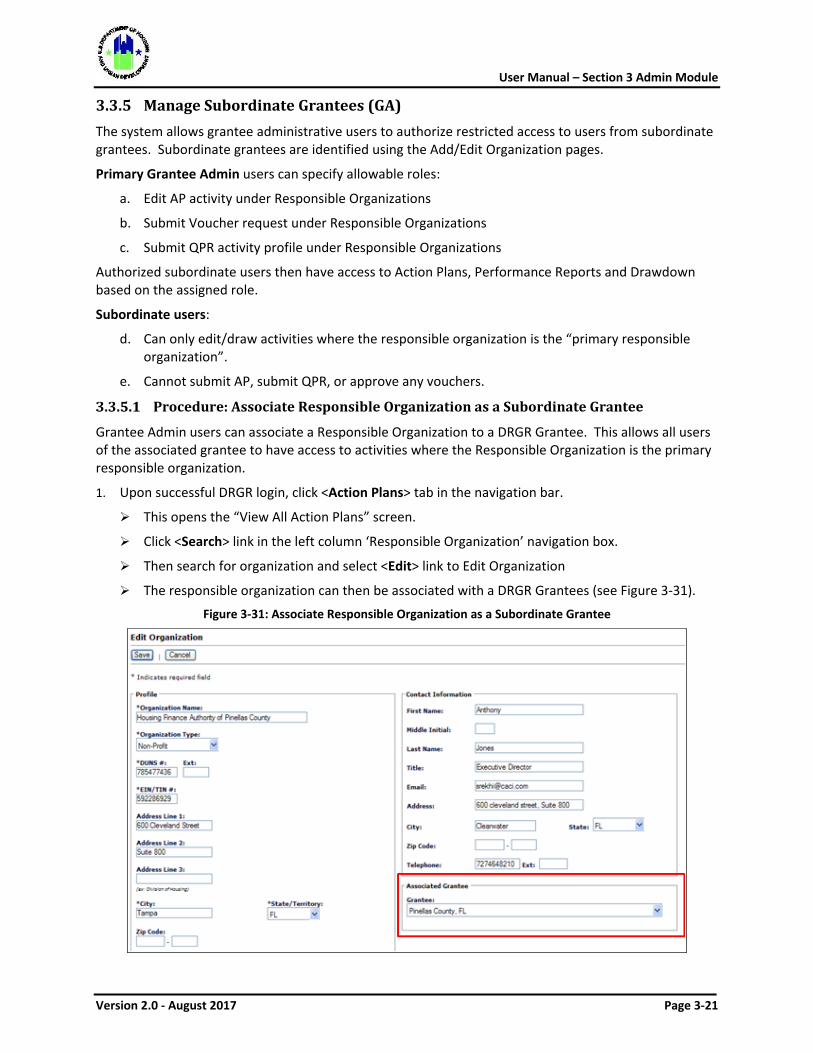
User Manual – Section 3 Admin Module
Version 2.0 - August 2017 Page 3-21
3.3.5 Manage Subordinate Grantees (GA) The system allows grantee administrative users to authorize restricted access to users from subordinate grantees. Subordinate grantees are identified using the Add/Edit Organization pages.
Primary Grantee Admin users can specify allowable roles:
a. Edit AP activity under Responsible Organizations
b. Submit Voucher request under Responsible Organizations
c. Submit QPR activity profile under Responsible Organizations
Authorized subordinate users then have access to Action Plans, Performance Reports and Drawdown based on the assigned role.
Subordinate users:
d. Can only edit/draw activities where the responsible organization is the “primary responsible organization”.
e. Cannot submit AP, submit QPR, or approve any vouchers.
Procedure: Associate Responsible Organization as a Subordinate Grantee
Grantee Admin users can associate a Responsible Organization to a DRGR Grantee. This allows all users of the associated grantee to have access to activities where the Responsible Organization is the primary responsible organization.
1. Upon successful DRGR login, click <Action Plans> tab in the navigation bar.
This opens the “View All Action Plans” screen.
Click <Search> link in the left column ‘Responsible Organization’ navigation box.
Then search for organization and select <Edit> link to Edit Organization
The responsible organization can then be associated with a DRGR Grantees (see Figure 3-31).
Figure 3-31: Associate Responsible Organization as a Subordinate Grantee
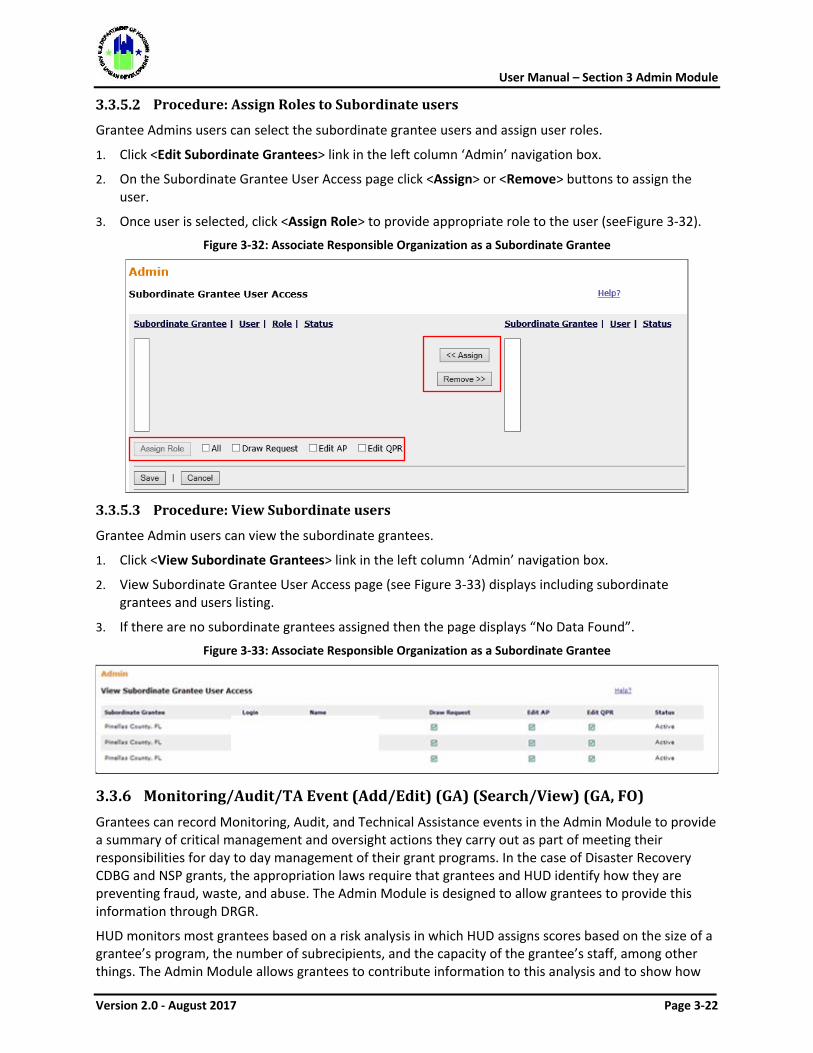
User Manual – Section 3 Admin Module
Version 2.0 - August 2017 Page 3-22
Procedure: Assign Roles to Subordinate users
Grantee Admins users can select the subordinate grantee users and assign user roles.
1. Click <Edit Subordinate Grantees> link in the left column ‘Admin’ navigation box.
2. On the Subordinate Grantee User Access page click <Assign> or <Remove> buttons to assign the user.
3. Once user is selected, click <Assign Role> to provide appropriate role to the user (seeFigure 3-32).
Figure 3-32: Associate Responsible Organization as a Subordinate Grantee
Procedure: View Subordinate users
Grantee Admin users can view the subordinate grantees.
1. Click <View Subordinate Grantees> link in the left column ‘Admin’ navigation box.
2. View Subordinate Grantee User Access page (see Figure 3-33) displays including subordinate grantees and users listing.
3. If there are no subordinate grantees assigned then the page displays “No Data Found”.
Figure 3-33: Associate Responsible Organization as a Subordinate Grantee
3.3.6 Monitoring/Audit/TA Event (Add/Edit) (GA) (Search/View) (GA, FO) Grantees can record Monitoring, Audit, and Technical Assistance events in the Admin Module to provide a summary of critical management and oversight actions they carry out as part of meeting their responsibilities for day to day management of their grant programs. In the case of Disaster Recovery CDBG and NSP grants, the appropriation laws require that grantees and HUD identify how they are preventing fraud, waste, and abuse. The Admin Module is designed to allow grantees to provide this information through DRGR.
HUD monitors most grantees based on a risk analysis in which HUD assigns scores based on the size of a grantee’s program, the number of subrecipients, and the capacity of the grantee’s staff, among other things. The Admin Module allows grantees to contribute information to this analysis and to show how
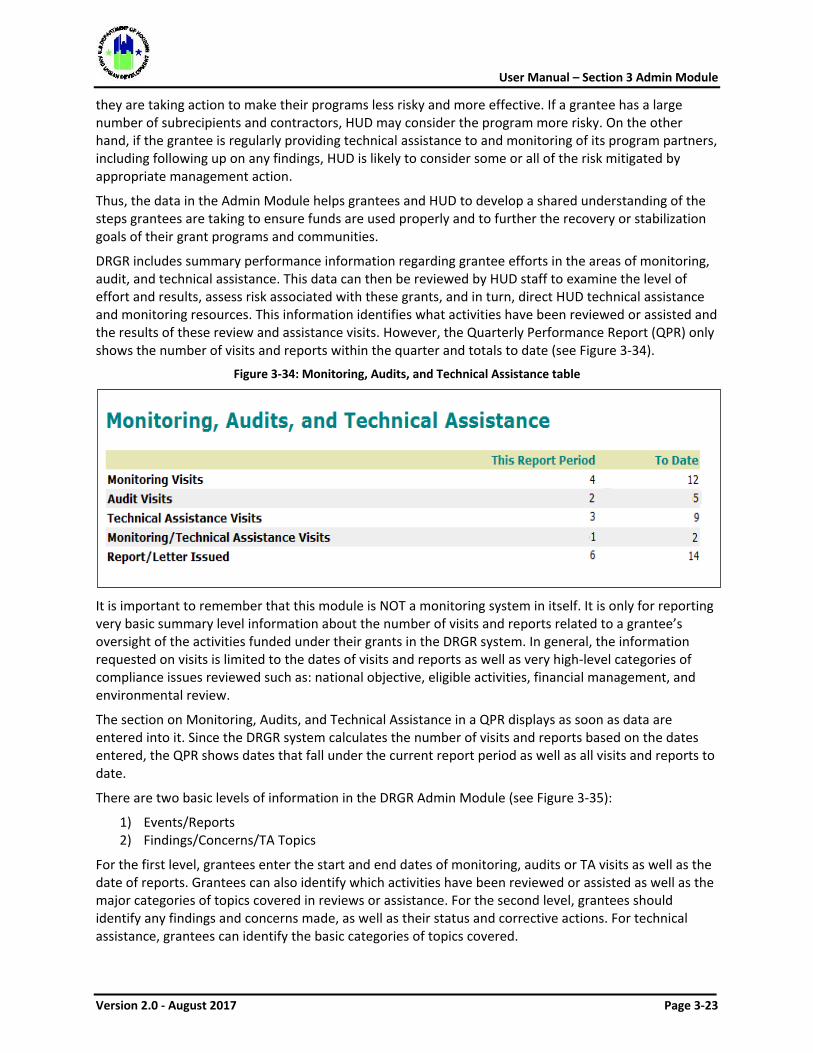
User Manual – Section 3 Admin Module
Version 2.0 - August 2017 Page 3-23
they are taking action to make their programs less risky and more effective. If a grantee has a large number of subrecipients and contractors, HUD may consider the program more risky. On the other hand, if the grantee is regularly providing technical assistance to and monitoring of its program partners, including following up on any findings, HUD is likely to consider some or all of the risk mitigated by appropriate management action.
Thus, the data in the Admin Module helps grantees and HUD to develop a shared understanding of the steps grantees are taking to ensure funds are used properly and to further the recovery or stabilization goals of their grant programs and communities.
DRGR includes summary performance information regarding grantee efforts in the areas of monitoring, audit, and technical assistance. This data can then be reviewed by HUD staff to examine the level of effort and results, assess risk associated with these grants, and in turn, direct HUD technical assistance and monitoring resources. This information identifies what activities have been reviewed or assisted and the results of these review and assistance visits. However, the Quarterly Performance Report (QPR) only shows the number of visits and reports within the quarter and totals to date (see Figure 3-34).
Figure 3-34: Monitoring, Audits, and Technical Assistance table
It is important to remember that this module is NOT a monitoring system in itself. It is only for reporting very basic summary level information about the number of visits and reports related to a grantee’s oversight of the activities funded under their grants in the DRGR system. In general, the information requested on visits is limited to the dates of visits and reports as well as very high-level categories of compliance issues reviewed such as: national objective, eligible activities, financial management, and environmental review.
The section on Monitoring, Audits, and Technical Assistance in a QPR displays as soon as data are entered into it. Since the DRGR system calculates the number of visits and reports based on the dates entered, the QPR shows dates that fall under the current report period as well as all visits and reports to date.
There are two basic levels of information in the DRGR Admin Module (see Figure 3-35):
1) Events/Reports 2) Findings/Concerns/TA Topics
For the first level, grantees enter the start and end dates of monitoring, audits or TA visits as well as the date of reports. Grantees can also identify which activities have been reviewed or assisted as well as the major categories of topics covered in reviews or assistance. For the second level, grantees should identify any findings and concerns made, as well as their status and corrective actions. For technical assistance, grantees can identify the basic categories of topics covered.
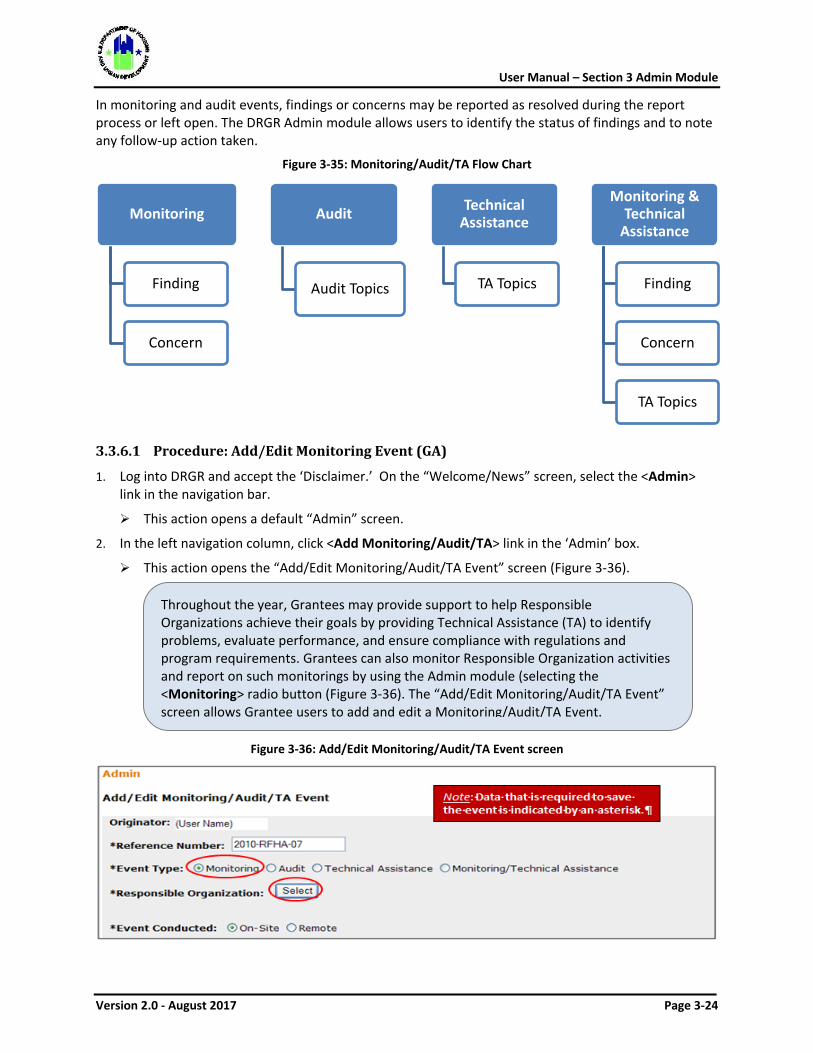
User Manual – Section 3 Admin Module
Version 2.0 - August 2017 Page 3-24
In monitoring and audit events, findings or concerns may be reported as resolved during the report process or left open. The DRGR Admin module allows users to identify the status of findings and to note any follow-up action taken.
Figure 3-35: Monitoring/Audit/TA Flow Chart
Procedure: Add/Edit Monitoring Event (GA)
1. Log into DRGR and accept the ‘Disclaimer.’ On the “Welcome/News” screen, select the <Admin> link in the navigation bar.
This action opens a default “Admin” screen.
2. In the left navigation column, click <Add Monitoring/Audit/TA> link in the ‘Admin’ box.
This action opens the “Add/Edit Monitoring/Audit/TA Event” screen (Figure 3-36).
Figure 3-36: Add/Edit Monitoring/Audit/TA Event screen
Monitoring
Finding
Concern
Audit
Audit Topics
Technical Assistance
TA Topics
Monitoring & Technical
Assistance
Finding
Concern
TA Topics
Throughout the year, Grantees may provide support to help Responsible Organizations achieve their goals by providing Technical Assistance (TA) to identify problems, evaluate performance, and ensure compliance with regulations and program requirements. Grantees can also monitor Responsible Organization activities and report on such monitorings by using the Admin module (selecting the <Monitoring> radio button (Figure 3-36). The “Add/Edit Monitoring/Audit/TA Event” screen allows Grantee users to add and edit a Monitoring/Audit/TA Event.
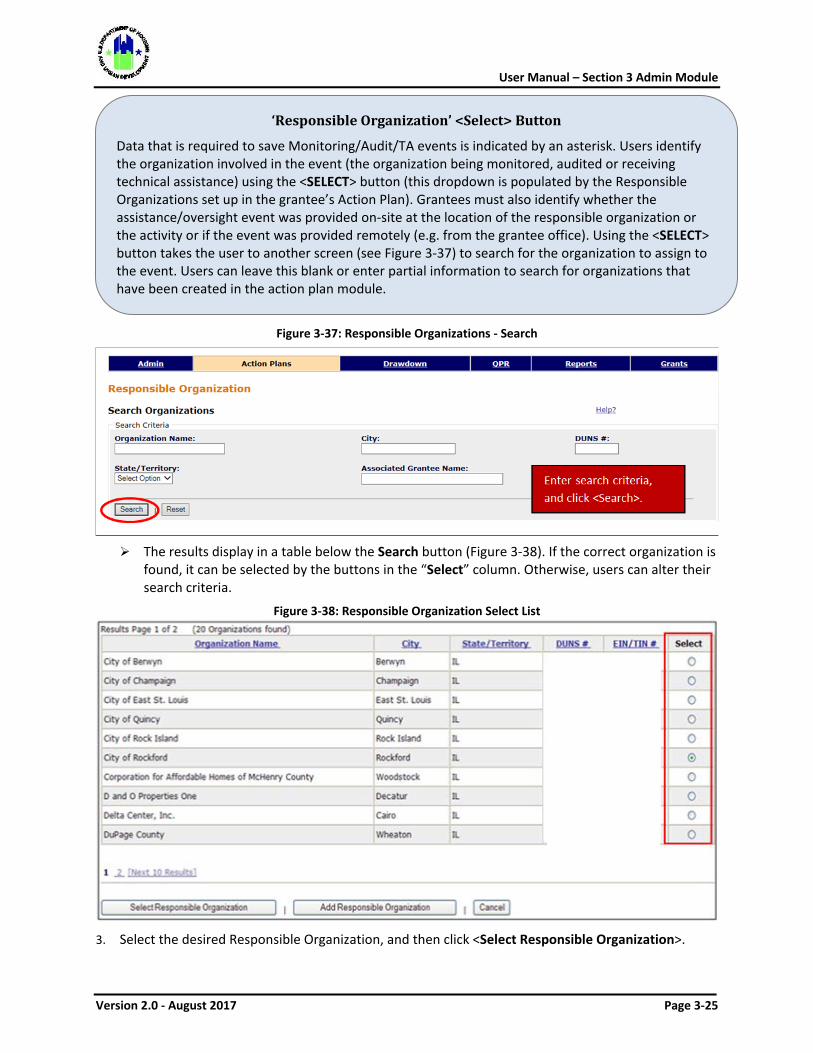
User Manual – Section 3 Admin Module
Version 2.0 - August 2017 Page 3-25
Figure 3-37: Responsible Organizations - Search
The results display in a table below the Search button (Figure 3-38). If the correct organization is
found, it can be selected by the buttons in the “Select” column. Otherwise, users can alter their search criteria.
Figure 3-38: Responsible Organization Select List
3. Select the desired Responsible Organization, and then click <Select Responsible Organization>.
‘Responsible Organization’ <Select> Button
Data that is required to save Monitoring/Audit/TA events is indicated by an asterisk. Users identify the organization involved in the event (the organization being monitored, audited or receiving technical assistance) using the <SELECT> button (this dropdown is populated by the Responsible Organizations set up in the grantee’s Action Plan). Grantees must also identify whether the assistance/oversight event was provided on-site at the location of the responsible organization or the activity or if the event was provided remotely (e.g. from the grantee office). Using the <SELECT> button takes the user to another screen (see Figure 3-37) to search for the organization to assign to the event. Users can leave this blank or enter partial information to search for organizations that have been created in the action plan module.
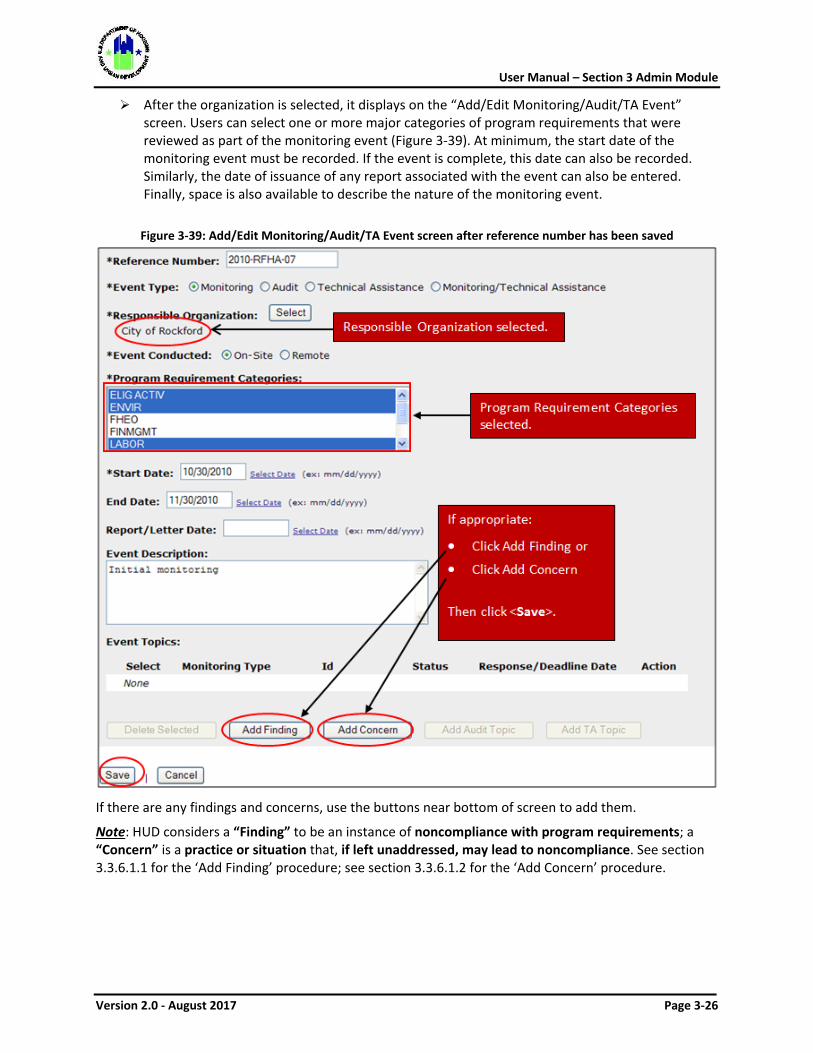
User Manual – Section 3 Admin Module
Version 2.0 - August 2017 Page 3-26
After the organization is selected, it displays on the “Add/Edit Monitoring/Audit/TA Event” screen. Users can select one or more major categories of program requirements that were reviewed as part of the monitoring event (Figure 3-39). At minimum, the start date of the monitoring event must be recorded. If the event is complete, this date can also be recorded. Similarly, the date of issuance of any report associated with the event can also be entered. Finally, space is also available to describe the nature of the monitoring event.
Figure 3-39: Add/Edit Monitoring/Audit/TA Event screen after reference number has been saved
If there are any findings and concerns, use the buttons near bottom of screen to add them.
Note: HUD considers a “Finding” to be an instance of noncompliance with program requirements; a “Concern” is a practice or situation that, if left unaddressed, may lead to noncompliance. See section 3.3.6.1.1 for the ‘Add Finding’ procedure; see section 3.3.6.1.2 for the ‘Add Concern’ procedure.
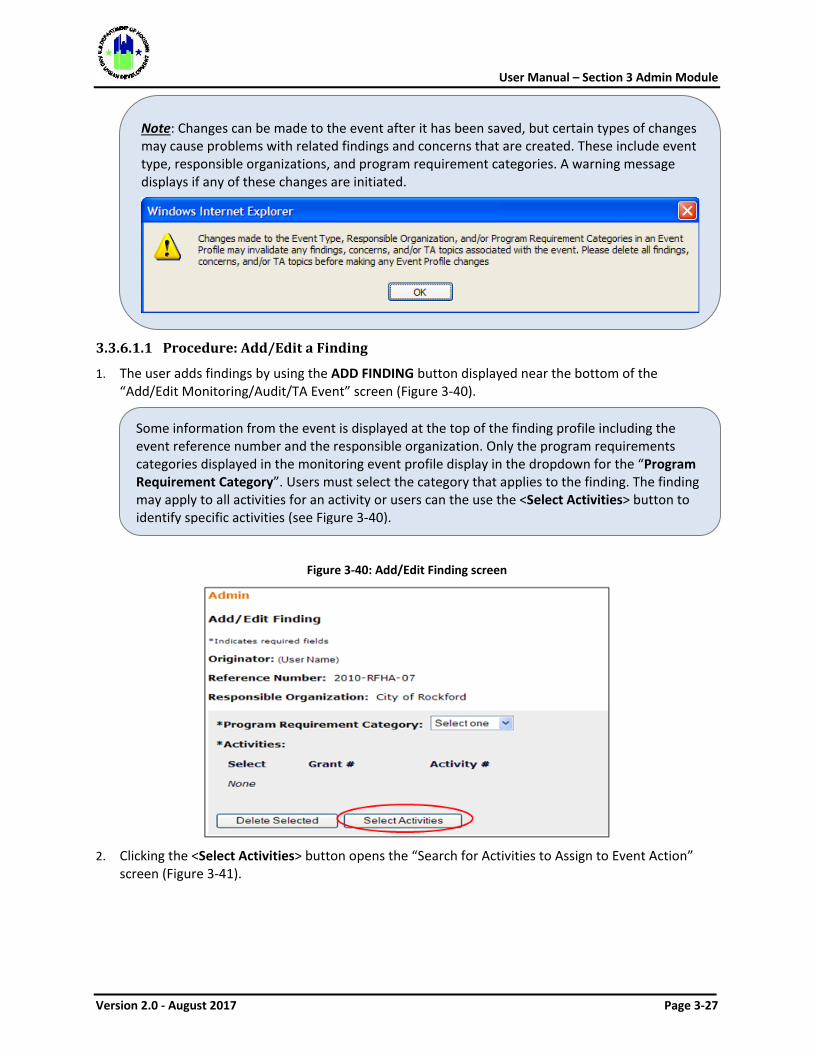
User Manual – Section 3 Admin Module
Version 2.0 - August 2017 Page 3-27
3.3.6.1.1 Procedure: Add/Edit a Finding
1. The user adds findings by using the ADD FINDING button displayed near the bottom of the “Add/Edit Monitoring/Audit/TA Event” screen (Figure 3-40).
Figure 3-40: Add/Edit Finding screen
2. Clicking the <Select Activities> button opens the “Search for Activities to Assign to Event Action”
screen (Figure 3-41).
Note: Changes can be made to the event after it has been saved, but certain types of changes may cause problems with related findings and concerns that are created. These include event type, responsible organizations, and program requirement categories. A warning message displays if any of these changes are initiated.
Some information from the event is displayed at the top of the finding profile including the event reference number and the responsible organization. Only the program requirements categories displayed in the monitoring event profile display in the dropdown for the “Program Requirement Category”. Users must select the category that applies to the finding. The finding may apply to all activities for an activity or users can the use the <Select Activities> button to identify specific activities (see Figure 3-40).
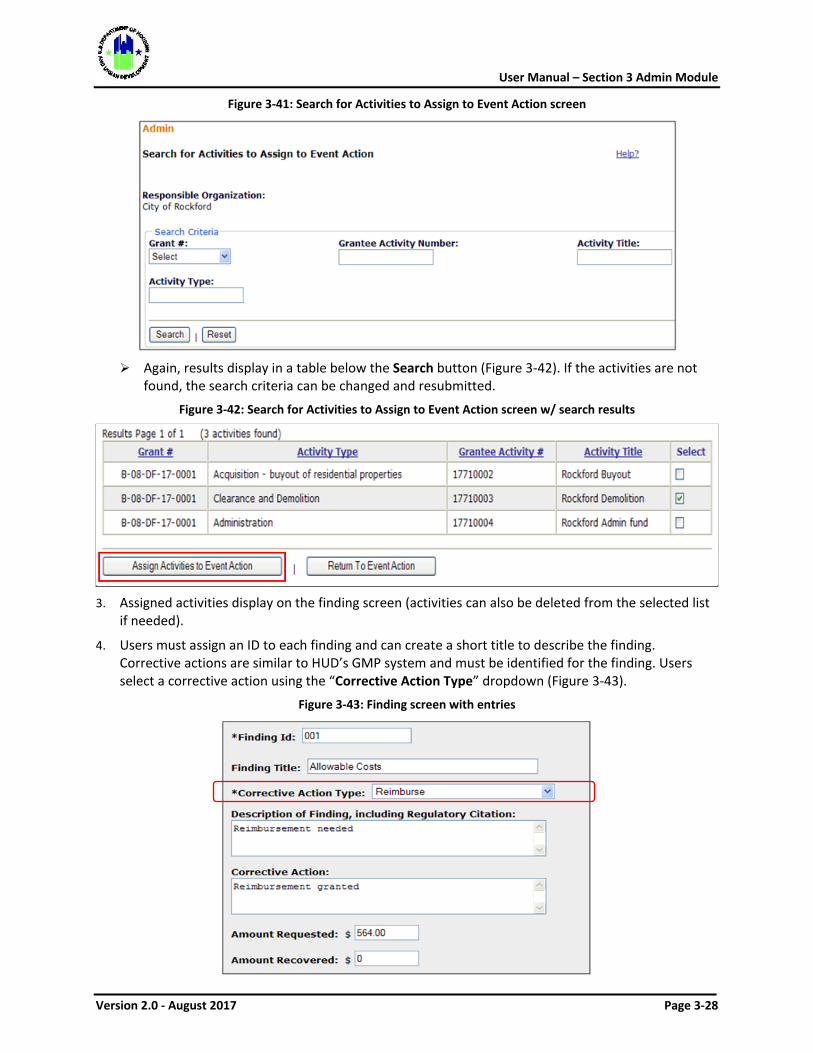
User Manual – Section 3 Admin Module
Version 2.0 - August 2017 Page 3-28
Figure 3-41: Search for Activities to Assign to Event Action screen
Again, results display in a table below the Search button (Figure 3-42). If the activities are not
found, the search criteria can be changed and resubmitted.
Figure 3-42: Search for Activities to Assign to Event Action screen w/ search results
3. Assigned activities display on the finding screen (activities can also be deleted from the selected list
if needed).
4. Users must assign an ID to each finding and can create a short title to describe the finding. Corrective actions are similar to HUD’s GMP system and must be identified for the finding. Users select a corrective action using the “Corrective Action Type” dropdown (Figure 3-43).
Figure 3-43: Finding screen with entries

User Manual – Section 3 Admin Module
Version 2.0 - August 2017 Page 3-29
Space is provided to describe findings and corrective actions, but the level of detail is up to the grantee. If the corrective action includes reimbursement, there is also space to identify the Amount Requested and the Amount Recovered. These amounts can be left as zero, as needed.
Figure 3-44: Bottom of Finding screen
5. On the bottom of the “Finding” screen (Figure 3-44), users must enter whether the finding is subject
to future verification and enter the “Response Deadline Date” Users must also indicate the “Status” of the finding. If the finding is shown as closed, a “Closed Date” must be entered. A narrative field is provided to describe follow-up action such as the dates or content of response letters. As with other narrative fields in the Admin module, the amount of text is up to the grantee. Click <Save> after you have completed all entries.
Note: Once the finding is saved, it displays above the <Add Finding> button. An <Edit> link is displayed under the Action column on the right (Figure 3-45). This link re-opens the “Add/Edit Finding” screen for editing of Finding information.
Figure 3-45: Add/Edit Activities to Assign to an Event Topic
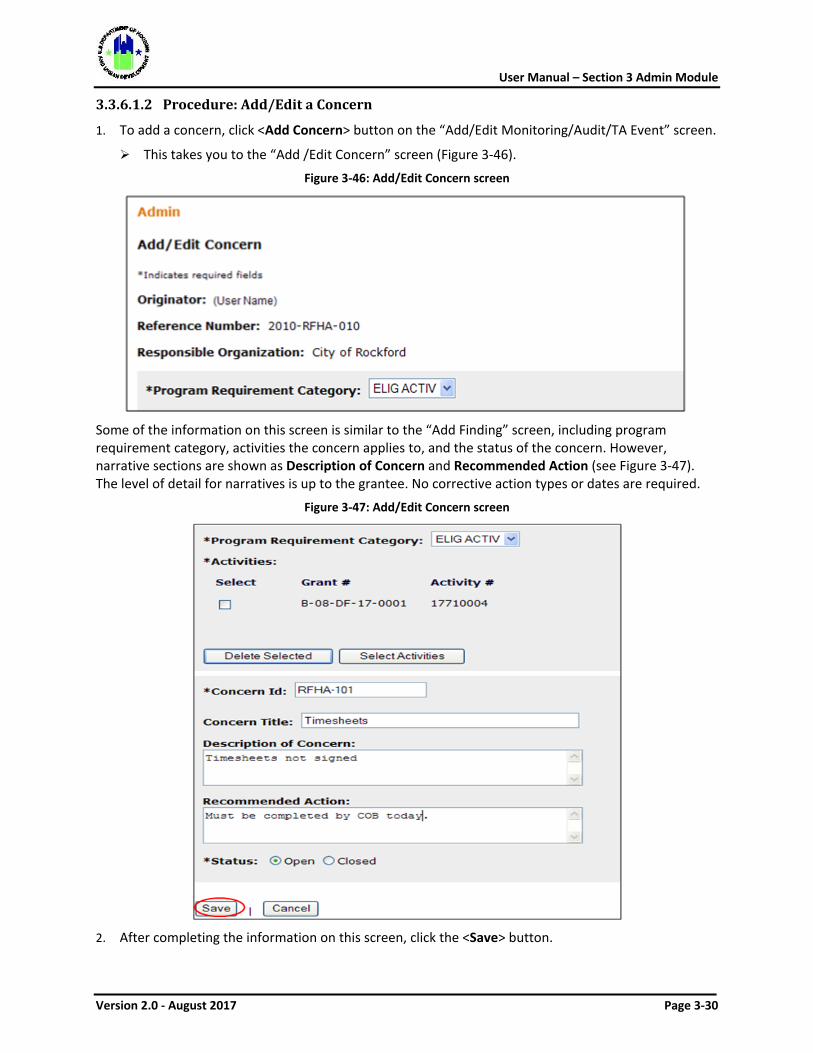
User Manual – Section 3 Admin Module
Version 2.0 - August 2017 Page 3-30
3.3.6.1.2 Procedure: Add/Edit a Concern
1. To add a concern, click <Add Concern> button on the “Add/Edit Monitoring/Audit/TA Event” screen.
This takes you to the “Add /Edit Concern” screen (Figure 3-46).
Figure 3-46: Add/Edit Concern screen
Some of the information on this screen is similar to the “Add Finding” screen, including program requirement category, activities the concern applies to, and the status of the concern. However, narrative sections are shown as Description of Concern and Recommended Action (see Figure 3-47). The level of detail for narratives is up to the grantee. No corrective action types or dates are required.
Figure 3-47: Add/Edit Concern screen
2. After completing the information on this screen, click the <Save> button.
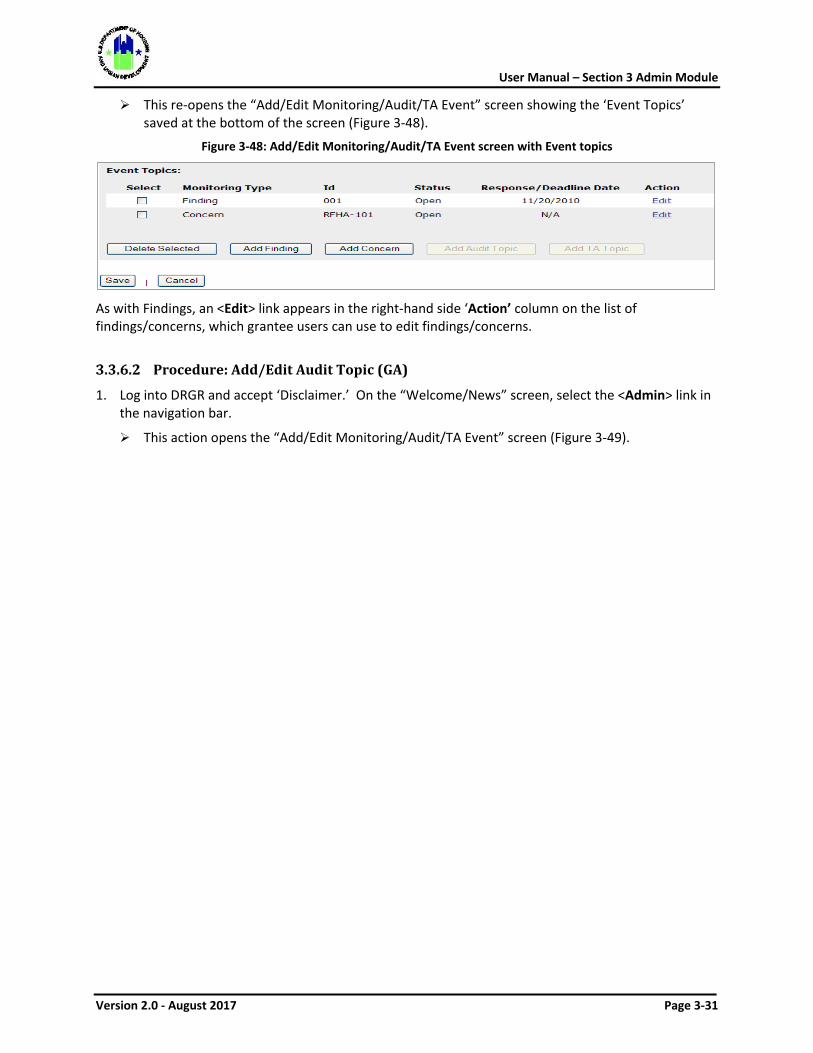
User Manual – Section 3 Admin Module
Version 2.0 - August 2017 Page 3-31
This re-opens the “Add/Edit Monitoring/Audit/TA Event” screen showing the ‘Event Topics’ saved at the bottom of the screen (Figure 3-48).
Figure 3-48: Add/Edit Monitoring/Audit/TA Event screen with Event topics
As with Findings, an <Edit> link appears in the right-hand side ‘Action’ column on the list of findings/concerns, which grantee users can use to edit findings/concerns.
Procedure: Add/Edit Audit Topic (GA)
1. Log into DRGR and accept ‘Disclaimer.’ On the “Welcome/News” screen, select the <Admin> link in the navigation bar.
This action opens the “Add/Edit Monitoring/Audit/TA Event” screen (Figure 3-49).
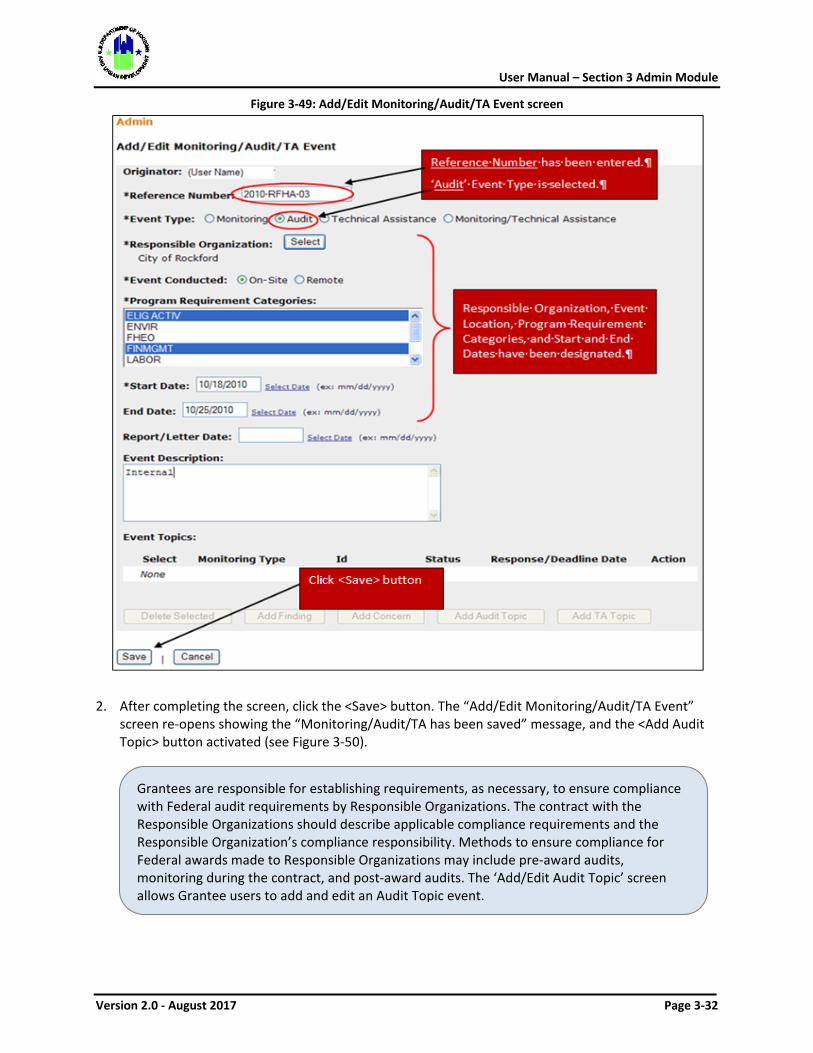
User Manual – Section 3 Admin Module
Version 2.0 - August 2017 Page 3-32
Figure 3-49: Add/Edit Monitoring/Audit/TA Event screen
2. After completing the screen, click the <Save> button. The “Add/Edit Monitoring/Audit/TA Event” screen re-opens showing the “Monitoring/Audit/TA has been saved” message, and the <Add Audit Topic> button activated (see Figure 3-50).
Grantees are responsible for establishing requirements, as necessary, to ensure compliance with Federal audit requirements by Responsible Organizations. The contract with the Responsible Organizations should describe applicable compliance requirements and the Responsible Organization’s compliance responsibility. Methods to ensure compliance for Federal awards made to Responsible Organizations may include pre-award audits, monitoring during the contract, and post-award audits. The ‘Add/Edit Audit Topic’ screen allows Grantee users to add and edit an Audit Topic event.
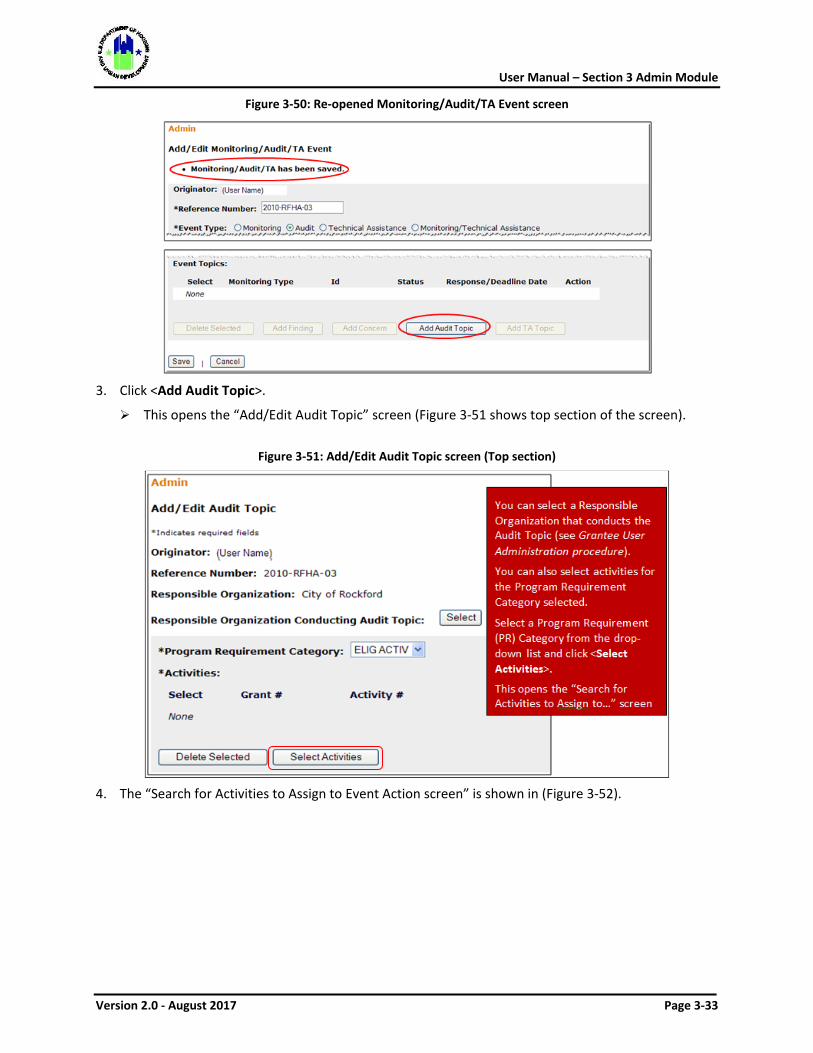
User Manual – Section 3 Admin Module
Version 2.0 - August 2017 Page 3-33
Figure 3-50: Re-opened Monitoring/Audit/TA Event screen
3. Click <Add Audit Topic>.
This opens the “Add/Edit Audit Topic” screen (Figure 3-51 shows top section of the screen).
Figure 3-51: Add/Edit Audit Topic screen (Top section)
4. The “Search for Activities to Assign to Event Action screen” is shown in (Figure 3-52).
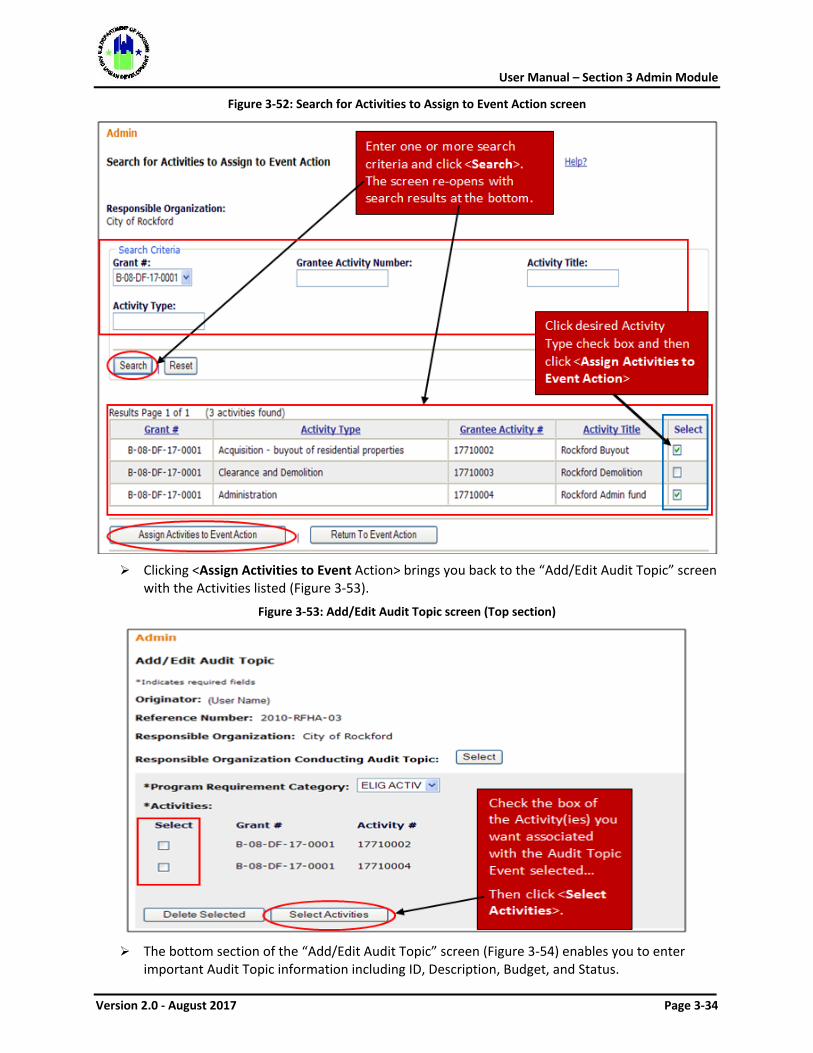
User Manual – Section 3 Admin Module
Version 2.0 - August 2017 Page 3-34
Figure 3-52: Search for Activities to Assign to Event Action screen
Clicking <Assign Activities to Event Action> brings you back to the “Add/Edit Audit Topic” screen
with the Activities listed (Figure 3-53).
Figure 3-53: Add/Edit Audit Topic screen (Top section)
The bottom section of the “Add/Edit Audit Topic” screen (Figure 3-54) enables you to enter
important Audit Topic information including ID, Description, Budget, and Status.

User Manual – Section 3 Admin Module
Version 2.0 - August 2017 Page 3-35
Figure 3-54: Add/Edit Audit Topic screen (bottom section)
Procedure: Add/Edit Technical Assistance (TA) Event (GA)
The procedure for adding/editing a TA Topic Event is almost identical to that for adding/editing an Audit Topic event. The main exception is the selection of the Event Type on the “Add/Edit Monitoring/Audit/ TA Event” screen which should be either ‘Technical Assistance’ or ‘Monitoring/Technical Assistance’ (Figure 3-55).
Throughout the year, the Grantees continue the process of providing support to help Responsible Organizations achieve their goals. This is accomplished by providing Technical Assistance (TA) to address identified problems, evaluate performance, and ensure compliance with regulations and program requirements. The ‘Add/Edit TA Topic’ screen allows Grantee users to add and edit a Technical Assistance Topic.
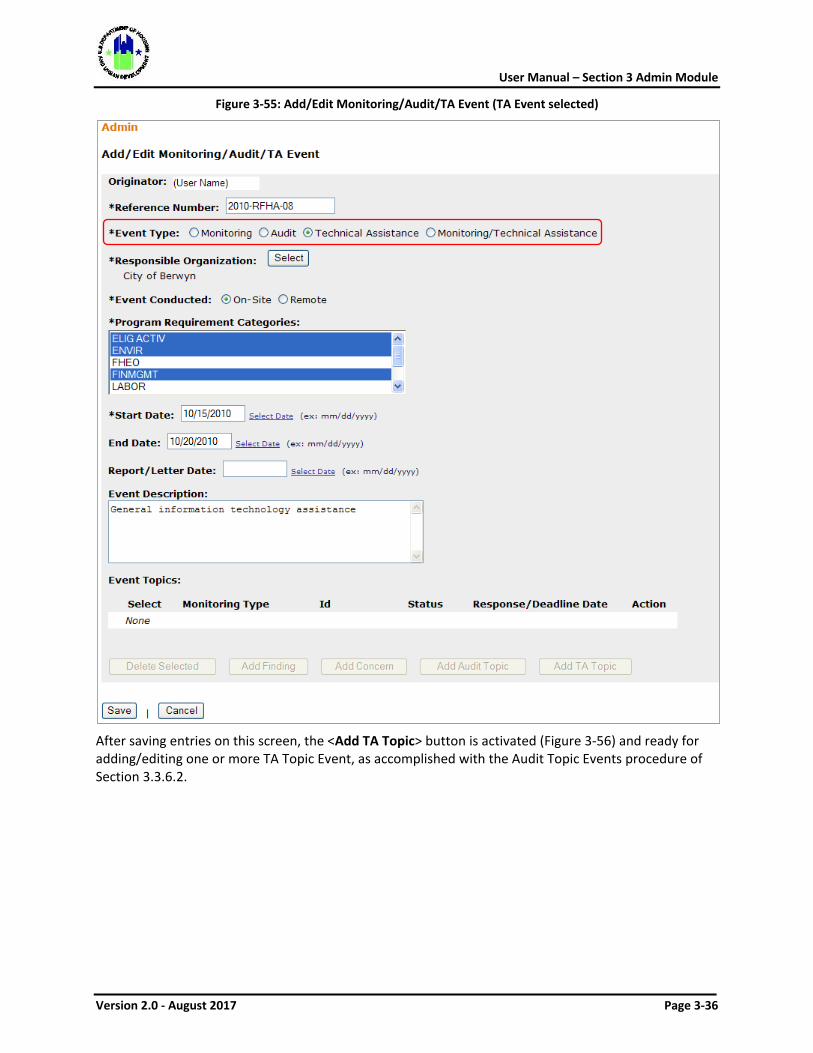
User Manual – Section 3 Admin Module
Version 2.0 - August 2017 Page 3-36
Figure 3-55: Add/Edit Monitoring/Audit/TA Event (TA Event selected)
After saving entries on this screen, the <Add TA Topic> button is activated (Figure 3-56) and ready for adding/editing one or more TA Topic Event, as accomplished with the Audit Topic Events procedure of Section 3.3.6.2.
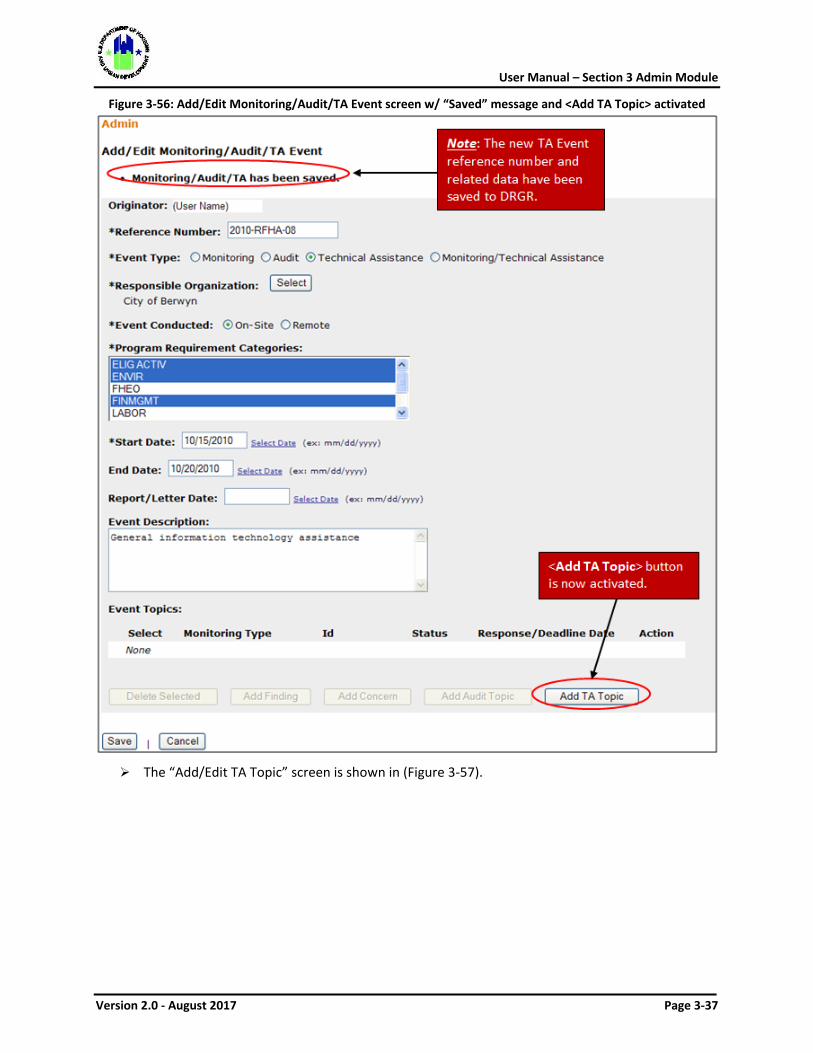
User Manual – Section 3 Admin Module
Version 2.0 - August 2017 Page 3-37
Figure 3-56: Add/Edit Monitoring/Audit/TA Event screen w/ “Saved” message and <Add TA Topic> activated
The “Add/Edit TA Topic” screen is shown in (Figure 3-57).
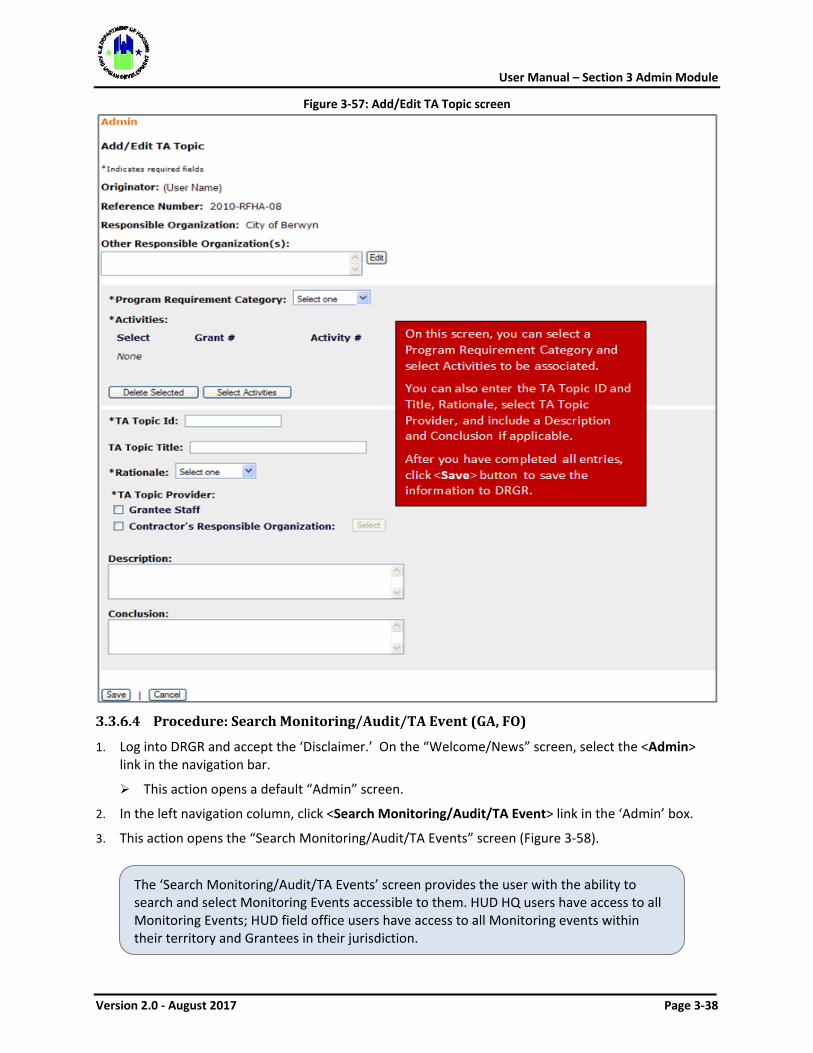
User Manual – Section 3 Admin Module
Version 2.0 - August 2017 Page 3-38
Figure 3-57: Add/Edit TA Topic screen
Procedure: Search Monitoring/Audit/TA Event (GA, FO)
1. Log into DRGR and accept the ‘Disclaimer.’ On the “Welcome/News” screen, select the <Admin> link in the navigation bar.
This action opens a default “Admin” screen.
2. In the left navigation column, click <Search Monitoring/Audit/TA Event> link in the ‘Admin’ box.
3. This action opens the “Search Monitoring/Audit/TA Events” screen (Figure 3-58).
The ‘Search Monitoring/Audit/TA Events’ screen provides the user with the ability to search and select Monitoring Events accessible to them. HUD HQ users have access to all Monitoring Events; HUD field office users have access to all Monitoring events within their territory and Grantees in their jurisdiction.
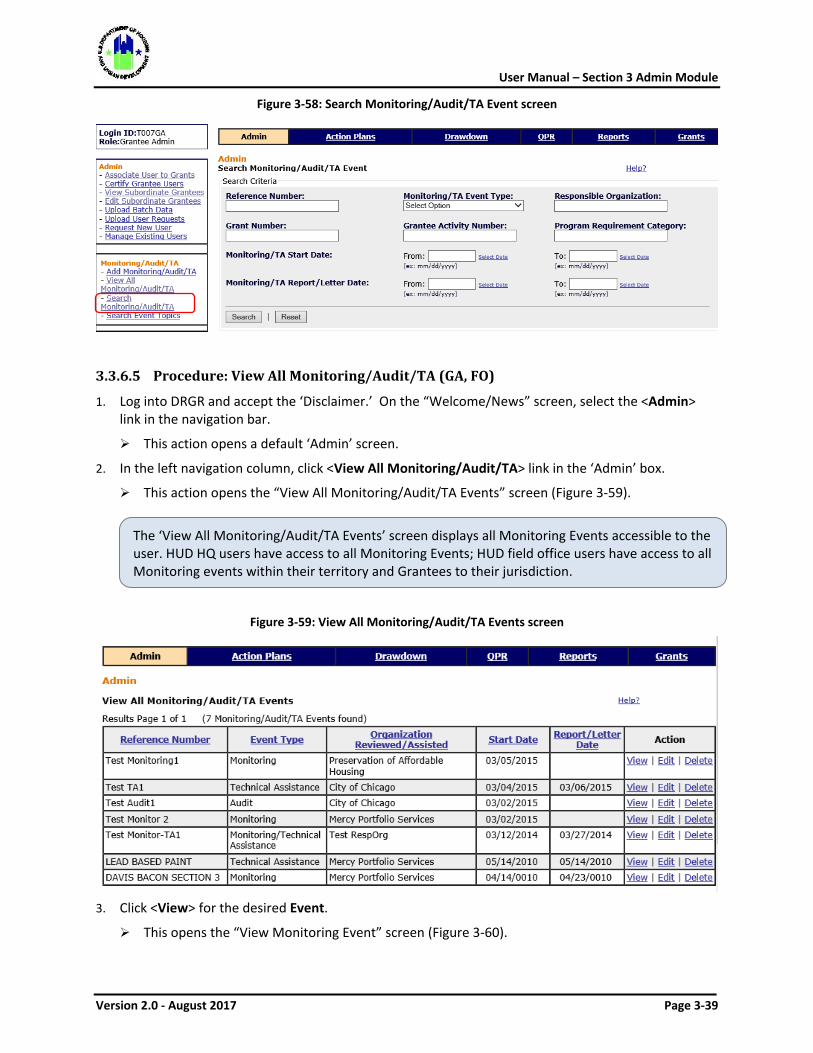
User Manual – Section 3 Admin Module
Version 2.0 - August 2017 Page 3-39
Figure 3-58: Search Monitoring/Audit/TA Event screen
Procedure: View All Monitoring/Audit/TA (GA, FO)
1. Log into DRGR and accept the ‘Disclaimer.’ On the “Welcome/News” screen, select the <Admin> link in the navigation bar.
This action opens a default ‘Admin’ screen.
2. In the left navigation column, click <View All Monitoring/Audit/TA> link in the ‘Admin’ box.
This action opens the “View All Monitoring/Audit/TA Events” screen (Figure 3-59).
Figure 3-59: View All Monitoring/Audit/TA Events screen
3. Click <View> for the desired Event.
This opens the “View Monitoring Event” screen (Figure 3-60).
The ‘View All Monitoring/Audit/TA Events’ screen displays all Monitoring Events accessible to the user. HUD HQ users have access to all Monitoring Events; HUD field office users have access to all Monitoring events within their territory and Grantees to their jurisdiction.
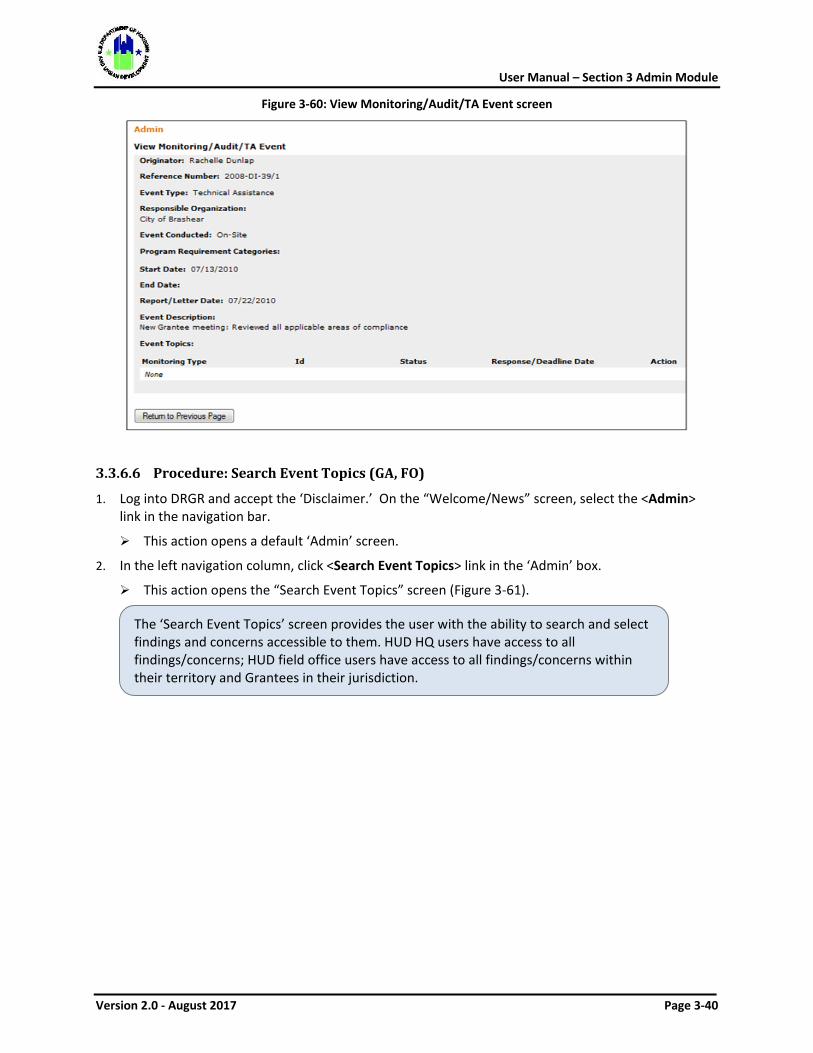
User Manual – Section 3 Admin Module
Version 2.0 - August 2017 Page 3-40
Figure 3-60: View Monitoring/Audit/TA Event screen
Procedure: Search Event Topics (GA, FO)
1. Log into DRGR and accept the ‘Disclaimer.’ On the “Welcome/News” screen, select the <Admin> link in the navigation bar.
This action opens a default ‘Admin’ screen.
2. In the left navigation column, click <Search Event Topics> link in the ‘Admin’ box.
This action opens the “Search Event Topics” screen (Figure 3-61).
The ‘Search Event Topics’ screen provides the user with the ability to search and select findings and concerns accessible to them. HUD HQ users have access to all findings/concerns; HUD field office users have access to all findings/concerns within their territory and Grantees in their jurisdiction.
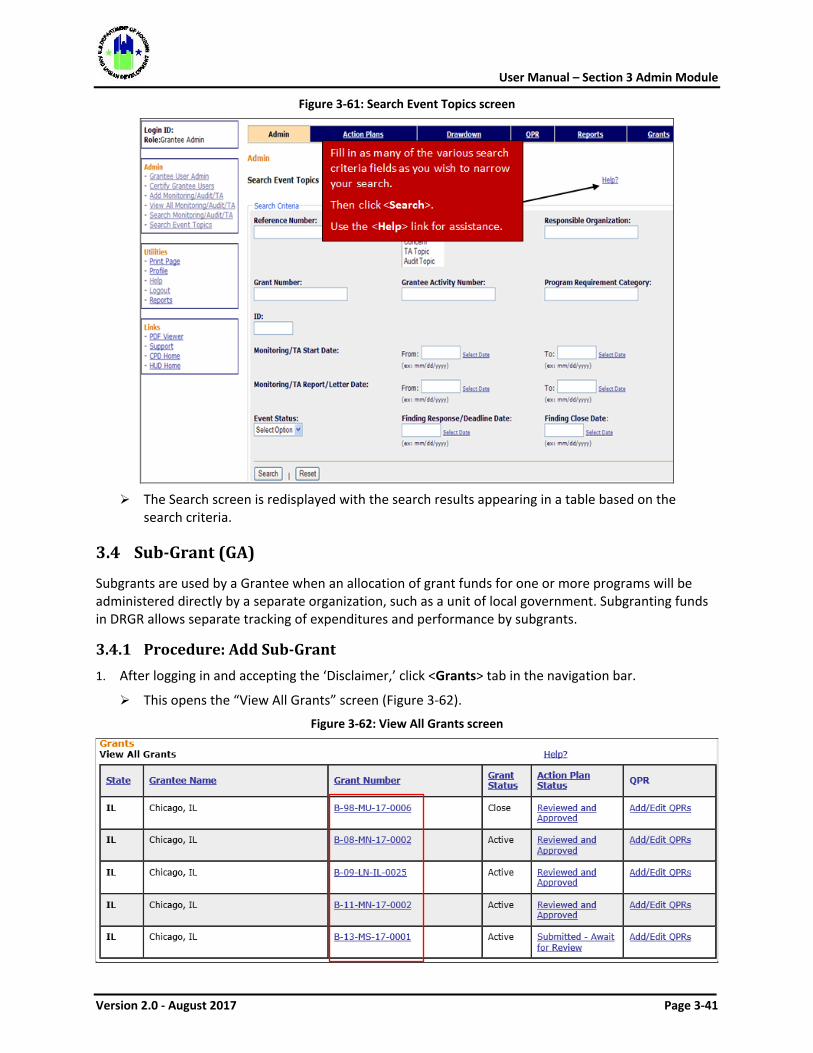
User Manual – Section 3 Admin Module
Version 2.0 - August 2017 Page 3-41
Figure 3-61: Search Event Topics screen
The Search screen is redisplayed with the search results appearing in a table based on the
search criteria.
3.4 Sub-Grant (GA)
Subgrants are used by a Grantee when an allocation of grant funds for one or more programs will be administered directly by a separate organization, such as a unit of local government. Subgranting funds in DRGR allows separate tracking of expenditures and performance by subgrants.
3.4.1 Procedure: Add Sub-Grant 1. After logging in and accepting the ‘Disclaimer,’ click <Grants> tab in the navigation bar.
This opens the “View All Grants” screen (Figure 3-62).
Figure 3-62: View All Grants screen
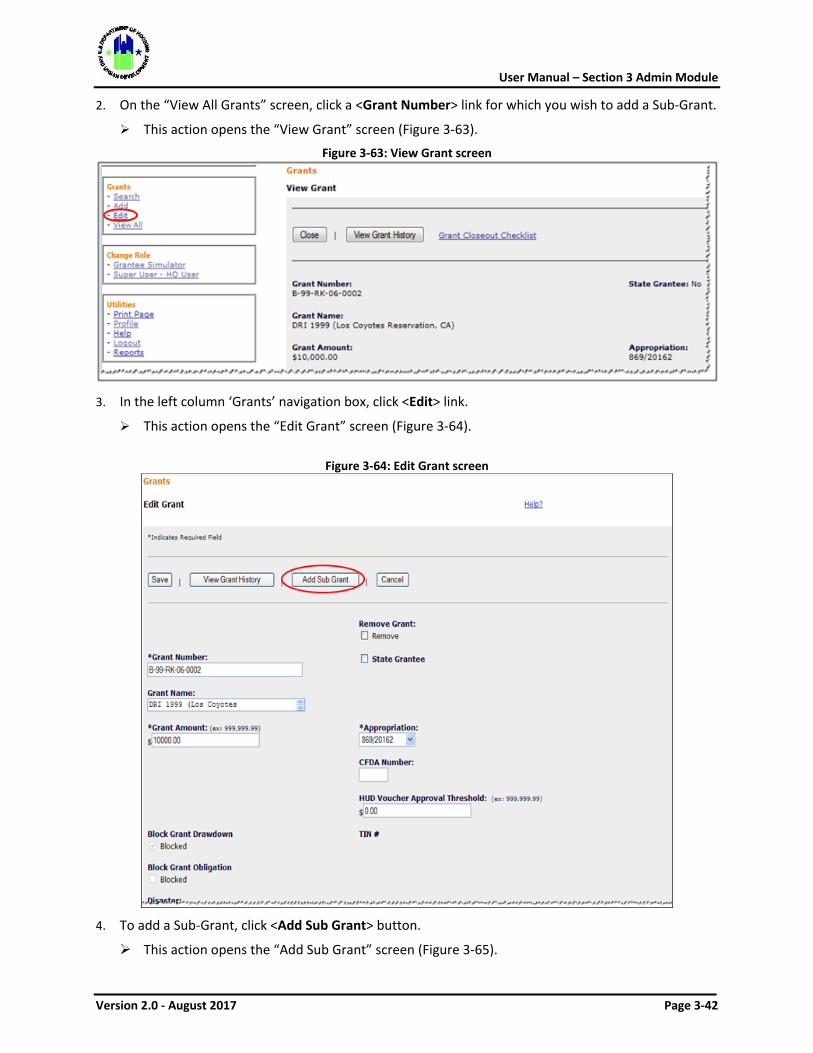
User Manual – Section 3 Admin Module
Version 2.0 - August 2017 Page 3-42
2. On the “View All Grants” screen, click a <Grant Number> link for which you wish to add a Sub-Grant.
This action opens the “View Grant” screen (Figure 3-63).
Figure 3-63: View Grant screen
3. In the left column ‘Grants’ navigation box, click <Edit> link.
This action opens the “Edit Grant” screen (Figure 3-64).
Figure 3-64: Edit Grant screen
4. To add a Sub-Grant, click <Add Sub Grant> button.
This action opens the “Add Sub Grant” screen (Figure 3-65).
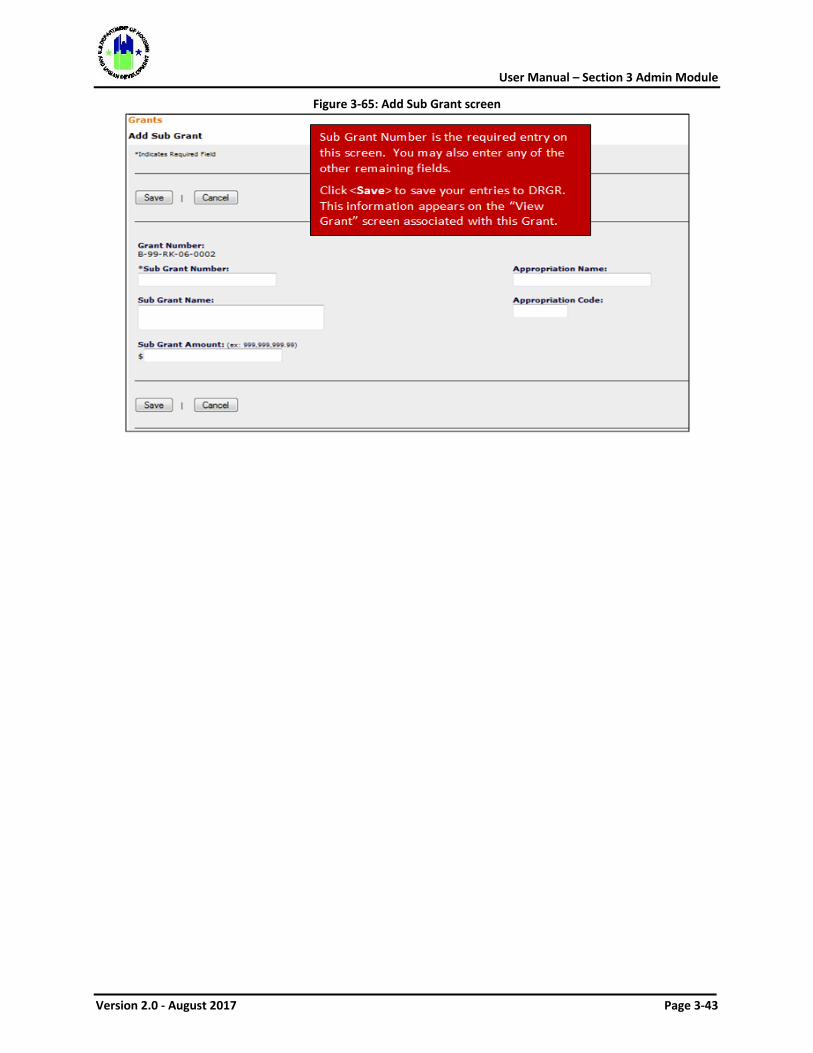
User Manual – Section 3 Admin Module
Version 2.0 - August 2017 Page 3-43
Figure 3-65: Add Sub Grant screen
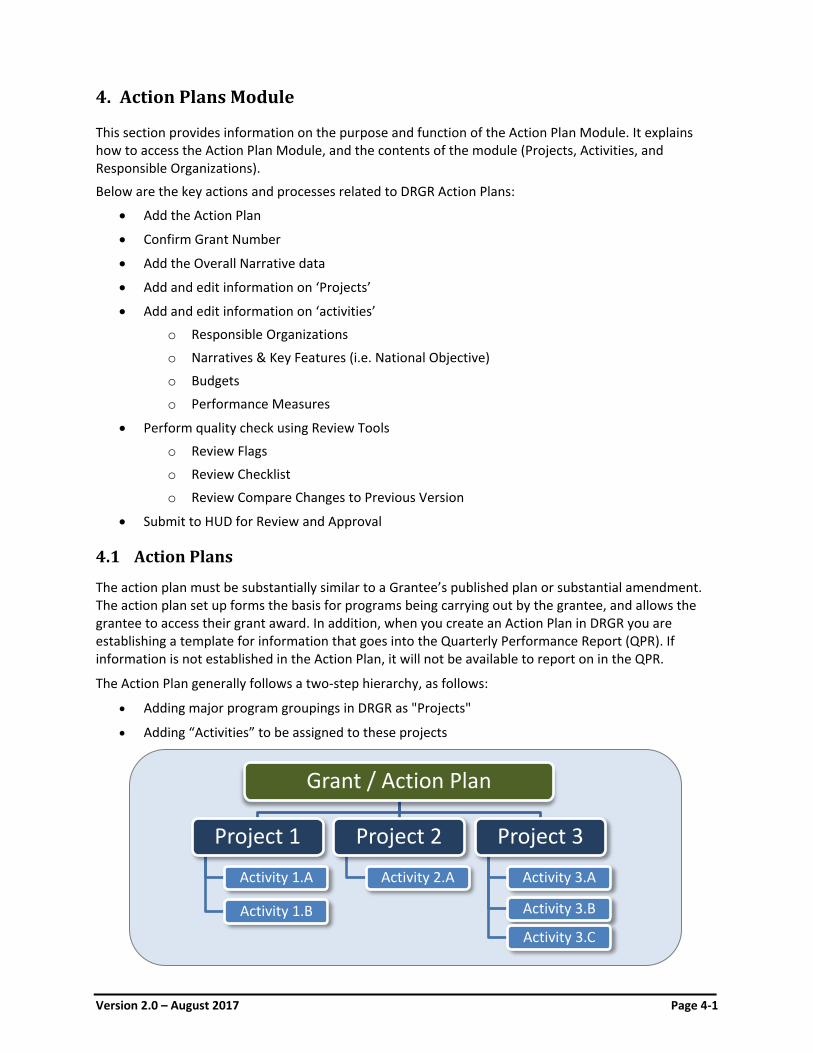
Version 2.0 – August 2017 Page 4-1
4. Action Plans Module
This section provides information on the purpose and function of the Action Plan Module. It explains how to access the Action Plan Module, and the contents of the module (Projects, Activities, and Responsible Organizations).
Below are the key actions and processes related to DRGR Action Plans:
• Add the Action Plan
• Confirm Grant Number
• Add the Overall Narrative data
• Add and edit information on ‘Projects’
• Add and edit information on ‘activities’
o Responsible Organizations
o Narratives & Key Features (i.e. National Objective)
o Budgets
o Performance Measures
• Perform quality check using Review Tools
o Review Flags
o Review Checklist
o Review Compare Changes to Previous Version
• Submit to HUD for Review and Approval
4.1 Action Plans
The action plan must be substantially similar to a Grantee’s published plan or substantial amendment. The action plan set up forms the basis for programs being carrying out by the grantee, and allows the grantee to access their grant award. In addition, when you create an Action Plan in DRGR you are establishing a template for information that goes into the Quarterly Performance Report (QPR). If information is not established in the Action Plan, it will not be available to report on in the QPR.
The Action Plan generally follows a two-step hierarchy, as follows:
• Adding major program groupings in DRGR as "Projects"
• Adding “Activities” to be assigned to these projects
Grant / Action Plan
Project 1
Activity 1.A
Activity 1.B
Project 2
Activity 2.A
Project 3
Activity 3.A
Activity 3.B
Activity 3.C

Version 2.0 – August 2017 Page 4-2
4.1.1 Initial Steps Proper set up of an Action Plan is one of the keys to reporting accurately in DRGR. However, before an Action Plan can be entered into DRGR, the following must take place:
1. Upon submittal of the Published Plan (Disaster Recovery) or Substantial Amendment (NSP), HUD must decide whether or not to approve the Grant.
2. If the Grant is approved, the primary Grant data is entered into the LOCCS system, which then informs the DRGR system that a new Grant exists, providing all relevant data.
3. The Grantee is informed of the acceptance of the Published Plan or Substantial Amendment, and is provided a role, and rights to establish log-in permission for the DRGR system.
4. When the Grantee logs into the DRGR system for the first time, the Disclaimer and Rules of Behavior must both be accepted.
5. Following this sequence, the DRGR system will show the Action Plan status for the Grant as ‘Overdue’. The Grantee will click the ‘Overdue’ link to add the Action Plan to DRGR.
6. Thereafter, the Grantee must add project and activities in accordance with the Published Plan or Substantial Amendment.
4.1.2 Add / Edit / View Action Plan 4.1.2.1 Procedure: Adding an Action Plan for the first time
DRGR includes two screens for adding an Action Plan to the system.
Note: In addition to the processes described below, information for the Action Plan can also be uploaded in DRGR. See Chapter 9 – Data Uploads for more information.
1. Log into DRGR and accept the ‘Disclaimer.’ On the Home screen, select the <Action Plans> link in the navigation bar.
This action opens a default “View All Action Plans” screen (Figure 4-1).
Figure 4-1: View All Action Plans screen with ‘Over Due’ Action Plan Status
2. Click the <Over Due> ‘Action Plan Status’ link to add an action plan.
This action opens the “Add Action Plan – Page 1” (Confirm Grant) screen (Figure 4-2).
‘Over Due’ simply means an Action Plan has not yet been added for this grant.
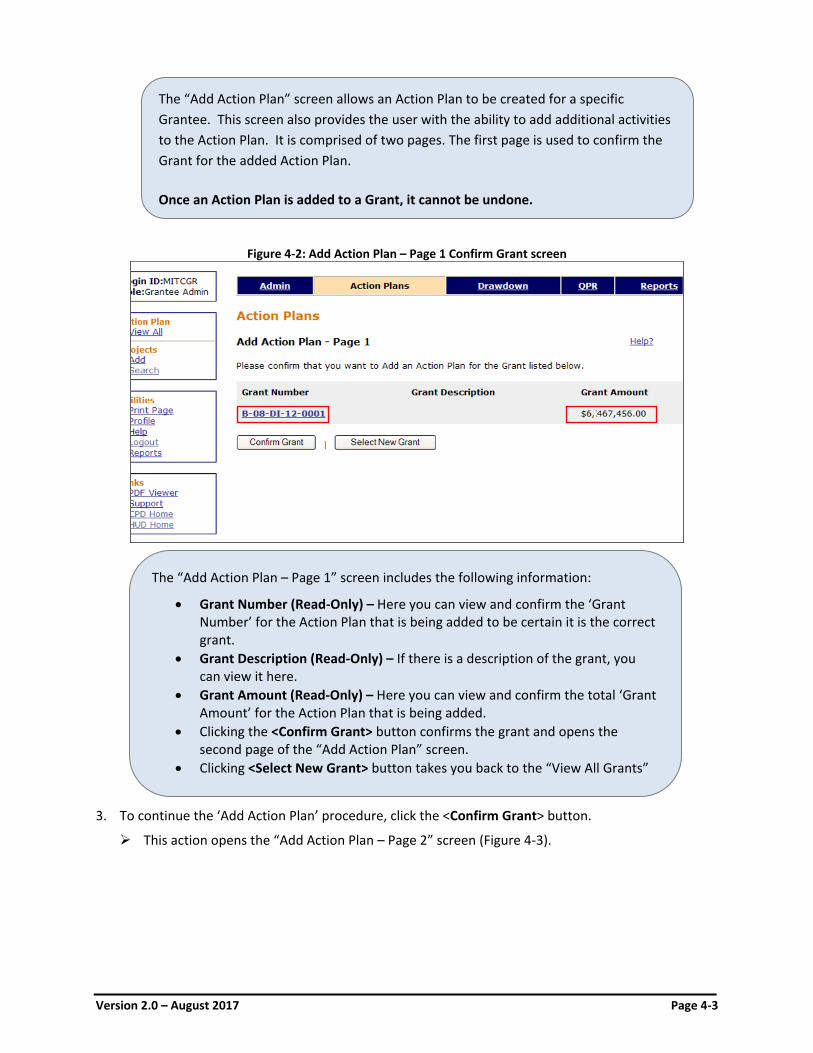
Version 2.0 – August 2017 Page 4-3
Figure 4-2: Add Action Plan – Page 1 Confirm Grant screen
3. To continue the ‘Add Action Plan’ procedure, click the <Confirm Grant> button.
This action opens the “Add Action Plan – Page 2” screen (Figure 4-3).
The “Add Action Plan” screen allows an Action Plan to be created for a specific Grantee. This screen also provides the user with the ability to add additional activities to the Action Plan. It is comprised of two pages. The first page is used to confirm the Grant for the added Action Plan.
Once an Action Plan is added to a Grant, it cannot be undone.
The “Add Action Plan – Page 1” screen includes the following information:
• Grant Number (Read-Only) – Here you can view and confirm the ‘Grant Number’ for the Action Plan that is being added to be certain it is the correct grant.
• Grant Description (Read-Only) – If there is a description of the grant, you can view it here.
• Grant Amount (Read-Only) – Here you can view and confirm the total ‘Grant Amount’ for the Action Plan that is being added.
• Clicking the <Confirm Grant> button confirms the grant and opens the second page of the “Add Action Plan” screen.
• Clicking <Select New Grant> button takes you back to the “View All Grants”
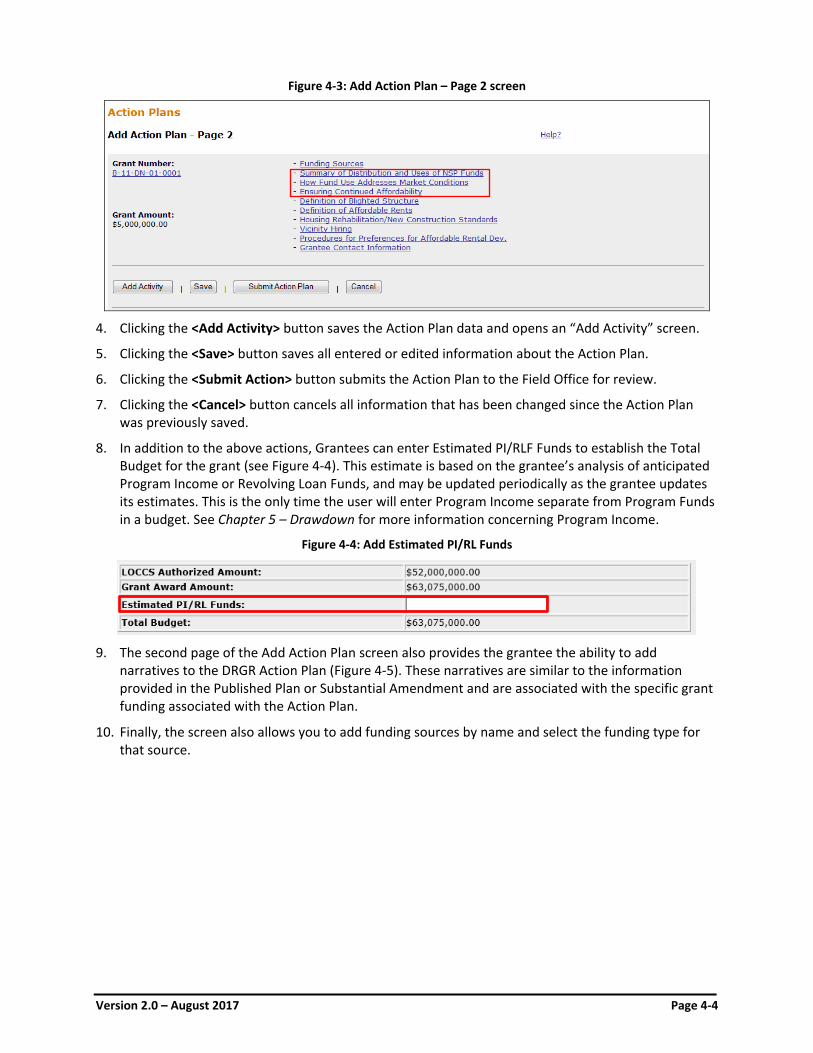
Version 2.0 – August 2017 Page 4-4
Figure 4-3: Add Action Plan – Page 2 screen
4. Clicking the <Add Activity> button saves the Action Plan data and opens an “Add Activity” screen.
5. Clicking the <Save> button saves all entered or edited information about the Action Plan.
6. Clicking the <Submit Action> button submits the Action Plan to the Field Office for review.
7. Clicking the <Cancel> button cancels all information that has been changed since the Action Plan was previously saved.
8. In addition to the above actions, Grantees can enter Estimated PI/RLF Funds to establish the Total Budget for the grant (see Figure 4-4). This estimate is based on the grantee’s analysis of anticipated Program Income or Revolving Loan Funds, and may be updated periodically as the grantee updates its estimates. This is the only time the user will enter Program Income separate from Program Funds in a budget. See Chapter 5 – Drawdown for more information concerning Program Income.
Figure 4-4: Add Estimated PI/RL Funds
9. The second page of the Add Action Plan screen also provides the grantee the ability to add
narratives to the DRGR Action Plan (Figure 4-5). These narratives are similar to the information provided in the Published Plan or Substantial Amendment and are associated with the specific grant funding associated with the Action Plan.
10. Finally, the screen also allows you to add funding sources by name and select the funding type for that source.

Version 2.0 – August 2017 Page 4-5
Figure 4-5: Action Plan Narratives (NSP Example)
4.1.2.2 Procedure: Editing an Action Plan
The DRGR Action Plan is fluid and may change often. All grantees will, at some point, need to revisit the information in the Action Plan to make changes. It is important to understand that those changes, even if minor, will require submission of the DRGR Action Plan to HUD for review and approval, and that until that review is completed, the grantee cannot submit a QPR. Given this relationship, grantees must work closely with their HUD CPD representatives to make sure any changes to the Action Plan will not interfere with the timely submission of the QPR.
The status field for the Action Plan will tell you where you are in the process (see Figure 4-6).
Minor changes can be handled by updating DRGR and resubmitting to HUD for review. Larger changes, however, may trigger additional public participation requirements. Work with your CPD Representative to determine if additional public participation is needed.
If the grantee is making several small changes to the Action Plan, they may want to wait until all of the changes are made and submit the Action Plan once to the HUD Rep for review.
To ‘Edit’ an Action Plan, follow the procedure below:
1. Log into DRGR and accept the ‘Disclaimer.’ On the Home screen, select the <Action Plans> link in the navigation bar.
This action opens a default “View All Action Plans” screen (Figure 4-6).
2. Select an ‘Action Plan Status’ link for an Action Plan that can be edited.
The “Edit Action Plan” screen opens (Figure 4-7) and any data previously entered or omitted can be edited and saved.
3. Click the <Save> button to save changes to the Action Plan, or click the <Submit Action Plan> to submit for HUD review.
NOTE: Specific processes for editing Projects and Activities are detailed in Section 4.2.
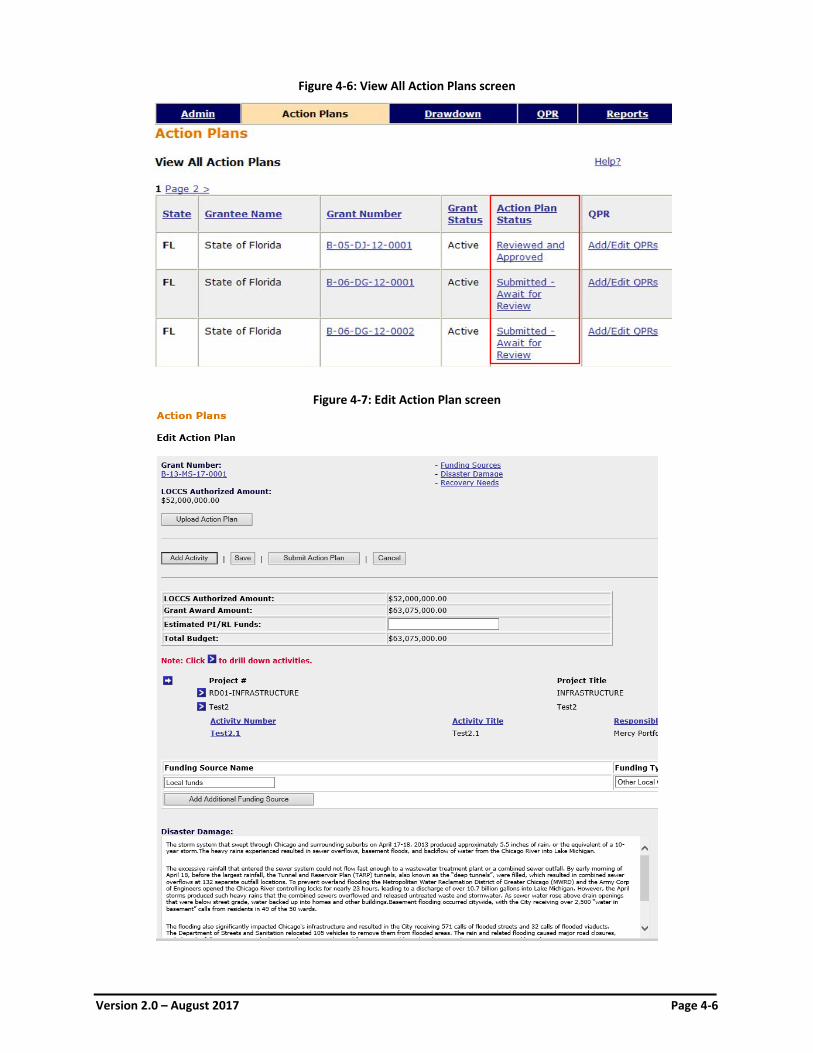
Version 2.0 – August 2017 Page 4-6
Figure 4-6: View All Action Plans screen
Figure 4-7: Edit Action Plan screen
Version 2.0 – August 2017 Page 4-7
4.1.2.3 Procedure: Viewing an Action Plan
1. Log into DRGR and accept the ‘Disclaimer.’ From the Home screen click <Action Plans> link located in the navigation bar.
This action opens the “View All Action Plans” screen (Figure 4-6).
2. In the “Action Plan Status” column, click applicable Action Plan.
This action opens the “View Action Plan” screen (Figure 4-8).
Why you may not be allowed to Edit and/or Submit an Action Plan:
In general, grantee users that have been authorized to access a grant should be able to edit Action Plans. However, grantee users must have the “Submit Action Plan” role to be able to submit an Action Plan. The following instances may prevent grantee users from editing or submitting Action Plans:
An Action Plan in a status of ‘Submitted’ cannot be modified: If a grantee user has submitted the Action Plan, it cannot be edited until a HUD user that can view the grant (e.g. your CPD Representative) has either rejected or approved the Action Plan. To resolve this issue, contact your CPD representative.
An Action Plan for a Grant with a QPR in a status of ‘Submitted’ cannot be submitted: Quarterly Performance Reports (QPRs) depend on data from the Action Plan. Although not recommended, grantee users can ‘edit’ an Action Plan while a QPR is in ‘submitted’ status. However, an Action Plan cannot be ‘submitted’ until a HUD user that can view the grant has either rejected or approved the QPR. To resolve this issue, contact your CPD representative.
An Action Plan cannot be submitted unless the Grantee User has the ‘Submit Action Plan’ role: Only users with the ‘Submit Action Plan’ role can submit Action Plans. Grantee Users can, however, edit Action Plans, even without the ‘Submit Action Plan’ role. See Chapter 3 Admin for instructions on adding additional user roles.
The Action Plan cannot be edited because: the Grantee is not active, the grant is not active or you don’t have edit capabilities: Any grantee DRGR accounts designated as ‘View Only’ cannot edit Action Plans or QPRs. If a grantee or grant is not showing as active in DRGR, this may be a mistake by HUD DRGR system administrators. Contact your grantee system administrator or [email protected].
The “View All Action Plans” screen provides the system user the ability to view all of the existing action plans stored in the DRGR system. This screen also provides the system user the ability to filter all of the grants returned by ‘State’, ‘Grantee Name’, ‘Grant Number’, ‘Grant Status’, ‘Action Plan Status,’ and ‘QPR.’
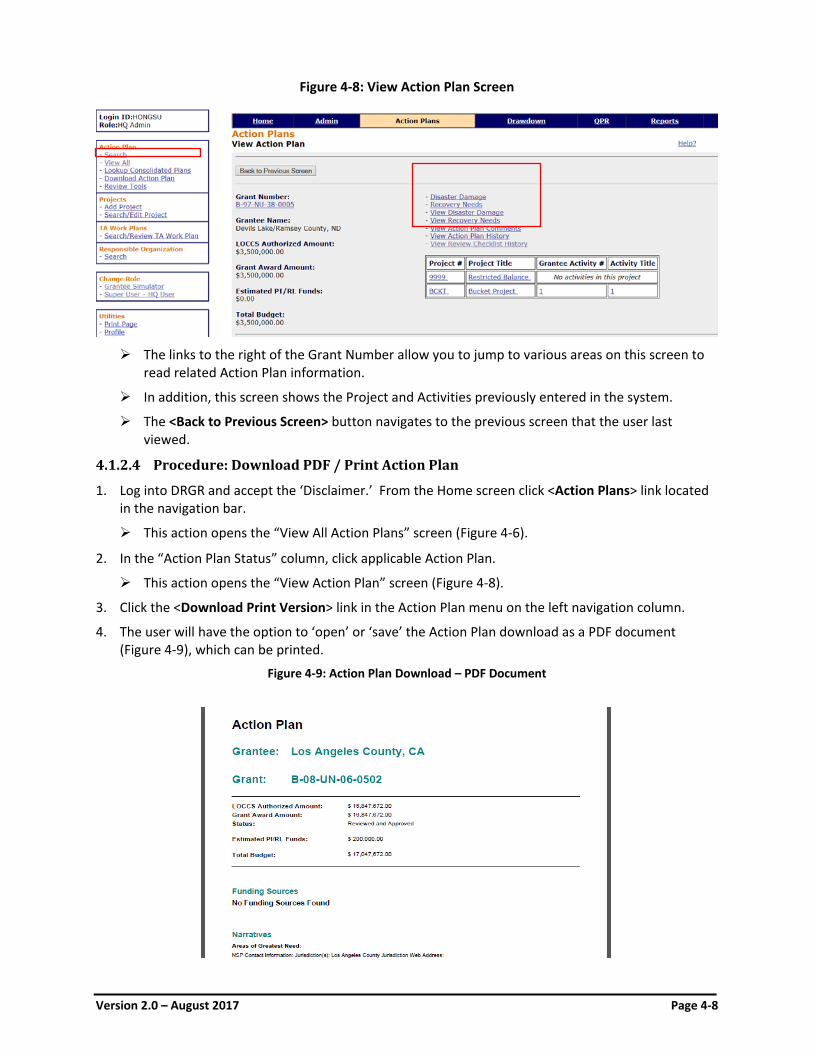
Version 2.0 – August 2017 Page 4-8
Figure 4-8: View Action Plan Screen
The links to the right of the Grant Number allow you to jump to various areas on this screen to
read related Action Plan information.
In addition, this screen shows the Project and Activities previously entered in the system.
The <Back to Previous Screen> button navigates to the previous screen that the user last viewed.
4.1.2.4 Procedure: Download PDF / Print Action Plan
1. Log into DRGR and accept the ‘Disclaimer.’ From the Home screen click <Action Plans> link located in the navigation bar.
This action opens the “View All Action Plans” screen (Figure 4-6).
2. In the “Action Plan Status” column, click applicable Action Plan.
This action opens the “View Action Plan” screen (Figure 4-8).
3. Click the <Download Print Version> link in the Action Plan menu on the left navigation column.
4. The user will have the option to ‘open’ or ‘save’ the Action Plan download as a PDF document (Figure 4-9), which can be printed.
Figure 4-9: Action Plan Download – PDF Document
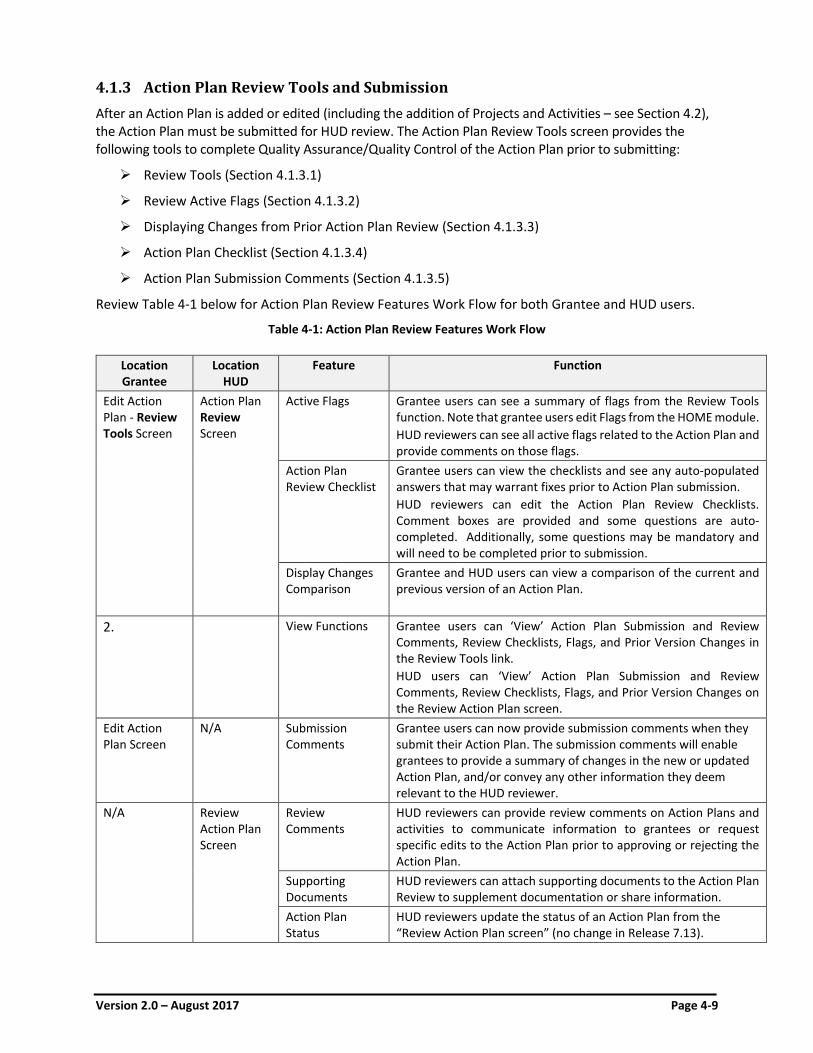
Version 2.0 – August 2017 Page 4-9
4.1.3 Action Plan Review Tools and Submission After an Action Plan is added or edited (including the addition of Projects and Activities – see Section 4.2), the Action Plan must be submitted for HUD review. The Action Plan Review Tools screen provides the following tools to complete Quality Assurance/Quality Control of the Action Plan prior to submitting:
Review Tools (Section 4.1.3.1)
Review Active Flags (Section 4.1.3.2)
Displaying Changes from Prior Action Plan Review (Section 4.1.3.3)
Action Plan Checklist (Section 4.1.3.4)
Action Plan Submission Comments (Section 4.1.3.5)
Review Table 4-1 below for Action Plan Review Features Work Flow for both Grantee and HUD users.
Table 4-1: Action Plan Review Features Work Flow
Location Grantee
Location HUD
Feature Function
Edit Action Plan - Review Tools Screen
Action Plan Review Screen
Active Flags Grantee users can see a summary of flags from the Review Tools function. Note that grantee users edit Flags from the HOME module. HUD reviewers can see all active flags related to the Action Plan and provide comments on those flags.
Action Plan Review Checklist
Grantee users can view the checklists and see any auto-populated answers that may warrant fixes prior to Action Plan submission. HUD reviewers can edit the Action Plan Review Checklists. Comment boxes are provided and some questions are auto-completed. Additionally, some questions may be mandatory and will need to be completed prior to submission.
Display Changes Comparison
Grantee and HUD users can view a comparison of the current and previous version of an Action Plan.
2. View Functions Grantee users can ‘View’ Action Plan Submission and Review Comments, Review Checklists, Flags, and Prior Version Changes in the Review Tools link. HUD users can ‘View’ Action Plan Submission and Review Comments, Review Checklists, Flags, and Prior Version Changes on the Review Action Plan screen.
Edit Action Plan Screen
N/A Submission Comments
Grantee users can now provide submission comments when they submit their Action Plan. The submission comments will enable grantees to provide a summary of changes in the new or updated Action Plan, and/or convey any other information they deem relevant to the HUD reviewer.
N/A
Review Action Plan Screen
Review Comments
HUD reviewers can provide review comments on Action Plans and activities to communicate information to grantees or request specific edits to the Action Plan prior to approving or rejecting the Action Plan.
Supporting Documents
HUD reviewers can attach supporting documents to the Action Plan Review to supplement documentation or share information.
Action Plan Status
HUD reviewers update the status of an Action Plan from the “Review Action Plan screen” (no change in Release 7.13).
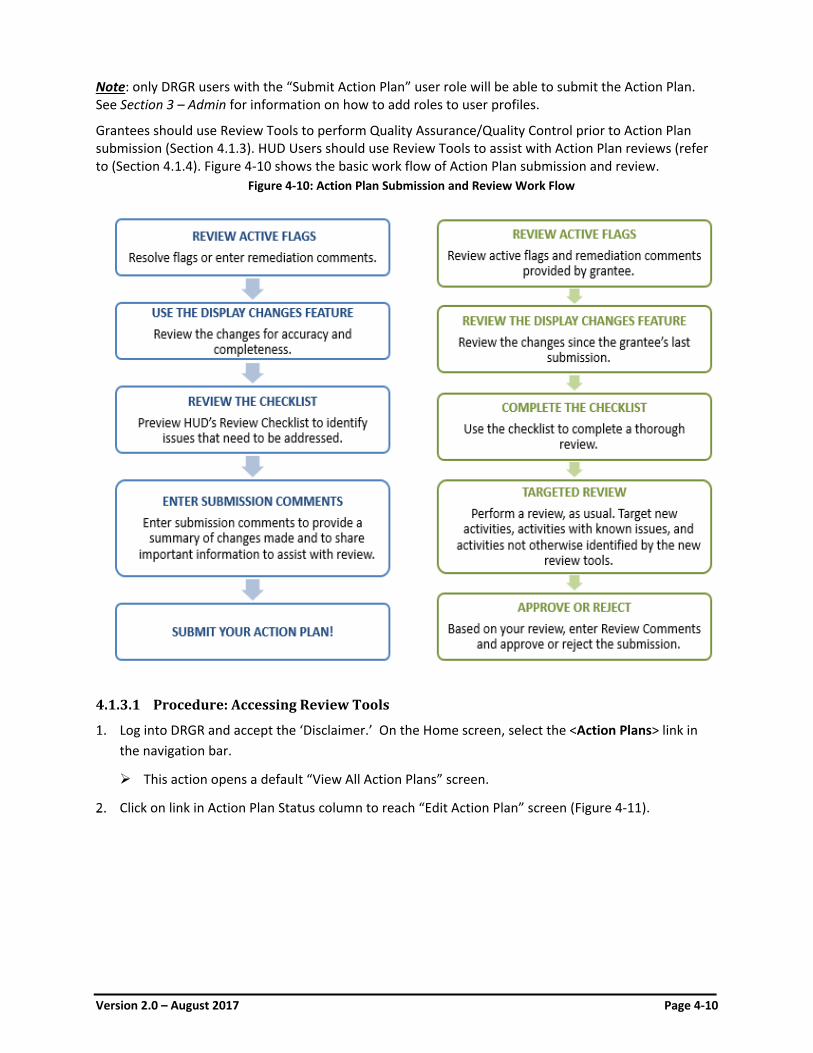
Version 2.0 – August 2017 Page 4-10
Note: only DRGR users with the “Submit Action Plan” user role will be able to submit the Action Plan. See Section 3 – Admin for information on how to add roles to user profiles.
Grantees should use Review Tools to perform Quality Assurance/Quality Control prior to Action Plan submission (Section 4.1.3). HUD Users should use Review Tools to assist with Action Plan reviews (refer to (Section 4.1.4). Figure 4-10 shows the basic work flow of Action Plan submission and review.
4.1.3.1 Procedure: Accessing Review Tools
Log into DRGR and accept the ‘Disclaimer.’ On the Home screen, select the <Action Plans> link in the navigation bar.
This action opens a default “View All Action Plans” screen.
Click on link in Action Plan Status column to reach “Edit Action Plan” screen (Figure 4-11).
Figure 4-10: Action Plan Submission and Review Work Flow
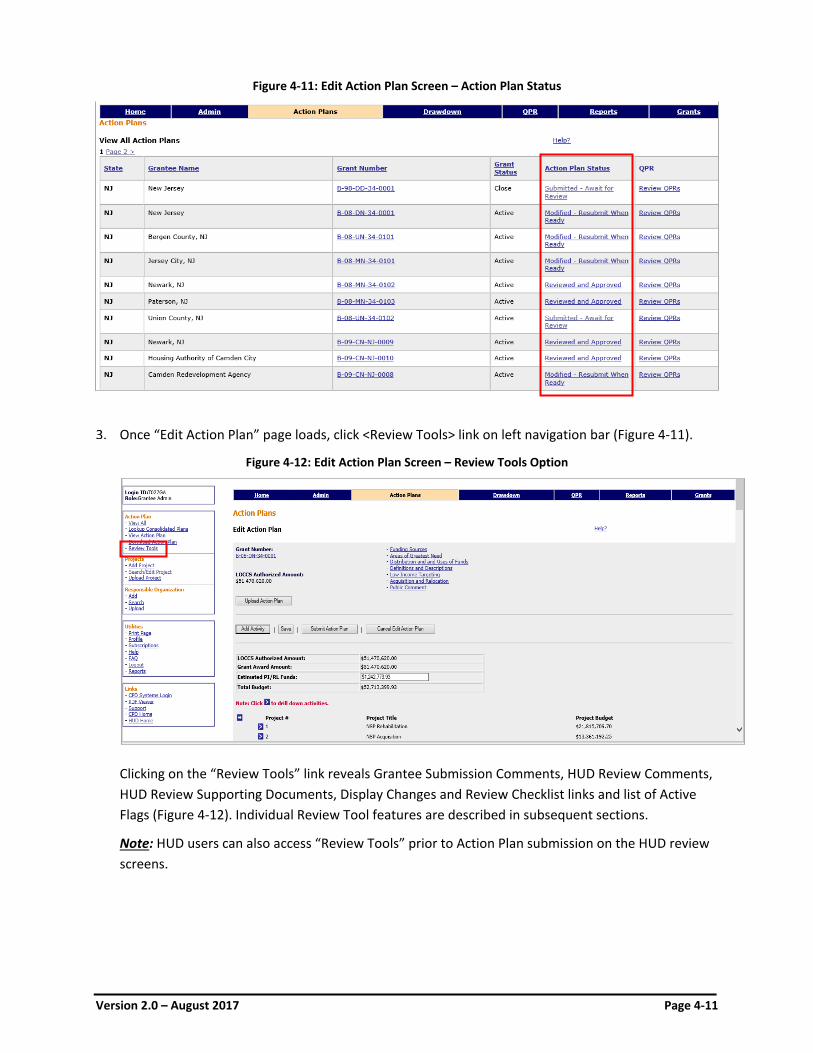
Version 2.0 – August 2017 Page 4-11
Once “Edit Action Plan” page loads, click <Review Tools> link on left navigation bar (Figure 4-11).
Figure 4-12: Edit Action Plan Screen – Review Tools Option
Clicking on the “Review Tools” link reveals Grantee Submission Comments, HUD Review Comments, HUD Review Supporting Documents, Display Changes and Review Checklist links and list of Active Flags (Figure 4-12). Individual Review Tool features are described in subsequent sections.
Note: HUD users can also access “Review Tools” prior to Action Plan submission on the HUD review screens.
Figure 4-11: Edit Action Plan Screen – Action Plan Status
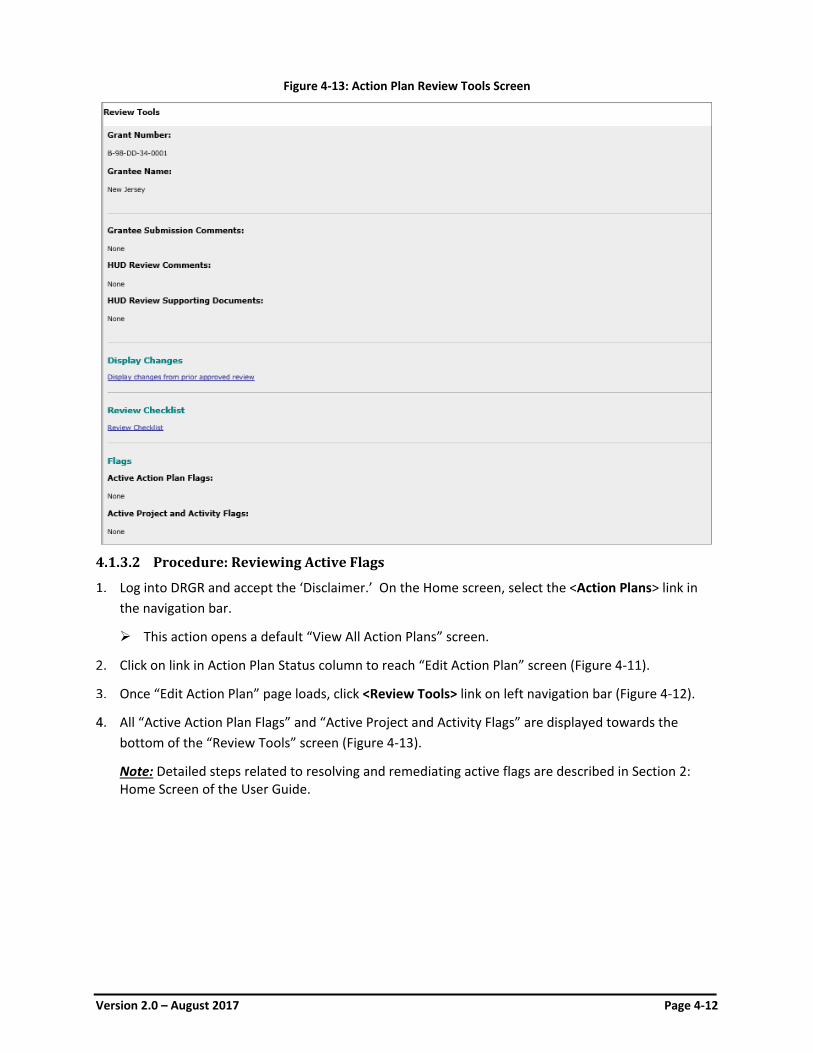
Version 2.0 – August 2017 Page 4-12
Figure 4-13: Action Plan Review Tools Screen
4.1.3.2 Procedure: Reviewing Active Flags
Log into DRGR and accept the ‘Disclaimer.’ On the Home screen, select the <Action Plans> link in the navigation bar.
This action opens a default “View All Action Plans” screen.
Click on link in Action Plan Status column to reach “Edit Action Plan” screen (Figure 4-11).
Once “Edit Action Plan” page loads, click <Review Tools> link on left navigation bar (Figure 4-12).
All “Active Action Plan Flags” and “Active Project and Activity Flags” are displayed towards the bottom of the “Review Tools” screen (Figure 4-13).
Note: Detailed steps related to resolving and remediating active flags are described in Section 2: Home Screen of the User Guide.
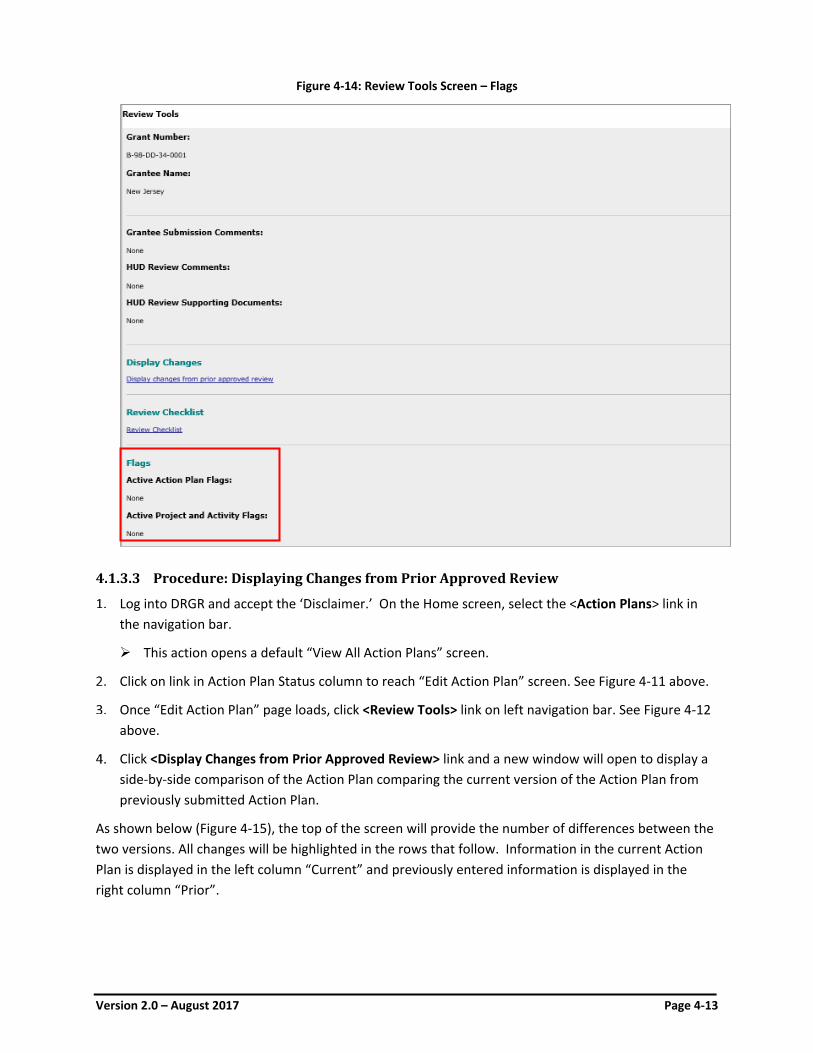
Version 2.0 – August 2017 Page 4-13
Figure 4-14: Review Tools Screen – Flags
4.1.3.3 Procedure: Displaying Changes from Prior Approved Review
Log into DRGR and accept the ‘Disclaimer.’ On the Home screen, select the <Action Plans> link in the navigation bar.
This action opens a default “View All Action Plans” screen.
Click on link in Action Plan Status column to reach “Edit Action Plan” screen. See Figure 4-11 above.
Once “Edit Action Plan” page loads, click <Review Tools> link on left navigation bar. See Figure 4-12 above.
Click <Display Changes from Prior Approved Review> link and a new window will open to display a side-by-side comparison of the Action Plan comparing the current version of the Action Plan from previously submitted Action Plan.
As shown below (Figure 4-15), the top of the screen will provide the number of differences between the two versions. All changes will be highlighted in the rows that follow. Information in the current Action Plan is displayed in the left column “Current” and previously entered information is displayed in the right column “Prior”.
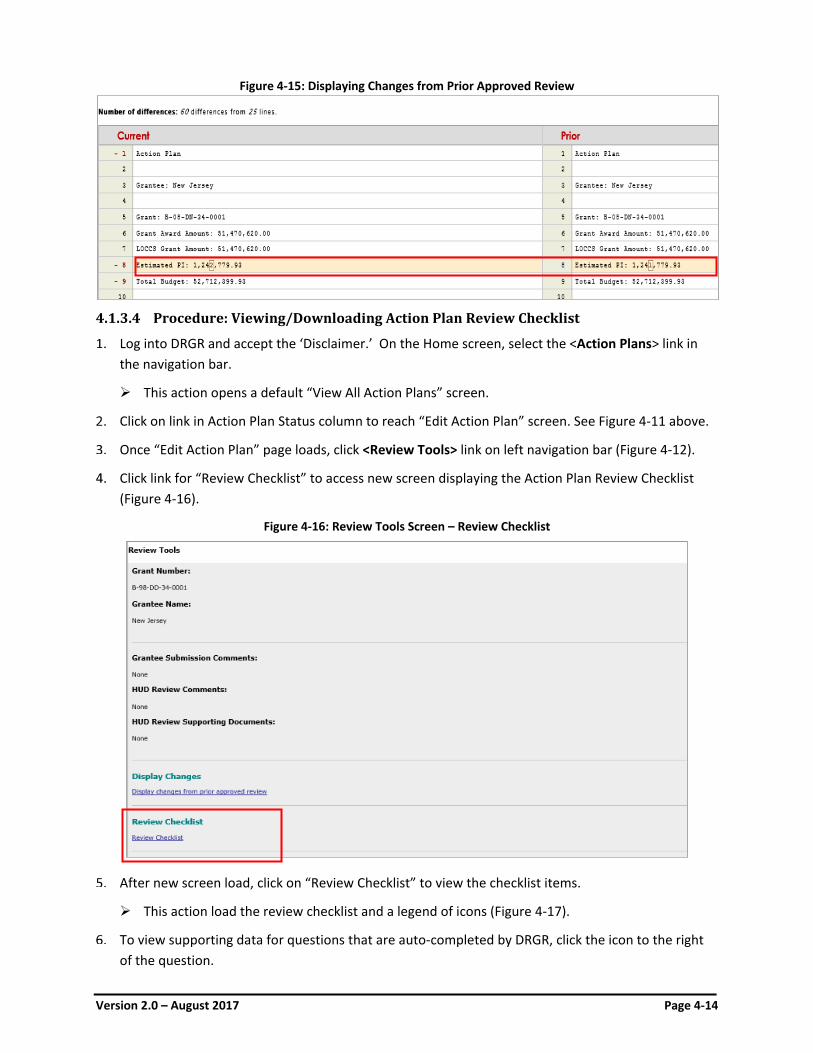
Version 2.0 – August 2017 Page 4-14
Figure 4-15: Displaying Changes from Prior Approved Review
4.1.3.4 Procedure: Viewing/Downloading Action Plan Review Checklist
Log into DRGR and accept the ‘Disclaimer.’ On the Home screen, select the <Action Plans> link in the navigation bar.
This action opens a default “View All Action Plans” screen.
Click on link in Action Plan Status column to reach “Edit Action Plan” screen. See Figure 4-11 above.
Once “Edit Action Plan” page loads, click <Review Tools> link on left navigation bar (Figure 4-12).
Click link for “Review Checklist” to access new screen displaying the Action Plan Review Checklist (Figure 4-16).
Figure 4-16: Review Tools Screen – Review Checklist
After new screen load, click on “Review Checklist” to view the checklist items.
This action load the review checklist and a legend of icons (Figure 4-17).
To view supporting data for questions that are auto-completed by DRGR, click the icon to the right of the question.
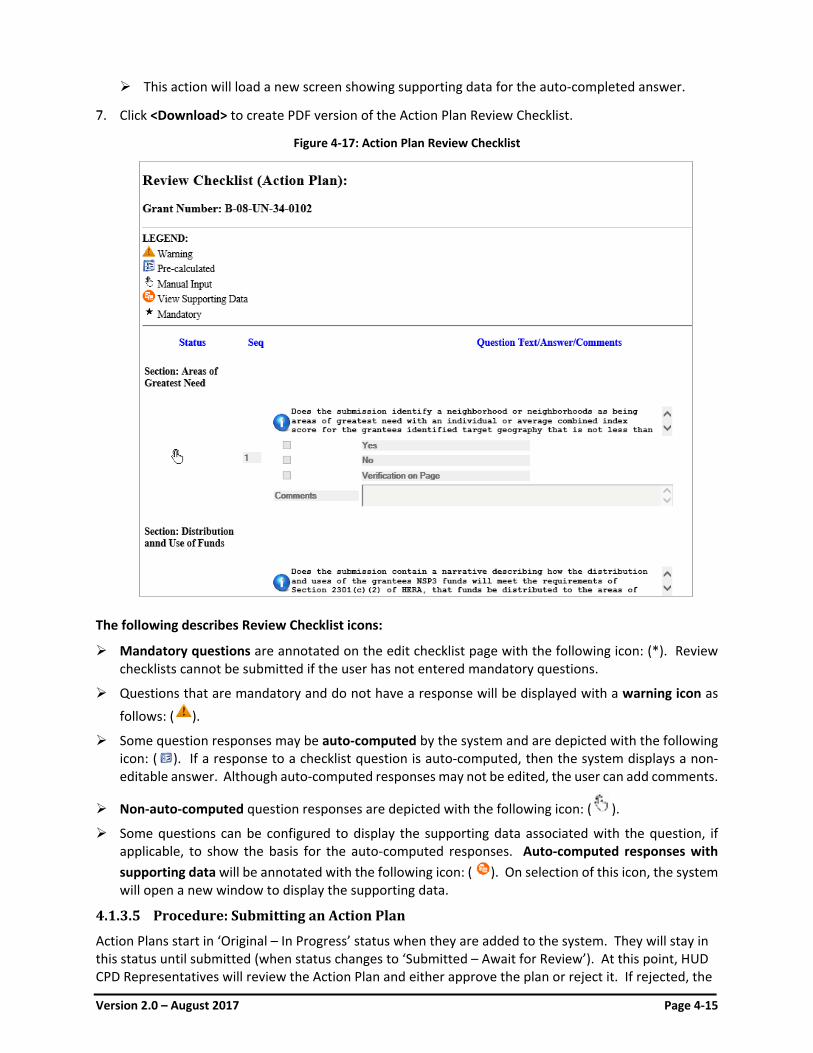
Version 2.0 – August 2017 Page 4-15
This action will load a new screen showing supporting data for the auto-completed answer.
Click <Download> to create PDF version of the Action Plan Review Checklist.
Figure 4-17: Action Plan Review Checklist
The following describes Review Checklist icons:
Mandatory questions are annotated on the edit checklist page with the following icon: (*). Review checklists cannot be submitted if the user has not entered mandatory questions.
Questions that are mandatory and do not have a response will be displayed with a warning icon as follows: ( ).
Some question responses may be auto-computed by the system and are depicted with the following icon: ( ). If a response to a checklist question is auto-computed, then the system displays a non-editable answer. Although auto-computed responses may not be edited, the user can add comments.
Non-auto-computed question responses are depicted with the following icon: ( ).
Some questions can be configured to display the supporting data associated with the question, if applicable, to show the basis for the auto-computed responses. Auto-computed responses with supporting data will be annotated with the following icon: ( ). On selection of this icon, the system will open a new window to display the supporting data.
4.1.3.5 Procedure: Submitting an Action Plan
Action Plans start in ‘Original – In Progress’ status when they are added to the system. They will stay in this status until submitted (when status changes to ‘Submitted – Await for Review’). At this point, HUD CPD Representatives will review the Action Plan and either approve the plan or reject it. If rejected, the
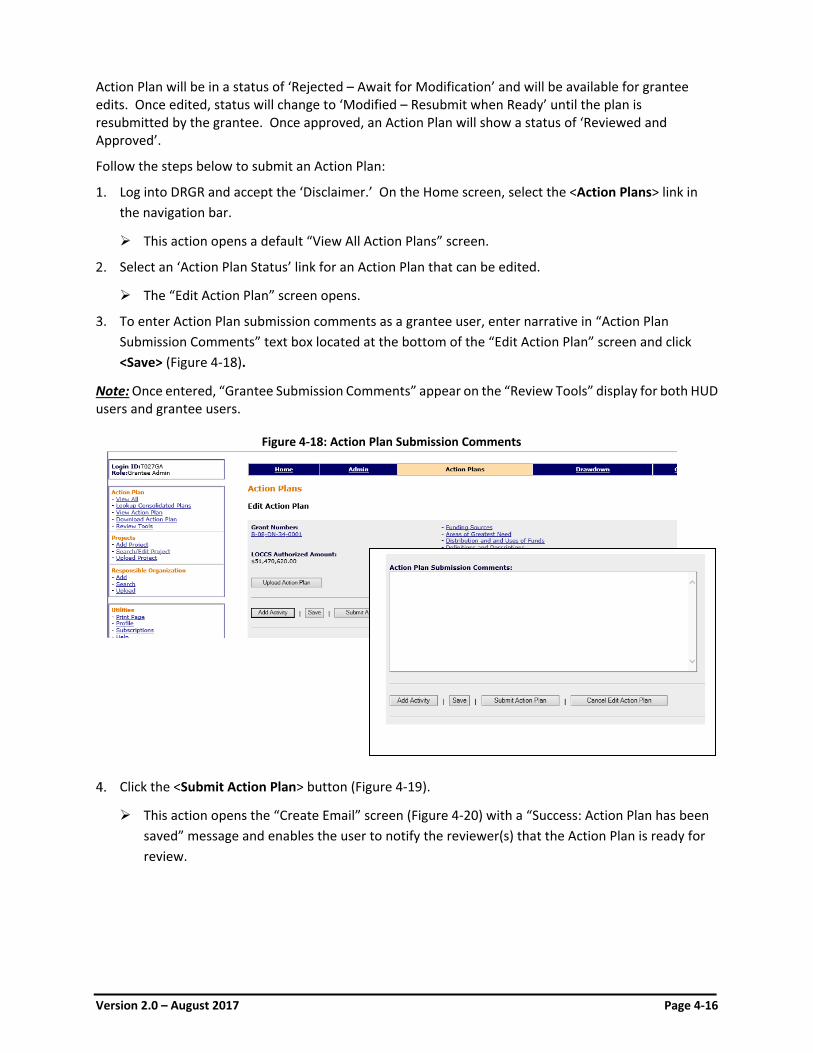
Version 2.0 – August 2017 Page 4-16
Action Plan will be in a status of ‘Rejected – Await for Modification’ and will be available for grantee edits. Once edited, status will change to ‘Modified – Resubmit when Ready’ until the plan is resubmitted by the grantee. Once approved, an Action Plan will show a status of ‘Reviewed and Approved’.
Follow the steps below to submit an Action Plan:
Log into DRGR and accept the ‘Disclaimer.’ On the Home screen, select the <Action Plans> link in the navigation bar.
This action opens a default “View All Action Plans” screen.
Select an ‘Action Plan Status’ link for an Action Plan that can be edited.
The “Edit Action Plan” screen opens.
To enter Action Plan submission comments as a grantee user, enter narrative in “Action Plan Submission Comments” text box located at the bottom of the “Edit Action Plan” screen and click <Save> (Figure 4-18).
Note: Once entered, “Grantee Submission Comments” appear on the “Review Tools” display for both HUD users and grantee users.
Click the <Submit Action Plan> button (Figure 4-19).
This action opens the “Create Email” screen (Figure 4-20) with a “Success: Action Plan has been saved” message and enables the user to notify the reviewer(s) that the Action Plan is ready for review.
Figure 4-18: Action Plan Submission Comments
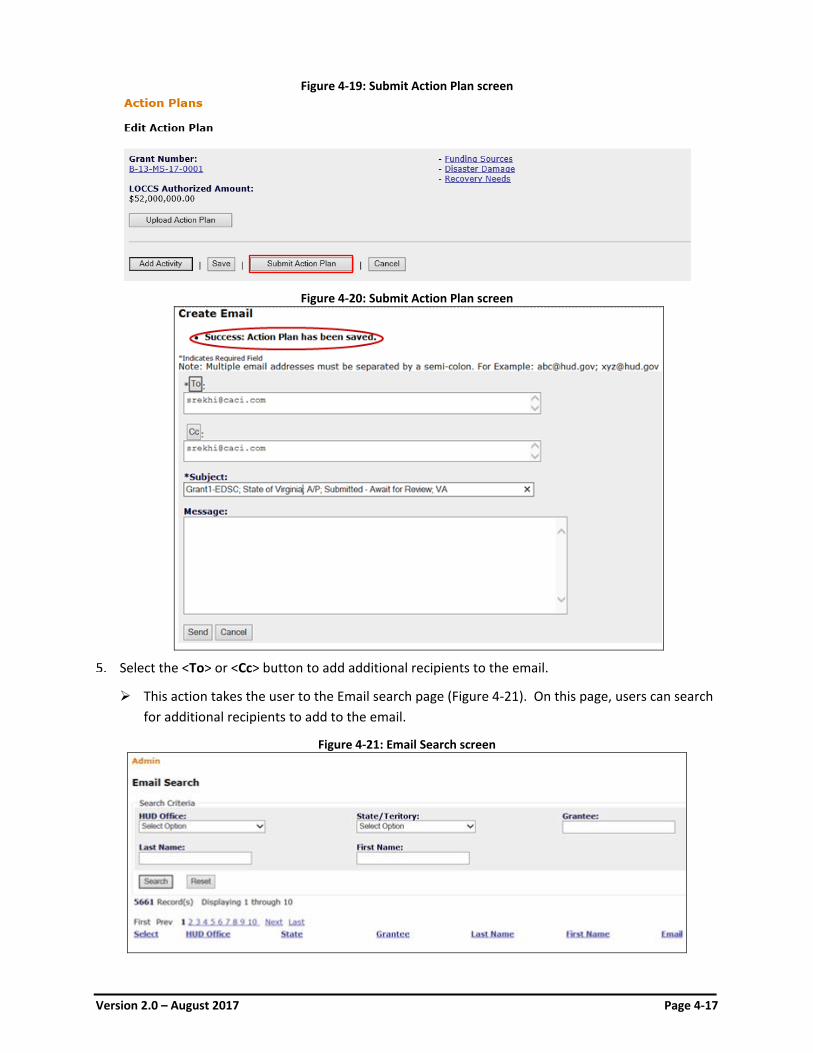
Version 2.0 – August 2017 Page 4-17
Figure 4-19: Submit Action Plan screen
Figure 4-20: Submit Action Plan screen
Select the <To> or <Cc> button to add additional recipients to the email.
This action takes the user to the Email search page (Figure 4-21). On this page, users can search for additional recipients to add to the email.
Figure 4-21: Email Search screen
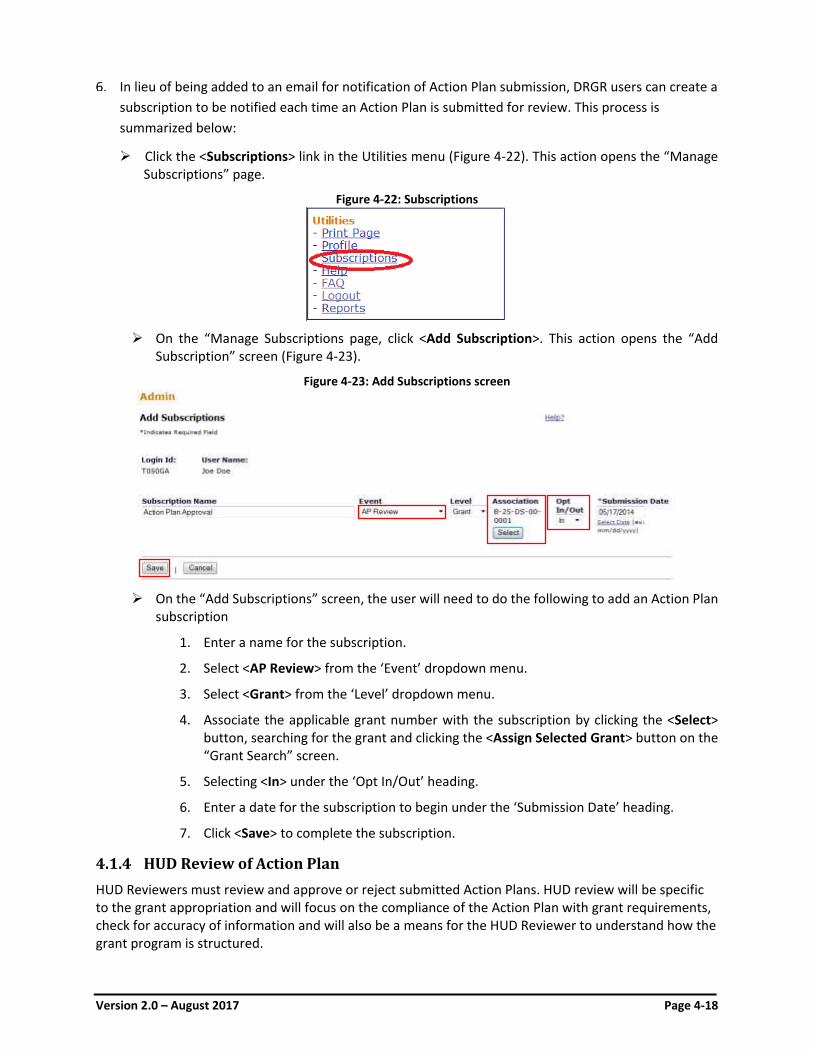
Version 2.0 – August 2017 Page 4-18
In lieu of being added to an email for notification of Action Plan submission, DRGR users can create a subscription to be notified each time an Action Plan is submitted for review. This process is summarized below:
Click the <Subscriptions> link in the Utilities menu (Figure 4-22). This action opens the “Manage Subscriptions” page.
Figure 4-22: Subscriptions
On the “Manage Subscriptions page, click <Add Subscription>. This action opens the “Add
Subscription” screen (Figure 4-23).
Figure 4-23: Add Subscriptions screen
On the “Add Subscriptions” screen, the user will need to do the following to add an Action Plan
subscription
1. Enter a name for the subscription.
2. Select <AP Review> from the ‘Event’ dropdown menu.
3. Select <Grant> from the ‘Level’ dropdown menu.
4. Associate the applicable grant number with the subscription by clicking the <Select> button, searching for the grant and clicking the <Assign Selected Grant> button on the “Grant Search” screen.
5. Selecting <In> under the ‘Opt In/Out’ heading.
6. Enter a date for the subscription to begin under the ‘Submission Date’ heading.
7. Click <Save> to complete the subscription.
4.1.4 HUD Review of Action Plan HUD Reviewers must review and approve or reject submitted Action Plans. HUD review will be specific to the grant appropriation and will focus on the compliance of the Action Plan with grant requirements, check for accuracy of information and will also be a means for the HUD Reviewer to understand how the grant program is structured.
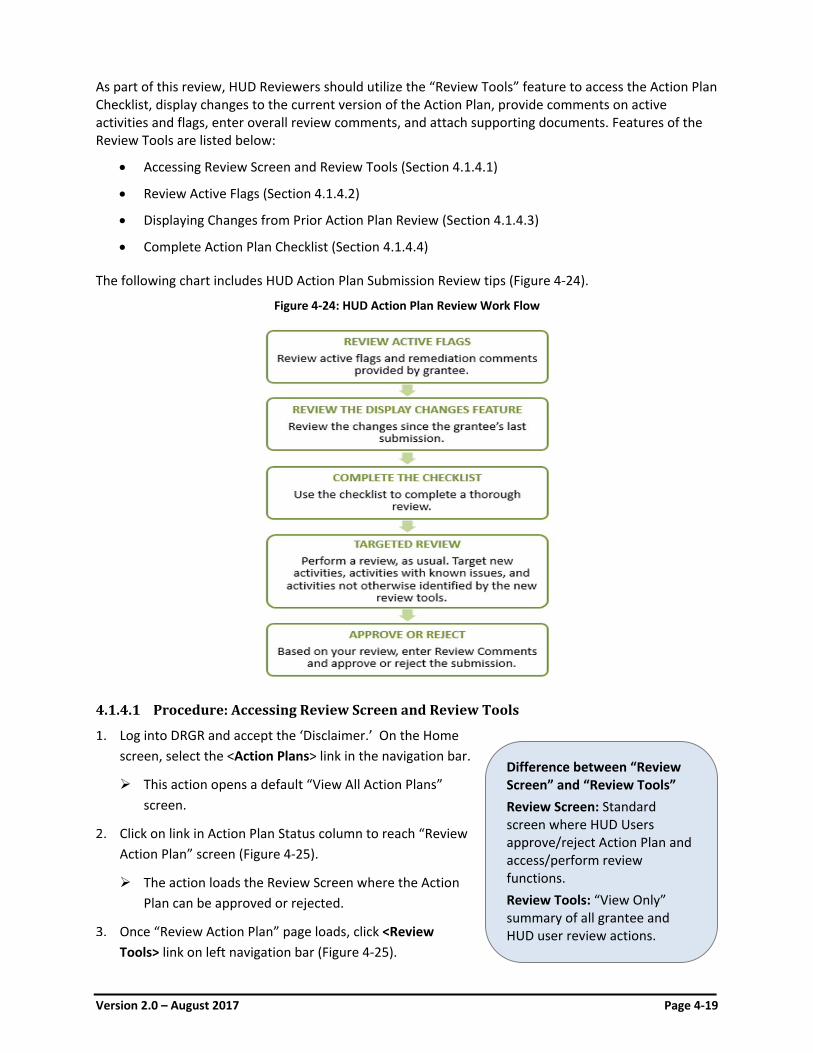
Version 2.0 – August 2017 Page 4-19
As part of this review, HUD Reviewers should utilize the “Review Tools” feature to access the Action Plan Checklist, display changes to the current version of the Action Plan, provide comments on active activities and flags, enter overall review comments, and attach supporting documents. Features of the Review Tools are listed below:
• Accessing Review Screen and Review Tools (Section 4.1.4.1)
• Review Active Flags (Section 4.1.4.2)
• Displaying Changes from Prior Action Plan Review (Section 4.1.4.3)
• Complete Action Plan Checklist (Section 4.1.4.4)
The following chart includes HUD Action Plan Submission Review tips (Figure 4-24).
Figure 4-24: HUD Action Plan Review Work Flow
4.1.4.1 Procedure: Accessing Review Screen and Review Tools
Log into DRGR and accept the ‘Disclaimer.’ On the Home screen, select the <Action Plans> link in the navigation bar.
This action opens a default “View All Action Plans” screen.
Click on link in Action Plan Status column to reach “Review Action Plan” screen (Figure 4-25).
The action loads the Review Screen where the Action Plan can be approved or rejected.
Once “Review Action Plan” page loads, click <Review Tools> link on left navigation bar (Figure 4-25).
Difference between “Review Screen” and “Review Tools” Review Screen: Standard screen where HUD Users approve/reject Action Plan and access/perform review functions. Review Tools: “View Only” summary of all grantee and HUD user review actions.
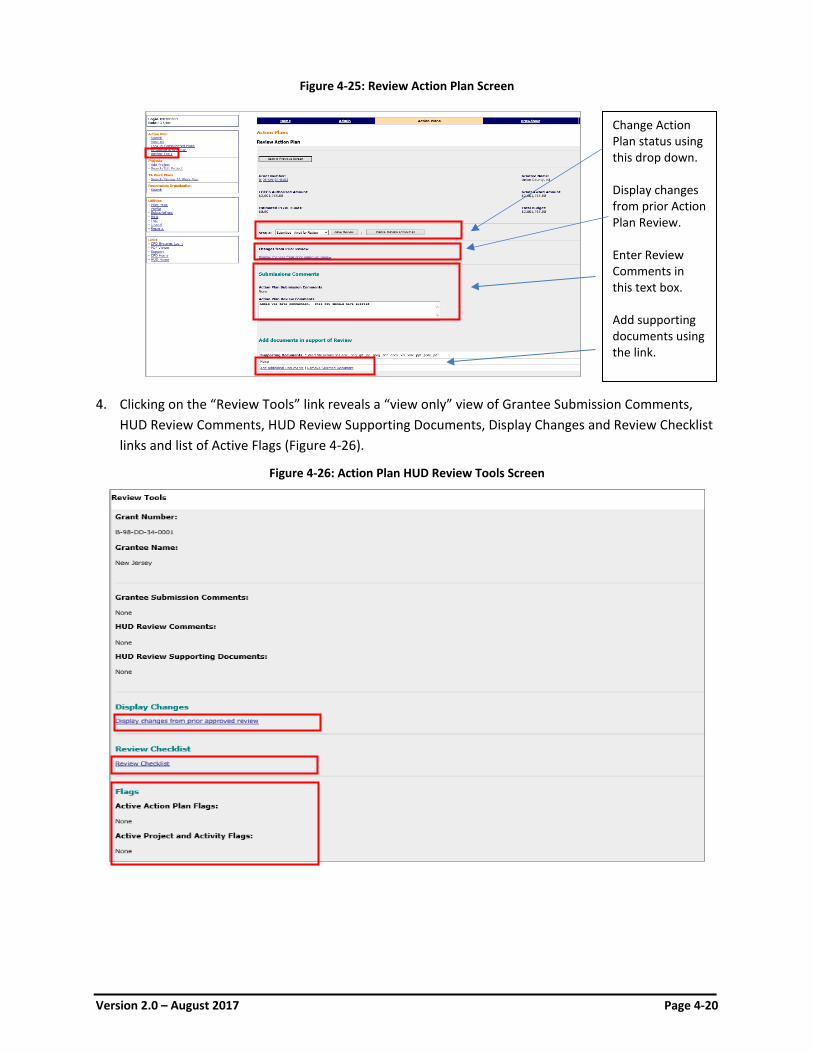
Version 2.0 – August 2017 Page 4-20
Figure 4-25: Review Action Plan Screen
Clicking on the “Review Tools” link reveals a “view only” view of Grantee Submission Comments, HUD Review Comments, HUD Review Supporting Documents, Display Changes and Review Checklist links and list of Active Flags (Figure 4-26).
Figure 4-26: Action Plan HUD Review Tools Screen
Change Action Plan status using this drop down. Display changes from prior Action Plan Review. Enter Review Comments in this text box. Add supporting documents using the link.
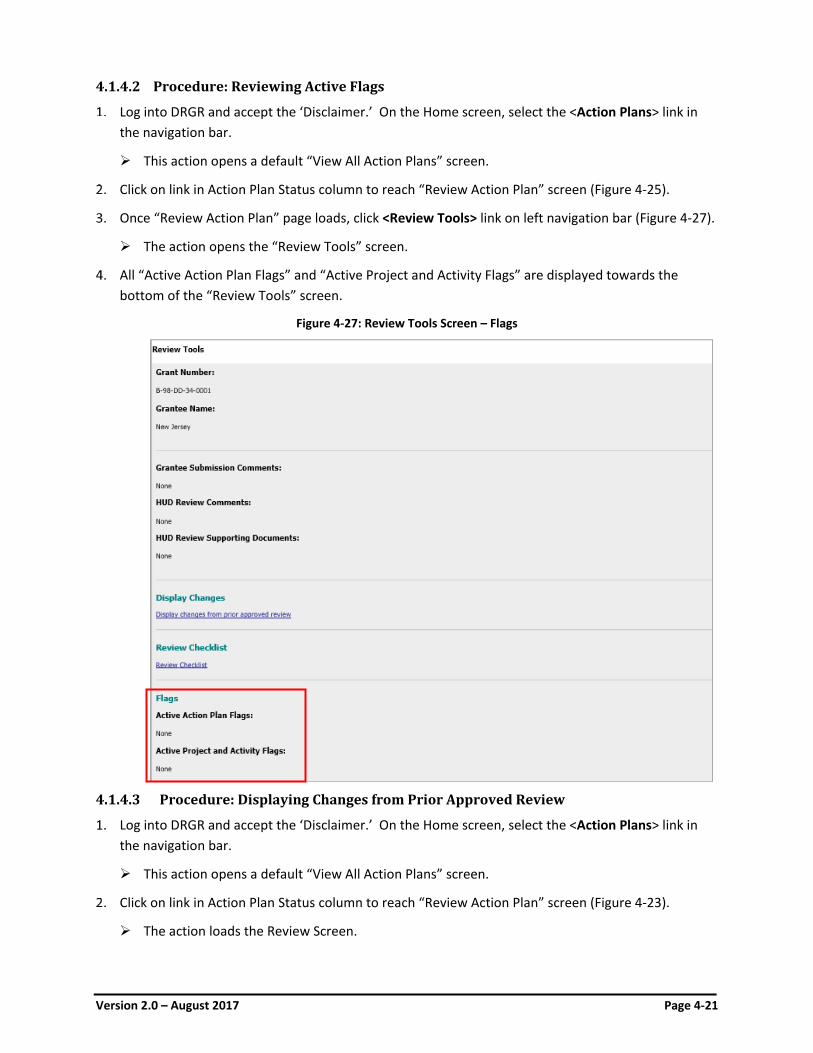
Version 2.0 – August 2017 Page 4-21
4.1.4.2 Procedure: Reviewing Active Flags
Log into DRGR and accept the ‘Disclaimer.’ On the Home screen, select the <Action Plans> link in the navigation bar.
This action opens a default “View All Action Plans” screen.
Click on link in Action Plan Status column to reach “Review Action Plan” screen (Figure 4-25).
Once “Review Action Plan” page loads, click <Review Tools> link on left navigation bar (Figure 4-27).
The action opens the “Review Tools” screen.
All “Active Action Plan Flags” and “Active Project and Activity Flags” are displayed towards the bottom of the “Review Tools” screen.
Figure 4-27: Review Tools Screen – Flags
4.1.4.3 Procedure: Displaying Changes from Prior Approved Review
Log into DRGR and accept the ‘Disclaimer.’ On the Home screen, select the <Action Plans> link in the navigation bar.
This action opens a default “View All Action Plans” screen.
Click on link in Action Plan Status column to reach “Review Action Plan” screen (Figure 4-23).
The action loads the Review Screen.
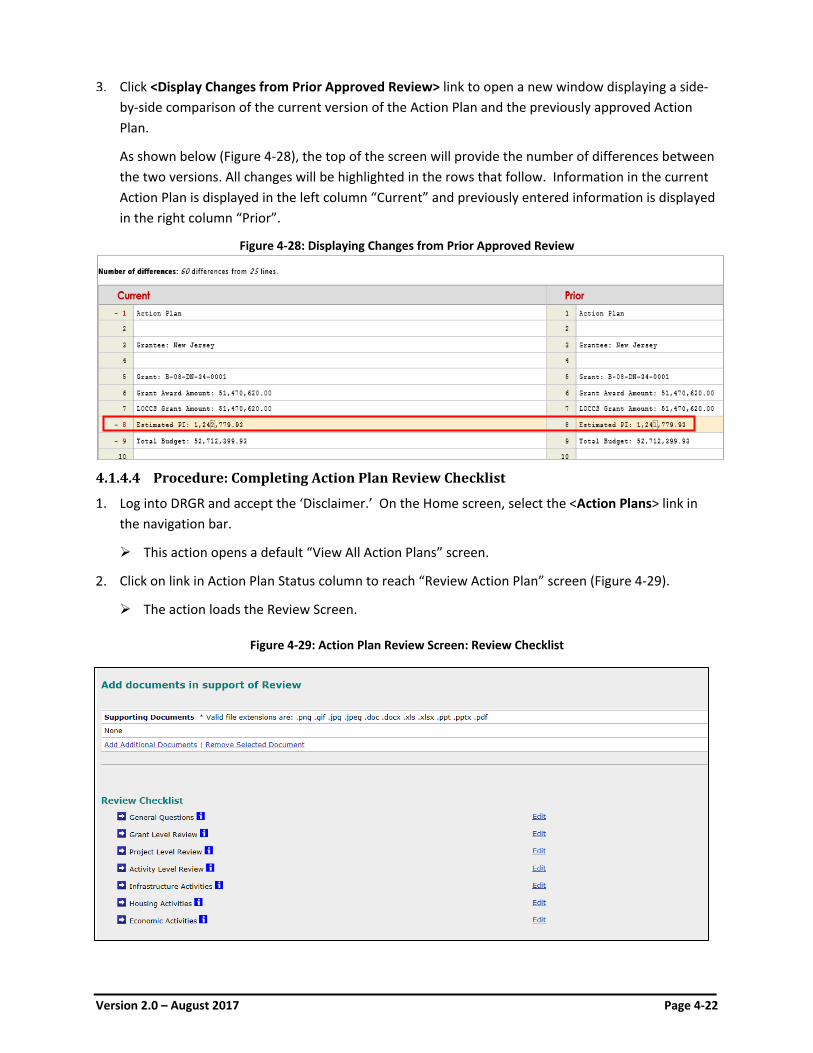
Version 2.0 – August 2017 Page 4-22
Click <Display Changes from Prior Approved Review> link to open a new window displaying a side-by-side comparison of the current version of the Action Plan and the previously approved Action Plan.
As shown below (Figure 4-28), the top of the screen will provide the number of differences between the two versions. All changes will be highlighted in the rows that follow. Information in the current Action Plan is displayed in the left column “Current” and previously entered information is displayed in the right column “Prior”.
Figure 4-28: Displaying Changes from Prior Approved Review
4.1.4.4 Procedure: Completing Action Plan Review Checklist
Log into DRGR and accept the ‘Disclaimer.’ On the Home screen, select the <Action Plans> link in the navigation bar.
This action opens a default “View All Action Plans” screen.
Click on link in Action Plan Status column to reach “Review Action Plan” screen (Figure 4-29).
The action loads the Review Screen.
Figure 4-29: Action Plan Review Screen: Review Checklist
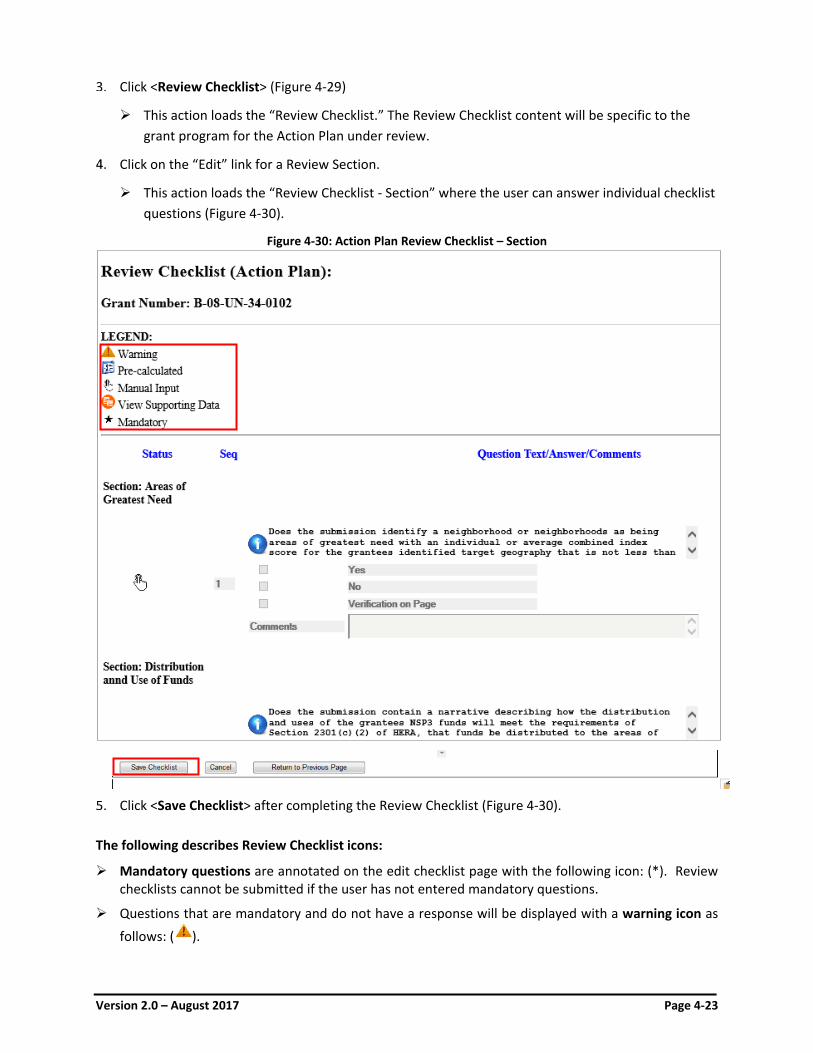
Version 2.0 – August 2017 Page 4-23
Click <Review Checklist> (Figure 4-29)
This action loads the “Review Checklist.” The Review Checklist content will be specific to the grant program for the Action Plan under review.
Click on the “Edit” link for a Review Section.
This action loads the “Review Checklist - Section” where the user can answer individual checklist questions (Figure 4-30).
Figure 4-30: Action Plan Review Checklist – Section
Click <Save Checklist> after completing the Review Checklist (Figure 4-30).
The following describes Review Checklist icons:
Mandatory questions are annotated on the edit checklist page with the following icon: (*). Review checklists cannot be submitted if the user has not entered mandatory questions.
Questions that are mandatory and do not have a response will be displayed with a warning icon as follows: ( ).
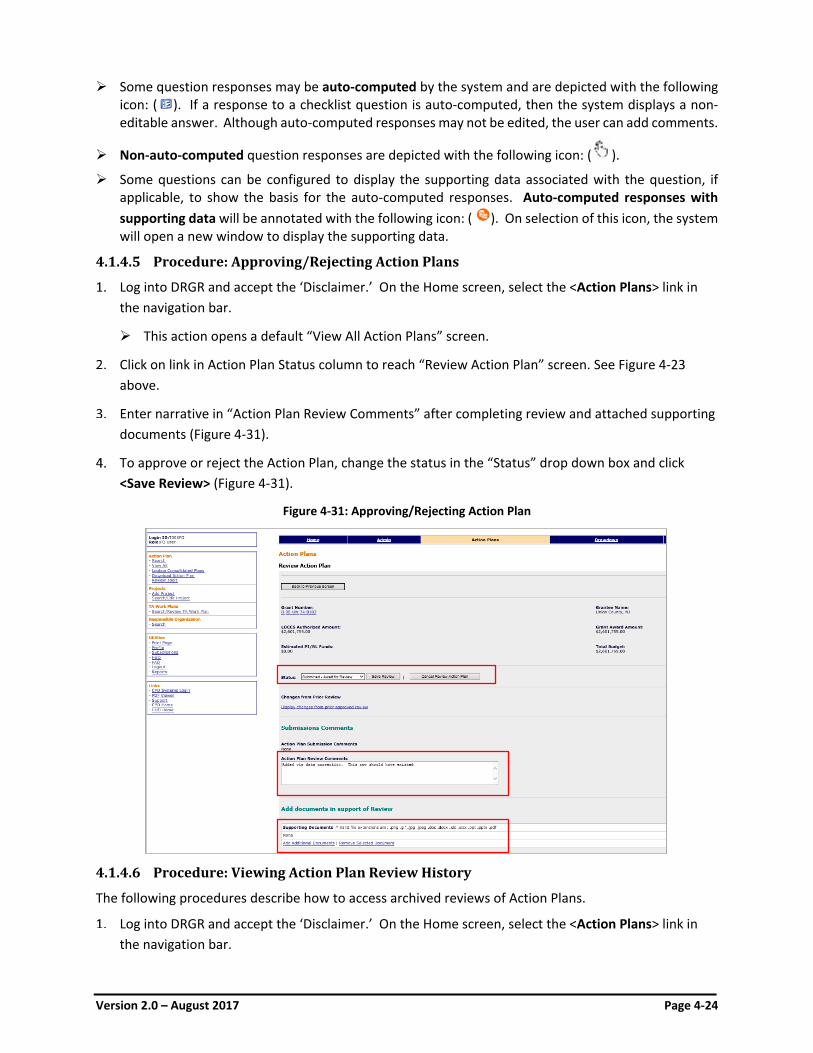
Version 2.0 – August 2017 Page 4-24
Some question responses may be auto-computed by the system and are depicted with the following icon: ( ). If a response to a checklist question is auto-computed, then the system displays a non-editable answer. Although auto-computed responses may not be edited, the user can add comments.
Non-auto-computed question responses are depicted with the following icon: ( ).
Some questions can be configured to display the supporting data associated with the question, if applicable, to show the basis for the auto-computed responses. Auto-computed responses with supporting data will be annotated with the following icon: ( ). On selection of this icon, the system will open a new window to display the supporting data.
4.1.4.5 Procedure: Approving/Rejecting Action Plans
Log into DRGR and accept the ‘Disclaimer.’ On the Home screen, select the <Action Plans> link in the navigation bar.
This action opens a default “View All Action Plans” screen.
Click on link in Action Plan Status column to reach “Review Action Plan” screen. See Figure 4-23 above.
Enter narrative in “Action Plan Review Comments” after completing review and attached supporting documents (Figure 4-31).
To approve or reject the Action Plan, change the status in the “Status” drop down box and click <Save Review> (Figure 4-31).
Figure 4-31: Approving/Rejecting Action Plan
4.1.4.6 Procedure: Viewing Action Plan Review History
The following procedures describe how to access archived reviews of Action Plans.
Log into DRGR and accept the ‘Disclaimer.’ On the Home screen, select the <Action Plans> link in the navigation bar.
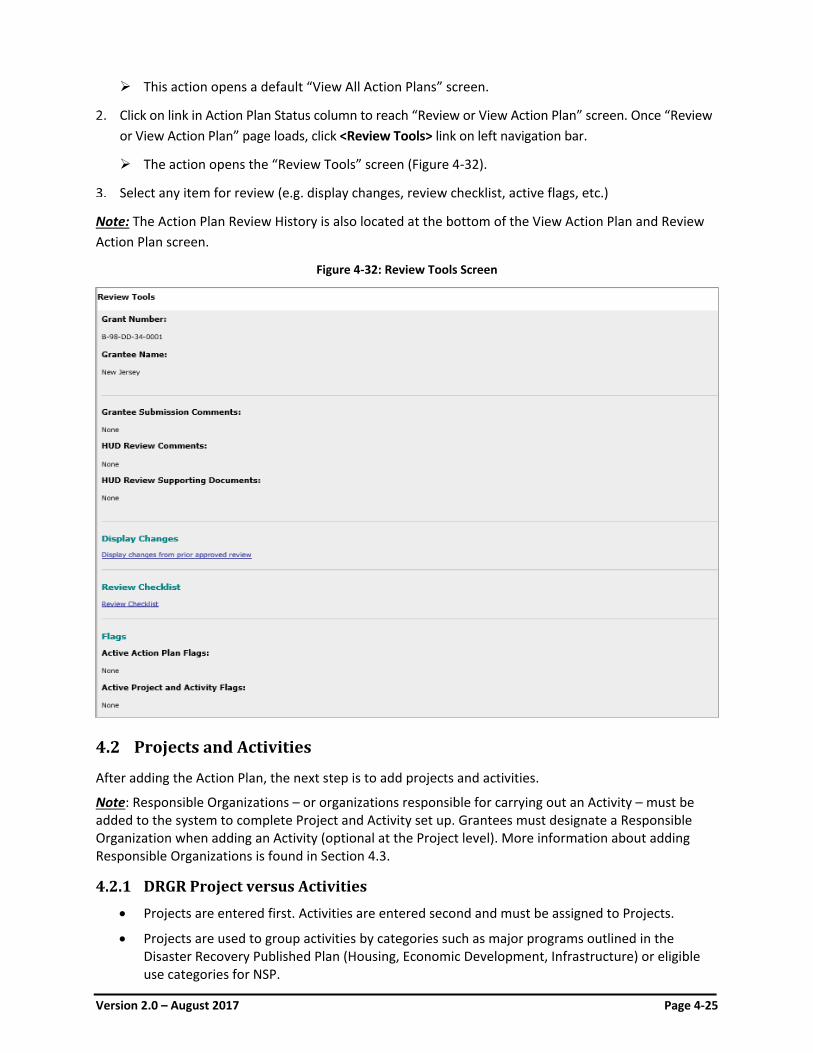
Version 2.0 – August 2017 Page 4-25
This action opens a default “View All Action Plans” screen.
Click on link in Action Plan Status column to reach “Review or View Action Plan” screen. Once “Review or View Action Plan” page loads, click <Review Tools> link on left navigation bar.
The action opens the “Review Tools” screen (Figure 4-32).
Select any item for review (e.g. display changes, review checklist, active flags, etc.)
Note: The Action Plan Review History is also located at the bottom of the View Action Plan and Review Action Plan screen.
Figure 4-32: Review Tools Screen
4.2 Projects and Activities
After adding the Action Plan, the next step is to add projects and activities.
Note: Responsible Organizations – or organizations responsible for carrying out an Activity – must be added to the system to complete Project and Activity set up. Grantees must designate a Responsible Organization when adding an Activity (optional at the Project level). More information about adding Responsible Organizations is found in Section 4.3.
4.2.1 DRGR Project versus Activities • Projects are entered first. Activities are entered second and must be assigned to Projects.
• Projects are used to group activities by categories such as major programs outlined in the Disaster Recovery Published Plan (Housing, Economic Development, Infrastructure) or eligible use categories for NSP.
Version 2.0 – August 2017 Page 4-26
• DRGR activities should be broken out, at minimum by, responsible organization, national
objective, activity type, and multifamily properties (as applicable).
• If a Grantee knows all Project and Activity budgets, both Projects and Activities can be entered into DRGR. If a Grantee (primarily states and urban counties) uses a competitive process to make funding awards, known Project budgets can be used to enter Projects, but Activities should not be entered until a funding award/budget is known.
4.2.2 Add / Edit Projects Projects serve as organizational structures under which specific activities are set-up. Projects are associated with a Grant, and Grants can have one or more Projects. Projects are typically set up as major activity categories corresponding to a Published Plan. For NSP grantees, HUD recommends setting up projects that correspond to NSP eligible uses.
Note: In addition to the procedures described below, Projects can be added or edited using the DRGR upload function. See Chapter 9 – Data Uploads for additional details.
4.2.2.1 Procedure: Adding a Project
1. Log into DRGR and accept the ‘Disclaimer.’ From the Home screen click <Action Plans> link located in the navigation bar.
This opens the “View All Action Plans” screen.
3. Click the <Add> link located in the “Project” section of the left navigation column.
This action opens the “Add Project” screen (Figure 4-33).
Note: Some grantees may see a Project called “Restricted Balance” pre-loaded into their DRGR data. This is a special project used by HUD to ensure it has all of the required information before the grantee has access to its entire award. Grantees can only access funds in published plans approved by HUD. Other funds from a grant award may be placed in the Restricted Balance Project
• If activities are added under the Restricted Balance project, drawdowns cannot be made on them until they are moved to other projects
• Only a HUD Super User can reduce the Restricted Balance project budget so activities can be re-assigned to other projects by grantee users
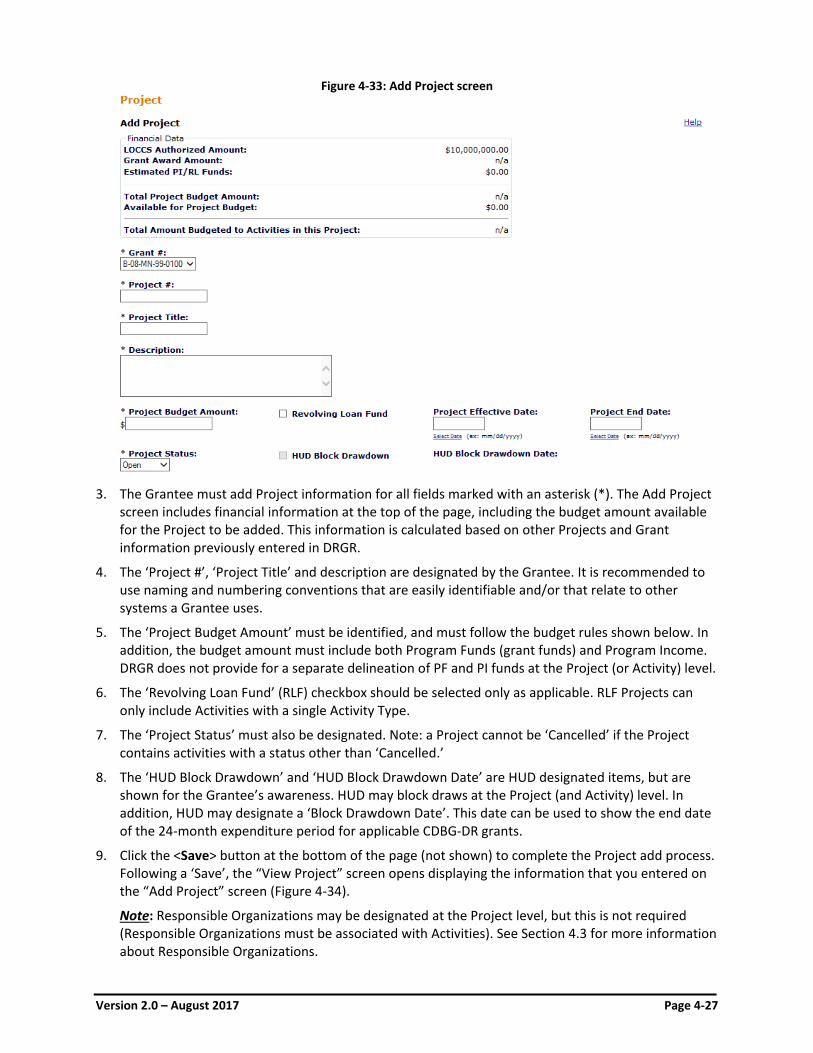
Version 2.0 – August 2017 Page 4-27
Figure 4-33: Add Project screen
3. The Grantee must add Project information for all fields marked with an asterisk (*). The Add Project
screen includes financial information at the top of the page, including the budget amount available for the Project to be added. This information is calculated based on other Projects and Grant information previously entered in DRGR.
4. The ‘Project #’, ‘Project Title’ and description are designated by the Grantee. It is recommended to use naming and numbering conventions that are easily identifiable and/or that relate to other systems a Grantee uses.
5. The ‘Project Budget Amount’ must be identified, and must follow the budget rules shown below. In addition, the budget amount must include both Program Funds (grant funds) and Program Income. DRGR does not provide for a separate delineation of PF and PI funds at the Project (or Activity) level.
6. The ‘Revolving Loan Fund’ (RLF) checkbox should be selected only as applicable. RLF Projects can only include Activities with a single Activity Type.
7. The ‘Project Status’ must also be designated. Note: a Project cannot be ‘Cancelled’ if the Project contains activities with a status other than ‘Cancelled.’
8. The ‘HUD Block Drawdown’ and ‘HUD Block Drawdown Date’ are HUD designated items, but are shown for the Grantee’s awareness. HUD may block draws at the Project (and Activity) level. In addition, HUD may designate a ‘Block Drawdown Date’. This date can be used to show the end date of the 24-month expenditure period for applicable CDBG-DR grants.
9. Click the <Save> button at the bottom of the page (not shown) to complete the Project add process. Following a ‘Save’, the “View Project” screen opens displaying the information that you entered on the “Add Project” screen (Figure 4-34).
Note: Responsible Organizations may be designated at the Project level, but this is not required (Responsible Organizations must be associated with Activities). See Section 4.3 for more information about Responsible Organizations.
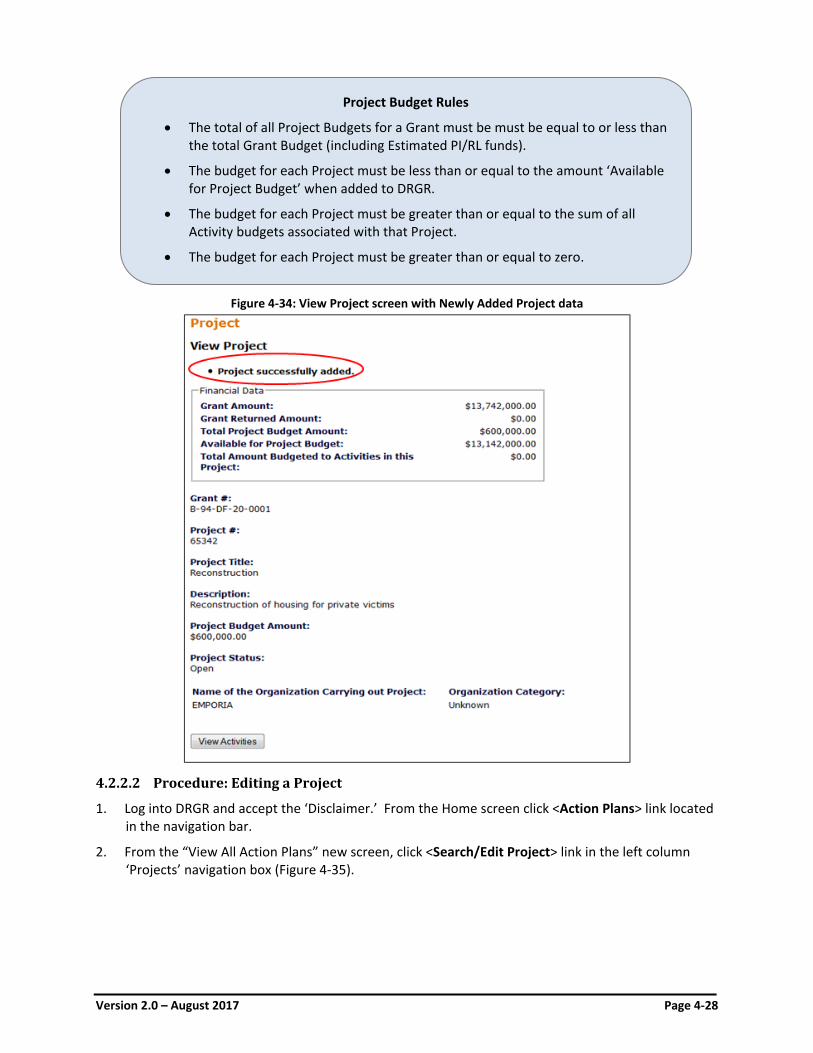
Version 2.0 – August 2017 Page 4-28
Figure 4-34: View Project screen with Newly Added Project data
4.2.2.2 Procedure: Editing a Project
1. Log into DRGR and accept the ‘Disclaimer.’ From the Home screen click <Action Plans> link located in the navigation bar.
2. From the “View All Action Plans” new screen, click <Search/Edit Project> link in the left column ‘Projects’ navigation box (Figure 4-35).
Project Budget Rules
• The total of all Project Budgets for a Grant must be must be equal to or less than the total Grant Budget (including Estimated PI/RL funds).
• The budget for each Project must be less than or equal to the amount ‘Available for Project Budget’ when added to DRGR.
• The budget for each Project must be greater than or equal to the sum of all Activity budgets associated with that Project.
• The budget for each Project must be greater than or equal to zero.
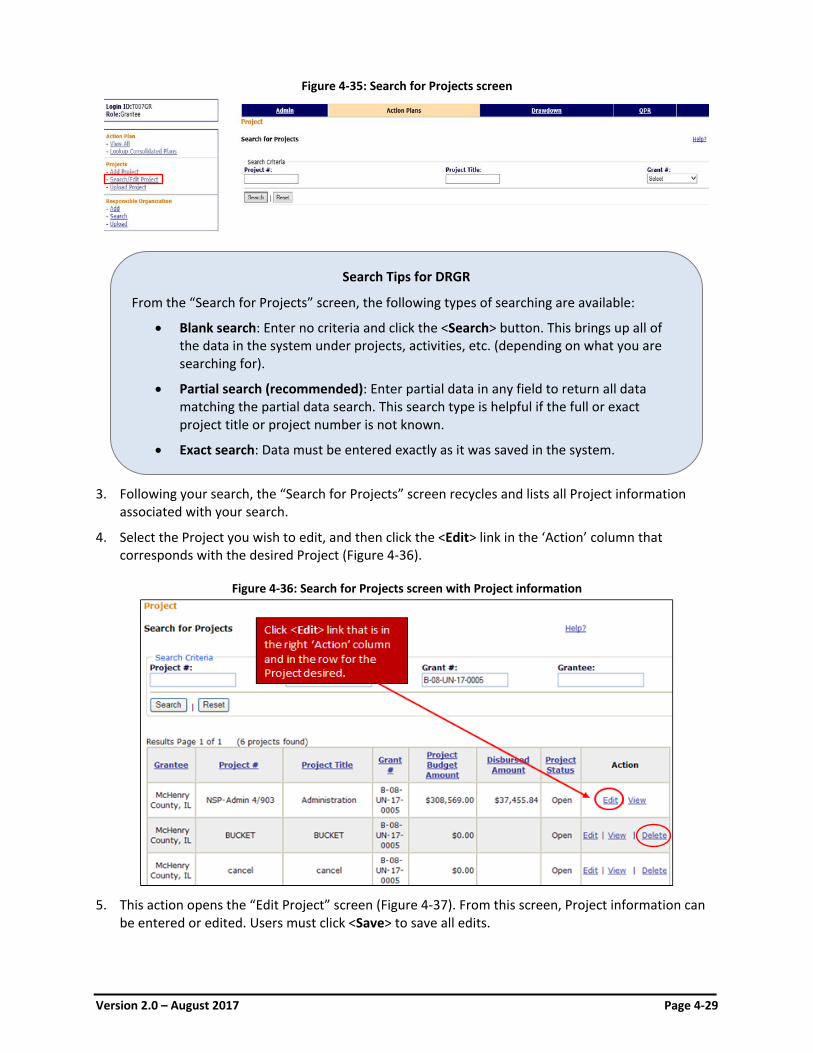
Version 2.0 – August 2017 Page 4-29
Figure 4-35: Search for Projects screen
3. Following your search, the “Search for Projects” screen recycles and lists all Project information
associated with your search.
4. Select the Project you wish to edit, and then click the <Edit> link in the ‘Action’ column that corresponds with the desired Project (Figure 4-36).
Figure 4-36: Search for Projects screen with Project information
5. This action opens the “Edit Project” screen (Figure 4-37). From this screen, Project information can
be entered or edited. Users must click <Save> to save all edits.
Search Tips for DRGR
From the “Search for Projects” screen, the following types of searching are available:
• Blank search: Enter no criteria and click the <Search> button. This brings up all of the data in the system under projects, activities, etc. (depending on what you are searching for).
• Partial search (recommended): Enter partial data in any field to return all data matching the partial data search. This search type is helpful if the full or exact project title or project number is not known.
• Exact search: Data must be entered exactly as it was saved in the system.
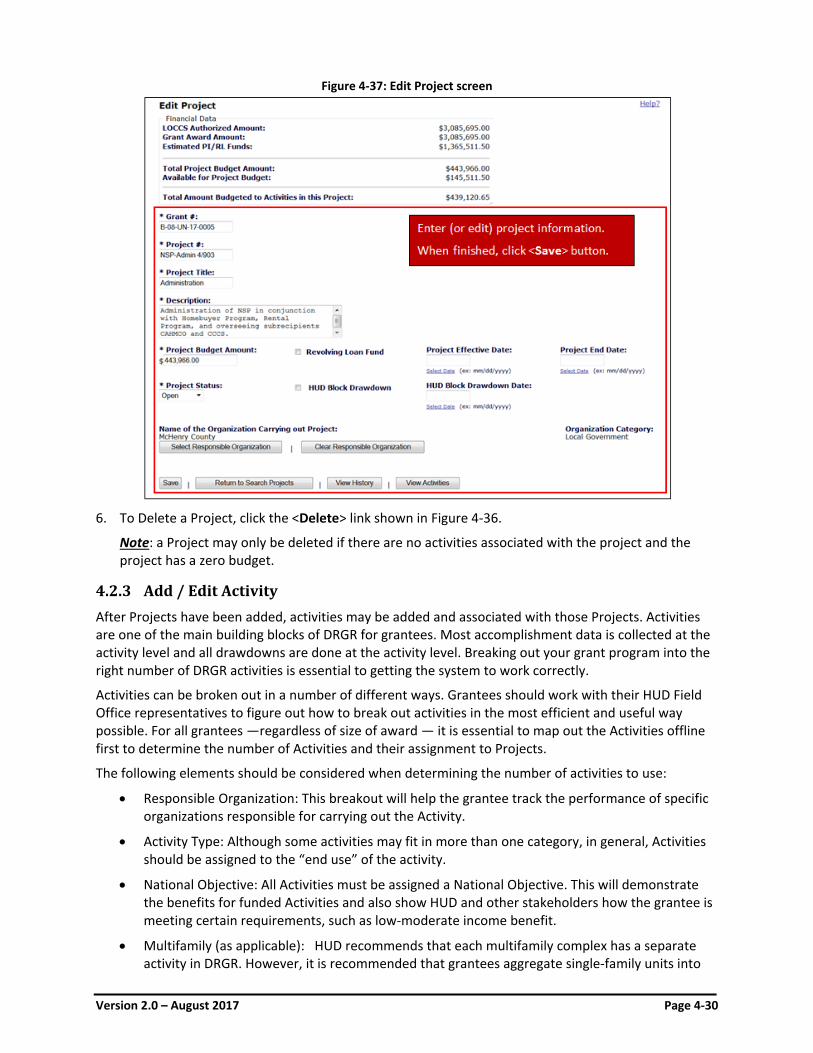
Version 2.0 – August 2017 Page 4-30
Figure 4-37: Edit Project screen
6. To Delete a Project, click the <Delete> link shown in Figure 4-36.
Note: a Project may only be deleted if there are no activities associated with the project and the project has a zero budget.
4.2.3 Add / Edit Activity After Projects have been added, activities may be added and associated with those Projects. Activities are one of the main building blocks of DRGR for grantees. Most accomplishment data is collected at the activity level and all drawdowns are done at the activity level. Breaking out your grant program into the right number of DRGR activities is essential to getting the system to work correctly.
Activities can be broken out in a number of different ways. Grantees should work with their HUD Field Office representatives to figure out how to break out activities in the most efficient and useful way possible. For all grantees —regardless of size of award — it is essential to map out the Activities offline first to determine the number of Activities and their assignment to Projects.
The following elements should be considered when determining the number of activities to use:
• Responsible Organization: This breakout will help the grantee track the performance of specific organizations responsible for carrying out the Activity.
• Activity Type: Although some activities may fit in more than one category, in general, Activities should be assigned to the “end use” of the activity.
• National Objective: All Activities must be assigned a National Objective. This will demonstrate the benefits for funded Activities and also show HUD and other stakeholders how the grantee is meeting certain requirements, such as low-moderate income benefit.
• Multifamily (as applicable): HUD recommends that each multifamily complex has a separate activity in DRGR. However, it is recommended that grantees aggregate single-family units into
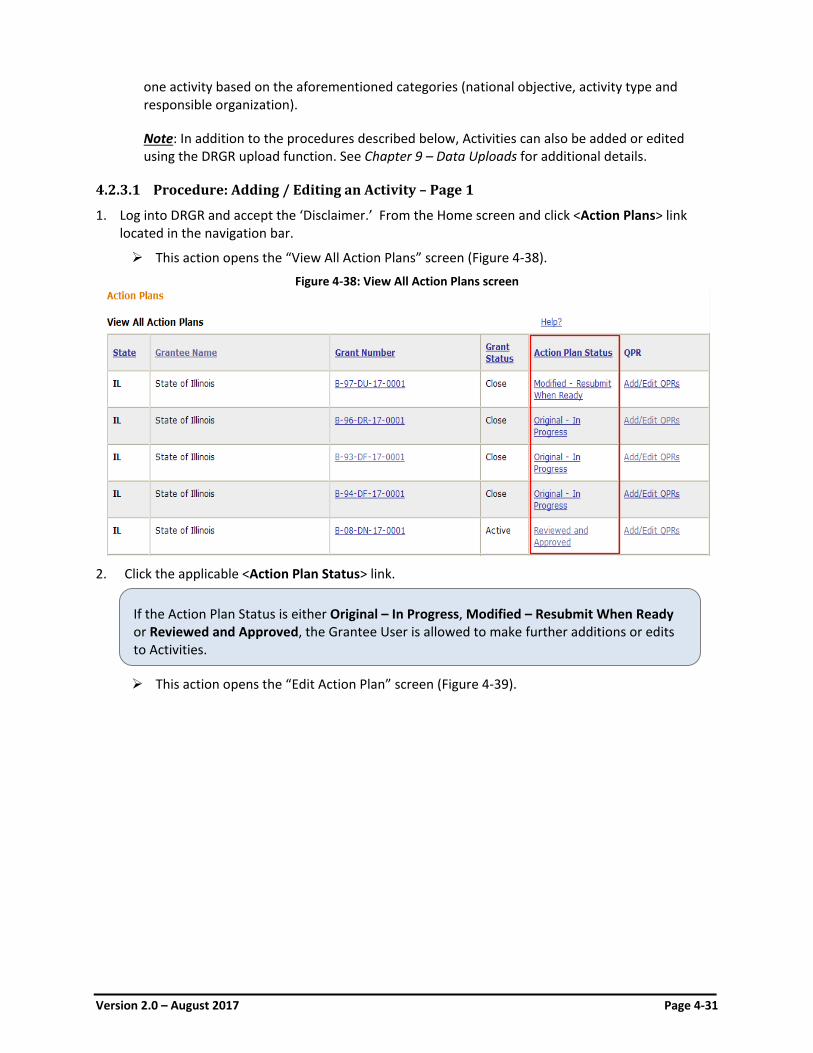
Version 2.0 – August 2017 Page 4-31
one activity based on the aforementioned categories (national objective, activity type and responsible organization).
Note: In addition to the procedures described below, Activities can also be added or edited using the DRGR upload function. See Chapter 9 – Data Uploads for additional details.
4.2.3.1 Procedure: Adding / Editing an Activity – Page 1
1. Log into DRGR and accept the ‘Disclaimer.’ From the Home screen and click <Action Plans> link located in the navigation bar.
This action opens the “View All Action Plans” screen (Figure 4-38).
Figure 4-38: View All Action Plans screen
2. Click the applicable <Action Plan Status> link.
This action opens the “Edit Action Plan” screen (Figure 4-39).
If the Action Plan Status is either Original – In Progress, Modified – Resubmit When Ready or Reviewed and Approved, the Grantee User is allowed to make further additions or edits to Activities.
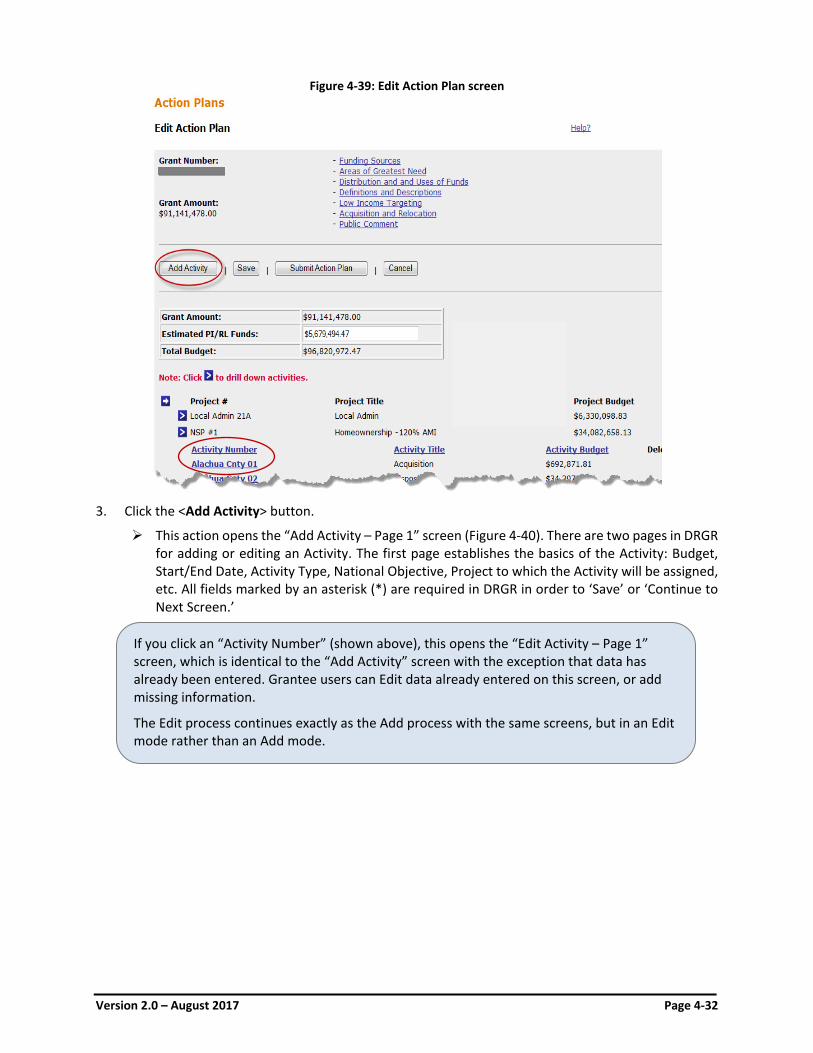
Version 2.0 – August 2017 Page 4-32
Figure 4-39: Edit Action Plan screen
3. Click the <Add Activity> button.
This action opens the “Add Activity – Page 1” screen (Figure 4-40). There are two pages in DRGR for adding or editing an Activity. The first page establishes the basics of the Activity: Budget, Start/End Date, Activity Type, National Objective, Project to which the Activity will be assigned, etc. All fields marked by an asterisk (*) are required in DRGR in order to ‘Save’ or ‘Continue to Next Screen.’
If you click an “Activity Number” (shown above), this opens the “Edit Activity – Page 1” screen, which is identical to the “Add Activity” screen with the exception that data has already been entered. Grantee users can Edit data already entered on this screen, or add missing information.
The Edit process continues exactly as the Add process with the same screens, but in an Edit mode rather than an Add mode.
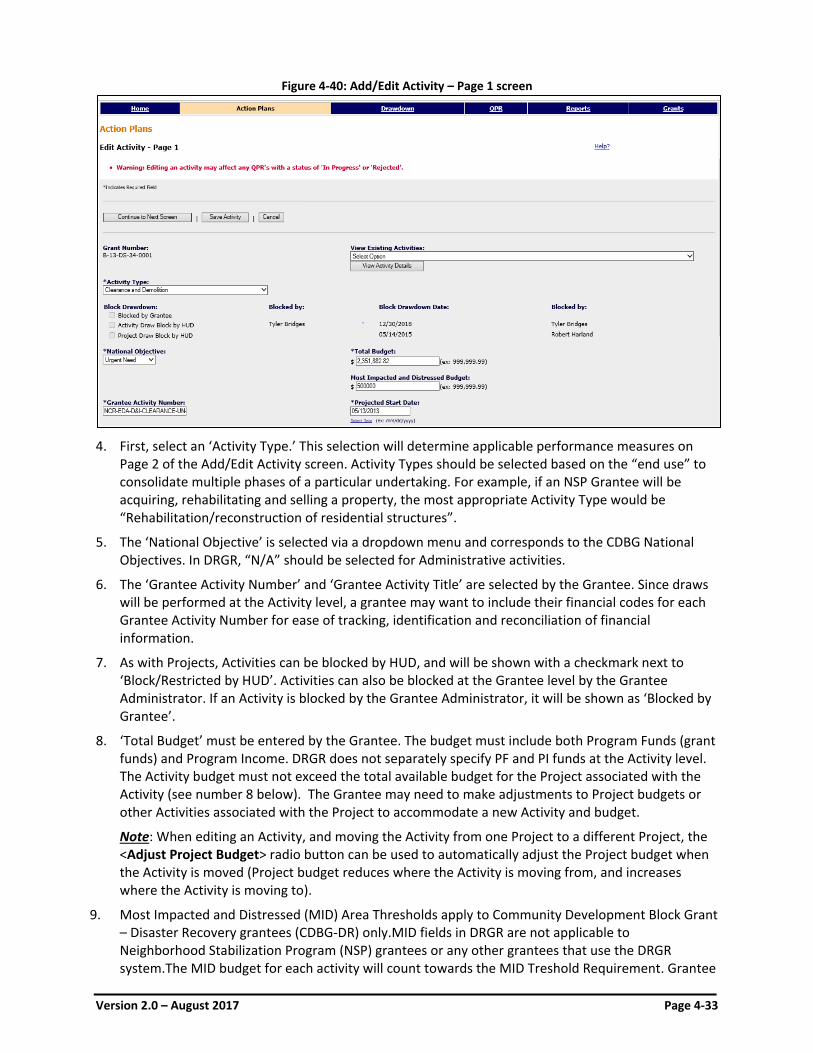
Version 2.0 – August 2017 Page 4-33
Figure 4-40: Add/Edit Activity – Page 1 screen
4. First, select an ‘Activity Type.’ This selection will determine applicable performance measures on
Page 2 of the Add/Edit Activity screen. Activity Types should be selected based on the “end use” to consolidate multiple phases of a particular undertaking. For example, if an NSP Grantee will be acquiring, rehabilitating and selling a property, the most appropriate Activity Type would be “Rehabilitation/reconstruction of residential structures”.
5. The ‘National Objective’ is selected via a dropdown menu and corresponds to the CDBG National Objectives. In DRGR, “N/A” should be selected for Administrative activities.
6. The ‘Grantee Activity Number’ and ‘Grantee Activity Title’ are selected by the Grantee. Since draws will be performed at the Activity level, a grantee may want to include their financial codes for each Grantee Activity Number for ease of tracking, identification and reconciliation of financial information.
7. As with Projects, Activities can be blocked by HUD, and will be shown with a checkmark next to ‘Block/Restricted by HUD’. Activities can also be blocked at the Grantee level by the Grantee Administrator. If an Activity is blocked by the Grantee Administrator, it will be shown as ‘Blocked by Grantee’.
8. ‘Total Budget’ must be entered by the Grantee. The budget must include both Program Funds (grant funds) and Program Income. DRGR does not separately specify PF and PI funds at the Activity level. The Activity budget must not exceed the total available budget for the Project associated with the Activity (see number 8 below). The Grantee may need to make adjustments to Project budgets or other Activities associated with the Project to accommodate a new Activity and budget.
Note: When editing an Activity, and moving the Activity from one Project to a different Project, the <Adjust Project Budget> radio button can be used to automatically adjust the Project budget when the Activity is moved (Project budget reduces where the Activity is moving from, and increases where the Activity is moving to).
9. Most Impacted and Distressed (MID) Area Thresholds apply to Community Development Block Grant – Disaster Recovery grantees (CDBG-DR) only.MID fields in DRGR are not applicable to Neighborhood Stabilization Program (NSP) grantees or any other grantees that use the DRGR system.The MID budget for each activity will count towards the MID Treshold Requirement. Grantee
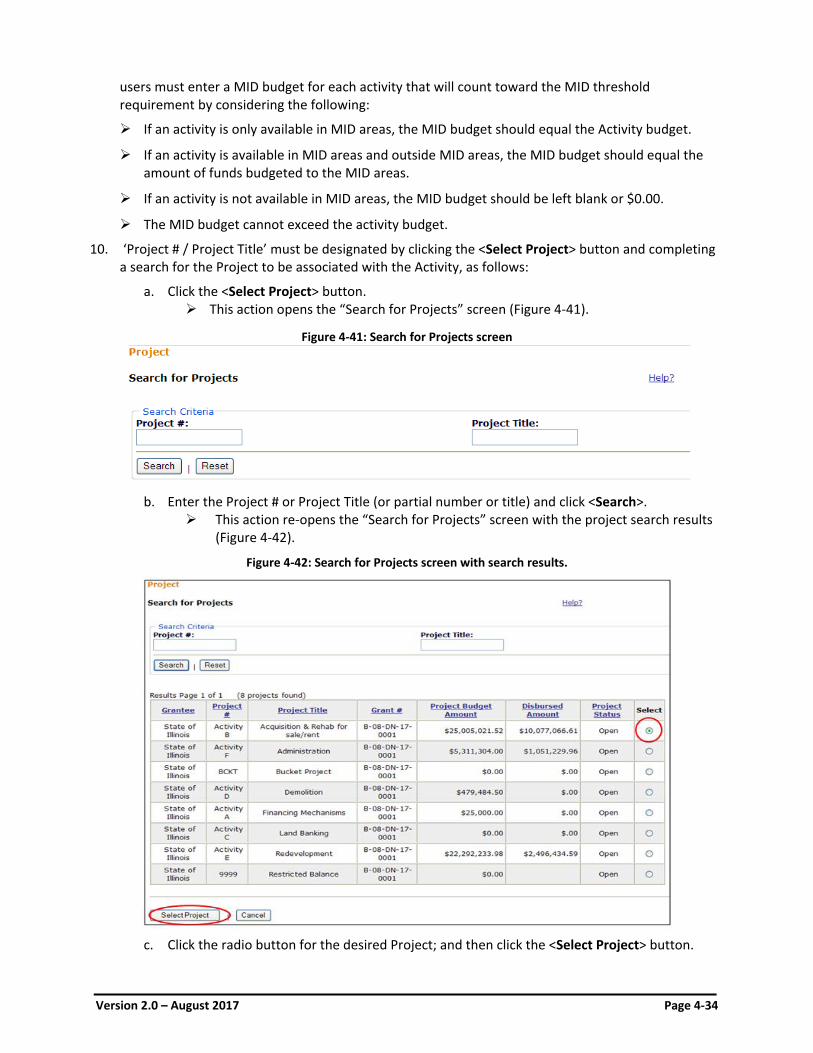
Version 2.0 – August 2017 Page 4-34
users must enter a MID budget for each activity that will count toward the MID threshold requirement by considering the following:
If an activity is only available in MID areas, the MID budget should equal the Activity budget.
If an activity is available in MID areas and outside MID areas, the MID budget should equal the amount of funds budgeted to the MID areas.
If an activity is not available in MID areas, the MID budget should be left blank or $0.00.
The MID budget cannot exceed the activity budget.
10. ‘Project # / Project Title’ must be designated by clicking the <Select Project> button and completing a search for the Project to be associated with the Activity, as follows:
a. Click the <Select Project> button. This action opens the “Search for Projects” screen (Figure 4-41).
Figure 4-41: Search for Projects screen
b. Enter the Project # or Project Title (or partial number or title) and click <Search>.
This action re-opens the “Search for Projects” screen with the project search results (Figure 4-42).
Figure 4-42: Search for Projects screen with search results.
c. Click the radio button for the desired Project; and then click the <Select Project> button.
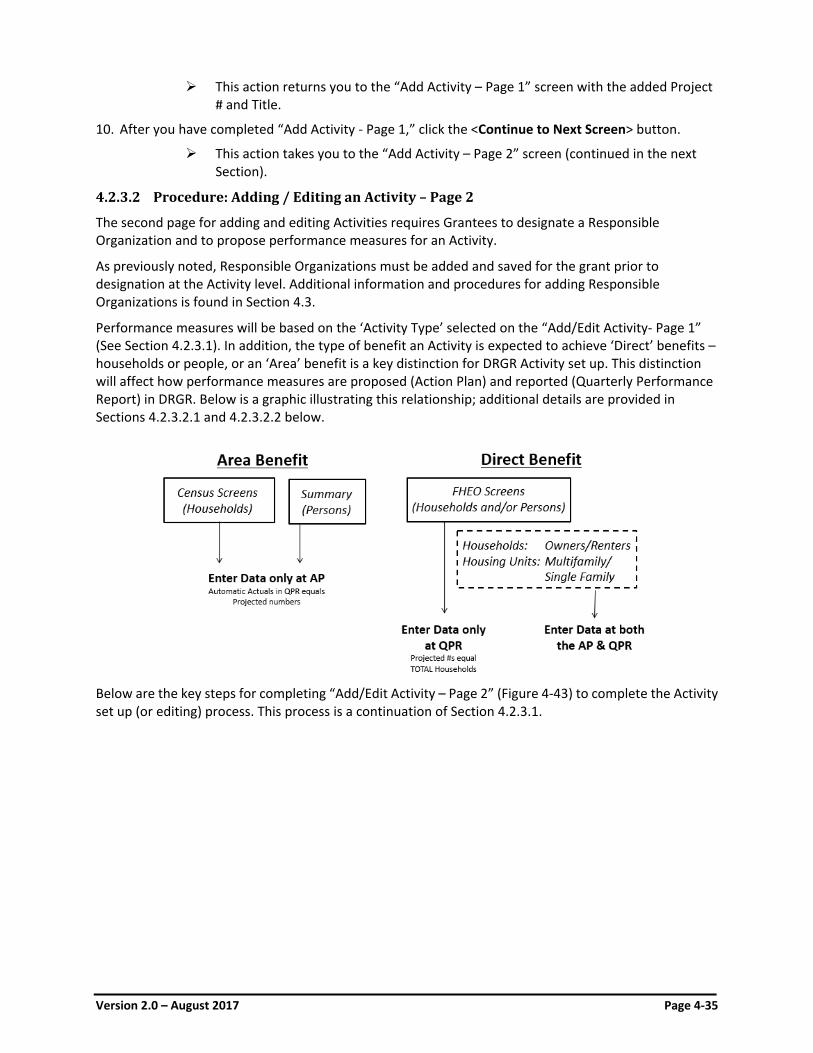
Version 2.0 – August 2017 Page 4-35
This action returns you to the “Add Activity – Page 1” screen with the added Project # and Title.
10. After you have completed “Add Activity - Page 1,” click the <Continue to Next Screen> button.
This action takes you to the “Add Activity – Page 2” screen (continued in the next Section).
4.2.3.2 Procedure: Adding / Editing an Activity – Page 2
The second page for adding and editing Activities requires Grantees to designate a Responsible Organization and to propose performance measures for an Activity.
As previously noted, Responsible Organizations must be added and saved for the grant prior to designation at the Activity level. Additional information and procedures for adding Responsible Organizations is found in Section 4.3.
Performance measures will be based on the ‘Activity Type’ selected on the “Add/Edit Activity- Page 1” (See Section 4.2.3.1). In addition, the type of benefit an Activity is expected to achieve ‘Direct’ benefits – households or people, or an ‘Area’ benefit is a key distinction for DRGR Activity set up. This distinction will affect how performance measures are proposed (Action Plan) and reported (Quarterly Performance Report) in DRGR. Below is a graphic illustrating this relationship; additional details are provided in Sections 4.2.3.2.1 and 4.2.3.2.2 below.
Below are the key steps for completing “Add/Edit Activity – Page 2” (Figure 4-43) to complete the Activity set up (or editing) process. This process is a continuation of Section 4.2.3.1.
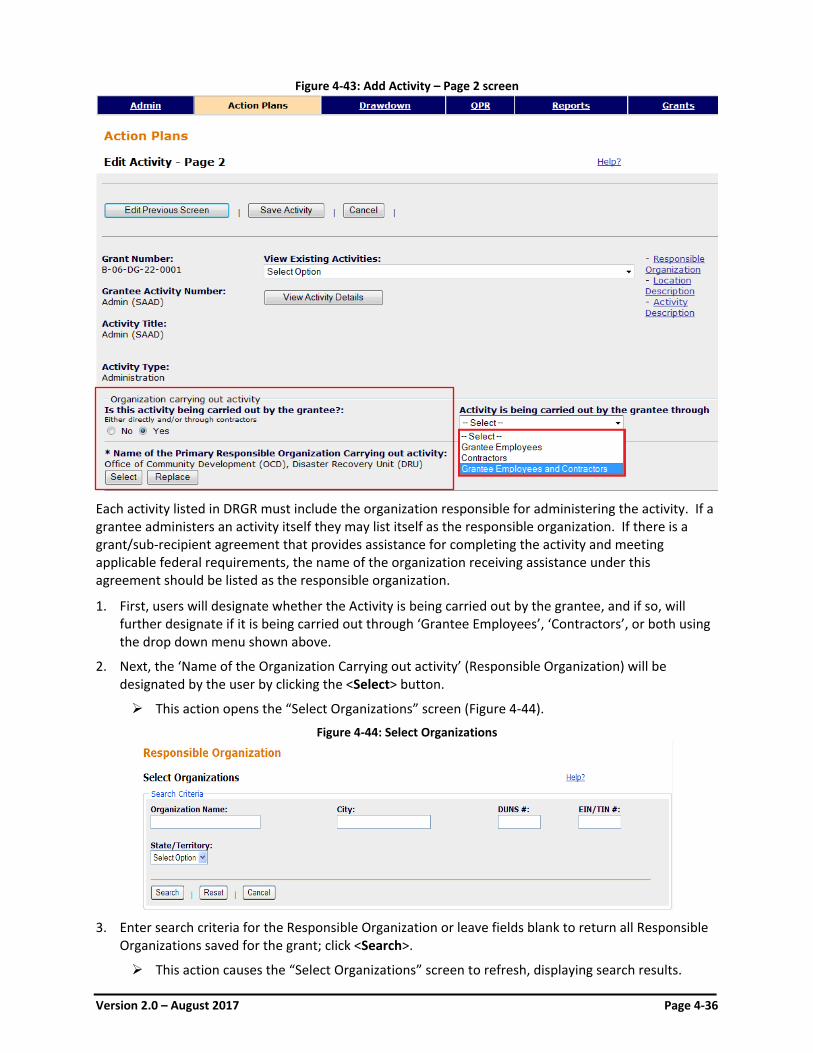
Version 2.0 – August 2017 Page 4-36
Figure 4-43: Add Activity – Page 2 screen
Each activity listed in DRGR must include the organization responsible for administering the activity. If a grantee administers an activity itself they may list itself as the responsible organization. If there is a grant/sub-recipient agreement that provides assistance for completing the activity and meeting applicable federal requirements, the name of the organization receiving assistance under this agreement should be listed as the responsible organization.
1. First, users will designate whether the Activity is being carried out by the grantee, and if so, will further designate if it is being carried out through ‘Grantee Employees’, ‘Contractors’, or both using the drop down menu shown above.
2. Next, the ‘Name of the Organization Carrying out activity’ (Responsible Organization) will be designated by the user by clicking the <Select> button.
This action opens the “Select Organizations” screen (Figure 4-44).
Figure 4-44: Select Organizations
3. Enter search criteria for the Responsible Organization or leave fields blank to return all Responsible
Organizations saved for the grant; click <Search>.
This action causes the “Select Organizations” screen to refresh, displaying search results.
Version 2.0 – August 2017 Page 4-37
4. Click the radio button for the desired Organization Name, and then click <Select Responsible Organization>.
This action re-opens the “Add Activity – Page 2” screen which displays the selected Responsible Organization (Figure 4-45).
The grantee has the option of specifying more than one organization (a Subordinate Organization) to carry out an activity. This is an optional feature but may help the grantee track the budget and expenditures of each organization.
• Subordinate organization functions cannot be used to list multiple UGLGs or subrecipients; each UGLG or subrecipient must be a separate activity. This is used to show budgets and self-reported expenditures for organizations such as contractors, if desired.
• It is important to note that only budgets and expenditures will be tracked at the subordinate organization level in DRGR. Subordinate organization budgets are provided on the Add Activity screen and expenditures for each subordinate organization will be recorded in the QPR. This information is not the same as Obligations and Drawdowns. Obligations and Drawdowns will be aggregated at the activity level; they will not be tracked down to the subordinate organization.
• Some examples of where a Subordinate Organization may be helpful include programs in which the grantee has awarded a contract to a housing counseling agency or a consultant to perform program delivery tasks. If these are listed as subordinate organizations, the grantee can track the budgets and activities for these contracts without setting up a new activity.
The ‘Primary’ Responsible Organization cannot be deleted. The user is allowed to delete the Responsible Organization only if no expenditures have been recorded (non-zero amounts) on the QPR for the selected Responsible Organization.
The user can enter a value in the ‘Proposed Budget’. There are no controls on the proposed budget amount in DRGR.
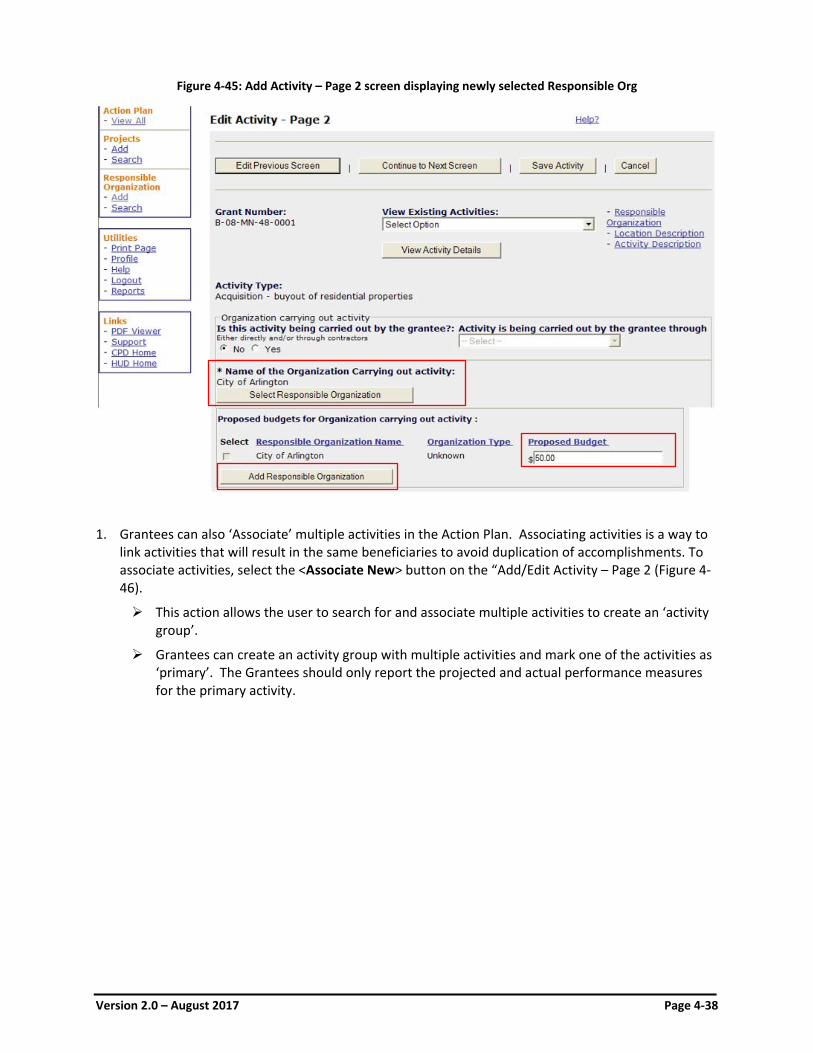
Version 2.0 – August 2017 Page 4-38
Figure 4-45: Add Activity – Page 2 screen displaying newly selected Responsible Org
1. Grantees can also ‘Associate’ multiple activities in the Action Plan. Associating activities is a way to link activities that will result in the same beneficiaries to avoid duplication of accomplishments. To associate activities, select the <Associate New> button on the “Add/Edit Activity – Page 2 (Figure 4-46).
This action allows the user to search for and associate multiple activities to create an ‘activity group’.
Grantees can create an activity group with multiple activities and mark one of the activities as ‘primary’. The Grantees should only report the projected and actual performance measures for the primary activity.
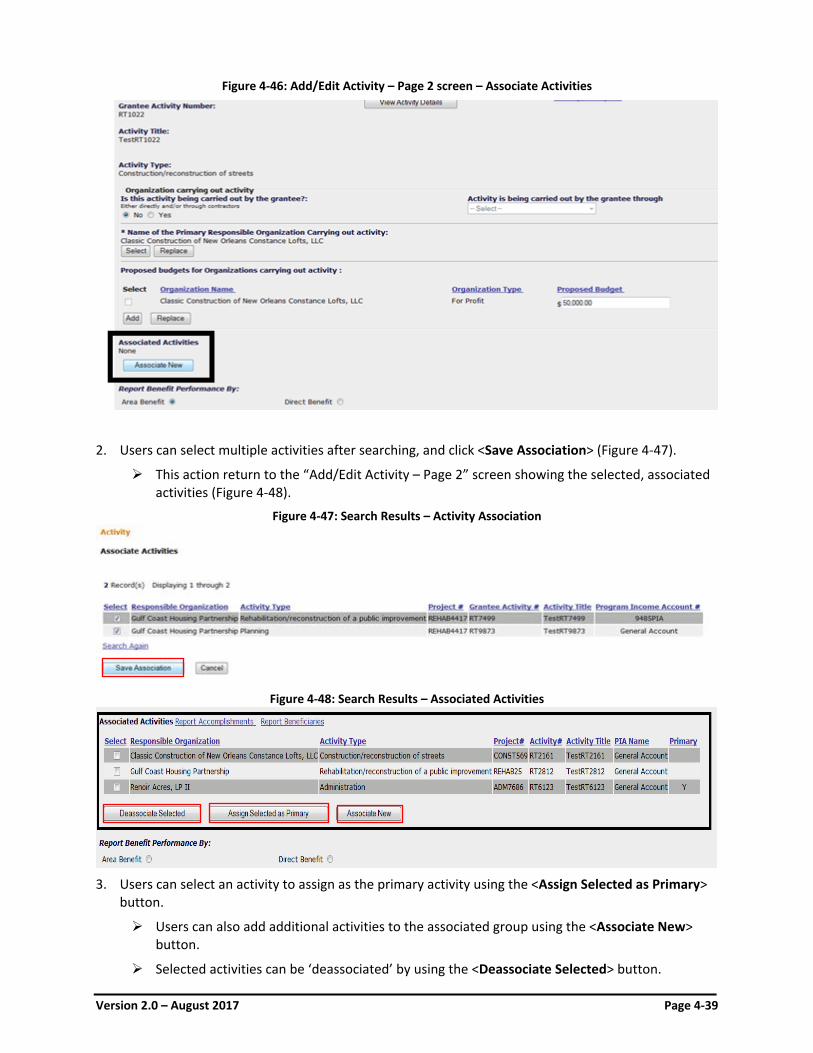
Version 2.0 – August 2017 Page 4-39
Figure 4-46: Add/Edit Activity – Page 2 screen – Associate Activities
2. Users can select multiple activities after searching, and click <Save Association> (Figure 4-47).
This action return to the “Add/Edit Activity – Page 2” screen showing the selected, associated activities (Figure 4-48).
Figure 4-47: Search Results – Activity Association
Figure 4-48: Search Results – Associated Activities
3. Users can select an activity to assign as the primary activity using the <Assign Selected as Primary>
button.
Users can also add additional activities to the associated group using the <Associate New> button.
Selected activities can be ‘deassociated’ by using the <Deassociate Selected> button.
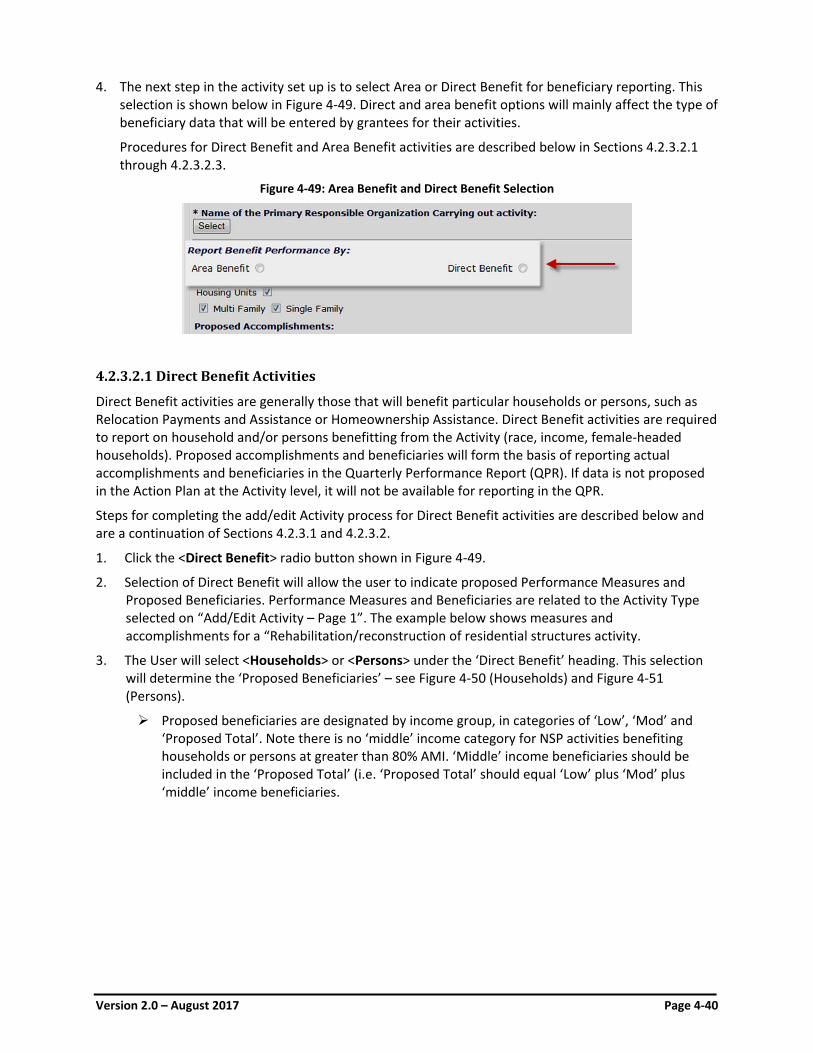
Version 2.0 – August 2017 Page 4-40
4. The next step in the activity set up is to select Area or Direct Benefit for beneficiary reporting. This selection is shown below in Figure 4-49. Direct and area benefit options will mainly affect the type of beneficiary data that will be entered by grantees for their activities.
Procedures for Direct Benefit and Area Benefit activities are described below in Sections 4.2.3.2.1 through 4.2.3.2.3.
Figure 4-49: Area Benefit and Direct Benefit Selection
4.2.3.2.1 Direct Benefit Activities
Direct Benefit activities are generally those that will benefit particular households or persons, such as Relocation Payments and Assistance or Homeownership Assistance. Direct Benefit activities are required to report on household and/or persons benefitting from the Activity (race, income, female-headed households). Proposed accomplishments and beneficiaries will form the basis of reporting actual accomplishments and beneficiaries in the Quarterly Performance Report (QPR). If data is not proposed in the Action Plan at the Activity level, it will not be available for reporting in the QPR.
Steps for completing the add/edit Activity process for Direct Benefit activities are described below and are a continuation of Sections 4.2.3.1 and 4.2.3.2.
1. Click the <Direct Benefit> radio button shown in Figure 4-49.
2. Selection of Direct Benefit will allow the user to indicate proposed Performance Measures and Proposed Beneficiaries. Performance Measures and Beneficiaries are related to the Activity Type selected on “Add/Edit Activity – Page 1”. The example below shows measures and accomplishments for a “Rehabilitation/reconstruction of residential structures activity.
3. The User will select <Households> or <Persons> under the ‘Direct Benefit’ heading. This selection will determine the ‘Proposed Beneficiaries’ – see Figure 4-50 (Households) and Figure 4-51 (Persons).
Proposed beneficiaries are designated by income group, in categories of ‘Low’, ‘Mod’ and ‘Proposed Total’. Note there is no ‘middle’ income category for NSP activities benefiting households or persons at greater than 80% AMI. ‘Middle’ income beneficiaries should be included in the ‘Proposed Total’ (i.e. ‘Proposed Total’ should equal ‘Low’ plus ‘Mod’ plus ‘middle’ income beneficiaries.
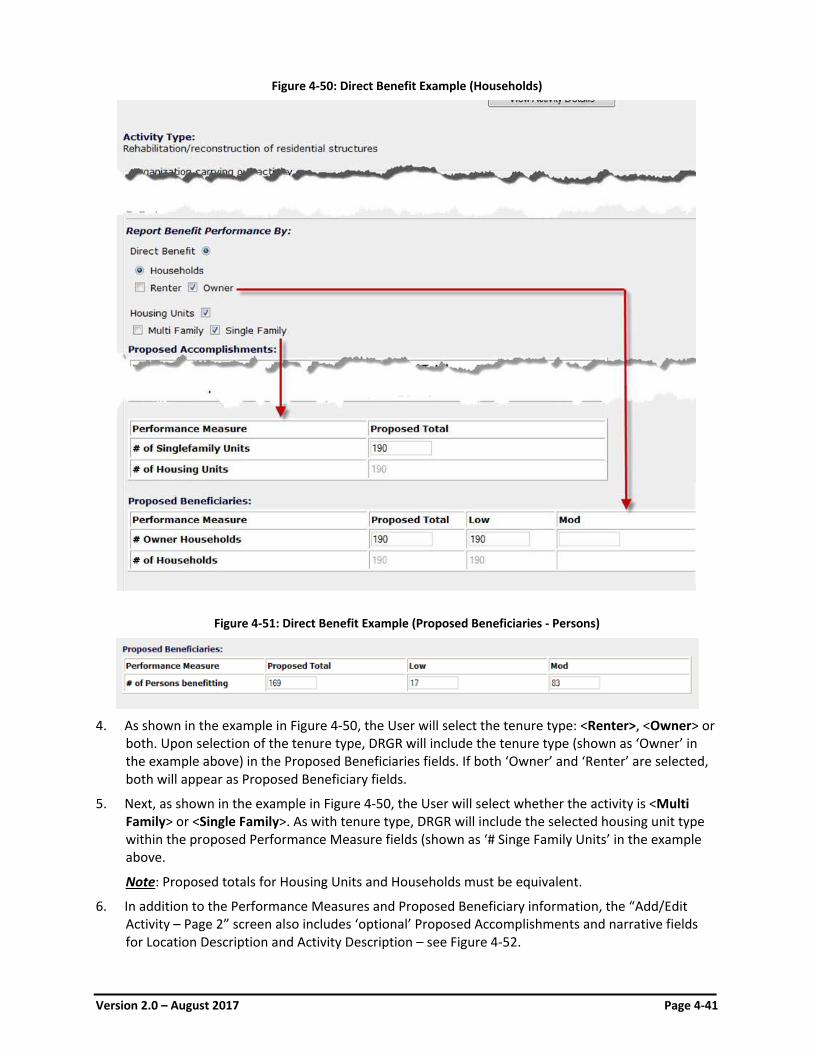
Version 2.0 – August 2017 Page 4-41
Figure 4-50: Direct Benefit Example (Households)
Figure 4-51: Direct Benefit Example (Proposed Beneficiaries - Persons)
4. As shown in the example in Figure 4-50, the User will select the tenure type: <Renter>, <Owner> or
both. Upon selection of the tenure type, DRGR will include the tenure type (shown as ‘Owner’ in the example above) in the Proposed Beneficiaries fields. If both ‘Owner’ and ‘Renter’ are selected, both will appear as Proposed Beneficiary fields.
5. Next, as shown in the example in Figure 4-50, the User will select whether the activity is <Multi Family> or <Single Family>. As with tenure type, DRGR will include the selected housing unit type within the proposed Performance Measure fields (shown as ‘# Singe Family Units’ in the example above.
Note: Proposed totals for Housing Units and Households must be equivalent.
6. In addition to the Performance Measures and Proposed Beneficiary information, the “Add/Edit Activity – Page 2” screen also includes ‘optional’ Proposed Accomplishments and narrative fields for Location Description and Activity Description – see Figure 4-52.
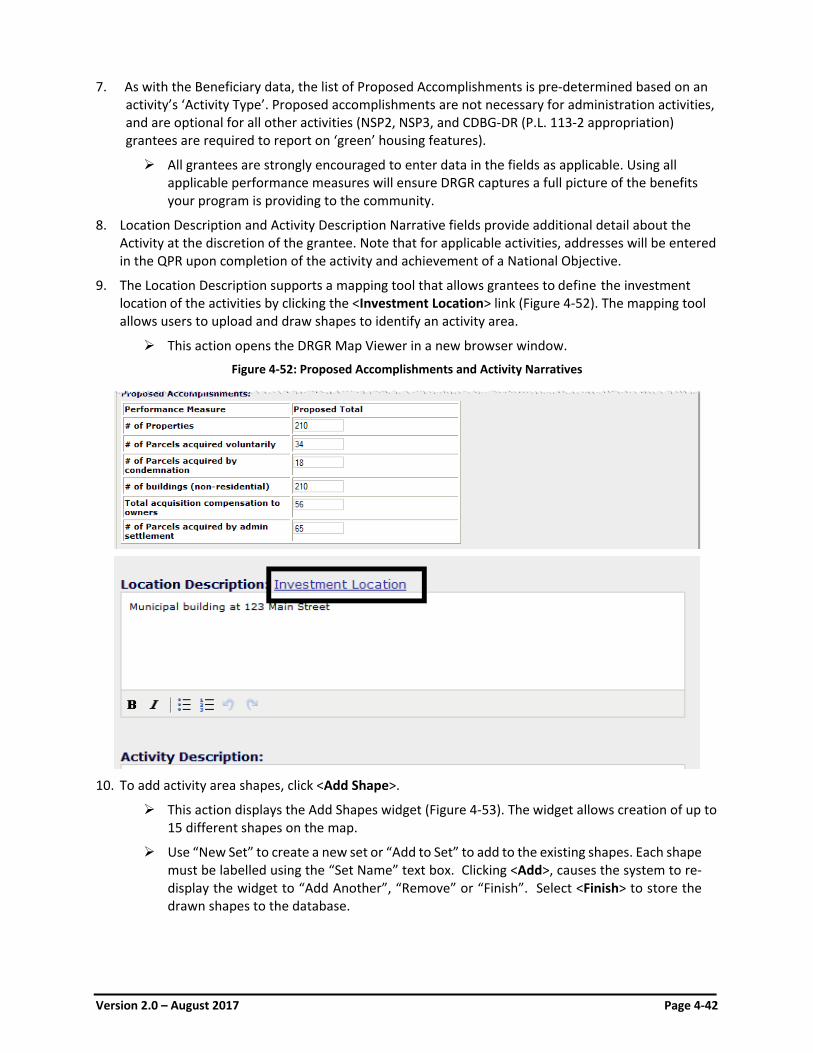
Version 2.0 – August 2017 Page 4-42
7. As with the Beneficiary data, the list of Proposed Accomplishments is pre-determined based on an activity’s ‘Activity Type’. Proposed accomplishments are not necessary for administration activities, and are optional for all other activities (NSP2, NSP3, and CDBG-DR (P.L. 113-2 appropriation) grantees are required to report on ‘green’ housing features).
All grantees are strongly encouraged to enter data in the fields as applicable. Using all applicable performance measures will ensure DRGR captures a full picture of the benefits your program is providing to the community.
8. Location Description and Activity Description Narrative fields provide additional detail about the Activity at the discretion of the grantee. Note that for applicable activities, addresses will be entered in the QPR upon completion of the activity and achievement of a National Objective.
9. The Location Description supports a mapping tool that allows grantees to define the investment location of the activities by clicking the <Investment Location> link (Figure 4-52). The mapping tool allows users to upload and draw shapes to identify an activity area.
This action opens the DRGR Map Viewer in a new browser window.
Figure 4-52: Proposed Accomplishments and Activity Narratives
10. To add activity area shapes, click <Add Shape>.
This action displays the Add Shapes widget (Figure 4-53). The widget allows creation of up to 15 different shapes on the map.
Use “New Set” to create a new set or “Add to Set” to add to the existing shapes. Each shape must be labelled using the “Set Name” text box. Clicking <Add>, causes the system to re-display the widget to “Add Another”, “Remove” or “Finish”. Select <Finish> to store the drawn shapes to the database.
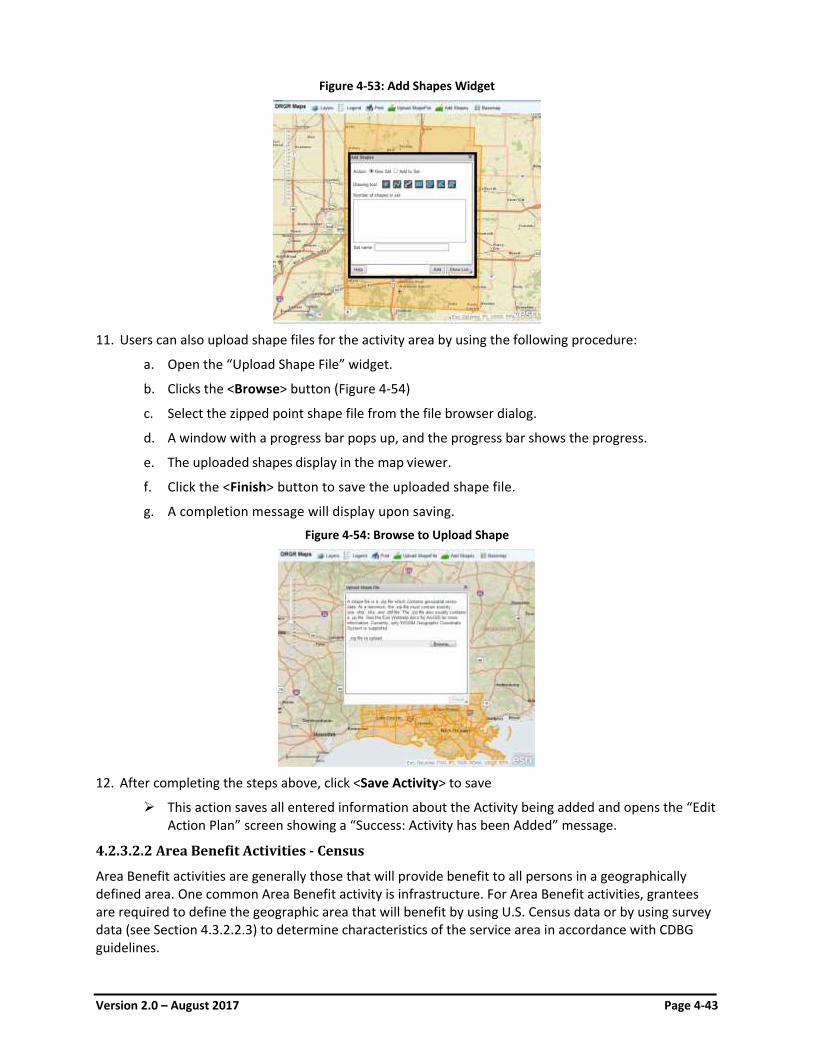
Version 2.0 – August 2017 Page 4-43
Figure 4-53: Add Shapes Widget
11. Users can also upload shape files for the activity area by using the following procedure:
a. Open the “Upload Shape File” widget.
b. Clicks the <Browse> button (Figure 4-54)
c. Select the zipped point shape file from the file browser dialog.
d. A window with a progress bar pops up, and the progress bar shows the progress.
e. The uploaded shapes display in the map viewer.
f. Click the <Finish> button to save the uploaded shape file.
g. A completion message will display upon saving.
Figure 4-54: Browse to Upload Shape
12. After completing the steps above, click <Save Activity> to save
This action saves all entered information about the Activity being added and opens the “Edit Action Plan” screen showing a “Success: Activity has been Added” message.
4.2.3.2.2 Area Benefit Activities - Census
Area Benefit activities are generally those that will provide benefit to all persons in a geographically defined area. One common Area Benefit activity is infrastructure. For Area Benefit activities, grantees are required to define the geographic area that will benefit by using U.S. Census data or by using survey data (see Section 4.3.2.2.3) to determine characteristics of the service area in accordance with CDBG guidelines.
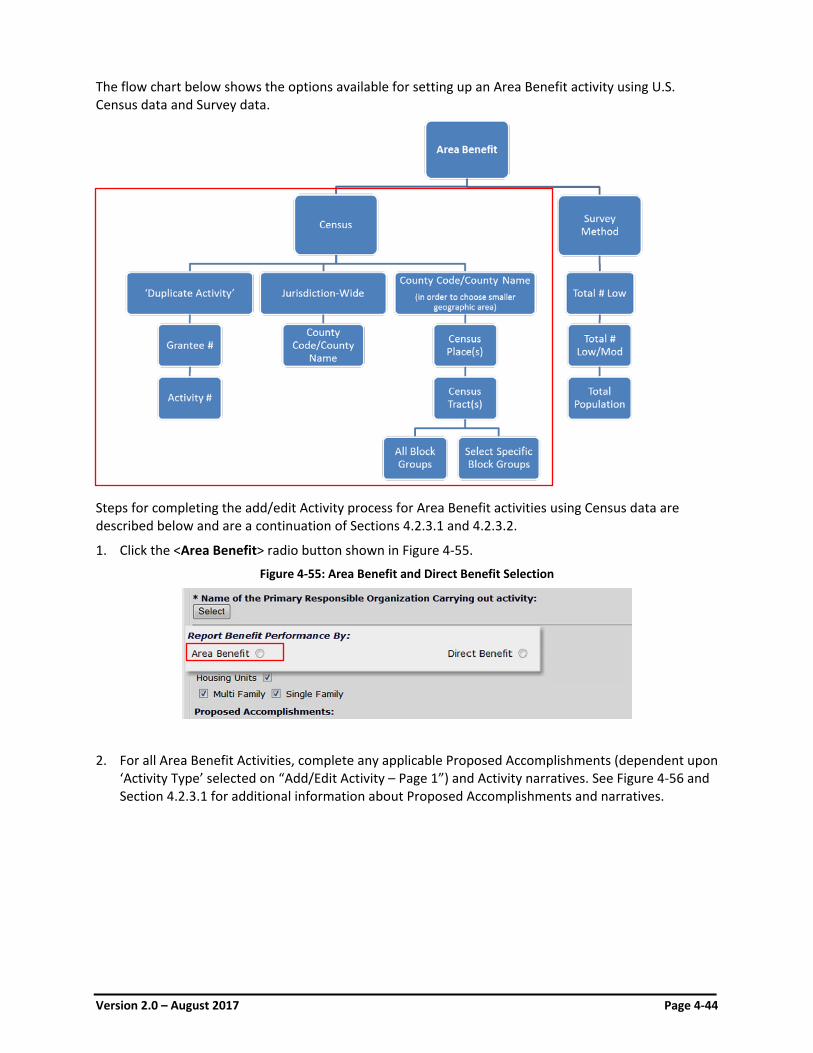
Version 2.0 – August 2017 Page 4-44
The flow chart below shows the options available for setting up an Area Benefit activity using U.S. Census data and Survey data.
Steps for completing the add/edit Activity process for Area Benefit activities using Census data are described below and are a continuation of Sections 4.2.3.1 and 4.2.3.2.
1. Click the <Area Benefit> radio button shown in Figure 4-55.
Figure 4-55: Area Benefit and Direct Benefit Selection
2. For all Area Benefit Activities, complete any applicable Proposed Accomplishments (dependent upon ‘Activity Type’ selected on “Add/Edit Activity – Page 1”) and Activity narratives. See Figure 4-56 and Section 4.2.3.1 for additional information about Proposed Accomplishments and narratives.

Version 2.0 – August 2017 Page 4-45
Figure 4-56: Area Benefit Proposed Accomplishments and Activity narratives
3. Select the <Census> or <Survey> radio button (Figure 4-56). This selection is a key distinction for set
up of an Area Benefit activity.
4. The process for completing the Census process is described below. For information on completing an Area Benefit activity using Survey data see Section 4.2.3.2.3.
a. After completing steps 1 through 3 above, click the <Identify Census Geography> button at the bottom of “Add/Edit Activity – Page 2” for Area Benefit activities (See Figure 4-57).
Figure 4-57: Area Benefit - Census
b. This action opens the “Add/Edit – Identify Census Geography” screen. From this screen, there
are three options for identifying Census data for the Activity.
i. Option 1: the <Duplicate Activity> check box allows you to duplicate a service area from another activity by selecting the ‘Grant’ and ‘Activity’ to copy from and clicking the <Copy Activity Area> button (Figure 4-58).
1. Click the <Save Activity> button to save the duplicated activity area and the activity.
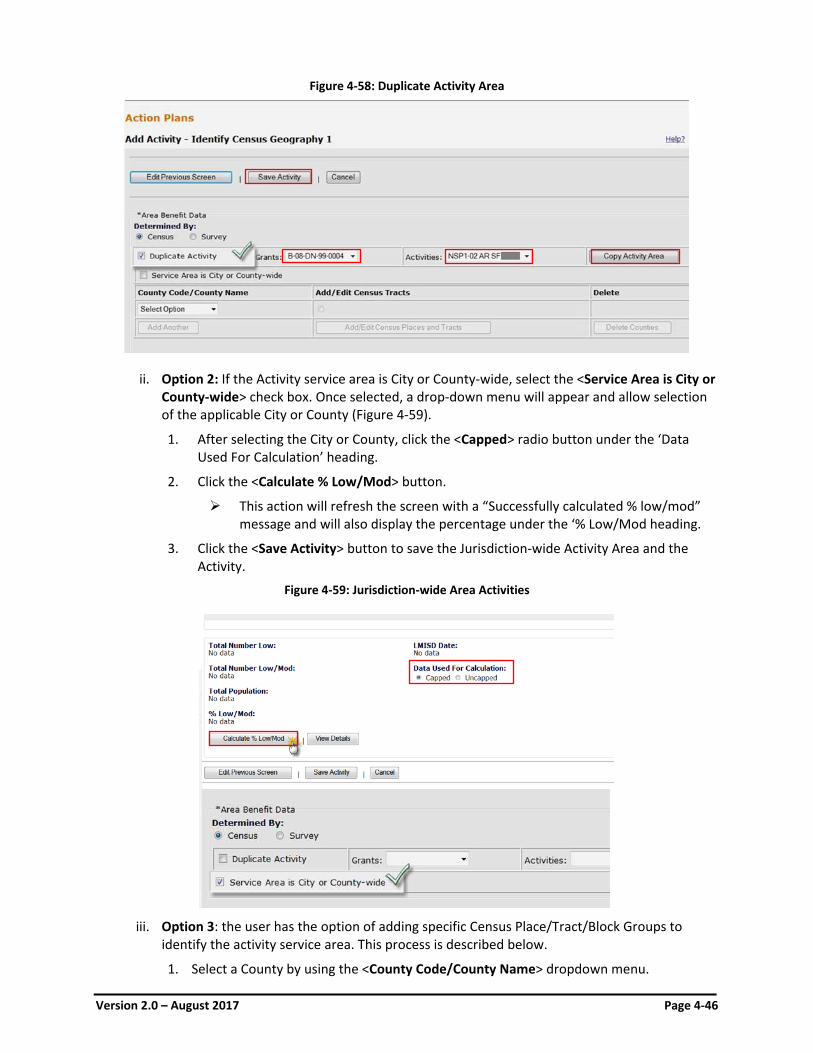
Version 2.0 – August 2017 Page 4-46
Figure 4-58: Duplicate Activity Area
ii. Option 2: If the Activity service area is City or County-wide, select the <Service Area is City or County-wide> check box. Once selected, a drop-down menu will appear and allow selection of the applicable City or County (Figure 4-59).
1. After selecting the City or County, click the <Capped> radio button under the ‘Data Used For Calculation’ heading.
2. Click the <Calculate % Low/Mod> button.
This action will refresh the screen with a “Successfully calculated % low/mod” message and will also display the percentage under the ‘% Low/Mod heading.
3. Click the <Save Activity> button to save the Jurisdiction-wide Activity Area and the Activity.
Figure 4-59: Jurisdiction-wide Area Activities
iii. Option 3: the user has the option of adding specific Census Place/Tract/Block Groups to
identify the activity service area. This process is described below.
1. Select a County by using the <County Code/County Name> dropdown menu.
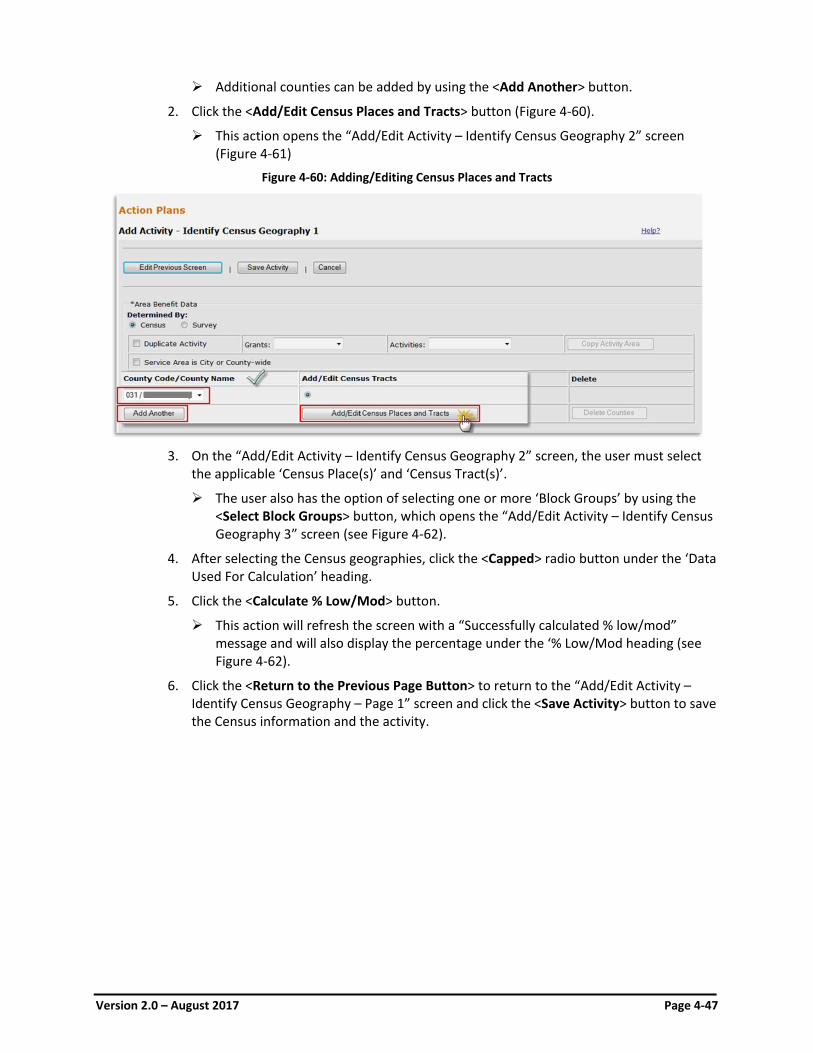
Version 2.0 – August 2017 Page 4-47
Additional counties can be added by using the <Add Another> button.
2. Click the <Add/Edit Census Places and Tracts> button (Figure 4-60).
This action opens the “Add/Edit Activity – Identify Census Geography 2” screen (Figure 4-61)
Figure 4-60: Adding/Editing Census Places and Tracts
3. On the “Add/Edit Activity – Identify Census Geography 2” screen, the user must select
the applicable ‘Census Place(s)’ and ‘Census Tract(s)’.
The user also has the option of selecting one or more ‘Block Groups’ by using the <Select Block Groups> button, which opens the “Add/Edit Activity – Identify Census Geography 3” screen (see Figure 4-62).
4. After selecting the Census geographies, click the <Capped> radio button under the ‘Data Used For Calculation’ heading.
5. Click the <Calculate % Low/Mod> button.
This action will refresh the screen with a “Successfully calculated % low/mod” message and will also display the percentage under the ‘% Low/Mod heading (see Figure 4-62).
6. Click the <Return to the Previous Page Button> to return to the “Add/Edit Activity – Identify Census Geography – Page 1” screen and click the <Save Activity> button to save the Census information and the activity.
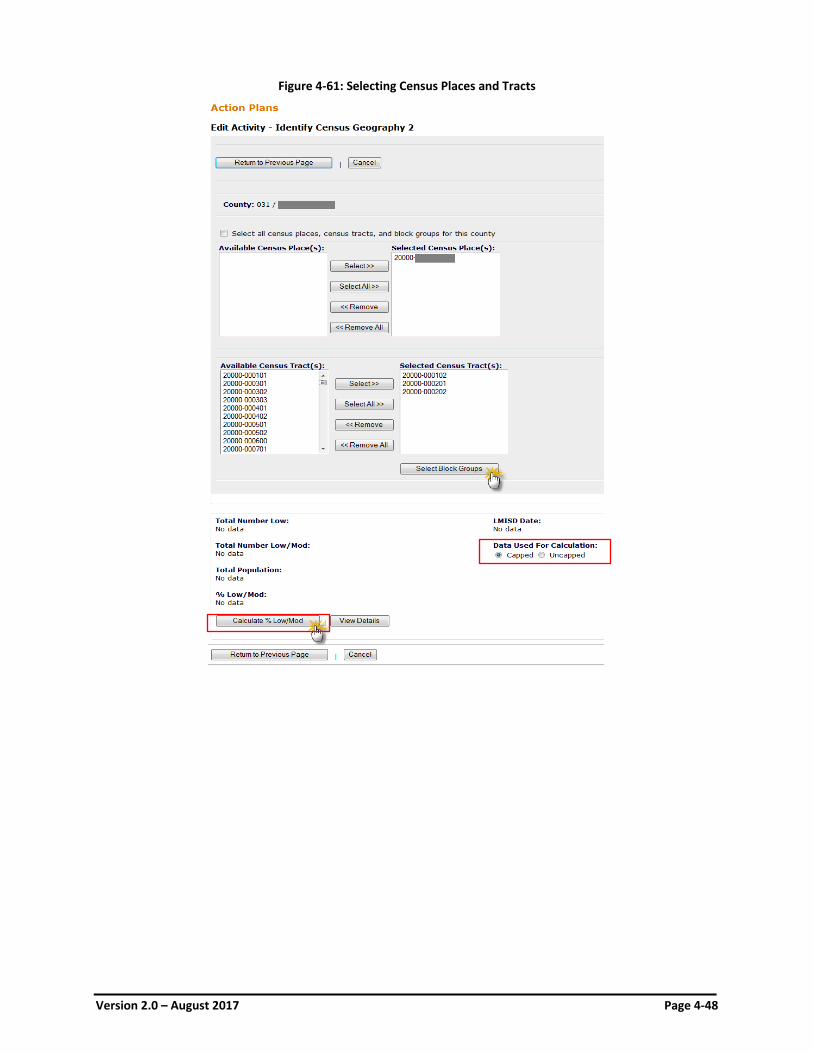
Version 2.0 – August 2017 Page 4-48
Figure 4-61: Selecting Census Places and Tracts
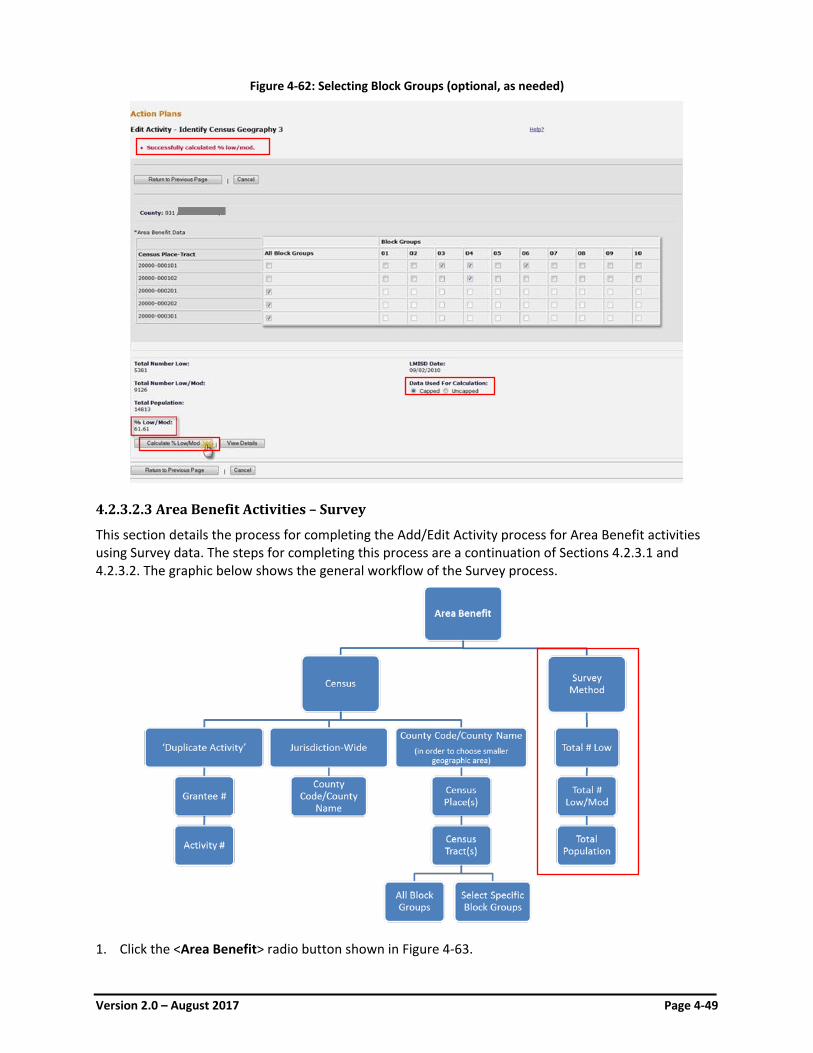
Version 2.0 – August 2017 Page 4-49
Figure 4-62: Selecting Block Groups (optional, as needed)
4.2.3.2.3 Area Benefit Activities – Survey
This section details the process for completing the Add/Edit Activity process for Area Benefit activities using Survey data. The steps for completing this process are a continuation of Sections 4.2.3.1 and 4.2.3.2. The graphic below shows the general workflow of the Survey process.
1. Click the <Area Benefit> radio button shown in Figure 4-63.
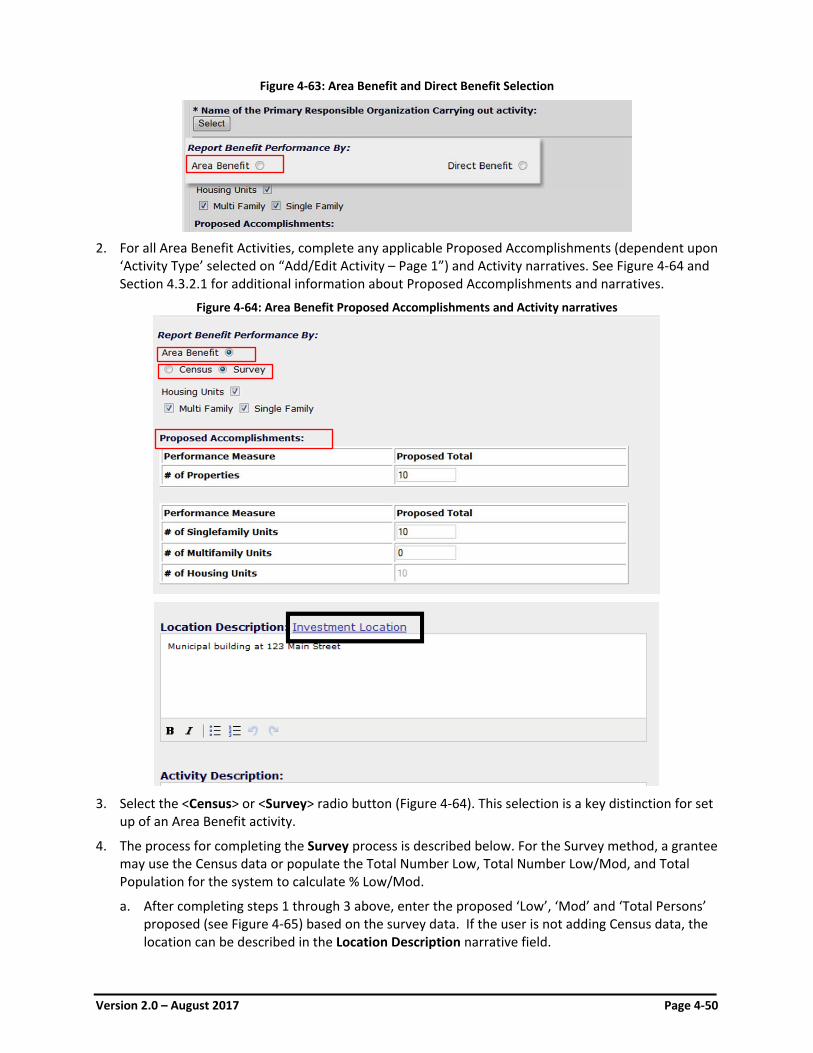
Version 2.0 – August 2017 Page 4-50
Figure 4-63: Area Benefit and Direct Benefit Selection
2. For all Area Benefit Activities, complete any applicable Proposed Accomplishments (dependent upon
‘Activity Type’ selected on “Add/Edit Activity – Page 1”) and Activity narratives. See Figure 4-64 and Section 4.3.2.1 for additional information about Proposed Accomplishments and narratives.
Figure 4-64: Area Benefit Proposed Accomplishments and Activity narratives
3. Select the <Census> or <Survey> radio button (Figure 4-64). This selection is a key distinction for set
up of an Area Benefit activity.
4. The process for completing the Survey process is described below. For the Survey method, a grantee may use the Census data or populate the Total Number Low, Total Number Low/Mod, and Total Population for the system to calculate % Low/Mod.
a. After completing steps 1 through 3 above, enter the proposed ‘Low’, ‘Mod’ and ‘Total Persons’ proposed (see Figure 4-65) based on the survey data. If the user is not adding Census data, the location can be described in the Location Description narrative field.
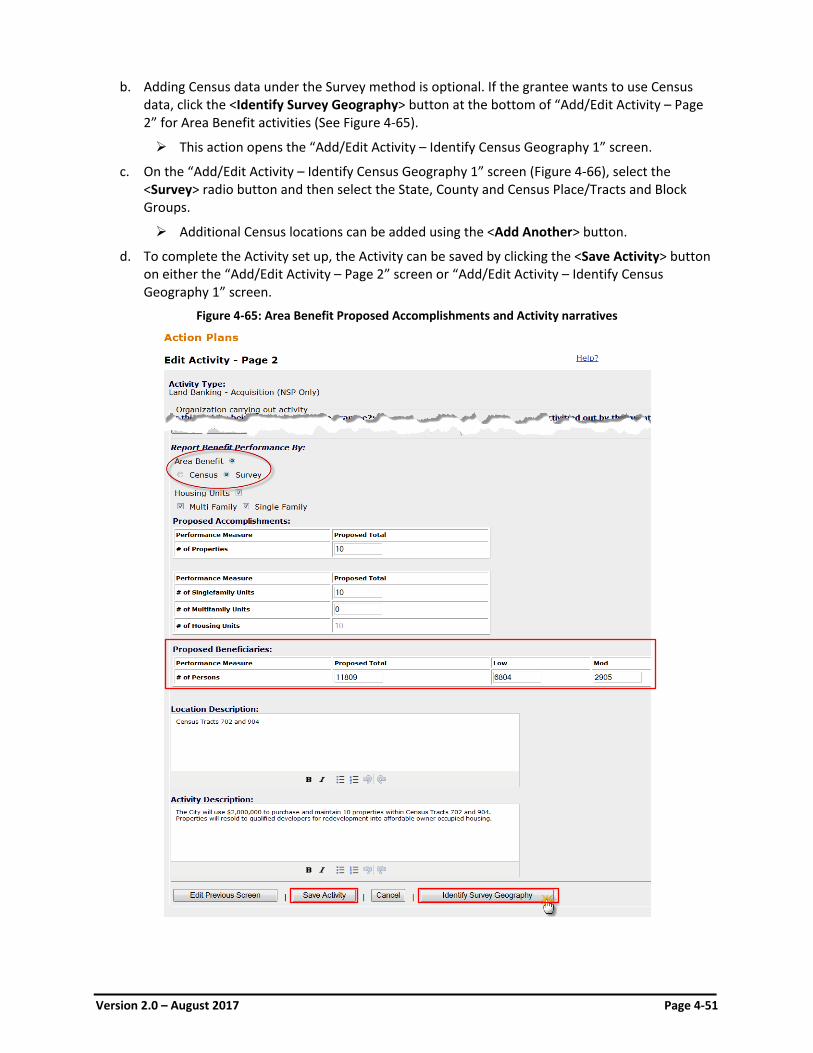
Version 2.0 – August 2017 Page 4-51
b. Adding Census data under the Survey method is optional. If the grantee wants to use Census data, click the <Identify Survey Geography> button at the bottom of “Add/Edit Activity – Page 2” for Area Benefit activities (See Figure 4-65).
This action opens the “Add/Edit Activity – Identify Census Geography 1” screen.
c. On the “Add/Edit Activity – Identify Census Geography 1” screen (Figure 4-66), select the <Survey> radio button and then select the State, County and Census Place/Tracts and Block Groups.
Additional Census locations can be added using the <Add Another> button.
d. To complete the Activity set up, the Activity can be saved by clicking the <Save Activity> button on either the “Add/Edit Activity – Page 2” screen or “Add/Edit Activity – Identify Census Geography 1” screen.
Figure 4-65: Area Benefit Proposed Accomplishments and Activity narratives
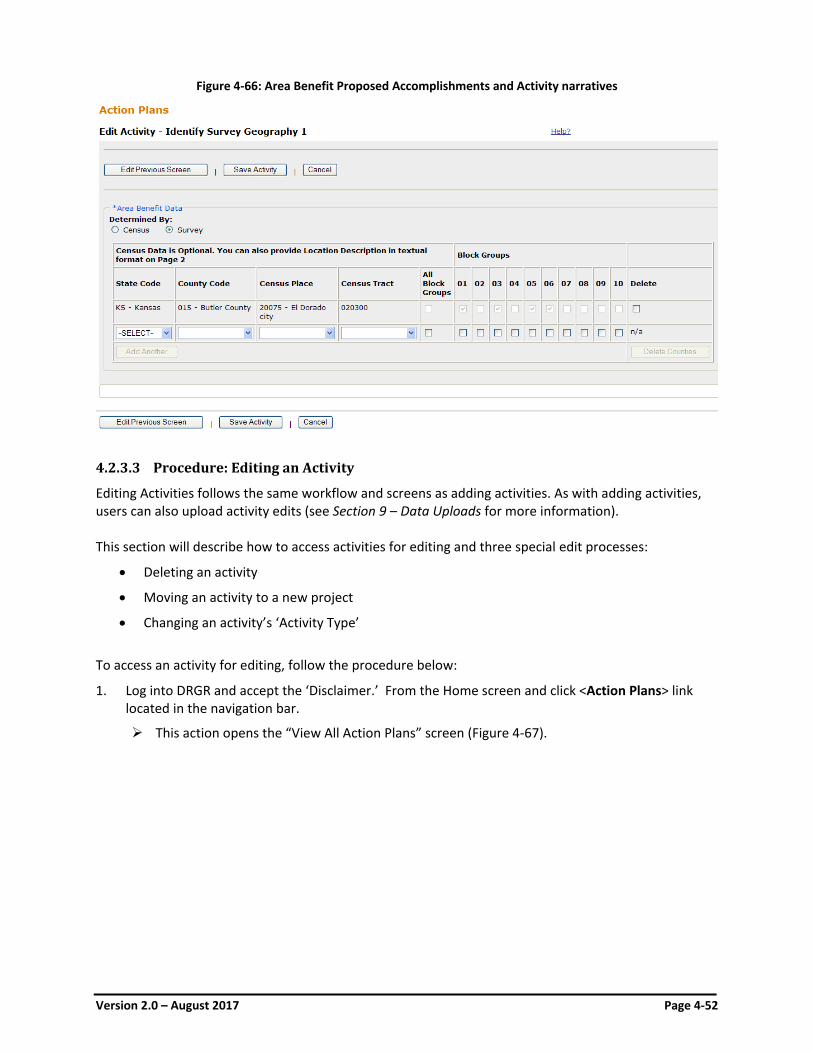
Version 2.0 – August 2017 Page 4-52
Figure 4-66: Area Benefit Proposed Accomplishments and Activity narratives
4.2.3.3 Procedure: Editing an Activity
Editing Activities follows the same workflow and screens as adding activities. As with adding activities, users can also upload activity edits (see Section 9 – Data Uploads for more information). This section will describe how to access activities for editing and three special edit processes:
• Deleting an activity
• Moving an activity to a new project
• Changing an activity’s ‘Activity Type’
To access an activity for editing, follow the procedure below:
1. Log into DRGR and accept the ‘Disclaimer.’ From the Home screen and click <Action Plans> link located in the navigation bar.
This action opens the “View All Action Plans” screen (Figure 4-67).
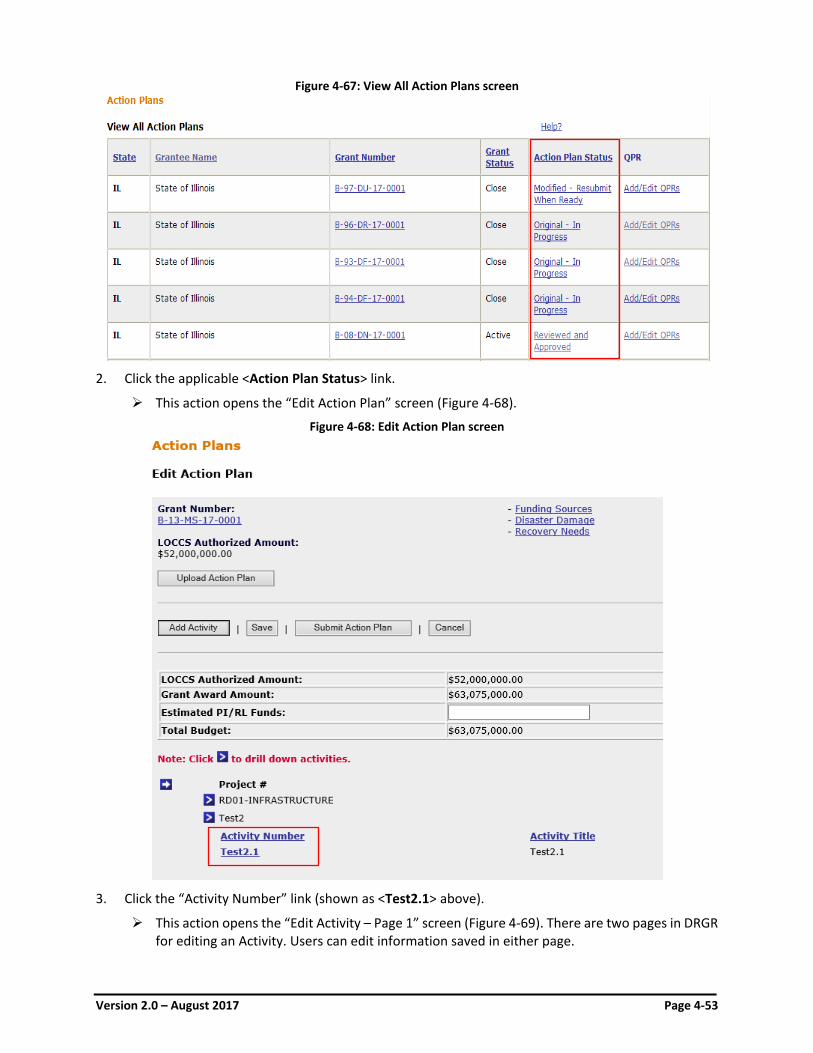
Version 2.0 – August 2017 Page 4-53
Figure 4-67: View All Action Plans screen
2. Click the applicable <Action Plan Status> link.
This action opens the “Edit Action Plan” screen (Figure 4-68).
Figure 4-68: Edit Action Plan screen
3. Click the “Activity Number” link (shown as <Test2.1> above).
This action opens the “Edit Activity – Page 1” screen (Figure 4-69). There are two pages in DRGR for editing an Activity. Users can edit information saved in either page.
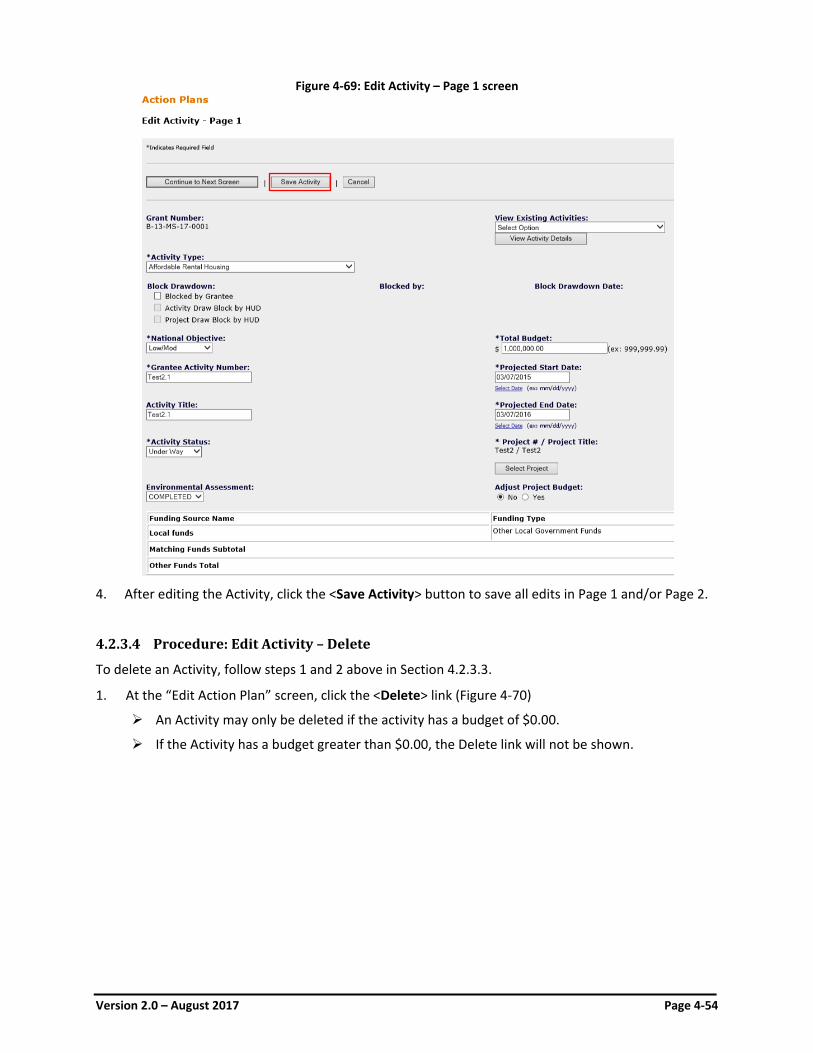
Version 2.0 – August 2017 Page 4-54
Figure 4-69: Edit Activity – Page 1 screen
4. After editing the Activity, click the <Save Activity> button to save all edits in Page 1 and/or Page 2.
4.2.3.4 Procedure: Edit Activity – Delete
To delete an Activity, follow steps 1 and 2 above in Section 4.2.3.3.
1. At the “Edit Action Plan” screen, click the <Delete> link (Figure 4-70)
An Activity may only be deleted if the activity has a budget of $0.00.
If the Activity has a budget greater than $0.00, the Delete link will not be shown.
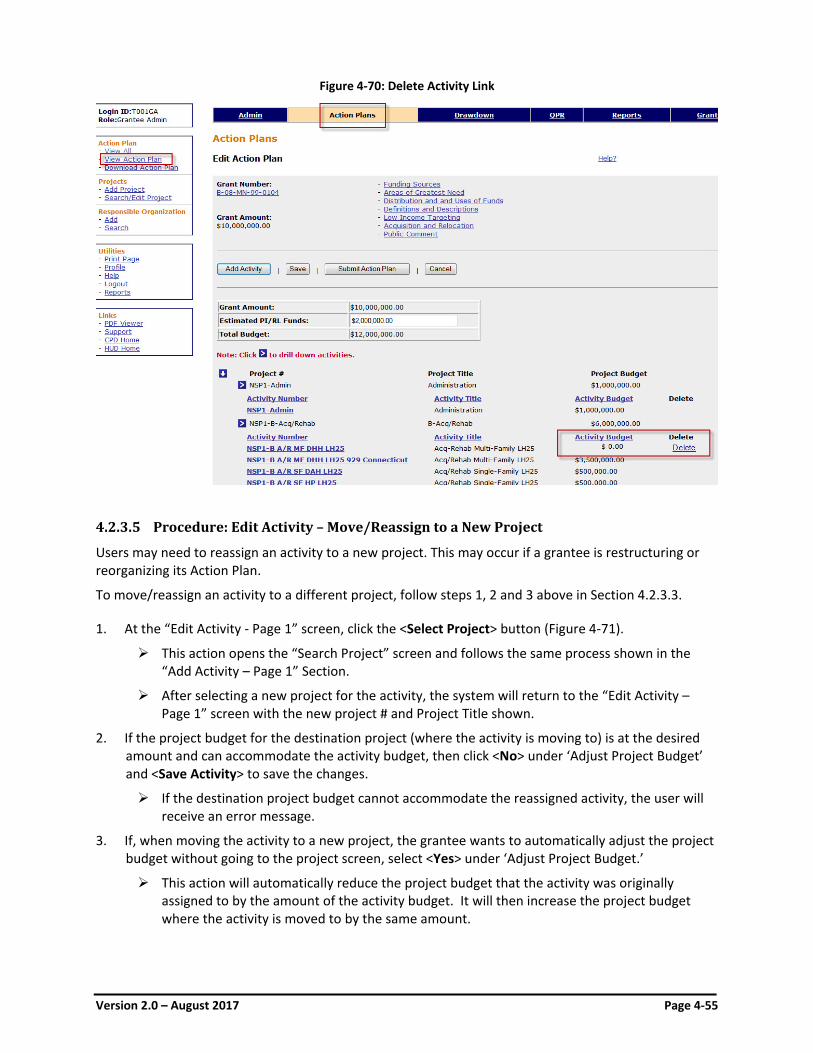
Version 2.0 – August 2017 Page 4-55
Figure 4-70: Delete Activity Link
4.2.3.5 Procedure: Edit Activity – Move/Reassign to a New Project
Users may need to reassign an activity to a new project. This may occur if a grantee is restructuring or reorganizing its Action Plan.
To move/reassign an activity to a different project, follow steps 1, 2 and 3 above in Section 4.2.3.3.
1. At the “Edit Activity - Page 1” screen, click the <Select Project> button (Figure 4-71).
This action opens the “Search Project” screen and follows the same process shown in the “Add Activity – Page 1” Section.
After selecting a new project for the activity, the system will return to the “Edit Activity – Page 1” screen with the new project # and Project Title shown.
2. If the project budget for the destination project (where the activity is moving to) is at the desired amount and can accommodate the activity budget, then click <No> under ‘Adjust Project Budget’ and <Save Activity> to save the changes.
If the destination project budget cannot accommodate the reassigned activity, the user will receive an error message.
3. If, when moving the activity to a new project, the grantee wants to automatically adjust the project budget without going to the project screen, select <Yes> under ‘Adjust Project Budget.’
This action will automatically reduce the project budget that the activity was originally assigned to by the amount of the activity budget. It will then increase the project budget where the activity is moved to by the same amount.
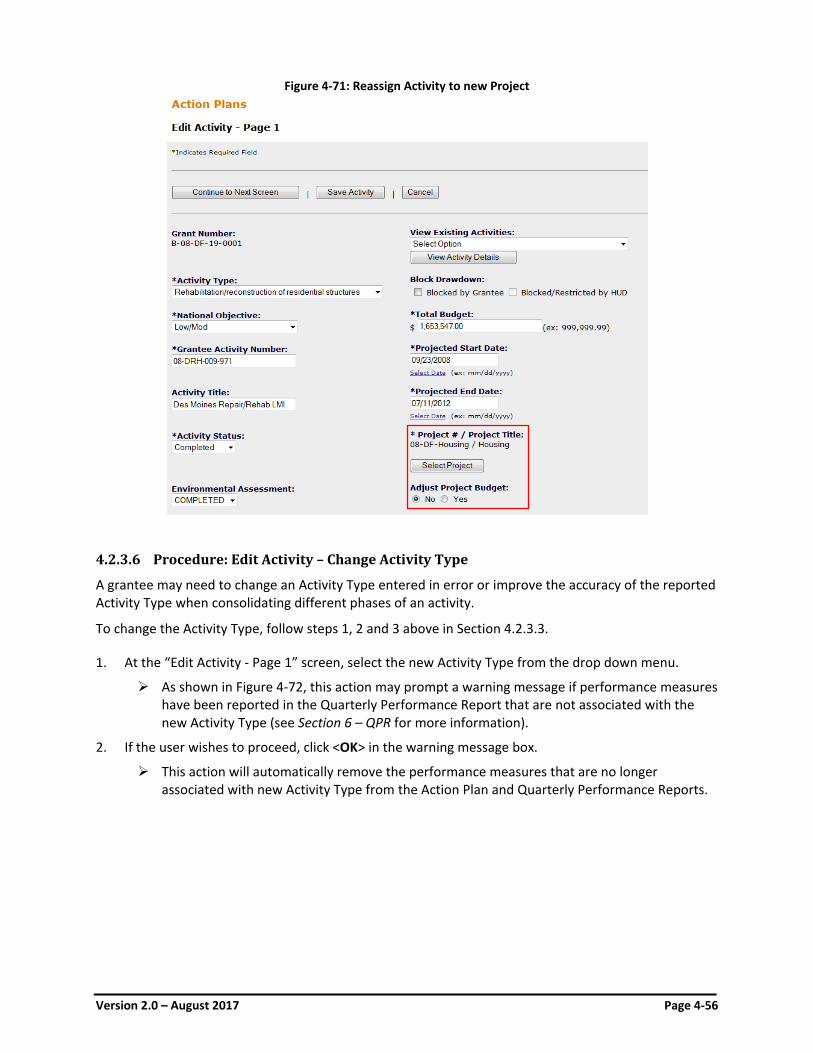
Version 2.0 – August 2017 Page 4-56
Figure 4-71: Reassign Activity to new Project
4.2.3.6 Procedure: Edit Activity – Change Activity Type
A grantee may need to change an Activity Type entered in error or improve the accuracy of the reported Activity Type when consolidating different phases of an activity.
To change the Activity Type, follow steps 1, 2 and 3 above in Section 4.2.3.3.
1. At the “Edit Activity - Page 1” screen, select the new Activity Type from the drop down menu.
As shown in Figure 4-72, this action may prompt a warning message if performance measures have been reported in the Quarterly Performance Report that are not associated with the new Activity Type (see Section 6 – QPR for more information).
2. If the user wishes to proceed, click <OK> in the warning message box.
This action will automatically remove the performance measures that are no longer associated with new Activity Type from the Action Plan and Quarterly Performance Reports.
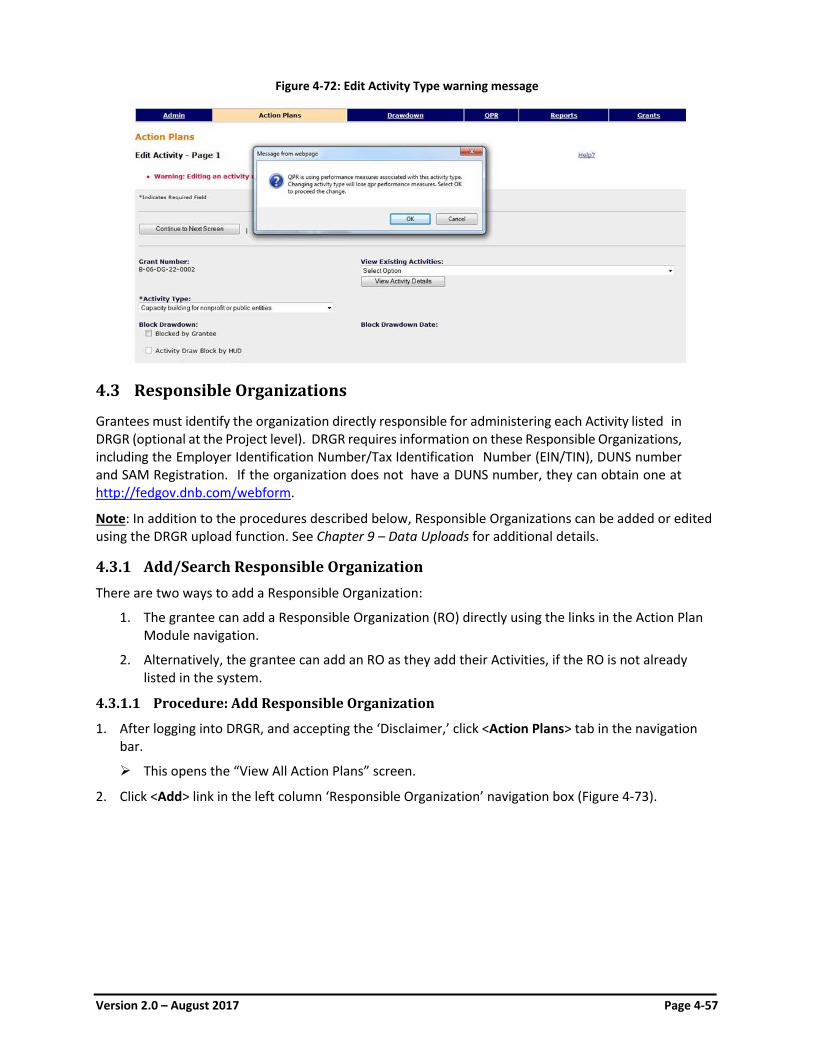
Version 2.0 – August 2017 Page 4-57
Figure 4-72: Edit Activity Type warning message
4.3 Responsible Organizations
Grantees must identify the organization directly responsible for administering each Activity listed in DRGR (optional at the Project level). DRGR requires information on these Responsible Organizations, including the Employer Identification Number/Tax Identification Number (EIN/TIN), DUNS number and SAM Registration. If the organization does not have a DUNS number, they can obtain one at http://fedgov.dnb.com/webform.
Note: In addition to the procedures described below, Responsible Organizations can be added or edited using the DRGR upload function. See Chapter 9 – Data Uploads for additional details.
4.3.1 Add/Search Responsible Organization There are two ways to add a Responsible Organization:
1. The grantee can add a Responsible Organization (RO) directly using the links in the Action Plan Module navigation.
2. Alternatively, the grantee can add an RO as they add their Activities, if the RO is not already listed in the system.
4.3.1.1 Procedure: Add Responsible Organization
1. After logging into DRGR, and accepting the ‘Disclaimer,’ click <Action Plans> tab in the navigation bar.
This opens the “View All Action Plans” screen.
2. Click <Add> link in the left column ‘Responsible Organization’ navigation box (Figure 4-73).
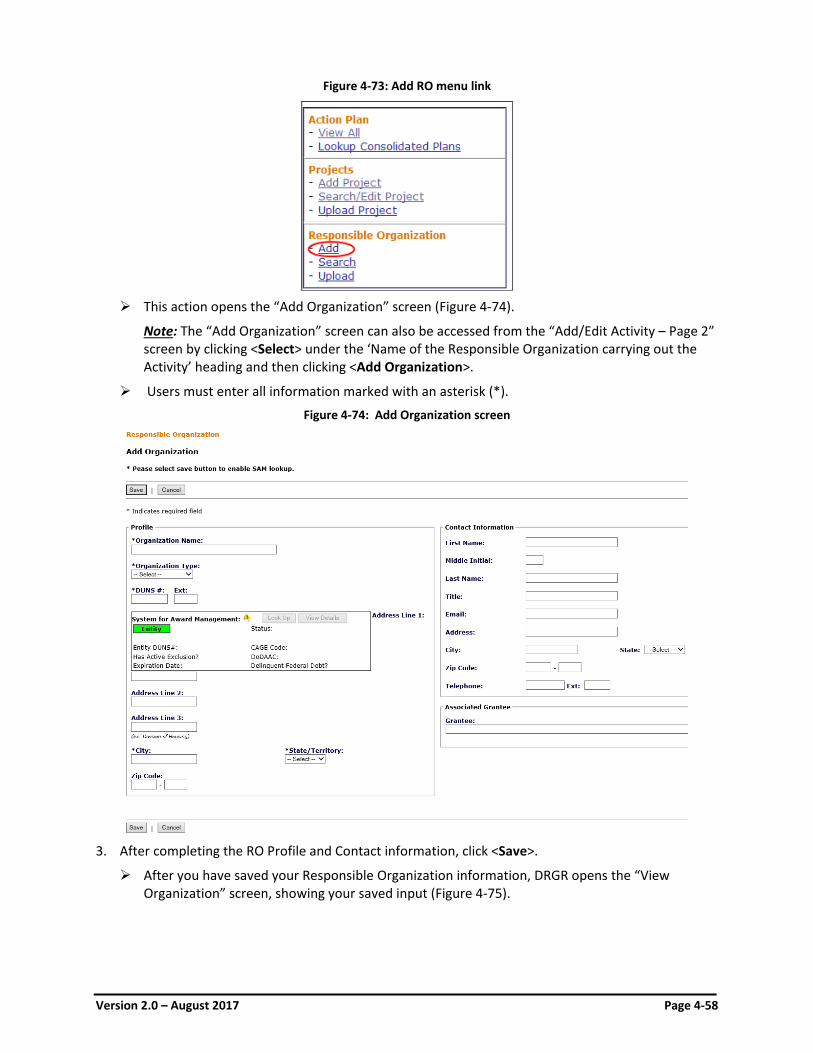
Version 2.0 – August 2017 Page 4-58
Figure 4-73: Add RO menu link
This action opens the “Add Organization” screen (Figure 4-74).
Note: The “Add Organization” screen can also be accessed from the “Add/Edit Activity – Page 2” screen by clicking <Select> under the ‘Name of the Responsible Organization carrying out the Activity’ heading and then clicking <Add Organization>.
Users must enter all information marked with an asterisk (*).
Figure 4-74: Add Organization screen
3. After completing the RO Profile and Contact information, click <Save>.
After you have saved your Responsible Organization information, DRGR opens the “View Organization” screen, showing your saved input (Figure 4-75).
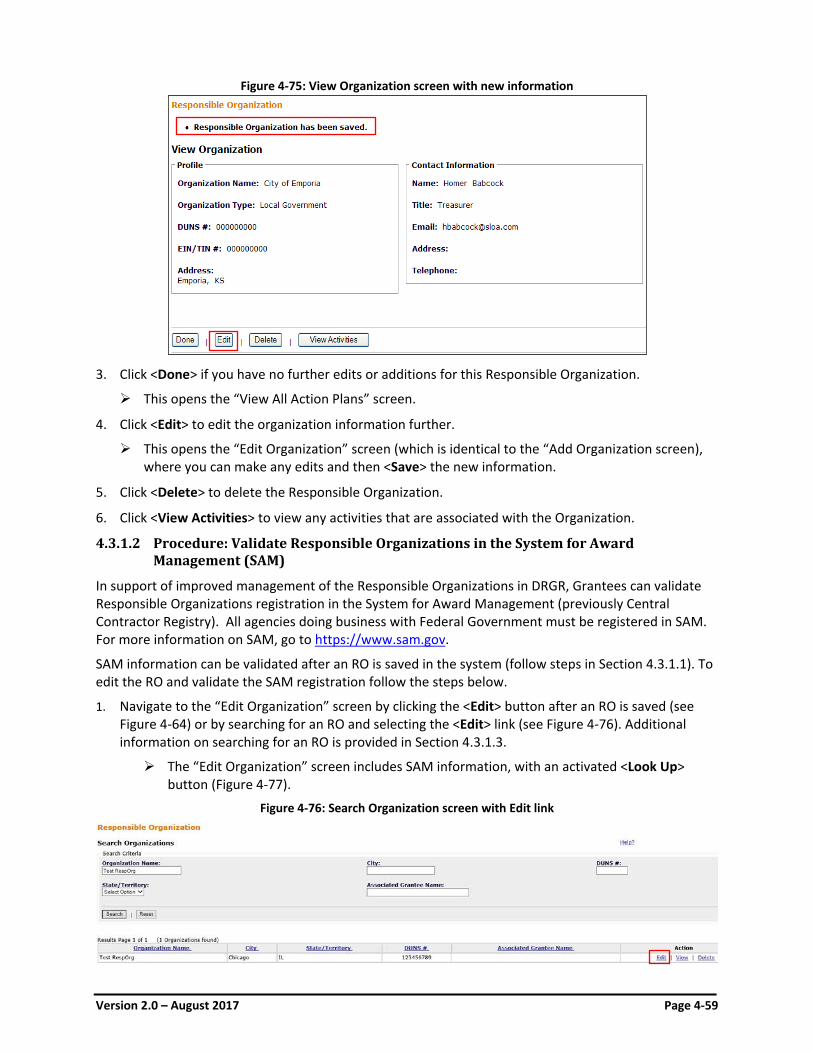
Version 2.0 – August 2017 Page 4-59
Figure 4-75: View Organization screen with new information
3. Click <Done> if you have no further edits or additions for this Responsible Organization.
This opens the “View All Action Plans” screen.
4. Click <Edit> to edit the organization information further.
This opens the “Edit Organization” screen (which is identical to the “Add Organization screen), where you can make any edits and then <Save> the new information.
5. Click <Delete> to delete the Responsible Organization.
6. Click <View Activities> to view any activities that are associated with the Organization.
4.3.1.2 Procedure: Validate Responsible Organizations in the System for Award Management (SAM)
In support of improved management of the Responsible Organizations in DRGR, Grantees can validate Responsible Organizations registration in the System for Award Management (previously Central Contractor Registry). All agencies doing business with Federal Government must be registered in SAM. For more information on SAM, go to https://www.sam.gov.
SAM information can be validated after an RO is saved in the system (follow steps in Section 4.3.1.1). To edit the RO and validate the SAM registration follow the steps below.
1. Navigate to the “Edit Organization” screen by clicking the <Edit> button after an RO is saved (see Figure 4-64) or by searching for an RO and selecting the <Edit> link (see Figure 4-76). Additional information on searching for an RO is provided in Section 4.3.1.3.
The “Edit Organization” screen includes SAM information, with an activated <Look Up> button (Figure 4-77).
Figure 4-76: Search Organization screen with Edit link

Version 2.0 – August 2017 Page 4-60
Figure 4-77: Edit Organization screen with SAM information
2. Click the <Look Up> button to search for a SAM entity.
This action displays the System for Award search page that allows searching by name, DUNS number or CAGE code (Figure 4-78). The system returns top ten matching entities based on the search criteria. When searching by name ensure the search criteria is well defined.

Version 2.0 – August 2017 Page 4-61
Figure 4-78: Search Organizations screen with search results
3. Use the radio buttons and the <Select> button at the bottom of the page to associate an entity to associate the SAM information with the Responsible Organization.
This action updates the RO profile with the SAM information (Figure 4-79)
Figure 4-79: Search Organizations screen with search results
4. Users can see additional SAM data for the organization by clicking the <View Details> button.
This action displays a browser window with SAM data for the Responsible Organization (Figure 4-80). Descriptions of the data and fields are shown below.
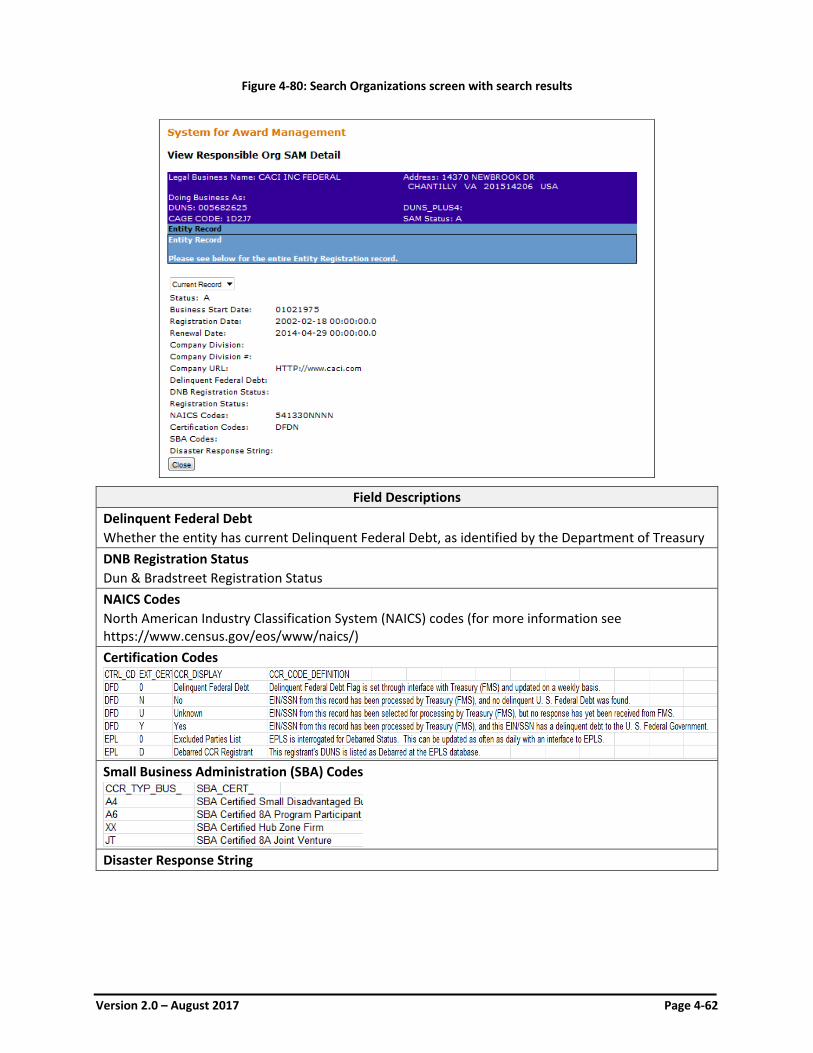
Version 2.0 – August 2017 Page 4-62
Figure 4-80: Search Organizations screen with search results
Field Descriptions Delinquent Federal Debt Whether the entity has current Delinquent Federal Debt, as identified by the Department of Treasury DNB Registration Status Dun & Bradstreet Registration Status NAICS Codes North American Industry Classification System (NAICS) codes (for more information see https://www.census.gov/eos/www/naics/) Certification Codes
Small Business Administration (SBA) Codes
Disaster Response String
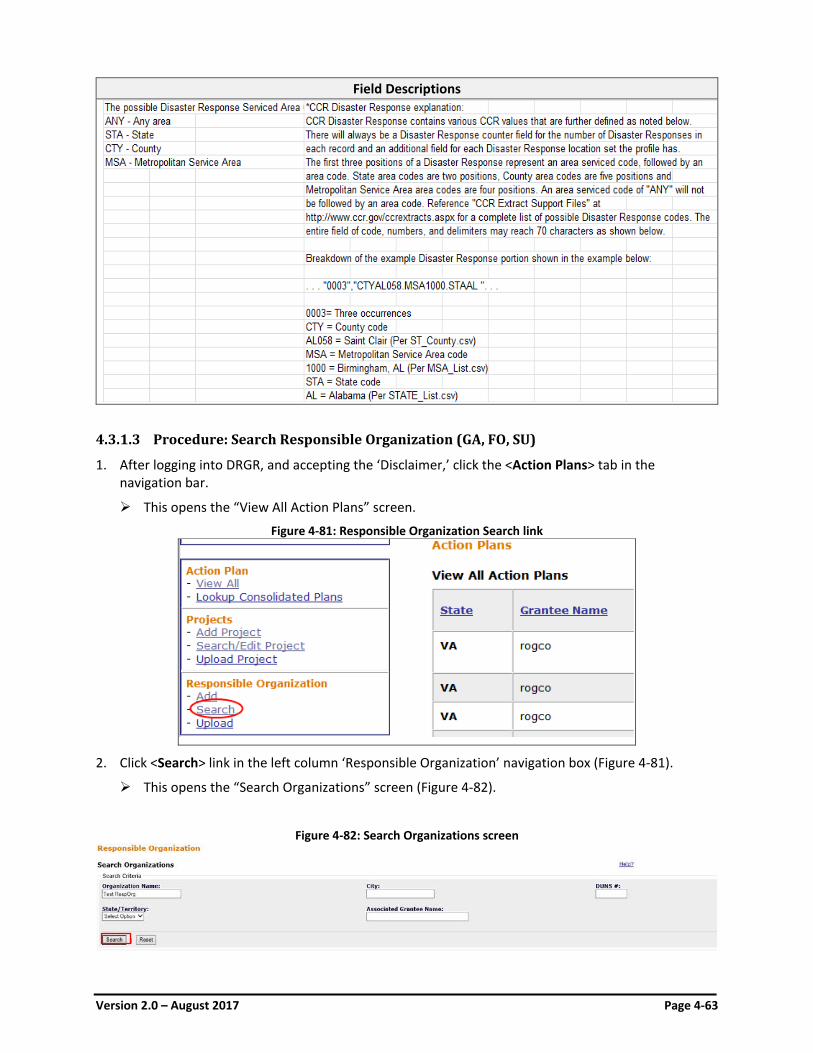
Version 2.0 – August 2017 Page 4-63
Field Descriptions
4.3.1.3 Procedure: Search Responsible Organization (GA, FO, SU)
1. After logging into DRGR, and accepting the ‘Disclaimer,’ click the <Action Plans> tab in the navigation bar.
This opens the “View All Action Plans” screen.
Figure 4-81: Responsible Organization Search link
2. Click <Search> link in the left column ‘Responsible Organization’ navigation box (Figure 4-81).
This opens the “Search Organizations” screen (Figure 4-82).
Figure 4-82: Search Organizations screen
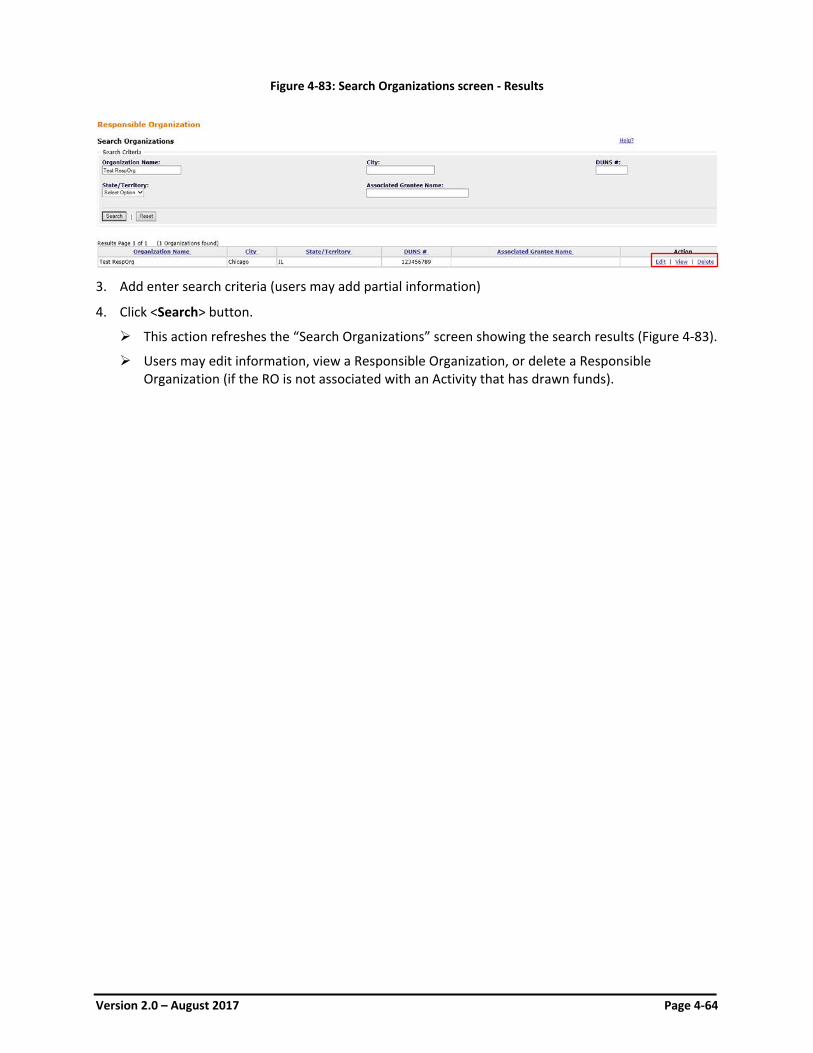
Version 2.0 – August 2017 Page 4-64
Figure 4-83: Search Organizations screen - Results
3. Add enter search criteria (users may add partial information)
4. Click <Search> button.
This action refreshes the “Search Organizations” screen showing the search results (Figure 4-83).
Users may edit information, view a Responsible Organization, or delete a Responsible Organization (if the RO is not associated with an Activity that has drawn funds).
User Manual – Section 5 Drawdown Module
Version 2.0 - August 2017 Page 5-1
5. Drawdown Module
The purpose of this section is to provide a general overview of the Drawdown Module, including guidance related to obligating funds, maintaining vouchers, managing program income, and other related functions such as blocking drawdowns and returning funds to LOCCS. This section includes tasks performed by grantees as well as tasks performed by HUD users.
5.1 Overview of Drawdown Module
A Drawdown (also called a Voucher) is a request for payment made by the grantee against the grantee’s line of credit for services performed in support of one or more activities. All vouchers must be created at the activity level. Before a grantee can drawdown funds from a grant:
The activity must have sufficient funds budgeted from a CPD funding source (CDBG-DR, NSP, or RIF) and/or Receipt Funds (Program Income); and
The grantee must have two DRGR Users with “Drawdown Roles”: one to create the voucher, and another to approve the voucher.
5.1.1 Overview of the Voucher Process In general, to drawdown funds, the following process must be followed:
1. Obligate funds to an activity (any user with a Drawdown role).
2. A grantee user with the “Drawdown Requester” role creates a voucher to drawdown funds for one or more activities.
3. When the drawdown request is generated, DRGR will perform a preliminary validation to ensure that sufficient funds are available. If yes, DRGR will generate a Voucher Number. The voucher is not sent to the Line of Credit Control System (LOCCS) until it is approved (next step).
4. A grantee user with the “Drawdown Approver” role then reviews and approves each voucher line item (or the entire voucher). If the voucher has multiple line items, the Drawdown Approver can approve some line items and reject the others or leave the rest for a later date.
5. DRGR sends the approved line items to LOCCS that night (or on a future date that the Drawdown Approver specified). However, if a voucher exceeds a drawdown threshold, it is forwarded to HUD for approval before being submitted to LOCCS. At that time, the grantee must also send their CPD Representative additional supporting documentation to substantiate the over-threshold draw.
6. LOCCS processes the vouchers overnight from a daily batch file submitted by DRGR. LOCCS approves or rejects all line items that were sent on one batch (this may not be all line items if the approver did not approve all line items on the voucher the same day). If approved by LOCCS, LOCCS sends the line items to the U.S. Treasury for payment. LOCCS also sends the status of the request back to DRGR. The drawdown results are reflected in DRGR the next day.
7. Once received by Treasury, if Treasury accepts, electronic payment is made to the grantee. If rejected by Treasury, Treasury sends DRGR the rejection status and the grantee has to create a new voucher for the rejected line items.
8. If necessary, grantees can “revoke” or “cancel” a voucher (or line item(s)) before the voucher is sent to LOCCS (see Sections 5.2.3.4 and 5.2.3.7). Once a voucher has been paid by Treasury, the grantee must revise the voucher line item(s) to another activity, or return funds to LOCCS (see Sections 5.2.3.5 and 5.2.4.2).
User Manual – Section 5 Drawdown Module
Version 2.0 - August 2017 Page 5-2
5.1.2 Glossary of Drawdown Module Terms The following terms are commonly used in reference to the Drawdown Module:
• Drawdown: A means by which a grantee requests funds from their Line of Credit. Also referred to as a “Voucher”.
• Drawdown Roles: To carryout drawdown functions, a DRGR User must have one of the following roles, which will dictate which permissions they have:
o Drawdown Requester: This DRGR User has the ability to create or “request” a voucher.
o Drawdown Approver: This DRGR User has the ability to approve Voucher Line Items created by the Drawdown Requester.
• Drawdown Blocks: HUD has the ability to block DRGR users from drawing down funds from activities. When an activity is blocked, all drawdown activity is prohibited until the block is lifted.
• Drawdown Threshold: HUD places a limit on the maximum amount of each voucher (i.e. $5 Million). If a voucher exceeds the limit, the voucher requires HUD approval before the voucher is processed by LOCCS. Grantees must attach supporting documentation to the voucher for HUD review and approval. Thresholds vary by appropriation. Consult with your CPD Representative for further information.
• Fund Type: Refers to Program Funds or Program Income.
• LOCCS: The Line of Credit Control System (LOCCS) is HUD’s system for processing Program Fund disbursements. DRGR interfaces with LOCCS and wire transfers approved vouchers to the grantee’s locally designated account.
• Maintain: A function in DRGR which allows DRGR Users to take action on a Voucher Line Item. For example, if a Drawdown Approver wishes to approve a Voucher Line Item, the user will need to click “Maintain” on that Voucher Line Item in order to approve the Voucher Line Item. The Maintain function also allows users to revise, reject, revoke, and cancel Voucher Line Items.
• Obligate: A means by which funds are committed to an activity. Funds must first be obligated to an activity before funds can be drawn from the activity. The definition of obligation varies by appropriation. Consult with your CPD Representative for further information.
• Program Funds: Grant Funds authorized by HUD via the appropriation and subsequent grant agreement(s).
• Program Income: Generally speaking, Program Income is revenue directly generated by activities carried out with grant funds. Consult with your CPD Representative for further information.
• Program Income Account: An optional mechanism in DRGR by which a grantee can “wall off” certain program income receipts from being drawn against other activities. Program Income Accounts should only be used in certain circumstances, such as when a grantee has a written agreement allowing a subrecipient to retain their program income for other eligible uses. Consult with your CPD Representative for further information.
• Program Income Receipt: The process of reporting program income in DRGR. Grantees are required to report all program income in DRGR. A “Receipt” records that program income has been received, and a “Drawdown” (of PI funds) reports the program income has been expended.
• Return Funds: A process by which a grantee has returned funds already drawn in DRGR to LOCCS. Funds are returned, for example, when your CPD Representative requests the funds be returned after discovering the funds were drawn for an illegible use.
User Manual – Section 5 Drawdown Module
Version 2.0 - August 2017 Page 5-3
• Voucher: A means by which a grantee request funds from their Line of Credit. Also referred to as a “Drawdown”.
• Voucher Actions: The following actions can be carried out by a DRGR User with one of the Drawdown Roles with respect to vouchers:
o Approve: A Drawdown Approver can approve one or more Voucher Line Items created by the Drawdown Requester. Approving a Voucher Line Item will send the voucher to LOCCS for processing.
o Create: A Drawdown Requester has the ability to create vouchers, the first step in the creation of a new voucher.
o Cancel: A Drawdown Requester can cancel a Voucher Line Item already created, but not yet approved by the Drawdown Approver. Cancelling a Voucher Line Item prevents the Drawdown Approver from approving the Voucher Line Item.
o Reject: A Drawdown Approver can reject one or more Voucher Line Items created by the Drawdown Requester. Rejecting a Voucher Line Item will prevent the Voucher Line Item from being sent to LOCCS for processing.
o Revise: A Drawdown Requester can revise an existing Voucher Line Item that has already been approved and processed by LOCCS. Voucher revisions are typically used to correct prior mistakes (i.e. due to billing or user error) or, for example, when a cost must be re-categorized by National Objective. Consult with your CPD Representative if you are unsure whether funds already drawn should by returned to LOCCS, or if a voucher revision is allowable.
o Revoke: A Drawdown Approver can revoke a Voucher Line Item they have approved, only if the Voucher Line Item has not yet been processed by LOCCS. Revoking an approval essentially rescinds the approval, thereby preventing LOCSS from processing the Voucher Line Item.
• Voucher Line Item: A voucher can contain one or more Voucher Line Items. DRGR will automatically create a separate Voucher Line Item for every activity and fund type added to a voucher by the Drawdown Requester.
• Voucher Line Item Status: A Voucher Line Item can have one of the following statuses:
o Approved: The Voucher Line Item has been approved, but not yet processed by LOCCS. For Program Income Line Items, the final status is “Approved” since program income is not processed by LOCCS.
o Completed: The Voucher Line Item has been processed by LOCCS.
o Open: The Voucher Line Item is has been created and is awaiting further action.
o Rejected: The Voucher Line Item has been rejected by the Drawdown Approver and no further action can be taken.
o Revised Pending Approval: A Voucher Line Item has been revised by the Drawdown Requester and awaits action by the Drawdown Approver.
o Revised: A Voucher Line Item revision initiated by the Drawdown Requester has been approved by the Drawdown Approver, and is therefore successfully revised from one activity to another (or revised to multiple other activities).
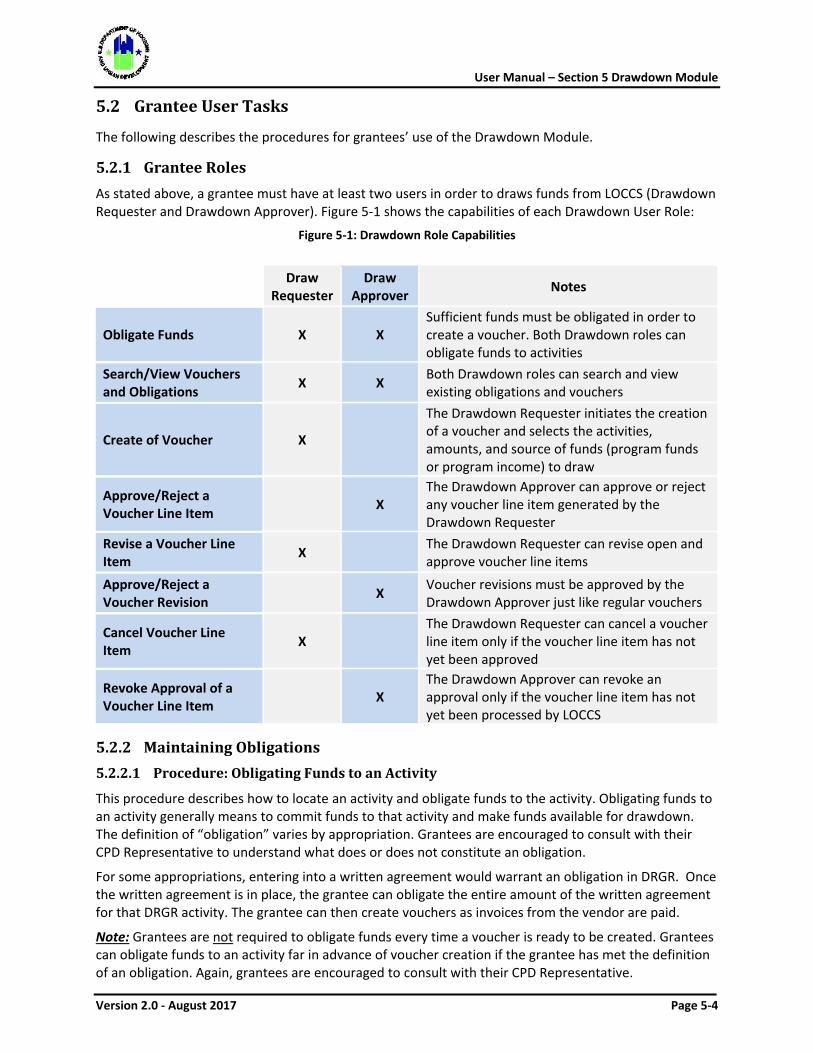
User Manual – Section 5 Drawdown Module
Version 2.0 - August 2017 Page 5-4
5.2 Grantee User Tasks
The following describes the procedures for grantees’ use of the Drawdown Module.
5.2.1 Grantee Roles As stated above, a grantee must have at least two users in order to draws funds from LOCCS (Drawdown Requester and Drawdown Approver). Figure 5-1 shows the capabilities of each Drawdown User Role:
Figure 5-1: Drawdown Role Capabilities
Draw
Requester Draw
Approver Notes
Obligate Funds X X Sufficient funds must be obligated in order to create a voucher. Both Drawdown roles can obligate funds to activities
Search/View Vouchers and Obligations X X Both Drawdown roles can search and view
existing obligations and vouchers
Create of Voucher X
The Drawdown Requester initiates the creation of a voucher and selects the activities, amounts, and source of funds (program funds or program income) to draw
Approve/Reject a Voucher Line Item X
The Drawdown Approver can approve or reject any voucher line item generated by the Drawdown Requester
Revise a Voucher Line Item X
The Drawdown Requester can revise open and approve voucher line items
Approve/Reject a Voucher Revision X
Voucher revisions must be approved by the Drawdown Approver just like regular vouchers
Cancel Voucher Line Item X
The Drawdown Requester can cancel a voucher line item only if the voucher line item has not yet been approved
Revoke Approval of a Voucher Line Item X
The Drawdown Approver can revoke an approval only if the voucher line item has not yet been processed by LOCCS
5.2.2 Maintaining Obligations 5.2.2.1 Procedure: Obligating Funds to an Activity
This procedure describes how to locate an activity and obligate funds to the activity. Obligating funds to an activity generally means to commit funds to that activity and make funds available for drawdown. The definition of “obligation” varies by appropriation. Grantees are encouraged to consult with their CPD Representative to understand what does or does not constitute an obligation.
For some appropriations, entering into a written agreement would warrant an obligation in DRGR. Once the written agreement is in place, the grantee can obligate the entire amount of the written agreement for that DRGR activity. The grantee can then create vouchers as invoices from the vendor are paid.
Note: Grantees are not required to obligate funds every time a voucher is ready to be created. Grantees can obligate funds to an activity far in advance of voucher creation if the grantee has met the definition of an obligation. Again, grantees are encouraged to consult with their CPD Representative.
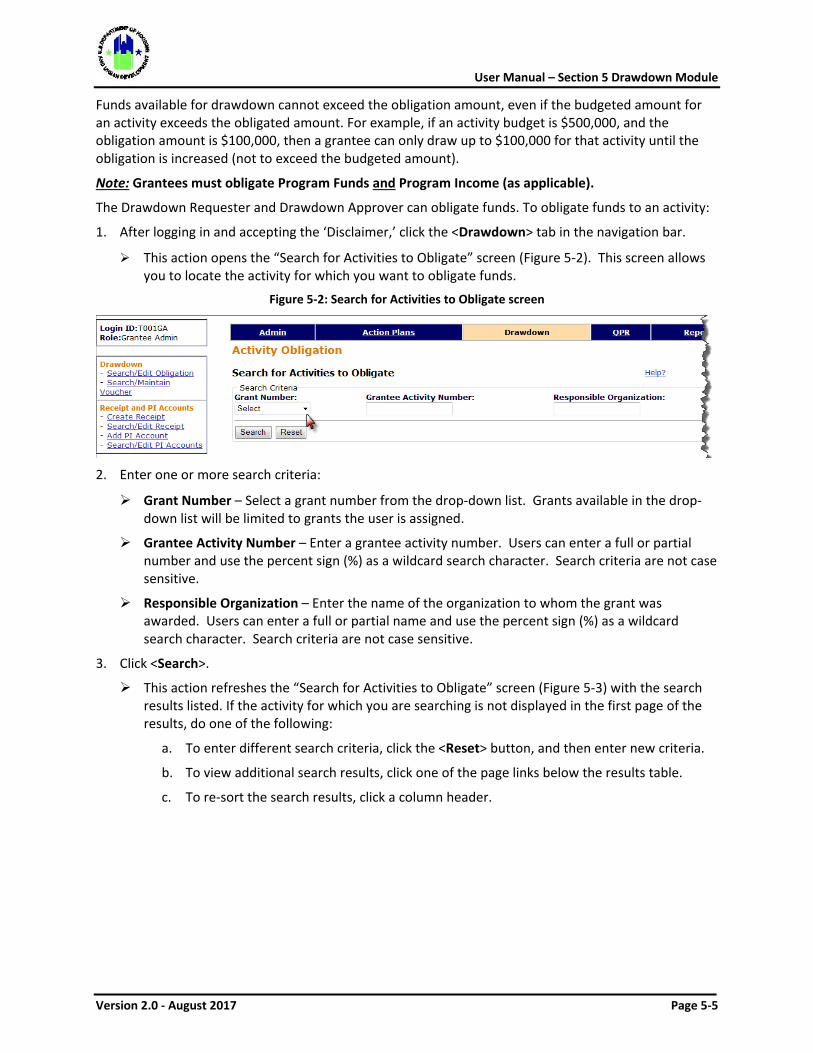
User Manual – Section 5 Drawdown Module
Version 2.0 - August 2017 Page 5-5
Funds available for drawdown cannot exceed the obligation amount, even if the budgeted amount for an activity exceeds the obligated amount. For example, if an activity budget is $500,000, and the obligation amount is $100,000, then a grantee can only draw up to $100,000 for that activity until the obligation is increased (not to exceed the budgeted amount).
Note: Grantees must obligate Program Funds and Program Income (as applicable).
The Drawdown Requester and Drawdown Approver can obligate funds. To obligate funds to an activity:
1. After logging in and accepting the ‘Disclaimer,’ click the <Drawdown> tab in the navigation bar.
This action opens the “Search for Activities to Obligate” screen (Figure 5-2). This screen allows you to locate the activity for which you want to obligate funds.
Figure 5-2: Search for Activities to Obligate screen
2. Enter one or more search criteria:
Grant Number – Select a grant number from the drop-down list. Grants available in the drop-down list will be limited to grants the user is assigned.
Grantee Activity Number – Enter a grantee activity number. Users can enter a full or partial number and use the percent sign (%) as a wildcard search character. Search criteria are not case sensitive.
Responsible Organization – Enter the name of the organization to whom the grant was awarded. Users can enter a full or partial name and use the percent sign (%) as a wildcard search character. Search criteria are not case sensitive.
3. Click <Search>.
This action refreshes the “Search for Activities to Obligate” screen (Figure 5-3) with the search results listed. If the activity for which you are searching is not displayed in the first page of the results, do one of the following:
a. To enter different search criteria, click the <Reset> button, and then enter new criteria.
b. To view additional search results, click one of the page links below the results table.
c. To re-sort the search results, click a column header.
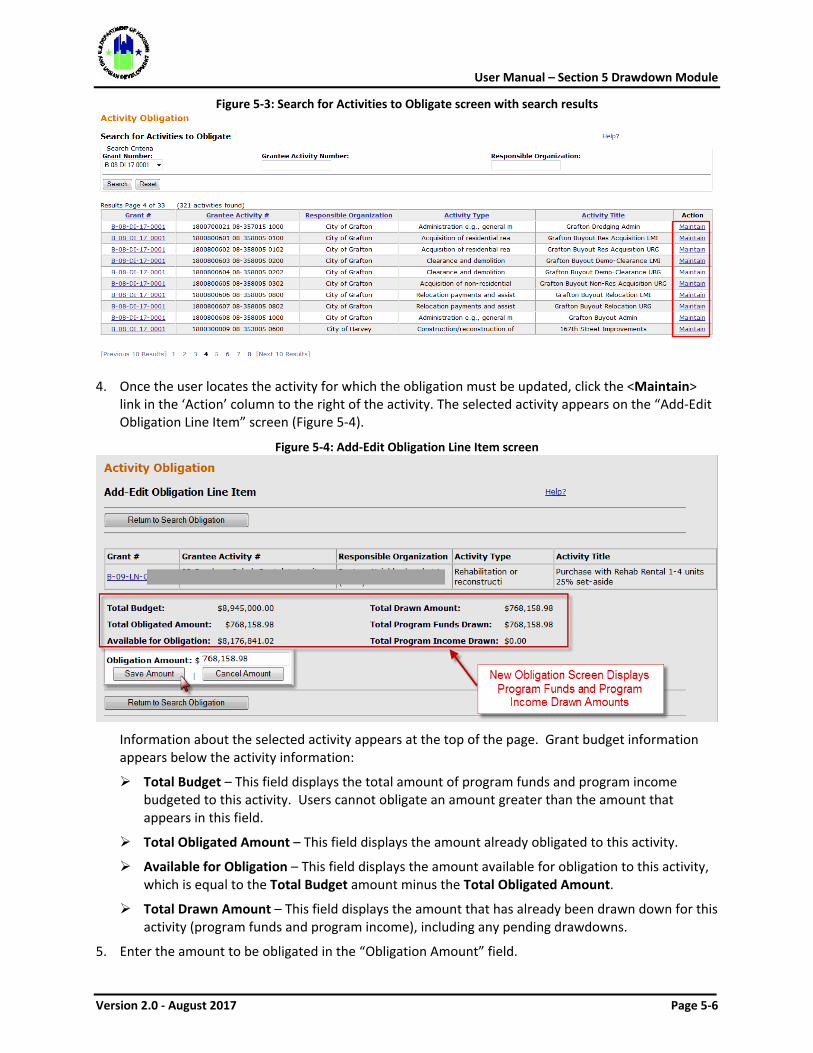
User Manual – Section 5 Drawdown Module
Version 2.0 - August 2017 Page 5-6
Figure 5-3: Search for Activities to Obligate screen with search results
4. Once the user locates the activity for which the obligation must be updated, click the <Maintain> link in the ‘Action’ column to the right of the activity. The selected activity appears on the “Add-Edit Obligation Line Item” screen (Figure 5-4).
Figure 5-4: Add-Edit Obligation Line Item screen
Information about the selected activity appears at the top of the page. Grant budget information appears below the activity information:
Total Budget – This field displays the total amount of program funds and program income budgeted to this activity. Users cannot obligate an amount greater than the amount that appears in this field.
Total Obligated Amount – This field displays the amount already obligated to this activity.
Available for Obligation – This field displays the amount available for obligation to this activity, which is equal to the Total Budget amount minus the Total Obligated Amount.
Total Drawn Amount – This field displays the amount that has already been drawn down for this activity (program funds and program income), including any pending drawdowns.
5. Enter the amount to be obligated in the “Obligation Amount” field.
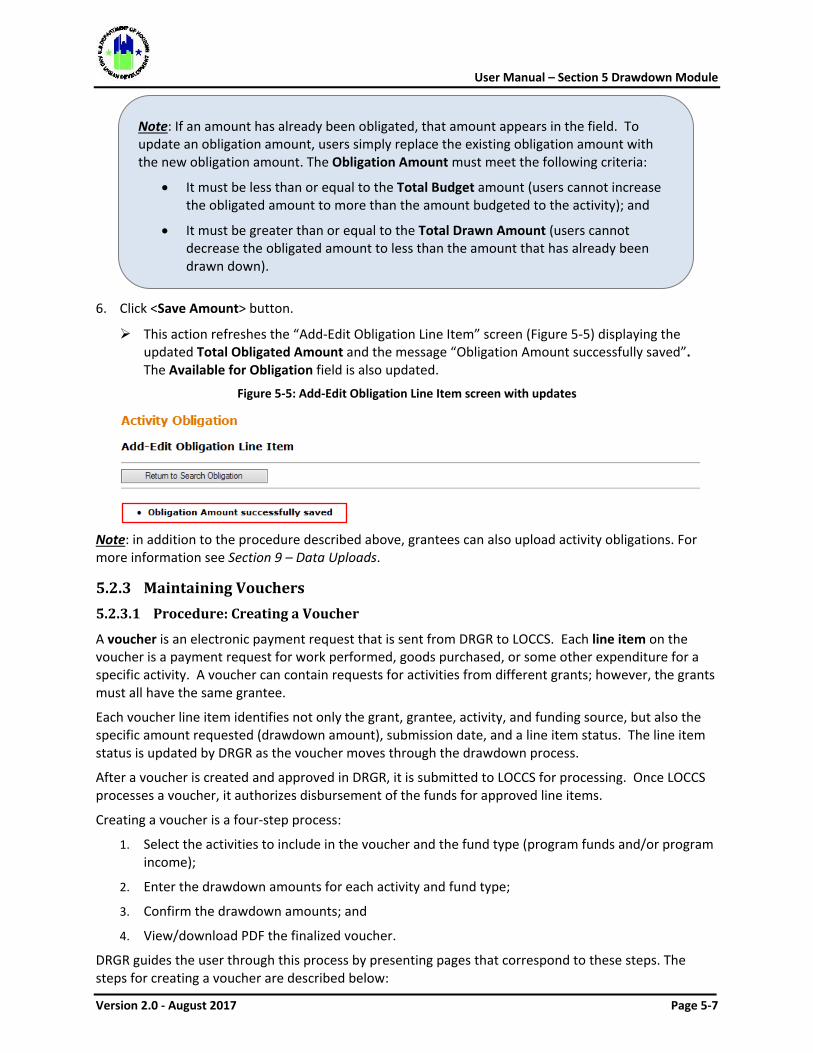
User Manual – Section 5 Drawdown Module
Version 2.0 - August 2017 Page 5-7
6. Click <Save Amount> button.
This action refreshes the “Add-Edit Obligation Line Item” screen (Figure 5-5) displaying the updated Total Obligated Amount and the message “Obligation Amount successfully saved”. The Available for Obligation field is also updated.
Figure 5-5: Add-Edit Obligation Line Item screen with updates
Note: in addition to the procedure described above, grantees can also upload activity obligations. For more information see Section 9 – Data Uploads.
5.2.3 Maintaining Vouchers 5.2.3.1 Procedure: Creating a Voucher
A voucher is an electronic payment request that is sent from DRGR to LOCCS. Each line item on the voucher is a payment request for work performed, goods purchased, or some other expenditure for a specific activity. A voucher can contain requests for activities from different grants; however, the grants must all have the same grantee.
Each voucher line item identifies not only the grant, grantee, activity, and funding source, but also the specific amount requested (drawdown amount), submission date, and a line item status. The line item status is updated by DRGR as the voucher moves through the drawdown process.
After a voucher is created and approved in DRGR, it is submitted to LOCCS for processing. Once LOCCS processes a voucher, it authorizes disbursement of the funds for approved line items.
Creating a voucher is a four-step process:
1. Select the activities to include in the voucher and the fund type (program funds and/or program income);
2. Enter the drawdown amounts for each activity and fund type;
3. Confirm the drawdown amounts; and
4. View/download PDF the finalized voucher.
DRGR guides the user through this process by presenting pages that correspond to these steps. The steps for creating a voucher are described below:
Note: If an amount has already been obligated, that amount appears in the field. To update an obligation amount, users simply replace the existing obligation amount with the new obligation amount. The Obligation Amount must meet the following criteria:
• It must be less than or equal to the Total Budget amount (users cannot increase the obligated amount to more than the amount budgeted to the activity); and
• It must be greater than or equal to the Total Drawn Amount (users cannot decrease the obligated amount to less than the amount that has already been drawn down).
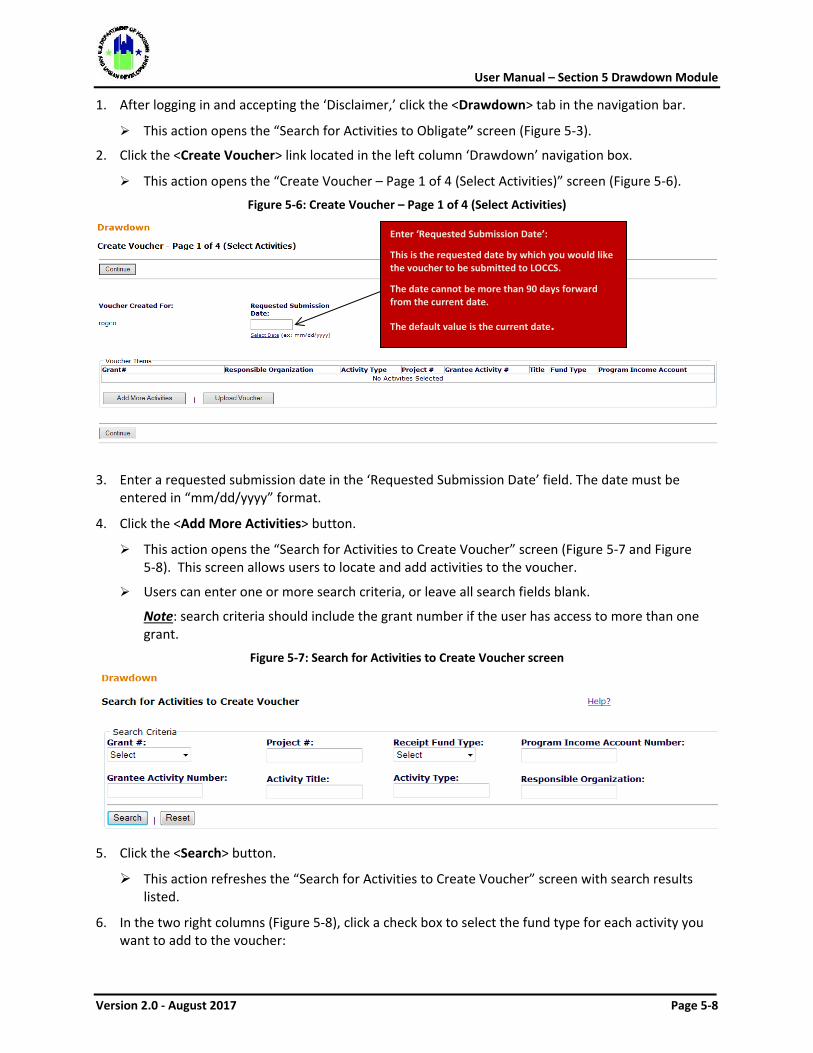
User Manual – Section 5 Drawdown Module
Version 2.0 - August 2017 Page 5-8
1. After logging in and accepting the ‘Disclaimer,’ click the <Drawdown> tab in the navigation bar.
This action opens the “Search for Activities to Obligate” screen (Figure 5-3).
2. Click the <Create Voucher> link located in the left column ‘Drawdown’ navigation box.
This action opens the “Create Voucher – Page 1 of 4 (Select Activities)” screen (Figure 5-6).
Figure 5-6: Create Voucher – Page 1 of 4 (Select Activities)
3. Enter a requested submission date in the ‘Requested Submission Date’ field. The date must be entered in “mm/dd/yyyy” format.
4. Click the <Add More Activities> button.
This action opens the “Search for Activities to Create Voucher” screen (Figure 5-7 and Figure 5-8). This screen allows users to locate and add activities to the voucher.
Users can enter one or more search criteria, or leave all search fields blank.
Note: search criteria should include the grant number if the user has access to more than one grant.
Figure 5-7: Search for Activities to Create Voucher screen
5. Click the <Search> button.
This action refreshes the “Search for Activities to Create Voucher” screen with search results listed.
6. In the two right columns (Figure 5-8), click a check box to select the fund type for each activity you want to add to the voucher:
Enter ‘Requested Submission Date’:
This is the requested date by which you would like the voucher to be submitted to LOCCS.
The date cannot be more than 90 days forward from the current date.
The default value is the current date.

User Manual – Section 5 Drawdown Module
Version 2.0 - August 2017 Page 5-9
Program Fund – Select this checkbox if the funds for the drawdown should come from HUD grant funds.
Receipt Fund – Select this checkbox if the funds for the drawdown should come from program income received/on-hand.
7. Click the <Add Selected Activities to Voucher> button.
The “Create Voucher – Page 1 of 4 (Select Activities)” screen is redisplayed (Figure 5-9). Each selected activity becomes a line item in the Voucher Items table.
Figure 5-8: Search for Activities to Create Voucher screen with search results
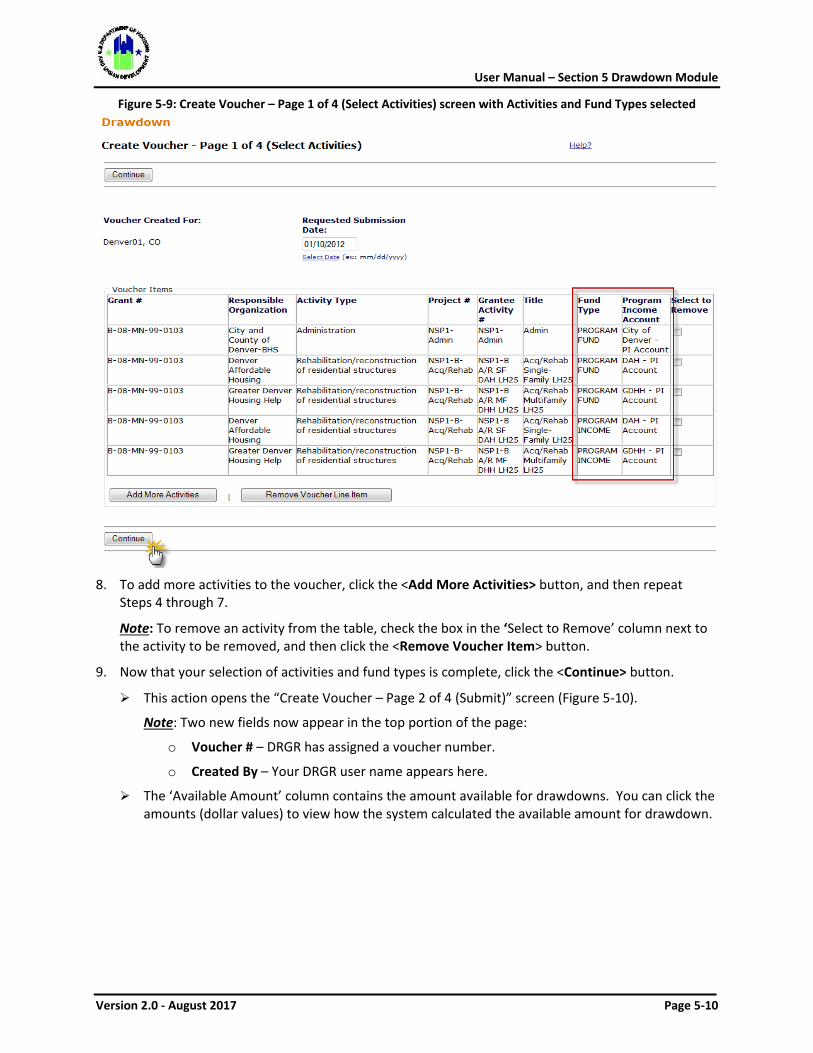
User Manual – Section 5 Drawdown Module
Version 2.0 - August 2017 Page 5-10
Figure 5-9: Create Voucher – Page 1 of 4 (Select Activities) screen with Activities and Fund Types selected
8. To add more activities to the voucher, click the <Add More Activities> button, and then repeat
Steps 4 through 7.
Note: To remove an activity from the table, check the box in the ‘Select to Remove’ column next to the activity to be removed, and then click the <Remove Voucher Item> button.
9. Now that your selection of activities and fund types is complete, click the <Continue> button.
This action opens the “Create Voucher – Page 2 of 4 (Submit)” screen (Figure 5-10).
Note: Two new fields now appear in the top portion of the page:
o Voucher # – DRGR has assigned a voucher number.
o Created By – Your DRGR user name appears here.
The ‘Available Amount’ column contains the amount available for drawdowns. You can click the amounts (dollar values) to view how the system calculated the available amount for drawdown.
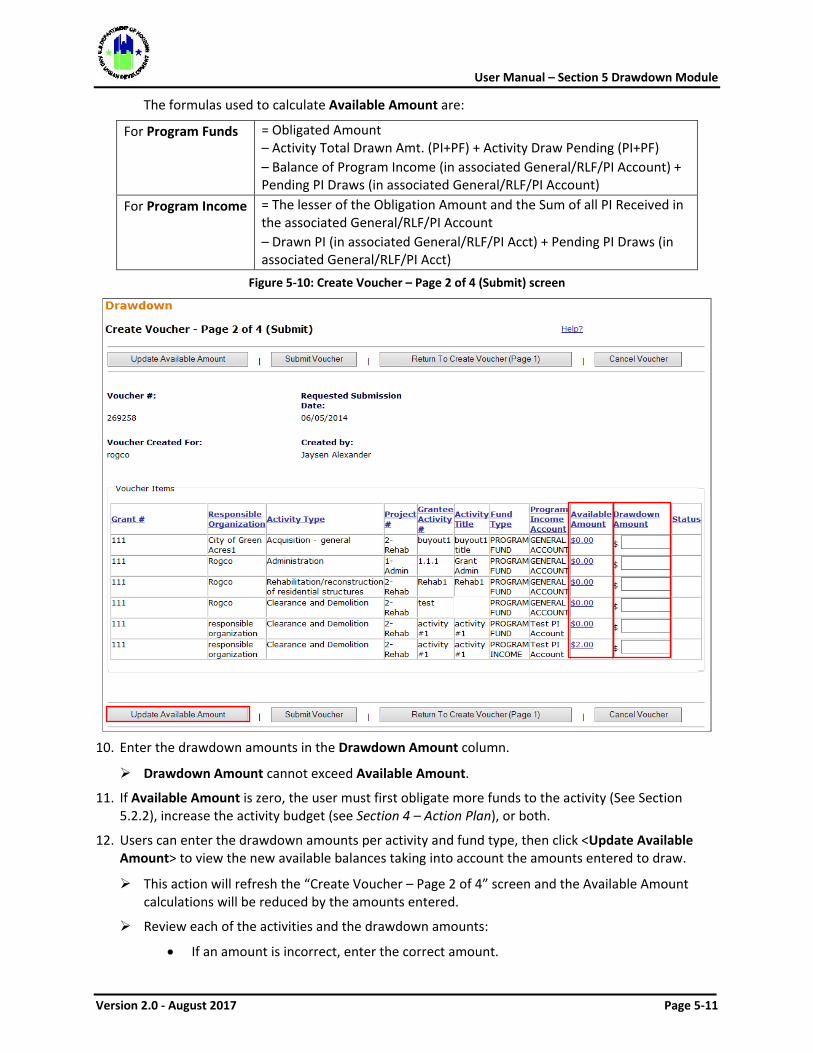
User Manual – Section 5 Drawdown Module
Version 2.0 - August 2017 Page 5-11
The formulas used to calculate Available Amount are:
For Program Funds = Obligated Amount – Activity Total Drawn Amt. (PI+PF) + Activity Draw Pending (PI+PF) – Balance of Program Income (in associated General/RLF/PI Account) + Pending PI Draws (in associated General/RLF/PI Account)
For Program Income = The lesser of the Obligation Amount and the Sum of all PI Received in the associated General/RLF/PI Account – Drawn PI (in associated General/RLF/PI Acct) + Pending PI Draws (in associated General/RLF/PI Acct)
Figure 5-10: Create Voucher – Page 2 of 4 (Submit) screen
10. Enter the drawdown amounts in the Drawdown Amount column.
Drawdown Amount cannot exceed Available Amount.
11. If Available Amount is zero, the user must first obligate more funds to the activity (See Section 5.2.2), increase the activity budget (see Section 4 – Action Plan), or both.
12. Users can enter the drawdown amounts per activity and fund type, then click <Update Available Amount> to view the new available balances taking into account the amounts entered to draw.
This action will refresh the “Create Voucher – Page 2 of 4” screen and the Available Amount calculations will be reduced by the amounts entered.
Review each of the activities and the drawdown amounts:
• If an amount is incorrect, enter the correct amount.
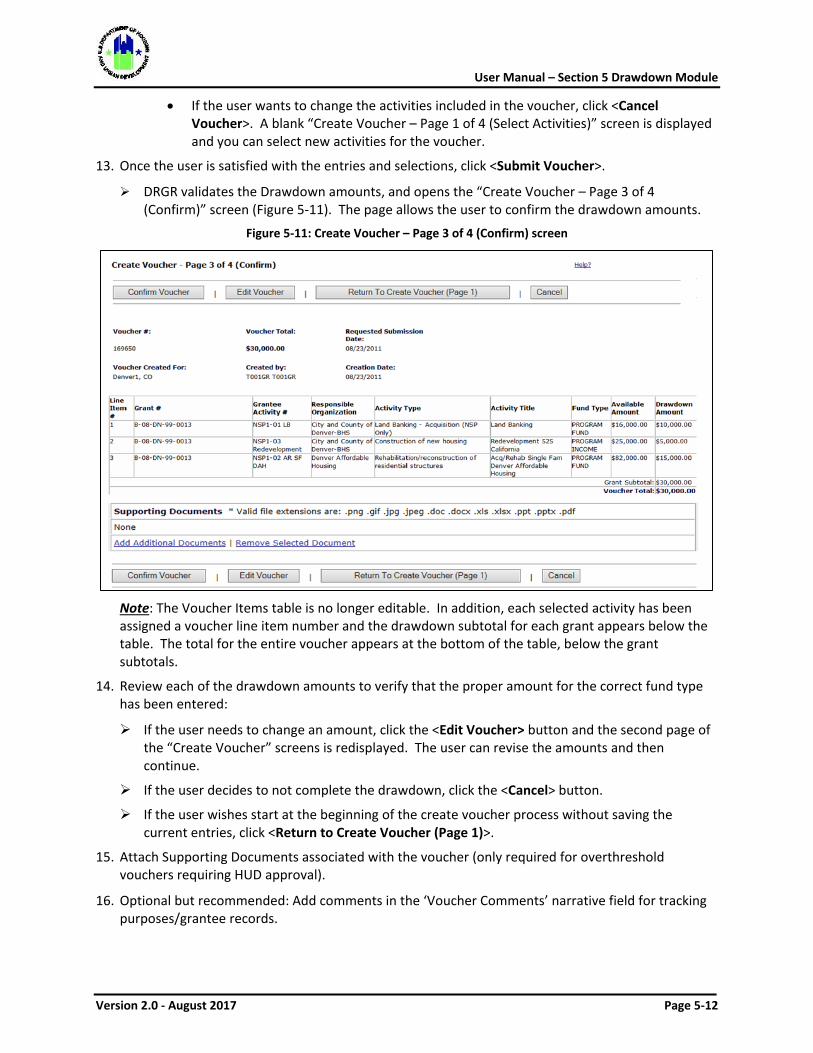
User Manual – Section 5 Drawdown Module
Version 2.0 - August 2017 Page 5-12
• If the user wants to change the activities included in the voucher, click <Cancel Voucher>. A blank “Create Voucher – Page 1 of 4 (Select Activities)” screen is displayed and you can select new activities for the voucher.
13. Once the user is satisfied with the entries and selections, click <Submit Voucher>.
DRGR validates the Drawdown amounts, and opens the “Create Voucher – Page 3 of 4 (Confirm)” screen (Figure 5-11). The page allows the user to confirm the drawdown amounts.
Figure 5-11: Create Voucher – Page 3 of 4 (Confirm) screen
Note: The Voucher Items table is no longer editable. In addition, each selected activity has been assigned a voucher line item number and the drawdown subtotal for each grant appears below the table. The total for the entire voucher appears at the bottom of the table, below the grant subtotals.
14. Review each of the drawdown amounts to verify that the proper amount for the correct fund type has been entered:
If the user needs to change an amount, click the <Edit Voucher> button and the second page of the “Create Voucher” screens is redisplayed. The user can revise the amounts and then continue.
If the user decides to not complete the drawdown, click the <Cancel> button.
If the user wishes start at the beginning of the create voucher process without saving the current entries, click <Return to Create Voucher (Page 1)>.
15. Attach Supporting Documents associated with the voucher (only required for overthreshold vouchers requiring HUD approval).
16. Optional but recommended: Add comments in the ‘Voucher Comments’ narrative field for tracking purposes/grantee records.
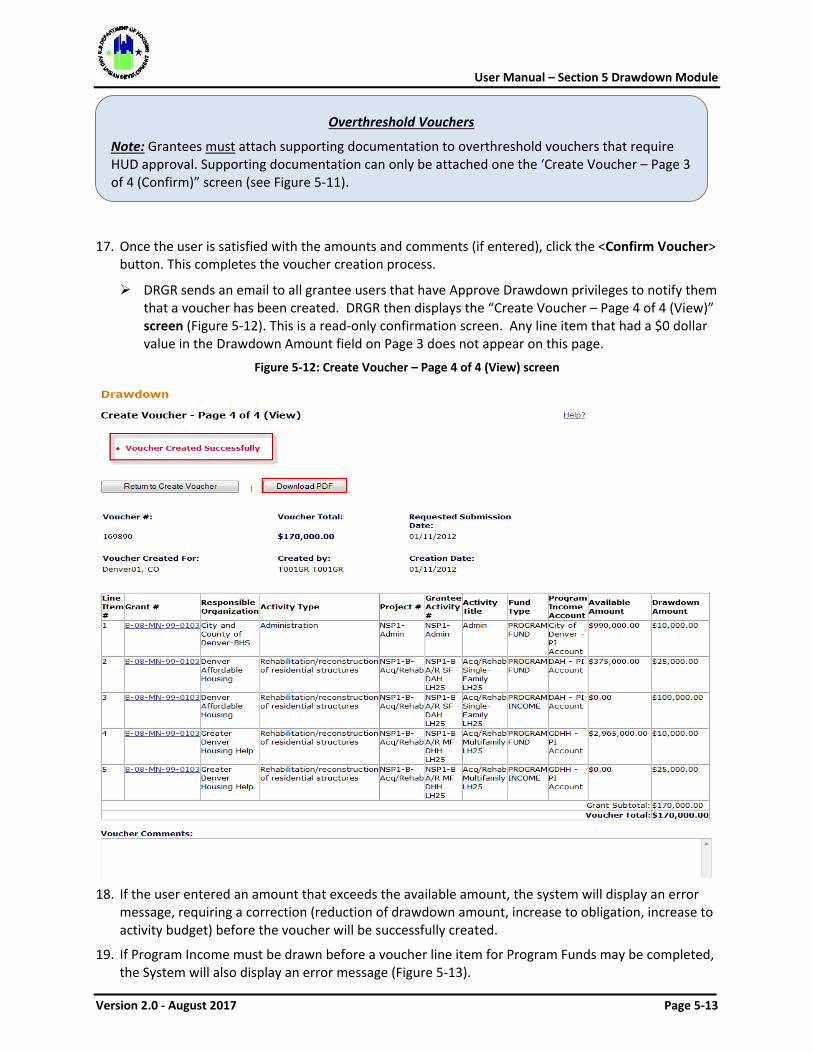
User Manual – Section 5 Drawdown Module
Version 2.0 - August 2017 Page 5-13
17. Once the user is satisfied with the amounts and comments (if entered), click the <Confirm Voucher> button. This completes the voucher creation process.
DRGR sends an email to all grantee users that have Approve Drawdown privileges to notify them that a voucher has been created. DRGR then displays the “Create Voucher – Page 4 of 4 (View)” screen (Figure 5-12). This is a read-only confirmation screen. Any line item that had a $0 dollar value in the Drawdown Amount field on Page 3 does not appear on this page.
Figure 5-12: Create Voucher – Page 4 of 4 (View) screen
18. If the user entered an amount that exceeds the available amount, the system will display an error
message, requiring a correction (reduction of drawdown amount, increase to obligation, increase to activity budget) before the voucher will be successfully created.
19. If Program Income must be drawn before a voucher line item for Program Funds may be completed, the System will also display an error message (Figure 5-13).
Overthreshold Vouchers
Note: Grantees must attach supporting documentation to overthreshold vouchers that require HUD approval. Supporting documentation can only be attached one the ‘Create Voucher – Page 3 of 4 (Confirm)” screen (see Figure 5-11).
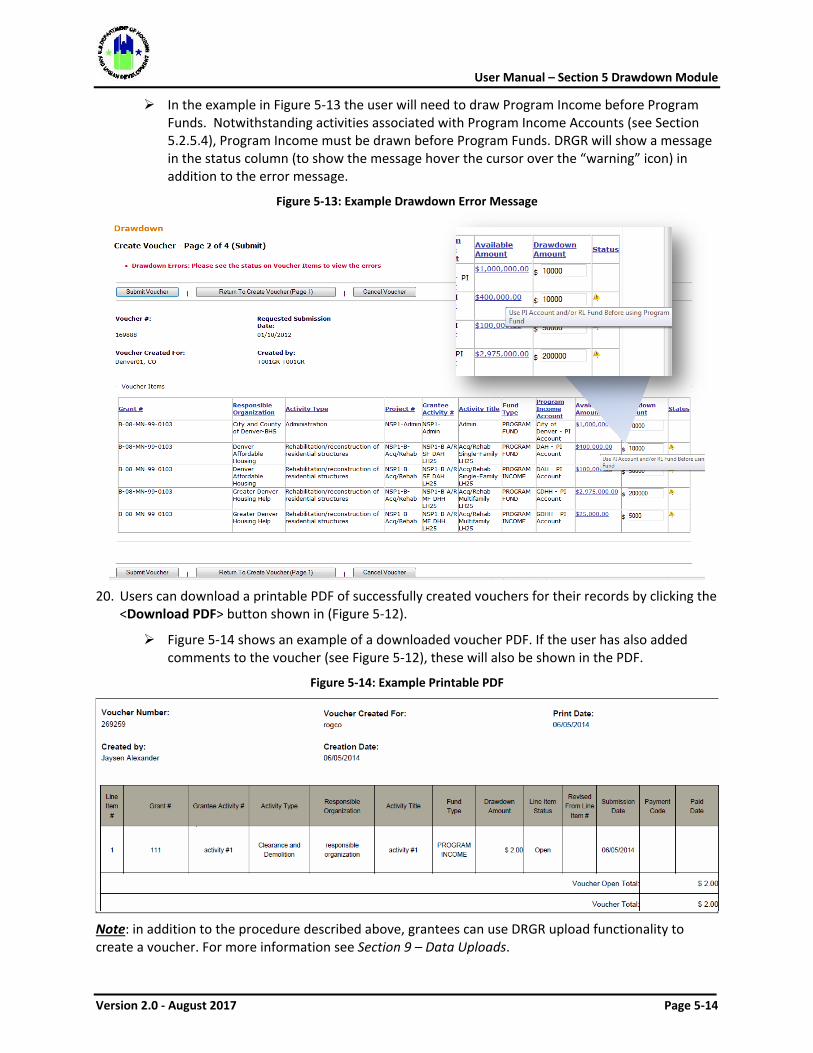
User Manual – Section 5 Drawdown Module
Version 2.0 - August 2017 Page 5-14
In the example in Figure 5-13 the user will need to draw Program Income before Program Funds. Notwithstanding activities associated with Program Income Accounts (see Section 5.2.5.4), Program Income must be drawn before Program Funds. DRGR will show a message in the status column (to show the message hover the cursor over the “warning” icon) in addition to the error message.
Figure 5-13: Example Drawdown Error Message
20. Users can download a printable PDF of successfully created vouchers for their records by clicking the
<Download PDF> button shown in (Figure 5-12).
Figure 5-14 shows an example of a downloaded voucher PDF. If the user has also added comments to the voucher (see Figure 5-12), these will also be shown in the PDF.
Figure 5-14: Example Printable PDF
Note: in addition to the procedure described above, grantees can use DRGR upload functionality to create a voucher. For more information see Section 9 – Data Uploads.
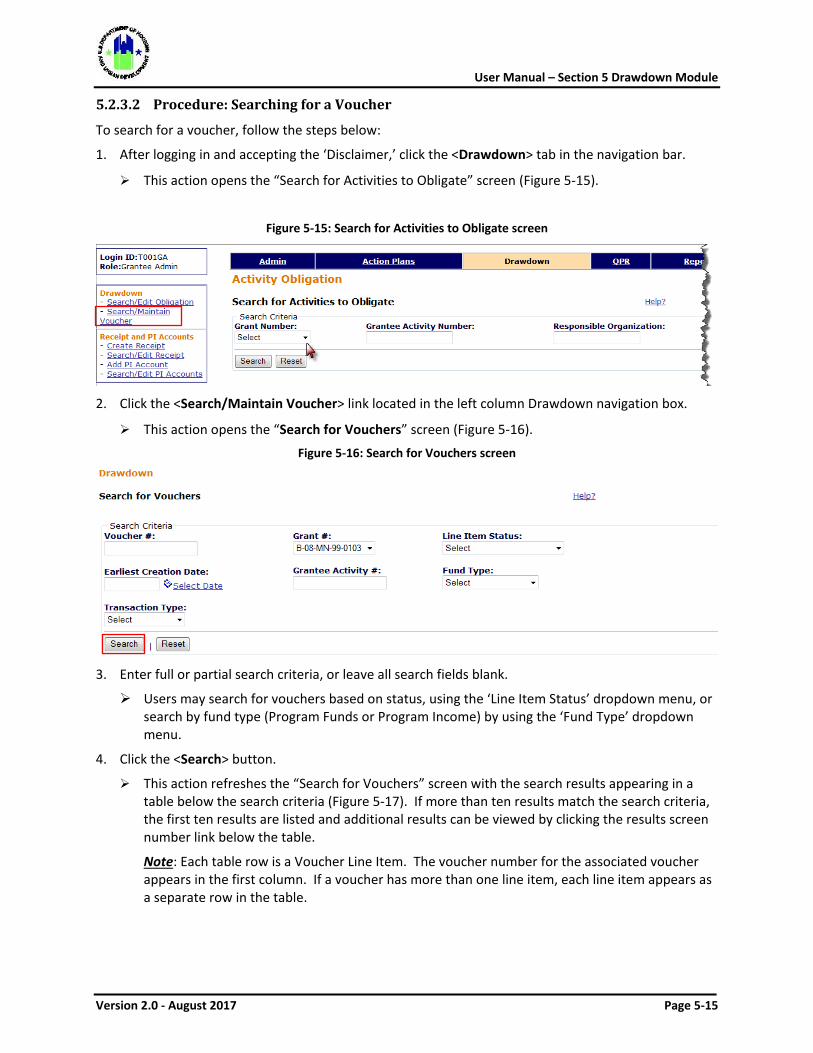
User Manual – Section 5 Drawdown Module
Version 2.0 - August 2017 Page 5-15
5.2.3.2 Procedure: Searching for a Voucher
To search for a voucher, follow the steps below:
1. After logging in and accepting the ‘Disclaimer,’ click the <Drawdown> tab in the navigation bar.
This action opens the “Search for Activities to Obligate” screen (Figure 5-15).
Figure 5-15: Search for Activities to Obligate screen
2. Click the <Search/Maintain Voucher> link located in the left column Drawdown navigation box.
This action opens the “Search for Vouchers” screen (Figure 5-16).
Figure 5-16: Search for Vouchers screen
3. Enter full or partial search criteria, or leave all search fields blank.
Users may search for vouchers based on status, using the ‘Line Item Status’ dropdown menu, or search by fund type (Program Funds or Program Income) by using the ‘Fund Type’ dropdown menu.
4. Click the <Search> button.
This action refreshes the “Search for Vouchers” screen with the search results appearing in a table below the search criteria (Figure 5-17). If more than ten results match the search criteria, the first ten results are listed and additional results can be viewed by clicking the results screen number link below the table.
Note: Each table row is a Voucher Line Item. The voucher number for the associated voucher appears in the first column. If a voucher has more than one line item, each line item appears as a separate row in the table.
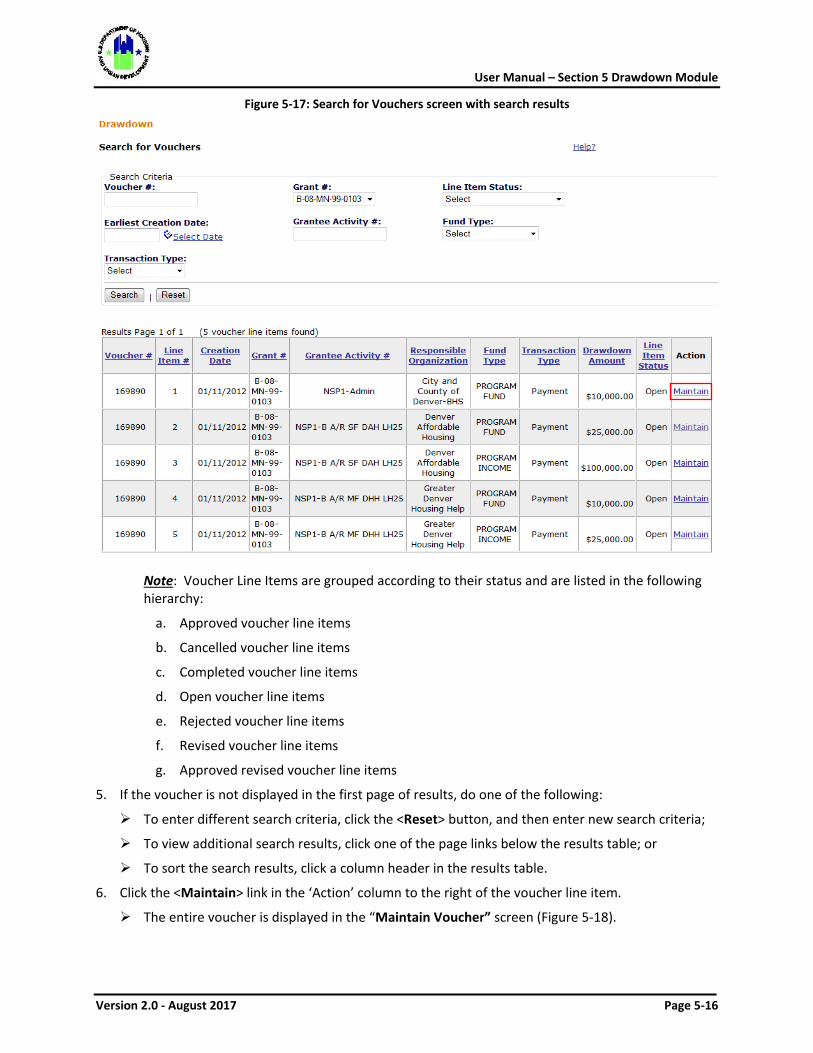
User Manual – Section 5 Drawdown Module
Version 2.0 - August 2017 Page 5-16
Figure 5-17: Search for Vouchers screen with search results
Note: Voucher Line Items are grouped according to their status and are listed in the following hierarchy:
a. Approved voucher line items
b. Cancelled voucher line items
c. Completed voucher line items
d. Open voucher line items
e. Rejected voucher line items
f. Revised voucher line items
g. Approved revised voucher line items
5. If the voucher is not displayed in the first page of results, do one of the following:
To enter different search criteria, click the <Reset> button, and then enter new search criteria;
To view additional search results, click one of the page links below the results table; or
To sort the search results, click a column header in the results table.
6. Click the <Maintain> link in the ‘Action’ column to the right of the voucher line item.
The entire voucher is displayed in the “Maintain Voucher” screen (Figure 5-18).

User Manual – Section 5 Drawdown Module
Version 2.0 - August 2017 Page 5-17
Figure 5-18: Maintain Voucher screen
7. From this screen the user can select a number of actions, designated by active links in the ‘Action’
column. These links are dependent upon the status of the Voucher Line Item, the user’s drawdown rights, and whether those rights are Draw Requestor or Approver (see below).
View a voucher or voucher line item (All Users; see Section 5.2.3.3)
Cancel a voucher line item (Drawdown Requesters only; see Section 5.2.3.4)
Revise a voucher line item (Drawdown Requesters only; see Section 5.2.3.5)
Approve or reject a voucher line item (Drawdown Approvers only; see Section 5.2.3.6)
Revoke approval of a voucher line item (Drawdown Approvers only; see Section 5.2.3.7)
Download a PDF of the voucher using the <Download PDF> button (All Users; see Section 5.2.3.1)
5.2.3.3 Procedure: Viewing a Voucher or Voucher Line Item (All Users)
To view a voucher or voucher line item:
1. Follow Steps 1-6 in the procedure: ‘Searching for a Voucher’, Section 5.2.3.2. At the completion of Step 6, the selected voucher is displayed on the “Maintain Voucher” screen (Figure 5-19).
Figure 5-19: Maintain Voucher screen
2. To view the details of a line item, click the <View> link in the ‘Action’ column for that line item.
This action opens the “View Voucher Line Item” screen (Figure 5-20). This screen displays detailed information about the selected voucher line item, including the status of the batch in which the line item was packaged and sent to LOCCS. Other sections of this screen include:
o Who created the voucher and the date of creation
o DRGR Information area – including the LOCCS Pay Code Description, which will display a rejection code if a voucher is rejected by LOCCS to help grantee users identify corrective actions needed
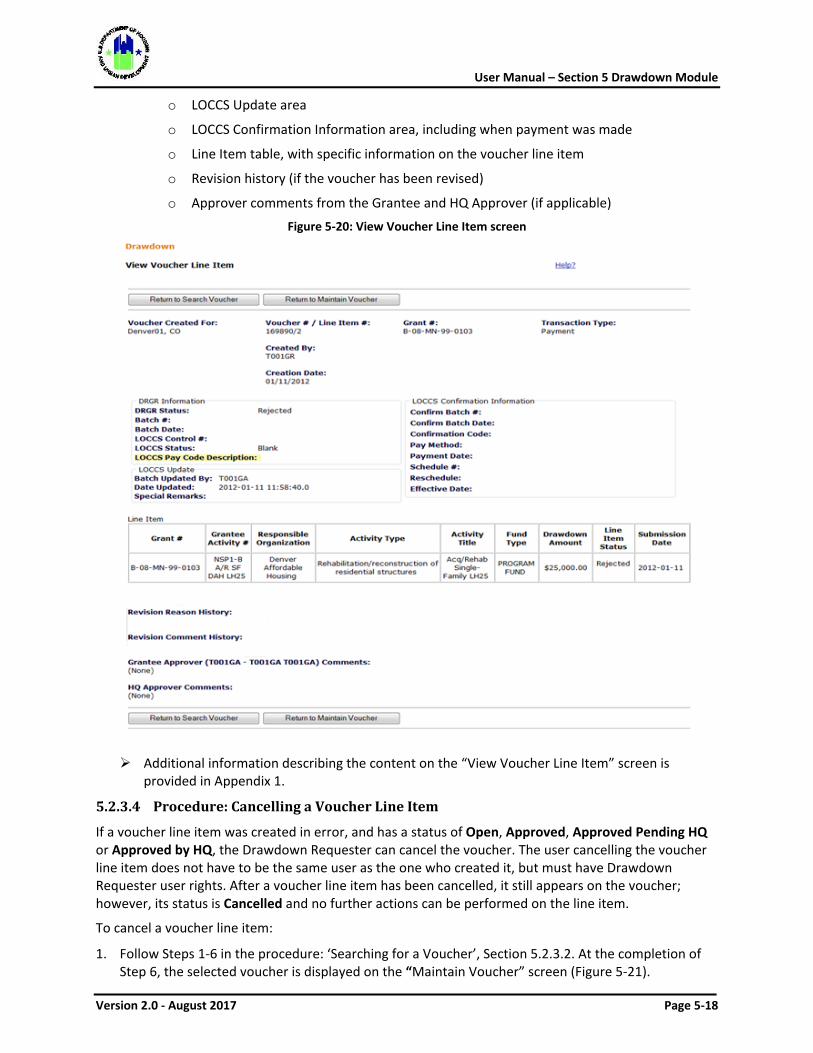
User Manual – Section 5 Drawdown Module
Version 2.0 - August 2017 Page 5-18
o LOCCS Update area
o LOCCS Confirmation Information area, including when payment was made
o Line Item table, with specific information on the voucher line item
o Revision history (if the voucher has been revised)
o Approver comments from the Grantee and HQ Approver (if applicable)
Figure 5-20: View Voucher Line Item screen
Additional information describing the content on the “View Voucher Line Item” screen is provided in Appendix 1.
5.2.3.4 Procedure: Cancelling a Voucher Line Item
If a voucher line item was created in error, and has a status of Open, Approved, Approved Pending HQ or Approved by HQ, the Drawdown Requester can cancel the voucher. The user cancelling the voucher line item does not have to be the same user as the one who created it, but must have Drawdown Requester user rights. After a voucher line item has been cancelled, it still appears on the voucher; however, its status is Cancelled and no further actions can be performed on the line item.
To cancel a voucher line item:
1. Follow Steps 1-6 in the procedure: ‘Searching for a Voucher’, Section 5.2.3.2. At the completion of Step 6, the selected voucher is displayed on the “Maintain Voucher” screen (Figure 5-21).
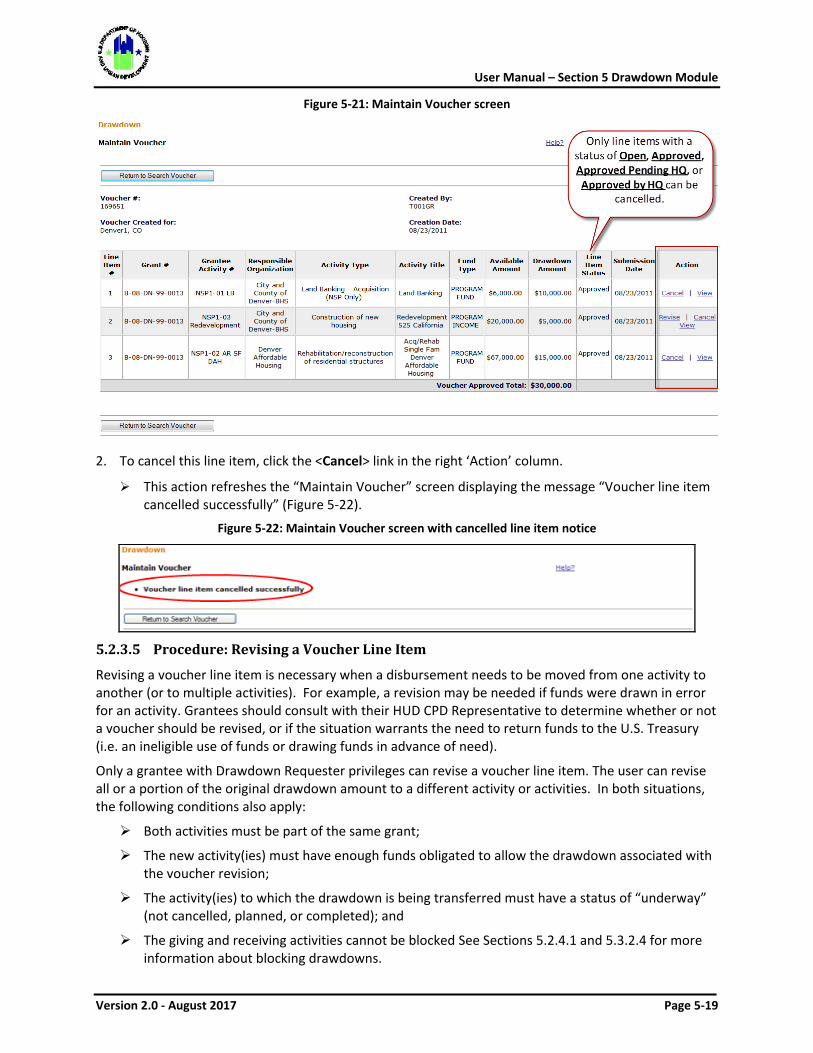
User Manual – Section 5 Drawdown Module
Version 2.0 - August 2017 Page 5-19
Figure 5-21: Maintain Voucher screen
2. To cancel this line item, click the <Cancel> link in the right ‘Action’ column.
This action refreshes the “Maintain Voucher” screen displaying the message “Voucher line item cancelled successfully” (Figure 5-22).
Figure 5-22: Maintain Voucher screen with cancelled line item notice
5.2.3.5 Procedure: Revising a Voucher Line Item
Revising a voucher line item is necessary when a disbursement needs to be moved from one activity to another (or to multiple activities). For example, a revision may be needed if funds were drawn in error for an activity. Grantees should consult with their HUD CPD Representative to determine whether or not a voucher should be revised, or if the situation warrants the need to return funds to the U.S. Treasury (i.e. an ineligible use of funds or drawing funds in advance of need).
Only a grantee with Drawdown Requester privileges can revise a voucher line item. The user can revise all or a portion of the original drawdown amount to a different activity or activities. In both situations, the following conditions also apply:
Both activities must be part of the same grant;
The new activity(ies) must have enough funds obligated to allow the drawdown associated with the voucher revision;
The activity(ies) to which the drawdown is being transferred must have a status of “underway” (not cancelled, planned, or completed); and
The giving and receiving activities cannot be blocked See Sections 5.2.4.1 and 5.3.2.4 for more information about blocking drawdowns.
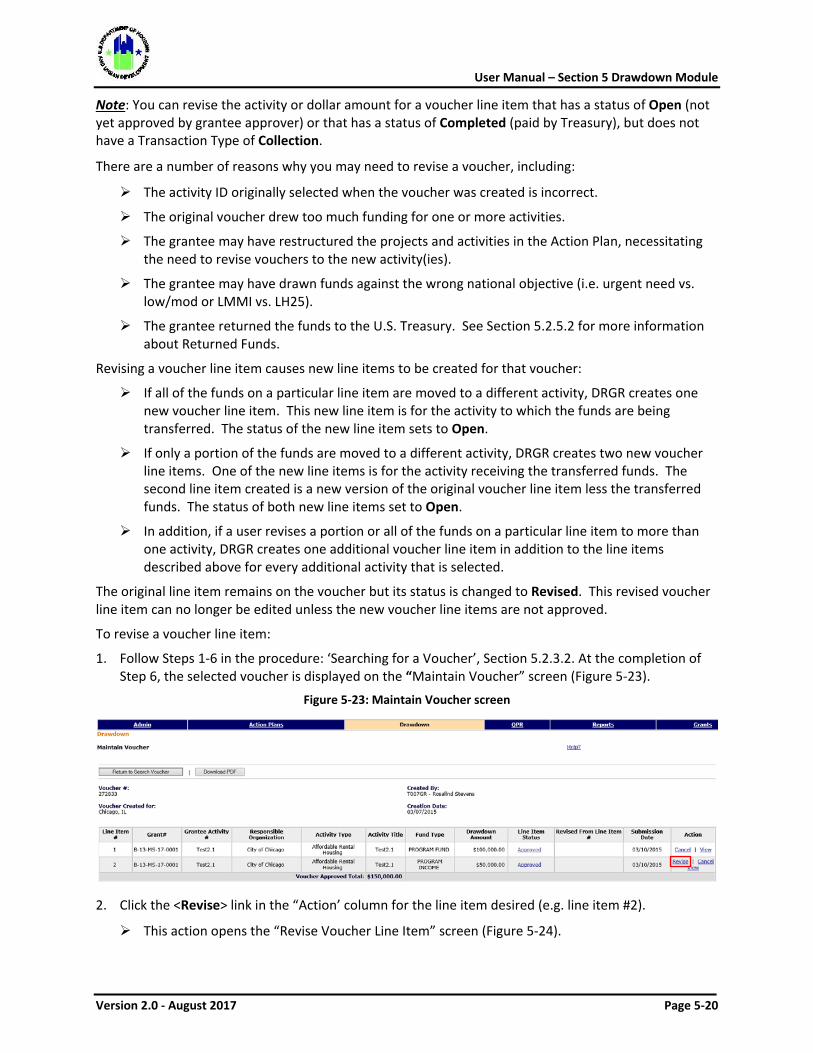
User Manual – Section 5 Drawdown Module
Version 2.0 - August 2017 Page 5-20
Note: You can revise the activity or dollar amount for a voucher line item that has a status of Open (not yet approved by grantee approver) or that has a status of Completed (paid by Treasury), but does not have a Transaction Type of Collection.
There are a number of reasons why you may need to revise a voucher, including:
The activity ID originally selected when the voucher was created is incorrect.
The original voucher drew too much funding for one or more activities.
The grantee may have restructured the projects and activities in the Action Plan, necessitating the need to revise vouchers to the new activity(ies).
The grantee may have drawn funds against the wrong national objective (i.e. urgent need vs. low/mod or LMMI vs. LH25).
The grantee returned the funds to the U.S. Treasury. See Section 5.2.5.2 for more information about Returned Funds.
Revising a voucher line item causes new line items to be created for that voucher:
If all of the funds on a particular line item are moved to a different activity, DRGR creates one new voucher line item. This new line item is for the activity to which the funds are being transferred. The status of the new line item sets to Open.
If only a portion of the funds are moved to a different activity, DRGR creates two new voucher line items. One of the new line items is for the activity receiving the transferred funds. The second line item created is a new version of the original voucher line item less the transferred funds. The status of both new line items set to Open.
In addition, if a user revises a portion or all of the funds on a particular line item to more than one activity, DRGR creates one additional voucher line item in addition to the line items described above for every additional activity that is selected.
The original line item remains on the voucher but its status is changed to Revised. This revised voucher line item can no longer be edited unless the new voucher line items are not approved.
To revise a voucher line item:
1. Follow Steps 1-6 in the procedure: ‘Searching for a Voucher’, Section 5.2.3.2. At the completion of Step 6, the selected voucher is displayed on the “Maintain Voucher” screen (Figure 5-23).
Figure 5-23: Maintain Voucher screen
2. Click the <Revise> link in the “Action’ column for the line item desired (e.g. line item #2).
This action opens the “Revise Voucher Line Item” screen (Figure 5-24).
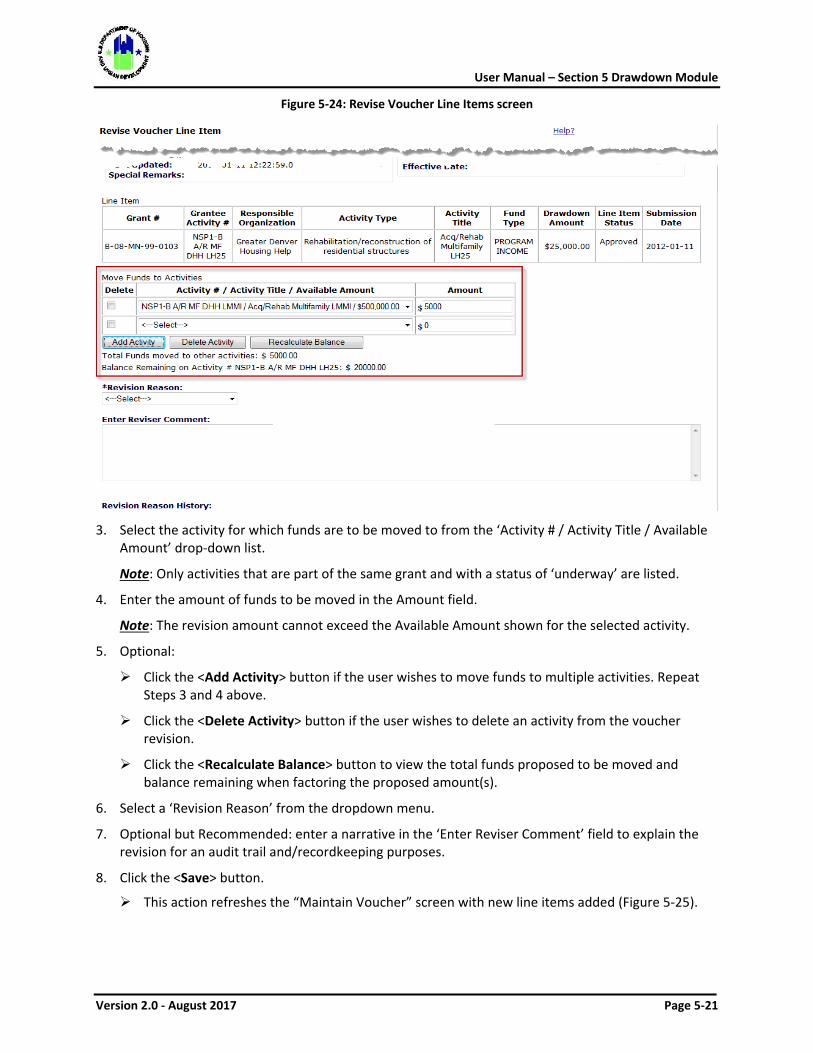
User Manual – Section 5 Drawdown Module
Version 2.0 - August 2017 Page 5-21
Figure 5-24: Revise Voucher Line Items screen
3. Select the activity for which funds are to be moved to from the ‘Activity # / Activity Title / Available
Amount’ drop-down list.
Note: Only activities that are part of the same grant and with a status of ‘underway’ are listed.
4. Enter the amount of funds to be moved in the Amount field.
Note: The revision amount cannot exceed the Available Amount shown for the selected activity.
5. Optional:
Click the <Add Activity> button if the user wishes to move funds to multiple activities. Repeat Steps 3 and 4 above.
Click the <Delete Activity> button if the user wishes to delete an activity from the voucher revision.
Click the <Recalculate Balance> button to view the total funds proposed to be moved and balance remaining when factoring the proposed amount(s).
6. Select a ‘Revision Reason’ from the dropdown menu.
7. Optional but Recommended: enter a narrative in the ‘Enter Reviser Comment’ field to explain the revision for an audit trail and/recordkeeping purposes.
8. Click the <Save> button.
This action refreshes the “Maintain Voucher” screen with new line items added (Figure 5-25).
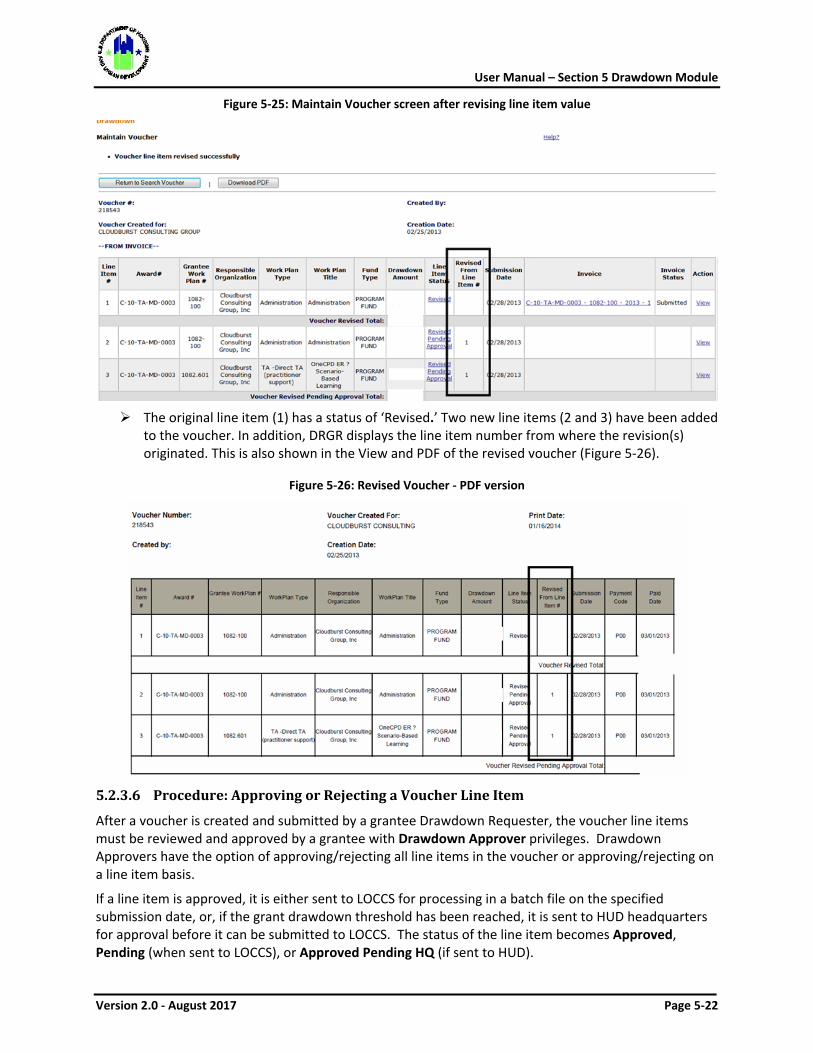
User Manual – Section 5 Drawdown Module
Version 2.0 - August 2017 Page 5-22
Figure 5-25: Maintain Voucher screen after revising line item value
The original line item (1) has a status of ‘Revised.’ Two new line items (2 and 3) have been added
to the voucher. In addition, DRGR displays the line item number from where the revision(s) originated. This is also shown in the View and PDF of the revised voucher (Figure 5-26).
Figure 5-26: Revised Voucher - PDF version
5.2.3.6 Procedure: Approving or Rejecting a Voucher Line Item
After a voucher is created and submitted by a grantee Drawdown Requester, the voucher line items must be reviewed and approved by a grantee with Drawdown Approver privileges. Drawdown Approvers have the option of approving/rejecting all line items in the voucher or approving/rejecting on a line item basis.
If a line item is approved, it is either sent to LOCCS for processing in a batch file on the specified submission date, or, if the grant drawdown threshold has been reached, it is sent to HUD headquarters for approval before it can be submitted to LOCCS. The status of the line item becomes Approved, Pending (when sent to LOCCS), or Approved Pending HQ (if sent to HUD).
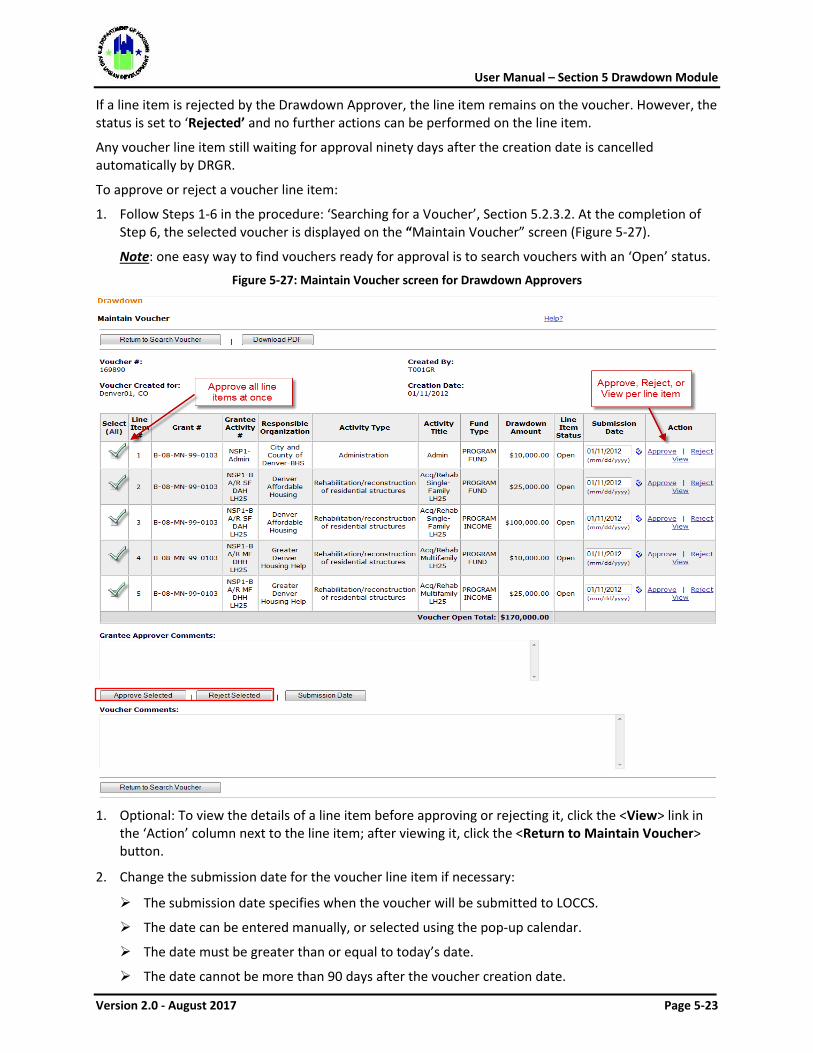
User Manual – Section 5 Drawdown Module
Version 2.0 - August 2017 Page 5-23
If a line item is rejected by the Drawdown Approver, the line item remains on the voucher. However, the status is set to ‘Rejected’ and no further actions can be performed on the line item.
Any voucher line item still waiting for approval ninety days after the creation date is cancelled automatically by DRGR.
To approve or reject a voucher line item:
1. Follow Steps 1-6 in the procedure: ‘Searching for a Voucher’, Section 5.2.3.2. At the completion of Step 6, the selected voucher is displayed on the “Maintain Voucher” screen (Figure 5-27).
Note: one easy way to find vouchers ready for approval is to search vouchers with an ‘Open’ status.
Figure 5-27: Maintain Voucher screen for Drawdown Approvers
1. Optional: To view the details of a line item before approving or rejecting it, click the <View> link in
the ‘Action’ column next to the line item; after viewing it, click the <Return to Maintain Voucher> button.
2. Change the submission date for the voucher line item if necessary:
The submission date specifies when the voucher will be submitted to LOCCS.
The date can be entered manually, or selected using the pop-up calendar.
The date must be greater than or equal to today’s date.
The date cannot be more than 90 days after the voucher creation date.
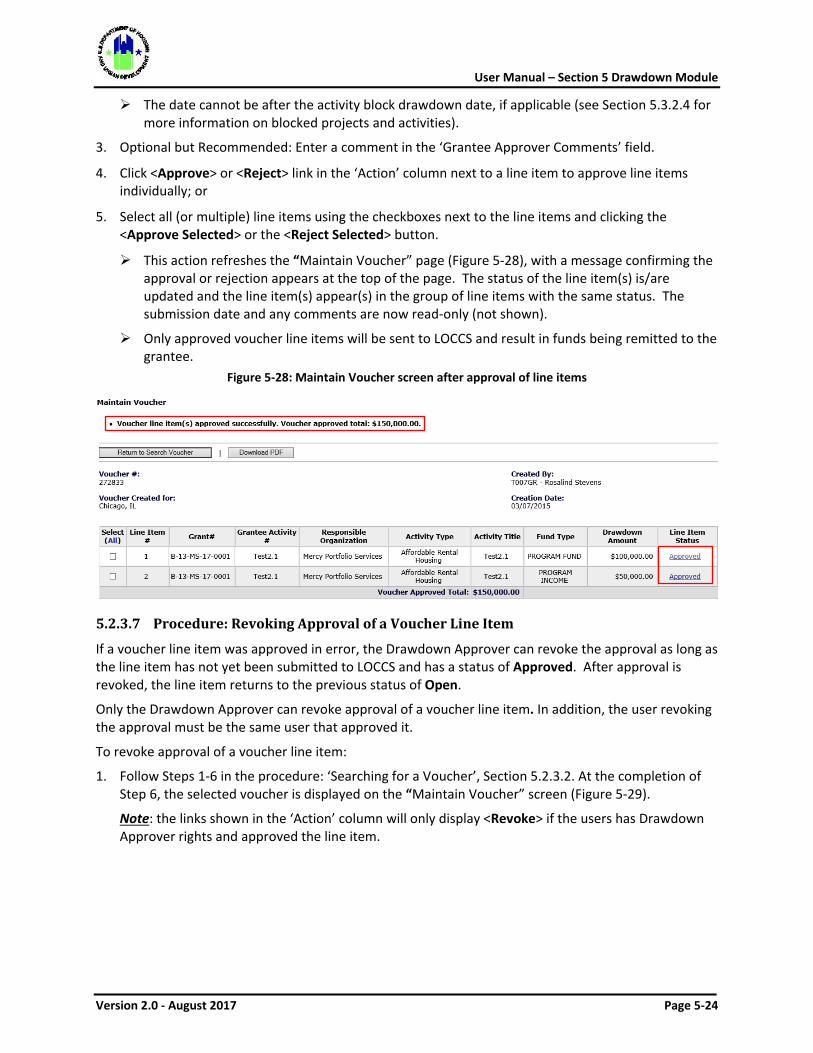
User Manual – Section 5 Drawdown Module
Version 2.0 - August 2017 Page 5-24
The date cannot be after the activity block drawdown date, if applicable (see Section 5.3.2.4 for more information on blocked projects and activities).
3. Optional but Recommended: Enter a comment in the ‘Grantee Approver Comments’ field.
4. Click <Approve> or <Reject> link in the ‘Action’ column next to a line item to approve line items individually; or
5. Select all (or multiple) line items using the checkboxes next to the line items and clicking the <Approve Selected> or the <Reject Selected> button.
This action refreshes the “Maintain Voucher” page (Figure 5-28), with a message confirming the approval or rejection appears at the top of the page. The status of the line item(s) is/are updated and the line item(s) appear(s) in the group of line items with the same status. The submission date and any comments are now read-only (not shown).
Only approved voucher line items will be sent to LOCCS and result in funds being remitted to the grantee.
Figure 5-28: Maintain Voucher screen after approval of line items
5.2.3.7 Procedure: Revoking Approval of a Voucher Line Item
If a voucher line item was approved in error, the Drawdown Approver can revoke the approval as long as the line item has not yet been submitted to LOCCS and has a status of Approved. After approval is revoked, the line item returns to the previous status of Open.
Only the Drawdown Approver can revoke approval of a voucher line item. In addition, the user revoking the approval must be the same user that approved it.
To revoke approval of a voucher line item:
1. Follow Steps 1-6 in the procedure: ‘Searching for a Voucher’, Section 5.2.3.2. At the completion of Step 6, the selected voucher is displayed on the “Maintain Voucher” screen (Figure 5-29).
Note: the links shown in the ‘Action’ column will only display <Revoke> if the users has Drawdown Approver rights and approved the line item.
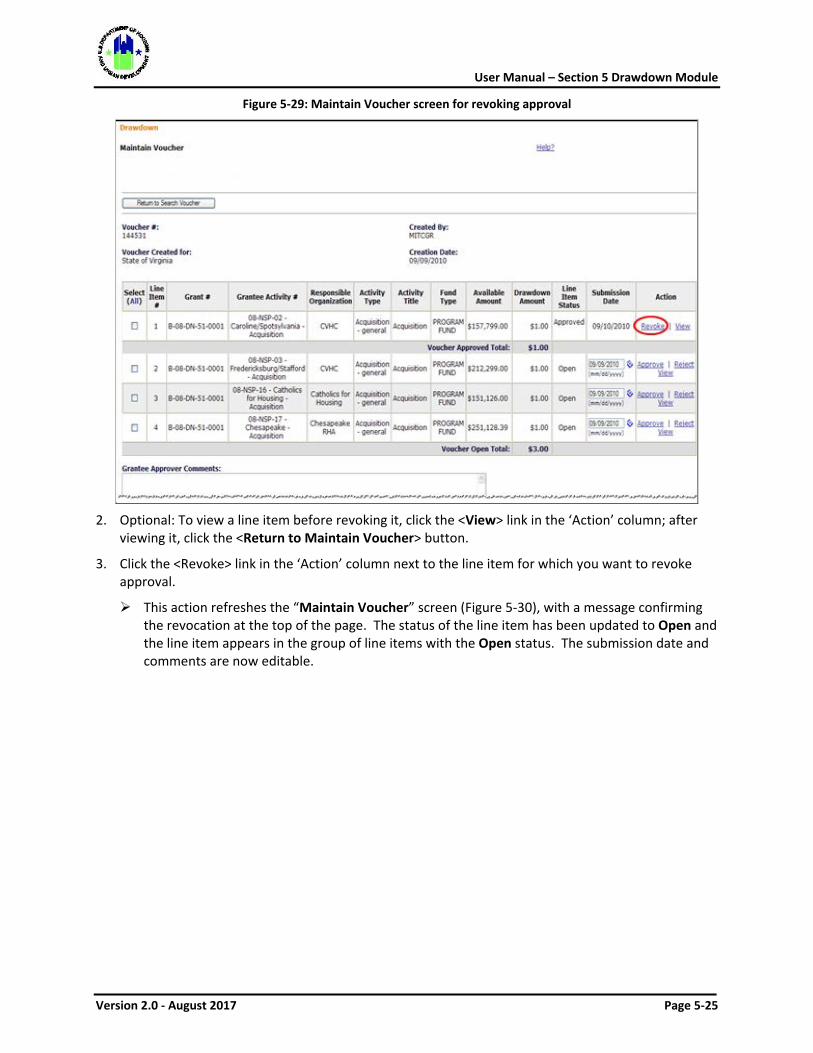
User Manual – Section 5 Drawdown Module
Version 2.0 - August 2017 Page 5-25
Figure 5-29: Maintain Voucher screen for revoking approval
2. Optional: To view a line item before revoking it, click the <View> link in the ‘Action’ column; after
viewing it, click the <Return to Maintain Voucher> button.
3. Click the <Revoke> link in the ‘Action’ column next to the line item for which you want to revoke approval.
This action refreshes the “Maintain Voucher” screen (Figure 5-30), with a message confirming the revocation at the top of the page. The status of the line item has been updated to Open and the line item appears in the group of line items with the Open status. The submission date and comments are now editable.
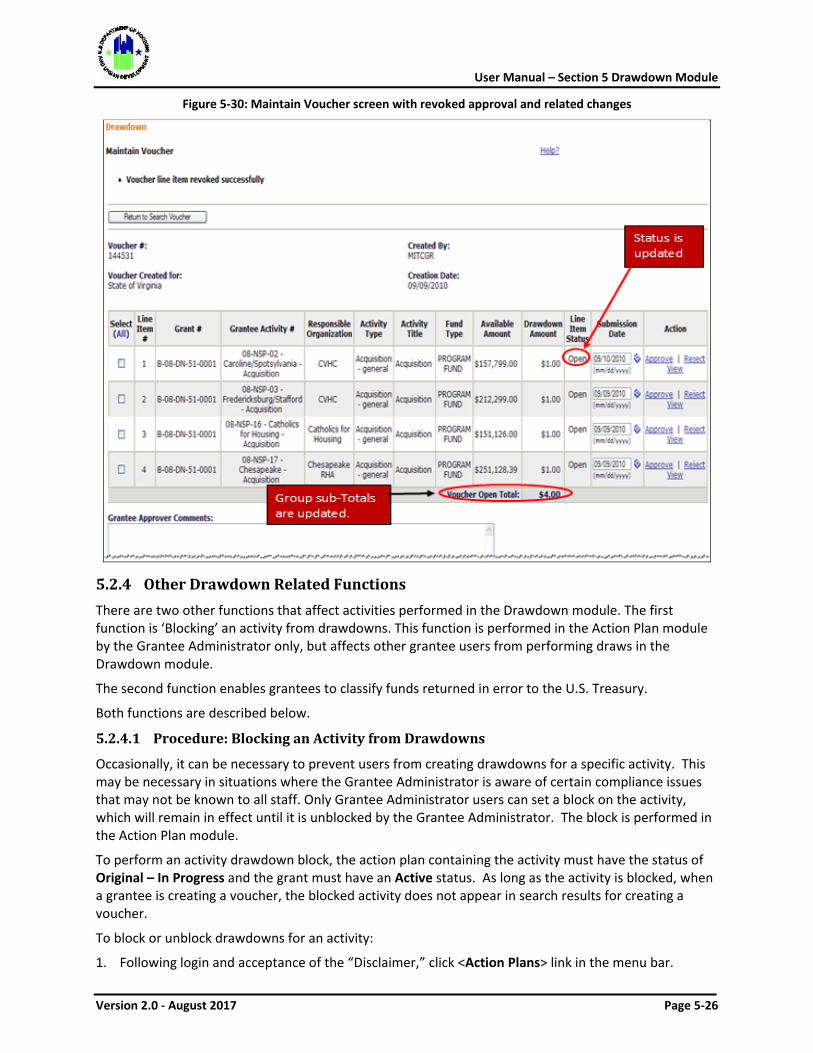
User Manual – Section 5 Drawdown Module
Version 2.0 - August 2017 Page 5-26
Figure 5-30: Maintain Voucher screen with revoked approval and related changes
5.2.4 Other Drawdown Related Functions There are two other functions that affect activities performed in the Drawdown module. The first function is ‘Blocking’ an activity from drawdowns. This function is performed in the Action Plan module by the Grantee Administrator only, but affects other grantee users from performing draws in the Drawdown module.
The second function enables grantees to classify funds returned in error to the U.S. Treasury.
Both functions are described below.
5.2.4.1 Procedure: Blocking an Activity from Drawdowns
Occasionally, it can be necessary to prevent users from creating drawdowns for a specific activity. This may be necessary in situations where the Grantee Administrator is aware of certain compliance issues that may not be known to all staff. Only Grantee Administrator users can set a block on the activity, which will remain in effect until it is unblocked by the Grantee Administrator. The block is performed in the Action Plan module.
To perform an activity drawdown block, the action plan containing the activity must have the status of Original – In Progress and the grant must have an Active status. As long as the activity is blocked, when a grantee is creating a voucher, the blocked activity does not appear in search results for creating a voucher.
To block or unblock drawdowns for an activity:
1. Following login and acceptance of the “Disclaimer,” click <Action Plans> link in the menu bar.

User Manual – Section 5 Drawdown Module
Version 2.0 - August 2017 Page 5-27
The “View All Action Plans” screen is displayed.
2. Click link in the ‘Action Plan Status’ column for the action plan containing the activity you want to block.
The “Edit Action Plan” screen is displayed (Figure 5-31).
Figure 5-31: Edit Action Plan screen
3. Click the link in the ‘Activity Number’ column for the activity you want to block.
The “Edit Activity – Page 1” page is displayed (Figure 5-32).
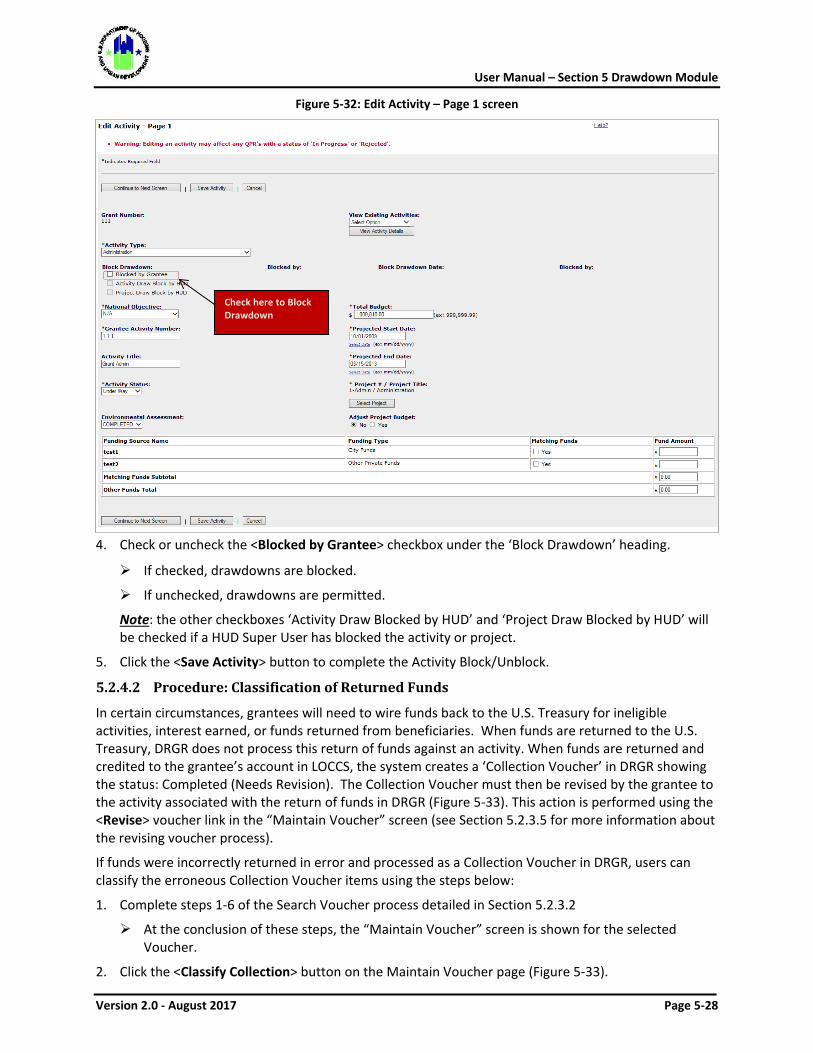
User Manual – Section 5 Drawdown Module
Version 2.0 - August 2017 Page 5-28
Figure 5-32: Edit Activity – Page 1 screen
4. Check or uncheck the <Blocked by Grantee> checkbox under the ‘Block Drawdown’ heading.
If checked, drawdowns are blocked.
If unchecked, drawdowns are permitted.
Note: the other checkboxes ‘Activity Draw Blocked by HUD’ and ‘Project Draw Blocked by HUD’ will be checked if a HUD Super User has blocked the activity or project.
5. Click the <Save Activity> button to complete the Activity Block/Unblock.
5.2.4.2 Procedure: Classification of Returned Funds
In certain circumstances, grantees will need to wire funds back to the U.S. Treasury for ineligible activities, interest earned, or funds returned from beneficiaries. When funds are returned to the U.S. Treasury, DRGR does not process this return of funds against an activity. When funds are returned and credited to the grantee’s account in LOCCS, the system creates a ‘Collection Voucher’ in DRGR showing the status: Completed (Needs Revision). The Collection Voucher must then be revised by the grantee to the activity associated with the return of funds in DRGR (Figure 5-33). This action is performed using the <Revise> voucher link in the “Maintain Voucher” screen (see Section 5.2.3.5 for more information about the revising voucher process).
If funds were incorrectly returned in error and processed as a Collection Voucher in DRGR, users can classify the erroneous Collection Voucher items using the steps below:
1. Complete steps 1-6 of the Search Voucher process detailed in Section 5.2.3.2
At the conclusion of these steps, the “Maintain Voucher” screen is shown for the selected Voucher.
2. Click the <Classify Collection> button on the Maintain Voucher page (Figure 5-33).
Check here to Block Drawdown
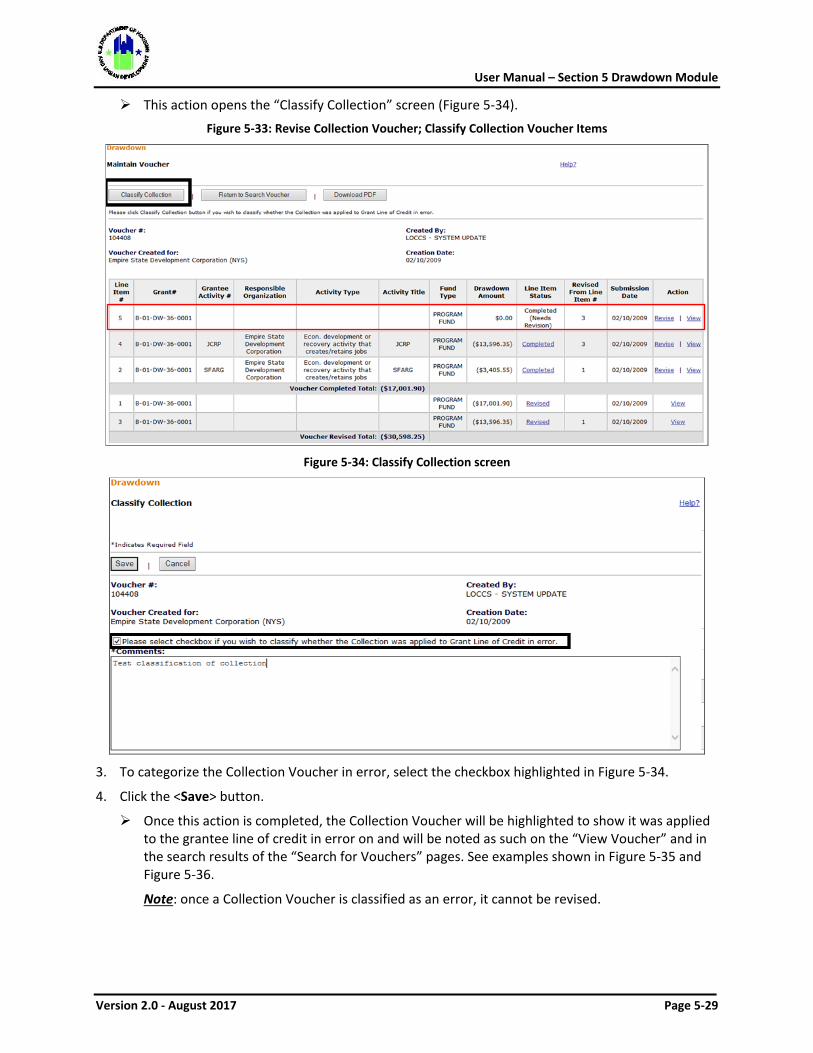
User Manual – Section 5 Drawdown Module
Version 2.0 - August 2017 Page 5-29
This action opens the “Classify Collection” screen (Figure 5-34).
Figure 5-33: Revise Collection Voucher; Classify Collection Voucher Items
Figure 5-34: Classify Collection screen
3. To categorize the Collection Voucher in error, select the checkbox highlighted in Figure 5-34.
4. Click the <Save> button.
Once this action is completed, the Collection Voucher will be highlighted to show it was applied to the grantee line of credit in error on and will be noted as such on the “View Voucher” and in the search results of the “Search for Vouchers” pages. See examples shown in Figure 5-35 and Figure 5-36.
Note: once a Collection Voucher is classified as an error, it cannot be revised.
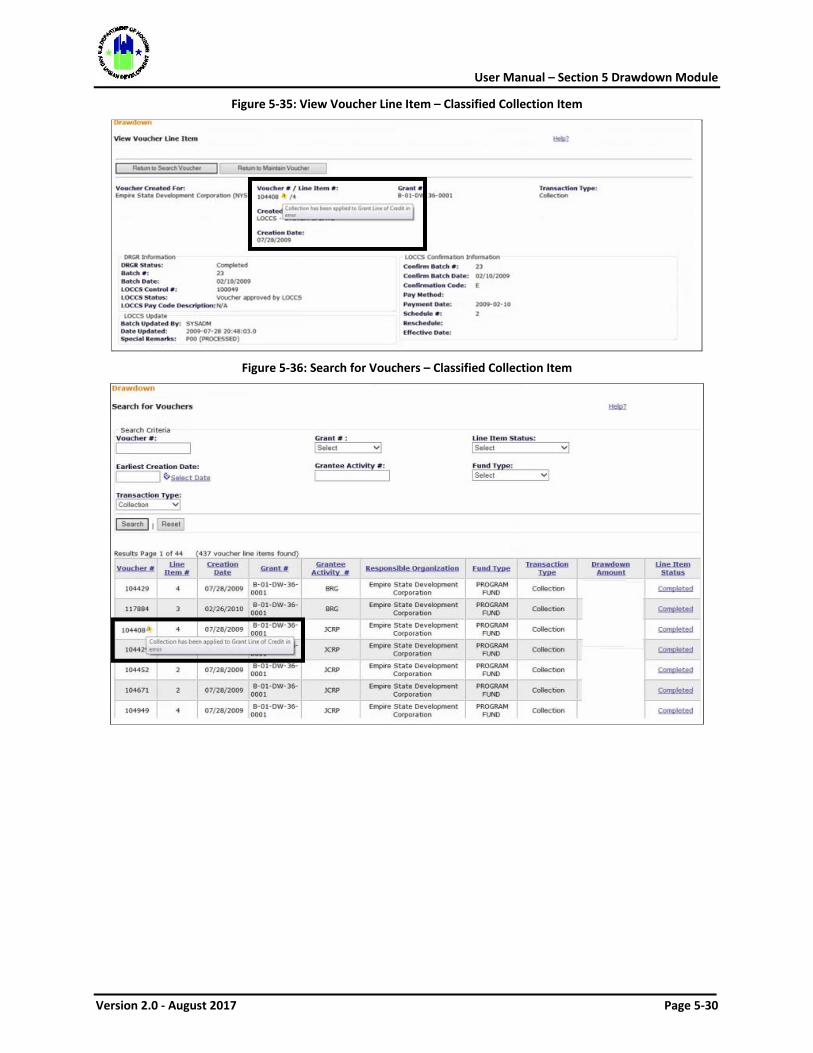
User Manual – Section 5 Drawdown Module
Version 2.0 - August 2017 Page 5-30
Figure 5-35: View Voucher Line Item – Classified Collection Item
Figure 5-36: Search for Vouchers – Classified Collection Item
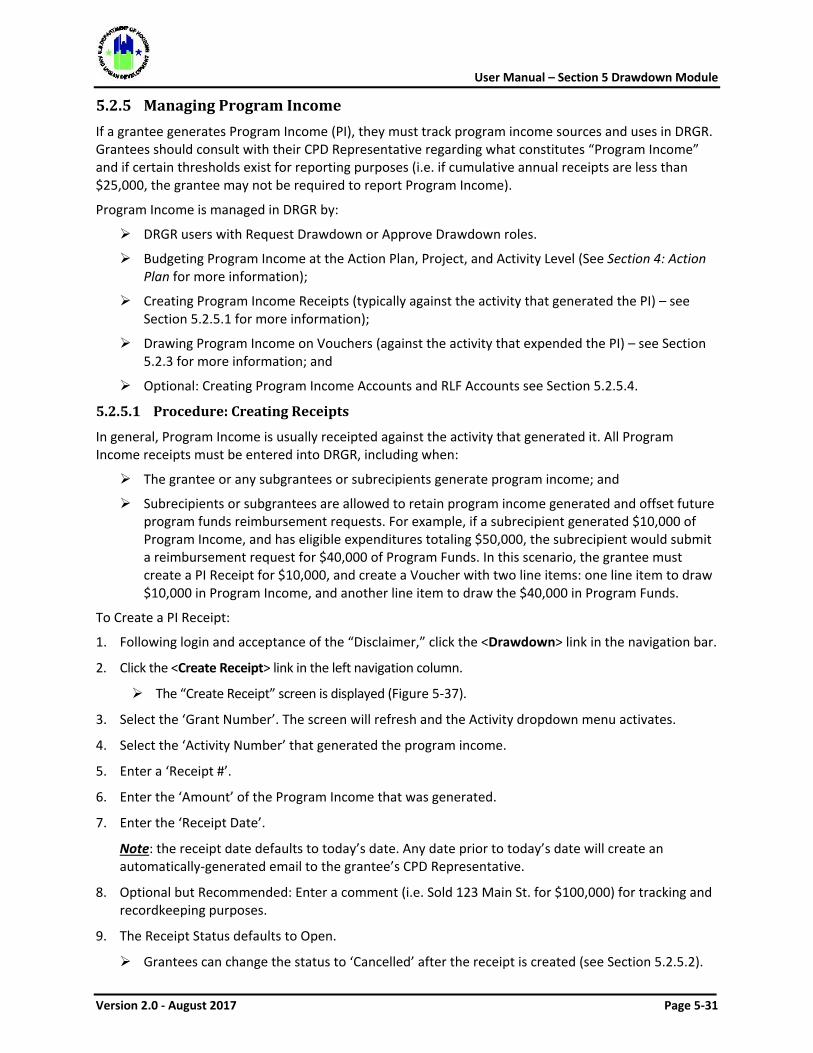
User Manual – Section 5 Drawdown Module
Version 2.0 - August 2017 Page 5-31
5.2.5 Managing Program Income If a grantee generates Program Income (PI), they must track program income sources and uses in DRGR. Grantees should consult with their CPD Representative regarding what constitutes “Program Income” and if certain thresholds exist for reporting purposes (i.e. if cumulative annual receipts are less than $25,000, the grantee may not be required to report Program Income).
Program Income is managed in DRGR by:
DRGR users with Request Drawdown or Approve Drawdown roles.
Budgeting Program Income at the Action Plan, Project, and Activity Level (See Section 4: Action Plan for more information);
Creating Program Income Receipts (typically against the activity that generated the PI) – see Section 5.2.5.1 for more information);
Drawing Program Income on Vouchers (against the activity that expended the PI) – see Section 5.2.3 for more information; and
Optional: Creating Program Income Accounts and RLF Accounts see Section 5.2.5.4.
5.2.5.1 Procedure: Creating Receipts
In general, Program Income is usually receipted against the activity that generated it. All Program Income receipts must be entered into DRGR, including when:
The grantee or any subgrantees or subrecipients generate program income; and
Subrecipients or subgrantees are allowed to retain program income generated and offset future program funds reimbursement requests. For example, if a subrecipient generated $10,000 of Program Income, and has eligible expenditures totaling $50,000, the subrecipient would submit a reimbursement request for $40,000 of Program Funds. In this scenario, the grantee must create a PI Receipt for $10,000, and create a Voucher with two line items: one line item to draw $10,000 in Program Income, and another line item to draw the $40,000 in Program Funds.
To Create a PI Receipt:
1. Following login and acceptance of the “Disclaimer,” click the <Drawdown> link in the navigation bar.
2. Click the <Create Receipt> link in the left navigation column.
The “Create Receipt” screen is displayed (Figure 5-37).
3. Select the ‘Grant Number’. The screen will refresh and the Activity dropdown menu activates.
4. Select the ‘Activity Number’ that generated the program income.
5. Enter a ‘Receipt #’.
6. Enter the ‘Amount’ of the Program Income that was generated.
7. Enter the ‘Receipt Date’.
Note: the receipt date defaults to today’s date. Any date prior to today’s date will create an automatically-generated email to the grantee’s CPD Representative.
8. Optional but Recommended: Enter a comment (i.e. Sold 123 Main St. for $100,000) for tracking and recordkeeping purposes.
9. The Receipt Status defaults to Open.
Grantees can change the status to ‘Cancelled’ after the receipt is created (see Section 5.2.5.2).
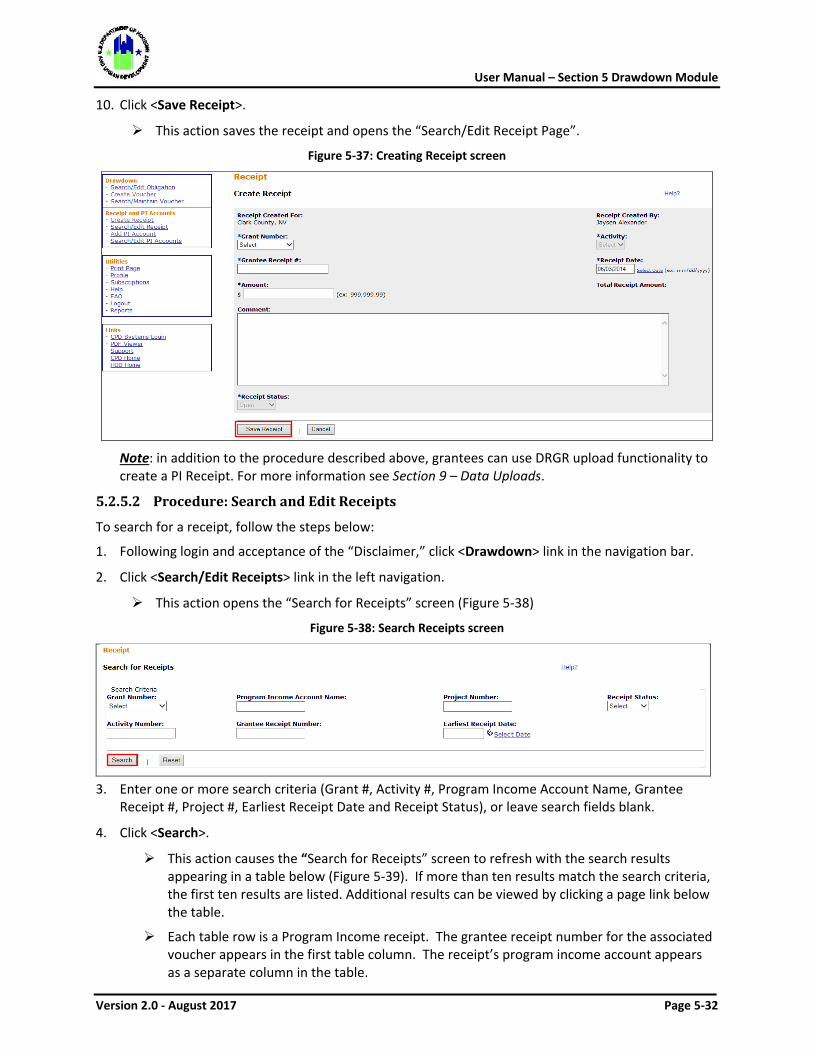
User Manual – Section 5 Drawdown Module
Version 2.0 - August 2017 Page 5-32
10. Click <Save Receipt>.
This action saves the receipt and opens the “Search/Edit Receipt Page”.
Figure 5-37: Creating Receipt screen
Note: in addition to the procedure described above, grantees can use DRGR upload functionality to create a PI Receipt. For more information see Section 9 – Data Uploads.
5.2.5.2 Procedure: Search and Edit Receipts
To search for a receipt, follow the steps below:
1. Following login and acceptance of the “Disclaimer,” click <Drawdown> link in the navigation bar.
2. Click <Search/Edit Receipts> link in the left navigation.
This action opens the “Search for Receipts” screen (Figure 5-38)
Figure 5-38: Search Receipts screen
3. Enter one or more search criteria (Grant #, Activity #, Program Income Account Name, Grantee
Receipt #, Project #, Earliest Receipt Date and Receipt Status), or leave search fields blank.
4. Click <Search>.
This action causes the “Search for Receipts” screen to refresh with the search results appearing in a table below (Figure 5-39). If more than ten results match the search criteria, the first ten results are listed. Additional results can be viewed by clicking a page link below the table.
Each table row is a Program Income receipt. The grantee receipt number for the associated voucher appears in the first table column. The receipt’s program income account appears as a separate column in the table.
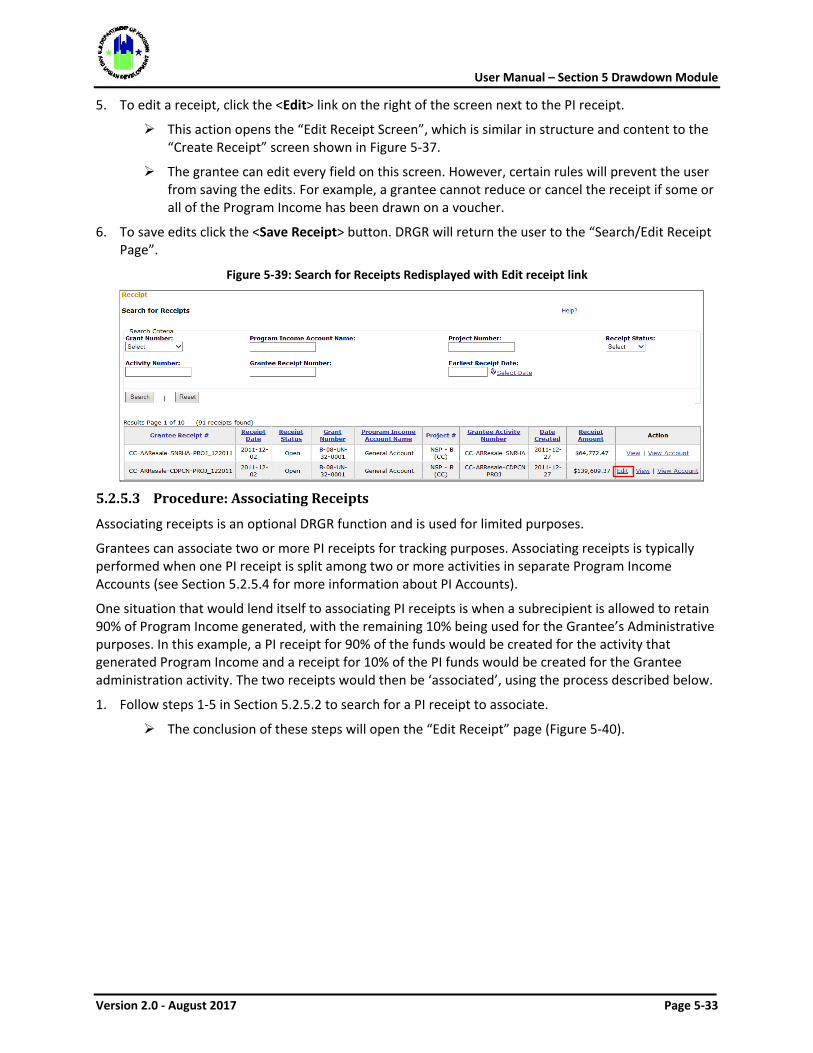
User Manual – Section 5 Drawdown Module
Version 2.0 - August 2017 Page 5-33
5. To edit a receipt, click the <Edit> link on the right of the screen next to the PI receipt.
This action opens the “Edit Receipt Screen”, which is similar in structure and content to the “Create Receipt” screen shown in Figure 5-37.
The grantee can edit every field on this screen. However, certain rules will prevent the user from saving the edits. For example, a grantee cannot reduce or cancel the receipt if some or all of the Program Income has been drawn on a voucher.
6. To save edits click the <Save Receipt> button. DRGR will return the user to the “Search/Edit Receipt Page”.
Figure 5-39: Search for Receipts Redisplayed with Edit receipt link
5.2.5.3 Procedure: Associating Receipts
Associating receipts is an optional DRGR function and is used for limited purposes.
Grantees can associate two or more PI receipts for tracking purposes. Associating receipts is typically performed when one PI receipt is split among two or more activities in separate Program Income Accounts (see Section 5.2.5.4 for more information about PI Accounts).
One situation that would lend itself to associating PI receipts is when a subrecipient is allowed to retain 90% of Program Income generated, with the remaining 10% being used for the Grantee’s Administrative purposes. In this example, a PI receipt for 90% of the funds would be created for the activity that generated Program Income and a receipt for 10% of the PI funds would be created for the Grantee administration activity. The two receipts would then be ‘associated’, using the process described below.
1. Follow steps 1-5 in Section 5.2.5.2 to search for a PI receipt to associate.
The conclusion of these steps will open the “Edit Receipt” page (Figure 5-40).
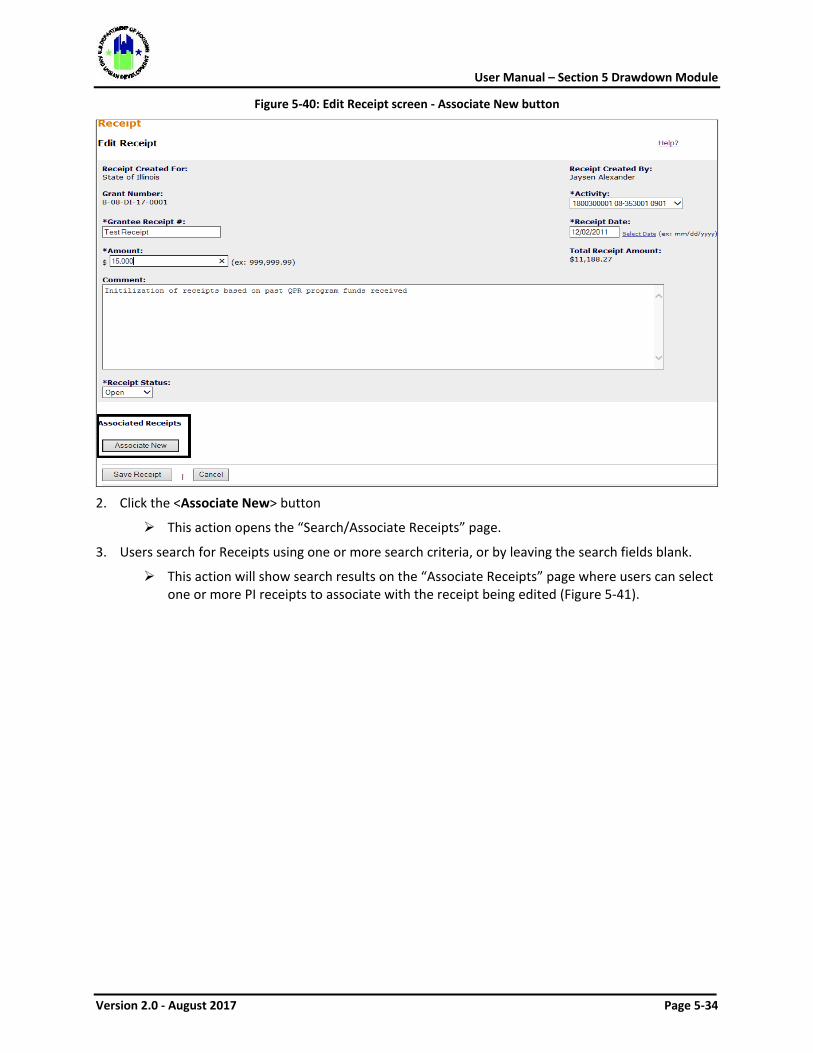
User Manual – Section 5 Drawdown Module
Version 2.0 - August 2017 Page 5-34
Figure 5-40: Edit Receipt screen - Associate New button
2. Click the <Associate New> button
This action opens the “Search/Associate Receipts” page.
3. Users search for Receipts using one or more search criteria, or by leaving the search fields blank.
This action will show search results on the “Associate Receipts” page where users can select one or more PI receipts to associate with the receipt being edited (Figure 5-41).
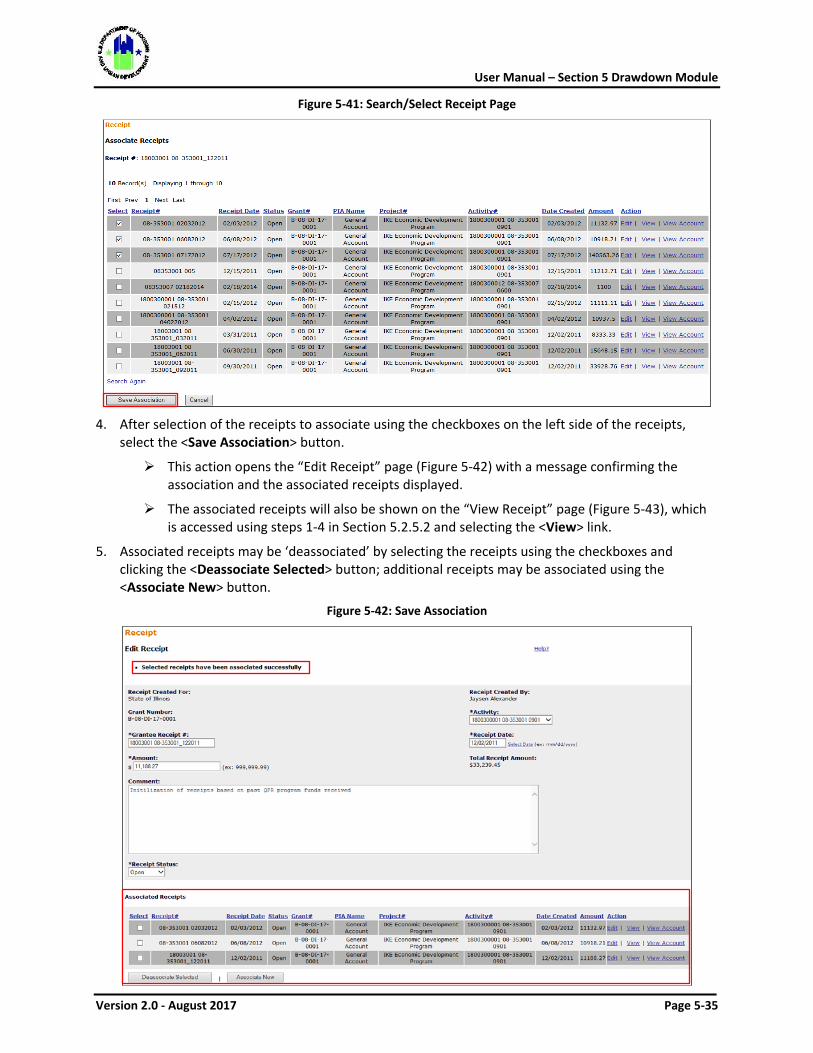
User Manual – Section 5 Drawdown Module
Version 2.0 - August 2017 Page 5-35
Figure 5-41: Search/Select Receipt Page
4. After selection of the receipts to associate using the checkboxes on the left side of the receipts,
select the <Save Association> button.
This action opens the “Edit Receipt” page (Figure 5-42) with a message confirming the association and the associated receipts displayed.
The associated receipts will also be shown on the “View Receipt” page (Figure 5-43), which is accessed using steps 1-4 in Section 5.2.5.2 and selecting the <View> link.
5. Associated receipts may be ‘deassociated’ by selecting the receipts using the checkboxes and clicking the <Deassociate Selected> button; additional receipts may be associated using the <Associate New> button.
Figure 5-42: Save Association
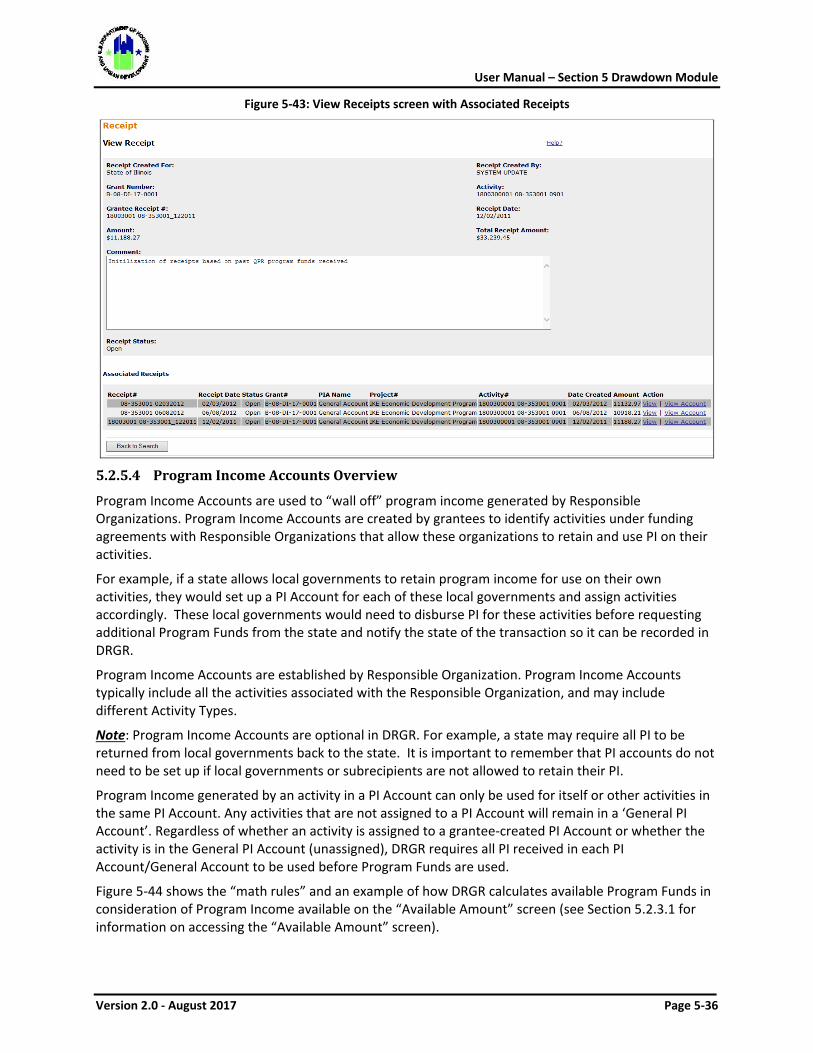
User Manual – Section 5 Drawdown Module
Version 2.0 - August 2017 Page 5-36
Figure 5-43: View Receipts screen with Associated Receipts
5.2.5.4 Program Income Accounts Overview
Program Income Accounts are used to “wall off” program income generated by Responsible Organizations. Program Income Accounts are created by grantees to identify activities under funding agreements with Responsible Organizations that allow these organizations to retain and use PI on their activities.
For example, if a state allows local governments to retain program income for use on their own activities, they would set up a PI Account for each of these local governments and assign activities accordingly. These local governments would need to disburse PI for these activities before requesting additional Program Funds from the state and notify the state of the transaction so it can be recorded in DRGR.
Program Income Accounts are established by Responsible Organization. Program Income Accounts typically include all the activities associated with the Responsible Organization, and may include different Activity Types.
Note: Program Income Accounts are optional in DRGR. For example, a state may require all PI to be returned from local governments back to the state. It is important to remember that PI accounts do not need to be set up if local governments or subrecipients are not allowed to retain their PI.
Program Income generated by an activity in a PI Account can only be used for itself or other activities in the same PI Account. Any activities that are not assigned to a PI Account will remain in a ‘General PI Account’. Regardless of whether an activity is assigned to a grantee-created PI Account or whether the activity is in the General PI Account (unassigned), DRGR requires all PI received in each PI Account/General Account to be used before Program Funds are used.
Figure 5-44 shows the “math rules” and an example of how DRGR calculates available Program Funds in consideration of Program Income available on the “Available Amount” screen (see Section 5.2.3.1 for information on accessing the “Available Amount” screen).
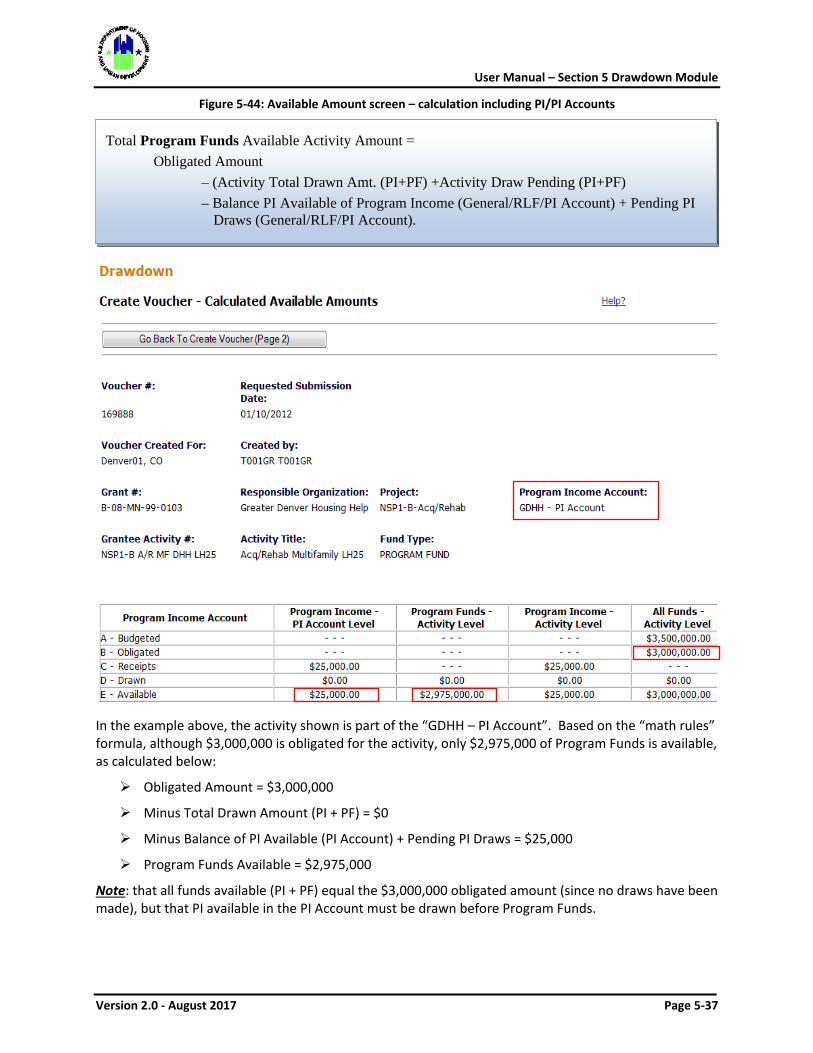
User Manual – Section 5 Drawdown Module
Version 2.0 - August 2017 Page 5-37
Figure 5-44: Available Amount screen – calculation including PI/PI Accounts
In the example above, the activity shown is part of the “GDHH – PI Account”. Based on the “math rules” formula, although $3,000,000 is obligated for the activity, only $2,975,000 of Program Funds is available, as calculated below:
Obligated Amount = $3,000,000
Minus Total Drawn Amount (PI + PF) = $0
Minus Balance of PI Available (PI Account) + Pending PI Draws = $25,000
Program Funds Available = $2,975,000
Note: that all funds available (PI + PF) equal the $3,000,000 obligated amount (since no draws have been made), but that PI available in the PI Account must be drawn before Program Funds.
Total Program Funds Available Activity Amount = Obligated Amount – (Activity Total Drawn Amt. (PI+PF) +Activity Draw Pending (PI+PF)
– Balance PI Available of Program Income (General/RLF/PI Account) + Pending PI Draws (General/RLF/PI Account).
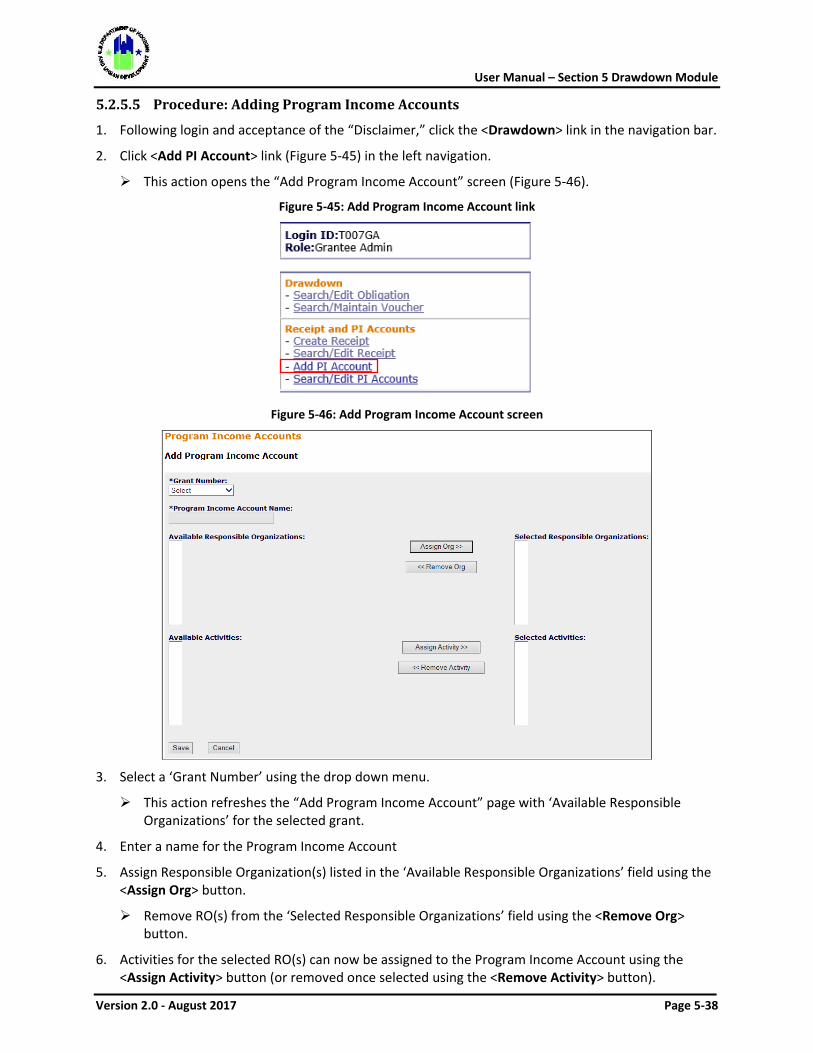
User Manual – Section 5 Drawdown Module
Version 2.0 - August 2017 Page 5-38
5.2.5.5 Procedure: Adding Program Income Accounts
1. Following login and acceptance of the “Disclaimer,” click the <Drawdown> link in the navigation bar.
2. Click <Add PI Account> link (Figure 5-45) in the left navigation.
This action opens the “Add Program Income Account” screen (Figure 5-46).
Figure 5-45: Add Program Income Account link
Figure 5-46: Add Program Income Account screen
3. Select a ‘Grant Number’ using the drop down menu.
This action refreshes the “Add Program Income Account” page with ‘Available Responsible Organizations’ for the selected grant.
4. Enter a name for the Program Income Account
5. Assign Responsible Organization(s) listed in the ‘Available Responsible Organizations’ field using the <Assign Org> button.
Remove RO(s) from the ‘Selected Responsible Organizations’ field using the <Remove Org> button.
6. Activities for the selected RO(s) can now be assigned to the Program Income Account using the <Assign Activity> button (or removed once selected using the <Remove Activity> button).
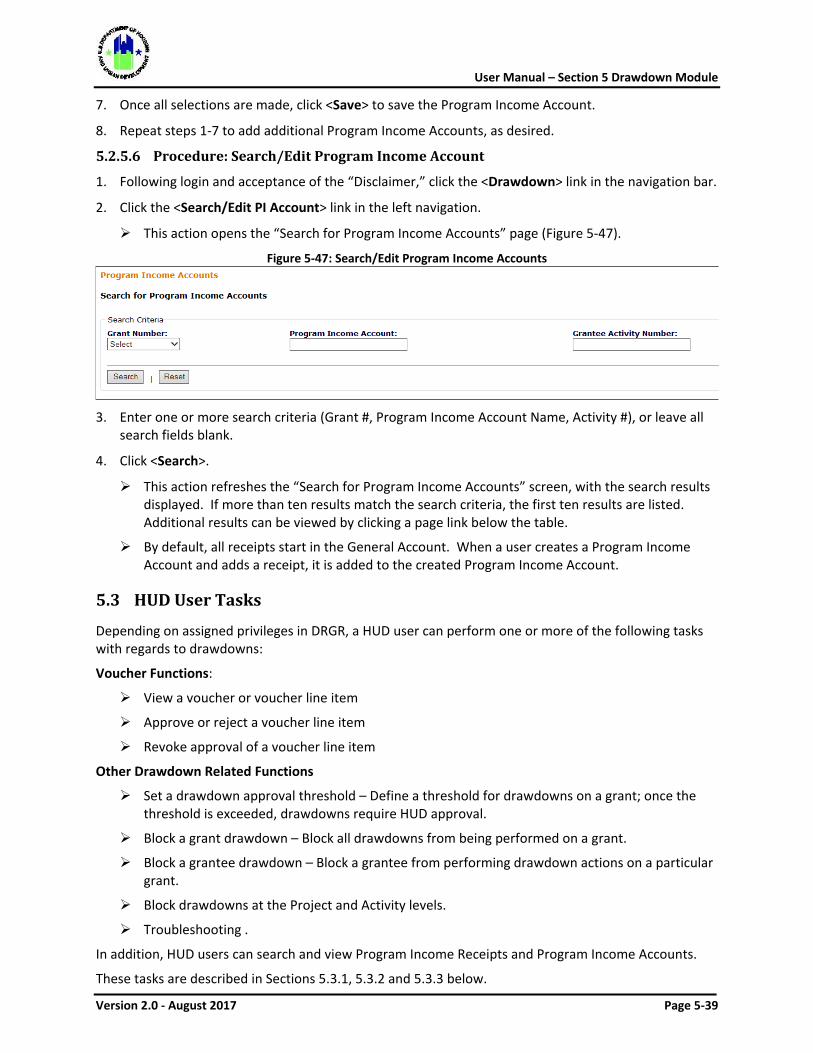
User Manual – Section 5 Drawdown Module
Version 2.0 - August 2017 Page 5-39
7. Once all selections are made, click <Save> to save the Program Income Account.
8. Repeat steps 1-7 to add additional Program Income Accounts, as desired.
5.2.5.6 Procedure: Search/Edit Program Income Account
1. Following login and acceptance of the “Disclaimer,” click the <Drawdown> link in the navigation bar.
2. Click the <Search/Edit PI Account> link in the left navigation.
This action opens the “Search for Program Income Accounts” page (Figure 5-47).
Figure 5-47: Search/Edit Program Income Accounts
3. Enter one or more search criteria (Grant #, Program Income Account Name, Activity #), or leave all search fields blank.
4. Click <Search>.
This action refreshes the “Search for Program Income Accounts” screen, with the search results displayed. If more than ten results match the search criteria, the first ten results are listed. Additional results can be viewed by clicking a page link below the table.
By default, all receipts start in the General Account. When a user creates a Program Income Account and adds a receipt, it is added to the created Program Income Account.
5.3 HUD User Tasks
Depending on assigned privileges in DRGR, a HUD user can perform one or more of the following tasks with regards to drawdowns:
Voucher Functions:
View a voucher or voucher line item
Approve or reject a voucher line item
Revoke approval of a voucher line item
Other Drawdown Related Functions
Set a drawdown approval threshold – Define a threshold for drawdowns on a grant; once the threshold is exceeded, drawdowns require HUD approval.
Block a grant drawdown – Block all drawdowns from being performed on a grant.
Block a grantee drawdown – Block a grantee from performing drawdown actions on a particular grant.
Block drawdowns at the Project and Activity levels.
Troubleshooting .
In addition, HUD users can search and view Program Income Receipts and Program Income Accounts.
These tasks are described in Sections 5.3.1, 5.3.2 and 5.3.3 below.
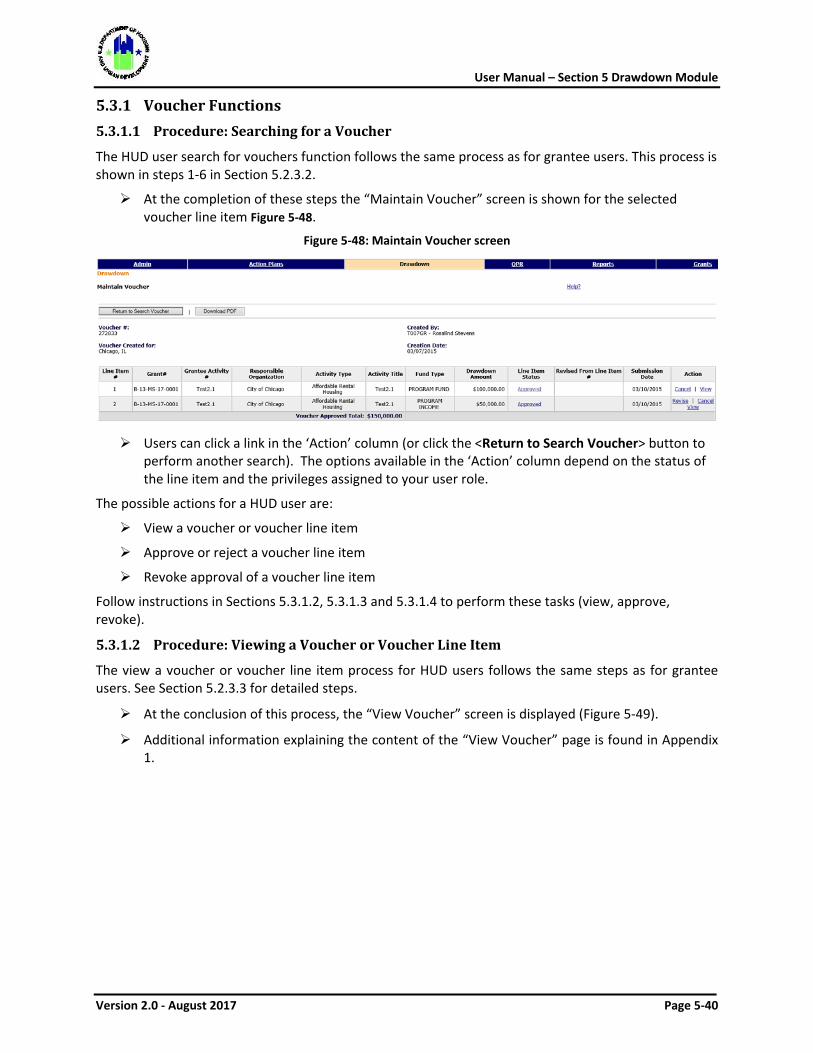
User Manual – Section 5 Drawdown Module
Version 2.0 - August 2017 Page 5-40
5.3.1 Voucher Functions 5.3.1.1 Procedure: Searching for a Voucher
The HUD user search for vouchers function follows the same process as for grantee users. This process is shown in steps 1-6 in Section 5.2.3.2.
At the completion of these steps the “Maintain Voucher” screen is shown for the selected voucher line item Figure 5-48.
Figure 5-48: Maintain Voucher screen
Users can click a link in the ‘Action’ column (or click the <Return to Search Voucher> button to
perform another search). The options available in the ‘Action’ column depend on the status of the line item and the privileges assigned to your user role.
The possible actions for a HUD user are:
View a voucher or voucher line item
Approve or reject a voucher line item
Revoke approval of a voucher line item
Follow instructions in Sections 5.3.1.2, 5.3.1.3 and 5.3.1.4 to perform these tasks (view, approve, revoke).
5.3.1.2 Procedure: Viewing a Voucher or Voucher Line Item
The view a voucher or voucher line item process for HUD users follows the same steps as for grantee users. See Section 5.2.3.3 for detailed steps.
At the conclusion of this process, the “View Voucher” screen is displayed (Figure 5-49).
Additional information explaining the content of the “View Voucher” page is found in Appendix 1.
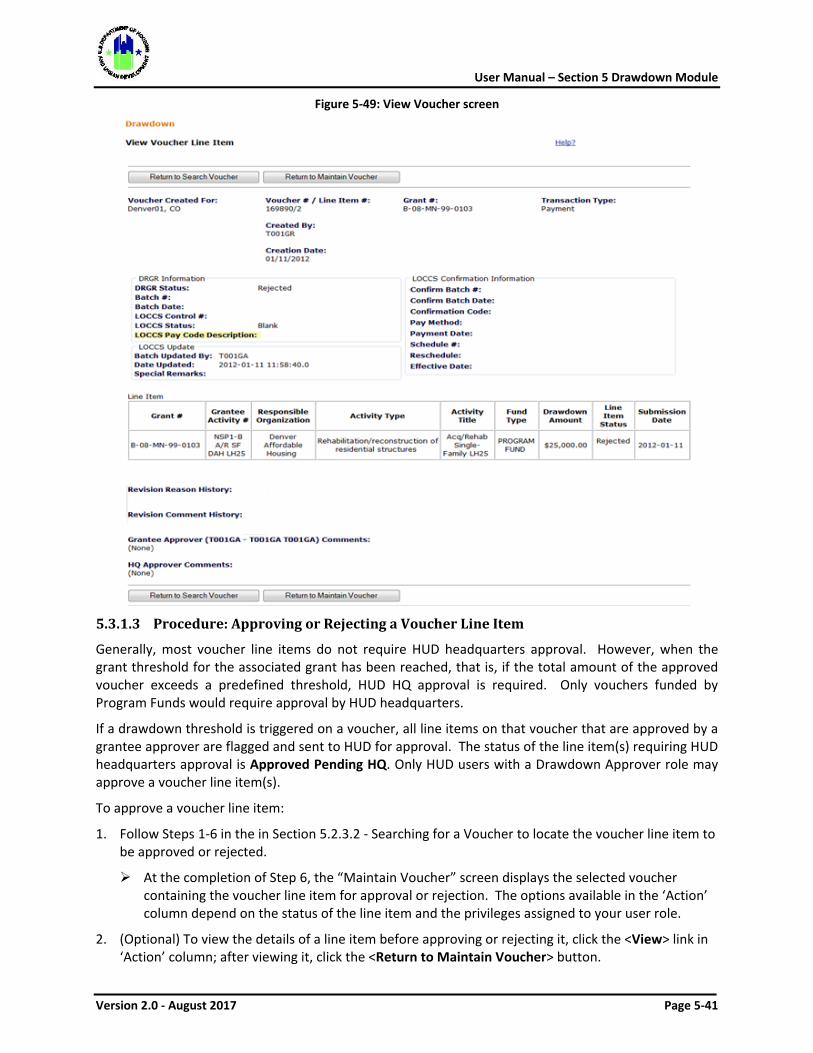
User Manual – Section 5 Drawdown Module
Version 2.0 - August 2017 Page 5-41
Figure 5-49: View Voucher screen
5.3.1.3 Procedure: Approving or Rejecting a Voucher Line Item
Generally, most voucher line items do not require HUD headquarters approval. However, when the grant threshold for the associated grant has been reached, that is, if the total amount of the approved voucher exceeds a predefined threshold, HUD HQ approval is required. Only vouchers funded by Program Funds would require approval by HUD headquarters.
If a drawdown threshold is triggered on a voucher, all line items on that voucher that are approved by a grantee approver are flagged and sent to HUD for approval. The status of the line item(s) requiring HUD headquarters approval is Approved Pending HQ. Only HUD users with a Drawdown Approver role may approve a voucher line item(s).
To approve a voucher line item:
1. Follow Steps 1-6 in the in Section 5.2.3.2 - Searching for a Voucher to locate the voucher line item to be approved or rejected.
At the completion of Step 6, the “Maintain Voucher” screen displays the selected voucher containing the voucher line item for approval or rejection. The options available in the ‘Action’ column depend on the status of the line item and the privileges assigned to your user role.
2. (Optional) To view the details of a line item before approving or rejecting it, click the <View> link in ‘Action’ column; after viewing it, click the <Return to Maintain Voucher> button.
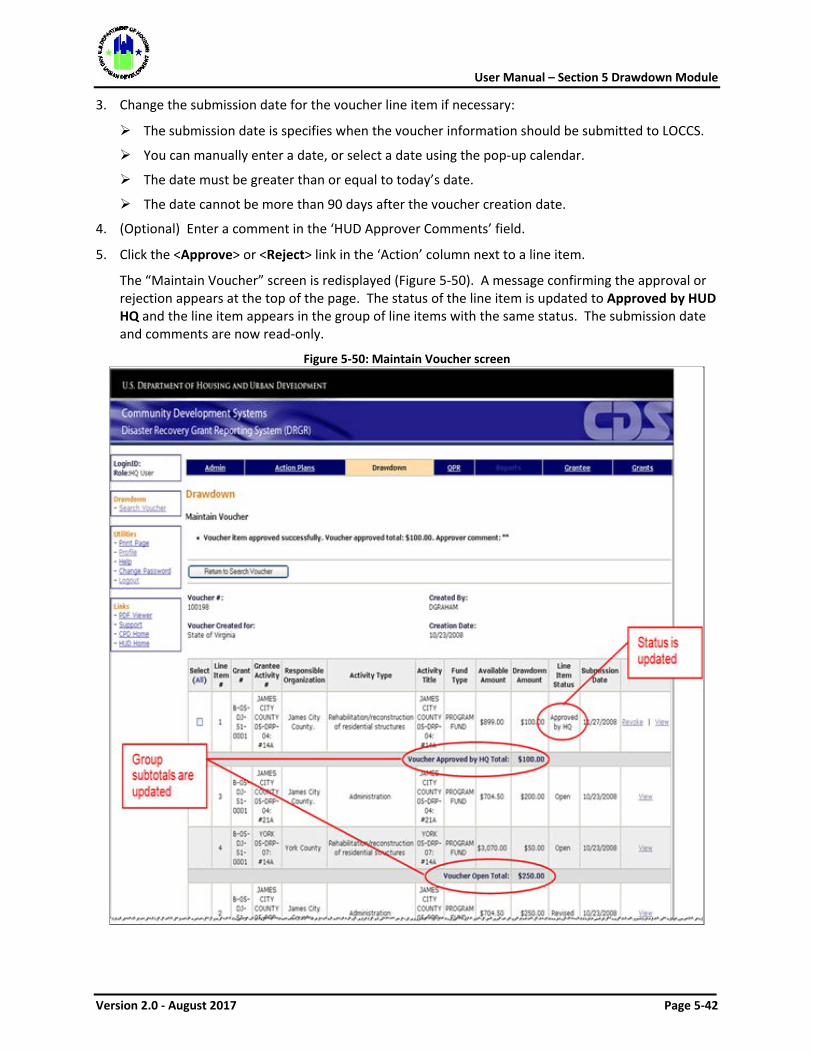
User Manual – Section 5 Drawdown Module
Version 2.0 - August 2017 Page 5-42
3. Change the submission date for the voucher line item if necessary:
The submission date is specifies when the voucher information should be submitted to LOCCS.
You can manually enter a date, or select a date using the pop-up calendar.
The date must be greater than or equal to today’s date.
The date cannot be more than 90 days after the voucher creation date.
4. (Optional) Enter a comment in the ‘HUD Approver Comments’ field.
5. Click the <Approve> or <Reject> link in the ‘Action’ column next to a line item.
The “Maintain Voucher” screen is redisplayed (Figure 5-50). A message confirming the approval or rejection appears at the top of the page. The status of the line item is updated to Approved by HUD HQ and the line item appears in the group of line items with the same status. The submission date and comments are now read-only.
Figure 5-50: Maintain Voucher screen
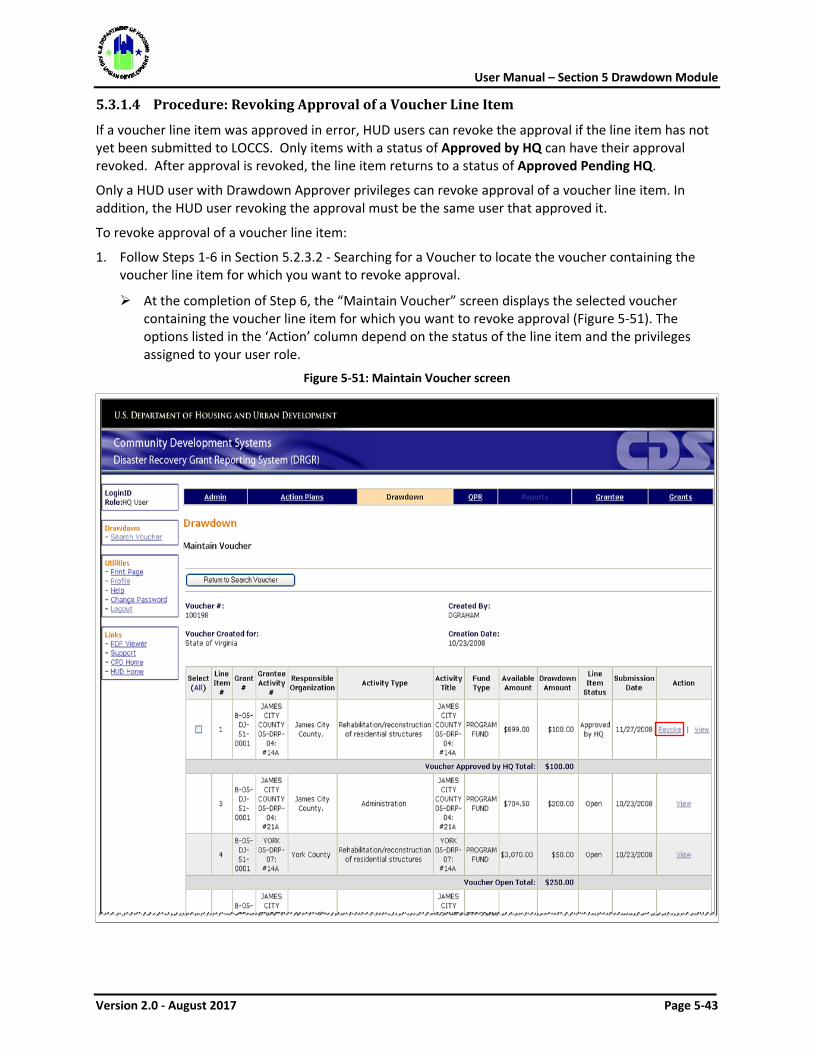
User Manual – Section 5 Drawdown Module
Version 2.0 - August 2017 Page 5-43
5.3.1.4 Procedure: Revoking Approval of a Voucher Line Item
If a voucher line item was approved in error, HUD users can revoke the approval if the line item has not yet been submitted to LOCCS. Only items with a status of Approved by HQ can have their approval revoked. After approval is revoked, the line item returns to a status of Approved Pending HQ.
Only a HUD user with Drawdown Approver privileges can revoke approval of a voucher line item. In addition, the HUD user revoking the approval must be the same user that approved it.
To revoke approval of a voucher line item:
1. Follow Steps 1-6 in Section 5.2.3.2 - Searching for a Voucher to locate the voucher containing the voucher line item for which you want to revoke approval.
At the completion of Step 6, the “Maintain Voucher” screen displays the selected voucher containing the voucher line item for which you want to revoke approval (Figure 5-51). The options listed in the ‘Action’ column depend on the status of the line item and the privileges assigned to your user role.
Figure 5-51: Maintain Voucher screen
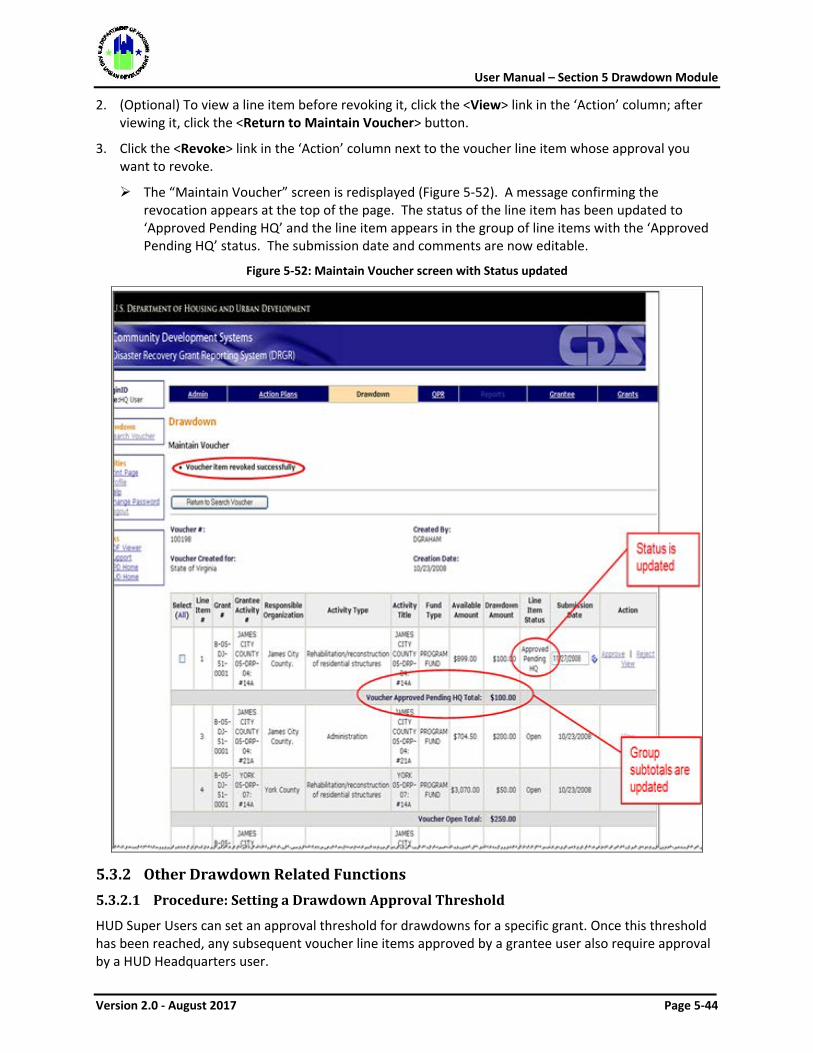
User Manual – Section 5 Drawdown Module
Version 2.0 - August 2017 Page 5-44
2. (Optional) To view a line item before revoking it, click the <View> link in the ‘Action’ column; after viewing it, click the <Return to Maintain Voucher> button.
3. Click the <Revoke> link in the ‘Action’ column next to the voucher line item whose approval you want to revoke.
The “Maintain Voucher” screen is redisplayed (Figure 5-52). A message confirming the revocation appears at the top of the page. The status of the line item has been updated to ‘Approved Pending HQ’ and the line item appears in the group of line items with the ‘Approved Pending HQ’ status. The submission date and comments are now editable.
Figure 5-52: Maintain Voucher screen with Status updated
5.3.2 Other Drawdown Related Functions 5.3.2.1 Procedure: Setting a Drawdown Approval Threshold
HUD Super Users can set an approval threshold for drawdowns for a specific grant. Once this threshold has been reached, any subsequent voucher line items approved by a grantee user also require approval by a HUD Headquarters user.
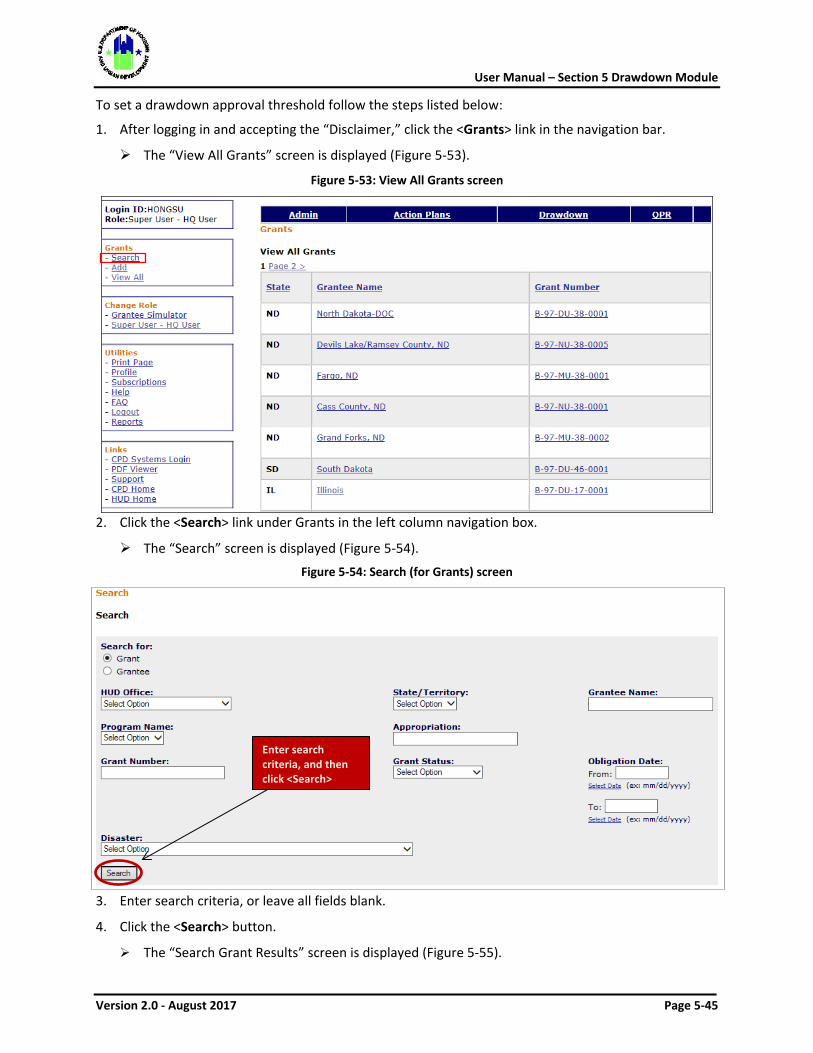
User Manual – Section 5 Drawdown Module
Version 2.0 - August 2017 Page 5-45
To set a drawdown approval threshold follow the steps listed below:
1. After logging in and accepting the “Disclaimer,” click the <Grants> link in the navigation bar.
The “View All Grants” screen is displayed (Figure 5-53).
Figure 5-53: View All Grants screen
2. Click the <Search> link under Grants in the left column navigation box.
The “Search” screen is displayed (Figure 5-54).
Figure 5-54: Search (for Grants) screen
3. Enter search criteria, or leave all fields blank.
4. Click the <Search> button.
The “Search Grant Results” screen is displayed (Figure 5-55).
Enter search criteria, and then click <Search>
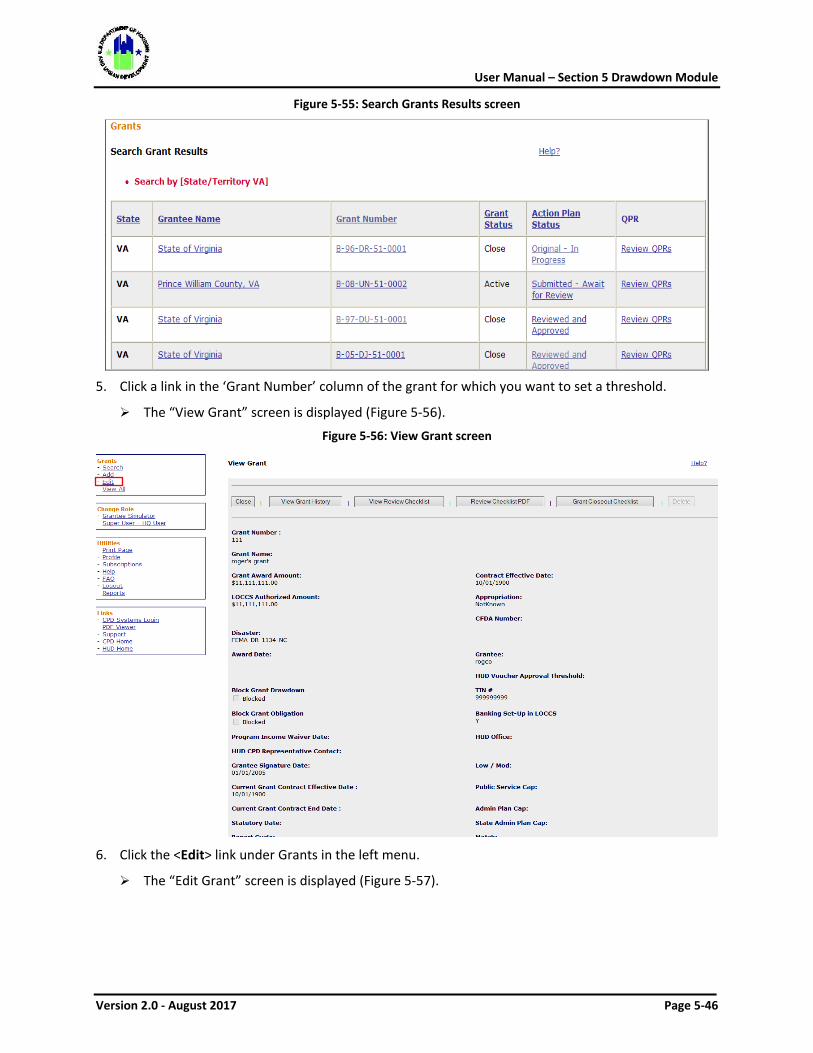
User Manual – Section 5 Drawdown Module
Version 2.0 - August 2017 Page 5-46
Figure 5-55: Search Grants Results screen
5. Click a link in the ‘Grant Number’ column of the grant for which you want to set a threshold.
The “View Grant” screen is displayed (Figure 5-56).
Figure 5-56: View Grant screen
6. Click the <Edit> link under Grants in the left menu.
The “Edit Grant” screen is displayed (Figure 5-57).
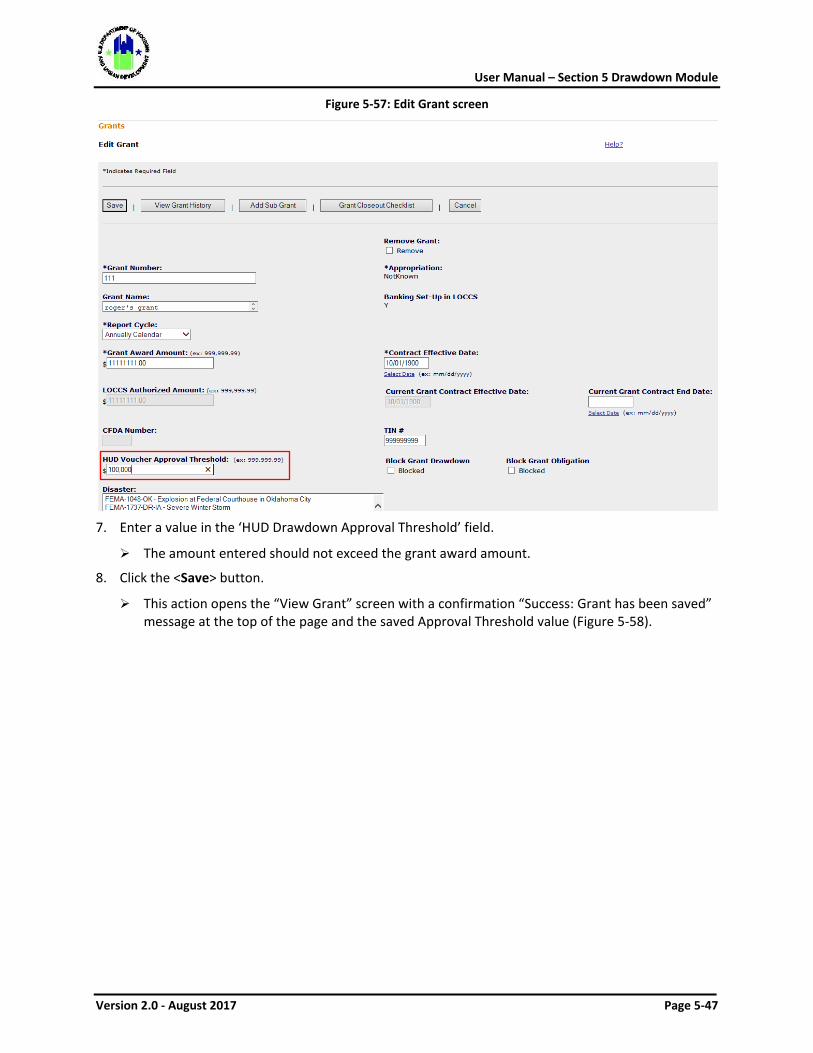
User Manual – Section 5 Drawdown Module
Version 2.0 - August 2017 Page 5-47
Figure 5-57: Edit Grant screen
7. Enter a value in the ‘HUD Drawdown Approval Threshold’ field.
The amount entered should not exceed the grant award amount.
8. Click the <Save> button.
This action opens the “View Grant” screen with a confirmation “Success: Grant has been saved” message at the top of the page and the saved Approval Threshold value (Figure 5-58).
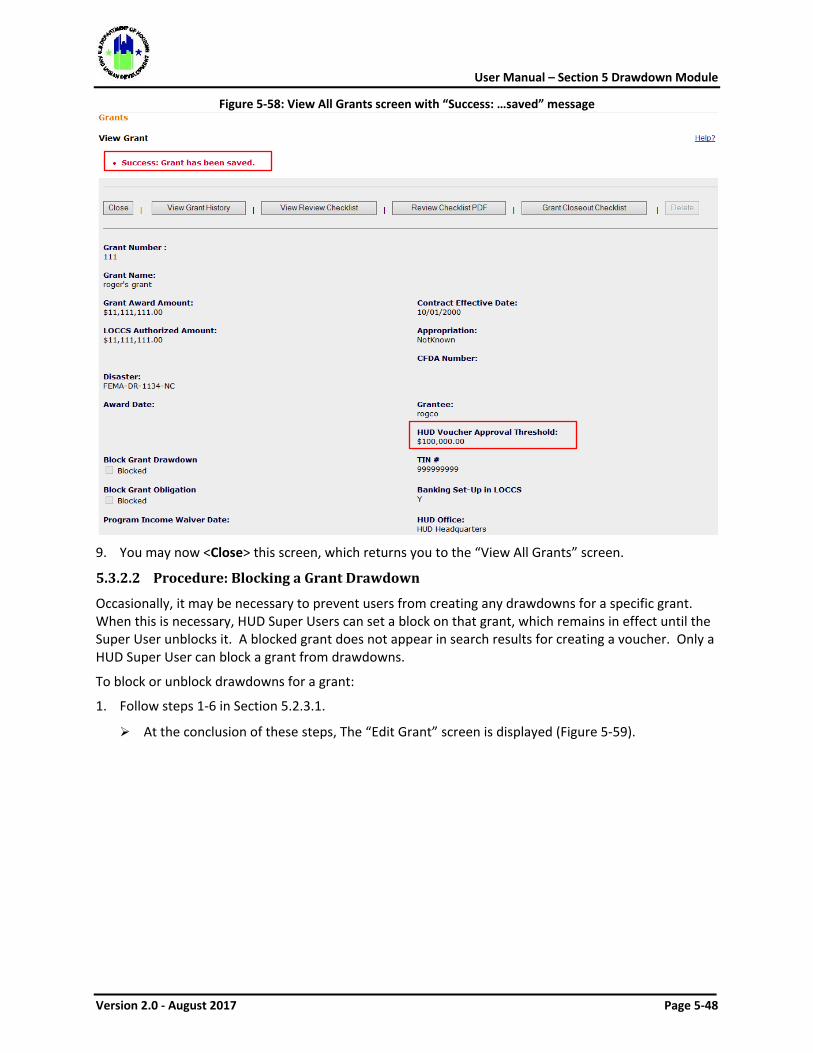
User Manual – Section 5 Drawdown Module
Version 2.0 - August 2017 Page 5-48
Figure 5-58: View All Grants screen with “Success: …saved” message
9. You may now <Close> this screen, which returns you to the “View All Grants” screen.
5.3.2.2 Procedure: Blocking a Grant Drawdown
Occasionally, it may be necessary to prevent users from creating any drawdowns for a specific grant. When this is necessary, HUD Super Users can set a block on that grant, which remains in effect until the Super User unblocks it. A blocked grant does not appear in search results for creating a voucher. Only a HUD Super User can block a grant from drawdowns.
To block or unblock drawdowns for a grant:
1. Follow steps 1-6 in Section 5.2.3.1.
At the conclusion of these steps, The “Edit Grant” screen is displayed (Figure 5-59).
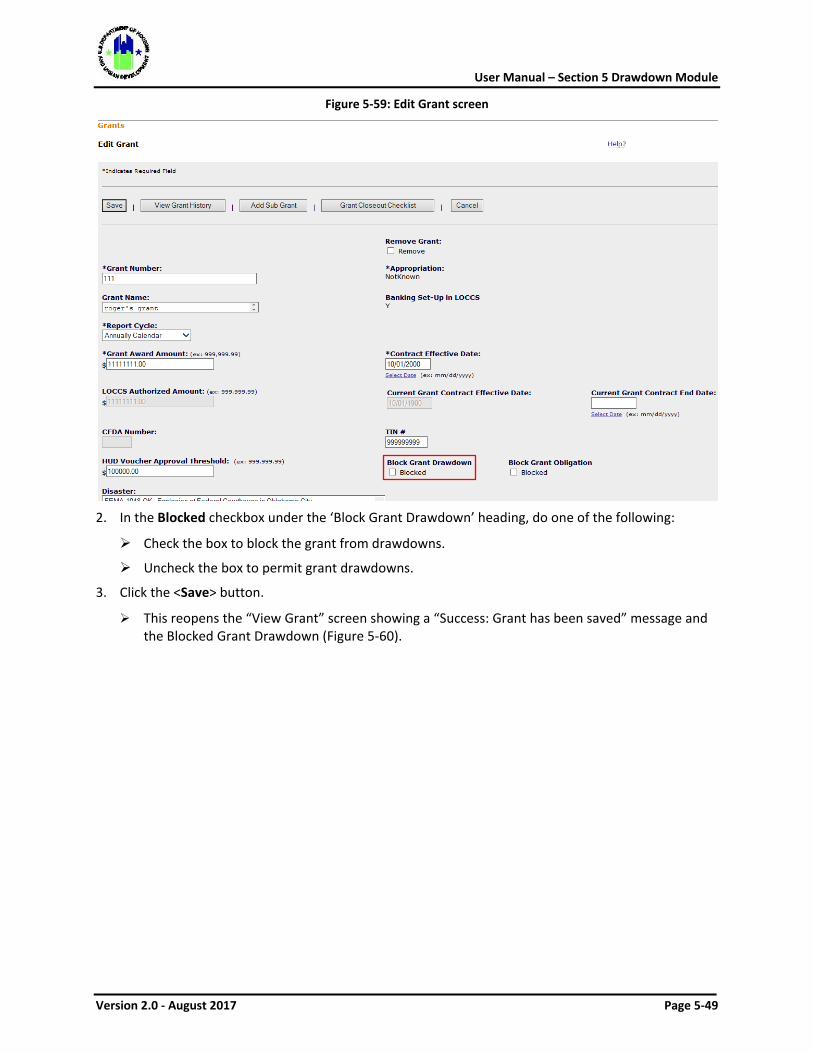
User Manual – Section 5 Drawdown Module
Version 2.0 - August 2017 Page 5-49
Figure 5-59: Edit Grant screen
2. In the Blocked checkbox under the ‘Block Grant Drawdown’ heading, do one of the following:
Check the box to block the grant from drawdowns.
Uncheck the box to permit grant drawdowns.
3. Click the <Save> button.
This reopens the “View Grant” screen showing a “Success: Grant has been saved” message and the Blocked Grant Drawdown (Figure 5-60).
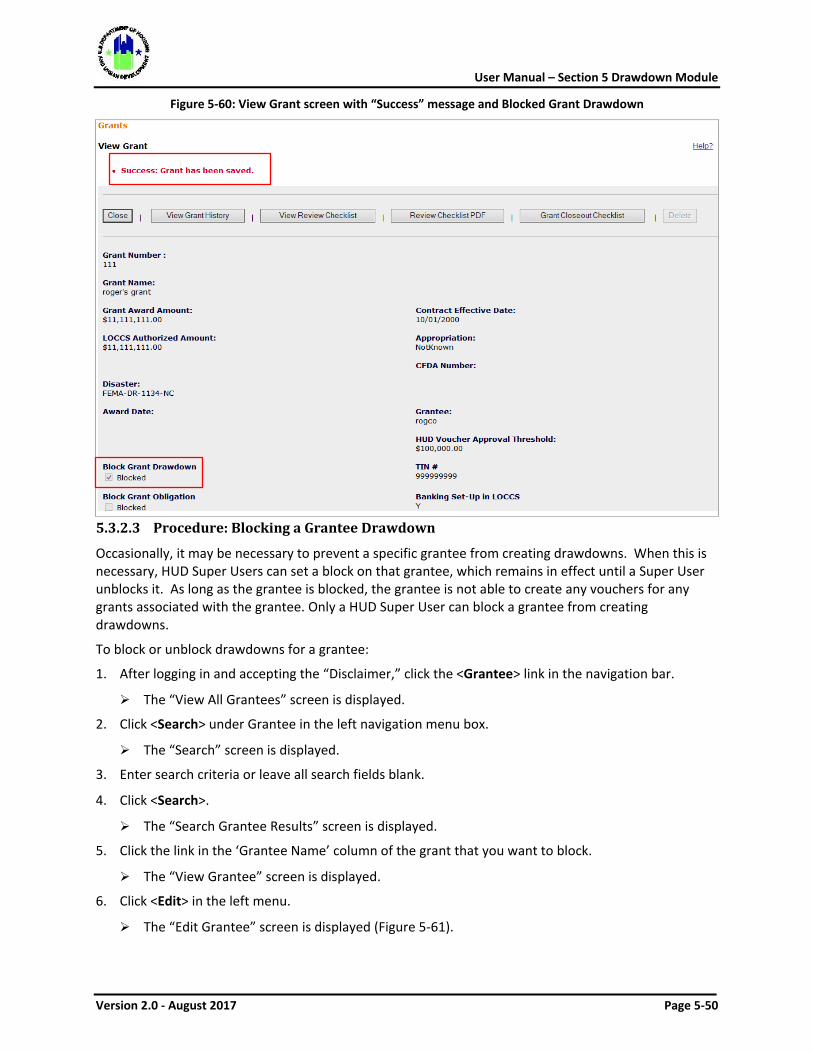
User Manual – Section 5 Drawdown Module
Version 2.0 - August 2017 Page 5-50
Figure 5-60: View Grant screen with “Success” message and Blocked Grant Drawdown
5.3.2.3 Procedure: Blocking a Grantee Drawdown
Occasionally, it may be necessary to prevent a specific grantee from creating drawdowns. When this is necessary, HUD Super Users can set a block on that grantee, which remains in effect until a Super User unblocks it. As long as the grantee is blocked, the grantee is not able to create any vouchers for any grants associated with the grantee. Only a HUD Super User can block a grantee from creating drawdowns.
To block or unblock drawdowns for a grantee:
1. After logging in and accepting the “Disclaimer,” click the <Grantee> link in the navigation bar.
The “View All Grantees” screen is displayed.
2. Click <Search> under Grantee in the left navigation menu box.
The “Search” screen is displayed.
3. Enter search criteria or leave all search fields blank.
4. Click <Search>.
The “Search Grantee Results” screen is displayed.
5. Click the link in the ‘Grantee Name’ column of the grant that you want to block.
The “View Grantee” screen is displayed.
6. Click <Edit> in the left menu.
The “Edit Grantee” screen is displayed (Figure 5-61).
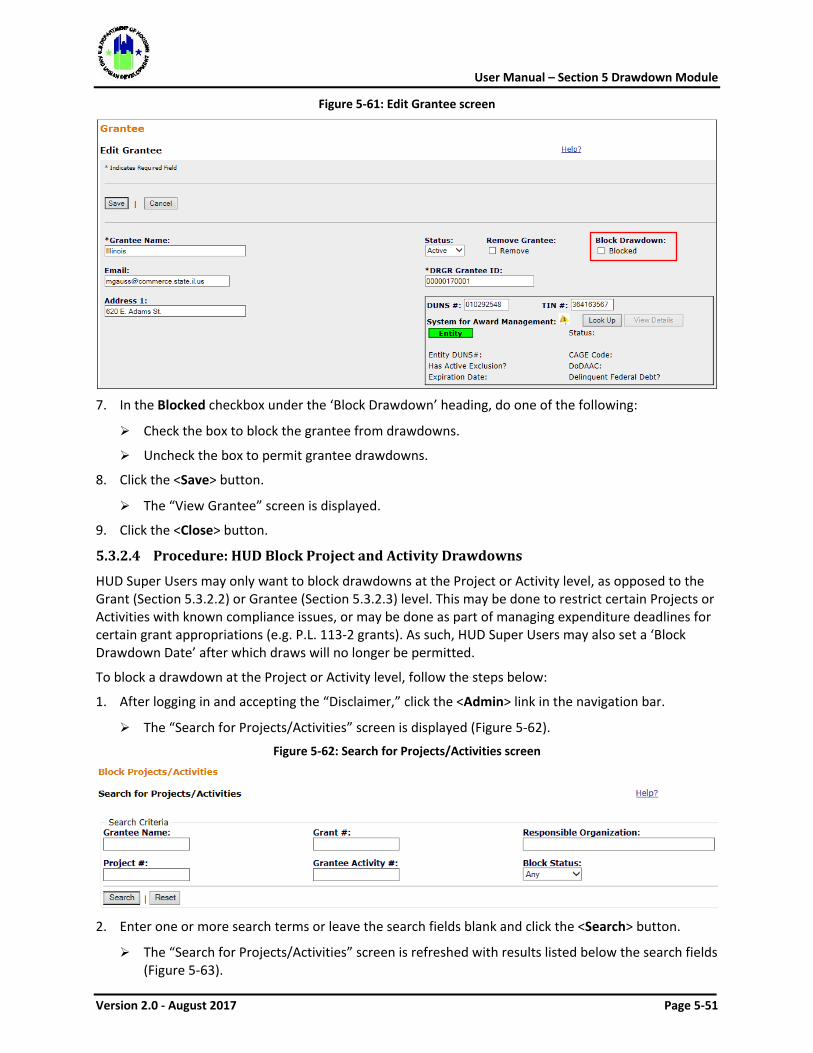
User Manual – Section 5 Drawdown Module
Version 2.0 - August 2017 Page 5-51
Figure 5-61: Edit Grantee screen
7. In the Blocked checkbox under the ‘Block Drawdown’ heading, do one of the following:
Check the box to block the grantee from drawdowns.
Uncheck the box to permit grantee drawdowns.
8. Click the <Save> button.
The “View Grantee” screen is displayed.
9. Click the <Close> button.
5.3.2.4 Procedure: HUD Block Project and Activity Drawdowns
HUD Super Users may only want to block drawdowns at the Project or Activity level, as opposed to the Grant (Section 5.3.2.2) or Grantee (Section 5.3.2.3) level. This may be done to restrict certain Projects or Activities with known compliance issues, or may be done as part of managing expenditure deadlines for certain grant appropriations (e.g. P.L. 113-2 grants). As such, HUD Super Users may also set a ‘Block Drawdown Date’ after which draws will no longer be permitted.
To block a drawdown at the Project or Activity level, follow the steps below:
1. After logging in and accepting the “Disclaimer,” click the <Admin> link in the navigation bar.
The “Search for Projects/Activities” screen is displayed (Figure 5-62).
Figure 5-62: Search for Projects/Activities screen
2. Enter one or more search terms or leave the search fields blank and click the <Search> button.
The “Search for Projects/Activities” screen is refreshed with results listed below the search fields (Figure 5-63).
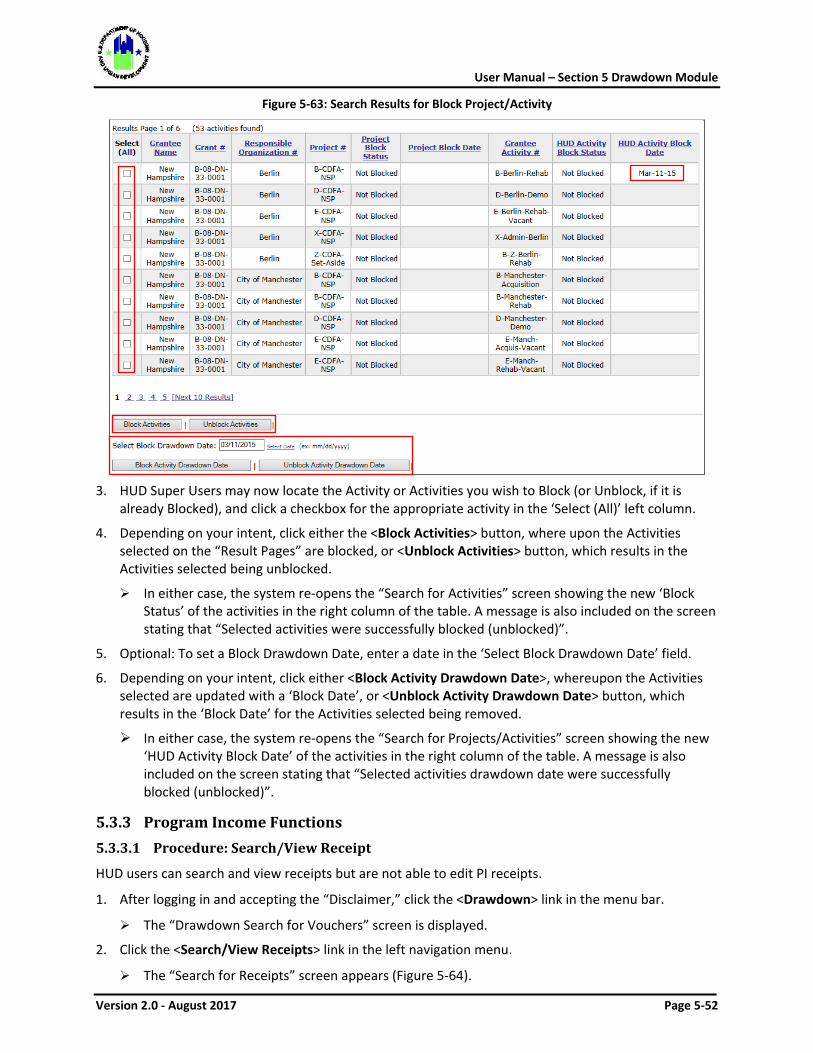
User Manual – Section 5 Drawdown Module
Version 2.0 - August 2017 Page 5-52
Figure 5-63: Search Results for Block Project/Activity
3. HUD Super Users may now locate the Activity or Activities you wish to Block (or Unblock, if it is
already Blocked), and click a checkbox for the appropriate activity in the ‘Select (All)’ left column.
4. Depending on your intent, click either the <Block Activities> button, where upon the Activities selected on the “Result Pages” are blocked, or <Unblock Activities> button, which results in the Activities selected being unblocked.
In either case, the system re-opens the “Search for Activities” screen showing the new ‘Block Status’ of the activities in the right column of the table. A message is also included on the screen stating that “Selected activities were successfully blocked (unblocked)”.
5. Optional: To set a Block Drawdown Date, enter a date in the ‘Select Block Drawdown Date’ field.
6. Depending on your intent, click either <Block Activity Drawdown Date>, whereupon the Activities selected are updated with a ‘Block Date’, or <Unblock Activity Drawdown Date> button, which results in the ‘Block Date’ for the Activities selected being removed.
In either case, the system re-opens the “Search for Projects/Activities” screen showing the new ‘HUD Activity Block Date’ of the activities in the right column of the table. A message is also included on the screen stating that “Selected activities drawdown date were successfully blocked (unblocked)”.
5.3.3 Program Income Functions 5.3.3.1 Procedure: Search/View Receipt
HUD users can search and view receipts but are not able to edit PI receipts.
1. After logging in and accepting the “Disclaimer,” click the <Drawdown> link in the menu bar.
The “Drawdown Search for Vouchers” screen is displayed.
2. Click the <Search/View Receipts> link in the left navigation menu.
The “Search for Receipts” screen appears (Figure 5-64).
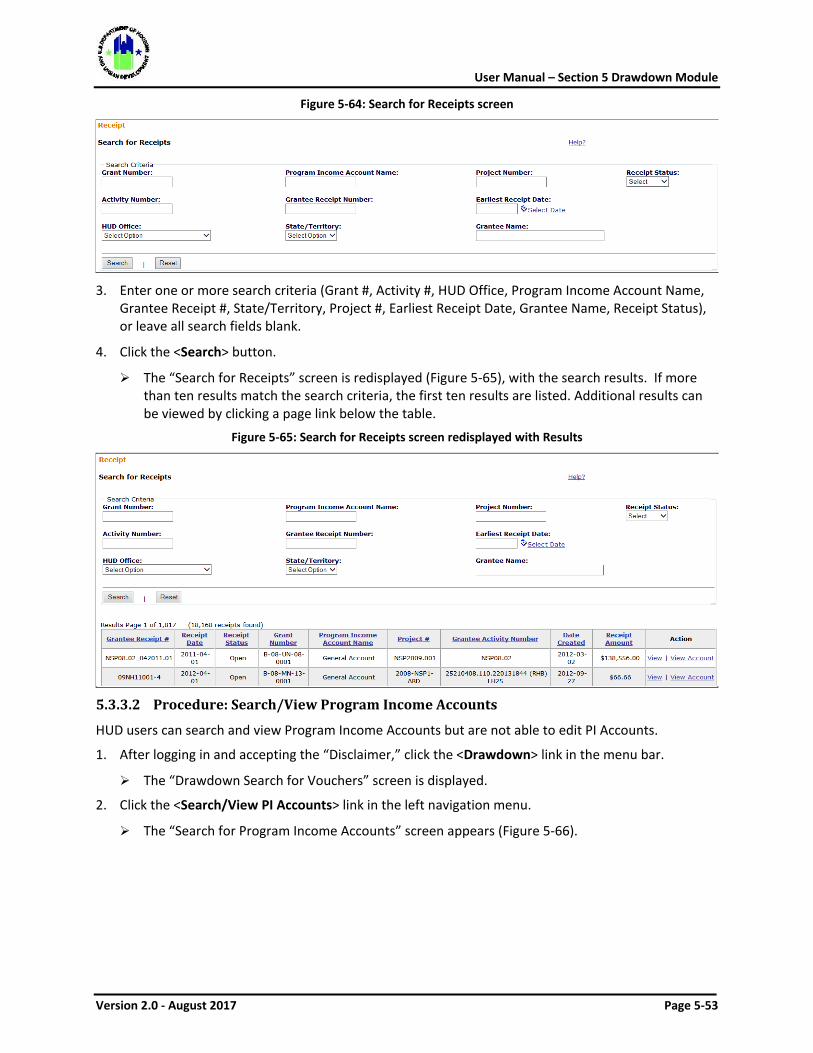
User Manual – Section 5 Drawdown Module
Version 2.0 - August 2017 Page 5-53
Figure 5-64: Search for Receipts screen
3. Enter one or more search criteria (Grant #, Activity #, HUD Office, Program Income Account Name,
Grantee Receipt #, State/Territory, Project #, Earliest Receipt Date, Grantee Name, Receipt Status), or leave all search fields blank.
4. Click the <Search> button.
The “Search for Receipts” screen is redisplayed (Figure 5-65), with the search results. If more than ten results match the search criteria, the first ten results are listed. Additional results can be viewed by clicking a page link below the table.
Figure 5-65: Search for Receipts screen redisplayed with Results
5.3.3.2 Procedure: Search/View Program Income Accounts
HUD users can search and view Program Income Accounts but are not able to edit PI Accounts.
1. After logging in and accepting the “Disclaimer,” click the <Drawdown> link in the menu bar.
The “Drawdown Search for Vouchers” screen is displayed.
2. Click the <Search/View PI Accounts> link in the left navigation menu.
The “Search for Program Income Accounts” screen appears (Figure 5-66).

User Manual – Section 5 Drawdown Module
Version 2.0 - August 2017 Page 5-54
Figure 5-66: Search for Program Income Accounts screen
3. Enter one or more search criteria (Grant #, HUD Office, Program Income Account, State/Territory,
Grantee Activity #, Grantee Name), or leave all search fields blank.
4. Click the <Search> button.
The “Search for Program Income Account” screen is redisplayed (Figure 5-67), with the search results. If more than ten results match the search criteria, the first ten results are listed. Additional results can be viewed by clicking a page link below the table.
Figure 5-67: Search for Program Income Accounts screen redisplayed with Results
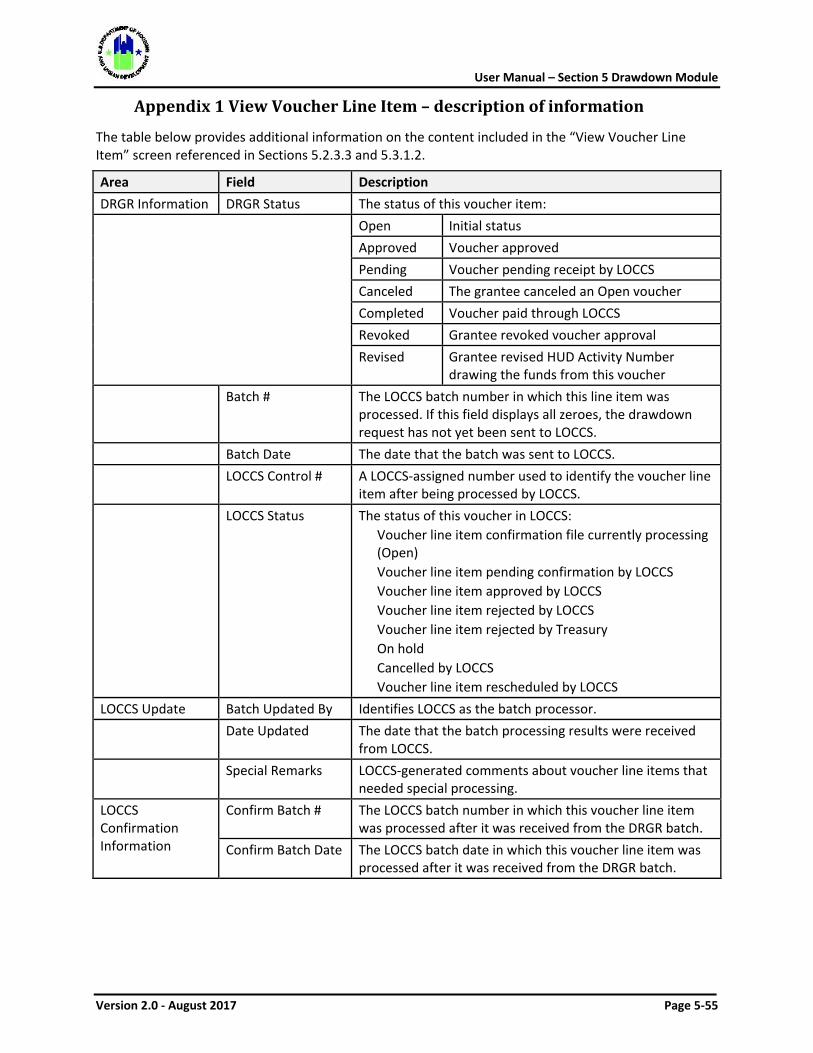
User Manual – Section 5 Drawdown Module
Version 2.0 - August 2017 Page 5-55
Appendix 1 View Voucher Line Item – description of information
The table below provides additional information on the content included in the “View Voucher Line Item” screen referenced in Sections 5.2.3.3 and 5.3.1.2.
Area Field Description DRGR Information DRGR Status The status of this voucher item: Open Initial status
Approved Voucher approved Pending Voucher pending receipt by LOCCS Canceled The grantee canceled an Open voucher Completed Voucher paid through LOCCS Revoked Grantee revoked voucher approval Revised Grantee revised HUD Activity Number
drawing the funds from this voucher Batch # The LOCCS batch number in which this line item was
processed. If this field displays all zeroes, the drawdown request has not yet been sent to LOCCS.
Batch Date The date that the batch was sent to LOCCS. LOCCS Control # A LOCCS-assigned number used to identify the voucher line
item after being processed by LOCCS. LOCCS Status The status of this voucher in LOCCS:
Voucher line item confirmation file currently processing (Open) Voucher line item pending confirmation by LOCCS Voucher line item approved by LOCCS Voucher line item rejected by LOCCS Voucher line item rejected by Treasury On hold Cancelled by LOCCS Voucher line item rescheduled by LOCCS
LOCCS Update Batch Updated By Identifies LOCCS as the batch processor. Date Updated The date that the batch processing results were received
from LOCCS. Special Remarks LOCCS-generated comments about voucher line items that
needed special processing. LOCCS Confirmation Information
Confirm Batch # The LOCCS batch number in which this voucher line item was processed after it was received from the DRGR batch.
Confirm Batch Date The LOCCS batch date in which this voucher line item was processed after it was received from the DRGR batch.
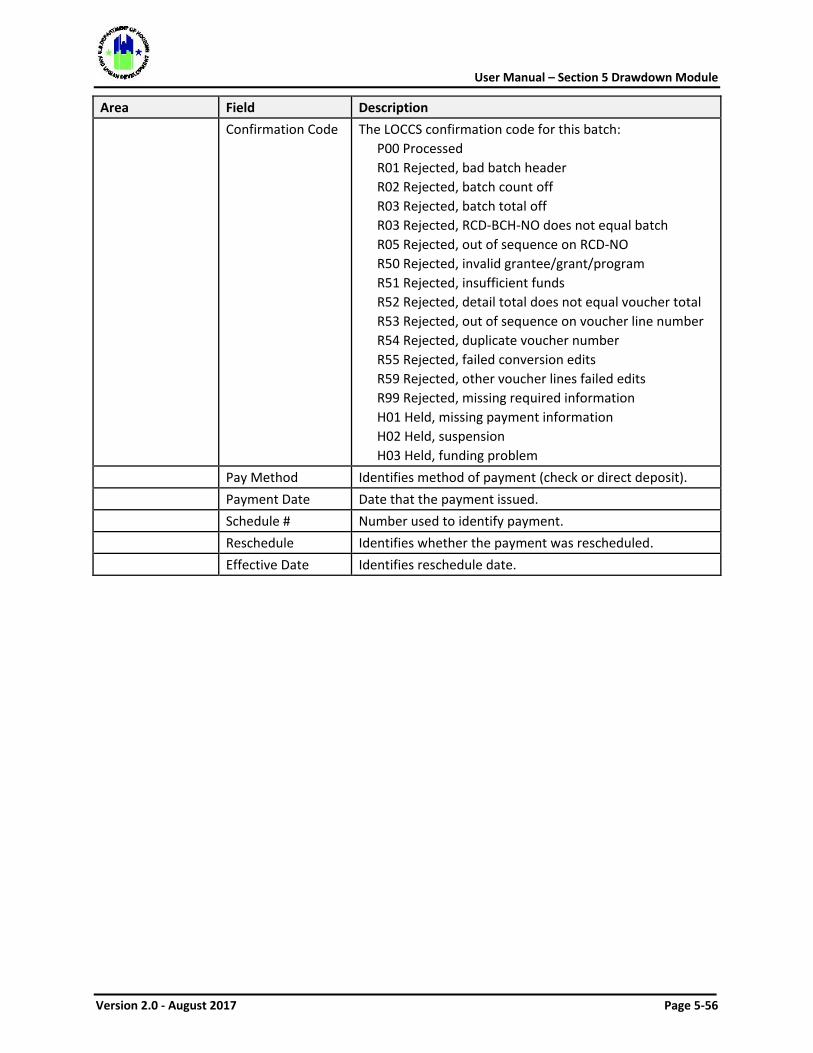
User Manual – Section 5 Drawdown Module
Version 2.0 - August 2017 Page 5-56
Area Field Description Confirmation Code The LOCCS confirmation code for this batch:
P00 Processed R01 Rejected, bad batch header R02 Rejected, batch count off R03 Rejected, batch total off R03 Rejected, RCD-BCH-NO does not equal batch R05 Rejected, out of sequence on RCD-NO R50 Rejected, invalid grantee/grant/program R51 Rejected, insufficient funds R52 Rejected, detail total does not equal voucher total R53 Rejected, out of sequence on voucher line number R54 Rejected, duplicate voucher number R55 Rejected, failed conversion edits R59 Rejected, other voucher lines failed edits R99 Rejected, missing required information H01 Held, missing payment information H02 Held, suspension H03 Held, funding problem
Pay Method Identifies method of payment (check or direct deposit). Payment Date Date that the payment issued. Schedule # Number used to identify payment. Reschedule Identifies whether the payment was rescheduled. Effective Date Identifies reschedule date.
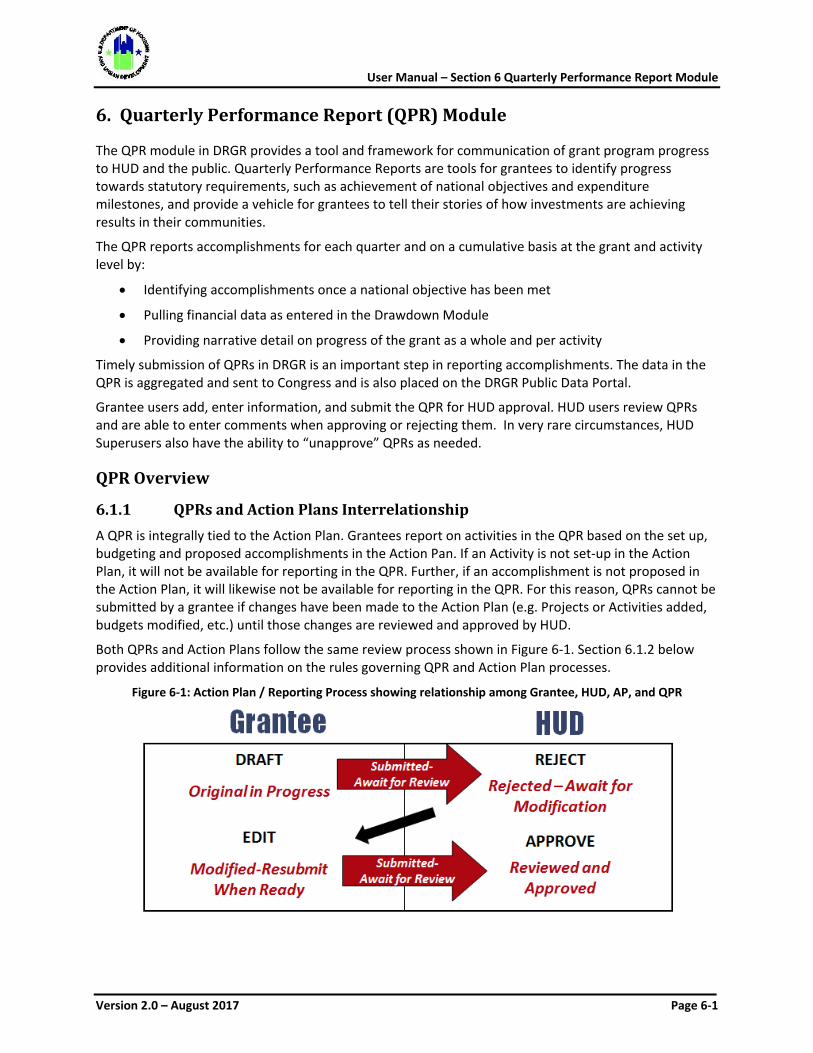
User Manual – Section 6 Quarterly Performance Report Module
Version 2.0 – August 2017 Page 6-1
6. Quarterly Performance Report (QPR) Module
The QPR module in DRGR provides a tool and framework for communication of grant program progress to HUD and the public. Quarterly Performance Reports are tools for grantees to identify progress towards statutory requirements, such as achievement of national objectives and expenditure milestones, and provide a vehicle for grantees to tell their stories of how investments are achieving results in their communities.
The QPR reports accomplishments for each quarter and on a cumulative basis at the grant and activity level by:
• Identifying accomplishments once a national objective has been met
• Pulling financial data as entered in the Drawdown Module
• Providing narrative detail on progress of the grant as a whole and per activity
Timely submission of QPRs in DRGR is an important step in reporting accomplishments. The data in the QPR is aggregated and sent to Congress and is also placed on the DRGR Public Data Portal.
Grantee users add, enter information, and submit the QPR for HUD approval. HUD users review QPRs and are able to enter comments when approving or rejecting them. In very rare circumstances, HUD Superusers also have the ability to “unapprove” QPRs as needed.
QPR Overview
6.1.1 QPRs and Action Plans Interrelationship A QPR is integrally tied to the Action Plan. Grantees report on activities in the QPR based on the set up, budgeting and proposed accomplishments in the Action Pan. If an Activity is not set-up in the Action Plan, it will not be available for reporting in the QPR. Further, if an accomplishment is not proposed in the Action Plan, it will likewise not be available for reporting in the QPR. For this reason, QPRs cannot be submitted by a grantee if changes have been made to the Action Plan (e.g. Projects or Activities added, budgets modified, etc.) until those changes are reviewed and approved by HUD.
Both QPRs and Action Plans follow the same review process shown in Figure 6-1. Section 6.1.2 below provides additional information on the rules governing QPR and Action Plan processes.
Figure 6-1: Action Plan / Reporting Process showing relationship among Grantee, HUD, AP, and QPR

User Manual – Section 6 Quarterly Performance Report Module
Version 2.0 – August 2017 Page 6-2
6.1.2 DRGR Rules for the Action Plans / QPRs Process The Action Plan must be in ‘Reviewed and Approved’ status in order for a grantee to submit a QPR. When Action Plans are in approved status, grantees can continue to add and submit QPRs for approval regardless of the status of prior QPRs. However, grantees should submit and HUD staff should approve QPRs in order since the data is cumulative based on prior QPRs.
Action Plan changes should be submitted well in advance of QPR due dates to allow time for HUD review of Action Plan changes. Grantees are encouraged to coordinate with their HUD CPD Representatives on submissions of Action Plans to avoid interference with QPR submissions.
6.1.3 QPR Due Dates A grantee’s first QPR is due 30 days after the first full quarter after the initial grant agreement is signed. Due dates vary by grant appropriation. With the exception of NSP2, most grant programs follow the due dates below (NSP2 QPRs are due 10 days following the Reporting Period end date):
Reporting Period End Date Grantee QPR Submission Deadlines
31-March 30-Apr
30-Jun 30-Jul
30-Sep 30-Oct
31-Dec 30-Jan
6.1.4 Submit QPR Roles All grantee users except ‘View Only’ users can edit QPRs. However, in order to submit a QPR to HUD, grantee users must have an additional ‘Submit QPR’ role. See Section 3 – Admin Module for more information on adding and changing grantee user roles.
6.1.5 Subordinate Grantees Grantee Admin users can elect to authorize restricted access to users from Subordinate Grantees. This access includes an ‘Edit QPR’ role, which allows authorized Subordinate Grantee users to edit activities in the QPR for which they are the primary Responsible Organization. Subordinate Grantee users can never submit a QPR or edit activities where they are not the primary Responsible Organization.
See Section 3 – Admin Module for more information about associating a Subordinate Grantee and assigning roles, including the ‘Edit QPR’ role, to Subordinate Grantee users.
6.2 QPR Functions
Grantees can perform a variety of functions in the QPR module to complete and modify grant reporting. The basic grantee QPR functions include:
• Adding a QPR to a grant, including adding ‘missing’ QPRs
• Editing a QPR, including adding accomplishment data and completing ‘prior period corrections’ (as necessary)
• Submitting a QPR
• HUD Review of QPR
• Viewing and Downloading a QPR
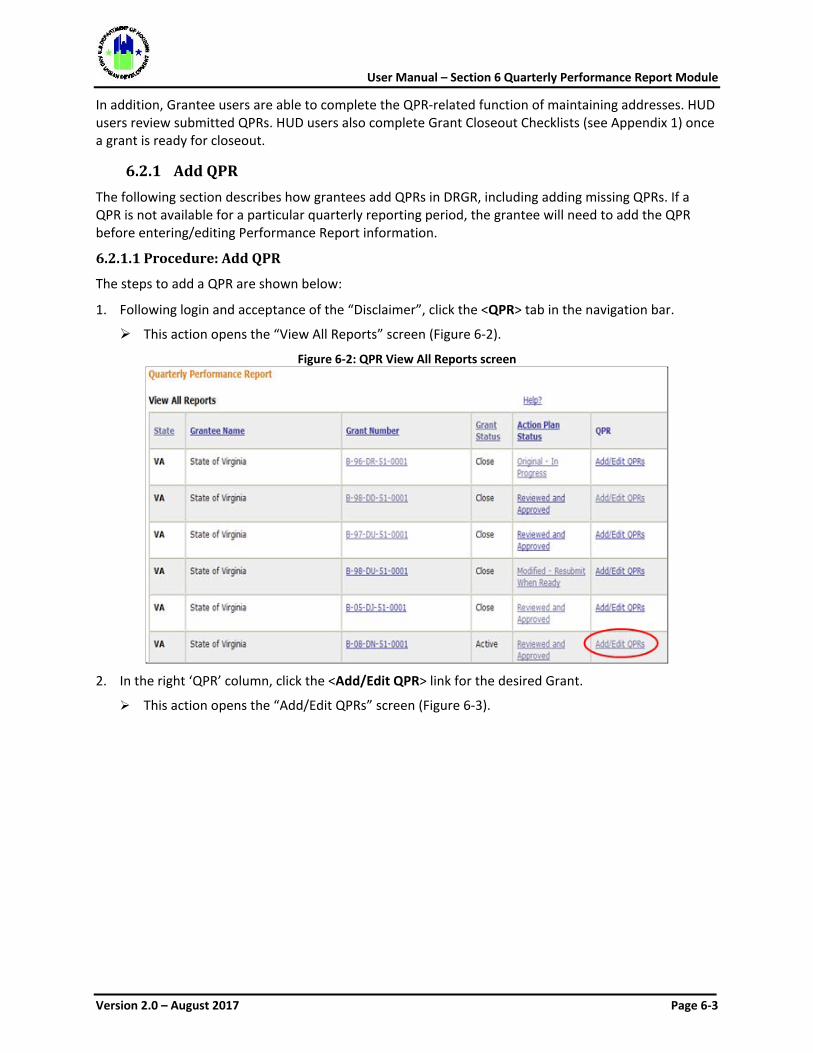
User Manual – Section 6 Quarterly Performance Report Module
Version 2.0 – August 2017 Page 6-3
In addition, Grantee users are able to complete the QPR-related function of maintaining addresses. HUD users review submitted QPRs. HUD users also complete Grant Closeout Checklists (see Appendix 1) once a grant is ready for closeout.
6.2.1 Add QPR The following section describes how grantees add QPRs in DRGR, including adding missing QPRs. If a QPR is not available for a particular quarterly reporting period, the grantee will need to add the QPR before entering/editing Performance Report information.
6.2.1.1 Procedure: Add QPR
The steps to add a QPR are shown below:
1. Following login and acceptance of the “Disclaimer”, click the <QPR> tab in the navigation bar.
This action opens the “View All Reports” screen (Figure 6-2).
Figure 6-2: QPR View All Reports screen
2. In the right ‘QPR’ column, click the <Add/Edit QPR> link for the desired Grant.
This action opens the “Add/Edit QPRs” screen (Figure 6-3).
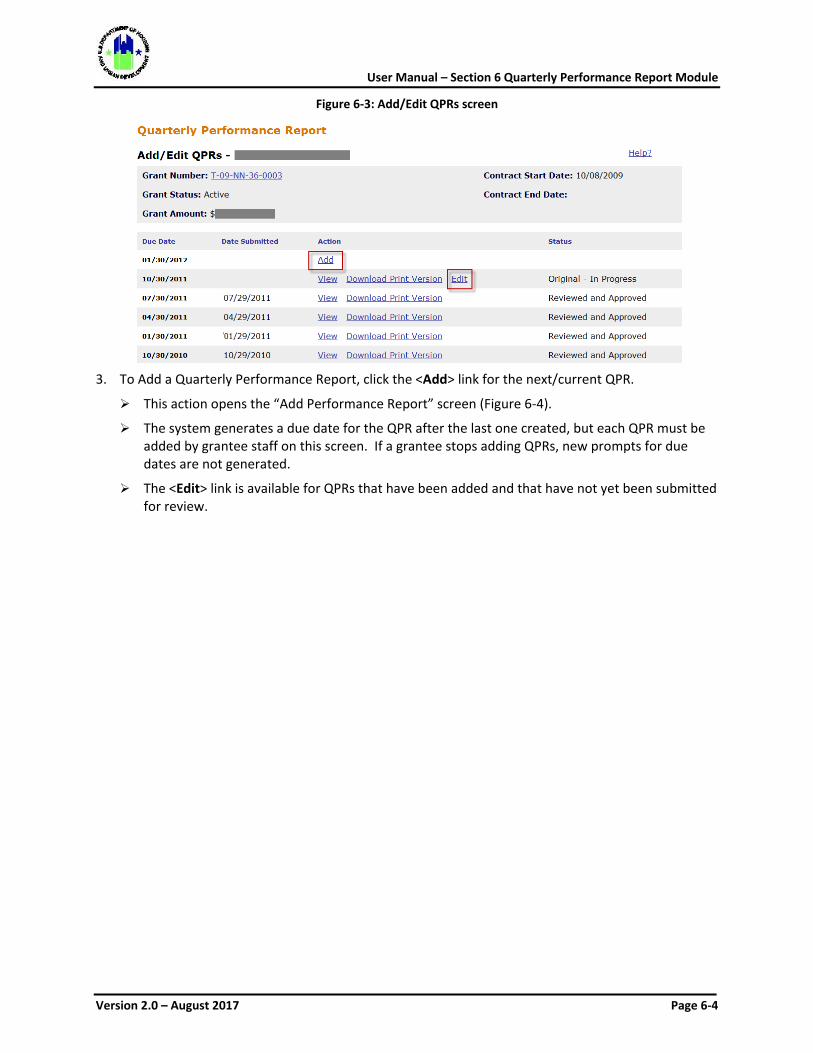
User Manual – Section 6 Quarterly Performance Report Module
Version 2.0 – August 2017 Page 6-4
Figure 6-3: Add/Edit QPRs screen
3. To Add a Quarterly Performance Report, click the <Add> link for the next/current QPR.
This action opens the “Add Performance Report” screen (Figure 6-4).
The system generates a due date for the QPR after the last one created, but each QPR must be added by grantee staff on this screen. If a grantee stops adding QPRs, new prompts for due dates are not generated.
The <Edit> link is available for QPRs that have been added and that have not yet been submitted for review.
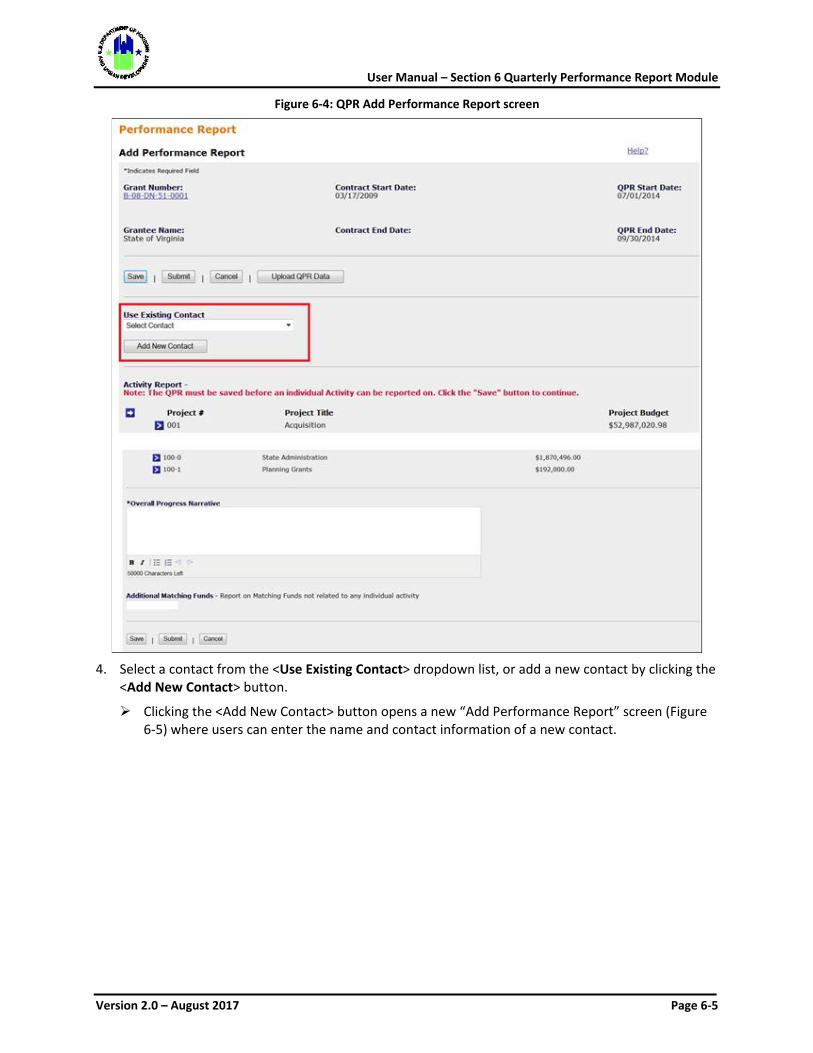
User Manual – Section 6 Quarterly Performance Report Module
Version 2.0 – August 2017 Page 6-5
Figure 6-4: QPR Add Performance Report screen
4. Select a contact from the <Use Existing Contact> dropdown list, or add a new contact by clicking the
<Add New Contact> button.
Clicking the <Add New Contact> button opens a new “Add Performance Report” screen (Figure 6-5) where users can enter the name and contact information of a new contact.
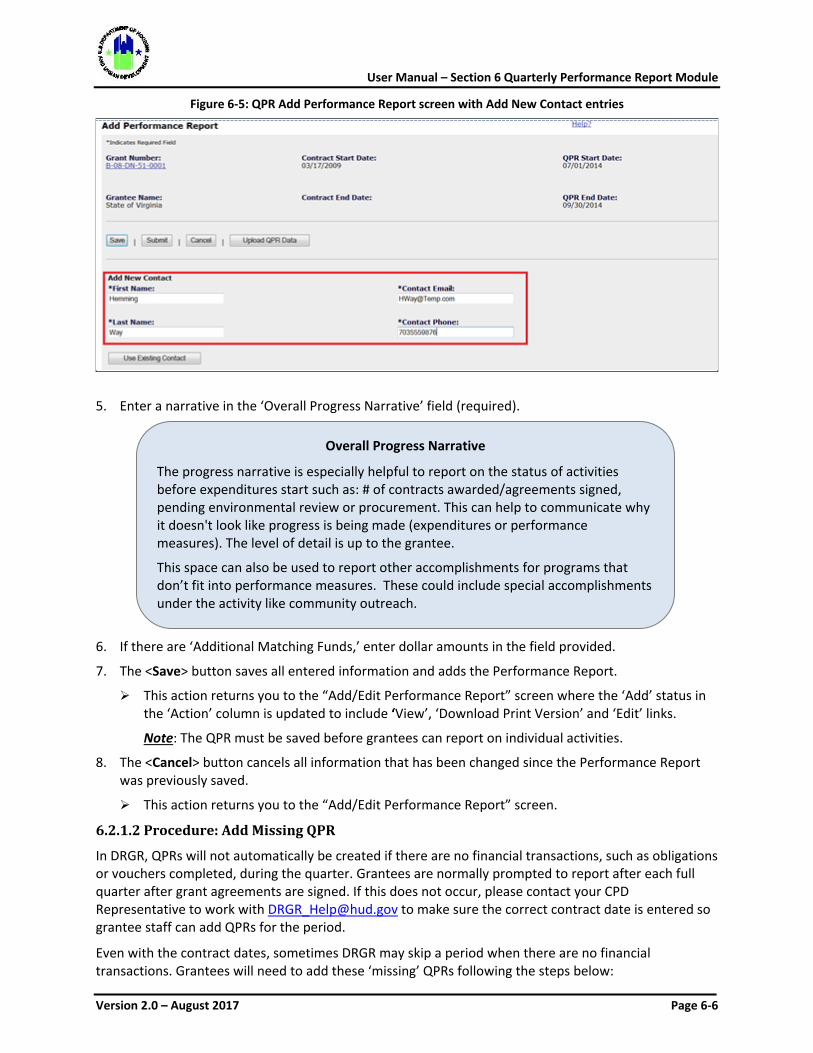
User Manual – Section 6 Quarterly Performance Report Module
Version 2.0 – August 2017 Page 6-6
Figure 6-5: QPR Add Performance Report screen with Add New Contact entries
5. Enter a narrative in the ‘Overall Progress Narrative’ field (required).
6. If there are ‘Additional Matching Funds,’ enter dollar amounts in the field provided.
7. The <Save> button saves all entered information and adds the Performance Report.
This action returns you to the “Add/Edit Performance Report” screen where the ‘Add’ status in the ‘Action’ column is updated to include ‘View’, ‘Download Print Version’ and ‘Edit’ links.
Note: The QPR must be saved before grantees can report on individual activities.
8. The <Cancel> button cancels all information that has been changed since the Performance Report was previously saved.
This action returns you to the “Add/Edit Performance Report” screen.
6.2.1.2 Procedure: Add Missing QPR
In DRGR, QPRs will not automatically be created if there are no financial transactions, such as obligations or vouchers completed, during the quarter. Grantees are normally prompted to report after each full quarter after grant agreements are signed. If this does not occur, please contact your CPD Representative to work with [email protected] to make sure the correct contract date is entered so grantee staff can add QPRs for the period.
Even with the contract dates, sometimes DRGR may skip a period when there are no financial transactions. Grantees will need to add these ‘missing’ QPRs following the steps below:
Overall Progress Narrative
The progress narrative is especially helpful to report on the status of activities before expenditures start such as: # of contracts awarded/agreements signed, pending environmental review or procurement. This can help to communicate why it doesn't look like progress is being made (expenditures or performance measures). The level of detail is up to the grantee.
This space can also be used to report other accomplishments for programs that don’t fit into performance measures. These could include special accomplishments under the activity like community outreach.
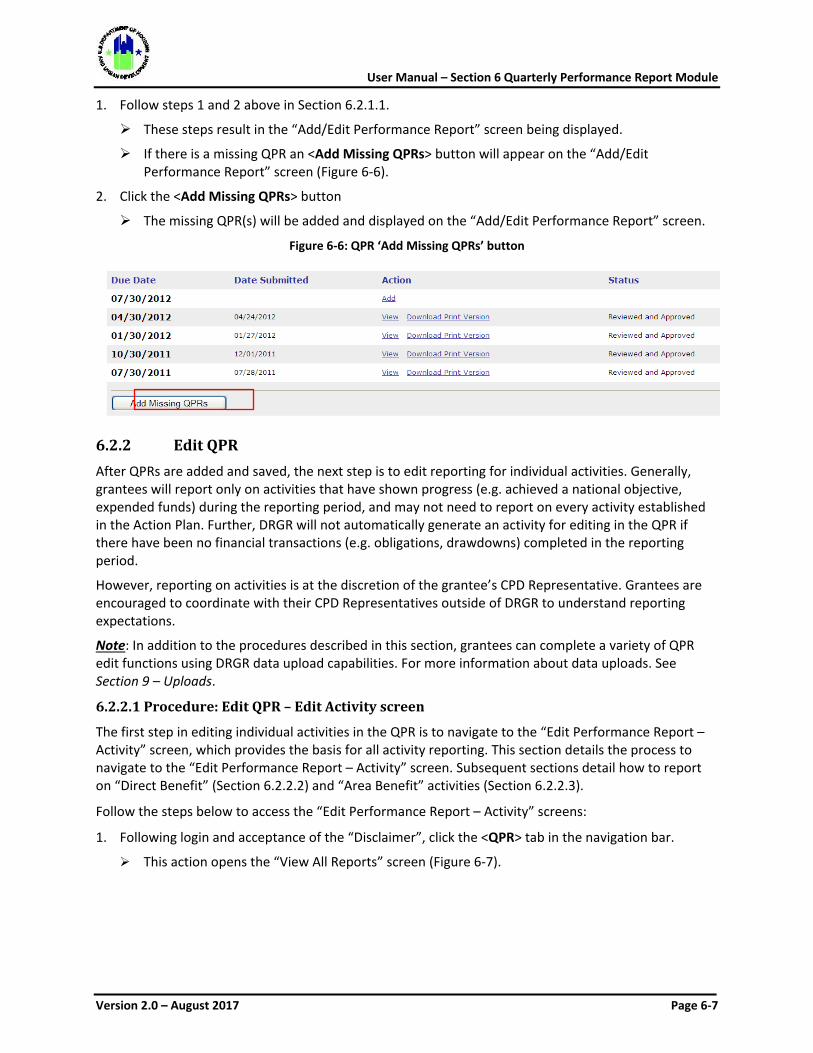
User Manual – Section 6 Quarterly Performance Report Module
Version 2.0 – August 2017 Page 6-7
1. Follow steps 1 and 2 above in Section 6.2.1.1.
These steps result in the “Add/Edit Performance Report” screen being displayed.
If there is a missing QPR an <Add Missing QPRs> button will appear on the “Add/Edit Performance Report” screen (Figure 6-6).
2. Click the <Add Missing QPRs> button
The missing QPR(s) will be added and displayed on the “Add/Edit Performance Report” screen.
Figure 6-6: QPR ‘Add Missing QPRs’ button
6.2.2 Edit QPR After QPRs are added and saved, the next step is to edit reporting for individual activities. Generally, grantees will report only on activities that have shown progress (e.g. achieved a national objective, expended funds) during the reporting period, and may not need to report on every activity established in the Action Plan. Further, DRGR will not automatically generate an activity for editing in the QPR if there have been no financial transactions (e.g. obligations, drawdowns) completed in the reporting period.
However, reporting on activities is at the discretion of the grantee’s CPD Representative. Grantees are encouraged to coordinate with their CPD Representatives outside of DRGR to understand reporting expectations.
Note: In addition to the procedures described in this section, grantees can complete a variety of QPR edit functions using DRGR data upload capabilities. For more information about data uploads. See Section 9 – Uploads.
6.2.2.1 Procedure: Edit QPR – Edit Activity screen
The first step in editing individual activities in the QPR is to navigate to the “Edit Performance Report – Activity” screen, which provides the basis for all activity reporting. This section details the process to navigate to the “Edit Performance Report – Activity” screen. Subsequent sections detail how to report on “Direct Benefit” (Section 6.2.2.2) and “Area Benefit” activities (Section 6.2.2.3).
Follow the steps below to access the “Edit Performance Report – Activity” screens:
1. Following login and acceptance of the “Disclaimer”, click the <QPR> tab in the navigation bar.
This action opens the “View All Reports” screen (Figure 6-7).
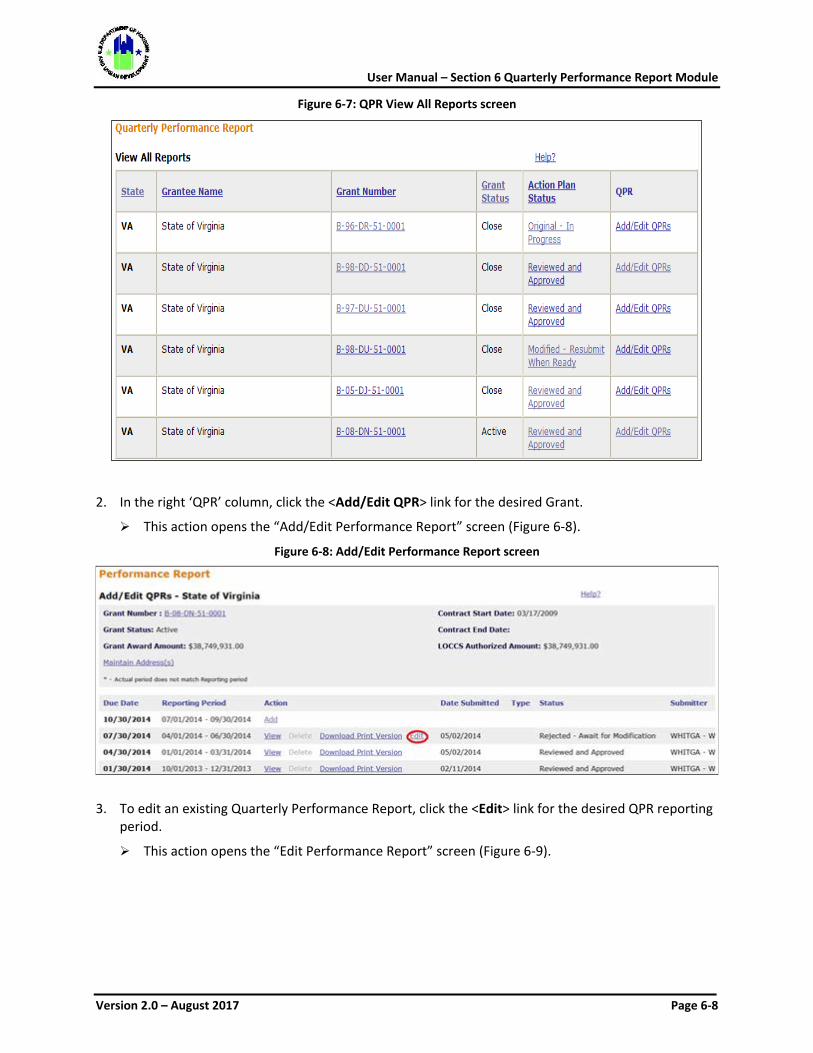
User Manual – Section 6 Quarterly Performance Report Module
Version 2.0 – August 2017 Page 6-8
Figure 6-7: QPR View All Reports screen
2. In the right ‘QPR’ column, click the <Add/Edit QPR> link for the desired Grant.
This action opens the “Add/Edit Performance Report” screen (Figure 6-8).
Figure 6-8: Add/Edit Performance Report screen
3. To edit an existing Quarterly Performance Report, click the <Edit> link for the desired QPR reporting period.
This action opens the “Edit Performance Report” screen (Figure 6-9).
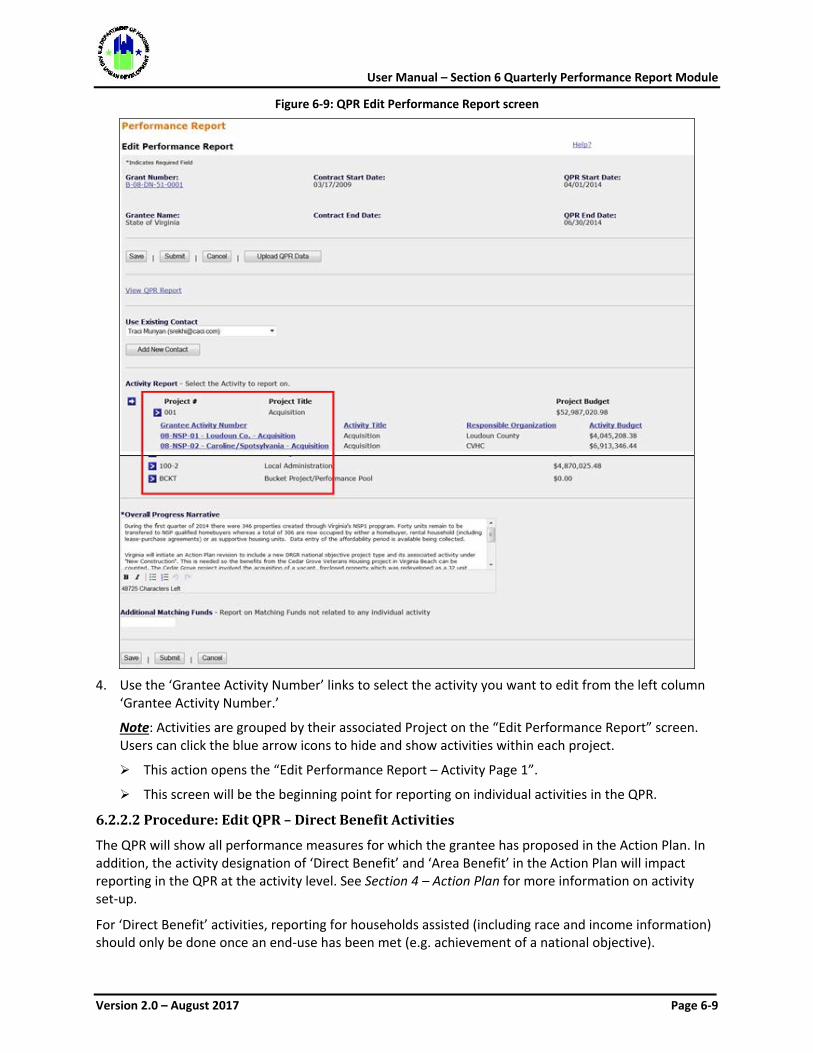
User Manual – Section 6 Quarterly Performance Report Module
Version 2.0 – August 2017 Page 6-9
Figure 6-9: QPR Edit Performance Report screen
4. Use the ‘Grantee Activity Number’ links to select the activity you want to edit from the left column
‘Grantee Activity Number.’
Note: Activities are grouped by their associated Project on the “Edit Performance Report” screen. Users can click the blue arrow icons to hide and show activities within each project.
This action opens the “Edit Performance Report – Activity Page 1”.
This screen will be the beginning point for reporting on individual activities in the QPR.
6.2.2.2 Procedure: Edit QPR – Direct Benefit Activities
The QPR will show all performance measures for which the grantee has proposed in the Action Plan. In addition, the activity designation of ‘Direct Benefit’ and ‘Area Benefit’ in the Action Plan will impact reporting in the QPR at the activity level. See Section 4 – Action Plan for more information on activity set-up.
For ‘Direct Benefit’ activities, reporting for households assisted (including race and income information) should only be done once an end-use has been met (e.g. achievement of a national objective).
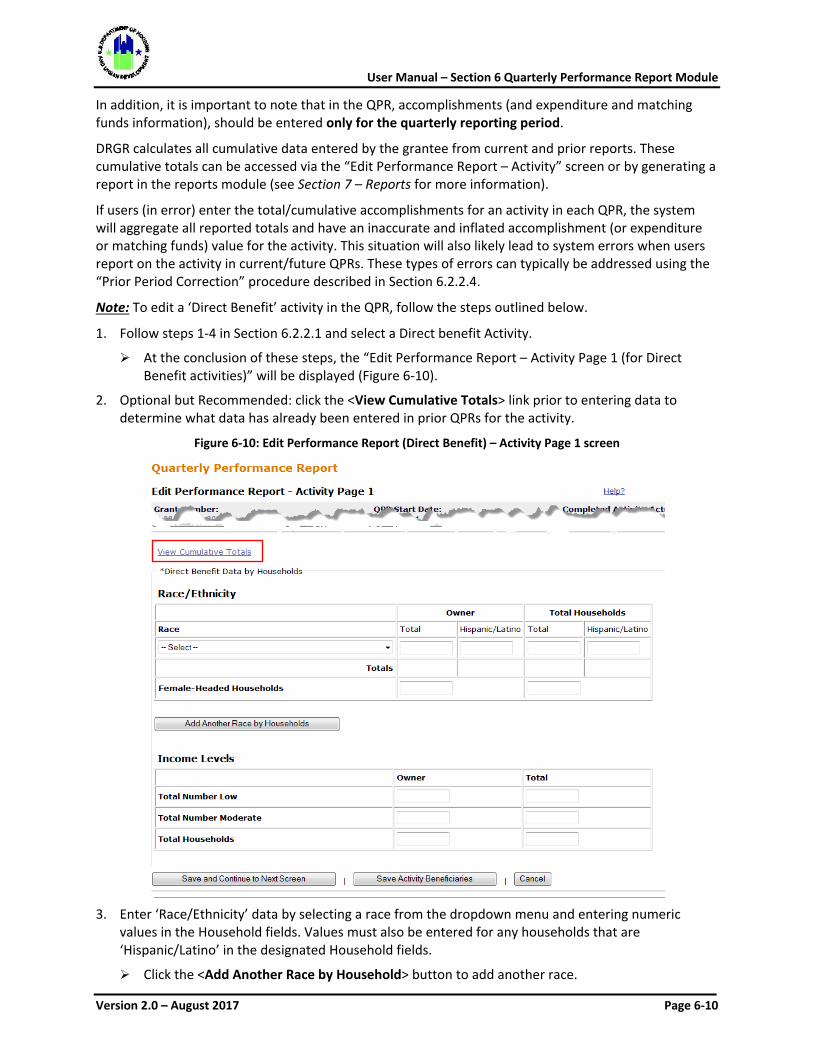
User Manual – Section 6 Quarterly Performance Report Module
Version 2.0 – August 2017 Page 6-10
In addition, it is important to note that in the QPR, accomplishments (and expenditure and matching funds information), should be entered only for the quarterly reporting period.
DRGR calculates all cumulative data entered by the grantee from current and prior reports. These cumulative totals can be accessed via the “Edit Performance Report – Activity” screen or by generating a report in the reports module (see Section 7 – Reports for more information).
If users (in error) enter the total/cumulative accomplishments for an activity in each QPR, the system will aggregate all reported totals and have an inaccurate and inflated accomplishment (or expenditure or matching funds) value for the activity. This situation will also likely lead to system errors when users report on the activity in current/future QPRs. These types of errors can typically be addressed using the “Prior Period Correction” procedure described in Section 6.2.2.4.
Note: To edit a ‘Direct Benefit’ activity in the QPR, follow the steps outlined below.
1. Follow steps 1-4 in Section 6.2.2.1 and select a Direct benefit Activity.
At the conclusion of these steps, the “Edit Performance Report – Activity Page 1 (for Direct Benefit activities)” will be displayed (Figure 6-10).
2. Optional but Recommended: click the <View Cumulative Totals> link prior to entering data to determine what data has already been entered in prior QPRs for the activity.
Figure 6-10: Edit Performance Report (Direct Benefit) – Activity Page 1 screen
3. Enter ‘Race/Ethnicity’ data by selecting a race from the dropdown menu and entering numeric
values in the Household fields. Values must also be entered for any households that are ‘Hispanic/Latino’ in the designated Household fields.
Click the <Add Another Race by Household> button to add another race.
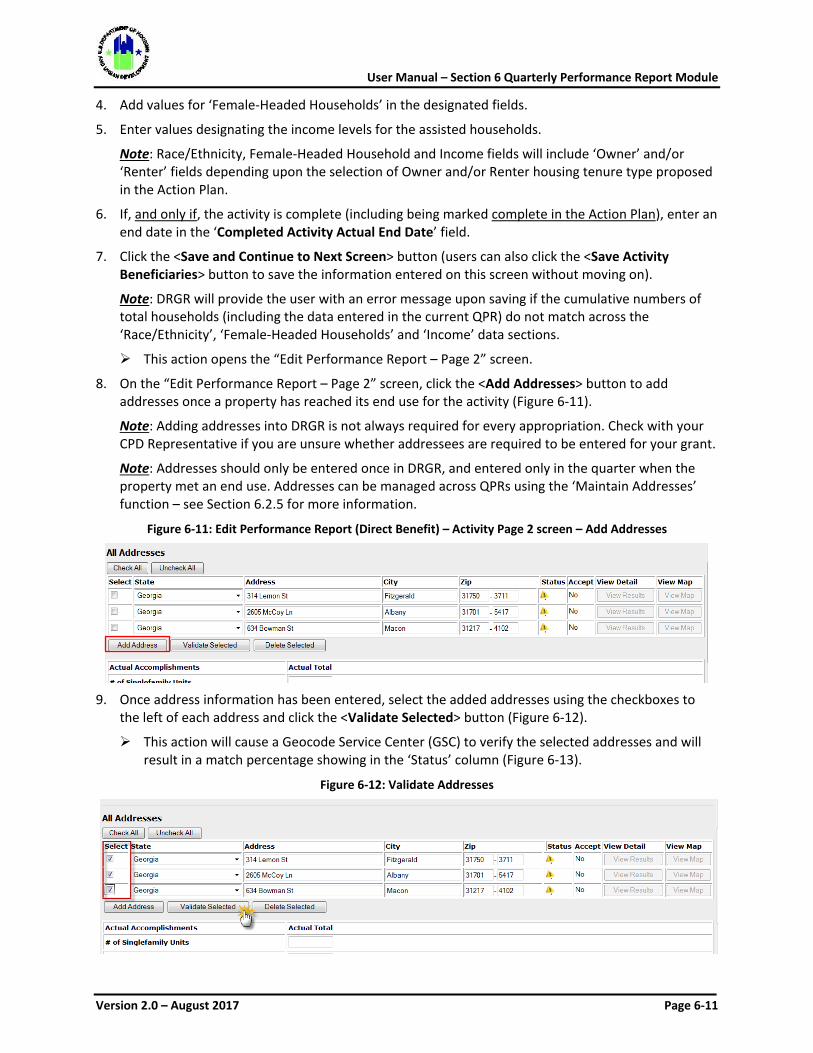
User Manual – Section 6 Quarterly Performance Report Module
Version 2.0 – August 2017 Page 6-11
4. Add values for ‘Female-Headed Households’ in the designated fields.
5. Enter values designating the income levels for the assisted households.
Note: Race/Ethnicity, Female-Headed Household and Income fields will include ‘Owner’ and/or ‘Renter’ fields depending upon the selection of Owner and/or Renter housing tenure type proposed in the Action Plan.
6. If, and only if, the activity is complete (including being marked complete in the Action Plan), enter an end date in the ‘Completed Activity Actual End Date’ field.
7. Click the <Save and Continue to Next Screen> button (users can also click the <Save Activity Beneficiaries> button to save the information entered on this screen without moving on).
Note: DRGR will provide the user with an error message upon saving if the cumulative numbers of total households (including the data entered in the current QPR) do not match across the ‘Race/Ethnicity’, ‘Female-Headed Households’ and ‘Income’ data sections.
This action opens the “Edit Performance Report – Page 2” screen.
8. On the “Edit Performance Report – Page 2” screen, click the <Add Addresses> button to add addresses once a property has reached its end use for the activity (Figure 6-11).
Note: Adding addresses into DRGR is not always required for every appropriation. Check with your CPD Representative if you are unsure whether addressees are required to be entered for your grant.
Note: Addresses should only be entered once in DRGR, and entered only in the quarter when the property met an end use. Addresses can be managed across QPRs using the ‘Maintain Addresses’ function – see Section 6.2.5 for more information.
Figure 6-11: Edit Performance Report (Direct Benefit) – Activity Page 2 screen – Add Addresses
9. Once address information has been entered, select the added addresses using the checkboxes to
the left of each address and click the <Validate Selected> button (Figure 6-12).
This action will cause a Geocode Service Center (GSC) to verify the selected addresses and will result in a match percentage showing in the ‘Status’ column (Figure 6-13).
Figure 6-12: Validate Addresses
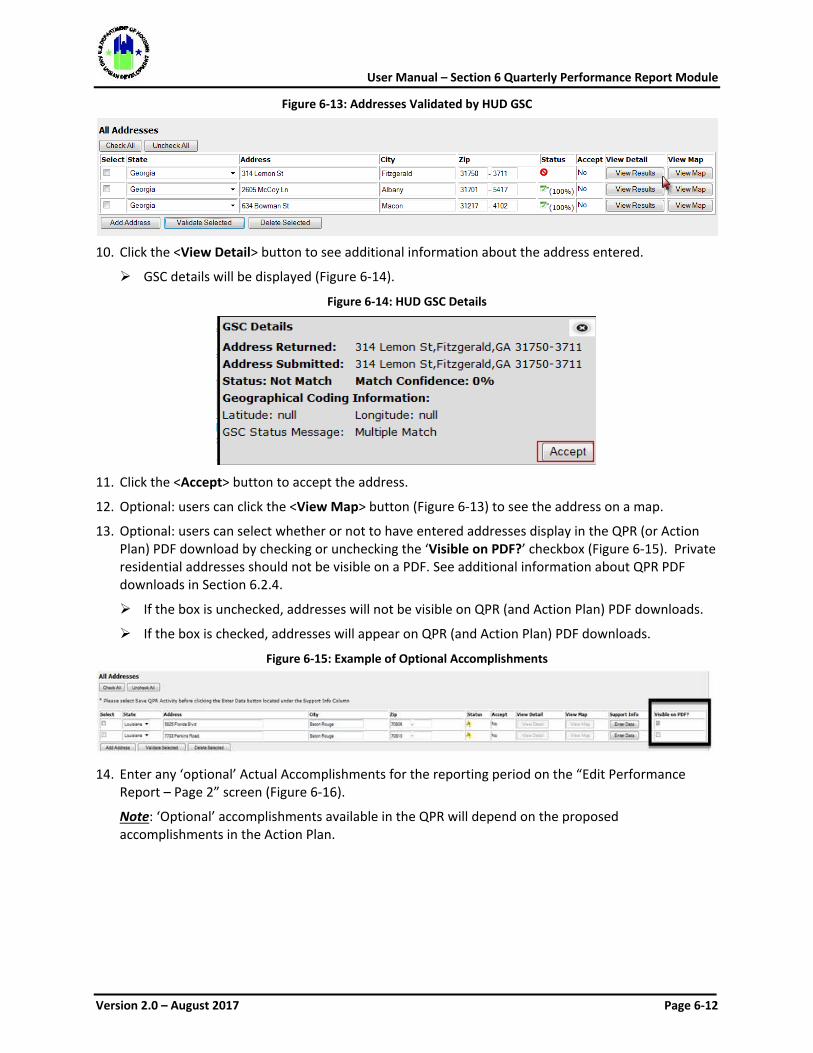
User Manual – Section 6 Quarterly Performance Report Module
Version 2.0 – August 2017 Page 6-12
Figure 6-13: Addresses Validated by HUD GSC
10. Click the <View Detail> button to see additional information about the address entered.
GSC details will be displayed (Figure 6-14).
Figure 6-14: HUD GSC Details
11. Click the <Accept> button to accept the address.
12. Optional: users can click the <View Map> button (Figure 6-13) to see the address on a map.
13. Optional: users can select whether or not to have entered addresses display in the QPR (or Action Plan) PDF download by checking or unchecking the ‘Visible on PDF?’ checkbox (Figure 6-15). Private residential addresses should not be visible on a PDF. See additional information about QPR PDF downloads in Section 6.2.4.
If the box is unchecked, addresses will not be visible on QPR (and Action Plan) PDF downloads.
If the box is checked, addresses will appear on QPR (and Action Plan) PDF downloads.
Figure 6-15: Example of Optional Accomplishments
14. Enter any ‘optional’ Actual Accomplishments for the reporting period on the “Edit Performance
Report – Page 2” screen (Figure 6-16).
Note: ‘Optional’ accomplishments available in the QPR will depend on the proposed accomplishments in the Action Plan.
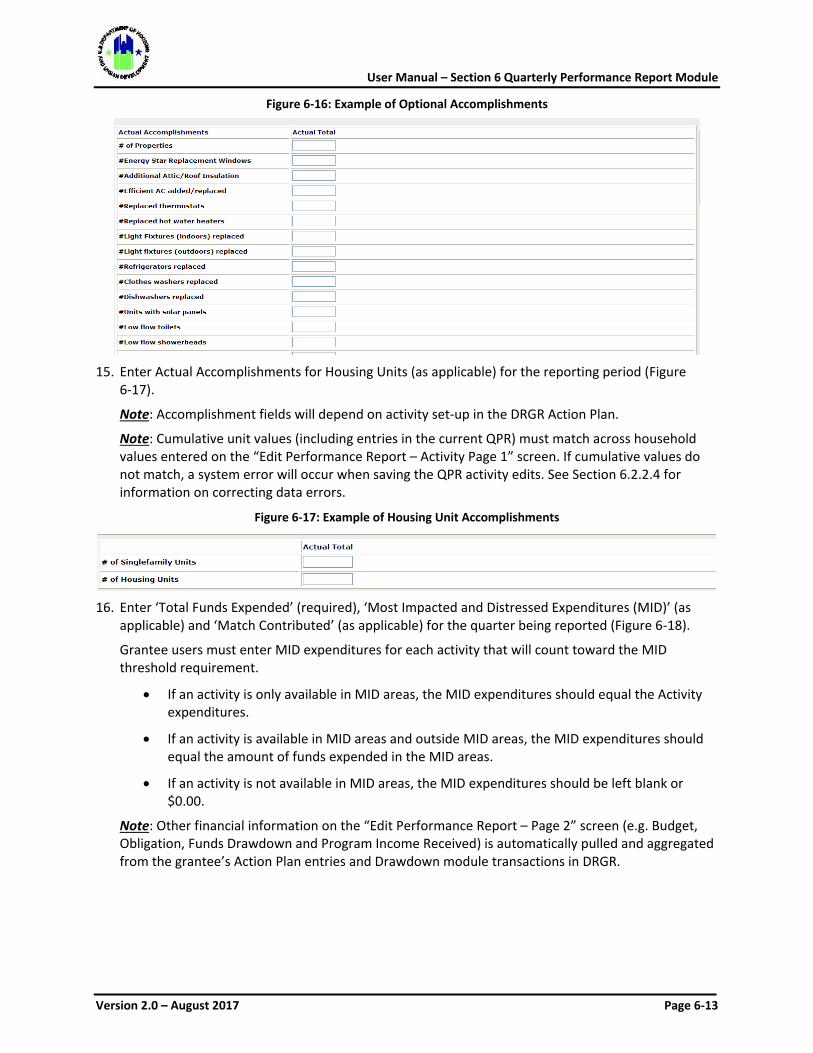
User Manual – Section 6 Quarterly Performance Report Module
Version 2.0 – August 2017 Page 6-13
Figure 6-16: Example of Optional Accomplishments
15. Enter Actual Accomplishments for Housing Units (as applicable) for the reporting period (Figure
6-17).
Note: Accomplishment fields will depend on activity set-up in the DRGR Action Plan.
Note: Cumulative unit values (including entries in the current QPR) must match across household values entered on the “Edit Performance Report – Activity Page 1” screen. If cumulative values do not match, a system error will occur when saving the QPR activity edits. See Section 6.2.2.4 for information on correcting data errors.
Figure 6-17: Example of Housing Unit Accomplishments
16. Enter ‘Total Funds Expended’ (required), ‘Most Impacted and Distressed Expenditures (MID)’ (as
applicable) and ‘Match Contributed’ (as applicable) for the quarter being reported (Figure 6-18).
Grantee users must enter MID expenditures for each activity that will count toward the MID threshold requirement.
• If an activity is only available in MID areas, the MID expenditures should equal the Activity expenditures.
• If an activity is available in MID areas and outside MID areas, the MID expenditures should equal the amount of funds expended in the MID areas.
• If an activity is not available in MID areas, the MID expenditures should be left blank or $0.00.
Note: Other financial information on the “Edit Performance Report – Page 2” screen (e.g. Budget, Obligation, Funds Drawdown and Program Income Received) is automatically pulled and aggregated from the grantee’s Action Plan entries and Drawdown module transactions in DRGR.
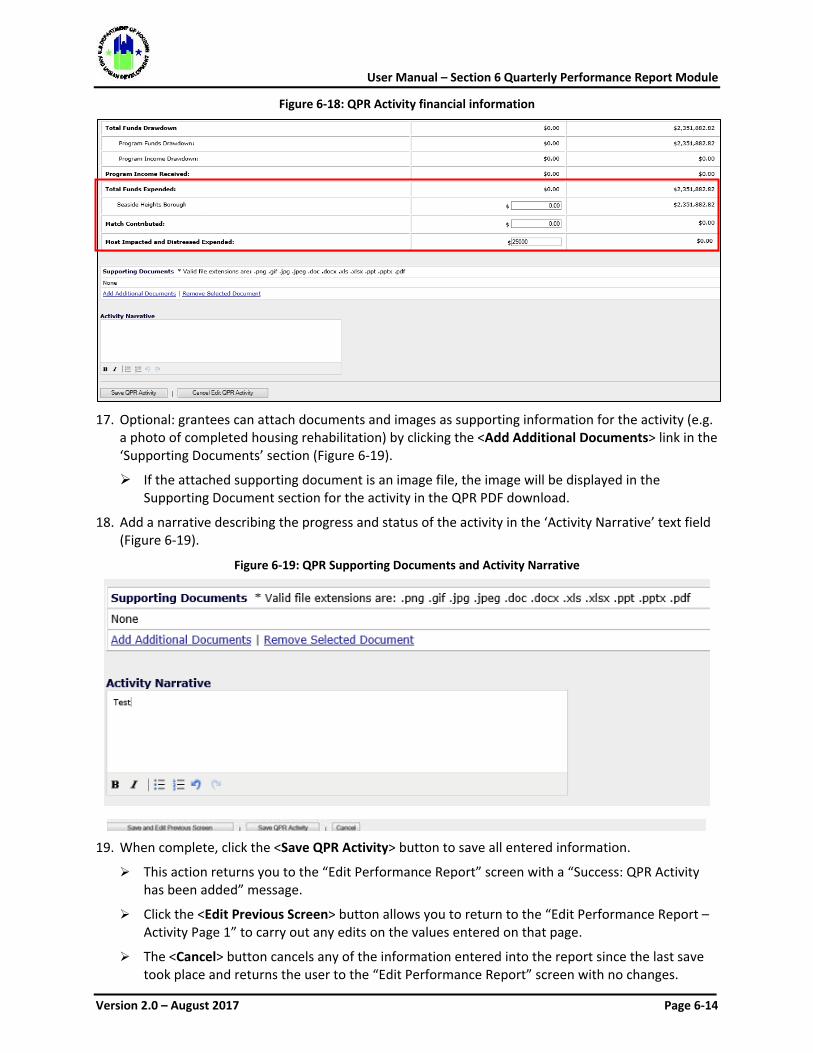
User Manual – Section 6 Quarterly Performance Report Module
Version 2.0 – August 2017 Page 6-14
Figure 6-18: QPR Activity financial information
17. Optional: grantees can attach documents and images as supporting information for the activity (e.g.
a photo of completed housing rehabilitation) by clicking the <Add Additional Documents> link in the ‘Supporting Documents’ section (Figure 6-19).
If the attached supporting document is an image file, the image will be displayed in the Supporting Document section for the activity in the QPR PDF download.
18. Add a narrative describing the progress and status of the activity in the ‘Activity Narrative’ text field (Figure 6-19).
Figure 6-19: QPR Supporting Documents and Activity Narrative
19. When complete, click the <Save QPR Activity> button to save all entered information.
This action returns you to the “Edit Performance Report” screen with a “Success: QPR Activity has been added” message.
Click the <Edit Previous Screen> button allows you to return to the “Edit Performance Report – Activity Page 1” to carry out any edits on the values entered on that page.
The <Cancel> button cancels any of the information entered into the report since the last save took place and returns the user to the “Edit Performance Report” screen with no changes.
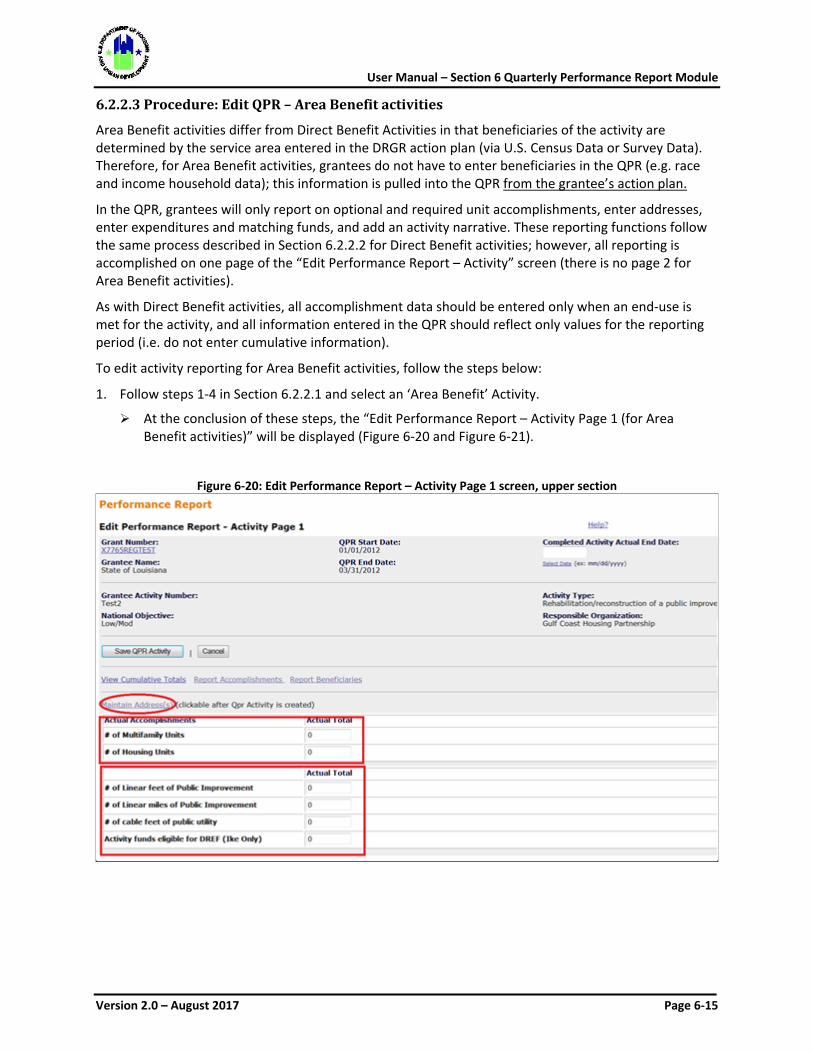
User Manual – Section 6 Quarterly Performance Report Module
Version 2.0 – August 2017 Page 6-15
6.2.2.3 Procedure: Edit QPR – Area Benefit activities
Area Benefit activities differ from Direct Benefit Activities in that beneficiaries of the activity are determined by the service area entered in the DRGR action plan (via U.S. Census Data or Survey Data). Therefore, for Area Benefit activities, grantees do not have to enter beneficiaries in the QPR (e.g. race and income household data); this information is pulled into the QPR from the grantee’s action plan.
In the QPR, grantees will only report on optional and required unit accomplishments, enter addresses, enter expenditures and matching funds, and add an activity narrative. These reporting functions follow the same process described in Section 6.2.2.2 for Direct Benefit activities; however, all reporting is accomplished on one page of the “Edit Performance Report – Activity” screen (there is no page 2 for Area Benefit activities).
As with Direct Benefit activities, all accomplishment data should be entered only when an end-use is met for the activity, and all information entered in the QPR should reflect only values for the reporting period (i.e. do not enter cumulative information).
To edit activity reporting for Area Benefit activities, follow the steps below:
1. Follow steps 1-4 in Section 6.2.2.1 and select an ‘Area Benefit’ Activity.
At the conclusion of these steps, the “Edit Performance Report – Activity Page 1 (for Area Benefit activities)” will be displayed (Figure 6-20 and Figure 6-21).
Figure 6-20: Edit Performance Report – Activity Page 1 screen, upper section
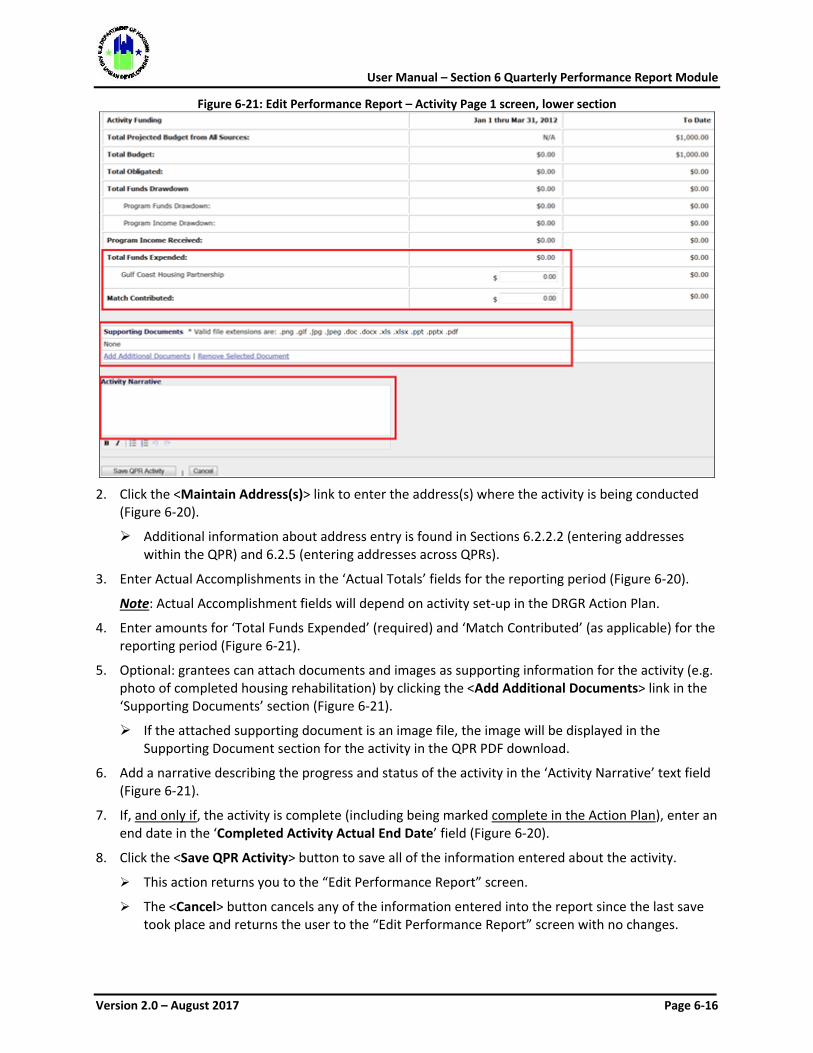
User Manual – Section 6 Quarterly Performance Report Module
Version 2.0 – August 2017 Page 6-16
Figure 6-21: Edit Performance Report – Activity Page 1 screen, lower section
2. Click the <Maintain Address(s)> link to enter the address(s) where the activity is being conducted
(Figure 6-20).
Additional information about address entry is found in Sections 6.2.2.2 (entering addresses within the QPR) and 6.2.5 (entering addresses across QPRs).
3. Enter Actual Accomplishments in the ‘Actual Totals’ fields for the reporting period (Figure 6-20).
Note: Actual Accomplishment fields will depend on activity set-up in the DRGR Action Plan.
4. Enter amounts for ‘Total Funds Expended’ (required) and ‘Match Contributed’ (as applicable) for the reporting period (Figure 6-21).
5. Optional: grantees can attach documents and images as supporting information for the activity (e.g. photo of completed housing rehabilitation) by clicking the <Add Additional Documents> link in the ‘Supporting Documents’ section (Figure 6-21).
If the attached supporting document is an image file, the image will be displayed in the Supporting Document section for the activity in the QPR PDF download.
6. Add a narrative describing the progress and status of the activity in the ‘Activity Narrative’ text field (Figure 6-21).
7. If, and only if, the activity is complete (including being marked complete in the Action Plan), enter an end date in the ‘Completed Activity Actual End Date’ field (Figure 6-20).
8. Click the <Save QPR Activity> button to save all of the information entered about the activity.
This action returns you to the “Edit Performance Report” screen.
The <Cancel> button cancels any of the information entered into the report since the last save took place and returns the user to the “Edit Performance Report” screen with no changes.

User Manual – Section 6 Quarterly Performance Report Module
Version 2.0 – August 2017 Page 6-17
6.2.2.4 Procedure: Prior Period Corrections
For Direct Benefit activities, DRGR will check the cumulative totals for total households from the race/ethnicity data and compare it to the cumulative totals by income level. Additionally, the system will check cumulative totals by tenure and by housing unit.
If there is an inconsistency, DRGR will display an error message.
• Example of an error message: “Cumulative sum of income levels for ‘Households - Total’ must be equal to cumulative sum of ‘Owner – Total’ <Number>”
In the example, the total number of households entered for income levels does not equal the total number of households entered for total ‘owner’ households. The user will likely need to resolve the error message through prior-period corrections. DRGR allows users to enter negative values in the QPR (when necessary) to make prior period connections.
Some common reasons for grantees to need to make prior period corrections are listed below:
• In the Action Plan during the quarter, a new benefit type was selected. However, in prior QPRs, the grantee has already reported accomplishment data.
• In the Action Plan during the quarter, benefit measures (i.e. owner/renter, single-family/multi-family) are added or modified. However, in prior QPRs, the grantee has already reported accomplishment data.
• Backing out incorrect data.
To make prior period corrections, follow the steps below.
1. Determine the correct actual cumulative data for the activity (regardless of what DRGR shows).
2. Determine the cumulative data showing in DRGR (based on all information entered into all prior QPRs to-date and including any information entered into the current QPR that is being corrected).
Use the ‘View Cumulative Totals’ link in the “Edit Performance Report – Activity” screen (Figure 6-22); and/or
Use the Reports module – PerfReport 1 and PerfReport 6 – to view existing data QPR data in DRGR. See Section 7 – Reports for more information on accessing reports in DRGR.
Figure 6-22: View Cumulative Totals Link
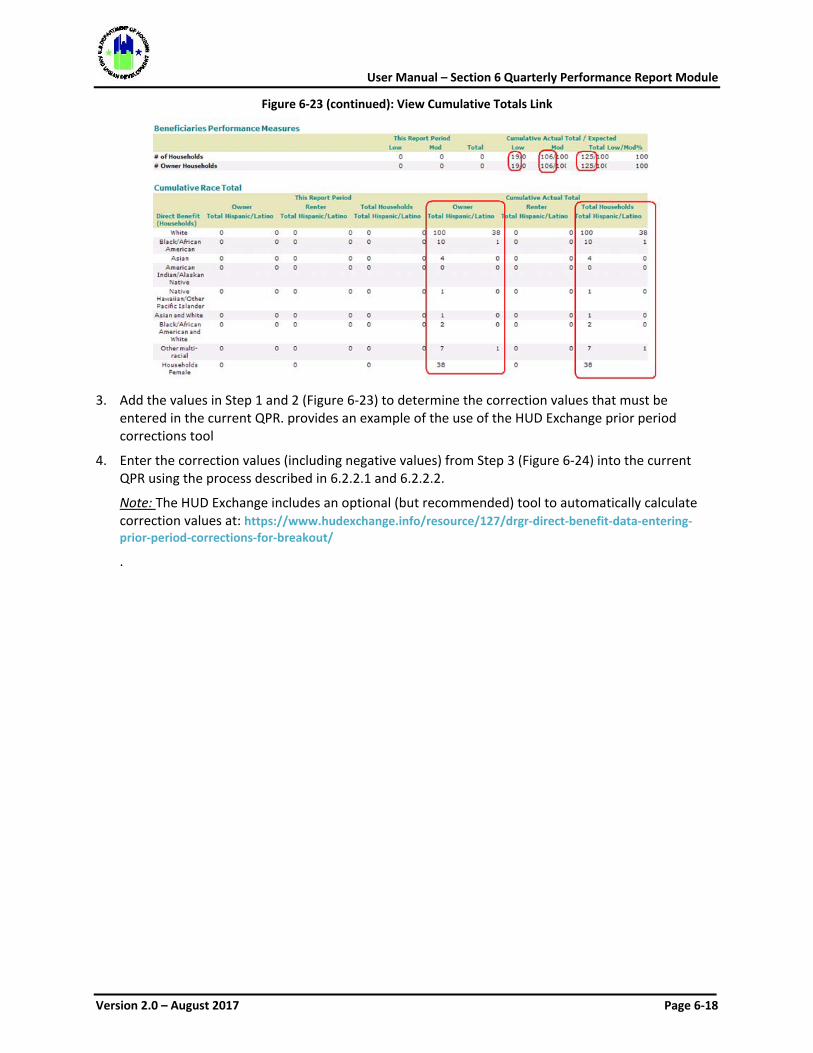
User Manual – Section 6 Quarterly Performance Report Module
Version 2.0 – August 2017 Page 6-18
Figure 6-23 (continued): View Cumulative Totals Link
3. Add the values in Step 1 and 2 (Figure 6-23) to determine the correction values that must be
entered in the current QPR. provides an example of the use of the HUD Exchange prior period corrections tool
4. Enter the correction values (including negative values) from Step 3 (Figure 6-24) into the current QPR using the process described in 6.2.2.1 and 6.2.2.2.
Note: The HUD Exchange includes an optional (but recommended) tool to automatically calculate correction values at: https://www.hudexchange.info/resource/127/drgr-direct-benefit-data-entering-prior-period-corrections-for-breakout/
.
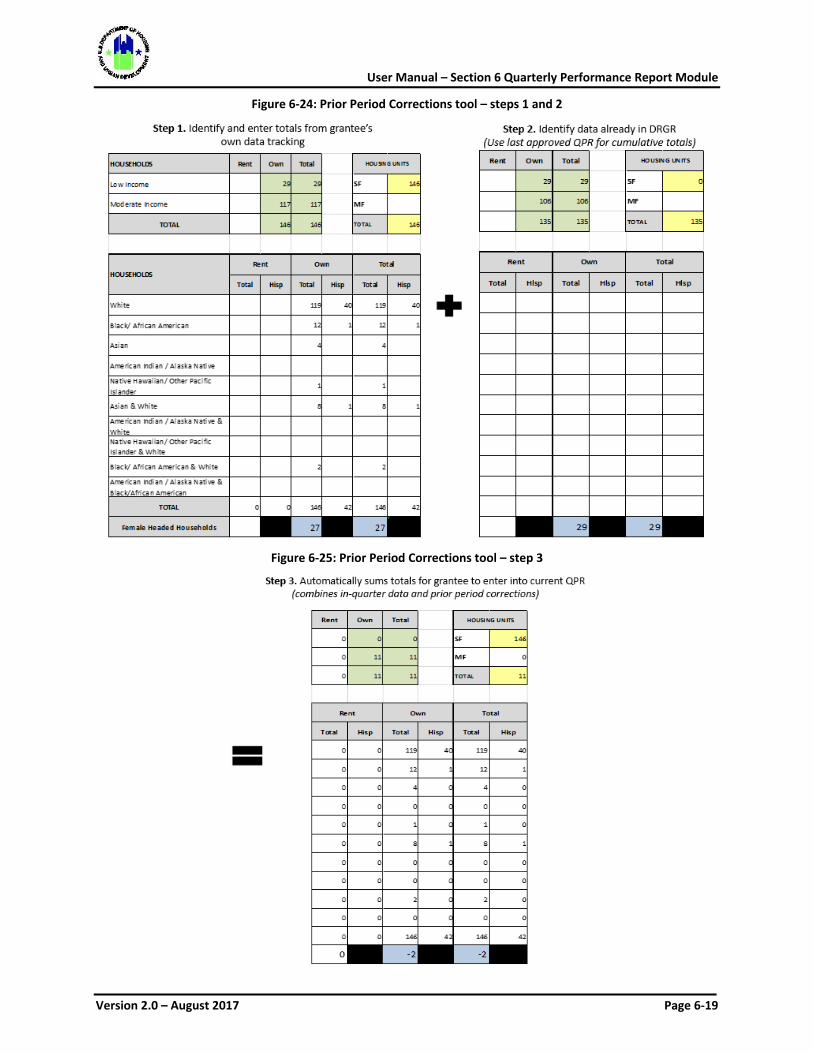
User Manual – Section 6 Quarterly Performance Report Module
Version 2.0 – August 2017 Page 6-19
Figure 6-24: Prior Period Corrections tool – steps 1 and 2
Figure 6-25: Prior Period Corrections tool – step 3
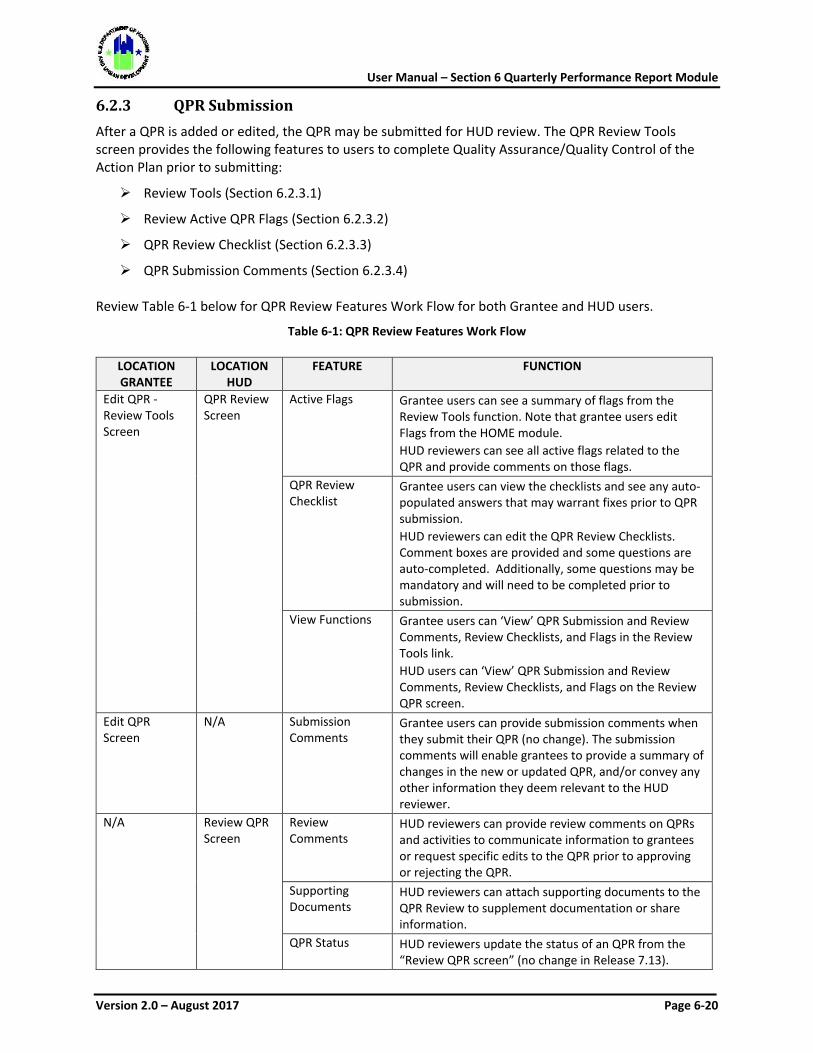
User Manual – Section 6 Quarterly Performance Report Module
Version 2.0 – August 2017 Page 6-20
6.2.3 QPR Submission After a QPR is added or edited, the QPR may be submitted for HUD review. The QPR Review Tools screen provides the following features to users to complete Quality Assurance/Quality Control of the Action Plan prior to submitting:
Review Tools (Section 6.2.3.1)
Review Active QPR Flags (Section 6.2.3.2)
QPR Review Checklist (Section 6.2.3.3)
QPR Submission Comments (Section 6.2.3.4) Review Table 6-1 below for QPR Review Features Work Flow for both Grantee and HUD users.
Table 6-1: QPR Review Features Work Flow
LOCATION GRANTEE
LOCATION HUD
FEATURE FUNCTION
Edit QPR - Review Tools Screen
QPR Review Screen
Active Flags Grantee users can see a summary of flags from the Review Tools function. Note that grantee users edit Flags from the HOME module. HUD reviewers can see all active flags related to the QPR and provide comments on those flags.
QPR Review Checklist
Grantee users can view the checklists and see any auto-populated answers that may warrant fixes prior to QPR submission. HUD reviewers can edit the QPR Review Checklists. Comment boxes are provided and some questions are auto-completed. Additionally, some questions may be mandatory and will need to be completed prior to submission.
View Functions Grantee users can ‘View’ QPR Submission and Review Comments, Review Checklists, and Flags in the Review Tools link. HUD users can ‘View’ QPR Submission and Review Comments, Review Checklists, and Flags on the Review QPR screen.
Edit QPR Screen
N/A Submission Comments
Grantee users can provide submission comments when they submit their QPR (no change). The submission comments will enable grantees to provide a summary of changes in the new or updated QPR, and/or convey any other information they deem relevant to the HUD reviewer.
N/A
Review QPR Screen
Review Comments
HUD reviewers can provide review comments on QPRs and activities to communicate information to grantees or request specific edits to the QPR prior to approving or rejecting the QPR.
Supporting Documents
HUD reviewers can attach supporting documents to the QPR Review to supplement documentation or share information.
QPR Status HUD reviewers update the status of an QPR from the “Review QPR screen” (no change in Release 7.13).
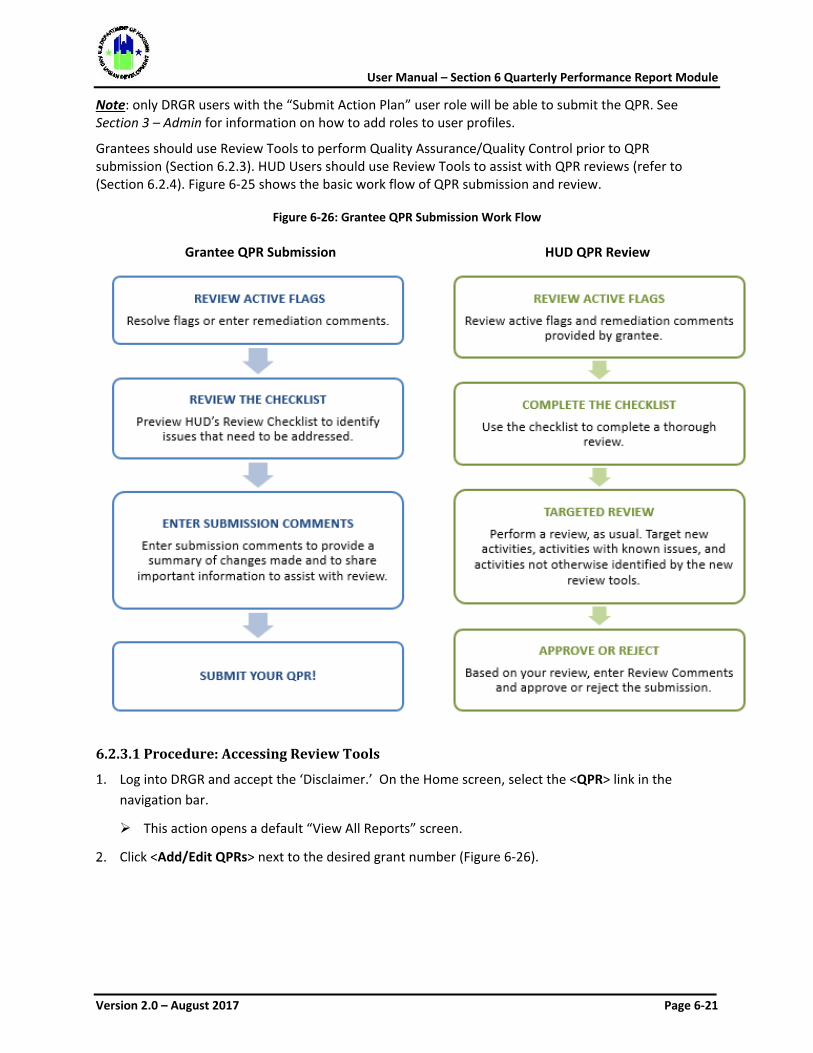
User Manual – Section 6 Quarterly Performance Report Module
Version 2.0 – August 2017 Page 6-21
Note: only DRGR users with the “Submit Action Plan” user role will be able to submit the QPR. See Section 3 – Admin for information on how to add roles to user profiles.
Grantees should use Review Tools to perform Quality Assurance/Quality Control prior to QPR submission (Section 6.2.3). HUD Users should use Review Tools to assist with QPR reviews (refer to (Section 6.2.4). Figure 6-25 shows the basic work flow of QPR submission and review.
Figure 6-26: Grantee QPR Submission Work Flow Grantee QPR Submission HUD QPR Review
6.2.3.1 Procedure: Accessing Review Tools
Log into DRGR and accept the ‘Disclaimer.’ On the Home screen, select the <QPR> link in the navigation bar.
This action opens a default “View All Reports” screen.
Click <Add/Edit QPRs> next to the desired grant number (Figure 6-26).
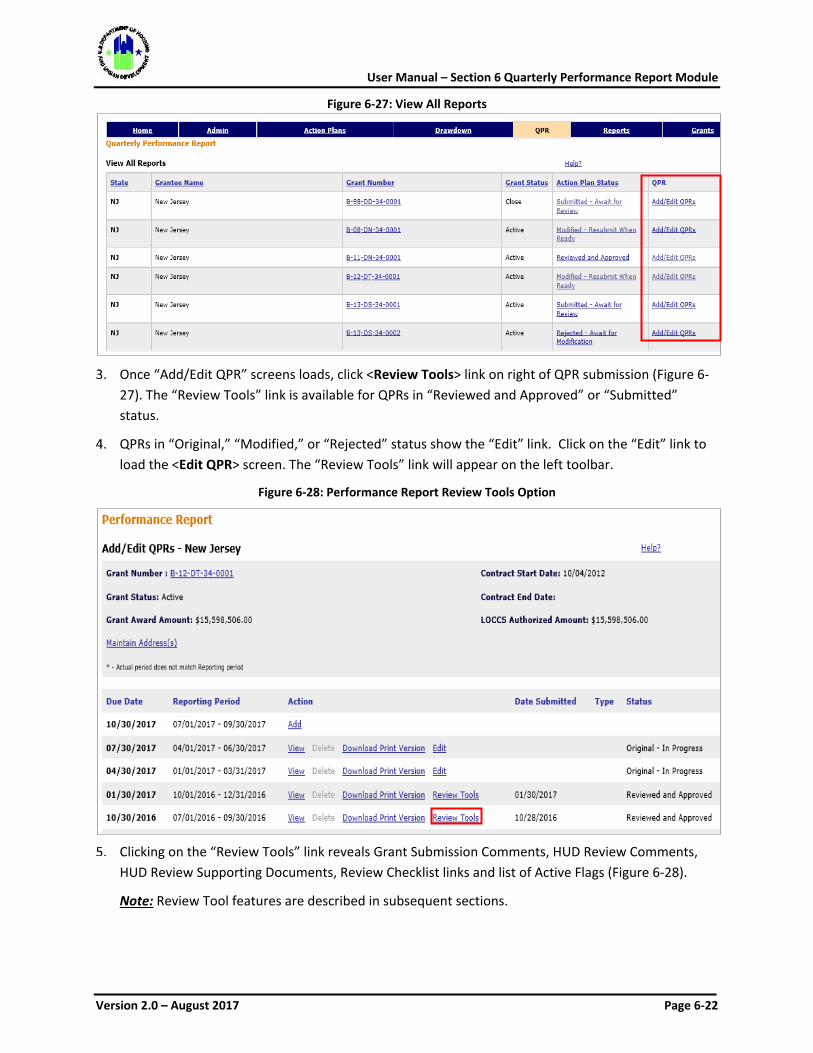
User Manual – Section 6 Quarterly Performance Report Module
Version 2.0 – August 2017 Page 6-22
Figure 6-27: View All Reports
Once “Add/Edit QPR” screens loads, click <Review Tools> link on right of QPR submission (Figure 6-
27). The “Review Tools” link is available for QPRs in “Reviewed and Approved” or “Submitted” status.
QPRs in “Original,” “Modified,” or “Rejected” status show the “Edit” link. Click on the “Edit” link to load the <Edit QPR> screen. The “Review Tools” link will appear on the left toolbar.
Figure 6-28: Performance Report Review Tools Option
Clicking on the “Review Tools” link reveals Grant Submission Comments, HUD Review Comments,
HUD Review Supporting Documents, Review Checklist links and list of Active Flags (Figure 6-28).
Note: Review Tool features are described in subsequent sections.
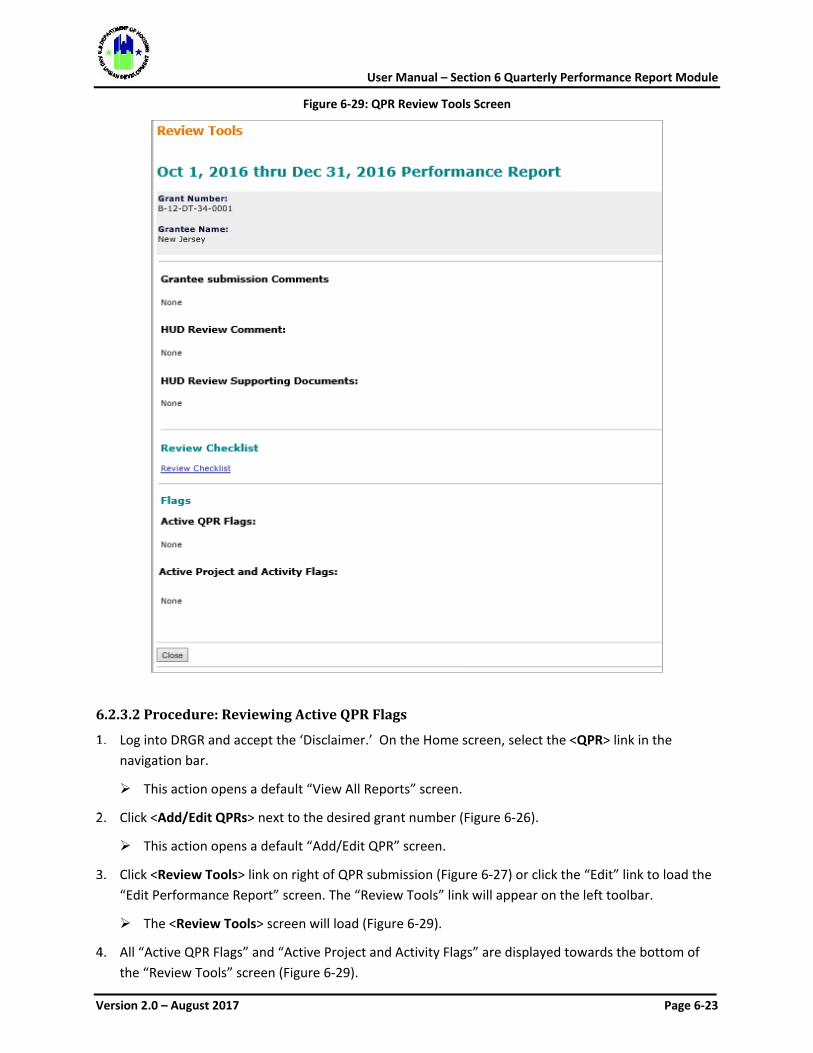
User Manual – Section 6 Quarterly Performance Report Module
Version 2.0 – August 2017 Page 6-23
Figure 6-29: QPR Review Tools Screen
6.2.3.2 Procedure: Reviewing Active QPR Flags
Log into DRGR and accept the ‘Disclaimer.’ On the Home screen, select the <QPR> link in the navigation bar.
This action opens a default “View All Reports” screen.
Click <Add/Edit QPRs> next to the desired grant number (Figure 6-26).
This action opens a default “Add/Edit QPR” screen.
Click <Review Tools> link on right of QPR submission (Figure 6-27) or click the “Edit” link to load the “Edit Performance Report” screen. The “Review Tools” link will appear on the left toolbar.
The <Review Tools> screen will load (Figure 6-29).
All “Active QPR Flags” and “Active Project and Activity Flags” are displayed towards the bottom of the “Review Tools” screen (Figure 6-29).

User Manual – Section 6 Quarterly Performance Report Module
Version 2.0 – August 2017 Page 6-24
Figure 6-30: QPR Review Tools Screen - Flags
Note: Detailed steps and information related to resolving and remediating active flags is described in Section 2: Basic Navigation and Home Screen of the User Guide.
6.2.3.3 Procedure: Viewing/Downloading QPR Review Checklist
Log into DRGR and accept the ‘Disclaimer.’ On the Home screen, select the <QPR> link in the navigation bar.
This action opens a default “View All Reports” screen.
Click <Add/Edit QPRs> next to the desired grant number (Figure 6-26).
This action opens a default “Add/Edit QPR” screen.
Click <Review Tools> link on right of QPR submission (Figure 6-27) or click the “Edit” link to load the “Edit Performance Report” screen. The “Review Tools” link will appear on the left toolbar.
The <Review Tools> screen will load (Figure 6-30).
Click “Review Checklist” to access new screen displaying the QPR Review Checklist (Figure 6-31).
Click <Download> to create PDF version of the QPR Review Checklist.
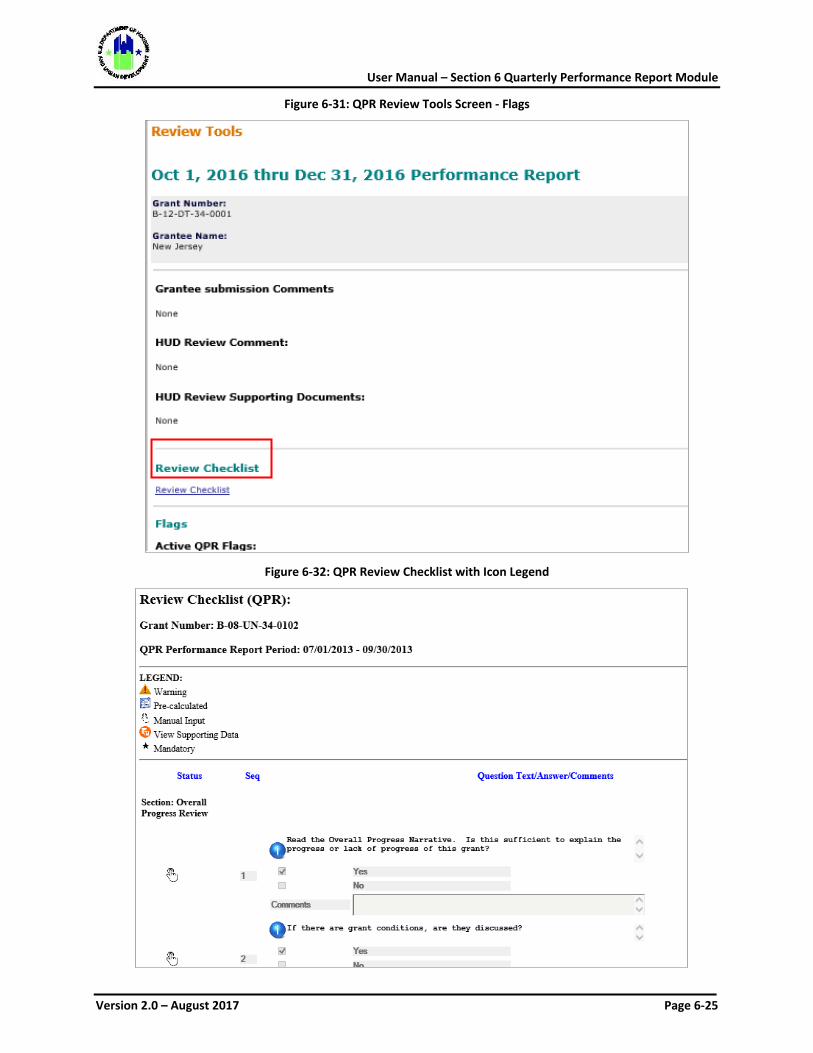
User Manual – Section 6 Quarterly Performance Report Module
Version 2.0 – August 2017 Page 6-25
Figure 6-31: QPR Review Tools Screen - Flags
Figure 6-32: QPR Review Checklist with Icon Legend
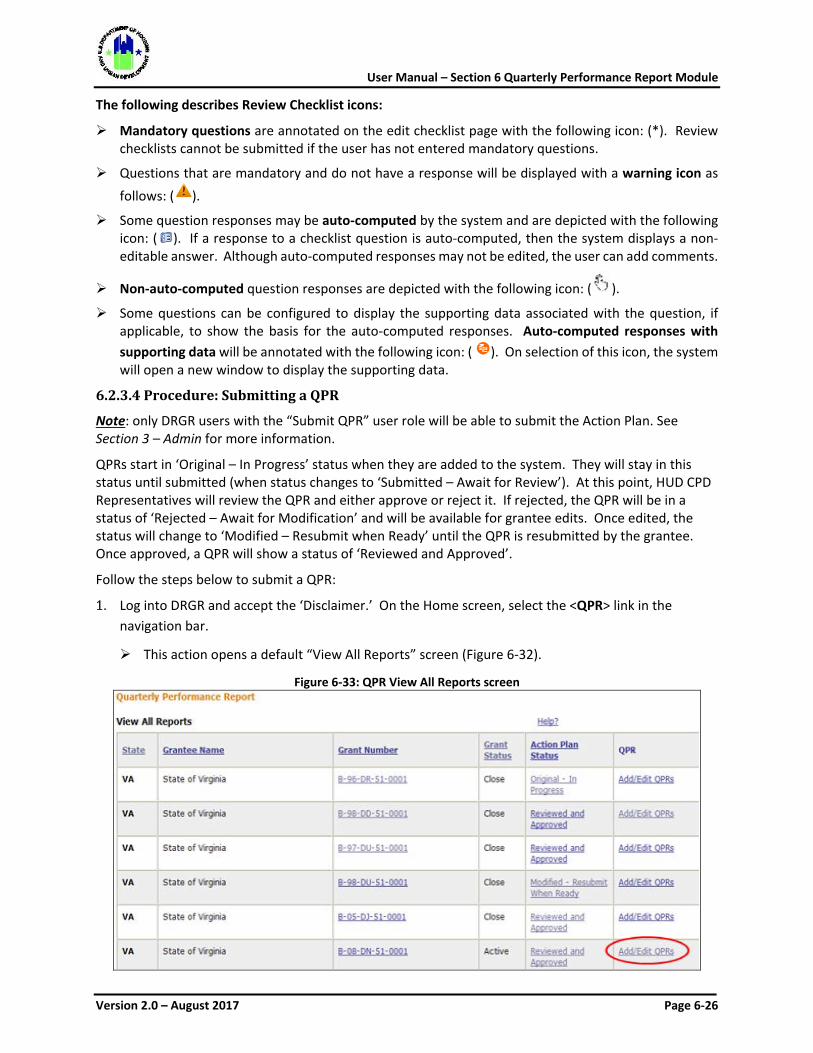
User Manual – Section 6 Quarterly Performance Report Module
Version 2.0 – August 2017 Page 6-26
The following describes Review Checklist icons:
Mandatory questions are annotated on the edit checklist page with the following icon: (*). Review checklists cannot be submitted if the user has not entered mandatory questions.
Questions that are mandatory and do not have a response will be displayed with a warning icon as follows: ( ).
Some question responses may be auto-computed by the system and are depicted with the following icon: ( ). If a response to a checklist question is auto-computed, then the system displays a non-editable answer. Although auto-computed responses may not be edited, the user can add comments.
Non-auto-computed question responses are depicted with the following icon: ( ).
Some questions can be configured to display the supporting data associated with the question, if applicable, to show the basis for the auto-computed responses. Auto-computed responses with supporting data will be annotated with the following icon: ( ). On selection of this icon, the system will open a new window to display the supporting data.
6.2.3.4 Procedure: Submitting a QPR
Note: only DRGR users with the “Submit QPR” user role will be able to submit the Action Plan. See Section 3 – Admin for more information.
QPRs start in ‘Original – In Progress’ status when they are added to the system. They will stay in this status until submitted (when status changes to ‘Submitted – Await for Review’). At this point, HUD CPD Representatives will review the QPR and either approve or reject it. If rejected, the QPR will be in a status of ‘Rejected – Await for Modification’ and will be available for grantee edits. Once edited, the status will change to ‘Modified – Resubmit when Ready’ until the QPR is resubmitted by the grantee. Once approved, a QPR will show a status of ‘Reviewed and Approved’.
Follow the steps below to submit a QPR:
Log into DRGR and accept the ‘Disclaimer.’ On the Home screen, select the <QPR> link in the navigation bar.
This action opens a default “View All Reports” screen (Figure 6-32).
Figure 6-33: QPR View All Reports screen
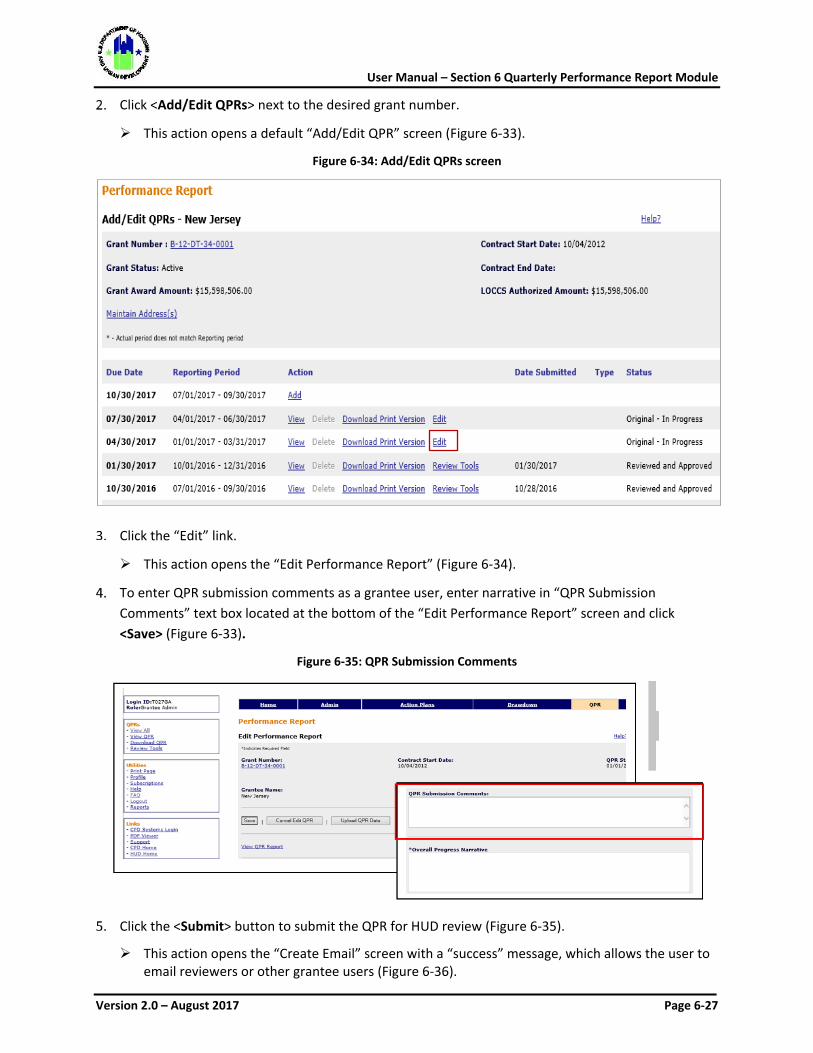
User Manual – Section 6 Quarterly Performance Report Module
Version 2.0 – August 2017 Page 6-27
Click <Add/Edit QPRs> next to the desired grant number.
This action opens a default “Add/Edit QPR” screen (Figure 6-33).
Figure 6-34: Add/Edit QPRs screen
Click the “Edit” link.
This action opens the “Edit Performance Report” (Figure 6-34).
To enter QPR submission comments as a grantee user, enter narrative in “QPR Submission Comments” text box located at the bottom of the “Edit Performance Report” screen and click <Save> (Figure 6-33).
Figure 6-35: QPR Submission Comments
Click the <Submit> button to submit the QPR for HUD review (Figure 6-35).
This action opens the “Create Email” screen with a “success” message, which allows the user to email reviewers or other grantee users (Figure 6-36).
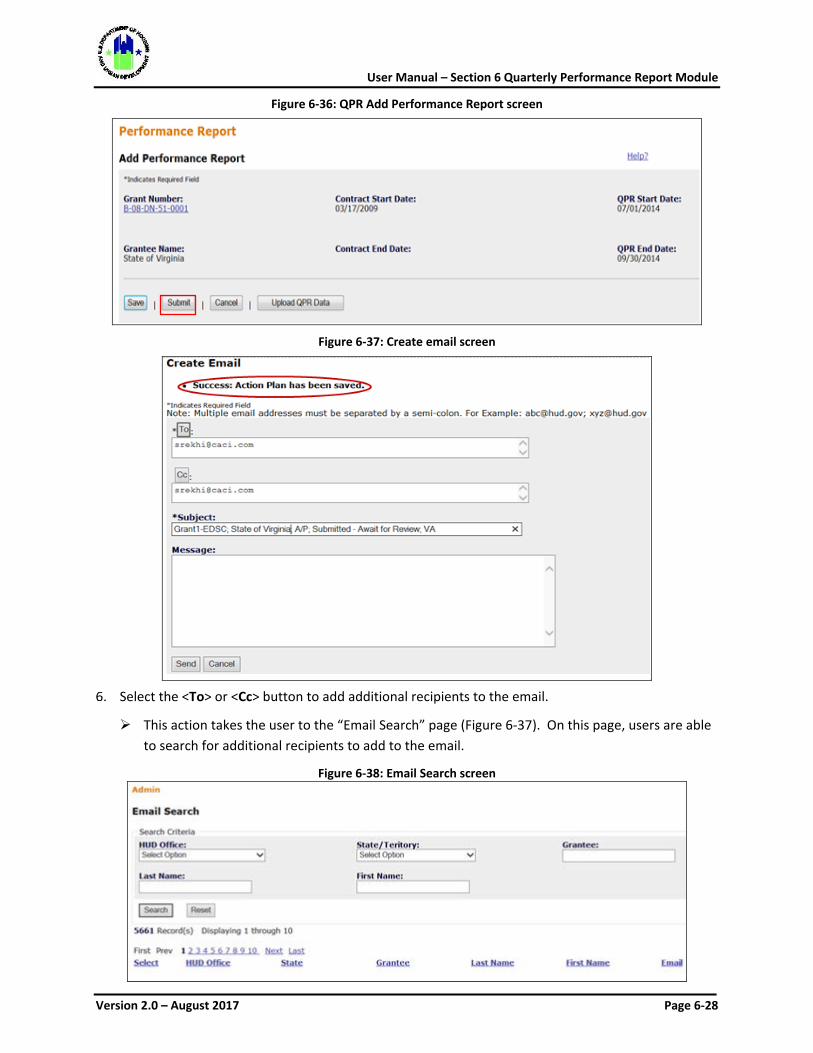
User Manual – Section 6 Quarterly Performance Report Module
Version 2.0 – August 2017 Page 6-28
Figure 6-36: QPR Add Performance Report screen
Figure 6-37: Create email screen
Select the <To> or <Cc> button to add additional recipients to the email.
This action takes the user to the “Email Search” page (Figure 6-37). On this page, users are able to search for additional recipients to add to the email.
Figure 6-38: Email Search screen
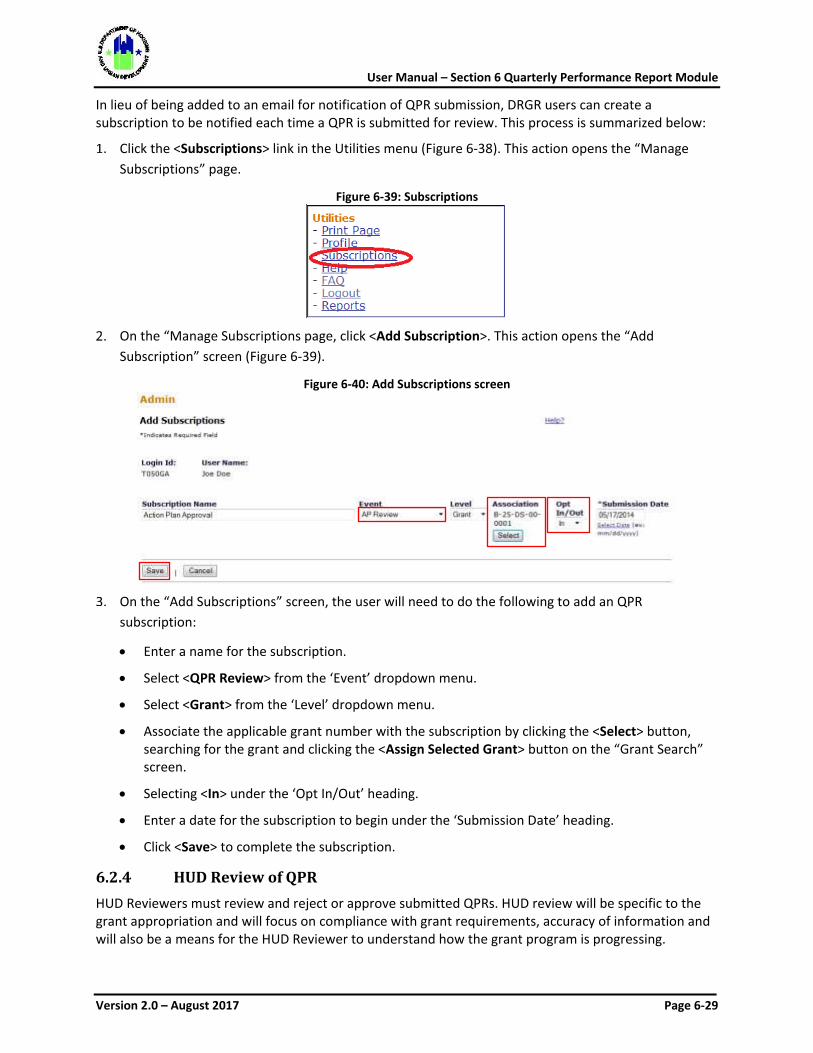
User Manual – Section 6 Quarterly Performance Report Module
Version 2.0 – August 2017 Page 6-29
In lieu of being added to an email for notification of QPR submission, DRGR users can create a subscription to be notified each time a QPR is submitted for review. This process is summarized below:
Click the <Subscriptions> link in the Utilities menu (Figure 6-38). This action opens the “Manage Subscriptions” page.
Figure 6-39: Subscriptions
On the “Manage Subscriptions page, click <Add Subscription>. This action opens the “Add
Subscription” screen (Figure 6-39).
Figure 6-40: Add Subscriptions screen
On the “Add Subscriptions” screen, the user will need to do the following to add an QPR
subscription:
• Enter a name for the subscription.
• Select <QPR Review> from the ‘Event’ dropdown menu.
• Select <Grant> from the ‘Level’ dropdown menu.
• Associate the applicable grant number with the subscription by clicking the <Select> button, searching for the grant and clicking the <Assign Selected Grant> button on the “Grant Search” screen.
• Selecting <In> under the ‘Opt In/Out’ heading.
• Enter a date for the subscription to begin under the ‘Submission Date’ heading.
• Click <Save> to complete the subscription.
6.2.4 HUD Review of QPR HUD Reviewers must review and reject or approve submitted QPRs. HUD review will be specific to the grant appropriation and will focus on compliance with grant requirements, accuracy of information and will also be a means for the HUD Reviewer to understand how the grant program is progressing.
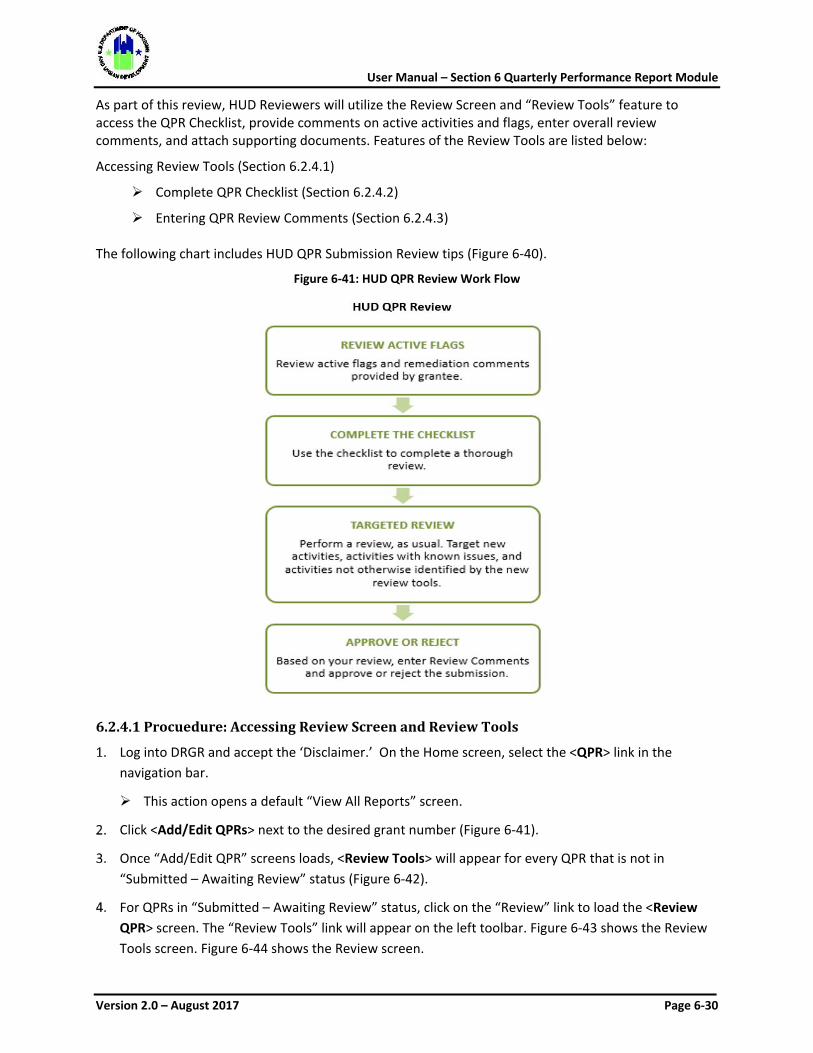
User Manual – Section 6 Quarterly Performance Report Module
Version 2.0 – August 2017 Page 6-30
As part of this review, HUD Reviewers will utilize the Review Screen and “Review Tools” feature to access the QPR Checklist, provide comments on active activities and flags, enter overall review comments, and attach supporting documents. Features of the Review Tools are listed below:
Accessing Review Tools (Section 6.2.4.1)
Complete QPR Checklist (Section 6.2.4.2)
Entering QPR Review Comments (Section 6.2.4.3) The following chart includes HUD QPR Submission Review tips (Figure 6-40).
Figure 6-41: HUD QPR Review Work Flow
6.2.4.1 Procuedure: Accessing Review Screen and Review Tools
Log into DRGR and accept the ‘Disclaimer.’ On the Home screen, select the <QPR> link in the navigation bar.
This action opens a default “View All Reports” screen.
Click <Add/Edit QPRs> next to the desired grant number (Figure 6-41).
Once “Add/Edit QPR” screens loads, <Review Tools> will appear for every QPR that is not in “Submitted – Awaiting Review” status (Figure 6-42).
For QPRs in “Submitted – Awaiting Review” status, click on the “Review” link to load the <Review QPR> screen. The “Review Tools” link will appear on the left toolbar. Figure 6-43 shows the Review Tools screen. Figure 6-44 shows the Review screen.

User Manual – Section 6 Quarterly Performance Report Module
Version 2.0 – August 2017 Page 6-31
Figure 6-42: View all Reports for HUD Reviewers
Figure 6-432: QPR Review Tools for HUD Reviewers
Note: HUD users are able to access the View QPR screen and a PDF version of the QPR to aid in their review. HUD users must be assigned to the grant and the QPR must be in “Submitted- Await for Review” status in order to use the following “Review Tool” features (Figure 6-43).
Difference between “Review Screen” and “Review Tools” Review Screen: Standard screen where HUD Users approve/reject QPR and access/perform review functions. Review Tools: “View Only” summary of all grantee and HUD user review actions.
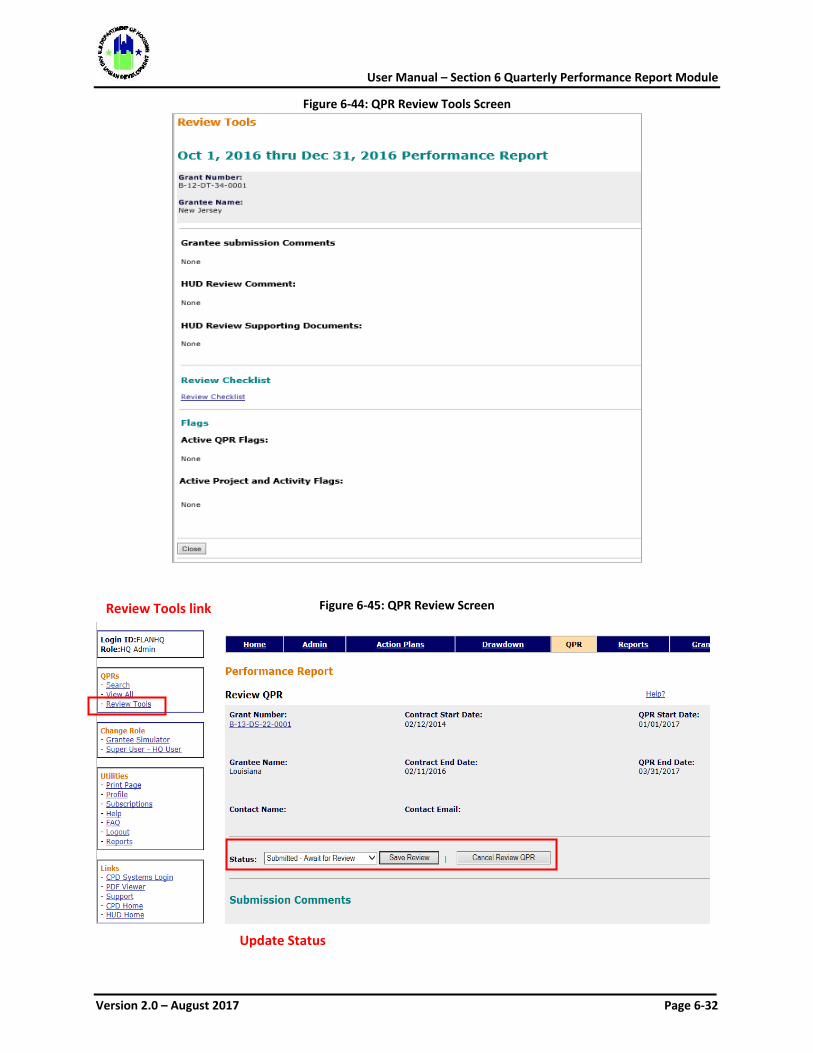
User Manual – Section 6 Quarterly Performance Report Module
Version 2.0 – August 2017 Page 6-32
Figure 6-44: QPR Review Tools Screen
Figure 6-45: QPR Review Screen
Review Tools link
Update Status
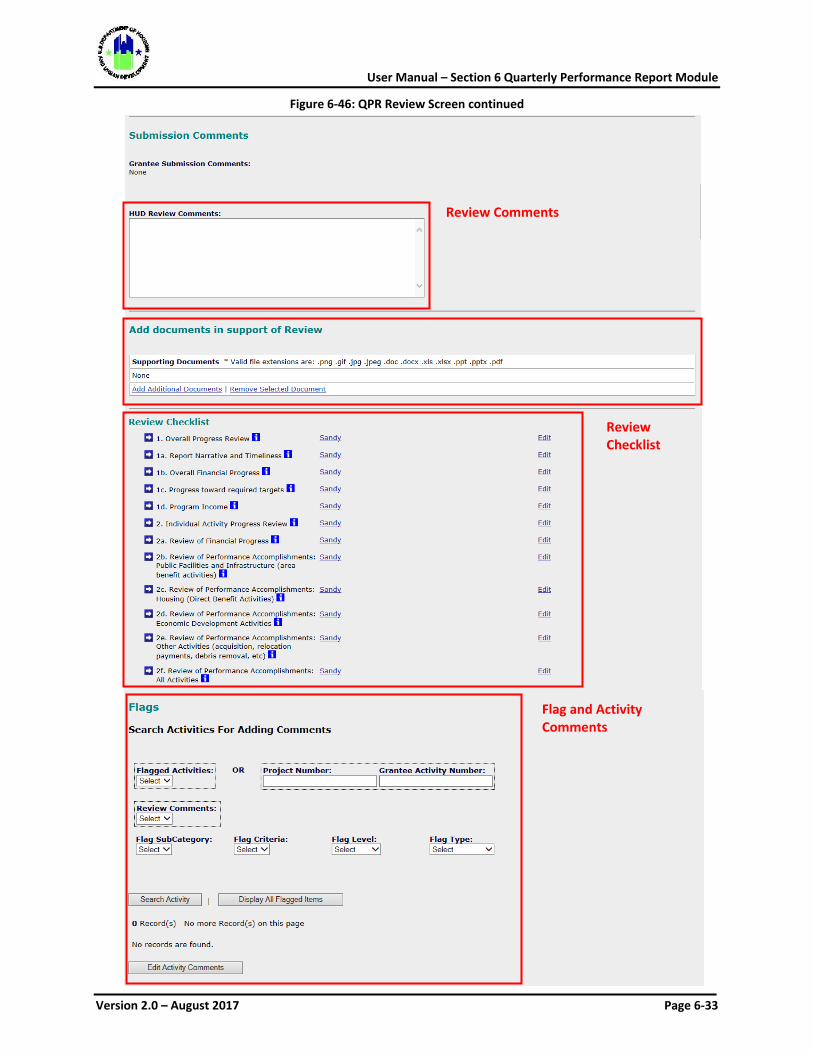
User Manual – Section 6 Quarterly Performance Report Module
Version 2.0 – August 2017 Page 6-33
Figure 6-46: QPR Review Screen continued
Review Comments
Review Checklist
Flag and Activity Comments
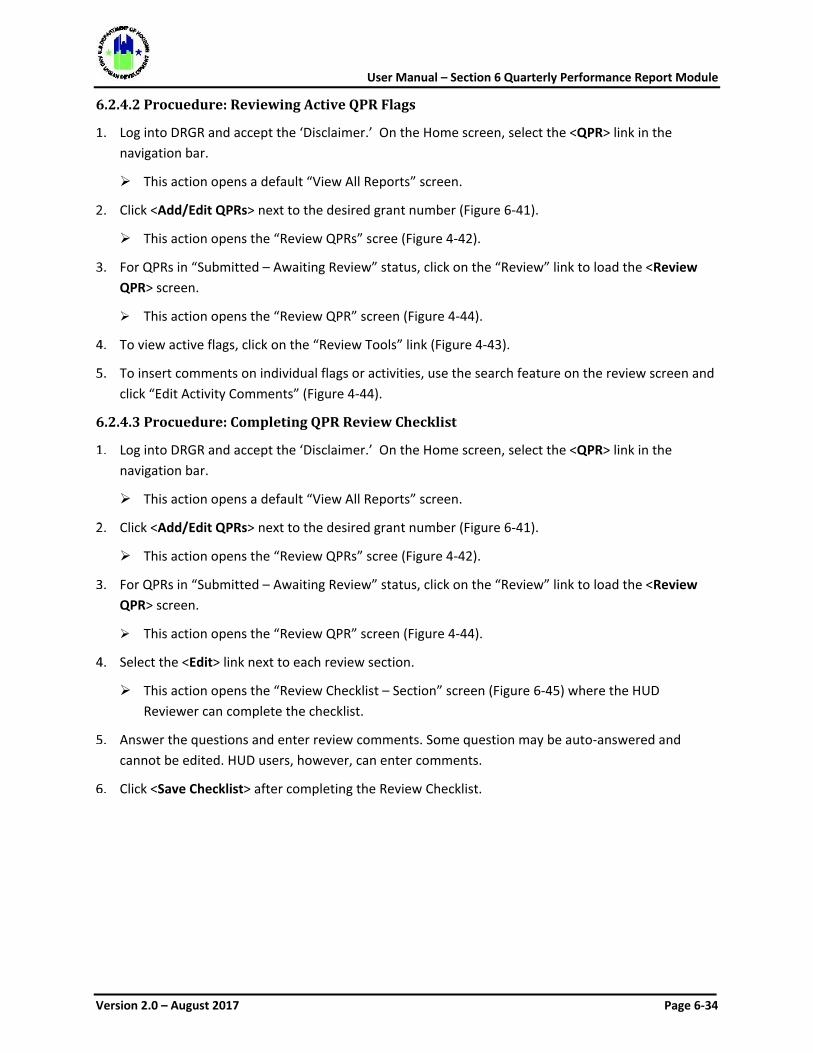
User Manual – Section 6 Quarterly Performance Report Module
Version 2.0 – August 2017 Page 6-34
6.2.4.2 Procuedure: Reviewing Active QPR Flags
Log into DRGR and accept the ‘Disclaimer.’ On the Home screen, select the <QPR> link in the navigation bar.
This action opens a default “View All Reports” screen.
Click <Add/Edit QPRs> next to the desired grant number (Figure 6-41).
This action opens the “Review QPRs” scree (Figure 4-42).
For QPRs in “Submitted – Awaiting Review” status, click on the “Review” link to load the <Review QPR> screen.
This action opens the “Review QPR” screen (Figure 4-44).
To view active flags, click on the “Review Tools” link (Figure 4-43).
To insert comments on individual flags or activities, use the search feature on the review screen and click “Edit Activity Comments” (Figure 4-44).
6.2.4.3 Procuedure: Completing QPR Review Checklist
Log into DRGR and accept the ‘Disclaimer.’ On the Home screen, select the <QPR> link in the navigation bar.
This action opens a default “View All Reports” screen.
Click <Add/Edit QPRs> next to the desired grant number (Figure 6-41).
This action opens the “Review QPRs” scree (Figure 4-42).
For QPRs in “Submitted – Awaiting Review” status, click on the “Review” link to load the <Review QPR> screen.
This action opens the “Review QPR” screen (Figure 4-44).
Select the <Edit> link next to each review section.
This action opens the “Review Checklist – Section” screen (Figure 6-45) where the HUD Reviewer can complete the checklist.
Answer the questions and enter review comments. Some question may be auto-answered and cannot be edited. HUD users, however, can enter comments.
Click <Save Checklist> after completing the Review Checklist.
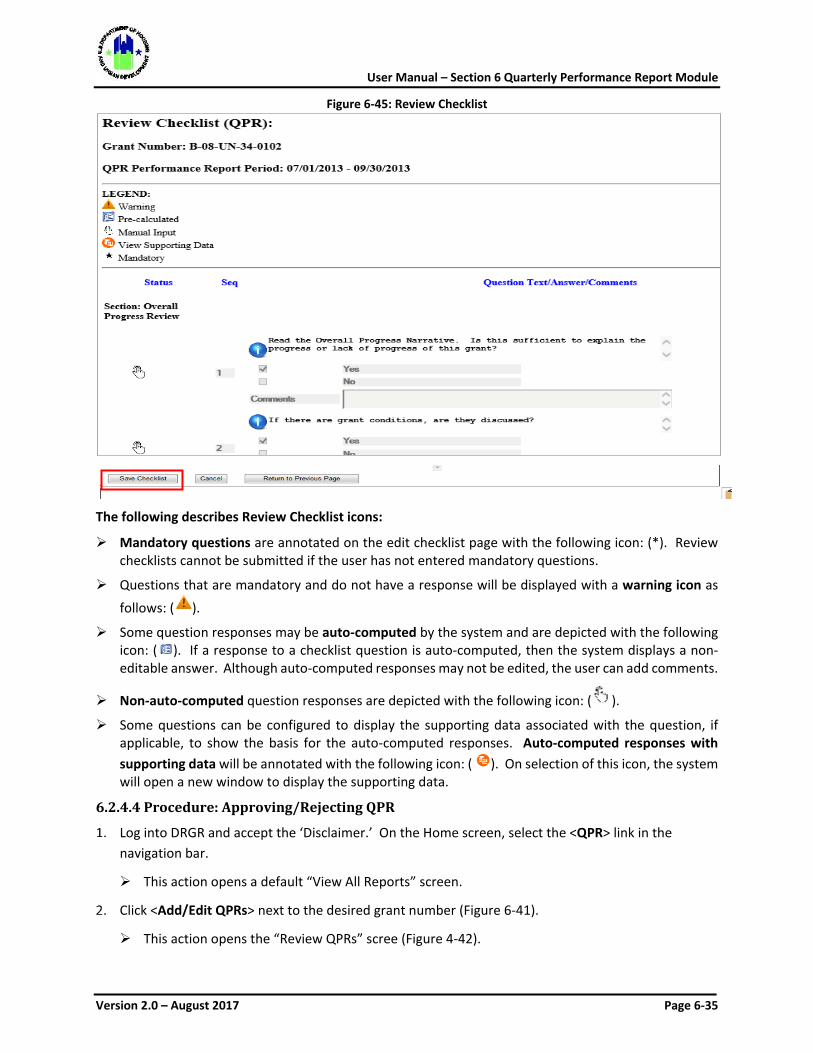
User Manual – Section 6 Quarterly Performance Report Module
Version 2.0 – August 2017 Page 6-35
Figure 6-45: Review Checklist
The following describes Review Checklist icons:
Mandatory questions are annotated on the edit checklist page with the following icon: (*). Review checklists cannot be submitted if the user has not entered mandatory questions.
Questions that are mandatory and do not have a response will be displayed with a warning icon as follows: ( ).
Some question responses may be auto-computed by the system and are depicted with the following icon: ( ). If a response to a checklist question is auto-computed, then the system displays a non-editable answer. Although auto-computed responses may not be edited, the user can add comments.
Non-auto-computed question responses are depicted with the following icon: ( ).
Some questions can be configured to display the supporting data associated with the question, if applicable, to show the basis for the auto-computed responses. Auto-computed responses with supporting data will be annotated with the following icon: ( ). On selection of this icon, the system will open a new window to display the supporting data.
6.2.4.4 Procedure: Approving/Rejecting QPR
Log into DRGR and accept the ‘Disclaimer.’ On the Home screen, select the <QPR> link in the navigation bar.
This action opens a default “View All Reports” screen.
Click <Add/Edit QPRs> next to the desired grant number (Figure 6-41).
This action opens the “Review QPRs” scree (Figure 4-42).
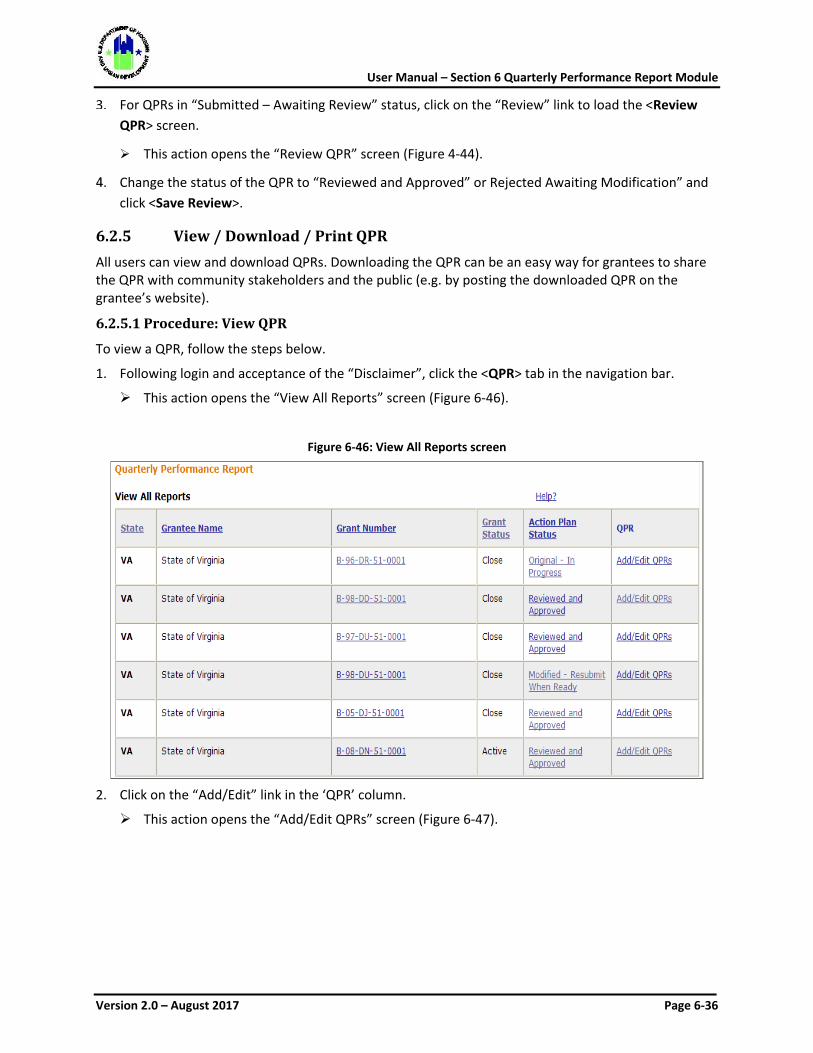
User Manual – Section 6 Quarterly Performance Report Module
Version 2.0 – August 2017 Page 6-36
For QPRs in “Submitted – Awaiting Review” status, click on the “Review” link to load the <Review QPR> screen.
This action opens the “Review QPR” screen (Figure 4-44).
Change the status of the QPR to “Reviewed and Approved” or Rejected Awaiting Modification” and click <Save Review>.
6.2.5 View / Download / Print QPR All users can view and download QPRs. Downloading the QPR can be an easy way for grantees to share the QPR with community stakeholders and the public (e.g. by posting the downloaded QPR on the grantee’s website).
6.2.5.1 Procedure: View QPR
To view a QPR, follow the steps below.
1. Following login and acceptance of the “Disclaimer”, click the <QPR> tab in the navigation bar.
This action opens the “View All Reports” screen (Figure 6-46).
Figure 6-46: View All Reports screen
2. Click on the “Add/Edit” link in the ‘QPR’ column.
This action opens the “Add/Edit QPRs” screen (Figure 6-47).
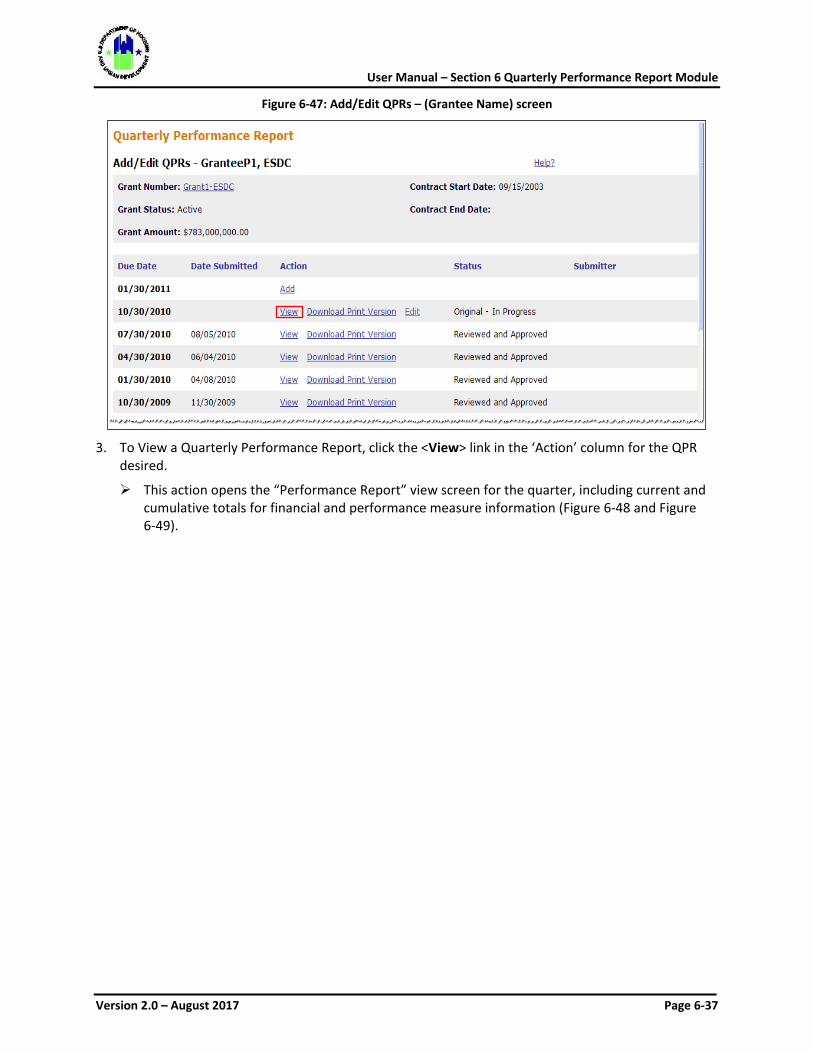
User Manual – Section 6 Quarterly Performance Report Module
Version 2.0 – August 2017 Page 6-37
Figure 6-47: Add/Edit QPRs – (Grantee Name) screen
3. To View a Quarterly Performance Report, click the <View> link in the ‘Action’ column for the QPR
desired.
This action opens the “Performance Report” view screen for the quarter, including current and cumulative totals for financial and performance measure information (Figure 6-48 and Figure 6-49).
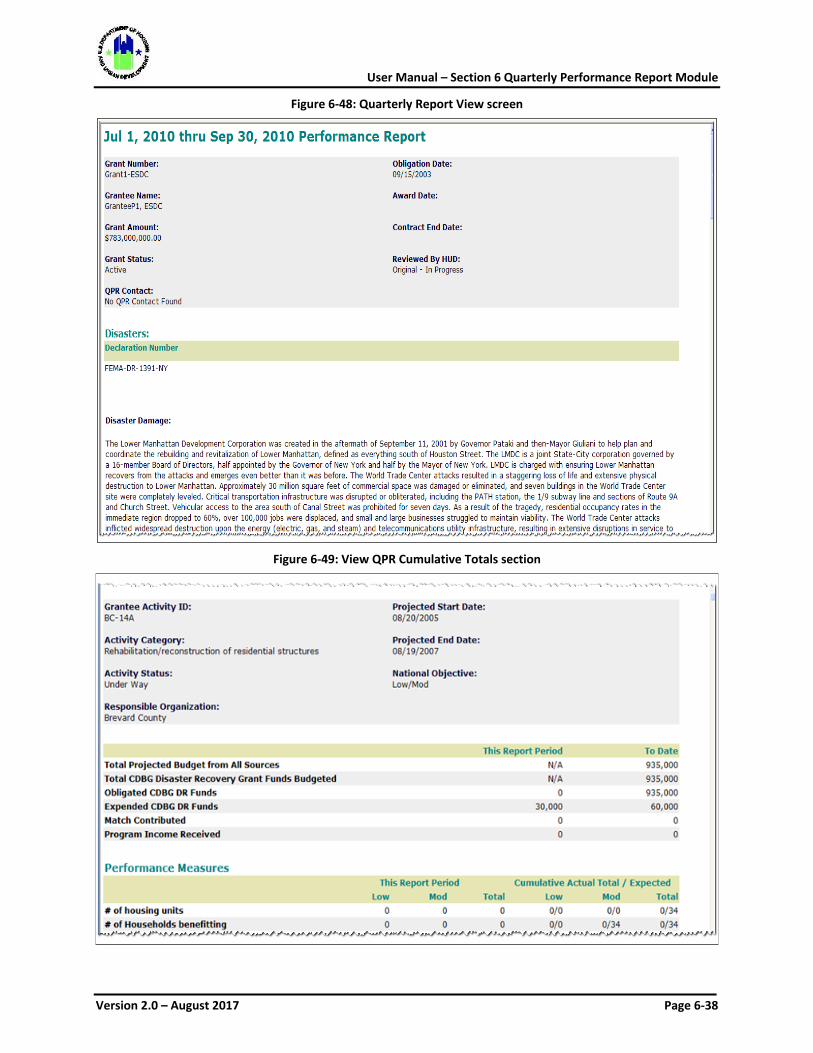
User Manual – Section 6 Quarterly Performance Report Module
Version 2.0 – August 2017 Page 6-38
Figure 6-48: Quarterly Report View screen
Figure 6-49: View QPR Cumulative Totals section
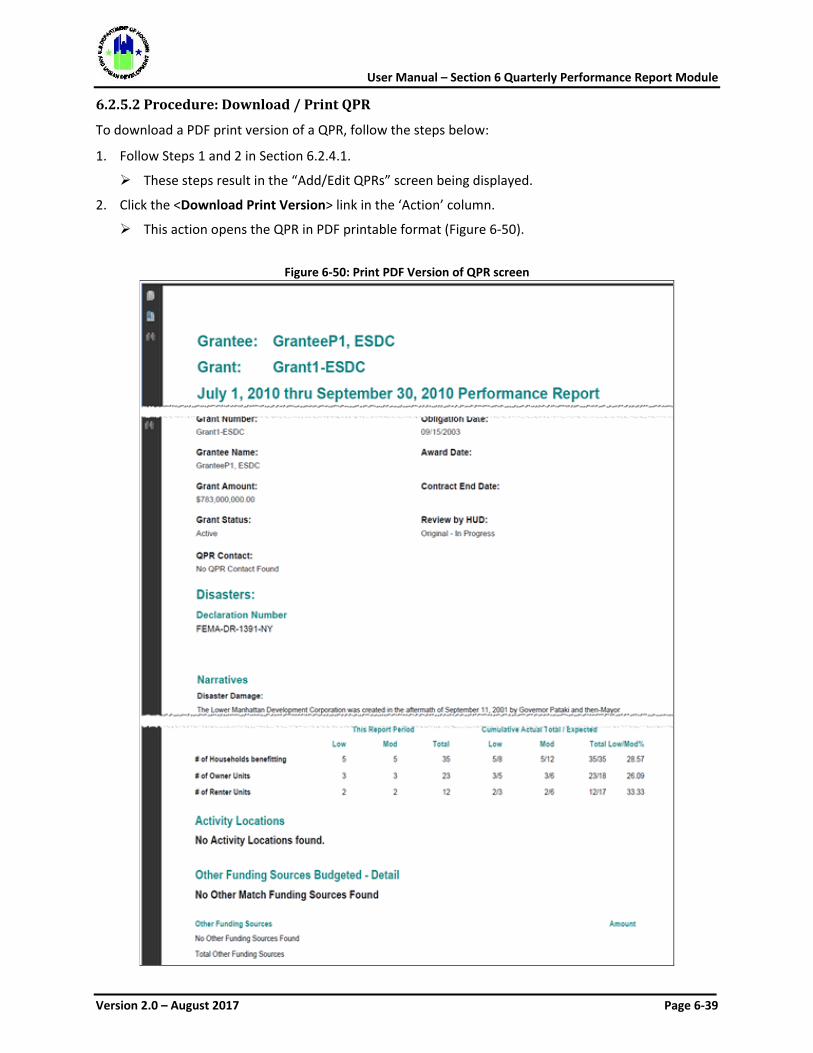
User Manual – Section 6 Quarterly Performance Report Module
Version 2.0 – August 2017 Page 6-39
6.2.5.2 Procedure: Download / Print QPR
To download a PDF print version of a QPR, follow the steps below:
1. Follow Steps 1 and 2 in Section 6.2.4.1.
These steps result in the “Add/Edit QPRs” screen being displayed.
2. Click the <Download Print Version> link in the ‘Action’ column.
This action opens the QPR in PDF printable format (Figure 6-50).
Figure 6-50: Print PDF Version of QPR screen
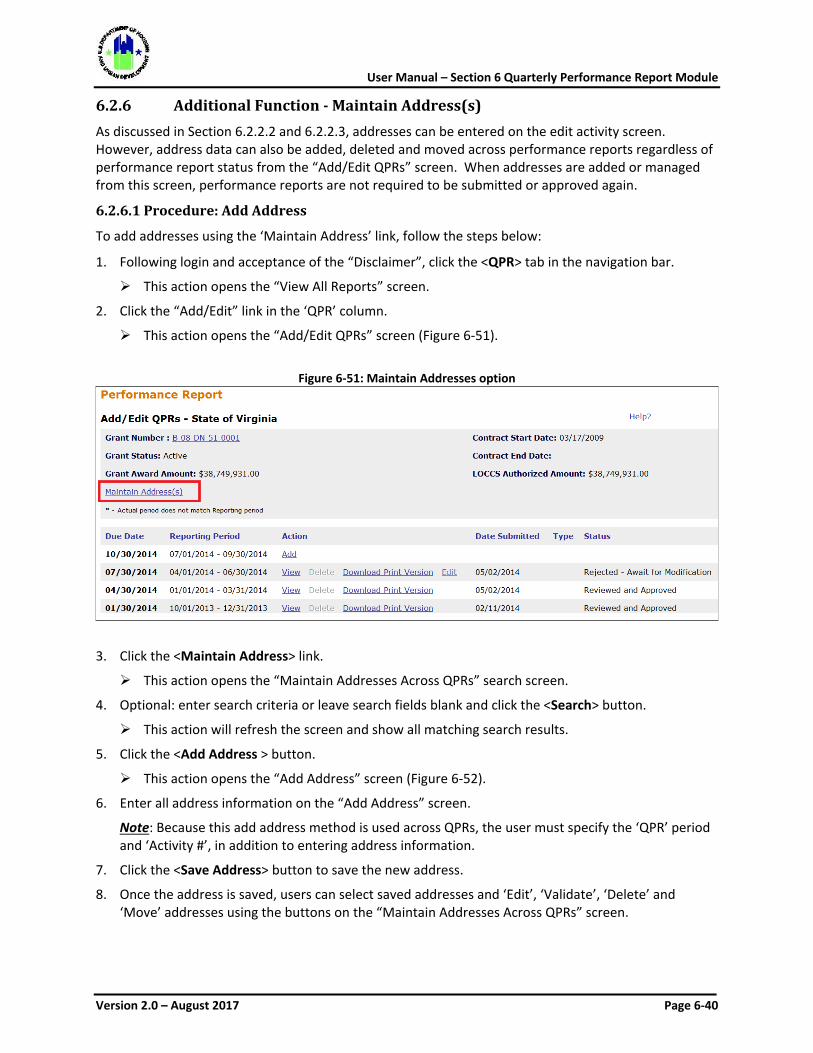
User Manual – Section 6 Quarterly Performance Report Module
Version 2.0 – August 2017 Page 6-40
6.2.6 Additional Function - Maintain Address(s) As discussed in Section 6.2.2.2 and 6.2.2.3, addresses can be entered on the edit activity screen. However, address data can also be added, deleted and moved across performance reports regardless of performance report status from the “Add/Edit QPRs” screen. When addresses are added or managed from this screen, performance reports are not required to be submitted or approved again.
6.2.6.1 Procedure: Add Address
To add addresses using the ‘Maintain Address’ link, follow the steps below:
1. Following login and acceptance of the “Disclaimer”, click the <QPR> tab in the navigation bar.
This action opens the “View All Reports” screen.
2. Click the “Add/Edit” link in the ‘QPR’ column.
This action opens the “Add/Edit QPRs” screen (Figure 6-51).
Figure 6-51: Maintain Addresses option
3. Click the <Maintain Address> link.
This action opens the “Maintain Addresses Across QPRs” search screen.
4. Optional: enter search criteria or leave search fields blank and click the <Search> button.
This action will refresh the screen and show all matching search results.
5. Click the <Add Address > button.
This action opens the “Add Address” screen (Figure 6-52).
6. Enter all address information on the “Add Address” screen.
Note: Because this add address method is used across QPRs, the user must specify the ‘QPR’ period and ‘Activity #’, in addition to entering address information.
7. Click the <Save Address> button to save the new address.
8. Once the address is saved, users can select saved addresses and ‘Edit’, ‘Validate’, ‘Delete’ and ‘Move’ addresses using the buttons on the “Maintain Addresses Across QPRs” screen.
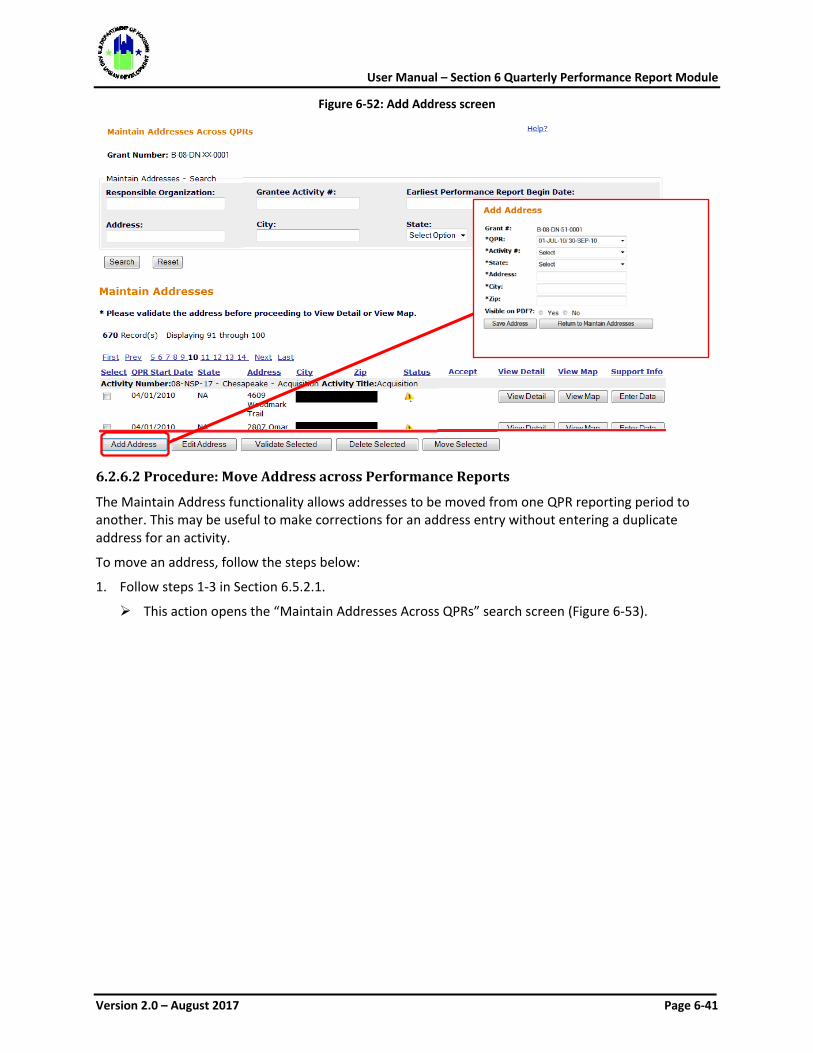
User Manual – Section 6 Quarterly Performance Report Module
Version 2.0 – August 2017 Page 6-41
Figure 6-52: Add Address screen
6.2.6.2 Procedure: Move Address across Performance Reports
The Maintain Address functionality allows addresses to be moved from one QPR reporting period to another. This may be useful to make corrections for an address entry without entering a duplicate address for an activity.
To move an address, follow the steps below:
1. Follow steps 1-3 in Section 6.5.2.1.
This action opens the “Maintain Addresses Across QPRs” search screen (Figure 6-53).
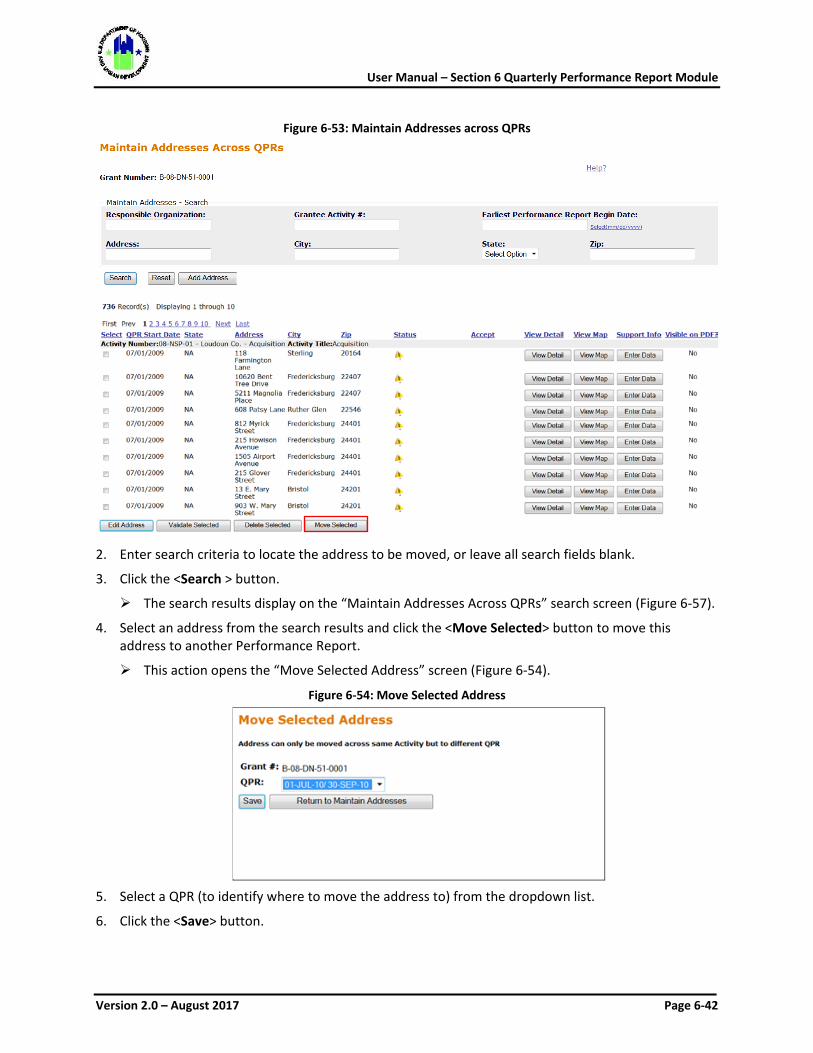
User Manual – Section 6 Quarterly Performance Report Module
Version 2.0 – August 2017 Page 6-42
Figure 6-53: Maintain Addresses across QPRs
2. Enter search criteria to locate the address to be moved, or leave all search fields blank.
3. Click the <Search > button.
The search results display on the “Maintain Addresses Across QPRs” search screen (Figure 6-57).
4. Select an address from the search results and click the <Move Selected> button to move this address to another Performance Report.
This action opens the “Move Selected Address” screen (Figure 6-54).
Figure 6-54: Move Selected Address
5. Select a QPR (to identify where to move the address to) from the dropdown list.
6. Click the <Save> button.
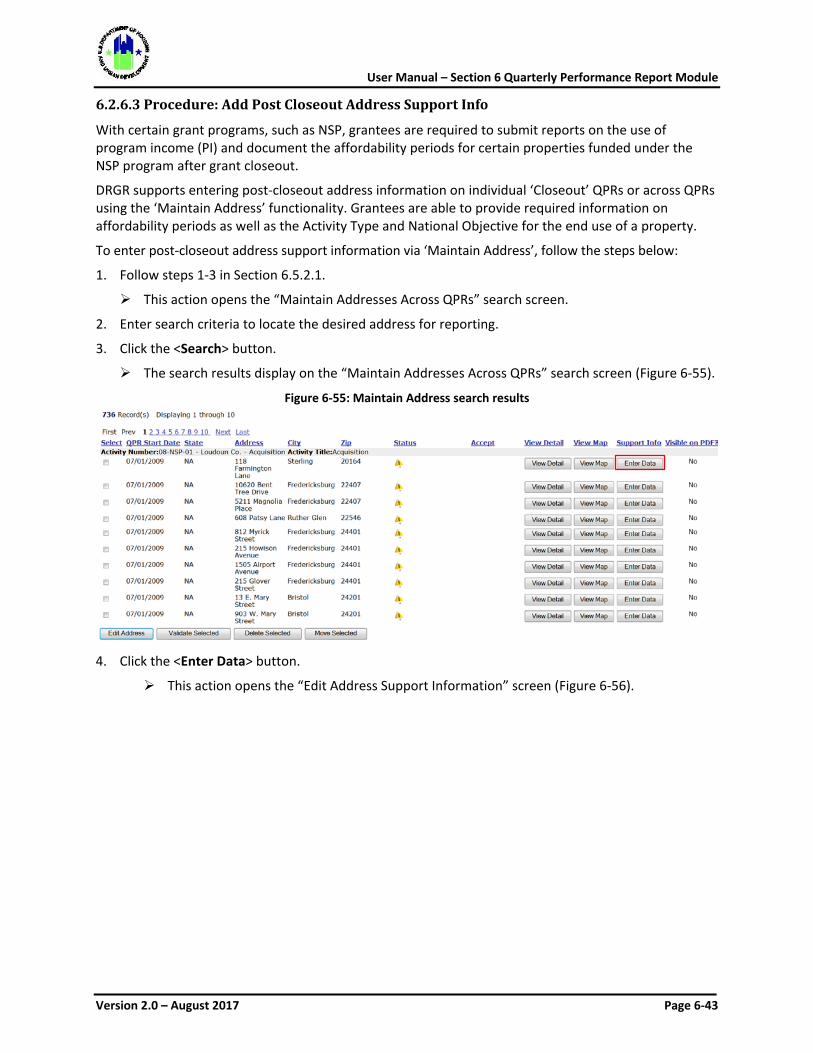
User Manual – Section 6 Quarterly Performance Report Module
Version 2.0 – August 2017 Page 6-43
6.2.6.3 Procedure: Add Post Closeout Address Support Info
With certain grant programs, such as NSP, grantees are required to submit reports on the use of program income (PI) and document the affordability periods for certain properties funded under the NSP program after grant closeout.
DRGR supports entering post-closeout address information on individual ‘Closeout’ QPRs or across QPRs using the ‘Maintain Address’ functionality. Grantees are able to provide required information on affordability periods as well as the Activity Type and National Objective for the end use of a property.
To enter post-closeout address support information via ‘Maintain Address’, follow the steps below:
1. Follow steps 1-3 in Section 6.5.2.1.
This action opens the “Maintain Addresses Across QPRs” search screen.
2. Enter search criteria to locate the desired address for reporting.
3. Click the <Search> button.
The search results display on the “Maintain Addresses Across QPRs” search screen (Figure 6-55).
Figure 6-55: Maintain Address search results
4. Click the <Enter Data> button.
This action opens the “Edit Address Support Information” screen (Figure 6-56).

User Manual – Section 6 Quarterly Performance Report Module
Version 2.0 – August 2017 Page 6-44
Figure 6-56: Edit Address Support Information screen
5. Required: Select ‘Property Status (affordability period)’, ‘Activity Type for End Use’ and ‘National
Objective for End Use’ information from the respective dropdown menus and enter associated dates.
6. Optional but recommended: Enter a ‘Description of End Use’ narrative and ‘Total Expenditure Amount’.
7. Click the <Save Address Info> button to save the address support information.
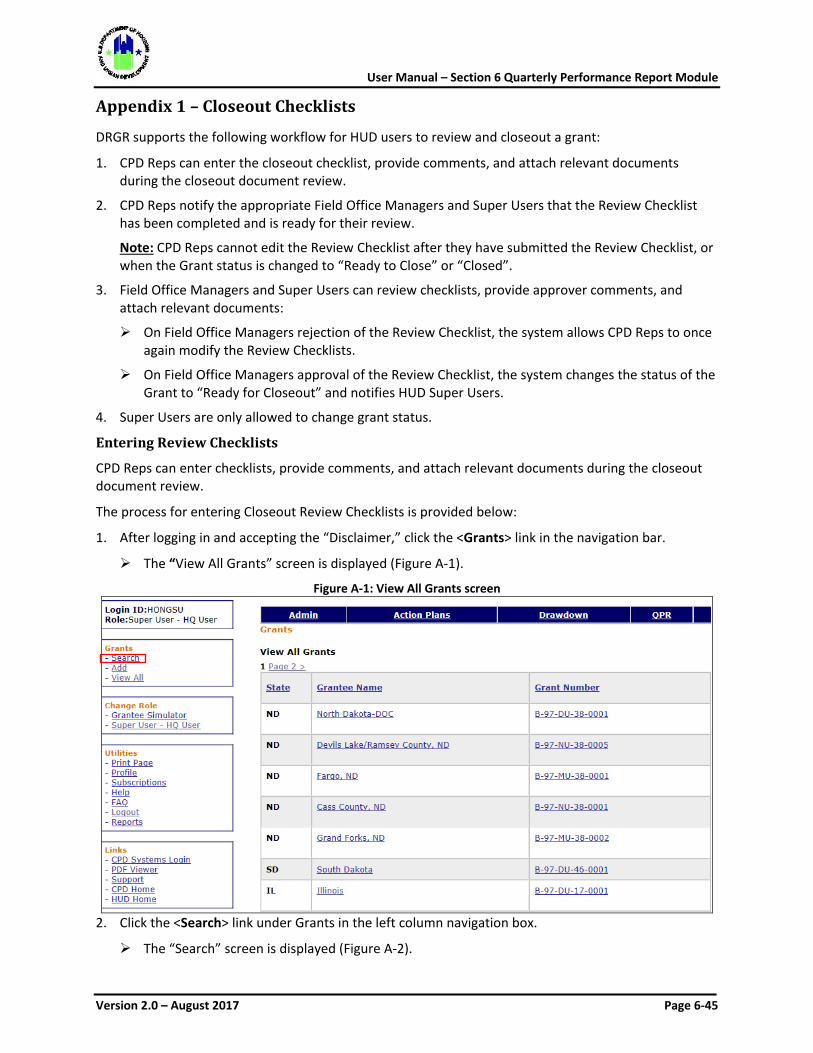
User Manual – Section 6 Quarterly Performance Report Module
Version 2.0 – August 2017 Page 6-45
Appendix 1 – Closeout Checklists
DRGR supports the following workflow for HUD users to review and closeout a grant:
1. CPD Reps can enter the closeout checklist, provide comments, and attach relevant documents during the closeout document review.
2. CPD Reps notify the appropriate Field Office Managers and Super Users that the Review Checklist has been completed and is ready for their review.
Note: CPD Reps cannot edit the Review Checklist after they have submitted the Review Checklist, or when the Grant status is changed to “Ready to Close” or “Closed”.
3. Field Office Managers and Super Users can review checklists, provide approver comments, and attach relevant documents:
On Field Office Managers rejection of the Review Checklist, the system allows CPD Reps to once again modify the Review Checklists.
On Field Office Managers approval of the Review Checklist, the system changes the status of the Grant to “Ready for Closeout” and notifies HUD Super Users.
4. Super Users are only allowed to change grant status.
Entering Review Checklists
CPD Reps can enter checklists, provide comments, and attach relevant documents during the closeout document review.
The process for entering Closeout Review Checklists is provided below:
1. After logging in and accepting the “Disclaimer,” click the <Grants> link in the navigation bar.
The “View All Grants” screen is displayed (Figure A-1).
Figure A-1: View All Grants screen
2. Click the <Search> link under Grants in the left column navigation box.
The “Search” screen is displayed (Figure A-2).
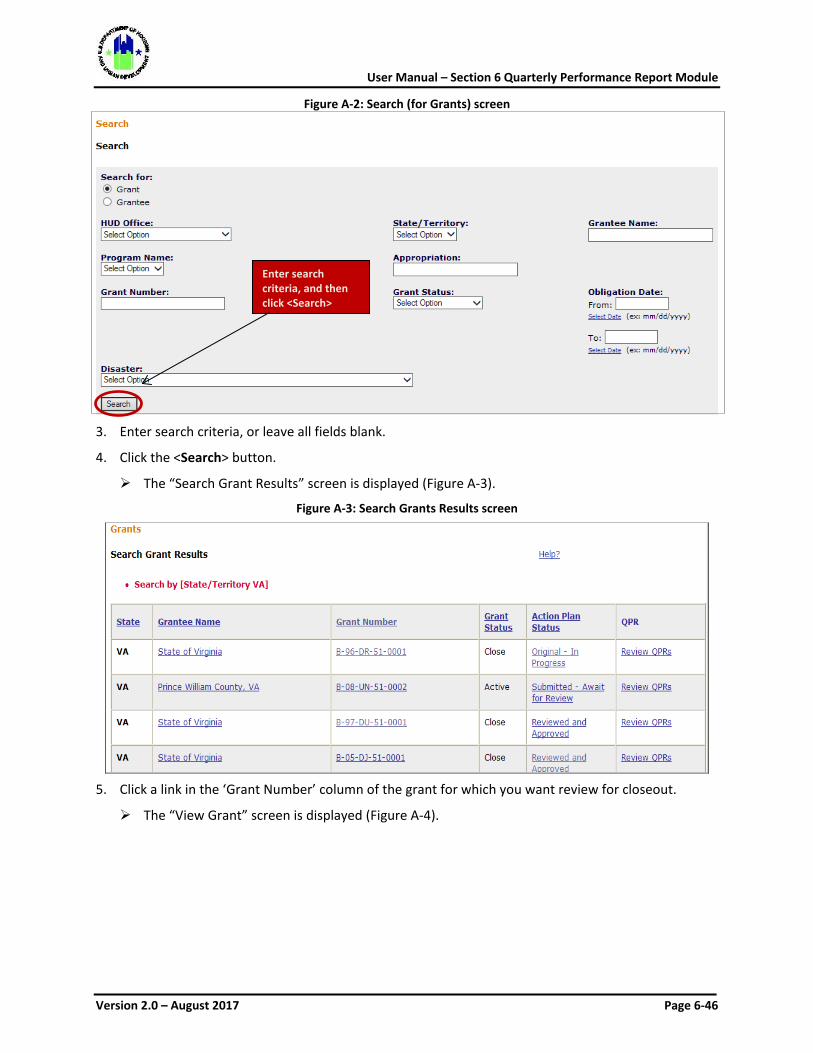
User Manual – Section 6 Quarterly Performance Report Module
Version 2.0 – August 2017 Page 6-46
Figure A-2: Search (for Grants) screen
3. Enter search criteria, or leave all fields blank.
4. Click the <Search> button.
The “Search Grant Results” screen is displayed (Figure A-3).
Figure A-3: Search Grants Results screen
5. Click a link in the ‘Grant Number’ column of the grant for which you want review for closeout.
The “View Grant” screen is displayed (Figure A-4).
Enter search criteria, and then click <Search>
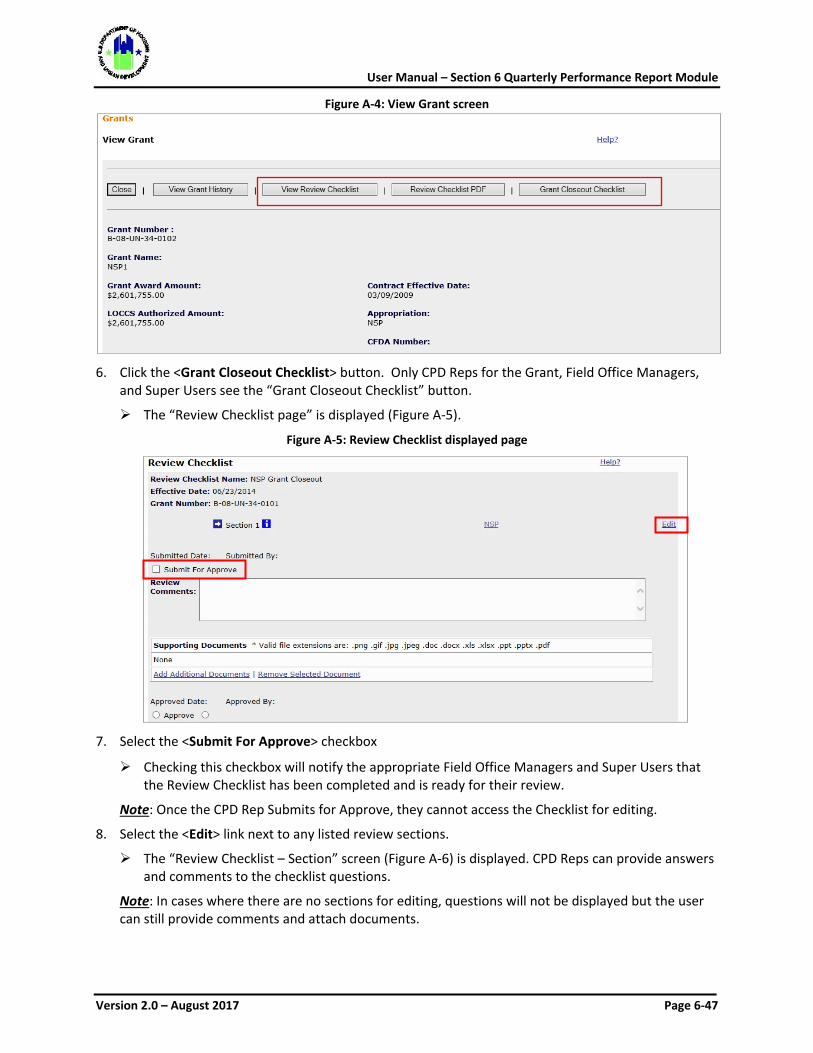
User Manual – Section 6 Quarterly Performance Report Module
Version 2.0 – August 2017 Page 6-47
Figure A-4: View Grant screen
6. Click the <Grant Closeout Checklist> button. Only CPD Reps for the Grant, Field Office Managers,
and Super Users see the “Grant Closeout Checklist” button.
The “Review Checklist page” is displayed (Figure A-5).
Figure A-5: Review Checklist displayed page
7. Select the <Submit For Approve> checkbox
Checking this checkbox will notify the appropriate Field Office Managers and Super Users that the Review Checklist has been completed and is ready for their review.
Note: Once the CPD Rep Submits for Approve, they cannot access the Checklist for editing.
8. Select the <Edit> link next to any listed review sections.
The “Review Checklist – Section” screen (Figure A-6) is displayed. CPD Reps can provide answers and comments to the checklist questions.
Note: In cases where there are no sections for editing, questions will not be displayed but the user can still provide comments and attach documents.
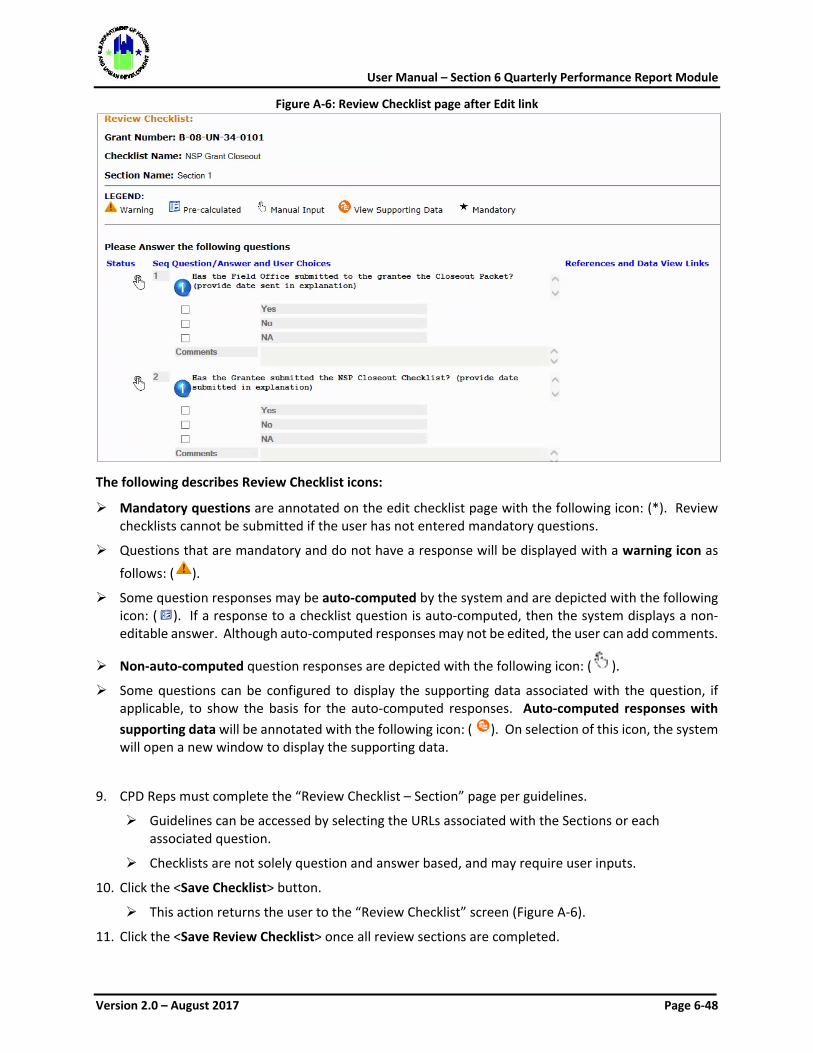
User Manual – Section 6 Quarterly Performance Report Module
Version 2.0 – August 2017 Page 6-48
Figure A-6: Review Checklist page after Edit link
The following describes Review Checklist icons:
Mandatory questions are annotated on the edit checklist page with the following icon: (*). Review checklists cannot be submitted if the user has not entered mandatory questions.
Questions that are mandatory and do not have a response will be displayed with a warning icon as follows: ( ).
Some question responses may be auto-computed by the system and are depicted with the following icon: ( ). If a response to a checklist question is auto-computed, then the system displays a non-editable answer. Although auto-computed responses may not be edited, the user can add comments.
Non-auto-computed question responses are depicted with the following icon: ( ).
Some questions can be configured to display the supporting data associated with the question, if applicable, to show the basis for the auto-computed responses. Auto-computed responses with supporting data will be annotated with the following icon: ( ). On selection of this icon, the system will open a new window to display the supporting data.
9. CPD Reps must complete the “Review Checklist – Section” page per guidelines.
Guidelines can be accessed by selecting the URLs associated with the Sections or each associated question.
Checklists are not solely question and answer based, and may require user inputs.
10. Click the <Save Checklist> button.
This action returns the user to the “Review Checklist” screen (Figure A-6).
11. Click the <Save Review Checklist> once all review sections are completed.
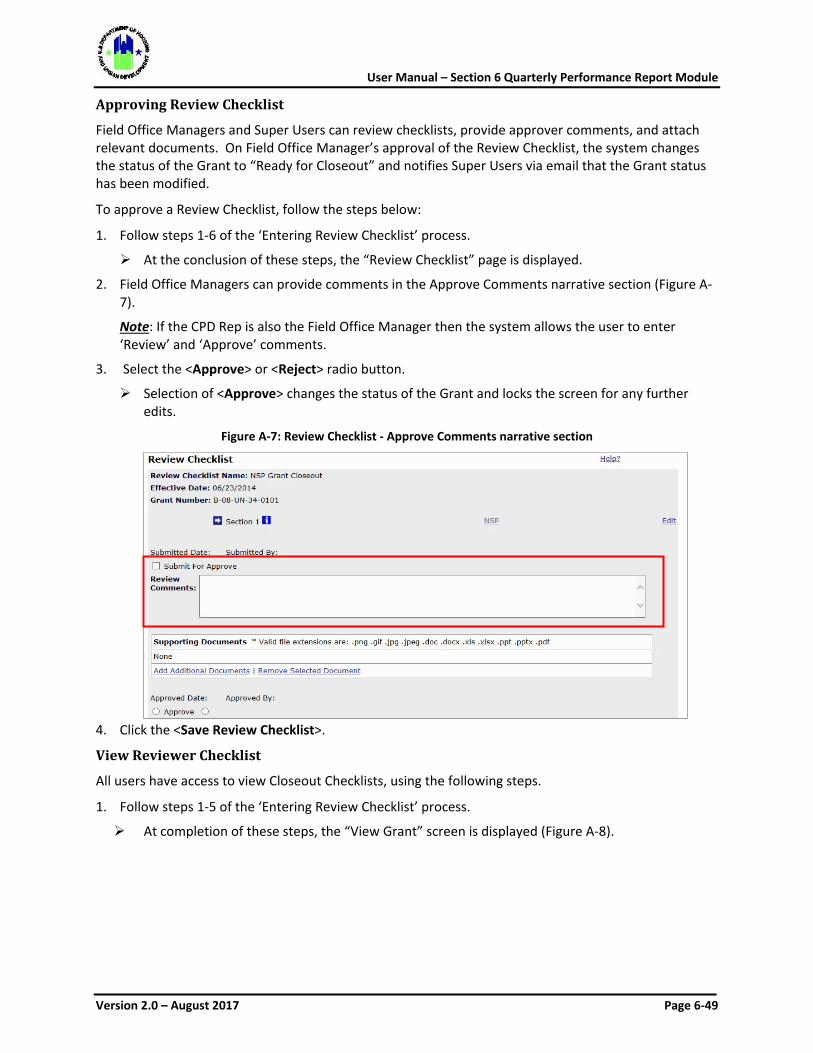
User Manual – Section 6 Quarterly Performance Report Module
Version 2.0 – August 2017 Page 6-49
Approving Review Checklist
Field Office Managers and Super Users can review checklists, provide approver comments, and attach relevant documents. On Field Office Manager’s approval of the Review Checklist, the system changes the status of the Grant to “Ready for Closeout” and notifies Super Users via email that the Grant status has been modified.
To approve a Review Checklist, follow the steps below:
1. Follow steps 1-6 of the ‘Entering Review Checklist’ process.
At the conclusion of these steps, the “Review Checklist” page is displayed.
2. Field Office Managers can provide comments in the Approve Comments narrative section (Figure A-7).
Note: If the CPD Rep is also the Field Office Manager then the system allows the user to enter ‘Review’ and ‘Approve’ comments.
3. Select the <Approve> or <Reject> radio button.
Selection of <Approve> changes the status of the Grant and locks the screen for any further edits.
Figure A-7: Review Checklist - Approve Comments narrative section
4. Click the <Save Review Checklist>.
View Reviewer Checklist
All users have access to view Closeout Checklists, using the following steps.
1. Follow steps 1-5 of the ‘Entering Review Checklist’ process.
At completion of these steps, the “View Grant” screen is displayed (Figure A-8).
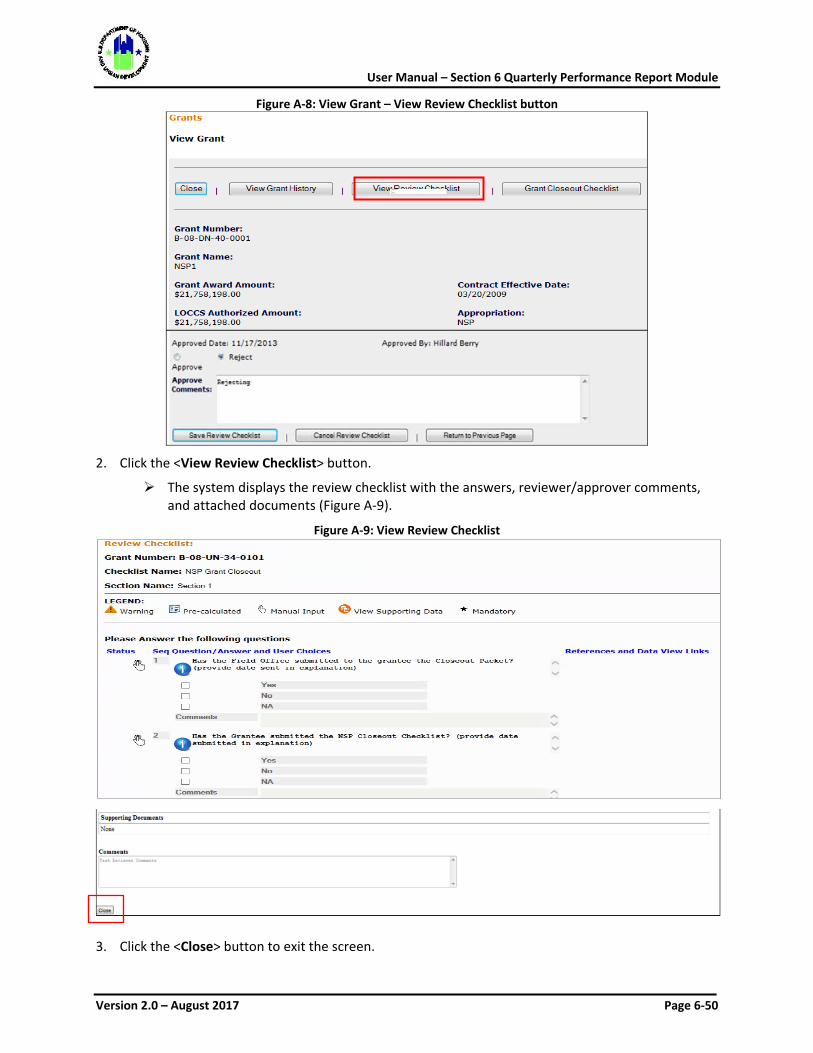
User Manual – Section 6 Quarterly Performance Report Module
Version 2.0 – August 2017 Page 6-50
Figure A-8: View Grant – View Review Checklist button
2. Click the <View Review Checklist> button.
The system displays the review checklist with the answers, reviewer/approver comments, and attached documents (Figure A-9).
Figure A-9: View Review Checklist
3. Click the <Close> button to exit the screen.
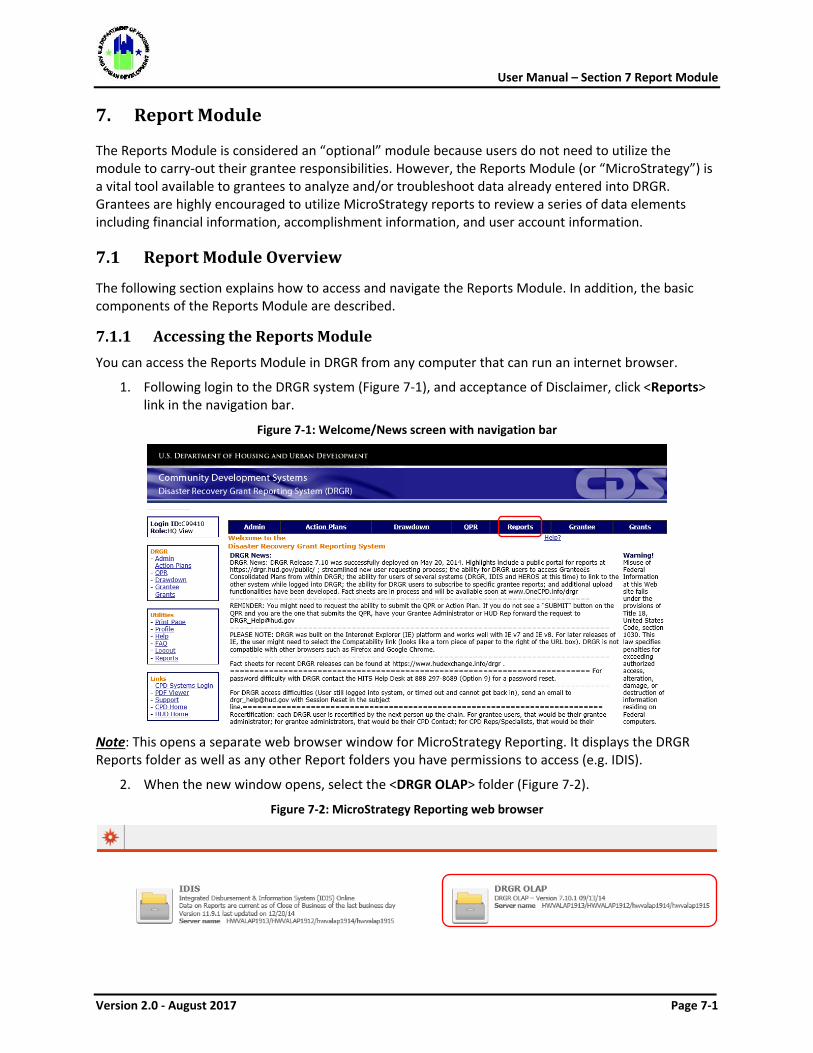
User Manual – Section 7 Report Module
Version 2.0 - August 2017 Page 7-1
7. Report Module
The Reports Module is considered an “optional” module because users do not need to utilize the module to carry-out their grantee responsibilities. However, the Reports Module (or “MicroStrategy”) is a vital tool available to grantees to analyze and/or troubleshoot data already entered into DRGR. Grantees are highly encouraged to utilize MicroStrategy reports to review a series of data elements including financial information, accomplishment information, and user account information.
7.1 Report Module Overview
The following section explains how to access and navigate the Reports Module. In addition, the basic components of the Reports Module are described.
7.1.1 Accessing the Reports Module You can access the Reports Module in DRGR from any computer that can run an internet browser.
1. Following login to the DRGR system (Figure 7-1), and acceptance of Disclaimer, click <Reports> link in the navigation bar.
Figure 7-1: Welcome/News screen with navigation bar
Note: This opens a separate web browser window for MicroStrategy Reporting. It displays the DRGR Reports folder as well as any other Report folders you have permissions to access (e.g. IDIS).
2. When the new window opens, select the <DRGR OLAP> folder (Figure 7-2).
Figure 7-2: MicroStrategy Reporting web browser
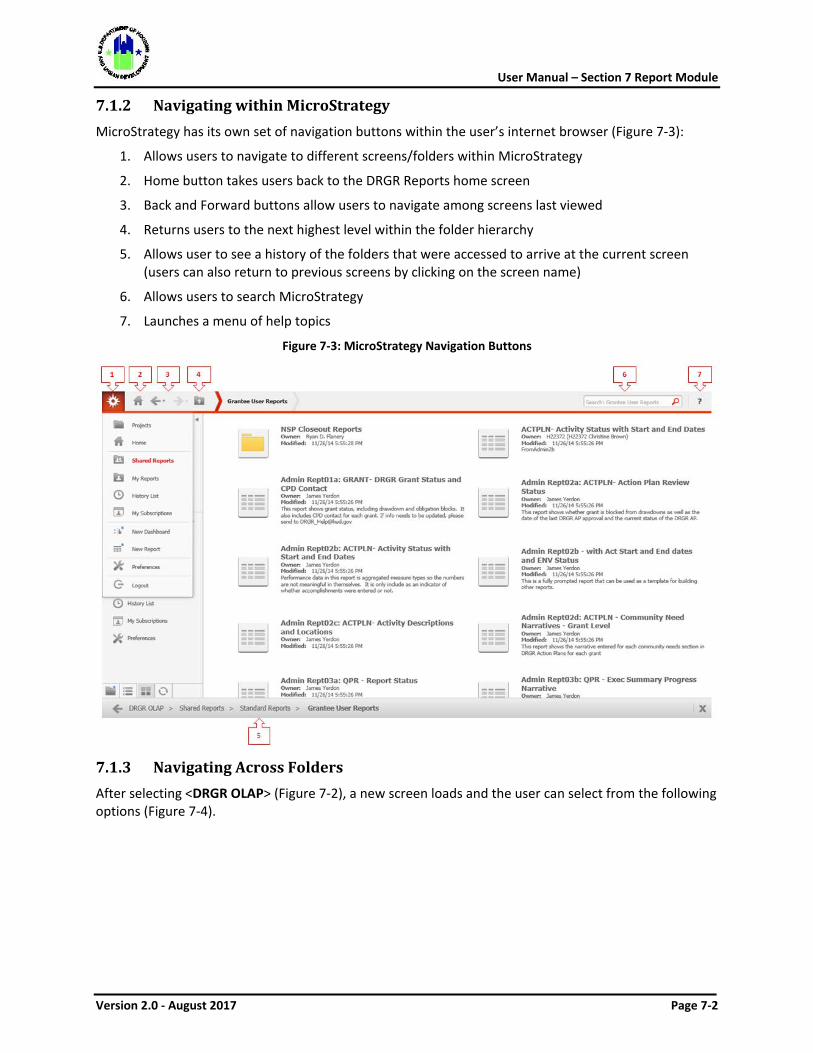
User Manual – Section 7 Report Module
Version 2.0 - August 2017 Page 7-2
7.1.2 Navigating within MicroStrategy MicroStrategy has its own set of navigation buttons within the user’s internet browser (Figure 7-3):
1. Allows users to navigate to different screens/folders within MicroStrategy
2. Home button takes users back to the DRGR Reports home screen
3. Back and Forward buttons allow users to navigate among screens last viewed
4. Returns users to the next highest level within the folder hierarchy
5. Allows user to see a history of the folders that were accessed to arrive at the current screen (users can also return to previous screens by clicking on the screen name)
6. Allows users to search MicroStrategy
7. Launches a menu of help topics
Figure 7-3: MicroStrategy Navigation Buttons
7.1.3 Navigating Across Folders After selecting <DRGR OLAP> (Figure 7-2), a new screen loads and the user can select from the following options (Figure 7-4).
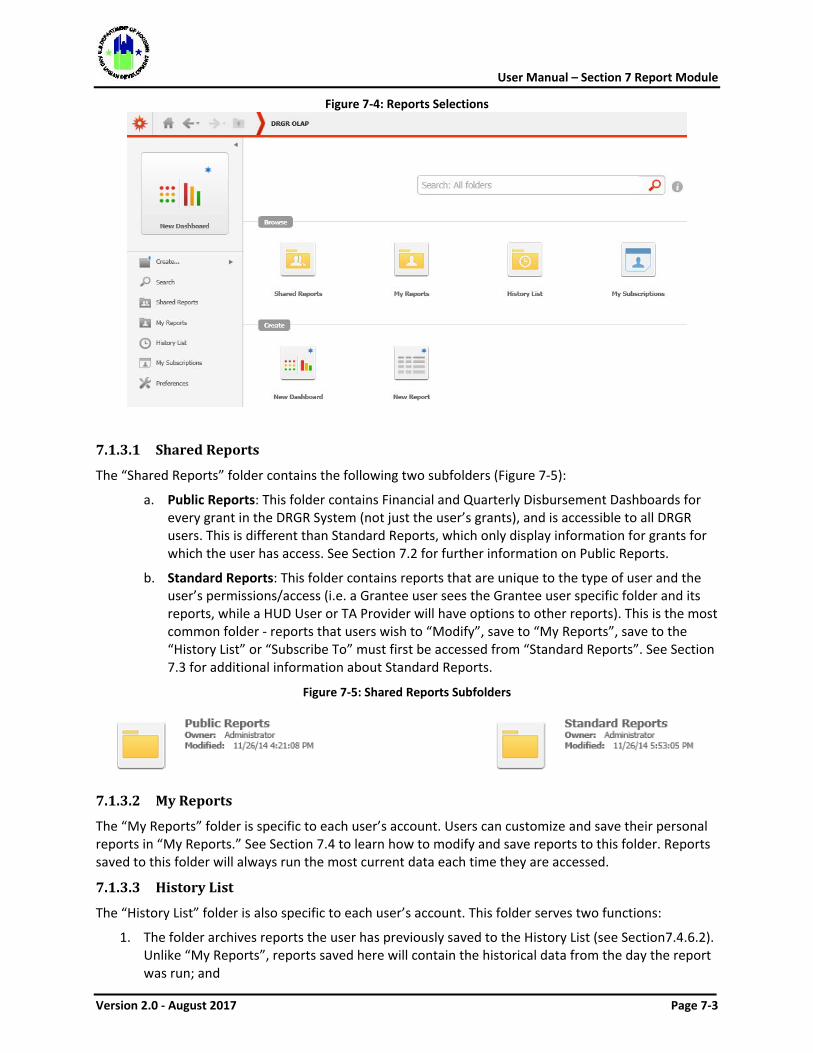
User Manual – Section 7 Report Module
Version 2.0 - August 2017 Page 7-3
Figure 7-4: Reports Selections
7.1.3.1 Shared Reports
The “Shared Reports” folder contains the following two subfolders (Figure 7-5):
a. Public Reports: This folder contains Financial and Quarterly Disbursement Dashboards for every grant in the DRGR System (not just the user’s grants), and is accessible to all DRGR users. This is different than Standard Reports, which only display information for grants for which the user has access. See Section 7.2 for further information on Public Reports.
b. Standard Reports: This folder contains reports that are unique to the type of user and the user’s permissions/access (i.e. a Grantee user sees the Grantee user specific folder and its reports, while a HUD User or TA Provider will have options to other reports). This is the most common folder - reports that users wish to “Modify”, save to “My Reports”, save to the “History List” or “Subscribe To” must first be accessed from “Standard Reports”. See Section 7.3 for additional information about Standard Reports.
Figure 7-5: Shared Reports Subfolders
7.1.3.2 My Reports
The “My Reports” folder is specific to each user’s account. Users can customize and save their personal reports in “My Reports.” See Section 7.4 to learn how to modify and save reports to this folder. Reports saved to this folder will always run the most current data each time they are accessed.
7.1.3.3 History List
The “History List” folder is also specific to each user’s account. This folder serves two functions:
1. The folder archives reports the user has previously saved to the History List (see Section7.4.6.2). Unlike “My Reports”, reports saved here will contain the historical data from the day the report was run; and
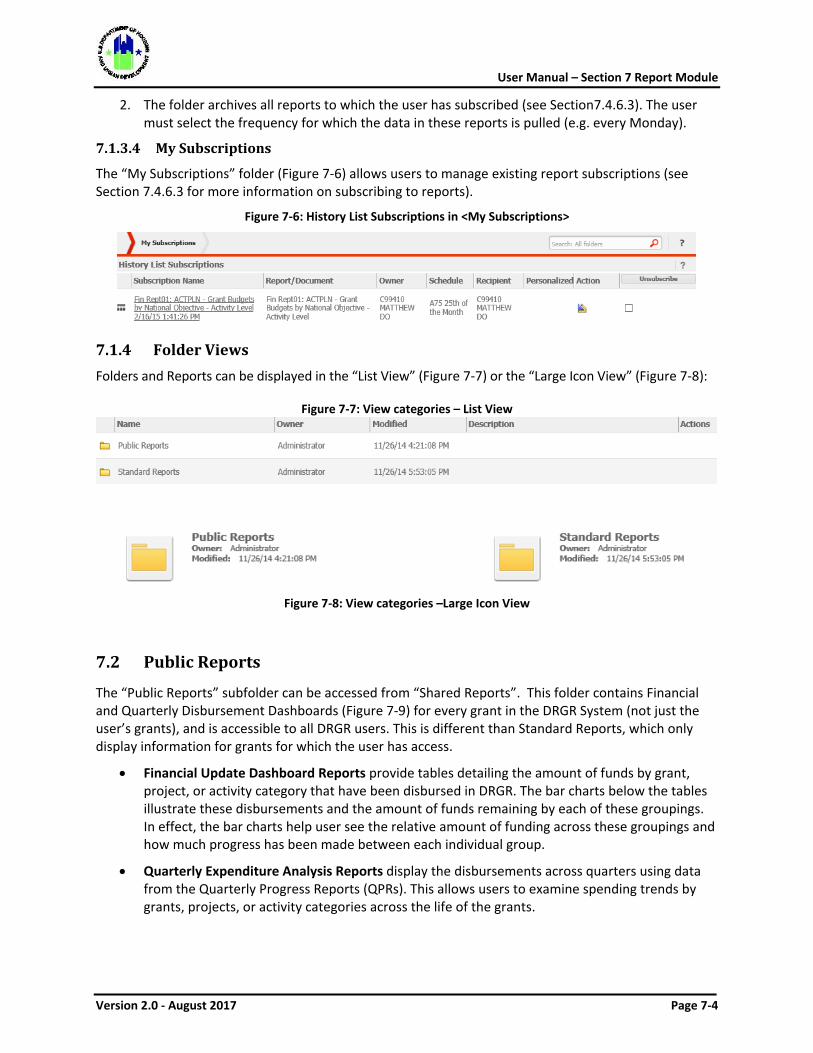
User Manual – Section 7 Report Module
Version 2.0 - August 2017 Page 7-4
2. The folder archives all reports to which the user has subscribed (see Section7.4.6.3). The user must select the frequency for which the data in these reports is pulled (e.g. every Monday).
7.1.3.4 My Subscriptions
The “My Subscriptions” folder (Figure 7-6) allows users to manage existing report subscriptions (see Section 7.4.6.3 for more information on subscribing to reports).
Figure 7-6: History List Subscriptions in <My Subscriptions>
7.1.4 Folder Views Folders and Reports can be displayed in the “List View” (Figure 7-7) or the “Large Icon View” (Figure 7-8):
Figure 7-7: View categories – List View
Figure 7-8: View categories –Large Icon View
7.2 Public Reports
The “Public Reports” subfolder can be accessed from “Shared Reports”. This folder contains Financial and Quarterly Disbursement Dashboards (Figure 7-9) for every grant in the DRGR System (not just the user’s grants), and is accessible to all DRGR users. This is different than Standard Reports, which only display information for grants for which the user has access.
• Financial Update Dashboard Reports provide tables detailing the amount of funds by grant, project, or activity category that have been disbursed in DRGR. The bar charts below the tables illustrate these disbursements and the amount of funds remaining by each of these groupings. In effect, the bar charts help user see the relative amount of funding across these groupings and how much progress has been made between each individual group.
• Quarterly Expenditure Analysis Reports display the disbursements across quarters using data from the Quarterly Progress Reports (QPRs). This allows users to examine spending trends by grants, projects, or activity categories across the life of the grants.
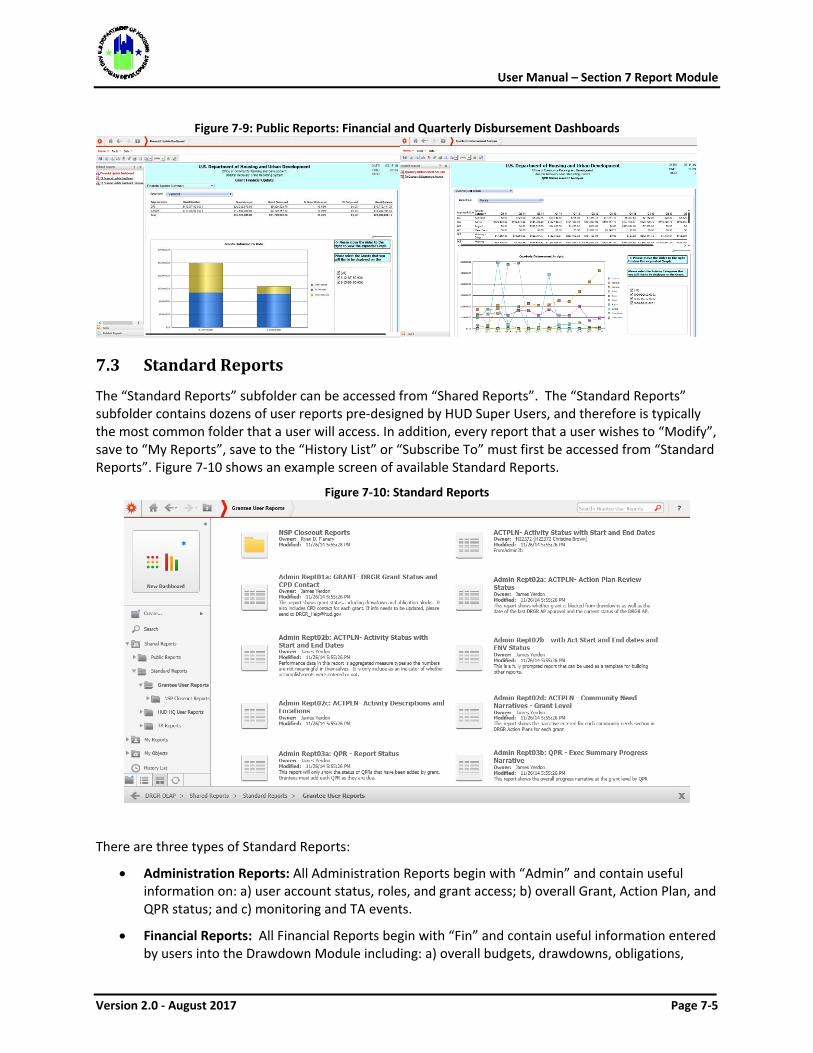
User Manual – Section 7 Report Module
Version 2.0 - August 2017 Page 7-5
Figure 7-9: Public Reports: Financial and Quarterly Disbursement Dashboards
7.3 Standard Reports
The “Standard Reports” subfolder can be accessed from “Shared Reports”. The “Standard Reports” subfolder contains dozens of user reports pre-designed by HUD Super Users, and therefore is typically the most common folder that a user will access. In addition, every report that a user wishes to “Modify”, save to “My Reports”, save to the “History List” or “Subscribe To” must first be accessed from “Standard Reports”. Figure 7-10 shows an example screen of available Standard Reports.
Figure 7-10: Standard Reports
There are three types of Standard Reports:
• Administration Reports: All Administration Reports begin with “Admin” and contain useful information on: a) user account status, roles, and grant access; b) overall Grant, Action Plan, and QPR status; and c) monitoring and TA events.
• Financial Reports: All Financial Reports begin with “Fin” and contain useful information entered by users into the Drawdown Module including: a) overall budgets, drawdowns, obligations,
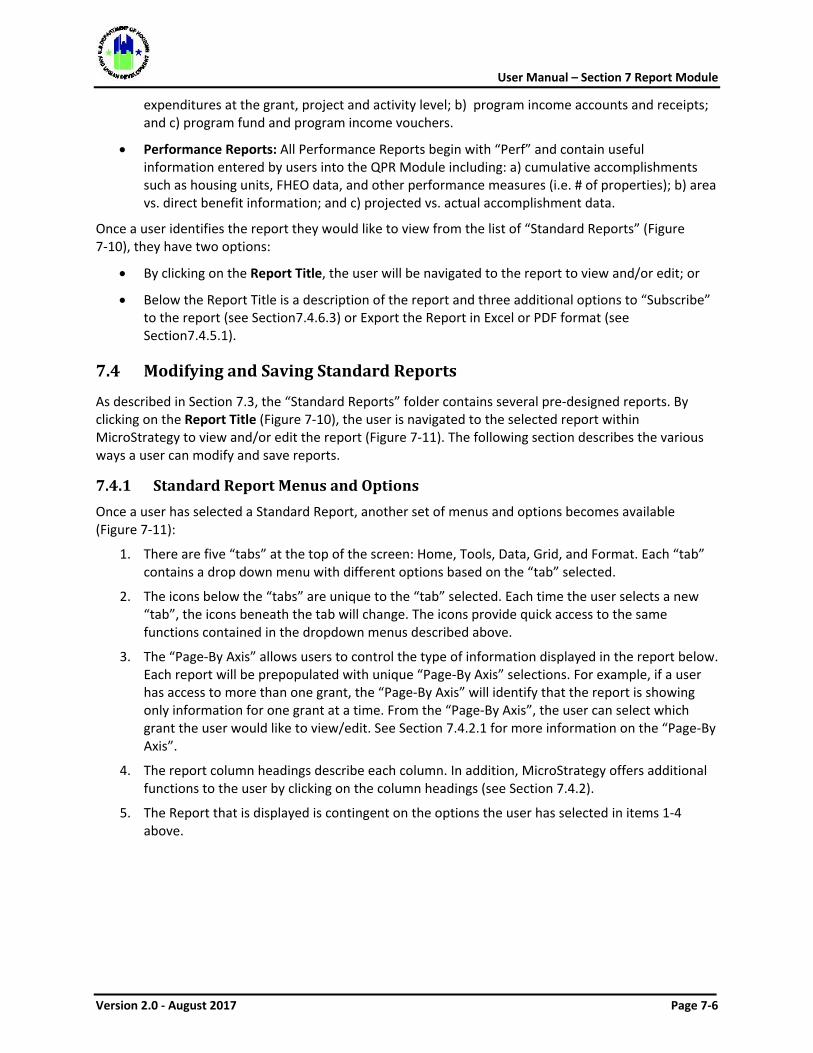
User Manual – Section 7 Report Module
Version 2.0 - August 2017 Page 7-6
expenditures at the grant, project and activity level; b) program income accounts and receipts; and c) program fund and program income vouchers.
• Performance Reports: All Performance Reports begin with “Perf” and contain useful information entered by users into the QPR Module including: a) cumulative accomplishments such as housing units, FHEO data, and other performance measures (i.e. # of properties); b) area vs. direct benefit information; and c) projected vs. actual accomplishment data.
Once a user identifies the report they would like to view from the list of “Standard Reports” (Figure 7-10), they have two options:
• By clicking on the Report Title, the user will be navigated to the report to view and/or edit; or
• Below the Report Title is a description of the report and three additional options to “Subscribe” to the report (see Section7.4.6.3) or Export the Report in Excel or PDF format (see Section7.4.5.1).
7.4 Modifying and Saving Standard Reports
As described in Section 7.3, the “Standard Reports” folder contains several pre-designed reports. By clicking on the Report Title (Figure 7-10), the user is navigated to the selected report within MicroStrategy to view and/or edit the report (Figure 7-11). The following section describes the various ways a user can modify and save reports.
7.4.1 Standard Report Menus and Options Once a user has selected a Standard Report, another set of menus and options becomes available (Figure 7-11):
1. There are five “tabs” at the top of the screen: Home, Tools, Data, Grid, and Format. Each “tab” contains a drop down menu with different options based on the “tab” selected.
2. The icons below the “tabs” are unique to the “tab” selected. Each time the user selects a new “tab”, the icons beneath the tab will change. The icons provide quick access to the same functions contained in the dropdown menus described above.
3. The “Page-By Axis” allows users to control the type of information displayed in the report below. Each report will be prepopulated with unique “Page-By Axis” selections. For example, if a user has access to more than one grant, the “Page-By Axis” will identify that the report is showing only information for one grant at a time. From the “Page-By Axis”, the user can select which grant the user would like to view/edit. See Section 7.4.2.1 for more information on the “Page-By Axis”.
4. The report column headings describe each column. In addition, MicroStrategy offers additional functions to the user by clicking on the column headings (see Section 7.4.2).
5. The Report that is displayed is contingent on the options the user has selected in items 1-4 above.
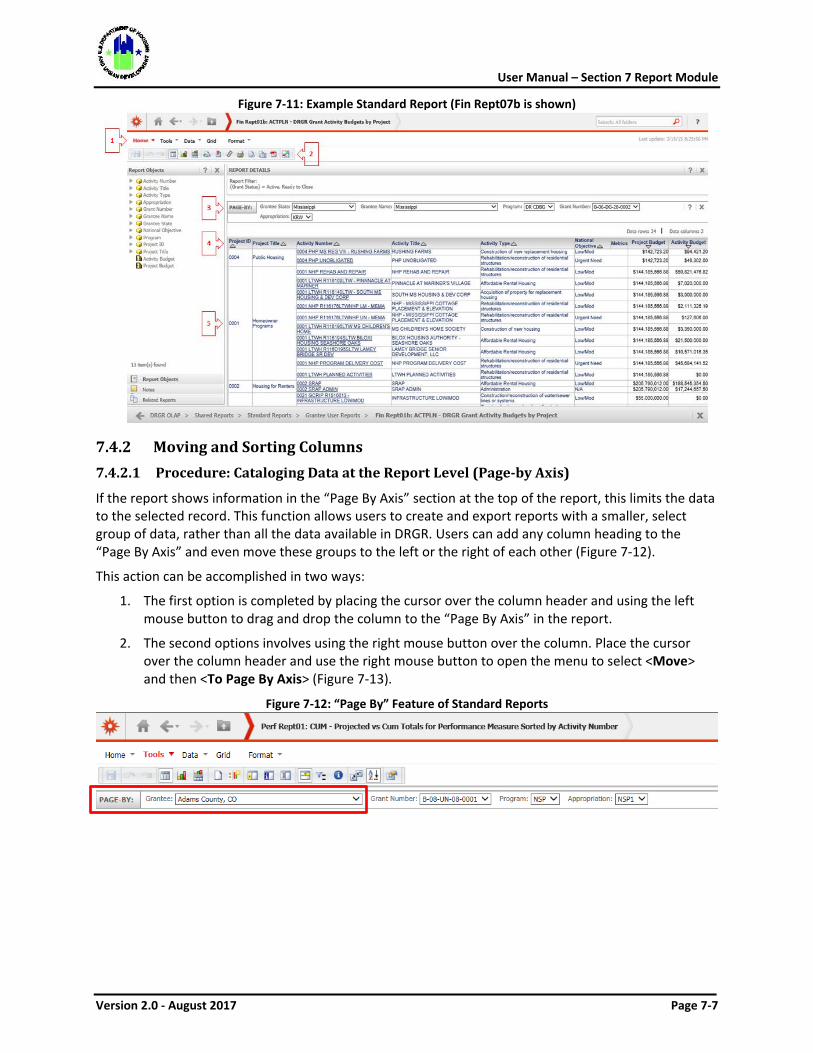
User Manual – Section 7 Report Module
Version 2.0 - August 2017 Page 7-7
Figure 7-11: Example Standard Report (Fin Rept07b is shown)
7.4.2 Moving and Sorting Columns 7.4.2.1 Procedure: Cataloging Data at the Report Level (Page-by Axis)
If the report shows information in the “Page By Axis” section at the top of the report, this limits the data to the selected record. This function allows users to create and export reports with a smaller, select group of data, rather than all the data available in DRGR. Users can add any column heading to the “Page By Axis” and even move these groups to the left or the right of each other (Figure 7-12).
This action can be accomplished in two ways:
1. The first option is completed by placing the cursor over the column header and using the left mouse button to drag and drop the column to the “Page By Axis” in the report.
2. The second options involves using the right mouse button over the column. Place the cursor over the column header and use the right mouse button to open the menu to select <Move> and then <To Page By Axis> (Figure 7-13).
Figure 7-12: “Page By” Feature of Standard Reports
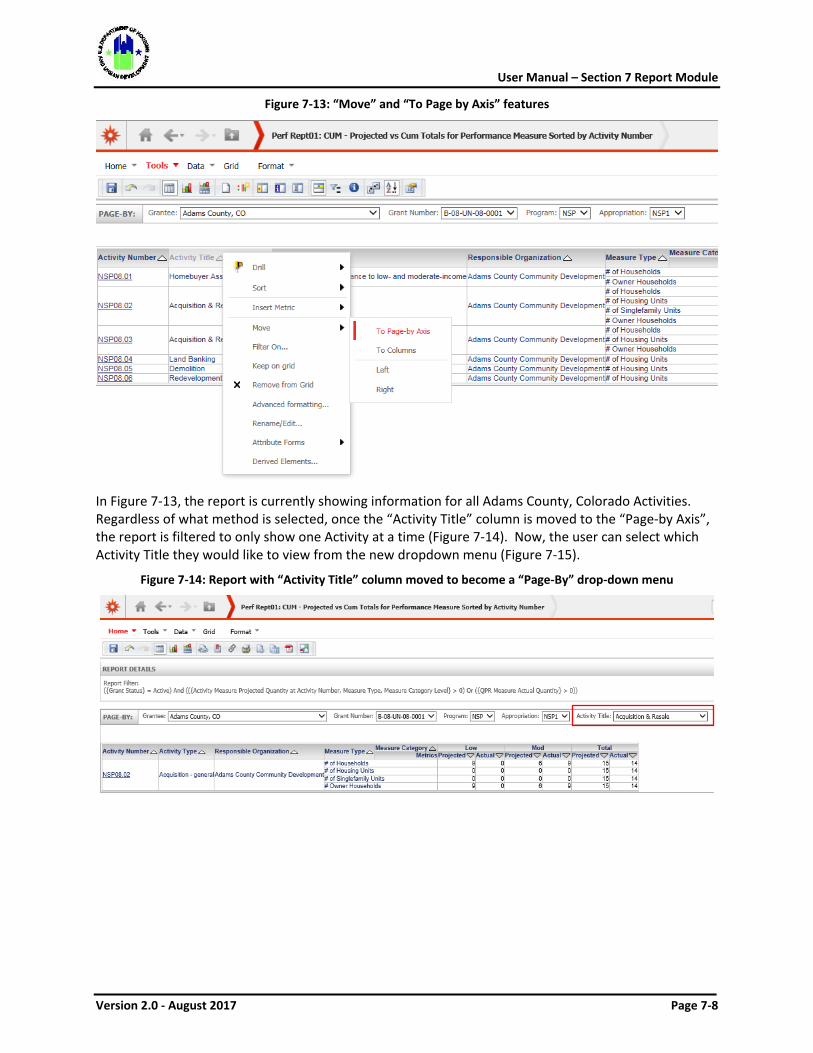
User Manual – Section 7 Report Module
Version 2.0 - August 2017 Page 7-8
Figure 7-13: “Move” and “To Page by Axis” features
In Figure 7-13, the report is currently showing information for all Adams County, Colorado Activities. Regardless of what method is selected, once the “Activity Title” column is moved to the “Page-by Axis”, the report is filtered to only show one Activity at a time (Figure 7-14). Now, the user can select which Activity Title they would like to view from the new dropdown menu (Figure 7-15).
Figure 7-14: Report with “Activity Title” column moved to become a “Page-By” drop-down menu
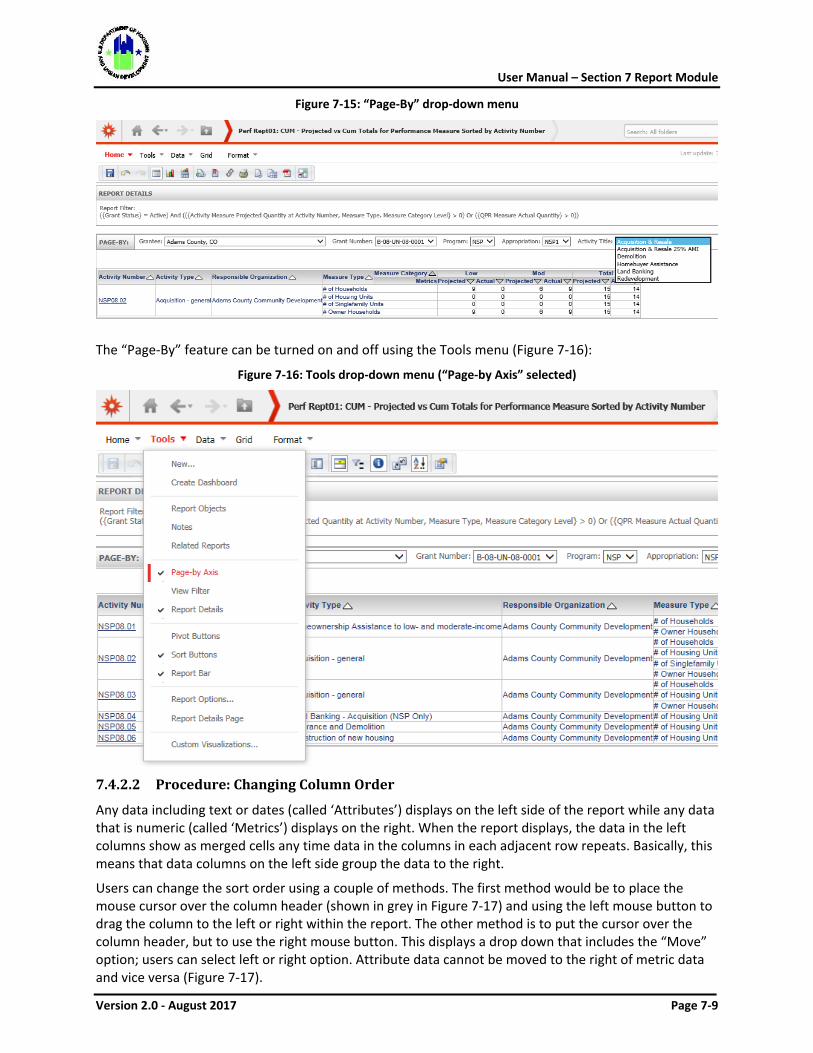
User Manual – Section 7 Report Module
Version 2.0 - August 2017 Page 7-9
Figure 7-15: “Page-By” drop-down menu
The “Page-By” feature can be turned on and off using the Tools menu (Figure 7-16):
Figure 7-16: Tools drop-down menu (“Page-by Axis” selected)
7.4.2.2 Procedure: Changing Column Order
Any data including text or dates (called ‘Attributes’) displays on the left side of the report while any data that is numeric (called ‘Metrics’) displays on the right. When the report displays, the data in the left columns show as merged cells any time data in the columns in each adjacent row repeats. Basically, this means that data columns on the left side group the data to the right.
Users can change the sort order using a couple of methods. The first method would be to place the mouse cursor over the column header (shown in grey in Figure 7-17) and using the left mouse button to drag the column to the left or right within the report. The other method is to put the cursor over the column header, but to use the right mouse button. This displays a drop down that includes the “Move” option; users can select left or right option. Attribute data cannot be moved to the right of metric data and vice versa (Figure 7-17).
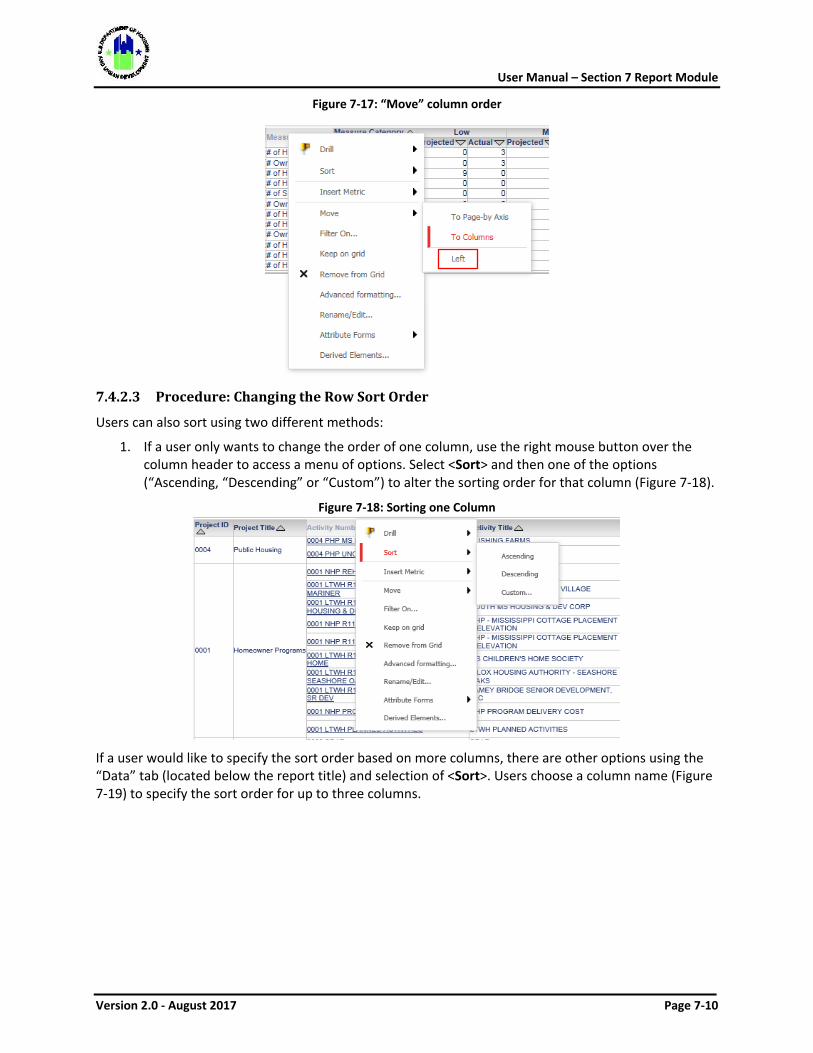
User Manual – Section 7 Report Module
Version 2.0 - August 2017 Page 7-10
Figure 7-17: “Move” column order
7.4.2.3 Procedure: Changing the Row Sort Order
Users can also sort using two different methods:
1. If a user only wants to change the order of one column, use the right mouse button over the column header to access a menu of options. Select <Sort> and then one of the options (“Ascending, “Descending” or “Custom”) to alter the sorting order for that column (Figure 7-18).
Figure 7-18: Sorting one Column
If a user would like to specify the sort order based on more columns, there are other options using the “Data” tab (located below the report title) and selection of <Sort>. Users choose a column name (Figure 7-19) to specify the sort order for up to three columns.
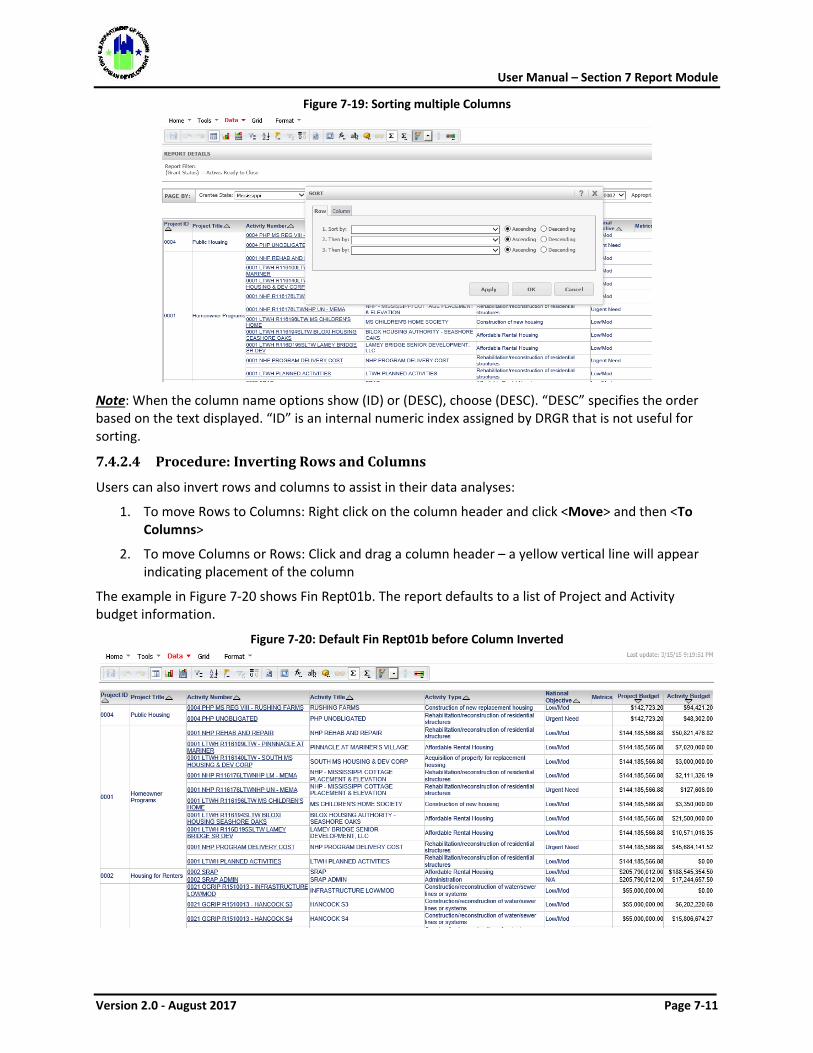
User Manual – Section 7 Report Module
Version 2.0 - August 2017 Page 7-11
Figure 7-19: Sorting multiple Columns
Note: When the column name options show (ID) or (DESC), choose (DESC). “DESC” specifies the order based on the text displayed. “ID” is an internal numeric index assigned by DRGR that is not useful for sorting.
7.4.2.4 Procedure: Inverting Rows and Columns
Users can also invert rows and columns to assist in their data analyses:
1. To move Rows to Columns: Right click on the column header and click <Move> and then <To Columns>
2. To move Columns or Rows: Click and drag a column header – a yellow vertical line will appear indicating placement of the column
The example in Figure 7-20 shows Fin Rept01b. The report defaults to a list of Project and Activity budget information.
Figure 7-20: Default Fin Rept01b before Column Inverted
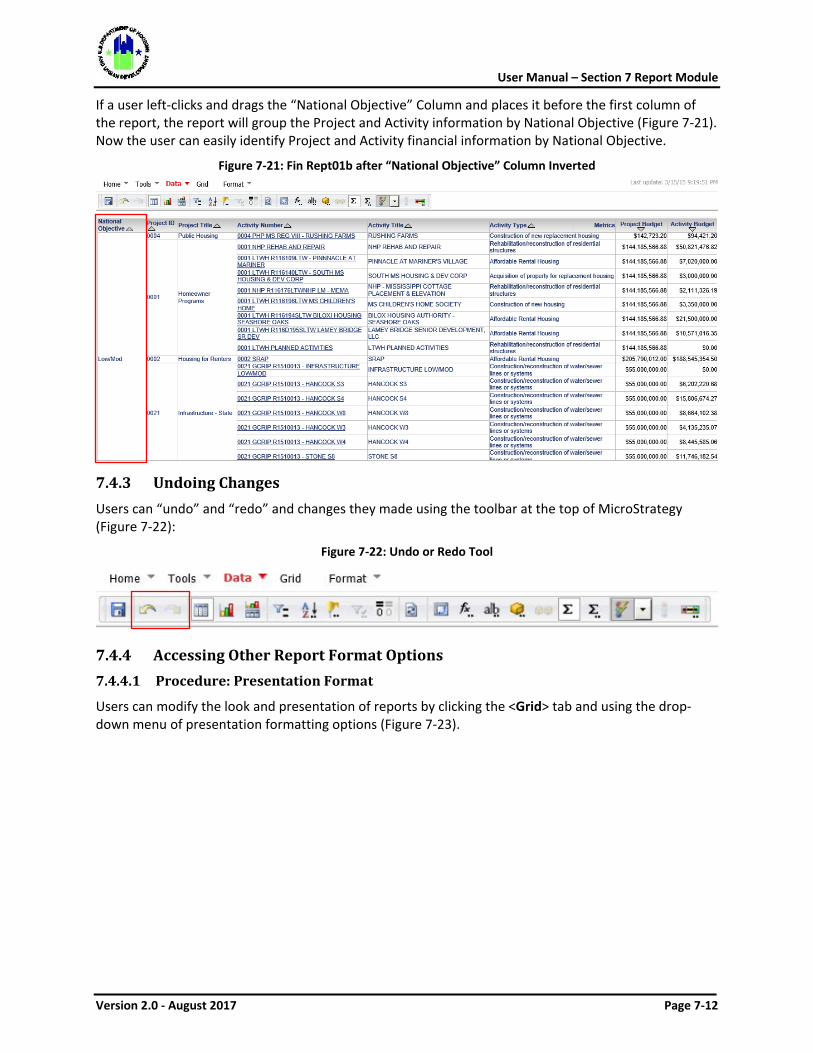
User Manual – Section 7 Report Module
Version 2.0 - August 2017 Page 7-12
If a user left-clicks and drags the “National Objective” Column and places it before the first column of the report, the report will group the Project and Activity information by National Objective (Figure 7-21). Now the user can easily identify Project and Activity financial information by National Objective.
Figure 7-21: Fin Rept01b after “National Objective” Column Inverted
7.4.3 Undoing Changes Users can “undo” and “redo” and changes they made using the toolbar at the top of MicroStrategy (Figure 7-22):
Figure 7-22: Undo or Redo Tool
7.4.4 Accessing Other Report Format Options 7.4.4.1 Procedure: Presentation Format
Users can modify the look and presentation of reports by clicking the <Grid> tab and using the drop-down menu of presentation formatting options (Figure 7-23).
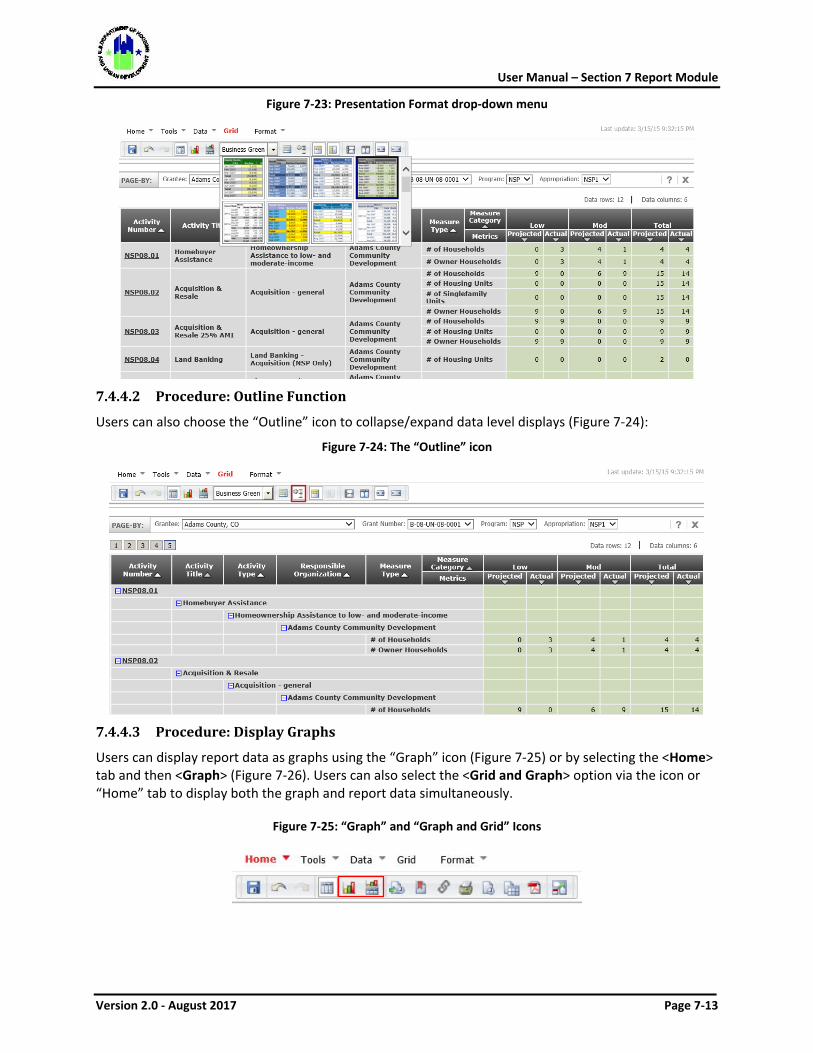
User Manual – Section 7 Report Module
Version 2.0 - August 2017 Page 7-13
Figure 7-23: Presentation Format drop-down menu
7.4.4.2 Procedure: Outline Function
Users can also choose the “Outline” icon to collapse/expand data level displays (Figure 7-24): Figure 7-24: The “Outline” icon
7.4.4.3 Procedure: Display Graphs
Users can display report data as graphs using the “Graph” icon (Figure 7-25) or by selecting the <Home> tab and then <Graph> (Figure 7-26). Users can also select the <Grid and Graph> option via the icon or “Home” tab to display both the graph and report data simultaneously.
Figure 7-25: “Graph” and “Graph and Grid” Icons
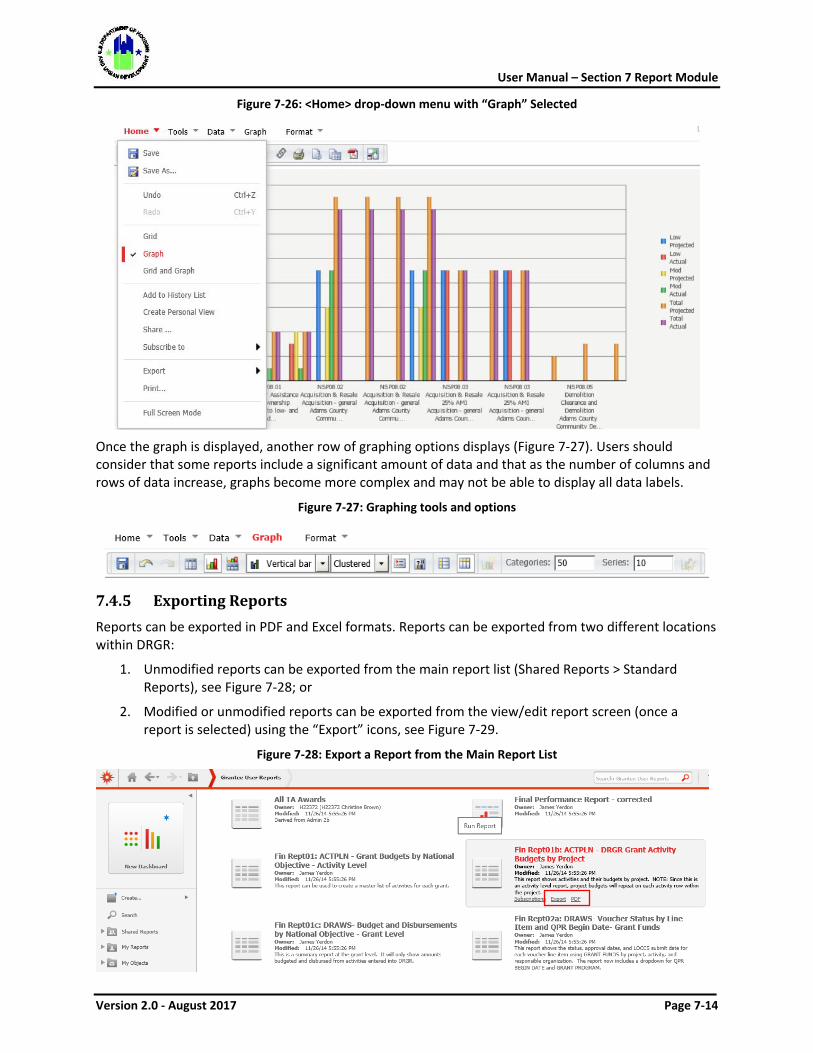
User Manual – Section 7 Report Module
Version 2.0 - August 2017 Page 7-14
Figure 7-26: <Home> drop-down menu with “Graph” Selected
Once the graph is displayed, another row of graphing options displays (Figure 7-27). Users should consider that some reports include a significant amount of data and that as the number of columns and rows of data increase, graphs become more complex and may not be able to display all data labels.
Figure 7-27: Graphing tools and options
7.4.5 Exporting Reports Reports can be exported in PDF and Excel formats. Reports can be exported from two different locations within DRGR:
1. Unmodified reports can be exported from the main report list (Shared Reports > Standard Reports), see Figure 7-28; or
2. Modified or unmodified reports can be exported from the view/edit report screen (once a report is selected) using the “Export” icons, see Figure 7-29.
Figure 7-28: Export a Report from the Main Report List
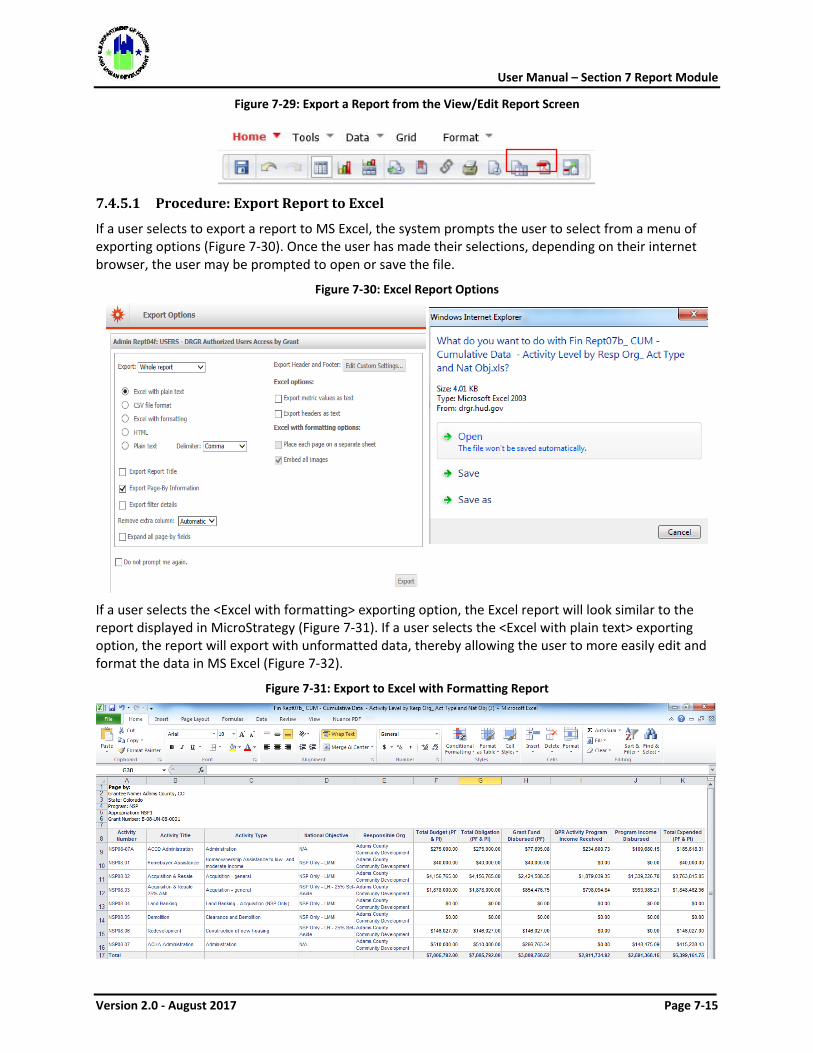
User Manual – Section 7 Report Module
Version 2.0 - August 2017 Page 7-15
Figure 7-29: Export a Report from the View/Edit Report Screen
7.4.5.1 Procedure: Export Report to Excel
If a user selects to export a report to MS Excel, the system prompts the user to select from a menu of exporting options (Figure 7-30). Once the user has made their selections, depending on their internet browser, the user may be prompted to open or save the file.
Figure 7-30: Excel Report Options
If a user selects the <Excel with formatting> exporting option, the Excel report will look similar to the report displayed in MicroStrategy (Figure 7-31). If a user selects the <Excel with plain text> exporting option, the report will export with unformatted data, thereby allowing the user to more easily edit and format the data in MS Excel (Figure 7-32).
Figure 7-31: Export to Excel with Formatting Report
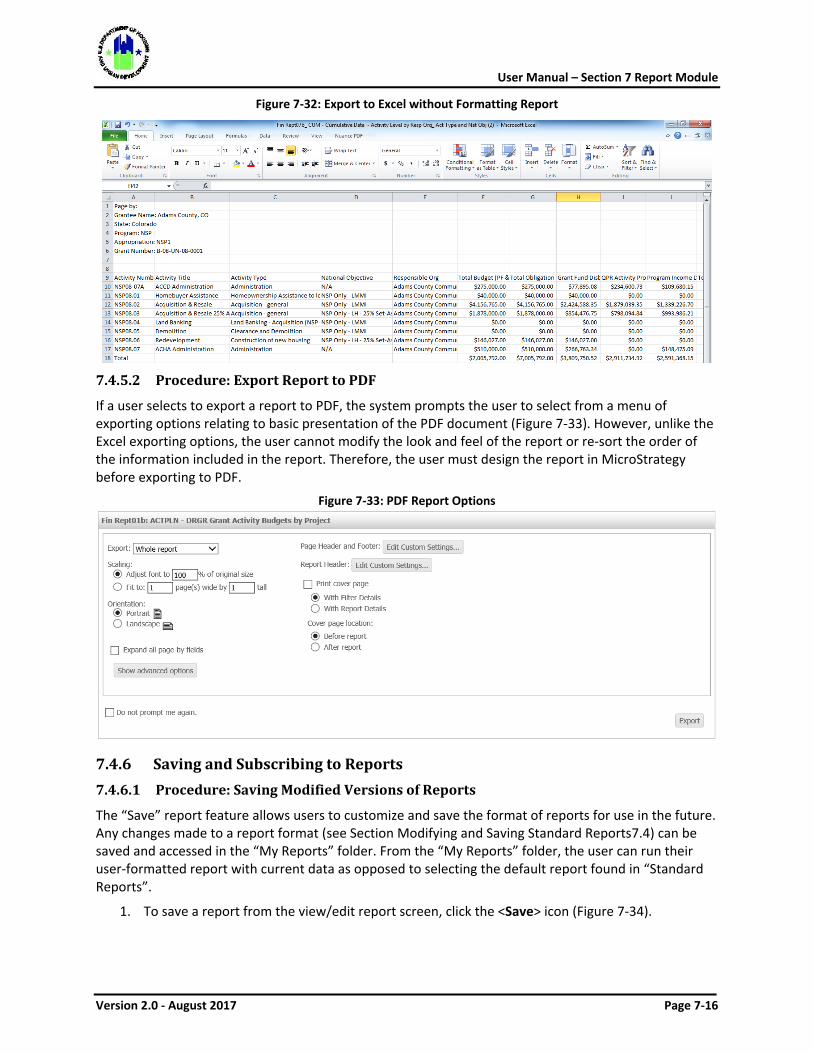
User Manual – Section 7 Report Module
Version 2.0 - August 2017 Page 7-16
Figure 7-32: Export to Excel without Formatting Report
7.4.5.2 Procedure: Export Report to PDF
If a user selects to export a report to PDF, the system prompts the user to select from a menu of exporting options relating to basic presentation of the PDF document (Figure 7-33). However, unlike the Excel exporting options, the user cannot modify the look and feel of the report or re-sort the order of the information included in the report. Therefore, the user must design the report in MicroStrategy before exporting to PDF.
Figure 7-33: PDF Report Options
7.4.6 Saving and Subscribing to Reports 7.4.6.1 Procedure: Saving Modified Versions of Reports
The “Save” report feature allows users to customize and save the format of reports for use in the future. Any changes made to a report format (see Section Modifying and Saving Standard Reports7.4) can be saved and accessed in the “My Reports” folder. From the “My Reports” folder, the user can run their user-formatted report with current data as opposed to selecting the default report found in “Standard Reports”.
1. To save a report from the view/edit report screen, click the <Save> icon (Figure 7-34).
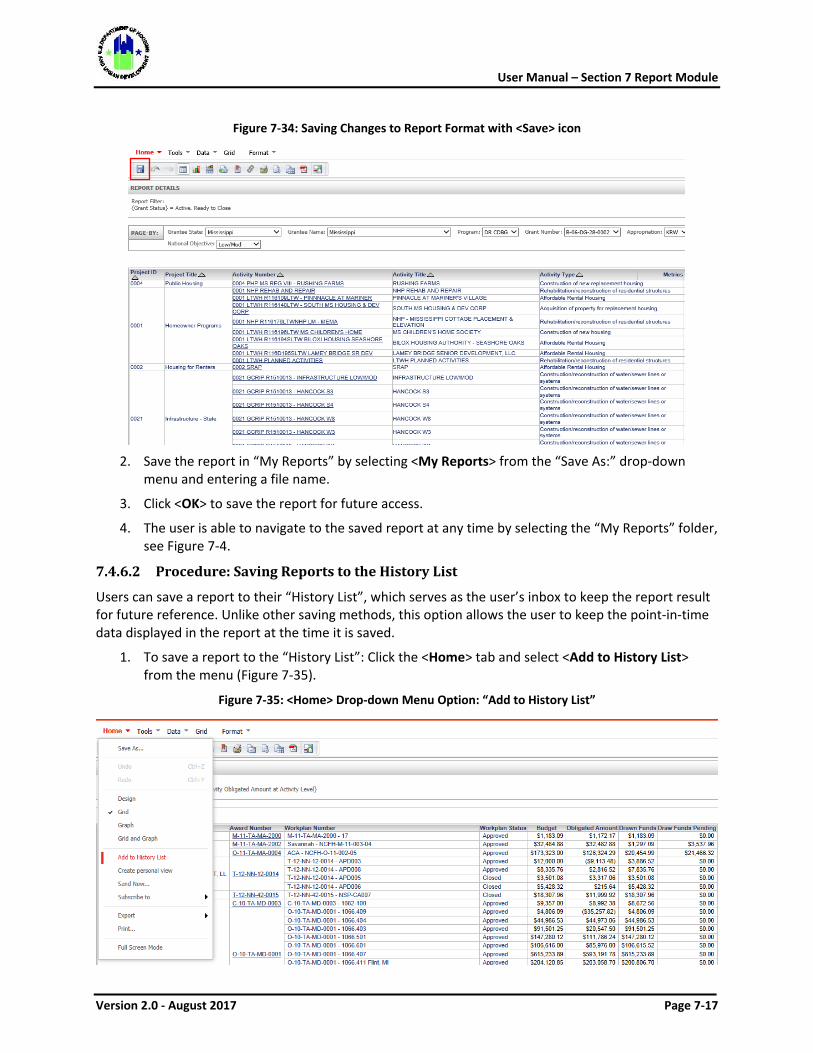
User Manual – Section 7 Report Module
Version 2.0 - August 2017 Page 7-17
Figure 7-34: Saving Changes to Report Format with <Save> icon
2. Save the report in “My Reports” by selecting <My Reports> from the “Save As:” drop-down
menu and entering a file name.
3. Click <OK> to save the report for future access.
4. The user is able to navigate to the saved report at any time by selecting the “My Reports” folder, see Figure 7-4.
7.4.6.2 Procedure: Saving Reports to the History List
Users can save a report to their “History List”, which serves as the user’s inbox to keep the report result for future reference. Unlike other saving methods, this option allows the user to keep the point-in-time data displayed in the report at the time it is saved.
1. To save a report to the “History List”: Click the <Home> tab and select <Add to History List> from the menu (Figure 7-35).
Figure 7-35: <Home> Drop-down Menu Option: “Add to History List”
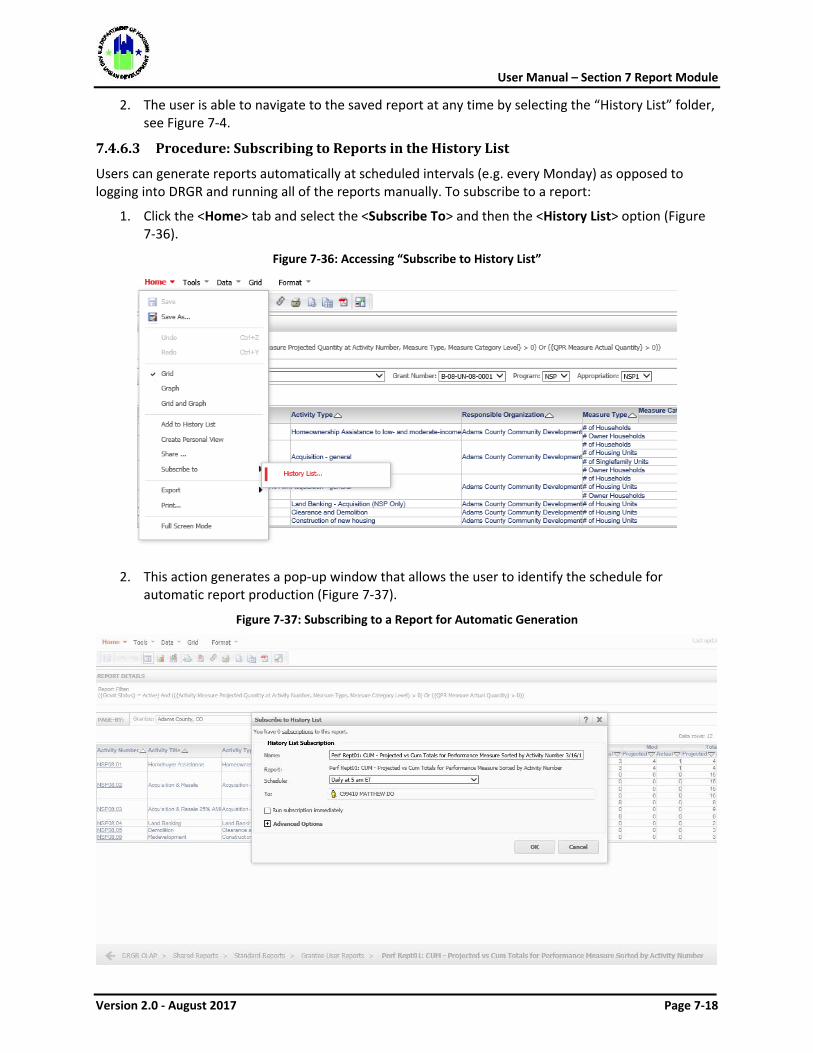
User Manual – Section 7 Report Module
Version 2.0 - August 2017 Page 7-18
2. The user is able to navigate to the saved report at any time by selecting the “History List” folder, see Figure 7-4.
7.4.6.3 Procedure: Subscribing to Reports in the History List
Users can generate reports automatically at scheduled intervals (e.g. every Monday) as opposed to logging into DRGR and running all of the reports manually. To subscribe to a report:
1. Click the <Home> tab and select the <Subscribe To> and then the <History List> option (Figure 7-36).
Figure 7-36: Accessing “Subscribe to History List”
2. This action generates a pop-up window that allows the user to identify the schedule for automatic report production (Figure 7-37).
Figure 7-37: Subscribing to a Report for Automatic Generation
User Manual – Section 7 Report Module
Version 2.0 - August 2017 Page 7-19
3. The user is able to navigate and view or edit the subscription at any time by selecting the “My Subscriptions” folder, see Figure 7-4.
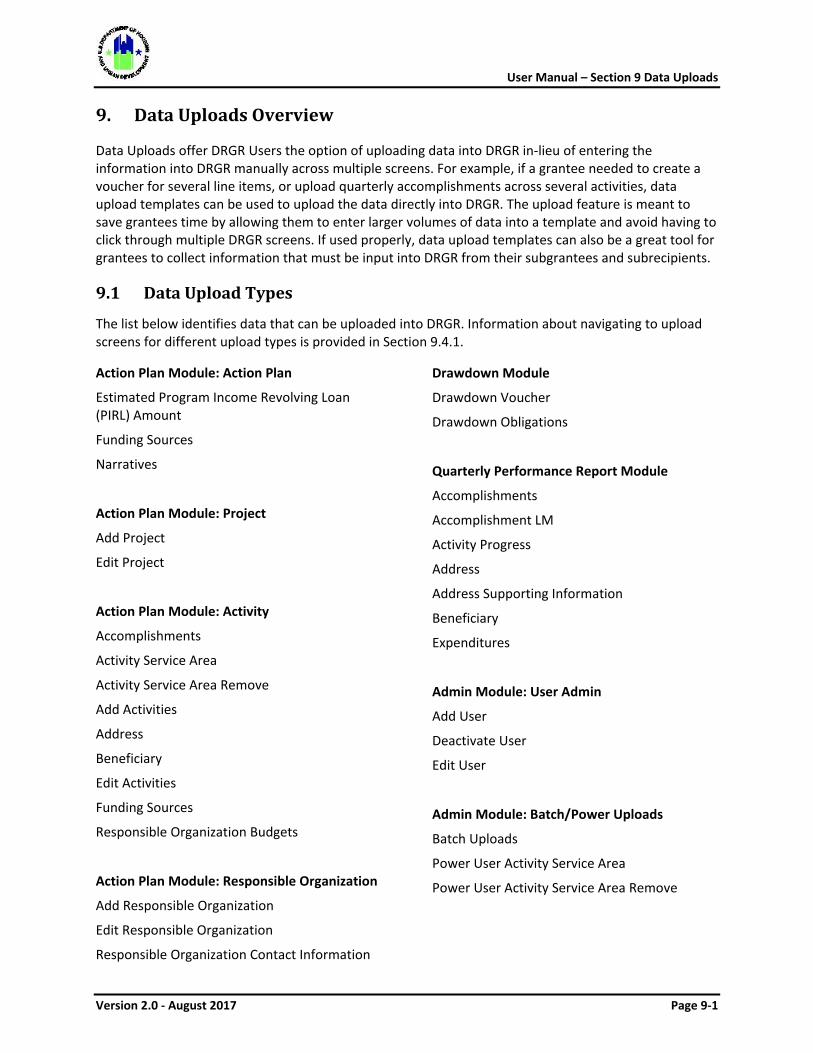
User Manual – Section 9 Data Uploads
Version 2.0 - August 2017 Page 9-1
9. Data Uploads Overview
Data Uploads offer DRGR Users the option of uploading data into DRGR in-lieu of entering the information into DRGR manually across multiple screens. For example, if a grantee needed to create a voucher for several line items, or upload quarterly accomplishments across several activities, data upload templates can be used to upload the data directly into DRGR. The upload feature is meant to save grantees time by allowing them to enter larger volumes of data into a template and avoid having to click through multiple DRGR screens. If used properly, data upload templates can also be a great tool for grantees to collect information that must be input into DRGR from their subgrantees and subrecipients.
9.1 Data Upload Types
The list below identifies data that can be uploaded into DRGR. Information about navigating to upload screens for different upload types is provided in Section 9.4.1.
Action Plan Module: Action Plan
Estimated Program Income Revolving Loan (PIRL) Amount
Funding Sources
Narratives
Action Plan Module: Project
Add Project
Edit Project
Action Plan Module: Activity
Accomplishments
Activity Service Area
Activity Service Area Remove
Add Activities
Address
Beneficiary
Edit Activities
Funding Sources
Responsible Organization Budgets
Action Plan Module: Responsible Organization
Add Responsible Organization
Edit Responsible Organization
Responsible Organization Contact Information
Drawdown Module
Drawdown Voucher
Drawdown Obligations
Quarterly Performance Report Module
Accomplishments
Accomplishment LM
Activity Progress
Address
Address Supporting Information
Beneficiary
Expenditures
Admin Module: User Admin
Add User
Deactivate User
Edit User
Admin Module: Batch/Power Uploads
Batch Uploads
Power User Activity Service Area
Power User Activity Service Area Remove
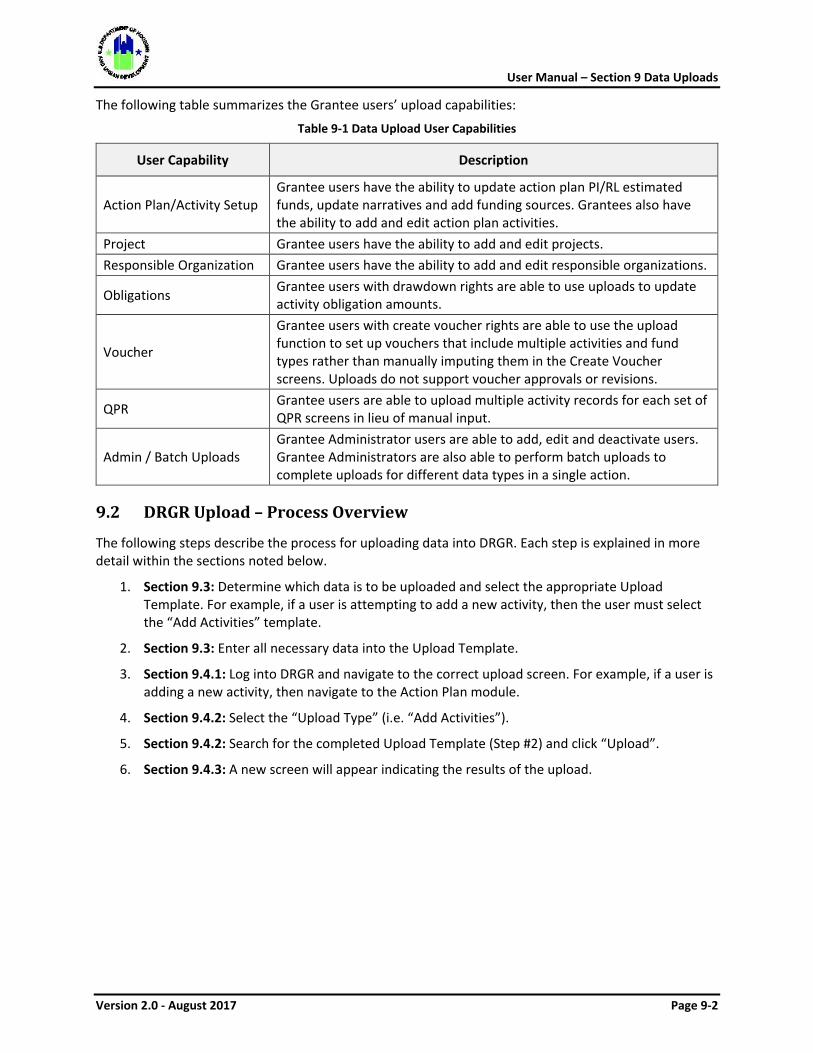
User Manual – Section 9 Data Uploads
Version 2.0 - August 2017 Page 9-2
The following table summarizes the Grantee users’ upload capabilities:
Table 9-1 Data Upload User Capabilities
User Capability Description
Action Plan/Activity Setup Grantee users have the ability to update action plan PI/RL estimated funds, update narratives and add funding sources. Grantees also have the ability to add and edit action plan activities.
Project Grantee users have the ability to add and edit projects. Responsible Organization Grantee users have the ability to add and edit responsible organizations.
Obligations Grantee users with drawdown rights are able to use uploads to update activity obligation amounts.
Voucher
Grantee users with create voucher rights are able to use the upload function to set up vouchers that include multiple activities and fund types rather than manually imputing them in the Create Voucher screens. Uploads do not support voucher approvals or revisions.
QPR Grantee users are able to upload multiple activity records for each set of QPR screens in lieu of manual input.
Admin / Batch Uploads Grantee Administrator users are able to add, edit and deactivate users. Grantee Administrators are also able to perform batch uploads to complete uploads for different data types in a single action.
9.2 DRGR Upload – Process Overview
The following steps describe the process for uploading data into DRGR. Each step is explained in more detail within the sections noted below.
1. Section 9.3: Determine which data is to be uploaded and select the appropriate Upload Template. For example, if a user is attempting to add a new activity, then the user must select the “Add Activities” template.
2. Section 9.3: Enter all necessary data into the Upload Template.
3. Section 9.4.1: Log into DRGR and navigate to the correct upload screen. For example, if a user is adding a new activity, then navigate to the Action Plan module.
4. Section 9.4.2: Select the “Upload Type” (i.e. “Add Activities”).
5. Section 9.4.2: Search for the completed Upload Template (Step #2) and click “Upload”.
6. Section 9.4.3: A new screen will appear indicating the results of the upload.
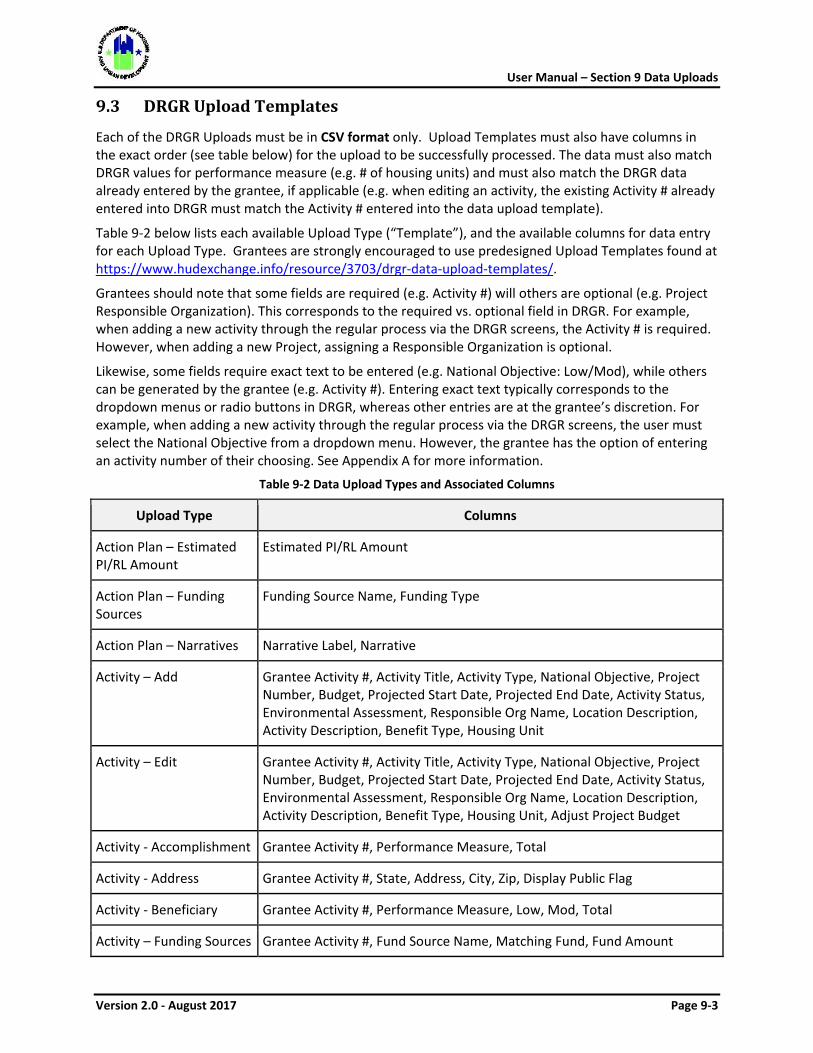
User Manual – Section 9 Data Uploads
Version 2.0 - August 2017 Page 9-3
9.3 DRGR Upload Templates
Each of the DRGR Uploads must be in CSV format only. Upload Templates must also have columns in the exact order (see table below) for the upload to be successfully processed. The data must also match DRGR values for performance measure (e.g. # of housing units) and must also match the DRGR data already entered by the grantee, if applicable (e.g. when editing an activity, the existing Activity # already entered into DRGR must match the Activity # entered into the data upload template).
Table 9-2 below lists each available Upload Type (“Template”), and the available columns for data entry for each Upload Type. Grantees are strongly encouraged to use predesigned Upload Templates found at https://www.hudexchange.info/resource/3703/drgr-data-upload-templates/.
Grantees should note that some fields are required (e.g. Activity #) will others are optional (e.g. Project Responsible Organization). This corresponds to the required vs. optional field in DRGR. For example, when adding a new activity through the regular process via the DRGR screens, the Activity # is required. However, when adding a new Project, assigning a Responsible Organization is optional.
Likewise, some fields require exact text to be entered (e.g. National Objective: Low/Mod), while others can be generated by the grantee (e.g. Activity #). Entering exact text typically corresponds to the dropdown menus or radio buttons in DRGR, whereas other entries are at the grantee’s discretion. For example, when adding a new activity through the regular process via the DRGR screens, the user must select the National Objective from a dropdown menu. However, the grantee has the option of entering an activity number of their choosing. See Appendix A for more information.
Table 9-2 Data Upload Types and Associated Columns
Upload Type Columns
Action Plan – Estimated PI/RL Amount
Estimated PI/RL Amount
Action Plan – Funding Sources
Funding Source Name, Funding Type
Action Plan – Narratives Narrative Label, Narrative
Activity – Add Grantee Activity #, Activity Title, Activity Type, National Objective, Project Number, Budget, Projected Start Date, Projected End Date, Activity Status, Environmental Assessment, Responsible Org Name, Location Description, Activity Description, Benefit Type, Housing Unit
Activity – Edit Grantee Activity #, Activity Title, Activity Type, National Objective, Project Number, Budget, Projected Start Date, Projected End Date, Activity Status, Environmental Assessment, Responsible Org Name, Location Description, Activity Description, Benefit Type, Housing Unit, Adjust Project Budget
Activity - Accomplishment Grantee Activity #, Performance Measure, Total
Activity - Address Grantee Activity #, State, Address, City, Zip, Display Public Flag
Activity - Beneficiary Grantee Activity #, Performance Measure, Low, Mod, Total
Activity – Funding Sources Grantee Activity #, Fund Source Name, Matching Fund, Fund Amount
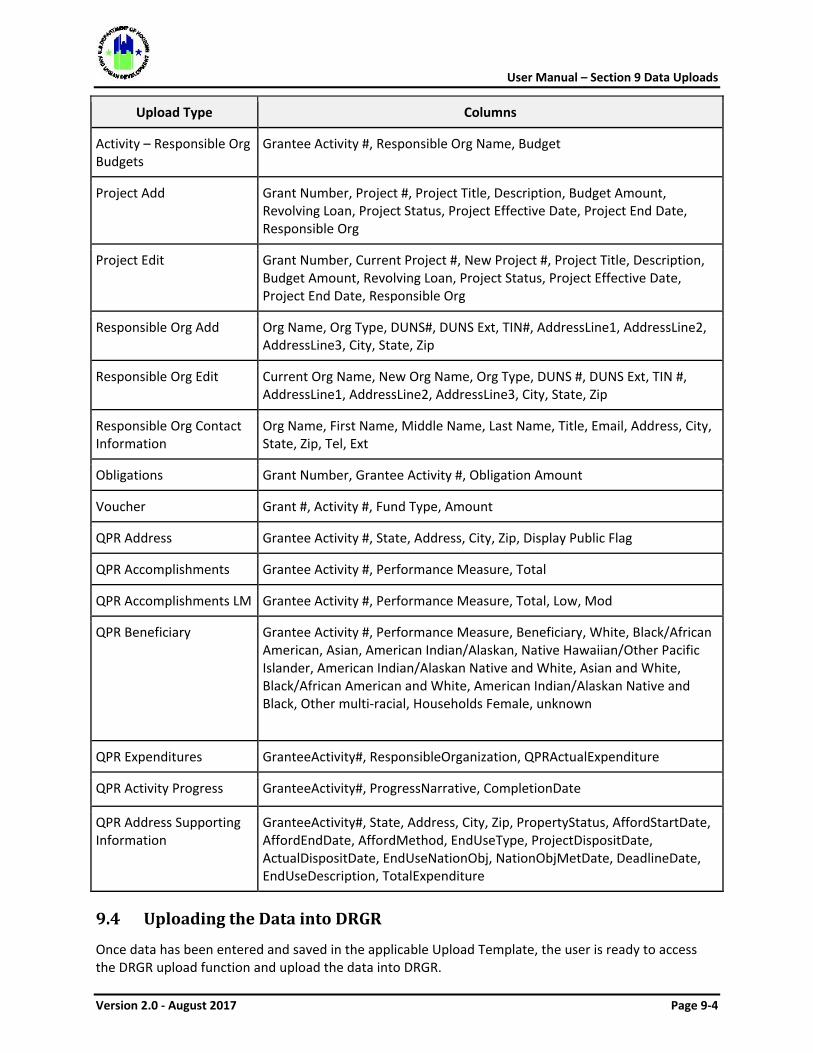
User Manual – Section 9 Data Uploads
Version 2.0 - August 2017 Page 9-4
Upload Type Columns
Activity – Responsible Org Budgets
Grantee Activity #, Responsible Org Name, Budget
Project Add Grant Number, Project #, Project Title, Description, Budget Amount, Revolving Loan, Project Status, Project Effective Date, Project End Date, Responsible Org
Project Edit Grant Number, Current Project #, New Project #, Project Title, Description, Budget Amount, Revolving Loan, Project Status, Project Effective Date, Project End Date, Responsible Org
Responsible Org Add Org Name, Org Type, DUNS#, DUNS Ext, TIN#, AddressLine1, AddressLine2, AddressLine3, City, State, Zip
Responsible Org Edit Current Org Name, New Org Name, Org Type, DUNS #, DUNS Ext, TIN #, AddressLine1, AddressLine2, AddressLine3, City, State, Zip
Responsible Org Contact Information
Org Name, First Name, Middle Name, Last Name, Title, Email, Address, City, State, Zip, Tel, Ext
Obligations Grant Number, Grantee Activity #, Obligation Amount
Voucher Grant #, Activity #, Fund Type, Amount
QPR Address Grantee Activity #, State, Address, City, Zip, Display Public Flag
QPR Accomplishments Grantee Activity #, Performance Measure, Total
QPR Accomplishments LM Grantee Activity #, Performance Measure, Total, Low, Mod
QPR Beneficiary Grantee Activity #, Performance Measure, Beneficiary, White, Black/African American, Asian, American Indian/Alaskan, Native Hawaiian/Other Pacific Islander, American Indian/Alaskan Native and White, Asian and White, Black/African American and White, American Indian/Alaskan Native and Black, Other multi-racial, Households Female, unknown
QPR Expenditures GranteeActivity#, ResponsibleOrganization, QPRActualExpenditure
QPR Activity Progress GranteeActivity#, ProgressNarrative, CompletionDate
QPR Address Supporting Information
GranteeActivity#, State, Address, City, Zip, PropertyStatus, AffordStartDate, AffordEndDate, AffordMethod, EndUseType, ProjectDispositDate, ActualDispositDate, EndUseNationObj, NationObjMetDate, DeadlineDate, EndUseDescription, TotalExpenditure
9.4 Uploading the Data into DRGR
Once data has been entered and saved in the applicable Upload Template, the user is ready to access the DRGR upload function and upload the data into DRGR.
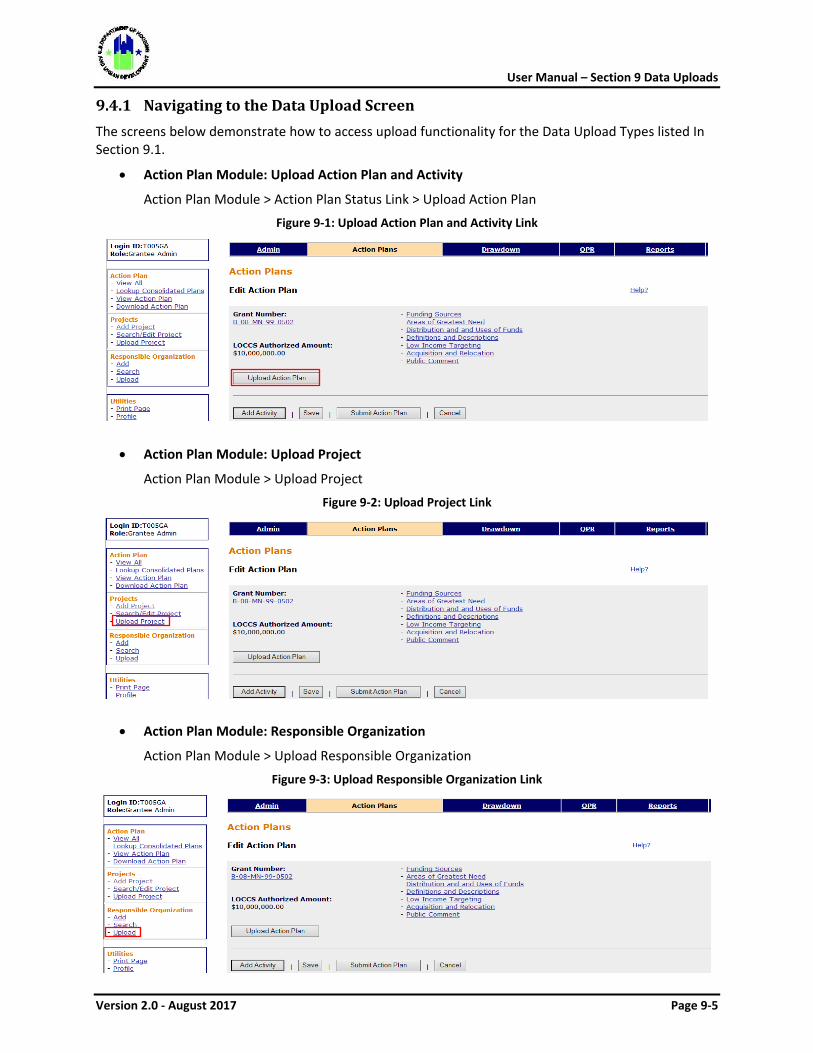
User Manual – Section 9 Data Uploads
Version 2.0 - August 2017 Page 9-5
9.4.1 Navigating to the Data Upload Screen The screens below demonstrate how to access upload functionality for the Data Upload Types listed In Section 9.1.
• Action Plan Module: Upload Action Plan and Activity
Action Plan Module > Action Plan Status Link > Upload Action Plan
Figure 9-1: Upload Action Plan and Activity Link
• Action Plan Module: Upload Project
Action Plan Module > Upload Project
Figure 9-2: Upload Project Link
• Action Plan Module: Responsible Organization
Action Plan Module > Upload Responsible Organization
Figure 9-3: Upload Responsible Organization Link
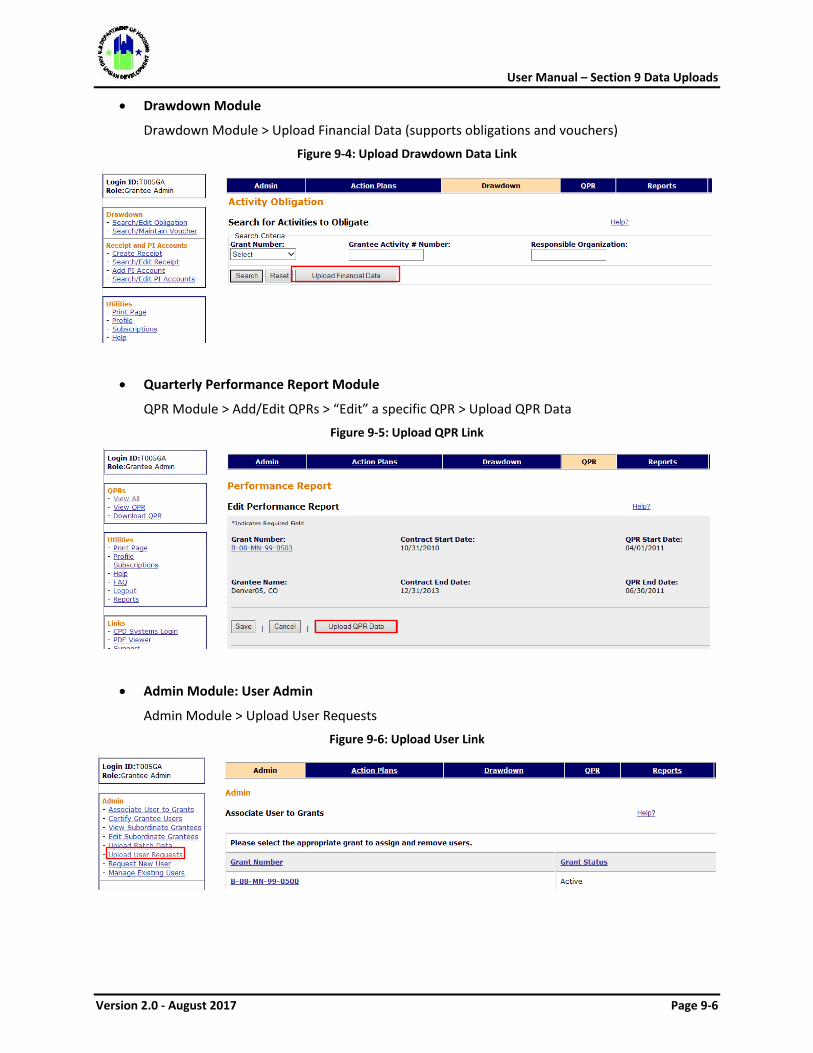
User Manual – Section 9 Data Uploads
Version 2.0 - August 2017 Page 9-6
• Drawdown Module
Drawdown Module > Upload Financial Data (supports obligations and vouchers)
Figure 9-4: Upload Drawdown Data Link
• Quarterly Performance Report Module
QPR Module > Add/Edit QPRs > “Edit” a specific QPR > Upload QPR Data
Figure 9-5: Upload QPR Link
• Admin Module: User Admin
Admin Module > Upload User Requests
Figure 9-6: Upload User Link
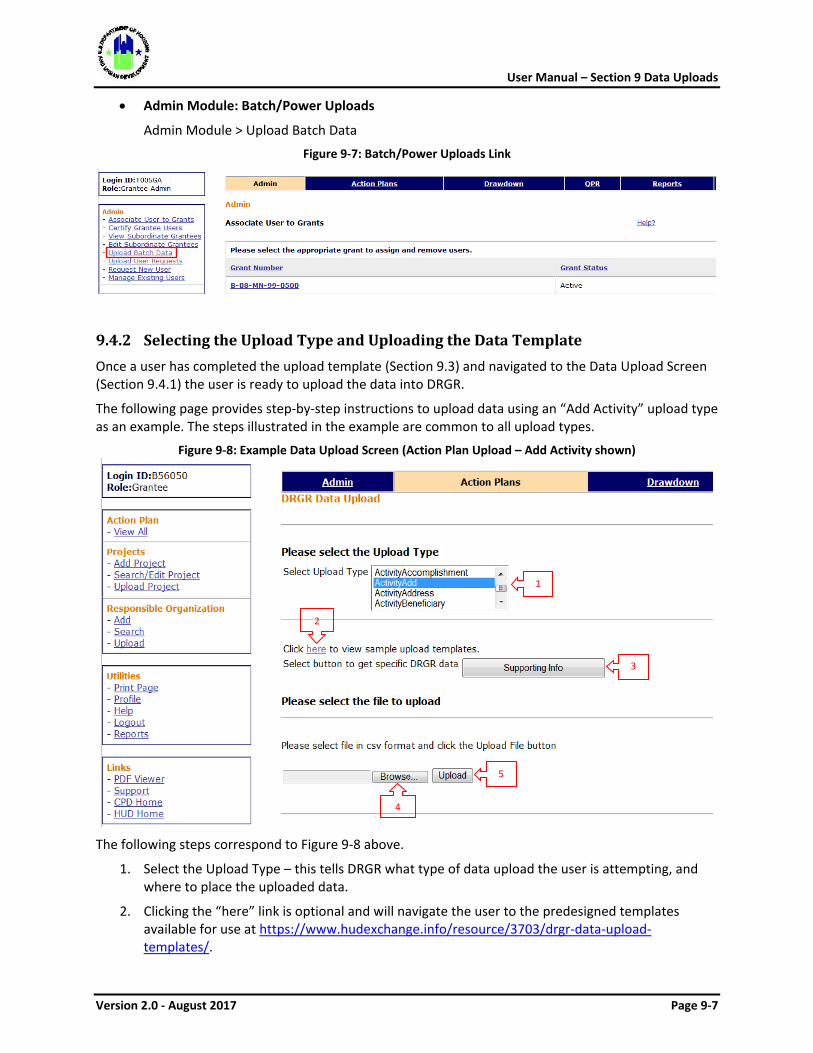
User Manual – Section 9 Data Uploads
Version 2.0 - August 2017 Page 9-7
• Admin Module: Batch/Power Uploads
Admin Module > Upload Batch Data
Figure 9-7: Batch/Power Uploads Link
9.4.2 Selecting the Upload Type and Uploading the Data Template Once a user has completed the upload template (Section 9.3) and navigated to the Data Upload Screen (Section 9.4.1) the user is ready to upload the data into DRGR.
The following page provides step-by-step instructions to upload data using an “Add Activity” upload type as an example. The steps illustrated in the example are common to all upload types.
Figure 9-8: Example Data Upload Screen (Action Plan Upload – Add Activity shown)
The following steps correspond to Figure 9-8 above.
1. Select the Upload Type – this tells DRGR what type of data upload the user is attempting, and where to place the uploaded data.
2. Clicking the “here” link is optional and will navigate the user to the predesigned templates available for use at https://www.hudexchange.info/resource/3703/drgr-data-upload-templates/.
1
2
3
4
5
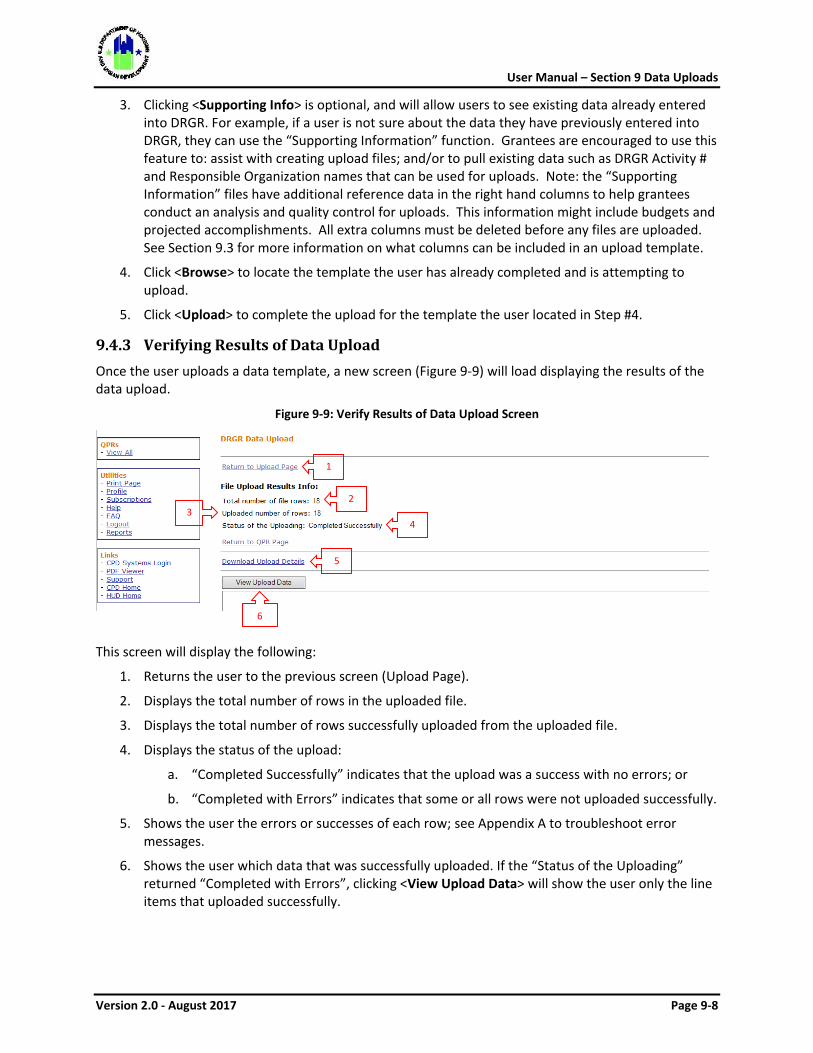
User Manual – Section 9 Data Uploads
Version 2.0 - August 2017 Page 9-8
3. Clicking <Supporting Info> is optional, and will allow users to see existing data already entered into DRGR. For example, if a user is not sure about the data they have previously entered into DRGR, they can use the “Supporting Information” function. Grantees are encouraged to use this feature to: assist with creating upload files; and/or to pull existing data such as DRGR Activity # and Responsible Organization names that can be used for uploads. Note: the “Supporting Information” files have additional reference data in the right hand columns to help grantees conduct an analysis and quality control for uploads. This information might include budgets and projected accomplishments. All extra columns must be deleted before any files are uploaded. See Section 9.3 for more information on what columns can be included in an upload template.
4. Click <Browse> to locate the template the user has already completed and is attempting to upload.
5. Click <Upload> to complete the upload for the template the user located in Step #4.
9.4.3 Verifying Results of Data Upload Once the user uploads a data template, a new screen (Figure 9-9) will load displaying the results of the data upload.
Figure 9-9: Verify Results of Data Upload Screen
This screen will display the following:
1. Returns the user to the previous screen (Upload Page).
2. Displays the total number of rows in the uploaded file.
3. Displays the total number of rows successfully uploaded from the uploaded file.
4. Displays the status of the upload:
a. “Completed Successfully” indicates that the upload was a success with no errors; or
b. “Completed with Errors” indicates that some or all rows were not uploaded successfully.
5. Shows the user the errors or successes of each row; see Appendix A to troubleshoot error messages.
6. Shows the user which data that was successfully uploaded. If the “Status of the Uploading” returned “Completed with Errors”, clicking <View Upload Data> will show the user only the line items that uploaded successfully.
1
2 3
4
5
6
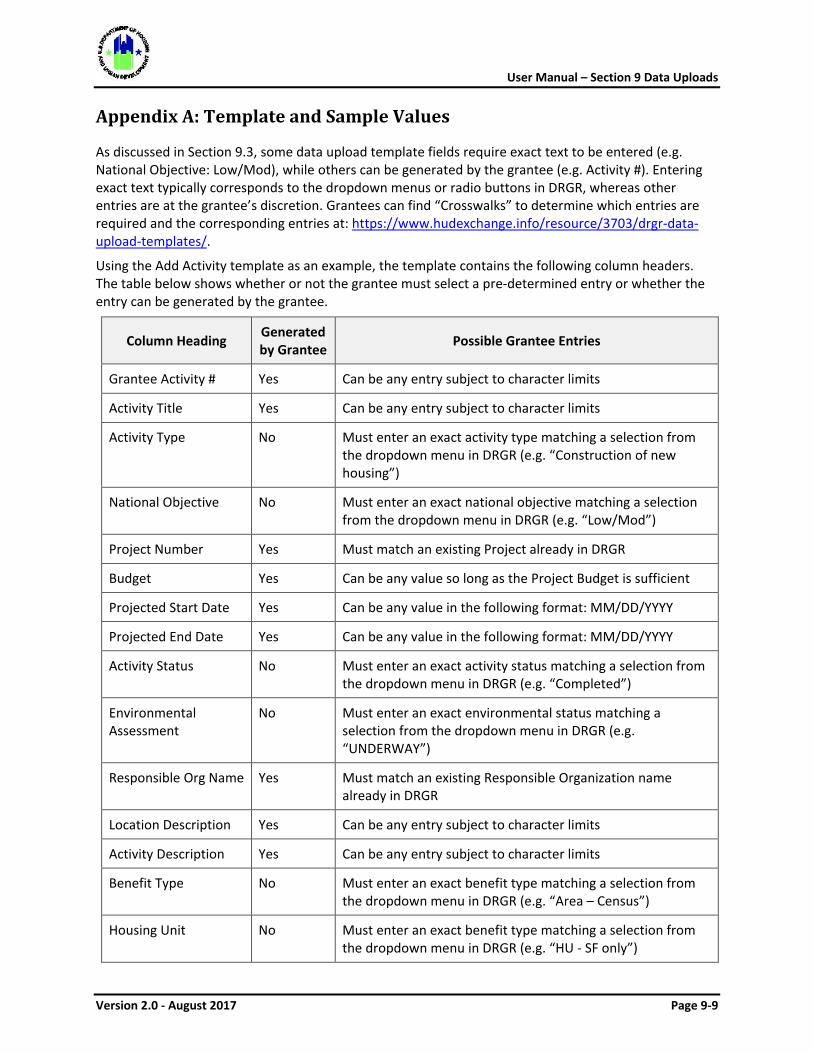
User Manual – Section 9 Data Uploads
Version 2.0 - August 2017 Page 9-9
Appendix A: Template and Sample Values
As discussed in Section 9.3, some data upload template fields require exact text to be entered (e.g. National Objective: Low/Mod), while others can be generated by the grantee (e.g. Activity #). Entering exact text typically corresponds to the dropdown menus or radio buttons in DRGR, whereas other entries are at the grantee’s discretion. Grantees can find “Crosswalks” to determine which entries are required and the corresponding entries at: https://www.hudexchange.info/resource/3703/drgr-data-upload-templates/.
Using the Add Activity template as an example, the template contains the following column headers. The table below shows whether or not the grantee must select a pre-determined entry or whether the entry can be generated by the grantee.
Column Heading Generated by Grantee Possible Grantee Entries
Grantee Activity # Yes Can be any entry subject to character limits
Activity Title Yes Can be any entry subject to character limits
Activity Type No Must enter an exact activity type matching a selection from the dropdown menu in DRGR (e.g. “Construction of new housing”)
National Objective No Must enter an exact national objective matching a selection from the dropdown menu in DRGR (e.g. “Low/Mod”)
Project Number Yes Must match an existing Project already in DRGR
Budget Yes Can be any value so long as the Project Budget is sufficient
Projected Start Date Yes Can be any value in the following format: MM/DD/YYYY
Projected End Date Yes Can be any value in the following format: MM/DD/YYYY
Activity Status No Must enter an exact activity status matching a selection from the dropdown menu in DRGR (e.g. “Completed”)
Environmental Assessment
No Must enter an exact environmental status matching a selection from the dropdown menu in DRGR (e.g. “UNDERWAY”)
Responsible Org Name Yes Must match an existing Responsible Organization name already in DRGR
Location Description Yes Can be any entry subject to character limits
Activity Description Yes Can be any entry subject to character limits
Benefit Type No Must enter an exact benefit type matching a selection from the dropdown menu in DRGR (e.g. “Area – Census”)
Housing Unit No Must enter an exact benefit type matching a selection from the dropdown menu in DRGR (e.g. “HU - SF only”)
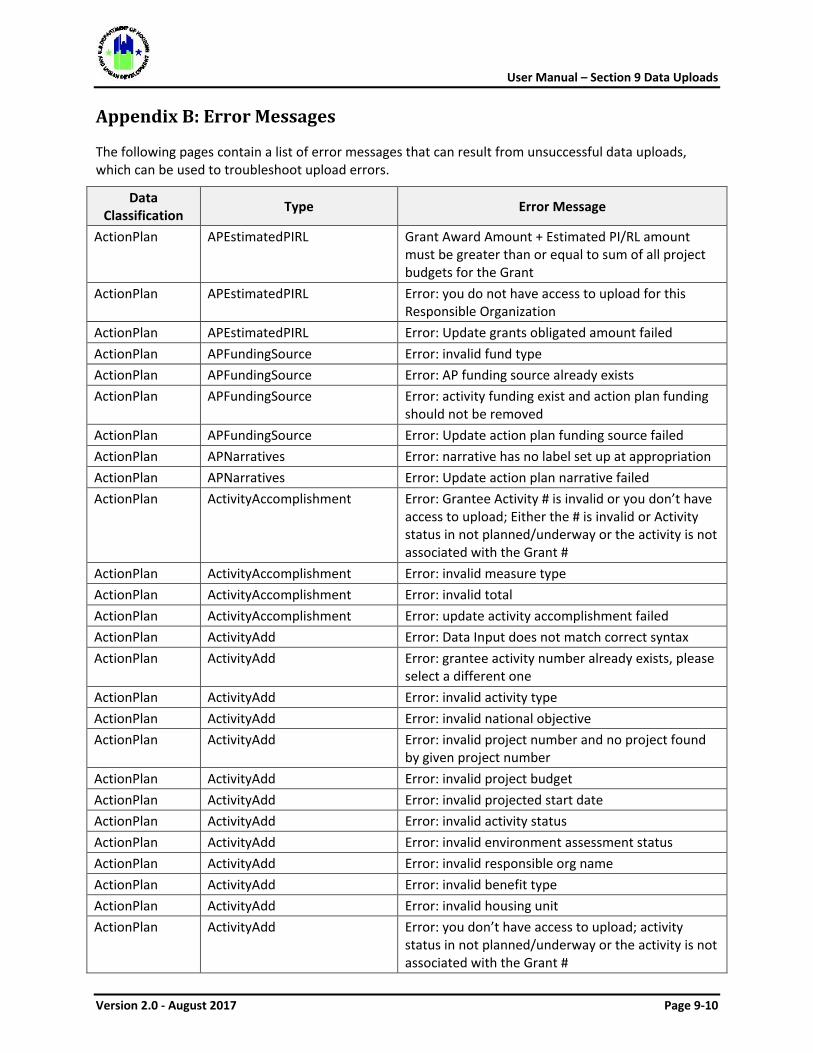
User Manual – Section 9 Data Uploads
Version 2.0 - August 2017 Page 9-10
Appendix B: Error Messages
The following pages contain a list of error messages that can result from unsuccessful data uploads, which can be used to troubleshoot upload errors.
Data Classification Type Error Message
ActionPlan APEstimatedPIRL Grant Award Amount + Estimated PI/RL amount must be greater than or equal to sum of all project budgets for the Grant
ActionPlan APEstimatedPIRL Error: you do not have access to upload for this Responsible Organization
ActionPlan APEstimatedPIRL Error: Update grants obligated amount failed ActionPlan APFundingSource Error: invalid fund type ActionPlan APFundingSource Error: AP funding source already exists ActionPlan APFundingSource Error: activity funding exist and action plan funding
should not be removed ActionPlan APFundingSource Error: Update action plan funding source failed ActionPlan APNarratives Error: narrative has no label set up at appropriation ActionPlan APNarratives Error: Update action plan narrative failed ActionPlan ActivityAccomplishment Error: Grantee Activity # is invalid or you don’t have
access to upload; Either the # is invalid or Activity status in not planned/underway or the activity is not associated with the Grant #
ActionPlan ActivityAccomplishment Error: invalid measure type ActionPlan ActivityAccomplishment Error: invalid total ActionPlan ActivityAccomplishment Error: update activity accomplishment failed ActionPlan ActivityAdd Error: Data Input does not match correct syntax ActionPlan ActivityAdd Error: grantee activity number already exists, please
select a different one ActionPlan ActivityAdd Error: invalid activity type ActionPlan ActivityAdd Error: invalid national objective ActionPlan ActivityAdd Error: invalid project number and no project found
by given project number ActionPlan ActivityAdd Error: invalid project budget ActionPlan ActivityAdd Error: invalid projected start date ActionPlan ActivityAdd Error: invalid activity status ActionPlan ActivityAdd Error: invalid environment assessment status ActionPlan ActivityAdd Error: invalid responsible org name ActionPlan ActivityAdd Error: invalid benefit type ActionPlan ActivityAdd Error: invalid housing unit ActionPlan ActivityAdd Error: you don’t have access to upload; activity
status in not planned/underway or the activity is not associated with the Grant #

User Manual – Section 9 Data Uploads
Version 2.0 - August 2017 Page 9-11
Data Classification Type Error Message
ActionPlan ActivityAdd Error: Insert activity and activity description failed in part 1
ActionPlan ActivityAdd Error: Insert activity and activity description failed in part 2
ActionPlan ActivityAddress Error: Grantee Activity # is invalid or you don’t have access to upload; Either the # is invalid or Activity status in not planned/underway or the activity is not associated with the Grant #
ActionPlan ActivityAddress Error: invalid state ActionPlan ActivityAddress Error: invalid activity address ActionPlan ActivityAddress Error: update activity address failed ActionPlan ActivityBeneficiary Error: Grantee Activity # is invalid or you don’t have
access to upload; Either the # is invalid or Activity status in not planned/underway or the activity is not associated with the Grant #
ActionPlan ActivityBeneficiary Error: invalid measure type ActionPlan ActivityBeneficiary Error: invalid total, mod and low ActionPlan ActivityBeneficiary Error: update activity beneficiary failed ActionPlan ActivityEdit Error: Data Input does not match correct syntax ActionPlan ActivityEdit Error: Grantee Activity # is invalid or you don’t have
access to upload; Either the # is invalid or Activity status in not planned/underway or the activity is not associated with the Grant #
ActionPlan ActivityEdit Error: invalid activity type either wrong type name or type not set up for this appropriation
ActionPlan ActivityEdit Error: invalid activity type - the new activity type does not have all performance measure from old activity type
ActionPlan ActivityEdit Error: invalid national objective ActionPlan ActivityEdit Error: invalid project number ActionPlan ActivityEdit Error: invalid project budget ActionPlan ActivityEdit Error: invalid projected start date ActionPlan ActivityEdit Error: invalid activity status ActionPlan ActivityEdit Error: invalid environment assessment status ActionPlan ActivityEdit Error: invalid responsible org name ActionPlan ActivityEdit Error: invalid benefit type ActionPlan ActivityEdit Error: invalid housing unit ActionPlan ActivityEdit Error: adjust project budget flag need to be set for
modifying project# ActionPlan ActivityEdit Error: edit activity failed in part 1 ActionPlan ActivityEdit Error: edit activity failed in part 2
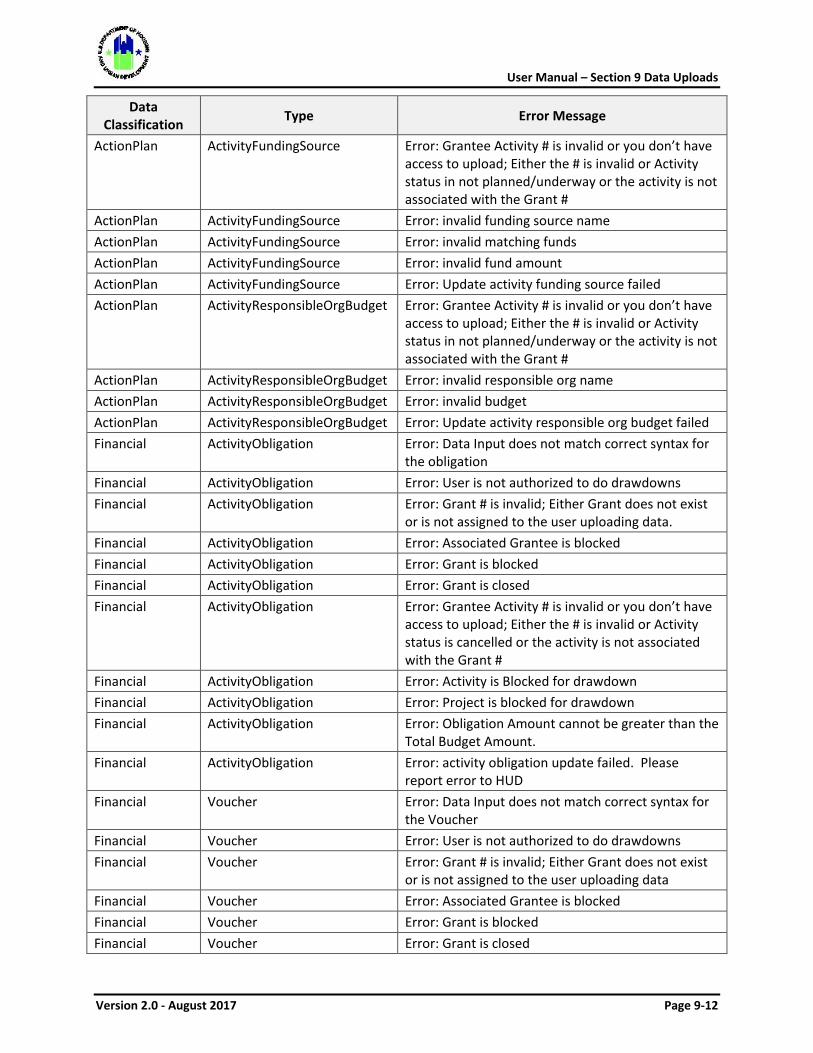
User Manual – Section 9 Data Uploads
Version 2.0 - August 2017 Page 9-12
Data Classification Type Error Message
ActionPlan ActivityFundingSource Error: Grantee Activity # is invalid or you don’t have access to upload; Either the # is invalid or Activity status in not planned/underway or the activity is not associated with the Grant #
ActionPlan ActivityFundingSource Error: invalid funding source name ActionPlan ActivityFundingSource Error: invalid matching funds ActionPlan ActivityFundingSource Error: invalid fund amount ActionPlan ActivityFundingSource Error: Update activity funding source failed ActionPlan ActivityResponsibleOrgBudget Error: Grantee Activity # is invalid or you don’t have
access to upload; Either the # is invalid or Activity status in not planned/underway or the activity is not associated with the Grant #
ActionPlan ActivityResponsibleOrgBudget Error: invalid responsible org name ActionPlan ActivityResponsibleOrgBudget Error: invalid budget ActionPlan ActivityResponsibleOrgBudget Error: Update activity responsible org budget failed Financial ActivityObligation Error: Data Input does not match correct syntax for
the obligation Financial ActivityObligation Error: User is not authorized to do drawdowns Financial ActivityObligation Error: Grant # is invalid; Either Grant does not exist
or is not assigned to the user uploading data. Financial ActivityObligation Error: Associated Grantee is blocked Financial ActivityObligation Error: Grant is blocked Financial ActivityObligation Error: Grant is closed Financial ActivityObligation Error: Grantee Activity # is invalid or you don’t have
access to upload; Either the # is invalid or Activity status is cancelled or the activity is not associated with the Grant #
Financial ActivityObligation Error: Activity is Blocked for drawdown Financial ActivityObligation Error: Project is blocked for drawdown Financial ActivityObligation Error: Obligation Amount cannot be greater than the
Total Budget Amount. Financial ActivityObligation Error: activity obligation update failed. Please
report error to HUD Financial Voucher Error: Data Input does not match correct syntax for
the Voucher Financial Voucher Error: User is not authorized to do drawdowns Financial Voucher Error: Grant # is invalid; Either Grant does not exist
or is not assigned to the user uploading data Financial Voucher Error: Associated Grantee is blocked Financial Voucher Error: Grant is blocked Financial Voucher Error: Grant is closed
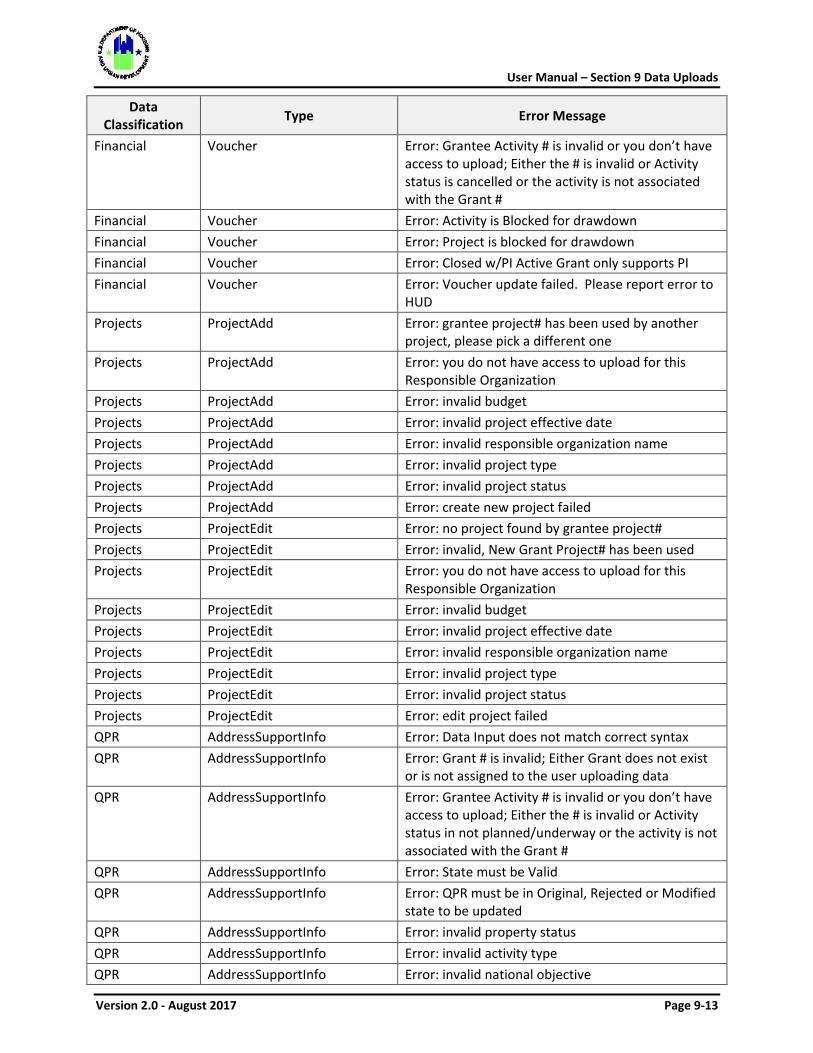
User Manual – Section 9 Data Uploads
Version 2.0 - August 2017 Page 9-13
Data Classification Type Error Message
Financial Voucher Error: Grantee Activity # is invalid or you don’t have access to upload; Either the # is invalid or Activity status is cancelled or the activity is not associated with the Grant #
Financial Voucher Error: Activity is Blocked for drawdown Financial Voucher Error: Project is blocked for drawdown Financial Voucher Error: Closed w/PI Active Grant only supports PI Financial Voucher Error: Voucher update failed. Please report error to
HUD Projects ProjectAdd Error: grantee project# has been used by another
project, please pick a different one Projects ProjectAdd Error: you do not have access to upload for this
Responsible Organization Projects ProjectAdd Error: invalid budget Projects ProjectAdd Error: invalid project effective date Projects ProjectAdd Error: invalid responsible organization name Projects ProjectAdd Error: invalid project type Projects ProjectAdd Error: invalid project status Projects ProjectAdd Error: create new project failed Projects ProjectEdit Error: no project found by grantee project# Projects ProjectEdit Error: invalid, New Grant Project# has been used Projects ProjectEdit Error: you do not have access to upload for this
Responsible Organization Projects ProjectEdit Error: invalid budget Projects ProjectEdit Error: invalid project effective date Projects ProjectEdit Error: invalid responsible organization name Projects ProjectEdit Error: invalid project type Projects ProjectEdit Error: invalid project status Projects ProjectEdit Error: edit project failed QPR AddressSupportInfo Error: Data Input does not match correct syntax QPR AddressSupportInfo Error: Grant # is invalid; Either Grant does not exist
or is not assigned to the user uploading data QPR AddressSupportInfo Error: Grantee Activity # is invalid or you don’t have
access to upload; Either the # is invalid or Activity status in not planned/underway or the activity is not associated with the Grant #
QPR AddressSupportInfo Error: State must be Valid QPR AddressSupportInfo Error: QPR must be in Original, Rejected or Modified
state to be updated QPR AddressSupportInfo Error: invalid property status QPR AddressSupportInfo Error: invalid activity type QPR AddressSupportInfo Error: invalid national objective
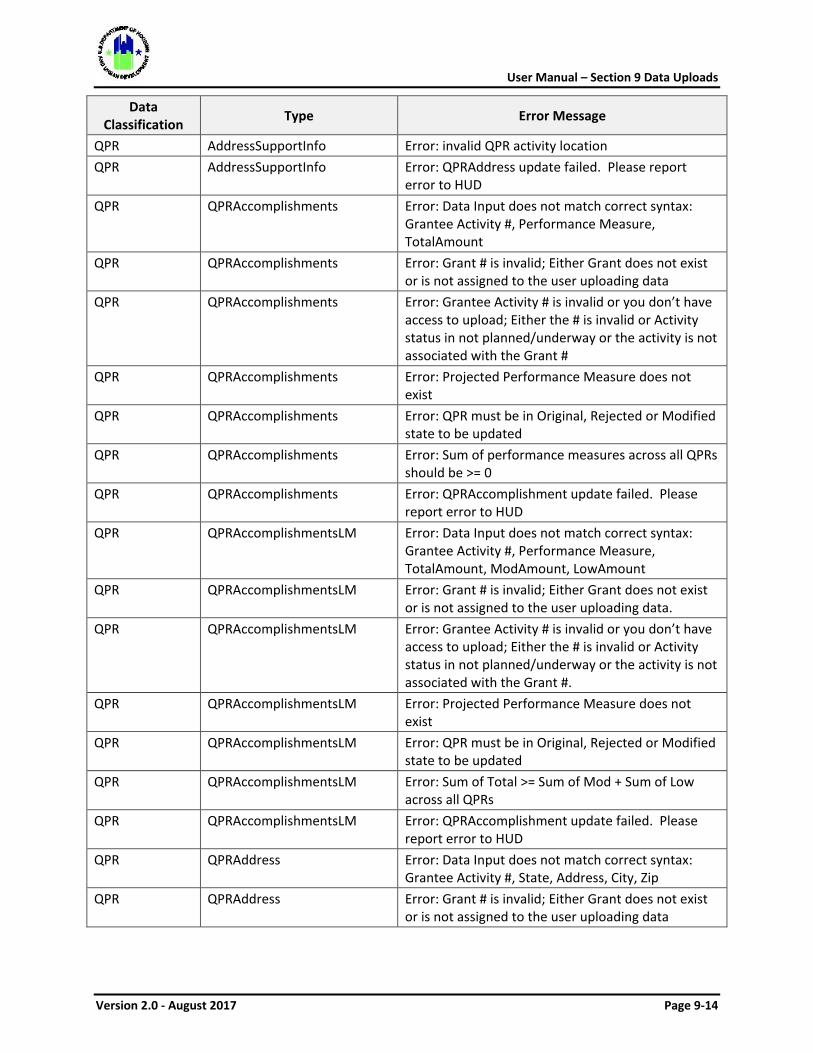
User Manual – Section 9 Data Uploads
Version 2.0 - August 2017 Page 9-14
Data Classification Type Error Message
QPR AddressSupportInfo Error: invalid QPR activity location QPR AddressSupportInfo Error: QPRAddress update failed. Please report
error to HUD QPR QPRAccomplishments Error: Data Input does not match correct syntax:
Grantee Activity #, Performance Measure, TotalAmount
QPR QPRAccomplishments Error: Grant # is invalid; Either Grant does not exist or is not assigned to the user uploading data
QPR QPRAccomplishments Error: Grantee Activity # is invalid or you don’t have access to upload; Either the # is invalid or Activity status in not planned/underway or the activity is not associated with the Grant #
QPR QPRAccomplishments Error: Projected Performance Measure does not exist
QPR QPRAccomplishments Error: QPR must be in Original, Rejected or Modified state to be updated
QPR QPRAccomplishments Error: Sum of performance measures across all QPRs should be >= 0
QPR QPRAccomplishments Error: QPRAccomplishment update failed. Please report error to HUD
QPR QPRAccomplishmentsLM Error: Data Input does not match correct syntax: Grantee Activity #, Performance Measure, TotalAmount, ModAmount, LowAmount
QPR QPRAccomplishmentsLM Error: Grant # is invalid; Either Grant does not exist or is not assigned to the user uploading data.
QPR QPRAccomplishmentsLM Error: Grantee Activity # is invalid or you don’t have access to upload; Either the # is invalid or Activity status in not planned/underway or the activity is not associated with the Grant #.
QPR QPRAccomplishmentsLM Error: Projected Performance Measure does not exist
QPR QPRAccomplishmentsLM Error: QPR must be in Original, Rejected or Modified state to be updated
QPR QPRAccomplishmentsLM Error: Sum of Total >= Sum of Mod + Sum of Low across all QPRs
QPR QPRAccomplishmentsLM Error: QPRAccomplishment update failed. Please report error to HUD
QPR QPRAddress Error: Data Input does not match correct syntax: Grantee Activity #, State, Address, City, Zip
QPR QPRAddress Error: Grant # is invalid; Either Grant does not exist or is not assigned to the user uploading data
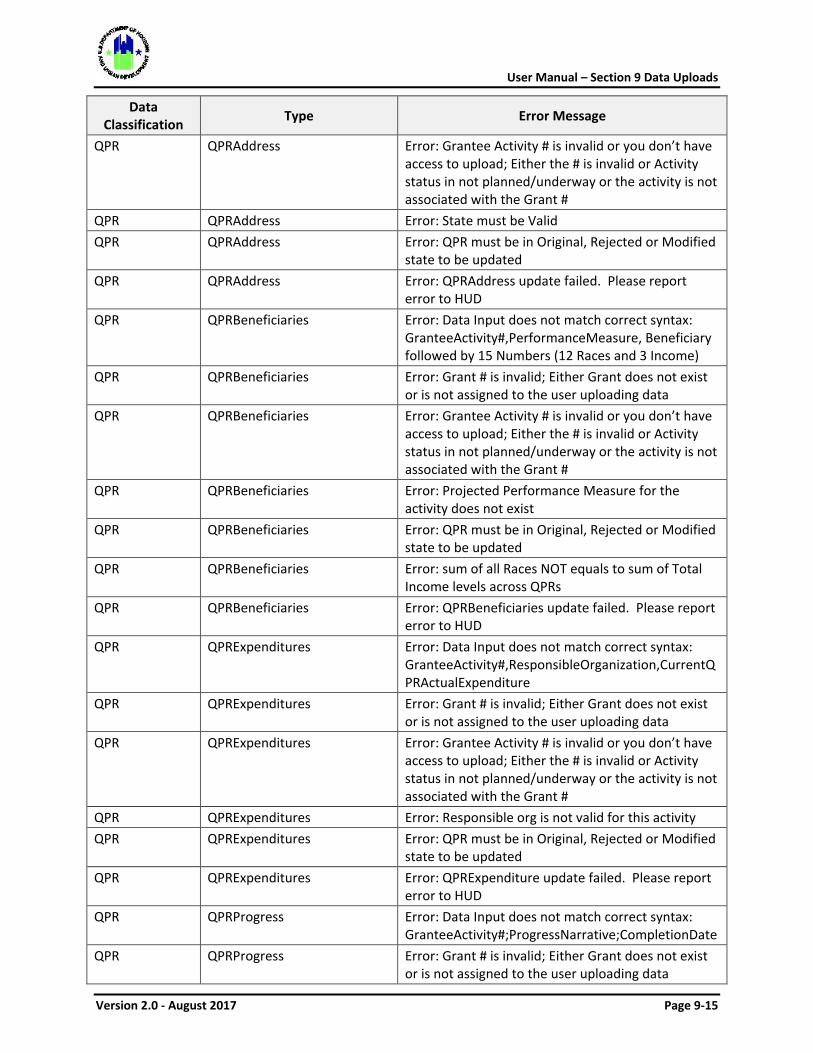
User Manual – Section 9 Data Uploads
Version 2.0 - August 2017 Page 9-15
Data Classification Type Error Message
QPR QPRAddress Error: Grantee Activity # is invalid or you don’t have access to upload; Either the # is invalid or Activity status in not planned/underway or the activity is not associated with the Grant #
QPR QPRAddress Error: State must be Valid QPR QPRAddress Error: QPR must be in Original, Rejected or Modified
state to be updated QPR QPRAddress Error: QPRAddress update failed. Please report
error to HUD QPR QPRBeneficiaries Error: Data Input does not match correct syntax:
GranteeActivity#,PerformanceMeasure, Beneficiary followed by 15 Numbers (12 Races and 3 Income)
QPR QPRBeneficiaries Error: Grant # is invalid; Either Grant does not exist or is not assigned to the user uploading data
QPR QPRBeneficiaries Error: Grantee Activity # is invalid or you don’t have access to upload; Either the # is invalid or Activity status in not planned/underway or the activity is not associated with the Grant #
QPR QPRBeneficiaries Error: Projected Performance Measure for the activity does not exist
QPR QPRBeneficiaries Error: QPR must be in Original, Rejected or Modified state to be updated
QPR QPRBeneficiaries Error: sum of all Races NOT equals to sum of Total Income levels across QPRs
QPR QPRBeneficiaries Error: QPRBeneficiaries update failed. Please report error to HUD
QPR QPRExpenditures Error: Data Input does not match correct syntax: GranteeActivity#,ResponsibleOrganization,CurrentQPRActualExpenditure
QPR QPRExpenditures Error: Grant # is invalid; Either Grant does not exist or is not assigned to the user uploading data
QPR QPRExpenditures Error: Grantee Activity # is invalid or you don’t have access to upload; Either the # is invalid or Activity status in not planned/underway or the activity is not associated with the Grant #
QPR QPRExpenditures Error: Responsible org is not valid for this activity QPR QPRExpenditures Error: QPR must be in Original, Rejected or Modified
state to be updated QPR QPRExpenditures Error: QPRExpenditure update failed. Please report
error to HUD QPR QPRProgress Error: Data Input does not match correct syntax:
GranteeActivity#;ProgressNarrative;CompletionDate QPR QPRProgress Error: Grant # is invalid; Either Grant does not exist
or is not assigned to the user uploading data
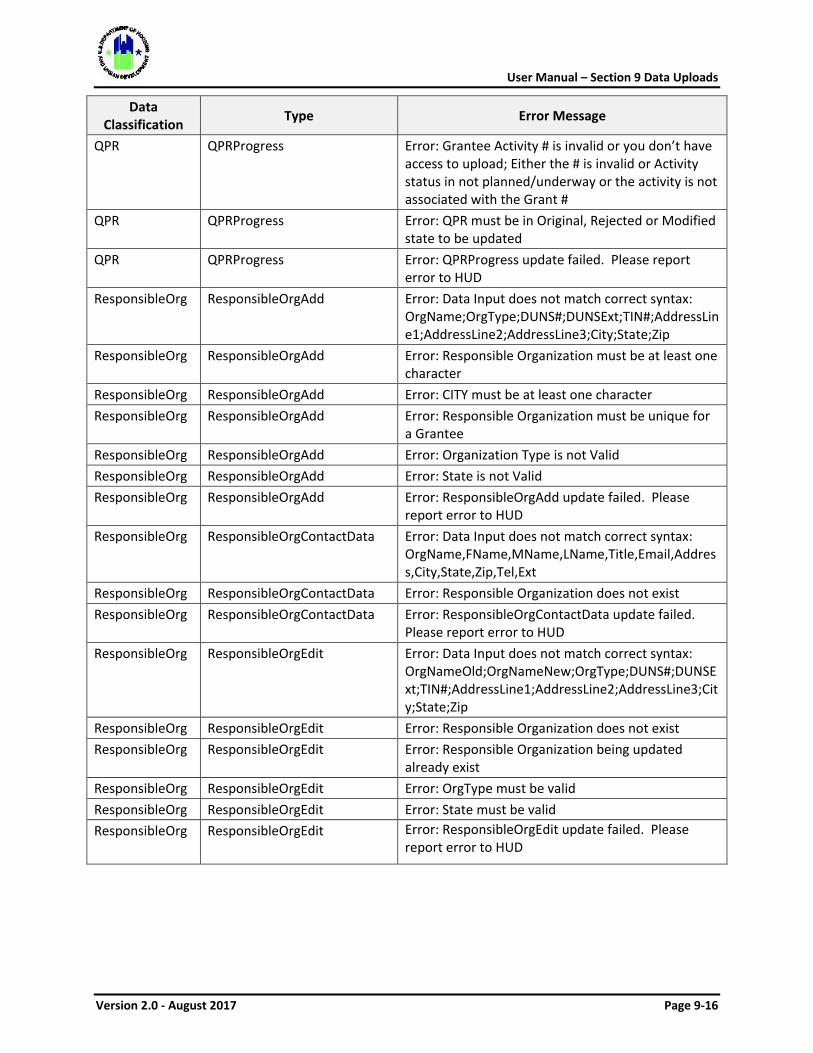
User Manual – Section 9 Data Uploads
Version 2.0 - August 2017 Page 9-16
Data Classification Type Error Message
QPR QPRProgress Error: Grantee Activity # is invalid or you don’t have access to upload; Either the # is invalid or Activity status in not planned/underway or the activity is not associated with the Grant #
QPR QPRProgress Error: QPR must be in Original, Rejected or Modified state to be updated
QPR QPRProgress Error: QPRProgress update failed. Please report error to HUD
ResponsibleOrg ResponsibleOrgAdd Error: Data Input does not match correct syntax: OrgName;OrgType;DUNS#;DUNSExt;TIN#;AddressLine1;AddressLine2;AddressLine3;City;State;Zip
ResponsibleOrg ResponsibleOrgAdd Error: Responsible Organization must be at least one character
ResponsibleOrg ResponsibleOrgAdd Error: CITY must be at least one character ResponsibleOrg ResponsibleOrgAdd Error: Responsible Organization must be unique for
a Grantee ResponsibleOrg ResponsibleOrgAdd Error: Organization Type is not Valid ResponsibleOrg ResponsibleOrgAdd Error: State is not Valid ResponsibleOrg ResponsibleOrgAdd Error: ResponsibleOrgAdd update failed. Please
report error to HUD ResponsibleOrg ResponsibleOrgContactData Error: Data Input does not match correct syntax:
OrgName,FName,MName,LName,Title,Email,Address,City,State,Zip,Tel,Ext
ResponsibleOrg ResponsibleOrgContactData Error: Responsible Organization does not exist ResponsibleOrg ResponsibleOrgContactData Error: ResponsibleOrgContactData update failed.
Please report error to HUD ResponsibleOrg ResponsibleOrgEdit Error: Data Input does not match correct syntax:
OrgNameOld;OrgNameNew;OrgType;DUNS#;DUNSExt;TIN#;AddressLine1;AddressLine2;AddressLine3;City;State;Zip
ResponsibleOrg ResponsibleOrgEdit Error: Responsible Organization does not exist ResponsibleOrg ResponsibleOrgEdit Error: Responsible Organization being updated
already exist ResponsibleOrg ResponsibleOrgEdit Error: OrgType must be valid ResponsibleOrg ResponsibleOrgEdit Error: State must be valid ResponsibleOrg ResponsibleOrgEdit Error: ResponsibleOrgEdit update failed. Please
report error to HUD
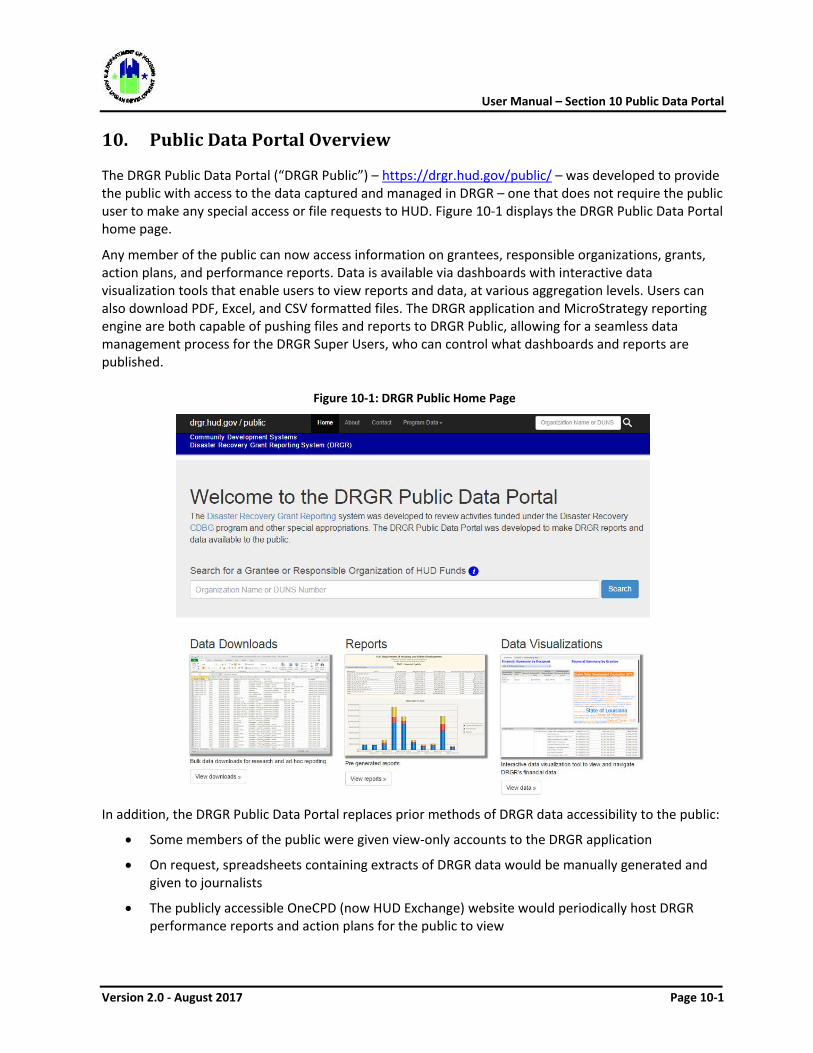
User Manual – Section 10 Public Data Portal
Version 2.0 - August 2017 Page 10-1
10. Public Data Portal Overview
The DRGR Public Data Portal (“DRGR Public”) – https://drgr.hud.gov/public/ – was developed to provide the public with access to the data captured and managed in DRGR – one that does not require the public user to make any special access or file requests to HUD. Figure 10-1 displays the DRGR Public Data Portal home page.
Any member of the public can now access information on grantees, responsible organizations, grants, action plans, and performance reports. Data is available via dashboards with interactive data visualization tools that enable users to view reports and data, at various aggregation levels. Users can also download PDF, Excel, and CSV formatted files. The DRGR application and MicroStrategy reporting engine are both capable of pushing files and reports to DRGR Public, allowing for a seamless data management process for the DRGR Super Users, who can control what dashboards and reports are published.
Figure 10-1: DRGR Public Home Page
In addition, the DRGR Public Data Portal replaces prior methods of DRGR data accessibility to the public:
• Some members of the public were given view-only accounts to the DRGR application
• On request, spreadsheets containing extracts of DRGR data would be manually generated and given to journalists
• The publicly accessible OneCPD (now HUD Exchange) website would periodically host DRGR performance reports and action plans for the public to view
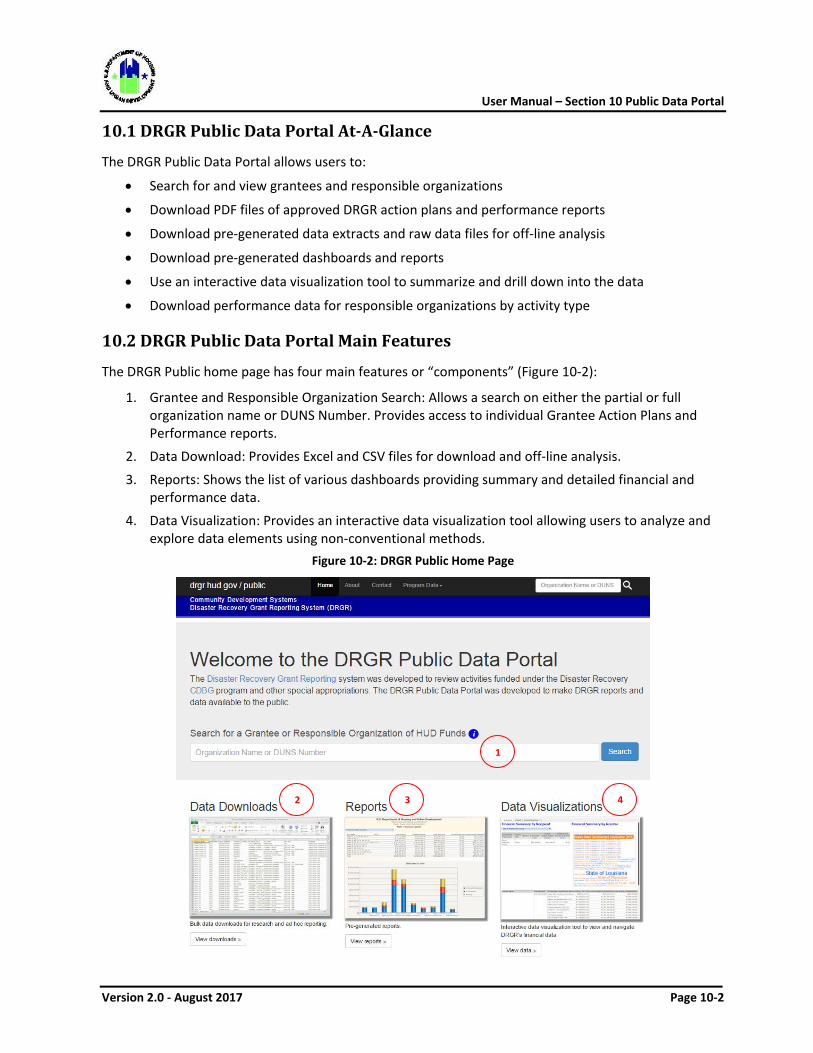
User Manual – Section 10 Public Data Portal
Version 2.0 - August 2017 Page 10-2
10.1 DRGR Public Data Portal At-A-Glance
The DRGR Public Data Portal allows users to:
• Search for and view grantees and responsible organizations
• Download PDF files of approved DRGR action plans and performance reports
• Download pre-generated data extracts and raw data files for off-line analysis
• Download pre-generated dashboards and reports
• Use an interactive data visualization tool to summarize and drill down into the data
• Download performance data for responsible organizations by activity type
10.2 DRGR Public Data Portal Main Features
The DRGR Public home page has four main features or “components” (Figure 10-2):
1. Grantee and Responsible Organization Search: Allows a search on either the partial or full organization name or DUNS Number. Provides access to individual Grantee Action Plans and Performance reports.
2. Data Download: Provides Excel and CSV files for download and off-line analysis.
3. Reports: Shows the list of various dashboards providing summary and detailed financial and performance data.
4. Data Visualization: Provides an interactive data visualization tool allowing users to analyze and explore data elements using non-conventional methods.
Figure 10-2: DRGR Public Home Page
1
2 3 4
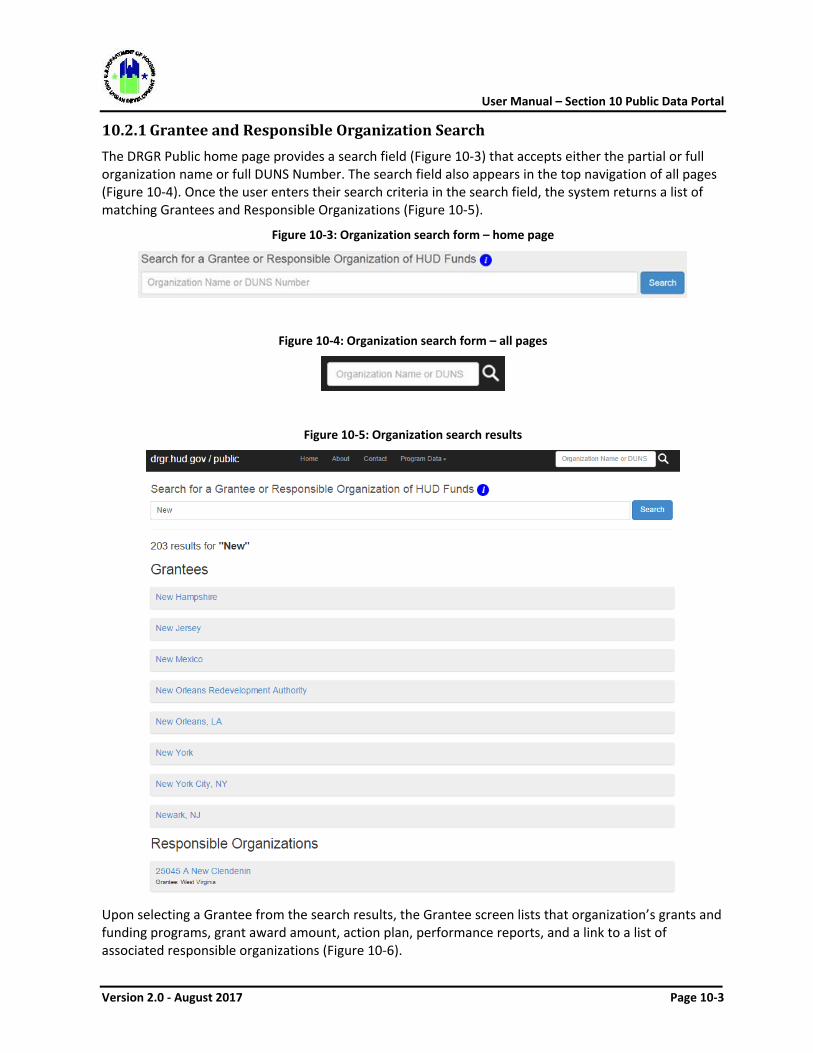
User Manual – Section 10 Public Data Portal
Version 2.0 - August 2017 Page 10-3
10.2.1 Grantee and Responsible Organization Search The DRGR Public home page provides a search field (Figure 10-3) that accepts either the partial or full organization name or full DUNS Number. The search field also appears in the top navigation of all pages (Figure 10-4). Once the user enters their search criteria in the search field, the system returns a list of matching Grantees and Responsible Organizations (Figure 10-5).
Figure 10-3: Organization search form – home page
Figure 10-4: Organization search form – all pages
Figure 10-5: Organization search results
Upon selecting a Grantee from the search results, the Grantee screen lists that organization’s grants and funding programs, grant award amount, action plan, performance reports, and a link to a list of associated responsible organizations (Figure 10-6).
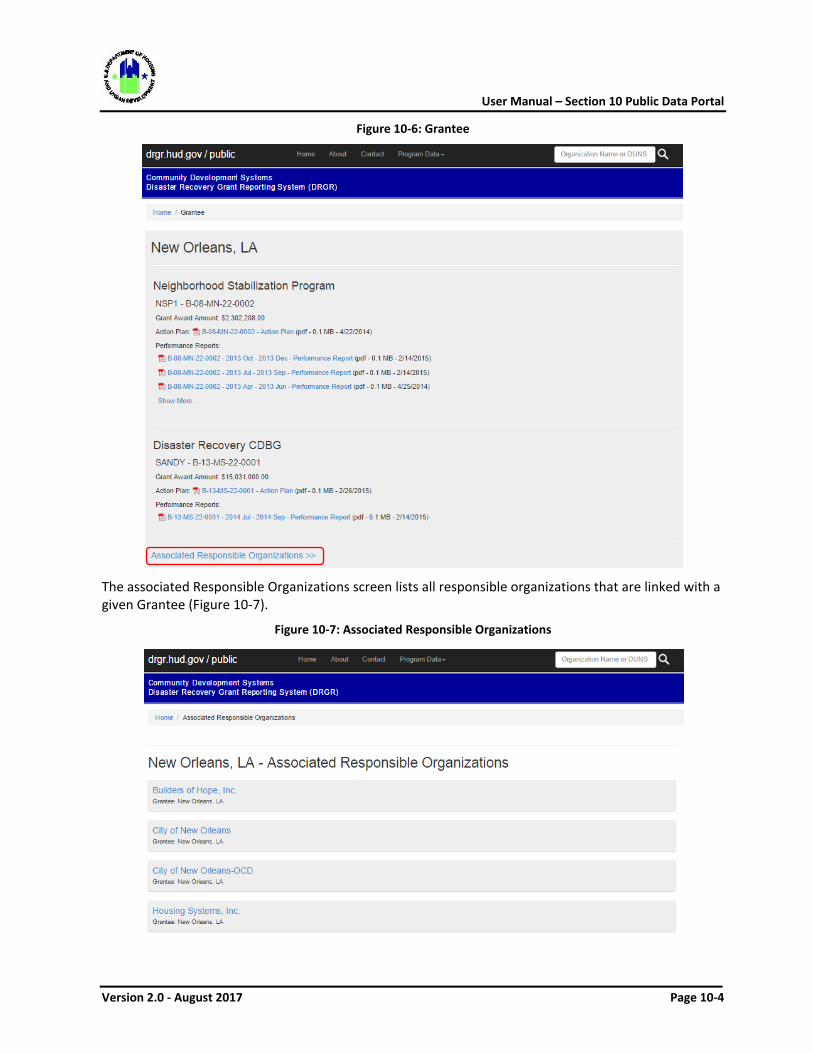
User Manual – Section 10 Public Data Portal
Version 2.0 - August 2017 Page 10-4
Figure 10-6: Grantee
The associated Responsible Organizations screen lists all responsible organizations that are linked with a given Grantee (Figure 10-7).
Figure 10-7: Associated Responsible Organizations
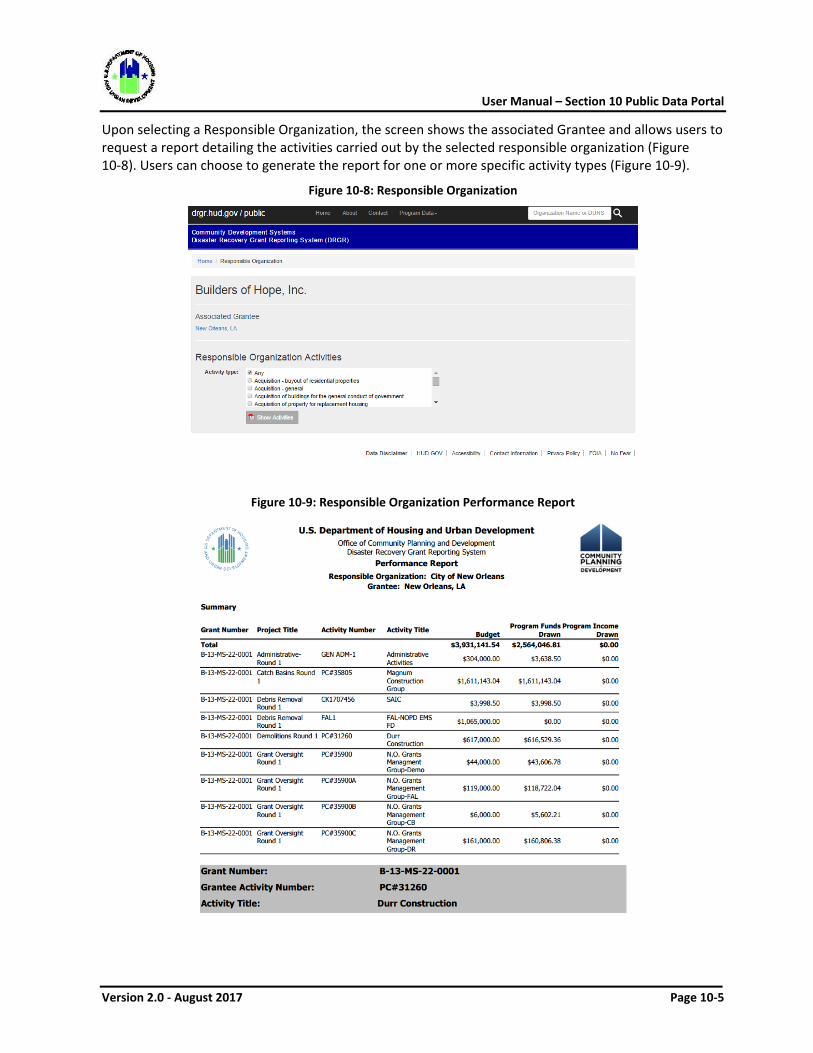
User Manual – Section 10 Public Data Portal
Version 2.0 - August 2017 Page 10-5
Upon selecting a Responsible Organization, the screen shows the associated Grantee and allows users to request a report detailing the activities carried out by the selected responsible organization (Figure 10-8). Users can choose to generate the report for one or more specific activity types (Figure 10-9).
Figure 10-8: Responsible Organization
Figure 10-9: Responsible Organization Performance Report
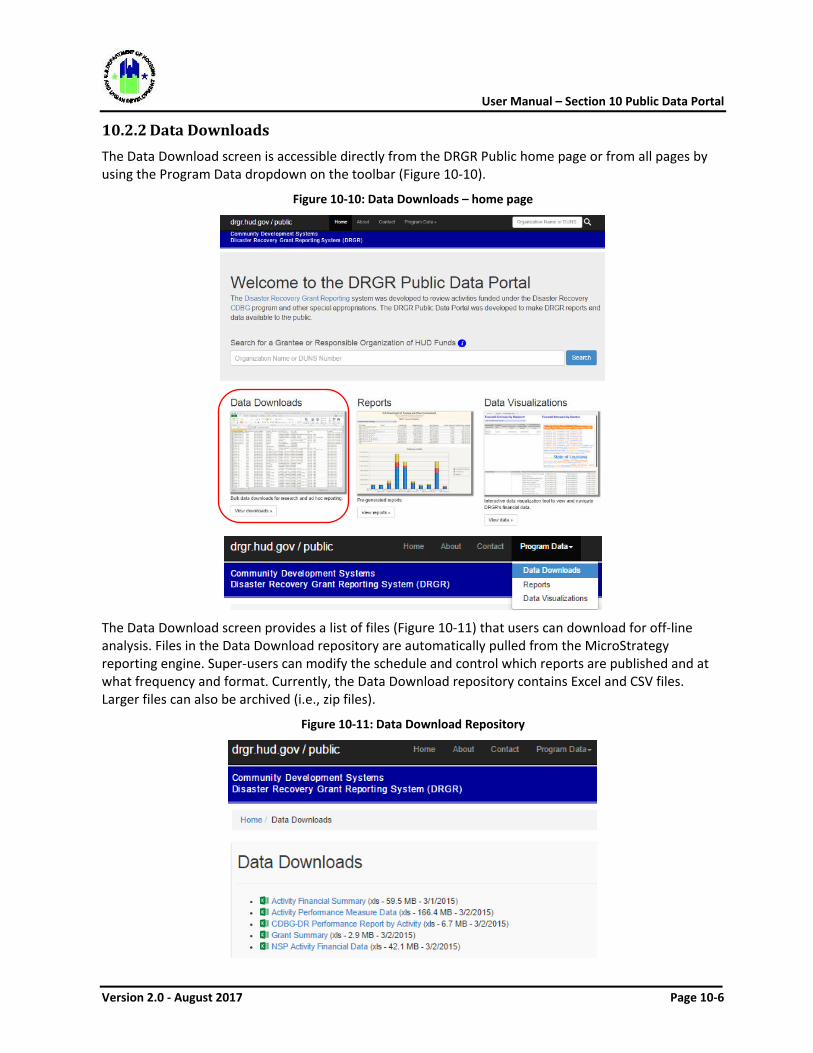
User Manual – Section 10 Public Data Portal
Version 2.0 - August 2017 Page 10-6
10.2.2 Data Downloads The Data Download screen is accessible directly from the DRGR Public home page or from all pages by using the Program Data dropdown on the toolbar (Figure 10-10).
Figure 10-10: Data Downloads – home page
The Data Download screen provides a list of files (Figure 10-11) that users can download for off-line analysis. Files in the Data Download repository are automatically pulled from the MicroStrategy reporting engine. Super-users can modify the schedule and control which reports are published and at what frequency and format. Currently, the Data Download repository contains Excel and CSV files. Larger files can also be archived (i.e., zip files).
Figure 10-11: Data Download Repository
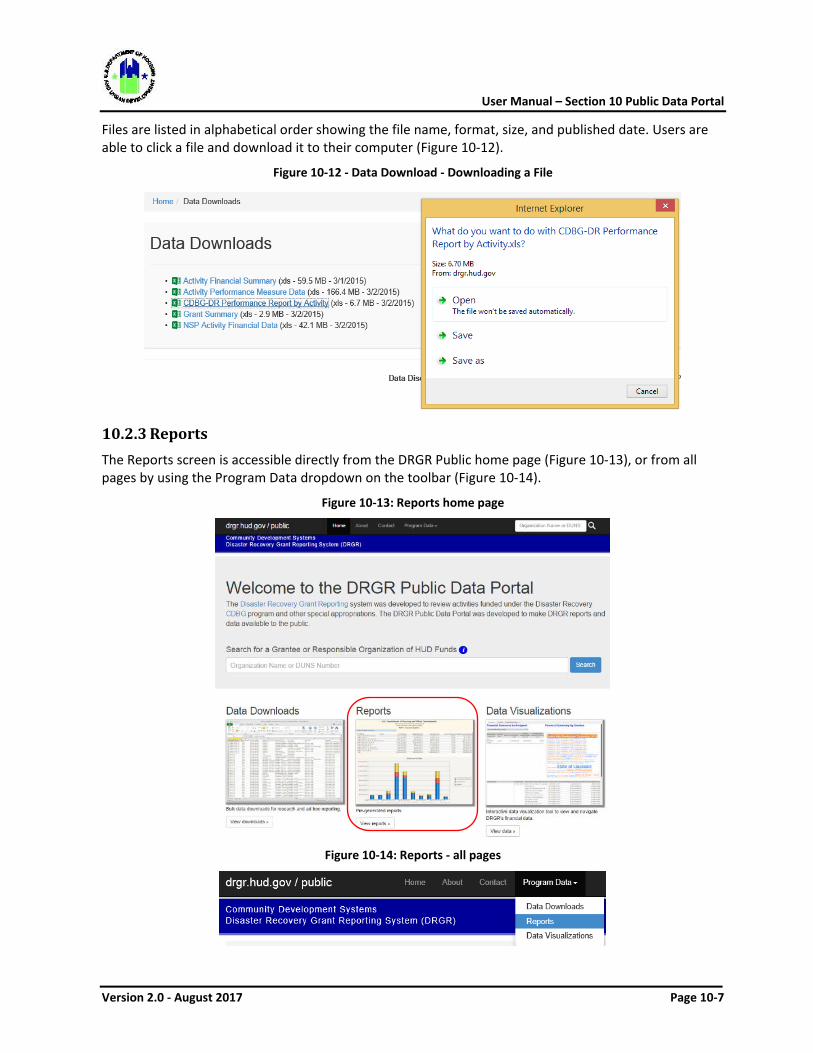
User Manual – Section 10 Public Data Portal
Version 2.0 - August 2017 Page 10-7
Files are listed in alphabetical order showing the file name, format, size, and published date. Users are able to click a file and download it to their computer (Figure 10-12).
Figure 10-12 - Data Download - Downloading a File
10.2.3 Reports The Reports screen is accessible directly from the DRGR Public home page (Figure 10-13), or from all pages by using the Program Data dropdown on the toolbar (Figure 10-14).
Figure 10-13: Reports home page
Figure 10-14: Reports - all pages
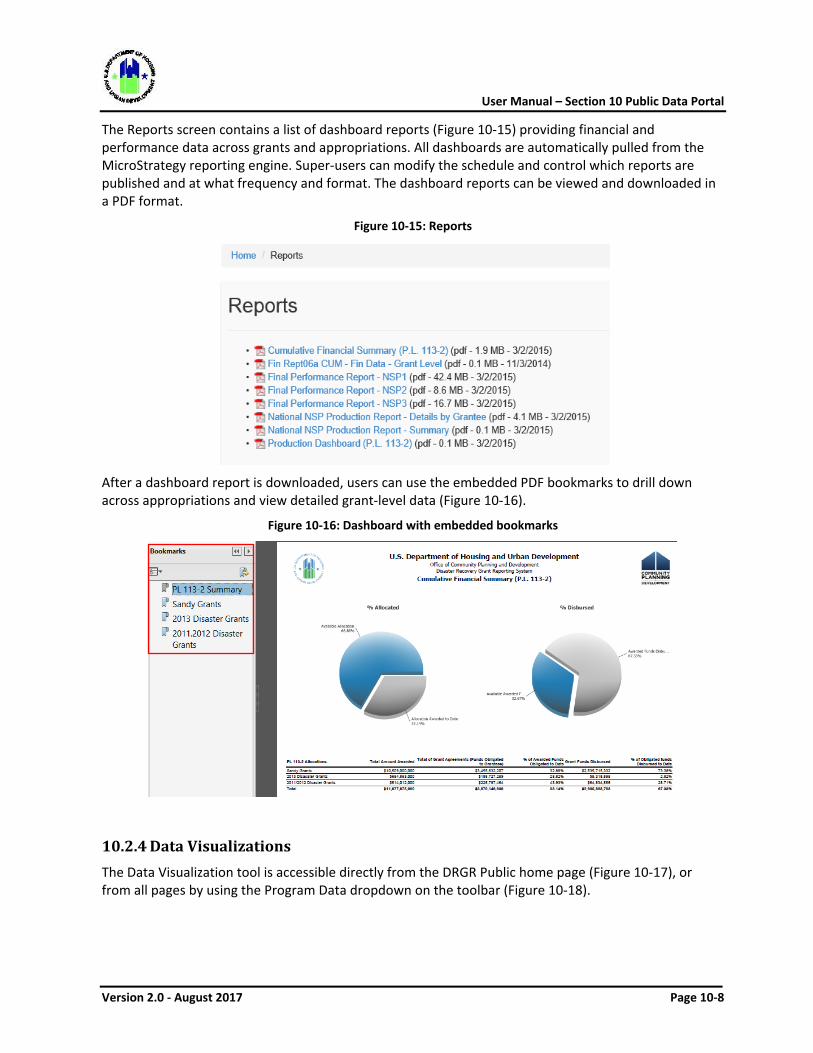
User Manual – Section 10 Public Data Portal
Version 2.0 - August 2017 Page 10-8
The Reports screen contains a list of dashboard reports (Figure 10-15) providing financial and performance data across grants and appropriations. All dashboards are automatically pulled from the MicroStrategy reporting engine. Super-users can modify the schedule and control which reports are published and at what frequency and format. The dashboard reports can be viewed and downloaded in a PDF format.
Figure 10-15: Reports
After a dashboard report is downloaded, users can use the embedded PDF bookmarks to drill down across appropriations and view detailed grant-level data (Figure 10-16).
Figure 10-16: Dashboard with embedded bookmarks
10.2.4 Data Visualizations The Data Visualization tool is accessible directly from the DRGR Public home page (Figure 10-17), or from all pages by using the Program Data dropdown on the toolbar (Figure 10-18).
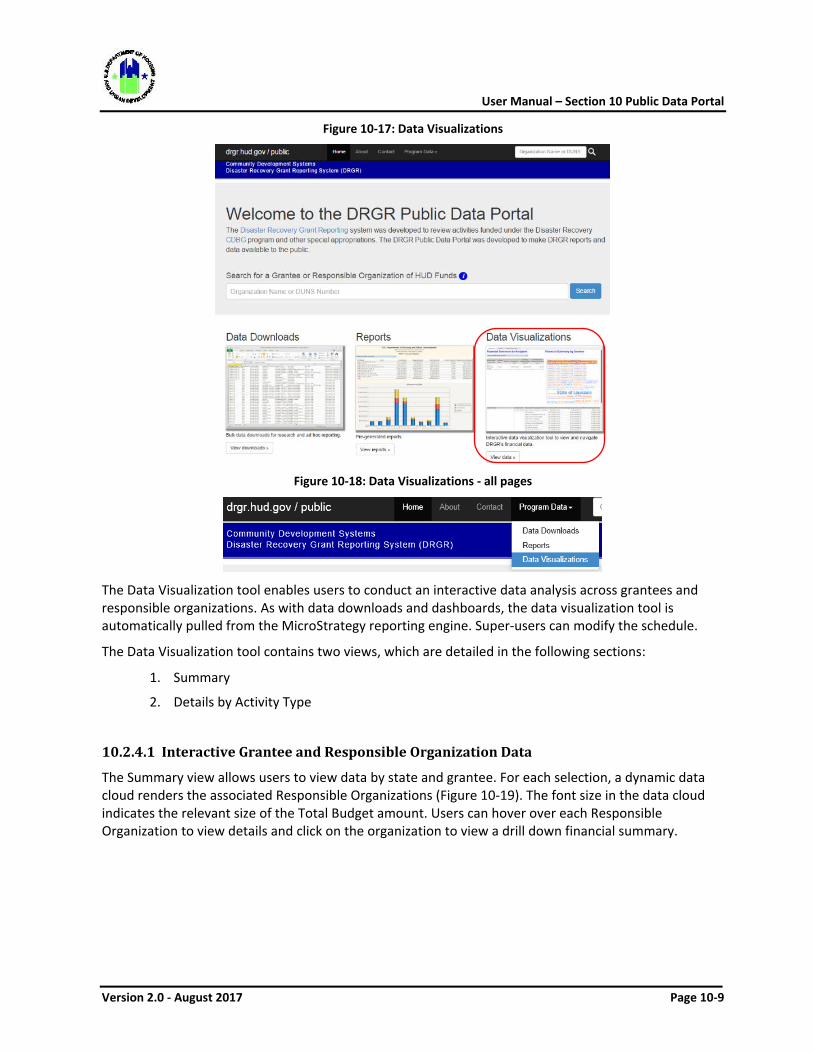
User Manual – Section 10 Public Data Portal
Version 2.0 - August 2017 Page 10-9
Figure 10-17: Data Visualizations
Figure 10-18: Data Visualizations - all pages
The Data Visualization tool enables users to conduct an interactive data analysis across grantees and responsible organizations. As with data downloads and dashboards, the data visualization tool is automatically pulled from the MicroStrategy reporting engine. Super-users can modify the schedule.
The Data Visualization tool contains two views, which are detailed in the following sections:
1. Summary
2. Details by Activity Type
10.2.4.1 Interactive Grantee and Responsible Organization Data
The Summary view allows users to view data by state and grantee. For each selection, a dynamic data cloud renders the associated Responsible Organizations (Figure 10-19). The font size in the data cloud indicates the relevant size of the Total Budget amount. Users can hover over each Responsible Organization to view details and click on the organization to view a drill down financial summary.
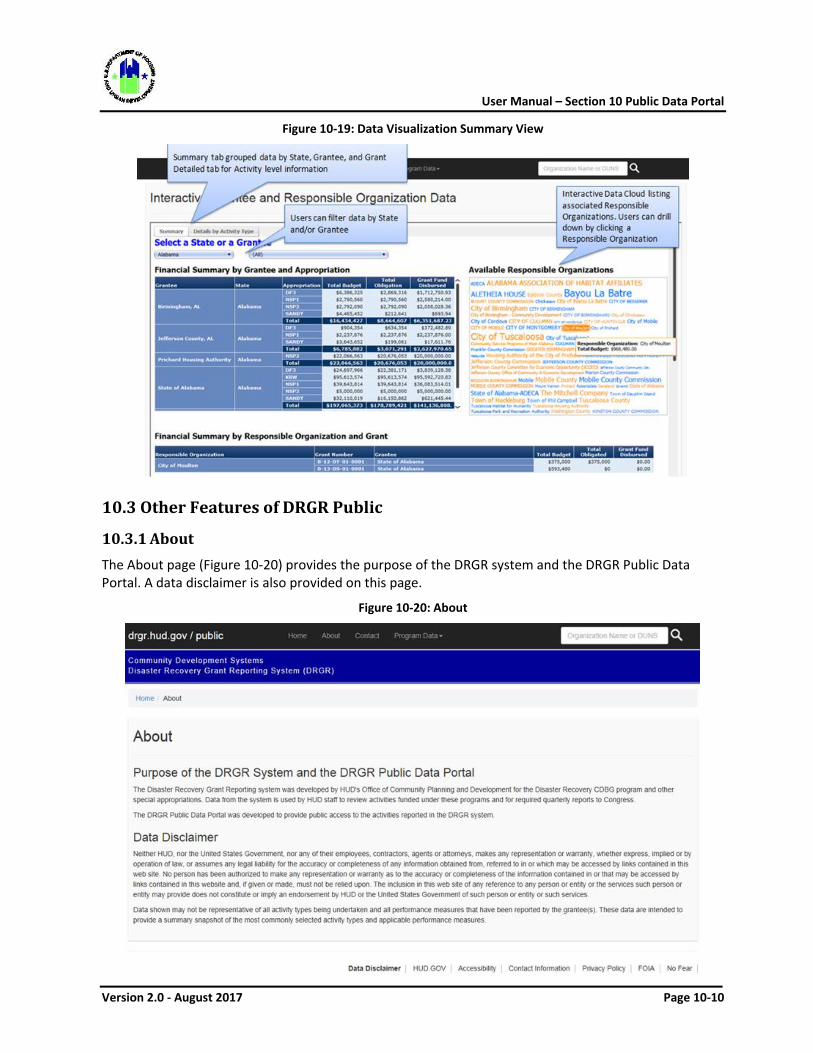
User Manual – Section 10 Public Data Portal
Version 2.0 - August 2017 Page 10-10
Figure 10-19: Data Visualization Summary View
10.3 Other Features of DRGR Public
10.3.1 About The About page (Figure 10-20) provides the purpose of the DRGR system and the DRGR Public Data Portal. A data disclaimer is also provided on this page.
Figure 10-20: About

User Manual – Section 10 Public Data Portal
Version 2.0 - August 2017 Page 10-11
10.3.2 Contact Us The Contact Us page describes how to contact the CPD DRGR group (Figure 10-21).
Figure 10-21: Contact Us
10.4 Report Management of DRGR Public
All of the features described above are part of DRGR Public. The following section describes the Super User’s ability to manage the reports placed on DRGR Public. This includes which reports are made available, and how often the data in the reports is updated on DRGR Public.
10.4.1 Manage DRGR Public from MicroStrategy Super Users have the ability to create and manage report subscriptions which are delivered and made available on the DRGR Public website. These functions are available in the MicroStrategy “Super User Reports” folder (located within “Standard Reports”) – see Figure 10-22: Super User Reports for DRGR Public below.
Figure 10-22: Super User Reports for DRGR Public
From the list of Reports, Super Users will use the “subscription” icon (highlighted above) to add a subscription for DRGR Public. Super Users will use the <Add file subscription> (Figure 10-23) link to access options for the subscription.
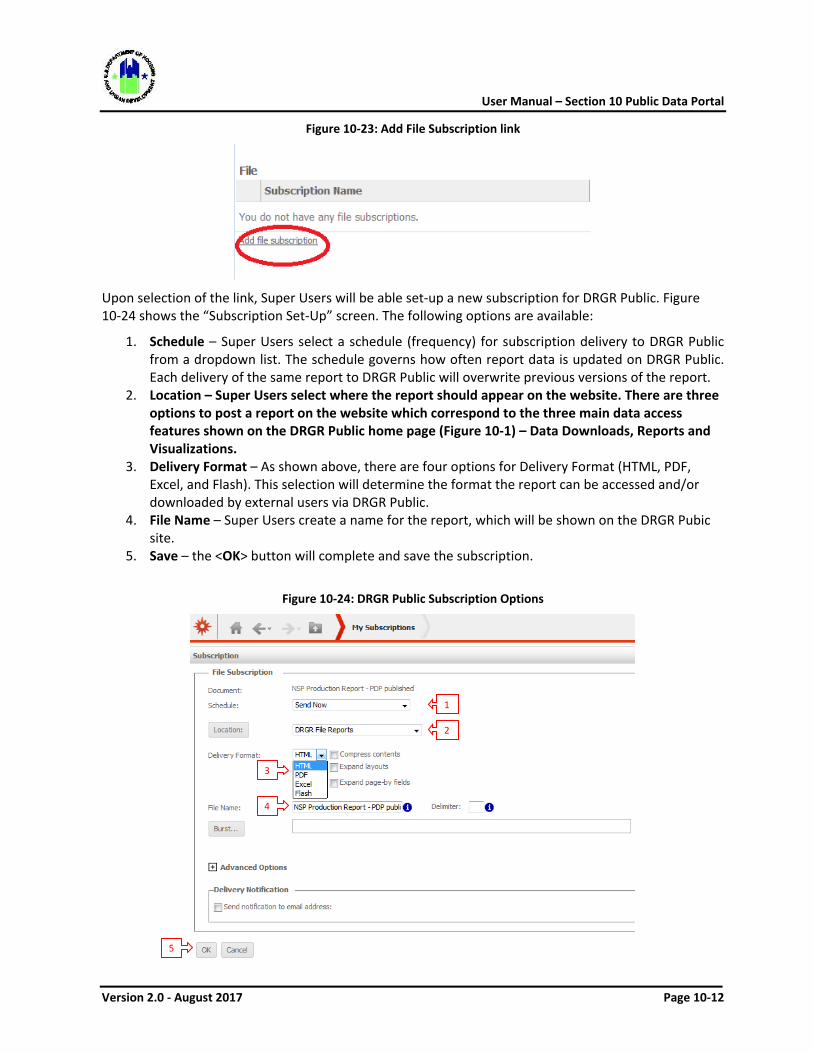
User Manual – Section 10 Public Data Portal
Version 2.0 - August 2017 Page 10-12
Figure 10-23: Add File Subscription link
Upon selection of the link, Super Users will be able set-up a new subscription for DRGR Public. Figure 10-24 shows the “Subscription Set-Up” screen. The following options are available:
1. Schedule – Super Users select a schedule (frequency) for subscription delivery to DRGR Public from a dropdown list. The schedule governs how often report data is updated on DRGR Public. Each delivery of the same report to DRGR Public will overwrite previous versions of the report.
2. Location – Super Users select where the report should appear on the website. There are three options to post a report on the website which correspond to the three main data access features shown on the DRGR Public home page (Figure 10-1) – Data Downloads, Reports and Visualizations.
3. Delivery Format – As shown above, there are four options for Delivery Format (HTML, PDF, Excel, and Flash). This selection will determine the format the report can be accessed and/or downloaded by external users via DRGR Public.
4. File Name – Super Users create a name for the report, which will be shown on the DRGR Pubic site.
5. Save – the <OK> button will complete and save the subscription.
Figure 10-24: DRGR Public Subscription Options
1
2
3
4
5
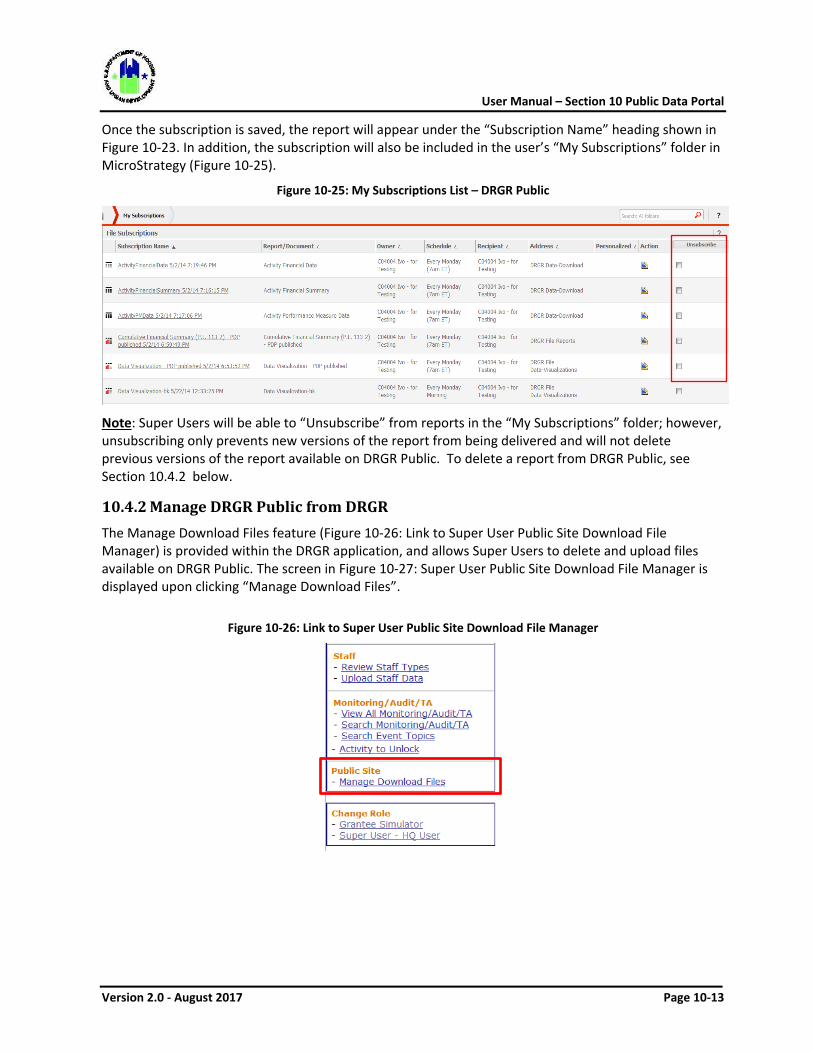
User Manual – Section 10 Public Data Portal
Version 2.0 - August 2017 Page 10-13
Once the subscription is saved, the report will appear under the “Subscription Name” heading shown in Figure 10-23. In addition, the subscription will also be included in the user’s “My Subscriptions” folder in MicroStrategy (Figure 10-25).
Figure 10-25: My Subscriptions List – DRGR Public
Note: Super Users will be able to “Unsubscribe” from reports in the “My Subscriptions” folder; however, unsubscribing only prevents new versions of the report from being delivered and will not delete previous versions of the report available on DRGR Public. To delete a report from DRGR Public, see Section 10.4.2 below.
10.4.2 Manage DRGR Public from DRGR The Manage Download Files feature (Figure 10-26: Link to Super User Public Site Download File Manager) is provided within the DRGR application, and allows Super Users to delete and upload files available on DRGR Public. The screen in Figure 10-27: Super User Public Site Download File Manager is displayed upon clicking “Manage Download Files”.
Figure 10-26: Link to Super User Public Site Download File Manager
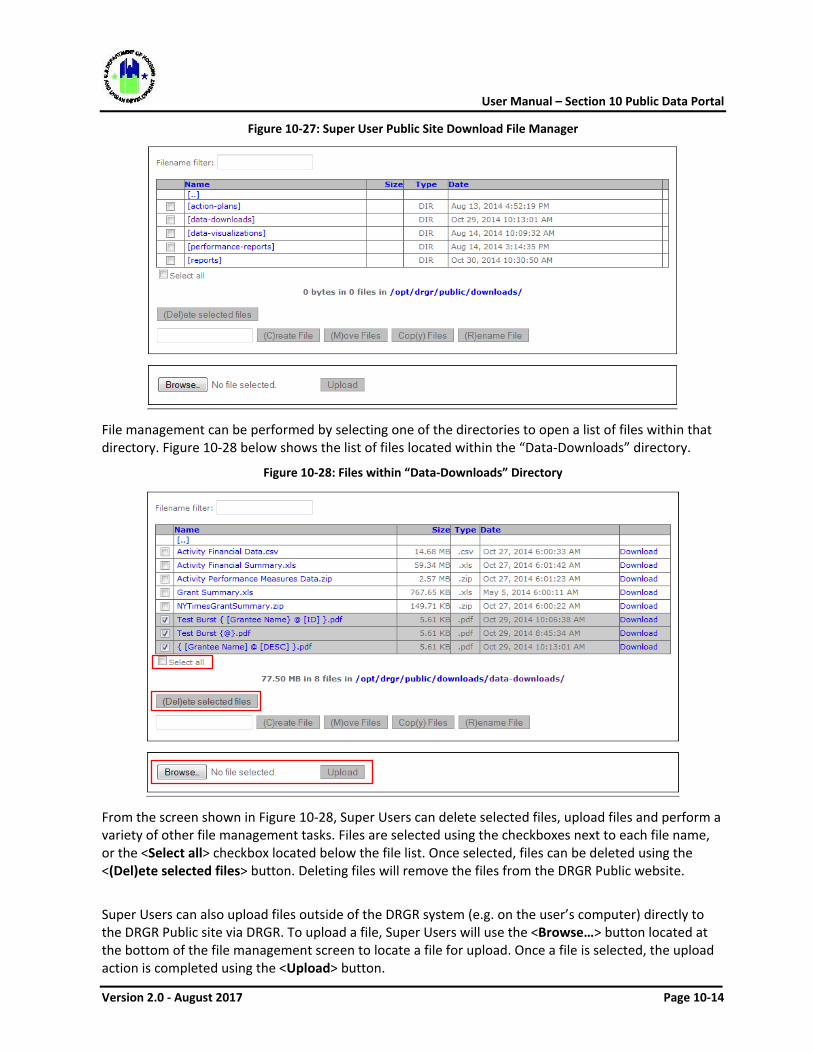
User Manual – Section 10 Public Data Portal
Version 2.0 - August 2017 Page 10-14
Figure 10-27: Super User Public Site Download File Manager
File management can be performed by selecting one of the directories to open a list of files within that directory. Figure 10-28 below shows the list of files located within the “Data-Downloads” directory.
Figure 10-28: Files within “Data-Downloads” Directory
From the screen shown in Figure 10-28, Super Users can delete selected files, upload files and perform a variety of other file management tasks. Files are selected using the checkboxes next to each file name, or the <Select all> checkbox located below the file list. Once selected, files can be deleted using the <(Del)ete selected files> button. Deleting files will remove the files from the DRGR Public website.
Super Users can also upload files outside of the DRGR system (e.g. on the user’s computer) directly to the DRGR Public site via DRGR. To upload a file, Super Users will use the <Browse…> button located at the bottom of the file management screen to locate a file for upload. Once a file is selected, the upload action is completed using the <Upload> button.
Related Documents


![HUD-FPI-MAY2013.PDF [ HUD-FPI-MAY2013.PDF ]](https://static.cupdf.com/doc/110x72/588c64bd1a28abf9208b7388/hud-fpi-may2013pdf-hud-fpi-may2013pdf-.jpg)