DRAFT 2.1 Mapping Eelgrass using the Garmin 12XL GPS: A Manual for the West Coast of British Columbia Prepared by Geostreams Consulting for Brad Mason Department of Fisheries and Oceans Canada May 31 st , 2004

Welcome message from author
This document is posted to help you gain knowledge. Please leave a comment to let me know what you think about it! Share it to your friends and learn new things together.
Transcript

DRAFT 2.1Mapping Eelgrass using the Garmin 12XL GPS:
A Manual for the West Coast of British Columbia
Preparedby
Geostreams Consulting
for
Brad MasonDepartment of Fisheries and Oceans Canada
May 31st, 2004
i
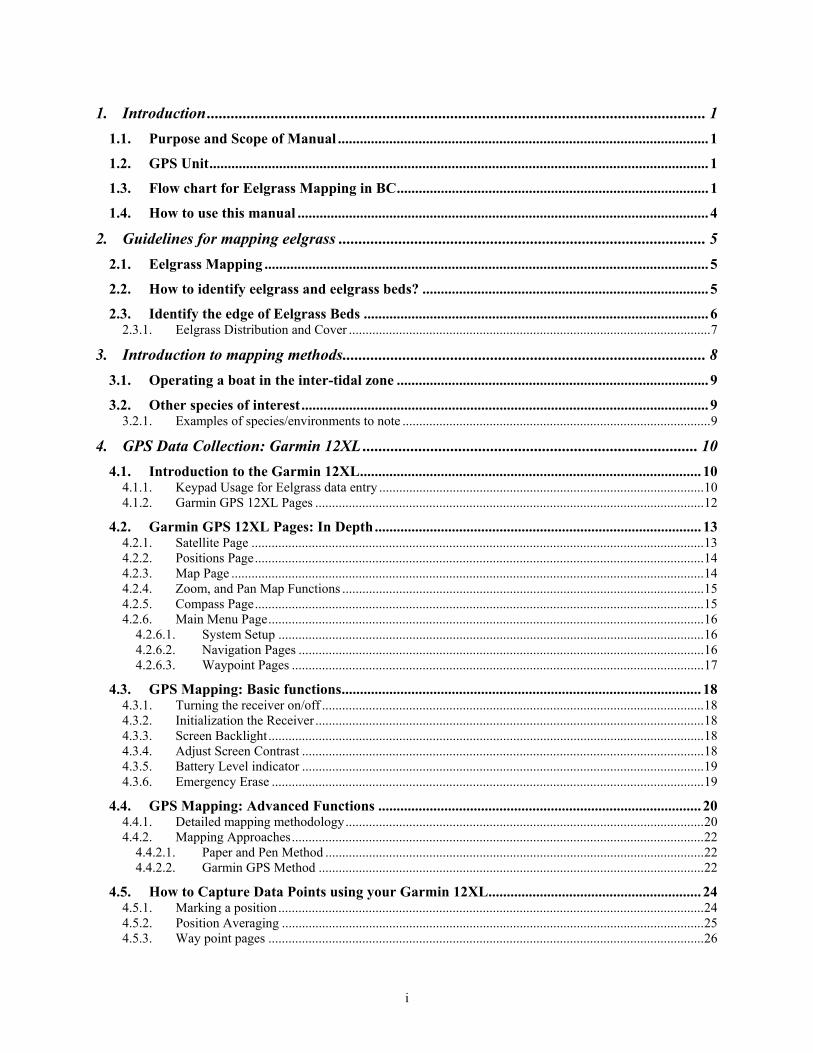
1. Introduction............................................................................................................................. 11.1. Purpose and Scope of Manual ..................................................................................................... 1
1.2. GPS Unit........................................................................................................................................ 1
1.3. Flow chart for Eelgrass Mapping in BC..................................................................................... 1
1.4. How to use this manual ................................................................................................................ 4
2. Guidelines for mapping eelgrass ............................................................................................ 52.1. Eelgrass Mapping ......................................................................................................................... 5
2.2. How to identify eelgrass and eelgrass beds? .............................................................................. 5
2.3. Identify the edge of Eelgrass Beds .............................................................................................. 62.3.1. Eelgrass Distribution and Cover ............................................................................................................7
3. Introduction to mapping methods........................................................................................... 83.1. Operating a boat in the inter-tidal zone ..................................................................................... 9
3.2. Other species of interest............................................................................................................... 93.2.1. Examples of species/environments to note ............................................................................................9
4. GPS Data Collection: Garmin 12XL .................................................................................... 104.1. Introduction to the Garmin 12XL............................................................................................. 10
4.1.1. Keypad Usage for Eelgrass data entry .................................................................................................104.1.2. Garmin GPS 12XL Pages ....................................................................................................................12
4.2. Garmin GPS 12XL Pages: In Depth......................................................................................... 134.2.1. Satellite Page .......................................................................................................................................134.2.2. Positions Page......................................................................................................................................144.2.3. Map Page .............................................................................................................................................144.2.4. Zoom, and Pan Map Functions ............................................................................................................154.2.5. Compass Page......................................................................................................................................154.2.6. Main Menu Page..................................................................................................................................16
4.2.6.1. System Setup ...............................................................................................................................164.2.6.2. Navigation Pages .........................................................................................................................164.2.6.3. Waypoint Pages ...........................................................................................................................17
4.3. GPS Mapping: Basic functions.................................................................................................. 184.3.1. Turning the receiver on/off ..................................................................................................................184.3.2. Initialization the Receiver ....................................................................................................................184.3.3. Screen Backlight ..................................................................................................................................184.3.4. Adjust Screen Contrast ........................................................................................................................184.3.5. Battery Level indicator ........................................................................................................................194.3.6. Emergency Erase .................................................................................................................................19
4.4. GPS Mapping: Advanced Functions ........................................................................................ 204.4.1. Detailed mapping methodology...........................................................................................................204.4.2. Mapping Approaches...........................................................................................................................22
4.4.2.1. Paper and Pen Method .................................................................................................................224.4.2.2. Garmin GPS Method ...................................................................................................................22
4.5. How to Capture Data Points using your Garmin 12XL.......................................................... 244.5.1. Marking a position...............................................................................................................................244.5.2. Position Averaging ..............................................................................................................................254.5.3. Way point pages ..................................................................................................................................26
ii
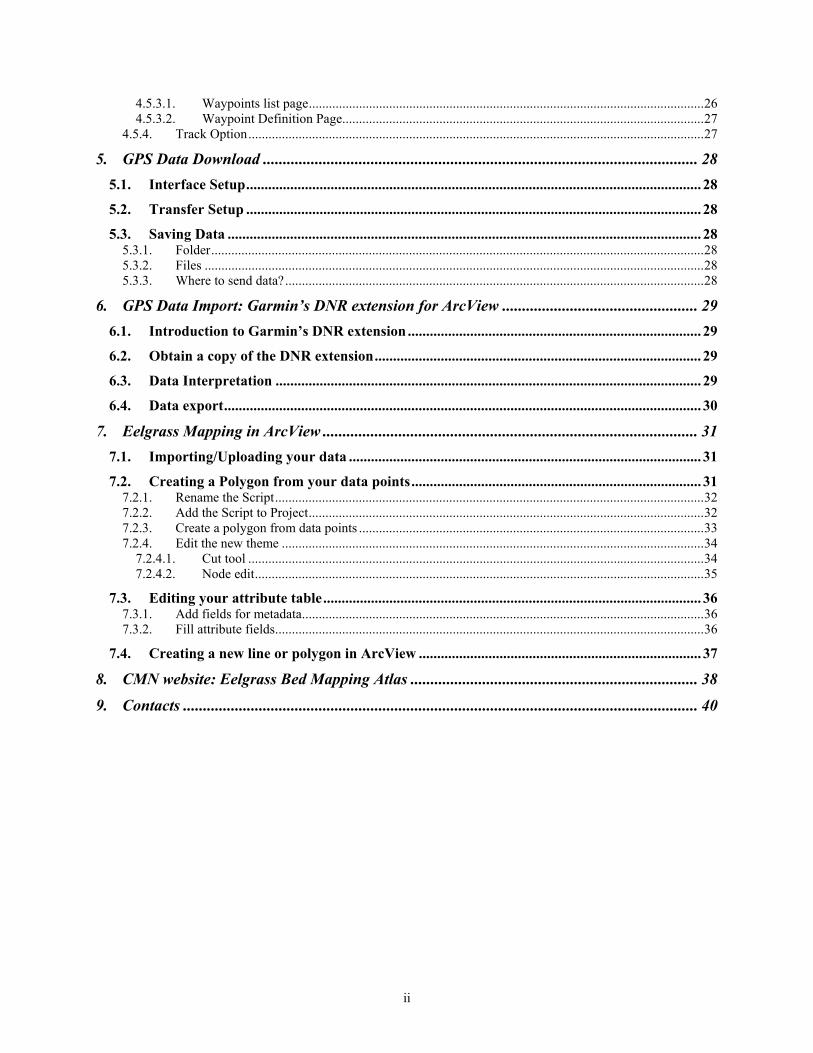
4.5.3.1. Waypoints list page......................................................................................................................264.5.3.2. Waypoint Definition Page............................................................................................................27
4.5.4. Track Option........................................................................................................................................27
5. GPS Data Download ............................................................................................................. 285.1. Interface Setup............................................................................................................................ 28
5.2. Transfer Setup ............................................................................................................................ 28
5.3. Saving Data ................................................................................................................................. 285.3.1. Folder...................................................................................................................................................285.3.2. Files .....................................................................................................................................................285.3.3. Where to send data?.............................................................................................................................28
6. GPS Data Import: Garmin’s DNR extension for ArcView ................................................. 296.1. Introduction to Garmin’s DNR extension ................................................................................ 29
6.2. Obtain a copy of the DNR extension......................................................................................... 29
6.3. Data Interpretation .................................................................................................................... 29
6.4. Data export.................................................................................................................................. 30
7. Eelgrass Mapping in ArcView .............................................................................................. 317.1. Importing/Uploading your data ................................................................................................ 31
7.2. Creating a Polygon from your data points............................................................................... 317.2.1. Rename the Script................................................................................................................................327.2.2. Add the Script to Project......................................................................................................................327.2.3. Create a polygon from data points .......................................................................................................337.2.4. Edit the new theme ..............................................................................................................................34
7.2.4.1. Cut tool ........................................................................................................................................347.2.4.2. Node edit......................................................................................................................................35
7.3. Editing your attribute table....................................................................................................... 367.3.1. Add fields for metadata........................................................................................................................367.3.2. Fill attribute fields................................................................................................................................36
7.4. Creating a new line or polygon in ArcView ............................................................................. 37
8. CMN website: Eelgrass Bed Mapping Atlas ........................................................................ 38
9. Contacts ................................................................................................................................. 40
1
1. Introduction
1.1. Purpose and Scope of ManualThis manual has been written to supplement the handbook “Methods for Mapping andMonitoring Eelgrass Habitat in British Columbia” (Precision Identification, 2002), a guide tofield-based methodology for mapping and monitoring eelgrass in BC. This supplement presentsinformation and tools for using Global Position Systems (GPS) to map eelgrass. These tools areintended for use by stewardship groups, communities, and volunteers to capture information oneelgrass beds along the BC coast.
The data collection method proposed in this manual utilizesa Garmin brand of GPS to capture eelgrass bed locations,and ESRI’s ArcView Geographic Information System (GIS)software with Minnesota’s Department of Natural Resources(DNR) Garmin extension to import, review, compile, updateand export both spatial data and metadata. There are othercompatible hardware and software systems that can be usedto capture eelgrass bed locations and to review and updatethe data collected in the field. However, it is not theintention of this manual to endorse one system over another.Additionally, the methods proposed in this manual do notmeet BC Provincial standards for data capture using GPS.However, this method will allow for initial identification of eelgrass bed locations until moresophisticated mapping techniques and/or funding for such undertakings becomes available.
1.2. GPS UnitThe manual contains an overview of data capture using the Garmin 12XL GPS unit. The Garmin12XL unit is applied as an example of how a user can capture eelgrass data. The Garmin isemployed in this manual because of its low-cost and ease of use, which enables stewardship andcommunity groups to more easily access the GPS unit for field-base data capture. Other GPSunits will perform similar tasks, however the scope of this manual does not encompass examplesof other such units.
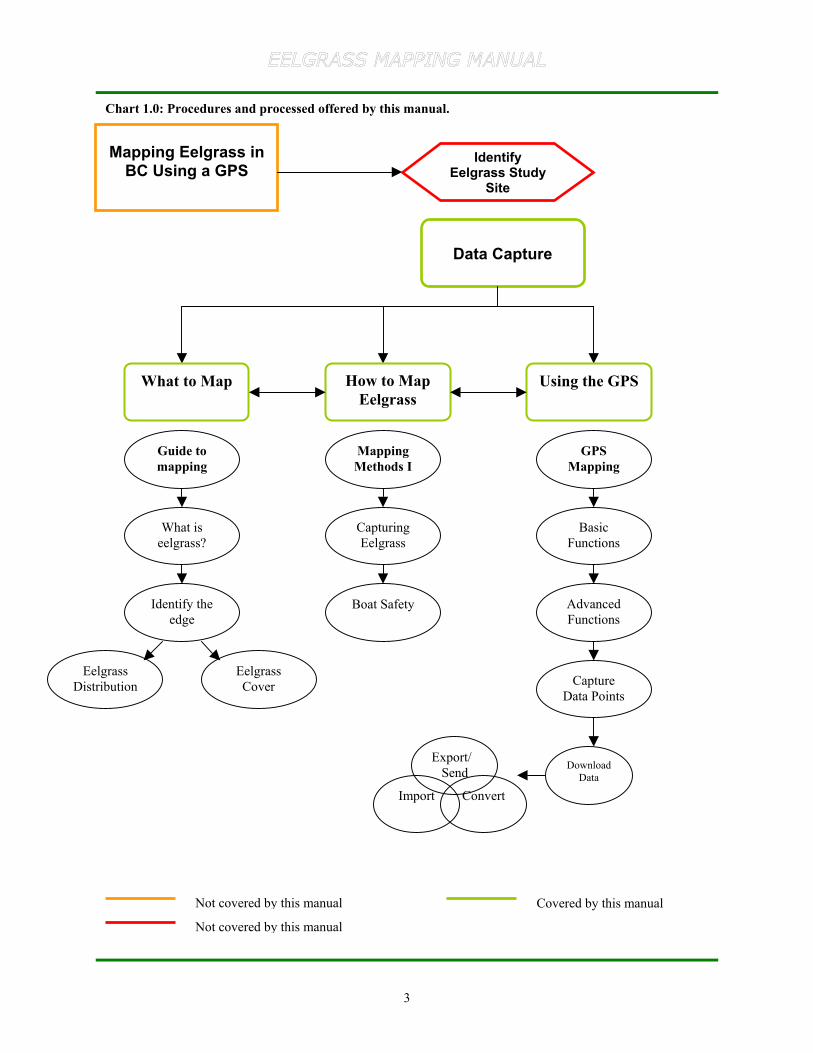
1.3. Flow chart for Eelgrass Mapping in BCThis manual has been designed to meet the needs of users who are not familiar with GPSmapping applications. Stewardship groups, non-profit and volunteer groups are the target usersfor whom this manual has been designed. However, government and contractors working in thisarea could also utilize this manual if so desired.
The flow model (Figure 1.0) outlines the approach we suggest for mapping eelgrass beds usingGPS. This basic outline will enable each user to apply the procedures laid out in this manualmore effectively. Please refer to this flow chart when you are mapping to ensure that each stephas been considered and that the proper planning and knowledge base is in place before youbegin your fieldwork.
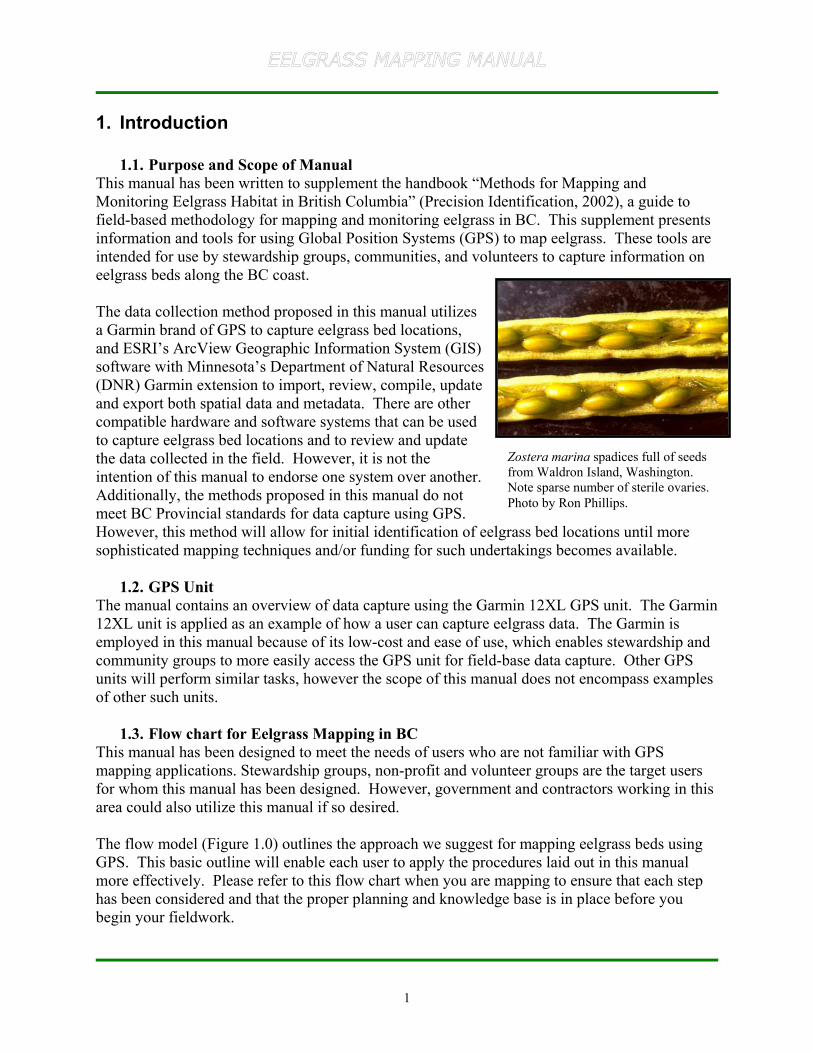
Zostera marina spadices full of seedsfrom Waldron Island, Washington.Note sparse number of sterile ovaries.Photo by Ron Phillips.
2
The flow chart outlines the initial stages of project development (orange box), includingreference to the Methods for Mapping and Monitoring Eelgrass Habitat in British Columbia(Precision Identification, 2002), and identification of a field study site where an initial eelgrasssurvey has already been undertaken. This manual does not go into the processes or proceduresrequired for identifying eelgrass bed locations along the BC Coast (red box). The techniques andapproach used to initially identify eelgrass beds are outlined in detail in the Methods forMapping and Monitoring Eelgrass Habitat in British Columbia (Precision Identification, 2002).This manual only describes the procedures to take after the initial site survey and identificationof eelgrass beds has been made. If you are interested in undertaking mapping methods asdescribed in this manual, but do not know of any eelgrass bed locations in your community orregion, please refer to the contact information located at the back of this manual. These peoplewill be able to assist you to find information on initial site survey and eelgrass bed locations inyour area. Additionally, this manual assumes that you have a general idea of where the eelgrassbeds are located in your area. It is recommended that a certified boat operator and fieldtechnician(s) are familiar with the area and tides and the general location of the eelgrass beds youare planning to map. Once you are familiar with the general location of the eelgrass bed in yourarea, you can begin to apply the tools and techniques offered by this manual.
This manual contains three main sections that outline what type of eelgrass beds to map, how tomap eelgrass beds, and specifics on how to use the GPS to map your targeted eelgrass sites. In‘What to Map’, data collection in the intertidal and nearshore environment is introduced. In thissection, we ask and answer the question “What is eelgrass?”. We determine how to find the edgeof an eelgrass bed, and discuss eelgrass distribution and cover types, and eelgrass density. Thereare many pictures that will guide you through this section of the manual. In the next section, wediscuss ‘How to Map Eelgrass’. This section introduces mapping methods. We explain thebasics of how to go about capturing information on the location of an eelgrass bed. We alsodiscuss boat safety and maneuvering around eelgrass beds. Finally, we briefly talk about otherspecies of interest that you may want to map.
In ‘Using the GPS’, we are introduced to GPS mapping using a Garmin 12XL GPS unit. Wereview the basic operational functions of the Garmin 12XL, including the main tools that youwill use to capture eelgrass location, bed shape and size, and other information. We then go intomore depth on these functions. We talk specifically about how to map eelgrass beds using theGPS. We present three different ways that you could use to capture an eelgrass bed. Then, weshow you how to capture data points using the Garmin 12XL GPS unit. We talk aboutdownloading the data you have captured, importing it into ArcView GIS using the DNR Garminextension, converting your points to polygons, and then exporting or sending the data out to webservers or eelgrass project stewards/data managers. We review an alternative way to convertyour data to polygons and submit it using the Community Mapping Network (www.cmnbc.ca)web site tools.
We hope that this manual will be an effective tool to assist you with your GPS survey. Shouldyou have any questions, please direct these concerns to the people listed at the back of thismanual in the Contacts section. They will be able to assist you with any of your issues and helpyou to undertake a safe and successful GPS mapping survey.
3
Guide tomapping
MappingMethods I
GPSMapping
What iseelgrass?
CapturingEelgrass
BasicFunctions
Boat SafetyIdentify theedge
Mapping Eelgrass inBC Using a GPS
Data Capture
What to Map How to MapEelgrass
Using the GPS
IdentifyEelgrass Study
Site
EelgrassDistribution
EelgrassCover
AdvancedFunctions
CaptureData Points
Import Convert
Export/Send
Not covered by this manual
Not covered by this manual
Covered by this manual
Chart 1.0: Procedures and processed offered by this manual.
DownloadData
4
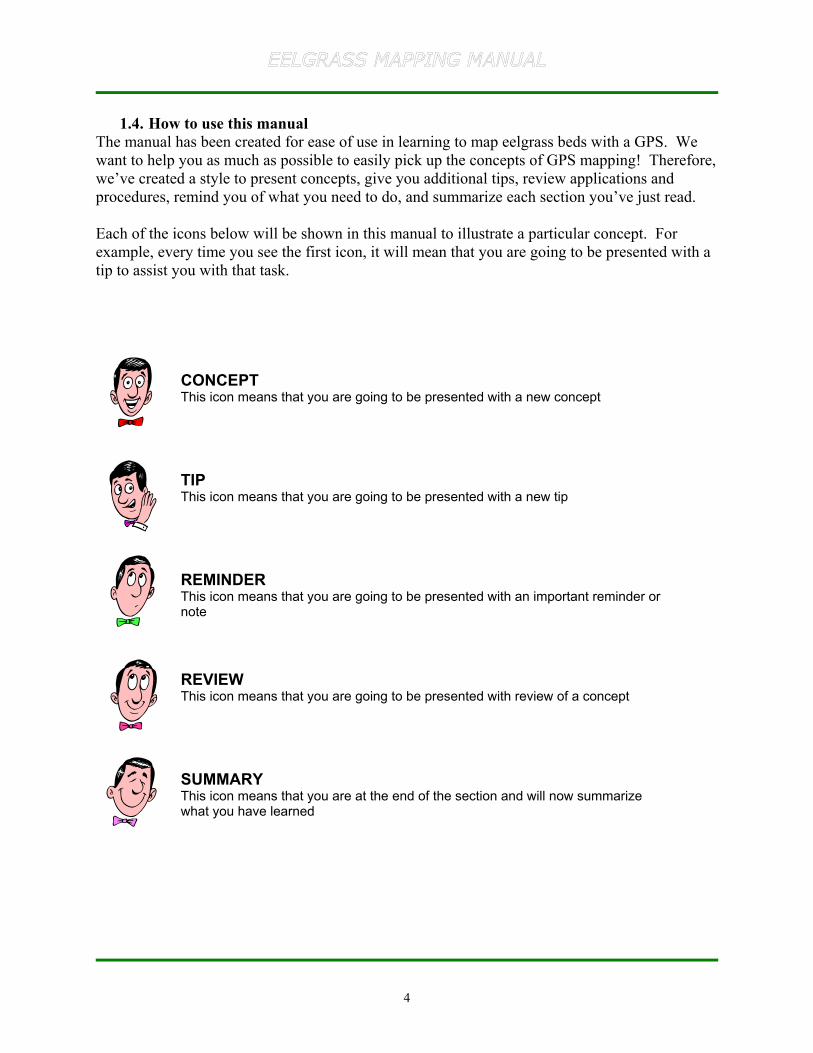
1.4. How to use this manualThe manual has been created for ease of use in learning to map eelgrass beds with a GPS. Wewant to help you as much as possible to easily pick up the concepts of GPS mapping! Therefore,we’ve created a style to present concepts, give you additional tips, review applications andprocedures, remind you of what you need to do, and summarize each section you’ve just read.
Each of the icons below will be shown in this manual to illustrate a particular concept. Forexample, every time you see the first icon, it will mean that you are going to be presented with atip to assist you with that task.
CONCEPTThis icon means that you are going to be presented with a new concept
TIPThis icon means that you are going to be presented with a new tip
REMINDERThis icon means that you are going to be presented with an important reminder ornote
REVIEWThis icon means that you are going to be presented with review of a concept
SUMMARYThis icon means that you are at the end of the section and will now summarizewhat you have learned
5
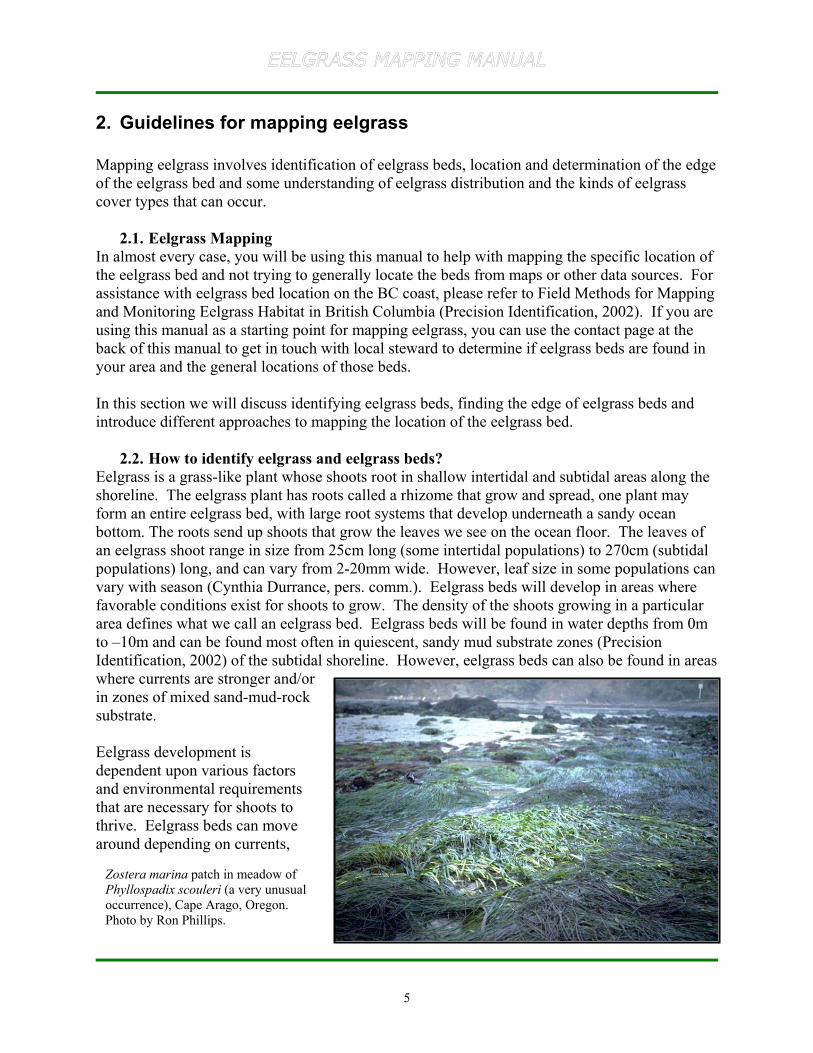
Zostera marina patch in meadow ofPhyllospadix scouleri (a very unusualoccurrence), Cape Arago, Oregon.Photo by Ron Phillips.
2. Guidelines for mapping eelgrass
Mapping eelgrass involves identification of eelgrass beds, location and determination of the edgeof the eelgrass bed and some understanding of eelgrass distribution and the kinds of eelgrasscover types that can occur.
2.1. Eelgrass MappingIn almost every case, you will be using this manual to help with mapping the specific location ofthe eelgrass bed and not trying to generally locate the beds from maps or other data sources. Forassistance with eelgrass bed location on the BC coast, please refer to Field Methods for Mappingand Monitoring Eelgrass Habitat in British Columbia (Precision Identification, 2002). If you areusing this manual as a starting point for mapping eelgrass, you can use the contact page at theback of this manual to get in touch with local steward to determine if eelgrass beds are found inyour area and the general locations of those beds.
In this section we will discuss identifying eelgrass beds, finding the edge of eelgrass beds andintroduce different approaches to mapping the location of the eelgrass bed.
2.2. How to identify eelgrass and eelgrass beds?Eelgrass is a grass-like plant whose shoots root in shallow intertidal and subtidal areas along theshoreline. The eelgrass plant has roots called a rhizome that grow and spread, one plant mayform an entire eelgrass bed, with large root systems that develop underneath a sandy oceanbottom. The roots send up shoots that grow the leaves we see on the ocean floor. The leaves ofan eelgrass shoot range in size from 25cm long (some intertidal populations) to 270cm (subtidalpopulations) long, and can vary from 2-20mm wide. However, leaf size in some populations canvary with season (Cynthia Durrance, pers. comm.). Eelgrass beds will develop in areas wherefavorable conditions exist for shoots to grow. The density of the shoots growing in a particulararea defines what we call an eelgrass bed. Eelgrass beds will be found in water depths from 0mto –10m and can be found most often in quiescent, sandy mud substrate zones (PrecisionIdentification, 2002) of the subtidal shoreline. However, eelgrass beds can also be found in areaswhere currents are stronger and/orin zones of mixed sand-mud-rocksubstrate.
Eelgrass development isdependent upon various factorsand environmental requirementsthat are necessary for shoots tothrive. Eelgrass beds can movearound depending on currents,
6
shifting sands or substrate/bed movement, and storms. Other reasons for eelgrass bed migrationand/or expansion and contraction may be environmental or related to human impacts. During asurvey, the eelgrass beds should not move greatly. However, if a large storm moves through thearea during your survey, you may see some disruption in the eelgrass bed.
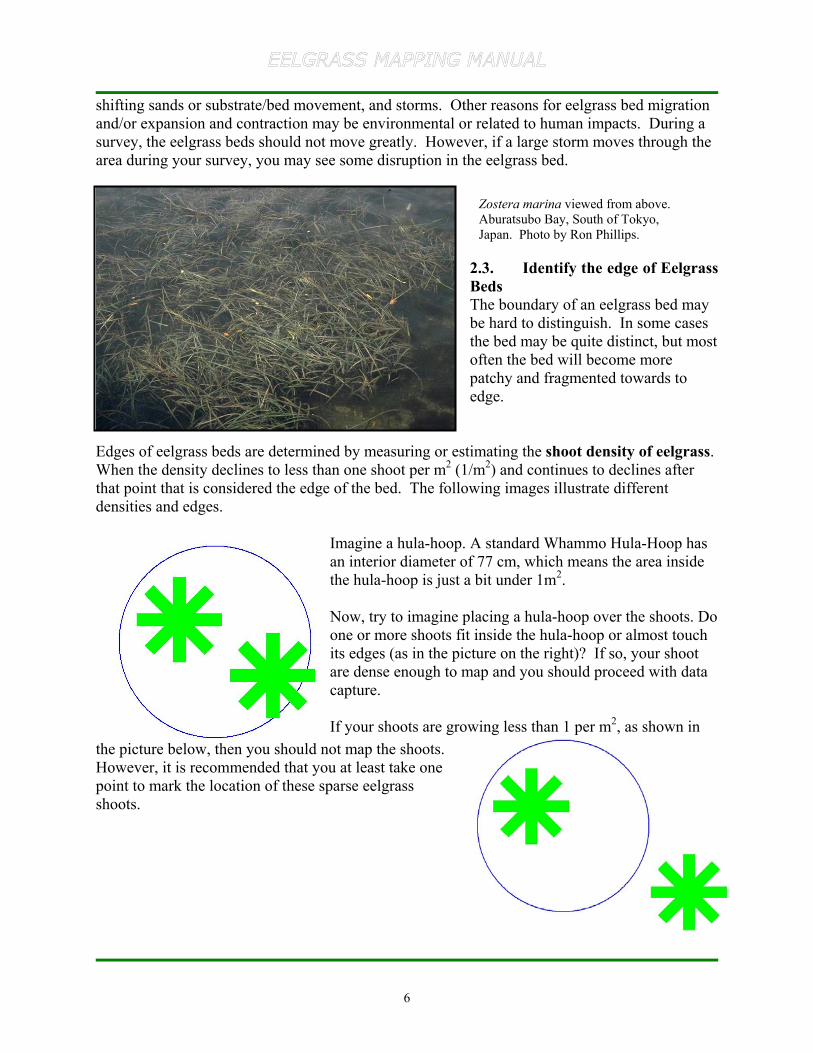
2.3. Identify the edge of EelgrassBedsThe boundary of an eelgrass bed maybe hard to distinguish. In some casesthe bed may be quite distinct, but mostoften the bed will become morepatchy and fragmented towards toedge.
Edges of eelgrass beds are determined by measuring or estimating the shoot density of eelgrass.When the density declines to less than one shoot per m2 (1/m2) and continues to declines afterthat point that is considered the edge of the bed. The following images illustrate differentdensities and edges.
Imagine a hula-hoop. A standard Whammo Hula-Hoop hasan interior diameter of 77 cm, which means the area insidethe hula-hoop is just a bit under 1m2.
Now, try to imagine placing a hula-hoop over the shoots. Doone or more shoots fit inside the hula-hoop or almost touchits edges (as in the picture on the right)? If so, your shootare dense enough to map and you should proceed with datacapture.
If your shoots are growing less than 1 per m2, as shown inthe picture below, then you should not map the shoots.However, it is recommended that you at least take onepoint to mark the location of these sparse eelgrassshoots.
Zostera marina viewed from above.Aburatsubo Bay, South of Tokyo,Japan. Photo by Ron Phillips.
7
Continuous Eelgrass Bed
Continuous Eelgrass Bed with Bare Areas
Patchy Eelgrass Bed
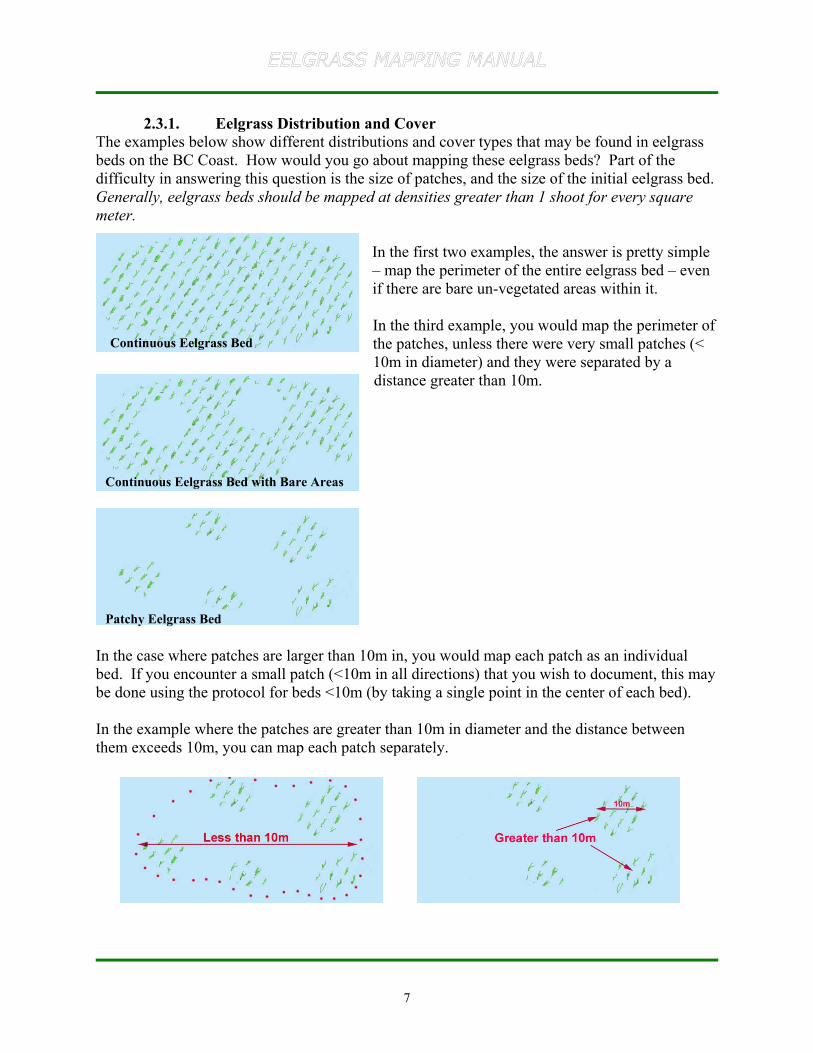
2.3.1. Eelgrass Distribution and CoverThe examples below show different distributions and cover types that may be found in eelgrassbeds on the BC Coast. How would you go about mapping these eelgrass beds? Part of thedifficulty in answering this question is the size of patches, and the size of the initial eelgrass bed.Generally, eelgrass beds should be mapped at densities greater than 1 shoot for every squaremeter.
In the first two examples, the answer is pretty simple– map the perimeter of the entire eelgrass bed – evenif there are bare un-vegetated areas within it.
In the third example, you would map the perimeter ofthe patches, unless there were very small patches (<10m in diameter) and they were separated by adistance greater than 10m.
In the case where patches are larger than 10m in, you would map each patch as an individualbed. If you encounter a small patch (<10m in all directions) that you wish to document, this maybe done using the protocol for beds <10m (by taking a single point in the center of each bed).
In the example where the patches are greater than 10m in diameter and the distance betweenthem exceeds 10m, you can map each patch separately.
8
3. Introduction to mapping methods
There are several ways to capture the location of an eelgrass bed. One of the most importantfactors is determining the edge of an eelgrass bed. We discussed how to determine the edge ofthe eelgrass bed in Section 2.3 of the manual. All mapping methods introduced here involveusing a Global Position System (GPS) to capture the specific location of the eelgrass bed.
The first and most basic method of capturing an eelgrass location is to capture a single point inthe center of an eelgrass bed. This method only applies when the bed measures less than 10 m inall directions. When only one point is recorded you must use a metre tape to measure the lengthand width of the bed. The length is the distance along shore, or parallel to the shore. The widthis the distance perpendicular to the shore.
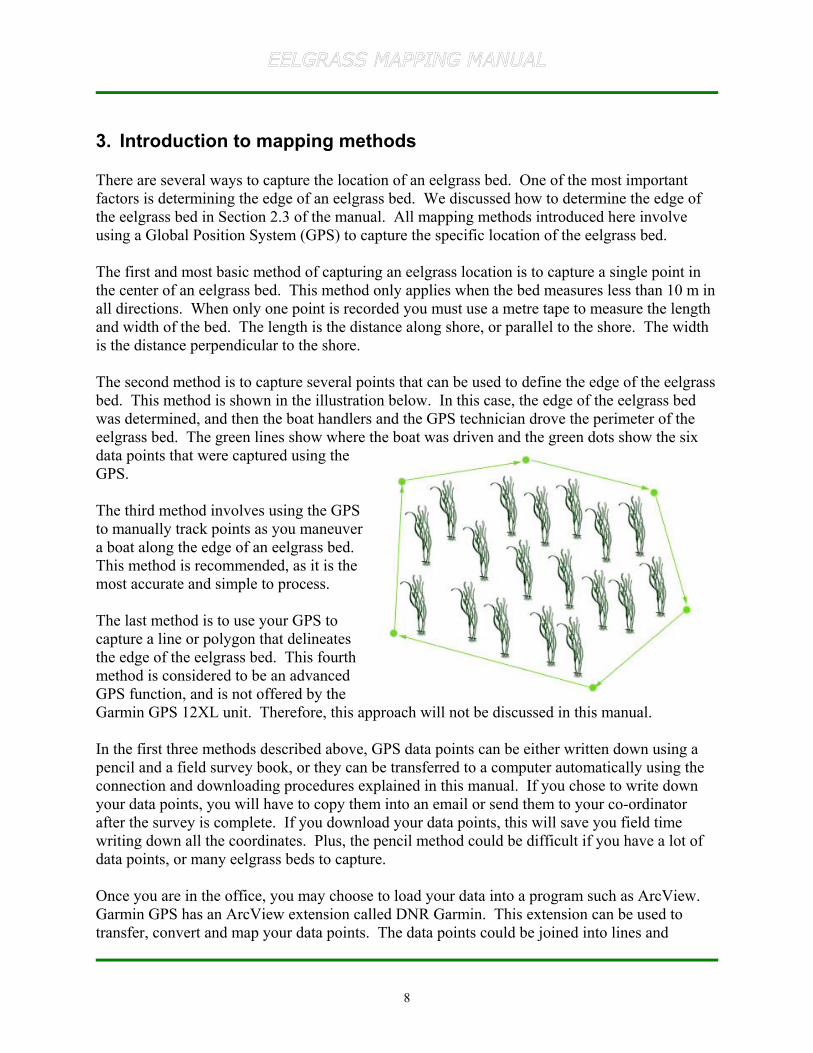
The second method is to capture several points that can be used to define the edge of the eelgrassbed. This method is shown in the illustration below. In this case, the edge of the eelgrass bedwas determined, and then the boat handlers and the GPS technician drove the perimeter of theeelgrass bed. The green lines show where the boat was driven and the green dots show the sixdata points that were captured using theGPS.
The third method involves using the GPSto manually track points as you maneuvera boat along the edge of an eelgrass bed.This method is recommended, as it is themost accurate and simple to process.
The last method is to use your GPS tocapture a line or polygon that delineatesthe edge of the eelgrass bed. This fourthmethod is considered to be an advancedGPS function, and is not offered by theGarmin GPS 12XL unit. Therefore, this approach will not be discussed in this manual.
In the first three methods described above, GPS data points can be either written down using apencil and a field survey book, or they can be transferred to a computer automatically using theconnection and downloading procedures explained in this manual. If you chose to write downyour data points, you will have to copy them into an email or send them to your co-ordinatorafter the survey is complete. If you download your data points, this will save you field timewriting down all the coordinates. Plus, the pencil method could be difficult if you have a lot ofdata points, or many eelgrass beds to capture.
Once you are in the office, you may choose to load your data into a program such as ArcView.Garmin GPS has an ArcView extension called DNR Garmin. This extension can be used totransfer, convert and map your data points. The data points could be joined into lines and
9
converted to polygons. Then these polygons could be sent as ArcView shape files to yourproject co-ordinator.
Which method is right for you? The method you use will depend on your survey needs and thetime (and energy) you have to devote to your survey.
3.1. Operating a boat in the inter-tidal zoneThis manual has not been designed to address safety issues when operating boats in the openocean/shoreline areas. Please refer to the Office of Boating Safety within the CanadianCoastguard (www.ccg-gcc.gc.ca/obs-bsn/main_e.htm) for more information on boat safety andboat operation requirements, including licensing. Do not undertake a survey without the propertraining in small craft operation and the appropriate equipment to ensure your safety and thesafety of all those assisting in the survey. Care and attention should be taken with regards tohuman safety above and beyond all else mentioned in this manual. You should use commonsense when examining the shoots to determine shoot characteristics, environmental monitoringand/or shoot density and any other tasks that require movement around the boat. Wear alifejacket at all times while in the boat and do not take it off for any reason, especially not toaccommodate any issues that may arise in conjunction with performing the tasks outlined in thismanual.
In general, care should be taken when working in and around eelgrass beds. The eelgrass shootsand beds are very sensitive and can be easily pulled up from its rooting position in the sand.Therefore, when operating a boat at low tide, avoid snagging eelgrass shoots on the prop anduprooting shoots as you drive in and around the eelgrass beds. Enroute or during your eelgrasssurvey, you may encounter sensitive areas and/or species that you should pay careful attentionnot to disturb or harm.
3.2. Other species of interestSingle points can be taken at specific features or important places to note near or within thesurvey area. Perhaps you may see a unique species of interest that you want to record for thedatabase – you could take a single point here. Or perhaps you want to record useful benchmarksor land-based features to assist future mapping surveyors find their way back to the eelgrass bed.Capturing the location of submerged rocks could help keep future surveyors or GPS mappingtechnicians safe while navigating around eelgrass beds!
3.2.1. Examples of species/environments to note
Species/Environments Who to ContactRocks/submerged features Note these features in your survey report so repeat surveyors
are warned of hazards in the field!Benchmarks, such as alighthouse, or buoy marker
Benchmarks can be valuable markers for other surveyors (oryou). Note the location of lighthouses, or buoys in relation tothe eelgrass bed for future field surveys.
Rare Species Contact DFO to report rare or endangered species found inthe field.
10
4. GPS Data Collection: Garmin 12XL
We are ready to start talking about GPS data collection! In this manual, we will use the Garmin12XL GPS system as an example of how to collect GPS data points to define and delineateeelgrass beds. This system has been shown to work well for eelgrass bed mapping (PrecisionIdentification, 2002). If you have other GPS systems that you use, and these have worked wellfor you in the past, please continue with these procedures. This mapping manual is designed forfirst-time users of both GPS systems, and the Garmin GPS 12XL system, in particular.
4.1. Introduction to the Garmin 12XLYour Garmin 12XL has many different functions available for your use. This section brieflyintroduces the Garmin 12XL unit and its basic functionality.
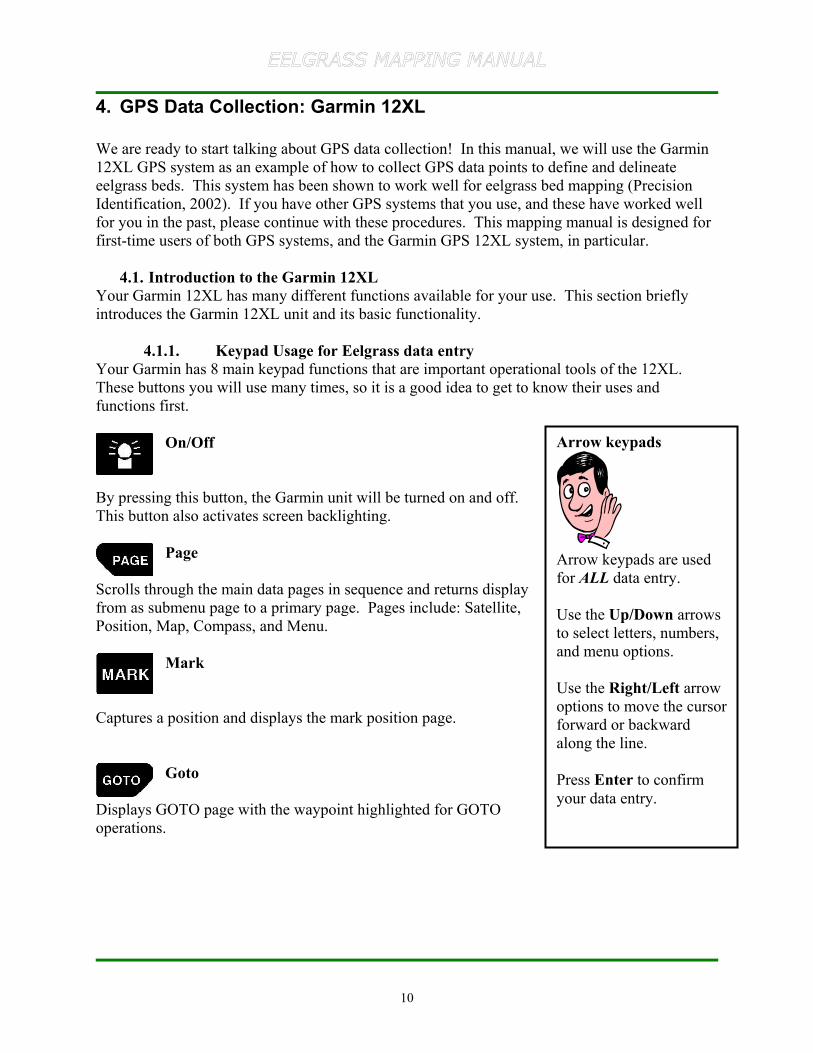
4.1.1. Keypad Usage for Eelgrass data entryYour Garmin has 8 main keypad functions that are important operational tools of the 12XL.These buttons you will use many times, so it is a good idea to get to know their uses andfunctions first.
On/Off
By pressing this button, the Garmin unit will be turned on and off.This button also activates screen backlighting.
Page
Scrolls through the main data pages in sequence and returns displayfrom as submenu page to a primary page. Pages include: Satellite,Position, Map, Compass, and Menu.
Mark
Captures a position and displays the mark position page.
Goto
Displays GOTO page with the waypoint highlighted for GOTOoperations.
Arrow keypads
Arrow keypads are usedfor ALL data entry.
Use the Up/Down arrowsto select letters, numbers,and menu options.
Use the Right/Left arrowoptions to move the cursorforward or backwardalong the line.
Press Enter to confirmyour data entry.

11
Enter
Confirms data entry. Allows data entry by activating highlighted fields.
Quit
Returns display to a previous page, or restores a data field’s previous value.
Up/Down Arrows
Selects alphanumerical (A, B, C, D, etc.) characters and menu choices. Moves the fieldhighlighter from field to field.
Left/Right Arrows
Moves the selected character field. Moves the field highlighter from field to field.
Zostera marina, new intertidal vegetative growth, Izembek Lagoon, Alaska. Photo byRon Phillips.
12
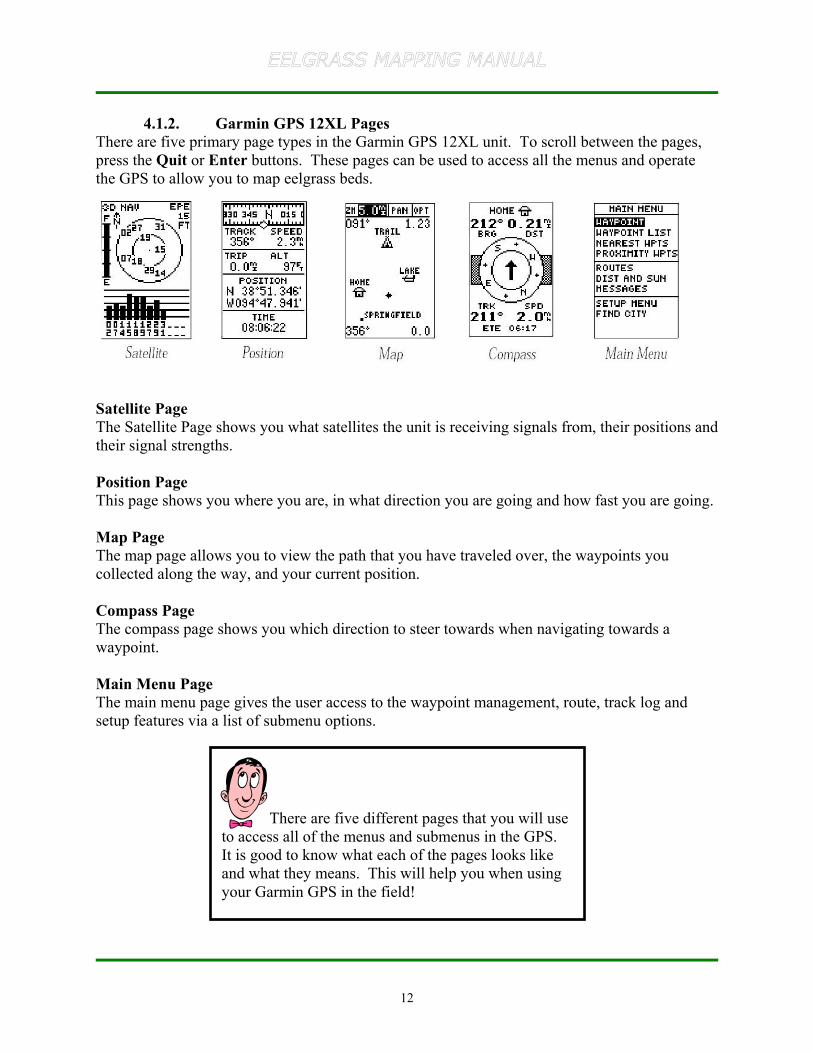
4.1.2. Garmin GPS 12XL PagesThere are five primary page types in the Garmin GPS 12XL unit. To scroll between the pages,press the Quit or Enter buttons. These pages can be used to access all the menus and operatethe GPS to allow you to map eelgrass beds.
Satellite PageThe Satellite Page shows you what satellites the unit is receiving signals from, their positions andtheir signal strengths.
Position PageThis page shows you where you are, in what direction you are going and how fast you are going.
Map PageThe map page allows you to view the path that you have traveled over, the waypoints youcollected along the way, and your current position.
Compass PageThe compass page shows you which direction to steer towards when navigating towards awaypoint.
Main Menu PageThe main menu page gives the user access to the waypoint management, route, track log andsetup features via a list of submenu options.
There are five different pages that you will useto access all of the menus and submenus in the GPS.It is good to know what each of the pages looks likeand what they means. This will help you when usingyour Garmin GPS in the field!
13
The Satellite Page will display thesatellites that are in your view, and areconnected to the GPS. It also displayssatellite signal strengths.
Use the satellite page to access theEZInit function, if you are havingtrouble initializing in the field.
4.2. Garmin GPS 12XL Pages: In Depth
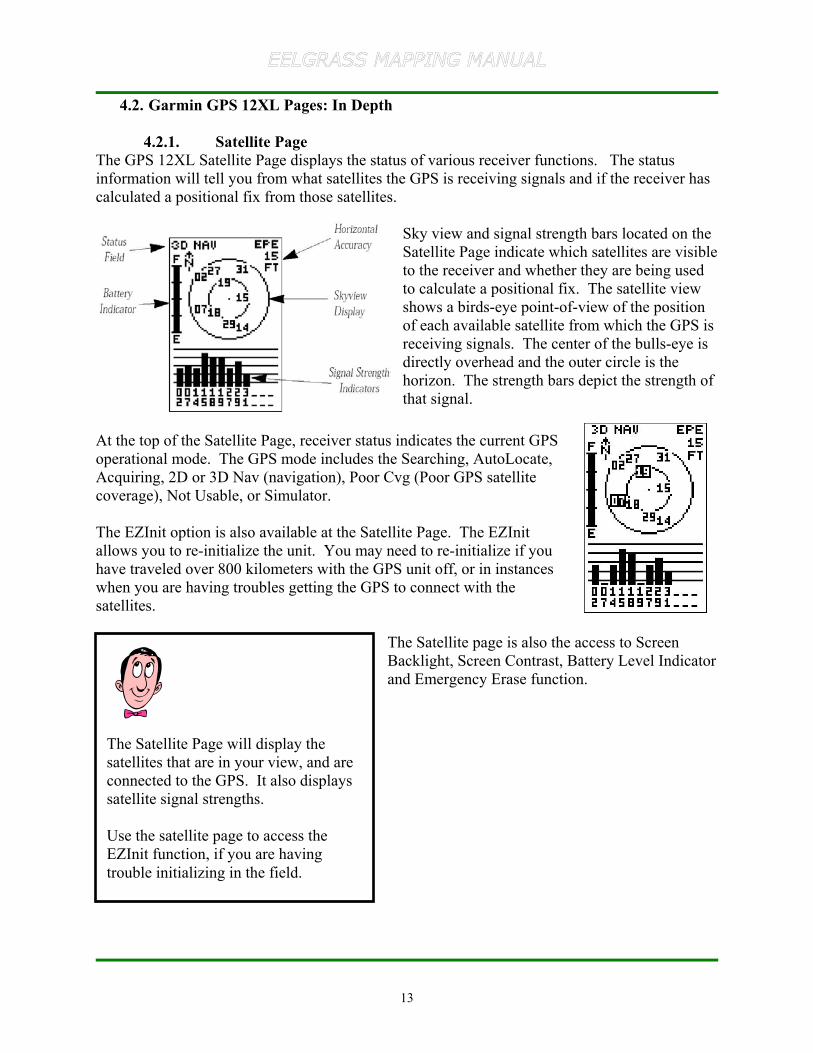
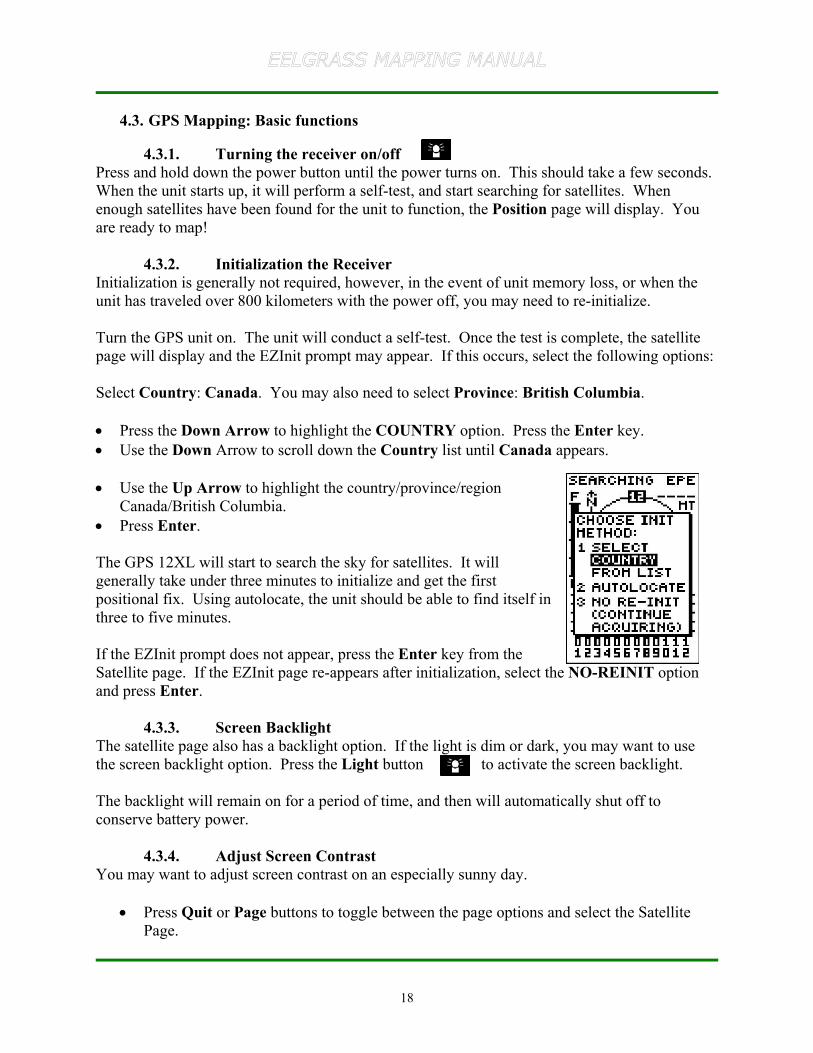
4.2.1. Satellite PageThe GPS 12XL Satellite Page displays the status of various receiver functions. The statusinformation will tell you from what satellites the GPS is receiving signals and if the receiver hascalculated a positional fix from those satellites.
Sky view and signal strength bars located on theSatellite Page indicate which satellites are visibleto the receiver and whether they are being usedto calculate a positional fix. The satellite viewshows a birds-eye point-of-view of the positionof each available satellite from which the GPS isreceiving signals. The center of the bulls-eye isdirectly overhead and the outer circle is thehorizon. The strength bars depict the strength ofthat signal.
At the top of the Satellite Page, receiver status indicates the current GPSoperational mode. The GPS mode includes the Searching, AutoLocate,Acquiring, 2D or 3D Nav (navigation), Poor Cvg (Poor GPS satellitecoverage), Not Usable, or Simulator.
The EZInit option is also available at the Satellite Page. The EZInitallows you to re-initialize the unit. You may need to re-initialize if youhave traveled over 800 kilometers with the GPS unit off, or in instanceswhen you are having troubles getting the GPS to connect with thesatellites.
The Satellite page is also the access to ScreenBacklight, Screen Contrast, Battery Level Indicatorand Emergency Erase function.
14
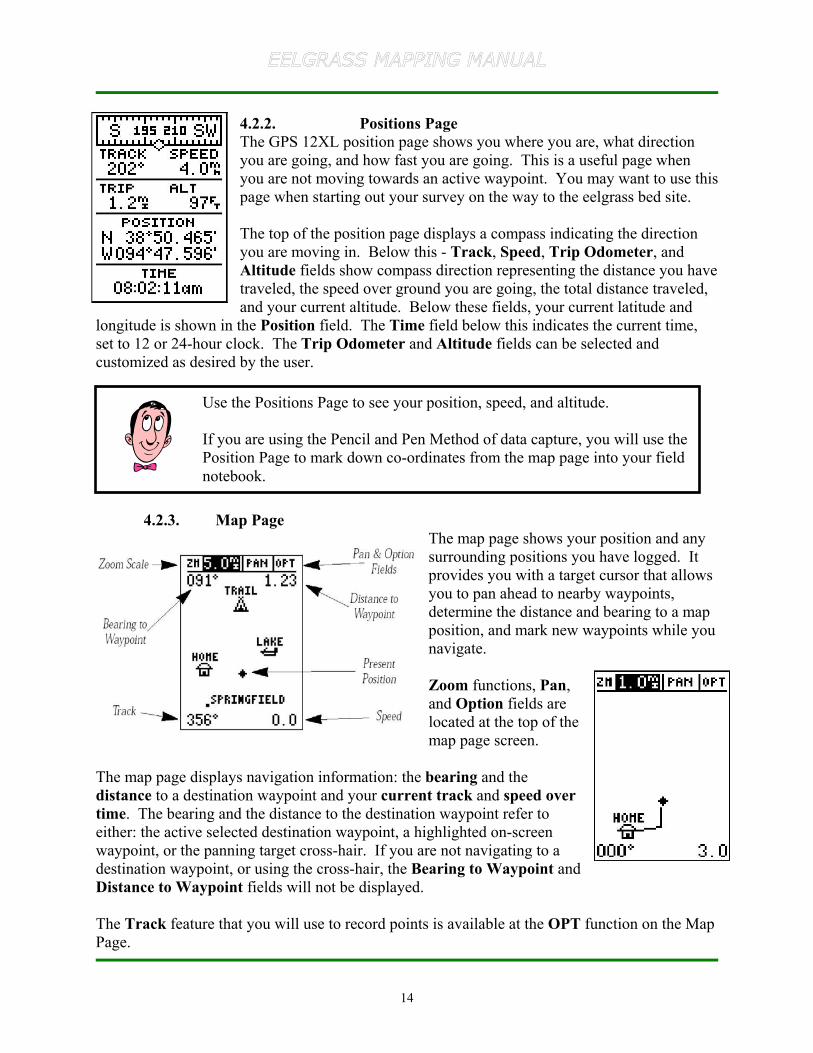
4.2.2. Positions PageThe GPS 12XL position page shows you where you are, what directionyou are going, and how fast you are going. This is a useful page whenyou are not moving towards an active waypoint. You may want to use thispage when starting out your survey on the way to the eelgrass bed site.
The top of the position page displays a compass indicating the directionyou are moving in. Below this - Track, Speed, Trip Odometer, andAltitude fields show compass direction representing the distance you havetraveled, the speed over ground you are going, the total distance traveled,and your current altitude. Below these fields, your current latitude and
longitude is shown in the Position field. The Time field below this indicates the current time,set to 12 or 24-hour clock. The Trip Odometer and Altitude fields can be selected andcustomized as desired by the user.
4.2.3. Map PageThe map page shows your position and anysurrounding positions you have logged. Itprovides you with a target cursor that allowsyou to pan ahead to nearby waypoints,determine the distance and bearing to a mapposition, and mark new waypoints while younavigate.
Zoom functions, Pan,and Option fields arelocated at the top of themap page screen.
The map page displays navigation information: the bearing and thedistance to a destination waypoint and your current track and speed overtime. The bearing and the distance to the destination waypoint refer toeither: the active selected destination waypoint, a highlighted on-screenwaypoint, or the panning target cross-hair. If you are not navigating to adestination waypoint, or using the cross-hair, the Bearing to Waypoint andDistance to Waypoint fields will not be displayed.
The Track feature that you will use to record points is available at the OPT function on the MapPage.
Use the Positions Page to see your position, speed, and altitude.
If you are using the Pencil and Pen Method of data capture, you will use thePosition Page to mark down co-ordinates from the map page into your fieldnotebook.

15
The map portion of the page displays your present location (with a diamond signal), and yourtrack/route displayed as a solid line. Nearby waypoints are symbolized with their names shownadjacent to each waypoint symbol location.
4.2.4. Zoom, and Pan Map FunctionsZooming, panning and pointing functions can be accessed from the mappage.
To Zoom, you need to first select a zoom scale• Highlight the Zoom field• Press the Enter key• Select a map scale, and press Enter.
To activate the Pan function:• Highlight the pan field• Press the Enter key• Use the arrow keys to move the map in any direction.• To cancel the Pan function, press the Quit button.
You can also use the pan function and the cross-hair to add new waypoints as you navigatealong. To perform this function, pan to the desired area of the map, and press Mark. Enter aname and a symbol for your new waypoint. Press Enter.
4.2.5. Compass PageWhenever you select a destination waypoint, the compass page will appear to steer you in thedirection of the waypoint. The compass ring in the middle of the page shows your course with apointer arrow in the middle to direct you towards your destination waypoint. When the arrowis pointing up it means you are moving directly towards your target waypoint. The bearingand distance fields are displayed at the top ofthe screen and your current track and speedover ground are shown at the bottom of thepage. The distance displayed is the straightline distance from your present location to thedestination waypoint.
The ETE field defines your estimated time ofarrival at the waypoint. The ETE field candisplay a number of different user-selectedoptions to describe your navigation. Thesefields include: Estimated Time Enroute (ETE), Estimated Time of Arrival (ETA), Course toSteer (CTS), Crosstrack Error (XTK), Velocity Made Good (VMG), and Turn (TRN).
When you are close to arrival at your destination waypoint (<1min) the screen will flash. Amessage will appear to let you know you have arrived at your waypoint location.
16
4.2.6. Main Menu PageThe main menu page contains systems information, including system setup, navigation setup andwaypoint pages.
4.2.6.1. System SetupThe setup menu contains options that allow you to configure your GPS to your preference. Thisincludes System Setup Mode, Time Offset, Time format, Screen contrast, and BacklightTimeout.
You should always be operating the System in Normal Mode. Simulator mode will not allow fordata entry.
Time offset: Date and Time offset should be set to local time. The GPS time is set to UTC(Greenwich Mean Time) time and you will have to either choose a value of either –7 or –8depending on the time of year. Remember that in the Pacific Region, Daylight Savings time(UTC -7) is the first weekend in April until the last weekend in October, approximately. Weoperate on Pacific Standard Time (UTC -8) for the remainder of the year.
To enter Time offset, highlight OFFSET and press Enter. Enter the time offset and pressEnter. To change the plus or minus sign, move the cursor to the left.
Time format: Time format changes the time from 12 to the 24-hour time clock. Highlight hoursand press Enter. Change the display format type to 12 or 24. Press Enter.
Screen Contrast: To change the screen contrast, highlight contrast and press Enter. Adjust thescale bar to the desired contrast level. Press Enter.
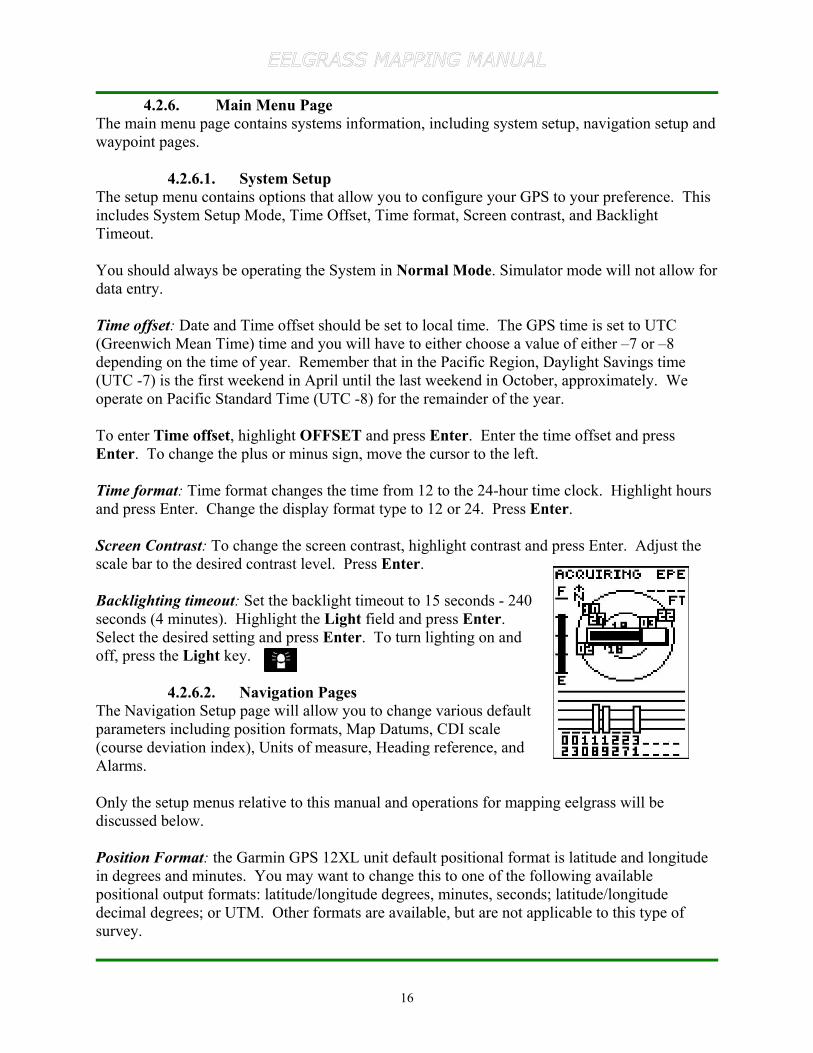
Backlighting timeout: Set the backlight timeout to 15 seconds - 240seconds (4 minutes). Highlight the Light field and press Enter.Select the desired setting and press Enter. To turn lighting on andoff, press the Light key.
4.2.6.2. Navigation PagesThe Navigation Setup page will allow you to change various defaultparameters including position formats, Map Datums, CDI scale(course deviation index), Units of measure, Heading reference, andAlarms.
Only the setup menus relative to this manual and operations for mapping eelgrass will bediscussed below.
Position Format: the Garmin GPS 12XL unit default positional format is latitude and longitudein degrees and minutes. You may want to change this to one of the following availablepositional output formats: latitude/longitude degrees, minutes, seconds; latitude/longitudedecimal degrees; or UTM. Other formats are available, but are not applicable to this type ofsurvey.
17
• Highlight the POSITION FRMT field and press Enter.• Select the desired setting and press Enter.
Map Datum: The default Map Datum is WGS84. You can change this setting to NAD83, but itis not advisable to change this setting unless it has been altered in the past. In this case, re-set themap datum to WGS84 but selecting the MAP DATUM field and pressing Enter. ChooseWGS84 and press Enter.
Units of Measure: The default measurement units for speed and distance readouts are ‘statute’.You can change this setting to nautical or metric units of measure by highlighting the UNITSfield and pressing Enter. Select the new units of measure and press Enter.
4.2.6.3. Waypoint PagesWaypoint pages are also available from the main menu. Waypoint pages are discussed in section4.5.1.
Zostera marina subtidal showing a mass of reproductive stalks in the center, Crab Bay, EvansIsland, Prince William Sound, Alaska. Photo by Ron Phillips.
18
4.3. GPS Mapping: Basic functions
4.3.1. Turning the receiver on/offPress and hold down the power button until the power turns on. This should take a few seconds.When the unit starts up, it will perform a self-test, and start searching for satellites. Whenenough satellites have been found for the unit to function, the Position page will display. Youare ready to map!
4.3.2. Initialization the ReceiverInitialization is generally not required, however, in the event of unit memory loss, or when theunit has traveled over 800 kilometers with the power off, you may need to re-initialize.
Turn the GPS unit on. The unit will conduct a self-test. Once the test is complete, the satellitepage will display and the EZInit prompt may appear. If this occurs, select the following options:
Select Country: Canada. You may also need to select Province: British Columbia.
• Press the Down Arrow to highlight the COUNTRY option. Press the Enter key.• Use the Down Arrow to scroll down the Country list until Canada appears.
• Use the Up Arrow to highlight the country/province/regionCanada/British Columbia.
• Press Enter.
The GPS 12XL will start to search the sky for satellites. It willgenerally take under three minutes to initialize and get the firstpositional fix. Using autolocate, the unit should be able to find itself inthree to five minutes.
If the EZInit prompt does not appear, press the Enter key from theSatellite page. If the EZInit page re-appears after initialization, select the NO-REINIT optionand press Enter.
4.3.3. Screen BacklightThe satellite page also has a backlight option. If the light is dim or dark, you may want to usethe screen backlight option. Press the Light button to activate the screen backlight.
The backlight will remain on for a period of time, and then will automatically shut off toconserve battery power.
4.3.4. Adjust Screen ContrastYou may want to adjust screen contrast on an especially sunny day.
• Press Quit or Page buttons to toggle between the page options and select the SatellitePage.
19
• Press the Back/Forward buttons to adjust the contrast level.
4.3.5. Battery Level indicatorThe Satellite page has a battery level indicator option that allows you to view the battery powerstatus of your batteries. When the battery level indicator is displaying close to E for Empty,replace the batteries with a fresh set.
This indicator is calibrated for use with alkaline batteries. Voltage differences between alkalineand Ni-Cad or lithium batteries will cause this indicator to ready differently for batteries of thistype, and therefore may not read accurately for Ni-Cad batteries.
The GPS 12XL unit also has an internal lithium battery that will retain system memory whenthe receiver battery power is not operating, or unit is turned off. Your data, such as waypointsand routes, will not be deleted if the unit is to run out of power completely.
4.3.6. Emergency EraseThis function will allow you to completely purge all stored data on the Garmin 12XL unit,including waypoints, routes, and the track log. You may want to do this on the first day of yourfield survey to erase all previously collected data and information from the unit.
To do this, first start by turning the unit off. While holding down the Mark button, turnthe unit on by pressing the On button.
A warning message will appear and ask you to confirm the Emergency Erase action byselecting Yes. At this point you can Cancel the Erase operation, press the right arrow key, andselect Enter. To erase ALL data on the unit, select Enter to confirm the operation.
Warning: Emergency Erase will purge all data on themachine! Ensure that you have all your data downloaded
before you use this function!
20
4.4. GPS Mapping: Advanced Functions
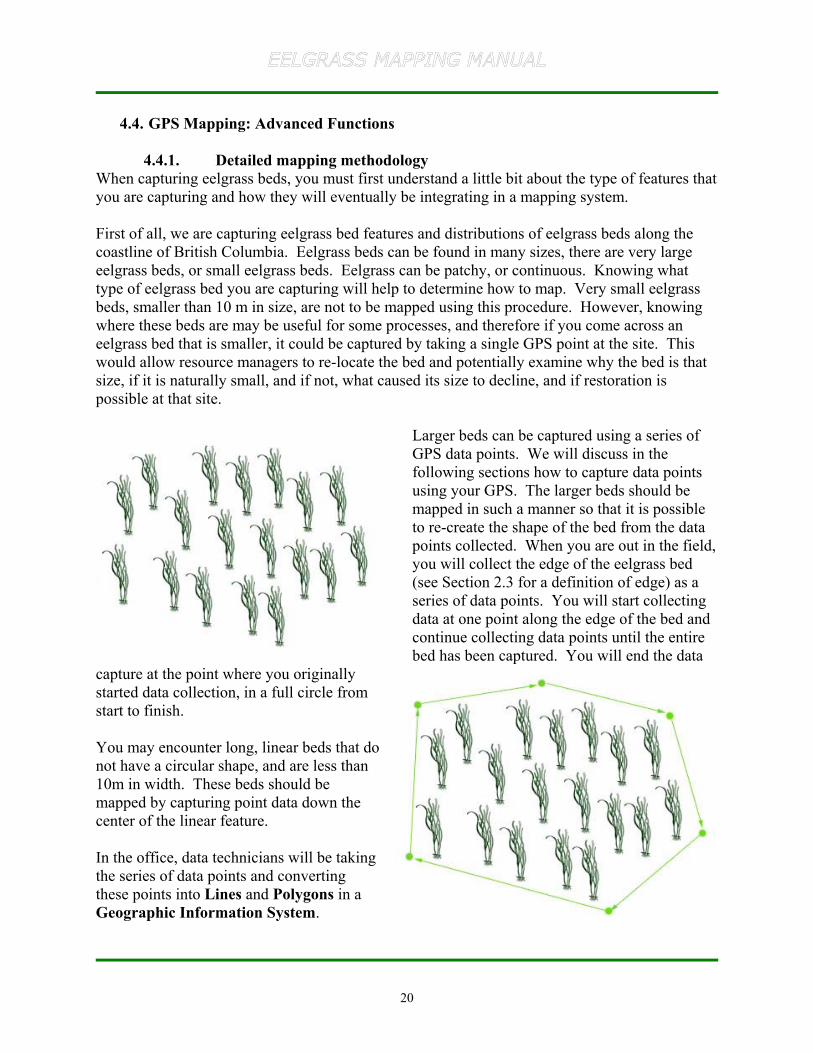
4.4.1. Detailed mapping methodologyWhen capturing eelgrass beds, you must first understand a little bit about the type of features thatyou are capturing and how they will eventually be integrating in a mapping system.
First of all, we are capturing eelgrass bed features and distributions of eelgrass beds along thecoastline of British Columbia. Eelgrass beds can be found in many sizes, there are very largeeelgrass beds, or small eelgrass beds. Eelgrass can be patchy, or continuous. Knowing whattype of eelgrass bed you are capturing will help to determine how to map. Very small eelgrassbeds, smaller than 10 m in size, are not to be mapped using this procedure. However, knowingwhere these beds are may be useful for some processes, and therefore if you come across aneelgrass bed that is smaller, it could be captured by taking a single GPS point at the site. Thiswould allow resource managers to re-locate the bed and potentially examine why the bed is thatsize, if it is naturally small, and if not, what caused its size to decline, and if restoration ispossible at that site.
Larger beds can be captured using a series ofGPS data points. We will discuss in thefollowing sections how to capture data pointsusing your GPS. The larger beds should bemapped in such a manner so that it is possibleto re-create the shape of the bed from the datapoints collected. When you are out in the field,you will collect the edge of the eelgrass bed(see Section 2.3 for a definition of edge) as aseries of data points. You will start collectingdata at one point along the edge of the bed andcontinue collecting data points until the entirebed has been captured. You will end the data
capture at the point where you originallystarted data collection, in a full circle fromstart to finish.
You may encounter long, linear beds that donot have a circular shape, and are less than10m in width. These beds should bemapped by capturing point data down thecenter of the linear feature.
In the office, data technicians will be takingthe series of data points and convertingthese points into Lines and Polygons in aGeographic Information System.
21
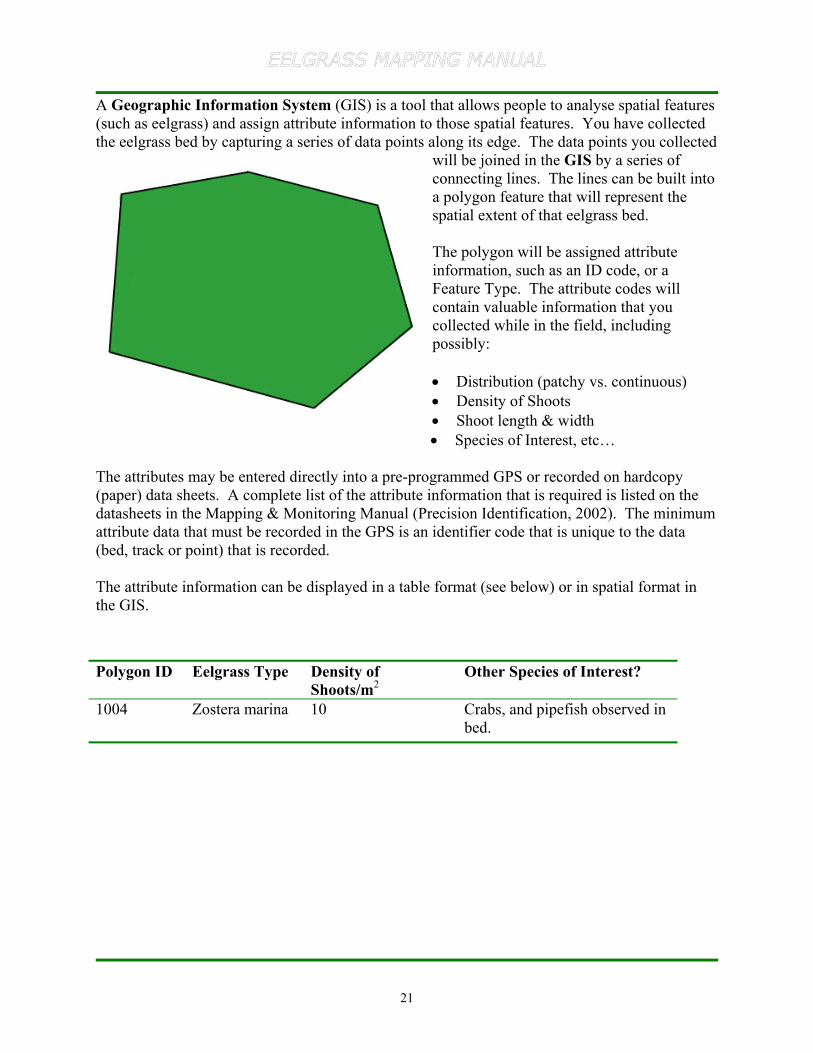
A Geographic Information System (GIS) is a tool that allows people to analyse spatial features(such as eelgrass) and assign attribute information to those spatial features. You have collectedthe eelgrass bed by capturing a series of data points along its edge. The data points you collected
will be joined in the GIS by a series ofconnecting lines. The lines can be built intoa polygon feature that will represent thespatial extent of that eelgrass bed.
The polygon will be assigned attributeinformation, such as an ID code, or aFeature Type. The attribute codes willcontain valuable information that youcollected while in the field, includingpossibly:
• Distribution (patchy vs. continuous)• Density of Shoots• Shoot length & width• Species of Interest, etc…
The attributes may be entered directly into a pre-programmed GPS or recorded on hardcopy(paper) data sheets. A complete list of the attribute information that is required is listed on thedatasheets in the Mapping & Monitoring Manual (Precision Identification, 2002). The minimumattribute data that must be recorded in the GPS is an identifier code that is unique to the data(bed, track or point) that is recorded.
The attribute information can be displayed in a table format (see below) or in spatial format inthe GIS.
Polygon ID Eelgrass Type Density ofShoots/m2
Other Species of Interest?
1004 Zostera marina 10 Crabs, and pipefish observed inbed.
22
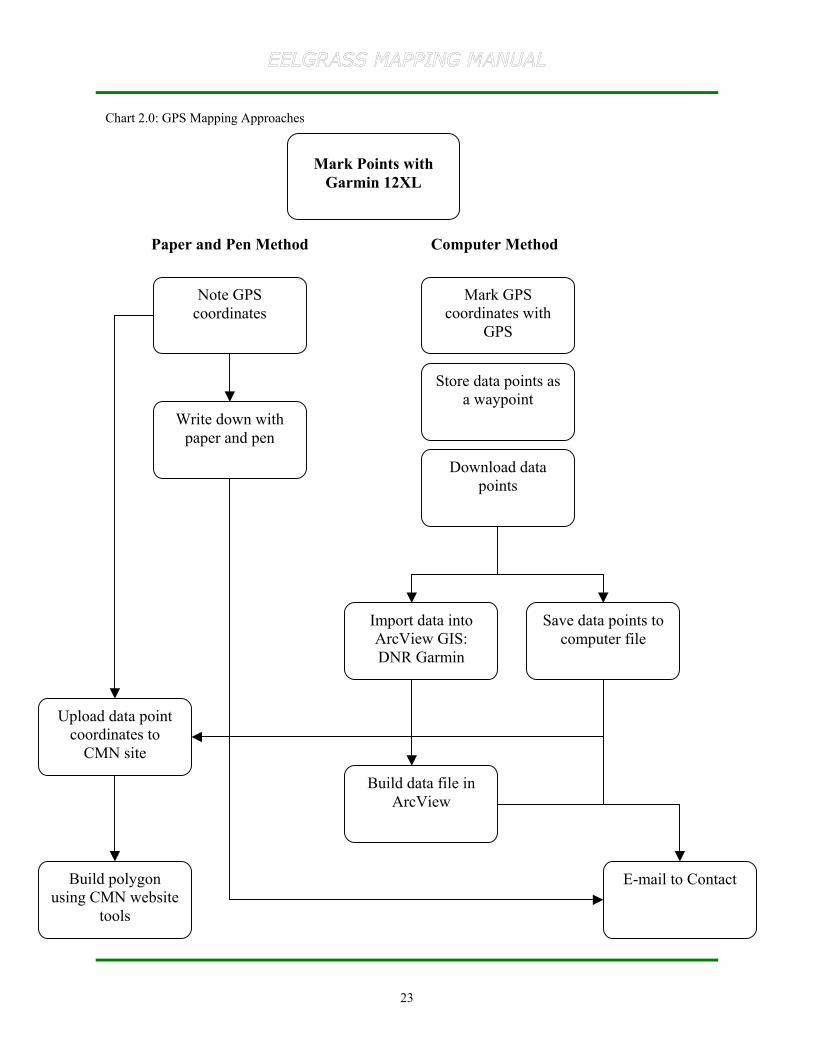
4.4.2. Mapping ApproachesThere is a few ways to approach eelgrass mapping. The flowchart (Chart 2.0) outlinesthe three approaches and how they could be applied.
4.4.2.1. Paper and Pen MethodField data points could be observed as the boat maneuvers along the edge of an eelgrasscomplex. Then those data points could be written down and e-mailed to the CMN contact. Thisis referred to in this manual as the paper and pen method.
4.4.2.2. Garmin GPS MethodFor more advanced users, field data points could be collected (the TRACK method isrecommended) and stored in the Garmin GPS as waypoints. Those points could be downloadedfrom the unit and mailed to the CMN contact. The points could also be downloaded using theDNR Garmin extension and either edited using the DNR Garmin stand-alone mode, or importedinto ArcView GIS. Once in ArcView, the user could build a polygon and then add attributeinformation to the polygon. Then the file could be sent to the CMN contact.
With data point locations, either from the Paper and Pen method, or from the Garmin GPSmethod, data from a file or data from a field book can be entered using the CMN web site dataentry tool. This data entry tool is explained in detail in Section 8. The tool will allow users toenter the web site, upload add their eelgrass data field measurements, create polygons and addmetadata.
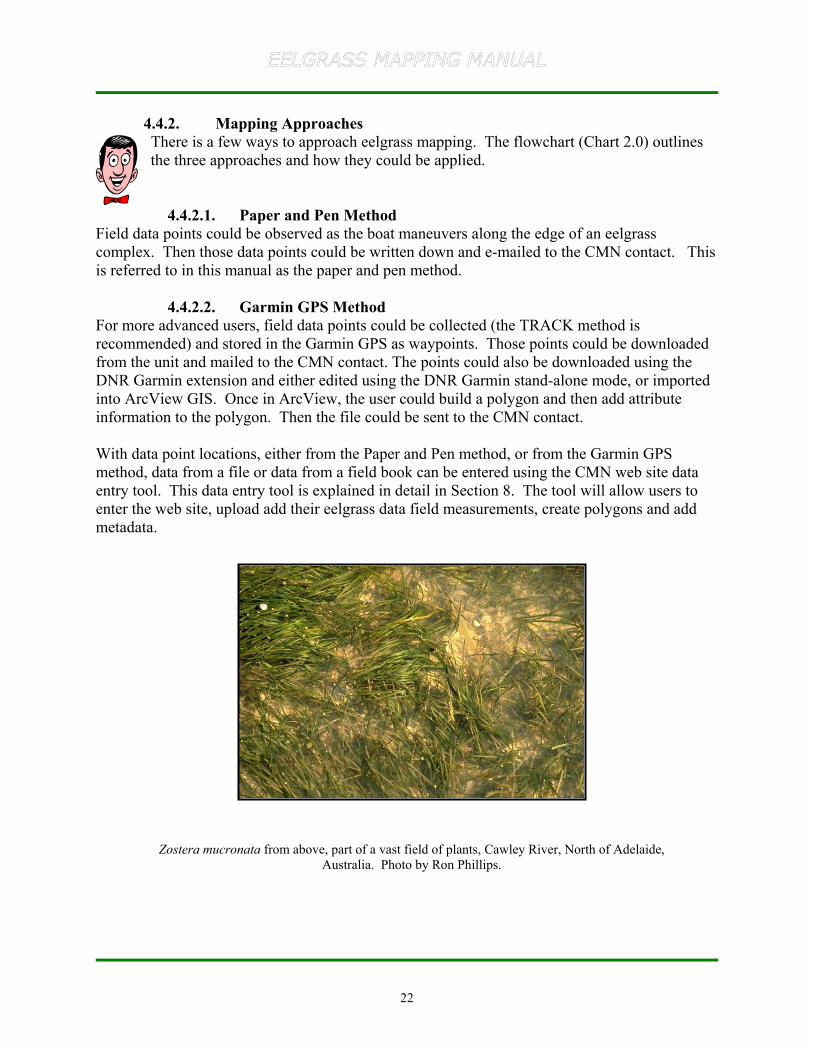
Zostera mucronata from above, part of a vast field of plants, Cawley River, North of Adelaide,Australia. Photo by Ron Phillips.
23
Mark Points withGarmin 12XL
Note GPScoordinates
Mark GPScoordinates with
GPS
E-mail to Contact
Paper and Pen Method
Build polygonusing CMN website
tools
Store data points asa waypoint
Write down withpaper and pen
Import data intoArcView GIS:DNR Garmin
Download datapoints
Upload data pointcoordinates to
CMN site
Save data points tocomputer file
Build data file inArcView
Computer Method
Chart 2.0: GPS Mapping Approaches
24
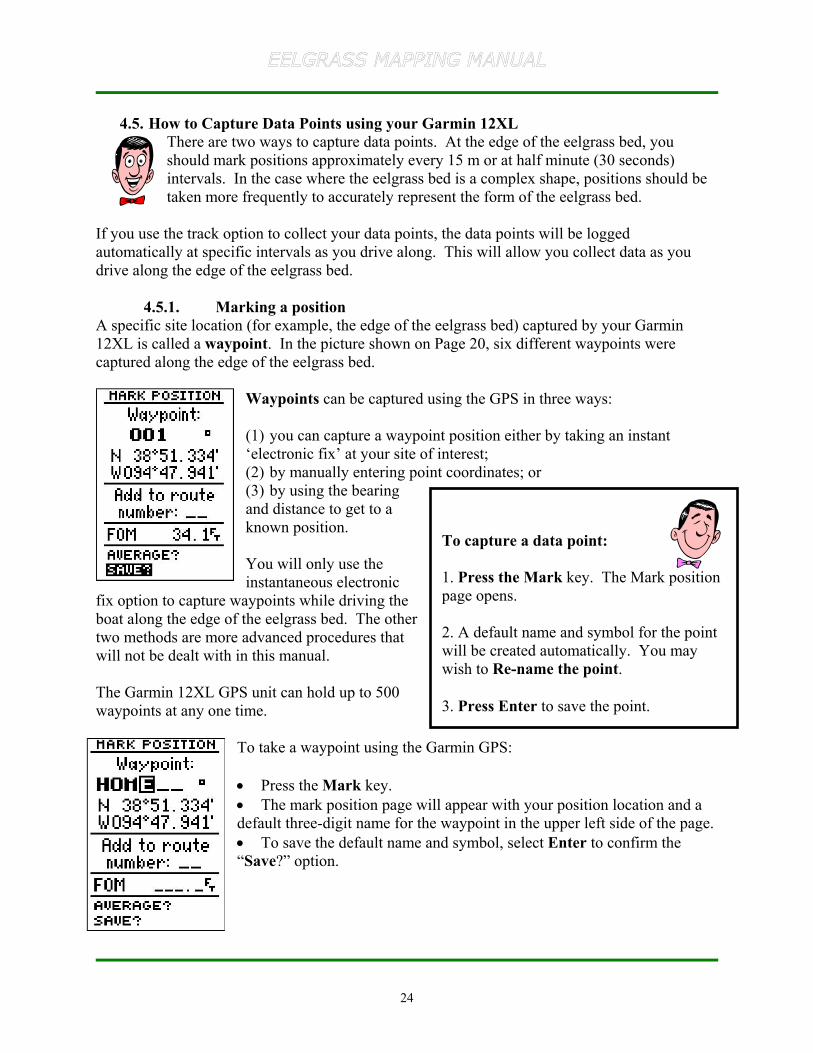
To capture a data point:
1. Press the Mark key. The Mark positionpage opens.
2. A default name and symbol for the pointwill be created automatically. You maywish to Re-name the point.
3. Press Enter to save the point.
4.5. How to Capture Data Points using your Garmin 12XLThere are two ways to capture data points. At the edge of the eelgrass bed, youshould mark positions approximately every 15 m or at half minute (30 seconds)intervals. In the case where the eelgrass bed is a complex shape, positions should betaken more frequently to accurately represent the form of the eelgrass bed.
If you use the track option to collect your data points, the data points will be loggedautomatically at specific intervals as you drive along. This will allow you collect data as youdrive along the edge of the eelgrass bed.
4.5.1. Marking a positionA specific site location (for example, the edge of the eelgrass bed) captured by your Garmin12XL is called a waypoint. In the picture shown on Page 20, six different waypoints werecaptured along the edge of the eelgrass bed.
Waypoints can be captured using the GPS in three ways:
(1) you can capture a waypoint position either by taking an instant‘electronic fix’ at your site of interest;(2) by manually entering point coordinates; or(3) by using the bearingand distance to get to aknown position.
You will only use theinstantaneous electronic
fix option to capture waypoints while driving theboat along the edge of the eelgrass bed. The othertwo methods are more advanced procedures thatwill not be dealt with in this manual.
The Garmin 12XL GPS unit can hold up to 500waypoints at any one time.
To take a waypoint using the Garmin GPS:
• Press the Mark key.• The mark position page will appear with your position location and adefault three-digit name for the waypoint in the upper left side of the page.• To save the default name and symbol, select Enter to confirm the“Save?” option.
25
Averaging is a quick method to improve theaccuracy of your GPS data points.
Remember the boat must be stable at each datapoint as you are averaging.
You must use your own discretion when decidinghow long to stay at each data point. If you have alarge eelgrass bed to map, you may only have 10seconds or less over which to average. If youhave a smaller eelgrass bed, you may be able tostay at each point for 30 seconds or longer. Thelonger you average, the more accurate and reliableyour data points will be!
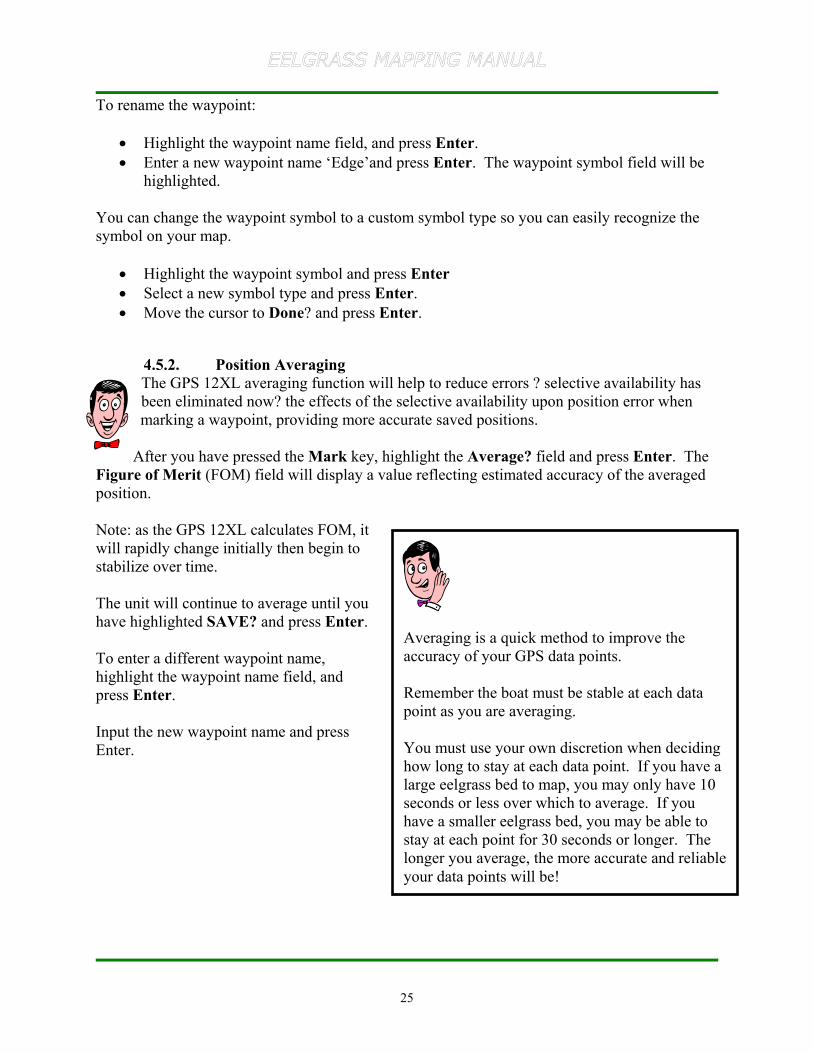
To rename the waypoint:
• Highlight the waypoint name field, and press Enter.• Enter a new waypoint name ‘Edge’and press Enter. The waypoint symbol field will be
highlighted.
You can change the waypoint symbol to a custom symbol type so you can easily recognize thesymbol on your map.
• Highlight the waypoint symbol and press Enter• Select a new symbol type and press Enter.• Move the cursor to Done? and press Enter.
4.5.2. Position AveragingThe GPS 12XL averaging function will help to reduce errors ? selective availability hasbeen eliminated now? the effects of the selective availability upon position error whenmarking a waypoint, providing more accurate saved positions.
After you have pressed the Mark key, highlight the Average? field and press Enter. TheFigure of Merit (FOM) field will display a value reflecting estimated accuracy of the averagedposition.
Note: as the GPS 12XL calculates FOM, itwill rapidly change initially then begin tostabilize over time.
The unit will continue to average until youhave highlighted SAVE? and press Enter.
To enter a different waypoint name,highlight the waypoint name field, andpress Enter.
Input the new waypoint name and pressEnter.
26
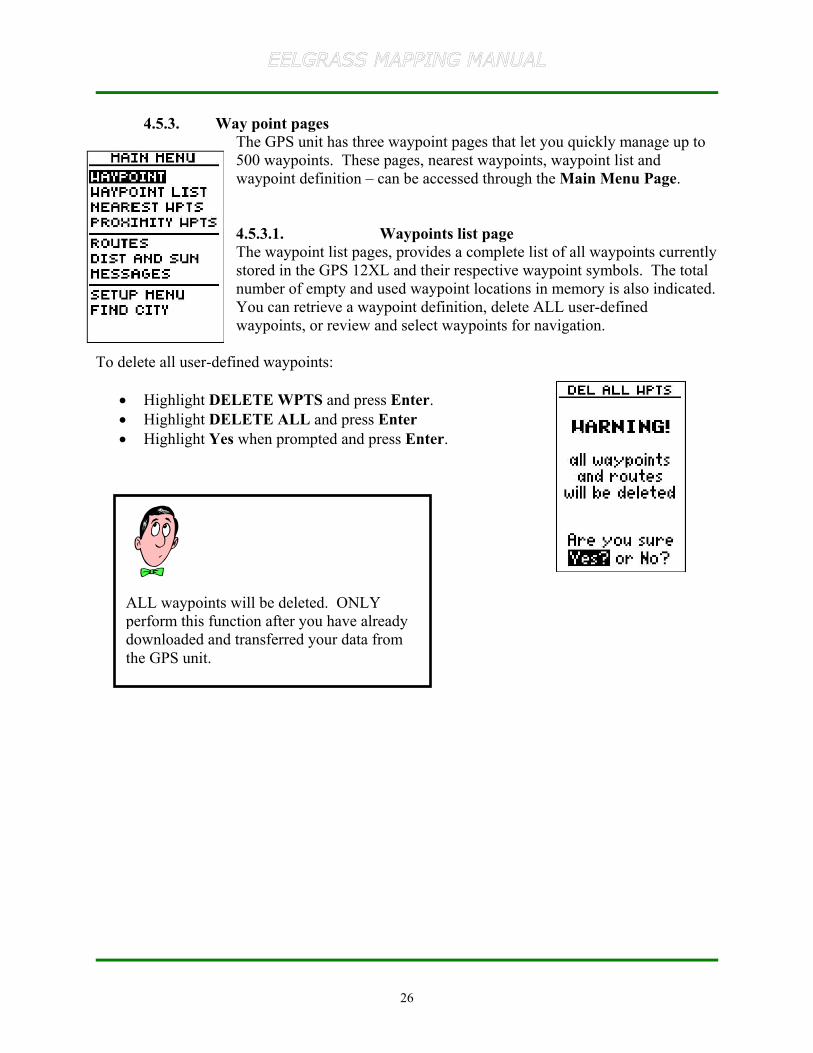
4.5.3. Way point pagesThe GPS unit has three waypoint pages that let you quickly manage up to500 waypoints. These pages, nearest waypoints, waypoint list andwaypoint definition – can be accessed through the Main Menu Page.
4.5.3.1. Waypoints list pageThe waypoint list pages, provides a complete list of all waypoints currentlystored in the GPS 12XL and their respective waypoint symbols. The totalnumber of empty and used waypoint locations in memory is also indicated.You can retrieve a waypoint definition, delete ALL user-definedwaypoints, or review and select waypoints for navigation.
To delete all user-defined waypoints:
• Highlight DELETE WPTS and press Enter.• Highlight DELETE ALL and press Enter• Highlight Yes when prompted and press Enter.
ALL waypoints will be deleted. ONLYperform this function after you have alreadydownloaded and transferred your data fromthe GPS unit.
27
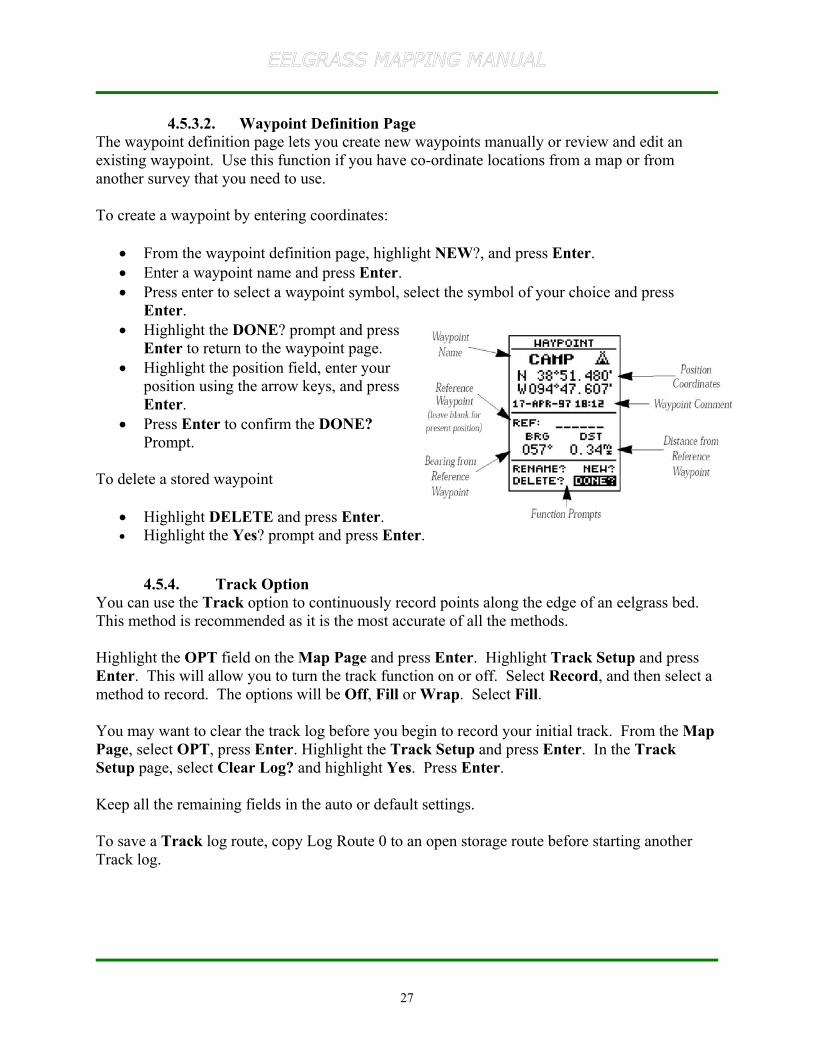
4.5.3.2. Waypoint Definition PageThe waypoint definition page lets you create new waypoints manually or review and edit anexisting waypoint. Use this function if you have co-ordinate locations from a map or fromanother survey that you need to use.
To create a waypoint by entering coordinates:
• From the waypoint definition page, highlight NEW?, and press Enter.• Enter a waypoint name and press Enter.• Press enter to select a waypoint symbol, select the symbol of your choice and press
Enter.• Highlight the DONE? prompt and press
Enter to return to the waypoint page.• Highlight the position field, enter your
position using the arrow keys, and pressEnter.
• Press Enter to confirm the DONE?Prompt.
To delete a stored waypoint
• Highlight DELETE and press Enter.• Highlight the Yes? prompt and press Enter.
4.5.4. Track OptionYou can use the Track option to continuously record points along the edge of an eelgrass bed.This method is recommended as it is the most accurate of all the methods.
Highlight the OPT field on the Map Page and press Enter. Highlight Track Setup and pressEnter. This will allow you to turn the track function on or off. Select Record, and then select amethod to record. The options will be Off, Fill or Wrap. Select Fill.
You may want to clear the track log before you begin to record your initial track. From the MapPage, select OPT, press Enter. Highlight the Track Setup and press Enter. In the TrackSetup page, select Clear Log? and highlight Yes. Press Enter.
Keep all the remaining fields in the auto or default settings.
To save a Track log route, copy Log Route 0 to an open storage route before starting anotherTrack log.

28
Before downloading your GPS data, youcan choose the option to download,install and start the Garmin GPSinterface. This interface contains toolsthat will allow you to download andimport your Garmin GPS data directlyinto ArcView.
If you are not utilizing ArcView tofurther process your data, use themethods above to download your data toa PC and then send the information to theappropriate data users.
5. GPS Data Download
To download data from the Garmin GPS you must connect the GPS 12XL to your PCcomputer using the interface cables provided.
5.1. Interface SetupThe Garmin GPS 12XL interface page allows you the select the format toconnect the GPS 12XL to a PC computer. This will allow you todownload waypoints from the GPS unit to your PC.
In the interface setup page, highlight the I/O (input/output) field andpress Enter.
Select the GRMN/GRMNoption. Press Enter.
5.2. Transfer SetupThe GRMN/GRMN will allow you to transfer the datato your computer. You must select the transfer name,Host.
• Highlight the transfer interface and press Enter.• Select the HOST option. Press Enter.
5.3. Saving Data
When data is saved to your computer, save each datafiles using the following format.
5.3.1. Folder<place>_<date>_eelgrass (i.e. saltspring_dec19_eelgrass)
5.3.2. FilesWaypoints_surveyname (i.e. Waypoints_boundarybay)
5.3.3. Where to send data?Send data files to your GIS or mapping contact person within your organization. Or, send filesto the CMN contact listed at the back of this manual.
1. Connect your Garmin to a PC.2. From the Interface Setup, select the I/O field to equal GRMN/GRMN.
3. Select the Transfer Setup to equal Host.You should now be able to download your data.
29
6. GPS Data Import: Garmin’s DNR extension for ArcView
6.1. Introduction to Garmin’s DNR extensionThe Minnesota Department of Natural Resources created the DNR extension to allowusers to transfer Waypoints, Tracks, and Routes from a Garmin GPS unit to ArcViewand store them as Points, lines or polygons. Information can also be uploaded fromArcView graphics or shapefiles to the GPS and used as tracks or waypoints.
6.2. Obtain a copy of the DNR extensionTo obtain a copy of the DNR extension, visit to following website:http://www.dnr.state.mn.us/mis/gis/tools/arcview/extensions/DNRGarmin/DNRGarmin.html
Download a copy of the DNRGARMIN4.ZIP file.
Unzip the file in a local directory on your hard drive such as C: Temp.
Double click on the dnrgarmin4setup.exe icon.
Follow the installation instructions.
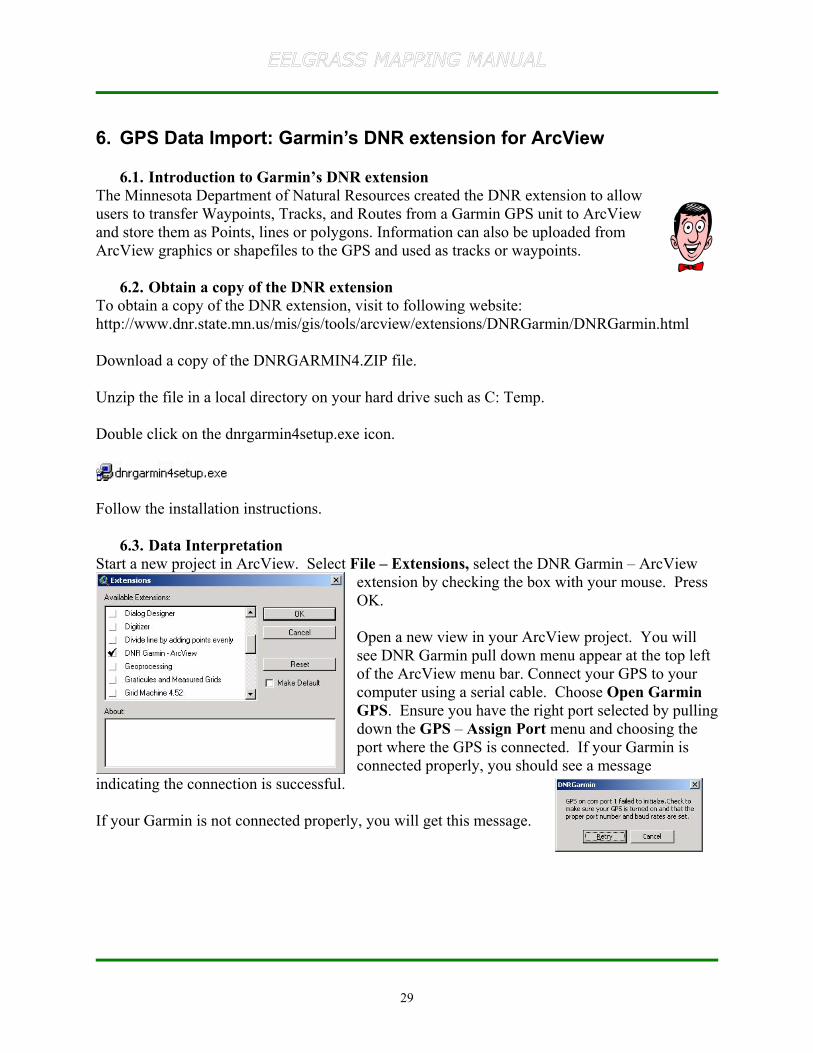
6.3. Data InterpretationStart a new project in ArcView. Select File – Extensions, select the DNR Garmin – ArcView
extension by checking the box with your mouse. PressOK.
Open a new view in your ArcView project. You willsee DNR Garmin pull down menu appear at the top leftof the ArcView menu bar. Connect your GPS to yourcomputer using a serial cable. Choose Open GarminGPS. Ensure you have the right port selected by pullingdown the GPS – Assign Port menu and choosing theport where the GPS is connected. If your Garmin isconnected properly, you should see a message
indicating the connection is successful.
If your Garmin is not connected properly, you will get this message.
30
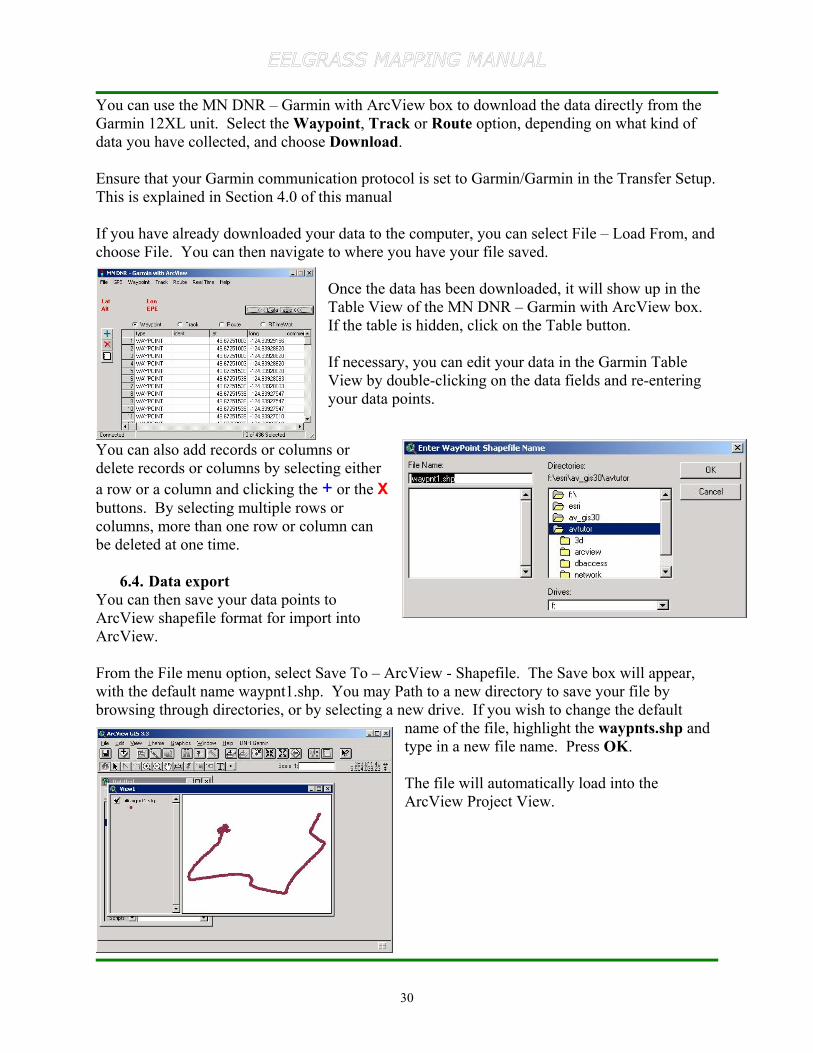
You can use the MN DNR – Garmin with ArcView box to download the data directly from theGarmin 12XL unit. Select the Waypoint, Track or Route option, depending on what kind ofdata you have collected, and choose Download.
Ensure that your Garmin communication protocol is set to Garmin/Garmin in the Transfer Setup.This is explained in Section 4.0 of this manual
If you have already downloaded your data to the computer, you can select File – Load From, andchoose File. You can then navigate to where you have your file saved.
Once the data has been downloaded, it will show up in theTable View of the MN DNR – Garmin with ArcView box.If the table is hidden, click on the Table button.
If necessary, you can edit your data in the Garmin TableView by double-clicking on the data fields and re-enteringyour data points.
You can also add records or columns ordelete records or columns by selecting eithera row or a column and clicking the + or the Xbuttons. By selecting multiple rows orcolumns, more than one row or column canbe deleted at one time.
6.4. Data exportYou can then save your data points toArcView shapefile format for import intoArcView.
From the File menu option, select Save To – ArcView - Shapefile. The Save box will appear,with the default name waypnt1.shp. You may Path to a new directory to save your file bybrowsing through directories, or by selecting a new drive. If you wish to change the default
name of the file, highlight the waypnts.shp andtype in a new file name. Press OK.
The file will automatically load into theArcView Project View.
31
7. Eelgrass Mapping in ArcViewThere are several important functions to know when mapping eelgrass data in ArcView.ArcView contains various tools that can assist you to review and edit your eelgrassdata. Once the data has been cleaned, verified, converted and attributed, it is ready tosend to your eelgrass contact.
7.1. Importing/Uploading your data
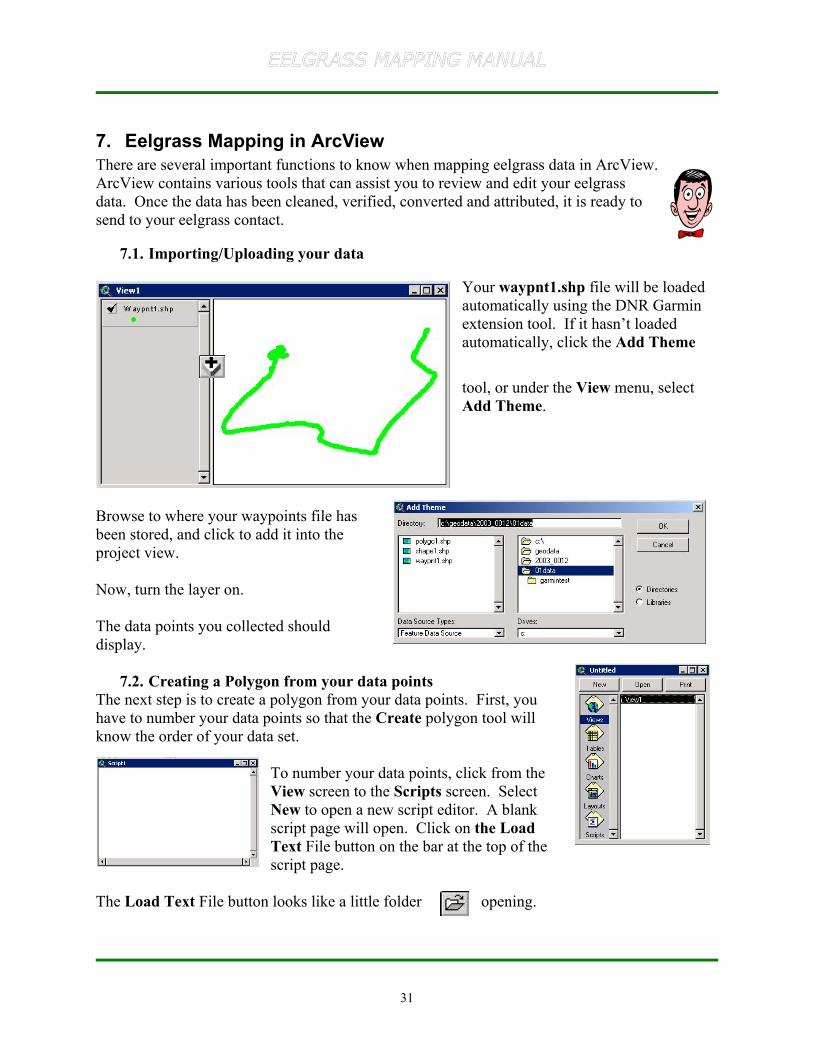
Your waypnt1.shp file will be loadedautomatically using the DNR Garminextension tool. If it hasn’t loadedautomatically, click the Add Theme
tool, or under the View menu, selectAdd Theme.
Browse to where your waypoints file hasbeen stored, and click to add it into theproject view.
Now, turn the layer on.
The data points you collected shoulddisplay.
7.2. Creating a Polygon from your data pointsThe next step is to create a polygon from your data points. First, youhave to number your data points so that the Create polygon tool willknow the order of your data set.
To number your data points, click from theView screen to the Scripts screen. SelectNew to open a new script editor. A blankscript page will open. Click on the LoadText File button on the bar at the top of thescript page.
The Load Text File button looks like a little folder opening.
32
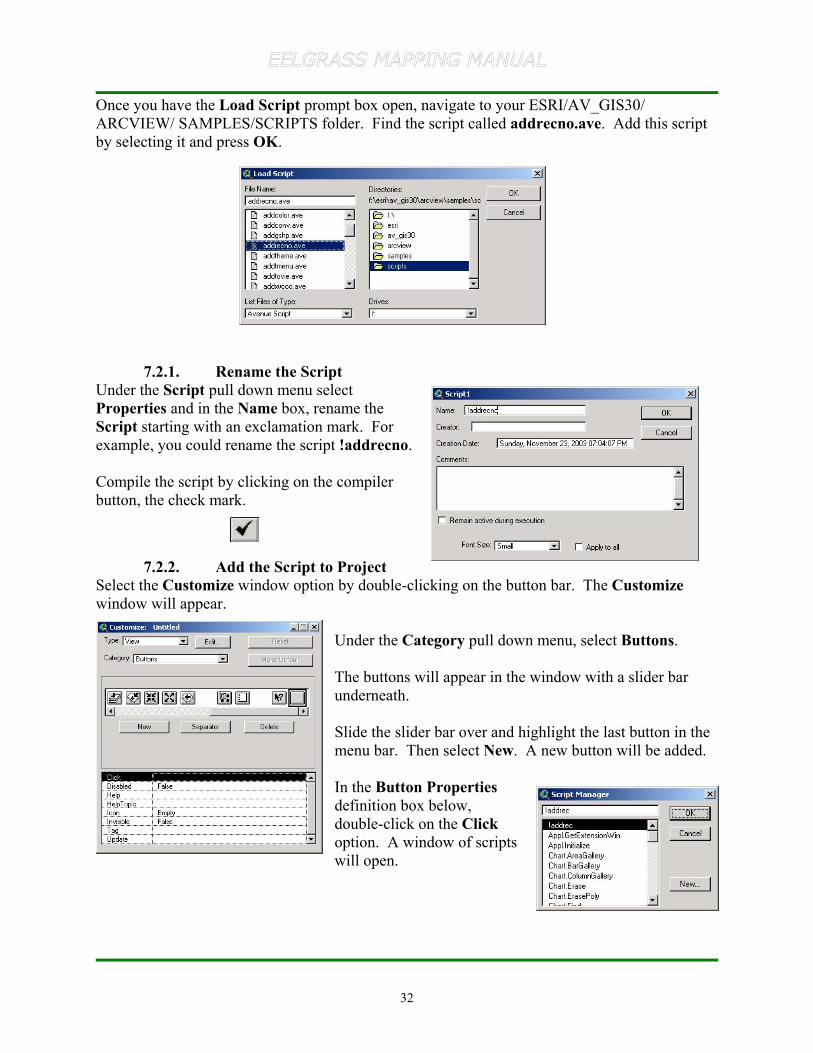
Once you have the Load Script prompt box open, navigate to your ESRI/AV_GIS30/ARCVIEW/ SAMPLES/SCRIPTS folder. Find the script called addrecno.ave. Add this scriptby selecting it and press OK.
7.2.1. Rename the ScriptUnder the Script pull down menu selectProperties and in the Name box, rename theScript starting with an exclamation mark. Forexample, you could rename the script !addrecno.
Compile the script by clicking on the compilerbutton, the check mark.
7.2.2. Add the Script to ProjectSelect the Customize window option by double-clicking on the button bar. The Customizewindow will appear.
Under the Category pull down menu, select Buttons.
The buttons will appear in the window with a slider barunderneath.
Slide the slider bar over and highlight the last button in themenu bar. Then select New. A new button will be added.
In the Button Propertiesdefinition box below,double-click on the Clickoption. A window of scriptswill open.
33
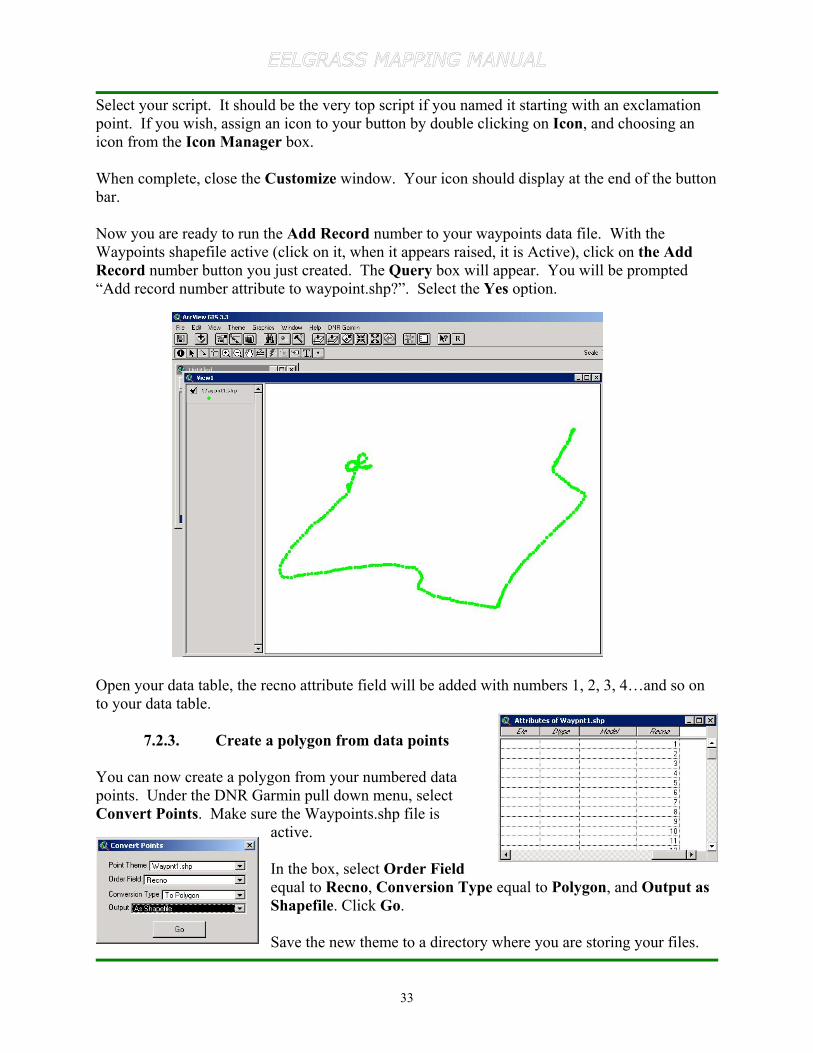
Select your script. It should be the very top script if you named it starting with an exclamationpoint. If you wish, assign an icon to your button by double clicking on Icon, and choosing anicon from the Icon Manager box.
When complete, close the Customize window. Your icon should display at the end of the buttonbar.
Now you are ready to run the Add Record number to your waypoints data file. With theWaypoints shapefile active (click on it, when it appears raised, it is Active), click on the AddRecord number button you just created. The Query box will appear. You will be prompted“Add record number attribute to waypoint.shp?”. Select the Yes option.
Open your data table, the recno attribute field will be added with numbers 1, 2, 3, 4…and so onto your data table.
7.2.3. Create a polygon from data points
You can now create a polygon from your numbered datapoints. Under the DNR Garmin pull down menu, selectConvert Points. Make sure the Waypoints.shp file is
active.
In the box, select Order Fieldequal to Recno, Conversion Type equal to Polygon, and Output asShapefile. Click Go.
Save the new theme to a directory where you are storing your files.
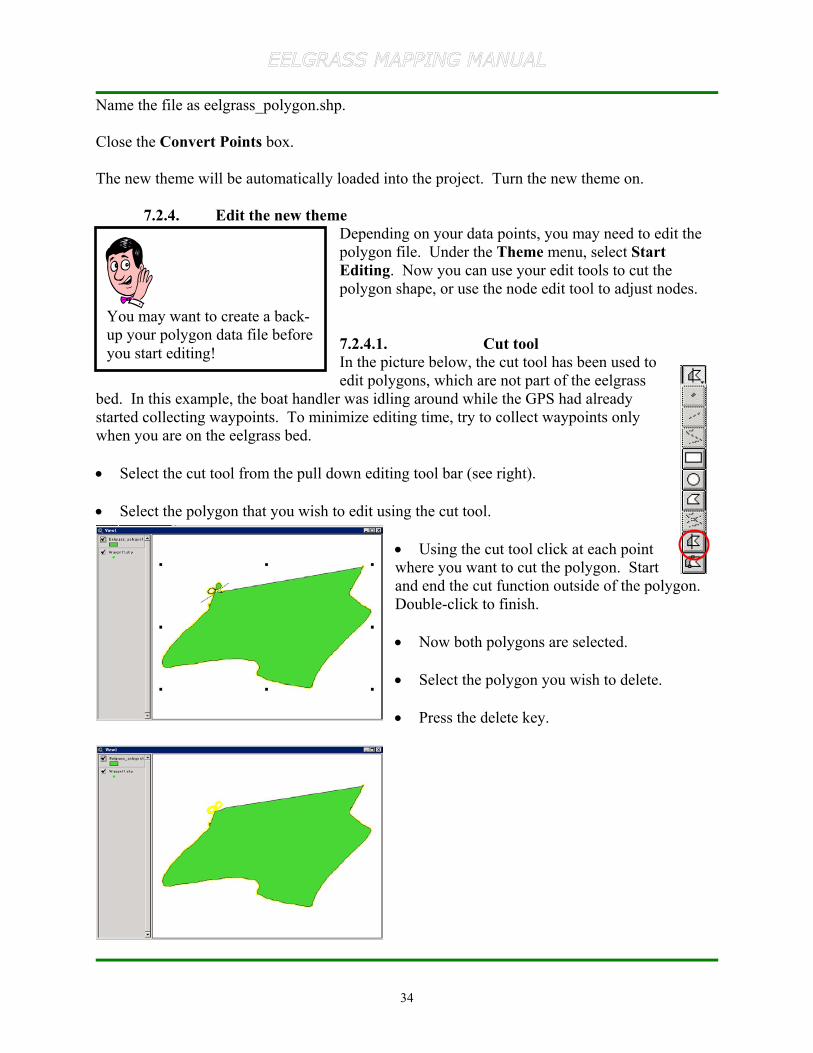
34
You may want to create a back-up your polygon data file beforeyou start editing!
Name the file as eelgrass_polygon.shp.
Close the Convert Points box.
The new theme will be automatically loaded into the project. Turn the new theme on.
7.2.4. Edit the new themeDepending on your data points, you may need to edit thepolygon file. Under the Theme menu, select StartEditing. Now you can use your edit tools to cut thepolygon shape, or use the node edit tool to adjust nodes.
7.2.4.1. Cut toolIn the picture below, the cut tool has been used toedit polygons, which are not part of the eelgrass
bed. In this example, the boat handler was idling around while the GPS had alreadystarted collecting waypoints. To minimize editing time, try to collect waypoints onlywhen you are on the eelgrass bed.
• Select the cut tool from the pull down editing tool bar (see right).
• Select the polygon that you wish to edit using the cut tool.
• Using the cut tool click at each pointwhere you want to cut the polygon. Startand end the cut function outside of the polygon.Double-click to finish.
• Now both polygons are selected.
• Select the polygon you wish to delete.
• Press the delete key.
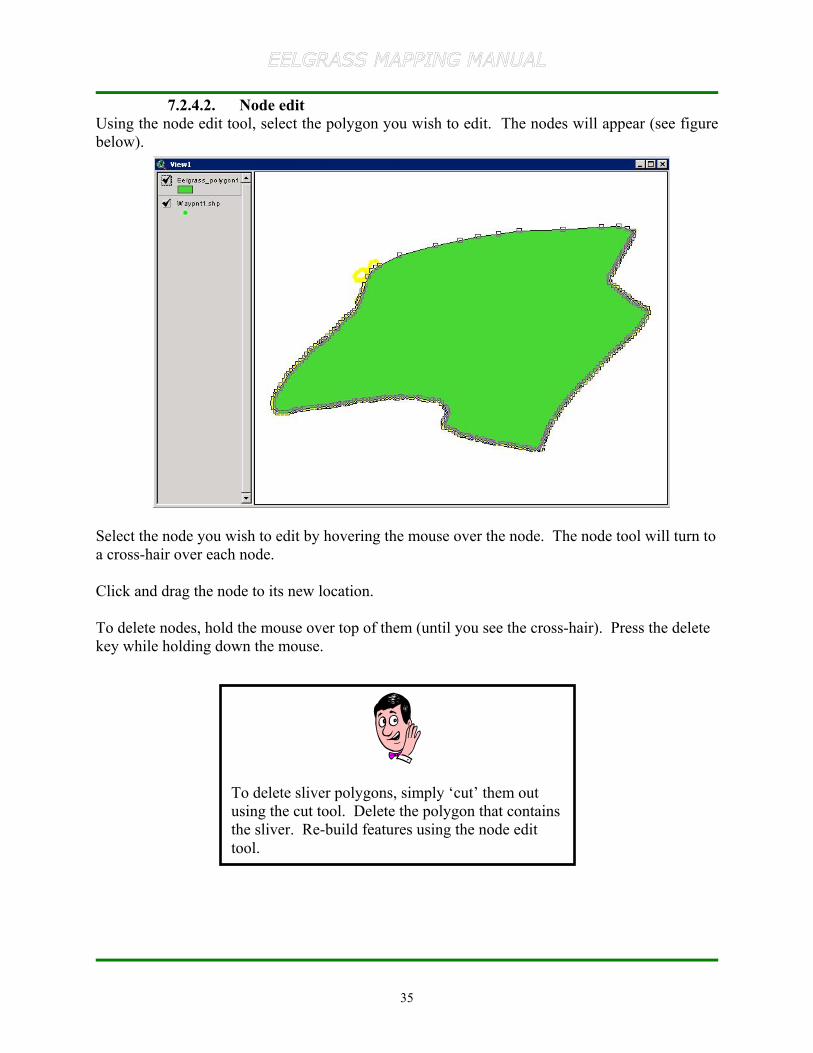
35
To delete sliver polygons, simply ‘cut’ them outusing the cut tool. Delete the polygon that containsthe sliver. Re-build features using the node edittool.
7.2.4.2. Node editUsing the node edit tool, select the polygon you wish to edit. The nodes will appear (see figurebelow).
Select the node you wish to edit by hovering the mouse over the node. The node tool will turn toa cross-hair over each node.
Click and drag the node to its new location.
To delete nodes, hold the mouse over top of them (until you see the cross-hair). Press the deletekey while holding down the mouse.
36
You may want to save youredits during this process. Underthe Theme menu, select, Saveyour edits throughout theprocess.
7.3. Editing your attribute tableAdding metadata to your polygon’s attribute table willprovide information about who collected the data, when itwas collected, eelgrass type, and more.
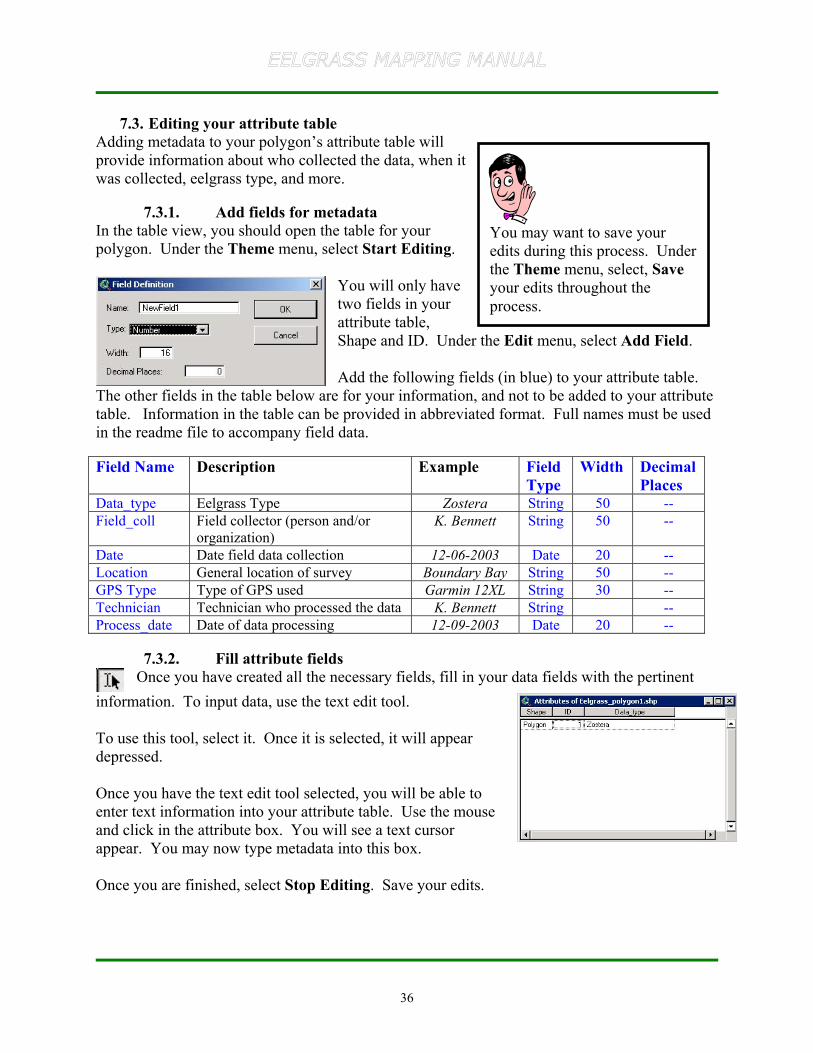
7.3.1. Add fields for metadataIn the table view, you should open the table for yourpolygon. Under the Theme menu, select Start Editing.
You will only havetwo fields in yourattribute table,Shape and ID. Under the Edit menu, select Add Field.
Add the following fields (in blue) to your attribute table.The other fields in the table below are for your information, and not to be added to your attributetable. Information in the table can be provided in abbreviated format. Full names must be usedin the readme file to accompany field data.
Field Name Description Example FieldType
Width DecimalPlaces
Data_type Eelgrass Type Zostera String 50 --Field_coll Field collector (person and/or
organization)K. Bennett String 50 --
Date Date field data collection 12-06-2003 Date 20 --Location General location of survey Boundary Bay String 50 --GPS Type Type of GPS used Garmin 12XL String 30 --Technician Technician who processed the data K. Bennett String --Process_date Date of data processing 12-09-2003 Date 20 --
7.3.2. Fill attribute fieldsOnce you have created all the necessary fields, fill in your data fields with the pertinent
information. To input data, use the text edit tool.
To use this tool, select it. Once it is selected, it will appeardepressed.
Once you have the text edit tool selected, you will be able toenter text information into your attribute table. Use the mouseand click in the attribute box. You will see a text cursorappear. You may now type metadata into this box.
Once you are finished, select Stop Editing. Save your edits.
37
7.4. Creating a new line or polygon in ArcView
You may want to create a new shapefile line or polygon to depict your eelgrass beds or otherfeatures you have you captured during your survey. Import the data you have collected in thefield (Section 6.0), and follow the instructions below to simply trace a new line or polygon overtop of your field data points.
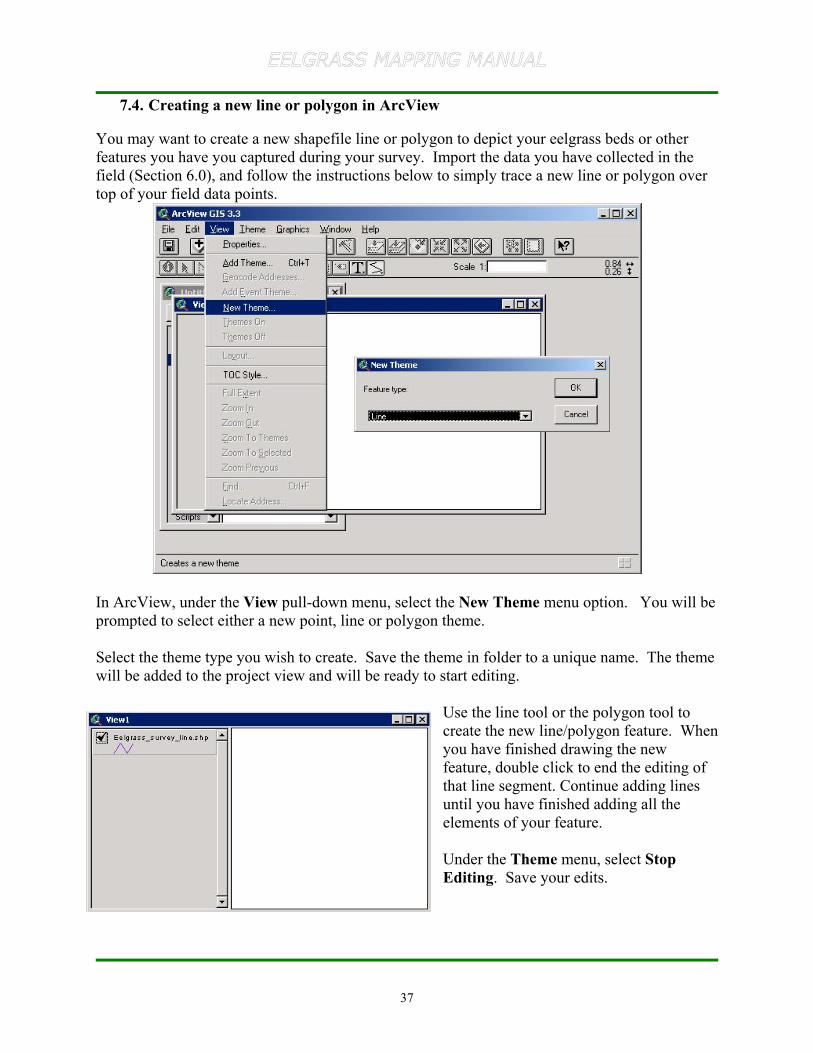
In ArcView, under the View pull-down menu, select the New Theme menu option. You will beprompted to select either a new point, line or polygon theme.
Select the theme type you wish to create. Save the theme in folder to a unique name. The themewill be added to the project view and will be ready to start editing.
Use the line tool or the polygon tool tocreate the new line/polygon feature. Whenyou have finished drawing the newfeature, double click to end the editing ofthat line segment. Continue adding linesuntil you have finished adding all theelements of your feature.
Under the Theme menu, select StopEditing. Save your edits.
38
For first time users, werecommend that you read thehelp pages “How to use the
Eelgrass bed mappingapplication”. These help pages
are available from the main menuunder the Help button.
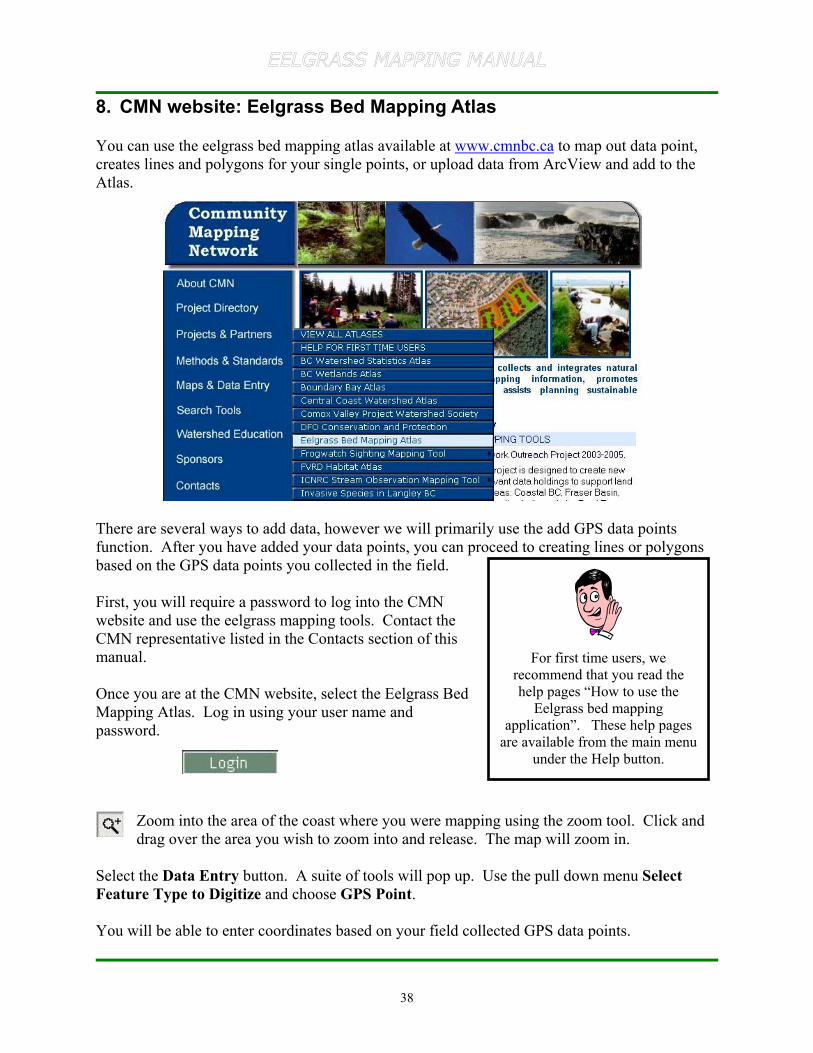
8. CMN website: Eelgrass Bed Mapping Atlas
You can use the eelgrass bed mapping atlas available at www.cmnbc.ca to map out data point,creates lines and polygons for your single points, or upload data from ArcView and add to theAtlas.
There are several ways to add data, however we will primarily use the add GPS data pointsfunction. After you have added your data points, you can proceed to creating lines or polygonsbased on the GPS data points you collected in the field.
First, you will require a password to log into the CMNwebsite and use the eelgrass mapping tools. Contact theCMN representative listed in the Contacts section of thismanual.
Once you are at the CMN website, select the Eelgrass BedMapping Atlas. Log in using your user name andpassword.
Zoom into the area of the coast where you were mapping using the zoom tool. Click anddrag over the area you wish to zoom into and release. The map will zoom in.
Select the Data Entry button. A suite of tools will pop up. Use the pull down menu SelectFeature Type to Digitize and choose GPS Point.
You will be able to enter coordinates based on your field collected GPS data points.
39
Note that the data entry tool is in UTMcoordinates system. Therefore, if youhave not collected your data in UTM,you will have to convert your data pointsinto a UTM system.
Once you have entered all your data points, then you can proceed with connecting the data pointsto make a polygon. Use the eelgrass bed function to create a Polygon from your data points.
In the case where you have captured eelgrass along a shoreline, you could select the Shoreline(line) option to digitize the shoreline where the eelgrass was mapped along.
In the case where the eelgrass was found in small patches less than 10m by 10m, you may havejust captured one data point. Just leave these data points as point data.
Where you have found eelgrass in linear patches, use the line tool to connect the data points thatyou mapped.
Once you have completed your data entry, you can use the Add Attributes or Source buttons tofill out fields that contain information on eelgrass bed attributes, information and metadata tocomplete your eelgrass survey report.
You can also choose to add an ArcViewshapefile, point or line file directly to the EelgrassMapping Atlas. Stay tuned for directions on thisfeature!
40
9. Contacts
Community Mapping Network Contact:
Brad Mason
Senior Habitat Inventory BiologistOceans/Watershed Planning and
Restoration DivisionHabitat and Enhancement Branch
Suite 200 - 401 Burrard StreetVancouver, BC V6C 3S4
tel: (604)666-7015fax: (604)666-0292
email: [email protected]
Related Documents