DP-85 Arranger digital piano user manual

Welcome message from author
This document is posted to help you gain knowledge. Please leave a comment to let me know what you think about it! Share it to your friends and learn new things together.
Transcript

DP-85 Arrangerdigital piano
user manual

Musikhaus Thomann e.K.
Treppendorf 30
96138 Burgebrach
Germany
Telephone: +49 (0) 9546 9223-0
E-mail: [email protected]
Internet: www.thomann.de
20.07.2012

Table of contents
1 General notes............................................................................................................................ 5
2 Safety instructions................................................................................................................. 6
3 Features....................................................................................................................................... 8
4 Setup guide................................................................................................................................ 9
5 Operating elements and connections........................................................................ 13
6 Connection options............................................................................................................. 16
7 Switching on / off and basic operation...................................................................... 177.1 Switching the digital piano on................................................................................. 177.1.1 Normal switching on / off....................................................................................... 177.1.2 Keystroke combinations for reset functions ................................................... 177.2 Setting the volume....................................................................................................... 187.3 Setting the sound brightness................................................................................... 187.4 Demo songs.................................................................................................................... 19
8 Functions.................................................................................................................................. 208.1 Voices and effects......................................................................................................... 208.1.1 Selecting voices ......................................................................................................... 208.1.2 Dual mode.................................................................................................................... 208.1.3 Split mode.................................................................................................................... 218.1.4 DSP effect..................................................................................................................... 218.1.5 Touch sensitivity........................................................................................................ 218.1.6 Transposing................................................................................................................. 228.1.7 Piano.............................................................................................................................. 228.2 Style operation............................................................................................................... 238.2.1 Selecting a style......................................................................................................... 238.2.2 Accompaniment function...................................................................................... 248.2.3 Starting a style............................................................................................................ 248.2.4 Fill A/B............................................................................................................................ 268.2.5 Ending a style.............................................................................................................. 268.2.6 Fade................................................................................................................................ 278.2.7 Tempo............................................................................................................................ 288.2.8 Accompaniment volume........................................................................................ 288.2.9 Metronome.................................................................................................................. 288.2.10 Chord detection...................................................................................................... 298.3 Function menu............................................................................................................... 328.3.1 Fine tuning................................................................................................................... 338.3.2 Beat................................................................................................................................. 338.3.3 Split point..................................................................................................................... 338.3.4 Pedal assignment...................................................................................................... 348.3.5 Reverb level................................................................................................................. 348.3.6 Chorus level................................................................................................................. 348.3.7 MIDI settings............................................................................................................... 35
Table of contents
DP-85 Arranger
3
8.4 Mixer menu..................................................................................................................... 358.5 Memory............................................................................................................................ 368.5.1 Memory banks............................................................................................................ 368.5.2 Memory data............................................................................................................... 368.5.3 Storing & loading parameters............................................................................... 378.6 One touch setting......................................................................................................... 388.7 Record, playback, deletion........................................................................................ 388.7.1 Song recording........................................................................................................... 398.7.2 Recording playback.................................................................................................. 408.7.3 Delete a recording..................................................................................................... 408.7.4 Style recording........................................................................................................... 418.8 Songs for practising..................................................................................................... 488.9 Chord dictionary............................................................................................................ 518.10 SD memory card......................................................................................................... 528.10.1 Playback..................................................................................................................... 538.10.2 Loading....................................................................................................................... 548.10.3 Saving ......................................................................................................................... 558.10.4 Deleting ..................................................................................................................... 568.10.5 Formatting ................................................................................................................ 568.10.6 Entering file name................................................................................................... 568.11 MIDI functions............................................................................................................. 578.11.1 What is MIDI?............................................................................................................ 578.11.2 USB connection....................................................................................................... 588.11.3 MIDI connection...................................................................................................... 588.11.4 MIDI applications ................................................................................................... 588.12 Troubleshooting......................................................................................................... 59
9 Voice list.................................................................................................................................... 60
10 Styles list................................................................................................................................... 67
11 Practice and demo songs.................................................................................................. 70
12 Chord list.................................................................................................................................. 72
13 MIDI implementation chart............................................................................................. 74
14 Technical specifications.................................................................................................... 77
15 Protecting the environment........................................................................................... 78
Table of contents
digital piano
4

1 General notes
This user manual contains important information on safe operation of the device.Read and follow all safety notes and all instructions. Save this manual for future refer‐ence. Make sure that it is available to all persons using this device. If you sell thedevice to other users, be sure that they also receive this manual.
Our products are subject to a process of continuous development. We thereforereserve the right to make changes without notice.
This section provides an overview of the symbols and signal words used in this usermanual.
Signal word Meaning
DANGER! This combination of symbol and signalword indicates an immediate dangeroussituation that will result in death orserious injury if it is not avoided.
CAUTION! This combination of symbol and signalword indicates a possible dangerous sit‐uation that can result in minor injury if itis not avoided.
NOTICE! This combination of symbol and signalword indicates a possible dangerous sit‐uation that can result in material andenvironmental damage if it is notavoided.
Warning signs Type of danger
Warning – high-voltage.
Warning – danger zone.
Symbols and signal words
General notes
DP-85 Arranger
5

2 Safety instructions
This device is intended to be used for electronic sound generation using a piano key‐board. Use the device only as described in this user manual. Any other use or useunder other operating conditions is considered to be improper and may result in per‐sonal injury or property damage. No liability will be assumed for damages resultingfrom improper use.
This device may be used only by persons with sufficient physical, sensorial, and intel‐lectual abilities and having corresponding knowledge and experience. Other personsmay use this device only if they are supervised or instructed by a person who isresponsible for their safety.
DANGER!Danger for childrenEnsure that plastic bags, packaging, etc. are disposed of properly andare not within reach of babies and young children. Choking hazard!
Ensure that children do not detach any small parts (e.g. knobs or thelike) from the unit. They could swallow the pieces and choke!
Never let children unattended use electrical devices.
DANGER!Electric shock caused by short-circuitAlways use proper ready-made insulated two-wire mains cabling(power cord). Do not modify the mains cable or the plug. Failure to doso could result in electric shock/death or fire. If in doubt, seek advicefrom a registered electrician.
DANGER!Electric shock caused by high voltages insideWithin the device there are areas where high voltages may be present.Never remove any covers.
There are no user-serviceable parts inside.
CAUTION!Possible hearing damageWith loudspeakers or headphones connected, the device can producevolume levels that may cause temporary or permanent hearing impair‐ment.
Do not operate the device permanently at a high volume level.Decrease the volume level immediately if you experience ringing inyour ears or hearing impairment.
Intended use
Safety
Safety instructions
digital piano
6
CAUTION!Risk of injury due to heavy weightDue to the heavy weight of the device, at least two persons are requiredfor transport and installation.
NOTICE!Operating conditionsThis device has been designed for indoor use only. To prevent damage,never expose the device to any liquid or moisture. Avoid direct sunlight,heavy dirt, and strong vibrations.
NOTICE!Power supplyBefore connecting the device, ensure that the input voltage (AC outlet)matches the voltage rating of the device and that the AC outlet is pro‐tected by a residual current circuit breaker. Failure to do so could resultin damage to the device and possibly injure the user.
Unplug the device before electrical storms occur and when it is unusedfor long periods of time to reduce the risk of electric shock or fire.
Safety instructions
DP-85 Arranger
7

3 Features
Special features of the digital piano:
n Keyboard: 88 weighted keys with hammer action and adjustable touch response.n Operation: user friendly controls and [+/–] buttons for parameter and menu
selection.n Voices: 559 voices in total. 28 voices can be selected directly.n Styles: 203 styles in total, including three user styles. 16 styles can be selected
directly.n Practise songs: 100 practise songs in total, each with self-learn function.n Demo songs: two demo songs in total.n Chord modes: single chord and fingered chord.n Learn mode: three steps, left and right selectable, including analysis.n Chord dictionary: the function assists you in learning the chords.n Record: 3 user songs, each incl. one accompaniment track and five melody tracks
can be recorded.n Style record: 3 user styles, each one includes 8 paragraphs, each paragraph
includes 8 tracks.n SD card support: for storing and loading of songs, styles and memory data.n Memory: 8 banks, 6 slots each.n Style control: Sync Start, Sync Stop, Start/Stop, Fill In A/Normal, Fill In B/Variation,
Intro/Ending, Fade In/Out, chord mode.n Further functions: fine tuning, beat counting, splitable keyboard, dual mode,
pedal selection, reverb level, chorus level, MIDI IN/OUT, metronome, One-Touch-Setting (O.T.S.) for sound presetting, transposing, accompaniment, etc.
n Mixer: volume control for Rhythmus_s, Rhythmus_m, Bass, polyphonic melody 1,polyphonic melody 2, polyphonic melody 3, phrase 1, phrase 2, SD card play‐back.
n Connections: MIDI IN/OUT, USB, AUX. OUT (left and right), headphones.n Pedals: sustain pedal (permanent), sostenuto pedal (permanent), multifunctional
pedal (switchable: soft, start/stop, memory selection).
Features
digital piano
8

4 Setup guide
You need a Phillips screwdriver (not supplied) to assemble the stand. Open the pack‐aging and please make sure prior to assembly that you have the full scope of deliveryavailable as listed below.
1. Piano housing 7. Screws 6 ´ 24 (4 pcs.)
2. Right side panel 8. Screws 4 ´ 15 (5 pcs.)
3. Left side panel 9. Adhesive cable holder (2 pcs.)
4. Rear wall 10. Power cable
5. Pedal box 11. Screws 6 ´ 12 (2 pcs.)
6. Handscrew (4 pcs.) 12. Pedal cable
Setup guide
DP-85 Arranger
9

1. Assemble the piano near a wall power outlet.
2. Proceed according to the illustrations and exclusively use the supplied screws.Using other screws could damage the piano housing or result in a reduced sta‐bility of the piano.
2. n (6) Handscrews (4 pcs.)n (7) Screws 6 ´ 24 (4 pcs.)n (8) Screws 4 ´ 15 (5 pcs.) andn (11) Screws 6 ´ 12 (2 pcs.) for rear wall mounting
3. Set the pedal box (5) between the left and right side panel ((2) and (3)) and use2 screws M 6 ´ 25 (7) on each side to affix both side panels to the pedal box.
4. Attach the rear wall with 5 screws 4 ´ 15 (8) to the pedal box (5) and with twoscrews 6 ´ 12 (11) to the rear sides of the side panels ((2) and (3)).
Mechanical setup
Setup guide
digital piano
10

5. Put the piano housing on the stand and affix it using the four hand screws (6).
6. Attach the two adhesive cable holder as shown here on the base. Connect theDIN plug of the pedal cable to the PEDAL jack on the rear panel of digitalpiano. Attach the cable to the cable holder. Move the digital piano to its desig‐nated location.
Setup guide
DP-85 Arranger
11

1. Make sure the unit is switched off before connecting it to the power supply ordisconnecting it.
2. Turn the volume knob counter-clockwise to minimum before connecting thedigital piano to the power supply or to other devices. This is to protect thespeakers from damage.
3. Plug the AC power cord into a properly wired mains wall outlet.
Connecting voltage supply
Setup guide
digital piano
12

5 Operating elements and connections
1 Rotary control BRILLIANCE to adjust the brightness of the sound.
2 Rotary control VOLUME to adjust the volume.
3 Direct selection buttons for STYLES.
4 [TEMPO +]/[TEMPO –] buttons to increase/decrease the tempo.
5 [ACCOMP +]/[ACCOMP –] buttons to adjust the volume of the accompani‐ment.
6 [TRANSPOSE +]/[TRANSPOSE –] buttons to transpose the note values.
7 LED FINGERED lights up when the single-finger chord mode is activated.
8 LED FULL RANGE lights up when the full-finger chord mode is activated.
Operating elements and connections
DP-85 Arranger
13

9 Buttons for operating mode STYLES
n START/STOP n SYNC/STOPn SYNC/START n INTRO/ENDINGn FILL A n FILL B n FADEn CHORD MODE
Buttons for operating mode SONG
n START/STOP n PAUSE n REPEAT A/Bn REW n FF
10 LCD.
11 [L] button for left hand selection.
12 [R] button for right hand selection.
13 [CHORD DICT.] button to call the chord dictionary function.
14 [LESSON] button to call the learn mode.
15 [BACK] button: function select back.
16 [NEXT] button: function select next.
17 [MIXER] button to adjust the volume of the individual components.
18 [BANK] button to select the memory bank.
19 Storage buttons for the memory slots [M1] to [M6].
20 Storage buttons [M1] to [M4] for O.T.S sound presetting.
21 [O.T.S.] button (One-Touch-Setting) for sound presetting.
22 [STYLE] to call the STYLE mode. Press the [STYLE] and [VOICE] buttons simulta‐neously for demo song playback.
23 [VOICE] button to call the VOICE mode. Press the [STYLE] and [VOICE] buttonssimultaneously for demo song playback.
24 [SONG] button for practising song playback.
25 [PIANO] button to call the normal piano mode.
26 Taste [METRONOME] to call the metronome function.
27 Jog dial to select functions, parameters and values.
28 [–/NO] button.
29 [+/YES] button.
30 ‘VOICES’ area: direct selection buttons for voices.
31 [STYLE RECORD] buttons to record styles.
Operating elements and connections
digital piano
14

32 The sequencer for recording and playback of melody and accompanimenttracks is operated by these buttons:
n [RECORD]n [PLAY/STOP]n [ACCOMP]n [MELODY 1]n [MELODY 2]n [MELODY 3]n [MELODY 4]n [MELODY 5]
33 [DUAL] button to call the dual mode (two voices at the same time).
34 [SPLIT] button to call the split mode function (two different voices for dif‐ferent keyboard areas).
35 [DSP] button to call various effects.
36 [TOUCH] button to adjust the touch sensitivity.
37 [SD MENU] button to call the SC card menu.
38 [SD EXECUTE] button to confirm/execute SD card menu options.
39 SD card slot.
USB USB/MIDI interface
For the connection of a computer.
PEDAL Connect the pedal plug to the ‘PEDAL’ socket on the rear panel of thedevice. Then you can use the respective pedal effects.
MIDI IN MIDI IN interface
Connection for the MIDI OUT of another MIDI device.
MIDI OUT MIDI OUT interface
Connection for the MIDI IN of another MIDI device.
AUX. OUT:L – R
Outlet for external audio devices like active speakers or amplifiers.
In the manual, the keys of the keyboard are named according to the following figure.
Rear panel connections
Keyboard
Operating elements and connections
DP-85 Arranger
15

6 Connection options
To the left beneath the keyboard you find the headphones outlets 1 and 2.
Connecting headphones (not supplied) to outlet 2 mutes the speakers.
Using outlet 1 maintains the sound output through the speakers.
n USB/MIDI interfaceMidi data will be sent and received via the USB/MIDI interface.
Connect the pedal plug to the PEDAL socket on the rear panel of the unit. Then youcan use the respective pedal effects.
n MIDI connectionsMIDI stands for ‘Musical Instrument Digital Interface’ and represents a world widestandard for the communication of numerous electronic instruments and soundmodules.– MIDI IN: the device receives MIDI data from other devices through this port.
– MIDI OUT: MIDI data from the digital piano are sent to other MIDI devicesthrough this port.
Use the AUX. OUT sockets to connect the digital piano to an amplifier, stereo device,mixing console or recording device. For stereo operation, connect these externalaudio devices to the AUX OUT L – R sockets. For mono operation, connect only one ofthe sockets. Connect the AUX. OUT sockets on the rear panel of the digital piano tothe input of the respective audio device.
NOTICE!Before connecting other devices to the digital piano turn the volume tominimum to avoid damage to the speakers.
Headphones
Computer
Pedal
MIDI interfaces
External audio devices
Connection options
digital piano
16

7 Switching on / off and basic operation
7.1 Switching the digital piano on
7.1.1 Normal switching on / off
Press the POWER ON/OFF switch to the left of the keyboard to switch the digitalpiano on or off.
7.1.2 Keystroke combinations for reset functions
1. To delete all recorded data, keep the [RECORD] and [PLAY/STOP] buttonspressed while switching the unit on.
2. To reset all memory data to the factory defaults, keep the [STORE] and [M1]buttons pressed while switching the unit on.
3. To reset all settings including memory data, recordings and recorded style datato the factory defaults, keep the [+/YES] and [–/NO] buttons pressed whileswitching the unit on.
Switching on / off and basic operation
DP-85 Arranger
17

7.2 Setting the volume
Use the rotary control VOLUME to adjust a comfortable volume for playback andpractising. Turn the knob clockwise to increase the volume, turn it counter-clockwiseto decrease the volume.
7.3 Setting the sound brightness
Use the rotary control BRILLIANCE to adjust the sound brightness of the digital piano.Turn the knob clockwise for a brighter and more brilliant sound of the whole keyrange. Turn it counter-clockwise for a more mellow and darker sound.
Switching on / off and basic operation
digital piano
18

7.4 Demo songs
There are two demo songs in total.
1. Press the [STYLE] and [VOICE] buttons simultaneously to start the DEMO mode.The display shows ‘DEMO’ . The first demo song is displayed and both demosongs are played in an endless loop.
2. Press the [STYLE] and [VOICE] buttons again or press the [ START/STOP] buttonto stop playback and to exit the current mode.
3. Use the [+/YES] and [ –/NO] buttons or the jog dial to select the desired songduring playback.
Switching on / off and basic operation
DP-85 Arranger
19

8 Functions
8.1 Voices and effects
8.1.1 Selecting voices
The digital piano offers 559 voices in total.
1. 28 voices can be called by direct select keys. Each direct VOICES select keygives access to 2 different voices. Press once to select the voice that is specifiedabove the key, press twice to select the voice that is specified below the key.
2. When powering on, the display shows ‘VOICE R1’ and the name of voice # 001.
3. To select another voice press the desired direct select key, use the [+/YES] or[–/NO] buttons or turn the jog dial.
If you activate the VOICE mode for the first time by pressing the [VOICE]button the display shows ‘VOICE R1’ (right hand voice). Press the [VOICE]button repeatedly to sequentially activate the following additional modes=> ‘VOICE R2’ (second right hand voice in Dual Mode) => ‘VOICE L’ (lefthand voice) => ‘VOICE R1’ (right hand voice).
8.1.2 Dual mode
In dual mode, you can play two voices simultaneously. When dual mode is off, ‘VOICER1’ is displayed. When dual mode is on, ‘VOICE R2’ is displayed.
1. Press the [DUAL] button to activate the Dual mode. The indicators ‘VOICE R2’and ‘DUAL’ then light up simultaneously. The number and name of the voice‘VOICE R2’ appear in the display. Now you hear two voices simultaneouslywhen pressing a key.
2. Press the buttons [+/YES] or [–/NO] or turn the jog dial to select the desiredvoice. The preset voice in Dual mode is no. ‘265 The Strings’ .
3. Press the [DUAL] button again to exit the dual mode. ‘VOICE R2’ is deactivatedand you only hear the voice selected for ‘VOICE R1’ .
In keyboard split mode, the Dual mode only affects the keys to the right ofthe split point. Then use the area left of the split point for playing chords.
Functions
digital piano
20

8.1.3 Split mode
This function lets you assign different voices to different keyboard areas.
1. Press the [SPLIT] button to activate the Split mode and the left hand voice. Theindicators ‘VOICE L’ and ‘SPLIT’ then appear in the display simultaneously. Thenumber and name of the voice VOICE L appear in the display. You can activatethe Split mode during playing by pressing this button.
2. Press the buttons [+/YES] or [–/NO] or turn the jog dial to select the desiredvoice. The preset voice in Split mode is no. ‘265 The Strings’ .
3. Press the [SPLIT] button again to exit the Split mode. The ‘SPLIT’ display turnsoff.
8.1.4 DSP effect
The DSP function lets the piano sound richer and more expressive.
1. DSP is activated by default and the ‘DSP’ indicator lights up in the display.Press the [DSP] button to select the four DSP settings available (DSP 1/2/3/off).The standard setting is ‘2’ . Select ‘OFF’ to deactivate the DSP effect. The ‘DSP’indicator turns off then.
2. Repeatedly press the [DSP] button to change this setting. Use the Reverb andChorus control to adjust the respective effect. (for details see Ä Chapter 8.3.5‘Reverb level’ on page 34 and Ä Chapter 8.3.6 ‘Chorus level’ on page 34).
8.1.5 Touch sensitivity
This function lets you adjust the touch response of the keyboard in four steps.
Parameter Description
‘OFF’ Touch sensitivity is off, very recommendablewhen playing the organ voice.
‘001’ Soft
In this setting, the volume is higher than usualeven when playing with a soft touch.
Functions
DP-85 Arranger
21

Parameter Description
‘002’ Normal
This setting corresponds to the usual touchresponse of a keyboard.
‘003’ Hard
In this setting, the volume is lower than usualeven when playing with a hard touch.
1. Press the [TOUCH] button. The display shows ‘Touch’ and the setting ‘002’ isbriefly indicated.
2. Press the [TOUCH] button repeatedly to choose from the four settings.
3. When selecting ‘OFF’ , the ‘TOUCH’ indicator turns off and the touch responsefunction is deactivated.
8.1.6 Transposing
This function lets you adjust the keyboard pitch in 12 semitone steps up or down.
1. First, press the [TRANSPOSE +] or [TRANSPOSE –] button to open the TRANS‐POSE menu. The display briefly shows the current setting.
2. Press one of these buttons again to shift the pitch up or down. You can alsouse the [+/YES] or [–/NO] buttons or the jog dial to do so. The default value is‘000’ .
3. Press the buttons [TRANSPOSE +] and [TRANSPOSE –][+] simultaneously torestore the preset ‘0’ (no transposing).
If you don't press a button for five seconds after opening the TRANSPOSEmenu, it will be automatically cancelled.
8.1.7 Piano
1. Press the [PIANO] button to activate the normal Piano playing mode. This auto‐matically ends the Chord mode and the entire keyboard sounds with the pianovoice.
Functions
digital piano
22

2. Press the [PIANO] button again to exit the current mode. To exit the Pianomode, you can also press the following buttons:
2. n [VOICE] and [STYLE] simultaneouslyn [SONG]n [DUAL]n [SPLIT]n [M1] to [M6].
3. You can select and play a style by first pressing the [STYLE] button and thenone of the STYLES direct select buttons. The display shows the style name. Ini‐tially, the accompaniment function plays the drum track only. The instrumentvoices join in as soon as you press a piano key and start your playing.
8.2 Style operation
The digital piano comprises of 203 styles (001 to 203) in total, including three userstyles. Style ‘001’ is preset by default.
8.2.1 Selecting a style
1. Press the [STYLE] button to select the STYLE mode. The display shows ‘STYLE’and the selected number.
2. Press the buttons [+/YES] or [–/NO] or use the jog dial to select the desiredstyle.
3. Direct select buttons:
3. You can also select the desired style using the direct select buttons. Two stylesare assigned to each direct select button, specified above and below eachbutton.
3.– Press the same button twice to toggle between upper and lower
style.– If you press another direct select button, the style is activated
depending on whether an upper or lower style was selectedbefore.
Functions
DP-85 Arranger
23

8.2.2 Accompaniment function
The accompaniment function is controlled by five parameters: INTRO, NORMAL, VAR‐IATION, FILL (A-A, A-B, B-A, B-B) and ENDING.
1. INTRO
1. To add an intro, press the [INTRO/ENDING] button before starting to play.Depending on the selected style, the rhythm starts with two to four bars, fol‐lowed by the main section.
2. NORMAL and VARIATION
2. There are two main sections: normal and variation. Depending on the style,each section consists of 2 to 4 bars.
3. FILL
3. With activated accompaniment, you can press the button [A] or [B] to insert arhythm and accompaniment part.
4. ENDING
4. If you press the button [INTRO/ENDING] while accompaniment is activated, anending section appropriate for the accompaniment is inserted that ends theperformance.
8.2.3 Starting a style
1. Instant start
1. Press the [START/STOP] button to start the style.
2. Chord mode
2. Press the [CHORD MODE] button once to activate the single-finger mode. The‘FINGERED‘ LED lights up. The area left to the split point is now considered tobe the chord area. When you play the chord with one finger, both the bass andthe chord voice will sound simultaneously.
2. Press the [CHORD MODE] button twice to activate the FULL RANGE mode. Thecorresponding LED lights up. Now the whole keyboard is considered as thechord area, but only for chord detection (see Ä Chapter 8.2.10 ‘Chord detection’on page 29). The set voice can now be played on the entire keyboard.
2. There are two ways to detect the chord: single finger detect and fingeredchord. If the chord is played according to the chord dictionary the chord is con‐sidered to be recognized and is output accordingly. If not, single finger chordwill be recognized.
2. Press the [CHORD MODE] button a third time to exit the chord mode.
Functions
digital piano
24

3. SYNC START
3. Press the [SYNC START] button.
ð Die LED 'SYNC START' lights up and ‘BEAT 1’ to ‘BEAT 4’ are flashing in thedisplay according to the current tempo. Press the [INTRO/ENDING] buttonto insert an intro. If you play the piano in this mode the style is automati‐cally started.
– If the chord mode is deactivated press any key on the key‐board to start the style.
– If the chord mode is activated press any key of the chordarea to start the style with automatic bass and chord accom‐paniment.
4. INTRO/ENDING
4. If no style is playing, press the [INTRO/ENDING] button.
ð ‘A’ or ‘B’ is flashing in the display. This shows, the intro is ready to play.The length of the intro varies in different styles. Press the [START/STOP]button, then the intro is started followed by the main section.
Functions
DP-85 Arranger
25

8.2.4 Fill A/B
Use this function to add fill bars.
1. In NORMAL mode, press the [A] button to insert one fill bar. ‘A’ is flashing inthe display. When the bar has ended the piano returns to NORMAL mode.
2. In NORMAL mode, press the [B] button to insert one fill bar. ‘B’ is flashing in thedisplay. When the bar has ended the piano changes to the VARIATION mode.
3. In VARIATION mode, press the [B] button to insert one fill bar. ‘B’ is flashing inthe display. When the bar has ended the piano returns to VARIATION mode.
4. In VARIATION mode, press the ‘A’ button to insert one fill bar. ‘A’ is flashing inthe display. When the bar has ended the piano changes to the NORMAL mode.
– If you keep the button [A] or [B] pressed while a style is playing, theselected fill pattern is played until you release the button.
– Press the [A] button after style playback has ended. Then the change tothe NORMAL section takes place and ‘A’ lights up in the Display.
– Press the [B] button after style playback has ended. Then the change tothe VARIATION section takes place and ‘B’ lights up in the Display.
8.2.5 Ending a style
1. Instant ending
1. You can exit the accompaniment function any time by pressing the[START/STOP] button.
2. Ending
2. Press the [INTRO/ENDING] button to finish the performance with an ending.The style stops after the ending.
Functions
digital piano
26

3. SYNC STOP
3. When chord mode is active and the style is not playing, press the [SYNC STOP]button. Then the LEDs 'SYNC STOP' and 'SYNC START' light up. In this mode,press any key left of the split point to start the style playing. Release the key tostop style playback.
3. When the 'SYNC STOP' LED is lit and a style is playing, press the [SYNC STOP]button. The 'SYNC STOP' LED then turns off. In this mode, the style is played inan endless loop.
SYNC STOP is only activated, if the CHORD MODE indicator is lit.
8.2.6 Fade
1. FADE IN
1. Press the [FADE] button when style is not playing. The FADE LED lights up.
1. The FADE LED glows after style playing begins and the style volume will beincreased within 10 seconds from 0 to maximum. Subsequently, the style willbe played normally. The FADE LED turns off.
1. If you press the [FADE] button again during the FADE OUT the FADE LED glowsand the style volume will be increased from the current level to maximum.Subsequently, the style will be played normally. Die FADE LED turns off.
2. FADE OUT
2. Press the [FADE] button during style playing. The FADE LED glows and the stylevolume will be decreased from maximum to 0. Subsequently, the style playingends.
2. If you press the [FADE] button again during the FADE IN the piano changes toFADE OUT and the volume will be decreased from the current level to 0. Thenstyle playing ends and the FADE LED turns off.
2. Press the [FADE] button again during the FADE OUT and the piano will changeto FADE IN. Then the volume will be increased from the current level to max‐imum. Subsequently, the style will be played normally. The FADE LED turns off.
Functions
DP-85 Arranger
27

8.2.7 Tempo
1. Press the buttons [TEMPO+]/[TEMPO–], [+/YES ]/[–/NO] or turn the jog dial toadjust the tempo within a range of 30 to 280 bpm.
2. Press the buttons [TEMPO+]/[TEMPO–] simultaneously to reset the tempo tothe preset default value.
– When Style is not active, the tempo will be set automatically to thedefault value along with the style.
– When style is active, the tempo will not change with the style you select.
8.2.8 Accompaniment volume
1. Press the buttons [ACCOMP+] or [ACCOMP–] to adjust the volume in styleplaying. The display shows the Accompaniment volume in a range of 0 to 31.The default value is 28.
2. If you press the buttons [ACCOMP+] and [ACCOMP–] simultaneously theaccompaniment track will be muted.
3. Press the buttons [ACCOMP+] and [ACCOMP–] simultaneously again to unmutethe accompaniment track.
8.2.9 Metronome
1. Press the [METRONOME] button to activate the metronome. You can select thebeat in the functions menu.
2. Press the [METRONOME] button again to turn the metronome off.
3. If the style mode is deactivated the beat follows the selection in the functionsmenu after turning on the metronome. If style mode is activated the beat set‐ting follows the current style.
4. The metronome can be activated together with the style. If the style plays atfirst, the metronome will be enabled with the next bar. On the other hand, themetronome responds at once to the first beat of the style.
Functions
digital piano
28

8.2.10 Chord detection
The 'Auto Bass Chord' function (A.B.C.) is turned off by default. Press the[CHORD MODE] button to turn 'A.B.C.' on. The keyboard area left to the split point isalready known as the chord area. When you now play a chord, bass and chord voicewill sound together.
As the A.B.C. chord detection is based on the root note of the chord, somechords that could be played according to the chord dictionary may not berecognised by A.B.C., such as B6, Bb6, Bb6(9), B6(9), Baug, Bbaug, Bbm6, Bm6,Adim7, Bbdim7, Bdim.
Functions
DP-85 Arranger
29

If the chord played is based on the illustration for multi-finger chords below, it will bedetected as a 'multi-fingered' chord. If not, it will be detected as a 'single-finger'chord.
n 'Single-finger' chordsUsing this method, you can play chords with just one, two or three fingers withinthe possibilities of the accompaniment function. In the following, we list someexamples for single-finger chords ©, Cm, C7 and Cm7).
Press the keys left to the split point with the A.B.C. function activated. Thechords are recognized as single-finger chords.
n 'Multi-fingered' chordUsing this method, you can play chords with just one, two or three fingers withinthe possibilities of the accompaniment function. In the following we list someexamples for single-finger chords ©, Cm, C7 and Cm7).Using this method, you can play chords with normal fingering within the possi‐bilities of the accompaniment function. In the following we list 32 chords usingC-chords as example.
Two ways to detect the chord: 'singlefinger detect' and 'multi-finger detect'
Functions
digital piano
30

n Chord basicsA chord consists of three or more notes played together. The most commonchord is the triad consisting of three notes: root, third and fifth of the corre‐sponding scale. The C-major chord, for example, is formed from the notes C(root), E (the third note of the C major scale) and G (the fifth note of the C majorscale). In the shown chord C major, the lowest note is the root note (this is thebasic form of the chord - if you play other notes of the chord as the lowest note,this is called 'chord inversion'). The root note is the central tone of the chord onwhich the other chord notes are based. The distance (interval) between adjacentnotes and the root note determines whether the result will be a third major orminor.
n Chordal structureThe lower interval in our triad (between the root and third) determines whetherthe result will be a major or minor triad. In addition, we can get the highest noteby a half step up or down to create two additional chords.The basic characteristic of the triad is obtained, even if we change the order ofnotes to create different inversions. Successive chords can be linked together in asoft chord progression, e.g. by selecting appropriate chord inversions (also called'voicings').
Functions
DP-85 Arranger
31

n Chord namesChord names tell you just about everything you need to know about a chord.The chord name tells you the root note, whether it is major, minor or diminishedchord, whether it requires a major or flatted seventh and what alterations or ten‐sion are used - everything at a glance.
n Some chord types
8.3 Function menu
Press the [FUNCTION/NEXT] or [FUNCTION/BACK] button to call the function menu.The first function shown after starting the menu is always ‘Tune’ (fine tuning). Pressthe [FUNCTION/NEXT] or [FUNCTION/BACK] button to select the desired option. Thenchange the parameter using the jog dial or the buttons [ +/YES] or [–/NO]:
Option Display Value range Default value
Fine tuning 000 Tune –50 to +50 000
Beat 004 Beat 000, 002 to 009 004
Split point 0034 Split Pt 001 to 088 0034
Pedal assignment 001 Ped Soft SOFT, MEM, ST/STOP
SOFT (001)
Reverb level 0030 Rvb Lev 000 to 127 030
Chorus level 000 Cho Lev 000 to 127 000
MIDI receive chan‐nels
ALL Receive 001 to 016, ALL ALL
MIDI send chan‐nels
001 Transmit 001 to 016 001
Functions
digital piano
32

If you don't press a key within five seconds after you enter the functionmenu, the menu will close automatically.
8.3.1 Fine tuning
Use this function to fine tune the entire keyboard in cent increments.
The display shows the current setting. Use the jog dial or the buttons [ +/YES]or [–/NO] to change the tuning within a range of –50 to +50 cents. Each key‐stroke changes the value by 1 cent. Press the buttons [ +/YES] or [–/NO] simul‐taneously to reset the tuning to the preset value.
8.3.2 Beat
This function sets the beat value in a range of 0 to 9.
The display shows the current setting. Use the jog wheel or the buttons[ +/YES] or [–/NO] to change the beat.
8.3.3 Split point
This function lets you set the point that separates the entire keyboard into two sec‐tions.
1. The display shows the current setting.
2. Use the jog wheel or the buttons [ +/YES] or [–/NO] to change the split point.You can also just press the key you would like to set as split point. The keysright to the split point are considered to be the right hand area, the oppositeside is the left hand area (chord area).
Functions
DP-85 Arranger
33

8.3.4 Pedal assignment
Use this option to set the function of the multifunctional pedal: soft, memory selector start/stop. Soft function is preset.
1. The display shows the current setting.
2. Use the jog wheel or the buttons [ +/YES] or [–/NO] to assign the desired func‐tion to the multifunctional pedal.
2. n ‘Ped Soft’Soft pedal.
n ‘Ped Mem’Step on the pedal to load the next memory parameter.
n ‘Ped ST/S’If you choose this option, the pedal has the same function as the[START/STOP ] button.
8.3.5 Reverb level
1. The display shows the current setting. The value range goes from 0 to 127. Thedefault value depends on the respective voice.
2. Use the jog wheel or the buttons [ +/YES] or [–/NO] to change the reverb level.
8.3.6 Chorus level
1. The display shows the current setting. The value range goes from 0 to 127. Thedefault value depends on the respective voice.
2. Use the jog wheel or the buttons [ +/YES] or [–/NO] to change the chorus level
Functions
digital piano
34

8.3.7 MIDI settings
1. When set to ‘Receive’ you can specify on which MIDI channels the digital pianoreceives MIDI information from other devices. Use the jog wheel or the buttons[ +/YES] or [–/NO] to select the MIDI receive channel(s). The parameter rangeincludes channels 1 to 16, or ‘ALL’ for all channels. The default value is ‘ALL’ .
2. When set to ‘Transmit’ you can specify on which MIDI channel the digital pianosends MIDI information to other devices. Use the jog wheel or the buttons[ +/YES] or [–/NO] to select the MIDI send channel. The parameter rangeincludes channels 1 to 16. The default value for the MIDI send channel is ‘001’ .
8.4 Mixer menu
Use this menu to set the volume for the various style elements.
1. Press the [MIXER] button to call the mixer menu. By default, the first optionafter opening this menu is ‘Rhythm_s’ .
2. Press the [MIXER] button repeatedly to select the desired option. Subsequently,you can set the selected parameter using the jog dial or the buttons [ +/YES] or[–/NO].
If you don't press a key within five seconds after you've entered the mixermenu, it will close automatically.
Adjustable options and parameter
Option Display Value range Standard Description
Rhythm_s Volume 026 Rhythm_s 000 to 031 026 Percussion instrument 1
Rhythm_m Volume 026 Rhythm_s 000 to 031 026 Percussion instrument 2
Bass Volume 026 Bass 000 to 031 026 Bass
Chord 1 Volume 026 Chord1 000 to 031 026 Polyphonic melody 1
Chord 2 Volume 026 Chord2 000 to 031 026 Polyphonic melody 2
Chord 3 Volume 026 Chord3 000 to 031 026 Polyphonic melody 3
Phrase 1 Volume 026 Phrase1 000 to 031 026 Intermezzo1
Functions
DP-85 Arranger
35

Option Display Value range Standard Description
Phrase 2 Volume 026 Phrase2 000 to 031 026 Intermezzo 2
Voice R1 Volume 026 Voice R1 000 to 031 026 Right hand voice
Voice R2 Volume 010 Voice R2 000 to 031 020 Second right hand voice indual mode
Voice L Volume 010 Voice L 000 to 031 012 Left hand voice
SD MIDI PLAY Volume 020 Sd play 000 to 031 020 MIDI playback from SD card
8.5 Memory
You can store up to 48 complete control panel setups that you can recall wheneverneeded.
8.5.1 Memory banks
There are eight memory banks in total. Each bank contains six memory slots (M1 toM6).
1. Press the [BANK] button. The display shows ‘00x Mem Bank’ .
2. Use the jog wheel or the buttons [+/YES] or [–/NO] to select the desiredmemory bank.
8.5.2 Memory data
You can store the settings for the following functions as data in the memory:
n Right hand voice R1n Second right hand voice R2n Left hand voice Ln Stylen Tempon Functionn Mixern Accompaniment volume
Functions
digital piano
36

If the current memory data are changed, the corresponding memory indi‐cator in the display turns off.
8.5.3 Storing & loading parameters
1. Keep the [STORE] button pressed and press one of the buttons [M1] to [M6]simultaneously. Then the data will be stored in the respective memory slot (M1to M6). Please note that any previously stored data will be overwritten.
2. Press one of the buttons [M1] to [M6]. The data is then loaded from the corre‐sponding memory slot replacing the current settings.
If you keep the buttons [STORE] and [M1] pressed during powering up, thecurrent memory data will be saved as the default values.
Functions
DP-85 Arranger
37

8.6 One touch setting
One Touch Setting is a convenient feature that allows you to immediately recon‐figure all the settings with just one single keystroke. These are rhythm-based combi‐nations of instrument voices. With this function, four types of parameters can beloaded (M1 to M4).
1. Press the [O.T.S.] button to start this mode. ‘O.T.S.’ appears in the display. Pressone of the buttons [M1] to [M4]. Then the unit loads the respective parametertypes according to the current style. The A.B.C. mode is automatically turnedon thereby.
2. Press one of the buttons [M1] to [M4] that provides the desired setting.
3. Press the [O.T.S.] button again to exit the O.T.S. mode.
4. The standard parameter saved in the O.T.S. are:
n Right hand voice R1n Second right hand voice in dual mode R2n Left hand voice Ln R1 volumen R2 volumen Chorus leveln Reverb level
8.7 Record, playback, deletion
You can record three user songs with the digital piano, each containing six tracks(one accompaniment track and five melody tracks).
If you keep the buttons [RECORD] and [PLAY/STOP] pressed when switchingthe digital piano on, all recorded data is deleted.
Functions
digital piano
38

8.7.1 Song recording
1. Press the [RECORD] button to select a song. The display shows the current titleand the current memory slot.
2. Use the jog wheel or the buttons [+/YES] or [–/NO] to select the memory slotyou want to record to.
8.7.1.1 Steps in detail
1. Recording standby
1. Press the [RECORD] button again to enable the recording mode. ‘REC’ lights upin the display. ‘BEAT 1’ to ‘BEAT 4’ start flashing synchronously, thus indicatingthe recording standby mode. At the same time an empty track is automaticallyselected for recording and the corresponding track indicator ([MELODY 1] to[MELODY 5] or [ACCOMP]) are flashing. The selection order is [MELODY 1] to[MELODY 5], [ACCOMP]. If no unused track is available, [MELODY 1] is selected.Press one of the buttons [MELODY 1] to [MELODY 5] or [ACCOMP] to select thetrack to be recorded.
2. Start recording
2. When ‘BEAT 1’ to ‘BEAT 4’ are flashing in the display, press the [START/STOP]button or one of the piano keys to start the recording.
2.If you start recording, any existing data on the selected track will bedeleted.
3. Select tracks
3. The button illumination can show three different states during track selection:flashing, on or off.
n A flashing button indicates that a track has been selected for recording.n A lighting button indicates that a track already contains recordings. These
data will be played when recording another track.n If a buttons remains off, there are no data on this track or there are data
that are not supposed to be played during a recording.
3. Press one of the buttons [MELODY 1] to [MELODY 5] or [ACCOMP] to select thedesired track. The corresponding track is then indicated as described above.
3.– You can only record one melody track at a time. However, you
can record the accompaniment track along with one of themelody tracks.
– You can only record a style if it is activated via the [ACCOMP]button.
Functions
DP-85 Arranger
39

4. Stop recording
4. Press the [RECORD] button a third time to stop the recording. If you'rerecording an accompaniment track press the [INTRO/ENDING] button to finishthe recording after the ending section. The recording stops automaticallywhen the memory is full. In this case, ‘Full’ appears in the display.
4.
8.7.2 Recording playback
1. First, press the [PLAY/STOP] button to be able to select a recording. The displayshows the current title and the current number.
2. Use the jog wheel or the buttons [+/YES] or [–/NO] to select the song for play‐back.
3. Press the [PLAY/STOP] button again to start playing the selected song.
4. Press the [PLAY/STOP] button a third time to stop the playback. You can alsopress the [START/STOP] button to do so.
5. Use the buttons [MELODY 1] to [MELODY 5] or [ACCOMP] to activate or deacti‐vate the tracks individually for playback.
If you press the [ PLAY/STOP] button, but no recording exists, ‘NULL’ brieflyappears in the display.
8.7.3 Delete a recording
1. First, press the [PLAY/STOP] button to be able to select a recording
2. Use the jog wheel or the buttons [+/YES] or [–/NO] to select the song you wantto delete.
3. Press the [RECORD] button. The display shows ‘DelUser?’ .
4. Now press the [+/YES] button to delete the current song. The display shows‘OK!’ and all tracks are now deleted.
Functions
digital piano
40

8.7.4 Style recording
Use this function to create a new style by recording and editing one of the built-instyles. Three styles can be recorded and remain stored if you switch the digital pianooff. You can also save the recorded styles to an SD card.
Before starting to record, you first have to select the original style to start from.Choose this style from 200 styles that already exist or have been previously recordedby you.
The style has to be recorded by paragraph and by track. If you have recorded thetrack of a section, you can continue recording another track in the same or of anothersection.
Style structure
A style may consist of a maximum ofeight sections
Each section may contain a maximumof eight tracks
Main_A (main section A) Rhythm sub (rhythm subsidiary)
Main_B (variation B) Rhythm main
Intro _ M (major) Bass
Intro _ m (minor) Chord 1 (polyphonic melody 1)
Fill _ A (fill bar in A) Chord 2 (polyphonic melody 2)
Fill _ B (fill bar in B) Chord 3 (polyphonic melody 3)
Ending _ M (major) Phrase 1 (intermezzo 1)
Ending _ m (minor) Phrase 2 (intermezzo 1)
If you turn the digital piano off while recording the style, the recorded datawill be lost.
Functions
DP-85 Arranger
41

8.7.4.1 Starting style recording
1. Press the [STYLE RECORD] button. The display shows the current user style.
2. Use the jog wheel or the buttons [+/YES] or [–/NO] to select another user style.
3. Press the [FUNCTION/NEXT] button to activate the next menu. First, the ‘Record’menu appears in the display.
4. Use the jog dial or the buttons [+/YES] or [–/NO] to select the other menus, like‘Record’ , ‘Copy’ , ‘Quantify’ , ‘ Edit’ and ‘Delete’ .
5. If the selected user style is empty you can only select ‘Record’ or ‘Copy’ .
6. To exit the recording mode during style recording you can any time press the[STYLE RECORD] button. Data will not be saved then.
Functions
digital piano
42

8.7.4.2 New style recording
1. Select Level 1 in ‘Style Record’ menu.
2. Press the [FUNCTION/NEXT] button to open the ‘Record’ menu. The displayshows ‘Overdub’ .
2. Use the jog wheel or the buttons [+/YES] or [–/NO] to select the desired recordmode: ‘Overdub’ or ‘Replace’ .
2. In ‘Overdub’ mode, the newly recorded data will be added to the existing styledata. In ‘Replace’ mode, the existing style data will be overwritten with thenewly recorded data.
3. Press the [FUNCTION/NEXT] button to open the menu for style selection.
3. Use the jog wheel or the buttons [+/YES] or [–/NO] to select the original style.Use the [FUNCTION/BACK] button to get back to the previous menu.
4. Press the [FUNCTION/NEXT] button to open the menu to select a section. Usethe jog wheel or the buttons [+/YES] or [–/NO] to select the desired section ofthe style.
5. Press the [FUNCTION/NEXT] button to open the menu for track selection. Usethe jog wheel or the buttons [+/YES] or [–/NO] to select the desired track.
6. Press the [FUNCTION/NEXT] button to activate the recording standby mode.Style recording is now in synchronised start mode and ‘BEAT 1’ to ‘BEAT 4’ areflashing in the current tempo. Now you can use the jog dial, the buttons[+/YES] or [–/NO] or the direct select buttons to change the voice for the cur‐rent track. If you have selected the drum track, only drum kits are available. Usethe [FUNCTION/BACK] button to get back to the previous menu.
7. Press the [START/STOP] button so start recording. The style will be played in C7.The selected section of the original style is played as loop. Play your piano per‐formance. The recorded data of the current loop will be played again in thenext loop. You can correct a wrong note of the previous loop by playing thecorrect note in the next loop at the same time (with a tolerance of an 1/8 note)and thus overwriting the previous note.
8. Press the [START/STOP] button again to end the recording and return to thesynchronised recording standby mode.
9. Press the [STYLE RECORD] button to exit the current mode. You can also repeatthe described operating steps by pressing the [FUNCTION/BACK] button andreturn to the previous menu to select other options.
Functions
DP-85 Arranger
43

8.7.4.3 Style copy
1. Select the user style memory slot, on which the new style should be stored.Press the [FUNCTION/NEXT] button to open the selection menu. Use the jog dialor the buttons [+/YES] or [–/NO] to select the ‘Copy’ option.
2. Press the [FUNCTION/NEXT] button to open the menu for style selection. Usethe jog wheel or the buttons [+/YES] or [–/NO] to select the user style to becopied.
3. Press the [FUNCTION/NEXT] button to open the next menu. The display nowshows ‘Sure? ’ . Confirm using the [+/YES] button or press the [–/NO] button toreturn to the previous menu.
4. Press the [+/YES] button to finish the copy operation.
8.7.4.4 Style quantization
If you timing-wise did not manage to record as accurately as you would have liked to,the quantization helps to correct timing errors by adjusting the notes exactly to thebeat. We recommend you to choose the shortest note you've played as the basis forthe quantization. If you choose a lower accuracy, such as a quarter note, althoughyou've played sixteenth notes as well, the shorter notes could thereby be filtered out.
1. Select the user style that should be quantized. Press the [FUNCTION/NEXT]button to open the selection menu. Use the jog dial or the buttons [+/YES] or[–/NO] to select the option ‘Quantify’ (this menu is not selectable if the userstyle does not contain data).
Functions
digital piano
44

2. Press the [FUNCTION/NEXT] button to call the menu for setting the quantiza‐tion accuracy. Use the jog dial or the buttons [+/YES] or [–/NO] to set thedesired accuracy. Selectable are:
2. n 1/4 (quarter note)n 1/4 Tri (quarter triplet)n 1/8 (eighth note)n 1/8 Tri (eighth triplet)n 1/16 (sixteenth note)n 1/16 Tri (sixteenth triplet)n 1/32 (thirty-second note)n 1/32 Tri (thirty-second triplet)
3. Press the [FUNCTION/NEXT] button to call the section menu. Use the jog dial orthe buttons [+/YES] or [–/NO] to select the desired section of the styles: Main _A, Main _ B, Intro _ M (major), Intro _ m (minor), Fill _ A, Fill _ B, Ending _ M(major), Ending _ m (minor).
4. Press the [FUNCTION/NEXT] button to call the track menu. Use the jog dial orthe buttons [+/YES] or [–/NO] to select the desired track: Rhythm sub, Rhythmmain, Bass, Chord 1, Chord 2, Chord 3, Phrase 1, Phrase 2.
5. Press the [FUNCTION/NEXT] button to call the next menu. The display nowshows ‘Sure?’ .
5.Timing and note length of the original recording can not be restoredafter quantisation!
5. Press [+/YES] to confirm or press the [–/NO] button to return to the previousmenu.
6. The display shows ‘Complete’ . The recorded style is played with the selectedquantisation setting.
Functions
DP-85 Arranger
45

8.7.4.5 Style editing
Select the style you want to edit.
1. Press the [FUNCTION/NEXT] button to open the selection menu. Use the jog dialor the buttons [+/YES] or [–/NO] to select the option ‘Edit’ .
2. Press the [FUNCTION/NEXT] button to open the menu for tempo change. Usethe jog wheel or the buttons [+/YES] or [–/NO] to change the tempo.
3. Press the [FUNCTION/NEXT] button to open the renaming menu (full name).Use the keyboard to enter the full name of the style. 26 alphanumeric charac‐ters are available. Press the [FUNCTION/BACK] button to change to the previousmenu. For further information about file naming see Ä Chapter 8.10.6 ‘Enteringfile name’ on page 56.
4. Press the [FUNCTION/NEXT] button to open the page with style name abbrevia‐tions.
4. Here you can assign eight alphanumeric characters. The display shows ‘Save?’ .
5. Press the [FUNCTION/NEXT] button to call the next menu. Press [+/YES] to con‐firm or press [–/NO] to return to the previous menu.
6. Press the [+/YES] button to finish the editing.
Functions
digital piano
46

8.7.4.6 Deleting a style
Select the style you want to delete.
1. Press the [FUNCTION/NEXT] button to open the selection menu. Use the jog dialor the buttons [+/YES] or [–/NO] to select the option ‘Delete’ .
2. Press the [FUNCTION/NEXT] button to open the menu for section selection. Usethe jog wheel or the buttons [+/YES] or [–/NO] to select the section to bedeleted. If you select here ‘All’ , the menu proceeds with step 4.
3. Press the [FUNCTION/NEXT] button to open the menu for track selection. Usethe jog wheel or the buttons [+/YES] or [–/NO] to select the track to be deleted.If you select here ‘All’ the style is deleted.
4. Press the [FUNCTION/NEXT] button to call the next menu. The display nowshows ‘Sure?’ .
4. Press [+/YES] to confirm or press [–/NO] to return to the previous menu.
5. Press the [+/YES] button to finish the deleting.
Functions
DP-85 Arranger
47

8.8 Songs for practising
The digital piano offers 100 songs for practising in total. For more information, seeÄ Chapter 11 ‘Practice and demo songs’ on page 70.
1. Playing and ending practising songs
1. Press the [SONG] button to enter the playback mode for practising songs.‘SONG’ appears in the display and all practising songs are played in an endlessloop.
1. Press the [START/STOP] button to end the currently played practising song. Thiswill not exit the mode for practising song playback ‘SONG’ .
2. Single loop
2. If you press the [START/STOP] button again this song will be repeated in anendless loop until you press the [START/STOP] button once more.
3. Selecting practising song
3. Use the jog wheel or the buttons [+/YES] or [–/NO] to select the desired prac‐tising song. When choosing a new practising song, the display first shows thetitle in ticker style, and then shows the abbreviations.
4. Playback control
4. Pre counting
4. Prior to playback start, the beat is pre-counted. The beat display starts with anegative value. The practising song begins with beat 1.
4. Fast-forward, rewind, pause
4. For fast-forwarding through the practising song, keep the button pressedduring playback. To skip back bar by bar, press the button. Press the button to pause the playback.
4. Repeat function
4. In practising song playback, you can press the [REPEAT A/B] button to set twoloop marks. Press the [ REPEAT A/B] button at the desired start mark of the loop.Press the button again to set the end mark. Press the [ REPEAT A/B] button onceagain during loop play to exit the A-B repeat function.
5. When the practising song has ended, press the buttons [STYLE] and [VOICE]simultaneously to exit the playback mode for practising songs. Or keep the[CHORD DICTIONARY] button pressed to call the chord dictionary.
Fast-forward, rewind and pause function are not available for custom prac‐tising songs.
Functions
digital piano
48

In practising, playing the right notes at the right time matters most. In this mode,you can check your progress. Press the [LESSON] button in SONG mode to activatethe lesson mode. There are three levels of practise. Use the [R] and [L] buttons todetermine which hand you want to practise. Choosing no hand will automaticallyselect the right hand.
Depending on the song, the left hand practices differently. For accompani‐ment, chords are mainly practised in the left hand. In songs 1 to 42 and 57,the melody is trained for both left and right hand equally. Songs 43 to 56and 58 to 100 are only for right hand practise. In song playback, the displayshows the melody and chords.
Press the [LESSON] button to call the lesson mode. ‘LESSON 1’ appears in the display.In this mode, it is only graded whether you play the note at the right time, notwhether you play the right note.
1. Press the [START/STOP] button to start practising.
2. If you have selected ‘R’ , the right hand voice is muted and you have to play theright hand yourself. As long as you keep in time, you hear the right hand voice.If you have selected ‘L’ , the left hand voice is muted and you have to play theleft hand yourself. If ‘L’ and ‘R’ are selected, the voices for both hands aremuted. In this case, you have to play in time with both hands.
3. After the practise is finished you're told the result.
Lesson mode
Lesson 1 - timing practise
Functions
DP-85 Arranger
49

Press the [LESSON] button again to call lesson mode 2. ‘LESSON 2’ appears in the dis‐play. In this mode, it is only graded whether you play the right note, not whether youplay the note at the right time. The practising song only continues, if you play theright note.
1. Press the [START/STOP] button to start practising.
2. After the practise is finished you're told the result.
Press the [LESSON] button once again to call the lesson mode 3. ‘LESSON 3’ appearsin the display. In this mode, it is graded whether you play the right notes at the righttime. The practising song only continues, if you're doing both right.
1. Press the [START/STOP] button to start practising.
2. After the practise is finished you're told the result.
Lesson 2 - hitting the right notes
Lesson 3 - hitting the right notes atthe right time
Functions
digital piano
50
8.9 Chord dictionary
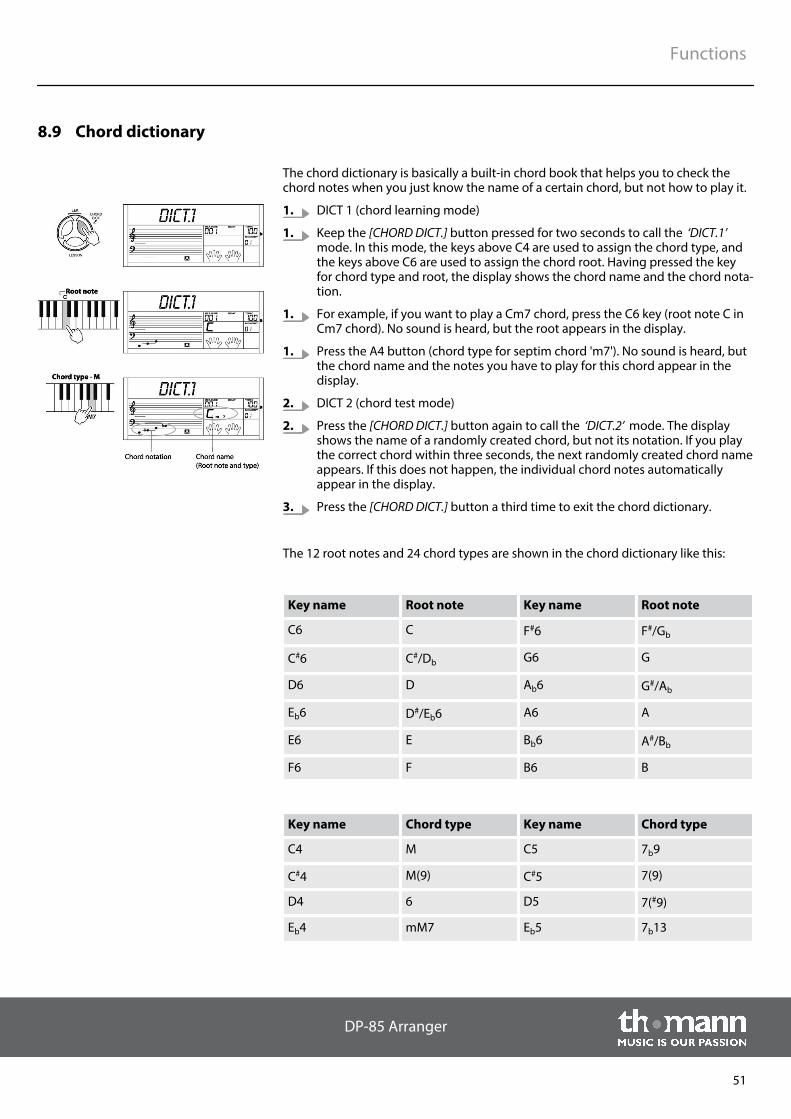
The chord dictionary is basically a built-in chord book that helps you to check thechord notes when you just know the name of a certain chord, but not how to play it.
1. DICT 1 (chord learning mode)
1. Keep the [CHORD DICT.] button pressed for two seconds to call the ‘DICT.1’mode. In this mode, the keys above C4 are used to assign the chord type, andthe keys above C6 are used to assign the chord root. Having pressed the keyfor chord type and root, the display shows the chord name and the chord nota‐tion.
1. For example, if you want to play a Cm7 chord, press the C6 key (root note C inCm7 chord). No sound is heard, but the root appears in the display.
1. Press the A4 button (chord type for septim chord 'm7'). No sound is heard, butthe chord name and the notes you have to play for this chord appear in thedisplay.
2. DICT 2 (chord test mode)
2. Press the [CHORD DICT.] button again to call the ‘DICT.2’ mode. The displayshows the name of a randomly created chord, but not its notation. If you playthe correct chord within three seconds, the next randomly created chord nameappears. If this does not happen, the individual chord notes automaticallyappear in the display.
3. Press the [CHORD DICT.] button a third time to exit the chord dictionary.
The 12 root notes and 24 chord types are shown in the chord dictionary like this:
Key name Root note Key name Root note
C6 C F#6 F#/Gb
C#6 C#/Db G6 G
D6 D Ab6 G#/Ab
Eb6 D#/Eb6 A6 A
E6 E Bb6 A#/Bb
F6 F B6 B
Key name Chord type Key name Chord type
C4 M C5 7b9
C#4 M(9) C#5 7(9)
D4 6 D5 7(#9)
Eb4 mM7 Eb5 7b13
Functions
DP-85 Arranger
51

Key name Chord type Key name Chord type
E4 M7 E5 7(13)
F4 m F5 7(#11)
F#4 m(9) F#5 dim7
G4 m6 G5 dim
Ab4 m7(9) Ab5 7aug
A4 m7 A5 aug
Bb4 m7b5 Bb5 7sus4
B4 7 B5 sus4
8.10 SD memory card
The digital piano offers a card slot for SD memory cards with a capacity of 16 MB to2 GB, formatted with FAT 16/32 file system format
1. Press the [MENU] button to call the SD card menu.
1. It offers the following functions: ‘Play’ , ‘Load’ , ‘Save’ , ‘Delete’ and ‘Format’ .
1. If no card is inserted, ‘No Card’ appears in the display.
2. Press the [MENU] button to close the menu.
2. The display briefly shows (for approx. three seconds) ‘Wait...!’ , then ‘Play’ isdisplayed.
2. You can also press one of the direct select buttons [VOICE], [STYLE], [SONG],[DUAL], [SPLIT], [PIANO] to leave the SD card menu.
3. During MIDI playback you can press the [MIXER] button followed by the [+/YES]or [–/NO] button to set the playback volume.
4. Press the [MENU] button repeatedly to exit the SC card menu step-by-step.Keep the [MENU] pressed for two seconds to exit the menu directly.
When in SC card mode, the device does not react to any other functions.Press the buttons [+/YES] or [–/NO] or turn the jog dial to select the desiredSD card function. Press the [EXECUTE] button to get one step further. Pressthe [MENU] button to get one step back.
Functions
digital piano
52

8.10.1 Playback
1. Select the menu option ‘Play’ and press the button [EXECUTE]. The displayshows the MIDI files and the root directory of the SD card.
1. If there is a selectable MIDI file on the SD card, an ‘F’ appears before the filename in the display. If no MIDI files can be found in the current directory, a ‘d’appears before the file name in the display.
1. Press the [EXECUTE] button to open the current subdirectory. Then, furtherMIDI files or subdirectories are displayed.
1. Are there neither MIDI files nor subdirectories in the current directory, the dis‐play shows a ‘d’ followed by ‘. .’ . Then you can press the [EXECUTE] button toexit the directory.
1. Are there neither MIDI files nor subdirectories in the root directory, the displayshows ‘No File’ .
2. Press the buttons [+/YES] or [–/NO] or turn the jog dial to select the desiredMIDI file. Then press the [START/STOP] button to play this file repeatedly. Pressthe [EXECUTE] button to play all files in the current directory in an endless loop.
2.– During file playback, you can select the next file in the same or in
a different directory.– During file playback, you can change the tempo using the but‐
tons [TEMPO +] or [TEMPO –]. Pressing both buttons simultane‐ously restores the original tempo of that song.
3. Press the [START/STOP] button to stop the playback. You can also press the[MENU] button to return to the playback menu. Or keep the [MENU] buttonpressed for two seconds to exit the SC card mode. File playback will end then.
Functions
DP-85 Arranger
53

8.10.2 Loading
1. Select the menu option ‘Load’ and press the [EXECUTE] button. The displayshows the options ‘LoadSong’ , ‘LoadSty’ and ‘LoadMem’ that you can selectwith the [+/YES] or [–/NO] buttons or the jog dial.
2. LoadSong
2. Select ‘LoadSong’ and press the button [EXECUTE]. The display shows the filessaved by you or the directories in the root directory of the SD card. A file nameconsists of 8 characters, the extension is ‘MID’ . Use the buttons [+/YES] or[–/NO] or the jog dial to select the files. Press the [EXECUTE] button to confirmthe file selection. If you press the [EXECUTE] button again the display shows‘Sure?’ . Press the [EXECUTE] button to load the file.
3. LoadSty
3. Select ‘LoadSty’ and press the button [EXECUTE]. The display shows the userstyles saved by you or the directories in the root directory of the SD card. A filename consists of 8 characters, the extension is ‘.STY’ . Use the buttons [+/YES]or [–/NO] or the jog dial to select the styles. Press the [EXECUTE] button to con‐firm the file selection. If you press the [EXECUTE] button again the displayshows ‘Sure?’ . Press the [EXECUTE] button to load the file.
4. LoadMem
4. Select ‘LoadMem’ and press the button [EXECUTE]. The display shows the filessaved by you or the directories in the root directory of the SD card. A file nameconsists of 8 characters, the extension is ‘.MEM’ . Press the [EXECUTE] button.The display shows ‘Sure?’ . Press the [EXECUTE] button to load the file.
Functions
digital piano
54
8.10.3 Saving
1. Select the menu option ‘Save’ and press the button [EXECUTE]. The displayshows the options ‘SaveSong’ , ‘SaveSty’ and ‘SaveMem’ that you can selectwith the [+/YES] or [–/NO] buttons or the jog dial.
2. SaveSong
2. Select ‘SaveSong’ and press the button [EXECUTE]. The display shows the songssaved by you. A file name consists of 8 characters, the extension is ‘.MID’ . Usethe buttons [+/YES] or [–/NO] or the jog dial to select the file. Press the[EXECUTE] button to confirm. Then you can press the [+/YES] or [–/NO] buttonsor turn the jog dial to select the directory in which the file should be saved.Press the [EXECUTE] button. Now you can enter the file name using the pianokeyboard (see Ä Chapter 8.10.6 ‘Entering file name’ on page 56). Press the[EXECUTE] button. The display shows ‘Sure?’ . Press the [EXECUTE] button tosave the file.
3. SaveSty
3. Select ‘SaveSty’ and press the button [EXECUTE]. The display shows the stylessaved by you. A file name consists of 8 characters, the extension is ‘.MID’ . Usethe buttons [+/YES] or [–/NO] or the jog dial to select the style to be saved.Press the [EXECUTE] button to confirm. Then you can press the [+/YES] or[–/NO] buttons or turn the jog dial to select the directory in which the fileshould be saved. Press the [EXECUTE] button. Now you can enter the file nameof the style using the piano keyboard (see Ä Chapter 8.10.6 ‘Entering file name’on page 56). Press the [EXECUTE] button. The display shows ‘Sure?’ . Press the[EXECUTE] button to save the file.
Functions
DP-85 Arranger
55

4. SaveMem
4. Select ‘SaveMem’ and press the button [EXECUTE]. Then you can press the[+/YES] or [–/NO] buttons or turn the jog dial to select the directory in whichthe file should be saved. Press the [EXECUTE] button. Now you can enter the filename of the style using the piano keyboard (see Ä Chapter 8.10.6 ‘Entering filename’ on page 56). Press the [EXECUTE] button. The display shows ‘Sure?’ . Pressthe [EXECUTE] button to save the file. There are 48 memory banks available intotal.
8.10.4 Deleting
1. Select the menu option ‘Delete’ and press the button [EXECUTE]. The displayshows all files including MIDI files, user songs and styles and all directories inthe root directory that you can select using the buttons [+/YES] or [–/NO] or thejog dial.
2. Press the [EXECUTE] button. The display shows ‘Sure?’ . Press the [EXECUTE]button to delete the file.
Directories can not be deleted.
8.10.5 Formatting
1. Select the menu option ‘Format’ and press the button [EXECUTE].
1.Formatting will irretrievably erase all data on the SD card.
2. Press the [EXECUTE] button. The display shows ‘Sure?’ . Press the [EXECUTE]button to format the SD card.
8.10.6 Entering file name
File names may consist of up to eight alphanumerical characters that you can enterusing the piano keyboard. The following illustration shows the key assignment:
Functions
digital piano
56

Key name Function
SHIFT The 26 letters are always displayed as capitals.
DEL Deletes the character at the cursor position.
BACK Moves the cursor to the left.
NEXT Moves the cursor to the right.
Notes
– The Shift key has no function in SD card mode.– If you want to assign an already existing file name, the display briefly
shows ‘SameName’ . In this case you have to choose another name.– If the card has not enough free memory available to store the file, the
display briefly shows ‘CardFull’ . In this case, delete files you no longerneed on the SD card or use another SD card with sufficient capacity.
8.11 MIDI functions
8.11.1 What is MIDI?
1. MIDI stands for 'Musical Instrument Digital Interface' and is the standard inter‐face for connecting musical instruments and computers.
2. The USB connection can be used for MIDI data exchange between computersand other USB host devices that support USB audio via USB cable.
3. The digital piano can be connected to computers or other devices with USBport.
4. You can use the tone generator of the piano to play MIDI files from computersor other USB devices.
Note
– You can not use the MIDI IN function during playback of a stylerecording. Otherwise the double assignment would cause playbackerrors.
Functions
DP-85 Arranger
57

8.11.2 USB connection
1. System requirements
1. n CPU: 300 MHz, Pentium or highern RAM: 64 MB or moren 2 MB free disc spacen Operating system: Windows® 2000/XP, Vista, Windows 7
2. Setup connections
2. Connect the USB port on the rear panel of the digital piano to the USB port ofyour computer using a standard USB cable (not supplied).
3. USB provisions
3. Please note the following instructions when connecting instruments to thecomputer. Otherwise, the instrument or the computer 'crashes', which can leadto data loss. If this happens, turn off computer and instrument and restart bothafter a few seconds.
3.– If the computer is in standby or sleep mode, wake the computer
before connecting the USB cable.– Establish the USB connection between computer and instrument
before turning on the instrument.
8.11.3 MIDI connection
1. Connection notes
1. With MIDI connections, the device that controls other devices is called 'master'.A device that is controlled via MIDI is called 'slave'. The MIDI OUT of the masteris connected to the MIDI IN of the slave. You can not connect the MIDI OUT of adevice to the MIDI IN of the same unit.
2. Connection method
2. Connect the MIDI interface to the computer.
3. Other devices
3. Connect other devices via the MIDI interface.
8.11.4 MIDI applications
n The digital piano can control other equipment or electronic instruments.n You can use other devices to control the digital piano.n The digital piano can play MIDI files from a computer.
Functions
digital piano
58

8.12 Troubleshooting
Problem Possible causes and solutions
You hear a 'pop' sound from the speakers when switching thedigital piano on and off.
This is normal. No need to worry.
No sound can be heard when playing the piano. Make sure that the volume control is set accordingly.
Check if the headphones are plugged into the headphoneoutput 2, which would mute the speakers of the digital piano.
Malfunction occurs when using a mobile phone. Using a mobile phone near the digital piano can cause inter‐ference. To prevent this, turn off the mobile phone or use itonly at a safe distance.
Functions
DP-85 Arranger
59

9 Voice list
No. Name No. Name No. Name
Piano 030 Detuned E .P.1 060 Clavichord 2
001 Stereo Grand Piano 1 031 Detuned E .P.2 061 Clavichord 1 / W
002 Stereo Grand Piano 2 032 E Piano 1 062 Clavichord 2 / W
003 Stereo Grand Piano / W 033 E Piano 2 063 Clavichord Wah
004 Grand Piano / W 034 E.Piano 1 / W 064 Punchy Clavichord
005 Stereo Piano Dark 035 E.Piano 2 / W Mallet
006 Octave Piano 1 036 E.Piano 3 / W 065 Celesta 1
007 Octave Piano 2 037 E.Piano 4 / W 066 Celesta 2
008 Synth Piano 038 Hard E.P. 067 Bright Celeasta
009 Dreamscape 039 Soft E.P. 068 Celesta & Sine
010 Piano & Strings 040 Deep E.P. 069 Reecho Bell
011 Piano & Choir 041 Velocity Crossfade E.P. 1 070 Celesta & Music Box
012 Acoustic Grand Piano 042 Velocity Crossfade E.P. 2 071 Glockenspiel 1
013 Stereo Bright Piano 043 Layered E.P. 1 072 Glockenspiel 2
014 Bright Piano 1 044 Layered E.P. 2 073 Glockenspiel & Sine
015 Bright Piano 2 045 Nylon E.P. 074 Glockenspiel & Celesta
016 Bright Piano 1 / W 046 Warm E.P. 075 Music Box 1
017 Bright Piano 2 / W 047 Cloudy E.P. 076 Music Box 2
018 Detuned Piano 048 Grand Harpsichord 077 Music Box 3
019 Chorus Piano 049 Harpsichord 1 078 Toy Box
020 Velocity Crossfade Piano 050 Harpsichord 2 079 Music Box & Harp
021 Piano Pad 051 Harpsichord 1 / W 080 Stereo Vibrapho
022 Piano & Vibraphone 052 Harpsichord 2 /W 081 Rigid Vibraphone
023 Electric Grand Piano 053 Harpsichord Octave 1 082 Vibraphone 1
024 Stereo Honk-Tonk 054 Harpsichord Octave 2 083 Vibraphone 2
025 Honky-Tonk 055 Harpsichord Release 084 Vibraphone 1 / W
026 Honky-Tonk Dark 056 Harpsikd /O 085 Vibraphone 2 / W
027 Honky-Tonk 1 / W 057 Piano & Harpsichord 086 Vibraphone & Bell
028 Honky-Tonk 2 / W 058 Stereo Clavichord 087 Vibraphone & Harpsichord
029 Stereo Hard E.P. 059 Clavichord 1 088 Marimba 1
Voice list
digital piano
60

No. Name No. Name No. Name
089 Marimba 2 119 Detuned Church Organ 149 Velocity Pedal Steel G.T.
090 Marimba / W 120 Church Organ 1 150 12 String G.T.
091 SinMarimba 121 Church Organ 2 151 Chorus Steel G.T.
092 Stereo Marimba 122 Octave Church Organ 152 Nylon & Steel G.T.
093 Marimba & Vibraphone 123 Stereo Reed Organ 153 Jazz G.T. 1
094 Wood Drum 124 Reed Organ 154 Jazz G.T. 2
095 Xylophone 1 125 Accordion 1 155 Mellow G.T.
096 Xylophone 2 126 Accordion 2 156 Velocity Jazz G.T.
097 Tubular Bells 1 127 Accordion 3 157 Jazz G.T. Detuned
098 Tubular Bells 2 128 Chorus Accordion 158 Clean G.T. 1
099 Tubular Bells 3 129 Mustte 159 Clean G.T. 2
100 Dulcimer 130 Accord ItSolo 160 Clean G.T. 3
101 Santur 131 Harmonica 1 161 Stereo Clean G.T.
102 Shorty 132 Harmonica 2 162 Velocity Clean G.T.
Organ 133 Detuned Harmonica 163 Chorus Clean G.T.
103 Drawbar Organ Stereo 134 Sweet Harmonica 164 Muted G.T. 1
104 Soft Stereo Drawbar Organ 135 Tango Accordion 167 Jazz Boy
105 Mellow Drawbar Organ Guitar 168 Stereo Muted G.T.
106 Drawbar Organ 136 Nylon G.T. 1 169 OverDriven G.T. 1
107 Drawbar Organ Detuned 137 Nylon G.T. 2 170 OverDriven G.T. 2
108 Bright Drawbar Organ 138 Nylon G.T. / R 171 Detuned OverDriven G.T.
109 1960 Drawbar Organ 139 Velocity Nylon G.T. 172 Distortion G.T. 1
110 1970 Percussive Organ 140 Detuned Nylon G.T. 173 Distorted G.T. 2
111 Percussive Organ 1 141 Chorus Nylon G.T. 174 Feedback G.T.1
112 Percussive Organ 2 142 Bright Nylon G.T. 175 Feedback G.T.2
113 Light Click Organ 143 Steel G.T. 1 176 Distorted Rhythm G.T.
114 Percussive Organ Detuned 144 Steel G.T. 2 177 5th Distortion
115 Stereo Rotary Organ 145 Detuned Steel G.T. 178 Distortion G.T. Octave
116 Rock Organ 146 Velocity Steel G.T. 179 Stereo Distorted G.T.
117 Rotary Organ 147 Velocity Steel G.T. (Fx) 180 G.T. Harmonics 1
118 Slow Rotary Organ 148 Pedal Steel G.T. 181 G.T. Harmonics 2
Voice list
DP-85 Arranger
61

No. Name No. Name No. Name
Bass 212 Slap Bass 1 242 Viola 3
182 Acoustic Bass 1 213 Slap Bass 2 243 Dark Viola
183 Acoustic Bass 2 214 Slap Bass 3 244 Cello 1
184 Acoustic Bass Detuned 215 Slap Bass 4 245 Cello 2
185 Acoustic Bass Filter 216 Power Slap Bass 246 Cello 3
186 Jazz Style 217 Lash Thumb Bass 247 Cello 4
187 A.Bass & Mute G.T. 218 Resonant Slap Bass 248 Celloen 1 6'
188 Resonant Bass 219 Velocity Switch Slap Bass 249 Chamber Music
189 Velocity Crossfade Bass 220 Synth Bass 1 250 Contrabass 1
190 Wah Bass 1 221 Synth Bass 2 251 Contrabass 2
191 Wah Bass 2 222 Synth Bass 3 252 Tremolo Strings 1
192 Finger Bass 1 223 Synth Bass 4 253 Tremolo Strings 2
193 Finger Bass 2 224 Synth Bass 5 254 Slow Tremolo Strings 1
194 Detuned Finger Bass 225 Super Synth Bass 255 Slow Tremolo Strings 2
195 Dark Finger Bass 226 Tech Synth Bass 256 Pizzicato Strings 1
196 Jazz Bass 227 Synth Bass / O 257 Pizzicato Strings 2
197 Resonant Finger Bass 228 Fast Syntonic Bass 258 Octave Pizzicato
198 Velocity Bass Strings 259 Orchestral Harp 1
199 Velocity Finger Bass (FX) 229 The Violin 260 Orchestral Harp 2
200 Bass & Distorted Elec Guitar 230 Violin 1 261 Velocity City
201 Pick Bass 1 231 Violin 2 262 Africa
202 Pick Bass 2 232 Violin 3 263 Timpani 1
203 Mute Pick Bass 233 Mono Violin 264 Timpani 2
204 Detuned Pick bass 234 Octave Violin Strings Ensemble
205 Fretless Bass 1 235 Electric Violin 265 The Strings
206 Fretless Bass 2 236 Slow Violin 266 Synth Strings 1
207 1990 Bass 237 Two Violins 267 Synth Strings 2
208 Fretless Bass & Sine 238 Soft Violin 268 Synth Strings 3
209 Fretless Bass Detuned 1 239 Large Violin 269 Synth Strings 4
210 Fretless Bass Detuned 2 240 Viola 1 270 Synth Strings 5
211 Fretless Bass Detuned 3 241 Viola 2 271 Strings Ensemble 1
Voice list
digital piano
62

No. Name No. Name No. Name
272 Strings Ensemble 2 302 Trumpet 3 333 Sforzato Brass
273 Resonant Strings 303 Dark Trumpet 334 Stereo Brass & Strings
274 Stereo Slow Strings 304 Resonant Trumpet 335 Synth Brass 1
275 Slow Strings 305 Sweet Trumpet 336 Synth Brass 2
276 Sforzato Strings 306 Wah Trumpet 337 Synth Brass 3
277 Orchestra 307 Trombone 1 338 Synth Brass 4
278 Legato Strings 308 Trombone 2 339 Synth Brass 5
279 Arco Strings 309 Trombone 3 340 Leap Brass
280 1960 Strings 310 Dark Trombone 342 Synth Brass & Strings 1
281 1970 Strings 311 Strings & Trombone 343 Synth Brass & Strings 2
282 Solo Strings 312 Tuba 1 344 Echo Brass
283 Choir Aahs 1 313 Tuba 2 345 Sooth Brass
284 Choir Aahs 2 314 Tuba Solo Reed
285 Choir Aahs 3 315 Soft Tuba 346 Soprano Sax 1
286 Mellow Choir 316 Muted Trumpet 1 347 Soprano Sax 2
287 Stereo Choir Aahs 1 317 Muted Trumpet 2 348 Soprano Sax Soft
288 Stereo Choir Aahs 2 318 French Horn 1 349 Solw Soprano Sax
289 Strings Choir 319 French Horn 2 350 Sweet Soprano Sax
290 Voice Oohs 1 320 Soft Horn 351 Alto Sax
291 Voice Oohs 2 321 Stereo French Horn 352 Alto Sax & Breath
292 Synth Voice 1 322 5th Horn Orchestra 353 Super Alto Sax
293 Synth Voice 2 323 Brass Section 1 354 Sax Band
294 Echo Synth Voice 324 Brass Section 2 355 Folk Sax
295 Orchestra Hit 1 325 Brass Section 3 356 Tenor Sax
296 Orchestra Hit 2 326 Brass Section 4 357 Baritone Sax
297 Orchestra Hit Octave 327 Brass Section Octave 358 Baritone Sax & Breath
298 Orchestra Hit Stereo 328 Brass Swell 359 Oboe 1
299 6th Orchestra Hit 329 Brass band 360 Oboe 2
Brass 330 Bright Brass Section 361 Sweet Oboe
300 Trumpet 1 331 Dark Brass 362 English Horn 1
301 Trumpet 2 332 Mute Brass Ensemble 363 English Horn 2
Voice list
DP-85 Arranger
63

No. Name No. Name No. Name
364 Analog Horns 393 Sawtooth Lead 1 423 Click Pad
365 Woodwinds 394 Sawtooth Lead 2 424 Analog Pad
366 Bassoon 1 395 Wavy Sawtooth 425 Poly Pad
367 Bassoon 2 396 Lead 2 (sawtooth) 426 Poly Synth Pad
368 Clarinet 1 397 Slow Saw 427 Pad 4 (choir)
369 Clarinet 2 398 Super Analog 428 Choir Pad 2
Pipe 399 Synther 429 Pad 5 (bowed)
370 Piccolo 400 Heavy Sawtooth 430 Bowed Pad 2
371 Flute 401 Bauble L ead 431 Pad 6 (metallic)
372 Jazz Flute 402 PWM 4th 432 Metallic Pad 2
373 Recorder 403 Lead 3 (calliope) 433 Pan Pad
374 Sweet Pan Flute 404 Lead 4 (chiff) 434 Pad 7 (halo)
375 Pan Flute 405 Lead 5 (charang) 435 Halo Pad 2
376 Dark Pan Flute 406 Lead 6 (voice) 436 Pad 8 (sweep)
377 Blown Bottle 407 Voice Lead 437 Sweep Pad 2
378 Shakuhachi 408 Lead 7 (fifths) 438 Dipolar Pad
379 Whistle 1 409 Fifths Lead Soft 439 Rising
380 Whistle 2 410 Fifth Lead 440 Congregate
381 Ocarina 411 Lead 8 (Bass & Lead) Effects
Lead 412 Massiness 441 FX1 (rain)
382 Lead 1 (square) 413 Bass Lead 442 FX2 (soundtrack)
383 Square Pad 443 Progenitor
384 Lead Sine 414 Pad 1 (newage) 444 Prelude
385 Slow Square Lead 415 Slow Square 445 FX3 (crystal)
386 Sine Solo 416 New Year Pad 446 FX4 (atmosphere)
387 Square Lead 1 417 Pad 2 (warm) 447 Warm Air
388 Square Lead 2 418 PWM Pad 448 FX5 (brightness)
389 Thick Square 419 Sine Pad 449 Smog
390 Corrie 420 Warmly Pad 450 FX6 (goblins)
391 Quint 421 Horn Pad 451 Choir Bell
392 2 Oscillators Lead 422 Pad 3 (Polysynth) 452 FX7 (echoes)
Voice list
digital piano
64

No. Name No. Name No. Name
453 Reecho Pan 481 Open Door 513 Lion
454 Large Pan 482 Starship 514 Frog
455 Echordrzz Slow 483 Close Door 515 Bird 2
456 Fantasyland 484 Siren 516 Dog
457 FX8 (sci-fi) 485 Gunshot 2 517 Spring
Ethnic 486 Rise 2 518 Gunshot 1
458 Sitar 487 Bird Tweet 519 Gunshot 3
459 Detuned Sitar 488 Ambulance 520 Laser Gun
460 Banjo 489 Rise 1 521 Drip
461 Shamisen 490 Fall 522 Siren 2
462 Koto 491 Seashore 2 Combined Voice
463 Kalimba 492 Bird 1 523 Stereo Piano & Strings Pad
464 Bagpipe 493 Clop 524 Stereo Piano & Choir
465 Fiddle 494 Wind 525 Piano & Warm Pad
466 Shanai 495 Cattle 526 FM Electric Piano
Percussive 496 Horse 527 Old Electric Piano
467 Tinkle Bell 497 Telephone Ring 1 528 Digital Piano
468 Agogo 498 Bird 529 E.Piano & Strings
469 Steel Drums 499 Breath Noise 2 530 Harpsichord & Stereo Strings
470 Wood Block 500 Heartbeat 531 Digital Music Box
471 Taiko Drum 501 Laugh 532 Serenity
472 Melodic Tom 502 Applause 2 533 Vibraphone & Stereo Strings
473 Synth Drum 503 Helicopter 1 534 FM Tubular Bells
474 Reverse Cymbal 504 Fire 535 Organ & Stereo Strings
Sound Effects 505 Punch 536 Stereo Organ & Piano
475 Guitar Fret Noise 506 ScratchCut 537 Accordian 2
476 Breath Noise 1 507 Fight 1 538 Power Distorted Guitar
477 Stream 508 Shot 539 Dynamic Bass
478 Helicopter 2 509 Fight 2 540 X Fade Bass
479 Seashore1 510 Applause 1 541 Stereo Strings & Piano
480 Telephone Ring 2 512 Firework 542 Orchestra
Voice list
DP-85 Arranger
65

No. Name No. Name No. Name
543 Full Strings 1 549 Woodwinds & Strings 554 Electronic Kit
544 Full Strings 2 550 Pan Flute & Strings Pad 555 Analog Kit
545 Symphonic Drum Set 556 Jazz Kit
546 Stereo Choir & Strings 551 Standard Kit 557 Brush Kit
547 Trombone & Stereo Strings 552 Room Kit 558 Orchestra Kit
548 Club Brass 553 Power Kit 559 SFX Kit
Voice list
digital piano
66

10 Styles list
No. Name No. Name No. Name
8BEAT 028 Brit. Pop 2 056 Rock & Roll
001 8 Beat Rock 029 Pop Hit 057 Rock 1
002 Guitar Pop 1 030 Fusion Shuffle 058 Rock Shuffle
003 8 Beat 1 031 Analog Night 059 R'N'R 1
004 Sweet Beat 032 Guitar Pop 2 060 Rock Shuffle
005 8 Beat Dance 033 Pop beat BALLROOM
006 8 Beat Disco 034 Soft Beat 061 Twist 1
007 Pop Funk 035 60's Pop 062 Twist 2
008 8 Beat 2 036 String Latin 063 Big Band Fox 1
009 60's 8 Beat BALLAD 064 Tango
010 Rhyth m & Beat 037 Soft Ballad 065 Slow Fox 1
011 Miami Beat 038 Natural Ballad 066 Slow Waltz 1
16BEAT 039 Love Ballad 067 Swing Fox
012 16 Beat 1 040 Easy Ballad 068 Salsa 2
013 Pop 16 Beat 1 041 Slow Ballad 069 Cha Cha 1
014 Pop 16 Beat 2 042 Folk Ballad 070 Cha Cha 2
015 Modern 16 Beat 043 Pop Ballad 1 071 Beguine 1
016 16 Beat Hot 044 Pop Ballad 2 072 Beguine 2
017 16 Beat Modern 045 EP Ballad 073 Rumba 1
018 16 Beat Funk 046 New R&B Ballad 074 Samba 1
019 16 Beat 2 ROCK 075 Samba 2
020 Cool Beat 047 Slow Rock 076 Jive
021 16 Beat Ballad 048 70' s Rock & Roll 077 Foxtrot
022 16 Beat 3 049 Folk Rock 078 Quick Step
023 Pop Shfl 050 Soft Rock DANCE
024 Guitar Funk 051 Pop Rock 079 Down Beat
025 16 Beat Funk 1 052 Old Rock 080 Techno
POP 053 Easy Rock 081 Progressive
026 6/8 Pop 054 New Shuffle 082 Rap 1
027 Brit. Pop 1 055 Rock Hip Hop 083 Rap 2
Styles list
DP-85 Arranger
67

No. Name No. Name No. Name
084 Disco SWING & JAZZ 141 Bossa Nova 1
085 Soft Disco 112 Swing 1 142 Latin
086 Disco Party 113 Swing 2 143 Bossa Nova 2
087 70's Disco 114 Jazz Brush 144 New Reggae
088 70's Disco Funk 115 Latin Jazz 145 Dance Reggae
089 Clubdance 116 Fusion 146 Pasodoble
090 Euro Dance 117 Acid Jazz 147 Lite Bossa
091 80's Dance 118 Cool Jazz Ballad 148 Latin Rock
092 Hip Hop 119 Swing Shuffle 149 Beguine
093 Garage 120 Big Band 40's 150 Slow Bolero
SOUL & FUNK 121 Big Band Medium 151 Disco Samba
094 Jay R&B 122 Dixieland 152 Mambo
095 Gospel Swing 123 Acoustic Jazz 153 Meneito
096 Gospel 124 Guitar Swing 154 Rumba 1
097 Funk 125 Ragtime 155 Rumba 2
098 Electric Funk 126 Modern Jazz Ballad 156 Tikitikita
099 Groove Funk 127 Swing Ballad 157 Lambada
100 Rubber Funk 128 Big Band Ballad 158 Pop Cha Cha 1
101 Cool Funky 129 Orchestra Swing 159 Pop Cha Cha 2
102 Jazz Funk COUNTRY 160 Salsa
103 Groove 130 Blue grass 161 Bossa 1
104 Soul 131 Country 8 Beat World
105 Hip Hop Soul 132 Modern Country 162 Enka Ballad
106 Hip Hop Beat 133 Country Pop 1 163 Laendler
107 R & B 134 Country Pop 2 164 Hawaiian
108 Soul Beat 135 2/4 Country 165 Sirtake
106 Hip Hop Beat 136 Country 166 Venezia
107 R & B 137 Country Quick Steps 167 6/8 Flipper
108 Soul Beat 138 Country Rock 168 New Age
109 R & B Ballad 139 Country Folk 169 Tarantella
110 British Soul Pop 140 Country Shuffle 170 Scottish
111 Samba Funk Latin/Latin Dance 171 Norteno
Styles list
digital piano
68

No. Name No. Name No. Name
Waltz TRADITIONAL ORIENTAL
172 Waltz 184 Polka 195 Dangdut 1
173 Old Waltz 185 6/8 March 196 Dangdut 2
174 English Waltz 186 German Polka 197 Dangdut 3
175 French Waltz 187 Party Polka 198 Dangdut 4
176 German Waltz 188 March 199 Dangdut 5
177 Italian Mazurka 189 Polka 2 200 Dangdut 6
178 Mariachi Waltz 190 US March USER STYLE
179 Vienna Waltz 1 191 Musette 201 Style 1
180 Slow Waltz 2 192 French Musette 202 Style 2
181 Vienna Waltz 2 193 Mazurke 203 Style 3
182 Slow Waltz 1 194 1-Mar
183 Jazz Waltz
Styles list
DP-85 Arranger
69

11 Practice and demo songs
No. Name No. Name
PIANO 029 The Happy Farmer
001 Moseta Dance 030 The Sleeping Beauty
002 Brave Cavalier 031 La Traviata
003 Four Little Swans 032 Wiegenlied
004 Habanera 033 Mov. 2 Adagio Non Troppo Piano Sonata No. 9 In D
005 Turkish March 034 Mov. 1 Andante Grazioso Piano Sonata No.11 In A[Alla Turca]
006 Aria 035 Prelude In C
007 Away In A Manger 036 Chinese Dance
008 Wedding March 037 Emperors Waltz
009 Jesus, Saviour Pilot Me 038 March Militaire
010 America The Beautiful 039 Symphony No. 40
CLASSICAL 040 Auf Flügeln Des Gesanges
011 Carmen Entracte II 041 Arpeggione Sonata in Am
012 Annen Polka FOLK & COUNTRY
013 Pianosonatan 08 IN Cm IN Pathetique 042 Santa Lucia
014 Brahms Waltz 043 Country
015 Aida 044 Jambalaya
016 Carmen Prelude 045 Susanna
017 L'Arlesienne 046 Bridge
018 Ungarischer Tanz 047 Battle Hymn Of The Republic
019 Mazurka 048 The Old Gray Mare
020 Menuett 049 American Patrol
021 Musical Moments 050 In The Rain
022 Pizzicato Polka 051 Sippin' Cider Through A Straw
023 Rigoletto GOLDEN & POP
024 Serenade 052 On London Bridge
025 Song Without Words 053 Are You Lonesome Tonight
026 Swan 054 Only You
027 Prelude To Act 2 (Swan Lake) 055 End Of The World
028 Valse (Swan Lake) 056 House Of The Rising Sun
Practice and demo songs
digital piano
70

No. Name No. Name
057 Solveig's Song 080 Last Rose Of Summer
058 The Blue-Bells Of Scotland 081 The Old King Cole
059 Over The Rainbow JAZZ & FUSION
060 Beautiful Dreamer 082 Little Brown Jug
061 It's Been A Long Long Time 083 Maple Leaf Rag
062 Edelweiss 084 June Samba
063 O Sole Mio 085 Funk
064 Der Deitcher's Dog 086 I Can ......
065 Joy To The World 087 Sea Shore
066 Silent Night 088 Guitar&Saxphone
067 Ave Maria 089 The Hip Hop's Night
068 Five Hundred Miles 090 Blue Lunch
069 Happy New Year 091 Cobweb
070 It's Beginning To Look A Lot Like Christmas 092 Wine
071 Jeanie With The Light Brown Hair 093 Jazz Old Man
072 My Bonnie 094 Dark Eyes
073 Song Of The Pearlfisher 095 Carlos
074 Summer Palace 096 Sad
075 The StageCoach 097 The Jazz
076 Entertainer ORIENTAL
077 Annie Laurie 098 South Mud Bay
078 Killing Me Softly With His Song 099 Give You A Rose
079 Love Is Blue 100 Flowing Rill
Demo songs
No. Name
001 Jazz
002 Dream Of Freedom
Practice and demo songs
DP-85 Arranger
71

12 Chord list
Chord description Normal chord construction Chordsymbol
Display
0 Major [M] 1–3–5 C C
1 Major sixth [6] 1–(3)–5–6 C6 C6
2 Major seventh [M7] 1–3–(5)–7 CM7 CM7
3 Major seventh with augmented eleventh [M7#11] 1–(2)–3–#4–(5)–7 CM7#11 CM7(#11)
4 Major add ninth [Madd9] 1–2–3–5 CMadd9 CM(9)
5 Major ninth [M9] 1–2–3–(5)–7 CM9 CM7(9)
6 Major sixth and ninth [6 9] 1–2–3–(5)–6 C6 9 C6(9)
7 Augmented [aug] 1–3–#5 Caug Caug
8 Minor [m] 1–b3–5 Cm Cm
9 Minor sixth [m6] 1–b3–5–6 Cm6 Cm6
10 Minor seventh [m7] 1–b3–(5)–b7 Cm7 Cm7
11 Minor seventh flatted fifth [m7b5] 1–b3–b5–b7 Cm7b5 Cm7(b5)
12 Minor add ninth [madd9] 1–2–b3–5 Cmadd9 Cm(9)
13 Minor ninth [m9] 1–2–b3–(5)–b7 Cm9 Cm7(9)
14 Minor eleventh [m11] 1–(2)–b3–4–5–(b7) Cm11 Cm7(11)
15 Minor major ninth [mM7] 1–b3–(5)–7 CmM7 CmM7
16 Minor major ninth [mM9] 1–2–b3–(5)–7 CmM9 CmM7(9)
17 Diminished [dim] 1–b3–b5 Cdim Cdim
18 Diminished seventh [dim7] 1–b3–b5–6 Cdim7 Cdim7
19 Seventh [7] 1–3–(5)–b7 C7 C7
20 Seventh suspended [7sus4] 1–4–5–b7 C7sus4 C7sus4
21 Seventh flatted fifth [7b5] 1–3–b5–b7 C7b5 C7(b5)
22 Seventh ninth [79] 1–2–3–(5)–b7 C7 9 C7(9)
23 Seventh sharp eleventh [7#11] 1–2–3–#4–(5)–b7 oder 1–(2)–3–#4–5–b7
C7#11 C7(#11)
24 Seventh thirteenth [7 13] 1–3–(5)–6–b7 oder 2–3–5–6–b7 C7 13 C7(13)
25 Seventh flatted ninth [7b9] 1–b2–3–(5)–b7 C7b9 C7(b9)
26 Seventh flatted thirteenth [7b13] 1–3–5–b6–b7 C7b13 C7(b13)
27 Seventh sharp ninth [7#9] (1)–#2–3–(5)–b7 C7#9 C7(#9)
28 Major seventh augmented [M7aug] 1–3–#5–7 CM7aug CM7aug
Chord list
digital piano
72

Chord description Normal chord construction Chordsymbol
Display
29 Seventh augmented [7aug] (1)–3–#5–b7 C7aug C7aug
30 Suspended fourth [sus4] 1–4–5 Csus4 Csus4
31 Suspended second [1+2+5] 1–2–5 C1+2+5 C
Chord list
DP-85 Arranger
73

13 MIDI implementation chart
Function Transmitted Received Remarks
Basic Channel Default 1 ALL
Changed 1-16 1-16
Mode Default No Mode 3
Messages No Mode 3
Altered ******** No
Note number 0 – 127 0 – 127
True voice ******** 0 – 127
Velocity note Note ON Yes, 9nH,
v = 1 – 127
Yes, 9nH,
v = 1 – 127
Note OFF No, 9nH,
v = 0
Yes, 9nH,
v = 0 or 8nH,v = 0 – 127
After touch Keys No No
Channels No No
Pitch bend No Yes
MIDI implementation chart
digital piano
74

Function Transmitted Received Remarks
Control change 0
1
5
6
7
10
11
64
65
66
67
80
81
91
93
120
121
123
Yes
No
No
Yes
Yes
No
No
Yes
No
Yes
Yes
No
No
Yes
Yes
No
No
Yes
Yes
Yes
Yes
Yes
Yes
Yes
Yes
Yes
Yes
Yes
Yes
Yes
Yes
Yes
Yes
Yes
Yes
Yes
Bank select
Modulation
Portamento time
Data entry
Volume
Pan
Expression
Sustain pedal
Portamento ON/OFF
Sostenuto pedal
Soft pedal
Reverb program
Chorus program
Reverb level
Chorus level
All sound off
Reset all controllers
All notes off
Program change True # Yes
********
Yes
0 – 127
System exclusive No Yes
System common Song position pointer No No
Song select No No
Tune request No No
System real time Clock No No
Commands No *1 No *1
Aux messages Local ON/OFF No Yes
ALL notes OFF Yes Yes
Active sensing Yes No
MIDI implementation chart
DP-85 Arranger
75

Function Transmitted Received Remarks
System reset No Yes
Notes: *1
When the accompaniment is started, an FAH message is transmitted.
When accompaniment is stopped, an FCH message is transmitted.
When an FAH message is received, accompaniment is started.
When an FCH message is received, accompaniment is stopped.
POLY MONO ON
OMNI ON Mode 1 Mode 2
OMNI OFF Mode 3 Mode 4
MIDI channel modes
MIDI implementation chart
digital piano
76
14 Technical specifications
Display Multifunctional LCD
Keyboard 88 weighted key with hammer action and adjustable touch response
Polyphony 64-voice (without DSP effect), 38-voice (with DSP effect)
Voices 559
Styles 203 including three user styles
Practise songs 100
Demo songs 2
Operating elements [POWER ON/OFF], [VOLUME], [BRILLIANCE], [ACCOMP +/–], [TEMPO +/–],[LESSON], [L&R], [CHORD DICTIONARY], [MIXER], [FUNCTION BACK/NEXT],[VOICE], [STYLE], [SONG], [O.T.S.], [M1-M6], [STORE], [BANK], [START/STOP]
, [SYNC START] , [SYNC STOP], [INTRO]/[END/]/ [REPEAT A/B], [A] ,[B] , [FADE], [CHORD MODE], [RECORD], [STYLE RECORD], [PLAY/STOP],[ACCOMP], [MELODY 1], [MELODY 2], [MELODY 3], [MELODY 4], [MELODY 5],[DUAL], [SPLIT], [TOUCH], [DSP], [SD MENU], [EXECUTE], [+/YES], [–/NO], [DIAL],[PIANO], [METRONOME], [TRANSPOSE +/– ]
Accompaniment [START/STOP] , [SYNC START] , [SYNC STOP], [INTRO]/[END/]/[REPEAT A/B], [A] , [B] , [FADE]
Record function [RECORD], [STYLE RECORD], [PLAY/STOP], [ACCOMP], [MELODY 1], [MELODY 2],[MELODY 3], [MELODY 4], [MELODY 5]
Memory 48 memory slots
Pedals Multifunction pedal, sostenuto, sustain
Connections Voltage supply AC 230 V , 2 × headphones (1/4" phone socket), AUX OUT(L/R), USB, MIDI IN, MIDI OUT
Speakers 2 × 25 W, 8 Ω
Operating voltage supply AC 230 V
Dimensions (W × D × H) 1410 mm × 530 mm × 850 mm
Weight 59 kg
Technical specifications
DP-85 Arranger
77

15 Protecting the environment
For the transport and protective packaging, environmentally friendly materials havebeen chosen that can be supplied to normal recycling.
Ensure that plastic bags, packaging, etc. are properly disposed of.
Do not just dispose of these materials with your normal household waste, but makesure that they are collected for recycling. Please follow the notes and markings onthe packaging.
This device is subject to the European directive 2002/96/EC.
Do not dispose of the device with your normal household waste.
Dispose of this device through an approved waste disposal firm or through your localwaste facility. When discarding the device, comply with the rules and regulationsthat apply in your country. If in doubt, consult your local waste disposal facility.
Disposal of the packaging material
Disposal of your old device
Protecting the environment
digital piano
78


Musikhaus Thomann e.K. · Treppendorf 30 · 96138 Burgebrach · Germany · www.thomann.de
Related Documents