Download Firestorm We will use Firestorm for both Second Life and VCER opensim. At home, you can download the firestorm from http://www.firestormviewer.org/downloads/ For Mac For PC

Welcome message from author
This document is posted to help you gain knowledge. Please leave a comment to let me know what you think about it! Share it to your friends and learn new things together.
Transcript

Download Firestorm We will use Firestorm for both Second Life and VCER opensim. At home, you can download the firestorm from
http://www.firestormviewer.org/downloads/
For Mac
For PC

Movement Use keyboard arrows key to move your avatars around. Hold Page Up and Page Down to fly up and down.
For Mac, hold Command key + arrows up and down =page up and down
Change view angle Holding keyboard Alt, Ctrl, and Shift and holding mouse left key, and move your mouse around (or keyboard arrow keys),
you will be able to change the view angle. In this way, you will finally be able to see your front face!
Please try to get used to use both hands at the same time. Right for the mose, left for keyboard.
Reset View
Click on Esc 2 times

VCER Registration Go to http://blogs.ubc.ca/educationalvirtualworld/ and click on Register VCER
Note. No special character or space in first name or last name!
Type in your
information to
register.
(Real name is
not required.)
Set up Firestorm for VCER!
Log in to Canvas and find our course first!
Under second week, find VCER login URI: http://52.60.242.150:9000/ And copy the highlighted part
Open Firestorm from Windows search
Click on “Ctrl+p” for the preference window, or go to top menu, ViewerPreference, and find “Opensim” in the
Preference window, check if you are in Grid Manager tab.
1
2
3
4

Paste (Ctrl+v) the link you just copied on Add new grid space, and click Apply. You will be seeing the VCER logo now.
Now, type in your user name* (firstname lastname) and pass word. Check to see if UBC VEC is selected, and log in!!
*User name example: my registered first name was black last name was tea, so my username is black tea
You will soon to see the world!!
First, please come to take the gift bag and landmarks by left click on these two objects. (And all other things around
there!)
You will find a folder called VIEW gift bag, and you will find landmark notecard in the notecard folder.
1 2

Edit
Right click on the object you select, on the pie chart, select “Edit” and you will see the building window
open.
Move object
You can simply drag the xyz axis to move this object.
Rotate Object
You can click on your keyboard “ctrl” you will be able to rotate this object,

Resize Object
When you click on your keyboard “ctrl+shift,” you will be able to stretch the object.
Undo
You can use “ctrl+z” to undo your last step.
If you accidently hit “delete” on your keyboard, there is no way to undo…
Change by parameters
In building window, under Object tab, you can also modify your object by changing its parameters.
If you modify an object by changing parameters, you will be able to use ctrl+z to undo your steps, but
need to hit ctrl+z for multiple times.

Edit linked parts
If you only want to change one part of your object, check “Edit linked,” and click on the part that you
want to change. Don’t forget to uncheck this when you are done!
Select face
If you only want to change one face of the object, check “select face.”
Texture
You can change color or texture of an object in Texture tab.
You can also
change here to
change how the
texture looks on
your object.

Now, please take a snapshot of the object you modified, and upload it on Connect!
(Direct email does not work in VCER, please save the snapshot on your computer and upload it on
Connect.)
You can find more building tutorials at http://blogs.ubc.ca/educationalvirtualworld/category/virtual-
world-tutorial/ (With VIDEOS!! )
Building window: Create & General tab (share) Use keyboard shortcut: Ctrl+b to open the building window. By default, you will be in the “Create” mode.
Once you click on the ground, the building window will automatically change your mode into “Edit” mode. In Edit mode,
you will be able to do most of the things. Ex: Under General tab, you will be able to change the name of your object and
give a description.
If you work in group, please click on Share and make anyone can move and copy.
Focus
Move
Edit
Create
Land When you first open
the create window,
(Ctrl+B) the create
tool is selected by
default.
You can select
different
shapes to
create.
Very important if
you work in group
You can select
different things
happen when users
click on this object

Object tab (locked, physical, phantom)
Features tab (flexible, light)
1. You could select “Locked,” “Physical,”
“Temporary,” or “Phantom” to change your
object state.
2. You could use the parameters to change the
position, size, or rotation of the object.
3. You can change the shape you the object
without redo it.
4. You can also change other parameters to cut,
twist, tap, or slice the object!
In features tab, you will be able to make your object soft
or as a light source
Note: Not all shapes can have flexible path.
After you check Flexible Path, you will need to set up
the wind of gravity to make it move. (Otherwise you can
also drag it around and see it moves.)
By click on Light, you will be able to see the object make
light. (This function works like the object is a light
source; this light will influence other objects.)
If you are in a very bright day, or if you select the lowest
graphic setting, you might not able to see it, but if your
environment setting is sunset or midnight, you will
easily see it!
The Light is different from “Glow” under texture tab.

Texture (transparency, glow, full bright, color) Under Texture tab, you will be able to change the color of the object, the texture of the object, set it transparent, make
it glow, and full bright. (Full bright is good for display information.)
You can also change the texture by playing with the parameters!

Upload texture, sound, and animation
First, before you upload, if you are working in group, you might want to open the permissions.
From top menu, under “Build” drag down menu, you will find Upload, select “Set Default Upload Permissions.”
When the permission window is opened, check all selections, and click OK.
You can upload Image, Sound, Animation, Mesh to VCER.
If you would like to show transparent parts in your image, you will need to save your image as .png
(It is not suggested to save your PowerPoint slides as .png files. .jpg/.jpeg is suggested for slides.)
Sound format: 10 seconds max, PCM WAV format, 16-bit, 44.1kHz, mono.
If you have more than one file would like to upload, you can choose Bulk upload.
To upload, BuldUploadBulk (free per file)select file (Hold shift to select multiple files.)
You will be able to find your image files in
Textures folder, sound in Sounds folder, and
animations in Animations folder.

Copy object by dragging
In Edit mode, when you hold shift on keyboard, and drag the position xyz axis, you will be able to copy the object.
Link & Unlink To link objects together, keyboard shortcut is Ctrl+L, you can also click “Link” to link multiple prims.
Ctrl+Shift+L is to unlink object.
Naming & Take to inventory After you created a linked object, under general tab, you can give this object a name. So you know what this object is!
Give it a name! Right click on our
object, and select
Take, the object will
be in your inventory,
under the “Object”
folder!
You can select multiple objects and hold shift
and drag to copy multiple objects.
When you see your prims have both yellow and
blue outline, it means your prims are linked.

Media (Website on surface)
Click on the webpage, the webpage will Auto zoom for you. To exit, double click “Esc” on your keyboard.
There are some steps to
follow:
5. Select your object
6. Choose “Select Face”
7. Click on the face that
you would like to apply
this website.
8. Check on “Full Bright”
9. Choose “Media”
1. Click “Choose”, the
“media setting”
window will open.
2. Type or paste on the
website you would like
to show.
3. Check “Auto Zoom”
4. And Apply!
Now you will see the website
on an object!!
It works on all shapes!
Experiment it, and have fun!!
1
2
3
4
5
6
7
8
9
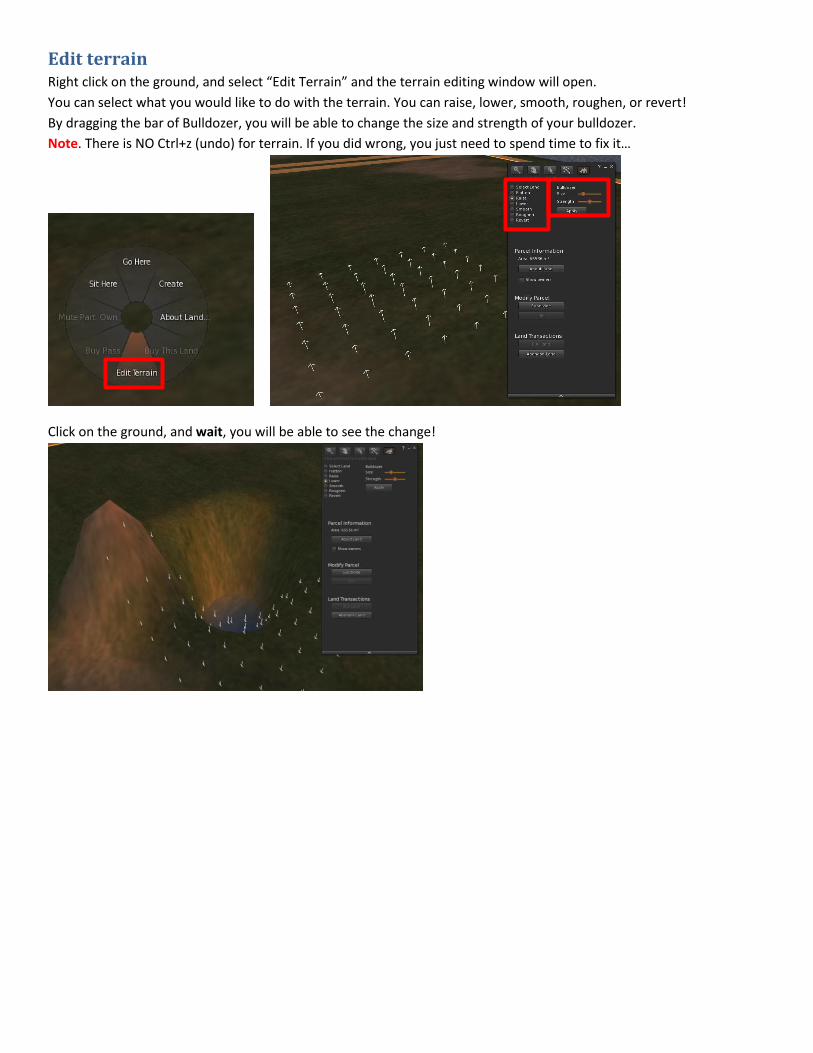
Edit terrain Right click on the ground, and select “Edit Terrain” and the terrain editing window will open.
You can select what you would like to do with the terrain. You can raise, lower, smooth, roughen, or revert!
By dragging the bar of Bulldozer, you will be able to change the size and strength of your bulldozer.
Note. There is NO Ctrl+z (undo) for terrain. If you did wrong, you just need to spend time to fix it…
Click on the ground, and wait, you will be able to see the change!

Create Landmark and set home To create a landmark will help you to come back to the place easily.
From top menu, under World, find “Landmark This Place.” After you click, the landmark of this location will be saved in
your inventory under Landmark folder. (You can also Set Home to Here, so you can easily come back.)
After you have the landmark in your inventory, you can simply hold and drag it to the top to create a shortcut.
Create notecard
Notecard is very convenient in VCER.
You can attach many things from your
inventory to a notecard.
You can create a notecard from your
inventory.
At the bottom of your inventory
window, there is a “+”, click on it, and
select New Notecard.
Give it a name, now you can start to
attach (drag item onto a notecard) all
kind of stuffs into the notecard.

Script (script me!) Please go to hop://142.103.123.135:9000/VEC/128/136/30 to click on the red cylinder and other 9 boxes to Buy scripts
and animations for free!
Contain You can put many things in one object for people to take or to interact with. The most important thing in this tab is the
scripting language.
You can also find OS / SL scripts from
Script me!
http://www.3greeneggs.com/autoscript/
And
http://opensimulator.org/wiki/Category:Scri
pts .

Using script When you want to use a script on an object, just drag this script from your inventory onto the object or in this object’s
content folder.
Each script Give landmark: You don’t need to open this script, just drag this script into the contain tab, and drag the
landmark you would like to give to your visitors!
Give notecard: You don’t need to open this script, just drag this script into the contain tab, and drag the
notecard you would like to give to your visitors!
Give object: You don’t need to open this script, just drag this script into the contain tab, and drag the object you
would like to give to your visitors!
Orb follow: This is a really fun script, you only need to put this script into the object you made, and this object
will follow you!
Poseball: You don’t need to change anything, just put this script with one “animation” when other avatars sit on
it, they will be animated.
rez an object: This is a fun one, just drag this script into the content tab, and put an object in the content tab as
well, when other avatar click on this object, your object will appear.
rotate like a door: Drag this script in the content tab, and click on the object to see what will happen!
Rotate texture: This script will rotate the texture on the object.
Sound: Just put the sound file into the content tab with this script, when you click on this object, the object will
make sound. (The sound file need to be 44.1kHz .wav format)
Slideshow: You don’t need to change anything, just put this script with images you would like to show in an
object, and click on the object. You can browse or loop your slideshow!
Float and down: Just put it in the content and see what will happen when you click on it.
Create hovering text: The only 1 thing you need to change. Find:
Drag
sandrine
Highlight
sandrine
Highlight
sandrine
Highlight
sandrine
Highlight

“ llSetText("hover", <1.0,1.0,1.0>, 1.0); ” only change “hover” to what you want to show. You can also change
“ <1.0,1.0,1.0> ” into the color you want. (see more information in Finding color in VCER.)
menu control up & down:
o llSetPos(llGetPos()+<0,0,5>); The <0,0,1.0> means the <x,y,z> distance. If you want this object move
to x axis 3 miter, y axis 4 miter, z axis 5 miter, you will change it into <3,4,5,>
Object Move and Back:
o llSetPos(llGetPos()+<0,0,5>); The <0,0,5> means the <x,y,z> distance. If you want this object move to
x axis 3 miter, y axis 4 miter, z axis 5 miter, you will change it into <3,4,5,>
o llSetTimerEvent(5); The (5) means second. If you want this object stay in that place 8 second, you will
change it to (8).
Rotate object: This script will make your object rotate by itself.
o llTargetOmega(<0,0,1>,3,1.0); In this script, <0,0,1> means the <x,y,z> ways of rotating. “ ,3” means
the rotate speed. If you like to use slower, you can give a smaller number.
Sit: Generally you don’t need to do anything when you use this script. However, when things are not working
correctly, there are two things you need to take care of.
o vector rot=<180.0, -180.0, 0.0>*DEG_TO_RAD; the < 180.0, -180.0, 0.0 > number means <x,y,z>
rotation, how you want your avatar sit on this object.
o llSitTarget(<-0.35, 0.0, 0.49>,finalrot); < -0.35, 0.0, 0.49> these number means how where you want
your avatar to sit, how far from the object.
o (It will be easier if you use the poseball script instead of the sit script)
Teleporter: in this script, you only need to look “ vector targetPos = <53, 59, 68>; ” the <53,59,68> is the landing
location. You can fine the coordinate number at the top web address bar.
Touch rotate: When you click on the object, your object will rotate. (More controlled than rotate object script)
o rotation Y_10 = llEuler2Rot( < 0, 0, 30 * DEG_TO_RAD > );
0, 0, 30 is the xyz rotation degree.
up&down by commend: this is a very smart script. You don’t need to change it, but by typing in nearby chat to
make the script work!
Particles: Here, just try to change the parameters, you will find it can change in very interesting ways.
sandrine
Highlight
sandrine
Highlight

Finding color It is not hard to find the color you want through Firestorm.
You will need to create an object first!
1. Open the texture tab,
2. Click on “color” to open the “color picker” window (step 5), and chose your own color.
3. After you find your color, click on “copy LSL” (step 6).
4. Now, you can past this color in any script you want to use!
1
2
3

Keyboard shortcuts
Environment setting:
Sunrise: Ctrl+Shift+u
Midday: Ctrl+Shift+y
Sunset: Ctrl+Shift+n
Midnight: Ctrl+Shift+x
General movement & camera view Zoom in/out: While press Alt on the keyboard, press on mouse left button and move forward/
backward.(Mouse wheel also works!)
Rotate view: While press Alt+Ctrl on the keyboard, press on mouse left button and move left and right
Off center view: While press Alt+Ctrl+Shift on the keyboard, press on mouse left button and click the mouse
around
Reset View: click on Esc 2 times
Fly up: page up (on mac notebook: hold comment and press ↑)
Fly down: page down(on mac notebook: hold comment and press ↓)
Run: double tap and hold on ↑
Sit: right click (comment+ right click on mac) on the object, and select “sit”
Building Create mode: Ctrl+B
Edit mode: right click (comment+ right click on mac) on the object, and select “Edit”
Rotate: hold Ctrl
Stretch: hold Ctrl+Shift
Link objects: Ctrl+L
Unlink objects: Ctrl+Shift+L
Copy: hold Shift and drag x/y/z axis
Undo: Ctrl+z (be careful! It doesn’t work well!)
VCER Registration: http://blogs.ubc.ca/educationalvirtualworld/
Download Firestorm https://www.firestormviewer.org/os-operating-system/
Login URI: http://52.60.242.150:9000/
Handout & video tutorial: http://blogs.ubc.ca/educationalvirtualworld/category/virtual-world-tutorial/ubc-view-tutorial/
Sandbox area: hop://52.60.242.150:9000/Sandbox/128/128/26
Related Documents