Dovetail Jig Code 502514 AT: 26/04/2021 BOOK VERSION: 2

Welcome message from author
This document is posted to help you gain knowledge. Please leave a comment to let me know what you think about it! Share it to your friends and learn new things together.
Transcript

Dovetail Jig
Code 502514
AT: 26/04/2021 BOOK VERSION: 2
Page No.
What’s in the Box................................................................................................................................................................................ 02Illustration and Parts Description of Dovetail Jig....................................................................................................................03Introduction...........................................................................................................................................................................................03Specification..........................................................................................................................................................................................04Assembling............................................................................................................................................................................................04Mounting the Jig and Mounting the Jig.....................................................................................................................................04Preparation of Timber....................................................................................................................................................................... 04Setting the End Stops..................................................................................................................................................................05-06 Setting Template and Backstop...............................................................................................................................................06-07Assembling Timber into the Jig.....................................................................................................................................................08 Setting the Dovetail Cutter..............................................................................................................................................................09Cutting the Joint..................................................................................................................................................................................10Box Jointing.................................................................................................................................................................................... 10-11Miniature Joints....................................................................................................................................................................................11
Index of Contents
02
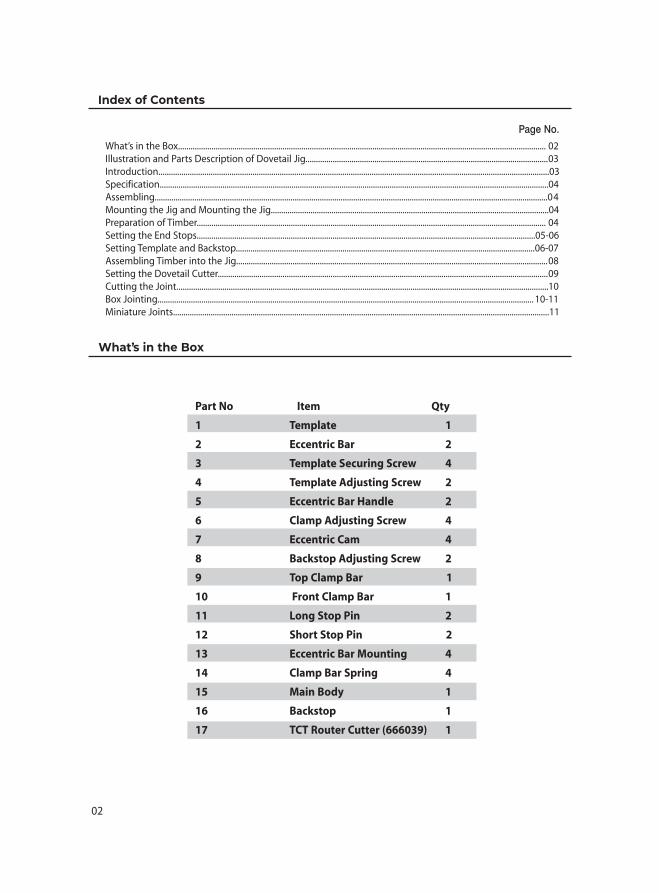
What’s in the Box
Part No Item Qty
1 Template 1
2 Eccentric Bar 2
3 Template Securing Screw 4
4 Template Adjusting Screw 2
5 Eccentric Bar Handle 2
6 Clamp Adjusting Screw 4
7 Eccentric Cam 4
8 Backstop Adjusting Screw 2
9 Top Clamp Bar 1
10 Front Clamp Bar 1
11 Long Stop Pin 2
12 Short Stop Pin 2
13 Eccentric Bar Mounting 4
14 Clamp Bar Spring 4
15 Main Body 1
16 Backstop 1
17 TCT Router Cutter (666039) 1
Introduction
03
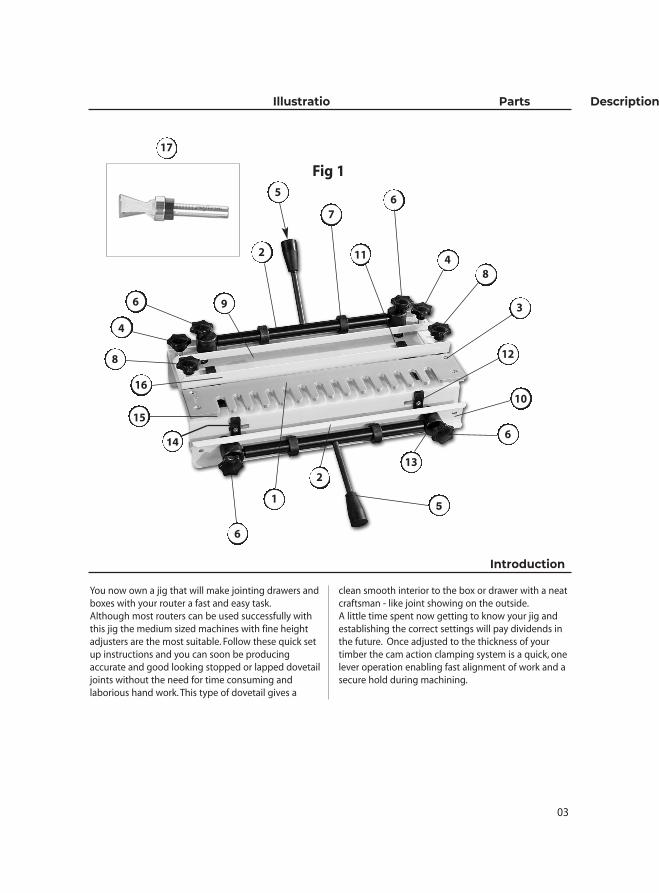
You now own a jig that will make jointing drawers andboxes with your router a fast and easy task.Although most routers can be used successfully withthis jig the medium sized machines with fine heightadjusters are the most suitable. Follow these quick setup instructions and you can soon be producingaccurate and good looking stopped or lapped dovetailjoints without the need for time consuming andlaborious hand work. This type of dovetail gives a
clean smooth interior to the box or drawer with a neatcraftsman - like joint showing on the outside. A little time spent now getting to know your jig andestablishing the correct settings will pay dividends inthe future. Once adjusted to the thickness of yourtimber the cam action clamping system is a quick, onelever operation enabling fast alignment of work and asecure hold during machining.
Illustration and Parts Description of Dovetail Jig
Fig 1
16
4
4
8
3
1
10
6
6
6
9
2
5
17
7
11
2
6
14
15
13
8
5
12
Specifications
Axminster No 502514
Rating Trade
Dovetail Size 15mm
Material Thickness 15 to 32mm
Material Width 275mm
Material Thickness Front and back pieces 1/2" (12.7mm) to 11/4" (32mm)
Side pieces 3/8" (9.5mm) to 3/4" (19mm)
Joint Size The template and cutter supplied will produce dovetail pins and sockets approximately 3/8"
(9 .5mm) deep and spaced 1" apart. The purchase of a bearing guided straight cutter,
(order no. 666106), will enable 1/2" wide box joints to be made in timber up to a
maximum thickness of 3/4"(19mm)
04
1. Assembling and Mounting the Jig
Screw the front and top handles into the eccentricbars in such a way that the workpiece is locked whenthe top handle is pushed away from you and when thelower handle is pushed downwards. Mount the jig to afirm and stable workbench at a comfortable height,remembering that the router sits on top of the jig. Thejig must be mounted close to the front edge so as toleave clear passage for the timber to the front, verticalclamp. Also, leave ample clearance to the rear of the jig
to accommodate the longest length of timber you arelikely to want to work a dovetail joint on.There are two holes provided in the base for securingthe jig to the bench. The front clamp holds the sidepiece and the top clamp holds the front or back pieceof the drawer. The complete joint is cut in a single passthrough the side piece (making the pins) and into theback or front piece (making the pockets).
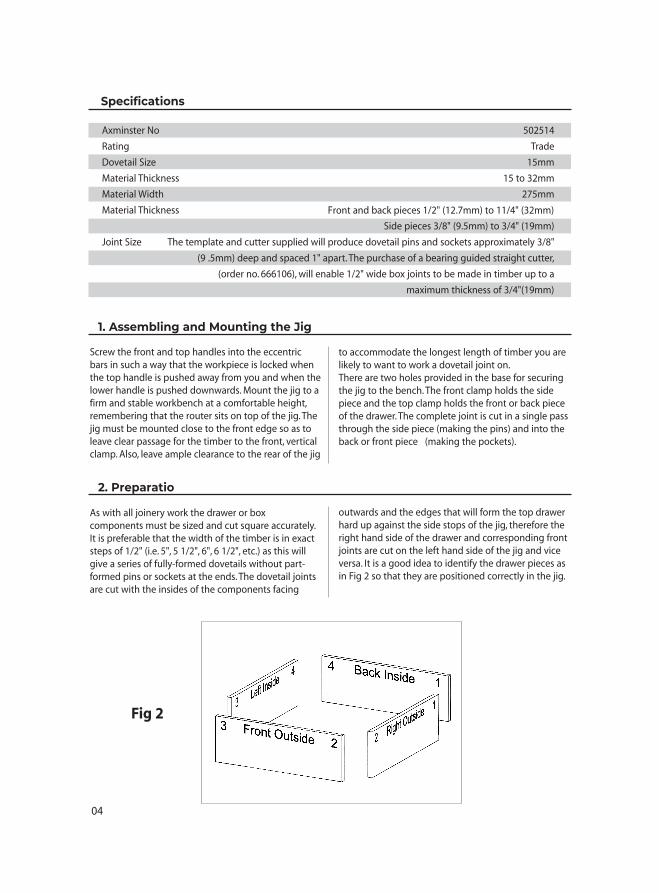
2. Preparation of Timber
As with all joinery work the drawer or boxcomponents must be sized and cut square accurately.It is preferable that the width of the timber is in exactsteps of 1/2" (i.e. 5", 5 1/2", 6", 6 1/2", etc.) as this willgive a series of fully-formed dovetails without part-formed pins or sockets at the ends. The dovetail jointsare cut with the insides of the components facing
outwards and the edges that will form the top drawerhard up against the side stops of the jig, therefore theright hand side of the drawer and corresponding frontjoints are cut on the left hand side of the jig and viceversa. It is a good idea to identify the drawer pieces asin Fig 2 so that they are positioned correctly in the jig.
Fig 2

05
3. Setting the End Stops
Start by temporarily removing the front clamp barfrom the jig. Now draw a pencil line across thetemplate, halfway across the first finger and square to the edges of the template.(see Fig 3).
Set the top left hand stop in line with the line markedon the template and square to the body of the jig.
Offset the left hand vertical stop 1/2" to the right ofthe top one and square with the top face of the jig (Fig 4).
Mirror these two settings on the right hand side of thejig, ensuring that 90˚ alignment to the front edge ofthe jig is maintained.
Fig 3
Left Hand Stop

06
Fig 4
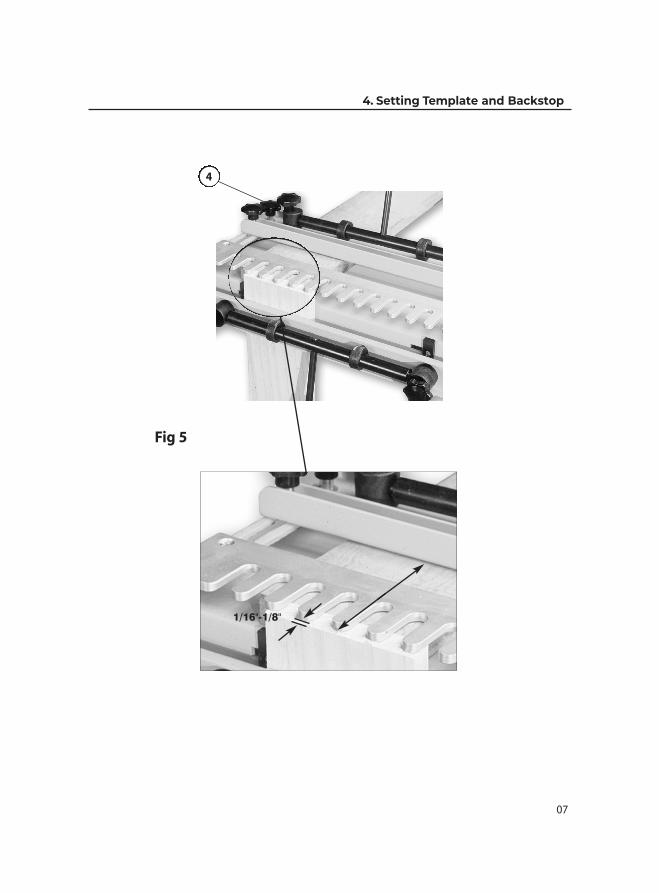
Unlock the two locking knobs (4) see Fig 5 andposition the template so that the tips of the fingers sitinside the vertically mounted timber by a minimum of1/16"(1.5mm) for thin timber and 1/8" (3mm) for thicktimber (see Fig 5).
Set the back stop so that the longest travel the cuttercan make is twice the thickness of the verticallymounted drawer side pieces, plus the distance fromthe centre of the cutter to the edge of the router baseplate that will contact the back stop, less half thediameter of the cutter (see Fig 5).
Example:- Using an router with a base width of110mm, a drawer side 15mm thick and thestandard cutter supplied with its tip diameter of14.8mm, the distance from the tips of the template fingers to the vertical face of the backstop shouldbe set at (110/2) +(2 x15) – (14.8/2) = 77.6mm.
It is not essential that this setting is exact at this stageas final adjustments can be made later on.
Ensure that the template and back stop stay in parallelwith the front edge of the jig during this setting procedure.
4. Setting Template and Backstop
1/2"
90˚
90˚
3. Setting the End Stops
07
4. Setting Template and Backstop
Fig 5
1/16"-1/8"
4

08
Adjust the top and front clamp bars via the handscrews at either end of each bar so that the wood isheld firmly in place when the cam clamp handles areoperated. When narrower pieces of timber are beingworked it is best to use a packing piece of the samethickness at the opposite end of the clamp bar toensure an even grip and to avoid distorting the bars.
Align the timber so that the piece forming one of thesides of the drawer, mounted in the front verticalclamp, extends above the front edge of the jig by thethickness of the piece to be mounted in the tophorizontal clamp (front or back of drawer). The piece inthe top clamp is then butted up to this so that bothare flush under the finger guide (see Fig 6).
5. Assembling Timber into the Jig
Fig 6
09
6. Setting the Dovetail Cutter
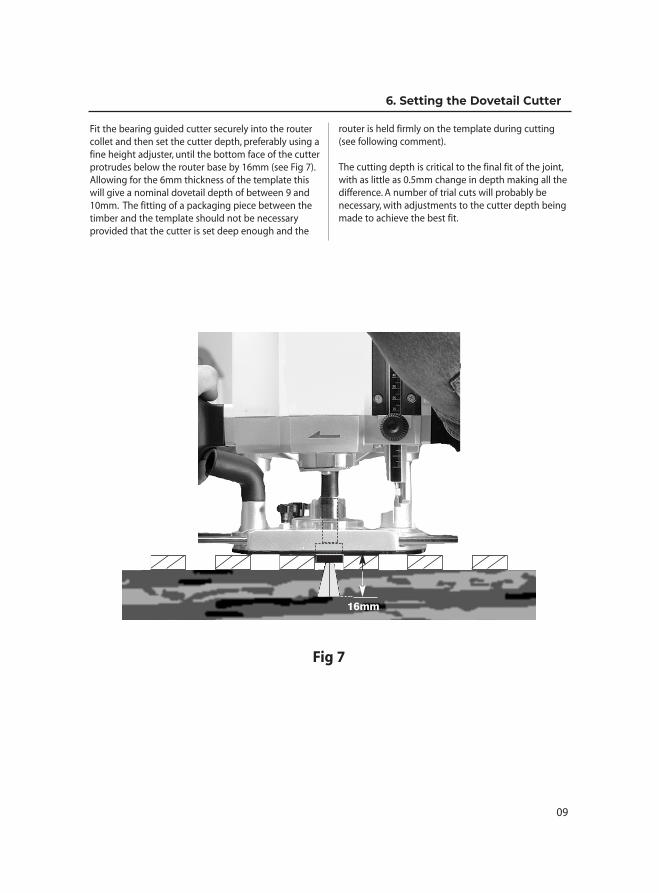
Fit the bearing guided cutter securely into the routercollet and then set the cutter depth, preferably using afine height adjuster, until the bottom face of the cutterprotrudes below the router base by 16mm (see Fig 7).Allowing for the 6mm thickness of the template thiswill give a nominal dovetail depth of between 9 and10mm. The fitting of a packaging piece between thetimber and the template should not be necessary provided that the cutter is set deep enough and the
router is held firmly on the template during cutting(see following comment).
The cutting depth is critical to the final fit of the joint,with as little as 0.5mm change in depth making all the difference. A number of trial cuts will probably benecessary, with adjustments to the cutter depth beingmade to achieve the best fit.
Fig 7
16mm
10
7. Cutting the Joint
Because there may be a need to alter one or more ofthe settings in order to get the joint to fit correctly it iswiser to carry out the initial cuts on two trial pieces oftimber of the same width and thickness as the finalcomponents.
Position the router on the template with the cutterclear of the timber and switch on.
Now with just a light cut run the router from right toleft across the work, just touching the end of eachfinger. Continue the cut allowing the router to do thework and avoiding any heavy-handed forced contactwith the template. Follow the template in and out ofthe finger guides working from left to right. Whencompleted switch the router off before lifting it fromthe jig.
It is important that a firm and even pressure is kept onthe router whilst the joint is being cut; this Will bothensure an accurate joint and prevent any possibility ofthe cutter guide bearing disengaging from the slots inthe template.
Remove the pieces from the jig, make a trial fit andthen, if necessary, make the following adjustments:
• If the fit is too loose, increase the cutter depth by0.5mm.• If the fit is too tight, decrease the cutter depth by0.5mm.• If the pins stand proud of the joint, move the backstop further back.• If the pins sit too deep in the joint, move the backstop further forward.
Having made the necessary adjustments you caneither make a second trial cut or proceed directly tothe final joint. Once the correct settings have beenmade then production runs of joints can beundertaken, although the settings will need to bechecked periodically to maintain accuracy.
Additional cutter avaliable:
Axcaliber Dovetail Cutter (Order no: 951241)
With a greater cutting depth this cutter is offered asan alternative to the standard cutter supplied withthe Axminster dovetail jig and is suitable for materialthickness of approx 19-30mm.
8. Box Jointing
Box joints can be formed in timber with a maximum thickness of 3/4" using a 1/2" template profile cutter, Stock No 666106. The procedure is different from that used for dovetailing in that both boards are mounted vertically in the front clamp and cut independently of each other with the fingers in one board offset by 1/2" from those on the other.
First of all, the template assembly needs to be brought forward as far as possible and locked in position with the locking knobs (4) see Fig 5; this will allow the cutter to move far enough in the fingers to cut the full 3/4" thickness of timber. Next, the template assembly should be raised high enough to allow the cutter to cut to its full depth without fouling the top surface of the jig body. This can be achieved by placing a timber spacer (or spacers) underneath both the rear clamp
and the template and locking in position with the rearclamp. The spacer should be at least 1/8" (3mm)thicker than the timber being jointed which should beenough to ensure that the cutter will cut the full depthwithout contacting the body of the jig.
The depth of the cutter below the router base plateshould be set to give the required joint depth plus thethickness of the template (e.g. 19 + 6 = 25mm in thecase of 3/4" timber). It is important to note that whenthinner timber is used the guide bearing will sit higherup in the template and in this case it may benecessary to position the timber below the bottom ofthe template (with the aid of a thin plywood shim) sothat the bearing still runs within the depth of thetemplate.
11
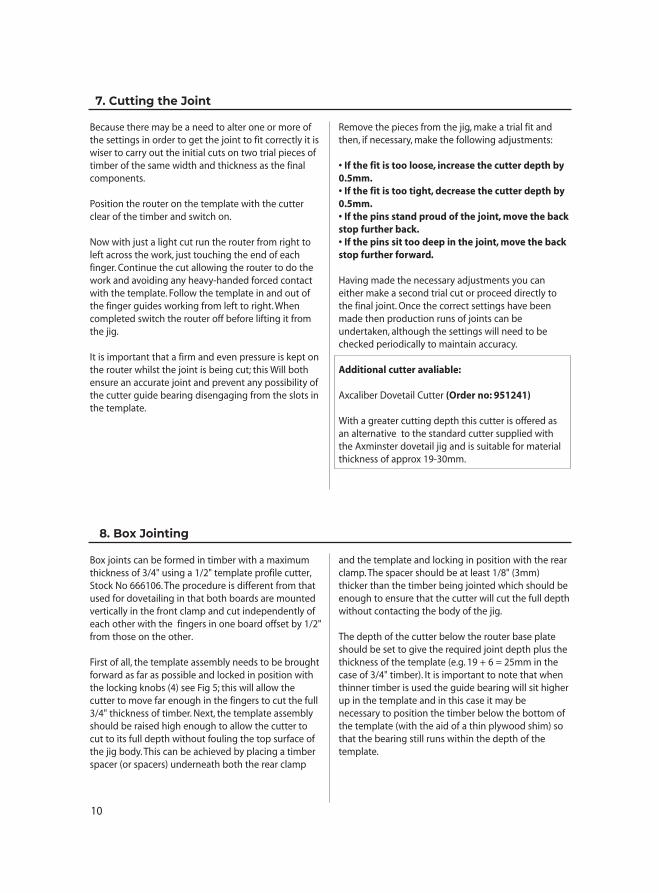
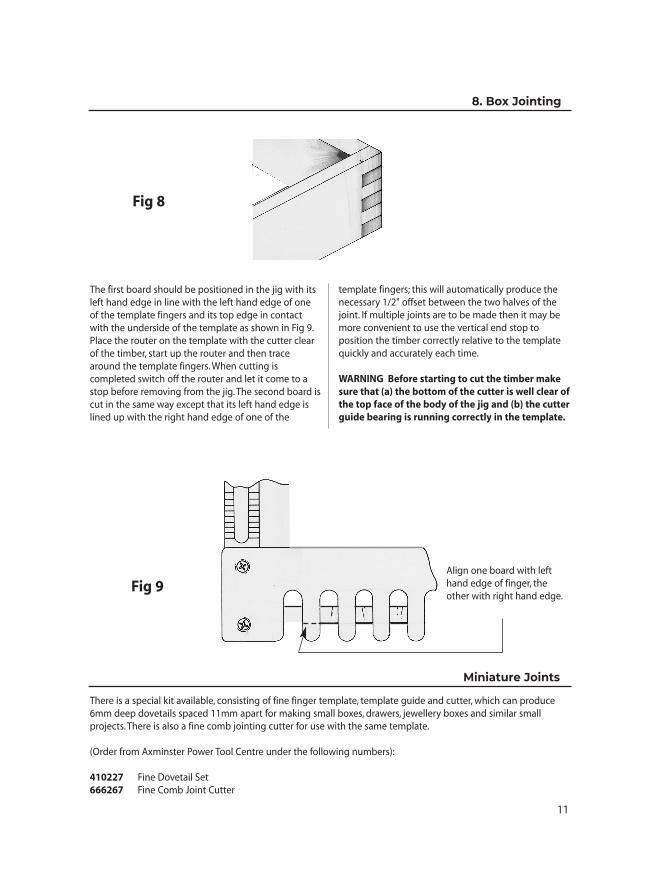
The first board should be positioned in the jig with itsleft hand edge in line with the left hand edge of oneof the template fingers and its top edge in contactwith the underside of the template as shown in Fig 9.Place the router on the template with the cutter clearof the timber, start up the router and then tracearound the template fingers. When cutting iscompleted switch off the router and let it come to astop before removing from the jig. The second board iscut in the same way except that its left hand edge islined up with the right hand edge of one of the
template fingers; this will automatically produce thenecessary 1/2" offset between the two halves of thejoint. If multiple joints are to be made then it may bemore convenient to use the vertical end stop toposition the timber correctly relative to the templatequickly and accurately each time.
WARNING Before starting to cut the timber makesure that (a) the bottom of the cutter is well clear ofthe top face of the body of the jig and (b) the cutterguide bearing is running correctly in the template.
8. Box Jointing
Miniature Joints
Fig 8
Fig 9Align one board with lefthand edge of finger, theother with right hand edge.
There is a special kit available, consisting of fine finger template, template guide and cutter, which can produce6mm deep dovetails spaced 11mm apart for making small boxes, drawers, jewellery boxes and similar smallprojects. There is also a fine comb jointing cutter for use with the same template.
(Order from Axminster Power Tool Centre under the following numbers):
410227 Fine Dovetail Set666267 Fine Comb Joint Cutter

Axmister Tools, Axminster, Devon EX13 5PH
axminstertools.com
Related Documents


