Welcome message from author
This document is posted to help you gain knowledge. Please leave a comment to let me know what you think about it! Share it to your friends and learn new things together.
Transcript


Introduction 42
Managing Your User Account 43
Logging In andOut 43
Logging into a Site 43
Logging in with a Security Code 45
Logging in with Facebook 46
Logging in with Google 47
Logging in with Live 48
Logging in with Twitter 49
Logging Out of a Site 50
Remembering Login Credentials 51
Retrieving your Password 51
Troubleshooting. Login Failed 53
Troubleshooting. Retrieving Password Failed 54
Managing Your Profile 54
Managing your User Profile 54
Changing your Password 59
Managing your Profile Photo 60
Uploading a New Image 61
Selecting a Previously Uploaded Image 61
Removing your Profile Image 61
Setting Image Privacy 61
Managing your User Credentials 62
Unregistering your User Account 63
Signing Up for a User Account 64
Signing up as a Registered User 64
Signing up as a Registered User with a Security Code 66
Subscribing toMember Services 68
Subscribing to aMember Service 68
Subscribing to a Service with an RSVP Code 69
Subscribing to a Service with an RSVP Link 70
Unsubscribing from aMember Service 70
Working with Content 71
Minimizing andMaximizing Content 71
Printing Content 71
Subscribing to Syndicated Content 72
Managing Notifications 73
Building Your Site 75
Getting Started 75
Configuring Basic Settings Using the SiteWizard 75
Advanced Configuration Settings 75
Adding Pages 75
Adding Content UsingModules 75
Understanding Role Based Access 76
Adding andManaging Pages 76
About Pages 76
Adding a New Page 77
Deleting a Page 78

Copying a Page 79
Copying Design to Child Pages 80
Copying Permissions to Children Pages 81
Editing Page Settings 82
Exporting a Page 82
Importing a New Page 84
Moving Page Location - Iconbar 86
Quick Add a New Page (RibbonBar Only) 87
Tagging Page Content 88
Viewing Any Page 88
Page Settings 89
About Page Permissions 89
Setting Page Permissions 91
Advanced Settings for Existing Pages 96
Advanced Settings for New Pages 99
Localization Settings for New Pages 103
Page Details Settings for Existing Pages 104
Page Details Settings for New Pages 106
Adding andManagingModules 108
About Modules 108
Module Actions Menu 110
Opening theModule Actions Menu 111
Edit Tools 113
Manage Tools 113

Move Tools 118
Adding a New Module (ControlBar) 118
Option One - Drag and DropModule 118
Option Two - Insert Module 120
Adding an ExistingModule (ControlBar) 123
Option One - Drag and DropModule 123
Option Two - Insert Module 125
AddingModule Content 127
Deleting aModule 128
DeletingModule Content 129
Drag and DropModule 130
EditingModule Content 133
Adding a New Module (RibbonBar) 135
Adding an ExistingModule (RibbonBar) 139
Adding a New Module (Iconbar) 142
Adding an ExistingModule (Iconbar) 144
Module Settings 145
About Module Settings 145
Module Settings 146
Configuring AdvancedModule Settings 146
Configuring Basic Module Settings 152
Viewing Added To Pages Module Settings 154
Page Settings 154
Configuring Advanced Page Settings for aModule 154

Configuring Basic Page Settings for Modules 155
Configuring Cache Settings for aModule 159
Permissions 160
About Module Permissions 160
SettingModule Permissions 163
SettingModule Permissions for DNN Community Edition 164
SettingModule Permissions for DNN Professional and Enterprise Edition 165
Setting Permissions for SharedModules 169
InstalledModules 171
Account Login 171
About the Account LoginModule 171
Administrators 173
Hiding Account Login from Authenticated Users 173
Troubleshooting: Cannot Access Login Page (Friendly URL's Off) 173
Troubleshooting: Cannot Access Login Page (Friendly URL's On) 173
Troubleshooting: Cannot Access Login Page 174
Add New User 174
About the Add New UserModule 174
Adding a New User 175
Banners 178
About the Banners Module 178
About Banner Types 179
Module Editors 182
Displaying a Banner 182

Displaying Banners Horizontally 183
Displaying Banners Vertically 184
Editing Banner Options 184
Setting Banner Spacing 184
Setting the Banner Border 186
Troubleshooting: Image Not Displaying 188
Commerce 190
About the CommerceModule 190
CommerceModule FAQ's 190
Configuring the CommerceModule 196
Commerce Customers 200
Commerce Dashboard 201
Commerce Discounts 202
CommerceOrders 204
Commerce Products 209
Configuring CommerceModule Options 215
General Settings 215
Payment Options 216
Tax Rates 218
Order Status Options 218
Creating a PayPal Test Account 218
Purchasing a Product 223
Product Display 223
Shopping Cart 223

Billing and Shipping 224
Review and Payment 226
Order Completion 227
Console 228
About the ConsoleModule 228
Displaying Groups using the Console 229
Displaying Child Pages using the Console 231
Displaying Profiles using the Console 236
Document Library 239
About the Document Library Module 239
Configuration 240
Setting the Parent Root Folder 240
Contributors 241
Managing Categories 241
Adding a Sub-Category 241
Configuring Direct View Settings for Categories 243
Configuring General Settings for Categories 244
Configuring Security Settings for Categories 245
Deleting a Category 246
Editing Category Settings 247
Managing Documents 248
Adding a Document Version 248
Adding a Document 250
Deleting a Document 253

Downloading a Document 254
Editing a Document Listing 255
Enabling Document Tracking 256
Managing Document Tracking 257
Managing Document Version Info 257
Re-Submitting a Document 258
Viewing Category Statistics 259
Viewing Document Statistics 261
Viewing Folder Statistics 263
ViewingMedia 264
Managing Folders 265
Adding a Sub-Folder 265
Configuring Direct View Settings for Folders 267
Configuring General Settings for Folders 268
Configuring Security Settings for Folders 269
Deleting a Folder 271
Editing Folder Settings 272
Setting User Security for Folders 273
Moderation 275
Deleting Unmoderated Files 275
Moderating Uploaded Files 276
Moderation Filter Options 279
Settings 280
Configuring Global Settings (Document Options) 280

Configuring Global Settings (Expired Documents Notification Options) 282
Configuring Global Settings (File System Options) 284
Configuring Global Settings (Module Options) 286
Configuring Global Settings (Statistic Options) 289
Configuring Local Settings (Document Grid Options) 290
Configuring Local Settings (Navigation TreeOptions) 293
HTML 295
About the HTMLModule 295
Module Editors 296
Adding Content (HTMLModule) 296
Adding Replacement Tokens (HTML Module) 297
ManagingMy Workflow Tasks (HTML Module) 299
Previewing Editor Content (HTML Module) 299
Publishing a Draft (HTML Module) 300
Rolling Back Content (HTML Module) 301
Viewing Previous Versions of Content (HTML Module) 302
Settings 303
Applying aWorkflow (HTML Module) 303
Enabling/Disabling Token Replacement (HTML Module) 304
Setting aWorkflow (HTML Module) 305
Using or Disabling Form Decoration 306
Administrators 307
Deleting a Content Version (HTML Module) 307
HTMLPro 308
About the HTMLProModule 308
Configuring and UsingWorkflow (HTMLPro) 309
Module Editors 311
Adding Content (HTML Pro) 311
Adding Replacement Tokens (HTML Pro) 312
Approving Content (HTML Pro) 313
Approving without Editing 314
Editing and Approving 315
Rejecting Content (HTML Pro) 317
Comparing andManaging Versions (HTML Pro) 319
Locking/UnlockingModule Content (HTML Pro) 321
Managing AutoSaved Content (HTML Pro) 322
ManagingMy Workflow Tasks (HTML Pro) 324
Previewing Editor Content (HTML Pro) 325
Publishing a Draft (HTML Pro) 326
Rolling Back Content (HTML Pro) 326
Settings 328
Displaying/Hiding Summary (HTML Pro) 328
Enabling/Disabling AutoSave (HTML Pro) 330
Enabling/Disabling Token Replacement (HTML Pro) 331
Setting aWorkflow (HTML Pro) 333
Using or Disabling Form Decoration 334
Administrators 335
Activating/Deactivating aWorkflow (HTML Pro) 335

Adding aWorkflow State (HTML Pro) 337
Adding aWorkflow (HTML Pro) 341
Configuring AdminWorkflow Settings (HTML Pro) 343
Deleting a Content Version (HTML Pro) 345
Deleting aWorkflow State (HTML Pro) 346
Editing aWorkflow State (HTML Pro) 347
SettingMaximum Version History (HTML Pro) 349
Journal 350
About the Journal Module 350
Adding a Journal Entry 351
Deleting a Journal Entry 354
Settings 355
Configuring Journal Settings 355
Member Directory 358
About theMember Directory Module 358
Connecting with aMember 359
Searching for Members 359
Basic Search 360
Advanced Search 360
Settings 361
Configuring Search Settings 361
Managing Templates 363
Setting Filters and Sorting 365
Message Centre 368

About theMessage Center Module 368
Viewing aMessage 369
Replying to aMessage 371
Composing aMessage 374
Archiving aMessage 376
Deleting aMessage 377
Editing/Sending a Draft Message 378
Managing Social Groups 379
Settings 380
ConfiguringMessage Center Settings 380
SettingMessaging Template Settings 382
My Modules 382
About theMy Modules Module 382
ManagingMy Modules 384
Filtering theModules List 384
Sorting theModules List 385
Navigating to a page or module 386
ManagingMultiple Modules 386
Search Input 387
About the Search Input Module 387
Performing a search using the Search Input module 387
Settings 389
Configuring the Search Input Module 389
Designing the Search Input Module 390

Search Results 391
About the Search Results Module 391
Settings 392
Configuring the Search Results Module 392
Social Groups 393
About the Social Groups Module 393
Adding a Social Group Journal Entry 393
Adding a Social Group 396
Configuring Social Groups Settings 397
Configuring the Social Groups Module 398
Editing a Social Group 399
Joining a Social Group 399
Leaving a Social Group 400
Users And Roles 401
Users and Roles Module Suite 401
ViewProfile 401
About the ViewProfile Module 401
Advanced Site Management 403
Multi Language Sites 403
Search Optimization 403
Site Design 403
Site Searching 403
Social Collaboration 403
Content Localization 405

About Content Localization 405
Adding aModule to all Languages 405
Adding a New Page (Default Language) 406
AddingModules to a Secondary LanguageOnly 406
DeleteModules from Secondary Language 406
Editing (Translating) LocalizedModule Content 406
Editing the Content of SharedModules 407
ModifyingModule Localization Status 407
Publishing a Secondary Language Page 408
Setting a Page as Ready for Translation 408
Setting a Page as Requiring Translation 411
Setting a Page as Translated 412
Translating a Page (Admin) 412
Translating a Page 416
Viewing a Site in a Secondary Language 418
Viewing a Site in the Default Language 419
Mobile Devices Support 419
About Mobile Devices Support 419
About theMobile Skin 420
Creating aMicroSite 424
Creating a StandaloneMobile Site 426
Previewing Your Mobile Device Site 427
Summary View and Full View 429
Control Panel Overview 430

About the DNN Control Panels 430
Overview of the ControlBar Control Panel 431
The AdminMenu 431
The Tools Menu 432
Tool 433
Description 433
Role Restriction 433
The HelpMenu 433
Tool 433
Description 433
Role Restriction 433
The Modules Menu 434
Function 434
Description 434
Permissions 434
Community 434
Professional 434
The Pages Menu 434
Function 434
Description 434
Permissions 434
Community 434
Professional 434
The Users Menu 436

Tool 436
Description 436
Role Restriction 436
Overview of the RibbonBar Control Panel 436
The AdminMenu 437
TheModules Menu 439
Function 439
Description 439
Permissions (Community/Professional) 439
The Pages Menu 440
Function 441
Description 441
Permissions (Community/Professional) 441
The Tools Menu 442
Tool 442
Description 442
Role Restriction 442
Setting the RibbonBarMode 443
Overview of the Iconbar Control Panel 447
Maximizing/Minimizing the Iconbar 447
Setting the Iconbar Mode 448
Page Functions Section 449
Module Insertion Section 449
Common Tasks Section 449

Admin Console 451
About the Admin Console 451
Advanced Configuration Settings 454
About Advanced Configuration Settings 454
Advanced Configuration Settings 456
Skins and Containers 457
Skin Basics 457
Containers 457
Skin Designer 457
Authentication Systems 457
Deploying Language Packs 457
Installing Authentication Systems 459
Installing Providers 459
Installing Optional Modules 460
Content Staging 461
About the Content StagingModule 461
Configuring Content Staging 462
Creating a Staging Site 464
Publishing Staged Content 465
Device Preview Management 468
About the Device Preview Management Module 468
Adding an Existing Preview Profile 470
Deleting a Preview Profile 471
Editing a Preview Profile 472

Event Viewer 472
About the Log ViewerModule 472
All Users 474
Filtering Events by any Event Type 474
Sending Exceptions by Email 474
Setting Event Records Per Page 476
Viewing Event Details 477
Extensions 478
About the Admin Extensions Module 478
All Users 480
Viewing Installed Extensions List 480
Module Editors 481
Configuring Default Authentication 481
Configuring Facebook Authentication 483
Configuring Google Authentication 484
Configuring Live Authentication 486
Configuring Twitter Authentication 487
Enabling/Disabling LiveID Authentication 488
Setting DNN Active Directory Authentication 489
Viewing Container Package Settings 490
Viewing Package Settings For All Extensions 491
Viewing Skin Package Settings 493
Administrators 494
Setting Permissions to Deploy aModule 494

File Manager 495
About the Admin File Manager Module 495
Getting Familiar with the File Manager Module 497
All Users 500
Downloading a File 500
Filtering Files 501
Navigating to and Selecting Folders 502
Navigating to Files 502
Refreshing All Files within a Folder 503
Reordering Files 504
Synchronizing Folders 504
Folder Editors 505
Adding a New Folder 505
Copying Files 507
Deleting a File 508
Deleting a Folder 509
DeletingMultiple Files 510
Moving Files 511
Renaming a File 512
Selecting Files 513
Setting the Archiving and Indexing Property of a File 514
Setting the Hidden Property of a File 515
Setting the ReadOnly Property of a File 517
Synchronizing Files within a Folder 518

Unzipping Compressed Files 519
Uploading Files 520
Module Editors 522
Overview of Folder Types 522
Adding aWindows Azure Folder Type 523
Adding an Amazon S3 Folder Type 525
Administrators 527
Overview of Folder Security Settings 527
Community Edition Permissions 528
Professional Edition Permissions 528
Assigning Folder Permissions by Role 529
Assigning Folder Permissions to a User 529
Removing Folder Permissions 530
Google Analytics 530
About the Google Analytics / Google Analytics ProModule 530
What Is Google Analytics and why should I consider using it 531
How do I get an account? 532
Signing Up for Google Analytics 532
Module Editors 535
Adding a Segmentation Rule 535
Configuring Google Analytics/Google Analytics Pro 537
Configuring Google Analytics 537
Configuring Google Analytics Pro 538
Deleting a Segmentation Rule 540

Editing a Segmentation Rule 540
Languages 541
About the LanguageManagement Module 541
All Users 542
Activating/Deactiving a Language 542
Deleting a Resource File 543
Editing Site Language Files 544
Enabling Localized Content 546
Enabling/Disabling a Language 549
Enabling/Disabling Browser Language Detection 550
Publishing Localized Content 551
Setting Language Files as Pending Translation 552
Setting the Default Site Language 554
Setting Translator Roles 555
Module Editors 557
Configuring Language Settings for a Site 557
Creating Localized Pages for a Language 558
SuperUsers 560
Adding a New Language 560
Creating a Core Language Pack 562
Creating a Full Language Pack 563
Creating aModule Language Pack 564
Creating a Provider Language Pack 566
Creating an Authentication System Language Pack 568

Editing Language Files (System, Host or Site) 569
Installing a Language Pack 571
Setting Fallback Languages 573
Verifying Resource Files 574
Language Files 576
Overview of the Type of Language Files 576
Adding/Editing the LoginMessage 577
Editing Privacy and Terms of Use Statements 579
Editing the Password Reminder Email 580
Email Messages 581
Affiliate Notification Email Message 581
Banner Notification Email Message 582
Bulk Email Confirmation Email Message 582
Bulk Email Start Confirmation Email Message 583
Password Reminder Email Message 583
Portal Signup Email Message 584
Profile Updated Email Message 584
Role Assignment Email Message 585
Role Update Email Message 585
Role Unassignment Email Message 586
SMTP Configuration Test Email Message 586
User Lockout Email Message 587
User Registration Administrator Email Message 587
User Registration Private Email Message 588

User Registration Public Email Message 588
User Registration Verified Email Message 589
User Unregister Email Message 589
User Unregister Email Message 590
Vendor Registration Administrator Email Message 591
Vendor Registration Email Message 591
Error Messages 592
The Default 403_3 Error Message 592
The Default 404 Error Message 592
Portal Messages 593
Portal Privacy Text 593
Portal Terms Text 597
Registration Instructions 605
Retrieve Password Instructions 605
Lists 606
About the Admin Lists Page 606
Adding a Child List 606
Adding a List Entry 608
Adding a Parent List 609
Deleting a List Entry 610
Deleting a List 611
Editing a List Entry 612
Managing the Profanity List (Site) 613
The first time youmanage this list 613

Adding a filtered word 613
Editing a filtered word 614
Deleting a filtered word 614
Newsletters 614
About the Newsletters Module 614
Newsletter Error Messages 617
Sending a Basic Newsletter 617
Sending a Newsletter to a Relay Service 621
Sending a Newsletter with Tokens 622
Sending a Personalized Newsletter without Tokens 625
Sending Newsletters in a User's Preferred Language 626
The Bulk Email Report 628
PageManagement 629
About the Pages (Tabs) module 629
Page Editors 630
Deleting a Page (Pages Module) 630
Editing Page Settings using the Pages Module 631
Enabling/Disabling Page Link (Pages Module) 638
Hiding/Showing a Page in Site Navigation 640
Viewing any Page (Pages Module) 642
Administrators 643
Adding One orMore Pages (Pages Module) 643
Moving Page Position in Menu 646
Moving a Page to a Parent Position 646

Moving a Page to a Child Position 649
Recycle Bin 653
About the Recycle BinModule 653
DeletingModules from the Recycle Bin 654
Deleting Pages from the Recycle Bin 655
Emptying the Recycle Bin 656
Restoring DeletedModules 657
Restoring Deleted Pages 658
Restoring a parent page and it's children 658
Restoring child page(s) 659
Restoring a parent page without children 659
Search Engine Site Map 660
About the Search Engine SiteMapModule 660
Configuring the SiteMap Settings 661
Purging Cached Sitemap 663
Setting the SiteMap Providers 663
Submitting Site to Google 664
Submitting Site to Yahoo! or Bing 665
Security Roles 666
About the Security Roles Module 666
Understanding Role Based Access 667
All Users 669
Filtering Security Roles by Role Group 669
Module Editors 670

User Settings 670
Managing User Account Settings 670
Adding a Role Group 670
Adding a Security Role (Basic Settings) 671
Adding a Security Role with a Fee 673
Adding a Security Role with an RSVP Code 677
Adding a User to a Security Role 678
Creating aMembership Service 680
Deleting a Role Group 682
Deleting a Security Role 683
Deleting a User from a Security Role 684
Editing a Role Group 684
Editing a Security Role 685
Editing a User's Security Role Access 686
Obtaining an RSVP Link 687
SharePoint Connector 688
About the SharePoint Connector Module 688
SharePoint Connector Benefits 689
Feature 690
SharePoint Connector FAQ's 691
SharePoint 2010 693
Managing Roles Security for SharePoint Connector (SP2010) 693
Configuring Site Collection Administrator Permissions (SP2010) 697
Installing DotNetNuke Connector (SP2010) 698
Setting the Synchronization Schedule (SP2010) 701
Activating the DotNetNuke Connector (SP2010) 704
Connecting DNN and SharePoint 2010 708
Enabling Synchronization Notifications (SP2010) 711
Adding a Synchronization Item (SP2010) 712
Managing Synchronized Document Libraries (SP2010) 715
Adding a Synchronization Item (SP2010) 716
Adding a Synchronized List to SharePoint (SP2010) 719
Adding a Synchronized SharePoint List (SP2010) 724
Adding a SharePoint Connection (SP2010) 724
Adding a Live SharePoint List (SP2010) 726
Editing a Live SharePoint List (SP2010) 729
Deleting a Live SharePoint List (SP2010) 730
Deactivating the DotNetNuke Connector (SP2010) 731
Uninstalling DotNetNuke Connector (SP2010) 734
SharePoint 2007 736
Managing Roles Security for SharePoint Connector (SP2007) 736
Configuring Site Collection Administrator Permissions (SP2007) 740
Installing DotNetNuke Connector (SP2007) 741
Setting the Synchronization Schedule (SP2007) 744
Activating the DNN Connector (SP2007) 747
Connecting DNN and SharePoint 2007 750
Enabling SharePoint Breadcrumbs (SP2007) 752
Enabling Synchronization Notifications (SP2007) 752

Adding a Synchronization Item (SP2007) 754
Managing Synchronization Items (SP2007) 756
Deactivating the DNN Connector (SP2007) 757
Uninstalling DotNetNuke Connector (SP2007) 758
SharePoint Viewer 761
About the SharePoint ViewerModule 761
Adding an Item to a SharePoint List 761
Displaying a SharePoint List 762
Site Log 765
About the Site LogModule 765
Viewing a Site Report 766
Affiliate Referrals Report 767
Detailed Site Log Report 767
Enabling the Site Log 768
Page Popularity Report 769
Page Views By Day Of Week Report 770
Page Views By Day Report 771
Page Views By Hour Report 772
Page Views By Month Report 773
Site Referrals 774
User Agents Report 775
User Frequency Report 776
User Registrations By Country Report 777
User Registrations By Date Report 778

Site RedirectionManagement 779
About the Site RedirectionManagement Module 779
Adding aMobile Site Redirection 780
Adding Advanced Site Redirections 782
Deleting a Redirection Path 785
Editing a Redirection Path 786
Site Settings 786
About the Site Settings Page 786
Basic Settings 788
Configuring your Site Details 788
Appearance 791
Enabling/Disabling SkinWidgets 791
Setting the Body Background 793
Setting the Default Site Skin and Container 795
Setting the Edit Skin and Container 798
Setting the Favicon 800
Setting the Site Logo 801
Uploading a Site Skin and/or Container 804
Site Marketing 805
Enabling/Disabling Banner Advertising 805
Submitting your Site MapURL to Google 806
Submitting your Site to Search Engines 807
Advanced Settings 808
PageManagement 808
Viewing the HomeDirectory 808
Setting the HomePage 809
Enabling a Custom Login Page 810
Restoring the Default Login Page 812
Setting a Custom Registration Page 812
Restoring the Default Registration Page 813
Setting the Search Results Page 814
Enabling/Disabling a Splash Page 815
Setting a Custom User Profile Page 817
Restoring the Default User Profile Page 819
Security Settings 820
Setting the Primary Administrator 820
Setting the Visibility of the Login Control 821
Payment Settings 822
Setting the Payment Processor 822
Usability Settings 824
Configuring the Control Panel Options 824
Enabling/Disabling Pop-Ups for Editing 826
Hiding System Folders 829
About Inline Editing 830
Setting the Site TimeZone 831
Stylesheet Editor 832
About the Stylesheet Editor 832
Editing the Stylesheet 833

Restoring the Default Stylesheet 833
User Account Settings 834
Login Settings 834
Managing Login and Logout Settings 834
Profile Settings 836
Adding a New Profile Property 836
Deleting Profile Settings 842
Editing Profile Settings 842
Managing Profile Settings 845
Registration Settings 846
Configuring a Custom Registration Form 846
Configuring the Standard Registration Form 849
Disabling User Registration 853
Enabling User Registration 854
Viewing Pre-Configured Registration Settings 856
SiteWizard 859
About the SiteWizardModule 859
Using the SiteWizard 859
Skins 863
About the Skins Module 863
All Users 865
Applying a Default Site Container 865
Applying the Default Site Skin 865
Previewing a Container Package 867

Previewing a Skin Package 868
Restoring the Default Skin 869
Skin Designer 870
About the Skin Designer Module 870
Message: YouMust Select A Token Setting 871
Setting Container Token Values 871
Setting Skin Token Values 871
Taxonomy 873
About the Taxonomy Manager Module 873
Viewing Vocabularies List 873
Module Editors 874
Adding Additional Terms (Hierarchical Vocabulary) 874
Adding Terms (Simple Vocabulary) 875
Adding the First Term (Hierarchical Vocabulary) 876
Creating a Vocabulary 878
Deleting a Vocabulary 879
Deleting Terms 880
Editing a Vocabulary 881
Editing Terms 881
Viewing User Entered Tags 882
User Accounts 883
About the User Accounts Module 883
Configuring User Account Settings 884
All Users 886

Filtering User Accounts by Online Users 886
Filtering User Accounts by Unauthorized Users 887
Filtering User Accounts by Username 887
Searching for a User Account 888
Viewing All User Accounts 890
Module Editors 890
Adding a User Account 890
Deleting a User Account 892
Editing a User Account 893
Forcing a Password Change 894
Managing a User Profile 894
Managing a User's Password 895
Removing a Deleted a User Account 895
RemovingMultiple Deleted User Accounts 896
Restoring a Deleted User Account 896
Administrators 897
Adding A User to a Role 897
Authorizing an Unauthorized User 898
Deleting a User from a Security Role 899
Deleting all Unauthorized User Accounts 900
UnAuthorizing a User 901
Vendors 902
About the Admin Vendors Module 902
Filtering Vendors by Company Name 903

Filtering Vendors by Unauthorized Vendors 904
Searching Vendors by Company Name 904
Searching Vendors by Email 905
Viewing All Vendor Accounts 906
Vendor Accounts 907
Adding a New Vendor 907
Authorizing/Unauthorizing a Vendor Account 909
Editing/Adding Vendor Account Details 910
Deleting a Vendor Account 912
Deleting all Unauthorized Vendors 913
Vendor Banners 914
Adding a Script Banner to a Vendor 914
Adding a Text Banner to a Vendor 915
Adding an Image Banner to a Vendor 919
Editing a Vendor Banner 923
Deleting a Vendor Banner 924
Emailing Banner Status to Vendor 925
Viewing the Clicks and Views for a Banner 925
Affiliate Accounts 926
About Vendor Affiliate Accounts 926
Adding an Affiliate Referral Account 927
Editing an Affiliate Referral Account 928
Deleting an Affiliate Referral Account 928
Sending Notification of Affiliate Referral Account 928

Common Tools 930
Calendar 930
Working with the Calendar 930
Default Calendar 930
Module Calendar 932
Editor 934
About the Editor 934
Adding Basic Text and HTML using Editor 934
Adding Rich Text Using The Editor 935
Pasting HTMLContent 936
Viewing Content in Design or HTMLView 937
DotNetNuke RadEditorProvider 938
Managing Images andMedia 938
Creating an ImageMap 938
Editing an ImageMap 940
Editing an Image 941
Inserting a Document 941
Inserting Flash 942
Inserting Images 944
InsertingMedia 945
Setting Document Properties 947
Setting Image Properties 947
Troubleshooting: Image Not Displaying 949
Using the ResourceManager 950
Working with the Image Editor 954
Managing Links and Anchors 956
Adding a Page Link 956
Adding a URL Link 958
Adding an Anchor Link 959
Adding an Anchor 960
Adding an Email Link 961
Deleting a Link 962
Deleting an Anchor 962
Editing a Site Page Link 962
Editing an Anchor 962
Editing an Email or URL Link 963
Linking to a Site Page 963
Viewing Link Tracking Report 964
Managing Tables 966
Deleting a Table 966
Editing a Table 967
Inserting a Table 968
Setting Cell Properties 969
Setting Table Accessibility 973
Setting Table Properties 976
Setting the Table Design 977
Showing/Hiding Table Border 979
Using the Style Builder 979

Using the TableWizard 980
Managing Templates 980
Inserting a Template 980
Saving a Template 980
About the DotNetNuke.RadEditorProvider 981
About the RadEditor 982
Check Spelling 984
RadEditor Toolbars 985
List of tools 986
TelerikEditorProvider 991
Overview of the TelerikEditorProvider 991
ViewingWord and Character Count 992
Modifying Editor Size 992
Toolbars 993
Actions Toolbar 993
Check Spelling 994
Color and CSS Toolbar 995
Content Toolbar 996
Fonts and Font Size Toolbar 997
Formatting Code Block 998
Formatting Toolbar 1000
Paragraph Toolbar 1001
Resources Toolbar 1002
Tables and Tools Toolbar 1002
Managing Images andMedia 1005
Creating an ImageMap 1005
Editing an ImageMap 1006
Editing an Image 1007
Inserting a Document 1007
Inserting Flash 1008
Inserting Images 1010
InsertingMedia 1011
Setting Document Properties 1012
Setting Image Properties 1013
Troubleshooting: Image Not Displaying 1014
Using the ResourceManager 1015
Working with the Image Editor 1017
Managing Links and Anchors 1019
Adding a Page Link 1019
Adding a URL Link 1021
Adding an Anchor Link 1021
Adding an Anchor 1023
Adding an Email Link 1023
Deleting a Link 1024
Deleting an Anchor 1025
Editing a Link 1025
Editing an Anchor 1025
Viewing Link Tracking Report 1026

Working with the RADCalendar 1028
Selecting a Date 1029
Managing Tables 1030
Deleting a Table 1030
Editing a Table 1031
Inserting a Table 1032
Setting Cell Properties 1034
Setting Table Accessibility 1036
Setting Table Properties 1037
Setting the Table Design 1039
Showing/Hiding Table Border 1040
Using the Style Builder 1041
Using the TableWizard 1041
Managing Templates 1042
Inserting a Template 1042
Saving a Template 1043
Link Control 1045
About the Link Control 1045
Administrators 1046
Deleting a URL from the Links URL List 1046
Module Editors 1047
Adding a User Profile Link 1047
Enabling/Disabling Opening a Link in a New Web BrowserWindow 1048
Enabling/Disabling the Link Log 1049
Enabling/Disabling Tracking of Link Clicks 1050
Selecting an Existing URL Link 1051
Setting a File Link 1052
Setting a Page Link 1053
Setting a URL Link 1054
Setting No Link 1054
Troubleshooting: Restricted File TypeWarningMessage 1055
Uploading and Linking to a File 1055
Viewing a Link Log Report 1056
Using the Install ExtensionWizard 1057
Pager 1058
About the Pager 1058
Replacement Tokens 1059
List of Replacement Tokens 1059

IntroductionThismanual has been written for DotNetNuke Community Edition 7.0.6, DotNetNuke Professional Edition
7.0.6 and DotNetNuke Enterprise Edition 7.0.6. It provides instructions on installing, upgrading, creating,
configuring and maintain one or more websites using DNN.
This manual has written to assist users of all levels with using, building and maintaining DNN sites. A sep-
arate manual that includes information on using the DNNProject modules can be obtained from
http://www.dotnetnuke.com/Resources/Manuals.aspx. Note: Host (SuperUser) level features are not
included in the DotNetNuke User Manual.
About DotNetNuke
DotNetNuke (DNN) is an open source Portal and Content Management Framework, based on Microsoft's
.NET technology. DNN offers a robust, extensible and fully functional framework for the development of a
broad range of commercial portal applications.
DNN is a world leading open source portal and content management framework, adopted by thousands of
organizations worldwide. Typically, portals provide a single web front-end to the many applications within
an organization. For example, it may present critical information from the HR, Finance, Marketing, and
Customer Service all from one website. Connected backend systems also provide businesses with the
opportunity to combine information and more easily assist.
About DotNetNuke Corp
DotNetNuke Corp. is the steward of the DotNetNuke open source project, the most widely adoptedWeb
Content management Platform for building websites and web applications on Microsoft .NET. Organ-
izations use DotNetNuke to quickly develop and deploy interactive and dynamic websites, intranets, extra-
nets and web applications.
The DotNetNuke platform is available in a freeCommunity Edition and the subscription-based Pro-
fessional Edition and Enterprise Editionwith an Elite Support option. DotNetNuke Corp. also operates
the DotNetNuke Store (http://store.dotnetnuke.com/) where users purchase third party software appli-
cations (apps) for the platform. Founded in 2006 and funded by Sierra Ventures, August Capital and
Pelion Venture Partners, DotNetNuke Corp. is headquartered in San Mateo, Calif.

Managing Your User Account
Logging In and Out
Logging into a Site
How to login to a site. This tutorial covers the default login settings that only requires a user name and a
password to login. Other user account information such as names, address details and contact details may
be required for login on some sites.
1. Click the Login link (typically located in the top right corner of each page) to open the User Login
pop-up window - OR - Navigate to an Account Login module.
2. In theUsername text box, enter your user name.3. In the Password text box, enter your password.

4. Click the Login button.5. Optional. If the message "You are using an unverified account. Please verify your account by click-
ing on the link contained in the verification email we've already sent to you." is displayed, you must
complete this final step in the registration to gain access all registered user services.
Once you are logged into the site and can view anymessages or notifications that have been sent to your
user account. You can also click on your Display Name and complete your user profile information.

Logging in with a Security Code
How to login to a site when the CAPTCHA security code is required. This is a unique code that is gen-
erated as a picture each time you login.
1. Click the Login link (typically located in the top right corner of each page) to open the User Login
pop-up window - OR - Navigate to an Account Login module.
2. In theUsername text box, enter your user name.3. In the Password text box, enter your password.4. In the Security Code text box, enter the code displayed as a picture.5. Click the Login button.

Logging inwith aSecurity Code
Related Topics:
l See "Configuring Default Authentication"
Logging in with Facebook
How to login to a DNN site using your existing Facebook account. This allows you to login without needing
to create a new user account for this site.
1. Click the Login link that is typically located in the top right corner of each page - OR - Navigate to an
Account Login module.
2. Click the Login with Facebook button to go to the Facebook website.

3. On the Facebook Login page, enter your email and password and then click the Log In button. If
you don't have a Facebook account, you can choose to create one now. If you are already logged
into your Facebook account on this computer, you can skip this step.
4. Select the groups of users who will be able to view posts created using DNN. E.g. Everyone,
Friends (the default setting), Only Me, Custom, Close Friends, Family, etc.
5. Click theGo to App button to return to the DNN site and complete your login.
Related Topics:
l See "Configuring Facebook Authentication"
Logging in with GoogleHow to login to a DNN site using your existing Facebook account. This allows you to login without needing
to create a new user account for this site.
1. Click the Login link that is typically located in the top right corner of each page - OR - Navigate to an
Account Login module.
2. Click the Sign with your Google Account button.

3. On the Google site, enter your email and password.
4. Click the Sign In button.
Related Topics:
l See "Configuring Google Authentication"
Logging in with Live
How to login to a DNN site using your existingWindows Live account. This allows you to login without need-
ing to create a new user account for this site.
1. Click the Login link that is typically located in the top right corner of each page - OR - Navigate to an
Account Login module.
2. Click the Login with Windows Live button to go to theWindows Live website.

3. Complete login using your Live credentials. If you are already logged into your Live account on this
computer you will be automatically logged in.
Related Topics:
l See "Configuring Live Authentication"
Logging in with Twitter
How to login to a DNN site using your existing Twitter account. This allows you to login without needing to
create a new user account for this site.
1. Click the Login link that is typically located in the top right corner of each page - OR - Navigate to an
Account Login module.
2. Click the Sign in with Twitter button to go to the Twitter website.
3. Complete login using your Twitter credentials. If you are already logged into Twitter on this com-
puter you will be automatically logged in.
Related Topics:
l See "Configuring Twitter Authentication"
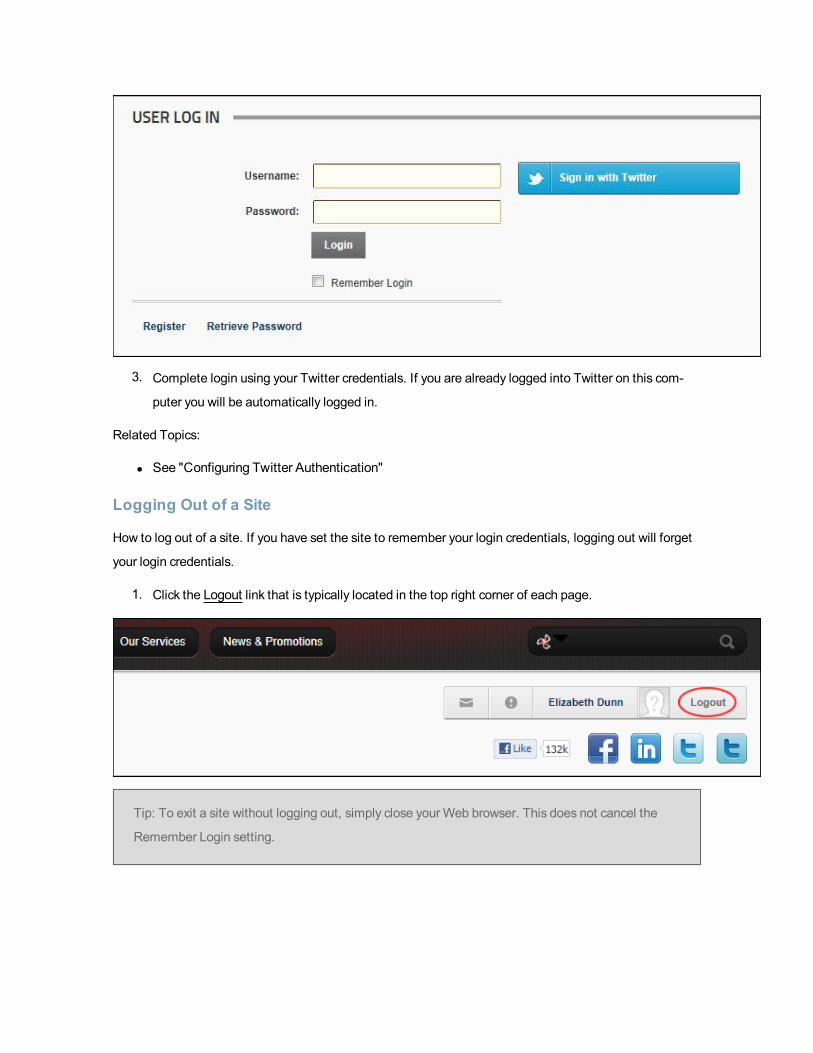
Logging Out of a Site
How to log out of a site. If you have set the site to remember your login credentials, logging out will forget
your login credentials.
1. Click the Logout link that is typically located in the top right corner of each page.
Tip: To exit a site without logging out, simply close yourWeb browser. This does not cancel the
Remember Login setting.

Remembering Login Credentials
How to enable a site to remember your login credentials. Selecting the Remember Login will automatically
log you into that site next time you visit it. This feature adds a cookie to your computer so it will not work on
another computer. It is also site specific so it will not log you in to other sites within this DNN installation
during the next 24 hours, at which time it will expire.
1. Click the Login link (which typically located in the top right corner) - OR - Navigate to an Account
Login module.
2. In theUser Name text box, enter your user name.3. In the Password text box, enter your password.4. Optional. Enter your verification code or the security code if required.5. Check theRemember Login check box.
6. Click the Login button.
Tip: To exit a site, simply close yourWeb browser. If you click the Logout link you will need to login
next time.
Retrieving your Password
If you forget your password you can have it sent to the email address associated with your user account.
1. Click the Login link or navigate to an Account Login module.
2. Click theRetrieve Password link.
3. In theUser Name text box, enter your user name.
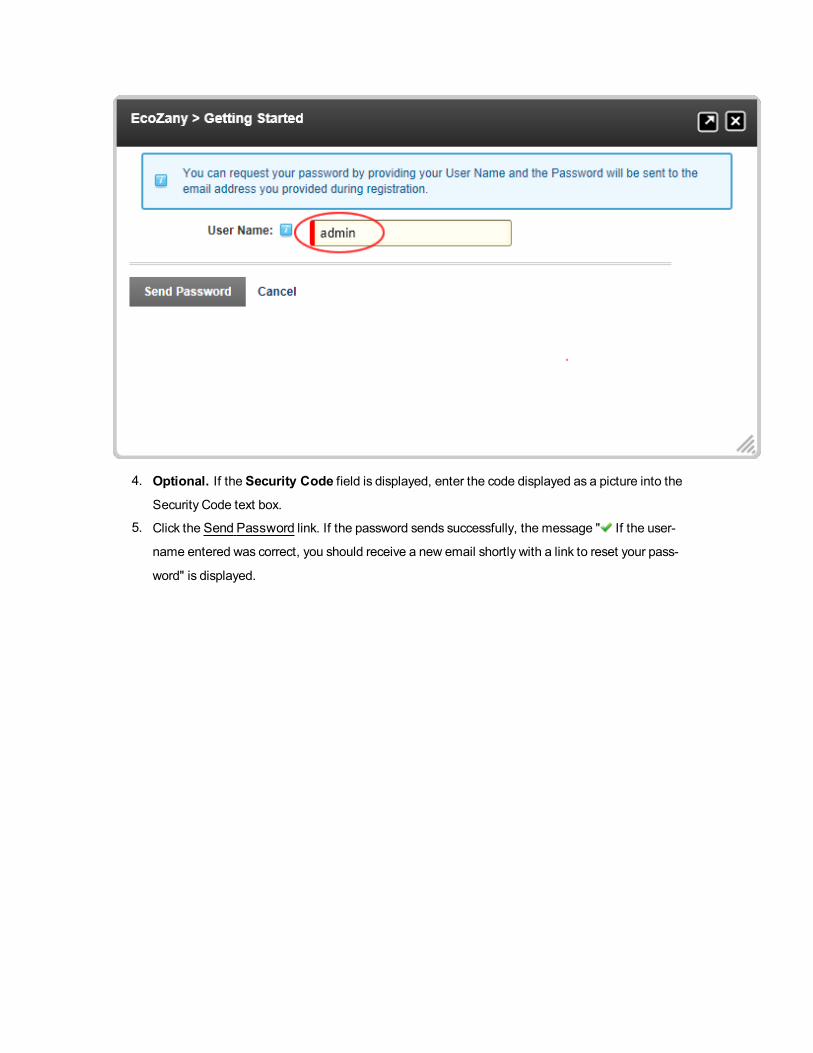
4. Optional. If the Security Code field is displayed, enter the code displayed as a picture into the
Security Code text box.
5. Click the Send Password link. If the password sends successfully, the message " If the user-
name entered was correct, you should receive a new email shortly with a link to reset your pass-
word" is displayed.

Success message for SendPassword option
Troubleshooting. Login Failed
What Happened: Login was unsuccessful.
System Message: Login Failed, remember that Passwords are case sensitive.
What to Do: Attempt to logging in again, ensuring Caps Lock is not selected on your keyboard. If you are
still unsuccessful, check your user name and password are correct, as detailed in theWelcomemessage
which was sent to you. If you are still unsuccessful, trySee "Retrieving your Password".
What Happened: Incorrect password entered multiple times.
System Message: This account has been locked out after too many unsuccessful login attempts.Please contact your administrator.
What to Do: You are now prevented from logging in, even with the correct details, until an Administrator
unlocks the account for you. Contact a site Administrator.
What Happened: Incorrect password entered multiple times.

System Message: This account has been locked out after too many unsuccessful login attempts.Please wait 10 minutes before trying to login again. If you have forgotten your password, please try the
Password Reminder option before contacting an Administrator.
What to Do: You are now prevented from logging in until your user account automatically unlocks itself
according to the number of minutes displayed in the system message. Alternatively, you can contact an
Administrator to unlock the account for you.
Troubleshooting. Retrieving Password Failed
The following error messagesmay be displayed when password retrieval fails:
l Please Enter Your User Name or the Email Address you used during Registration - Enter
your user name or email address into the text box and then click the Retrieve Password link.
l Please Enter Your User Name - Enter your user name into the text box and then click the
retrieve password link.
l More than one user has been found with this email address. Please enter your UserName and try again - Email address can only be used to retrieve your password if it is unique in
the site. If more than one user has the same email address, then the username is the only valid
value to retrieve the password.
l Retrieve Password option is currently unavailable - Email may not be enabled or correctly
configured on this site. Administrators should contact their host to check SMTP settings for this
site.
Managing Your Profile
Managing your User Profile
How to manage all your personal user details including your name, contact details, biography, photo, time
zone and preferred locale. The fields used in this example are typical for a US based site; however sites in
other countries will typically use local names for address fields, etc.
You can manage the privacy of each field of your user profile bymodifying the Visibility setting dis-played beside a field. The following options are provided:
l Public: Select to set a field as visible to any site visitor or member who can view your user profile.
l Members Only: Select to set a field as visible to all authenticated site members.l Admin Only: Select to set a field as visible to Administrators only.

l Friends and Groups: Select to set a field as visible to your friends and the members of all social
groups you have joined. You can further refine this setting by select either Friends or Followers.
In the default set-up, all name fields (Prefix, First Name, Middle Name, Last Name and Suffix) and the
Photo field are set as visible to the Public and all other fields are set as visible to Admin Only.
Tip: You can modify the Manage Profile page to suit your needs. You can add, rename and modify
fields and more . See "Managing Profile Settings"
Here's how to update your user profile:
1. Login to the site. See "Logging into a Site"
2. Click on your [Display Name] link (typically located in the top right corner of the site) - OR - Navi-
gate to a ViewProfile module. This displays the user profile page.
3. Click the Edit Profile button.4. Select theManage Profile tab.5. Complete or edit any of the following fields and then select the Visibility for each field (see note
above).
a. In the Prefix text box, enter a prefix for the name. E.g. Mrb. In the First Name text box, enter the first name. E.g. Jamesc. In theMiddle Name text box, enter the first name. E.g. Ad. In the Last Name text box, enter the first name. E.g. Woolworth
e. In the Suffix text box, enter a suffix for the name. E.g. MDf. In theUnit text box, enter a unit number. E.g. Suite 36

g. In the Street text box, enter the street address. E.g. 3457W. Somewhere Street
h. In theCity text box, enter the city. E.g. Someplacei. In theRegion text box, enter/select the region. E.g. CA. Note: If your country is either Can-
ada or United States of America, select the Country before selecting a Region as this will
pre-populate the Region field.
j. At Country, select a country from the drop down list. United States
k. In the Postal Code text box, enter/select the postal code.l. In the Telephone text box, enter your telephone number.
m. In theCell/Mobile text box, enter your mobile number.n. In the Fax text box, enter your facsimile number.o. In theWebsite text box, enter your web site URL. E.g. www.awesomecycles.bizp. In the IM text box, enter your instant messenger id. E.g. [email protected]


q. In theBiography Editor, enter a biography.r. A Preferred Time Zone, select your preferred time zone.s. At Preferred Locale, set the following:
i. Select English Name to display your locale in English (E.g. Italy) - OR - Select
Native Name to display the native spelling of your locale (E.g. Italia)ii. Select the name of your preferred locale from the drop down list. Note: The list of
available locales is managed using the Languagesmodule. See "Enabling/Disabling
a Language"
t. At Photo, select, upload or remove a photo or image for your profile.6. Click theUpdate button.

Changing your Password
How to update the password associated with your user profile.

Important. If you are updating the default SuperUser or Administrator login details for the first time, begin
this tutorial at Step 5.
1. Login to the site. See "Logging into a Site"
2. Click on your [Display Name] link (typically located in the top right corner of the site) - OR - Navi-
gate to a View Profile module (also called the My Profile module). This displays the User Profile
page.
3. Click the Edit Profile link. This displays the Manage Profile page.
4. Select theManage Password tab.5. In theChange Password section, update the following fields:
a. In theCurrent Password text box, enter your current password.b. In theNew Password text box, enter your new password.
c. In theConfirm Password text box, re-enter your new password.
6. Click theChange Password button.
Managing your Profile Photo
How to manage the photo associated with your user profile.

1. Login to the site. See "Logging into a Site"
2. Click on yourDisplay Name (typically located in the top right corner of the site) - OR - Navigate to a
ViewProfile module. This displays the user profile page.
3. Click the Edit Profile link.
4. Select theManage Profile tab of the View Profile (also titled My Profile or User Profile) module.
See "Managing your User Profile"
5. Scroll down to the Photo field and then perform one of the following actions:
Uploading a New Image
1. Click theUpload File button.2. Click theBrowse... button and then select the file from your computer.3. This displays the selected image beside the Photo field.
4. Click theUpdate button.5. Optional. This photo is set as visible to the public by default, however you can increase your pri-
vacy by changing the visibility of this field.
Selecting a Previously Uploaded Image
1. At File, select the required photo from the drop down list. This displays the image to the right of
this field.
2. Click theUpdate button.
Removing your Profile Image
1. At File, select < None Specified >.2. Click theUpdate button.
Setting Image Privacy
Your photo is displayed on your user profile and on the Members Directorymodule by default. To change
the privacy of your image, click the Visibility button and choose from these options:
l Public: Select to set a field as visible to any site visitor or member who can view your user profile.
l Members Only: Select to set a field as visible to all authenticated site members.l Admin Only: Select to set a field as visible to Administrators only.l Friends and Groups: Select to set a field as visible to your friends and the members of all social
groups you have joined. You can further refine this setting by select either Friends or Followers.

Managing your User Credentials
How to manage your user credentials including your names and email address. Note: Your user name can-
not be changed.
1. Login to the site. See "Logging into a Site"
2. Click on your [Display Name] link (typically located in the top right corner of the site) - OR - Navi-
gate to a ViewProfile module. This will display the Activity Feed page of your user profile.
3. Click the Edit Profile link. This displays the Manage Profile page.
4. Select theManage User Credentials tab.5. Update any of the below details:
a. In the First Name text box, edit your first name.b. In the Last Name text box, edit your last name.c. In theDisplay Name text box, edit the name you want to be displayed to other site
members.
d. In the Email Address text box, edit your email address.
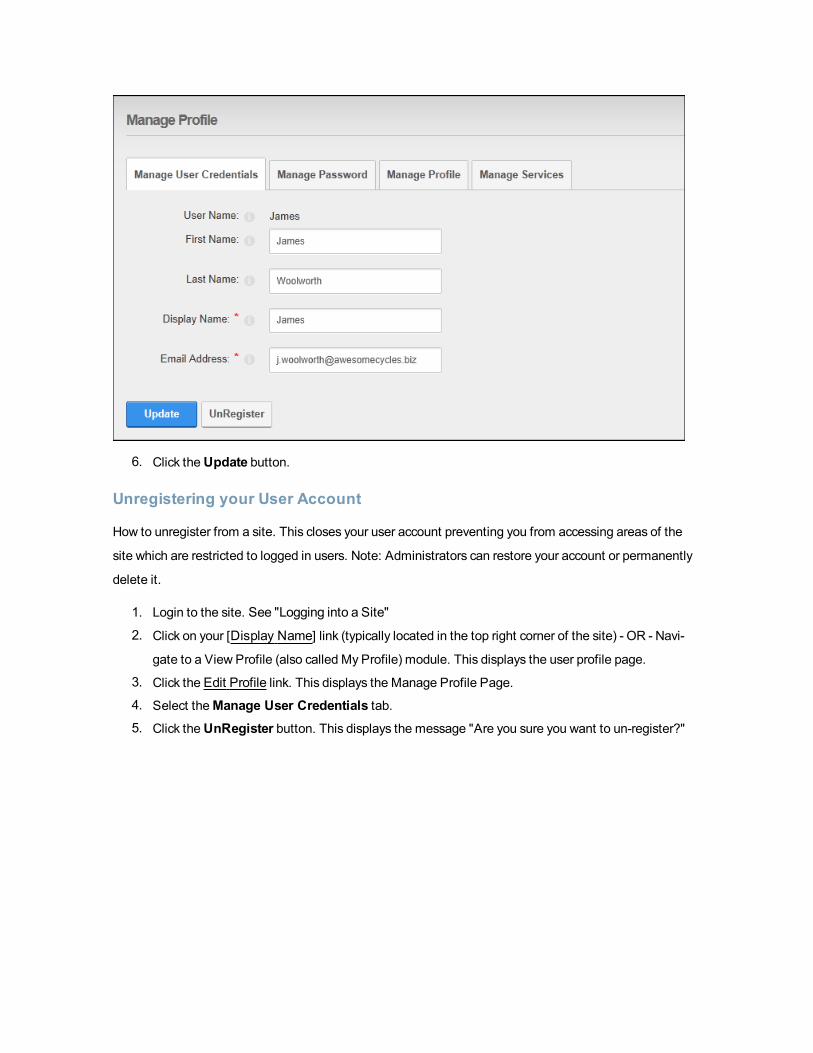
6. Click theUpdate button.
Unregistering your User Account
How to unregister from a site. This closes your user account preventing you from accessing areas of the
site which are restricted to logged in users. Note: Administrators can restore your account or permanently
delete it.
1. Login to the site. See "Logging into a Site"
2. Click on your [Display Name] link (typically located in the top right corner of the site) - OR - Navi-
gate to a View Profile (also called My Profile) module. This displays the user profile page.
3. Click the Edit Profile link. This displays the Manage Profile Page.
4. Select theManage User Credentials tab.5. Click theUnRegister button. This displays the message "Are you sure you want to un-register?"

6. Click theOK button to confirm. You are now unregistered and have been automatically logged out
of the site. A message is sent to you confirming that your account has been unregistered. A mes-
sage is also sent to the Administrator advising that you have unregistered.
Signing Up for a User Account
Signing up as a Registered UserHow to sign up to become a registered user of a site. This tutorial includes the fields required to register
when the default registration settings and requirements are used, however other information such names,
address details and contact details may be displayed on the registration form if these settings are mod-
ified. Depending on the site, registration fields including user name, display name and email addressmay
need to be unique to your account. If you enter information that isn't unique, you will be asked to enter dif-
ferent information on your registration form and then resubmit it.
1. Click theRegister link (typically located in the top right corner of the page). This opens the User
Registration page.

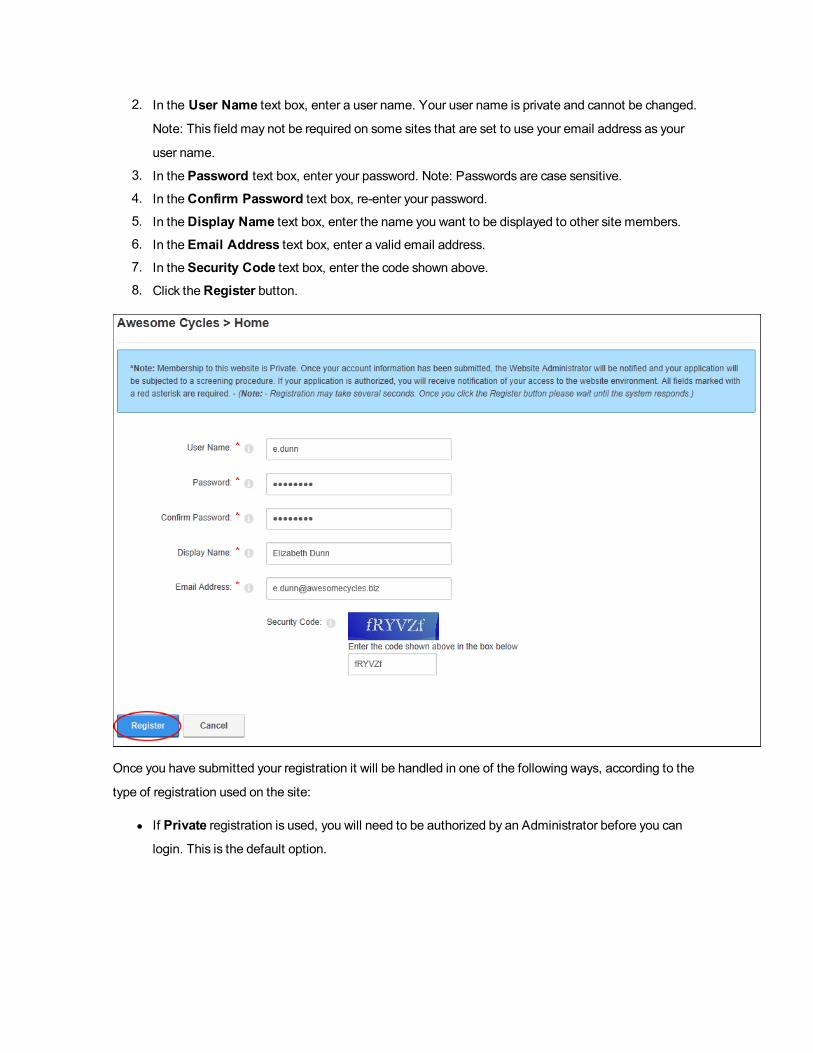
2. In the User Name text box, enter a user name. Your user name is private and cannot be changed.
Note: This field may not be required on some sites that are set to use your email address as your
user name.
3. In the Password text box, enter your password. Note: Passwords are case sensitive.
4. In theConfirm Password text box, re-enter your password.5. In theDisplay Name text box, enter the name you want to be displayed to other site members.6. In the Email Address text box, enter a valid email address.7. Click theRegister button.

Once you have submitted your registration it will be handled in one of the following ways, according to the
type of registration used on the site:
l If Private registration is used, you will need to be authorized by an Administrator before you can
login. This is the default option.
l If Public registration is used, you will be automatically logged in to the site as shown in the below
image. Once you are logged into the site you can view anyMessages or Notifications that have
been sent to your user account and update your user profile.
l If Verified registration is used, you will be logged in to the site as an unverified user and will need
to open your welcome email to obtain additional information to complete your registration and
obtain access to any content that is restricted to site members.
Related Topics:
l See "Managing your User Profile"
l See "Managing your Profile Photo"
Signing up as a Registered User with a Security CodeHow to sign up to become a registered user of a site when the CAPTCHA security code is required. This
tutorial includes the fields required to register on the default registration settings and requirements. Other
information such names, address details and contact details may be displayed on the registration form if
these settings are modified.
1. Click theRegister link (typically located in the top right corner of each page). This opens the User
Registration page.
2. In the User Name text box, enter a user name. Your user name is private and cannot be changed.
Note: This field may not be required on some sites that are set to use your email address as your
user name.
3. In the Password text box, enter your password. Note: Passwords are case sensitive.
4. In theConfirm Password text box, re-enter your password.5. In theDisplay Name text box, enter the name you want to be displayed to other site members.6. In the Email Address text box, enter a valid email address.7. In the Security Code text box, enter the code shown above.8. Click theRegister button.
Once you have submitted your registration it will be handled in one of the following ways, according to the
type of registration used on the site:
l If Private registration is used, you will need to be authorized by an Administrator before you can
login. This is the default option.

l If Verified registration is enabled, you will be logged in to the site as an unverified user and will
need to open your welcome email to obtain additional information to complete your registration and
obtain access to any content that is restricted to site members.
l If Public registration is enabled, you will be automatically logged in to the site as shown in the
below image. Once you are logged into the site you can view anyMessages or Notifications that
have been sent to your user account and update your user profile.
Related Topics:
l See "Configuring the Standard Registration Form"
l See "Configuring a Custom Registration Form"
l See "Managing your User Profile"
l See "Managing your Profile Photo"
Subscribing to Member Services
Subscribing to a Member Service
How to subscribe to a member's service. Once a user subscribes they immediately gain access to anymod-
ules or pages restricted to this service. The user may need to refresh their Web browser to view additional
areas of access.
1. Login to the site. See "Logging into a Site"2. Click on your [Display Name] link (typically located in the top right corner of the site) - OR - Navigate
to a ViewProfile module. This displays the user profile page.
3. Click the Edit Profile link. This displays the Manage Profile page.
4. Select theManage Services tab. This displays a list of the available services.5. Click the Subscribe link beside the service you want to subscribe to. If a fee is charged for this serv-
ice you will now be redirected to the payment website to complete the payment process. Once you

have successfully subscribed to the service this message is displayed at the top of the module: "
You have successfully subscribed to the [Service Name] role."
6. Optional. Refresh (Ctrl+5) your website browser to access any new areas such as pages or mod-
ules. If this is not successful, try logging out and then logging in again.
Subscribing to a Service with an RSVP Code
How to subscribe to a member's service using an RSVP code provided by an Administrator. Subscription
grants you immediate access to any pages or content restricted to service subscribers.
1. Login to the site. See "Logging into a Site"2. Click on your [Display Name] link (typically located in the top right corner of the site) - OR - Navigate
to a ViewProfile module. This displays the user profile page.
3. Click the Edit Profile button. This displays the Manage Profile page.4. Select theManage Services tab. This displays a list of the available services.5. In theRSVP Code text box, enter the code supplied to you.6. Click the Subscribe link to the right of the RSVP Code text box. If a fee is charged for this service
you will now be redirected to the payment website to complete the payment process. Once you
have successfully subscribed to the service this message is displayed at the top of the module: "
You have successfully subscribed to the [Service Name] role."

7. Optional. Refresh (Ctrl + 5) your website browser to access any new areas such as pages or mod-
ules. If this is not successful, try logging out and then logging in again.
Subscribing to a Service with an RSVP Link
How to subscribe to a member's service using an RSVP link provided by an Administrator. Subscription
grants you immediate access to any pages or content restricted to service subscribers.
1. Login to the site. See "Logging into a Site"2. Enter the RSVP link into the Address window or yourWeb browser - OR - click on the RSVP link in
an email message. E.g. http//www.domain.com/Default.aspx?rsvp=rsvpcode&portalid=0
3. Refresh (Ctrl + 5) your website browser to access any new areas such as pages or modules.
Troubleshooting. If the login is unsuccessful, try logging out and then logging in again.
Unsubscribing from a Member Service
How to unsubscribe from amember's service. Unsubscribing from a service removes your access to any
modules or pages restricted to subscribers.
1. Login to the site. See "Logging into a Site"2. Click on your [Display Name] link (typically located in the top right corner of the site) - OR - Navigate
to a ViewProfile module. This displays the user profile page.
3. Click the Edit Profile link. This displays the Manage Profile page.
4. Select theManage Services tab. This displays a list of the available services.5. Click theUnsubscribe link beside the service you want to unsubscribe from. This displays the mes-
sage "You have successfully unsubscribed from the [Service] role."

Working with Content
Minimizing and Maximizing Content
How to minimize or maximize module content. Note: This skin object is not used the default skin provided
with DNN.
l Click theMaximize button to show content.
l Click theMinimize button to hide content. Only the title, header and footer are visible.
Tip: If you are logged in, these settings are remembered the next time you visit the site enabling
you to customize the way you view different pages.
Printing Content
How to print module content. This option may not be available for all content.
1. Select Print from the module actionsmenu. This opens a newWeb browser with the content dis-
played in a print friendly format.
2. Use the Print option on your newWeb browser to print this content.

Content displayed in aWebbrowser ready to print
Subscribing to Syndicated Content
How to create an RSS feed of content. You can then subscribe to the feed and view it using Internet
Explorer, or other RSS programs. This option may not be for all content.
Tip: Display syndicated content using the News Feeds (RSS) module.
1. Select Syndicate from the module actionsmenu - OR - Click the Syndicate button (typically
located in the bottom right corner of the module). This displays the XML code for the module con-
tent.
You can now do one of the following:
l Copy the URL from the Address bar of yourWeb browser and use as required.

l Click the Subscribe to this feed link and complete the Subscribe to this Feed dialog box.
Managing Notifications
How to view and respond to notifications received when a site member chooses to follow your journal or
sends a friend request.
1. Click theCheck Notifications button. The number of new notifications, if any, is displayed
here.

2. You can now do any of the following:
l On friend requests, you can choose to Accept orDismiss each friend request.
l Where a member has chosen to follow you, you can choose to Follow Back orDismiss.
Related Topics:
l See "Connecting with aMember"

Building Your Site
Getting Started
How to create your first site using these three simple steps. Use the Site Wizard to configure basic site set-
tings, add pages, add modules and then add content to the modules.
Configuring Basic Settings Using the Site Wizard
Using the simple step-by-step Site Wizard to quickly configure the basic settings for this site. You can also
change the site design and apply a template.
l See "About the SiteWizardModule"
Advanced Configuration Settings
The Advanced Configuration Settings section groups together a range of tools to provide SuperUsers with
a single location where they viewing and changing the Skins and Containers applied to the current site,
setup site email and install language packs, authentication systems, providers and optional modules.
l See "About Advanced Configuration Settings"
Adding Pages
DNN sites are built by adding one or more pages to the site and then adding content (using modules) to
each page.
l See "Adding a New Page"
l To add and manage multiple pages and perform other page management tasks. See "About the
Pages (Tabs) module"
Adding Content Using Modules
DNN uses a modular design system to display content on a page. One or more modules are added to each
site page to create and manage the site content. There are many different types of modules, each man-
aging a different type of site content or site administrative task.
The HTML or HTML Pro module (typically titled Text/HTML) allows you display rich text, HTML, images,
flash or can perform a script. This module is selected by default when adding a module using the Rib-
bonBar.

l See "Adding a New Module (RibbonBar)"
l See "Adding an ExistingModule (RibbonBar)"
l See "About the HTMLModule"
l See "About the HTMLProModule"
Understanding Role Based Access
l See "Understanding Role Based Access"
Adding and Managing Pages
About Pages
DNN sites are created by adding one or more pages and then adding modules which display content onto
those pages. Administrator, SuperUsers and user with Add permissions can add pages. Pages can be
added by clicking Add New Page in the Pagesmenu of the ControlBar or the Pagesmodule, See "About
the Pages (Tabs) module". The below image displays a site with four publicly accessible pages called
Home, About Us, Our Services and Contact Us.
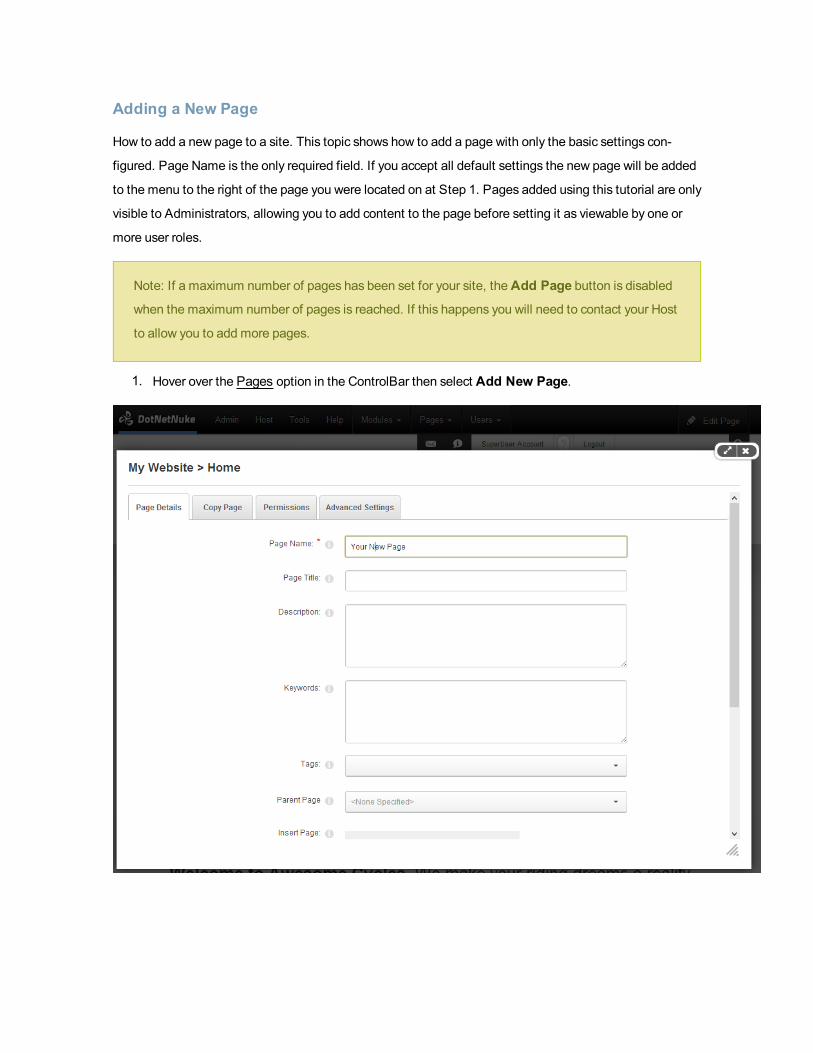
Adding a New Page
How to add a new page to a site. This topic shows how to add a page with only the basic settings con-
figured. Page Name is the only required field. If you accept all default settings the new page will be added
to the menu to the right of the page you were located on at Step 1. Pages added using this tutorial are only
visible to Administrators, allowing you to add content to the page before setting it as viewable by one or
more user roles.
Note: If a maximum number of pages has been set for your site, theAdd Page button is disabled
when the maximum number of pages is reached. If this happens you will need to contact your Host
to allow you to add more pages.
1. Hover over the Pages option in the ControlBar then select Add New Page.
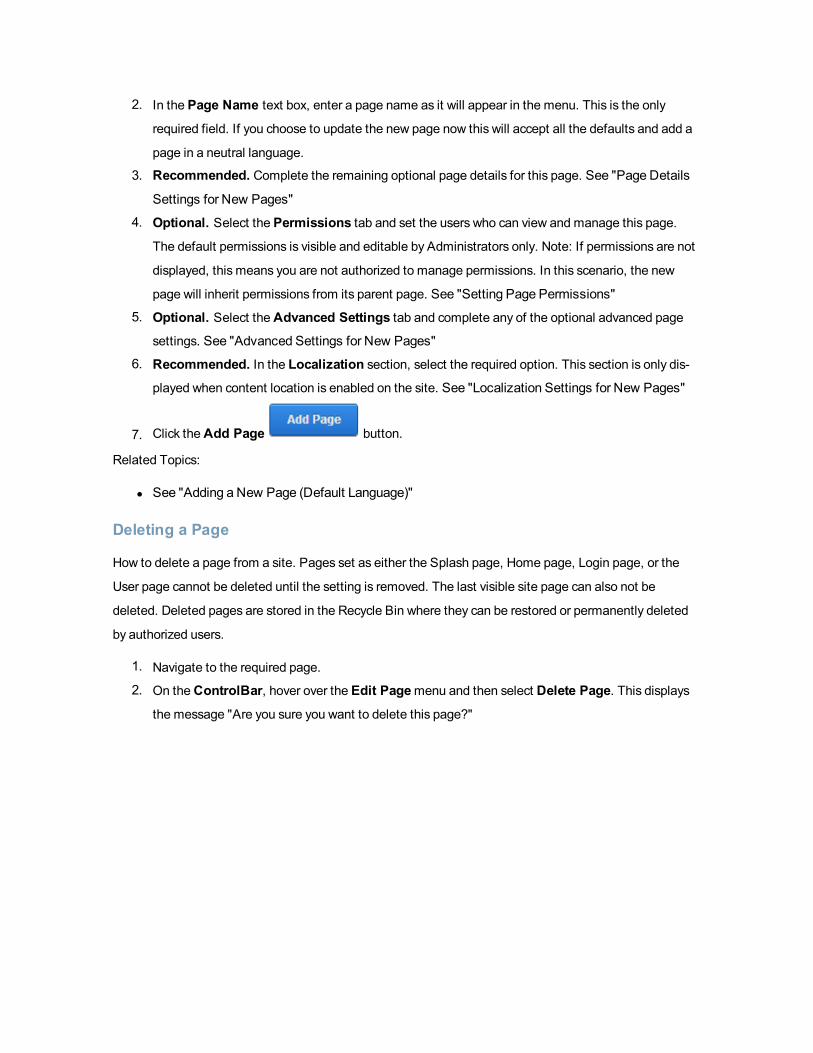
2. In the Page Name text box, enter a page name as it will appear in the menu. This is the only
required field. If you choose to update the new page now this will accept all the defaults and add a
page in a neutral language.
3. Recommended. Complete the remaining optional page details for this page. See "Page Details
Settings for New Pages"
4. Optional. Select the Permissions tab and set the users who can view and manage this page.
The default permissions is visible and editable by Administrators only. Note: If permissions are not
displayed, this means you are not authorized to manage permissions. In this scenario, the new
page will inherit permissions from its parent page. See "Setting Page Permissions"
5. Optional. Select theAdvanced Settings tab and complete any of the optional advanced page
settings. See "Advanced Settings for New Pages"
6. Recommended. In the Localization section, select the required option. This section is only dis-
played when content location is enabled on the site. See "Localization Settings for New Pages"
7. Click theAdd Page button.
Related Topics:
l See "Adding a New Page (Default Language)"
Deleting a Page
How to delete a page from a site. Pages set as either the Splash page, Home page, Login page, or the
User page cannot be deleted until the setting is removed. The last visible site page can also not be
deleted. Deleted pages are stored in the Recycle Bin where they can be restored or permanently deleted
by authorized users.
1. Navigate to the required page.
2. On theControlBar, hover over the Edit Pagemenu and then select Delete Page. This displays
the message "Are you sure you want to delete this page?"

3. Click the Yes button to confirm.
Tip: You can also delete a page via Page Settings.
Related Topics:
l See "About the Recycle BinModule"
Copying a Page
How to copy any existing page including the modules and optional module content.
Note 1: Page Name is the only required field. If you don't set new permissions, then the page will be visible
and editable by Administrators only. Note: If permissions are not displayed, this means you are not author-
ized to manage permissions. In this scenario, the new page will inherit permissions from its parent page.
Note 2: When you are located on a Page with a different locale setting you will not be able to copy the
page.
When you click Copy Page the page Settings popup will open on the Copy Page tab and shows you which
page is going to be copied and the modules on that page.
1. Optional. Navigate to the page you want to copy.2. On the ControlBar, hover over the Pages link until the Pagesmenu is displayed and then select
Copy Page. This opens the Copy Page tab of the Page Settings page.3. At Specify Modules, complete the following fields from left to right for each module listed:
a. Check the check box (typically located to the left of the module title) beside the module
title to be copied to the new page - Uncheck the check box beside anymodule you do

NOT want copy.
b. Optional. In the text box where the Module Title is displayed, edit the title if required.c. In the next field you can view the name of the pane where the module will be inserted.
d. Set the content option for this module:
l New: Select to add the module without any content.l Copy: Select to add the module with an independent copy of the module content.
Modifying copied content doesn't update the content of the original module. Note:
This option will be disabled for modules which don't have content which can be cop-
ied such as the Feedback and Account Login modules.
l Reference: Select to add the module with a referenced version of the copied con-
tent. If you modify the content on either instance this module in the future, the con-
tent on both copies of the module are updated.
4. Click the Page Details tab5. In the Page Name text box, enter a name for the new page. The page name is displayed in the
menu.
6. Recommended. Complete the additional basic settings for this page. See "Page Details Settings
for New Pages"
7. Optional. Select the Permissions tab to set which users can view this page. See "Setting Page
Permissions"
8. Optional. Select theAdvanced Settings tab and complete any of the optional advanced page
settings. See "Advanced Settings for New Pages"
9. Optional. In the Localization section, select the required option. See "Localization Settings for
New Pages"
10. Click theAdd Page button. You are now taken to the new page.
Copying Design to Child Pages
How to copy the design applied to a page to all of its child (descendant) pages using the ControlBar. This
applies the Page Skin and Page Container settings of the parent page to all child pages. This setting is
only available for existing pages with child pages.
1. Navigate to the parent page whose design you want to copy.
2. On theControlBar, hover over the Edit Pagemenu option and select Page Appearance.3. This will open the Page Settings popup on theAdvanced Settings tab with theAppearance
Section opened.

4. Scroll down a little bit and click the Copy Design button. This displays the message "Skin and con-
tainer will be replaced for all children of this page. Are you sure you want to continue?"
5. Click the Yes button to confirm.
Copying Permissions to Children Pages
How to copy the permissions applied to a parent page to all of its descendant (child) pages using the Con-
trolBar. This applies the Permissions set for viewing and editing pages. This setting is only displayed for
pages with existing child pages.
1. Navigate to the parent page whose design you want to copy.
2. On the Control Panel, hover over the Pagesmenu option and select Copy Permissions to Chil-
dren. This displays the message "Skin and container will be replaced for all children of this page.
Are you sure you want to continue?"

4. Click the Yes button to confirm.
Editing Page Settings
How to edit the settings of the current page via the Control Panel
1. Go to the required page. See "Viewing Any Page"
2. Hover over the Edit Page and then select Page Settings.
3. Edit page settings as required. See "Page Details Settings for Existing Pages" and See
"Advanced Settings for Existing Pages"
4. Click theUpdate Page button.
Exporting a Page
How to export a page which will be saved as a page template which can then be imported into any DNN
site.
1. Navigate to the required page. See "Viewing Any Page"
2. On theControlBar, hover over the Edit Pagesmenu option and then select Export Page

3. At Folder, select a folder of the site's File Manager where the exported page will be stored.4. In the Template Name text box, the name of the exported page is displayed. You can either use
this as the name of the page template or change it to a new name.
5. In theDescription text box, enter a description of the page you are exporting. This description is
exported with the page template. Typically the description provides a brief overview of the page
and (if included) it's content.
6. Optional. At Include Content?, check the check box to include module content - OR - Uncheck
the check box to add the modules without any content.
7. Click the Export button.

8. The path where the page template has been created is now displayed.
Importing a New Page
How to add a new page using the Import function. This enables you to apply a page template that has pre-
viously been exported. The new page is added to the site before user can change the page settings.
1. On theControlBar, hover over the Pagesmenu option and select Import Page
2. At Folder, select the folder of your File Manager where the template is located. This enables the
template field below and populates the drop down list with all templates within this folder.

3. At Template, select a template from the drop down list. This displays a description of the selected
template providing more details of the template.
4. At Import Mode, select Create A New Page. to add a new page orReplace the Current Page
to import the content and settings into the page you are currently on.
5. In the Page Name text box, the name of the template will be displayed. You can choose to enter a
new page name or use this name,
6. At Parent Page, select <None Specified> to set this page as a parent page - OR - Select the par-
ent page from the drop down list. Note: Page Editors can only select parent pages which they are
editors of.
7. At Insert Page, select from these options to choose the location of the new page in the menu:
l Select a page from the drop down list and then select to add the new page eitherBefore or
After that page in the menu on the current level.l Select Add to End to add the new page to the end of the menu on the current level.
8. At Redirect Mode? select from the following options to set where you will be redirected to once
you complete this importing:
a. Select View Imported Page to be redirected to the newly created page upon creation
(Import).
b. Select Edit Imported Page to be redirected to the Page Settings page of the newly
created page upon creation (Import). This enables you to configure the page settings imme-
diately.
9. Click the Import link.

Tip: View the new page to ensure that anymodules that are set to display on all pages are not
duplicated. This may occur if the selected template includesmodules that are displayed on all
pages.
Moving Page Location - Iconbar
How to move a page to a new location on the site menu using the Iconbar Control Panel.
1. Go to the required page. See "Viewing Any Page"
2. Go to the Page Functions section and then select Settings.3. Go to theBasic Settings - Page Details section.4. At Parent Page, select a new parent page, or select < None Specified > to change this page to a
parent page.
5. Click theUpdate button.

Quick Add a New Page (RibbonBar Only)
How to add a new page to a site using the RibbonBar that will only visible to Administrators until per-
missions are updated. Name is the only required field and if you accept all the other default settings the
new page will be added to the menu to the right of the page you were located on at Step 1. Pages added
using this tutorial are only visible to Administrators, allowing you to add content to the page before setting
it as viewable by one or more user roles. See "Setting Page Permissions"
Note 1: If content localization is enabled, the below tutorial will add a neutral culture page that will be used
for all languages. This topic assumes you are viewing the site in the default language. To create pages for
other cultures, See "Adding a New Page".
Note 2: If a maximum number of pages has been set for your site, theAdd Page button is disabled when
the maximum number of pages is reached. If this happens you will need to contact your Host to allow you
to add more pages.
1. Hover over the Pages link until the Pagesmenu is displayed.
2. Go to theAdd New Page section.3. In theName text box, enter a name for the page. This is the name which appears in the menu.4. Optional. At Template, select a page template. Page templates add one or more modules with
optional content to the page - OR - Select No template. The Default template included with DNN
adds an HTMLmodule without any content into the Content Pane.
5. Optional. At Insert, select from these options:
l Skip this step to add the page after (to the right of) the page you are currently on.
l Select to add the page eitherBefore (to the left of) orAfter (to the right of) the page name
selected in the second drop down list.
l Select to add the page as aChild Of the page name selected in the second drop down list.6. Optional. At Include In Menu, check the check box to include this page in the menu - OR -
Uncheck the check box to hide the page in the menu. Note: You can provide users another way
to navigate to the page by adding a link to that page using the HTML or Linksmodule. Admin-
istrators can navigate to the page using the Pagesmodule.
7. Click theAdd Page button.
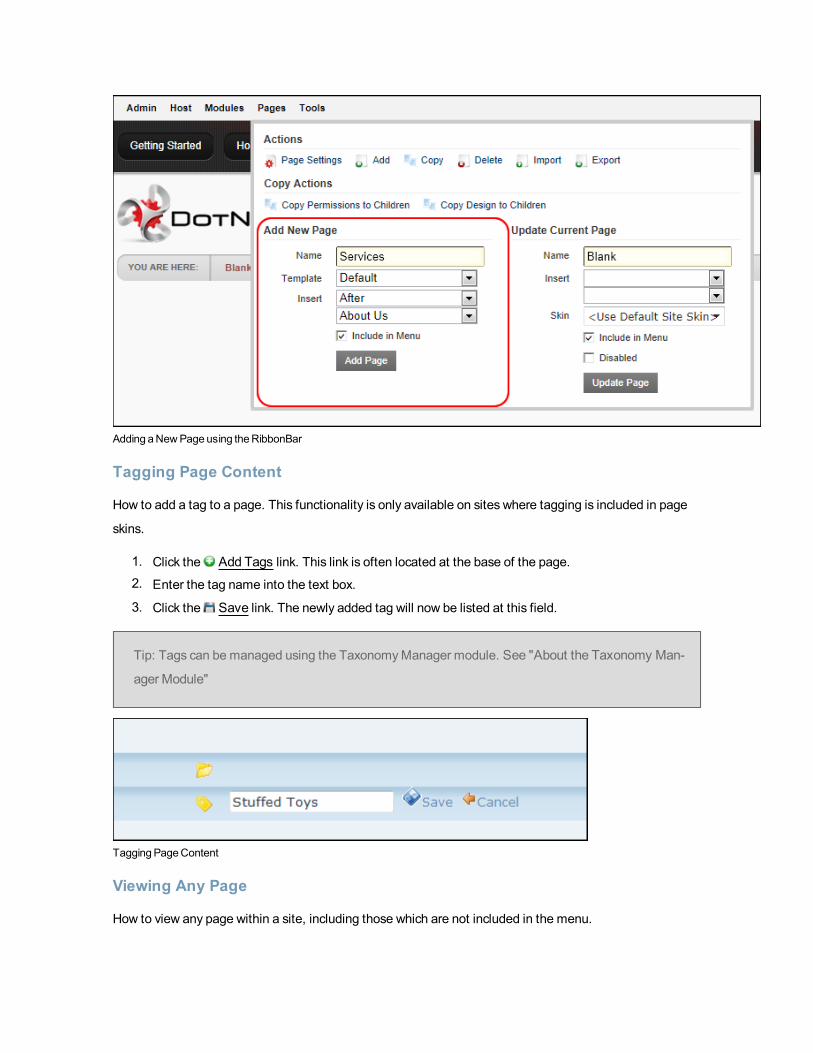
Adding aNewPageusing theRibbonBar
Tagging Page Content
How to add a tag to a page. This functionality is only available on sites where tagging is included in page
skins.
1. Click the Add Tags link. This link is often located at the base of the page.2. Enter the tag name into the text box.
3. Click the Save link. The newly added tag will now be listed at this field.
Tip: Tags can be managed using the TaxonomyManager module. See "About the Taxonomy Man-
ager Module"
TaggingPageContent
Viewing Any Page
How to view any page within a site, including those which are not included in the menu.

l Option One: If the page is included in the menu, then navigate to the page using the site menu.l Option Two: If the page is not included in the menu click on a link to the page. Authorized users
can create a page link using the Linksmodule. See "Setting a Page Link"
l Option Three:See "Viewing any Page (Pages Module)"
Page Settings
About Page Permissions
How to set access to view, edit and manage pages and page content setting permissions by roles and/or
usernames. This topic provides an overview of the different page permissions available. For full details,
See "Setting Page Permissions"
Important. In DNNCommunity edition, page management permissions consist of only two settings: View
Page and Edit Page. In DNNProfessional, page management has ten permissions.
Permissions for Professional and Enterprise EditionsOnly available in DotNetNuke Professional Edition and DotNetNuke Enterprise Edition
Here is the full list of page permissions available in Professional Edition:
l View: View permissions enable users to view the page.
l Add: Users with Add permissions for a page can add child pages to that page. They cannot add
any parent pages, and they cannot add child pages to any other pages.
l Add Content: Users with Add Content permissions for a page can edit content on the page. These
users can add, move and delete modules, as well asmanage the content and settings for modules
on the page.
l Copy: Users with Copy permission can make a copy any page they can view. The new page can
only be a child of the page they have copy permissions for.
l Delete: Users with Delete permissions can delete the page. If the page has child pages they are
also deleted when the parent is deleted, however the user does not automatically have Delete per-
missions for these child pages.
l Export: Users with Export permissions can export the page.l Import: Users with Import permissions can import a page.l Manage Settings: Users with Manage Settings permissions can change the page settings. Users
can edit all of the settings on the Settings page, except for the permissions section which will not
be visible.

l Navigate: Users with Navigate permissions can view a page in the navigation menu. Users can
have this permission without view permissions, in which case they will not be able to view any con-
tent on the page but the page will be visible in the menu.
l Full Control: Users with Full Control permissions have full administrative rights for the page. This
permission is the same as the Edit Page permission in the Community Edition.
PagePermissions inDNNProfessionalEdition
Community Edition Permissions
Here is the list of page permissions available in Community Edition:
l View Page: View permissions enable users to view the page.
l Edit Page: Edit permissions give users full administrative rights for the page.

PagePermissions inDNNCommunity Edition
Setting Page Permissions
How to set page permissions by username and roles. Note: Access to view and set page permissions are
only available to Administrators and users with Edit/Full Control permissions for the page. See "About
Page Permissions"
Tip: When setting Permissions, you can change the selection at Filter ByGroup and set per-
missions for any of the roles within that group before updating.
Important. In DNNCommunity edition two permissions called View Page and Edit Page permissions are
available for managing pages. In DNNProfessional and Enterprise Editions there are ten different per-
missions for page management.

1. Select Page Permissions from the Edit Page menu on theControl Bar.2. At Username, enter the username of a user that you want to grant or deny page permissions to,
and then click the Add link.
3. Optional. At Filter By Group, select from the following options:
l < All Roles >: Select to view all roles (both global role and roles groups) in one single list.
l < Global Roles >: Select to view all roles which are not associated with a Role Group. E.g.
Administrators, All Users, Registered Users, and Unauthenticated Users.
l [Role Group Name]: Select the name of a Role Group to view the roles within that group.
4. In the View (or View Page) column, click on the check box beside a user/role repeatedly until the
correct permission is displayed.
l Permission Granted:: Permission to view the page is granted.
l Permission Denied: Permission to view the page is denied, unless Full Control is
granted.
l Not Specified: Permissions are not specified. Users cannot view the page unless they
belong to another role/username which has been granted permission, or are granted Full
Control/Edit Page permissions.
5. If you are using DNNCommunity Edition, skip to the final step in this tutorial.
6. In theAdd column, select from these options:
l Permission Granted: Users with Add permissions for a page can add child pages to
that page. They cannot add any parent pages, and they cannot add child pages to any other
pages.
l Permission Denied: Permission to add child pages is denied, unless Full Control is
granted.
l Not Specified: Permissions are not specified. Users are unable to add pages unless
they belong to another role/username which has been granted permission.
7. In theAdd Content column, select from these options:
l Permission Granted: Users with Add Content permissions for a page can edit content
on the page. These users can add, move and delete modules, as well asmanage the con-
tent and settings for modules on the page.
l Permission Denied: Permission to add and manage module content is denied, unless
Full Control is granted.
l Not Specified: Permissions are not specified. Users are unable to view the page unless
they belong to another role/username which has been granted permission.

8. In theCopy column, select from these options:
l Permission Granted: Users with Copy permission can make a copy any page they can
view. The new page can only be a child of the page they have copy permissions for.
l Permission Denied: Permission to copy the page is denied, unless Full Control is
granted.
l Not Specified: Permissions are not specified. Users are unable to copy the page unless
they belong to another role/username which has been granted permission.
9. In theDelete column, select from these options:
l Permission Granted: Users with Delete permissions can delete the page. If the page
has child pages they are also deleted when the parent is deleted, however the user does not
automatically have Delete permissions for these child pages.
l Permission Denied: Permission to delete the page is denied, unless Full Control is
granted.
l Not Specified: Permissions are not specified. Users are unable to delete the page
unless they belong to another role/username which has been granted permission.
10. In the Export column, select from these options:
l Permission Granted: Users with Export permissions can export a page.l Permission Denied: Permission to export the page is denied, unless Full Control is
granted.
l Not Specified: Permissions are not specified. Users are unable to export the page
unless they belong to another role/username which has been granted permission.
11. In the Import column, select from these options:
l Permission Granted: Users with Import permissions can import a page.l Permission Denied: Permission to import the page is denied, unless Full Control is
granted.
l Not Specified: Users cannot import the page unless Full Control/Edit permission is
granted.
12. In theManage Settings column, select from these options:
l Permission Granted: Users with Manage Settings permissions can change the page
settings. Users can edit all of the settings on the Settings page, except for the permissions
section which will not be visible.
l Permission Denied: Permission to manage settings the page is denied, unless Full
Control is granted.
l Not Specified: Permissions are not specified. Users are unable to manage settings for
the page unless they belong to another role/username which has been granted permission.
13. In theNavigate column, select from these options:
l Permission Granted: Users with Navigate permissions can view a page in the navi-
gation menu. Users can have this permission without view permissions, in which case they
will not be able to view any content on the page but the page will be visible in the menu.
l Permission Denied: Permission to navigate to the page is denied, unless Full Control
is granted.
l Not Specified: Permissions are not specified. Users are unable to navigate to the page
unless they belong to another role/username which has been granted permission.
14. In the Full Control (or Edit Page) column, select from these options:
l Permission Granted: Users with Full Control permissions have full administrative rights
for the page. This permission is the same as the Edit Page permission in the Community
Edition. This role overrides other settings.
l Permission Denied: Permission to delete the page is denied, unless Full Control is
granted.
l Not Specified: Permissions are not specified.15. Click theUpdate Page link.

PagePermissions inDNNProfessionalandEnterpriseEditions
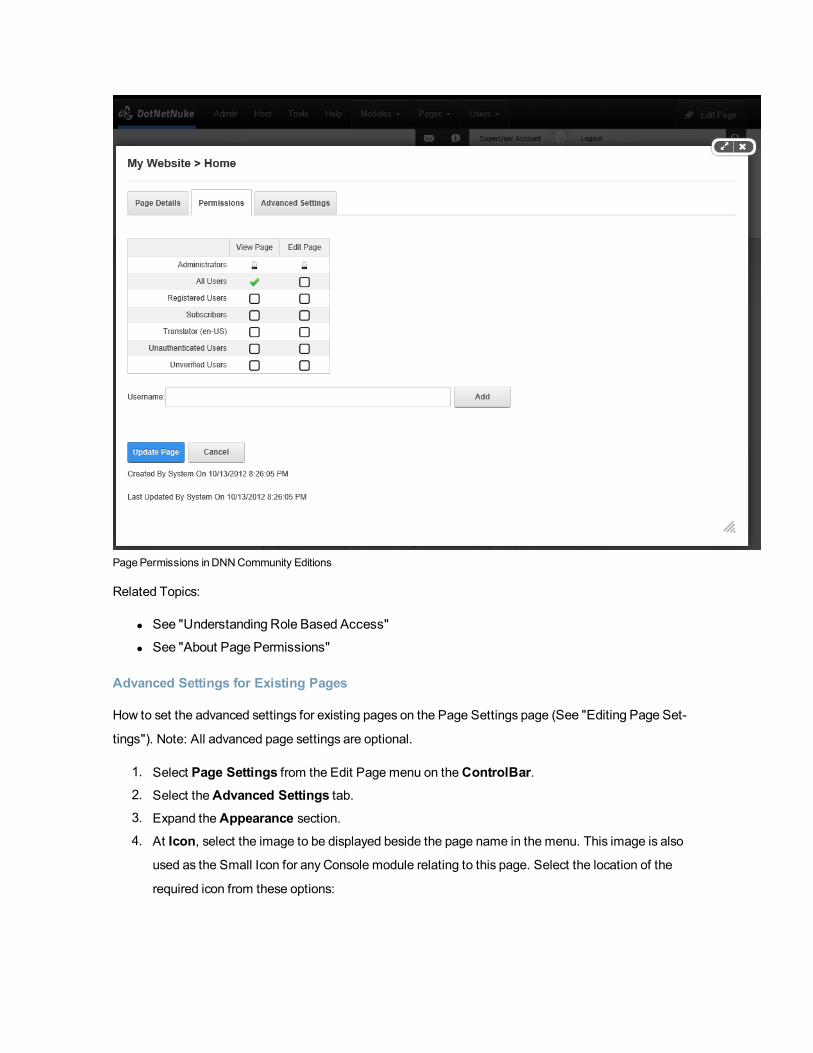
PagePermissions inDNNCommunity Editions
Related Topics:
l See "Understanding Role Based Access"
l See "About Page Permissions"
Advanced Settings for Existing Pages
How to set the advanced settings for existing pages on the Page Settings page (See "Editing Page Set-
tings"). Note: All advanced page settings are optional.
1. Select Page Settings from the Edit Page menu on theControlBar.2. Select theAdvanced Settings tab.3. Expand theAppearance section.4. At Icon, select the image to be displayed beside the page name in the menu. This image is also
used as the Small Icon for any Console module relating to this page. Select the location of the
required icon from these options:

l File (A File On Your Site ), select to choose any image. See "Uploading and Linking to a
File"
1. Set the link to an existing file (See "Setting a File Link") or a new file (See "Upload-
ing and Linking to a File"). Note: You can remove the icon from this and the fol-
lowing field by selecting < None Specified > as the File Name when setting a file
link.
l System Image: Select to choose an icon which is part of your DNN application. This dis-
plays a list of available images.
1. Select the required image.
5. At Large Icon, using the same steps as for the above field, select an image to be used as the
Large Icon for any Console module relating to this page.
6. At Page Skin, select a skin from the drop down list. The default option is < None Specified >
which uses the default site skin. See "Setting the Default Site Skin and Container"
7. At Page Container, select a container from the drop down list. The default option is < None
Specified > which uses the default site container.8. At Copy Design to Descendants, click theCopy Design link. See "Copying Design to Child
Pages". This setting is only available on existing pages for users who have Edit Page/Manage Set-
tings permissions for child pages.
9. At Disabled, select from these options:
l Check the check box if the page name is not a link. I.e. When you click on the page name
in the menu nothing happens. This option is typically selected for a parent page to provide a
way for users to navigate to its child pages.
l Uncheck the check box for this page name to be a link to the page. This is the default
option.
10. In theRefresh Internal (seconds) text box, enter the interval to wait between automatic page
refreshes. (E.g. Enter "60" for 1 minute or 60 seconds.) Leave field blank to disable.
11. In the Page Header Tags text box, enter any tags (i.e. meta-tags) that should be rendered in the
"HEAD" tag of the HTML for this page

12. Expand theCache Settings section.13. At Output Cache Provider, select the provider to use for this page from these options:
l FileOutputCachingProvider:l DatabaseOutputCachingProvider:l MemoryOutputCachingProvider:
14. Expand theOther Settings section.15. At Secure?, check the check box to force this page to use a secure connection (SSL). This
option will only be enabled if the host has enabled SSL - OR - Uncheck the check box remove
use of SSL connection.

16. In the Site Map Priority text box, enter the desired priority (between 0 and 1.0). This helps deter-
mine how this page is ranked in Google with respect to other pages on your site (0.5 is the default).
17. At Start Date, click theCalendar icon and select the first date the page is viewable.
18. At End Date, click theCalendar icon and select the last date the page is viewable. Note:Expired pages can be viewed by Administrators via the Admin > Pages page. See "Viewing any
Page (Pages Module)"
19. At Link URL, to set this page to be a navigation link to another resource, select or add the link
here. See "About the Link Control"
20. At Permanently Redirect?, check the check box to notify the client that this page should be con-
sidered as permanently moved. This would allow Search Engines to modify their URL's to directly
link to the resource. Note: This setting is ignored if the Link Type is set to None.
21. Click theUpdate Page link.
Advanced Settings for New Pages
An overview of the advanced settings for new pages. All advanced page settings are optional. This topic
assumes you are in the process of adding a new page (See "Adding a New Page"). If you are editing an
existing page See "Editing Page Settings" which has a few differences to page settlings for new pages.
1. Select theAdvanced Settings tab.2. TheAppearance section will be open.
3. At Icon, select the image to be displayed beside the page name in the menu if the menu you are
using shows Page icons. This image is also used as the Small Icon for any Console module relating
to this page. Select the location of the required icon from these options:
l File (A File On Your Site ), select to choose any image. See "Uploading and Linking to a
File" .
1. Set the link to an existing file (See "Setting a File Link") or a new file (See "Upload-
ing and Linking to a File"). Note: You can remove the icon from this and the fol-
lowing field by selecting < None Specified > as the File Name when setting a file
link.
l System Image: Select to choose an icon which is part of your DNN application. This dis-
plays a list of available images.
1. Select the required image.
4. At Large Icon, using the same steps as for the above field, select an image to be used as the
Large Icon for any Console module relating to this page.
5. At Page Skin, select a skin from the drop down list. The default option of < None Specified >
uses whichever skin is set as the default for this site. See "Setting the Default Site Skin and Con-
tainer"
6. At Page Container, select a container from the drop down list. Note: The default option of <
None Specified > uses the skin is set as the default for this site.7. In theRefresh Internal (seconds) text box, enter the interval to wait between automatic page
refreshes. (E.g. Enter "60" for 1 minute or 60 seconds.) Leave field blank to disable.
8. In the Page Header Tags text box, enter any tags that should be rendered in the "HEAD" tag of
the HTML for this page.

9. Expand theCache Settings section.10. At Output Cache Provider, select the provider to use for this page from these options:
l FileOutputCachingProvider
l DatabaseOutputCachingProvider
l MemoryOutputCachingProvider
11. Expand theOther Settings section.12. At Secure? check the check box to force this page to use a secure connection or secure socket
layer (SSL). This option requires the Administrator to configure the SSL Settings on the Admin >
Site Settings page.

13. At Site Map Priority, enter the desired priority (between 0 and 1.0). This helps determine how this
page is ranked in Google with respect to other pages on your site (0.5 is the default).
14. At Start Date, click theCalendar icon and select the first date the page is viewable.
15. At End Date, click theCalendar icon and select the last date the page is viewable. Note:Expired pages can be viewed by Administrators via the Admin > Pages page.
16. At Link URL, to set this page to be a navigation link to another resource (rather than displaying the
page itself), select or add the link here. See "About the Link Control"
17. At Permanently Redirect?, check the check box to notify the web browser that this page should
be considered as permanently moved. This enables Search Engines to modify their URL's to
directly link to the resource. Note: This setting is ignored if the Link Type is set toNone.
18. Click theUpdate Page link.
Tip: If a Small Icon is set for the page, it will also be used as the small icon for any Console module
which is added to the page.
Related Topics:
l See "Working with the Calendar"
l See "About the ConsoleModule"

Localization Settings for New Pages
How to set the Localization setting for pages on the Page Settings page.
Prerequisite. The Localization section only displays if content localization is enabled.
1. Go to the Localization section.2. At Culture Type, select from the following:
l Create Single Neutral Culture Page: Select to create a single page which is shared for
all languages.
l Create Localized Versions of Page: Select to create a version of this page for each lan-
guage. This is the default option.
l Create in Current Culture only: Select to create a page for the language you are cur-
rently viewing the site in.
Note: If Create Localized Versions of Page is selected, the below information is displayed once
the Add Page link is clicked. This will enable you to set pages as Ready for Translation, however
you will most likely want to add modules and content beforehand.

Page Details Settings for Existing Pages
How to set page details settings for existing pages using the Page Settings page. See "Editing Page Set-
tings" to begin this process. Note: Page Name is the only required field.
1. Select the Page Details tab.2. In the Page Name text box, enter a name for the page. If this page is displayed in the menu, this
will be the name in the menu.
3. In the Page Title text box, enter a short, descriptive sentence summarizing the page content. The
title is used by search engines to identify the information contained on the page. It is recommended
that the title contains at least 5 highly descriptive words and does not exceed 200 characters.
4. In theDescription text box, enter a description of the page content. The description is used by
search engines to identify the information contained on the page. It is recommended that the
description contains at least 5 words and does not exceed 1000 characters.
5. In theKeywords text box, enter key words for this page separated by comma.6. At Tags, check the check box beside a tag that is associated with the content of this page.
Repeat to associate additional tags. Page tagging is a way of categorizing content for more mean-
ingful search results. Note: Tags can be created by users (See "Tagging Page Content") or editors
(See "Creating a Vocabulary").
7. At Parent Page, select < None Specified > to set this page as a parent page - OR - Select the
parent page from the drop down list. Note: Users can only select parent pages which they have
been grantedAdd, Full Control permissions for (Edit permissions in Community Edition)8. At Include In Menu?, check the check box to include this page in the menu - OR - Uncheck
the check box to hide the page.
9. Click theUpdate Page button.

Page Details Settings for New Pages
How to set page details settings for new pages using the Page Settings page. Note: The Page Name field
is the only mandatory field. This topic assumes you have already begun the process of adding a new page.
See "Adding a New Page"
1. Select the Page Details tab.2. In the Page Name text box, enter a name for the page. If this page is displayed in the menu, this
will be the name in the menu.
3. In the Page Title text box, enter a short, descriptive sentence summarizing the page content. The
title is used by search engines to identify the information contained on the page. It is recommended
that the title contains at least 5 highly descriptive words and does not exceed 200 characters.

4. In theDescription text box, enter a description of the page content. The description is used by
search engines to identify the information contained on the page. It is recommended that the
description contains at least 5 words and does not exceed 1000 characters.
5. In theKeywords text box, enter key words for this page separated by comma.6. At Tags, check the check box beside a tag that is associated with the content of this page.
Repeat to associate additional tags. Page tagging is a way of categorizing content for more mean-
ingful search results. Note: Tags can be created by users (See "Tagging Page Content") or editors
(See "Creating a Vocabulary").
7. At Parent Page, select < None Specified > to set this page as a parent page - OR - Select the
parent page from the drop down list. Note: Page Editors can only select parent pages which they
are authorized to edit.
8. At Insert Page, select from these options to choose the location of the new page in the menu:
l Select a page from the drop down list and then select to add the new page eitherBefore or
After that page in the menu on the current level.l Select Add to End to add the new page to the end of the menu on the current level.
9. Optional. Set a page template which allows you to add modules with optional content to a new
page. Note: This option is not available when copying a page. Complete the following to set the
template for this page:
1. At Template Folder, select the folder where the required template is located.2. At Page Template, select the required template.
10. At Include In Menu?, check the check box to include this page in the menu- OR - Uncheck
the check box to hide the page.
11. Click theAdd Page button.

Basic Settings for NewPages
Related Topics:
l See "About the Taxonomy Manager Module"
Adding and Managing Modules
About Modules
DNN uses a modular design system to display content on a page. One or more modules are added to each
page allowing you to create and manage content. There are many different types of modules, each man-
aging a different type of site content or site administrative task.

DNN supports a number of Project Modules which are maintained by active DNN community members
and freely distributed as open source projects. These Project Modules can be deployed and installed on
your site for no charge. The wider DNN community also produce and sell commercial modules. DNNmod-
ules and other types of extensions can be obtained from the DotNetNuke Store (http://store-
.dotnetnuke.com/).
Many of the modules that are located on the Admin Console pages can also be deployed and added to site
pages. These modules (sometimes referred to as Admin or Administration modules) enable authorized
users to undertake site administrative tasks, such asmanaging user accounts, security roles and vendor
accounts.

Note: All users can perform the following actions on modules, however these actionsmay be dis-
abled on one or more modules.
l See "Minimizing andMaximizing Content"
l See "Printing Content"
l See "Subscribing to Syndicated Content"
l See "Tagging Page Content"
Related Topics:
l See "About Module Settings" and the related section for details on setting the module settings that
are common to all modules.
Module Actions Menu
The module actionsmenu is displayed across the top of a module to users with appropriate permissions
and provides quick access to module editing tools, module management tools and the module settings
page.
TheModuleActions Menu

Opening the Module Actions Menu
How to view the options available to you on the module actionsmenu. Note: Somemenu options are role
restricted.
Prerequisite. If the Control Panel is displayed, it must be in Edit Mode to view and access the module
action menu.
The tools of the module action menu are divided into the three following groups:
l Edit: Mouse over the Edit button to display the editing tools available to the current user.Options typically include Edit Content andMy Work for the HTML/HTML Pro modules) andAdd
New Item for other modules.
l Manage: Mouse over theManage button to display the module management tools thatare available to this user.

l Move: Mouse over theMove button to display a list of the panes for this page where the usercan move this module to.

Edit Tools
Name Function
Edit ContentAdd new content or edit the existing content to the module. See "AddingModule Con-
tent"
MyWork View your current workflow tasks for the HTML/HTML Pro module.
Manage Tools
Name Function
ManageSet-
tings
Opens the module settings page for this module. This page provides Page Editors and Admin-
istrators with access to configure a wide range of module settings. Important. Ensure Mode is
set to Edit on the Control Panel.
1. Select Settings from the module actionsmenu - OR - Click the Settings button.2. This opens the Module Settings page.
3. Edit one or more settings as required.
4. Click theUpdate button.
Export
Content
Export content from the module. Exported content can then be imported it into another module
of the same type. E.g. You can only import content from a Linksmodule into another Linksmod-
ule. Modules which allow content import/export are known as IPortable modules. Examples
include the Announcements, FAQ, Help, Links, Media, Repository, Survey, HTML/HTML Pro
and XMLmodules.
This option may be disabled in the menu.
1. Select Export Content from the module actionsmenu. This opens the Export Mod-
ule page.
2. At Folder, select the folder where you want to save the exported content.3. In the File text box, enter a name for the export file. Note: The module type is entered
by default. It is useful to keep this as the start of the file name so you can easily identify
the module type in the future. E.g. Links_Sponsors_December2011
4. Click the Export link. This creates an XML file which is saved to the selected folder.

Name Function
ExportingModuleContent
Import
Content
Enables exported content to be imported into IPortable modules. Note: Content must first be
exported from amodule of the same type. E.g. You can only import content from a Linksmod-
ule into another Linksmodule. Note: This option may be disabled in the menu.
1. Select Import Content from the module actionsmenu. This opens the Import Mod-
ule page.
2. Expand the Import File section.3. At Folder, select the folder where exported file is located from the drop down list.
4. At File, select the file name from the drop down list.
5. Optional. If you want to modify or remove content from the file before importing it,
Expand theModule Content section and edit the content as required.6. Click the Import link.
Tip: If the module already contains content, the imported content is merged with the
existing content.

Name Function
ImportingModuleContent
Syn-
dicate
Enables users to view a syndicated feed of the module content. This feed can be downloaded
to your computer or displayed in another module such as the News Feeds (RSS) module. Syn-
dication must be enabled on the Module Setting page of a module. See "Configuring Basic
Page Settings for Modules"
Help Opens the Module Help page for this module. Here you can view basic module information and
help.
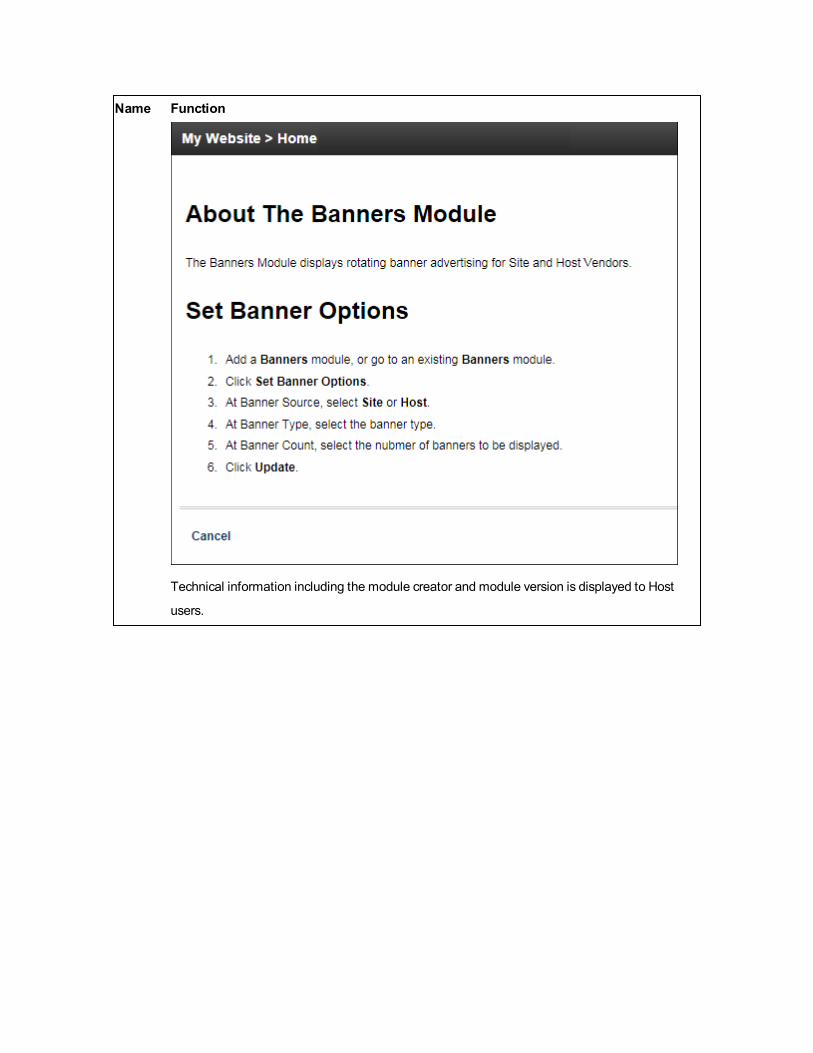
Name Function
Technical information including the module creator and module version is displayed to Host
users.

Name Function
1. Optional. Click the View Online Help link to view detailed help for this module online.
This opens the Online Help resource in a newWeb browser.
2. Click theCancel link to return to the module.
Print Provides a print friendly copy of the module content for printing. Print must be enabled on the
Module Setting page of a module. See "Configuring Basic Page Settings for Modules"
Delete Delete the module. See "Restoring DeletedModules"
Refreshes the module with the latest content.

Name FunctionRefresh
Move Tools
Name Function
Top Move the module to the top (above all other modules) within the current pane.
Up Move the module up one position within the current pane.
Down Move the module down one position within the current pane.
Bottom Move the module to the bottom (below all other modules) within the current pane.
To [Pane-
Name]
Move the module to another pane on the current page. Alternatively, See "Configuring
Advanced Page Settings for aModule"
Adding a New Module (ControlBar)
How to add a newmodule without content into the current page using the ControlBar. Adding a newmod-
ule inserts a module.
Permissions. You must be authorized to deploy a module and have the appropriate page editing per-
missions to add a module to a page.
Important. If content localization is enabled, See "Adding aModule to all Languages" or See "Adding
Modules to a Secondary LanguageOnly" as required.
Option One - Drag and Drop Module
1. On the Control Bar, hover over theModules drop downmenu and then select Add New Module.
This will load and display a list of all modules within All Categories, or the previously selected cat-
egory.
2. Optional. Filter the module list by selecting a module category from the drop down box that is dis-
played above the list of modules. The available categories are:
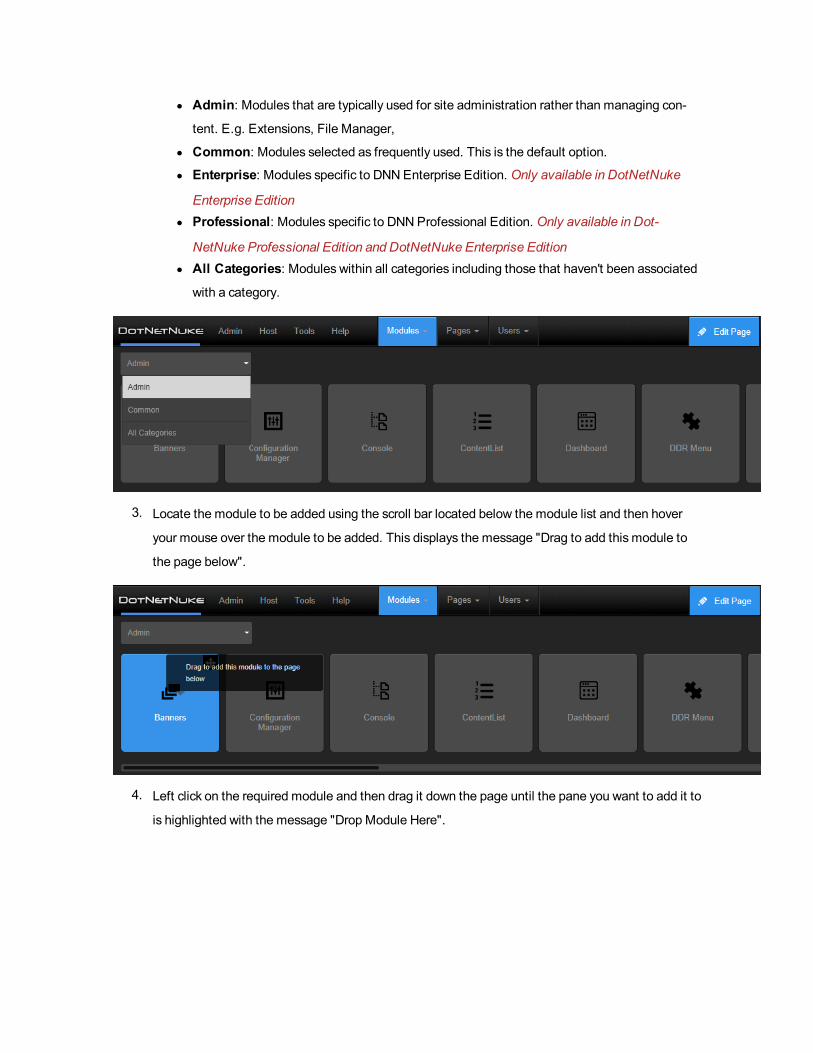
l Admin: Modules that are typically used for site administration rather than managing con-
tent. E.g. Extensions, File Manager,
l Common: Modules selected as frequently used. This is the default option.l Enterprise: Modules specific to DNNEnterprise Edition. Only available in DotNetNuke
Enterprise Editionl Professional: Modules specific to DNNProfessional Edition. Only available in Dot-
NetNuke Professional Edition and DotNetNuke Enterprise Editionl All Categories: Modules within all categories including those that haven't been associated
with a category.
3. Locate the module to be added using the scroll bar located below the module list and then hover
your mouse over the module to be added. This displays the message "Drag to add this module to
the page below".
4. Left click on the required module and then drag it down the page until the pane you want to add it to
is highlighted with the message "Drop Module Here".

5. Release your mouse button. The module is now added to the page.
Option Two - Insert Module
1. On the Control Bar, hover over theModules drop downmenu and then select Add New Module.
This will load and display a list of the modules within the Common category, or the previously

selected category.
2. Optional. If the required module isn't displayed, select the category that the module belongs to
from the drop down box which is displayed above the list of modules. The available categories are:
l Admin: Modules that are typically used for site administration rather than managing con-
tent. E.g. Extensions, File Manager,
l Common: Modules selected as frequently used. This is the default option.l Enterprise: Modules specific to DNNEnterprise Edition.
l Professional: Modules specific to DNNProfessional Edition.
l All Categories: Modules within all categories including those that haven't been associated
with a category.
3. Locate the module to be added using the scroll bar located below the module list and then hover
your mouse over the module to be added. This displays theMove icon in the top right corner ofthe module.
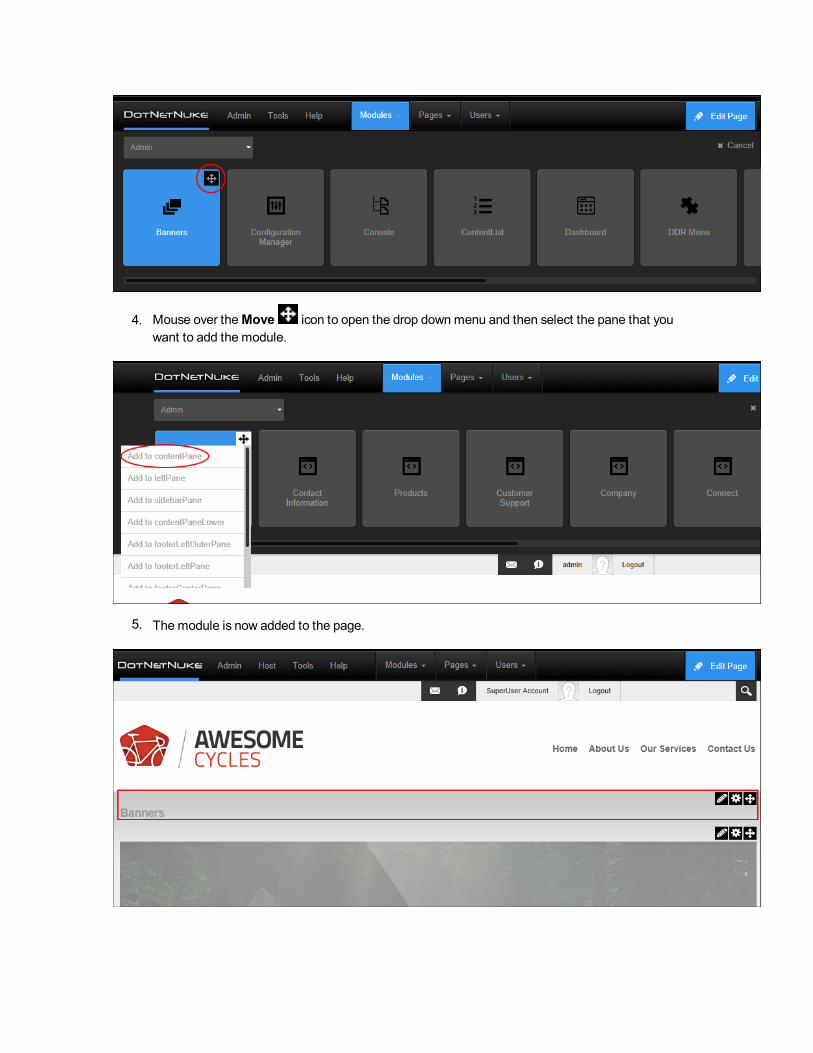
4. Mouse over theMove icon to open the drop downmenu and then select the pane that youwant to add the module.
5. The module is now added to the page.
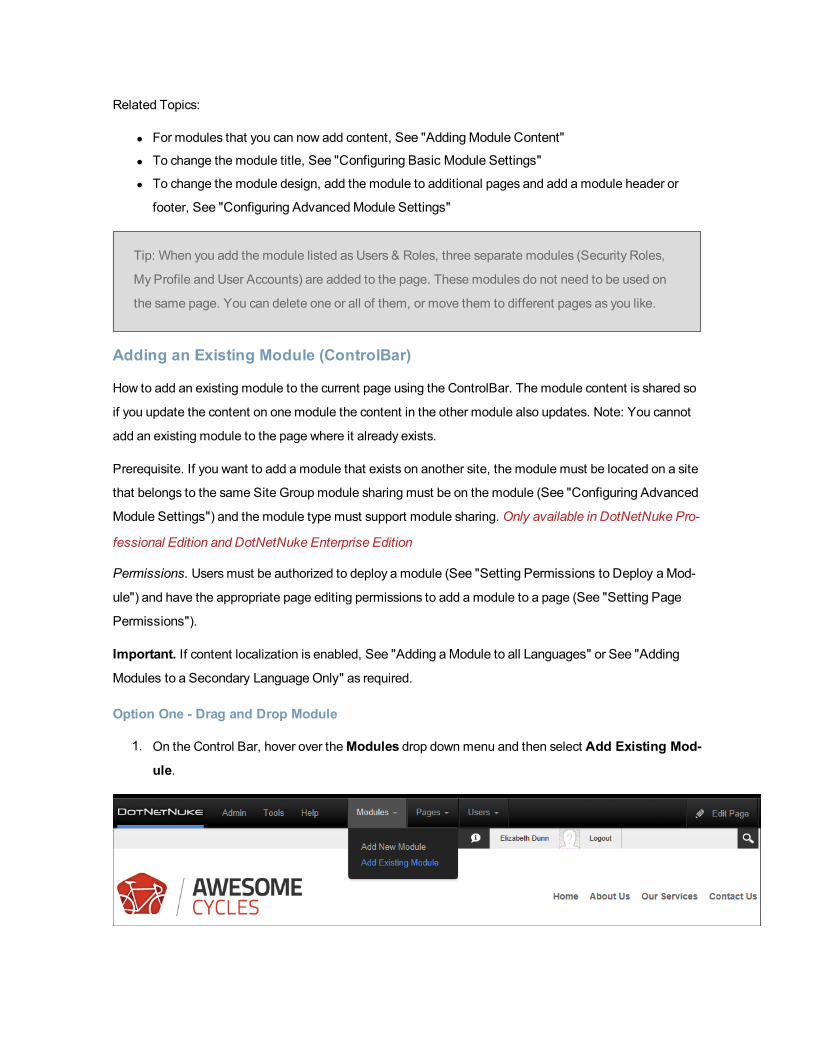
Related Topics:
l For modules that you can now add content, See "AddingModule Content"
l To change the module title, See "Configuring Basic Module Settings"
l To change the module design, add the module to additional pages and add a module header or
footer, See "Configuring AdvancedModule Settings"
Tip: When you add the module listed as Users & Roles, three separate modules (Security Roles,
My Profile and User Accounts) are added to the page. These modules do not need to be used on
the same page. You can delete one or all of them, or move them to different pages as you like.
Adding an Existing Module (ControlBar)
How to add an existing module to the current page using the ControlBar. The module content is shared so
if you update the content on one module the content in the other module also updates. Note: You cannot
add an existing module to the page where it already exists.
Prerequisite. If you want to add a module that exists on another site, the module must be located on a site
that belongs to the same Site Group module sharing must be on the module (See "Configuring Advanced
Module Settings") and the module type must support module sharing. Only available in DotNetNuke Pro-
fessional Edition and DotNetNuke Enterprise Edition
Permissions. Usersmust be authorized to deploy a module (See "Setting Permissions to Deploy aMod-
ule") and have the appropriate page editing permissions to add a module to a page (See "Setting Page
Permissions").
Important. If content localization is enabled, See "Adding aModule to all Languages" or See "Adding
Modules to a Secondary LanguageOnly" as required.
Option One - Drag and Drop Module
1. On the Control Bar, hover over theModules drop downmenu and then select Add Existing Mod-
ule.

2. If your site belongs to a Site Group, select the name of the site that the module it located on from
the Select Site drop down list. Only available in DotNetNuke Professional Edition and Dot-
NetNuke Enterprise Edition
3. At Select Page, select the page that the module is located on.4. Select from these options on the next drop down list:
l Same As Page: This sets the module as visible to all roles/users who can view this page.
This is the default setting.
l Page Editors Only: The setsmodule as only visible only to the roles/user who can edit this
page. You might choose this option if you want to add content and configure the module set-
tings before others can view the module.
5. At Make a Copy, check the check box to create an independent copy of the module content that
can be modified without affecting the original existing module - OR - Uncheck the check box to use
the share the samemodule content across both instances of the module so that updating content
on one module will change the content on both modules. This is the default setting.
6. Locate the module to be added using the scroll bar located below the module list and then hover
your mouse over the module to be added. This displays the message "Drag to add this module to
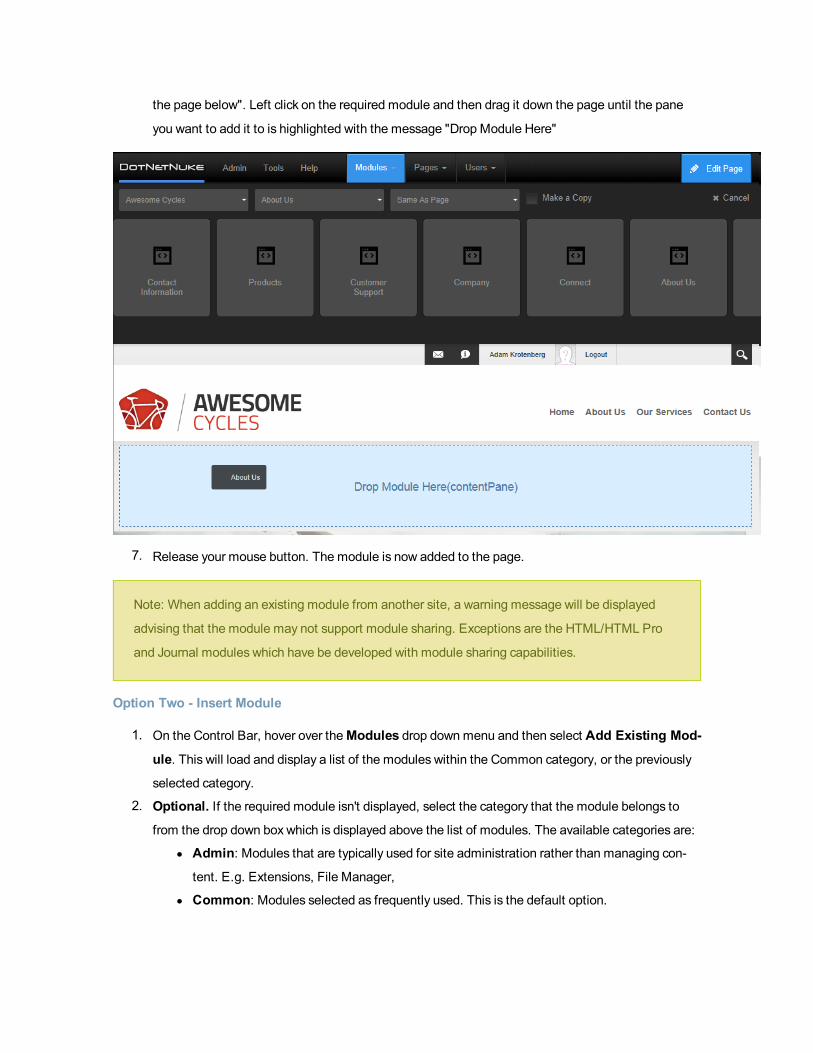
the page below". Left click on the required module and then drag it down the page until the pane
you want to add it to is highlighted with the message "Drop Module Here"
7. Release your mouse button. The module is now added to the page.
Note: When adding an existing module from another site, a warning message will be displayed
advising that the module may not support module sharing. Exceptions are the HTML/HTML Pro
and Journal modules which have be developed with module sharing capabilities.
Option Two - Insert Module
1. On the Control Bar, hover over theModules drop downmenu and then select Add Existing Mod-
ule. This will load and display a list of the modules within the Common category, or the previously
selected category.
2. Optional. If the required module isn't displayed, select the category that the module belongs to
from the drop down box which is displayed above the list of modules. The available categories are:
l Admin: Modules that are typically used for site administration rather than managing con-
tent. E.g. Extensions, File Manager,
l Common: Modules selected as frequently used. This is the default option.

l Enterprise: Modules specific to DNNEnterprise Edition.
l Professional: Modules specific to DNNProfessional Edition.
l All Categories: Modules within all categories including those that haven't been associated
with a category.
3. At Select Page, select the page that the module is located on.4. Select from these options on the next drop down list:
l Same As Page: This sets the module as visible to all roles/users who can view this page.
This is the default setting.
l Page Editors Only: The setsmodule as only visible only to the roles/user who can edit this
page. You might choose this option if you want to add content and configure the module set-
tings before others can view the module.
5. At Make a Copy, check the check box to create an independent copy of the module content that
can be modified without affecting the original existing module - OR - Uncheck the check box to use
the share the samemodule content across both instances of the module so that updating content
on one module will change the content on both modules. This is the default setting.
6. Locate the module to be added using the scroll bar located below the module list and then hover
your mouse over the module to be added. This displays theMove icon in the top right corner ofthe module.
7. Mouse over theMove icon to open the drop downmenu and then select the pane that youwant to add the module.
8. The module is now added to the page.
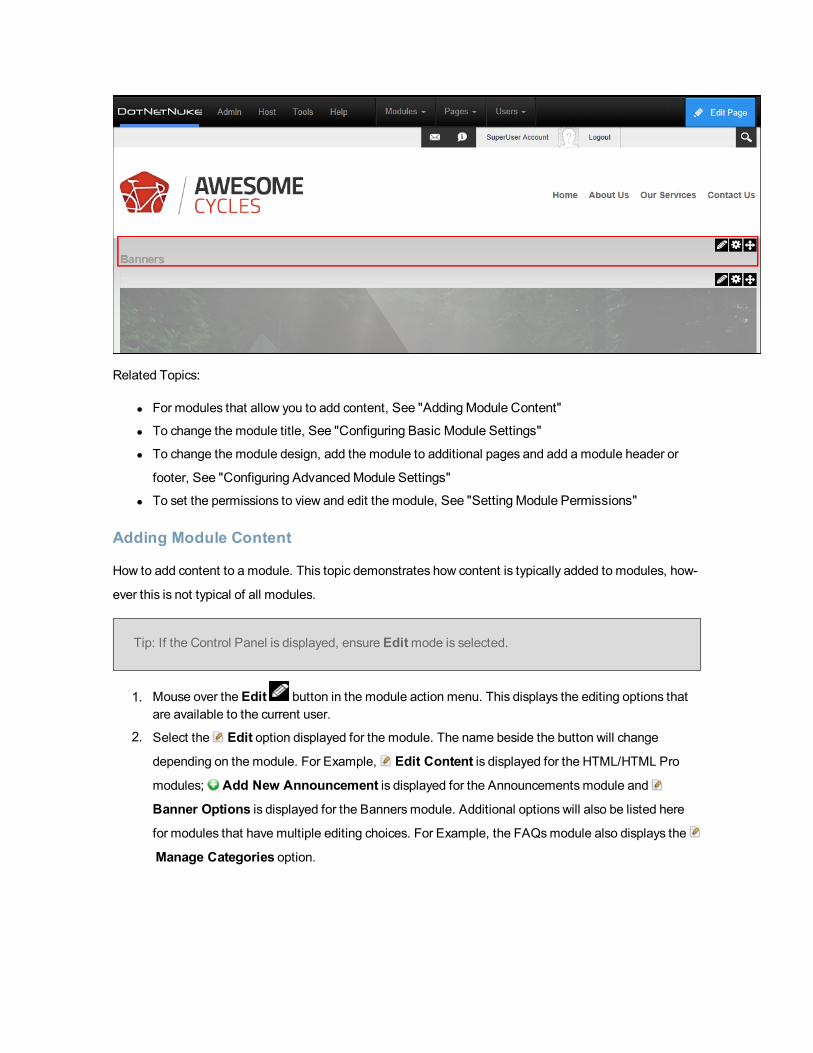
Related Topics:
l For modules that allow you to add content, See "AddingModule Content"
l To change the module title, See "Configuring Basic Module Settings"
l To change the module design, add the module to additional pages and add a module header or
footer, See "Configuring AdvancedModule Settings"
l To set the permissions to view and edit the module, See "SettingModule Permissions"
Adding Module Content
How to add content to a module. This topic demonstrates how content is typically added to modules, how-
ever this is not typical of all modules.
Tip: If the Control Panel is displayed, ensure Editmode is selected.
1. Mouse over the Edit button in the module action menu. This displays the editing options thatare available to the current user.
2. Select the Edit option displayed for the module. The name beside the button will change
depending on the module. For Example, Edit Content is displayed for the HTML/HTML Pro
modules; Add New Announcement is displayed for the Announcementsmodule and
Banner Options is displayed for the Bannersmodule. Additional options will also be listed here
for modules that have multiple editing choices. For Example, the FAQsmodule also displays the
Manage Categories option.

3. Add, edit and update the module content as required.
For details on adding content to specific modules see "Installed Modules" and "Available Modules" sec-
tions.
Deleting a Module
How to delete a module from a page.
Tip: Deleted modules are stored in the Recycle Bin.
1. Mouse over theManage button on the module action menu.2. Select Delete from drop down list. This displays the message "Are You Sure YouWish To
Delete This Module?"
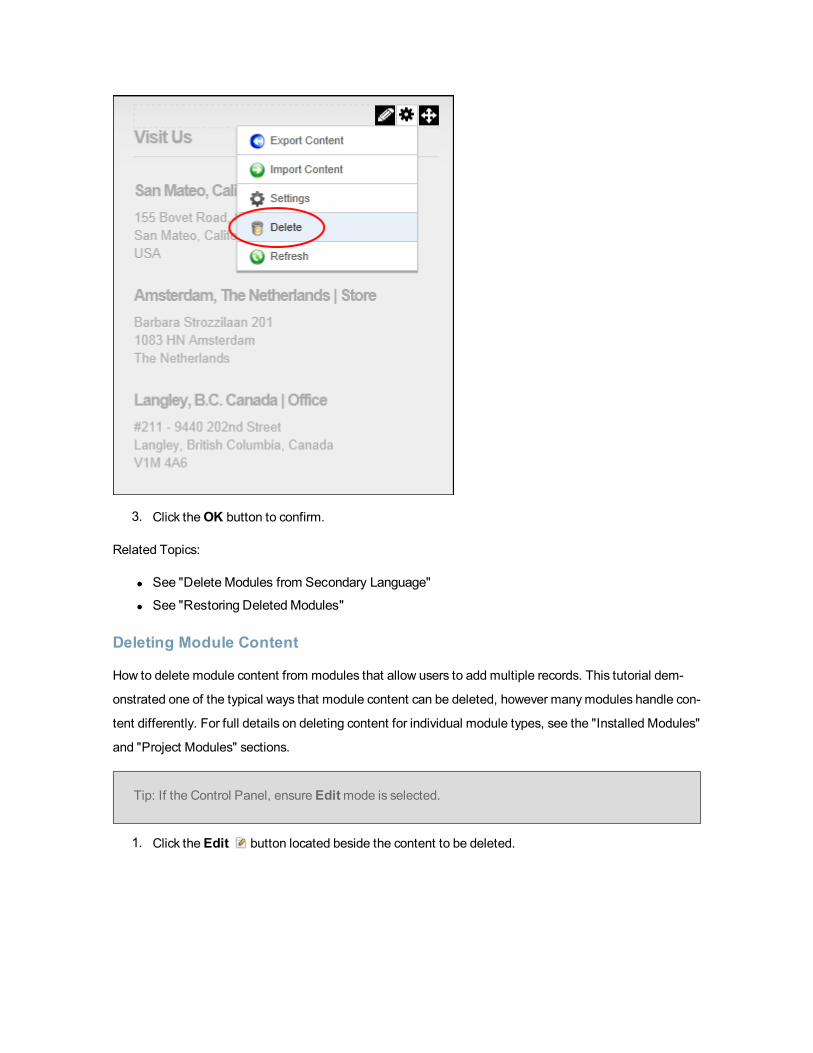
3. Click theOK button to confirm.
Related Topics:
l See "DeleteModules from Secondary Language"
l See "Restoring DeletedModules"
Deleting Module Content
How to delete module content from modules that allow users to add multiple records. This tutorial dem-
onstrated one of the typical ways that module content can be deleted, however manymodules handle con-
tent differently. For full details on deleting content for individual module types, see the "Installed Modules"
and "Project Modules" sections.
Tip: If the Control Panel, ensure Editmode is selected.
1. Click the Edit button located beside the content to be deleted.

2. Click the Delete link. This displays the message "Are You Sure YouWish To Delete This Item?"
3. Click theOK or Yes button to confirm.
Tip: To delete content from modules with a single content item such as the HTML and IFramemod-
ules you can either remove all the content or simply delete the module.
Drag and Drop Module
How to drag a module from its current location (pane) on a page to and drop it into another pane.
Prerequisite. You must be in Edit mode and be a Page Editor for the page where the module is locate.
1. Locate the module to be moved.
2. Hover your mouse over the section of the Module Action Bar that doesn't have any icons. This dis-
plays the message "Drag this module to a new Location".
3. Click and hold on your mouse to select this module and then drag the module to the required loca-
tion.

4. When the module is positioned over a pane, the message "Drop Module Here" will be displayed
showing the location that the module will be relocated to once the dragging module is released.
When the correct pane is highlighted, release the module.

5. The module is now displayed in the chosen location.

Related Topics:
l To move the module to a new page, See "Configuring Advanced Page Settings for aModule"
l To use the module action menu to move a module on the same page, See "Module Actions Menu"
Editing Module Content
How to edit module content. This topic demonstrates how content is typically edited on modules, however
this is not applicable to all modules. For detailed information on editing content for individual module
types, see the "Installed Modules" and "Available Modules" sections.
Tip: If the Control Panel, ensure Editmode is selected.

Editing modules with a single content item such as the HTML, HTML Pro and IFrame modules:
1. Mouse over the Edit button in the module action menu. This displays the editing options thatare available to the current user.
2. Select the Edit option displayed for the module. The name beside the button will change
depending on the module. For Example, Edit Content is displayed for the HTML/HTML Pro
modules; Add New Announcement is displayed for the Announcementsmodule and
Banner Options is displayed for the Bannersmodule. Additional options will also be listed here
for modules that have multiple editing choices. For Example, the FAQsmodule also displays the
Manage Categories option.
2. Edit the fields.
3. Click theUpdate button.
Editing modules with multiple items such as the Announcements and Links modules:
1. Click the Edit button located beside the content to be edited. This opens the edit page for this
module.
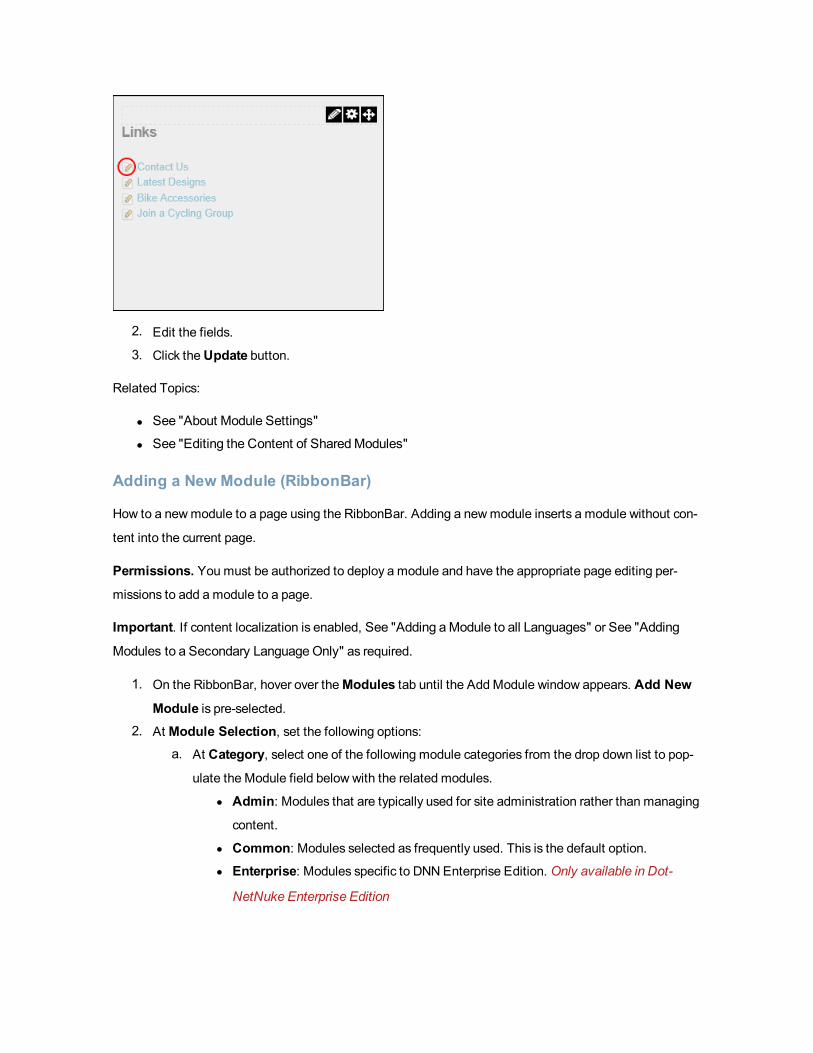
2. Edit the fields.
3. Click theUpdate button.
Related Topics:
l See "About Module Settings"
l See "Editing the Content of SharedModules"
Adding a New Module (RibbonBar)
How to a newmodule to a page using the RibbonBar. Adding a newmodule inserts a module without con-
tent into the current page.
Permissions. You must be authorized to deploy a module and have the appropriate page editing per-
missions to add a module to a page.
Important. If content localization is enabled, See "Adding aModule to all Languages" or See "Adding
Modules to a Secondary LanguageOnly" as required.
1. On the RibbonBar, hover over theModules tab until the Add Module window appears. Add New
Module is pre-selected.2. At Module Selection, set the following options:
a. At Category, select one of the following module categories from the drop down list to pop-
ulate the Module field below with the related modules.
l Admin: Modules that are typically used for site administration rather than managing
content.
l Common: Modules selected as frequently used. This is the default option.l Enterprise: Modules specific to DNNEnterprise Edition. Only available in Dot-
NetNuke Enterprise Edition

l Professional: Modules specific to DNNProfessional Edition. Only available in Dot-
NetNuke Professional Edition and DotNetNuke Enterprise Editionl All Categories: Modules within all categories including those that haven't been
associated with a category.
b. At Module, select the module to be added. E.g. HTML
3. Optional. In the Title text box, enter a title for this module. E.g. About Us. If no title is entered,
the module name is used by default.
4. Optional. At Visibility, select from the following options:
l Same As Page: This sets the module as visible to all roles/users who can view this page.
This is the default setting.
l Page Editors Only: The setsmodule as only visible only to the roles/user who can edit this
page. Select this option if you want to add content and configure the module settings before
others can view the module.
5. Optional. At Pane, select the pane you want to insert the module into. The module is added to the
Content Pane by default. The names of other panes will depend upon the skin applied to this page.
If you select a pane other than the Content Pane, the position of the pane is briefly shown on the
page.
6. Optional. At Insert, select the placement of the module from the first drop down list. One or more
of the following options is available, depending on the number of modules located in the selected
pane:
l Top: Select to add the module above all existing modules within the selected pane. Skip to
Step 9.
l Above: Select to add the module above another chosen module within the selected pane.1. At Module, select the module the newmodule will be added above.
l Below: Select to add the module below another module within the selected pane.
1. At Module, select the module the newmodule will be added below.
l Bottom: This adds the module below all existing modules within the selected pane. This is
the default option.
7. Click theAdd Module button on the RibbonBar.

8. The module is now added to the page. For modules that require you to add content, See "Adding
Module Content"

Tip: When you add the module listed as Users & Roles, three separate modules (Security Roles,
My Profile and User Accounts) are added to the page. These modules do not need to be used on
the same page. You can delete one or all of them, or move them to different pages as you like.
Adding an Existing Module (RibbonBar)
How to add an existing module to the current page using the RibbonBar. The content of this module is
shared with the existing module, therefore updating the content on any version of this module will update
the content in all of the other versions as well.
Important. You cannot add an existing module to the page where it already exists.
Tip: You must be authorized to deploy a module and have the appropriate page editing per-
missions to add modules to the current page.
1. Hover over theModules link until the Module menu is displayed.
2. In theAdd Module section, select theAdd Existing Module radio button.

3. Go to theAdd Module section.4. At Page, select the page where the existing module is located.5. At Module, select the module to be added. Modules are listed bymodule title. Note: Selecting the
module here appends either 'with content' or 'without content' to the CopyModule field below
depending on whether the selected module supports copying of content.
6. Optional. At Visibility, select from the following options:
l Same As Page: This sets the module as visible to all roles/users who can view this page.
This is the default setting.
l Page Editors Only: The setsmodule as only visible only to the roles/user who can edit this
page. Select this option if you want to add content and configure the module settings before
others can view the module.
7. Go to theModule Location section.8. Optional. At Pane, select the pane you want to insert the module into. The module is added to the
Content Pane by default. The names of other panes will depend upon the skin applied to this page.
If you select a pane other than the Content Pane, the position of the pane is briefly shown on the
page.
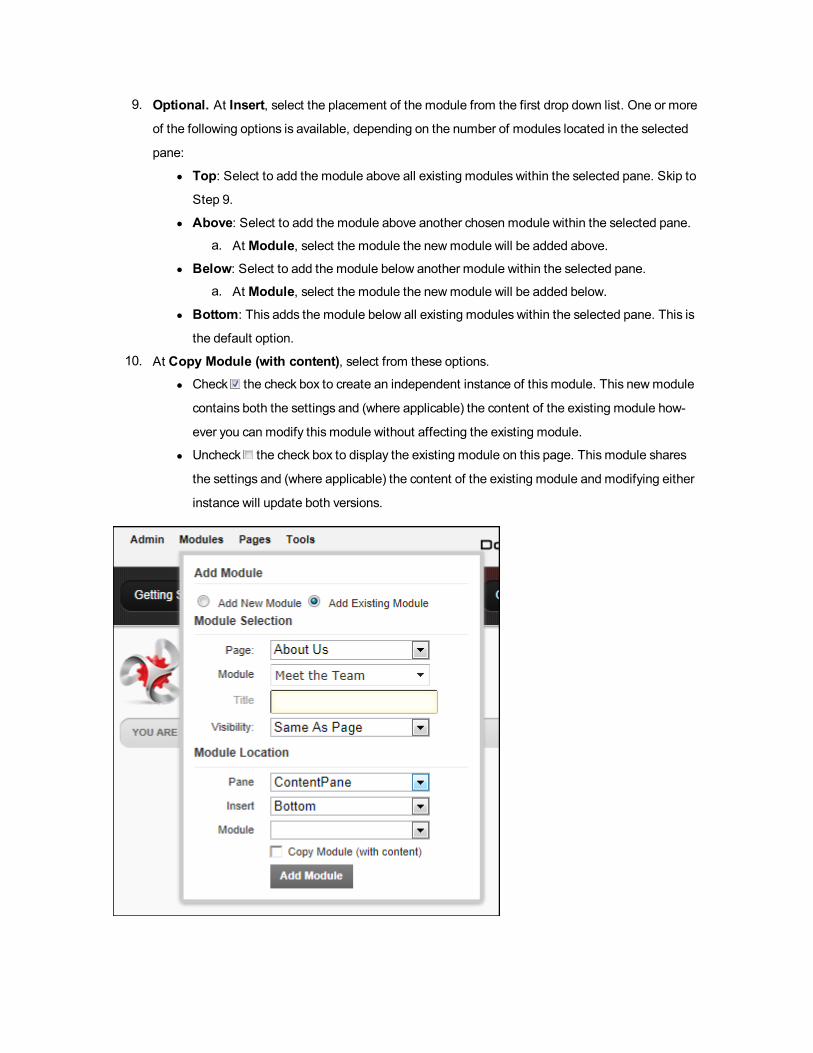
9. Optional. At Insert, select the placement of the module from the first drop down list. One or more
of the following options is available, depending on the number of modules located in the selected
pane:
l Top: Select to add the module above all existing modules within the selected pane. Skip to
Step 9.
l Above: Select to add the module above another chosen module within the selected pane.a. At Module, select the module the newmodule will be added above.
l Below: Select to add the module below another module within the selected pane.
a. At Module, select the module the newmodule will be added below.
l Bottom: This adds the module below all existing modules within the selected pane. This is
the default option.
10. At Copy Module (with content), select from these options.
l Check the check box to create an independent instance of this module. This newmodule
contains both the settings and (where applicable) the content of the existing module how-
ever you can modify this module without affecting the existing module.
l Uncheck the check box to display the existing module on this page. This module shares
the settings and (where applicable) the content of the existing module and modifying either
instance will update both versions.

11. Click theAdd Module button.
Note: When adding an existing module from another site, a warning message will be displayed
advising that the module may not support module sharing. Exceptions are the HTML/HTML Pro
and Journal modules which have be developed with module sharing capabilities.
Related Topics:
l See "AddingModule Content"
l See "Setting Permissions to Deploy aModule"
Adding a New Module (Iconbar)
How to a newmodule to a page using the Iconbar. The Iconbar Control Panel provides a single interface
from which authorized users can access page and module management tools, shortcuts to six common
administration tasks and quick links to the Administration and Host pages.. Adding a newmodule inserts a
module without content into the current page.
Permissions. You must be authorized to deploy a module and have the appropriate page editing per-
missions to add a module to a page.
Important. If content localization is enabled, See "Adding aModule to all Languages" or See "Adding
Modules to a Secondary LanguageOnly" as required.
1. On the Iconbar, go to the Module Insertion section and select Add New Module.2. At Module Selection, set the following options:
a. At Category, select one of the following module categories from the drop down list to pop-
ulate the Module field below with the related modules.
l Admin: Modules which are typically used for site administration rather than man-
aging content.
l Common: Modules selected as frequently used. This is the default option.l Enterprise: Modules specific to DNN Enterprise Edition. Only available in Dot-
NetNuke Enterprise Editionl Professional: Modules specific to DNN Professional Edition. Only available in Dot-
NetNuke Professional Edition and DotNetNuke Enterprise Editionl All Categories: Modules within all categories including those which haven't been
associated with a category).
b. At Module, select the module to be added. E.g. HTML
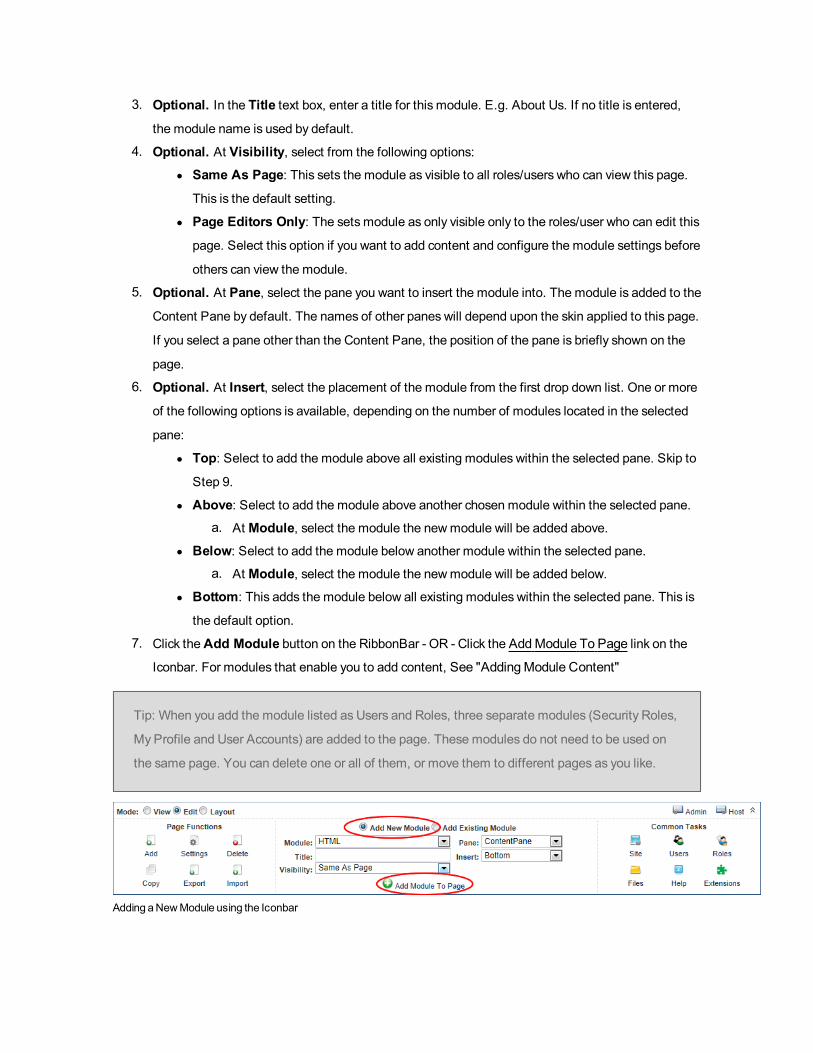
3. Optional. In the Title text box, enter a title for this module. E.g. About Us. If no title is entered,
the module name is used by default.
4. Optional. At Visibility, select from the following options:
l Same As Page: This sets the module as visible to all roles/users who can view this page.
This is the default setting.
l Page Editors Only: The setsmodule as only visible only to the roles/user who can edit this
page. Select this option if you want to add content and configure the module settings before
others can view the module.
5. Optional. At Pane, select the pane you want to insert the module into. The module is added to the
Content Pane by default. The names of other panes will depend upon the skin applied to this page.
If you select a pane other than the Content Pane, the position of the pane is briefly shown on the
page.
6. Optional. At Insert, select the placement of the module from the first drop down list. One or more
of the following options is available, depending on the number of modules located in the selected
pane:
l Top: Select to add the module above all existing modules within the selected pane. Skip to
Step 9.
l Above: Select to add the module above another chosen module within the selected pane.a. At Module, select the module the newmodule will be added above.
l Below: Select to add the module below another module within the selected pane.
a. At Module, select the module the newmodule will be added below.
l Bottom: This adds the module below all existing modules within the selected pane. This is
the default option.
7. Click theAdd Module button on the RibbonBar - OR - Click the AddModule To Page link on the
Iconbar. For modules that enable you to add content, See "AddingModule Content"
Tip: When you add the module listed as Users and Roles, three separate modules (Security Roles,
My Profile and User Accounts) are added to the page. These modules do not need to be used on
the same page. You can delete one or all of them, or move them to different pages as you like.
Adding aNewModule using the Iconbar

Adding an Existing Module (Iconbar)
How to add an existing module to the current page using the Iconbar. The module content is shared so if
you update the content on one module the content in the other module also updates.
Important. You cannot add an existing module to the page where it already exists.
Tip: You must be authorized to deploy a module and have the appropriate page editing per-
missions to add a module to a page.
1. Maximize the Control Panel.
2. Go to the Module Insertion section and select Add Existing Module.3. At Page, select the page where the existing module is located.4. At Module, select the module to be added.5. Optional. At Visibility, select from the following options:
l Same As Page: This sets the module as visible to all roles/users who can view this page.
This is the default setting.
l Page Editors Only: The setsmodule as only visible only to the roles/user who can edit this
page. Select this option if you want to add content and configure the module settings before
others can view the module.
6. Optional. At Pane, select the pane you want to insert the module into. The module is added to the
Content Pane by default. The names of other panes will depend upon the skin applied to this page.
If you select a pane other than the Content Pane, the position of the pane is briefly shown on the
page.
7. Optional. At Insert, select the placement of the module from the first drop down list. One or more
of the following options is available, depending on the number of modules located in the selected
pane:
l Top: Select to add the module above all existing modules within the selected pane. Skip to
Step 9.
l Above: Select to add the module above another chosen module within the selected pane.a. At Module, select the module the newmodule will be added above.
l Below: Select to add the module below another module within the selected pane.
a. At Module, select the module the newmodule will be added below.
l Bottom: This adds the module below all existing modules within the selected pane. This is
the default option.

8. Click the AddModule To Page link. For modules that enable you to add content.
Related Topics:
l See "AddingModule Content"
Module Settings
About Module Settings
All modules include a Module Settings page that enables authorized users to modify basic settings related
to the module content (e.g. module title, module header and footer, module start and end dates) and mod-
ule permissions (e.g. which roles or users are able to view and manage the module). This page also con-
trols more advanced settings related to the design of the module (containers, borders, printing) and site
wide module settings.
All modules have a Settings page that can be accessed by selecting Settings from the module actions
menu. The Module Settings page enables authorized users to modify basic module settings related to the
module content (e.g. module title, module header and footer, module start and end dates) and module per-
missions (e.g. which roles are able to view and edit a module). This page also controls more advanced set-
tings related to the design of the module (containers, borders, printing) and site wide module settings.
The page is divided into these tabs:
l Module Settings: Settings relating to the Module content. Module Settings are settings which are
the same on all pages where the Module appears. This section is divided into Basic Settings,
Advanced Settings and Added to Pages.
l Permissions: This section includesmodule permissions where access to view, edit and manage
the module is set. Note: Somemodules have additional permissions to add/edit and manage mod-
ule content.
l Page Settings: Settings specific to this particular occurrence of the module for this page. This sec-
tion is divided into Basic Settings and Advanced Settings.
l Localization Settings: The Localization section only displays if content localization is enabled.
For full details on working with this section, See "About Content Localization"
l Module Specific Settings: Several modules have additional settings which are specific to this
module type. This section is typically named according to the module type. E.g. This section is
named Links Settings on the Linksmodule. Modules which have specific settings include the
Announcements, Documents, Events, FAQ and manymore.

Module Settings
Configuring Advanced Module Settings
How to configure the advanced module settings for the current module. This section allows you to set the
pages this module is displayed on, configure module sharing, set start and end dates for a module and dis-
play a header and footer above and below the module content.
This section allows you to display a module on multiple pages including the Admin pages, or to only on
newly added pages. Module content is shared therefore changesmade on one instance of the module are
reflected on all instances of the module. If you choose to only display the module on new pages, this does-
n't affect the pages where it is already located. Once a module is set to display on all/new pages, if you
make changes to anymodule settings located on the Module Settings tab, then these changes will be
reflected on all copies of the module. However, changes to module settings located on the Page Settings
tab are unique to the module that you have changed.
1. Select Manage > Settings from the module actionsmenu.2. Select theModule Settings tab.3. Expand theAdvanced Settings section.4. At Display Module On All Pages?, select from these options:
l Check the check box to add this module to all pages. Note: Once this setting is updated
you can delete a single instance of a module from any page and all other instances on other
pages will remain and be unaffected. Enabling this setting, reveals two additional fields that
allow you to customize this setting.
a. At Only Display Search Results Once check the check box to display a single
search results for all instances of this module - OR - Uncheck the check box to dis-
play the search results for each instance of this module. For example, if there are
five instances of the module on the site and this field is unchecked, whenever a
search is made, there will be five search results for the same content with each result
going to a different module.
b. At Add To New Pages Only?, check the check box to add this module to each
new pages that is added to the site - OR - Uncheck the check box to add the mod-
ule to both existing and new pages. This is the default setting.
l Uncheck the check box to display this module on this page only. This will remove all other
instances of this module apart from the one you are currently working on. It doesn't matter
which module you choose to enable or disable this feature using.

5. At Is Shareable? select from these options to configure this settings:
l Check the check box to allow this module to be shared. This allows the module to be dis-
played in the "Add Existing Module" list on the Control Panel. For DNN Professional and
Enterprise Editions, this also allowsmodules that support module sharing to be shared with
other sites that belong to the same Site Group. Module Sharing between sites is available
for modules that have been developed to support this feature.
a. At View Only?, check the check box if this module can only be edited via this site
- OR - Uncheck the check box if this module can be edited from other sites that it is
shared with.
l Uncheck the check box if this module to disable module sharing for this module..

6. At Hide Admin Border, select from these options to set the visibility of the "Visible By Admin-
istrators Only" message. The message is displayed to Administrators and SuperUsers on modules
which are only visible to Administrators. This message appears on the page where the module is
located as well as on the Module Settings page for that module. This message is also displayed by
default for anymodules which are added to the Admin pages.
l Check the check box to hide the message. This will hide the message even if the module
is only visible by administrators.
l Uncheck the check box to display the message. This displays the message even if the
module is only visible to members in the Administrator role (which by default includes all
hosts).
7. In theHeader text box, add, edit or delete the header that is displayed above the module content.
Plain text and basic HTML such as headings, italic and bold can be used.
8. In the Footer text box, add, edit or delete the footer that is displayed below the module content.
9. At Start Date, click theCalendar button and select the first day that the module will be visibleon the site. This displays the date you selected along with the default time of 12:00:00 AM. To mod-
ify this default time, click the Time button and select a different time. Modules with a start dateare only visible to Page Editors and Administrators prior to that date, enabling them to create con-

tent in advance. A "Module Effective - [start date]" message is displayed to these users prior to the
start date.
10. At End Date, click theCalendar button and then select the last day that the module will be vis-ible on the site. This displays the date you selected along with the default time of 12:00:00 AM. To
modify this default time, click the Time button and select a different time. When the end dateand time is reached, the module is only visible to Page Editors and Administrators, enabling them
to retain, edit and republish the content as desired. A "Module Expired [end date]" message is dis-
played to these users once the module has expired.

11. Click theUpdate button.
Below are some examples of modules with some of these Advanced Module Settings applied.

Amodulewith a header and footer displayed above andbelow themodule content

TheModuleExpiredmessage that is displayed toAdministrators once themodule has expired.
Related Topics:
l See "Working with the Calendar"
Configuring Basic Module Settings
How to view basic module settings and set the module title and tags. Tags allows site content to be cat-
egorized in a meaningful way in search results.
Important. In order to view the Module Title, the "Display Container?" field must be checked and the con-
tainer applied to the module must include the [TITLE] skin token.
1. Select Manage > Settings from the module actionsmenu.2. Select the Page Settings tab.3. Expand theAdvanced Settings section.

4. At Module Culture, the culture associated with this module is displayed.5. At Module, view the name of the module. This field cannot be edited. E.g. Announcements,
HTML, etc.
6. In theModule Title text box, edit the module title.7. At Tags, click on the drop down list and then check the check box beside the tag you want to
associate with this module. Repeat to select additional tags. Tagging is a way of categorizing con-
tent for more meaningful search results. Note: Tags can be created by users (See "Tagging Page
Content") or editors (See "Creating a Vocabulary").
8. Click theUpdate button.
HTMLmodulewith the title "Home" displayed

Viewing Added To Pages Module Settings
How to view a list of the pages where a module is located. This setting includes a link to view the module
on any of the listed pages.
1. Select Manage > Settings from the module actionsmenu.2. Select theModule Settings tab.3. Expand theAdded To Pages section. This displays a hierarchical list of all pages (apart from the
current page) where this module is located.
4. Optional. Click on the linked [Page Name] to view the module on that page.
TheAddedToPages List
Related Topics:
l See "Configuring AdvancedModule Settings"
Page Settings
Configuring Advanced Page Settings for a Module
How to set the Advanced Page Settings on this module as the default settings for all newmodules. You
can optionally set these settings for all existing modules.
1. Select Manage > Settings from the module actionsmenu.2. Select the Page Settings tab.3. Expand theAdvanced Settings section.4. At Set As Default Settings?, check the check box to use these page settings for all newmod-
ules.
5. Optional. At Apply To All Modules?, check the check box to apply these page settings to all
existing modules.
6. At Move To Page, select the page name where the module will be moved to from the drop down
list.

7. Click theUpdate button.
Related Topics:
l See "Drag and DropModule"
l See "Module Actions Menu"
Configuring Basic Page Settings for Modules
How to set the Module Settings in the Page Settings - Basic Settings section of the Module Settings
page.
Note: Somemodule containersmay not include the skin token required to view the icon, module
title, Minimize/Maximize button, Print button or Syndicate button.
Important. TheDisplay Container? setting must be checked to view the Icon, Module Title, Expand/Col-
lapse, Print and Syndicate settings.
The below diagram shows the settings which you can set in this section.
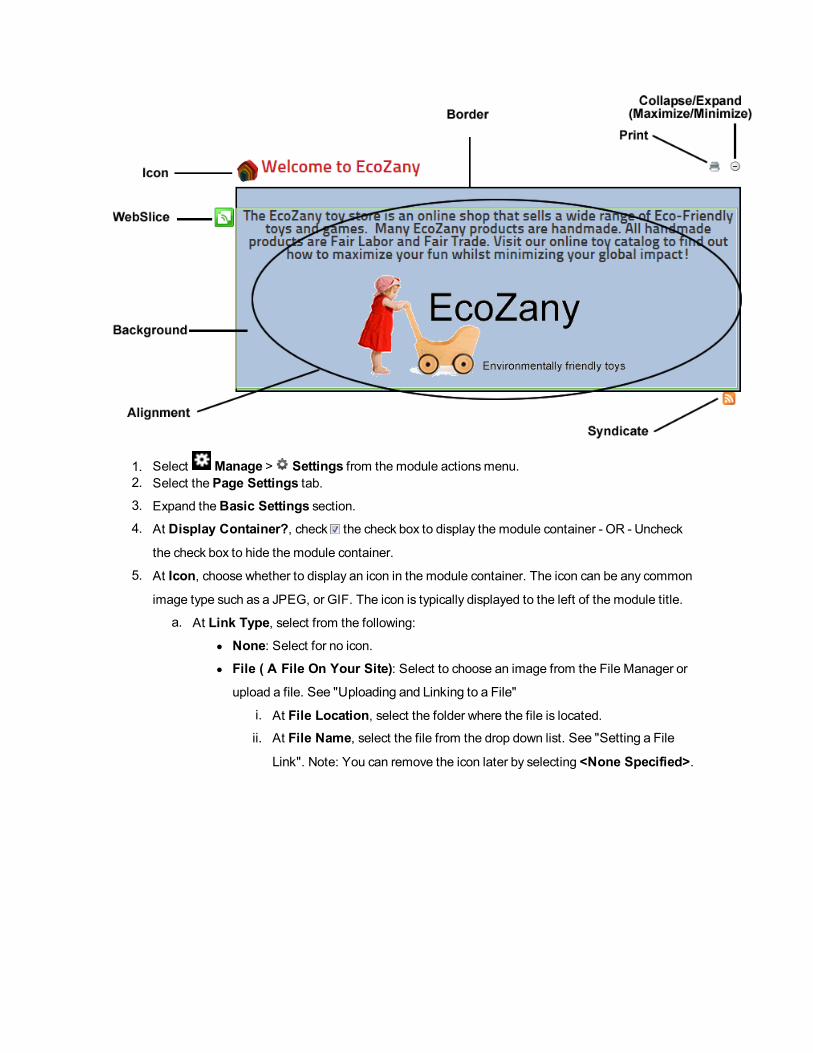
1. Select Manage > Settings from the module actionsmenu.2. Select the Page Settings tab.3. Expand theBasic Settings section.4. At Display Container?, check the check box to display the module container - OR - Uncheck
the check box to hide the module container.
5. At Icon, choose whether to display an icon in the module container. The icon can be any common
image type such as a JPEG, or GIF. The icon is typically displayed to the left of the module title.
a. At Link Type, select from the following:
l None: Select for no icon.l File ( A File On Your Site): Select to choose an image from the File Manager or
upload a file. See "Uploading and Linking to a File"
i. At File Location, select the folder where the file is located.ii. At File Name, select the file from the drop down list. See "Setting a File
Link". Note: You can remove the icon later by selecting <None Specified>.
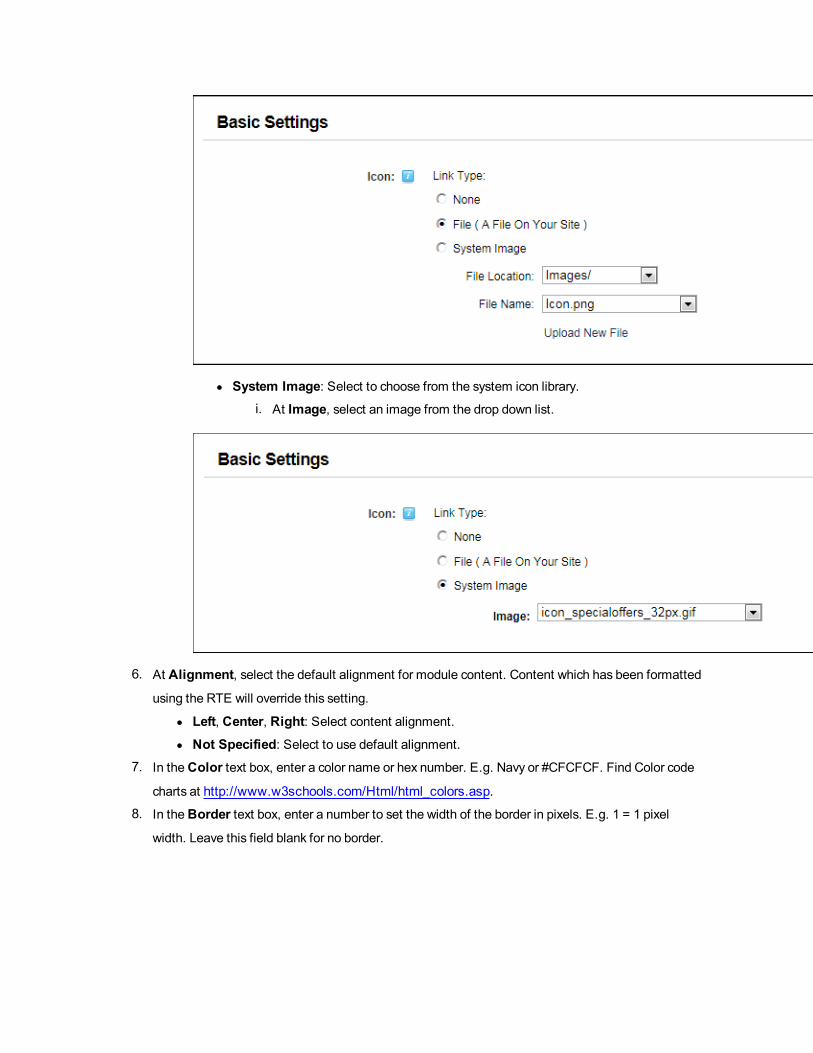
l System Image: Select to choose from the system icon library.
i. At Image, select an image from the drop down list.
6. At Alignment, select the default alignment for module content. Content which has been formatted
using the RTE will override this setting.
l Left, Center, Right: Select content alignment.l Not Specified: Select to use default alignment.
7. In theColor text box, enter a color name or hex number. E.g. Navy or #CFCFCF. Find Color code
charts at http://www.w3schools.com/Html/html_colors.asp.
8. In theBorder text box, enter a number to set the width of the border in pixels. E.g. 1 = 1 pixel
width. Leave this field blank for no border.

9. At Collapse/Expand, select from the following options to set the visibility of module content.
l Maximized: Select to display the module content on the page. TheMinimize button is
displayed enabling users to minimize the content.
l Minimized: Select to hide the module content. The module title, header and footer are still
visible. TheMaximize button is displayed enabling users to maximize the content.
l None: Select to displaymodule content and remove theMaximize / Minimize but-
ton.
10. At Display Container?, check the check box to display the module container - OR - Uncheck
the check box to hide the module container including the icon, module title, Minimize/Maximize but-
ton, Print button or Syndicate button.
11. At Allow Print?, select from the following options to set the visibility of the Print button which
enables users to print the module content. The Print icon displays in the menu and on the module
container.
l Check the check box to display the Print button and allow printing.
l Uncheck the check box to disable.
12. At Allow Syndicate?, select from the following options to enable or disable the Syndicate but-
ton. Syndication enables users to create an XML syndication of module content.
l Check the check box to allow syndication and display the Syndicate button.
l Uncheck the check box to disable syndication.
13. At Is a WebSlice?, optionally set this module as aWebslice.
l Check the check box to enable WebSlice and set any of these optional settings:
a. Optional. In theWeb Slice Title text box, enter a title for theWeb Slice - OR -
Leave blank to use the module title.

b. Optional. AtWeb Slice Expires: Enter a date when theWeb Slice will expire - OR
- Leave blank to use the End date . See "Working with the Calendar"
c. Optional. In theWeb Slice TTL text box, enter the Time to Live (TTL) for this web
slice in minutes - OR - Leave blank to use the default to the cache time (converted as
minutes).
l Uncheck the check to disable WebSlice.
14. At Module Container, select the name of the module container you want to use on this module
from the drop down list.
a. Optional. Click the Preview link to view the module with this container applied in a new
browser window.
15. Click theUpdate button.
Tip: System icons associated with the Icon field are stored in the Images folder of your Dot-
NetNuke Installation.
Configuring Cache Settings for a Module
How to set the provider used for cached files and set the period before the cache in DNN refreshes.
1. Select Manage > Settings from the module actionsmenu.2. Select the Page Settings tab.3. Go to theCache Settings section.
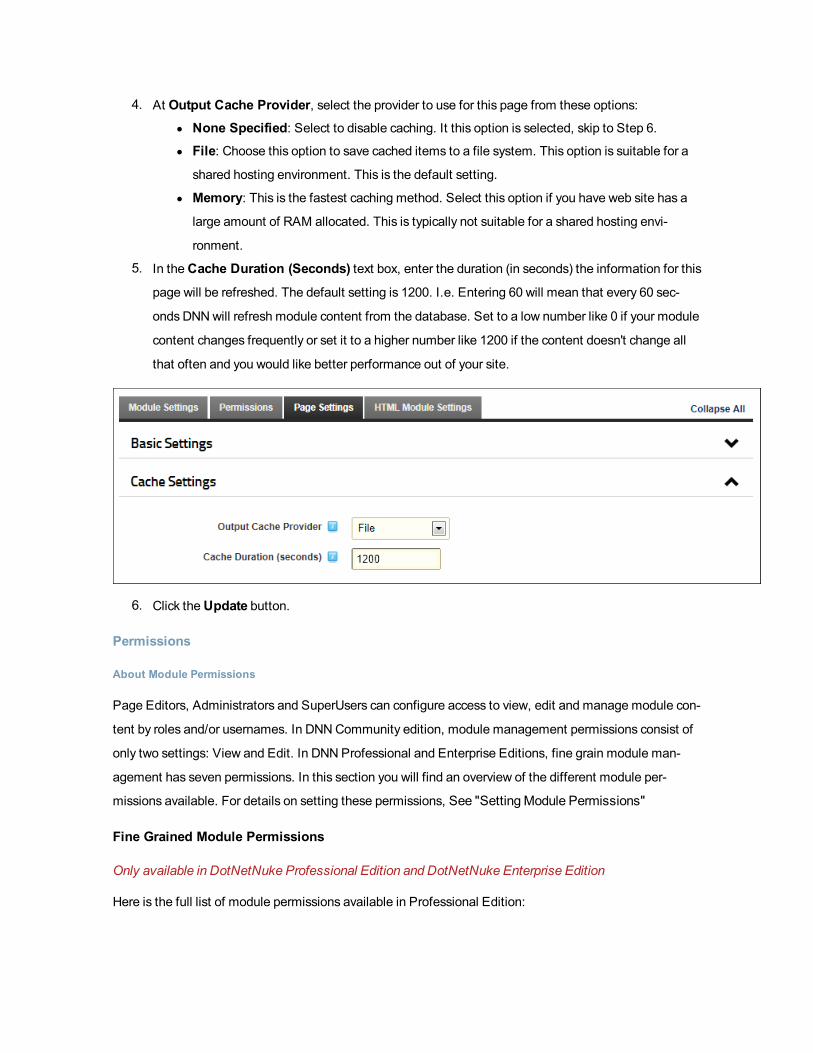
4. At Output Cache Provider, select the provider to use for this page from these options:
l None Specified: Select to disable caching. It this option is selected, skip to Step 6.l File: Choose this option to save cached items to a file system. This option is suitable for a
shared hosting environment. This is the default setting.
l Memory: This is the fastest caching method. Select this option if you have web site has a
large amount of RAM allocated. This is typically not suitable for a shared hosting envi-
ronment.
5. In theCache Duration (Seconds) text box, enter the duration (in seconds) the information for this
page will be refreshed. The default setting is 1200. I.e. Entering 60 will mean that every 60 sec-
onds DNNwill refresh module content from the database. Set to a low number like 0 if your module
content changes frequently or set it to a higher number like 1200 if the content doesn't change all
that often and you would like better performance out of your site.
6. Click theUpdate button.
Permissions
About Module Permissions
Page Editors, Administrators and SuperUsers can configure access to view, edit and manage module con-
tent by roles and/or usernames. In DNNCommunity edition, module management permissions consist of
only two settings: View and Edit. In DNNProfessional and Enterprise Editions, fine grain module man-
agement has seven permissions. In this section you will find an overview of the different module per-
missions available. For details on setting these permissions, See "SettingModule Permissions"
Fine Grained Module Permissions
Only available in DotNetNuke Professional Edition and DotNetNuke Enterprise Edition
Here is the full list of module permissions available in Professional Edition:

l View: Users can view the module on the page.
l Edit Content: Users can edit the module content.l Delete: Users can delete the module through the module actionsmenu.l Export: Users can export the module content using the module actionsmenu.l Import: Users can import the module content using the module actionsmenu.l Manage Settings: Users can change access the module settings page for this module and man-
age all setting excluding permissions.
l Full Control: Users have full administrator rights for the module.

ModulePermissions inDNNProfessionalEdition
Community Edition Module Permissions:
The following module permissions available in DNNCommunity Edition:
l View Module: Users can view the module on the page.
l Edit Module: Users can add and edit the module content.

ModulePermissions inDNNCommunity Edition
Setting Module Permissions
How to set permissions to view and edit a module. Permission can be granted or denied for a role or for an
individual user. Additional permission options are available on somemodules such as the Events and
Feedbackmodules.
In addition to these two basic permissions, finer grain permissions for editing modules (Delete, Import,
Export, Manage Settings, and Full Control) are also available. Only available in DotNetNuke Pro-
fessional Edition and DotNetNuke Enterprise Edition
This tutorial details how to set See "SettingModule Permissions for DNN Community Edition", See "Set-
tingModule Permissions for DNN Professional and Enterprise Edition" and See "Setting Permissions
for SharedModules"

Setting Module Permissions for DNN Community Edition
1. Select Manage > Settings from the module actionsmenu.2. Select the Permissions tab.3. Optional. In theUsername text box, enter the username of the user that you want to grant or
denymodule permissions to and then click the Add link. Repeat this step to add additional user-
names.
4. Optional. At Filter By Group, select from the following options:
l < All Roles >: Select to view all roles (both global and group roles) in one single list.
l < Global Roles >: Select to view all roles which are not associated with a Role Group. This
includes Administrators, All Users, Registered Users, and Unauthenticated Users.
l [Role Name]: Select the name of a Role Group to view the roles within that group.
5. Optional. At Inherit View permissions from Page, select from these options:
l Check the check box if the users who are authorized to view the page this module is
located on are always authorized to view this module. This displays the Security Locked
image in the ViewModule column indicating that the view security is 'locked'. Skip to step 7.
l Uncheck the check box to set different permissions for viewing this module than set for
the page it is located on. If you choose to uncheck this option, the check boxes at ViewMod-
ule will become available.
6. In the View Module column, click on the check box beside a role/username repeatedly until the cor-
rect permission is displayed. The following options are available:
l Not Specified: Permissions are not specified. Users cannot view the module unless
they belong to another role/username that has been granted permission.
l Permission Granted: Users can view the module.
l Permission Denied: Users cannot view the module.
7. In the Edit Module column, click on the check box beside a role/username repeatedly until the cor-
rect permission is displayed. The following options are available:
l Not Specified: Permissions are not specified. Users cannot edit content unless they
belong to another role/username that has been granted permissions.
l Permission Granted: Users can edit content.l Permission Denied: Users cannot edit content. If these users have been granted per-
mission to edit the content under another role/username, this setting will override those per-
missions and prevent them editing this module.
8. Click theUpdate button.

Tip: When setting Permissions, you can change the selection at Filter ByGroup and set per-
missions for any of the related roles before updating.
For Example: In the below screen capture, permissions to view the module are inherited from the
page, permission to edit the module has been granted to the Marketing and Translator roles, how-
ever the user Bree Brueton (username Brueton) is denied access to edit the module.
SettingModulePermissions
Setting Module Permissions for DNN Professional and Enterprise Edition
1. Select Manage > Settings from the module actionsmenu.2. Select the Permissions tab.

3. Optional. In theUsername text box, enter the username of the user that you want to grant or
denymodule permissions to and then click the Add link. Repeat this step to add additional user-
names.
4. Optional. At Filter By Group, select from the following options:
5. < All Roles >: Select to view all roles (both global and group roles) in one single list.
6. < Global Roles >: Select to view all roles which are not associated with a Role Group. This
includes Administrators, All Users, Registered Users, and Unauthenticated Users.
7. [Role Name]: Select the name of a Role Group to view the roles within that group.
8. Optional. At Inherit View permissions from Page, select from these options:
l Check the check box if the users who are authorized to view the page this module is
located on are always authorized to view this module. This displays the Security Locked
image in the View column indicating that the view security is 'locked'. Skip to Step 10.
l Uncheck the check box to set different permissions for viewing this module than set for
the page it is located on. If you choose to uncheck this option, the check boxes at ViewMod-
ule will become available.
9. In the View column, click on the check box beside a role/username repeatedly until the correct per-
mission is displayed. The following options are available:
l Not Specified: Permissions are not specified. Users cannot view the module unless
they belong to another role/username which has been granted permission, or are granted
Full Control permissions. Note: Users with Edit Module permissions in DNNCommunity Edi-
tion cannot view the module.
l Permission Granted: Users can view the module.
l Permission Denied: Users cannot view the module, unless Full Control is granted.
10. In the Edit Content column, click on the check box beside a role/username repeatedly until the cor-
rect permission is displayed. The following options are available:
l Not Specified: Permissions are not specified. Users cannot edit content unless they
belong to another role/username which has been granted permission, or are granted Full
Control permissions.
l Permission Granted: Users can edit content.l Permission Denied: Users cannot edit content, unless Full Control is granted.
9. In theDelete column, click on the check box beside a role/username repeatedly until the correct
permission is displayed. The following options are available:
l Not Specified: Permissions are not specified. Users cannot delete the module unless
they belong to another role/username which has been granted permission, or are granted
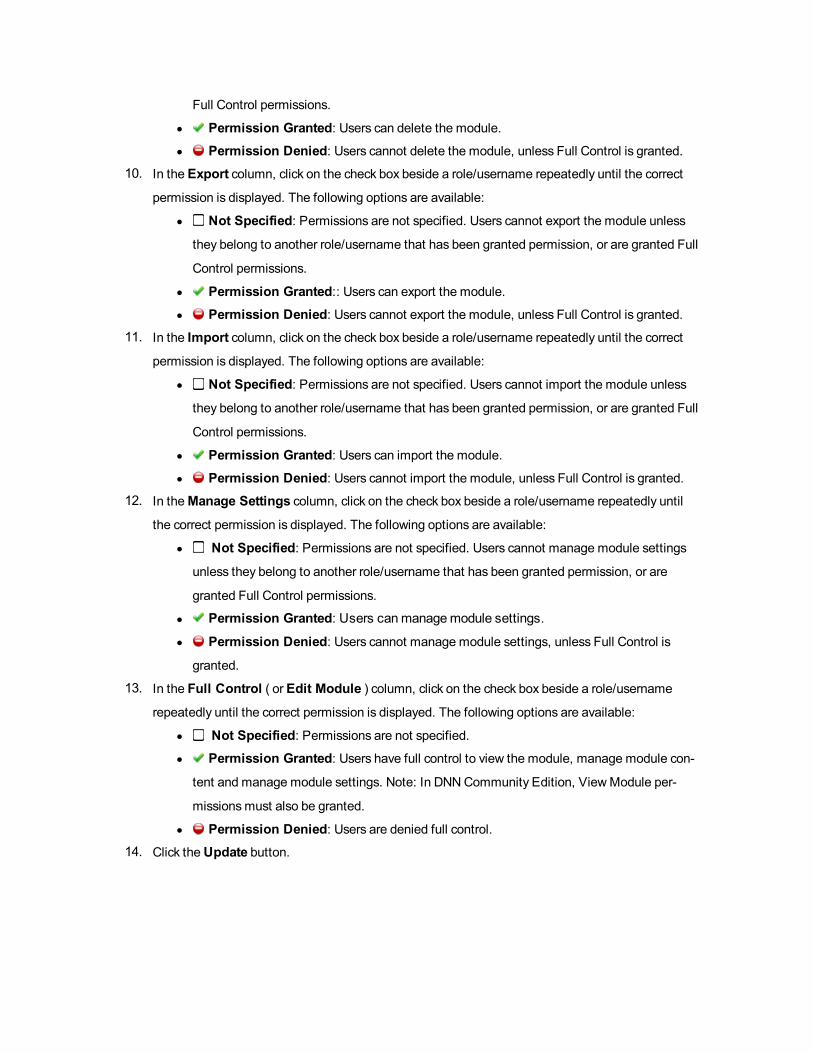
Full Control permissions.
l Permission Granted: Users can delete the module.l Permission Denied: Users cannot delete the module, unless Full Control is granted.
10. In the Export column, click on the check box beside a role/username repeatedly until the correct
permission is displayed. The following options are available:
l Not Specified: Permissions are not specified. Users cannot export the module unless
they belong to another role/username that has been granted permission, or are granted Full
Control permissions.
l Permission Granted:: Users can export the module.l Permission Denied: Users cannot export the module, unless Full Control is granted.
11. In the Import column, click on the check box beside a role/username repeatedly until the correct
permission is displayed. The following options are available:
l Not Specified: Permissions are not specified. Users cannot import the module unless
they belong to another role/username that has been granted permission, or are granted Full
Control permissions.
l Permission Granted: Users can import the module.l Permission Denied: Users cannot import the module, unless Full Control is granted.
12. In theManage Settings column, click on the check box beside a role/username repeatedly until
the correct permission is displayed. The following options are available:
l Not Specified: Permissions are not specified. Users cannot manage module settings
unless they belong to another role/username that has been granted permission, or are
granted Full Control permissions.
l Permission Granted: Users canmanagemodule settings.l Permission Denied: Users cannot manage module settings, unless Full Control is
granted.
13. In the Full Control ( or Edit Module ) column, click on the check box beside a role/username
repeatedly until the correct permission is displayed. The following options are available:
l Not Specified: Permissions are not specified.l Permission Granted: Users have full control to view the module, manage module con-
tent and manage module settings. Note: In DNNCommunity Edition, ViewModule per-
missionsmust also be granted.
l Permission Denied: Users are denied full control.14. Click theUpdate button.

Tip: When setting Permissions, you can change the selection at Filter ByGroup and set per-
missions for any of the related roles before updating.
For Example: In the below screen capture, permissions to view the module are inherited from the
page; permission to Edit Content has been granted to Registered Users; users in the Marketing
and Translator roles can Edit, Import and Export content, however they cannot Delete content; the
user Cherrie Bendry is able to Edit and Import content; and finally Chief Editors have been granted
Full Control of the module.

Setting Permissions for Shared Modules
How to grant module viewing permissions for modules that have been shared from another site within the
same Site Group.

1. Select Settings > Permissions from the module action menu.
2. Optional. At Filter By Group, select from the following options:
l < All Roles >: Select to view all roles (both global and group roles) in one single list.
l < Global Roles >: Select to view all roles which are not associated with a Role Group. This
includes Administrators, All Users, Registered Users, and Unauthenticated Users.
l [Role Name]: Select the name of a Role Group to view the roles within that group.
3. In the View column, click on the check box beside a role/username repeatedly until the correct per-
mission is displayed. The following options are available:
l Not Specified: Permissions to view this module are not specified. Users cannot view the
module unless they belong to another role/username that has been granted permission.
l Permission Granted: Users within this role can view the module.
l Permission Denied: Users within this role will be denied access to view the module.
This will override any other permissions they have been granted under other roles.
4. In theUsername text box, enter the username of a user and then click the Add link. Repeat this
step to add additional usernames.
5. Click theUpdate button.
For Example: The below screen capture shows a shared module that has been set to only provide
view permissions. Permission to view the module has been granted to users in the Chief Editor and
Marketing roles, as well as the user Cherrie Bendry.

Related Topics:
l See "Understanding Role Based Access"
Installed Modules
Account Login
About the Account Login Module
The Account Login module enables registered users to log in to a site using their login credentials. If reg-
istration is enabled on the site aRegister link enables visitors to join as registered user of the site. The
module can be enabled to help with forgotten passwords.

Important. For information on logging in and logging out using the Account Login module, See "Logging
into a Site" and other tutorials in this section.
The Account Login module can be deployed to any page and is automatically displayed on the default
User Log In page.
Installation Note: This module is typically installed on the site.
Module Version: The version number is always the same as the DNN framework version number.
TheAccount Loginmodule enabling login
Skin Token: The [LOGIN] skin token displays the Login link that opens the User Log In page. The login
link is located in the top right corner of the default DNN skin.
TheLogin skin token
Related Topics:
l See "Logging into a Site"
l See "Adding/Editing the LoginMessage"
l See "Editing the Password Reminder Email"
l See "Enabling a Custom Login Page"
l See "Restoring the Default Login Page"

Administrators
Hiding Account Login from Authenticated Users
You can optionally set an Account Login module as only visible to unauthenticated users. This means the
module will 'hide' once a user logs into the site. This setting is unique to the module and won't affect
the Account Login module associated with the default User Log In page.
1. Navigate to the requiredAccount Loginmodule.
2. Select Manage > Settings from the module actionsmenu.3. At Permissions, uncheck the Inherit View permissions from Page check box.4. At Permissions, check the View Module check box forUnauthenticated Users and ensure
all other View Module check boxes are unchecked.5. Click theUpdate button.
Troubleshooting: Cannot Access Login Page (Friendly URL's Off)
If the Login Page setting on your site has been configured incorrectly you not be able to access the login
page. This can happen if:
l The page that has set as a custom Login page doesn't have a Login module on it.
l The Login page or the Account Login module on that page is set as not visible to All Users.
Here's how you can display the default User Log In page (for sites with friendly URL's disabled).
1. Navigate to any on your site and in the address bar of theWeb browser, add login.aspx to the
domain name. E.g. http://www.awesomecycles.biz/login.aspx
Troubleshooting: Cannot Access Login Page (Friendly URL's On)
If a Login page is set (see Admin > Site Settings) on your site it is possible to incorrectly configure the site
so that you cannot access the login page. This may happen if:
l You set a Login page but do not add a Login module to the page and then logout of the site.
l You set a Login page but accidentally delete the page and logout of the site.
To display the login page where friendly URL's have been enabled:
1. Navigate to any other page on the site and replace Default.aspx with /ctl/Login/Default.aspx in the
URL.
E.g. If the URL is http://www.domain.com/Home/tabid/36/Default.aspx, the login page will be http://ww-
w.domain.com/Home/tabid/36/ctl/Login/Default.aspx
Troubleshooting: Cannot Access Login Page
If the Login Page setting on your site has been configured incorrectly you not be able to access the login
page. This can happen if:
l The page that has set as a custom Login page doesn't have a Login module on it.
l The Login page or the Account Login module on that page is set as not visible to All Users.
Here's how you can display the default User Log In page (for sites with friendly URL's disabled).
1. Navigate to any on your site and in the address bar of theWeb browser, add login.aspx to the
domain name. E.g. http://www.awesomecycles.biz/login.aspx
Add New User
About the Add New User Module
The Add NewUser module enables authorized users to create new user accounts. Once the user account
is created, it can be managed using the User Accountsmodule. See "About the User Accounts Module"
Note: The Add NewUser module forms part of the Users & Rolesmodule package. This means
that you must select the module titled "Users & Roles" to add this module to a page.
Module Version: The version number is always the same as the DNN framework version number.

TheAddNewUser Module
Adding a New User
How to add a new user to a DotNetNuke site using the Add NewUser module. Each time a new user is
added a new user record is created in the User Accountsmodule.
Permissions. Administrators and SuperUsers only.
Note 1: Usernames are unique and cannot be changed. If you attempt to save a user account using an
existing username the following message is displayed: "A User Already Exists For the Username

Specified. Please Register Again Using A Different Username." In this scenario you should change the
username and retry saving the new account.
Note 2: The site may be set to only allow unique passwords. If this is the case, you will be asked to choose
a new password, or opt for a random password.
Tip. The Add NewUser module should be added to any custom Registration page that you create.
See "Configuring a Custom Registration Form"
1. Go to an Add NewUser module.
2. In theUser Name text box, enter a user name. Notes: Only letters and numbers can be entered.3. In the First Name text box, enter the person's first name.4. In the Last Name text box, enter the person's last name.5. In theDisplay Name text box, enter the name to be displayed to other site members. Note: This
field may not be displayed. See "Managing Profile Settings"
6. In the Email Address text box, enter a valid email address.7. At Authorize, select from the following options:
l Check the check box if the user is authorized to access the site. This will automatically pro-
vide access to the Registered User role and any roles set for Auto Assignment. This is the
default setting.
l Uncheck the check box if the new user is not yet authorized to access areas of the site
that are restricted to Registered Users. In this case an Administrator must authorize the
account to grant access to the Registered User role.
8. At Notify, select from the following options:
l Check the check box to send a notification email to the user's email address. This is the
default setting.
l Uncheck the check box if you don't wish to send notification. If the account is not author-
ized, you may like to send the notification at a later time.

9. To create the user's password, select from these options:
1. To generate a random password, check theRandom Password check box.
1. To create a password manually:
a. Uncheck theRandom Password check box.b. In the Password text box, enter a password.
c. In theConfirm Password text box, re-enter the same password.

10. Click the AddNew User link. The newly added user account can now be viewed and modified using
the User Accountsmodule.
Thenewly addeduser account displayed in theUser Accounts module
Banners
About the Banners Module
The Bannersmodule displays vendor banner advertising. Banners can be plain text, HTML, a static
image, an animated image or they can execute a script such as JavaScript. You can set the number of
banners to be displayed and modify the layout. If there are more banners available than is set to display in
the module one time, then different banners are displayed each time the page is visited or refreshed.
Installation Note: This module is installed during a typical DNN installation.
Module Version: The version number is always the same as the DNN framework version number.
Related Topics:
l See "About the Admin Vendors Module"
l See "Enabling/Disabling Banner Advertising"
About Banner Types
An overview of the different types of banners that can be associated with a vendor account and displayed
using the bannersmodule. Five sizes of image banners are provided: Banner, MicroButton, Button, Block
and Skyscraper. The Banner Type 'Banner' can be displayed either using a Bannersmodule, or by adding
the [BANNER] skin object to the skin applied to the site or to a page of the site. The [BANNER] skin object
can be enabled or disabled on the Admin > Site Settings page and is a site wide setting. This can be set to
either Site or Host.
Below are examples of the industry standard sizes for banner images. These sizes are recommendations
only.
Banner: 468 x 60 pixel
The banner type called "Banner" can be displayed either using a Bannersmodule, or it can display where
ever the [BANNER] skin object is included in the skin applied to a page. See "Enabling/Disabling Banner
Advertising"

Micro Button: 120 x 60 pixels
Button: 120 x 90 pixels
Block:125 x 125 pixels
Skyscraper: 120 x 600 pixels

Script Banner: Script type banners can contain java-script which is executed when the banner is shown
on the site.
Text Banner: Text banners can be either plain text or HTML. Stylesheet styles are applied.
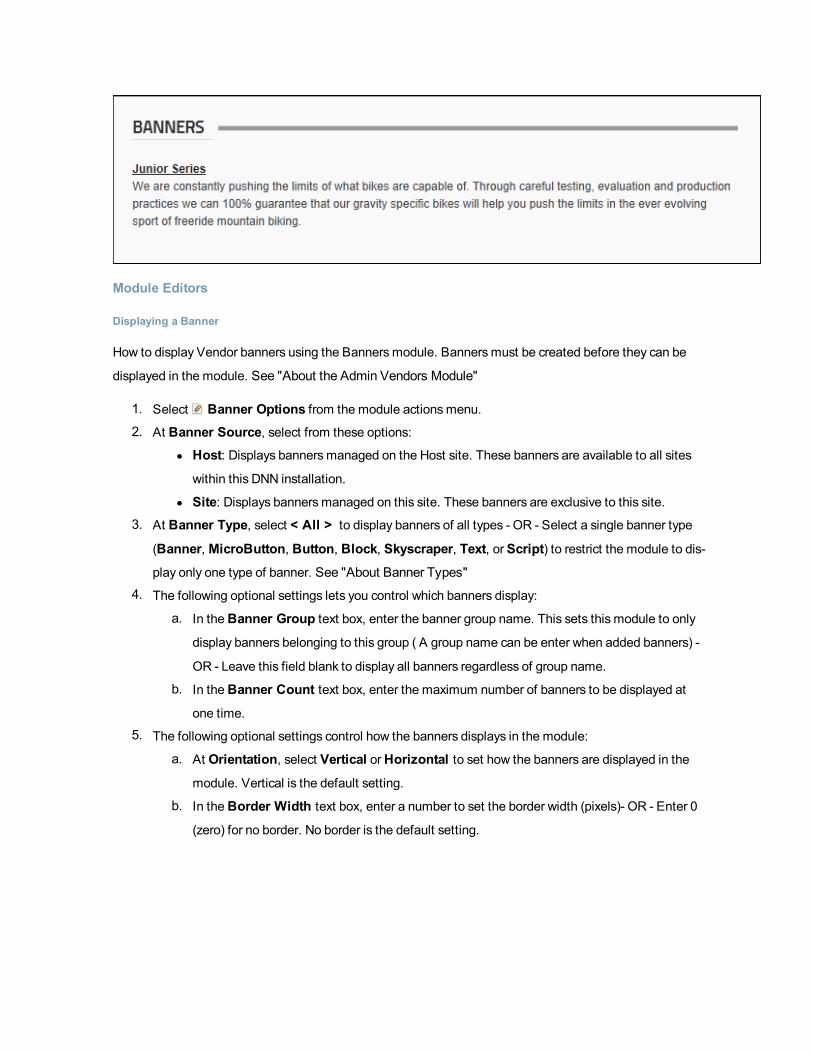
Module Editors
Displaying a Banner
How to display Vendor banners using the Bannersmodule. Bannersmust be created before they can be
displayed in the module. See "About the Admin Vendors Module"
1. Select Banner Options from the module actionsmenu.
2. At Banner Source, select from these options:
l Host: Displays bannersmanaged on the Host site. These banners are available to all sites
within this DNN installation.
l Site: Displays bannersmanaged on this site. These banners are exclusive to this site.3. At Banner Type, select < All > to display banners of all types - OR - Select a single banner type
(Banner, MicroButton, Button, Block, Skyscraper, Text, or Script) to restrict the module to dis-
play only one type of banner. See "About Banner Types"4. The following optional settings lets you control which banners display:
a. In theBanner Group text box, enter the banner group name. This sets this module to only
display banners belonging to this group ( A group name can be enter when added banners) -
OR - Leave this field blank to display all banners regardless of group name.
b. In theBanner Count text box, enter the maximum number of banners to be displayed at
one time.
5. The following optional settings control how the banners displays in the module:
a. At Orientation, select Vertical orHorizontal to set how the banners are displayed in the
module. Vertical is the default setting.
b. In theBorder Width text box, enter a number to set the border width (pixels)- OR - Enter 0
(zero) for no border. No border is the default setting.

c. In theBorder Color text box, enter a color for the border. E.g. DarkOrange. BorderWidth
must be set to enable this setting. See Reference > Color Codes and Names for more
details. Note: A BorderWidth must be set for this field to work.
d. In theCell Padding text box, enter a number to set the space between banners and the
border. BorderWidth must be set to enable this setting.
e. In theRow Height text box, enter a number to set the height for each banner cell (pixels).f. In theColumn Width text box, enter the pixel width for each banner cell.
6. In theBanner Click Through URL text box, enter an redirect page which applies to all banners in
this module.
7. Click theUpdate button.
Displaying Banners Horizontally
How to set the Bannersmodule to display banners horizontally across the page.
1. Select Banner Options from the module actionsmenu.
2. At Orientation, select Horizontal.3. Optional. In theColumn Width text box, enter a number to set the width of each column cell. If
this setting is left empty the bannersmay not align evenly across the module.
4. Click theUpdate button.
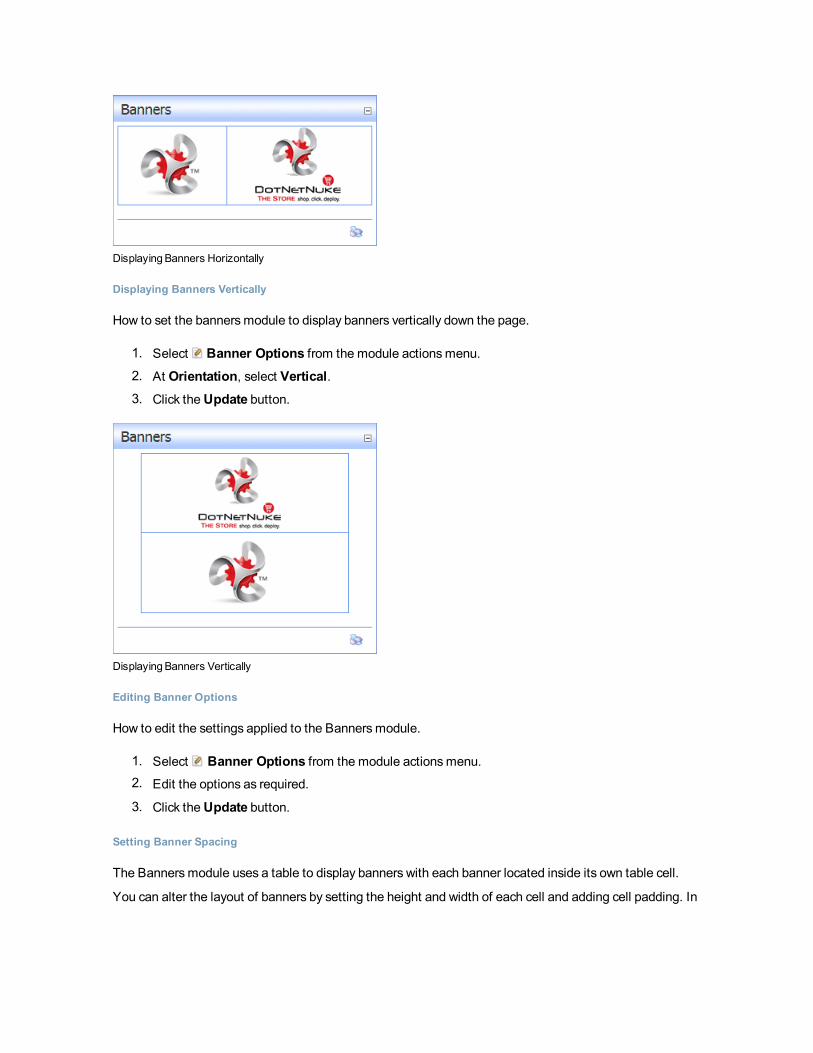
DisplayingBanners Horizontally
Displaying Banners Vertically
How to set the bannersmodule to display banners vertically down the page.
1. Select Banner Options from the module actionsmenu.
2. At Orientation, select Vertical.3. Click theUpdate button.
DisplayingBanners Vertically
Editing Banner Options
How to edit the settings applied to the Bannersmodule.
1. Select Banner Options from the module actionsmenu.2. Edit the options as required.
3. Click theUpdate button.
Setting Banner Spacing
The Bannersmodule uses a table to display banners with each banner located inside its own table cell.
You can alter the layout of banners by setting the height and width of each cell and adding cell padding. In

this tutorial each cell is set to a height and width of 300 pixels. Table cell are not visible by default, how-
ever a cornflower blue border is also set in this tutorial for the purpose of showing the cell size.
Here's how to set the width and height of table cells on the Bannersmodule:
1. Select Banner Options from the module actionsmenu.
2. In theCell Padding text box, enter the pixel height of the row. The default value is 4.3. In theRow Height text box, enter the height for each banner cell in pixels.4. In theColumn Width text box, enter the width for each banner cell in pixels.
5. Click theUpdate button.

SettingBanner Spacing
Setting the Banner Border
How to set the width and color of the border around each banner that is displayed in a bannersmodule.
1. Select Banner Options from the module actionsmenu.
2. At Border Width, enter the pixel width of the border. E.g. 33. At Border Color, enter a hex number (#6495ED) or color code (CornflowerBlue) to set the color of
the border.
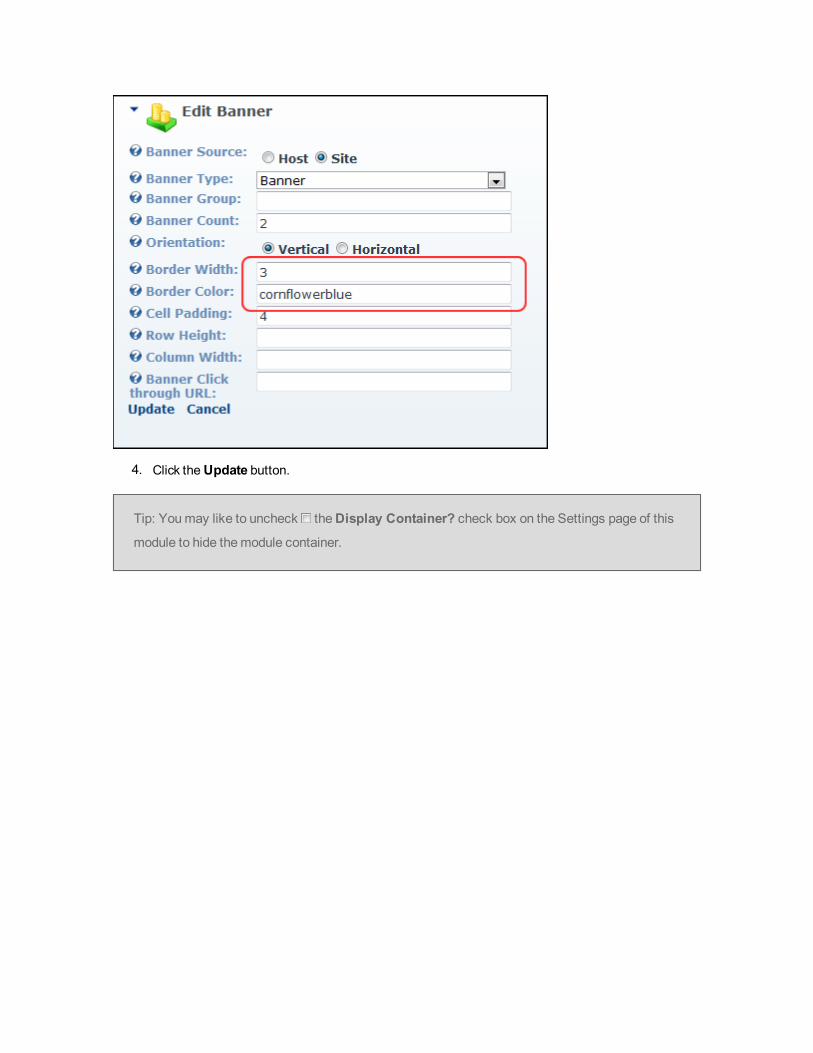
4. Click theUpdate button.
Tip: Youmay like to uncheck theDisplay Container? check box on the Settings page of this
module to hide themodule container.

TheBanners modulewithBorders displayed
Troubleshooting: Image Not Displaying
Depending upon the caching set, an image may not display in the Bannersmodule if its properties are set
as hidden.
1. Go to a File Manager module - OR - Navigate to Admin > File Manager.2. Locate the required file.
3. Click theRename File button beside the file to be edited.
4. Uncheck theH: check box to remove the hidden property from the file.
5. Click the Save Changes button to save your changes.

6. Return to the module to see if the image is displaying. You may need to Refresh (Hold down the
Shift key and strike the F5 key) the page to see the changes.
Troubleshooting: ImageNot Displaying inHTMLModule
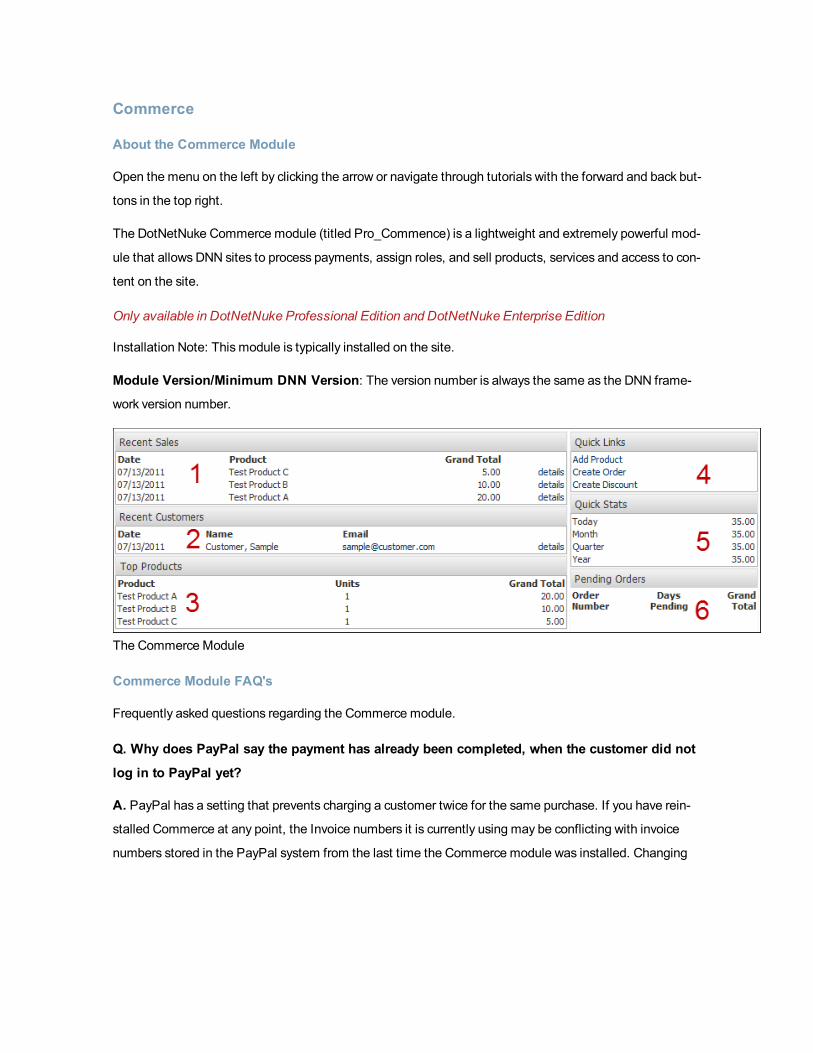
Commerce
About the Commerce Module
Open the menu on the left by clicking the arrow or navigate through tutorials with the forward and back but-
tons in the top right.
The DotNetNuke Commerce module (titled Pro_Commence) is a lightweight and extremely powerful mod-
ule that allows DNN sites to process payments, assign roles, and sell products, services and access to con-
tent on the site.
Only available in DotNetNuke Professional Edition and DotNetNuke Enterprise Edition
Installation Note: This module is typically installed on the site.
Module Version/Minimum DNN Version: The version number is always the same as the DNN frame-
work version number.
The Commerce Module
Commerce Module FAQ's
Frequently asked questions regarding the Commerce module.
Q. Why does PayPal say the payment has already been completed, when the customer did not
log in to PayPal yet?
A. PayPal has a setting that prevents charging a customer twice for the same purchase. If you have rein-
stalled Commerce at any point, the Invoice numbers it is currently using may be conflicting with invoice
numbers stored in the PayPal system from the last time the Commerce module was installed. Changing

the Order Number to a value higher than any previously used will avoid this issue. This setting is found on
the General tab of the Options & Settings page in the control panel.
Q. How do I create a site specific list for the List type product property?
A. To create a site specific list, you may need to download an additional module. One such module is avail-
able here: http://portallists.codeplex.com
Q. How do I select a different Credit Card Payment Provider?
A. This information will be available in theWiki on www.dotnetnuke.com.
Q. How do I create a PayPal test account?
A. Complete the below tutorial:
1. Navigate to https://developer.paypal.com/
2. Click the orange Sign Up Now button.
3. Complete the required fields. You should use a valid email address, but not one associated with a
live PayPal account. Click Agree and Submit when finished.
4. PayPal will send an email to you. Locate the email and click the link to verify your email address.
5. Login with the new account.
6. Click Test Accounts.
7. Click New Test Account: Preconfigured

8. Set the Account Type to Seller. The email address is only used in the sandbox test area, so
choose something you will remember. The password will probably change when you reset the test
account later, so write this down. Add a bank account and a credit card, to make sure the account is
"verified".

9. ClickCreate Account. After the system finishes creating the account, click Preconfigured again.10. This time you will configure the Buyer account. The email address should be different, and the
account balance should not be zero.

11. You should now see the two accounts listed. If at any point you need to create a new password, or
change the account balance, click the Reset link next to the appropriate account.
12. Copy the email address for the buyer account. It is likely that PayPal added a bunch of numbers
and _biz to the address.
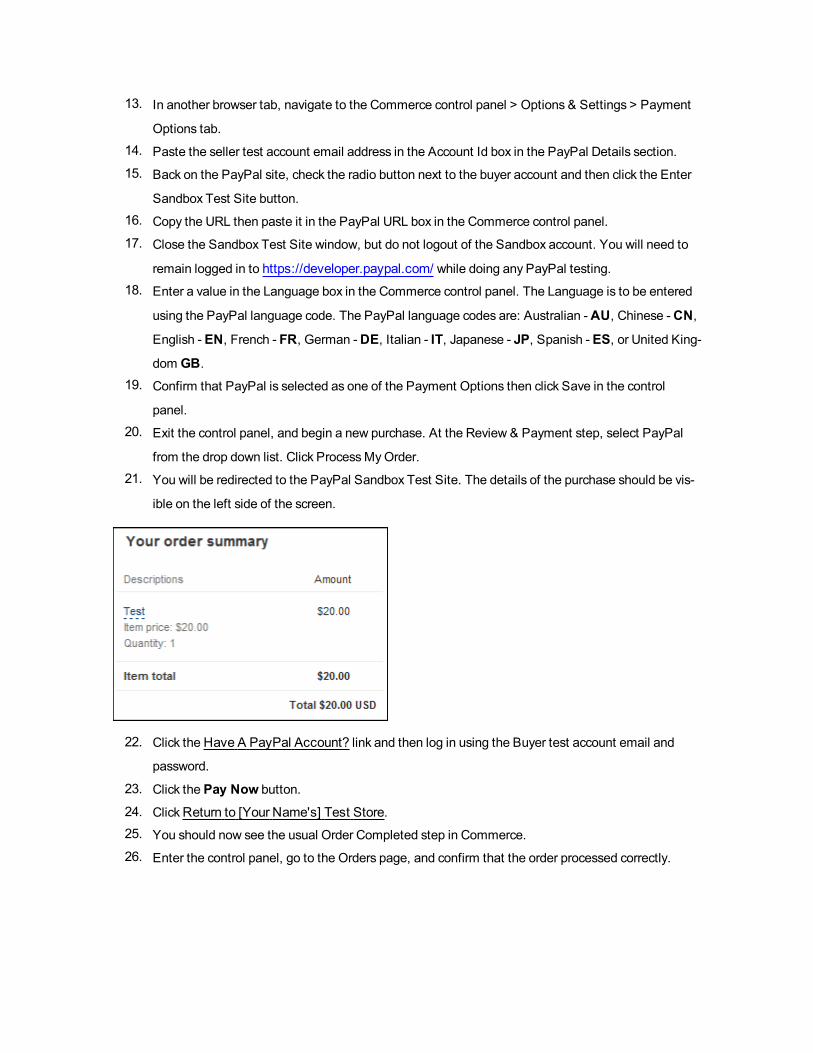
13. In another browser tab, navigate to the Commerce control panel > Options & Settings > Payment
Options tab.
14. Paste the seller test account email address in the Account Id box in the PayPal Details section.
15. Back on the PayPal site, check the radio button next to the buyer account and then click the Enter
Sandbox Test Site button.
16. Copy the URL then paste it in the PayPal URL box in the Commerce control panel.
17. Close the Sandbox Test Site window, but do not logout of the Sandbox account. You will need to
remain logged in to https://developer.paypal.com/ while doing any PayPal testing.18. Enter a value in the Language box in the Commerce control panel. The Language is to be entered
using the PayPal language code. The PayPal language codes are: Australian -AU, Chinese -CN,
English - EN, French - FR, German -DE, Italian - IT, Japanese - JP, Spanish - ES, or United King-
dom GB.19. Confirm that PayPal is selected as one of the Payment Options then click Save in the control
panel.
20. Exit the control panel, and begin a new purchase. At the Review & Payment step, select PayPal
from the drop down list. Click ProcessMyOrder.
21. You will be redirected to the PayPal Sandbox Test Site. The details of the purchase should be vis-
ible on the left side of the screen.
22. Click theHave A PayPal Account? link and then log in using the Buyer test account email and
password.
23. Click the Pay Now button.
24. ClickReturn to [Your Name's] Test Store.25. You should now see the usual Order Completed step in Commerce.
26. Enter the control panel, go to the Orders page, and confirm that the order processed correctly.
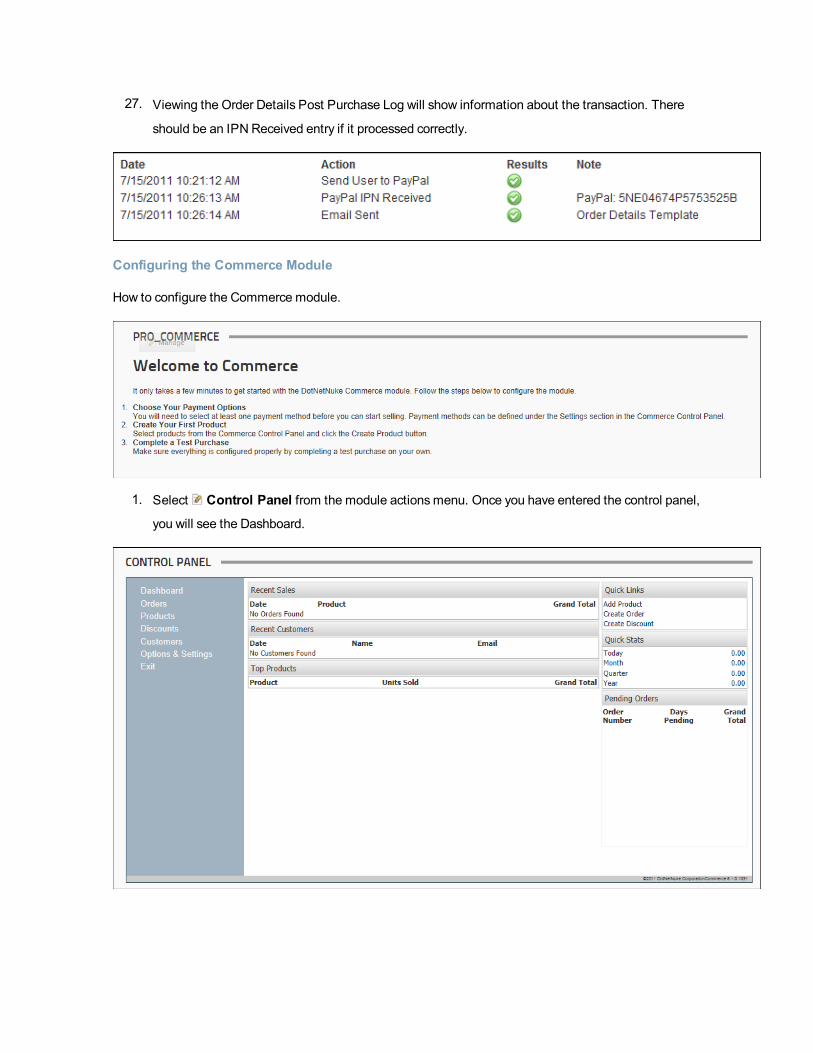
27. Viewing the Order Details Post Purchase Log will show information about the transaction. There
should be an IPNReceived entry if it processed correctly.
Configuring the Commerce Module
How to configure the Commerce module.
1. Select Control Panel from the module actionsmenu. Once you have entered the control panel,
you will see the Dashboard.

2. Select Options & Settings from the left hand panel.
3. Click the Payment Options tab to configure the payment options.
4. Check the check box for to each payment type you want to enable. If you select one of the four
credit card types, you will need to configure the Credit Card Payment Provider section below. If you
select PayPal, you will need to complete the PayPal details section. If you select eitherBank
Transfer, Other and Purchase Order these options all require manual payment processing.
5. Go to theCredit Card Payment Provider section. By default the Assembly, Class and Payment
URL fields are specific to authorize.net. You will need to enter the Login ID and Password/Key
from your authorize.net account. If you are using a sandbox account, you will need to enable Test
Mode and change the Payment URL to https://test.authorize.net/gateway/transact.dll
6. Go to the PayPal Details section.a. In theAccount ID text box, enter your PayPal ID. This information will come directly from
the PayPal website.
b. In the PayPal URL text box, enter the PayPal URL you want to use for processing. This
information will come directly from the PayPal website.

c. In the Language text box, enter the two letter language code for the language to be used.
The PayPal language codes are: Australian -AU, Chinese -CN, English - EN, French -
FR, German -DE, Italian - IT, Japanese - JP, Spanish - ES, or United Kingdom GB.7. Click the Save button to save these payment options. Now that you can process payments, you
need something to sell.
8. Click the Products link on the left hand panel to open the Products page.
9. Click theCreate Product button.10. Required. In theName text box, enter the name of your product.11. Required. In the SKU text box, enter a Stock Keeping Unit which is a brief sequence of letters and
numbers to help keep products unique and provide better reporting options.
12. Recommended. In the Price text box, enter a price for this product.13. Recommended. At Active, check the check box to set this product as available for purchase
14. Recommended. At Visible, check the check box to set this product as visible.
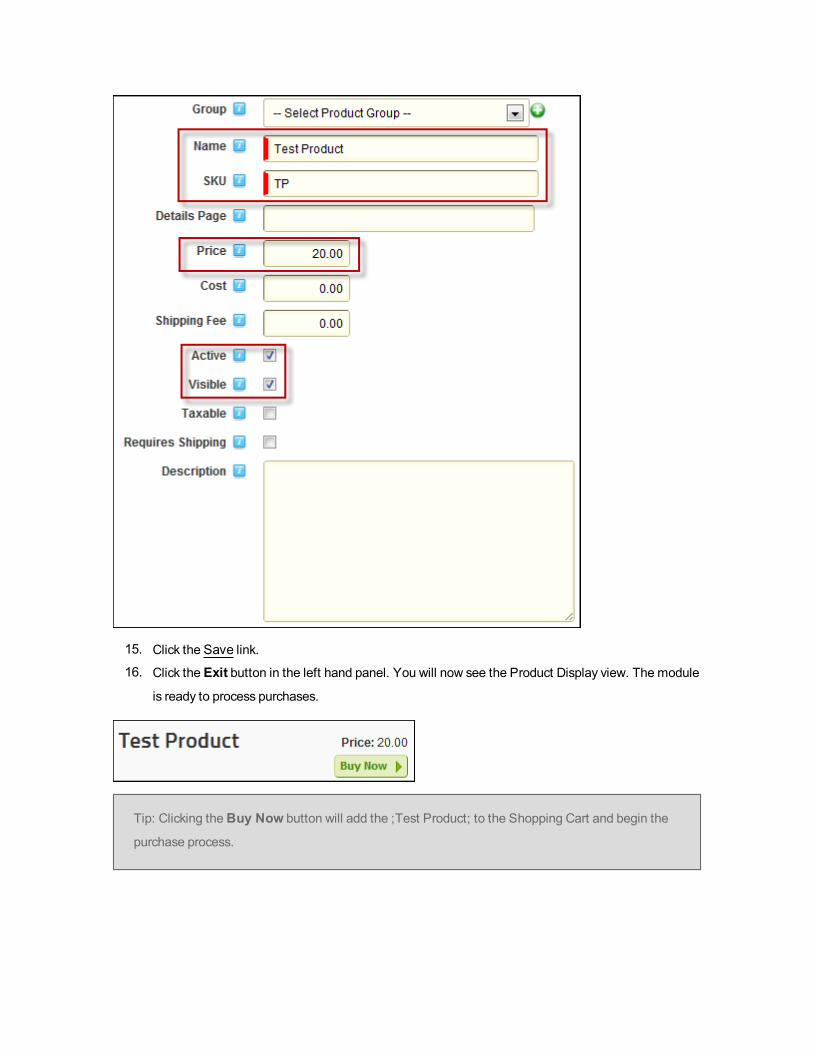
15. Click the Save link.
16. Click the Exit button in the left hand panel. You will now see the Product Display view. The module
is ready to process purchases.
Tip: Clicking theBuy Now button will add the ;Test Product; to the Shopping Cart and begin the
purchase process.

Commerce Customers
The Customers page allows you to browse for customers, and view their account and order information.
Customer List
After searching, a list of customers will be displayed here. Click on a single user to display additional
details.
l Search: Enter the first few letters of a customer’s first name, last name, username or display
name. The results should be displayed instantly.
Customer Details: Clicking on the name of a customer will display their details. Clicking the Up or down
arrows will collapse and expand the sections.
l Personal Informationl Name: The customers first and last name.l Display Name: The customers DNNDisplay Name.
l User ID: The customer’s User Id. This is designated by DNNwhen the user registers and
cannot be changed.
l Username: The username the customer chose to represent them.l Email: The customers email address.l Date Created: The date the customer was recorded in the system.
l Order Historyl Order Number: The invoice numbers of the customer’s previous purchases. Clicking an
order number will display the order details.
l Date of Purchase: The date the purchases were made.l Grand Total: The total amount they spent on the purchase.
l Security Roles: Roles are defined in DNN, and used to control and group users.o Role Name: The name of the role.o Effective Date: The date the user becomes a member of the role.o Expiration Date: The date when the user is no longer a member of the role.
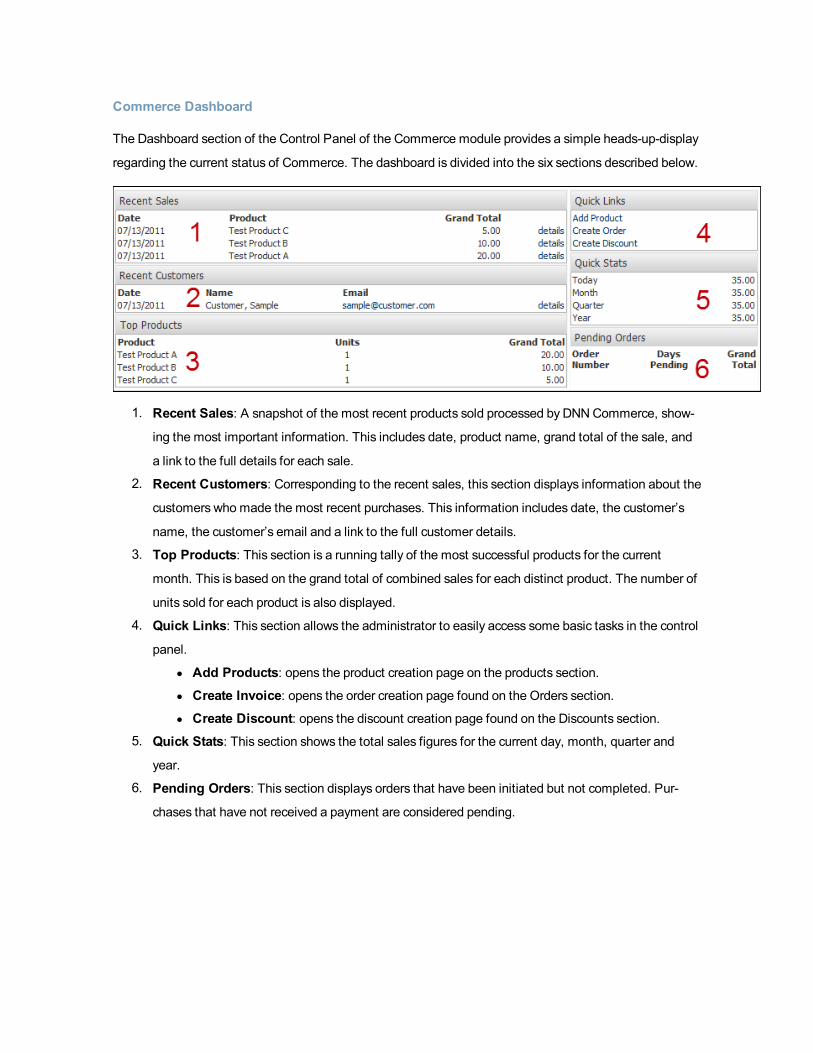
Commerce Dashboard
The Dashboard section of the Control Panel of the Commerce module provides a simple heads-up-display
regarding the current status of Commerce. The dashboard is divided into the six sections described below.
1. Recent Sales: A snapshot of the most recent products sold processed by DNNCommerce, show-
ing the most important information. This includes date, product name, grand total of the sale, and
a link to the full details for each sale.
2. Recent Customers: Corresponding to the recent sales, this section displays information about the
customers who made the most recent purchases. This information includes date, the customer’s
name, the customer’s email and a link to the full customer details.
3. Top Products: This section is a running tally of the most successful products for the current
month. This is based on the grand total of combined sales for each distinct product. The number of
units sold for each product is also displayed.
4. Quick Links: This section allows the administrator to easily access some basic tasks in the control
panel.
l Add Products: opens the product creation page on the products section.l Create Invoice: opens the order creation page found on the Orders section.l Create Discount: opens the discount creation page found on the Discounts section.
5. Quick Stats: This section shows the total sales figures for the current day, month, quarter and
year.
6. Pending Orders: This section displays orders that have been initiated but not completed. Pur-
chases that have not received a payment are considered pending.
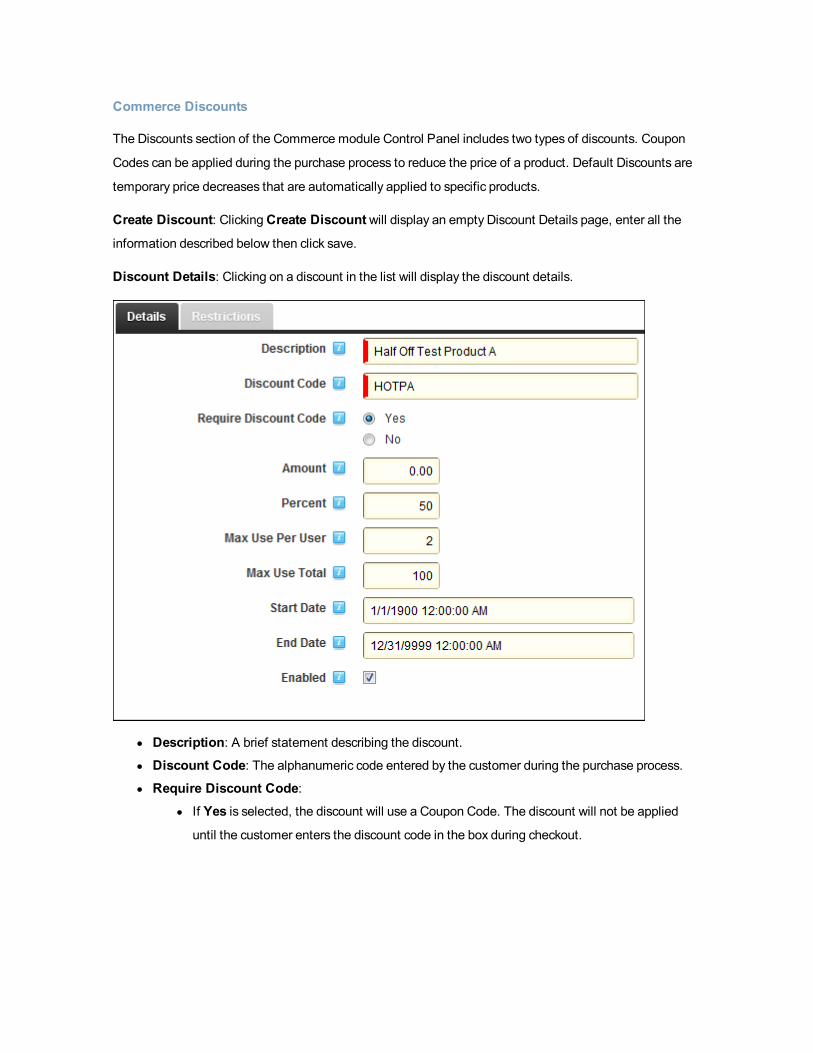
Commerce Discounts
The Discounts section of the Commerce module Control Panel includes two types of discounts. Coupon
Codes can be applied during the purchase process to reduce the price of a product. Default Discounts are
temporary price decreases that are automatically applied to specific products.
Create Discount: ClickingCreate Discountwill display an empty Discount Details page, enter all the
information described below then click save.
Discount Details: Clicking on a discount in the list will display the discount details.
l Description: A brief statement describing the discount.
l Discount Code: The alphanumeric code entered by the customer during the purchase process.l Require Discount Code:
l If Yes is selected, the discount will use a Coupon Code. The discount will not be applied
until the customer enters the discount code in the box during checkout.

l If No is selected, the discount will be a Default Discount. It will automatically reduce the
price of applicable products. A Specific Product Discount Restriction must be added in order
to activate a Default Discount.
l Amount: The static value of currency that should be discounted from the price. If you enter a value
here, Percent should be 0 (zero).
l Percent: The percentage value that should be discounted from the price. If you enter a value here,
Amount should be 0 (zero).
l Max Use Per User: Enter a number indicating howmany times a particular customer can use the
discount code.
l Max Use Total: Enter a number indicating howmany times the discount code can be used by all
customers combined.
l Start Date: The date when the discount becomes active.l End Date: The date when the discount code will no longer work.l Enabled: Discounts that are not enabled will not reduce the price of a product.
Discount Restrictions
Restriction List: Click the red X to delete a restriction.
Add Restriction: Click the Add Restriction button to create a new discount restriction.
l Restriction Type: Select a type from the drop down list.

l Specific Product(s): This restriction causes the discount to only be applied to a specified product.
Select the name of an existing product. Multiple restrictions can be created to apply the discount to
multiple products.
l Products Purchased: This restriction causes the discount to only be available to customers who
have previously purchased a specified product. Select the name of an existing product from the
drop down list. Enter a date range for qualifying purchases (MM/DD/YYYY or DD/MM/YYYY
depending on locale). If a customer purchased the specified product in the time frame between the
;After; date and the ;Before; date, then they will be eligible for the discount.
l Specific Role(s): This restriction causes the discount to only be available to members of the spec-
ified role. Select a role from the drop down list.
Discount List: A list of available discounts.
l Search: Enter the name or code of a discount to filter the list. Click on a single discount to view the
details, and to enable/disable it.
l Search Options:l Active Only: Only display Active Discountsl Sort Column: Change how the discounts are sorted.
l Sort Order: Change the direction of the sorted list.l Rows: Specify howmany rows to display.
Commerce Orders
The Orders section of the Control Panel of the Commerce module provides a comprehensive list of all the
order processed by DNNCommerce.

Order List: The order list shows the most recent orders processed by DNNCommerce. Each grey box is a
single order with an invoice number, customer name, time and date of purchase, grand total and payment
status indicator. Clicking on a single order will expand that order’s details.
Search: The search box allows you to enter a customer name, order number, or grand total amount to
filter the list. The order list will instantly display the filtered results of your search as you type.
Search Options: Clicking the small lightning bolt icon to the right of the Search button will expand the
search options.
l StatusChoose to display only paid or only not-paid orders.l Sort Column: Change which value is used to sort the list.l Sort Order: Change the direction that the list is displayed.l Rows: Select howmany rows to display at once.
Order Details: Clicking on a single order in the list will display the order’s details. A single order hasmany
details associated with it.

Order Information
l Invoice: The invoice number for the purchase. This value is unique per purchase and can be used
to track specific orders.
l Date: The date and time of the purchase.l Source: The channel used to process the sale. (Example: Phone, web, email, other)l Sales Rep: An optional detail, clicking the down-arrow will show a list of available sales reps.
Select one to designate that user as the sales representative responsible for the current order.
l Status: An optional detail, clicking the down arrow will show a list of available statuses.
Customer Information
l Clicking on the name will lead to the customer’s details view.
l Clicking edit will display a screen used to select a customer to associate with the purchase.

l If the customer does not exist as a DNN user, the NewCustomer tab can be used to create a new
user to attach to the order.
Payment Details: A brief description of the payment information for the order.
l Method: The type of currency used. Credit Card, PayPal, Other, etc.l Last 4: If a credit card was used, this will show the last four digits of the credit card number
l Transaction ID: The transaction ID for the purchase.
l Authorization: The authorization code from the payment processor.
Billing Address: The billing address for the customer. Clicking the pencil will display the currently avail-
able addresses, and the option to add a new address.
Shipping Address: The shipping address for the customer. This might be the same as the billing
address. Clicking the pencil will display the currently available addresses, and the option to add a new
address.

Items Ordered List: Below the header is a list of the products included in the current order. Listed here is
the name of the product, per unit price, quantity purchased, miscellaneous fees and the total price per
product.
l Clicking the pencil will display the Order Item Details which is used to modify properties of the prod-
uct in the order. The properties are the same as those listed in the product list, with the addition of
a notes field.
l Clicking the trash can icon will delete a product from the order.
l Clicking Add Itemswill display the Order Item Details. Selecting a product that does not currently
exist in the order will add it.
Post Purchase Log: The post purchase log is a list of the actions taken by Commerce after a customer
completes a purchase. If one of these actions fails it will have a red X icon instead of the green check
mark. The information displayed includes the timestamp of when the action occurred, the type of action, if
it was successful or failed, and any additional information regarding the action. The note field will show
error codes from the payment processors, which email template was sent and other specific codes.
Create Order: Clicking theCreate Order button on the order list will display a blankOrder Details page.
When creating an order it is important to complete asmany fields as possible. The various Edit buttons
and Add Items button, in addition to the drop down lists are used to add content.
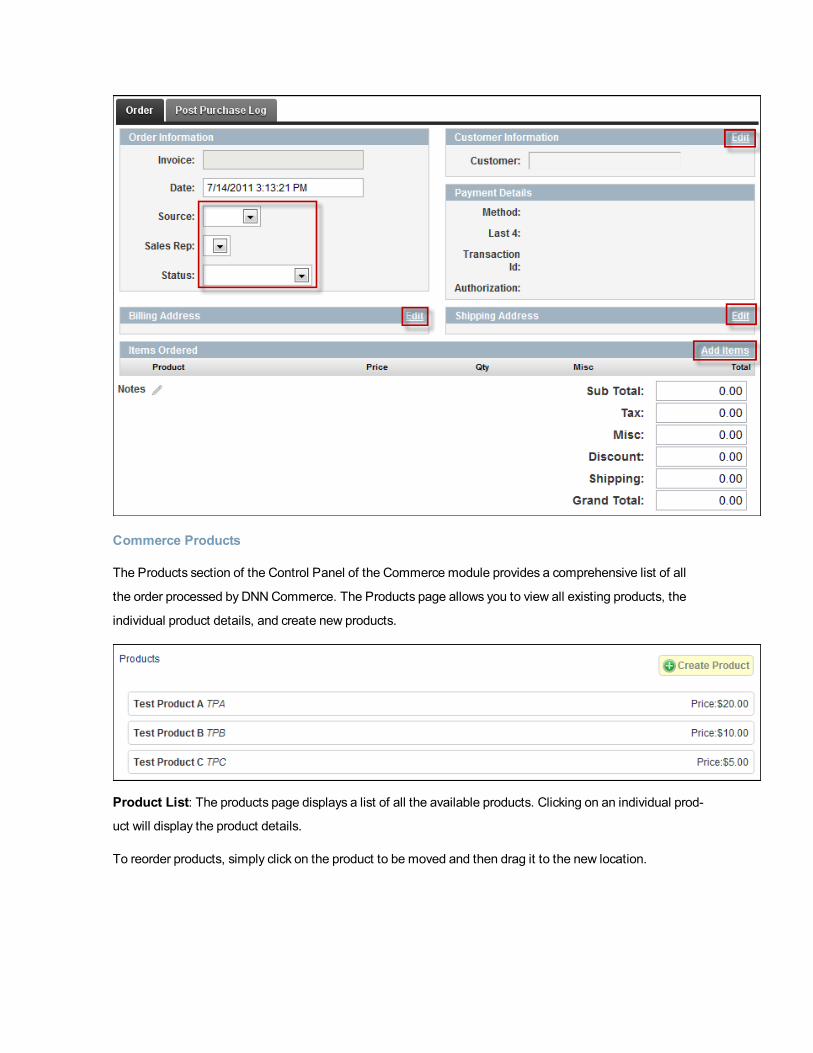
Commerce Products
The Products section of the Control Panel of the Commerce module provides a comprehensive list of all
the order processed by DNNCommerce. The Products page allows you to view all existing products, the
individual product details, and create new products.
Product List: The products page displays a list of all the available products. Clicking on an individual prod-
uct will display the product details.
To reorder products, simply click on the product to be moved and then drag it to the new location.

Create Product: Clicking the Create Product button will display a blank Product Details page, where the
information about the new product is entered. Click Save when all relevant information is entered.
Product Details
l Group: Available product groups are in the drop down list. If there are none available, clicking the
green + icon will display the Edit Product Group window. Product groups are used to categorize sim-
ilar products. The name of any product group that currently has products assigned to it will be vis-
ible to customers on the Product Display view.
l Edit Product Group: Enter the name for the new product group and then click the Save
button.
l Name: The name of the product. The text you enter here will be displayed in large bold letters on
the Product Display view, so entering a clear, concise title is appropriate.
l SKU: A SKU (Stock Keeping Unit) is a short, simple, unique alphanumeric code used to keep track
of different products.
l Details Page: Enter a URL, including the protocol (http://), that containsmore information about
the product. The product name on the Product Display view will become a hyperlink that directs the
customer to the URL.
l Price: The amount that you wish to charge customers who purchase the product.l Cost: The amount that it cost to produce the product.l Shipping Fee: The amount that it costs to ship the item.l Active: Enabled or disable the product. Disabled products cannot be sold.l Visible: Toggle whether the product will be displayed on the Product Display view or hidden. A
product can be active, but not visible. In that situation, an alternative method such as a direct link or
a custom action must be used to allow customers to purchase the product.
l Taxable: Toggle whether the product requires a sales tax applied to it.l Requires Shipping: Toggle whether or not the product will need to be physically shipped. (As
opposed to electronic distribution.)
l Description: A short summary of the products features. This text will be shown on the Product Dis-
play view below the name of the product.

Product Options
l Allowed Roles: Select a role from the drop down list then click Add Role. Any role that is added
will be able to purchase the item. If no roles are added, it will be available to any user with per-
mission to view the Product Display view.
l Add To Roles: Select a role from the drop down list then click Add Role. When a customer pur-
chases the product, the customer will be added to any DNN role added here.
l Custom Action: Enter the class name and assembly that contains instructions to carry out custom
actions after a customer completes a purchase.
l Product Email Template: Select an email template that will be sent when a customer purchases
the product. By default the email template should be Order Shipment Notification.

Billing Type
l One-time Payment: A typical situation where a customer pays once, then receives the product.
l Recurring Payment: Used for subscriptions or products that require multiple payments from the
customer.
l Interval: Select Days if you want the payment to occur after a specific number of days have
passed. Select Months if you want the payment to occur after a specific number of months
have passed, on the same day of the month as the initial purchase.
l Units: The specific length of the interval. Enter a value between 7 and 365.l Occurrences: The number of times a customer is to be billed, not including the initial pur-
chase. Enter a number between 1 and 9999.
Note: The interval, units and occurrences work together to control the schedule of recurring pay-
ments. Example: If the values ;Days;, ;7;, and ;10; are entered, then the customer will be billed
every 7 days, starting 7 days after the initial purchase, until a total of 10 additional periodic pay-
ments are made.
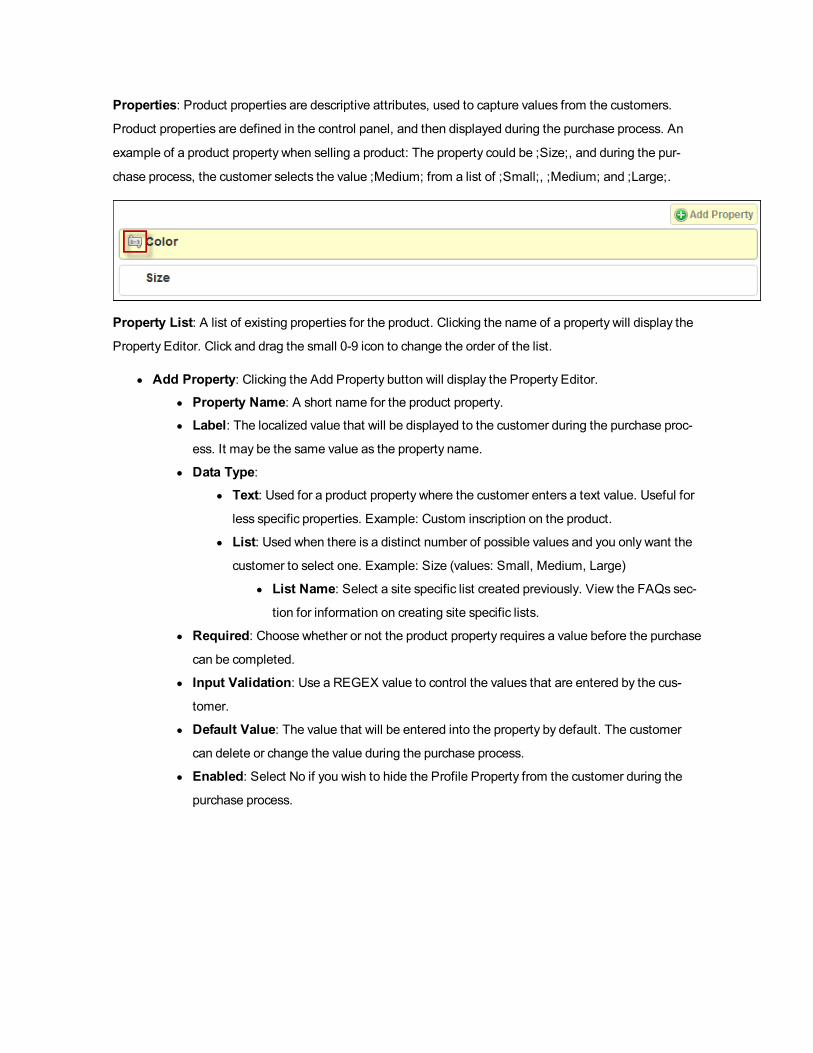
Properties: Product properties are descriptive attributes, used to capture values from the customers.
Product properties are defined in the control panel, and then displayed during the purchase process. An
example of a product property when selling a product: The property could be ;Size;, and during the pur-
chase process, the customer selects the value ;Medium; from a list of ;Small;, ;Medium; and ;Large;.
Property List: A list of existing properties for the product. Clicking the name of a property will display the
Property Editor. Click and drag the small 0-9 icon to change the order of the list.
l Add Property: Clicking the Add Property button will display the Property Editor.l Property Name: A short name for the product property.
l Label: The localized value that will be displayed to the customer during the purchase proc-
ess. It may be the same value as the property name.
l Data Type:l Text: Used for a product property where the customer enters a text value. Useful for
less specific properties. Example: Custom inscription on the product.
l List: Used when there is a distinct number of possible values and you only want the
customer to select one. Example: Size (values: Small, Medium, Large)
l List Name: Select a site specific list created previously. View the FAQs sec-
tion for information on creating site specific lists.
l Required: Choose whether or not the product property requires a value before the purchase
can be completed.
l Input Validation: Use a REGEX value to control the values that are entered by the cus-
tomer.
l Default Value: The value that will be entered into the property by default. The customer
can delete or change the value during the purchase process.
l Enabled: Select No if you wish to hide the Profile Property from the customer during the
purchase process.

l Special Instructions: If enabled, these instructions will be displayed after the customer com-
pletes their purchase. Instructions such as where to download files, where to get support, or where
to register would be common here.
l Downloads: These files are available to the customer after they complete their purchase.l File List: Files that have been previously uploaded are listed here. Clicking the small trash
can icon will delete the file.
l Add File: Clicking Add File will display the Upload File interface.l Title: Enter the name of the file. This name will be displayed to customers who pur-
chase the product.
l Date of Purchase: The file will only be available for download to customers who pur-
chase after this date.
l File: Use the file browser to select the file to upload. Click Upload File when fin-
ished.

Configuring Commerce Module Options
How to configure the payment options, tax rates, email addresses, shipping charges and other related
options and settings for the Commerce module.
1. Select Edit > Control Panel from the module actionsmenu.
2. Select theOptions & Settings tab from the right hand panel. This displays the four related tabs
across the top of the Control Panel named General, Payment Options, Tax Rates, Order Status
Options. Here's an overview of each tab.
General Settings
Select theGeneral tab to configure these settings:
l Order Number: The number of the most recent invoice. If no purchases have been made, any
number entered will be the starting point for invoice numbers.
l Store Email: The email address that appears as the “From” address in outgoing email noti-
fications.
l Do you collect tax?: Select Yes to add sales tax to purchases - OR - Select No if you don't col-
lect tax.
l Do you charge shipping?: Select Yes to add a shipping fee for physical goods - OR - Select No
if you don't charge shipping costs.
l Theme: Select a theme. Different themes affect the colors and styles of the Product Display view.l Order Sources: Comma separated values are used to define all the possible sources of a sale.l Sales Reps: Select a role that contains existing users. These users can be specified as the sales
representatives for orders.
l Date Format: Select the preferred date format to be displayed on the module.l Time Format: Select the preferred time format to be displayed on the module.l Default Country: Select the default country to be used in the billing address.l Roles to Notify: Select a role and then click theAdd Role button. The members of the selected
roles will receive an Order Notification email when a purchase is completed.
l Email Templatesl Order Notification: Sent to administrators and other specified roles when a purchase is
completed.
l New Customer: Sent to new customers that register during the purchase process.
l Order Details: Sent to a customer after they complete a purchase.

l Pending Payment: Sent to a customer when the purchase has not been completed due to
a pending payment.
Payment Options
Select the Payment Options tab to configure these settings:
l Payment Options Selection: Select one or more payment options that will be available to cus-
tomers during the purchase process.
l Visa: A common Credit Card
l MasterCard: A common Credit Card
l American Express: A common Credit Card
l Discover: A Common Credit Card
l PayPal: A popular online payment processor. Selecting this option will route the customer
to the PayPal website after the purchase. Additional configuration is described below.
l Bank Transfer: Direct electronic funds transfer. This option will require manual interaction
with the customer to get the details of the bank accounts.
l Other: Any type of payment not listed. This could include a cash, check or money order pay-
ment. This type of payment requiresmanual interaction with the customer after the pur-
chase has been completed.
l Purchase Order: A purchase order is a commercial document issued by a buyer to a seller,
indicating types, quantities, and agreed prices for products or services the seller will provide
to the buyer.

l Enable SSL: Selecting this option will ensure that purchases are processed using SSL.l Currency: The currency type used for transactions. The four credit card options processed by the
default Credit Card payment provider, authorize.net, will only process transactions using US Dol-
lars. PayPal and the other manual options can use the other currencies.
l Credit Card Payment Provider: Information regarding the entity that will process credit card pay-
ments.
l Assembly Name: Enter the name of the assembly that is located in your bin directory that
will handle your payment processing.
l Class Name: Enter the full name of the class that is within the assembly you specified
above that will be used to process payments. The default class points to authorize.net.
l Login ID: The ID used to authenticate with the payment provider.
l Transaction Key: The unique key used to perform transactions. Provided by the payment
processor.
l Test Mode: Set the module into Test Mode, which will not process actual real money trans-
actions.
l Payment URL: The location of the payment provider gateway. By default it uses the author-
ize.net gateway.
l PayPal Detailsl Account Id: The email address associated with your PayPal store.l PayPal URL: The page that the customer will be directed to after the purchase is com-
plete.
l Language: The language desired for the PayPal page. The Language is to be entered
using the PayPal language code. The PayPal language codes are: Australian -AU, Chi-
nese -CN, English - EN, French - FR, German -DE, Italian - IT, Japanese - JP, Spanish -
ES, or United Kingdom –GB.

Tax Rates
Select the Tax Rates tab to configure these settings:
l Identifier: Used to specify when a specific tax should be applied. If the customer resides in an iden-
tifier zone, the tax will be applied. Options include City, State, Postal Code, and Country.
l Qualifier: Used to list a specific instance of the identifier zone. When a customer enters a value
found in the qualifier column for a matching identifier, the tax will be applied. The values for City,
State and Postal Zone must be the full name of the zone (Example San Mateo, California, 94402)
The Country qualifier uses the country code (Example US, CA and JP for United States, Canada
and Japan) If multiple zones need to be taxed, multiple tax rate entriesmust be created for each
specific zone.
l Rate: Enter the percentage value of the tax rate.l Tax Rate List: A list of previously created tax rates. The qualifier and percent rate are displayed.
Click the red X icon to delete a tax rate.
Order Status Options
These options are potential statuses for a purchase completed by a customer. The default options avail-
able are: Complete, Pending Payment, Processing, Shipped, and Canceled.
Select theOrder Status Options tab to configure these settings:
l Edit: Click the pencil and paper icon to change the name of an existing option.l Delete: Click the red X to delete and existing option.
l New: Enter a name in the text box, then click Save to create a new option.
Creating a PayPal Test Account
How to create a PayPal test account and set it up for the Commerce module.
1. Navigate to https://developer.paypal.com/
2. Click the orange Sign Up Now button.

3. Complete the required fields. You should use a valid email address, but not one associated with a
live PayPal account. Click Agree and Submit when finished.
4. PayPal will send an email to you. Locate the email and click the link to verify your email address.
5. Login with the new account.
6. Click Test Accounts.
7. Click New Test Account: Preconfigured
8. Set the Account Type to Seller. The email address is only used in the sandbox test area, so
choose something you will remember. The password will probably change when you reset the test
account later, so write this down. Add a bank account and a credit card, to make sure the account is
"verified".

9. ClickCreate Account. After the system finishes creating the account, click Preconfigured again.10. This time you will configure the Buyer account. The email address should be different, and the
account balance should not be zero.

11. You should now see the two accounts listed. If at any point you need to create a new password, or
change the account balance, click the Reset link next to the appropriate account.
12. Copy the email address for the buyer account. It is likely that PayPal added a bunch of numbers
and _biz to the address.

13. In another browser tab, navigate to the Commerce control panel > Options & Settings > Payment
Options tab.
14. Paste the seller test account email address in the Account Id box in the PayPal Details section.
15. Back on the PayPal site, check the radio button next to the buyer account and then click the Enter
Sandbox Test Site button.
16. Copy the URL then paste it in the PayPal URL box in the Commerce control panel.
17. Close the Sandbox Test Site window, but do not logout of the Sandbox account. You will need to
remain logged in to https://developer.paypal.com/ while doing any PayPal testing.18. Enter a value in the Language box in the Commerce control panel. The Language is to be entered
using the PayPal language code. The PayPal language codes are: Australian -AU, Chinese -CN,
English - EN, French - FR, German -DE, Italian - IT, Japanese - JP, Spanish - ES, or United King-
dom GB.19. Confirm that PayPal is selected as one of the Payment Options then click Save in the control
panel.
20. Exit the control panel, and begin a new purchase. At the Review & Payment step, select PayPal
from the drop down list. Click ProcessMyOrder.
21. You will be redirected to the PayPal Sandbox Test Site. The details of the purchase should be vis-
ible on the left side of the screen.
22. Click theHave A PayPal Account? link and then log in using the Buyer test account email and
password.
23. Click the Pay Now button.
24. ClickReturn to [Your Name's] Test Store.25. You should now see the usual Order Completed step in Commerce.
26. Enter the control panel, go to the Orders page, and confirm that the order processed correctly.

27. Viewing the Order Details > Post Purchase Log will show information about the transaction. There
should be an IPNReceived entry if it processed correctly.
Purchasing a Product
An overview of the functionally available when purchasing a product and the purchasing process using the
Commerce module.
Product Display
An overview of the details displayed for each product and how to select a product to purchase.
l Product Group: Large bold letters display the name of the product group.l Name: The name of the product.l Page Link: Clicking on the name of a product will lead to the details page. If a details page was
not entered when the product was created, the product name will not be a hyperlink.
l Description: A short description of the product.
l Price: The amount the customer has to pay. This value may be temporarily reduced with dis-
counts.
l Buy Now: Clicking this button will add the product to the shopping cart. Note: After clickingBuy
Now, the customer will need to enter values for any required product properties.
Shopping Cart

l Delete: Hovering over a product will cause a small gray X icon to display. Clicking the icon will
remove the product from the shopping cart.
l Qty: The quantity of the product being purchased. The number can be adjusted by clicking the up
and down arrows, after the product has been added to the cart.
l Name: The name of the product.l Properties: The values entered for the product's properties will be displayed below the
name.
l Price: The price of an individual product.l Discount: Any discount that is automatically applied to the product price.l Total: Total price of the product (Price X Qty)
l Back to Products: Clicking this button will return the customer to the Product Display view.l Proceed to Checkout: Clicking this button will continue the purchase process.
Billing and Shipping
An overview of the Billing and Shipping page and how to complete the required fields:
l Your Information:l First Name: Entered by the customer.l Last Name: Entered by the customer.

l Email: The customers email.l Billing Address: This will usually need to be the address on file with the customer's credit card
company.
l Name: Enter the full name.l Street: This must include the numerical address.l City: The city where the customer resides.l Region: This may be a state, or other region. The values in the drop down list will depend
on the county selected below.
l Postal Code: Also known as Zip code.l Country: Select your country from the drop down list.
l Shipping Address: An alternate address can be supplied if the product requires shipping. If this is
left blank it will use the same address as the Billing Address. This will only appear if the product
requires shipping, and shipping is also enabled in the Options and Settings.

l Back to Products: Clicking this button will return to the Product Display view.l Proceed to Payment: Clicking this button will continue the purchase process.
Review and Payment
An overview of the Review and Payment page and how to complete the required fields.
l Shopping Cart: Displays all products included in the order. This is the last chance to change quan-
tities, or delete products. If additional products need to be added, click Back to Products. If the cus-
tomer wishes to cancel the order, they can delete all the products and be redirected to the Product
Display view.
l Any special instructions or comments?: A text area where the customer adds any additional
information regarding the purchase.
l Apply Discount Code?: Enter any valid discount Coupon Codes, and then click Apply.l Total Price:
l Sub Total: The total before tax, shipping, discounts and any other miscellaneous fees.l Tax: Automatically calculated based on Tax Rates defined in the control panel.

l Shipping: Applied if enabled, and required for the product.l Misc.: Miscellaneous fees.l Discount: The total amount the price was reduced.l Grand Total: The total price after tax, shipping, discounts and other fees have been cal-
culated.
l Your Billing and Shipping Information: Information regarding the customer. This information
was entered on the previous step. If there is an error, click Back to Products and begin again. Click-
ing the back button in the browser will work as well, but may not be recommended.
l Your Payment Information:l Other: If the Other, Bank Transfer or Purchase Order options are selected, no payment information
is required. However the seller must contact the customer, in order to get the payment information,
to complete the purchase.
l Credit Card: Complete these fields:l Name on Card: The name of the credit card holder as it appears on the card.l Card Number: The credit card number.l Expiration Date: Select the expiration date for the card.l CCV: The short 3 or 4 digit security code on the back of the credit card.
l PayPal: Clicking ProcessMyOrder will redirect the customer to the PayPal website.l Back to Products: Clicking this button will return to the Product Display view.l Process My Order: Clicking this button will complete the purchase process.
Order Completion

l Additional Instructions: The contents of the additional instructions tab in the product details is
displayed below the name of the product.
l File Downloads: Any files that were attached to a product are shown as hyperlinks below the
name of the product.
Console
About the Console Module
Open the menu on the left by clicking the arrow or navigate through tutorials with the forward and back but-
tons in the top right.
The Console module displays a list of links to the child pages below any parent pages. The Console mod-
ule is added to both the Admin Console and Host Console pages by default and can also be deployed to a
site and added to any page. The Console module can be configured to display links in a variety of layouts
and to displaymore or less information about the pages that are listed.
Installation Note: This module is typically installed on the site.
Module Version: The version number is always the same as the DNN framework version number.
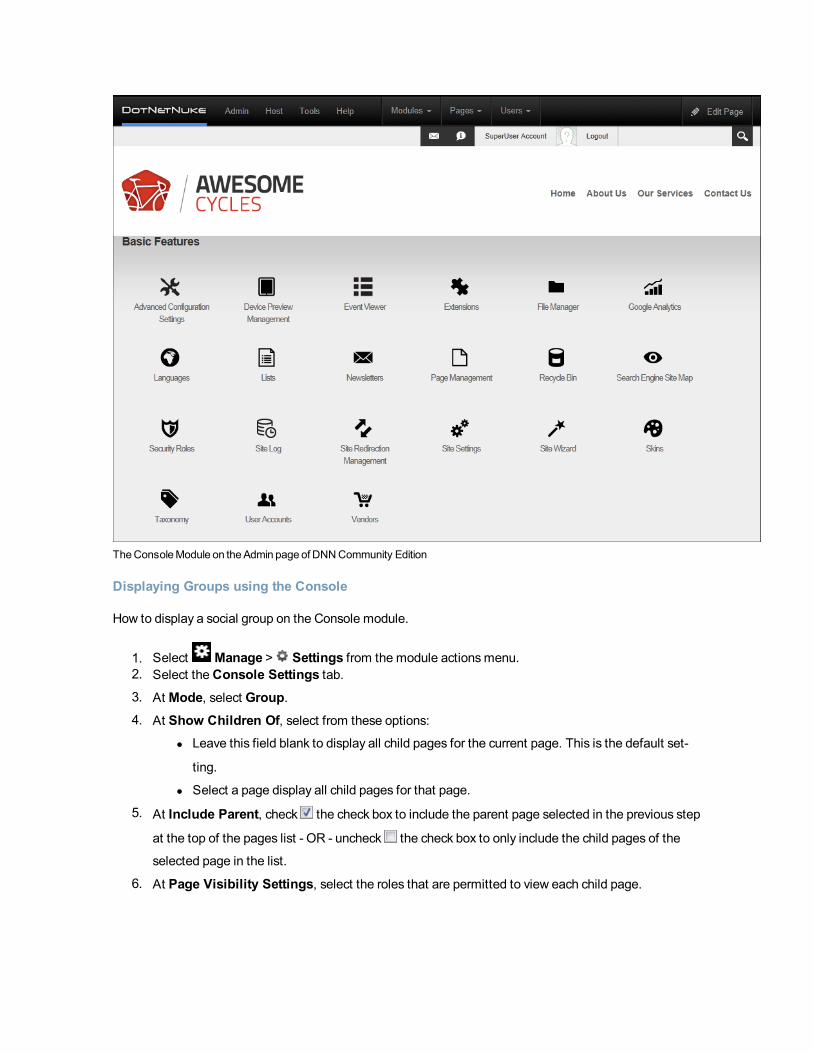
TheConsoleModule on theAdmin pageof DNNCommunity Edition
Displaying Groups using the Console
How to display a social group on the Console module.
1. Select Manage > Settings from the module actionsmenu.2. Select theConsole Settings tab.3. At Mode, select Group.4. At Show Children Of, select from these options:
l Leave this field blank to display all child pages for the current page. This is the default set-
ting.
l Select a page display all child pages for that page.
5. At Include Parent, check the check box to include the parent page selected in the previous step
at the top of the pages list - OR - uncheck the check box to only include the child pages of the
selected page in the list.
6. At Page Visibility Settings, select the roles that are permitted to view each child page.
7. At Default Icon Size, select from the following:
l Small Icons (16 px): Select to display a 16 pixel icons. The icon used will either be the
default icon provided with the Console module or the "Icon" image set for the page. See
"Advanced Settings for New Pages" or See "Advanced Settings for Existing Pages". This
is the default setting.
l Large Icons (32 px): Select to display a 32 pixel icons. The icon used will either be the
default icon provided with the Console module or the "Large Icon" image set for the page.
See "Advanced Settings for New Pages" or See "Advanced Settings for Existing Pages"
l No Icons: Select if you don't want to display an icon on the pages list. Skip the next step.8. At Allow Icon Resize, select from these options:
l Check the check box to displays a drop down list at the top of the module that allows
users to change the size of the icon. This is the default setting.
l Uncheck the check box to only display the default icon.
9. At Default View, select from these options:
l Simple View: Select to display the page name. This is the default setting.l Detailed View: Select to display the page name and the page description for each item.
10. At Allow View Change, select from these options:
l Check the check box to display a drop down list at the top of the module that allows users
to switch between simple and detailed views. This is the default setting.
l Uncheck the check box to only display the default view.
11. At Show Tooltip, select from these options:
l Check the check box to display the page description as a tool tip when a user hovers over
the page name in Simple View. This is the default setting.
l Uncheck the check box to hide the tool tip and hide the page description in Simple View.
12. In theWidth text box, select from these options:
l Enter a pixel width to set the width of this module. For example, enter 400px to display 2 col-
umns of icons in the content pane.
l Leave this field blank to allow the icons to expand horizontally. This is the default setting.
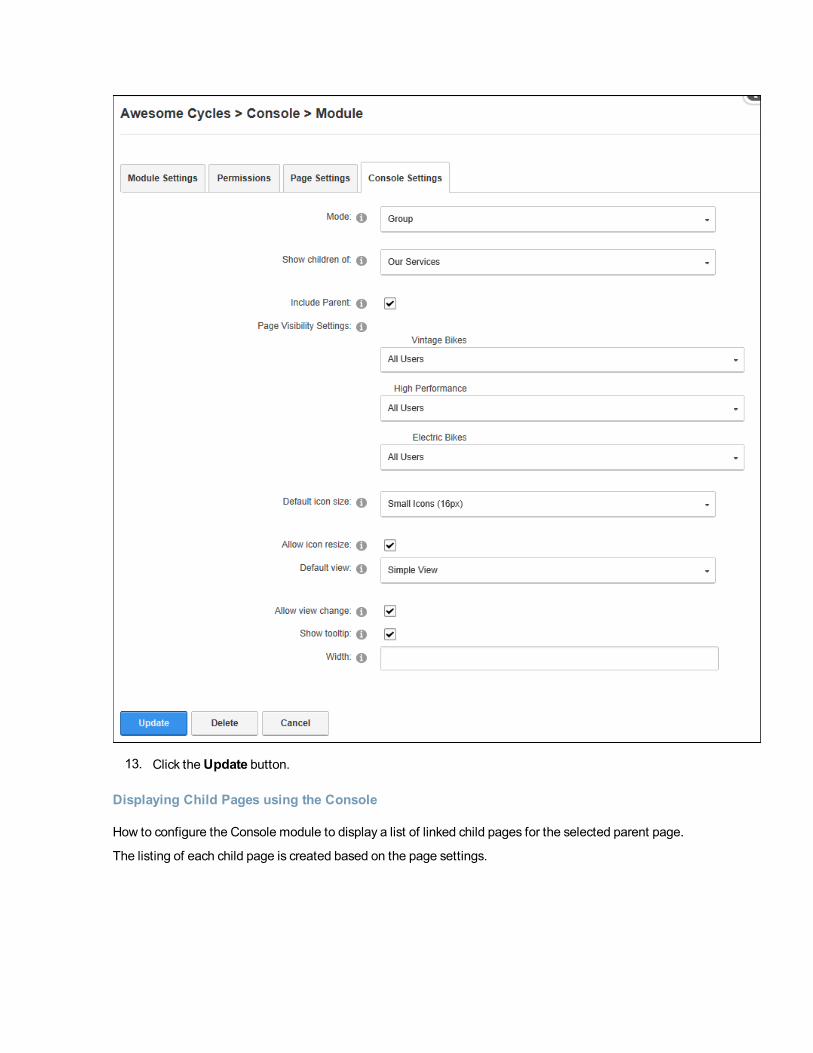
13. Click theUpdate button.
Displaying Child Pages using the Console
How to configure the Console module to display a list of linked child pages for the selected parent page.
The listing of each child page is created based on the page settings.

1. Select Manage > Settings from the module actionsmenu.2. Select theConsole Settings tab.3. At Mode, select Normal.4. At Show Children Of, select from these options:
l Leave this field blank to display all child pages for the current page. This is the default set-
ting.
l Select a page display all child pages for that page.
5. At Include Parent, check the check box to include the parent page selected in the previous step
at the top of the pages list - OR - uncheck the check box to only include the child pages of the
selected page in the list.
6. At Default Icon Size, select from the following:
l Small Icons (16 px): Select to display a 16 pixel icons. The icon used will either be the
default icon provided with the Console module or the "Icon" image set for the page. See
"Advanced Settings for New Pages" or See "Advanced Settings for Existing Pages". This
is the default setting.
l Large Icons (32 px): Select to display a 32 pixel icons. The icon used will either be the
default icon provided with the Console module or the "Large Icon" image set for the page.
See "Advanced Settings for New Pages" or See "Advanced Settings for Existing Pages"
l No Icons: Select if you don't want to display an icon on the pages list. Skip the next step.7. At Allow Icon Resize, select from these options:
l Check the check box to displays a drop down list at the top of the module that allows
users to hide, display or change the size of the icon. This is the default setting.
l Uncheck the check box to remove the icon resize option and only display the icon selected
or no icon, as selected in the previous step.
8. At Default View, select from these options:
l Simple View: Select to display an icon and the page name for each item. This is the
default setting.
l Detailed View: Select to display an icon, the page name and the page description for each
item.
9. At Allow View Change, select from these options:
l Check the check box to display a drop down list at the top of the module that allows users
to switch between simple and detailed views. This is the default setting.
l Uncheck the check box to only display the default view.
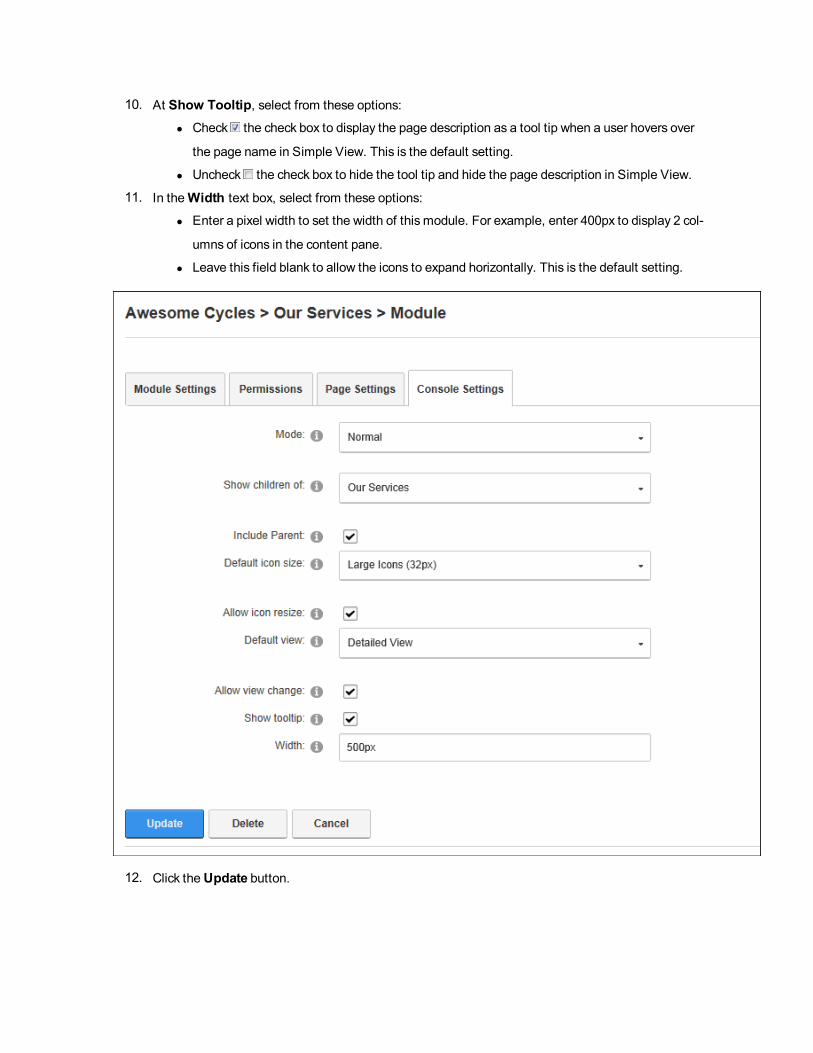
10. At Show Tooltip, select from these options:
l Check the check box to display the page description as a tool tip when a user hovers over
the page name in Simple View. This is the default setting.
l Uncheck the check box to hide the tool tip and hide the page description in Simple View.
11. In theWidth text box, select from these options:
l Enter a pixel width to set the width of this module. For example, enter 400px to display 2 col-
umns of icons in the content pane.
l Leave this field blank to allow the icons to expand horizontally. This is the default setting.
12. Click theUpdate button.

Tip: If an icon has not been set on a page then the default icons called "icon_unknown_32px.gif"
for the large icon and "icon_unknown_16px.gif" for the small icon will be displayed. An example of
this is seen on the parent page "Our Services" in the below image.


TheConsolemodule sets to display both the parent and child pages with large icons and detailed view
Displaying Profiles using the Console
How to configure the Console module to display profiles.
1. Select Manage > Settings from the module actionsmenu.2. Select theConsole Settings tab.3. At Mode, select Profile.4. At Page Visibility Settings, select visibility of the following pages:
1. My Profile: Select who can view a member's profile from these options:
l All Users: All logged in users can view the profiles of other site members.
l Friends: Members can only profiles of their friends.l User: Users can only view their own profile.
2. Friends: select the users who can view friend relationships:
l All Users: All logged in users can view the friends of other site members.
l Friends: Members can only friend relationships of their friends.l User: Users can only view their own friend relationships.
3. Messages:select the users who can viewmessages:
1. All Users: All logged in users can send messages to other site members.2. Friends: Only site members can send messages.3. User: Users can only view their own profile.
5. At Default Icon Size, select from the following:
l Small Icons (16 px): Select to display a 16 pixel icons. The icon used will either be the
default icon provided with the Console module or the "Icon" image set for the page. See
"Advanced Settings for New Pages" or See "Advanced Settings for Existing Pages". This
is the default setting.
l Large Icons (32 px): Select to display a 32 pixel icons. The icon used will either be the
default icon provided with the Console module or the "Large Icon" image set for the page.
See "Advanced Settings for New Pages" or See "Advanced Settings for Existing Pages"
l No Icons: Select if you don't want to display an icon on the pages list. Skip the next step.6. At Allow Icon Resize, select from these options:
l Check the check box to displays a drop down list at the top of the module that allows
users to change the size of the icon. This is the default setting.
l Uncheck the check box to only display the default icon.

7. At Default View, select from these options:
l Simple View: Select to display an icon and the page name for each item. This is the
default setting.
l Detailed View: Select to display an icon, the page name and the page description for each
item.
8. At Allow View Change, select from these options:
l Check the check box to display a drop down list at the top of the module that allows users
to switch between simple and detailed views. This is the default setting.
l Uncheck the check box to only display the default view.
9. At Show Tooltip, select from these options:
l Check the check box to display the page description as a tool tip when a user hovers over
the page name in Simple View. This is the default setting.
l Uncheck the check box to hide the tool tip and hide the page description in Simple View.
10. In theWidth text box, select from these options:
l Enter a pixel width to set the width of this module. For example, enter 400px to display 2 col-
umns of icons in the content pane.
l Leave this field blank to allow the icons to expand horizontally. This is the default setting.

11. Click theUpdate button.

Document Library
About the Document Library Module
The Document Library (also called the Open-Document Library and the DocumentLibrarymodule) module
enables users to manage and share documents in a flexible, intelligent way, offering granular control over
Folder and Document access. The module offers the possibility to organize documents by physical Folder
and by logical Categories, thusmaking it easy for your users to look for and find documents according to
areas of interest. Benefits of a document management system include helping companies to become
more organized bymaking it easier to file, share, retrieve, and secure information; increasing employees
productivity bymaking information easier and faster to find; improving collaboration and sharing of ideas;
and allowmultiple employees to access the information simultaneously.
Only available in DotNetNuke Professional Edition and DotNetNuke Enterprise Edition
Installation Note: This module is typically installed on the site.
Module Version/Minimum DNN Version: The version number is always the same as the DNN frame-
work version number.
Features: ISearchable, IUpgradable
Important. There can be only one Document Librarymodule per site and only one instance of the module
on any given page. You can however have 100 pages on your site each with an instance of the module. A
wide range of settings allows you to configure each instance to display different information. If you have
child sites, and you install Document Library on a child site, it is considered an entirely separate library.
Troubleshooting: If the module does not load correctly follow these step:

1. Go to the Document-Librarymodule.
2. Select Manage > Settings from the module actionsmenu.3. Click theUpdate button.
TheDocument Library Module
Configuration
Setting the Parent Root Folder
Setting the root folder for the Document Librarymodule. Multiple sub-folders (child folders) can be added
beneath the parent category.
Permissions. Administrators and SuperUsers only.
1. Select Manage > Settings from the module actionsmenu.2. Select theDocumentLibrary Settings tab.3. Expand theGlobal Settings > File System Options section.4. At Root Folder, select an existing folder of the Admin File Manager. This is the folder where the
documents will be stored.
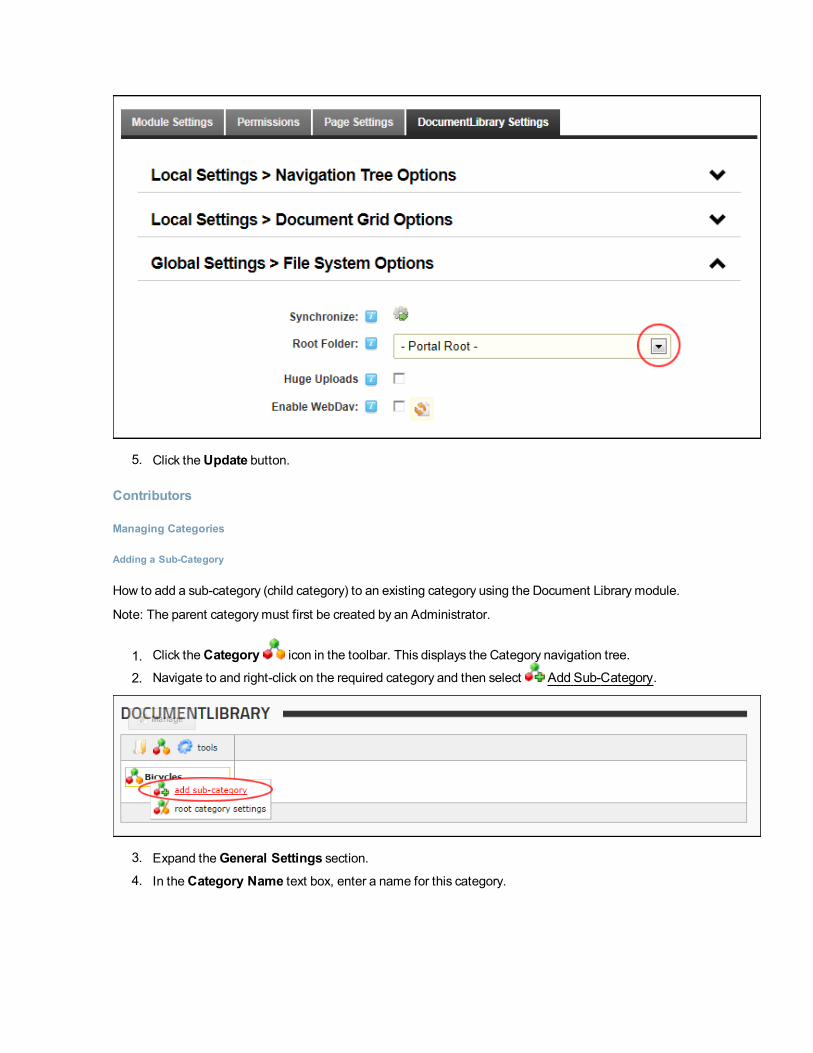
5. Click theUpdate button.
Contributors
Managing Categories
Adding a Sub-Category
How to add a sub-category (child category) to an existing category using the Document Librarymodule.
Note: The parent categorymust first be created by an Administrator.
1. Click theCategory icon in the toolbar. This displays the Category navigation tree.
2. Navigate to and right-click on the required category and then select Add Sub-Category.
3. Expand theGeneral Settings section.4. In theCategory Name text box, enter a name for this category.

5. Optional. At Parent Category, select a different parent category if desired.6. Optional. To modify the Direct View Settings for this category, See "Configuring Direct View Set-
tings for Categories"
7. Optional. To change the Security Settings for this new folder, See "Configuring Security Settings
for Categories". The default security settings for this category are inherited from the parent cat-
egory selected at Step 2. If however you choose to modify the parent category at Step 5, the secu-
rity settings are not updated. Note: Security settings can only be modified by authorized users.
8. Click theUpdate button. This displays the new category in the category navigation tree.
Adding aSub-Category to theDocumentLibrary module

Configuring Direct View Settings for Categories
How to configure the General settings for categories in the Document Librarymodule. This topic assumes
you are currently adding (See "Adding a Sub-Category") or editing (See "Editing Category Settings") a
category.
1. Expand theDirect View Settings section.2. At Direct Access Only select from these options:
l Check the check box to set this category as hidden from general view, unless accessed
directly through the 'Direct URL' field or through setting the value of 'Restrict List to 1 Cat-
egory' in the module settings. If the categorymarked for direct view contains sub-categories,
all sub-categories will also be visible, unless those sub-categories have also been marked
for direct view as well.
1. In theDirect Access Key text box, enter a unique key that is required to access this
"Direct AccessOnly" category. If you do add a key, and you access the category
through the 'Direct URL' method, then you'll need to place both the xsfid parameter
as well as a new key parameter in the URL. If you access the category through the
'Restrict List to 1 Category' method, then you'll need to place only the new key param-
eter in the URL. [url format: xsfid=id&xsfk=key]
2. In theCategory Direct URL text box you can view the direct URL for this category
is displayed. If you are linking to this page through an external link and you only want
to show the contents of this specific category (and all of its sub-categories), then this
is the parameter to be added to the URL. Adding this parameter to the URL will
achieve the same results as setting the value of 'Restrict List to 1 Category' in the
module settings.
l Uncheck the check box to enable access to all authorized users using the Navigation tree.
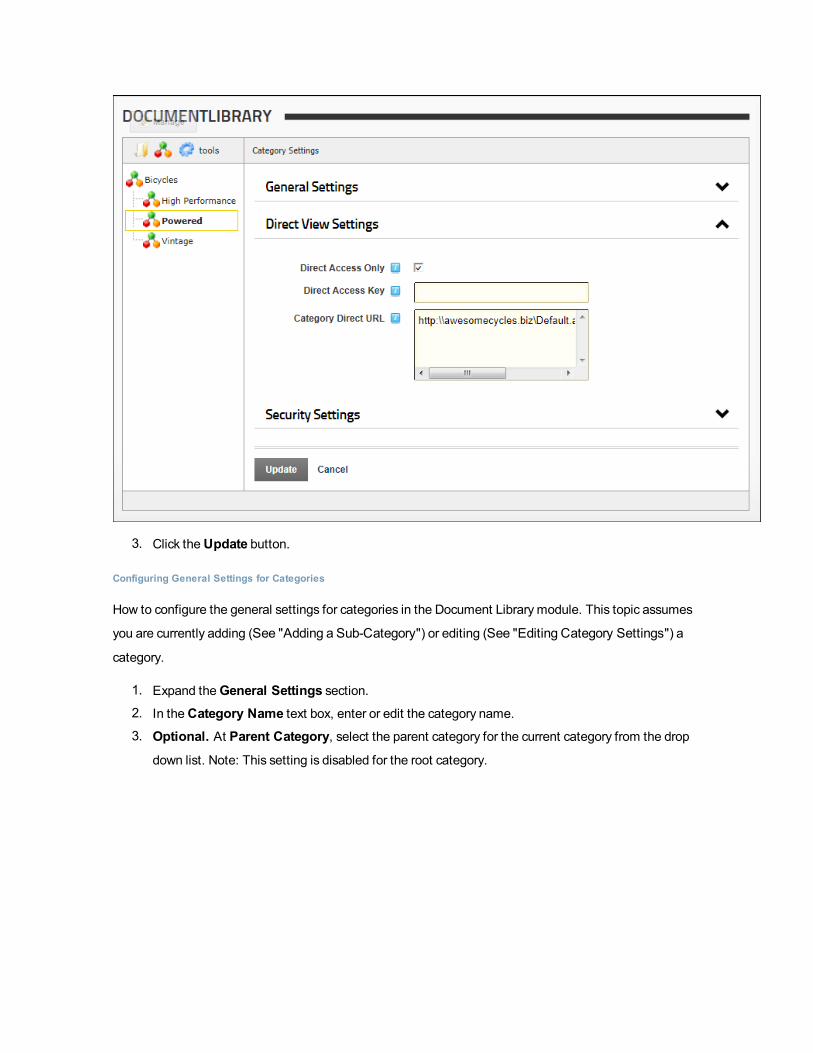
3. Click theUpdate button.
Configuring General Settings for Categories
How to configure the general settings for categories in the Document Librarymodule. This topic assumes
you are currently adding (See "Adding a Sub-Category") or editing (See "Editing Category Settings") a
category.
1. Expand theGeneral Settings section.2. In theCategory Name text box, enter or edit the category name.3. Optional. At Parent Category, select the parent category for the current category from the drop
down list. Note: This setting is disabled for the root category.

4. Click theUpdate button.
Configuring Security Settings for Categories
How to configure the Security settings for categories using the Document Librarymodule. This topic
assumes you are currently adding (See "Adding a Sub-Category") or editing (See "Editing Category Set-
tings") a category.
1. Expand the Security Settings section.2. Check the check box to grant one or more permissions to a role:
l View: Users can view the category in the navigation tree and view the associated doc-
uments.
l Add: Users can add sub-categories to this category.l Full Control: Users have full administrator rights to manage this category.l Delete: Users can delete the category.l Edit Security: Users can view the Security Settings section for this category and assign per-
missions to roles and usernames.
3. Optional. In theUsername text box, enter the username of the user you want to grant per-
missions to and then click the Add link.1. Set permissions for this user as shown at Step 2.
4. Optional. Repeat Step 4 to set permissions for additional usernames.

5. Click theUpdate button.
Deleting a Category
How to delete a category in the Document Librarymodule.
1. Click theCategory icon in the toolbar. This displays the Category navigation tree.
2. Navigate to and right-click on the required category and then select Delete Category from thedrop down list. This displays the category details in the right pane.
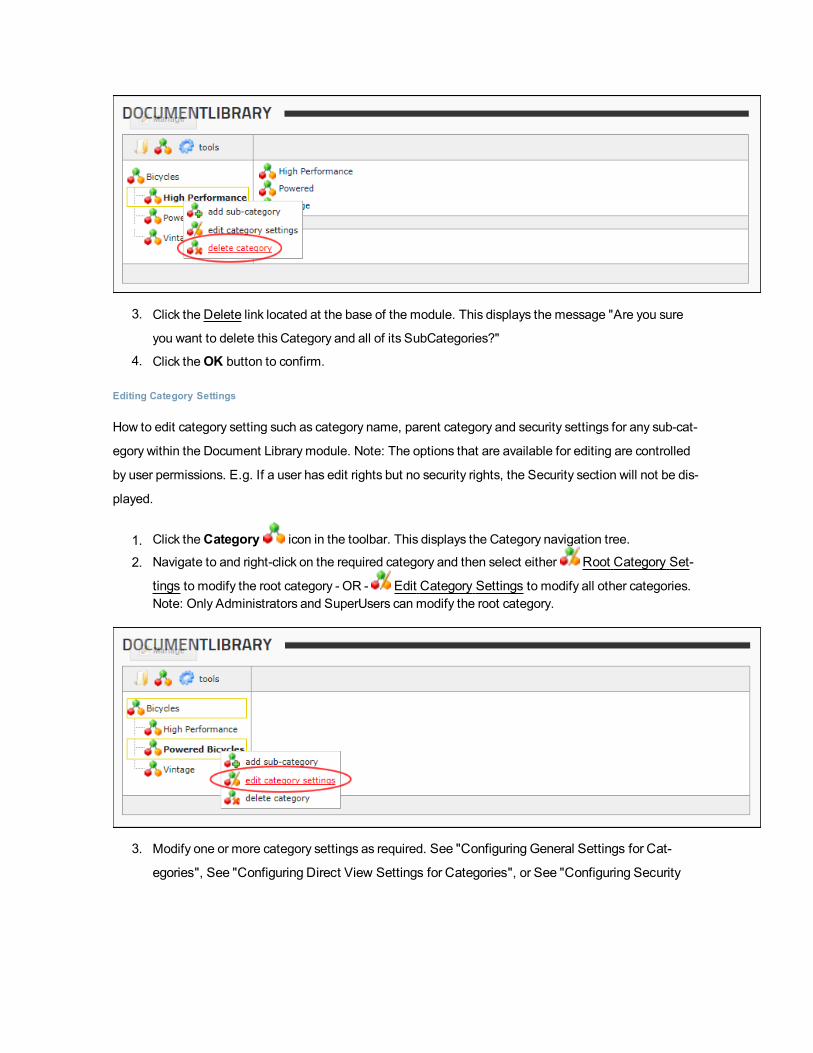
3. Click theDelete link located at the base of the module. This displays the message "Are you sure
you want to delete this Category and all of its SubCategories?"
4. Click theOK button to confirm.
Editing Category Settings
How to edit category setting such as category name, parent category and security settings for any sub-cat-
egory within the Document Librarymodule. Note: The options that are available for editing are controlled
by user permissions. E.g. If a user has edit rights but no security rights, the Security section will not be dis-
played.
1. Click theCategory icon in the toolbar. This displays the Category navigation tree.
2. Navigate to and right-click on the required category and then select either Root Category Set-
tings to modify the root category - OR - Edit Category Settings to modify all other categories.Note: Only Administrators and SuperUsers can modify the root category.
3. Modify one or more category settings as required. See "Configuring General Settings for Cat-
egories", See "Configuring Direct View Settings for Categories", or See "Configuring Security
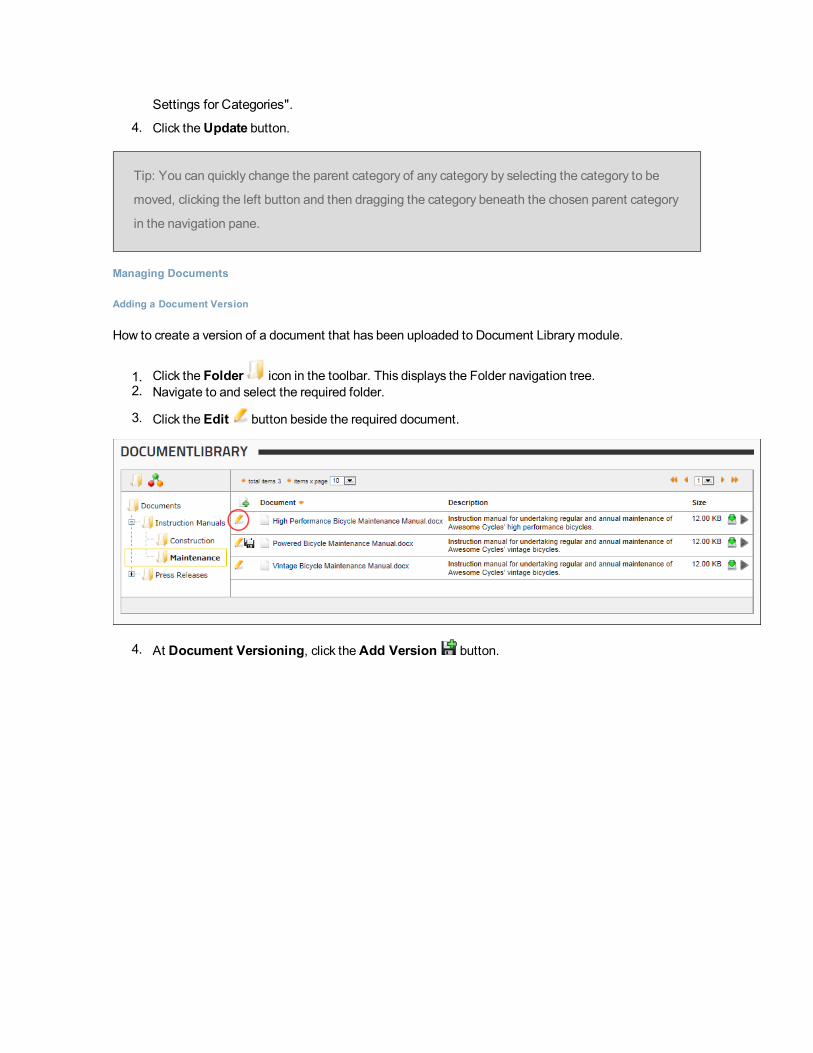
Settings for Categories".
4. Click theUpdate button.
Tip: You can quickly change the parent category of any category by selecting the category to be
moved, clicking the left button and then dragging the category beneath the chosen parent category
in the navigation pane.
Managing Documents
Adding a Document Version
How to create a version of a document that has been uploaded to Document Librarymodule.
1. Click the Folder icon in the toolbar. This displays the Folder navigation tree.2. Navigate to and select the required folder.
3. Click the Edit button beside the required document.
4. At Document Versioning, click theAdd Version button.

5. A list of any previous versions of this document including the newly added version is now displayed.
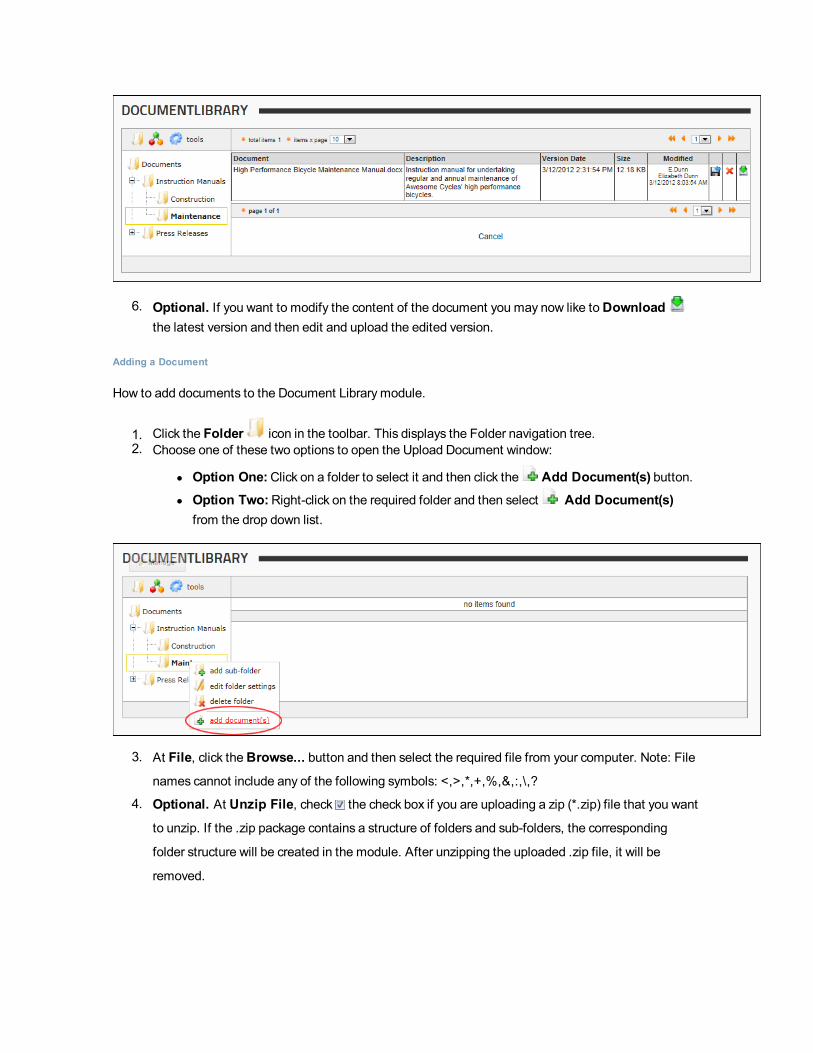
6. Optional. If you want to modify the content of the document you may now like toDownloadthe latest version and then edit and upload the edited version.
Adding a Document
How to add documents to the Document Librarymodule.
1. Click the Folder icon in the toolbar. This displays the Folder navigation tree.2. Choose one of these two options to open the Upload Document window:
l Option One:Click on a folder to select it and then click the Add Document(s) button.l Option Two:Right-click on the required folder and then select Add Document(s)
from the drop down list.
3. At File, click theBrowse... button and then select the required file from your computer. Note: File
names cannot include any of the following symbols: <,>,*,+,%,&,:,\,?
4. Optional. At Unzip File, check the check box if you are uploading a zip (*.zip) file that you want
to unzip. If the .zip package contains a structure of folders and sub-folders, the corresponding
folder structure will be created in the module. After unzipping the uploaded .zip file, it will be
removed.
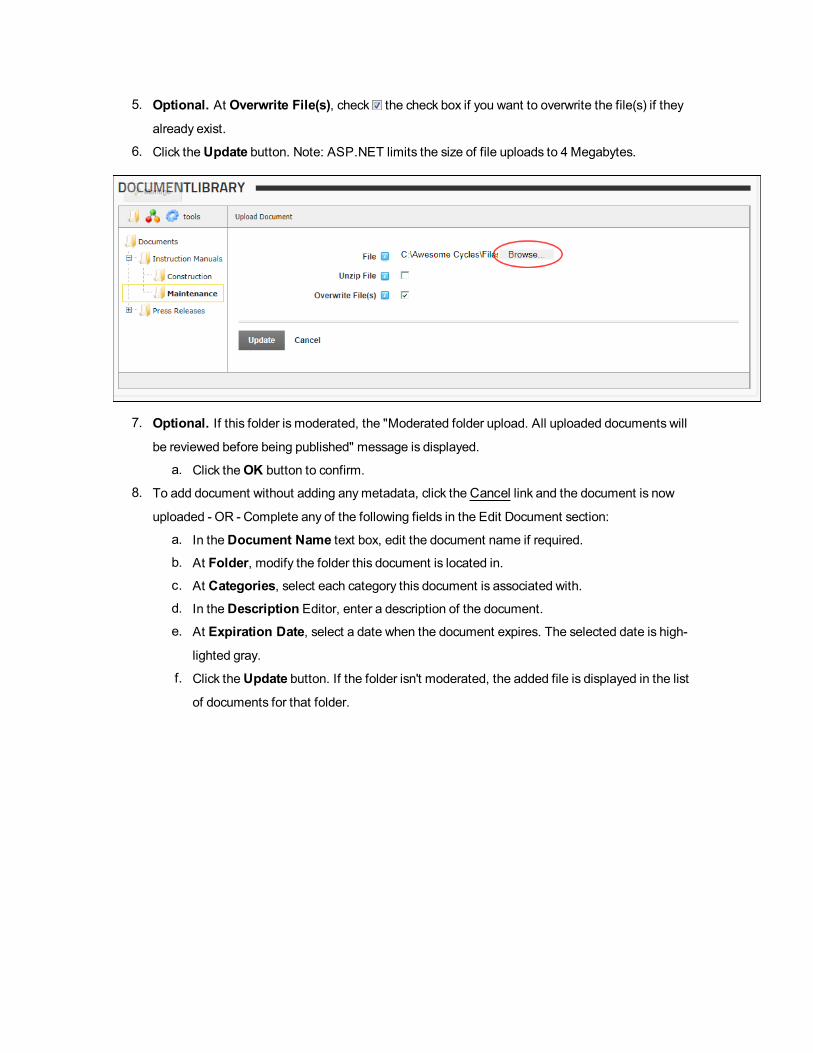
5. Optional. At Overwrite File(s), check the check box if you want to overwrite the file(s) if they
already exist.
6. Click theUpdate button. Note: ASP.NET limits the size of file uploads to 4 Megabytes.
7. Optional. If this folder is moderated, the "Moderated folder upload. All uploaded documents will
be reviewed before being published" message is displayed.
a. Click theOK button to confirm.
8. To add document without adding anymetadata, click theCancel link and the document is now
uploaded - OR - Complete any of the following fields in the Edit Document section:
a. In theDocument Name text box, edit the document name if required.b. At Folder, modify the folder this document is located in.c. At Categories, select each category this document is associated with.d. In theDescription Editor, enter a description of the document.e. At Expiration Date, select a date when the document expires. The selected date is high-
lighted gray.
f. Click theUpdate button. If the folder isn't moderated, the added file is displayed in the list
of documents for that folder.
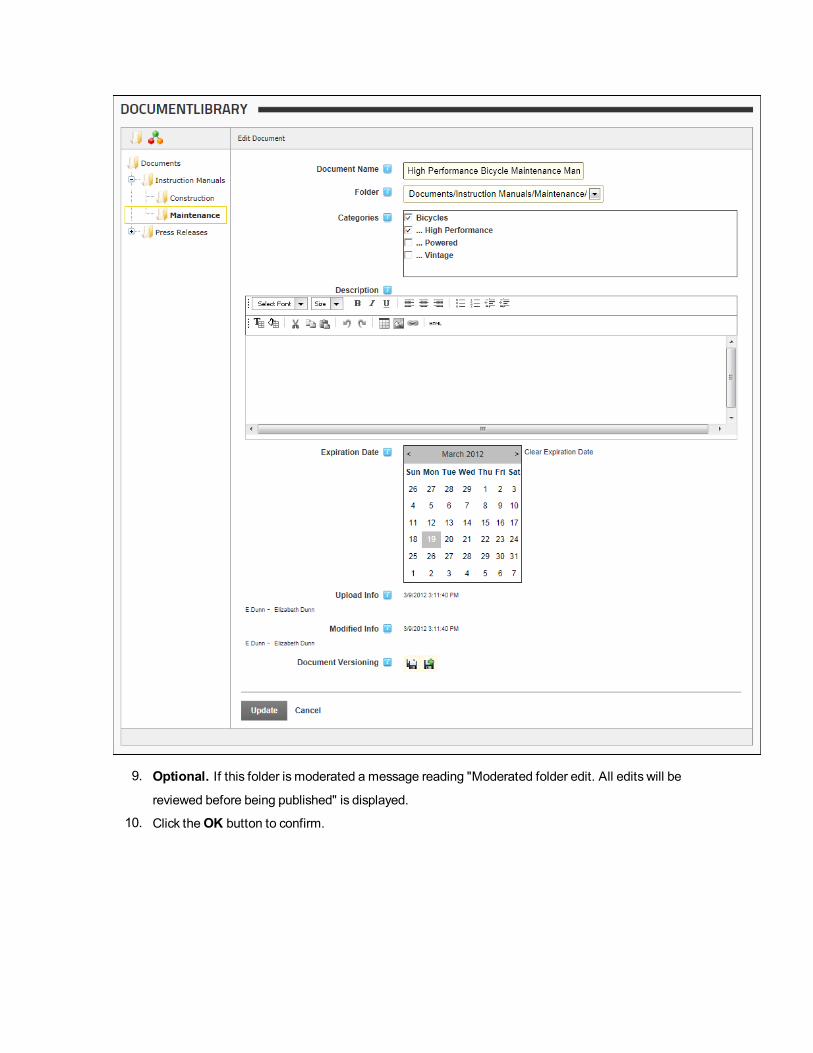
9. Optional. If this folder is moderated a message reading "Moderated folder edit. All edits will be
reviewed before being published" is displayed.
10. Click theOK button to confirm.
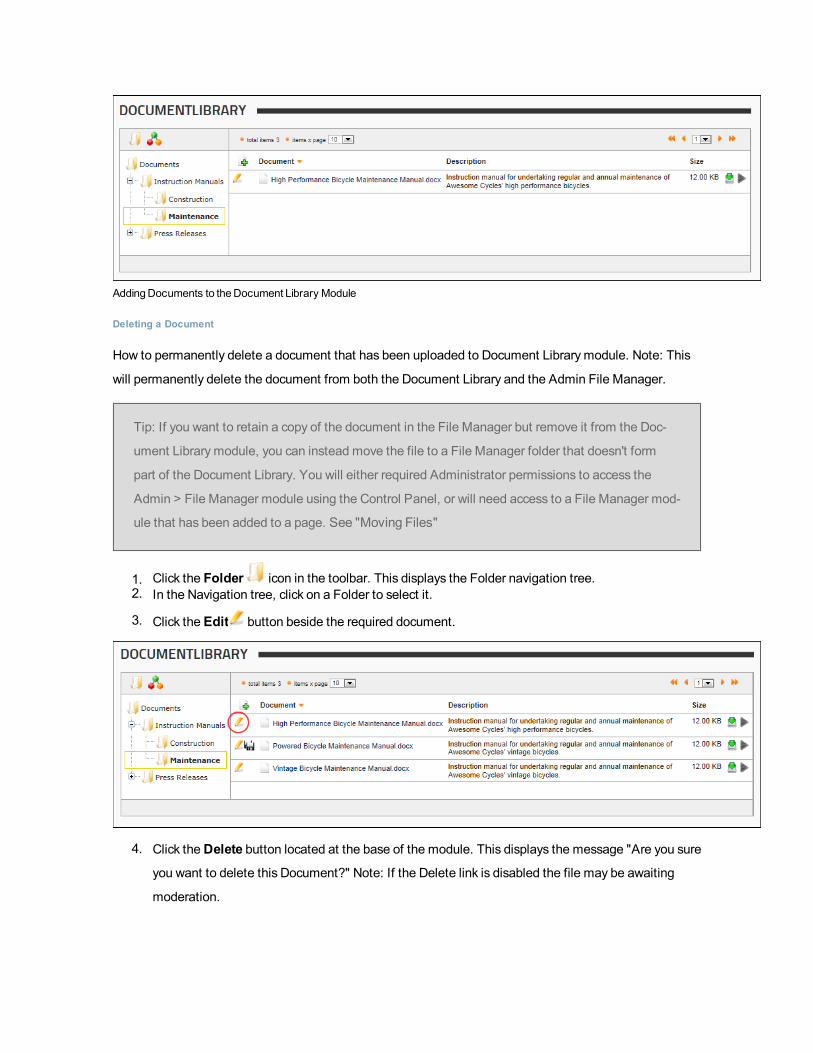
AddingDocuments to theDocument Library Module
Deleting a Document
How to permanently delete a document that has been uploaded to Document Librarymodule. Note: This
will permanently delete the document from both the Document Library and the Admin File Manager.
Tip: If you want to retain a copy of the document in the File Manager but remove it from the Doc-
ument Librarymodule, you can instead move the file to a File Manager folder that doesn't form
part of the Document Library. You will either required Administrator permissions to access the
Admin > File Manager module using the Control Panel, or will need access to a File Manager mod-
ule that has been added to a page. See "Moving Files"
1. Click the Folder icon in the toolbar. This displays the Folder navigation tree.2. In the Navigation tree, click on a Folder to select it.
3. Click the Edit button beside the required document.
4. Click theDelete button located at the base of the module. This displays the message "Are you sure
you want to delete this Document?" Note: If the Delete link is disabled the file may be awaiting
moderation.

5. Click theOK button to confirm.
Downloading a Document
How to download the selected document to your local file system.
1. Click the Folder icon in the toolbar. This displays the Folder navigation tree.2. Navigate to the folder where the document is located.
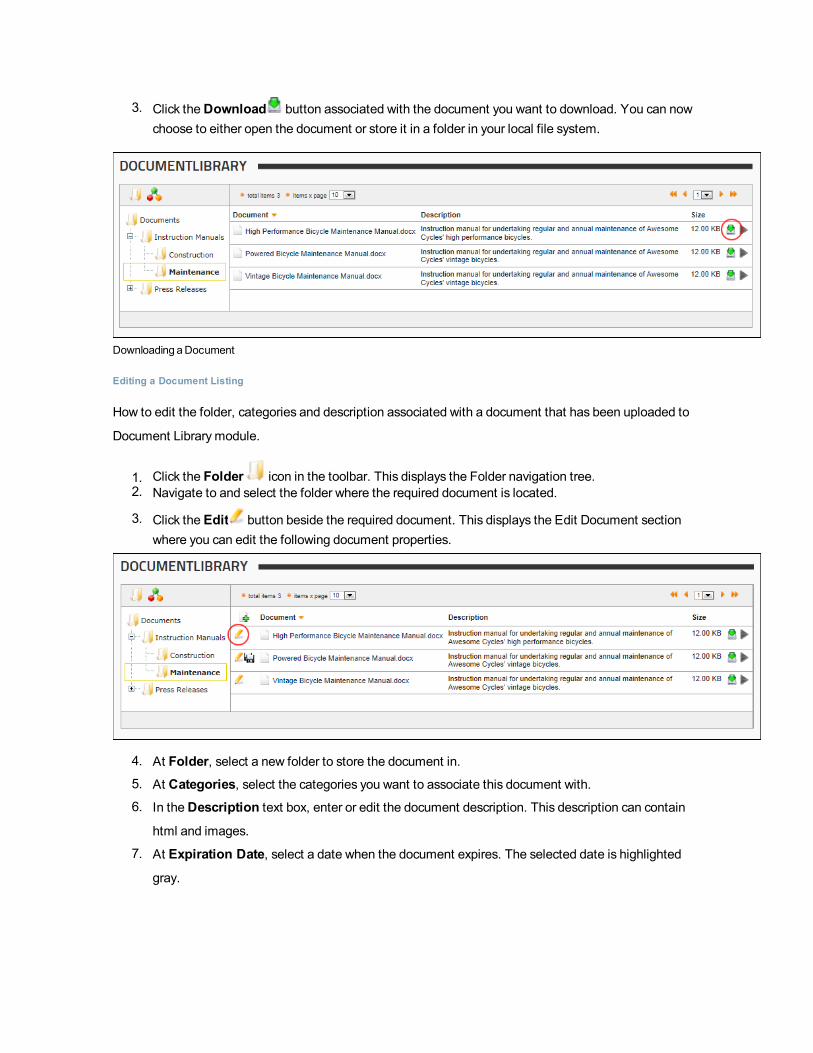
3. Click theDownload button associated with the document you want to download. You can nowchoose to either open the document or store it in a folder in your local file system.
Downloading aDocument
Editing a Document Listing
How to edit the folder, categories and description associated with a document that has been uploaded to
Document Librarymodule.
1. Click the Folder icon in the toolbar. This displays the Folder navigation tree.2. Navigate to and select the folder where the required document is located.
3. Click the Edit button beside the required document. This displays the Edit Document sectionwhere you can edit the following document properties.
4. At Folder, select a new folder to store the document in.
5. At Categories, select the categories you want to associate this document with.6. In theDescription text box, enter or edit the document description. This description can contain
html and images.
7. At Expiration Date, select a date when the document expires. The selected date is highlighted
gray.

8. Click theUpdate button. If the folder isn't moderated, the added file is displayed in the list of doc-
uments for that folder.
1. Optional. If this folder is moderated a message reading "Moderated folder edit. All edits
will be reviewed before being published" is displayed.
2. Click theOK button to confirm.
Enabling Document Tracking
How to enable or disable tracking of a single document or all documents within a folder of the Document
Librarymodule.
Permissions. Usersmust be granted Track Folder and/or Track Document permissions to manage folder
and document tracking respectively.
1. Click the Folder icon in the toolbar. This displays the Folder navigation tree.2. In the Navigation tree, navigate to and select the required folder.
3. Select from these options to enable or disable tracking:
l To enable tracking for all documents within this folder, click the Tracking icon in the titlebar. This displays the message "You are about to enable document tracking on the entire
folder. You will be notified of changes to all existing items, as well as new item uploads."
1. Click theOK button to confirm.
l To disable tracking for all documents within this folder, click theNot Tracking icon inthe title bar. This displays the message "You are about to disable document tracking on the
entire folder. You will no longer receive notification on any item changes or uploads."
1. Click theOK button to confirm.
l To enable tracking for an individual document, click the Tracking button.
l To disable tracking for an individual document, click theNot Tracking button.

Enabling or Disabling Tracking for an individualdocument
Managing Document Tracking
How to view a list of tracked documents and disable tracking for one or more documents using the Open-
Document module.
1. Navigate to Tools > Tracked Items. A complete list of tracked documents is displayed.2. Optional. In the Filter Options section, select a folder to only view results from that folder and then
click the View Items link.
3. Optional. To disable tracking of a document, click the Stop Tracking button for that doc-ument.
Viewing andDisablingDocument Tracking
Managing Document Version Info
How to view version information and choose to restore, permanently delete or download previous versions
of the document. A version is automatically created every time a document is re-uploaded in the same
folder and with the same name.
1. Click the Folder icon in the toolbar.2. Navigate to the required folder and locate the required document.
3. Click the Version Info button.

4. A list of each version for the selected document. Note: If there are no versions saved, this section
will be empty. The following options are available
l Click theRestore button beside a version to restore it and set it as the current doc-ument. The version that was replaced as the current version will now be added as a new ver-
sion.
l Click theDelete button beside a version to permanently delete it.
l Click theDownload button beside a version to download it.
5. Click theCancel link to return to the module.
Re-Submitting a Document
How to re-submit a document using the Document Librarymodule. This is necessary when you receive noti-
fication from amoderator requesting you to revise and then re-submit a previously uploaded document for
approval. This topic explains how to edit the document properties and re-submit it.
Permissions. Usersmust be granted Moderate Folder permissions to the folder.
1. On the toolbar, navigate to Tools > Moderate and then select My Items.

2. Optional. In the Filter Options section, apply one or more filters. See "Moderation Filter Options"
3. Click theReview button beside the required file. This opens the Edit Document section.4. Optional. Edit one or more document fields. Note: File names cannot include any of the following
symbols: <,>,*,+,%,&,:,\,?
5. Click theUpdate button.6. Click theRe-Submit link to re-submit the file for moderation.
Viewing Category Statistics
How to view the comprehensive set of statistics tools using the Document Librarymodule. Information pro-
vided for each category is the category path, the name of the module used to view the category, the user-
name (if known) of the user who viewed the category and the date and time for each view. All statistics can
be filtered by user name and date range.
1. Navigate to Tools > Statistics > [by Category] using the Document Library toolbar.
2. This opens the Category Statistics page and displays category information and the number of
views.
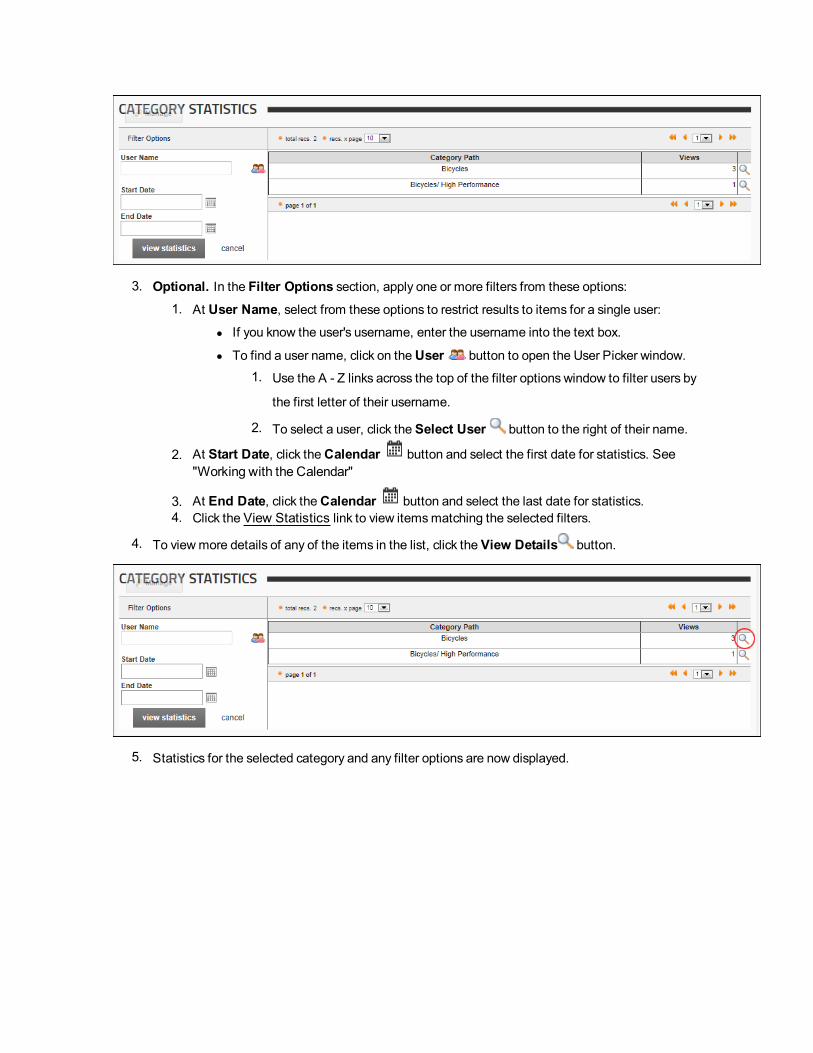
3. Optional. In the Filter Options section, apply one or more filters from these options:
1. At User Name, select from these options to restrict results to items for a single user:
l If you know the user's username, enter the username into the text box.
l To find a user name, click on theUser button to open the User Picker window.1. Use the A - Z links across the top of the filter options window to filter users by
the first letter of their username.
2. To select a user, click the Select User button to the right of their name.
2. At Start Date, click theCalendar button and select the first date for statistics. See"Working with the Calendar"
3. At End Date, click theCalendar button and select the last date for statistics.4. Click the View Statistics link to view itemsmatching the selected filters.
4. To viewmore details of any of the items in the list, click the View Details button.
5. Statistics for the selected category and any filter options are now displayed.

Viewing Document Statistics
How to view download statistics for documents within the Document Librarymodule. Information provided
is the name of the module where the document was downloaded from, the username (if known) of the user
who downloaded the document and the date and time that it was downloaded. All statistics can be filtered
by folder, user name and any date range.
1. Navigate to Tools > Statistics > [by Documents].
2. This opens the Document Statistics pane and display summary list of all download activity.

3. Optional. In the Filter Options section, apply one or more filters from these options:
1. At Folder, select a folder to restrict results to documents within that folder.2. At User Name, select from these options to restrict results to items for a single user:
l If you know the user's username, enter the username into the text box.
l To find a user name, click on theUser button to open the User Picker window.1. Use the A - Z links across the top of the filter options window to filter users by
the first letter of their username.
2. To select a user, click the Select User button to the right of their name.
3. At Start Date, click theCalendar button and select the first date for statistics. See"Working with the Calendar"
4. At End Date, click theCalendar button and select the last date for statistics.5. Click the View Statistics link to view itemsmatching the selected filters.
4. To viewmore details of any of the items in the list, click the View Details button.
5. Download details for the selected document are now displayed.

Viewing Folder Statistics
How to view statistics for document folders within the Document Librarymodule. Information provided for
each folder is the folder path, the name of the module used to view the folder, the username (if known) of
the user who viewed the folder and the date and time for each view. All statistics can be filtered by user
name and date range.
1. Navigate to Tools > Statistics > [by Folder] using the Document Library toolbar.
2. This opens Folder Statistics pane and display a summary list of all download activity.
3. Optional. In the Filter Options section, apply one or more filters from these options:
1. At User Name, select from these options to restrict results to items for a single user:
l If you know the user's username, enter the username into the text box.
l To find a user name, click on theUser button to open the User Picker window.1. Use the A - Z links across the top of the filter options window to filter users by
the first letter of their username.
2. To select a user, click the Select User button to the right of their name.
2. At Start Date, click theCalendar button and select the first date for statistics. See"Working with the Calendar"
3. At End Date, click theCalendar button and select the last date for statistics.4. Click the View Statistics link to view itemsmatching the selected filters.
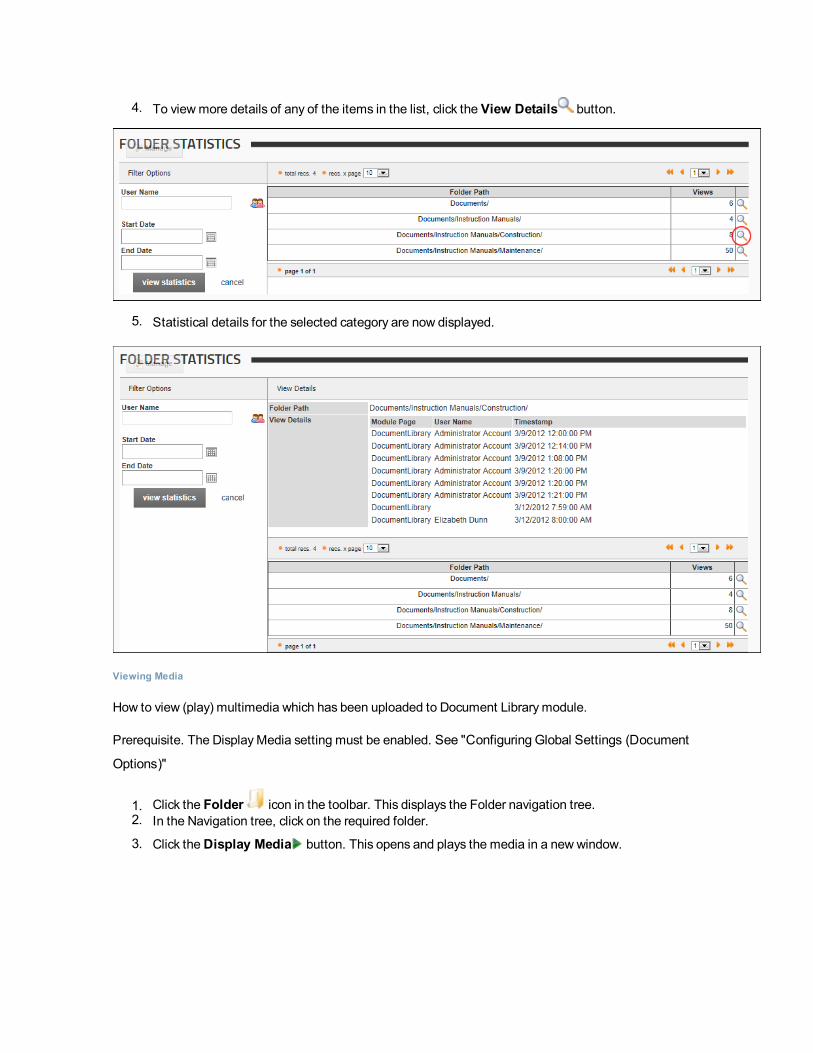
4. To viewmore details of any of the items in the list, click the View Details button.
5. Statistical details for the selected category are now displayed.
Viewing Media
How to view (play) multimedia which has been uploaded to Document Librarymodule.
Prerequisite. The DisplayMedia setting must be enabled. See "Configuring Global Settings (Document
Options)"
1. Click the Folder icon in the toolbar. This displays the Folder navigation tree.2. In the Navigation tree, click on the required folder.
3. Click theDisplay Media button. This opens and plays the media in a newwindow.
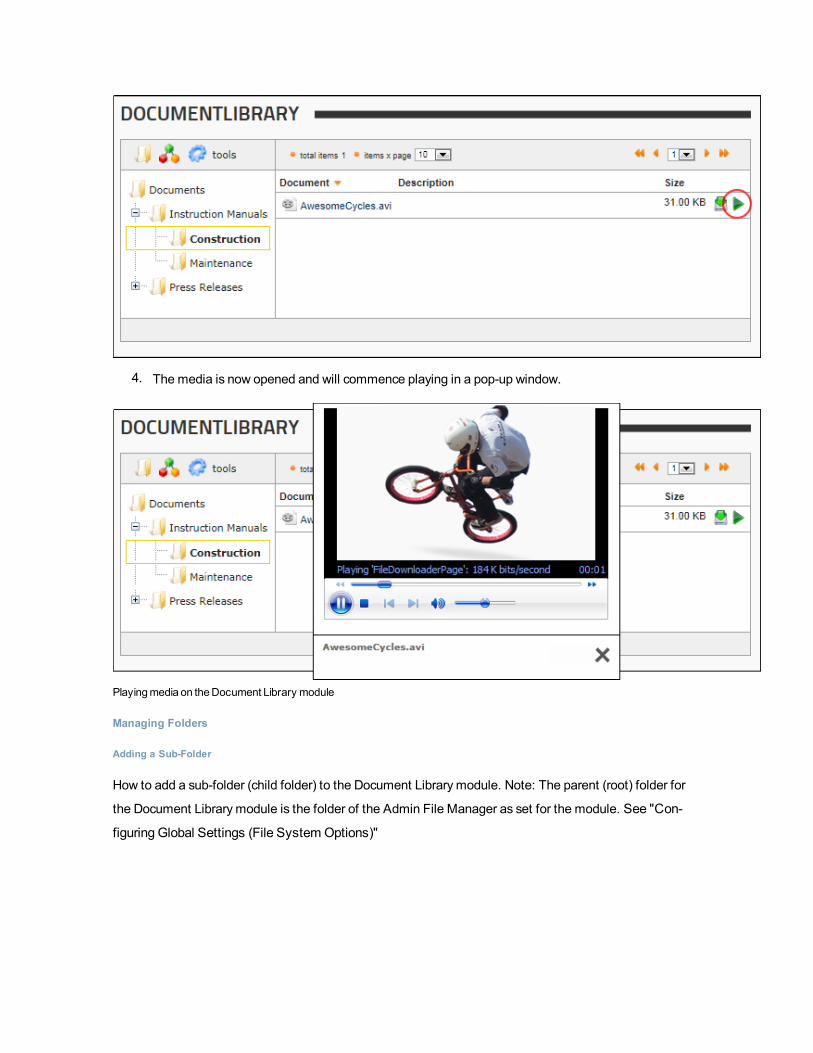
4. The media is now opened and will commence playing in a pop-up window.
Playingmedia on theDocument Library module
Managing Folders
Adding a Sub-Folder
How to add a sub-folder (child folder) to the Document Librarymodule. Note: The parent (root) folder for
the Document Librarymodule is the folder of the Admin File Manager as set for the module. See "Con-
figuring Global Settings (File System Options)"
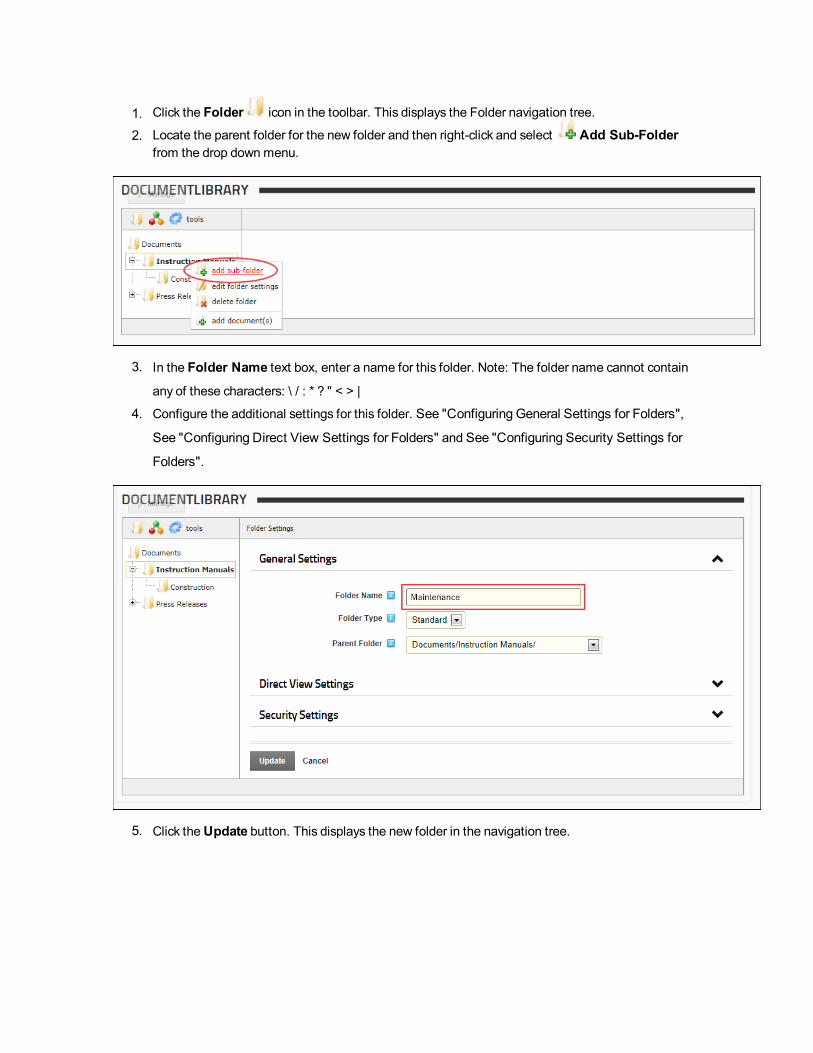
1. Click the Folder icon in the toolbar. This displays the Folder navigation tree.
2. Locate the parent folder for the new folder and then right-click and select Add Sub-Folderfrom the drop downmenu.
3. In the Folder Name text box, enter a name for this folder. Note: The folder name cannot contain
any of these characters: \ / : * ? " < > |
4. Configure the additional settings for this folder. See "Configuring General Settings for Folders",
See "Configuring Direct View Settings for Folders" and See "Configuring Security Settings for
Folders".
5. Click theUpdate button. This displays the new folder in the navigation tree.

Adding aSub-Folder
Configuring Direct View Settings for Folders
How to configure the Direct View Settings for folders in the Document Librarymodule. This tutorial
assumes you are currently adding (See "Adding a Sub-Folder") or editing (See "Editing Folder Settings")
a folder.
1. Expand the Direct View Settings section.
2. At Direct Access Only select from these options:
l Check the check box to set this folder as hidden from general view, unless accessed
directly through the 'Direct URL' (as shown in the image below) or through setting the value
of 'Restrict List to 1 Folder' in the Module Settings. If the folder marked for direct view con-
tains sub-folders, all sub-folders will also be visible, unless those sub-folders have also been
marked for direct view as well.
1. In theDirect Access Key, enter a unique key that will be required in order to access
this "Direct AccessOnly" folder. If you do add a key, and you access the folder
through the 'Direct URL' method, then you'll need to place both the xsfid parameter
as well as a new key parameter in the URL. If you access the folder through the
'Restrict List to 1 Folder' method, then you'll need to place only the new key param-
eter in the URL. [url format: xsfid=id&xsfk=key]
2. At Direct URL the direct URL for this folder is displayed. If linking to this page
through an external link, and you only want to show the contents of this specific
folder (and all of its sub-folders), this is the parameter to be added to the URL. Add-
ing this parameter to the URL will achieve the same results as setting the value of
'Restrict List to 1 Folder' in the module settings.
l Uncheck the check box to enable access to all authorized users using the Navigation tree.
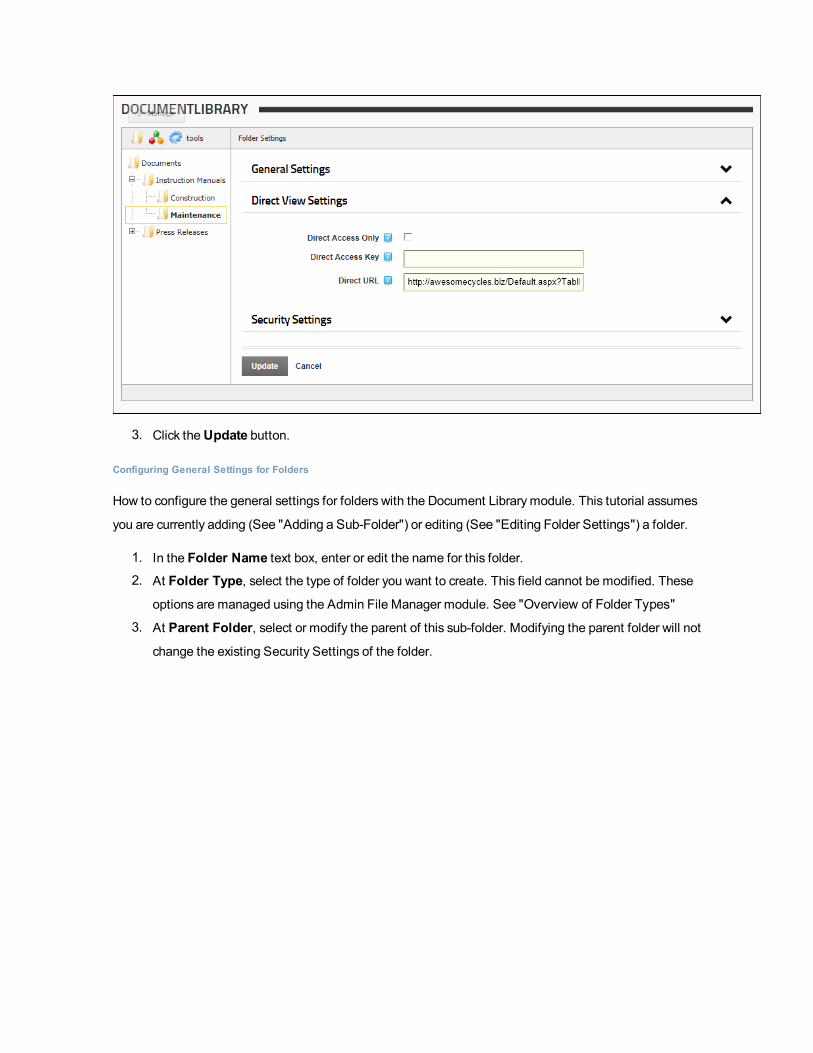
3. Click theUpdate button.
Configuring General Settings for Folders
How to configure the general settings for folders with the Document Librarymodule. This tutorial assumes
you are currently adding (See "Adding a Sub-Folder") or editing (See "Editing Folder Settings") a folder.
1. In the Folder Name text box, enter or edit the name for this folder.2. At Folder Type, select the type of folder you want to create. This field cannot be modified. These
options are managed using the Admin File Manager module. See "Overview of Folder Types"
3. At Parent Folder, select or modify the parent of this sub-folder. Modifying the parent folder will not
change the existing Security Settings of the folder.
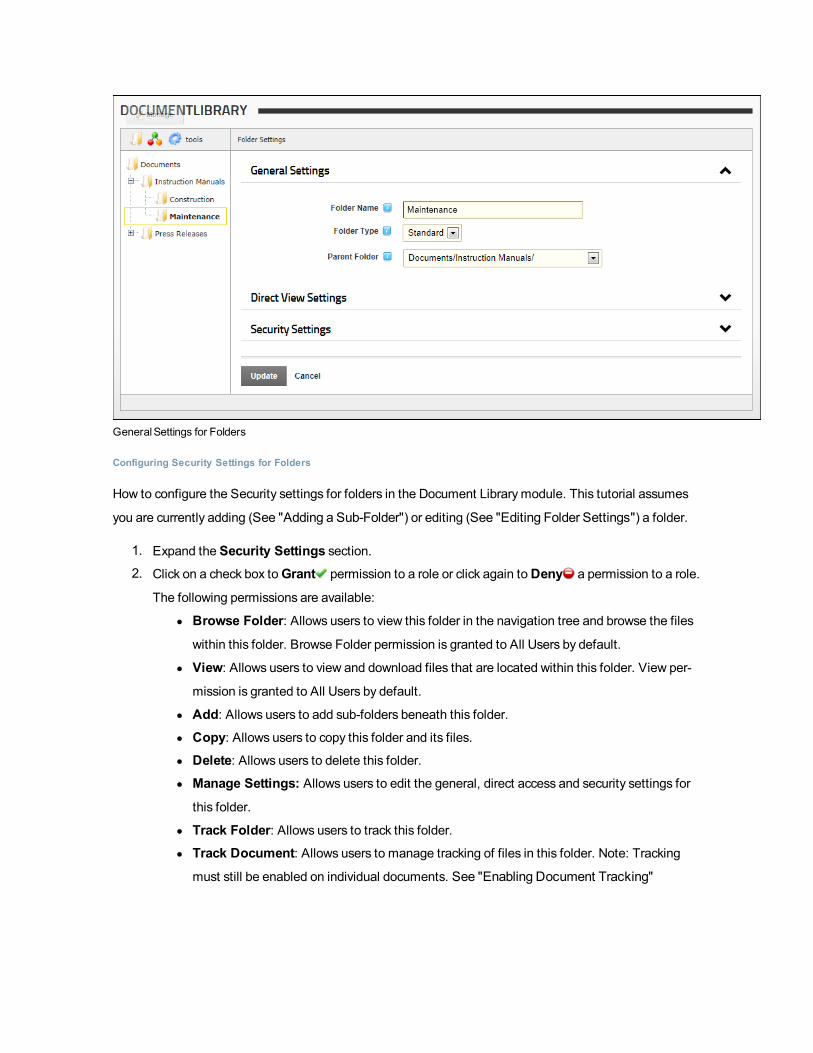
GeneralSettings for Folders
Configuring Security Settings for Folders
How to configure the Security settings for folders in the Document Librarymodule. This tutorial assumes
you are currently adding (See "Adding a Sub-Folder") or editing (See "Editing Folder Settings") a folder.
1. Expand the Security Settings section.2. Click on a check box toGrant permission to a role or click again toDeny a permission to a role.
The following permissions are available:
l Browse Folder: Allows users to view this folder in the navigation tree and browse the files
within this folder. Browse Folder permission is granted to All Users by default.
l View: Allows users to view and download files that are located within this folder. View per-
mission is granted to All Users by default.
l Add: Allows users to add sub-folders beneath this folder.l Copy: Allows users to copy this folder and its files.l Delete: Allows users to delete this folder.l Manage Settings: Allows users to edit the general, direct access and security settings for
this folder.
l Track Folder: Allows users to track this folder.l Track Document: Allows users to manage tracking of files in this folder. Note: Tracking
must still be enabled on individual documents. See "Enabling Document Tracking"

l Moderate Folder: Allows users to access the Moderate section under tools where they can
moderate and approve documents uploaded to this folder.
l Full Control: Allows users to perform all file and folder management tasks for this folder.
This permission does not include permission to track documents or folders or perform doc-
ument moderation.
3. Optional. In theUsername text box, enter the username of the user you want to grant or deny per-
missions to and then click the Add link.4. Set permissions for this user as shown at Step 2.
5. Optional. Repeat Step 3-4 to set permissions for additional usernames.6. Click theUpdate button.
SettingSecurity Settings for Document Library Folders

Deleting a Folder
How to delete a folder in the Document Librarymodule. This deletes the folder from both the database as
well as the file system.
1. Click the Folder icon in the toolbar. This displays the Folder navigation tree.
2. Locate the folder to be deleted, right-click on the folder name and select Delete Folder fromthe drop downmenu.
3. Click theDelete link. This displays the message "Are you sure you want to delete this Folder and all
of its Documents and SubFolders?"

4. Click theOK button to confirm.
Editing Folder Settings
How to edit folder setting such as folder name, parent folder, security settings and viewing settings for fold-
ers within the Document Librarymodule.
Permissions. Access to folder settings is restriction by user permissions. E.g. A user must have Full Con-
trol permissions to view the Security Setting section. Only Administrators and SuperUsers can edit Root
folder settings.
1. Click the Folder icon in the toolbar. This displays the Folder navigation tree.
2. Navigate to the required folder and then right-click on the folder name and select Edit FolderSettings for sub folders - OR -Root Folder Settings for the root folder.

3. Configure the additional settings for this folder. See "Configuring General Settings for Folders",
See "Configuring Direct View Settings for Folders" and See "Configuring Security Settings for
Folders"
4. Click theUpdate button.
Tip: The parent folder of a specific folder can be also changed through drag & drop utility. Just
select the folder you want to move, click the left button and drag the folder to the chosen parent
folder. This will not change the security setting of the moved folder.
Setting User Security for Folders
How to give specific users a specific set of access rights to the parent folder (root folder) of the Document
Librarymodule. Note: This topic assumes you have already created the folder.
1. Right-click on the required folder and then select Root Folder Settings (root folder only) or
select Edit Folder Settings for sub-folders.
2. Select the Security tab.
3. At User Security, click on theUser button. This opens a windowwhere you can view a list ofthe existing users.
4. Use the A-Z links above the grid to filter users by the first letter of their username.
5. To select a user, click the Select User button to the right of their name. This displays their user-name in the User Security text box.

6. Click theAdd button. This adds their name to the User Security section and creates a full list ofsecurity options that you can select from.
7. Repeat Steps 3-6 to add additional usernames.
8. Select one or more permissions for each user.
9. Click theUpdate button.
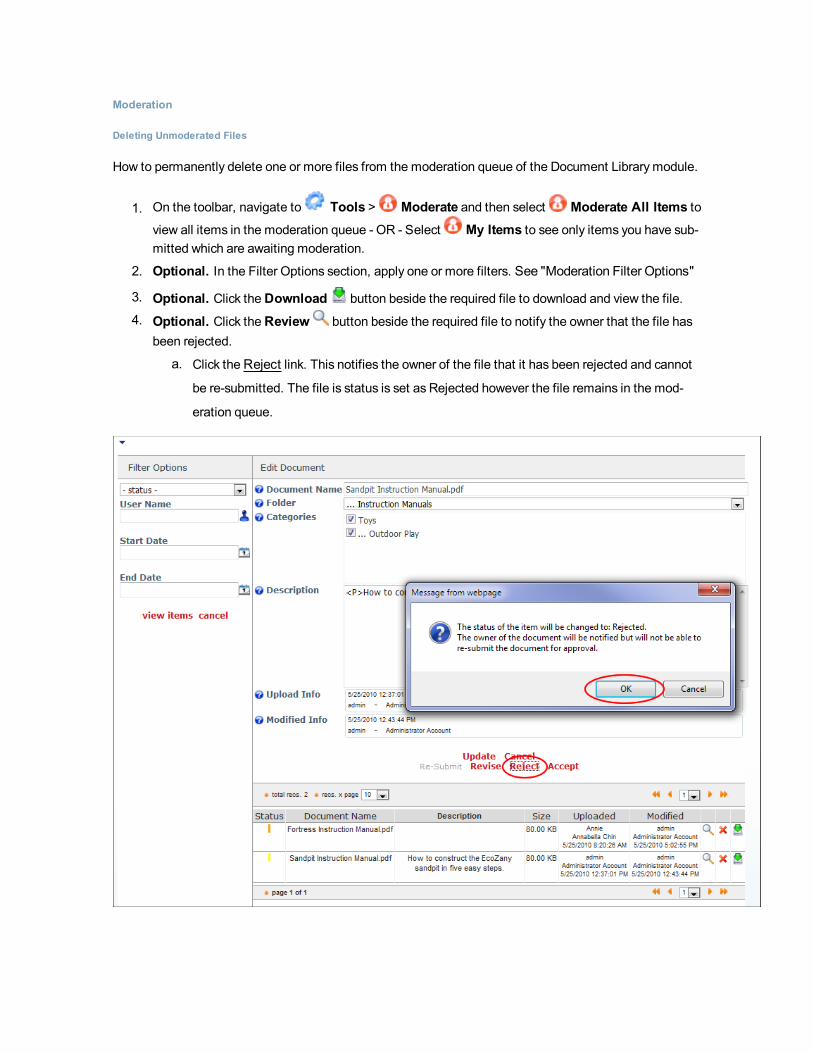
Moderation
Deleting Unmoderated Files
How to permanently delete one or more files from the moderation queue of the Document Librarymodule.
1. On the toolbar, navigate to Tools > Moderate and then select Moderate All Items toview all items in the moderation queue - OR - Select My Items to see only items you have sub-mitted which are awaiting moderation.
2. Optional. In the Filter Options section, apply one or more filters. See "Moderation Filter Options"
3. Optional. Click theDownload button beside the required file to download and view the file.4. Optional. Click theReview button beside the required file to notify the owner that the file has
been rejected.
a. Click theReject link. This notifies the owner of the file that it has been rejected and cannot
be re-submitted. The file is status is set as Rejected however the file remains in the mod-
eration queue.

5. Click theDelete button beside the file to be deleted. This display the message "Are you sureyou want to delete this item permanently?"
6. Click theOK button to confirm.7. Repeat Steps 2-6 to delete additional files.
DeletingUnmoderatedFiles
Moderating Uploaded Files
How to moderate files uploaded using the Document Librarymodule.
1. On the Document Librarymodule toolbar, navigate to Tools > Moderate and then selectModerate All Items to view all files in the moderation queue - OR - Select My Items to
see only files you have submitted which are awaiting moderation.
2. Optional. In the Filter Options section, apply one or more filters. See "Moderation Filter Options"
3. Optional. Click theDownload button beside a file to download and review the content of thefile.
4. Click theReview button beside the required file.

5. This opens the Edit Document section.
6. Optional. Edit the document categories or description1. Click theUpdate button. You are now returned to the previous screen.
2. Click theReview button beside the file again to return to the Edit Document section.7. Select one or these options to complete moderation for this file:
l Revise: Select to set the file for revision. This notifies the owner requesting they revise the
file and then re-submit it for approval. The file status is set as Revise and the file remains in
the Moderation list.
l Reject: Select to reject the file. This notifies the owner of the file that it has been rejected
and cannot be re-submitted. The file status is set as Rejected and it remains in the Mod-
eration list.
l Accept: Select to accept the file. This notifies the owner of the file that it has been
accepted. This file is published and removed from the Moderation list.

8. Optional. If you chose to Reject an file at Step 7, you can permanently delete the file if you don't
want to retain a copy.
1. Click theDelete button beside the file to be deleted. This display the message "Are you
sure you want to delete this item permanently?
2. Click theOK button to confirm.
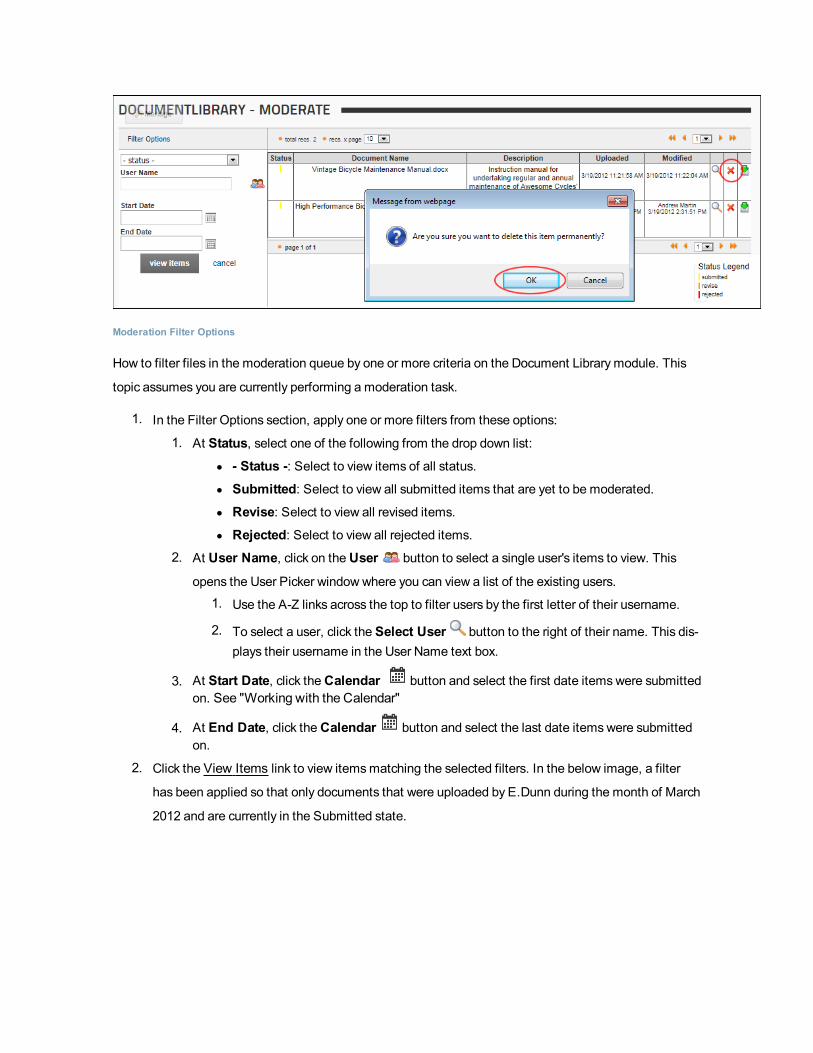
Moderation Filter Options
How to filter files in the moderation queue by one or more criteria on the Document Librarymodule. This
topic assumes you are currently performing a moderation task.
1. In the Filter Options section, apply one or more filters from these options:
1. At Status, select one of the following from the drop down list:
l - Status -: Select to view items of all status.
l Submitted: Select to view all submitted items that are yet to be moderated.
l Revise: Select to view all revised items.
l Rejected: Select to view all rejected items.
2. At User Name, click on theUser button to select a single user's items to view. This
opens the User Picker windowwhere you can view a list of the existing users.
1. Use the A-Z links across the top to filter users by the first letter of their username.
2. To select a user, click the Select User button to the right of their name. This dis-plays their username in the User Name text box.
3. At Start Date, click theCalendar button and select the first date itemswere submittedon. See "Working with the Calendar"
4. At End Date, click theCalendar button and select the last date itemswere submittedon.
2. Click the View Items link to view itemsmatching the selected filters. In the below image, a filter
has been applied so that only documents that were uploaded by E.Dunn during the month of March
2012 and are currently in the Submitted state.

ModerationQueueFilter Options
Settings
Configuring Global Settings (Document Options)
How to configure global settings for the Document Librarymodule. Note: All settings on the Global tab
apply to all instances of the module in the given site.
1. Select Manage > Settings from the module actionsmenu.2. Select theDocumentLibrary Settings tab.3. Expand the Local Settings > Document Options section.4. At Enabled Extensions, you can set the file extensions that can be uploaded to Document Library
modules on this site. The complete list of allowed extensions is a Host Setting that is managed by
SuperUsers.
l Enable all available extensions: Select to enable all file extensions asmaintained under
Host Settings. This is the default option. Skip to Step 5.
l Select extensions to enable: Select to limit the types of files that can be uploaded to Doc-
ument Librarymodules within this site.
l To enable an extension: Select one or more extensions in the Disabled list and click
theAllow Selected button.
l To disable an extension: Select one or more extensions in the Enabled list and click
theBlock Selected button.

l To enable all extensions: Click theAllow All button.
l To disable all extension: Click theBlock All button.
5. At Confirm Download [pop-up], Check the check box to show a pop-up windowwith addi-
tional information before a download is started - OR - Uncheck the check box to set the down-
load to start directly.
6. At Display Media, check the check box to display a Play button for media files (audio,images and video) - OR - Uncheck the check box to disable.
7. At Box Size, select the size of the box that displays the media content of the documents.8. At Versioning Enabled, select from these options:
l Check the check box to enable versioning. Versioning allows you to save a specified
number of copies of the documents you upload. Every time you re-upload a new version of
the same document, the previous version is saved and can be restored on demand. Note:
You can also save a version of your document any time you want to, by editing the doc-
ument and then clicking on theAdd Version button.1. In the Versioning Max Number text box, enter the maximum number of versions
which can be saved for each document.
l Uncheck the check box to disable.

9. At DNN Search Enabled, select from these options:
l Check the check box to enable the documents to be included in the default DNN Search.
The searchable fields are the Name and the Description of the document. Note: The default
DNN Search does not index document content. Also, it does not implement any kind of secu-
rity. Therefore, unauthorized usersmay see descriptions for documents theymay not have
access to. Such documents will still be download protected.
l Uncheck the check box to remove this module from the DNNSearch.
10. Click theUpdate button.
Configuring Global Settings (Expired Documents Notification Options)
How to configure the notification message that is sent to selected users to inform them that one or more
documents will expire from the Document Librarymodule the following day. This setting provides the
selected users with an opportunity to review and manage the document(s). Note: All settings on the Global
tab apply to all instances of the module in the given site.
1. Select Manage > Settings from the module actionsmenu.2. Select theDocumentLibrary Settings tab.3. Expand the Local Settings > Expired Documents Notification Options section.4. At Recipients List, select from these options:
l Leave the field blank to send notifications to all Administrators.
l Begin typing the name of the user or role that will receive a notification and then click on a
result to select it. E.g. In the below image, the search criteria "a" returns two matching
roles, Administrators and Translator (en-US), and three matching users Augustine Meal,
Efren Alber and Tonette Aho.

5. Repeat Step 4 to add additional users or roles to the recipient list.
6. Optional. In theNotification Subject text box, edit the subject of the notification email
message. The default subject is: Documents about to expire
7. Optional. In theNotification Body text box, edit the body of the notification message. The
default message is: <p>The following documents are about to expire in web-
site "<a href="[SiteUrl]">[SiteName]</a>":<ul>[Documents]</ul></p>
8. Optional. In the Template of Expired Documents text box, edit the template for each doc-
ument listed in the message body. You can use the following tokens: [DocumentName]: Doc-
ument's name, [FolderPath]: The folder which saved the document, [ExpirationDate]: The time
when document will expire. The default message is: <li>"[DocumentName]" in folder "
[FolderPath]" will expire on "[ExpirationDate]"</li>
9. Click theUpdate button.

Related Topics:
l See "About the ScheduleModule"
Configuring Global Settings (File System Options)
How to configure global settings for the file system of the Document Librarymodule. Note: All settings on
the Global tab apply to all instances of the module in the given site.
Prerequisite. To enable Huge Uploads, a SuperUser must enable full trust for this site.
1. Select Manage > Settings from the module actionsmenu.2. Select theDocumentLibrary Settings tab.3. Expand theGlobal Settings > File System Options section.
4. At Synchronize, click on the Synchronize the Folders button to synchronize the folders anddocuments. This adds and/or removes any folders and documents that were added directly to the
database. The process is asynchronous.
5. At Root Folder, select an existing folder of the Admin File Manager. This is the folder where the
documents will be stored.

6. At Huge Uploads, select from these options:
l Check the check box to allow uploads up to 2 Gigabytes. Notice that the web.config will
be automatically modified (a backup of the actual configuration file will be created on the
same folder). And also, a folder will be created in the root folder of the application. Impor-
tant. Huge uploadsmust be uncheck before uninstalling this module.l Uncheck the check box to disallow large uploads. Changes to the web.config and the
folder in the root folder will be eliminated.
7. At Enable WebDav, select from these options:
l Check the check box to display an alternative 'open on server' button in the documents
grid, next to the 'download\' button. Clicking on the 'open on server' button will open the doc-
ument in its client environment (MS Word or MS Excel). Note 1: The folder must be aWeb-
Dav folder [you will need to configure the server]. To check if the current root folder is
correctly setup as aWebDav folder, click theCheck If WebDav Is Enabled On The
Server button. Note 2: If WebDav is not correctly setup on the server, and this option isselected, the document will still open in its corresponding application, but the [save] and
[save as] options will only save the document in a local [to your PC] folder. Note 3: You
must enable ActiveX controls to run on your client PC, by changing the corresponding Zone
Security Options.
l Uncheck the check box to disable WebDav.

8. Click theUpdate button.
Configuring Global Settings (Module Options)
How to modify the look and feel of an instance of the Document Librarymodule by changing the style that
is applied to the module.
1. Select Manage > Settings from the module actionsmenu.2. Select theDocumentLibrary Settings tab.3. Expand theGlobal Settings > Module Options section and set any of the following optional set-
tings.
4. At Style, select the style to be applied to this module. The following styles are included by default:
Default,White, Gray,White Web2.0 andGray Web2.0.
5. Click theUpdate button.

Tip: All styles can be changed through the module.css style sheet found in the module's specific
directories.
Here's is an example of each style:
Default:
White:
Gray:

White Web 2.0:
Gray Web 2.0:

Configuring Global Settings (Statistic Options)
How to configure the statistic options for an instance of the Document Librarymodule.
1. Select Manage > Settings from the module actionsmenu.2. Select theDocumentLibrary Settings tab.3. Expand the Local Settings > Statistics Options section.4. In the Stats Log History [Days] text box, enter the number of days that you want to retain folder,
category and document statistics information for.

5. Click theUpdate button.
Configuring Local Settings (Document Grid Options)
How to configure local settings for the document grid on the Document Librarymodule. Here you can con-
trol what document information is displayed as well as the default sort field and direction. Except for Doc-
ument Name, which is a required field, you can opt to show or hide all other fields. Options selected here
only apply to this specific instance of the module.
1. Select Manage > Settings from the module actionsmenu.2. Select theDocumentLibrary Settings tab.3. Expand the Local Settings >Document Grid Options section.4. At Display Navigation, select from these options:
l Check the check box to display the paging and navigation bar above and below files in the
grid asmarked in the image below. This is the default option.
l Uncheck the check box to remove navigation bar and display all items in the list at once.
5. At Items Per Page, select the number of items to be displayed in the grid at once. Available
options are: 10, 25, 50, or 100. The default setting is 10 as shown in the image below.
6. At Layout, select the layout for the document grid from the available options.
l Multiple Columns [Default]: This is the default option.

l Compact: Document title and description are displayed in one column and there is no head-
ing for the Size column.
l Multimedia: Suitable for displaying multimedia, this layout displays a small Play button
beside each file. Note: The DisplayMedia setting must be checked to enable the Play but-
ton. See "Configuring Global Settings (Document Options)"
l Thumbnails: Suitable for displaying multimedia, this layout displays a large Play button
beside each file. The DisplayMedia setting must be checked to enable the Play button. See
"Configuring Global Settings (Document Options)"
7. Optional. In the Thumbnail Background Color text box, enter the color (in hexadecimal format)
that will be used to replace the transparent background of any images that have a transparent back-
ground. This setting will only be valid when layout is set to "thumbnails". If you don't set a value and
the layout is set to "thumbnails", transparent pixels will be replaced with white pixels. Examples:
#FF0000, #12A2C3.
8. In theName - Display Length text box, enter the maximum number of characters for document
name field (including spaces). E.g. If a maximum of 10 is entered and the document name exceeds
the display length, then the name will display as "Document N..."
9. At the follow fields, check theDisplay check box to display the document field in the grid - OR -
Uncheck to hide the field:
1. Description: Select to view the description field of the document in the Document grid.
2. Size: Select to view the size field of the document in the Document grid.
3. Uploaded: Select to view the date and Display Name of the user that uploaded the doc-
ument in the Document Grid.
4. Modified: Select to view the date and Display Name of the user that modified the metadata
of the document, in the Document Grid.
10. In theDefault Sort - Ascending column, select the default field documents are sorted by when
displayed in ascending order.
11. In theDefault Sort - Descending column, select the default field documents are sorted by when
displayed in descending order.

12. Click theUpdate button.
Configuring Local Settings (Navigation Tree Options)
How to configure local settings for the Document Librarymodule. This section allows you to control the
way users can navigate through the document hierarchies. Options selected here only apply to this specific
instance of the module.
1. Select Manage > Settings from the module actionsmenu.2. Select theDocumentLibrary Settings tab.3. Expand the Local Settings > Navigation Tree Options section and set any of the following
optional settings.
4. At Default Tree Mode, set the default view for the navigation tree of this Document Library mod-
ule from these options:
l Folder [Default]: Select to display root folder and any sub-folders. This is the default set-
ting.
l Category: Select to display the list of Categories.5. At Allow Tree Mode Toggle, select from these options:
l Check the check box to display both the Folder andCategory icons in the tool-bar that is displayed at the top of the module. This enables users to view files organized by
either Folders or Categories and access both the Folder and Category drop down lists. This
is the default option.
l Uncheck the check box to disallow toggling. This removes both the Folder andCat-
egory icons from the toolbar and display the navigation tree as either Folders or Cat-egories, as selected at the Default Tree Mode field above. Important. If the Default Tree
Mode is set the Categories, users cannot add documents because they cannot access the
drop down list. Note: Administrators will continue to see the toggle options for admin-
istrative purposes. A No Togglemessage is also displayed to Administrators.6. At Restrict Tree to 1 Folder, select a folder to restrict this instance of the module to display only
that folder. Users can navigate to sub-folders and documents belonging to the selected folder. The
below image displays the tree restricted to the Instruction Manuals folder. Note: A Restricted
message is displayed to Administrators.
7. At Restrict Tree to 1 Category select a category name from the drop down list to restrict this
instance of the module to that category. Users can navigate to subcategories and documents
belonging to the selected category. The below image displays the tree restricted to the Indoor Play
category. Note: A Restrictedmessage is displayed to Administrators.8. At Tree Style, select the style for the navigation tree from these options:
l Plus-Minus Signs (Default): Select to view the plus and minus buttons in the navigation
tree.
l Up-Down Arrows: Select to view up and down arrow buttons in the navigation tree.
9. At Hide Tree [Flat View], select from these options:
l Check the check box hide the navigation tree. This displays all the documents within the
selected folder ( as selected at "Restrict Tree to 1 Folder" ) or category (as selected at
"Restrict Tree to 1 Category" ), including documents within the sub-folders/sub-categories.
Important. Tree must be restricted by folder or category to use this setting. Note: Admin-

istrators continue to see the navigation tree for administrative purposes.
l Uncheck the check box to display the navigation tree. This is the default option.
10. Allow Tree Horizontal Scroll select from these options:
l Check the check box to prevent the tree from growing in width. This displays a scroll bar
below the tree enabling users to scroll to the right or left, in order to see the folders.
l Uncheck the check box to enable the navigation tree grows in size (horizontally and ver-
tically) according to the number of folders that are open at any one time. This is the default
option.
11. Click theUpdate button.
HTML
About the HTML Module
The HTMLmodule (typically titled Text/HTML) displays rich text, HTML, images, flash or can perform a
script. This is a free form module that uses the Editor control to manage content using either a Basic Text
Box or Rich Text Editor.
Installation Note: This module is typically pre-installed on the site.
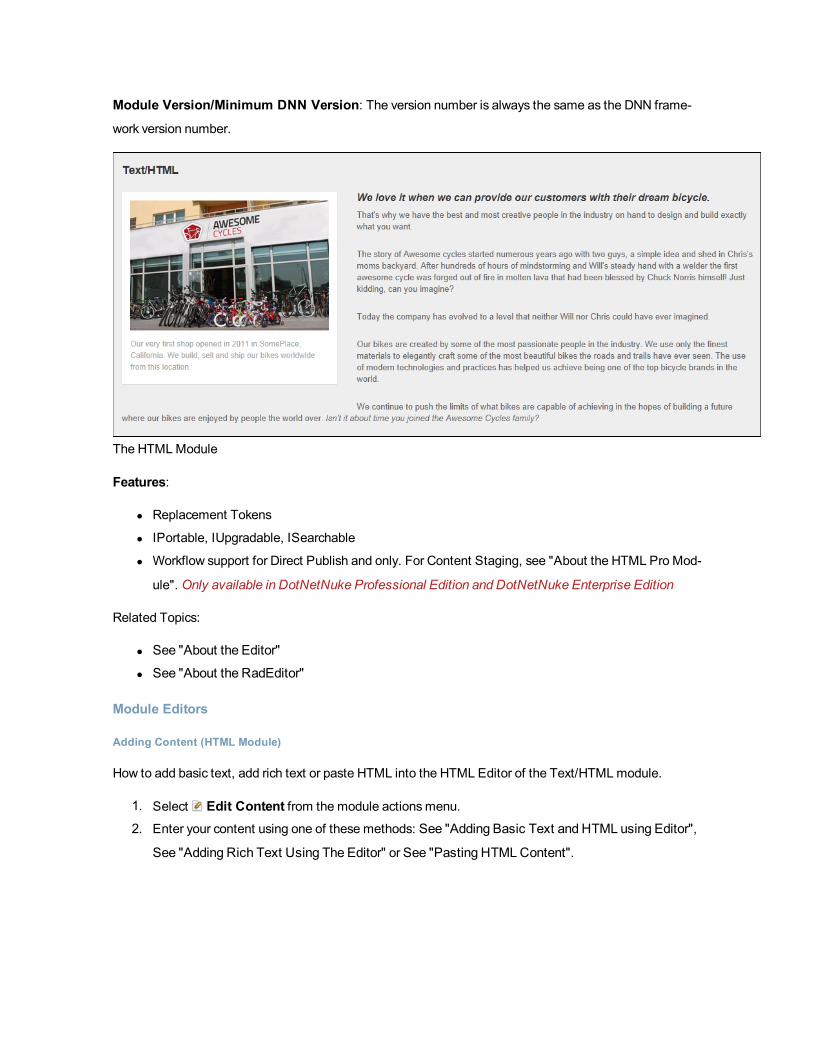
Module Version/Minimum DNN Version: The version number is always the same as the DNN frame-
work version number.
The HTMLModule
Features:
l Replacement Tokens
l IPortable, IUpgradable, ISearchable
l Workflow support for Direct Publish and only. For Content Staging, see "About the HTML Pro Mod-
ule". Only available in DotNetNuke Professional Edition and DotNetNuke Enterprise Edition
Related Topics:
l See "About the Editor"
l See "About the RadEditor"
Module Editors
Adding Content (HTML Module)
How to add basic text, add rich text or paste HTML into the HTML Editor of the Text/HTMLmodule.
1. Select Edit Content from the module actionsmenu.
2. Enter your content using one of these methods: See "Adding Basic Text and HTML using Editor",
See "Adding Rich Text Using The Editor" or See "Pasting HTMLContent".
3. Optional. Click the Preview link located below the Editor. This expands the Preview section
below and displays the content currently displayed in the Editor. If Direct Publish (rather than Con-
tent Staging) is used for this module, then skip to Step 7.
4. At On Save? / Publish Changes?, select from the below options (Note: This field only displays
when Content Staging is enabled. See "Setting aWorkflow (HTML Module)"):
l Check the check box to publish these changes and set them as ready for approval. This
automatically locks the content until it is either published or the lock is manually removed by
an Administrator.
l Uncheck the check box if the content is not yet ready for publishing/approval. This enables
you to save this draft and return to edit it at a later stage before submitting the content for
approval.
5. Click the Save link. If Direct Publishing is set for this module, the content changes are now dis-
played in the HTML Pro module. If Content Approval is enabled, continue to Step 7.
6. Optional. In the Enter Submission Comment text box, enter a comment relating to this sub-
mission.
7. Click the Submit link. This enters these changes into the next stage of content approval and sends
out notification messages as set in the workflow. You will be notified when your changes are
approved or rejected.
Note: If content approval is enabled and this content is ready to publish, See "Publishing a Draft
(HTML Module)"
Related Topics:
l See "About the Editor"
Adding Replacement Tokens (HTML Module)
How to add replacement tokens into the HTMLmodule.
1. Select Edit Content from the HTMLmodule actionsmenu.2. Enter the replacement token into the Editor. E.g. [User:FirstName] [User:LastName].

3. If Workflow is enabled, choose the required state. See "Adding Content (HTMLModule)" for more
details on advancing this content through the workflow process.
5. Click the Save link. If Direct Publishing is set for this module, the content changes are immediately
displayed in the HTMLmodule. If Content Approval is enabled and this content is ready to publish,
See "Publishing a Draft (HTML Module)"
Replacement Tokens Displaying theUser's Name
Related Topics:
l See "Enabling/Disabling Token Replacement (HTML Module)"
l See "List of Replacement Tokens"
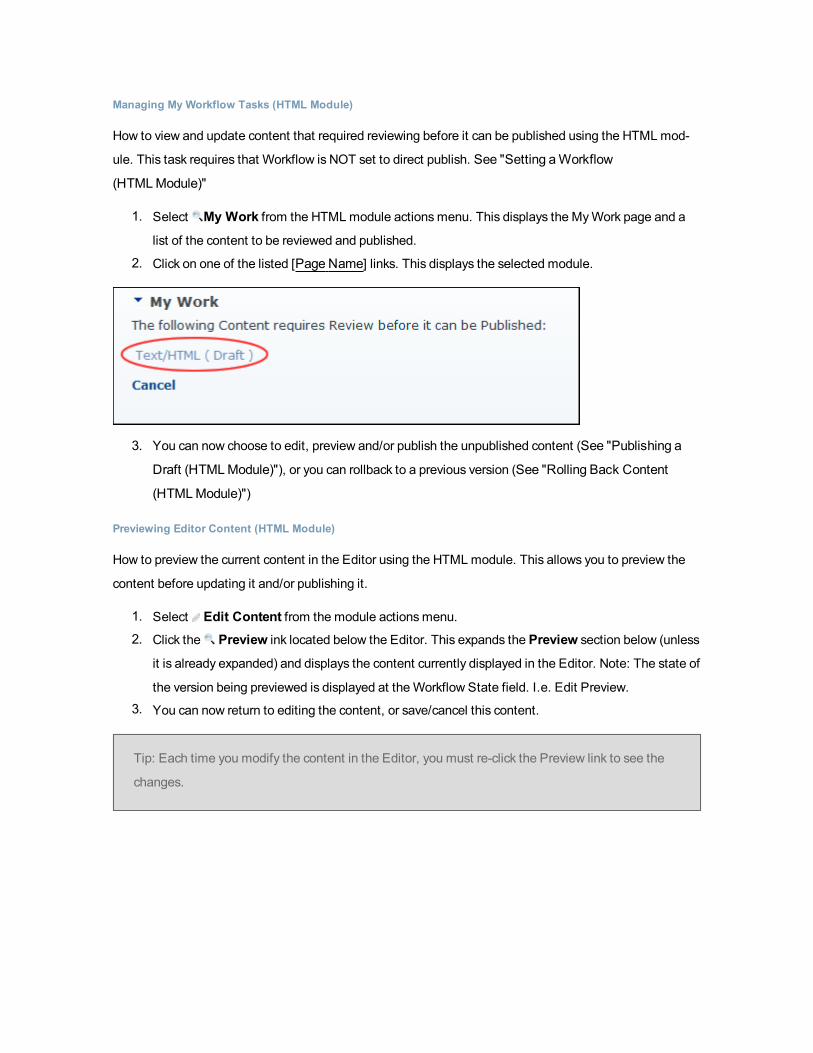
Managing My Workflow Tasks (HTML Module)
How to view and update content that required reviewing before it can be published using the HTMLmod-
ule. This task requires that Workflow is NOT set to direct publish. See "Setting aWorkflow
(HTML Module)"
1. Select My Work from the HTMLmodule actionsmenu. This displays the MyWork page and a
list of the content to be reviewed and published.
2. Click on one of the listed [Page Name] links. This displays the selected module.
3. You can now choose to edit, preview and/or publish the unpublished content (See "Publishing a
Draft (HTML Module)"), or you can rollback to a previous version (See "Rolling Back Content
(HTML Module)")
Previewing Editor Content (HTML Module)
How to preview the current content in the Editor using the HTMLmodule. This allows you to preview the
content before updating it and/or publishing it.
1. Select Edit Content from the module actionsmenu.
2. Click the Preview ink located below the Editor. This expands the Preview section below (unless
it is already expanded) and displays the content currently displayed in the Editor. Note: The state of
the version being previewed is displayed at theWorkflow State field. I.e. Edit Preview.
3. You can now return to editing the content, or save/cancel this content.
Tip: Each time you modify the content in the Editor, you must re-click the Preview link to see the
changes.

PreviewingCurrent Content in Editor
Publishing a Draft (HTML Module)
How to publish a draft of content using the HTMLmodule. Note: This tutorial only applies to the Content
Staging workflow.
1. Go to the required HTMLmodule. See "ManagingMy Workflow Tasks (HTML Module)"
2. Select Publish from the module actionsmenu.

Publishing aDraft
Rolling Back Content (HTML Module)
How to rollback to a previous content version using the HTML module. Note: This task requires that Work-
flow is NOT set to direct publish. See "Setting aWorkflow (HTML Module)"
1. Select Edit Content from the HTMLmodule actionsmenu.
2. Maximize the Version History section.3. Locate the required version.
4. Optional. Click the Preview button to preview a version. This expands the Preview section and
displays the selected version including details on the related workflow and the Item History.
5. Click theRollback button. The selected version is published immediately, even if the version
was initially a draft (Content Staging).
6. Click theCancel link to return to the module.

Viewing Previous Versions of Content (HTML Module)
How to view previous versions, as well as the currently saved version, of content for an instance of the
HTML module.
1. Select Edit Content from the HTMLmodule actionsmenu.
2. Expand the Version History section.3. Click the Preview button beside the required version.
The Preview section above is now maximized. It displays the content for the selected version and the
Workflow State set for the version being previewed. In addition, the Item History section can be
expanded to view additional details.

ViewingPrevious Versions of Content
Settings
Applying a Workflow (HTML Module)
1. Select Manage > Settings from the module actionsmenu.2. Select the HTML Module Settings tab.3. At Apply Workflow To, select from these options:
l Module: Select to apply the workflow set on this module to this module only.
l Page: Select to apply the workflow set on this module to all modules on this page.
l Site: Select to apply the workflow set on this module across all modules on the site.
4. At Replace Existing Settings?, check the check box to replace the existing settings for this
Module, Modules on this Page, or the whole site - depending on which of these three options you
selected at Step 3.
5. Click theUpdate button.
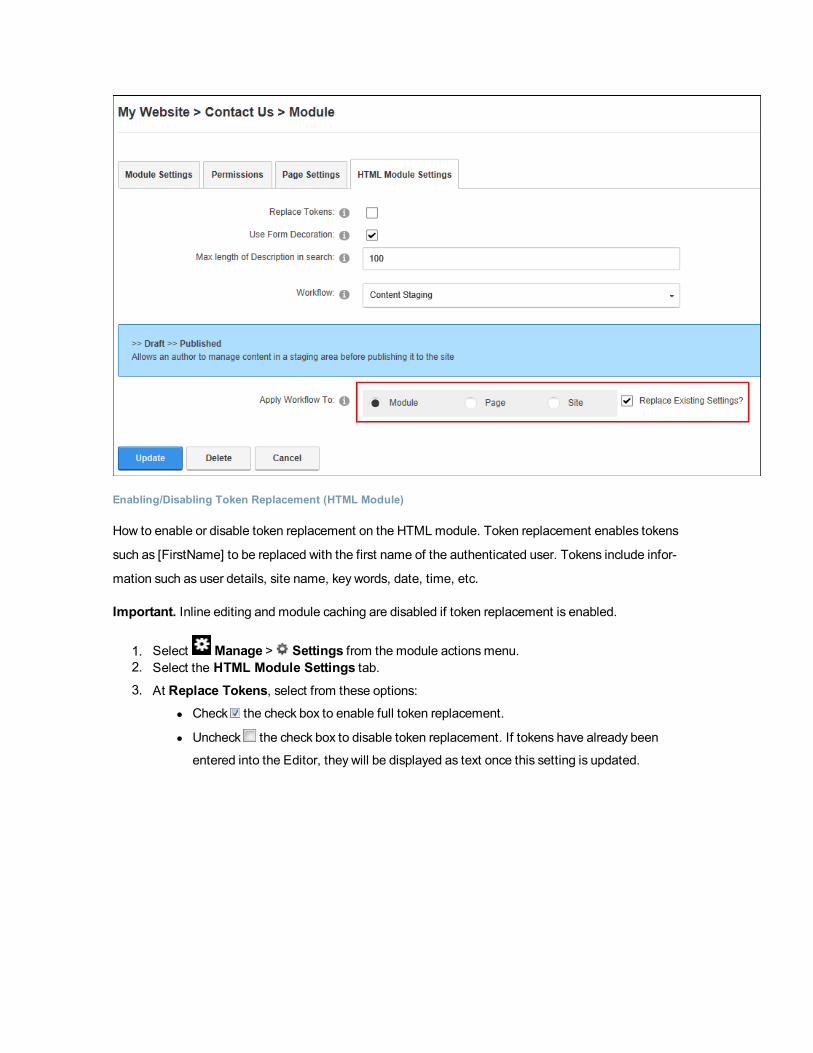
Enabling/Disabling Token Replacement (HTML Module)
How to enable or disable token replacement on the HTMLmodule. Token replacement enables tokens
such as [FirstName] to be replaced with the first name of the authenticated user. Tokens include infor-
mation such as user details, site name, key words, date, time, etc.
Important. Inline editing and module caching are disabled if token replacement is enabled.
1. Select Manage > Settings from the module actionsmenu.2. Select the HTML Module Settings tab.3. At Replace Tokens, select from these options:
l Check the check box to enable full token replacement.
l Uncheck the check box to disable token replacement. If tokens have already been
entered into the Editor, they will be displayed as text once this setting is updated.

4. Click theUpdate button.
Related Topics:
l See "Adding Replacement Tokens (HTML Module)"
Setting a Workflow (HTML Module)
How to set the workflow for an individual HTML module.
1. Select Manage > Settings from the module actionsmenu.2. Select the HTML Module Settings tab.3. AtWorkflow, select the workflow you wish to use from these options:
l Content Staging: Content staging allows content to be saved as a draft before it is pub-
lished. Draft content will only be visible when edit mode is selected by users who can edit
the module/page. In viewmode the most recent published version of content will be dis-
played instead of the draft. This is the same for users with view permissions only. See "Pub-
lishing a Draft (HTML Module)"
l Direct Publish: With the direct publish workflow any content that is saved on the Edit Con-
tent page or through the inline editor will be immediately visible to all users with permissions
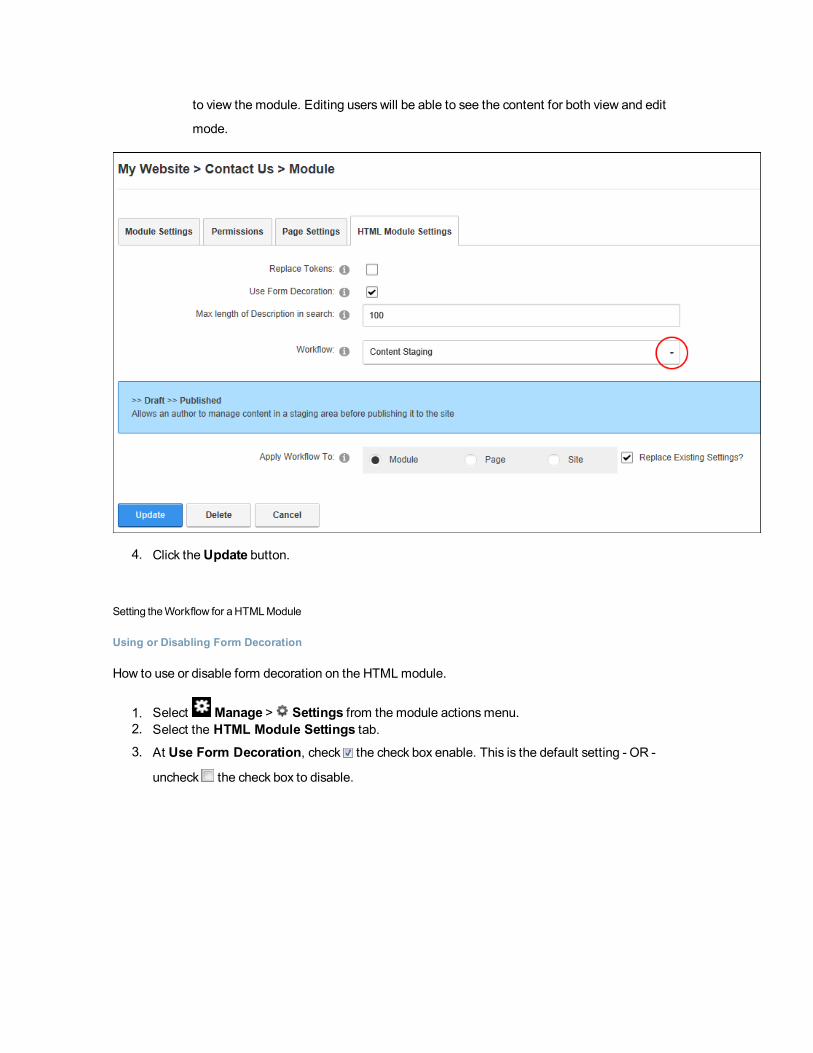
to view the module. Editing users will be able to see the content for both view and edit
mode.
4. Click theUpdate button.
Setting theWorkflow for aHTML Module
Using or Disabling Form Decoration
How to use or disable form decoration on the HTMLmodule.
1. Select Manage > Settings from the module actionsmenu.2. Select the HTML Module Settings tab.3. At Use Form Decoration, check the check box enable. This is the default setting - OR -
uncheck the check box to disable.
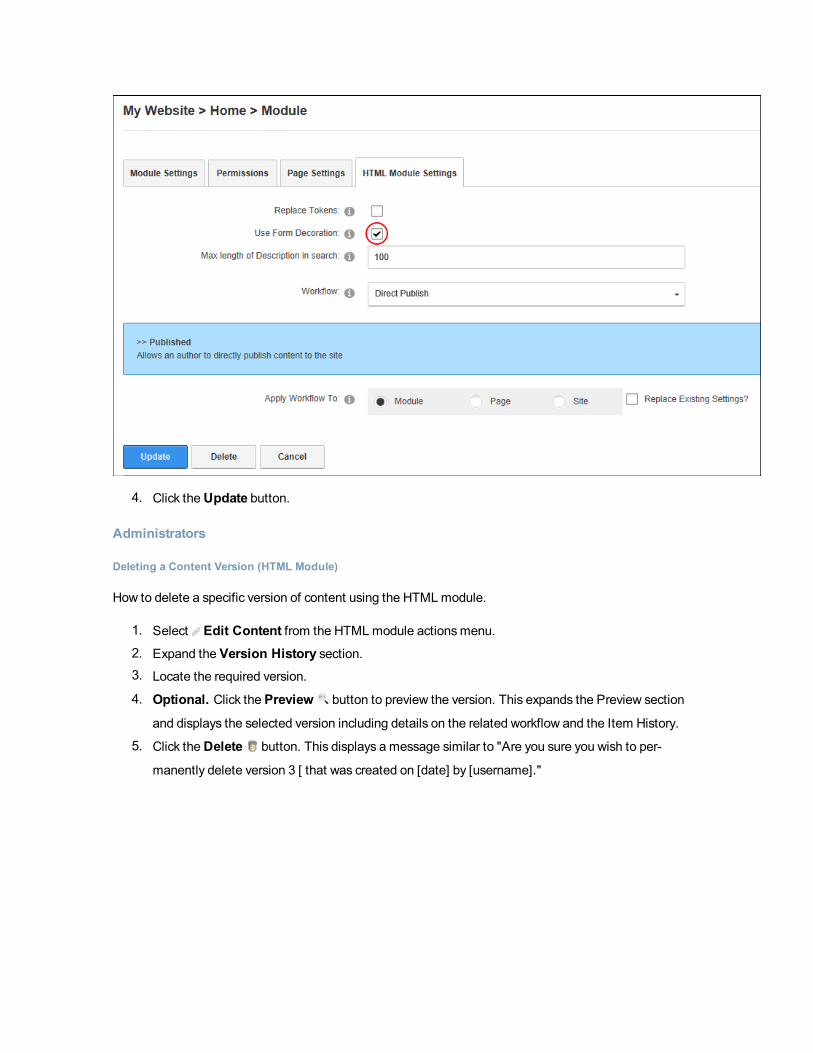
4. Click theUpdate button.
Administrators
Deleting a Content Version (HTML Module)
How to delete a specific version of content using the HTMLmodule.
1. Select Edit Content from the HTMLmodule actionsmenu.
2. Expand the Version History section.3. Locate the required version.
4. Optional. Click the Preview button to preview the version. This expands the Preview section
and displays the selected version including details on the related workflow and the Item History.
5. Click theDelete button. This displays a message similar to "Are you sure you wish to per-
manently delete version 3 [ that was created on [date] by [username]."
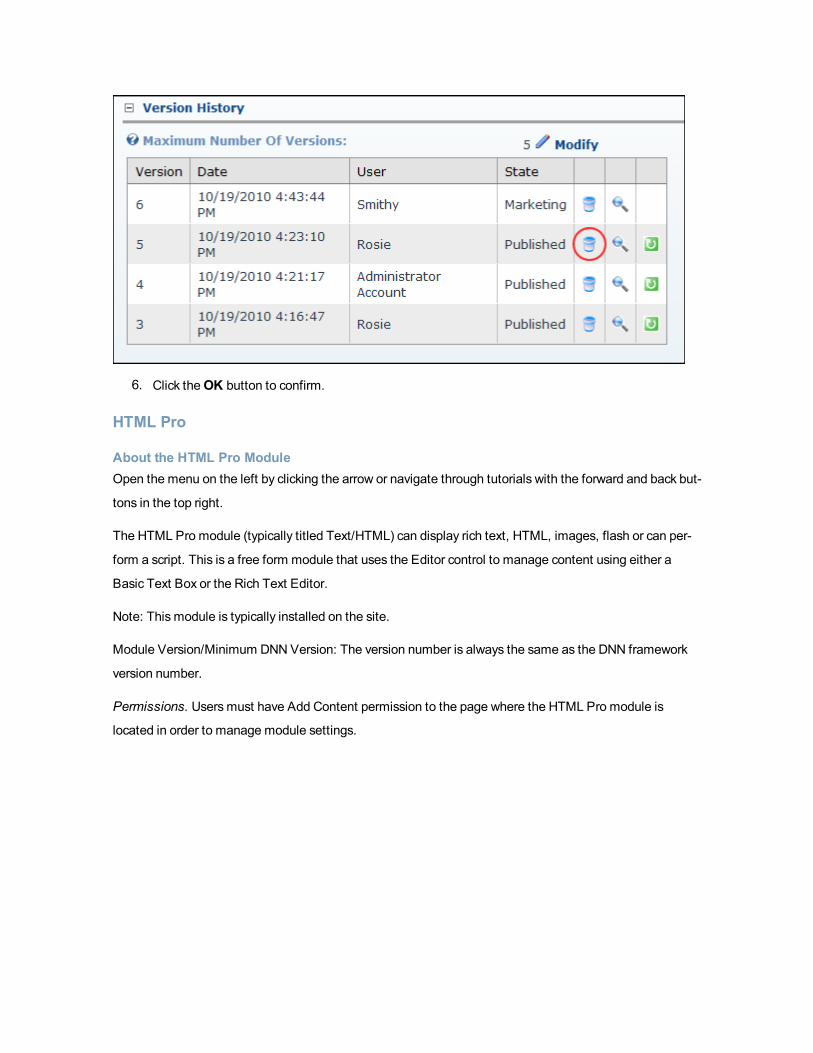
6. Click theOK button to confirm.
HTML Pro
About the HTML Pro ModuleOpen the menu on the left by clicking the arrow or navigate through tutorials with the forward and back but-
tons in the top right.
The HTML Pro module (typically titled Text/HTML) can display rich text, HTML, images, flash or can per-
form a script. This is a free form module that uses the Editor control to manage content using either a
Basic Text Box or the Rich Text Editor.
Note: This module is typically installed on the site.
Module Version/Minimum DNNVersion: The version number is always the same as the DNN framework
version number.
Permissions. Usersmust have Add Content permission to the page where the HTML Pro module is
located in order to manage module settings.

The HTML Pro Module
Features:
l Replacement Tokens
l IPortable, Upgradable, ISearchable
l Workflow support for both direct publishing which publishes changes to content immediately, as
well as content staging which allows editors to save and view content in a staging area prior to pub-
lishing. The HTML Pro module also enables Administrators to create additional and unique content
staging workflows.
l Administrators can set the number of previous versions which are kept and editors can preview and
rollback content an earlier version.
l View a detailed history of content versions.
Related Topics:
l See "About the Editor"
Configuring and Using Workflow (HTML Pro)
The HTML Pro module provides workflow support for both direct publishing and content publishing work-
flows that allow editors to save and view content in a staging area prior to publishing.
Here is an overview of process for setting up and using workflow:
1. Choose the workflow to be used for this module. See "Setting aWorkflow (HTML Pro)". The mod-
ule comes with one workflow titled "Content Approval" which includes three workflow states: Draft,

Ready For Review, and Published. If this workflow doesn't suit your requirements, Administrators
can instead create a newworkflow (See "Adding aWorkflow (HTML Pro)") and add asmany states
as are desired to that workflow (See "Adding aWorkflow State (HTML Pro)")2. Once the required workflow has been set, Administrators can choose howwidely the workflow is
used on the site. See "Configuring AdminWorkflow Settings (HTML Pro)"
3. Other settings to consider updating before continuing are See "Enabling/Disabling AutoSave
(HTML Pro)", See "SettingMaximum Version History (HTML Pro)" and See "Enabling/Disabling
Token Replacement (HTML Pro)"
4. Now you are ready to begin adding content. See "Adding Content (HTML Pro)"5. Module Editors can now add the first draft of the content and make asmany changes and updates
as they like. These updates will not be published or be viewable by site visitors. Once the editor is
happy with her/his work the content can be set for publishing (Publish Changes) and Locked to pre-
vent further changes.
6. The content nowmoves into the next state in the workflow. For example, for the "Content
Approval" workflow, the workflow will have nowmoved from the "Draft" state to the "Ready For
Review" state. Users who have been granted permission for the "Ready For Review" state will
receive a notification message advising that the content is ready to review. The notification mes-
sage can be accessed via their user account (See "Managing Notifications") or using the MyMod-
ulesmodule. See "ManagingMy Modules".7. In this next state of workflow, these users can now choose the following actions:
a. Approve the content. The content is then moved to the next state.
b. Edit and Approve the content. The content is then moved to the next state.
c. Edit and save the content without approving it. This allows users to return to the content and
make further changes without moving to the next workflow state. Saving the content without
approving it will move the lock to the current user however the content will remain in the cur-
rent state until it is approved.
Additional Notes:
Content Approval workflow
When the module is in Published or Draft workflow state, a user with edit permission can edit the content
and lock or publish the content after clicking save. The outcomes are
l If the content is not published, the new state is draft

l When the content is published, it is locked to the user by default and the new state isReady for
Review
When the module is in Ready for Review workflow state, a user with permission to approve the content can
edit the content, and approve or reject the content after clicking save
l If the content is only edited, then the lock is transferred to the approver user
l If the content is rejected, the new state isDraft and the lock remains with the original user
l If the content is approved, the new state isPublished and the content is unlocked
l If the user is an Administrator, they can choose to lock, approve or reject the content.
Save Draft workflow (e.g. more than one state between draft and published)
When the module is in Published or Draft workflow state, a user with edit permission can edit the content
and lock or publish the content after clicking save
l If the content is not published, the new state isDraft. The content can also be locked optionally
l When the content is published, its new state isPublished
l If the user is an Administrator, the content can be unlocked
Module Editors
Adding Content (HTML Pro)
How to add content to the HTML Pro module. Add basic text, rich text or paste in HTML using the Editor.
Prerequisite. If a workflow other than direct publishing is required, the required workflowmust be acti-
vated on the site (See "Activating/Deactivating aWorkflow (HTML Pro)") and set for this module, See
"Setting aWorkflow (HTML Pro)"
1. Select Edit Content from the module actionsmenu.
2. Optional. In the Summary section, enter a summary for mobile devices. See "Displaying/Hiding
Summary (HTML Pro)" for more details.
3. Enter your content using one of these methods. See "Adding Basic Text and HTML using Editor",
See "Adding Rich Text Using The Editor" or See "Pasting HTMLContent"
4. Optional. Click the Preview tab below the Editor to view the content currently displayed in the
Editor - OR - Select the Content Preview tab above the Editor. If Direct Publish (rather than Save
Draft) is used for this module, then skip to Step 7.
5. At On Save? / Publish Changes?, select from the below options (Note: This field only displays
when Save Draft is enabled. See "Setting aWorkflow (HTML Pro)"):

l Check the check box to publish these changes and set them as ready for approval. This
automatically locks the content until it is either published or the lock is manually removed by
an Administrator.
l Uncheck the check box if the content is not yet ready for publishing/approval. This ena-
bles you to save this draft and return to edit it at a later stage before submitting the content
for approval.
a. Check the Lock Content? check box to lock this content from further changes
until you the changes are published - OR - Uncheck the check box to allow addi-
tional changes to this draft prior to publishing.
6. Click the Save link. If Direct Publishing is set for this module, the content changes are now dis-
played in the HTML Pro module. If Content Approval is enabled, continue this tutorial.
7. Enter a useful comment regarding this update (if prompted). Note "Save Draft" does not ask for a
comment. The "Content Approval" asks for comment twice, once while publishing and once while
approving/rejecting.
8. Click the AddComment link. This enters these changes into the next stage of content approval and
sends out notification messages as set in the workflow. You will be notified when your changes are
approved or rejected.
Next Step (You can now perform one of the following tasks):
l If content approval is enabled and this content is now ready to publish, See "Publishing a Draft
(HTML Pro)"
l If the content requires further editing, repeat this tutorial.
l If the lock status of the content requires changing, See "Locking/UnlockingModule Content
(HTML Pro)"
Related Topics:
l See "About the Editor"
l See "Managing AutoSaved Content (HTML Pro)"
Adding Replacement Tokens (HTML Pro)
How to add replacement tokens into the HTML Pro module.
Prerequisite. See "Enabling/Disabling Token Replacement (HTML Pro)"
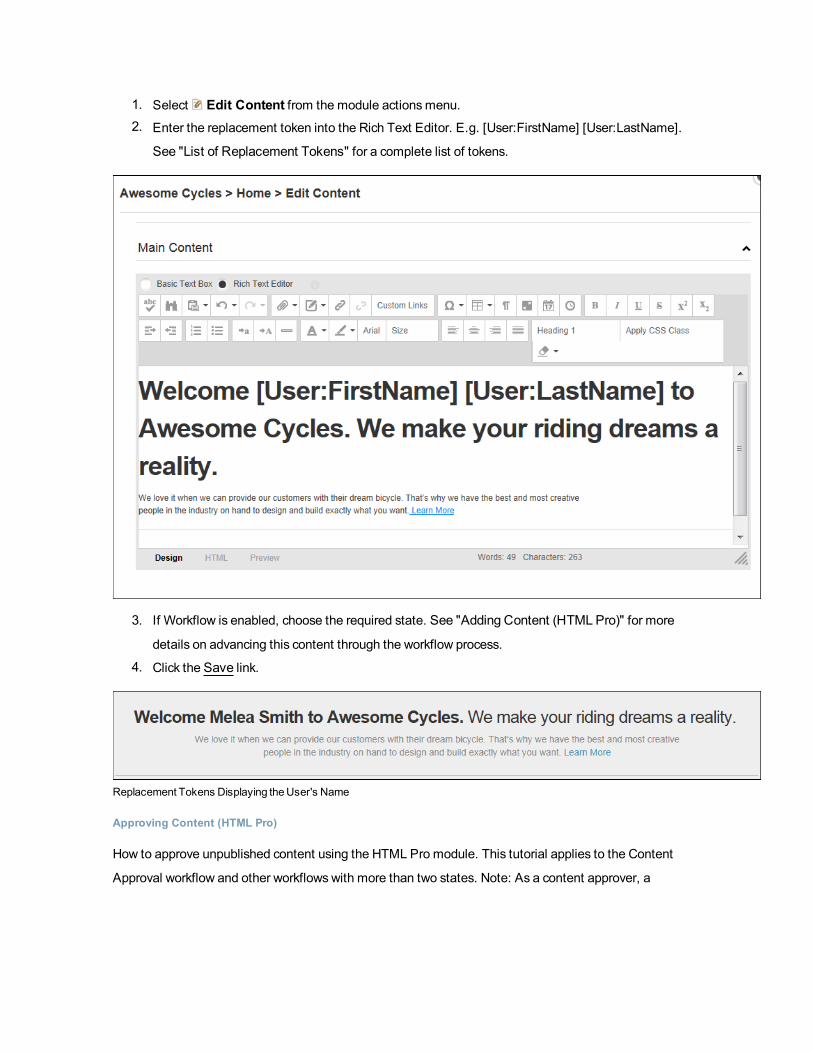
1. Select Edit Content from the module actionsmenu.2. Enter the replacement token into the Rich Text Editor. E.g. [User:FirstName] [User:LastName].
See "List of Replacement Tokens" for a complete list of tokens.
3. If Workflow is enabled, choose the required state. See "Adding Content (HTML Pro)" for more
details on advancing this content through the workflow process.
4. Click the Save link.
Replacement Tokens Displaying theUser's Name
Approving Content (HTML Pro)
How to approve unpublished content using the HTML Pro module. This tutorial applies to the Content
Approval workflow and other workflows with more than two states. Note: As a content approver, a

notification message is sent to you when content is ready to be reviewed.
Approving without Editing
1. Go to the required HTML Pro module.
2. Select Approve from the HTML Pro module actionsmenu. This displays the approval comment
text box.
3. Enter a comment into the Edit Content text box. This comment is included in the notification mes-
sage sent to the author. Note: Entering a comment is mandatory for publishing or rejecting content.
4. Click theAdd Comment link to approve this content and send an approval message to the author.

ApprovingHTMLProModuleContent
Editing and Approving
1. Go to the required HTMLmodule.
2. Select Edit Content from the module actionsmenu.3. Edit the content as required.
4. At On Save?, check theApprove Content? check box to approve and publish this content.Note: This field only displays when Save Draft is enabled. See "Setting aWorkflow (HTML Pro)"
5. Click the Save button.

6. Optional. Enter a comment into the Edit Content text box. This comment is included in the noti-
fication message sent to the author.
7. Click theAdd Comment link to approve this content and send an approval message to the author.

Rejecting Content (HTML Pro)
How to reject unpublished content using the HTML Pro module. This tutorial applies to the Content
Approval workflow and other workflows with more than two states.
Tip: As a content approver, you will receive a notification message when content is ready to be
reviewed.
Option One
1. Go to the HTML Pro module.
2. Select Reject from the HTML Pro module actionsmenu.
3. Enter a comment explaining why the content is being rejected into the Edit Content text box. This
comment is included in the notification message sent to the editor who made the rejected changes.
4. Click the AddComment link to reject this content and send the explanatorymessage to the author.

RejectingHTMLProModuleContent
Option Two
1. Go to the HTML Pro module.
2. Select Edit Content from the module actionsmenu.
3. At On Save?, check theReject Content? check box to reject this content.4. Enter a comment explaining why the content is being rejected into the Edit Content text box. This
comment is included in the notification message sent to the editor who made the rejected changes.
5. Click the AddComment link to reject this content and send the explanatorymessage to the author.

RejectingHTMLProModuleContent
Comparing and Managing Versions (HTML Pro)
How to compare any two versions of the content using the HTML Pro module. For example, an old version
can be compared to a new version, or a new version can be compared to an old version.
1. Select Edit Content from module actionsmenu.
2. Select the Version Tracking tab.3. In the Compare column, check the check box beside the two versions to be compared.
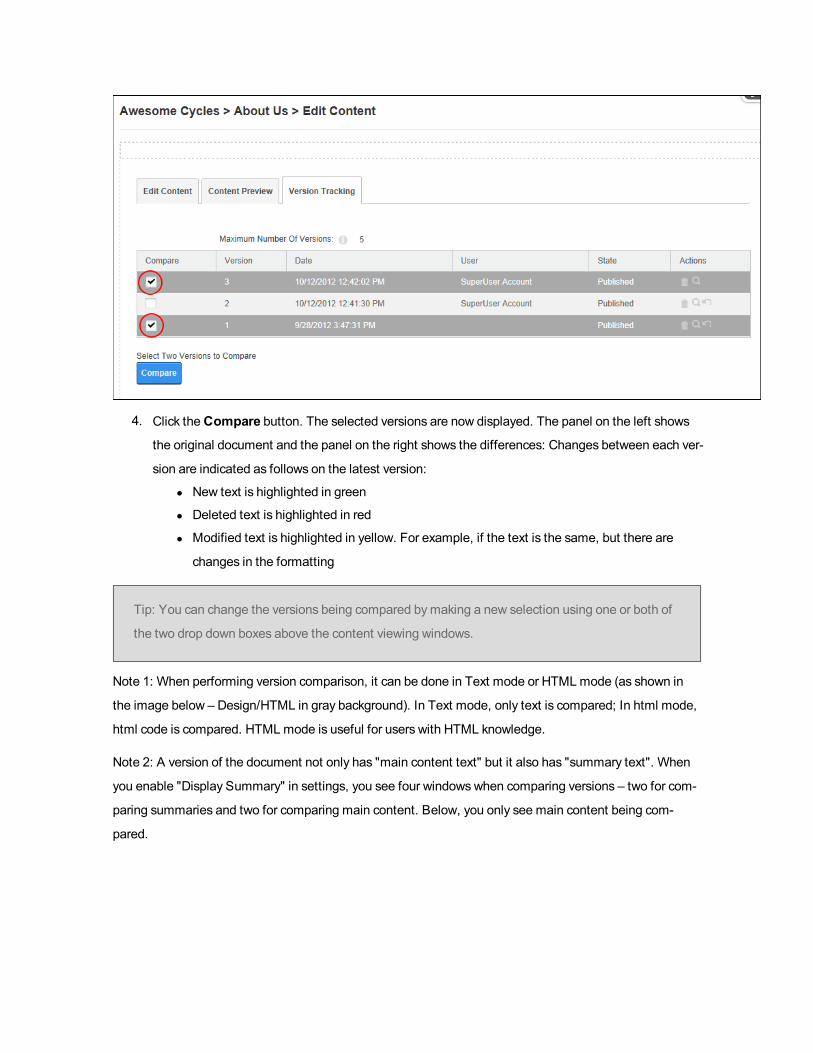
4. Click theCompare button. The selected versions are now displayed. The panel on the left shows
the original document and the panel on the right shows the differences: Changes between each ver-
sion are indicated as follows on the latest version:
l New text is highlighted in green
l Deleted text is highlighted in red
l Modified text is highlighted in yellow. For example, if the text is the same, but there are
changes in the formatting
Tip: You can change the versions being compared bymaking a new selection using one or both of
the two drop down boxes above the content viewing windows.
Note 1: When performing version comparison, it can be done in Text mode or HTMLmode (as shown in
the image below – Design/HTML in gray background). In Text mode, only text is compared; In html mode,
html code is compared. HTMLmode is useful for users with HTML knowledge.
Note 2: A version of the document not only has "main content text" but it also has "summary text". When
you enable "Display Summary" in settings, you see four windowswhen comparing versions – two for com-
paring summaries and two for comparing main content. Below, you only see main content being com-
pared.

The user can now click on the Back to Version History link and perform one of the following task:
l See "Rolling Back Content (HTML Pro)"
l See "Publishing a Draft (HTML Pro)"
l See "Approving Content (HTML Pro)" or See "Rejecting Content (HTML Pro)"
l See "Deleting a Content Version (HTML Pro)" (Administrators only)
Locking/Unlocking Module Content (HTML Pro)
How to lock or unlock the content within the HTML Pro module. Locking the content prevents further
changes to the current content until either the changes are published or the module is manually unlocked.
Unlocking the content enables the currently published content to be edited and published.
Note: The module is automatically locked when submitting for approval and automatically unlocked on pub-
lish.
Option One
1. Select Lock Content or Unlock Content from the module actionsmenu.

UnlockingModuleContent
Option Two
Module content can also be locked or unlocked when adding or editing content.
Option Three
The MyModulesmodule allows authorized users to Lock/Unlock HTML Pro modules as well as pub-
lish/approve/reject content from the MyModulesmodule for one or multiple modules in one click, bypass-
ing the need to enter a comment. The MyModulesmodule lists all your modules and helps you finish your
editing/approving/rejecting workmuch faster as you can see all “locked” modules together or listing mod-
ules of a certain type
To unlock and manage multiple modules, See "ManagingMy Modules"
Managing AutoSaved Content (HTML Pro)
The HTML Pro module includes an AutoSave feature that ensures content that is entered into the Editor
but has not yet been updated will be saved to a temporary location until the Save button is clicked. This
means that the content within the Editor will be available for saving regardless of external events such as
lost Internet connections or user error. When a user edits content of a module with AutoSave enabled, the
page will automatically save to a temporary location the inline content. AutoSave is disabled by default.
If a user closes the editor or cancels editing without saving their latest changes, a message reading "This
page contains unsaved changes. Are you sure you want to leave this page?" is displayed. The user can
then choose to leave the page anyway by clickingOK, which will discard the AutoSave changes, or click
Cancel and return to the Editor and save the changes.

Alternatively, if an unexpected event occurs and there is content that has been AutoSaved but not
updated, the following options are available to the user when they return to the Edit Content page of the
module:
l Retrieve unsaved Changes: This recovers the last AutoSaved content of the module and
replaces the current content with the recovered content.
l Load Saved Content: This displays the current content that has been saved and discards the
AutoSaved content that is no longer required.

Related Topics:
l See "Enabling/Disabling AutoSave (HTML Pro)"
Managing My Workflow Tasks (HTML Pro)
How to view and update content that required reviewing before it can be published using the HTML Pro
module. This task requires that Workflow is NOT set to direct publish. See "Setting aWorkflow
(HTML Pro)"
1. Select My Work from the HTML Pro module actionsmenu.
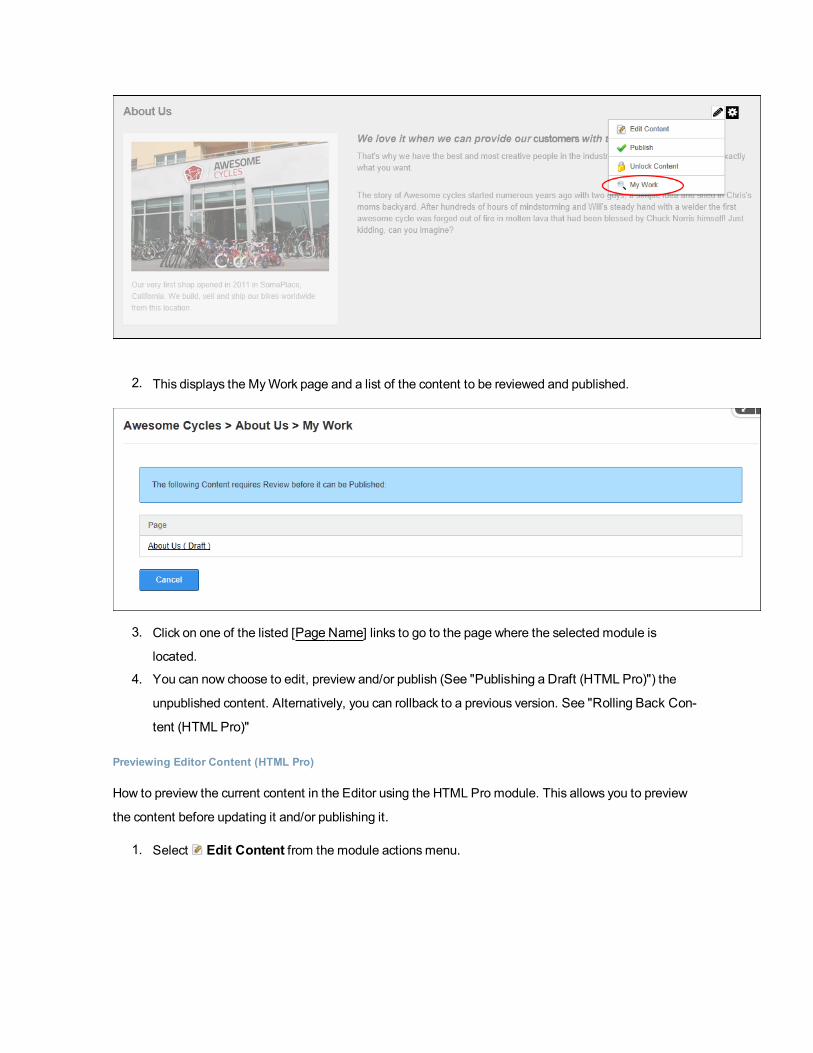
2. This displays the MyWork page and a list of the content to be reviewed and published.
3. Click on one of the listed [Page Name] links to go to the page where the selected module is
located.
4. You can now choose to edit, preview and/or publish (See "Publishing a Draft (HTML Pro)") the
unpublished content. Alternatively, you can rollback to a previous version. See "Rolling Back Con-
tent (HTML Pro)"
Previewing Editor Content (HTML Pro)
How to preview the current content in the Editor using the HTML Pro module. This allows you to preview
the content before updating it and/or publishing it.
1. Select Edit Content from the module actionsmenu.
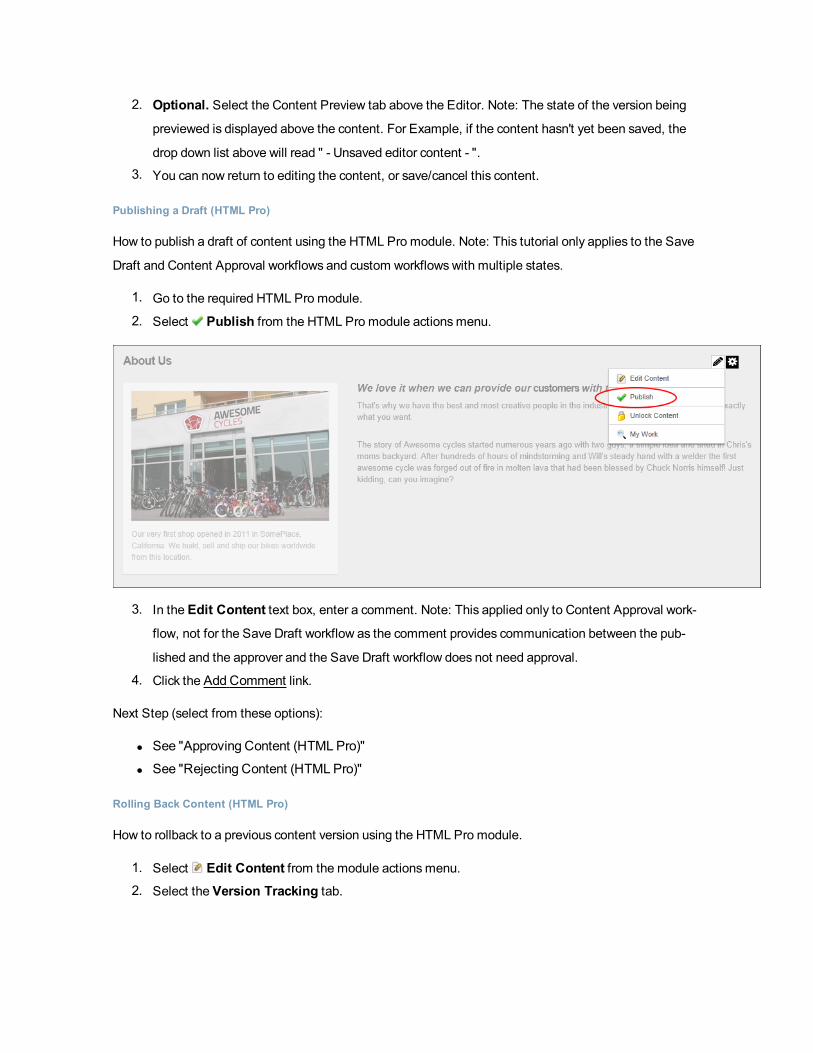
2. Optional. Select the Content Preview tab above the Editor. Note: The state of the version being
previewed is displayed above the content. For Example, if the content hasn't yet been saved, the
drop down list above will read " - Unsaved editor content - ".
3. You can now return to editing the content, or save/cancel this content.
Publishing a Draft (HTML Pro)
How to publish a draft of content using the HTML Pro module. Note: This tutorial only applies to the Save
Draft and Content Approval workflows and custom workflows with multiple states.
1. Go to the required HTML Pro module.
2. Select Publish from the HTML Pro module actionsmenu.
3. In the Edit Content text box, enter a comment. Note: This applied only to Content Approval work-
flow, not for the Save Draft workflow as the comment provides communication between the pub-
lished and the approver and the Save Draft workflow does not need approval.
4. Click the AddComment link.
Next Step (select from these options):
l See "Approving Content (HTML Pro)"
l See "Rejecting Content (HTML Pro)"
Rolling Back Content (HTML Pro)
How to rollback to a previous content version using the HTML Pro module.
1. Select Edit Content from the module actionsmenu.
2. Select the Version Tracking tab.
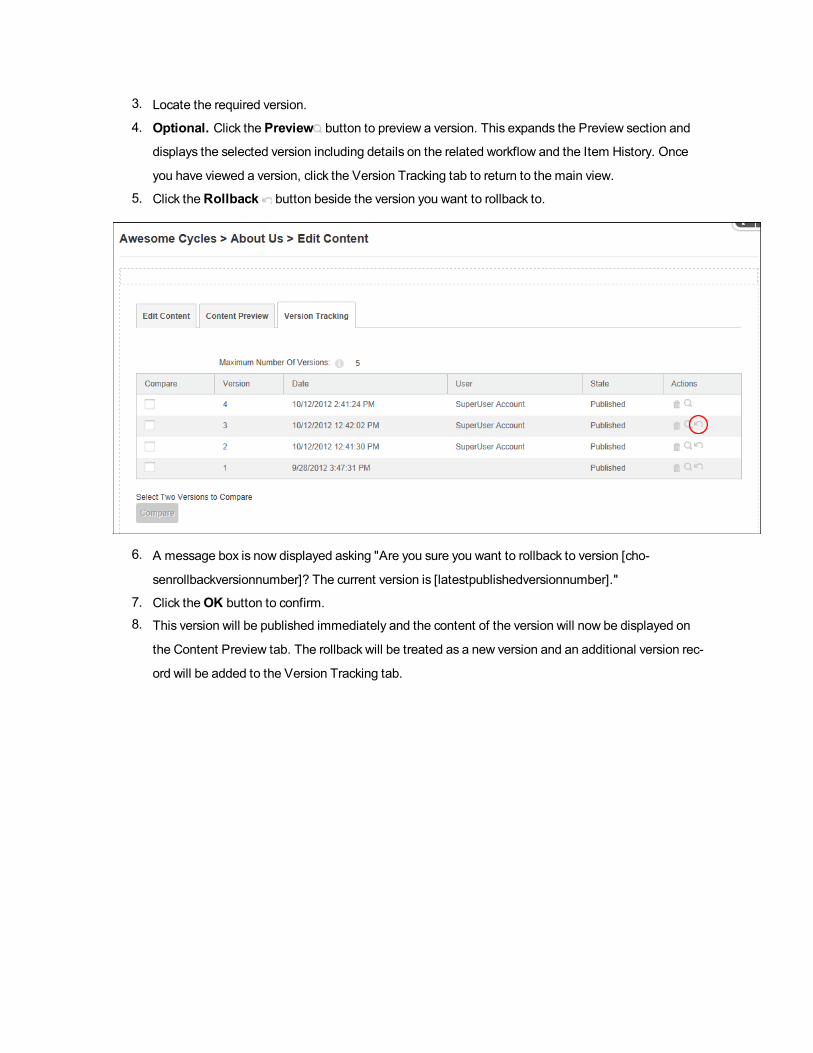
3. Locate the required version.
4. Optional. Click the Preview button to preview a version. This expands the Preview section and
displays the selected version including details on the related workflow and the Item History. Once
you have viewed a version, click the Version Tracking tab to return to the main view.
5. Click theRollback button beside the version you want to rollback to.
6. A message box is now displayed asking "Are you sure you want to rollback to version [cho-
senrollbackversionnumber]? The current version is [latestpublishedversionnumber]."
7. Click theOK button to confirm.8. This version will be published immediately and the content of the version will now be displayed on
the Content Preview tab. The rollback will be treated as a new version and an additional version rec-
ord will be added to the Version Tracking tab.

Settings
Displaying/Hiding Summary (HTML Pro)
The HTML Pro module can be configured to display or hide the content entered into the Summary field on
the Edit Content page of a particular HTML Pro module. The summary view is useful to maximize the view-
ing experience on mobile devices as it enables content editors to create a brief summary of their main
HTML content. If summary view for the HTML content is enabled, it will show the Summary View by
default. To view the full HTML content click on theMore button. If the field is set to display the summary,
then it will show in the module with aMore link that can be clicked to view the main content.
1. Select Manage > Settings from the module actionsmenu.2. Select the HTML Module Settings tab.3. At Display Summary, select from these options:
l Check the check box to display the summary with a Read More link to view the Main Con-
tent.
l Uncheck the check box to hide the summary and display the Main Content.

4. Click theUpdate button.
The following image displays the Summary content with theMore link.
Clicking on theMore link displays the main content with the Summary link. Click the Summary link to hide
the main content and once again show the summary.

Related Topics:
l See "About Mobile Devices Support"
l See "Adding Content (HTML Pro)"
Enabling/Disabling AutoSave (HTML Pro)
The HTML Pro module includes an AutoSave feature that ensures content that is entered into the Editor
which has not been updated will be saved to a temporary location regardless of external events such as
lost Internet connections or browser crash or system crash or user error. When a user edits content of a
module with AutoSave enabled, the page will automatically save the inline content to a temporary loca-
tion. AutoSave is enabled on the site by default.
Here's how to enable or disable the AutoSave feature:
1. Select Manage > Settings from the module actionsmenu.2. Select the HTML Module Settings tab.3. At Enable AutoSave, select from these options:
l Check the check box to enable AutoSave for all modules of the same type.
a. In the Time to AutoSave (Seconds) text box, enter the number of seconds (mini-
mum of 10 to a maximum of 120 seconds) between each AutoSave. The default set-
ting is 10 seconds.
l Uncheck the check box to disable AutoSave.

4. Click theUpdate button.
Related Topics:
l See "Managing AutoSaved Content (HTML Pro)"
Enabling/Disabling Token Replacement (HTML Pro)
How to enable or disable token replacement on the HTML Pro module. Token replacement enables tokens
such as [FirstName] to be replaced with the first name of the authenticated user. Tokens include infor-
mation such as user details, site name, key words, date, time, etc.
Important. Inline editing and module caching are disabled if token replacement is enabled.

Important. Usersmust have Add Content/Edit permissions to the Page on which the HTMLmodule is
located in order to manage module settings.
1. Select Manage > Settings from the module actionsmenu.2. Select the HTML Module Settings tab.3. At Replace Tokens, select from these options:
l Check the check box to enable full token replacement.
l Uncheck the check box to disable token replacement. This displays any tokens as text in
the Editor.
4. Click theUpdate button.
Related Topics:

l See "Adding Replacement Tokens (HTML Pro)"
Setting a Workflow (HTML Pro)
How to set the workflow for the HTML Pro module. The below settings are available to authorized editors.
Note: Administrators can also set a workflow as the site default. See "Configuring AdminWorkflow Set-
tings (HTML Pro)"
Permissions. Usersmust have Add Content/Edit permissions to the Page on which the HTML Pro module
is located in order to manage module settings.
Tip: Whether it is for an individual module or you wish to set the default for the site an HTML Pro
module must first be added to some page on your site.
1. Select Manage > Settings from the module actionsmenu.2. Select the HTML Module Settings tab.3. AtWorkflow, select the workflow you wish to use from these options:
l Content Approval: Content Approval is similar to Save Draft but it adds an extra "Ready
for Approval" state between the draft and published states. This allows reviewers to monitor
and either approve or reject any content added before it is actually published to the site.
l Save Draft: Save Draft allows content to be saved as a draft before it is published. Draft
content will only be visible when edit mode is selected by users who can edit the mod-
ule/page. In viewmode the most recent published version of content will be displayed
instead of the draft. This is the same for users with view permissions only. See "Publishing
a Draft (HTML Pro)"
l Direct Publish: With the direct publish workflow any content that is saved on the Edit Con-
tent page or through the inline editor will be immediately visible to all users with permissions
to view the module. Editing users will be able to see the content for both view and edit
mode.
4. At Module Workflow Override, select from the below options. Note: This option will be disabled
if PageWorkflowOverride has been disabled by an Administrator.
l Check the check box to enable page level workflow configuration to be overridden at the
module level. This enables a unique workflow the be set for this module, rather than using
the workflow set for all modules on this page by an Administrator.
l Uncheck the check box to set all modules on this page to use the workflow defined for the
page.

5. At Replace Existing Settings, check the check box to replace the existing settings with these
new settings. This option must be selected to override the previous settings. It exists as a safe-
guard against accidental changes.
6. Click theUpdate button.
Using or Disabling Form Decoration
How to use or disable form decoration on the HTML Pro module.
1. Select Manage > Settings from the module actionsmenu.2. Select the HTML Module Settings tab.3. At Use Form Decoration, check the check box enable. This is the default setting - OR -
uncheck the check box to disable.
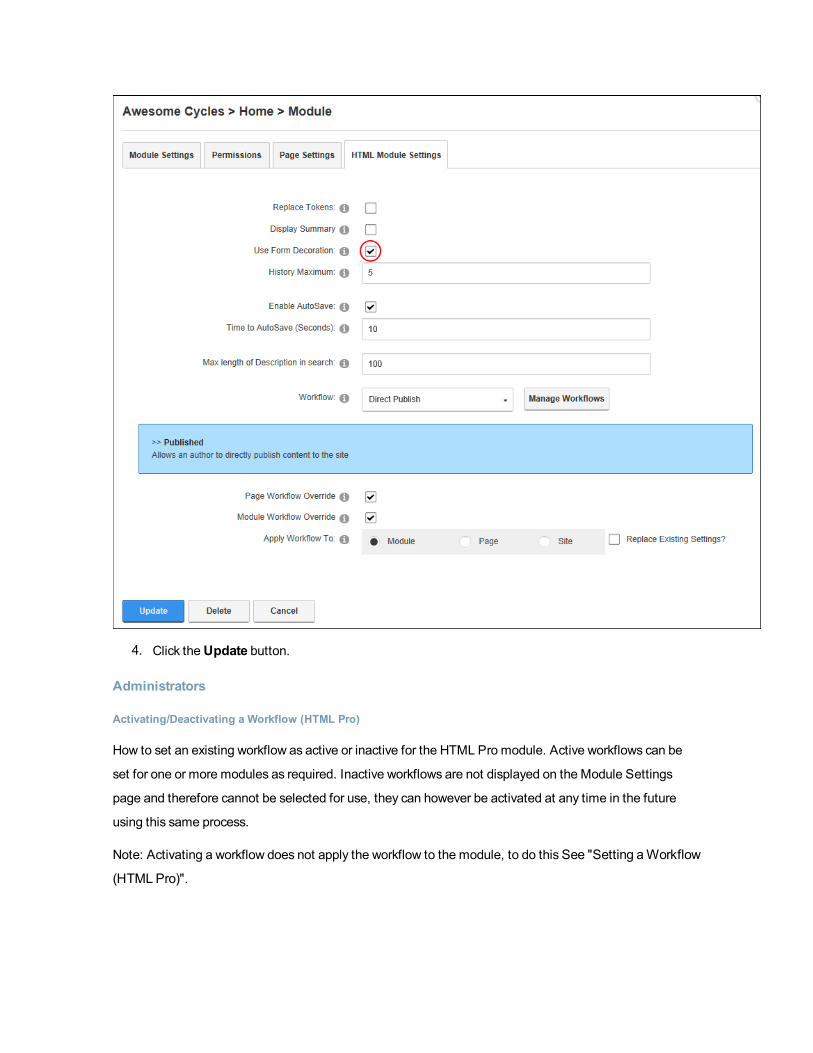
4. Click theUpdate button.
Administrators
Activating/Deactivating a Workflow (HTML Pro)
How to set an existing workflow as active or inactive for the HTML Pro module. Active workflows can be
set for one or more modules as required. Inactive workflows are not displayed on the Module Settings
page and therefore cannot be selected for use, they can however be activated at any time in the future
using this same process.
Note: Activating a workflow does not apply the workflow to the module, to do thisSee "Setting aWorkflow
(HTML Pro)".

1. Select Manage > Settings from the module actionsmenu.2. Select theHTML Module Settings tab.3. Click theManageWorkflows link. This will open the ManageWorkflows page.
4. AtWorkflow, select the required workflow from the workflow drop down list.
5. At Deleted? select from these options:
l Check the check box to deactivate this workflow. Deactivated workflows cannot be
selected when configuring the HTML Module Settings. This allows any existing modules
with this workflow set to continue using this workflow if required, whilst preventing this work-
flow from being selected for future use.
l Uncheck the check box to activate this workflow for the site. This will reinstate this work-
flow in the drop down list on the HTMLModule Settings page.
6. Click theUpdate button.

7. You can now activate/deactivate additional workflows, or clickCancel to return to the module.
Adding a Workflow State (HTML Pro)
How to add a new state to a workflow for a HTML Pro module. In this tutorial we will add states to the Mar-
keting workflow that will allows anymodule editor to add content, then an Editor will review the content,
and finally a Manager must give the content a final review and then publish the content.
1. Select Manage > Settings from the module actionsmenu.2. Select theHTML Module Settings tab.3. Click theManageWorkflows link. This opens the ManageWorkflows page.
4. AtWorkflow, select the required workflow from the workflow drop down list.
5. Click the AddNew State link. This displays the State Configuration section.

6. In the State text box, enter a name for this state.7. At Reviewers, click the check box in the Review Content column toGrant review content per-
missions to one or more roles and or usernames. You can also choose to Deny review content per-
missions to roles/usernames. For more details on setting permissions, See "SettingModule
Permissions"
8. At Notify?, select from these options:
l Check the check box to set the reviewers specified at Permissions to receive an email noti-
fication once a version reaches this state. For the published state the author of the version
will receive an email notification once it is published.
l Uncheck the check box to disable notifications.
9. At Active?, check the check box to enable this new state - OR - Uncheck the check box if this
new state is not currently active.

10. Click theUpdate button. The newly created workflow state is now listed in the States section.

11. Optional. Repeat Steps 5-10 to add additional workflow states. For example, an additional state
called Editor has been added to this workflow.
12. Optional. Use theUp andDown buttons to reorder each state that you have added according
to your workflow requirements. Note that the Draft and Published states cannot be reordered.

Adding a Workflow (HTML Pro)
How to add a workflow to the HTML Pro module.
1. Select Manage > Settings from the module actionsmenu.2. Select theHTML Module Settings tab.3. Click theManageWorkflows link. This opens the ManageWorkflows page.

4. Click the AddNew Workflow link.
5. In theWorkflow text box, enter a name for this workflow.
6. In theDescription text box, enter a description of this workflow.

8. Click theUpdate button. This saves the newworkflow and displays the States section that allows
you to modify the default workflow states (Draft and Published) that have been created for this new
workflow.
Next Step: See "Adding aWorkflow State (HTML Pro)" and continue from Step 7 to add additional states
to this workflow.
Configuring Admin Workflow Settings (HTML Pro)
How to configure workflow settings for the HTML Pro module. For more details on the settings available to
authorized editors, See "Setting aWorkflow (HTML Pro)"
Permissions. Administrator only.
1. Select Manage > Settings from the module actionsmenu.2. Select theHTML Module Settings tab.3. At Page Workflow Override, select from these options:
l Check the check box to enable site level workflow configuration to be overridden at the
page level. This enables the Page option at the ApplyWorkflow To field below.

l Uncheck the check box to require all HTML Pro modules on all pages to use the workflow
configuration defined for the site. This disables the Page option at the ApplyWorkflow To
field below.
4. At Module Workflow Override, select from these options:
l Check the check box to enable site level workflow configuration to be overridden at the
module level. This enables the Module option at the ApplyWorkflow To field below.
l Uncheck the check box to require all HTML Pro modules on this page to use the workflow
configuration defined for this page. This disables the Module option at the ApplyWorkflow
To field below.
5. At Apply Workflow To, select from these options:
l Module: Select to apply the workflow set on this module to this module only.
l Page: Select to apply the workflow set on this module to all modules on this page.
l Site: Select to apply the workflow set on this module across all modules on the site.
6. At Replace Existing Settings?, check the check box to replace the existing settings for this
Module/Modules on this Page/the whole Site - depending on which of these three options you
selected at Step 5.
7. Click theUpdate button.
Tip: The Replace Existing Settings field must be checked to apply a workflow at the Page or Site
level. This provides a safeguard against Administrators accidentally modifying Page and Site work-
flows.

Deleting a Content Version (HTML Pro)
How to delete a specific version of the content using the HTML Pro module.
1. Select Edit Content from the module actionsmenu.
2. Select the Version Tracking tab.3. Locate the version to be deleted.
4. Optional. Click the Preview button to preview the version. This displays the selected version
including details on the related workflow and the Item History on theContent Preview tab. Once
you have confirmed this is the correct version, reselect the Version Tracking tab.
5. Click theDelete button beside the version to be deleted. This displays a message similar to "Are
you sure you wish to permanently delete version 3 [ that was created on [date] by [username]."
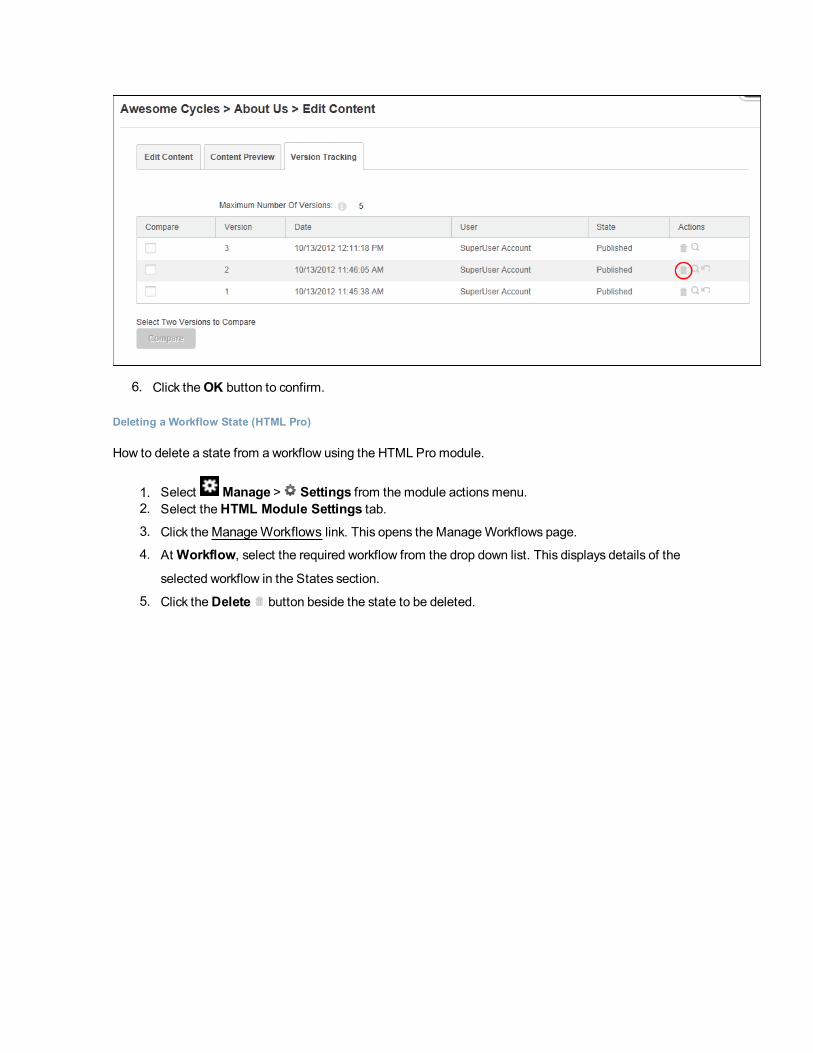
6. Click theOK button to confirm.
Deleting a Workflow State (HTML Pro)
How to delete a state from a workflow using the HTML Pro module.
1. Select Manage > Settings from the module actionsmenu.2. Select theHTML Module Settings tab.3. Click theManageWorkflows link. This opens the ManageWorkflows page.
4. AtWorkflow, select the required workflow from the drop down list. This displays details of the
selected workflow in the States section.
5. Click theDelete button beside the state to be deleted.

6. This displays the message "Are You Sure YouWish To Delete This Item?"
7. ClickYes to confirm.
Editing a Workflow State (HTML Pro)
How to edit an existing state in a workflow for the HTML Pro module.
1. Select Manage > Settings from the module actionsmenu.2. Select theHTML Module Settings tab.3. Click theManageWorkflows link. This opens the ManageWorkflows page.
4. AtWorkflow, select the required workflow from the drop down list. This displays details of the
selected workflow in the States section.
5. Click the Edit button beside the state to be edited.

6. Go to the edit any of the following as required:
a. In the State text box, edit the workflow name.
b. At Reviewers, set the roles and/or usernames for this state. See "SettingModule Per-
missions"
c. At Notify?, select from these options.
l Check the check box to set the reviewers specified at Permissions to receive an
email notification once a version reaches this state. For the published state the
author of the version will receive an email notification once it is published.
l Uncheck the check box to disable notifications.
d. At Active?, check the check box to enable this state - OR - Uncheck the check box to
disable this state.
7. Click theUpdate button.
Setting Maximum Version History (HTML Pro)
How to set the maximum number of versions to keep in the history for each HTML Pro module instance
using the HTML Pro module.
When publishing new content results in more versions than this number, the oldest version(s) will be per-
manently deleted (purged) until the remaining number of versionsmatches this number. When the value
of the maximum number of versions changes from higher to lower, we will purge (delete) all the exceeding
version history itemsONLY when a new version is created. If the value changes from higher to lower, we
retain all the history itemsUNTIL a new version is created; thus if we do not create a new version and
change the value from lower back to higher, then the history items that were not purged, will re-appear.
The purging of older versionsmay appear to work differently depending on the defined workflow. If content
approval is defined somewhere in the workflow, when drafts are created (which are not considered new ver-
sions) the above scenario does not apply. Also regarding drafts, drafts are directly related to a version, if a
version is purged, then the draft will also be purged. So depending on your workflow, version purging will
becomemore implicit and dependant on your workflow.
1. Select Manage > Settings from the module actionsmenu.2. Go to theHTML Module Settings tab.3. In theHistory Maximum text box, enter the maximum number of versions to save. The default
value is 5.
4. Click theUpdate button.

SettingMaximumVersionHistory
Tip: The Version History List section on the Edit Content page only displays after the first version
of content is saved.
Journal
About the Journal Module
The Journal module allows registered users to write journal entries that can be viewed by all or some site
users. A file or image can be attached to journal entries and the module can be configured in a number of
layouts. The Journal forms part of each uses profile as well as being a standalone module that can be
added to any site page.
Installation Note: This module is typically installed on the site and cannot be uninstalled.
Module Version: The version number for this module is the same as version of the DNN framework.

The JournalModule
Adding a Journal Entry
How to post an entry to the Journal module. Depending on the Journal settings, you may be able to attach
a photo or a file to each post. You cannot add more than one attachment (either a photo or a file) to a post.
Photo attachments display below the post and are scaled up or down to be as a standard width of 250 pix-
els. File attachments display as a File icon above the linked file name.
1. Click on yourDisplay Name link - OR - Go to a Journal module.
2. In the "Tell the world something..." message box, paste or type your message. A maximum length
is set for each message so if you paste in a message longer than the allowed message length, then
the additional characters will be trimmed from the end of the message. Likewise, if you attempt to
type in a longer message than is permitted you will be prevented from entering any additional char-
acters once the maximum is reached. Note: You can cancel the new entry by clicking theCancel
button that is displayed in the top right corner of the module once you commence entering themessage.

3. Optional. Click the Photo button to attach a photo to your post. This displays the Select photo
to share section where you can choose from these options:
l Browse from site: Click this link and then select an image that you have previously
uploaded to your personal image folder (called "My Folder") using the Journal module.
Note: You cannot manage the files in this folder, only upload new images.
l Upload from my computer: Click this link and then navigate to and select the image.
Once you have selected and uploaded the photo it will be displayed on the module.
4. Optional. Click theAttachment button to attach a file to your post. This displays the Select file
to share section where you can choose from these options:
l Browse from site: Click this link and then select an image that you have previously
uploaded to your personal image folder (called "My Folder") using the Journal module.
Note: You cannot manage the files in this folder, only upload new images.
l Upload from my computer: Click this link and then navigate to and select the file.
Once you have selected and uploaded the file a File icon is displayed indicating the file is
successfully attached. Note: You can select a different image or attachment, of click the
Delete button displayed beside an image or attachment to remove it from the entry.

5. Recommended. Click the Share button and choose the users can view this message from
these options:
l Everyone: Any user who can view the Journal
l Community Members: Any authenticated user who can view the Journal
l Friends: Any user that you have added as a Friend. See "Connecting with aMember"

6. Click the Share button. The post is now displayed below the message box. In the below example, a
post with a file attachment has been added.
Deleting a Journal Entry
How to post an entry to the Journal module. Depending on the Journal settings, you may be able to attach
a photo or a file to each post. You cannot add more than one attachment (either a photo or a file) to a post.
Photo attachments display below the post and are scaled up or down to be as a standard width of 250 pix-
els. File attachments display as a File icon above the linked file name.
1. Click on yourDisplay Name link - OR - Go to a Journal module.
2. Hover your mouse over the entry to be deleted. This displays aDelete button to the right of theentry.
3. Click theDelete button. This will display the message "Are You Sure YouWish To Delete ThisItem?'
4. Click the Yes button to confirm.

Settings
Configuring Journal Settings
How to configure the settings applied to an instance of the Journal module.
1. Select Manage > Settings from the module actionsmenu.2. Select the Journal Settings tab.3. At Journal Mode, select from the following modes to ensure the journal displays properly on group
and profile pages:
l Auto: This mode will attempt to detect whether or not the module is being used on a group
or profile page. This is the default mode.
l Profile: This mode will only render journal itemswhen a User Id value is present in the URL.l Group: This mode will only render journal itemswhen a group id is present in the URL.
4. At Enable File Attachments, select from these options:
l Check the check box to allow users to attach files to journal posts. This displays the
Attachment button below the message entry box. This is the default setting.
l Uncheck the check box to disable file attachments.
5. At Enable Photo Attachments, select from these options:
l Check the check box to allow users to attach photographs to journal posts. This displays
the Photo button below the message entry box. This is the default setting.
l Uncheck the check box to disable photograph attachments.
6. At Default Page Size, select the number of journal items that are displayed per page. The default
setting is 20.
7. At Maximum Characters per message, select the maximum number of characters for a mes-
sage. The default setting is 250.
8. At Journal Types, select the types of journals you want to display.9. Click theUpdate button.


The JournalSetting
Member Directory
About the Member Directory Module
The Member Directorymodule allows users to view a list of registered site members and perform searches
for particular members. The Member Director module can be configured to only displaymembers of a par-
ticular role or relationship such as friends or members whose activities you are following.
TheMembers Directory module

Connecting with a Member
Registered users and subscribers can form social relationships using the Members Directorymodule.
Users can choose to friend and follow other users or groups and to receive notifications which allow them
to approve or reject new friends and followers.
1. Go to the Members Directorymodule.
2. Search for the required member. See "Searching for Members"3. Select one or more of the following options:
l Click the Add as Friend link to send a friend request to the member. The request must now
be accepted by the member.
l Click the Follow link to follow the activity of the member. Note: TheUnfollow link will now
replace the Follow link, enabling you to remove this connection any time you choose.
l Click the Send Message button to compose a message to the member.l In the Subject text box, enter the subject of this message.l In the Your Message text box, enter the body of this message.l Click the Send link.
Related Topics:
l See "Managing Notifications"
Searching for Members
How to search for site members using the Member Directorymodule.

Basic Search
1. Go to a Member Directorymodule.
2. In the Search text box, begin typing in the user name, first name or last name of the message
recipient or the name of the Role. This will display a list of the matching users.
3. Click the Search button to view all results (as shown below) - OR - Click on a member's name in the
list of results to view that member only.
Advanced Search
1. Go to a Member Directorymodule.
2. Click theAdvanced Search button. This displays the advanced search options that can include
one or more of the below options. Complete one or more search criteria:
l In theDisplay Name text box, enter all or part of the member's display name.l In the Email Address text box, enter all or part of the member's email address.

l In theCity text box, enter the name of the member's city.l In theCountry text box, enter the name of the member's country.
3. Click the Search button to view the matching members.
Related Topics:
l See "Configuring Search Settings"
Settings
Configuring Search Settings
How to enable/disable search capabilities on the Member Directorymodule and configure the advanced
search options. Two search tools can be enabled. The Simple Search tool allowsmembers to search by
user name, first name or last name of the message recipient or role name. The Advanced Search tool
allows up to four search criteria to be specified for searches. The available options are Display Name,
Email, Prefix, First Name, Middle Name, Last Name, Suffix, Unit, Street, City, Region, Country, Postal
Code, Telephone, Cell/Mobile, Website, IM, or Fax.

1. Select Manage > Settings from the module actionsmenu.2. Select theMember Directory Settings tab.3. Expand the Search Settings section.4. At Display Search, select from these options:
l None: Select to remove both the simple and advanced search tools.l Simple Search: Select to only dil Simple and Advanced Searchl basic and advanced search boxes - OR - Uncheck the check box
5. At Search Field 1, select the first field displayed on the advanced search box. The default option
is Username.
6. At Search Field 2, select the second field displayed on the advanced search box. The default
option is Email.
7. At Search Field 3, select the third field displayed on the advanced search box. The default option
is City.
8. At Search Field 4, select the fourth field displayed on the advanced search box. The default
option is Country.

9. Click theUpdate button.
Thedefault search setting for theMembers Directory module
Related Topics:
l See "Searching for Members"
Managing Templates
The layout of the Member Directorymodule can be changed using the templatesmaintained on the
Member Directory Settings page. In the below image the default templates that are provided with DNN are
used.

Here's how to configure the Member Directory templates:
1. Select Manage > Settings from the module actionsmenu.2. Select theMember Directory Settings tab.3. Expand the Templates section.4. In the Item Template text box, edit the template for member listings.5. In theAlternative Item Template text box, edit the template for alternate member listings or
leave this field blank to use the same layout for all members.
6. At Enable PopUp, select from these options:
l Check the check box to displaymember details in a popup windowwhen a user mouses
over a member's listing.
l Uncheck the check box to disable popup window.
7. In the PopUp Template text box, edit the template used for the PopUp window.

8. Click theUpdate button.
Setting Filters and Sorting
The Member Directorymodule uses templates to allow authorized users to define the layout of the mod-
ule. Different filters can also be applied to the Members Directorymodule to control which member records
are displayed.
1. Select Manage > Settings from the module actionsmenu.2. Select theMember Directory Settings tab.3. Expand the Filters and Sorting section.
4. Optional. At Filter By, you can choose to apply a filter to this instance of the Members Directory
module.
l No Filter: Select this option to remove the filter and display all members.l User: Select this option to only display the profile of the member who is currently logged
into the site.
l Group: Select this option and then select a Social Group to only displaymembers who
belong to that group.

l Relationship: Select this option to only displaymembers that you have a relationship with.
E.g. friend or follower.
l Profile Property: Select this option and then choose a profile property to only display
matching members. E.g. Select Country and then enter United States to only display
members who have set United States as their country.
5. At Sort Field, choose to sort member cards by User ID, Last Name, Display Name, or Date
Created. Display Name is the default setting.
6. At Sort Order, choose to sort member cards in ascending or descending order. Ascending is the
default setting.
7. Click theUpdate button.

Members Directory module filtered by user
Members Directory module filtered by SocialGroup.
Members Directory module filtered by followers
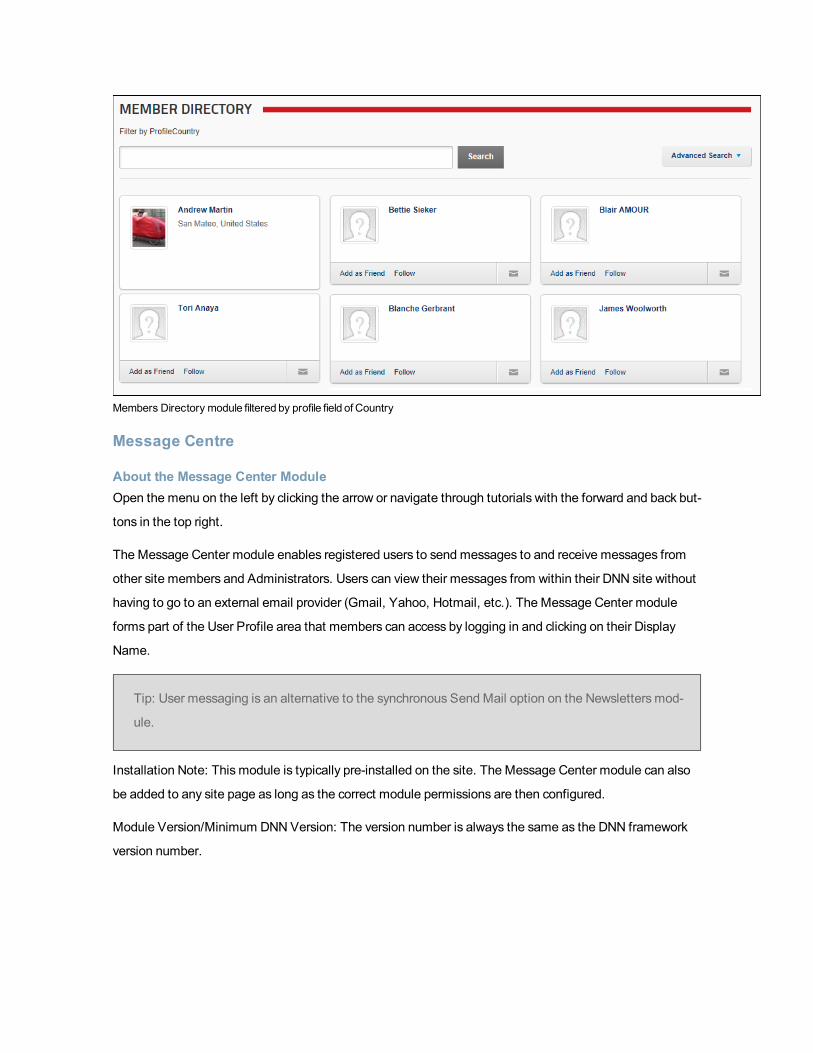
Members Directory module filtered by profile field of Country
Message Centre
About the Message Center ModuleOpen the menu on the left by clicking the arrow or navigate through tutorials with the forward and back but-
tons in the top right.
The Message Center module enables registered users to send messages to and receive messages from
other site members and Administrators. Users can view their messages from within their DNN site without
having to go to an external email provider (Gmail, Yahoo, Hotmail, etc.). The Message Center module
forms part of the User Profile area that members can access by logging in and clicking on their Display
Name.
Tip: User messaging is an alternative to the synchronous Send Mail option on the Newsletters mod-
ule.
Installation Note: This module is typically pre-installed on the site. The Message Center module can also
be added to any site page as long as the correct module permissions are then configured.
Module Version/Minimum DNNVersion: The version number is always the same as the DNN framework
version number.

The Message Center module added to a site page
The Message Center module on the User Profile page
Viewing a Message
How to view a message sent to you using either your User Profile or using a standalone Message Center
module. Note: The images used in this tutorial use the User Profile page, rather than the Message Center
module.
1. Click theCheck Messages button. Note: The number of newmessages is displayed beside
this button - OR - Navigate to a Message Center module.

2. Optional. Click either the Sent orArchived tabs to viewmessages in either of these folders if the
required message isn't in your Inbox.
3. The latest messages for the selected folder are now displayed.
4. If the required message isn't displayed, click the LoadMore link to view additional messages. You
can also filter messages by clicking on the Select button and then choosing to view eitherAll,
None, Read orUnreadmessages.
5. Click on the message title link to read the message in full. This will mark the message as read, how-
ever you can choose to keep the message marked as unread by clicking theMark as Unread link.
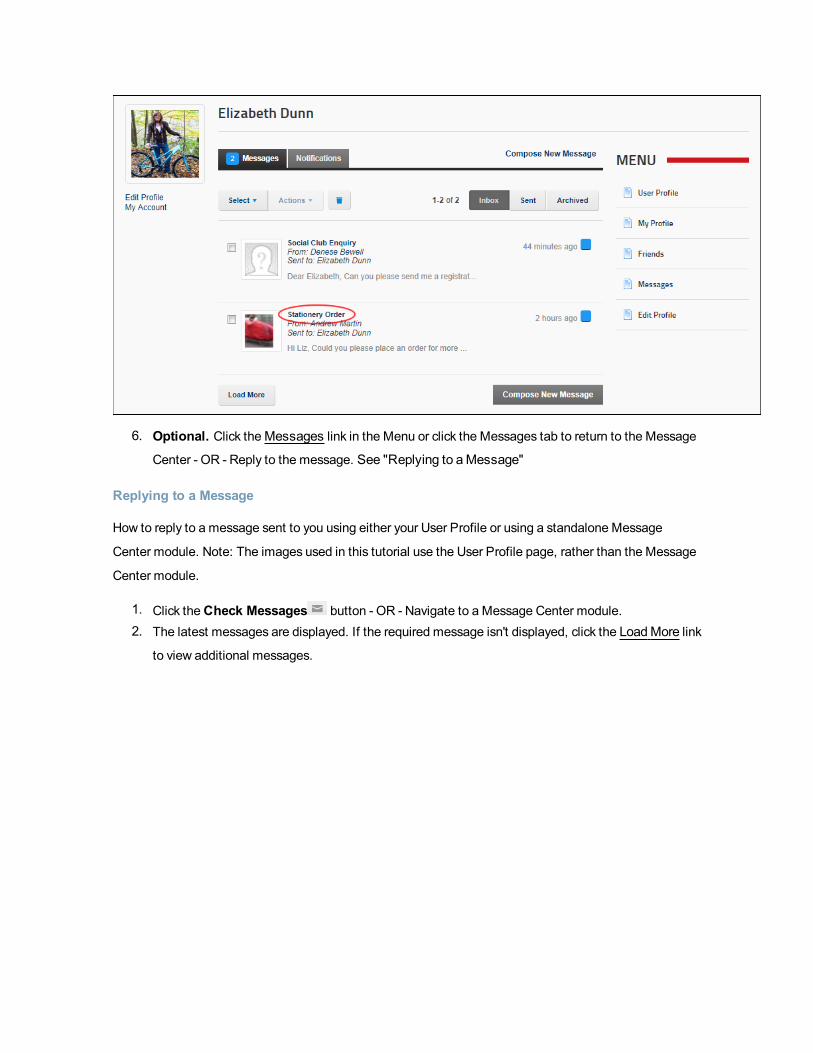
6. Optional. Click theMessages link in the Menu or click the Messages tab to return to the Message
Center - OR - Reply to the message. See "Replying to aMessage"
Replying to a Message
How to reply to a message sent to you using either your User Profile or using a standalone Message
Center module. Note: The images used in this tutorial use the User Profile page, rather than the Message
Center module.
1. Click theCheck Messages button - OR - Navigate to a Message Center module.2. The latest messages are displayed. If the required message isn't displayed, click the LoadMore link
to view additional messages.

3. Once the required message is visible, you can either hover your mouse over the message title and
then click theReply link - OR - Click on the message title to read the message in full.
4. Enter your reply into the message text box.
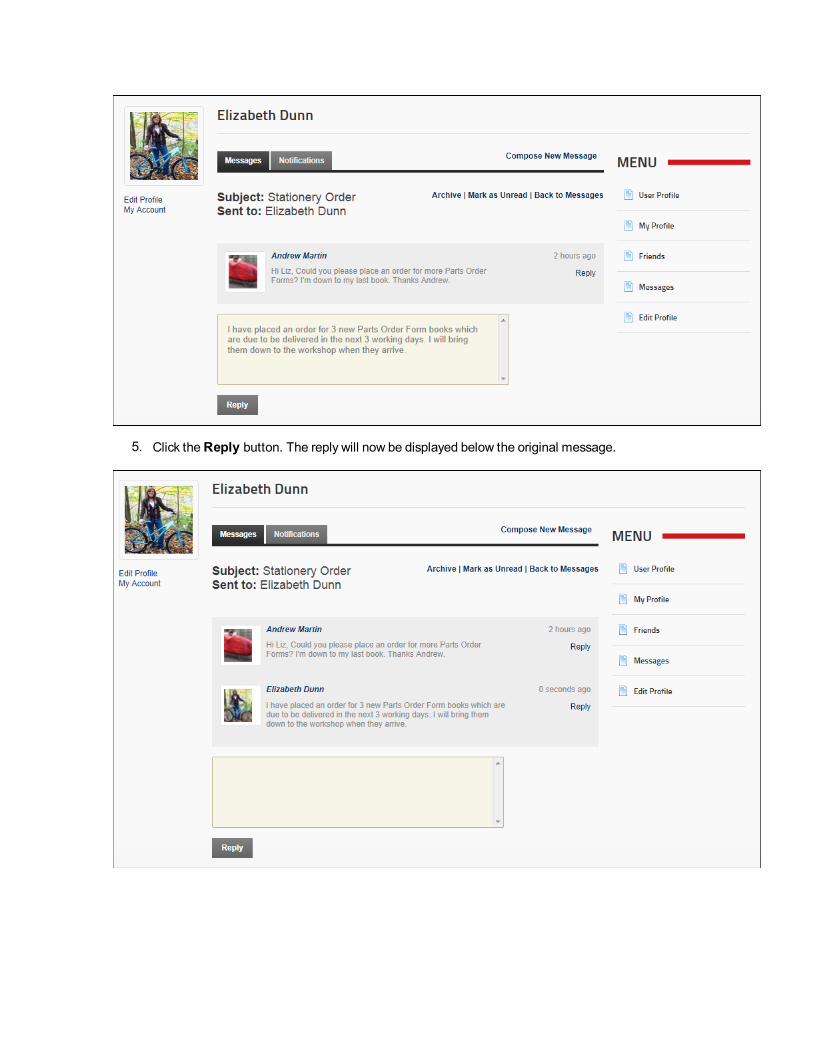
5. Click theReply button. The reply will now be displayed below the original message.
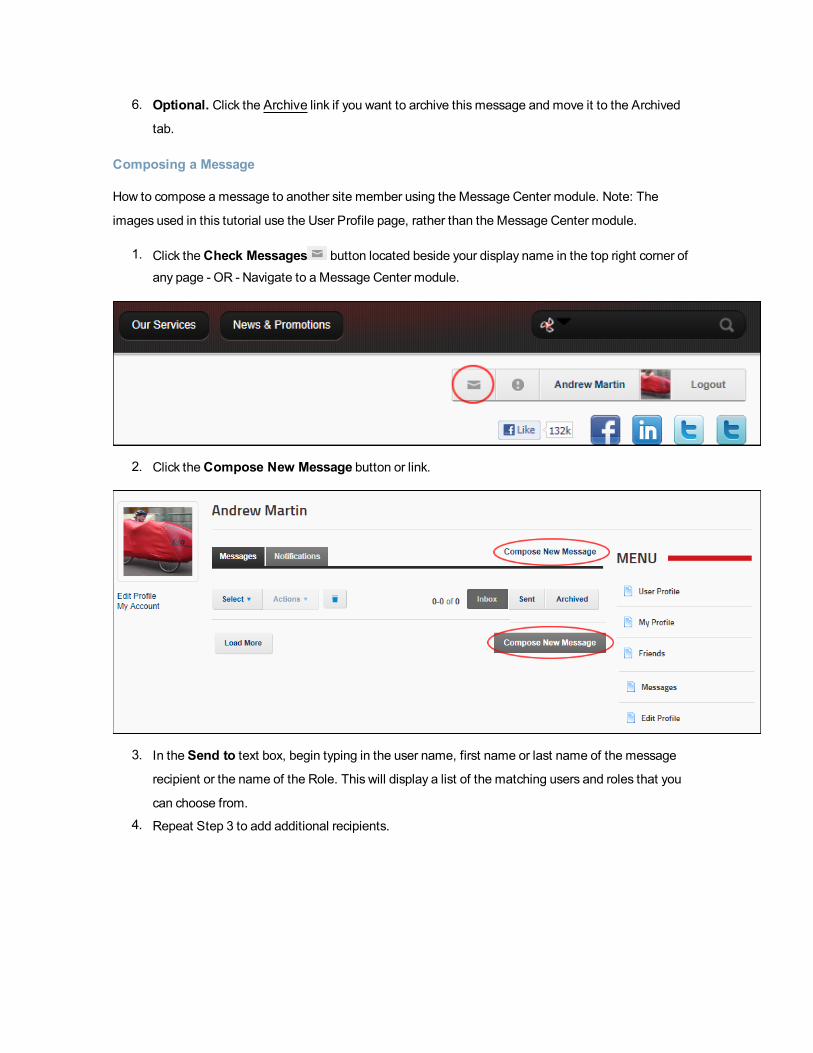
6. Optional. Click the Archive link if you want to archive this message and move it to the Archived
tab.
Composing a Message
How to compose a message to another site member using the Message Center module. Note: The
images used in this tutorial use the User Profile page, rather than the Message Center module.
1. Click theCheck Messages button located beside your display name in the top right corner of
any page - OR - Navigate to a Message Center module.
2. Click theCompose New Message button or link.
3. In the Send to text box, begin typing in the user name, first name or last name of the message
recipient or the name of the Role. This will display a list of the matching users and roles that you
can choose from.
4. Repeat Step 3 to add additional recipients.

5. In the Subject text box, enter the subject of this message.6. In the Your Message text box, enter the body of this message.
7. Click the Send button. A summary of the sent message is now displayed in the Message Center.

Archiving a Message
How to archive a message sent to you using either your User Profile or using a standalone Message
Center module. Archiving a message moves that message from the Inbox tab to the Archived tab.
Archived messages can be Unarchived at any time. Note: The images used in this tutorial use the User
Profile page, rather than the Message Center module.
1. Click theCheck Messages button - OR - Navigate to a Message Center module.2. The latest messages are displayed. If the required message isn't displayed, click the LoadMore link
to view additional messages.
3. Once the required message is visible, you can either hover your mouse over the message title and
then click the Archive link (as shown below) - OR - Click on the message title to read the message
in full and then click the Archive link - OR - Check the check box beside the message and select
Archive from the Actions drop down list.

4. The archived message is now located under theArchived tab.
Deleting a Message
How to delete a draft message from the Messaging module.
1. Click the Edit link beside the required message.

2. Click theDeleteMessage link.
Deleting aMessage
Editing/Sending a Draft Message
How to edit and/or send a draft message using the Messaging module.
1. Click the Edit link beside the required message.

2. Modify the message subject and/or message if required.
3. Click the Save Draft button to save a draft of this message to send later - OR - Click the Send Mes-
sage button to send the message now.
Sending aDraftMessage
Managing Social Groups
How to manage notifications to create social groups and manage group membership.
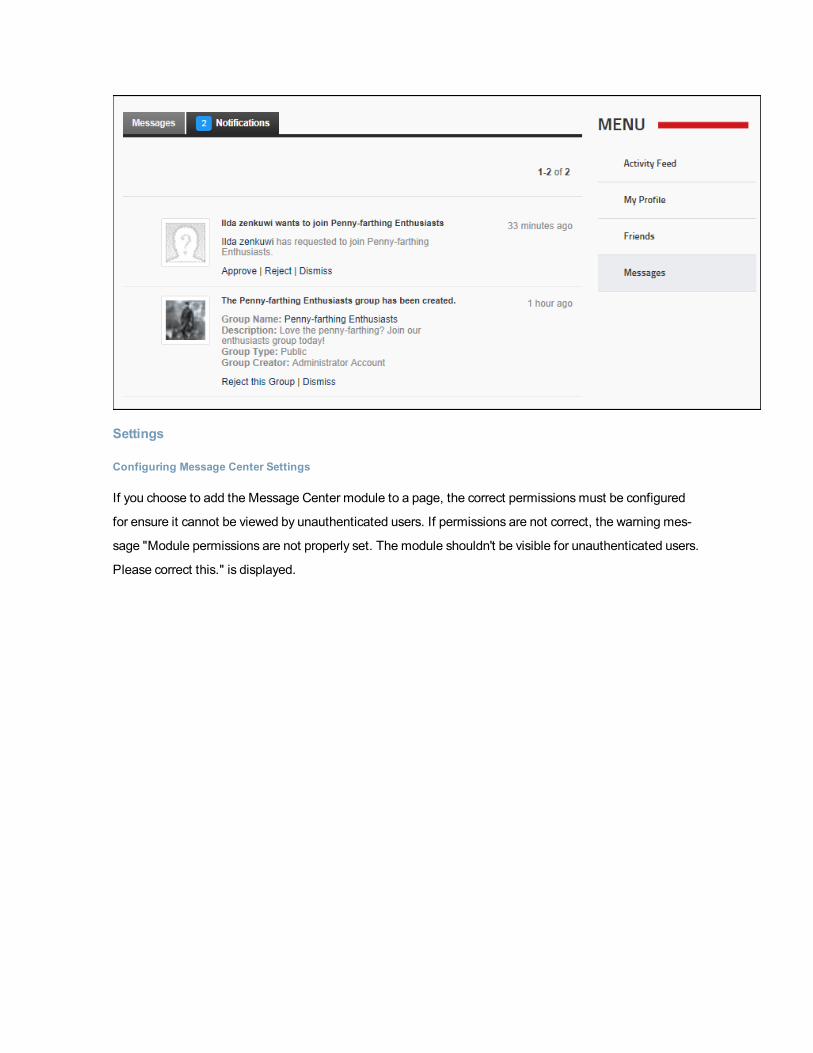
Settings
Configuring Message Center Settings
If you choose to add the Message Center module to a page, the correct permissionsmust be configured
for ensure it cannot be viewed by unauthenticated users. If permissions are not correct, the warning mes-
sage "Module permissions are not properly set. The module shouldn't be visible for unauthenticated users.
Please correct this." is displayed.

Here's how to set the correct permissions:
1. Select Manage > Settings from the module actionsmenu.2. Select the Page Settings tab.3. At Inherit View Permissions from Page, uncheck the check box.
4. In the View Module column, click on theRegistered Users andUnverified Users check boxes
to grant permission to these roles.

5. Click theUpdate button.
Setting Messaging Template Settings
How to create a custom template to be used for messages sent from this instance of the Messaging mod-
ule.
1. Select Manage > Settings from the module actionsmenu.2. Select the Messaging Settings tab.3. In the Template text box, enter a custom template. Replacement tokens and HTML formatting are
allowed.
4. Click theUpdate button.
Related Topics:
l See "List of Replacement Tokens"
My Modules
About the My Modules ModuleOpen the menu on the left by clicking the arrow or navigate through tutorials with the forward and back

buttons in the top right.
The MyModulesmodule displays a list of the modules that the current user is authorized to edit. The fol-
lowing details are listed for each module that can be edited:
l Page Name: The name of the page where the module is located. Click on a page name to go to
that page.
l Title: The title given to the module. Click on a module title to go to that page.l Type: The type of module. E.g. Linksmodule, HTMLmodule, HTML Pro modulel Workflow: The type of workflow that has been set for each module.
l Status: The current status of the module content in the workflow.l Locked By: If the content status is locked, the name of the user who locked the content will be dis-
played.
l Actions: Lists the editing rights (permissions) granted to this user. Click the Settings or Edit link to
go directly to the either settings or edit page for this module.
The module includes the following filters that can be applied separately or at one time to limit the results.
l Page Name: Select a page name to only view results for modules on that page.
l Type: Select a type of module, such as HTML Pro, to only view results for that module type.
l Show Locked Only: Check the check box to only view results for modules that have locked con-
tent.
Only available in DotNetNuke Professional Edition and DotNetNuke Enterprise Edition
Installation Note: This module is typically installed on the site.
Module Version/Minimum DNN Version: The version number is always the same as the DNN frame-
work version number.
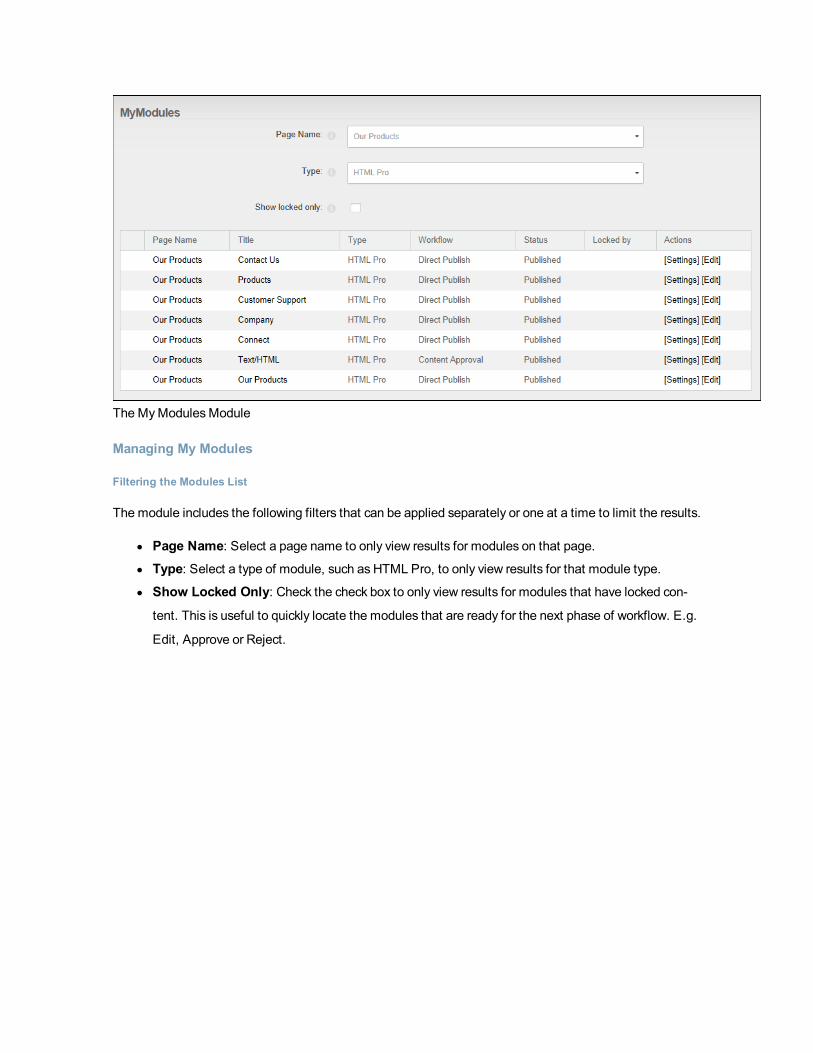
The MyModulesModule
Managing My Modules
Filtering the Modules List
The module includes the following filters that can be applied separately or one at a time to limit the results.
l Page Name: Select a page name to only view results for modules on that page.
l Type: Select a type of module, such as HTML Pro, to only view results for that module type.
l Show Locked Only: Check the check box to only view results for modules that have locked con-
tent. This is useful to quickly locate the modules that are ready for the next phase of workflow. E.g.
Edit, Approve or Reject.

Sorting the Modules List
Users are able to sort results by all columns (apart from the Actions column) by clicking on the column
name.

Navigating to a page or module
Users can navigate directly to a page or module by clicking on the page name or module title in the Page
Name or Title columns respectively.
Managing Multiple Modules
The user can approve and publish, reject or unlock the content of one or more modules directly from the
MyModulesmodule.
1. At Show Locked Only, check the check box to filter the list so only the modules that are ready for
the next stage of workflow are displayed. In the Status column you can view the current state of the
modules.
2. Check the check box beside each module to be Approved, Rejected or Unlocked.
3. Select the action to be taken for the selected modules:
l Approve Selectedl Reject Selectedl Unlock Selected
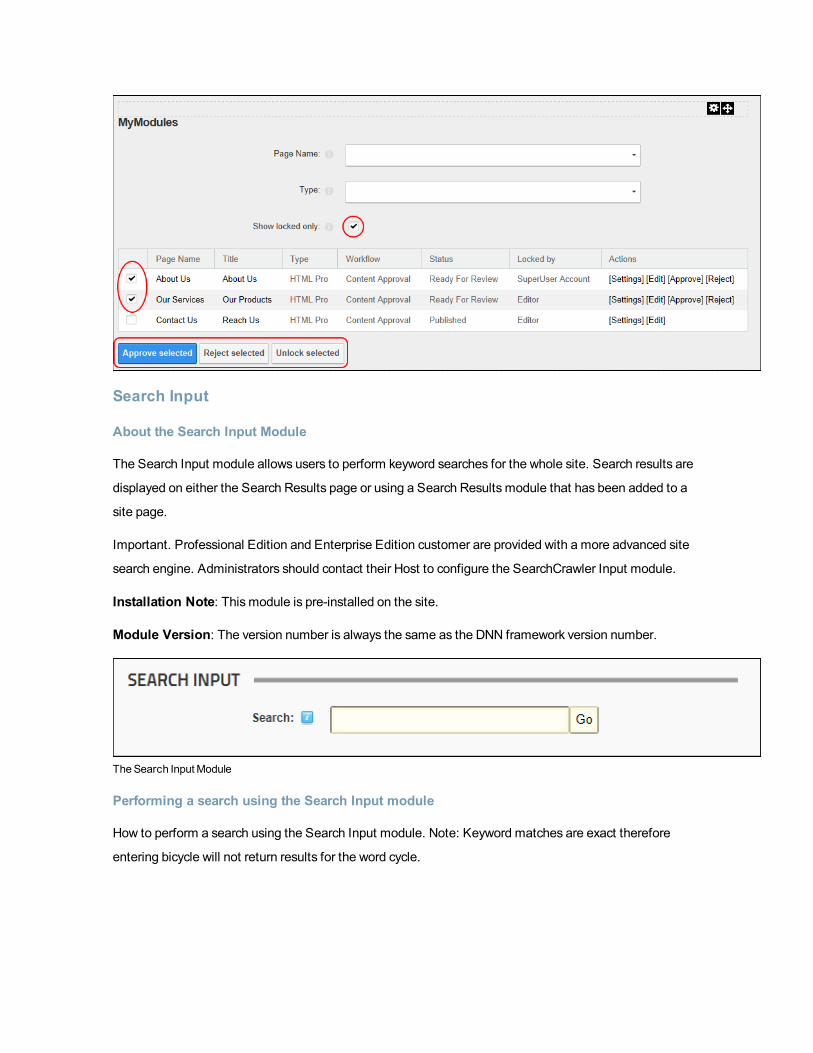
Search Input
About the Search Input Module
The Search Input module allows users to perform keyword searches for the whole site. Search results are
displayed on either the Search Results page or using a Search Results module that has been added to a
site page.
Important. Professional Edition and Enterprise Edition customer are provided with a more advanced site
search engine. Administrators should contact their Host to configure the SearchCrawler Input module.
Installation Note: This module is pre-installed on the site.
Module Version: The version number is always the same as the DNN framework version number.
TheSearch Input Module
Performing a search using the Search Input module
How to perform a search using the Search Input module. Note: Keyword matches are exact therefore
entering bicycle will not return results for the word cycle.

Permissions. Any user that has been granted permission to view the Search Input module can perform a
search.
1. Go to a Search Inputmodule.2. Enter a keyword into the search text box. E.g. bicycle
3. Click theGo button.
4. Review the displayed results and then click on either the linked Module Title (e.g. Our Goal) or
page name (e.g. http://awesomecycles.biz/AboutUs.apsx) to go to the page.
5. The selected result is now displayed.
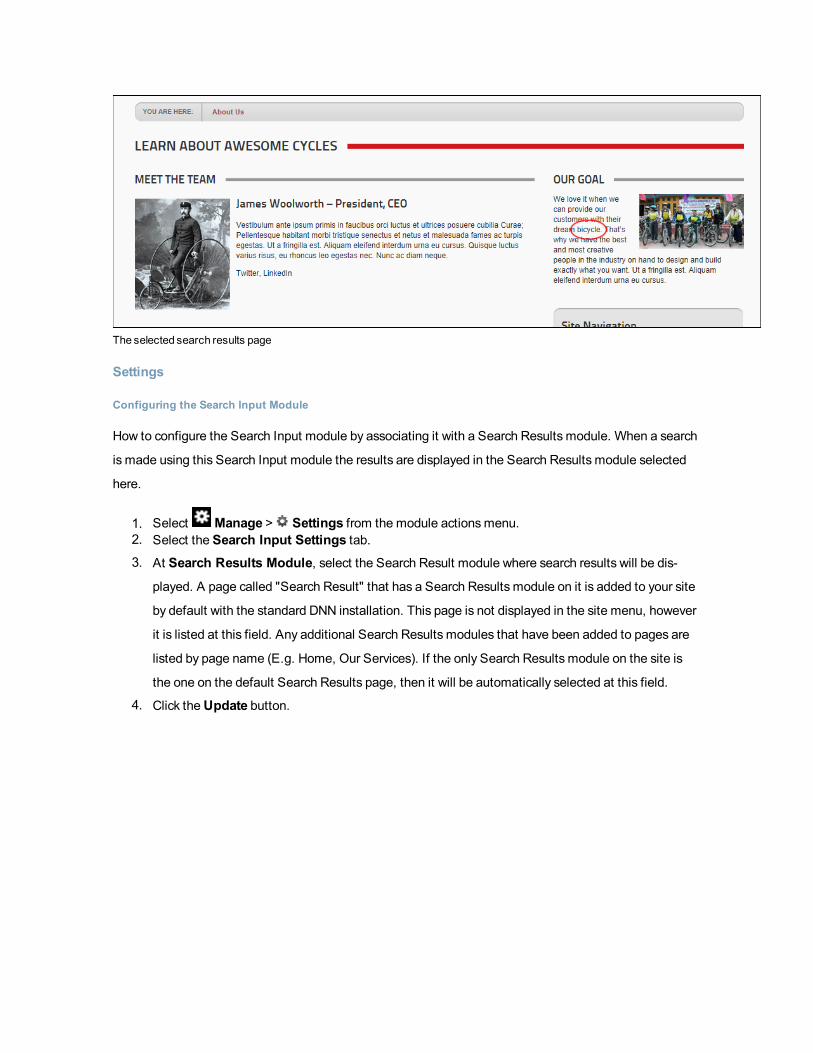
The selected search results page
Settings
Configuring the Search Input Module
How to configure the Search Input module by associating it with a Search Results module. When a search
is made using this Search Input module the results are displayed in the Search Results module selected
here.
1. Select Manage > Settings from the module actionsmenu.2. Select the Search Input Settings tab.3. At Search Results Module, select the Search Result module where search results will be dis-
played. A page called "Search Result" that has a Search Results module on it is added to your site
by default with the standard DNN installation. This page is not displayed in the site menu, however
it is listed at this field. Any additional Search Results modules that have been added to pages are
listed by page name (E.g. Home, Our Services). If the only Search Results module on the site is
the one on the default Search Results page, then it will be automatically selected at this field.
4. Click theUpdate button.
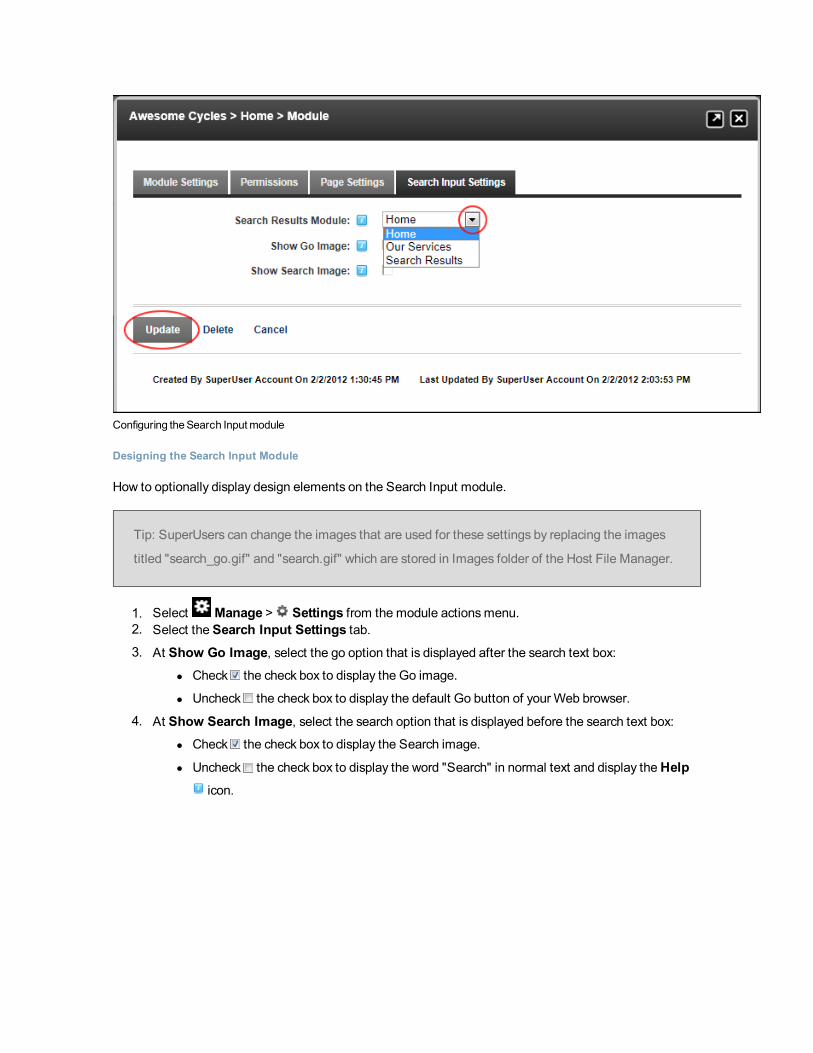
Configuring theSearch Inputmodule
Designing the Search Input Module
How to optionally display design elements on the Search Input module.
Tip: SuperUsers can change the images that are used for these settings by replacing the images
titled "search_go.gif" and "search.gif" which are stored in Images folder of the Host File Manager.
1. Select Manage > Settings from the module actionsmenu.2. Select the Search Input Settings tab.3. At Show Go Image, select the go option that is displayed after the search text box:
l Check the check box to display the Go image.
l Uncheck the check box to display the default Go button of yourWeb browser.
4. At Show Search Image, select the search option that is displayed before the search text box:l Check the check box to display the Search image.
l Uncheck the check box to display the word "Search" in normal text and display theHelpicon.

5. Click theUpdate button.
Search Inputmodule displaying the default Go&Search images
Thedefault layout of theSearch Inputmodulewithout both images disabled
Search Results
About the Search Results Module
The Search Results module displays results of searches conducted using the Search Input module.
Prerequisite. The Search Input module MUST be added to the site in order to perform a search.
Permissions. All users who are authorized to view the module can view search results. Page Editors can
customize the way results are displayed.

Important. Professional Edition and Enterprise Edition customer are provided with a more advanced site
search engine. Administrators should contact their Host to configure the SearchCrawler Input module.
Installation Note: This module is pre-installed on the site.
Module Version: The version number is always the same as the DNN framework version number.
TheSearchResults Module
Settings
Configuring the Search Results Module
How to configure the appearance of results displayed in the Search Results module.
1. Select Manage > Settings from the module actionsmenu.2. Select the Search Results Settings tab and then set one or more of theseOptional settings:3. In theMaximum Search Results text box, enter the maximum number of results that the search
can display.
4. In theResults Per Page text box, enter the maximum number of results to be displayed per
results page.
5. In theMaximum Title Length text box, enter the maximum number of characters that the search
title can display.
6. In theMaximum Description Length text box, enter the maximum number of characters that the
search description can display.
7. At Show Description, check the check box to display a description for the search results.

8. Click theUpdate button.
Social Groups
About the Social Groups Module
The Social Groupsmodule allows authorized users to browse, view, create and join social groups.
Members of a group can post journal entries to a group and view details of other group members.
Adding a Social Group Journal Entry
How to post an entry to the Journal associated with a Social Group. The entry will appear in both your pro-
file and on the Social Groupsmodule. Depending on the Journal settings, you may be able to attach a
photo or a file to each post. You cannot add more than one attachment (either a photo or a file) to a post.
Photo attachments display below the post and are scaled up or down to be as a standard width of 250 pix-
els. File attachments display as a File icon above the linked file name.

Tip: For information on how to manage these Journal posts, See "About the Journal Module".
Note: You will need to go to the Social Groupsmodule to perform these tasks.
1. Navigate to the Social Groupsmodule.
2. Click on the name of the required group.
3. In the "Tell the world something..." message box, paste or type your message. A maximum length
is set for each message so if you paste in a message longer than the allowed message length, then
the additional characters will be trimmed from the end of the message. Likewise, if you attempt to
type in a longer message than is permitted you will be prevented from entering any additional char-
acters once the maximum is reached. Note: You can cancel the new entry by clicking theCancel
button that is displayed in the top right corner of the module once you commence entering themessage.
3. Optional. Click the Photo button to attach a photo to your post. This displays the Select
photo to share section where you can choose from these options:
l Browse from site:l Upload from my computer: Click this link and then navigate to and select the image.
Once you have selected and uploaded the photo it will be displayed on the module.
4. Optional. Click theAttachment button to attach a file to your post. This displays the Select
file to share section where you can choose from these options:
l Browse from site:

l Upload from my computer: Click this link and then navigate to and select the file.
Once you have selected and uploaded the file a File icon is displayed indicating the file
is successfully attached
5. Recommended. Click the Share button and choose the users can view this message from
these options:
l Everyone: Any user who can view this social group.
l Community Members: Any authenticated user who belongs to this social group.l Friends: Any user that you have added as a Friend. See "Connecting with aMember"
6. Click the Share button. The post is now displayed below the message box. In the below example, a
post with a file attachment has been added.
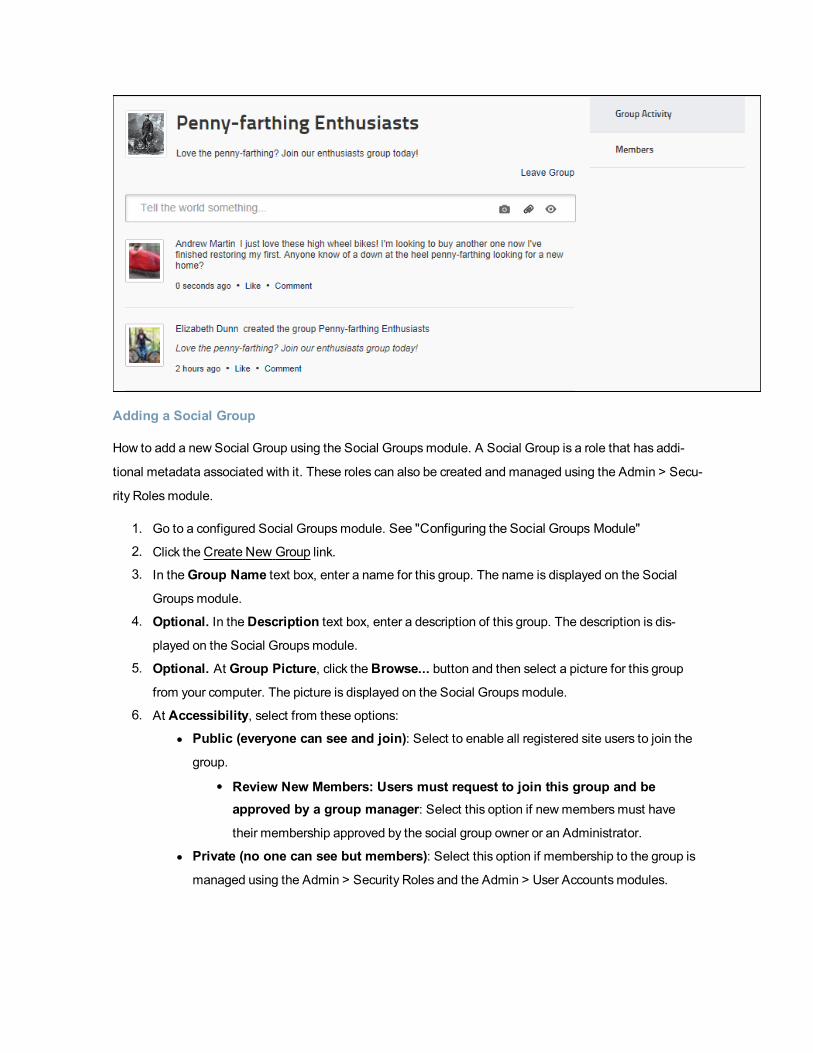
Adding a Social Group
How to add a new Social Group using the Social Groupsmodule. A Social Group is a role that has addi-
tional metadata associated with it. These roles can also be created and managed using the Admin > Secu-
rity Rolesmodule.
1. Go to a configured Social Groupsmodule. See "Configuring the Social Groups Module"
2. Click theCreate New Group link.
3. In theGroup Name text box, enter a name for this group. The name is displayed on the Social
Groupsmodule.
4. Optional. In theDescription text box, enter a description of this group. The description is dis-
played on the Social Groupsmodule.
5. Optional. At Group Picture, click theBrowse... button and then select a picture for this group
from your computer. The picture is displayed on the Social Groupsmodule.
6. At Accessibility, select from these options:
l Public (everyone can see and join): Select to enable all registered site users to join the
group.
l Review New Members: Users must request to join this group and beapproved by a group manager: Select this option if newmembersmust have
their membership approved by the social group owner or an Administrator.
l Private (no one can see but members): Select this option if membership to the group is
managed using the Admin > Security Roles and the Admin > User Accountsmodules.
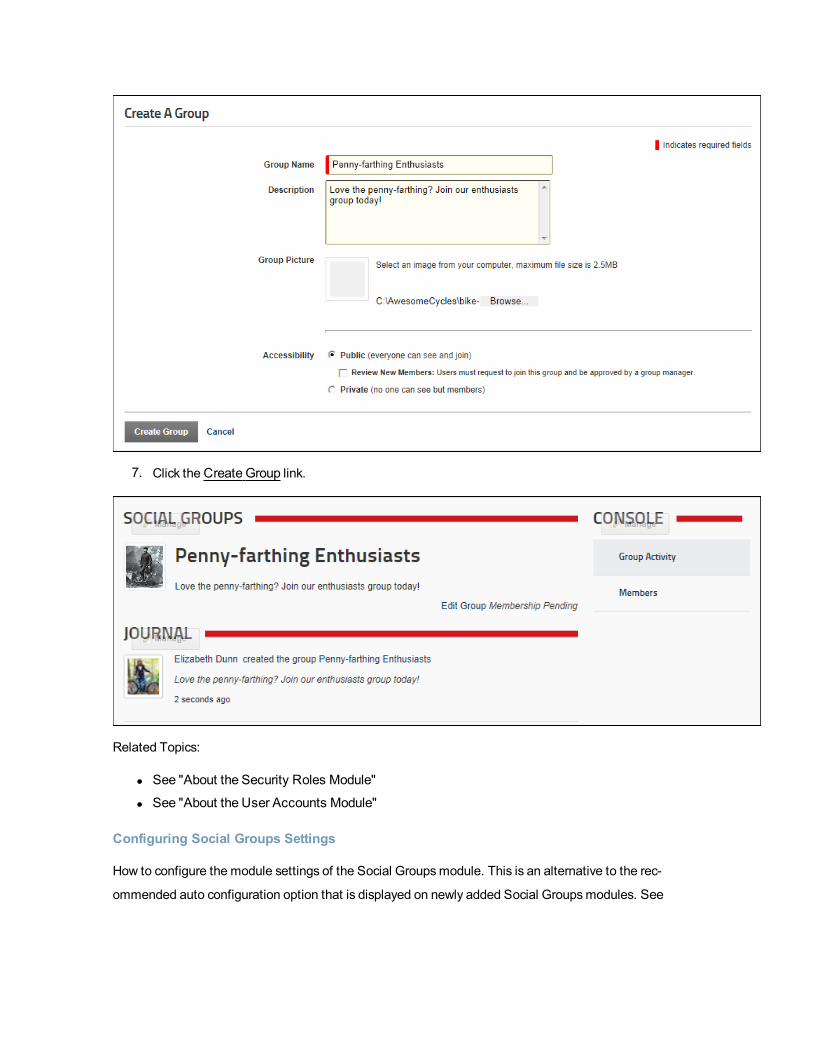
7. Click theCreate Group link.
Related Topics:
l See "About the Security Roles Module"
l See "About the User Accounts Module"
Configuring Social Groups Settings
How to configure the module settings of the Social Groupsmodule. This is an alternative to the rec-
ommended auto configuration option that is displayed on newly added Social Groupsmodules. See

"Configuring the Social Groups Module"
1. Navigate to a Social Groupsmodule.
2. Select Manage > Settings from the module actionsmenu.3. Select theGroup Module Settings tab.4. At Default Role Group, select the role group that contains the roles you want to display.5. At Module View Mode, select to display groups as a list or view.6. At Group View Page, select the page where users will go to view a particular group.
7. At Group View Template, modify the default template in order to customize the group list dis-
play. Common tokens are: [groupitem:GroupName] [groupitem:GroupDescription] [grou-
pitem:PhotoURL] [groupviewurl]
8. At Groups Require Approval, check the check box if groupsmust be approved before they are
displayed on this module - OR - Uncheck the check box to display all groups.
9. Click theUpdate button.
Configuring the Social Groups Module
How to configure the Social Groupsmodule using the recommended auto configuration. The Social
Groupsmodule can also be manually configured, however this is recommended for experienced users
only. The auto configured settings can be changed. See "Configuring Social Groups Settings"

1. Navigate to new instance of the Social Groupsmodule - OR - Add a Social Groupsmodule to a
page.
2. Click theAuto Configure button.
Editing a Social Group
How to edit a social group using the Social Groupsmodule. Social Groups can also be managed using the
Admin > Security Rolesmodules.
1. Navigate to a Social Groupsmodule.
2. Click on the name of the required Social Group.
3. Click on the Edit Group link.
4. On the Edit Group page, edit one or more fields as required. See "Adding a Social Group"
5. Click the SaveGroup link.
Related Topics:
l See "About the Security Roles Module"
Joining a Social Group
How to join a public social group using the Social Groupsmodule. Group members are granted access to
viewGroup Activity (journal entries posted to this group by all group members) and view details of other
group members on the Members Directorymodule.
1. Navigate to a Social Groupsmodule which displays a list of the social groups you can join.
2. Click the Join link - OR - Click on the name of the required Social Group to viewmore information
and then click the Join Group link.

Depending on the Social Group, your request to join will be handled in one of these ways:
l You are granted immediate access to the group and are taken to the Group Activity page.
l The Group Administrator (the person who created the group) will need to approve your request to
join the group before access is granted. You will be sent an message when your request is proc-
essed.
Leaving a Social Group
How to leave a social group using the Social Groupsmodule. This removes the user from the security role.
There is no message sent to a user who elects to leave a group.
1. Navigate to a Social Groupsmodule.
2. Click on the name of the required Social Group.
3. Click the LeaveGroup link.
Users And Roles
Users and Roles Module Suite
The Users and Roles extension consists of three modules that allows authorized users to add users to the
site, add and manage existing site users and add and manage security roles. When you add the Users And
Rolesmodule to a page, the following modules are added:
l See "About the Add New UserModule"
l See "About the Security Roles Module"
l See "About the User Accounts Module"
Important. The Users and Rolesmodule suite is set as a Premium module in the default DNN con-
figuration. This setting was chosen to reduce the possibility of these modules, which contain confidential
user information and manage security access to your site, being added to a page without due con-
sideration. Administrators should contact their Host to change this setting.
ViewProfile
About the ViewProfile Module
The ViewProfile module enables users to manage their user credentials, password, profile and sub-
scriptions to services. The module is accessed by clicking on your display name (the name you chose to be
displayed to you and to others on the website) which is typically located in the top right hand corner of the
website.
Installation Note: This module is pre-installed on the site.
Module Version: The version number is always the same as the DNN framework version number.
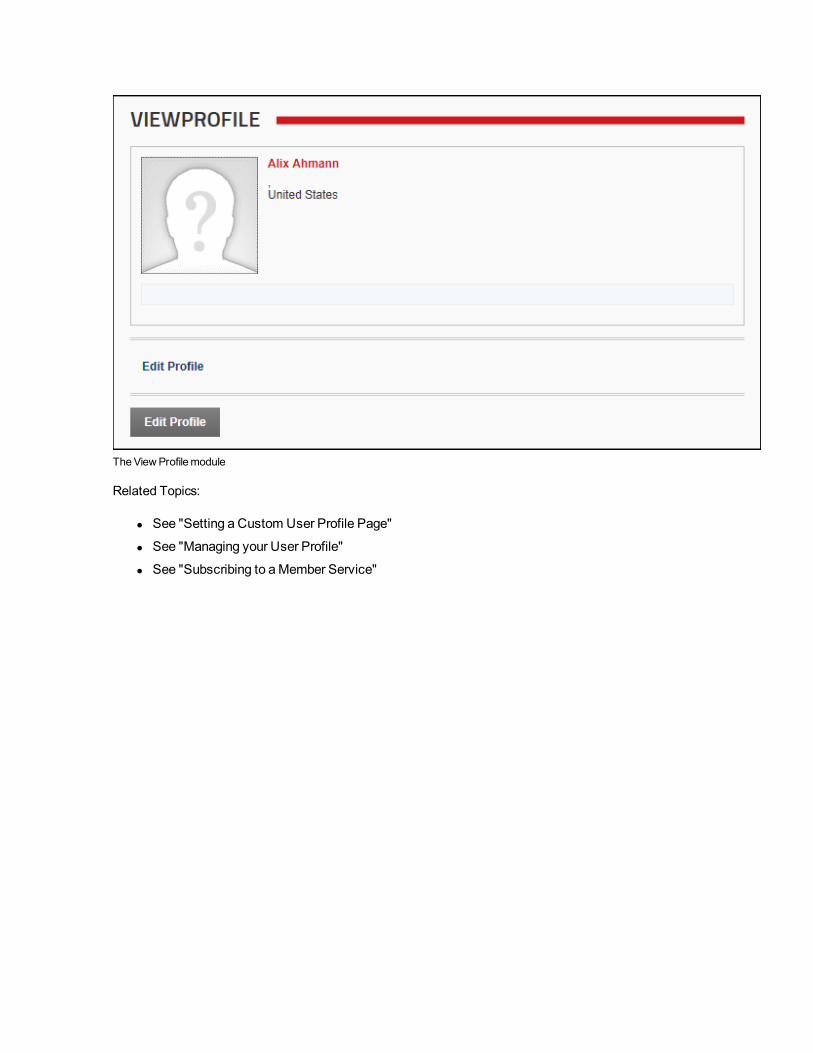
TheViewProfilemodule
Related Topics:
l See "Setting a Custom User Profile Page"
l See "Managing your User Profile"
l See "Subscribing to aMember Service"
Advanced Site Management
Multi Language Sites
You can enable multiple languages using the Languagesmodule on your site and use Content Local-
ization to translate site content into multiple languages.
l See "About Content Localization"
l See "About the LanguageManagement Module"
Search Optimization
How to optimize search results both within your site and for search engines using these module.
l See "About the Google Analytics / Google Analytics ProModule"
l See "About the Search Engine SiteMapModule"
Site Design
DNN uses skins to manage the design of your site. You can set a single design for your whole site or use
different designs on different pages and modules.
l See "About the Skins Module" - Viewing and applying skins
l See "About the Skin Designer Module" - Managing skin design
l See "About the Stylesheet Editor"
Site Searching
Use these three modules to add search capabilities to your site.
l See "About the Search Input Module"
l See "About the Search Results Module"
Social Collaboration
Everyone is talking social. And evidence is mounting that social collaboration has real business benefit.
Social intranets drive employee productivity and increased efficiency. Communities turn customers into
advocates and help grow business. The latest version of DotNetNuke builds on the already strongWeb
Content Management System (WCMS) capabilities that have made it the number oneWeb content

solution in the Microsoft ecosystem. The new release enables businesses to quickly build internal social
networks to improve collaboration, communication and employee productivity. It also enables the creation
of external communities that turn customers into advocates, which lowers support cost and increases reve-
nue opportunities.
The Journal Module - Activity feed powers user interactions
The Journal module is an interactive activity feed which enables community members to interact in a fash-
ion that has been popularized by familiar social networks like Facebook, Twitter, and LinkedIn. The Jour-
nal module can be placed on any DotNetNuke page and can be used to post and reply to status updates,
like, tag users and share links, files, photos and videos. Privacy controls unable users to determine who
can view posts. See "About the Journal Module"
The Social Groups Module - Social groups and forums increase team collaboration
DNN fosters collaboration through the ability to create topic specific social groups. Users can join groups
and share content with group members. Discussion forums can also be associated with social groups ena-
bling members to ask and respond to questions and gain feedback on new ideas. See "About the Social
Groups Module"
Managing your User Profile - Interactive user profile offers more personalization
DNN empowers community members to create and manage a personal profile and dashboard. The new
profile can be easily customized to display desired member information. It also offers flexible privacy con-
trols, and a user focused activity feed. See "Managing your User Profile"
The Message Center Module - Message center improves communication
In addition to activity feed based communication users can also send and reply to private messages. DNN
6.2 includes an integrated message center that enables users to interact with other users or groups
through messages that are similar to email. See "About theMessage Center Module"
The Member Directory Module - Member directory provides foundation for collaboration
A member directory is vital to the success of any collaborative site that is based on user-to-user inter-
action. It enables users to find and connect with other users on the site. With DNN 6.2+ users can search
for members based on multiple search criteria. User relationships foster community and Registered users
and subscribers can now form social relationships on any DNN 6.2+ site. This allows users to friend and fol-
low other users or groups and to receive notifications which allow them to approve or reject new friends
and followers. See "About theMember Directory Module"

Social authentication increases community participation
Users and members can nowmore easily register and sign onto a DotNetNuke web site using their cre-
dentials from Facebook, Twitter and Google+. DNNmakes it easier than ever for customers and prospects
to participate in an online community.
l See "Configuring Facebook Authentication"
l See "Configuring Google Authentication"
l See "Configuring Live Authentication"
l See "Configuring Twitter Authentication"
l See "Logging in with Facebook"
l See "Logging in with Google"
l See "Logging in with Live"
l See "Logging in with Twitter"
Content Localization
About Content Localization
Content Localization allows Administrators and translators to create localized module content in multiple
languages (cultures).
Prerequisite. Content localization must be allowed on the site by a SuperUser and more than one lan-
guage must be enabled and activated.
Related Topics:
l See "Enabling/Disabling a Language"
Adding a Module to all Languages
How to add a newmodule (and then add module content) for all enabled languages on your site.
1. View the site in the default language. See "Viewing a Site in the Default Language"
2. Navigate to the page where you want to add the module. See "Viewing Any Page" or See "View-
ing any Page (Pages Module)"
3. Add the module. See "Adding an ExistingModule (ControlBar)", See "Adding a New Module (Rib-
bonBar)" or See "Adding a New Module (Iconbar)"
4. Add module content as required. See "EditingModule Content"
Adding a New Page (Default Language)
How to add a page to a site for the default language. This will create a single page for all cultures, a page
in the current culture or a localized version for all cultures depending on the Localization settings you
choose.
1. View the site in the default language. See "Viewing a Site in the Default Language"2. Add the new page as per usual ensuring you set the Permissions and Localization settings as
required. See "Adding a New Page" and See "Localization Settings for New Pages".3. Add modules and content to this page as required.
4. If you have chosen to create localized versions of the page, once the content is completed, you can
set page for translation. See "Setting a Page as Ready for Translation"
Adding Modules to a Secondary Language Only
How to add one or more modules to the site which only display when the user is viewing the site in a sec-
ondary language (i.e. a language other than the default site language).
1. View the site in the required secondary language. See "Viewing a Site in a Secondary Language"2. Navigate to the page where you want to add the module.
3. Add the module. See "Adding a New Module (ControlBar)" or See "Adding a New Module (Rib-
bonBar)"4. Add module content as required, typically this will be in the selected language.
Next Step: See "ModifyingModule Localization Status" to markmodule as translated.
Delete Modules from Secondary Language
How to delete a module from a page which is in a secondary language. Note: The module is still available
in other languages.
1. View the site in the required secondary language. See "Viewing a Site in a Secondary Language"
2. Navigate to the required page. See "Viewing Any Page" or See "Viewing any Page (Pages Mod-
ule)"
3. Delete the module. See "Deleting aModule"
Editing (Translating) Localized Module Content
How to translate module content into a language other than the default site language.
Important. Localized content must first be created. See "Creating Localized Pages for a Language"

1. View the site in the required secondary language. See "Viewing a Site in a Secondary Language"
2. Select the edit option for this module. E.g. For the HTML module, click the Edit Content link.3. Edit/translate text as required.
Editing the Content of Shared Modules
How to edit the content of a shared module. Note: Since shared modules are a reference to a single
instance of the module, when updating a module, all the pages that contain the reference are updated.
1. View the site in the default language. See "Viewing a Site in the Default Language"
2. Navigate to the page where the shared module is located. See "Viewing any Page (Pages Module)
" or See "Viewing Any Page"
3. Edit the module content. See "EditingModule Content"
Modifying Module Localization Status
How to manually modify the status of one or more modules located on a page which is in a secondary lan-
guage. In the below example, the HTMLmodule for English (Australia) will be marked as translated.
1. Ensure you are viewing the site in the required language. See "Viewing a Site in a Secondary Lan-
guage"
2. Go to the Page Settings page. See "Editing Page Settings"
3. Select the Localization tab.4. Go to theModule Localization section which lists of each of the modules on this page.5. Check the check box beside each of the modules whose status you want to modify - OR - Select
the check box located in the header row to select all modules.
6. Click one of the following links as required:
l Detach from Default Culture: Select to create a separate version of the module content
from the default culture. You can then translate this content as required. This displays the
Grant icon in the Is Detached? column.l Reference Default Culture: Select to make module content the same as the content in the
default culture. This displays the message "Binding to the default culture version will delete
the content from the sub culture versions. This action is irreversible. Are you sure you wish
to proceed?"
1. Click theOK button to confirm. This displays theDeny icon in the Is Detached?
column.
l Mark as Translated: Select to mark these modules as translated. This displays theGranticon in the Is Detached? column.

l Mark as Not Translated: Select to mark these modules as requiring translation. This dis-
plays theDeny icon in the Is Detached? column.7. Repeat Steps 5-6, selecting different modules and a different status as required.
8. Click theCancel link to return to the module.
Publishing a Secondary Language Page
How to publish a page that has been translated into a secondary language. This will copy the view per-
missions from the page that is the default language to this page.
Prerequisite. The page must be translated. See "Setting a Page as Translated"
1. Navigate to the required page.
2. On the ControlBar, hover over the Edit Page and then select Page Settings. (On the RibbonBar,
go to the Pages tab and select Page Settings - OR - On the Iconbar, Go to the Page Functions
section and select Settings.) This opens the Page Settings page.3. Recommended. If you haven't already done so, you should now set the view rights for this page.
E.g. All Users.
4. Select the Localization tab. Here you can view the current localization information for this page.
5. At Publish Page, click the Save button.
Setting a Page as Ready for Translation
How to set a page as ready for translation using the Languagesmodule. Setting a page as ready for trans-
lation creates a copy of the page (including modules and content) for each of the enabled language. Trans-
lators are automatically granted Edit Rights to the page and they receive email notification and a
Notification message to their User Profile that the page is ready for translation.

Note: Once a page is set as ready for translation it cannot be viewed by site visitors or users until it has
been translated.
1. Ensure you are viewing the site in default site language. See "Viewing a Site in the Default Lan-
guage"2. Navigate to the required page.
3. On the RibbonBar, hover over the Pages link and select Page Settings - OR - On the Iconbar,
Go to the Page Functions section and select Settings. This opens the Page Settings page.4. Recommended. If you haven't already done so, you should now set the view rights for this page.
E.g. All Users. See "Setting Page Permissions"
5. Go to the Localization section. You can view the current localization information on this page, as
well as review related notes.
6. Click theReady For Translation link.
7. In the Enter Translation Comment text box, enter a comment to assist translators.

8. Click the Submit link. This creates a localization version of the page in each language as well as
each modules on the page.
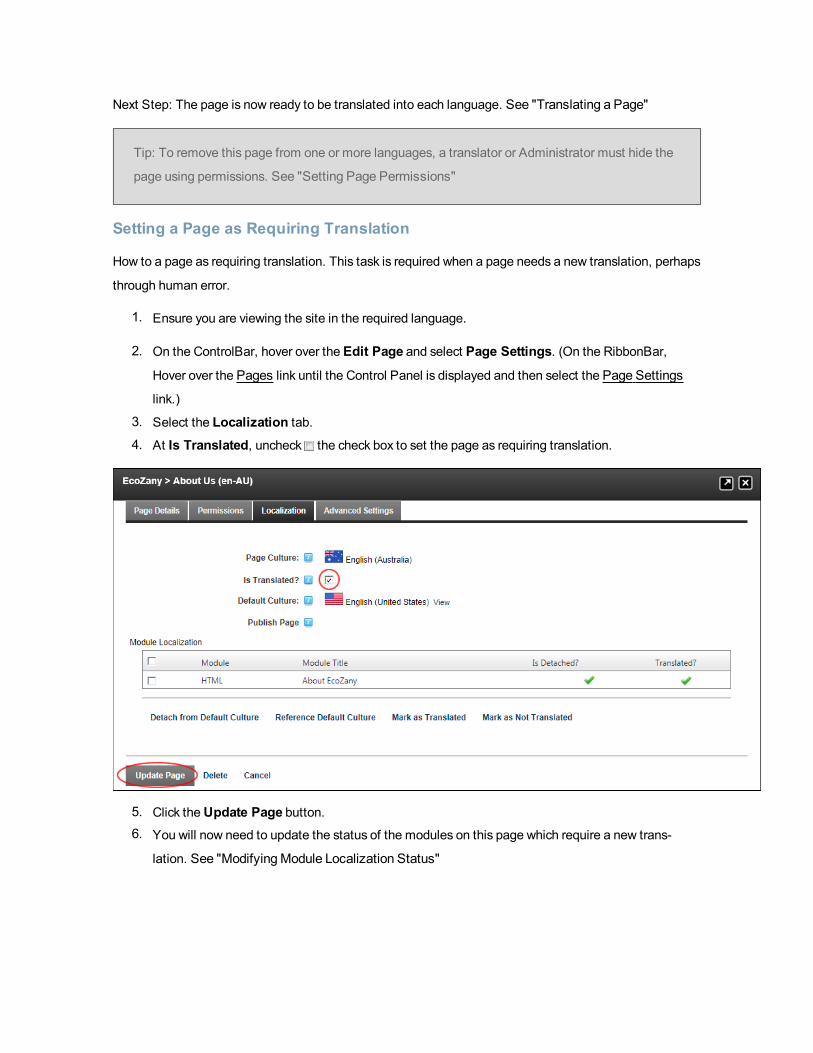
Next Step: The page is now ready to be translated into each language. See "Translating a Page"
Tip: To remove this page from one or more languages, a translator or Administrator must hide the
page using permissions. See "Setting Page Permissions"
Setting a Page as Requiring Translation
How to a page as requiring translation. This task is required when a page needs a new translation, perhaps
through human error.
1. Ensure you are viewing the site in the required language.
2. On the ControlBar, hover over the Edit Page and select Page Settings. (On the RibbonBar,
Hover over the Pages link until the Control Panel is displayed and then select the Page Settings
link.)
3. Select the Localization tab.4. At Is Translated, uncheck the check box to set the page as requiring translation.
5. Click theUpdate Page button.6. You will now need to update the status of the modules on this page which require a new trans-
lation. See "ModifyingModule Localization Status"

Setting a Page as Translated
How to mark a page as translated.
1. Ensure you are viewing the site in the required language. See "Viewing a Site in a Secondary Lan-
guage" or See "Viewing a Site in the Default Language"
2. On the ControlBar, hover over the Edit Page and select Page Settings. (On the RibbonBar, hover
over the Pages link until the Control Panel is displayed and then select the Page Settings link.)
3. Select the Localization tab.4. In theModule Localization grid, ensure all module are translated. This is indicated by theGrant
icon in the Translated? column.5. At Is Translated, check the check box to set this page as translated.
6. Click theUpdate Page button.7. Click theCancel link to return to the module.
Next Step: If this page is now ready to publish live on your site, See "Publishing a Secondary Language
Page"
Translating a Page (Admin)
How to translate a page including both the page name and module content into a language other than the
default language. You must be either an administrator to perform this task. Localized content must first be

created. See "Creating Localized Pages for a Language"
Tip: Administrators and SuperUsers can view the flag buttons for all enabled languages.
1. Click the Country Flag associated with the language to be translated. This button is typically
located in the top right corner of the site. E.g. The English (Australia) button. This displays
the site in the selected language. Page Names are appended with the language code. E.g. "About
Us" is now "About Us (EN-AU)"
2. On the ControlBar, hover over the Edit Page and select Page Settings. (On the RibbonBar, hover
over the Pages link until the Control Panel is displayed and then select the Page Settings link.)
3. Select the Page Details tab.4. In the Page Name text box, edit the page name as required. E.g. Change it from "About Us (EN-
AU)", to "About Us".
5. Select the Localization tab.6. In theModule Localization grid, check the check box beside each module to be translated - OR
- check the very top check box in the Grid Header Row to select all modules.
7. Click theDetach from Default Culture link.

8. Click theUpdate Page button.
9. TheGrant icon is now displayed in the Is Detached? column. Click theCancel link to return to
the module.
10. Edit the text of the modules as usual.
11. Return to the Page Settings page.

12. Select the Localization tab.13. In theModule Localization grid, check the check box beside each module which has been
translated - OR - check the top check box to select all modules.
14. Click theMark as Translated link.
15. TheGrant icon is now displayed in the Translated? column. Click theCancel link to return to
the module.

Translating a Page
How to translate a page including both the page name and the content of modules into a language other
than the default language.
Permissions. A user must belong to one or more translator roles to translate pages for one or more lan-
guages.
1. Login to your user account. See "Logging into a Site". Note: The language flag for the site you are
a translator for is now displayed above the control panel. Since this page is not yet translated, this
flag is only visible to translators, Administrators and SuperUsers until the content has been set as
translated. Administrators and SuperUsers can always view all pages in all enabled languages
regardless of translation status.
2. Click on your [Display Name] to go to your user account. As a translator, you will receive a message
whenever content is awaiting translation. See "Viewing aMessage"
3. Go to the MyMessagesmodule and click on theNew Content Ready for Translation link in the
Subject column.
4. In the ViewMessage screen, click the Page Name link to go to the page. Note: The Page Name is
appended with the language code. E.g. About Us is now About Us (EN-AU)

5. Translate the page content as required and then click the Save link. Note: In the below image,
notice how a version of the content in the Master Language is displayed above the Editor for your
reference.

6. Optional. You may also wish to translate the page name. See "Page Details Settings for Existing
Pages"
Next Step: See "Setting a Page as Translated"
Viewing a Site in a Secondary Language
How to view the site in a secondary language (e.g. a language other than the default site language).
Tip: Translators can view unpublished languages which they are authorized to translate. Admin-
istrators and SuperUsers can view all unpublished languages.
1. Click on the country flag icon associated with the required secondary Language.

Viewing aSite in aSecondary Language
Viewing a Site in the Default Language
How to view a site in the default site language. This tutorial assumesmore than one language is enabled
on the site and that content localization is enabled.
1. Click on the country flag icon displayed on the left hand side. This displays the site menu in the
default language.
Viewing aSite in theDefault Language
Mobile Devices Support
About Mobile Devices Support
DNN empowers business people, developers and designers to quickly create and update mobile versions
of their websites. DNN allows you to create either a separate Standalone Mobile Site (See "Creating a

StandaloneMobile Site") or a MicroSite (See "Creating aMicroSite") that is a part of your main site.
Once you've created your mobile site, you can create redirection paths for different mobile devices, See
"About the Site RedirectionManagement Module"
To preview your mobile device site, DNNProfessional Edition and Enterprise Edition customers can use
the emulator on the Control Panel. DNNCommunity Edition users can use an emulator (E.g. http://www.-
electricplum.com/dlsim.html) to emulate the experience of your site visitors.
Related Topics:
l See "Creating aMicroSite"
l See "Creating a StandaloneMobile Site"
l See "Displaying/Hiding Summary (HTML Pro)"
l See "About theMobile Skin"
l See " Previewing Your Mobile Device Site"
l See "About the Site RedirectionManagement Module"
About the Mobile Skin
A mobile site skin package called DotNetNuke.DarkKnightMobile is included with DotNetNuke. These
skins are suitable for use for a mobile website. This skin package includes skin objects appropriate for an
independent mobile website and skin objects that are appropriate for a mobile microsite.
Mobile Friendly Menu
The mobile friendly skin will present the website menu in two different styles in order to maximize the view-
ing experience on mobile devices.
Landscape Mode
For devices with a wide aspect ratio, the menu will show across the top of the page with the direct children
pages showing as links above the main menu.

Portrait Mode
For devices with narrower aspect ratio, the menu will initially be hidden with a button which will expand to
show the top level pages. Direct child pages will be shown in a stacked styled-menu at the bottom of the
page.

Mobile Website
The mobile skin package will contain two types of mobile friendly skins, one for use with standalone mobile
websites and one for use with microsites. The only difference between the two types of skins is what
shows in the menu.

Standalone Mobile Website
Using theDarkKnightMobile - Home andDarkKnightMobile - Interior page skins. All pages of the
website are shown in the mobile skin menu.
Website usingDarkKnightMobileSkin for standalonemobilewebsite shows ALLpages
MicroSite
Using theDarkKnightMobile - Microsite_Home andDarkKnightMobile - Microsite_Interior page
skins.
Only child pages of the parent mobile page will show in the mobile skin menu.

Products - Mobile is our parentmobile page for this MicroSite
Mobilemenuonly shows the child pages of theProducts-Mobile parentmobile page
Creating a MicroSite
If you want to manage your mobile device web presence from a single site, you can create a MicroSite that
forms part of your main site but is only visible to mobile device users. A MicroSite consists of a single par-
ent page and multiple child pages that can be created and managed from your main site in the same way
as you would normally create site pages.
Here's how to build a MicroSite:
1. Add a new page to your current site (See "Adding a New Page"), ensuring you choose theDark-
KnightMobile - Microsite_Home page skin. This page will be the parent page of your mobile
micrometer.

2. Add one or more child pages beneath the parent page you created at Step 1, ensuring you choose
theDarkKnightMobile - Microsite_Interior page skin.3. Repeat Step 2 to add child pages below the child pages and complete your MicroSite structure.
In the below example, the parent page of the MicroSite is called "Products - Mobile"
Notice that when you select a child page of the MicroSite that the child page displays in the mobile skin
menu.
Related Topics:
l See "About Mobile Devices Support"
l See "Displaying/Hiding Summary (HTML Pro)"
l See "About theMobile Skin"
l See " Previewing Your Mobile Device Site"

Creating a Standalone Mobile Site
How to create a Standalone Mobile website using the Mobile Website site template. The Mobile Website
template is responsive to different screen resolutions so visitors will always have the optimal experience on
their device. The template provides a flexible and adaptive layout for various devices including smart-
phones and tablets.
Updating an existing site
Use the Admin > Site Wizard to change an existing site into a Mobile Website by selecting the MobileWebsite template. See "About the SiteWizardModule"
Once you've created your site pages, you must create the content. Although content cannot be shared
between sites, you can use the IPortable feature of manymodules to quickly copy content to the mobile
device site.
Related Topics:
l See "About Mobile Devices Support"
l See "Displaying/Hiding Summary (HTML Pro)"
l See "About theMobile Skin"
l See " Previewing Your Mobile Device Site"
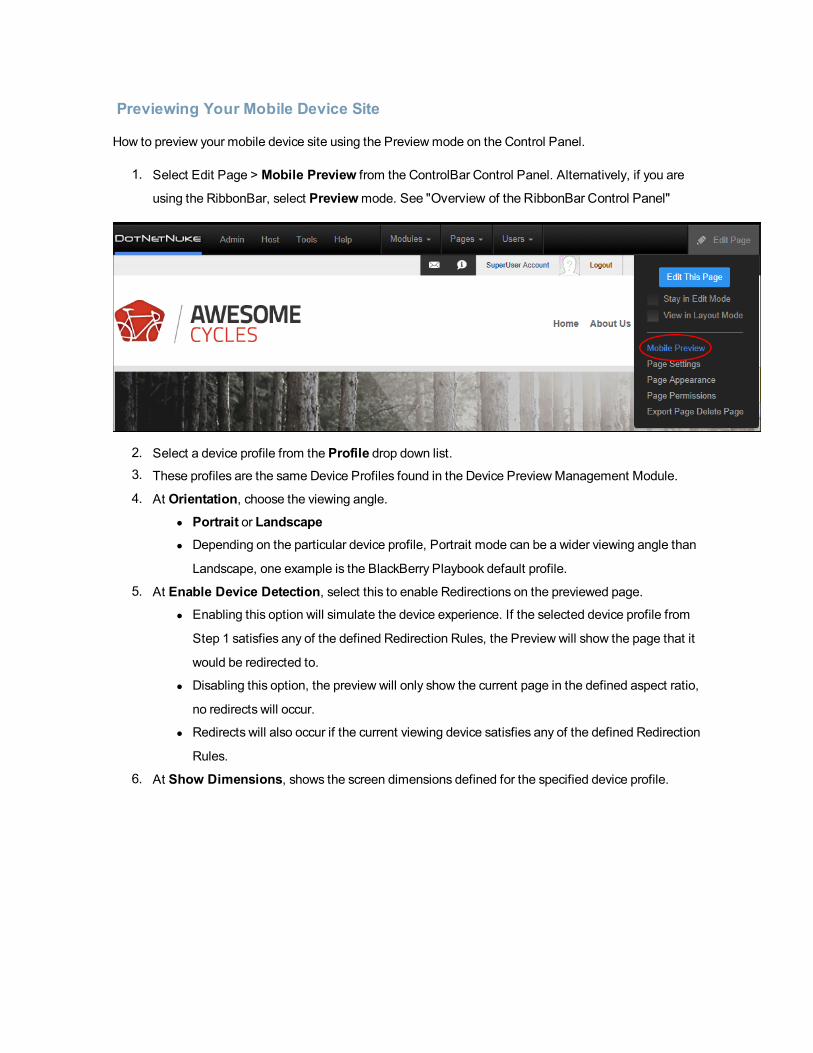
Previewing Your Mobile Device Site
How to preview your mobile device site using the Previewmode on the Control Panel.
1. Select Edit Page > Mobile Preview from the ControlBar Control Panel. Alternatively, if you are
using the RibbonBar, select Previewmode. See "Overview of the RibbonBar Control Panel"
2. Select a device profile from the Profile drop down list.3. These profiles are the same Device Profiles found in the Device PreviewManagement Module.
4. At Orientation, choose the viewing angle.l Portrait or Landscapel Depending on the particular device profile, Portrait mode can be a wider viewing angle than
Landscape, one example is the BlackBerry Playbook default profile.
5. At Enable Device Detection, select this to enable Redirections on the previewed page.l Enabling this option will simulate the device experience. If the selected device profile from
Step 1 satisfies any of the defined Redirection Rules, the Preview will show the page that it
would be redirected to.
l Disabling this option, the preview will only show the current page in the defined aspect ratio,
no redirects will occur.
l Redirects will also occur if the current viewing device satisfies any of the defined Redirection
Rules.
6. At Show Dimensions, shows the screen dimensions defined for the specified device profile.

PreviewMode: Showing theProducts page being redirected toProducts-Mobile page in aBlackBerry Bold 9000Portrait
aspect ratio.
Related Topics:
l See "About Mobile Devices Support"
l See "Creating aMicroSite"
l See "Creating a StandaloneMobile Site"
l See "Displaying/Hiding Summary (HTML Pro)"
l See "Adding Content (HTML Pro)"
l See "About theMobile Skin"

Summary View and Full View
If summary view for the HTML content is enabled, it will show the Summary View by default. To view the
full HTML content click on theMore button. To switch back to the Summary View click the Summary but-
ton.
Content shown inSummary View
Content shown in FullView
Related Topics:
l See "Displaying/Hiding Summary (HTML Pro)"
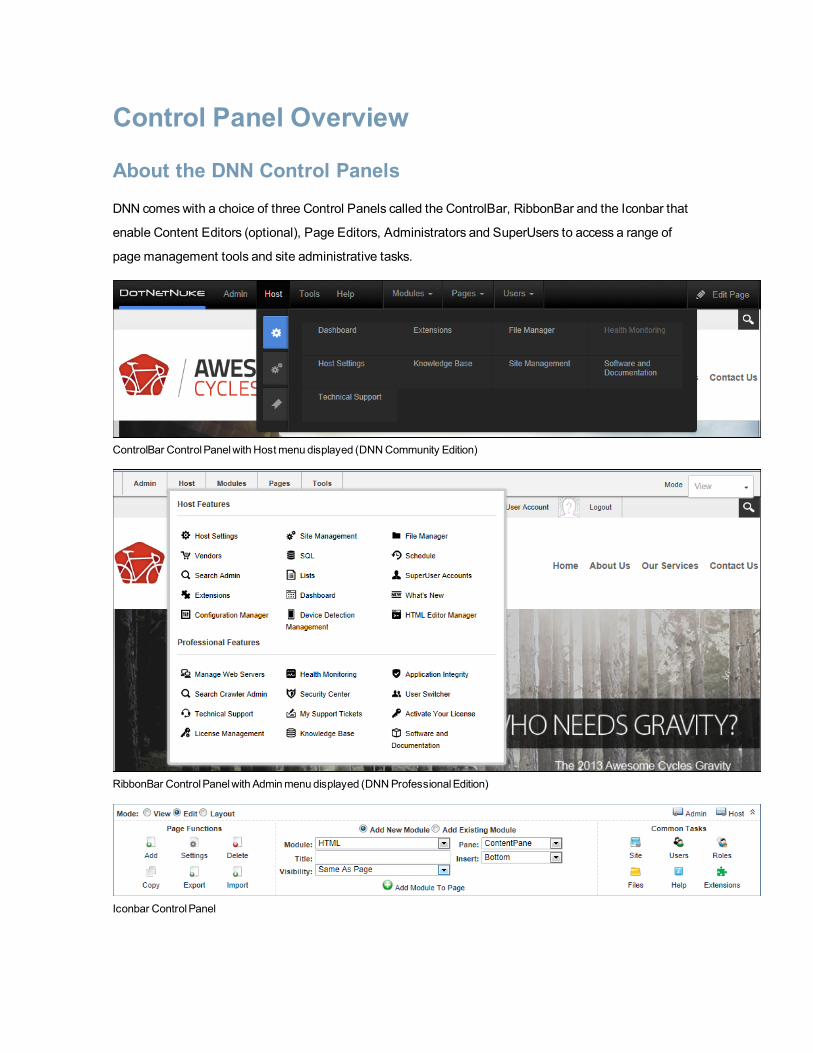
Control Panel Overview
About the DNN Control Panels
DNN comeswith a choice of three Control Panels called the ControlBar, RibbonBar and the Iconbar that
enable Content Editors (optional), Page Editors, Administrators and SuperUsers to access a range of
page management tools and site administrative tasks.
ControlBar ControlPanelwithHostmenudisplayed (DNNCommunity Edition)
RibbonBar ControlPanelwithAdminmenudisplayed (DNNProfessionalEdition)
Iconbar ControlPanel

Related Topics:
l See "Overview of the ControlBar Control Panel"
l See "Overview of the RibbonBar Control Panel"
l See "Overview of the Iconbar Control Panel"
Overview of the ControlBar Control Panel
The ControlBar Control Panel displays a single row of options at the very top of your web browser above
your site. Each of the links displayed on the left side have drop downmenu.
Permissions. The Admin menu is displayed to Administrators and SuperUsers.In DNNCommunity Edi-
tion, usersmust have Edit Page permissions granted to access the Modules and Pagesmenus. Finer
grain permissions are provided in DNN Professional Edition are listed in the below tables. Finally, the Con-
trolBar can optionally be displayed to Module Editors providing them with a visual reminder that they can
edit the current page.
The ControlBar as it is displayed to users with different editing permissions:
ControlBar as displayed toAdministrators
ControlBar as displayed toPageEditors
ControlBar as displayed toModuleEditors. This optionmay bedisabled.
On the right hand side of the ControlBar, is the Edit Pagemenu which allows users to change the view of
the page, and access the page settings etc.
The Admin Menu
Administrators and SuperUsers can click on the Admin link to go to the Admin Console (See "About the
Admin Console") - OR - Mouse over the Admin link to view the drop down Admin menu and then select
the desired function. Functions are grouped together beneath two tabs, called "Common Settings" and
"Advanced Settings", which are displayed down the left side of this drop downmenu.

AdminMenu (CommonSettings) for DNNCommunity Edition
AdminMenu (AdvancedSettings) for DNNEnterpriseEdition
A third tab called "Bookmarked Settings" displays any functions that have bookmarked by the current
Administrator. This allows you to add your most commonly used features to this tab, simply by clicking the
Add to Bookmarks button that is displayed when you hover over an option on the drop downmenu.
The Tools Menu
The Tools menu is displayed to Administrators and SuperUsers who must mouse over the Tools menu to
view the drop down list.
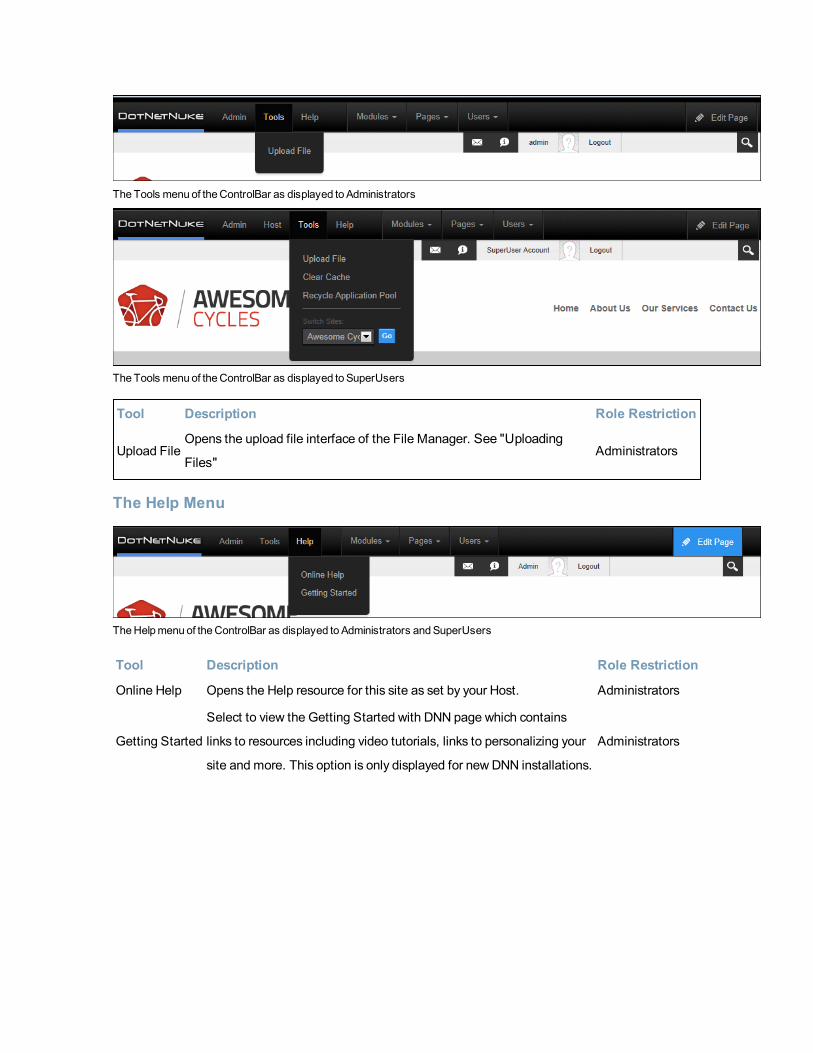
TheTools menuof theControlBar as displayed toAdministrators
TheTools menuof theControlBar as displayed toSuperUsers
Tool Description Role Restriction
Upload FileOpens the upload file interface of the File Manager. See "Uploading
Files"Administrators
The Help Menu
TheHelpmenuof theControlBar as displayed toAdministrators andSuperUsers
Tool Description Role Restriction
Online Help Opens the Help resource for this site as set by your Host. Administrators
Getting Started
Select to view the Getting Started with DNN page which contains
links to resources including video tutorials, links to personalizing your
site and more. This option is only displayed for newDNN installations.
Administrators

The Modules Menu
Function DescriptionPermissions
Community Professional
Add NewModuleAdds a newmodule to the current page.
See "Adding a New Module (ControlBar)"Edit Content Add Content / Full Control
Add Existing Module
Adds a new instance of an existing module
to the current page. See "Adding an Exist-
ingModule (ControlBar)"
Edit Content Add Content / Full Control
The Pages Menu
The Page Management features are in two drop downs now to group like features together. Note: In DNN
Community Edition, user must have Edit Page permissions granted to access these tools. The per-
missions required for Professional Edition Permissions are listed in the below table.
Pages Menuof theControlBar as seen by PageEditors
Function DescriptionPermissions
Community Professional

Pages Menu
Add New Page Edit Page Add / Full Control
Copy Page
Select to copy the current (or any other)
page including modifying modules. See
"Copying a Page"
Edit Page Copy /Full Control
Import PageLink to import a page. See "Importing a
New Page"Edit Page Import / Full Control
Edit Page Menu
Edit This PageSelect to enable the Action Menus for
the modules on the current the page.Edit Page Add Content / Full Control
Stay in Edit Mode
Once "Edit This Page" has been
selected, you can check the check box
to remain in Edit Mode when you navi-
gate away from the current page onto
other pages that you have the editing
permissions for.
Edit Page Add Content / Full Control
View in Layout Mode
Check the check box to view the page
in Layout Mode. This displays the lay-
out of the panes within the skin that is
applied to this page and the title and
module actionsmenu of each module
within each pane. Use this view to
quickly view and update the page lay-
out. This view is helpful when you want
to delete or move a module but cannot
access the module action menu when
the content is displayed.
Edit Page Add Content / Full Control
Mobile Preview
Opens the Mobile Preview popup that
allows users to see how the current
page is displayed on a mobile device.
See " Previewing Your Mobile Device
Site"
Edit Page Add Content / Full Control
Page Settings Opens the page settings page for the Edit Page Manage Settings / Full Control

current page. The Permissions tab is
only display to user with Full Control.
See "Editing Page Settings"
Page Appearance
Opens the Page Settings page with the
Appearance section of the Advanced
Settings tab expanded. See
"Advanced Settings for Existing
Pages"
Edit Page Manage Settings / Full Control
Page Permissions
Opens the Page Settings page for this
page with the Permissions tab. See
"Setting Page Permissions"
Edit Page Full Control
Export PageLink to export a page. See "Exporting a
Page"Edit Page Export
Delete Page
Link to delete current page. See "Delet-
ing a Page". This option is disabled if
the current page is a special page, that
is a page that has been set as either
Home, User Profile, etc.
Edit Page Delete
The Users Menu
Tool Description Role Restriction
Add New User Opens the Add NewUser page. See "Adding a User Account" Administrators
Manage UsersOpens the Admin > User Accounts page. See "About the User
Accounts Module"Administrators
Manage RoleOpens the Admin > Security Roles page. See "About the Security
Roles Module"Administrators
Overview of the RibbonBar Control Panel
The RibbonBar Control Panel displays a single row of options at the very top of your web browser above
your DNN site. The links displayed on the left side of the RibbonBar each have drop downmenus. The
Mode drop down list on the right side of the RibbonBar allows you to preview your site in a number of
ways.
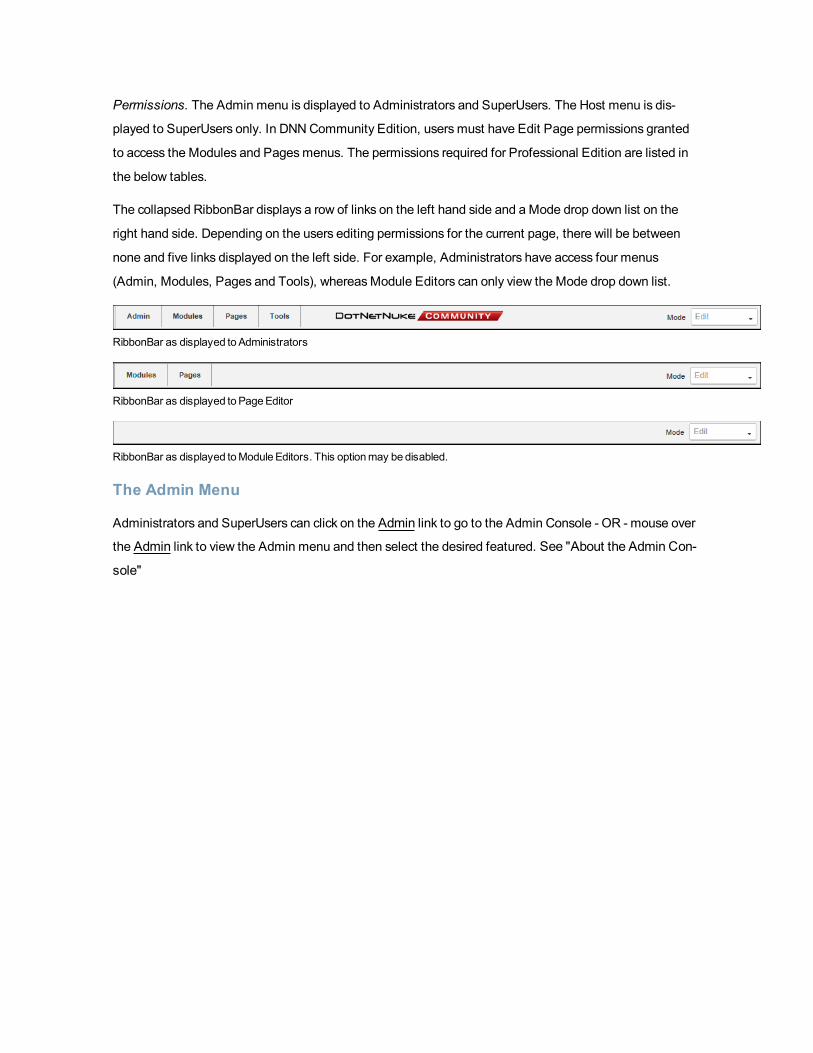
Permissions. The Admin menu is displayed to Administrators and SuperUsers. The Host menu is dis-
played to SuperUsers only. In DNNCommunity Edition, usersmust have Edit Page permissions granted
to access the Modules and Pagesmenus. The permissions required for Professional Edition are listed in
the below tables.
The collapsed RibbonBar displays a row of links on the left hand side and a Mode drop down list on the
right hand side. Depending on the users editing permissions for the current page, there will be between
none and five links displayed on the left side. For example, Administrators have access four menus
(Admin, Modules, Pages and Tools), whereasModule Editors can only view the Mode drop down list.
RibbonBar as displayed toAdministrators
RibbonBar as displayed toPageEditor
RibbonBar as displayed toModuleEditors. This optionmay bedisabled.
The Admin Menu
Administrators and SuperUsers can click on the Admin link to go to the Admin Console - OR - mouse over
the Admin link to view the Admin menu and then select the desired featured. See "About the Admin Con-
sole"
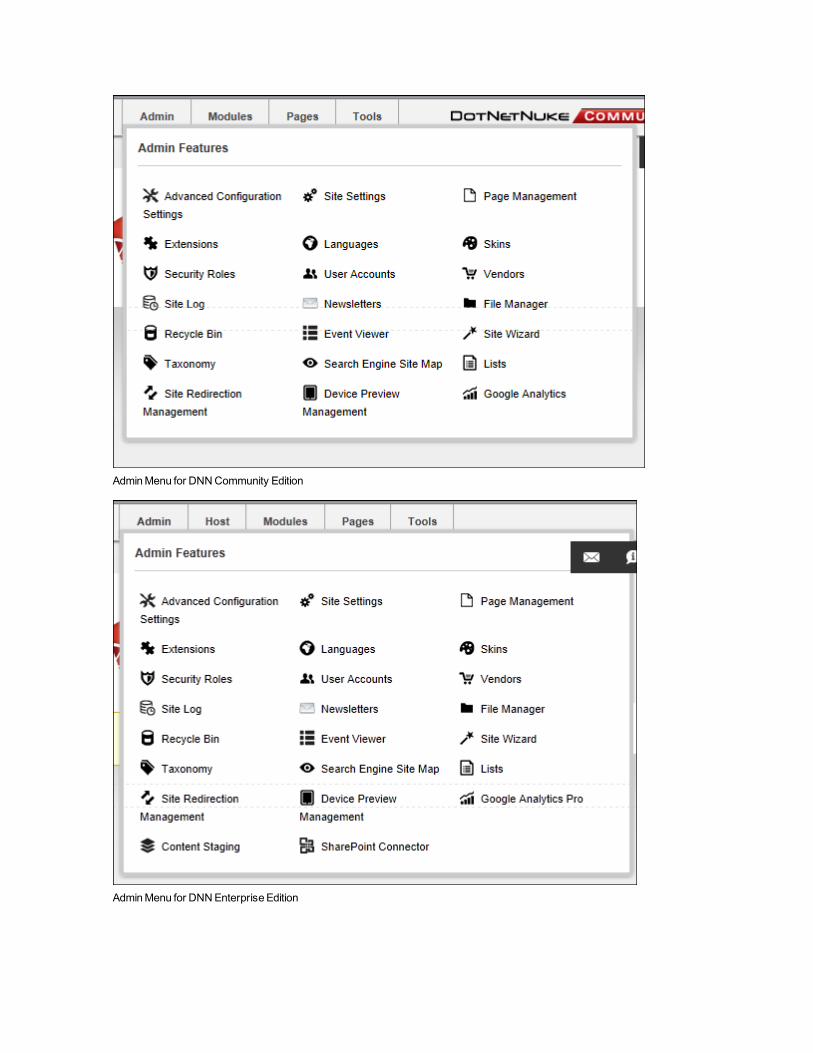
AdminMenu for DNNCommunity Edition
AdminMenu for DNNEnterpriseEdition
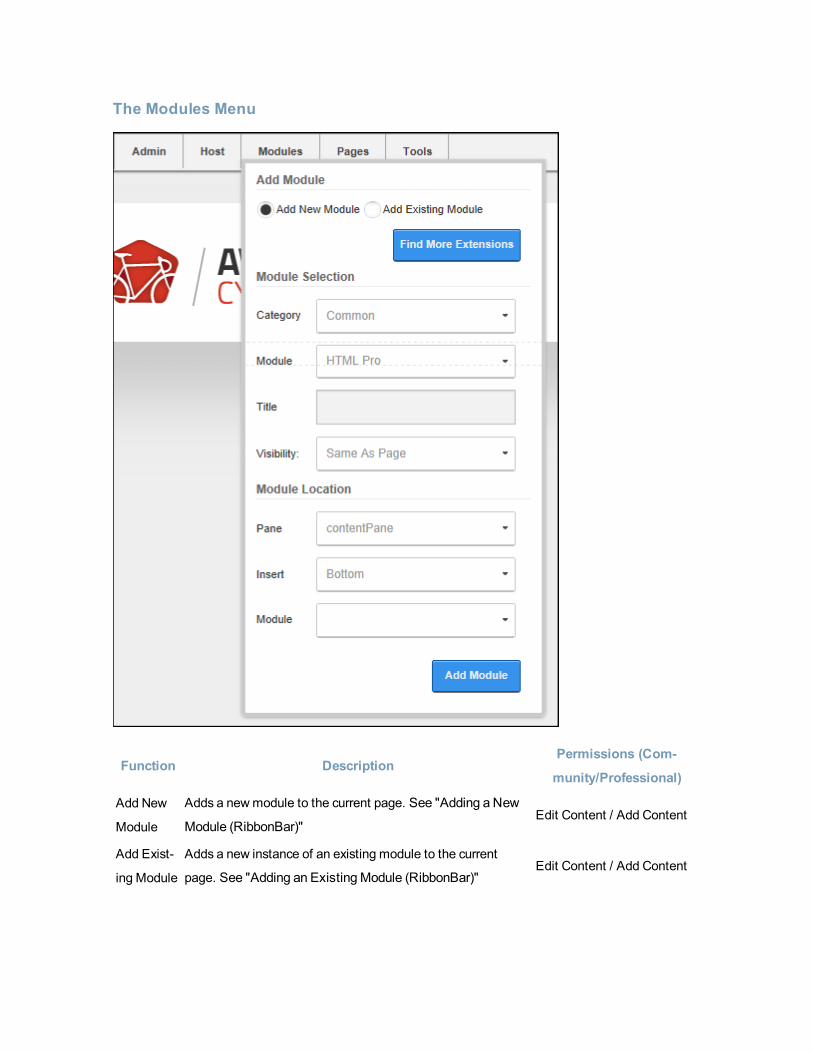
The Modules Menu
Function DescriptionPermissions (Com-
munity/Professional)
Add New
Module
Adds a newmodule to the current page. See "Adding a New
Module (RibbonBar)"Edit Content / Add Content
Add Exist-
ing Module
Adds a new instance of an existing module to the current
page. See "Adding an ExistingModule (RibbonBar)"Edit Content / Add Content

The Pages Menu
Note: In DNNCommunity Edition, user must have Edit Page permissions granted to access these tools.
The permissions required for Professional Edition Permissions are listed in the below table.
Pages Menuof theRibbonBar as displayed toPageEditors

Pages Menuof theRibbonBar as displayed toAdministrators
Function DescriptionPermissions (Com-
munity/Professional)
Actions Section
Page Set-
tings
Link to edit current page settings. See "Editing Page Set-
tings"Edit Page / Manage Settings
AddSelect to add a new page and configure setting. See "Add-
ing a New Page"Edit Page / Add Page
CopySelect to copy the current (or any other) page including mod-
ifying modules. See "Copying a Page"Edit Page / Copy Page
Delete
Link to delete current page. See "Deleting a Page". This
option is disabled if the current page is a special page, that is
a page that has been set as either Home, User Profile, etc.
Edit Page / Delete Page
Import Link to import a page. See "Importing a New Page" Edit Page / Import Page

Export Link to export a page. See "Exporting a Page" Edit Page / Export Page
Copy Actions Section
Copy Per-
missions to
Children
Copy current page permission to children pages. See "Copy-
ing Permissions to Children Pages". Enabled if page has
child pages.
Administrator Only / Manage
Settings
Copy
Design to
Children
Copy current page design (skin and container settings) to chil-
dren. See "Copying Design to Child Pages"Edit Page / Manage Settings
Add New Page Section
Add New
Page
Add a new page directly from the Control Panel. See "Quick
Add a New Page (RibbonBar Only)"Edit Page / Add Page
Update Current Page Section
Update Cur-
rent Page
Update the page name, menu options and skin for the cur-
rent page.Edit Page / Manage Settings
The Tools Menu
TheTools menuof theRibbonBar as displayed toAdministrators
Tool DescriptionRole Restric-
tion
Common Actions Section
Add Opens the Add User page. See "Adding a User Account" Administrators

Tool DescriptionRole Restric-
tion
User
Add
RoleOpens the Add Role page. See "Adding a Security Role (Basic Settings)" Administrators
Upload
FileOpens the upload file interface of the File Manager. See "Uploading Files" Administrators
Help Section
HelpOpens the Help resource for this site. Link (newwindow) to Help URL
defined in Host Settings.Administrators
Setting the RibbonBar Mode
How to select the mode that you view your site in. Important. You cannot edit module content in View
mode. Click on theMode drop down list to view the mode options.
Select from the following modes:
View: Select to view your site as a typical user without editing rights. This hides the module actionsmenu
on all modules and disables the Tools menu.

Edit: Select to edit your site. This displays the module actionsmenu for all modules
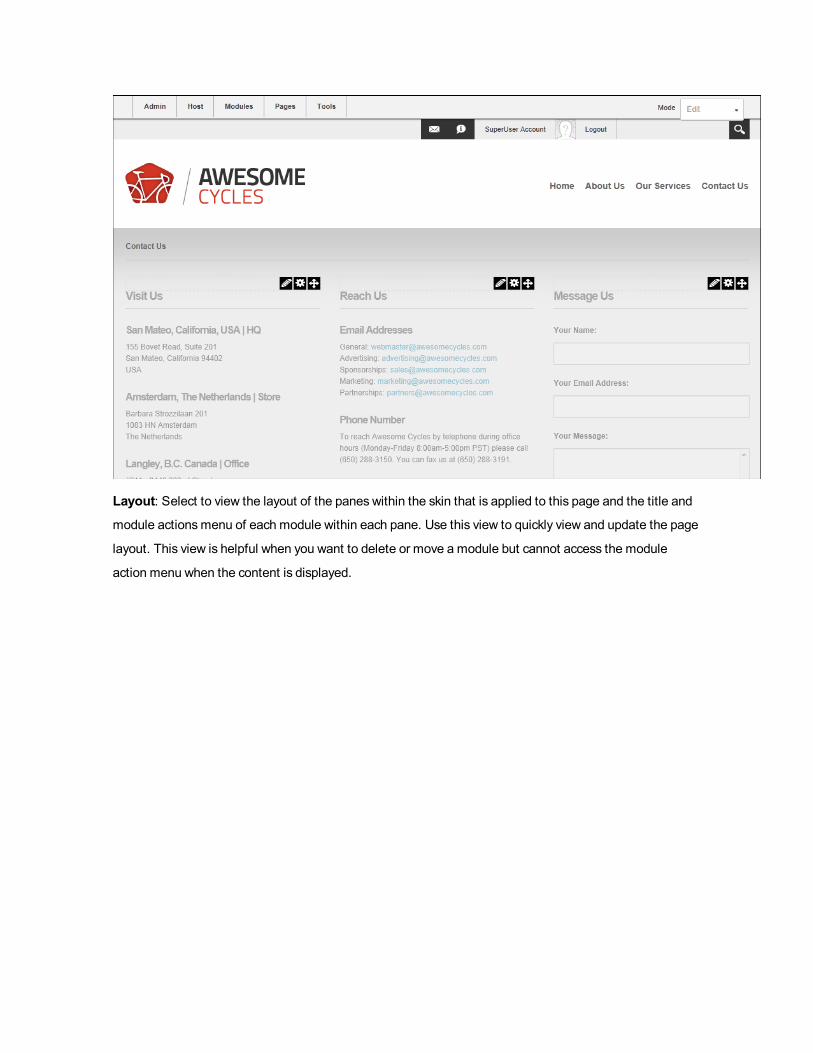
Layout: Select to view the layout of the panes within the skin that is applied to this page and the title and
module actionsmenu of each module within each pane. Use this view to quickly view and update the page
layout. This view is helpful when you want to delete or move a module but cannot access the module
action menu when the content is displayed.

Preview: The Previewmode displays the current page as it would be viewed on a specified mobile device.
See " Previewing Your Mobile Device Site"

Overview of the Iconbar Control Panel
The Iconbar Control Panel provides a single interface from which authorized users can access page and
module management tools, shortcuts to six common administration tasks and quick links to the Admin and
Host Consoles.
Maximizing/Minimizing the Iconbar
How to hide or display the Iconbar using the Maximize/Minimize button.

Permissions. This functionality isn't available to Module Editors. The default visibility is set by Admin-
istrators.
1. In the top right hand corner of the Control Panel, select from these options:
l Click theMinimize button to hide the Control Panel.
l Click theMaximize button to display the Control Panel.
The IconBar Minimized
SuperUsers can click either the Admin or Host links (top right) to view the Admin Console or Host
Console respectively.
Administrators can click the Admin link (top right) to view the Admin Console page.
The Iconbar ControlPanelas displayed toSuperUsers
Setting the Iconbar Mode
How to set the mode of the Iconbar Control Panel. Note: The Previewmode that displays the current page
as it would be viewed on a specified mobile device is not available on the Iconbar.
1. Click on theMode drop down list and select from these options:
l View: View the page with module editing tools hidden. This option shows you how the page
appears to site visitors.
l Edit: Displays all module editing tools available to the current user. E.g. Module menu,
add/edit links, Settings button. This optionmust be selected to edit the page.l Layout: Displays the layout of page panes and anymodules within those panes. Module
content is hidden. This option enables you to view the design of the page skin without the
distraction of module content.

The Iconbar ModeSetting
Page Functions Section
The Page Functions section (left) is accessible to Page Editors, Administrators and SuperUsers. It ena-
bles users to add new pages (See "Adding a New Page"), edit settings for the current page (See "Editing
Page Settings"), delete the current page (See "Deleting a Page"), copy the current page (See "Copying a
Page"), export the current page (See "Exporting a Page") and import a page (See "Importing a New
Page"). Note: Page Editors will have access to one or more of these tools according to the permissions
granted to them. Access will change depending on the permissions for the current page.
Module Insertion Section
TheModule Insertion section (center) is accessible to Page Editors (users with Add Content or Full Con-
trol permissions in Professional Edition, or Edit Page permissions in DNNCommunity Edition) and Admin-
istrators. It enables these users to add new or existing modules as well as set the role visibility, title, pane
and alignment of the module being added. See "Adding a New Module (Iconbar)", and See "Adding an
ExistingModule (Iconbar)"
Tip: Usersmust be authorized to deploy a module and be a page editor to add a module to a page.
Common Tasks Section
Page Editors can access this icon:
l Help button which links to the DNNOnline Help URL set by the host. This option is disabled if
no help link is provided.
Administrators and SuperUsers can access these additional icons:
l Site: Opens the Admin > Site Settings page. See "About the Site Settings Page"l Users: Opens the Admin > User Account page. See "About the User Accounts Module"l Roles: Opens the Admin > Security Roles page. See "About the Security Roles Module"

l Files: Opens the Admin > File Manager page. See "About the Admin File Manager Module"l Help: Opens the Online Help resource associated with the site.l Extensions: Opens the Admin > Extensions page. See "About the Admin Extensions Module"

Admin Console
About the Admin Console
The Admin Console can be accessed either by hovering over or clicking on the Admin link in the Control
Panel. The Admin Console allows Administrators and SuperUsers to manage settings and tools for this
site.
Tip: You can choose to display the Admin Console as a page in the menu by setting the page as
visible in the menu using the Admin > Page Management page. See "Hiding/Showing a Page in
Site Navigation"
TheAdminConsoleDNNCommunity Edition
Overview of the Admin Child Pages

Icon Page Name Description and Tutorial Link
Advanced
Configuration
Settings
Advanced Settings for configuring your site. Includes skinning, outgoing mail set-
tings, languages, authentication systems, providers and optional modules.
Content Stag-
ing
The Admin > Content Staging page displays the Content Staging module that ena-
bles users to publish content from a staging site to a target (production) site. See
"About the Content StagingModule" Only available in DotNetNuke Enterprise Edi-
tion
Device Pre-
viewMan-
agement
The Admin > Device PreviewManagement page displays the Device PreviewMan-
agement module which enables Administrators to manage a list of profiles for view-
ing your site in different devices such asmobile phones. See "About the Device
Preview Management Module".
Event Viewer
The Admin > Event Viewer page displays the Log Viewer module (also called the
Event Viewer module) which provides a log of database events. This page includes
tasks that are only available to SuperUsers. See "About the Log ViewerModule"
Extensions
The Admin > Extensions page displays the Extensionsmodule that enables Admin-
istrators to manage extensions which have been installed on the site by the Host.
Additional extension management can be accessed by SuperUsers. See "About the
Admin Extensions Module"
File ManagerThe Admin > File Manager page displays the File Manager module which enables
management of site files. See "About the Admin File Manager Module"
Google Ana-
lytics Pro
The Admin > Google Analytics page displays the Google Analytics module that
improves your site results online. See "About the Google Analytics / Google Ana-
lytics ProModule"
Languages
The Admin > Languages page displays the Languagesmodule that enables Admin-
istrators and SuperUsers to enable and manage the languages files associated with
a site. See "About the LanguageManagement Module". Tip: A large section of lan-
guage packs are available from theDotNetNuke website and the DotNetNuke
Store (http://store.dotnetnuke.com/).
Lists
The Admin > Lists page displays the Lists module that enables Administrators to
maintain lists of information that can be identified by a key value and a data value.
See "About the Admin Lists Page"
Newsletters The Admin > Newsletters page displays the Newsletters module that enables send-

Icon Page Name Description and Tutorial Link
ing bulking email messages to individual email addresses and security roles. See
"About the Newsletters Module"
Page Man-
agement
The Admin > Page Management page displays the Tabsmodule that provides full
page management including the ability to modify page hierarchy. SuperUsers can
also manage Host Tabs from this page. See "About the Pages (Tabs) module"
Recycle Bin
The Admin > Recycle Bin page displays the Recycle Bin module that enables users
to restore or permanently delete pages and modules. This module can be deployed
on site pages. See "About the Recycle BinModule"
Search
Engine Site
Map
The Admin > Search Engine SiteMap page displays the SiteMap module. See
"About the Search Engine SiteMapModule"
Security
Roles
The Admin > Security Roles page displays the Security Rolesmodule which enables
the management of security roles as well as role assignment. See "About the Secu-
rity Roles Module"
SharePoint
Connector
The Admin > SharePoint Connector page allows Administrators to push files from
their SharePoint site up to their DotNetNuke site. See "About the SharePoint Con-
nector Module" Only available in DotNetNuke Enterprise Edition
Site LogThe Admin > Site Log page displays the Site Log module that enables viewing of
statistical reports for the site. See "About the Site LogModule"
Site Redi-
rection Man-
agement
The Admin > Site Redirection Management page displays the Site Redirection Man-
agement module which enables Administrators to create site redirection paths for
mobile devices. See "About the Site RedirectionManagement Module"
Site Settings
The Admin > Site Settings page displays the Site Settingsmodule. This module
cannot be deployed on site pages and is therefore only accessible to Administrators
and SuperUsers. See "About the Site Settings Page". Additional settings can be
accessed by SuperUsers.
Site Wizard
The Admin > Site Wizard page displays the Site Wizard module that enables author-
ized to view the module to configure basic site settings, page design as well as apply
a template to the site using a simple step-by-step wizard. See "About the SiteWiz-
ardModule"
Skins The Admin > Skins page displays the Skinsmodule, also titled the Skin Editor and

Icon Page Name Description and Tutorial Link
the Skin Designer module. The Skin module, that can be deployed on any site page,
enables authorized users to preview and apply skins to the site. The Skin Designer
module, which cannot be deployed on site pages, enables Administrators to set con-
tainer and skin token values. See "About the Skins Module" and See "About the
Skin Designer Module". Tip: Skin installation is managed by the Host using the
Host > Extensions page.
Taxonomy
The Admin > Taxonomy page displays the TaxonomyManager module. This page
includes tasks that are only available to SuperUsers. See "About the Taxonomy
Manager Module"
User
Accounts
The Admin > User Accounts page displays the User Accountsmodule which enables
the creation and management of user accounts, as well as configuration of user set-
tings relating to authentication. See "About the User Accounts Module"
Vendors
The Admin > Vendors page displays the Vendorsmodule that enables the creation
and management of vendor accounts, vendor banners and affiliate accounts using
the Vendorsmodule. Vendor accounts and bannersmaintained under the Admin
page are only available to this site. See "About the Admin Vendors Module"
Advanced Configuration Settings
About Advanced Configuration Settings
The Advanced Configuration Settings section provides Administrators with an alternative location where
they can change the Skins and Containers applied to the current site, setup site email and install language
packs, authentication systems, providers and optional modules.

AdvancedConfigurations Settings page for Administrators
The Advanced Configuration Settings section is accessed from the ControlBar by selecting Admin
> Advanced Settings > Advanced Configuration Settings or from the Admin Console page.

On newDNN installations (not upgraded sites) it can also be accessed from the Getting Started page that
is displayed when you first install DNN or from the ControlBar by selecting Help > Getting Started. For
upgraded sites, if a page named “Getting Started” does not exist, the link is hidden. If a page already exist-
ing is called “Getting Started” the link will lead to that page.
Advanced Configuration Settings
The Advanced Configuration Settings page groups together settings that are documented in other sec-
tions of this manual. Here we will provide a complete list of the tools available in this section and links to
the related tutorials.
Skins and Containers
Skin Basics
l See "Applying the Default Site Skin"
l See "Previewing a Skin Package"
l See "Restoring the Default Skin"
Containers
l See "Applying a Default Site Container"
Skin Designer
l See "About the Skin Designer Module"
l See "Setting Skin Token Values"
l See "Setting Container Token Values"
Authentication Systems
Deploying Language Packs
How to deploy one of the five language packs included with DNN via the Advanced Configuration Settings
page.
1. Navigate to Admin > Advanced Settings > Advanced Configuration Settings.2. Select the Language Packs tab.3. Click theDeploy button beside the language to be installed.
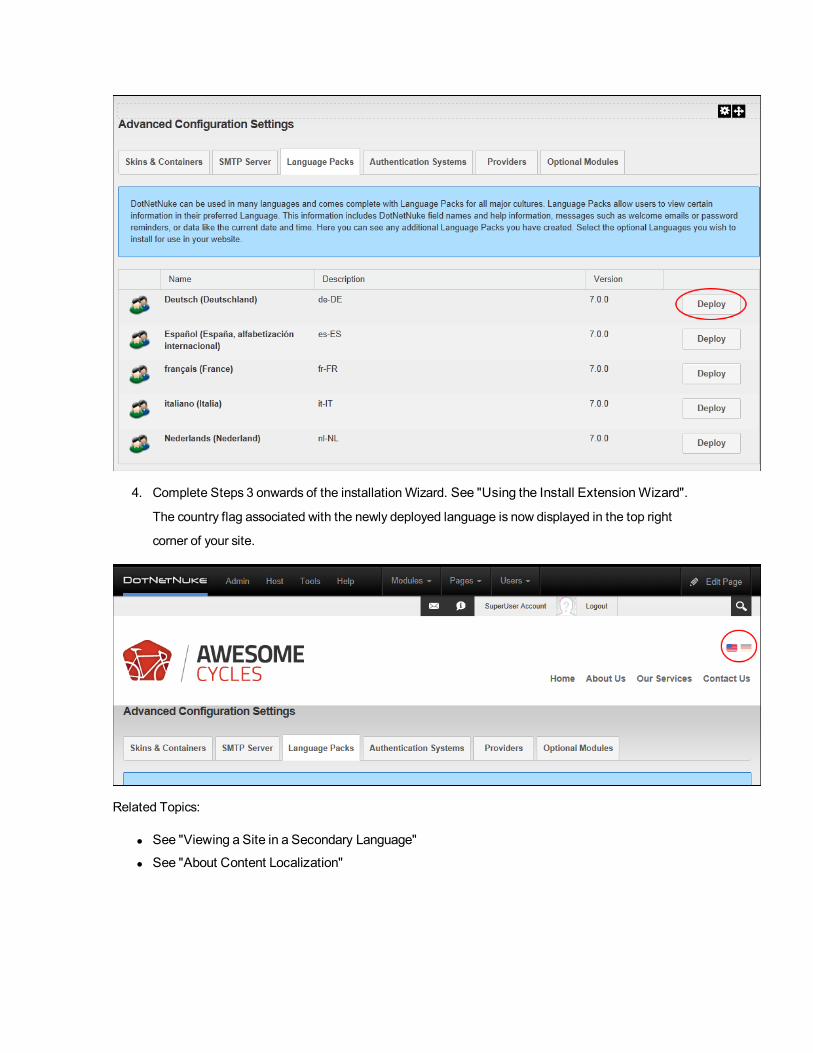
4. Complete Steps 3 onwards of the installationWizard. See "Using the Install ExtensionWizard".
The country flag associated with the newly deployed language is now displayed in the top right
corner of your site.
Related Topics:
l See "Viewing a Site in a Secondary Language"
l See "About Content Localization"

Installing Authentication Systems
How to deploy one of the five language packs included with DNN.
1. Navigate to Admin > Advanced Settings > Advanced Configuration Settings.2. Select theAuthentication Systems tab.3. Click theDeploy button beside the language to be installed.
4. Complete Steps 3 onwards of the installationWizard. See "Using the Install ExtensionWizard"
Installing Providers
How to deploy one of the four providers included with DNN.
1. Navigate to Admin > Advanced Settings > Advanced Configuration Settings.2. Select the Providers tab.3. Click the Install button beside the provider to be installed.

4. Complete Steps 3 onwards of the installationWizard. See "Using the Install ExtensionWizard"
Installing Optional Modules
How to install a module that is included with DNN or has been added to your DNN installation.
1. Navigate to Admin > Advanced Settings > Advanced Configuration Settings.2. Select theModules tab.3. Click the Install button beside the module to be installed. Note: The below image displays the mod-
ules that are included with DNN Professional and DNN Enterprise Editions.

4. Complete Steps 3 onwards of the installationWizard. See "Using the Install ExtensionWizard"
Content Staging
About the Content Staging Module
The Content Staging module, located on the Admin > Advanced Settings > Content Staging page,
allows content to be published from a staging site to a production site. It eliminates the need to make con-
tent changes to your live production site. The Content Staging module cannot be added to site pages.
Note: Content staging is only supported between cloned sites. This means your staging site should be
created using a backup of your production site.
Only available in DotNetNuke Enterprise Edition
The following types of entities are deployed to the production sever when content is published:
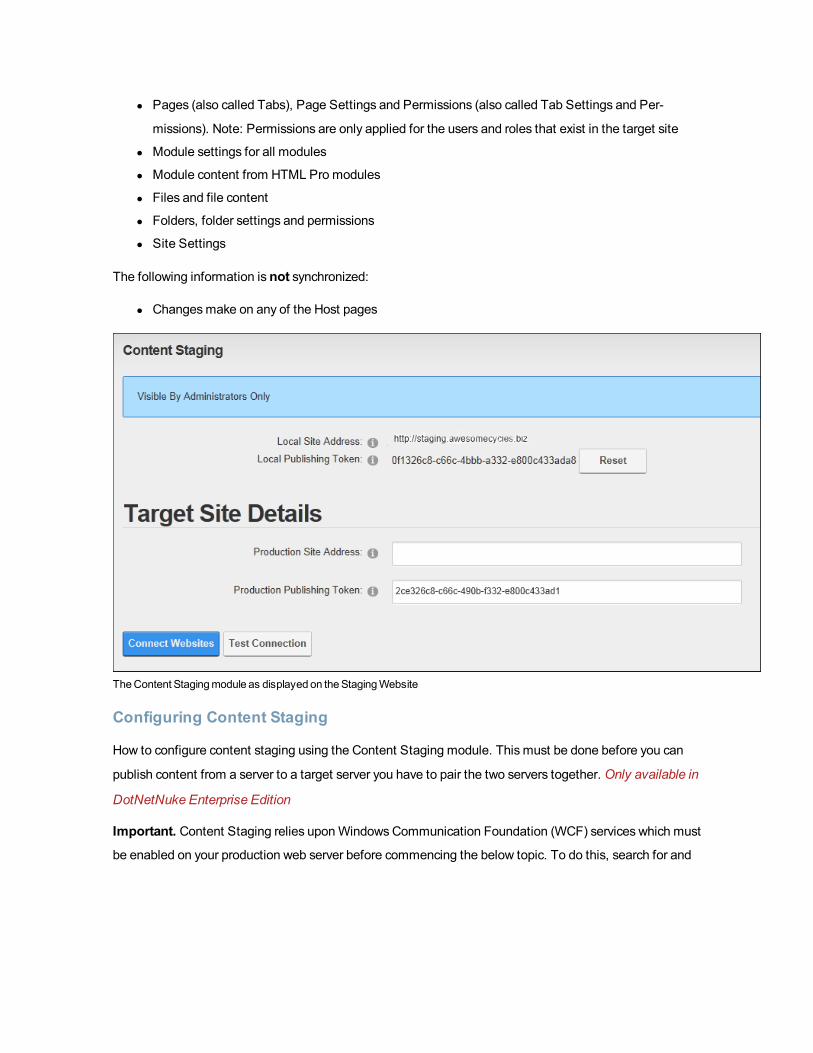
l Pages (also called Tabs), Page Settings and Permissions (also called Tab Settings and Per-
missions). Note: Permissions are only applied for the users and roles that exist in the target site
l Module settings for all modules
l Module content from HTML Pro modules
l Files and file content
l Folders, folder settings and permissions
l Site Settings
The following information is not synchronized:
l Changesmake on any of the Host pages
TheContent Stagingmodule as displayed on theStagingWebsite
Configuring Content Staging
How to configure content staging using the Content Staging module. This must be done before you can
publish content from a server to a target server you have to pair the two servers together. Only available in
DotNetNuke Enterprise Edition
Important. Content Staging relies uponWindowsCommunication Foundation (WCF) services which must
be enabled on your production web server before commencing the below topic. To do this, search for and

open "Windows Features" and then check the "WindowsCommunication Foundation HTTP Activation"
check box.
1. Login to your production site.
2. Navigate to Admin > Advanced Settings > Content Staging - OR - Go to aContent Staging
module.
3. Copy the information displayed at the Local Site Address and Local Publishing Token fields.
Tip: You may find it helpful to copy and paste this information into a text file.

4. Login to your staging site.
5. Navigate to Admin > Content Staging - OR - Go to a Content Stagingmodule.
6. Enter (or paste) the information you copied at Step 4 intoProduction Site Address andPro-
duction Publishing Token fields respectively. Note: If the domains you are using are not
entered into a DNS server you will need to add the URL and IP Address of BOTH servers into the
HOSTS file on BOTH servers so that they can communicate.
7. Click the Test Connection button. If successful, the "Connection Verified Successfully" message
is displayed.
8. Click theConnect Websites button. Your production and staging sites are now successfully con-
nected.
Next Step: You can now publish staged content. See "Publishing Staged Content"
Creating a Staging Site
How to create a staging site from a production site.
1. Create a backup of your production SQL database.
2. Create a new database for your staging site.
3. Restore the production site database into your staging database.
4. Open the Portal Alias table in the new staging database.

5. Delete the records in the Portal Alias table. This will be regenerated the first time the staging site is
accessed.
6. OpenWindows Explorer and make a copy of the folder that is the physical location for the pro-
duction web site. This will be the physical location for the staging site.
7. Rename the folder to help you identify it as the physical location of your staging site.
8. Edit the web.config file for the staging site to update the connection string to connect to the staging
database.
9. Create a new IIS web site for the staging site with the physical location set to the folder you created
in step 6.
Publishing Staged Content
How to publish content from your staging site to your production site. Note: All modules and languages
which are present on the Staging site must be installed on the production site before staged content can
be published.
1. Login to your staging site.
2. Navigate to Admin > Advanced Settings > Content Staging - OR - Go to aContent Staging
module.
3. Go to the Publish Staged Content section.
4. In theUser Name/Password text boxes, enter either the Host or Admin login details. Note: Even
though the user name and password are entered in the staging site, the authentication is done at
the production site; the user should either be a Host user or be in the Administrator role in the pro-
duction server for the login attempt to be successful. Note: You will need to re-enter these details
every time you navigate to the Content Staging module to publish content.
5. Click theAuthenticate button.
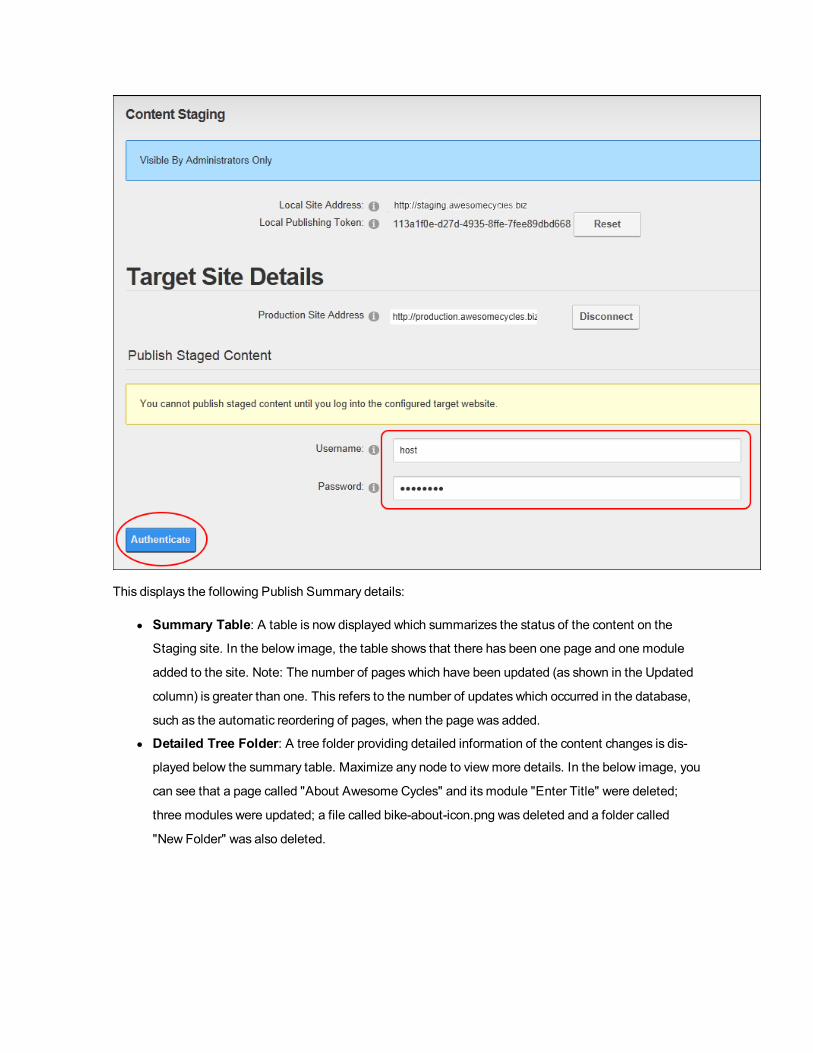
This displays the following Publish Summary details:
l Summary Table: A table is now displayed which summarizes the status of the content on the
Staging site. In the below image, the table shows that there has been one page and one module
added to the site. Note: The number of pages which have been updated (as shown in the Updated
column) is greater than one. This refers to the number of updates which occurred in the database,
such as the automatic reordering of pages, when the page was added.
l Detailed Tree Folder: A tree folder providing detailed information of the content changes is dis-
played below the summary table. Maximize any node to viewmore details. In the below image, you
can see that a page called "About Awesome Cycles" and its module "Enter Title" were deleted;
three modules were updated; a file called bike-about-icon.png was deleted and a folder called
"New Folder" was also deleted.

6. Optional. Click theAnalyze Content button if it is possible that additional changesmay have
been made recently.
7. At Publish User Folder and Files, check the check box to include any changes that individual
users have made their personal folders and files, such as their profile avatar - OR - uncheck the
check box to exclude changes to user folders and files.
8. Click the Publish Content button to publish the content changes to your production site. If suc-
cessful, the message "Your content has successfully published to your target server" is displayed.

Device Preview Management
About the Device Preview Management Module
The Device PreviewManagement module allows Administrators and the Host to preview their mobile
device site as it will appear on different mobile devices. The module comes with a pre-existing list of pre-
view profiles for commonly used devices. It also has the ability to create new preview profiles using either a
pre-configured list of common profiles or you can create a new profile from scratch. Existing profiles can
also be modified or deleted.
This module is located on the Admin > Advanced Settings > Device PreviewManagement page. It can-not be added to additional pages.

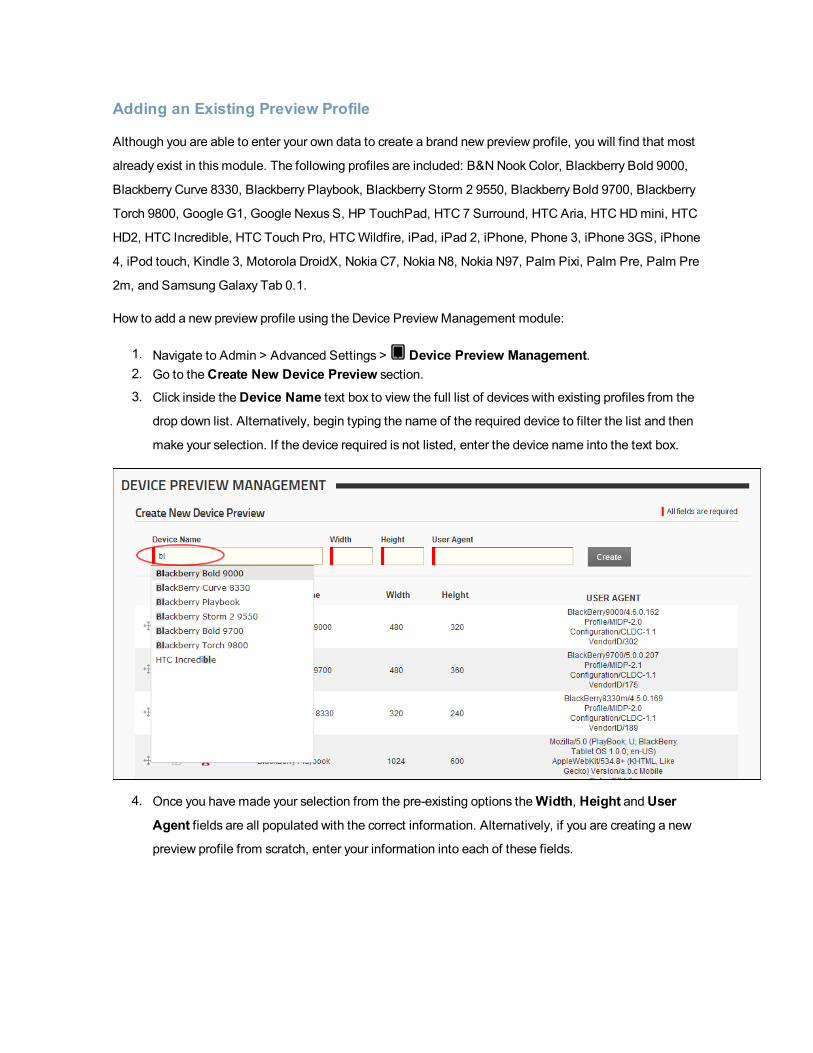
Adding an Existing Preview Profile
Although you are able to enter your own data to create a brand new preview profile, you will find that most
already exist in this module. The following profiles are included: B&NNook Color, Blackberry Bold 9000,
Blackberry Curve 8330, Blackberry Playbook, Blackberry Storm 2 9550, Blackberry Bold 9700, Blackberry
Torch 9800, Google G1, Google Nexus S, HP TouchPad, HTC 7 Surround, HTC Aria, HTCHDmini, HTC
HD2, HTC Incredible, HTC Touch Pro, HTCWildfire, iPad, iPad 2, iPhone, Phone 3, iPhone 3GS, iPhone
4, iPod touch, Kindle 3, Motorola DroidX, Nokia C7, Nokia N8, Nokia N97, Palm Pixi, Palm Pre, Palm Pre
2m, and Samsung Galaxy Tab 0.1.
How to add a new preview profile using the Device PreviewManagement module:
1. Navigate to Admin > Advanced Settings > Device Preview Management.2. Go to theCreate New Device Preview section.
3. Click inside theDevice Name text box to view the full list of devices with existing profiles from the
drop down list. Alternatively, begin typing the name of the required device to filter the list and then
make your selection. If the device required is not listed, enter the device name into the text box.
4. Once you have made your selection from the pre-existing options theWidth, Height andUser
Agent fields are all populated with the correct information. Alternatively, if you are creating a new
preview profile from scratch, enter your information into each of these fields.
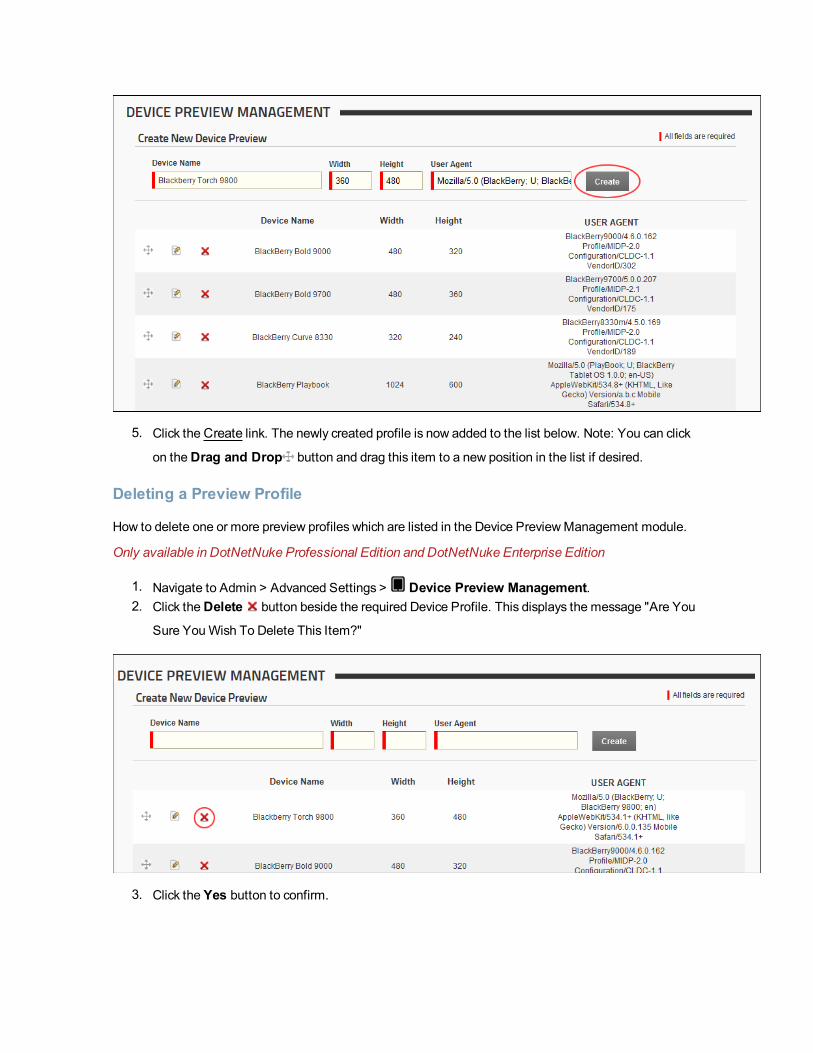
5. Click theCreate link. The newly created profile is now added to the list below. Note: You can click
on theDrag and Drop button and drag this item to a new position in the list if desired.
Deleting a Preview Profile
How to delete one or more preview profiles which are listed in the Device PreviewManagement module.
Only available in DotNetNuke Professional Edition and DotNetNuke Enterprise Edition
1. Navigate to Admin > Advanced Settings > Device Preview Management.2. Click theDelete button beside the required Device Profile. This displays the message "Are You
Sure YouWish To Delete This Item?"
3. Click the Yes button to confirm.

Editing a Preview Profile
How to edit one or more fields of a preview profile that is listed in the Device PreviewManagement mod-
ule.
1. Navigate to Admin > Advanced Settings > Device Preview Management.2. Click the Edit button beside the Device Profile to be edited. This displays the selected record in
the edit fields at the top of the module.
3. Edit one or more fields as required.
4. Click the Save button to save your changes.
Event Viewer
About the Log Viewer Module
The Event Viewer page displays the Log Viewer module that provides an historical log of database events
such as events which are scheduled, exceptions, account logins, module and page changes, user account
activities, security role activities, etc. Authorized users can send exceptions to any email address. Super-
Users can add, edit and delete event records for all sites.
The Log Viewer module is located on the Admin > Event Viewer page. This Administration module canbe deployed to sites and can be added to pages.
Module Version: The version number is always the same as the DNN framework version number.

TheLogViewer Module as displayed toSuperUsers

All Users
Filtering Events by any Event Type
How to filter the event records that are displayed in the Log Viewer module by a single event type.
1. Navigate to Admin > Event Viewer - OR - Navigate to a Log Viewer module.2. Expand the Viewer section.3. At Type, select an event type from the drop down list. The matching records will then be displayed
below.
Filtering LogViewer records by event type
Sending Exceptions by Email
How to send one or more selection exception records via email using the Event Viewer module.

Warning: You may be sending sensitive data over the Internet in clear text (not encrypted). Before send-
ing your exception submission, please review the contents of your exception log to verify that no sensitive
data is contained within it.
1. Navigate to Admin > Event Viewer - OR - Navigate to a Log Viewer module.2. Expand the Viewer section.3. Locate the required exceptions. Filtering records by type such asGeneral Exception can be useful.
Note: If color coding is enabled, exceptions are colored red.
4. Check the check box beside each record to be emailed.5. Expand the Send Log Entries section.6. In the Email Address text box, enter one or more email addresses separated by a semi-colon ( ; ).
E.g. [email protected];[email protected]
7. Optional. In the Subject text box, enter a subject for the message. Leave blank to use "[Portal
Name] Exceptions".
8. Optional. In theMessage (optional) text box, enter a message.9. Click the Send Selected Exceptions link.

SendingExceptions by Email
Setting Event Records Per Page
How to set the number of records that are displayed on one page of the Log Viewer module. Ten (10) rec-
ords are displayed per page by default. You can choose to display up to 250 records per page however the
module will default back to ten (10) records each time the page is refreshed.
1. Navigate to Admin > Event Viewer - OR - Navigate to a Log Viewer module.2. Expand the Viewer section.3. At Records per page, select the number of records to be displayed per page from the drop down
list. The options are 10, 25, 50, 100 and 250.

Setting the number of records displayed per page
Viewing Event Details
How to display a detailed report of a logged event using the Log Viewer module.
1. Navigate to Admin > Event Viewer - OR - Navigate to a Log Viewer module.2. Expand the Viewer section.3. Optional. At Type, select the required event type to filter records.4. Click on the colored bar of a record to view a detailed report.
5. Optional. Click the record a second time to close the detailed report.

Extensions
About the Admin Extensions Module
The Admin Extensionsmodule allows users to view and manage extensions that have been installed on
the site by a SuperUser. This Admin module is located on the Admin > Advanced Settings >

Extensions page and can be added to additional pages. The module displays a details of each extension
and indicates which extensions are in use on this site.
Important. An additional Extensionsmodule is located on the Host > Extensions page. This version ofthe Extensionsmodule allows SuperUsers can install and deploy additional modules.
Permissions. Administrators can perform all extension management tasks. Users that have edit rights to
an Extensionsmodule can view basic information about the installed extensions and update some authen-
tication settings. Users that have edit rights for a page that the Extensionsmodule is located on can view
additional information about the installed extensions.
Module Version: The version number is always the same as the DNN framework version number.

TheAdminExtensions Module
All Users
Viewing Installed Extensions List
The Admin Extensionsmodule displays a list of the all the extensions that are installed on this site.
Permissions. Users with View permissions can view the icon, name, description and version number of
each installed extension. If the extension is a module, you can also see if the module is currently in use on
the site. Note: Additional tools are available to authenticated users with module and page editing per-
missions.
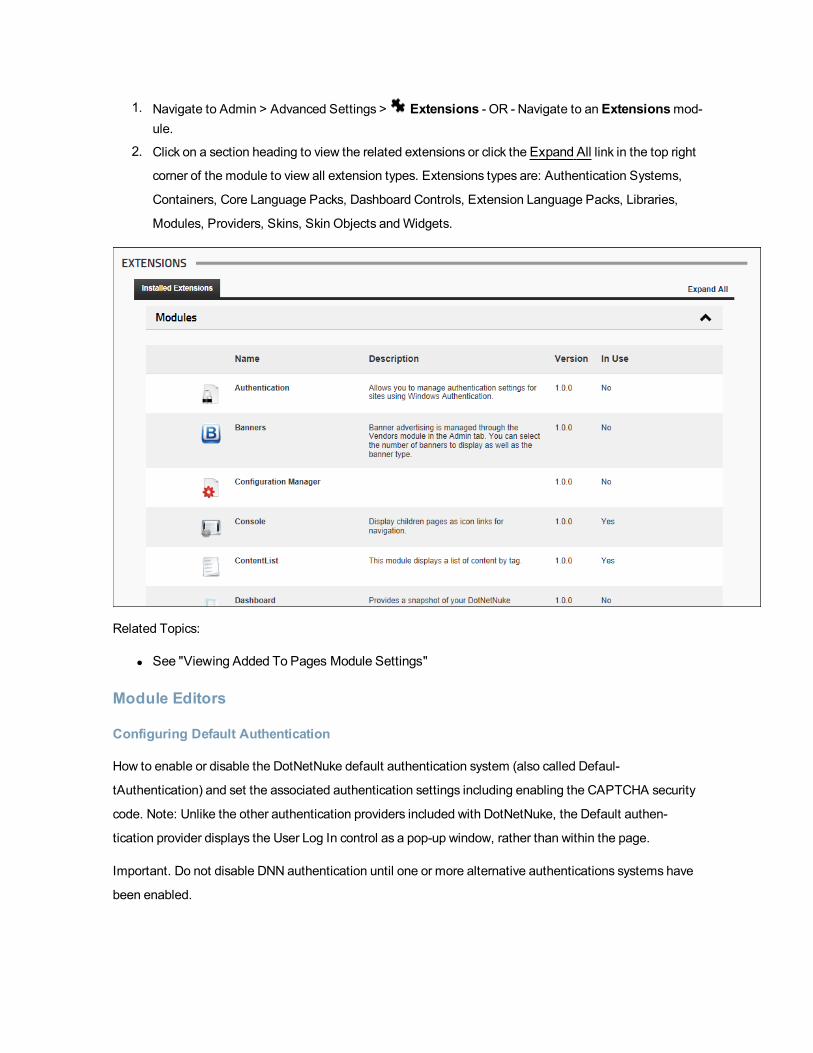
1. Navigate to Admin > Advanced Settings > Extensions - OR - Navigate to an Extensionsmod-ule.
2. Click on a section heading to view the related extensions or click the Expand All link in the top right
corner of the module to view all extension types. Extensions types are: Authentication Systems,
Containers, Core Language Packs, Dashboard Controls, Extension Language Packs, Libraries,
Modules, Providers, Skins, Skin Objects andWidgets.
Related Topics:
l See "Viewing Added To Pages Module Settings"
Module Editors
Configuring Default Authentication
How to enable or disable the DotNetNuke default authentication system (also called Defaul-
tAuthentication) and set the associated authentication settings including enabling the CAPTCHA security
code. Note: Unlike the other authentication providers included with DotNetNuke, the Default authen-
tication provider displays the User Log In control as a pop-up window, rather than within the page.
Important. Do not disable DNN authentication until one or more alternative authentications systems have
been enabled.
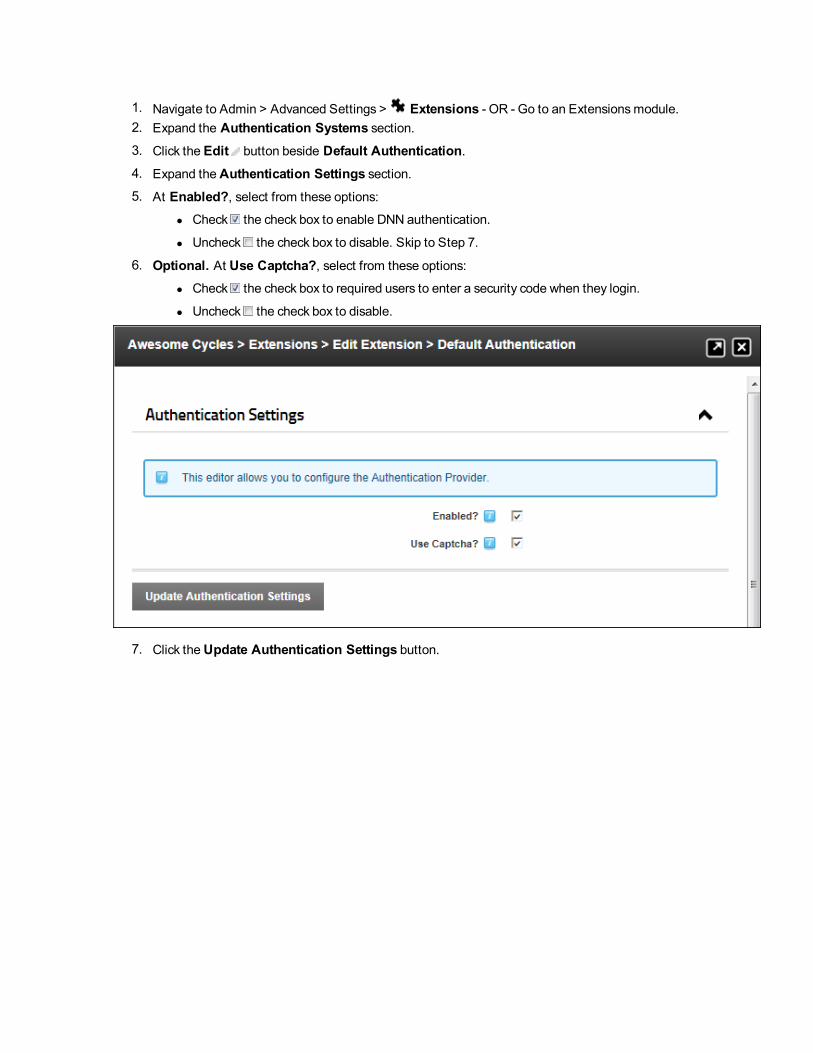
1. Navigate to Admin > Advanced Settings > Extensions - OR - Go to an Extensionsmodule.2. Expand the Authentication Systems section.3. Click the Edit button beside Default Authentication.4. Expand theAuthentication Settings section.5. At Enabled?, select from these options:
l Check the check box to enable DNN authentication.
l Uncheck the check box to disable. Skip to Step 7.
6. Optional. At Use Captcha?, select from these options:
l Check the check box to required users to enter a security code when they login.
l Uncheck the check box to disable.
7. Click theUpdate Authentication Settings button.
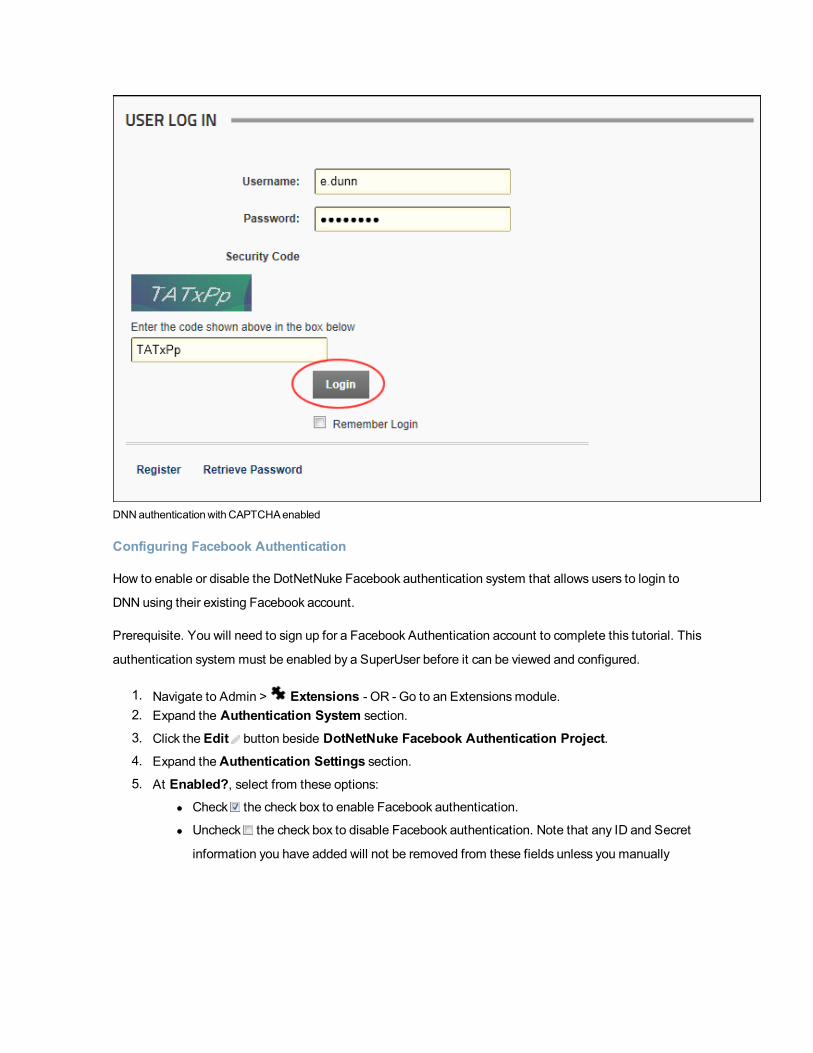
DNNauthenticationwithCAPTCHAenabled
Configuring Facebook Authentication
How to enable or disable the DotNetNuke Facebook authentication system that allows users to login to
DNN using their existing Facebook account.
Prerequisite. You will need to sign up for a Facebook Authentication account to complete this tutorial. This
authentication system must be enabled by a SuperUser before it can be viewed and configured.
1. Navigate to Admin > Extensions - OR - Go to an Extensionsmodule.2. Expand the Authentication System section.
3. Click the Edit button beside DotNetNuke Facebook Authentication Project.4. Expand theAuthentication Settings section.5. At Enabled?, select from these options:
l Check the check box to enable Facebook authentication.
l Uncheck the check box to disable Facebook authentication. Note that any ID and Secret
information you have added will not be removed from these fields unless you manually

remove them. This allows you to re-enable this authentication system at any time without
re-entering this information. Skip to Step 8.
6. In theAPP ID text box, enter the information provided to you by Facebook.
7. In theAPP Secret text box, enter the secret code provided to you by Facebook.
8. Click theUpdate Authentication Settings link.
9. Click theCancel link to return to the Extensionsmodule. The Facebook login button is now dis-
played on the Login page and any Account Login modules.
Related Topics:
l See "Logging in with Facebook"
Configuring Google Authentication
How to enable or disable the DotNetNuke Google authentication system that allows users to login to DNN
using their existing Google account to login to DotNetNuke.
Prerequisite. Configure a custom login page, See "Enabling a Custom Login Page"

Prerequisite. You will need to sign up for a Google Authentication account to complete this tutorial. This
authentication system must be enabled by a SuperUser before it can be viewed and configured. At Google
API Console, add your login page to the redirect URL's. If you have multiple languages, you will also need
to add those URL's too. E.g.: http://www.yoursite.com/de-de/login.aspx
1. Navigate to Admin > Advanced Settings > Extensions - OR - Go to an Extensionsmodule.2. Expand theAuthentication Systems section.3. Click the Edit button beside DotNetNuke Google Authentication Project.4. Expand theAuthentication Settings section.5. At Enabled?, select from these options:
l Check the check box to enable Google authentication.
l Uncheck the check box to disable Google authentication. Note that any ID and Secret
information you have added will not be removed from these fields unless you manually
remove them. This allows you to re-enable this authentication system at any time without
re-entering this information. Skip to Step 8.
6. In theAPP ID text box, enter the information provided to you byGoogle.
7. In theAPP Secret text box, enter the secret code provided to you byGoogle.
8. Click theUpdate Authentication Settings button. The Google login button is now displayed on
the Login page and any Account Login modules.

Related Topics:
l See "Logging in with Google"
Configuring Live Authentication
How to enable or disable the DotNetNuke Live authentication system that allows users to login to DNN
using their existing Live account. Note: The authentication providers included with DNN open the User Log
In control within the page. The exception is DNN default authentication which uses a pop-up window for
authentication.
Prerequisite. You will need to sign up for a Live Authentication account to complete this tutorial. This
authentication system must be enabled by a SuperUser before it can be viewed and configured.
1. Navigate to Admin > Advanced Settings > Extensions - OR - Go to an Extensionsmodule.2. Expand the Authentication System section.
3. Click the Edit button beside DotNetNuke Live Authentication Project.4. Expand theAuthentication Settings section.5. At Enabled?, select from these options:
l Check the check box to enable Live authentication.
l Uncheck the check box to disable Live authentication. Note that any ID and Secret infor-
mation you have added will not be removed from these fields unless you manually remove
them. This allows you to re-enable this authentication system at any time without re-enter-
ing this information. Skip to Step 8.

6. In theAPP ID text box, enter the information provided to you by Live.
7. In theAPP Secret text box, enter the secret code provided to you by Live.
8. Click theUpdate Authentication Settings link. The Live login button is now displayed on the Login
page and any Account Login modules.
Related Topics:
l See "Logging in with Live"
Configuring Twitter Authentication
How to enable or disable the DotNetNuke Twitter authentication system that allows users to login to DNN
using their existing Twitter account. Note: The authentication providers included with DNN open the User
Log In control within the page. The exception is DNN default authentication which uses a pop-up window
for authentication.
Prerequisite. This authentication system must be enabled by a SuperUser before it can be viewed and con-
figured. You will also need to sign up for a Twitter Authentication account to complete this tutorial.
1. Navigate to Admin > Advanced Settings > Extensions - OR - Go to an Extensionsmodule.2. Expand the Authentication System section.
3. Click the Edit button beside DotNetNuke Twitter Authentication Project.4. Expand theAuthentication Settings section.5. At Enabled?, select from these options:
l Check the check box to enable Twitter authentication.
l Uncheck the check box to disable Twitter authentication. Note that any ID and Secret
information you have added will not be removed from these fields unless you manually
remove them. This allows you to re-enable this authentication system at any time without
re-entering this information. Skip to Step 8.
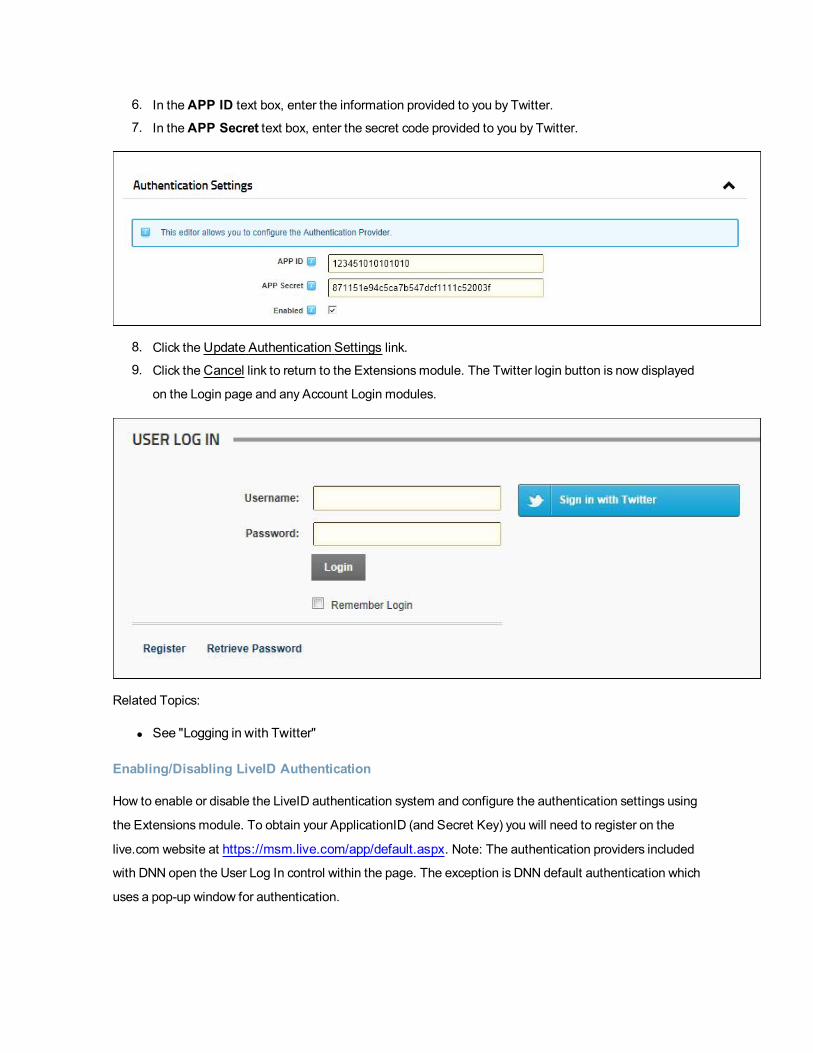
6. In theAPP ID text box, enter the information provided to you by Twitter.
7. In theAPP Secret text box, enter the secret code provided to you by Twitter.
8. Click theUpdate Authentication Settings link.
9. Click theCancel link to return to the Extensionsmodule. The Twitter login button is now displayed
on the Login page and any Account Login modules.
Related Topics:
l See "Logging in with Twitter"
Enabling/Disabling LiveID Authentication
How to enable or disable the LiveID authentication system and configure the authentication settings using
the Extensionsmodule. To obtain your ApplicationID (and Secret Key) you will need to register on the
live.com website at https://msm.live.com/app/default.aspx. Note: The authentication providers included
with DNN open the User Log In control within the page. The exception is DNN default authentication which
uses a pop-up window for authentication.

1. Navigate to Admin > Advanced Settings > Extensions - OR - Go to an Extensionsmodule.2. Expand the Authentication Settings section.3. Click the Edit button besideDNN_LiveIDAuthentication.4. Go to the Extension Settings section.5. At Enabled?, select from these options:
l Check the check box to enable LiveID authentication.
l Uncheck the check box to disable. Skip to Step 9.
6. Optional. At Include Help? check the check box to render help text for the LiveID Login box -
OR - Uncheck the check box to hide it.
7. In theApplication ID text box, enter yourWindows LiveID Application ID.
8. In the Secret Key text box, enter yourWindows LiveID secret key.
9. Click theUpdate Authentication Settings link.
Setting DNN Active Directory Authentication
How to enable or disable DNNActive Directory Authentication and configure the optional settings. This
authentication system uses theWindows Active Directory authentication protocol to authenticate users.
Note: The authentication providers included with DNN open the User Log In control within the page. The
exception is DNN default authentication which uses a pop-up window for authentication.
1. Navigate to Admin > Advanced Settings > Extensions - OR - Go to an Extensionsmodule.2. Expand the Authentication System section.
3. Click the Edit button besideDNN_ActiveDirectoryAuthentication.4. Go to theAuthentication Settings section.5. At Enabled?, select from these options:
l Check the check box to enable this authentication.
l Uncheck the check box to disable. Skip to Step 9.
6. At Hide Login Controls?, select from these options:
l Check the check box to hide theWindows Login button on the Login screen.
l Uncheck the check box to display theWindows Login button on the Login screen.
7. At Synchronize Role?, select from these options:
l Check the check box to synchronize the user's role with theWindows Active Directory
security group each time user logs on.
l Uncheck the check box to disable.
8. At Do Not Automatically Create Users? select from these options:
l Check the check box to prevent Active Directory users from log into the DNN site until an
account is created.

l Uncheck the check box to disable.
9. At Provider, select the Authentication provider for this site. E.g. ADSIAuthenticationProvider10. At Authentication Type, select the Authentication type for this site. Note: Delegation is recom-
menced.
11. In theRoot Domain text box, enter your Root Domain in the format yourdomain.com or
DC=yourdomain,DC=com. Leave this value blank if you want to obtain Active Directory objects
from root forest. Optionally, you can explicitly define the Organizational Unit (OU) you want to
authenticate your users against. Once you define the Organizational Unit, the authentication will
verify against all users belonging to the Organizational Unit, as well as the users of Sub-Units
belonging to it. The lowest level of Organization Unit you wish to validate against must be listed
first. (E.g. "OU=Admin Users,OU=All Users,DC=yourdomain,DC=com" – which will only validate
Admin Users as authenticated.)
12. In theUser Name text box, enter who has permission to access Active Directory.13. In thePassword text box, enter the password for the above user name.14. In theConfirm Password text box, re-enter the above password.15. Optional. In theEmail Domain text box, enter the Email Domain to be used for user email
when your network doesn't haveWindows Active Directory. Note: It is recommended that you
leave this field blank.
16. Optional. In theDefault Domain text box, enter the default domain to enable users to login with
just their username instead of DOMAIN\Username.
17. Optional. In theAuto-login IP Address (Optional) text box, enter the IP string, address, or
range separated by semicolons that you want to automatically log in (E.g.: 192.168.0.1-192 -
192.168.0.100 for any IP in that range, 192.168.0.50 for only that IP.). An example string could
look like 192.168.0.100;192.168.0.1-192.168.0.100.
18. Click theUpdate Authentication Settings link.
Viewing Container Package Settings
How to view the container package settings for containers that are installed on a site using the Admin
Extensionsmodule.
1. Navigate to Admin > Advanced Settings > Extensions - OR - Go to an Extensionsmodule.2. Expand theContainers section.3. Click the Edit button beside the required container package.
4. Expand theContainer Package Settings section.

5. At Skin Package Name, the name of the skin package associated with this container package is
displayed.
6. Expand the Package Settings section to view the Package Settings. For a full list of these fields,
See "Viewing Package Settings For All Extensions".
Container PackageSettings
Viewing Package Settings For All Extensions
How to view the package settings of any extension using the Admin Extensionsmodule. Package Settings
provide detail such as the friendly name, description, version, license, release notes, owner, organization
name and contact details.
Permissions. Usersmust be granted Edit/Edit Content rights to the Extensionsmodule.
1. Navigate to Admin > Advanced Settings > Extensions - OR - Go to an Extensionsmodule.2. Expand the required section.
3. Click the Edit button beside an extension.

4. Expand the first section that is named according to the extension type. E.g. Module Settings, Con-
tainer Package Settings, etc. Here you can view some basic information for the extension. Where a
task can be performed, it is covered in another tutorial in this section.
5. Go to the Package Settings section to view the following details about this extension:
l Name: The name of this container package.l Type: The type of extension. E.g. Module, Container, etc.l Friendly Name: The friendly name of this package.l Icon Name: The name of the image associated with this extension. This image is displayed
beside the extension on the default page of the Extensionsmodule.
l Description: The description of this package.l Version: The package version number.l License: The license for this package.l Release Notes: Any release notes for this package.l Owner: The name of the owner of this package.l Organization: The name of the organization responsible for this package.l URL: The URL of the organization.l Email Address: A contact email address for this package.
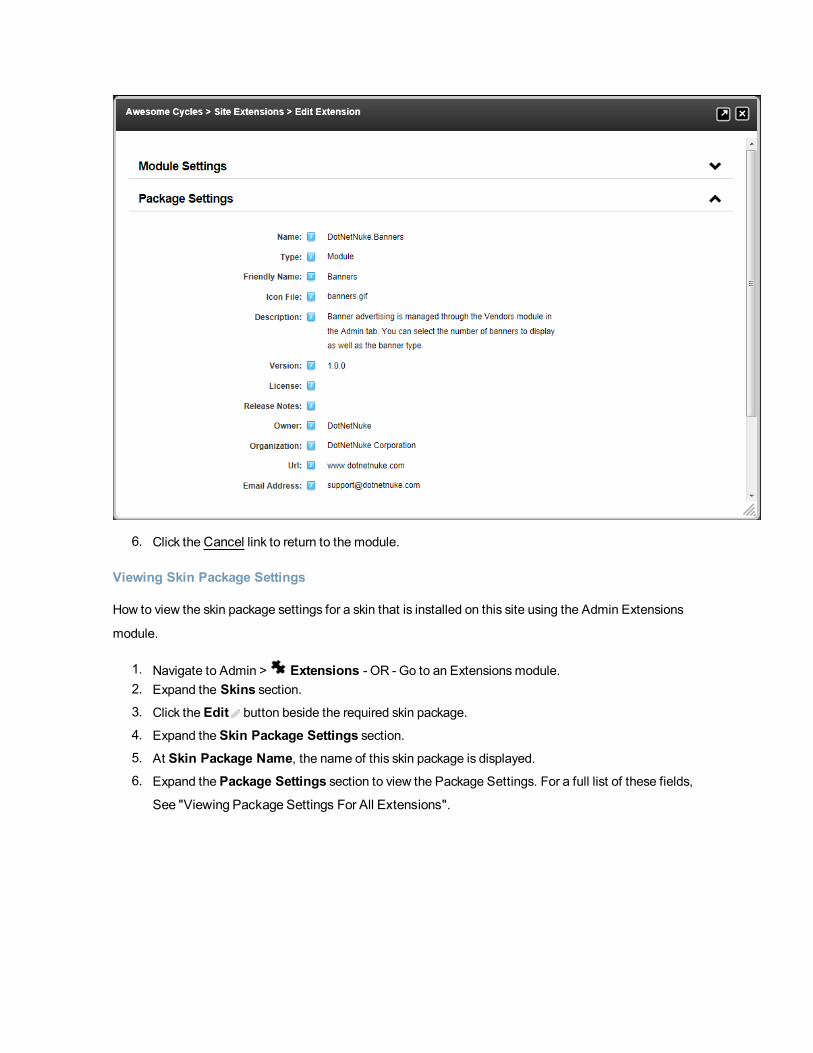
6. Click theCancel link to return to the module.
Viewing Skin Package Settings
How to view the skin package settings for a skin that is installed on this site using the Admin Extensions
module.
1. Navigate to Admin > Extensions - OR - Go to an Extensionsmodule.2. Expand the Skins section.3. Click the Edit button beside the required skin package.
4. Expand the Skin Package Settings section.5. At Skin Package Name, the name of this skin package is displayed.6. Expand the Package Settings section to view the Package Settings. For a full list of these fields,
See "Viewing Package Settings For All Extensions".

SkinPackageSettings
Administrators
Setting Permissions to Deploy a Module
How to assign permissions to deploy (add) a module to a page using the Admin Extensionsmodule.
1. Navigate to Admin > Advanced Settings > Extensions.2. Expand the Modules section.3. Click the Edit button beside the required module.
4. Expand theModule Settings section.5. Optional. To set permission for individual users, complete the following:
a. In theUsername text box, enter a username.b. Click theAdd button.
6. Optional. At Filter By Group, select aRole Group to view the related roles. Note: This field is
only displayed if one or more role groups have been created. If you do choose to filter roles by a
group, you can choose to make another role group selection or return to the main roles at any time.
Any changes you make to permissions will be retained ready for you to update.

7. Select the permissions for each role/username as follows:
l Permission Granted: Permission is granted to deploy this module.l Not Specified: Permission is not specified. These roles/users are unable to deploy the
module unless they belong to another role that has been granted permissions.
l Permission Denied: Permission to deploy this module is denied. These roles/users are
unable to deploy the module regardless of whether they belong to another role that has
been granted permissions.
8. Click theUpdate Desktop Module button.
File Manager
About the Admin File Manager Module
The File Manager module that is located on the Admin > File Manager page allows Administrators tomanage files on this site. This administration module can be added to any site page, and is also displayed
on the Admin and Host menus.

Permissions. Authorized users can upload new files, download files, delete files and synchronize the file
upload directory. It also provides information on the amount of disk space used and available.
Installation Note: This module is pre-installed on your site.
Module Version: The version number is always the same as the DNN framework version number.
TheFileManager Module - Community Edition

TheFileManager Module - ProfessionalEdition
Getting Familiar with the File Manager Module
Here's an overview of the different areas of the File Manager:
Folders Toolbar: Located at the very top of the File Manager, this toolbar enables the management of
folders, as well as file synchronization. The Folders Toolbar includes the following tools:
l Add Folder: See "Adding a New Folder"
l Delete Folder: See "Deleting a Folder"l Synchronize Files / Recursive: See "Synchronizing Files within a Folder"

Files Toolbar: Located below the Folders toolbar, this toolbar enable management of files within the
selected folder. The File Toolbar includes the following tools:
l Refresh: See "Refreshing All Files within a Folder"l Copy Files: See "Copying Files"
l Move Files: See "Moving Files"l Upload: See "Uploading Files"l Delete Files: See "DeletingMultiple Files"
l Filter: See "Filtering Files"
Folder Explorer: Located on the left of the File Manager, the Folder Explorer enables users to navigate
to folders using a hierarchical structure. See "Navigating to and Selecting Folders" and See "Syn-
chronizing Folders"
Files Window: This central window lists files within the selected folder. Note: Use the Files Navigation
bar to access files not displayed (See "Navigating to Files"). This section provides the following options:
l Rename File: See "Renaming a File" as well as editing file properties. See "Setting the ReadOnly Property of a File", See "Setting the Hidden Property of a File", or See "Setting the Archiv-
ing and Indexing Property of a File"
l Delete File: See "Deleting a File"l Select All: Click to select all files; or UnSelect All: Click to unselect all files.
l Select File: Select one or more individual files to perform any of the above tasks on the Files
Toolbar.
l Unzip File: See "Unzipping Compressed Files"

Files Navigation Bar: This bar provides navigation and file display tools. It displays the Page [Page
Number] of [Number of Pages]: enables the user to scroll through files when there are more items than dis-
played on one page. E.g. Page 1 of 5.
Folder Information Bar: This information bar is located below the Folder Explorer and provides details
related to the File Manager. The following information is displayed from left to right:
l Folder Address
l Used and Available Space
l Items Per Page: Select the number of Items (files) displayed in the FilesWindow. The default set-
ting is ten (10) and this setting defaults back to ten (10) when the page is refreshed. Other options
are: 15, 20, 30, 40, and 50.
Folder Security Settings: This section enables Administrators to control security role access to each
folder.
Three basic permissions are available in DNNCommunity Edition: Open Files in Folder, Browse Files in
Folder, andWrite to Folder
DNNProfessional Edition has seven permissions: Browse, Folder, View, Add, Copy, Delete, Manage Set-
tings, and Full Control.
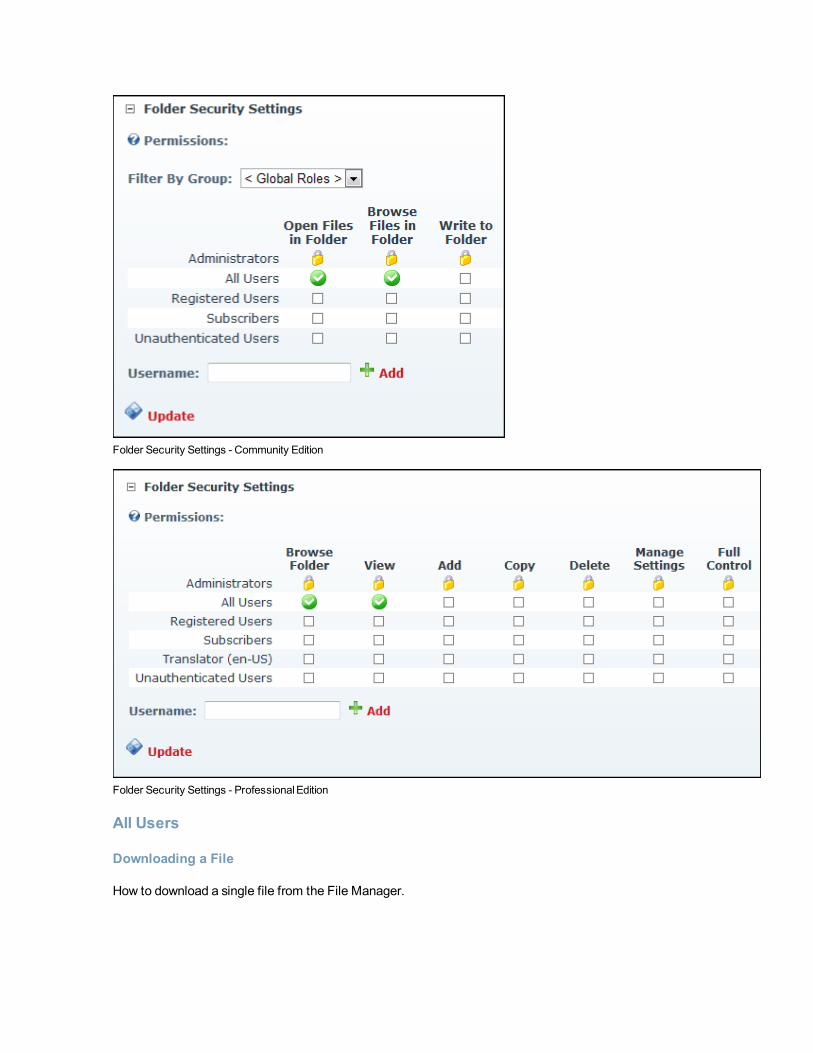
Folder Security Settings - Community Edition
Folder Security Settings - ProfessionalEdition
All Users
Downloading a File
How to download a single file from the File Manager.

1. Navigate to Admin > File Manager - OR - Go to a File Manager module.2. Navigate to and select the folder containing the file to be downloaded. See "Navigating to and
Selecting Folders"3. Click the linked file name.
4. Save the file to your computer.
Filtering Files
How to filter the files using the File Manager module. This will display only files which match the entered
criteria and which are in the selected folder. The filter is applied to both the file name and the file exten-
sion.
Tip: You must remove the filter to view all files again. Do this by deleting the filter criteria from the
text box and clicking the Filter button.
1. Navigate to Admin > File Manager - OR - Go to a File Manager module.2. Navigate to and select the required folder. See "Navigating to and Selecting Folders"

3. Go to the Files Toolbar and enter the filter criteria into the text box.4. Click the Filter button. This filters the files displayed in the FilesWindow so only files containing
the filter criteria are displayed.
Filtering Files
Navigating to and Selecting Folders
How to navigate to and select a folder with the File Manager module.
l View Child Folders: Click theMaximize button beside a folder to view its child folders.
l Hide Child Folders: Click theMinimize button beside a folder to close it and hide its child fold-
ers.
l Select Folder: Click on a folder name to select it. This highlight the selected folder name and
displays the associated files in the FilesWindow.
Navigating to Files
By default the File Manager displays the first ten (10) files within the selected folder inside the FilesWin-
dow. When there are more than ten (10) files, the following options are displayed enabling you to navigate
to the additional files as well as change the default number of files displayed.
l Page 1 of 4: If there is more than one page of files associated with the selected folder, the number
of pages and the page number of the current page will be displayed along with the Items Per Page
tool.
l Page Navigation: The following navigation buttons are displayed.
l Move First: Displays the first page of files.
l Move Previous: Displays the previous page of files.
l Move Next: Displays the next page of files.
l Move Last: Displays the last page of files.

l Items Per Page: Select a number to change the number of files displayed in the FilesWindow.
This setting will default to ten (10) whenever the File Manager is refreshed. Important. When per-
forming a task against multiple files, use this feature to enable you to select up to 50 items at one
time, rather than the 10 itemswhich are displayed by default.
Selecting Items Per Page
Refreshing All Files within a Folder
How to refresh the files within a selected folder of the File Manager module. This task refreshes the file
information in the database to match the files on the server. This may be required if files have been
uploaded via FTP.
1. Navigate to Admin > File Manager - OR - Go to a File Manager module.2. Navigate to and select the required folder. See "Navigating to and Selecting Folders"
3. Click the Refresh button to refresh files.

RefreshingFiles
Reordering Files
How to reorder the files displayed in the FilesWindow of the File Manager module. Files can be ordered in
either ascending or descending order by the File Name, Date or Size columns.
1. Navigate to Admin > File Manager - OR - Go to a File Manager module.2. In the Title Bar of the FilesWindow, click on a column title (I.e. File Name, Date, or Size) to order
files in ascending order by that field.
3. Optional. Click the same column title again to a second time to reorder files in descending order.
OrderingFiles by Size
Synchronizing Folders
How to synchronize the folders of the File Manager module. Synchronizing ensures the folders listed
match the folder structure within the database. Use this feature when folders are uploaded using FTP
directly to the database.

1. Navigate to Admin > File Manager - OR - Go to a File Manager module.2. Click the Synchronize Folders button located in the title bar of the Folder Explorer. The
Folder Explorer is minimized when synchronization is completed.
SynchronizingFolders
Folder Editors
Adding a New Folder
How to add a new folder to the File Manager module. The new folder will inherit the permissions assigned
to its parent folder.
Permissions. In DNNCommunity Edition, Edit Content permission is required for the module andWrite to
Folder permission is required for the parent folder of the new folder. In DNNProfessional and Enterprise
Editions, Edit Content permission is required for the module and Add permission is required for the parent
folder of the new folder.
1. Navigate to Admin > File Manager - OR - Go to a File Manager module.2. Navigate to and select the folder which will be the parent for the new folder. See "Navigating to
and Selecting Folders"

3. On the Folders Toolbar, select one of the following options from the Folders drop down list:l Standard - File System: Select this option to store most of your files. This is the default
option.
l Secure - File System: Select this option if you want to encrypt the file name to prevent
direct linking to this file.
l Secure - Database: Stores files as a byte array in the database rather than in the usual file
system.
l Amazon Folder Provider: Stores files on the Amazon service. Only available in Dot-
NetNuke Professional Edition and DotNetNuke Enterprise Editionl AzureFolder Provider: Stores files on the Azure service. Only available in DotNetNuke
Professional Edition and DotNetNuke Enterprise Edition4. In the Folders text box, enter a name for the new folder.
5. Click the Add Folder button. This displays the new folder in the Folder Explorer.

TheNewly AddedFolder displayed in theFolder Explorer
Copying Files
How to copy one or more files from one folder to another folder of the File Manager module.
Permissions. DNN Community Edition: Edit Content permission for the module (See "SettingModule
Permissions") andWrite to Folder permission for the folder where the file is located as well as the des-
tination folder.
Permissions. DNN Professional Edition: Edit Content permission for the module (See "SettingModule
Permissions") and Copy permission for the folder where the file is located as well as the destination
folder.
1. Navigate to Admin > File Manager - OR - Go to a File Manager module.2. Navigate to and select the folder where the files to be copied are located. See "Navigating to and
Selecting Folders"
3. In the FilesWindow, check the check box beside each of the files to be copied - OR - Click the
Select All button to select all of the files displayed in the FilesWindow. Tip: See "Navigating to
Files" to select different or additional files within this folder.

4. Click the Copy Files button. This displays the "Copy Checked Files?" message.5. Click theOK button to confirm. This displays the Copying Filesmessage which lists the names of
the files to be copied and requests that you select the destination folder.
6. Navigate to and select the folder you want to copy the files to. Note: Files cannot be copied to the
same folder. This displays the Copy Selected Files To message which displays the name of the
selected folder.
7. Click theOK button to confirm.
Deleting a File
How to permanently delete a single file from the File Manager module. Users require the following mini-
mum permissions to complete this task:
DNN Community Edition: Edit Content permission for the module (See "SettingModule Permissions")
andWrite to Folder permission for the folder where the file is located.
DNN Professional Edition: Edit Content permission for the module (See "SettingModule Per-
missions") and Manage Settings permission for the folder where the file is located.
1. Navigate to Admin > File Manager - OR - Go to a File Manager module.2. Navigate to and select the folder containing the file to be deleted. See "Navigating to and Select-
ing Folders"3. See "Navigating to Files
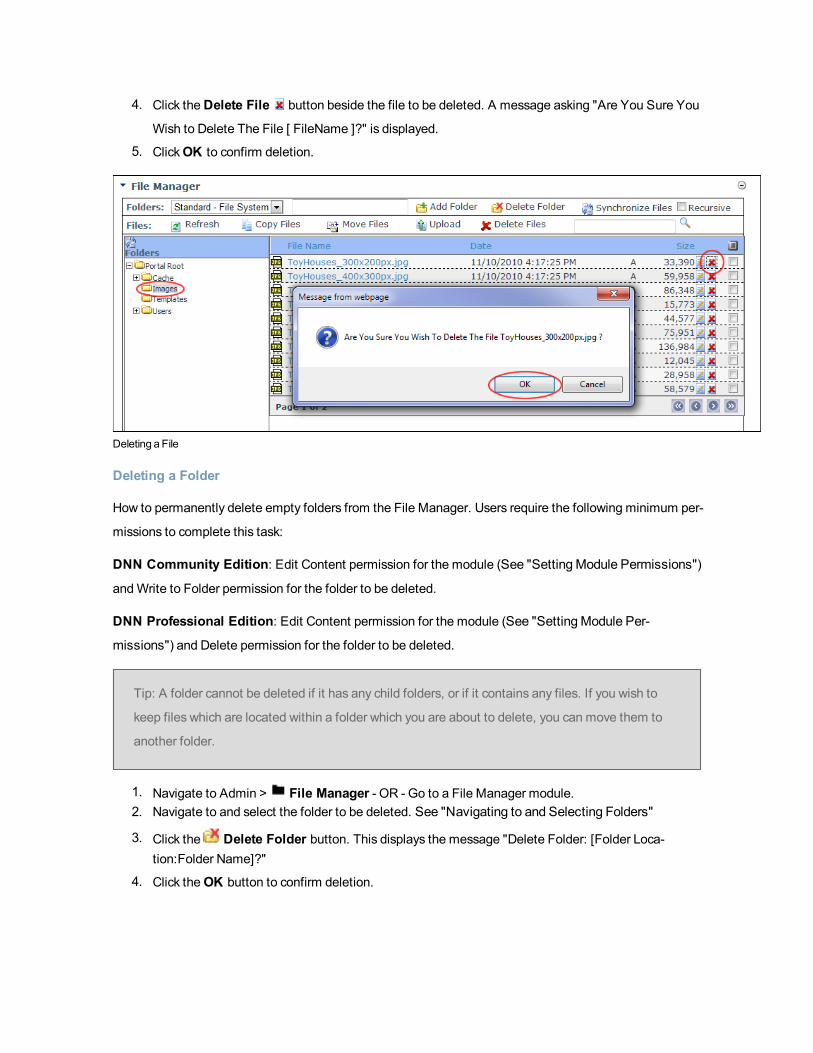
4. Click theDelete File button beside the file to be deleted. A message asking "Are You Sure You
Wish to Delete The File [ FileName ]?" is displayed.
5. ClickOK to confirm deletion.
Deleting aFile
Deleting a Folder
How to permanently delete empty folders from the File Manager. Users require the following minimum per-
missions to complete this task:
DNN Community Edition: Edit Content permission for the module (See "SettingModule Permissions")
andWrite to Folder permission for the folder to be deleted.
DNN Professional Edition: Edit Content permission for the module (See "SettingModule Per-
missions") and Delete permission for the folder to be deleted.
Tip: A folder cannot be deleted if it has any child folders, or if it contains any files. If you wish to
keep files which are located within a folder which you are about to delete, you can move them to
another folder.
1. Navigate to Admin > File Manager - OR - Go to a File Manager module.2. Navigate to and select the folder to be deleted. See "Navigating to and Selecting Folders"
3. Click the Delete Folder button. This displays the message "Delete Folder: [Folder Loca-tion:Folder Name]?"
4. Click theOK button to confirm deletion.

Deleting aFolder from theFileManager
Deleting Multiple Files
How to permanently delete multiple files from the File Manager module. Users require the following mini-
mum permissions to complete this task:
DNN Community Edition: Edit Content permission for the module (See "SettingModule Permissions")
andWrite to Folder permission for the folder where the file is located.
DNN Professional Edition: Edit Content permission for the module (See "SettingModule Per-
missions") and Full Control permission for the folder where the file is located.
1. Navigate to Admin > File Manager - OR - Go to a File Manager module.2. Navigate to and select the folder containing the files to be deleted. See "Navigating to and Select-
ing Folders"
3. In the FilesWindow, display the required files. See "Navigating to Files"
4. Check the check box beside each of the files to be deleted - OR - Click the Select All button
to select all of the files currently displayed in the File Window. Tip: See "Navigating to Files" to
select different or additional files within this folder.
5. Click the Delete Files button. This displays the Delete Filesmessage which lists the filesselected for deletion.

6. Click theOK button to confirm.
Moving Files
How to move one or more selected files from one folder into another folder within the File Manager mod-
ule. Users require the following minimum permissions to complete this task:
DNN Community Edition: Edit Content permission for the module (See "SettingModule Permissions")
andWrite to Folder permission for the folder where the file is located as well as the destination folder.
DNN Professional Edition: Edit Content permission for the module (See "SettingModule Per-
missions") and Copy permission for the folder where the file is located as well as the destination folder.
1. Navigate to Admin > File Manager - OR - Go to a File Manager module.2. Navigate to and select the folder where the files to be moved are located. See "Navigating to and
Selecting Folders"
3. In the FilesWindow, check the check box beside each of the files to be moved - OR - Click the
Select All button to select all of the files displayed in the FilesWindow. Tip: See "Navigating to
Files" to select different or additional files within this folder.
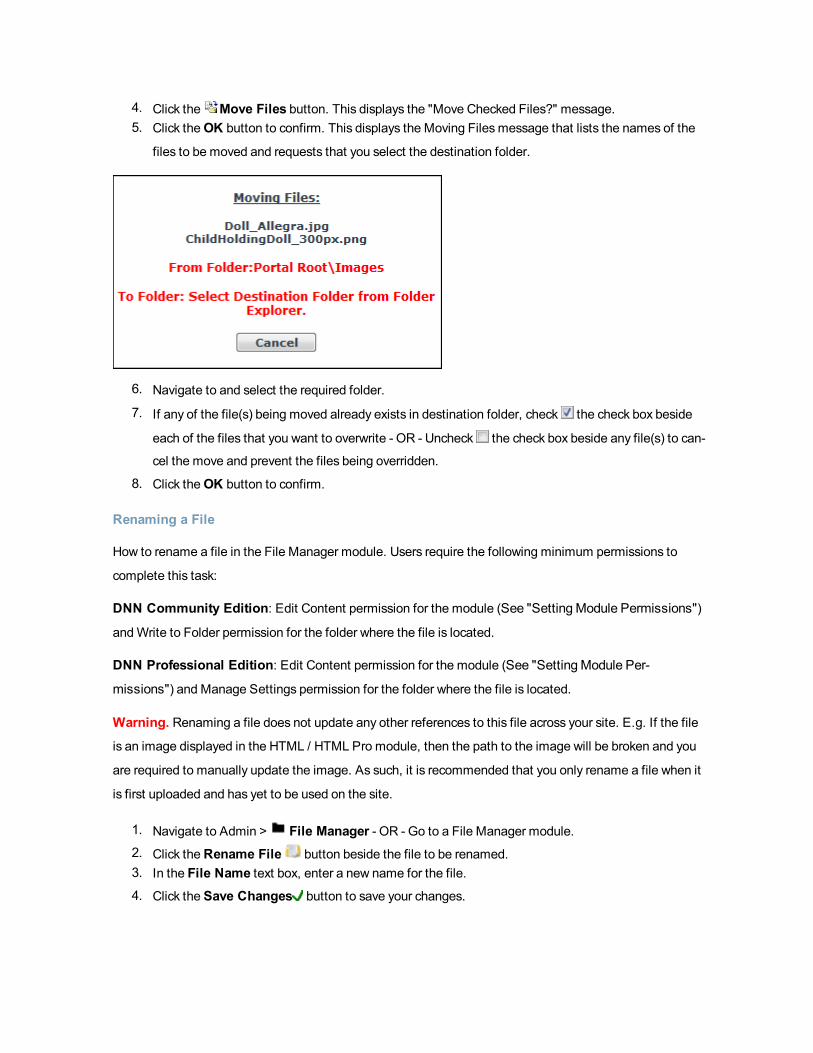
4. Click the Move Files button. This displays the "Move Checked Files?" message.5. Click theOK button to confirm. This displays the Moving Filesmessage that lists the names of the
files to be moved and requests that you select the destination folder.
6. Navigate to and select the required folder.
7. If any of the file(s) being moved already exists in destination folder, check the check box beside
each of the files that you want to overwrite - OR - Uncheck the check box beside any file(s) to can-
cel the move and prevent the files being overridden.
8. Click theOK button to confirm.
Renaming a File
How to rename a file in the File Manager module. Users require the following minimum permissions to
complete this task:
DNN Community Edition: Edit Content permission for the module (See "SettingModule Permissions")
andWrite to Folder permission for the folder where the file is located.
DNN Professional Edition: Edit Content permission for the module (See "SettingModule Per-
missions") and Manage Settings permission for the folder where the file is located.
Warning. Renaming a file does not update any other references to this file across your site. E.g. If the file
is an image displayed in the HTML / HTML Pro module, then the path to the image will be broken and you
are required to manually update the image. As such, it is recommended that you only rename a file when it
is first uploaded and has yet to be used on the site.
1. Navigate to Admin > File Manager - OR - Go to a File Manager module.2. Click theRename File button beside the file to be renamed.3. In the File Name text box, enter a new name for the file.
4. Click the Save Changes button to save your changes.

Renaming aFile
Selecting Files
How to select one or more files in the File Manager module. Selecting files enables you to perform file
management tasks such as copying and moving files.
Permissions. Usersmust be granted Edit (DNNCommunity Edition) / Edit Content (DNNProfessional Edi-
tion) permissions to the module. (See "SettingModule Permissions") Note: These permissions enable
users to select files and perform file refreshing and filtering. Additional permissions are required to perform
specific tasks.
Here are the options for selecting files:
Select a File: Check the check box to the right of the file to select it.
Deselect a File: Uncheck the check box to the right of the file to deselect it.
Select All Files: Check the check box in the title bar of the FilesWindow to select all of the displayed
files. Important. Use the Items Per Page tool if you want to select more files at one time. This enables
you to select up to 50 files at one time. See "Modifying Items Per Page"

Deselect All Files: Uncheck the check box in the title bar of the FilesWindow to deselect all of the dis-
played files.
Setting the Archiving and Indexing Property of a File
How to set the archiving and indexing properties of a file within the File Manager.
Permissions. Users require the following minimum permissions to complete this task:
DNN Community Edition: Edit Content permission for the module (See "SettingModule Permissions")
andWrite to Folder permission for the folder where the file is located.
DNN Professional Edition: Edit Content permission for the module (See "SettingModule Per-
missions") and Manage Settings permission for the folder where the file is located.
1. Navigate to Admin > File Manager - OR - Go to a File Manager module.2. Locate the required file. See "Navigating to Files"
3. Click theRename File button beside the file to be edited.
4. At the S check box, select from these options:
l Check the check box to disable hidden option in file properties (Windows). For fast search-
ing, allow Indexing Service to index this file.
l Uncheck the check box to remove this file property.

5. At theA check box, select from these options:
l Check the check box to allow file to be archived by the operating system. This is the
default option.
l Uncheck the check box to remove this file property.6. Click the Save Changes button to save your changes - OR - Click theCancel Rename but-
ton to cancel.
Set archiving and indexing for a file
Tip: The lettersS andA are displayed beside the selected files if these options are set.
Setting the Hidden Property of a File
How to set the hidden property of a file in the File Manager module. Hidden files don't display on your site
in modules such as the Media and HTML / HTML Pro modules, they are also not displayed on vendor
banners, nor are they displayed for selection on RTE galleries. Users require the following minimum per-
missions to complete this task:
DNN Community Edition: Edit Content permission for the module (See "SettingModule Permissions")
andWrite to Folder permission for the folder where the file is located.
DNN Professional Edition: Edit Content permission for the module (See "SettingModule Per-
missions") and Manage Settings permission for the folder where the file is located.
An ImageSet as Hidden isn't displayed in theHTMLmodule

The Imagedisplays once theHidden property is removed
1. Navigate to Admin > File Manager - OR - Go to a File Manager module.2. Locate the required file. See "Navigating to Files"
3. Click theRename File button beside the file to be edited.
4. At theH check box, select one of the following options:
l Check the check box to set the file as hidden.
l Uncheck the check box to remove the hidden property from the file.

5. Click the Save Changes button to save your changes - OR - Click theCancel Rename but-
ton to cancel.
Tip: The letterH is displayed beside files set as Hidden.
Setting the Read Only Property of a File
How to set the read only property of a file in the File Manager module. Users require the following mini-
mum permissions to complete this task:
DNN Community Edition: Edit Content permission for the module (See "SettingModule Permissions")
andWrite to Folder permission for the folder where the file is located.
DNN Professional Edition: Edit Content permission for the module (See "SettingModule Per-
missions") and Manage Settings permission for the folder where the file is located.
Tip: Setting a file as Read Only does not prevent it from being deleting.

1. Navigate to Admin > File Manager - OR - Go to a File Manager module.2. Locate the required file. See "Navigating to Files"
3. Click theRename File button beside the file to be edited.4. At theR check box, select one of the following options:
l Check the check box to set the file as read only.
l Uncheck the check box to remove the read only property from the file.5. Click the Save Changes button to save your changes - OR - Click theCancel Rename but-
ton to cancel.
Setting a file as read only
Tip: The letterR is displayed beside files set as Read Only.
Synchronizing Files within a Folder
How to synchronize the files inside one or more folders of the File Manager module. Synchronizing
ensures the files listed match the files within the database. Use this feature when files are uploaded using
FTP directly to the database, or when you wish to refresh the file within multiple folders. Users require the
following minimum permissions to complete this task:
DNN Community Edition: Edit Content permission for the module (See "SettingModule Permissions")
andWrite to Folder permission to the required folder.
DNN Professional Edition: Edit Content or Full Control permission for the module (See "SettingMod-
ule Permissions") and Manage Settings permission to the required folder.
1. Navigate to Admin > File Manager - OR - Go to a File Manager module.2. Navigate to and select the folder to be synchronized. See "Navigating to and Selecting Folders"
3. Optional. At Recursive, check the check to synchronize all child folders of the selected folder.
4. Click the Synchronize Files button. The Folder Explorer is minimized when synchronization iscompleted.

SynchronizingFiles within theSelectedFolders
Unzipping Compressed Files
How to decompress a zipped folder of files (compressed files) within the File Manager module. Users
require the following minimum permissions to complete this task:
DNN Community Edition: Edit Content permission for the module (See "SettingModule Permissions")
andWrite to Folder permission for the folder where the file is located as well as the destination folder.
DNN Professional Edition: Edit Content permission for the module (See "SettingModule Per-
missions") and Add permission for the folder where the file is located as well as the destination folder.
1. Navigate to Admin > File Manager - OR - Go to a File Manager module.2. Navigate to and select the Folder containing the file to be unzipped. See "Navigating to and Select-
ing Folders"
3. Click theUnzip File button beside the file to be decompressed. This displays the message ask-ing "UnZip Files(s): [FileName]?"
4. Click theOK button to confirm. This displays a message asking you to select the destination folder
from the Folder Explorer.

5. Navigate to and select the folder you want to unzip the files to. This displays the Unzip Select Files
To message. Note: If you wish to unzip the files into the folder where they currently reside, then you
must click the folder name twice.6. Click theOK button to confirm. The files are now unzipped in the selected folder. The original zip
file is still located in the original folder.
Uploading Files
How to upload one or more individual files or a zipped (compressed) file to the File Manager module.
These files can then be viewed using variousmodules such as Links, Media, HTML/HTML Pro, etc. Users
require the following minimum permissions to complete this task:
DNN Community Edition: Edit Content permission for the module (See "SettingModule Permissions")
andWrite to Folder permission for the folder where the file will be uploaded to.

DNN Professional Edition: Edit Content permission for the module (See "SettingModule Per-
missions") and Add permission for the folder where the file will be uploaded to.
1. Navigate to Admin > File Manager - OR - Go to a File Manager module.2. Navigate to and select a folder that you are authorized to upload files to. See "Navigating to and
Selecting Folders". Note: You can skip this step and choose the folder later from the File Upload
page.
3. Click the Upload button located on the Files toolbar. This opens the File Upload page.4. Click theBrowse... button and select a file from your computer.
5. Optional. At the drop down list, choose/change the folder where the file will be uploaded to. The
default selection is the folder you chose at Step 2.
6. Optional. At Decompress ZIP Files?, select from the following options if you are uploading a zip
file that you wish to decompress (unzip) during upload.
l Check the check box to decompress the files while uploading them. This adds both the
ZIP file and all the individual files to the selected folder.
l Uncheck the check box to upload the file as a zipped folder. You can unzip the files at a
later time if required. See "Unzipping Compressed Files"
7. Click the Upload File link. If upload is successful, the [FileName] Uploaded Successfully mes-
sage is displayed.

8. Repeat Steps 4-7 to upload additional files.
9. Click theReturn link to return to the module.
Module Editors
Overview of Folder Types
There are three (3) different types of folders, called standard, secure and database that are included with
DNNCommunity Edition. In addition, DNNProfessional Edition and DNNEnterprise Editions come with
two (2) Cloud based folder types, one is located on Amazon's S3 service and the other on Microsoft's
Azure Service.
Overview of the folder types:
l Standard - File System: Location to store most of your files. This is the default option.
l Secure - File System: This folder encrypts file names to prevent direct linking to files.
l Secure - Database: Stores files as a byte array in the database rather than in the usual file sys-
tem.
l Amazon Folder Provider: Stores files on the Amazon service. Only available in Professional and
Enterprise Editions.
l Azure Folder Provider: Stores files on the Azure service. Only available in Professional and
Enterprise Editions.
To view the Folder Types:

1. Navigate to Admin > File Manager - OR - Go to a File Manager module.2. Click theManage Folder Types button located at the base of the module.
TheFolder TypeDefinitions Page
Related Topics:
l "Adding an Amazon S3 Folder Type"
l "Adding aWindows Azure Folder Type"
Adding a Windows Azure Folder Type
How to add aWindows Azure folder type to the File Manager. This enables you to store your files on the
Windows Azure cloud which is a paid service.
Prerequisite. You must create aWindows Azure account. For details and to sign up, go to http://ww-
w.microsoft.com/windowsazure/storage.
1. Navigate to Admin > File Manager - OR - Go to a File Manager module.2. Click theManage Folder Types button located at the base of the module.

3. Click theAdd New Type button.4. Go to theGeneral Settings section.5. Click theAdd New Type button.6. In theName text box, enter a name for the new provider. This name will show up in the File Man-
ager as a Folder Type when you add new folders.
7. At Folder Provider, select AzureFolderProvider from the drop down list. This displays the
Folder Provider Settings section.
8. In theAccount Name text box, enter your account name.9. In theAccount Key text box, enter the account key for your service.10. At Container Name, select Refresh from the drop down list. This populates the list with the
bucket available for you to store files in.
11. At Container Name, select the container you want to store the files in.

12. Click theUpdate button. This will now take you back to the Folder Types list and show the new
Azure Folder Provider.
Adding an Amazon S3 Folder Type
How to add an Amazon Simple Storage Service (Amazon s3) folder type to the File Manager. This ena-
bles you to store your files on the Amazon cloud using the paid Amazon S3 service.
Prerequisite. You must first sign up for an Amazon S3 account. For details and to sign up, go to http://aws-
.amazon.com/s3.

1. Navigate to Admin > File Manager - OR - Go to a File Manager module.2. Click theManage Folder Types button located at the base of the module.
3. Click theAdd New Type button.4. Go to theGeneral Settings section.5. In theName text box, enter a name for the new provider. This name will show up in the File Man-
ager as a Folder Type when you add new folders.
6. At Folder Provider, select AmazonS3FolderProvider from the drop down list. This displays the
Folder Provider Settings section.
7. Go to the Folder Provider Settings section.8. In theAccessKeyID text box, enter the key for your service.
9. In the SecretAccessKey text box, enter the secret key for your service.10. At Bucket Name, select Refresh from the drop down list. This populates the list with the bucket
available for you to store files in.
11. At Bucket Name, select the bucket you want to store the files in.

12. Click theUpdate button. This returns to the Folder Types list and displays the new Amazon S3
Folder Provider.
Administrators
Overview of Folder Security Settings
The File Manager module enables authorized users to manage access to one or more folders within the
File Manager by setting Folder Security Settings. Here's a description of the different permissions which
can be set:

Community Edition Permissions
l Open Files in Folder: Enables authorized users to view the files within this folder which are dis-
played or linked to on the site. All Users are granted this permission by default.
l Browse Files in Folder: Enables authorized users to browse and select the files within this
folder. Users are granted permission to their personal folder only by default. This enables them to
manage their profile image, etc.
l Write to Folder: Enables authorized users to perform all file management tasks for files within
this folder.
Professional Edition Permissions
l Browse Folder: Enables authorized users to browse and select the files within this folder. Users
are granted permission to their personal folder only by default. This enables them to manage their
profile image, etc.
l View: Enables authorized users to view the files within this folder which are displayed or linked to
on the site. All Users are granted this permission by default.
l Add: Enables authorized users to add folders and documents beneath (as child folders) this folder.l Copy: Enables authorized users to copy files to and from this folder.
l Delete: Enables authorized users to delete a folder and/or its child folders.l Manage Settings: Enables authorized users to manage folder settings.

l Full Control: Provides authorized users with full control to perform all file and folder management
task within the selected folder.
Related Topics:
l See "Adding a New Folder"
l See "Assigning Folder Permissions to a User"
l See "Assigning Folder Permissions by Role"
Assigning Folder Permissions by Role
How to assign permissions to manage a folder of the File Manager to users with one or more roles.
1. Navigate to Admin > File Manager - OR - Go to a File Manager module.2. Navigate to and select the folder to have permissions assigned. The name of the selected folder is
displayed in the Folders Information Bar.
3. Go to the Folder Security Settings section. The current permission settings are displayed.4. Optional. At Permissions, select < All Roles > from the Filter ByGroup drop down list (if dis-
played) to view all available roles.
5. Check the check box in one or more columns to grant permissions to that role. See "Overview of
Folder Security Settings"
6. Click theUpdate button.
Assigning Folder Permissions to a User
How to assign access to view folders and upload to folders of the File Manager module.

1. Navigate to Admin > File Manager - OR - Go to a File Manager module.2. Navigate to and select the folder to have permissions assigned. The name of the selected folder is
displayed in the Folders Information Bar.
3. Go to the Folder Security Settings section. The current permission settings are displayed.4. At Permissions, enter the username of the user into the "Username" text box.5. Click the Add link. This adds the user's name to the Permission role list.
6. Check the check box in one or more columns beside this user's name to grant them folder per-
missions. See "Overview of Folder Security Settings"7. Repeat Step 4-6 for to assign folder permission to additional users.
8. Click theUpdate button.
Removing Folder Permissions
How to remove permission to view files within a folder and/or to write to a folder of the File Manager mod-
ule.
1. Navigate to Admin > File Manager - OR - Go to a File Manager module.2. Navigate to and select the folder to have permissions assigned. The name of the selected folder is
displayed in the Folders Information Bar.
3. Go to the Folder Security Settings section. The current permission settings are displayed.4. Optional. At Permissions, select < All Roles > at the Filter By Group drop down list (if dis-
played) to display all of the roles.
5. Uncheck the check box beside in one or more columns to remove that permission. See "Over-
view of Folder Security Settings"
6. Click theUpdate button.
Google Analytics
About the Google Analytics / Google Analytics Pro Module
The Google Analytics module enables Administrators and authorized users to analyze and improve online
search results. The Google Analytics Professional module (titled "GoogleAnalyticsPro") provides the addi-
tional features that allow you to create segmentation rules that isolate and analyze subsets of your site traf-
fic.
The Google Analytics / Google Analytics Professional module is located on the Admin > Advanced Set-
tings Google Analytics / Google Analytics Pro page respectively. These modules can be added toany site page.

Module Version: The version number is always the same as the DNN framework version number.
TheGoogleAnalytics Module
TheGoogleAnalytics Promodule includes the ability to addSegmentationRules
What Is Google Analytics and why should I consider using it
Taken directly from the Google Analytics site (http://www.google.ca/analytics/), Google
Analytics is the enterprise-class web analytics solution that gives you rich insights into your
website traffic and marketing effectiveness. Powerful, flexible and easy-to-use features now
let you see and analyze your traffic data in an entirely newway. With Google Analytics,
you're more prepared to write better-targeted ads, strengthen your marketing initiatives and
create higher converting websites."
Currently, some of the major feature points include:

l Analytics Intelligence: Google Analytics monitors your reports and automatically alerts you of sig-
nificant changes in data patterns.
l Advanced Segmentation: Isolate and analyze subsets of your traffic with a fast interactive seg-
ment builder. Only available in DotNetNuke Professional Edition and DotNetNuke Enterprise Edi-
tion
l Flexible Customization: Get the data you need, organized in the way you want to see it with cus-
tom reports, custom variables, and a flexible tracking API.
l E-Commence Tracking: Trace transactions to campaigns and keywords, get loyalty and latency
metrics, and identify your revenue sources. GOALS Track sales and conversions. Measure your
site engagement goals against threshold levels that you define. MOBILE TRACKING Track web-
enabled phones, mobile websites and mobile app's.
l Data Export: API Integrate business information and develop applications that accessGoogle
Analytics data.
l Advance Analysis Tools: Perform advanced data analysis with pivot tables, filtering and mul-
tiple dimensions. Discover new trends and insights with motion chart visualizations.
l Benchmarking: Find out whether your site usage metrics underperform or outperform those in
your industry.
How do I get an account?
For details on Google Analytics and to sign up for an account, visit the Google Analytics website at
http://www.google.com/analytics and look for the sign up link.
Signing Up for Google Analytics
How to sign up for a Google Analytics account.
1. Go to http://www.google.ca/analytics/
2. Click the Sign UpNow link and follow the prompts.3. Once you gain access to the Google Analytics dashboard, go ahead and create an account for your
site. Here are different pathways for new users and existing Google Analytics users.
New Users
1. At My Analytics Accounts (located on the top right) select "Create New Account" from the drop
down list and then click the Sign Up button. This displays the "Analytics: New Account Signup"
page.

2. Complete the "Analytics: New Account Signup" information as per your requirements, along with
the Contact Information, and User Agreement pages.
3. Once complete, you will end up on the "Add Tracking" page, which should resemble something sim-
ilar to the below image. The single most important piece of information on this page is the Tracking
ID, based on the above screen shot our new Tracking ID is: “UA-17965093-1”. Copy this down in a
safe place.

Existing Users
1. Existing Users should see their account on the home page of Google Analytics, something similar
to this image:
2. Under the Name field, click the relevant Domain which you need to start tracking. It should switch
over, and now the Name field includes the URL along with the tracking code to the right. Similar to:
3. As you can see above, the tracking code is “UA-78805-1”, copy this down into a safe place. You are
now ready to begin See "Configuring Google Analytics/Google Analytics Pro".
Module Editors
Adding a Segmentation Rule
How to add up to 5 segmentation rules using the Google Analytics Pro module. Segmentation Rules allow
you to isolate and analyze subsets of your traffic in a granular fashion. The rule editor is designed to facil-
itate the creation of a list of rules that are enumerated in order until a match is found. The order of rules is
important because the match criteria are Page, then membership within a Role. In order to see code
emitted on the page, two conditions would have to be met: Restart app after changing rules as they are
cached; and at least one rule much match. The order of rules sets the priority in which they are applied.
For example, if a user satisfiesmore than one rule, then the first rule will apply to him/her.
Only available in DotNetNuke Professional Edition and DotNetNuke Enterprise Edition
Prerequisite. The Google Analytics module must be configured. See "Configuring Google Ana-
lytics/Google Analytics Pro"
1. Navigate to Admin > Advanced Settings > Google Analytics Pro - OR - Go to aGoogle Ana-lytics Promodule.
2. Expand the Segmentation Rules section.3. In the Label text box, enter a name (label) for this segmentation rule.4. Optional. In the Value text box, enter the value of the segmentation category.5. Optional. At Page, select a page name to limit this rule to a single page - OR - Select Any Page
to apply the rule to any pages.
6. Optional. At Role, select a role name to limit this rule to a single role - OR - Select Any Role to
apply the rule to any page.
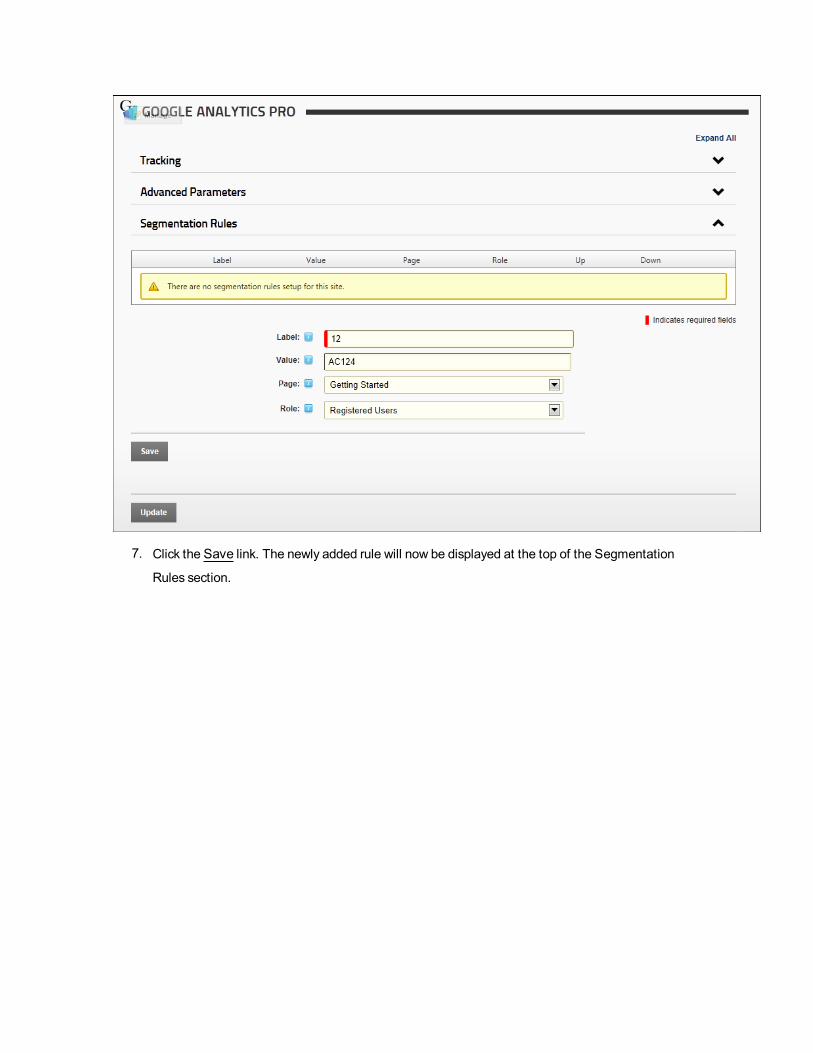
7. Click the Save link. The newly added rule will now be displayed at the top of the Segmentation
Rules section.

.
8. Repeat steps 3-7 to add additional rules and then use the Up and Down arrows to order the rules in
order of priority.
Configuring Google Analytics/Google Analytics Pro
How to configure either the Google Analytics or the Google Analytics Pro module. Only available in Dot-
NetNuke Professional Edition and DotNetNuke Enterprise Edition
Prerequisite. You must have an existing Google Analytics account. Visit the Google Analytics website at
http://www.google.com/analytics and click theCreate an Account button.
Configuring Google Analytics
1. Navigate to Admin > Advanced Settings > Google Analytics Pro - OR - Go to aGoogle Ana-lytics Promodule.
2. In the Tracking ID text box, enter the website tracking ID that you obtained from the welcomemes-
sage sent by Google when you signed up for an account.
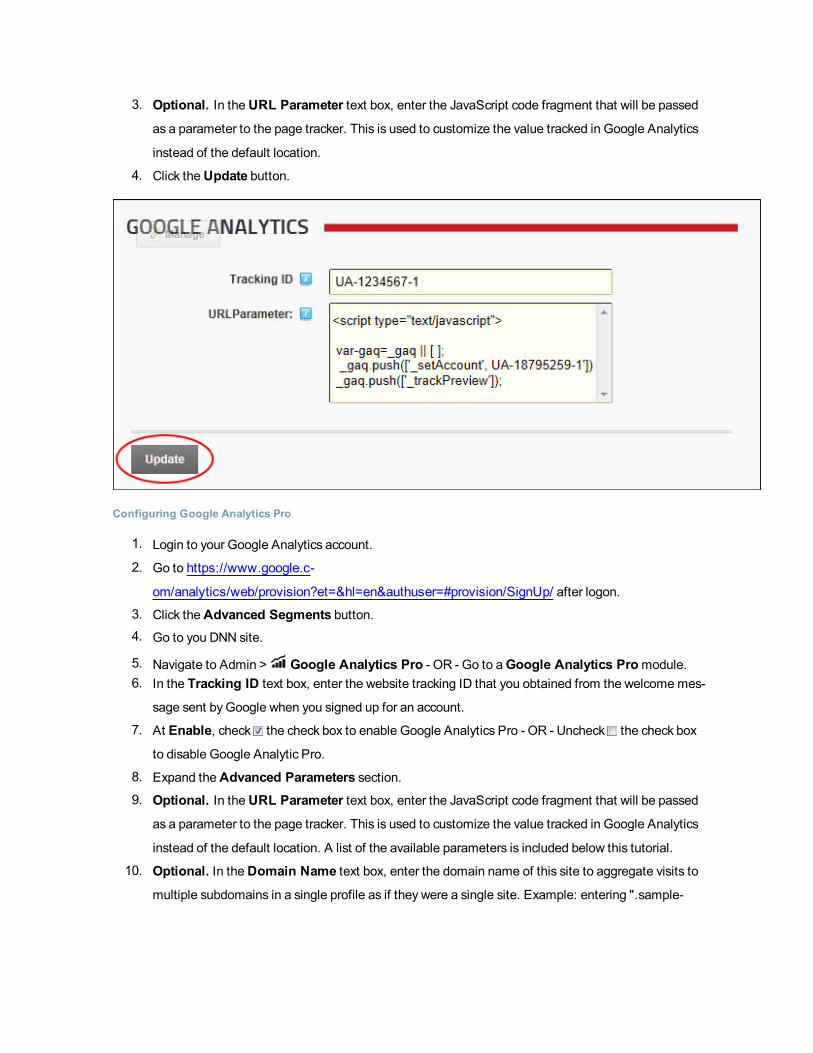
3. Optional. In theURL Parameter text box, enter the JavaScript code fragment that will be passed
as a parameter to the page tracker. This is used to customize the value tracked in Google Analytics
instead of the default location.
4. Click theUpdate button.
Configuring Google Analytics Pro
1. Login to your Google Analytics account.
2. Go to https://www.google.c-
om/analytics/web/provision?et=&hl=en&authuser=#provision/SignUp/ after logon.
3. Click theAdvanced Segments button.4. Go to you DNN site.
5. Navigate to Admin > Google Analytics Pro - OR - Go to aGoogle Analytics Promodule.6. In the Tracking ID text box, enter the website tracking ID that you obtained from the welcomemes-
sage sent by Google when you signed up for an account.
7. At Enable, check the check box to enable Google Analytics Pro - OR - Uncheck the check box
to disable Google Analytic Pro.
8. Expand theAdvanced Parameters section.9. Optional. In theURL Parameter text box, enter the JavaScript code fragment that will be passed
as a parameter to the page tracker. This is used to customize the value tracked in Google Analytics
instead of the default location. A list of the available parameters is included below this tutorial.
10. Optional. In theDomain Name text box, enter the domain name of this site to aggregate visits to
multiple subdomains in a single profile as if they were a single site. Example: entering ".sample-
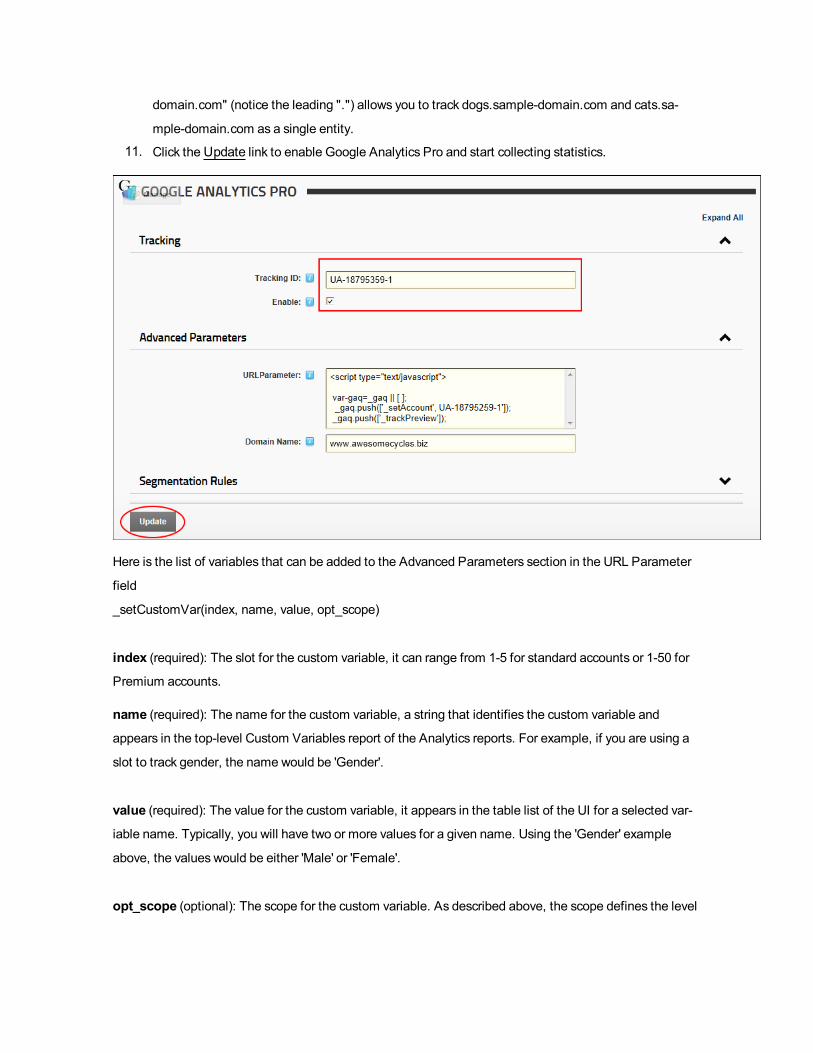
domain.com" (notice the leading ".") allows you to track dogs.sample-domain.com and cats.sa-
mple-domain.com as a single entity.
11. Click theUpdate link to enable Google Analytics Pro and start collecting statistics.
Here is the list of variables that can be added to the Advanced Parameters section in the URL Parameter
field
_setCustomVar(index, name, value, opt_scope)
index (required): The slot for the custom variable, it can range from 1-5 for standard accounts or 1-50 for
Premium accounts.
name (required): The name for the custom variable, a string that identifies the custom variable and
appears in the top-level Custom Variables report of the Analytics reports. For example, if you are using a
slot to track gender, the name would be 'Gender'.
value (required): The value for the custom variable, it appears in the table list of the UI for a selected var-
iable name. Typically, you will have two or more values for a given name. Using the 'Gender' example
above, the values would be either 'Male' or 'Female'.
opt_scope (optional): The scope for the custom variable. As described above, the scope defines the level

of user engagement with the site. It is a number whose possible values are 1 (visitor-level), 2 (session-
level), or 3 (page-level). When left undefined, the custom variable scope defaults to page-level interaction.
Deleting a Segmentation Rule
How to delete a segmentation rule from the Google Analytics Pro module. Only available in DotNetNuke
Professional Edition and DotNetNuke Enterprise Edition
1. Navigate to Admin > Advanced Settings > Google Analytics Pro - OR - Go to aGoogle Ana-lytics Promodule.
2. Expand the Segmentation Rules section.3. Click theDelete button beside the rule to be deleted.
Editing a Segmentation RuleHow to edit a segmentation rule to the Google Analytics Pro module. Only available in DotNetNuke Pro-
fessional Edition and DotNetNuke Enterprise Edition
1. Navigate to Admin > Advanced Settings > Google Analytics Pro - OR - Go to aGoogle Ana-lytics Promodule.
2. Expand the Segmentation Rules section.3. Click the Edit button beside the rule to be edited. This displays the Edit Segmentation Rule sec-
tion.

4. Edit one or more fields as required.
5. Click the Save link.
Languages
About the Language Management Module
The Languagesmodule (titled "Language Management") is located on the Navigate to Admin > Advanced
Settings > Languages - OR - Go to a Languagesmodule. Five languages (German, French, Spanish,Italian and Dutch) are provided with the default installation of DNN.
Installation Note: The languagesmodule is installed on the Admin > Languages page by default and can
be added to site pages.
Module Version: The version number is always the same as the DNN framework version number.
It allows authorized users to perform the following:

l Enable multiple languages (cultures)
l Manage the languages files (such as the welcome email message sent to new users) associated
with a site
l Manage Content Localization, which allows you to create localized module content in multiple lan-
guages (cultures). Note: Additional tasks relating to Content Localization which are not undertaken
using the Languagesmodule are covered in the Content Localization section. See "About Content
Localization"
l SuperUsers can install, create and manage languages and language localization
Tip: A large section of language packs are available from theDotNetNuke website and the Dot-
NetNuke Store (http://store.dotnetnuke.com/).
TheLanguages Module
All Users
Activating/Deactiving a Language
How to activate or deactivate a language using the Languagesmodule. Activating a language enables site
visitors to see these pages and thereby choose which language to view the site in. Note: The skin applied
to the site (or any individual site pages) must include the Languages skin token to view flag icons.
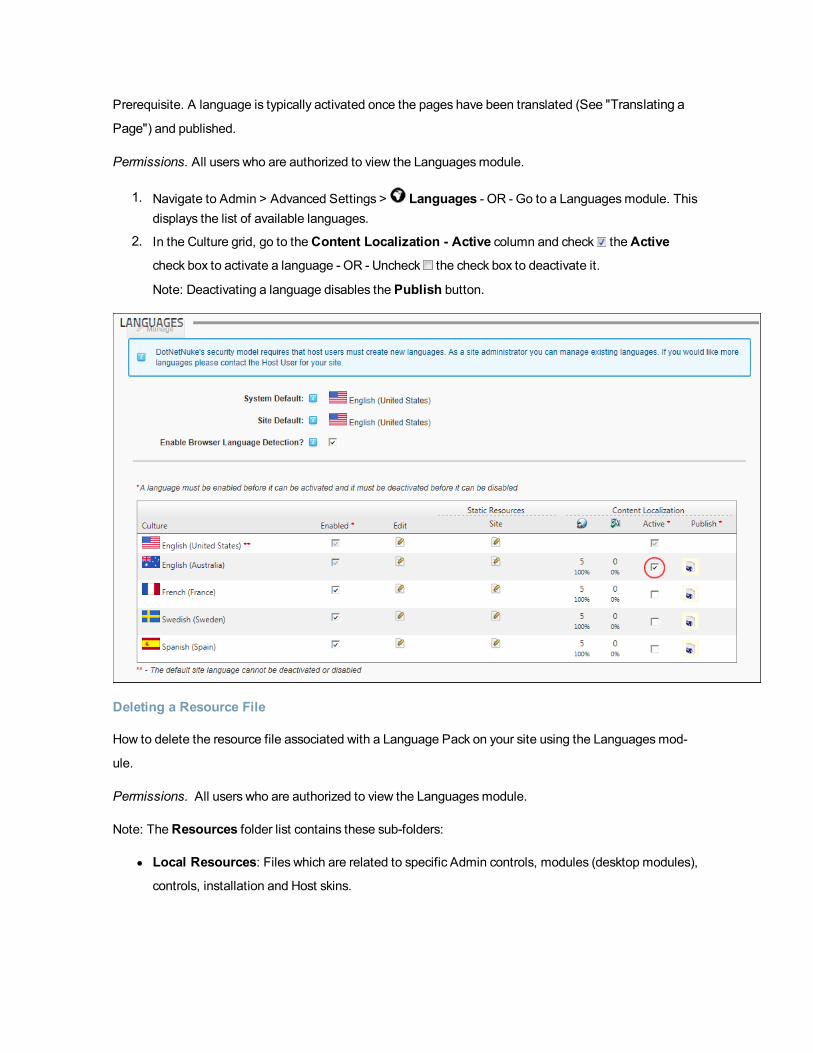
Prerequisite. A language is typically activated once the pages have been translated (See "Translating a
Page") and published.
Permissions. All users who are authorized to view the Languagesmodule.
1. Navigate to Admin > Advanced Settings > Languages - OR - Go to a Languagesmodule. Thisdisplays the list of available languages.
2. In the Culture grid, go to theContent Localization - Active column and check theActive
check box to activate a language - OR - Uncheck the check box to deactivate it.
Note: Deactivating a language disables the Publish button.
Deleting a Resource File
How to delete the resource file associated with a Language Pack on your site using the Languagesmod-
ule.
Permissions. All users who are authorized to view the Languagesmodule.
Note: TheResources folder list contains these sub-folders:
l Local Resources: Files which are related to specific Admin controls, modules (desktop modules),
controls, installation and Host skins.

l Global Resources: Files which are used across the site. This is divided into Exceptions, Glob-
alResources, SharedResources andWebControls. Note: The GlobalResources sub-section is
where you can edit system messages which are sent to users, error messages, site messages, etc.
1. Navigate to Admin > Advanced Settings > Languages - OR - Go to a Languagesmodule.2. In the Static Resources - Site column, click the Edit button beside the language associated
with the resource file to be deleted.
3. In theResources folder list, navigate to and select the required file.4. The name of the file you selected for deletion at Step 3 is now displayed at Selected Resource
File.5. Click theDelete Resource File link to delete the file. This displays the message "Are You Sure
YouWish To Delete This Item?"
6. Click theOK button to confirm.
Editing Site Language Files
How to edit the Language files associated with a Language Pack on your site using the Languagesmod-
ule. See the Language Files section below for a complete list of the email messages, error messages and
site messages which can be edited as well as examples for editing files which are commonly updated.
Permissions. All users who are authorized to view the Languagesmodule.

1. Navigate to Admin > Advanced Settings > Languages - OR - Go to a Languagesmodule.2. In the Static Resources - Site column of the Culture grid, click the Edit button beside the lan-
guage to be edited. This displays the GlobalResources file ready for editing. Note: This is where
you will find the filesmost commonly edited files such asmessages. If these are the required files,
skip to Step 4.
3. Optional. In theResources folder list, navigate to and select the required file from the below fold-
ers.
l Local Resources: Files which are related to specific Admin controls, modules (desktop
modules), controls, installation and Host skins.
l Global Resources: Files which are used across the site. This is divided into Glob-
alResources and SharedResources. This is where you can edit the messages that are sent
to users, error messages, site messages, etc.
4. Locate the required resource file. Note: If Paging is enabled, the file may be located on another
page.
5. To edit a resource file, perform one of the following options:
1. In the Localized Value text box, edit the text.
- OR -

2. Click the Edit button. This displays the message "All unsaved changes will be lost if you
continue. Are you sure you want to continue?"
1. Click theOK button.2. In the Editor, enter the new text ensuring you include the desired replacement
tokens displayed at Default Value.
3. Click theUpdate button.6. Optional. To edit the subject associated with email messages, edit the associated Subject
resource file which will be listed above the Body resource file.
7. Repeat steps 4-6 to edit additional files.
8. Click the Save Resource File link to save your changes.
Enabling Localized Content
How to create a localized copy of the current site content for each of the enabled languages using the Lan-
guagesmodule. This creates a translator role ( titled Translator and then appended with the country code.
E.g. Translator (EN-AU) ) for each enabled language. This also enables the Localization tab under Page
Settings for all site pages. See "Localization Settings for New Pages"
Prerequisite. Localized content must be enabled by a SuperUser. Localized content cannot be disabled
once it has been enabled.
Permissions. All users who are authorized to view the Languagesmodule.
1. Navigate to Admin > Advanced Settings > Languages - OR - Go to a Languagesmodule.2. Click the Enable Localized Content link.

3. The Enable Localized Content message box is now displayed, which shows the Current Site
Default language and informs you that this language cannot be changed once localized content is
enabled. If you wish to change the default site culture, you must select Cancel now and change the
default language.
4. Click the Enable Localized Content link. This displays progress bars which show the languages and
pages being created for each of the enabled languages. This creates a copy of each of these pages
(including the modules and content on these pages) for each language. It also creates a translator
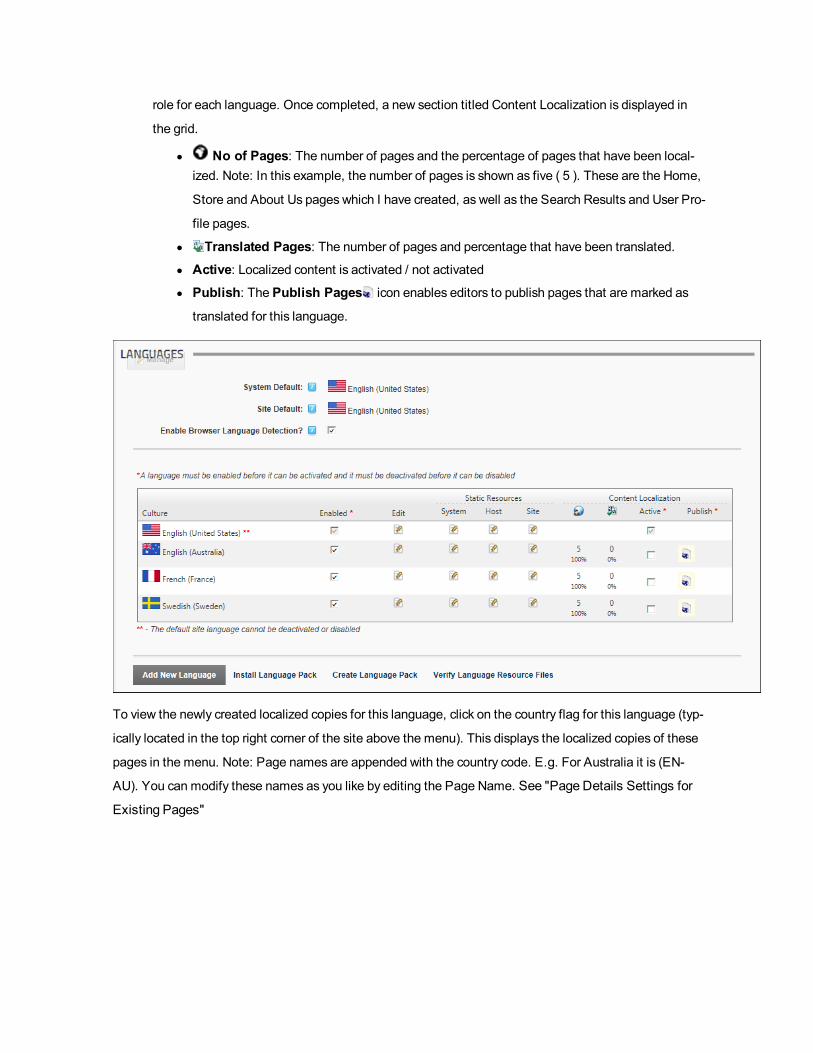
role for each language. Once completed, a new section titled Content Localization is displayed in
the grid.
l No of Pages: The number of pages and the percentage of pages that have been local-ized. Note: In this example, the number of pages is shown as five ( 5 ). These are the Home,
Store and About Us pages which I have created, as well as the Search Results and User Pro-
file pages.
l Translated Pages: The number of pages and percentage that have been translated.l Active: Localized content is activated / not activatedl Publish: The Publish Pages icon enables editors to publish pages that are marked as
translated for this language.
To view the newly created localized copies for this language, click on the country flag for this language (typ-
ically located in the top right corner of the site above the menu). This displays the localized copies of these
pages in the menu. Note: Page names are appended with the country code. E.g. For Australia it is (EN-
AU). You can modify these names as you like by editing the Page Name. See "Page Details Settings for
Existing Pages"

A translator role named Translator (en-AU) is now displayed in the Security Rolesmodule for Australian
English. Before translation can begin, the users who are the translators for each language should be
added to the newly created translator roles. See "Adding A User to a Role"
Tip: You can also assign other roles as translators for a language. See "Setting Translator Roles"
Next Step: You are now ready to begin translation. See "Translating a Page" for details on translating con-
tent and managing content for multiple languages. Also See "About Content Localization" and other tuto-
rials in the Content Localization section.
Enabling/Disabling a Language
How to enable or disable a language on your site using the Languagesmodule. Once two or more lan-
guages are enabled, users can set their preferred language on their user profile.
Permissions. All users who are authorized to view the Languagesmodule.
Prerequisite. More than one language must be added as at least one language must always be enabled.
1. Navigate to Admin > Advanced Settings > Languages - OR - Go to a Languagesmodule.2. In the Enabled column, check the check box beside the language to be enabled - OR - Uncheck
the check box to disable the language. Note: The default language cannot be disabled.

Tip: Where two or more languages are enabled on a site, different settings can be configured for
each language via the Site Settings page.
Related Topics:
Enabling/Disabling Browser Language Detection
How to enable or disable Web browser Language Detection for a single site. If enabled, the user'sWeb
browser language is used to detect the user's preferred language.
Permissions. All users who are authorized to view the Languagesmodule.
1. Navigate to Admin > Advanced Settings > Languages - OR - Go to a Languagesmodule.2. At Enable Browser Language Detection?, check the check box to enable - OR - Uncheck
the check box to disable.

3. Click theUpdate link.
Publishing Localized Content
How to publish localized content using the Languagesmodule. Publishing only affects pages which are
marked as translated. Once pages are published, the viewing permissions of published pages will be
updated to be the same as for the default language.
Permissions. All users who are authorized to view the Languagesmodule.
Prerequisite. Publishing should occur once the pages have been translated. See "Translating a Page".
Prerequisite. A language must be Active in order to be published.
1. Navigate to Admin > Advanced Settings > Languages - OR - Go to a Languagesmodule.2. In the Culture grid, go to theContent Localization - Publish column.3. Click the Publish Pages button. This displays the message "All translated pages in the [lan-
guage - region] language have been published."

4. Click theOK button to confirm.
Setting Language Files as Pending Translation
How to set the values (language files) associated with a language package as pending translation using
the Languagesmodule.
Permissions. All users who are authorized to view the Languagesmodule.
1. Navigate to Admin > Advanced Settings > Languages - OR - Go to a Languagesmodule.2. In the Static Resources - Site column of the Culture grid, click the Edit button for the language
file to be edited. This displays the GlobalResources file ready for editing.

3. At Highlight Pending Translations, check the check box to set all values as pending trans-
lation. This displays the text in the Localized Values text boxes as highlighted in red.
4. To edit a resource file, perform one of the following options:
1. In the Localized Value text box, edit the text.
- OR -
2. Click the Edit button. This displays the message "All unsaved changes will be lost if you
continue. Are you sure you want to continue?"

1. Click theOK button.
2. In the Editor, enter the new text ensuring you include the desired replacement
tokens displayed at Default Value.
3. Click theUpdate button. Note: The red highlight is removed from the box each time
you update a value using the Editor.
5. Repeat Step 4 to edit additional files.
6. Click the Save Resource File link to save your changes. This will remove highlight from these trans-
lated files.
7. At Highlight Pending Translations, uncheck the check box once translations are completed -
OR - leave checked to maintain the highlighted of files for future translation.
8. Click the Save Resource File link.
Tip: Whenever you check Highlight Pending Translations, the fields that haven't been translated
are once again displayed.
Setting the Default Site Language
How to set the default language for this site. This language is allocated to site members upon registration,
or when the regional language selected by a user is unavailable. SuperUsers can add additional languages
which can then be enabled or disabled by Administrators. More language packs are freely available from
theDotNetNuke.com website.
Permissions. Any user who are authorized to view the Languagesmodule.

Note 1: A language must be enabled to become the default site language. If it is not enabled, it is auto-
matically enabled when you set it as the default.
Note 2: Changing the default language doesn't update the language allocated to existing users. Only Eng-
lish (United States) is installed by default.
1. Navigate to Admin > Advanced Settings > Languages - OR - Go to a Languagesmodule.2. At Site Default, select the default language for this site from the drop down list.
3. Click theUpdate button.
Setting theDefault Site Language
Setting Translator Roles
How to enable or disable one or more roles to have Edit Rights to translate all new pages and localized
modules for a language using the Languagesmodule. Note: A translator role is automatically created for
each language upon creation of localized content. This tutorial explains how to add additional roles if
required.
Permissions. All users who are authorized to view the Languagesmodule.
1. Navigate to Admin > Advanced Settings > Languages - OR - Go to a Languagesmodule.2. In the Edit column of the Culture grid, click the Edit This Language button beside the required
language. This opens the Edit Language page.

3. At Localized Content Translators, check the check box in the Selected Role column beside
each role which can translate this language. Note: The translator role associated with this role is
checked by default.

4. Click theUpdate link.
Module Editors
Configuring Language Settings for a Site
How to configure language settings for a single site.
Permissions. Usersmust be granted "Edit Page" (DNN Community Edition) or "Add Content"
(DNN Professional and Enterprise Editions) permissions to the page where the Languagesmodule is
located.
1. Navigate to Admin > Advanced Settings > Languages - OR - Go to a Languagesmodule.
2. Select Manage > Settings from the module actionsmenu.3. Select theWebsite Language Settings tab.4. At Use Paging in Editor?, select from these options:
l Check the check box to enable paging which is disabled by default. Use paging to reduce
the size of the page.
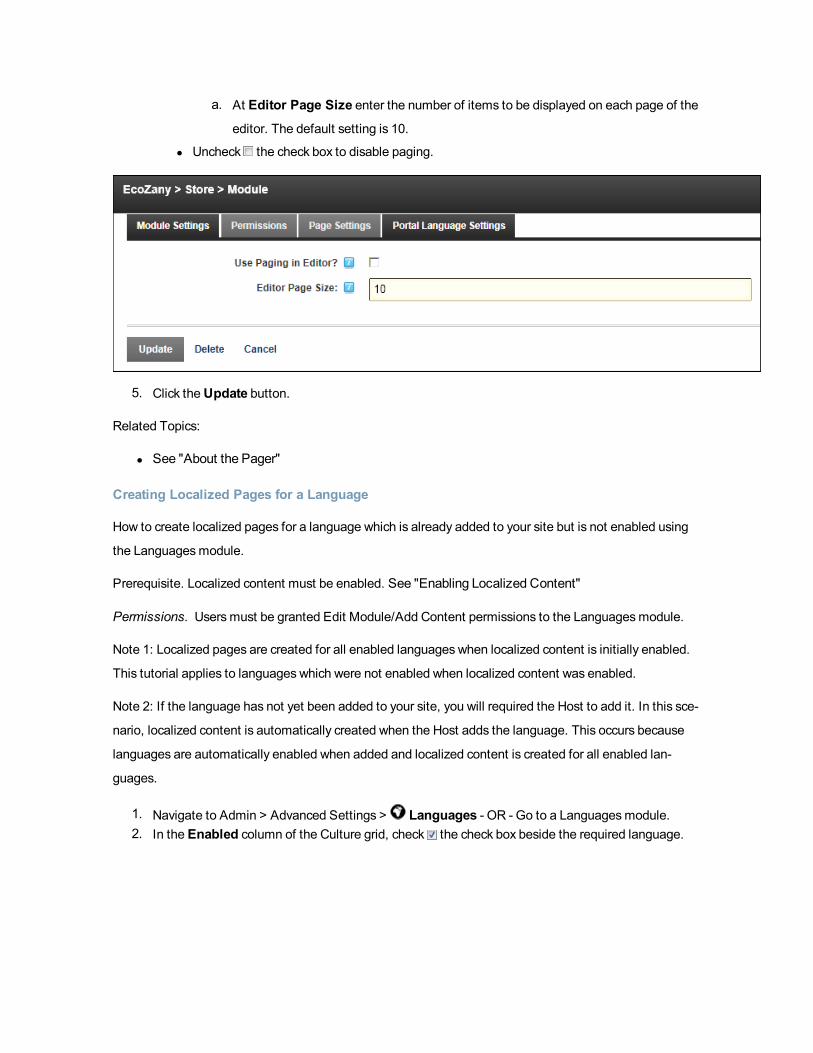
a. At Editor Page Size enter the number of items to be displayed on each page of the
editor. The default setting is 10.
l Uncheck the check box to disable paging.
5. Click theUpdate button.
Related Topics:
l See "About the Pager"
Creating Localized Pages for a Language
How to create localized pages for a language which is already added to your site but is not enabled using
the Languagesmodule.
Prerequisite. Localized content must be enabled. See "Enabling Localized Content"
Permissions. Usersmust be granted Edit Module/Add Content permissions to the Languagesmodule.
Note 1: Localized pages are created for all enabled languages when localized content is initially enabled.
This tutorial applies to languages which were not enabled when localized content was enabled.
Note 2: If the language has not yet been added to your site, you will required the Host to add it. In this sce-
nario, localized content is automatically created when the Host adds the language. This occurs because
languages are automatically enabled when added and localized content is created for all enabled lan-
guages.
1. Navigate to Admin > Advanced Settings > Languages - OR - Go to a Languagesmodule.2. In the Enabled column of the Culture grid, check the check box beside the required language.
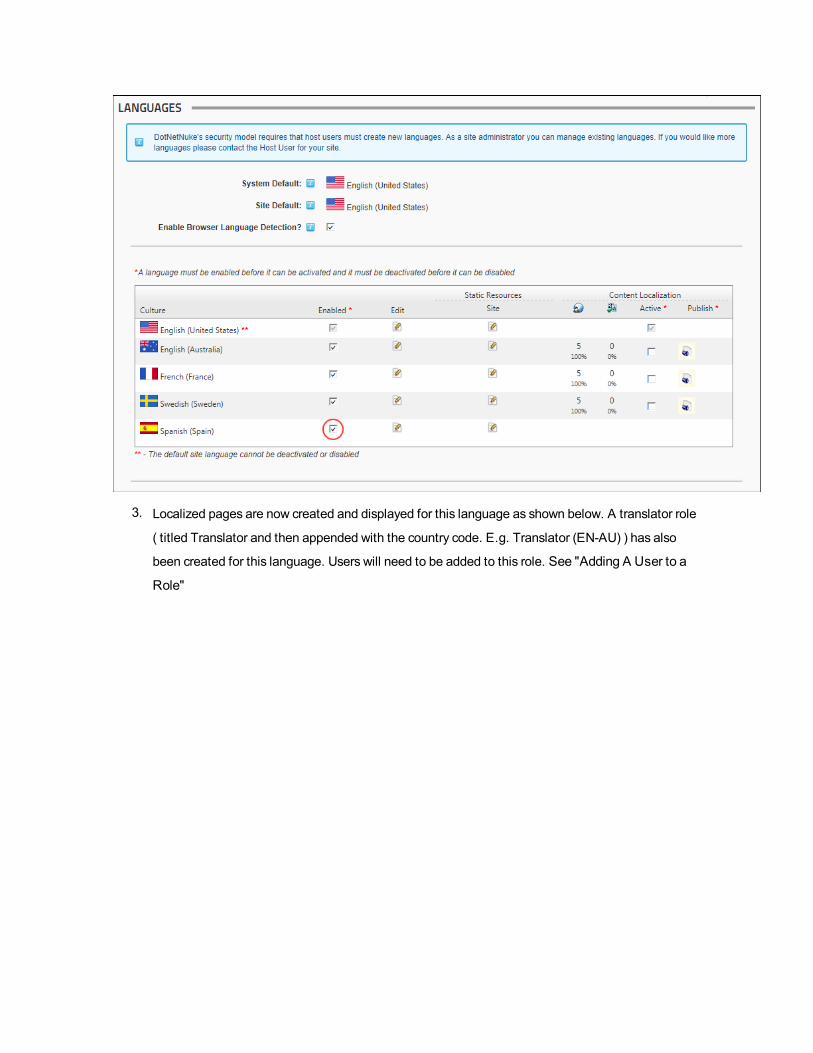
3. Localized pages are now created and displayed for this language as shown below. A translator role
( titled Translator and then appended with the country code. E.g. Translator (EN-AU) ) has also
been created for this language. Users will need to be added to this role. See "Adding A User to a
Role"

Next Step: You are now ready to begin translations. See "Translating a Page"
SuperUsers
Adding a New Language
How to add a new language to a site using the Languagesmodule. A comprehensive suite of languages
are available. If the required language is not listed, or you have a custom language pack, you can instead
install a language. See "Installing a Language Pack"
1. Navigate to Admin > Advanced Settings > Languages - OR - Go to a Languagesmodule.2. Click the AddNew Language link. This will open the Edit Language page.
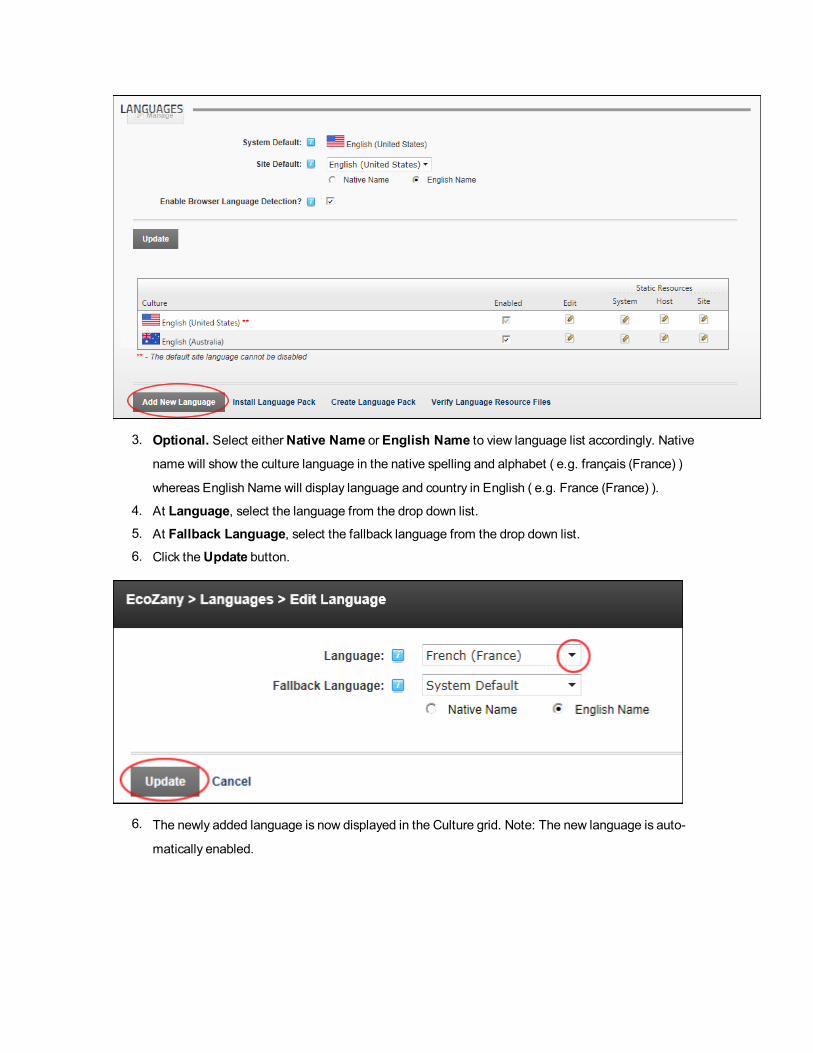
3. Optional. Select eitherNative Name or English Name to view language list accordingly. Native
name will show the culture language in the native spelling and alphabet ( e.g. français (France) )
whereas English Name will display language and country in English ( e.g. France (France) ).
4. At Language, select the language from the drop down list.
5. At Fallback Language, select the fallback language from the drop down list.
6. Click theUpdate button.
6. The newly added language is now displayed in the Culture grid. Note: The new language is auto-
matically enabled.
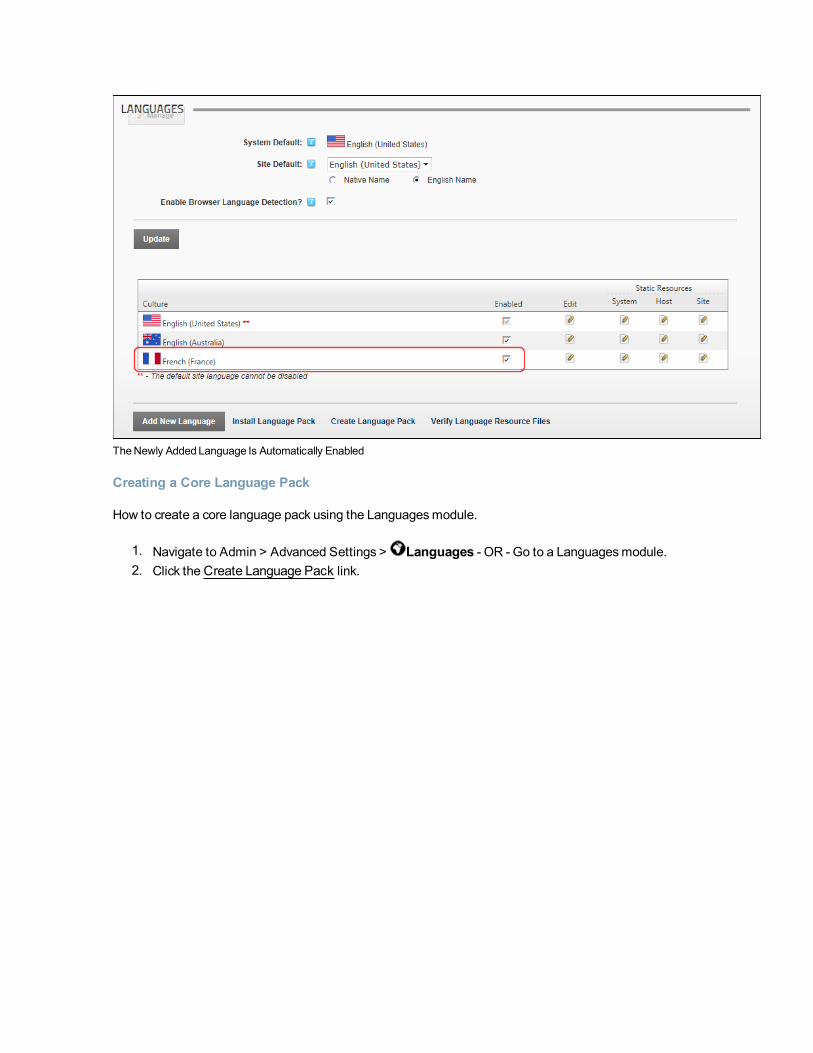
TheNewly AddedLanguage Is Automatically Enabled
Creating a Core Language Pack
How to create a core language pack using the Languagesmodule.
1. Navigate to Admin > Advanced Settings > Languages - OR - Go to a Languagesmodule.2. Click theCreate Language Pack link.

3. At Resource Locale, select the locale that want to generate the language pack for.4. At Resource Pack Type, select Core.5. Optional. In theResource Pack Name text box, modify the name of the generated resource
pack. Note: Part of the name is fixed.
6. Click theCreate link. This displays a successmessage with details of where the file is located.
Creating a Full Language Pack
How to create a full language pack using the Languagesmodule.
1. Navigate to Admin > Advanced Settings > Languages - OR - Go to a Languagesmodule.2. Click theCreate Language Pack link.

3. At Resource Locale, select the locale that want to generate the language pack for.4. At Resource Pack Type, select Full.5. Optional. In theResource Pack Name text box, modify the name of the generated resource
pack. Note: Part of the name is fixed.
6. Click theCreate link. This displays a successmessage with details of where the file is located.
Creating a Module Language Pack
How to create a module language pack using the Languagesmodule.
1. Navigate to Admin > Advanced Settings > Languages - OR - Go to a Languagesmodule.2. Click theCreate Language Pack link.

3. At Resource Locale, select the locale that want to generate the language pack for.4. At Resource Pack Type, select Module.5. At Select the Module(s) you would like to include in the resource pack, Select each of the
modules to be included in the resource pack.

6. Click theCreate link. This displays a successmessage with details of where the file is located.
Creating a Provider Language Pack
How to create a provider language pack using the Languagesmodule.
1. Navigate to Admin > Advanced Settings > Languages - OR - Go to a Languagesmodule.2. Click theCreate Language Pack link.

3. At Resource Locale, select the locale that want to generate the language pack for.4. At Resource Pack Type, select Provider.5. At Select the Module(s) you would like to include in the resource pack, select each of the
providers to be included in the resource pack.
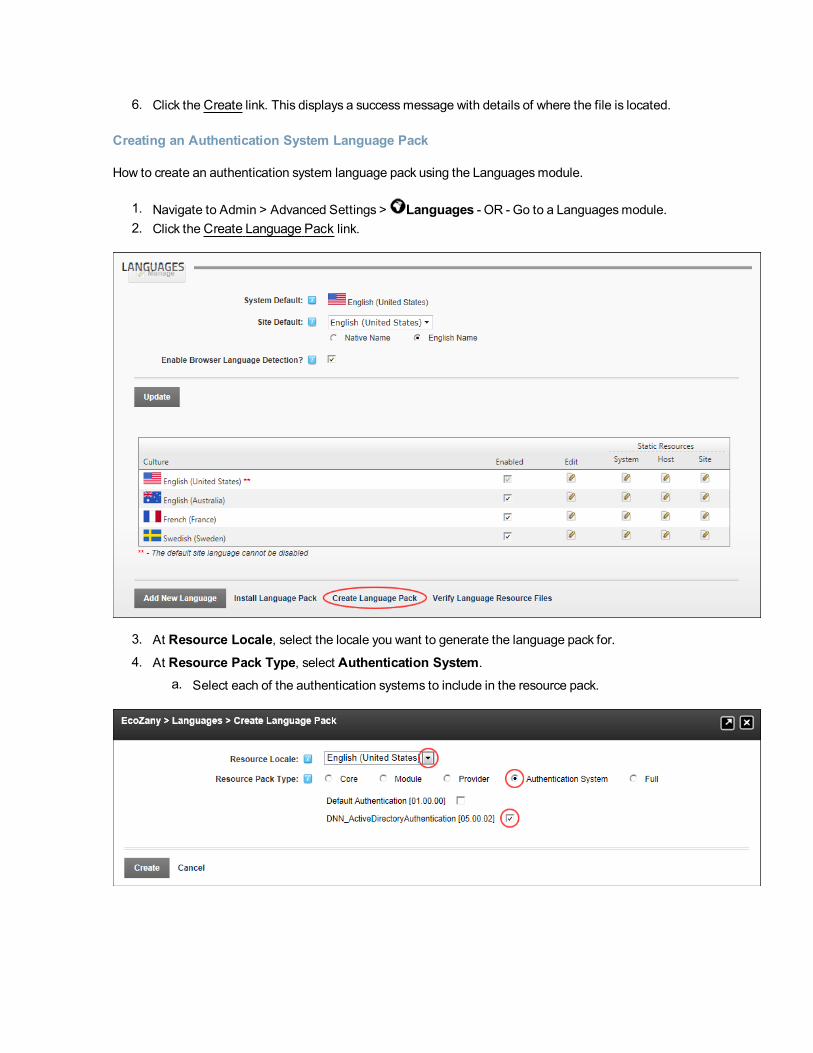
6. Click theCreate link. This displays a successmessage with details of where the file is located.
Creating an Authentication System Language Pack
How to create an authentication system language pack using the Languagesmodule.
1. Navigate to Admin > Advanced Settings > Languages - OR - Go to a Languagesmodule.2. Click theCreate Language Pack link.
3. At Resource Locale, select the locale you want to generate the language pack for.4. At Resource Pack Type, select Authentication System.
a. Select each of the authentication systems to include in the resource pack.

5. Click theCreate link. This displays a successmessage with details of where the file is located.
TheNewly CreatedAuthenticationSystemLanguagePack
Editing Language Files (System, Host or Site)
How to edit the Language files for a single site, the host installation or the full DNN system using the Lan-
guagesmodule. System and Host files can only be managed by SuperUsers.
1. Navigate to Admin > Advanced Settings > Languages - OR - Go to a Languages module.2. Optional. In theCulture grid, located the required language. If you are editing System files, this
step isn't required.
3. Click the Edit button beside one of these options to open the Language Editor page:
l System: Select to edit the base file for a given language.
l Host: Select to create a custom version of the localized file for all sites within this instal-
lation.
l Site: Select to edit files for the current site only.
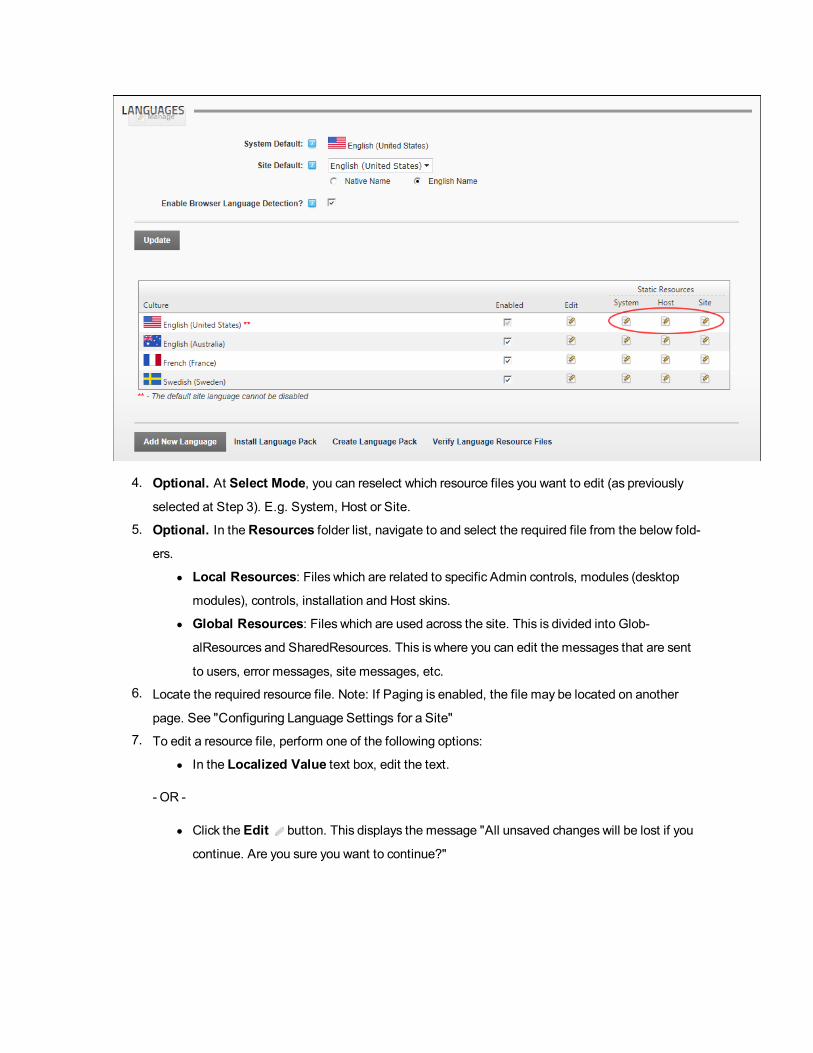
4. Optional. At Select Mode, you can reselect which resource files you want to edit (as previously
selected at Step 3). E.g. System, Host or Site.
5. Optional. In theResources folder list, navigate to and select the required file from the below fold-
ers.
l Local Resources: Files which are related to specific Admin controls, modules (desktop
modules), controls, installation and Host skins.
l Global Resources: Files which are used across the site. This is divided into Glob-
alResources and SharedResources. This is where you can edit the messages that are sent
to users, error messages, site messages, etc.
6. Locate the required resource file. Note: If Paging is enabled, the file may be located on another
page. See "Configuring Language Settings for a Site"7. To edit a resource file, perform one of the following options:
l In the Localized Value text box, edit the text.
- OR -
l Click the Edit button. This displays the message "All unsaved changes will be lost if you
continue. Are you sure you want to continue?"

a. Click theOK button.b. In the Editor, enter the new text ensuring you include the desired replacement
tokens displayed at Default Value.
c. Click theUpdate link.
8. Optional. To edit the subject associated with email messages, edit the associated Subject
resource file which will be listed above the Body resource file.
9. Repeat steps 4-8 to edit additional files.
10. Click the Save Resource File link to save your changes.
11. Click theReturn link.
Installing a Language Pack
How to install a language resource package using the Languagesmodule. This will install the language
pack across all sites within this installation. Note: SuperUser access is required to install language packs.

1. Navigate to Admin > Advanced Settings > Languages - OR - Go to a Languagesmodule.2. Click the Install Language Pack link located at the base of the module.
3. Complete the Install ExtensionWizard. See "Using the Install ExtensionWizard"4. You are now returned to the Languagesmodule and the newly installed language (Swedish in this
example) is displayed and enabled in the Culture grid.

TheNewly Installed LanguagePack Is Automatically Enabled
Setting Fallback Languages
How to set the fallback language using the Languagesmodule. The fallback language is used if the
selected language is not available.
Permissions. SuperUsers only.
1. Navigate to Admin > Advanced Settings > Languages - OR - Go to a Languagesmodule.2. In the Edit column of the Culture grid, click the Edit button for the required language.

3. Optional. At Fallback Language, select Native Name to view names in their native spelling, or
English Name to view names in English spelling.
4. At Fallback Language, select the fallback language to be used - OR - Select System Default to
always use the default system language.
5. Click theUpdate link.
Verifying Resource Files
How to verify the resource files for missing file, entries, obsolete entries and old files. This task enables the
Host to verify all the installed language packs in the site and check their status against the default system
language. The verification process will look at all the system default resource files and compare them to

the localized version for all supported languages. Once you receive the report, and if any issues are found,
you can use the Languages Localization Editor to solve all the issues reported.
1. Navigate to Admin > Advanced Settings > Languages - OR - Go to a Languagesmodule.2. Click the Verify Language Resource Files link. This displays a report for each locale.
3. Click theMaximize button to view details of any missing files, entries or obsolete entries. More
on the types of issues that can be found for any resource file:
l Missing Resource Files: The localized version for a given resource file is missing. To cor-
rect this issue select the resource file on the Languages Localization Editor and the lan-
guage where the error is given. The localized file will be automatically created.
l Files With Missing Entries: The localized version for a given resource file does not
include some entries that are present on the default system resource file. To correct this
issue select the resource file on the Languages Localization Editor and the language where
the error is given. You will be given the option to add all missing keys to the localized
resource file.
l Files With Obsolete Entries: The localized version for a given resource file includes some
entries that are not present on the default system resource file. To correct this issue select

the resource file on the Languages Localization Editor and the language where the error is
given. All keys that are not necessary will be automatically deleted.
l Files Older Than System Default:
4. Click theCancel link to return to the module.
Language Files
Overview of the Type of Language Files
The Core Language Pack included with DNN includes language files which can be modified. Here's a list of
the types of language files which can be edited using the Languagesmodule.
l Actions: The names given to common actions such as clear cache, delete module, edit module.l Strings: String resources are the names attributed Admin and Host pages, Banner types and Per-
mission to Deploymodules.
l Error Messages: Messages which appear when an error occurs.l Email Messages: Email messages are sent by DNNwhen users request password reminders, sub-
scribe to a role, etc. They can also be message to editors or Administrators confirming actions such
as deleting user accounts or sending newsletters.
l Text: Text language files.
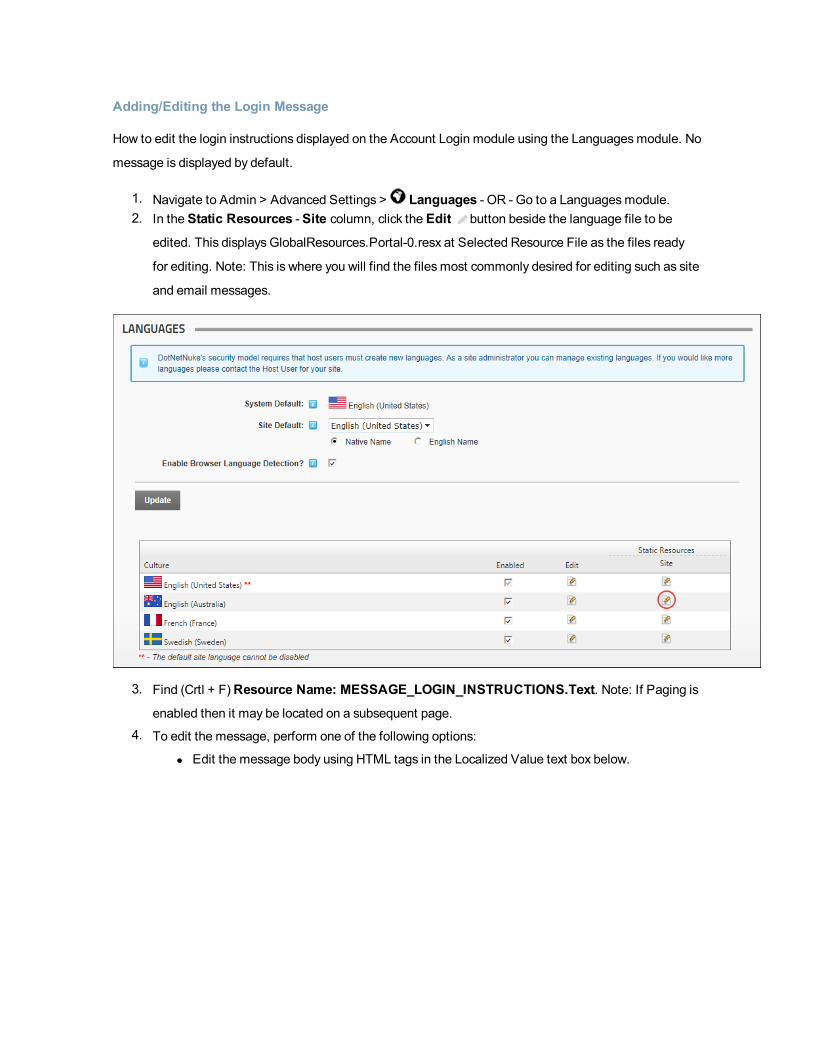
Adding/Editing the Login Message
How to edit the login instructions displayed on the Account Login module using the Languagesmodule. No
message is displayed by default.
1. Navigate to Admin > Advanced Settings > Languages - OR - Go to a Languagesmodule.2. In the Static Resources - Site column, click the Edit button beside the language file to be
edited. This displays GlobalResources.Portal-0.resx at Selected Resource File as the files ready
for editing. Note: This is where you will find the filesmost commonly desired for editing such as site
and email messages.
3. Find (Crtl + F)Resource Name: MESSAGE_LOGIN_INSTRUCTIONS.Text. Note: If Paging is
enabled then it may be located on a subsequent page.
4. To edit the message, perform one of the following options:
l Edit the message body using HTML tags in the Localized Value text box below.
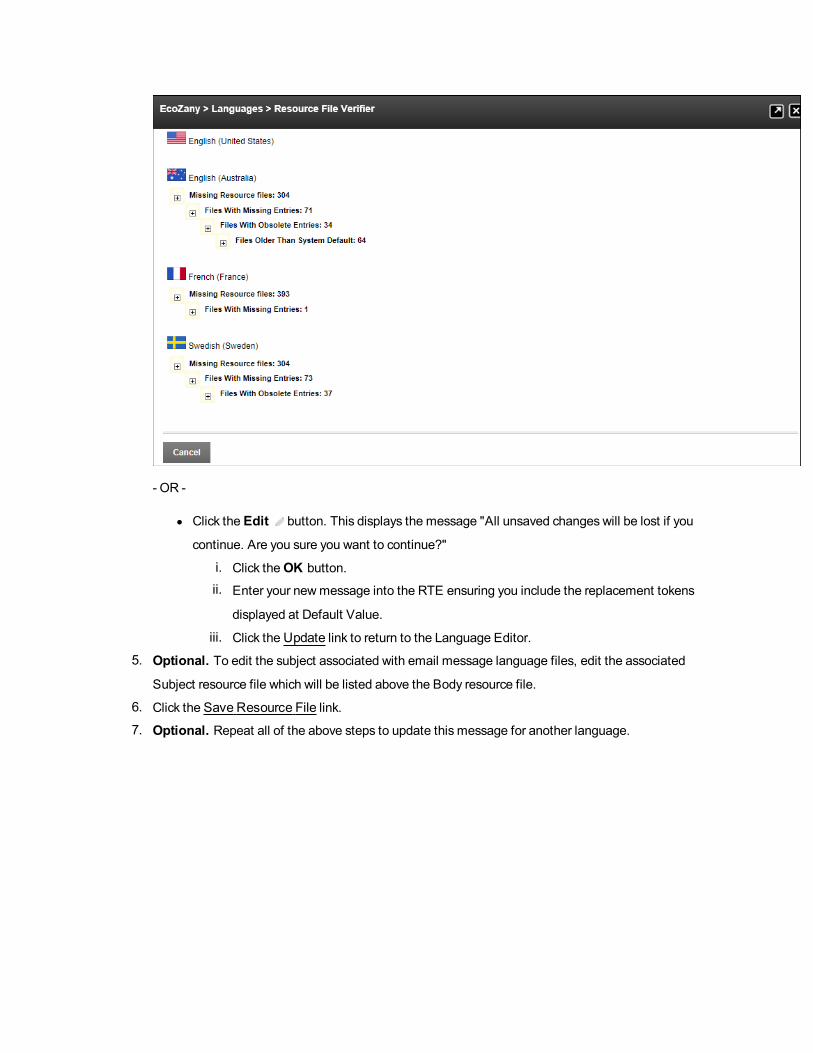
- OR -
l Click the Edit button. This displays the message "All unsaved changes will be lost if you
continue. Are you sure you want to continue?"
i. Click theOK button.ii. Enter your newmessage into the RTE ensuring you include the replacement tokens
displayed at Default Value.
iii. Click the Update link to return to the Language Editor.
5. Optional. To edit the subject associated with email message language files, edit the associated
Subject resource file which will be listed above the Body resource file.
6. Click the Save Resource File link.
7. Optional. Repeat all of the above steps to update this message for another language.

Login Instructions on theUser Log In page
Editing Privacy and Terms of Use Statements
How to edit the Privacy statement and/or the Terms of Use Statements using the Languagesmodule. No
message is displayed by default. See "Portal Privacy Text"
1. Navigate to Admin > Advanced Settings > Languages - OR - Go to a Languagesmodule.2. In the Static Resources - Site column, click the Edit button beside the language file to be
edited. This displays GlobalResources.Portal-0.resx at Selected Resource File as the files ready
for editing. Note: This is where you will find the filesmost commonly desired for editing such as por-
tal and email messages.

3. FindResource Name: MESSAGE_PORTAL_PRIVACY.Text orMESSAGE_PORTAL_
TERMS.Text as desired. Note: If Paging is enabled then it may be located on a subsequent page.
See "Configuring Language Settings for a Site"4. To edit the message, perform one of the following options:
l Edit the message body using HTML tags in the Localized Value text box below
- OR -
l Click the Edit button. This displays the message "All unsaved changes will be lost if you
continue. Are you sure you want to continue?"
a. Click theOK button.b. Enter your newmessage into the RTE ensuring you include the replacement tokens
displayed at Default Value.
c. Click theUpdate link to return to the Language Editor.
5. Optional. To edit the subject associated with email message language files, edit the associated
Subject resource file which will be listed above the Body resource file.
6. Click theUpdate button.7. Optional. Repeat all of the above steps to update this message for another language.
Editing the Password Reminder Email
How to edit the message sent to users when they request a password reminder.

1. Navigate to Admin > Advanced Settings > Languages - OR - Go to a Languagesmodule.2. Click the Language Editor link.3. At Available Locales, select a language from the drop down list. The related email messages will
be displayed below.
4. Go toResource Name: EMAIL_PASSWORD_REMINDER_BODY.Text. A quick way to do
this is to use the Find (Ctrl + F) feature of yourWeb browser.
5. To view the current details click the Maximize button at Default Value.6. To edit the message, perform one of the following options:
7. Edit the message body using HTML tags in the Localized Value text box below
- OR -
a. Click the Edit button. This displays the message "All unsaved changes will be lost if you
continue. Are you sure you want to continue?"
b. Click theOK button.c. Copy, Paste and Edit the default value into the RTE, or enter your newmessage into the
RTE ensuring you include the replacement tokens displayed at Default Value.
d. Click the Update link to return to the Language Editor.
8. To edit the email subject go to Resource Name: EMAIL_PASSWORD_REMINDER_SUB-
JECT.Textwhich is the next field down the list.9. Edit the subject in the Localized Value text box.10. Click theUpdate button.11. Repeat all of the above steps to update this message for another language.
Email Messages
Affiliate Notification Email Message
The Affiliate Notification email message is sent to an affiliate when their account is created. To locate this
resource file, use the Find option on your web browser and search for EMAIL_AFFILIATE_NOTI-
FICATION_SUBJECT.Text and EMAIL_AFFILIATE_NOTIFICATION_BODY.Text.
Here is the subject title and message for this email as provided in the default DNN core language pack:
[Portal:PortalName] Affiliate Notification
Dear [Custom:0],
Your account for the [Portal:PortalName] Affiliate Program has been created.
To begin earning rewards, please use the following URL to link to our site: [Custom:1]
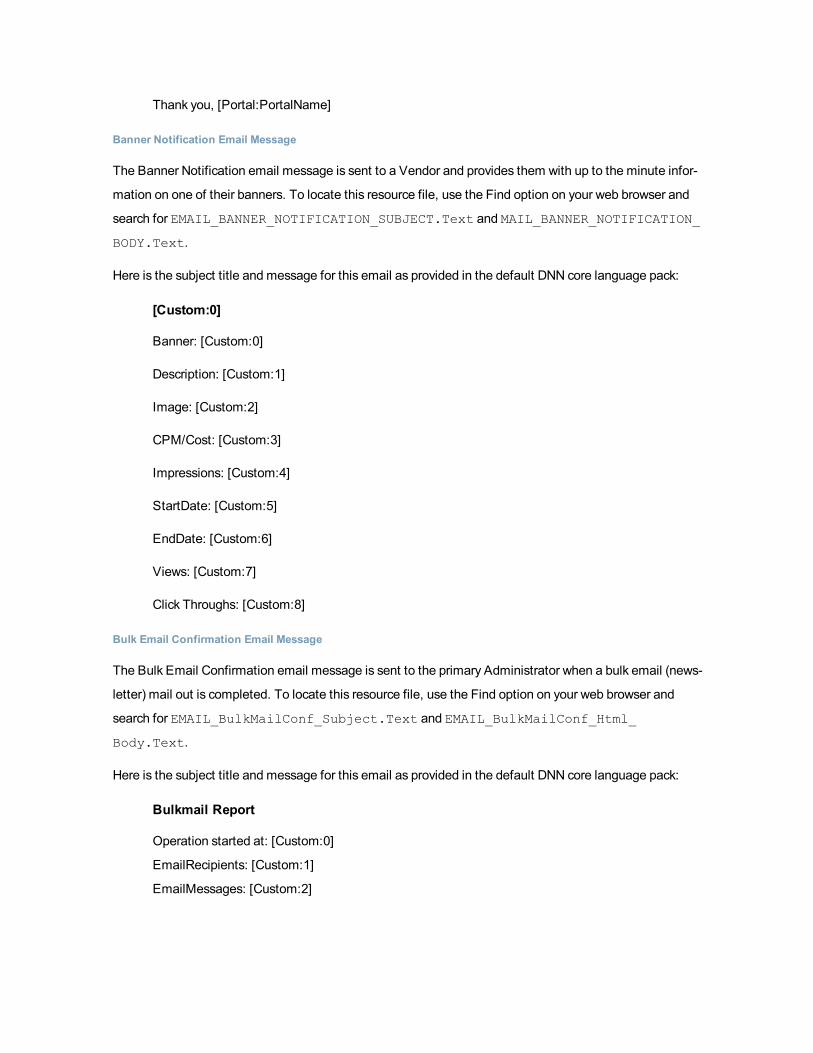
Thank you, [Portal:PortalName]
Banner Notification Email Message
The Banner Notification email message is sent to a Vendor and provides them with up to the minute infor-
mation on one of their banners. To locate this resource file, use the Find option on your web browser and
search for EMAIL_BANNER_NOTIFICATION_SUBJECT.Text and MAIL_BANNER_NOTIFICATION_
BODY.Text.
Here is the subject title and message for this email as provided in the default DNN core language pack:
[Custom:0]
Banner: [Custom:0]
Description: [Custom:1]
Image: [Custom:2]
CPM/Cost: [Custom:3]
Impressions: [Custom:4]
StartDate: [Custom:5]
EndDate: [Custom:6]
Views: [Custom:7]
Click Throughs: [Custom:8]
Bulk Email Confirmation Email Message
The Bulk Email Confirmation email message is sent to the primary Administrator when a bulk email (news-
letter) mail out is completed. To locate this resource file, use the Find option on your web browser and
search for EMAIL_BulkMailConf_Subject.Text and EMAIL_BulkMailConf_Html_
Body.Text.
Here is the subject title and message for this email as provided in the default DNN core language pack:
Bulkmail Report
Operation started at: [Custom:0]
EmailRecipients: [Custom:1]
EmailMessages: [Custom:2]
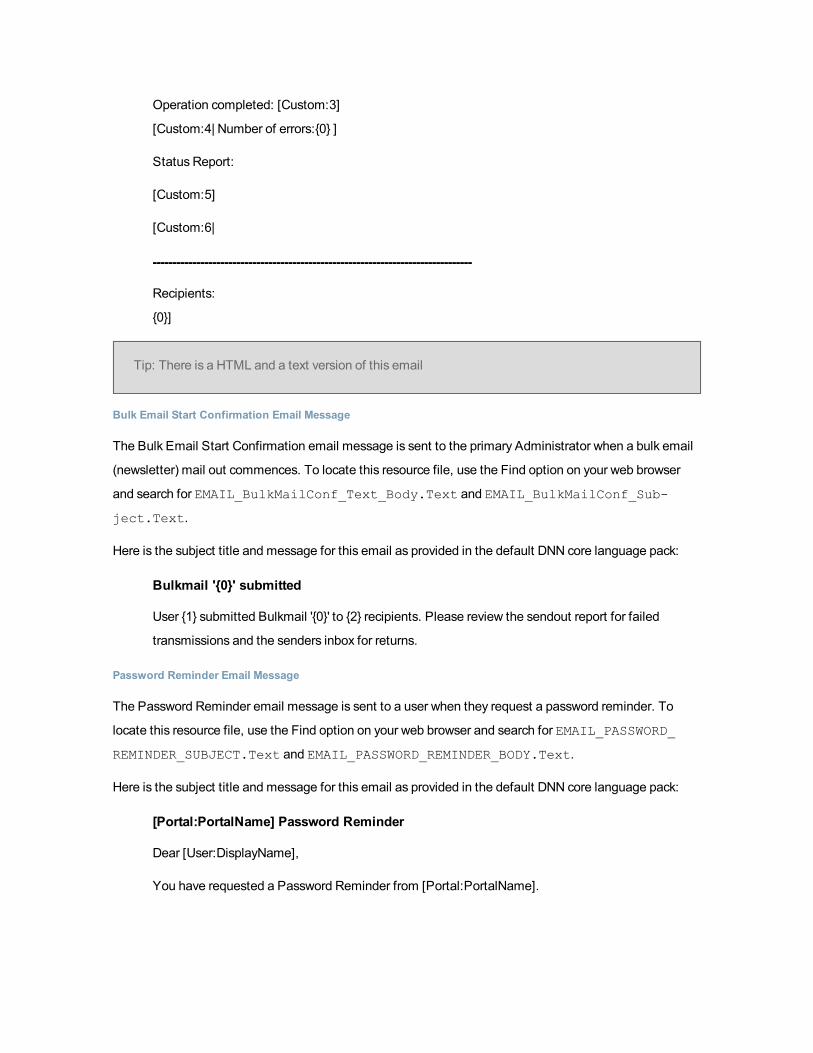
Operation completed: [Custom:3]
[Custom:4| Number of errors:{0} ]
Status Report:
[Custom:5]
[Custom:6|
--------------------------------------------------------------------------------
Recipients:
{0}]
Tip: There is a HTML and a text version of this email
Bulk Email Start Confirmation Email Message
The Bulk Email Start Confirmation email message is sent to the primary Administrator when a bulk email
(newsletter) mail out commences. To locate this resource file, use the Find option on your web browser
and search for EMAIL_BulkMailConf_Text_Body.Text and EMAIL_BulkMailConf_Sub-
ject.Text.
Here is the subject title and message for this email as provided in the default DNN core language pack:
Bulkmail '{0}' submitted
User {1} submitted Bulkmail '{0}' to {2} recipients. Please review the sendout report for failed
transmissions and the senders inbox for returns.
Password Reminder Email Message
The Password Reminder email message is sent to a user when they request a password reminder. To
locate this resource file, use the Find option on your web browser and search for EMAIL_PASSWORD_
REMINDER_SUBJECT.Text and EMAIL_PASSWORD_REMINDER_BODY.Text.
Here is the subject title and message for this email as provided in the default DNN core language pack:
[Portal:PortalName] Password Reminder
Dear [User:DisplayName],
You have requested a Password Reminder from [Portal:PortalName].

Please login using the following information:
Portal Website Address: [Portal:URL]
Username: [Membership:Username]
Password: [Membership:Password]
Sincerely,
[Portal:PortalName]
*Note: If you did not request a Password Reminder, please disregard this Message.
Portal Signup Email Message
The Portal Signup email message is sent to the new site Administrator when the portal is created. To
locate this resource file, use the Find option on your web browser and search for EMAIL_PORTAL_SIG-
NUP_SUBJECT.Text and EMAIL_PORTAL_SIGNUP_BODY.Text.
Here is the subject title and message for this email as provided in the default DNN core language pack:
[Host:HostTitle] Portal Signup
Dear [User:DisplayName],
Your Portal Website Has Been Created. Please read the following information carefully and
be sure to save this message in a safe location for future reference.
Portal Website Address: [Portal:URL]
Username: [Membership:UserName]
Verification Code: [User:VerificationCode]
Please take the opportunity to visit the website to review its content and take advantage of
its many features.
Thank you, we appreciate your support...
[Host:HostTitle]
Profile Updated Email Message
The Profile Updated email message is sent to a user when they update their profile. To locate this
resource file, use the Find option on your web browser and search for EMAIL_PROFILE_UPDATED_SUB-
JECT.Text and EMAIL_PROFILE_UPDATED_BODY.Text.
Here is the subject title and message for this email as provided in the default DNN core language pack:
[Portal:PortalName] Profile Update Notice
Dear [User:DisplayName],
Your profile on [Portal:PortalName] has been successfully updated.
Sincerely,
[Portal:PortalName]
Role Assignment Email Message
The Role Assignment email message is optionally sent to a user when they are assigned to a role. To
locate this resource file, use the Find option on your web browser and search for EMAIL_ROLE_ASSIGN-
MENT_SUBJECT.Text and EMAIL_ROLE_ASSIGNMENT_BODY.Text.
Here is the subject title and message for this email as provided in the default DNN core language pack:
[Portal:PortalName] User Account Update
Dear [User:DisplayName],
Your user account at [Portal:PortalName] has been recently updated to include access to
the following Security Role:
Role: [Custom:0]
Description: [Custom:1]
Effective Date: [Custom:2]
Expiry Date: [Custom:3]
Thank you, we appreciate your support...
[Portal:PortalName]
Role Update Email Message
The Role Unassignment email message is optionally sent to a user when they are unassigned from a role.
To locate this resource file, use the Find option on your web browser and search for EMAIL_ROLE_
UPDATE_SUBJECT.Text and EMAIL_ROLE_UPDATE_BODY.Text.
Here is the subject title and message for this email as provided in the default DNN core language pack:
[Portal:PortalName] User Account Update
Dear [User:DisplayName],

Your user account at [Portal:PortalName] has been recently updated to modify access to
the following Security Role:
Role: [Custom:0]
Description: [Custom:1]
Effective Date: [Custom:2]
Expiry Date: [Custom:3]
Thank you, we appreciate your support...
[Portal:PortalName]
Role Unassignment Email Message
The Role Unassignment email message is optionally sent to a user when they are unassigned from a role.
To locate this resource file, use the Find option on your web browser and search for EMAIL_ROLE_UNAS-
SIGNMENT_SUBJECT.Text and EMAIL_ROLE_UNASSIGNMENT_BODY.Text.
Here is the subject title and message for this email as provided in the default DNN core language pack:
[Portal:PortalName] User Account Update
Dear [User:DisplayName],
Your user account at [Portal:PortalName] has been recently updated to restrict access to
the following Security Role:
Role: [Custom:0]
Description: [Custom:1]
Thank you, we appreciate your support...
[Portal:PortalName]
SMTP Configuration Test Email Message
The SMTP Configuration Test email message is sent to the Host when they test the SMTP configuration.
To locate this resource file, use the Find option on your web browser and search for EMAIL_SMTP_TEST_
SUBJECT.Text.
Here is the subject title and message for this email as provided in the default DNN core language pack:
[Host:HostTitle] SMTP Configuration Test

User Lockout Email Message
The User Lockout email message is sent to the Administrator when a user attempts to login to a locked out
user account. To locate this resource file, use the Find option on your web browser and search for EMAIL_
USER_LOCKOUT_SUBJECT.Text and EMAIL_USER_LOCKOUT_BODY.Text
Here is the subject title and message for this email as provided in the default DNN core language pack:
[Portal:PortalName] User Account Lockout Alert
An attempt wasmade to access a locked out user account ( username: [Custom:0] ) on
[Date:Current]. You maywish to investigate this matter further...
Thank you,
[Portal:PortalName]
User Registration Administrator Email Message
The User Registration Administrator email message is sent to the primary site Administrator when a user
registration occurs. This includes those made by visitors, users authorized to create user accounts, and
other Administrators. To locate this resource file, use the Find option on your web browser and search for
EMAIL_USER_REGISTRATION_ADMINISTRATOR_SUBJECT.Text and EMAIL_USER_REG-
ISTRATION_ADMINISTRATOR_BODY.Text.
Here is the subject title and message for this email as provided in the default DNN core language pack:
[Portal:PortalName] New User Registration
Date: [Date:Current]
First Name: [Profile:FirstName]
Last Name: [Profile:LastName]
Unit: [Profile:Unit]
Street: [Profile:Street]
City: [Profile:City]
Region: [Profile:Region]
Country: [Profile:Country]
Postal Code: [Profile:PostalCode]
Telephone: [Profile:Telephone]
Email: [User:Email]

User Registration Private Email Message
The User Registration Private email message is used when site registration is set as Private. It is sent to
the new user when they register for a user account. To locate this resource file, use the Find option on your
web browser and search for EMAIL_USER_UPDATED_OWN_PASSWORD_SUBJECT.Text and EMAIL_
USER_UPDATED_OWN_PASSWORD_TEXT.Text.
Here is the subject title and message for this email as provided in the default DNN core language pack:
[Portal:PortalName] Password Updated
Dear [User:DisplayName],
You have changed your Password on [Portal:PortalName].
Please login using the following information:
Website Address: [Portal:URL]
Username: [User:Username]
Sincerely,
[Portal:PortalName]
User Registration Public Email Message
The User Registration Public email message is used when site registration is set as Public. It is sent to the
new user when they register for a user account. To locate this resource file, use the Find option on your
web browser and search for EMAIL_USER_REGISTRATION_PUBLIC_SUBJECT.Text and EMAIL_
USER_REGISTRATION_PUBLIC_TEXT.Text.
Here is the subject title and message for this email as provided in the default DNN core language pack:
[Portal:PortalName] New User Registration
Dear [User:DisplayName],
We are pleased to advise that you have been added as a Registered User to [Por-
tal:PortalName].
Please read the following information carefully and be sure to save this message in a safe
location for future reference.
Portal Website Address: [Portal:URL]
Username: [Membership:UserName]
Please take the opportunity to visit the website to review its content and take advantage of
its many features.
Thank you, we appreciate your support...
[Portal:PortalName]
User Registration Verified Email Message
The User Registration Verified email message is used when site registration is set as Verified. It is sent to
the new user when they register for a user account. To locate this resource file, use the Find option on your
web browser and search for EMAIL_USER_REGISTRATION_VERIFIED_SUBJECT.Text and EMAIL_
USER_REGISTRATION_VERIFIED_TEXT.Text.
Here is the subject title and message for this email as provided in the default DNN core language pack:
[Portal:PortalName] New User Registration
Dear [User:DisplayName],
We are pleased to advise that you have been added as a Registered User to [Por-
tal:PortalName].
Please read the following information carefully and be sure to save this message in a safe
location for future reference.
Portal Website Address: [Portal:URL]
Username: [User:UserName]
You can use the following link to complete your verified registration: http://[Portal:URL]
/default.aspx?ctl=Login&username=[Custom:0]&verificationcode=[Custom:1]
Thank you, we appreciate your support...
[Portal:PortalName]
User Unregister Email Message
The User Unregister email message is sent to the primary site Administrator when a user unregister or is
unregistered. To locate this resource file, use the Find option on your web browser and search for EMAIL_

USER_UNREGISTER_SUBJECT.Text and EMAIL_USER_UNREGISTER_BODY.Text.
Here is the subject title and message for this email as provided in the default DNN core language pack:
[Portal:PortalName] Unregister User
Date: [Date:Current]
First Name: [Profile:FirstName]
Last Name: [Profile:LastName]
Unit: [Profile:Unit]
Street: [Profile:Street]
City: [Profile:City]
Region: [Profile:Region]
Country: [Profile:Country]
Postal Code: [Profile:PostalCode]
Telephone: [Profile:Telephone]
Email: [User:Email]
User Unregister Email Message
The User Unregister email message is sent to the primary site Administrator when a user unregister or is
unregistered. To locate this resource file, use the Find option on your web browser and search for EMAIL_
USER_UNREGISTER_SUBJECT.Text and EMAIL_USER_UNREGISTER_BODY.Text.
Here is the subject title and message for this email as provided in the default DNN core language pack:
[Portal:PortalName] Unregister User
Date: [Date:Current]
First Name: [Profile:FirstName]
Last Name: [Profile:LastName]
Unit: [Profile:Unit]
Street: [Profile:Street]
City: [Profile:City]
Region: [Profile:Region]
Country: [Profile:Country]
Postal Code: [Profile:PostalCode]
Telephone: [Profile:Telephone]
Email: [User:Email]

Vendor Registration Administrator Email Message
The Vendor Registration Administrator email message is sent to the primary site Administrator when a
new Vendor account is created. To locate this resource file, use the Find option on your web browser and
search for EMAIL_VENDOR_REGISTRATION_ADMINISTRATOR_SUBJECT.Text and EMAIL_VEN-
DOR_REGISTRATION_ADMINISTRATOR_BODY.Text.
Here is the subject title and message for this email as provided in the default DNN core language pack:
[Portal:PortalName] Vendor Application
Date: [Custom:0]
Vendor Name: [Custom:1]
First Name: [Custom:2]
Last Name: [Custom:3]
Unit: [Custom:4]
Street: [Custom:5]
City: [Custom:6]
Region: [Custom:7]
Country: [Custom:8]
Postal Code: [Custom:9]
Telephone: [Custom:10]
Fax: [Custom:11]
Cell: [Custom:12]
Email: [Custom:13]
Website: [Custom:14]
Vendor Registration Email Message
The Vendor Registration email message is sent to a Vendor when their new Vendor account is created. To
locate this resource file, use the Find option on your web browser and search for EMAIL_VENDOR_REG-
ISTRATION_SUBJECT.Text and EMAIL_VENDOR_REGISTRATION_BODY.Text.
Here is the subject title and message for this email as provided in the default DNN core language pack:
[Portal:PortalName] Vendor Application
Dear [Custom:0] [Custom:1],
[Custom:2] company has been successfully registered at [Portal:PortalName].

Thank you,
[Portal:PortalName]
Error Messages
The Default 403_3 Error Message
Here is the default text for the 403_3 Error Message in the DNN core language pack:
DotNetNuke Configuration Error {0} DotNetNuke has extensive file upload capabilities for
content, modules, and skins. These features require custom security settings so that the
application is able to create and remove files in your website.
UsingWindows Explorer, browse to the root folder of the website ( C:\DotNetNuke by
default ). Right-click the folder and select Sharing and Security from the popup menu (
Note: If you are usingWindows XP you may need toDisable Simple File Sharing before
these options are displayed ). Select the Security tab. Add the appropriate User Account
and set the Permissions.
n If using Windows 2000 - IIS5l the [SERVER]\ASPNET User Account must have Read, Write, and Change
Control of the virtual root of your website.
n If using Windows 2003 - IIS6l the NT AUTHORITY\NETWORK SERVICE User Account must have Read,
Write, and Change Control of the virtual root of your website.
The Default 404 Error Message
Here is the default text for the 404 Error Message in the DNN core language pack:
Domain Name {0} Does Not Exist In The Database
DNN supports multiple portals from a single database/codebase. It accomplishes this by converting the
URL of the client Web browser Request to a valid PortalID in the Portals database table. The following
steps describe the process:
1. Web Server Processingl When a web server receives a Request from a client Web browser, it compares the file
name extension on the target URL resource to its Application Extension Mappings defined
in IIS.

l Based on the corresponding match, IIS then sends the Request to the defined Executable
Path ( aspnet_asapi.dll in the case of ASP.NET Requests ).
l The aspnet_isapi.dll engine processes the Request in an ordered series of events beginning
with Application_BeginRequest.
2. HttpModule.URLRewrite OnBeginRequest ( UrlRewriteModule.vb )l The Request URL is parsed based on the "/" character A Domain Name is constructed using
each of the relevant parsed URL segments.
Examples:
URL: http://www.domain.com/default.aspx = Domain Name: www.domain.com
URL: http://209.75.24.131/default.aspx = Domain Name: 209.75.24.131
URL: http://localhost/DotNetNuke/default.aspx = Domain Name: localhost/DotNetNuke
URL: http://www.domain.com/virtualdirectory/default.aspx = Domain Name: www.d-
omain.com/virtualdirectory
URL: http://www.domain.com/directory/default.aspx = Domain Name: www.d-
omain.com/directory
l Using the Domain Name, the application queries the database ( Portals table - PortalAlias
field ) to locate a matching record.
Note: If there are multiple URLs which correspond to the same portal then the PortalAlias
field must contain each valid Domain Name in a comma seperated list.
Example: URL: http://localhost/DotNetNuke/default.aspx
URL: http://MACHINENAME/DotNetNuke/default.aspx
URL: http://209.32.134.65/DotNetNuke/default.aspx
PortalAlias: localhost/DotNetNuke,MACHINENAME/DotNetNuke,209-
.32.134.65/DotNetNuke
Note: If you are installing the application to a remote server you must modify the PortalAlias field value for
the default record in the Portals table according to the rules defined above.
Portal Messages
Portal Privacy Text
The Portal Privacy text is associated with the Privacy skin object that displays the Privacy Statement link
which is displayed in the bottom right corner of the standard DNN skin. This language file is located in the
Language Editor Resources List under: Local Resources - Admin - Portal - App-

LocalResources: Privacy.ascx. To locate this resource file, use the Find option on your web browser and
search for MESSAGE_PORTAL_PRIVACY.Text .
Here is the default text of this site message in the DNN core language pack:
[Portal:PortalName] is committed to protecting your privacy and developing technology that
gives you the most powerful and safe online experience. This Statement of Privacy applies
to the [Portal:PortalName] Web Site and governs data collection and usage. By using the
[Portal:PortalName] Web Site, you consent to the data practices described in this state-
ment.
Collection of your Personal Information
[Portal:PortalName] collects personally identifiable information, such as your e-mail
address, name, home or work address or telephone number. [Portal:PortalName] also col-
lects anonymous demographic information, which is not unique to you, such as your ZIP
code, age, gender, preferences, interests and favorites.
There is also information about your computer hardware and software that is automatically
collected by [Portal:PortalName]. This information can include: your IP address, browser
type, domain names, access times and referringWeb Site addresses. This information is
used by [Portal:PortalName] for the operation of the service, to maintain quality of the serv-
ice, and to provide general statistics regarding use of the [Portal:PortalName] Web Site.
Please keep in mind that if you directly disclose personally identifiable information or per-
sonally sensitive data through [Portal:PortalName] public message boards, this information
may be collected and used by others. Note: [Portal:PortalName] does not read any of your
private online communications.
[Portal:PortalName] encourages you to review the privacy statements of Web Sites you
choose to link to from [Portal:PortalName] so that you can understand how thoseWeb Sites
collect, use and share your information. [Portal:PortalName] is not responsible for the pri-
vacy statements or other content onWeb Sites outside of the [Portal:PortalName] and [Por-
tal:PortalName] family of Web Sites.
Use of your Personal Information
[Portal:PortalName] collects and uses your personal information to operate the [Por-
tal:PortalName] Web Site and deliver the services you have requested.

[Portal:PortalName] also uses your personally identifiable information to inform you of other
products or services available from [Portal:PortalName] and its affiliates. [Por-
tal:PortalName] may also contact you via surveys to conduct research about your opinion of
current services or of potential new services that may be offered.
[Portal:PortalName] does not sell, rent or lease its customer lists to third parties. [Por-
tal:PortalName] may, from time to time, contact you on behalf of external business partners
about a particular offering that may be of interest to you. In those cases, your unique per-
sonally identifiable information (e-mail, name, address, telephone number) is not trans-
ferred to the third party. In addition, [Portal:PortalName] may share data with trusted
partners to help us perform statistical analysis, send you email or postal mail, provide cus-
tomer support, or arrange for deliveries. All such third parties are prohibited from using your
personal information except to provide these services to [Portal:PortalName], and they are
required to maintain the confidentiality of your information.
[Portal:PortalName] does not use or disclose sensitive personal information, such as race,
religion, or political affiliations, without your explicit consent.
[Portal:PortalName] keeps track of theWeb Sites and pages our customers visit within [Por-
tal:PortalName], in order to determine what [Portal:PortalName] services are the most pop-
ular. This data is used to deliver customized content and advertising within
[Portal:PortalName] to customers whose behavior indicates that they are interested in a par-
ticular subject area. [Portal:PortalName] Web Sites will disclose your personal information,
without notice, only if required to do so by law or in the good faith belief that such action is
necessary to: (a) conform to the edicts of the law or comply with legal process served on
[Portal:PortalName] or the site; (b) protect and defend the rights or property of [Por-
tal:PortalName]; and, (c) act under exigent circumstances to protect the personal safety of
users of [Portal:PortalName], or the public.
Use of Cookies
The [Portal:PortalName] Web Site use "cookies" to help you personalize your online expe-
rience. A cookie is a text file that is placed on your hard disk by aWeb page server. Cookies
cannot be used to run programs or deliver viruses to your computer. Cookies are uniquely
assigned to you, and can only be read by a web server in the domain that issued the cookie
to you.

One of the primary purposes of cookies is to provide a convenience feature to save you
time. The purpose of a cookie is to tell theWeb server that you have returned to a specific
page. For example, if you personalize [Portal:PortalName] pages, or register with [Por-
tal:PortalName] site or services, a cookie helps [Portal:PortalName] to recall your specific
information on subsequent visits. This simplifies the process of recording your personal infor-
mation, such as billing addresses, shipping addresses, and so on. When you return to the
same [Portal:PortalName] Web Site, the information you previously provided can be
retrieved, so you can easily use the [Portal:PortalName] features that you customized.
You have the ability to accept or decline cookies. Most Web browsers automatically accept
cookies, but you can usually modify your browser setting to decline cookies if you prefer. If
you choose to decline cookies, you may not be able to fully experience the interactive fea-
tures of the [Portal:PortalName] services orWeb Sites you visit.
Security of your Personal Information
[Portal:PortalName] secures your personal information from unauthorized access, use or
disclosure. [Portal:PortalName] secures the personally identifiable information you provide
on computer servers in a controlled, secure environment, protected from unauthorized
access, use or disclosure. When personal information (such as a credit card number) is trans-
mitted to other Web Sites, it is protected through the use of encryption, such as the Secure
Socket Layer (SSL) protocol.
Changes to this Statement
[Portal:PortalName] will occasionally update this Statement of Privacy to reflect company
and customer feedback. [Portal:PortalName] encourages you to periodically review this
Statement to be informed of how [Portal:PortalName] is protecting your information.
Contact Information
[Portal:PortalName] welcomes your comments regarding this Statement of Privacy. If you
believe that [Portal:PortalName] has not adhered to this Statement, please contact [Por-
tal:PortalName] at [Portal:Email]. We will use commercially reasonable efforts to promptly
determine and remedy the problem.

Portal Terms Text
The Portal Terms text is associated with the Terms skin object. To locate this resource file, use the Find
option on your web browser and search for MESSAGE_PORTAL_TERMS.Text .
Here is the default text of this site message in the DNN core language pack:
AGREEMENT BETWEEN USER AND [Portal:PortalName]

The [Portal:PortalName] Web Site is comprised of variousWeb pages operated by [Por-
tal:PortalName].
The [Portal:PortalName] Web Site is offered to you conditioned on your acceptance without
modification of the terms, conditions, and notices contained herein. Your use of the [Por-
tal:PortalName] Web Site constitutes your agreement to all such terms, conditions, and
notices.
MODIFICATION OF THESE TERMS OF USE
[Portal:PortalName] reserves the right to change the terms, conditions, and notices under
which the [Portal:PortalName] Web Site is offered, including but not limited to the charges
associated with the use of the [Portal:PortalName] Web Site.
LINKS TO THIRD PARTY SITES
The [Portal:PortalName] Web Site may contain links to other Web Sites ("Linked Sites").
The Linked Sites are not under the control of [Portal:PortalName] and [Portal:PortalName]
is not responsible for the contents of any Linked Site, including without limitation any link
contained in a Linked Site, or any changes or updates to a Linked Site. [Portal:PortalName]
is not responsible for webcasting or any other form of transmission received from any Linked
Site. [Portal:PortalName] is providing these links to you only as a convenience, and the
inclusion of any link does not imply endorsement by [Portal:PortalName] of the site or any
association with its operators.
NO UNLAWFUL OR PROHIBITED USE
As a condition of your use of the [Portal:PortalName] Web Site, you warrant to [Por-
tal:PortalName] that you will not use the [Portal:PortalName] Web Site for any purpose that
is unlawful or prohibited by these terms, conditions, and notices. You may not use the [Por-
tal:PortalName] Web Site in anymanner which could damage, disable, overburden, or
impair the [Portal:PortalName] Web Site or interfere with any other party's use and enjoy-
ment of the [Portal:PortalName] Web Site. You may not obtain or attempt to obtain any
materials or information through anymeans not intentionally made available or provided for
through the [Portal:PortalName] Web Sites.
USE OF COMMUNICATION SERVICES

The [Portal:PortalName] Web Site may contain bulletin board services, chat areas, news
groups, forums, communities, personal web pages, calendars, and/or other message or
communication facilities designed to enable you to communicate with the public at large or
with a group (collectively, "Communication Services"), you agree to use the Communication
Services only to post, send and receive messages and material that are proper and related
to the particular Communication Service. By way of example, and not as a limitation, you
agree that when using a Communication Service, you will not:
l Defame, abuse, harass, stalk, threaten or otherwise violate the legal rights (such as
rights of privacy and publicity) of others.
l Publish, post, upload, distribute or disseminate any inappropriate, profane, defam-
atory, infringing, obscene, indecent or unlawful topic, name, material or information.
l Upload files that contain software or other material protected by intellectual property
laws (or by rights of privacy of publicity) unless you own or control the rights thereto
or have received all necessary consents.
l Upload files that contain viruses, corrupted files, or any other similar software or pro-
grams that may damage the operation of another's computer.
l Advertise or offer to sell or buy any goods or services for any business purpose,
unless such Communication Service specifically allows such messages.
l Conduct or forward surveys, contests, pyramid schemes or chain letters.
l Download any file posted by another user of a Communication Service that you
know, or reasonably should know, cannot be legally distributed in such manner.
l Falsify or delete any author attributions, legal or other proper notices or proprietary
designations or labels of the origin or source of software or other material contained
in a file that is uploaded.
l Restrict or inhibit any other user from using and enjoying the Communication Serv-
ices.
l Violate any code of conduct or other guidelines which may be applicable for any par-
ticular Communication Service.
l Harvest or otherwise collect information about others, including e-mail addresses,
without their consent.
l Violate any applicable laws or regulations.
[Portal:PortalName] has no obligation to monitor the Communication Services. However,
[Portal:PortalName] reserves the right to reviewmaterials posted to a Communication

Service and to remove anymaterials in its sole discretion. [Portal:PortalName] reserves the
right to terminate your access to any or all of the Communication Services at any time with-
out notice for any reason whatsoever.
[Portal:PortalName] reserves the right at all times to disclose any information as necessary
to satisfy any applicable law, regulation, legal process or governmental request, or to edit,
refuse to post or to remove any information or materials, in whole or in part, in [Por-
tal:PortalName]'s sole discretion.
Always use caution when giving out any personally identifying information about yourself or
your children in any Communication Service. [Portal:PortalName] does not control or
endorse the content, messages or information found in any Communication Service and,
therefore, [Portal:PortalName] specifically disclaims any liability with regard to the Com-
munication Services and any actions resulting from your participation in any Communication
Service. Managers and hosts are not authorized [Portal:PortalName] spokespersons, and
their views do not necessarily reflect those of [Portal:PortalName].
Materials uploaded to a Communication Service may be subject to posted limitations on
usage, reproduction and/or dissemination. You are responsible for adhering to such lim-
itations if you download the materials.
MATERIALS PROVIDED TO [Portal:PortalName] OR POSTED AT ANY [Por-
tal:PortalName] WEB SITE
[Portal:PortalName] does not claim ownership of the materials you provide to [Por-
tal:PortalName] (including feedback and suggestions) or post, upload, input or submit to
any [Portal:PortalName] Web Site or its associated services (collectively "Submissions").
However, by posting, uploading, inputting, providing or submitting your Submission you are
granting [Portal:PortalName], its affiliated companies and necessary sublicensees per-
mission to use your Submission in connection with the operation of their Internet businesses
including, without limitation, the rights to: copy, distribute, transmit, publicly display, pub-
licly perform, reproduce, edit, translate and reformat your Submission; and to publish your
name in connection with your Submission.
No compensation will be paid with respect to the use of your Submission, as provided
herein. [Portal:PortalName] is under no obligation to post or use any Submission you may

provide and may remove any Submission at any time in [Portal:PortalName]'s sole dis-
cretion.
By posting, uploading, inputting, providing or submitting your Submission you warrant and
represent that you own or otherwise control all of the rights to your Submission as described
in this section including, without limitation, all the rights necessary for you to provide, post,
upload, input or submit the Submissions.
LIABILITY DISCLAIMER
THE INFORMATION, SOFTWARE, PRODUCTS, ANDSERVICES INCLUDED INOR
AVAILABLE THROUGHTHE [Portal:PortalName] WEB SITE MAY INCLUDE INAC-
CURACIES OR TYPOGRAPHICAL ERRORS. CHANGES ARE PERIODICALLY ADDED
TO THE INFORMATIONHEREIN. [Portal:PortalName] AND/OR ITS SUPPLIERS MAY
MAKE IMPROVEMENTS AND/ORCHANGES IN THE [Portal:PortalName] WEB SITE
AT ANY TIME. ADVICE RECEIVED VIA THE [Portal:PortalName] WEB SITE SHOULD
NOT BE RELIEDUPON FORPERSONAL, MEDICAL, LEGAL OR FINANCIAL DECI-
SIONS ANDYOUSHOULDCONSULT ANAPPROPRIATE PROFESSIONAL FORSPE-
CIFIC ADVICE TAILORED TO YOURSITUATION.
[Portal:PortalName] AND/OR ITS SUPPLIERS MAKE NO REPRESENTATIONS
ABOUT THE SUITABILITY, RELIABILITY, AVAILABILITY, TIMELINESS, ANDACCU-
RACY OF THE INFORMATION, SOFTWARE, PRODUCTS, SERVICES ANDRELATED
GRAPHICS CONTAINEDON THE [Portal:PortalName] WEB SITE FORANY PUR-
POSE. TO THE MAXIMUM EXTENT PERMITTED BY APPLICABLE LAW, ALL SUCH
INFORMATION, SOFTWARE, PRODUCTS, SERVICES ANDRELATEDGRAPHICS
ARE PROVIDED "AS IS" WITHOUTWARRANTY ORCONDITIONOF ANY KIND. [Por-
tal:PortalName] AND/OR ITS SUPPLIERS HEREBY DISCLAIM ALLWARRANTIES
ANDCONDITIONS WITHREGARD TO THIS INFORMATION, SOFTWARE, PROD-
UCTS, SERVICES ANDRELATEDGRAPHICS, INCLUDING ALL IMPLIEDWAR-
RANTIES ORCONDITIONS OF MERCHANTABILITY, FITNESS FORA PARTICULAR
PURPOSE, TITLE ANDNON-INFRINGEMENT.
TO THE MAXIMUM EXTENT PERMITTED BY APPLICABLE LAW, IN NO EVENT
SHALL [Portal:PortalName] AND/OR ITS SUPPLIERS BE LIABLE FORANY DIRECT,
INDIRECT, PUNITIVE, INCIDENTAL, SPECIAL, CONSEQUENTIAL DAMAGES OR

ANY DAMAGES WHATSOEVER INCLUDING, WITHOUT LIMITATION, DAMAGES
FOR LOSS OF USE, DATA ORPROFITS, ARISING OUT OF OR IN ANY WAY CON-
NECTEDWITH THE USE ORPERFORMANCE OF THE [Portal:PortalName] WEB
SITE, WITH THE DELAY OR INABILITY TO USE THE [Portal:PortalName] WEB SITE
ORRELATEDSERVICES, THE PROVISIONOF OR FAILURE TO PROVIDE SERV-
ICES, OR FORANY INFORMATION, SOFTWARE, PRODUCTS, SERVICES AND
RELATEDGRAPHICS OBTAINED THROUGHTHE [Portal:PortalName] WEB SITE, OR
OTHERWISE ARISING OUT OF THE USE OF THE [Portal:PortalName] WEB SITE,
WHETHERBASEDONCONTRACT, TORT, NEGLIGENCE, STRICT LIABILITY OR
OTHERWISE, EVEN IF [Portal:PortalName] OR ANY OF ITS SUPPLIERS HAS BEEN
ADVISEDOF THE POSSIBILITY OF DAMAGES. BECAUSE SOME STATES/JU-
RISDICTIONS DO NOT ALLOWTHE EXCLUSIONOR LIMITATIONOF LIABILITY FOR
CONSEQUENTIAL OR INCIDENTAL DAMAGES, THE ABOVE LIMITATIONMAY NOT
APPLY TO YOU. IF YOUARE DISSATISFIEDWITH ANY PORTIONOF THE [Por-
tal:PortalName] WEB SITE, ORWITH ANY OF THESE TERMS OF USE, YOURSOLE
ANDEXCLUSIVE REMEDY IS TO DISCONTINUE USING THE [Portal:PortalName]
WEB SITE.
SERVICE CONTACT : [Portal:Email]
TERMINATION/ACCESS RESTRICTION
[Portal:PortalName] reserves the right, in its sole discretion, to terminate your access to the
[Portal:PortalName] Web Site and the related services or any portion thereof at any time,
without notice. GENERAL To the maximum extent permitted by law, this agreement is gov-
erned by the laws of the State of Washington, U.S.A. and you hereby consent to the exclu-
sive jurisdiction and venue of courts in King County, Washington, U.S.A. in all disputes
arising out of or relating to the use of the [Portal:PortalName] Web Site. Use of the [Por-
tal:PortalName] Web Site is unauthorized in any jurisdiction that does not give effect to all
provisions of these terms and conditions, including without limitation this paragraph. You
agree that no joint venture, partnership, employment, or agency relationship exists between
you and [Portal:PortalName] as a result of this agreement or use of the [Por-
tal:PortalName] Web Site. [Portal:PortalName]'s performance of this agreement is subject
to existing laws and legal process, and nothing contained in this agreement is in derogation
of [Portal:PortalName]'s right to comply with governmental, court and law enforcement

requests or requirements relating to your use of the [Portal:PortalName] Web Site or infor-
mation provided to or gathered by [Portal:PortalName] with respect to such use. If any part
of this agreement is determined to be invalid or unenforceable pursuant to applicable law
including, but not limited to, the warranty disclaimers and liability limitations set forth above,
then the invalid or unenforceable provision will be deemed superseded by a valid, enforce-
able provision that most closely matches the intent of the original provision and the
remainder of the agreement shall continue in effect. Unless otherwise specified herein, this
agreement constitutes the entire agreement between the user and [Portal:PortalName]
with respect to the [Portal:PortalName] Web Site and it supersedes all prior or con-
temporaneous communications and proposals, whether electronic, oral or written, between
the user and [Portal:PortalName] with respect to the [Portal:PortalName] Web Site. A
printed version of this agreement and of any notice given in electronic form shall be admis-
sible in judicial or administrative proceedings based upon or relating to this agreement to
the same extent an d subject to the same conditions as other business documents and rec-
ords originally generated and maintained in printed form. It is the express wish to the parties
that this agreement and all related documents be drawn up in English.
COPYRIGHT AND TRADEMARK NOTICES:
All contents of the [Portal:PortalName] Web Site are: [Portal:FooterText] and/or its sup-
pliers. All rights reserved.
TRADEMARKS
The names of actual companies and productsmentioned herein may be the trademarks of
their respective owners. The example companies, organizations, products, people and
events depicted herein are fictitious. No association with any real company, organization,
product, person, or event is intended or should be inferred. Any rights not expressly granted
herein are reserved.
NOTICES AND PROCEDURE FOR MAKING CLAIMS OF COPYRIGHT INFRINGE-
MENT
Pursuant to Title 17, United States Code, Section 512(c)(2), notifications of claimed copy-
right infringement under United States copyright law should be sent to Service Provider's
Designated Agent.

ALL INQUIRIES NOT RELEVANT TO THE FOLLOWING PROCEDURE WILL
RECEIVE NO RESPONSE.
See Notice and Procedure for Making Claims of Copyright Infringement.

Registration Instructions
The Registration Instructions site message allows you to display a message on the Registration page to
assist site visitors during registration. To locate this resource file, use the Find option on your web browser
and search for MESSAGE_REGISTRATION_INSTRUCTIONS.Text.
There is no default text for registration instructions.
Retrieve Password Instructions
The Retrieve Password instructions are displayed to a user when a question and answer is required to mod-
ify or retrieve their password. To locate this resource file, use the Find option on your web browser and
search for MESSAGE_RETRIEVEPASSWORD_INSTRUCTIONS.Text .
Here is the default text of this site message in the DNN core language pack:
In order to retrieve your password, you will need to provide your user name, and the answer
to the Password Question.

Lists
About the Admin Lists Page
The Admin > Advanced Settings > Lists page displays the Lists module that enables Administrators tomaintain lists of information that can be identified by a key value and a data value. A related copy of the
Lists module is also available on the Host > Advanced Settings > Lists page.
The Admin List module can access entries from Host List module, but Host List cannot access Admin List.
The Host List stores site-wide Lists, such as Country, State, Region. Administrators can add new entries
to lists maintained on the Host List menu as well as create new lists.
The List module is based around Lists and Entries, which are in effect the same, but their usage defines
their differences:
l A List is a collection of Entries, which has a Key Identifier and a Data Portion.
l An Entry is an individual item of data which relates to a List and is made up of a Key Identifier and
a Data Portion. An example of this is the countries list used in DNN. The list is 'Countries' and the
entries are the actual countries. E.g. Australia, England, Holland
Note: Each Entry can also be a list. An example of this is the regions list used in DNN. In this case the
Country, which is an entry under the Countries List, can be its own list and have region entries associated
with it.
TheLists Module
Adding a Child List
How to add a child list beneath a parent list that is maintained on either the Admin Lists module or the
Host Lists module. Lists created by users other than SuperUsers are automatically encoded for security
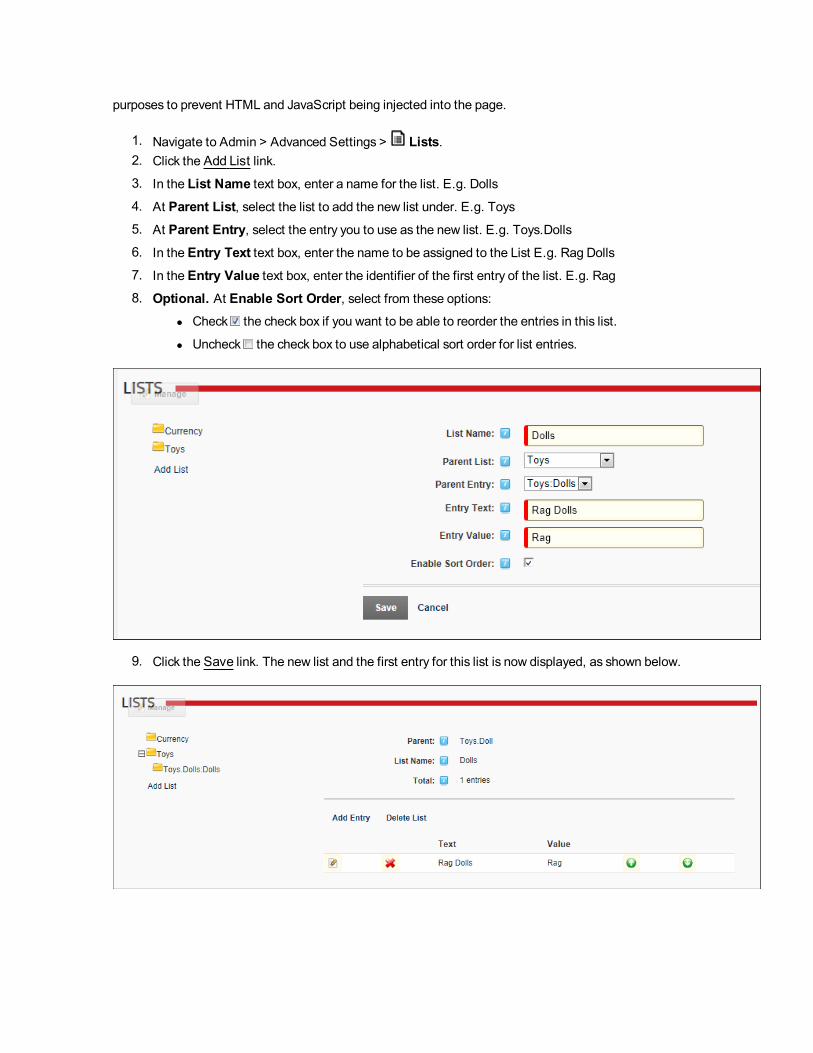
purposes to prevent HTML and JavaScript being injected into the page.
1. Navigate to Admin > Advanced Settings > Lists.2. Click the Add List link.
3. In the List Name text box, enter a name for the list. E.g. Dolls4. At Parent List, select the list to add the new list under. E.g. Toys
5. At Parent Entry, select the entry you to use as the new list. E.g. Toys.Dolls
6. In the Entry Text text box, enter the name to be assigned to the List E.g. Rag Dolls7. In the Entry Value text box, enter the identifier of the first entry of the list. E.g. Rag8. Optional. At Enable Sort Order, select from these options:
l Check the check box if you want to be able to reorder the entries in this list.
l Uncheck the check box to use alphabetical sort order for list entries.
9. Click the Save link. The new list and the first entry for this list is now displayed, as shown below.

Adding a List Entry
How to add a new list entry to an existing list using the Admin Lists page. Lists created by users other than
SuperUsers are automatically encoded for security purposes to prevent HTML and JavaScript being
injected into the page. List entries can be added to lists maintained by Administrators on the Admin > List
page, as well as lists maintained by SuperUsers on the Host > List page. In the below example, the new
list entry is being added to the Currency list that is maintained by SuperUsers using the Host > List mod-
ule.
1. Navigate to Admin > Advanced Settings > Lists.2. Click the Add List link.
3. In the List Name text box, enter a name for the list. E.g. Currency4. At Parent List, leave this field set toNone Specified.5. In the Entry Text text box, enter the first entry (item) that will be in this list. E.g. Singapore Dollar
(SGD)
6. In the Entry Value text box, enter the identifier or code for the first entry. E.g. SGD7. Optional. At Enable Sort Order, select from these options:
l Check the check box if you want to be able to reorder the entries in this list.
l Uncheck the check box to use alphabetical sort order for list entries.
8. Click the Save link. This displays the new currency type to the Currency list. Note: In the below
image only the new list entry can be edited and deleted because the other entries are maintained
by SuperUsers using the Host List module.
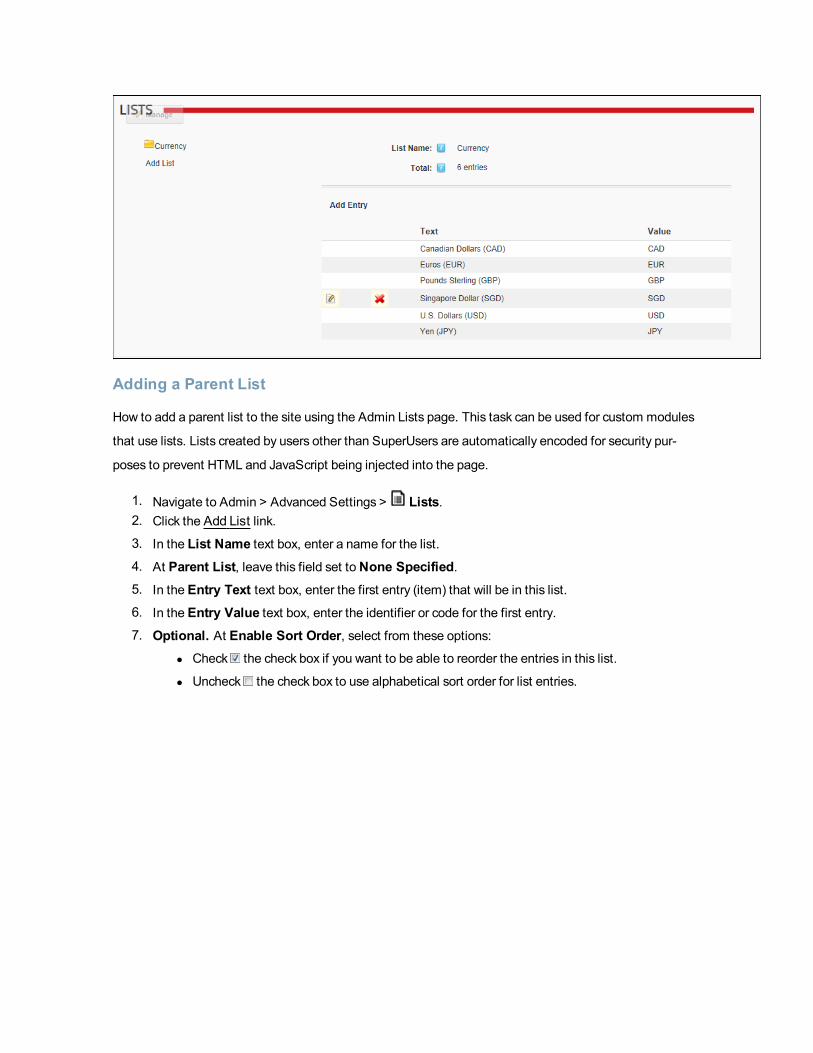
Adding a Parent List
How to add a parent list to the site using the Admin Lists page. This task can be used for custom modules
that use lists. Lists created by users other than SuperUsers are automatically encoded for security pur-
poses to prevent HTML and JavaScript being injected into the page.
1. Navigate to Admin > Advanced Settings > Lists.2. Click the Add List link.
3. In the List Name text box, enter a name for the list.4. At Parent List, leave this field set toNone Specified.5. In the Entry Text text box, enter the first entry (item) that will be in this list.6. In the Entry Value text box, enter the identifier or code for the first entry.7. Optional. At Enable Sort Order, select from these options:
l Check the check box if you want to be able to reorder the entries in this list.
l Uncheck the check box to use alphabetical sort order for list entries.

8. Click the Save link. This displays the new list on the left side of the module.
9. You can now add addition list entries to this list. See "Adding a List Entry"
Deleting a List Entry
How to delete a list entry using the Admin Lists module. If an entry is also a parent list, then the list and
any child lists and their associated list entries will also be deleted. In the below example only one of the list
entries can be edited because the Currency list is maintained by SuperUsers using the Host List module.
1. Navigate to Admin > Advanced Settings > Lists.2. In the Lists section, navigate to and select the title of the required list. This displays the details of
this list.

3. Click the Delete button beside the entry to be deleted. This displays the message "Are You Sure
YouWish To Delete This Item?"
4. Click theOK button to confirm.
Deleting a List
How to delete a list from the Admin Lists page. Note: Only user generated lists can be deleted.
1. Navigate to Admin > Advanced Settings > Lists.2. In the Lists section, navigate to and select the title of the required list. E.g. Coun-
try.Australia:Region. This displays details of this list and its related list entries.
3. Click the Delete button. This displays the message "Are You Sure YouWish To Delete This
Item?"
4. Click theOK button to confirm.

Editing a List Entry
How to edit a list entry using the Admin Lists module. In the below example only one of the list entries can
be edited because the Currency list is maintained by SuperUsers using the Host List module.
1. Navigate to Admin > Advanced Settings > Lists.2. In the Lists section, select the title of the required list to view the list details.
3. Click the Edit button beside the list entry to be edited.
4. Edit the entry details as required.
5. Optional. Click either theMove Entry Up orMove Entry Down button repeatedly to
change the position of the entry in the list.
6. Click the Save link.

Managing the Profanity List (Site)
How to create and manage a list of replacement words for a site. This list allows you to replace unwanted
or profane words that are added to messages sent using the Message Center module. Note: You can
enter any keyboard characters into both the replaced and replacement fields. E.g. ****
Important. Profanity filters must be enabled on a site to use this list.
1. Navigate to Admin > Advanced Settings > Lists.2. Select the ProfanityFilter-0 list.
The first time you manage this list
1. Click the Edit button beside the blank list entry that has been added as an example and should
be updated with real information.
2. In the Entry Text text box, enter the text to be replaced.3. In the Entry Value text box, enter the replacement word.4. Click the Save link.
Adding a filtered word
1. Click the Add Entry link.
2. In the Entry Text text box, enter the text to be replaced.3. In the Entry Value text box, enter the replacement word.4. Click the Save link.

Editing a filtered word
1. Click the Edit button beside the list entry called "FindThisText". This list entry has been added as
an example and should be updated with real information.
2. In the Entry Text text box, enter the text to be replaced.3. In the Entry Value text box, enter the replacement word.4. Click the Save link.
Deleting a filtered word
1. Click the Delete button beside the entry to be deleted. This displays the message "Are You Sure
YouWish To Delete This Item?"
2. Click theOK button to confirm
Related Topics:
l See "About theMessage Center Module"
l See "ConfiguringMessage Center Settings"
Newsletters
About the Newsletters Module
The Newsletters module allows you to send individual or bulk email messages (newsletters). The news-
letter can be sent to the members of one or more security roles and/or to one or more email addresses.
Messages are sent to each recipient separately to prevent recipients from seeing each other's details. The
module also identifies when a newsletter is set to send to an email addressmore than once and ensures
only one copy of the newsletter is sent to that address. The message can be either plain text or HTML for-
mat. Files can be attached and replacement tokens can be included. Once a newsletter is sent, the sender
receives the "Bulk Email Report for [Newsletter Subject]" message. See "The Bulk Email Report"
Installation Note: This module is pre-installed on the Admin >Newsletters page by default and can also be
deployed to sites and added to pages.
Permissions. All users who are authorized to view the module can send emails. Authenticated users
require appropriate File Manager permissions to upload and/or select files. Unauthenticated users cannot
attach files to messages.
Prerequisite. In order for the newsletter module to function correctly you must first:
1. Ensure you have a valid email address on your user account. This will be the default email address
for newsletters, however you can specify a different from address when required. See "Managing
your User Profile"2. Ensure your Host has correctly configured you SMTP mail settings.

TheNewsletters Module

Newsletter Error Messages
One of the following error messages will be displayed if a message fails to send.
l "No Messages were sent because there are no recipients for this email." In this case, you must
either select one or more roles at theUser Role(s) field or enter one or more recipients into the
Additional Emails field.l "No Messages were sent. A confirmation email has been sent to [From Email Address] with a
description of the errors that happened during the sending process."
l "An error occurred while sending the email: [Error Description]"
Sending a Basic Newsletter
How to send a newsletter without See "List of Replacement Tokens" or personalization using the News-
letters module.
1. Navigate to Admin > Advanced Settings > Newsletters - OR - Go to a Newsletters module.
2. Select theMessage tab.3. Complete one or both of these address fields:
1. At User Role(s), check the check box beside each role which will receive the newsletter.
Note: Users in multiple roles will only receive one copy of the newsletter.
2. In theAdditional Emails text box, enter each of the email addresses to receive the news-
letter separated by a semi-colon ( ; ). E.g. admin@aw-
esomecycles.biz;[email protected]
4. Optional. In the From text box, enter/modify the email address to be displayed in the From field of
this newsletter. If you are logged in to the site, the email address associated with your user account
is displayed here by default.
5. Optional. In theReply To text box, enter the reply to email address for the email.6. In the Subject text box, enter a subject title for the email.

7. At Editor, select Basic Text Box to send a plain text email - OR - Select Rich Text Editor to
send an HTML email with formatting and images).
8. In the Editor text box, enter the body of the newsletter.9. Optional. Click the Preview Email button located at the base of the module to preview the news-
letter before sending it.

10. Select theAdvanced Settings tab and then set these required settings:1. At Replace Tokens?, uncheck the check box.
2. At Send Method, select BCC: One Email To Blind Distribution List ( Not Per-
sonalized ).

11. Set any of theseOptional Advanced Settings:1. At Attachment, select the required attachment. See "Setting a File Link" or See "Upload-
ing and Linking to a File".
2. At Priority, select the priority of the email (High, Normal, or Low) from the drop down list.
The default setting is Normal.
3. At Send Action, select from the following options:
l Synchronous: Emails are all sent before your page refreshes. This method is suit-
able for small mail outs of approximately 100 or less.
l Asynchronous: This starts a separate thread (user process) to send emails. This
method is suitable for large mail outs of approximately 100 or more. This is the
default option.
12. Click the Send Email button. Successful or Not Successful message is displayed once the
message is sent. For messages sent Synchronously, the message displays once all emails have

been sent. For messages sent Asynchronously, the message displays when the send action has
successfully commenced. See "Newsletter Error Messages"
TheNewsletter in the recipient's mailbox
Sending a Newsletter to a Relay Service
How to send a newsletter via SMS ("Short Message Service" commonly known as phone texting), IM
(instant messaging), fax or other non-email service using a relay service.
1. Navigate to Admin > Advanced Settings > Newsletters - OR - Go to a Newsletters module.
2. Select theMessage tab.3. Complete required fields and enter the message into the Editor. See "Sending a Basic News-
letter"

4. Select theAdvanced Settings tab and then set these required settings:a. At Send Method, select Relay: One Message Per Email Address ( Personalized )
to a specified relay server.
b. At Relay Address, enter the address of the relay service.5. Complete the additional Advanced Settings as required.6. Click the Send Email button. A Successful or Not Successful message is now displayed. For
Synchronous send action, the message doesn't display until after all emails have been sent. For
Asynchronous send action, the message displays once the send action has successfully com-
menced.
Sending a Newsletter with Tokens
How to send a newsletter that includes replacement tokens using the Newsletters module. Using replace-
ment tokens in your messages enables you include relevant and up-to-date information in your messages.
For example, you can display the recipient's name in the salutation, or include information such as the site
name or description in the body of your message. By using replacement tokens instead of static content,
you can be sure that details which may change, such as the site administrators email address are always
current. See "List of Replacement Tokens" for a list of tokens that can be used.
1. Navigate to Admin > Advanced Settings > Newsletters - OR - Go to a Newsletters module.
2. Select theMessage tab and complete the required settings. See "Sending a Basic Newsletter"1. At Editor, select Basic Text Box to send a plain text email - OR - Select Rich Text
Editor to send an HTML email with formatting and images.2. Enter the body of the newsletter into the Editor including replacement tokens. E.g.
[User:FirstName] [User:LastName]. See "List of Replacement Tokens"

3. Select theAdvanced Settings tab and then set these required settings:1. At Replace Tokens?, check the check box.2. At Send Method, select To: One Message Per Email Address ( Personalized ).

4. Set any of the optional Advanced Settings, See "Sending a Basic Newsletter"
5. Click the Send Email button. This displays either a Successful or Not Successful message.
For Synchronous send action, the message doesn't display until after all emails have been sent.
For Asynchronous send action, the message displays once the send action has successfully com-
menced.

TheReceivedMessage. Note the recipients first and last nameare included
Sending a Personalized Newsletter without Tokens
How to send a personalized newsletter without enabling See "List of Replacement Tokens" using the
Newsletter module. This option adds a greeting before the message. The greeting for registered users
includes their first and last name. E.g. Dear Julie Black. The greeting for other recipients (those entered in
the Additional Emails field), are addressed to their email address. E.g. Dear [email protected].
1. Navigate to Admin > Advanced Settings > Newsletters - OR - Go to a Newsletters module.
2. Select theMessage tab and complete the required fields. See "Sending a Basic Newsletter"3. Select theAdvanced Settings tab and then set these required settings:
1. At Replace Tokens?, uncheck the check box.2. At Send Method, select To: One Message Per Email Address ( Personalized ).

4. To set any of the optional Advanced Settings, See "Sending a Basic Newsletter"
5. Click the Send Email button. This displays either a Successful or Not Successful message.
For Synchronous send action, the message doesn't display until after all emails have been sent.
For Asynchronous send action, the message displays once the send action has successfully com-
menced.
Sending Newsletters in a User's Preferred Language
How to send a newsletter to user's in their preferred language using the Newsletter module. Multiple lan-
guagesmust be installed and enabled on this site to display the Language Filter field.
Important. When you select a Language Filter, only users associated with that language will receive a
newsletter. E.g. If you select English (United States) as the language filter, then only users who have
selected English (United States) as their Preferred Locale in their profile will receive the newsletter. Users

who have selected English (Australia) will not receive a newsletter. If a user has not set a preferred lan-
guage, they will only receive newsletters sent to the default site language.
1. Navigate to Admin > Advanced Settings > Newsletters - OR - Go to a Newsletters module.
2. Select theMessage tab and complete all fields and enter the message into your Editor. See other
tutorials in this section for full details.
3. At Language Filter, check the check box beside the language(s) to receive this newsletter. If no
language is selected then no filter is applied and all users will receive this newsletter.
4. Select theAdvanced Settings tab and then set these required settings:1. At Replace Tokens?, uncheck the check box.2. At Send Method, select To: One Message Per Email Address ( Personalized ).
5. To set any of the optional Advanced Settings, See "Sending a Basic Newsletter"
6. Click the Send Email link. This displays either a Successful or Not Successful message. For
Synchronous send action, the message doesn't display until after all emails have been sent. For
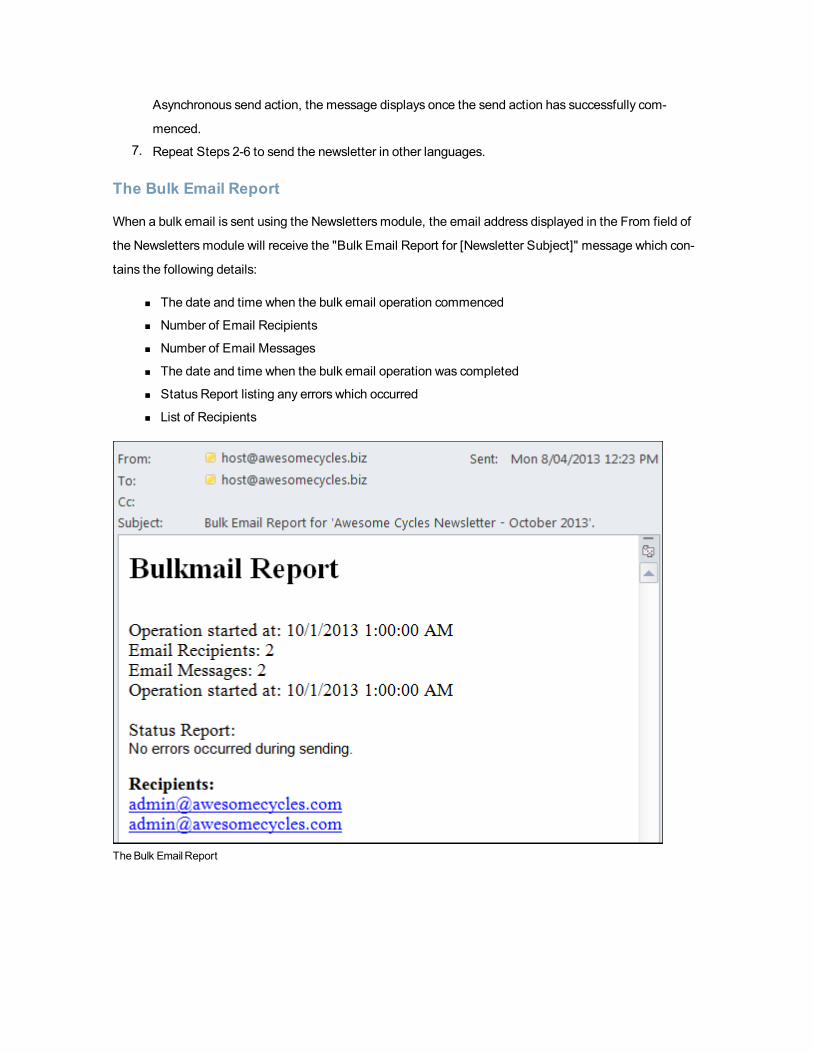
Asynchronous send action, the message displays once the send action has successfully com-
menced.
7. Repeat Steps 2-6 to send the newsletter in other languages.
The Bulk Email Report
When a bulk email is sent using the Newsletters module, the email address displayed in the From field of
the Newsletters module will receive the "Bulk Email Report for [Newsletter Subject]" message which con-
tains the following details:
n The date and time when the bulk email operation commenced
n Number of Email Recipients
n Number of Email Messages
n The date and time when the bulk email operation was completed
n Status Report listing any errors which occurred
n List of Recipients
TheBulk EmailReport

Page Management
About the Pages (Tabs) module
The Pagesmodule (titled "Page Management" and also referred to as the Tabsmodule) allows authorized
users to create and manage pages. This module is located under Admin > Page Management on the Con-
trol Panel and can be added to site pages. This module has additional page management tools than the
Pages section of the Control Panel, including the ability to modify page hierarchy and add multiple pages
at one time.
Installation Note: This module is pre-installed on the site.
Version: The version number is the same as the DNN framework.
Permissions. Only Page Editors and Administrators can access pages where the Pagesmodule is
located. Usersmust be granted Edit Page permission in DNNCommunity Edition, or Add Content per-
missions in DNNProfessional Edition, to the page where the Pagesmodule is located to access the mod-
ule. This permission enables these users to manage any pages that they are Page Editors for.
ThePages Module as viewedby Admin

Page Editors
Deleting a Page (Pages Module)
How to delete a page including any child pages using the Pagesmodule. Deleted pages are stored in the
Recycle Bin where they can be restored or permanently deleted. See "About the Recycle BinModule"
Note: The following pages cannot be deleted: any of the Admin and Host pages; any page defined
as the Home, Splash, Login, User Registration or the Profile page; or the last visible site page.
Permissions. Usersmust have Edit Page / Add Content permissions to the page where the Pagesmodule
is located as well as Edit Page / Delete permissions for the page they want to delete.
1. Navigate to Admin > Page Management - OR - Go to a Pagesmodules.2. In the left-hand navigation tree, right-click on the required page and then select Delete Page from
the drop down list.

3. This displays the message "This will delete the selected page and all its child pages. Are you
sure?"
4. Click theOK button to confirm.
Editing Page Settings using the Pages Module
How to view and or edit a selection of page settings for any page using the Pagesmodule.
Permissions. Usersmust have Edit Page / Add Content permissions to the page where the Pagesmodule
is located as well as Edit Page / Manage Settings permissions to the page that is being edited.
Option One
1. Navigate to Admin > Page Management - OR - Go to a Pagesmodules.2. In the left-hand navigation tree, click on a required page name. This displays the settings for this
page to the right.
3. Go to theCommon section and enter/edit any of the following settings:1. In the Page Name text box, enter a name for the page. If this page is displayed in the
menu, this will be the name in the menu.
2. In the Page Title text box, enter a short, descriptive sentence summarizing the page con-
tent. The title is used by search engines to identify the information contained on the page. It
is recommended that the title contains at least 5 highly descriptive words and does not
exceed 200 characters.
3. At Include In Menu?, check the check box to include this page in the menu- OR -
Uncheck the check box to hide the page.
4. At Disabled, select from these options:
l Check the check box if the page name is not a link. I.e. When you click on the page
name in the menu nothing happens. This option is typically selected for a parent
page to provide a way for users to navigate to its child pages.
l Uncheck the check box for this page name to be a link to the page. This is the
default option.
5. Optional. At Secure? check the check box to force this page to use a secure connection
or secure socket layer (SSL). This option requires the Administrator to configure the SSL
Settings on the Admin > Site Settings page.
6. Optional. At Allow Indexed, check the check box to allow this page to be indexed by
the search spider. See "About the Search Engine SiteMapModule"

4. Expand the Permissions section to update permissions. Note: This section is only visible to
Administrators and SuperUsers. See "Setting Page Permissions"
5. Expand theModules section to view a list of all modules on this page.
l Click theDelete button to delete the related module.
l Click the Edit button to go to the Module Settings page for the related module.

6. Expand the SEO section and enter/edit any of the following settings:
1. In the Sitemap Priority text box, enter a number between 0.1- 1.0 that is used to deter-
mine the SEO SiteMap priority.
2. In the Page Description text box, enter a description of the page content. The description
is used by search engines to identify the information contained on the page. It is rec-
ommended that the description contains at least 5 words and does not exceed 1000 char-
acters.
3. In the Page Keywords text box, enter key words for this page separated by comma.4. In the Page Tags text box, select one or more tags associated with this page. Page tagging
is a way of categorizing content for more meaningful search results.

7. Expand theMetatags section and enter/edit any of the following settings:1. In theRefresh Internal (seconds) text box, enter the interval to wait between automatic
page refreshes. (E.g. Enter "60" for 1 minute or 60 seconds.) Leave field blank to disable.
2. In the Page Header Tags text box, enter any tags that should be rendered in the "HEAD"
tag of the HTML for this page.

8. Expand theAppearance section and edit/set any of these optional settings:1. At Page Skin, select a skin from the drop down list or select [Default Skin] to use the
default skin set for the site. See "Setting the Default Site Skin and Container"
2. At Default Container, select a container from the drop down list or select [Default Con-
tainer] to use the default container set for the site.3. At Large Icon, select an image to be used as the Large Icon for any Console module relat-
ing to this page. Select the location of the required icon from these options:
l File (A File On Your Site ), select to insert any image from the Admin File Man-
ager, or upload a new file.
1. Set the link to an existing file (See "Setting a File Link") or a new file (See
"Uploading and Linking to a File"). Note: You can remove the icon from this
and the following field by selecting < None Specified > as the File Name
when setting a file link.
l System Image: Select to choose an icon which is part of your DNN application. This
displays a list of available images.
1. Select the required image.
4. At Small Icon, using the same steps as for the above field, select the image to be dis-
played beside the page name in the menu. This image is also used as the Small Icon for
any Console module relating to this page.

9. Expand the Link section and edit/set any of these optional settings:1. At Link URL, to set this page to be a navigation link to another resource (rather than dis-
playing the page itself), select or add the link here. See "About the Link Control"
2. At Permanently Redirect?, check the check box to notify the web browser that this page
should be considered as permanently moved. This enables Search Engines to modify their

URL's to directly link to the resource. Note: This setting is ignored if the Link Type is set to
None.
10. Click theUpdate Page button.
Option Two
1. Navigate to Admin > Page Management - OR - Go to a Pagesmodules.2. In the left-hand navigation tree, right-click on the required page and then select Page Settings
from the drop down list. This will open the settings page for this page in a newwindow.

3. Update page settings as required. See "Page Details Settings for Existing Pages", See
"Advanced Settings for Existing Pages", See "Setting Page Permissions"
4. Click theUpdate Page button.
Enabling/Disabling Page Link (Pages Module)
How to prevent or allow a page to functioning as a link in the site menu using the Pagesmodule. This set-
ting is the same as the "Disabled?" check box field on the Settings page of each page.
Permissions. Usersmust have Edit Page / Add Content permissions to the page where the Pagesmodule
is located as well as Edit Page / Manage Settings permission to the page that is being edited.
1. Navigate to Admin > Page Management - OR - Go to a Pagesmodules.2. In the left-hand navigation tree, right-click on the required page. One of these two options will be
displayed:
l Disable Link In Navigation: Select this option to disable the page link. The page will still
be visible in the menu; however no action is taken when a user clicks on the page in the
menu. An example of when you might disable a link is when you have a parent page that

doesn't have any content, but still allows users to navigate to its children.
l Enable Link In Navigation: Select this option to enable the page link.
Tip: Disabled pages display theDisabled icon in the Pagesmodule for quick reference.

Hiding/Showing a Page in Site Navigation
How to hide or show a page to in the site menu using the Pagesmodule. This settings updates the
"Include In Menu?" check box under the settings for this page.
Permissions. Usersmust have Edit Page / Add Content permissions to the page where the Pagesmodule
is located as well as Edit Page / Manage Settings permission to the page that is being edited.
1. Navigate to Admin > Page Management - OR - Go to a Pagesmodules.2. In the left-hand navigation tree, right-click on the required page and then select eitherHide From
Navigation or Show In Navigation from the drop down list.
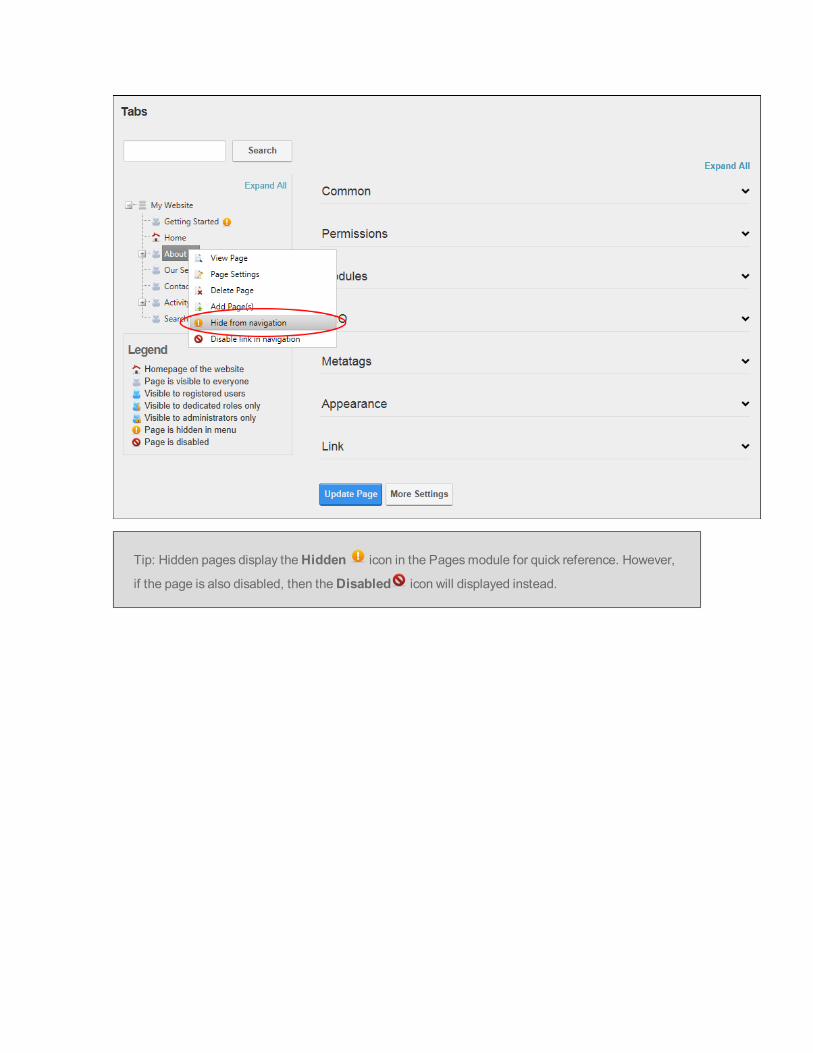
Tip: Hidden pages display theHidden icon in the Pagesmodule for quick reference. However,
if the page is also disabled, then theDisabled icon will displayed instead.

Viewing any Page (Pages Module)
How to view any page on your site including pages which aren't displayed in the site menu using the Pages
module.
Permissions. Usersmust have Edit Page / Add Content permissions to the page where the Pagesmodule
is located as well as View Page / View permissions to the page to be viewed.
1. Navigate to Admin > Page Management - OR - Go to a Pagesmodules.2. In the left-hand navigation tree, right-click on the page name and then select View Page from the
drop down list.

Administrators
Adding One or More Pages (Pages Module)
How to add one or more new pages to a site using the Pagesmodule.
1. Navigate to Admin > Page Management - OR - Go to a Pagesmodules.2. In the left-hand navigation tree, right-click on a page name and then select Add Page(s) from the
drop down list.

3. In the Pagesmulti-line text box, enter each page name on a separate line. If you wish to create a
page hierarchy, simply add one right chevron characters ( > ) for each child level.
4. Click theCreate Page(s) button.
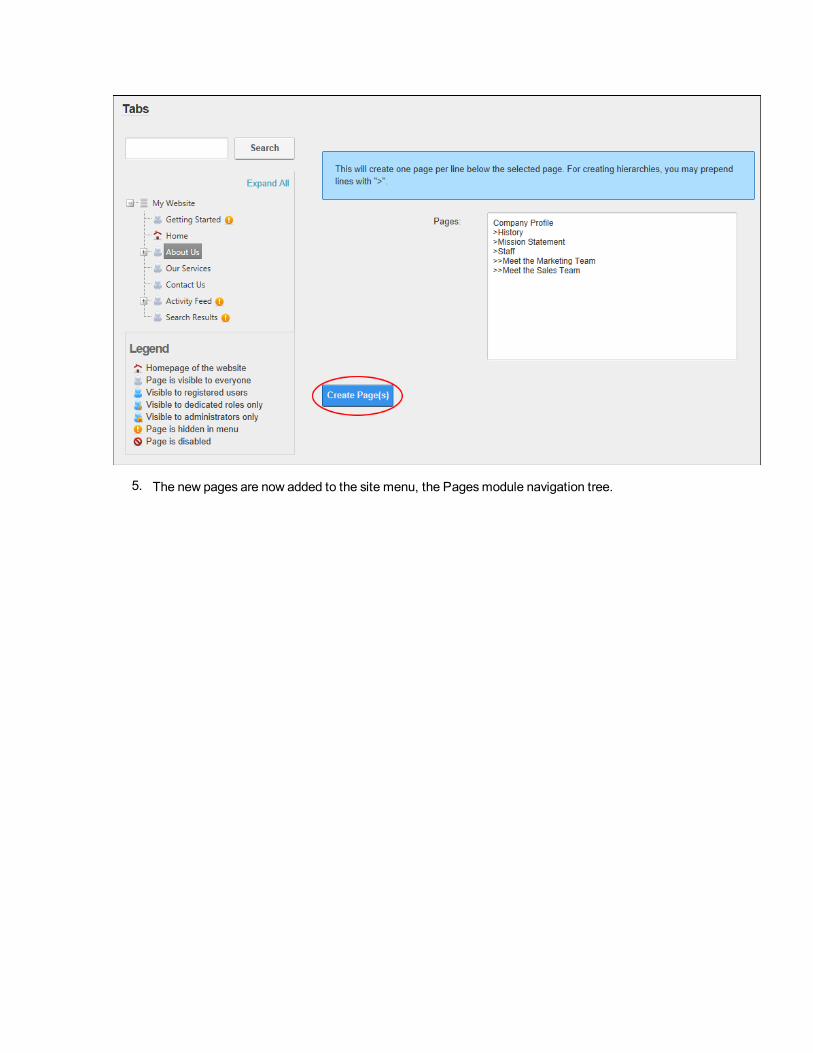
5. The new pages are now added to the site menu, the Pagesmodule navigation tree.

Moving Page Position in Menu
How to move a page to a new position in the site menu using the Pagesmodule.
Permissions. In addition to the required permissions for the Pagesmodule, usersmust also have Edit
Page (Manage Settings for DNNProfessional Edition) permissions to the required page.
Moving a Page to a Parent Position
1. Navigate to Admin > Page Management - OR - Go to a Pagesmodules.2. Click and hold on the name of the page to be moved.

3. Drag the page to the new location. The place where the page will be inserted will be indicated by a
dotted line.

4. Release to insert the page.
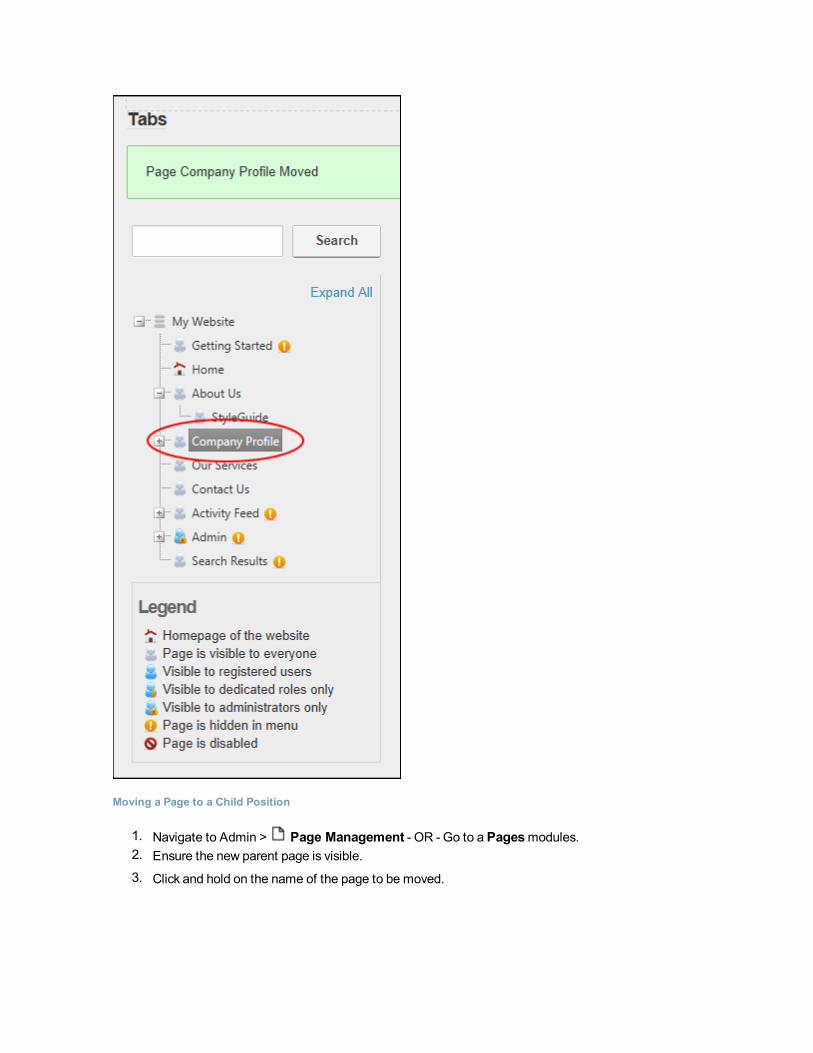
Moving a Page to a Child Position
1. Navigate to Admin > Page Management - OR - Go to a Pagesmodules.2. Ensure the new parent page is visible.
3. Click and hold on the name of the page to be moved.
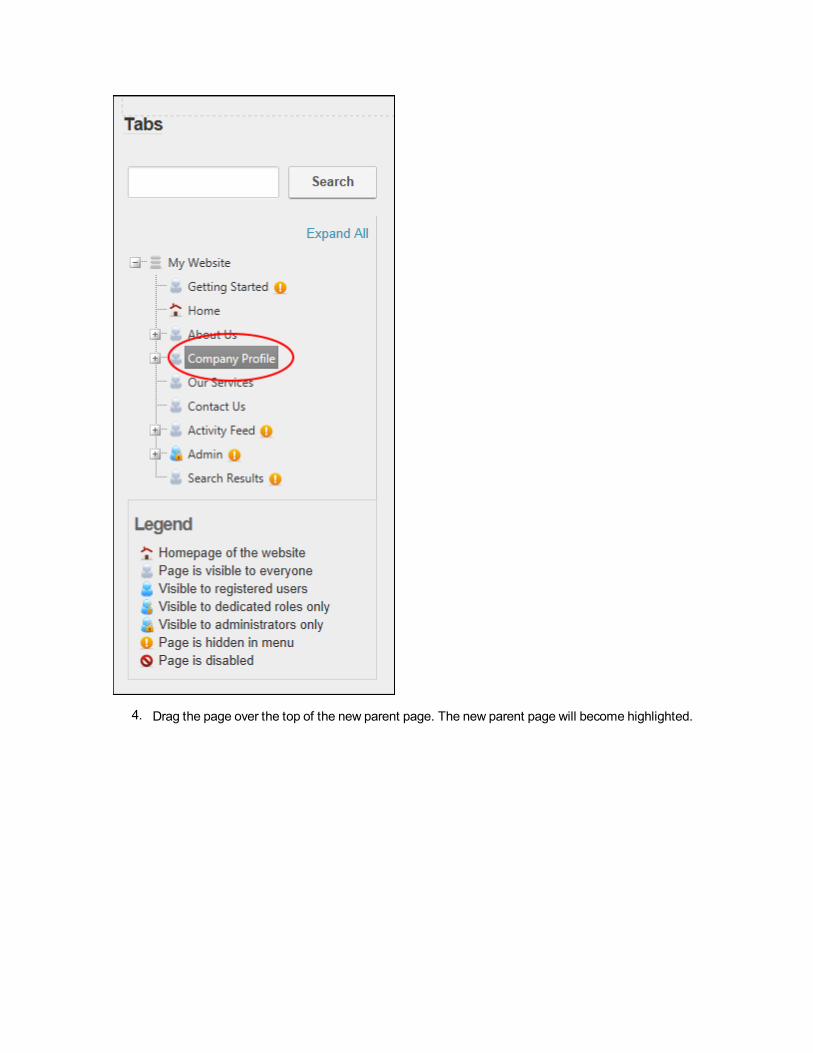
4. Drag the page over the top of the new parent page. The new parent page will become highlighted.

5. Release the page.


Recycle Bin
About the Recycle Bin Module
The Recycle Bin module stores all pages and modules that have been deleted from a site. These pages
and modules can be restored to the site or permanently removed. This Admin module is located on the
Admin > Recycle Bin page and can be added to any site page.
Permissions. All site visitors who can view the page where the Recycle Bin module is located are able to
see details of all pages and modules within in the Recycle Bin, however, they cannot perform any tasks.
Only authenticated users who have been granted Edit Module (Edit Content) permissions can perform
tasks.
Version: The version number is the same as the DNN framework.
The Pages Tab
l Lists pages by page name
l Lists pages in deletion order from most recently deleted to first deleted
The Modules Tab
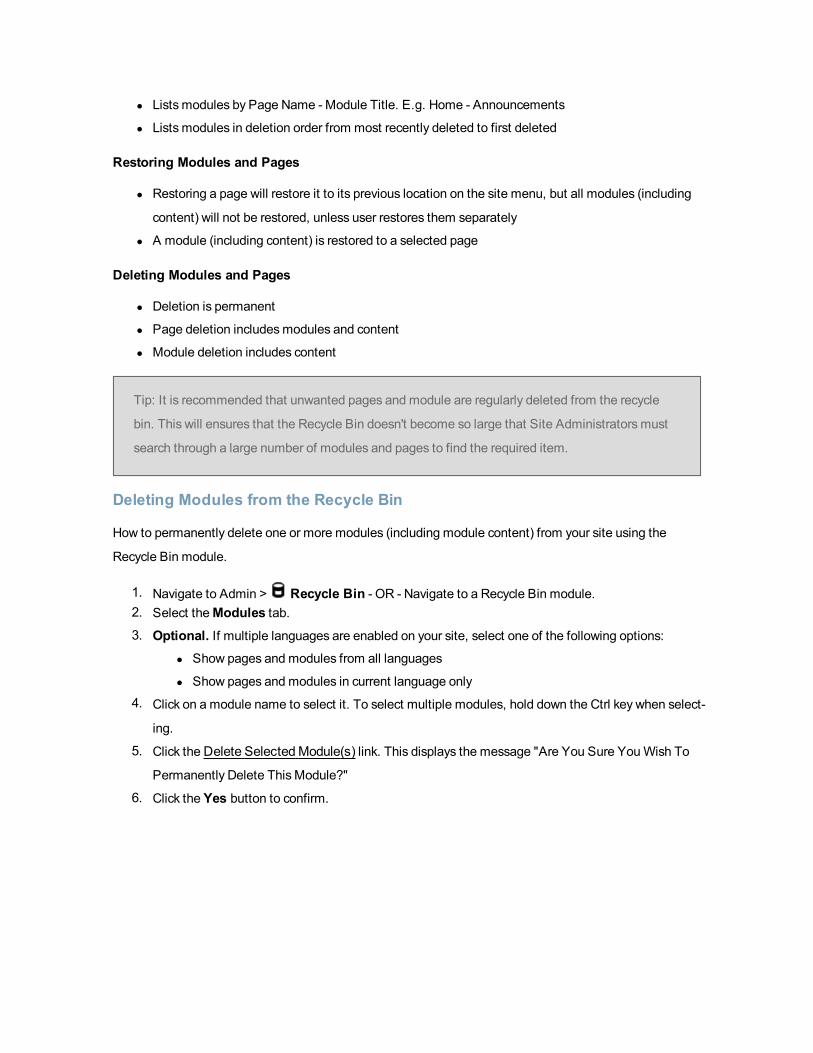
l Lists modules by Page Name - Module Title. E.g. Home - Announcements
l Lists modules in deletion order from most recently deleted to first deleted
Restoring Modules and Pages
l Restoring a page will restore it to its previous location on the site menu, but all modules (including
content) will not be restored, unless user restores them separately
l A module (including content) is restored to a selected page
Deleting Modules and Pages
l Deletion is permanent
l Page deletion includesmodules and content
l Module deletion includes content
Tip: It is recommended that unwanted pages and module are regularly deleted from the recycle
bin. This will ensures that the Recycle Bin doesn't become so large that Site Administrators must
search through a large number of modules and pages to find the required item.
Deleting Modules from the Recycle Bin
How to permanently delete one or more modules (including module content) from your site using the
Recycle Bin module.
1. Navigate to Admin > Recycle Bin - OR - Navigate to a Recycle Bin module.2. Select theModules tab.3. Optional. If multiple languages are enabled on your site, select one of the following options:
l Show pages and modules from all languages
l Show pages and modules in current language only
4. Click on a module name to select it. To select multiple modules, hold down the Ctrl key when select-
ing.
5. Click theDelete SelectedModule(s) link. This displays the message "Are You Sure YouWish To
Permanently Delete This Module?"
6. Click the Yes button to confirm.

Permanently DeleteOneOr MoreModules
Deleting Pages from the Recycle Bin
How to permanently delete one or more pages (including modules and module content) using the Recycle
Bin module.
Permissions. Authenticated users who have been granted Edit Module (Edit Content) permissions.
1. Navigate to Admin > Recycle Bin - OR - Navigate to a Recycle Bin module.2. Select the Pages tab.3. Optional. If multiple languages are enabled on your site, select one of the following options:
l Show pages and modules from all languages.
l Show pages and modules in current language only.
4. Click on a page name to select it. To select multiple pages, hold down the Ctrl key when selecting.
5. Click theDelete Selected Page(s) link. This displays the message "Are You Sure YouWish To Per-
manently Delete This Page?"
6. Click the Yes button to confirm.

DeletingPages from theRecycleBin
Emptying the Recycle Bin
How to permanently delete all pages and modules from the Recycle Bin module.
Permissions. Authenticated users who have been granted Edit Module (Edit Content) permissions.
1. Navigate to Admin > Recycle Bin - OR - Navigate to a Recycle Bin module.2. Click the Empty Recycle Bin link. This displays the message "Are You Sure YouWish To Per-
manently Delete All Pages and Modules?"
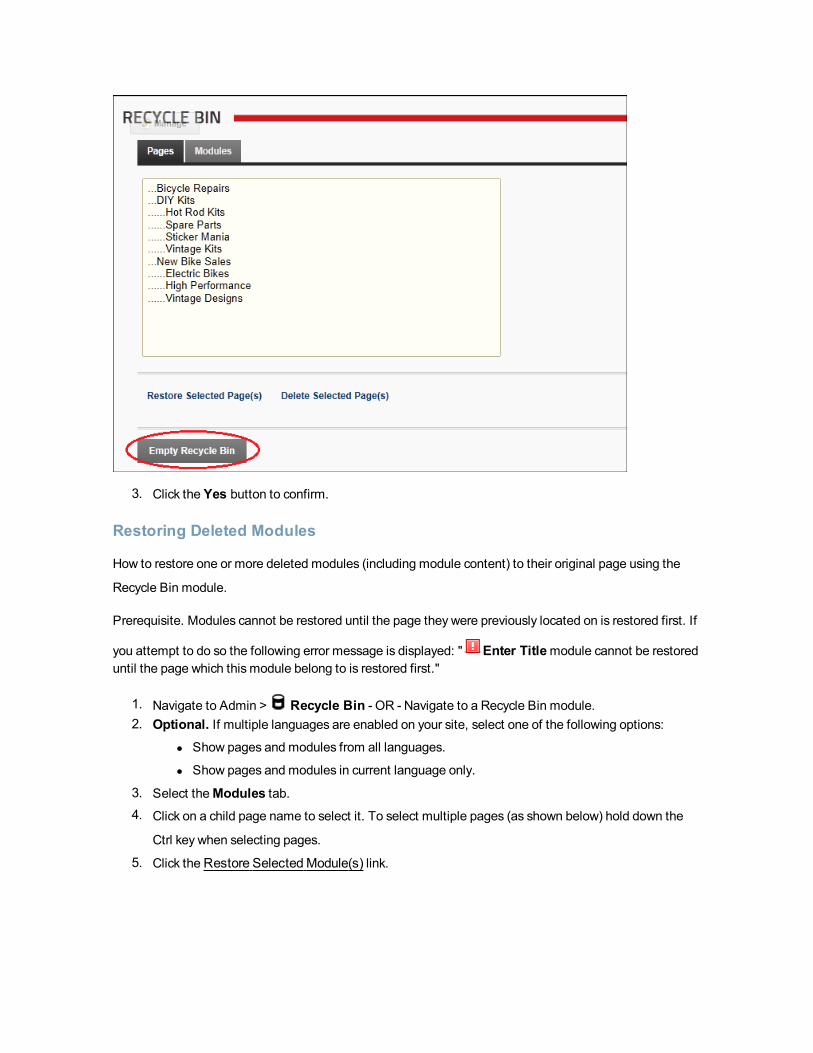
3. Click the Yes button to confirm.
Restoring Deleted Modules
How to restore one or more deleted modules (including module content) to their original page using the
Recycle Bin module.
Prerequisite. Modules cannot be restored until the page they were previously located on is restored first. If
you attempt to do so the following error message is displayed: " Enter Titlemodule cannot be restoreduntil the page which this module belong to is restored first."
1. Navigate to Admin > Recycle Bin - OR - Navigate to a Recycle Bin module.2. Optional. If multiple languages are enabled on your site, select one of the following options:
l Show pages and modules from all languages.
l Show pages and modules in current language only.
3. Select theModules tab.4. Click on a child page name to select it. To select multiple pages (as shown below) hold down the
Ctrl key when selecting pages.
5. Click theRestore SelectedModule(s) link.
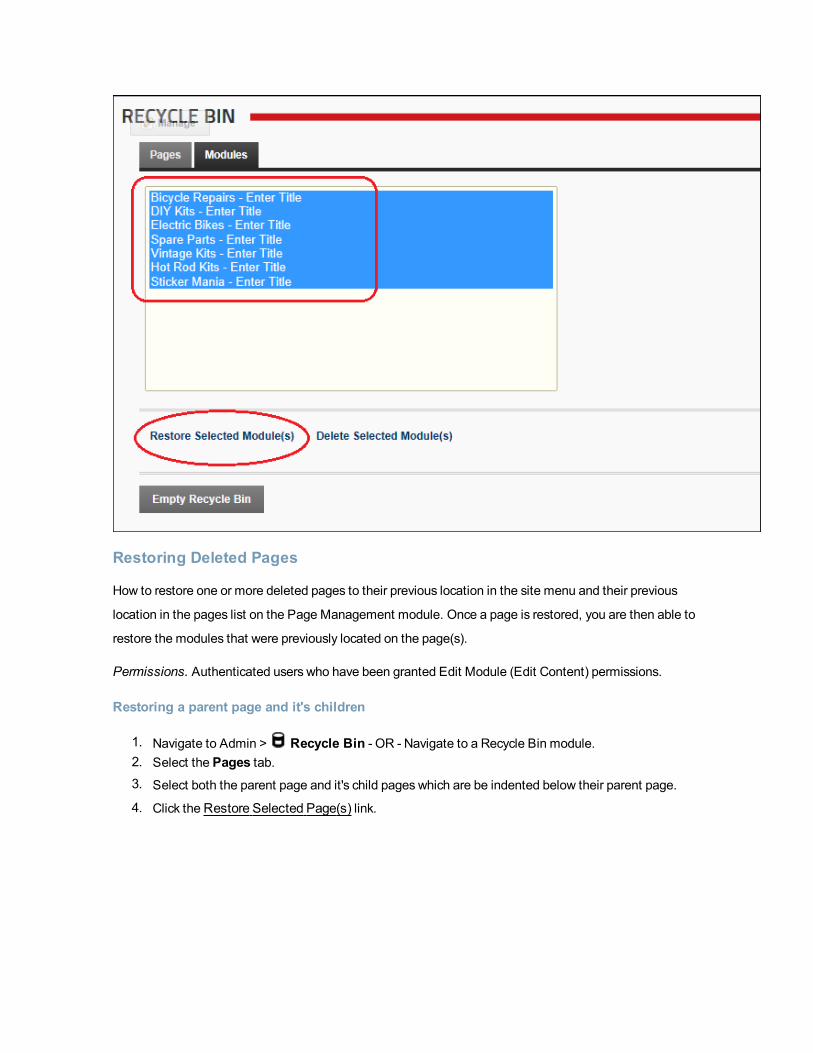
Restoring Deleted Pages
How to restore one or more deleted pages to their previous location in the site menu and their previous
location in the pages list on the Page Management module. Once a page is restored, you are then able to
restore the modules that were previously located on the page(s).
Permissions. Authenticated users who have been granted Edit Module (Edit Content) permissions.
Restoring a parent page and it's children
1. Navigate to Admin > Recycle Bin - OR - Navigate to a Recycle Bin module.2. Select the Pages tab.3. Select both the parent page and it's child pages which are be indented below their parent page.
4. Click theRestore Selected Page(s) link.
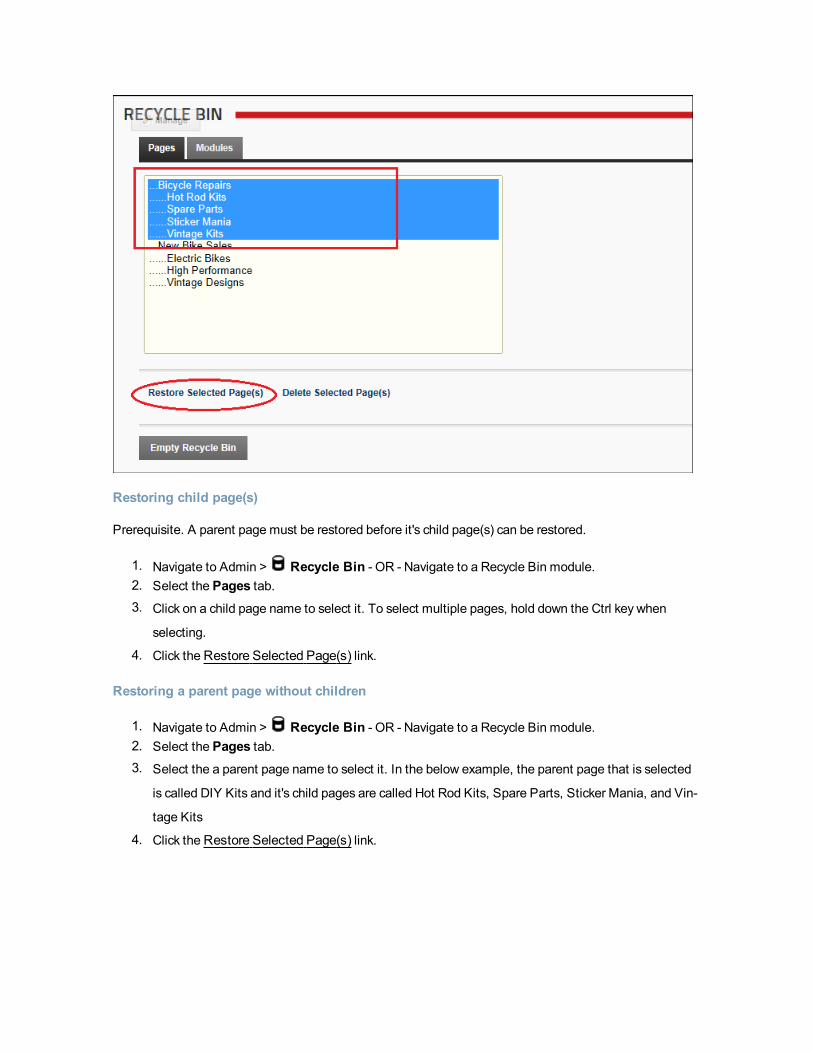
Restoring child page(s)
Prerequisite. A parent page must be restored before it's child page(s) can be restored.
1. Navigate to Admin > Recycle Bin - OR - Navigate to a Recycle Bin module.2. Select the Pages tab.3. Click on a child page name to select it. To select multiple pages, hold down the Ctrl key when
selecting.
4. Click theRestore Selected Page(s) link.
Restoring a parent page without children
1. Navigate to Admin > Recycle Bin - OR - Navigate to a Recycle Bin module.2. Select the Pages tab.3. Select the a parent page name to select it. In the below example, the parent page that is selected
is called DIY Kits and it's child pages are called Hot Rod Kits, Spare Parts, Sticker Mania, and Vin-
tage Kits
4. Click theRestore Selected Page(s) link.

Search Engine Site Map
About the Search Engine SiteMap Module
The Search Engine SiteMap module (titled "Sitemap" in the ControlBar and when you add it to a site
page) allows users to configure a SiteMap that can then be submitted to one or more search engines for
improved search optimization. Sitemap providers for DotNetNuke allows any DotNetNuke module to par-
ticipate into the Google/Yahoo!/Bing Sitemap generation for your site. Sitemap files generated by Dot-
NetNuke Sitemap provider are fully compliant with protocol specification published at:
http://www.sitemaps.org/protocol.php
Permissions. All users who are granted permissions to view the module can configure and submit the Site-
Map.
Module Version: The version number is always the same as the DNN framework version number.

TheSitemapModule
Configuring the SiteMap Settings
How to configure the search engine settings and priorities using the Sitemap module.
1. Navigate to Admin > Advanced Settings > Search Engine Site Map - OR - Go to a Sitemapmodule.
2. The Sitemap URL field located at the top of the module displays the URL of your Sitemap as well
as the Sitemap providers that are enabled. E.g. http://awesomecycles.biz/SiteMap.aspx
3. Optional. Expand the Base Page URL's Settings section. Here you can modify the basic settings
that apply to general DotNetNuke pages.
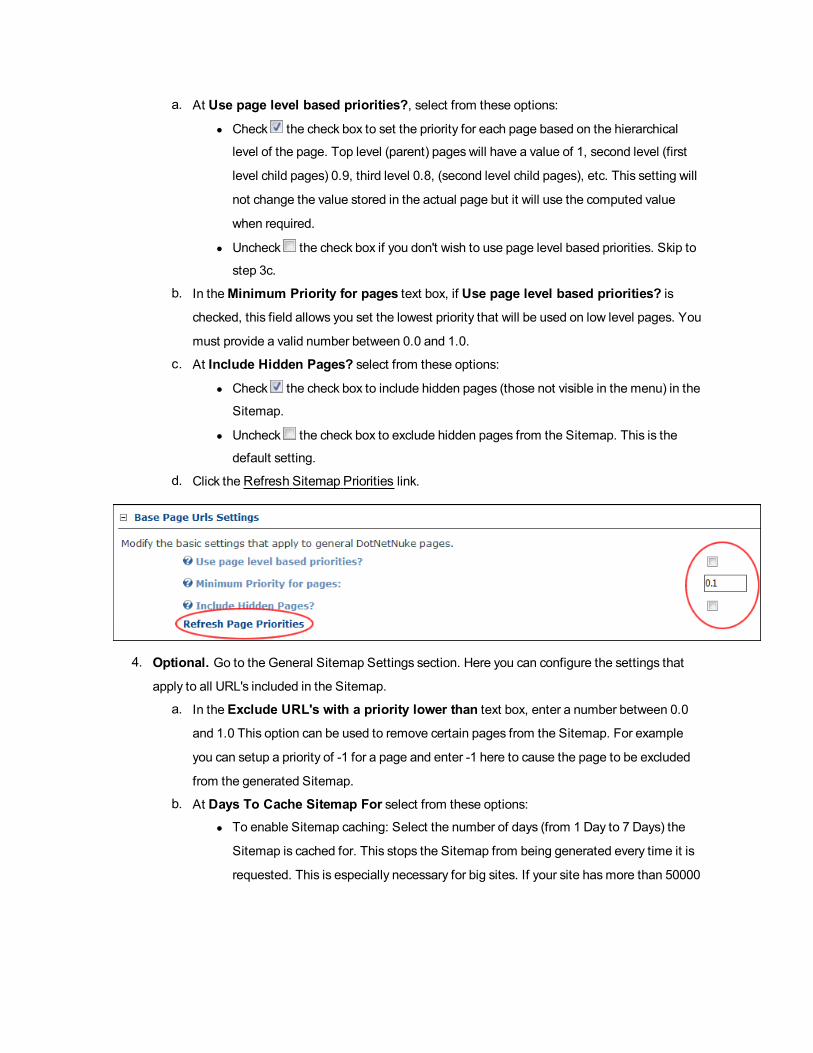
a. At Use page level based priorities?, select from these options:
l Check the check box to set the priority for each page based on the hierarchical
level of the page. Top level (parent) pages will have a value of 1, second level (first
level child pages) 0.9, third level 0.8, (second level child pages), etc. This setting will
not change the value stored in the actual page but it will use the computed value
when required.
l Uncheck the check box if you don't wish to use page level based priorities. Skip to
step 3c.
b. In theMinimum Priority for pages text box, if Use page level based priorities? is
checked, this field allows you set the lowest priority that will be used on low level pages. You
must provide a valid number between 0.0 and 1.0.
c. At Include Hidden Pages? select from these options:
l Check the check box to include hidden pages (those not visible in the menu) in the
Sitemap.
l Uncheck the check box to exclude hidden pages from the Sitemap. This is the
default setting.
d. Click theRefresh Sitemap Priorities link.
4. Optional. Go to the General Sitemap Settings section. Here you can configure the settings that
apply to all URL's included in the Sitemap.
a. In the Exclude URL's with a priority lower than text box, enter a number between 0.0
and 1.0 This option can be used to remove certain pages from the Sitemap. For example
you can setup a priority of -1 for a page and enter -1 here to cause the page to be excluded
from the generated Sitemap.
b. At Days To Cache Sitemap For select from these options:
l To enable Sitemap caching: Select the number of days (from 1 Day to 7 Days) the
Sitemap is cached for. This stops the Sitemap from being generated every time it is
requested. This is especially necessary for big sites. If your site hasmore than 50000
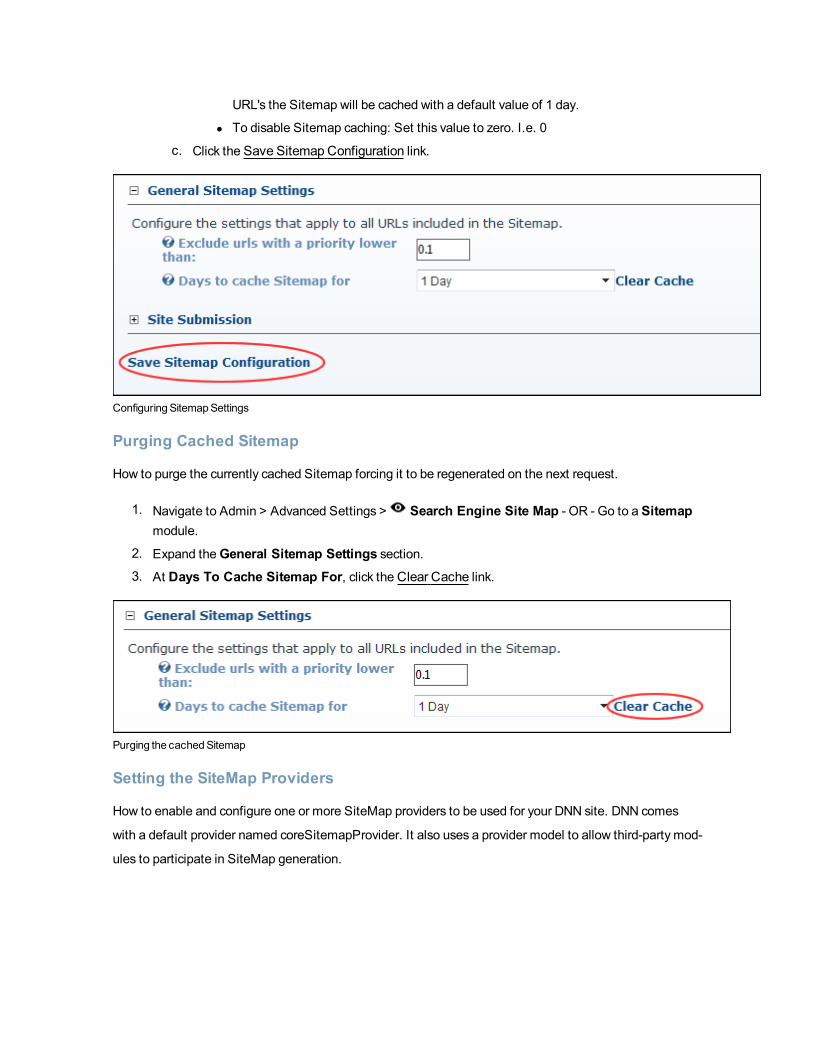
URL's the Sitemap will be cached with a default value of 1 day.
l To disable Sitemap caching: Set this value to zero. I.e. 0
c. Click the Save Sitemap Configuration link.
ConfiguringSitemapSettings
Purging Cached Sitemap
How to purge the currently cached Sitemap forcing it to be regenerated on the next request.
1. Navigate to Admin > Advanced Settings > Search Engine Site Map - OR - Go to a Sitemapmodule.
2. Expand theGeneral Sitemap Settings section.3. At Days To Cache Sitemap For, click theClear Cache link.
Purging the cachedSitemap
Setting the SiteMap Providers
How to enable and configure one or more SiteMap providers to be used for your DNN site. DNN comes
with a default provider named coreSitemapProvider. It also uses a provider model to allow third-party mod-
ules to participate in SiteMap generation.

1. Navigate to Admin > Advanced Settings > Search Engine Site Map - OR - Go to a Sitemapmodule.
2. Below the Sitemap URL field, you can view details SiteMap provider that is in use on this site.
3. Click the Edit button beside the Sitemap Provider to be modified.
4. At Enabled, select from these options:
l Check the check box to enable this SiteMap provider. If only one provider is enabled, skip
to Step 5.
1. Optional. At Override Priority, check the check box to override the priority given
to pages crawled by a SiteMap provider - OR - Uncheck the check box to use the
priority given to pages crawled by a SiteMap provider.
2. Optional. In the Priority text box, enter a numerical value to set the priority for this
provider.
l Uncheck the check box to disable it.
5. Click theUpdate button.
Submitting Site to Google
How to submit a site for indexing to the Google search engine using the Sitemap module. This tutorial
assumes you have already configured the Sitemap settings. See "Configuring the SiteMap Settings"
1. Navigate to Admin > Advanced Settings > Search Engine Site Map - OR - Go to a Sitemapmodule.
2. Expand the Site Submission section.

3. At Search Engine, select Google. When signing up with Google Webmaster Tools you will need
to Verify your site ownership. Choose the "Upload an HTML file" method from the Google Ver-
ification screen.
5. In the Verification text box, enter the file name displayed. E.g. google53c0cef435b2b81e.html6. Click theCreate button.7. Return to Google and select the Verify button.8. Return to the Sitemap module.
9. At Search Engine, click the Submit button.
SubmittingSite toGoogle
Submitting Site to Yahoo! or Bing
How to submit a site for indexing to either the Yahoo! or Bing search engine using the Sitemap module.
1. Navigate to Admin > Advanced Settings > Search Engine Site Map - OR - Go to a Sitemapmodule.
2. Expand the Site Submission section.
3. At Search Engine, select eitherBing or Yahoo!.4. Click the Submit link.5. Repeat Steps 3-4 to submit the site to the other search engine if desired.
SubmittingSitemap toYahoo! or Bing

Security Roles
About the Security Roles Module
The Security Rolesmodule enables the creation and management of security roles and security role
groups. It also permits authorized user to manage users within roles. This Admin module is located on the
Admin > Security Roles page and can be added to any site page. Note: This module forms part ofthe Users & Rolesmodule package.
Permissions. Usersmust be granted Edit Module (DNNCommunity Edition) or Edit Content (DNNPro-
fessional Edition) permissions to perform tasks.
Module Version: The version number is always the same as the DNN framework version number.
TheSecurity Roles Module
The following details of each role are displayed on the Security Rolesmodule by default:
l Role Name
l Role description
l Role fee and period
l Trial fee and period

l If the role is public
l If users are automatically assigned to the role
l The number of users belonging to the role
Security Roles can be configured in a number of ways to change the way users can access roles. The fol-
lowing options are available.
l Public Role: Roles set as public enable all registered users to be able to subscribe or unsubscribe
to the role. Public Roles are managed by authenticated users under Membership Services on the
View Profile (also called the My Profile) module.
l Private Role: When a role is not set as public, it is a private role. Only Administrators have access
to manage user access to these roles, unless the role includes an RSVP Code.
l RSVP Code: When a role includes an RSVP code, users can subscribe to the role by entering the
code into a text box under Manage Services on their profile. This provides a quick way to subscribe
and also enables subscriptions to be limited to those with the code if the role is set as Private.
l RSVP Link: The RSVP link setting automatically adds a user to that role when they go to the
RSVP link. This provides a very easy way of subscribing to a role.
l Auto Assignment: All registered users are automatically added to these roles upon registration. If
the role is also set as Public, users can unsubscribe and unsubscribe to it. If the role is set as Pri-
vate, only Administrators can manage user access.
Understanding Role Based Access
Access to view and manage the site content and settings is controlled using role based access. By asso-
ciating a user account with one or more security roles (also called roles) you can allow users access to
pages and modules.
The Security Rolesmodule has three (3) following default security roles: Administrators, Registered Users
and Subscribers.
l Administrators: Members of this role have full access to manage this site. This includes access to
add, delete and edit all pages and modules on the site. Members of this role also have access to
the Admin Console, which enable users to access all of the Site Administration modules which
other users can be authorized to access as well as the additional Pages, Solutions Explorer, What's
New, Pages and Site Settings pages. This role cannot be deleted or modified.
l Registered Users: Everyone who is a registered user of this site is amember of this role.
Members of this role canmanage their User Profile andmay be granted rights to view pages and
modules which are only displayed to logged in users. Registered user accounts can be set as

either Authorized or Unauthorized. If an account is Unauthorized, then the user cannot access
pages/modules that are restricted to this role. This role cannot be deleted or modified.
l Subscribers: All Registered Users are added to this role by default. Authenticated users can
unsubscribe or re-subscribe to this role under Membership Services on the View Profile (also
called theMy Profile) module. Administrators can delete andmodify this role.
The following terms are used throughout DNN and in this manual. They refer to groups of users as well as
their authentication status.
l All Users: All Users refers to all site visitors regardless of whether they are logged in or registered
on the site. This term is used on page and module setting pages to enable them to be set as acces-
sible to all users. This term is not used on the Security Rolesmodule.
l Authenticated Users: An authenticated user is a registered user who is logged into the site.l Unauthenticated Users: An unauthenticated user is a site visitor who isn't logged into the site.
This term is used on page settings and module setting pages, but is not displayed as a role on the
Security Rolesmodule. A typical application for these users would be to set a page or module as
viewable to Unauthenticated Users, but not to All Users. Then when an unauthenticated user logs
into the site, the page or module is no longer visible. This could be used for information about join-
ing the site which isn't relevant to users who are already registered.
l Module Deployer: A user or members of a role that has been granted permission to add one or
more types of modules to site pages. This term is used on the Extensionsmodule.
l Module Editors: A user who has been granted Edit / Edit Content permissions to a module.
l Page Editors: A user who has been granted Edit / Edit Content permissions to a page.
Restricting access and manage site files, pages and modules:
l Create and manage roles. See "About the Security Roles Module"
l Create and manage user accounts. See "About the User Accounts Module"
l Add users to roles. See "Adding a User to a Security Role"
l Restrict access to files which have been uploaded to the site. See "About the Admin File Manager
Module"
l Restrict access to view and manage modules. See "SettingModule Permissions"
l Restrict access to view and manage pages. See "Setting Page Permissions"
Related Topics:
l See "Setting Permissions to Deploy aModule"
l See "Enabling User Registration"

l See "Disabling User Registration"
All Users
Filtering Security Roles by Role Group
How to filter the security roles displayed in the Security Rolesmodule. You can choose to view all roles,
global roles or roles belonging to a role group . Note: One or more role groupsmust already exist to enable
the filter drop down list.
1. Navigate to Admin > Security Roles - OR - Go to a Security Rolesmodule.2. At Filter By Role Group, select one of the following options from the drop down list:
l < All Roles >: Displays all roles including both roles within and not within a role group.l < Global Roles >: Displays all roles that do not belong to a role group. The default global
roles are Administrators, Registered Users, Subscribers and Translator (en-US)
l [Role Group Name]: Select the name of a role group to view each of the roles within that
Role Group. For example, the below image displays a Staff role group.
Filtering by RoleGroup
Module Editors
User Settings
Managing User Account Settings
How to view and manage the settings applied to the User Accountsmodule. These settings can be
accessed using either the User Accounts or Security Rolesmodule.
l See "Configuring a Custom Registration Form"
l See "Configuring the Standard Registration Form"
l See "Managing Login and Logout Settings"
l See "Managing Profile Settings"
Adding a Role Group
How to add a role group to a Security Role using the Security Rolesmodule. Role Groups enable you to
group multiple roles together, making them easier to manage. E.g. The Role Group called Staff could
have the following Security Roles associated with it: All Staff, Telemarketing, Marketing, Sales, Infor-
mation Technology, etc. Roles can be filtered by Role Group, which is useful on sites with a large number
of roles. Once a role group has been added, one or more security roles can be added to the role group.
See "Adding a Security Role (Basic Settings)" and See "Editing a Security Role"
1. Navigate to Admin > Security Roles - OR - Go to a Security Rolesmodule.2. Click theAdd New Role Group button.3. In theGroup Name text box, enter a name for the Security Role Group. E.g. Staff4. In theDescription text box, enter a brief description of the Security Role Group.

5. Click theUpdate button.
Adding a Security Role (Basic Settings)
How to add a basic security role to a site using the Security Rolesmodule.
1. Navigate to Admin > Security Roles - OR - Go to a Security Rolesmodule.2. Click theAdd New Role button.3. Select theBasic Settings tab.4. In theRole Name text box, enter a name for the Security Role. This is the only required field.
Choosing to update this role now and accept the default settings will add a private role that users
cannot subscribe to.
5. Optional. In theDescription text box, enter a brief description of this role.
6. Optional. At Role Group, select a group for this role if desired. Note: One or more role groups
must already be created to set this field. You can also associate a role with a role group at a later
time. See "Adding a Role Group"
7. At Public Role?, select one of the following options:
l Check the check box if all users are able to view details of this role and subscribe to this
role. Users can subscribe to or unsubscribe from these roles when theymanage their profile.
l Uncheck the check box if the role is Private. Only Administrators can add a user to a pri-
vate role unless it has an RSVP Code or RSVP Link (see below) that has been supplied to
the user.
8. At Auto Assignment, select one of the following options:l Check the check box if users are automatically assigned to this role. This will expose the
"Assign to existing users" field.
l At Assign to Existing Users, check the check box to assign all current and
future users to this role - OR - Uncheck the check box to only assign any new users
that are created to this role.
l Uncheck the check box if usersmust be manually added to the role. If the role is public,
then users can add themselves. If the role is not public, then only Administrators and Super-
Users can add user to the role.
9. At Security Mode, select one of the following options:l SecurityRole: Select to add a security role.l SocialGroup: Select to add a social group. Social groups are displayed on the Social
Groupsmodule allowing site members to join, follow and participate in groups.
l Both: Select to add a role that is both a social group and a security role.10. At Status, select one of the following options:
l Disabled: The Role Group is not available regardless of the "Public Role" setting.l Approved: The Role Group is available dependent upon the "Public Role" setting.l Pending: The Role Group is available to non-Administrators/SuperUsers regardless of the
"Public Role" setting. However, the Group is not permitted until it is moved to "Approved"
status.
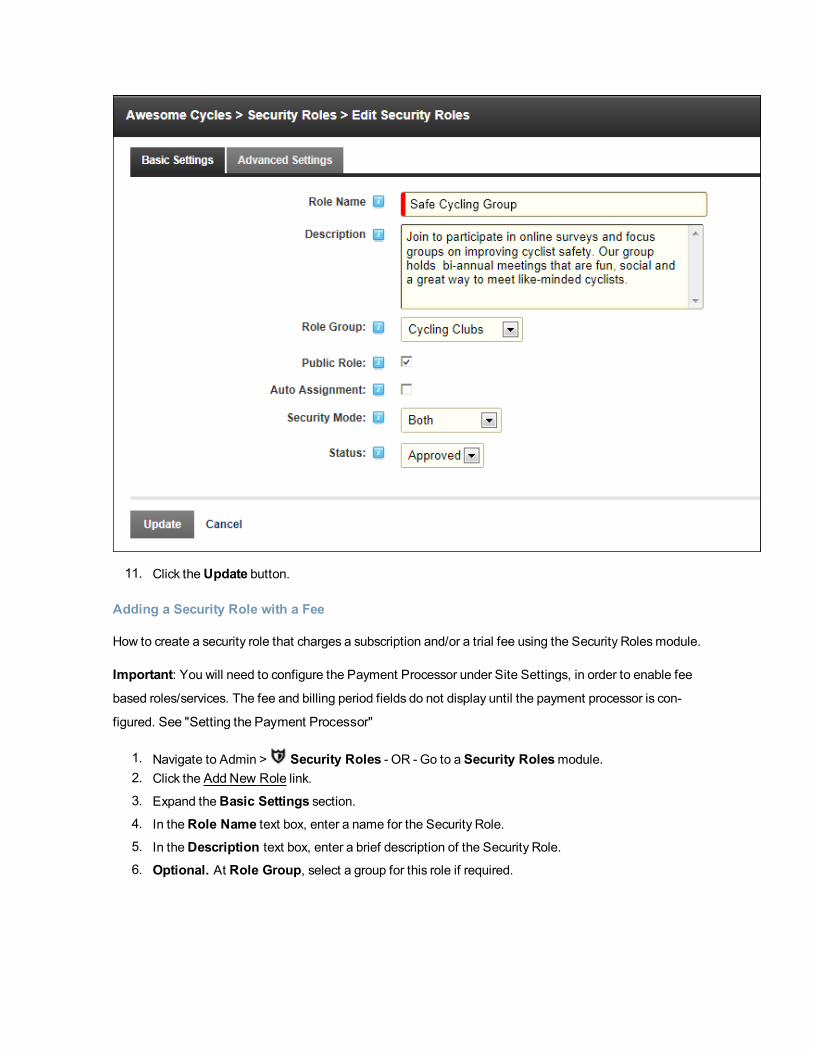
11. Click theUpdate button.
Adding a Security Role with a Fee
How to create a security role that charges a subscription and/or a trial fee using the Security Rolesmodule.
Important: You will need to configure the Payment Processor under Site Settings, in order to enable fee
based roles/services. The fee and billing period fields do not display until the payment processor is con-
figured. See "Setting the Payment Processor"
1. Navigate to Admin > Security Roles - OR - Go to a Security Rolesmodule.2. Click the AddNew Role link.
3. Expand theBasic Settings section.4. In theRole Name text box, enter a name for the Security Role.5. In theDescription text box, enter a brief description of the Security Role.
6. Optional. At Role Group, select a group for this role if required.

7. At Public Role?, select one of the following options:
l Check the check box if all users are able to view details of this role and subscribe to this
role. Public Roles can be maintained by user on their profile under Manage Service.
l Uncheck the check box if the role is Private. Details of private roles are not displayed on
the user profile page. Only Administrators can add a user to a Private role unless it has an
RSVP Code (see below) which has been supplied to the user.
8. At Auto Assignment, select one of the following options:l Check the check box if users are automatically assigned to this role. This will expose the
"Assign to existing users" field.
l At Assign to Existing Users, check the check box to assign all current and
future users to this role - OR - Uncheck the check box to only assign any new users
that are created to this role.
l Uncheck the check box if usersmust be manually added to the role. If the role is public,
then users can add themselves. If the role is not public, then only Administrators and Super-
Users can add user to the role.
9. At Security Mode, select one of the following options:l Security Role: Select to add a security role.l Social Group: Select to add a social group. Social groups are displayed on the Social
Groupsmodule allowing site members to join, follow and participate in groups.
l Both: Select to add a role that is both a social group and a security role.10. At Status, select one of the following options:
l Disabled: The Role Group is not available regardless of the "Public Role" setting.l Approved: The Role Group is available dependent upon the "Public Role" setting.l Pending: The Role Group is available to non-Administrators/SuperUsers regardless of the
"Public Role" setting. However, the Group is not permitted until it is moved to "Approved"
status.
11. At Security Mode, select one of the following options:l Security Role: Select to add a security role.l Social Group: Select to add a social group. Social groups are displayed on the Social
Groupsmodule allowing site members to join, follow and participate in groups.
l Both: Select to add a role that is both a social group and a security role.12. At Status, select one of the following options:
l Disabled: The Role Group is not available regardless of the "Public Role" setting.l Approved: The Role Group is available dependent upon the "Public Role" setting.
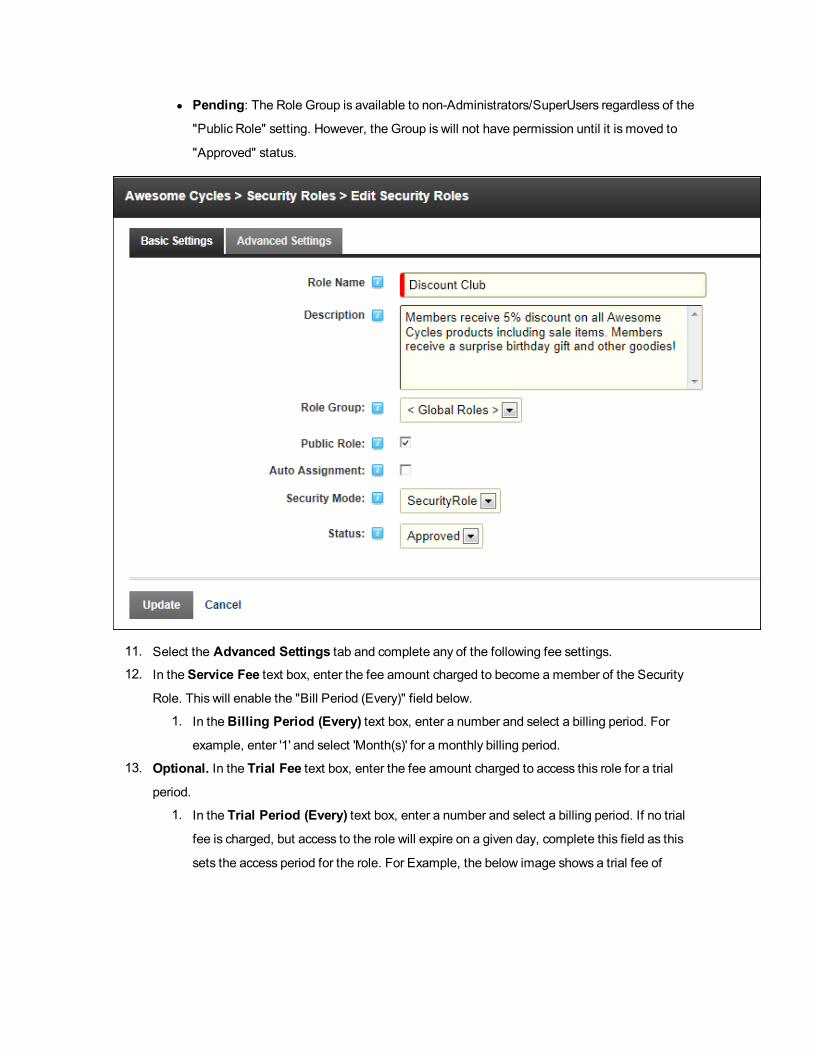
l Pending: The Role Group is available to non-Administrators/SuperUsers regardless of the
"Public Role" setting. However, the Group is will not have permission until it is moved to
"Approved" status.
11. Select the Advanced Settings tab and complete any of the following fee settings.12. In the Service Fee text box, enter the fee amount charged to become a member of the Security
Role. This will enable the "Bill Period (Every)" field below.
1. In theBilling Period (Every) text box, enter a number and select a billing period. For
example, enter '1' and select 'Month(s)' for a monthly billing period.
13. Optional. In the Trial Fee text box, enter the fee amount charged to access this role for a trial
period.
1. In the Trial Period (Every) text box, enter a number and select a billing period. If no trial
fee is charged, but access to the role will expire on a given day, complete this field as this
sets the access period for the role. For Example, the below image shows a trial fee of

$10.00 that will be charged for the first 3 months, after which the fee will revert to the stand-
ard Service Fee of $10.00 per month.
14. Optional. In theRSVP Code text box, enter a code that enables users to subscribe to this role.15. Optional. At Icon, select or upload an image for the role. See "Setting a File Link"
16. Click theUpdate button.
Related Topics:

l See "Adding a Security Role with an RSVP Code"
Adding a Security Role with an RSVP Code
How to create an RSVP Code for a security role using the Security Rolesmodule. The RSVP feature pro-
vides you with a code and a link that you can share with users to give them a simple way to join a role. The
RSVP link can be sent to your users allowing them to subscribe simply by clinking on the link. Alter-
natively, users can enter the RSVP code on the Manage Services page of their User Profile to join a role.
1. Navigate to Admin > Security Roles - OR - Go to a Security Rolesmodule.2. Click theAdd New Role link.3. On theBasic Settings tab, complete the required fields. See "Adding a Security Role (Basic Set-
tings)"
4. Select theAdvanced Settings tab.5. In theRSVP Code text box, enter a code that will enable users to subscribe to this role. The code
can be any combination of letters and numbers. E.g. N!ce
6. Click theUpdate link to save the role and generate the RSVP link that is displayed on the Edit
Security Roles page.
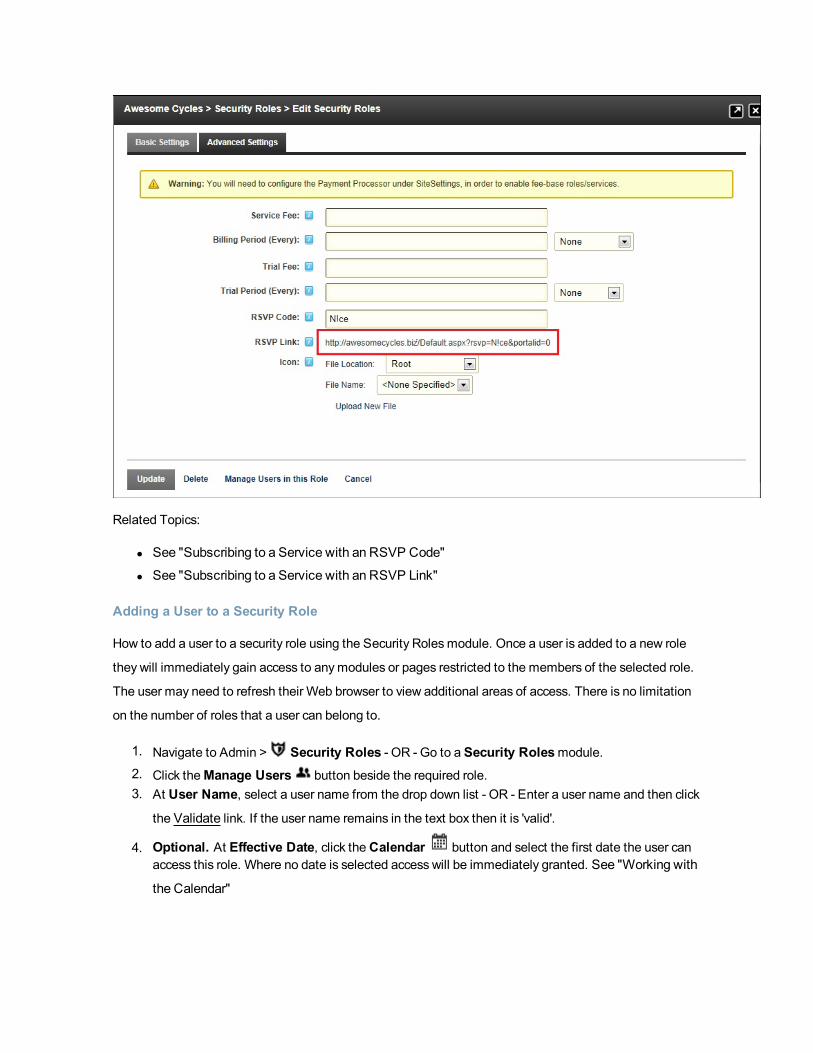
Related Topics:
l See "Subscribing to a Service with an RSVP Code"
l See "Subscribing to a Service with an RSVP Link"
Adding a User to a Security Role
How to add a user to a security role using the Security Rolesmodule. Once a user is added to a new role
they will immediately gain access to anymodules or pages restricted to the members of the selected role.
The user may need to refresh their Web browser to view additional areas of access. There is no limitation
on the number of roles that a user can belong to.
1. Navigate to Admin > Security Roles - OR - Go to a Security Rolesmodule.2. Click theManage Users button beside the required role.3. At User Name, select a user name from the drop down list - OR - Enter a user name and then click
the Validate link. If the user name remains in the text box then it is 'valid'.
4. Optional. At Effective Date, click theCalendar button and select the first date the user canaccess this role. Where no date is selected access will be immediately granted. See "Working with
the Calendar"
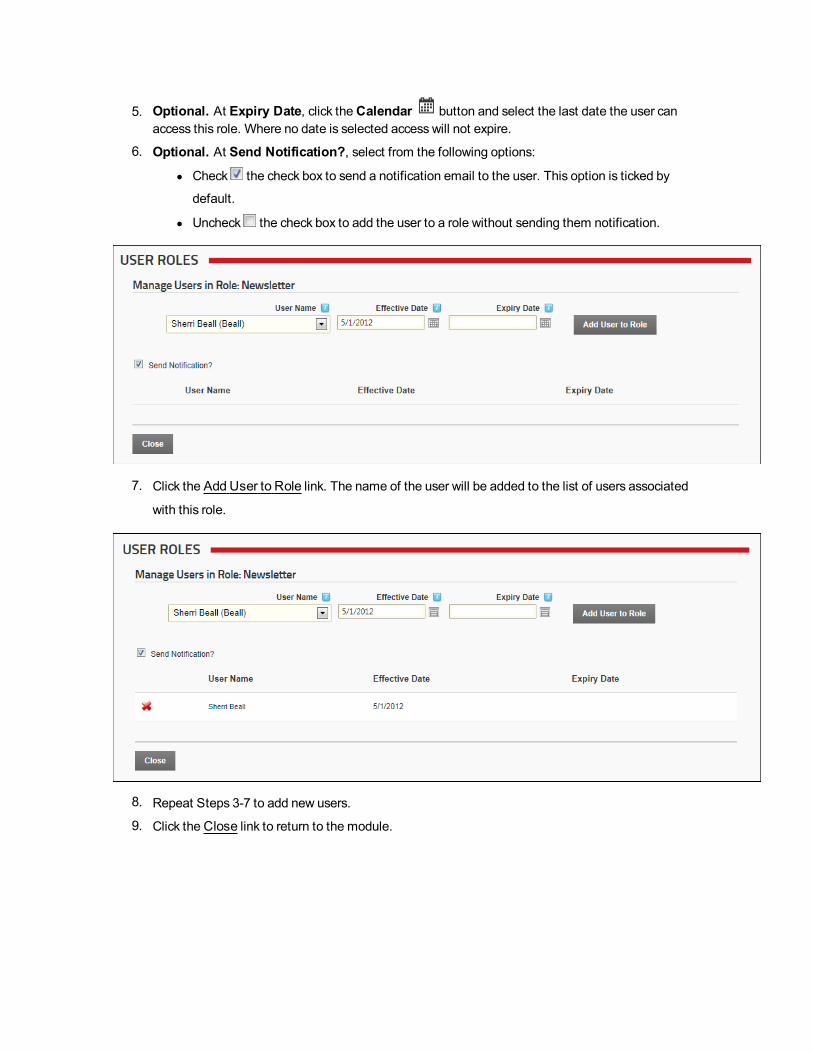
5. Optional. At Expiry Date, click theCalendar button and select the last date the user canaccess this role. Where no date is selected access will not expire.
6. Optional. At Send Notification?, select from the following options:
l Check the check box to send a notification email to the user. This option is ticked by
default.
l Uncheck the check box to add the user to a role without sending them notification.
7. Click the AddUser to Role link. The name of the user will be added to the list of users associated
with this role.
8. Repeat Steps 3-7 to add new users.
9. Click theClose link to return to the module.

Creating a Membership Service
How to create a Membership Service using the Security Rolesmodule. A Membership Service is a security
role that is set as Public. These roles are displayed to users when theymanage their account under the
Manage Services link on the Manage Profile page. For here users can view details of the available mem-
bership services and elect to subscribe to or unsubscribe to them. A trial period, trial fee, service period,
and service fee can also be set for membership services. See "Adding a Security Role with a Fee"
1. Navigate to Admin > Security Roles - OR - Go to a Security Rolesmodule.2. Click theAdd New Role button.3. Go to theBasic Settings section.4. In theRole Name text box, enter a name for the role.5. Optional. In theDescription text box, enter a brief description of the role.
6. Optional. At Role Group, select a role group for this role if required.7. At Public Role?, check the check box to set this role as a Membership Service.8. Optional. At Auto Assignment, select from the following options:
l Check the check box to assign all users to this role. This includes both existing and new
users.
l Uncheck the check box if usersmust subscribe to the role.9. At Security Mode, select one of the following options:
l Security Role: Select to add a security role.l Social Group: Select to add a social group. Social groups are displayed on the Social
Groupsmodule allowing site members to join, follow and participate in groups.
l Both: Select to add a role that is both a social group and a security role.10. At Status, select one of the following options:
l Disabled: The Role Group is not available regardless of the "Public Role" setting.l Approved: The Role Group is available dependent upon the "Public Role" setting.l Pending: The Role Group is available to non-Administrators/SuperUsers regardless of the
"Public Role" setting. However, the Group is not permissioned until it is moved to
"Approved" status.

11. Click theUpdate button.
Tip: The new role is now displayed as a member's service on the View Profile (also called the My
Profile) module.

Member Services displayed on theManageProfile page on theUser Profile page
Deleting a Role Group
How to delete a role group from the Security Rolesmodule. Note: If a role group has associated roles, the
delete option will not be displayed.
Prerequisite. You must first remove all roles belonging to a role group before deleting it. This can be
achieved by editing each role associated with the Role Group and either changing the associated role
group or disassociating the role group from all roles. See "Editing a Security Role"
1. Navigate to Admin > Security Roles - OR - Go to a Security Rolesmodule.2. At Filter By Role Group, select the role group from the drop down list.
3. Click theDelete button. This displays the message "Are You Sure YouWish To Delete This
Item".
4. Click theOK button to confirm.

Deleting a Security Role
How to permanently delete a security role from the Security Rolesmodule. This will also delete the infor-
mation of which users were members of this role.
Tip: The Administrators and Registered Users roles cannot be deleted.
1. Navigate to Admin > Security Roles - OR - Go to a Security Rolesmodule.2. If the required role is not displayed, at Filter By Role Group select the [Role Group Name] asso-
ciated with the role, or select < All Roles >.3. Click the Edit button beside the role to be deleted.
4. Click theDelete link. This displays the message "Are You Sure YouWish To Delete This Item?"
5. Click theOK button to confirm.

Deleting a User from a Security Role
How to delete a user from a security role using the Security Rolesmodule. Users will immediately be
denied access to anymodules or pages which are restricted to members of the selected roles.
1. Navigate to Admin > Security Roles - OR - Go to a Security Rolesmodule.2. If the required role is not displayed, at Filter By Role Group select the [Role Group Name] asso-
ciated with the role - OR - Select < All Roles >.
3. Click theManage Users button beside the required role. This opens the Manage Users In Rolepage for the selected role.
4. Locate the user and click theDelete button located to the left of their name. This displays themessage "Are you sure you want to remove [username] from the [role name] role?"
5. Click theOK button to confirm.
Tip: On the Manage Users In Role page, each user who is a member of the role is listed by User-
name. Clicking on a linked Username will display their users profile and enable you to check their
account details and ensure you have the correct user.
Editing a Role Group
How to edit a security role group using the Security Rolesmodule.

1. Navigate to Admin > Security Roles - OR - Go to a Security Rolesmodule.2. At Filter By Role Group, select the role group from the drop down list. This displays the Edit but-
ton beside this field.
3. Click the Edit button. This opens the Edit Role Group page.
4. Edit the role group as required.
5. Click theUpdate button.
Editing a Security Role
How to edit the settings and details of a security role using the Security Rolesmodule.
1. Navigate to Admin > Security Roles - OR - Go to a Security Rolesmodule.2. If the required role is not displayed, at Filter By Role Group select the role from the drop down
list.
3. Click the Edit button beside the role to be edited.

4. Edit the settings as required.
5. Click theUpdate button.
Editing a User's Security Role Access
How to modify the date range that a user is able to access a security role using the Security Rolesmodule.
1. Navigate to Admin > Security Roles - OR - Go to a Security Rolesmodule.2. Click theManage Users button beside the role.3. At User Name, select the required user from the drop down list - OR - Enter the user's User Name
into the text box and then click the Validate link. If the user name remains in the text box then it is
'valid'.
4. Optional. At Effective Date, click theCalendar button and select the first date the user canaccess this role. Leave this field blank for immediate access to the role.
5. Optional. At Expiry Date click theCalendar button and select the last date the user canaccess this role. Leave this field blank if access to the role does not expire.
6. At Send Notification?, select from the following options:
l Check the check box to send a notification email to the user informing them of their new
role access. This is the default setting.
l Uncheck the check box to add the user to the role without notifying them.

7. Click the AddUser To Role link. This either adds a new record for this user in the User Name table
below, or updates the existing record.
8. Click theCancel link to return to the module.
Related Topics:
l See "Working with the Calendar"
Obtaining an RSVP Link
How to obtain an RSVP link using the Security Rolesmodule. Once you have created a security role with
an RSVP Code an RSVP Link will be generated for that role. Users can subscribe to the role simply by
clicking on the link or going to the URL.
1. Navigate to Admin > Security Roles - OR - Go to a Security Rolesmodule.2. If the required role is not displayed, at Filter By Role Group select the [Role Group Name] asso-
ciated with the role, or select [All Roles]< All >.3. Click the Edit button beside the required role.
4. Select theAdvanced Settings tab.5. At RSVP Link, copy the link.

6. Click theCancel link to return to the module.
Related Topics:
l See "Subscribing to a Service with an RSVP Code"
l See "Subscribing to a Service with an RSVP Link"
SharePoint Connector
About the SharePoint Connector Module
DotNetNuke's Enterprise Edition is for organizations with a sophisticated IT infrastructure and multiple con-
tent contributors that deploy DotNetNuke in critical web applications. The Microsoft SharePoint Connector
enables organizations to leverage the power of the SharePoint Enterprise Content Management (ECM)
solution and the flexibility of the DotNetNukeWeb Content Management System (CMS). Organizations
can securely, cost effectively publish documents stored in their SharePoint document repository to a public
web site, extranet or intranet powered by DotNetNuke. The connector ensures that only the last checked-in
version of documents and SharePoint Lists is exposed, ensuring adherence to governance rules and best
business practices.
The SharePoint Connector module enables SuperUsers and Administrators to synchronize files between a
SharePoint site and a DNN site. Files that are maintained on SharePoint are the 'master' source files that
are then 'pushed' to your DNN site.
l See "Installing DotNetNuke Connector (SP2007)"
l See "Installing DotNetNuke Connector (SP2007)"
The SharePoint Connector module is located on both the Host > Advanced Settings > SharePoint Con-
nector page and the Admin > Advanced Settings > SharePoint Connector page. The SharePointViewer module can be module can also be added to any site page. Only available in DotNetNuke Enter-
prise Edition
Features:
l Files deletes from your SharePoint can optionally be deleted from your DNN site, as configured for
each Synchronization Item.
l Synchronization can be scheduled according to your business requirements.
l A Log Viewer is integrated with SharePoint Connector to enable Administrators and SuperUsers to
view, manage and send log entries. See "About the Log ViewerModule"

TheSharePoint Connector Module
SharePoint Connector Benefits
The Enterprise Edition SharePoint Connector allows you to take advantage of the SharePoint Document
Library 2007 (MOSS andWSS 3.0) and 2010 (Foundation, Standard and Enterprise) to deploy documents
to your web site, intranet or extranet. You can schedule the deployment of the desired SharePoint Views
and Folders from your SharePoint Document Library to your DotNetNuke site and manage the documents
using any available DotNetNuke document management module.

Feature
Easy to
Configure
Automated Document Push
Using the standard SharePoint Central Administration console, you can easily configure and
schedule your document deployment from SharePoint to DotNetNuke. Publishing schedules
are flexible and can be set for every hour, day or week.
Flexible Configuration
DotNetNuke's SharePoint connector can be enabled and configured independently in every
site collection, allowing the Site Collection Administrator to have full control over their doc-
uments.
Publish Existing SharePoint Views and File Structures
Reuse your existing SharePoint folder structures and views. Publish them to your Dot-
NetNuke public web site, intranet or extranet.
Manage Document Deletions
Specify whether deleted documents are automatically removed from your DotNetNuke site.
Configure Email Alerts
Receive an email notification when an exception occurs such as an unsupported file exten-
sion or a file is too large.
Secure SharePoint Stays Behind Your Firewall
Your SharePoint server remains safe behind your firewall. Only the specific documents you
choose to publish are available on your DotNetNuke site.
Leverage the Extended DotNetNuke Security Model
Use the full complement of DotNetNuke security features to control access to documents on
your web site. Active Directory integration allows you to configure employee permissions. The
granular DotNetNuke Enterprise Edition permissionsmodel allows you to expose documents
to a broad or very narrow group, from any anonymous visitor to only a subset of company
employees.
Granular Activity Tracking
Available options include tracking documents published, documents deleted, publishing
events, and exceptions.
HTTPS Support
Flexible Use for Any Type of Site
DotNetNuke is easily configurable as a public web site, extranet or intranet solution. Control

site access using the granular security features built into the Enterprise Edition. You can also
publish documents from multiple site collections to a single DotNetNuke site and from a sin-
gle site collection to multiple DotNetNuke sites*
Cost
Effective
Reduce Upfront Costs
DotNetNuke offers a lower total cost of ownership when used as a public facing web site solu-
tion. DotNetNuke costsmuch less than SharePoint to initially configure as a web front end.
Minimize Operational Costs The Enterprise Edition is much less expensive on a yearly basis
than a SharePoint Internet Connector license for web sites with anonymous visitors. Sharing
documents via a DotNetNuke web site may also reduce the need for SharePoint CALs, fur-
ther reducing ongoing costs.
SharePoint Connector FAQ'sFrequently asked questions regarding the SharePoint Connector.
Q. Where are the documents stored on DotNetNuke?
A. The user can choose any of the available options in DotNetNuke, this can include Standard, Secure
and Database Folders, as well as any options available through a folder provider, like: Amazon S3, UNC,
etc.
Q. What versions of SharePoint are supported?
A. SharePoint Document Library 2007 (MOSS andWSS 3.0) and 2010* (Foundation, Standard and Enter-
prise)
Q. Is there a limit to number of files or file size?
A. Yes, the number of files and folders is managed by the Farm Administrator from SharePoint's Central
Administration. In regards to the file size, DotNetNuke has an option under the host settings that limits the
size of the files on the website; the SharePoint Connector compares the files against that number before
publishing them to the website, and any files that are bigger than what the website allows are not pub-
lished and an error message is logged.
Q. Is there a maximum number of synchronization items?
A. No.
Q. What are the security specifics? How are documents moved securely from SharePoint to
DNN?
A. The connector can be configured to use SSL but it is not required.
Q. Does it synch only documents or also other content?
A. It syncs images, videos and any other files allowed in DotNetNuke. For example, you can publish an
html file if the website is configured to allow html files.
Q. From DNN can you link to a folder in SharePoint and show that doc tree in DNN?
A. You can publish complete folder structures to DNN and show them in a tree. However configuring DNN
to point to a SharePoint folder is not possible.
Q. Can you push items in SharePoint from a local network to an internet site without opening
ports?
A. Assuming port 80 is open (this is usually the case), yes.
Q. Can I upload to SharePoint directory through DNN?
A. No, currently we only offer a one way deployment (SharePoint to DNN). The main reason is because a
reverse integration would require our users to open a port in their firewall and allow an external system to
write into their intranet, which is not a standard practice.
Q. Is there a way to import content directly into modules?
A. You can use documents / images / videos in a module and update them if the file gets updated in
SharePoint.
Q. Do we need to use the Document Library?
A. The SharePoint Connector works with anymodule that integrates with the file system and folder pro-
viders. For example: document library, file manager, html module, documentsmodule, and 3rd party mod-
ules like DMX, etc.
Q. When you delete from SharePoint does it delete from the website?
A. Yes, if "propagate deletions" is selected the file will be deleted from DNN. However, it will result in a
broken link if there are references to that file from amodule. For example: if there is a link to the document
from the HTMLmodule
Q. How is it set up? For each SharePoint site? Can you use a common connector?
A. The connector is installed for the server farm and it can be enabled for any of the individual Site Col-
lections.
Q. How are permissions handled from SharePoint to a DNN site?

A. Permissions are managed with DotNetNuke's Security Model.
Q. Is the SharePoint connector installed on the web server or SharePoint server?
A. The Connector is installed in the SharePoint server but there is also a SharePoint module on the web-
site.
Q. Is there a limitation on the number of users who can contribute files?
A. DotNetNuke SharePoint Connector does not have limitations on the number of users.
Q. Is there a way to manage permissions across SharePoint and DNN?
A. No, the main reason is because in many cases users and roles are not the same in the intranet and the
public website.
Q. Are there admin controls for preventing SharePoint users from adding or deleting content
from the website?
A. No. We do not have a way of enabling / disabling individual actions.
Q. Can you buy the SharePoint connector separately?
A. No. Only it is only available as part of the DotNetNuke Enterprise Edition.
Q. Is it possible to use self-signed SLL certificate for HTTPS connection?
A. Yes, you can enable skipping of SSL certificate validation in SharePoint for debug purpose.
Q. Is it possible to delete Item in SharePoint List from DNN?
A. It is possible to delete SharePoint List item from Live List. Removing from Synchronized List is not sup-
ported.
Q. Is it possible to delete Synchronization List from DNN?
A. No, Synchronization List Item must be deleted from SharePoint.
Q. Is it possible to perform synchronization manually without Scheduler?
A. It is possible to perform manual synchronization for Synchronized List item in SharePoint.
SharePoint 2010
Managing Roles Security for SharePoint Connector (SP2010)
How to set the required roles security on your SharePoint 2010 Server for SharePoint Connector
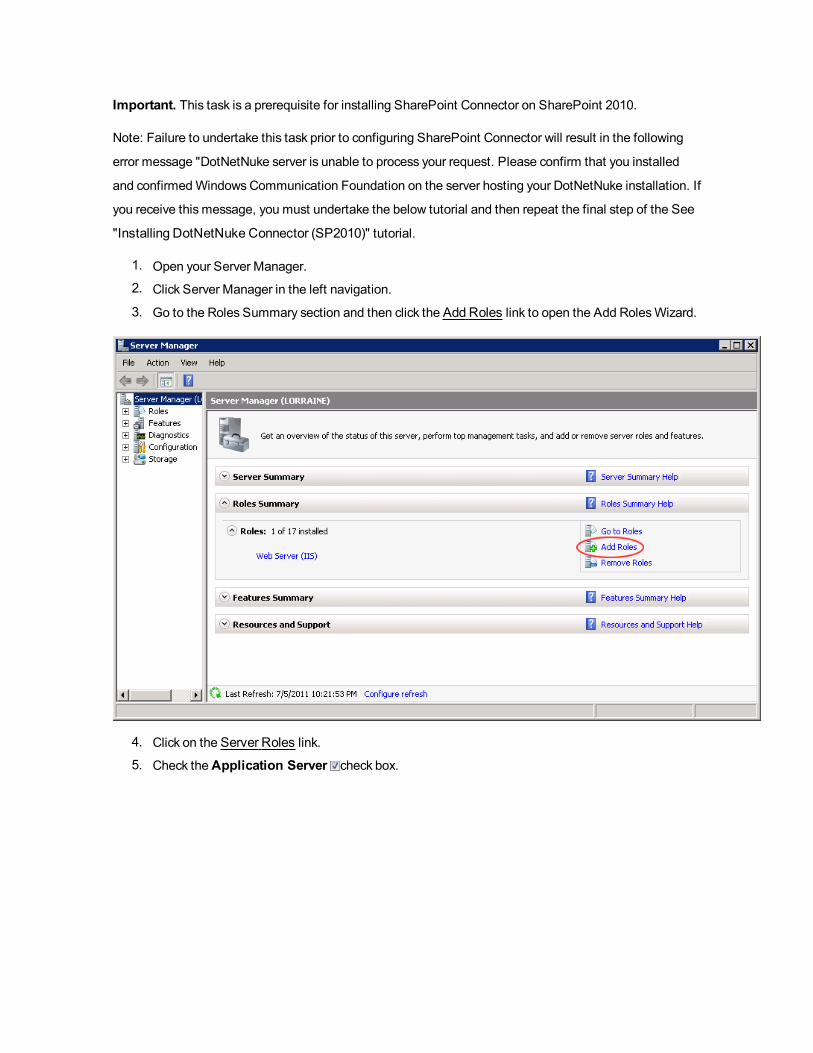
Important. This task is a prerequisite for installing SharePoint Connector on SharePoint 2010.
Note: Failure to undertake this task prior to configuring SharePoint Connector will result in the following
error message "DotNetNuke server is unable to process your request. Please confirm that you installed
and confirmedWindowsCommunication Foundation on the server hosting your DotNetNuke installation. If
you receive this message, you must undertake the below tutorial and then repeat the final step of the See
"Installing DotNetNuke Connector (SP2010)" tutorial.
1. Open your Server Manager.
2. Click Server Manager in the left navigation.
3. Go to the Roles Summary section and then click the AddRoles link to open the Add RolesWizard.
4. Click on the Server Roles link.
5. Check theApplication Server check box.

6. Click theNext button until you advance to the Select Roles Services page.7. Check theWeb Server (IIS) Support check box. This opens the Add RolesWizard.
8. Click theAdd Required Roles Services button.

9. Click all theNext buttons until the Install button is enabled.10. Click the Install button. The Installation will now commence running. The Results page is dis-
played once the installation is completed.
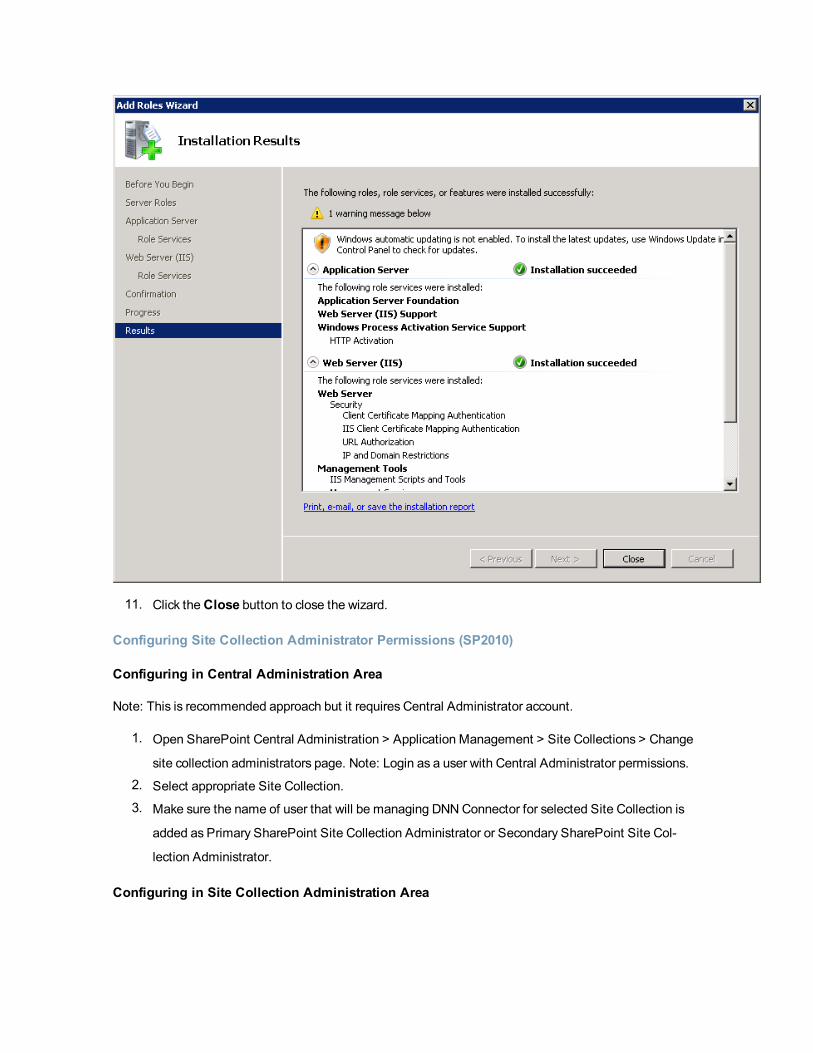
11. Click theClose button to close the wizard.
Configuring Site Collection Administrator Permissions (SP2010)
Configuring in Central Administration Area
Note: This is recommended approach but it requires Central Administrator account.
1. Open SharePoint Central Administration > Application Management > Site Collections > Change
site collection administrators page. Note: Login as a user with Central Administrator permissions.
2. Select appropriate Site Collection.
3. Make sure the name of user that will be managing DNNConnector for selected Site Collection is
added as Primary SharePoint Site Collection Administrator or Secondary SharePoint Site Col-
lection Administrator.
Configuring in Site Collection Administration Area

Note: This approach is useful when one Site Collection Administrator wants to assign another user as Site
Collection Administrator.
1. Open Site Actions > Site Settings > Users and Permissions > Site collection administrators page>
Note: Login as a user with Site Collection Administrator permissions.
2. Add account of a user that will be managing DNNConnector for current Site Collection into Site
Collection Administrator field.
Installing DotNetNuke Connector (SP2010)
How to deploy the DotNetNuke Connector to your SharePoint 2010 server. This task is performed by the
SharePoint Farm Administrator.
Prerequisite 1. You must have the DNN Timer Job file which is available from the DotNetNuke Support
Network. The default Timer Job name is "DotNetNuke_Enterprise_6.1.5_Share-
PointConnector2010.wsp".
Prerequisite 2. Full Trust must be enabled on the DNN site by a SuperUser. Note: Failure to undertake
this task prior to configuring SharePoint Connector will result in the following error message "That
assembly does not allow partially trusted callers. The DotNetNuke server has rejected your request to
pair". If you receive this message, you must enable full trust and then repeat the final step of the below
tutorial.
Prerequisite 3. Set appropriate role security levels on your SharePoint server. See "Managing Roles
Security for SharePoint Connector (SP2010)"
1. Go to your SharePoint Server.
a. Paste a copy of the wsp file into the c: drive.
b. Click theWindowsStart button.c. In the Search box, enter cmd and then press and hold theCtrl + Shift + Enter keys. This
opens the Command Prompt window in elevated privilege mode.
d. In the Command Prompt window, enter the below path. Note: You cannot copy and paste
this path, instead it must be typed into the Command Prompt. "C:\Program Files\Co-
mmon Files\microsoft shared\Web Server Exten-
sions\14\BIN\stsadm" -o addsolution -filename " c:\DotNetNuke_
Enterprise_6.1.5_SharePointConnector2010.wsp"
e. Strike the Enter key. The "Operation Completed Successfully" message is displayed.

2. Go to your SharePoint Central Administration.
a. Navigate to Central Admin > System Settings > Manage Farm Solutions. This opens the
Solution Properties page.
b. In the Name column, click on the Timer Job file name. E.g. DotNetNuke_Enterprise_6.1.5_
SharePointConnector2010.wsp
c. Click theDeploy Solution link. This opens the Deploy Solution page.
d. In theDeploy When section, ensure the solutions is set to deployNow.e. Click theOK button to confirm.

f. You are now returned to the Solution Management page, where the DNNSharePoint Con-
nector solution status is now listed as "Deployed".

Next Step: The DotNetNuke Connector must now be activated for each SharePoint site where it will be
used. See "Activating the DotNetNuke Connector (SP2010)"
Setting the Synchronization Schedule (SP2010)
How to configure the synchronization settings for the DotNetNuke Connector. In this section SharePoint
Farm Administrators can modify the defaults that set the number of items saved in the history, set the max-
imum number of files and folder transferred during synchronization and request email notifications if an
error occurs during synchronization. You can also set the Synchronization Schedule that determines how
frequently files are pushed from your SharePoint site to your DNN site.
1. Go to your SharePoint Central Administration.
2. Click on the Site Actionsmenu and then select Site Settings.
3. Click theGeneral Application Settings link.
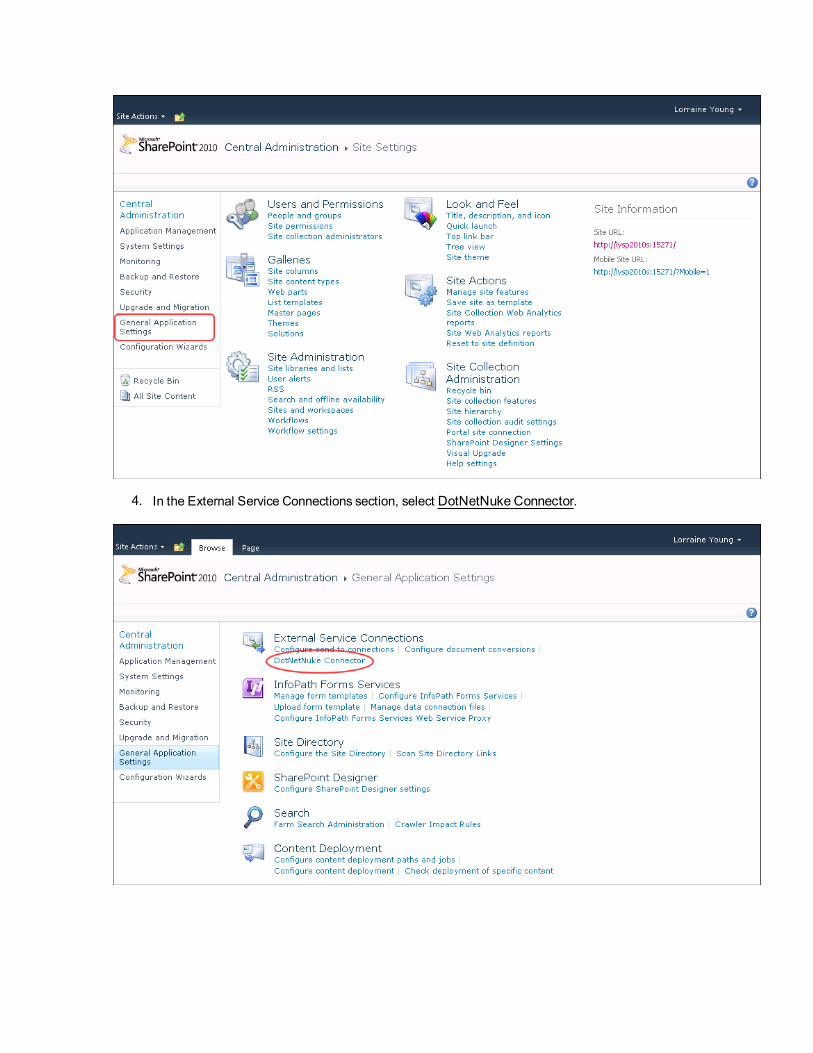
4. In the External Service Connections section, select DotNetNuke Connector.

5. You can now choose to modify the following default schedule settings, or skip to the Step 4 to set
the synchronization schedule.
a. Optional. In the Item History section, enter the number of items that will be saved in the
history into theNumber Of Items text box. Older itemswill be deleted from the queue. The
default setting is 10.
b. Optional. In the Folder and Folder Limit section, enter the maximum number of files
and folders to be transferred during synchronization. The default limits are 2000 files and
5000 folders.
c. Optional. In the Email Notifications section, check the Enable check box to enable
email notification to be sent if an error occurs during synchronization. Note: Site Collection
Administrators can also manage email notifications for their site. See "Enabling Syn-
chronization Notifications (SP2010)"
a. In theRecipient's Email Address text box, enter the email address where the noti-
fication will be sent.
d. Click theOK button to save any changes.

6. Click the Edit Synchronization Schedule link.
7. In the Synchronization Schedule section, select one of the following radio buttons and then
specify how often the DotNetNuke Connector timer job should run.
l Every Hour: Select to synchronize files every hour.a. Optional. Select the number of minutes after the hour. The default setting is on the
hour. Note: This is the option selected in the below image.
l Every Day: Select to synchronize files daily.a. Optional. Select the time of the day. The default setting is 12 AM.
l Every Week: Select to synchronize files weekly.a. Optional. Select the day of the week and time. The default setting is Sunday and 12
AM.
8. Click theOK button to confirm.
Activating the DotNetNuke Connector (SP2010)
How to activate the DotNetNuke Connector on one or more SharePoint Site Collections. This task can be
performed by SharePoint Site Collection Administrators.
Prerequisite. The DotNetNuke Connector must be installed on your SharePoint Server before it can be
activated. See "Installing DotNetNuke Connector (SP2010)"

Note: If the DotNetNuke SharePoint Connector is not displayed in the Site Features list, you may need to
do an IIS Reset because sometimes after installing a new feature, SharePoint requires IIS to be reset.
1. Go to your SharePoint site.
2. Navigate to Site Actions > Site Settings.
3. In the Site Collection Administration section, click the Site Collection Features link.

4. In the Status column, click theActivate button to activate theDotNetNuke Connector on this
site.

The DotNetNuke Connector is now activated for this site. A link to the DotNetNuke Connector is now dis-
played on the Site Settings page of this SharePoint as well as being added as an item in the SharePoint
menu. Here you can create connections to a DNN server and then manage and run synchronization.

Next Step: See "Connecting DNN and SharePoint 2010"
Connecting DNN and SharePoint 2010
How to connect your DNN site with your SharePoint site. Once this is completed you will be able to syn-
chronize files from SharePoint to DNN. This task can be performed by SharePoint Site Collection Admin-
istrators.
Prerequisite. The DotNetNuke Connector must be installed on the SharePoint server (See "Installing Dot-
NetNuke Connector (SP2010)") and then activated on the SharePoint site (See "Activating the Dot-
NetNuke Connector (SP2010)").
1. Go to your DNN site.
2. Navigate to Host > Advanced Settings > SharePoint Connector.3. At SharePoint Synchronization Site Address, copy the address to your clipboard.

4. At DotNetNuke Synchronization Token, select from the following options:
l Site Token: Select to connect SharePoint to a specific site.l Server Token: Select to connect SharePoint with all DNN sites on this server.
5. Go to your SharePoint site.
6. Navigate to Site Actions > Site Settings.
7. Go to the DotNetNuke section and click theDotNetNuke Connector link.
8. Click on the Settingsmenu and then select AddConnection.9. On the Server Connection page, go to the DotNetNuke Server section.
10. In theDotNetNuke Server Address text box, enter the DotNetNuke Synchronization Site
Address.
11. In theDotNetNuke Synchronization Token text box, enter either the site token or the server
token.
12. Go to theDotNetNuke Credentials section.13. In theDotNetNuke Username text box, enter the username of a SuperUser for the DotNetNuke
server.
14. In theDotNetNuke Password text box, enter the password of a SuperUser for the DotNetNuke
server.
15. Click theOK button.
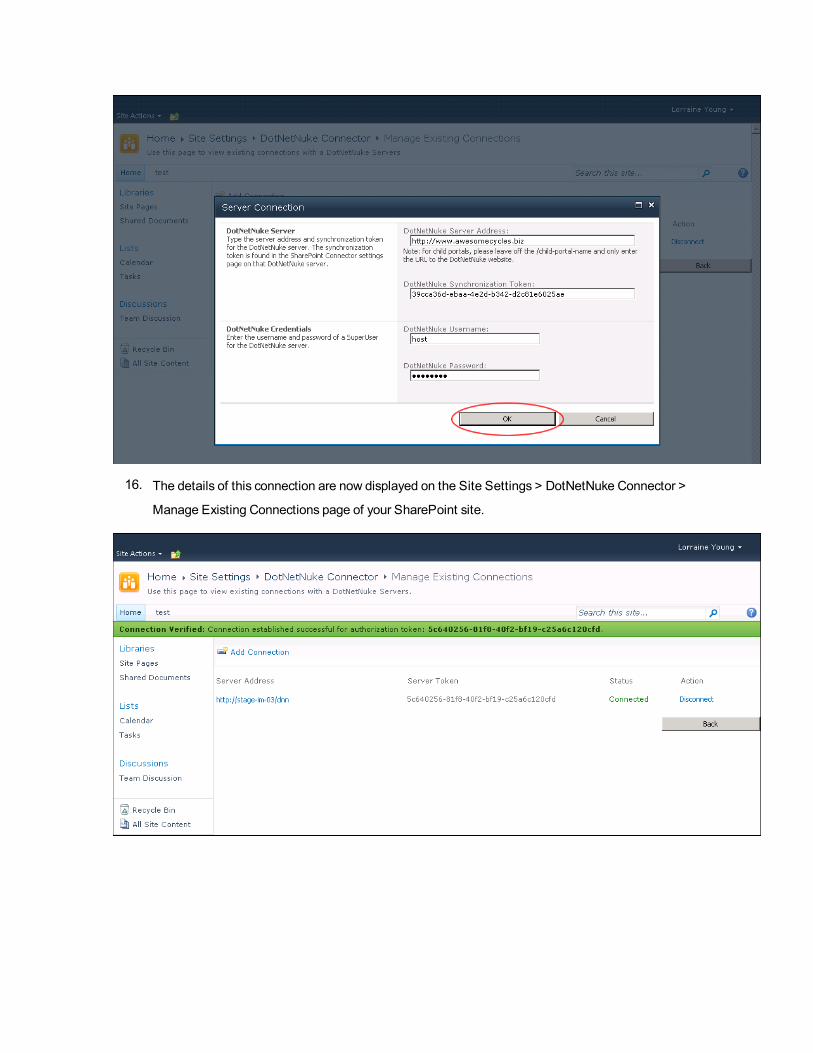
16. The details of this connection are now displayed on the Site Settings > DotNetNuke Connector >
Manage Existing Connections page of your SharePoint site.

Enabling Synchronization Notifications (SP2010)
How to enable and configure email notification to be sent if document synchronization encounters an error
and/or when synchronization occurs. This task can be performed by SharePoint Site Collection Admin-
istrators.
Prerequisite. The DotNetNuke Connector must be installed on the SharePoint server (See "Installing Dot-
NetNuke Connector (SP2010)") and then activated on the SharePoint site (See "Activating the Dot-
NetNuke Connector (SP2010)").
1. Go to your SharePoint site.
2. Navigate to Site Actions > Site Settings.
3. Go to the DotNetNuke section and then click theDotNetNuke Connector link.
4. Click on the Settingsmenu and then select Email Notifications.
5. At Enable Error Notification, check the check box to enable notifications - OR - Uncheck the
check box to disable notifications.
6. At Enable notification when synchronization item created or edited, check the check box
to enable these notification - OR - Uncheck the check box to disable.
1. In theRecipient's Email address text box, enter the email address of the user who will
receive these notifications.
7. Click theOK button.

Adding a Synchronization Item (SP2010)
How to create a synchronization task that will 'push' the files from your SharePoint site up to your DNN
site. This task can be performed by a SharePoint Site Collection Administrator.
1. Go to your SharePoint site.
2. Navigate to Site Actions > Site Settings.
3. Go to the DotNetNuke section and then click theDotNetNuke Connector link.
4. Click the Add Synchronization Item link to open the Synchronization Item page.

5. Go to theDocument Source section.1. Select the document folder library to be synchronized with DNN.
2. Optional. At Include Subfolders, check the check box to include all subfolders of the
selected folder - OR - Uncheck the check box to exclude all subfolders of the selected
folder. This option is checked by default.
6. Go to theDocument Destination section.1. At DotNetNuke Server, select the DotNetNuke server you want to connect to.2. At DotNetNuke Site, select the destination site.
7. Select the parent folder on your DNN site.
8. Optional. In the Propagate Deletions section, check the check box if you want deleted files
from your SharePoint server to be deleted from your DotNetNuke server as well. Please note that
this could cause performance issues depending on the number of documents that you are trans-
ferring.

8. Click theOK button to confirm. Details of this pending synchronization is now displayed on the Dot-
NetNuke Connector page. You can now create additional synchronization items as required.

Following the next synchronization, a successful or unsuccessful record will be displayed on this page.
Managing Synchronized Document Libraries (SP2010)
How to edit, delete and view details of synchronization tasks. This task can be performed by a SharePoint
Site Collection Administrator.
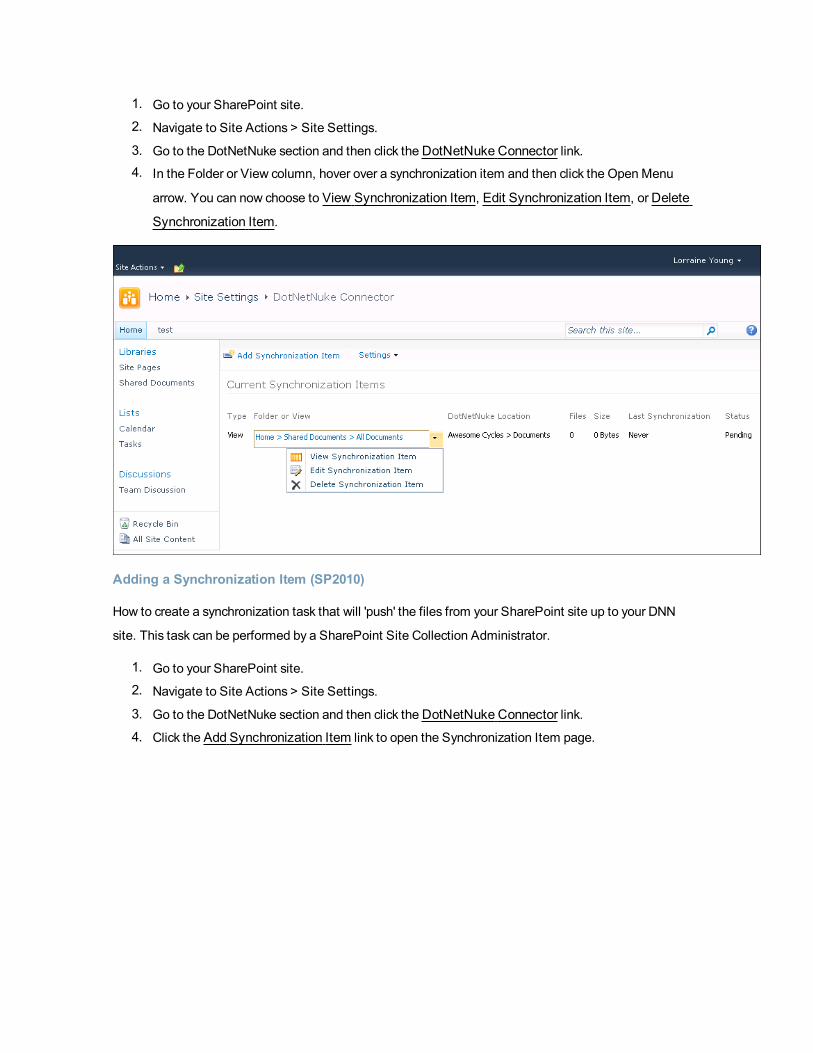
1. Go to your SharePoint site.
2. Navigate to Site Actions > Site Settings.
3. Go to the DotNetNuke section and then click theDotNetNuke Connector link.4. In the Folder or View column, hover over a synchronization item and then click the Open Menu
arrow. You can now choose to View Synchronization Item, Edit Synchronization Item, orDelete
Synchronization Item.
Adding a Synchronization Item (SP2010)
How to create a synchronization task that will 'push' the files from your SharePoint site up to your DNN
site. This task can be performed by a SharePoint Site Collection Administrator.
1. Go to your SharePoint site.
2. Navigate to Site Actions > Site Settings.
3. Go to the DotNetNuke section and then click theDotNetNuke Connector link.
4. Click the Add Synchronization Item link to open the Synchronization Item page.

5. Go to theDocument Source section.1. Select the document folder library to be synchronized with DNN.
2. Optional. At Include Subfolders, check the check box to include all subfolders of the
selected folder - OR - Uncheck the check box to exclude all subfolders of the selected
folder. This option is checked by default.
6. Go to theDocument Destination section.1. At DotNetNuke Server, select the DotNetNuke server you want to connect to.2. At DotNetNuke Site, select the destination site.
7. Select the parent folder on your DNN site.
8. Optional. In the Propagate Deletions section, check the check box if you want deleted files
from your SharePoint server to be deleted from your DotNetNuke server as well. Please note that
this could cause performance issues depending on the number of documents that you are trans-
ferring.

8. Click theOK button to confirm. Details of this pending synchronization is now displayed on the Dot-
NetNuke Connector page. You can now create additional synchronization items as required.
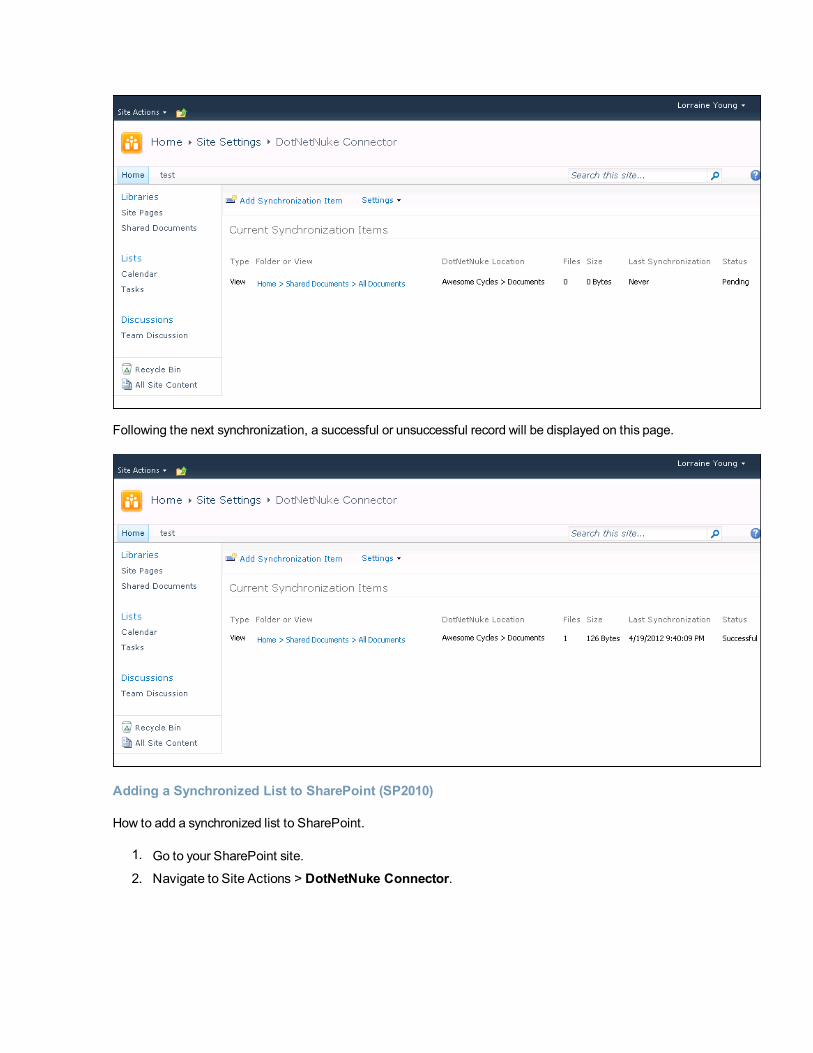
Following the next synchronization, a successful or unsuccessful record will be displayed on this page.
Adding a Synchronized List to SharePoint (SP2010)
How to add a synchronized list to SharePoint.
1. Go to your SharePoint site.
2. Navigate to Site Actions > DotNetNuke Connector.
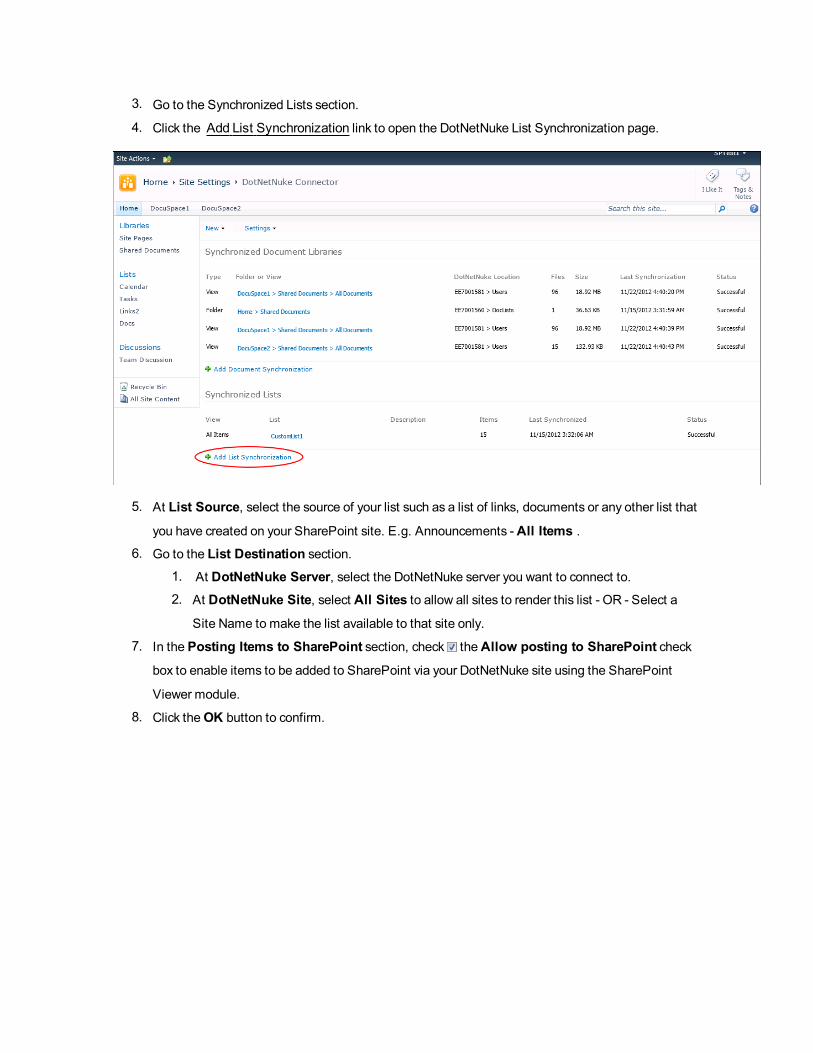
3. Go to the Synchronized Lists section.
4. Click the Add List Synchronization link to open the DotNetNuke List Synchronization page.
5. At List Source, select the source of your list such as a list of links, documents or any other list that
you have created on your SharePoint site. E.g. Announcements -All Items .6. Go to the List Destination section.
1. At DotNetNuke Server, select the DotNetNuke server you want to connect to.2. At DotNetNuke Site, select All Sites to allow all sites to render this list - OR - Select a
Site Name to make the list available to that site only.
7. In the Posting Items to SharePoint section, check theAllow posting to SharePoint check
box to enable items to be added to SharePoint via your DotNetNuke site using the SharePoint
Viewer module.
8. Click theOK button to confirm.

9. You are now returned to the DotNetNuke Connector page of your SharePoint site and the newly
added list is displayed in Synchronized List section.

10. Optional. You can now choose to run the Synchronization Job for this Synchronized List.1. Click on the List Title. E.g. Announcements
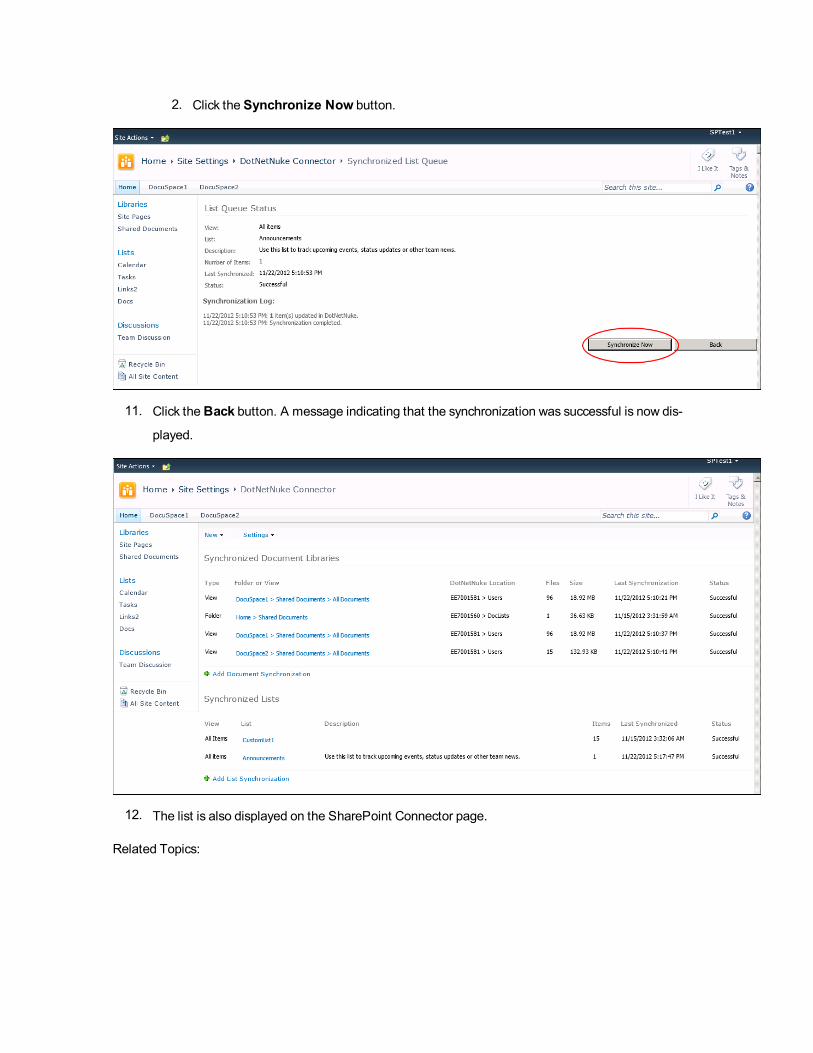
2. Click the Synchronize Now button.
11. Click theBack button. A message indicating that the synchronization was successful is now dis-
played.
12. The list is also displayed on the SharePoint Connector page.
Related Topics:

l See "Setting the Synchronization Schedule (SP2010)"
l See "Enabling Synchronization Notifications (SP2010)"
l See "Adding an Item to a SharePoint List"
Adding a Synchronized SharePoint List (SP2010)
How to add a synchronized SharePoint List to your DNN site.
Prerequisite. One or more synchronized SharePoint lists must exist.
1. Go to your DNN site.
2. Navigate to Host > Advanced Settings > SharePoint Connector.3. Select the SharePoint Lists tab.4. Click theAdd Synchronized SharePoint list button.
Adding a SharePoint Connection (SP2010)
How to add a SharePoint Connection to your DNN site.
1. Go to your DNN site.
2. Navigate to Host > Advanced Settings > SharePoint Connector.

3. Select the SharePoint Connections tab.4. Click theAdd Connection button. This will open the Edit Connection page.
5. In theConnection Name text box, enter a friendly name for this connection.6. In the SharePoint Site URL text box, enter the fully qualified URL to your SharePoint site. E.g.
http://mydomain.com/SitePages/Home.aspx
7. In theUser Name text box, enter the SharePoint user name.8. In the Password text box, enter the SharePoint password.9. At Associated Site, select All Sites to add a connection available to all your DNN sites - OR -
Select a site name to limit the connection to that site only.
10. Click the Save button.

11. The newly added connection is now displayed on the SharePoint Connections tab of the Share-
Point Connector module.
Adding a Live SharePoint List (SP2010)
How to add a live SharePoint List to your DNN site.

Prerequisite. One or more synchronized SharePoint lists must exist (See "Adding a Synchronized List to
SharePoint (SP2010)") and a SharePoint Connection must be created. See "Adding a SharePoint Con-
nection (SP2010)"
1. Go to your DNN site.
2. Navigate to Host > Advanced Settings > SharePoint Connector.3. Select the SharePoint Lists tab.4. Click theAdd Live SharePoint List button.
5. At Select Connection, select the connection to the SharePoint site.6. Click theConnect link.

7. At Select List and View, select the view to be displayed in the SharePoint Viewer module. Select-
ing the List will display the default View.
8. At Select Site, select All Sites to allow all sites to render this list - OR - Select a Site Name to
make the list available to that site only.
9. Click the Save List button.
10. The list is now displayed in the SharePoint Lists section of the SharePoint Connector module.

Editing a Live SharePoint List (SP2010)
How to edit a live SharePoint List to your DNN site.
1. Go to your DNN site.
2. Navigate to Host > Advanced Settings > SharePoint Connector.3. Select the SharePoint Lists tab.4. Click the Edit button beside the list to be edited. Note: Only live lists display this icon.

5. Edit one of more fields as required.
6. Click the Save List button.
Deleting a Live SharePoint List (SP2010)
How to delete a live SharePoint List to your DNN site.
1. Go to your DNN site.
2. Navigate to Host > Advanced Settings > SharePoint Connector.3. Select the SharePoint Lists tab.4. Click the Delete button beside the list to be deleted. Note: Only live lists display this icon.

5. This displays the message "Are You Sure YouWant To Delete This List?"
6. Click theOK button to confirm.
Deactivating the DotNetNuke Connector (SP2010)
How to deactivate the DotNetNuke Connector from a SharePoint Site Collection. This task can be per-
formed by SharePoint Site Collection Administrators.
1. Go to your SharePoint site.
2. Navigate to Site Actions > Site Settings.
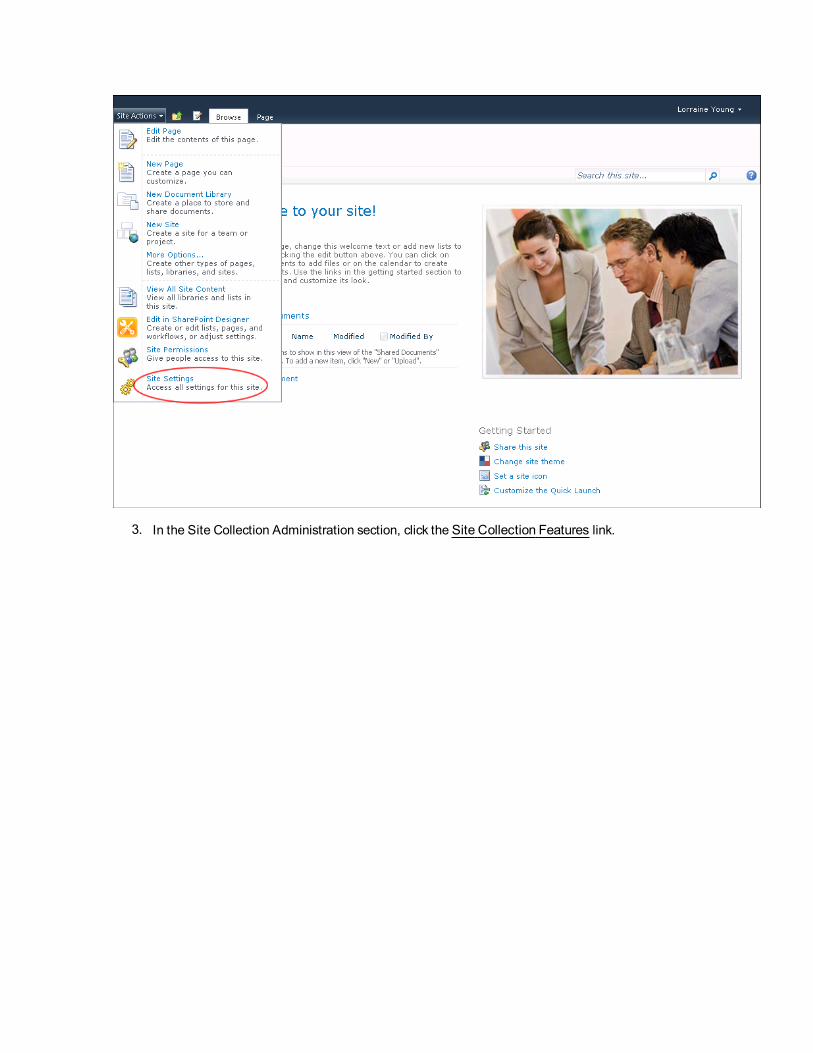
3. In the Site Collection Administration section, click the Site Collection Features link.

4. In the Status column, click theDeactivate button to deactivate the DotNetNuke Connector on this
site.

Uninstalling DotNetNuke Connector (SP2010)
How to uninstall a timer job for the DotNetNuke SharePoint Connector.
Important: You are required to use the name of your Timer Job at Step 7. In the below example it is
referred to as "Timer Job Name". The default Timer Job name is "DotNetNuke_Enterprise_6.1.5_Share-
PointConnector2010.wsp".
1. Log into SharePoint as Administrator.
2. Navigate to Start > All Programs > Accessories and then right click on "Command Prompt" and
select "Run as Administrator".
3. In the Command Prompt type cd c:\
4. Strike the Enter key. This displays c:>5. At c:\> type or copy in cd \Program Files\Common Files\Microsoft Shared\Web
Server Extensions\14\BIN
6. Strike the Enter key.7. Type or copy in stsadm -o deletesolution -name <Timer Job Name>
8. Strike the Enter key.

9. Open aWeb browser and go to SharePoint Central Administration.10. Navigate to Operations > Solution Management. This displays a list of the solutions in the farm.11. In the Name column, click on the name of the timer job link. E.g. dotnetnuke_enterprise_6.1.5_
sharepointconnector2010.wsp. This opens the Solution Properties page.
12. Select Retract Solution.

13. In theRetract When? section, select from these options:
l Select Now to retract the solution immediately. This is the default option.
l Select At A Specified Time and then set the date and time.14. Click theOK button.
15. Once the Solutions.aspx page (Solution Management) shows Status = "Not Deployed", go to the
cmd window and then strike the Enter key. The "Operation completed successfully" message is
now displayed.
16. Refresh (F5) the Solutions.aspx page (Solution Management). The Timer Job is no longer dis-
played.
SharePoint 2007
Managing Roles Security for SharePoint Connector (SP2007)
How to set the required roles security on your SharePoint 2007 Server for SharePoint Connector.
Important. This task is a prerequisite for installing SharePoint Connector on SharePoint 2007.
Note: Failure to undertake this task prior to configuring SharePoint Connector will result in the following
error message "DotNetNuke server is unable to process your request. Please confirm that you installed
and confirmedWindowsCommunication Foundation on the server hosting your DotNetNuke installation. If

you receive this message, you must undertake the below tutorial and then repeat the final step of the See
"Installing DotNetNuke Connector (SP2007)" tutorial.
1. Open your Server Manager.
2. Click Server Manager in the left navigation.
3. Go to the Roles Summary section and then click the AddRoles link to open the Add RolesWizard.
4. Click on the Server Roles link.
5. Check theApplication Server check box.

6. Click theNext button until you advance to the Select Roles Services page.7. Check theWeb Server (IIS) Support check box. This opens the Add RolesWizard.
8. Click theAdd Required Roles Services button.

9. Click all theNext buttons until the Install button is enabled.10. Click the Install button. The Installation will now commence running. The Results page is dis-
played once the installation is completed.

11. Click theClose button to close the wizard.
Configuring Site Collection Administrator Permissions (SP2007)
How to configure Site Collection Admin permissions in Central Administration Area. Note. This is rec-
ommended approach but it requires Central Administrator account.
1. Open SharePoint Central Administration > Application Management > SharePoint Site Man-
agement > Site collection administrators page (login as a user with Central Administrator per-
missions).
2. Select appropriate Site Collection.
3. Make sure the name of user that will be managing DNNConnector for selected Site Collection is
added as Primary SharePoint Site Collection Administrator or Secondary SharePoint Site Col-
lection Administrator.

Installing DotNetNuke Connector (SP2007)
How to deploy the DotNetNuke Connector to your SharePoint 2007 server. This task is performed by the
SharePoint Farm Administrator.
Prerequisite 1. You must have the DNN Timer Job file which is available from the DotNetNuke Support
Network. The default Timer Job name is "DotNetNuke_Enterprise_6.1.5_Share-
PointConnector2007.wsp".
Prerequisite 2. A SuperUser must enable Full Trust on your DNN site. Note: Failure to undertake this
task prior to configuring SharePoint Connector will result in the following error message "That assembly
does not allow partially trusted callers. The DotNetNuke server has rejected your request to pair". If you
receive this message, you must enable full trust and then repeat the final step of the below tutorial.
Prerequisite 3. Set appropriate role security levels on your SharePoint server. See "Managing Roles
Security for SharePoint Connector (SP2007)"
1. Go to your SharePoint Server.
a. Paste a copy of the wsp file into the c: drive.
b. Click theWindowsStart button.c. In the Search box, enter cmd and then press and hold theCtrl + Shift + Enter keys. This
opens the Command Prompt window in elevated privilege mode.
d. In the Command Prompt window, enter the below path. Note: You cannot copy and paste
this path, instead it must be typed into the Command Prompt. "C:\Program Files\Co-
mmon Files\microsoft shared\Web Server Exten-
sions\12\BIN\stsadm" -o addsolution -filename " c:\DotNetNuke_
Enterprise_6.1.5_SharePointConnector2007.wsp"
e. Strike the Enter key. The "Operation Completed Successfully" message is displayed.

2. Go to your SharePoint Central Administration.
a. Navigate to Operations > Global Configuration - Solution Management. This opens the
Solution Management page.
b. In the Name column, click on the Timer Job file name. E.g. DotNetNuke_Enterprise_6.1.5_
SharePointConnector2007.wsp
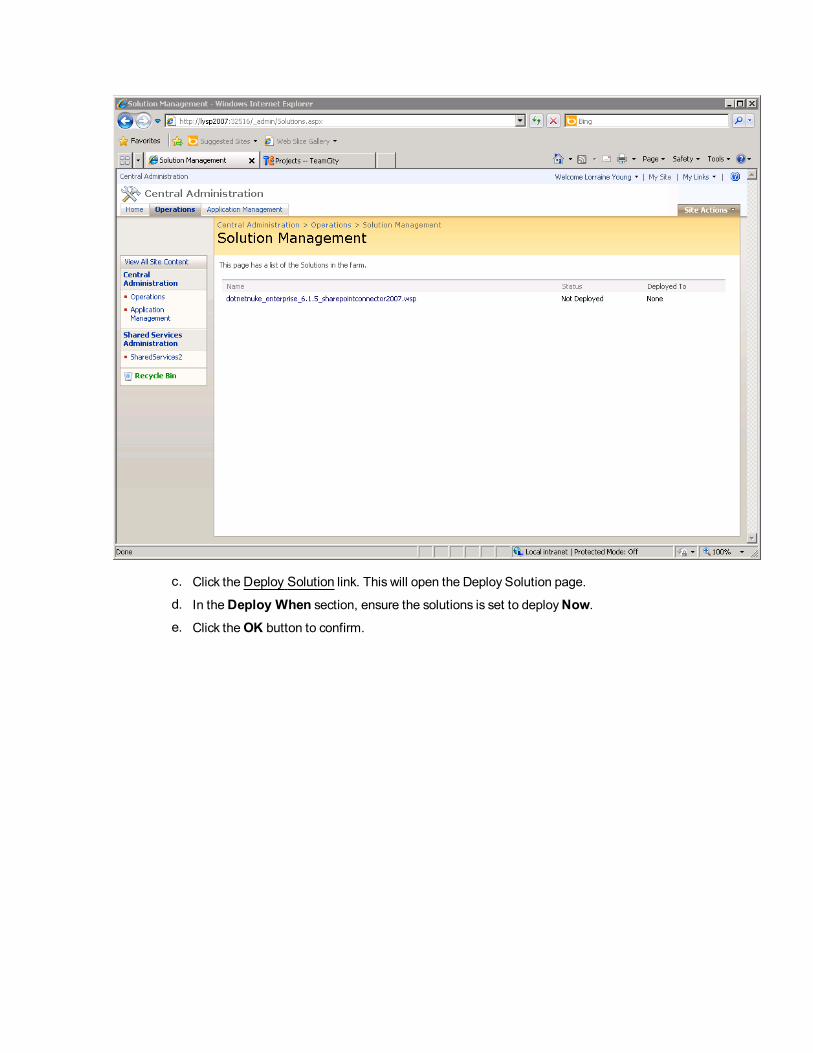
c. Click theDeploy Solution link. This will open the Deploy Solution page.
d. In theDeploy When section, ensure the solutions is set to deployNow.e. Click theOK button to confirm.

f. You are now returned to the Solution Management page, where the DNNSharePoint Con-
nector solution status is now listed as "Deployed".
Next Step: The DotNetNuke Connector must now be activated for each SharePoint site where it will be
used. See "Activating the DNN Connector (SP2007)"
Setting the Synchronization Schedule (SP2007)
How to configure the synchronization settings for the DotNetNuke Connector. In this section SharePoint
Farm Administrators can modify the defaults that set the number of items saved in the history, set the max-
imum number of files and folder transferred during synchronization and request email notifications if an
error occurs during synchronization. You can also set the Synchronization Schedule that determines how
frequently files are pushed from your SharePoint site to your DNN site.
1. Go to your SharePoint Central Administration.
2. Navigate to Application Management > External Service Connections -DotNetNuke Connector.

3. You can now choose to modify the following default schedule settings, or skip to the Step 4 to set
the synchronization schedule.
a. Optional. In the Item History section, enter the number of items that will be saved in the
history into theNumber Of Items text box. Older itemswill be deleted from the queue. The
default setting is 10.
b. Optional. In the Folder and Folder Limit section, enter the maximum number of files
and folders to be transferred during synchronization. The default limits are 2000 files and
5000 folders.
c. Optional. In the Email Notifications section, check the Enable check box to enable
email notification to be sent if an error occurs during synchronization. Note: SharePoint Site
Collection Administrators can also manage email notifications for their site. See "Enabling
Synchronization Notifications (SP2007)"
a. In theRecipient's Email Address text box, enter the email address where the noti-
fication will be sent.

d. Click theOK button to save any changes.
4. Click the Edit Synchronization Schedule link.
5. In the Synchronization Schedule section, select one of the following radio buttons and then
specify how often the DotNetNuke Connector timer job should run.
l Every Hour: Select to synchronize files every hour.a. Optional. Select the number of minutes after the hour. The default setting is on the
hour. Note: This is the option selected in the below image.
l Every Day: Select to synchronize files daily.a. Optional. Select the time of the day. The default setting is 12 AM.
l Every Week: Select to synchronize files weekly.a. Optional. Select the day of the week and time. The default setting is Sunday and 12
AM.

6. Click theOK button to confirm.
Activating the DNN Connector (SP2007)
How to activate the DotNetNuke Connector on one or more SharePoint sites. This task can be performed
by SharePoint Site Collection Administrators.
Prerequisite. The DotNetNuke Connector must be installed on your SharePoint Server before it can be
activated. See "Installing DotNetNuke Connector (SP2007)"
Note: If the DotNetNuke SharePoint Connector is not displayed in the Site Features list, you may need to
do an IIS Reset because sometimes after installing a new feature, SharePoint requires IIS to be reset.
1. Go to your SharePoint site.
2. Navigate to Site Actions > Site Settings.
3. In the Site Collection Administration section, click the Site Collection Features link. Note: You
may need to click theGo to top level site settings link to view Site Collection Administration
options.

4. In the Status column, click theActivate button to activate theDotNetNuke Connector on this
site.
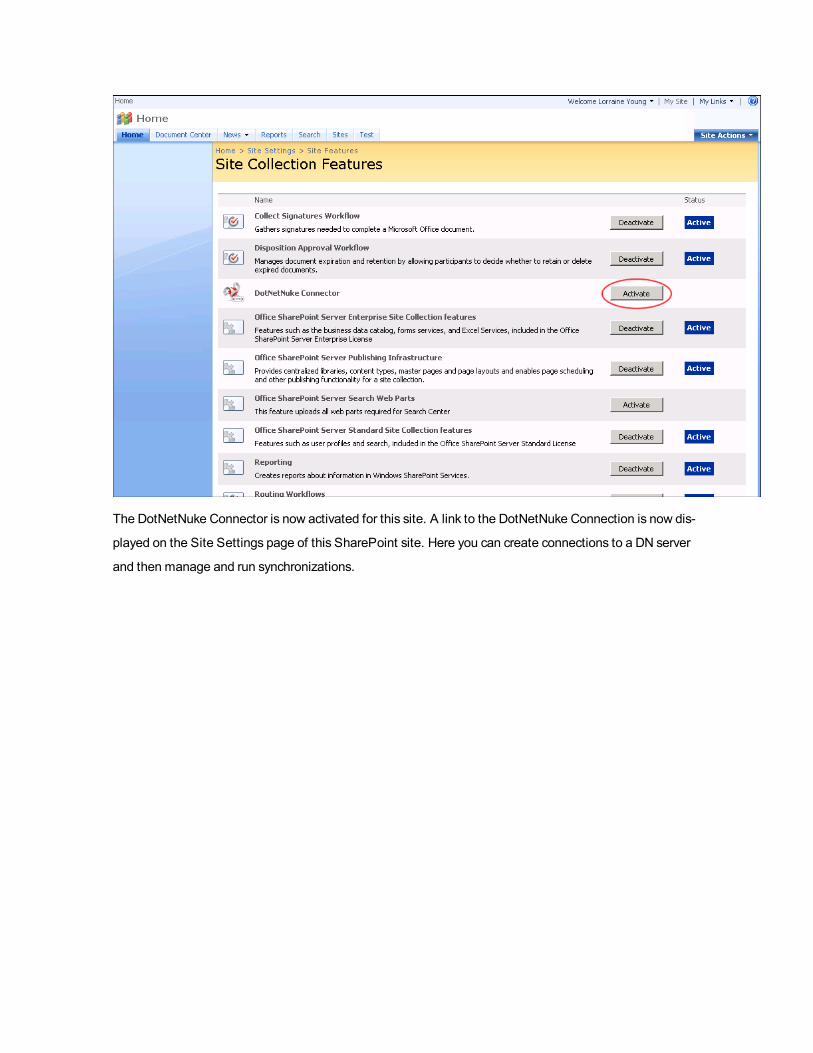
The DotNetNuke Connector is now activated for this site. A link to the DotNetNuke Connection is now dis-
played on the Site Settings page of this SharePoint site. Here you can create connections to a DN server
and then manage and run synchronizations.

Next Step: See "Connecting DNN and SharePoint 2007"
Connecting DNN and SharePoint 2007
How to connect DNNwith either a server or a specific SharePoint site. Once the connection has been
made, SharePoint Site Collection Administrators are able to synchronize files from SharePoint to DNN.
Prerequisite. The DotNetNuke Connector must be installed on the SharePoint server (See "Installing Dot-
NetNuke Connector (SP2007)") and then activated on the SharePoint site. See "Activating the DNN
Connector (SP2007)"
1. Go to your DNN site.
2. Navigate to Host > Advanced Settings > SharePoint Connector.3. At the SharePoint Synchronization Site Address field, copy the site address field.

4. At theDotNetNuke Synchronization Token field, copy one of these tokens:l Site Token: Copy this token to connect this site only to DNN.l Server Token: Copy this token to connect the server with DNN aswe support "many to
many" connections therefore there can be more than one server.
5. Go to your SharePoint site.
6. Navigate to Site Actions > Site Settings.
7. Go to the DotNetNuke section and click theDotNetNuke Connector link.
8. Click on the Settingsmenu and then select Manage Existing Connections.9. Click the AddConnection link.10. On the Server Connection page, go to the DotNetNuke Server section.
11. In theDotNetNuke Server Address text box, enter or paste the SharePoint Synchronization Site
Address from your clipboard.
12. In theDotNetNuke Synchronization Token text box, enter or paste the synchronization token
from your clipboard.
13. Go to theDotNetNuke Credentials section.14. In theDotNetNuke Username text box, enter the username of a SuperUser for the DotNetNuke
server.
15. In theDotNetNuke Password text box, enter the password of a SuperUser for the DotNetNuke
server.
16. Click theOK button.

Enabling SharePoint Breadcrumbs (SP2007)
How to enable breadcrumbs to DotNetNuke File Synchronization Management within your SharePoint.
The creates breadcrumbing to Central Administration > Application Management > DotNetNuke Con-
nector > Synchronization Item.
1. Go to your SharePoint Server.
2. Click theWindowsStart button.3. In the Search box, enter cmd and then press and hold theCtrl + Shift + Enter keys. This opens
the Command Prompt window in elevated privilege mode.
4. Enter "C:\Program Files\Common Files\microsoft shared\Web Server Exten-
sions\12\BIN\stsadm" -o copyappbincontent
5. Strike the Enter key.
Enabling Synchronization Notifications (SP2007)
How to enable and configure email notification to be sent if document synchronization encounters an error
and/or when synchronization occurs. This task can be performed by SharePoint Site Collection Admin-
istrators.

Prerequisite. The DotNetNuke Connector must be installed on the SharePoint server (See "Installing Dot-
NetNuke Connector (SP2007)") and then activated on the SharePoint site (See "Activating the DNN
Connector (SP2007)").
1. Go to your SharePoint site.
2. Navigate to Site Actions > Site Settings.
3. Go to the DotNetNuke section and then click theDotNetNuke Connector link.
4. Click on the Settingsmenu and then select Email Notifications.
5. At Enable Error Notification, check the check box to enable notifications - OR - Uncheck the
check box to disable notifications.
6. At Enable notification when synchronization item created or edited, check the check box
to enable these notification - OR - Uncheck the check box to disable.
1. In theRecipient's Email address text box, enter the email address of the user who will
receive these notifications.
7. Click theOK button.

Adding a Synchronization Item (SP2007)
How to create a synchronization task that will 'push' the files from your SharePoint site up to your DNN
site. This tutorial assumes you have one or more files uploaded to your SharePoint site that are ready to
be synchronized.
1. Go to your SharePoint site.
2. Navigate to Site Actions > Site Settings.
3. Go to the DotNetNuke section and then click theDotNetNuke Connector link.
4. Click the Add Synchronization Item link to open the Synchronization Item page.
5. Go to theDocument Source section.6. Select the document folder library to be synchronized with DNN.
7. Optional. At Include Subfolders, check the check box to include all subfolders of the selected
folder - OR - Uncheck the check box to exclude all subfolders of the selected folder. This option is
checked by default.
8. Go to theDocument Destination section.9. At DotNetNuke Server, select the DotNetNuke server you want to connect to.10. At DotNetNuke Site, select the destination site.11. Select the parent folder on your DNN site.
12. Optional. In the Propagate Deletions section, check the check box if you want deleted files
from your SharePoint server to be deleted from your DotNetNuke server as well. Please note that
this could cause performance issues depending on the number of documents that you are trans-
ferring.
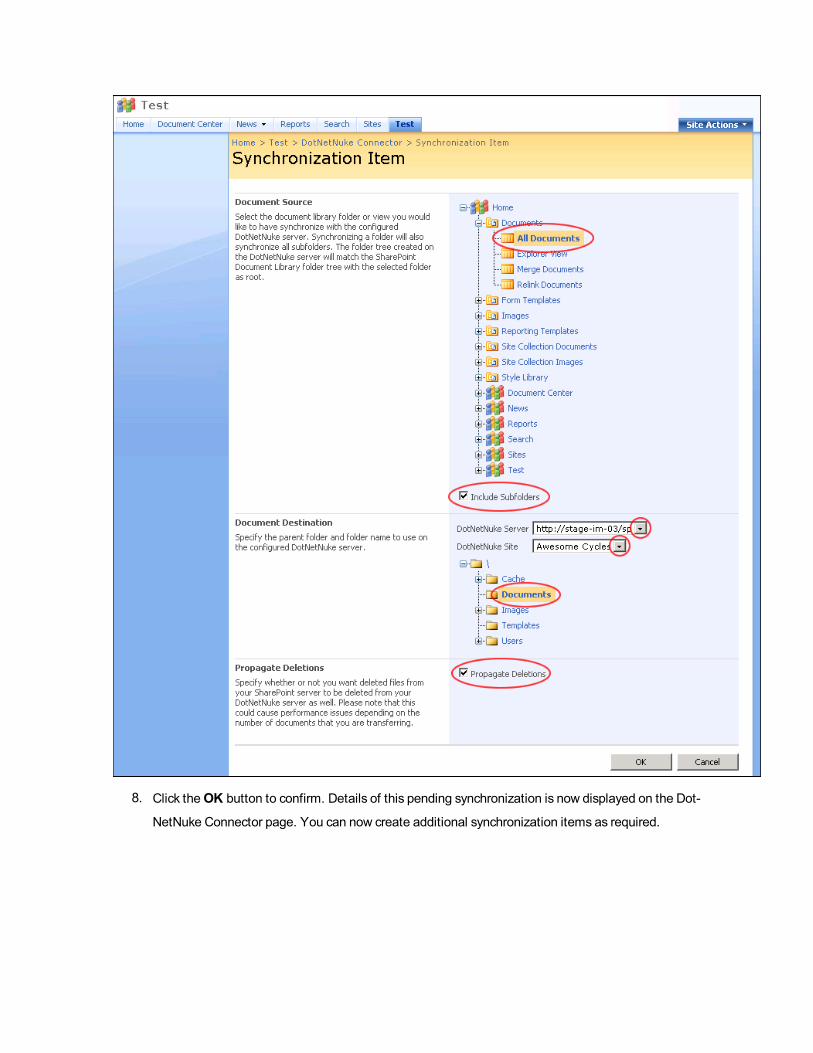
8. Click theOK button to confirm. Details of this pending synchronization is now displayed on the Dot-
NetNuke Connector page. You can now create additional synchronization items as required.

Following the next synchronization, a successful or unsuccessful record will be displayed on this page.
Managing Synchronization Items (SP2007)
How to edit, delete and view details of synchronization tasks. This tutorial assumes you have one or more
files uploaded to your SharePoint site that are ready to be synchronized.
1. Go to your SharePoint site.
2. Navigate to Site Actions > Site Settings.
3. Go to the DotNetNuke section and then click theDotNetNuke Connector link.4. In the Folder or View column, hover over a synchronization item and then click the Open Menu
arrow. You can now choose to View Synchronization Item, Edit Synchronization Item, orDelete
Synchronization Item.

Deactivating the DNN Connector (SP2007)
How to deactivate the DotNetNuke Connector from a SharePoint site. This task can be performed by
SharePoint Site Collection Administrators.
1. Go to your SharePoint site.
2. Navigate to Site Actions > Site Settings.3. In the Site Collection Administration section, click the Site Collection Features link. Note: You
may need to click theGo to top level site settings link to view Site Collection Administration
options.

4. In the Status column, click theDeactivate button to deactivate the DotNetNuke Connector on this
site.
Uninstalling DotNetNuke Connector (SP2007)
How to uninstall a timer job for the DotNetNuke SharePoint Connector.
Important: You are required to use the name of your Timer Job at Step 7. In the below example it is
referred to as "Timer Job Name". The default Timer Job name is "DotNetNuke_Enterprise_6.1.5_Share-
PointConnector2007.wsp".
1. Log into SharePoint as Administrator.
2. Navigate to Start > All Programs > Accessories and then right click on "Command Prompt" and
select "Run as Administrator".
3. In the Command Prompt type cd c:\
4. Strike the Enter key. This displays c:>

5. At c:\> type or copy in cd Program Files\COMMON FILES\microsoft shared\web
server extensions\12\bin
6. Strike the Enter key.7. Type or copy in stsadm -o deletesolution -name <Timer Job Name>
8. Strike the Enter key.
9. Open aWeb browser and go to SharePoint Central Administration.10. Navigate to Operations > Solution Management. This displays a list of the solutions in the farm.11. In the Name column, click on the name of the timer job link. E.g. dotnetnuke_enterprise_6.1.5_
sharepointconnector2007.wsp. This opens the Solution Properties page.
12. Select Retract Solution.

13. In theRetract When? section, select from these options:
l Select Now to retract the solution immediately. This is the default option.
l Select At A Specified Time and then set the date and time.14. Click theOK button.
15. Once the Solutions.aspx page (Solution Management) shows Status = "Not Deployed", go to the
cmd window and then strike the Enter key. The "Operation completed successfully" message is
now displayed.

16. Refresh (F5) the Solutions.aspx page (Solution Management). The Timer Job is no longer dis-
played.
SharePoint Viewer
About the SharePoint Viewer Module
Thismodule is installed on DNN by default but is not added to any page. Only available in DotNetNuke
Enterprise Edition
TheSharePoint Viewer Module
Adding an Item to a SharePoint List
How to add an item to a SharePoint List using the SharePoint Viewer module.
Prerequisite. Posting Items to SharePoint must be enabled for synchronized lists ( See "Adding a Syn-
chronized List to SharePoint (SP2010)") and the SharePoint Viewer module must be configured to dis-
play a "List with Form" or a "Submission Form Only".
1. Click theAdd New Item button.
2. Complete the form details.
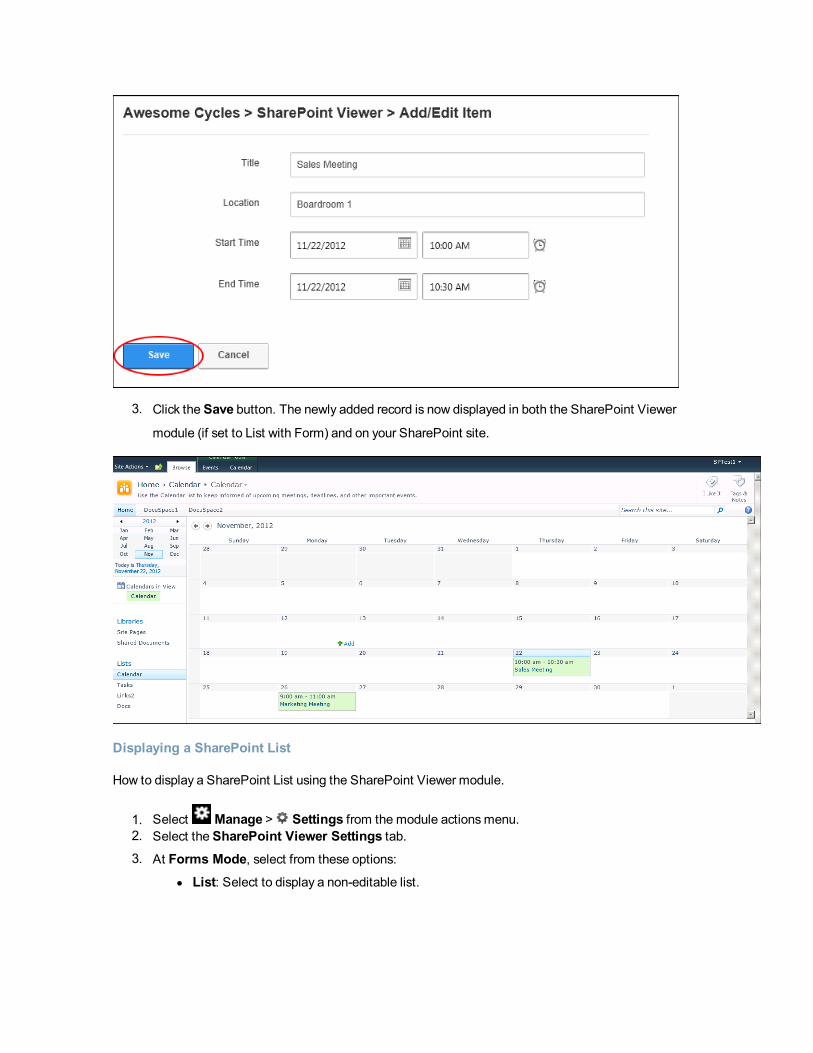
3. Click the Save button. The newly added record is now displayed in both the SharePoint Viewer
module (if set to List with Form) and on your SharePoint site.
Displaying a SharePoint List
How to display a SharePoint List using the SharePoint Viewer module.
1. Select Manage > Settings from the module actionsmenu.2. Select the SharePoint Viewer Settings tab.3. At Forms Mode, select from these options:
l List: Select to display a non-editable list.

l List with Form: Select to display an editable list with a "Add New Item" button to add new
items using a form.
l Submission Form Only: Select to display a submission form only.

4. At List, select a SharePoint list from the drop down list. This will display details of the chosen list at
the base of this page.
1. Optional. Modify the layout of the list/form as follows:
l In theDisplay Name text boxes, modify the name one or more fields.l In theOrder text boxes, modify the number displayed for each field to change the
order of fields.
l In theRegex text boxes, enter a regular expressions to restrict the values that are
allowed in the other entry field.
l In theRegex Error Message text boxes, enter the error message that will be dis-
played if the regular expression is not met.
5. In the Page Size text box, enter the maximum number of records that are displayed on the page.
Where a greater number of items exist, the Pager control will be displayed. See "About the Pager"
6. Click theUpdate button.

Site Log
About the Site Log Module
The Site Log module enables users to view statistical reports on site activity. Twelve (12) reports are pro-
vided. Each report can be set by date range, with the previousmonth being the default setting. Any user
who has been granted access to view this module can view reports. The Host is able to enable the Site Log
and restrict the number of days log history is kept for.
Permissions. All users who are authorized to view the Site Log module can select and view any report.
Module Version: The version number is always the same as the DNN framework version number.
TheSite LogModule

Viewing a Site Report
How to view a site report using the Site Log module.
1. Navigate to Admin > Advanced Settings > Site Log - OR - Navigate to a Site Log module.
2. At Report Type, select the required report. You can now skip to Step 5 if you want to view a report
for last seven days including today.
3. Optional. At Start Date, click theCalendar button and select the start date for the report.
4. Optional. At End Date, click theCalendar button and select the end date for the report.5. Click theDisplay button to view the report results. If there aren't anymatching results for the
selected report and date range, then the "No records were found" message is displayed at the top
of the module.
Viewing aSite LogReport
Related Topics:

l See "Working with the Calendar"
Affiliate Referrals Report
The Affiliate Referrals report tracks referrals from affiliates that include an affiliate ID = number in the URL
to your site.
Report Fields:
l Affiliate Id: The ID number of the affiliate
l Requests: Number of requests associated with this affiliatel Last Referral: Date and time when the last referral occurred
TheAffiliateReferrals Report
Detailed Site Log Report
The Detailed Site Log report displays a detailed log of all site activity. This report includes activity for all
users, including Administrators and SuperUsers.
Report Fields:
l Date Time: Date and time of the visitl Name: Displays the user name of authenticated usersl Referrer: The previous website the user visited during this sessionl User Agent: The type of Web browser used

l User Host Address: The Host address of the userl Tab Name: The name of the page being visited
TheDetailedSite LogReport
Enabling the Site Log
The Site Log module is disabled by default and must be enabled and configured by a SuperUser before it
can be used to generate reports. The disabled Site Log module displays the yellow warning message
"Your Hosting Provider Has Disabled the Site Log History Feature For Your Portal".

Page Popularity Report
The Page Popularity report displays a summary list of the most visited pages.
Report Fields:
l Page Name: The page being visitedl Requests: The number of times the page has been visitedl Last Request: The last time the page was visited

ThePagePopularity Report
Page Views By Day Of Week Report
The Page Views By DayOf Week report displays a summary list of the number of visitors and users who
viewed the site during the selected day range.
Report Fields:
l Week Day: The day of the weekl Views: Number of views for the dayl Visitors: Number of all visitors for the dayl Users: Number of registered user visits for the day

ThePageViews By Day OfWeek Site LogReport
Page Views By Day Report
The Page Views By Day report provides a summary list of the number of visitors and users who viewed the
site for the selected day range.
Report Fields:
l Date: Date of the visitl Views: Number of views for the dayl Visitors: Number of all visitors for the dayl Users: Number of registered user visits for the day
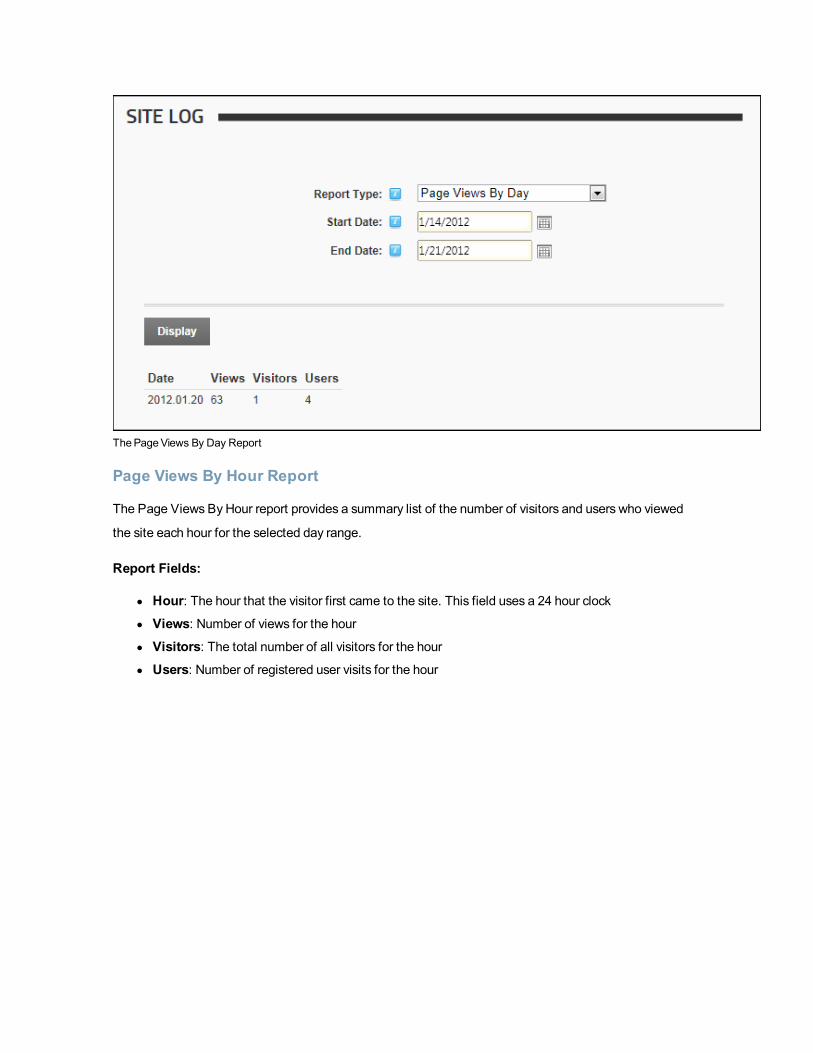
ThePageViews By Day Report
Page Views By Hour Report
The Page Views By Hour report provides a summary list of the number of visitors and users who viewed
the site each hour for the selected day range.
Report Fields:
l Hour: The hour that the visitor first came to the site. This field uses a 24 hour clockl Views: Number of views for the hourl Visitors: The total number of all visitors for the hourl Users: Number of registered user visits for the hour

ThePageViews By Hour Report
Page Views By Month Report
The Page Views ByMonth report displays the total number of visitors and users who viewed the site each
month for the selected range of months.
Report Fields:
l Month: The number of the current calendar month. E.g. 1 = Januaryl Views: Number of views for the monthl Visitors: Total number of all visitors for the monthl Users: Number of visits by registered user for the month

ThePageViews By MonthSite LogReport
Site Referrals
The Site Referrals report displays a summary list of the website or search engine that visitors were on prior
to visiting the site.
Report Fields:
l Referrer: The URL of the referring websitel Requests: Number of requestsl Last Request: Date and time of the last request
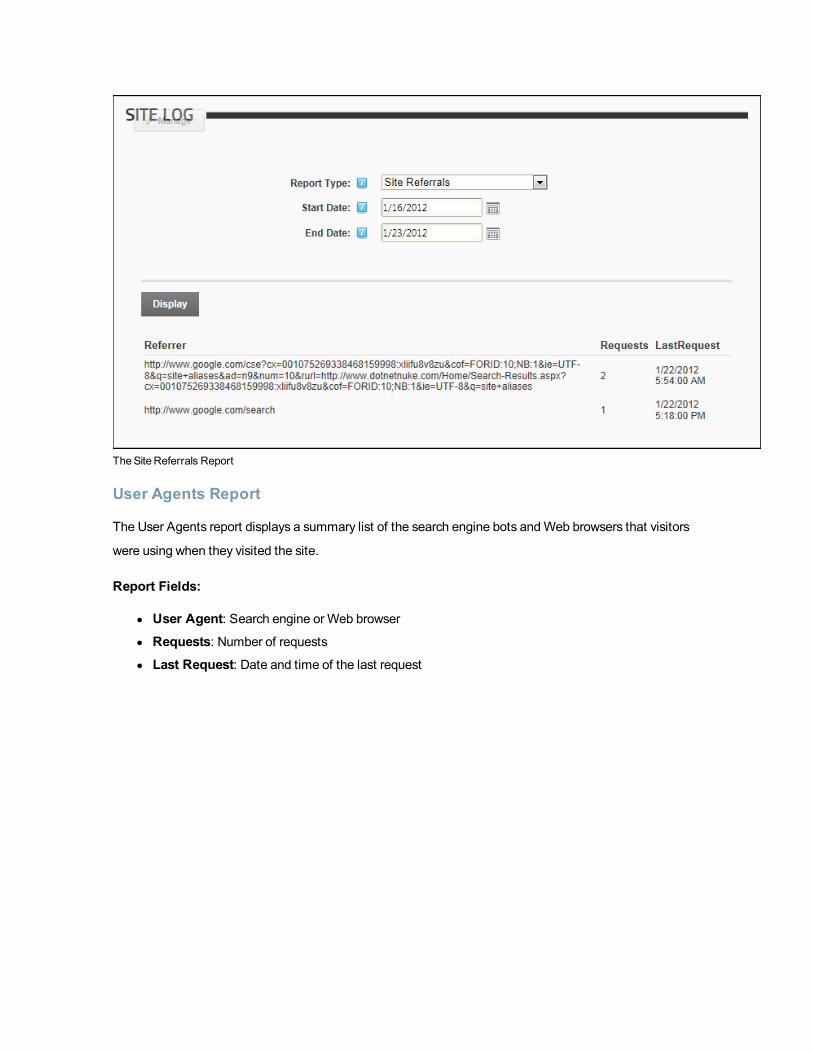
TheSiteReferrals Report
User Agents Report
The User Agents report displays a summary list of the search engine bots andWeb browsers that visitors
were using when they visited the site.
Report Fields:
l User Agent: Search engine orWeb browser
l Requests: Number of requestsl Last Request: Date and time of the last request
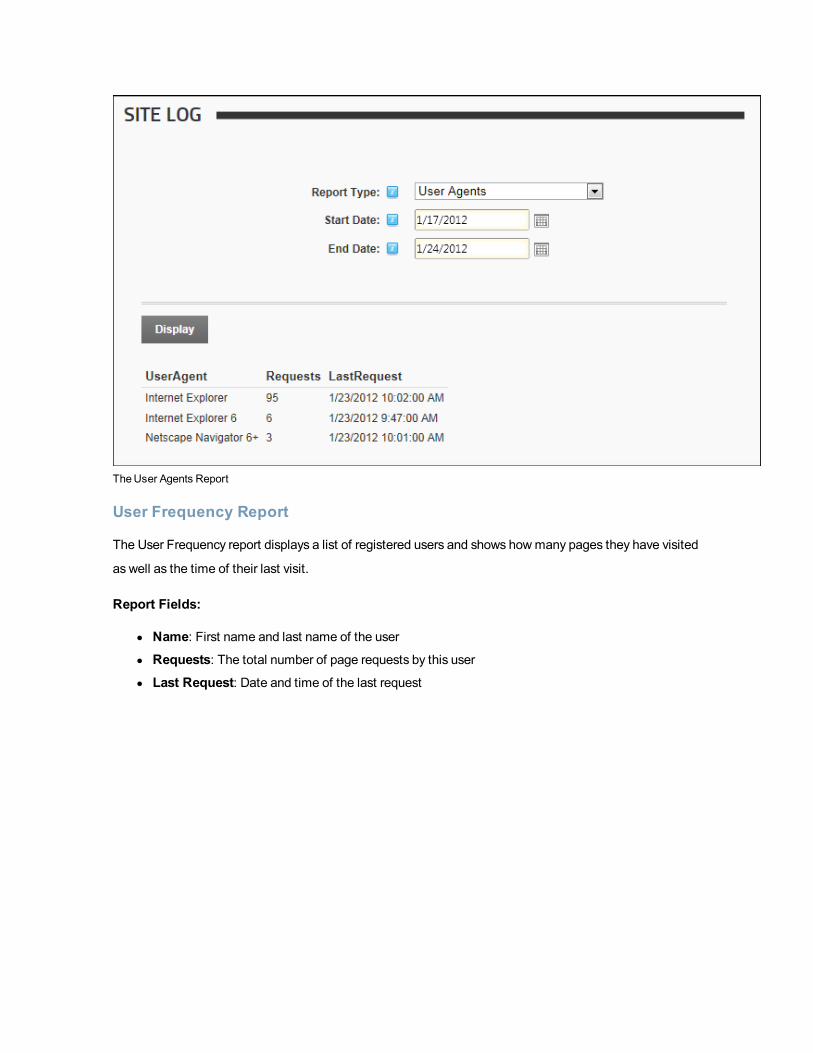
TheUser Agents Report
User Frequency Report
The User Frequency report displays a list of registered users and shows howmany pages they have visited
as well as the time of their last visit.
Report Fields:
l Name: First name and last name of the userl Requests: The total number of page requests by this userl Last Request: Date and time of the last request

TheUser Frequency Report
User Registrations By Country Report
The User Registrations By Country report displays the number of new registered users for each country for
the selected date range.
Report Fields:
l Full Name: The first name and last name of the userl User Name: The user name of the userl Country: The country selected by a user on their user profile
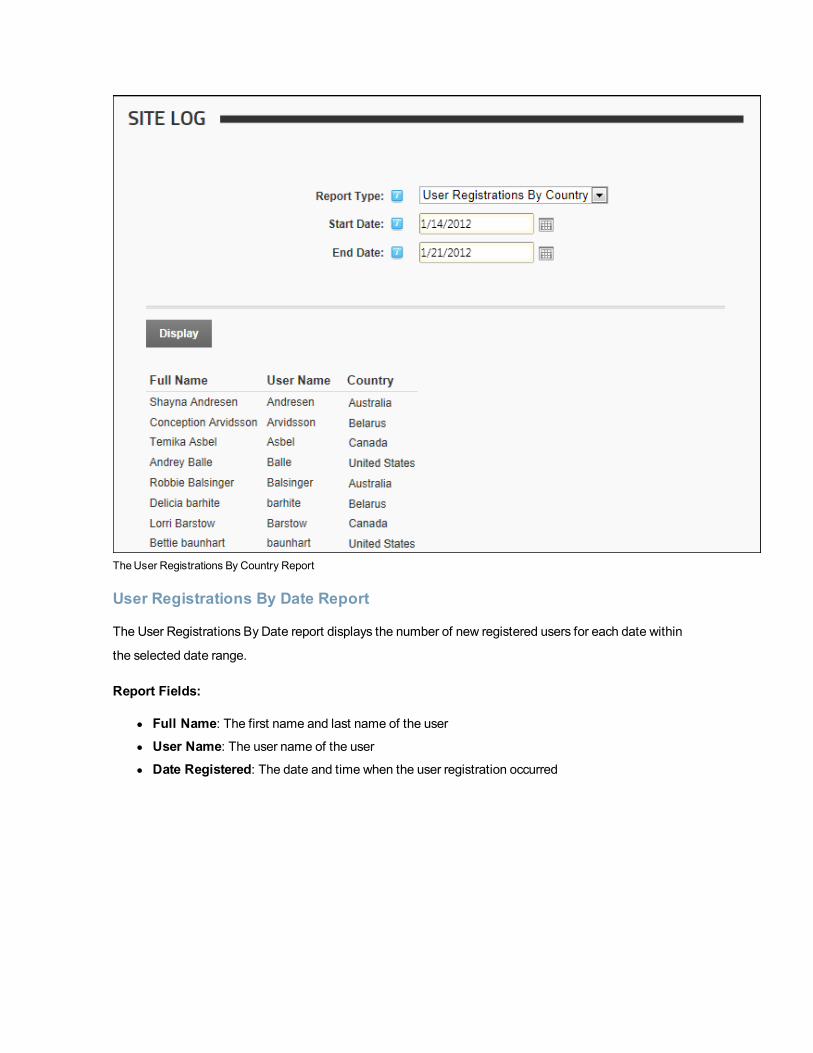
TheUser Registrations By Country Report
User Registrations By Date Report
The User Registrations By Date report displays the number of new registered users for each date within
the selected date range.
Report Fields:
l Full Name: The first name and last name of the userl User Name: The user name of the userl Date Registered: The date and time when the user registration occurred

TheUser Registrations By DateReport
Site Redirection Management
About the Site Redirection Management Module
The Site Redirection Management module allows Administrators to direct users to different sites or site
pages depending on the type of device they are using to browse your site. By configuring site redirection
rules you can ensure users are always sent to the site that provides optimum viewing for their mobile
device.
This Admin module is located on the Admin > Advanced Settings > Site Redirection Management
page. It cannot be added to additional pages.
DotNetNuke Community Edition comes with device data that provides the ability to configure site redi-
rection paths for mobile phones, however you will need to obtain additional data to create redirection paths
for other types of mobile devices such as smartphones, eBook readers, tablets, etc. DNNCommunity Edi-
tion users can upgrade to this premium data service by purchasing a licence from the DNNStore.
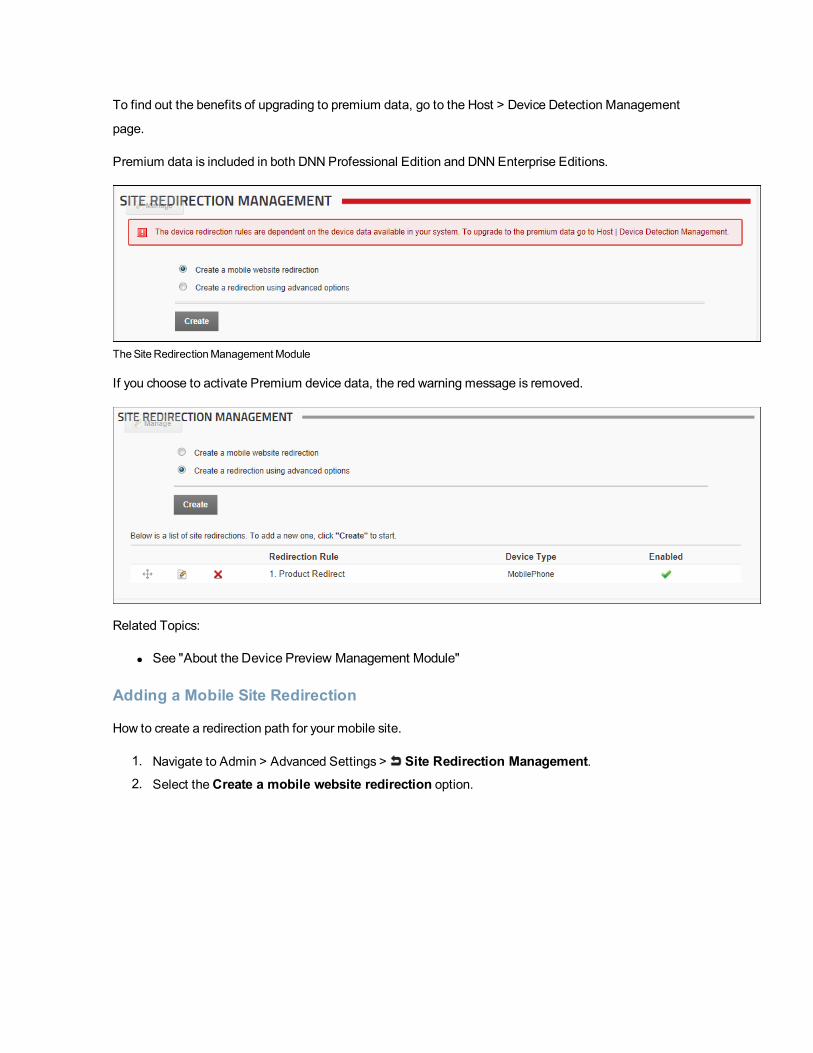
To find out the benefits of upgrading to premium data, go to the Host > Device Detection Management
page.
Premium data is included in both DNNProfessional Edition and DNNEnterprise Editions.
TheSiteRedirectionManagementModule
If you choose to activate Premium device data, the red warning message is removed.
Related Topics:
l See "About the Device Preview Management Module"
Adding a Mobile Site Redirection
How to create a redirection path for your mobile site.
1. Navigate to Admin > Advanced Settings > Site Redirection Management.2. Select theCreate a mobile website redirection option.

3. Click theCreate link.
4. At Redirecting, the name of the page currently set as the Home page is displayed.5. At To, select the location you want to redirect users to from these options:
l Site: Select to redirect users to another site within this installation.a. Select the site name from the drop down list. As shown in the below image.
l Page within this site: Select to redirect users to a particular page within the current site.a. Select the page name from the drop down list.
l URL: Select to redirect users to an external URL.a. In the URL text box, enter the redirection URL.
6. Click the Save link. The newly created redirection is now listed.

Adding Advanced Site Redirections
How to create advanced redirection paths for a site. Advanced options include the ability to create a redi-
rection that only applies to a page and its child pages or a redirection that applies to a full site. Redi-
rections can be associated with one or more types of user devices or a set of rules can be applied to further
limit a redirection.
1. Navigate to Admin > Advanced Settings > Site Redirection Management.2. Select theCreate a redirection using advanced options option.
3. Click theCreate link.
4. In the Site Redirection Name text box, enter a name for this redirection. This redirection is auto-
matically enabled, however if you wish to disable it you can uncheck the Enable check box.5. At Redirecting, select from these options:
l Page within this site: Choose this option to redirect users from a site page:a. Select the page name from the drop down list. The current Home page of the site is
selected by default.

b. Optional. Check the Include all child pages check box if you wish apply this
redirection to all of the child pages.
c. At To, select the location you want to redirect uses to from these options:
l Site: Select to redirect users to another site within this installation and then
select the site from the drop down list.
l Page within this site: Select to redirect users to another page with this site
and then select the page name from the drop down list.
l URL: Select to redirect users to an external URL and then enter the redi-
rection URL into theURL text box.l Site: Select to create a redirection for the entire site.
a. Select the site name from the drop down list.
b. At To, select the location you want to redirect uses to from these options:
l Site: Select to redirect users to another site within this installation and then
select the site from the drop down list.
l URL: Select to redirect users to an external URL and then enter the redi-
rection URL into the URL text box.
6. At Select User Device, choose the device for this redirection from these option:
l Mobile Phone: Redirects mobile phone users. This is the default option.l Tablet: Redirects tablet users. This option on available for premium data users.
l Both: Redirects users of both mobile phones and tablets. This option on available for pre-
mium data users.
l Advanced: Select to create multiple rules for this redirection:a. At Capability, select a condition for this rule from the drop down list.
b. At Matching Value, select the matching value for this rule.c. Click theAdd button to add this ruled. Repeat the above 3 steps to add additional rules.
7. Click the Save link. The newly created redirection is now listed.
As an example the below image shows a redirection which redirects all users who browse the Products
page of the site (including any of its child page) to another page of the site called "Products - Mobile".

In another example the below image shows a redirection which redirects all mobile phone users to another
site within this DNN installation. This redirection applies to all site pages.

Deleting a Redirection Path
How to delete a user device redirection which has been created using the Site Redirection Management
module.
1. Navigate to Admin > Advanced Settings > Site Redirection Management.2. Click theDelete button beside the redirection rule to be deleted. This displays the message "Are
You Sure YouWish To Delete This Item?"
3. Click the Yes button.
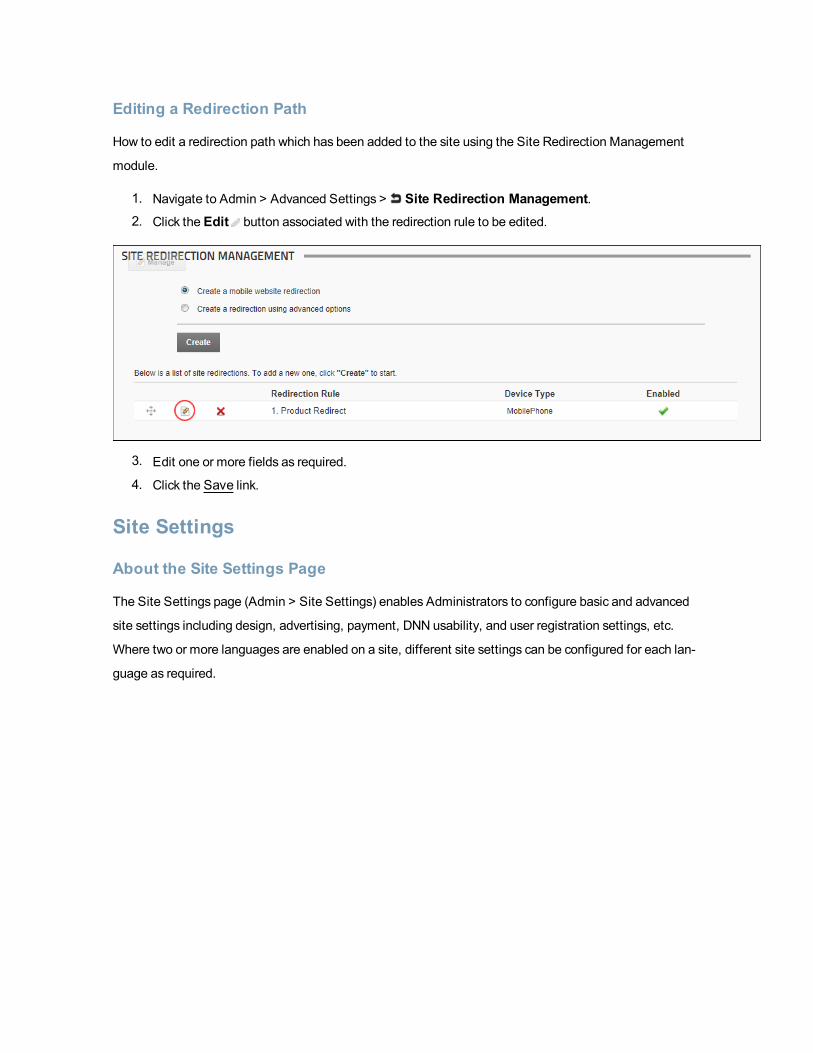
Editing a Redirection Path
How to edit a redirection path which has been added to the site using the Site Redirection Management
module.
1. Navigate to Admin > Advanced Settings > Site Redirection Management.2. Click the Edit button associated with the redirection rule to be edited.
3. Edit one or more fields as required.
4. Click the Save link.
Site Settings
About the Site Settings Page
The Site Settings page (Admin > Site Settings) enables Administrators to configure basic and advanced
site settings including design, advertising, payment, DNN usability, and user registration settings, etc.
Where two or more languages are enabled on a site, different site settings can be configured for each lan-
guage as required.

TheBasic Settings tab of theSiteSettings Module

TheAdvancedSettings tab of theSiteSettings Module as displayed toSuperUsers
Basic Settings
Configuring your Site Details
How to modify the title, description, keywords and copyright notice for your site via the Site Settings page.
You can also view the GUID for your site in this section.
Note 1: The copyright notice displays on pages where the applied skin contains the Copyright skin object.
In the default DNN skin, the copyright notice appears at the bottom left corner of all pages.
1. Navigate to Admin > Site Settings.2. Select theBasic Settings tab.3. Expand the Site Details section.4. Optional. Click on the country flag icon associated with the culture (language) to be updated. This
field only displays when multiple languages are enabled. See "Viewing a Site in a Secondary Lan-
guage"
5. In the Title text box, enter a title for the site. This title displays in the title bar of theWeb browser
and is used in language files such as the Privacy Statement, Terms of Use, etc. Note: This title is

also used as a tool tip when a user places their mouse over the site logo, as shown in the image
beneath this tutorial. See "Setting the Site Logo"
6. Optional. In theDescription text box, enter a description that will be used by search engines to
index this site.
7. Optional. In theKeywords text box, enter one or more keywords separated by commaswhich will
be used by search engines to index this site. E.g. toys,eco-friendly,organic toys,fair trade toys,fair
labor toys,
8. Optional. In theCopyright text box, set the copyright notice for the site in one of the following
way:
l Dynamic Copyright Notice: Leave the Copyright field blank to automatically display the
current year and the site title as the copyright notice. E.g. Entering "Awesome Cycles" in
the Title field above will display the copyright notice 'Copyright (c) 2012 Awesome Cycles'. If
the Title field is blank, then the copyright notice displays as 'Copyright (c) 2012'
l Custom Copyright Notice: Enter the text of your copyright message. To include the cur-
rent year in the notice, enter [year] into the notice. E.g. Enter 'Copyright (C) [year] Awe-
some Cycles.biz' to display 'Copyright (C) 2012 Awesome Cycles.biz', as shown in the
image beneath this tutorial.

9. At GUID, you can view the GUID (globally unique identifier) which can be used to identify this site.
Wikipedia.org defines a GUID as "a special type of identifier used in software applications in order
to provide a reference number which is unique in any context (hence, "Globally"), for example, in
defining the internal reference for a type of access point in a software application, or for creating
unique keys in a database".
10. Click theUpdate button.

Appearance
Enabling/Disabling Skin Widgets
How to enable or disable widget functionality in skins. Enable this setting to enable JavaScript/HTML widg-
ets that have been included in skins. The skin widget field is associated with theWidget skin object.

1. Navigate to Admin > Site Settings.2. Optional. Click on the country flag icon associated with the culture (language) to be updated. This
field only displays when multiple languages are enabled. See "Viewing a Site in a Secondary Lan-
guage"
3. Select theBasic Settings tab.4. Expand theAppearance section.5. At Enable Skin Widgets, select from these options:
l Check the check box to enable skin widgets.
l Uncheck the check box to disable skin widgets.

6. Click theUpdate button.
Setting the Body Background
How to set the background image to be tiled on all pages of this site. Where a background has been set in
the skin it will override this setting.

1. Navigate to Admin > Site Settings.2. Optional. Click on the country flag icon associated with the culture (language) to be updated. This
field only displays when multiple languages are enabled. See "Viewing a Site in a Secondary Lan-
guage"
3. Select theBasic Settings tab.4. Expand theAppearance section.5. At Body Background, select from these options:
1. To select an existing file:
1. At Folder, select the folder where the file is located.2. Selecting the required file from the File drop down list. A small image of the
selected file is now displayed at this field.
2. Upload a new file:
1. Clicking theUpload File link
2. Clicking theBrowse... button.3. Selecting the file from your computer.
4. Clicking the Save File link. The uploaded file is automatically selected and a small
image of the selected file is now displayed at this field.

6. Click theUpdate button.
Setting the Default Site Skin and Container
How to set the default skin that is applied to all site pages including the Admin pages and set container
that is applied to all existing and newmodules on these pages.
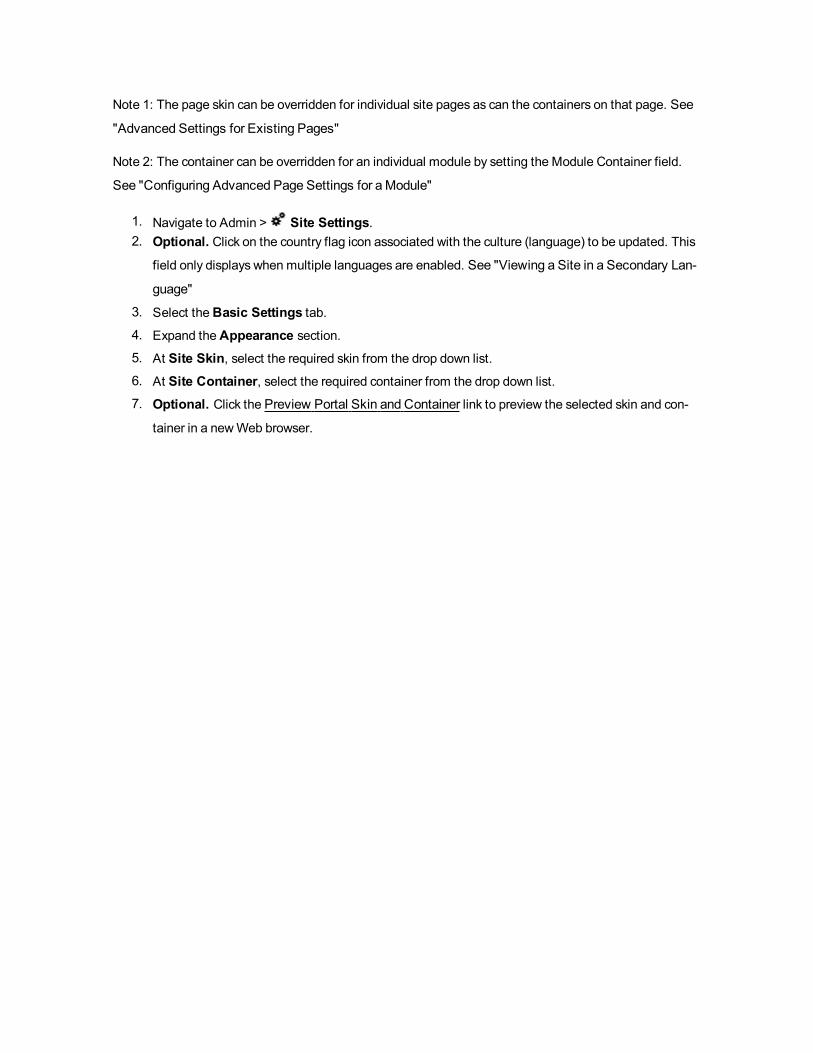
Note 1: The page skin can be overridden for individual site pages as can the containers on that page. See
"Advanced Settings for Existing Pages"
Note 2: The container can be overridden for an individual module by setting the Module Container field.
See "Configuring Advanced Page Settings for aModule"
1. Navigate to Admin > Site Settings.2. Optional. Click on the country flag icon associated with the culture (language) to be updated. This
field only displays when multiple languages are enabled. See "Viewing a Site in a Secondary Lan-
guage"
3. Select theBasic Settings tab.4. Expand theAppearance section.5. At Site Skin, select the required skin from the drop down list.
6. At Site Container, select the required container from the drop down list.
7. Optional. Click the Preview Portal Skin and Container link to preview the selected skin and con-
tainer in a newWeb browser.

8. Click theUpdate button.
Related Topics:
l See "Uploading a Site Skin and/or Container"

Setting the Edit Skin and Container
How to set the skin which is applied to the editing pages of the site and the container which is applied to
the modules on those pages. E.g. module editing pages, module settings pages, page settings pages,
etc.
Tip: Choose a skin and container with minimal design and images as it will load quickly into your
Web browser and reduce the editing time.
1. Navigate to Admin > Site Settings.2. Optional. Click on the country flag icon associated with the culture (language) to be updated. This
field only displays when multiple languages are enabled. See "Viewing a Site in a Secondary Lan-
guage"
3. Select theBasic Settings tab.4. Expand theAppearance section.5. At Edit Skin, select the required skin from the drop down list.
6. At Edit Container, select the required container from the drop down list.
7. Optional. Click the Preview Edit Skin and Container link to preview the selected skin and con-
tainer in a newWeb browser.

8. Click theUpdate button.
Related Topics:
l See "Uploading a Site Skin and/or Container"

Setting the Favicon
How to set the favicon for your site. A favicon (short for favorites icon) is an icon file, most commonly
16x16 pixels, associated with a particular website or web page. A web designer can create such an icon
and install it into a web site (or web page) by several means, and graphical web browsers will then make
use of it. Browsers that provide favicon support typically display a page's favicon in the browser's address
bar and next to the page's name in a list of bookmarks. Browsers that support a tabbed document interface
typically display the favicon next to the page title on the tab, and site-specific browsers use the favicon as
desktop icon. The favicon is an important aspect of a site's brand identity and is an important attribute
which needs to be customized for marketing purposes.
Note 1: If no favicon is set and there is a favicon.Ico file in the root of the site that favicon.Ico will be
detected by browsers and used. DNN comeswith a favorites icon (named "favicon.ico") that is located in
the root folder of the Admin File Manager by default. See "About the Admin File Manager Module"
Note 2: Only files with an *.ico extension can be selected at this field, as these are the only files supported
by Internet Explorer.
1. Navigate to Admin > Site Settings.2. Select theBasic Settings tab.3. Expand theAppearance section.4. At Favicon.ico, select from these options:
l For no favicon: Select <None Specified> from the File drop down list.l To select an existing file:
1. At Folder, select the folder where the file is located.2. Selecting the required file from the File drop down list. A small image of the
selected file is now displayed at this field.
l Upload a new file:
1. Clicking theUpload File link
2. Clicking theBrowse... button.3. Selecting the file from your computer.
4. Clicking the Save File link. The uploaded file is automatically selected and a small
image of the selected file is now displayed at this field.

5. Click theUpdate button.
Setting the Site Logo
How to set the logo for this site as well as update the favorite icon. The site logo displays on pages where
the applied skin contains the Logo skin object. A site logo is typically displayed in the top left corner of all
site pages.

1. Navigate to Admin > Site Settings.2. Optional. Click on the country flag icon associated with the culture (language) to be updated. This
field only displays when multiple languages are enabled. See "Viewing a Site in a Secondary Lan-
guage"
3. Select theBasic Settings tab.4. Expand theAppearance section.5. At Logo, select from these options:
1. To select an existing file:
1. At Folder, select the folder where the file is located.2. Selecting the required file from the File drop down list. A small image of the
selected file is now displayed at this field.
2. Upload a new file:
1. Clicking theUpload File link.
2. Clicking theBrowse... button.3. Selecting the file from your computer.
4. Clicking the Save File link. The uploaded file is automatically selected and a small
image of the selected file is now displayed at this field.

6. Click theUpdate button.
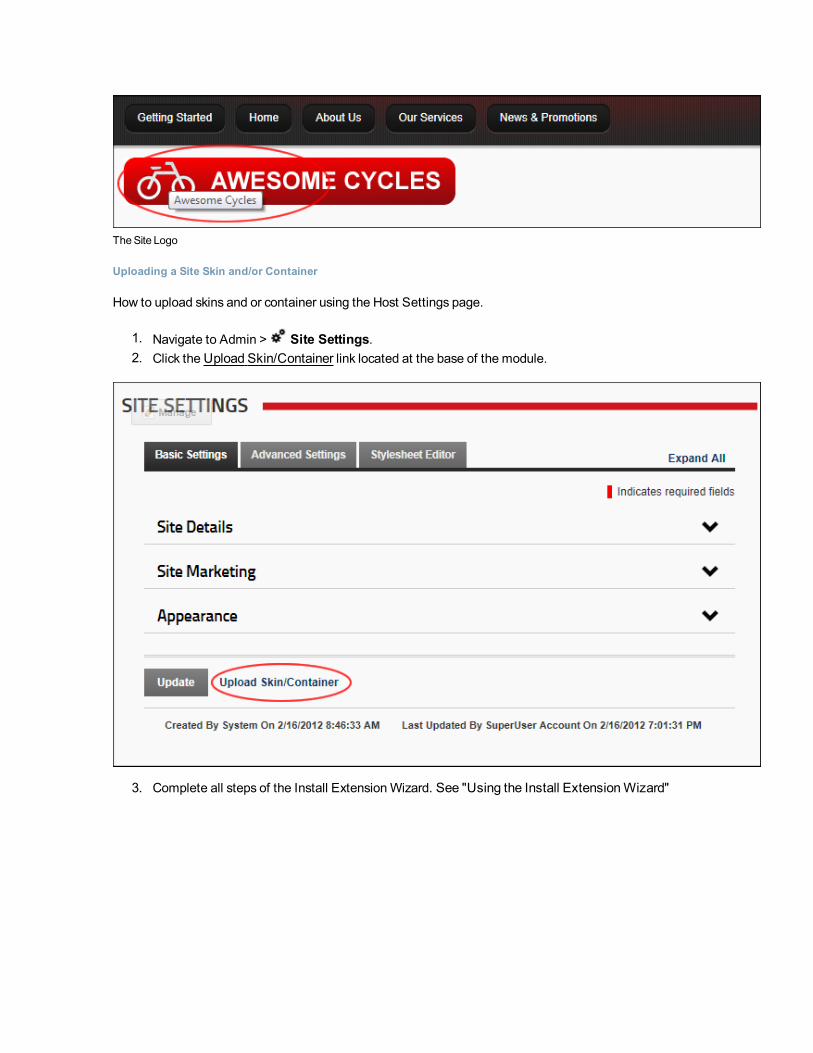
TheSite Logo
Uploading a Site Skin and/or Container
How to upload skins and or container using the Host Settings page.
1. Navigate to Admin > Site Settings.2. Click theUpload Skin/Container link located at the base of the module.
3. Complete all steps of the Install ExtensionWizard. See "Using the Install ExtensionWizard"
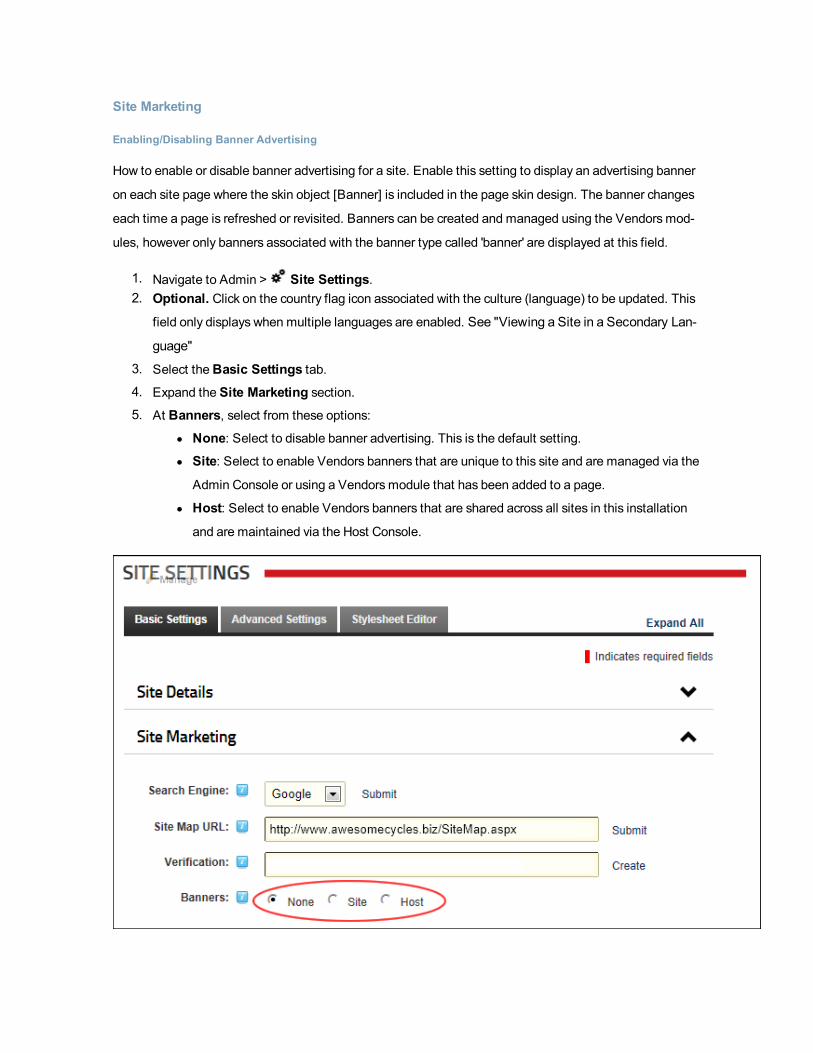
Site Marketing
Enabling/Disabling Banner Advertising
How to enable or disable banner advertising for a site. Enable this setting to display an advertising banner
on each site page where the skin object [Banner] is included in the page skin design. The banner changes
each time a page is refreshed or revisited. Banners can be created and managed using the Vendorsmod-
ules, however only banners associated with the banner type called 'banner' are displayed at this field.
1. Navigate to Admin > Site Settings.2. Optional. Click on the country flag icon associated with the culture (language) to be updated. This
field only displays when multiple languages are enabled. See "Viewing a Site in a Secondary Lan-
guage"
3. Select theBasic Settings tab.4. Expand the Site Marketing section.5. At Banners, select from these options:
l None: Select to disable banner advertising. This is the default setting.l Site: Select to enable Vendors banners that are unique to this site and are managed via the
Admin Console or using a Vendorsmodule that has been added to a page.
l Host: Select to enable Vendors banners that are shared across all sites in this installation
and are maintained via the Host Console.
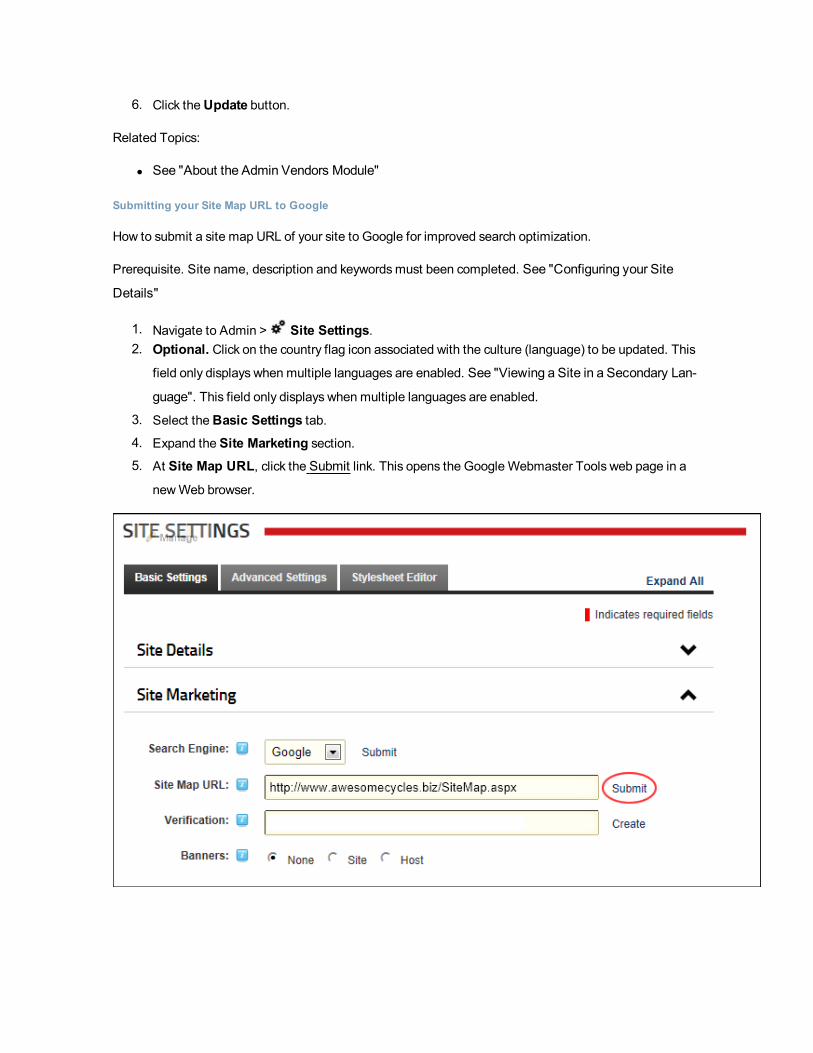
6. Click theUpdate button.
Related Topics:
l See "About the Admin Vendors Module"
Submitting your Site Map URL to Google
How to submit a site map URL of your site to Google for improved search optimization.
Prerequisite. Site name, description and keywordsmust been completed. See "Configuring your Site
Details"
1. Navigate to Admin > Site Settings.2. Optional. Click on the country flag icon associated with the culture (language) to be updated. This
field only displays when multiple languages are enabled. See "Viewing a Site in a Secondary Lan-
guage". This field only displays when multiple languages are enabled.
3. Select theBasic Settings tab.4. Expand the Site Marketing section.5. At Site Map URL, click the Submit link. This opens the Google Webmaster Tools web page in a
newWeb browser.

6. OnGoogle Webmaster Tools web page, complete the following steps:
a. If you do not have a Google Account, sign up for one.
b. Sign in toGoogle Webmaster Toolswith your Google account.c. Go to theDashboard.d. In theAdd Site text box, enter the URL of your site. E.g. http://www.domain.com/e. Click theOK button to confirm.
f. Click the Verify link.
g. Select Upload an HTML file. This will display a unique file name. Copy this name.7. Return to the Site Settings page of your DNN site and complete the following steps:
a. In the Verification text box, enter the file name.
b. Click theCreate link.8. OnGoogle Webmaster Tools web page, complete the following steps:
a. Click the Verified button.
b. On theGoogle Sitemaps tab, select Add General Web Sitemap.c. Copy the URL that is now displayed.
9. Return to the Site Settings page of your DNN site and complete the following steps:
a. Paste the URL you just copied into the Site Map URL text box.
Submitting your Site to Search Engines
How to submit the site to one or more search engines for indexing. This will add the site to the search
engine's list of sites to be indexed.
Prerequisites. Site name, description and keywordsmust been completed. See "Configuring your Site
Details"
1. Navigate to Admin > Site Settings.2. Optional. Click on the country flag icon associated with the culture (language) to be updated. This
field only displays when multiple languages are enabled. See "Viewing a Site in a Secondary Lan-
guage"
3. Select theBasic Settings tab.4. Expand the Site Marketing section.
5. At Search Engine, select either theGoogle, Yahoo orMicrosoft search engines.
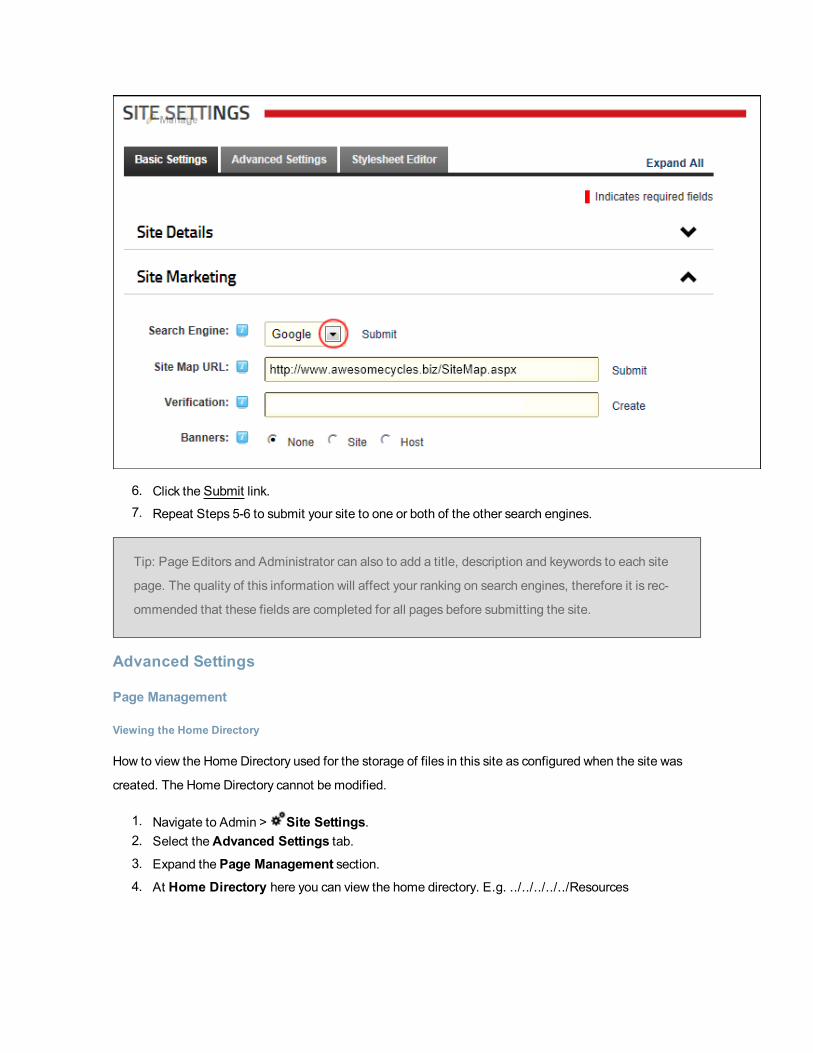
6. Click the Submit link.7. Repeat Steps 5-6 to submit your site to one or both of the other search engines.
Tip: Page Editors and Administrator can also to add a title, description and keywords to each site
page. The quality of this information will affect your ranking on search engines, therefore it is rec-
ommended that these fields are completed for all pages before submitting the site.
Advanced Settings
Page Management
Viewing the Home Directory
How to view the Home Directory used for the storage of files in this site as configured when the site was
created. The Home Directory cannot be modified.
1. Navigate to Admin > Site Settings.2. Select theAdvanced Settings tab.3. Expand the Page Management section.4. At Home Directory here you can view the home directory. E.g. ../../../../../Resources
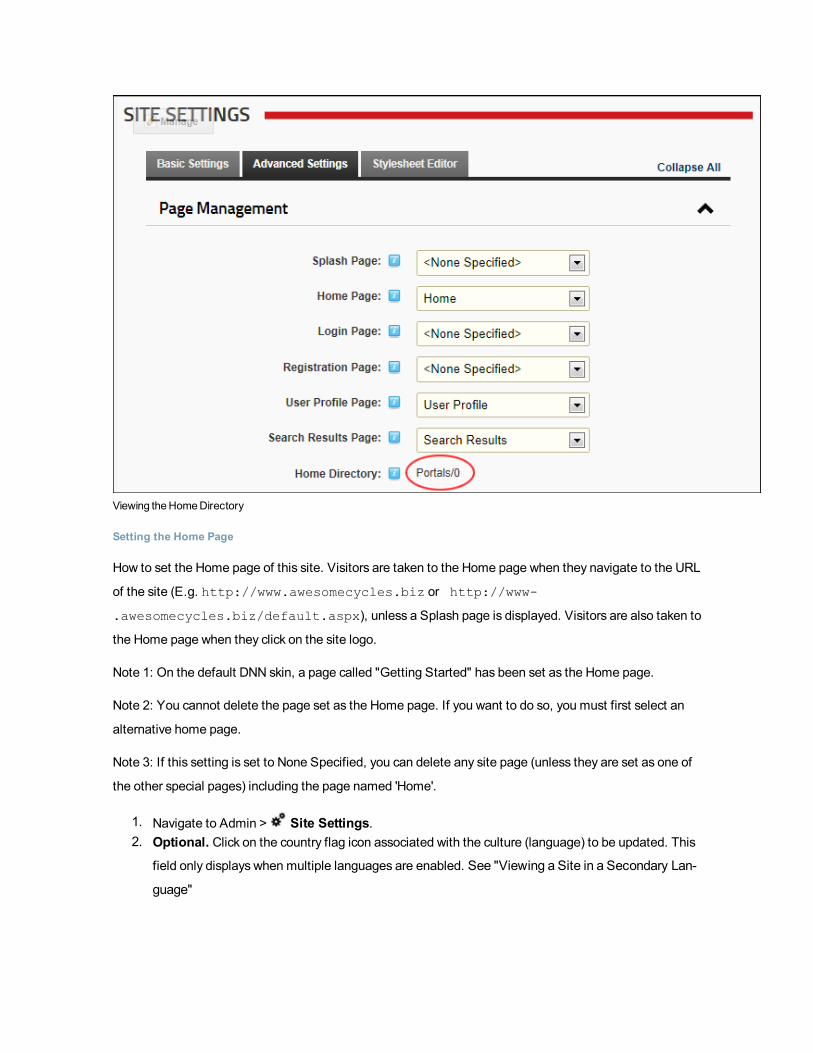
Viewing theHomeDirectory
Setting the Home Page
How to set the Home page of this site. Visitors are taken to the Home page when they navigate to the URL
of the site (E.g. http://www.awesomecycles.biz or http://www-
.awesomecycles.biz/default.aspx), unless a Splash page is displayed. Visitors are also taken to
the Home page when they click on the site logo.
Note 1: On the default DNN skin, a page called "Getting Started" has been set as the Home page.
Note 2: You cannot delete the page set as the Home page. If you want to do so, you must first select an
alternative home page.
Note 3: If this setting is set to None Specified, you can delete any site page (unless they are set as one of
the other special pages) including the page named 'Home'.
1. Navigate to Admin > Site Settings.2. Optional. Click on the country flag icon associated with the culture (language) to be updated. This
field only displays when multiple languages are enabled. See "Viewing a Site in a Secondary Lan-
guage"

3. Select theAdvanced Settings tab.4. Expand the Page Management section.5. At Home Page, select from the following options:
l To set any page as the Home page, select the page name from the drop down list. The
page can be called Home but it could also be any other page name.
l To set the first page that is visible on the site menu page as the default Home page, select
<None Specified> This will set either the page that is located on the far left or the top of
the menu as the Home page.
6. Click theUpdate button.
Enabling a Custom Login Page
How to set any page as the Login page for the site. This setting enables you to create a custom Login page
rather than using the default login page which only displays the Account Login module. If a Login page is
not set, the default Login page is used. The default login page requires the Login skin object to be included
in the skin.
Prerequisite. Create a custom login page as follows:

1. Add a new page to your site (E.g. Login page). Your Login pagemust have the following:l All Usersmust be granted permissions to view the page.
l An Account Log In module must be added to the page and visible to all users.
Warning: Do not apply this setting without first adding an Account Login module to the page you are
selecting and ensure the page is available to All Users. If you have logged out of the site and do not have
an Account login module viewable by 'All Users' you will be unable to log in again. If this occurs, enter your
site URL into the address bar of yourWeb browser and add "login.aspx" to the end of the URL. E.g.
http://www.awesomecycles.biz/Login.aspx. This will display the default login page.
1. Navigate to Admin > Site Settings.2. Optional. Click on the country flag icon associated with the culture (language) to be updated. This
field only displays when multiple languages are enabled. See "Viewing a Site in a Secondary Lan-
guage"
3. Select theAdvanced Settings tab.4. Expand the Page Management section.5. At Login Page, select the name of the Login page you created from the drop down list.
6. Click theUpdate button.

Restoring the Default Login Page
How to restore the default Login page to the site. Skin Token: The Login token must be included in the
Site Skin to access the default login page. Don't restore the default Login page if you are using a custom
Site Skin that doesn't include this skin object.
1. Navigate to Admin > Site Settings.2. Optional. Click on the country flag icon associated with the culture (language) to be updated. This
field only displays when multiple languages are enabled. See "Viewing a Site in a Secondary Lan-
guage"
3. Select theAdvanced Settings tab.4. Expand the Page Management section.5. At Login Page, select < None Specified >.
6. Click theUpdate button.
Setting a Custom Registration Page
How to set a custom registration page for this site. This page enables visitors to register for a new account.

Important. The page that you set as the registration page must have the Add NewUser module added to
it. Ensure permissions to view the page and the module are granted to all users.
1. Navigate to Admin > Site Settings.2. Optional. Click on the country flag icon associated with the culture (language) to be updated. This
field only displays when multiple languages are enabled. See "Viewing a Site in a Secondary Lan-
guage"
3. Select theAdvanced Settings tab.4. Expand the Page Management section.5. At Registration Page, select the registration page you created from the drop down list. E.g. Reg-
ister
6. Click theUpdate button.
Restoring the Default Registration Page
How to restore the default user registration page to this site.

1. Navigate to Admin > Site Settings.2. Optional. Click on the country flag icon associated with the culture (language) to be updated. This
field only displays when multiple languages are enabled. See "Viewing a Site in a Secondary Lan-
guage"
3. Select theAdvanced Settings tab.4. Expand the Page Management section.5. At Registration Page, select <None Specified>.
6. Click theUpdate button.
Setting the Search Results Page
How to set a custom or a default search results page for this site using the Site Settings page.
1. Navigate to Admin > Site Settings.2. Select theAdvanced Settings tab.3. Expand the Page Management section.

4. At Search Results Page, select from the following options:
l To set a custom search results page, select the page name from the drop down list. The
selected pagemust have a Search Results module on the page in order for the search
results to be displayed.
l To use the default search results page, select Search Results.
5. Click theUpdate button.
Enabling/Disabling a Splash Page
How to enable or disable a Splash page for this site. When a visitor first comes to the standard URL of your
site, that is the main URL (E.g. http://www.awesomecycles.biz or http://www-
.awesomecycles.biz) rather than a specific page (E.g. http://www-
.awesomecycles.biz/ContactUs/tabid/103/Default.aspx) the Splash page is displayed.
A Splash page must be created by a Page Editor or an Administrator. The Splash page is typically not
included in the site menu. The Splash page should include some form of redirection to one or more site
pages. This can be done by adding a link to a site pages, or adding a Flash animation with an automatic
redirect feature to the Splash page.
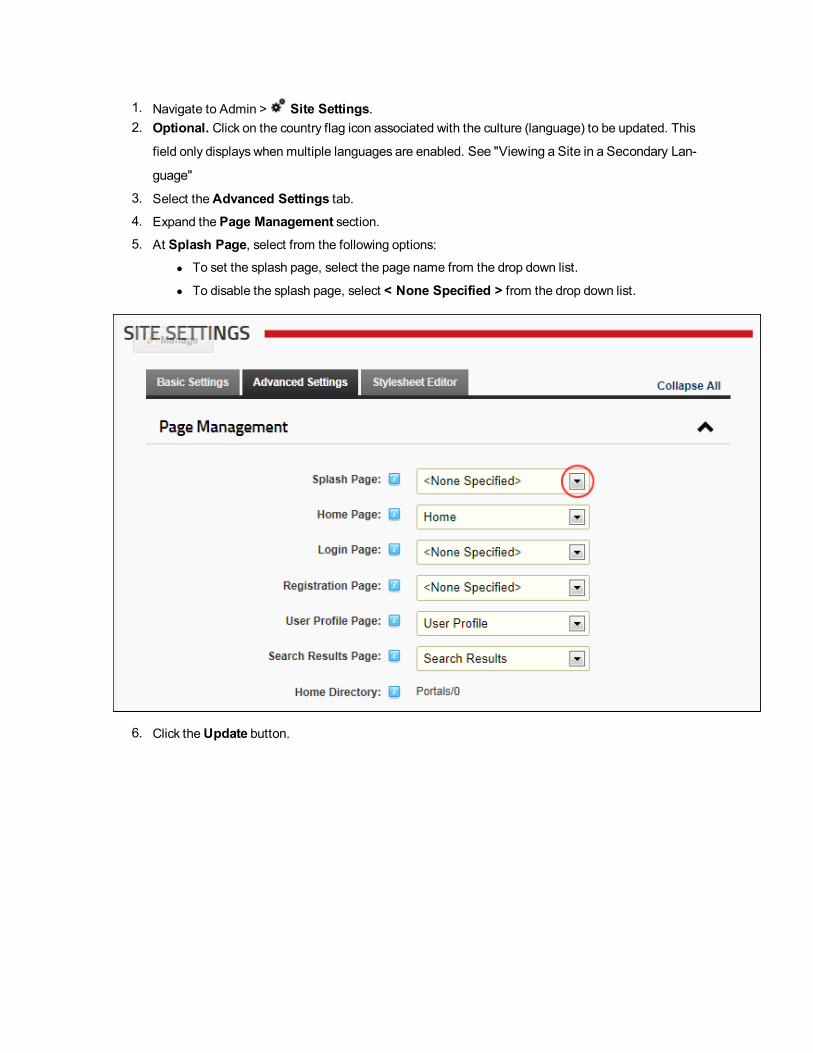
1. Navigate to Admin > Site Settings.2. Optional. Click on the country flag icon associated with the culture (language) to be updated. This
field only displays when multiple languages are enabled. See "Viewing a Site in a Secondary Lan-
guage"
3. Select theAdvanced Settings tab.4. Expand the Page Management section.5. At Splash Page, select from the following options:
l To set the splash page, select the page name from the drop down list.
l To disable the splash page, select < None Specified > from the drop down list.
6. Click theUpdate button.

ASampleSplashPage
Setting a Custom User Profile Page
How to create and set a custom user profile page for this site. The user profile enables authorized users to
maintain their user credentials, profile, password and services. In addition, usersmanage messages from
and to other site members using the Message Center module (See "About theMessage Center Module")
and manage modules they are authorized to using the MyModulesmodule. See "About theMy Modules
Module"Only available in DotNetNuke Professional Edition and DotNetNuke Enterprise Edition
Prerequisite. Create a User Profile page:
1. Create a new page to your site (E.g. Awesome Users), ensuring permission to view the page is
granted to All Users. You may like to set the page as not included in the menu. See "Adding a New
Page"
2. Add a View Profile module to the page that is visible to all users. See "Adding a New Module (Rib-
bonBar)"3. Add any other modules and content as desired.
Warning. Do not apply this setting without first creating a User Profile page.
1. Navigate to Admin > Site Settings.2. Optional. Click on the country flag icon associated with the culture (language) to be updated. This
field only displays when multiple languages are enabled. See "Viewing a Site in a Secondary Lan-
guage"
3. Select theAdvanced Settings tab.4. Expand the Page Management section.5. At User Profile Page, select the user profile page that you created from the drop down list. E.g.
Awesome Users

6. Click theUpdate button.
Restoring the Default User Profile Page
How to restore the default user profile page of this site.
1. Navigate to Admin > Site Settings.2. Optional. Click on the country flag icon associated with the culture (language) to be updated. This
field only displays when multiple languages are enabled. See "Viewing a Site in a Secondary Lan-
guage"
3. Select theAdvanced Settings tab.4. Expand the Page Management section.5. At User Profile Page, select User Profile.

6. Click theUpdate button.
Security Settings
Setting the Primary Administrator
How to set the Primary Administrator who will receive email notification of member activities such as new
registrations, unregistered accounts and feedback submitted using the Feedbackmodule (unless this is
overridden on the Feedbackmodule). In newDNN installations, the Host user account that is created is
selected by default for the first site that is created.
Tip: To create new Administrators, add a new user account (See "Adding a User Account") and
then add the user to the Administrators security role (See "Adding a User to a Security Role").
1. Navigate to Admin > Site Settings.2. Select theAdvanced Settings tab.3. Expand the Security Settings section.4. At Administrator, select the display name of the required administrator from the drop down list.

5. Click theUpdate button.
Setting the Visibility of the Login Control
This setting is useful for site owners do not want a Login option visible on their public website, as they feel
that it could be a potential security vulnerability. Rather than forcing a site to have a Login option on their
pages this settings provides a hidden URL where privileged users can log into the system. Note that this
URL does not offer any true security benefits as it simply obscures the location of the Login page for casual
website visitors.
1. Navigate to Admin > Site Settings.2. Select theAdvanced Settings tab.3. Expand the Security Settings section.4. At Hide Login Control, check the check box to display the Login control - OR uncheck the
check box to hide the Login control. This option requires users to navigate to the /login.aspx page
to view the login control. E.g. www.awesomecycles.biz//login.aspx.
5. Click theUpdate button.
Related Topics:
l See "Managing Login and Logout Settings"

Payment Settings
Setting the Payment Processor
How to configure payment processing for this site and receive payment from users who subscribe to
Member Services (roles) on this site. PayPal is the only payment processor included by default, however
your DNN developer can configure DNN to work with other providers. The PayPal Sandbox (https:/-
/developer.paypal.com) allows you to test PayPal and have test orders sent to the payment gateway with-
out taking live transactions. Enabling the PayPal Sandbox allows you to create paid subscriptions and test
the process without spending any real money. To use this system you must sign up for a Sandbox account
and use those credentials in the Payment Settings section shown below. See "Adding a Security Role
with a Fee" for more details on setting up subscriptions.
1. Navigate to Admin > Site Settings.2. Optional. Click on the country flag icon associated with the culture (language) to be updated. This
field only displays when multiple languages are enabled. See "Viewing a Site in a Secondary Lan-
guage"
3. Select theAdvanced Settings tab.4. Expand the Payment Settings section.5. At Currency, select the currency to process payments with.6. At Payment Processor, select a payment processing company from the drop down list. E.g. Pay-
Pal
7. ClickGo To Payment ProcessorWebSite and sign up for an account.

8. In the Processor UserId text box, enter the UserID code provided by PayPal.
9. In the Processor Password text box, enter the Password provided by PayPal.10. Optional. In the PayPal Return URL text box, enter the page URL that subscribers are redi-
rected to after payment. Leave blank to return to the Home page.
11. Optional. In the PayPal Cancel URL text box, enter page URL that subscribers are redirected if
payment is canceled. Leave blank to return to the Home page.
12. At Use Sandbox?, select from these options
l Check the check box to enable PayPal Sandbox.
l Uncheck the check box to disable Sandbox and enable live transactions.

13. Click theUpdate button.
Usability Settings
Configuring the Control Panel Options
How to configure the default settings for the Control Panel. Whenever an authorized user interacts with
the Control Panel the mode and visibility last selected by that user will be applied the next time.
1. Navigate to Admin > Site Settings.2. Select theAdvanced Settings tab.3. Expand theUsability Settings section.4. At Control Panel Mode, select either View or Edit as the default mode for the Control Panel.5. At Control Panel Visibility, select eitherMinimized orMaximized as the default view for the
Iconbar ControlBar only. This setting is not relevant to either the ControlBar or the RibbonBar Con-
trol Panels.

6. At Control Panel Security, select from the following options to set which groups of site editors
can view the Control Panel.
l Page Editors: Select to display the Control Panel to Page Editors only. A Page Editor is
any user that is authorized to create and manage pages and page settings.
l Module Editors: Select to display the Control Panel to both Page Editors and Module
Editors. A Module Editor is any user that is authorized to edit and/or manage content on
one or module modules. Choosing this option will allow these users to view the site in either
View or Editmode.

8. Click theUpdate button.
Related Topics:
l See "Overview of the ControlBar Control Panel"
l See "Overview of the RibbonBar Control Panel"
Enabling/Disabling Pop-Ups for Editing
How to optionally enable pop-up edit pages throughout this site.
1. Navigate to Admin > Site Settings.2. Select theAdvanced Settings tab.3. Expand theUsability Settings section.4. At Enable Pop-Ups?, select from these options:
l Check the check box to pop-up a newwindow that is separate to the web browser when
performing editing tasks.
l Uncheck the check box to perform editing tasks within the web browser.

5. Click theUpdate button.

Pop-ups enabledwheneditingmodule content

Pop-ups disabledwheneditingmodule content
Hiding System Folders
How to optionally prevent hidden folders or folders that start with an underscore from being included during
folder synchronization.
1. Navigate to Admin > Site Settings.2. Select theAdvanced Settings tab.3. Expand theUsability Settings section.4. At Hide System Folders, select from these options:
l Check the check box to prevent adding hidden and underscore folders.
l Uncheck the check box to allow.

5. Click theUpdate button.
About Inline Editing
The Inline Editing feature has been removed from DNN6+, however the field is still displayed in the
Advanced Settings > Usability Settings section of the Site Settings page. Enabling this feature here
will not have any effect on site editing.

Setting the Site TimeZone
How to set the time zone for this site. This sets all time related information on this site including the
default setting for the current time and date ( [DateTime:Now] ) replacement token. See "List of Replace-
ment Tokens" for more details.
1. Navigate to Admin > Site Settings.2. Select theAdvanced Settings tab.3. Expand theUsability Settings section.4. At Site TimeZone, select the time zone for the location of this site from the drop down list.
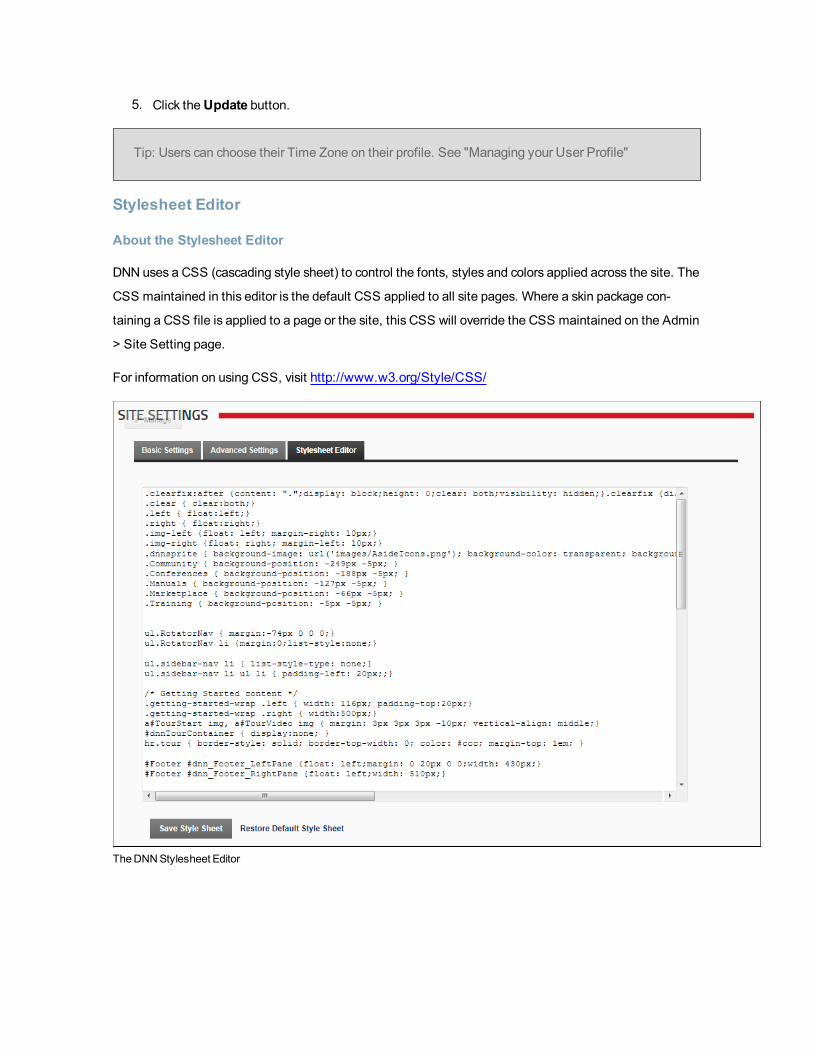
5. Click theUpdate button.
Tip: Users can choose their Time Zone on their profile. See "Managing your User Profile"
Stylesheet Editor
About the Stylesheet Editor
DNN uses a CSS (cascading style sheet) to control the fonts, styles and colors applied across the site. The
CSS maintained in this editor is the default CSS applied to all site pages. Where a skin package con-
taining a CSS file is applied to a page or the site, this CSS will override the CSS maintained on the Admin
> Site Setting page.
For information on using CSS, visit http://www.w3.org/Style/CSS/
TheDNNStylesheet Editor

Editing the Stylesheet
How to edit and save changes to the default stylesheet. This doesn't affect any styles that are part of a skin
package uploaded to this site.
1. Navigate to Admin > Site Settings.2. Select the Stylesheet Editor tab.3. In the multi-line text box, edit the current stylesheet.
4. Click the Save Style Sheet link.
5. Hold down theCtrl button and press the F5 button - OR - Click theRefresh button on yourWeb
browser to view the changes.
Editing theStylesheet
Restoring the Default Stylesheet
Restore the default stylesheet to the site. Anymodifications to the stylesheet on this page will be deleted.
The site uses a CSS (cascading style sheet) to control the fonts and colors applied across the site. Note:

this will not affect any stylesheets that are part of a skin package.
1. Navigate to Admin > Site Settings.
2. Select theStylesheet Editor tab.
3. Click theRestore Default Style Sheet link. This displays the message "Are You Sure YouWant To
Restore The Default Stylesheet (All Changes To The Current Stylesheet Will Be Lost)?"
4. Click theOK button to confirm.
5. Hold down theCtrl button and press the F5 button - OR - Click theRefresh button on yourWeb
browser to view the changes.
Restoring theDefault Stylesheet
User Account Settings
Login Settings
Managing Login and Logout Settings
How to set login and logout options for this site using the Site Settings page.
1. Navigate to Admin > Site Settings.2. Select theUser Account Settings tab.3. Expand the Login section and set any of the following options.
4. At Use CAPTCHA For Associating Logins, check the check box to use the CAPTCHA secu-
rity code for every authentication system that is enabled on this site - OR - Uncheck the check
box to remove CAPTCHA from associated logins. CAPTCHA can optionally be enabled on the
default DNN authentication method.
5. At Require a Valid Profile for Login, check the check box to require users to update their pro-
file during login if their profile no longer meets the requirements for a valid profile. E.g. If the
required fields for a valid profile have changed since the user last logged in - OR - Uncheck the
check box if a valid profile is now required to login. This is the default setting.
6. At Use CAPTCHA to Retrieve Password, check the check box to display the CAPTCHA secu-
rity box on the Retrieve Password page - OR - Uncheck the check box to disable CAPTCHA. This
is the default setting.
7. At Redirect After Login, select a page to redirect users to when they login to the site - OR -
Select < None Specified > to disable redirection.
8. At Redirect After Logout, select a page to redirect users to when they logout of the site - OR -
Select < None Specified > to disable redirection.

9. Click theUpdate button.
Related Topics:
l See "Setting the Visibility of the Login Control"
Profile Settings
Adding a New Profile Property
How to add a new field to the Manage Profile page using the Site Settings page.
1. Navigate to Admin > Site Settings.2. Select theUser Account Settings tab.3. Expand the Profile Settings section.4. Click the AddNew Profile Property link.5. On the Add New Property Details page, complete the following fields.

6. In the Property Name text box, enter a name for this property as it will appear on the Manage Pro-
file page.
7. At Data Type, select a data type from the following options: Checkbox, Date, DateTime, Country,
List, Locale, Page, Region, RichText, TimeZone, Integer, Multi-line Text, Text, TrueFalse, Image,
TimeZoneInfo and Unknown.
8. In the Property Category text box, enter the category that this property belongs to. This deter-
mined where it is displayed in the profile. Pre-existing categories are: Name, Address, Contact
Info, Preferences.
9. Optional. In the Length text box, enter the maximum character length for this field. This is only rel-
evant to fields where users enter information such as Text and RichText data types.
10. Optional. In theDefault Value text box, enter the default value for this field.11. Optional. In the Validation Expression text box, enter a regular expression to validate data
entered into this field.
12. Optional. At Required, select from these options:
l Check the check box to set the field as required. Existing users will be required to com-
plete this field the next time they login to the site.
l Uncheck the check box to set this field as optional. Users can choose to complete this
field on their profile at any time.
13. Optional. At Read Only, check the check box to set the field as editable by Administrators only.
Other users can view this field but cannot edit it.
14. Optional. At Visible, check the check box to set the field as visible in the User Accountsmodule
- OR - Uncheck the check box to hide it.
15. Optional. In the View Over text box, enter the view order for this property.
16. At Default Visibility, select one of the following options to set the default visibility of this property:
l All Users: All users can view this property by default.
l Members Only: Only registered users can view this property by default.
l Admin Only: Only Administrators can view this property by default.
17. Click theNext link. This saves this property information entered above and opens the Manage
Localization page.
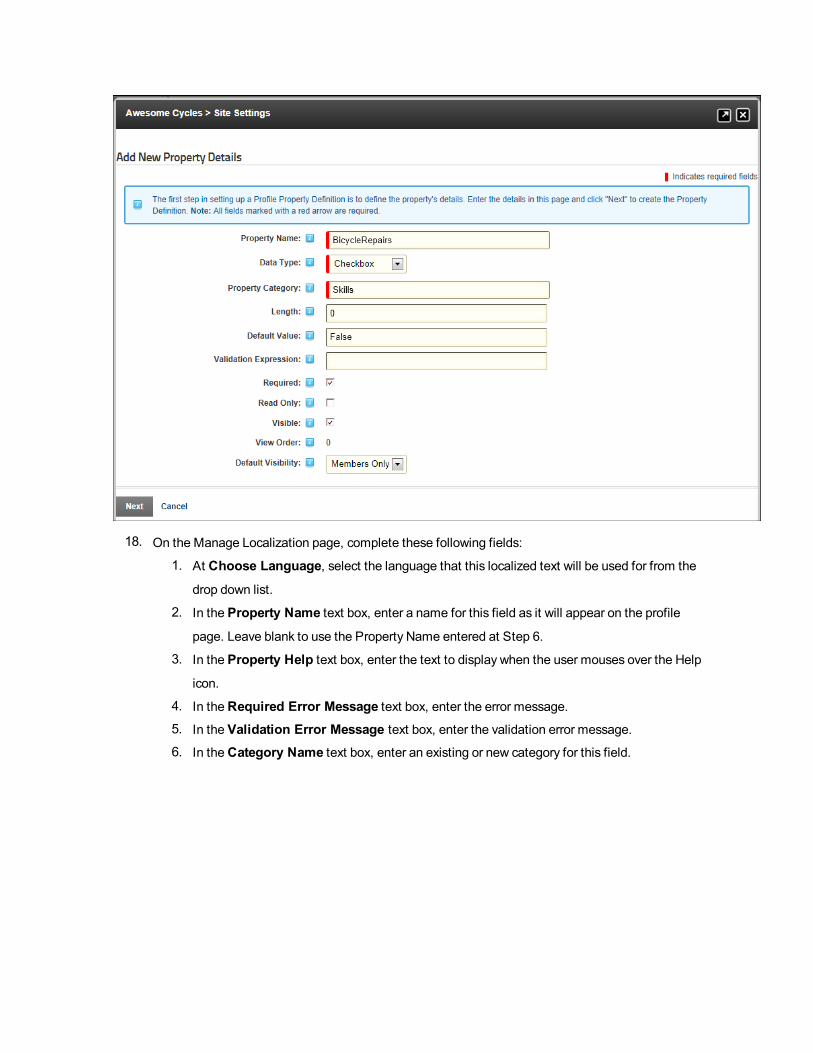
18. On the Manage Localization page, complete these following fields:
1. At Choose Language, select the language that this localized text will be used for from the
drop down list.
2. In the Property Name text box, enter a name for this field as it will appear on the profile
page. Leave blank to use the Property Name entered at Step 6.
3. In the Property Help text box, enter the text to display when the user mouses over the Help
icon.
4. In theRequired Error Message text box, enter the error message.5. In the Validation Error Message text box, enter the validation error message.6. In theCategory Name text box, enter an existing or new category for this field.
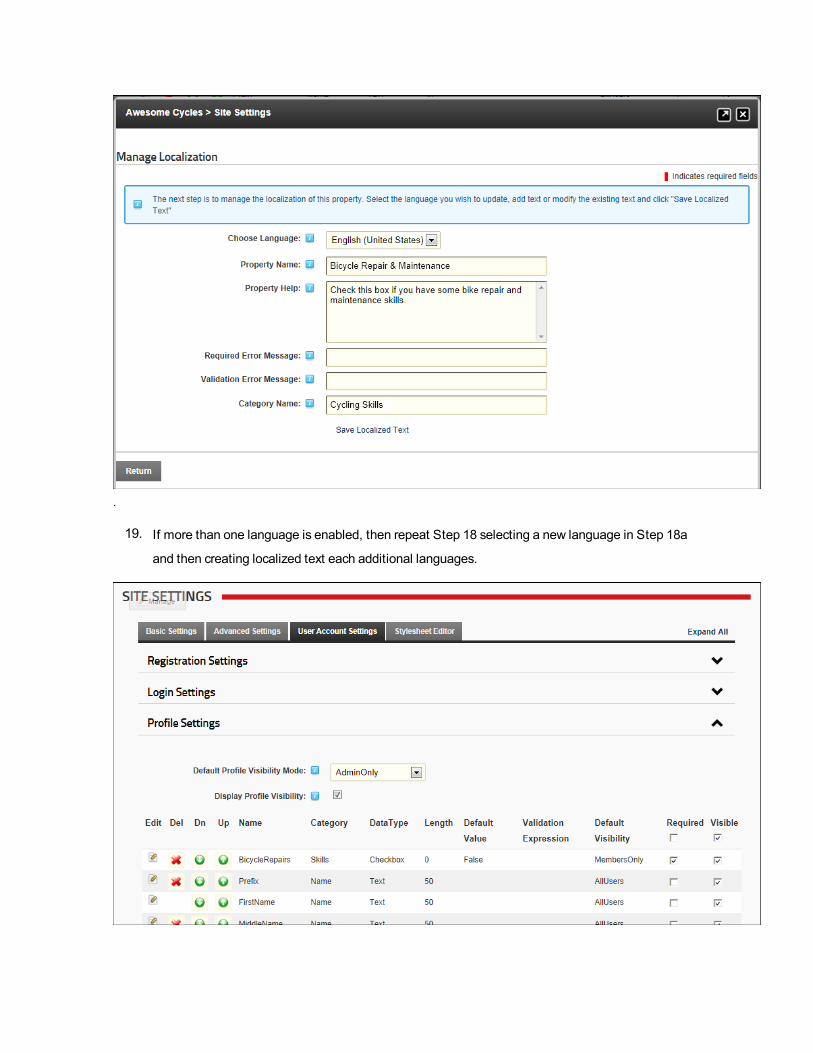
.
19. If more than one language is enabled, then repeat Step 18 selecting a new language in Step 18a
and then creating localized text each additional languages.

20. Optional. Navigate to the Manage Profile page to see your changes.

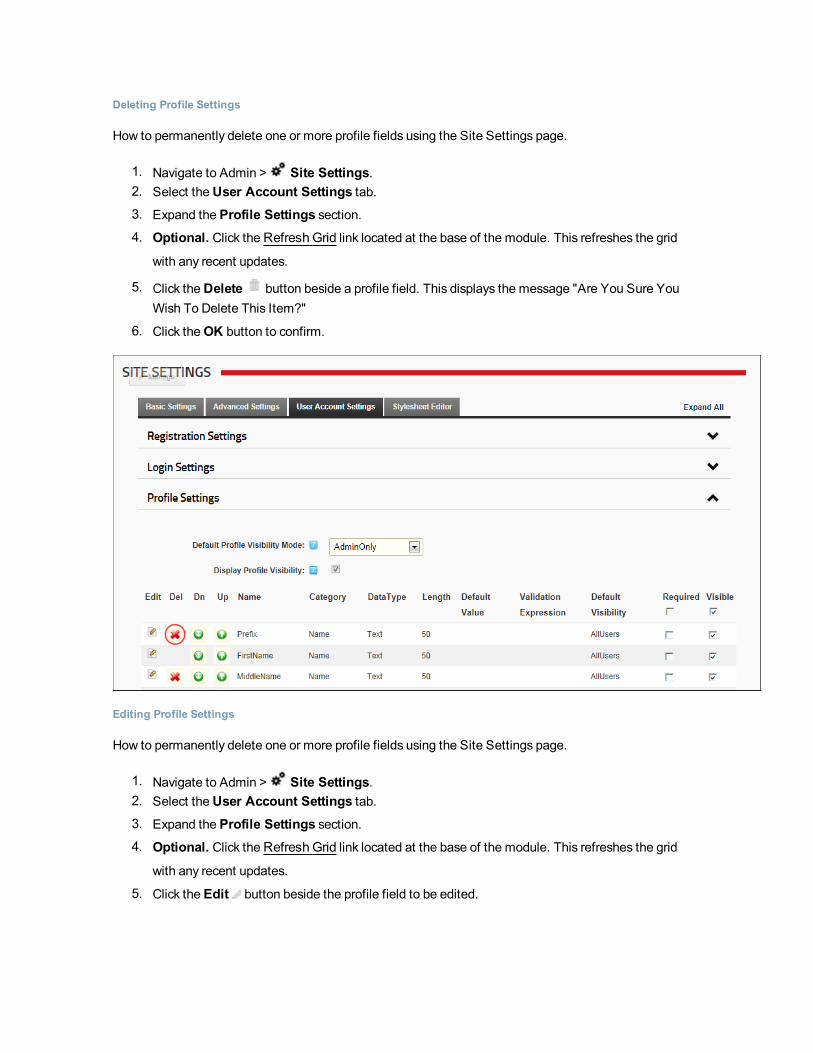
Deleting Profile Settings
How to permanently delete one or more profile fields using the Site Settings page.
1. Navigate to Admin > Site Settings.2. Select theUser Account Settings tab.3. Expand the Profile Settings section.4. Optional. Click theRefresh Grid link located at the base of the module. This refreshes the grid
with any recent updates.
5. Click theDelete button beside a profile field. This displays the message "Are You Sure YouWish To Delete This Item?"
6. Click theOK button to confirm.
Editing Profile Settings
How to permanently delete one or more profile fields using the Site Settings page.
1. Navigate to Admin > Site Settings.2. Select theUser Account Settings tab.3. Expand the Profile Settings section.4. Optional. Click theRefresh Grid link located at the base of the module. This refreshes the grid
with any recent updates.
5. Click the Edit button beside the profile field to be edited.

6. On the Edit Property Details page, edit one or more the following fields as required:
7. In the Property Name text box, enter a name for this property as it will appear on the Manage Pro-
file page.
8. At Data Type, select a data type from the following options: Checkbox, Date, DateTime, Country,
List, Locale, Page, Region, RichText, TimeZone, Integer, Multi-line Text, Text, TrueFalse, Image,
TimeZoneInfo and Unknown.
9. In the Property Category text box, enter the category that this property belongs to. This deter-
mined where it is displayed in the profile. Pre-existing categories are: Name, Address, Contact
Info, Preferences.
10. Optional. In the Length text box, enter the maximum character length for this field. This is only rel-
evant to fields where users enter information such as Text and RichText data types.
11. Optional. In theDefault Value text box, enter the default value for this field.12. Optional. In the Validation Expression text box, enter a regular expression to validate data
entered into this field.
13. Optional. At Required, check the check box to set the field as required - OR - Uncheck the
check box to set it as optional.
14. Optional. At Read Only, check the check box to set the field as editable by Administrators only.
Other users can view this field but cannot edit it.
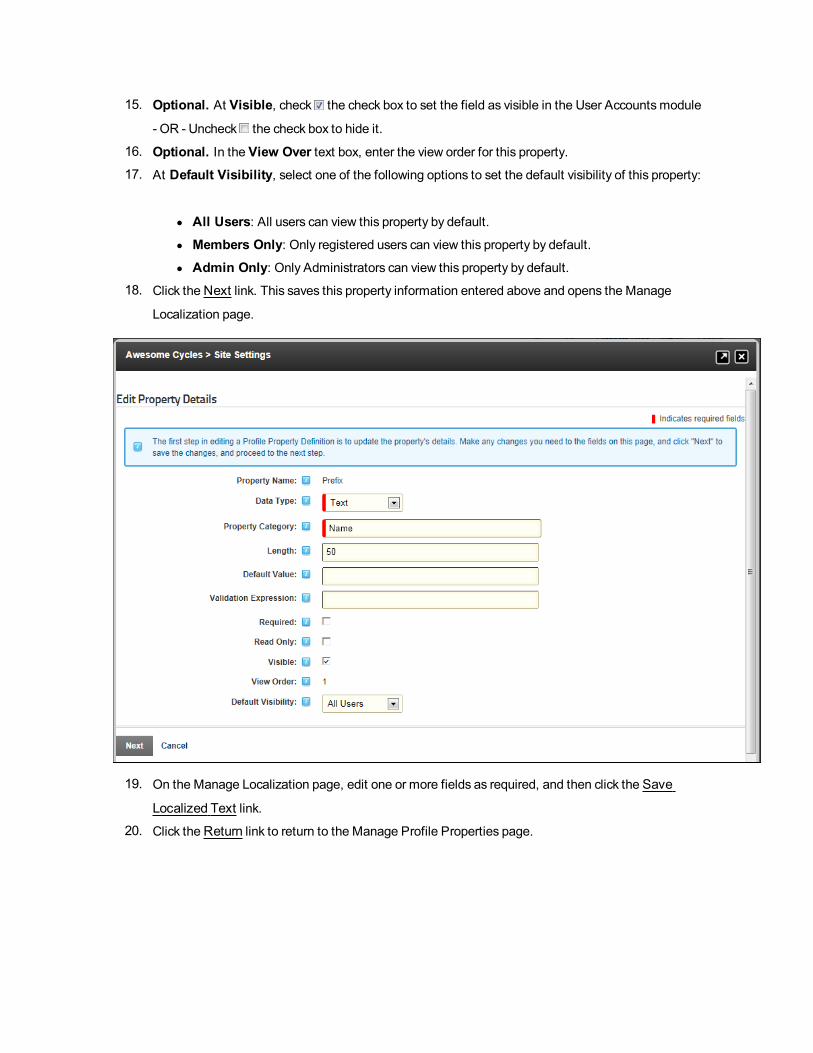
15. Optional. At Visible, check the check box to set the field as visible in the User Accountsmodule
- OR - Uncheck the check box to hide it.
16. Optional. In the View Over text box, enter the view order for this property.
17. At Default Visibility, select one of the following options to set the default visibility of this property:
l All Users: All users can view this property by default.
l Members Only: Only registered users can view this property by default.
l Admin Only: Only Administrators can view this property by default.
18. Click theNext link. This saves this property information entered above and opens the Manage
Localization page.
19. On the Manage Localization page, edit one or more fields as required, and then click the Save
Localized Text link.
20. Click theReturn link to return to the Manage Profile Properties page.

Managing Profile Settings
How to set the properties user profile fields under Site Settings.
1. Navigate to Admin > Site Settings.2. Select theUser Account Settings tab.3. Expand the Profile Settings section.4. Optional. Click theRefresh Grid link located at the base of the module if you have been idle on the
page for some time and there are two or more Administrators on this site, or a SuperUser has been
making updates. This refreshes the grid with any recent changes.
5. Click theDown button to move a field down one position on the profile page.
6. Click theUp button to move a field up one position on the profile page.7. In theRequired column, perform any of the following to set the fields that are required for a valid
profile:
l Check the check box at the top of this column to set all fields as required - OR - Uncheck
the check box at the top of this column to set all fields as optional.
l Check the check box beside a field to set it asmandatory on the User's Profile page. The
user will be prompted to update this field when they edit their profile. Note: The field will
only be required at Registration if set under User Settings (See "Configuring a Custom

Registration Form" and See "Configuring the Standard Registration Form") - OR - Uncheck
the check box beside a field to set it as optional.
8. At Visible, select from the following options to set the visibility of fields on the Manage Profile
page:
l Check the check box located at the top of this column to set all fields as visible - OR -
Uncheck the check box at the top of this column to hide all fields.
l Check the check box beside a field to set it as visible - OR - Uncheck the check box
beside a field to set it as not visible.
9. Click theUpdate button.
Registration Settings
Configuring a Custom Registration Form
How to set the user registration options for this site. Settings include choosing the page users are redi-
rected to after registration, optionally enabling the CAPTCHA security code feature and adding validation
requirements.
1. Navigate to Admin > Site Settings.2. Select theUser Account Settings tab.3. Expand theRegistration Settings section and then modify one or more settings.
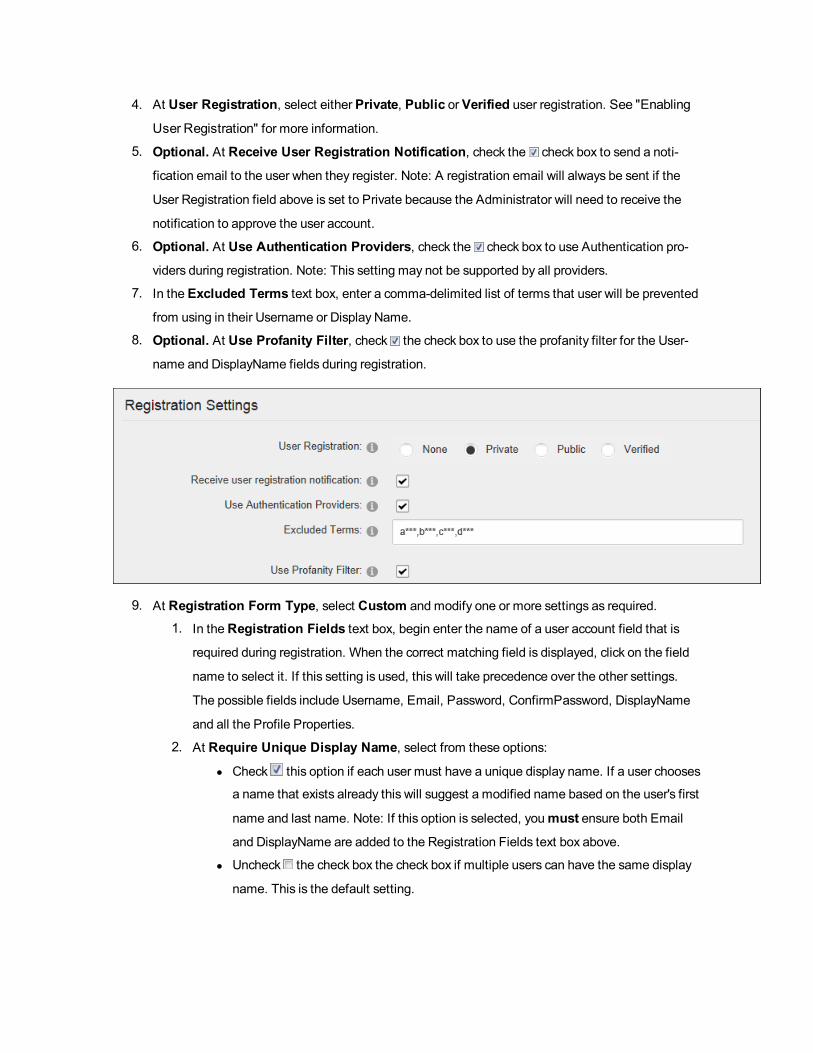
4. At User Registration, select either Private, Public or Verified user registration. See "Enabling
User Registration" for more information.
5. Optional. At Receive User Registration Notification, check the check box to send a noti-
fication email to the user when they register. Note: A registration email will always be sent if the
User Registration field above is set to Private because the Administrator will need to receive the
notification to approve the user account.
6. Optional. At Use Authentication Providers, check the check box to use Authentication pro-
viders during registration. Note: This setting may not be supported by all providers.
7. In the Excluded Terms text box, enter a comma-delimited list of terms that user will be prevented
from using in their Username or Display Name.
8. Optional. At Use Profanity Filter, check the check box to use the profanity filter for the User-
name and DisplayName fields during registration.
9. At Registration Form Type, select Custom and modify one or more settings as required.
1. In theRegistration Fields text box, begin enter the name of a user account field that is
required during registration. When the correct matching field is displayed, click on the field
name to select it. If this setting is used, this will take precedence over the other settings.
The possible fields include Username, Email, Password, ConfirmPassword, DisplayName
and all the Profile Properties.
2. At Require Unique Display Name, select from these options:
l Check this option if each user must have a unique display name. If a user chooses
a name that exists already this will suggest a modified name based on the user's first
name and last name. Note: If this option is selected, youmust ensure both Email
and DisplayName are added to the Registration Fields text box above.
l Uncheck the check box the check box if multiple users can have the same display
name. This is the default setting.

3. In theDisplay Name Format text box, specify a format for the users display name. The for-
mat can include tokens for dynamic substitution such as [FIRSTNAME] [LASTNAME]. If a
display name format is specified, the display name will no longer be editable through the
user interface.
4. In theUser Name Validation text box, modify the user name validation expression if
required.
5. In the Email Address Validation text box, modify the provided email validation expres-
sion.
6. At Password Expiry (in days) the number of days before a user's password expires is dis-
played. Users will be prompted to change their password the next time they login. Note 1: 0
= no expiry. Note: This field is only enforced if the user is using the regular DNNAuthen-
tication method. (I.e. They enter their User Name and Password when logging in). If the
user logs in using alternate authentication methods such as Facebook, Live, Yahoo or
Google, this setting will be ignored.
7. At Password Expiry Reminder (in days) the number of days warning given to a user that
they will be required to change their password is displayed.
8. At Require a Valid Profile for Registration, select from these option:
l Check the check box to select to require users to enter a valid profile during reg-
istration. Valid Profiles require the User Name, First Name, Last Names, Display
Name, Email Address and Password fields to all be completed. In addition, all fields
set as required on the Manage Profile Properties page are required when registering
on the site. See "Managing Profile Settings", See "Editing Profile Settings", or See
"Adding a New Profile Property"
l Uncheck the check box the check box to disable. This is the default setting.
9. At Use CAPTCHA For Registration, check the check box to use the CAPTCHA secu-
rity code box during registration - OR - Uncheck the check box to remove CAPTCHA.
10. At Redirect After Registration, select the name of the page that users are redirected to
after registering on the site - OR - Select < None Specified > to disable redirection.

10. Click theUpdate button.
Configuring the Standard Registration Form
How to set the user registration options for this site. Settings include choosing the page users are redi-
rected to after registration, optionally enabling the CAPTCHA security code feature and adding validation
requirements.

1. Navigate to Admin > Site Settings.2. Select theUser Account Settings tab.3. Expand theRegistration Settings section and then modify one or more settings.4. At User Registration, select either Private, Public or Verified user registration. See "Enabling
User Registration" and See "Disabling User Registration" for more information.
5. Optional. At Receive User Registration Notification, check the check box to send a noti-
fication email to the user when they register. Note: A registration email will always be sent if the
User Registration field above is set to Private because the Administrator will need to receive the
notification to approve the user account.
6. Optional. At Use Authentication Providers, check the check box to use Authentication pro-
viders during registration. Note: This setting may not be supported by all providers.
7. Optional. In the Excluded Terms text box, enter a comma-delimited list of terms that users will
be prevented from using in their Username or Display Name. This is useful to prevent profanities or
other unwanted words. Any excluded terms added here are in addition to those included with any
profanity filters set.
8. Optional. At Use Profanity Filter, check the check box to enforce the profanity filter for both
the Username and Display Name fields during registration.
1. At Registration Form Type, select the Standard registration form.1. Optional. At Use Email Address as Username, check the check box to use the email
address as a user name. This will remove the user name field from the registration form.
2. At Require Unique Display Name, check this option to require your users to use a
unique display name. If a user chooses a name that exists already this will suggest a mod-
ified name based on the user's first name and last name - OR - Uncheck the check box if
more than one user can have the same display name. This option is unchecked by default.

3. In theDisplay Name Format text box, enter tokens to set the format of the users display
name. Setting this option will prevent users from editing their display name. You can option-
ally specify a format for the users display name. The format can include tokens for dynamic
substitution such as [FIRSTNAME] [LASTNAME] and [USERNAME]. If a display name for-
mat is specified, the display name will no longer be editable through the user interface.
4. In theUser Name Validation text box, modify the user name validation expression if
required. E.g. [a-zA-Z0-9_]*$
5. In the Email Address Validation text box, modify the provided email validation expres-
sion.
6. Optional. At Use Random Password, check the check box to generate random pass-
words during registration, rather than displaying a password entry field.
7. Optional. At Require Password Confirmation, check the check box to require the
registration form to display a password confirmation box.
8. Optional. In the Password Expiry (in days) text box, enter the number of days until a
user's password expires. Users will be prompted to change their password the next time they
login. Enter 0 if the password never expires. Note: This field is only enforced if the user is
using the regular DNNAuthentication method. (I.e. They enter their User Name and Pass-
word when logging in). If the user logs in using alternate authentication methods such as
Facebook, Live, Yahoo or Google, this setting will be ignored.
9. In the Password Expiry Reminder (in days) text box, enter the number of days warning
given to a user notifying them that their password is about to expire and they are required to
change it.
10. The following nine (9) read only settings are managed using the Configuration Manager.
See "Viewing Pre-Configured Registration Settings"
11. At Require a Valid Profile for Registration, check the check box to select to require
users to enter a valid profile during registration. Valid Profiles require the User Name, First
Name, Last Names, Display Name, Email Address and Password fields to all be completed.
In addition, all fields set as required on the Manage Profile Properties page are required
when registering on the site. See "Managing Profile Settings" - OR - Uncheck the check
box to disable. This is the default setting.
12. At Use CAPTCHA For Registration, check the check box to use the CAPTCHA
security code box during registration - OR - Uncheck the check box to remove CAPT-
CHA.
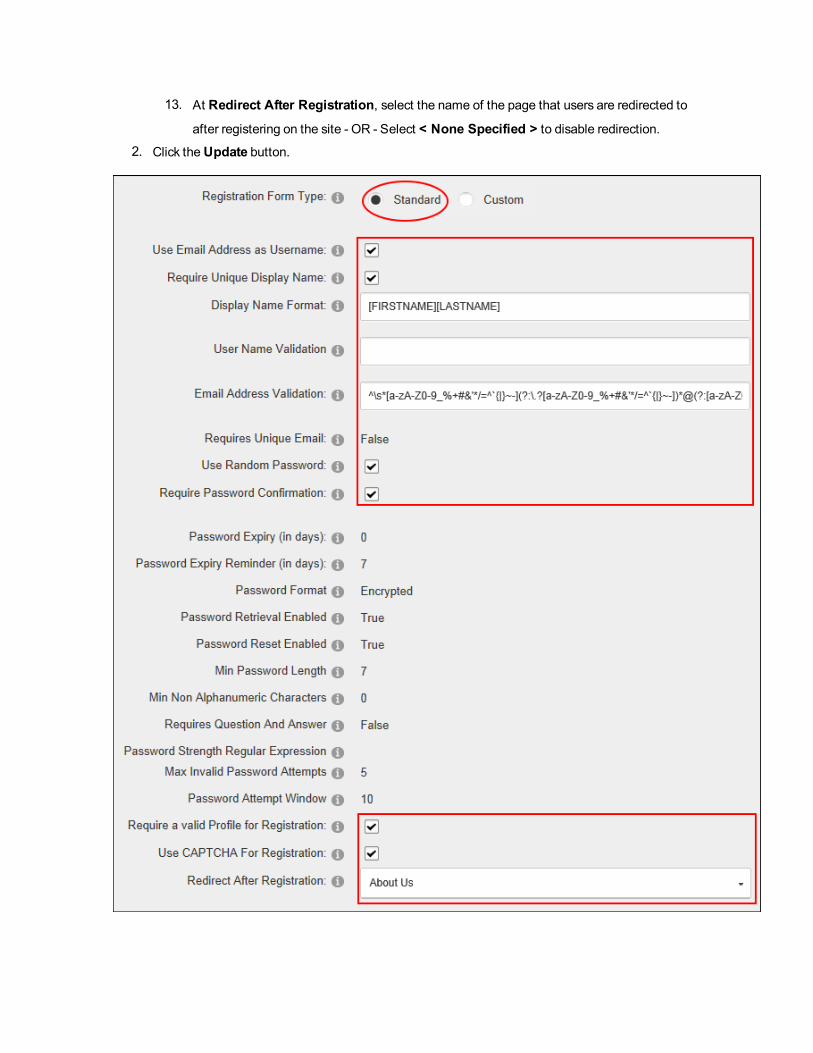
13. At Redirect After Registration, select the name of the page that users are redirected to
after registering on the site - OR - Select < None Specified > to disable redirection.2. Click theUpdate button.

Disabling User Registration
How to disable user registration and prevent visitors from registering on your site by removing theRegister
link from the site pages and the Account Login module.
1. Navigate to Admin > Site Settings.2. Select theUser Account Settings tab.3. Expand theRegistration Settings section.4. At User Registration, select None.
5. Click theUpdate button.

Enabling User Registration
How to allow site visitors to register as a member of the site. Enabling user registration displays theReg-
ister link on the Account Login module and aRegister link on site pages. When a visitor registers a wel-
comemessage is sent to them containing their account and login details. A notification message is also
sent to the primary administrator. User Registration is enabled and set as Private on new
DNN installations.
1. Navigate to Admin > Site Settings.2. Select theUser Account Settings tab.3. Expand theRegistration Settings section.4. At User Registration, select from the following registration types:
l Private: Visitors can apply to become a site member. DNN creates a user account for them,
however access to the Registered User role is restricted until the account is authorized.

l Public: Visitors who successfully register gain immediate access to the Registered User
security role. This is the default option, as shown in the below images. This is the default
option.
l Verified: Visitors who successfully register must verifying their account by entering a ver-
ification code the first time they log in to the site. Once the account is verified the user gains
access to the Registered User security role. This allows you to verify that the email address
provided during registration is correct.
5. Optional. At Receive User Registration Notification, check the check box to send a noti-
fication email to the user when they register. Note: A registration email will always be sent if the
User Registration field above is set to Private because the Administrator will need to receive the
notification to approve the user account.
6. Click theUpdate button. You may nowwant to customize the registration settings for your site.
See "Configuring the Standard Registration Form" or See "Configuring a Custom Registration
Form"

User Registration is enabled and theRegister link displayed on the site page
Viewing Pre-Configured Registration Settings
The following read only registration settings determine how new registrations are handled by this site.
These settings can be configured in the web.config file or using the Host > Configuration Manager.
1. Navigate to Admin > Site Settings2. Select theUser Account Settings tab.3. Expand theRegistration Settings section to view the following settings.
l Requires Unique Email: If set to True, each user will be required to provide a unique
email address when registering. This prevents people from registering multiple times with
the same email address. Note: This feature is only available with Standard Registration.
l Password Format: Displays the password format. The default option is Encrypted.l Password Retrieval Enabled: If checked users can retrieve their password using the
account login module.
l Password Reset Enabled: If checked Administrators can reset user passwords.

l Min Password Length: Displays the minimum number of characters required for a valid
password.
l Min Non Alphanumeric Characters: Displays the minimum number of non-alpha-
numeric characters required for a valid password.
l Requires Question and Answer: Displays whether it is True or False that a user must
answer a question to retrieve their password. If True, Administrators will be prevented from
adding new users and editing user accounts on the site. The default setting is False.
l Password Strength Regular Expression: Displays the regular expression used to eval-
uate password complexity from the provider specified in the Provider property.
l Max Invalid Password Attempts: Displays the maximum number of times a user may
attempt to login with invalid credentials before they are locked out of their account. If a user
is locked out an Administrator must unlock the account.
l Password Attempt Window: The maximum number of minutes in which the set number
of invalid login attempts (as set in the above field) must be made before lock out occurs.


Pre-configuredRegistrationSettings with theStandard registration formdisplayed
Site Wizard
About the Site Wizard Module
The DotNetNuke Site Wizard is a simple step-by-step wizard that allows you to configure basic site setting,
choose a site design and use a site template that can include site content.
Permissions. All users who are authorized to view the Site Wizard module can complete the wizard, how-
ever only authenticated users can change the site logo and must have file upload permission to upload a
new logo image.
Using the Site Wizard
Tip: All pages of the Site Wizard are options. If you don't want to perform a change on a particular
screen, simply click theNext link to skip to the next page of the Site Wizard.
1. Navigate to Admin > Advanced Settings > Site Wizard - OR - Go to a Site Wizardmodule.2. On the Site Configuration Wizard page, review the introduction and then click theNext link.
3. On theChoose a Template for your site page, you can optionally choose a site template for the
site. Templates contain pages with modules which may or may not include content. If you don't
want to change templates, Click the Next link to continue.
1. At Build your site from a template (below), check the check box to display a list of the
available templates.
2. Click on the name of a template to select it. This displays a description of the selected tem-
plate.

3. Choose one of the following options to set how duplicate modules will be handled:
l Ignore: Places a copy of any duplicated modules on the same page.l Replace: Deletes the existing copy of the duplicate content and replaces it with the
template copy. Deleted pages are moved to the Recycle Bin and the page name
appended with _Old. E.g. The replaced Home page will be called Home_Old. Restor-
ing these pages will only restore the page and not the modules or module content.
l Merge: Combines the existing information and template information into one mod-
ule.
4. Click theNext link.
4. On the Select a Skin for your Site page, you can select a new default skin for site pages. This
won't change the skin used on pages that aren't using the default skin. Note: From this page
onwards, you can click the Previous link to return to the previous page.
1. Optional. To preview a skin, click on the thumbnail image (where provided). This displays a
larger image of the skin in a newWeb browser.
2. Select a skin.
3. Click theNext link

5. On theChoose a Default Container for your site page, select a new default container to be
used for modules. This won't change the container used on modules that aren't using the default
container.

1. If you selected a skin at Step 3, the matching containers are displayed here and the default
container is pre-selected.
2. Optional. Check the Show All Containers check box to view all of the available con-
tainers.
3. Optional. To preview a container click on a thumbnail image (where provided). This dis-
plays a larger image of the container in a newWeb browser.
4. Select a container.
5. Click theNext link.
6. On theAdd Site Details page, enter or edit the site details for this site. These are the default
details used by search engines to index your site.
1. In theName/Title text box, enter the name or title to be applied to the site. This will show in
visitor'sWeb browser title.
2. In theDescription text box, enter description to be applied to the site. This will be the
description that Internet search engines will display to visitors. The site must be submitted
to these search engines.

3. In theKeyWords text box, enter keywords to be applied to the site. This will be what the
Internet search engines look for if you choose to submit your site to them.
4. At Logo, upload and/or select a new site logo. See "Setting a File Link" or See "Uploading
and Linking to a File"
5. Click the Finish link.
7. You will not be redirected to the Home page of your site and any changes you made will be visible.
Skins
About the Skins Module
The Skinsmodule (also titled the Skin Editor module) enables users to manage skin packages, skins and
containers. Skins which have been installed on this site are available to all sites within this DNN instal-
lation. Note: This manual does not cover how to build skins.
This module is located under the Admin page and can also be added to site pages.

Note: On the Default Site Template there are two pages (Getting Started and Home) that are created by
default and are hard coded to stay using the default 6.0 skin unless a user goes into the pages settings and
sets them to use another skin. This may cause some confusion if you install a skin via extensions then
change the site skin only to notice that the home page is using the default DNN skin. It is expected that the
user will delete the Getting Started page.
TheSkins Module

All Users
Applying a Default Site Container
How to apply a container as the default container for all modules on a site. This setting does not override
containers set for individual modules on the module settings page.
1. Navigate to Admin > Advanced Settings > Skins and go to the Skin Editor module - OR - Go toa Skinsmodule.
2. Locate and optional preview the required container.
3. At Apply To, select one or both of the following options:l Website: check the check box to apply the container to all site pages.
l Admin: check the check box to apply the container to all Admin Console pages.
4. Click the Apply link below the chosen container.
Applying theDefault SiteContainer
Applying the Default Site Skin
How to apply a skin as the default skin for all modules on a site. This setting does not override page set-
tings. See "Advanced Settings for Existing Pages"

1. Navigate to Admin > Advanced Settings > Skins and go to the Skin Editor module - OR - Go toa Skinsmodule.
2. Locate and optional preview the required skin. See "Previewing a Skin Package"
3. At Apply To, select one or both of the following options:1. Website: check the check box to apply the skin to all site pages.
2. Admin: check the check box to apply the skin to all Admin Console pages.
4. Click the Apply link.
Applying theDefault Site Skin

Previewing a Container Package
How to preview all of the containers within a container package.
1. Navigate to Admin > Advanced Settings > Skins and go to the Skin Editor module - OR - Go toa Skinsmodule.
2. At Skin Type, select one or both of these options:l Host: Select to view skins which are available to all sites.
l Site:Select to view skins which are only available to this site.
3. Optional. At Skins, select from these options:
l Select a skin package from the drop down list to only view containers associated with that
skin. A thumbnail image for each skin and container is displayed.
l Select < Not Specified > to hide all skins.4. At Containers, select a container package from the drop down list. A thumbnail image for each
container is displayed.
5. Click the Preview link to preview a container. This opens a newWeb browser with a preview of the
container.
6. Repeat Step 5 to preview additional containers.
Previewing aContainer Package

Previewing a Skin Package
How to preview all skins and containers contained within a skin package.
1. Navigate to Admin > Advanced Settings > Skins and go to the Skin Editor module - OR - Goto a Skinsmodule.
2. At Skin Type, select one or both of these options:l Host: Select to view skins which are available to all sites.
l Site:Select to view skins which are only available to this site.
3. At Skins, select a skin package from the drop down list. A thumbnail image for each skin and con-
tainer is displayed.
4. Click a Preview link to preview that skin or a container. This opens a newWeb browser with a pre-
view of the skin.
5. Repeat Step 4 to preview additional containers.

PreviewingSkins
Restoring the Default Skin
How to restore the default skin to a site. For more on setting the default skin, See "Setting the Default
Site Skin and Container"
1. Navigate to Admin > Advanced Settings > Skins and go to the Skin Editor module - OR - Go toa Skinsmodule.
2. Click theRestore Default Skin link located at the base of the module.

Restoring theDefault Skin
Skin Designer
About the Skin Designer Module
The Skin Designer module is only located on the Admin > Advanced Settings > Skins page. It enablesAdministrators to set container and skin token values.

TheSkinDesigner Module
Message: You Must Select A Token Setting
When using the Skin Designer on the Host > Skins page, the yellow warning message "You Must Select A
Token Setting" displays when one or more settings are incomplete.
To resolve this error, complete all fields.
Setting Container Token Values
How to set the values of container tokens using the Skin Designer module.
1. Navigate to Admin > Advanced Settings > Skins.2. Go to the Skin Designer module.3. At Skin, select a skin package. This lists all skins within this package at the File field below.4. At Container, select a container package.5. At File, select the name of the required container.6. At Token, select a skin token. If a yellow warning message reading "Object Selected Does Not
Have Settings Defined" is displayed there are no values associated with that token. In this case,
reselect a new token."
7. At Setting, select a setting from the options. This displays a description of this setting below.
8. In the Value text box, enter the value for the setting.9. Click theUpdate button.
Setting Skin Token Values
How to set the values of skin tokens using the Skin Designer module.

1. Navigate to Admin > Advanced Settings > Skins.2. Go to the Skin Designer module.3. At Skin, select a skin package. This lists all skins within this package at the File field below.4. At File, select the name of the required skin.5. At Token, select a skin token. If a yellow warning message reading "Object Selected Does Not
Have Settings Defined" is displayed there are no values associated with that token. In this case,
reselect a new token." At Setting, select a setting from the options. This displays a description of
this setting below.
6. In the Value text box, enter the value for the setting.7. Click theUpdate button.
Anexample of the Logo tokenwith a 3 pixel border width

Taxonomy
About the Taxonomy Manager Module
The TaxonomyManager module allows you to create and manage tags which are used to classify site con-
tent. Tags can be associated with pages (See "Page Details Settings for Existing Pages") and modules.
Depending on the skin used on your site, usersmay be able associate content with existing tags created
using the TaxonomyManager module. Theymay also be able to create their own tags which can then be
managed using the TaxonomyManager module.
Permissions. Users work can view the module can view the list of existing vocabularies. Editors and
Administrators can create and manage site specific vocabularies.
SuperUsers can create and manage application wide vocabularies which are available to all sites.
The TaxonomyManager is located on the Admin > Advanced Settings > Taxonomy page and can alsobe added to site pages.
Module Version/Minimum DNN Version: The version number is always the same as the DNN frame-
work version number.
TheTaxonomy Manager Module
Viewing Vocabularies List
Users who are authorized to view the TaxonomyManager module are able to view the list of vocabularies
which have been created. The TaxonomyManager module displays the following information:
l Name: The Vocabulary namel Description: The description given to the vocabularyl Type: Whether the vocabulary is a simple or hierarchical list

l Scope: Whether the vocabulary is available to all sites in this DNN application (i.e. Application) or
only this site (i.e. Site).
TheTaxonomy Module
Module Editors
Adding Additional Terms (Hierarchical Vocabulary)
How to add terms to a hierarchical vocabulary using the TaxonomyManager module.
Important. The first term for a vocabulary requires a different process. See "Adding the First Term (Hier-
archical Vocabulary)"
1. Navigate to Admin > Advanced Settings > Taxonomy - OR - Go to a Taxonomy Managermodule.
2. Click the Edit link beside the vocabulary for this term. This opens the Edit Vocabulary page.
3. Click theAdd New button. This displays the Create New Term section.4. In the Create New Term section, complete these fields:
a. In theName text box, enter a name for this term.b. In theDescription text box, enter a description for this term.c. At Parent Term, select the parent term for this term.
5. Click the Save button. The new term is now displayed in the Terms hierarchical list.6. Repeat Steps 3-5 to add additional terms.
As an example, in the below image, the first term added was called Products. Two additional terms called
Dolls andWooden Toys were added next. Finally, this image displays the term Blocks being added to the
parent categoryWooden Toys.

Thenewly addedhierarchical term
Adding Terms (Simple Vocabulary)
How to add terms to a simple vocabulary using the TaxonomyManager module.
1. Navigate to Admin > Advanced Settings > Taxonomy - OR - Go to a Taxonomy Managermodule.
2. Click the Edit link beside the vocabulary for this term. This opens the Edit Vocabulary page.

3. Click theAdd New button. This displays the Create New Term section.4. In the Create New Term section, complete these fields:
a. In theName text box, enter a name for this term.b. In theDescription text box, enter a description for this term.
5. Click the Save button. The new term is now displayed in the Terms hierarchical list.6. Repeat Steps 3-5 to add additional terms.
Adding a term to a simple vocabulary list
Adding the First Term (Hierarchical Vocabulary)
How to add the first term to a hierarchical vocabulary using the TaxonomyManager module. Important. It
is recommended that you name this first term the same as the Vocabulary name. This allows you to create
a hierarchical tree of terms. Failure to set up terms in this way will restrict you to only one top level parent
term.

1. Navigate to Admin > Advanced Settings > Taxonomy - OR - Go to a Taxonomy Managermodule.
2. Click the Edit link beside the vocabulary for the new terms. This opens the Edit Vocabulary page.
3. Click theAdd New button. This displays the Create New Term section.4. In the Create New Term section, complete these fields:
a. In theName text box, enter the vocabulary name.b. In theDescription text box, enter a description for this term. Tip: Copying the Vocabulary
description is suitable.
5. Click the Save button.
6. The newly added term is now displayed in the Terms section. You can now add additional terms.
See "Adding Additional Terms (Hierarchical Vocabulary)"

Thenewly added first hierarchical term
Creating a Vocabulary
How to create a new vocabulary using the TaxonomyManager module.
Tip: Only the Description field can be edited once the vocabulary is saved.
1. Navigate to Admin > Advanced Settings > Taxonomy - OR - Go to a Taxonomy Managermodule.
2. Click theCreate New Vocabulary button located at the base of the TaxonomyManager module.
This opens the Create New Vocabulary page.
3. In theName text box, enter the name for this vocabulary.4. In theDescription text box, enter the description of this vocabulary.5. At Type, select from this options:
l Simple: Select to create a flat list.l Hierarchy: Select to hierarchical tree list.
6. At Scope, Portal is pre-selected. This confirms that the vocabulary is only available to this site.7. Click theCreate Vocabulary button. You can now add terms to this vocabulary. See "Adding the
First Term (Hierarchical Vocabulary)"
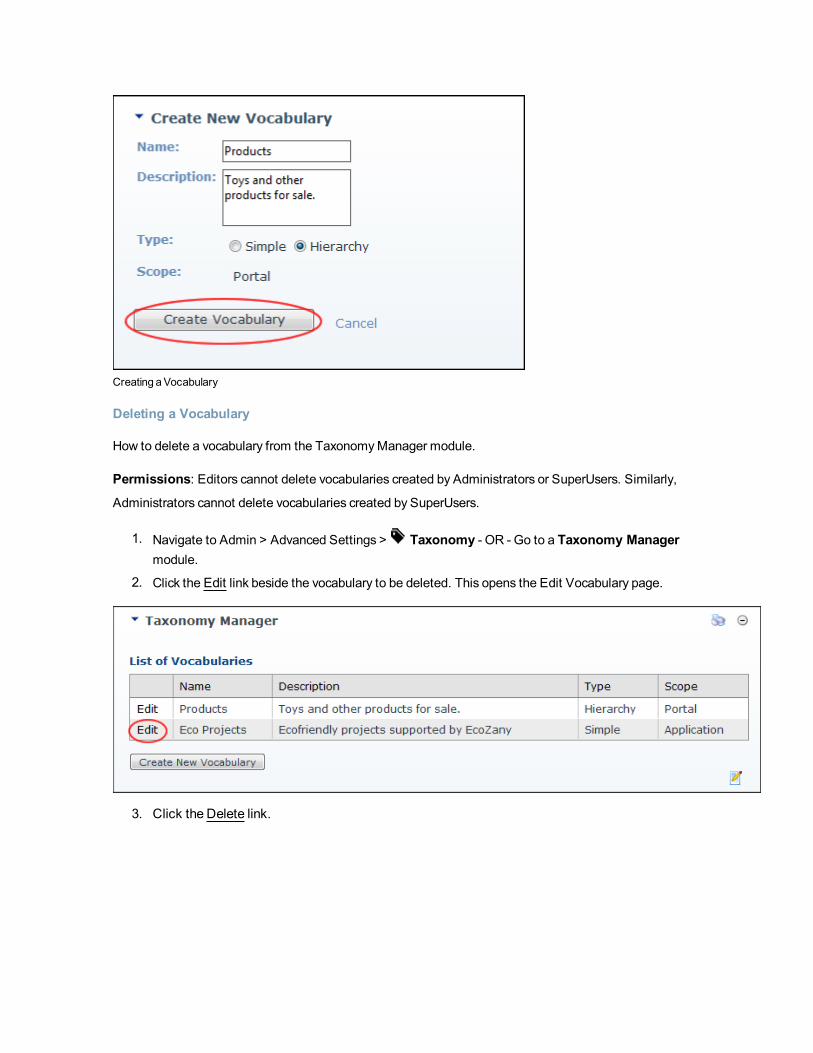
Creating aVocabulary
Deleting a Vocabulary
How to delete a vocabulary from the TaxonomyManager module.
Permissions: Editors cannot delete vocabularies created by Administrators or SuperUsers. Similarly,
Administrators cannot delete vocabularies created by SuperUsers.
1. Navigate to Admin > Advanced Settings > Taxonomy - OR - Go to a Taxonomy Managermodule.
2. Click the Edit link beside the vocabulary to be deleted. This opens the Edit Vocabulary page.
3. Click the Delete link.

Deleting aVocabulary
Deleting Terms
How to delete one or more term associated with either a simple or hierarchical vocabulary using the Tax-
onomyManager module.
1. Navigate to Admin > Advanced Settings > Taxonomy - OR - Go to a Taxonomy Managermodule.
2. Click the Edit link beside the vocabulary which the term is associated with. This opens the Edit
Vocabulary page.
3. In the Terms list, select the term to be edited. This displays the Edit Term section.
4. Click theDelete link located below the Edit Term section.5. Repeat Steps 3-4 to delete additional terms.
6. Click theCancel link to return to the module.

DeletingVocabulary Terms
Editing a Vocabulary
How to edit the description of a vocabulary using the TaxonomyManager module.
1. Navigate to Admin > Advanced Settings > Taxonomy - OR - Go to a Taxonomy Managermodule.
2. Click the Edit link beside the vocabulary to be edited. This opens the Edit Vocabulary page.
3. In theDescription text box, edit the description of this vocabulary.4. Click theUpdate button.
Editing Terms
How to edit one or more term associated with either a simple or hierarchical vocabulary using the Tax-
onomyManager module.
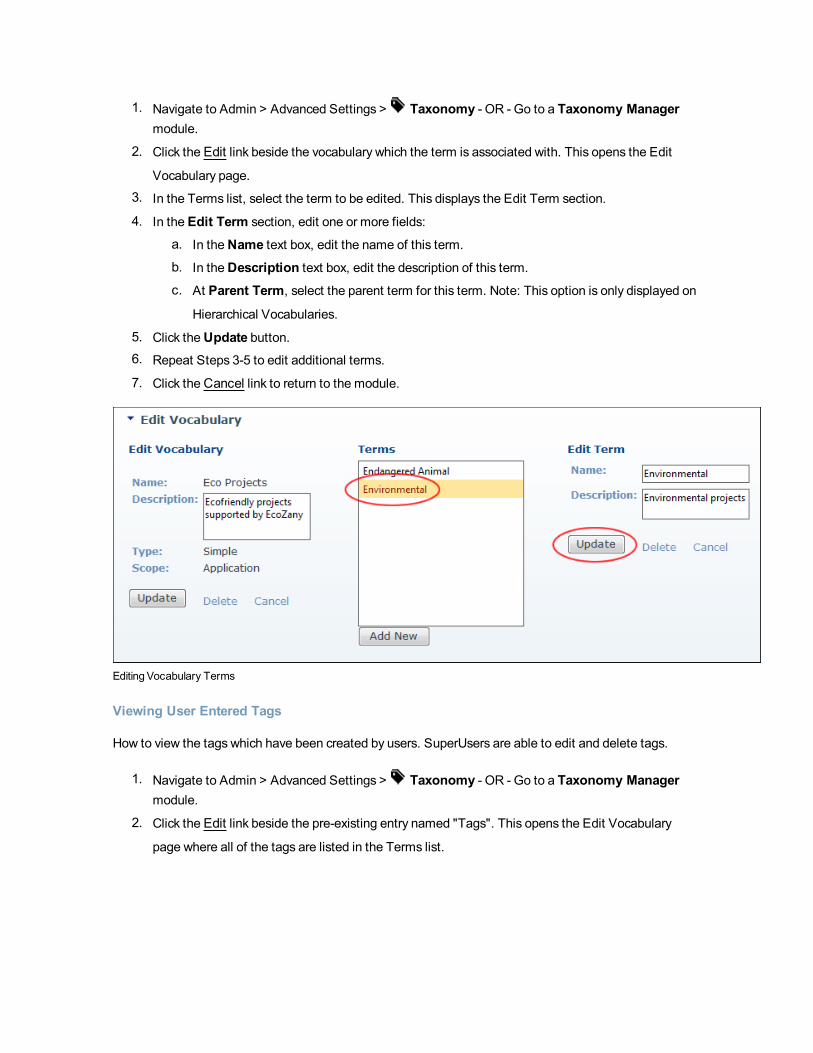
1. Navigate to Admin > Advanced Settings > Taxonomy - OR - Go to a Taxonomy Managermodule.
2. Click the Edit link beside the vocabulary which the term is associated with. This opens the Edit
Vocabulary page.
3. In the Terms list, select the term to be edited. This displays the Edit Term section.
4. In the Edit Term section, edit one or more fields:
a. In theName text box, edit the name of this term.b. In theDescription text box, edit the description of this term.c. At Parent Term, select the parent term for this term. Note: This option is only displayed on
Hierarchical Vocabularies.
5. Click theUpdate button.6. Repeat Steps 3-5 to edit additional terms.
7. Click theCancel link to return to the module.
EditingVocabulary Terms
Viewing User Entered Tags
How to view the tags which have been created by users. SuperUsers are able to edit and delete tags.
1. Navigate to Admin > Advanced Settings > Taxonomy - OR - Go to a Taxonomy Managermodule.
2. Click the Edit link beside the pre-existing entry named "Tags". This opens the Edit Vocabulary
page where all of the tags are listed in the Terms list.

3. In the Terms list, click on a tag. This displays the description in the Edit Term section.
4. Repeat Step 2 to view descriptions for other tags.
5. Click theCancel link to return to the module.
User Accounts
About the User Accounts Module
The User Accountsmodule enables the creation and management of registered user accounts, as well as
assignment of security roles. The fields displayed on the module can be set, as well as the way user
accounts are handled. See the Manage Profile Properties and User Settings sections. New profile prop-
erties can be created. This Admin module is displayed on the Admin > User Accounts page and can also
be deployed to any page by an authorized user.
Note: This module forms part of the Users & Rolesmodule package which is set as a Premium Module by
default to reduce the instance of it being accidentally added to a page and revealing personal user infor-
mation.
Module Version: The version number is always the same as the DNN framework version number.
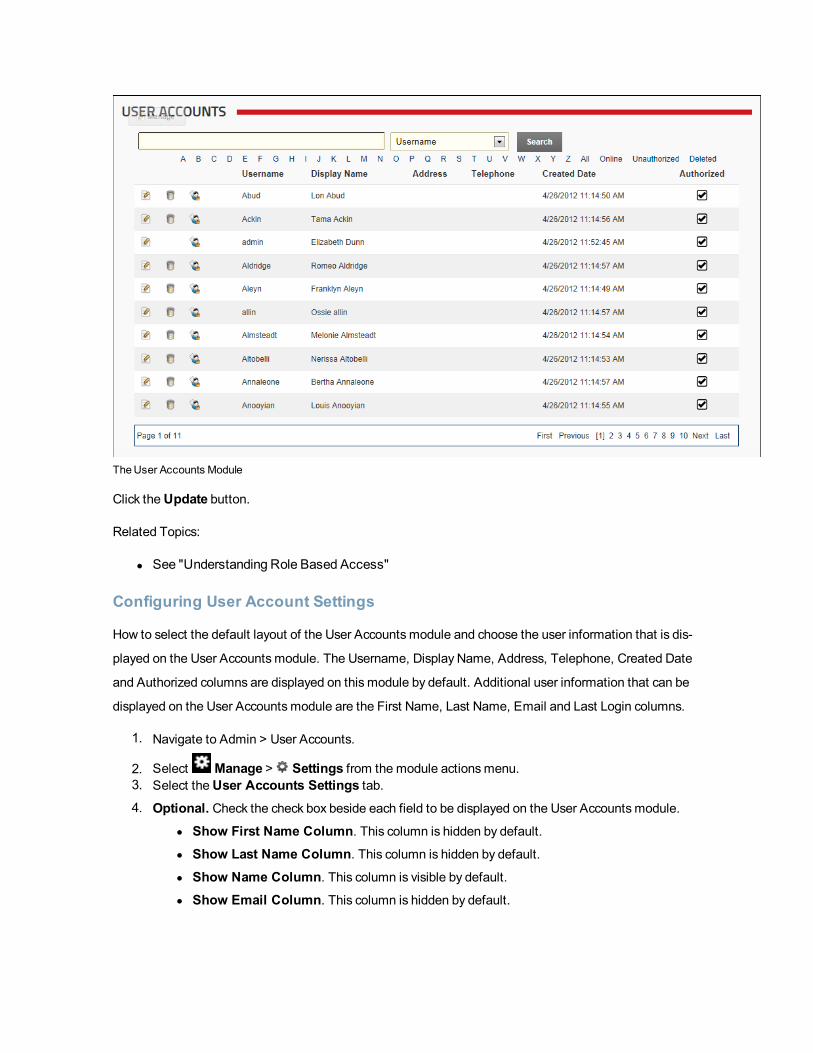
TheUser Accounts Module
Click theUpdate button.
Related Topics:
l See "Understanding Role Based Access"
Configuring User Account Settings
How to select the default layout of the User Accountsmodule and choose the user information that is dis-
played on the User Accountsmodule. The Username, Display Name, Address, Telephone, Created Date
and Authorized columns are displayed on this module by default. Additional user information that can be
displayed on the User Accountsmodule are the First Name, Last Name, Email and Last Login columns.
1. Navigate to Admin > User Accounts.
2. Select Manage > Settings from the module actionsmenu.3. Select theUser Accounts Settings tab.4. Optional. Check the check box beside each field to be displayed on the User Accountsmodule.
l Show First Name Column. This column is hidden by default.l Show Last Name Column. This column is hidden by default.l Show Name Column. This column is visible by default.l Show Email Column. This column is hidden by default.

l Show Address Column. This column is displayed by default.l Show Telephone Column. This column is visible by default.l Show Authorized Column. This column is visible by default.l Show Created Date Column. This column is visible by default.l Show Last Login Column. This column is hidden by default.
5. At Default Display Mode, select the records that are displayed on the User Accountsmodule by
default:
l All: Select to display user accounts in alpha-numerical order. E.g. 1,2,3,a,b,c.l First Letter: Select to display user accounts in alphabetical order. E.g. a,b,c. Tip: If this
option is selected, you will need to click the All link to view usernames that begin with a
number.
l None: Select to hide all user account records.6. At Display Manage Services, select to display the Manage Services section in the user profile.7. At Users per Page, click theUp andDown icons to set the number of records that are displayed
on each page of the User Accountsmodule. The default setting is 10 records.
8. At Users Display Mode in Manage Roles, select from these options to set the Manage Users
page of the Security Rolesmodule:
l Combo: Select to display all usernames alphabetically in a drop down list. This is the
default settings.
l TextBox: Select to display a text box where the required username can be entered and
then validated as correct.

9. Click theUpdate button.
All Users
Filtering User Accounts by Online Users
How to filter user accounts to only view users who are currently logged in to this site using the User
Accountsmodule.
Prerequisite. This filter is integrated with the Users Online module. The Users Online module must be ena-
bled by a SuperUser for this filter to work.
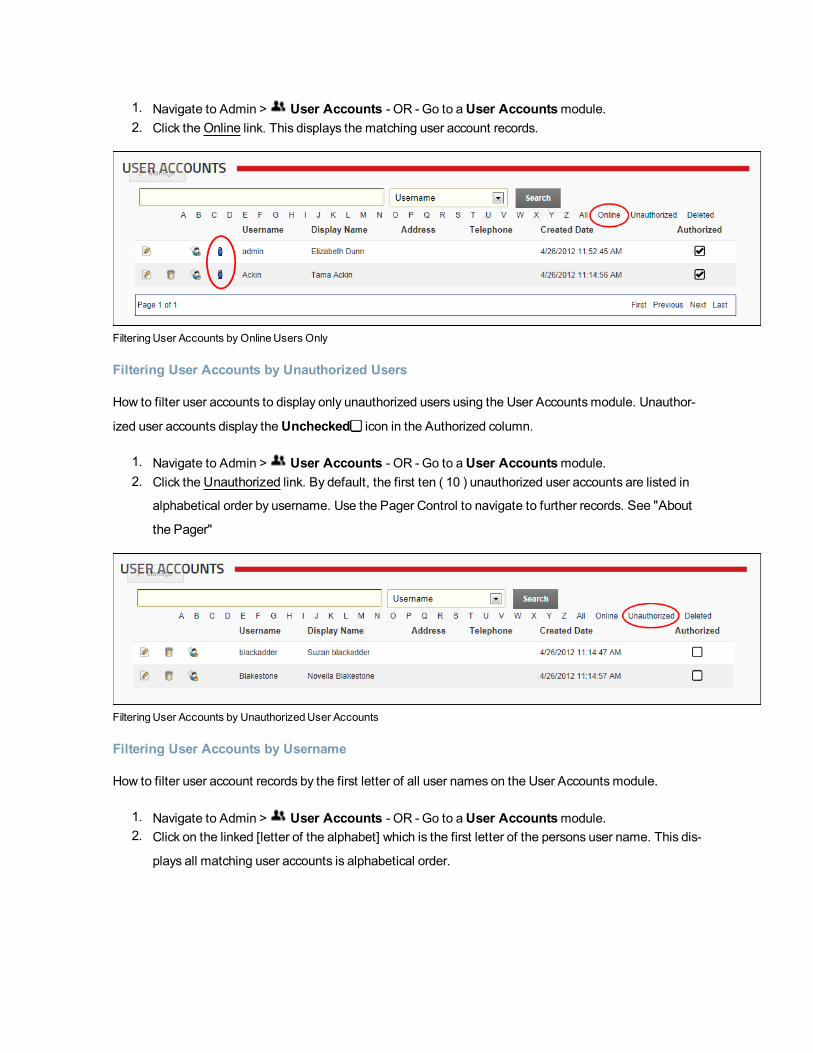
1. Navigate to Admin > User Accounts - OR - Go to aUser Accountsmodule.2. Click theOnline link. This displays the matching user account records.
FilteringUser Accounts by OnlineUsers Only
Filtering User Accounts by Unauthorized Users
How to filter user accounts to display only unauthorized users using the User Accountsmodule. Unauthor-
ized user accounts display theUnchecked icon in the Authorized column.
1. Navigate to Admin > User Accounts - OR - Go to aUser Accountsmodule.2. Click theUnauthorized link. By default, the first ten ( 10 ) unauthorized user accounts are listed in
alphabetical order by username. Use the Pager Control to navigate to further records. See "About
the Pager"
FilteringUser Accounts by UnauthorizedUser Accounts
Filtering User Accounts by Username
How to filter user account records by the first letter of all user names on the User Accountsmodule.
1. Navigate to Admin > User Accounts - OR - Go to aUser Accountsmodule.2. Click on the linked [letter of the alphabet] which is the first letter of the persons user name. This dis-
plays all matching user accounts is alphabetical order.

FilteringUser Accounts by Username
Searching for a User Account
How to search for a user account on the User Accountsmodule. Searches can be performed using one of
several account details such as user name, address, email, name, etc.
1. Navigate to Admin > User Accounts - OR - Go to aUser Accountsmodule.2. In the Search text box located at the top right of the module, enter the search criteria.3. Select one of the following options from the drop down list:
l Username: Searches for exact matches and all or part of the beginning of the username.
E.g. Entering Ad, Admin, or A will return Admin.
l Email: Searches for exact matches only.l Prefix: Searches for exact matches and all or part of the beginning of the prefix. E.g. Enter-
ing M, or Mr will return Mr and Mrs.
l First Name, Middle Name and Last Name: Searches for exact matches and all or part of
the beginning of the name. E.g. Entering J will return all names beginning with J.
l Suffix: Searches for exact matches and all or part of the beginning of the suffix. E.g. Enter-
ing E or Esq will return Esq. and Esquire.
l Unit: Searches for exact matches and all or part of the beginning of the unit address.

l Street: Searches for exact matches and all or part of the beginning of the street address.
The street number must be included. E.g. Entering 1 Jack, 1 Jack Street will return 1 Jack
Street and 1 Jackson Street. Entering Jack Street will not all addresses with Jack street.
l City: Searches for exact matches and all or part of the beginning of the city name. E.g.
Entering Melb will return Melbourne.
l Region: Searches for exact matches and all or part of the beginning of the region name.
E.g. Entering V or Vic will return Victoria.
l Country: Searches for exact matches and all or part of the beginning of the region name.
E.g. Entering Aus will return Austria and Australia.
l Postal Code: Searches for exact matches and all or part of the beginning of the postal
code.
l Telephone andCell and Fax: Searches for exact matches and all or part of the beginning
of the number.
l Website: Searches for exact matches only as displayed on the user's profile. E.g. If the
user's website is entered as www.domain.com, searching on domain.com will not return a
match.
l IM: Searches for exact matches only as displayed on the user's profile.l Biography: Search for both exact matches and text that matches the beginning of a word.l Preferred Time Zone: Searches for user's within this time zone.l Preferred Locale: Searches for user's within this locale.
4. Click the Search button.
Searching for aUser Account

Viewing All User Accounts
How to view all user accounts in the User Accountsmodule.
1. Navigate to Admin > User Accounts - OR - Go to aUser Accountsmodule.2. Click the All link. By default, the first ten (10) of all user accounts will be listed in alphabetical order
by username. Use the Pager Control to navigate to further records. See "About the Pager"
Module Editors
Adding a User Account
How to add new user account to the site using the User Accountsmodule. Important. If this site requires
users to answer a question to retrieve their password adding or edit users, so these features have been dis-
abled for this website.
1. Navigate to Admin > User Accounts - OR - Go to aUser Accountsmodule.2. Click the AddNew User link. This opens the Add NewUser interface.
3. In theUser Name text box, enter a user name. Notes: Only letters and numbers can be entered.
Usernames are unique and cannot be changed. If you attempt to save a user account using an exist-
ing username the following message is displayed: "A User Already Exists For the Username Spec-
ified. Please Register Again Using A Different Username." In this scenario you should change the
username and retry saving the new account.
4. In the First Name text box, enter the person's first name.5. In the Last Name text box, enter the person's last name.6. In theDisplay Name text box, enter the name to be displayed to other site members. Note: This
field may not be displayed. See "Configuring User Account Settings"
7. In the Email Address text box, enter a valid email address.8. At Authorize, select from the following options:
l Check the check box if the user is authorized to access the site. This will automatically pro-
vide access to the Registered User role and any roles set for Auto Assignment. This is the
default setting.
l Uncheck the check box if the new user is not yet authorized to access the site. The Admin-
istrator is required to authorize this account at a later date.
9. At Notify, select from the following options:
l Check the check box to send a notification email to the user's email address. This is the
default setting.
l Uncheck the check box if you don't wish to send notification. If the account is not author-
ized, you may like to send the notification at a later time.
10. To create the user's password, select from these options:
l To generate a random password, check theRandom Password check box.l To create a password manually:
1. Uncheck theRandom Password check box.2. In the Password text box, enter a password.
3. In theConfirm Password text box, re-enter the same password. Note: The site
may be set to required unique passwords or theymay need to fulfil certain criteria
such asminimum character length. If the password you enter doesn't meet the site's
criteria, you will be asked to enter a new password or opt for a random password.
11. Click the AddNew User link.

Adding a new user with a randomly generated password
Deleting a User Account
How to "soft" delete a user account from a site using the User Accountsmodule. Information about this
deleted account can still be viewed using this module.
1. Navigate to Admin > User Accounts - OR - Go to aUser Accountsmodule.2. Find the user to be deleted using a filter or by searching.
3. Click theDelete button beside their record. This displays the message "Are you sure you wantto delete this user?"

4. Click theOK button to confirm.
Editing a User Account
How to edit the details of a user's account using the User Accountsmodule. Note: The user name field can-
not be edited.
1. Navigate to Admin > User Accounts - OR - Go to aUser Accountsmodule.2. Find the user to be edited using a filter or by searching.
3. Click the Edit button beside their record. This opens the Edit User Accounts page.
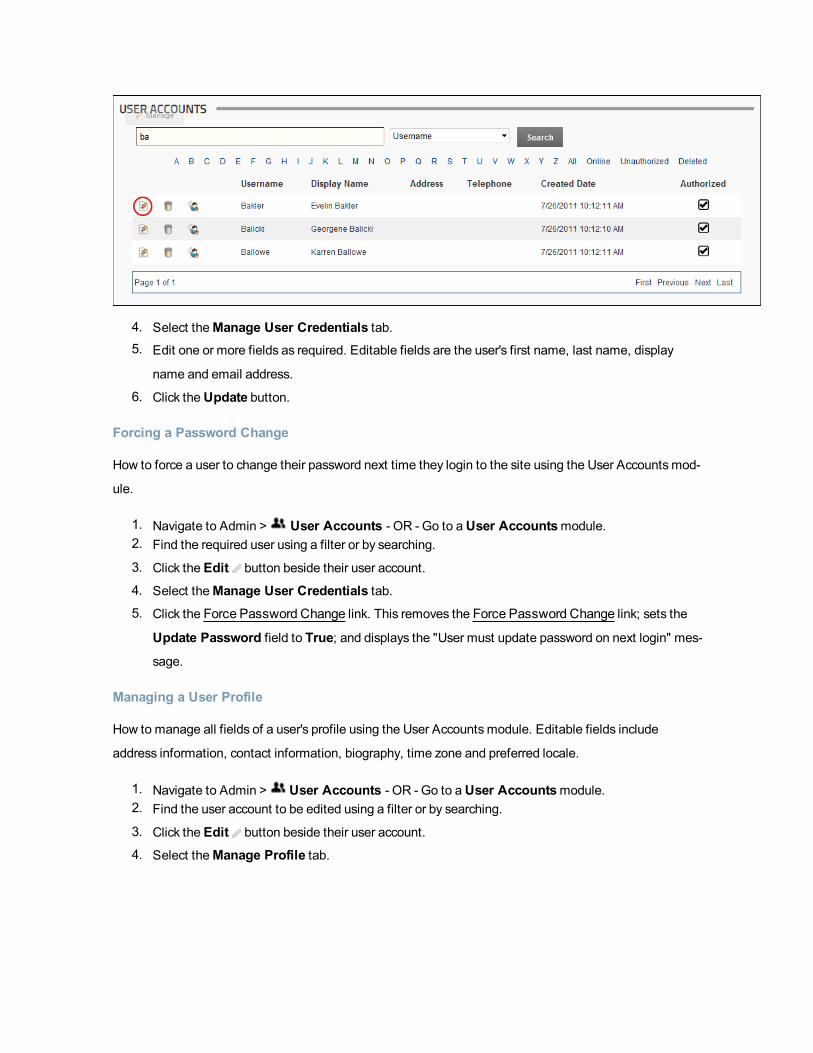
4. Select theManage User Credentials tab.5. Edit one or more fields as required. Editable fields are the user's first name, last name, display
name and email address.
6. Click theUpdate button.
Forcing a Password Change
How to force a user to change their password next time they login to the site using the User Accountsmod-
ule.
1. Navigate to Admin > User Accounts - OR - Go to aUser Accountsmodule.2. Find the required user using a filter or by searching.
3. Click the Edit button beside their user account.
4. Select theManage User Credentials tab.5. Click the Force Password Change link. This removes the Force Password Change link; sets the
Update Password field to True; and displays the "User must update password on next login" mes-
sage.
Managing a User Profile
How to manage all fields of a user's profile using the User Accountsmodule. Editable fields include
address information, contact information, biography, time zone and preferred locale.
1. Navigate to Admin > User Accounts - OR - Go to aUser Accountsmodule.2. Find the user account to be edited using a filter or by searching.
3. Click the Edit button beside their user account.
4. Select theManage Profile tab.
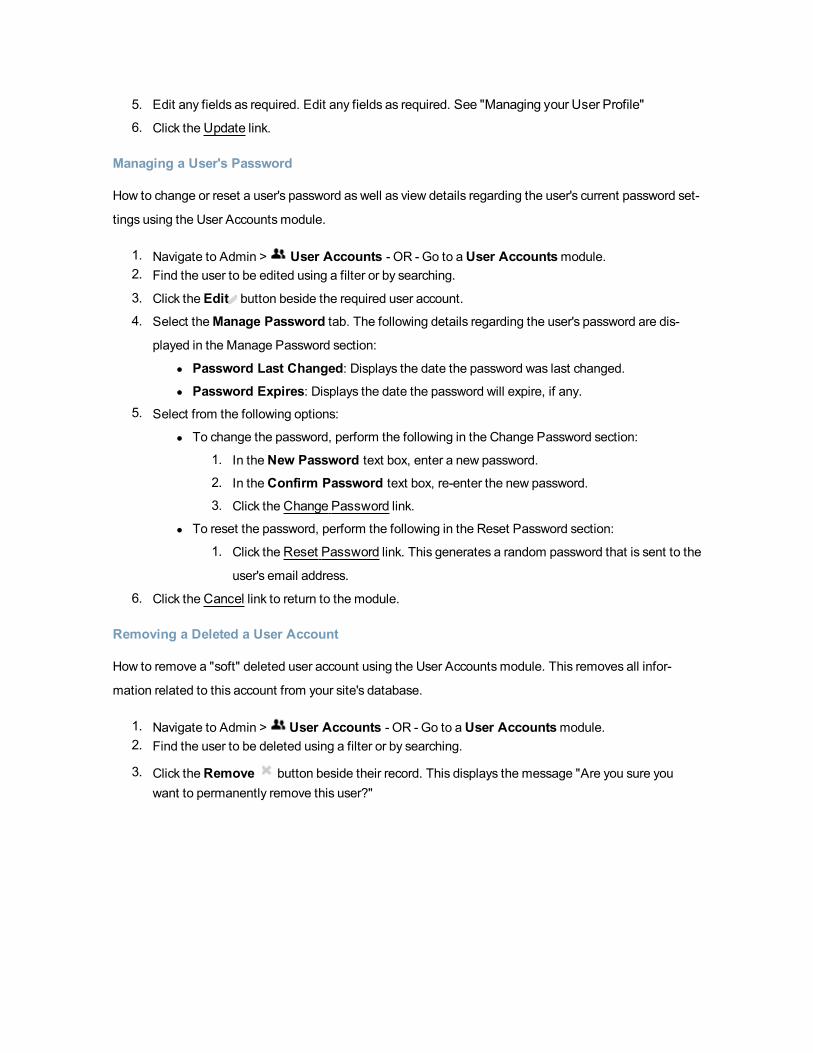
5. Edit any fields as required. Edit any fields as required. See "Managing your User Profile"
6. Click theUpdate link.
Managing a User's Password
How to change or reset a user's password as well as view details regarding the user's current password set-
tings using the User Accountsmodule.
1. Navigate to Admin > User Accounts - OR - Go to aUser Accountsmodule.2. Find the user to be edited using a filter or by searching.
3. Click the Edit button beside the required user account.
4. Select theManage Password tab. The following details regarding the user's password are dis-
played in the Manage Password section:
l Password Last Changed: Displays the date the password was last changed.l Password Expires: Displays the date the password will expire, if any.
5. Select from the following options:
l To change the password, perform the following in the Change Password section:
1. In theNew Password text box, enter a new password.
2. In theConfirm Password text box, re-enter the new password.
3. Click theChange Password link.
l To reset the password, perform the following in the Reset Password section:
1. Click theReset Password link. This generates a random password that is sent to the
user's email address.
6. Click theCancel link to return to the module.
Removing a Deleted a User Account
How to remove a "soft" deleted user account using the User Accountsmodule. This removes all infor-
mation related to this account from your site's database.
1. Navigate to Admin > User Accounts - OR - Go to aUser Accountsmodule.2. Find the user to be deleted using a filter or by searching.
3. Click theRemove button beside their record. This displays the message "Are you sure youwant to permanently remove this user?"
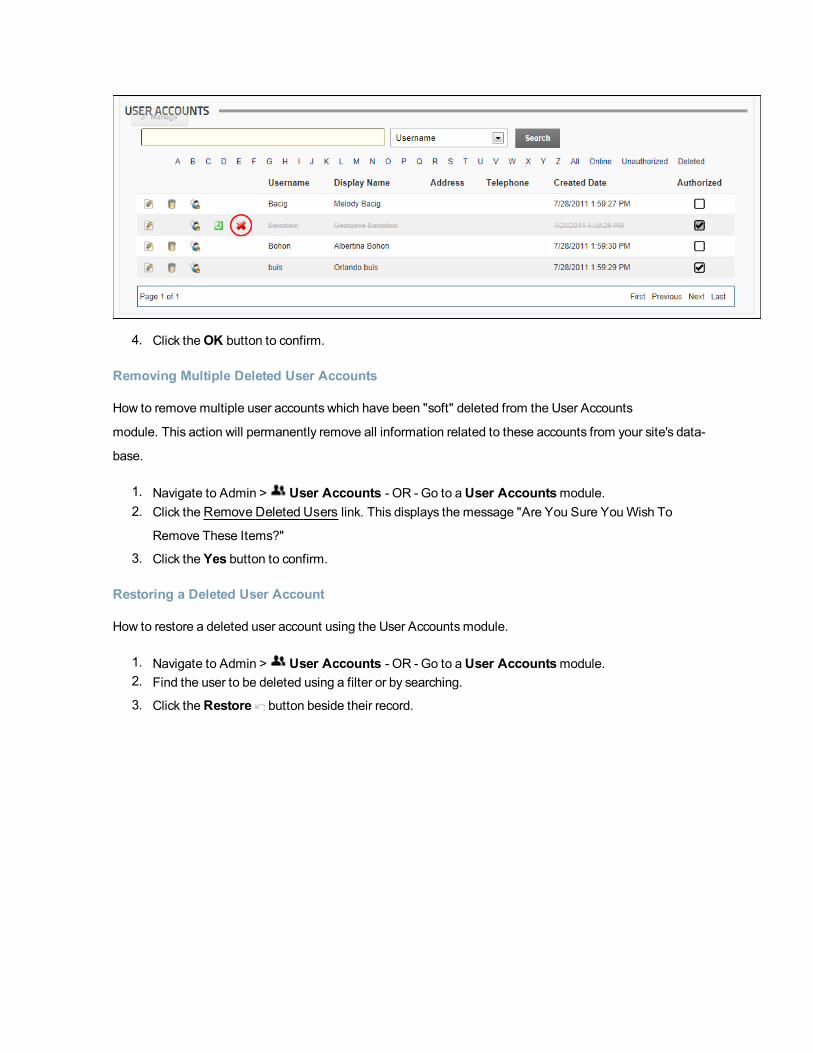
4. Click theOK button to confirm.
Removing Multiple Deleted User Accounts
How to remove multiple user accounts which have been "soft" deleted from the User Accounts
module. This action will permanently remove all information related to these accounts from your site's data-
base.
1. Navigate to Admin > User Accounts - OR - Go to aUser Accountsmodule.2. Click the Remove Deleted Users link. This displays the message "Are You Sure YouWish To
Remove These Items?"
3. Click the Yes button to confirm.
Restoring a Deleted User Account
How to restore a deleted user account using the User Accountsmodule.
1. Navigate to Admin > User Accounts - OR - Go to aUser Accountsmodule.2. Find the user to be deleted using a filter or by searching.
3. Click theRestore button beside their record.
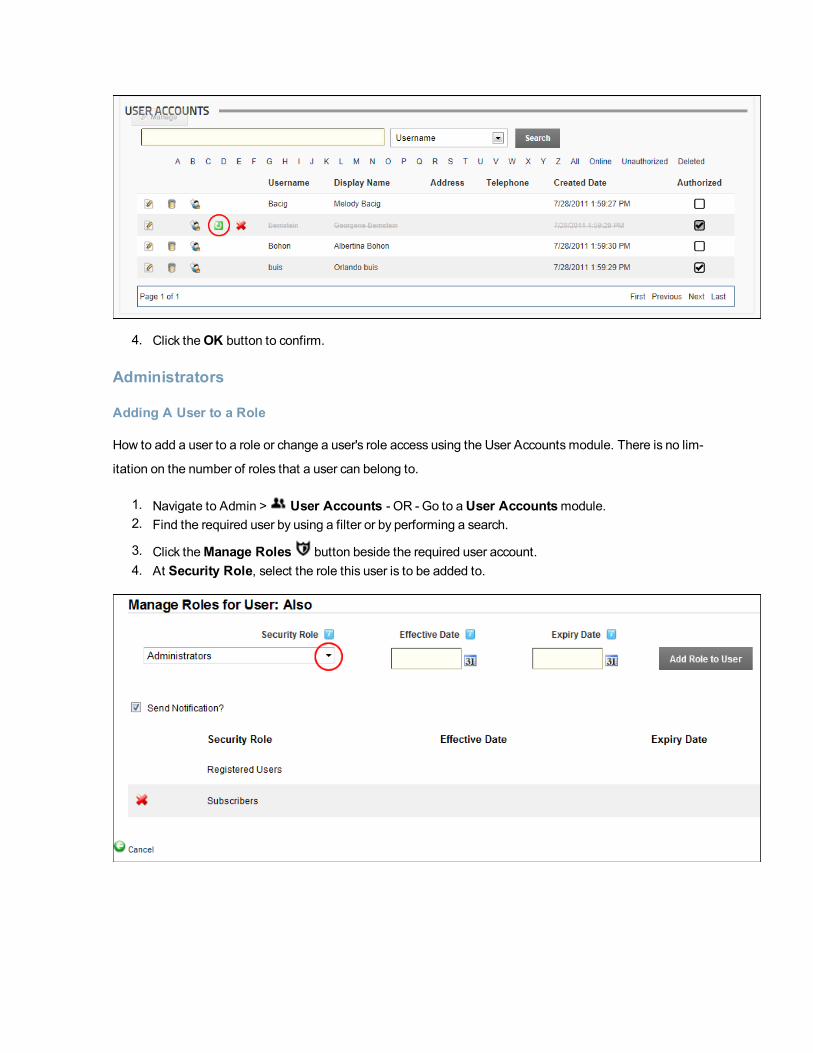
4. Click theOK button to confirm.
Administrators
Adding A User to a Role
How to add a user to a role or change a user's role access using the User Accountsmodule. There is no lim-
itation on the number of roles that a user can belong to.
1. Navigate to Admin > User Accounts - OR - Go to aUser Accountsmodule.2. Find the required user by using a filter or by performing a search.
3. Click theManage Roles button beside the required user account.4. At Security Role, select the role this user is to be added to.

5. Optional. At Effective Date, click the Calendar button and select the first date the user canaccess this role. If no date is selected then access to this role is immediately granted. See
"Working with the Calendar"
6. Optional. At Expiry Date, click the Calendar button and select the last date the user canaccess this role. If no date is selected then access to this role will not expire.
7. At Send Notification?, select from the following options:
l Check the check box to send a notification email to the user informing them of their new
role access. This is the default setting.
l Uncheck the check box to add the user to the role without notifying them.
8. Click theUpdate User Role link. The updated role details are now displayed in the list below.
9. Repeat Steps 3-8 to add this user to additional roles.
10. Click theCancel link to return to the module.
Authorizing an Unauthorized User
How to authorize an unauthorized user account using the User Accountsmodule.
1. Navigate to Admin > User Accounts - OR - Go to aUser Accountsmodule.2. Click theUnauthorized link to display only unauthorized accounts and find the required account.
3. Click the Edit button beside their record.
4. Click the Authorize User link. This displays the message "User Successfully Authorized" and sets
the Authorized field to True.

Deleting a User from a Security Role
How to delete a user from a security role using the User Accountsmodule.
1. Navigate to Admin > User Accounts - OR - Go to aUser Accountsmodule.2. Locate the required user using a filter or by performing a search.
3. Click theManage Roles button beside the required user account.4. At Send Notification?, select from the following options:
l Check the check box to send a notification email to the user informing them that they
have been removed from the role. This is the default setting.
l Uncheck the check box to delete role access without sending a notification email.
5. Click theDelete button beside the role the user is to be deleted from. This displays the mes-sage "Are You Sure YouWish To Delete This Item?"

6. Click theOK button to confirm.7. Repeat Steps 5-6 to delete this user from additional roles.
Deleting all Unauthorized User Accounts
How to permanently delete all unauthorized user accounts using the User Accountsmodule.
1. Navigate to Admin > User Accounts - OR - Go to aUser Accountsmodule.2. Optional. Click theUnauthorized link to view a list of unauthorized users before deleting them.
3. Click theDelete Unauthorized Users link at the base of the module. This displays the message
"Are You Sure YouWish To Delete These Items?"

4. Click the Yes button to confirm deletion.
UnAuthorizing a User
How to unauthorize a user's account using the User Accountsmodule. Unauthorized users will be unable
to login to the site, thereby removing their access to all role restricted areas.
1. Navigate to Admin > User Accounts - OR - Go to aUser Accountsmodule.2. Find the user to be unauthorized using a filter or by searching.
3. Click the Edit button beside their record. This opens the Edit User Accounts page.
4. Select theManage User Credentials tab.5. Click theUnAuthorize User link. This displays the message "User Successfully UnAuthorized" and
sets the Authorized field to False.
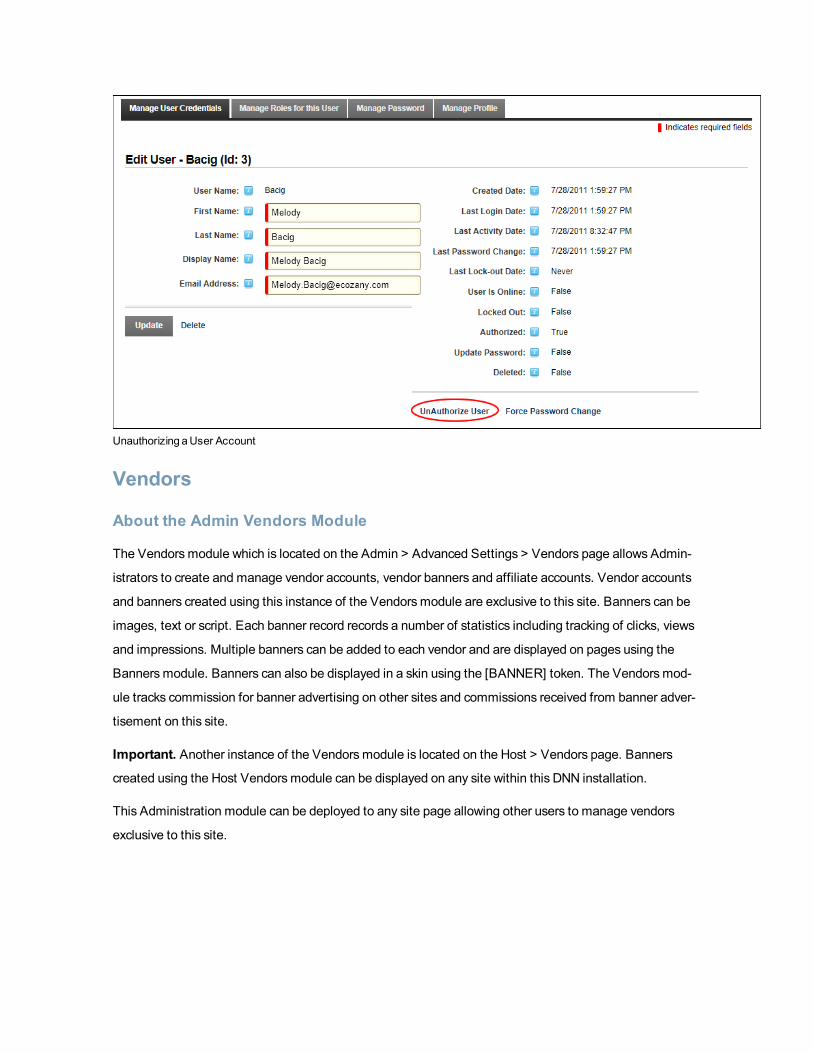
Unauthorizing aUser Account
Vendors
About the Admin Vendors Module
The Vendorsmodule which is located on the Admin > Advanced Settings > Vendors page allows Admin-
istrators to create and manage vendor accounts, vendor banners and affiliate accounts. Vendor accounts
and banners created using this instance of the Vendorsmodule are exclusive to this site. Banners can be
images, text or script. Each banner record records a number of statistics including tracking of clicks, views
and impressions. Multiple banners can be added to each vendor and are displayed on pages using the
Bannersmodule. Banners can also be displayed in a skin using the [BANNER] token. The Vendorsmod-
ule tracks commission for banner advertising on other sites and commissions received from banner adver-
tisement on this site.
Important. Another instance of the Vendorsmodule is located on the Host > Vendors page. Banners
created using the Host Vendorsmodule can be displayed on any site within this DNN installation.
This Administration module can be deployed to any site page allowing other users to manage vendors
exclusive to this site.

Permissions. Users with view permissions can view, search and filter vendor accounts. Users with
Edit/Edit Content permissions on the Vendorsmodule create and manage vendors, banners and affiliate
accounts.
Installation Note: This module is pre-installed on the site.
Module Version: The version number is always the same as the DNN framework version number.
TheVendors Module
Related Topics:
l See "About the Banners Module"
l See "About Banner Types"
l See "Enabling/Disabling Banner Advertising"
Filtering Vendors by Company Name
How to filter vendor records by the first letter of the company name using the Vendorsmodule.
1. Navigate to Admin > Advanced Settings > Vendors.2. Click on the linked [letter of the alphabet] that corresponds with the first letter of required vendor
name (company name). This displays the first ten (10) matching records listed alphabetically by
name. If there are more than ten matching records, then the Pager Control is displayed allowing
you to access the other records.

FilteringVendors by Name
Filtering Vendors by Unauthorized Vendors
How to view all vendor accounts that have been set as unauthorized on the Vendorsmodule. Note: The
Unauthorized link only displays when there are one or more unauthorized vendors.
1. Navigate to Admin > Advanced Settings > Vendors.2. Click theUnauthorized link. This displays the first ten (10) matching records listed alphabetically by
name. If there are more than ten matching records, then the Pager Control is displayed allowing
you to access the other records.
ViewingUnauthorizedVendor Accounts Only
Searching Vendors by Company Name
How to search for vendors by all or part of the beginning of their company name on the Vendorsmodule.

1. Navigate to Admin > Advanced Settings > Vendors.2. In the Search text box, enter all or part of the Vendor's company name.
3. Select Name from the drop down list.
4. Click the Search button. This displays the first ten (10) matching records listed alphabetically by
name. If there are more than ten matching records, then the Pager Control is displayed allowing
you to access the other records.
Search for aVendor by theCompany Name
Searching Vendors by Email
How to search for a vendor account by email address on the Vendorsmodule. This search returns exact
matches only.
1. Navigate to Admin > Advanced Settings > Vendors.2. In the Search text box, enter the vendor's full email address.
3. Select Email from the drop down list.
4. Click the Search button. This displays the first ten (10) matching records listed alphabetically by
name. If there are more than ten matching records, then the Pager Control is displayed allowing
you to access the other records.
Tip: You must enter the full and exact email address.

Searching for aVendor by EmailAddress
Viewing All Vendor Accounts
How to view all vendor accounts on the Vendorsmodule.
1. Navigate to Admin > Advanced Settings > Vendors.2. Click the All link. This displays the first ten (10) matching records listed alphabetically by name. If
there are more than ten matching records, then the Pager Control is displayed allowing you to
access the other records.
ViewingAllVendor Accounts
Related Topics:
l See "About the Pager"
Vendor Accounts
Adding a New Vendor
How to add a vendor account using the Vendorsmodule. Note: Mandatory fields are indicated with an
asterisk ( * ). Where a check box is displayed beside a field, uncheck the check box to make the field
optional - OR - Check the check box to make the field mandatory.
1. Navigate to Admin > Advanced Settings > Vendors.2. Click the AddNew Vendor link. This opens the Edit Vendors page.
3. In the Vendor Details section, complete all of these fields:1. In theCompany* text box, enter the company name of the vendor.2. In the First Name* text box, enter the first name of the contact person for the vendor.3. In the Last Name* text box, enter the last name of the contact person for the vendor.4. In the Email Address* text box, enter the email address of the contact person listed
above.
4. Optional. In theAddress Details section, complete the address details. Note: Address field
names and required details may vary.
1. In the Street text box, enter the street part of the Vendor's address. E.g. 10 Main Road2. In theUnit # text box, enter the unit number. E.g. Unit 6, or Suite 6, etc.3. In theCity text box, enter the Vendor's city. E.g. Melbourne4. At Country, select the Vendor's country.5. In the Region text box, enter the Region/State/Province of the Vendor - OR - select from
the drop down list where available. (See Host > Lists for more details on creating regions for
countries).
6. In the Postal Code text box, enter the Vendor's postal code. E.g. 312347. In the Telephone text box, enter the Vendor's telephone number. E.g. +61 3 9421 65558. In theCell text box, enter the Vendor's cell (mobile) number. E.g. 0400 100 1009. In the Fax text box, enter the Vendor's facsimile number. E.g. + 61 3 9421 6444
5. In theOther Details section, the following optional field is available:6. In theWebsite text box, enter the Vendor's website address. E.g. http://www.domain.com.7. Click theUpdate button.


Tip: Once a new vendor is created the following additional settings will be available vendor logo,
authorization, classifications, banner advertising, and affiliate referrals. To complete these addi-
tional fields, you must edit the vendor record.
Authorizing/Unauthorizing a Vendor Account
How to authorize or unauthorized a vendor account using the Vendorsmodule.
1. Navigate to Admin > Advanced Settings > Vendors.2. Locate the required vendor account by selecting a filter or doing a search - OR - Click theUnauthor-
ized link to view all unauthorized vendor accounts.
3. Click the Edit button beside the vendor.
4. Go to theOther Details section.5. At Authorized, check the check box to authorize the account - OR - uncheck the check box to
unauthorize the account.

6. Click theUpdate button.
Editing/Adding Vendor Account Details
How to edit existing vendor details and add new details such as a logo using the Vendorsmodule.
1. Navigate to Admin > Advanced Settings > Vendors.2. Locate the required vendor account by selecting a filter or doing a search.
3. Click the Edit button beside the required vendor account. This opens the Edit Vendors page.4. Edit any of the below fields as required.
5. In the Vendor Details section, edit any of the required fields.6. In theAddress Details section, edit/complete any the address fields.

7. In theOther Details section, edit/complete any of the following optional fields:1. In theWebsite text box, enter the Vendor's website address. E.g. www.domain.com2. At Logo, select or upload a logo for this vendor. See "Setting a File Link" or See "Upload-
ing and Linking to a File"
3. At Authorized, check the check box to authorize this vendor. Important. This setting ena-
bles Administrator(s) to easily identify unauthorized vendors however it doesn't prevent cur-
rent banners from displaying in the Bannersmodule - OR - Uncheck the check box to
unauthorize this Vendor.
8. Expand the Vendor Classification section to access these fields which are not implemented:
1. In theClassifications box, define the classifications for the Vendor. This setting is not cur-
rently enabled.
2. InKey Words text box, enter key words for the Vendor.9. Expand theBanner Advertising section to add and manage banners. See the "Vendor Banners"
section.
10. Expand theAffiliate Referrals section to add and manage affiliates. See the "Affiliate Referrals"
section.
11. Click theUpdate button.

Editing aVendor Account
Deleting a Vendor Account
How to permanently delete a vendor account from the Vendorsmodule.
1. Navigate to Admin > Advanced Settings > Vendors.2. Locate the required vendor account.

3. Click the Edit button beside the required vendor.
4. Click theDelete link. This displays the message "Are You Sure YouWish To Delete This Item?"
5. Click theOK button to confirm deletion.
Deleting all Unauthorized Vendors
How to permanently delete all unauthorized vendors from the Vendorsmodule. Deleting a vendor does not
delete any related Vendor banner for the File Manager, however the banners will no longer be displayed in
the bannersmodule.
1. Navigate to Admin > Advanced Settings > Vendors.2. Optional. Click theUnauthorized link to view unauthorized vendor accounts before deleting them.
3. Click theDelete Unauthorized Vendors button to display the message "Are You Sure YouWish
To Delete These Items?"
4. Click the Yes button to confirm.
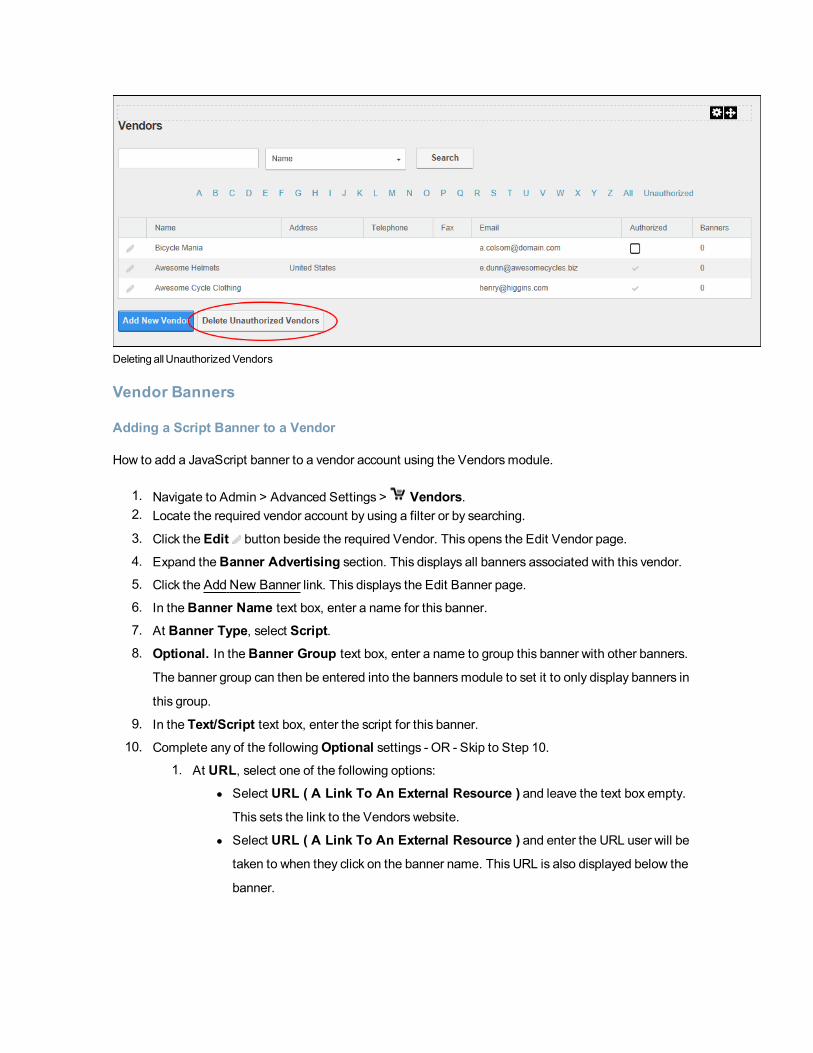
Deleting allUnauthorizedVendors
Vendor Banners
Adding a Script Banner to a Vendor
How to add a JavaScript banner to a vendor account using the Vendorsmodule.
1. Navigate to Admin > Advanced Settings > Vendors.2. Locate the required vendor account by using a filter or by searching.
3. Click the Edit button beside the required Vendor. This opens the Edit Vendor page.
4. Expand theBanner Advertising section. This displays all banners associated with this vendor.5. Click the AddNew Banner link. This displays the Edit Banner page.
6. In theBanner Name text box, enter a name for this banner.7. At Banner Type, select Script.8. Optional. In theBanner Group text box, enter a name to group this banner with other banners.
The banner group can then be entered into the bannersmodule to set it to only display banners in
this group.
9. In the Text/Script text box, enter the script for this banner.10. Complete any of the followingOptional settings - OR - Skip to Step 10.
1. At URL, select one of the following options:l Select URL ( A Link To An External Resource ) and leave the text box empty.
This sets the link to the Vendors website.
l Select URL ( A Link To An External Resource ) and enter the URL user will be
taken to when they click on the banner name. This URL is also displayed below the
banner.

l Select Page (A Page On Your Site ) and select the page users are taken to when
they click on this banner.
l Select File (A File On Your Site ) and select the file to be displayed when a user
clicks on this banner.
2. In theCPM/Cost text box, enter the cost per 1000 Impressions or the once off cost. E.g.
For every 1000 impressions of the banner the Vendor will charge the listed amount. Alter-
natively, the vendor may charge a flat fee for banner advertising.
3. In the Impressions text box, enter the number of impressions the banner will display for. A
impression is made each time a banner is displayed on the page.
4. At Start Date, click theCalendar link and select the first date the banner will be displayed.
See "Working with the Calendar"
5. At End Date, click theCalendar link and select the last date the banner will be displayed.6. At Criteria, select one of the following options:
And: Banner only expires if both the Impressions and the End Date has been met.
I.e. The banner has reached its number of clicks AND a banner has expired.
7. Or: Banner expires if either the Impressions or the End Date has been met. I.e. The banner
has reached its number of clicks OR the banner has expired.
11. Click theUpdate button. This returns you to the Edit Vendor page.12. Optional. To view a preview of the newly added banner:
1. Expand theBanner Advertising section.2. Click the Edit button beside the new banner. This opens the Edit Banner page which dis-
plays a preview of the banner.
Related Topics:
l See "Working with the Calendar"
Adding a Text Banner to a Vendor
How to add a text banner to a vendor account using the Vendorsmodule.
1. Navigate to Admin > Advanced Settings > Vendors.2. Click the Edit button beside the required Vendor. This opens the Edit Vendor page.
3. Expand theBanner Advertising section. This displays all banners associated with this vendor.4. Click the AddNew Banner link. This opens the Edit Banner page.
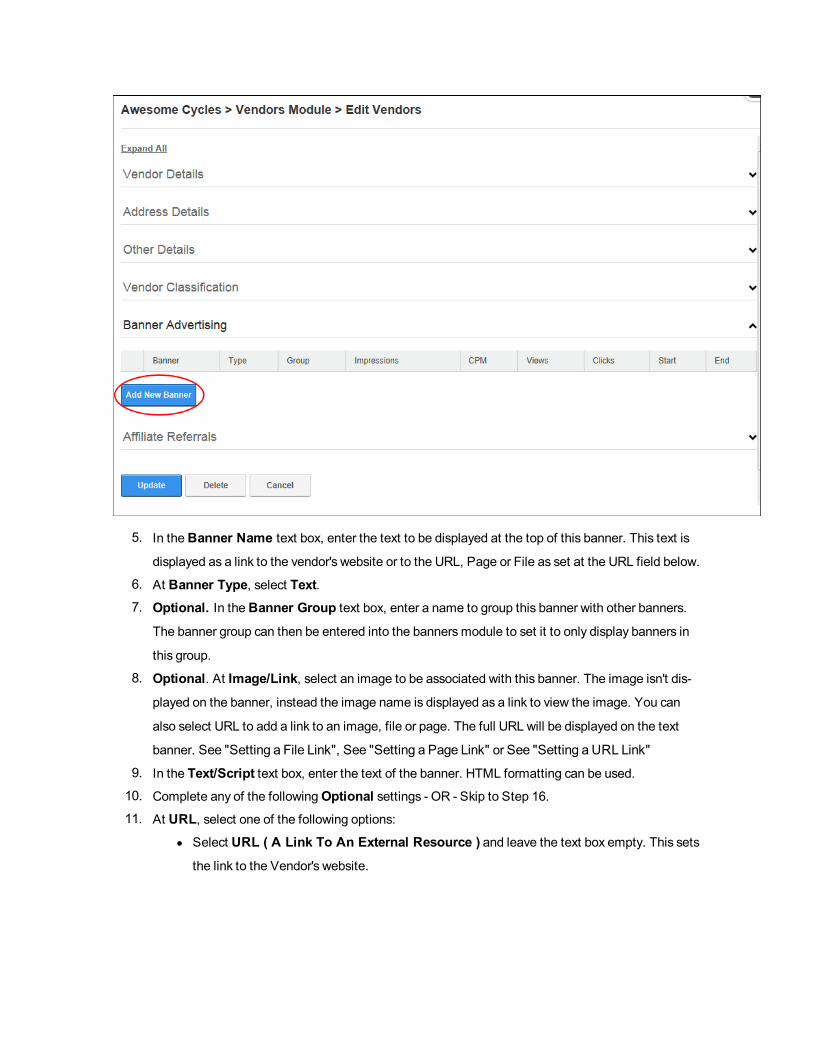
5. In theBanner Name text box, enter the text to be displayed at the top of this banner. This text is
displayed as a link to the vendor's website or to the URL, Page or File as set at the URL field below.
6. At Banner Type, select Text.7. Optional. In theBanner Group text box, enter a name to group this banner with other banners.
The banner group can then be entered into the bannersmodule to set it to only display banners in
this group.
8. Optional. At Image/Link, select an image to be associated with this banner. The image isn't dis-
played on the banner, instead the image name is displayed as a link to view the image. You can
also select URL to add a link to an image, file or page. The full URL will be displayed on the text
banner. See "Setting a File Link", See "Setting a Page Link" or See "Setting a URL Link"
9. In the Text/Script text box, enter the text of the banner. HTML formatting can be used.10. Complete any of the followingOptional settings - OR - Skip to Step 16.
11. At URL, select one of the following options:l Select URL ( A Link To An External Resource ) and leave the text box empty. This sets
the link to the Vendor's website.

l Select URL ( A Link To An External Resource ) and enter the URL users go to when
they click on the banner name. This URL also displays at the bottom of the banner.
l Select Page (A Page On Your Site ) and select the page users go to when they click on
the banner name. The page number is also displayed at the bottom of the banner. E.g. 85
l Select File (A File On Your Site ) and select the file the user go to when they click on the
banner name. The file ID number is also displayed at the bottom of the banner. E.g.
FileID=148.
12. In theCPM/Cost text box, enter the cost per 1000 Impressions or the once off cost. E.g. For every
1000 impressions of the banner the vendor will charge the listed amount. Alternatively, the Vendor
may charge a flat fee for banner advertising.
13. In the Impressions text box, enter the number of impressions the banner will display for.
14. At Start Date, click theCalendar button and select the first date the banner is displayed.See "Working with the Calendar"
15. At End Date, click theCalendar button and select the last date the banner is displayed.16. At Criteria, select one of the following options:
l And: Banner only expires if both the Impressions and the End Date has been met. I.e. The
banner has reached its number of clicks AND a banner has expired.
l Or: Banner expires if either the Impressions or the End Date has been met. I.e. The banner
has reached its number of clicks OR the banner has expired.

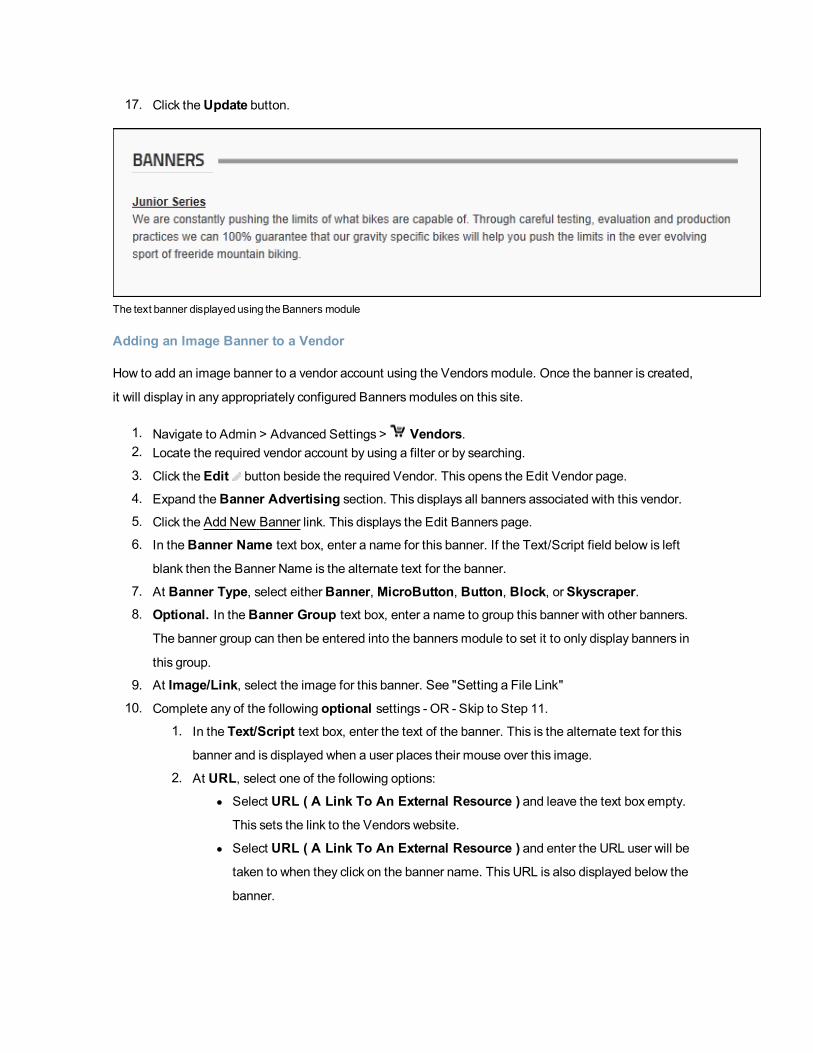
17. Click theUpdate button.
The text banner displayed using theBanners module
Adding an Image Banner to a Vendor
How to add an image banner to a vendor account using the Vendorsmodule. Once the banner is created,
it will display in any appropriately configured Bannersmodules on this site.
1. Navigate to Admin > Advanced Settings > Vendors.2. Locate the required vendor account by using a filter or by searching.
3. Click the Edit button beside the required Vendor. This opens the Edit Vendor page.
4. Expand theBanner Advertising section. This displays all banners associated with this vendor.5. Click the AddNew Banner link. This displays the Edit Banners page.
6. In theBanner Name text box, enter a name for this banner. If the Text/Script field below is left
blank then the Banner Name is the alternate text for the banner.
7. At Banner Type, select eitherBanner, MicroButton, Button, Block, or Skyscraper.8. Optional. In theBanner Group text box, enter a name to group this banner with other banners.
The banner group can then be entered into the bannersmodule to set it to only display banners in
this group.
9. At Image/Link, select the image for this banner. See "Setting a File Link"10. Complete any of the following optional settings - OR - Skip to Step 11.
1. In the Text/Script text box, enter the text of the banner. This is the alternate text for this
banner and is displayed when a user places their mouse over this image.
2. At URL, select one of the following options:l Select URL ( A Link To An External Resource ) and leave the text box empty.
This sets the link to the Vendors website.
l Select URL ( A Link To An External Resource ) and enter the URL user will be
taken to when they click on the banner name. This URL is also displayed below the
banner.

l Select Page (A Page On Your Site ) and select the page users are taken to when
they click on this banner.
l Select File (A File On Your Site ) and select the file to be displayed when a user
clicks on this banner.
3. In theCPM/Cost text box, enter the cost per 1000 Impressions or the once off cost. E.g.
For every 1000 impressions of the banner the Vendor will charge the listed amount. Alter-
natively, the vendor may charge a flat fee for banner advertising.
4. In the Impressions text box, enter the number of impressions the banner will display for. A
impression is made each time a banner is displayed on the page.
5. At Start Date, click theCalendar button and select the first date the banner is dis-played. See "Working with the Calendar"
6. At End Date, click theCalendar button and select the last date the banner is dis-played.
7. At Criteria, select one of the following options:l And: Banner only expires if both the Impressions and the End Date has been met.
I.e. The banner has reached its number of clicks AND a banner has expired.
l Or: Banner expires if either the Impressions or the End Date has been met. I.e. The
banner has reached its number of clicks or it has expired.


11. Click theUpdate button. This returns you to the Edit Vendor page.12. Optional. To view a preview of the newly added banner:
a. Expand theBanner Advertising section.b. Click the Edit button beside the new banner. This opens the Edit Banner page which dis-
plays a preview of the banner.
Previewing a newly added imagebanner using theVendors module

The imagebanner displayed in theBanners module
Related Topics:
l See "Working with the Calendar"
Editing a Vendor Banner
How to edit the properties of a banner using the Vendorsmodule.
1. Navigate to Admin > Advanced Settings > Vendors.2. Locate the required vendor account by selecting a filter or doing a search.
3. Click the Edit button beside the required vendor account. This opens the Edit Vendors page.
4. Expand theBanner Advertising section. This displays all banners associated with this vendor.5. Click the Edit button beside the banner to be edited.

6. Edit the required fields.
7. Click theUpdate button.
Deleting a Vendor Banner
How to edit the properties of a banner using the Vendorsmodule.
1. Navigate to Admin > Advanced Settings > Vendors.2. Locate the required vendor account by selecting a filter or doing a search.
3. Click the Edit button beside the required vendor account. This opens the Edit Vendors page.
4. Expand theBanner Advertising section. This displays all banners associated with this vendor.5. Click the Edit button beside the banner to be deleted.

6. Click theDelete button. This displays the message "Are You Sure YouWish To Delete This Item?"
7. Click theOK button to confirm.
Emailing Banner Status to Vendor
How to send a banner status report to the related vendor using the Vendorsmodule. The report contains
the following information: Banner Name, Banner Description, Image Name, Number of CPM/Cost,
Number of Impressions, Start Date, End Date, Number of Views, and Number of Click Through's.
1. Click the Edit button beside the required Vendor. This opens the Edit Vendor page.
2. Expand theBanner Advertising section. This displays all banners associated with this vendor.3. Click the Edit button beside the required banner.
4. Click the Email Status to Vendor link at the base of the module. A success or failure message is dis-
played at top of the module letting you know if the email sent successfully.
5. Click theCancel link to return to the module.
Viewing the Clicks and Views for a Banner
How to view the number of times a banner has been viewed and clicked using the Vendorsmodule.
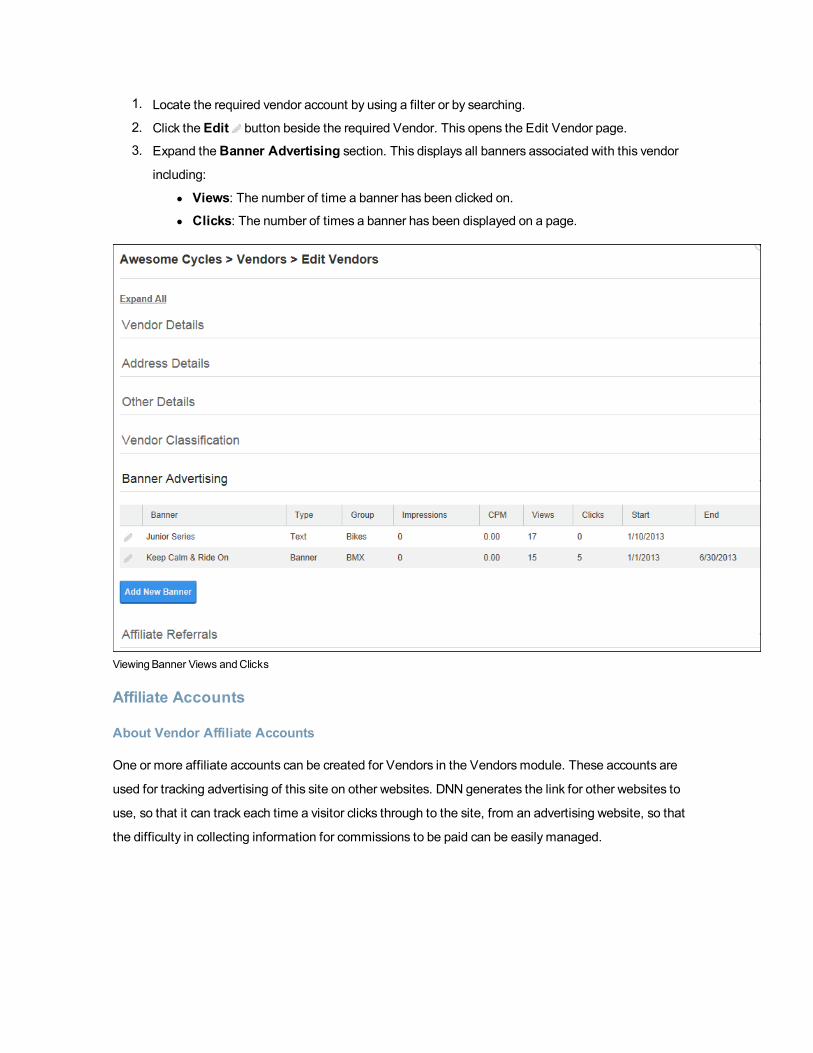
1. Locate the required vendor account by using a filter or by searching.
2. Click the Edit button beside the required Vendor. This opens the Edit Vendor page.
3. Expand theBanner Advertising section. This displays all banners associated with this vendor
including:
l Views: The number of time a banner has been clicked on.l Clicks: The number of times a banner has been displayed on a page.
ViewingBanner Views andClicks
Affiliate Accounts
About Vendor Affiliate Accounts
One or more affiliate accounts can be created for Vendors in the Vendorsmodule. These accounts are
used for tracking advertising of this site on other websites. DNN generates the link for other websites to
use, so that it can track each time a visitor clicks through to the site, from an advertising website, so that
the difficulty in collecting information for commissions to be paid can be easily managed.

Adding an Affiliate Referral Account
How to add affiliate referral account to a vendor in the Vendorsmodule. This generates a link which affil-
iates can add to their website. The number of clicks and acquisitions for the link is tracked within the Affil-
iate Referral module, permitting the tracking of commission owing to the vendor.
1. Navigate to Admin > Advanced Settings > Vendors.2. Locate the required vendor account by selecting a filter or by doing a search.
3. Click the Edit button beside the required vendor account. This opens the Edit Vendors page.
4. Expand theAffiliate Referrals section. This displays any affiliate referral accounts associated
with this vendor.
5. Click theAdd New Affiliate button.
1. Optional. At Start Date, click theCalendar link and select a start date. See "Working with the Cal-
endar"
2. Optional. At End Date, click theCalendar link and select an end date.

3. In theCost Per Click ( CPC ) text box, enter the advertising charge. CPC is the commission paid
to the vendor when a visitor is referred to your site.
4. In theCost Per Acquisition ( CPA ) text box, enter the advertising charge. CPA is the com-
mission paid to the vendor when a visitor becomes a member of your site.
5. Click theUpdate button.
Editing an Affiliate Referral Account
How to edit the details of an affiliate referral account using the Vendorsmodule.
1. Navigate to Admin > Advanced Settings > Vendors.2. Locate the required vendor account by selecting a filter or by doing a search.
3. Click the Edit button beside the required vendor account. This opens the Edit Vendors page.
4. Expand theAffiliate Referrals section. This displays any affiliate referral accounts associated with
this vendor.
5. Click the Edit button beside the required record.6. Edit fields as required.
7. Click theUpdate button.
Deleting an Affiliate Referral Account
How to permanently delete an affiliate referral account from the Vendorsmodule.
1. Navigate to Admin > Advanced Settings > Vendors.2. Locate the required vendor account by selecting a filter or by doing a search.
3. Click the Edit button beside the required vendor account. This opens the Edit Vendors page.
4. Expand theAffiliate Referrals section. This displays any affiliate referral accounts associated with
this vendor.
5. Click the Edit button beside the required record.
6. Click theDelete link. This displays the message "Are You Sure YouWish To Delete This Item?"
7. ClickOK to confirm deletion.
Sending Notification of Affiliate Referral Account
How to send an affiliate report email to an affiliate using the Vendorsmodule. The report provides details
of the site they have been made an affiliate of and the URL link to be used.
1. Navigate to Admin > Advanced Settings > Vendors.2. Locate the required vendor account by selecting a filter or by doing a search.
3. Click the Edit button beside the required vendor account. This opens the Edit Vendors page.
4. Expand theAffiliate Referrals section. This displays any affiliate referral accounts associated with
this vendor.
5. Click the Edit button beside the required record.
6. Click the Send Notification link.
7. Click theCancel link to return to the module.

Common Tools
Calendar
Working with the Calendar
The Calendar is an ASP.Net control widely used to select and maintain dates in module content, module
settings, page settings, Admin Console, etc. The Calendar is typically accessed by clicking or theCal-
endar button, however somemodules have other link names. E.g. Eventsmodule displays the ViewDate link.
Default Calendar
The default Calendar control is used throughout the DNN Framework and in a growing number of mod-
ules.
To view the Calendar, click theCalendar link or theCalendar button. The current date is highlighted ina lighter gray. i.e. The current date on the below Calendar is 22 October, 2012.
Step One: Locating the required date
l Modifying the Month and/or Year:1. Click on theMonth Year information located above the monthly calendar. This will open a
popup list of months and years.

2. Optional. If the required year isn't displayed, use theDouble Right Arrow orDouble
Left Arrow buttons to view the other years.3. Select the required month and/or year.
4. Click theOK button to select. This will close the popup list with the selected month/year cal-
endar displayed, allowing you to choose the required date.

l Viewing Today's Date:1. Click on theMonth Year information located above the monthly calendar.2. Click the Today button to view the current month/year with Today's date.
l Navigating to Other Months:o Click the Left Arrow button above the calendar month to view the calendar for the pre-
viousmonth.
o Click theRight Arrow button above the calendar month to view the calendar for the nextmonth.
Step Two: Selecting the Required Date
l To Select a Date: Click on the date cell in the calendar. This will close the calendar and the
selected date will be displayed in the associated text box. Note: You may be unable to select dates
prior to today, depending on where the Calendar is in use.
l To close the Calendar without selecting a Date: Click off the calendar.
Module Calendar
Several DNNProject modules use the Calendar control that was standard in previous versions on DNN.
These modules are currently being updated to use the default calendar.
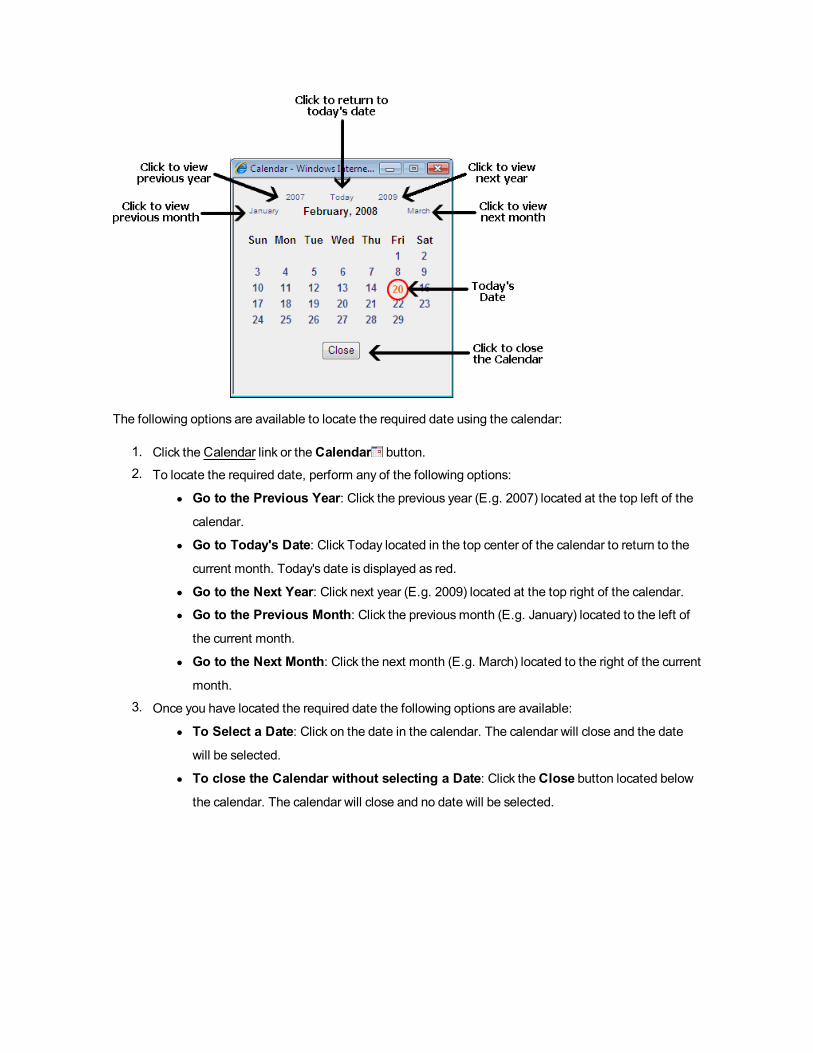
The following options are available to locate the required date using the calendar:
1. Click theCalendar link or theCalendar button.2. To locate the required date, perform any of the following options:
l Go to the Previous Year: Click the previous year (E.g. 2007) located at the top left of the
calendar.
l Go to Today's Date: Click Today located in the top center of the calendar to return to the
current month. Today's date is displayed as red.
l Go to the Next Year: Click next year (E.g. 2009) located at the top right of the calendar.l Go to the Previous Month: Click the previousmonth (E.g. January) located to the left of
the current month.
l Go to the Next Month: Click the next month (E.g. March) located to the right of the current
month.
3. Once you have located the required date the following options are available:
l To Select a Date: Click on the date in the calendar. The calendar will close and the date
will be selected.
l To close the Calendar without selecting a Date: Click theClose button located below
the calendar. The calendar will close and no date will be selected.

Editor
About the Editor
The Editor provides basic and rich text editing capabilities across numerousmodules including Announce-
ments, FAQ, Events and HTML/HTML Pro. The Basic Text Box associated with the Editor is the same for
all DNN versions. The Rich Text Editor (RTE) associated with the Editor provider will depend upon the ver-
sion and edition of DNN you are using.
This manual details how to use two different providers for the RadEditor control, theDot-
NetNuke.RadEditorProvider (default) and the TelerikEditorProvider, which are both included with
DNN 6+.
Other RTE's which can be integrated with DNN include the FCKEditor and the Free Text Box.
TheDefault Editor for DNN6.0+ (DotNetNuke.RadEditorProvider for theRadEditor)
Adding Basic Text and HTML using Editor
How to add basic text into the Basic Text Box of the Editor. You can also paste basic HTML into the basic
text box.

1. Select theBasic Text Box radio button located above the Editor.2. At Render Mode (located below the Editor) select the Text radio button.
3. Click inside the Editor and then enter or paste (Ctrl + V) your text.
Adding Rich Text Using The Editor
How to add rich text to the Editor. This enables the Editor toolbars and displays the content of the Editor
as rich text. Note: This is the default view for this Editor, however if you last viewed the Editor as the Basic
Text Box, it will display as such until it is changed.
1. Select theRich Text Editor radio button located above the Editor.

2. Click inside the Editor and then enter your text, insert images, links, etc. Here are links to common
types of rich content that can be added using the default RTE:
l See "InsertingMedia"
l See "Inserting Images"
l See "Adding a Page Link"
l See "Linking to a Site Page"
l See "Inserting a Table"
Pasting HTML Content
How to paste HTML content into the Editor control.
1. Select theBasic Text Box radio button located above the Editor. This displays the Editor as a
Basic Text Box. The content within the Editor is displayed as HTML.
2. At Render Mode (located below the Editor), select Html.3. Paste in your Html.
Tip: HTML can also be pasted into theRaw Render Mode

PastingHTML into theHTML module
Viewing Content in Design or HTML View
How to switch between Design and HTML view in the RadEditor.
1. Click either theDesign orHTML tab located below the editor.

DotNetNuke RadEditorProvider
Managing Images and Media
Creating an Image Map
How to create an image map using the DotNetNuke.RadEditorProvider for the RTE.
1. Insert an image.
2. Right-click on the image and then select Image Map Editor from the drop down list - OR - Click
the Insert Media button and then select Image Map Editor from the actions toolbar. Thiswill open the Image Map Editor.

3. To create an area:
a. At Select Area Shape, select eitherRectangle orCircle.b. Click theNew Area button. This displays a gray box defining the area.c. Move and resize the area as required. This updates the Define Area Properties fields for
Left, Width, Top and Height.
d. Optional. In theURL text box, enter the URL to open when a user clicks on this Area.i. At Target, select the target for the URL from these options:
l Target: No target is set and the link will open in the same window.l New Window: Will open a newwindow.
l Parent Window: If web page consists of frames, the link will open in the par-
ent frame.
l Same Window: The link will open in the same window.l Browser Window: The link will open in the same window.l Search Panel Media Pane
ii. In theAlt Text text box, enter the text to be displayed for this area.iii. Click theUpdate Area button.
4. Repeat Step 3 to add additional areas.
5. These additional editing options are available:
l To edit an existing area, click on it in the preview window, edit the properties as required and
then click theUpdate Area button.l To remove an area, click theRemove Area button.l To remove all areas, click theRemove All button.
6. Click theOK button to confirm.
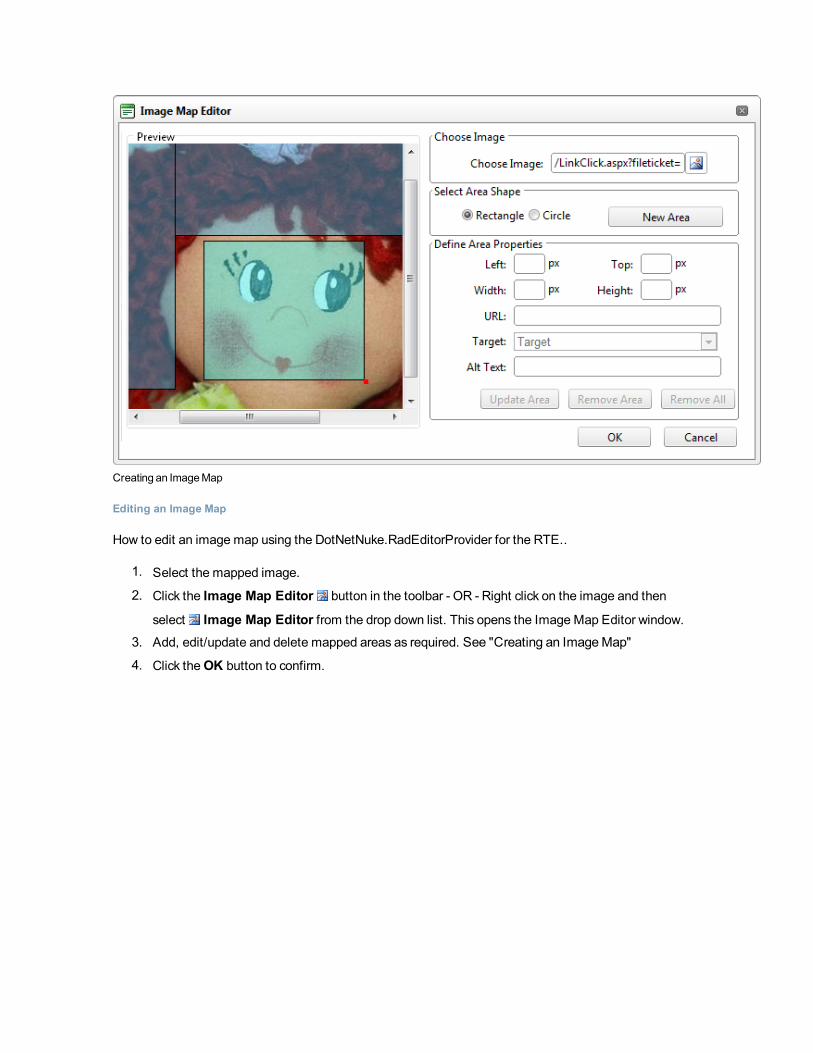
Creating an ImageMap
Editing an Image Map
How to edit an image map using the DotNetNuke.RadEditorProvider for the RTE..
1. Select the mapped image.
2. Click the Image Map Editor button in the toolbar - OR - Right click on the image and then
select Image Map Editor from the drop down list. This opens the Image Map Editor window.
3. Add, edit/update and delete mapped areas as required. See "Creating an ImageMap"
4. Click theOK button to confirm.

Creating an ImageMap
Editing an Image
How to edit an image inserted in the DotNetNuke.RadEditorProvider for the RTE.
1. Select the image to be edited.
2. Right-click on the image.
3. Select Properties... from the drop down list. This opens the Properties window.
l To change the image: At Image Src, click the Image Manager button and then locateand select the new image.
l Modify any other properties as required. See "Setting Image Properties"
4. Click theOK button to confirm.
Tip: The new image will inherit the properties of the previous image.
Inserting a Document
How to insert a document using the DotNetNuke.RadEditorProvider RTE.
1. Click the Insert Media button and select Document Manager from the drop down list. This will
open the Document Manager.

2. Navigate to and select the required document. See "Using the ResourceManager"
3. Optional. In the Link Text text box, modify the text associated with this document. The filename
is used by default.
4. Optional. At Target select the target window for this link.
5. Optional. In the Tooltip text box, enter a tool tip to be displayed when a user places their mouse
over this link.
6. Optional. At CSS Class, select a class for the document link.7. Click the Insert button.
Tip: Additional document properties are available. See "Setting Document Properties"
TheDocumentManager
Inserting Flash
How to insert Flash media using the DotNetNuke.RadEditorProvider for the RTE.

1. Click the Insert Media button and then select Flash Manager from the drop down list.This will open the Flash Manager.
2. Navigate to and select the required Flash. See "Using the ResourceManager"
3. Optional. Click the Properties tab and set the properties.a. At Specify Class ID, select from these options:
l Check the check box to set a class for this media. This reveals the Class ID text
box.
i. In theClass ID text box, enter the name of the CSS class to be applied to
this Flash.
ii. Uncheck the Specify Class ID check box to hide the Class ID field and
ensure all other fields can be set.
l Uncheck the check box to use the default class.
b. In theWidth text box, enter a pixel value to set the Flash width. Leave this field blank to use
the width defined by the Flash.
c. In theHeight text box, enter a pixel value to set the Flash height. Leave this field blank to
use the height defined by the Flash.
d. At Quality, select High, Medium or Low as the quality of the Flash.
e. At Play, check the check box to auto play the Flash - OR - Uncheck the check box if the
user must select to play the Flash.
f. At Loop, check the check box to automatically loop the Flash movie repeated - OR -
Uncheck the check box if the user must select to replay the Flash.
g. At Flash Menu, check the check box to display the Flash menu - OR - Uncheck the
check box to hide it.
h. At Transparent, check the check box for a transparent background - OR - Uncheck the
check box to disable.
i. At HTML Align, select the HTML alignment.j. At Flash Align, select the Flash alignment.k. At Background Color, select No Color for no background color or select a color from the
drop down list.
4. Click the Insert button.
Tip: You cannot edit the properties of Flash once it has been inserted. To modify Flash, simply
delete it and reinsert it with the required properties.

TheFlashManager
Inserting Images
How to insert an image using the default Rich Text Editor (DotNetNuke.RadEditorProvider) provided with
DotNetNuke.
1. Click the Insert Media button and select Image Manager from the drop down list. Thiswill open the Image Manager. (The keyboard shortcut is CTRL + G)
2. Navigate to and select the required image. See "Using the ResourceManager"
3. Optional. In the Image Editor, use theBest Fit, Actual Size, Zoom In and Zoom Out buttons
to modify the previewed image - these changes cannot be saved.
4. Optional. Click the Image Editor button to edit the way the image is displayed. See "Working
with the Image Editor"
5. Optional. Click the Properties tab and set image properties. See "Setting Image Properties"6. Click the Insert button.
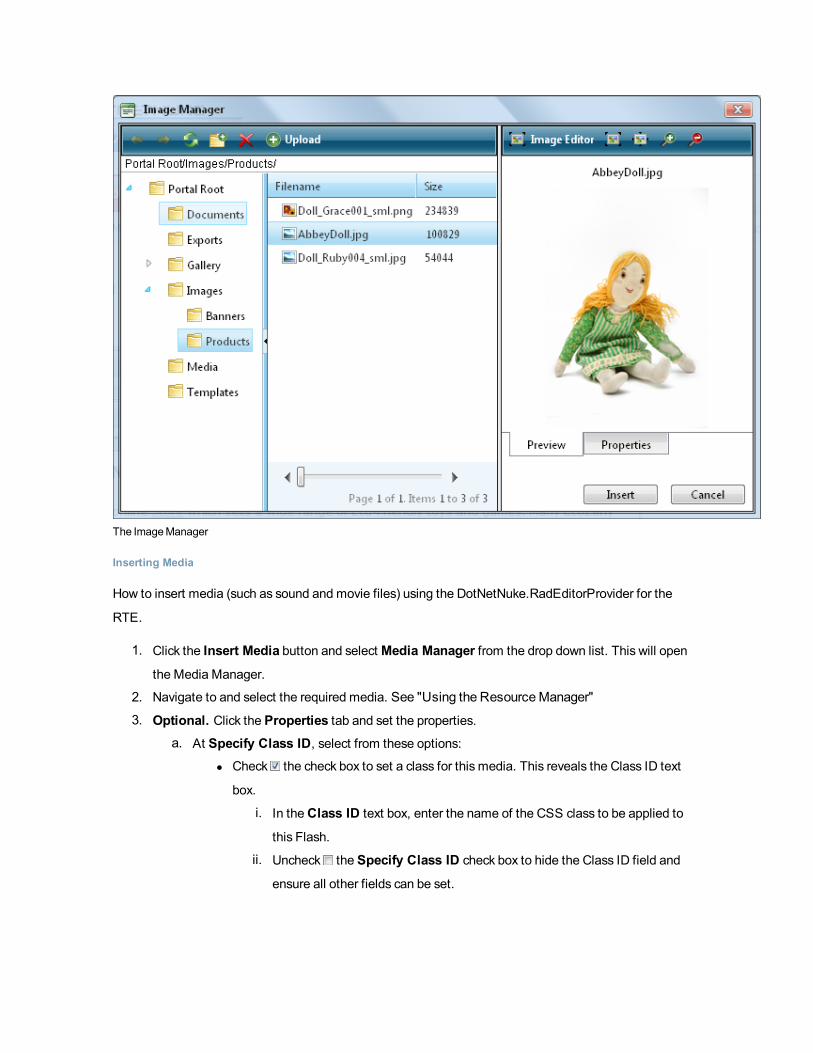
The ImageManager
Inserting Media
How to insert media (such as sound and movie files) using the DotNetNuke.RadEditorProvider for the
RTE.
1. Click the Insert Media button and select Media Manager from the drop down list. This will open
the Media Manager.
2. Navigate to and select the required media. See "Using the ResourceManager"
3. Optional. Click the Properties tab and set the properties.a. At Specify Class ID, select from these options:
l Check the check box to set a class for this media. This reveals the Class ID text
box.
i. In theClass ID text box, enter the name of the CSS class to be applied to
this Flash.
ii. Uncheck the Specify Class ID check box to hide the Class ID field and
ensure all other fields can be set.

l Uncheck the check box to use the default class.
b. In theWidth text box, enter the pixel value to set the media width. Leave blank to use the
actual media size.
c. In theHeight text box, enter the pixel value to set the media height. Leave blank to use the
actual media size.
d. At Align, select the alignment.e. At Properties select a property to viewmore information on that property and select Yes or
No as required. Repeat for each property as required.4. Click the Insert button.
Tip: You cannot edit the properties of media once it has been inserted. To modify media, simply
delete it and reinsert it with the required properties.
TheMediaManager
Setting Document Properties
How to set/edit the optional properties of documents inserted using the DotNetNuke.RadEditorProvider
for the RTE.
1. Insert the document.
2. Right-click on the document and click the Properties... button from the drop down list. Thisopens the HyperlinkManager.
3. Add/edit the link, anchor or email address as required.
4. Click theOK button to confirm.
Setting Image Properties
How to set the optional properties of an image using the Image Manager of the Dot-
NetNuke.RadEditorProvider for the RTE.
1. If the image has already been inserted, right-click on the image and select Properties...from the drop down list. Alternatively, if you are currently adding the image, click on theProp-
erties tab of the ImageManager.
2. Click the Lock Ratio / Unlock Ratio button to unlock or lock the width/height ratio at anytime. Unlocking the ratio enables the width and/or height to be modified independently.
3. In theWidth text box, enter the width in pixels which the image will be displayed as.4. In theHeight text box, enter the height in pixels which the image will be displayed as.5. At Border Color, click theColor Picker button and select the border color. Note: A BorderWidth
must be entered to display the border.
6. In theBorder Width text box, enter the pixel width for the border - OR - Use the Increase and
Decrease arrows.7. In theAlt Text text box, enter the alternative text for this image.8. In the Long Description text box, enter the long description for this image.9. At Image Alignment, click theAlignment Selector button and select the alignment for this
image.
10. At Margin, set any of these fields:1. In the Top text box, enter a pixel value or use the Increase andDecrease arrows to set the
top margin.
2. In theBottom text box, enter a pixel value or use the Increase andDecrease arrows to set
the bottom margin.

3. In theRight text box, enter a pixel value or use the Increase andDecrease arrows to set
the right margin.
4. In the Left text box, enter a pixel value or use the Increase andDecrease arrows to set the
left margin.
11. At CSS Class, select a class for this image.12. Click theOK button to confirm.
Setting the properties of an existing image

Setting the properties of an imageduring insertion
Troubleshooting: Image Not Displaying
Some imagesmay not display in the Editor.
This can occur if the image is set as hidden.
1. Remove the Hidden property from the image. See "Setting the Hidden Property of a File"2. Return to the module to see if the image is displaying. You may need to Refresh (Hold down the
Shift key and strike the F5 key) the page to see the changes.

This can also occur if module caching is set for too longer period. In this case, extend the caching time as
required. See "Configuring Cache Settings for aModule"
Troubleshooting: ImageNot Displaying inHTMLModule
Using the Resource Manager
How to navigate to, select or manage folders and files using the Resource Manager of the Dot-
NetNuke.RadEditorProvider for the RTE. The Resource Manager is commonly used for the Image Man-
ager, Document Manager, Flash Manager, Media Manager and Template Manager of the RadEditor.
Note: Access to some tools is restricted by role.
The Resource Manager consists of the following toolbar and windows: Resource Manager Toolbar, Folder
Window, FilenameWindow, Preview/PropertiesWindow.

Resource Manager Toolbar
Tool Icon Description
Back Click to go back by one folder in the Folders window.
Forward Click to move forward by one folder in the Folders window.
Refresh Click to refresh to retrieve newly updated files.
New Folder 1. In the Folder window, select the parent folder and then click theNew
Folder button.2. In the Enter the new folder name dialog box, overwrite the text "New-
Folder" with the name for this new folder.
3. Click theOK button to confirm.

Tool Icon Description
Delete1. Select the image or folder to be deleted and then click theDelete
button. This displays the message "Are you sure you want to delete the
selected file? The selected file may be in use. If deleted, some pages will
not be displayed properly.
2. Click theOK button to confirm.
Grid View Click to view the files in the Filename window in a compact grid without thumb-
nail images.
Thumb-
nails View
Click to view the files in the Filename windowwith large folder icons and thumb-
nail images.
Upload Clicking theUpload button will open the Upload dialog box. Here you can select
one or more files to upload and view the settings for uploading files.
Note 1: The maximum file size that can be upload is listed at the base of the
Upload dialog box at Max file size allowed. The default setting is 1,000KB. If
you attempt to upload a file of a greater size then the following message is dis-
played "[FileName]: The size of the uploaded file exceedsmax size allowed."
Note 2: The list of file extensions that can be uploaded is listed at the base of
the Upload dialog box at File extensions allowed. If you attempt to add a file
not listed here the following message is displayed "[FileName]: The extension of
the uploaded file is not valid. Please provide a valid file!" The list of allowed file
extensions reflects the settings configured for this site by your Host.
1. In the Folder window, navigate to and select the Folder you want to
upload the new file to.
2. Click the Upload button. This opens the Upload dialog box.3. In the Upload dialog box, click the Select button and choose the required
file from your computer.
4. Repeat Step 3 to add additional files.
5. Optional. To upload more than three files, click theAdd button and then
repeat Step 3.
6. At Overwrite if file exists?, check the check box if you wish to over-
write a file of the same name which has been previously uploaded - OR -
Uncheck the check box if you don't want to overwrite an existing ver-

Tool Icon Description
sion of this file. If the file with this name does exist you will be notified
with a dialog box when you upload the file. In this case, the new file
selected for upload will not be uploaded.
7. Click theUpload button.
Tip: Click theRemove button to remove a file which hasbeen selected for upload.
Folder Window: This window displays the folders of the File Manager using a hierarchical tree structure.
A folder named "My Folder" is displayed to all users (with the exception of SuperUsers) that allows users
to view and manage their personal images. This folder is unique to the individual user and cannot be
accessed or edited by other users.
Select a folder to view its sub-folders and/or files in the FilenameWindow. Folders can be moved by drag-
ging into a different folder. Right click a folder to perform Delete, Rename, New Folder or Upload.
Filename Window: Displays a list of the folders and/or files within the selected folder. Select a file to
view a preview and/or properties information in the Preview/PropertiesWindow. Files can be moved by
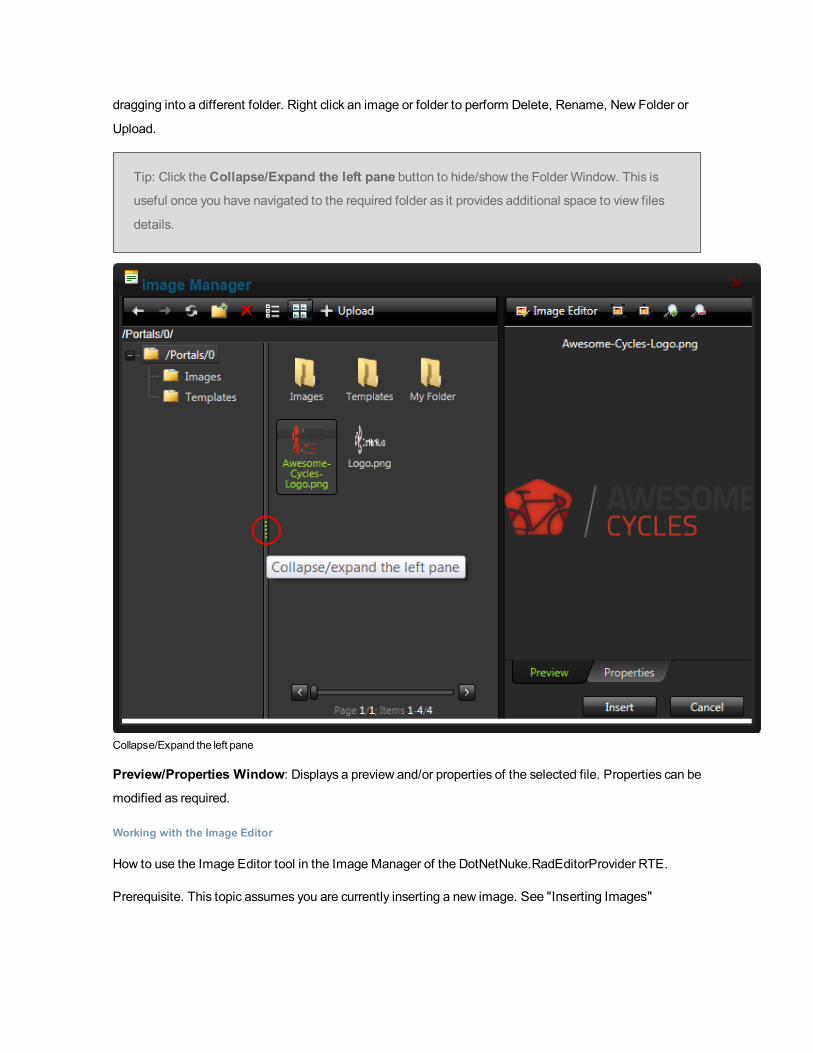
dragging into a different folder. Right click an image or folder to perform Delete, Rename, New Folder or
Upload.
Tip: Click theCollapse/Expand the left pane button to hide/show the Folder Window. This is
useful once you have navigated to the required folder as it provides additional space to view files
details.
Collapse/Expand the left pane
Preview/Properties Window: Displays a preview and/or properties of the selected file. Properties can be
modified as required.
Working with the Image Editor
How to use the Image Editor tool in the Image Manager of the DotNetNuke.RadEditorProvider RTE.
Prerequisite. This topic assumes you are currently inserting a new image. See "Inserting Images"
1. Click the Insert Media button and select Image Manager from the drop down list. Thiswill open the Image Manager. (The keyboard shortcut is CTRL + G)
2. Click the Image Media button to open the Image Editor.3. Select from these editing options:
a. At Opacity, drag the slider to the preferred percentage (%) - OR - Enter the opacity per-
centage into the% text box.
b. In theResize section:i. At Constrain proportions? check the check box to lock the width/height ratio -
OR - Uncheck the check box to allow the width and height to be modified inde-
pendently.
ii. AtWidth and/orHeight, drag the slider to the preferred image size - OR - Click the
Decrease and Increase buttons. The pixel size is displayed in the respective Px text
boxes to the right.
c. At Flip, select a direction to flip the image from these options: None, Flip Horizontal,
Flip Vertical, or Flip Both.d. At Rotate, select from None, 90, 180, or 270.e. At Crop, click the Enable Crop button. This displays a red box which defines the area to
be cropped. You can now define the area to be cropped:
i. In the X and Y text boxes, enter the X (vertical) and Y (horizontal) coordinates for the
crop area.
ii. In theWidth andHeight text boxes, enter the width and height in pixels for the crop
area.
3. In the Save As... text box, a new name for this edited image is displayed. It is in the format of file-
name_thumb. Modify this name as desired. Tip: Remove the _thumb from the file name to over-
ride the original file. The image will be saved as a .jpg extension file.
4. At Overwrite If File Exists?, check the check box to overwrite a file that exists with the name
entered in the Save As... text box - OR - Uncheck the check box if you don't want to override an
existing file. This enables warning message if the filename already exists.
5. Click the Save button.
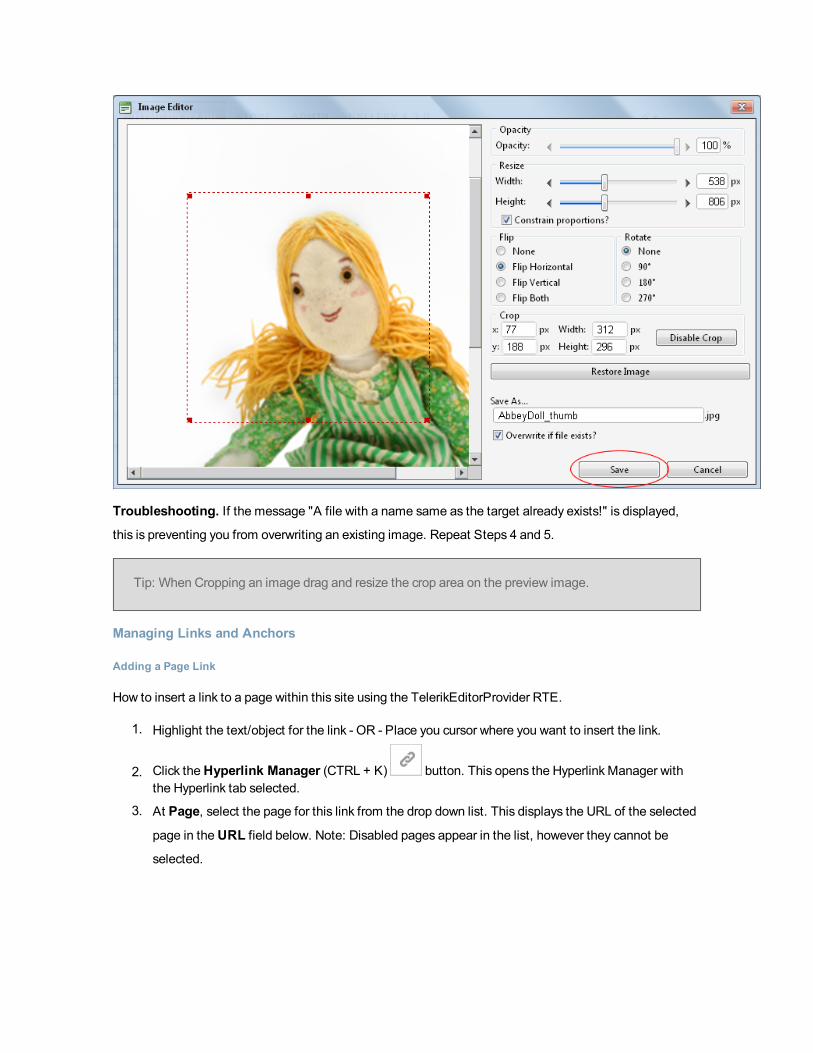
Troubleshooting. If the message "A file with a name same as the target already exists!" is displayed,
this is preventing you from overwriting an existing image. Repeat Steps 4 and 5.
Tip: When Cropping an image drag and resize the crop area on the preview image.
Managing Links and Anchors
Adding a Page Link
How to insert a link to a page within this site using the TelerikEditorProvider RTE.
1. Highlight the text/object for the link - OR - Place you cursor where you want to insert the link.
2. Click theHyperlink Manager (CTRL + K) button. This opens the HyperlinkManager withthe Hyperlink tab selected.
3. At Page, select the page for this link from the drop down list. This displays the URL of the selected
page in theURL field below. Note: Disabled pages appear in the list, however they cannot be
selected.

4. The following optional setting are available:a. In the Link Text text box, edit the linked text. Note: This field is not displayed when adding
a link to an image.
b. At Target, select the target window for this link. The default option isNonewhich opens the
link in the current window.
c. In the Tooltip text box, enter a tool tip to be displayed when a user places their mouse over
this link.
d. At CSS Class, select a class for the link - OR - Select Clear Class to use the default class.e. Check the Track the number of times this link is clicked check box to enable Link
Tracking for this link. The linkmust be saved before you can view the Tracking tab where
tracking information is displayed.
i. Check the Log the user, date and time for each click check box to also enable
the Link Log.
5. Click theOK button to confirm.
Related Topics:
l See "Viewing a Link Log Report"

Adding a URL Link
How to insert a link to a URL located on another web site using the DotNetNuke.RadEditorProvider for the
RTE.
1. Highlight the text/object for the link - OR - Place you cursor where you want to insert the link.
2. Click theHyperlink Manager (CTRL + K) button. This opens the HyperlinkManager withthe Hyperlink tab pre-selected.
3. In theURL text box, enter the URL address for this link.4. Optional. In the Link Text text box, enter the text for this link. If you highlighted text at Step 1,
then this field will be pre-populated with that text. Note: This field is not displayed when adding a
link to an image.
5. Optional. At Target, select the target window for this link.
6. Optional. In the Tooltip text box, enter a tool tip to be displayed when a user places their mouse
over this link.
7. Optional. At CSS Class, select a class for the link - OR - Select Clear Class to use the default
class.

8. Click theOK button to confirm.
Adding an Anchor Link
How to create a link to an anchor using the DotNetNuke.RadEditorProvider for the RTE.
1. Highlight the text/object to be linked to the anchor.
2. Click theHyperlink Manager (CTRL + K) button. This opens the HyperlinkManager withthe Hyperlink tab pre-selected.
3. At Existing Anchor, select the anchor name. This displays the anchorURL in theURL field. E.g.
#Fair Labor
4. The following optional settings are available:a. In the Link Text text box, enter/edit the linked text as required.b. At Target, select the target for this link - OR - Select None to use the existing window.c. In the Tooltip text box, enter the text to be displayed when a user places their mouse over
this link.
d. At CSS Class, select the CSS class to use.
e. Check the Track the number of times this link is clicked check box to enable Link
Tracking for this link. The linkmust be saved before you can view the Tracking tab where
tracking information is displayed.

i. Check the Log the user, date and time for each click check box to also enable
the Link Log.
5. Click theOK button to confirm.
Related Topics:
l See "Adding an Anchor"
Adding an Anchor
How to create an anchor using the DotNetNuke.RadEditorProvider for the RTE. An anchor is a location
within this content which can be linked to using the HyperlinkManager. Note: Links to this anchor can only
be created in this instance of this module.
1. Place your cursor where you want to insert the anchor - OR - Highlight the text or object for the
anchor. Note: Text may display link formatting even though there is no link.
2. Click theHyperlink Manager (CTRL + K) button. This opens the HyperlinkManager.3. Select theAnchor tab.4. In theName text box, enter an anchor name.
5. Click theOK button to confirm.

Adding an Email Link
How to add an email link to text or an image using the DotNetNuke.RadEditorProvider for the RTE. Click-
ing the link opens the user's email program with the selected email address in the "Send To" field.
Tip: If you type an email address with a recognized extension directly into the Editor it will auto-
matically add a "send to" link to the address.
1. Highlight the text/object for the link - OR - Place you cursor where you want to insert the link.
2. Click theHyperlink Manager (CTRL + K) button. This opens the HyperlinkManager.3. Select the E-mail tab.4. In theAddress text box, enter the email address. If you have selected a recognized email address
it will be displayed here.
5. In the Link Text text box, enter the text for this link. Note: This field is not displayed when adding a
link to an image.
6. In the Subject text box, enter a subject which will populate the subject field of the email message.7. Optional. At CSS Class, select a class for the link - OR - Select Clear Class to use the default
class.
8. Click theOK button to confirm.
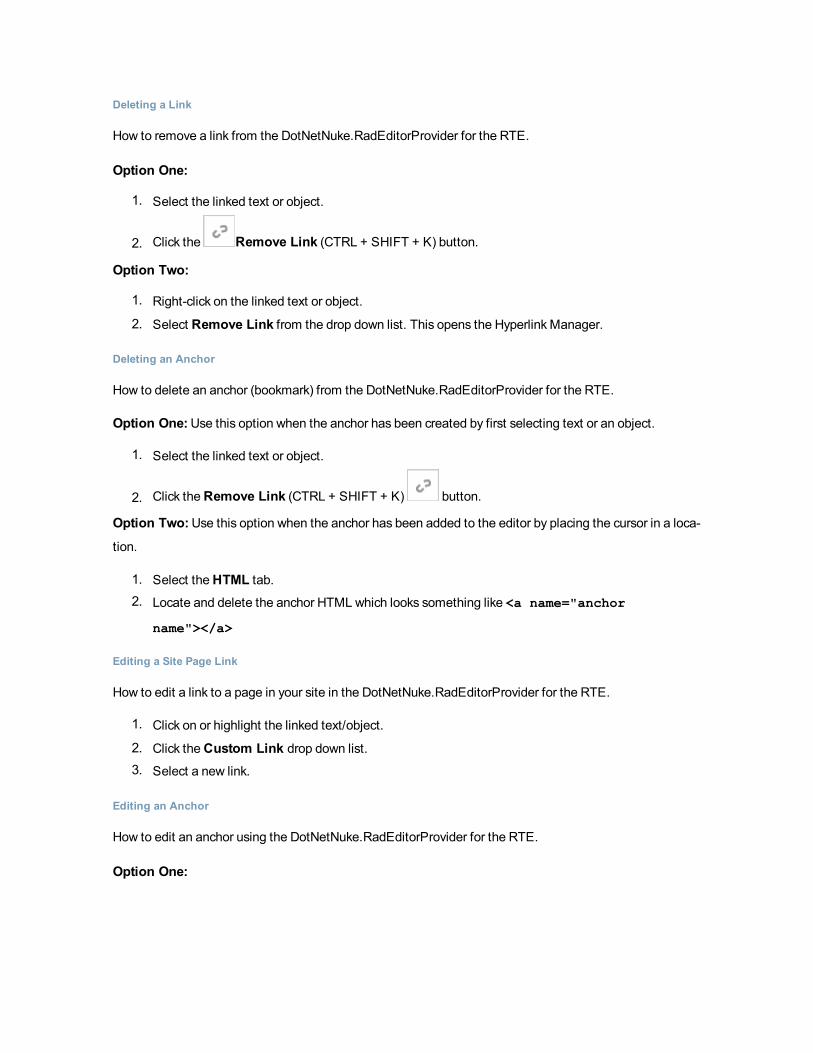
Deleting a Link
How to remove a link from the DotNetNuke.RadEditorProvider for the RTE.
Option One:
1. Select the linked text or object.
2. Click the Remove Link (CTRL + SHIFT + K) button.
Option Two:
1. Right-click on the linked text or object.
2. Select Remove Link from the drop down list. This opens the HyperlinkManager.
Deleting an Anchor
How to delete an anchor (bookmark) from the DotNetNuke.RadEditorProvider for the RTE.
Option One:Use this option when the anchor has been created by first selecting text or an object.
1. Select the linked text or object.
2. Click theRemove Link (CTRL + SHIFT + K) button.
Option Two:Use this option when the anchor has been added to the editor by placing the cursor in a loca-
tion.
1. Select theHTML tab.2. Locate and delete the anchor HTML which looks something like <a name="anchor
name"></a>
Editing a Site Page Link
How to edit a link to a page in your site in the DotNetNuke.RadEditorProvider for the RTE.
1. Click on or highlight the linked text/object.
2. Click theCustom Link drop down list.3. Select a new link.
Editing an Anchor
How to edit an anchor using the DotNetNuke.RadEditorProvider for the RTE.
Option One:

1. Select the anchored text or object.
2. Click theHyperlink Manager (CTRL + K) button. This opens the HyperlinkManager.3. Edit the anchor as required.
4. Click theOK button to confirm.
Option Two:
1. Right-click on the linked text or object.
2. Select Properties... from the drop down list. This opens the HyperlinkManager.3. Edit the anchor as required.
4. Click theOK button to confirm.
Editing an Email or URL Link
How to edit a link in the DotNetNuke.RadEditorProvider for the RTE.
Option One:
1. Select the linked text or object.
2. Click theHyperlink Manager (CTRL + K) button. This opens the HyperlinkManager.3. Edit the link as required. For more details on the available fields, See "Adding an Email Link" or
See "Adding a URL Link"
4. Click theOK button.
Option Two:
1. Right-click on the linked text or object.
2. Select Properties... from the drop down list. This opens the HyperlinkManager.3. Edit the link as required. For more details on the available fields, See "Adding an Email Link" or
See "Adding a URL Link"
4. Click theOK button.
Linking to a Site Page
How to link to any page of your site using the DotNetNuke.RadEditorProvider for the RTE. Note: You can
only select links which you are authorized to view. E.g. Only Administrators can link to the Admin Console
pages.
1. Highlight the text/object for the link - OR - Place you cursor where you want to insert the link.
2. Click theCustom Link button to view the drop down list.

3. Maximize the Portal Links heading to display a list of your site pages.4. Locate and select the page for this link.
Tip: If you didn't select any text/object at Step 1, then the page name is used as the linked text.
E.g. If you link to the Home page, then aHome link is inserted.
Viewing Link Tracking Report
How to view tracking information for a tracked link within the TelerikEditorProvider RTE. In additional the
tracking report displays data for the selected date range.
1. Select the linked text or object and then click theHyperlink Manager (CTRL + K) button -OR - Right-click on the linked item and select Properties... from the drop down list. This opens the
HyperlinkManager with the Hyperlink tab selected.
2. Select the Tracking tab.3. In the Link Info section, the following information is displayed:
l URL: The URL for this link. E.g. http://awesomecycles.biz/Store.aspxl Created: The date this link was created. 12/22/2010 8:42:27 AMl Tracking URL: The tracking URL for this link. E.g. http://-
awesomecycles.biz/LinkClick.aspx?link=63&tabid=41&mid=386
l Clicks: The number of times this link has been clicked.l Last Click: The date and time when the link was last clicked.
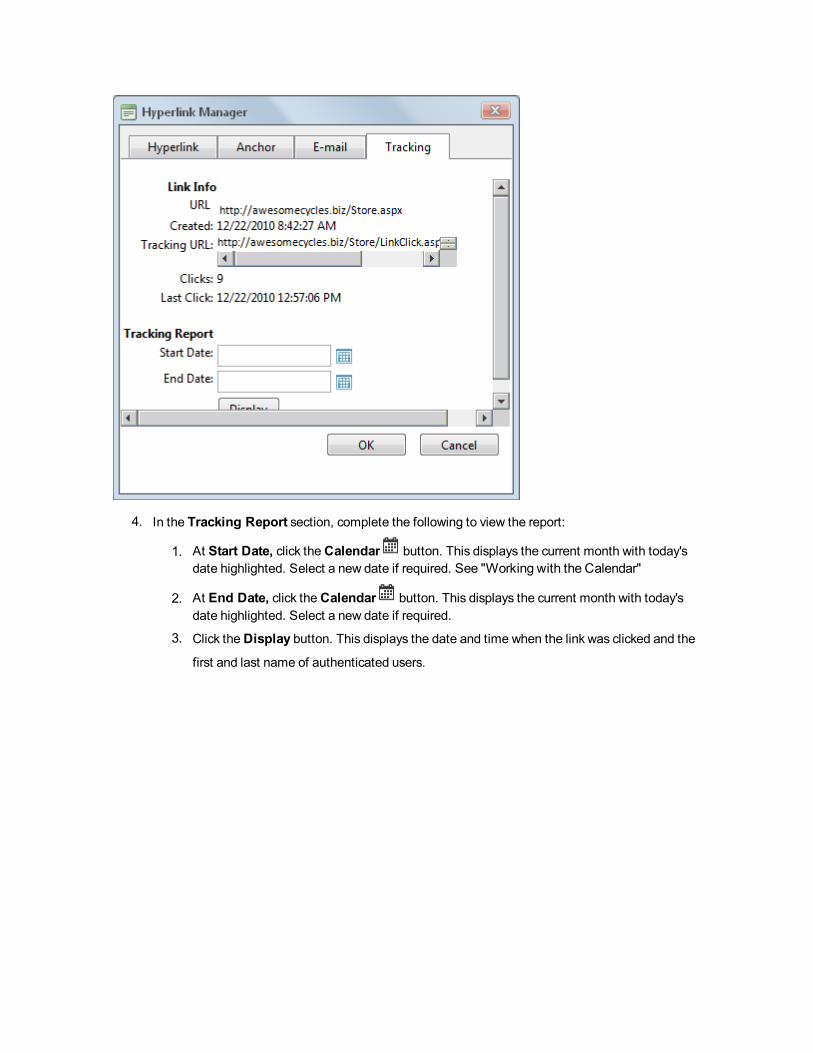
4. In the Tracking Report section, complete the following to view the report:
1. At Start Date, click theCalendar button. This displays the current month with today'sdate highlighted. Select a new date if required. See "Working with the Calendar"
2. At End Date, click theCalendar button. This displays the current month with today'sdate highlighted. Select a new date if required.
3. Click theDisplay button. This displays the date and time when the link was clicked and the
first and last name of authenticated users.

5. Click theCancel button to close the HyperlinkManager.
Managing Tables
Deleting a Table
How to delete a table from the DotNetNuke.RadEditorProvider for the RTE.
Option One:
1. Click on the corner of the table to select it.
2. Strike theDelete button on your keyboard.
Option Two:
1. Click on the corner of the table to select it.
2. Click on the corner of the table to select it. and select Delete Table from the drop down list.
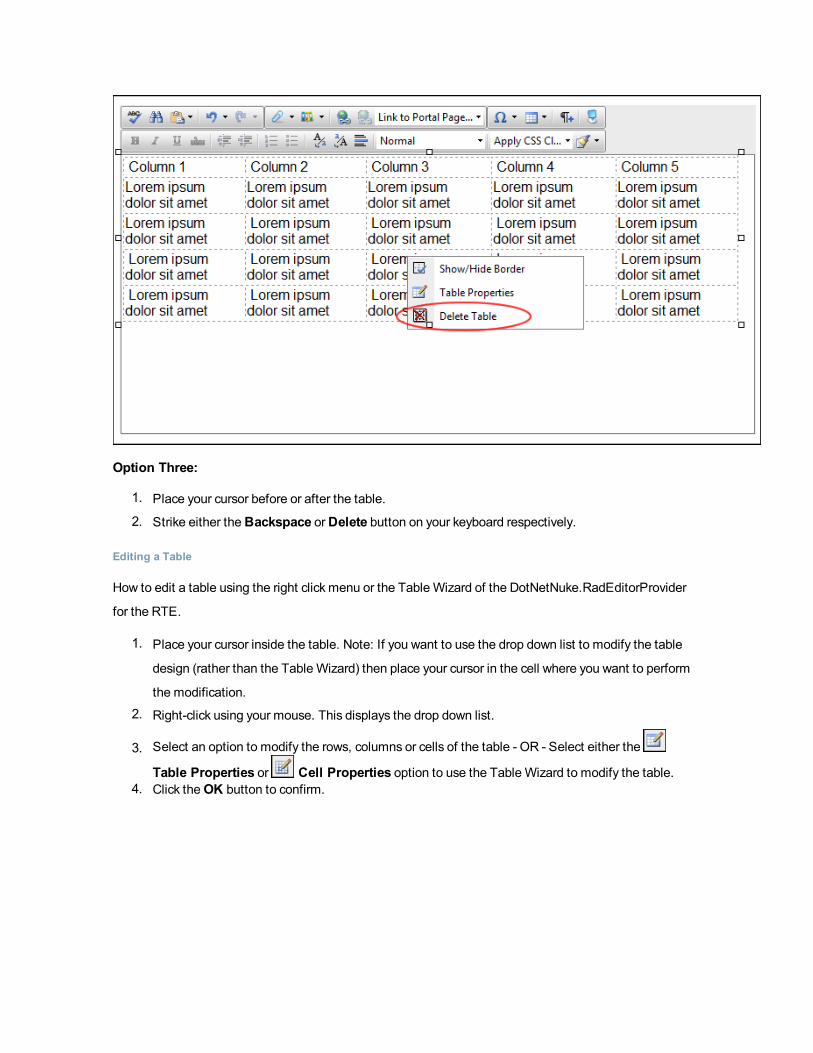
Option Three:
1. Place your cursor before or after the table.
2. Strike either theBackspace orDelete button on your keyboard respectively.
Editing a Table
How to edit a table using the right click menu or the Table Wizard of the DotNetNuke.RadEditorProvider
for the RTE.
1. Place your cursor inside the table. Note: If you want to use the drop down list to modify the table
design (rather than the Table Wizard) then place your cursor in the cell where you want to perform
the modification.
2. Right-click using your mouse. This displays the drop down list.
3. Select an option to modify the rows, columns or cells of the table - OR - Select either the
Table Properties or Cell Properties option to use the Table Wizard to modify the table.4. Click theOK button to confirm.
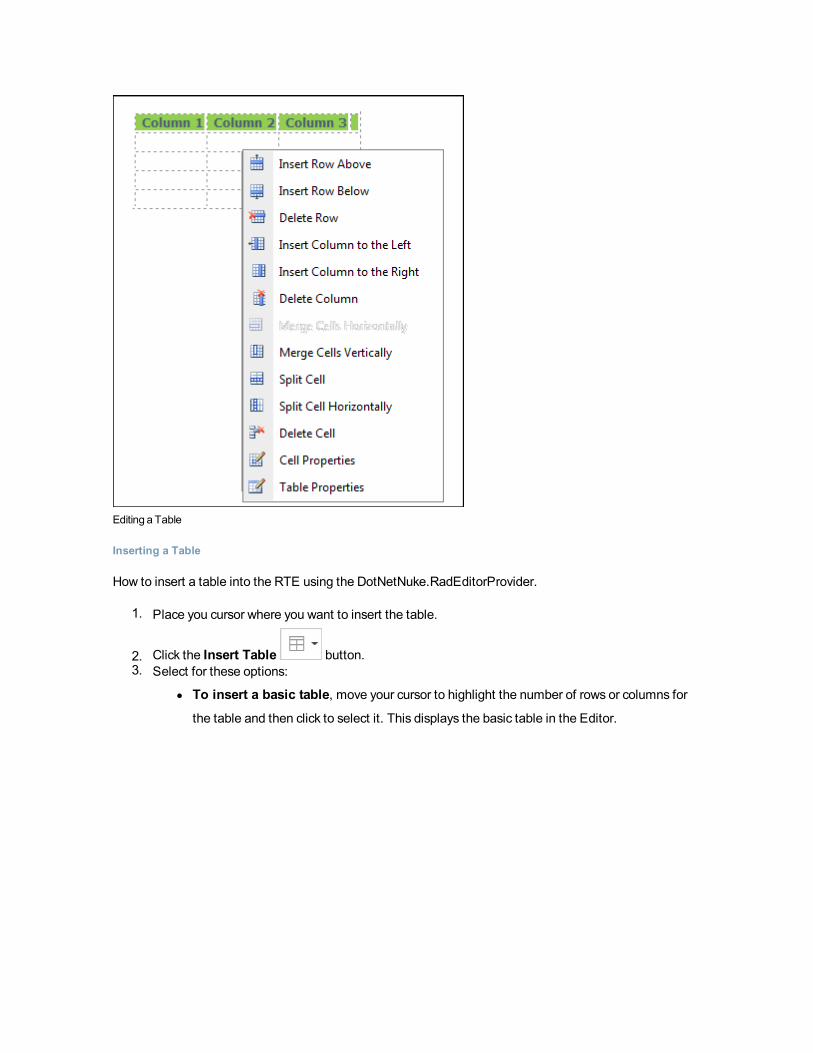
Editing aTable
Inserting a Table
How to insert a table into the RTE using the DotNetNuke.RadEditorProvider.
1. Place you cursor where you want to insert the table.
2. Click the Insert Table button.3. Select for these options:
l To insert a basic table, move your cursor to highlight the number of rows or columns for
the table and then click to select it. This displays the basic table in the Editor.

l To design a more complex table, click the Table Wizard button. See "Setting the
Table Design"
Setting Cell Properties
How to set the optional cell properties of a new or existing table using the Table Wizard of the Dot-
NetNuke.RadEditorProvider for the RTE. The below tutorial demonstrates how to add a background color
to the first row of your table.
1. Right-click inside a cell of an existing table and select Cell Properties from the drop downlist.

2. This opens the Cell Properties tab of the Table Wizard.

3. At Preview, select the cells you want to set the properties of:l To select a single cell, click on that cell. The selected cell is highlighted.
l To select multiple cells, hold down the Ctrl key and click on cell to select it - OR - Click the
Select All link and then hold down the Ctrl key and click on one or more cells to deselect
them. The selected cells are highlighted.
4. At Cell Properties, set any of the following:a. In theHeight text box, set the cell height in either pixels or as a percentage by either typing
a value into the text box or by using the Increase andDecrease buttons. The value will
automatically be saved in pixels unless you enter the percentage symbol (%) into the text
box. E.g. Enter 100px or 100 to set the height as 100 pixels, or enter 100% to set the height
as 100%. Leave blank for no specified height.
b. In theWidth text box, set the cell width in either pixels or as a percentage as for height.
Leave blank for no specified width.
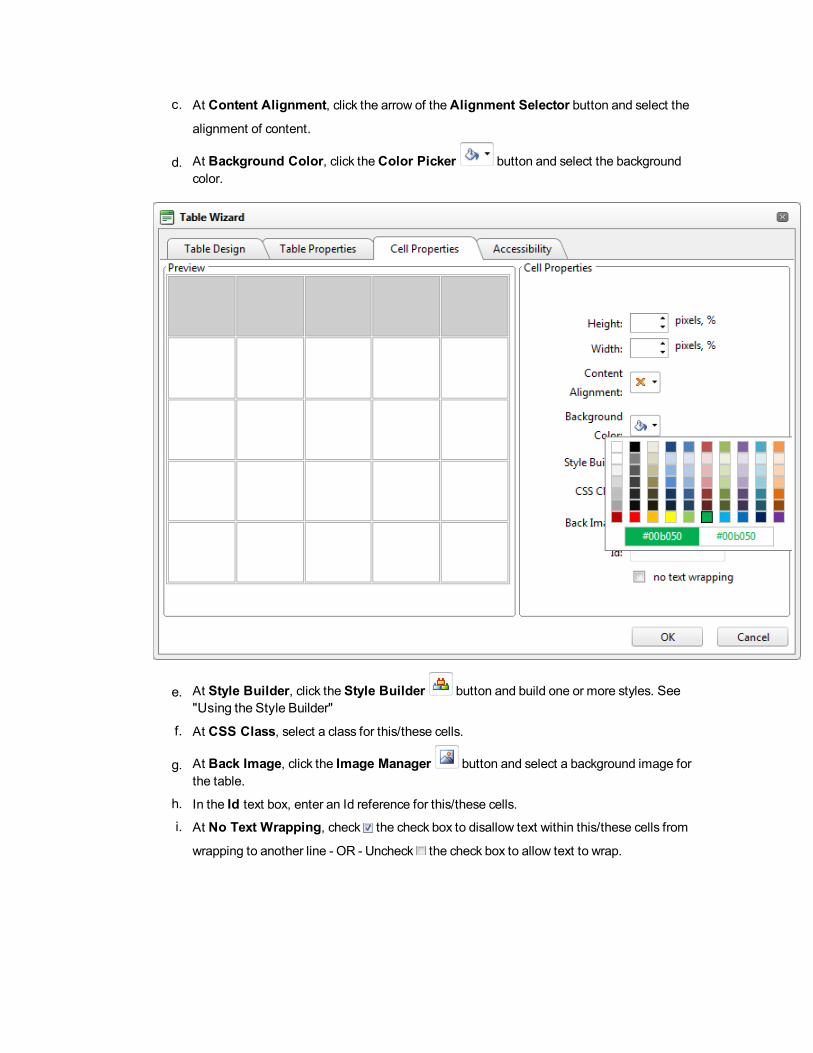
c. At Content Alignment, click the arrow of theAlignment Selector button and select the
alignment of content.
d. At Background Color, click theColor Picker button and select the backgroundcolor.
e. At Style Builder, click the Style Builder button and build one or more styles. See"Using the Style Builder"
f. At CSS Class, select a class for this/these cells.
g. At Back Image, click the Image Manager button and select a background image forthe table.
h. In the Id text box, enter an Id reference for this/these cells.
i. At No Text Wrapping, check the check box to disallow text within this/these cells from
wrapping to another line - OR - Uncheck the check box to allow text to wrap.

5. Click theOK button to confirm. Alternatively, you can select another tab of the Table Wizard to set
more properties.
SettingCellProperties
Setting Table Accessibility
How to set the accessibility of a new or existing table using the Table Wizard of the Dot-
NetNuke.RadEditorProvider for the RTE. The below tutorial demonstrates how to set one heading row
and add a caption to the table.
1. Right-click inside a cell of an existing table and select Table Properties - OR - Open theTable Wizard. See "Inserting a Table"

2. Select theAccessibility tab and set any of these Accessibility Options:a. In theHeading Rows text box, enter the number of rows which are headings. The max-
imum number of heading rows for the current table is displayed to the right of this field. E.g.
1
b. In theHeading Columns text box, enter the number of columns which are headings. The
maximum number of heading columns for the current table is displayed to the right of this
field.
c. In theCaption text box, enter a caption to be displayed above the table.d. row associated with theAlignment Selector button and then select the alignment of the
caption. If no alignment is selected, the default is center alignment.
e. In the Summary text box, enter a summary of the table contents. The table summary isn't
displayed on the page, but can be read using accessibility tools such as text readers.
f. At Associate Cells With Headers, check the check box to associate cells with headers
- OR - uncheck the check box to disable.
g. Optional. Select a new tab to set additional properties.

3. Click theOK button to confirm.
Setting TableAccessibility by adding a table caption and a header row.

Setting Table Properties
How to set the optional properties of a new or existing table using the Table Wizard of the Dot-
NetNuke.RadEditorProvider for the RTE.
1. Open the Table Wizard. See "Inserting a Table" - OR - Right-click on an existing table and then
select Table Properties from the drop down list.2. Go to the Table Properties tab and set any of these optional settings:3. In the Dimensions section:
a. In theHeight text box, set the table height in either pixels or as a percentage by either typ-
ing a value into the text box or by using the Increase andDecrease buttons. The value
will automatically be saved in pixels unless you enter the percentage symbol (%) into the
text box. E.g. Enter 100px or 100 to set the height as 100 pixels, or enter 100% to set the
height as 100%. Leave blank for no specified height.
b. In theWidth text box, set the table width in either pixels or as a percentage as for height.
Leave blank for no specified width.
4. In the Layout section:
a. In theCell Spacing text box, enter a number to set the pixel spacing between cells - OR -
Use the Increase andDecrease buttons.
b. In theCell Padding text box, enter a number to set the pixel padding between cells - OR -
Use the Increase andDecrease buttons.
c. At Alignment, click the arrow of theAlignment Selector button and select the tablealignment.
d. At Background Color, click theColor Picker button and select the backgroundcolor.
e. At Style Builder, click the Style Builder button and build one or more styles. See"Using the Style Builder"
f. At CSS Class, select a class for the content of this table.
g. At Back Image, click the Image SRC button and select a background image for thetable.
h. In the Id text box, enter an Id reference for this table.5. In the CSS Class Layout section:
a. Select a CSS layout design from the drop down list. The design is displayed in the Preview
window below.

b. At Apply Special Formats To, select which rows or column you want to apply special for-
matting to. You can see the changes in the Preview window below.
6. Optional. Select a new tab to set additional properties.
7. Click theOK button to confirm.
Setting TableProperties
Setting the Table Design
How to set the design a table using the Table Wizard of the DotNetNuke.RadEditorProvider for the RTE.
1. Right-click on an existing table and select Table Properties - OR - Open the Table Wizard.See "Inserting a Table"
2. Select the Table Design tab. If you are adding a new table, a table of two columns by two rows is
displayed as the basis for your design. If you are editing an existing table, your current design is dis-
played.

3. To modify the table, perform any of these actions:
l To add a column: At Columns, click the Increase button.
l To remove a column: At Columns, click theDecrease button.l To insert a column span: select a cell and then at Column Span, click the Increase but-
ton.
l To remove a column span: select a cell and then at Column Span, click theDecreasebutton.
l To add a row: At Rows, click the Increase button.
l To remove a row: At Row, click theDecrease button.l To insert a row span: select a cell and then at Row Span, click the Increase button.
l To remove a row span: select a cell and then at Row Span, click theDecrease button.4. Optional. Select a new tab to set additional properties.
5. Click theOK button to confirm.

Showing/Hiding Table Border
How to hide or show the table borders using the Table Wizard of the DotNetNuke.RadEditorProvider for
the RTE.
1. Place your cursor on the outer edge of the table. The cursor will change to show the table can be
selected.
2. Right-click and select Show/Hide Border from the drop down list to either hide or show the
table border.
Using the Style Builder
How to create CSS styles for tables using the Style Builder of the TelerikEditorProvider for the RTE. The
Style Builder can be accessed from the Table Properties tab of the Table Wizard when adding or editing a
table. See "Setting Table Properties"
1. At Style Builder, click the Style Builder button. This opens the Style Builder window. The Font
tab will be displayed.
2. Set the following Font properties:
a. Go to the Font Name section.
i. At Family, select the required font type.

b. Go to the Font Attributes section.
i. At Color, click theColor Picker button and select the font color.ii. At Italics, select from these options:
l Normal: No italicsl Italics: Italics (text leans forward)l Oblique: Oblique italics (text leans backwards)
iii. At Small Caps, select from these options:
l Normal: No capitalizationl Small Caps: Small capitalization
Using the Table Wizard
How to design a table using the Table Wizard of the DotNetNuke.RadEditorProvider for the RTE.
1. Click the Insert Table button.2. Select Table Wizard. This opens the Table Wizard on the Table Design tab. A table of two col-
umns by two rows is displayed as the basis for your design.
3. Optional. Select a cell. This enables the Increase andDecrease buttons which are available to
change the design.
4. Select an Increase orDecrease button to modify the table design. You can choose to add col-
umns and rows, as well as span columns and rows.
5. Optional. Change tabs to set other properties.6. Click theOK button to confirm.
Managing Templates
Inserting a Template
How to insert a template using the DotNetNuke.RadEditorProvider for the RTE.
1. Place you cursor where you want to insert the template.
2. Click the Save Template icon and then select Template Manager from the drop down list.This opens the Template Manager.
3. Navigate to and select the required template. Note: Templates are typically stored in the Site Root
> Templates folder. See "Using the ResourceManager"
4. Click the Insert button. This inserts the template into the editor read for you to edit.
Saving a Template
How to create and save a template using the DotNetNuke.RadEditorProvider for the RTE.
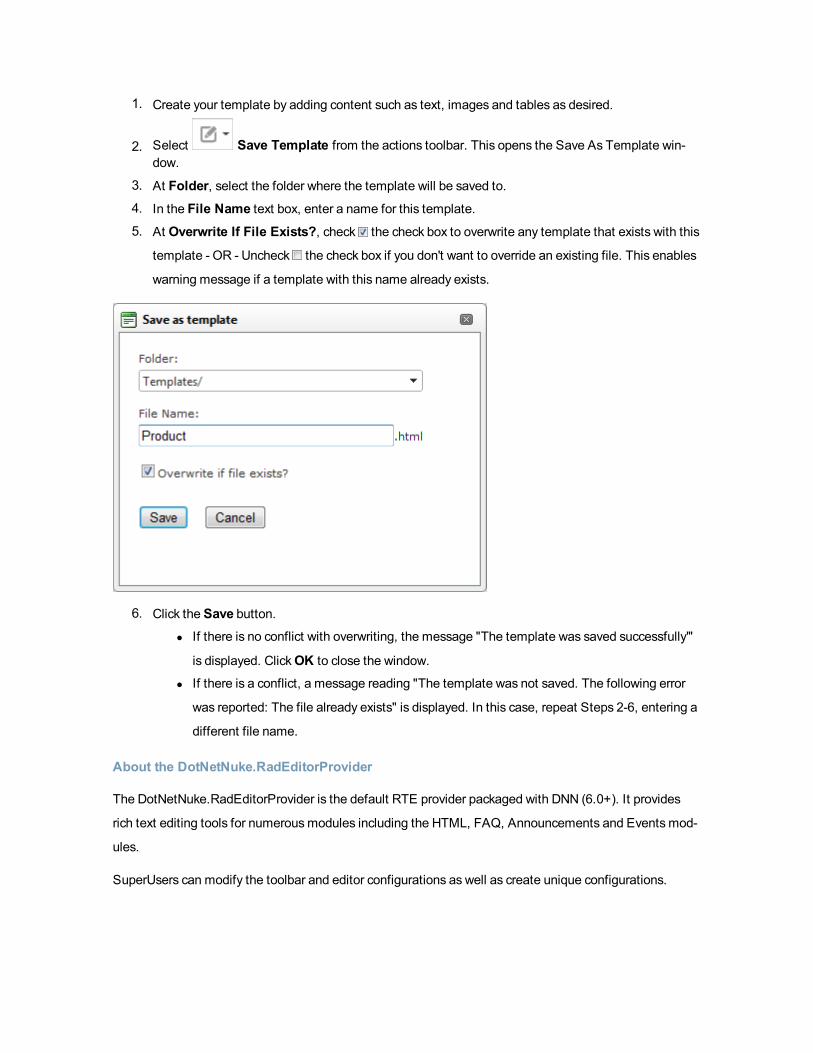
1. Create your template by adding content such as text, images and tables as desired.
2. Select Save Template from the actions toolbar. This opens the Save As Template win-dow.
3. At Folder, select the folder where the template will be saved to.4. In the File Name text box, enter a name for this template.5. At Overwrite If File Exists?, check the check box to overwrite any template that exists with this
template - OR - Uncheck the check box if you don't want to override an existing file. This enables
warning message if a template with this name already exists.
6. Click the Save button.l If there is no conflict with overwriting, the message "The template was saved successfully'"
is displayed. ClickOK to close the window.
l If there is a conflict, a message reading "The template was not saved. The following error
was reported: The file already exists" is displayed. In this case, repeat Steps 2-6, entering a
different file name.
About the DotNetNuke.RadEditorProvider
The DotNetNuke.RadEditorProvider is the default RTE provider packaged with DNN (6.0+). It provides
rich text editing tools for numerousmodules including the HTML, FAQ, Announcements and Eventsmod-
ules.
SuperUsers can modify the toolbar and editor configurations as well as create unique configurations.
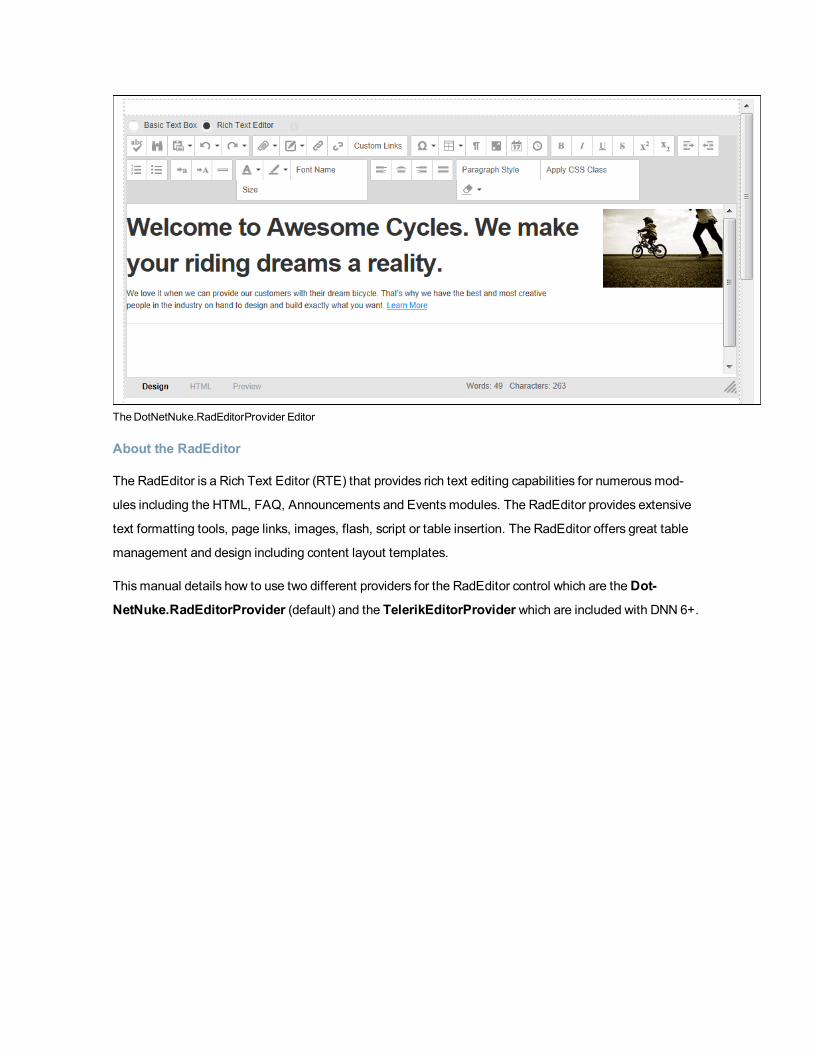
TheDotNetNuke.RadEditorProvider Editor
About the RadEditor
The RadEditor is a Rich Text Editor (RTE) that provides rich text editing capabilities for numerousmod-
ules including the HTML, FAQ, Announcements and Eventsmodules. The RadEditor provides extensive
text formatting tools, page links, images, flash, script or table insertion. The RadEditor offers great table
management and design including content layout templates.
This manual details how to use two different providers for the RadEditor control which are theDot-
NetNuke.RadEditorProvider (default) and the TelerikEditorProvider which are included with DNN 6+.
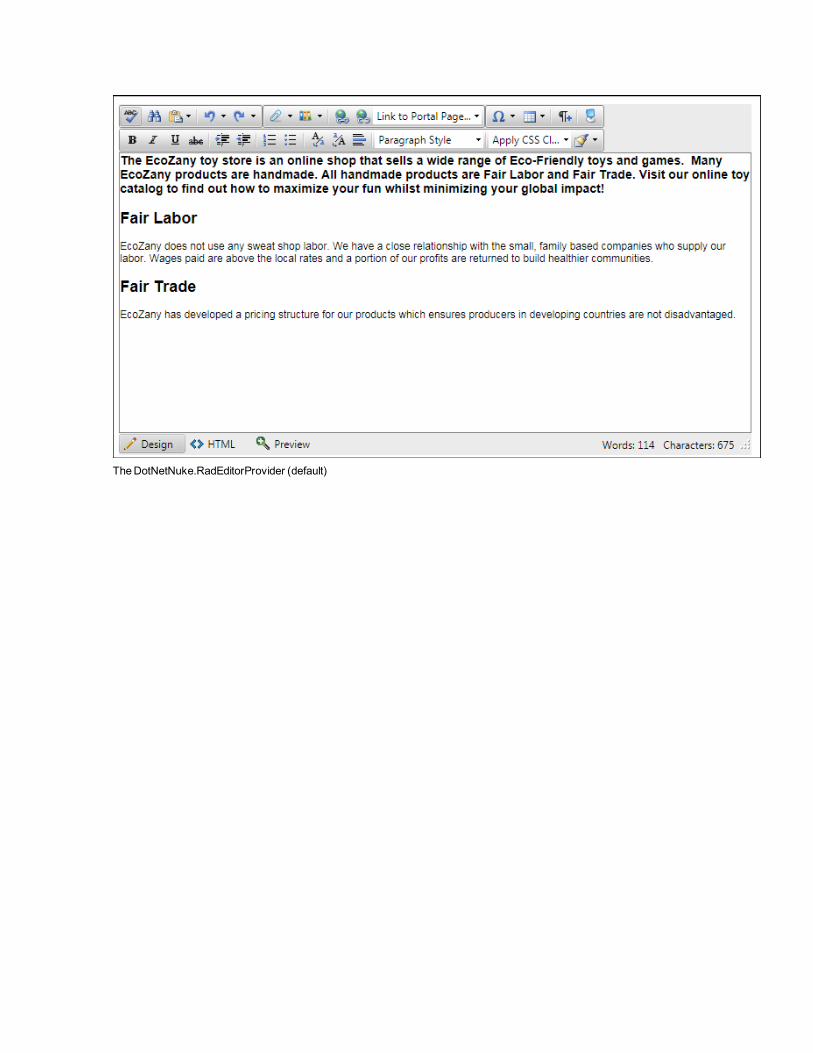
TheDotNetNuke.RadEditorProvider (default)

TheTelerikEditorProvider
Check Spelling
How to check spelling using the DotNetNuke.RadEditorProvider for the RTE.
1. Place your cursor inside the Editor.
2. Click theAJAX Spellchecker icon. This starts spell checking. Misspelled words are high-lighted in yellow. The first misspelt word is ready to perform one of the following actions against:
l Choose Suggested: Click on the correct word from the list of suggested words. If no sug-
gestions are available, then (no suggestions) is displayed.
l Ignore/Ignore All: Select this option to ignore this word and continue with spell checking.l Change Manually: Select this option and then enter word into the provided text box and
then clickChange Manually .l Add to Dictionary: Select this option to add the word to your dictionary.
3. Repeat for each misspelt word.
4. Click the Finish Spellchecking button when you are finished - OR - Click theCancel button to
exit Spell checking mode.

Tip: You can edit anymisspelt word by clicking on it.
SpellChecking using theDotNetNuke.RadEditorProvider RTE
RadEditor Toolbars
The DotNetNuke.RadEditorProvider comes packaged with these following toolbars:
AJAX Spellchecker, Find & Replace, Paste Options, Undo, Redo
Insert Media, Templates, HyperlinkManager, Remove Link, Custom Links
Insert Symbol, Insert Table, New Paragraph, Toggle Full Screen Mode, Insert Date, Insert Time
Bold, Italic, Underline, Strikethrough, Superscript, Subscript
Indent, Outdent, Numbered List, Bullet List
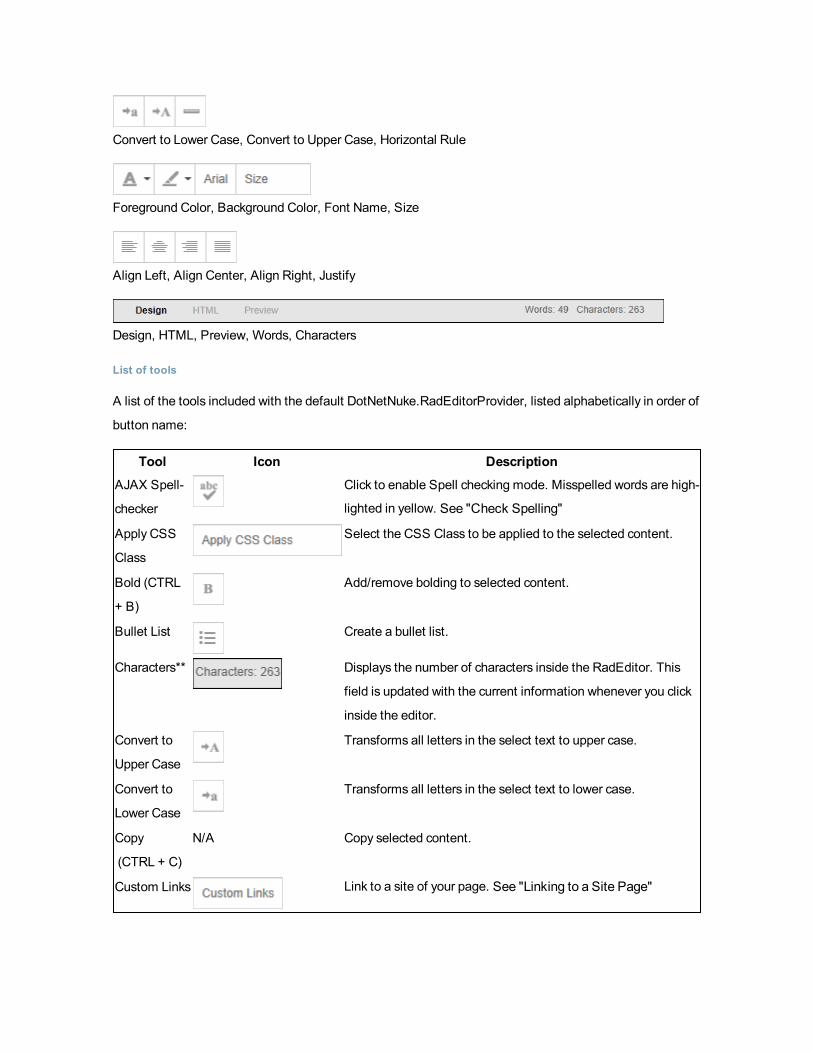
Convert to Lower Case, Convert to Upper Case, Horizontal Rule
Foreground Color, Background Color, Font Name, Size
Align Left, Align Center, Align Right, Justify
Design, HTML, Preview, Words, Characters
List of tools
A list of the tools included with the default DotNetNuke.RadEditorProvider, listed alphabetically in order of
button name:
Tool Icon DescriptionAJAX Spell-
checker
Click to enable Spell checking mode. Misspelled words are high-
lighted in yellow. See "Check Spelling"
Apply CSS
Class
Select the CSS Class to be applied to the selected content.
Bold (CTRL
+ B)
Add/remove bolding to selected content.
Bullet List Create a bullet list.
Characters** Displays the number of characters inside the RadEditor. This
field is updated with the current information whenever you click
inside the editor.
Convert to
Upper Case
Transforms all letters in the select text to upper case.
Convert to
Lower Case
Transforms all letters in the select text to lower case.
Copy
(CTRL + C)
N/A Copy selected content.
Custom Links Link to a site of your page. See "Linking to a Site Page"

Tool Icon DescriptionCut
(CTRL + X)
N/A Cut selected content.
Design Click to view content in design mode. This enables all toolbars.
Document
Manager*
N/A Opens the Document Manager that enables you to insert a doc-
ument link into the Editor. Additional link settings are available.
See "Inserting a Document"
Find And
Replace
(CTRL + F)
Click theFind And Replace
icon (or CTRL + F) to open
the Find / Find And Replace dialog box.
Choose to either find, find and replace, or find and replace all
instances of the text entered into the Find text box. Additional
options include Match Case, MatchWholeWords, and search
up or down from the current cursor position.
Flash Man-
ager*
N/A Opens the Flash Manager that enables you to insert Flash
(*.swf) into the Editor. The properties tab enables you to set
properties of the flash to be inserted. See "Inserting Flash"
Format
Stripper
1. Select the content you want to strip formatting from
(such as font color, font heading).
2. Click theArrow icon beside the Strip Formatting but-ton and then select the type of formatting to be stripped
from these options: Strip All Formatting, Strip Css For-
matting, Strip Font Elements, Strip Span Elements,
Strip Word Formatting
Horizontal
Rule
Inserts a horizontal rule where the cursor is currently located.
HTML Click to view, add or edit the HTML for this content. This dis-
ables all tools and toolbars with the exception of the Design but-
ton.
Hyperlink
Manager
(CTRL + K)*
Insert a link, anchor or email link. Additional settings are avail-
able. See "Adding an Email Link", See "Adding a URL Link", or
See "Adding an Anchor"
Image Man- N/A Opens the Image Manager that enables you to insert images

Tool Icon Descriptionager* into the Editor. The properties tab enables you to set the prop-
erties of the image to be inserted. See "Inserting Images"
Image Map
Editor
N/A Opens the Image Map Editor that enables you to create an
image map. You must first select the image to be mapped. See
"Creating an ImageMap"
Indent Indent selected content.
Insert Media1. Click the Insert Media icon to open the drop
down list of media insertion tools.
2. Select from these options: Insert Media, Document Man-
ager, Flash Manager, Media Manager, or Image Map
Editor.
Once you have selected an option, the icon associated with that
option is displayed in the toolbar. This icon changes each time
you make a new selection, which means the last selected option
is always displayed. To choose an option other that the one dis-
played in the toolbar, click theArrow icon.Insert Sym-
bol Option One:Click theArrow associated with the InsertSymbol icon to open the symbol gallery and then select the
symbol to be inserted from the options.
Option Two:Click the Insert Symbol icon to insert thesymbol that was inserted previously.
Insert Table Click theInsert Table
icon to insert a table in the cur-

Tool Icon Descriptionrent location - OR - Select Table Wizard to design a more com-
plex table. See "Inserting a Table"
Italicize
(CTRL + I)
Add/remove italics to selected content.
Media Man-
ager*
N/A Opens the Media Manager which enables you to insert media
into the Editor. The properties tab enables you to set properties
of the media to be inserted. See "InsertingMedia"
NewPar-
agraph
Place your cursor in the required location and then select the
New Paragraphicon (or CTRL + M) to insert a paragraph
break.
Numbered
List
Create a numbered list.
Outdent Outdent selected content.
Paste
(CTRL + V)
N/A CTRL + V to paste cut or copied content into the Editor.
Paragraph
Style
Select the paragraph style for the selected text.
Paste
Options
Paste copied content into the Editor. Paste options are Paste;
Paste From Word; Paste from Word, Strip Font; Paste Plain
Text; Paste As Html, PasteHTML.
Preview Click to preview content inside editor. This disables all tools and
toolbars with the exception of the Design and Preview buttons.
Resize Editor How to increase or decrease the size of the Editor.
1. Position your mouse over the bottom right corner of the
Editor until it becomes a two directional arrow.
2. Click and drag the Editor larger or smaller as desired.
Release your mouse button when you are finished.
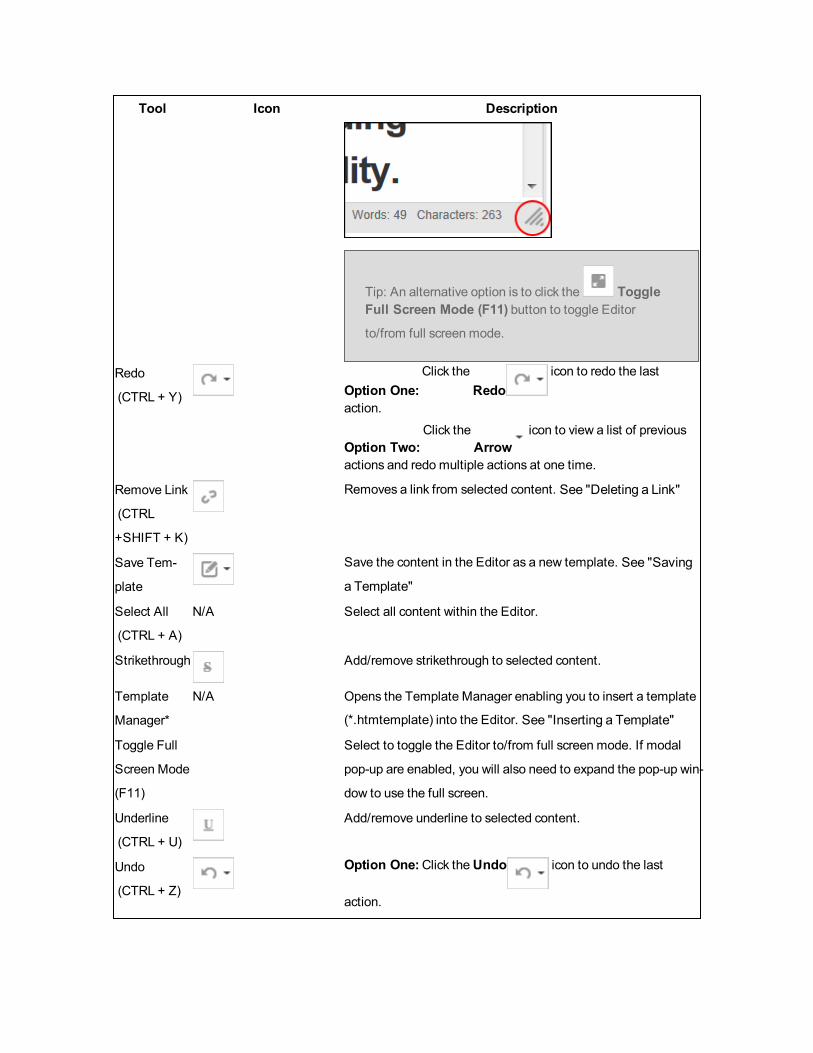
Tool Icon Description
Tip: An alternative option is to click the ToggleFull Screen Mode (F11) button to toggle Editor
to/from full screen mode.
Redo
(CTRL + Y) Option One:Click the
Redoicon to redo the last
action.
Option Two:Click the
Arrowicon to view a list of previous
actions and redo multiple actions at one time.
Remove Link
(CTRL
+SHIFT + K)
Removes a link from selected content. See "Deleting a Link"
Save Tem-
plate
Save the content in the Editor as a new template. See "Saving
a Template"
Select All
(CTRL + A)
N/A Select all content within the Editor.
Strikethrough Add/remove strikethrough to selected content.
Template
Manager*
N/A Opens the Template Manager enabling you to insert a template
(*.htmtemplate) into the Editor. See "Inserting a Template"
Toggle Full
Screen Mode
(F11)
Select to toggle the Editor to/from full screen mode. If modal
pop-up are enabled, you will also need to expand the pop-up win-
dow to use the full screen.
Underline
(CTRL + U)
Add/remove underline to selected content.
Undo
(CTRL + Z)
Option One:Click theUndo icon to undo the last
action.

Tool Icon Description
Option Two:Click the
Arrowicon to view a list of previous
actions and undo multiple actions at one time.
Words Displays the number of words inside the RadEditor. This field is
updated with the current information whenever you click inside
the editor.
* These tools provide access to the Admin > File Manager where, depending on your authorization level,
you can upload files and create and manage files and folders.
TelerikEditorProvider
Overview of the TelerikEditorProvider
The TelerikEditorProvider for the RTE is an alternative Editor that can be installed for DotNetNuke.
Important. The TelerikEditorProvider must be installed and enabled by a SuperUser.
TheTelerikEditorProvider RadEditor

Viewing Word and Character Count
The number of words and characters inside the RadEditor is displayed in the bottom right corner. These
are updated each time you click inside the editor after a modification.
Modifying Editor Size
How to increase or decrease the size of the RadEditor.
1. Position your mouse over the bottom right corner of the Editor until it becomes a two directional
arrow.
2. Click and drag the Editor larger or smaller as desired. Release when the desired size is displayed.

Tip: An alternative option is to click the Toggle Full Screen Mode (F11) button to toggleEditor to/from full screen mode.
ModifyingEditor Size
Toolbars
Actions Toolbar
The actions toolbar of the TelerikEditorProvider RTE has the following tools:

Tool Icon Description
Print (CTRL + P)
Print all Editor content. Depending on your computer set-up you may be able to
print to a printer and/or create an XPS document.
Print Options:
l Print All Linked Documents: Creates separate printouts for each link.
E.g. Page links display the page. Document content is not printed in full.
l Print Table of Links: A reference table of any links is appended to the
printout.
AJAX SpellcheckerClick to enable Spell checking mode. Misspelled words are highlighted in yellow.
See "Check Spelling"
Find and Replace
(CTRL + F)
Click the Find And Replace icon (or CTRL + F) to open the Find / FindAnd Replace dialog box.
Choose to either find, find and replace, or find and replace all instances of the
text entered into the Find text box. Additional options include Match Case,
MatchWholeWords, and search up or down from the current cursor position.
Select All
(CTRL + A)Select all content within the Editor.
Cut (CTRL + X) Cut selected content.
Copy (CTRL + C) Copy selected content.
Paste (CTRL + V) CTRL + V to paste cut or copied content into the Editor.
Paste Options
Paste copied content into the Editor. Paste options are Paste; Paste From
Word; Paste from Word, Strip Font; Paste Plain Text; Paste As Html, Pas-
teHTML.
Undo (CTRL + Z)
Option One: Click theUndo icon to undo the last action.
Option Two:Click theArrow icon to view a list of previous actions and undo
multiple actions at one time.
Redo (CTRL + Y)
Option One: Click theRedo icon to redo the last action.
Option Two:Click theArrow icon to view a list of previous actions and redo
multiple actions at one time.
Check Spelling
How to check spelling using the TelerikEditorProvider RTE.

1. Place your cursor inside the Editor.
2. Click theAJAX Spellchecker button. This starts spell checking. Misspelled words are high-lighted in yellow. The first misspelt word is ready to perform one of the following actions against:
l Choose Suggested: Select the correct word from the list of suggested words. If no sug-
gestions are available, then (no suggestions) is displayed.
l Ignore/Ignore All: Select to ignore this word and continue with spell checking.l Change Manually: Select and enter word into the provided text box and then click the
Change Manually icon.
l Add to Dictionary: Select to add the word to your dictionary.3. Repeat for each misspelt word.
4. Click the Finish Spellchecking button when you are finished - OR - Click theCancel button to
exit Spell checking mode.
Tip: Edit anymisspelt word by clicking on it.
SpellChecking using theRadEditor
Color and CSS Toolbar
The Color and CSS toolbar of the TelerikEditorProvider RTE has the following tools:

Tool Icon Description
Foreground Color
Option One: Click theArrow icon associated with the ForegroundColor button open the color picker and then select the required fore-
ground color for the selected content.
Option Two: Click the Foreground Color icon to apply the used last
color to the content.
Background Color
Option One: Click theArrow icon associated with the BackgroundColor button to open the color picker and then select the required back-
ground color for the selected content.
Option Two: Click theBackground Color icon to apply the used
last color to the selected content.
Apply CSS Class Select the CSS Class to be applied to the selected content.
Format Stripper
1. Select the content you want to strip formatting from (such as
font color, font heading).
2. Click theArrow icon associated with the Strip Formattingbutton and then select the type of formatting to be stripped
from these options: Strip All Formatting, Strip Css Formatting,
Strip Font Elements, Strip Span Elements, Strip Word For-
matting.
Content Toolbar
The Content toolbar of the TelerikEditorProvider RTE.
Tip: This toolbar is located below the editor.

Tool Icon Description
DesignClick to view content in design mode. This ena-
bles all toolbars.
HTML
Click to view, add or edit the HTML for this con-
tent. This disables all tools and toolbars with the
exception of theDesign button.
Words* N/ADisplays the number of words inside the Rad-
Editor.
Characters* N/ADisplays the number of characters inside the Rad-
Editor.
Resize Editor**
Increase or decrease the Editor window size.
1. Position your mouse over the bottom right
corner of the Editor until it becomes a two
directional arrow.
2. Click and drag the Editor larger or smaller
as desired. Release your mouse button
when you are finished.
Tip: A similar tool is the Toggle FullScreen Mode (F11) button which tog-
gles the Editor between the current editor
size and the full screen of the edit page.
* These fields are updated each time you click inside the editor after a modification.
Fonts and Font Size Toolbar
The Fonts and Font Size toolbar of the TelerikEditorProvider RTE has the following tools:
Tool Icon DescriptionParagraph Style Set the paragraph style for the selected text.
Font Name
(CTRL + SHIFT + F)Set the font for the selected text.

Tool Icon DescriptionReal Font Size
(CTRL + SHIFT + P)Set the font size in pixels for the selected text.
Formatting Code Block
How to insert a code block in the TelerikEditorProvider RTE.
1. Place your cursor where you want to place the code block.
2. Click the Format Code Block button. This opens the Format Code Block window.3. In the Paste Source Code Below text box, paste the source code.
4. In theOptions section complete the following:5. Optional. In theMax Snippet Width text box, set the maximum width of the code block in either
pixels or as a percentage. Do this by either typing a value into the text box or by using the IncreaseandDecrease buttons. The value will automatically be saved as pixels unless you enter the per-
centage symbol (%) into the text box. E.g. Enter 100px or 100 to set the width as 100 pixels, or
enter 100% to set the width as 100%. Leave blank for no specified width.
6. Optional. In theMax Snippet Height text box, set the maximum height of the code block
in either pixels or as a percentage. Leave blank for no specified width.
7. At Select Language, select the language of the code block from these options: Markup - (x)
HTML, XML, ASPX, ..."; Javascript, CSS, C#, CPP, VB, Php, SQL, Delphi, or Python.
8. At Display Line Numbers, check the check box to display line numbers for each line of code -
OR - Uncheck the check box to disable numbering.

9. Optional. Click the Preview button to preview the code in the Preview window below.

10. Click theOK button to insert the code block.
Formatting Toolbar
The Formatting toolbar of the TelerikEditorProvider RTE has the following tools:
Tool Icon Description
Text FormattingBold (CTRL + B) Add/remove bolding to selected content.
Italicize (CTRL + I) Add/remove italics to selected content.
Underline
(CTRL + U)Add/remove underline to selected content.
Strikethrough Add/remove strikethrough to selected content.

Tool Icon Description
AlignmentAlign Left Left align the selected content.
Align Center Center align the selected content.
Align Right Right align the selected content.
Justify Justify align the selected content.
Remove Alignment Remove alignment formatting from selected content.
Indent and ListsIndent Indent selected content.
Outdent Outdent selected content.
Numbered List Create a numbered list.
Bullet List Create a bullet list.
Other
Show/Hide BordersClick to show or hide all table borders. This is useful where table borders
are not displayed.
XHTML Validator
Click to open the XHTML Validator window. At the very top of the win-
dow, select the radio button to set the type of XHTML validation you wish
to perform. This displays the validation results and details.
Paragraph Toolbar
The Paragraph toolbar of the TelerikEditorProvider RTE has the following tools:
Tool Icon DescriptionSuperScript Transforms selected content to superscript.
Subscript Transforms selected content to subscript.
New Paragraph Inserts a new paragraph.
Insert GroupboxInserts a group box. Use to layout forms and to label sections of your con-
tent.
Horizontal Rule Inserts a horizontal line.
Insert Date Inserts the current date according to your computer.
Insert Time Inserts the current time according to your computer.
Format Code BlockEnables you to insert and format a block of code and have it render as
text. See "Formatting Code Block"

Resources Toolbar
The Resources toolbar of the TelerikEditorProvider RTE has the following tools:
Tool Icon Description
Image Manager
(CTRL + G) *
Opens the Image Manager which enables you to insert images into the
Editor. The properties tab enables you to set properties of the image to
be inserted.
Document Manager
*
Opens the Document Manager which enables you to insert a document
link into the Editor. Additional link settings are available.
Flash Manager *
Opens the Flash Manager which enables you to insert Flash (*.swf) into
the Editor. The properties tab enables you to set properties of the flash to
be inserted.
Media Manager *
Opens the Media Manager which enables you to insert media into the
Editor. The properties tab enables you to set properties of the media to
be inserted.
Template Manager *Opens the Template Manager which enables you to insert a template
(*.htmtemplate) into the Editor.
Save Template Save the content in the Editor as a new template.
HyperlinkManager
(CTRL + K) *Insert a link, anchor or email link. Additional settings are available.
Remove Link
(CTRL +SHIFT + K)Removes a link from selected content.
* These tools provide access your site's File Manager where, depending on your authorization level, you
can also create folders, as well as upload and manage files.
Tables and Tools Toolbar
The Tables and Tools toolbar of the TelerikEditorProvider RTE has the following tools:
ToolIco-
nDescription
Insert Option One: Click theArrow icon to open the symbol gallery and then select the
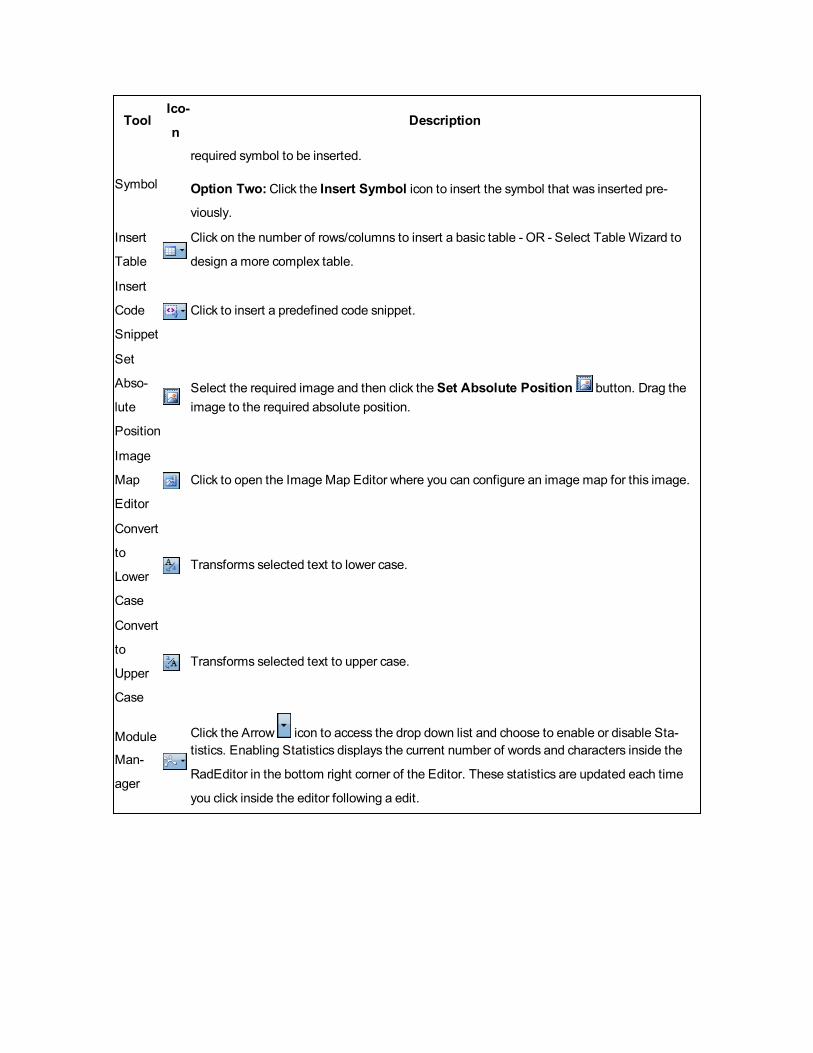
ToolIco-
nDescription
Symbol
required symbol to be inserted.
Option Two: Click the Insert Symbol icon to insert the symbol that was inserted pre-
viously.
Insert
Table
Click on the number of rows/columns to insert a basic table - OR - Select Table Wizard to
design a more complex table.
Insert
Code
Snippet
Click to insert a predefined code snippet.
Set
Abso-
lute
Position
Select the required image and then click the Set Absolute Position button. Drag theimage to the required absolute position.
Image
Map
Editor
Click to open the Image Map Editor where you can configure an image map for this image.
Convert
to
Lower
Case
Transforms selected text to lower case.
Convert
to
Upper
Case
Transforms selected text to upper case.
Module
Man-
ager
Click the Arrow icon to access the drop down list and choose to enable or disable Sta-tistics. Enabling Statistics displays the current number of words and characters inside the
RadEditor in the bottom right corner of the Editor. These statistics are updated each time
you click inside the editor following a edit.

ToolIco-
nDescription
Toggle
Full
Screen
Mode
(F11)
Select to toggle the Editor to/from full screen mode.
Track
Change-
s
Click to view the changes between your initial content and current content. Content changes
are marked up with green background for new content and red strikethrough for deleted con-
tent.
Emot-
iconsInsert Current Emoticon: Click on the Emoticons icon to insert the emoticonwhich is currently displayed on the button. Note: The last emoticon inserted during this edit-

ToolIco-
nDescription
ing session is displayed. The Angel Smile emoticon is displayed by default.
Insert Different Emoticon: Click on theArrow icon to select a different emoticon. Thiswill insert the selected emoticon and set it as the default emoticon for this session.
About
Rad-
Editor
Opens the About RadEditor windowwhich has a linkmore information on the RadEditor.
Managing Images and Media
Creating an Image Map
How to create an image map using the TelerikEditorProvider for the RTE.
1. Insert an image.
2. Right click on the image and click the Image Map Editor button. This opens the Image Map
Editor window.
3. To create an area:
a. At Select Area Shape, select eitherRectangle orCircle.b. Click theNew Area button. This displays a gray box defining the area.c. Move and resize the area as required. This updates the Define Area Properties fields for
Left, Width, Top and Height.
d. Optional. In theURL text box, enter the URL to open when a user clicks on this Area.i. At Target, select the target for the URL.
l Target: No target is set and the link will open in the same window.l New Window: Will open a newwindow.
l Parent Window: If web page consists of frames, the link will open in the par-
ent frame.
l Same Window: The link will open in the same window.

l Browser Window: The link will open in the same window.l Search Pane:l Media Pane:
e. In theAlt Text text box, enter the text to be displayed for this area.f. Click theUpdate Area button.
4. Repeat Step 3 to add additional areas.
5. These additional editing options are available:
l To edit an existing area, click on it in the preview window, edit the properties as required and
then click theUpdate Area button.l To remove an area, click theRemove Area button.l To remove all areas, click theRemove All button.
6. ClickOK to save.
Creating an ImageMap
Editing an Image Map
How to edit an image map using the TelerikEditorProvider for the RTE.
1. Select the mapped image.
2. Click the Image Map Editor button in the toolbar - OR - Right click on the image and then
select Image Map Editor from the drop down list. This opens the ImageMap Editor window.

3. Add, edit/update and deletemapped areas as required. See "Creating an ImageMap"
4. Click theOK button to confirm.
Creating an ImageMap
Editing an Image
How to edit an image inserted in the TelerikEditorProvider for the RTE.
1. Select the image to be edited.
2. Right-click on the image.
3. Select Properties... from the drop down list.
l To change the image: At Image Src, click the Image Manager button and then locateand select the new image.
l Modify any other properties as required. See "Setting Image Properties"
4. Click theOK button to confirm.
Tip: The new image will inherit the properties of the previous image.
Inserting a Document
How to insert a document using the TelerikEditorProvider for the RTE.

1. Click theDocument Manager button. This opens the Document Manager.2. Navigate to and select the required document. See "Using the ResourceManager"
3. Optional. In the Link Text text box, modify the text associated with this document. The filename
is used by default.
4. Optional. At Target select the target window for this link.
5. Optional. In the Tooltip text box, enter a tool tip to be displayed when a user places their mouse
over this link.
6. Optional. At CSS Class, select a class for the document link.7. Click the Insert button.
Tip: Additional document properties are available. See "Setting Document Properties"
Inserting aDocument
Inserting Flash
How to insert Flash media using the TelerikEditorProvider for the RTE.

1. Click the Flash Manager button. This opens the Flash Manager.2. Navigate to and select the required Flash. See "Using the ResourceManager"
3. Optional. Click the Properties tab and set the properties.a. At Specify Class ID, select from these options:
l Check the check box to set a class for this media. This reveals the Class ID text
box.
i. In theClass ID text box, enter the name of the CSS class to be applied to
this Flash.
ii. Uncheck the Specify Class ID check box to hide the Class ID field and
ensure all other fields can be set.
l Uncheck the check box to use the default class.
b. In the Width text box, enter a pixel value to set the Flash width. Leave this field blank to use
the width defined by the Flash.
c. In the Height text box, enter a pixel value to set the Flash height. Leave this field blank to
use the height defined by the Flash.
d. At Quality, select High, Medium or Low as the quality of the Flash.
e. At Play, check the check box to auto play the Flash - OR - Uncheck the check box if the
user must select to play the Flash.
f. At Loop, check the check box to automatically loop the Flash movie repeated - OR -
Uncheck the check box if the user must select to replay the Flash.
g. At Flash Menu, check the check box to display the Flash menu - OR - Uncheck the
check box to hide it.
h. At Transparent, check the check box for a transparent background - OR - Uncheck the
check box to disable.
i. At HTML Align, select the HTML alignment.j. At Flash Align, select the Flash alignment.k. At Background Color, select No Color for no background color or select a color from the
drop down list.
4. Click the Insert button.
Tip: You cannot edit the properties of Flash once it has been inserted. To modify Flash, simply
delete it and reinsert it with the required properties.

Inserting Flash
Inserting Images
How to insert an image using the TelerikEditorProvider for the RTE.
1. Select Insert Media .2. Click the Image Manager (CTRL + G) button. This opens the Image Manager.3. Navigate to and select the required image. See "Using the ResourceManager"
4. Optional. Use theBest Fit, Actual Size, Zoom In and Zoom Out buttons to modify the pre-
viewed image - these changes cannot be saved.
5. Optional. Click the Image Editor button to edit the way the image is displayed. See "Working
with the Image Editor"
6. Optional. Click the Properties tab and set image properties. See "Setting Image Properties"7. Click the Insert button.

Inserting Media
How to insert media (such as sound and movie files) using the TelerikEditorProvider for the RTE.
1. Click theMedia Manager button. This opens the Media Manager.2. Navigate to and select the required media. See "Using the ResourceManager"
3. Optional. Click the Properties tab and set the properties.a. At Specify Class ID, select from these options:
l Check the check box to set a class for this media. This reveals the Class ID text
box.
i. In theClass ID text box, enter the name of the CSS class to be applied to
this Flash.
ii. Uncheck the Specify Class ID check box to hide the Class ID field and
ensure all other fields can be set.
l Uncheck the check box to use the default class.
b. In the Width text box, enter the pixel value to set the media width. Leave blank to use the
actual media size.

c. In the Height text box, enter the pixel value to set the media height. Leave blank to use the
actual media size.
d. At Align, select the alignment.e. At Properties select a property to viewmore information on that property and select Yes or
No as required. Repeat for each property as required.4. Click the Insert button.
Tip: You cannot edit the properties of media once it has been inserted. To modify media, simply
delete it and reinsert it with the required properties.
InsertingMedia
Setting Document Properties
How to set/edit the optional properties of documents inserted using the TelerikEditorProvider for the RTE.

1. Insert the document.
2. Right-click on the document and click the Properties... button from the drop down list. Thisopens the HyperlinkManager.
3. Edit the link as required.
4. Click theOK button to confirm.
Setting Image Properties
How to set the optional properties of an image using the Image Manager of the TelerikEditorProvider for
the RTE.
1. If the image has already been inserted, right-click on the image and select the Properties... but-ton. Alternatively, if you are currently adding the image, click on the Properties tab of the Image
Manager.
2. Click the Lock Ratio / Unlock Ratio button to unlock or lock the width/height ratio at any time.Unlocking the ratio enables the width and/or height to be modified independently.
3. In the Width text box, enter the width in pixels which the image will be displayed as.4. In the Height text box, enter the height in pixels which the image will be displayed as.5. At Border Color, click theColor Picker button and select the border color. Note: A BorderWidth
must be entered to display the border.
6. In theBorder Width text box, enter the pixel width for the border - OR - use the Increase and
Decrease arrows.7. In theAlt Text text box, enter the alternative text for this image.8. In the Long Description text box, enter the long description for this image.9. At Image Alignment, click theAlignment Selector button and select the alignment for this
image.
10. At Margin, set any of these fields:1. In the Top text box, enter a pixel value or use the Increase andDecrease arrows to set the
top margin.
2. In the Bottom text box, enter a pixel value or use the Increase andDecrease arrows to set
the bottom margin.
3. In the Right text box, enter a pixel value or use the Increase andDecrease arrows to set
the right margin.
4. In the Left text box, enter a pixel value or use the Increase andDecrease arrows to set the
left margin.
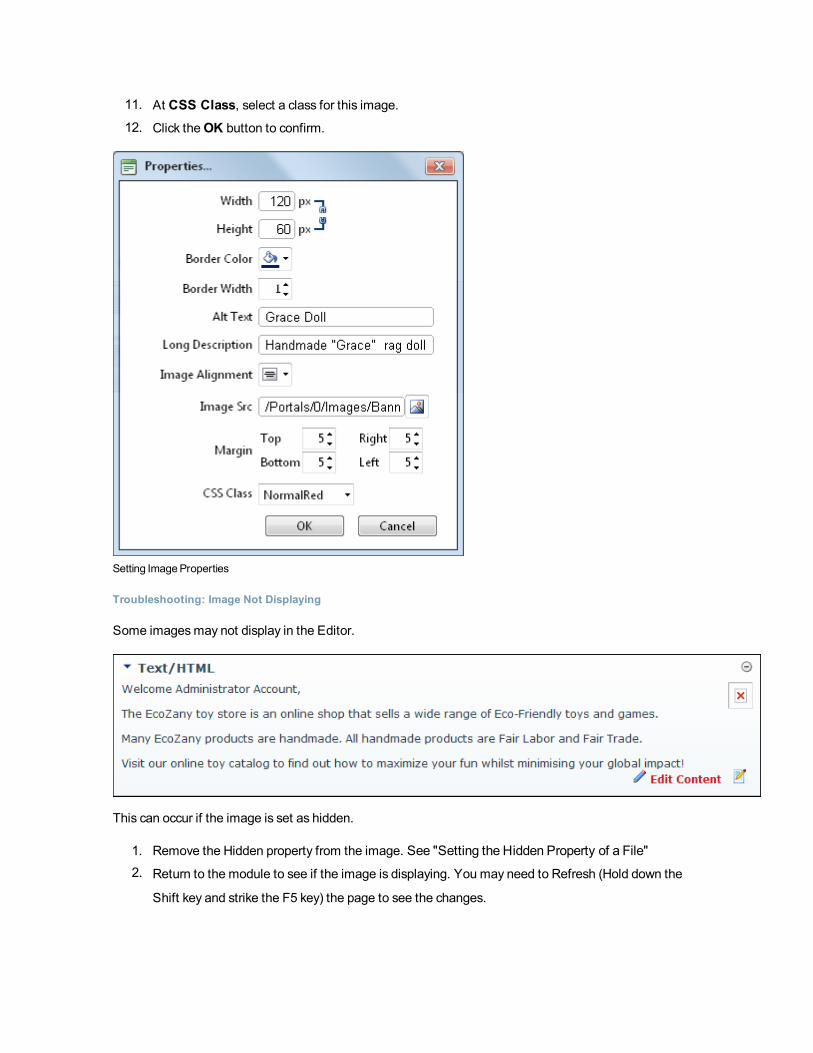
11. At CSS Class, select a class for this image.12. Click theOK button to confirm.
Setting ImageProperties
Troubleshooting: Image Not Displaying
Some imagesmay not display in the Editor.
This can occur if the image is set as hidden.
1. Remove the Hidden property from the image. See "Setting the Hidden Property of a File"2. Return to the module to see if the image is displaying. You may need to Refresh (Hold down the
Shift key and strike the F5 key) the page to see the changes.

This can also occur if module caching is set for too longer period. In this case, extend the caching time as
required. See "Configuring Cache Settings for aModule"
Troubleshooting: ImageNot Displaying inHTML Module
Using the Resource Manager
How to navigate to, select or manage folders and files using the Resource Manager provided with the Tel-
erikEditorProvider for the RTE. The Resource Manager is commonly used for the Image Manager, Doc-
ument Manager, Flash Manager, Media Manager and Template Manager tools of the RadEditor.
Note: Access to some tools is restricted by role.
The Resource Manager consists of the following toolbar and windows: Resource Manager Toolbar, Folder
Window, FilenameWindow, Preview/PropertiesWindow.

Resource Manager Toolbar
Tool Icon Description
Back Go back by one folder in the Folders window.
Forward Move forward by one folder in the Folders window.
Refresh Refresh to retrieve newly updated files.
New FolderIn the Folders window, select the parent folder and then click theNew
Folder button.
Delete
1. Select the image or folder to be deleted and then click the
Delete button. This displays the message "Are you sure you
want to delete the selected file? The selected file may be in
use. If deleted, some pages will not be displayed properly.
Press "OK" to confirm deletion."
2. Click theOK button to confirm.
UploadIn the Folders window, select the folder where the file will be uploaded
to and then click the Upload button.
Folder Window: This window displays the folders of the File Manager using a hierarchical tree structure.
Select a folder to view its sub-folders and/or files in the FilenameWindow. Folders can be moved by drag-
ging into a different folder. Right click a folder to perform Delete, Rename, New Folder or Upload.
Filename Window: Displays a list of the folders and/or files within the selected folder. Select a file to
view a preview and/or properties information in the Preview/PropertiesWindow. Files can be moved by
dragging into a different folder. Right click an image or folder to perform Delete, Rename, New Folder or
Upload.
Tip: Click theCollapse/Expand the left pane button to hide/show the Folder Window. This is
useful once you have navigated to the required folder as it provides additional space to view files
details.
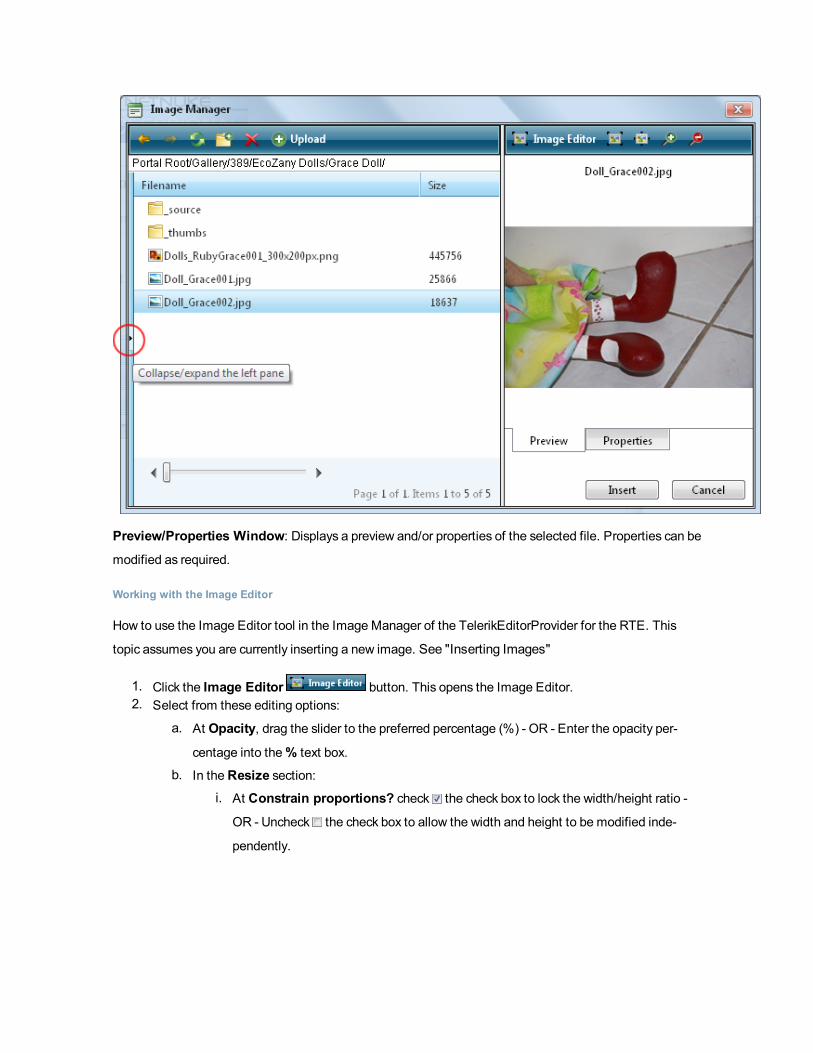
Preview/Properties Window: Displays a preview and/or properties of the selected file. Properties can be
modified as required.
Working with the Image Editor
How to use the Image Editor tool in the Image Manager of the TelerikEditorProvider for the RTE. This
topic assumes you are currently inserting a new image. See "Inserting Images"
1. Click the Image Editor button. This opens the Image Editor.2. Select from these editing options:
a. At Opacity, drag the slider to the preferred percentage (%) - OR - Enter the opacity per-
centage into the% text box.
b. In theResize section:i. At Constrain proportions? check the check box to lock the width/height ratio -
OR - Uncheck the check box to allow the width and height to be modified inde-
pendently.

ii. AtWidth and/orHeight, drag the slider to the preferred image size - OR - Click the
Decrease and Increase buttons. The pixel size is displayed in the respective Px text
boxes to the right.
c. At Flip, select a direction to flip the image from these options: None, Flip Horizontal,
Flip Vertical, or Flip Both.d. At Rotate, select from None, 90°, 180°, or 270°.e. At Crop, click the Enable Crop button. This displays a red box which defines the area to
be cropped. You can now define the area to be cropped:
i. In the X and Y text boxes, enter the X (vertical) and Y (horizontal) coordinates for the
crop area.
ii. In theWidth andHeight text boxes, enter the width and height in pixels for the crop
area.
3. In the Save As... text box, a new name for this edited image is displayed. It is in the format of file-
name_thumb. Modify this name as desired. Tip: Remove the _thumb from the file name to over-
ride the original file. The image will be saved as a .jpg extension file.
4. At Overwrite If File Exists?, check the check box to overwrite a file that exists with the name
entered in the Save As... text box - OR - Uncheck the check box if you don't want to override an
existing file. This enables warning message if the filename already exists.
5. Click the Save button.
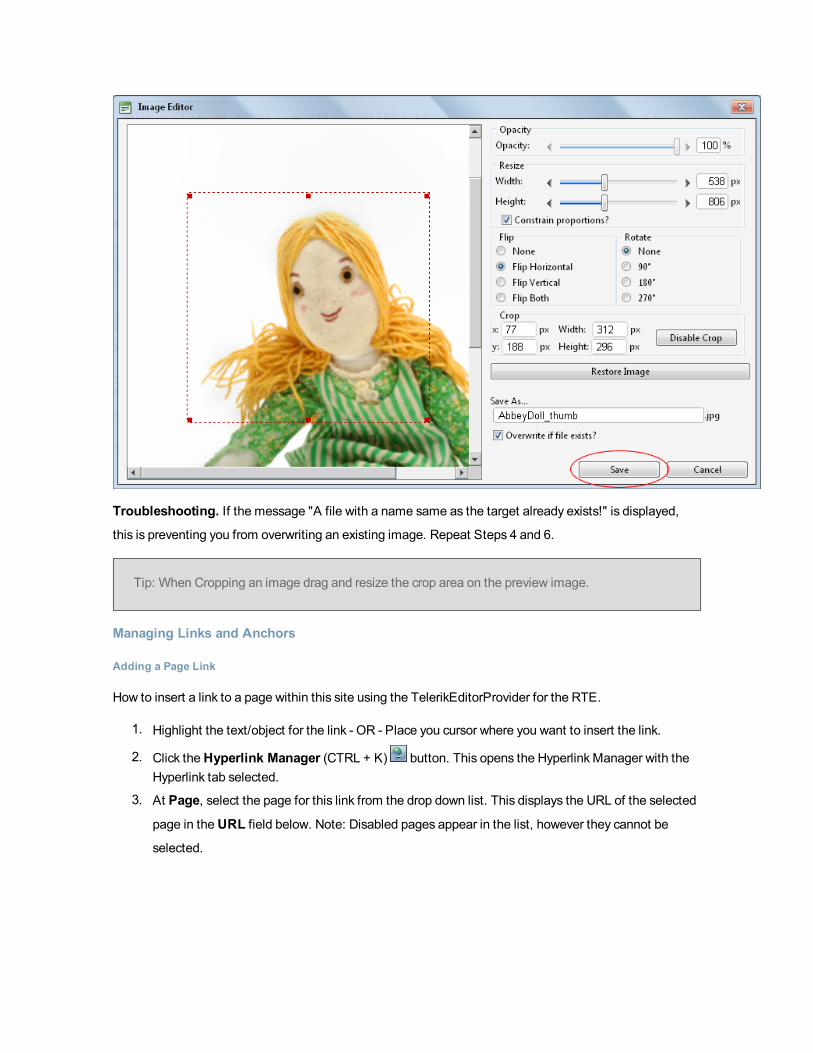
Troubleshooting. If the message "A file with a name same as the target already exists!" is displayed,
this is preventing you from overwriting an existing image. Repeat Steps 4 and 6.
Tip: When Cropping an image drag and resize the crop area on the preview image.
Managing Links and Anchors
Adding a Page Link
How to insert a link to a page within this site using the TelerikEditorProvider for the RTE.
1. Highlight the text/object for the link - OR - Place you cursor where you want to insert the link.
2. Click theHyperlink Manager (CTRL + K) button. This opens the HyperlinkManager with theHyperlink tab selected.
3. At Page, select the page for this link from the drop down list. This displays the URL of the selected
page in theURL field below. Note: Disabled pages appear in the list, however they cannot be
selected.

4. The following optional setting are available:a. In the Link Text text box, edit the linked text. Note: This field is not displayed when adding
a link to an image.
b. At Target, select the target window for this link. The default option isNonewhich opens the
link in the current window.
c. In the Tooltip text box, enter a tool tip to be displayed when a user places their mouse over
this link.
d. At CSS Class, select a class for the link - OR - Select Clear Class to use the default class.e. Check the Track the number of times this link is clicked check box to enable Link
Tracking for this link. The linkmust be saved before you can view the Tracking tab where
tracking information is displayed.
i. Check the Log the user, date and time for each click check box to also enable
the Link Log.
5. Click theOK button to confirm.
Related Topics:
l See "Viewing a Link Log Report"

Adding a URL Link
How to insert a link to a URL located on another web site using the TelerikEditorProvider for the RTE.
1. Highlight the text/object for the link - OR - Place you cursor where you want to insert the link.
2. Click theHyperlink Manager (CTRL + K) button. This opens the HyperlinkManager with theHyperlink tab pre-selected.
3. In theURL text box, enter the URL address for this link.4. Optional. At Track Clicks, check the check box to track the number of clicks on this link - OR -
Uncheck the check box to disable link tracking. Enabling this option will update the URL dis-
played in the URL field above.
5. In the Link Text text box, enter/edit the text for this link. If you highlighted text at Step 1, then this
field will be pre-populated with that text. Note: This field is not displayed when adding a link to an
image.
6. Optional. At Target, select the target window for this link.
7. Optional. In the Tooltip text box, enter a tool tip to be displayed when a user places their mouse
over this link.
8. Optional. At CSS Class, select a class for the link - OR - Select Clear Class to use the default
class.
9. Click theOK button to confirm.
Adding an Anchor Link
How to create a link to an anchor using the TelerikEditorProvider for the RTE.
1. Highlight the text/object to be linked to the anchor.
2. Click theHyperlink Manager (CTRL + K) button. This opens the HyperlinkManager.3. At Existing Anchor, select the anchor name. This displays the anchorURL in theURL field. E.g.
#Fair Labor

4. The following optional settings are available:a. In the Link Text text box, enter/edit the linked text as required.b. At Target, select the target for this link - OR - Select None to use the existing window.c. In the Tooltip text box, enter the text to be displayed when a user places their mouse over
this link.
d. At CSS Class select the CSS class to use.
e. Check the Track the number of times this link is clicked check box to enable Link
Tracking for this link. The linkmust be saved before you can view the Tracking tab where
tracking information is displayed.
i. Check the Log the user, date and time for each click check box to also enable
the Link Log.
5. Click theOK button to confirm.
Related Topics:
l See "Adding an Anchor"

Adding an Anchor
How to create an anchor using the TelerikEditorProvider for the RTE. An anchor is a location within this
content which can be linked to using the HyperlinkManager. Note Links to this anchor can only be created
in this instance of this module.
1. Place your cursor where you want to insert the anchor - OR - Highlight some text or an object to add
an anchor to it. Note: Text may display link formatting even though there is no link.
2. Click theHyperlink Manager (CTRL + K) button. This opens the HyperlinkManager.3. Select theAnchor tab.4. In theName text box, enter an anchor name.
5. Click theOK button to confirm.
Adding an Email Link
How to add an email link to text or an image using the TelerikEditorProvider for the RTE. Clicking the link
opens the user's email program with the selected email address in the Send To field.

Tip: If you type an email address with a recognized extension directly into the Editor it will auto-
matically add a "send to" link to the address.
1. Highlight the text/object for the link - OR - Place you cursor where you want to insert the link.
2. Click theHyperlink Manager (CTRL + K) button. This opens the HyperlinkManager.3. Select the E-mail tab.4. In theAddress text box, enter the email address. If you have selected a recognized email address
it will be displayed here.
5. In the Link Text text box, enter the text for this link. Note: This field is not displayed when adding a
link to an image.
6. In the Subject text box, enter a subject which will populate the subject field of the email message.7. Optional. At CSS Class, select a class for the link - OR - Select Clear Class to use the default
class.
8. Click theOK button to confirm.
Adding anEmail Link
Deleting a Link
How to remove a link from the TelerikEditorProvider for the RTE.
Option One:
1. Select the linked text or object.
2. Click theRemove Link (CTRL + SHIFT + K) button.
Option Two:
1. Right-click on the linked text or object.
2. Select Remove Link from the drop down list. This opens the HyperlinkManager.
Deleting an Anchor
How to delete an anchor (bookmark) from the TelerikEditorProvider for the RTE.
Option One:Use this option when the anchor has been created by first selecting text or an object.
1. Select the linked text or object.
2. Click theRemove Link (CTRL + SHIFT + K) button.
Option Two:Use this option when the anchor has been added to the editor by placing the cursor in a loca-
tion.
1. Select theHTML tab.2. Locate and delete the anchor HTML that looks something like name="anchor name"
Editing a Link
How to edit a link in the TelerikEditorProvider for the RTE.
Option One:
1. Select the linked text or object.
2. Click theHyperlink Manager (CTRL + K) button. This opens the HyperlinkManager.3. Edit the link as required. For more details on the available fields, See "Adding an Email Link", See
"Adding a Page Link" or See "Adding a Page Link".
Option Two:
1. Right-click on the linked text or object.
2. Select Properties... from the drop down list. This opens the HyperlinkManager.
3. Edit the link as required. For more details on the available fields,See "Adding an Email Link", See
"Adding a Page Link" or See "Adding a Page Link".
4. Click theOK button.
Editing an Anchor
How to edit an anchor using the TelerikEditorProvider for the RTE.
Option One:

1. Select the anchored text or object.
2. Click theHyperlink Manager (CTRL + K) button. This opens the HyperlinkManager.3. Edit the anchor as required.
4. Click theOK button.
Option Two:
1. Right-click on the linked text or object.
2. Select Properties... from the drop down list. This opens the HyperlinkManager.3. Edit the anchor as required.
4. Click theOK button.
Viewing Link Tracking Report
How to view tracking information for a tracked link within the TelerikEditorProvider for the RTE. In addi-
tional the tracking report displays data for the selected date range.
1. Select the linked text or object, and then click theHyperlink Manager (CTRL + K) button - OR- Right-click on the linked item and select Properties... from the drop down list. This opens the
HyperlinkManager with the Hyperlink tab selected.
2. Select the Tracking tab.3. In the Link Info section, the following information is displayed:
l URL: The URL for this link. E.g. http://awesomecycles.biz/Store.aspxl Created: The date this link was created. 12/22/2010 8:42:27 AMl Tracking URL: The tracking URL for this link. E.g. http://-
awesomecycles.biz/LinkClick.aspx?link=63&tabid=41&mid=386
l Clicks: The number of times this link has been clicked.l Last Click: The date and time when the link was last clicked.

4. In the Tracking Report section, complete the following to view the report:
1. At Start Date, click theCalendar button. This displays the current month with today'sdate highlighted. Select a new date if required. See "Working with the Calendar"
2. At End Date, click theCalendar button. This displays the current month with today'sdate highlighted. Select a new date if required.
3. Click theDisplay button. This displays the date and time when the link was clicked and the
first and last name of authenticated users.

5. Click theCancel button to close the HyperlinkManager.
Working with the RADCalendar
The RADCalendar is date selection tool which is used when viewing link tracking reports within the Tel-
erikEditorProvider for the RTE.

Selecting a Date
Step One - View the required Month/Year in Calendar
1. Click theCalendar button. This opens the RADCalendar. Here's an overview of the dateselection options available for the RADCalendar:
l View Calendar for Another Month:
l Click the button view calendar three months previous
l Click the button to view calendar for the previousmonth
l Click the button to advance the calendar by one month
l Click the button advance the calendar by three monthsl View Calendar for Today:
1. Click theMonth/Date above the calendar.
2. Click a month to view that month for the selected year.
3. Click the Today link.
l View Calendar for Another Month/Year:
1. Click theMonth/Date above the calendar.2. Click a month to view that month for the selected year.
3. Click a different year to view if required.
4. Optional. If the required year is not displayed, then click either the ll or rr buttons below the
displayed years. This displays the previous or next ten years respectively.
5. Click theOK button to view the calendar for the selected month/year.
Tip: Click theCancel link to cancel any selection and return to calendar.
Step Two - Selecting the Date

1. Click on a date in the calendar to select it. This closes the pop-up window and displays the selected
date in the associated field.
Related Topics:
l See "Viewing Link Tracking Report"
Managing Tables
Deleting a Table
How to delete a table from the TelerikEditorProvider for the RTE.
Option One:
1. Click on the corner of the table to select it.
2. Strike theDelete button on your keyboard.
Option Two:
1. Click on the corner of the table to select it.
2. Right click to view the drop down list.
3. Click theDelete Table button.
Option Three:
1. Place your cursor before or after the table.
2. Strike either theBackspace orDelete button on your keyboard respectively.

Deleting aTable
Editing a Table
How to edit a table using the right click menu or the Table Wizard of the TelerikEditorProvider for the RTE.
1. Place your cursor inside the table. Note: If you want to use the drop down list to modify the table
design (rather than the Table Wizard) then place your cursor in the cell where you want to perform
the modification.
2. Right-click using your mouse. This displays the drop down list.
3. Select an option to modify the rows, columns or cells of the table - OR - Select either the
Table Properties or Cell Properties to use the Table Wizard to modify the table.4. Click theOK button to confirm.

Editing aTable
Inserting a Table
How to insert a table using the TelerikEditorProvider for the RTE.
1. Place you cursor where you want to insert the table.
2. Click the Insert Table button.3. Select for these options:
l To insert a basic table, move your cursor to highlight the number of rows or columns for
the table and then click to select it. This displays the basic table in the Editor.
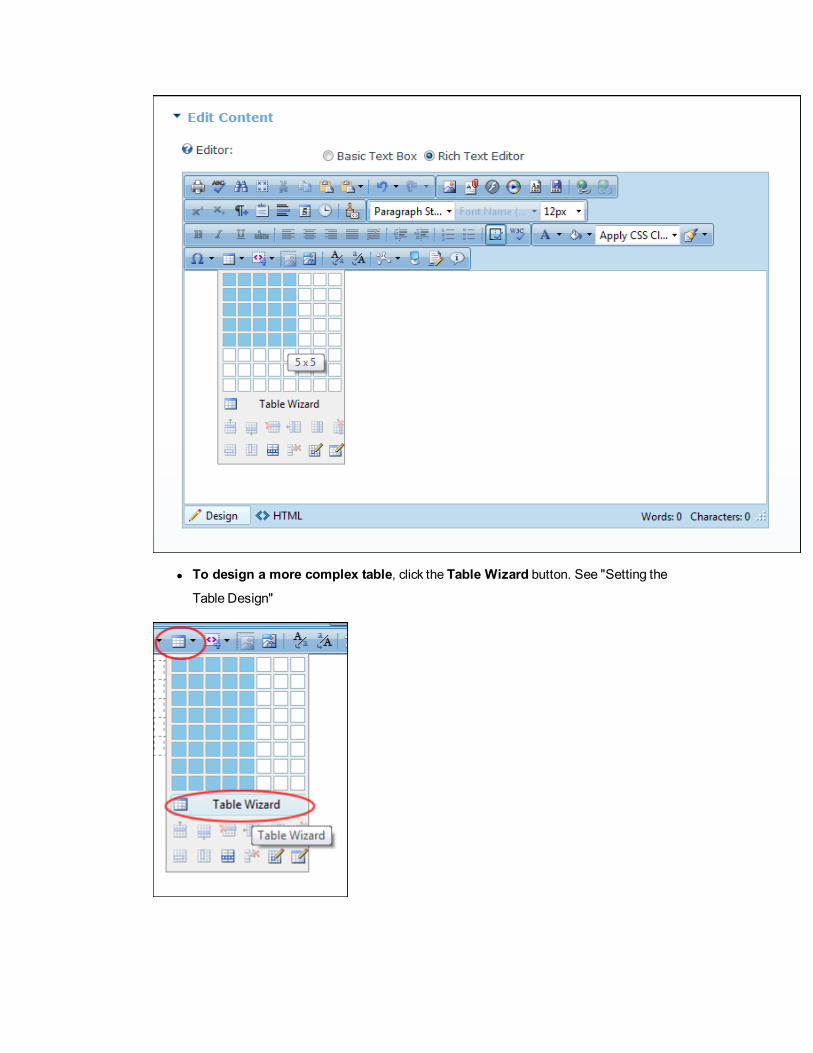
l To design a more complex table, click the Table Wizard button. See "Setting the
Table Design"

Setting Cell Properties
How to set the optional cell properties of a new or existing table using the Table Wizard of the Tel-
erikEditorProvider for the RTE.
1. Right-click inside a cell of an existing table and select Cell Properties from the drop downlist. This opens the Cell Properties tab of the Table Wizard.
2. At Preview, select which cells you want to set the properties of:l To select a single cell, click on that cell. The selected cell is highlighted.
l To select multiple cells, hold down the Ctrl key and click on each required cell - OR - click the
Select All link and then hold down the Ctrl key and click on one or more cells to deselect
them. The selected cells are highlighted.
3. At Cell Properties, set any of the following:a. In theHeight text box, set the cell height in either pixels or as a percentage by either typing
a value into the text box or by using the Increase andDecrease buttons. The value will
automatically be saved in pixels unless you enter the percentage symbol (%) into the text
box. E.g. Enter 100px or 100 to set the height as 100 pixels, or enter 100% to set the height
as 100%. Leave blank for no specified height.
b. In theWidth text box, set the cell width in either pixels or as a percentage as for height.
Leave blank for no specified width.
c. At Content Alignment, click the arrow of theAlignment Selector button and select the
alignment of content.
d. At Background, click theColor Picker button and select the background color.
e. At Style Builder, click the Style Builder button and build one or more styles. See"Using the Style Builder"
f. At CSS Class, select a class for this/these cells.
g. At Back Image, click the Image Manager button and select a background image forthe table.
h. In the Id text box, enter an Id reference for this/these cells.
i. At No Text Wrapping, check the check box to disallow text within this/these cells
from wrapping to another line - OR - Uncheck the check box to allow text to wrap.

5. Click theOK button to save or go to another tab of the Table Wizard to set more properties.
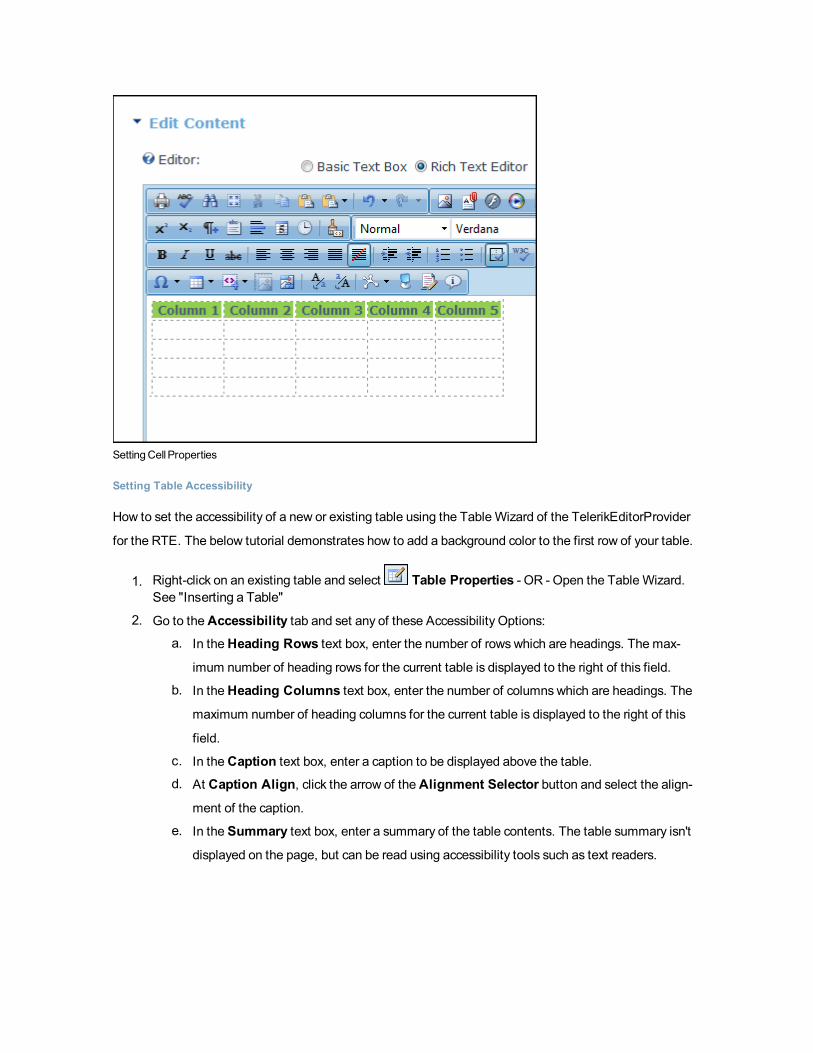
SettingCellProperties
Setting Table Accessibility
How to set the accessibility of a new or existing table using the Table Wizard of the TelerikEditorProvider
for the RTE. The below tutorial demonstrates how to add a background color to the first row of your table.
1. Right-click on an existing table and select Table Properties - OR - Open the Table Wizard.See "Inserting a Table"
2. Go to theAccessibility tab and set any of these Accessibility Options:a. In theHeading Rows text box, enter the number of rows which are headings. The max-
imum number of heading rows for the current table is displayed to the right of this field.
b. In theHeading Columns text box, enter the number of columns which are headings. The
maximum number of heading columns for the current table is displayed to the right of this
field.
c. In theCaption text box, enter a caption to be displayed above the table.d. At Caption Align, click the arrow of theAlignment Selector button and select the align-
ment of the caption.
e. In the Summary text box, enter a summary of the table contents. The table summary isn't
displayed on the page, but can be read using accessibility tools such as text readers.

f. At Associate Cells With Headers, check the check box to associate cells with headers
- OR - uncheck the check box to disable.
g. Optional. Select a new tab to set additional properties.
3. Click theOK button.
Setting TableAccessibility
Setting Table Properties
How to set the optional properties of a new or existing table using the Table Wizard of the Tel-
erikEditorProvider for the RTE.
1. Open the TableWizard. See "Inserting a Table" - OR - Right-click on an existing table and then
select Table Properties from the drop down list.2. Go to the Table Properties tab and set any of these optional settings:

3. In the Dimensions section:
a. In theHeight text box, set the table height in either pixels or as a percentage by either typ-
ing a value into the text box or by using the Increase andDecrease buttons. The value
will automatically be saved in pixels unless you enter the percentage symbol (%) into the
text box. E.g. Enter 100px or 100 to set the height as 100 pixels, or enter 100% to set the
height as 100%. Leave blank for no specified height.
b. In theWidth text box, set the table width in either pixels or as a percentage as for height.
Leave blank for no specified width.
4. In the Layout section:
a. In theCell Spacing text box, enter a number to set the pixel spacing between cells - OR -
Use the Increase andDecrease buttons.
b. In theCell Padding text box, enter a number to set the pixel padding between cells - OR -
Use the Increase andDecrease buttons.
c. At Alignment, click the arrow of theAlignment Selector button and select thetable alignment.
d. At Background Color, click theColor Picker button and select the backgroundcolor.
e. At Style Builder, click the Style Builder button and build one or more styles. See"Using the Style Builder"
f. At CSS Class, select a class for the content of this table.
g. At Back Image, click the Image SRC button and select a background image for thetable.
h. In the Id text box, enter an Id reference for this table.5. In the CSS Class Layout section:
a. Select a CSS layout design for your table from the drop down list. The design is displayed in
the Preview window below.
b. At Apply Special Formats To, check or uncheck one or more check box to apply/remove
one or more styles as desired. The changes can be viewed in the Preview window below.
6. Optional. Select a new tab to set additional properties.
7. Click theOK button to confirm.

Setting TableProperties
Setting the Table Design
How to set the design a table using the Table Wizard of the TelerikEditorProvider for the RTE.
1. Open the Table Wizard. See "Inserting a Table" - OR - Right click on an existing table and select
Table Properties.2. Go to the Table Design tab. If you are adding a new table, a table of two columns by two rows is
displayed as the basis for your design. If you are editing an existing table, your current design is dis-
played.
3. To modify the table, perform any of these actions:
l To add a column: At Columns, click the Increase button.
l To remove a column: At Columns, click theDecrease button.
l To insert a column span: select a cell and then at Column Span, click the Increasebutton.

l To remove a column span: select a cell and then at Column Span, click theDecreasebutton.
l To add a row: At Rows, click the Increase button.
l To remove a row: At Row, click theDecrease button.
l To insert a row span: select a cell and then at Row Span, click the Increase button.
l To remove a row span: select a cell and then at Row Span, click theDecrease button.4. Optional. Select a new tab to set additional properties.
5. Click theOK button.
Designing aTable
Showing/Hiding Table Border
How to hide or show the table borders using the Table Wizard of the TelerikEditorProvider for the RTE.
1. Place your cursor on the outer edge of the table. The cursor will change to show the table can be
selected.
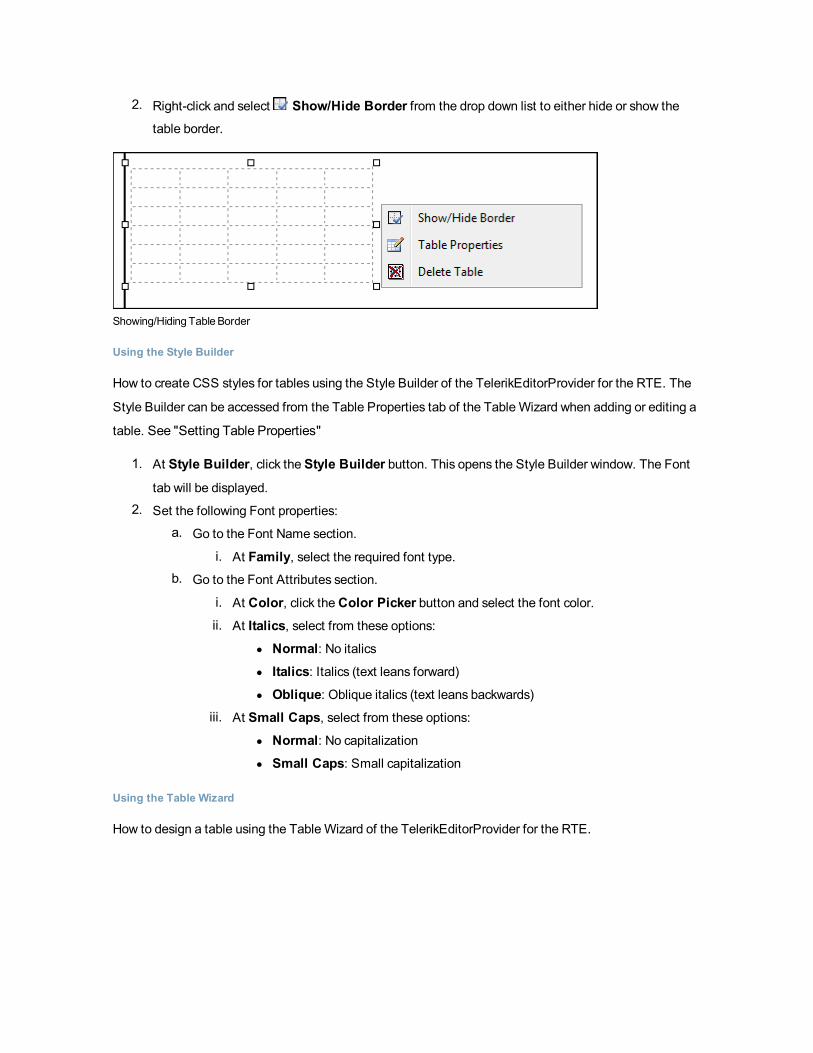
2. Right-click and select Show/Hide Border from the drop down list to either hide or show the
table border.
Showing/HidingTableBorder
Using the Style Builder
How to create CSS styles for tables using the Style Builder of the TelerikEditorProvider for the RTE. The
Style Builder can be accessed from the Table Properties tab of the Table Wizard when adding or editing a
table. See "Setting Table Properties"
1. At Style Builder, click the Style Builder button. This opens the Style Builder window. The Font
tab will be displayed.
2. Set the following Font properties:
a. Go to the Font Name section.
i. At Family, select the required font type.b. Go to the Font Attributes section.
i. At Color, click theColor Picker button and select the font color.ii. At Italics, select from these options:
l Normal: No italicsl Italics: Italics (text leans forward)l Oblique: Oblique italics (text leans backwards)
iii. At Small Caps, select from these options:
l Normal: No capitalizationl Small Caps: Small capitalization
Using the Table Wizard
How to design a table using the Table Wizard of the TelerikEditorProvider for the RTE.

1. Click the Insert Table button.2. Select Table Wizard. This opens the Table Wizard on the Table Design tab. A table of two col-
umns by two rows is displayed as the basis for your design.
3. Optional. Select a cell. This enables the Increase andDecrease buttons which are available to
change the design.
4. Select an Increase orDecrease button to modify the table design. You can choose to add col-
umns and rows, as well as span columns and rows.
5. Optional. Change tabs to set other properties.6. Click theOK button.
Managing Templates
Inserting a Template
How to insert a template using the TelerikEditorProvider for the RTE.
1. Place you cursor where you want to insert the template.
2. Click the Template Manager button. This opens the Template Manager.3. Navigate to and select the required template. Note: Templates are typically stored in the Portal
Root > Templates folder. See "Using the ResourceManager"
4. Click the Insert button. This inserts the template into the editor read for you to edit.

Inserting aTemplate
Saving a Template
How to create and save a template using the TelerikEditorProvider for the RTE.
1. Create your template by adding content such as text, images and tables as desired.

2. Click the Save Template button. This opens the Save As Template window.3. At Folder, select the folder where the template will be saved to.4. In the File Name text box, enter a name for this template.5. At Overwrite If File Exists?, check the check box to overwrite any template that exists with this
template - OR - Uncheck the check box if you don't want to override an existing file. This enables
warning message if a template with this name already exists.
6. Click the Save button.l If there is no conflict with overwriting, the message "The template was saved successfully'"
is displayed. ClickOK to close the window.
l If there is a conflict, a message reading "The template was not saved. The following error
was reported: The file already exists" is displayed. In this case, repeat Steps 2-6, entering a
different file name.

Saving aTemplate
Link Control
About the Link Control
The Link Control allowsModule and Page Editors to select a link to a URL, a page on this site, a file that
has been uploaded to the Admin File Manager, the profile of a registered user. The Link Control can also
be used to disable a link field on a module, such as the Announcementsmodule. The Link Control is dis-
played on the add and edit page of manymodules including the Links, Announcement, Documents,
Events, Media and Vendorsmodule.
Optional Settings:
l Track the number of times a link is clicked. See "Enabling/Disabling Tracking of Link Clicks"
l Log the user, date and time for every link click. See "Enabling/Disabling the Link Log"
l Open a link in a newWeb browser window. See "Enabling/Disabling Opening a Link in a New Web
BrowserWindow"

TheLink Control as displayed on theEdit page of the Links module
Related Topics:
l See "Setting a File Link"
l See "Setting a Page Link"
l See "Setting a URL Link"
l See "Adding a User Profile Link"
Administrators
Deleting a URL from the Links URL List
How to delete a URL from the existing URL's list on the Link Control. URL's that have been set using the
Link Control are stored on the Link Control. These URL's can then be selected by Editors to quickly and
easily reuse without re-entering the URL. Administrators can delete URL's from this list. Deleting a URL
will not remove any links that have been set to the URL using a module.
1. At Link / Link Type, select URL (A Link To An External Resource).2. Below the Link / Location: ( Enter The Address Of The Link ) text box, click the Select An
Existing URL link. This displays a list of the existing URL's in the Link / Location: ( Enter The
Address Of The Link ) drop down list.3. At Link / Location: ( Enter The Address Of The Link ), select the URL to be deleted.4. Click theDelete Selected URL From The List link. This displays the message "Are You Sure You
Wish To Delete This Item?"

5. Click theOK button to confirm.
Module Editors
Adding a User Profile Link
How to set a link to a User Profile using the Link Control. The user can control which profile fields are vis-
ible to the public, site members or Administrators only.
1. At Link Type, select User ( A Member Of Your Site ).2. In the Enter The Username Of A Member Of Your Site text box, enter the user name of an
existing user.

Tip: If you enter a username that does not exist in the User Accountsmodule a message reading
"Username entered does not match a User in this web site" is displayed when you attempt to
update the item.
TheUser's Profile
Enabling/Disabling Opening a Link in a New Web Browser Window
How to set a link to either open in a newWeb browser window or open in the same window using the Link
Control.
Note: This tutorial assumes you are viewing the Link Control, typically located on a Settings page or dis-
played on an Edit Item page when adding/editing an item such as a link on a module.
1. At Open This Link In New Browser Window? select from these options:
l Check the check box to open the link in a newWeb browser, as shown in below image.
l Uncheck the check box to open the link in the sameWeb browser window.

2. Click theUpdate button.
Enabling/Disabling the Link Log
The Link Log, which forms part of the Link Control, can be enabled or disabled for each links. Once ena-
bled it records the date and time that the link is clicked, as well as the first and last name of authenticated
users. The Link Log is displayed on the Edit Item page of any logged links. Note: The following tutorials
assume you are viewing the Link Control, either on a Settings page or whilst adding/editing an item such
as a link on a module.
Important. The RadEditor has a different method for adding and managing link tracking. See "Setting a
Page Link" and See "Viewing a Link Log Report"
To Enable the Link Log:
1. Recommended. At Track Number Of Times This Link Is Clicked? check the check box.
Although this is not mandatory, the Link Log performs best with this settings enabled.
2. At Log The User, Date, And Time For Every Link Click? check the check box to enable the
Link Log.

3. Click theUpdate button.
To Disable the Link Log:
1. At Log The User, Date, And Time For Every Link Click? uncheck the check box to disable
the Link Log
2. Click theUpdate button.
Enabling/Disabling Tracking of Link Clicks
How to track the number of times a link is clicked using the Link Control. This option can be used with any
of the link types (URL, Page, File or User). Link Tracking information is displayed on the Edit Item page of
any link it is enabled for. Enabling this setting records and displays the following additional link infor-
mation:
l URL: Displays the URL that will be tracked. E.g. http://-
awesomecycles.biz/LinkClick.aspx?link=59&tabid=84&mid=478&language=en-US. Note: In the
below image, more than one language is enabled for the site, therefore the link includes the asso-
ciated language.
l Clicks: The total number of times this link has been clicked. This total includes clicks on other
occurrences of this link on this module. However it does not include clicks on this link for other Links
modules or any other types of modules. E.g. Click 3
l Last Click: The time and date when the link was last clicked. E.g. 8/25/2011 2:37:49 PM

Note: This tutorial assumes you are viewing the Link Control, typically located on a Settings page or dis-
played on an Edit Item page when adding/editing an item such as a link on a module.
1. At Track Number Of Times This Link Is Clicked? check the check box to enable link track-
ing. - OR - Uncheck the check box to disable it.
2. Click theUpdate button. Note: Link tracking isn't enabled and displayed until the item is updated
and you return to the Edit Page for this item.
Selecting an Existing URL Link
How to select a link to an existing URL link using the Link Control. The URL linkmust have already been
saved using the Link Control. Note: This tutorial assumes you are currently viewing the Link Control, which
means you are either editing/adding an item on the Edit Page of a module or are on a Settings page.
1. At Link Type, select URL ( A Link To An External Resource ).
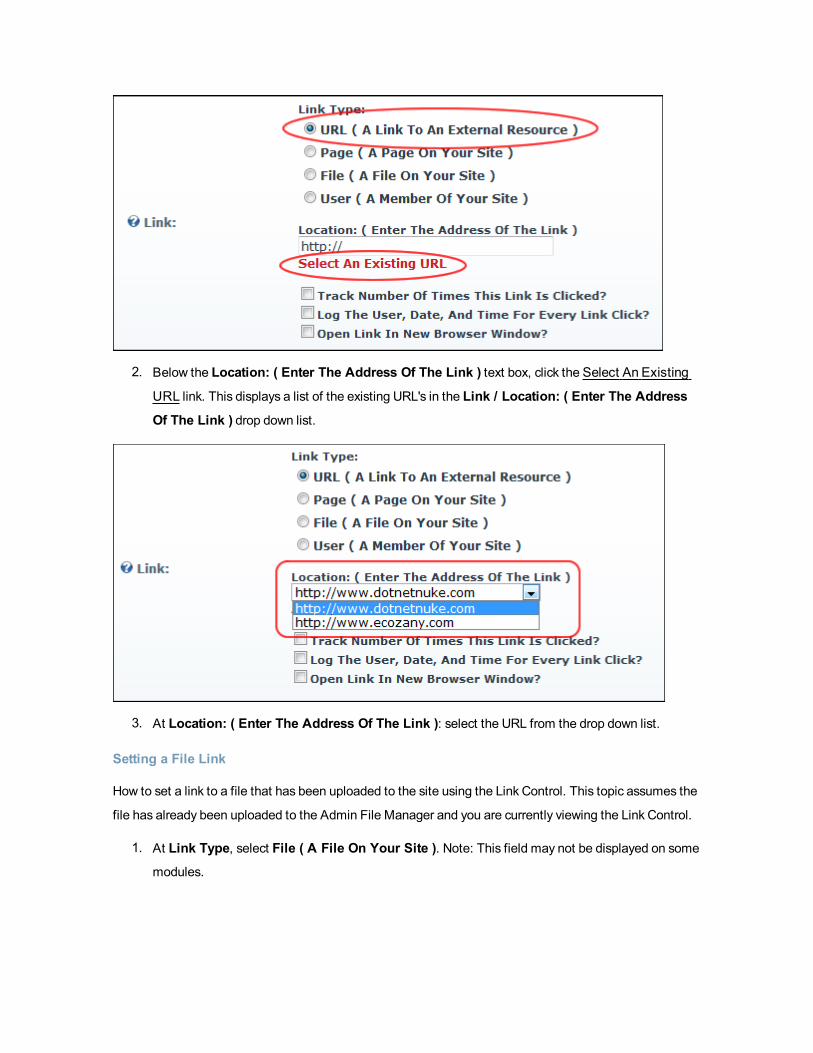
2. Below the Location: ( Enter The Address Of The Link ) text box, click the Select An Existing
URL link. This displays a list of the existing URL's in the Link / Location: ( Enter The Address
Of The Link ) drop down list.
3. At Location: ( Enter The Address Of The Link ): select the URL from the drop down list.
Setting a File Link
How to set a link to a file that has been uploaded to the site using the Link Control. This topic assumes the
file has already been uploaded to the Admin File Manager and you are currently viewing the Link Control.
1. At Link Type, select File ( A File On Your Site ). Note: This field may not be displayed on some
modules.

2. At File Location, select the folder where the file is located. This will populate the File Name field
below with the file in this folder. Note: The My Folder folder is your own personal folder where you
can manage your personal files such as your profile image.
3. At File Name, select the file from the drop down list.
Setting aFile Link
Setting a Page Link
How to set a link to an existing page on the site using the Link Control.
1. At Link Type, select Page ( A Page On Your Site ).2. At Select A Web Page From Your Site, select the page from the drop down list. Note: Pages
that are not included in the menu and which have not been given a Parent page will be displayed at
the end of this list.

Tip: Pages which are set as disabled are displayed in the list of pages. Disabled pages can be
linked to, however the link will only work for Administrators and SuperUsers. Other users will see
the link but nothing will happen when they click on it. It is therefore recommended that you test
page links.
Setting a URL Link
How to set a link to any URL using the Link Control. The URL can be to any resource or file available on the
Internet including website domains, web pages, files, or images.
1. At Link Type, select URL ( A Link To An External Resource ).2. In the Location ( Enter The Address Of The Link ) text box, enter the URL. E.g. http://ww-
w.domain.com.
Setting aURL link
Setting No Link
This topic explains how to set the Link Control for no link. This option is only available on modules where a
link is optional such as the Announcementsmodule.
1. At Link Type, select None.

SettingNoLinking
Troubleshooting: Restricted File Type Warning Message
You may receive a Restricted File Type warning message when attempting to upload a file via the Link
Control to a module. This message is displayed when you attempt to upload a file with an extension that
you are not enabled to upload such as a movie or a sound file. E.g. .avi, .wma.
TheRestrictedFile TypeWarningMessage
Uploading and Linking to a File
How to upload a file and then set a link to that file using the Link Control. Note: Editors must have per-
mission to upload files to at least one folder in the File Manager.
1. At Link Type, select File ( A File On Your Site ). Note: This field may not be displayed on some
modules.
2. At File Location, select a folder that you have access to upload files to. When you select a folder
that you have access to upload files to theUpload New File link is displayed. This will populate the
File Name field below with the file in this folder. Note: The My Folder folder is your own personal
folder where you can manage your personal files such as your profile image.

3. At File Name, click theUpload New File link. This displays theBrowse... button.4. Click theBrowse... button.5. Locate and select the required file on your computer.
6. Click theUploaded Selected File link.
Uploading and Linking to aFile
Viewing a Link Log Report
How to view details of links which are logged using the Link Control.
1. Go to the Edit page associated with the logged link. E.g. Click the Edit button beside the item
which may be an announcement, a link, etc.
2. At Log Start Date the first day of the current week is displayed. To choose a different start date
click theCalendar link and select a new date. See "Working with the Calendar"
3. At Log End Date the last day of the current week is displayed. To choose a different end date,
click theCalendar link and select a new date.
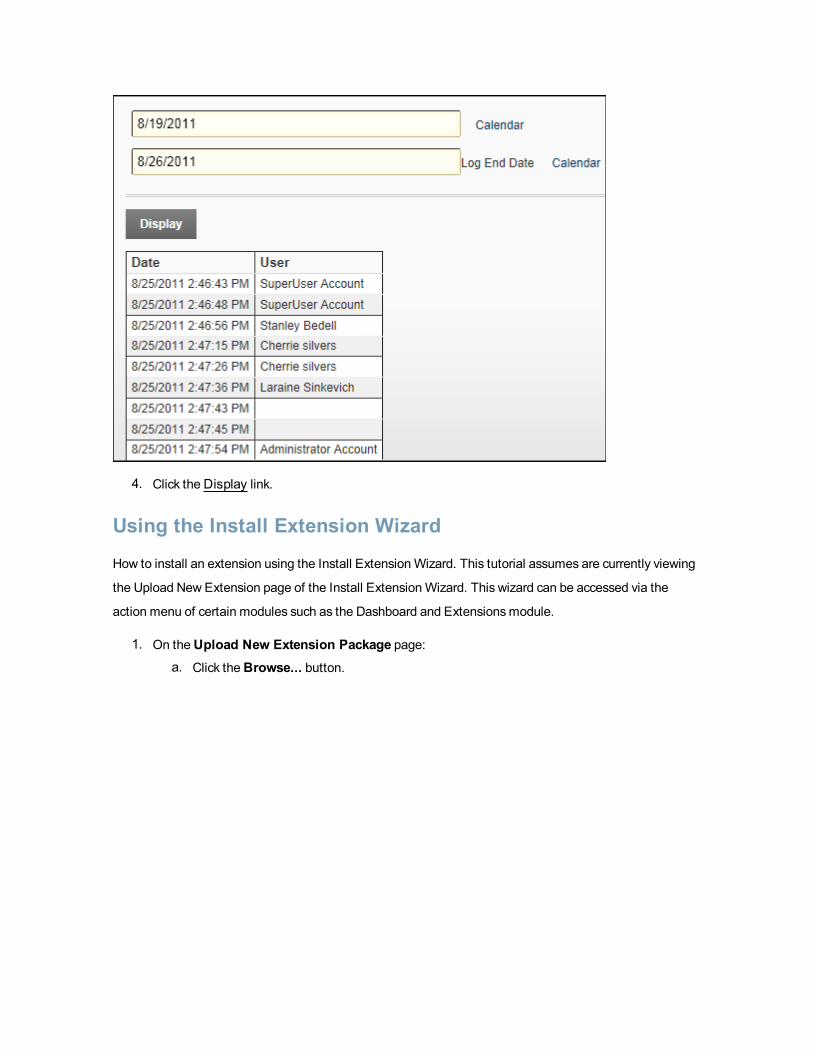
4. Click theDisplay link.
Using the Install Extension Wizard
How to install an extension using the Install ExtensionWizard. This tutorial assumes are currently viewing
the Upload New Extension page of the Install ExtensionWizard. This wizard can be accessed via the
action menu of certain modules such as the Dashboard and Extensionsmodule.
1. On theUpload New Extension Package page:a. Click theBrowse... button.

b. Select the required file from your computer.
c. Click theNext link.
2. Optional. TheUpload Results page will be displayed if there is an unusual result such as a leg-
acy Skin or Container, or the language package has already been uploaded. In this case, select the
required action and click theNext link - OR - ClickCancel and start again.
3. On the Package Information page, review the package information and then click theNext link.
4. On theRelease Notes page, review the release notes and then click theNext link.
5. On theReview License page:a. At License, review the license for this extension.
b. At Accept License? check the check box to agree to the license terms.
c. Click theNext link.
6. On the Package Installation Report page, review the package installation results and then click
theReturn link to return to the module that you accessed theWizard from. Note: The newly added
extension is now listed on the Installed Extensions tab of the Extensionsmodule.
Pager
About the Pager
The Pager is a control which enables you to easily navigate to other pages of records and is used on a
number of DNNAdmin and Host modules such as the Event Viewer and the User Accountsmodules.
Here's an overview to this control:

n The current page and total number of pages is displayed to the left.
n Page navigation links are displayed on the right enabling you to quickly move to:
o The First page of all records,o The Previous page of recordso A specific page by number. E.g. Page 1, 2, 3, etc.o The Next page of recordso The Last page of records
ThePager Control
Tip: On theUser Account page, the default number of records displayed per page can be set and
the pager control can also be suppressed.
Replacement Tokens
List of Replacement Tokens
By adding one or more of the below replacement tokens into content you can display site or user data to
site users. Some examples how you might use a replacement token are to display the site name and
description as the content of a module, or to add a personalized salutation at the beginning of each news-
letter.
Replacement Token ExampleReplacement Token
Description
[Portal:Currency] USD
Displays the site currency
type as set on the Site Set-
tings page.
[Portal:Description]Awesome Cycles is an online shop that sells a
wide range of bikes and biking accessories.
Displays the site description
as set on the Site Settings
page.
[Portal:Email] [email protected] Displays the email address
of the primary Administrator
as set on the Site Settings
page.

[Portal:FooterText] Copyright 2012 by Awesome Cycles
Displays the copyright text
entered in the Copyright field
on the Site Settings page.
[Portal:HomeDirectory] ../../Resources/AwesomeCycles/Relative Path of the Portals
Home Directory.
[Portal:LogoFile] logo.gifSite Path to Logo file. E.g.
logo.gif
[Portal:PortalName] Awesome CyclesThe site name as set on the
Site Settings page.
[Portal:TimeZoneOffset] -480
Difference in minutes
between the default site
time and UTC.
User Tokens
[User:DisplayName]Rose Booth The display name of the
user.
[User:Email][email protected] The email address of the
user.
[User:FirstName] Rose The first name of the user.
[User:LastName] Booth The last name of the user.
[User:Username] Rosie The username of the user.
Membership Tokens
[Membership:Approved] Yes / NoIndicates if the user is
approved.
[Membership:CreatedDate] 10/4/2011 1:08 PM
Displays the date and time
when the user registered on
the site.
[Membership:IsOnline] Yes / NoIndicates if the user is cur-
rently online.
Page (Tab) Tokens
[Tab:Description] Welcome to Awesome CyclesDisplays the description of
the current page.
[Tab:FullUrl] http://www.awesomecycles.biz/Services/tabid/ Displays the full URL of the

73/Default.aspx current page.
[Tab:IconFile] icon.gifPage relative path to icon
file.
[Tab:KeyWords] bikes, bicycles, cyclingDisplays the keywords for
the current page.
[Tab:TabName] Home Page name
[Tab:TabPath] //HTML Page relative path
[Tab:URL] Page URL
Date Tokens
[DateTime:Now] 10/15/2012 5:39 PM Current date and time.
[DateTime:Now|f] Tuesday, October 26, 2012 5:39 PMDisplays long date and short
time.
[DateTime:Now|F] Tuesday, October 26, 2012 5:39:20 PMDisplays long date and long
time.
[DateTime:Now|g] 10/26/2012 5:39 PMDisplays short date and short
time.
[DateTime:Now|G] 10/26/2012 5:39:20 PMDisplays short date and long
time.
[DateTime:Now|Y] October, 2012 Displays year and month.
[DateTime:UTC] 10/15/2012 5:39 PM Coordinated Universal Time.
[DateTime:UTC|f] Tuesday, October 26, 2012 5:39 PM
Coordinated Universal Time
- long date and short time.
Other appended options are
F, g, G and Y; as for Date-
Time above.
[DateTime:System] 10/15/2012 5:39 PMDisplays date and time as
per your local settings.
[DateTime:System|f] Tuesday, October 26, 2012 5:39:20 PM
Displays date and time as
per your local settings. This
example displays long date
and short time. Other
appended options are F, g,

G and Y; as for DateTime
above.
Tick Tokens
[Ticks:Now] 633282985407609550CPU tick count for current
second.
[Ticks:Today] 633282624000000000CPU tick count since mid-
night.
[Ticks:TicksPerDay] 864000000000CPU ticks per day (for cal-
culations)
Related Documents