Door-Type High Temperature Sanitizing Dishwasher (USA Version) OWNER ’ S I NSTALLATION , O PERATION AND MAINTENANCE MANUAL MEIKO • 1349 Heil Quaker Blvd. • La Vergne, TN 37086 • Phone: (615) 399-6600 • (800) 55-MEIKO • Fax: (615) 399-6620 Rev. 8/14 M ODEL DV 80.2

Welcome message from author
This document is posted to help you gain knowledge. Please leave a comment to let me know what you think about it! Share it to your friends and learn new things together.
Transcript

Door-Type High Temperature Sanitizing Dishwasher(USA Version)
OWNER’S INSTALLATION, OPERATION AND
MAINTENANCE MANUAL
MEIKO • 1349 Heil Quaker Blvd. • La Vergne, TN 37086 • Phone: (615) 399-6600 • (800) 55-MEIKO • Fax: (615) 399-6620
Rev. 8/14
MODEL DV 80.2

Page 2
TABLE OF CONTENTS 3.12 Drain Hose Positioning ............................ 113.13 Tabling Attachment .................................. 123.14 Final Assembly ........................................ 143.15 Priming the Detergent and Rinse
Additive Lines .......................................... 143.16 Checking for Correct Chemical
Concentration .......................................... 14
4. OPERATION ....................................... 154.1 Location and Description of Controls ....... 154.2 Startup ..................................................... 164.3 Loading .................................................... 164.4 Operation ................................................. 174.5 Between Cycles ....................................... 174.6 Shutdown ................................................ 17
5. CLEANING ......................................... 185.1 Daily Cleaning (or as required) ................ 185.2 Weekly Cleaning (or as required) ............ 185.3 Exterior Cleaning (as required) ................ 195.4 Deliming (as required) ............................. 19
6. TROUBLESHOOTING........................ 20
1. INTRODUCTION ................................. 31.1 Overview of Equipment ............................. 31.2 General Safety Information........................ 3
2. TRANSPORT AND SHIPPING ............ 3
3. INSTALLATION .................................... 43.1 Overview of Installation ............................. 43.2 Requirements Before Installation .............. 43.3 Uncrating, Positioning and Leveling ............. 53.4 Accessing the Utility Connections ............. 53.5 Main Electrical Supply Connection ............ 63.6 Dispensing System Overview .................... 73.7 Installing an External Detergent System ... 83.8 Installing an External Liquid Rinse
Aid System ................................................ 93.9 Wiring External Chemical
Dispensing Systems .................................. 93.10 Connecting Chemical Containers
or Dispensers .......................................... 103.11 Fresh Water Supply Connection .............. 11
MEIKO reserves the right to change any specifications without notice at any time.© 2010 MEIKO USA, Inc. All rights reserved.
THE MEIKO MODEL DV 80.2 DISHWASHER HAS BEEN DESIGNEDEXCLUSIVELY FOR THE WASHING OF DISHES, GLASSWARE, CUTLERY
AND KITCHEN UTENSILS IN A COMMERCIAL OR INSTITUTIONAL SETTINGAND MUST NOT BE USED FOR ANY OTHER PURPOSE.
MEIKO ACCEPTS NO RESPONSIBILITY FOR DAMAGE TO THE APPLIANCE, SURROUNDINGEQUIPMENT OR ENVIRONMENT THAT IS CAUSED BY INAPPROPRIATE INSTALLATION OR
OPERATION, OR FROM ANY SERVICE THAT IS UNDERTAKEN BY NON-AUTHORIZEDPERSONNEL, OR FROM THE USE OF ANY PARTS EXCEPT THOSE THAT ARE APPROVED BY THE
MANUFACTURER. ANY SUCH INSTALLATION, USE OR SERVICE WILL IMMEDIATELY VOID THEMANUFACTURER’S WARRANTY.
ANY MODIFICATIONS TO THE APPLIANCE THAT ARE PERFORMED WITHOUT THE WRITTENPERMISSION OF MEIKO WILL IMMEDIATELY VOID THE MANUFACTURER’S WARRANTY.
AN ELECTRICAL WIRING DIAGRAM IS LOCATED INSIDE THELOWER-FRONT COMPARTMENT OF THIS MACHINE.
MEIKO • 1349 Heil Quaker Blvd. • La Vergne, TN 37086Phone: (615) 399-6600 • (800) 55-MEIKO • Fax: (615) 399-6620www.meiko.us

Page 3
SECTION 1 - INTRODUCTION
1 INTRODUCTION
1.1 Overview of Equipment
The MEIKO Model DV 80.2 is a commercialdishwasher designed for cleaning dishes,glassware, trays, cutlery and kitchen utensilswith a minimum of employee intervention orsupervision.
A control keypad allows easy selection ofthree different dishwashing cycles toaccommodate different levels of soiling. Adigital display permits easy monitoring ofoperation.
Other features of the unit that affect operationinclude:
Auto Safe - An internal booster heater is regulatedby the electronic control system to ensure aproper sanitizing final rinse temperature,regardless of the incoming water temperature.
Soft Start - The wash water is pumped at areduced pressure for the first few seconds ofthe wash cycle. This protects the ware frombeing moved or damaged by a sudden burstof pressure.
Pumped Rinse - An internal rinse pumpensures that the final rinse pressure isconstant.
Pumped Drain - Accommodates wall or floordrains.
Aqua Stop - The unit will automatically shutdown if a water leak is detected.
Positive-Action Door Handle - After the unithas been started for the day, the wash cyclecan be activated simply by pressing down onthe door handle.
For efficient and SAFE operation, be sure tofollow the installation and operatinginstructions provided in this manual. Inparticular, all safety symbols and notices onthe equipment and in the supplieddocumentation must be followed.
IMPORTANTThe Model DV 80.2 dishwasher has beendesigned exclusively for the washing ofdishes, glassware, trays, cutlery and kitchenutensils in a commercial or institutional settingand must not be used for any other purpose.
2 TRANSPORT AND SHIPPING
IMPORTANT
• Observe any notices on the cratingmaterial that pertain to shipping.
• Use care when transporting theequipment.
• As you unpack the equipment, check thatall components shown on the shippinginvoice are present and intact. Be sure tocheck for shipping damage. If shippingdamage is present, call MEIKO CustomerService at 1-800-868-3840, providing fulldetails on the customer, serial number andextent of damage present. MEIKO will filea freight claim based on this information.
WARNING!In NO EVENT should a damagedappliance be installed or operated!
1.2 General Safety Information
The following symbols and headings are usedthroughout this manual to indicate possiblehazards to persons or to the equipment. Thesymbols and headings are shown in order ofimportance. The descriptive text following theseheadings is italicized for easy recognition.
WARNING! Possible hazard to per-sons, such as from elec-trical shock, crushing, orhot surfaces.
CAUTION Possible hazard to thedishwasher or to otherequipment.
IMPORTANT Vital information or tips forthe installer or operator.
NOTE Information or tips for theinstaller or operator.

Page 4
SECTION 3 - INSTALLATION
3 INSTALLATION
3.1 Overview of InstallationThe owner should contract with qualifiedpersonnel to move the appliance to theinstallation location, unpack it, and prepare itfor final utility connections. In most cases, localcodes prevent the final utility connections frombeing made by any party other than a licensedelectrician and/or plumber.IMPORTANTIt is the responsibility of the owner to ensurethat all aspects of the installation comply withall applicable local and national codes.IMPORTANTThe appliance’s warranty is not valid until aMEIKO Authorized Service Agent performs aStartup and Demonstration on the appliance.This Demonstration should be scheduled afterinstallation.Installation of the dishwasher involves thefollowing steps:• Verifying that the utility connections are
present, are appropriate for the appliance,and comply with all applicable local andnational codes.
• Unwrapping the appliance (leaving theshipping skid in place for easier move-ment) and checking for shipping damage.
• Moving the appliance to the installationlocation, removing the skid, and leveling thefeet.
• For units equipped with the optionalAirConcept waste air heat recovery system,installing the system and its enclosure tothe upper rear of the machine. If the unit isso equipped, refer to the separateinstructions packaged with this optionalsystem for details.
• Connecting the electrical supply.• Installing the chemical dispensing system.
For units equipped with the optionaldispensing system, this involves connectingthe warewasher’s detergent and rinse additivetubes to appropriate dispensers.For units without the optional system, thedispensing system installer should followthe manufacturer’s instructions AND theinstructions in Section 3 of this Manual.
• Connecting the fresh water supply.• Positioning the drain hose.• Connecting the machine to tabling.• Contacting your MEIKO Authorized Service
Agent to perform a Startup andDemonstration on the appliance. This stepalso validates the appliance’s warranty.
3.2 Requirements Before InstallationBefore the installer can uncrate and move theappliance to the installation location, thefollowing conditions MUST be met:• INSTALLATION AREA REQUIREMENTS
- The area MUST be frost-free. Freezingtemperatures (32°F/0°C or lower)inhibit proper operation and candamage internal components.
- The area MUST have a firm floor surface.It is possible to compensate for unevenflooring by adjusting the feet.
- The area should be away fromappliances, furniture or surfaces that canbe damaged by steam. If this is notpossible, these items should beprotected from the small quantities ofsteam that are released during normaloperation of the dishwasher.
• UTILTITY CONNECTION REQUIREMENTS- Connections must be present and ready
for hookup to the appliance. All utilitysupplies must comply with the electricalinformation labels, with the informationon the data plate, and with all applicablelocal and national codes.
- Electrical leads and the water supplyhose (supplied by the customer) mustbe present.
- For units without the optional dispensingsystem, external detergent and rinseadditive pumps (if used) should beinstalled according to the manufac-turer’s instructions.
- For units with the optional dispensingsystem, appropriate dispensers orcontainers should be installed andready for connection to the appliance.
• GENERAL REQUIREMENTSAuthorized personnel should be availableto perform the actual utility connections.

Page 5
SELECT
NO
RMAL
CYC
LESELEC
TEXTEN
DED
CYC
LESELEC
THEAVYCYC
LE
PO
WER
ON
PO
WER
ON
PO
WER
ON
PO
WER
ON
STAR
T
STAR
T
STAR
T
STAR
TCYC
LE
CYC
LE
CYC
LE
CYC
LED
RAIN
DR
AIN
DR
AIN
DR
AIN
or
or
or
OFF
OFF
OFF
OFF
PO
WER
PO
WER
PO
WER
PO
WER
MIN. 180°F / 82°C
MIN. 150°F / 66°C
WASH TANK TEM
P
FINALRINSE TEM
P
Press "STOP" then
"START" to drain
Remove2 screws onbottom edge
Figure 3-1
SECTION 3 - INSTALLATION
Removescrew
As panel isremoved, disconnect
ribbon cable toMIKE 2 controller
Figure 3-2
Swingelectricalbox down
Mainelectrical
supplyterminal
block
Figure 3-3
Chemicaldispenserterminalblock (ifused)
Electricalbox
3.3 Uncrating, Positioning and Leveling1. Remove all shipping and packaging material
from the appliance, including supports andwrappings. Leave the shipping skid in place atthis time to allow for easier movement to theinstallation location.
2. Check for shipping damage as described inSection 2, “Transport and Shipping.” If damageis present, call MEIKO Customer Service at1-800-868-3840, providing full details on thecustomer, serial number and extent of damagepresent. MEIKO will file a freight claim based onthis information.
3. Move the appliance to the installation area andremove the skid. Use caution to avoid damagingthe appliance or any of its components.
4. Using a spirit level, check that the appliance islevel in both directions (front-to-back AND side-to-side). If necessary, level the appliance byrotating the bottom section of each foot.CAUTIONThe dishwasher MUST be level for properoperation.
5. If the machine is equipped with the optionalAirConcept waste air heat recovery system, itshould be installed to the dishwasher at this time.Refer to the separate instructions packaged withthis optional system for details.
3.4 Accessing the Utility ConnectionsWater supply and drain connections are located atthe lower rear of the dishwasher. The electrical supplyenters through a strain relief at the lower rear, butthe terminal blocks are accessed from the front ofthe machine.To remove the lower front panel:1. Remove AND RETAIN the two screws on the
bottom edge of the lower front panel. See Figure3-1.
2. Slide the panel down and away from thedishwasher to remove it. As you pull the panelaway from the dishwasher, disconnect the ribboncable for the MIKE 2 controller to avoid damage.
3. Remove the screw that holds the electrical boxin place, as shown in Figure 3-2. Swing the boxdown as shown in Figure 3-3. The main electricalsupply terminal block is on the left side of themachine. The chemical dispenser terminal block(if used) is underneath the wash tank on the rightside of the machine.
Page 6
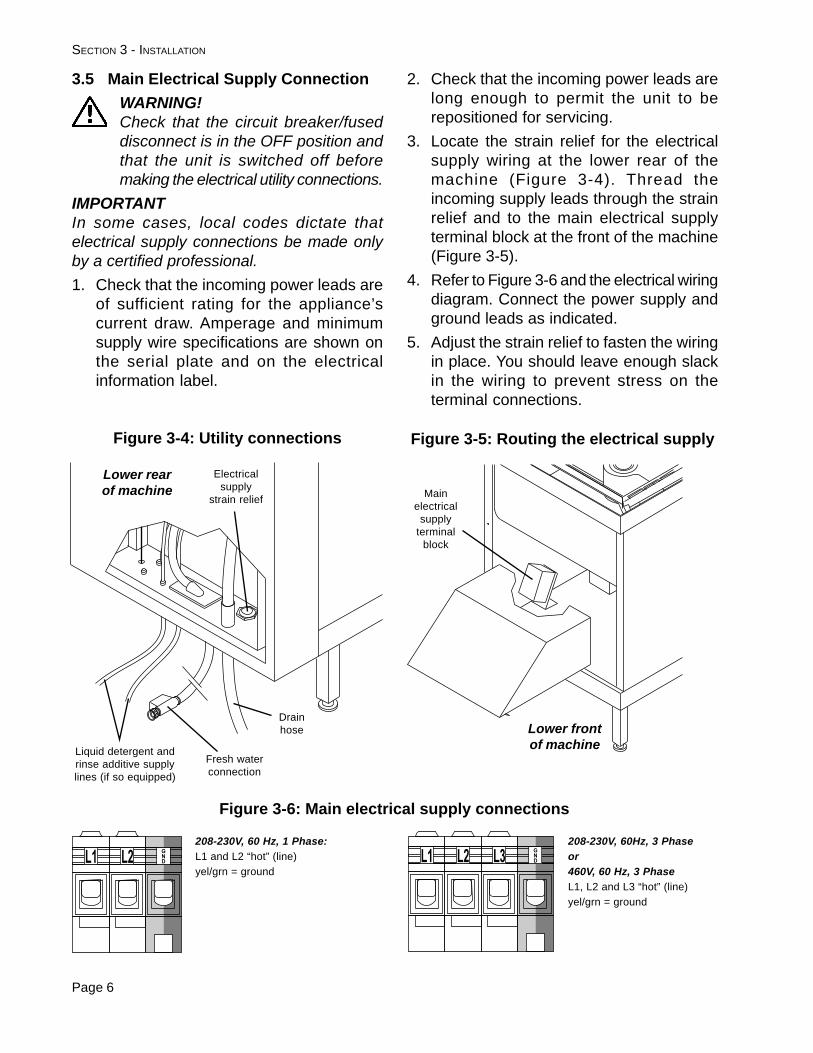
3.5 Main Electrical Supply Connection
WARNING!Check that the circuit breaker/fuseddisconnect is in the OFF position andthat the unit is switched off beforemaking the electrical utility connections.
IMPORTANTIn some cases, local codes dictate thatelectrical supply connections be made onlyby a certified professional.
1. Check that the incoming power leads areof sufficient rating for the appliance’scurrent draw. Amperage and minimumsupply wire specifications are shown onthe serial plate and on the electricalinformation label.
SECTION 3 - INSTALLATION
2. Check that the incoming power leads arelong enough to permit the unit to berepositioned for servicing.
3. Locate the strain relief for the electricalsupply wiring at the lower rear of themachine (Figure 3-4). Thread theincoming supply leads through the strainrelief and to the main electrical supplyterminal block at the front of the machine(Figure 3-5).
4. Refer to Figure 3-6 and the electrical wiringdiagram. Connect the power supply andground leads as indicated.
5. Adjust the strain relief to fasten the wiringin place. You should leave enough slackin the wiring to prevent stress on theterminal connections.
208-230V, 60 Hz, 1 Phase:
L1 and L2 “hot” (line)
yel/grn = ground
Figure 3-6: Main electrical supply connections
208-230V, 60Hz, 3 Phase
or
460V, 60 Hz, 3 Phase
L1, L2 and L3 “hot” (line)
yel/grn = ground
L2L1GND L2L1
GNDL3
Figure 3-5: Routing the electrical supply
Mainelectrical
supplyterminal
block
Electricalsupply
strain relief
Lower rearof machine
Lower frontof machine
Figure 3-4: Utility connections
Liquid detergent andrinse additive supplylines (if so equipped)
Fresh waterconnection
Drainhose

Page 7
SECTION 3 - INSTALLATION
Figure 3-7: Chemical connections
Duplicate
panel
ison opposite
side of machine.
REMOVE
ACCESS
PANEL TO
ROUTE
DETERGENT
LINE.Dummy plugfor detergentconcentration
probe
Liquid rinseadditiveinjection
(blue)
Liquid detergent injection(clear) - only present onmachines with internalchemical pump option
Mainelectrical
supplyterminal
blockChemicaldispenserterminal
block
Dummyplugs fordetergentinjection
Accesspanel forexternalchemicaldispenserinjection
(either side)
3.6 Dispensing system overview
The DV 80.2 is designed for usewith a liquid rinse aid, and eithersolid or liquid detergents.
Units equipped with optional liquidinternal detergent and rinse aidpumps have two tubes exiting themachine at the lower rear. Thesetubes can simply be attached todetergent and rinse aid containers.See Figure 3-7.
Units that are NOT equipped withthe internal pumps have:
• A blue rinse aid line exiting themachine at the lower rear.
• Two dummy plugs coveringholes in the back of the washtank that can be used for de-tergent injection. The plugs areaccessed by removable panelson the sides of the machine.Either plug can be used.
• A hole in the bottom of the washtank for the installation of a de-tergent concentration probe.
A dispensing system terminal block(shown in Figure 3-7) providescontacts for two line voltagerelays. These relays, when closed,provide a “window” for externalpump systems to activate.
• The rinse aid pump relay closesfor approximately 16.5 secondswhenever the booster tankrefills (once per cycle).
• The detergent pump relaycloses whenever the washpump is in operation.
Activation of the pumps can becontrolled as follows:
• Solid detergent systems shoulduse a detergent concentrationprobe installed in the wash tankto activate the external pump.A dummy plug at the bottom ofthe wash tank provides aninstallation location for the probe.
• Liquid detergent systems can use EITHER adetergent concentration probe, OR a timer system.A detergent concentration probe is HIGHLYRECOMMENDED.
• Liquid rinse aid systems should be controlled usinga timer system.

Page 8
SECTION 3 - INSTALLATION
Duplicate
panel
ison opposite
side of machine.
REMOVE
ACCESS
PANEL TO
ROUTE
DETERGENT
LINE.
Figure 3-9:External
detergentsystem
Remove large plug toroute solid detergent
supply line
ORRemove small plug toroute liquid detergent
supply line
Remove dummyplug to attach
detergent supply line
Accesspanel forexternalchemicaldispenserinjection
Remove dummy plug toinstall detergent
concentration probe(if using a probe)
CAUTIONIf the unit will NOT use one or both ofthe chemical supply tubes, cut theunused tube(s) close to the pointwhere it exits the machine’s exteriorpanel and seal it using the suppliedplug and wire clamp. See Figure 3-8.
For units equipped with the optionalinternal chemical dispensing system,skip ahead to Section 3.10, “Connect-ing Chemical Containers or Dispens-ers.”
3.7 Installing an ExternalDetergent System
To install a detergent dispensingsystem:
1. Remove the detergent plug accesspanel on either side of the machine.Remove the matching dummy plugfrom the back of the wash tank.See Figure 3-9.
2. Route the detergent supply linethrough one of the two holes in theaccess panel, through the sidepanel, and into the wash tank. Forsolid systems, use the large holein the access panel. For liquidsystems, use the smaller hole.
3. Fasten the line in place and sealthe connection.
4. Replace the access panel.
5. If a detergent concentration probewill be used, remove the dummyplug in the bottom of the wash tank.Then, install the detergentconcentration probe and seal theconnection. See Figure 3-9.
6. Check that the pump is correctlyinstalled according to the manu-facturer’s instructions.
Figure 3-8: Sealing unused chemical tubes (ifnot using a liquid detergent or rinse additive)
Cuttubing
Seal with plugand wire clamp

Page 9
SECTION 3 - INSTALLATION
3.8 Installing an External Liquid Rinse AidSystem
A pre-plumbed, blue 1/4” ID tube at the lowerrear of the unit serves as the connection pointfor the rinse aid supply. See Figure 3-10.
If a liquid rinse aid system will NOT be used,cut the tubing near the rear panel. Then, closeand seal it with the plug and wire clamp thatare supplied on the end of the tube. SeeFigure 3-8.
To install a liquid rinse aid dispensing system:
1. Route the rinse aid supply line to the blue1/4” ID tube at the lower rear of themachine.
2. Fasten the line in place and seal theconnection.
3. Check that the pump is correctly installedaccording to the manufacturer ’sinstructions.
3.9 Wiring External Chemical DispensingSystems
IMPORTANTSome local codes dictate that electricalconnections be made only by a certifiedprofessional.
1. Locate the chemical dispenser terminalblock. See Figure 3-3.
2. Thread the incoming leads from thechemical pumps through the extra strainreliefs (at the lower rear of machine) andto the chemical dispenser terminal block.
3. Connect the wires as shown in Figure3-11. Note that the terminal block suppliesLINE VOLTAGE SIGNALS. An additionaltransformer may be required dependingon the supply requirements of the externalpumps.
4. Adjust the strain reliefs to fasten the wiringin place. Leave enough slack in the wiringto prevent stress on the terminalconnections. Bundle the wires togetherusing wire ties to prevent them fromtangling when repositioning the appliance.
Figure 3-10: Liquid rinse additive system
Liquid rinseadditiveinjection
(blue)
Figure 3-11: Dispenser pump wiring

Page 10
3.10 Connecting Chemical Containers orDispensers (if so equipped)
This section applies to units with eitherinternal or external chemical dispensingpumps.
1. Check that the rinse additive anddetergent are compatible with the unit. Inparticular, a commercial (not a domestic)detergent MUST be used.
2 Check that the containers/dispensers arecorrectly installed according to themanufacturer’s instructions.
3. If the dishwasher is equipped with factoryinternal chemical dispensing pumps, twostrainer assemblies for the chemicalcontainers are also included. See Figure3-12. These strainers should beassembled onto the lids for the detergentand rinse additive containers.
Strainertube
Lid for detergentor rinse additive
container
Wireclamp
Figure 3-12: Strainer assembly
4. For liquid detergent systems, locate theCLEAR liquid detergent tube. Connect thetubing to the detergent container.
For solid detergent systems, connect thedetergent supply line according to themanufacturer’s instructions.
5. Locate the BLUE liquid rinse additive tubeat the lower rear of the unit. Connect thetubing to the rinse additive container.
6. If using the strainers shown in Figure3-12, be sure to use the supplied wireclamps to fasten the chemical supplytubes securely. MEIKO STRONGLYRECOMMENDS the use of a sealingcompound on these connections toprevent leakage.
SECTION 3 - INSTALLATION

Page 11
3.11 Fresh Water Supply Connection
CAUTIONBefore connecting the water supply hose, theline MUST be flushed clean of all debris,including (but not limited to) pipe sealant,metal particles, solder, etc. This debris candamage the appliance.
IMPORTANTIn some cases, local codes dictate that watersupply connections be made only by acertified professional.
1. Check that iron or other metal particlescannot contaminate the fresh watersupplied to the dishwasher.
2. Check that the incoming water pressureis within the acceptable range for theappliance (8.7-72.5 psi, 0.6-5.0 bars). Itmay be necessary to increase the pres-sure (with a booster pump) or to reducethe pressure (with a reducing valve).
3. Check the incoming water temperature.MEIKO recommends a water temperatureof 140°F/60°C for optimum operation,although if necessary the appliance willsanitize correctly using water at anytemperature. Colder water will result in alonger preheat time (during initial startup)and may extend the cycle time to allowthe final rinse water to heat to 180°F/82°C.
4. Check the incoming water hardness.MEIKO recommends a hardness of 4-6grains per U.S. gallon.
5. Because the water inlet incorporates astainless steel dirt trap, an additional trapis unnecessary unless required by local,national or international codes.
6. The dishwasher includes a water supplyline that ends in an enclosure containingthe water inlet valve and the Aqua-Stopshutoff valve (see Figure 3-13). Connectthe customer-supplied water line to thefitting on the end of this enclosure. Use asealing compound on the threads to ensurethat no leaks are present in the connection.
7. Check that the water line is long enoughto permit the unit to be repositioned forservicing.
3.12 Drain Hose Positioning
1. Check that the end of the drain hose willempty into a drain with a minimumdiameter of 1-1/2”/38mm.
2. Check the type of drain that will be used.Because the DV 80.2 uses a pumped drain,either a floor or wall drain is acceptable.
CAUTIONNo portion of a wall drain system may behigher than 24” (610m) A.F.F. to ensurethat the drain pump is operating withinrated specifications. See Figure 3-14.
3. Route the drain hose to the drain. In somecases, a grease trap (supplied by others)must be fitted into the waste water line. Ifthis trap is required for your installation,check that it is present.
Lower rearof machine
Figure 3-13: Fresh water supply anddrain connections
Fresh waterconnection
Drainhose
Figure 3-14: Drain linevertical rise limitations
No portion ofdrain system
may be higherthan 24”(610mm)
A.F.F.
SECTION 3 - INSTALLATION

Page 12
SELECTNORMALCYCLESELECT
EXTENDEDCYCLESELECTHEAVYCYCLE
POW
ERO
N
POW
ERO
N
POW
ERO
N
POW
ERO
N
START
START
START
STARTCYCLE
CYCLE
CYCLE
CYCLE
DRAIN
DRAIN
DRAIN
DRAIN
orororor
OFF
OFF
OFF
OFF
POW
ER
POW
ER
POW
ER
POW
ER
MIN. 180°F / 82°C
MIN. 150°F / 66°C
WASH TANK TEMP
FINALRINSE TEMP
Press "STOP" then
"START" to drain
START
START
START
STARTCYCLE
CYCLE
CYCLE
CYCLE
DRAIN
DRAIN
DRAIN
DRAIN
orororor
OFF
OFF
OFF
OFF
POW
ER
POW
ER
POW
ER
POW
ER
MIN. 180°F / 82°C
FINALRINSE TEMP
Press "STOP" then
"START" to drain
3.13 Tabling Attachment
The DV 80.2 can be positioned ineither of two tabling configurations;straight through, or in a cornerinstallation. See Figure 3-15.
1. IF the machine will bepositioned in a corner, performthe following steps beforeattaching the tables:
• Position the machine so thatthe LEFT REAR corner ofthe machine faces thecorner of the wall, as shownin Figure 3-15. For cornerinstallations, this placementis necessary to ensure thatthe control panel can bereached by the operator.
• Remove the FRONT rackguide as shown in Figure 3-15. The guide is held inplace by two screws.Replace the guide on theLEFT SIDE position in the2 mounting holes provided.
2. Position the machine and tablesas follows:
• Check that the centerline ofthe opening at the end ofeach table is aligned withthe centerline of the racktrack of the machine. SeeFigure 3-16.
• Check that the surfaceheight of each tablematches the height of therack track of the machine,to ensure a smooth transi-tion. The standard table sur-face height is 34” (864mm).
• Check that the machine islevel.
The height of the machine, andof most tables, can be adjustedby rotating the feet at the endof the legs.
Figure 3-15: Straight-through andcorner tabling configurations
Straight-through
Controlpanel
For a cornerinstallation ONLY,move the rack rail
guide from theFRONT position to
the LEFT SIDEposition.
Corner installation:Left rear corner of machineMUST face corner of wall to
ensure access to control panel.
Before After
Figure 3-16: Aligning the table centerlineswith the dishmachine
Centerline ofrack track
Centerline oftable opening
Centerline ofrack track
Centerline oftable opening
Straight-through installation
Corner installation
SECTION 3 - INSTALLATION

Page 13
CAUTIONAfter adjusting the height of the machine,always check that it is level to ensureproper operation.
3. Position each table lip-in at the machine,as shown in Figure 3-17. Be sure to seatthe lip-in against the inner, vertical mount-ing surface.
CAUTIONIf the table lip-in extends beyond thevertical mounting surface, and down to theangled face of the inside of the machine,it will not seat properly. The lip-in shouldbe no more than 3/4” (19mm) in depthto ensure correct mounting to themachine.
4. For corner installations, check that thesides of the front table do not prevent thedoor handle from being pushed down farenough to engage the door switch. Bypushing the handle slowly, you shouldhear an audible “click” as the switchengages.
If it is necessary to trim the table sides toclear the handle and allow the switch toengage, refer to Figure 3-18.
5. After the tables have been positionedcorrectly, secure them to the machineusing silicone sealant.
20-1/4”(514mm)
recommended
Turndownlip-in
flange3/4”
(19mm)max.
Lip-in flange MUSTbe flush against the
vertical mountingsurface
Lip-in flange MUSTNOT extend to theangled face inside
the machine
Figure 3-17: Tabling attachment
Figure 3-18: Door handle clearance for corner installations
5”(127mm)
2-1/2”(64mm)
Cutout allows doorhandle to be
pushed down toengage door switch
SECTION 3 - INSTALLATION

Page 14
SECTION 3 - INSTALLATION
3.15 Priming the Detergent and RinseAdditive Lines
For machines equipped with externalchemical dispensing systems, prime thedetergent and rinse additive lines accordingto the manufacturer’s instructions.
For machines equipped with factory internalchemical dispensing systems, prime the linesas follows:
1. Press and hold the STOP/OFF (O) keyuntil appears in thedisplay (about 4-5 seconds).
2. Press the START/DRAIN ( )key 5 timesuntil appears in the display.
3. Press the key. willappear in the display.
4. Press the START/DRAIN ( )key to startpriming the liquid rinse additive lines. Atimer will count down the time remaining.By default, the system will prime for 180seconds.
5. When the display returns to, press the key so that appears in the display.
6. Press the START/DRAIN ( )key to startpriming the liquid detergent lines. A timerwill count down the time remaining. By default,the system will prime for 30 seconds.
7. When the display returns to, press the STOP/OFF
(O) key to shut off the dishwasher.
3.16 Checking for Correct ChemicalConcentration
Machines equipped with external chemicaldispensing systems will have normal settingsrecommended by the manufacturer.
For machines equipped with factory internalchemical dispensing systems, the normalsettings for chemical injection are:
• Detergent - 0.256 oz. per gallon of washwater (2.0 ml per liter).
• Rinse additive - 0.0256 oz. per gallon ofrinse water (0.2 ml per liter).
To check if the normal settings are correct foryour chemicals, RUN THREE EMPTYLOADS to completely cycle the water supplyand obtain accurate test results. This will onlytake a few minutes. Then, run a sample loadwith soiled ware and examine the results.
• If the detergent setting is too low, the warewill not be adequately cleaned. In somecases, this can be corrected by simplyselecting a longer cycle time (using theCycle Select II, Extended or Cycle SelectIII, Heavy buttons), but the detergentconcentration may also need to be adjusted.
• If the rinse additive setting is too low,spotting or streaking may occur on theware.
• If too much of either chemical is added,the extra chemicals will be wasted. Thisis often difficult to detect except bydetermining how long your chemicalsupplies last. If the chemicals are beingexhausted quickly, you may need to havethe chemical concentration adjusted.
IN ALL CASES, ANY ADJUSTMENTS OFTHE FACTORY CHEMICAL INJECTIONSETTINGS ARE TO BE PERFORMED
ONLY BY A MEIKO AUTHORIZEDSERVICE AGENT. CHANGES BY
UNAUTHORIZED PERSONNEL WILLVOID YOUR WARRANTY.
If you need to contact your AuthorizedService Agency, please contact MEIKOTechnical Support at 1-800-868-3840.
3.14 Final Assembly
1. Check and tighten all electrical terminalscrews.
2. Replace all panels onto the dishwasher.When replacing the lower front panel, besure to reconnect the ribbon cable for theMIKE 2 controller.
3. Switch the circuit breaker/fuseddisconnect to the ON position. Be sure toprime the detergent pumps and check forcorrect chemical concentration beforeoperating the unit.

Page 15
SECTION 4 - OPERATION
4 OPERATION
4.1 Location and Description of Controls
The dishwasher controls are on the keypad on the front panel. See Figure 4-1.
Figure 4-1: Dishwasher controls
A
A, B, C - POWER/CYCLE SELECT keys
These keys turn the dishwasher on. Each keyselects a different cycle length toaccommodate differing levels of soiling:
Normal cycle for typically soileditems
Extended cycle for items withgreater soiling
Heavy cycle for very heavily soileditems
The keys may also be pressed betweencycles to choose a different cycle length.
D - START/DRAIN key
If pressed when the unit is readyto operate, this key starts theoperating cycle. If the dishwasherhas been switched off (forinstance, at the end of the shift),this key empties the tank.
The machine also includes a positive-actiondoor handle that allows the currently-selectedwash cycle to activate simply by pressingdown on the handle (if the door is closed).
B C D
E
F G
E - STOP/OFF key
If pressed when the unit is inoperation, this key ends thecycle immediately. If the unit isNOT in operation, this key willswitch the unit off.
F - WASH TANK TEMPdisplay
Shows the currenttemperature of the water inthe wash tank.
G - FINAL RINSE TEMPdisplay
Shows the currenttemperature of the final
rinse water. The dishwasher cannot begin afinal rinse cycle until the rinse water hasheated to the proper temperature. The washcycle will automatically extend (if necessary)until the proper rinse temperature is reached.
POSITIVE-ACTION DOOR HANDLE (not shown)
After the unit has been started for the day,the wash cycle can be activated simply bypressing down on the door handle.

Page 16
SECTION 4 - OPERATION
4.2 Startup
The light above the selectedPOWER/CYCLE SELECT key willbegin to flash, showing that the tankis filling and the water is heating tothe correct temperature.
The time required for filling and preheatingwill vary based on the temperature of theincoming water supply. For incoming waterat 140°F/60°C, the machine may need up to15 minutes to fill and heat to the correct washtemperature. The default wash temperatureis several degrees above 150°F/66°C forefficient operation.
Press any of the three POWER/CYCLESELECT keys to turn on the dishwasher.
Normal cycle for typically soileditems
Extended cycle for items withgreater soiling
Heavy cycle for very heavily soileditems
If desired, you can watch the WASH TANKTEMPERATURE and FINAL RINSE TEM-PERATURE displays as they rise. This givesan indication of the amount of time left be-fore the dishwasher can be operated.
(constant)
4.3 Loading
The loading guidelines shown here will leadto faster, more efficient cleaning of your ware.
Load hollow or concave dishware (glasses,large bowls, etc.) upside-down and at anangle. This allows water to drain more quickly,preventing stains.
For greater efficiency in loading cutlery, youcan use cutlery holders. When loading them:
• Do not overload the holders.
• Always load knives, forks andspoons with the handleDOWN.
• Do not load identical wareinto any given holder.Instead, load an assortmentof knives, forks and spoonsinto each holder. Identicalware is often too closelyspaced for effective cleaning.
Do not stack items in the dishwasher. Stackeditems require longer or multiple cleaningcycles because the wash water cannot reachthe food residue as effectively. It is moreefficient to load the dishwasher with feweritems and run multiple, shorter cycle times.
Load plates, soup bowls, etc. at an angle withthe inside face pointing up. Ensure that watercannot pool in the bottom of bowls.
When the tank is full and the waterhas been heated to the correcttemperature, the light above theselected POWER/CYCLE SELECTkey will stop flashing. The machineis now ready for operation.
Check the level of the external detergent andrinse additive dispensers. If necessary,replace or refill the dispensers.
Position bowls toallow water to drain
(flashing)
OPTIONAL

Page 17
SECTION 4 - OPERATION
4.5 Between Cycles
Between cycles, leave the door of the machineclosed. If the door is left open, the wash tankwater will cool. This will activate the tank heaters,consuming extra energy, and may lengthen therecovery time when another cycle is started.If necessary, you can choose a different cyclelength between cycles by pressing any of thePOWER/CYCLE SELECT keys.When you are ready to start a new cycle, referto Section 4.3, “Loading.”
When the cycle has completed, the dishwasherwill stop operating and sound a three-stagebeeping tone. After the tone has sounded, youmay open the door and unload the dishware.Note that steam escapes when the door isopened; this is normal.
WARNING!Use caution when handling hotdishware.
4.6 Shutdown
At the end of the shift, press theSTOP/OFF key.
Press the START/DRAIN key toempty the tank.
After the water has drained, the dishwasher willenter a self-cleaning mode. The interior will besprayed with hot, fresh water as the boostertank empties. When this is completed, the drainwill “pulse” several times to empty the waterand the dishwasher will automatically shut off.
WARNING!DO NOT open the door of thedishwasher during the self-cleaningprocess! The process will beinterrupted and hot water may sprayout of the dishwasher.
After the dishwasher has finished its self-cleaning cycle, open the door. Remove anyfood particles, scraps or bones from the scrapscreens. MEIKO recommends that the doorof the dishwasher be left open overnight toallow it to air thoroughly.
4.4 Operation
Press the START/DRAIN key tobegin the selected cycle. The keywill not work unless the lightabove the selected POWER/CYCLE SELECT key hasstopped flashing.
You can also begin the selected cycle bypushing down on the door handle, and thenreleasing it.
The dishwasher will begin a wash and rinsecycle. The Soft Start feature pumps the waterthrough the arms slowly for the first few secondsof the cycle to protect the ware. After a fewseconds, full pressure will engage.
The time of the total cycle will be at least aslong as the times shown on the serial plate.
• When using a cold water supply, themachine will automatically extend the washcycle if necessary until the final rinse watercan be heated to the correct temperature.
• If the machine is equipped with the optionalAirConcept waste air heat recovery system,a separate heat recovery cycle will followthe final sanitizing rinse. The door shouldNOT be opened during the heat recoverycycle, or steam will escape into the room.
Push down,then release
handle tobegin cycle
If desired, the cycle can be stopped at any timeby pressing the STOP/OFF (O) key OR byopening the door.
WARNING!If the door is opened suddenly, hot
water can spray out of the dishwasher. Toprevent this from happening:
• Open the door slowly until the dishwasherstops operating, OR
• Press the STOP/OFF (O) key to stop thewash/rinse cycle before opening the door.
SELECT
NO
RMAL
CYC
LESELEC
TEXTEN
DED
CYC
LESELEC
THEAVYCYC
LE
PO
WER
ON
PO
WER
ON
PO
WER
ON
PO
WER
ON
STA
RT
STA
RT
STA
RT
STAR
TCYC
LE
CYC
LE
CYC
LE
CYC
LED
RAIN
DR
AIN
DR
AIN
DR
AIN
or
or
or
OFF
OFF
OFF
OFF
PO
WER
PO
WER
PO
WER
PO
WER

Page 18
SECTION 5 - CLEANING
5 CLEANING
WARNING!Before ANY cleaning, check that thecircuit breaker/fused disconnect is inthe OFF position and that the unit isswitched off.
IMPORTANTThe headings Daily Cleaning and WeeklyCleaning in this section are generalrecommendations based on typical soiling.
If soil beings to accumulate, the unit shouldbe cleaned more frequently. Extensive foodsoil deposits inside the machine work againstoptimal performance. Some items may notbe cleaned as effectively, resulting in the needfor either a longer cycle or repeat washing. Inaddition, heavy soiling in the wash waterincreases detergent consumption.
5.1 Daily Cleaning (or as required)
1. The dishwasher automatically enters aself-cleaning cycle when it is turned off.The interior will be sprayed with hot, freshwater as the booster tank empties.
2. AFTER this cycle ends and the machineshuts down, open the door. Remove anyfood particles, scraps or bones from thescrap screens.
3. Lift out the scrap screens and clean themthoroughly using a brush and warm water.
4. Lift out the Active Plus filter. Clean it thor-oughly using a brush and warm water. Besure to use care to avoid damaging thescreen on the Active Plus filter.
5. MEIKO recommends that the door of thedishwasher be left open overnight to allowit to air thoroughly.
6. Reassemble all components into the ma-chine before operation. Note the following:- The Active Plus filter MUST be rein-
stalled with the slotted end facingDOWN. See Figure 5-1.
- The scrap screens MUST be reinstalledso that the round grate lines up withthe Active Plus filter. See Figure 5-1.
5.2 Weekly Cleaning (or as required)
Once per week, or as required, perform thefollowing steps:
1. Open the door. Remove and clean thescrap screens and Active Plus filter as de-scribed in Section 5.1, “Daily Cleaning.”
2. Remove and disassemble the arms asshown in Figures 5-2 and 5-3. Clean thearms with a brush and warm running water.
3. Reassemble all components into the dish-washer. Note the following:- The Active Plus filter MUST be rein-
stalled with the slotted end facingDOWN. See Figure 5-1.
- The scrap screens MUST be reinstalledso that the round grate lines up withthe Active Plus filter. See Figure 5-1.
- The top and bottom wash arms areidentical and interchangeable.
- The rinse arms are NOT interchange-able and MUST be replaced in theiroriginal positions. The bottom rinsearm is marked “BOTTOM.” The toprinse arm is marked “TOP.”
Figure 5-1: Screen and filter removal
Scrapscreens (2)
ActivePlusfilter
Round grate isaligned with
Active Plus filter
Slottedend faces
DOWN

Page 19
SECTION 5 - CLEANING
Figure 5-2: Wash andrinse arm removal
Retainingscrews
Steelwasher
Wash arm(top)
Bearingring (2)
Bearingring
Wash armdisassembly (x2)
Rinse armdisassembly (x2)
Wash arm(bottom)
Figure 5-3: Wash andrinse arm disassembly
Steelwasher
5.3 Exterior cleaning (as required)
CAUTIONWhen cleaning the exterior of the dishwasher,be sure to follow these guidelines:
• MEIKO strongly recommends usingdetergent when cleaning the exterior ofthe unit, instead of commercial stainlesssteel cleaners. These cleaners candamage the surface of the control panel.
• Never use abrasive cleaners or pads whencleaning the exterior of the dishwasher.These can scratch the surface of the unit.
WARNING!Ensure that detergents and stainlesssteel cleaners are kept out of the inte-rior of the dishwasher. If the interior ofthe unit requires cleaning, refer to thedeliming procedures (Section 5.4).
5.4 Deliming (as required)
Lime scale deposits will occur over time onthe interior of the dishwasher if it is operatedusing a hard water supply. MEIKO recommendsa hardness of 4-6 grains per U.S. gallon.
A deliming or de-scaling process can be usedto remove these deposits, as well as anyaccumulated food residue.
CAUTIONWhen deliming the interior, be sure to followthese guidelines:
• Use deliming agents designed for use withcommercial dishwashers.
• Follow the instructions for the delimingagent that is used.
After the deliming process:
1. Run the dishwasher through 3-6 regularcycles without a load to rinse and sanitizethe interior thoroughly.
2. Inspect the interior for any remainingdeliming agent residue. If residue ispresent, remove it using a soft cloth andhot water; then, run the machine throughone final empty cycle.
3. Press the STOP/OFF (O) key; then, pressthe START/DRAIN key. This will empty thetank, ensuring that any deliming agent stillin the tank will be flushed out of themachine.
WARNING!Ensure that ALL residue of thedeliming agent is removed. Residuefrom the agent can:- Pose a health hazard;- Damage seals and plastic com-
ponents inside the dishwasher.
Rinse arm(“TOP”)
Rinse arm(“BOTTOM”)

Page 20
SECTION 6 - TROUBLESHOOTING
6 TROUBLESHOOTING
If the dishwasher encounters a problem, an Info Code or Error Code will usually appear in thedisplay. If you use this troubleshooting guide to resolve simple problems, you can often returnthe appliance to operation faster than by placing a service call.
Display Shows Problem Action
Tank is not heating ORfresh water is notentering unit
Check that the water hose is correctlyattached and is free of “kinks” orpinching. Also check that the watersupply is turned on.
Door is not closed ORdoor switch is defective
Check that the door is completelyclosed.
Water leakage onto floorpan
Check that the water line to the unit isnot leaking, and that the drain hoseempties correctly into the drain.
Correct water level wasnot reached during initialfilling
Check that the water hose is correctlyattached and is free of “kinks” orpinching. Also check that the watersupply is turned on.
Filling process takes toolong
Check that the water hose is correctlyattached and is free of “kinks” orpinching. Also check that the watersupply is turned on.
Info Codes appear for minor difficulties. Error codes appear for more complex issues. Aftercorrecting the condition, if the unit does not return to normal operation automatically, pressthe START/DRAIN ( )key or the STOP/OFF (O) key to clear the message.
You should contact your MEIKO Authorized Service Agent IF:
• The dishwasher encounters a problem but does not display anerror code, OR
• An error code appears that is not shown here, OR
• The listed action fails to correct the problem.
An Authorized Service Agency Listing was supplied with yourdishwasher. If you do not have the listing, call 1-800-868-3840 forassistance.

Page 21
Notes
________________________________________________________________________________
________________________________________________________________________________
________________________________________________________________________________
________________________________________________________________________________________________________________________________________________________________
________________________________________________________________________________________________________________________________________________________________
________________________________________________________________________________________________________________________________________________________________
________________________________________________________________________________________________________________________________________________________________
________________________________________________________________________________________________________________________________________________________________
________________________________________________________________________________________________________________________________________________________________
________________________________________________________________________________________________________________________________________________________________
________________________________________________________________________________________________________________________________________________________________
________________________________________________________________________________________________________________________________________________________________
________________________________________________________________________________________________________________________________________________________________
________________________________________________________________________________________________________________________________________________________________
________________________________________________________________________________________________________________________________________________________________
________________________________________________________________________________________________________________________________________________________________
________________________________________________________________________________________________________________________________________________________________
________________________________________________________________________________________________________________________________________________________________
________________________________________________________________________________________________________________________________________________________________
________________________________________________________________________________________________________________________________________________________________
________________________________________________________________________________________________________________________________________________________________
________________________________________________________________________________________________________________________________________________________________
________________________________________________________________________________

Page 22
Notes
________________________________________________________________________________
________________________________________________________________________________
________________________________________________________________________________
________________________________________________________________________________________________________________________________________________________________
________________________________________________________________________________________________________________________________________________________________
________________________________________________________________________________________________________________________________________________________________
________________________________________________________________________________________________________________________________________________________________
________________________________________________________________________________________________________________________________________________________________
________________________________________________________________________________________________________________________________________________________________
________________________________________________________________________________________________________________________________________________________________
________________________________________________________________________________________________________________________________________________________________
________________________________________________________________________________________________________________________________________________________________
________________________________________________________________________________________________________________________________________________________________
________________________________________________________________________________________________________________________________________________________________
________________________________________________________________________________________________________________________________________________________________
________________________________________________________________________________________________________________________________________________________________
________________________________________________________________________________________________________________________________________________________________
________________________________________________________________________________________________________________________________________________________________
________________________________________________________________________________________________________________________________________________________________
________________________________________________________________________________________________________________________________________________________________
________________________________________________________________________________________________________________________________________________________________
________________________________________________________________________________________________________________________________________________________________
________________________________________________________________________________

Page 23
Notes
________________________________________________________________________________
________________________________________________________________________________
________________________________________________________________________________
________________________________________________________________________________________________________________________________________________________________
________________________________________________________________________________________________________________________________________________________________
________________________________________________________________________________________________________________________________________________________________
________________________________________________________________________________________________________________________________________________________________
________________________________________________________________________________________________________________________________________________________________
________________________________________________________________________________________________________________________________________________________________
________________________________________________________________________________________________________________________________________________________________
________________________________________________________________________________________________________________________________________________________________
________________________________________________________________________________________________________________________________________________________________
________________________________________________________________________________________________________________________________________________________________
________________________________________________________________________________________________________________________________________________________________
________________________________________________________________________________________________________________________________________________________________
________________________________________________________________________________________________________________________________________________________________
________________________________________________________________________________________________________________________________________________________________
________________________________________________________________________________________________________________________________________________________________
________________________________________________________________________________________________________________________________________________________________
________________________________________________________________________________________________________________________________________________________________
________________________________________________________________________________________________________________________________________________________________
________________________________________________________________________________________________________________________________________________________________
________________________________________________________________________________

If you need service...
MEIKO dishwashers are designed for solid reliability as much as foroutstanding ware-cleaning ability. With proper care, your dishwashershould provide years of trouble-free operation.
If service is necessary, contact your local MEIKO Authorized ServiceAgent. With factory training, OEM parts and direct support from thefactory, MEIKO’s nationwide service network is highly qualified to quicklyrestore your dishwasher to regular operation.
An Authorized Service Agency Listing is supplied with this Manual.If you do not have the listing, call 1-800-868-3840 for assistance.
MEIKO1349 Heil Quaker Blvd.La Vergne, TN 37086Phone: (615) 399-6600(800) 55-MEIKOFax: (615) 399-6620
Related Documents