DOME CONSTRUCTION Application of Domes: n Plain masonry built with blocks or bricks n Floors for multi-storey buildings, they can be leveled flat n Roofs, they can be left like that and they will be waterproofed n Earthquakes zones, they can be used with a reinforced ringbeam They are Built Free Spanning: n It means that they are built without form n This way is also called the Nubian technique Timber Saving: n Domes are built with bricks and blocks (rarely with stones) Variety of Plans and Shapes: n Domes can be built on round, square, rectangular rooms, etc. n They allow a wider variety of shapes than vaults Stability Study: n The shape of a dome is crucial for stability, and a stability study is often needed. Be careful, a wrong shape will collapse Need of Skilled Masons: n Building a dome requires trained masons. Never improvise when building domes, ask advice from skilled people n Be careful, a badly built dome may collapse Need of Good Quality Materials: n Domes built with compressed earth blocks should be made of blocks of very regular thickness Dhyanalingam Temple – Coimbatore, India elliptical section ( ˘ 22.16 m, 9.85 m high) Treasure of Atreus – Tomb of Agamemnon (˘ +/- 18m) Mycene, Greece (+/- 1500 BC) Sainte Sophia, VI th Century – Istanbul, Turkey (31-32 m side, 55 m high) Blue mosque, XVI th century – Istanbul, Turkey ( ˘ 23.50 m, 43 m high) School – Auroville, India (5.70 m side, 2 m rise) Office, Auroville, India (3.63 m side, 0.60 m rise) For further information on dome construction Please contact: UNITED NATIONS CENTRE FOR HUMAN SETTLEMENTS (UNCHS - HABITAT) PO Box 30030, Nairobi, KENYA Phone: (254-2) 621234 Fax: (254-2) 624265 E-mail: [email protected] AUROVILLE BUILDING CENTRE (AVBC / EARTH UNIT) Auroshilpam, Auroville - 605 101 Tamil Nadu, INDIA Phone: +91 (0)413-622277 / 622168 Fax: +91 (0)413-622057 E-mail: [email protected] BASICS FOR DOMES Variety of Shapes Basic Structural Principles Terminology Generality: n A dome is composed of a series of rings, resting on each other n A dome is characterized by a thrust, with pushes on the walls Two forces are acting in a dome: n The thrust (T), which pushes down with an angle on the walls n A concentric thrust ( CT), which acts in every ring and compresses it The thrust (T) is composed of 2 forces: n A horizontal force (HT), which tends to push the walls apart n The weight (W), which is the weight of the masonry CT : Concentric thrust HT : Horizontal thrust W : Weight of the masonry T : Resultant of the thrust Technique Basics: n The clay which is present in a soil binds a brick or block n This technique can use adobe (sun dried bricks), stabilized CEB (compressed earth blocks), or fired bricks n The blocks must be dry before starting the block laying process n The mortar is like a glue, it is very sticky; clay is the binder n The mortar contains more soil than sand, and some cement n The cement does not help for adhesion, the clay does it n Mortar proportions will vary according to the soil quality n The mortar thickness should not exceed 2-3 mm n Hemispherical dome (square plan) n Hemispherical dome (circular plan) n Cloister arch dome (square plan) n Dome on squinches (square plan) Segmental Hemispherical Pointed Conical Faceted On pendentives On squinches Cloister arch Suitability of Domes Typical Square Dome for Village House Hemispherical dome n It often needs a tie ring n The round wall can be a difficulty n If it is for an exposed roof, the water- proofing often cracks Hemispherical dome on pendentives n It is advised to use a tie beam n It needs arches n If the segmental sphere is the roof, the waterproofing often cracks Pointed cloister arch dome n It always needs a tie beam n It does not need arches to support it n It is suitable for roofs with a pyramidal shape. Durable waterproofing Segmental cloister arch dome n It always needs a tie beam n It does not need arches to support it n Suitable for floors of apartments in multi- storey buildings n Section n Plan n These dimensions and specifications must be rigorously respected! Any disregard to them may cause collapse... RING BEAM SECTION (4 SIDES) BUILDING A CIRCULAR DOME 1. Setting up the Compass 5. Adjust the Block 2. Detail of a Compass 6. Wedge the Joints n Adjust the sliding guide at the proper radius n Support the compass in the centre n The compass level (articulation) is at the same level as the springer level n Sliding pipe (45 x 45 x 45 mm) with a nut welded and a bolt n Wooden reaper (4 x 4 cm x 4 m) n Articulation with flat steel and 2 bolts welded at 90 º n Supporting plate with a pipe welded at 90 º n Block to support the compass and adjust it in the centre n Handle the compass to check if the block is on the radius n Adjust the block if needed n The outside joint must be wedged with a stone chip or pebble n The wedge is inserted by hand and must be tight in the joint n 0 mm 3. Soaking the Block and Laying the Glue 4. Stick the Block on the Masonry 7. Laying the Last Block 8. Starting a New Ring n Soak the block for 2 seconds just before laying it It will start a capillary action which will suck the glue in n The glue is made of soil, sand, a little cement and a lot of water n Immediately after soaking the block, apply 3-4 mm glue on it n Blocks must touch each other in their lower part: Intrados = 0 mm mortar for the side joint The laying mortar must be thin (2-3 mm) n The previous course must be humid n Adjust the length of the last block n It must touch on either side at the intrados = 0 mm of mortar n Wedge tight, by hand, the outside of the joint n Start laying the blocks in the same way, but don ’t forget to cross the bonds n 0 mm BUILDING A SQUARE DOME 1. Setting up the Template 5. Adjust the Block 2. Soaking the Block 6. Wedge the Joints n Lay the template in the corners, adjust it and pull the strings n Template with steel pipes n Soak the block for 2 seconds just before laying it on the mortar n The block start a capillary action, which suck the glue in n Check that the block does not touch the string (1 mm below) n The outside joint must be wedged with a chip or pebble n The wedge is inserted by hand and must be tight in the joint 3. Laying the Glue 4. Stick the Block on the Masonry 7. Laying the Keystone 8. Starting a New Arch n Blocks must touch each other in their lower part: Intrados = 0 mm mortar for the side joint The laying mortar must be thin (2-3 mm) n The previous course must be humid n It must be touching at the intrados = 0 mm of mortar n Wedge tight, by hand, the outside of the joint n Adjust the block length and cross the bonds n Lay the blocks in the same way, don’t forget to cross the bonds n Don’t forget to build each arch and the dome symmetrically n The binder is glue, which is made of soil, sand, a little cement and a lot of water n Immediately after soaking the block, apply 3-4 mm glue on it

Welcome message from author
This document is posted to help you gain knowledge. Please leave a comment to let me know what you think about it! Share it to your friends and learn new things together.
Transcript
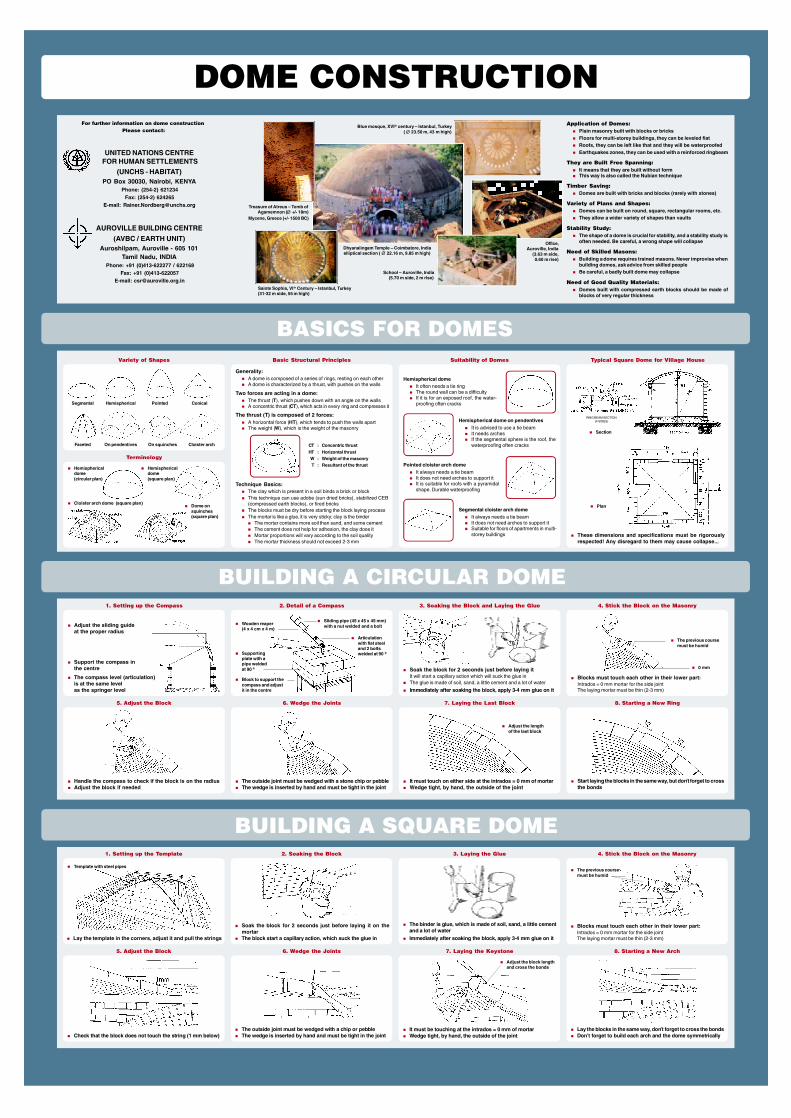
DOME CONSTRUCTIONApplication of Domes:n Plain masonry built with blocks or bricksn Floors for multi-storey buildings, they can be leveled flatn Roofs, they can be left like that and they will be waterproofedn Earthquakes zones, they can be used with a reinforced ringbeam
They are Built Free Spanning:n It means that they are built without formn This way is also called the Nubian technique
Timber Saving:n Domes are built with bricks and blocks (rarely with stones)
Variety of Plans and Shapes:n Domes can be built on round, square, rectangular rooms, etc.n They allow a wider variety of shapes than vaults
Stability Study:n The shape of a dome is crucial for stability, and a stability study is
often needed. Be careful, a wrong shape will collapse
Need of Skilled Masons:n Building a dome requires trained masons. Never improvise when
building domes, ask advice from skilled peoplen Be careful, a badly built dome may collapse
Need of Good Quality Materials:n Domes built with compressed earth blocks should be made of
blocks of very regular thickness
Dhyanalingam Temple – Coimbatore, Indiaelliptical section ( ∅ 22.16 m, 9.85 m high)
Treasure of Atreus – Tomb ofAgamemnon (∅ +/- 18m)
Mycene, Greece (+/- 1500 BC)
Sainte Sophia, VI th Century – Istanbul, Turkey(31-32 m side, 55 m high)
Blue mosque, XVIth century – Istanbul, Turkey( ∅ 23.50 m, 43 m high)
School – Auroville, India(5.70 m side, 2 m rise)
Office, Auroville, India
(3.63 m side,0.60 m rise)
For further information on dome constructionPlease contact:
UNITED NATIONS CENTRE FOR HUMAN SETTLEMENTS
(UNCHS - HABITAT)PO Box 30030, Nairobi, KENYA
Phone: (254-2) 621234Fax: (254-2) 624265
E-mail: [email protected]
AUROVILLE BUILDING CENTRE
(AVBC / EARTH UNIT)Auroshilpam, Auroville - 605 101
Tamil Nadu, INDIAPhone: +91 (0)413-622277 / 622168
Fax: +91 (0)413-622057E-mail: [email protected]
BASICS FOR DOMESVariety of Shapes Basic Structural Principles
Terminology
Generality:n A dome is composed of a series of rings, resting on each othern A dome is characterized by a thrust, with pushes on the walls
Two forces are acting in a dome:n The thrust (T), which pushes down with an angle on the wallsn A concentric thrust (CT), which acts in every ring and compresses it
The thrust (T) is composed of 2 forces:n A horizontal force (HT), which tends to push the walls apartn The weight (W), which is the weight of the masonry
CT : Concentric thrust
HT : Horizontal thrustW : Weight of the masonryT : Resultant of the thrust
Technique Basics:n The clay which is present in a soil binds a brick or blockn This technique can use adobe (sun dried bricks), stabilized CEB
(compressed earth blocks), or fired bricksn The blocks must be dry before starting the block laying processn The mortar is like a glue, it is very sticky; clay is the bindern The mortar contains more soil than sand, and some cementn The cement does not help for adhesion, the clay does itn Mortar proportions will vary according to the soil qualityn The mortar thickness should not exceed 2-3 mm
n Hemisphericaldome(square plan)
n Hemisphericaldome(circular plan)
n Cloister arch dome (square plan)n Dome on
squinches(square plan)
Segmental Hemispherical Pointed Conical
Faceted On pendentives On squinches Cloister arch
Suitability of Domes Typical Square Dome for Village House
Hemispherical domen It often needs a tie ringn The round wall can be a difficultyn If it is for an exposed roof, the water-
proofing often cracks
Hemispherical dome on pendentivesn It is advised to use a tie beamn It needs archesn If the segmental sphere is the roof, the
waterproofing often cracks
Pointed cloister arch domen It always needs a tie beamn It does not need arches to support itn It is suitable for roofs with a pyramidal
shape. Durable waterproofing
Segmental cloister arch domen It always needs a tie beamn It does not need arches to support itn Suitable for floors of apartments in multi-
storey buildings
n Section
n Plan
n These dimensions and specifications must be rigorouslyrespected! Any disregard to them may cause collapse...
RING BEAM SECTION(4 SIDES)
BUILDING A CIRCULAR DOME1. Setting up the Compass
5. Adjust the Block
2. Detail of a Compass
6. Wedge the Joints
n Adjust the sliding guideat the proper radius
n Support the compass inthe centre
n The compass level (articulation)is at the same levelas the springer level
n Sliding pipe (45 x 45 x 45 mm)with a nut welded and a boltn Wooden reaper
(4 x 4 cm x 4 m)
n Articulationwith flat steeland 2 boltswelded at 90 ºn Supporting
plate with apipe weldedat 90 º
n Block to support thecompass and adjustit in the centre
n Handle the compass to check if the block is on the radiusn Adjust the block if needed
n The outside joint must be wedged with a stone chip or pebblen The wedge is inserted by hand and must be tight in the joint
n 0 mm
3. Soaking the Block and Laying the Glue 4. Stick the Block on the Masonry
7. Laying the Last Block 8. Starting a New Ring
n Soak the block for 2 seconds just before laying itIt will start a capillary action which will suck the glue in
n The glue is made of soil, sand, a little cement and a lot of water
n Immediately after soaking the block, apply 3-4 mm glue on it
n Blocks must touch each other in their lower part:Intrados = 0 mm mortar for the side jointThe laying mortar must be thin (2-3 mm)
n The previous coursemust be humid
n Adjust the lengthof the last block
n It must touch on either side at the intrados = 0 mm of mortarn Wedge tight, by hand, the outside of the joint
n Start laying the blocks in the same way, but don’t forget to crossthe bonds
n 0 mm
BUILDING A SQUARE DOME1. Setting up the Template
5. Adjust the Block
2. Soaking the Block
6. Wedge the Joints
n Lay the template in the corners, adjust it and pull the strings
n Template with steel pipes
n Soak the block for 2 seconds just before laying it on themortar
n The block start a capillary action, which suck the glue in
n Check that the block does not touch the string (1 mm below)n The outside joint must be wedged with a chip or pebblen The wedge is inserted by hand and must be tight in the joint
3. Laying the Glue 4. Stick the Block on the Masonry
7. Laying the Keystone 8. Starting a New Arch
n Blocks must touch each other in their lower part:Intrados = 0 mm mortar for the side jointThe laying mortar must be thin (2-3 mm)
n The previous coursemust be humid
n It must be touching at the intrados = 0 mm of mortarn Wedge tight, by hand, the outside of the joint
n Adjust the block lengthand cross the bonds
n Lay the blocks in the same way, don’t forget to cross the bondsn Don’t forget to build each arch and the dome symmetrically
n The binder is glue, which is made of soil, sand, a little cementand a lot of water
n Immediately after soaking the block, apply 3-4 mm glue on it
Related Documents