Dolphin 75e Wearable Solution with Windows Embedded 8.1 Handheld User’s Guide

Welcome message from author
This document is posted to help you gain knowledge. Please leave a comment to let me know what you think about it! Share it to your friends and learn new things together.
Transcript

Dolphin 75e Wearable Solution
with Windows Embedded 8.1 Handheld
User’s Guide
DisclaimerHoneywell International Inc. (“HII”) reserves the right to make changes in specifications and other information contained in this document without prior notice, and the reader should in all cases consult HII to determine whether any such changes have been made. The information in this publication does not represent a commitment on the part of HII.
HII shall not be liable for technical or editorial errors or omissions contained herein; nor for incidental or consequential damages resulting from the furnishing, performance, or use of this material. HII disclaims all responsibility for the selection and use of software and/or hardware to achieve intended results.
This document contains proprietary information that is protected by copyright. All rights are reserved. No part of this document may be photocopied, reproduced, or translated into another language without the prior written consent of HII.
Copyright 2016 Honeywell International Inc. All rights reserved.
Web Address: www.honeywellaidc.com
Other product names or marks mentioned in this document may be trademarks or registered trademarks of other companies and are the property of their respective owners.
For patent information, please refer to www.hsmpats.com.
Table of Contents
Contact Customer SupportProduct Service and Repair ................................................................................................... vLimited Warranty .................................................................................................................... vSend Feedback ...................................................................................................................... v
Chapter 1 - Getting Started
Overview ..............................................................................................................................1-1What You Need....................................................................................................................1-1
Belt Mount with Voice.....................................................................................................1-1Arm Mount with Tethered Ring Scanner ........................................................................1-1Arm Mount with Voice and Tethered Ring Scanner .......................................................1-1
About this Guide ..................................................................................................................1-1Additional Documents ....................................................................................................1-1
Before You Begin.................................................................................................................1-2Minimum Firmware Requirements .................................................................................1-2Battery............................................................................................................................1-2
Chapter 2 - Installing and Mounting
Arm Mount Applications .......................................................................................................2-1Install the Terminal in the Arm Mount Sled ....................................................................2-1Mount the Arm Band and Attach the Terminal ...............................................................2-3
Belt Mount Applications .......................................................................................................2-5Install the Terminal in the Belt Mount Sled.....................................................................2-5Attach the Sled to the Belt Clip ......................................................................................2-7
Attach the Headset (Optional)..............................................................................................2-7Adjusting Headset / Microphone and Securing Cable....................................................2-8
Connect the Ring Scanner (Optional) ..................................................................................2-9Attaching the Ring to your Finger...................................................................................2-9Trigger Rotation .............................................................................................................2-9
Chapter 3 - About the Hardware
About the Terminal...............................................................................................................3-1Turn Power On...............................................................................................................3-1Turn Power Off...............................................................................................................3-1Sleep Mode (Suspend Mode) ........................................................................................3-1Restart the Terminal.......................................................................................................3-1Reset the Terminal.........................................................................................................3-2
About the Arm Mount Sled...................................................................................................3-3Arm Mount Features ......................................................................................................3-3Terminal Features Not Used ..........................................................................................3-3Remove the Terminal from the Arm Mount Sled............................................................3-4
About the Belt Mount Sled ...................................................................................................3-5Belt Mount Features.......................................................................................................3-5Terminal Features Not Used ..........................................................................................3-5Remove the Terminal from the Belt Mount Sled ............................................................3-6
i
About the 8620 Ring Scanner ............................................................................................. 3-7Ring Scanner Features.................................................................................................. 3-7Eject the Ring Scanner .................................................................................................. 3-8Remove the Ring Strap/C-Ring ..................................................................................... 3-8Replace the Ring Strap/C-Ring ..................................................................................... 3-9Remove the Trigger ....................................................................................................... 3-9Replace the Trigger ..................................................................................................... 3-10
Battery Specifications ........................................................................................................ 3-11Storing Batteries .......................................................................................................... 3-11Guidelines for Battery Pack Use and Disposal ............................................................ 3-11
Replace the Battery ........................................................................................................... 3-12
Chapter 4 - Using the Ring Scanner
Overview.............................................................................................................................. 4-1Minimum Terminal Software Requirements................................................................... 4-1Updating the Terminal Software .................................................................................... 4-1
Decoding Bar Codes ........................................................................................................... 4-2Aiming Beam ................................................................................................................. 4-2
Using Scan Demo to Decode a Bar Code ........................................................................... 4-2Automatic Scanning....................................................................................................... 4-3Continuous Scanning..................................................................................................... 4-3
Configuring the Scan Demo Application.............................................................................. 4-4Scan Settings................................................................................................................. 4-4Symbology Settings ....................................................................................................... 4-4Profiles........................................................................................................................... 4-5
Advanced Ring Scanner Configuration ............................................................................... 4-5Custom Profiles ............................................................................................................. 4-5Microsoft POS APIs ....................................................................................................... 4-6
Upgrading Ring Scanner Firmware ..................................................................................... 4-6Installing EZConfig-Scanning from the Web.................................................................. 4-6
Appendix A - Ring Scanner Specifications
8620 Ring Scanner Specifications.......................................................................................A-1Supported Bar Code Symbologies ...............................................................................A-2Field of View ..................................................................................................................A-2Depth of Field ................................................................................................................A-2
Required Safety Labels .......................................................................................................A-3Laser Label ....................................................................................................................A-3
Laser Aperture Location ......................................................................................................A-3
Appendix B - Coding for POS Barcode Applications
Introduction..........................................................................................................................B-1Suggested Application Structure .........................................................................................B-1Suspending and Resuming the Application.........................................................................B-1Switching Between Applications..........................................................................................B-1
ii

Connecting and Disconnecting External Scanners .............................................................B-1DeviceAdded() ...............................................................................................................B-1DeviceRemoved() ..........................................................................................................B-2DeviceUpdated()............................................................................................................B-2DeviceEnumCompleted()...............................................................................................B-2DetectorStopped() .........................................................................................................B-2
iii

iv
Contact Customer SupportTo search our knowledge base for a solution or to log in to the Technical Support portal and report a problem, go to www.hsmcontactsupport.com.
For our latest contact information, see www.honeywellaidc.com/locations.
Product Service and RepairHoneywell International Inc. provides service for all of its products through service centers throughout the world. To find your service center, go to www.honeywellaidc.com and select Support. Contact your service center to obtain a Return Material Authorization number (RMA #) before you return the product.
To obtain warranty or non-warranty service, return your product to Honeywell (postage paid) with a copy of the dated pur-chase record.Limited Warranty
Limited WarrantyFor warranty information, go to www.honeywellaidc.com and click Resources > Warranty.
Send FeedbackYour feedback is crucial to the continual improvement of our documentation. To provide feedback about this manual, con-tact the Honeywell Technical Communications department at [email protected].
v

vi
1
Getting StartedOverviewThe Dolphin 75e Wearable Solution consists of a Dolphin 75e terminal, a wearable sled, a ring scanner (optional), and/or head-set (optional). The wearable sled is available in one of the following configurations:
• Arm Mount Sled (page 3-3)• Belt Mount Sled (page 3-5)
The terminal is available in either standard or extended battery versions. The Dolphin 75e Wearable Solution is IP 54 rated.
What You NeedThere are several use cases for the Honeywell Wearable Solution. The examples below indicate the typical items used in sam-ple use cases. The Dolphin 75e terminal and accessories may be packaged separately from the other wearable accessories.
Belt Mount with Voice• Dolphin 75e• Belt mount sled• Belt mount clip• Headset adapter cable• Headset
Arm Mount with Tethered Ring Scanner• Dolphin 75e• Arm mount sled• Armband• Tethered Ring Scanner
Arm Mount with Voice and Tethered Ring Scanner• Dolphin 75e• Arm mount sled• Armband• Audio end cap (to replace standard end cap)• Headset adapter cable• Headset• Tethered Ring Scanner
About this GuideThis guide provides assembling and mounting instructions as well as information about terminal setup and configuration as a wearable solution. Daily use instructions are included. This document describes only those features of the Dolphin 75e unique to the Wearable Solution.
Additional DocumentsThis guide is intended to supplement the following documents available at www.honeywellaidc.com:
• Dolphin 75e with Windows Embedded Handheld 8.1 User’s Guide• 8620 Ring Scanner Command Reference Manual
1 - 1
Before You BeginHere is a list of things you should check before you begin.
Minimum Firmware RequirementsThe minimum software requirements for the terminal (Settings:
• Software version 57.1.2.160 or higher
To update your software see page 4-1.
BatteryThe Dolphin 75e is designed for use with battery part numbers BAT-STANDARD-02 (Li-ion 3.7 V, 6.179 watt hour) and BAT-EXTENDED-02 (Li-ion 3.7 V, 12.358 watt hour) manufactured for Honeywell International Inc.
We recommend use of Honeywell Li-ion battery packs. Use of any non-Honeywell battery may result in damage not covered by the warranty.
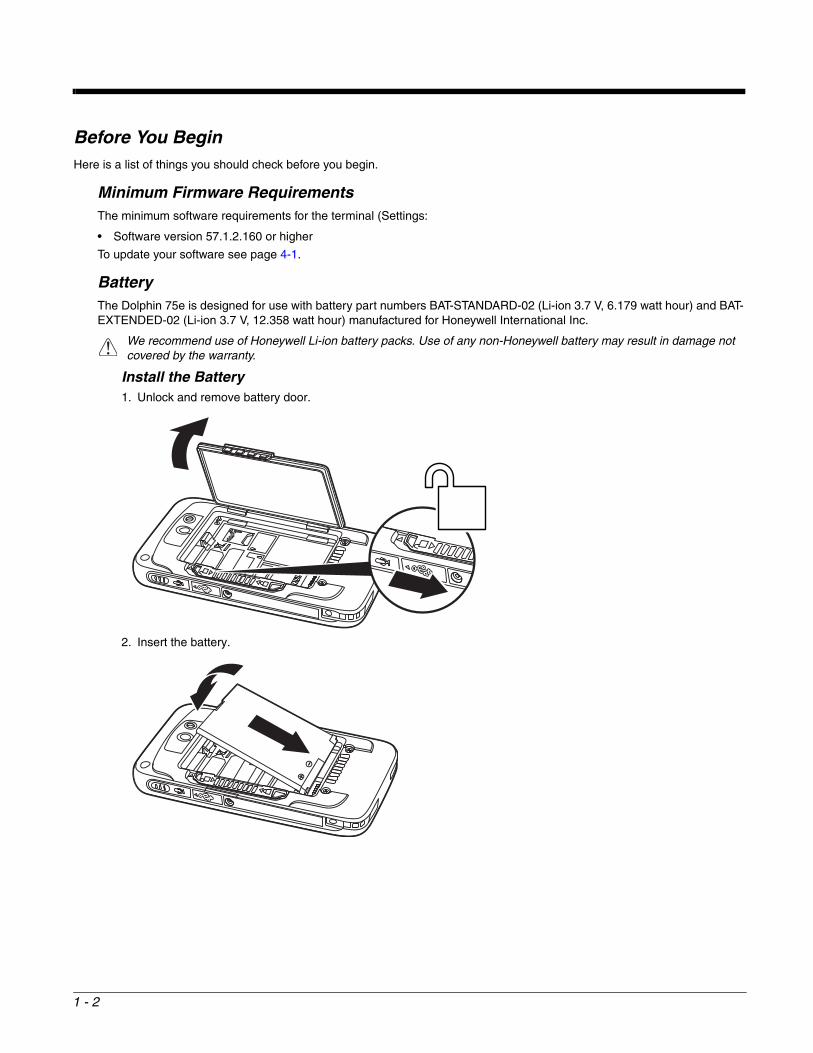
Install the Battery1. Unlock and remove battery door.
2. Insert the battery.
!
1 - 2
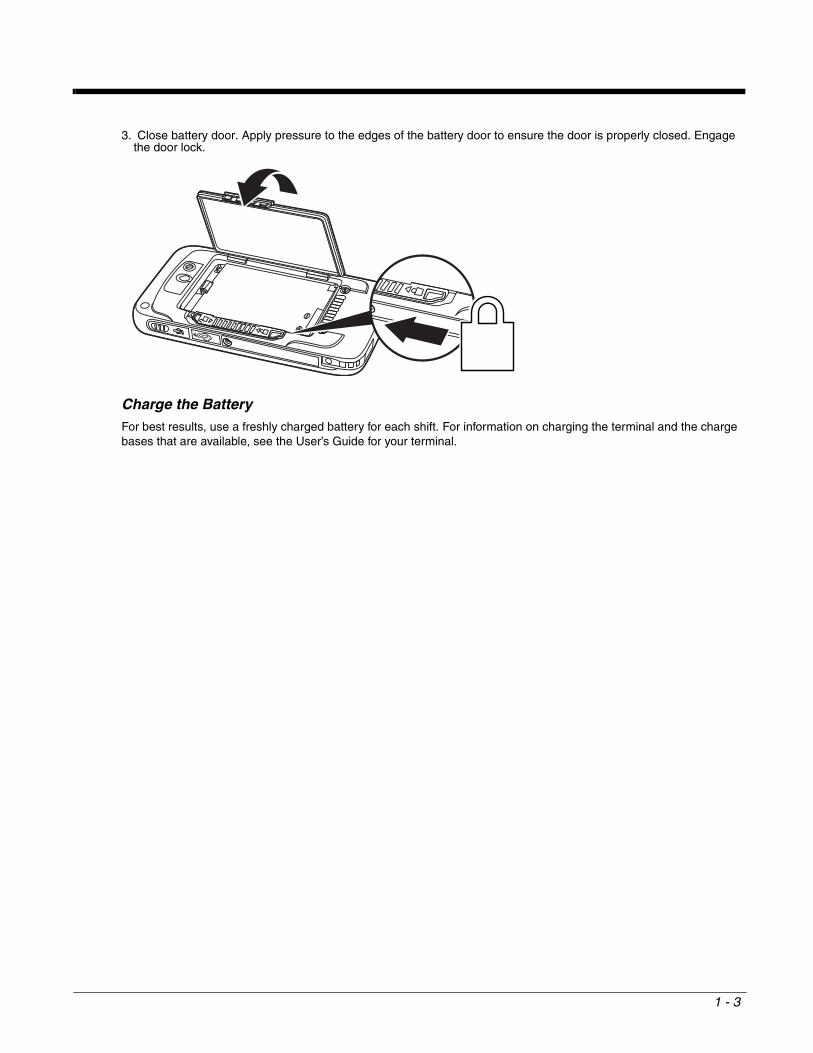
3. Close battery door. Apply pressure to the edges of the battery door to ensure the door is properly closed. Engage the door lock.
Charge the BatteryFor best results, use a freshly charged battery for each shift. For information on charging the terminal and the charge bases that are available, see the User’s Guide for your terminal.
1 - 3

1 - 4
2
Installing and MountingArm Mount ApplicationsThis section describes how to install and mount the arm mount configuration.
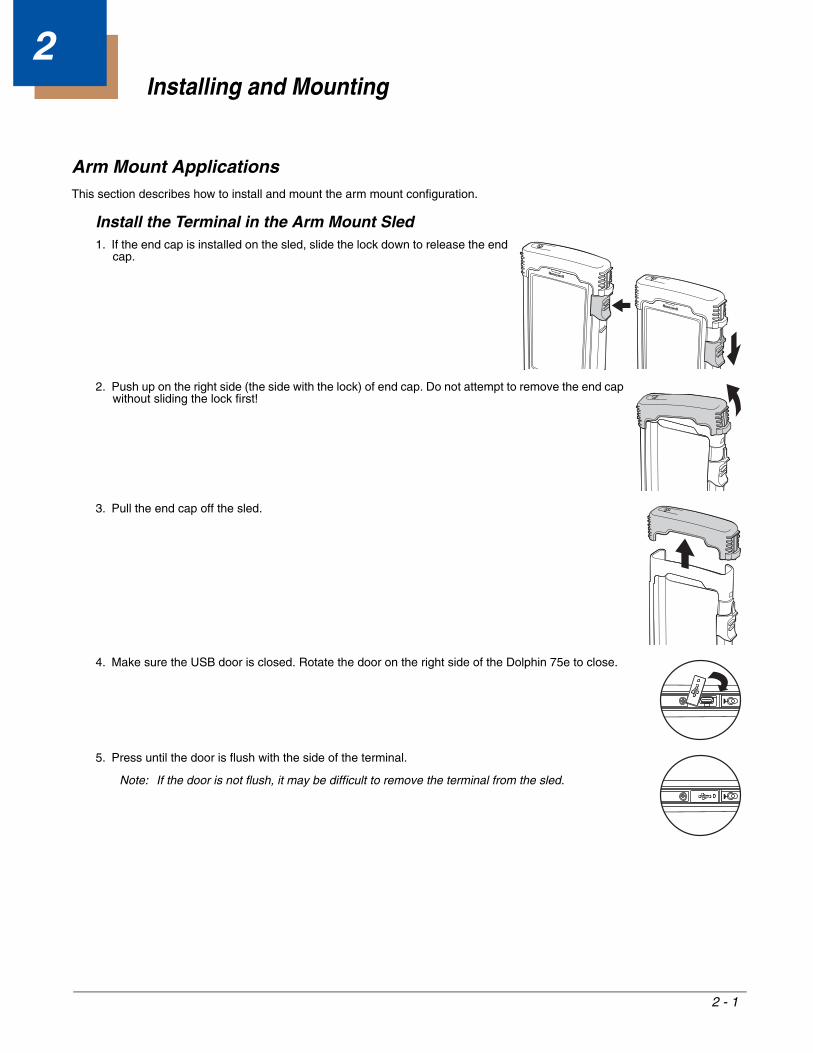
Install the Terminal in the Arm Mount Sled1. If the end cap is installed on the sled, slide the lock down to release the end
cap.
2. Push up on the right side (the side with the lock) of end cap. Do not attempt to remove the end cap without sliding the lock first!
3. Pull the end cap off the sled.
4. Make sure the USB door is closed. Rotate the door on the right side of the Dolphin 75e to close.
5. Press until the door is flush with the side of the terminal.
Note: If the door is not flush, it may be difficult to remove the terminal from the sled.
2 - 1
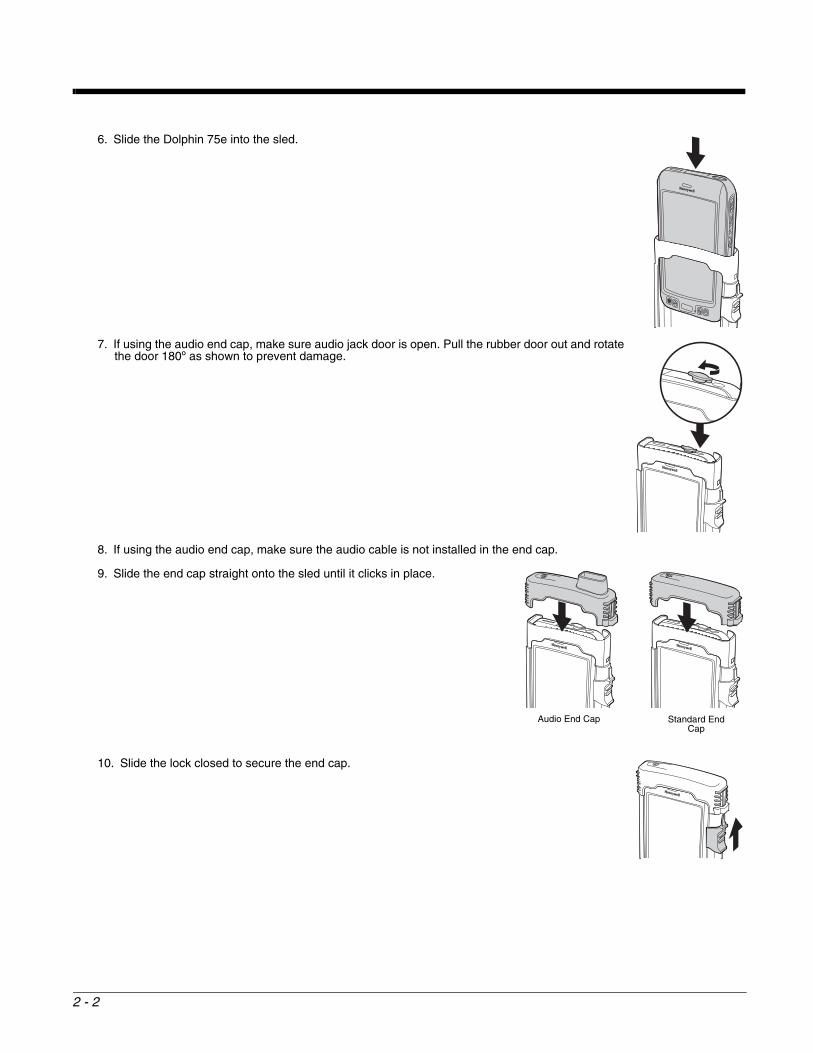
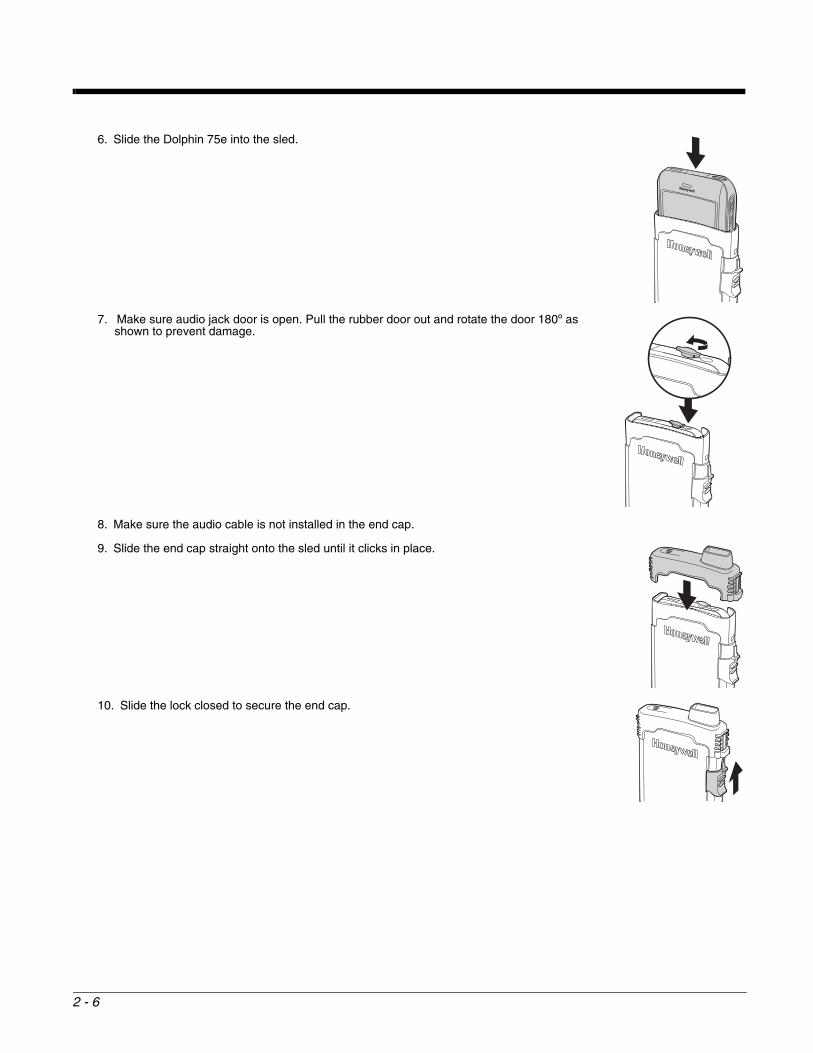
6. Slide the Dolphin 75e into the sled.
7. If using the audio end cap, make sure audio jack door is open. Pull the rubber door out and rotate the door 180º as shown to prevent damage.
8. If using the audio end cap, make sure the audio cable is not installed in the end cap.
9. Slide the end cap straight onto the sled until it clicks in place.
10. Slide the lock closed to secure the end cap.
Standard End Cap
Audio End Cap
2 - 2
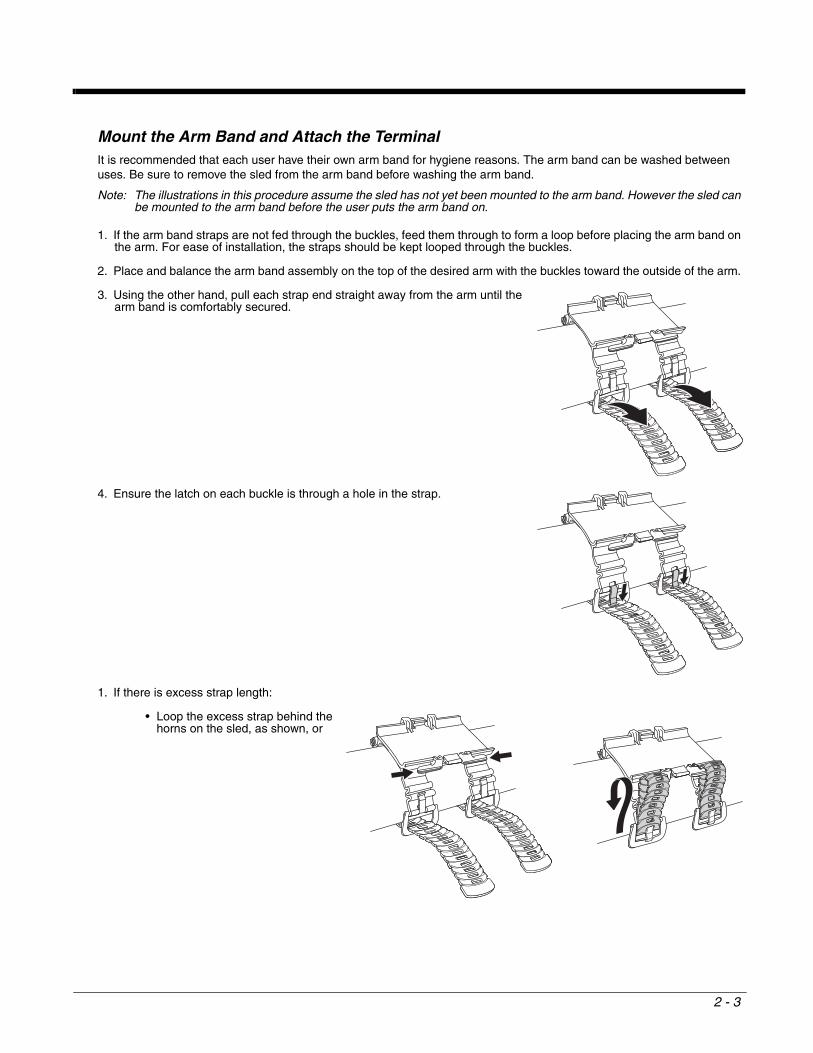
Mount the Arm Band and Attach the TerminalIt is recommended that each user have their own arm band for hygiene reasons. The arm band can be washed between uses. Be sure to remove the sled from the arm band before washing the arm band.
Note: The illustrations in this procedure assume the sled has not yet been mounted to the arm band. However the sled can be mounted to the arm band before the user puts the arm band on.
1. If the arm band straps are not fed through the buckles, feed them through to form a loop before placing the arm band on the arm. For ease of installation, the straps should be kept looped through the buckles.
2. Place and balance the arm band assembly on the top of the desired arm with the buckles toward the outside of the arm.
3. Using the other hand, pull each strap end straight away from the arm until the arm band is comfortably secured.
4. Ensure the latch on each buckle is through a hole in the strap.
1. If there is excess strap length:
• Loop the excess strap behind the horns on the sled, as shown, or
2 - 3
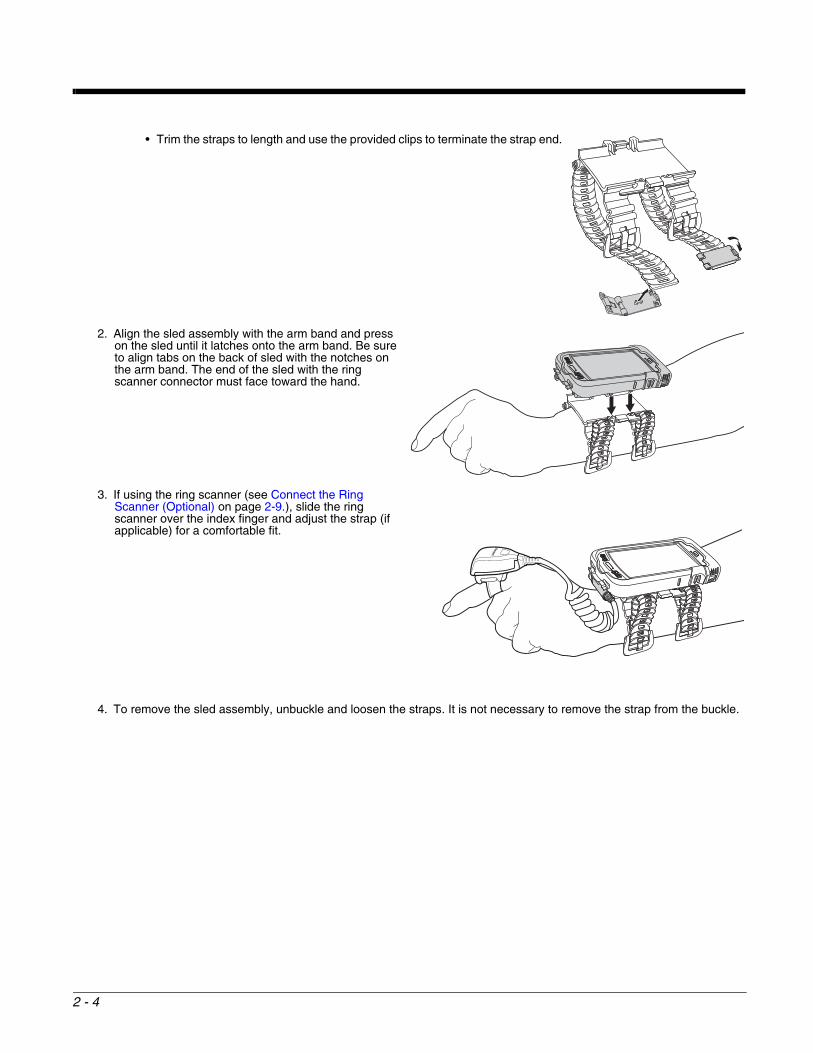
• Trim the straps to length and use the provided clips to terminate the strap end.
2. Align the sled assembly with the arm band and press on the sled until it latches onto the arm band. Be sure to align tabs on the back of sled with the notches on the arm band. The end of the sled with the ring scanner connector must face toward the hand.
3. If using the ring scanner (see Connect the Ring Scanner (Optional) on page 2-9.), slide the ring scanner over the index finger and adjust the strap (if applicable) for a comfortable fit.
4. To remove the sled assembly, unbuckle and loosen the straps. It is not necessary to remove the strap from the buckle.
2 - 4
Belt Mount ApplicationsThis section describes how to install and mount the belt mount configuration.
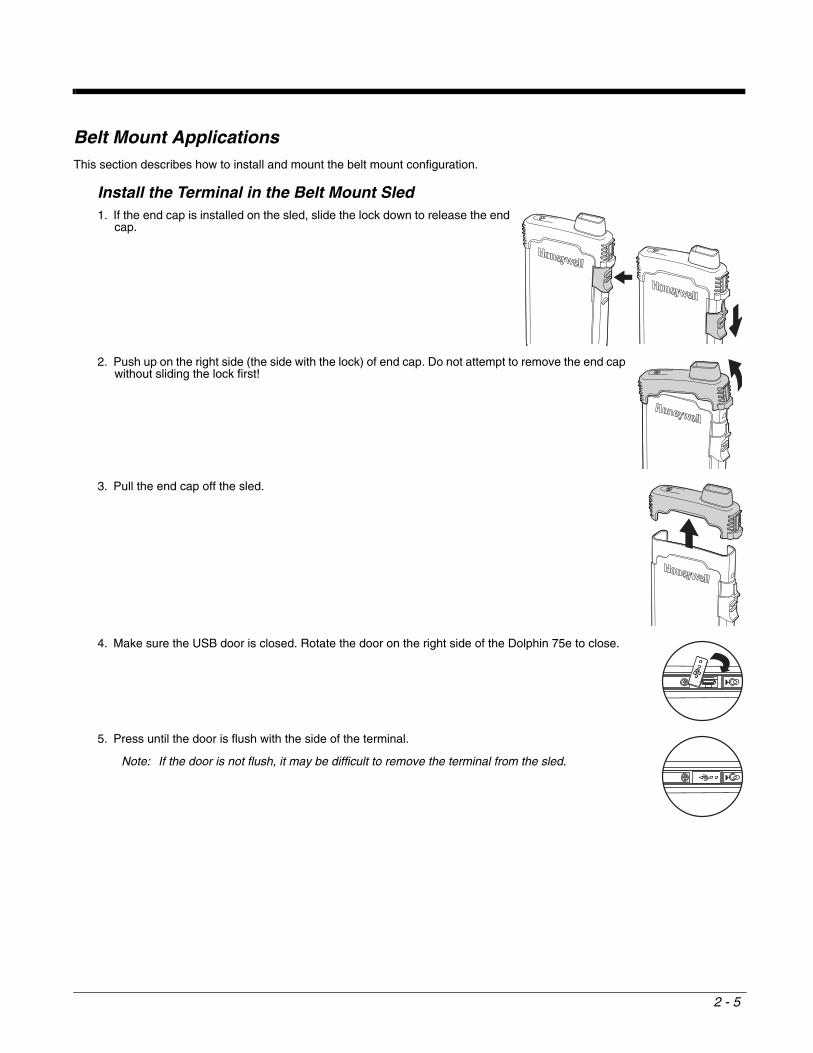
Install the Terminal in the Belt Mount Sled1. If the end cap is installed on the sled, slide the lock down to release the end
cap.
2. Push up on the right side (the side with the lock) of end cap. Do not attempt to remove the end cap without sliding the lock first!
3. Pull the end cap off the sled.
4. Make sure the USB door is closed. Rotate the door on the right side of the Dolphin 75e to close.
5. Press until the door is flush with the side of the terminal.
Note: If the door is not flush, it may be difficult to remove the terminal from the sled.
2 - 5
6. Slide the Dolphin 75e into the sled.
7. Make sure audio jack door is open. Pull the rubber door out and rotate the door 180º as shown to prevent damage.
8. Make sure the audio cable is not installed in the end cap.
9. Slide the end cap straight onto the sled until it clicks in place.
10. Slide the lock closed to secure the end cap.
2 - 6
Attach the Sled to the Belt Clip
Attach the Headset (Optional)
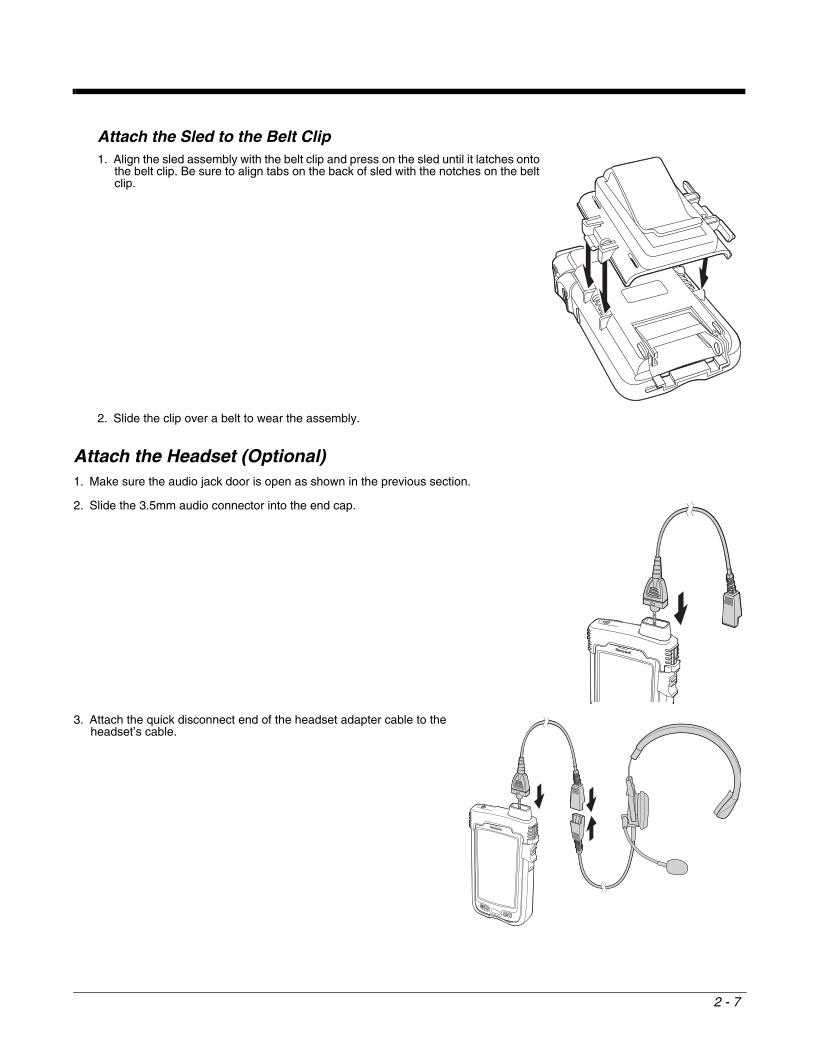
1. Align the sled assembly with the belt clip and press on the sled until it latches onto the belt clip. Be sure to align tabs on the back of sled with the notches on the belt clip.
2. Slide the clip over a belt to wear the assembly.
1. Make sure the audio jack door is open as shown in the previous section.
2. Slide the 3.5mm audio connector into the end cap.
3. Attach the quick disconnect end of the headset adapter cable to the headset’s cable.
2 - 7
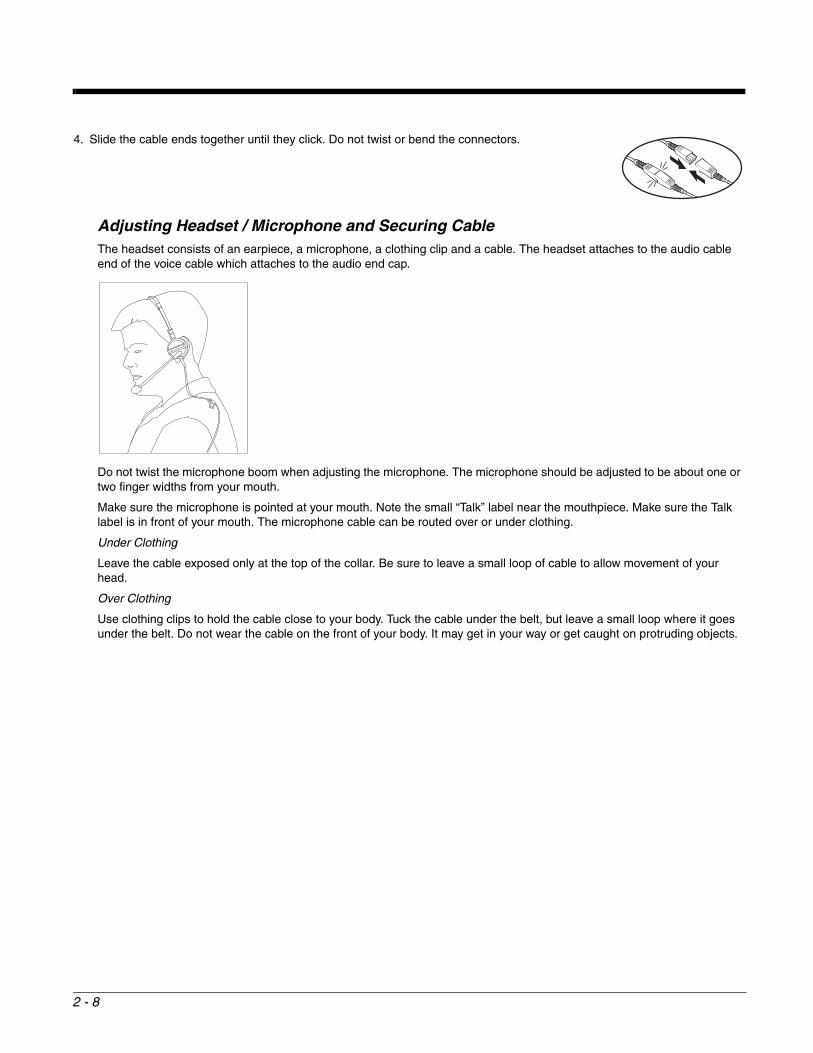
Adjusting Headset / Microphone and Securing CableThe headset consists of an earpiece, a microphone, a clothing clip and a cable. The headset attaches to the audio cable end of the voice cable which attaches to the audio end cap.
Do not twist the microphone boom when adjusting the microphone. The microphone should be adjusted to be about one or two finger widths from your mouth.
Make sure the microphone is pointed at your mouth. Note the small “Talk” label near the mouthpiece. Make sure the Talk label is in front of your mouth. The microphone cable can be routed over or under clothing.
Under Clothing
Leave the cable exposed only at the top of the collar. Be sure to leave a small loop of cable to allow movement of your head.
Over Clothing
Use clothing clips to hold the cable close to your body. Tuck the cable under the belt, but leave a small loop where it goes under the belt. Do not wear the cable on the front of your body. It may get in your way or get caught on protruding objects.
4. Slide the cable ends together until they click. Do not twist or bend the connectors.
2 - 8
Connect the Ring Scanner (Optional)
Attaching the Ring to your Finger1. Remove shipping film off the scanner window.
2. Slide finger into loosened ring strap.
3. Pull ring strap to secure ring to finger.
Note: If using the C-ring simply slide on to finger.
The ring scanner has a built-in quick disconnect designed for occasional safety hazards. It is not intended for frequent, nor-mal removal of the ring scanner from the hand.
Do not touch, push against or brace your finger on the scan aperture at any time.
Trigger RotationThe scanner head can be rotated 180° to be work on the right or left hand.
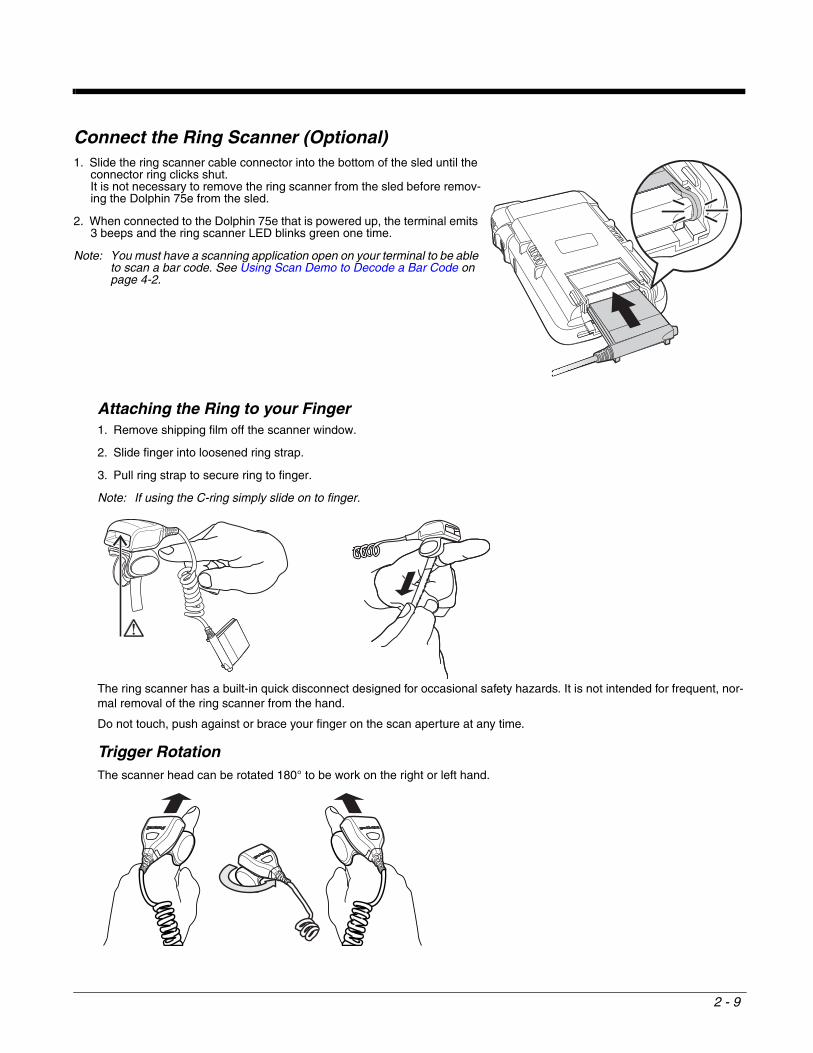
1. Slide the ring scanner cable connector into the bottom of the sled until the connector ring clicks shut.It is not necessary to remove the ring scanner from the sled before remov-ing the Dolphin 75e from the sled.
2. When connected to the Dolphin 75e that is powered up, the terminal emits 3 beeps and the ring scanner LED blinks green one time.
Note: You must have a scanning application open on your terminal to be able to scan a bar code. See Using Scan Demo to Decode a Bar Code on page 4-2.
2 - 9

2 - 10

3
About the HardwareAbout the TerminalFor more information on the Dolphin 75e, see the User’s Guide for your product.
Turn Power On
To turn the terminal On, press and release the Power button .
Turn Power Off
1. Press and hold the Power button .
2. When the message, “slide down to power off” appears, release the button and swipe down toward the bottom of the screen.
Sleep Mode (Suspend Mode)Sleep mode automatically turns the touch panel display off and locks the terminal to save battery power when the terminal is inactive for a programmed period of time. The automatic timeout limits are adjustable.
To wake up from sleep mode and unlock the screen:
1. Press and release the Power button .
2. Swipe up from the bottom of the screen to unlock the terminal.
To manually place the terminal in Sleep Mode press and release the Power button .
To adjust the time out limits:
1. Touch Settings on the Apps list screen.
2. Select lock screen to adjust the display time out limit or select sensor settings > features to adjust the sleep time out limit.
Restart the TerminalYou may need to restart the terminal to correct conditions where an application stops responding to the system or the termi-nal seems to be locked up.
• Press and hold the Power button . When the message, “slide down to power off” appears, release the button and swipe down toward the bottom of the screen. Press the Power button and to turn the terminal back on.
To perform a restart if the touch panel display is unresponsive:
• Press and hold the Volume Down and Power buttons simultaneously for 10-15 seconds. The terminal automatically restarts.
3 - 1
Reset the TerminalIf the terminal completely stops responding, you may need to perform a Factory Reset (Clean Boot). Because a Factory Reset can result in data loss, use this method only if all other recovery methods have failed. All personal content is erased (e.g., emails, pictures, contacts) and factory default settings are restored when a factory reset is performed.
1. Touch Settings on the Apps list screen.
2. Touch about, and then select reset your phone.
3. Touch Yes, and then Yes again to confirm restoring the factory settings.
4. Once the terminal resets, the set up Welcome screen appears.
To perform a Factory Reset if your touchscreen is unresponsive and all other recovery methods have failed:
1. Press and hold the Volume Down and Power buttons simultaneously until a large exclamation mark appears on the screen.
2. Press the following buttons in this order: Volume Up > Volume Down > Power > Volume Down .
3. Once the terminal resets, the set up Welcome screen appears.
Caution: A Factory Reset (Clean Boot) erases the memory in the terminal, including all applications and data files, with the exception of those found in the Flash File Store or any removable storage.!
3 - 2
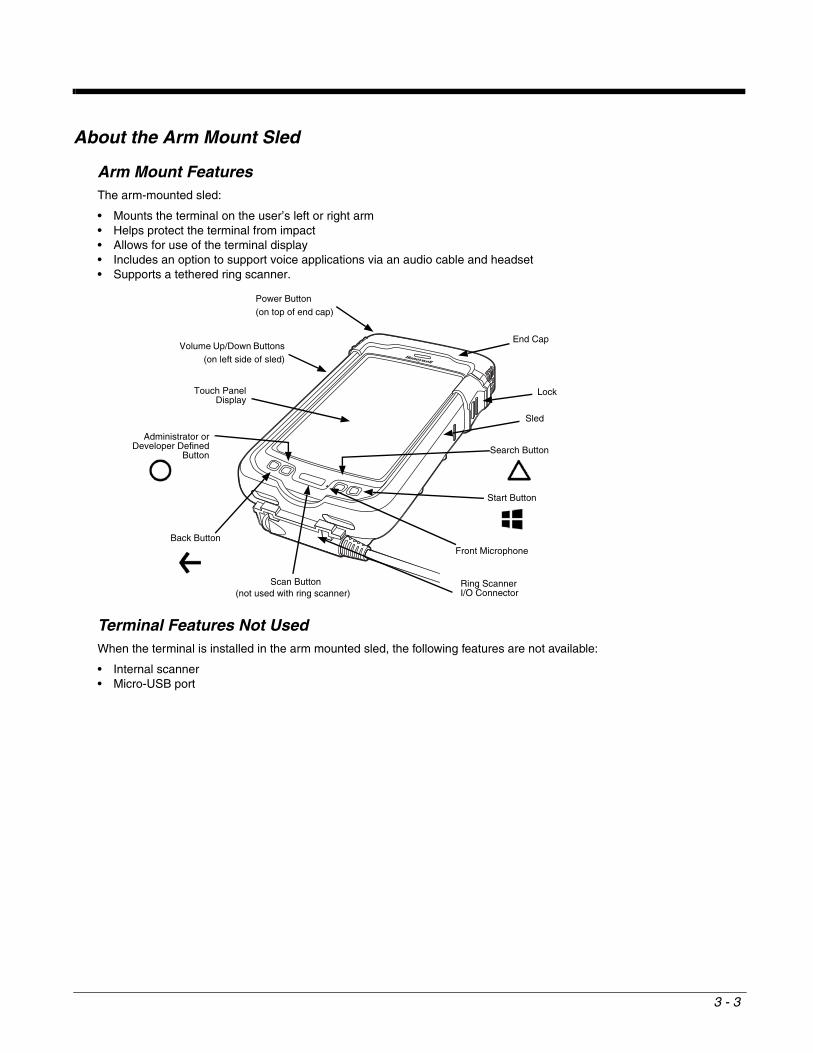
About the Arm Mount Sled
Arm Mount FeaturesThe arm-mounted sled:
• Mounts the terminal on the user’s left or right arm• Helps protect the terminal from impact• Allows for use of the terminal display• Includes an option to support voice applications via an audio cable and headset• Supports a tethered ring scanner.
Terminal Features Not UsedWhen the terminal is installed in the arm mounted sled, the following features are not available:
• Internal scanner• Micro-USB port
Scan Button
End Cap
Ring Scanner I/O Connector
Administrator orDeveloper Defined
Button
Lock
Search Button
Volume Up/Down Buttons(on left side of sled)
Power Button(on top of end cap)
Touch PanelDisplay
Start Button
Back Button
Sled
(not used with ring scanner)
Front Microphone
3 - 3
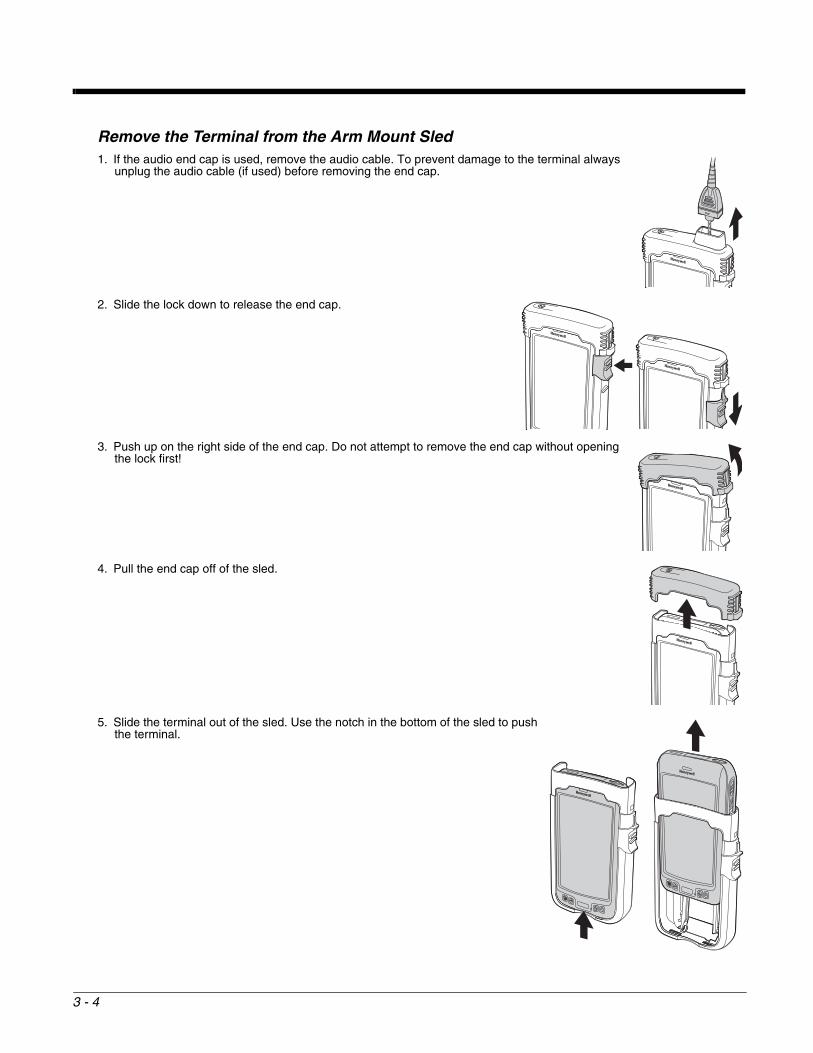
Remove the Terminal from the Arm Mount Sled1. If the audio end cap is used, remove the audio cable. To prevent damage to the terminal always
unplug the audio cable (if used) before removing the end cap.
2. Slide the lock down to release the end cap.
3. Push up on the right side of the end cap. Do not attempt to remove the end cap without opening the lock first!
4. Pull the end cap off of the sled.
5. Slide the terminal out of the sled. Use the notch in the bottom of the sled to push the terminal.
3 - 4
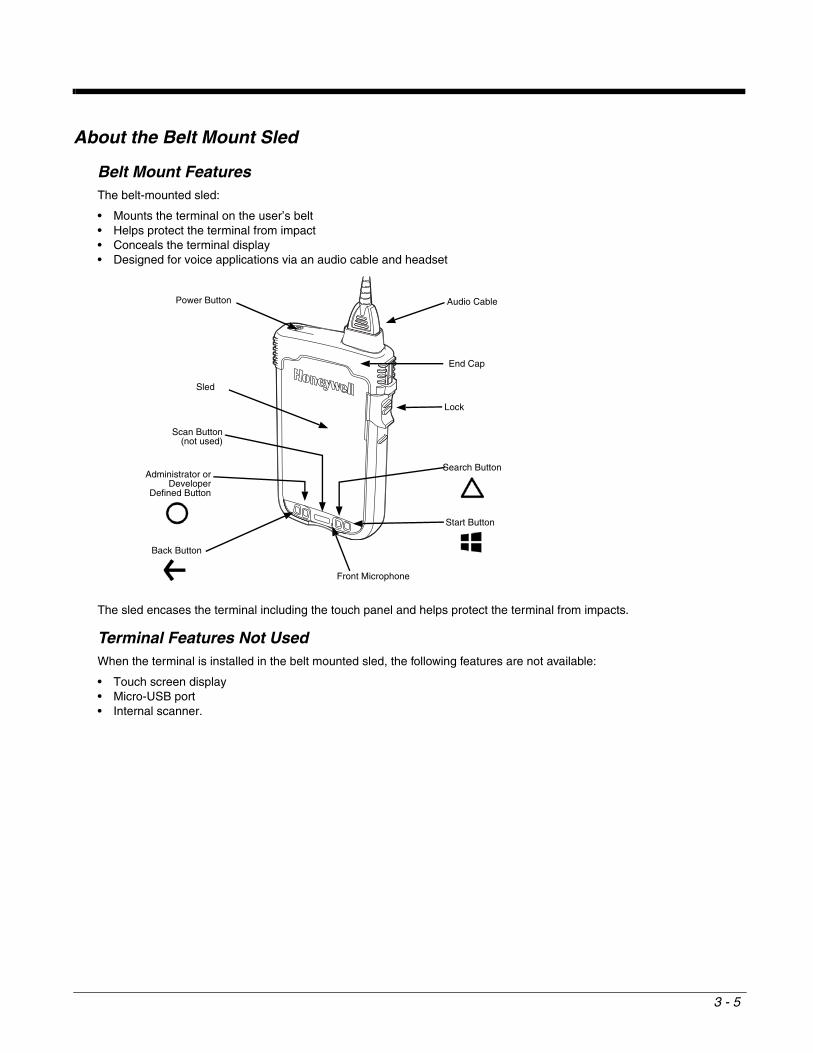
About the Belt Mount Sled
Belt Mount FeaturesThe belt-mounted sled:
• Mounts the terminal on the user’s belt• Helps protect the terminal from impact• Conceals the terminal display• Designed for voice applications via an audio cable and headset
The sled encases the terminal including the touch panel and helps protect the terminal from impacts.
Terminal Features Not UsedWhen the terminal is installed in the belt mounted sled, the following features are not available:
• Touch screen display• Micro-USB port• Internal scanner.
Front Microphone
Scan Button(not used)
Sled
Audio Cable
Lock
Start Button
Administrator orDeveloper
Defined Button
End Cap
Back Button
Search Button
Power Button
3 - 5

Remove the Terminal from the Belt Mount Sled1. If the audio end cap is used, remove the audio cable. To prevent damage to the terminal always
unplug the audio cable before removing the end cap.
2. Slide the lock down to release the end cap.
3. Push up on the right side of the end cap. Do not attempt to remove the end cap without opening the lock first!
4. Pull the end cap off of the sled.
5. Slide the terminal out of the sled. Use the notch in the bottom of the sled to push the terminal.
3 - 6
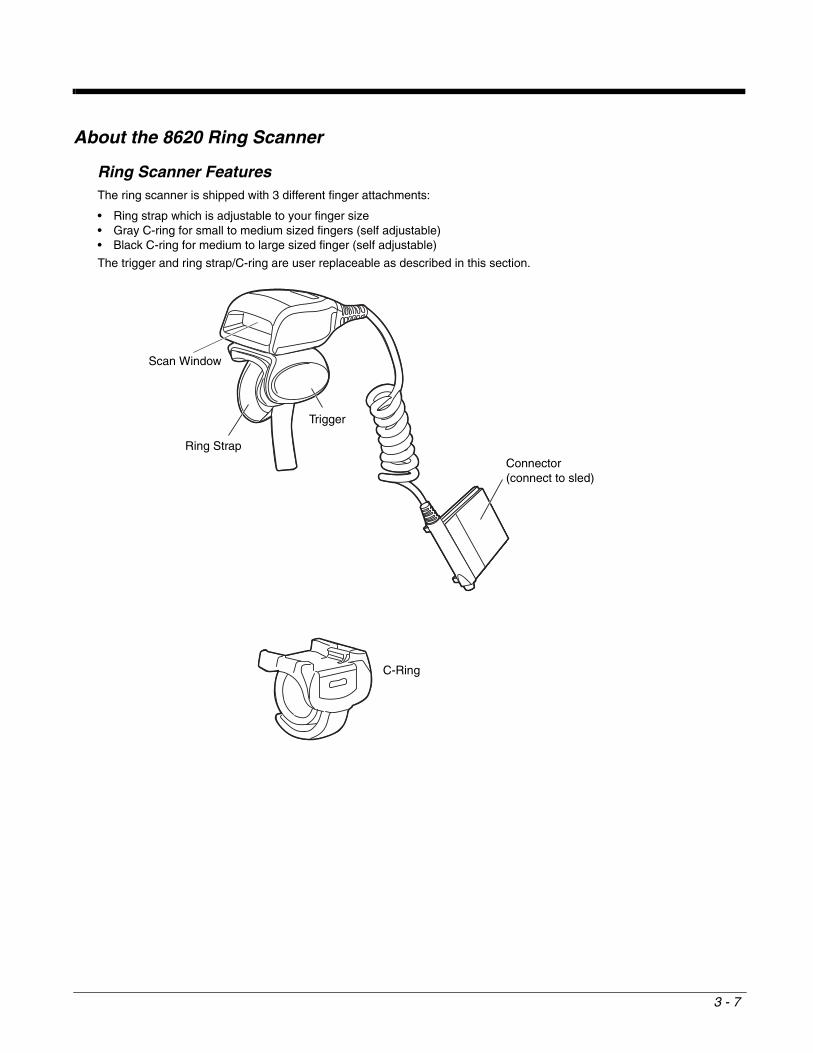
About the 8620 Ring Scanner
Ring Scanner FeaturesThe ring scanner is shipped with 3 different finger attachments:
• Ring strap which is adjustable to your finger size• Gray C-ring for small to medium sized fingers (self adjustable)• Black C-ring for medium to large sized finger (self adjustable)
The trigger and ring strap/C-ring are user replaceable as described in this section.
C-Ring
Scan Window
Ring Strap
Trigger
Connector (connect to sled)
3 - 7
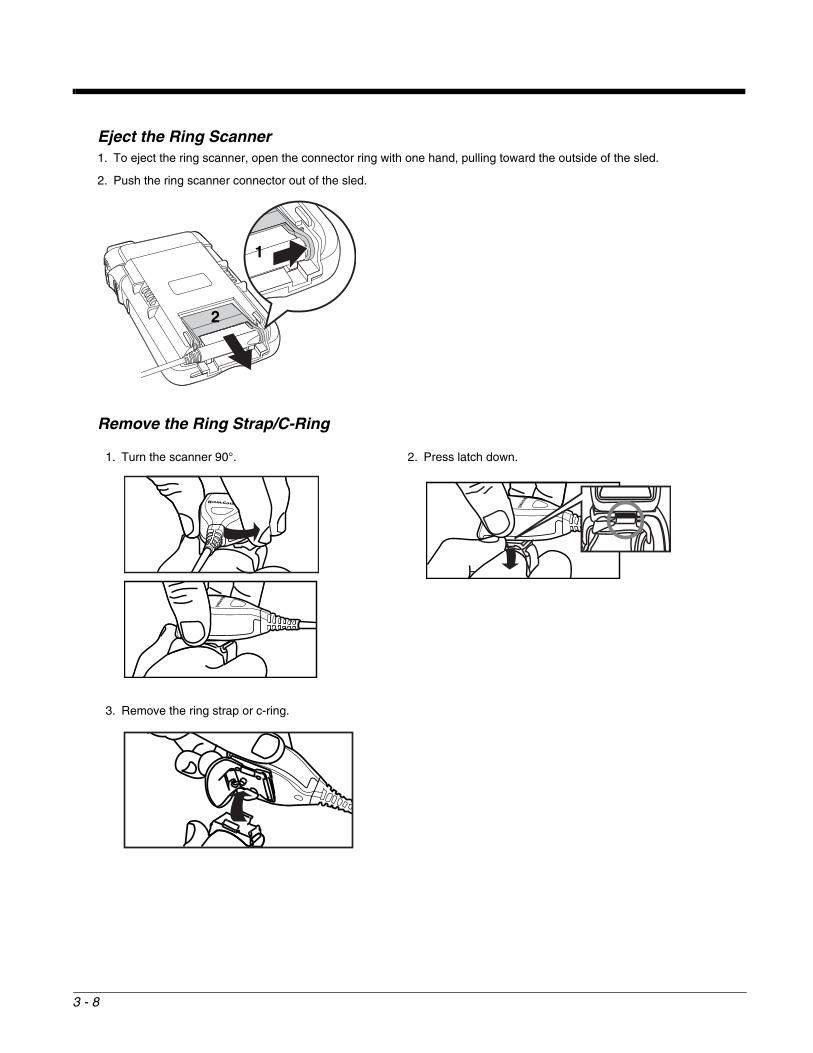
Eject the Ring Scanner1. To eject the ring scanner, open the connector ring with one hand, pulling toward the outside of the sled.
2. Push the ring scanner connector out of the sled.
Remove the Ring Strap/C-Ring
1. Turn the scanner 90°. 2. Press latch down.
3. Remove the ring strap or c-ring.
1
2
3 - 8
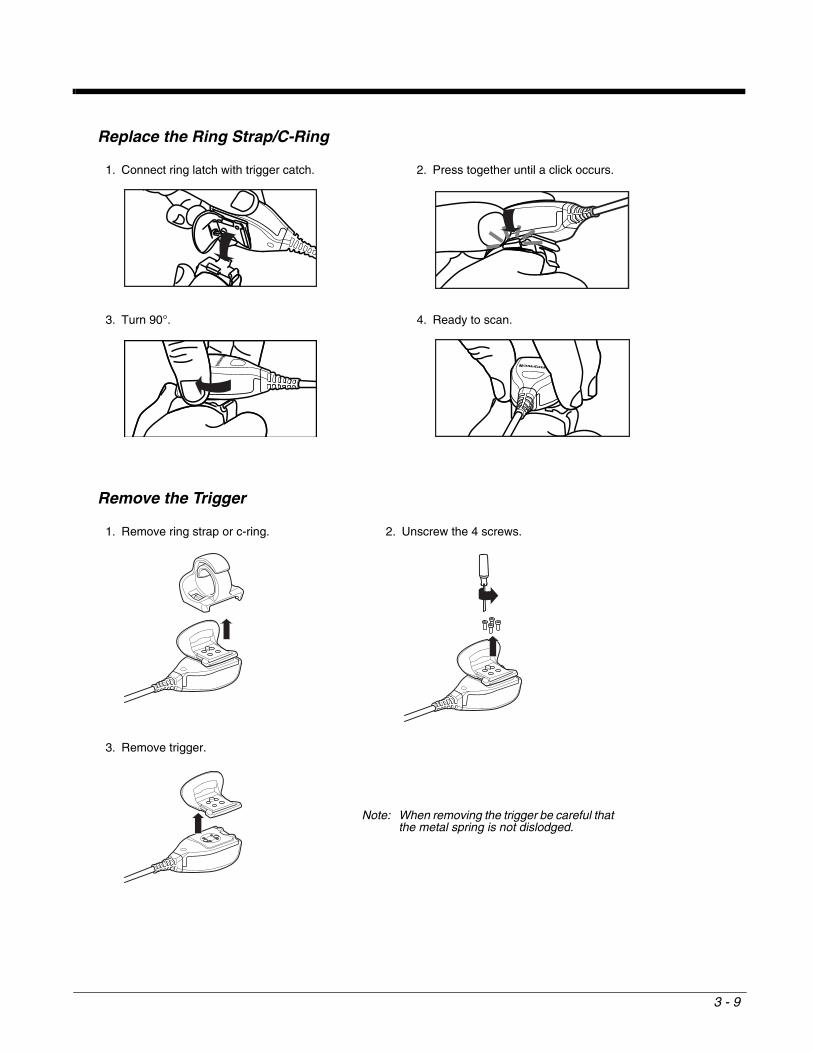
Replace the Ring Strap/C-Ring
Remove the Trigger
1. Connect ring latch with trigger catch. 2. Press together until a click occurs.
3. Turn 90°. 4. Ready to scan.
1. Remove ring strap or c-ring. 2. Unscrew the 4 screws.
3. Remove trigger.
Note: When removing the trigger be careful that the metal spring is not dislodged.
3 - 9
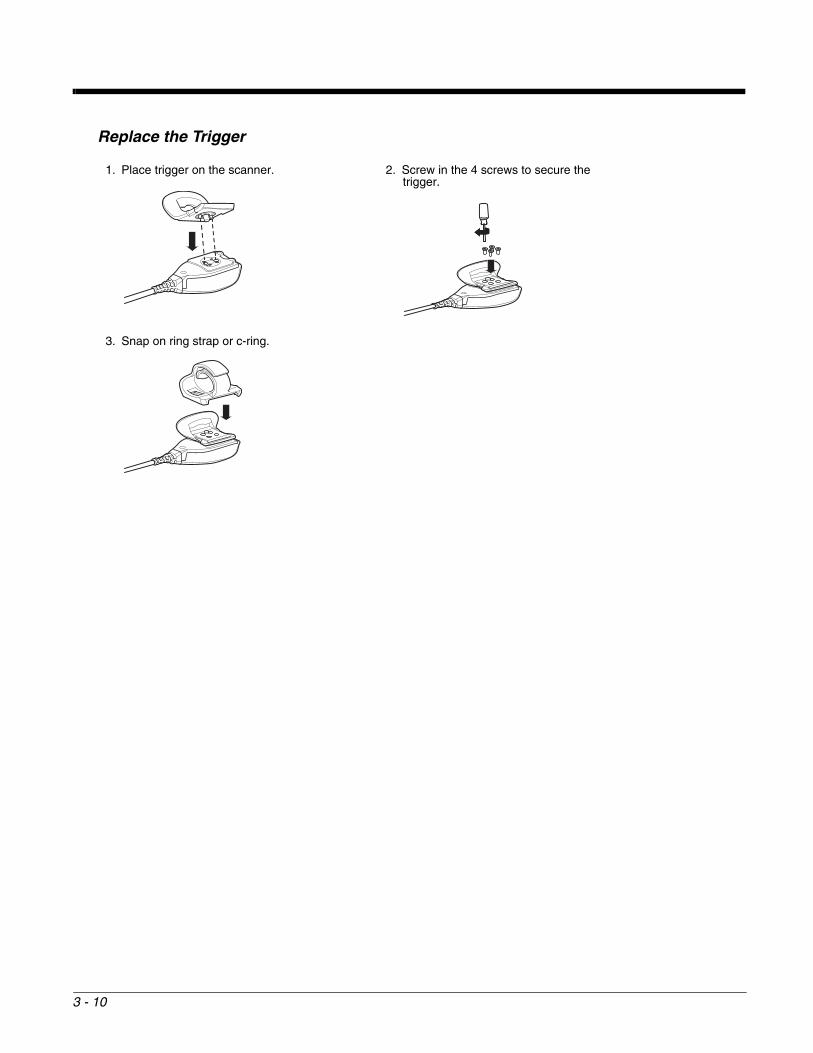
Replace the Trigger
1. Place trigger on the scanner. 2. Screw in the 4 screws to secure the trigger.
3. Snap on ring strap or c-ring.
3 - 10

Battery Specifications
Storing BatteriesTo maintain top performance from batteries, avoid storing batteries outside of the following temperature ranges:
• 14°F to 113°F (-10°C to +45°C) for short term storage of less than one month• 32°F to 86°F (-0°C to +30°C) for long term storage
Do not store batteries in extremely high humidity. For prolonged storage, do not keep batteries stored in a charger that is connected to a power source.
Guidelines for Battery Pack Use and DisposalThe following are general guidelines for the safe use and disposal of batteries:
• Do not disassemble or open crush, bend or deform, puncture or shred. • Do not modify or re-manufacture, attempt to insert foreign objects into the battery, immerse or expose to water or other
liquids, expose to fire, explosion or other hazard.• Improper battery use may result in a fire, explosion or other hazard.• We recommend use of Honeywell Li-ion battery packs. Use of any non-Honeywell battery may pose a personal hazard
to the user. • Only use the battery for the system for which it is specified. Do not use a battery in any other manner outside its intended
use in Dolphin terminals and peripherals. • Only use the battery with a charging system that has been qualified with the system per CTIA Certification Requirements
for Battery System Compliance to IEEE 1725. Use of an unqualified battery or charger may present a risk of fire, explosion, leakage, or other hazard.
• Replace the battery only with another battery that has been qualified with the system per this standard, IEEE-Std-1725. Use of an unqualified battery may present a risk of fire, explosion, leakage or other hazard.
• Replace defective batteries immediately; using a defective battery could damage the Dolphin terminal.• Never throw a used battery in the trash. Promptly dispose of used batteries in accordance with local regulations.• Do not short-circuit a battery or throw it into a fire; it can explode and cause severe personal injury. Do not allow metallic
conductive objects to contact battery terminals.• If you observe that the Honeywell battery supplied is physically damaged, please send it to Honeywell International Inc.
or an authorized service center for inspection, see Product Service and Repair on page TOC-v.• Battery usage by children should be supervised.• Avoid dropping the terminal or battery. If the terminal or battery is dropped, especially on a hard surface, and the user
suspects damage, send it to a Honeywell International Inc. or an authorized service center for inspection.• If you are not sure the battery or charger is working properly, send it to Honeywell International Inc. or an authorized
service center for inspection, See Product Service and Repair on page TOC-v.• Excessive discharge can degrade battery performance. Recharge the battery when your terminal indicates low battery
power. • Although your battery can be recharged many times, the battery life is limited. Replace it after the battery is unable to
hold an adequate charge.
3 - 11
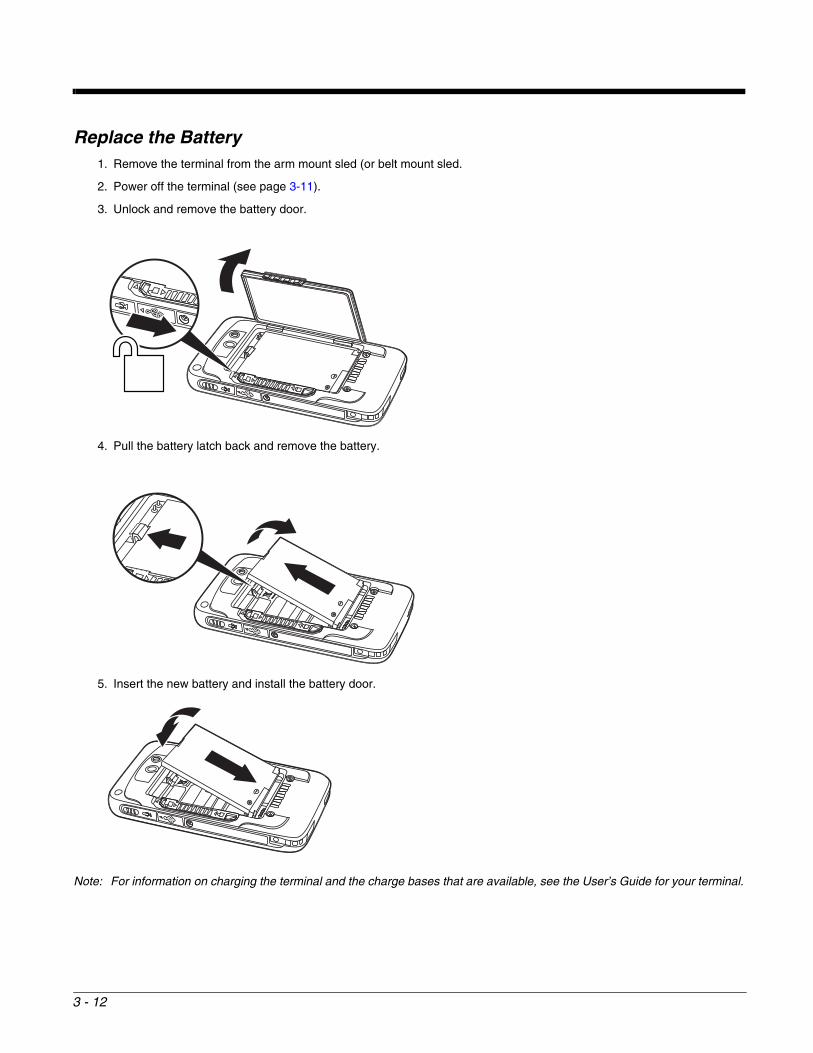
Replace the Battery1. Remove the terminal from the arm mount sled (or belt mount sled.
2. Power off the terminal (see page 3-11).
3. Unlock and remove the battery door.
4. Pull the battery latch back and remove the battery.
5. Insert the new battery and install the battery door.
Note: For information on charging the terminal and the charge bases that are available, see the User’s Guide for your terminal.
3 - 12
4
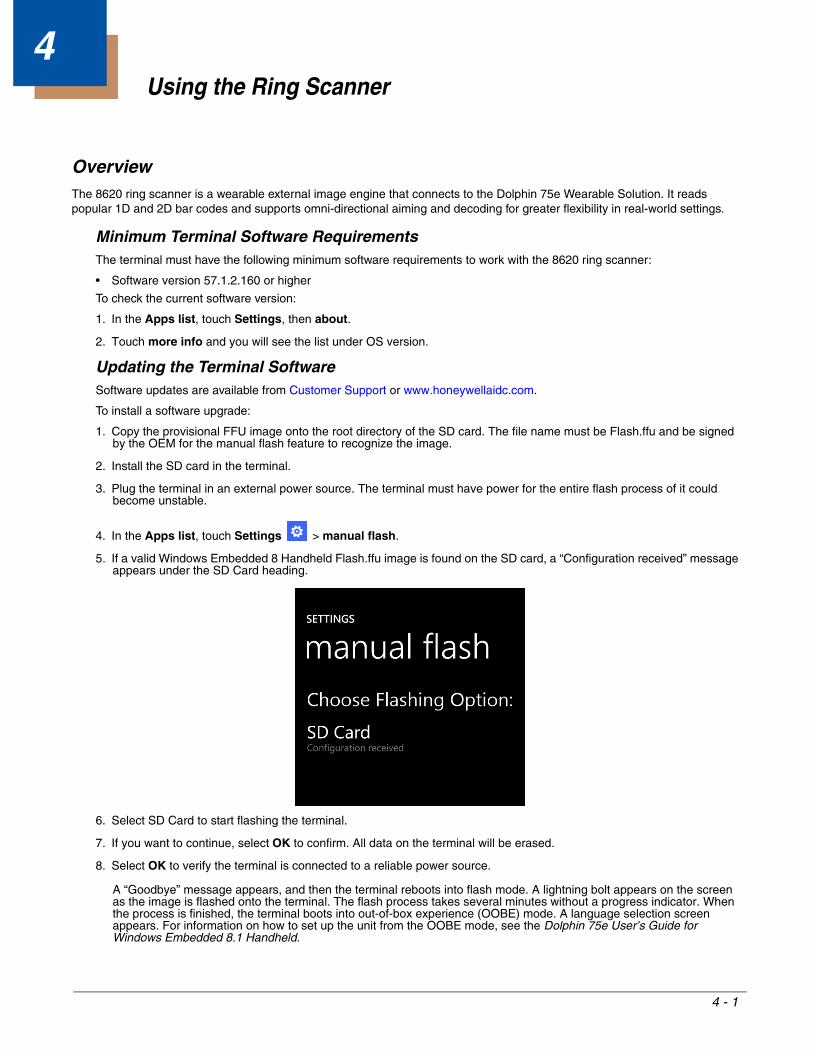
Using the Ring ScannerOverviewThe 8620 ring scanner is a wearable external image engine that connects to the Dolphin 75e Wearable Solution. It reads popular 1D and 2D bar codes and supports omni-directional aiming and decoding for greater flexibility in real-world settings.
Minimum Terminal Software RequirementsThe terminal must have the following minimum software requirements to work with the 8620 ring scanner:
• Software version 57.1.2.160 or higher
To check the current software version:
1. In the Apps list, touch Settings, then about.
2. Touch more info and you will see the list under OS version.
Updating the Terminal SoftwareSoftware updates are available from Customer Support or www.honeywellaidc.com.
To install a software upgrade:
1. Copy the provisional FFU image onto the root directory of the SD card. The file name must be Flash.ffu and be signed by the OEM for the manual flash feature to recognize the image.
2. Install the SD card in the terminal.
3. Plug the terminal in an external power source. The terminal must have power for the entire flash process of it could become unstable.
4. In the Apps list, touch Settings > manual flash.
5. If a valid Windows Embedded 8 Handheld Flash.ffu image is found on the SD card, a “Configuration received” message appears under the SD Card heading.
6. Select SD Card to start flashing the terminal.
7. If you want to continue, select OK to confirm. All data on the terminal will be erased.
8. Select OK to verify the terminal is connected to a reliable power source.
A “Goodbye” message appears, and then the terminal reboots into flash mode. A lightning bolt appears on the screen as the image is flashed onto the terminal. The flash process takes several minutes without a progress indicator. When the process is finished, the terminal boots into out-of-box experience (OOBE) mode. A language selection screen appears. For information on how to set up the unit from the OOBE mode, see the Dolphin 75e User’s Guide for Windows Embedded 8.1 Handheld.
4 - 1
Decoding Bar CodesOnce the ring scanner is connected, you must run a scanning application, such as Scan Demo (see below), before your scanner will be able to scan. The lighting and aimer will not turn on when you press the trigger until a scanning application is running on the terminal.
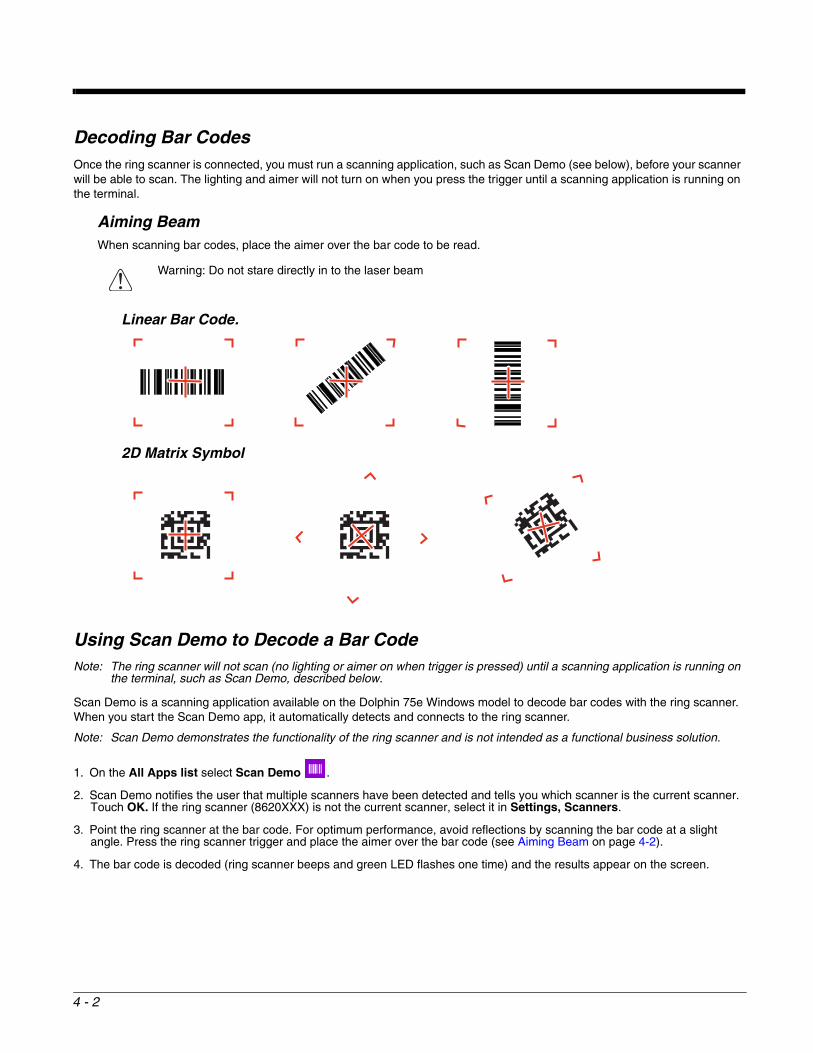
Aiming BeamWhen scanning bar codes, place the aimer over the bar code to be read.
Linear Bar Code.
2D Matrix Symbol
Using Scan Demo to Decode a Bar CodeNote: The ring scanner will not scan (no lighting or aimer on when trigger is pressed) until a scanning application is running on
the terminal, such as Scan Demo, described below.
Scan Demo is a scanning application available on the Dolphin 75e Windows model to decode bar codes with the ring scanner. When you start the Scan Demo app, it automatically detects and connects to the ring scanner.
Note: Scan Demo demonstrates the functionality of the ring scanner and is not intended as a functional business solution.
1. On the All Apps list select Scan Demo .
2. Scan Demo notifies the user that multiple scanners have been detected and tells you which scanner is the current scanner. Touch OK. If the ring scanner (8620XXX) is not the current scanner, select it in Settings, Scanners.
3. Point the ring scanner at the bar code. For optimum performance, avoid reflections by scanning the bar code at a slight angle. Press the ring scanner trigger and place the aimer over the bar code (see Aiming Beam on page 4-2).
4. The bar code is decoded (ring scanner beeps and green LED flashes one time) and the results appear on the screen.
Warning: Do not stare directly in to the laser beam!
4 - 2
Automatic ScanningEnable Automatic scan mode to activate the ring scanner for automatic scanning that does not require the operator to press the trigger for each bar code presented in the field of view of the ring scanner. The scanner automatically starts scan-ner after a specified timeout (Automatic Interval).
1. Open the Scan Demo .
2. Scan Demo notifies the user that multiple scanners have been detected and tells you which scanner is the current scanner. Touch OK. If the ring scanner (8620XXX) is not the current scanner, select it in Settings, Scanners.
3. Swipe left or touch Settings, and then select Scan.
4. Change the Scan Mode to Automatic.
5. Use the slider adjustment under Automatic Interval to set the number of seconds (0 to 30) between scan attempts.
6. Press the Back button to return to the Scan screen.
7. Press the trigger on the ring scanner to activate the scanner. Once activated, the ring scanner automatically scans and decodes bar codes presented in the field of view based on the Automatic Interval set.
To disable the feature set the Scan mode back to Normal.
Continuous ScanningEnable Continuous scan mode to activate the ring scanner for continuous scanning when you press and hold the trigger.
1. Open the Scan Demo .
2. Scan Demo notifies the user that multiple scanners have been detected. It automatically selects the ring scanner (ARSxx). Touch OK.
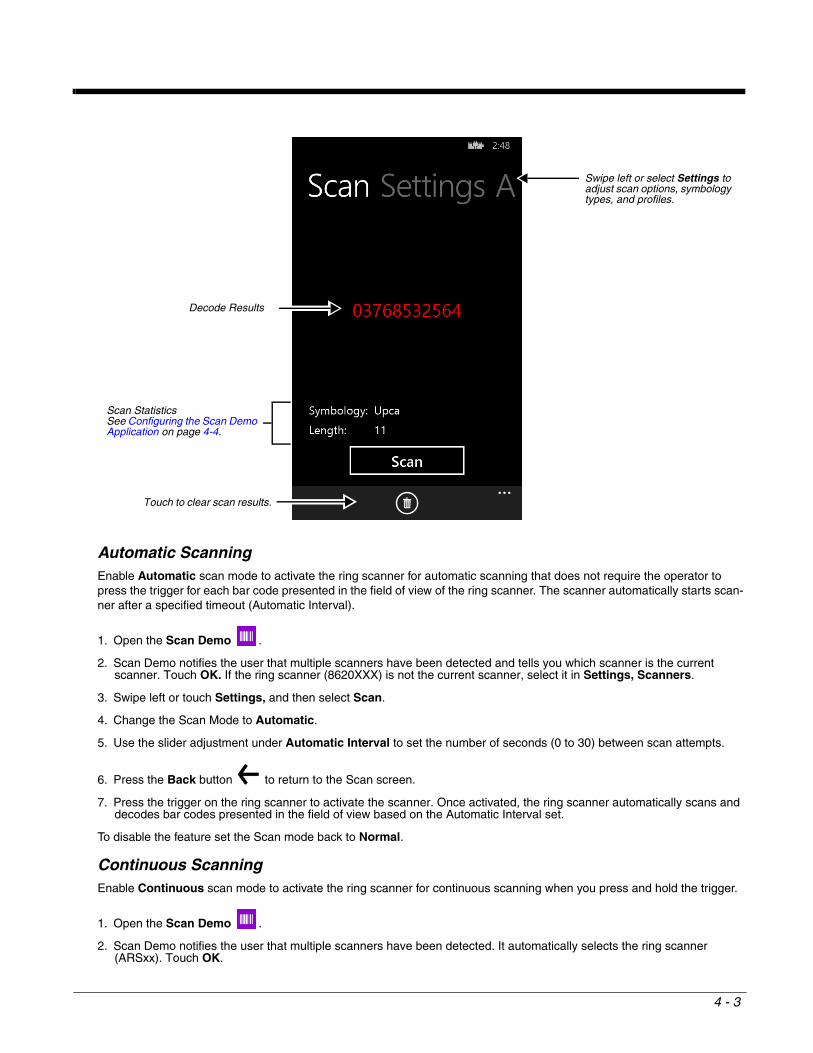
Swipe left or select Settings to adjust scan options, symbology types, and profiles.
Decode Results
Scan Statistics See Configuring the Scan Demo Application on page 4-4.
Touch to clear scan results.
4 - 3
3. Swipe left or touch Settings, and then select Scan.
4. Change the Scan Mode to Continuous.
5. Press the Back button to return to the Scan screen.
6. Press and hold the trigger to activate the ring scanner. The scanner scans and decodes bar codes presented in the terminal’s field of view as long as the trigger is pressed.
7. Release the trigger to deactivate the ring scanner.
To disable the feature set the Scan mode back to Normal.
Configuring the Scan Demo Application
1. Open the Scan Demo .
2. Scan Demo notifies the user that multiple scanners have been detected. It automatically selects the ring scanner (ARSxx). Touch OK.
3. Swipe left or touch Settings.
4. Select Scan, Symbology, or Profiles.
5. Modify the settings to meet your application needs, and then press the Back button to return to the Scan Demo screen.
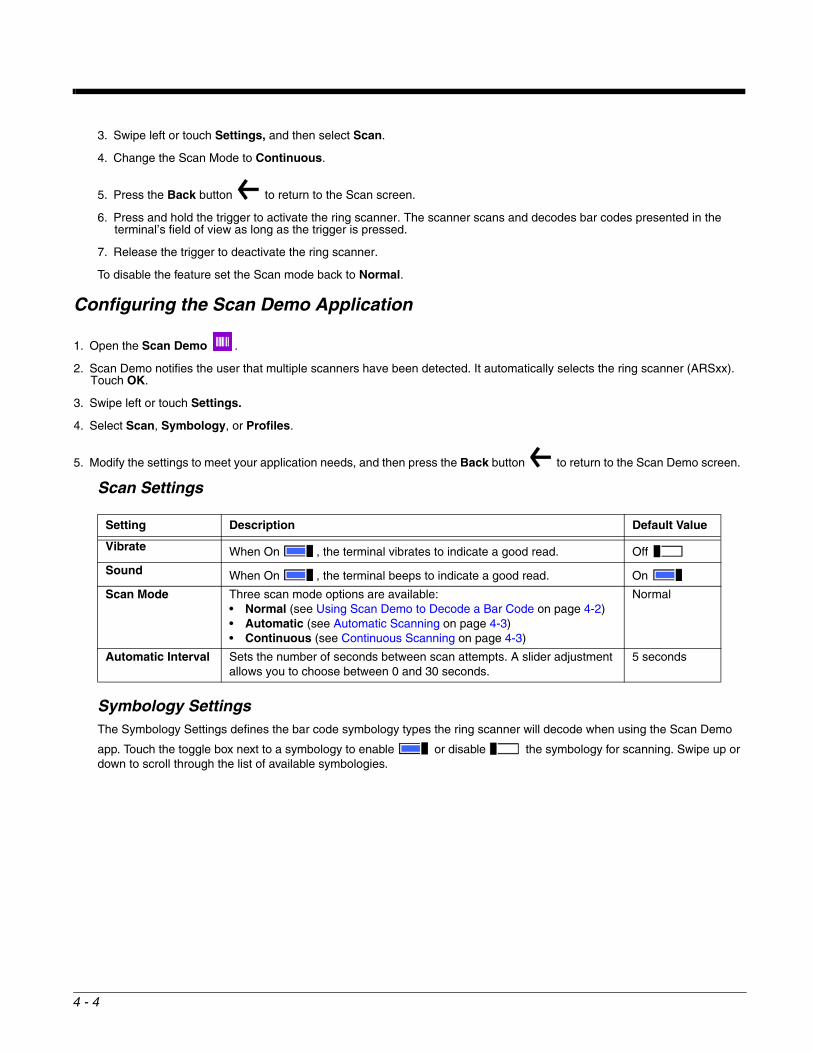
Scan Settings
Symbology SettingsThe Symbology Settings defines the bar code symbology types the ring scanner will decode when using the Scan Demo
app. Touch the toggle box next to a symbology to enable or disable the symbology for scanning. Swipe up or down to scroll through the list of available symbologies.
Setting Description Default Value
Vibrate When On , the terminal vibrates to indicate a good read. Off
Sound When On , the terminal beeps to indicate a good read. On
Scan Mode Three scan mode options are available: • Normal (see Using Scan Demo to Decode a Bar Code on page 4-2)• Automatic (see Automatic Scanning on page 4-3)• Continuous (see Continuous Scanning on page 4-3)
Normal
Automatic Interval Sets the number of seconds between scan attempts. A slider adjustment allows you to choose between 0 and 30 seconds.
5 seconds
4 - 4
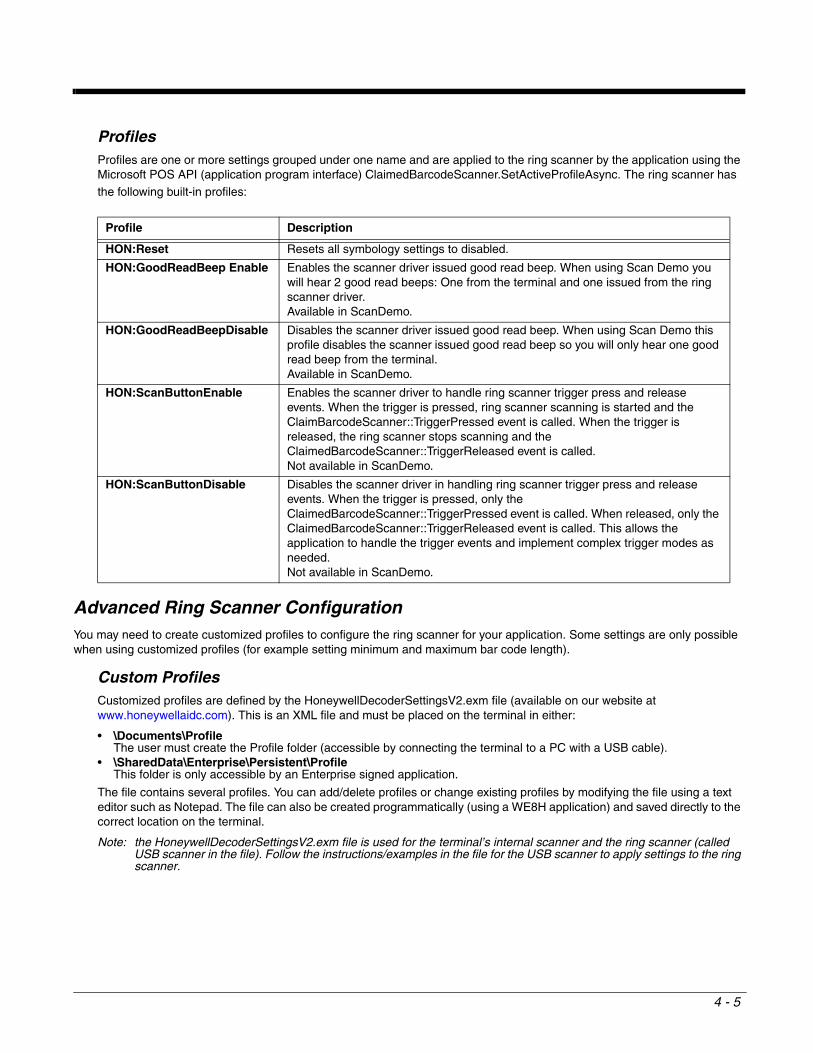
ProfilesProfiles are one or more settings grouped under one name and are applied to the ring scanner by the application using the Microsoft POS API (application program interface) ClaimedBarcodeScanner.SetActiveProfileAsync. The ring scanner has
the following built-in profiles:
Advanced Ring Scanner ConfigurationYou may need to create customized profiles to configure the ring scanner for your application. Some settings are only possible when using customized profiles (for example setting minimum and maximum bar code length).
Custom ProfilesCustomized profiles are defined by the HoneywellDecoderSettingsV2.exm file (available on our website at www.honeywellaidc.com). This is an XML file and must be placed on the terminal in either:
• \Documents\Profile The user must create the Profile folder (accessible by connecting the terminal to a PC with a USB cable).
• \SharedData\Enterprise\Persistent\Profile This folder is only accessible by an Enterprise signed application.
The file contains several profiles. You can add/delete profiles or change existing profiles by modifying the file using a text editor such as Notepad. The file can also be created programmatically (using a WE8H application) and saved directly to the correct location on the terminal.
Note: the HoneywellDecoderSettingsV2.exm file is used for the terminal’s internal scanner and the ring scanner (called USB scanner in the file). Follow the instructions/examples in the file for the USB scanner to apply settings to the ring scanner.
Profile Description
HON:Reset Resets all symbology settings to disabled.
HON:GoodReadBeep Enable Enables the scanner driver issued good read beep. When using Scan Demo you will hear 2 good read beeps: One from the terminal and one issued from the ring scanner driver. Available in ScanDemo.
HON:GoodReadBeepDisable Disables the scanner driver issued good read beep. When using Scan Demo this profile disables the scanner issued good read beep so you will only hear one good read beep from the terminal. Available in ScanDemo.
HON:ScanButtonEnable Enables the scanner driver to handle ring scanner trigger press and release events. When the trigger is pressed, ring scanner scanning is started and the ClaimBarcodeScanner::TriggerPressed event is called. When the trigger is released, the ring scanner stops scanning and the ClaimedBarcodeScanner::TriggerReleased event is called.Not available in ScanDemo.
HON:ScanButtonDisable Disables the scanner driver in handling ring scanner trigger press and release events. When the trigger is pressed, only the ClaimedBarcodeScanner::TriggerPressed event is called. When released, only the ClaimedBarcodeScanner::TriggerReleased event is called. This allows the application to handle the trigger events and implement complex trigger modes as needed.Not available in ScanDemo.
4 - 5
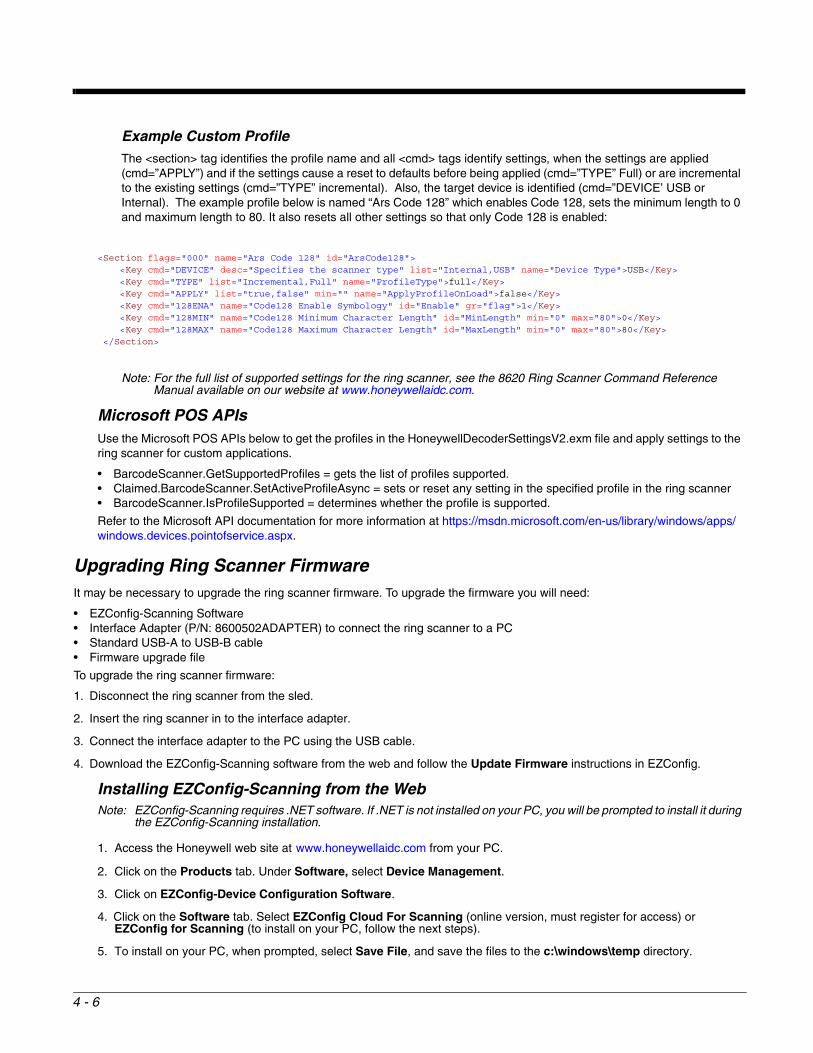
Example Custom ProfileThe <section> tag identifies the profile name and all <cmd> tags identify settings, when the settings are applied (cmd=”APPLY”) and if the settings cause a reset to defaults before being applied (cmd=”TYPE” Full) or are incremental to the existing settings (cmd=”TYPE” incremental). Also, the target device is identified (cmd=”DEVICE’ USB or Internal). The example profile below is named “Ars Code 128” which enables Code 128, sets the minimum length to 0 and maximum length to 80. It also resets all other settings so that only Code 128 is enabled:
<Section flags="000" name="Ars Code 128" id="ArsCode128"> <Key cmd="DEVICE" desc="Specifies the scanner type" list="Internal,USB" name="Device Type">USB</Key> <Key cmd="TYPE" list="Incremental,Full" name="ProfileType">full</Key> <Key cmd="APPLY" list="true,false" min="" name="ApplyProfileOnLoad">false</Key> <Key cmd="128ENA" name="Code128 Enable Symbology" id="Enable" gr="flag">1</Key> <Key cmd="128MIN" name="Code128 Minimum Character Length" id="MinLength" min="0" max="80">0</Key> <Key cmd="128MAX" name="Code128 Maximum Character Length" id="MaxLength" min="0" max="80">80</Key>
</Section>
Note: For the full list of supported settings for the ring scanner, see the 8620 Ring Scanner Command Reference Manual available on our website at www.honeywellaidc.com.
Microsoft POS APIsUse the Microsoft POS APIs below to get the profiles in the HoneywellDecoderSettingsV2.exm file and apply settings to the ring scanner for custom applications.
• BarcodeScanner.GetSupportedProfiles = gets the list of profiles supported.• Claimed.BarcodeScanner.SetActiveProfileAsync = sets or reset any setting in the specified profile in the ring scanner• BarcodeScanner.IsProfileSupported = determines whether the profile is supported.
Refer to the Microsoft API documentation for more information at https://msdn.microsoft.com/en-us/library/windows/apps/windows.devices.pointofservice.aspx.
Upgrading Ring Scanner FirmwareIt may be necessary to upgrade the ring scanner firmware. To upgrade the firmware you will need:
• EZConfig-Scanning Software• Interface Adapter (P/N: 8600502ADAPTER) to connect the ring scanner to a PC• Standard USB-A to USB-B cable• Firmware upgrade file
To upgrade the ring scanner firmware:
1. Disconnect the ring scanner from the sled.
2. Insert the ring scanner in to the interface adapter.
3. Connect the interface adapter to the PC using the USB cable.
4. Download the EZConfig-Scanning software from the web and follow the Update Firmware instructions in EZConfig.
Installing EZConfig-Scanning from the WebNote: EZConfig-Scanning requires .NET software. If .NET is not installed on your PC, you will be prompted to install it during
the EZConfig-Scanning installation.
1. Access the Honeywell web site at www.honeywellaidc.com from your PC.
2. Click on the Products tab. Under Software, select Device Management.
3. Click on EZConfig-Device Configuration Software.
4. Click on the Software tab. Select EZConfig Cloud For Scanning (online version, must register for access) or EZConfig for Scanning (to install on your PC, follow the next steps).
5. To install on your PC, when prompted, select Save File, and save the files to the c:\windows\temp directory.
4 - 6

6. Once you have finished downloading the file, exit the web site.
7. Using Explorer, go to the c:\windows\temp file.
8. Double click on the Setup.exe file. Follow the screen prompts to install the EZConfig-Scanning program.
9. If you’ve selected the defaults during installation, you can click on Start Menu-All Programs-Honeywell-EZConfig-Scanning and select EZConfig for your browser.
4 - 7

4 - 8
A
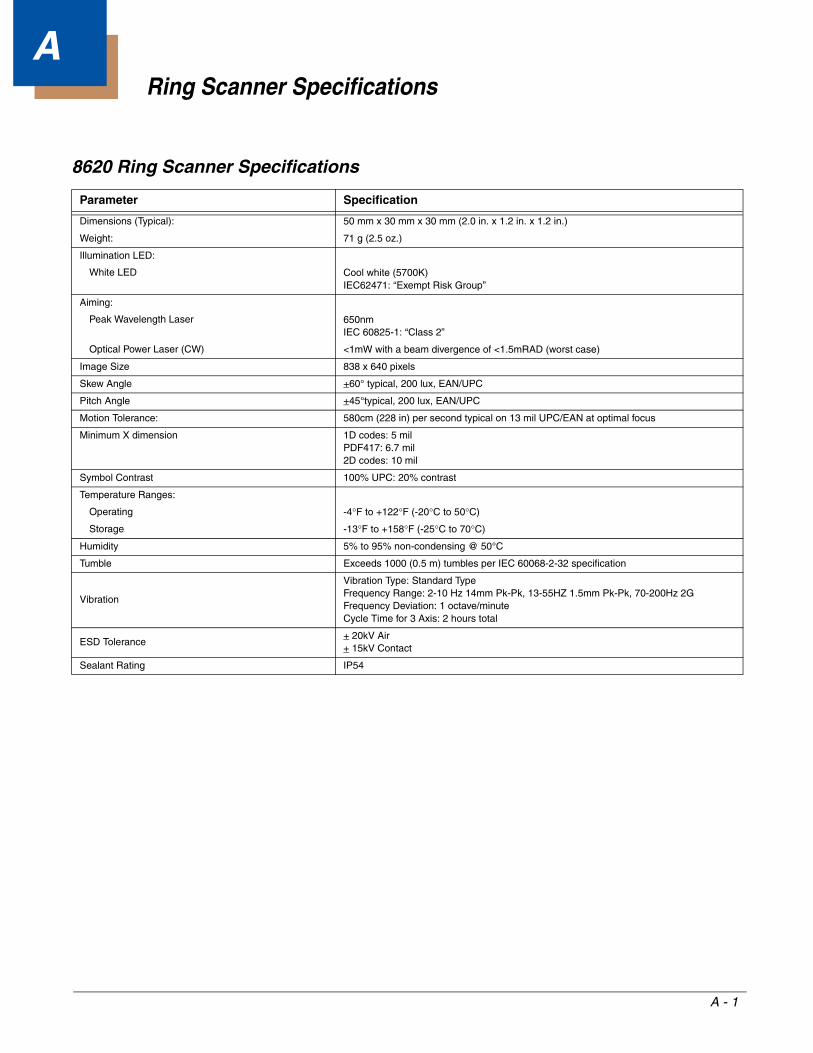
Ring Scanner Specifications8620 Ring Scanner Specifications
Parameter Specification
Dimensions (Typical): 50 mm x 30 mm x 30 mm (2.0 in. x 1.2 in. x 1.2 in.)
Weight: 71 g (2.5 oz.)
Illumination LED:
White LED Cool white (5700K)IEC62471: “Exempt Risk Group”
Aiming:
Peak Wavelength Laser 650nmIEC 60825-1: “Class 2”
Optical Power Laser (CW) <1mW with a beam divergence of <1.5mRAD (worst case)
Image Size 838 x 640 pixels
Skew Angle +60° typical, 200 lux, EAN/UPC
Pitch Angle +45°typical, 200 lux, EAN/UPC
Motion Tolerance: 580cm (228 in) per second typical on 13 mil UPC/EAN at optimal focus
Minimum X dimension 1D codes: 5 milPDF417: 6.7 mil2D codes: 10 mil
Symbol Contrast 100% UPC: 20% contrast
Temperature Ranges:
Operating -4°F to +122°F (-20°C to 50°C)
Storage -13°F to +158°F (-25°C to 70°C)
Humidity 5% to 95% non-condensing @ 50°C
Tumble Exceeds 1000 (0.5 m) tumbles per IEC 60068-2-32 specification
Vibration
Vibration Type: Standard TypeFrequency Range: 2-10 Hz 14mm Pk-Pk, 13-55HZ 1.5mm Pk-Pk, 70-200Hz 2GFrequency Deviation: 1 octave/minuteCycle Time for 3 Axis: 2 hours total
ESD Tolerance+ 20kV Air+ 15kV Contact
Sealant Rating IP54
A - 1
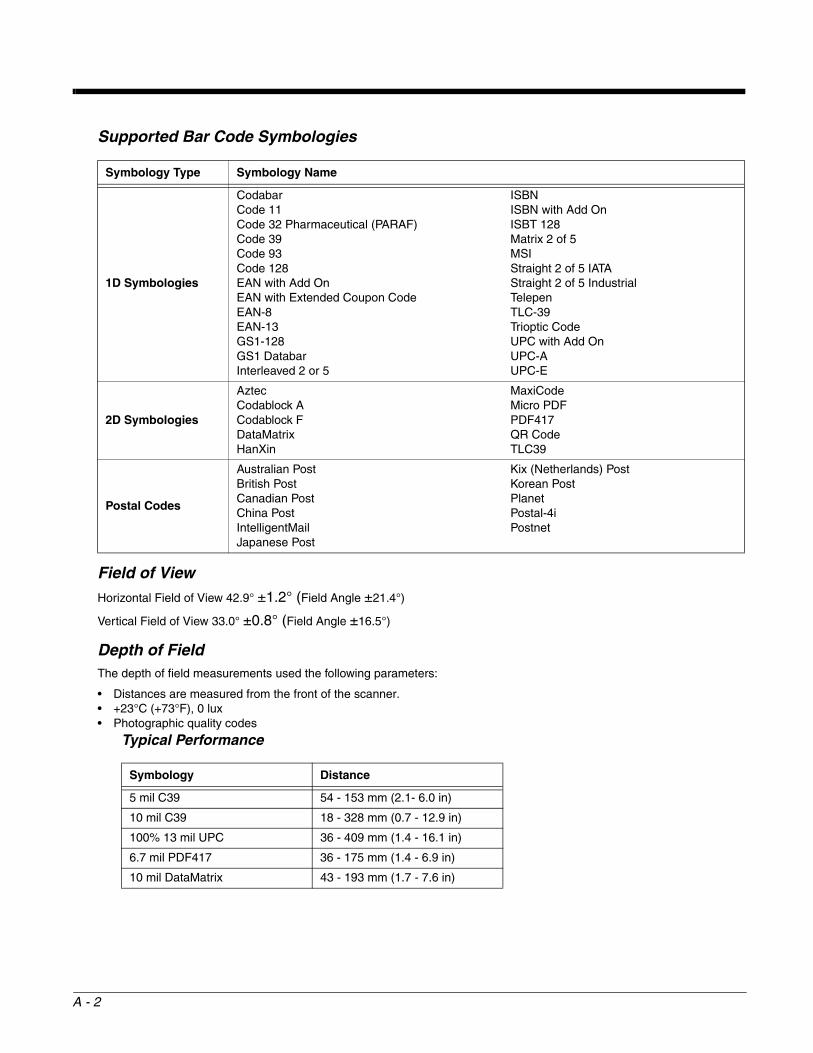
Supported Bar Code Symbologies
Field of ViewHorizontal Field of View 42.9° ±1.2° (Field Angle ±21.4°)
Vertical Field of View 33.0° ±0.8° (Field Angle ±16.5°)
Depth of FieldThe depth of field measurements used the following parameters:
• Distances are measured from the front of the scanner.• +23°C (+73°F), 0 lux• Photographic quality codes
Typical Performance
Symbology Type Symbology Name
1D Symbologies
CodabarCode 11Code 32 Pharmaceutical (PARAF)Code 39Code 93 Code 128 EAN with Add OnEAN with Extended Coupon CodeEAN-8 EAN-13 GS1-128GS1 DatabarInterleaved 2 or 5
ISBNISBN with Add On ISBT 128Matrix 2 of 5MSIStraight 2 of 5 IATAStraight 2 of 5 IndustrialTelepen TLC-39Trioptic CodeUPC with Add OnUPC-AUPC-E
2D Symbologies
AztecCodablock ACodablock FDataMatrixHanXin
MaxiCodeMicro PDFPDF417QR CodeTLC39
Postal Codes
Australian PostBritish PostCanadian PostChina PostIntelligentMailJapanese Post
Kix (Netherlands) PostKorean PostPlanetPostal-4iPostnet
Symbology Distance
5 mil C39 54 - 153 mm (2.1- 6.0 in)
10 mil C39 18 - 328 mm (0.7 - 12.9 in)
100% 13 mil UPC 36 - 409 mm (1.4 - 16.1 in)
6.7 mil PDF417 36 - 175 mm (1.4 - 6.9 in)
10 mil DataMatrix 43 - 193 mm (1.7 - 7.6 in)
A - 2
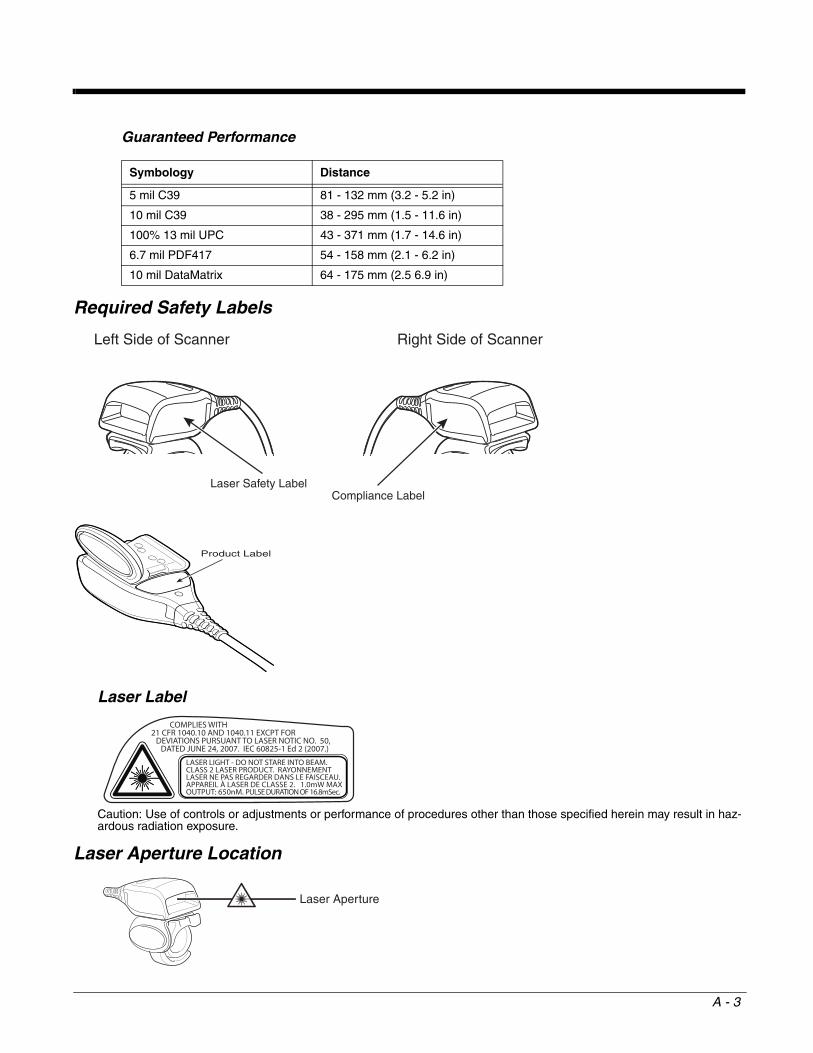
Guaranteed Performance
Required Safety Labels
Laser Label
Caution: Use of controls or adjustments or performance of procedures other than those specified herein may result in haz-ardous radiation exposure.
Laser Aperture Location
Symbology Distance
5 mil C39 81 - 132 mm (3.2 - 5.2 in)
10 mil C39 38 - 295 mm (1.5 - 11.6 in)
100% 13 mil UPC 43 - 371 mm (1.7 - 14.6 in)
6.7 mil PDF417 54 - 158 mm (2.1 - 6.2 in)
10 mil DataMatrix 64 - 175 mm (2.5 6.9 in)
Left Side of Scanner
Laser Safety LabelCompliance Label
Right Side of Scanner
Product Label
Laser Aperture
A - 3

A - 4
B
Coding for POS Barcode ApplicationsIntroductionUsing the Microsoft Point of Service API and the various application templates that are available (Pivot App, Hub App, etc), it is fairly simple to develop a straightforward scanning application for a Windows 8.1 phone-based device. The online documenta-tion at https://msdn.microsoft.com/en-us/library/windows/apps/windows.devices.pointofservice.aspx is clear and easy to use.
However details are very important. For a truly practical, production-quality user experience, you must code for the following application life cycle transitions:
• Suspending and resuming the application• Switching back and forth between the scanning application and another application• Connecting and disconnecting an external scanner
The scanner stack, that is, the structures created by creating, claiming, enabling, and providing enabled symbologies and set-tings profiles, gets destroyed or corrupted on any of these transitions. It must be rebuilt when the application resumes. Therefore the application life cycle state must be internally tracked to allow this rebuilding.
The following discussion assumes non-Silverlight application development in the NET framework (C#, managed C++, or Visual Basic). Any coding below will be in C# syntax. Visual Basic and C++ will look similar.
Suggested Application StructureYou should add all scanner support as static objects in the singleton derived App object (for instance App : Application), which all application templates provide for you when first creating the application. That way the scanning support is available to all pages of your app. The App object also provides the callbacks supporting application lifecycle transitions.
Suspending and Resuming the ApplicationOn creation of a Windows Phone project, the application template you choose will generate an App object that already has an OnSuspending() callback method. You will probably need to generate your own OnResuming() callback method by chaining to the application’s Resume event, which should be pre-generated by the application template. In Visual Studio C#, there is good support for creating such a method using the “+=” operator and the TAB key on the Resume event.
Be sure and track the acts of suspending and resuming in persistent state variables in the App object.
To restore scanning when resuming, call
• BarcodeScanner bcs = BarcodeScanner.CreateById();• ClaimedBarcodeScanner cbcs = bcs.ClaimScannerAsync();• cbcs.EnableScanner();• cbcs.SetActiveSymbologiesAsync( List<uint>symsToEnable );• cbcs.SetActiveProfileAsync( List<string>profilesToEnable );
Switching Between ApplicationsThis is similar to suspending and resuming. Your code doesn’t need to know any difference.
Connecting and Disconnecting External ScannersYou will need to add a static instance of Windows.Devices.Enumeration.DeviceWatcher in order to receive callbacks when the connection state of an external scanner changes. There are a number of callbacks that must be present in your code for full support of connection changes:
DeviceAdded()Called by the OS when a device connects. You should track this event in persistent state variables. When this event occurs, you should recreate the scanning stack as follows:
• BarcodeScanner bcs = BarcodeScanner.CreateById();• ClaimedBarcodeScanner cbcs = bcs.ClaimScannerAsync();• cbcs.EnableScanner();• cbcs.SetActiveSymbologiesAsync( List<uint>symsToEnable );• cbcs.SetActiveProfileAsync( List<string>profilesToEnable );
B - 1
DeviceRemoved()Called by the OS when a device disconnects. You should track this event in persistent state variables.
DeviceUpdated()Can be called by the OS when a device connects, so as with DeviceAdded(), you should have state transition code in place to catch this. When this event occurs, you should recreate the scanning stack as follows:
• BarcodeScanner bcs = BarcodeScanner.CreateById();• ClaimedBarcodeScanner cbcs = bcs.ClaimScannerAsync();• cbcs.EnableScanner();• cbcs.SetActiveSymbologiesAsync( List<uint>symsToEnable );• cbcs.SetActiveProfileAsync( List<string>profilesToEnable );
DeviceEnumCompleted()Optional to track, but callback must be provided.
DetectorStopped()Optional to track, but callback must be provided.
To register these callbacks, chain your support code to the events in the DeviceWatcher object.
To restore scanning when resuming, call
• BarcodeScanner bcs = BarcodeScanner.CreateById();• ClaimedBarcodeScanner cbcs = bcs.ClaimScannerAsync();• cbcs.EnableScanner();• cbcs.SetActiveSymbologiesAsync( List<uint>symsToEnable );• cbcs.SetActiveProfileAsync( List<string>profilesToEnable );
B - 2


™
Honeywell9680 Old Bailes RoadFort Mill, SC 29707
75EWS-W8-ENUS-UG Rev B 03/16
Related Documents