
Welcome message from author
This document is posted to help you gain knowledge. Please leave a comment to let me know what you think about it! Share it to your friends and learn new things together.
Transcript


Trend Micro Incorporated reserves the right to make changes to this document and tothe product described herein without notice. Before installing and using the product,please review the readme files, release notes, and/or the latest version of the applicabledocumentation, which are available from the Trend Micro website at:
http://docs.trendmicro.com/en-us/enterprise/interscan-messaging-security.aspx
Trend Micro, the Trend Micro t-ball logo, Control Manager, eManager, InterScan, andTrendLabs are trademarks or registered trademarks of Trend Micro Incorporated. Allother product or company names may be trademarks or registered trademarks of theirowners.
© 2016. Trend Micro Incorporated. All Rights Reserved.
Document Part No.: MSEM97320_160201
Release Date: June 2016
Protected by U.S. Patent No.: Patents pending
This documentation introduces the main features of the product and/or providesinstallation instructions for a production environment. Read through the documentationbefore installing or using the product.
Detailed information about how to use specific features within the product may beavailable in the Trend Micro Online Help and/or the Trend Micro Knowledge Base atthe Trend Micro website.
Trend Micro always seeks to improve its documentation. If you have questions,comments, or suggestions about this or any Trend Micro document, please contact us [email protected].
Evaluate this documentation on the following site:
http://www.trendmicro.com/download/documentation/rating.asp


i
Table of ContentsAbout this Manual
About this Manual ........................................................................................... vii
What's New ...................................................................................................... viii
Audience .............................................................................................................. x
InterScan Messaging Security Virtual Appliance Documentation ............. xi
Document Conventions ................................................................................... xi
Chapter 1: Introducing InterScan Messaging SecurityVirtual Appliance
About InterScan Messaging Security Virtual Appliance ........................... 1-2
IMSVA Main Features and Benefits ............................................................ 1-2
About Cloud Pre-Filter ................................................................................ 1-13
About Email Encryption ............................................................................. 1-13
About Spyware/Grayware .......................................................................... 1-13How Spyware/Grayware Gets into Your Network ........................ 1-14Potential Risks and Threats ................................................................ 1-14
About Web Reputation Services ................................................................ 1-15
About Email Reputation ............................................................................. 1-16Types of Email Reputation ................................................................. 1-16How Email Reputation Technology Works ..................................... 1-17
About Trend Micro Control Manager ...................................................... 1-18Control Manager Support ................................................................... 1-19
About Graymail Scanning ........................................................................... 1-21
About Command & Control (C&C) Contact Alert Services ................. 1-22
Chapter 2: Component DescriptionsAbout IMSVA Components ......................................................................... 2-2

Trend Micro InterScan Messaging Security Virtual Appliance Installation Guide
ii
Cloud Pre-Filter Service Overview .............................................................. 2-2Sender Filtering ....................................................................................... 2-2Reputation-Based Source Filtering ...................................................... 2-2Virus and Spam Protection ................................................................... 2-2
About Spam Prevention Solution ................................................................ 2-3Spam Prevention Solution Technology .............................................. 2-3Using Spam Prevention Solution ......................................................... 2-3
About Sender Filtering ................................................................................... 2-3How IP Profiler Works ......................................................................... 2-4How SMTP Traffic Throttling Works ................................................ 2-5
About End-User Quarantine (EUQ) ........................................................... 2-5
About Centralized Reporting ........................................................................ 2-6
Chapter 3: Planning for DeploymentDeployment Checklist .................................................................................... 3-2
Network Topology Considerations ............................................................. 3-4IMSVA Deployment with Cloud Pre-Filter ....................................... 3-5Deployment at the Gateway or Behind the Gateway ....................... 3-6Installing without a Firewall .................................................................. 3-9Installing in Front of a Firewall .......................................................... 3-10Installing Behind a Firewall ................................................................ 3-11Installing in the De-Militarized Zone ................................................ 3-12
About Device Roles ..................................................................................... 3-13
About Device Services ................................................................................. 3-13Service Selection ................................................................................... 3-14Deployment with Sender Filtering .................................................... 3-14Understanding Internal Communication Port ................................. 3-14
Understanding POP3 Scanning .................................................................. 3-15Requirements for POP3 Scanning ..................................................... 3-16Configuring a POP3 Client that Receives Email Through IMSVA .................................................................................................................. 3-16
Opening the IMSVA Management Console ............................................ 3-16

Table of Contents
iii
Chapter 4: Installing IMSVA 9.1System Requirements ..................................................................................... 4-2
Additional Requirements and Tools .................................................... 4-3
Installing IMSVA ............................................................................................ 4-4
Setting Up a Single Parent Device ............................................................. 4-21Step 1: Configuring System Settings .................................................. 4-23Step 2: Configuring Deployment Settings ........................................ 4-24Step 3: Configuring SMTP Routing Settings ................................... 4-25Step 4: Configuring Notification Settings ......................................... 4-27Step 5: Configuring the Update Source ............................................ 4-28Step 6: Configuring LDAP Settings .................................................. 4-30Step 7: Configuring Internal Addresses ............................................ 4-33Step 8: Configuring Control Manager Server Settings .................... 4-35Step 9: Activating the Product ........................................................... 4-37Step 10: Reviewing the Settings ......................................................... 4-38
Setting Up a Child Device ........................................................................... 4-39
Verifying Successful Deployment .............................................................. 4-40
Chapter 5: Upgrading from Previous VersionsUpgrading from an Evaluation Version ...................................................... 5-2
Upgrading from IMSVA 9.0 Patch 1 ........................................................... 5-4Backing Up IMSVA 9.0 Patch 1 .......................................................... 5-5Upgrading a Single IMSVA ................................................................... 5-6Upgrading a Distributed Environment ............................................. 5-17Batch Upgrade ...................................................................................... 5-20Offline Upgrade .................................................................................... 5-27Rolling Back an Upgrade ..................................................................... 5-32
Migrating from Previous Versions ............................................................. 5-34Migration Process ................................................................................. 5-34Migrating from IMSS for Windows .................................................. 5-37Migrating from IMSS for Linux ......................................................... 5-39Migrating from IMSS for Solaris ........................................................ 5-40Migrating from IMSVA 8.0 Patch 2, IMSVA 8.2 SP2 Patch 1,IMSVA 8.5 SP1 Patch 1 or IMSVA 9.0 Patch 1 ............................. 5-40

Trend Micro InterScan Messaging Security Virtual Appliance Installation Guide
iv
Exporting Debugging Files ................................................................. 5-42
Chapter 6: TroubleshootingTroubleshooting Utilities ............................................................................... 6-2
Troubleshooting Communication Between Devices in a Group ........... 6-3
Troubleshooting Child Device Registration ............................................... 6-4
Troubleshooting Child Device Unregistration ........................................... 6-5
Troubleshooting the Hardware Identification Error ................................ 6-5
Troubleshooting Network Connectivity ..................................................... 6-9
Appendix A: Technical SupportTroubleshooting Resources ......................................................................... A-2
Trend Community ................................................................................. A-2Using the Support Portal ...................................................................... A-2Security Intelligence Community ........................................................ A-3Threat Encyclopedia ............................................................................. A-3
Contacting Trend Micro ............................................................................... A-3Speeding Up the Support Call ............................................................. A-4
Sending Suspicious Content to Trend Micro ............................................ A-5File Reputation Services ....................................................................... A-5Email Reputation Services ................................................................... A-5Web Reputation Services ...................................................................... A-5
Other Resources ............................................................................................ A-6TrendEdge .............................................................................................. A-6Download Center .................................................................................. A-6TrendLabs ............................................................................................... A-6
Appendix B: Creating a New Virtual Machine Under VMwareESX for IMSVA
Creating a New Virtual Machine ................................................................. B-2

Table of Contents
v
Appendix C: Creating a New Virtual Machine UnderMicrosoft Hyper-V for IMSVA
Understanding Hyper-V Installation .......................................................... C-2IMSVA Support for Hyper-V .............................................................. C-2
Installing IMSVA on Microsoft Hyper-V .................................................. C-2Creating a Virtual Network Assignment ............................................ C-2Creating a New Virtual Machine ......................................................... C-7
IndexIndex .............................................................................................................. IN-1

vii
Preface
About this ManualWelcome to the Trend Micro™ InterScan™ Messaging Security Virtual ApplianceInstallation Guide. This manual contains information about InterScan MessagingSecurity Virtual Appliance (IMSVA) features, system requirements, as well asinstructions on installing and upgrading IMSVA settings.
Refer to the IMSVA 9.1 Administrator's Guide for information about configuringIMSVA settings and the Online Help in the management console for detailedinformation about each field on the user interface.
Topics include:
• What's New on page viii
• Audience on page x
• InterScan Messaging Security Virtual Appliance Documentation on page xi
• Document Conventions on page xi

Trend Micro InterScan Messaging Security Virtual Appliance Installation Guide
viii
What's New
TABLE 1. IMSVA 9.1 New Features
NEW FEATURE DESCRIPTION
Syslog integration To provide enterprise-class logging capabilities,IMSVA supports sending logs through the syslogprotocol to multiple external syslog servers in astructured format. On the IMSVA managementconsole, you can add, delete, import and exportsyslog servers.
Multiple Virtual Analyzer servers To achieve better load balance and failovercapabilities, IMSVA allows you to add multipleservers for Virtual Analyzer. You can also enable,disable and delete Virtual Analyzer servers on theIMSVA management console.
SMTP Traffic Throttling SMTP Traffic Throttling blocks messages from asingle IP address or sender for a certain time whenthe number of connections or messages reachesthe specified maximum.
Audit log support As an enhanced log category of system events,Audit log replaces Admin activity on the IMSVAmanagement console. Audit logs record variousadministrator operations and provide a way toquery activities of specified administrator accounts.
Enhanced queue management IMSVA uses mail transfer agent (MTA) queues tostore messages that just arrived, messages readyto be delivered to the next MTA, messagesdeferred due to delivery failure, and messageskept on hold for later manual delivery. Specificactions can be taken on the messages in MTAqueues.

About this Manual
ix
NEW FEATURE DESCRIPTION
Enhanced Smart Protection IMSVA supports both Trend Micro SmartProtection Network and Smart Protection Serveras smart protection sources. Smart ProtectionServers are supported to localize smart protectionservices to the corporate network to reduceoutbound traffic and optimize efficiency.
External database support IMSVA allows you to use not only the internal butalso external PostgreSQL database as the admindatabase or the EUQ database.
Time-of-Click Protection IMSVA provides time-of-click protection againstmalicious URLs in email messages. If you enableTime-of-Click Protection, IMSVA rewrites URLs inemail messages for further analysis. Trend Microanalyzes those URLs at the time of click and willblock them if they are malicious.
Connected Threat Defense Configure IMSVA to subscribe to the suspiciousobject lists on the Trend Micro Control Managerserver. Using the Control Manager console, youcan specify customized actions for objectsdetected by the suspicious object lists to providecustom defense against threats identified byendpoints protected by Trend Micro productsspecific to your environment.
Control Manager facilitates the investigation oftargeted attacks and advanced threats usingsuspicious objects. Files and URLs that have thepotential to expose systems to danger or loss willbe detected.
DomainKeys Identified Mail (DKIM)signature
IMSVA supports adding DKIM signatures tooutgoing email messages. On the IMSVAmanagement console, you can add or delete DKIMsignatures and import or export DKIM signaturefiles.
Report delivery through email IMSVA allows you to send newly generated reportsand archived reports through email. Detailed viewsof reports will be included.

Trend Micro InterScan Messaging Security Virtual Appliance Installation Guide
x
NEW FEATURE DESCRIPTION
Keyword and expressionenhancement
To improve visibility of triggered keywords andexpressions, the entity name (where the keywordexpression appears in a message) and thematched expressions now appear in the policyevent log query details page. Administrators canalso add a description to new keyword expressionsfor better tracking.
Attachment names supported bymessage tracking logs
Message tracking logs include attachment namesas a new attribute. Multiple attachment names canbe specified to query message tracking logs.
Logon notice support Customizable logon notices are available both onthe administrator logon page and End-UserQuarantine logon page.
Quarantine event summary IMSVA provides quarantine event logs and reportsfor users to learn information about quarantineevents, for example, the percentage of releaseevents in all the quarantine events.
LDAPS support IMSVA supports LDAP over SSL (LDAPS) thatprovides users a secure and encrypted channel tocommunicate with LDAP servers.
AudienceThe IMSVA documentation is written for IT administrators in medium and largeenterprises. The documentation assumes that the reader has in-depth knowledge ofemail messaging networks, including details related to the following:
• SMTP and POP3 protocols
• Message transfer agents (MTAs), such as Postfix or Microsoft™ Exchange
• LDAP
• Database management
• Transport Layer Security

About this Manual
xi
The documentation does not assume that the reader has any knowledge of antivirus orantispam technology.
InterScan Messaging Security VirtualAppliance Documentation
The IMSVA documentation consists of the following:
Administrator’s GuideHelps you get IMSVA up and running with post-installation instructions onhow to configure and administer IMSVA.
Installation GuideContains introductions to IMSVA features, system requirements, andprovides instructions on how to deploy and upgrade IMSVA in variousnetwork environments.
Online HelpProvides detailed instructions on each field and how to configure all featuresthrough the user interface. To access the online help, open the webmanagement console, then click the help icon.
Readme FileContain late-breaking product information that might not be found in theother documentation. Topics include a description of features, installationtips, known issues, and product release history.
The documentation is available at:
http://docs.trendmicro.com
Document ConventionsThe documentation uses the following conventions:

Trend Micro InterScan Messaging Security Virtual Appliance Installation Guide
xii
TABLE 2. Document Conventions
CONVENTION DESCRIPTION
UPPER CASE Acronyms, abbreviations, and names of certaincommands and keys on the keyboard
Bold Menus and menu commands, command buttons, tabs,and options
Italics References to other documents
Monospace Sample command lines, program code, web URLs, filenames, and program output
Navigation > Path The navigation path to reach a particular screen
For example, File > Save means, click File and then clickSave on the interface
Note Configuration notes
Tip Recommendations or suggestions
Important Information regarding required or default configurationsettings and product limitations
WARNING! Critical actions and configuration options

1-1
Chapter 1
Introducing InterScan™ MessagingSecurity Virtual Appliance
This chapter introduces InterScan™ Messaging Security Virtual Appliance (IMSVA)features, capabilities, and technology, and provides basic information on other TrendMicro products that will enhance your anti-spam capabilities.
Topics include:
• About InterScan Messaging Security Virtual Appliance on page 1-2
• IMSVA Main Features and Benefits on page 1-2
• About Cloud Pre-Filter on page 1-13
• About Email Encryption on page 1-13
• About Spyware/Grayware on page 1-13
• About Web Reputation Services on page 1-15
• About Trend Micro Control Manager on page 1-18
• About Graymail Scanning on page 1-21
• About Command & Control (C&C) Contact Alert Services on page 1-22

Trend Micro InterScan Messaging Security Virtual Appliance Installation Guide
1-2
About InterScan Messaging Security VirtualAppliance
InterScan Messaging Security Virtual Appliance (IMSVA) integrates multi-tiered spamprevention and anti-phishing with award-winning antivirus and anti-spyware. Contentfiltering enforces compliance and prevents data leakage. This easy-to-deploy appliance isdelivered on a highly scalable platform with centralized management, providing easyadministration. Optimized for high performance and continuous security, the applianceprovides comprehensive gateway email security.
IMSVA Main Features and BenefitsThe following table outlines the main features and benefits that IMSVA can provide toyour network.
TABLE 1-1. Main Features and Benefits
FEATURE DESCRIPTIONS BENEFITS
Data and system protection
Cloud-basedpre-filtering ofmessages
Cloud Pre-Filter integrates withIMSVA to scan all email trafficbefore it reaches your network.
Cloud Pre-Filter can stopsignificant amounts of spam andmalicious messages (up to 90%of your total message traffic)from ever reaching your network.
Emailencryption
Trend Micro Email Encryptionintegrates with IMSVA to encrypt ordecrypt all email traffic entering andleaving your network.
Trend Micro Email Encryptionprovides IMSVA the ability toencrypt all email messagesleaving your network. Byencrypting all email messagesleaving a network administratorscan prevent sensitive data frombeing leaked.

Introducing InterScan Messaging Security Virtual Appliance
1-3
FEATURE DESCRIPTIONS BENEFITS
Advanced anti-malwareprotection
The Advanced Threat Scan Engine(ATSE) uses a combination ofpattern-based scanning andaggressive heuristic scanning todetect document exploits and otherthreats used in targeted attacks.
ATSE identifies both known andunknown advanced threats,protecting your system from newthreats that have yet to be addedto patterns.
Command &Control (C&C)Contact AlertServices
C&C Contact Alert Services allowsIMSVA to inspect the sender,recipients and reply-to addresses ina message's header, as well asURLs in the message body, to seeif any of them matches known C&Cobjects.
C&C Contact Alert Servicesprovides IMSVA with enhanceddetection and alert capabilities tomitigate the damage caused byadvanced persistent threats andtargeted attacks.
Graymail Graymail refers to solicited bulkemail messages that are not spam.IMSVA detects marketingmessages and newsletters andsocial network notifications asgraymail.
IMSVA manages graymailseparately from common spamto allow administrators to identifygraymail messages. IPaddresses specified in thegraymail exception list bypassscanning.
Regulatorycompliance
Administrators can meetgovernment regulatoryrequirements using the new defaultpolicy scanning conditionsCompliance templates.
Compliance templates provideadministrators with regulatorycompliance. For a detailed list ofavailable templates, see http://docs.trendmicro.com/en-us/enterprise/data-protection-reference-documents.aspx.

Trend Micro InterScan Messaging Security Virtual Appliance Installation Guide
1-4
FEATURE DESCRIPTIONS BENEFITS
Smart Scan Smart Scan facilitates a moreefficient scanning process by off-loading a large number of threatsignatures previously stored on theIMSVA server to the cloud.
Smart Scan leverages the SmartProtection Network to:
• Enable fast, real-timesecurity status lookupcapabilities in the cloud
• Reduce the time necessaryto deliver protection againstemerging threats
• Lower memory consumptionon the server
IntelliTrap Virus writers often attempt tocircumvent virus filtering by usingdifferent file compression schemes.IntelliTrap provides heuristicevaluation of these compressedfiles.
Because there is the possibility thatIntelliTrap may identify a non-threatfile as a security risk, Trend Microrecommends quarantining messageattachments that fall into thiscategory when IntelliTrap isenabled. In addition, if your usersregularly exchange compressedfiles, you may want to disable thisfeature.
By default, IntelliTrap is turned onas one of the scanning conditionsfor an antivirus policy, and isconfigured to quarantine messageattachments that may be classifiedas security risks.
IntelliTrap helps reduce the riskthat a virus compressed usingdifferent file compressionschemes will enter your networkthrough email.

Introducing InterScan Messaging Security Virtual Appliance
1-5
FEATURE DESCRIPTIONS BENEFITS
Contentmanagement
IMSVA analyzes email messagesand their attachments, traveling toand from your network, forappropriate content.
Content that you deeminappropriate, such as personalcommunication, largeattachments, and so on, can beblocked or deferred effectivelyusing IMSVA.
Real-timeStatistics andMonitor
Administrators can monitor thescan performance and SenderFiltering performance of all IMSVAdevices (within a group) on themanagement console.
IMSVA provides administratorswith an overview of the systemthat keeps administratorsinformed on the first sign of mailprocessing issues. Detailedlogging helps administratorsproactively manage issuesbefore they become a problem.
Protection against other email threats
DoS attacks By flooding a mail server with largeattachments, or sending messagesthat contain multiple viruses orrecursively compressed files,individuals with malicious intent candisrupt mail processing.
IMSVA allows you to configurethe characteristics of messagesthat you want to stop at theSMTP gateway, thus reducingthe chances of a DoS attack.
Maliciousemail content
Many types of file attachments,such as executable programs anddocuments with embedded macros,can harbor viruses. Messages withHTML script files, HTML links, Javaapplets, or ActiveX controls canalso perform harmful actions.
IMSVA allows you to configurethe types of messages that areallowed to pass through theSMTP gateway.

Trend Micro InterScan Messaging Security Virtual Appliance Installation Guide
1-6
FEATURE DESCRIPTIONS BENEFITS
Degradation ofservices
Non-business-related email traffichas become a problem in manyorganizations. Spam messagesconsume network bandwidth andaffect employee productivity. Someemployees use companymessaging systems to sendpersonal messages, transfer largemultimedia files, or conductpersonal business during workinghours.
Most companies haveacceptable usage policies fortheir messaging system—IMSVAprovides tools to enforce andensure compliance with existingpolicies.
Legal liabilityand businessintegrity
Improper use of email can also puta company at risk of legal liability.Employees may engage in sexualor racial harassment, or other illegalactivity. Dishonest employees canuse a company messaging systemto leak confidential information.Inappropriate messages thatoriginate from a company’s mailserver damage the company’sreputation, even if the opinionsexpressed in the message are notthose of the company.
IMSVA provides tools formonitoring and blocking contentto help reduce the risk thatmessages containinginappropriate or confidentialmaterial will be allowed throughyour gateway.

Introducing InterScan Messaging Security Virtual Appliance
1-7
FEATURE DESCRIPTIONS BENEFITS
Mass mailingviruscontainment
Email-borne viruses that mayautomatically spread bogusmessages through a company’smessaging system can beexpensive to clean up and causepanic among users.
When IMSVA detects a mass-mailing virus, the action performedagainst this virus can be differentfrom the actions against other typesof viruses.
For example, if IMSVA detects amacro virus in a Microsoft Officedocument with importantinformation, you can configure theprogram to quarantine the messageinstead of deleting the entiremessage, to ensure that importantinformation will not be lost.However, if IMSVA detects a mass-mailing virus, the program canautomatically delete the entiremessage.
By auto-deleting messages thatcontain mass-mailing viruses,you avoid using server resourcesto scan, quarantine, or processmessages and files that have noredeeming value.
The identities of known mass-mailing viruses are in the MassMailing Pattern that is updatedusing the TrendLabs℠ActiveUpdate Servers. You cansave resources, avoid help deskcalls from concerned employeesand eliminate post-outbreakcleanup work by choosing toautomatically delete these typesof viruses and their emailcontainers.
Protection from spyware and other types of grayware
Spyware andother types ofgrayware
Other than viruses, your clients areat risk from potential threats suchas spyware, adware and dialers.For more information, see AboutSpyware/Grayware on page 1-13.
IMSVA’s ability to protect yourenvironment against spywareand other types of graywareenables you to significantlyreduce security, confidentiality,and legal risks to yourorganization.
Integrated anti-spam features

Trend Micro InterScan Messaging Security Virtual Appliance Installation Guide
1-8
FEATURE DESCRIPTIONS BENEFITS
SpamPreventionSolution (SPS)
Spam Prevention Solution (SPS) isa licensed product from TrendMicro that provides spam detectionservices to other Trend Microproducts. To use SPS, obtain anSPS Activation Code. For moreinformation, contact your salesrepresentative.
SPS works by using a built-in spamfilter that automatically becomesactive when you register andactivate the SPS license.
The detection technology usedby Spam Prevention Solution(SPS) is based on sophisticatedcontent processing and statisticalanalysis. Unlike otherapproaches to identifying spam,content analysis provides high-performance, real-time detectionthat is highly adaptable, even asspam senders change theirtechniques.
Spam Filteringwith IP Profiler,EmailReputationand SMTPTrafficThrottling
IP Profiler is a self-learning, fullyconfigurable feature that proactivelyblocks IP addresses of computersthat send spam and other types ofpotential threats. Email reputationblocks IP addresses of knownspam senders that Trend Micromaintains in a central database.SMTP Traffic Throttling blocksmessages from a single IP addressor sender for a certain time whenthe number of connections ormessages reaches the specifiedmaximum.
NoteActivate SPS before youconfigure IP Profiler andEmail Reputation.
With the integration of SenderFiltering, which includes IPProfiler, Email Reputation andSMTP Traffic Throttling, IMSVAcan block spammers at the IPlevel.

Introducing InterScan Messaging Security Virtual Appliance
1-9
FEATURE DESCRIPTIONS BENEFITS
SocialEngineeringAttackProtection
Social Engineering AttackProtection detects suspiciousbehavior related to socialengineering attacks in emailmessages.
When Social Engineering AttackProtection is enabled, the TrendMicro Antispam Engine scans forsuspicious behavior in severalparts of each email transmission,including the email header,subject line, body, attachments,and the SMTP protocolinformation. If the AntispamEngine detects behaviorassociated with socialengineering attacks, theAntispam Engine returns detailsabout the message to IMSVA forfurther action, policyenforcement, or reporting.
Administration and integration
LDAP anddomain-basedpolicies
You can configure LDAP settings ifyou are using LDAP directoryservices such as Lotus Domino™or Microsoft™ Active Directory™for user-group definition andadministrator privileges.
Using LDAP, you can definemultiple rules to enforce yourcompany’s email usageguidelines. You can define rulesfor individuals or groups, basedon the sender and recipientaddresses.
Web-basedmanagementconsole
The management console allowsyou to conveniently configureIMSVA policies and settings.
The management console isSSL-compatible. Being SSL-compatible means access toIMSVA is more secure.

Trend Micro InterScan Messaging Security Virtual Appliance Installation Guide
1-10
FEATURE DESCRIPTIONS BENEFITS
End-UserQuarantine(EUQ)
IMSVA provides web-based EUQ toimprove spam management. Theweb-based EUQ service allowsend-users to manage the spamquarantine of their personalaccounts and of distribution liststhat they belong to. IMSVAquarantines messages that itdetermines are spam. The EUQindexes these messages into adatabase. The messages are thenavailable for end-users to review,delete, or approve for delivery.
With the web-based EUQmanagement console, end-userscan manage messages thatIMSVA quarantines.
IMSVA also enables users toapply actions to quarantinedmessages and to add senders tothe Approved Senders listthrough links in the EUQ digest.
Delegatedadministration
IMSVA offers the ability to createdifferent access rights to themanagement console. You canchoose which sections of theconsole are accessible for differentadministrator logon accounts.
By delegating administrativeroles to different employees, youcan promote the sharing ofadministrative duties.
Centralizedreporting
Centralized reporting gives you theflexibility of generating one time (ondemand) reports or scheduledreports.
Helps you analyze how IMSVA isperforming.
One time (on demand) reportsallow you to specify the type ofreport content as and whenrequired. Alternatively, you canconfigure IMSVA to automaticallygenerate reports daily, weekly,and monthly.
IMSVA allows you to send bothone-time and scheduled reportsthrough email.
Systemavailabilitymonitor
A built-in agent monitors the healthof your IMSVA server and deliversnotifications through email orSNMP trap when a fault conditionthreatens to disrupt the mail flow.
Email and SNMP notification ondetection of system failure allowsyou to take immediate correctiveactions and minimize downtime.

Introducing InterScan Messaging Security Virtual Appliance
1-11
FEATURE DESCRIPTIONS BENEFITS
POP3scanning
You can choose to enable ordisable POP3 scanning from themanagement console.
In addition to SMTP traffic,IMSVA can also scan POP3messages at the gateway asmessaging clients in yournetwork retrieve them.
Clusteredarchitecture
The current version of IMSVA hasbeen designed to make distributeddeployment possible.
You can install the variousIMSVA components on differentcomputers, and somecomponents can exist inmultiples. For example, if yourmessaging volume demands,you can install additional IMSVAscanner components onadditional servers, all using thesame policy services.
Integrationwith VirtualAnalyzer
IMSVA integrates with VirtualAnalyzer, which is an isolatedvirtual environment used to manageand analyze samples in DeepDiscovery Advisor and DeepDiscovery Analyzer.
IMSVA sends suspiciousmessages, includingattachments, to Virtual Analyzerfor further analysis. VirtualAnalyzer performs contentsimulation and analysis in anisolated virtual environment toidentify characteristics commonlyassociated with many types ofmalware. In particular, VirtualAnalyzer checks if files attachedto messages contain exploitcode.
Trend Micro InterScan Messaging Security Virtual Appliance Installation Guide
1-12
FEATURE DESCRIPTIONS BENEFITS
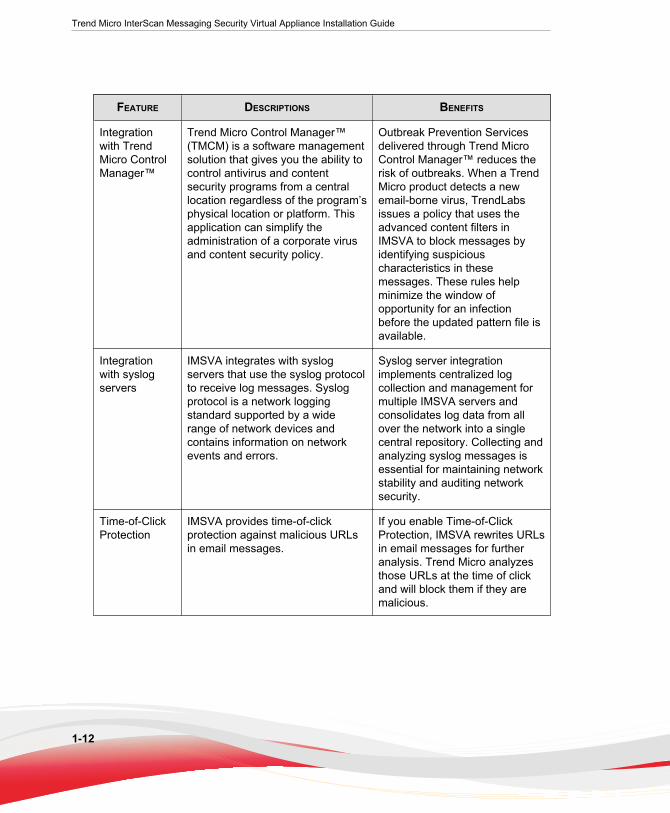
Integrationwith TrendMicro ControlManager™
Trend Micro Control Manager™(TMCM) is a software managementsolution that gives you the ability tocontrol antivirus and contentsecurity programs from a centrallocation regardless of the program’sphysical location or platform. Thisapplication can simplify theadministration of a corporate virusand content security policy.
Outbreak Prevention Servicesdelivered through Trend MicroControl Manager™ reduces therisk of outbreaks. When a TrendMicro product detects a newemail-borne virus, TrendLabsissues a policy that uses theadvanced content filters inIMSVA to block messages byidentifying suspiciouscharacteristics in thesemessages. These rules helpminimize the window ofopportunity for an infectionbefore the updated pattern file isavailable.
Integrationwith syslogservers
IMSVA integrates with syslogservers that use the syslog protocolto receive log messages. Syslogprotocol is a network loggingstandard supported by a widerange of network devices andcontains information on networkevents and errors.
Syslog server integrationimplements centralized logcollection and management formultiple IMSVA servers andconsolidates log data from allover the network into a singlecentral repository. Collecting andanalyzing syslog messages isessential for maintaining networkstability and auditing networksecurity.
Time-of-ClickProtection
IMSVA provides time-of-clickprotection against malicious URLsin email messages.
If you enable Time-of-ClickProtection, IMSVA rewrites URLsin email messages for furtheranalysis. Trend Micro analyzesthose URLs at the time of clickand will block them if they aremalicious.

Introducing InterScan Messaging Security Virtual Appliance
1-13
About Cloud Pre-FilterCloud Pre-Filter is a cloud security solution that integrates with IMSVA to provideproactive protection in the cloud with the privacy and control of an on-premise, virtualappliance.
Cloud Pre-Filter reduces inbound email volume up to 90% by blocking spam andmalware outside your network. Cloud Pre-Filter is integrated with IMSVA at thegateway allowing flexible control over sensitive information. And local quarantinesensure your email stays private. No email is stored in the cloud. With Cloud Pre-Filter,you can reduce complexity and overhead to realize significant cost savings.
About Email EncryptionTrend Micro Email Encryption provides IMSVA with the ability to perform encryptionand decryption of email. With Email Encryption, IMSVA has the ability to encrypt anddecrypt email regardless of the email client or platform from which it originated. Theencryption and decryption of email on Trend Micro Email Encryption is controlled by aPolicy Manager that enables an administrator to configure policies based on variousparameters, such as sender and recipient email addresses, keywords or where the email(or attachments) contain credit card numbers. Trend Micro Email Encryption presentsitself as a simple mail transfer protocol (SMTP) interface and delivers email out overSMTP to a configured outbound mail transport agent (MTA). This enables easyintegration with other email server-based products, be them content scanners, mailservers or archiving solutions.
About Spyware/GraywareYour clients are at risk from potential threats other than viruses/malware. Grayware cannegatively affect the performance of the computers on your network and introducesignificant security, confidentiality, and legal risks to your organization.

Trend Micro InterScan Messaging Security Virtual Appliance Installation Guide
1-14
TABLE 1-2. Types of Grayware
TYPE DESCRIPTION
Spyware Gathers data, such as account user names and passwords, andtransmits them to third parties
Adware Displays advertisements and gathers data, such as user websurfing preferences, to target advertisements at the userthrough a web browser
Dialers Changes computer Internet settings and can force a computerto dial pre-configured phone numbers through a modem
Joke Programs Causes abnormal computer behavior, such as closing andopening the CD-ROM tray and displaying numerous messageboxes
Hacking Tools Helps hackers enter computers
Remote Access Tools Helps hackers remotely access and control computers
Password CrackingApplications
Helps hackers decipher account user names and passwords
Other Other types not covered above
How Spyware/Grayware Gets into Your Network
Spyware/grayware often gets into a corporate network when users download legitimatesoftware that has grayware applications included in the installation package.
Most software programs include an End User License Agreement (EULA), which theuser has to accept before downloading. Often the EULA does include informationabout the application and its intended use to collect personal data; however, users oftenoverlook this information or do not understand the legal jargon.
Potential Risks and Threats
The existence of spyware/grayware on your network has the potential to introduce thefollowing:

Introducing InterScan Messaging Security Virtual Appliance
1-15
TABLE 1-3. Types of Risks
TYPE DESCRIPTION
Reduced computerperformance
To perform their tasks, spyware/grayware applications oftenrequire significant CPU and system memory resources.
Increased webbrowser-relatedcrashes
Certain types of grayware, such as adware, are often designedto create pop-up windows or display information in a browserframe or window. Depending on how the code in theseapplications interacts with system processes, grayware cansometimes cause browsers to crash or freeze and may evenrequire a system reboot.
Reduced userefficiency
By needing to close frequently occurring pop-up advertisementsand deal with the negative effects of joke programs, users canbe unnecessarily distracted from their main tasks.
Degradation ofnetwork bandwidth
Spyware/grayware applications often regularly transmit the datathey collect to other applications running on your network or tolocations outside of your network.
Loss of personal andcorporate information
Not all data that spyware/grayware applications collect is asinnocuous as a list of websites users visit. Spyware/graywarecan also collect the user names and passwords users type toaccess their personal accounts, such as a bank account, andcorporate accounts that access resources on your network.
Higher risk of legalliability
If hackers gain access to the computer resources on yournetwork, they may be able to utilize your client computers tolaunch attacks or install spyware/grayware on computersoutside your network. Having your network resources unwillinglyparticipate in these types of activities could leave yourorganization legally liable to damages incurred by other parties.
About Web Reputation ServicesTrend Micro web reputation technology helps break the infection chain by assigningwebsites a “reputation” based on an assessment of the trustworthiness of an URL,derived from an analysis of the domain. Web reputation protects against web-basedthreats including zero-day attacks, before they reach the network. Trend Micro web

Trend Micro InterScan Messaging Security Virtual Appliance Installation Guide
1-16
reputation technology tracks the lifecycle of hundreds of millions of web domains,extending proven Trend Micro anti-spam protection to the Internet.
About Email ReputationTrend Micro designed Email reputation to identify and block spam before it enters acomputer network by routing Internet Protocol (IP) addresses of incoming mailconnections to Trend Micro Smart Protection Network for verification against anextensive Reputation Database.
Types of Email Reputation
There are two types of Email reputation: Standard on page 1-16 and Advanced on page1-17.
Email Reputation: Standard
This service helps block spam by validating requested IP addresses against the TrendMicro reputation database, powered by the Trend Micro Smart Protection Network.This ever-expanding database currently contains over 1 billion IP addresses withreputation ratings based on spamming activity. Trend Micro spam investigatorscontinuously review and update these ratings to ensure accuracy.
Email reputation: Standard is a DNS single-query-based service. Your designated emailserver makes a DNS query to the standard reputation database server whenever anincoming email message is received from an unknown host. If the host is listed in thestandard reputation database, Email reputation reports that email message as spam.
Tip
Trend Micro recommends that you configure IMSVA to block, not receive, any emailmessages from an IP address that is included on the standard reputation database.

Introducing InterScan Messaging Security Virtual Appliance
1-17
Email Reputation: Advanced
Email reputation: Advanced identifies and stops sources of spam while they are in theprocess of sending millions of messages.
This is a dynamic, real-time antispam solution. To provide this service, Trend Microcontinuously monitors network and traffic patterns and immediately updates thedynamic reputation database as new spam sources emerge, often within minutes of thefirst sign of spam. As evidence of spam activity ceases, the dynamic reputation databaseis updated accordingly.
Like Email reputation: Standard, Email reputation: Advanced is a DNS query-basedservice, but two queries can be made to two different databases: the standard reputationdatabase and the dynamic reputation database (a database updated dynamically in realtime). These two databases have distinct entries (no overlapping IP addresses), allowingTrend Micro to maintain a very efficient and effective database that can quickly respondto highly dynamic sources of spam. Email reputation: Advanced has blocked more than80% of total incoming connections (all were malicious) in customer networks. Resultswill vary depending on how much of your incoming email stream is spam. The morespam you receive, the higher the percentage of blocked connections you will see.
How Email Reputation Technology Works
Trend Micro Email reputation technology is a Domain Name Service (DNS) query-based service. The following process takes place after IMSVA receives a connectionrequest from a sending mail server:
1. IMSVA records the IP address of the computer requesting the connection.
2. IMSVA forwards the IP address to the Trend Micro Email reputation DNS serversand queries the Reputation Database. If the IP address had already been reportedas a source of spam, a record of the address will already exist in the database at thetime of the query.
3. If a record exists, Email reputation instructs IMSVA to permanently or temporarilyblock the connection request. The decision to block the request depends on thetype of spam source, its history, current activity level, and other observedparameters.

Trend Micro InterScan Messaging Security Virtual Appliance Installation Guide
1-18
The figure below illustrates how Email reputation works.
FIGURE 1-1. How Email reputation works
For more information on the operation of Trend Micro Email reputation, visit https://ers.trendmicro.com/.
About Trend Micro Control ManagerTrend Micro™ Control Manager™ is a software management solution that gives youthe ability to control antivirus and content security programs from a central location-regardless of the program’s physical location or platform. This application can simplifythe administration of a corporate virus/malware and content security policy.

Introducing InterScan Messaging Security Virtual Appliance
1-19
• Control Manager server: The Control Manager server is the machine upon whichthe Control Manager application is installed. The web-based Control Managermanagement console is hosted from this server.
• Agent: The agent is an application installed on a managed product that allowsControl Manager to manage the product. The agent receives commands from theControl Manager server, and then applies them to the managed product. The agentcollects logs from the product, and sends them to Control Manager.
• Entity: An entity is a representation of a managed product on the ProductDirectory link. Each entity has an icon in the directory tree. The directory treedisplays all managed entities residing on the Control Manager console.
Control Manager Support
The following table shows a list of Control Manager features that IMSVA supports.
TABLE 1-4. Supported Control Manager Features
FEATURE DESCRIPTION SUPPORTED?
Two-waycommunication
Using 2-way communication,either IMSVA or ControlManager may initiate thecommunication process.
No.
Only IMSVA can initiate acommunication process withControl Manager.
Outbreak PreventionPolicy
The Outbreak PreventionPolicy (OPP) is a quickresponse to an outbreakdeveloped by TrendLabs thatcontains a list of actionsIMSVA should perform toreduce the likelihood of theIMSVA server or its clientsfrom becoming infected.
Trend Micro ActiveUpdateServer deploys this policy toIMSVA through ControlManager.
Yes

Trend Micro InterScan Messaging Security Virtual Appliance Installation Guide
1-20
FEATURE DESCRIPTION SUPPORTED?
Log upload for query Uploads IMSVA virus logs,Content Security logs, andEmail reputation logs toControl Manager for querypurposes.
Yes
Single Sign-on Manage IMSVA from ControlManager directly without firstlogging on to the IMSVAmanagement console.
No.
You need to first log on to theIMSVA management consolebefore you can manageIMSVA from Control Manager.
Configurationreplication
Replicate configurationsettings from an existingIMSVA server to a newIMSVA server from ControlManager.
Yes
Pattern update Update pattern files used byIMSVA from Control Manager
Yes
Engine update Update engines used byIMSVA from Control Manager.
Yes
Product componentupdate
Update IMSVA productcomponents such as patchesand hot fixes from ControlManager.
No.
Refer to the specific patch orhot fix readme file forinstructions on how to updatethe product components.
Configuration by userinterface redirect
Configure IMSVA through theIMSVA management consoleaccessible from ControlManager.
Yes
Renew productregistration
Renew IMSVA productlicense from Control Manager.
Yes
Customized reportingfrom Control Manager
Control Manager providescustomized reporting and logqueries for email-related data.
Yes

Introducing InterScan Messaging Security Virtual Appliance
1-21
FEATURE DESCRIPTION SUPPORTED?
Control Manager agentinstallation/uninstallation
Install or uninstall IMSVAControl Manager agent fromControl Manager.
No.
IMSVA Control Manageragent is automaticallyinstalled when you installIMSVA. To enable/disable theagent, do the following fromthe IMSVA managementconsole:
1. Go to Administration >Connections.
2. Click the TMCM Servertab.
3. To enable/disable theagent, select/clear thecheck box next to EnableMCP Agent.
Event notification Send IMSVA eventnotification from ControlManager.
Yes
Command tracking forall commands
Track the status of commandsthat Control Manager issuesto IMSVA.
Yes
About Graymail ScanningGraymail refers to solicited bulk email messages that are not spam. IMSVA detectsmarketing messages and newsletters and social network notifications as graymail.IMSVA identifies graymail messages in two ways:
• Email Reputation Services scoring the source IP address
• Trend Micro Anti-Spam Engine identifying message content

Trend Micro InterScan Messaging Security Virtual Appliance Installation Guide
1-22
Note
Note that while IMSVA detects these kinds of email messages, these messages are nottagged as spam.
Administrators define the rule criteria to take an action on those email messages. Everygraymail message rule has an exception list containing address objects that bypassmessage filtering. An address object is a single IP address or address range (IPv4 orIPv6), or the Classless Inter-Domain Routing (CIDR) block.
Administrators have several options to understand graymail message traffic in thenetwork. Reports illustrate the highest senders and recipients of graymail messages fromexternal or internal sources. Administrators can also query detailed log information orview the email quarantine and release messages identified as permitted graymailmessages when necessary.
The graymail exception list can be exported and imported.
Note
Ensure that IMSVA can query external DNS servers for graymail scanning. If you changeany DNS server settings, restart the scanner server to load the new settings.
About Command & Control (C&C) ContactAlert Services
Trend Micro Command & Control (C&C) Contact Alert Services provides IMSVA withenhanced detection and alert capabilities to mitigate the damage caused by advancedpersistent threats and targeted attacks. It leverages the Global Intelligence list compiled,tested, and rated by the Trend Micro Smart Protection Network to detect callbackaddresses.
With C&C Contact Alert Services, IMSVA has the ability to inspect the sender,recipients and reply-to addresses in a message's header, as well as URLs in the messagebody, to see if any of them matches known C&C objects. Administrators can configureIMSVA to quarantine such messages and send a notification when a message is flagged.

Introducing InterScan Messaging Security Virtual Appliance
1-23
IMSVA logs all detected email with C&C objects and the action taken on thesemessages. IMSVA sends these logs to Control Manager for query purposes.


2-1
Chapter 2
Component DescriptionsThis chapter explains the requirements necessary to manage IMSVA and the varioussoftware components the product needs to function.
Topics include:
• About IMSVA Components on page 2-2
• Cloud Pre-Filter Service Overview on page 2-2
• About Spam Prevention Solution on page 2-3
• About Sender Filtering on page 2-3
• About Email Reputation on page 1-16
• About End-User Quarantine (EUQ) on page 2-5
• About Centralized Reporting on page 2-6

Trend Micro InterScan Messaging Security Virtual Appliance Installation Guide
2-2
About IMSVA ComponentsThe new architecture of IMSVA separates the product into distinct components thateach perform a particular task in message processing. The following sections provide anoverview of each component.
Cloud Pre-Filter Service OverviewCloud Pre-Filter service is a managed email security service powered by the Trend MicroEmail Security Platform. By routing your inbound messages through the service, youprotect your domains against spam, phishing, malware, and other messaging threatsbefore the threats reach your network.
Sender FilteringBy approving senders, Cloud Pre-Filter Service subscribers automatically allow messagesfrom trusted mail servers or email addresses. Messages from approved senders are notchecked for spam or source reputation. Messages from approved senders are scannedfor viruses.
By blocking senders, subscribers automatically block messages from untrusted sources.
Reputation-Based Source FilteringWith Trend Micro Email Reputation, Cloud Pre-Filter service verifies email sourcesagainst dynamic and self-updating reputation databases to block messages from thelatest botnets and other IP addresses controlled by spammers, phishers, and malwaredistributors.
Virus and Spam ProtectionWith Trend Micro antivirus technology, Cloud Pre-Filter Service protects againstinfectious messages from mass-mailing worms or manually crafted messages thatcontain Trojans, spyware, or other malicious code.
Component Descriptions
2-3
Cloud Pre-Filter Service checks messages for spam characteristics to effectively reducethe volume of unsolicited messages.
About Spam Prevention SolutionSpam Prevention Solution (SPS) is a licensed product from Trend Micro that providesspam-detection services to other Trend Micro products. The SPS license is included inthe Trend Micro Antivirus and Content Filter license. For more information, contact toyour sales representative.
Spam Prevention Solution TechnologySPS uses detection technology based on sophisticated content processing and statisticalanalysis. Unlike other approaches to identifying spam, content analysis provides highperformance, real-time detection that is highly adaptable, even as spammers change theirtechniques.
Using Spam Prevention SolutionSPS works through a built-in spam filter that automatically becomes active when youregister and activate the Spam Prevention Solution license.
About Sender FilteringIMSVA includes optional Sender Filtering, which consists of three parts:
IP ProfilerAllows you to configure threshold settings used to analyze email traffic. Whentraffic from an IP address violates the settings, IP Profiler adds the IP addressof the sender to its database and then blocks incoming connections from theIP address.
IP profiler detects any of these four potential Internet threats:
• Spam: Email messages with unwanted advertising content.

Trend Micro InterScan Messaging Security Virtual Appliance Installation Guide
2-4
• Viruses: Various virus threats, including Trojan programs.
• Directory Harvest Attack (DHA): A method used by spammers tocollect valid email addresses by generating random email addresses usinga combination of random email names with valid domain names. Emailsare then sent to these generated email addresses. If an email message isdelivered, the email address is determined to be genuine and thus addedto the spam databases.
• Bounced Mail: An attack that uses your mail server to generate emailmessages that have the target's email domain in the "From" field.Fictitious addresses send email messages and when they return, theyflood the target's mail server.
Email ReputationBlocks email from known spam senders at the IP-level.
SMTP Traffic ThrottlingBlocks messages from a single IP address or sender for certain time when thenumber of connections or messages reaches the specified maximum.
How IP Profiler WorksIP Profiler proactively identifies IP addresses of computers that send email messagescontaining threats mentioned in the section About Sender Filtering on page 2-3. Youcan customize several criteria that determine when IMSVA starts taking a specifiedaction on an IP address. The criteria differ depending on the potential threat, butcommonly include a duration during which IMSVA monitors the IP address and athreshold.
The following process takes place after IMSVA receives a connection request from asending mail server:
1. FoxProxy queries the IP Profiler's DNS server to see if the IP address is on theblocked list.
2. If the IP address is on the blocked list, IMSVA denies the connection request.
If the IP address is not on the blocked list, IMSVA analyzes the email trafficaccording to the threshold criteria you specify for IP Profiler.

Component Descriptions
2-5
3. If the email traffic violates the criteria, IMSVA adds the sender IP address to theblocked list.
How SMTP Traffic Throttling WorksSMTP Traffic Throttling identifies IP addresses or sender addresses that deliverconnection requests or email messages too frequently and blocks these addresses if theytrigger specific rules. You can customize IP-based and sender-based throttling rules tomonitor behaviors of all IP addresses and senders and take actions on them if necessary.The rule criteria include the duration to monitor, maximum number of connections ormessages allowed, and block duration. The difference is that sender-based throttlingdoes not allow you to specify the maximum number of connections while IP-basedthrottling does.
The following process takes place after IMSVA receives a connection request from asending mail server or a sender:
1. SMTP Traffic Throttling records the number of connections from this IP addressin the specified duration to monitor.
2. SMTP Traffic Throttling records the number of email messages from this IPaddress in the specified duration to monitor.
3. SMTP Traffic Throttling records the number of email messages from this sender inthe specified duration to monitor.
4. When the number of connections or messages from this IP address reaches thethreshold you set, SMTP Traffic Throttling will add this IP address to the BlockedList and block subsequent connections or messages from this IP addresstemporarily.
5. When the number of messages from this sender reaches the threshold you set,SMTP Traffic Throttling will add this sender to the Blocked List and blocksubsequent messages from this sender temporarily.
About End-User Quarantine (EUQ)IMSVA provides web-based EUQ to improve spam management. The Web-basedEUQ service allows end users to manage their own spam quarantine. Messages that

Trend Micro InterScan Messaging Security Virtual Appliance Installation Guide
2-6
Spam Prevention Solution (licensed separately from IMSVA), or administrator-createdcontent filters, determine to be spam, are placed into quarantine. These messages areindexed into a database by the EUQ agent and are then available for end users to reviewand delete or approve for delivery.
About Centralized ReportingTo help you analyze how IMSVA is performing, use the centralized reporting feature.You can configure one time (on demand) reports or automatically generate reports(daily, weekly, and monthly). IMSVA allows you to send both one-time and scheduledreports through email.

3-1
Chapter 3
Planning for DeploymentThis chapter explains how to plan for IMSVA deployment. For instructions onperforming initial configuration, see the Administrator’s Guide.
Topics include:
• Deployment Checklist on page 3-2
• Network Topology Considerations on page 3-4
• About Device Roles on page 3-13
• About Device Services on page 3-13
• Understanding POP3 Scanning on page 3-15
• Opening the IMSVA Management Console on page 3-16
• Setting Up a Single Parent Device on page 4-21
• Setting Up a Child Device on page 4-39
• Verifying Successful Deployment on page 4-40

Trend Micro InterScan Messaging Security Virtual Appliance Installation Guide
3-2
Deployment ChecklistThe deployment checklist provides step-by-step instructions on the pre-installation andpost-installation tasks for deploying IMSVA.
1. Deploy IMSVA with Cloud Pre-Filter
TICK WHENCOMPLETED
TASKS OPTIONAL REFERENCE
Deploy with CloudPre-Filter
Yes IMSVADeployment withCloud Pre-Filter onpage 3-5
2. Identify the location of IMSVA
TICK WHENCOMPLETED
TASKS OPTIONAL REFERENCE
Select one of the following locations on your network whereyou would like to install IMSVA.
At the gateway Deployment at theGateway or Behindthe Gateway onpage 3-6
Behind thegateway
Deployment at theGateway or Behindthe Gateway onpage 3-6
Without a firewall
In front of a firewall
Behind a firewall
In the De-Militarized Zone
3. Plan the scope

Planning for Deployment
3-3
TICK WHENCOMPLETED
TASKSOPTIONA
LREFERENCE
Decide whether you would like to install a single IMSVA device ormultiple devices.
Single device installation About Device Roles on page3-13
Multiple IMSVA devices About Device Roles on page3-13
4. Deploy or Upgrade
TICK WHENCOMPLETED
TASKSOPTIONA
LREFERENCE
Deploy a new IMSVA device or upgrade from a previous version.
Upgrade from a previousversion
Upgrading from PreviousVersions on page 5-1
5. Start services
TICK WHENCOMPLETED
TASKSOPTIONA
LREFERENCE
Activate IMSVA services to start protecting your network againstvarious threats.
Scanner IMSVA Services section ofthe Administrator’s Guide
Policy
EUQ Yes
6. Configure other IMSVA settings
TICK WHENCOMPLETED
TASKSOPTIONA
LREFERENCE
Configure various IMSVA settings to get IMSVA up and running.

Trend Micro InterScan Messaging Security Virtual Appliance Installation Guide
3-4
TICK WHENCOMPLETED
TASKSOPTIONA
LREFERENCE
Sender Filtering Rules Yes Sender Filtering Servicesection of the Administrator'sGuide
SMTP Routing Scanning SMTP Messagessection of the Administrator'sGuide
POP3 Settings Yes Scanning POP3 Messagessection of the Administrator'sGuide
Policy and scanningexceptions
Managing Policies section ofthe Administrator's Guide
Perform a manual updateof components andconfigure scheduledupdates
Updating Scan Engine andPattern Files section of theAdministrator's Guide
Log settings Configuring Log Settingssection of the Administrator'sGuide
7. Back up IMSVA
TICK WHENCOMPLETED
TASKSOPTIONA
LREFERENCE
Perform a backup of IMSVA as a precaution against system failure.
Back up IMSVA settings Backing Up IMSVA section ofthe Administrator’s Guide.
Network Topology ConsiderationsDecide how you want to use IMSVA in your existing email and network topology. Thefollowing are common scenarios for handling SMTP traffic.

Planning for Deployment
3-5
IMSVA Deployment with Cloud Pre-FilterCloud Pre-Filter has no impact on how IMSVA should be deployed.
Note
Cloud Pre-Filter uses port 9000 as the web service listening port. This port must be openon the firewall for IMSVA to connect to Cloud Pre-Filter.
However, when adding Cloud Pre-Filter policies you must change the MX records, ofthe domain specified in the policy, to that of the Cloud Pre-Filter inbound addresses.The address is provided on the bottom of Cloud Pre-Filter Policy List screen. ClickCloud Pre-Filter in the IMSVA management console to display the Cloud Pre-FilterPolicy List screen.
Tip
Trend Micro recommends adding IMSVA’s address to the domain’s MX records, andplacing IMSVA at a lower priority than Cloud Pre-Filter. This allows IMSVA to provideemail service continuity as a backup to Cloud Pre-Filter.

Trend Micro InterScan Messaging Security Virtual Appliance Installation Guide
3-6
Deployment at the Gateway or Behind the GatewayTABLE 3-1. Common scenarios for handling SMTP traffic
SINGLE DEVICE MULTIPLE DEVICES
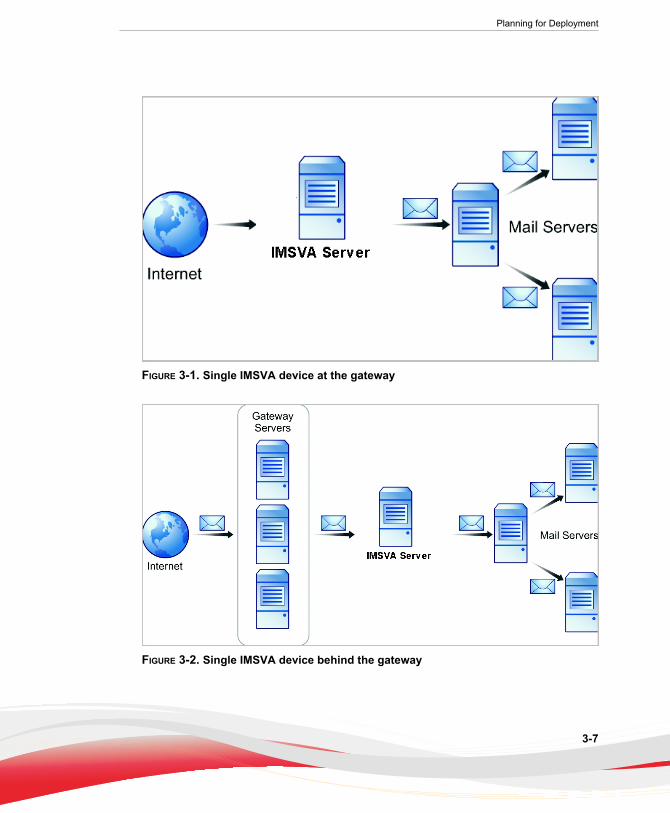
At the Gateway The only setup if you planto use Sender Filtering withthe device. IMSVA isdeployed at the gateway toprovide antivirus, contentfiltering, spam preventionand Sender Filteringservices, which includeNetwork ReputationServices and IP Profiler.See Figure 3-1: SingleIMSVA device at thegateway on page 3-7.
The only setup if you planto use Sender Filtering withat least one of the devices.You can enable or disableservices on differentdevices. See the following:
• Figure 3-3: IMSVAgroup at the gatewayon page 3-8
• Service Selection onpage 3-14
Behind the Gateway The most common setup.IMSVA is deployedbetween upstream anddownstream MTAs toprovide antivirus, contentfiltering and spamprevention services. SeeFigure 3-2: Single IMSVAdevice behind the gatewayon page 3-7.
The most common groupsetup. IMSVA devices aredeployed betweenupstream and downstreamMTAs to provide antivirus,content filtering and spamprevention services. Youcan enable or disableservices on differentdevices. See the following:
• Figure 3-4: IMSVAgroup behind thegateway on page 3-8
• Service Selection onpage 3-14
Trend Micro Control Manager scenario
If you have multiple groups, you can use Trend Micro Control Manager (TMCM) tomanage the devices.
Planning for Deployment
3-7
FIGURE 3-1. Single IMSVA device at the gateway
FIGURE 3-2. Single IMSVA device behind the gateway

Trend Micro InterScan Messaging Security Virtual Appliance Installation Guide
3-8
FIGURE 3-3. IMSVA group at the gateway
FIGURE 3-4. IMSVA group behind the gateway

Planning for Deployment
3-9
Installing without a FirewallThe following figure illustrates how to deploy IMSVA when your network does nothave a firewall.
FIGURE 3-5. Installation topology: no firewall
Note
Trend Micro does not recommend installing IMSVA without a firewall. Placing the serverhosting IMSVA at the edge of the network may expose it to security threats.

Trend Micro InterScan Messaging Security Virtual Appliance Installation Guide
3-10
Installing in Front of a Firewall
The following figure illustrates the installation topology when you install IMSVA infront of your firewall.
FIGURE 3-6. Installation topology: in front of the firewall
Incoming Traffic
• Configure IMSVA to reference your SMTP server(s) and configure the firewall topermit incoming traffic from the IMSVA server.
• Configure the Relay Control settings to only allow relay for local domains.
Outgoing Traffic
• Configure the firewall (proxy-based) to route all outbound messages to IMSVA.
• Configure IMSVA to allow internal SMTP gateways to relay to any domainthrough IMSVA.
Tip
For more information, see the Configuring SMTP Routing section of the IMSVAAdministrator’s Guide.

Planning for Deployment
3-11
Installing Behind a FirewallThe following figure illustrates how to deploy IMSVA behind your firewall.
FIGURE 3-7. Installation scenario: behind a firewall
Incoming Traffic• Configure your proxy-based firewall, as follows:
• Incoming SMTP messages go to IMSVA, and then to the SMTP servers inthe domain.
• Configure IMSVA to route messages destined for your local domain(s) to theSMTP gateway or your internal mail server.
• Configure relay restriction to only allow relay for local domain(s).
Outgoing Traffic• Configure all internal SMTP gateways to send outgoing messages to IMSVA
servers.
• If you are replacing your SMTP gateway with IMSVA, configure your internal mailserver to send outgoing messages to IMSVA servers.
• Configure IMSVA to route all outgoing messages (to domains other than local), tothe firewall, or deliver the messages.

Trend Micro InterScan Messaging Security Virtual Appliance Installation Guide
3-12
• Configure IMSVA to allow internal SMTP gateways to relay to any domain usingIMSVA.
Tip
For more information, see the Configuring SMTP Routing section of the IMSVAAdministrator’s Guide.
Installing in the De-Militarized Zone
You can also install IMSVA in the De-Militarized Zone (DMZ).
Incoming Traffic
• Configure your packet-based firewall.
• Configure IMSVA to route email messages destined for your local domain(s) to theSMTP gateway or your internal mail server.
Outgoing Traffic
• Configure your internal mail server to route all outgoing messages (destined fordomains other than the local domains) to the firewall or deliver them usingIMSVA .
• Configure all internal SMTP gateways to forward outgoing mail to IMSVA.
• Configure IMSVA to allow internal SMTP gateways to relay to any domainthrough IMSVA.
Tip
For more information, see the Configuring SMTP Routing section of the IMSVAAdministrator’s Guide.

Planning for Deployment
3-13
About Device RolesIMSVA can act as a parent or child device. Parent and child devices compose a group,where the parent provides central management services to the child devices registered toit.
• Parent: Manages child devices. If you are deploying a single IMSVA device, selectparent mode during setup so that all IMSVA components are deployed.
• Child: Managed by a single parent device and uses all global settings that youconfigure through the parent device’s management console.
A group refers to a parent device with at least one child device registered to it.
About Device ServicesYou can enable different kinds of services on IMSVA devices.
Parent-only services:
• Admin user interface service (management console): Manages global settings.
Parent and child services:
• Policy service: Manages the rules that you configure.
• Scanner service: Scans email traffic.
• EUQ service: Manages End-User Quarantine, which allows your users to view theirmessages that IMSVA determined were spam.
• Command Line Interface (CLI) service: Provides access to CLI features.
A child device is functional only when it is registered to a parent.

Trend Micro InterScan Messaging Security Virtual Appliance Installation Guide
3-14
Service Selection
You can enable different types of services on parent and child devices. For example, toincrease throughput, add more child devices, enable all their services and allow the childdevices to scan traffic and provide EUQ services.
You can deploy IMSVA devices in a parent/child group in either deployment scenario.However, if you enable the scanner service on parent and child devices, you must usethe same type of deployment for all devices in a single group. You cannot deploy somechild devices at the gateway and others behind the gateway.
In addition to the above SMTP-scanning scenarios, you might want IMSVA to scanPOP3 traffic. See Understanding POP3 Scanning on page 3-15 for more information.
Deployment with Sender Filtering
The Trend Micro Sender Filtering, which includes IP Profiler, Email Reputation andSMTP Traffic Throttling, blocks connections at the IP level.
To use Sender Filtering, any firewall between IMSVA and the edge of your networkmust not modify the connecting IP address as Sender Filtering is not compatible withnetworks using network address translation (NAT). If IMSVA accepts SMTPconnections from the same source IP address, for instance, Sender Filtering will notwork, as this address would be the same for every received message and the senderfiltering software would be unable to determine whether the original initiator of theSMTP session was a known sender of spam.
Understanding Internal Communication Port
IMSVA supports multiple network interfaces. This means one IMSVA device may havemultiple IP addresses. This introduces challenges when devices try to communicateusing a unique IP address. IMSVA incorporates the use of an Internal CommunicationPort to overcome this challenge.
• Users must specify one network interface card (NIC) as an InternalCommunication Port to identify the IMSVA device during installation.

Planning for Deployment
3-15
• After installation, users can change the Internal Communication Port on theIMSVA management console through the Configuration Wizard or the commandline interface (CLI).
• In a group scenario, parent devices and child devices must use their InternalCommunication Port to communicate with each other. When registering a childdevice to parent device, the user must specify the IP address of the parent device’sInternal Communication Port.
Tip
Trend Micro recommends configuring a host route entry on each IMSVA device ofthe group to ensure that parent-child communication uses the InternalCommunication Port.
• IMSVA devices use the Internal Communication Port’s IP address to register toControl Manager servers. When users want to configure IMSVA devices from theControl Manager management console, the management console service on theInternal Communication Port needs to be enabled. By default, the managementconsole service is enabled on all ports.
Understanding POP3 ScanningIn addition to SMTP traffic, IMSVA can scan POP3 messages at the gateway as yourclients retrieve them. Even if your company does not use POP3 email, your employeesmight access personal, web-based POP3 email accounts, which can create points ofvulnerability on your network if the messages from those accounts are not scanned.
The most common email scanning deployments will use IMSVA to scan SMTP traffic,which it does by default. However, to scan POP3 traffic that your organization mightreceive from a POP3 server over the Internet, enable POP3 scanning.
With POP3 scanning enabled, IMSVA acts as a proxy, positioned between mail clientsand POP3 servers, to scan messages as the clients retrieve them.
To scan POP3 traffic, configure your email clients to connect to the IMSVA serverPOP3 proxy, which connects to POP3 servers to retrieve and scan messages.

Trend Micro InterScan Messaging Security Virtual Appliance Installation Guide
3-16
Requirements for POP3 ScanningFor IMSVA to scan POP3 traffic, a firewall must be installed on the network andconfigured to block POP3 requests from all computers except IMSVA. Thisconfiguration ensures that all POP3 traffic passes through the firewall to IMSVA andthat only IMSVA scans the POP3 traffic.
Note
If you disable POP3 scanning, your clients cannot receive POP3 mail.
Configuring a POP3 Client that Receives Email ThroughIMSVA
To configure a POP3 client using a generic POP3 connection, configure the following:
• IP address/Domain name: The IMSVA IP address or domain name
• Port: IMSVA Generic POP3 port
• Account: account_name#POP3_Server_Domain-name
For example: user#10.18.125.168
To configure a POP3 client using dedicated POP3 connections, configure the following:
• IP address: The IMSVA IP address
• Port: The IMSVA dedicated POP3 port
• Account: account_name
For example: user
Opening the IMSVA Management ConsoleYou can view the IMSVA management console with a web browser from the serverwhere you deployed the program, or remotely across the network.

Planning for Deployment
3-17
To view the console in a browser, go to the following URL:
https://{IMSVA}:8445
where {IMSVA} refers to the IP address or Fully Qualified Domain Name.
For example: https://196.168.10.1:8445 or https://IMSVA1:8445
An alternative to using the IP address is to use the target server’s fully qualified domainname (FQDN). To view the management console using SSL, type “https://” before thedomain name and append the port number after it.
The default logon credentials are as follows:
• Administrator user name: admin
• Password: imsva
Type the logon credentials the first time you open the console and click Log on.
WARNING!
To prevent unauthorized changes to your policies, Trend Micro recommends that you set anew logon password immediately after deployment and change the password regularly.
Note
If you are using Internet Explorer (IE) to access the management console, IE will block theaccess and display a popup dialog box indicating that the certificate was issued from adifferent web address. Simply ignore this message and click Continue to this website toproceed.


4-1
Chapter 4
Installing IMSVA 9.1This chapter explains how to install IMSVA under different scenarios.
Topics include:
• System Requirements on page 4-2
• Installing IMSVA on page 4-4

Trend Micro InterScan Messaging Security Virtual Appliance Installation Guide
4-2
System RequirementsThe following table provides the recommended and minimum system requirements forrunning IMSVA.
TABLE 4-1. System Requirements
SPECIFICATION DESCRIPTION
Operating System IMSVA provides a self-contained installation that uses a standardCentOS Linux operating system. This dedicated operating systeminstalls with IMSVA to provide a turnkey solution. A separateoperating system, such as Linux, Windows, or Solaris, is notrequired.
NoteIMSVA uses a 64-bit operating system. When installing a64-bit OS on ESX/ESXi, you need to enter the BIOS andenable VT (Virtualization Technology).
CPU • Recommended: 8-core Intel™ Xeon™ processor orequivalent
• Minimum: dual-core Intel™ Xeon™ processor or equivalent
Memory • Recommended: 8GB RAM
• Minimum: 4GB RAM
Disk Space • Recommended: 250GB
NoteIMSVA automatically partitions the detected disk spacebased on recommended Linux practices.
• Minimum: 120GB
NoteIMSVA automatically partitions the detected disk spacebased on recommended Linux practices.

Installing IMSVA 9.1
4-3
SPECIFICATION DESCRIPTION
Monitor Monitor that supports 800 x 600 resolution with 256 colors orhigher
Additional Requirements and ToolsThe following table lists the minimum application requirements to access the CLI andmanagement console interfaces and to manage IMSVA with Control Manager.
TABLE 4-2. Minimum Software Requirements
APPLICATION SYSTEM REQUIREMENTS REMARKS
SSHcommunications application
SSH protocol version 2 To adequately view the IMSVACLI through an SSH connection,set the terminal window size to 80columns and 24 rows.
VMware™ESX server
• VMware ESXi 5.0 Update 3
• VMware ESXi 5.5 Update 2
• VMware ESXi 6.0
To install IMSVA as virtualmachine, install IMSVA on aVMware ESXi 5.0, VMware ESXi5.5 or VMware ESXi 6.0.
Hyper-V • Windows Server 2008 R2SP1
• Windows Server 2012
• Windows Server 2012 R2
• Microsoft Hyper-V Server2008 R2 SP1
• Microsoft Hyper-V Server2012 R2
IMSVA supports Hyper-V onWindows Server 2008 R2 SP1,Windows Server 2012, WindowsServer 2012 R2, Microsoft Hyper-V Server 2008 R2 SP1, andMicrosoft Hyper-V Server 2012R2.

Trend Micro InterScan Messaging Security Virtual Appliance Installation Guide
4-4
APPLICATION SYSTEM REQUIREMENTS REMARKS
InternetExplorer™
• Version 9.0
• Version 10.0
• Version 11.0
To access the web console, whichallows you to configure all IMSVAsettings, use Internet Explorer 9.0or above, Firefox 45.0 or above, orMicrosoft Edge 31 or above. Usingthe data port IP address you setduring initial configuration, enterthe following URL:https://[IPAddress]:8445
MozillaFirefox™
Version 45.0
MicrosoftEdge™
Version 31
Java™ VirtualMachine
Version 5.0 or later or SUN JRE1.4+
To view certain items in the webconsole, the computer must haveJVM.
PostgreSQLdatabase
Version 9.2 The IMSVA admin database andEUQ database can be installedeither on the internal or externaldatabase server.
Trend MicroControlManager
• Version 5.5 SP1 Patch 4 orlater
• Version 6.0 SP3 Patch 1 orlater
Install Trend Micro ControlManager 6.0 SP3 Patch 1 hot fixbuild 3262 so that Data LossPrevention policies can bedeployed to IMSVA 9.1.
Installing IMSVAIMSVA 9.1 supports upgrading only from IMSVA 9.0 and migrates existingconfiguration and policy data during the upgrade.
The IMSVA installation process formats your existing system to install IMSVA. Theinstallation procedure is basically the same for both a Bare Metal and a VMware ESXvirtual machine platform. The Bare Metal installation boots off of the IMSVAinstallation DVD to begin the procedure and the VMware installation requires thecreation of a virtual machine before installation.

Installing IMSVA 9.1
4-5
WARNING!
Any existing data or partitions are erased during the installation process. Back up anyexisting data on the system (if any) before installing IMSVA.
Procedure
1. Start the IMSVA installation.
For system requirements, see System Requirements on page 4-2.
• On a Bare Metal Server
a. Make sure the Bare Metal server supports CentOS 6.4 x86_64.
b. Insert the IMSVA Installation DVD into the DVD drive of the desiredserver.
c. Power on the Bare Metal server.
• On a VMware ESX Virtual Machine
a. Create a virtual machine on your VMware ESX server.
b. Start the virtual machine.
c. Insert the IMSVA Installation DVD into the virtual DVD drive with anyone of the following methods.
• Insert the IMSVA Installation DVD into the physical DVD driveof the ESX server, and then connect the virtual DVD drive of thevirtual machine to the physical DVD drive.
• Connect the virtual DVD drive of the virtual machine to theIMSVA-9.1-xxxx-x86_64.iso file. The IMSVA-9.1-xxxx-x86_64.iso file is available at:
http://www.trendmicro.com/download
d. Restart the virtual machine by clicking VM > Send Ctrl+Alt+Del on theVMware web console.
For both a VMware ESX Virtual Machine and a Bare Metal Server installation, apage appears displaying the IMSVA 9.1 Setup Wizard with the following options:

Trend Micro InterScan Messaging Security Virtual Appliance Installation Guide
4-6
• Fresh Install or version upgrade: Select this option to install IMSVA onto thenew hardware or virtual machine or upgrade the existing IMSVA.
• System recovery: Select this option to fix operating system errors and recoveradministrative passwords.
• System memory test: Select this option to perform memory diagnostic tests.
• Exit installation: Select this option to exit the installation process and to bootfrom the local disk.
2. Select Fresh install or version upgrade.

Installing IMSVA 9.1
4-7
The License Agreement page appears.
3. Click Accept to continue.

Trend Micro InterScan Messaging Security Virtual Appliance Installation Guide
4-8
A keyboard language selection screen appears.
4. Select the keyboard language for the system, and then click Next.

Installing IMSVA 9.1
4-9
A screen appears for you to select your installation type.
5. Select Fresh Install, and then click Next.

Trend Micro InterScan Messaging Security Virtual Appliance Installation Guide
4-10
A screen appears for you to select the drive used for installation.
6. Select the drive, and then click Next.
A warning dialog box appears.

Installing IMSVA 9.1
4-11
7. Click Yes to proceed.
The IMSVA installation program scans your hardware and software to determine ifthe minimum requirements have been met and displays the results. If the hardwareor software contains any components that do not meet the minimum requirements,the installation program highlights those components and the installation stops.
8. Make sure the hardware and software information is correct, and then click Next.

Trend Micro InterScan Messaging Security Virtual Appliance Installation Guide
4-12
The network devices configuration screen appears.
TABLE 4-3. Network Device Configuration
CONFIGURATION PARAMETER DESCRIPTION
IPv4 Address Type the IMSVA management IPaddress and subnet mask.
Hostname Type in the applicable FQDN for thisIMSVA host.
Gateway Type the applicable IP address as thegateway for this IMSVA installation.
Primary DNS Type the applicable IP address as theprimary DNS server for this IMSVAinstallation.

Installing IMSVA 9.1
4-13
CONFIGURATION PARAMETER DESCRIPTION
Secondary DNS Type the applicable IP address as thesecondary DNS server for this IMSVAinstallation.
9. Provide all the information to install IMSVA, and then click Next.
The time zone configuration screen appears.
10. Specify the IMSVA server's time and clock settings
a. Select the location of the IMSVA server.
b. Specify whether the server's system clock uses UTC or not by selecting orclearing the System clock uses UTC check box.
11. Click Next.

Trend Micro InterScan Messaging Security Virtual Appliance Installation Guide
4-14
The account settings screen appears.
12. Specify passwords for the root and enable accounts.
IMSVA uses two different levels of administrator accounts to secure the system.
The password must be a minimum of 6 characters and a maximum of 32characters.
Tip
For the best security, create a highly unique password only known to you. You canuse both upper and lower case alphabetic characters, numerals, and any specialcharacters found on your keyboard to create your passwords.
• Root Account: Used to gain access to the operating system shell and has allrights to the server. This is the most powerful user on the system.

Installing IMSVA 9.1
4-15
• Enable Account: Used to gain access to the command line interface's privilegemode. This account has all rights to execute any CLI command.
13. Select a database from the following:
• Internal PostgreSQL database: This is the default database used.

Trend Micro InterScan Messaging Security Virtual Appliance Installation Guide
4-16
• External PostgreSQL database: If you select this option, provide externaldatabase information as required.
Note
To use the external database, do the following:
a. Make sure the account used to install the IMSVA admin database has thesuperuser role.
b. Manually change the maximum number of database connections to 600:
vi /var/lib/pgsql/9.2/data/postgresql.conf
max_connection = 600 (default 100)
restart DB service (service postgresql-9.2 restart ORsystemctl restart postgresql)
c. Make sure that IMSVA and the external database server use the same timezoneand time settings; otherwise, some unexpected issues may happen.

Installing IMSVA 9.1
4-17
14. Click Next.
A screen appears, showing a summary of your configuration settings.
15. Verify settings, and then click Next.

Trend Micro InterScan Messaging Security Virtual Appliance Installation Guide
4-18
A dialog box appears, asking you whether to continue the installation.
Important
Selecting Continue erases any data on the hard disk partition and formats the harddisk. If you have data on the hard disk that you would like to keep, cancel theinstallation and back up the information before proceeding.
16. Click Continue.

Installing IMSVA 9.1
4-19
A screen appears that provides the formatting status of the local drive for theIMSVA installation. When formatting completes, the IMSVA installation begins.
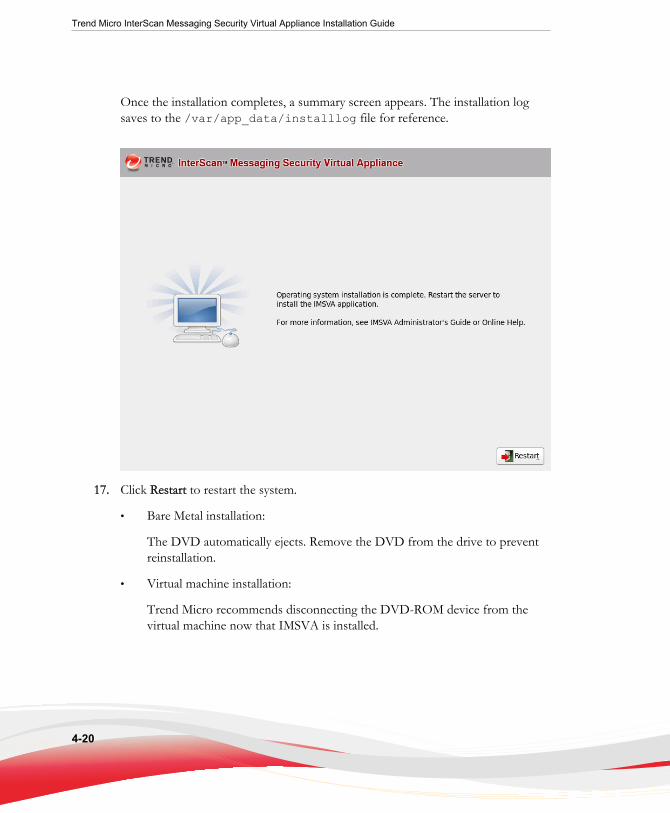
Trend Micro InterScan Messaging Security Virtual Appliance Installation Guide
4-20
Once the installation completes, a summary screen appears. The installation logsaves to the /var/app_data/installlog file for reference.
17. Click Restart to restart the system.
• Bare Metal installation:
The DVD automatically ejects. Remove the DVD from the drive to preventreinstallation.
• Virtual machine installation:
Trend Micro recommends disconnecting the DVD-ROM device from thevirtual machine now that IMSVA is installed.

Installing IMSVA 9.1
4-21
After IMSVA reboots, the initial CLI login screen appears.
18. Log on through either the CLI or IMSVA management console to launch IMSVA.
Tip
Log on to the CLI shell to perform additional configuration, troubleshooting, orhousekeeping tasks.
Setting Up a Single Parent DeviceIMSVA provides a Configuration Wizard to help you configure all the settings you needto get IMSVA up and running.
Procedure
1. Make sure that your management computer can ping IMSVA's IP address that youconfigured during installation.

Trend Micro InterScan Messaging Security Virtual Appliance Installation Guide
4-22
2. On the management computer, open Internet Explorer, Firefox or MicrosoftEdge.
3. Type the following URL (accept the security certificate if necessary):
https://<IP address>:8445
The logon screen appears.
4. Select the Open Configuration Wizard check box.
5. Type the following default user name and password:
• User name: admin
• Password: imsva
The Configuration Wizard screen appears.
FIGURE 4-1. Configuration Wizard screen
6. Progress through the Configuration Wizard screens to configure the settings.

Installing IMSVA 9.1
4-23
Step 1: Configuring System Settings
Procedure
1. After you read the welcome screen, click Next. The Local System Settings screenappears.
FIGURE 4-2. Local System Settings

Trend Micro InterScan Messaging Security Virtual Appliance Installation Guide
4-24
2. Modify the device host name, IP address, and netmask if necessary. Also, configureyour network settings and set the device system time.
Note
The local system settings take effect immediately when you click the Next> button. Ifthe IP address or time settings are changed, IMSVA will restart. Wait until IMSVA isonline and then log on again.
Step 2: Configuring Deployment Settings
Procedure
1. Click Next.
The Deployment Settings screen appears.
FIGURE 4-3. Deployment Settings

Installing IMSVA 9.1
4-25
2. Select Parent Device or Child Device.
• Parent Device: If this is the first device you are setting up, you must select thisoption. You can configure additional child devices at a later time. Also, decideif you want to use the NTP service.
• Child Device: If you select this option, specify the parent managementconsole settings. Make sure the user account you use here has fulladministration rights.
Step 3: Configuring SMTP Routing Settings
Procedure
1. Click Next.

Trend Micro InterScan Messaging Security Virtual Appliance Installation Guide
4-26
The SMTP Routing Settings screen appears.
FIGURE 4-4. SMTP Routing Settings

Installing IMSVA 9.1
4-27
2. Specify the incoming message settings.
3. Specify the message delivery settings.
Step 4: Configuring Notification Settings
Procedure
1. Click Next.
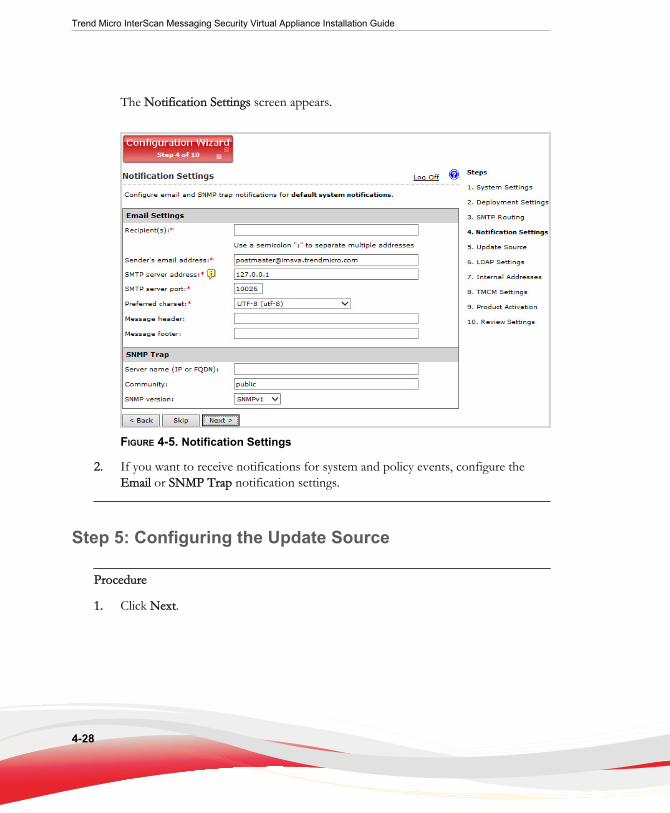
Trend Micro InterScan Messaging Security Virtual Appliance Installation Guide
4-28
The Notification Settings screen appears.
FIGURE 4-5. Notification Settings
2. If you want to receive notifications for system and policy events, configure theEmail or SNMP Trap notification settings.
Step 5: Configuring the Update Source
Procedure
1. Click Next.

Installing IMSVA 9.1
4-29
The Update Source screen appears.
FIGURE 4-6. Update Source
2. Configure the following update settings, which will determine from where IMSVAwill receive its component updates and through which proxy (if any) IMSVA needsto connect to access the Internet:
• Source: Click Trend Micro ActiveUpdate (AU) server to receive updatesdirectly from Trend Micro. Alternatively, click Other Internet source and typethe URL of the update source that will check the Trend Micro AU server forupdates. You can specify an update source of your choice or type the URL ofyour Control Manager server http://<TMCM server address>/TvcsDownload/ActiveUpdate/, if applicable.
• Proxy Settings: Select the Use proxy server check box and configure the proxytype, server name, port, user name, and password.

Trend Micro InterScan Messaging Security Virtual Appliance Installation Guide
4-30
Step 6: Configuring LDAP Settings
Procedure
1. Click Next.
The LDAP Settings screen appears.

Installing IMSVA 9.1
4-31
2. Specify a meaningful description for the LDAP server.
3. Complete the following to enable LDAP settings:
a. For LDAP server type, select one of the following:
• Domino
• Microsoft Active Directory
• Microsoft AD Global Catalog
• OpenLDAP
• Sun iPlanet Directory
b. To enable one or both LDAP servers, select the check boxes next to EnableLDAP 1 or Enable LDAP 2.

Trend Micro InterScan Messaging Security Virtual Appliance Installation Guide
4-32
c. Specify the names of the LDAP servers and the port numbers they listen on.
d. Under LDAP Cache Expiration for Policy Services and EUQ services, type anumber that represents the time to live next to the Time To Live in minutesfield.
e. Under LDAP Admin, type the administrator account, its correspondingpassword, and the base-distinguished name. See the following table for aguide on what to specify for the LDAP admin settings.
TABLE 4-4. LDAP admin settings
LDAP SERVERLDAP ADMIN
ACCOUNT (EXAMPLES)
BASEDISTINGUISHED
NAME (EXAMPLES)
AUTHENTICATION METHOD
ActiveDirectory
Without Kerberos:[email protected](UPN) or domain\user1
With Kerberos:[email protected]
dc=domain,dc=com
Simple
Advanced(withKerberos)
ActiveDirectoryGlobal Catalog
Without Kerberos:[email protected](UPN) or domain\user1
With Kerberos:[email protected]
dc=domain,dc=com
dc=domain1,dc=com (if multipleunique domainsexist)
Simple
Advanced(withKerberos)
Lotus Domino cn=manager,dc=test1, dc=com
dc=test1, dc=com Simple
Lotus Domino user1/domain Not applicable Simple
Sun iPlanetDirectory
uid=user1,ou=people,dc=domain, dc=com
dc=domain,dc=com
Simple
Open LDAP cn=manager,dc=test1, dc=com
dc=test1, dc=com Simple

Installing IMSVA 9.1
4-33
f. For Authentication method, click Simple or Advanced authentication. ForActive Directory advanced authentication, configure the Kerberosauthentication default realm, Default domain, KDC and admin server, andKDC port number.
Note
Specify LDAP settings only if you will use LDAP for user-group definition,administrator privileges, or web quarantine authentication.
g. Select the Enable encrypted communication between IMSVA and LDAPcheck box and click Browse to upload a CA certificate file.
Step 7: Configuring Internal Addresses
Procedure
1. Click Next.

Trend Micro InterScan Messaging Security Virtual Appliance Installation Guide
4-34
The Internal Addresses screen appears.
FIGURE 4-7. Internal Addresses
2. IMSVA uses the internal addresses to determine whether a policy or an event isinbound or outbound.
• If you are configuring a rule for outgoing messages, the internal address listapplies to the senders.
• If you are configuring a rule for incoming messages, the internal address listapplies to the recipients.
To define internal domains and user groups, do one of the following:
• Select Enter domain from the drop-down list, type the domain in the textbox, and then click >>.

Installing IMSVA 9.1
4-35
• Select Search for LDAP groups from the drop-down list. A screen forselecting the LDAP groups appears. Type an LDAP group name for whichyou want to search in the text box and click Search. The search result appearsin the list box. To add it to the Selected list, click >>.
Step 8: Configuring Control Manager Server Settings
Procedure
1. Click Next.

Trend Micro InterScan Messaging Security Virtual Appliance Installation Guide
4-36
The TMCM Server Settings screen appears.
FIGURE 4-8. TMCM Server Settings
2. If you will use Control Manager to manage IMSVA, do the following:
a. Select Enable MCP Agent (included with IMSVA by default).
b. Next to Server, type the Control Manager IP address or FQDN.
c. Next to Communication protocol, select HTTP or HTTPS and type thecorresponding port number. The default port number for HTTP access is 80,and the default port number for HTTPS is 443.

Installing IMSVA 9.1
4-37
d. Under Web server authentication, type the user name and password for theweb server if it requires authentication.
e. If a proxy server is between IMSVA and Control Manager, select Enableproxy.
f. Type the proxy server port number, user name, and password.
Step 9: Activating the Product
Procedure
1. Click Next.
The Product Activation screen appears.
FIGURE 4-9. Product Activation

Trend Micro InterScan Messaging Security Virtual Appliance Installation Guide
4-38
2. Type the Activation Codes for the products or services you want to activate. If youdo not have an Activation Code, click Register Online and follow the directions atthe Trend Micro Registration website.
Step 10: Reviewing the Settings
Procedure
1. Click Next.
The Review Settings screen appears.
FIGURE 4-10. Review Settings
2. If your settings are correct, click Finish.
To modify any of your settings, click Back and keep moving through the screensuntil your settings are complete. IMSVA will be operational after you click Finishand exit the Wizard.

Installing IMSVA 9.1
4-39
Setting Up a Child DeviceThis section explains how to set up a child device and register it to the parent device.
Procedure
1. Determine the IP address of the child device.
2. On the parent device, do the following:
a. After you set up a parent device (see Setting Up a Single Parent Device onpage 4-21), make sure the parent device is operational.
b. Log on to the management console. Make sure that you are logging on theparent device management console.
c. Go to Administration > IMSVA Configuration > Connections > Child IP.
d. Under Add IP Address, add the IP address for the Internal CommunicationPort of the child device.
3. On the child device, do the following:
a. Just as you did for the parent device, connect a management computer to thechild device and log on to the management console. All IMSVA devices havethe same default management console logon credentials.
b. In the Setup Wizard, configure the local system settings and then click Next>.
c. On the Deployment Settings screen, select Child Device and specify the IPaddress, port, logon user name and password for the management console ofthe parent device.
Note
The logon user account that you specified must have full administration rights.
d. Click Finish.
4. On the parent device, do the following:
a. Go to System Status.
Trend Micro InterScan Messaging Security Virtual Appliance Installation Guide
4-40
b. Verify that the child device appears under Managed Services and that a greencheck mark appears under Connection. You can start or stop Scanner, Policy,or EUQ services.
Note
If you enabled EUQ on the parent, it will also be enabled on the child.
5. If you want to use EUQ on the child device, redistribute the data across the EUQdatabases:
a. On the parent device, navigate to Administration > End-User Quarantine.
The EUQ Management tab appears by default.
b. Select Redistribute all or Only redistribute approved senders. Trend Microrecommends selecting Redistribute all.
c. Click Redistribute.
Note
If you registered an EUQ-enabled child device to its parent device, add senders to theapproved senders list, and then re-distribute EUQ data, some of the newly addedapproved senders might not appear.
Trend Micro recommends the following:
• After redistributing EUQ, the administrator informs all end users to verify thatthe newly added approved senders are still available.
• That the administrator notifies all end users not to add EUQ approved senderslist when the administrator is adding a child device and redistributing EUQ.
Verifying Successful DeploymentAfter you have set up the IMSVA devices, the services should start automatically.

Installing IMSVA 9.1
4-41
Procedure
1. Go to System Status.
2. Under Managed Services, ensure that the scanner and policy services are active.Otherwise, click the Start button to activate them.
Note
You can choose to enable or disable the EUQ services.


5-1
Chapter 5
Upgrading from Previous VersionsThis chapter provides instructions on upgrading from previous versions of IMSVA.
Topics include:
• Upgrading from an Evaluation Version on page 5-2
• Upgrading from IMSVA 9.0 Patch 1 on page 5-4
• Migrating from Previous Versions on page 5-34

Trend Micro InterScan Messaging Security Virtual Appliance Installation Guide
5-2
Upgrading from an Evaluation VersionIf you provided an evaluation Activation Code to activate IMSVA previously, you havestarted an evaluation period that allows you to try the full functionality of the product.The evaluation period varies depending on the type of Activation Code used.
Fourteen (14) days prior to the expiry of the evaluation period, IMSVA will display awarning message on the management console alerting you of the impending expiration.
To continue using IMSVA, purchase the full version license for the product. You willthen be provided a new Activation Code.
Procedure
1. Go to Administration > Product Licenses.
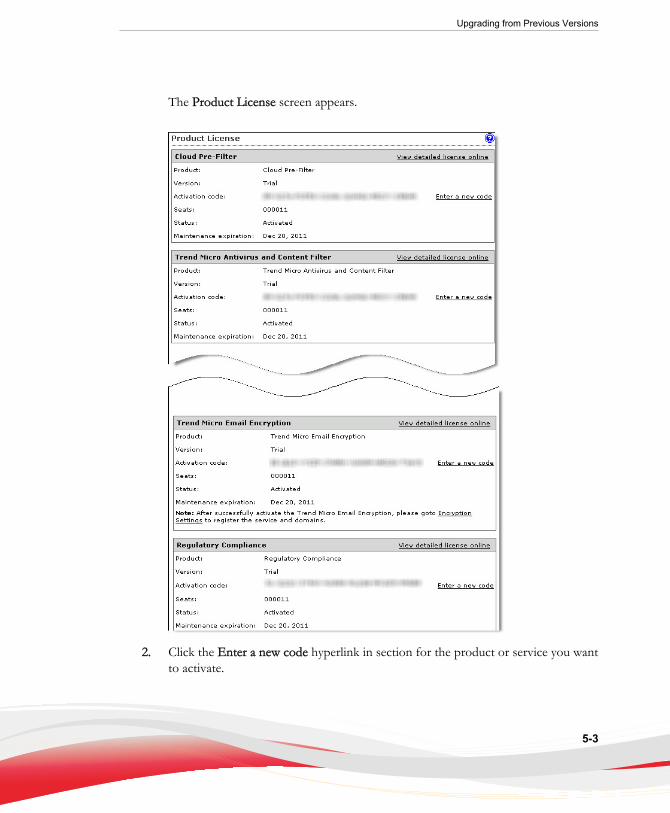
Upgrading from Previous Versions
5-3
The Product License screen appears.
2. Click the Enter a new code hyperlink in section for the product or service you wantto activate.

Trend Micro InterScan Messaging Security Virtual Appliance Installation Guide
5-4
The Enter A New Code screen appears.
3. Type the new Activation Code in the box provided.
Note
When you purchase the full licensed version of IMSVA, Trend Micro will send thenew Activation Code to you by email. To prevent mistakes when typing theActivation Code (in the format xx-xxxx-xxxxx-xxxxx-xxxxx-xxxxx-xxxxx), you cancopy the Activation Code from the email and paste it in the box provided.
4. Click Activate.
5. Repeat steps 2 to 5 for all the products or services you want to activate.
Upgrading from IMSVA 9.0 Patch 1Upgrade IMSVA 9.0 Patch 1 as a single device or an entire distributed environment canbe upgraded.

Upgrading from Previous Versions
5-5
Note
Do not restart IMSVA until you have completed the upgrade process.
During the upgrade, no customized operating system settings migrate, except the host,network, and gateway settings. To retain the original settings, do the following:
1. Mount the original root partition to a path on the upgraded server, for example, /root/original_root:
mount /dev/mapper/IMSVA-Root1 /root/original_root
2. Find the original settings in the mounted path.
3. Add the original settings to the upgrade server.
Backing Up IMSVA 9.0 Patch 1
IMSVA 9.0 Patch 1 backs up the configuration settings and performs an auto-rollback ifthe upgrade is not successful. However, Trend Micro recommends backing up IMSVA9.0 Patch 1 before attempting to upgrade to IMSVA 9.1:
Procedure
1. Do any of the following tasks to back up IMSVA 9.0 Patch 1:
• Ghost the entire computer where IMSVA 9.0 Patch 1 is installed.
• Take a snapshot for IMSVA 9.0 Patch 1 if it is installed on a virtual machine.
• Back up the IMSVA 9.0 Patch 1 app_data partition.
a. Open the operating system shell console and run the followingcommands:
/opt/trend/imss/script/imssctl.sh stop
service crond stop
b. Mount an external disk to /var/udisk.
c. Copy all files to the disk:

Trend Micro InterScan Messaging Security Virtual Appliance Installation Guide
5-6
cp –rf -–preserve /var/app_data/* /var/udisk/app_data_backup/
2. Start all IMSVA services after backup.
Upgrading a Single IMSVAThis procedure explains how to upgrade a single IMSVA to version 9.1.
Procedure
1. Back up IMSVA 9.0 Patch 1.
Note
For details, see Backing Up IMSVA 9.0 Patch 1 on page 5-5.
2. Use the following command in the CLI console to verify there are no messages inthe Postfix queue:
postqueue –p
3. Restart the server that you want to upgrade with the IMSVA Installation DVD.
Note
For details, see Step 1 in Installing IMSVA on page 4-4.

Upgrading from Previous Versions
5-7
The IMSVA 9.1 Setup Wizard screen appears.
4. Select Fresh install or version upgrade.

Trend Micro InterScan Messaging Security Virtual Appliance Installation Guide
5-8
The License Agreement screen appears.
5. Click Accept to continue.

Upgrading from Previous Versions
5-9
A keyboard language selection screen appears.
6. Select the keyboard language for the system, and then click Next.

Trend Micro InterScan Messaging Security Virtual Appliance Installation Guide
5-10
A screen appears for you to select your installation type.
7. Select Version Upgrade, and then click Next.
The IMSVA upgrade program scans your hardware and software to determine ifthe minimum requirements have been met and displays the results. If the hardware
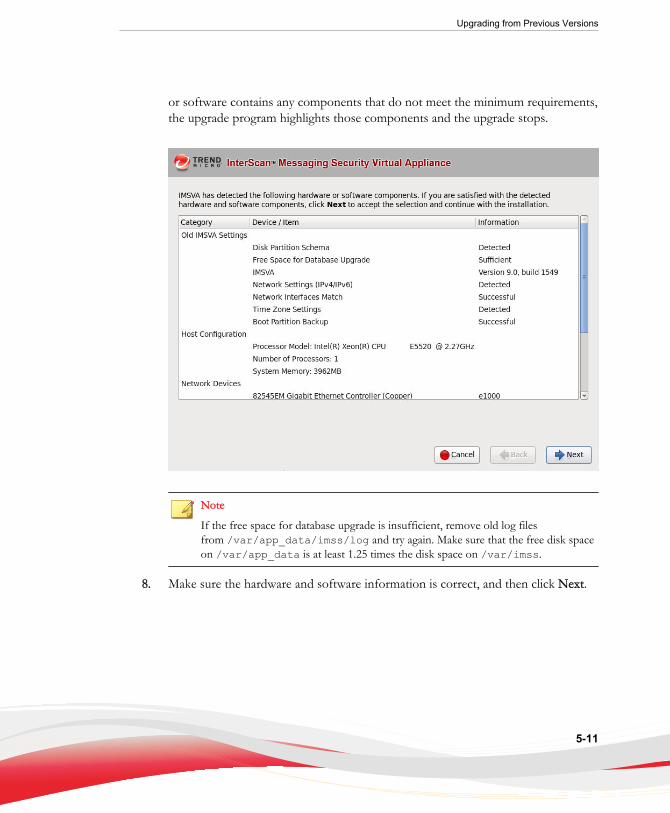
Upgrading from Previous Versions
5-11
or software contains any components that do not meet the minimum requirements,the upgrade program highlights those components and the upgrade stops.
Note
If the free space for database upgrade is insufficient, remove old log filesfrom /var/app_data/imss/log and try again. Make sure that the free disk spaceon /var/app_data is at least 1.25 times the disk space on /var/imss.
8. Make sure the hardware and software information is correct, and then click Next.

Trend Micro InterScan Messaging Security Virtual Appliance Installation Guide
5-12
The Account Settings screen appears.
9. Specify passwords for the root and enable accounts.
IMSVA uses two different levels of administrator types to secure the system.
The password must be a minimum of 6 characters and a maximum of 32characters.
Tip
For the best security, create a highly unique password only known to you. You canuse both upper and lower case alphabetic characters, numerals, and any specialcharacters to create your passwords.
• Root Account: Used to gain access to the operating system shell and has allrights to the server. This is the most powerful user on the system.

Upgrading from Previous Versions
5-13
• Enable Account: Used to gain access to the command line interface's privilegemode. This account has all rights to execute any CLI command.
10. Click Next.
A screen appears, showing a summary of your configuration settings.
11. Verify settings, and then click Next.

Trend Micro InterScan Messaging Security Virtual Appliance Installation Guide
5-14
A screen appears that provides the formatting status of the local drive for theIMSVA upgrade.

Upgrading from Previous Versions
5-15
Once the formatting is complete, a summary screen appears.
12. Click Restart to restart the system.

Trend Micro InterScan Messaging Security Virtual Appliance Installation Guide
5-16
The upgrade continues after the system restarts. When the following informationappears, the upgrade is complete.
Note
To avoid any unexpected error, do not restart your machine in any of the followingsteps.
13. Press any key to enter the system shell command line interface.
14. Use the following command to verify the upgrade:
# tail -1 /var/app_data/installlog
15. Once IMSVA upgrade completes, restart IMSVA services from the CLI consolewith the following command:
/mnt/backup/dry_run.sh
16. Verify that IMSVA is working properly after the upgrade.
17. To roll back to IMSVA 9.0 Patch 1, use the following commands:
/mnt/backup/confirm.sh

Upgrading from Previous Versions
5-17
“no”
18. If the IMSVA is working properly after the upgrade, use the following commandsto complete the upgrade:
/mnt/backup/confirm.sh
“yes”
If you do not roll back to IMSVA 9.0 Patch 1 within 2 hours, all IMSVA serviceswill stop automatically. You must then decide whether to roll back to IMSVA 9.0Patch 1, or to complete the upgrade using the following command:
/mnt/backup/confirm.sh
Type yes to complete the upgrade or no to roll back.
Upgrading a Distributed Environment
IMSVA now supports upgrading an entire distributed deployment, for example, in anetwork where IMSVA is being used in a parent-child deployment.
Procedure
1. Prepare for the upgrade.
a. Back up IMSVA 9.0 Patch 1.
Note
For details, see Backing Up IMSVA 9.0 Patch 1 on page 5-5.
b. Use the following command in the CLI console to verify there are nomessages in the Postfix queue:
postqueue –p
c. Make sure that all IMSVA services are working properly on the managementconsole.

Trend Micro InterScan Messaging Security Virtual Appliance Installation Guide
5-18
On the System Status screen, all the services under Managed Services areactive.
d. Stop all services on child devices using the following command:
# /opt/trend/imss/script/imssctl.sh stop
Note
In a distributed deployment, the parent device must be upgraded before childdevices.
WARNING!
Performing this step will interrupt your email traffic. If you want to avoid trafficinterruption, perform Batch Upgrade on page 5-20 or Offline Upgrade onpage 5-27.
e. Start the database service on child devices using the following command:
# /opt/trend/imss/script/dbctl.sh start
2. Upgrade the parent and child devices.

Upgrading from Previous Versions
5-19
a. Upgrade the parent device. See steps 3 to 13 in Upgrading a Single IMSVA onpage 5-6.
b. Use the following command to verify that the database is working properly onthe parent device:
# ps -ef |grep imss
Information similar to the following appears:
imss 5602 0.0 0.2 63412 3376 ? S Oct14 1:09 /opt/trend/imss/PostgreSQL/bin/postgres -D /var/imss/pgdata -i
c. Upgrade all the child devices one at a time, a few at a time, or all at once.
WARNING!
Do not restart IMSVA services until all devices have been upgraded.
Do not run /mnt/backup/dry_run.sh or /mnt/backup/confirm.shon any of the parent or child device before you finish upgrading all the devices.
If one of the child devices encounters issues while upgrading, unregister thechild device using the CLI.
3. Verify that the upgrade is successful.
a. Open the installation log file using the following command:
# tail -1 /var/app_data/installlog
b. Check the installation logs for information indicating the upgrade success.
4. Complete the upgrade.
a. After upgrading all devices, restart IMSVA services on the parent device andthen on the child devices with the following command:
/mnt/backup/dry_run.sh
b. Verify that IMSVA is working properly after the upgrade.
c. To roll back to IMSVA 9.0 Patch 1, first roll back all child devices and thenthe parent device with the following commands:

Trend Micro InterScan Messaging Security Virtual Appliance Installation Guide
5-20
/mnt/backup/confirm.sh
“no”
d. If the IMSVA is working properly after the upgrade, use the followingcommands to complete the upgrade:
/mnt/backup/confirm.sh
“yes”
If you do not roll back to IMSVA 9.0 Patch 1 within 2 hours, all IMSVAservices will stop automatically. You must then decide to roll back to IMSVA9.0 Patch 1, or to complete the upgrade, using the following command:
/mnt/backup/confirm.sh
Type yes to complete the upgrade or no to roll back.
Batch UpgradeBatch upgrade allows upgrading of two or more parent and child devices. This optionreserves log information during the upgrade process and does not cause any downtime.
Tip
Trend Micro recommends performing batch upgrade when email traffic is at a minimum.Evaluate if the IMSVA devices to be upgraded after the first batch can accommodate thetotal email traffic during the upgrade process.
Batch upgrade is best performed between 4:00 and 22:00. The daemon service on the childdevices may be restarted outside the recommended time period, preventing these devicesfrom connecting to the parent device.

Upgrading from Previous Versions
5-21
The following is an overview of the batch upgrade process:
1. Select the first batch of child devices to upgrade.
2. Block connections between parent and child devices (with IP table or firewall),except devices selected in Step 1.
Note
At this stage, child devices should not be able to connect to the parent device.However, the parent device can connect to the child devices to conduct a pre-upgrade check.
3. Perform offline upgrade for the parent and child devices selected in Step 1.
4. Deploy the upgraded devices to production.
5. Perform offline upgrade for the rest of the child devices.
6. Restore the connection between the upgraded parent and child devices.

Trend Micro InterScan Messaging Security Virtual Appliance Installation Guide
5-22
7. Deploy the upgraded devices to production.
8. Repeat the steps until all parent and child devices are upgraded.
Note
During the batch upgrade process, it is important to block the connection between parentand child devices.
Configure the firewall of the parent and child devices to block the second batch of childdevice upgrades. The child devices cannot be restarted unless the connection is blocked.
Step 1: Blocking Connections Between Parent and ChildDevices
Note
In this procedure, C1 refers to the first batch of child devices to be upgraded, and C2 refersto the second batch of child devices.
Procedure
1. Select the first batch of devices to be upgraded (referred to hereafter as C1).
a. Select a parent device.
b. Select child devices.
c. Modify the DNS record to stop sending messages to the selected devices.
2. Change the iptables on the second batch of child devices (referred to hereafter asC2).
a. Change the iptables.
# vi /etc/init.d/rcFirewall
At the end of start(), add the following rules:
iptables -I INPUT -s [parent's IP] -j REJECT
iptables -I INPUT -s [C1's IP] -j REJECT

Upgrading from Previous Versions
5-23
iptables -I INPUT -s [parent's IP] -p tcp --sport 5432 -j ACCEPT
iptables -I INPUT -s [parent's IP] -p tcp --dport 5432 -j ACCEPT
iptables -I OUTPUT -d [C1's IP] -j REJECT
iptables -I OUTPUT -d [parent's IP] -p tcp --sport 5432-j ACCEPT
b. Apply the added rules.
# /etc/init.d/rcFirewall restart
3. Change the iptables on the parent device.
a. On the parent device, add the following rule:
iptables -I INPUT -s [C2's IP] -p tcp --sport 5432 -jACCEPT
b. Apply the added rules.
# /etc/init.d/rcFirewall restart
Step 2: Performing Inline Upgrade
Note
In this procedure, C1 refers to the first batch of child devices to be upgraded, and C2 refersto the second batch of child devices.
Procedure
1. Verify that there are no messages in the Postfix queue on both parent and C1devices.
a. On the CLI console, check the Postfix queue.
# postqueue –p

Trend Micro InterScan Messaging Security Virtual Appliance Installation Guide
5-24
The upgrade will continue only if the Postfix queue is empty. Otherwise, youmay lose messages in the Postfix queue.
2. Stop all IMSVA services except the database services on C1 devices using thefollowing commands:
# /opt/trend/imss/script/imssctl.sh stop
# /opt/trend/imss/script/dbctl.sh start
3. Perform inline upgrade to IMSVA 9.1.
Note
For detailed upgrade procedure, see Upgrading a Single IMSVA on page 5-6.
4. Perform a test deployment of IMSVA 9.1.
a. After successfully upgrading the C1 devices, modify the iptables on the parentdevice to establish a connection with a remote server. You can update theparent device's database data from this remote server.
# iptables -I INPUT -s [Remote server's IP] -p tcp --sport 5432 -j ACCEPT
# iptables -I INPUT -s [Remote server's IP] -p tcp --dport 5432 -j ACCEPT
b. Log on to the parent device SQL database and update the table.
# select * from tb_component_list;
# update tb_component_list set app_ver='9.1.0.xxxx'where ip_addr='[C2's IP]';
Note
This step enables IMSVA to bypass the check performed before the dry run.
Record the original IMSVA version (app_ver) of the C2 devices for referencein Step 3: Performing Inline Upgrade for Other Child Devices on page 5-25(substep 4-b). Then, replace 9.1.0.xxxx with the number of the IMSVA 9.1build that you intend to install.

Upgrading from Previous Versions
5-25
c. On the CLI console, restart all IMSVA services.
# /mnt/backup/dry_run.sh
Note
Restart the parent device first, and then all child devices.
5. Check the build number.
a. Go to Administration > Updates > System & Applications.
b. Under Current Status, check if the application version is 9.1.0.xxxx.
6. Complete the inline upgrade.
a. To complete the upgrade on all parent and C1 devices, run the followingcommand (first on the parent, and then on the C1 devices):
# /mnt/backup/confirm.sh
“yes”
b. To roll back to IMSVA 9.0, first roll back all child devices, then the parentdevices.
# /mnt/backup/confirm.sh
“no”
c. Modify the DNS record to start sending messages to the upgraded parent andC1 devices, and to stop sending messages to the C2 devices.
Step 3: Performing Inline Upgrade for Other Child Devices
Note
Upgrade child devices individually or in batches.
In this procedure, C1 refers to the first batch of child devices to be upgraded, and C2 refersto the second batch of child devices.

Trend Micro InterScan Messaging Security Virtual Appliance Installation Guide
5-26
Procedure
1. Select child devices.
2. Modify the DNS record to stop sending messages to the selected devices.
3. Verify that there are no messages in the Postfix queue.
a. On the CLI console, check the Postfix queue.
# postqueue -p
4. Modify the settings for the C2 devices.
a. To bypass the inline upgrade check, change the iptables on the C2 devices.
# iptables -I OUTPUT -d [parent's IP] -p tcp --dport5432 -j ACCEPT
b. Change the IMSVA version for the C2 devices on the parent database.
# /opt/trend/imss/PostgreSQL/bin/psql imss sa
# select * from tb_component_list;
# update tb_component_list set app_ver='9.0.0.1549'where ip_addr='[C2's IP]';
Note
The IMSVA version (app_ver) should reflect the version that you recorded inStep 2: Performing Inline Upgrade on page 5-23 (substep 4-b).
5. Perform inline upgrade to IMSVA 9.1.
Note
For detailed upgrade procedure, see Upgrading a Single IMSVA on page 5-6.
6. Perform a test deployment of IMSVA 9.1.
a. On the CLI console, restart all IMSVA services:
# /mnt/backup/dry_run.sh

Upgrading from Previous Versions
5-27
7. Check the build number.
a. Go to Administration > Updates > System & Applications.
b. Under Current Status, check if the application version is 9.1.0.xxxx.
8. Complete the inline upgrade.
a. To complete the upgrade on all devices, run the following command:
# /mnt/backup/confirm.sh
“yes”
b. To roll back to IMSVA 9.0, run the following command:
# /mnt/backup/confirm.sh
“no”
9. Restore the C2 devices.
a. Modify the DNS record and start sending messages to the C2 devices.
b. Continue upgrading the other child devices until the batch upgrade process iscompleted .
Offline UpgradeDuring offline upgrade, a temporary IMSVA device is used to process email traffic.IMSVA logs all information and does not experience any downtime during the upgradeprocess.

Trend Micro InterScan Messaging Security Virtual Appliance Installation Guide
5-28
Tip
Trend Micro recommends performing offline upgrade when mail traffic is at a minimum.Evaluate if the temporary IMSVA device can accommodate the total mail traffic during theupgrade process.
When using offline upgrade:
1. Back up your files before deploying IMSVA to virtual machines.
2. Use an NTP server to ensure that the production IMSVA devices and the temporaryIMSVA device use the same system time.
The following is an overview of the offline upgrade process:
1. Install IMSVA 9.1 on a temporary device.
2. Import the configuration settings from the production IMSVA devices.
3. Modify the DNS MX record to redirect mail traffic to the temporary device.
4. Disconnect the production devices from the network.
5. Upgrade the devices.
6. Redirect mail traffic back to the production devices.
7. Copy the logs and queue folders from the temporary device to one of theproduction child devices.

Upgrading from Previous Versions
5-29
Note
Data gaps may occur after restoring the data to the child devices. If Virtual Analyzernotifications are enabled, you may receive Virtual Analyzer service messages after data isrestored.
Step 1: Installing IMSVA 9.1 on a Temporary Device
Procedure
1. Install IMSVA 9.1 on a temporary device using an ISO file.
2. Back up the default settings of the temporary IMSVA 9.1 device.
a. Log on to the parent device management console.
b. Go to Administration > Import/Export.
c. Click Export and save the exported files.
3. Export the settings of the existing parent and child devices.
a. Log on to the parent device management console.
b. Go to Administration > Import/Export.
c. Click Export and save the exported files.
4. Import the parent device settings to the temporary device.
a. Log on to the temporary device management console.
b. Go to Administration > Import/Export.
c. Click Import.
Note
If problems occur during the import process, restore the IMSVA 9.1 default settings usingthe backup file created in Step 2.

Trend Micro InterScan Messaging Security Virtual Appliance Installation Guide
5-30
Step 2: Redirecting Mail Traffic to the Temporary IMSVADevice
Trend Micro recommends upgrading the production server when email traffic isminimal.
Procedure
1. Modify the DNS MX record to redirect the mail traffic to the temporary IMSVAdevice.
2. Stop sending messages to the parent and child devices.
Step 3: Performing Offline Upgrade
Procedure
1. Upgrade the parent and child devices while offline. For more information, seeUpgrading a Distributed Environment on page 5-17.
2. Modify the DNS MX record to redirect mail traffic to the parent and child devices,with the exception of one child device.
3. Configure any customized settings that were lost in the upgrade process.
4. Stop sending messages to the temporary IMSVA device.
Step 4: Copying IMSVA 9.1 Logs and Queue Folder to aChild Device
Procedure
1. Stop the monitor, manager, and message tracing services on the child device(referred to as Machine B hereafter).
[root@machine B ~]# S99MONITOR stop

Upgrading from Previous Versions
5-31
[root@machine B ~]# S99MANAGER stop
[root@machine B ~]# S99CMAGENT stop
[root@machine B ~]# S99MSGTRACING stop
2. If you enabled Virtual Analyzer on the temporary device, verify that there are nomessages in the Virtual Analyzer upload folder.
[root@machine C ~]# ls –l /var/app_data/imss/dtas_upload/
Note
Trend Micro recommends disabling Virtual Analyzer on the temporary IMSVAdevice to prevent receiving notifications after log import. Ignore the notifications ifyou intend to keep Virtual Analyzer enabled.
3. Copy and merge the queue folder from the temporary IMSVA device to the ChildB device.
[root@machine C ~]# scp -r /opt/trend/imss/queueroot@machine B:/opt/trend/imss/
[root@machine B ~]# chown –R imss:imss /opt/trend/imss/queue
4. Copy the temporary IMSVA device policy event logs and append at the end of thelatest Child B policy event logs.
For example:
[root@machine C ~]# scp /opt/trend/imss/log/polevt.imss.20130325.0001 root@machine B:/root/
[root@machine B ~]# cat /root/polevt.imss.20130325.0001 >>
/opt/trend/imss/log/polevt.imss.20130325.0001
5. Copy the temporary IMSVA device mail logs and append at the end of the Child Bmail logs.
[root@machine C ~]# scp /var/log/maillog root@machine B:/root/

Trend Micro InterScan Messaging Security Virtual Appliance Installation Guide
5-32
[root@machine B ~]# cat /root/maillog >> /var/log/maillog
6. Copy the temporary IMSVA device fox* log and append at the end of the latestChild B fox* log.
For example:
[root@machine C ~]# scp /opt/trend/imss/log/foxmsg.20130325.0001 root@machine B:/root/
[root@machine B ~]# cat /root/foxmsg.20130325.0001 >>
/opt/trend/imss/log/foxmsg.20130325.0001
7. On the Child B device, start the monitor, manager, and message tracking services.The appended log will be imported to the database shortly.
[root@machine B ~]# S99MANAGER start
[root@machine B ~]# S99MONITOR start
[root@machine B ~]# S99CMAGENT start
[root@machine B ~]# S99MSGTRACING start
8. After importing the appended log into the database, restore the Child B devicesettings by modifying the DNS MX record.
Rolling Back an UpgradeIMSVA rolls back automatically if there are problems during the upgrade process.However, if the automatic rollback encounters issues, you need to perform a manualrollback.
Procedure
1. If you created a ghost image or have a virtual machine image of your originalIMSVA, replace the upgraded image with the original image.
2. Stop the cron service using the following command:
service crond stop

Upgrading from Previous Versions
5-33
3. Check the cron settings backup file /var/spool/cron/root.bakForUpgrade. After finding the file, restore the cron settings using thefollowing command:
rm -rf /var/spool/cron/root && /bin/mv -f /var/spool/cron/root.bakForUpgrade /var/spool/cron/root
4. Check the log backup file /var/app_data/imss/log.bakForUpgrade. Afterfinding the backup file, restore the log file using the following command:
rm -rf /var/app_data/imss/log/ && /bin/mv -f /var/app_data/imss/log.bakForUpgrade /var/app_data/imss/log/
5. Stop the database service using the following command:
killall postgres
6. On the parent device, check the database backup file /var/app_data/imss/pgdata.bakForUpgrade. After finding the file, restore the database file usingthe following command:
rm -rf /var/app_data/imss/db/pgdata && /bin/mv -f /var/app_data/imss/pgdata.bakForUpgrade /var/app_data/imss/db/pgdata
7. If not mounted, mount the root partition of IMSVA 9.0 Patch 1 using thefollowing command:
mkdir -p /var/tmp/orig_root
mount -t ext3 /dev/mapper/IMSVA-Root1 /var/tmp/orig_root
8. Restore the /boot folder using the following command:
/bin/cp -af /var/tmp/orig_root/boot-imsva-9.0-back-
up-for-9.1/* /boot
9. Update the boot partition UUID.
a. Obtain the 9.1 boot partition UUID from /etc/fstab.
b. Replace 9.0 Patch 1 boot partition UUID in /var/tmp/orig_root/etc/fstab with 9.1 boot partition UUID.

Trend Micro InterScan Messaging Security Virtual Appliance Installation Guide
5-34
10. Restart your machine.
Migrating from Previous VersionsIMSVA 9.1 supports migration from previous versions of IMSS and IMSVA.
The following table lists the minimum versions that support migration to IMSVA 9.1:
TABLE 5-1. Supported Migration Platform and Versions
PLATFORM VERSION
IMSS for Solaris 7.0 Service Pack 1 Patch 4
IMSS for Linux 7.1 Service Pack 2
IMSS for Windows 7.1 Patch 3
IMSS for Windows 7.5
IMSVA 8.0 Patch 2
IMSVA 8.2 Service Pack 2 Patch 1
IMSVA 8.5 Service Pack 1 Patch 1
IMSVA 9.0 Patch 1
Migration ProcessThe migration process requires the following tasks:
• Step 1: Exporting the settings from previous versions of IMSS or IMSVA
• Step 2: Importing the settings to IMSVA 9.1
Exporting Settings from Previous Versions of IMSS orIMSVAThe following settings do not migrate:

Upgrading from Previous Versions
5-35
TABLE 5-2. Settings that Cannot Migrate
MTA SETTINGS SETTINGS NOT MIGRATED
MTA Settings IP address of SMTP Interface
Configuration Settings Database settings (example: Internal file path)
Management console password
Control Manager settings
Activation Codes
NoteAll earlier versions of IMSVA will migrate the Cloud Pre-Filter Activation Code to IMSVA 9.1
Important
When exporting configuration settings, ensure that the IMSS or IMSVA server is:
• Not performing database-related tasks.
• Not stopped or started.
Certificate usage for child devices cannot be exported.
Procedure
1. Go to Administration > Import/Export from the IMSS servers or IMSVA tomigrate from.
The Import/Export screen appears.
2. Click Export.
The configuration settings export to a package that IMSVA can import.

Trend Micro InterScan Messaging Security Virtual Appliance Installation Guide
5-36
Exporting Settings from IMSS 7.0 Service Pack 1 Patch 4 forSolaris
Procedure
1. Copy the migration tool package (export_tool_sol_70.tar.gz) on to theIMSS 7.0 for Solaris server.
2. Extract the export tool using the following command.
gzip –d export_tool_sol_70.tar.gztar xf export_tool_sol_70.tar
Note
The tool exports configuration settings to an encrypted package that can be used toduplicate these settings on other InterScan Messaging Security products.
3. Change the current working directory using the following command.
cd export70sol
4. Run the following command.
./export_tool_70.sh
The tool creates the exported settings package (imss_config_70.tar.gz) anda detailed log file (export_70.<xxxxxxxx>.log) in the current directory.
Importing Settings to IMSVA 9.1
Procedure
1. Perform a fresh installation of IMSVA 9.1.
Tip
Trend Micro recommends importing configuration packages to a fresh installation ofIMSVA 9.1, because the imported configuration settings overwrite all existingsettings.

Upgrading from Previous Versions
5-37
2. Retrieve the package that contains the configuration settings that you wish tomigrate.
3. Go to Administration > Import/Export on the IMSVA 9.1 management console.
The Import/Export screen appears.
4. Import the configuration package.
Note
By default, all child devices use the certificates of the parent device after migration. Ifyou do not want to use those certificates, assign other certificates to child devices.
Migrating from IMSS for WindowsTo migrate from IMSS for Windows to IMSVA 9.1, see Migration Process on page 5-34.
IMSS for Windows Settings that ChangeThe following settings of IMSS for Windows change during migration:
• During migration IMSVA 9.1 changes all customized actions to Default intelligentaction, unless the customized action is Connection rejected with in which case thesetting remains unchanged.
• Default Delivery with Smart Host set, changes to *
• If several Smart Hosts of a Domain were set, all Smart Hosts in the list migrate toIMSVA 9.1 with Static Routing as the delivery method
• The maximum date size/messages per connection settings are reduced.
• Free disk space on any scanner less than changes to Data partition on free space onany host less than in IMSVA 9.1.
IMSS for Windows 7.1 Patch 3 Settings that Do Not MigrateAll IMSS for Windows 7.1 Patch 3 settings migrate to IMSVA 9.1 except the following:

Trend Micro InterScan Messaging Security Virtual Appliance Installation Guide
5-38
• All Control Manager agent settings
• Administrator account user name and password
• Patterns and engines
• SMTP interface and port number
• Some internal settings that affect system performance
• Transport Layer Security settings
• Activation Code because IMSVA cannot use the Activation Code from IMSSWindows 7.1
• The following Administration > Connections > Components internal ports do notmigrate:
• IMSS manager port
• Policy service port
• The BATV rule and all related settings do not migrate.
IMSS for Windows 7.5 Settings that Do Not Migrate
All IMSS for Windows 7.5 settings migrate to IMSVA 9.1 except the following:
• All Control Manager agent settings
• Administrator account user name and password
• Patterns and engines
• SMTP interface and port number
• Some internal settings that affect system performance
• Virtual Analyzer settings
• Transport Layer Security settings
• Activation Code because IMSVA cannot use the Activation Code from IMSSWindows 7.5

Upgrading from Previous Versions
5-39
• The following Administration > Connections > Components internal ports do notmigrate:
• IMSS manager port
• Policy service port
• The BATV rule and all related settings do not migrate.
Migrating from IMSS for Linux
To migrate from IMSS for Linux to IMSVA 9.1, see Migration Process on page 5-34.
IMSS for Linux Settings that Change
The following settings of IMSS for Linux change during migration:
• The Administration > Notifications > Events notification:
Free disk space on any scanner less than changes to Data partition on free space onany host less than in IMSVA 9.1.
IMSS for Linux 7.1 SP2 Settings that Do Not Migrate
All IMSS for Linux 7.1 SP2 settings migrate to IMSVA 9.1 except the following:
• All Control Manager agent settings
• Administrator account user name and password
• Patterns and engines
• SMTP interface and port number
• Some internal settings that affect system performance
• Transport Layer Security (TLS) settings
• Activation Code because IMSVA cannot use the Activation Code from IMSSLinux 7.1

Trend Micro InterScan Messaging Security Virtual Appliance Installation Guide
5-40
• Email addresses in the marketing message exception list
Migrating from IMSS for SolarisTo migrate from IMSS for Solaris to IMSVA 9.1, see Migration Process on page 5-34.
IMSS for Solaris 7.0 SP1 Patch 4 Settings that Do NotMigrate
All IMSS for Solaris 7.0 SP1 Patch 4 settings migrate to IMSVA 9.1 except thefollowing:
• All Control Manager agent settings
• Administrator account user name and password
• Patterns and engines
• SMTP interface and port number
• Some internal settings that affect system performance
• TLS settings
• Activation Code because IMSVA cannot use the Activation Code from IMSSSolaris 7.0
Migrating from IMSVA 8.0 Patch 2, IMSVA 8.2 SP2 Patch 1,IMSVA 8.5 SP1 Patch 1 or IMSVA 9.0 Patch 1
To migrate from previous IMSVA versions to IMSVA 9.1, see Migration Process onpage 5-34.
IMSVA 8.0 Patch 2 Settings that Do Not Migrate
All IMSVA 8.0 Patch 2 settings migrate to IMSVA 9.1 except the following:
• All Control Manager agent settings

Upgrading from Previous Versions
5-41
• Administrator account user name and password
• Patterns and engines
• SMTP interface and port number
• Some internal settings that affect system performance
• TLS settings
IMSVA 8.2 SP2 Patch 1 Settings that Do Not Migrate
All IMSVA 8.2 SP2 Patch 1 settings migrate to IMSVA 9.1 except the following:
• All Control Manager agent settings
• Administrator account user name and password
• Patterns and engines
• SMTP interface and port number
• Some internal settings that affect system performance
• Encryption settings
• Virtual Analyzer settings
• TLS settings
IMSVA 8.5 SP1 Patch 1 Settings that Do Not Migrate
All IMSVA 8.5 SP1 Patch 1 settings migrate to IMSVA 9.1 except the following:
• All Control Manager agent settings
• Administrator account user name and password
• Patterns and engines
• SMTP interface and port number
• Some internal settings that affect system performance

Trend Micro InterScan Messaging Security Virtual Appliance Installation Guide
5-42
• Encryption settings
• Virtual Analyzer settings
• TLS settings
IMSVA 9.0 Patch 1 Settings that Do Not Migrate
All IMSVA 9.0 Patch 1 settings migrate to IMSVA 9.1 except the following:
• All Control Manager agent settings
• Administrator account user name and password
• Patterns and engines
• SMTP interface and port number
• Some internal settings that affect system performance
• Encryption settings
• Virtual Analyzer settings
Exporting Debugging FilesIf you need to analyze the debug files for troubleshooting purposes, you can exportdebug logs for up to the past two days for the parent device or any device that isregistered to the parent device.
Note
The debug logs are contained in a password protected zip file. The default password forthe file is trend.
Procedure
1. Go to Administration > Export Debugging Files.
2. Next to Scanner, select a device.

Upgrading from Previous Versions
5-43
3. Select the number of days to export.
4. Click Export.
The process might take 10 minutes to 1 hour or more depending on the total logfile size.


6-1
Chapter 6
TroubleshootingThis sections helps to resolves common issues that you might encounter when installing,or configuring and administering IMSVA. If you have additional problems, check theTrend Micro Knowledge Base.
Topics include:
• Troubleshooting Utilities on page 6-2
• Troubleshooting Communication Between Devices in a Group on page 6-3
• Troubleshooting Child Device Registration on page 6-4
• Troubleshooting Child Device Unregistration on page 6-5
• Troubleshooting the Hardware Identification Error on page 6-5

Trend Micro InterScan Messaging Security Virtual Appliance Installation Guide
6-2
Troubleshooting UtilitiesUse the following troubleshooting-related utilities and commands with caution. TrendMicro recommends contacting your support provider before modifying any internalIMSVA files.
• Admin database
Open /opt/trend/imss/config/odbc.ini and check the value of the keydatabase
• EUQ database
Open /opt/trend/imss/config/euqodbc.ini and check the value of thekey database.
Note
If you use the internal database, the default password of the database is postgreSQL.
• Firewall setting check:
iptables -nvxL
• PostgreSQL command line tool:
/opt/trend/imss/PostgreSQL/bin/psql -U sa -d imss
Note
imss refers to the admin database name that you obtain from /opt/trend/imss/config/odbc.ini.
• cdt (password: "trend")—Collect the following information:
• Configuration information
• Logs
• Core dumps
• Other utilities:

Troubleshooting
6-3
• pstack: shows the callstack of the process, including all threads
• ipcs: lists all IPCs in the current system
• gdb: the debugger
• tcpdump: sniffs network packages
• netstat: lists current network connection
Troubleshooting Communication BetweenDevices in a Group
If several IMSVA devices are deployed in a group, they must communicate with eachother.
Procedure
1. Verify that the following ports are accessible on all devices:
• 5060: Policy service
• 15505: IMSVA control service
• 53 UDP/TCP: IP Profiler
• 5432: Database service
• 8009: EUQ internal service
• 389: LDAP local cache service
• 998/999: TLS setting service
• 10030: Message Delivery setting service
• 10040: SMTP Traffic Throttling service
• 8891: DKIM setting service
2. Verify the following:

Trend Micro InterScan Messaging Security Virtual Appliance Installation Guide
6-4
• The current firewall settings in “iptables”.
• The firewall configuration files in /etc/conf/fw.rules.
• The table “tb_trusted_ip_list” in the database has the IP addresses of thecorrect devices. The IP address of any other devices trying to access thisdevice must be in this list.
3. Verify that all the necessary ports are accessible for the relevant services.
Troubleshooting Child Device Registration
Procedure
1. Open the parent device’s management console and navigate to Administration >IMSVA Configuration > Connections > Child IP.
2. Verify that the IP address of the child is on the Child IP Address List.
3. In the Configuration Wizard, verify that Child is selected for the device role.
4. Verify that the Admin Database is accessible.
5. Unregister the MCP agent (if MCP agent is enabled).
6. Verify that no other child device registered to the parent has the same IP address asthe device you are trying to register.
7. Remove all the logs and quarantined messages.
8. Change the configuration and restart the services.
9. The parent device management console (in the Configuration Wizard) makes theinitial request.

Troubleshooting
6-5
Troubleshooting Child Device Unregistration
Procedure
1. Connect to the child device through the command line interface.
2. Check whether the Admin Database is accessible. If yes, remove the child devicefrom the Child IP list on the parent management console and update the trustedchild list.
3. Rescue the device, which will forcibly unregister it from the parent.
4. Update the patches.
5. To verify that a child is unregistered from its parent, to either of the following:
• Try to access the management console on the child device. If the console isaccessible, the device is successfully unregistered.
• Run the following command:
/opt/trend/imss/script/cfgtool.sh dereg
Troubleshooting the Hardware IdentificationError
If IMSVA cannot identify your hardware such as storage or network device, load driverdisks before you try to install IMSVA again.
Contact the hardware vender to obtain a hardware driver applicable to CentOS 6.4(x86_64). Then load a driver disk by referring to the driver's installation guide.
The following is an example of loading a driver disk.
Procedure
1. Prepare your removable disk, for example, a USB diskette. Make sure the filesystem of your removable disk is available.

Trend Micro InterScan Messaging Security Virtual Appliance Installation Guide
6-6
2. Copy the driver image to the USB diskette.
cp dd.iso /mnt/usb
3. Insert the IMSVA Installation DVD into the DVD drive and start IMSVAinstallation.
The setup wizard screen appears.
4. Select Fresh install or version upgrade and press Tab to enter the edit mode.
5. Append dd to the information that appears at the bottom of the setup wizardscreen.
6. Press Enter.

Troubleshooting
6-7
The Driver disk screen appears.
7. Insert your USB diskette and select Yes.
The Driver Disk Source screen appears.

Trend Micro InterScan Messaging Security Virtual Appliance Installation Guide
6-8
8. Select your USB diskette, for example, sdb, and select OK.
The Select driver disk image screen appears.
9. Select the driver disk image.
The More Driver Disks screen appears.

Troubleshooting
6-9
10. Unplug your USB diskette and click No to continue IMSVA installation.
Troubleshooting Network ConnectivityIf a network connectivity problem occurs on your virtual machine, check whether theMAC address assigned to your NIC card changes.
Sometimes the MAC address automatically assigned to a virtual machine changesdynamically. However, the MAC address recorded either in the interface configurationfiles or in the udev persistent network rule files does not change. As a result, the NICcard might be unavailable.
Trend Micro recommends that you use a static MAC address. If your MAC addresschanges, do the following to make sure your NIC card works properly:
Procedure
1. Remove the udev rule file using the following command:
rm -rf /etc/udev/70-persistent-net.rules
2. Remove the following lines from the /etc/sysconfig/network-scripts/ifcfg-eth<X> file:
HWADDR=<MAC>
UUID=<UUID>
Note
The interface configuration files are named /etc/sysconfig/network-scripts/ifcfg-eth<X>, where <X> is a unique number corresponding to aspecific card.
3. Fine the following information in the /lib/udev/rules.d/75-persistent-net-generator.rules file:
ATTR{addr_assign_type}=="0",GOTO="globally_administered_whitelist"

Trend Micro InterScan Messaging Security Virtual Appliance Installation Guide
6-10
4. Add the following lines before the information you found:
# ignore VMWare virtual interfaces
ENV{MATCHADDR}=="00:0c:29:*|00:50:56:*",GOTO="persistent_net_generator_end"
# ignore Hyper-V virtual interfaces
ENV{MATCHADDR}=="00:15:5d:*",GOTO="persistent_net_generator_end"
5. Restart your virtual machine to verify your network connectivity.

A-1
Appendix A
Technical SupportThis appendix explains various Trend Micro resources and technical supportinformation.
Topics include:
• Troubleshooting Resources on page A-2
• Contacting Trend Micro on page A-3
• Sending Suspicious Content to Trend Micro on page A-5
• Other Resources on page A-6

Trend Micro InterScan Messaging Security Virtual Appliance Installation Guide
A-2
Troubleshooting ResourcesBefore contacting technical support, consider visiting the following Trend Micro onlineresources.
Trend Community
To get help, share experiences, ask questions, and discuss security concerns with otherusers, enthusiasts, and security experts, go to:
http://community.trendmicro.com/
Using the Support Portal
The Trend Micro Support Portal is a 24x7 online resource that contains the most up-to-date information about both common and unusual problems.
Procedure
1. Go to http://esupport.trendmicro.com.
2. Select a product or service from the appropriate drop-down list and specify anyother related information.
The Technical Support product page appears.
3. Use the Search Support box to search for available solutions.
4. If no solution is found, click Submit a Support Case from the left navigation andadd any relevant details, or submit a support case here:
http://esupport.trendmicro.com/srf/SRFMain.aspx
A Trend Micro support engineer investigates the case and responds in 24 hours orless.

Technical Support
A-3
Security Intelligence Community
Trend Micro cyber security experts are an elite security intelligence team specializing inthreat detection and analysis, cloud and virtualization security, and data encryption.
Go to http://www.trendmicro.com/us/security-intelligence/index.html to learn about:
• Trend Micro blogs, Twitter, Facebook, YouTube, and other social media
• Threat reports, research papers, and spotlight articles
• Solutions, podcasts, and newsletters from global security insiders
• Free tools, apps, and widgets.
Threat Encyclopedia
Most malware today consists of "blended threats" - two or more technologies combinedto bypass computer security protocols. Trend Micro combats this complex malware withproducts that create a custom defense strategy. The Threat Encyclopedia provides acomprehensive list of names and symptoms for various blended threats, includingknown malware, spam, malicious URLs, and known vulnerabilities.
Go to http://www.trendmicro.com/vinfo to learn more about:
• Malware and malicious mobile code currently active or "in the wild"
• Correlated threat information pages to form a complete web attack story
• Internet threat advisories about targeted attacks and security threats
• Web attack and online trend information
• Weekly malware reports.
Contacting Trend MicroIn the United States, Trend Micro representatives are available by phone, fax, or email:

Trend Micro InterScan Messaging Security Virtual Appliance Installation Guide
A-4
Address Trend Micro, Inc. 10101 North De Anza Blvd., Cupertino, CA 95014
Phone Toll free: +1 (800) 228-5651 (sales)
Voice: +1 (408) 257-1500 (main)
Fax +1 (408) 257-2003
Website http://www.trendmicro.com
Email address [email protected]
• Worldwide support offices:
http://www.trendmicro.com/us/about-us/contact/index.html
• Trend Micro product documentation:
http://docs.trendmicro.com
Speeding Up the Support Call
To improve problem resolution, have the following information available:
• Steps to reproduce the problem
• Appliance or network information
• Computer brand, model, and any additional hardware connected to the endpoint
• Amount of memory and free hard disk space
• Operating system and service pack version
• Endpoint client version
• Serial number or activation code
• Detailed description of install environment
• Exact text of any error message received.

Technical Support
A-5
Sending Suspicious Content to Trend MicroSeveral options are available for sending suspicious content to Trend Micro for furtheranalysis.
File Reputation Services
Gather system information and submit suspicious file content to Trend Micro:
http://esupport.trendmicro.com/solution/en-us/1059565.aspx
Record the case number for tracking purposes.
Email Reputation Services
Query the reputation of a specific IP address and nominate a message transfer agent forinclusion in the global approved list:
https://ers.trendmicro.com/
Refer to the following Knowledge Base entry to send message samples to Trend Micro:
http://esupport.trendmicro.com/solution/en-us/1036097.aspx
Web Reputation Services
Query the safety rating and content type of a URL suspected of being a phishing site, orother so-called "disease vector" (the intentional source of Internet threats such asspyware and malware):
http://global.sitesafety.trendmicro.com/
If the assigned rating is incorrect, send a re-classification request to Trend Micro.

Trend Micro InterScan Messaging Security Virtual Appliance Installation Guide
A-6
Other ResourcesIn addition to solutions and support, there are many other helpful resources availableonline to stay up to date, learn about innovations, and be aware of the latest securitytrends.
TrendEdgeFind information about unsupported, innovative techniques, tools, and best practicesfor Trend Micro products and services. The TrendEdge database contains numerousdocuments covering a wide range of topics for Trend Micro partners, employees, andother interested parties.
See the latest information added to TrendEdge at:
http://trendedge.trendmicro.com/
Download CenterFrom time to time, Trend Micro may release a patch for a reported known issue or anupgrade that applies to a specific product or service. To find out whether any patchesare available, go to:
http://www.trendmicro.com/download/
If a patch has not been applied (patches are dated), open the Readme file to determinewhether it is relevant to your environment. The Readme file also contains installationinstructions.
TrendLabsTrendLabs℠ is a global network of research, development, and action centers committedto 24x7 threat surveillance, attack prevention, and timely and seamless solutions delivery.Serving as the backbone of the Trend Micro service infrastructure, TrendLabs is staffedby a team of several hundred engineers and certified support personnel that provide awide range of product and technical support services.

Technical Support
A-7
TrendLabs monitors the worldwide threat landscape to deliver effective securitymeasures designed to detect, preempt, and eliminate attacks. The daily culmination ofthese efforts is shared with customers through frequent virus pattern file updates andscan engine refinements.
Learn more about TrendLabs at:
http://cloudsecurity.trendmicro.com/us/technology-innovation/experts/index.html#trendlabs


B-1
Appendix B
Creating a New Virtual MachineUnder VMware ESX for IMSVA
This appendix describes how to create a new virtual machine for IMSVA.
Topic includes:
• Creating a New Virtual Machine on page B-2

Trend Micro InterScan Messaging Security Virtual Appliance Installation Guide
B-2
Creating a New Virtual MachineThe actual installation of ESX is not covered in this document. Please refer to VMware'sproduct documentation to install this product.
The steps outlined below detail the process to create a new virtual machine underVMware ESX to install IMSVA. Please use the following steps as a guideline for creatingthe virtual machine for your environment. The number of CPUs, NIC cards, memoryand hard disk space selected should reflect the requirements for your deployment. Thevalues entered here are for instructional purposes.
Procedure
1. From the menu bar, select File > New > Virtual Machine.

Creating a New Virtual Machine Under VMware ESX for IMSVA
B-3
The New Virtual Machine Wizard appears.
FIGURE B-1. Virtual Machine Configuration
2. Under Virtual Machine Configuration, leave the Typical radio button selected.
3. Click Next.

Trend Micro InterScan Messaging Security Virtual Appliance Installation Guide
B-4
The Name and Location screen appears.
FIGURE B-2. Specify a Name and Location for this Virtual Machine
4. In the Name field, type an appropriate machine name and then click Next.

Creating a New Virtual Machine Under VMware ESX for IMSVA
B-5
The Datastore screen appears.
FIGURE B-3. Virtual Machine Datastore
5. Select the datastore where the virtual machine will reside.
6. Click Next.

Trend Micro InterScan Messaging Security Virtual Appliance Installation Guide
B-6
The Guest Operating System screen appears.
FIGURE B-4. Virtual Machine Guest Operating System
7. For the guest operating system, select Linux and then Other Linux (64-bit) orCentOS 4/5/6/7 (64-bit).
8. Click Next.

Creating a New Virtual Machine Under VMware ESX for IMSVA
B-7
The Network screen appears.
FIGURE B-5. Virtual Machine Network
9. Accept the default network settings.
10. Click Next.

Trend Micro InterScan Messaging Security Virtual Appliance Installation Guide
B-8
The Create a Disk screen appears.
FIGURE B-6. Virtual Disk Capacity
11. Specify at least 120GB of disk space. IMSVA requires at least 120GB disk space.See for more information on disk space allocation.
Tip
Trend Micro recommends 250GB or more of disk space for message quarantine andlogging purposes.
12. Click Next.
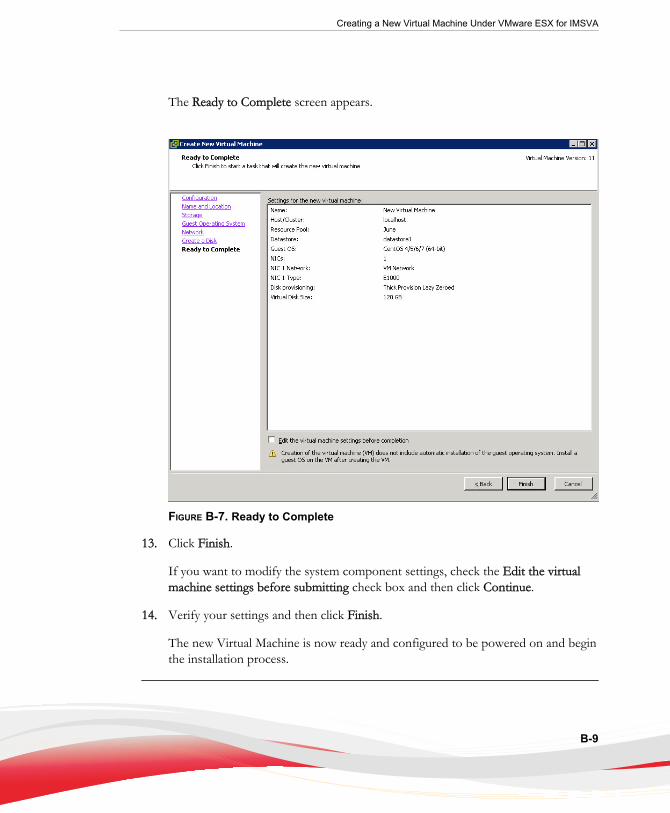
Creating a New Virtual Machine Under VMware ESX for IMSVA
B-9
The Ready to Complete screen appears.
FIGURE B-7. Ready to Complete
13. Click Finish.
If you want to modify the system component settings, check the Edit the virtualmachine settings before submitting check box and then click Continue.
14. Verify your settings and then click Finish.
The new Virtual Machine is now ready and configured to be powered on and beginthe installation process.

C-1
Appendix C
Creating a New Virtual MachineUnder Microsoft Hyper-V for IMSVA
This appendix describes how to create a new virtual machine for IMSVA underMicrosoft Hyper-V.
Topics include:
• Understanding Hyper-V Installation on page C-2
• Installing IMSVA on Microsoft Hyper-V on page C-2

Trend Micro InterScan Messaging Security Virtual Appliance Installation Guide
C-2
Understanding Hyper-V InstallationIMSVA supports installation on Microsoft Hyper-V based virtual platforms. Thisappendix provides step-by-step instructions to install IMSVA on Hyper-V based virtualmachines. The actual installation of Hyper-V is not covered in this document. Refer toMicrosoft product documentation to install Hyper-V. The procedure outlined in thisappendix describes how to install IMSVA on a Windows Server 2012 R2 Hyper-Vserver.
IMSVA Support for Hyper-VIMSVA supports Hyper-V on the following platforms:
• Windows Server 2008 R2 SP1
• Windows Server 2012
• Windows Server 2012 R2
• Microsoft Hyper-V Server 2008 R2 SP1
• Microsoft Hyper-V Server 2012 R2
Installing IMSVA on Microsoft Hyper-VUse the following steps as a guideline for creating a virtual machine for yourenvironment. The number of CPUs, NIC cards, memory, and hard disk space selectedshould reflect the requirements for your deployment. The values provided are forinstructional purposes.
Creating a Virtual Network Assignment
Procedure
1. From the Hyper-V Server Manager menu, right-click Hyper-V Manager.

Creating a New Virtual Machine Under Microsoft Hyper-V for IMSVA
C-3
A menu appears.
FIGURE C-1. Connect to Server
2. Select Connect to Server.
A dialog box appears prompting you to select the location of the virtualizationserver that you want to connect to.
FIGURE C-2. Location of Virtualization Server
3. Specify the location of the virtualization server and click OK.
4. Right-click the Windows Server 2012 R2 server and select Virtual Switch Manager.

Trend Micro InterScan Messaging Security Virtual Appliance Installation Guide
C-4
FIGURE C-3. Select Virtual Network Manager
5. Create a new virtual network by selecting External from the list of options andclicking Add.

Creating a New Virtual Machine Under Microsoft Hyper-V for IMSVA
C-5
FIGURE C-4. Adding the “External” Virtual Network
6. From the External drop-down menu, select the physical network adapter you wantto connect to.

Trend Micro InterScan Messaging Security Virtual Appliance Installation Guide
C-6
Note
The physical adapter must be connected to the network and have access to thecorporate network and the Internet.
When you have Hyper-V running on Microsoft Windows Server 2012 or WindowsServer 2012 R2 together with Broadcom NetXtreme 1-gigabit network adapters (butnot NetXtreme II network adapters), you may notice one or more of the followingsymptoms:
• Virtual machines may randomly lose network connectivity. The network adapterseems to be working in the virtual machine. However, you cannot ping or accessnetwork resources from the virtual machine. Restarting the virtual machine doesnot resolve the issue.
• You cannot ping or connect to a virtual machine from a remote computer.
This is a known issue. For details, see https://support.microsoft.com/en-us/kb/2986895.

Creating a New Virtual Machine Under Microsoft Hyper-V for IMSVA
C-7
FIGURE C-5. Physical Network Adapter Selection
Creating a New Virtual Machine
Procedure
1. From the Hyper-V Server Manager menu, right-click the Windows Server 2012 R2server, and select New > Virtual Machine.

Trend Micro InterScan Messaging Security Virtual Appliance Installation Guide
C-8
The New Virtual Machine Wizard appears.
FIGURE C-6. New Virtual Machine Wizard
2. Click Next.

Creating a New Virtual Machine Under Microsoft Hyper-V for IMSVA
C-9
The Specify Name and Location screen appears.
FIGURE C-7. Specify Name and Location
3. In the Name field, type a meaningful machine name. If you plan to store the virtualmachine to another folder, select Store the virtual machine in a different locationand provide the correct location.
4. Click Next.

Trend Micro InterScan Messaging Security Virtual Appliance Installation Guide
C-10
The Specify Generation screen appears.
FIGURE C-8. Specify Generation
5. Select Generation 1 and click Next.

Creating a New Virtual Machine Under Microsoft Hyper-V for IMSVA
C-11
The Assign Memory screen appears.
FIGURE C-9. Assign Memory
6. Allocate at least 4096MB of memory for IMSVA.
Tip
Trend Micro recommends allocating 8192MB of RAM.
The maximum number of virtual processors allowed on Windows 2008 R2 Hyper-Vis 4. To add more than four core CPUs and more than 4096MB memory, setnuma=off on Hyper-V and IMSVA.
7. Click Next.

Trend Micro InterScan Messaging Security Virtual Appliance Installation Guide
C-12
The Configure Networking screen appears.
FIGURE C-10. Configure Networking
8. Select the virtual network created in Creating a Virtual Network Assignment onpage C-2.
9. Click Next.

Creating a New Virtual Machine Under Microsoft Hyper-V for IMSVA
C-13
The Connect Virtual Hard Disk screen appears.
FIGURE C-11. Connect the Virtual Hard Disk
10. Specify at least 120GB disk space for IMSVA.
Tip
Trend Micro recommends 250GB or more of disk space for message quarantine andlogging purposes.
11. Specify a location to store the virtual hard disk, and click Next.

Trend Micro InterScan Messaging Security Virtual Appliance Installation Guide
C-14
The Installation Options screen appears.
FIGURE C-12. Installation Options
12. Click Install an operating system from a boot CD/DVD-ROM, specify theinstallation ISO file for IMSVA, and then click Next.

Creating a New Virtual Machine Under Microsoft Hyper-V for IMSVA
C-15
The Completing the New Virtual Machine Wizard screen appears.
FIGURE C-13. Completing the New Virtual Machine Wizard
13. Verify your settings and click Finish.
The virtual machine is now ready to be powered on to begin the installationprocess.


IN-1
IndexAabout IMSVA, 1-2adware, 1-14audience, x
CCentralized Reporting, 2-6Command & Control (C&C) Contact AlertServices, 1-22community, A-2Control Manager
see Trend Micro Control Manager, 1-18CPU requirements, 4-2
Ddialers, 1-14disk space requirements, 4-2documentation, xi
EEmail reputation
about, 1-16types, 1-16
email threatsspam, 1-6unproductive messages, 1-6
End-User Quarantine, 2-5
Ffiltering, how it works, 1-8
Ggraymail, 1-21
Hhacking tools, 1-14
IIMSVA
about, 1-2installing
before a firewall, 3-10behind a firewall, 3-11in the DMZ, 3-12no firewall, 3-9
IP Profilerabout, 2-3detects, 2-3how it works, 2-4
Jjoke program, 1-14
Mmass mailing viruses
pattern, 1-7memory requirements, 4-2migrate
from IMSS for Linux, 5-39from IMSS for Solaris, 5-40from IMSS for Windows, 5-37from IMSVA, 5-40
minimum requirements, 4-2
Nnew features, viii
Oonline
community, A-2online help, xi

Trend Micro InterScan Messaging Security Virtual Appliance Installation Guide
IN-2
Ppassword cracking applications, 1-14POP3
deployment planning, 3-15Pre-Filter Service, 2-2
Rreadme file, xiremote access tools, 1-14requirements, 4-2
Ssecurity risks
spyware/grayware, 1-13Sender Filtering
about, 2-3spyware/grayware, 1-13
adware, 1-14dialers, 1-14entering the network, 1-14hacking tools, 1-14joke program, 1-14password cracking applications, 1-14remote access tools, 1-14risks and threats, 1-14
supportknowledge base, A-2resolve issues faster, A-4TrendLabs, A-6
system requirements, 4-2
TTrendLabs, A-6Trend Micro Control Manager, 1-18
agent, 1-18server, 1-18
troubleshooting, 6-1
Wwhat's new, viii

Related Documents


