Django Training for Python Developers with examples and hands-on exercises WEBUCATOR

Welcome message from author
This document is posted to help you gain knowledge. Please leave a comment to let me know what you think about it! Share it to your friends and learn new things together.
Transcript
Django Training forPython Developers
with examples andhands-on exercises
WEBUCATOR
Copyright © 2021 by Webucator. All rights reserved.
No part of this manual may be reproduced or used in any manner without written permissionof the copyright owner.
Version: 1.0.3
Class Files
Download the class files used in this manual athttps://static.webucator.com/media/public/materials/classfiles/DJG501-1.0.3.zip.
Errata
Corrections to errors in the manual can be found athttps://www.webucator.com/books/errata/.
Table of Contents
LESSON 1. Getting Started with Django..........................................................................1Welcome to the Server-side.....................................................................................................1Google Chrome DevTools: Network Tab...................................................................................3Creating the Virtual Environment.............................................................................................6
Exercise 1: Creating a Virtual Environment and Installing Django...................................7Exploring the Django Source Code.........................................................................................10Creating a New Project...........................................................................................................10
Exercise 2: Hello, Django!............................................................................................12Settings...................................................................................................................................15Django Apps...........................................................................................................................17Creating a New App................................................................................................................19
Exercise 3: First Django App........................................................................................20Exercise 4: Templates..................................................................................................25Exercise 5: Creating an About Us Page.........................................................................33
LESSON 2. Git, GitHub, and an App with a Model.........................................................37djangojokes.com.....................................................................................................................37Version Control Systems, Git, and GitHub..............................................................................40
Exercise 6: Setting Up VS Code, Git, and GitHub..........................................................41Exercise 7: Creating the Project...................................................................................52Exercise 8: Creating a pages App.................................................................................56Exercise 9: Creating the jokes App...............................................................................62
Models....................................................................................................................................64Exercise 10: Migrating.................................................................................................66Exercise 11: Creating a Model......................................................................................68
Types of Views........................................................................................................................73Exercise 12: Creating a ListView...................................................................................74Exercise 13: Creating a DetailView...............................................................................79
GET and POST Requests..........................................................................................................85Exercise 14: Creating and Updating Jokes....................................................................87
Deleting Objects.....................................................................................................................94Exercise 15: Deleting Jokes..........................................................................................95
Table of Contents | i
LESSON 3. Template Filters and Tags..........................................................................101
Exercise 16: Setting Up the Project............................................................................102get_context_data()...............................................................................................................109
Exercise 17: Adding Template Context.......................................................................110Template Filter Basics...........................................................................................................112
Exercise 18: Adding Filters.........................................................................................116Most Useful Template Filters................................................................................................116Template Filter Quick Reference...........................................................................................129Template Tag Basics..............................................................................................................134Most Useful Template Tags...................................................................................................135Template Tag Quick Reference.............................................................................................143Custom Filters.......................................................................................................................148
Exercise 19: Creating Custom Filters..........................................................................149Custom Tags..........................................................................................................................155
Exercise 20: Creating Custom Tags.............................................................................156LESSON 4. Static Files.................................................................................................161
Static File Basics....................................................................................................................161Exercise 21: Adding Static Files to Django Jokes.........................................................164
Review of the Settings..........................................................................................................167LESSON 5. Django Admin and the User Model...........................................................171
The Database........................................................................................................................171Exercise 22: Setting Up PostgreSQL............................................................................172
The Default User Model.......................................................................................................177Exercise 23: Creating a Custom User Model...............................................................181
Referencing the User Model.................................................................................................185Exercise 24: Getting Started with Django Admin........................................................186Exercise 25: Adding the jokes Table to Django Admin................................................196Exercise 26: Installing the Django Admin Documentation Generator..........................198
LESSON 6. URLs and Slugs........................................................................................201Slugs.....................................................................................................................................201
Exercise 27: Creating a Slug-generating Function.......................................................203Exercise 28: Changing Jokes to Use Slugs...................................................................206
LESSON 7. Sending Email with SendGrid....................................................................215Transactional Email Services.................................................................................................215
Exercise 29: Getting a SendGrid Account...................................................................217Exercise 30: Creating an Email Utility Function..........................................................222
ii | Table of Contents
LESSON 8. Forms and Widgets...................................................................................225Form Processing...................................................................................................................225Understanding Form Fields..................................................................................................226
Exercise 31: Creating a Job Application Form.............................................................233Core Field Arguments...........................................................................................................241
Exercise 32: Building out the Application...................................................................243Typed Choice Fields..............................................................................................................247Changing Widgets.................................................................................................................247
Exercise 33: Improving the Job Application Form.......................................................252Validators..............................................................................................................................255
Exercise 34: Crispy Forms..........................................................................................259Exercise 35: Making the Joke Form Crispy..................................................................265
LESSON 9. ModelForms..............................................................................................267Models..................................................................................................................................267Model Fields.........................................................................................................................268Model Field Arguments........................................................................................................270ModelForms.........................................................................................................................270
Exercise 36: Creating a ModelForm............................................................................273Many-to-One Relationships..................................................................................................277
Exercise 37: Adding Joke Categories..........................................................................278Many-to-Many Relationships...............................................................................................283
Exercise 38: Adding Joke Tags....................................................................................285Exercise 39: Updating the Joke Templates..................................................................290Exercise 40: Tying Job Applications to Models...........................................................295
LESSON 10. User Registration.....................................................................................307The User-Registration Process..............................................................................................307
Exercise 41: Getting Started with django-allauth.......................................................309django-allauth Templates.....................................................................................................318
Exercise 42: Making the Authentication Pages Crispy................................................320Exercise 43: Updating the _base.html Template.........................................................330
Email Templates....................................................................................................................333Exercise 44: Custom User Registration.......................................................................336Exercise 45: Creating a My Account Page...................................................................338Exercise 46: Associating Users with Jokes..................................................................349
Mixins...................................................................................................................................352Exercise 47: Restricting Joke Creating and Updating..................................................353
Table of Contents | iii
LESSON 11. Messages Framework.............................................................................361Message Framework............................................................................................................361
Exercise 48: Adding Messages...................................................................................364Exercise 49: Using SuccessMessageMixin...................................................................369Exercise 50: Adding Success Messages to the Joke Views...........................................371Exercise 51: Adding a Success Message to JokeDeleteView........................................373
LESSON 12. Media Files..............................................................................................375Media File Basics..................................................................................................................375
Exercise 52: Adding Media Settings...........................................................................377Exercise 53: Uploading a Resume..............................................................................379Exercise 54: Checking File Type..................................................................................383Exercise 55: Keeping Resume Files Private.................................................................386Exercise 56: Adding an ImageField to the Model........................................................390Exercise 57: Displaying the Avatar.............................................................................393
Amazon Simple Storage Service (Amazon S3)......................................................................395Exercise 58: Setting Up Amazon S3............................................................................397Exercise 59: Static Settings in Development...............................................................413
LESSON 13. Making Queries, Ajax, and View Functions.............................................415Useful Prerequisites..............................................................................................................415Managers and QuerySets.....................................................................................................416Indexing and Slicing QuerySets............................................................................................418Checking for Existence..........................................................................................................419Creating, Updating, and Saving Model Instances.................................................................420QuerySet Methods that Don’t Return QuerySets.................................................................421One-to-Many Relationships..................................................................................................422Many-to-Many Relationships...............................................................................................425Spanning Relationships.........................................................................................................427Joke Voting...........................................................................................................................434
Exercise 60: Adding a JokeVote Model.......................................................................435Exercise 61: Registering the JokeVote Model.............................................................438Exercise 62: Adding Properties to the Joke Model......................................................439Exercise 63: Rating Jokes Using Ajax..........................................................................441Exercise 64: Adding a vote() View Function................................................................444Exercise 65: Updating the URLConf............................................................................450Exercise 66: Updating the Templates.........................................................................451
Model Constraints................................................................................................................457Letting JavaScript Know if the User is Logged In..................................................................460
iv | Table of Contents
LESSON 14. Pagination and Ordering..........................................................................463Fixtures.................................................................................................................................464
Exercise 67: Loading Data from a Fixture...................................................................466Exercise 68: Pagination..............................................................................................470Exercise 69: Ordering.................................................................................................473
LESSON 15. Advanced Querying and Search.............................................................487Field Lookups........................................................................................................................488Q Objects..............................................................................................................................493
Exercise 70: Limiting Results by Category, Tag, or Creator..........................................494Exercise 71: Implementing Search.............................................................................498
Aggregation..........................................................................................................................500Exercise 72: Getting Joke Ratings...............................................................................504
Code Optimization................................................................................................................507Exercise 73: Installing and Using the Django Debug Toolbar.......................................509
Brief Introduction to Annotation..........................................................................................517Viewing SQL Used in QuerySets...........................................................................................518
LESSON 16. Deploying your Website to Production.....................................................521Where to Host Your Django Site...........................................................................................521
Exercise 74: Deploying to Heroku..............................................................................522LESSON 17. Customizing Django Admin.....................................................................535
Django Admin Views.............................................................................................................535Exercise 75: Customizing Titles and Headers..............................................................536
ModelAdmin Attributes that Affect the List View................................................................537Exercise 76: Creating a Custom ModelAdmin Base Class............................................539Exercise 77: Customizing the Django Admin List View................................................542
Lists vs. Tuples......................................................................................................................543ModelAdmin Attributes that Affect Forms...........................................................................545
Exercise 78: Customizing Django Admin Form Views..................................................549Customizing Fieldsets...........................................................................................................550
Exercise 79: Modifying the CustomUserAdmin Class..................................................553Adding Calculated Read-only Fields.....................................................................................560
Exercise 80: Adding a Link to the Change Password Form..........................................561Exercise 81: Unregistering Models.............................................................................563Exercise 82: Django Admin Groups and Permissions..................................................565
LESSON 18. Additional Topics......................................................................................569Additional Learning..............................................................................................................569Additional Projects...............................................................................................................572
Table of Contents | v

LESSON 1Getting Started with Django
Topics Covered
Setting up a virtual environment.
Installing Django.
Creating your first Django website.
Introduction
In this lesson, you will create a virtual environment and install Django within it. You willthen create your first Django website.
❋
1.1. Welcome to the Server-side
Django is a Python web framework, which means that it’s just Python. When you createa Django application, you will be using the Python language and any languages used inthe static pages you send to the client: usually HTML, CSS, and JavaScript. Before learningDjango or any server-side programming framework, you should be familiar with creatingbasic static websites using HTML and CSS. These client-side programming languagesare executed by the browser, but the browser needs to get those pages somehow.Generally, they are delivered by a server. For static websites, the server will simply fetchand deliver those pages. For dynamic websites, some magic gets done on the server,which could affect the content of the pages returned.
1.1.1. What is a web server?
The first step to understanding server-side programming is to understand how a webserver works. The following diagram shows how a web server delivers static pages, suchas HTML, CSS, JavaScript, image, audio, video, and PDF files, all of which browsers havea built-in way of handling; and other files that can be downloaded but not handled by thebrowser, such as Microsoft Word documents, zip files, and executables. All these files,
LESSON 1: Getting Started with Django | 1
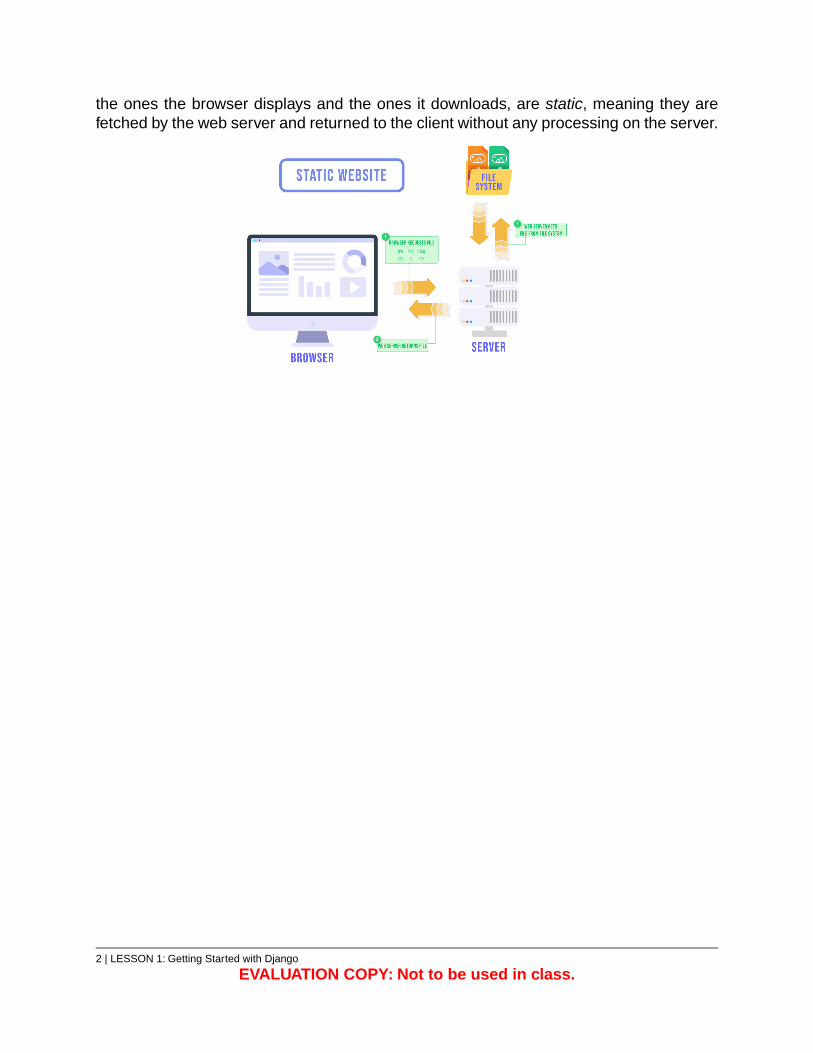
the ones the browser displays and the ones it downloads, are static, meaning they arefetched by the web server and returned to the client without any processing on the server.
2 | LESSON 1: Getting Started with Django
EVALUATION COPY: Not to be used in class.
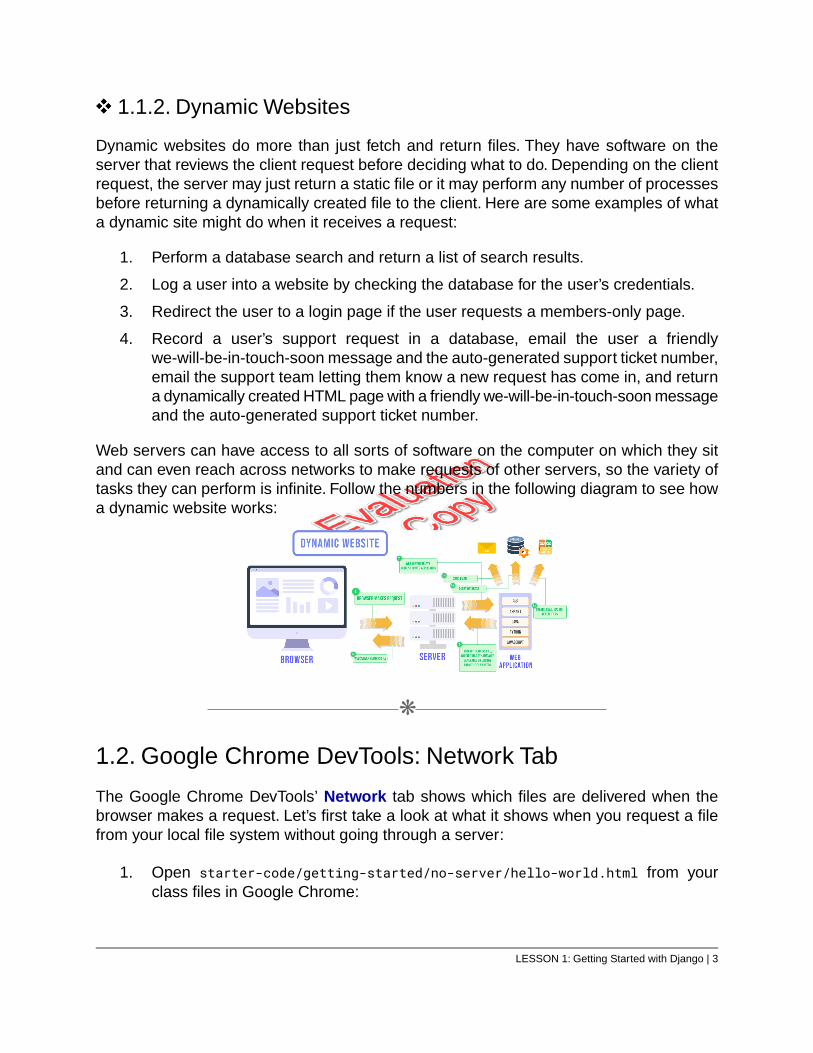
1.1.2. Dynamic Websites
Dynamic websites do more than just fetch and return files. They have software on theserver that reviews the client request before deciding what to do. Depending on the clientrequest, the server may just return a static file or it may perform any number of processesbefore returning a dynamically created file to the client. Here are some examples of whata dynamic site might do when it receives a request:
1. Perform a database search and return a list of search results.
2. Log a user into a website by checking the database for the user’s credentials.
3. Redirect the user to a login page if the user requests a members-only page.
4. Record a user’s support request in a database, email the user a friendlywe-will-be-in-touch-soon message and the auto-generated support ticket number,email the support team letting them know a new request has come in, and returna dynamically created HTML page with a friendly we-will-be-in-touch-soon messageand the auto-generated support ticket number.
Web servers can have access to all sorts of software on the computer on which they sitand can even reach across networks to make requests of other servers, so the variety oftasks they can perform is infinite. Follow the numbers in the following diagram to see howa dynamic website works:
❋
1.2. Google Chrome DevTools: Network Tab
The Google Chrome DevTools’ Network tab shows which files are delivered when thebrowser makes a request. Let’s first take a look at what it shows when you request a filefrom your local file system without going through a server:
1. Open starter-code/getting-started/no-server/hello-world.html from yourclass files in Google Chrome:
LESSON 1: Getting Started with Django | 3
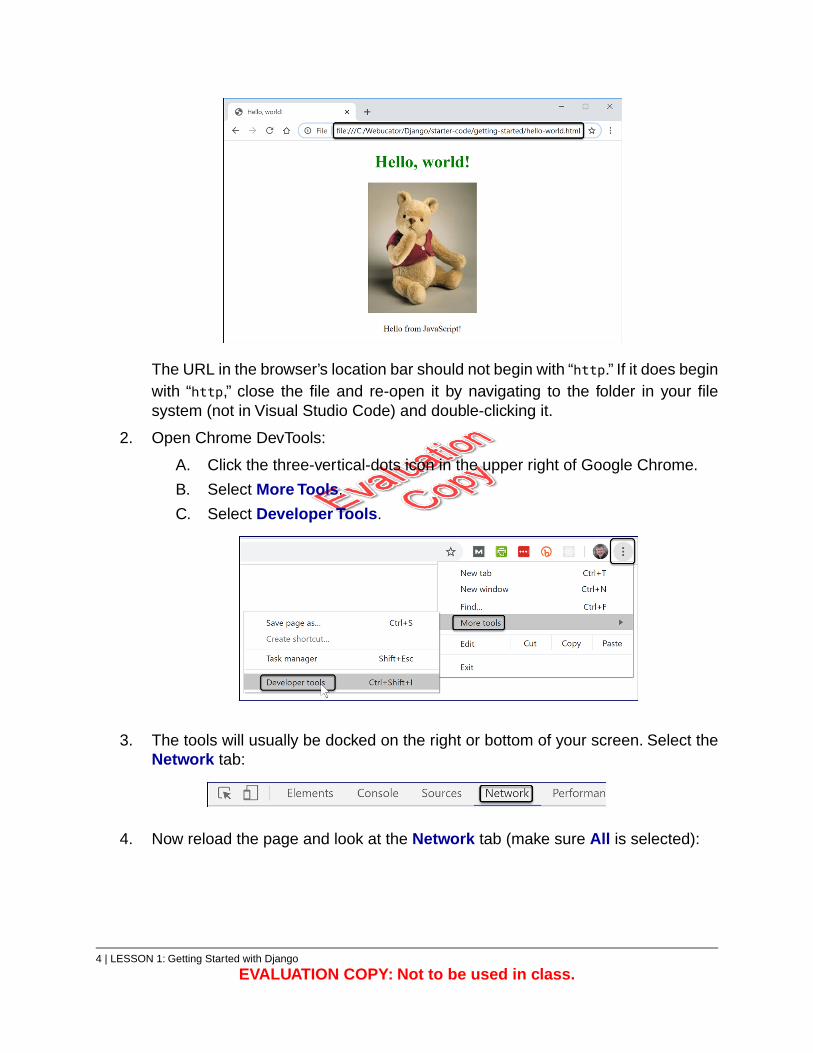
The URL in the browser’s location bar should not begin with “http.” If it does beginwith “http,” close the file and re-open it by navigating to the folder in your filesystem (not in Visual Studio Code) and double-clicking it.
2. Open Chrome DevTools:
A. Click the three-vertical-dots icon in the upper right of Google Chrome.
B. Select More Tools.
C. Select Developer Tools.
3. The tools will usually be docked on the right or bottom of your screen. Select theNetwork tab:
4. Now reload the page and look at the Network tab (make sure All is selected):
4 | LESSON 1: Getting Started with Django
EVALUATION COPY: Not to be used in class.
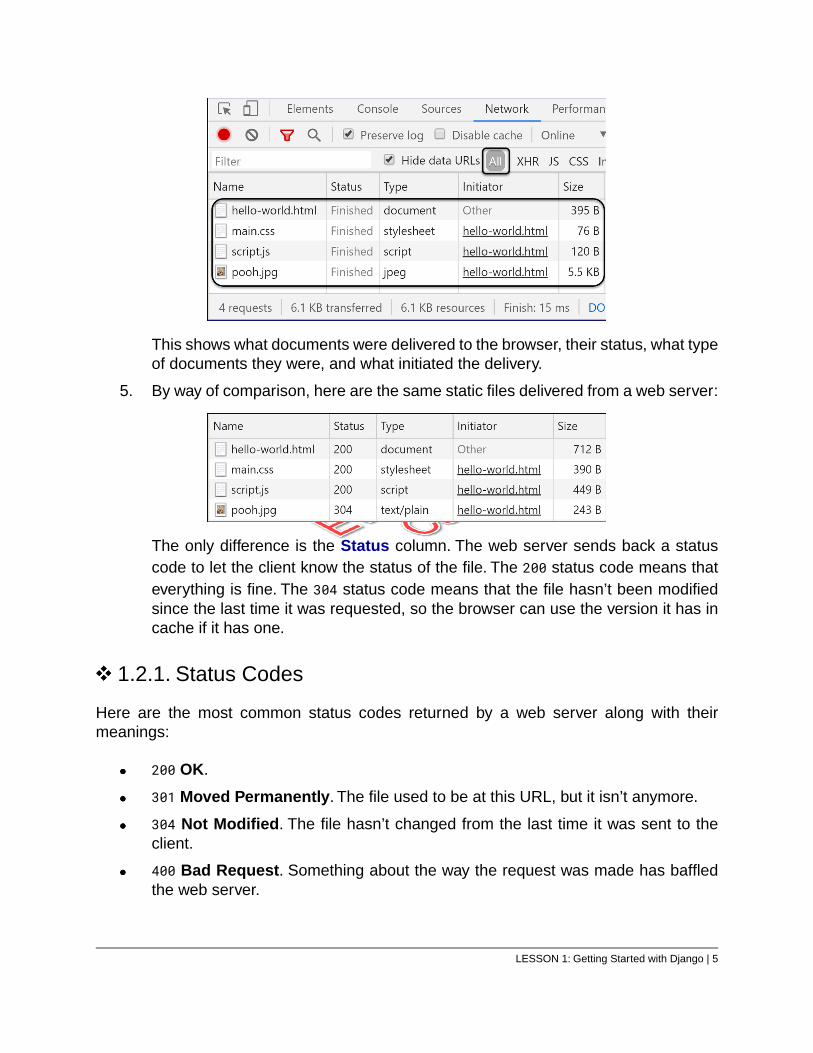
This shows what documents were delivered to the browser, their status, what typeof documents they were, and what initiated the delivery.
5. By way of comparison, here are the same static files delivered from a web server:
The only difference is the Status column. The web server sends back a statuscode to let the client know the status of the file. The 200 status code means thateverything is fine. The 304 status code means that the file hasn’t been modifiedsince the last time it was requested, so the browser can use the version it has incache if it has one.
1.2.1. Status Codes
Here are the most common status codes returned by a web server along with theirmeanings:
200 OK.
301 Moved Permanently. The file used to be at this URL, but it isn’t anymore.
304 Not Modified. The file hasn’t changed from the last time it was sent to theclient.
400 Bad Request. Something about the way the request was made has baffledthe web server.
LESSON 1: Getting Started with Django | 5
401 Unauthorized.You have to be logged in to access this file.
403 Forbidden.You can’t have this even if you are logged in.
404 Not Found. There is no file here.
500 Internal Server Error. Something went wrong on the server.
503 Service Unavailable. The web server is down or overloaded.
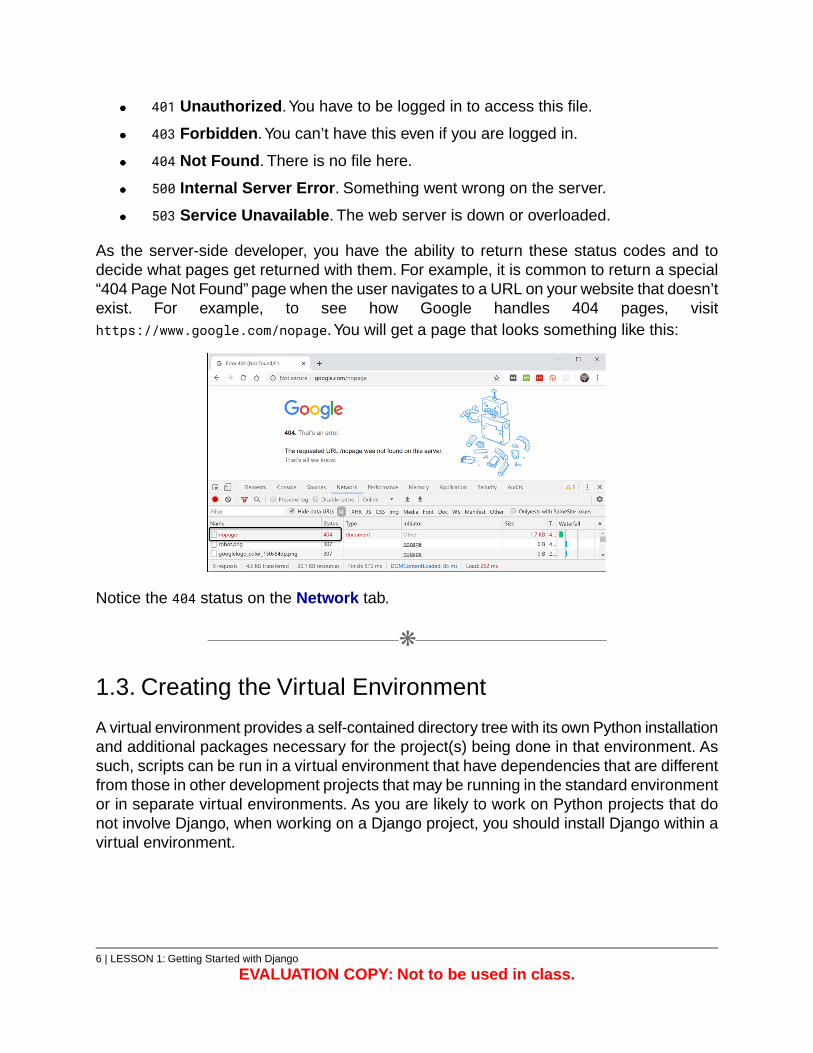
As the server-side developer, you have the ability to return these status codes and todecide what pages get returned with them. For example, it is common to return a special“404 Page Not Found” page when the user navigates to a URL on your website that doesn’texist. For example, to see how Google handles 404 pages, visithttps://www.google.com/nopage.You will get a page that looks something like this:
Notice the 404 status on the Network tab.
❋
1.3. Creating the Virtual Environment
A virtual environment provides a self-contained directory tree with its own Python installationand additional packages necessary for the project(s) being done in that environment. Assuch, scripts can be run in a virtual environment that have dependencies that are differentfrom those in other development projects that may be running in the standard environmentor in separate virtual environments. As you are likely to work on Python projects that donot involve Django, when working on a Django project, you should install Django within avirtual environment.
6 | LESSON 1: Getting Started with Django
EVALUATION COPY: Not to be used in class.
Exercise 1: Creating a Virtual Environmentand Installing Django
15 to 25 minutes
To create a virtual environment, you will use Python’s built-in venv module.
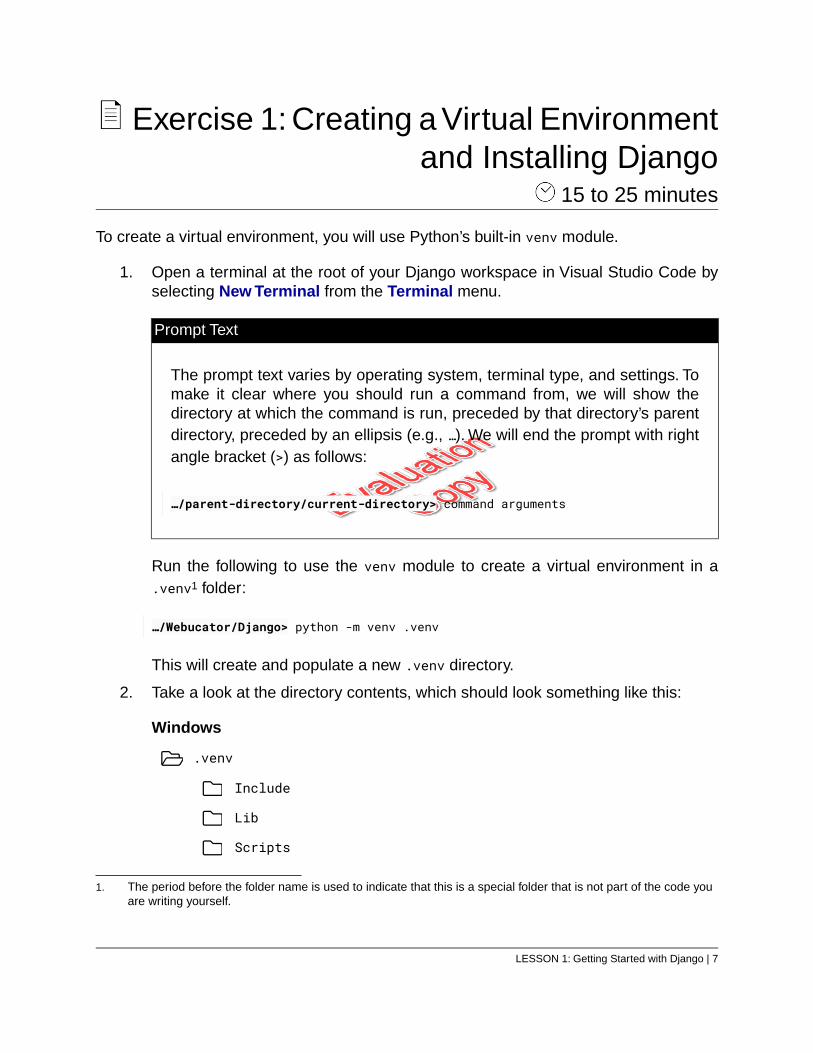
1. Open a terminal at the root of your Django workspace in Visual Studio Code byselecting New Terminal from the Terminal menu.
Prompt Text
The prompt text varies by operating system, terminal type, and settings. Tomake it clear where you should run a command from, we will show thedirectory at which the command is run, preceded by that directory’s parentdirectory, preceded by an ellipsis (e.g., …). We will end the prompt with rightangle bracket (>) as follows:
…/parent-directory/current-directory> command arguments
Run the following to use the venv module to create a virtual environment in a.venv1 folder:
…/Webucator/Django> python -m venv .venv
This will create and populate a new .venv directory.
2. Take a look at the directory contents, which should look something like this:
Windows
.venv
Include
Lib
Scripts
1. The period before the folder name is used to indicate that this is a special folder that is not part of the code youare writing yourself.
LESSON 1: Getting Started with Django | 7
pyvenv.cfg
Mac / Linux
.venv
bin
include
lib
pyvenv.cfg
The contents will differ by operating system. Included in this directory is a Scripts(Windows) or bin (Mac) folder that contains the python executable file and scriptsfor activating the virtual environment.
3. To work within your virtual environment, you must first activate it. The commandfor activating a virtual environment varies by operating system. In the terminal,run one of the following:
Windows
…/Webucator/Django> .venv\Scripts\activate
Mac / Linux
…/Webucator/Django> source .venv/bin/activate
4. When the virtual environment is activated, its name will always appear enclosedin parentheses before the prompt. For example:
(.venv) …/Webucator/Django>
If you don’t see the virtual environment name in parentheses before the prompt,you are not in the virtual environment.
5. You can now invoke the Python interpreter and/or install additional packages(using pip) within the virtual environment. Install Django:
(.venv) …/Webucator/Django> pip install django
8 | LESSON 1: Getting Started with Django
EVALUATION COPY: Not to be used in class.
6. Check to see what version of Django you installed:
(.venv) …/Webucator/Django> python -m django --version3.1
7. Django is a standard Python package, which you can import in Python just likeany other Python package. Open Python interactive mode (by running python inthe terminal) and use Django to check the version:
>>> import django>>> django.get_version()'3.1'
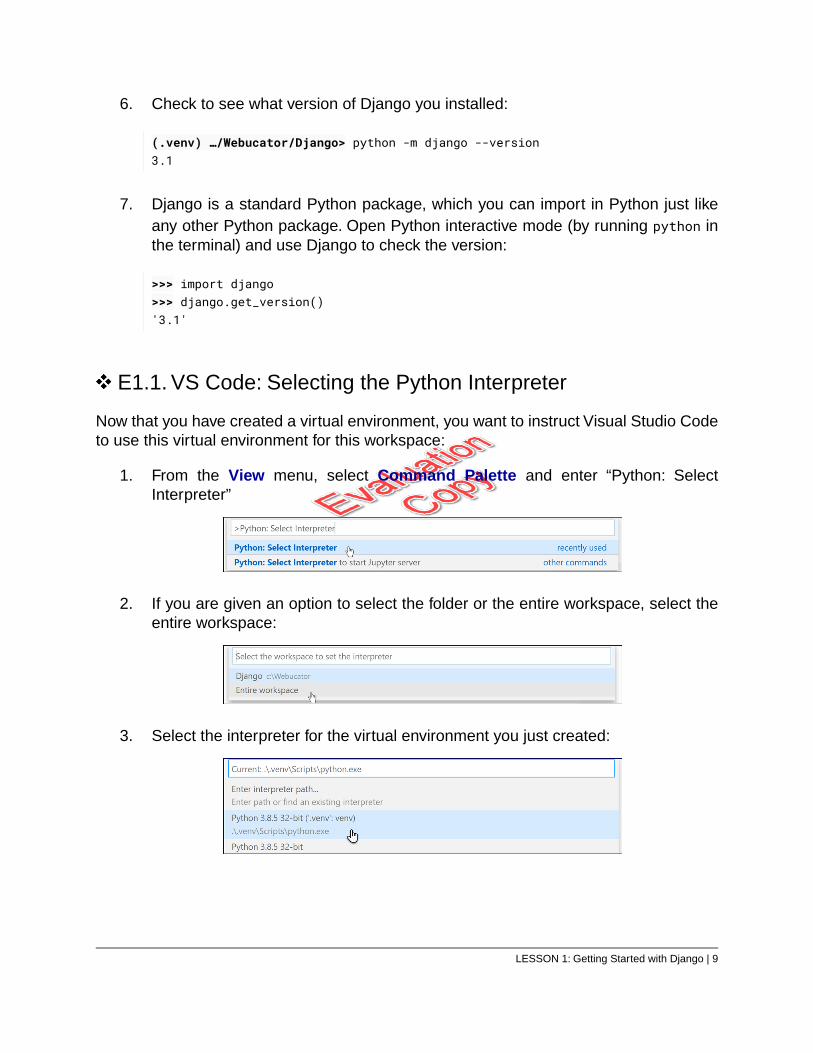
E1.1. VS Code: Selecting the Python Interpreter
Now that you have created a virtual environment, you want to instruct Visual Studio Codeto use this virtual environment for this workspace:
1. From the View menu, select Command Palette and enter “Python: SelectInterpreter”
2. If you are given an option to select the folder or the entire workspace, select theentire workspace:
3. Select the interpreter for the virtual environment you just created:
LESSON 1: Getting Started with Django | 9
The Python interpreter in your virtual environment will now be used in newterminals.
❋
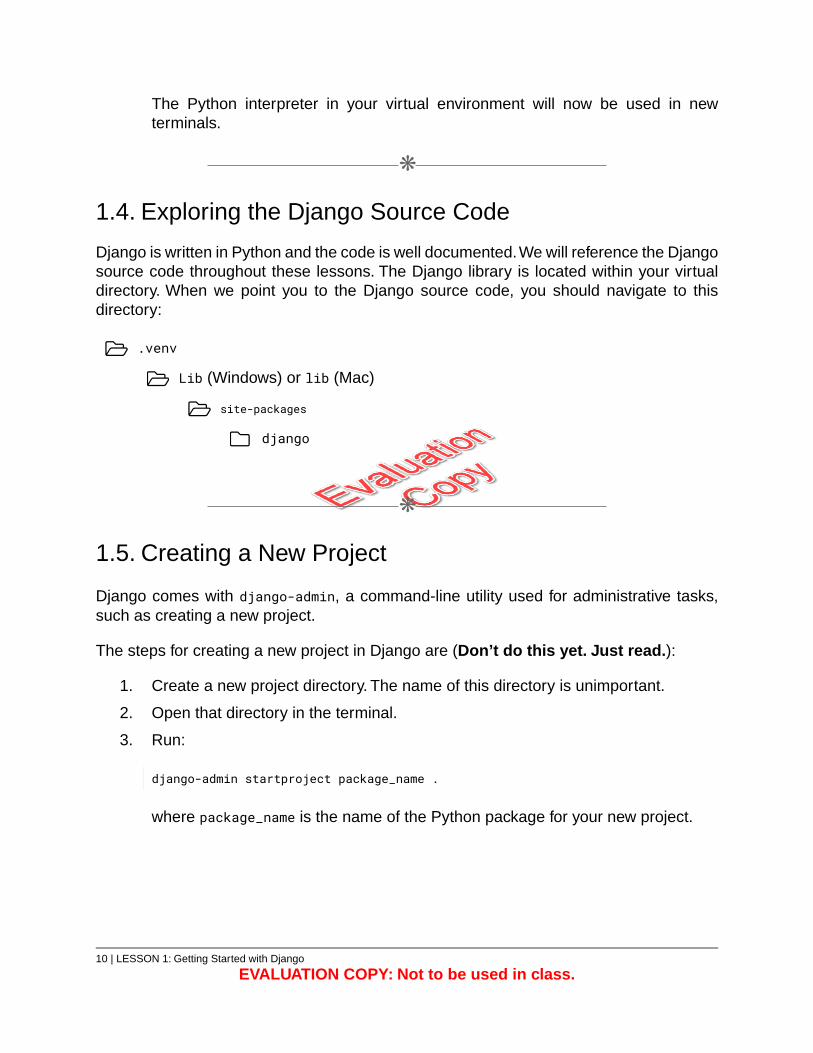
1.4. Exploring the Django Source Code
Django is written in Python and the code is well documented.We will reference the Djangosource code throughout these lessons. The Django library is located within your virtualdirectory. When we point you to the Django source code, you should navigate to thisdirectory:
.venv
Lib (Windows) or lib (Mac)
site-packages
django
❋
1.5. Creating a New Project
Django comes with django-admin, a command-line utility used for administrative tasks,such as creating a new project.
The steps for creating a new project in Django are (Don’t do this yet. Just read.):
1. Create a new project directory. The name of this directory is unimportant.
2. Open that directory in the terminal.
3. Run:
django-admin startproject package_name .
where package_name is the name of the Python package for your new project.
10 | LESSON 1: Getting Started with Django
EVALUATION COPY: Not to be used in class.
Don’t Forget the Dot
The dot (.) at the end of django-admin startproject package_name . indicates thatthe project should be created in the current directory. If you leave it off, a new projectdirectory will be created with a nested folder that has the same name, which can beconfusing.
It’s time to create your first project!
LESSON 1: Getting Started with Django | 11
Exercise 2: Hello, Django! 15 to 25 minutes
When a user browses to a page on a Django-based website, Python communicates withfile systems, databases, and email servers as necessary, and then provides the web serverwith content (generally HTML) to return to the browser. Let’s build your first Django projectto see how it works.
1. Create a new hello_proj folder within the projects folder.
2. Open the new folder in the terminal and run the following command. Be sure toinclude the dot at the end!:
(.venv) …/projects/hello_proj> django-admin startproject hello_django .
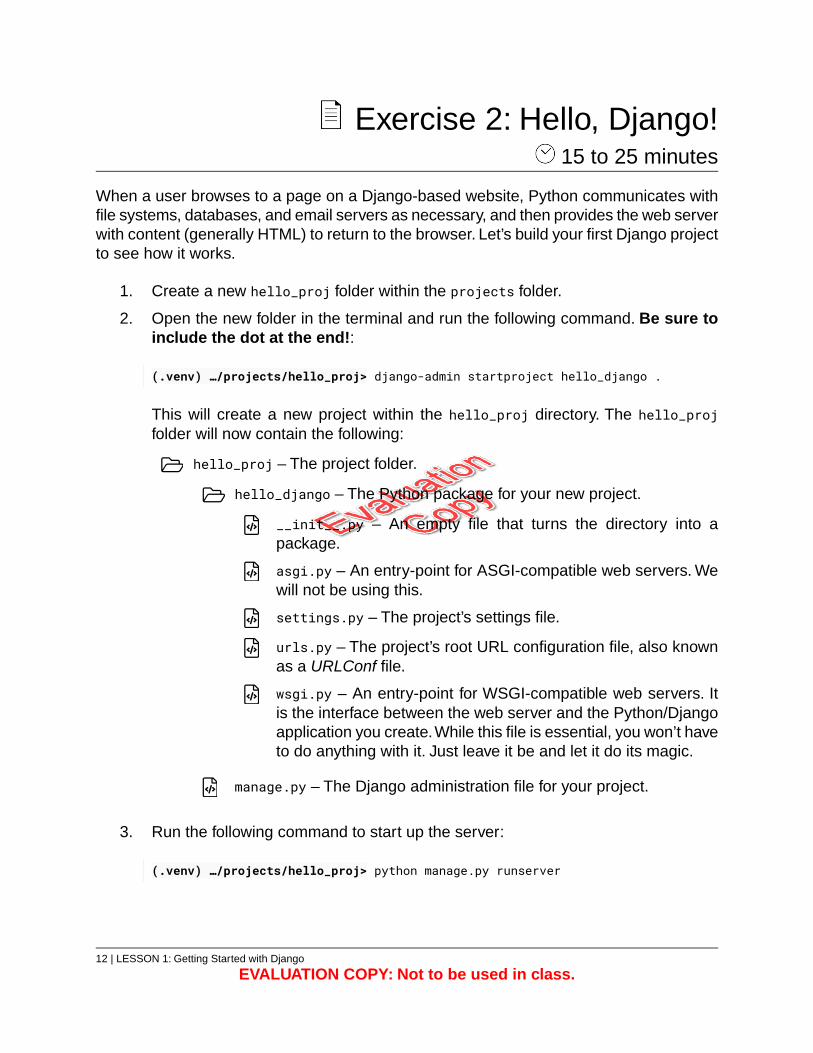
This will create a new project within the hello_proj directory. The hello_projfolder will now contain the following:
hello_proj – The project folder.
hello_django – The Python package for your new project.
__init__.py – An empty file that turns the directory into apackage.
asgi.py – An entry-point for ASGI-compatible web servers. Wewill not be using this.
settings.py – The project’s settings file.
urls.py – The project’s root URL configuration file, also knownas a URLConf file.
wsgi.py – An entry-point for WSGI-compatible web servers. Itis the interface between the web server and the Python/Djangoapplication you create.While this file is essential, you won’t haveto do anything with it. Just leave it be and let it do its magic.
manage.py – The Django administration file for your project.
3. Run the following command to start up the server:
(.venv) …/projects/hello_proj> python manage.py runserver
12 | LESSON 1: Getting Started with Django
EVALUATION COPY: Not to be used in class.
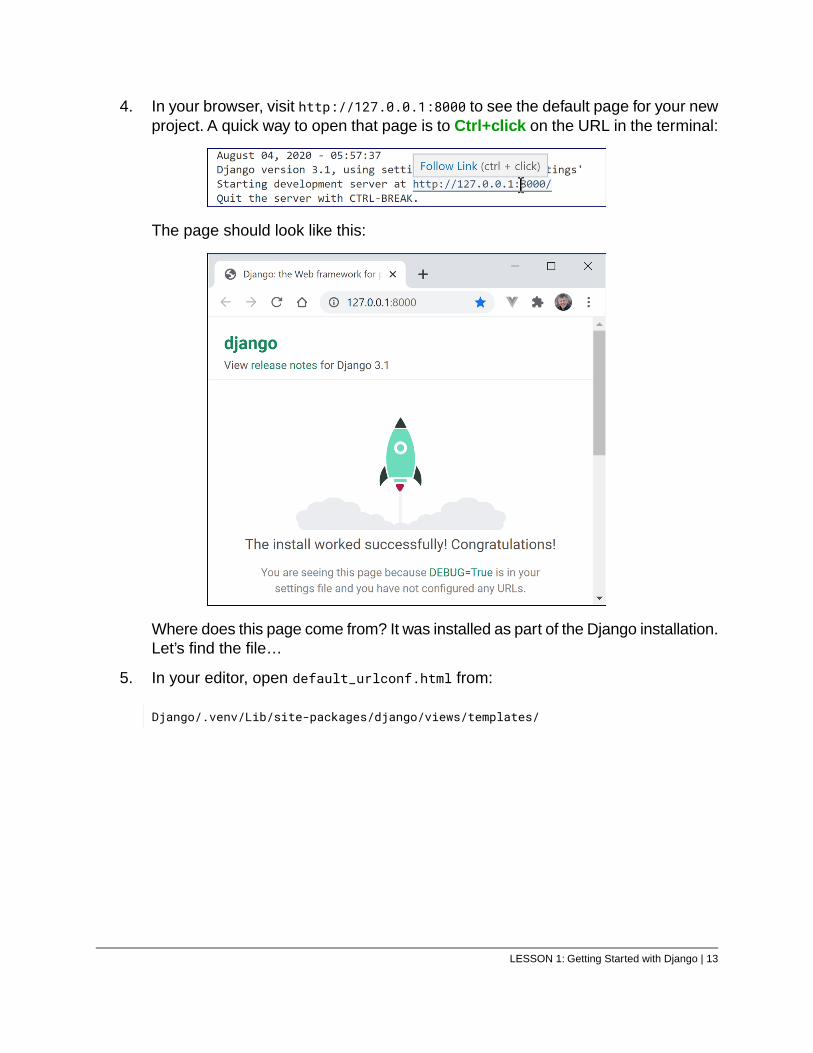
4. In your browser, visit http://127.0.0.1:8000 to see the default page for your newproject. A quick way to open that page is to Ctrl+click on the URL in the terminal:
The page should look like this:
Where does this page come from? It was installed as part of the Django installation.Let’s find the file…
5. In your editor, open default_urlconf.html from:
Django/.venv/Lib/site-packages/django/views/templates/
LESSON 1: Getting Started with Django | 13
The file begins like this:
{% load i18n %}<!doctype html>{% get_current_language_bidi as LANGUAGE_BIDI %}<html{% if LANGUAGE_BIDI %} dir="rtl"{% endif %}>
<head><meta charset="utf-8"><title>{% translate "Django: the Web framework for perfectionists…
6. Browse through the code on the page. You will see that it is a standard HTMLpage with embedded CSS. In addition, it includes Django template variables(denoted with double curly braces) and Django template tags (denoted with curlybraces and percentage signs).
Django Template Variable
{{ variable_name }}
Django Template Tag
{% tag_name %}
You will learn more about both later.
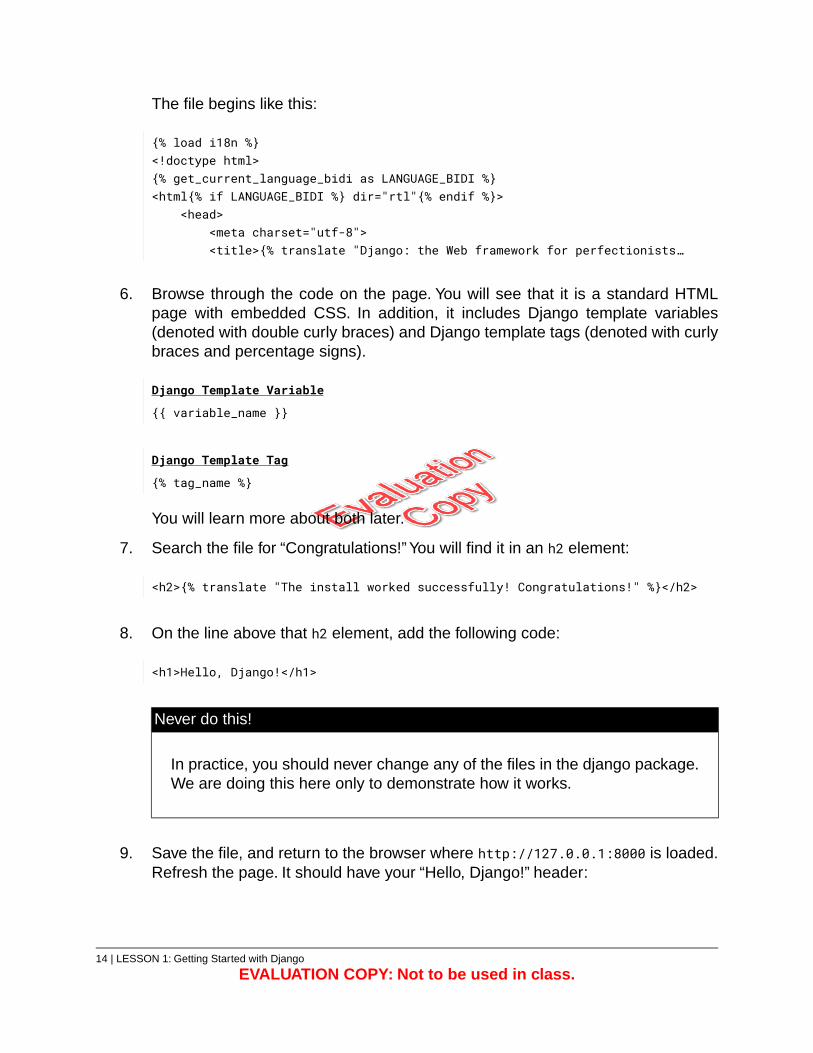
7. Search the file for “Congratulations!” You will find it in an h2 element:
<h2>{% translate "The install worked successfully! Congratulations!" %}</h2>
8. On the line above that h2 element, add the following code:
<h1>Hello, Django!</h1>
Never do this!
In practice, you should never change any of the files in the django package.We are doing this here only to demonstrate how it works.
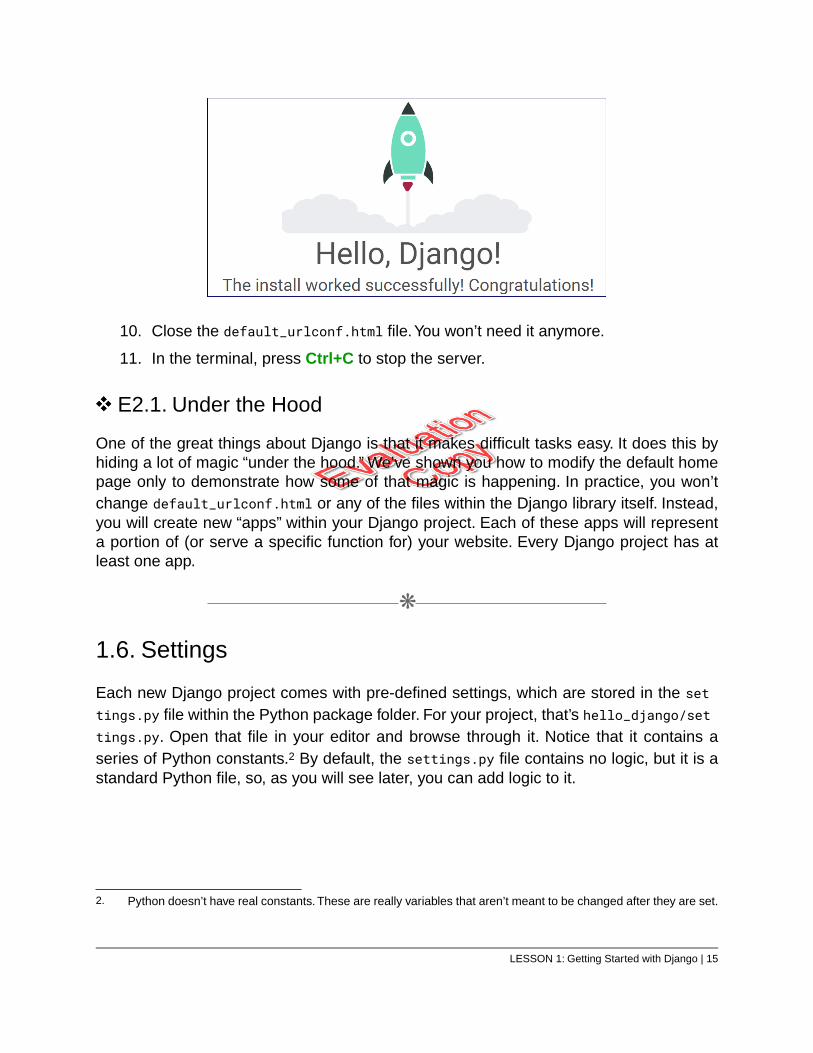
9. Save the file, and return to the browser where http://127.0.0.1:8000 is loaded.Refresh the page. It should have your “Hello, Django!” header:
14 | LESSON 1: Getting Started with Django
EVALUATION COPY: Not to be used in class.
10. Close the default_urlconf.html file.You won’t need it anymore.
11. In the terminal, press Ctrl+C to stop the server.
E2.1. Under the Hood
One of the great things about Django is that it makes difficult tasks easy. It does this byhiding a lot of magic “under the hood.” We’ve shown you how to modify the default homepage only to demonstrate how some of that magic is happening. In practice, you won’tchange default_urlconf.html or any of the files within the Django library itself. Instead,you will create new “apps” within your Django project. Each of these apps will representa portion of (or serve a specific function for) your website. Every Django project has atleast one app.
❋
1.6. Settings
Each new Django project comes with pre-defined settings, which are stored in the settings.py file within the Python package folder. For your project, that’s hello_django/settings.py. Open that file in your editor and browse through it. Notice that it contains aseries of Python constants.2 By default, the settings.py file contains no logic, but it is astandard Python file, so, as you will see later, you can add logic to it.
2. Python doesn’t have real constants. These are really variables that aren’t meant to be changed after they are set.
LESSON 1: Getting Started with Django | 15
1.6.1. Default Settings for New Django Projects
Here, we provide a brief description of each of the settings included with new Djangoprojects. We will cover many of these in detail later on.
BASE_DIR – The absolute path to the project directory.
SECRET_KEY – A secret key unique to the project. Keep it secret!
DEBUG – Set to True to display detailed errors in the browser. In production, DEBUGshould always be set to False.
ALLOWED_HOSTS – A list of domains or IP addresses that can serve this site.
INSTALLED_APPS – A list of apps in the project.
MIDDLEWARE – A list of components that affect Django’s input/output processing.
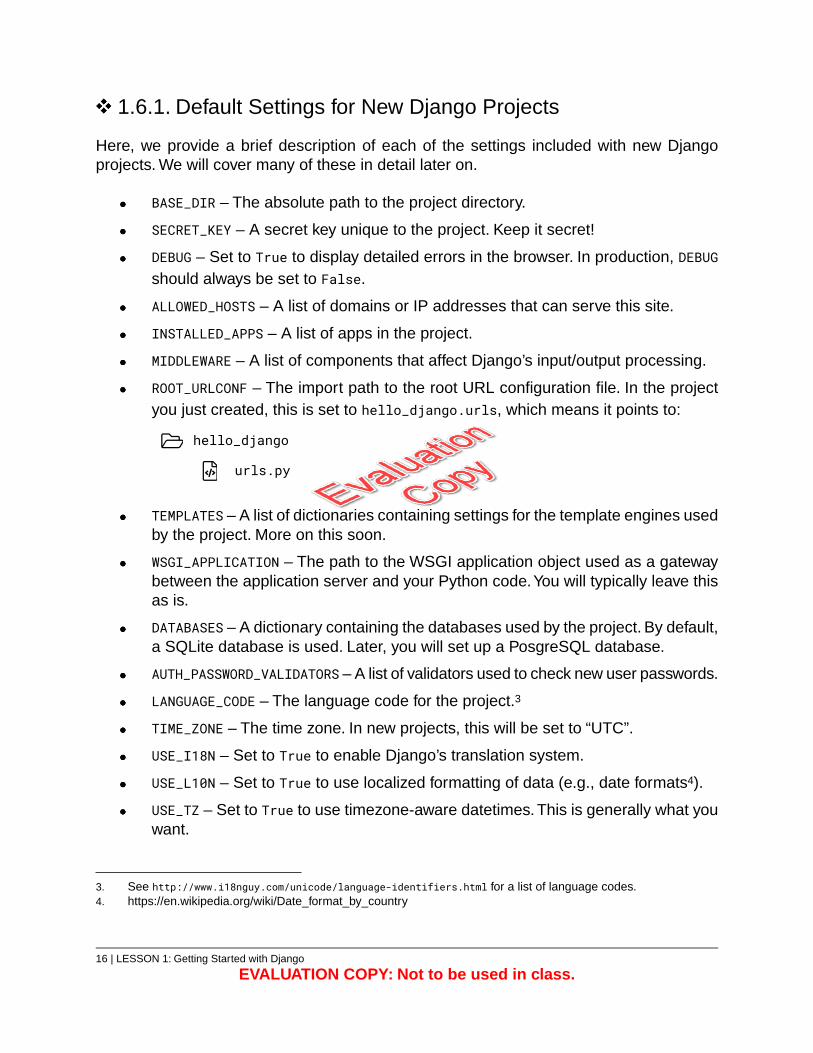
ROOT_URLCONF – The import path to the root URL configuration file. In the projectyou just created, this is set to hello_django.urls, which means it points to:
hello_django
urls.py
TEMPLATES – A list of dictionaries containing settings for the template engines usedby the project. More on this soon.
WSGI_APPLICATION – The path to the WSGI application object used as a gatewaybetween the application server and your Python code.You will typically leave thisas is.
DATABASES – A dictionary containing the databases used by the project. By default,a SQLite database is used. Later, you will set up a PosgreSQL database.
AUTH_PASSWORD_VALIDATORS – A list of validators used to check new user passwords.
LANGUAGE_CODE – The language code for the project.3
TIME_ZONE – The time zone. In new projects, this will be set to “UTC”.
USE_I18N – Set to True to enable Django’s translation system.
USE_L10N – Set to True to use localized formatting of data (e.g., date formats4).
USE_TZ – Set to True to use timezone-aware datetimes. This is generally what youwant.
3. See http://www.i18nguy.com/unicode/language-identifiers.html for a list of language codes.4. https://en.wikipedia.org/wiki/Date_format_by_country
16 | LESSON 1: Getting Started with Django
EVALUATION COPY: Not to be used in class.
STATIC_URL – The URL to use when referencing static files, such as CSS andJavaScript files and images.
1.6.2. The Shell
As Django is used to create websites, you will often view the results of the code you writein a browser. However, it can be useful to interact with your Django code directly in Pythoninteractive mode. To open a Python interpreter that is aware of your Django project, run:
(.venv) …/projects/hello_proj> python manage.py shell
With the shell open, you can import modules from your project. For example, to import allthe settings variables in settings.py, run:
>>> from hello_django.settings import *
You can then look at different settings:
>>> BASE_DIRWindowsPath('C:/Webucator/Django/projects/hello_proj')>>> LANGUAGE_CODE'en-us'>>> ROOT_URLCONF'hello_django.urls'
You will use the shell regularly throughout these lessons.
❋
1.7. Django Apps
Before creating your own app, let’s take a look at the apps that are included by defaultwith a new Django project.You can print these out at the shell using Python. If it’s not stillopen, open the Django shell:
(.venv) …/projects/hello_proj> python manage.py shell
Run the following code to loop through and print the apps in INSTALLED_APPS:
LESSON 1: Getting Started with Django | 17
>>> from hello_django.settings import *>>> for app in INSTALLED_APPS:... print(app)...django.contrib.admindjango.contrib.authdjango.contrib.contenttypesdjango.contrib.sessionsdjango.contrib.messagesdjango.contrib.staticfiles
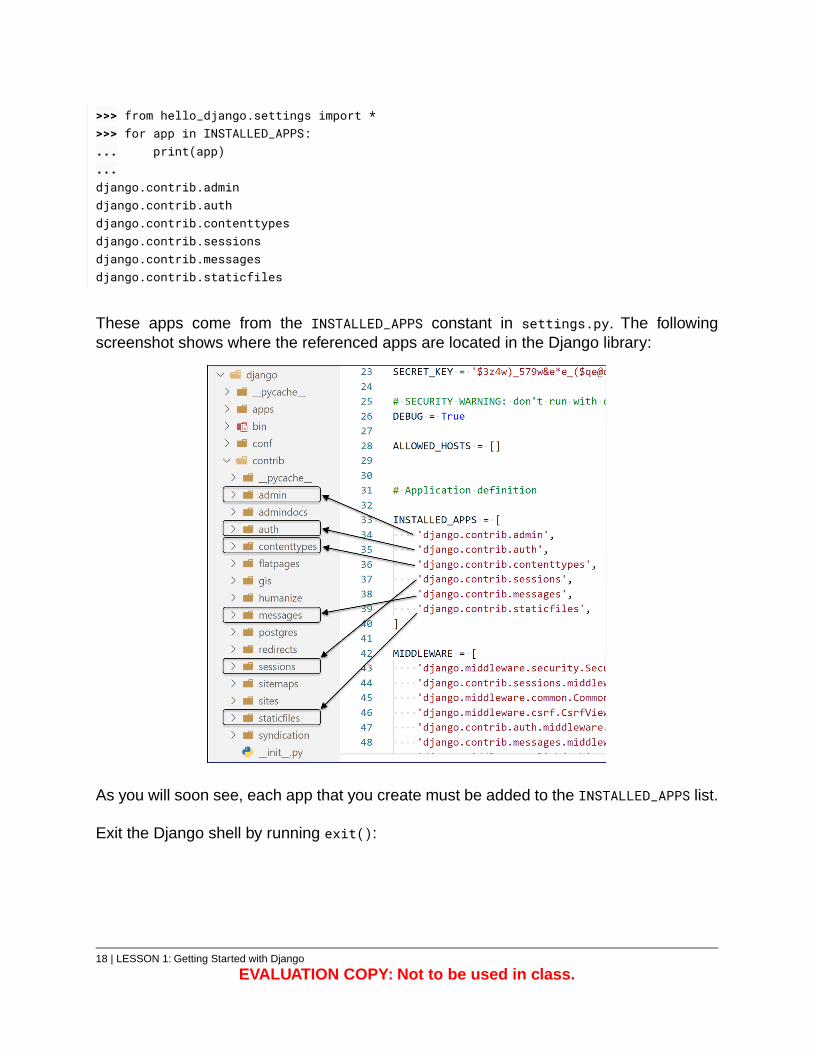
These apps come from the INSTALLED_APPS constant in settings.py. The followingscreenshot shows where the referenced apps are located in the Django library:
As you will soon see, each app that you create must be added to the INSTALLED_APPS list.
Exit the Django shell by running exit():
18 | LESSON 1: Getting Started with Django
EVALUATION COPY: Not to be used in class.
>>> exit()
❋
1.8. Creating a New App
The initial steps for creating an app in a Django project are (Don’t do this yet. Just read.):
1. Create the scaffolding of the app by running:
python manage.py startapp app_name
where “app_name” is the name of the app.
2. Add the new application to the INSTALLED_APPS list.
3. Create one or more views. A view determines what happens when a user visits apage on the website.
4. Configure URLs. This is where you connect URLs to views, where you say: whena user visits this URL, run this view.
5. Create any necessary templates for the HTML code that renders the page. Mostviews will specify a template for rendering the page that is returned to the browser.
With those steps in mind, let’s create your first app.
LESSON 1: Getting Started with Django | 19
Exercise 3: First Django App 15 to 25 minutes
E3.1. Scaffolding
Make sure that you are in the hello_proj directory in the terminal and that you’re not inPython interactive mode. Then run:
(.venv) …/projects/hello_proj> python manage.py startapp pages
This will create a new pages directory within hello_proj with the following contents:
pages
migrations – Holds migration files that automagically update the databasemodel based on changes in models.py.
__init__.py – An empty file that turns the directory into a package.
admin.py – For writing admin code.
apps.py – For writing application registration code.
models.py – For writing the data models.
tests.py – For writing tests.
views.py – For writing views.
E3.2. Installed Apps
You must add your new app to the INSTALLED_APPS list in the settings file. This will be yourfirst modification to the settings file. As you modify this file, you should add comments tomake it easier to read later on. It’s a good idea to differentiate between what you haveadded and what was already there. Go ahead and add your new pages app to theINSTALLED_APPS list along with comments separating the built-in Django apps from theapps you created:
20 | LESSON 1: Getting Started with Django
EVALUATION COPY: Not to be used in class.
INSTALLED_APPS = [# Built-in Django apps'django.contrib.admin','django.contrib.auth','django.contrib.contenttypes','django.contrib.sessions','django.contrib.messages','django.contrib.staticfiles',
# Local apps'pages.apps.PagesConfig',
]
Notice the list ends with a comma. This is not required, but it is a common practice in thesettings file to make it easier to add additional items to a list.
Legacy Django Projects (and tutorials)
If you work with Django projects that were written a while ago, or reference oldertutorials or documentation, you may see local apps added to INSTALLED_APPS usingjust the app name (e.g., 'pages' instead of 'pages.apps.PagesConfig'). That wasthe old way, and while it still works, you should use the full dotted path to theAppConfig subclass.5
E3.3. Views
Views are responsible for taking a web request, doing some magic, and then returning aweb response. Views are created in the views.py file in the app folder.
1. Open pages/views.py.
2. By default, render is imported from django.shortcuts. It is a more common practiceto use Django’s built-in generic views, which are class-based. So, replace thatimport line with:
from django.views.generic import TemplateView
5. https://docs.djangoproject.com/en/3.1/ref/applications/#configuring-applications
LESSON 1: Getting Started with Django | 21
3. Below that, add the following class, which inherits from TemplateView:
class HomePageView(TemplateView):template_name = 'home.html'
This tells Django to load the home.html template when rendering the HomePageViewview. The complete views.py file should now look like this:
Exercise Code 3.1: pages/views.py
from django.views.generic import TemplateView1.2.
class HomePageView(TemplateView):3.template_name = 'home.html'4.
E3.4. URLs
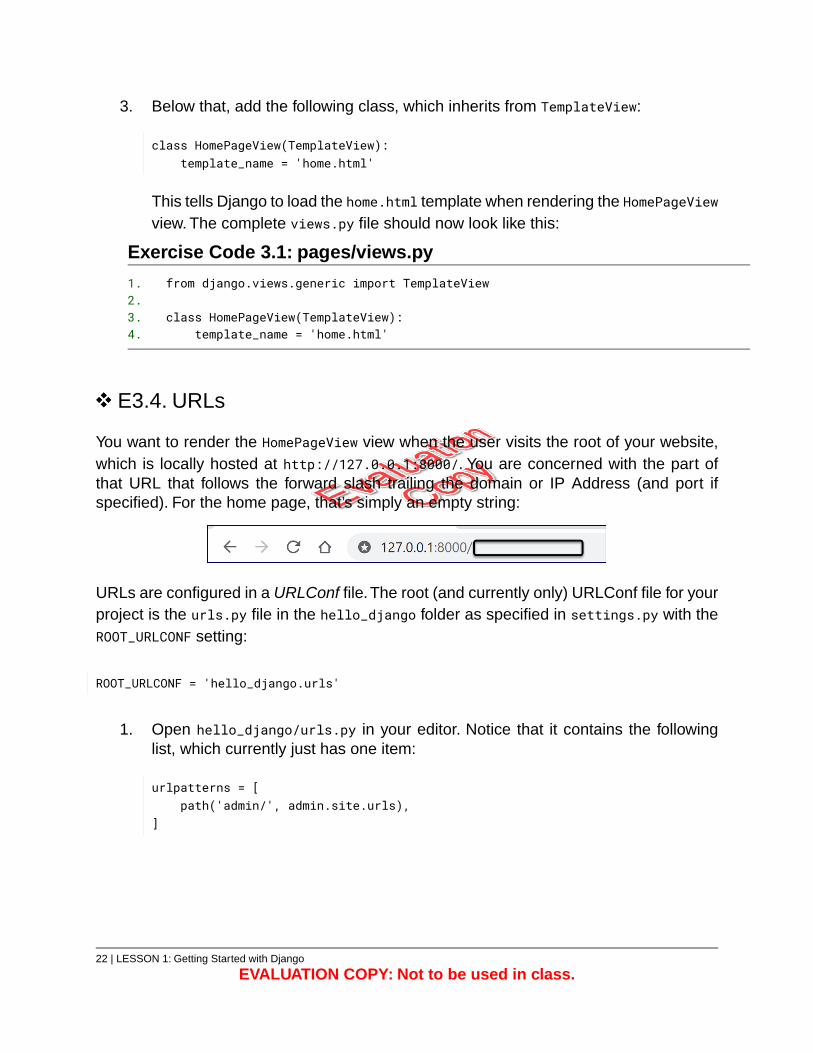
You want to render the HomePageView view when the user visits the root of your website,which is locally hosted at http://127.0.0.1:8000/. You are concerned with the part ofthat URL that follows the forward slash trailing the domain or IP Address (and port ifspecified). For the home page, that’s simply an empty string:
URLs are configured in a URLConf file.The root (and currently only) URLConf file for yourproject is the urls.py file in the hello_django folder as specified in settings.py with theROOT_URLCONF setting:
ROOT_URLCONF = 'hello_django.urls'
1. Open hello_django/urls.py in your editor. Notice that it contains the followinglist, which currently just has one item:
urlpatterns = [path('admin/', admin.site.urls),
]
22 | LESSON 1: Getting Started with Django
EVALUATION COPY: Not to be used in class.
This path identifies Django’s built-in admin site, which we will explore later (seepage 193). At the top of the file, admin is imported from django.contrib and thepath() function is imported from django.urls:
from django.contrib import adminfrom django.urls import path
2. You need to add your own URL configurations to the urlpatterns list. There aredifferent ways of doing this. The simplest approach is just to add a new path tothe list. Add the following highlighted line of code:
urlpatterns = [path('admin/', admin.site.urls),path('', HomePageView.as_view()),
]
This specifies that when a user visits http://127.0.0.1:8000/ (with nothing trailingit), the HomePageView should be rendered as a view.
3. To make the urls.py module aware of HomePageView, you need to import it. Addthe following line of code below the existing imports:
from pages.views import HomePageView
You can remove the long comment at the beginning of the file.
4. The complete urls.py file should now look like this:
Exercise Code 3.2: hello_django/urls.py
from django.contrib import admin1.from django.urls import path2.
3.from pages.views import HomePageView4.
5.urlpatterns = [6.
path('admin/', admin.site.urls),7.path('', HomePageView.as_view()),8.
]9.
LESSON 1: Getting Started with Django | 23
Give it a try to see how it works: if you have stopped the server, start it back upagain by running the following command from the hello_proj directory:
(.venv) …/projects/hello_proj> python manage.py runserver
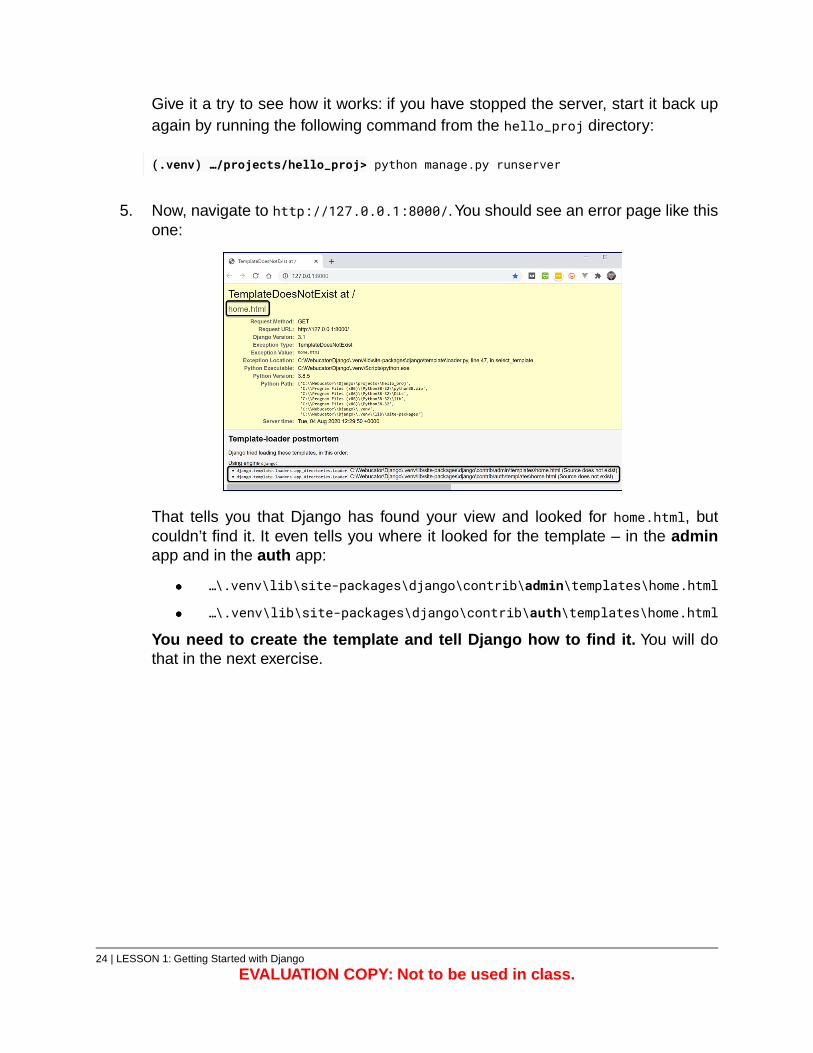
5. Now, navigate to http://127.0.0.1:8000/.You should see an error page like thisone:
That tells you that Django has found your view and looked for home.html, butcouldn’t find it. It even tells you where it looked for the template – in the adminapp and in the auth app:
…\.venv\lib\site-packages\django\contrib\admin\templates\home.html
…\.venv\lib\site-packages\django\contrib\auth\templates\home.html
You need to create the template and tell Django how to find it. You will dothat in the next exercise.
24 | LESSON 1: Getting Started with Django
EVALUATION COPY: Not to be used in class.
Exercise 4: Templates 30 to 45 minutes
The settings file contains a TEMPLATES constant, which contains an empty DIRS list and anAPP_DIRS boolean set to True:
TEMPLATES = [{
'BACKEND': 'django.template.backends.django.DjangoTemplates','DIRS': [],'APP_DIRS': True,…
},]
The empty DIRS list, which you will soon add to, tells Django where to look for templates.If APP_DIRS is True, Django will also look in each app folder for a templates directory, whichis what you want.
You want to create a project-level templates directory and tell Django to look for templatesthere too.
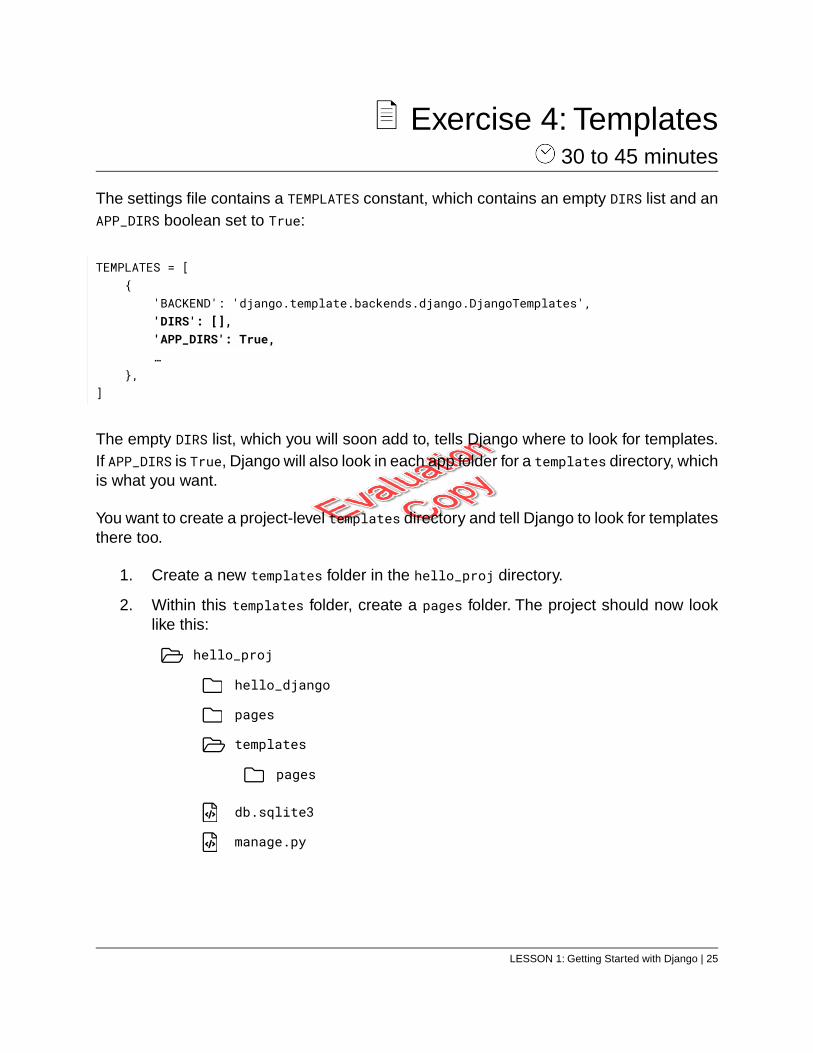
1. Create a new templates folder in the hello_proj directory.
2. Within this templates folder, create a pages folder. The project should now looklike this:
hello_proj
hello_django
pages
templates
pages
db.sqlite3
manage.py
LESSON 1: Getting Started with Django | 25
3. Within the new pages folder, create a home.html file with the following HTML code:6
Exercise Code 4.1: templates/pages/home.html
<!DOCTYPE html>1.<html lang="en">2.<head>3.<meta charset="UTF-8">4.<meta name="viewport" content="width=device-width, initial-scale=1">5.<title>Hello, Django!</title>6.</head>7.<body>8.<p>Hello, Django!</p>9.</body>10.</html>11.
4. Add the following to the DIRS value of the dictionary in TEMPLATES:
'DIRS': [BASE_DIR / 'templates'],
To understand exactly what this does, open the shell in the project directory in anew terminal:
(.venv) …/projects/hello_proj> python manage.py shell
VS Code Tip
In Visual Studio Code, right-click a folder in the Explorer panel and selectOpen in Integrated Terminal to open a new terminal:
6. Don’t want to type? Copy from starter-code/getting-started/home.html.
26 | LESSON 1: Getting Started with Django
EVALUATION COPY: Not to be used in class.
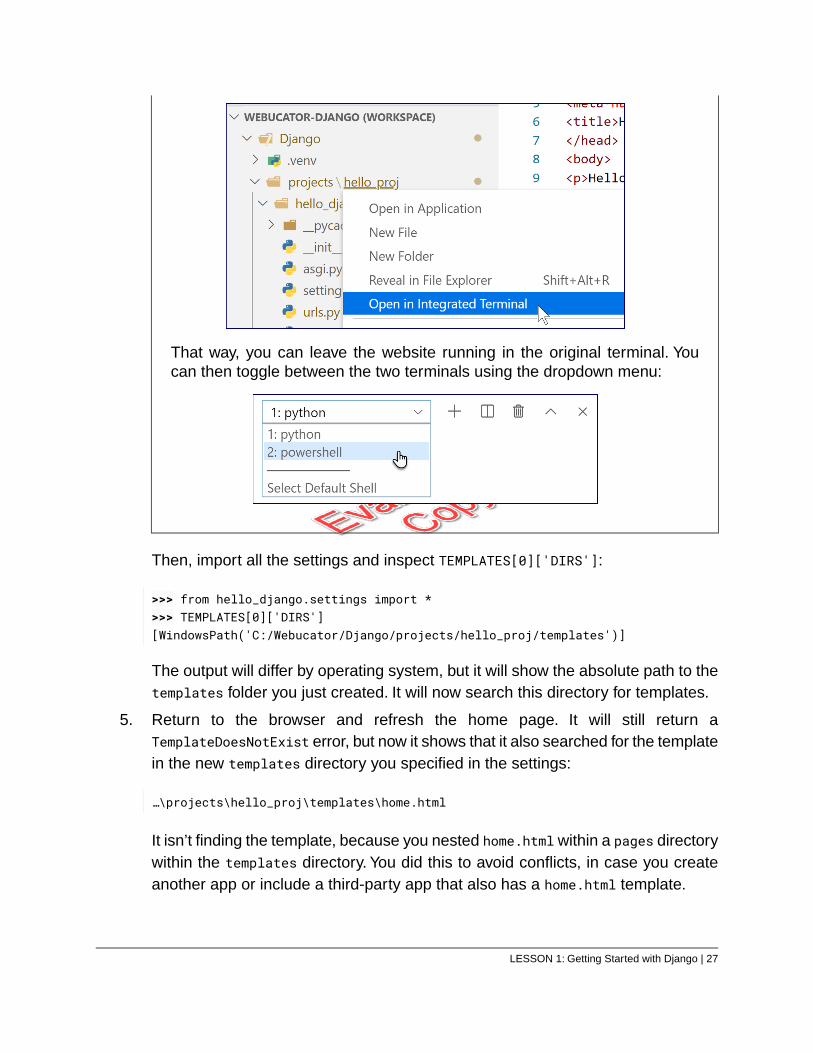
That way, you can leave the website running in the original terminal. Youcan then toggle between the two terminals using the dropdown menu:
Then, import all the settings and inspect TEMPLATES[0]['DIRS']:
>>> from hello_django.settings import *>>> TEMPLATES[0]['DIRS'][WindowsPath('C:/Webucator/Django/projects/hello_proj/templates')]
The output will differ by operating system, but it will show the absolute path to thetemplates folder you just created. It will now search this directory for templates.
5. Return to the browser and refresh the home page. It will still return aTemplateDoesNotExist error, but now it shows that it also searched for the templatein the new templates directory you specified in the settings:
…\projects\hello_proj\templates\home.html
It isn’t finding the template, because you nested home.html within a pages directorywithin the templates directory. You did this to avoid conflicts, in case you createanother app or include a third-party app that also has a home.html template.
LESSON 1: Getting Started with Django | 27
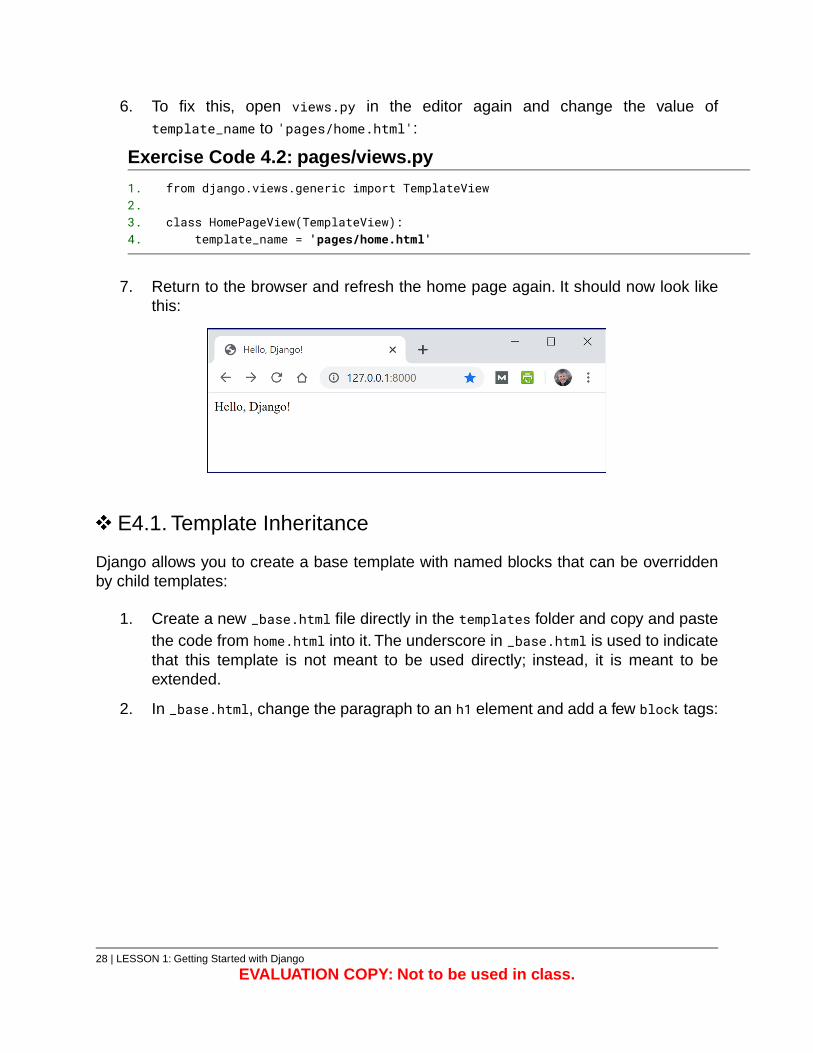
6. To fix this, open views.py in the editor again and change the value oftemplate_name to 'pages/home.html':
Exercise Code 4.2: pages/views.py
from django.views.generic import TemplateView1.2.
class HomePageView(TemplateView):3.template_name = 'pages/home.html'4.
7. Return to the browser and refresh the home page again. It should now look likethis:
E4.1. Template Inheritance
Django allows you to create a base template with named blocks that can be overriddenby child templates:
1. Create a new _base.html file directly in the templates folder and copy and pastethe code from home.html into it. The underscore in _base.html is used to indicatethat this template is not meant to be used directly; instead, it is meant to beextended.
2. In _base.html, change the paragraph to an h1 element and add a few block tags:
28 | LESSON 1: Getting Started with Django
EVALUATION COPY: Not to be used in class.
Exercise Code 4.3: templates/_base.html
<!DOCTYPE html>1.<html lang="en">2.<head>3.<meta charset="UTF-8">4.<meta name="viewport" content="width=device-width, initial-scale=1">5.<title>{% block title %}{% endblock %} | Hello, Django!</title>6.</head>7.<body>8.<h1>{% block header %}Hello, Django!{% endblock %}</h1>9.<main>10.{% block main %}{% endblock %}11.
</main>12.</body>13.</html>14.
Notice the file has three blocks defined and that only the header block containsdefault content:
A. {% block title %}{% endblock %}
B. {% block header %}Hello, Django!{% endblock %}
C. {% block main %}{% endblock %}
3. Replace the contents of pages/home.html with the following:
Exercise Code 4.4: templates/pages/home.html
{% extends "_base.html" %}1.2.
{% block title %}Home{% endblock %}3.{% block main %}4.<p>Thank you for visiting our site!</p>5.
{% endblock %}6.
4. Return to your browser and refresh the page. It should now look like this:
LESSON 1: Getting Started with Django | 29
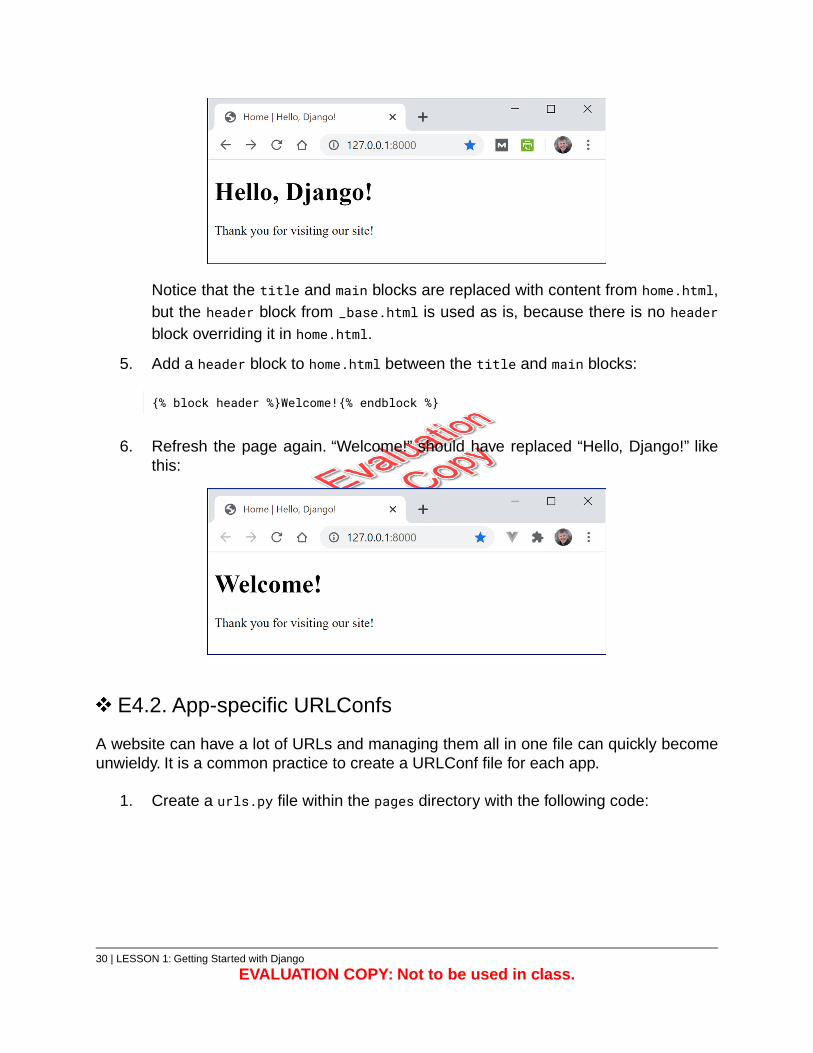
Notice that the title and main blocks are replaced with content from home.html,but the header block from _base.html is used as is, because there is no headerblock overriding it in home.html.
5. Add a header block to home.html between the title and main blocks:
{% block header %}Welcome!{% endblock %}
6. Refresh the page again. “Welcome!” should have replaced “Hello, Django!” likethis:
E4.2. App-specific URLConfs
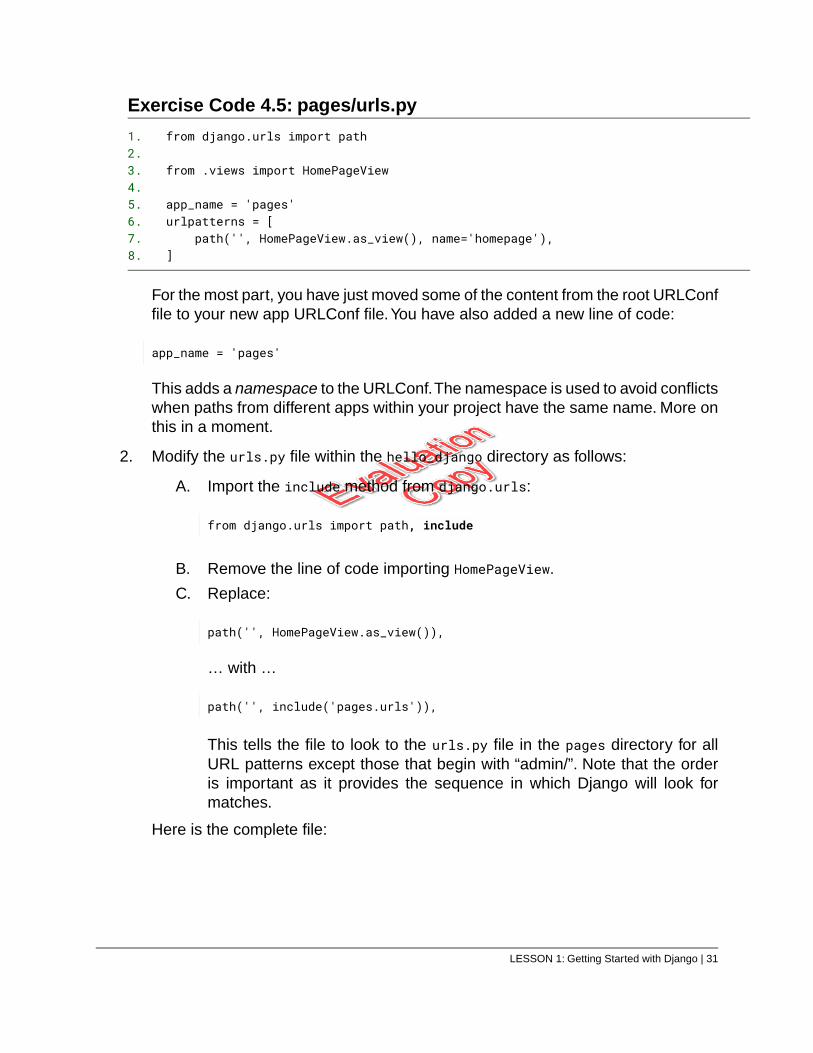
A website can have a lot of URLs and managing them all in one file can quickly becomeunwieldy. It is a common practice to create a URLConf file for each app.
1. Create a urls.py file within the pages directory with the following code:
30 | LESSON 1: Getting Started with Django
EVALUATION COPY: Not to be used in class.
Exercise Code 4.5: pages/urls.py
from django.urls import path1.2.
from .views import HomePageView3.4.
app_name = 'pages'5.urlpatterns = [6.
path('', HomePageView.as_view(), name='homepage'),7.]8.
For the most part, you have just moved some of the content from the root URLConffile to your new app URLConf file.You have also added a new line of code:
app_name = 'pages'
This adds a namespace to the URLConf.The namespace is used to avoid conflictswhen paths from different apps within your project have the same name. More onthis in a moment.
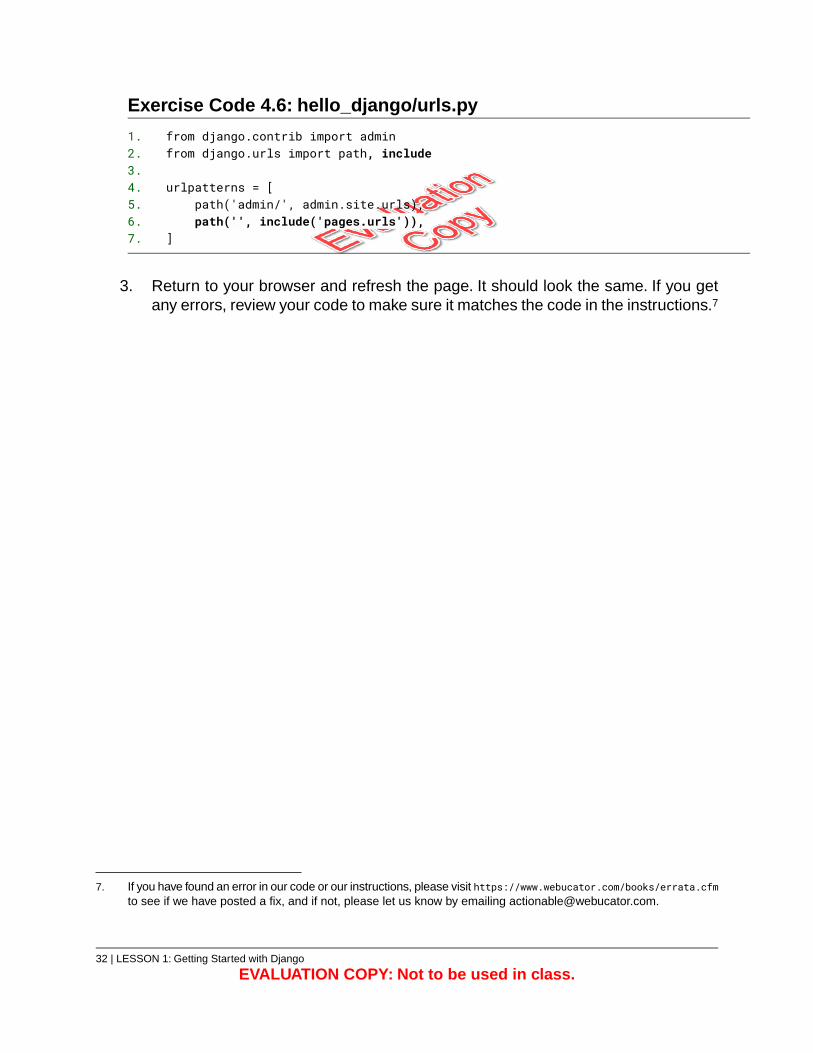
2. Modify the urls.py file within the hello_django directory as follows:
A. Import the include method from django.urls:
from django.urls import path, include
B. Remove the line of code importing HomePageView.
C. Replace:
path('', HomePageView.as_view()),
… with …
path('', include('pages.urls')),
This tells the file to look to the urls.py file in the pages directory for allURL patterns except those that begin with “admin/”. Note that the orderis important as it provides the sequence in which Django will look formatches.
Here is the complete file:
LESSON 1: Getting Started with Django | 31
Exercise Code 4.6: hello_django/urls.py
from django.contrib import admin1.from django.urls import path, include2.
3.urlpatterns = [4.
path('admin/', admin.site.urls),5.path('', include('pages.urls')),6.
]7.
3. Return to your browser and refresh the page. It should look the same. If you getany errors, review your code to make sure it matches the code in the instructions.7
7. If you have found an error in our code or our instructions, please visit https://www.webucator.com/books/errata.cfmto see if we have posted a fix, and if not, please let us know by emailing [email protected].
32 | LESSON 1: Getting Started with Django
EVALUATION COPY: Not to be used in class.
Exercise 5: Creating an About Us Page 15 to 25 minutes
Now that you have your pages app, follow these steps to create a new About-Us page:
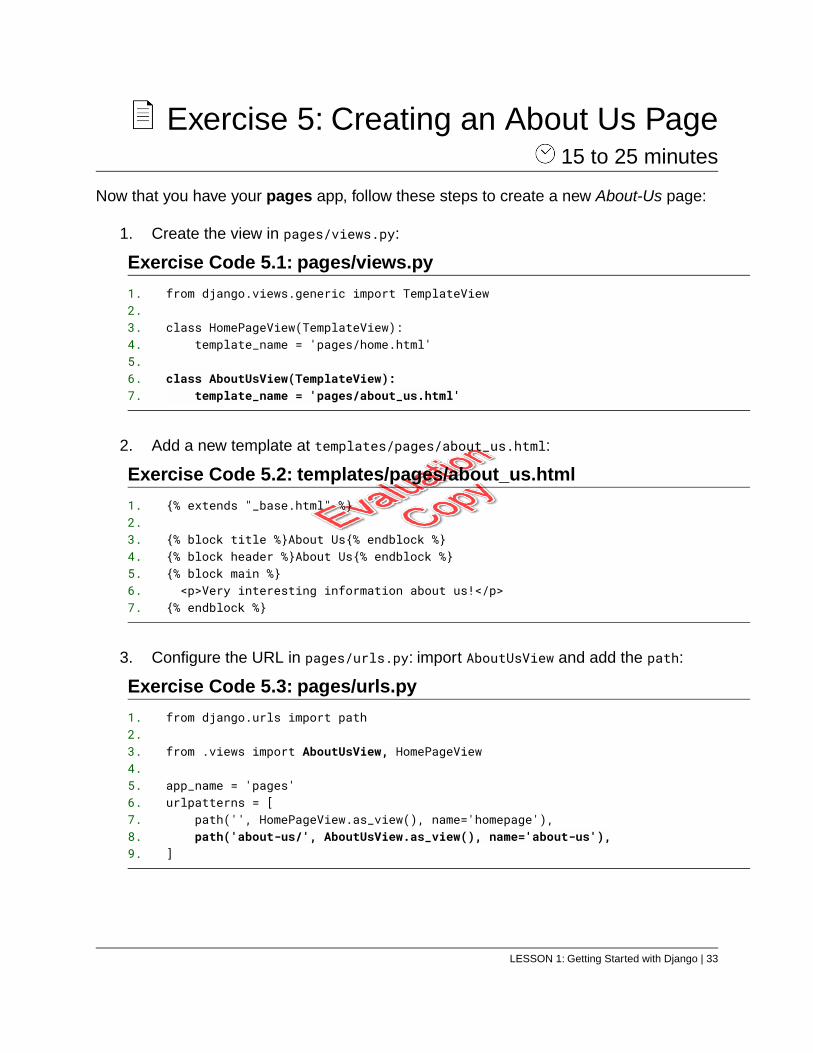
1. Create the view in pages/views.py:
Exercise Code 5.1: pages/views.py
from django.views.generic import TemplateView1.2.
class HomePageView(TemplateView):3.template_name = 'pages/home.html'4.
5.class AboutUsView(TemplateView):6.
template_name = 'pages/about_us.html'7.
2. Add a new template at templates/pages/about_us.html:
Exercise Code 5.2: templates/pages/about_us.html
{% extends "_base.html" %}1.2.
{% block title %}About Us{% endblock %}3.{% block header %}About Us{% endblock %}4.{% block main %}5.<p>Very interesting information about us!</p>6.
{% endblock %}7.
3. Configure the URL in pages/urls.py: import AboutUsView and add the path:
Exercise Code 5.3: pages/urls.py
from django.urls import path1.2.
from .views import AboutUsView, HomePageView3.4.
app_name = 'pages'5.urlpatterns = [6.
path('', HomePageView.as_view(), name='homepage'),7.path('about-us/', AboutUsView.as_view(), name='about-us'),8.
]9.
LESSON 1: Getting Started with Django | 33
4. If you have stopped the server, start it back up again by running the followingcommand from the hello_proj directory:
(.venv) …/projects/hello_proj> python manage.py runserver
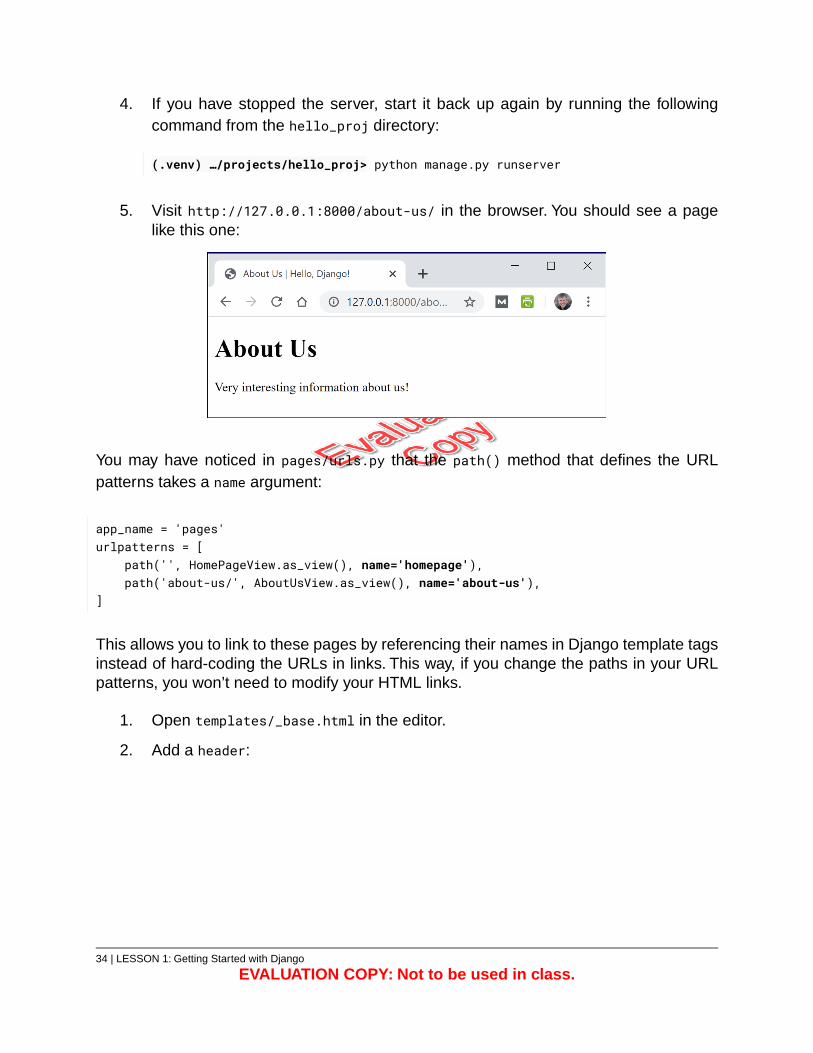
5. Visit http://127.0.0.1:8000/about-us/ in the browser. You should see a pagelike this one:
You may have noticed in pages/urls.py that the path() method that defines the URLpatterns takes a name argument:
app_name = 'pages'urlpatterns = [
path('', HomePageView.as_view(), name='homepage'),path('about-us/', AboutUsView.as_view(), name='about-us'),
]
This allows you to link to these pages by referencing their names in Django template tagsinstead of hard-coding the URLs in links. This way, if you change the paths in your URLpatterns, you won’t need to modify your HTML links.
1. Open templates/_base.html in the editor.
2. Add a header:
34 | LESSON 1: Getting Started with Django
EVALUATION COPY: Not to be used in class.
Exercise Code 5.4: templates/_base.html
<!DOCTYPE html>1.<html lang="en">2.<head>3.<meta charset="UTF-8">4.<meta name="viewport" content="width=device-width, initial-scale=1">5.<title>{% block title %}{% endblock %} | Hello, Django!</title>6.</head>7.<body>8.<header>9.<a href="{% url 'pages:homepage' %}">Home</a> |10.<a href="{% url 'pages:about-us' %}">About</a>11.
</header>12.<h1>{% block header %}Hello, Django!{% endblock %}</h1>13.<main>14.{% block main %}{% endblock %}15.
</main>16.</body>17.</html>18.
Notice the syntax of the URL tags:
{% url 'namespace:url-pattern-name' %}
where url-pattern-name is the name given to a URL pattern and namespace is thenamespace given to the URLConf.
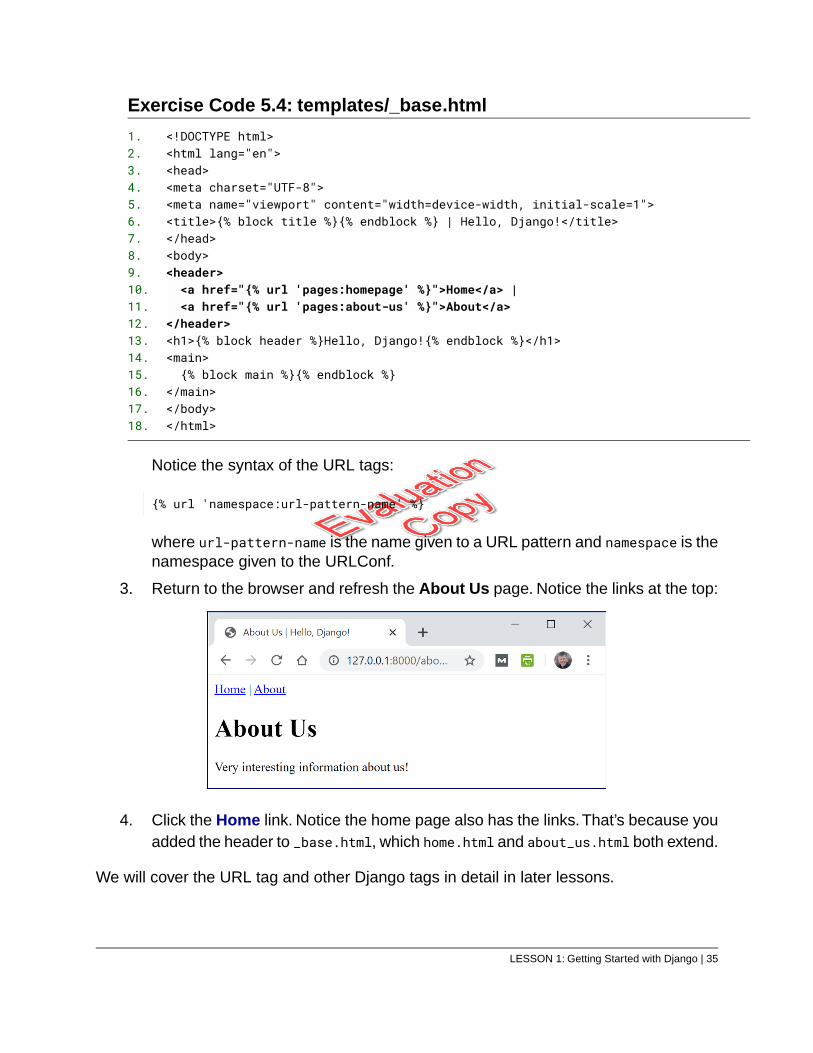
3. Return to the browser and refresh the About Us page. Notice the links at the top:
4. Click the Home link. Notice the home page also has the links.That’s because youadded the header to _base.html, which home.html and about_us.html both extend.
We will cover the URL tag and other Django tags in detail in later lessons.
LESSON 1: Getting Started with Django | 35
Conclusion
In this lesson, you have learned to install Django within a virtual environment and havecreated your first Django application. The completed project for this lesson is available insolutions/getting-started/hello_proj.
36 | LESSON 1: Getting Started with Django
EVALUATION COPY: Not to be used in class.

LESSON 2Git, GitHub, and an App with a Model
Topics Covered
Git and GitHub.
Django Models.
Migrations.
Introduction
In this lesson, you will create a full jokes app and learn to use version control to back itup. You will touch on many different pieces of a Django application and learn the majorsteps in building a Django app. In later lessons, we will dig deeper into each of the individualpieces.
❋
2.1. djangojokes.com
Throughout these lessons, you will build an app that is based on https://www.djangojokes.com:
LESSON 2: Git, GitHub, and an App with a Model | 37
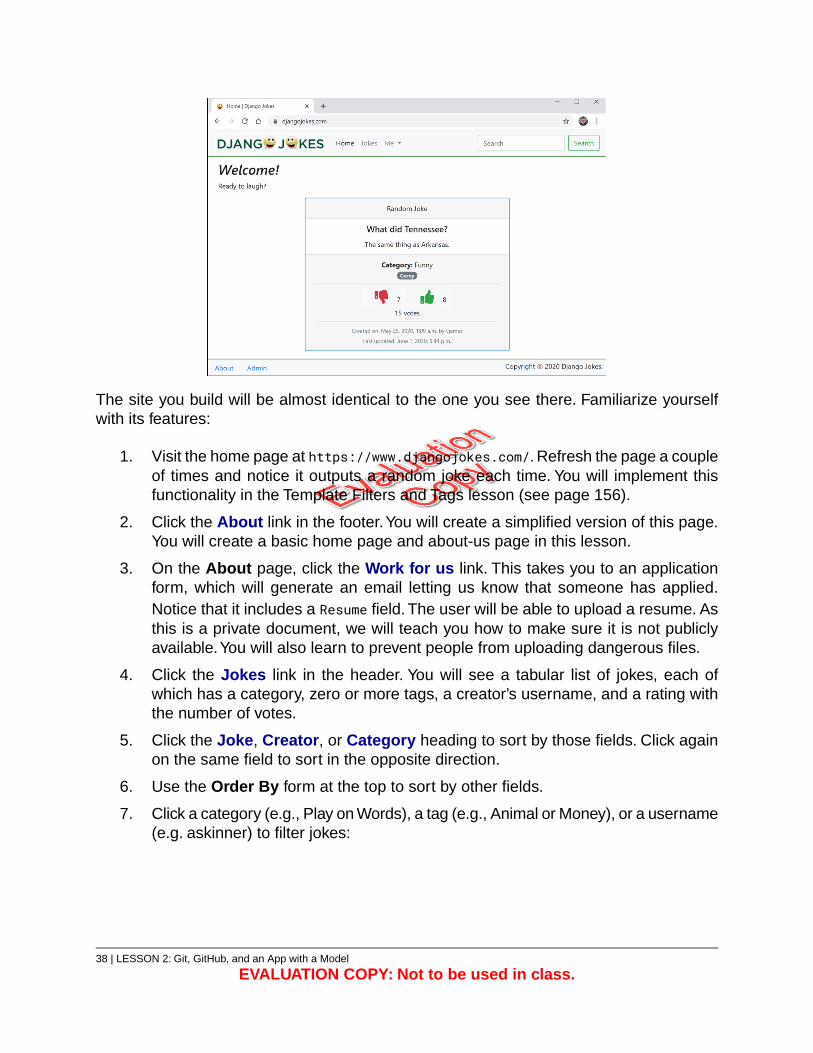
The site you build will be almost identical to the one you see there. Familiarize yourselfwith its features:
1. Visit the home page at https://www.djangojokes.com/. Refresh the page a coupleof times and notice it outputs a random joke each time. You will implement thisfunctionality in the Template Filters and Tags lesson (see page 156).
2. Click the About link in the footer.You will create a simplified version of this page.You will create a basic home page and about-us page in this lesson.
3. On the About page, click the Work for us link. This takes you to an applicationform, which will generate an email letting us know that someone has applied.Notice that it includes a Resume field. The user will be able to upload a resume. Asthis is a private document, we will teach you how to make sure it is not publiclyavailable.You will also learn to prevent people from uploading dangerous files.
4. Click the Jokes link in the header. You will see a tabular list of jokes, each ofwhich has a category, zero or more tags, a creator’s username, and a rating withthe number of votes.
5. Click the Joke, Creator, or Category heading to sort by those fields. Click againon the same field to sort in the opposite direction.
6. Use the Order By form at the top to sort by other fields.
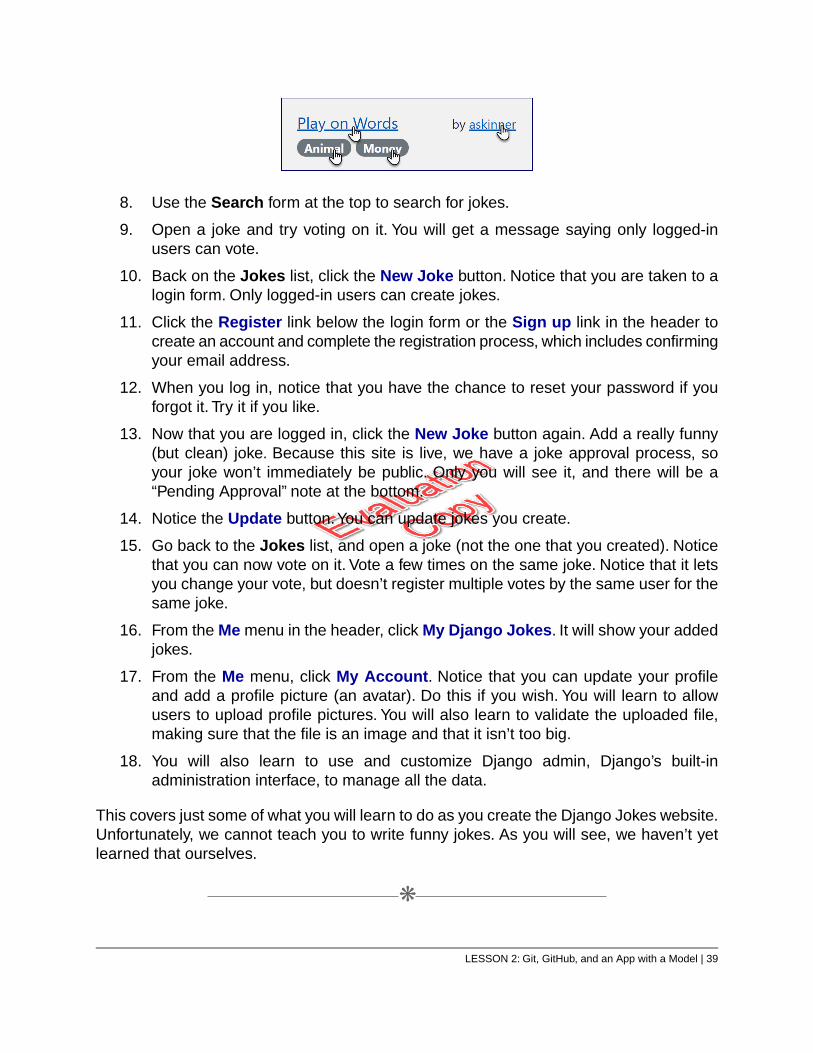
7. Click a category (e.g., Play on Words), a tag (e.g., Animal or Money), or a username(e.g. askinner) to filter jokes:
38 | LESSON 2: Git, GitHub, and an App with a Model
EVALUATION COPY: Not to be used in class.
8. Use the Search form at the top to search for jokes.
9. Open a joke and try voting on it. You will get a message saying only logged-inusers can vote.
10. Back on the Jokes list, click the New Joke button. Notice that you are taken to alogin form. Only logged-in users can create jokes.
11. Click the Register link below the login form or the Sign up link in the header tocreate an account and complete the registration process, which includes confirmingyour email address.
12. When you log in, notice that you have the chance to reset your password if youforgot it. Try it if you like.
13. Now that you are logged in, click the New Joke button again. Add a really funny(but clean) joke. Because this site is live, we have a joke approval process, soyour joke won’t immediately be public. Only you will see it, and there will be a“Pending Approval” note at the bottom.
14. Notice the Update button.You can update jokes you create.
15. Go back to the Jokes list, and open a joke (not the one that you created). Noticethat you can now vote on it. Vote a few times on the same joke. Notice that it letsyou change your vote, but doesn’t register multiple votes by the same user for thesame joke.
16. From the Me menu in the header, click My Django Jokes. It will show your addedjokes.
17. From the Me menu, click My Account. Notice that you can update your profileand add a profile picture (an avatar). Do this if you wish. You will learn to allowusers to upload profile pictures. You will also learn to validate the uploaded file,making sure that the file is an image and that it isn’t too big.
18. You will also learn to use and customize Django admin, Django’s built-inadministration interface, to manage all the data.
This covers just some of what you will learn to do as you create the Django Jokes website.Unfortunately, we cannot teach you to write funny jokes. As you will see, we haven’t yetlearned that ourselves.
❋
LESSON 2: Git, GitHub, and an App with a Model | 39
2.2. Version Control Systems, Git, and GitHub
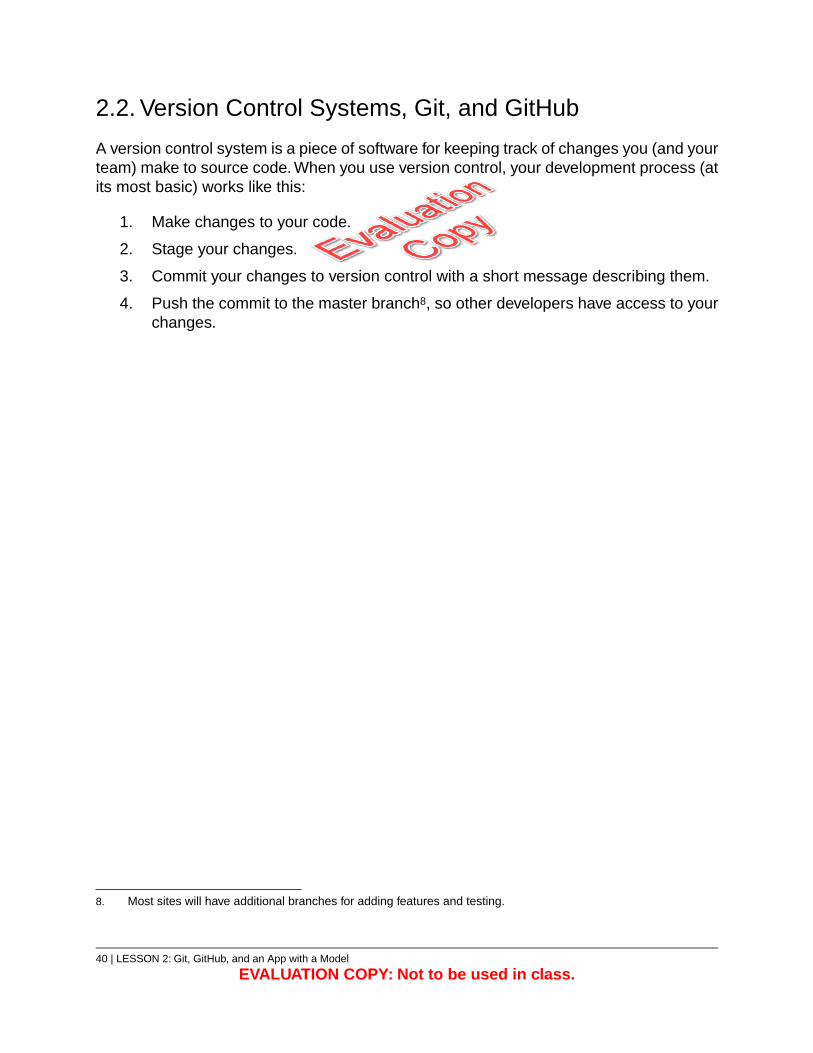
A version control system is a piece of software for keeping track of changes you (and yourteam) make to source code. When you use version control, your development process (atits most basic) works like this:
1. Make changes to your code.
2. Stage your changes.
3. Commit your changes to version control with a short message describing them.
4. Push the commit to the master branch8, so other developers have access to yourchanges.
8. Most sites will have additional branches for adding features and testing.
40 | LESSON 2: Git, GitHub, and an App with a Model
EVALUATION COPY: Not to be used in class.

Exercise 6: Setting Up VS Code, Git, andGitHub
45 to 60 minutes
In this exercise, you will:
1. Sign up for a GitHub account and create a repository.
2. Create a new workspace in Visual Studio Code.
3. Download and install Git.
4. Get the GitHub Pull Requests and Issues extension for Visual Studio Code.
5. Clone the GitHub repository you created on your local machine.
6. Make a change to a file in the repository.
7. Stage that change. When you stage changes, you are indicating that thosechanges are ready to commit. This does not mean that they are ready forproduction. It only means that you are ready to commit those changes to versioncontrol for safe keeping.
8. Make your first Git commit.Your files will be added to version control.
9. Push your changes to the master branch. The master branch is the main branch– the one that will be used in production. You can create other branches off ofmaster that allow you to work on new features without affecting production, butfor our purposes, we will just stick with the one branch. After you push your changesto master, you will be able to see them on GitHub.
E6.1. Create a GitHub Account and Repository
1. Follow the instructions at https://bit.ly/github-signup to sign up for a newGitHub account. For our purposes, the free tier will work fine.
2. Once you have created you GitHub account, log into it.
3. Next to the Repositories header on the left, click New:
LESSON 2: Git, GitHub, and an App with a Model | 41
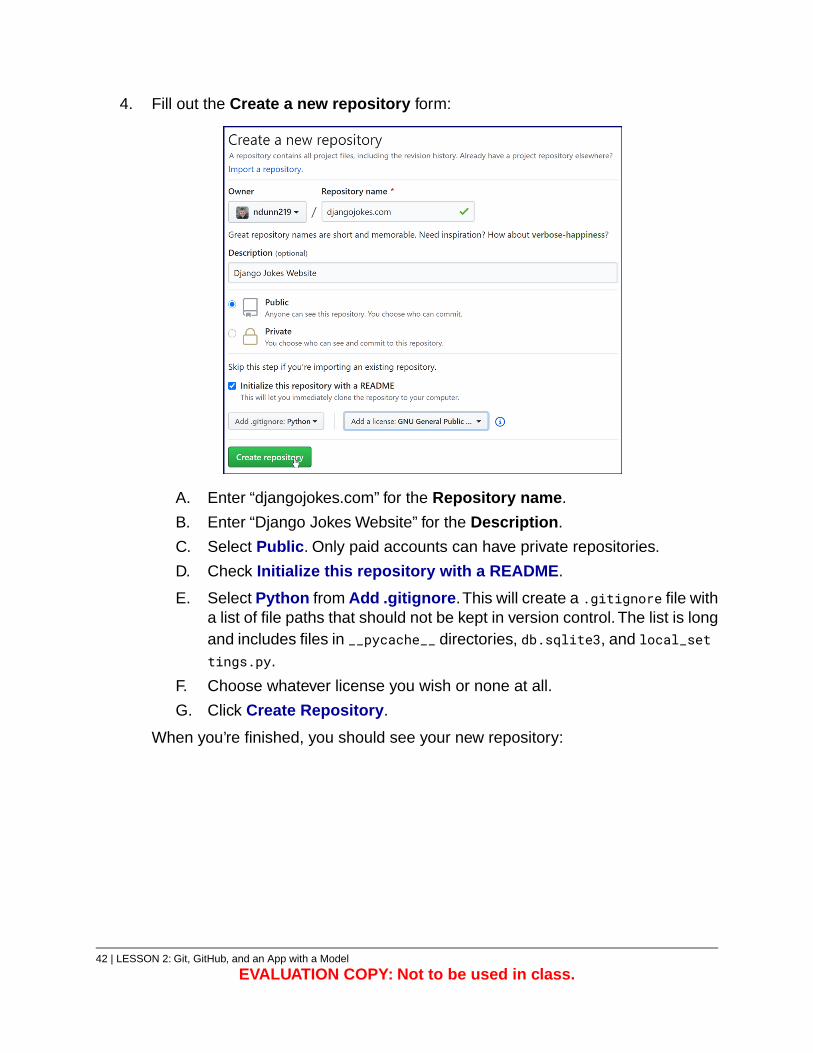
4. Fill out the Create a new repository form:
A. Enter “djangojokes.com” for the Repository name.
B. Enter “Django Jokes Website” for the Description.
C. Select Public. Only paid accounts can have private repositories.
D. Check Initialize this repository with a README.
E. Select Python from Add .gitignore.This will create a .gitignore file witha list of file paths that should not be kept in version control. The list is longand includes files in __pycache__ directories, db.sqlite3, and local_settings.py.
F. Choose whatever license you wish or none at all.
G. Click Create Repository.
When you’re finished, you should see your new repository:
42 | LESSON 2: Git, GitHub, and an App with a Model
EVALUATION COPY: Not to be used in class.
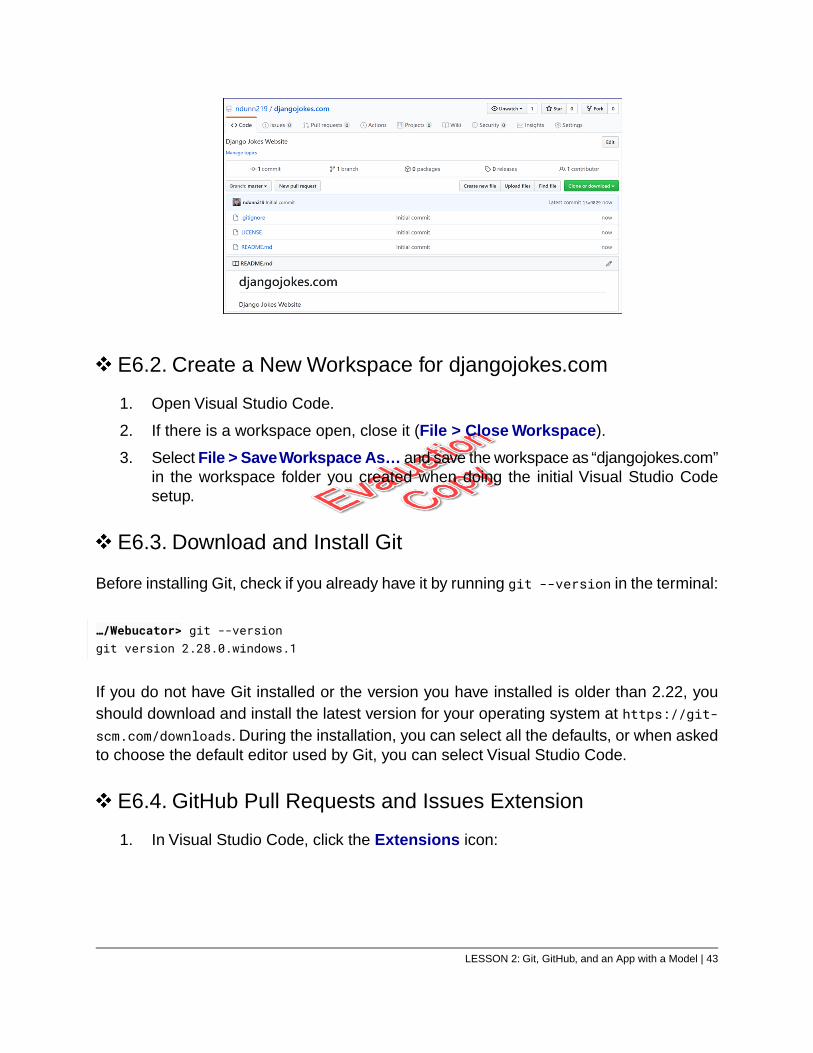
E6.2. Create a New Workspace for djangojokes.com
1. Open Visual Studio Code.
2. If there is a workspace open, close it (File > Close Workspace).
3. Select File > Save Workspace As… and save the workspace as “djangojokes.com”in the workspace folder you created when doing the initial Visual Studio Codesetup.
E6.3. Download and Install Git
Before installing Git, check if you already have it by running git --version in the terminal:
…/Webucator> git --versiongit version 2.28.0.windows.1
If you do not have Git installed or the version you have installed is older than 2.22, youshould download and install the latest version for your operating system at https://git-scm.com/downloads. During the installation, you can select all the defaults, or when askedto choose the default editor used by Git, you can select Visual Studio Code.
E6.4. GitHub Pull Requests and Issues Extension
1. In Visual Studio Code, click the Extensions icon:
LESSON 2: Git, GitHub, and an App with a Model | 43
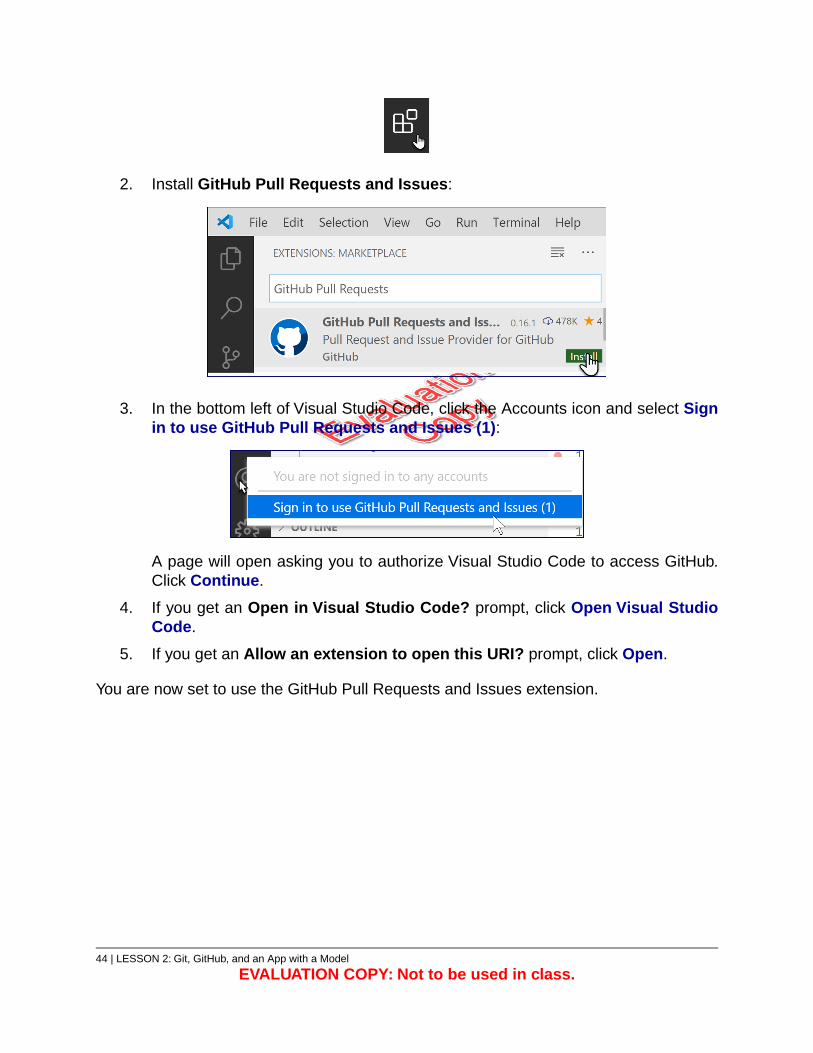
2. Install GitHub Pull Requests and Issues:
3. In the bottom left of Visual Studio Code, click the Accounts icon and select Signin to use GitHub Pull Requests and Issues (1):
A page will open asking you to authorize Visual Studio Code to access GitHub.Click Continue.
4. If you get an Open in Visual Studio Code? prompt, click Open Visual StudioCode.
5. If you get an Allow an extension to open this URI? prompt, click Open.
You are now set to use the GitHub Pull Requests and Issues extension.
44 | LESSON 2: Git, GitHub, and an App with a Model
EVALUATION COPY: Not to be used in class.
E6.5. Clone Your GitHub Repository
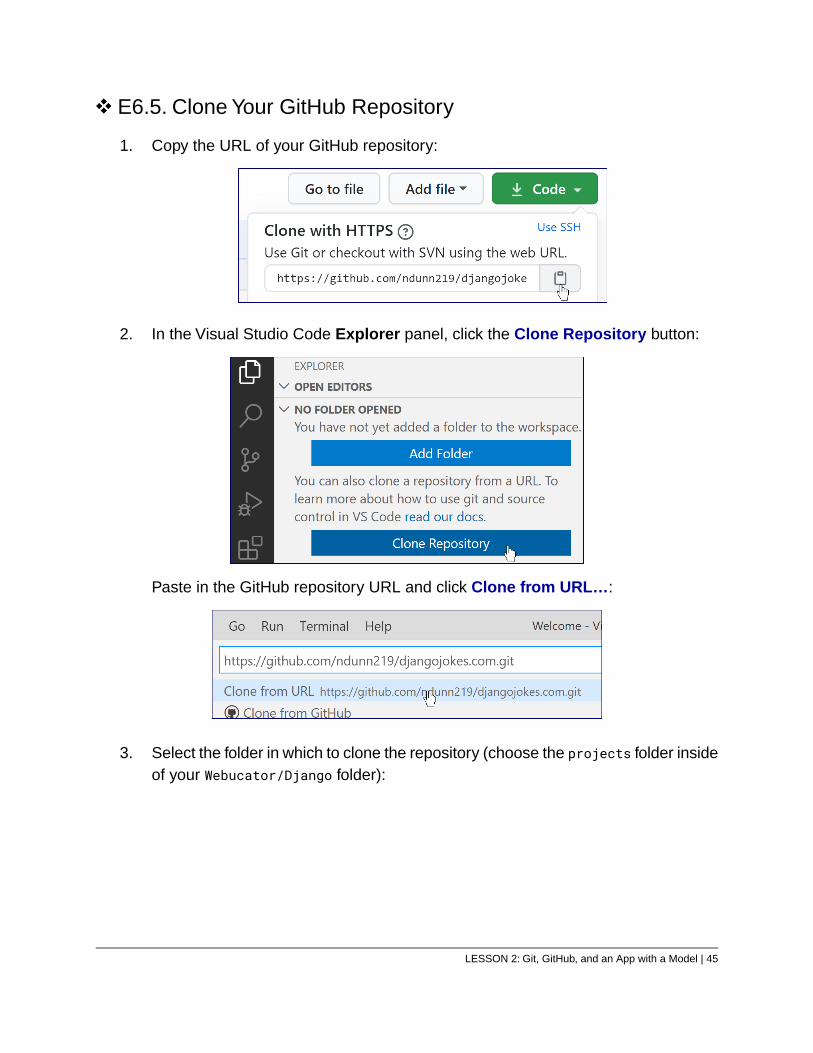
1. Copy the URL of your GitHub repository:
2. In the Visual Studio Code Explorer panel, click the Clone Repository button:
Paste in the GitHub repository URL and click Clone from URL…:
3. Select the folder in which to clone the repository (choose the projects folder insideof your Webucator/Django folder):
LESSON 2: Git, GitHub, and an App with a Model | 45
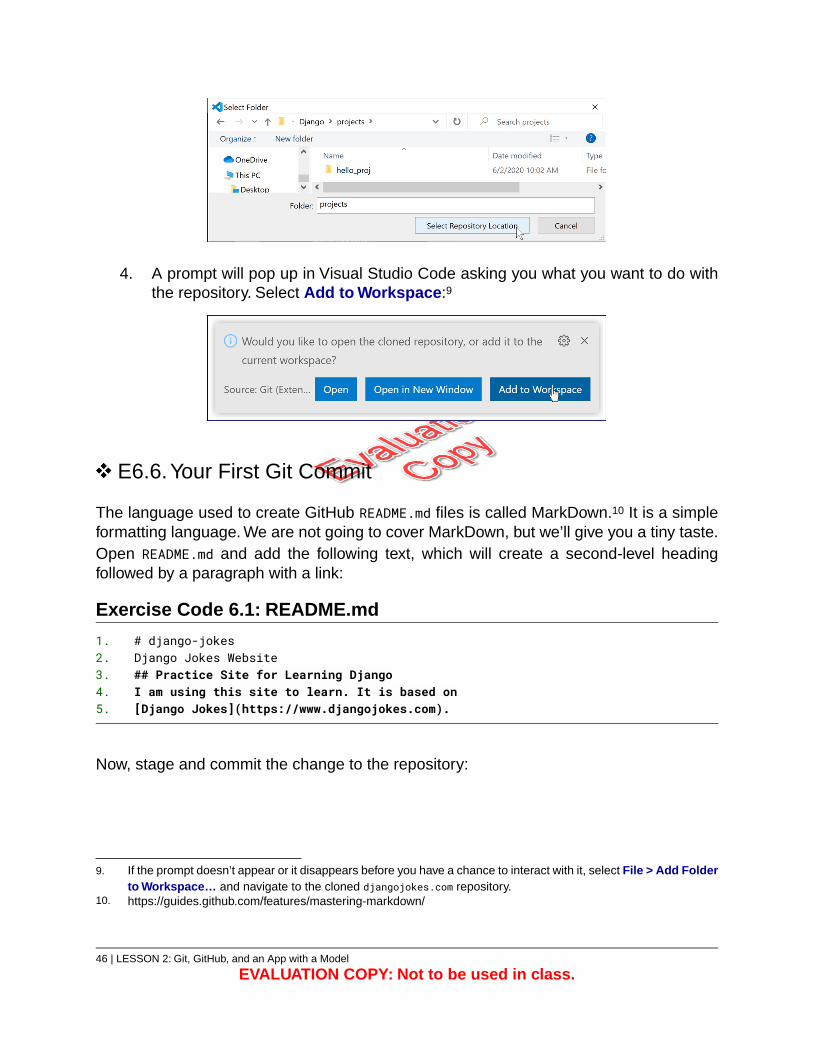
4. A prompt will pop up in Visual Studio Code asking you what you want to do withthe repository. Select Add to Workspace:9
E6.6.Your First Git Commit
The language used to create GitHub README.md files is called MarkDown.10 It is a simpleformatting language. We are not going to cover MarkDown, but we’ll give you a tiny taste.Open README.md and add the following text, which will create a second-level headingfollowed by a paragraph with a link:
Exercise Code 6.1: README.md
# django-jokes1.Django Jokes Website2.## Practice Site for Learning Django3.I am using this site to learn. It is based on4.[Django Jokes](https://www.djangojokes.com).5.
Now, stage and commit the change to the repository:
9. If the prompt doesn’t appear or it disappears before you have a chance to interact with it, select File > Add Folderto Workspace… and navigate to the cloned djangojokes.com repository.
10. https://guides.github.com/features/mastering-markdown/
46 | LESSON 2: Git, GitHub, and an App with a Model
EVALUATION COPY: Not to be used in class.
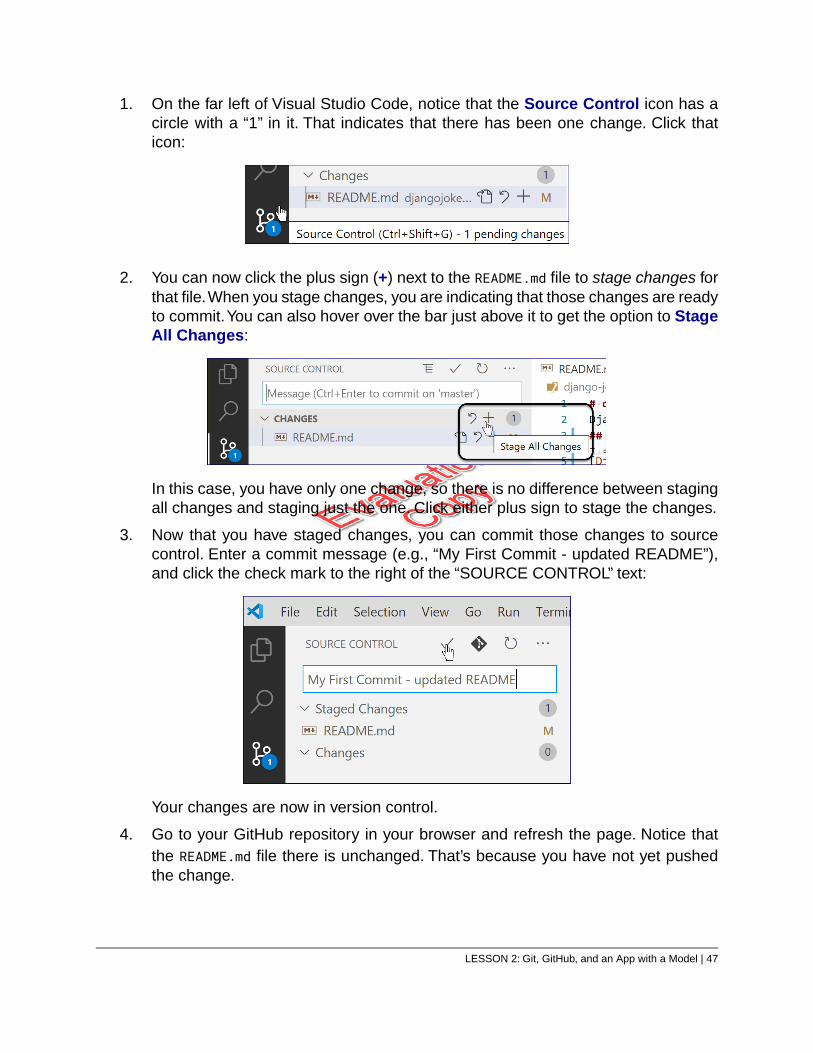
1. On the far left of Visual Studio Code, notice that the Source Control icon has acircle with a “1” in it. That indicates that there has been one change. Click thaticon:
2. You can now click the plus sign (+) next to the README.md file to stage changes forthat file.When you stage changes, you are indicating that those changes are readyto commit.You can also hover over the bar just above it to get the option to StageAll Changes:
In this case, you have only one change, so there is no difference between stagingall changes and staging just the one. Click either plus sign to stage the changes.
3. Now that you have staged changes, you can commit those changes to sourcecontrol. Enter a commit message (e.g., “My First Commit - updated README”),and click the check mark to the right of the “SOURCE CONTROL” text:
Your changes are now in version control.
4. Go to your GitHub repository in your browser and refresh the page. Notice thatthe README.md file there is unchanged. That’s because you have not yet pushedthe change.
LESSON 2: Git, GitHub, and an App with a Model | 47
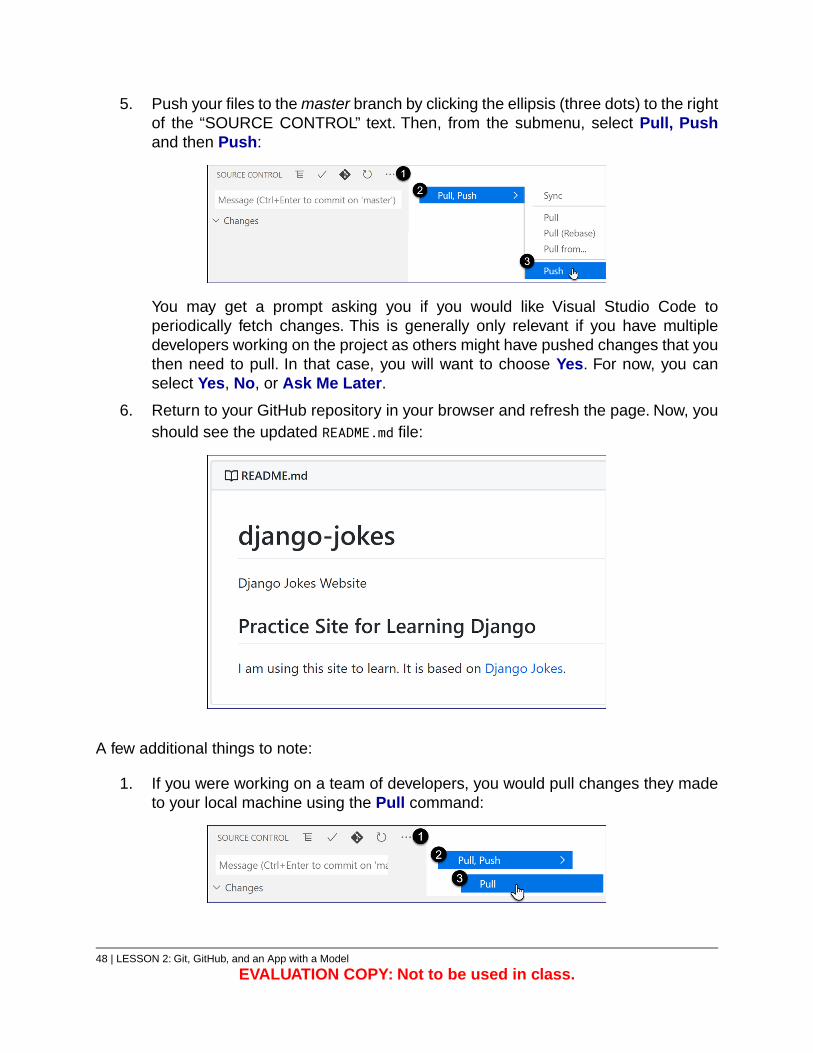
5. Push your files to the master branch by clicking the ellipsis (three dots) to the rightof the “SOURCE CONTROL” text. Then, from the submenu, select Pull, Pushand then Push:
You may get a prompt asking you if you would like Visual Studio Code toperiodically fetch changes. This is generally only relevant if you have multipledevelopers working on the project as others might have pushed changes that youthen need to pull. In that case, you will want to choose Yes. For now, you canselect Yes, No, or Ask Me Later.
6. Return to your GitHub repository in your browser and refresh the page. Now, youshould see the updated README.md file:
A few additional things to note:
1. If you were working on a team of developers, you would pull changes they madeto your local machine using the Pull command:
48 | LESSON 2: Git, GitHub, and an App with a Model
EVALUATION COPY: Not to be used in class.

2. In a team environment, and even when you’re working alone on a larger project,you might have multiple branches. In this case, you could use the Push to…command to choose the branch to push to:
3. If you don’t want to have to explicitly stage your changes before committing, youcan skip the staging step, and just click the Commit check mark. The first timeyou do it, you will get a prompt like this one:
Click Always to always auto-stage your changes.
E6.7. Setting Up the Environment
1. In Visual Studio Code, right-click the djangojokes.com folder and select Open inTerminal.
2. Create the virtual environment by running the following command:
…/projects/djangojokes.com> python -m venv .venv
3. You don’t want to commit the .venv folder to version control. It doesn’t containcode you wrote and it’s huge! Among other things, it will contain the Pythoninterpreter, all of the Django code, and every other library you install. Open the.gitignore file in Visual Studio Code and search it for “.venv”. You will find it in a
LESSON 2: Git, GitHub, and an App with a Model | 49

section that contains common virtual environment files and folders. It looks likethis:
# Environments.env.venvenv/venv/ENV/env.bak/venv.bak/
The .gitignore file tells Git what to ignore – that is, what to leave out of versioncontrol. It is a plain text file with one string or regular expression per line. GitHubcreated this one for us, but if you were to create your own, you would want toinclude, at the very least:
__pycache__/.venvlocal_settings.pydb.sqlite3
4. Set the Python Interpreter for the workspace:
A. Select Command Palette from the View menu.
B. Enter “Python: Select Interpreter” and select Python: Select Interpreter:
C. Select Entire workspace:
D. Select the Python executable from the virtual directory you just created:
50 | LESSON 2: Git, GitHub, and an App with a Model
EVALUATION COPY: Not to be used in class.
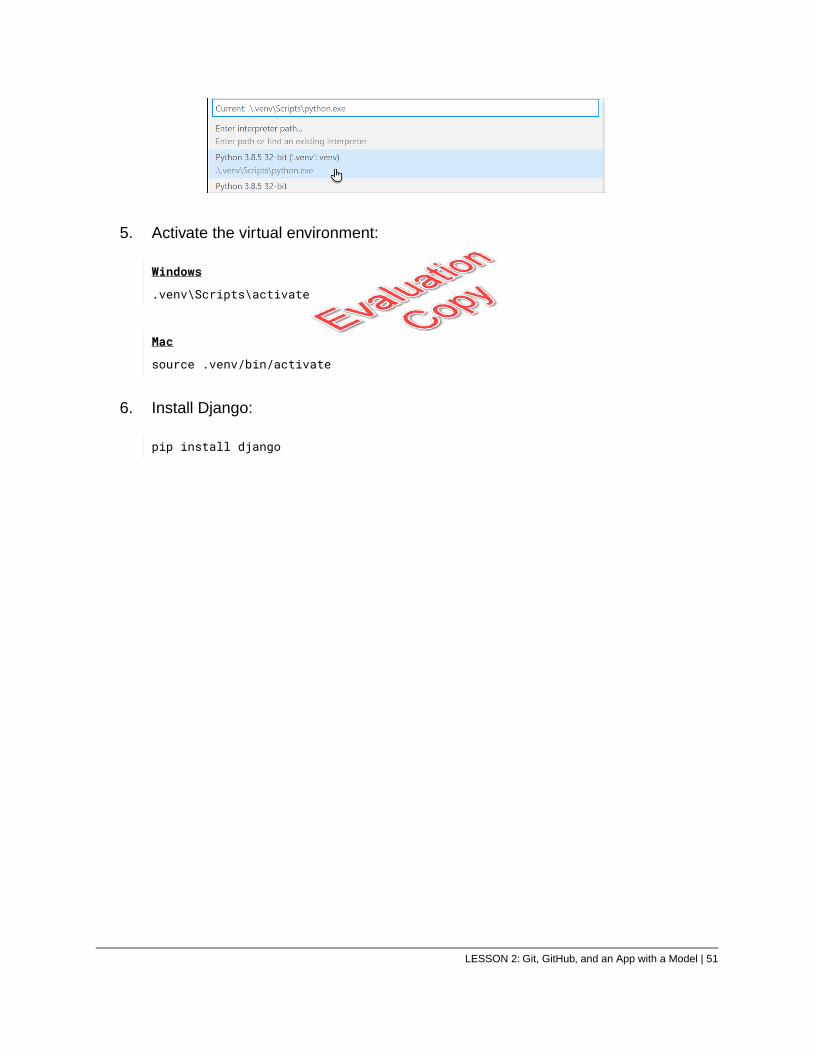
5. Activate the virtual environment:
Windows
.venv\Scripts\activate
Mac
source .venv/bin/activate
6. Install Django:
pip install django
LESSON 2: Git, GitHub, and an App with a Model | 51
Exercise 7: Creating the Project 15 to 25 minutes
1. Open djangojokes.com in the terminal and create the new project by running(Don’t forget the dot at the end):
(.venv) …/projects/djangojokes.com> django-admin startproject djangojokes .
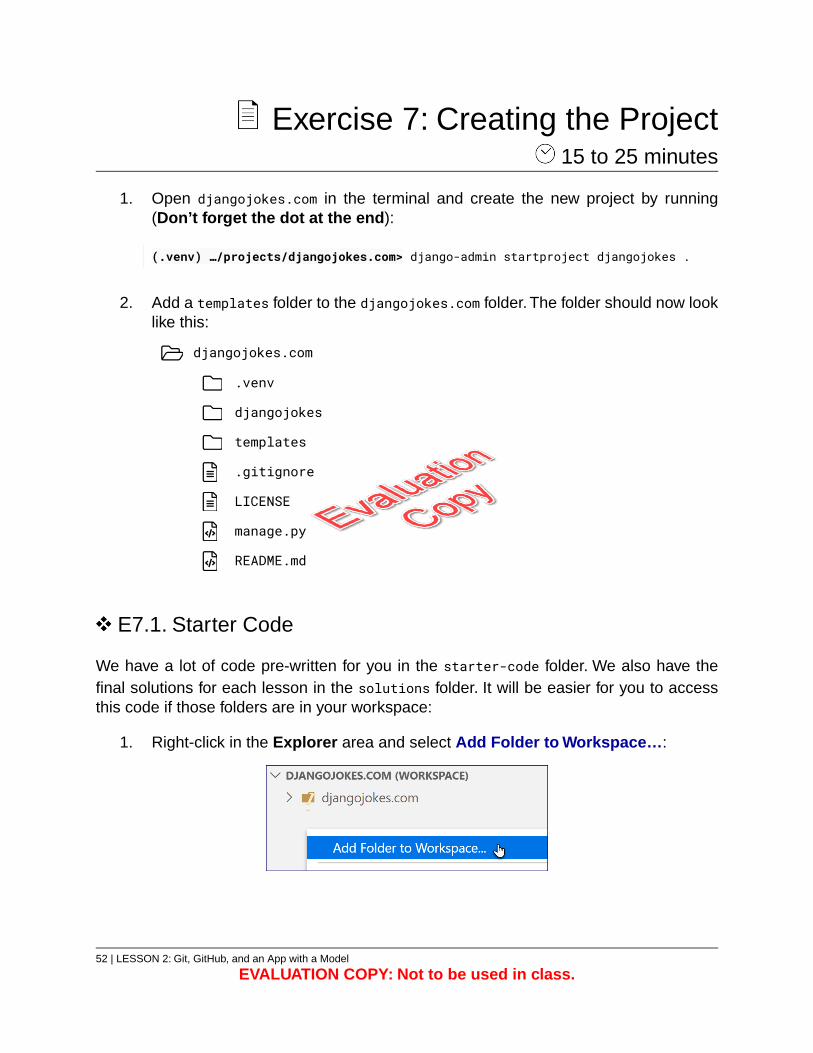
2. Add a templates folder to the djangojokes.com folder. The folder should now looklike this:
djangojokes.com
.venv
djangojokes
templates
.gitignore
LICENSE
manage.py
README.md
E7.1. Starter Code
We have a lot of code pre-written for you in the starter-code folder. We also have thefinal solutions for each lesson in the solutions folder. It will be easier for you to accessthis code if those folders are in your workspace:
1. Right-click in the Explorer area and select Add Folder to Workspace…:
52 | LESSON 2: Git, GitHub, and an App with a Model
EVALUATION COPY: Not to be used in class.
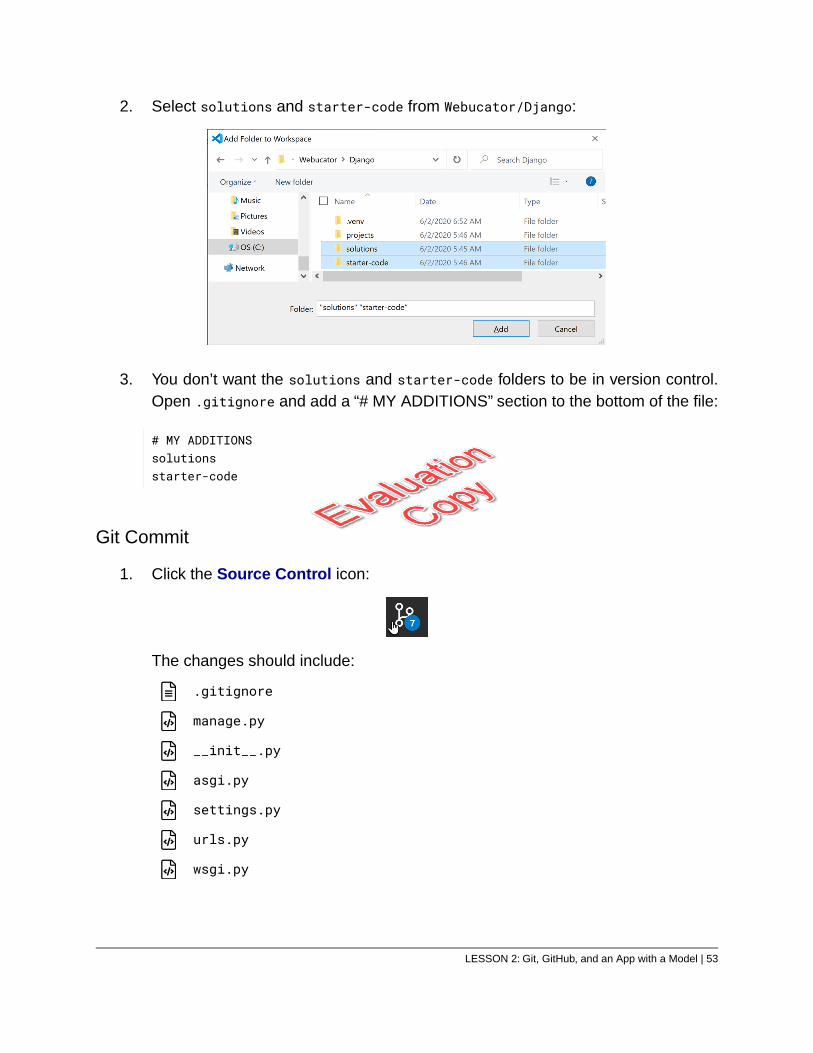
2. Select solutions and starter-code from Webucator/Django:
3. You don’t want the solutions and starter-code folders to be in version control.Open .gitignore and add a “# MY ADDITIONS” section to the bottom of the file:
# MY ADDITIONSsolutionsstarter-code
Git Commit
1. Click the Source Control icon:
The changes should include:
.gitignore
manage.py
__init__.py
asgi.py
settings.py
urls.py
wsgi.py
LESSON 2: Git, GitHub, and an App with a Model | 53
They should not include anything in your solutions or starter-code folders.
2. Add a short message (e.g., “Initial project”), click the “Commit” check, click theellipsis, and select Push.
E7.2. Adding a Base Template
Every project typically will have a base template, which we like to name _base.html. Wehave created one that you can customize as you see fit:
1. Directly in your starter-code folder, you will find a _base.html file. Open_base.html for editing:
A. The _base.html file includes Bootstrap classes. Bootstrap is a popularframework for designing web pages with CSS and JavaScript. You needto add references to the Bootstrap CSS and JavaScript files in _base.html:
i. Visit https://getbootstrap.com.
ii. Click the Get Started button.
iii. Copy the Bootstrap CSS <link> tag on that page and paste it overthe “ADD BOOTSTRAP CSS” comment in the head of _base.html.
iv. Copy the Bootstrap JS <script> tags on that page and paste themover the “ADD BOOTSTRAP JS” comment immediately abovethe closing </body> tag at the bottom of _base.html.
B. You will also use some Font Awesome icons. Font Awesome provides acollection of free vector icons that you can use on your websites.You canget access to these icons through a free content delivery network (CDN).To do so, you will need get your own unique <script> tag with the latestversion of Font Awesome:
i. Go to https://fontawesome.com/start.
ii. Enter your email address in the form and submit.You will be sentan email asking you to confirm your email address and create anaccount. After creating an account, you will be provided with a<script> tag that looks something like this:
<script src="https://kit.fontawesome.com/yoursecretcode.js"crossorigin="anonymous"></script>
54 | LESSON 2: Git, GitHub, and an App with a Model
EVALUATION COPY: Not to be used in class.
iii. Paste this tag over the “ADD FONT AWESOME” comment in thehead of _base.html.
2. Close _base.html. Then, copy the _base.html file (not the text of the file but thefile itself) from the starter-code folder and paste it into the djangojokes.com/templates folder you just created.
3. Open djangojokes.com/templates/_base.html for editing.
4. Replace all instances of “SITENAME” in _base.html with “Django Jokes”.
5. Replace the link text that reads “NavLink” with “Jokes”.
6. We need to tell Django to look in this templates folder when searching fortemplates. Open djangojokes/settings.py and add the following to the DIRS valueof the dictionary in TEMPLATES:
'DIRS': [BASE_DIR / 'templates'],
And that’s it: the project is created and ready to use.
Git Commit
Whenever you make significant changes, you should commit your code to Git. From hereon out, we will remind you to commit (you can commit even more often if you wish), butwe will not walk you through the process every time. If you need to, you can refer back tothe initial instructions (see page 46). Note that you do not need to push your code everytime, but it won’t be backed up on GitHub until you do.
LESSON 2: Git, GitHub, and an App with a Model | 55
Exercise 8: Creating a pages App 25 to 40 minutes
In this exercise, you will create a pages app to hold the home page and the about-us page.Remember, the steps for creating a new app are:
1. Create the scaffolding of the app by running:
python manage.py startapp app_name
where “app_name” is the name of the app.
2. Add the new application to the INSTALLED_APPS list.
3. Create one or more views.
4. Configure URLs. Generally, this involves creating a URLConf file in the app andadding a path to the main URLConf file to hand off certain paths to the new app’sURLConf file.
5. Create and update any necessary templates. For the pages app, you will createtwo templates:
templates/pages/home.html
templates/pages/about_us.html
Both templates will extend _base.html, and just need minimal HTML in the body(e.g., an h2 element and a p element).You will also want to update the links in theheader and footer of _base.html to point to the new pages.
Try this on your own before looking at the solution.Test your solution by running the serverand visiting the site.
56 | LESSON 2: Git, GitHub, and an App with a Model
EVALUATION COPY: Not to be used in class.

LESSON 2: Git, GitHub, and an App with a Model | 57
Solution
1. Create the scaffolding:
(.venv) …/projects/djangojokes.com> python manage.py startapp pages
2. Add the new application to the INSTALLED_APPS list in djangojokes/settings.py:
INSTALLED_APPS = [# Built-in Django apps'django.contrib.admin','django.contrib.auth','django.contrib.contenttypes','django.contrib.sessions','django.contrib.messages','django.contrib.staticfiles',
# Local apps'pages.apps.PagesConfig',
]
3. Create the views:
Exercise Code 8.1: pages/views.py
from django.views.generic import TemplateView1.2.
class HomePageView(TemplateView):3.template_name = 'pages/home.html'4.
5.6.
class AboutUsView(TemplateView):7.template_name = 'pages/about_us.html'8.
4. Configure the main URLConf:
58 | LESSON 2: Git, GitHub, and an App with a Model
EVALUATION COPY: Not to be used in class.
Exercise Code 8.2: djangojokes/urls.py
from django.contrib import admin1.from django.urls import path, include2.
3.urlpatterns = [4.
path('admin/', admin.site.urls),5.path('', include('pages.urls')),6.
]7.
You can remove the long comment at the beginning of the file or leave it, whicheveryou prefer.
5. Create a new urls.py file in the pages folder:
Exercise Code 8.3: pages/urls.py
from django.urls import path1.2.
from .views import AboutUsView, HomePageView3.4.
app_name = 'pages'5.urlpatterns = [6.
path('', HomePageView.as_view(), name='homepage'),7.path('about-us/', AboutUsView.as_view(), name='about-us'),8.
]9.
6. Create a pages folder in the templates folder. Then, create these two templatesin that pages folder:
Exercise Code 8.4: pages/home.html
{% extends "_base.html" %}1.2.
{% block title %}Home{% endblock %}3.{% block main %}4.<h2>Welcome!</h2>5.<p>Ready to laugh?</p>6.
{% endblock %}7.
LESSON 2: Git, GitHub, and an App with a Model | 59
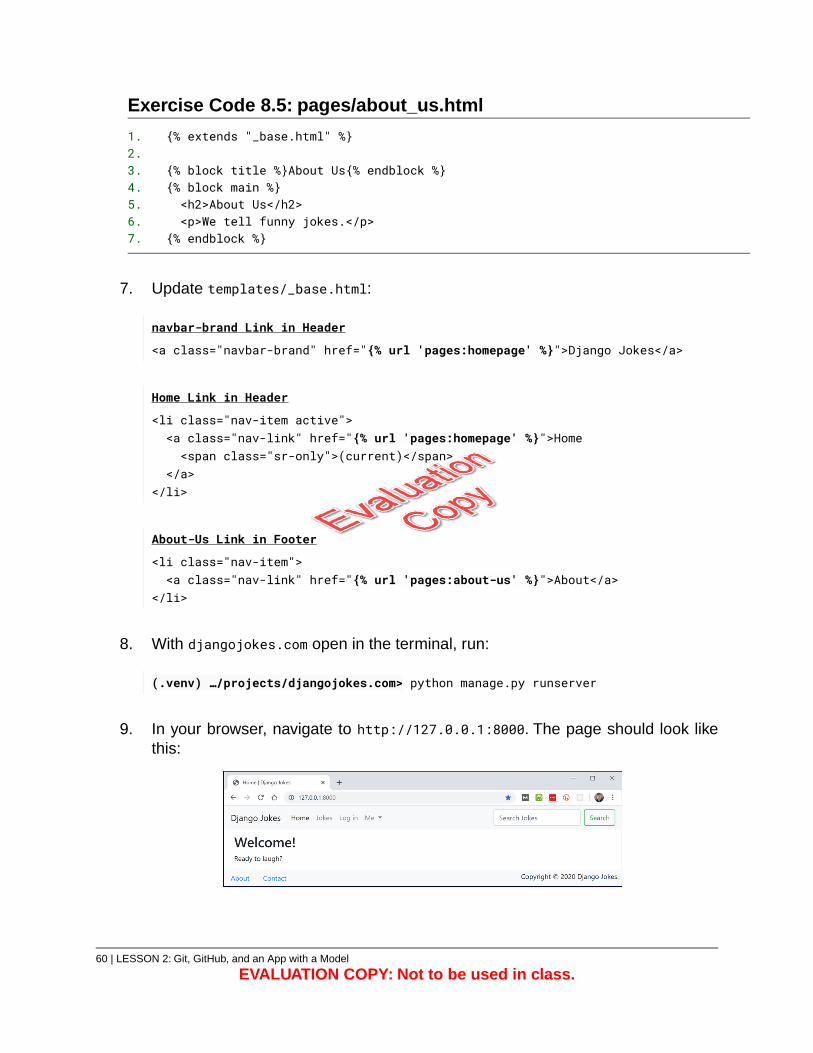
Exercise Code 8.5: pages/about_us.html
{% extends "_base.html" %}1.2.
{% block title %}About Us{% endblock %}3.{% block main %}4.<h2>About Us</h2>5.<p>We tell funny jokes.</p>6.
{% endblock %}7.
7. Update templates/_base.html:
navbar-brand Link in Header
<a class="navbar-brand" href="{% url 'pages:homepage' %}">Django Jokes</a>
Home Link in Header
<li class="nav-item active"><a class="nav-link" href="{% url 'pages:homepage' %}">Home<span class="sr-only">(current)</span>
</a></li>
About-Us Link in Footer
<li class="nav-item"><a class="nav-link" href="{% url 'pages:about-us' %}">About</a>
</li>
8. With djangojokes.com open in the terminal, run:
(.venv) …/projects/djangojokes.com> python manage.py runserver
9. In your browser, navigate to http://127.0.0.1:8000. The page should look likethis:
60 | LESSON 2: Git, GitHub, and an App with a Model
EVALUATION COPY: Not to be used in class.
Click the About link in the footer to visit the about-us page.
You can press Ctrl+C in the terminal to stop the server, or leave it running and open anew terminal to continue working on the project.
Git Commit
Commit your code to Git.
LESSON 2: Git, GitHub, and an App with a Model | 61
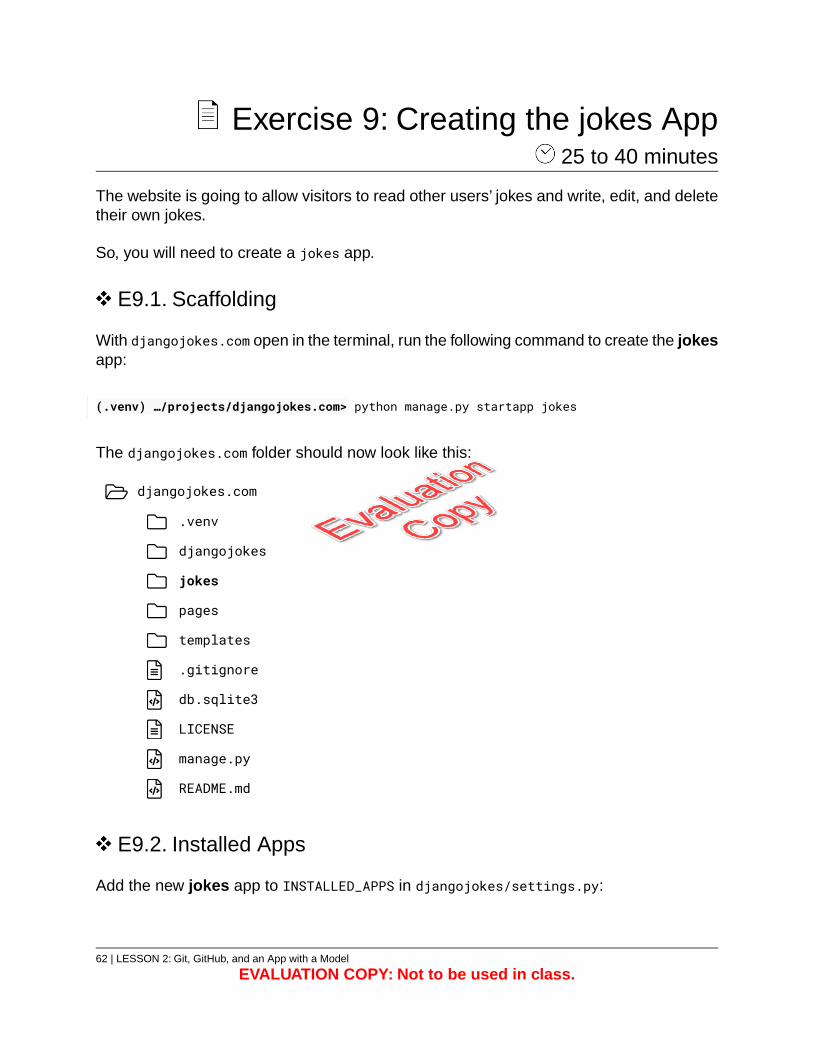
Exercise 9: Creating the jokes App 25 to 40 minutes
The website is going to allow visitors to read other users’ jokes and write, edit, and deletetheir own jokes.
So, you will need to create a jokes app.
E9.1. Scaffolding
With djangojokes.com open in the terminal, run the following command to create the jokesapp:
(.venv) …/projects/djangojokes.com> python manage.py startapp jokes
The djangojokes.com folder should now look like this:
djangojokes.com
.venv
djangojokes
jokes
pages
templates
.gitignore
db.sqlite3
LICENSE
manage.py
README.md
E9.2. Installed Apps
Add the new jokes app to INSTALLED_APPS in djangojokes/settings.py:
62 | LESSON 2: Git, GitHub, and an App with a Model
EVALUATION COPY: Not to be used in class.
INSTALLED_APPS = […
# Local apps'jokes.apps.JokesConfig','pages.apps.PagesConfig',
]
Tip: All Else Equal, Alphabetize
In some cases, the order in which code runs makes a difference, but when it doesn’t,try to organize similar lines of code in alphabetical order. It makes the code easierto navigate. It’s with this in mind that we add 'jokes.apps.JokesConfig' before'pages.apps.PagesConfig'.
E9.3. URLs
Next, you need to create a URLConf for the jokes app and let the main URLConf know tohand off some paths to it.
1. Within the jokes folder, create a urls.py file with the following content:
Exercise Code 9.1: jokes/urls.py
from django.urls import path1.2.
app_name = 'jokes'3.urlpatterns = []4.
This URLConf has a namespace of “jokes,” which is also the name of the app.The urlpatterns list is currently empty, but you will be adding paths to it shortly.
2. Now, you need to let the main URLConf know that it should hand off some pathsto the jokes URLConf. Open djangojokes/urls.py and modify it as follows:
LESSON 2: Git, GitHub, and an App with a Model | 63
Exercise Code 9.2: djangojokes/urls.py
from django.contrib import admin1.from django.urls import path, include2.
3.urlpatterns = [4.
path('admin/', admin.site.urls),5.path('jokes/', include('jokes.urls')),6.path('', include('pages.urls')),7.
]8.
Now, all paths that begin with “jokes/” will get handed off to the jokes URLConf.
❋
2.3. Models
Models contains the data fields and behaviors for an app.
2.3.1. The Database
The data for the data fields is stored in a database. By default, that is a SQLite database;however, for production projects, you should use something more robust. You will useSQLite for now, but later you will switch to PostgreSQL, which is the most commondatabase used with Django.
Open djangojokes/settings.py and look for the DATABASES constant:
DATABASES = {'default': {
'ENGINE': 'django.db.backends.sqlite3','NAME': BASE_DIR / 'db.sqlite3',
}}
This is where the database is set. Remember that BASE_DIR is set at the top of the settingsfile. Let’s use the shell to see where exactly that db.sqlite3 file is saved:
64 | LESSON 2: Git, GitHub, and an App with a Model
EVALUATION COPY: Not to be used in class.
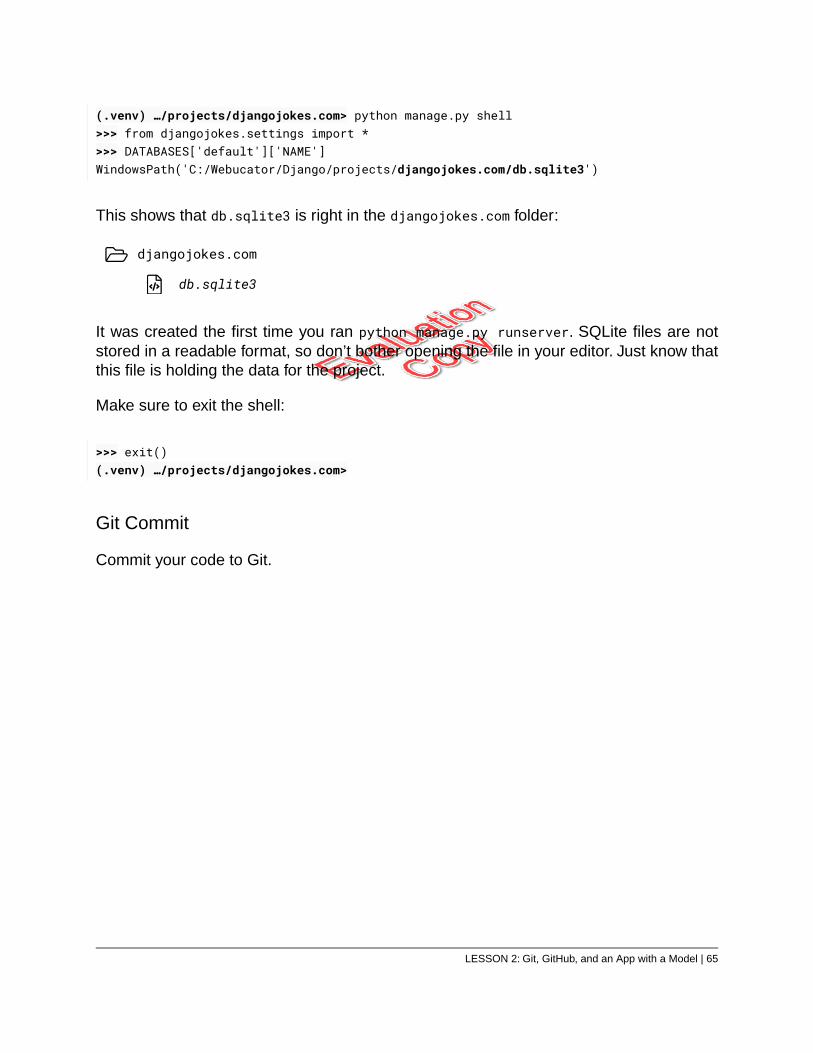
(.venv) …/projects/djangojokes.com> python manage.py shell>>> from djangojokes.settings import *>>> DATABASES['default']['NAME']WindowsPath('C:/Webucator/Django/projects/djangojokes.com/db.sqlite3')
This shows that db.sqlite3 is right in the djangojokes.com folder:
djangojokes.com
db.sqlite3
It was created the first time you ran python manage.py runserver. SQLite files are notstored in a readable format, so don’t bother opening the file in your editor. Just know thatthis file is holding the data for the project.
Make sure to exit the shell:
>>> exit()(.venv) …/projects/djangojokes.com>
Git Commit
Commit your code to Git.
LESSON 2: Git, GitHub, and an App with a Model | 65
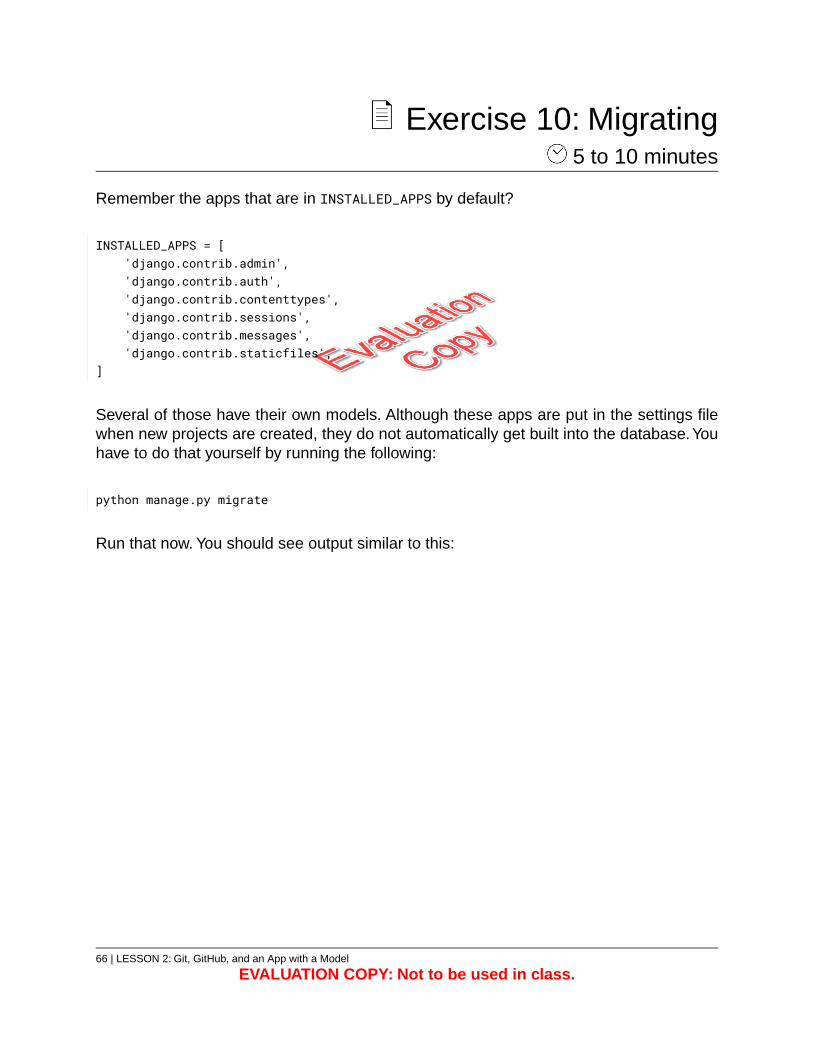
Exercise 10: Migrating 5 to 10 minutes
Remember the apps that are in INSTALLED_APPS by default?
INSTALLED_APPS = ['django.contrib.admin','django.contrib.auth','django.contrib.contenttypes','django.contrib.sessions','django.contrib.messages','django.contrib.staticfiles',
]
Several of those have their own models. Although these apps are put in the settings filewhen new projects are created, they do not automatically get built into the database.Youhave to do that yourself by running the following:
python manage.py migrate
Run that now. You should see output similar to this:
66 | LESSON 2: Git, GitHub, and an App with a Model
EVALUATION COPY: Not to be used in class.
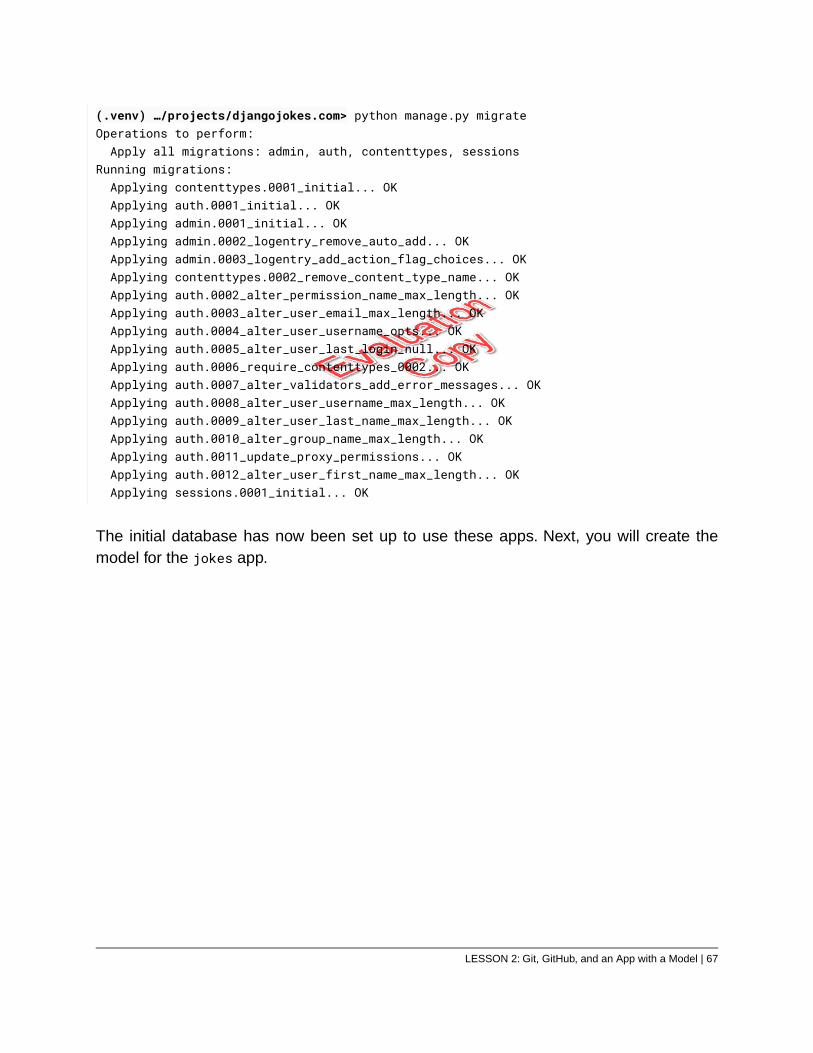
(.venv) …/projects/djangojokes.com> python manage.py migrateOperations to perform:Apply all migrations: admin, auth, contenttypes, sessions
Running migrations:Applying contenttypes.0001_initial... OKApplying auth.0001_initial... OKApplying admin.0001_initial... OKApplying admin.0002_logentry_remove_auto_add... OKApplying admin.0003_logentry_add_action_flag_choices... OKApplying contenttypes.0002_remove_content_type_name... OKApplying auth.0002_alter_permission_name_max_length... OKApplying auth.0003_alter_user_email_max_length... OKApplying auth.0004_alter_user_username_opts... OKApplying auth.0005_alter_user_last_login_null... OKApplying auth.0006_require_contenttypes_0002... OKApplying auth.0007_alter_validators_add_error_messages... OKApplying auth.0008_alter_user_username_max_length... OKApplying auth.0009_alter_user_last_name_max_length... OKApplying auth.0010_alter_group_name_max_length... OKApplying auth.0011_update_proxy_permissions... OKApplying auth.0012_alter_user_first_name_max_length... OKApplying sessions.0001_initial... OK
The initial database has now been set up to use these apps. Next, you will create themodel for the jokes app.
LESSON 2: Git, GitHub, and an App with a Model | 67
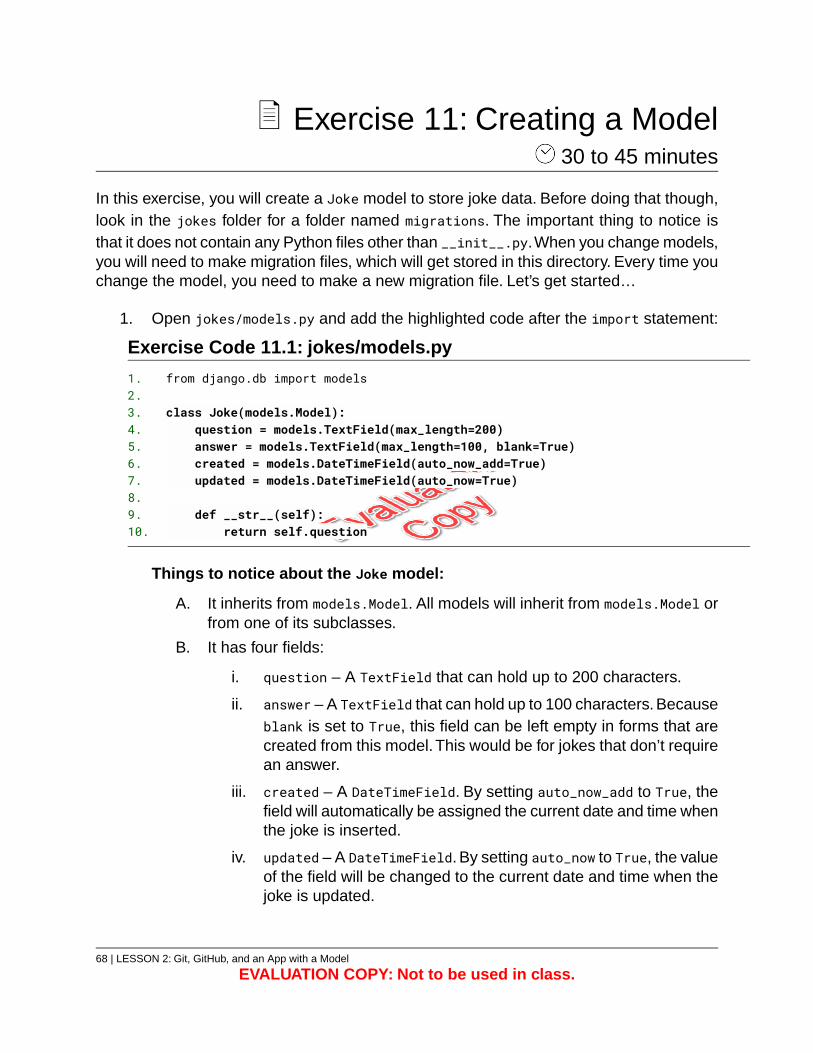
Exercise 11: Creating a Model 30 to 45 minutes
In this exercise, you will create a Joke model to store joke data. Before doing that though,look in the jokes folder for a folder named migrations. The important thing to notice isthat it does not contain any Python files other than __init__.py.When you change models,you will need to make migration files, which will get stored in this directory. Every time youchange the model, you need to make a new migration file. Let’s get started…
1. Open jokes/models.py and add the highlighted code after the import statement:
Exercise Code 11.1: jokes/models.py
from django.db import models1.2.
class Joke(models.Model):3.question = models.TextField(max_length=200)4.answer = models.TextField(max_length=100, blank=True)5.created = models.DateTimeField(auto_now_add=True)6.updated = models.DateTimeField(auto_now=True)7.
8.def __str__(self):9.
return self.question10.
Things to notice about the Joke model:
A. It inherits from models.Model. All models will inherit from models.Model orfrom one of its subclasses.
B. It has four fields:
i. question – A TextField that can hold up to 200 characters.
ii. answer – A TextField that can hold up to 100 characters. Becauseblank is set to True, this field can be left empty in forms that arecreated from this model.This would be for jokes that don’t requirean answer.
iii. created – A DateTimeField. By setting auto_now_add to True, thefield will automatically be assigned the current date and time whenthe joke is inserted.
iv. updated – A DateTimeField. By setting auto_now to True, the valueof the field will be changed to the current date and time when thejoke is updated.
68 | LESSON 2: Git, GitHub, and an App with a Model
EVALUATION COPY: Not to be used in class.
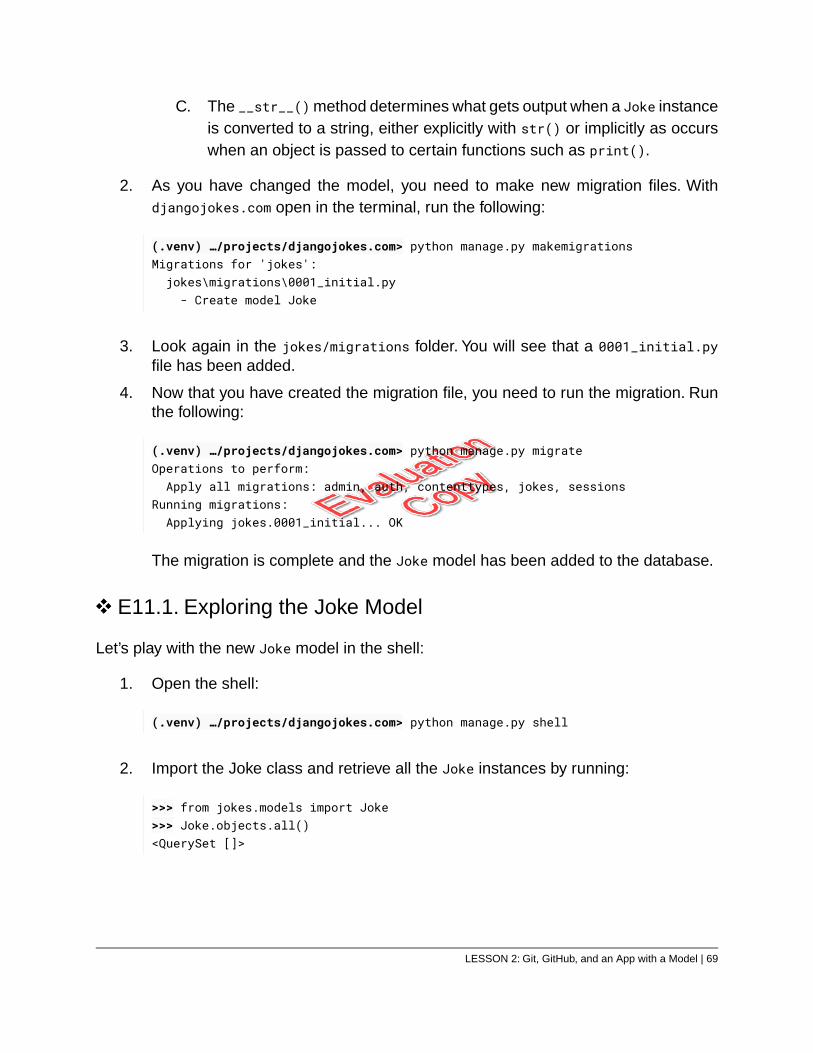
C. The __str__() method determines what gets output when a Joke instanceis converted to a string, either explicitly with str() or implicitly as occurswhen an object is passed to certain functions such as print().
2. As you have changed the model, you need to make new migration files. Withdjangojokes.com open in the terminal, run the following:
(.venv) …/projects/djangojokes.com> python manage.py makemigrationsMigrations for 'jokes':jokes\migrations\0001_initial.py- Create model Joke
3. Look again in the jokes/migrations folder. You will see that a 0001_initial.pyfile has been added.
4. Now that you have created the migration file, you need to run the migration. Runthe following:
(.venv) …/projects/djangojokes.com> python manage.py migrateOperations to perform:Apply all migrations: admin, auth, contenttypes, jokes, sessions
Running migrations:Applying jokes.0001_initial... OK
The migration is complete and the Joke model has been added to the database.
E11.1. Exploring the Joke Model
Let’s play with the new Joke model in the shell:
1. Open the shell:
(.venv) …/projects/djangojokes.com> python manage.py shell
2. Import the Joke class and retrieve all the Joke instances by running:
>>> from jokes.models import Joke>>> Joke.objects.all()<QuerySet []>
LESSON 2: Git, GitHub, and an App with a Model | 69
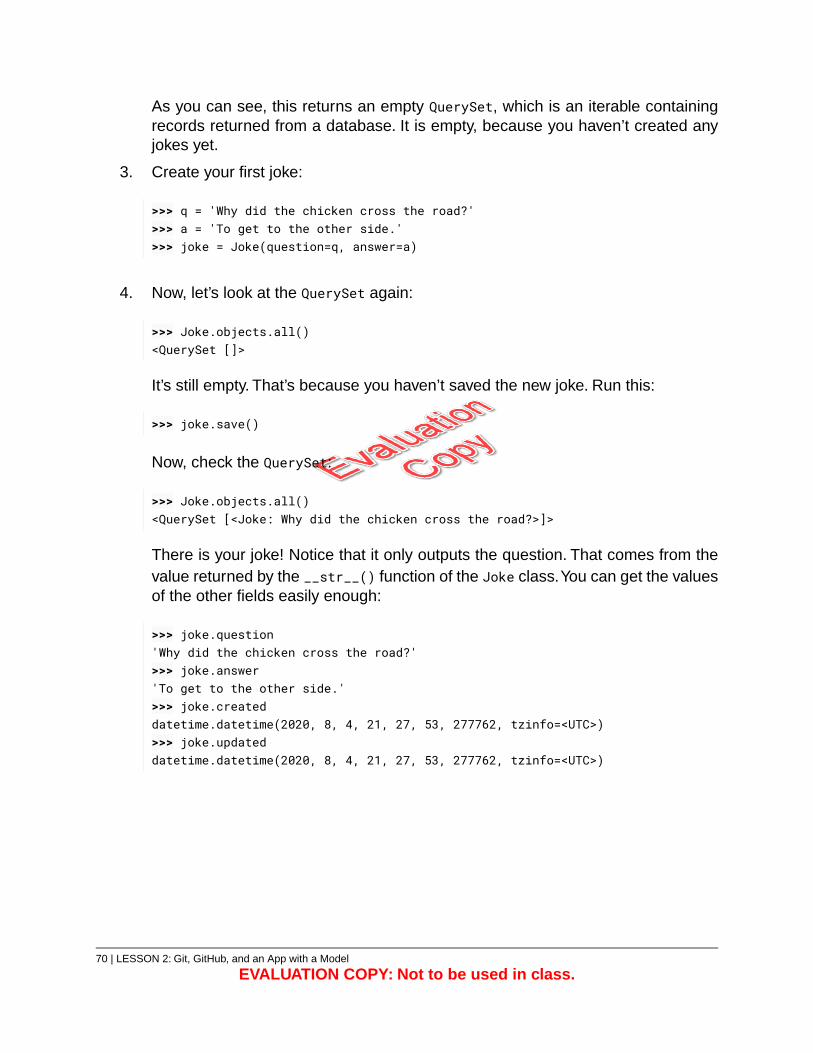
As you can see, this returns an empty QuerySet, which is an iterable containingrecords returned from a database. It is empty, because you haven’t created anyjokes yet.
3. Create your first joke:
>>> q = 'Why did the chicken cross the road?'>>> a = 'To get to the other side.'>>> joke = Joke(question=q, answer=a)
4. Now, let’s look at the QuerySet again:
>>> Joke.objects.all()<QuerySet []>
It’s still empty. That’s because you haven’t saved the new joke. Run this:
>>> joke.save()
Now, check the QuerySet:
>>> Joke.objects.all()<QuerySet [<Joke: Why did the chicken cross the road?>]>
There is your joke! Notice that it only outputs the question. That comes from thevalue returned by the __str__() function of the Joke class.You can get the valuesof the other fields easily enough:
>>> joke.question'Why did the chicken cross the road?'>>> joke.answer'To get to the other side.'>>> joke.createddatetime.datetime(2020, 8, 4, 21, 27, 53, 277762, tzinfo=<UTC>)>>> joke.updateddatetime.datetime(2020, 8, 4, 21, 27, 53, 277762, tzinfo=<UTC>)
70 | LESSON 2: Git, GitHub, and an App with a Model
EVALUATION COPY: Not to be used in class.

5. In addition to the fields explicitly named in the model, an auto-incrementing idfield is added to every model as the primary key for the table. It can be referencedas id or as pk (for primary key):
>>> joke.id1>>> joke.pk1
6. Add another joke:
>>> q = 'What kind of music do windmills like?'>>> a = 'Dude, they\'re big heavy metal fans.'>>> joke = Joke(question=q, answer=a)>>> joke.save()
7. Now, look at the jokes again, this time using a for loop:
>>> for joke in Joke.objects.all():... print('Q:', joke.question)... print('A:', joke.answer)...Q: Why did the chicken cross the road?A: To get to the other side.Q: What kind of music do windmills like?A: Dude, they're big heavy metal fans.
8. I think “huge heavy metal fans” sounds better than “big heavy metal fans.” Let’supdate that. Assign the last joke you entered to a variable:
>>> windmill_joke = Joke.objects.last()
9. Look at the current answer to that joke:
>>> windmill_joke.answer"Dude, they're big heavy metal fans."
10. Change the answer and save:
>>> windmill_joke.answer = "Dude, they're huge heavy metal fans!">>> windmill_joke.save()
LESSON 2: Git, GitHub, and an App with a Model | 71
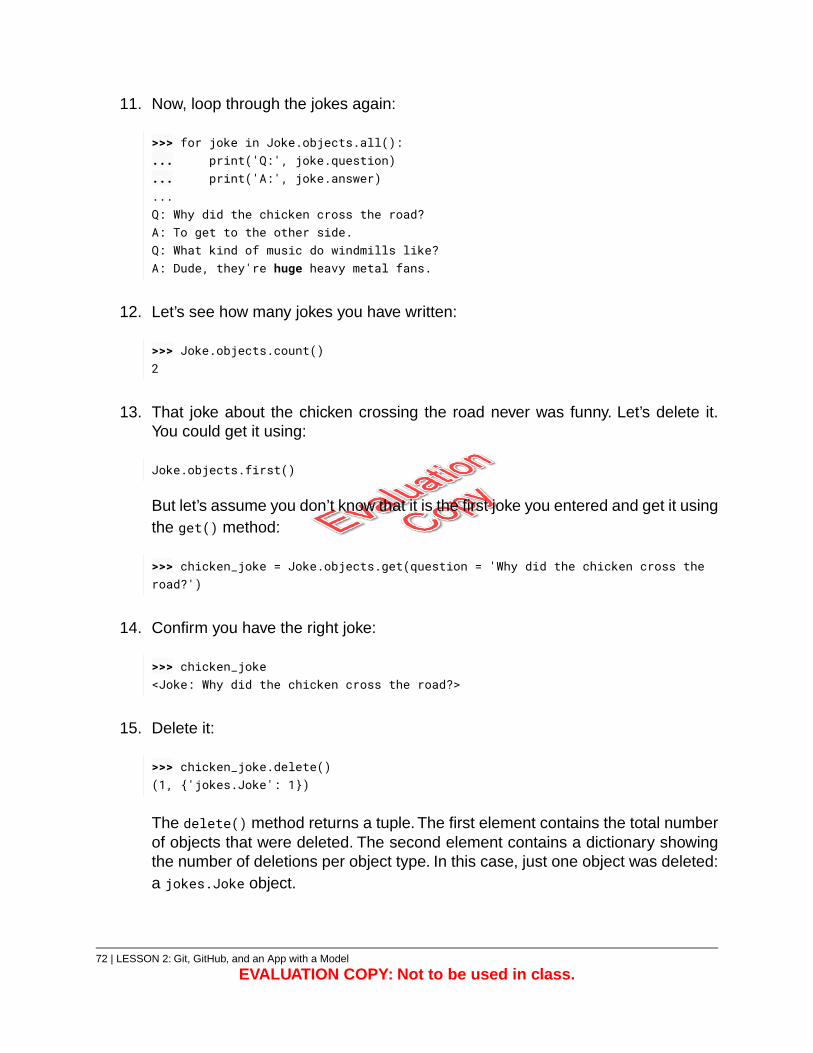
11. Now, loop through the jokes again:
>>> for joke in Joke.objects.all():... print('Q:', joke.question)... print('A:', joke.answer)...Q: Why did the chicken cross the road?A: To get to the other side.Q: What kind of music do windmills like?A: Dude, they're huge heavy metal fans.
12. Let’s see how many jokes you have written:
>>> Joke.objects.count()2
13. That joke about the chicken crossing the road never was funny. Let’s delete it.You could get it using:
Joke.objects.first()
But let’s assume you don’t know that it is the first joke you entered and get it usingthe get() method:
>>> chicken_joke = Joke.objects.get(question = 'Why did the chicken cross theroad?')
14. Confirm you have the right joke:
>>> chicken_joke<Joke: Why did the chicken cross the road?>
15. Delete it:
>>> chicken_joke.delete()(1, {'jokes.Joke': 1})
The delete() method returns a tuple. The first element contains the total numberof objects that were deleted. The second element contains a dictionary showingthe number of deletions per object type. In this case, just one object was deleted:a jokes.Joke object.
72 | LESSON 2: Git, GitHub, and an App with a Model
EVALUATION COPY: Not to be used in class.
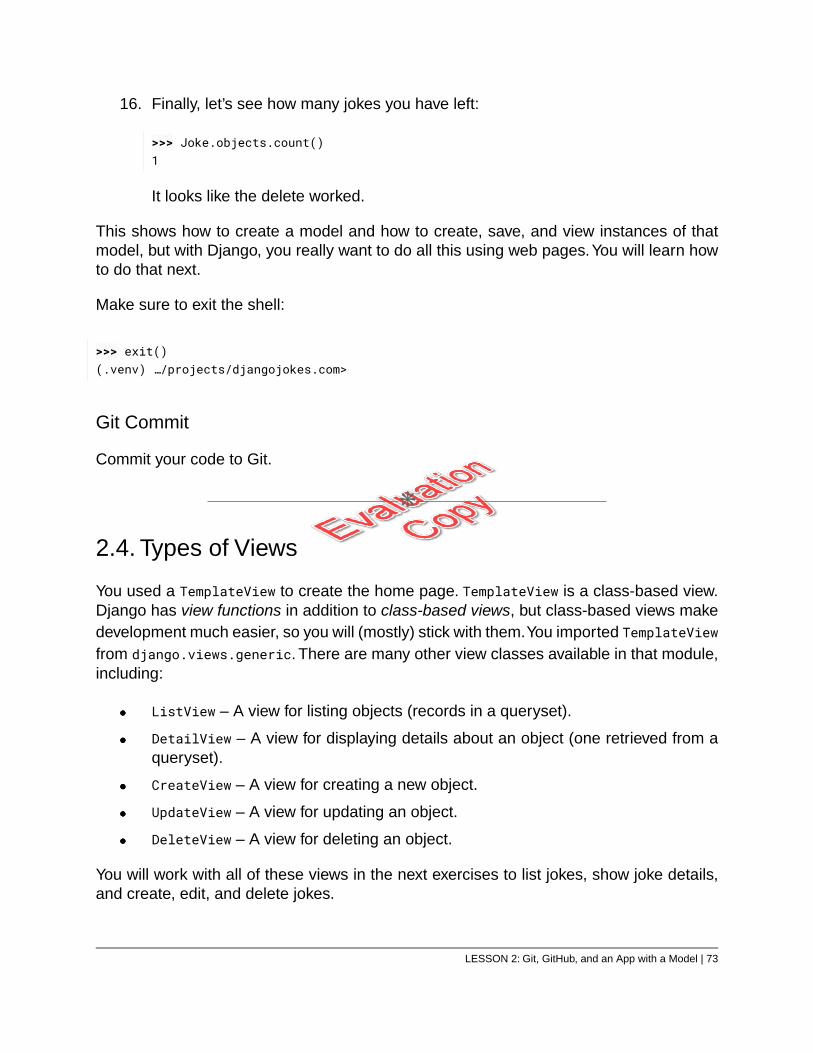
16. Finally, let’s see how many jokes you have left:
>>> Joke.objects.count()1
It looks like the delete worked.
This shows how to create a model and how to create, save, and view instances of thatmodel, but with Django, you really want to do all this using web pages.You will learn howto do that next.
Make sure to exit the shell:
>>> exit()(.venv) …/projects/djangojokes.com>
Git Commit
Commit your code to Git.
❋
2.4. Types of Views
You used a TemplateView to create the home page. TemplateView is a class-based view.Django has view functions in addition to class-based views, but class-based views makedevelopment much easier, so you will (mostly) stick with them.You imported TemplateViewfrom django.views.generic. There are many other view classes available in that module,including:
ListView – A view for listing objects (records in a queryset).
DetailView – A view for displaying details about an object (one retrieved from aqueryset).
CreateView – A view for creating a new object.
UpdateView – A view for updating an object.
DeleteView – A view for deleting an object.
You will work with all of these views in the next exercises to list jokes, show joke details,and create, edit, and delete jokes.
LESSON 2: Git, GitHub, and an App with a Model | 73
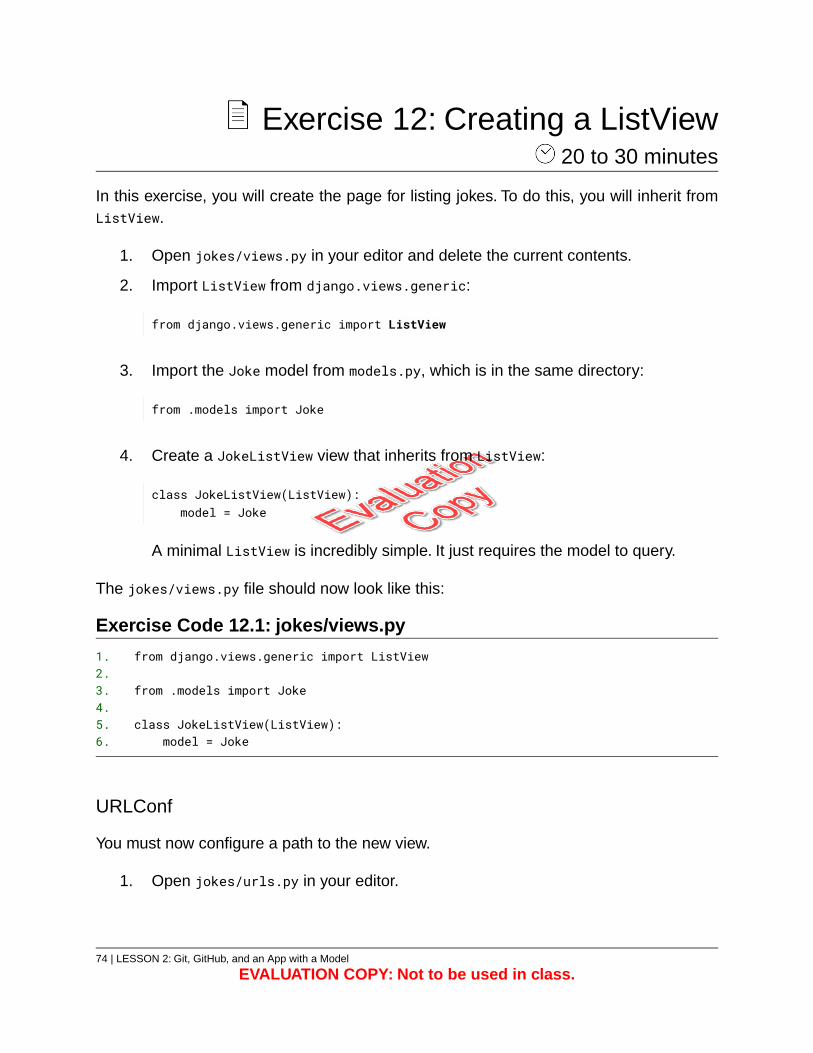
Exercise 12: Creating a ListView 20 to 30 minutes
In this exercise, you will create the page for listing jokes. To do this, you will inherit fromListView.
1. Open jokes/views.py in your editor and delete the current contents.
2. Import ListView from django.views.generic:
from django.views.generic import ListView
3. Import the Joke model from models.py, which is in the same directory:
from .models import Joke
4. Create a JokeListView view that inherits from ListView:
class JokeListView(ListView):model = Joke
A minimal ListView is incredibly simple. It just requires the model to query.
The jokes/views.py file should now look like this:
Exercise Code 12.1: jokes/views.py
from django.views.generic import ListView1.2.
from .models import Joke3.4.
class JokeListView(ListView):5.model = Joke6.
URLConf
You must now configure a path to the new view.
1. Open jokes/urls.py in your editor.
74 | LESSON 2: Git, GitHub, and an App with a Model
EVALUATION COPY: Not to be used in class.
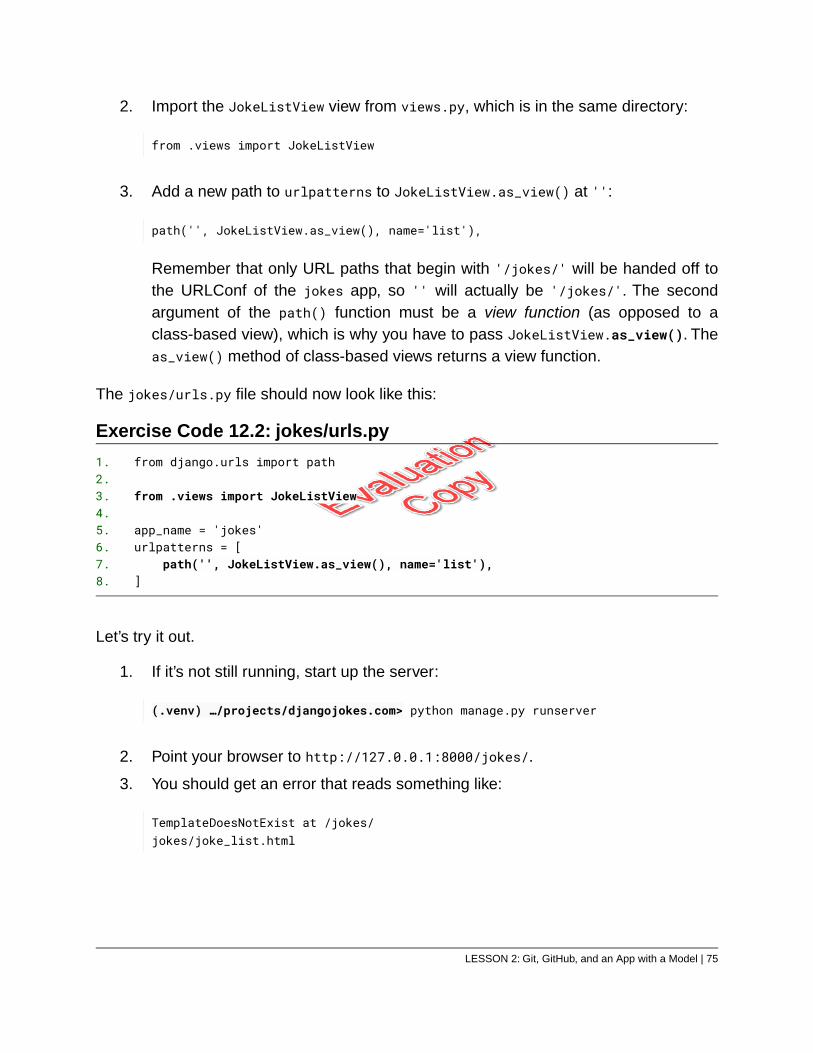
2. Import the JokeListView view from views.py, which is in the same directory:
from .views import JokeListView
3. Add a new path to urlpatterns to JokeListView.as_view() at '':
path('', JokeListView.as_view(), name='list'),
Remember that only URL paths that begin with '/jokes/' will be handed off tothe URLConf of the jokes app, so '' will actually be '/jokes/'. The secondargument of the path() function must be a view function (as opposed to aclass-based view), which is why you have to pass JokeListView.as_view(). Theas_view() method of class-based views returns a view function.
The jokes/urls.py file should now look like this:
Exercise Code 12.2: jokes/urls.py
from django.urls import path1.2.
from .views import JokeListView3.4.
app_name = 'jokes'5.urlpatterns = [6.
path('', JokeListView.as_view(), name='list'),7.]8.
Let’s try it out.
1. If it’s not still running, start up the server:
(.venv) …/projects/djangojokes.com> python manage.py runserver
2. Point your browser to http://127.0.0.1:8000/jokes/.
3. You should get an error that reads something like:
TemplateDoesNotExist at /jokes/jokes/joke_list.html
LESSON 2: Git, GitHub, and an App with a Model | 75
Oops! We forgot to create a template for JokeListView. But, there is somethingeven more interesting about this error: it tells us where it looked for that template:jokes/joke_list.html.
The Template
Take another look at the JokeListView code:
class JokeListView(ListView):model = Joke
Notice that you do not define a template_name attribute as you did with HomePageView.When no template_name is defined for a ListView, Django infers a template_name as:
app_name/model_list.html
where app_name is the name of the app (e.g., jokes) and model is the lowercase name ofthe model. So, for JokeListView, Django is looking for the template at:
jokes/joke_list.html
Create that template:
Create a jokes folder within the templates folder, and within that, create a joke_list.htmlfile with the following content:
Exercise Code 12.3: templates/jokes/joke_list.html
{% extends "_base.html" %}1.2.
{% block title %}Jokes{% endblock %}3.{% block main %}4.<h2>Jokes</h2>5.<ul class="list-group list-group-flush mb-3">6.{% for joke in joke_list %}7.<li class="list-group-item">{{ joke.question }}</li>8.
{% endfor %}9.</ul>10.
{% endblock %}11.
76 | LESSON 2: Git, GitHub, and an App with a Model
EVALUATION COPY: Not to be used in class.
Things to notice:
1. The template extends _base.html:
{% extends "_base.html" %}
2. You use the for template tag, which we will cover in detail later (see page 135), toloop through the queryset, which is stored in an auto-created variable calledjoke_list (created by appending “_list” to the lowercase model name):
{% for joke in joke_list %}<li class="list-group-item">{{ joke.question }}</li>{% endfor %}
The double curly braces hold a template variable (or expression) that should beevaluated. This for loop is the Django template equivalent of:
for joke in Joke.objects.all():print(f'\n <li class="list-group-item">{joke.question}</li>\n')
While you are working on templates, change the NavLink link in the header of the_base.html template to link to the jokes page using a url template tag:
<li class="nav-item"><a class="nav-link" href="{% url 'jokes:list' %}">Jokes</a>
</li>
Try It Out
In your browser, go to http://127.0.0.1:8000/ and click the Jokes link in the header. Itshould look like this:
LESSON 2: Git, GitHub, and an App with a Model | 77
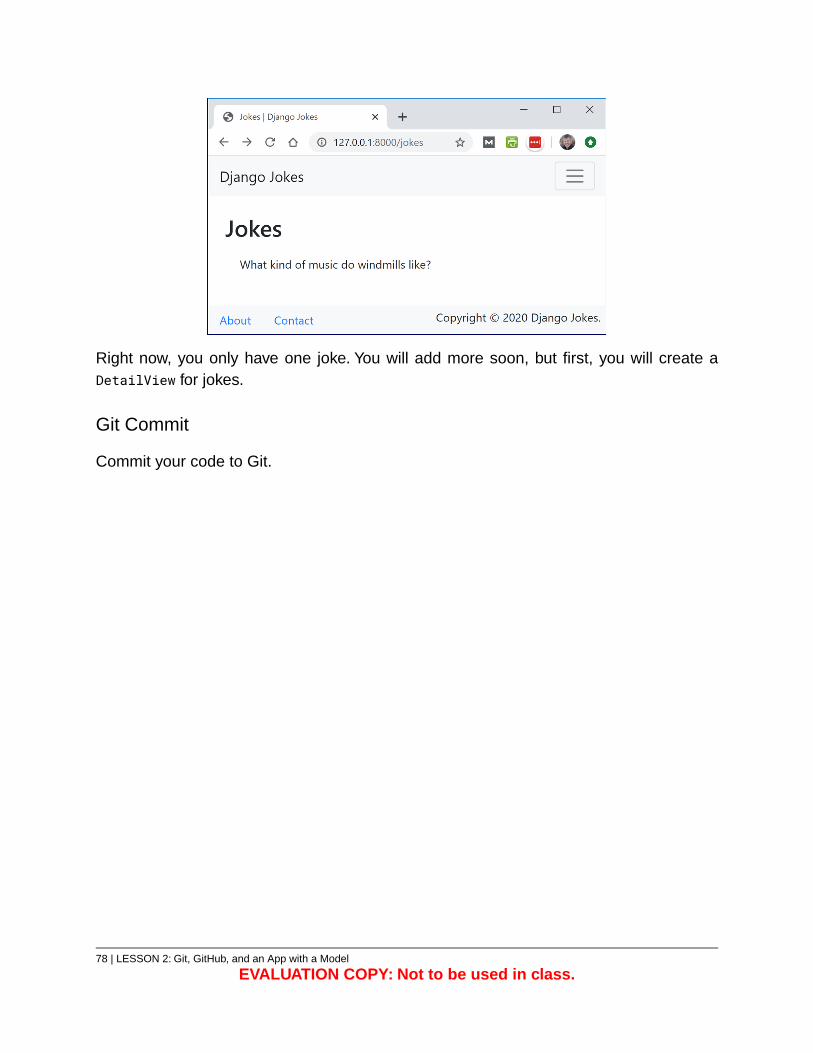
Right now, you only have one joke. You will add more soon, but first, you will create aDetailView for jokes.
Git Commit
Commit your code to Git.
78 | LESSON 2: Git, GitHub, and an App with a Model
EVALUATION COPY: Not to be used in class.
Exercise 13: Creating a DetailView 25 to 40 minutes
In this exercise, you will create the page to show information about an individual joke. Todo this, you will inherit from DetailView.
1. Open jokes/views.py in your editor.
2. Import DetailView from django.views.generic:
from django.views.generic import DetailView, ListView
3. Create a JokeDetailView view that inherits from DetailView:
class JokeDetailView(DetailView):model = Joke
Just like a ListView, a minimal DetailView only requires the model to query.
The jokes/views.py file should now look like this:
Exercise Code 13.1: jokes/views.py
from django.views.generic import DetailView, ListView1.2.
from .models import Joke3.4.
class JokeDetailView(DetailView):5.model = Joke6.
7.8.
class JokeListView(ListView):9.model = Joke10.
URLConf
You must now configure a path to the new view. Because each joke will have its own detailpage, you must identify the specific joke to show. For now, you will do this using the jokeobject’s primary key.
LESSON 2: Git, GitHub, and an App with a Model | 79
1. Open jokes/urls.py in your editor.
2. Import the JokeDetailView view from views.py, which is in the same directory:
from .views import JokeDetailView, JokeListView
3. Add a new path to urlpatterns to JokeDetailView.as_view() at 'joke/<int:pk>/':
path('joke/<int:pk>/', JokeDetailView.as_view(), name='detail'),
The path is constructed as “joke/<int:pk>/”. int:pk indicates that the valueentered for this part of the path must be an integer. The view will have access tothis value via self.kwargs.get('pk') and will use it to get the specific joke objectto use.11
The jokes/urls.py file should now look like this:
Exercise Code 13.2: jokes/urls.py
from django.urls import path1.2.
from .views import JokeDetailView, JokeListView3.4.
app_name = 'jokes'5.urlpatterns = [6.
path('joke/<int:pk>/', JokeDetailView.as_view(), name='detail'),7.path('', JokeListView.as_view(), name='jokes'),8.
]9.
The Template
Can you guess the default name of the template used by the JokeDetailView? If youguessed jokes/joke_detail.html, you’re right. Create that template:
Within the templates/jokes folder, add a joke_detail.html file with the following content:12
11. Look in .venv\Lib\site-packages\django\views\generic\detail.py at the get_object() method of theSingleObjectMixin class to see how this magic works behind the scenes.
12. Don’t want to type? Copy from starter-code/app-with-model/joke_detail.html.
80 | LESSON 2: Git, GitHub, and an App with a Model
EVALUATION COPY: Not to be used in class.
Exercise Code 13.3: templates/jokes/joke_detail.html
{% extends "_base.html" %}1.2.
{% block title %}Joke{% endblock %}3.{% block main %}4.<div class="card border-primary m-auto mb-3 text-center"5.style="max-width: 30rem">6.<div class="card-header">{{ joke.question }}</div>7.<div class="card-body text-primary">8.<h5 class="card-title">{{ joke.answer }}</h5>9.
</div>10.<div class="card-footer">11.<small class="text-muted">12.Created on: {{ joke.created }}13.Last updated: {{ joke.updated }}14.
</small>15.</div>16.
</div>17.{% endblock %}18.
Things to notice:
1. The template extends _base.html:
{% extends "_base.html" %}
2. The template has access to an auto-created variable called joke (the lowercasemodel name) containing the joke object.
Open templates/jokes/joke_list.html and make joke.question a link:
Exercise Code 13.4: templates/jokes/joke_list.html
-------Lines 1 through 6 Omitted-------{% for joke in joke_list %}7.<li class="list-group-item">8.<a href="{% url 'jokes:detail' joke.pk %}">{{ joke.question }}</a>9.
</li>10.{% endfor %}11.
-------Lines 12 through 13 Omitted-------
LESSON 2: Git, GitHub, and an App with a Model | 81
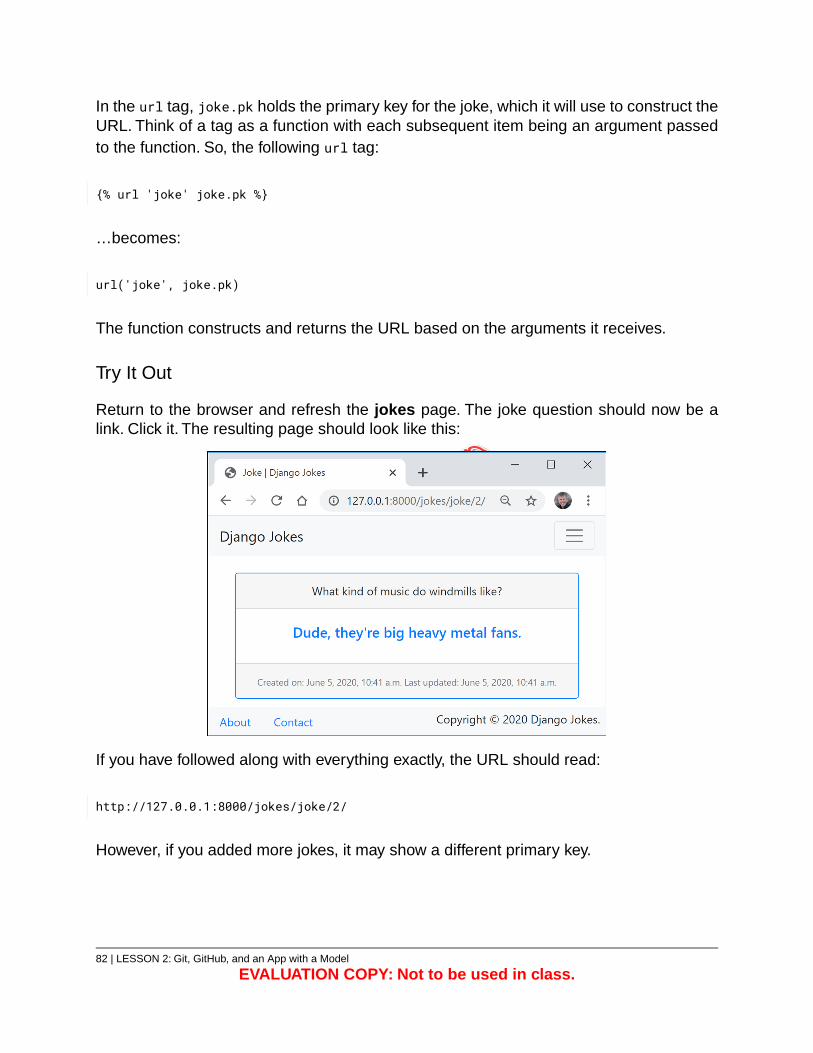
In the url tag, joke.pk holds the primary key for the joke, which it will use to construct theURL. Think of a tag as a function with each subsequent item being an argument passedto the function. So, the following url tag:
{% url 'joke' joke.pk %}
…becomes:
url('joke', joke.pk)
The function constructs and returns the URL based on the arguments it receives.
Try It Out
Return to the browser and refresh the jokes page. The joke question should now be alink. Click it. The resulting page should look like this:
If you have followed along with everything exactly, the URL should read:
http://127.0.0.1:8000/jokes/joke/2/
However, if you added more jokes, it may show a different primary key.
82 | LESSON 2: Git, GitHub, and an App with a Model
EVALUATION COPY: Not to be used in class.
Avoid Using Primary Keys in URLs
It is not a great idea to use primary keys in URLs. We will show a better way ofcreating URLs for jokes in a later lesson (see page 201).
get_absolute_url()
An alternative to constructing URLs with the url tag as we did in joke_list.html is to usethe get_absolute_url() method, like this:
joke.get_absolute_url
However, before you do that, you need to add the get_absolute_url() method to themodel:
1. Open jokes/models.py in your editor.
2. Import the reverse() function from django.urls:
from django.urls import reverse
The reverse() function gets and returns the URL based on the passed-in URLpattern name.
3. Add the get_absolute_url() function above the __str()__ function in the Jokemodel:13
def get_absolute_url(self):return reverse('jokes:detail', args=[str(self.pk)])
The arguments passed to the preceding reverse() function are:
13. See https://docs.djangoproject.com/en/3.1/ref/models/instances/#django.db.models.Model.get_absolute_urlfor documentation on get_absolute_url().
LESSON 2: Git, GitHub, and an App with a Model | 83
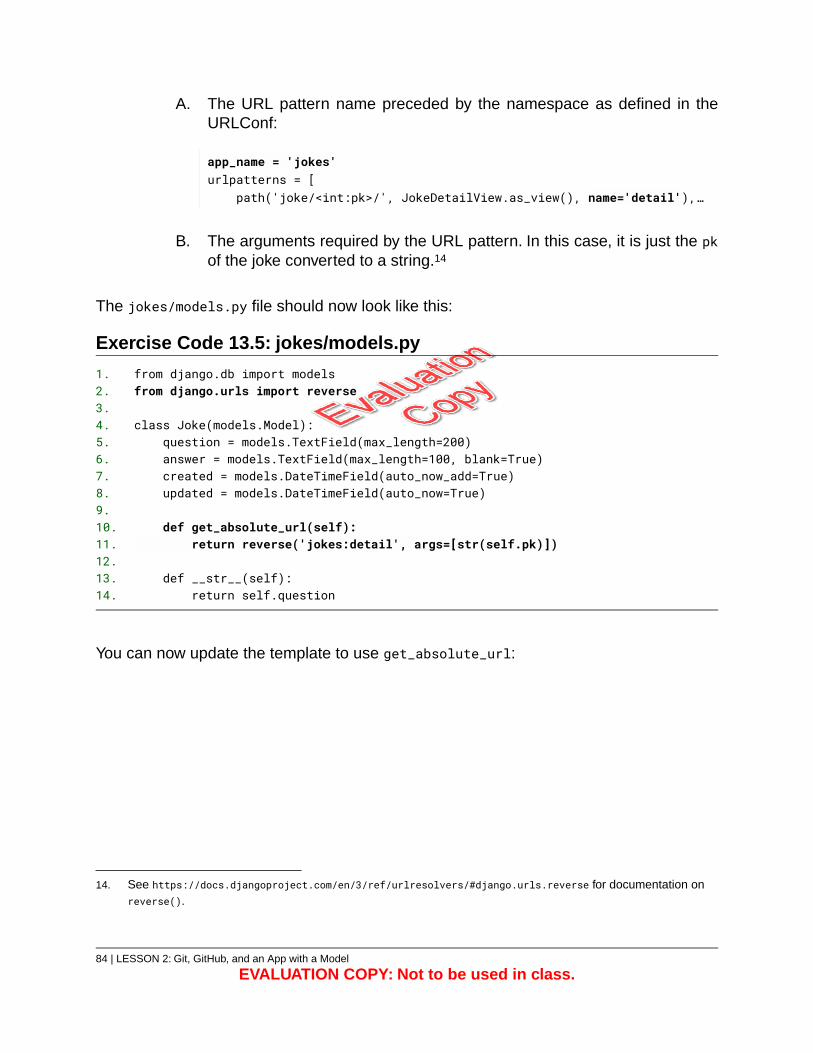
A. The URL pattern name preceded by the namespace as defined in theURLConf:
app_name = 'jokes'urlpatterns = [
path('joke/<int:pk>/', JokeDetailView.as_view(), name='detail'),…
B. The arguments required by the URL pattern. In this case, it is just the pkof the joke converted to a string.14
The jokes/models.py file should now look like this:
Exercise Code 13.5: jokes/models.py
from django.db import models1.from django.urls import reverse2.
3.class Joke(models.Model):4.
question = models.TextField(max_length=200)5.answer = models.TextField(max_length=100, blank=True)6.created = models.DateTimeField(auto_now_add=True)7.updated = models.DateTimeField(auto_now=True)8.
9.def get_absolute_url(self):10.
return reverse('jokes:detail', args=[str(self.pk)])11.12.
def __str__(self):13.return self.question14.
You can now update the template to use get_absolute_url:
14. See https://docs.djangoproject.com/en/3/ref/urlresolvers/#django.urls.reverse for documentation onreverse().
84 | LESSON 2: Git, GitHub, and an App with a Model
EVALUATION COPY: Not to be used in class.
Exercise Code 13.6: templates/jokes/joke_list.html
-------Lines 1 through 6 Omitted-------{% for joke in joke_list %}7.<li class="list-group-item">8.<a href="{{ joke.get_absolute_url }}">{{ joke.question }}</a>9.
</li>10.{% endfor %}11.
-------Lines 12 through 13 Omitted-------
A big advantage of using get_absolute_url is that you don’t have to change the templateif you change the way that URLs are constructed for jokes, which you will eventually do.
Git Commit
Commit your code to Git.
❋
2.5. GET and POST Requests
The value of a form’s method attribute determines how the form data will be passed to theserver.
get
When using the get method, which is the default, form data is sent to the server in theURL as a query string. The query string is appended to the website address starting witha question mark (?) and followed by name-value pairs delimited (separated) by anampersand (&). A URL with a query string might look like this:
https://www.example.com?firstname=Nat&lastname=Dunn
The get method is commonly used by search engines, because it allows the resultingpage to be bookmarked. For example, Google uses the get method.You can tell by lookingat the location bar after doing a search:
LESSON 2: Git, GitHub, and an App with a Model | 85
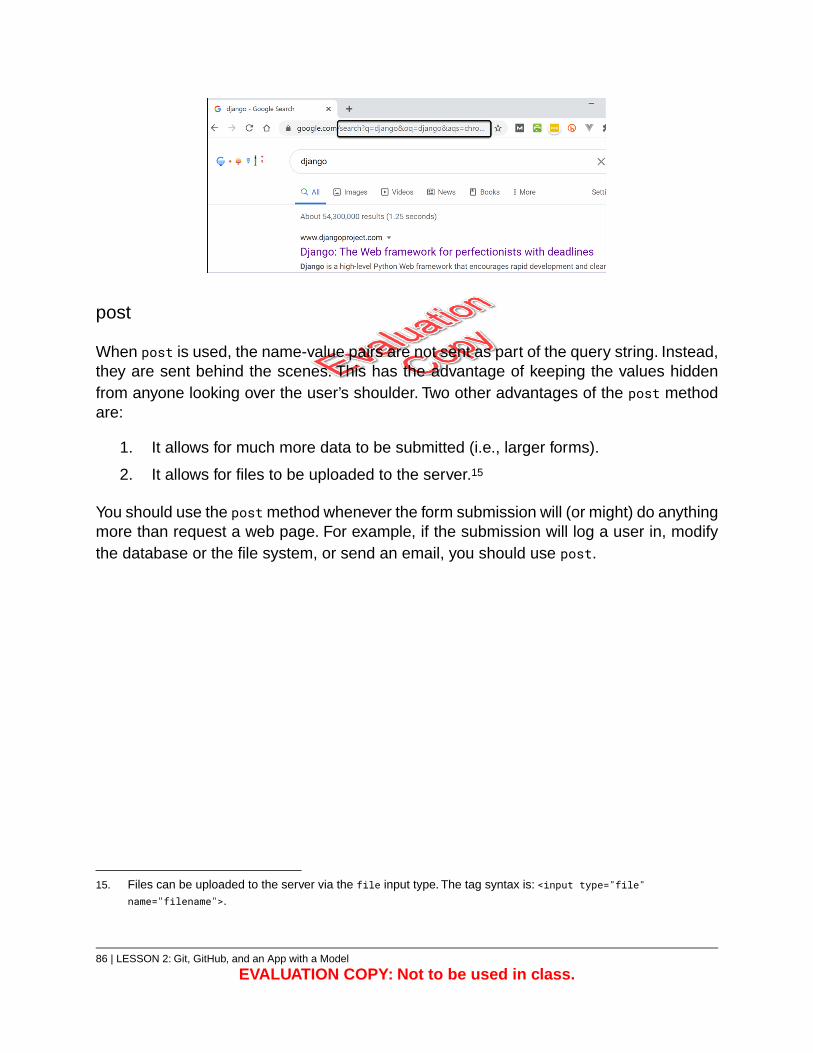
post
When post is used, the name-value pairs are not sent as part of the query string. Instead,they are sent behind the scenes. This has the advantage of keeping the values hiddenfrom anyone looking over the user’s shoulder. Two other advantages of the post methodare:
1. It allows for much more data to be submitted (i.e., larger forms).
2. It allows for files to be uploaded to the server.15
You should use the post method whenever the form submission will (or might) do anythingmore than request a web page. For example, if the submission will log a user in, modifythe database or the file system, or send an email, you should use post.
15. Files can be uploaded to the server via the file input type. The tag syntax is: <input type="file"
name="filename">.
86 | LESSON 2: Git, GitHub, and an App with a Model
EVALUATION COPY: Not to be used in class.
Exercise 14: Creating and Updating Jokes 25 to 40 minutes
In this exercise, you will create the views and forms for creating and updating jokes. Wewill explain just the bare minimum about forms to get the pages working. Later, we will digmuch deeper into Django forms (see page 225).
1. Open jokes/views.py in your editor.
2. Add CreateView and UpdateView to the list of imported views fromdjango.views.generic:
from django.views.generic import CreateView, DetailView, ListView, UpdateView
3. Add two new views:
A. JokeCreateView:
class JokeCreateView(CreateView):model = Jokefields = ['question', 'answer']
B. JokeUpdateView:
class JokeUpdateView(UpdateView):model = Jokefields = ['question', 'answer']
Notice that each of these views takes the model and the fields you want to includein the form.
The jokes/views.py file should now look like this:
LESSON 2: Git, GitHub, and an App with a Model | 87
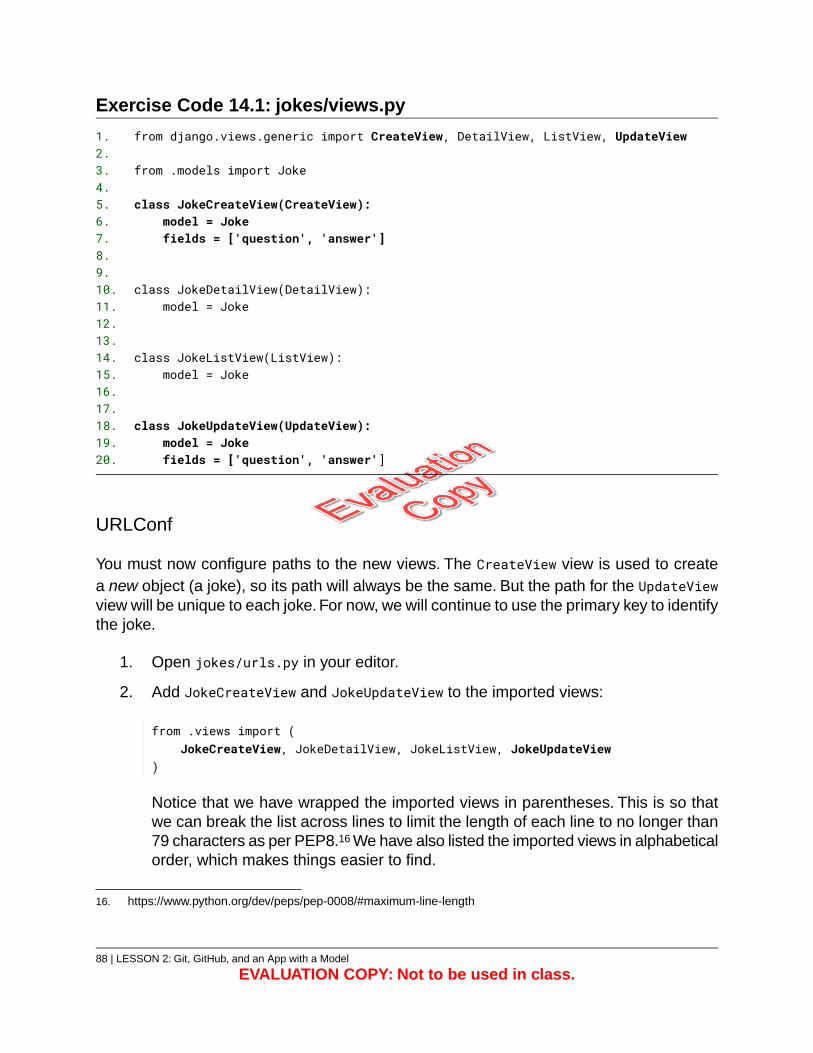
Exercise Code 14.1: jokes/views.py
from django.views.generic import CreateView, DetailView, ListView, UpdateView1.2.
from .models import Joke3.4.
class JokeCreateView(CreateView):5.model = Joke6.fields = ['question', 'answer']7.
8.9.
class JokeDetailView(DetailView):10.model = Joke11.
12.13.
class JokeListView(ListView):14.model = Joke15.
16.17.
class JokeUpdateView(UpdateView):18.model = Joke19.fields = ['question', 'answer']20.
URLConf
You must now configure paths to the new views. The CreateView view is used to createa new object (a joke), so its path will always be the same. But the path for the UpdateViewview will be unique to each joke. For now, we will continue to use the primary key to identifythe joke.
1. Open jokes/urls.py in your editor.
2. Add JokeCreateView and JokeUpdateView to the imported views:
from .views import (JokeCreateView, JokeDetailView, JokeListView, JokeUpdateView
)
Notice that we have wrapped the imported views in parentheses. This is so thatwe can break the list across lines to limit the length of each line to no longer than79 characters as per PEP8.16 We have also listed the imported views in alphabeticalorder, which makes things easier to find.
16. https://www.python.org/dev/peps/pep-0008/#maximum-line-length
88 | LESSON 2: Git, GitHub, and an App with a Model
EVALUATION COPY: Not to be used in class.
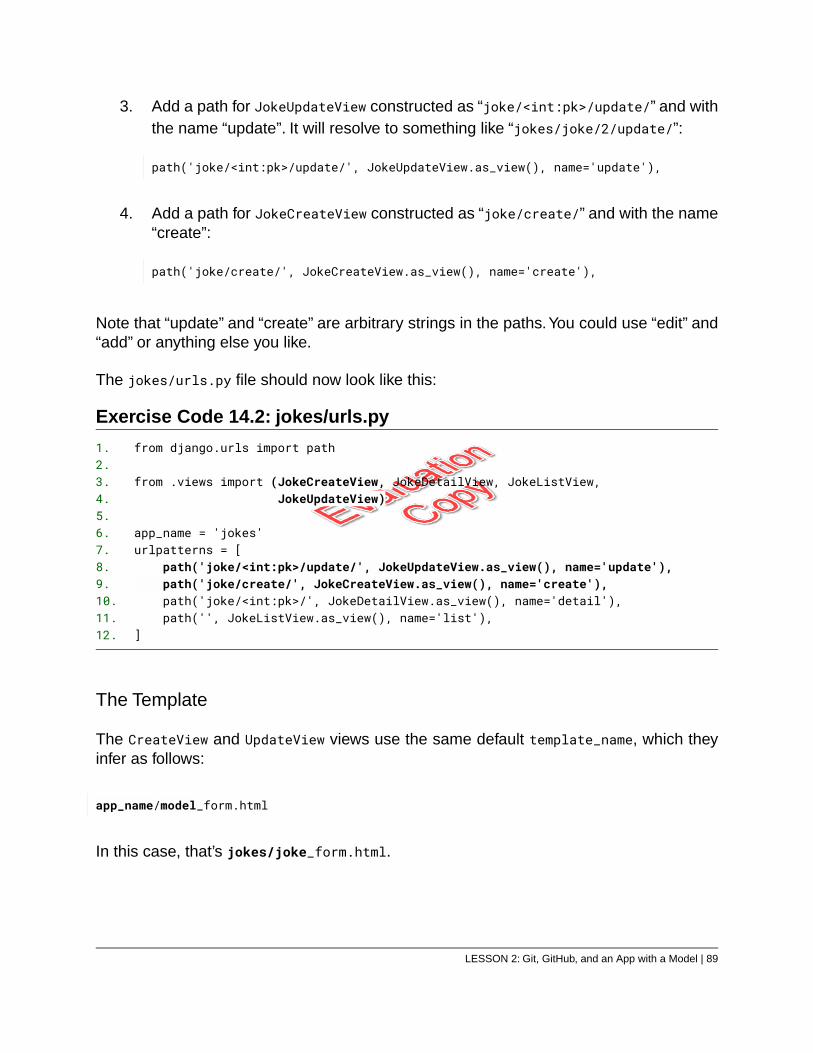
3. Add a path for JokeUpdateView constructed as “joke/<int:pk>/update/” and withthe name “update”. It will resolve to something like “jokes/joke/2/update/”:
path('joke/<int:pk>/update/', JokeUpdateView.as_view(), name='update'),
4. Add a path for JokeCreateView constructed as “joke/create/” and with the name“create”:
path('joke/create/', JokeCreateView.as_view(), name='create'),
Note that “update” and “create” are arbitrary strings in the paths.You could use “edit” and“add” or anything else you like.
The jokes/urls.py file should now look like this:
Exercise Code 14.2: jokes/urls.py
from django.urls import path1.2.
from .views import (JokeCreateView, JokeDetailView, JokeListView,3.JokeUpdateView)4.
5.app_name = 'jokes'6.urlpatterns = [7.
path('joke/<int:pk>/update/', JokeUpdateView.as_view(), name='update'),8.path('joke/create/', JokeCreateView.as_view(), name='create'),9.path('joke/<int:pk>/', JokeDetailView.as_view(), name='detail'),10.path('', JokeListView.as_view(), name='list'),11.
]12.
The Template
The CreateView and UpdateView views use the same default template_name, which theyinfer as follows:
app_name/model_form.html
In this case, that’s jokes/joke_form.html.
LESSON 2: Git, GitHub, and an App with a Model | 89
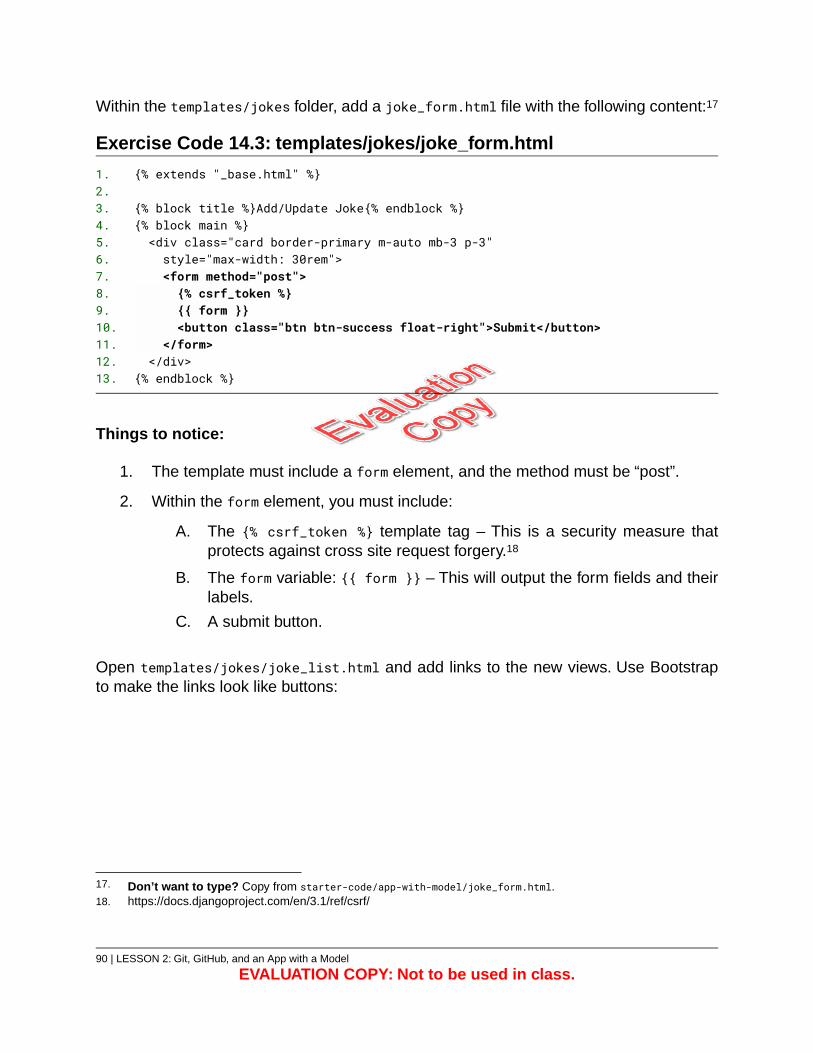
Within the templates/jokes folder, add a joke_form.html file with the following content:17
Exercise Code 14.3: templates/jokes/joke_form.html
{% extends "_base.html" %}1.2.
{% block title %}Add/Update Joke{% endblock %}3.{% block main %}4.<div class="card border-primary m-auto mb-3 p-3"5.style="max-width: 30rem">6.<form method="post">7.{% csrf_token %}8.{{ form }}9.<button class="btn btn-success float-right">Submit</button>10.
</form>11.</div>12.
{% endblock %}13.
Things to notice:
1. The template must include a form element, and the method must be “post”.
2. Within the form element, you must include:
A. The {% csrf_token %} template tag – This is a security measure thatprotects against cross site request forgery.18
B. The form variable: {{ form }} – This will output the form fields and theirlabels.
C. A submit button.
Open templates/jokes/joke_list.html and add links to the new views. Use Bootstrapto make the links look like buttons:
17. Don’t want to type? Copy from starter-code/app-with-model/joke_form.html.18. https://docs.djangoproject.com/en/3.1/ref/csrf/
90 | LESSON 2: Git, GitHub, and an App with a Model
EVALUATION COPY: Not to be used in class.
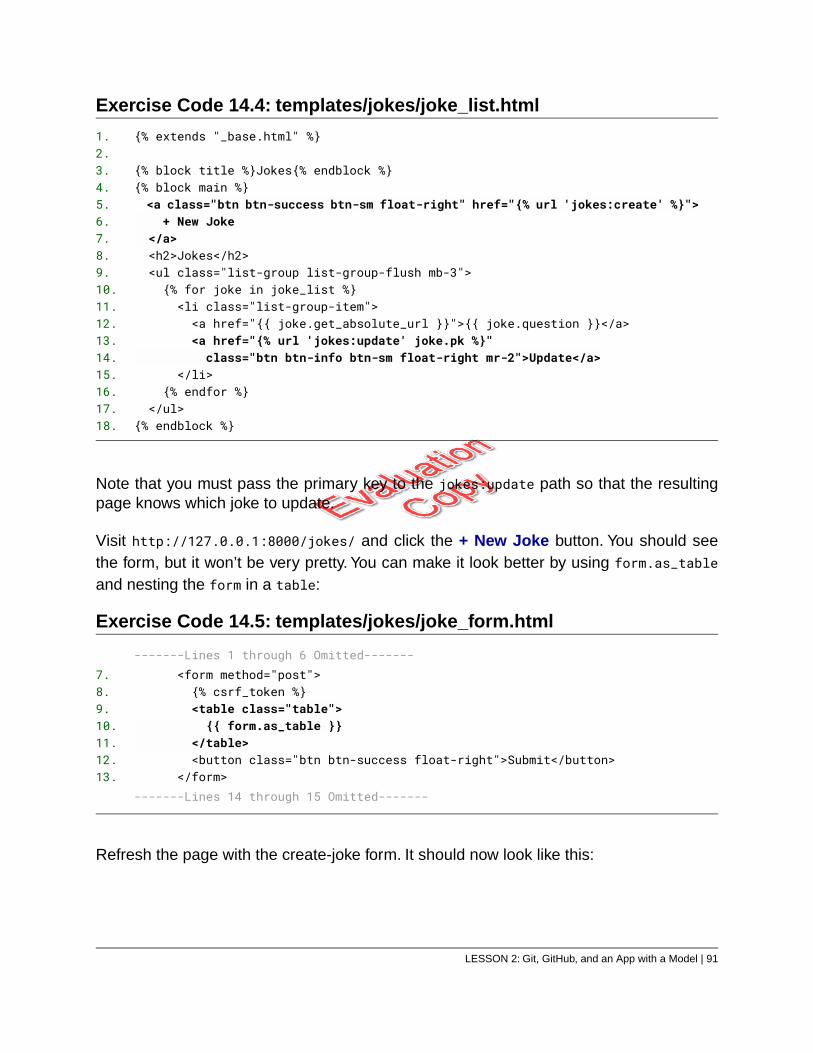
Exercise Code 14.4: templates/jokes/joke_list.html
{% extends "_base.html" %}1.2.
{% block title %}Jokes{% endblock %}3.{% block main %}4.<a class="btn btn-success btn-sm float-right" href="{% url 'jokes:create' %}">5.
+ New Joke6.</a>7.<h2>Jokes</h2>8.<ul class="list-group list-group-flush mb-3">9.{% for joke in joke_list %}10.<li class="list-group-item">11.<a href="{{ joke.get_absolute_url }}">{{ joke.question }}</a>12.<a href="{% url 'jokes:update' joke.pk %}"13.class="btn btn-info btn-sm float-right mr-2">Update</a>14.
</li>15.{% endfor %}16.
</ul>17.{% endblock %}18.
Note that you must pass the primary key to the jokes:update path so that the resultingpage knows which joke to update.
Visit http://127.0.0.1:8000/jokes/ and click the + New Joke button. You should seethe form, but it won’t be very pretty. You can make it look better by using form.as_tableand nesting the form in a table:
Exercise Code 14.5: templates/jokes/joke_form.html
-------Lines 1 through 6 Omitted-------<form method="post">7.{% csrf_token %}8.<table class="table">9.{{ form.as_table }}10.
</table>11.<button class="btn btn-success float-right">Submit</button>12.
</form>13.-------Lines 14 through 15 Omitted-------
Refresh the page with the create-joke form. It should now look like this:
LESSON 2: Git, GitHub, and an App with a Model | 91
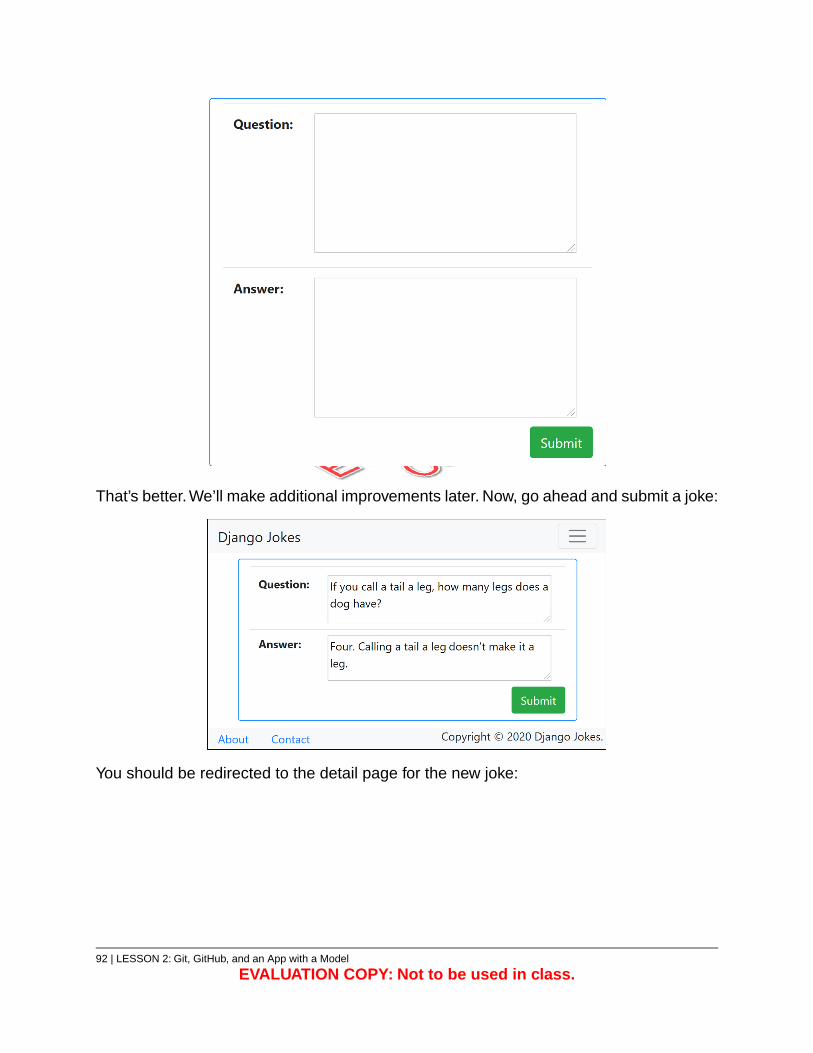
That’s better.We’ll make additional improvements later. Now, go ahead and submit a joke:
You should be redirected to the detail page for the new joke:
92 | LESSON 2: Git, GitHub, and an App with a Model
EVALUATION COPY: Not to be used in class.
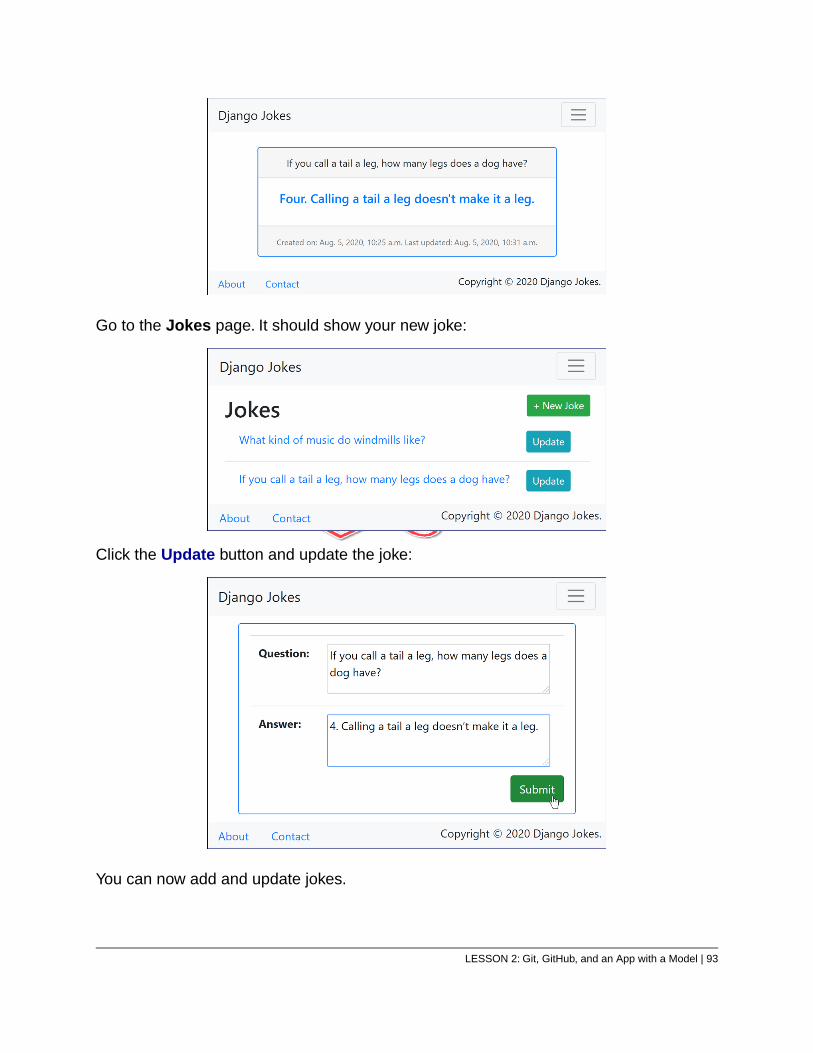
Go to the Jokes page. It should show your new joke:
Click the Update button and update the joke:
You can now add and update jokes.
LESSON 2: Git, GitHub, and an App with a Model | 93
Git Commit
Commit your code to Git.
❋
2.6. Deleting Objects
Django’s default delete process works like this:
1. The user clicks a Delete link or button, resulting in a get request to a DeleteConfirmation page, which contains a simple form with a single submit button.
2. The user submits the form, resulting in a post request that deletes the record fromthe database.
3. The server redirects to a “success url” specified in the view as success_url.
94 | LESSON 2: Git, GitHub, and an App with a Model
EVALUATION COPY: Not to be used in class.
Exercise 15: Deleting Jokes 15 to 25 minutes
In this exercise, you will create the view and form for deleting a joke:
1. Open jokes/views.py in your editor.
2. At the top of the page, import the reverse_lazy() function from django.urls:
from django.urls import reverse_lazy
reverse_lazy() works just like reverse(): it returns the URL based on thepassed-in URL pattern name. But unlike reverse(), it waits to get the URL until itis needed. More on this in a moment.
3. Add DeleteView to the list of imported views from django.views.generic:
from django.views.generic import (CreateView, DeleteView, DetailView, ListView, UpdateView
)
4. Add the view:
class JokeDeleteView(DeleteView):model = Jokesuccess_url = reverse_lazy('jokes:list')
Notice that we use reverse_lazy() here. The view is created before the URLconfiguration, so if you try to use reverse(), you will likely get an error about acircular import. The issue is that, with reverse(), the view needs the URLConf tohave already been created, but the URLConf imports the view, so it cannot becreated until the view exists.
The complete jokes/views.py should now look like this:
LESSON 2: Git, GitHub, and an App with a Model | 95
Exercise Code 15.1: jokes/views.py
from django.urls import reverse_lazy1.2.
from django.views.generic import (3.CreateView, DeleteView, DetailView, ListView, UpdateView4.
)5.6.
from .models import Joke7.8.
class JokeCreateView(CreateView):9.model = Joke10.fields = ['question', 'answer']11.
12.13.
class JokeDeleteView(DeleteView):14.model = Joke15.success_url = reverse_lazy('jokes:list')16.
17.18.
class JokeDetailView(DetailView):19.model = Joke20.
21.22.
class JokeListView(ListView):23.model = Joke24.
25.26.
class JokeUpdateView(UpdateView):27.model = Joke28.fields = ['question', 'answer']29.
URLConf
You must now configure the path to the new view. As you did with UpdateView, you willuse the primary key to identify the joke to be deleted.
1. Open jokes/urls.py in your editor.
2. Add JokeDeleteView to the imported views:
from .views import (JokeCreateView, JokeDeleteView, JokeDetailView, JokeListView, JokeUpdateView
)
96 | LESSON 2: Git, GitHub, and an App with a Model
EVALUATION COPY: Not to be used in class.
3. Add a path for JokeDeleteView constructed as “joke/<int:pk>/delete/” and withthe name “delete”. It will resolve to something like “jokes/joke/2/delete/”:
path('joke/<int:pk>/delete/', JokeDeleteView.as_view(), name='delete'),
“delete” is an arbitrary string. You could use “remove”, “destroy” or anything elseyou like.
Exercise Code 15.2: jokes/urls.py
from django.urls import path1.2.
from .views import (3.JokeCreateView, JokeDeleteView, JokeDetailView, JokeListView, JokeUpdateView4.
)5.6.
app_name = 'jokes'7.urlpatterns = [8.
path('joke/<int:pk>/update/', JokeUpdateView.as_view(), name='update'),9.path('joke/<int:pk>/delete/', JokeDeleteView.as_view(), name='delete'),10.path('joke/create/', JokeCreateView.as_view(), name='create'),11.path('joke/<int:pk>/', JokeDetailView.as_view(), name='detail'),12.path('', JokeListView.as_view(), name='list'),13.
]14.
The Template
The default template_name for a DeleteView is inferred as follows:
app_name/model_confirm_delete.html
In this case, that’s jokes/joke_confirm_delete.html.
Within the templates/jokes folder, add a joke_confirm_delete.html file with the followingcontent:19
19. Don’t want to type? Copy from starter-code/app-with-model/joke_confirm_delete.html.
LESSON 2: Git, GitHub, and an App with a Model | 97
Exercise Code 15.3: templates/jokes/joke_confirm_delete.html
{% extends "_base.html" %}1.2.
{% block title %}Delete Joke{% endblock %}3.{% block main %}4.<div class="card border-primary m-auto mb-3 text-center"5.style="max-width: 30rem">6.<form method="post">7.{% csrf_token %}8.<p><strong>Are you sure you want to delete this joke?</strong></p>9.<p>{{ joke.question }}</p>10.<button class="btn btn-success form-control">Confirm</button>11.
</form>12.</div>13.
{% endblock %}14.
Things to notice:
1. The template must include a form element, and the method should be “post”.
2. Within the form element, you must include:
A. The {% csrf_token %} template tag – Again, this is a security measure.
B. A submit button.
Open templates/jokes/joke_list.html and add a delete button link:
Exercise Code 15.4: templates/jokes/joke_list.html
-------Lines 1 through 11 Omitted-------<a href="{{ joke.get_absolute_url }}">{{ joke.question }}</a>12.<a href="{% url 'jokes:update' joke.pk %}"13.class="btn btn-info btn-sm float-right mr-2">Update</a>14.
<a href="{% url 'jokes:delete' joke.pk %}"15.class="btn btn-danger btn-sm float-right mr-2">Delete</a>16.
-------Lines 17 through 20 Omitted-------
Note that you must pass the primary key with to the delete path so that the resulting pageknows which joke to delete.
98 | LESSON 2: Git, GitHub, and an App with a Model
EVALUATION COPY: Not to be used in class.
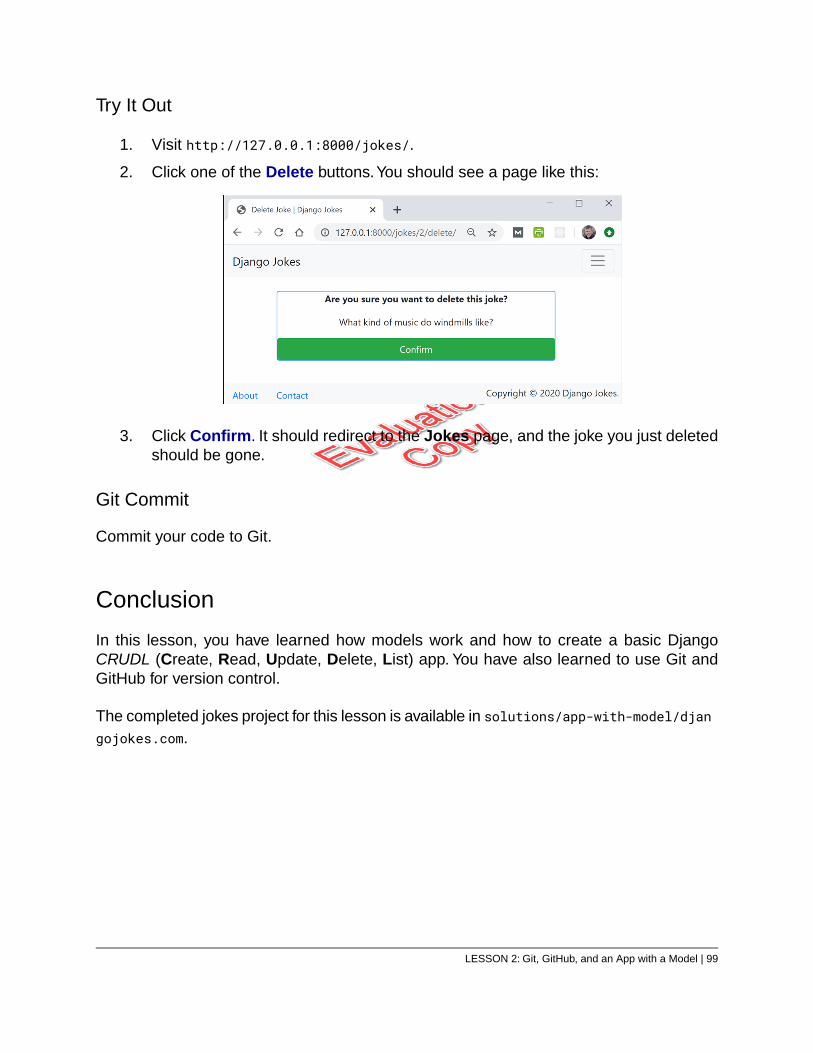
Try It Out
1. Visit http://127.0.0.1:8000/jokes/.
2. Click one of the Delete buttons.You should see a page like this:
3. Click Confirm. It should redirect to the Jokes page, and the joke you just deletedshould be gone.
Git Commit
Commit your code to Git.
Conclusion
In this lesson, you have learned how models work and how to create a basic DjangoCRUDL (Create, Read, Update, Delete, List) app. You have also learned to use Git andGitHub for version control.
The completed jokes project for this lesson is available in solutions/app-with-model/djangojokes.com.
LESSON 2: Git, GitHub, and an App with a Model | 99

100 | LESSON 2: Git, GitHub, and an App with a Model
EVALUATION COPY: Not to be used in class.
LESSON 3Template Filters and Tags
Topics Covered
Built-in template filters.
Built-in template tags.
Custom template filters and tags.
Introduction
The Django template language includes 57 built-in template filters and 25 built-in templatetags. In this lesson, we will describe the most useful filters and tags and give a briefoverview of the rest of them. We will also teach you how to create custom filters and tags.
LESSON 3: Template Filters and Tags | 101
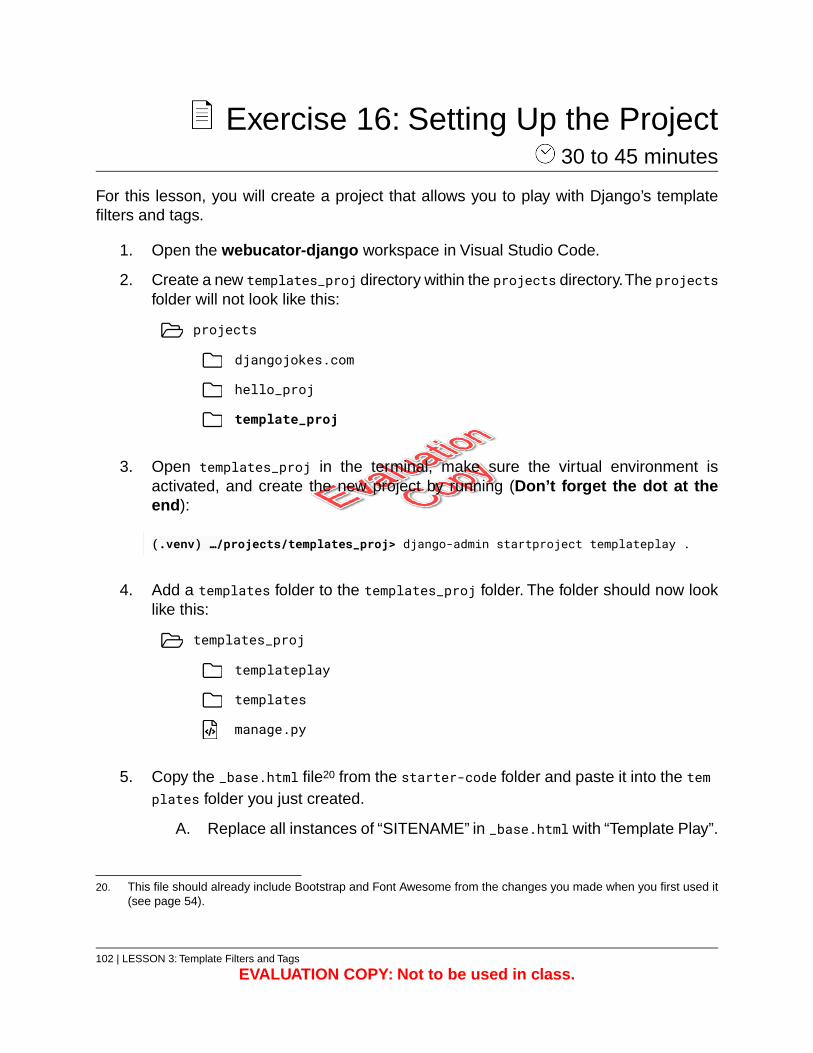
Exercise 16: Setting Up the Project 30 to 45 minutes
For this lesson, you will create a project that allows you to play with Django’s templatefilters and tags.
1. Open the webucator-django workspace in Visual Studio Code.
2. Create a new templates_proj directory within the projects directory.The projectsfolder will not look like this:
projects
djangojokes.com
hello_proj
template_proj
3. Open templates_proj in the terminal, make sure the virtual environment isactivated, and create the new project by running (Don’t forget the dot at theend):
(.venv) …/projects/templates_proj> django-admin startproject templateplay .
4. Add a templates folder to the templates_proj folder. The folder should now looklike this:
templates_proj
templateplay
templates
manage.py
5. Copy the _base.html file20 from the starter-code folder and paste it into the templates folder you just created.
A. Replace all instances of “SITENAME” in _base.html with “Template Play”.
20. This file should already include Bootstrap and Font Awesome from the changes you made when you first used it(see page 54).
102 | LESSON 3: Template Filters and Tags
EVALUATION COPY: Not to be used in class.
B. Replace the link that reads “NavLink” with:
<a class="nav-link" href="{% url 'filters' %}">Filters</a>
This will link to the filters practice page.
C. Replace the link that reads “Log in” with:
<a class="nav-link" href="{% url 'tags' %}">Tags</a>
This will link to the tags practice page.
D. Replace the href values in the home link and the Template Play link with{% url 'homepage' %}:
<a class="navbar-brand" href="{% url 'homepage' %}">Template Play</a>
<a class="nav-link" href="{% url 'homepage' %}">Home<span class="sr-only">(current)</span>
</a>
E. Add the following style block to the head right below the title tag:
<style>h2, h3 {border-bottom: thin black solid;margin: .5em auto;
}
h3 {font-size: 1.2rem;
}</style>
This will make your practice pages look a little nicer.
6. You have to let Django know to look for templates in your new templates directory.Open templateplay/settings.py and add the following to the DIRS value of thedictionary in TEMPLATES:
'DIRS': [BASE_DIR / 'templates'],
LESSON 3: Template Filters and Tags | 103
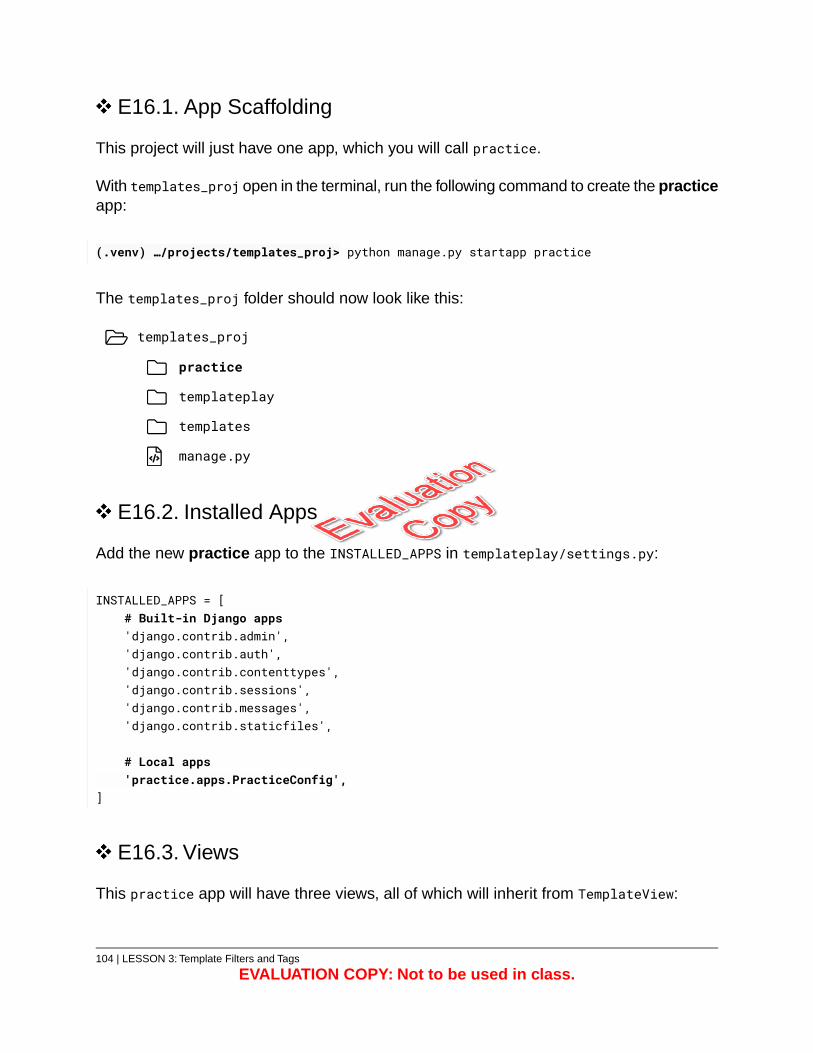
E16.1. App Scaffolding
This project will just have one app, which you will call practice.
With templates_proj open in the terminal, run the following command to create the practiceapp:
(.venv) …/projects/templates_proj> python manage.py startapp practice
The templates_proj folder should now look like this:
templates_proj
practice
templateplay
templates
manage.py
E16.2. Installed Apps
Add the new practice app to the INSTALLED_APPS in templateplay/settings.py:
INSTALLED_APPS = [# Built-in Django apps'django.contrib.admin','django.contrib.auth','django.contrib.contenttypes','django.contrib.sessions','django.contrib.messages','django.contrib.staticfiles',
# Local apps'practice.apps.PracticeConfig',
]
E16.3. Views
This practice app will have three views, all of which will inherit from TemplateView:
104 | LESSON 3: Template Filters and Tags
EVALUATION COPY: Not to be used in class.

1. HomePageView - for linking to the other two views.21
2. FilterView - for playing with filters.
3. TagView - for playing with tags.
Open practice/views.py and change it as shown in the following file:22
Exercise Code 16.1: practice/views.py
from django.views.generic import TemplateView1.2.
class FilterView(TemplateView):3.template_name = 'practice/filters.html'4.
5.6.
class HomePageView(TemplateView):7.template_name = 'home.html'8.
9.10.
class TagView(TemplateView):11.template_name = 'practice/tags.html'12.
E16.4. Templates23
1. Create a home.html file within the templates folder with the following content:
21. As the project only has one app, you will put the HomePageView in that app. In a multi-app project, you wouldnormally have a separate app for your pages that were general to the project.
22. Don’t want to type? Copy from starter-code/template-filters-and-tags/views.py.23. Don’t want to type? Copy from home.html, filters.html, and tags.html in starter-code/template-filters-
and-tags.
LESSON 3: Template Filters and Tags | 105
Exercise Code 16.2: templates/home.html
{% extends "_base.html" %}1.2.
{% block title %}Home{% endblock %}3.{% block main %}4.<h2>Welcome!</h2>5.<ul>6.<li><a href="{% url 'filters' %}">Filters</a></li>7.<li><a href="{% url 'tags' %}">Tags</a></li>8.
</ul>9.{% endblock %}10.
2. Add a practice folder to the templates folder.
3. Within the templates/practice folder, add filters.html and tags.html:
Exercise Code 16.3: templates/practice/filters.html
{% extends "_base.html" %}1.2.
{% block title %}Filters{% endblock %}3.{% block main %}4.<h2>Filters</h2>5.
{% endblock %}6.
Exercise Code 16.4: templates/practice/tags.html
{% extends "_base.html" %}1.2.
{% block title %}Tags{% endblock %}3.{% block main %}4.<h2>Tags</h2>5.
{% endblock %}6.
E16.5. URLs24
Create URLConf in New App
Within the practice folder (the one in templates_proj, not the one in templates), createa urls.py file with the following content:
24. Don’t want to type? Copy from urls.py and urls_main.py in starter-code/template-filters-and-tags.
106 | LESSON 3: Template Filters and Tags
EVALUATION COPY: Not to be used in class.
Exercise Code 16.5: practice/urls.py
from django.urls import path1.2.
from .views import FilterView, HomePageView, TagView3.4.
urlpatterns = [5.path('', HomePageView.as_view(), name='homepage'),6.path('filters/', FilterView.as_view(), name='filters'),7.path('tags/', TagView.as_view(), name='tags'),8.
]9.
Code Explanation
Notice that you did not set app_name to create a namespace for the URLConf as you havedone in previous URLConfs. That’s because this project just has one app. This is why thehref values in _base.html are written as {% url 'filters' %} and {% url 'tags' %}
instead of {% url 'practice:filters' %} and {% url 'practice:tags' %}.
Include App URLConf in Main URLConf
Next, you need to let your main URLConf know to hand off some paths to the practiceURLConf. Open templateplay/urls.py and modify it as follows:
Exercise Code 16.6: templateplay/urls.py
from django.contrib import admin1.from django.urls import path, include2.
3.urlpatterns = [4.
path('admin/', admin.site.urls),5.path('', include('practice.urls')),6.
]7.
E16.6. Viewing the Website
Now that you have done the initial setup, you can view your website:
LESSON 3: Template Filters and Tags | 107
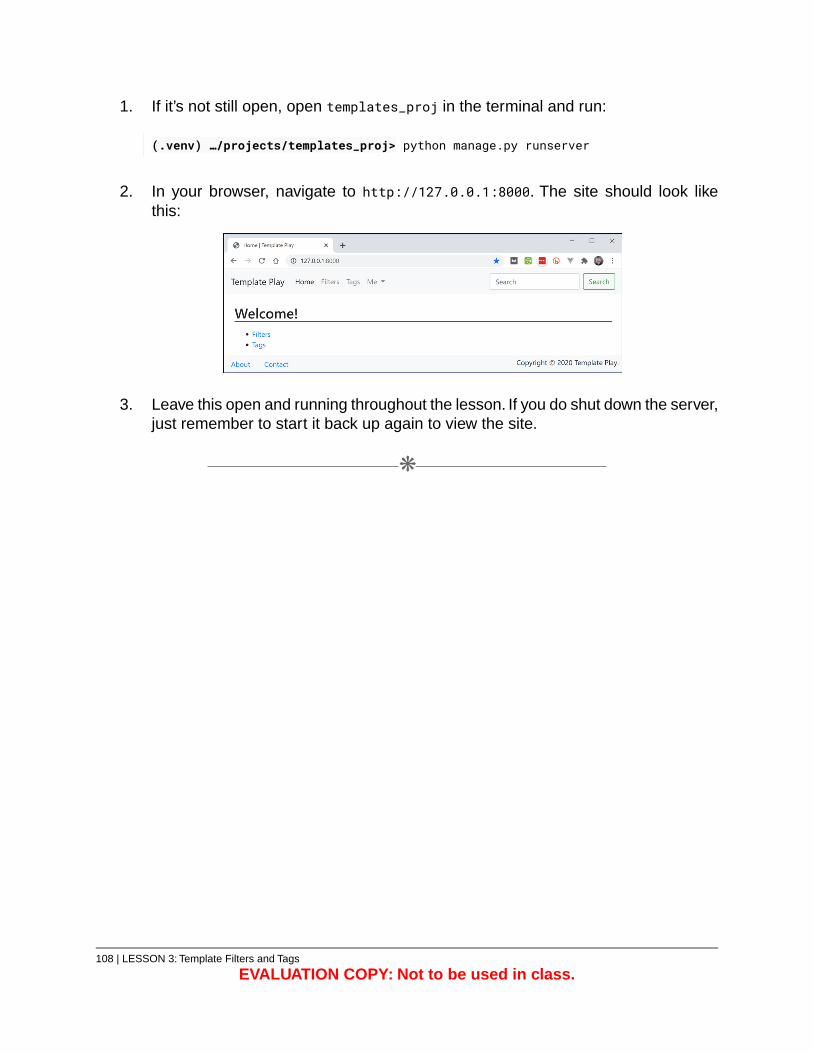
1. If it’s not still open, open templates_proj in the terminal and run:
(.venv) …/projects/templates_proj> python manage.py runserver
2. In your browser, navigate to http://127.0.0.1:8000. The site should look likethis:
3. Leave this open and running throughout the lesson. If you do shut down the server,just remember to start it back up again to view the site.
❋
108 | LESSON 3: Template Filters and Tags
EVALUATION COPY: Not to be used in class.
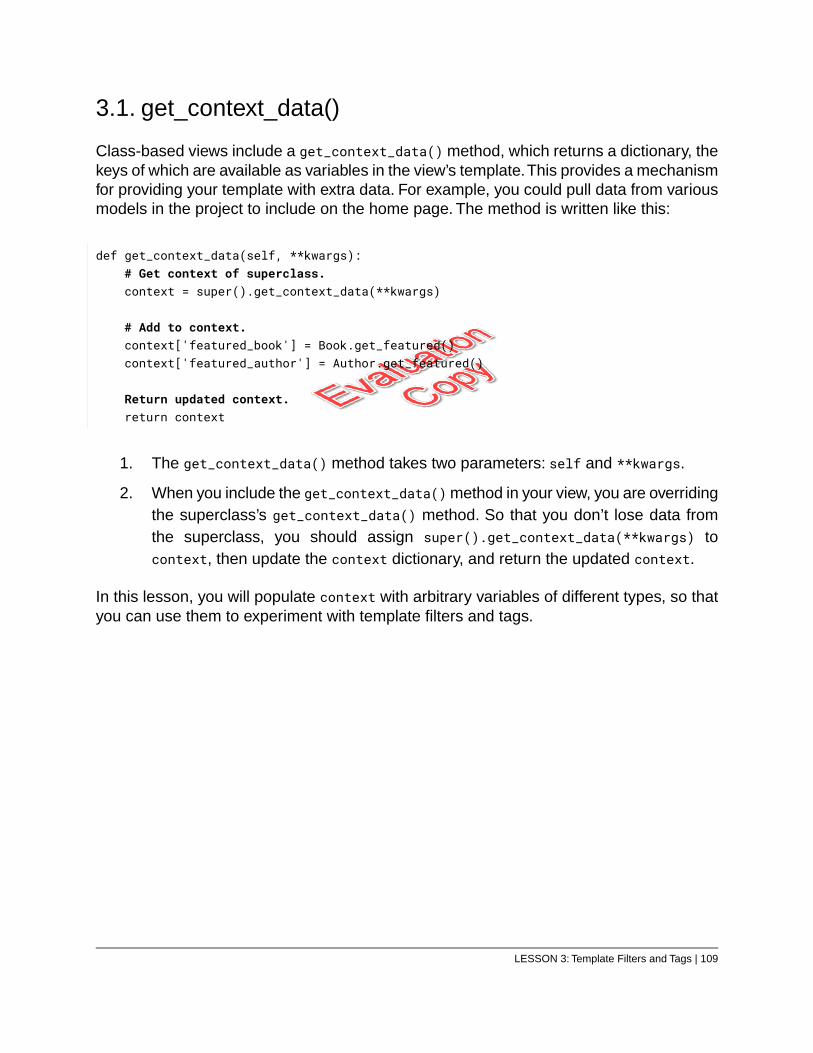
3.1. get_context_data()
Class-based views include a get_context_data() method, which returns a dictionary, thekeys of which are available as variables in the view’s template.This provides a mechanismfor providing your template with extra data. For example, you could pull data from variousmodels in the project to include on the home page. The method is written like this:
def get_context_data(self, **kwargs):# Get context of superclass.context = super().get_context_data(**kwargs)
# Add to context.context['featured_book'] = Book.get_featured()context['featured_author'] = Author.get_featured()
Return updated context.return context
1. The get_context_data() method takes two parameters: self and **kwargs.
2. When you include the get_context_data() method in your view, you are overridingthe superclass’s get_context_data() method. So that you don’t lose data fromthe superclass, you should assign super().get_context_data(**kwargs) tocontext, then update the context dictionary, and return the updated context.
In this lesson, you will populate context with arbitrary variables of different types, so thatyou can use them to experiment with template filters and tags.
LESSON 3: Template Filters and Tags | 109
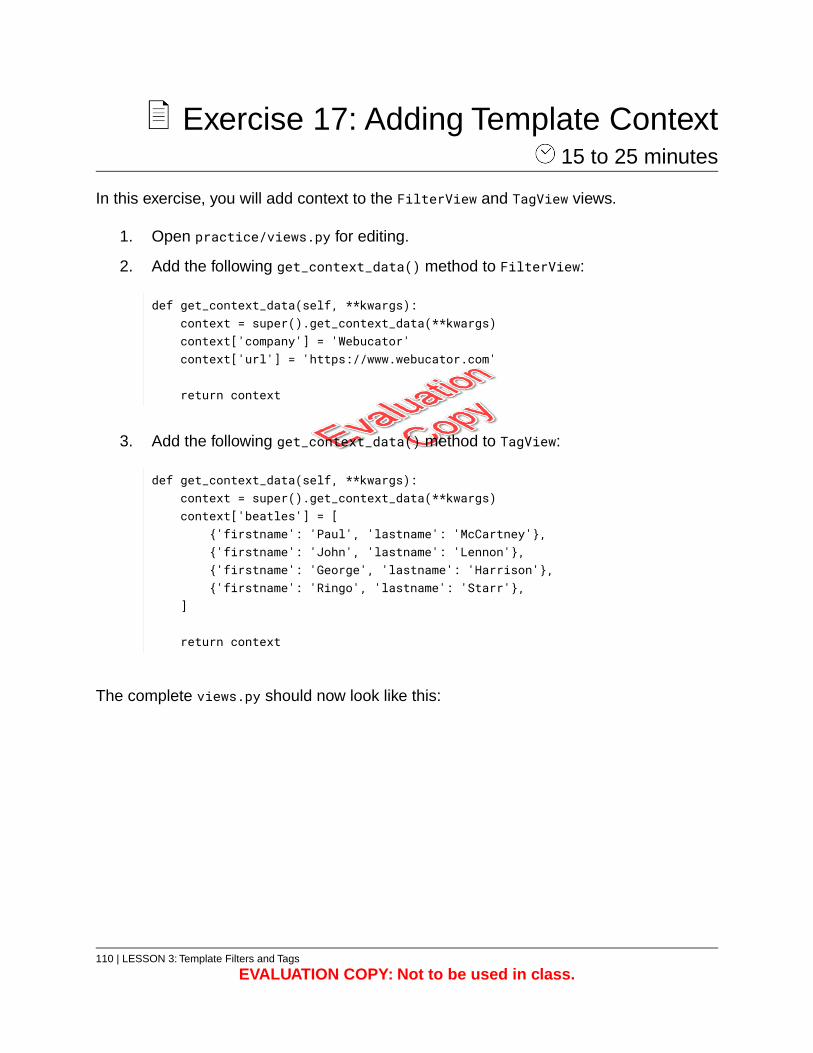
Exercise 17: Adding Template Context 15 to 25 minutes
In this exercise, you will add context to the FilterView and TagView views.
1. Open practice/views.py for editing.
2. Add the following get_context_data() method to FilterView:
def get_context_data(self, **kwargs):context = super().get_context_data(**kwargs)context['company'] = 'Webucator'context['url'] = 'https://www.webucator.com'
return context
3. Add the following get_context_data() method to TagView:
def get_context_data(self, **kwargs):context = super().get_context_data(**kwargs)context['beatles'] = [
{'firstname': 'Paul', 'lastname': 'McCartney'},{'firstname': 'John', 'lastname': 'Lennon'},{'firstname': 'George', 'lastname': 'Harrison'},{'firstname': 'Ringo', 'lastname': 'Starr'},
]
return context
The complete views.py should now look like this:
110 | LESSON 3: Template Filters and Tags
EVALUATION COPY: Not to be used in class.
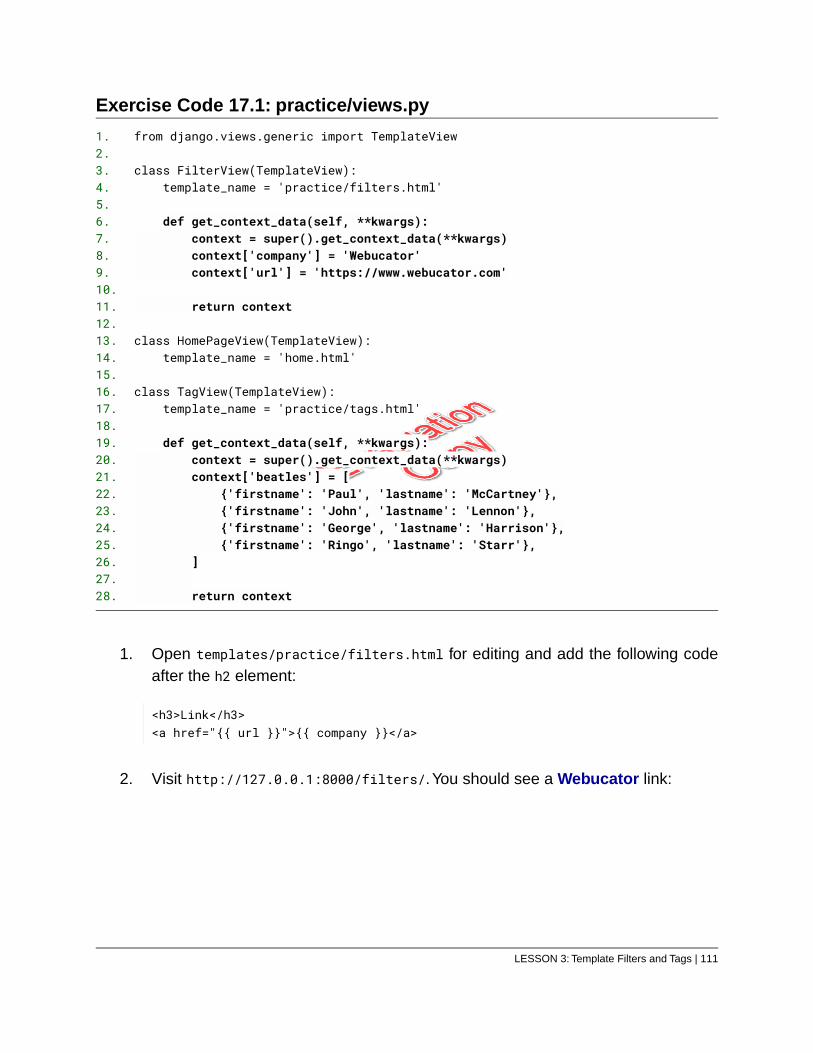
Exercise Code 17.1: practice/views.py
from django.views.generic import TemplateView1.2.
class FilterView(TemplateView):3.template_name = 'practice/filters.html'4.
5.def get_context_data(self, **kwargs):6.
context = super().get_context_data(**kwargs)7.context['company'] = 'Webucator'8.context['url'] = 'https://www.webucator.com'9.
10.return context11.
12.class HomePageView(TemplateView):13.
template_name = 'home.html'14.15.
class TagView(TemplateView):16.template_name = 'practice/tags.html'17.
18.def get_context_data(self, **kwargs):19.
context = super().get_context_data(**kwargs)20.context['beatles'] = [21.
{'firstname': 'Paul', 'lastname': 'McCartney'},22.{'firstname': 'John', 'lastname': 'Lennon'},23.{'firstname': 'George', 'lastname': 'Harrison'},24.{'firstname': 'Ringo', 'lastname': 'Starr'},25.
]26.27.
return context28.
1. Open templates/practice/filters.html for editing and add the following codeafter the h2 element:
<h3>Link</h3><a href="{{ url }}">{{ company }}</a>
2. Visit http://127.0.0.1:8000/filters/.You should see a Webucator link:
LESSON 3: Template Filters and Tags | 111
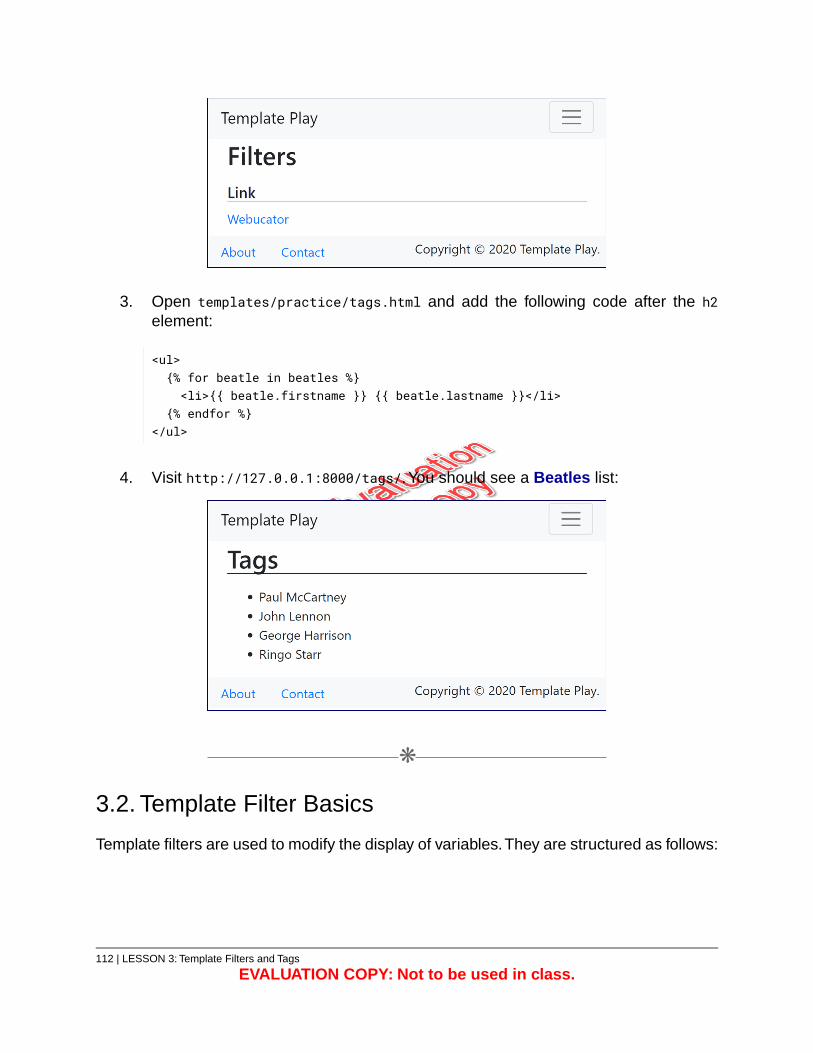
3. Open templates/practice/tags.html and add the following code after the h2element:
<ul>{% for beatle in beatles %}<li>{{ beatle.firstname }} {{ beatle.lastname }}</li>
{% endfor %}</ul>
4. Visit http://127.0.0.1:8000/tags/.You should see a Beatles list:
❋
3.2. Template Filter Basics
Template filters are used to modify the display of variables.They are structured as follows:
112 | LESSON 3: Template Filters and Tags
EVALUATION COPY: Not to be used in class.
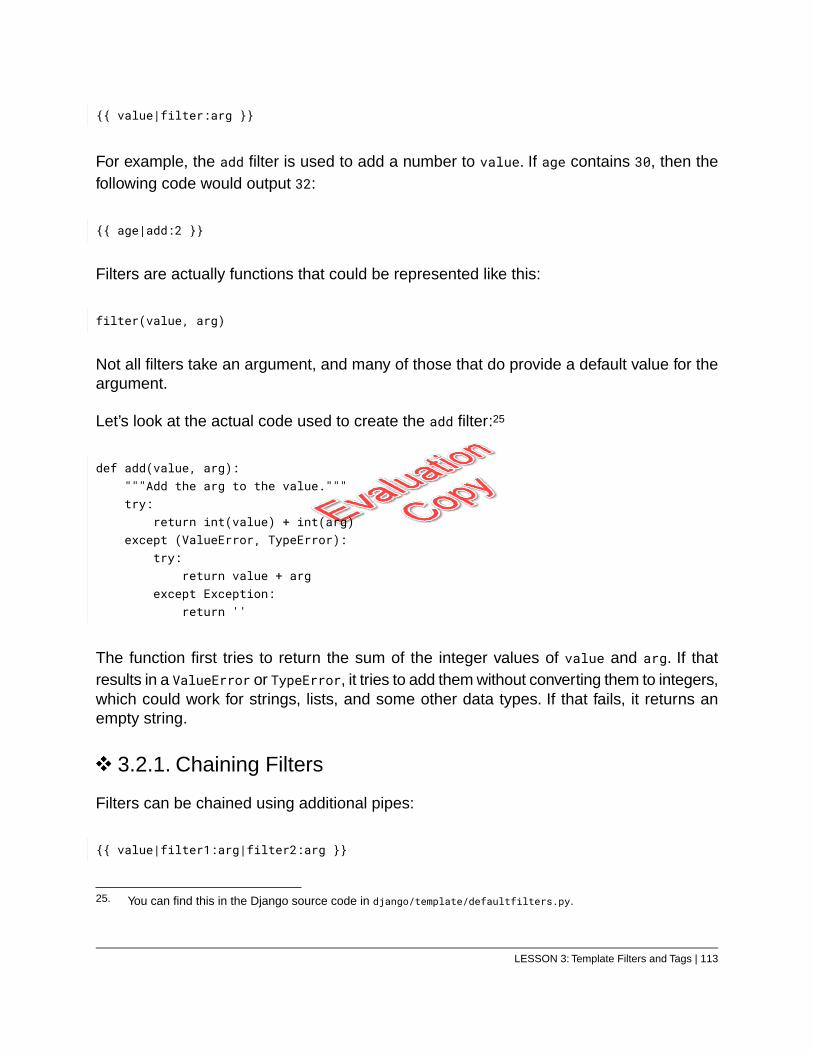
{{ value|filter:arg }}
For example, the add filter is used to add a number to value. If age contains 30, then thefollowing code would output 32:
{{ age|add:2 }}
Filters are actually functions that could be represented like this:
filter(value, arg)
Not all filters take an argument, and many of those that do provide a default value for theargument.
Let’s look at the actual code used to create the add filter:25
def add(value, arg):"""Add the arg to the value."""try:
return int(value) + int(arg)except (ValueError, TypeError):
try:return value + arg
except Exception:return ''
The function first tries to return the sum of the integer values of value and arg. If thatresults in a ValueError or TypeError, it tries to add them without converting them to integers,which could work for strings, lists, and some other data types. If that fails, it returns anempty string.
3.2.1. Chaining Filters
Filters can be chained using additional pipes:
{{ value|filter1:arg|filter2:arg }}
25. You can find this in the Django source code in django/template/defaultfilters.py.
LESSON 3: Template Filters and Tags | 113
In this case filter1 acts on value and the result is applied to filter2. This could berepresented like this:
filter2(filter1(value, arg), arg)
For example:
{{ age|add:2|divisibleby:3 }}
The preceding code will return True if age + 2 is divisible by 3. Otherwise, it will returnFalse.
Order Matters
When chaining filters, order matters. Consider the following two lines of code:
{{ age|add:2|divisibleby:3 }}{{ age|divisibleby:3|add:2 }}
The first line of code is equivalent to:
divisibleby(add(age, 2), 3)
It first adds 2 to age and then checks if the result is divisible by 3. If age is 9, then theequation is:
(9 + 2) % 3 == 0
This will return False, because 11 is not divisible by 3.
The second line of code is equivalent to:
add(divisibleby(age, 3), 2)
It first checks if the age is divisible by 3 and then adds 2 to the result. The equivalentequation is:
114 | LESSON 3: Template Filters and Tags
EVALUATION COPY: Not to be used in class.
(age % 3 == 0) + 2
This doesn’t seem to make much sense, but Python will handle it by converting (age % 3
== 0) to an integer:
1 if the equation is True.
0 if the equation is False.
If age is 9, then the equation is:
(9 % 3 == 0) + 2
As 9 % 3 does equal 0, that evaluates to 1 + 2 or 3.
The takeaway is that the order in which the filters are applied matters.
3.2.2. Filters without Arguments
Filters that don’t take any arguments are written like this:
{{ value|filter }}
For example, the following code will output the value of company with the first lettercapitalized:
{{ company|capfirst }}
LESSON 3: Template Filters and Tags | 115
Exercise 18: Adding Filters 10 to 15 minutes
In this exercise, you will add a couple of filters to templates/practice/filters.html tosee how they work.
1. Open templates/practice/filters.html for editing.
2. Add the following code before the {% endblock %} line:
<h3>First Filters</h3>{{ company|upper }}:{{ url|urlize }}
3. Visit http://127.0.0.1:8000/filters/. You should see “WEBUCATOR” in alluppercase letters followed by the URL converted into a link. View the source ofthe page and notice that that portion of the code looks like this:
WEBUCATOR:<a href="https://www.webucator.com" rel="nofollow">https://www.webucator.com</a>
The upper filter converted “Webucator” to all uppercase letters, and the urlizefilter converted the URL into an HTML link.
While neither of these filters is particularly useful, they demonstrate how you go aboutusing filters in a template. In the next section, we will take a look at more useful filters.
❋
3.3. Most Useful Template Filters
Django includes many filters that you will rarely, if ever, use, either because they are meantfor special cases or because there are alternative ways of accomplishing the same thing.In this section, we list the most useful filters and provide usage examples. You shouldread this section carefully and then read more quickly through the rest of the filters, sothat you know what is available.
116 | LESSON 3: Template Filters and Tags
EVALUATION COPY: Not to be used in class.

Practicing
As you learn about these filters, add to the context in the FilterView view and addthe filters in the templates/practice/filters.html template.
date:format and time:format
The date and time filters are used to format the date and time of a datetime, date, or timeobject.
They take an optional format argument:
{{ datetime|date:format }}{{ datetime|time:format }}
The format argument can be constructed using format strings26 or (for the date filter only)using one of the following predefined formats:
1. DATE_FORMAT
2. DATETIME_FORMAT
3. SHORT_DATE_FORMAT
4. SHORT_DATETIME_FORMAT
In practice/views.py, import datetime and add the following datetime object to the contextin the get_context_data() method of FilterView:
26. See https://docs.djangoproject.com/en/3.1/ref/templates/builtins/#std:templatefilter-date fordocumentation.
LESSON 3: Template Filters and Tags | 117
import datetime
from django.views.generic import TemplateView
class FilterView(TemplateView):template_name = 'practice/filters.html'
def get_context_data(self, **kwargs):context = super().get_context_data(**kwargs)context['company'] = 'Webucator'context['url'] = 'https://www.webucator.com'context['moon_landing'] = datetime.datetime(
year=1969, month=7, day=21,hour=2, minute=56, second=15,tzinfo=datetime.timezone.utc
)
return context
Try adding some of these filters in the template:
{{ moon_landing }} – July 21, 1969, 2:56 a.m.
{{ moon_landing|date }} – July 21, 1969
{{ moon_landing|date:"DATE_FORMAT" }} – July 21, 1969
{{ moon_landing|date:"DATETIME_FORMAT" }} – July 21, 1969, 2:56 a.m.
{{ moon_landing|date:"SHORT_DATE_FORMAT" }} – 07/21/1969
{{ moon_landing|date:"SHORT_DATETIME_FORMAT" }} – 07/21/1969 2:56 a.m.
{{ moon_landing|date:"Y-m-d H:i" }} – 1969-07-21 02:56
{{ moon_landing|time }} – 2:56 a.m.
{{ moon_landing|time:'G:i:s' }} – 2:56:15
Note that the predefined formats are based on the current locale.
timesince:to_date
The timesince filter outputs the amount of time between the value and the to_dateargument, which defaults to the current time.
118 | LESSON 3: Template Filters and Tags
EVALUATION COPY: Not to be used in class.
Add the following datetime object to the context:
context['launch_date'] = datetime.datetime(year=1969, month=7, day=16, hour=13, minute=32, second=0,tzinfo=datetime.timezone.utc
)
And add these filters in the template:
{{ moon_landing|timesince }}<br>{{ launch_date|timesince:moon_landing }}
This will output something like:
51 years<br>4 days, 13 hours
The first time period is the amount of time that has passed since the moon landing(at the time of this writing).
The second time period is the time between the rocket launch and the momentNeil Armstrong stepped on the moon.
The timesince filter is commonly used to output how much time has passed since anarticle was written (e.g., “Posted 1 year, 2 months ago.”).
timeuntil:from_date
The timeuntil filter outputs the amount of time between the from_date argument, whichdefaults to the current time, and the value.
Add the following datetime object to the context:
context['century22'] = datetime.datetime(year=2100, month=1, day=1, tzinfo=datetime.timezone.utc
)
And add this in the template:
LESSON 3: Template Filters and Tags | 119
{{ century22|timeuntil }}<br>{{ century22|timeuntil:moon_landing }}
This will output:
79 years, 4 months<br>130 years, 5 months
The first time period is the time left until January 1, 2100 (at the time of this writing).
The second time period is the time between the moon landing and January 1,2100.
The timeuntil filter is commonly used to output how much time is remaining before someevent takes place (e.g., “Sale ends in 9 hours, 50 minutes.”).
default:default
The default filter is used to provide a default string when value evaluates to False.
Add this dictionary to the context:
context['inventory'] = {'gloves': 0,'hats': 51,'scarves': 2,'socks': 13
}
And add this loop in the template:
<ol>{% for item, remaining in inventory.items %}<li>{{ item }}: {{ remaining|default:"out of stock" }}</li>
{% endfor %}</ol>
The output will be:
120 | LESSON 3: Template Filters and Tags
EVALUATION COPY: Not to be used in class.
<ol><li>gloves: out of stock</li><li>hats: 51</li><li>scarves: 2</li><li>socks: 13</li>
</ol>
Because the value for 'gloves' is 0, which evaluates to False, the filter outputs “out ofstock” for the remaining gloves. The other values all evaluate to True, so the default is notused.
floatformat:n
The floatformat filter takes an n argument for the number of decimal places to round to.Without that argument, it will round to one decimal place unless the decimal value is 0, inwhich case it will just output the integer.
3.141591000.111000.0Filter \ Value of i:
3.11000.11000{{ i|floatformat }}
3.141000.111000.00{{ i|floatformat:2 }}
310001000{{ i|floatformat:0 }}
length and pluralize:suffix
The length and pluralize filters can be used independently, but are often used together.
{{ value|length }} – The length filter returns the length of value, which can bea string or a sequence.
{{ value|pluralize:suffix }} – If value is not 1, '1', or an object of length 1, thepluralize filter outputs an “s” or the value of the suffix argument if one is used.
Add the following dictionary to the context:
LESSON 3: Template Filters and Tags | 121
context['classes'] = {'Python': [
'Introduction to Python', 'Advanced Python','Data Science', 'Django'
],'Databases': [
'Introduction to PostgreSQL', 'Introduction to MySQL','Introduction to SQL Server', 'Introduction to Oracle'
],'Web': [
'HTML', 'CSS', 'JavaScript'],'XML': [
'Introduction to XML']
}
And add this loop in the template:
<ol>{% for category, titles in classes.items %}<li>{{ category }}: {{ titles|length }}class{{ titles|pluralize:"es" }}
</li>{% endfor %}
</ol>
The output will be:
<ol><li>Python: 4 classes</li><li>Databases: 4 classes</li><li>Web: 3 classes</li><li>XML: 1 class</li>
</ol>
122 | LESSON 3: Template Filters and Tags
EVALUATION COPY: Not to be used in class.
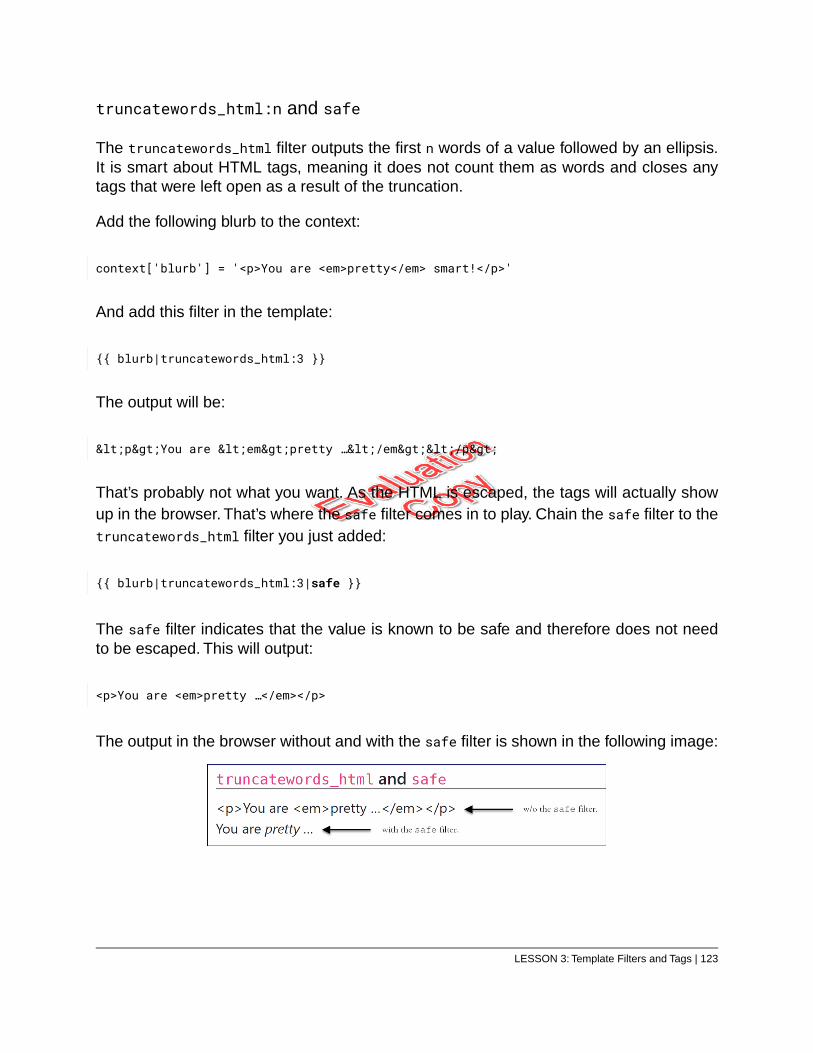
truncatewords_html:n and safe
The truncatewords_html filter outputs the first n words of a value followed by an ellipsis.It is smart about HTML tags, meaning it does not count them as words and closes anytags that were left open as a result of the truncation.
Add the following blurb to the context:
context['blurb'] = '<p>You are <em>pretty</em> smart!</p>'
And add this filter in the template:
{{ blurb|truncatewords_html:3 }}
The output will be:
<p>You are <em>pretty …</em></p>
That’s probably not what you want. As the HTML is escaped, the tags will actually showup in the browser. That’s where the safe filter comes in to play. Chain the safe filter to thetruncatewords_html filter you just added:
{{ blurb|truncatewords_html:3|safe }}
The safe filter indicates that the value is known to be safe and therefore does not needto be escaped. This will output:
<p>You are <em>pretty …</em></p>
The output in the browser without and with the safe filter is shown in the following image:
LESSON 3: Template Filters and Tags | 123

yesno:mapping
The yesno filter maps values that evaluate to True, False, and None to "yes", "no", and"maybe" or to alternative strings passed in as a comma-delimited string. Using theinventory dictionary again:
context['inventory'] = {'gloves': 0,'hats': 51,'scarves': 2,'socks': 13
}
Add this loop in the template:
<ol>{% for item, remaining in inventory.items %}<li class="{{ remaining|yesno:'instock,outofstock' }}">{{ item }}: {{ remaining }} remaining{{ remaining|yesno:',(time to place an order)' }}
</li>{% endfor %}
</ol>
Notice how the yesno filter is used once to determine the value of the class attribute andagain to determine whether or not to output “(time to place an order)”.
The output will be:
<ol><li class="outofstock">gloves: 0 remaining (time to place an order)</li><li class="instock">hats: 51 remaining</li><li class="instock">scarves: 2 remaining</li><li class="instock">socks: 13 remaining</li>
</ol>
The next few filters are useful in specific situations. You should read through them, butyou don’t need to write the code (unless you want to):
124 | LESSON 3: Template Filters and Tags
EVALUATION COPY: Not to be used in class.
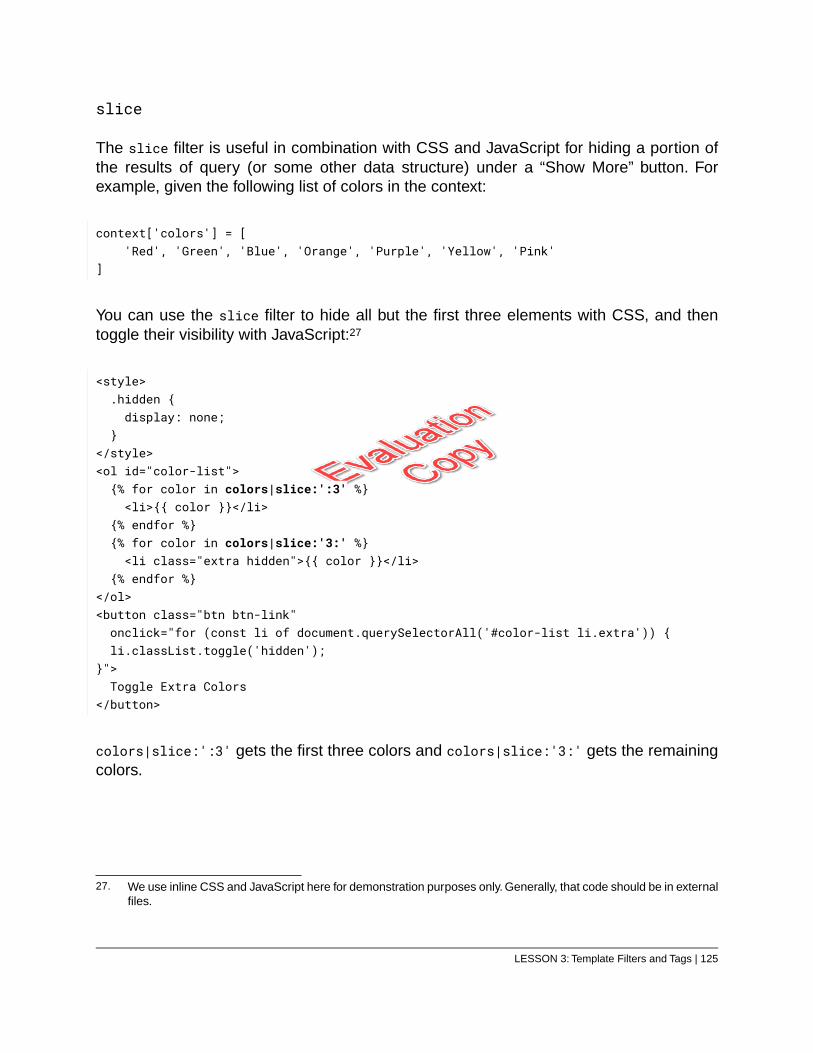
slice
The slice filter is useful in combination with CSS and JavaScript for hiding a portion ofthe results of query (or some other data structure) under a “Show More” button. Forexample, given the following list of colors in the context:
context['colors'] = ['Red', 'Green', 'Blue', 'Orange', 'Purple', 'Yellow', 'Pink'
]
You can use the slice filter to hide all but the first three elements with CSS, and thentoggle their visibility with JavaScript:27
<style>.hidden {display: none;
}</style><ol id="color-list">{% for color in colors|slice:':3' %}<li>{{ color }}</li>
{% endfor %}{% for color in colors|slice:'3:' %}<li class="extra hidden">{{ color }}</li>
{% endfor %}</ol><button class="btn btn-link"onclick="for (const li of document.querySelectorAll('#color-list li.extra')) {li.classList.toggle('hidden');
}">Toggle Extra Colors
</button>
colors|slice:':3' gets the first three colors and colors|slice:'3:' gets the remainingcolors.
27. We use inline CSS and JavaScript here for demonstration purposes only. Generally, that code should be in externalfiles.
LESSON 3: Template Filters and Tags | 125
filesizeformat
The filesizeformat filter converts a value in bytes to a friendly file size format. Forexample, given the following:
context['files'] = [{
'filename': 'macOS 64-bit installer','filesize': 29163525
},{
'filename': 'Windows x86-64 executable installer','filesize': 26797616
},{
'filename': 'Windows x86-64 web-based installer','filesize': 1348896
}]
… and this loop in the template:
<ol>{% for file in files %}<li>{{ file.filename }} ({{ file.filesize|filesizeformat }})</li>
{% endfor %}</ol>
The output would be:
<ol><li>macOS 64-bit installer (27.8 MB)</li><li>Windows x86-64 executable installer (25.6 MB)</li><li>Windows x86-64 web-based installer (1.3 MB)</li>
</ol>
126 | LESSON 3: Template Filters and Tags
EVALUATION COPY: Not to be used in class.
json_script
The json_script filter outputs a Python object as JSON inside of a script element.
What is JSON
JSON stands for JavaScript Object Notation. According to the https://json.org,JSON is:
1. A lightweight data-interchange format.
2. Easy for humans to read and write.
3. Easy for machines to parse and generate.
Because most modern programming languages have tools for working with JSON,JSON is commonly used for transferring data between applications.
This is the safest way to include data to be used by JavaScript. For example, imagine theclasses dictionary we saw earlier was dynamically generated from data in a database andthen added to the context. Here is the dictionary again:
context['classes'] = {'Python': [
'Introduction to Python', 'Advanced Python','Data Science', 'Django'
],'Databases': [
'Introduction to PostgreSQL', 'Introduction to MySQL','Introduction to SQL Server', 'Introduction to Oracle'
],'Web': [
'HTML', 'CSS', 'JavaScript'],'XML': [
'Introduction to XML']
}
The following line of code will convert the dictionary to JSON and add it to the templateinside of a <script> tag with an id of “classdata”:
LESSON 3: Template Filters and Tags | 127
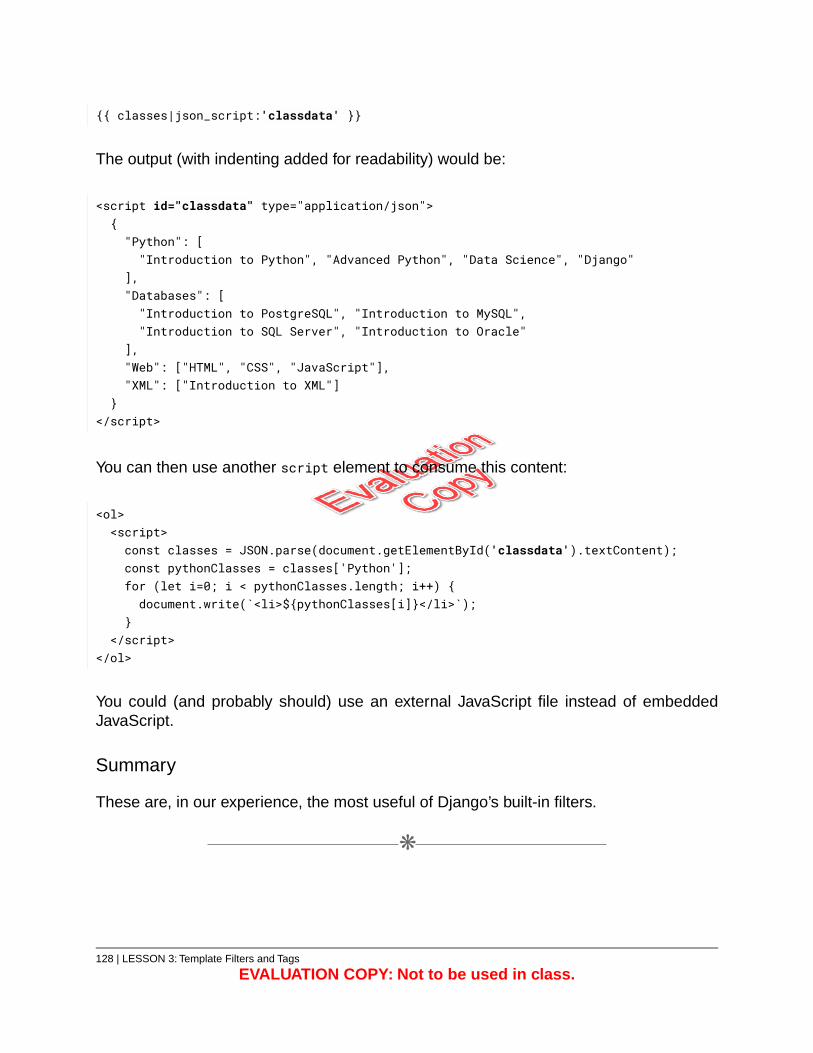
{{ classes|json_script:'classdata' }}
The output (with indenting added for readability) would be:
<script id="classdata" type="application/json">{"Python": ["Introduction to Python", "Advanced Python", "Data Science", "Django"
],"Databases": ["Introduction to PostgreSQL", "Introduction to MySQL","Introduction to SQL Server", "Introduction to Oracle"
],"Web": ["HTML", "CSS", "JavaScript"],"XML": ["Introduction to XML"]
}</script>
You can then use another script element to consume this content:
<ol><script>const classes = JSON.parse(document.getElementById('classdata').textContent);const pythonClasses = classes['Python'];for (let i=0; i < pythonClasses.length; i++) {document.write(`<li>${pythonClasses[i]}</li>`);
}</script>
</ol>
You could (and probably should) use an external JavaScript file instead of embeddedJavaScript.
Summary
These are, in our experience, the most useful of Django’s built-in filters.
❋
128 | LESSON 3: Template Filters and Tags
EVALUATION COPY: Not to be used in class.
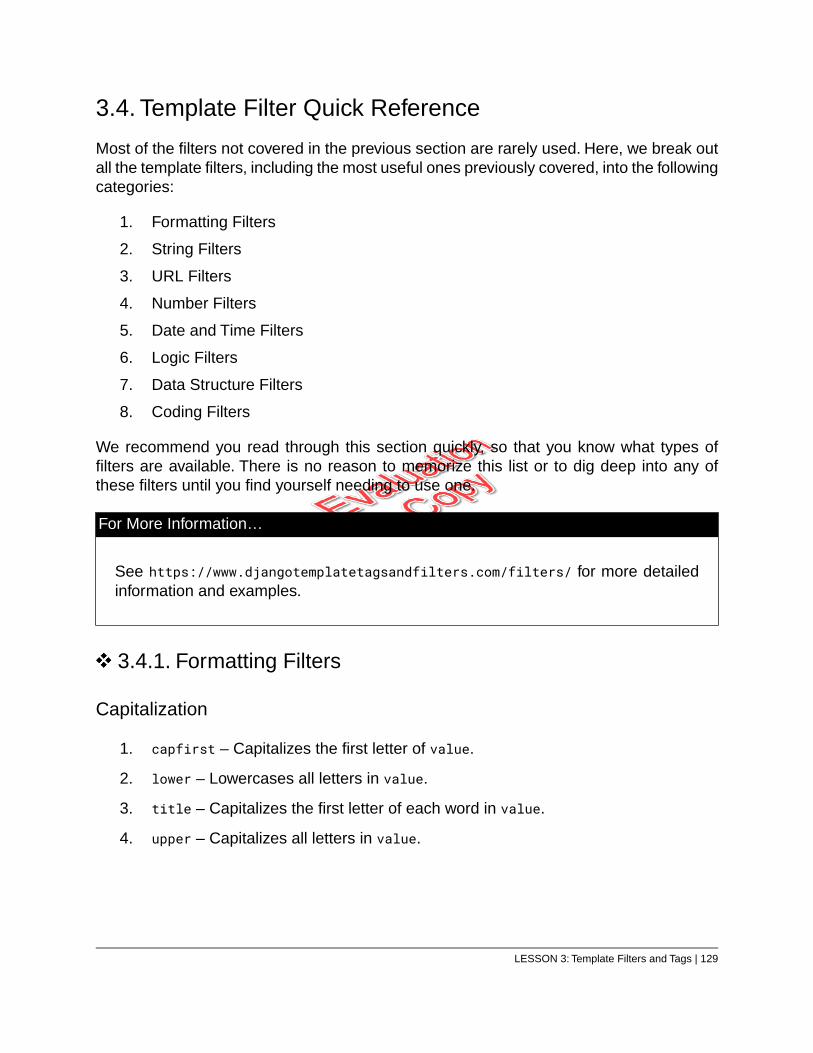
3.4. Template Filter Quick Reference
Most of the filters not covered in the previous section are rarely used. Here, we break outall the template filters, including the most useful ones previously covered, into the followingcategories:
1. Formatting Filters
2. String Filters
3. URL Filters
4. Number Filters
5. Date and Time Filters
6. Logic Filters
7. Data Structure Filters
8. Coding Filters
We recommend you read through this section quickly, so that you know what types offilters are available. There is no reason to memorize this list or to dig deep into any ofthese filters until you find yourself needing to use one.
For More Information…
See https://www.djangotemplatetagsandfilters.com/filters/ for more detailedinformation and examples.
3.4.1. Formatting Filters
Capitalization
1. capfirst – Capitalizes the first letter of value.
2. lower – Lowercases all letters in value.
3. title – Capitalizes the first letter of each word in value.
4. upper – Capitalizes all letters in value.
LESSON 3: Template Filters and Tags | 129
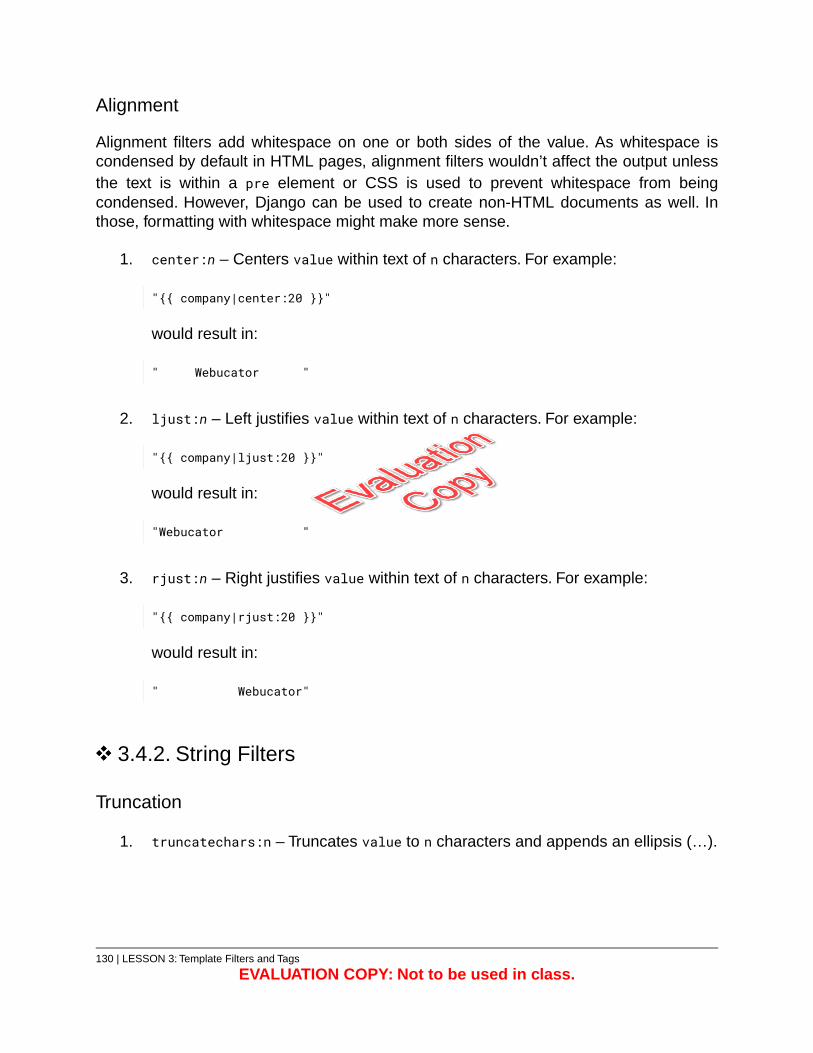
Alignment
Alignment filters add whitespace on one or both sides of the value. As whitespace iscondensed by default in HTML pages, alignment filters wouldn’t affect the output unlessthe text is within a pre element or CSS is used to prevent whitespace from beingcondensed. However, Django can be used to create non-HTML documents as well. Inthose, formatting with whitespace might make more sense.
1. center:n – Centers value within text of n characters. For example:
"{{ company|center:20 }}"
would result in:
" Webucator "
2. ljust:n – Left justifies value within text of n characters. For example:
"{{ company|ljust:20 }}"
would result in:
"Webucator "
3. rjust:n – Right justifies value within text of n characters. For example:
"{{ company|rjust:20 }}"
would result in:
" Webucator"
3.4.2. String Filters
Truncation
1. truncatechars:n – Truncates value to n characters and appends an ellipsis (…).
130 | LESSON 3: Template Filters and Tags
EVALUATION COPY: Not to be used in class.
2. truncatechars_html:n – Like truncatechars, but it is smart about HTML tags,meaning it does not count them as words and closes any tags that were left openas a result of the truncation.
3. truncatewords:n – Truncates value to n words and appends an ellipsis (…).
4. truncatewords_html:n – Covered in Most Useful Filters (see page 123).
Other String Filters
1. cut:string_to_cut – Removes all instances of string_to_cut from value.
2. linenumbers – Prepends each line of text with a line number. Useful for plain text,but not typically for HTML.
3. phone2numeric – Converts letters to numbers for a phone number (e.g., 877-WEBUCATbecomes 877-9328228).
4. pluralize:suffix – Covered in Most Useful Filters (see page 121).
5. stringformat:format – Formats value using the old printf-style string formatting.28
6. wordwrap:n – Implements word wrapping by inserting a newline character everyn characters. Useful for plain text, but not typically for HTML.
3.4.3. URL Filters
1. iriencode – Converts an IRI (Internationalized Resource Identifier) to a string thatcan be used in a URL.
2. slugify – Converts value to a slug.29
3. urlencode – Escapes value for use in a URL. This is useful for passing data onthe querystring in a link.
4. urlize – Converts URLs in value to clickable links by wrapping them in an <a>tag.
5. urlizetrunc:n – Same as urlize, but truncates the link text to n characters.
28. https://docs.python.org/3/library/stdtypes.html#old-string-formatting29. We will discuss slugs in detail the URLs and Slugs lesson (see page 201).
LESSON 3: Template Filters and Tags | 131
3.4.4. Number Filters
1. add:arg – Adds arg to value.
2. divisibleby:n – Returns True if value is divisible by n, and False otherwise.
3. filesizeformat – Covered in Most Useful Filters (see page 126).
4. floatformat – Covered in Most Useful Filters (see page 121).
5. get_digit:i – Returns the digit i characters from the right side of value. Forexample, the following will output 9, 8, 7, 6:
{{ 6789|get_digit:1 }}, {{ 6789|get_digit:2 }},{{ 6789|get_digit:3 }}, {{ 6789|get_digit:4 }}
6. length – Covered in Most Useful Filters (see page 121).
7. wordcount – Outputs the number of words in value.
3.4.5. Date and Time Filters
1. date:format – Covered in Most Useful Filters (see page 117).
2. time:format – Covered in Most Useful Filters (see page 117).
3. timesince:to_date – Covered in Most Useful Filters (see page 118).
4. timeuntil:from_date – Covered in Most Useful Filters (see page 119).
3.4.6. Logic Filters
1. default:default – Covered in Most Useful Filters (see page 120).
2. default_if_none:default – Outputs default if and only if value is None.
3. length_is:n – Returns True if the length of value is n, and False otherwise.
4. yesno – Covered in Most Useful Filters (see page 124).
3.4.7. Data Structure Filters
1. dictsort:key – Sorts a list of dictionaries by key.
2. dictsortreversed:key – Reverse sorts a list of dictionaries by key.
132 | LESSON 3: Template Filters and Tags
EVALUATION COPY: Not to be used in class.
3. first – Outputs the first element in a sequence.
4. join:s – Joins a list on s. Works just like Python’s s.join(value).
5. last – Outputs the last element in a sequence.
6. make_list – Converts value to a list of characters.
7. random – Outputs a random item from a sequence. Like Python’srandom.choice(value).
8. safeseq – Applies the safe filter to each element of a sequence.
9. slice:slice –Covered in Most Useful Filters (see page 125).
10. unordered_list – Creates an unordered HTML list from a Python list that containsother lists, which also may contain lists, etc. You must add the outermost <ul>tags. In theory, this is interesting, but it requires an oddly structured Python list towork correctly.
3.4.8. Coding Filters
1. addslashes – Adds backslashes before quotation marks to escape them (e.g.,“That's” becomes “That\'s”).
2. escape – Escapes HTML characters. Only relevant if autoescaping is off (see page143).
3. escapejs – Escapes characters used in JavaScript strings.
4. force_escape – Almost identical to escape, and you almost definitely want to useescape instead.
5. json_script – Covered in Most Useful Filters (see page 127).
6. linebreaks – Adds <br> tags between lines of text separated by a single newlinecharacter, and wraps lines of text separated by two newline characters in <p> tags.
7. linebreaksbr – Converts all newline characters in value to <br> tags.
8. pprint – Pretty prints a Python object. Used for debugging.
9. safe – Covered in Most Useful Filters (see page 123).
10. striptags – Strips HTML tags.This can be useful for converting a template HTMLemail to text when you want to send both HTML and text versions of an email.
❋
LESSON 3: Template Filters and Tags | 133
3.5. Template Tag Basics
Template tags add logic to the template. They are structured as follows:
{% tag arg arg %}
Some tags take no arguments, some take a set number of arguments, and some take anarbitrary number of arguments.
Many tags have ending tags, which means that they affect the content between thebeginning and ending tags. Ending tags are prefixed with “end”. For example:
<ul>{% for beatle in beatles %}<li>{{ beatle.firstname }} {{ beatle.lastname }}</li>
{% endfor %}</ul>
You added this for loop to templates/practice/tags.html earlier in the lesson, alongwith this dictionary in the get_context_data method of TagView:
context['beatles'] = [{'firstname': 'Paul', 'lastname': 'McCartney'},{'firstname': 'John', 'lastname': 'Lennon'},{'firstname': 'George', 'lastname': 'Harrison'},{'firstname': 'Ringo', 'lastname': 'Starr'},
]
The resulting output is:
<ul><li>Paul McCartney</li><li>John Lennon</li><li>George Harrison</li><li>Ringo Starr</li>
</ul>
134 | LESSON 3: Template Filters and Tags
EVALUATION COPY: Not to be used in class.
3.5.1. Filters in Tags
Filters can be used within tags. For example, you can change the order in which the Beatlesget output using the dictsort filter:
{% for beatle in beatles|dictsort:'firstname' %}
❋
3.6. Most Useful Template Tags
As with template filters, Django includes many tags that you will rarely, if ever, use. In thissection, we list the most useful tags and provide usage examples. You should read thissection carefully and then read more quickly through the rest of the tags, so that you knowwhat is available.
Practicing
As you learn about these tags, add to the context in the TagView view and add thetags in the templates/practice/tags.html template.
{% for obj in sequence %} and {% empty %}
The for tag is often used to loop through querysets, but it can be used to loop throughany iterable. Some examples:
Looping through a Queryset
<ul>{% for joke in joke_list %}<li>{{ joke.question }}</li>
{% endfor %}</ul>
LESSON 3: Template Filters and Tags | 135
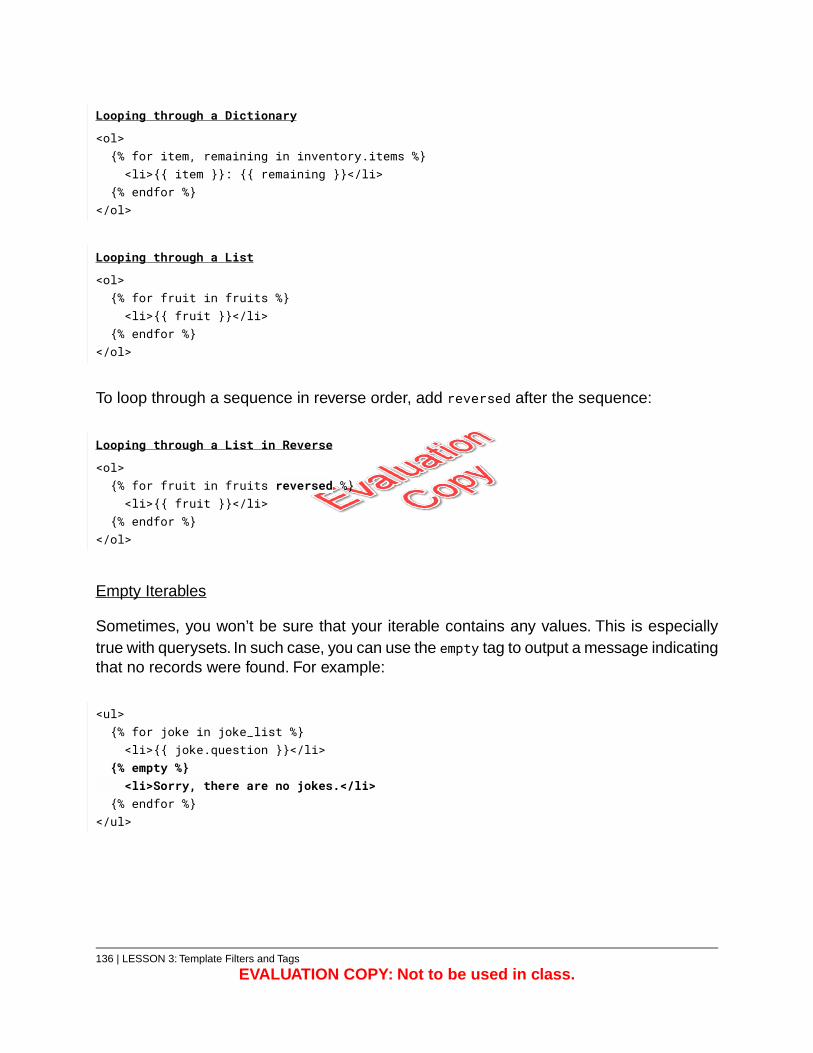
Looping through a Dictionary
<ol>{% for item, remaining in inventory.items %}<li>{{ item }}: {{ remaining }}</li>
{% endfor %}</ol>
Looping through a List
<ol>{% for fruit in fruits %}<li>{{ fruit }}</li>
{% endfor %}</ol>
To loop through a sequence in reverse order, add reversed after the sequence:
Looping through a List in Reverse
<ol>{% for fruit in fruits reversed %}<li>{{ fruit }}</li>
{% endfor %}</ol>
Empty Iterables
Sometimes, you won’t be sure that your iterable contains any values. This is especiallytrue with querysets. In such case, you can use the empty tag to output a message indicatingthat no records were found. For example:
<ul>{% for joke in joke_list %}<li>{{ joke.question }}</li>
{% empty %}<li>Sorry, there are no jokes.</li>
{% endfor %}</ul>
136 | LESSON 3: Template Filters and Tags
EVALUATION COPY: Not to be used in class.
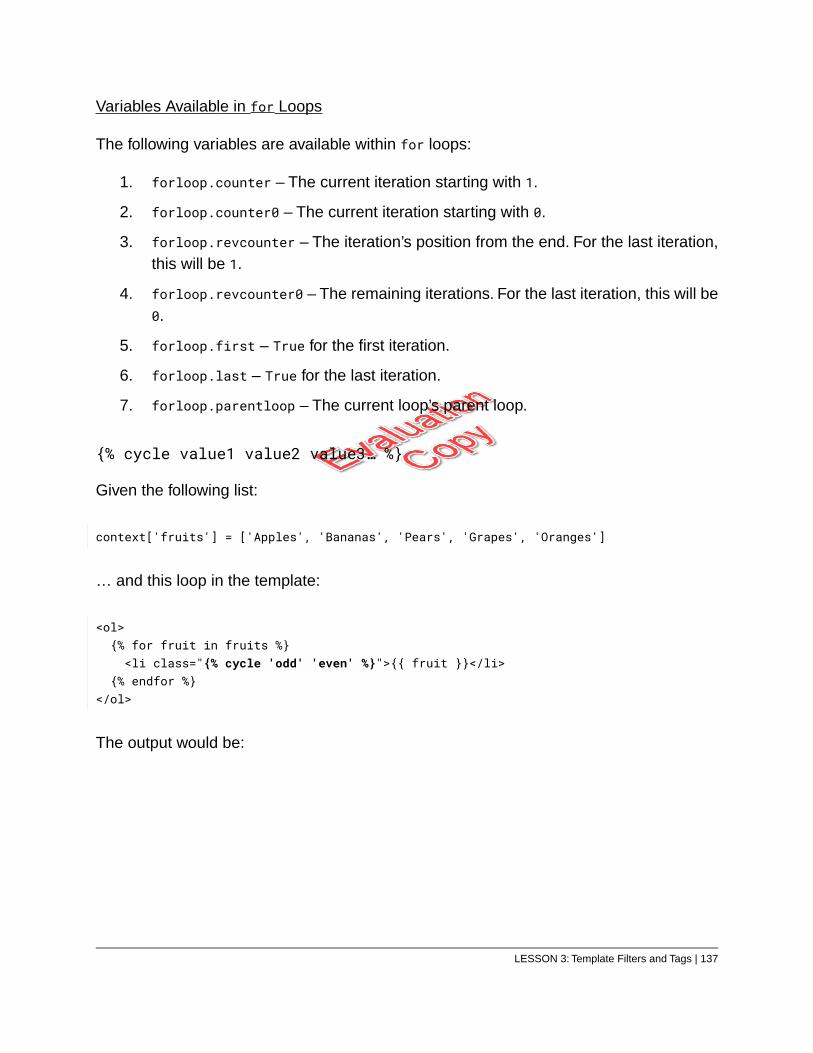
Variables Available in for Loops
The following variables are available within for loops:
1. forloop.counter – The current iteration starting with 1.
2. forloop.counter0 – The current iteration starting with 0.
3. forloop.revcounter – The iteration’s position from the end. For the last iteration,this will be 1.
4. forloop.revcounter0 – The remaining iterations. For the last iteration, this will be0.
5. forloop.first – True for the first iteration.
6. forloop.last – True for the last iteration.
7. forloop.parentloop – The current loop’s parent loop.
{% cycle value1 value2 value3… %}
Given the following list:
context['fruits'] = ['Apples', 'Bananas', 'Pears', 'Grapes', 'Oranges']
… and this loop in the template:
<ol>{% for fruit in fruits %}<li class="{% cycle 'odd' 'even' %}">{{ fruit }}</li>
{% endfor %}</ol>
The output would be:
LESSON 3: Template Filters and Tags | 137
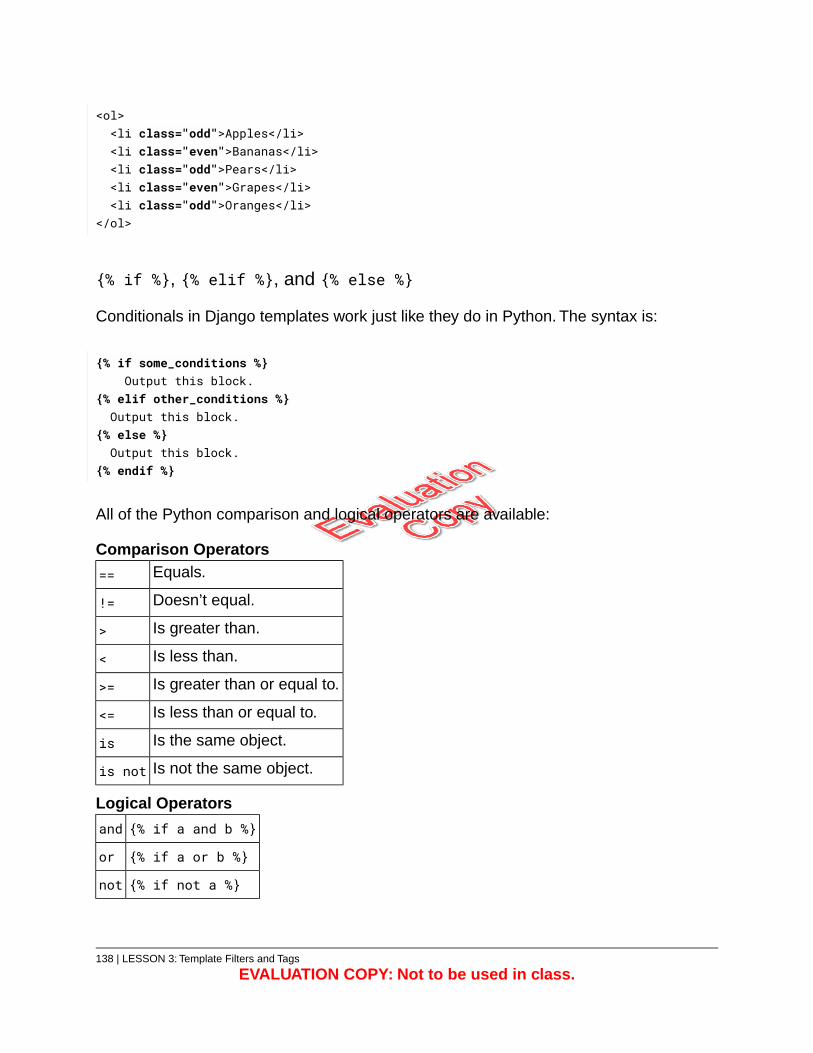
<ol><li class="odd">Apples</li><li class="even">Bananas</li><li class="odd">Pears</li><li class="even">Grapes</li><li class="odd">Oranges</li>
</ol>
{% if %}, {% elif %}, and {% else %}
Conditionals in Django templates work just like they do in Python. The syntax is:
{% if some_conditions %}Output this block.
{% elif other_conditions %}Output this block.
{% else %}Output this block.
{% endif %}
All of the Python comparison and logical operators are available:
Comparison OperatorsEquals.==
Doesn’t equal.!=
Is greater than.>
Is less than.<
Is greater than or equal to.>=
Is less than or equal to.<=
Is the same object.is
Is not the same object.is not
Logical Operators
{% if a and b %}and
{% if a or b %}or
{% if not a %}not
138 | LESSON 3: Template Filters and Tags
EVALUATION COPY: Not to be used in class.
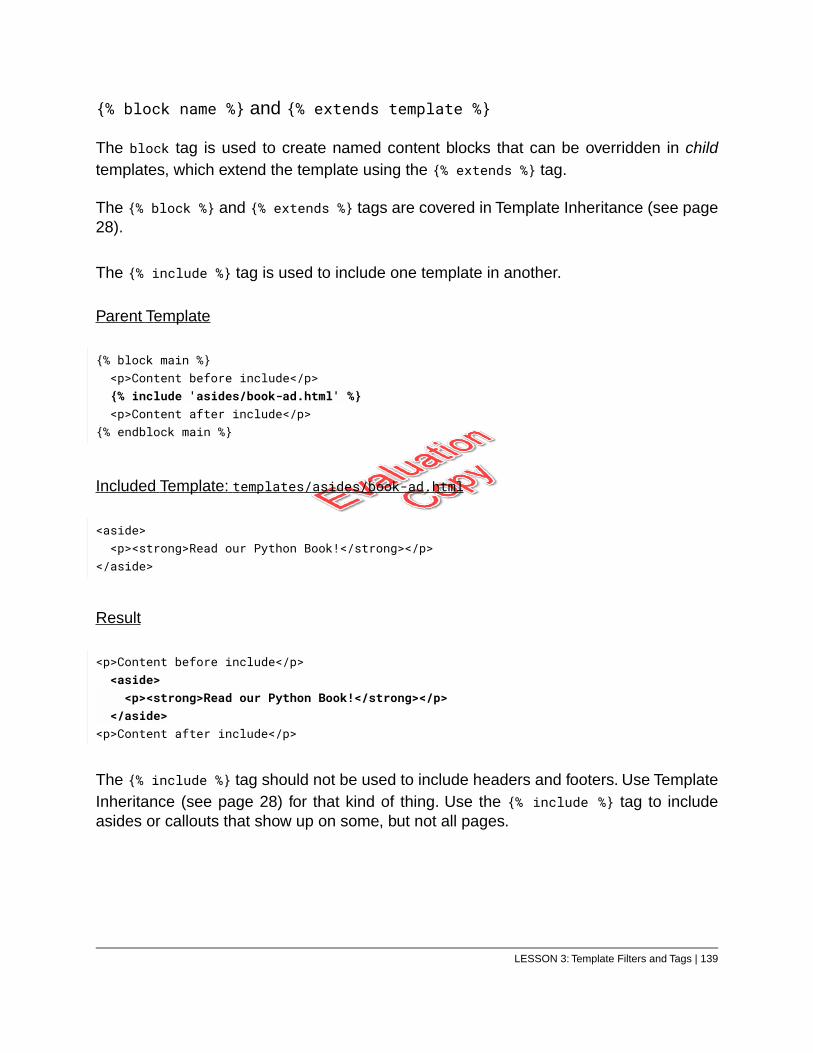
{% block name %} and {% extends template %}
The block tag is used to create named content blocks that can be overridden in childtemplates, which extend the template using the {% extends %} tag.
The {% block %} and {% extends %} tags are covered in Template Inheritance (see page28).
The {% include %} tag is used to include one template in another.
Parent Template
{% block main %}<p>Content before include</p>{% include 'asides/book-ad.html' %}<p>Content after include</p>
{% endblock main %}
Included Template: templates/asides/book-ad.html
<aside><p><strong>Read our Python Book!</strong></p>
</aside>
Result
<p>Content before include</p><aside><p><strong>Read our Python Book!</strong></p>
</aside><p>Content after include</p>
The {% include %} tag should not be used to include headers and footers. Use TemplateInheritance (see page 28) for that kind of thing. Use the {% include %} tag to includeasides or callouts that show up on some, but not all pages.
LESSON 3: Template Filters and Tags | 139
{% comment "comment" %}
The comment tag is used to comment out code to prevent template tags or variables frombeing interpreted and/or to prevent the content from being delivered to the browser.
{% comment "Should we include this?" %}<small class="text-muted">Created on: {{ joke.created }}Last updated: {{ joke.updated }}
</small>{% endcomment %}
{% csrf_token %}
The csrf_token tag must be included in all Django forms that post data. It protects againstcross site request forgery.30
{% load library1 library2… %}
The load tag is used to load one or more libraries of tags and filters.This could be a librarybuilt in to Django, such as django.contrib.humanize,31 a third-party library, or a libraryyou create yourself.
You can only load template tag libraries from apps that are included in INSTALLED_APPS insettings.py.
{% url urlname arg1 arg2… %}
The url tag is used to output the path to the view mapping to urlname as defined in theURLConf file.
{% with var1=value1 var2=value2… %}
The code between an open with tag (e.g., {% with var1=value1 var2=value2… %}) andclose endwith tag (e.g., {% endwidth %}) has access to the variables defined in the openwith tag.
30. https://docs.djangoproject.com/en/3.1/ref/csrf/31. See https://docs.djangoproject.com/en/3.1/ref/contrib/humanize.
140 | LESSON 3: Template Filters and Tags
EVALUATION COPY: Not to be used in class.
The with tag is useful for reusing the results of an expensive method. Consider thefollowing:
{{ jokes.count }} joke{{ jokes.count|pluralize }} that match your search.
In the preceding code, jokes.count has to be evaluated twice.The following code assignsjokes.count to joke_count and then uses the result within the block:
{% with joke_count=jokes.count %}{{ joke_count }} joke{{ joke_count|pluralize }} that match your search.
{% endwith %}
This way, the database is only hit once and the count is stored in a variable, which canbe reused as often as necessary.
LESSON 3: Template Filters and Tags | 141

widthratio
The widthratio tag is used to create bar charts and the like. The syntax is:
{% widthratio this_value max_value max_width %}
The value is calculated using this formula:
(this_value/max_value) * max_width
For example:
<div id="barchart"><div id="red" style="width:{% widthratio 25 100 300 %}px"></div><div id="blue" style="width:{% widthratio 10 100 300 %}px"></div><div id="green" style="width:{% widthratio 45 100 300 %}px"></div>
</div>
Output
<div id="barchart"><div id="red" style="width:75px"></div><div id="blue" style="width:30px"></div><div id="green" style="width:135px"></div>
</div>
With some CSS applied, the resulting output might look like this:
Summary
These are, in our experience, the most useful of Django’s built-in tags.
❋
142 | LESSON 3: Template Filters and Tags
EVALUATION COPY: Not to be used in class.

3.7. Template Tag Quick Reference
Most of the tags not covered in the previous section are rarely used. Here, we break outall the template tags, including the most useful ones previously covered, into the followingcategories:
1. Coding Tags
2. Logic Tags
3. Utility Tags
We recommend you read through this section quickly, so that you know what types of tagsare available.There is no reason to memorize this list or to dig deep into any of these tagsuntil you find yourself needing to use one.
For More Information…
See https://www.djangotemplatetagsandfilters.com/tags/ for more detailedinformation and examples.
3.7.1. Coding Tags
1. autoescape – Turns autoescaping of HTML on or off. The autoescape tag takesone argument, which must be either “on” or “off”:
on (the default) – The HTML in all variables will be escaped using HTMLentities.
off – The HTML will not be escaped.
As autoescaping is applied by default, you are most likely to use this tag to turnautoescaping off. It can be used to output HTML stored in a database (e.g., for ablog article or a product description). For example, given the following:
context['blurb'] = '<p>You are <em>pretty</em> smart!</p>'
LESSON 3: Template Filters and Tags | 143
This would output escaped HTML:
{{ blurb }}
Output
<p>You are <em>pretty</em> smart!</p>
And this would output unescaped HTML:
{% autoescape off %}{{ blurb }}
{% endautoescape %}
Output
<p>You are <em>pretty</em> smart!</p>
An alternative, and often a better/safer approach, is to use the safe filter (see page123) on each variable that you want to output without escaping.
2. spaceless – Removes irrelevant whitespace between HTML tags.
{% spaceless %}<p><small class="text-muted">Created on: {{ joke.created }}Last updated: {{ joke.updated }}
</small></p>
{% endspaceless %}
Output
<p><small class="text-muted">Created on: April 12, 2020, 2:54 p.m.Last updated: April 15, 2020, 1:11 p.m.
</small></p>
Notice that the whitespace within the small element has not been removed. Onlywhitespace between successive opening tags and successive closing tags isremoved.
3. templatetag – Outputs special characters used to create template tags (e.g.,braces and percentage signs). Unless you’re planning to write an online Django
144 | LESSON 3: Template Filters and Tags
EVALUATION COPY: Not to be used in class.
tutorial in which you need to output symbols used in Django templates, you’reunlikely to need this tag.
{% templatetag openblock %} tag {% templatetag closeblock %}{% templatetag openvariable %} variable {% templatetag closevariable %}{% templatetag openbrace %} braces {% templatetag closebrace %}{% templatetag opencomment %} comment {% templatetag closecomment %}
Output
{% tag %}{{ variable }}{ braces }{# comment #}
4. verbatim – Template rendering is turned off between open {% verbatim blockname
%} and closing {% endverbatim blockname %}.
5. widthratio – Covered in Most Useful Tags (see page 142).
3.7.2. Logic Tags
1. cycle – Covered in Most Useful Tags (see page 137).
2. firstof – Returns the first argument in a list of arguments that evaluates to True.For example, given:
context['a'] = Falsecontext['b'] = 0context['c'] = ""context['d'] = "hello"
…the following will output “hello”.
{% firstof a b c d %}
The tag allows for a default string literal:
{% firstof a b c d "goodbye" %}
3. for – Covered in Most Useful Tags (see page 135).
4. for … empty – Covered in Most Useful Tags (see page 135).
LESSON 3: Template Filters and Tags | 145
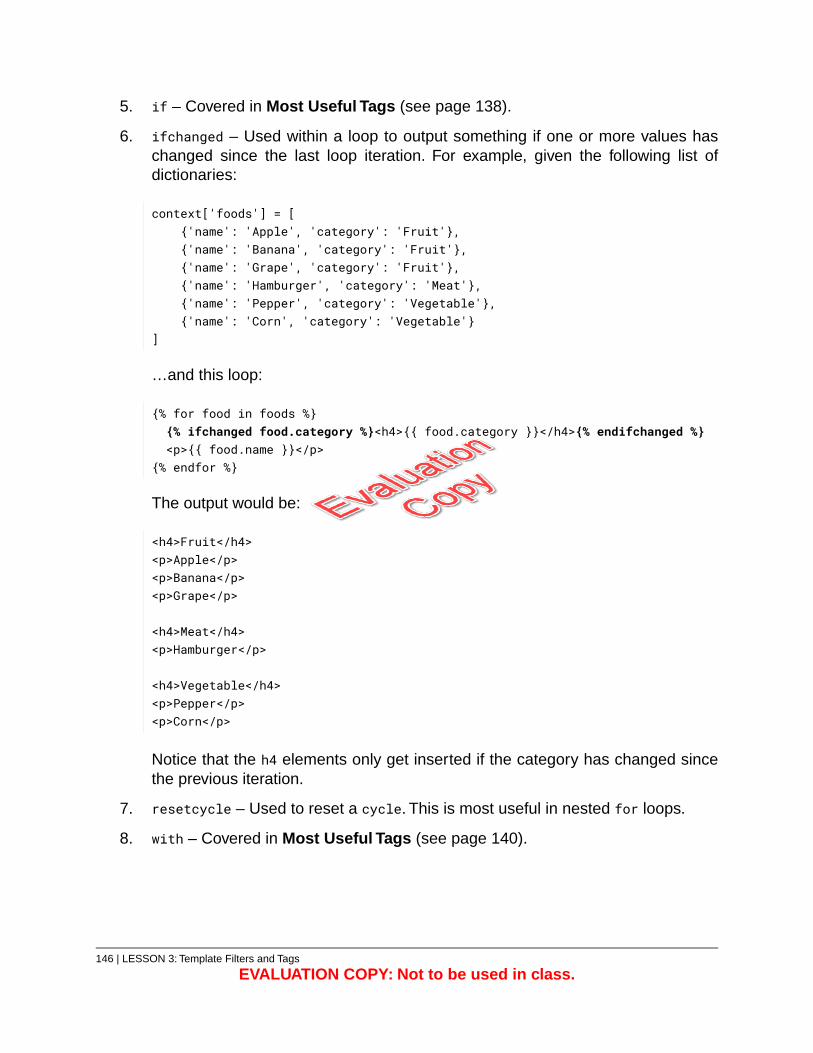
5. if – Covered in Most Useful Tags (see page 138).
6. ifchanged – Used within a loop to output something if one or more values haschanged since the last loop iteration. For example, given the following list ofdictionaries:
context['foods'] = [{'name': 'Apple', 'category': 'Fruit'},{'name': 'Banana', 'category': 'Fruit'},{'name': 'Grape', 'category': 'Fruit'},{'name': 'Hamburger', 'category': 'Meat'},{'name': 'Pepper', 'category': 'Vegetable'},{'name': 'Corn', 'category': 'Vegetable'}
]
…and this loop:
{% for food in foods %}{% ifchanged food.category %}<h4>{{ food.category }}</h4>{% endifchanged %}<p>{{ food.name }}</p>
{% endfor %}
The output would be:
<h4>Fruit</h4><p>Apple</p><p>Banana</p><p>Grape</p>
<h4>Meat</h4><p>Hamburger</p>
<h4>Vegetable</h4><p>Pepper</p><p>Corn</p>
Notice that the h4 elements only get inserted if the category has changed sincethe previous iteration.
7. resetcycle – Used to reset a cycle. This is most useful in nested for loops.
8. with – Covered in Most Useful Tags (see page 140).
146 | LESSON 3: Template Filters and Tags
EVALUATION COPY: Not to be used in class.
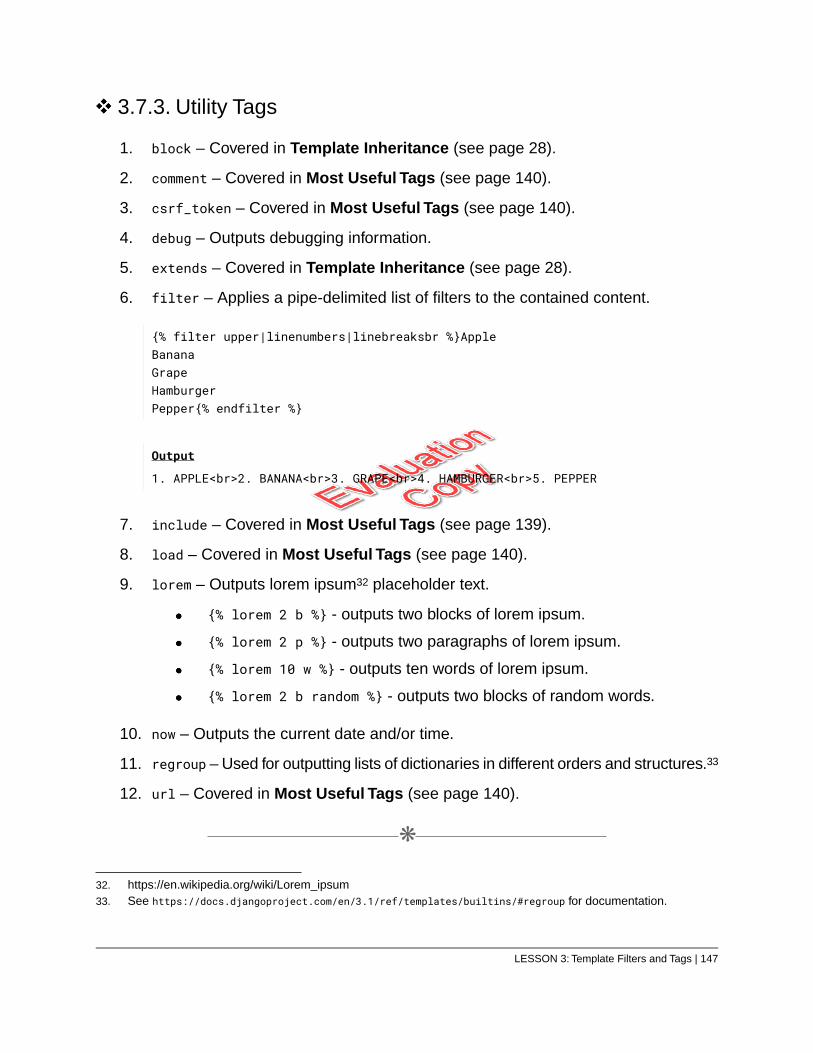
3.7.3. Utility Tags
1. block – Covered in Template Inheritance (see page 28).
2. comment – Covered in Most Useful Tags (see page 140).
3. csrf_token – Covered in Most Useful Tags (see page 140).
4. debug – Outputs debugging information.
5. extends – Covered in Template Inheritance (see page 28).
6. filter – Applies a pipe-delimited list of filters to the contained content.
{% filter upper|linenumbers|linebreaksbr %}AppleBananaGrapeHamburgerPepper{% endfilter %}
Output
1. APPLE<br>2. BANANA<br>3. GRAPE<br>4. HAMBURGER<br>5. PEPPER
7. include – Covered in Most Useful Tags (see page 139).
8. load – Covered in Most Useful Tags (see page 140).
9. lorem – Outputs lorem ipsum32 placeholder text.
{% lorem 2 b %} - outputs two blocks of lorem ipsum.
{% lorem 2 p %} - outputs two paragraphs of lorem ipsum.
{% lorem 10 w %} - outputs ten words of lorem ipsum.
{% lorem 2 b random %} - outputs two blocks of random words.
10. now – Outputs the current date and/or time.
11. regroup – Used for outputting lists of dictionaries in different orders and structures.33
12. url – Covered in Most Useful Tags (see page 140).
❋
32. https://en.wikipedia.org/wiki/Lorem_ipsum33. See https://docs.djangoproject.com/en/3.1/ref/templates/builtins/#regroup for documentation.
LESSON 3: Template Filters and Tags | 147
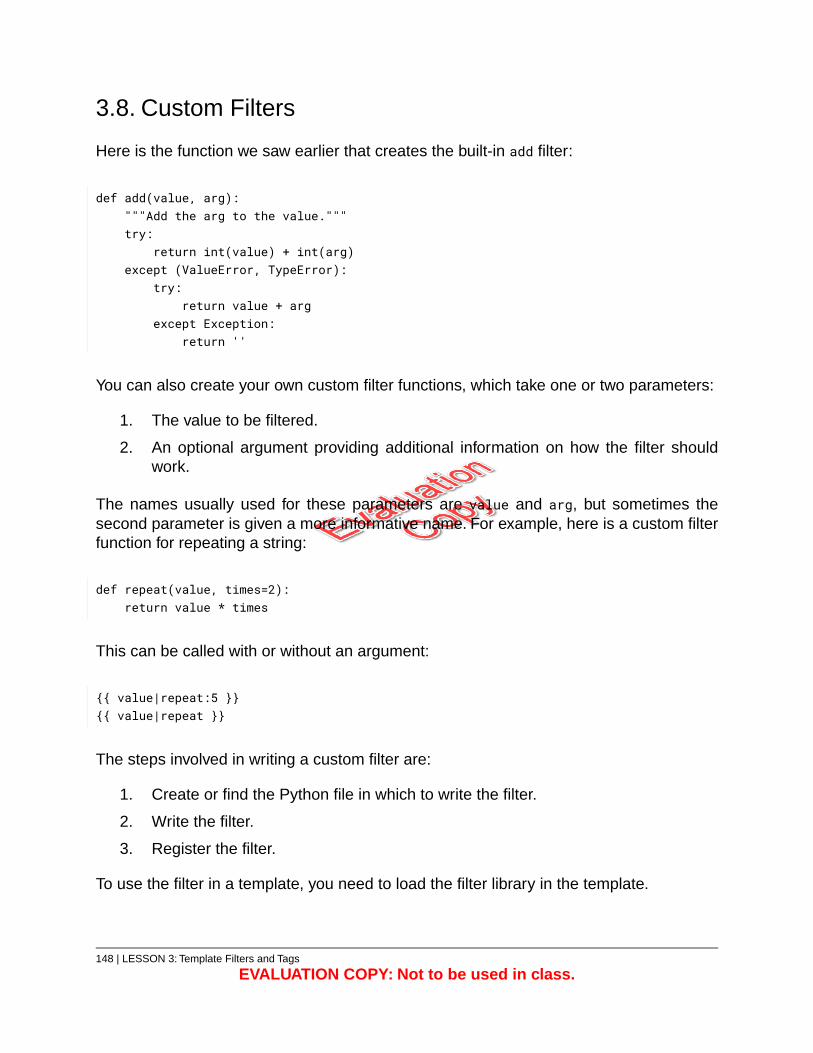
3.8. Custom Filters
Here is the function we saw earlier that creates the built-in add filter:
def add(value, arg):"""Add the arg to the value."""try:
return int(value) + int(arg)except (ValueError, TypeError):
try:return value + arg
except Exception:return ''
You can also create your own custom filter functions, which take one or two parameters:
1. The value to be filtered.
2. An optional argument providing additional information on how the filter shouldwork.
The names usually used for these parameters are value and arg, but sometimes thesecond parameter is given a more informative name. For example, here is a custom filterfunction for repeating a string:
def repeat(value, times=2):return value * times
This can be called with or without an argument:
{{ value|repeat:5 }}{{ value|repeat }}
The steps involved in writing a custom filter are:
1. Create or find the Python file in which to write the filter.
2. Write the filter.
3. Register the filter.
To use the filter in a template, you need to load the filter library in the template.
148 | LESSON 3: Template Filters and Tags
EVALUATION COPY: Not to be used in class.
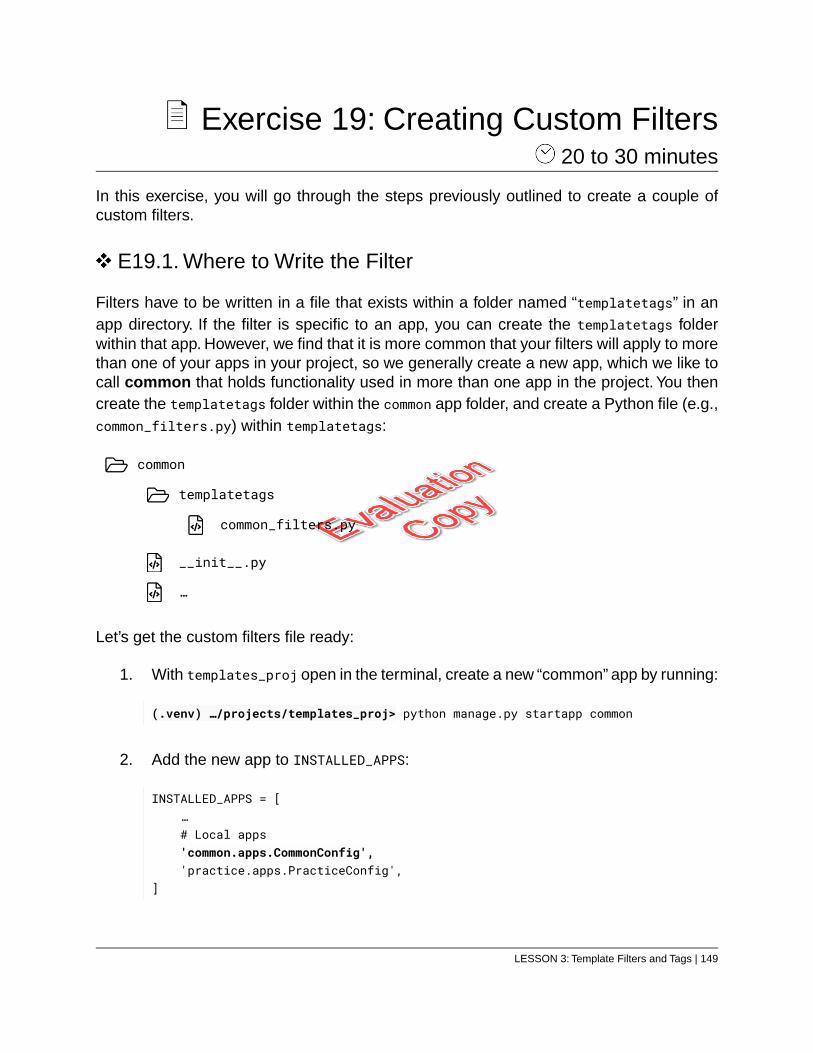
Exercise 19: Creating Custom Filters 20 to 30 minutes
In this exercise, you will go through the steps previously outlined to create a couple ofcustom filters.
E19.1. Where to Write the Filter
Filters have to be written in a file that exists within a folder named “templatetags” in anapp directory. If the filter is specific to an app, you can create the templatetags folderwithin that app. However, we find that it is more common that your filters will apply to morethan one of your apps in your project, so we generally create a new app, which we like tocall common that holds functionality used in more than one app in the project. You thencreate the templatetags folder within the common app folder, and create a Python file (e.g.,common_filters.py) within templatetags:
common
templatetags
common_filters.py
__init__.py
…
Let’s get the custom filters file ready:
1. With templates_proj open in the terminal, create a new “common” app by running:
(.venv) …/projects/templates_proj> python manage.py startapp common
2. Add the new app to INSTALLED_APPS:
INSTALLED_APPS = […# Local apps'common.apps.CommonConfig','practice.apps.PracticeConfig',
]
LESSON 3: Template Filters and Tags | 149
3. Within the new template_proj/common folder, add a templatetags folder.
4. Within the new templatetags folder, add common_filters.py file.
You now have the file in which to write your custom filters.
E19.2. Writing and Registering the Filter
Open common_filters.py for editing and add the following code:
Exercise Code 19.1: common/templatetags/common_filters.py
from django import template1.2.
register = template.Library()3.4.
@register.filter5.def repeat(value, times=2):6.
return value * times7.
Things to notice:
1. You must import template from django:
from django import template
2. The function is just a regular function that returns a value:
def repeat(value, times=2):return value * times
3. To register the function, you must create an instance of template.Library in avariable named register.
register = template.Library()
The register variable is used to register the filters. The easiest way to do that isto use a decorator before the filter function:
@register.filterdef …
150 | LESSON 3: Template Filters and Tags
EVALUATION COPY: Not to be used in class.
Your custom filter is now ready to use.
E19.3. Using the Filter
1. Open templates/practice/filters.html for editing.
2. Immediately after the {% extends %} tag, add the following tag to load the newcustom_filters tag library:
{% load common_filters %}
3. At the end of the main block, add the following:
<p>{{ company|repeat:3 }}</p>
4. Start up the server. If it’s already running, stop and restart it, as tag libraries areregistered when the server starts up.
5. In your browser, navigate to http://127.0.0.1:8000/filters/. You should seethe following toward the bottom of the page:
WebucatorWebucatorWebucator
E19.4. Filters that Act on Strings
Some filters, like the repeat filter you just created are meant to act on strings. Such filterscan take the stringfilter decorator, which will force the value to be converted to a string.To see why this is necessary, add the following code to templates/practice/filters.htmlat the end of the main block:
<p>{{ 5|repeat:3 }}</p>
Return to http://127.0.0.1:8000/filters/ in your browser and refresh the page.Towardthe bottom of the page, you should see the number 15.
The repeat filter is supposed to repeat “5” three times, but it is multiplying instead. Because5 is an integer, 5 * 3 returns 15.
LESSON 3: Template Filters and Tags | 151
Modify common_filters.py to match the following code, which imports stringfilter fromdjango.template.defaultfilters and uses it to decorate the repeat filter:
Exercise Code 19.2: common/templatetags/common_filters.py
from django import template1.from django.template.defaultfilters import stringfilter2.
3.register = template.Library()4.
[email protected][email protected] repeat(value, times=2):8.
return value * times9.
Refresh http://127.0.0.1:8000/filters/ in your browser. Where it showed 15 before,it should now show 555.
E19.5. Cleaning Cusses
Let’s add a filter for cleaning cuss words.
1. Add the following highlighted code to common_filters.py:
152 | LESSON 3: Template Filters and Tags
EVALUATION COPY: Not to be used in class.
Exercise Code 19.3: common/templatetags/common_filters.py
import random1.import re2.from django import template3.from django.template.defaultfilters import stringfilter4.
5.register = template.Library()6.
[email protected][email protected] repeat(value, times=2):10.
return value * times11.12.
@register.filter13.def clean(value):14.
cusses = ['stupid', 'stinky', 'darn', 'shucks', 'crud', 'dirt']15.for cuss in cusses:16.
cuss_re = re.compile(re.escape(cuss), re.IGNORECASE)17.chars = ''.join([random.choice('!@#$%^&*') for letter in cuss])18.value = cuss_re.sub(chars, value)19.
return value20.
Things to notice:
A. We have imported the random and re libraries.
B. The clean() function loops through a list of “cuss” words, which you wouldnormally get from a file, a database, or a service,34 and uses a regularexpression to replace any case-insensitive matches of those words withrandom symbols.
C. The clean filter does not take an argument.
2. Add the following to the context of the FilterView view in practice/views.py:
context['user_blurb'] = """Shucks! What a cruddy day I\'ve had.I spent the whole darn day with my dirtiestfriend darning his STINKY socks."""
34. It is nearly impossible to create a filter that captures all cuss words.
LESSON 3: Template Filters and Tags | 153
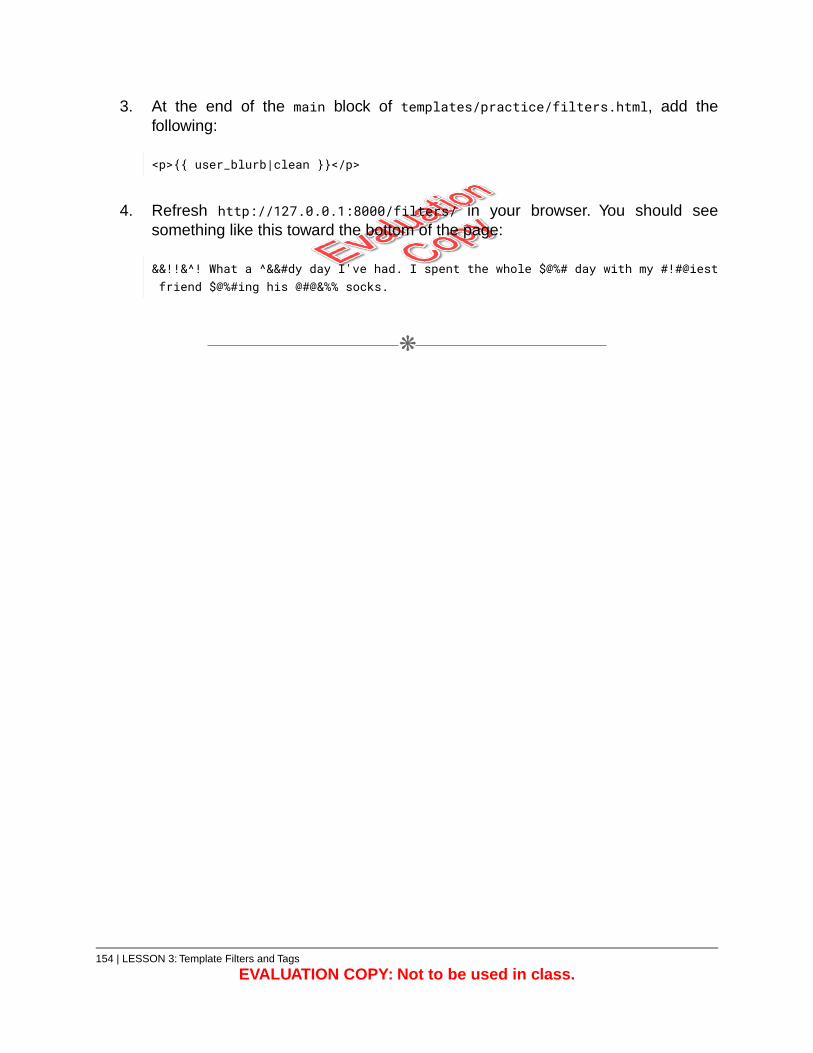
3. At the end of the main block of templates/practice/filters.html, add thefollowing:
<p>{{ user_blurb|clean }}</p>
4. Refresh http://127.0.0.1:8000/filters/ in your browser. You should seesomething like this toward the bottom of the page:
&&!!&^! What a ^&&#dy day I've had. I spent the whole $@%# day with my #!#@iestfriend $@%#ing his @#@&%% socks.
❋
154 | LESSON 3: Template Filters and Tags
EVALUATION COPY: Not to be used in class.

3.9. Custom Tags
Custom tags are a bit more complex than custom filters, but Django provides two decoratorsthat make it easy to create most types of custom tags: simple_tag and inclusion_tag. Asimple custom tag can be very much like a custom filter:
Demo 3.1: common/templatetags/common_tags.py
from django import template1.from django.template.defaultfilters import stringfilter2.
3.register = template.Library()4.
[email protected][email protected] repeat(text, times=2):8.
return text * times9.
Things to notice:
1. As with custom filters, custom tags must be stored in a file within a templatetagsdirectory. In this case, we have named that file common_tags.py to indicate thatthey are common to the project. You will need to restart your server before youcan use this new tag library.
2. The repeat tag is registered with @register.simple_tag.
3. The repeat tag takes two arguments, one of which has a default. Unlike filters,which can only take one argument, tags can take any number of arguments.
In the template, you would first need to load the tag library:
{% load common_tags %}
You could then use the custom tag like this:
<p>{% repeat company 3 %}</p>
The inclusion_tag decorator is more powerful as it allows you to include a customtemplate.You will create a custom inclusion tag in the next exercise.
LESSON 3: Template Filters and Tags | 155
Exercise 20: Creating Custom Tags 20 to 30 minutes
In this exercise, you will add a custom tag to the djangojokes.com project. The customtag will make it easy to put a random joke on any page on the site using this simple templatetag:
{% random_joke %}
1. Open the djangojokes.com workspace in Visual Studio Code.
2. With djangojokes.com open in the terminal and the virtual environment activated,run:
(.venv) …/projects/djangojokes.com> python manage.py startapp common
3. Add the new app to INSTALLED_APPS:
INSTALLED_APPS = […
# Local apps'common.apps.CommonConfig','jokes.apps.JokesConfig','pages.apps.PagesConfig',
]
4. Within the common folder, create a templatetags folder, and create a common_tags.pyfile within that.
5. Add the following code to common_tags.py:35
35. Don’t want to type? Copy from starter-code/template-filters-and-tags/common_tags.py.
156 | LESSON 3: Template Filters and Tags
EVALUATION COPY: Not to be used in class.
Exercise Code 20.1: common/templatetags/common_tags.py
import random1.from django import template2.
3.from jokes.models import Joke4.
5.register = template.Library()6.
[email protected]_tag('common/joke.html')8.def random_joke():9.
count = Joke.objects.count()10.if count > 0: # In case we haven't added any jokes yet11.
i = random.randint(0, count-1)12.joke = Joke.objects.all()[i]13.return {'joke': joke}14.
else:15.return {16.
'joke': {17.'question': 'You know what is funny?',18.'answer': 'There are no jokes in the database.'19.
}20.}21.
Things to notice:
A. Just as with custom filters, you need to import template from django andcreate the register variable.
B. You import Joke from jokes.models.
C. The template function is decorated with:
@register.inclusion_tag('common/joke.html')
inclusion_tag functions must return a dictionary, which provides contextfor the associated template (in this case, common/joke.html), which Djangowill search for in the same places it searches for other templates.
D. The function itself gets a random integer between 0 and one less than thenumber of jokes in the database. It uses that integer to get a random joke,which it returns in the dictionary. If there are no jokes, it returns a defaultjoke.
LESSON 3: Template Filters and Tags | 157
6. Within the project’s templates folder, create a new common folder, and within that,create a joke.html template with the following content:36
Exercise Code 20.2: templates/common/joke.html
<div class="card border-primary m-auto mb-3 text-center"1.style="max-width: 30rem">2.<div class="card-header">Random Joke</div>3.<div class="card-body">4.<h5 class="card-title">{{ joke.question }}</h5>5.<p class="card-text">{{ joke.answer }}</p>6.
</div>7.</div>8.
This template works like any other template and will be included within the templatethat uses the custom {% random_joke %} tag.
7. Open templates/pages/home.html:
A. Immediately below the {% extends "_base.html" %} tag, add:
{% load common_tags %}
B. Immediately above the final {% endblock %}, add:
{% random_joke %}
8. Start up the server:
(.venv) …/projects/djangojokes.com> python manage.py runserver
9. In your browser, navigate to http://127.0.0.1:8000. The site should look likethis:
36. Don’t want to type? Copy from starter-code/template-filters-and-tags/joke.html.
158 | LESSON 3: Template Filters and Tags
EVALUATION COPY: Not to be used in class.
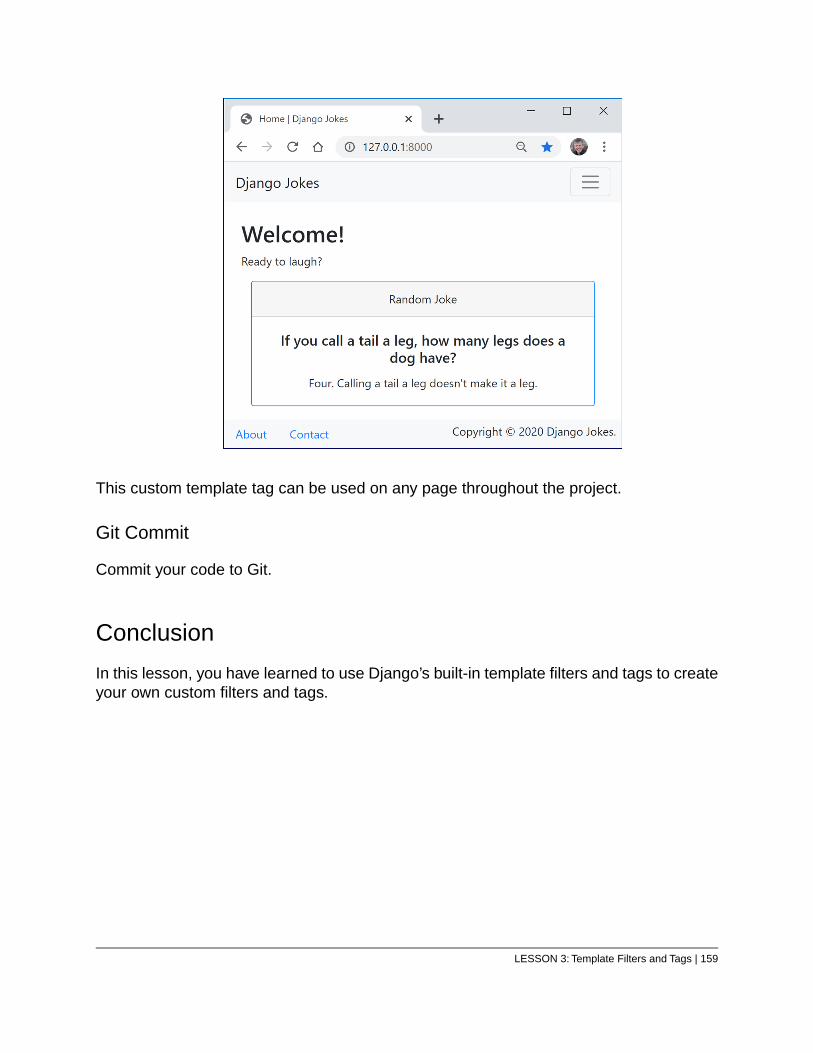
This custom template tag can be used on any page throughout the project.
Git Commit
Commit your code to Git.
Conclusion
In this lesson, you have learned to use Django’s built-in template filters and tags to createyour own custom filters and tags.
LESSON 3: Template Filters and Tags | 159

160 | LESSON 3: Template Filters and Tags
EVALUATION COPY: Not to be used in class.
LESSON 4Static Files
Topics Covered
What is a “static” file?
Managing static files in Django.
Introduction
In this lesson, you will learn to add static files, such as JavaScript, CSS, and image files,to your site.
❋
4.1. Static File Basics
Static files are files that do not need to be processed on the server before being sent tothe browser. Django differentiates between static files created during development andstatic files that users upload, such as profile pictures. It refers to the latter as media files(see page 375). The static files we are concerned with here are files that make up part ofthe website (e.g., JavaScript, CSS, and image files).
4.1.1. settings.py
The first step to delivering static files is to configure the settings in settings.py:
1. django.contrib.staticfiles should be in the INSTALLED_APPS list. It gets addedwhen you first create a project. Don’t remove it.
2. Make sure the settings include this line:
STATIC_URL = '/static/'
It also gets added to settings.py (at the very bottom) when you first create aproject. This is the path that Django will use to deliver static files.
LESSON 4: Static Files | 161
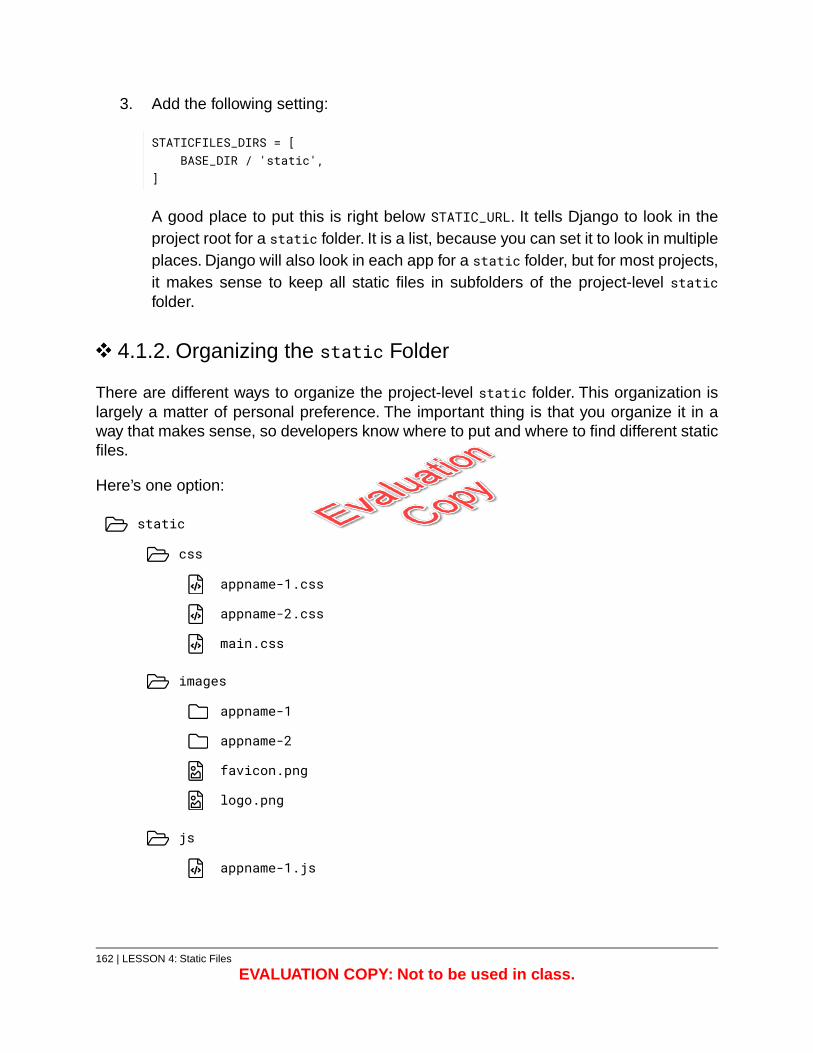
3. Add the following setting:
STATICFILES_DIRS = [BASE_DIR / 'static',
]
A good place to put this is right below STATIC_URL. It tells Django to look in theproject root for a static folder. It is a list, because you can set it to look in multipleplaces. Django will also look in each app for a static folder, but for most projects,it makes sense to keep all static files in subfolders of the project-level staticfolder.
4.1.2. Organizing the static Folder
There are different ways to organize the project-level static folder. This organization islargely a matter of personal preference. The important thing is that you organize it in away that makes sense, so developers know where to put and where to find different staticfiles.
Here’s one option:
static
css
appname-1.css
appname-2.css
main.css
images
appname-1
appname-2
favicon.png
logo.png
js
appname-1.js
162 | LESSON 4: Static Files
EVALUATION COPY: Not to be used in class.
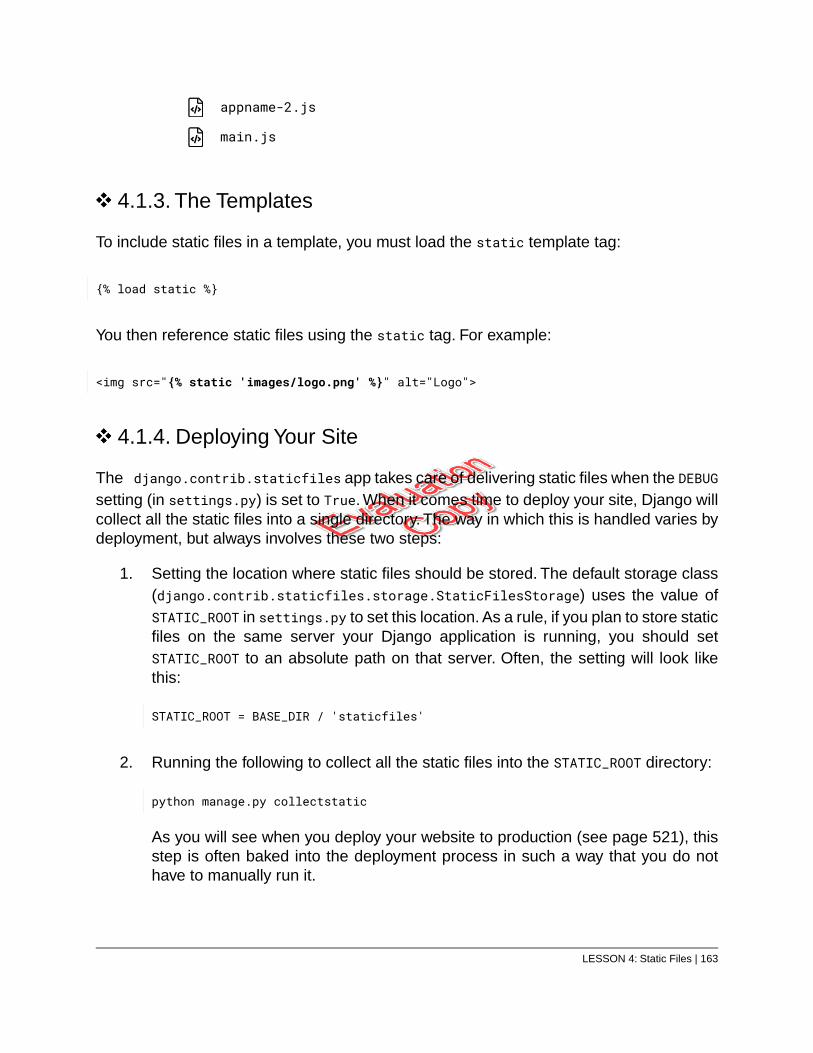
appname-2.js
main.js
4.1.3. The Templates
To include static files in a template, you must load the static template tag:
{% load static %}
You then reference static files using the static tag. For example:
<img src="{% static 'images/logo.png' %}" alt="Logo">
4.1.4. Deploying Your Site
The django.contrib.staticfiles app takes care of delivering static files when the DEBUGsetting (in settings.py) is set to True. When it comes time to deploy your site, Django willcollect all the static files into a single directory. The way in which this is handled varies bydeployment, but always involves these two steps:
1. Setting the location where static files should be stored. The default storage class(django.contrib.staticfiles.storage.StaticFilesStorage) uses the value ofSTATIC_ROOT in settings.py to set this location. As a rule, if you plan to store staticfiles on the same server your Django application is running, you should setSTATIC_ROOT to an absolute path on that server. Often, the setting will look likethis:
STATIC_ROOT = BASE_DIR / 'staticfiles'
2. Running the following to collect all the static files into the STATIC_ROOT directory:
python manage.py collectstatic
As you will see when you deploy your website to production (see page 521), thisstep is often baked into the deployment process in such a way that you do nothave to manually run it.
LESSON 4: Static Files | 163
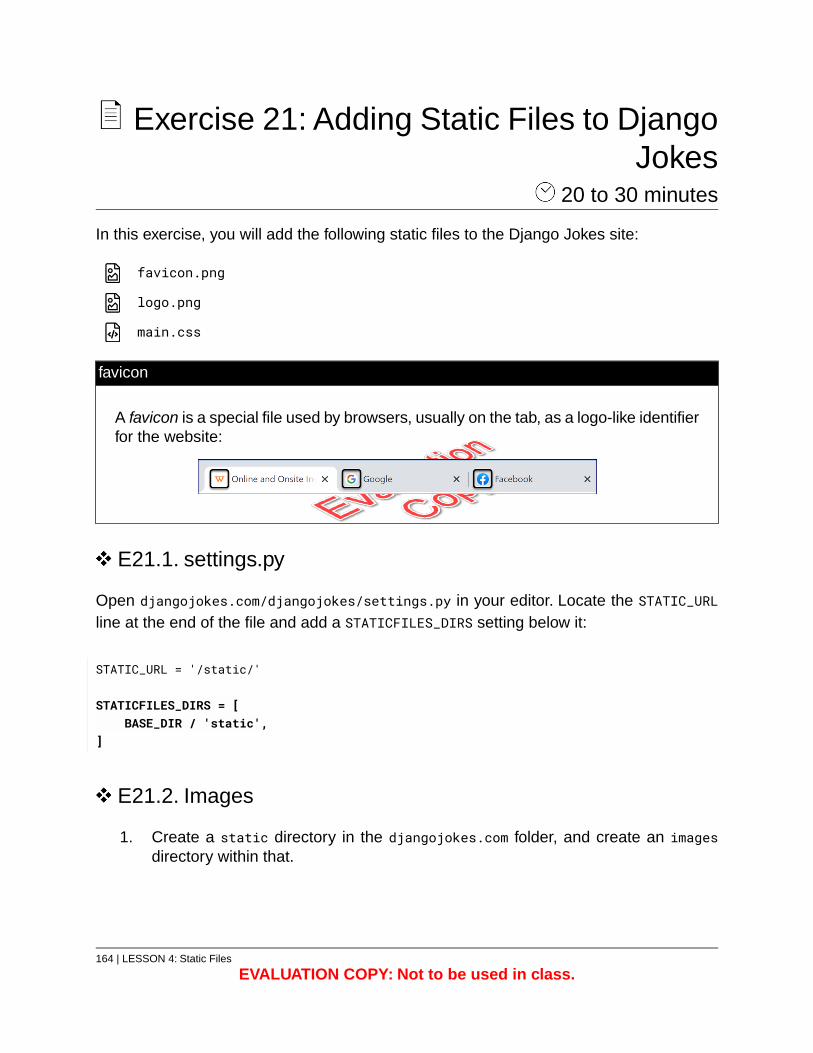
Exercise 21: Adding Static Files to DjangoJokes
20 to 30 minutes
In this exercise, you will add the following static files to the Django Jokes site:
favicon.png
logo.png
main.css
favicon
A favicon is a special file used by browsers, usually on the tab, as a logo-like identifierfor the website:
E21.1. settings.py
Open djangojokes.com/djangojokes/settings.py in your editor. Locate the STATIC_URLline at the end of the file and add a STATICFILES_DIRS setting below it:
STATIC_URL = '/static/'
STATICFILES_DIRS = [BASE_DIR / 'static',
]
E21.2. Images
1. Create a static directory in the djangojokes.com folder, and create an imagesdirectory within that.
164 | LESSON 4: Static Files
EVALUATION COPY: Not to be used in class.
2. Add favicon.png and logo.png images to the images directory. You can createyour own images or use the ones located in the starter-code/static-filesfolder.37
3. Open templates/_base.html in your editor.
A. At the very top of the document, load the static tag:
{% load static %}
B. Add the following link element immediately before the title element inthe head:
<link rel="shortcut icon" type="image/png"href="{% static 'images/favicon.png' %}">
C. Replace the “Django Jokes” text within the navbar-brand link with animage:
<a class="navbar-brand" href="{% url 'homepage' %}"><img src="{% static 'images/logo.png' %}" alt="Logo" class="img-fluid"/>
</a>
Start the server by opening djangojokes.com in the terminal and running:
(.venv) …/projects/djangojokes.com> python manage.py runserver
Then, point your browser to http://127.0.0.1:8000/. The page should look similar tothis:
37. The https://commons.wikimedia.org/wiki/File:Gaim_balloon-free.svg image is in the public domain (https://commons.wikimedia.org/wiki/Public_domain).
LESSON 4: Static Files | 165
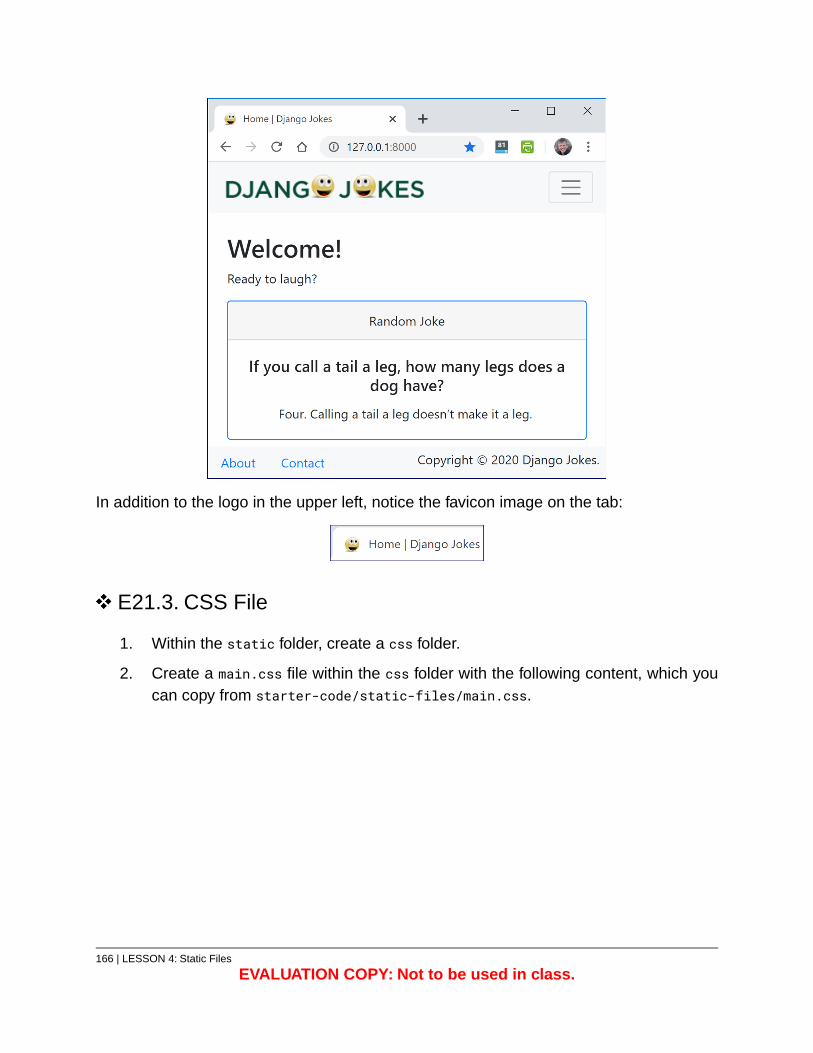
In addition to the logo in the upper left, notice the favicon image on the tab:
E21.3. CSS File
1. Within the static folder, create a css folder.
2. Create a main.css file within the css folder with the following content, which youcan copy from starter-code/static-files/main.css.
166 | LESSON 4: Static Files
EVALUATION COPY: Not to be used in class.
Exercise Code 21.1: static/css/main.css
body {1.padding-bottom: 50px;2.
}3.4.
footer {5.border-top: 1px solid darkgreen;6.
}7.8.
header {9.border-bottom: 1px solid darkgreen;10.
}11.12.
h2 {13.font-style: italic;14.
}15.
If you like, you may add some of your own styles.
3. In templates/_base.html, add a <link> tag below the existing Bootstrap <link>tag to include main.css:
<link rel="stylesheet" href="{% static 'css/main.css' %}">
4. Return to the browser and refresh the page to see the new styles you added.
Git Commit
Commit your code to Git.
❋
4.2. Review of the Settings
The settings for static files can be confusing. Let’s review the difference between STATIC_URLand STATICFILES_DIRS.
4.2.1. STATIC_URL
Remember that STATIC_URL is set to '/static/'. While this also happens to be the nameof the folder that holds static files, there is no connection between the STATIC_URL setting
LESSON 4: Static Files | 167
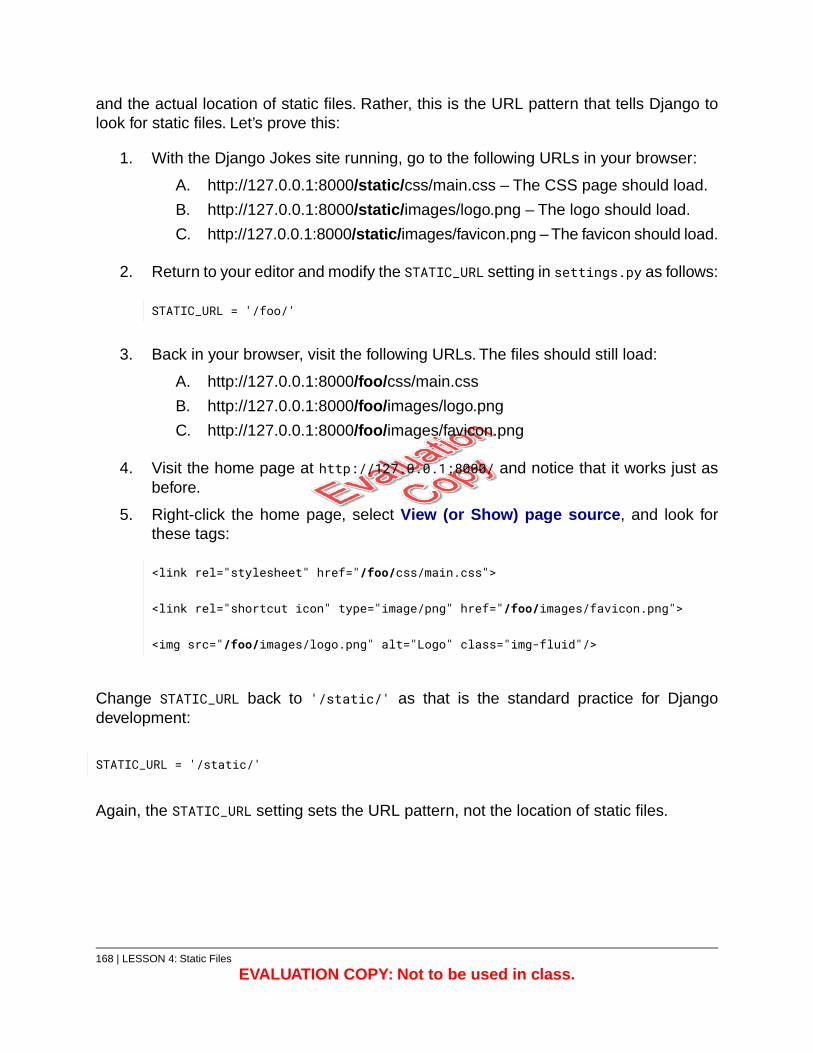
and the actual location of static files. Rather, this is the URL pattern that tells Django tolook for static files. Let’s prove this:
1. With the Django Jokes site running, go to the following URLs in your browser:
A. http://127.0.0.1:8000/static/css/main.css – The CSS page should load.
B. http://127.0.0.1:8000/static/images/logo.png – The logo should load.
C. http://127.0.0.1:8000/static/images/favicon.png – The favicon should load.
2. Return to your editor and modify the STATIC_URL setting in settings.py as follows:
STATIC_URL = '/foo/'
3. Back in your browser, visit the following URLs. The files should still load:
A. http://127.0.0.1:8000/foo/css/main.css
B. http://127.0.0.1:8000/foo/images/logo.png
C. http://127.0.0.1:8000/foo/images/favicon.png
4. Visit the home page at http://127.0.0.1:8000/ and notice that it works just asbefore.
5. Right-click the home page, select View (or Show) page source, and look forthese tags:
<link rel="stylesheet" href="/foo/css/main.css">
<link rel="shortcut icon" type="image/png" href="/foo/images/favicon.png">
<img src="/foo/images/logo.png" alt="Logo" class="img-fluid"/>
Change STATIC_URL back to '/static/' as that is the standard practice for Djangodevelopment:
STATIC_URL = '/static/'
Again, the STATIC_URL setting sets the URL pattern, not the location of static files.
168 | LESSON 4: Static Files
EVALUATION COPY: Not to be used in class.
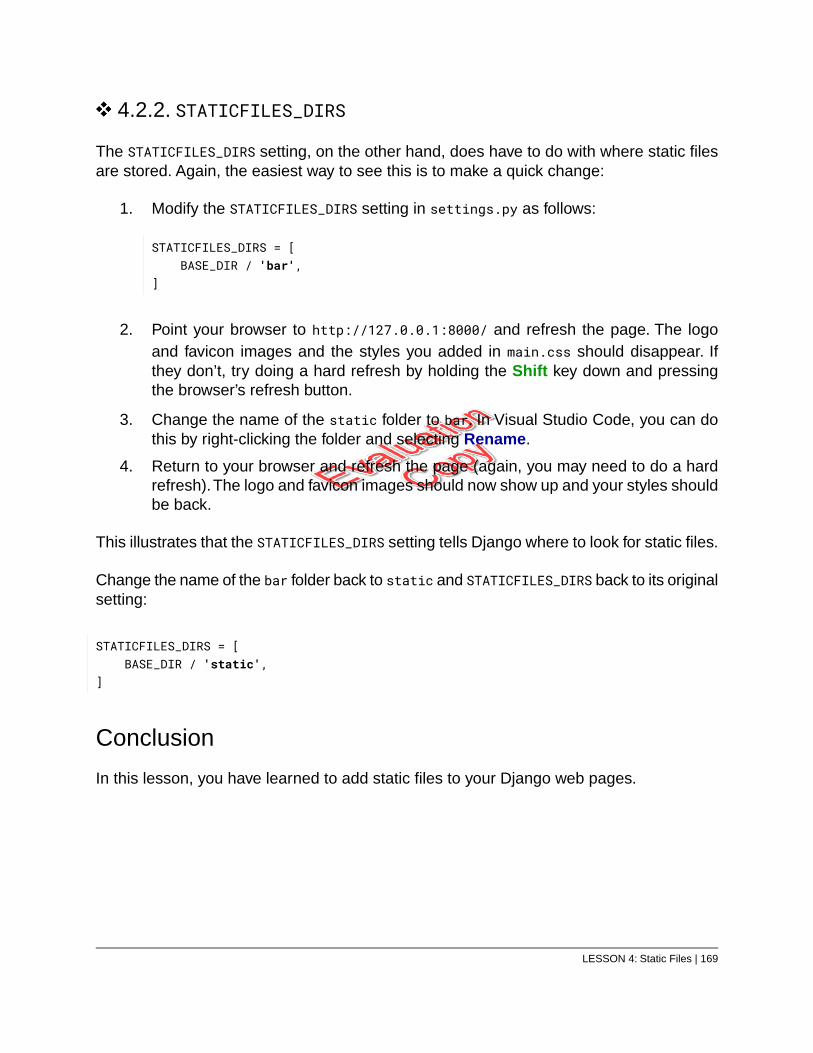
4.2.2. STATICFILES_DIRS
The STATICFILES_DIRS setting, on the other hand, does have to do with where static filesare stored. Again, the easiest way to see this is to make a quick change:
1. Modify the STATICFILES_DIRS setting in settings.py as follows:
STATICFILES_DIRS = [BASE_DIR / 'bar',
]
2. Point your browser to http://127.0.0.1:8000/ and refresh the page. The logoand favicon images and the styles you added in main.css should disappear. Ifthey don’t, try doing a hard refresh by holding the Shift key down and pressingthe browser’s refresh button.
3. Change the name of the static folder to bar. In Visual Studio Code, you can dothis by right-clicking the folder and selecting Rename.
4. Return to your browser and refresh the page (again, you may need to do a hardrefresh).The logo and favicon images should now show up and your styles shouldbe back.
This illustrates that the STATICFILES_DIRS setting tells Django where to look for static files.
Change the name of the bar folder back to static and STATICFILES_DIRS back to its originalsetting:
STATICFILES_DIRS = [BASE_DIR / 'static',
]
Conclusion
In this lesson, you have learned to add static files to your Django web pages.
LESSON 4: Static Files | 169

170 | LESSON 4: Static Files
EVALUATION COPY: Not to be used in class.
LESSON 5Django Admin and the User Model
Topics Covered
The default user model.
Superusers.
Django admin.
Introduction
In this lesson, you will switch from SQLite to PostgreSQL, create a superuser, and learnabout Django admin – Django’s built-in administration interface.
❋
5.1. The Database
Up until this point, you have been using a SQLite database.This works great for practicing,but on production websites, you will want to use something more robust. While you canuse any of the major databases, including MySQL, Microsoft SQL Server, and Oracle, themost popular database to use with Django is PostgreSQL. In the following exercise, youwill download and install PostgreSQL and create a jokes database to use with the DjangoJokes project.
LESSON 5: Django Admin and the User Model | 171
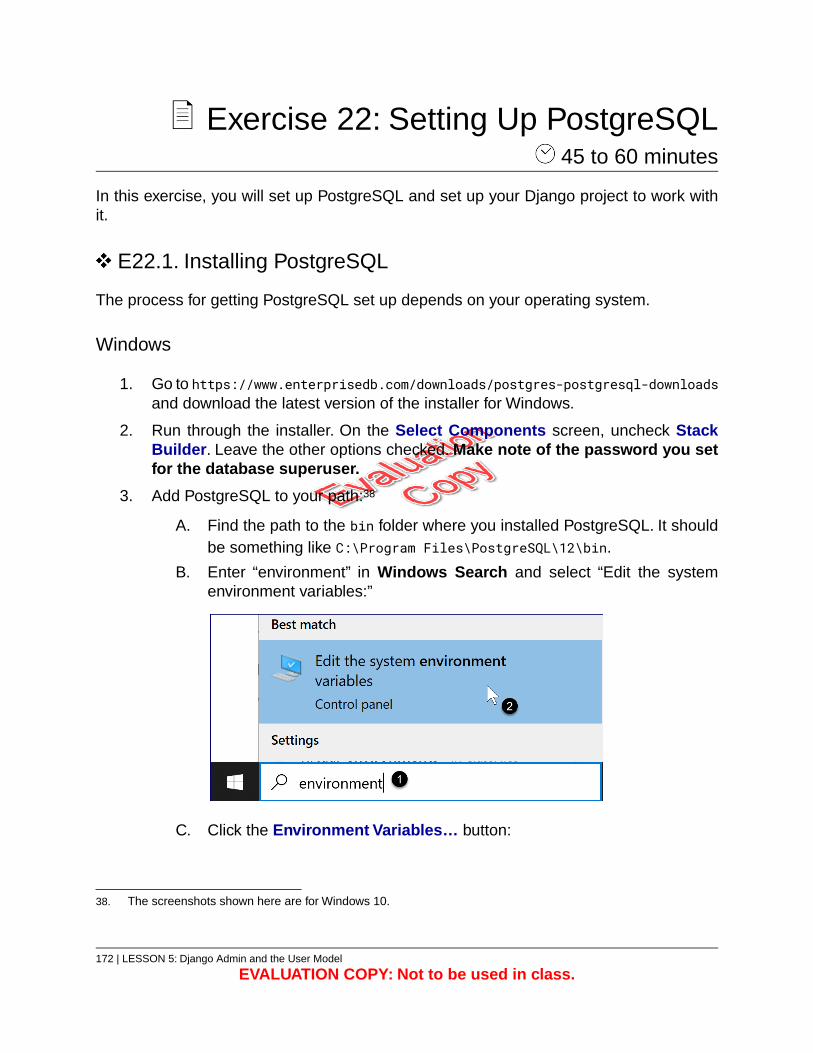
Exercise 22: Setting Up PostgreSQL 45 to 60 minutes
In this exercise, you will set up PostgreSQL and set up your Django project to work withit.
E22.1. Installing PostgreSQL
The process for getting PostgreSQL set up depends on your operating system.
Windows
1. Go to https://www.enterprisedb.com/downloads/postgres-postgresql-downloadsand download the latest version of the installer for Windows.
2. Run through the installer. On the Select Components screen, uncheck StackBuilder. Leave the other options checked. Make note of the password you setfor the database superuser.
3. Add PostgreSQL to your path:38
A. Find the path to the bin folder where you installed PostgreSQL. It shouldbe something like C:\Program Files\PostgreSQL\12\bin.
B. Enter “environment” in Windows Search and select “Edit the systemenvironment variables:”
C. Click the Environment Variables… button:
38. The screenshots shown here are for Windows 10.
172 | LESSON 5: Django Admin and the User Model
EVALUATION COPY: Not to be used in class.

D. Under System variables, select Path and click the Edit button:
E. Click the New button, enter the path you found in step 3-A, and click OK:
LESSON 5: Django Admin and the User Model | 173
F. To test that the path is set up correctly, open a command prompt and run:
…/projects/djangojokes.com> postgres -Vpostgres (PostgreSQL) 12.3
It should return the version of PostgreSQL that you installed.
Mac
1. Go to https://www.enterprisedb.com/downloads/postgres-postgresql-downloadsand download the latest version of the installer for Mac.
2. Double-click the zip file to extract the installer (named something like postgresql-12.3-2-osx.app), and then double-click the installer.
3. Run through the installer. On the Select Components screen, uncheck StackBuilder, but leave the other options checked. Be sure to remember the passwordyou set for the database superuser.
Linux/Other
Visit https://www.postgresql.org/download and follow the appropriate instructions foryour operating system. Then download and install the latest version of pgAdmin for youroperating system at https://www.pgadmin.org/download.
E22.2. pgAdmin
pgAdmin, which you should have installed along with PostgreSQL, is a free front-endbrowser-based client for PostgreSQL. Although you do not need a PostgreSQL client towork with Django, having it gives you the ability to easily explore the tables Django createsbehind the scenes.
1. Open pgAdmin just as you would open any other application on your computer.On Windows, you can type in “pgAdmin” in Windows Search and select pgAdmin4. On a Mac, you can press Cmd+Space, enter “pgAdmin,” and select pgAdmin4.app.
2. pgAdmin will open in your browser. The first time it opens, it will prompt you to seta master password. This is different from the password you entered for thedatabase superuser when installing PostgreSQL; however, you can use the samepassword. Don’t forget it!
174 | LESSON 5: Django Admin and the User Model
EVALUATION COPY: Not to be used in class.
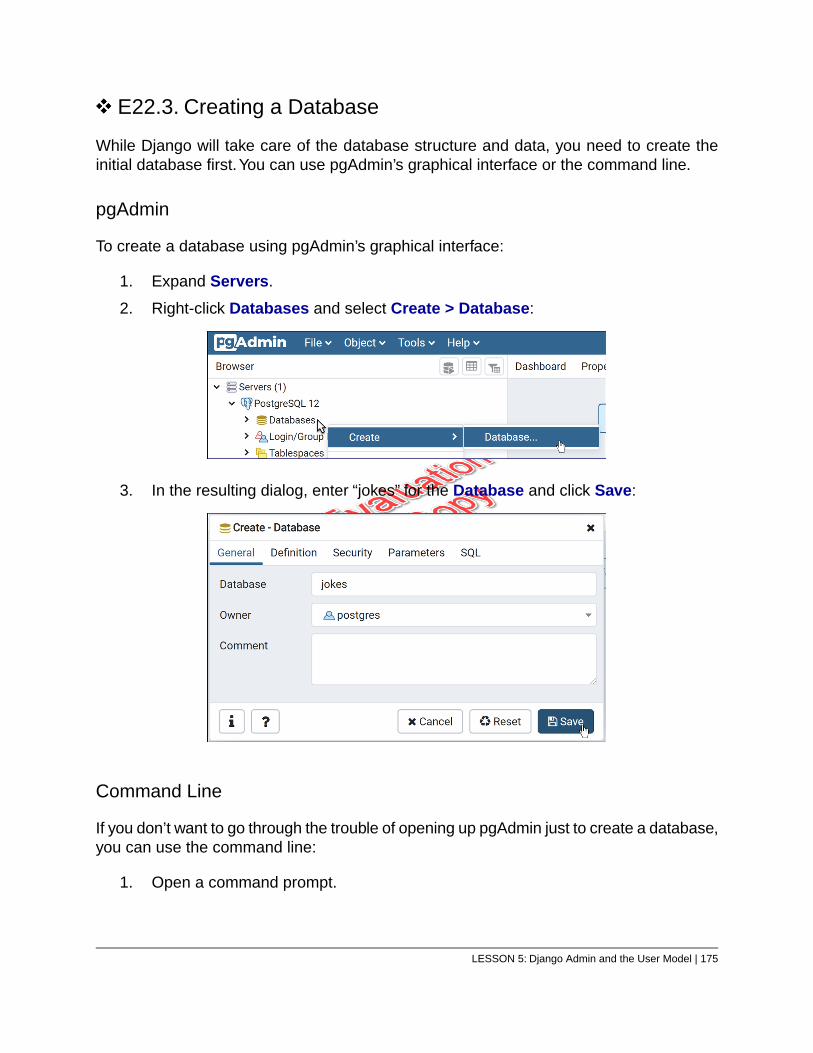
E22.3. Creating a Database
While Django will take care of the database structure and data, you need to create theinitial database first.You can use pgAdmin’s graphical interface or the command line.
pgAdmin
To create a database using pgAdmin’s graphical interface:
1. Expand Servers.
2. Right-click Databases and select Create > Database:
3. In the resulting dialog, enter “jokes” for the Database and click Save:
Command Line
If you don’t want to go through the trouble of opening up pgAdmin just to create a database,you can use the command line:
1. Open a command prompt.
LESSON 5: Django Admin and the User Model | 175
2. Run the following command to log in to PostgreSQL:
psql -U postgres
You will be prompted for the superuser password. Enter it and press Enter.
3. You will get a postgres=# prompt, at which you can create the database like this:
postgres=# CREATE DATABASE jokes;
E22.4. The Database Adapter
Python requires a database adapter to communicate with a database. The most populardatabase adapter used with PostgreSQL is psycopg2. Install psycopg2 with pip in the virtualenvironment:
(.venv) …/projects/djangojokes.com> pip install psycopg2
E22.5. Switching the Django Jokes Project to PostgreSQL
You are now ready to switch from SQLite to PostgreSQL for the Django Jokes project.
1. Open settings.py from djangojokes for editing.
2. Change the DATABASES setting to:
DATABASES = {'default': {
'ENGINE': 'django.db.backends.postgresql','NAME': 'jokes','USER': 'postgres','PASSWORD': 'YOURPASSWORD','HOST': 'localhost','PORT': 5432
}}
Be sure to replace YOURPASSWORD with the password you created whileinstalling PostgreSQL.
3. Because you have changed the database, all your data will be lost. Luckily, youonly had one or two jokes in there, unless you added more on your own. Even
176 | LESSON 5: Django Admin and the User Model
EVALUATION COPY: Not to be used in class.
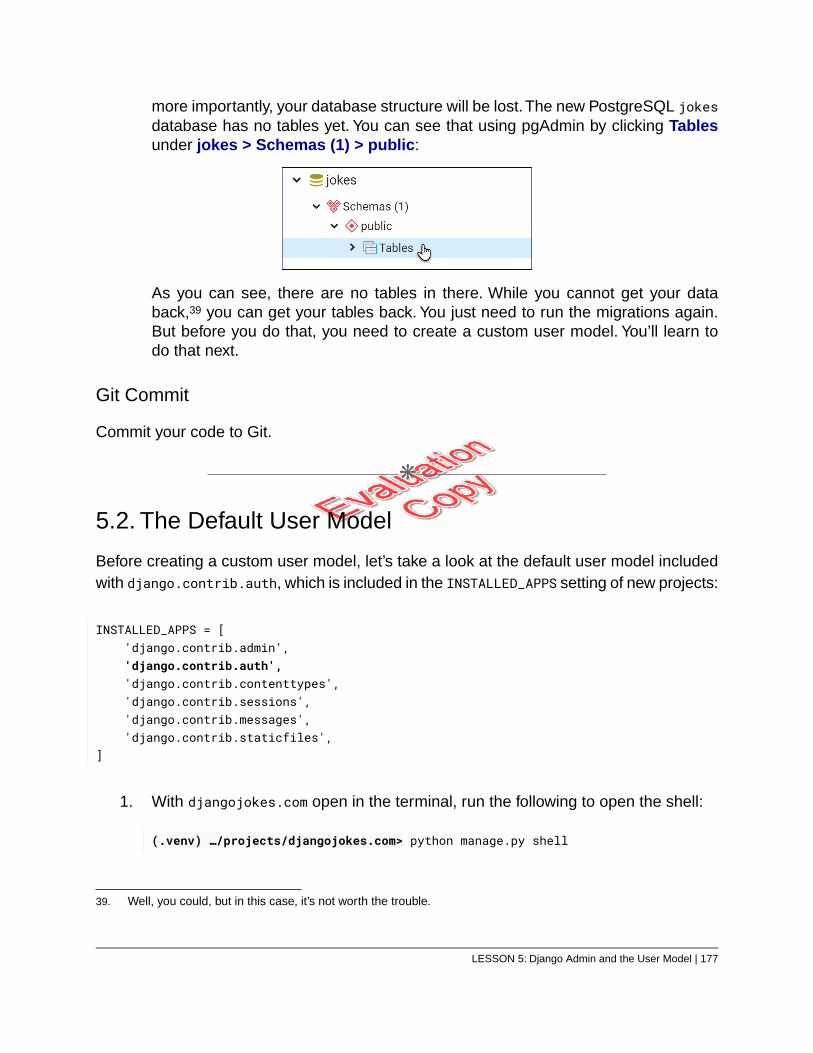
more importantly, your database structure will be lost.The new PostgreSQL jokesdatabase has no tables yet. You can see that using pgAdmin by clicking Tablesunder jokes > Schemas (1) > public:
As you can see, there are no tables in there. While you cannot get your databack,39 you can get your tables back. You just need to run the migrations again.But before you do that, you need to create a custom user model. You’ll learn todo that next.
Git Commit
Commit your code to Git.
❋
5.2. The Default User Model
Before creating a custom user model, let’s take a look at the default user model includedwith django.contrib.auth, which is included in the INSTALLED_APPS setting of new projects:
INSTALLED_APPS = ['django.contrib.admin','django.contrib.auth','django.contrib.contenttypes','django.contrib.sessions','django.contrib.messages','django.contrib.staticfiles',
]
1. With djangojokes.com open in the terminal, run the following to open the shell:
(.venv) …/projects/djangojokes.com> python manage.py shell
39. Well, you could, but in this case, it’s not worth the trouble.
LESSON 5: Django Admin and the User Model | 177
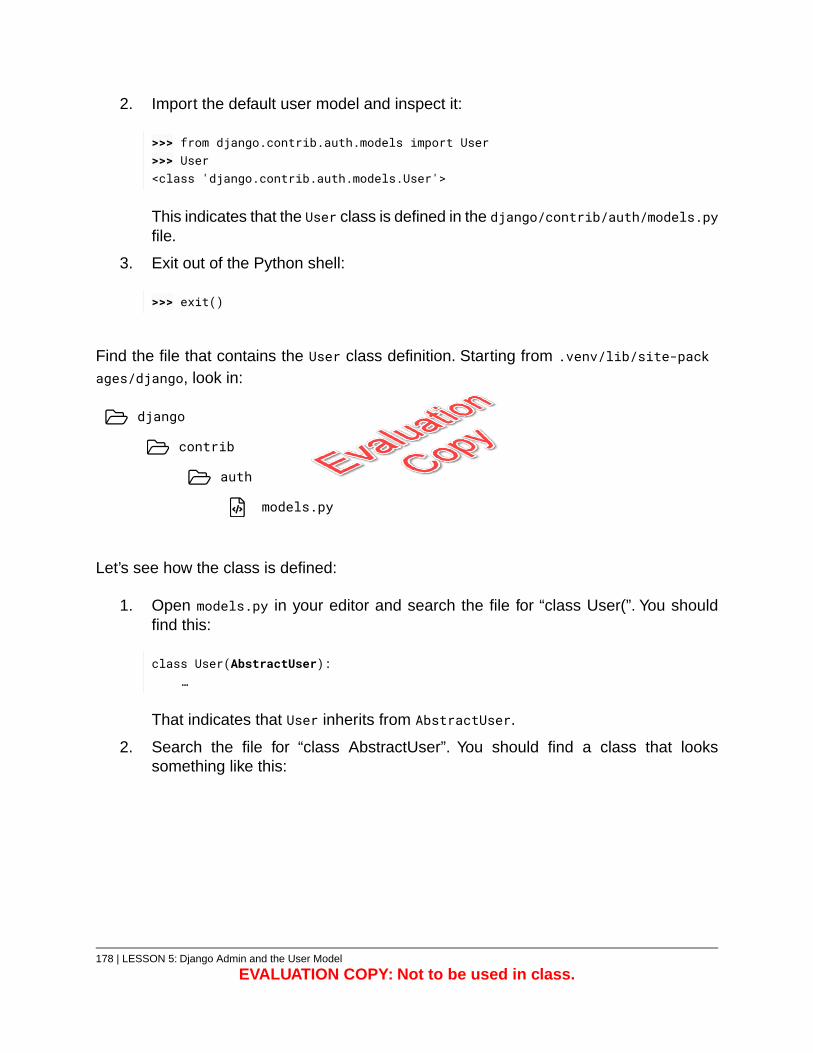
2. Import the default user model and inspect it:
>>> from django.contrib.auth.models import User>>> User<class 'django.contrib.auth.models.User'>
This indicates that the User class is defined in the django/contrib/auth/models.pyfile.
3. Exit out of the Python shell:
>>> exit()
Find the file that contains the User class definition. Starting from .venv/lib/site-packages/django, look in:
django
contrib
auth
models.py
Let’s see how the class is defined:
1. Open models.py in your editor and search the file for “class User(”. You shouldfind this:
class User(AbstractUser):…
That indicates that User inherits from AbstractUser.
2. Search the file for “class AbstractUser”. You should find a class that lookssomething like this:
178 | LESSON 5: Django Admin and the User Model
EVALUATION COPY: Not to be used in class.
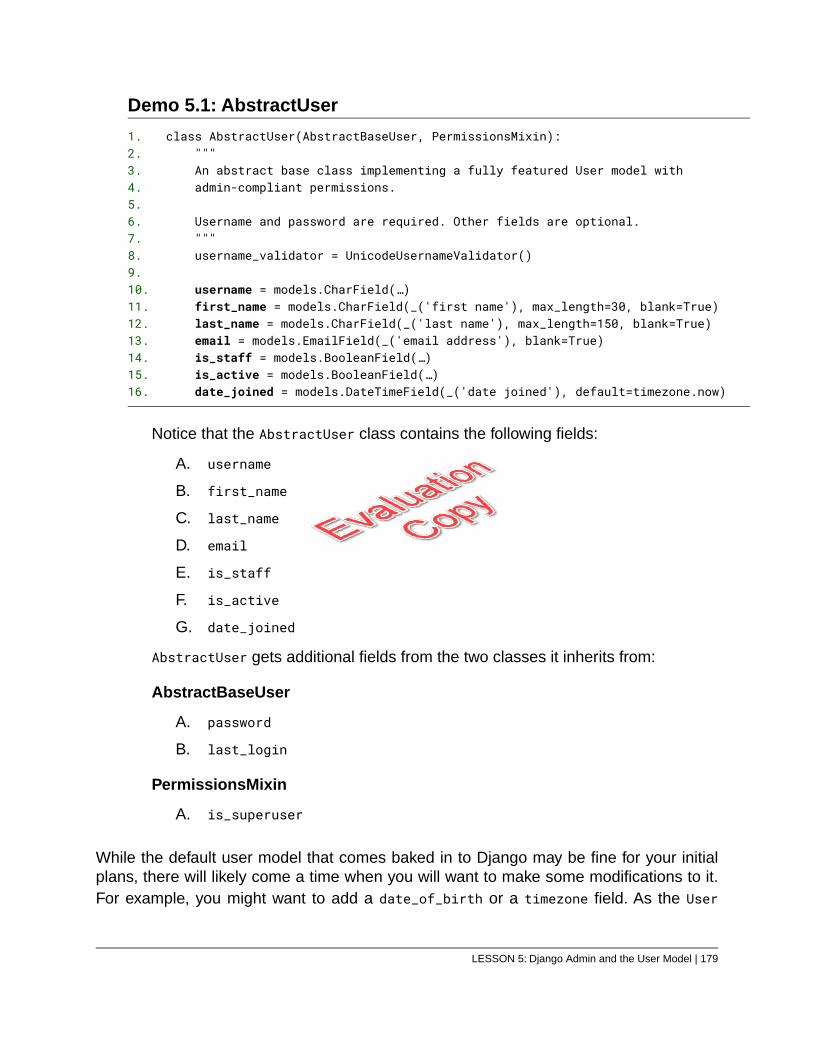
Demo 5.1: AbstractUser
class AbstractUser(AbstractBaseUser, PermissionsMixin):1."""2.An abstract base class implementing a fully featured User model with3.admin-compliant permissions.4.
5.Username and password are required. Other fields are optional.6."""7.username_validator = UnicodeUsernameValidator()8.
9.username = models.CharField(…)10.first_name = models.CharField(_('first name'), max_length=30, blank=True)11.last_name = models.CharField(_('last name'), max_length=150, blank=True)12.email = models.EmailField(_('email address'), blank=True)13.is_staff = models.BooleanField(…)14.is_active = models.BooleanField(…)15.date_joined = models.DateTimeField(_('date joined'), default=timezone.now)16.
Notice that the AbstractUser class contains the following fields:
A. username
B. first_name
C. last_name
D. email
E. is_staff
F. is_active
G. date_joined
AbstractUser gets additional fields from the two classes it inherits from:
AbstractBaseUser
A. password
B. last_login
PermissionsMixin
A. is_superuser
While the default user model that comes baked in to Django may be fine for your initialplans, there will likely come a time when you will want to make some modifications to it.For example, you might want to add a date_of_birth or a timezone field. As the User
LESSON 5: Django Admin and the User Model | 179
model is part of the built-in django.contrib.auth app, you won’t be able to make changesto the model.40 As such, you should always create a custom user model when starting anew project. This will give you full control over the user model as your project develops.And, as it turns out, it’s easy to do.
40. Well, you could, but you shouldn’t.
180 | LESSON 5: Django Admin and the User Model
EVALUATION COPY: Not to be used in class.
Exercise 23: Creating a Custom UserModel
20 to 30 minutes
In this exercise, you will create a new app with a custom user model in the djangojokesproject.
1. With djangojokes.com open in the terminal, run the following command to createthe users app:
(.venv) …/projects/djangojokes.com> python manage.py startapp users
2. Open users/models.py for editing, and add the following code:
Exercise Code 23.1: users/models.py
from django.contrib.auth.models import AbstractUser1.from django.db import models2.
3.class CustomUser(AbstractUser):4.
pass5.
Things to notice:
You import AbstractUser from django.contrib.auth.models.
The CustomUser class inherits from AbstractUser, but doesn’t change itat all. While you haven’t made any changes yet, creating this subclass ofAbstractUser gives you the option of making changes in the future.
3. Open djangojokes/settings.py for editing:
LESSON 5: Django Admin and the User Model | 181
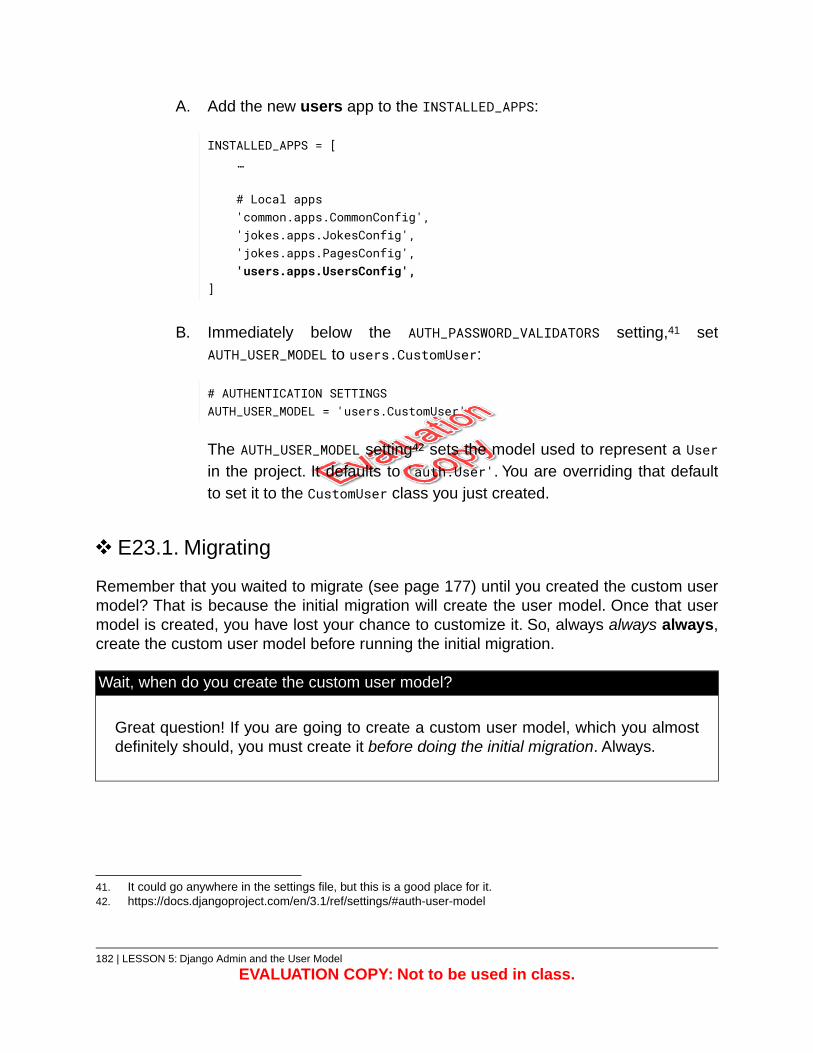
Add the new users app to the INSTALLED_APPS:
INSTALLED_APPS = […
# Local apps'common.apps.CommonConfig','jokes.apps.JokesConfig','jokes.apps.PagesConfig','users.apps.UsersConfig',
]
A.
B. Immediately below the AUTH_PASSWORD_VALIDATORS setting,41 setAUTH_USER_MODEL to users.CustomUser:
# AUTHENTICATION SETTINGSAUTH_USER_MODEL = 'users.CustomUser'
The AUTH_USER_MODEL setting42 sets the model used to represent a Userin the project. It defaults to 'auth.User'. You are overriding that defaultto set it to the CustomUser class you just created.
E23.1. Migrating
Remember that you waited to migrate (see page 177) until you created the custom usermodel? That is because the initial migration will create the user model. Once that usermodel is created, you have lost your chance to customize it. So, always always always,create the custom user model before running the initial migration.
Wait, when do you create the custom user model?
Great question! If you are going to create a custom user model, which you almostdefinitely should, you must create it before doing the initial migration. Always.
41. It could go anywhere in the settings file, but this is a good place for it.42. https://docs.djangoproject.com/en/3.1/ref/settings/#auth-user-model
182 | LESSON 5: Django Admin and the User Model
EVALUATION COPY: Not to be used in class.
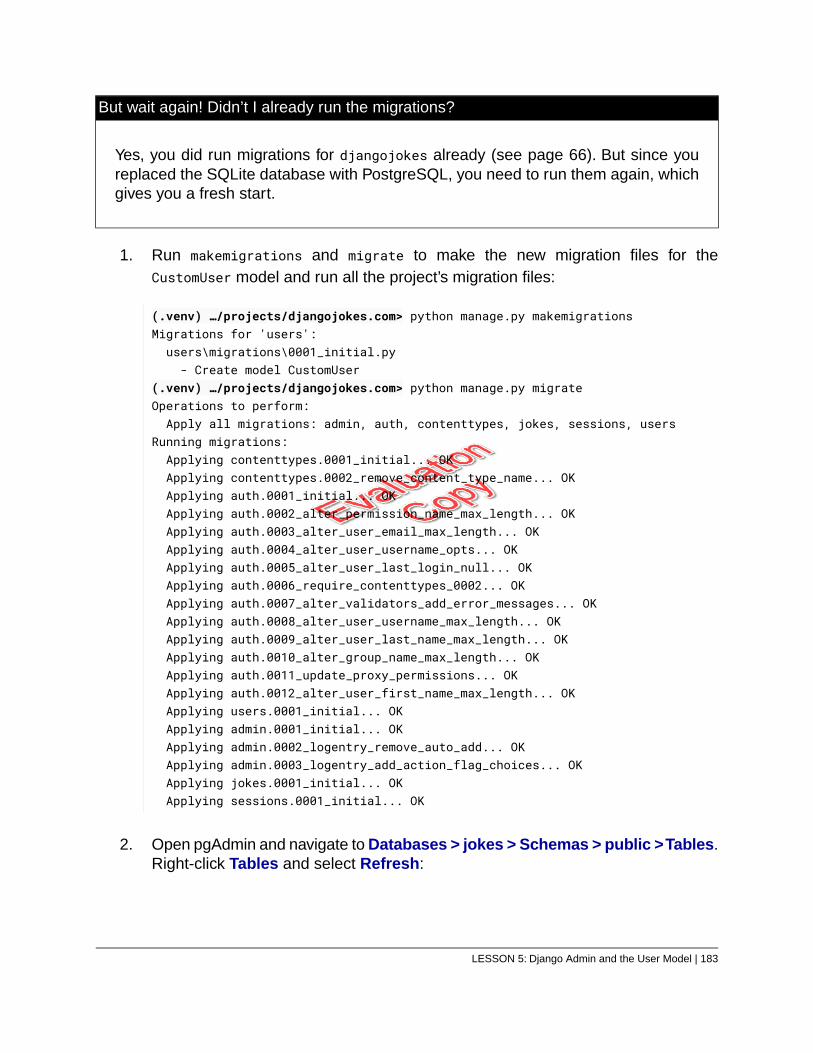
But wait again! Didn’t I already run the migrations?
Yes, you did run migrations for djangojokes already (see page 66). But since youreplaced the SQLite database with PostgreSQL, you need to run them again, whichgives you a fresh start.
1. Run makemigrations and migrate to make the new migration files for theCustomUser model and run all the project’s migration files:
(.venv) …/projects/djangojokes.com> python manage.py makemigrationsMigrations for 'users':users\migrations\0001_initial.py- Create model CustomUser
(.venv) …/projects/djangojokes.com> python manage.py migrateOperations to perform:Apply all migrations: admin, auth, contenttypes, jokes, sessions, users
Running migrations:Applying contenttypes.0001_initial... OKApplying contenttypes.0002_remove_content_type_name... OKApplying auth.0001_initial... OKApplying auth.0002_alter_permission_name_max_length... OKApplying auth.0003_alter_user_email_max_length... OKApplying auth.0004_alter_user_username_opts... OKApplying auth.0005_alter_user_last_login_null... OKApplying auth.0006_require_contenttypes_0002... OKApplying auth.0007_alter_validators_add_error_messages... OKApplying auth.0008_alter_user_username_max_length... OKApplying auth.0009_alter_user_last_name_max_length... OKApplying auth.0010_alter_group_name_max_length... OKApplying auth.0011_update_proxy_permissions... OKApplying auth.0012_alter_user_first_name_max_length... OKApplying users.0001_initial... OKApplying admin.0001_initial... OKApplying admin.0002_logentry_remove_auto_add... OKApplying admin.0003_logentry_add_action_flag_choices... OKApplying jokes.0001_initial... OKApplying sessions.0001_initial... OK
2. Open pgAdmin and navigate to Databases > jokes > Schemas > public > Tables.Right-click Tables and select Refresh:
LESSON 5: Django Admin and the User Model | 183
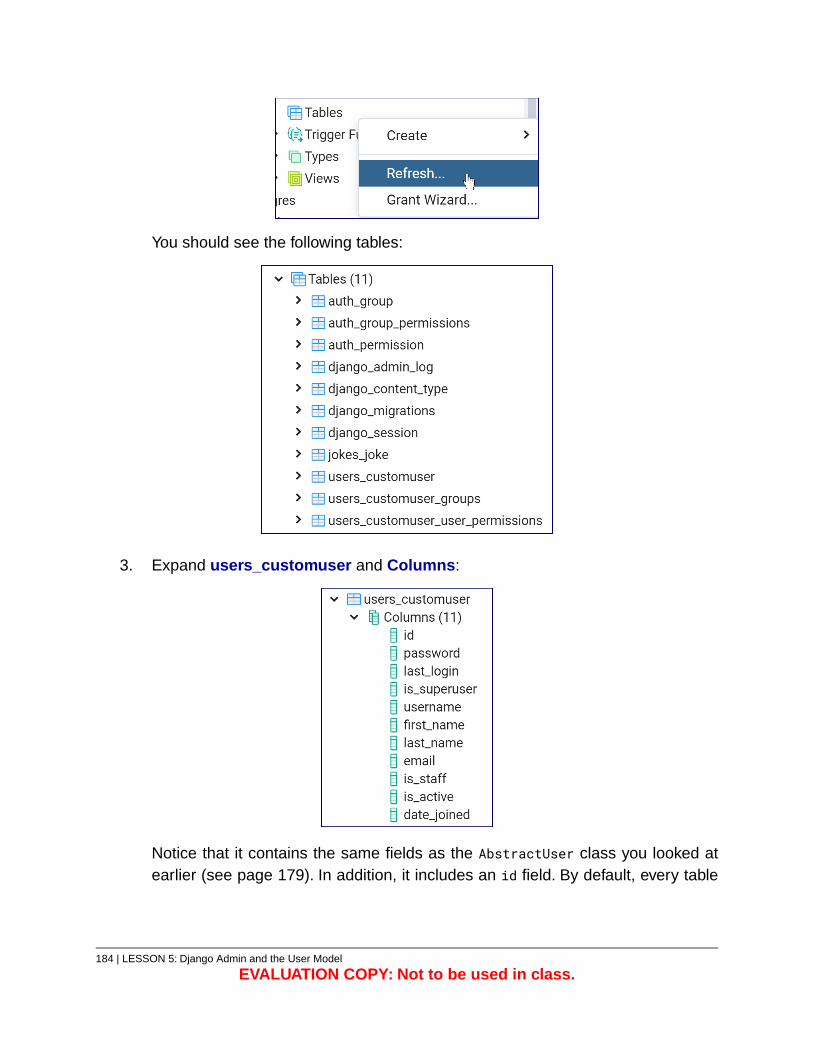
You should see the following tables:
3. Expand users_customuser and Columns:
Notice that it contains the same fields as the AbstractUser class you looked atearlier (see page 179). In addition, it includes an id field. By default, every table
184 | LESSON 5: Django Admin and the User Model
EVALUATION COPY: Not to be used in class.

created in Django will get an id primary key field that is an auto-incrementinginteger.
Git Commit
Commit your code to Git.
❋
5.3. Referencing the User Model
There are two commonly used ways of referencing the user model:
1. The get_user_model() method from the django.contrib.auth app.
2. The AUTH_USER_MODEL variable in the project settings.
You should use AUTH_USER_MODEL when referencing the model as a foreign key to othermodels. You will see this when you associate users with the jokes they create (see page349).
In most other cases, you should use get_user_model().
LESSON 5: Django Admin and the User Model | 185
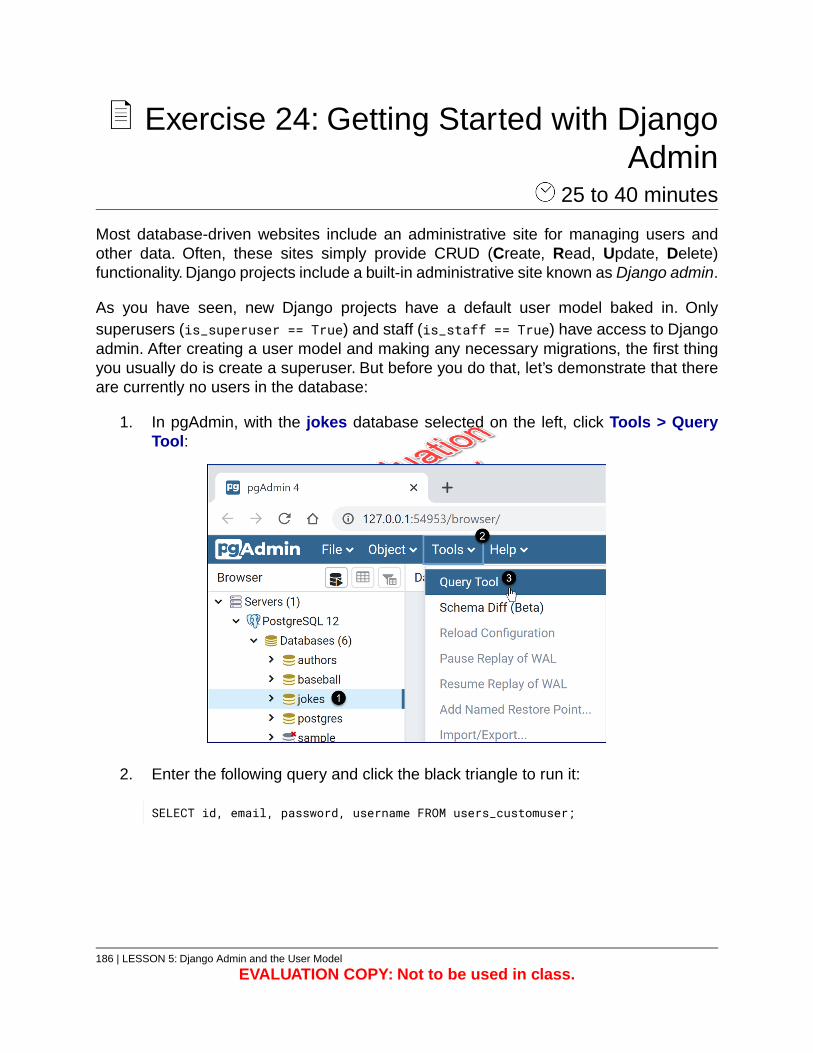
Exercise 24: Getting Started with DjangoAdmin
25 to 40 minutes
Most database-driven websites include an administrative site for managing users andother data. Often, these sites simply provide CRUD (Create, Read, Update, Delete)functionality. Django projects include a built-in administrative site known as Django admin.
As you have seen, new Django projects have a default user model baked in. Onlysuperusers (is_superuser == True) and staff (is_staff == True) have access to Djangoadmin. After creating a user model and making any necessary migrations, the first thingyou usually do is create a superuser. But before you do that, let’s demonstrate that thereare currently no users in the database:
1. In pgAdmin, with the jokes database selected on the left, click Tools > QueryTool:
2. Enter the following query and click the black triangle to run it:
SELECT id, email, password, username FROM users_customuser;
186 | LESSON 5: Django Admin and the User Model
EVALUATION COPY: Not to be used in class.
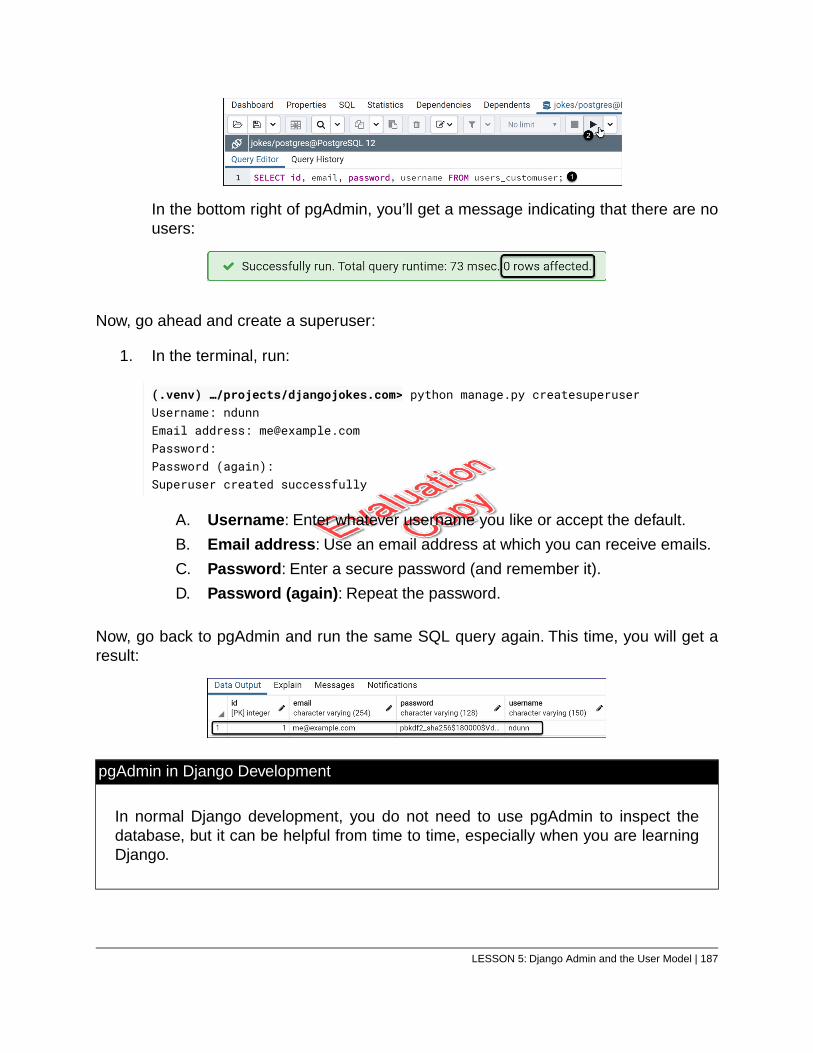
In the bottom right of pgAdmin, you’ll get a message indicating that there are nousers:
Now, go ahead and create a superuser:
1. In the terminal, run:
(.venv) …/projects/djangojokes.com> python manage.py createsuperuserUsername: ndunnEmail address: [email protected]:Password (again):Superuser created successfully
A. Username: Enter whatever username you like or accept the default.
B. Email address: Use an email address at which you can receive emails.
C. Password: Enter a secure password (and remember it).
D. Password (again): Repeat the password.
Now, go back to pgAdmin and run the same SQL query again. This time, you will get aresult:
pgAdmin in Django Development
In normal Django development, you do not need to use pgAdmin to inspect thedatabase, but it can be helpful from time to time, especially when you are learningDjango.
LESSON 5: Django Admin and the User Model | 187
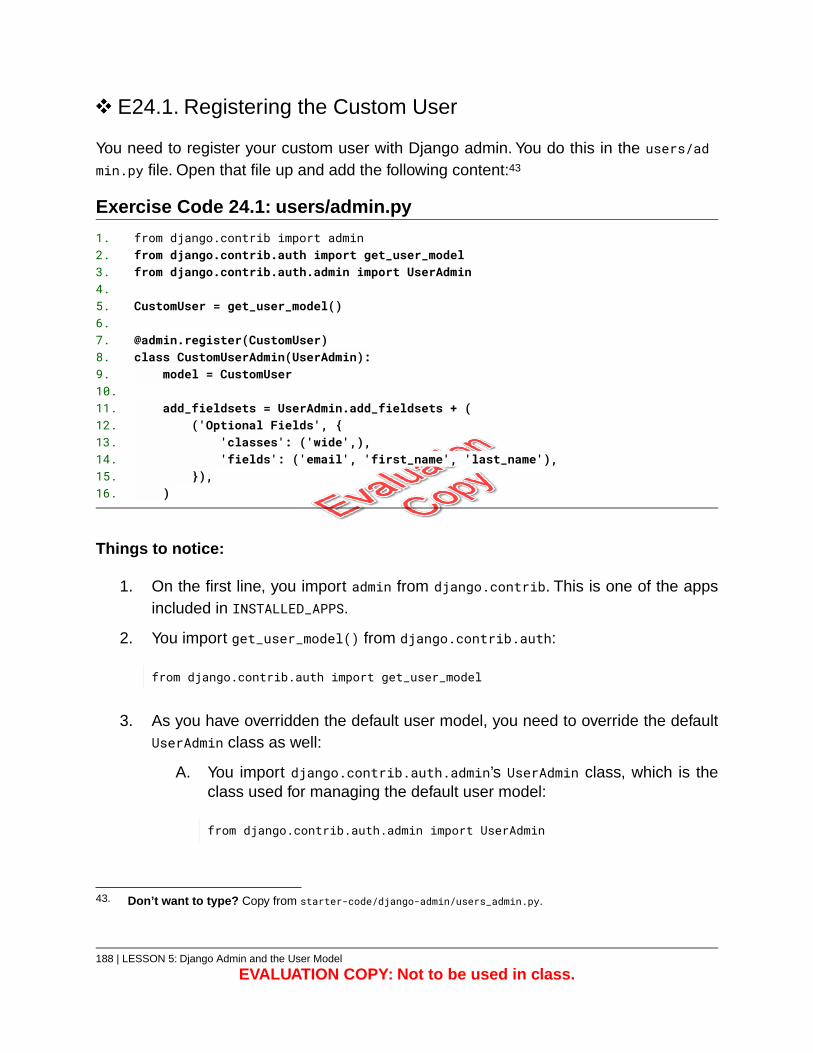
E24.1. Registering the Custom User
You need to register your custom user with Django admin. You do this in the users/admin.py file. Open that file up and add the following content:43
Exercise Code 24.1: users/admin.py
from django.contrib import admin1.from django.contrib.auth import get_user_model2.from django.contrib.auth.admin import UserAdmin3.
4.CustomUser = get_user_model()5.
[email protected](CustomUser)7.class CustomUserAdmin(UserAdmin):8.
model = CustomUser9.10.
add_fieldsets = UserAdmin.add_fieldsets + (11.('Optional Fields', {12.
'classes': ('wide',),13.'fields': ('email', 'first_name', 'last_name'),14.
}),15.)16.
Things to notice:
1. On the first line, you import admin from django.contrib. This is one of the appsincluded in INSTALLED_APPS.
2. You import get_user_model() from django.contrib.auth:
from django.contrib.auth import get_user_model
3. As you have overridden the default user model, you need to override the defaultUserAdmin class as well:
A. You import django.contrib.auth.admin’s UserAdmin class, which is theclass used for managing the default user model:
from django.contrib.auth.admin import UserAdmin
43. Don’t want to type? Copy from starter-code/django-admin/users_admin.py.
188 | LESSON 5: Django Admin and the User Model
EVALUATION COPY: Not to be used in class.
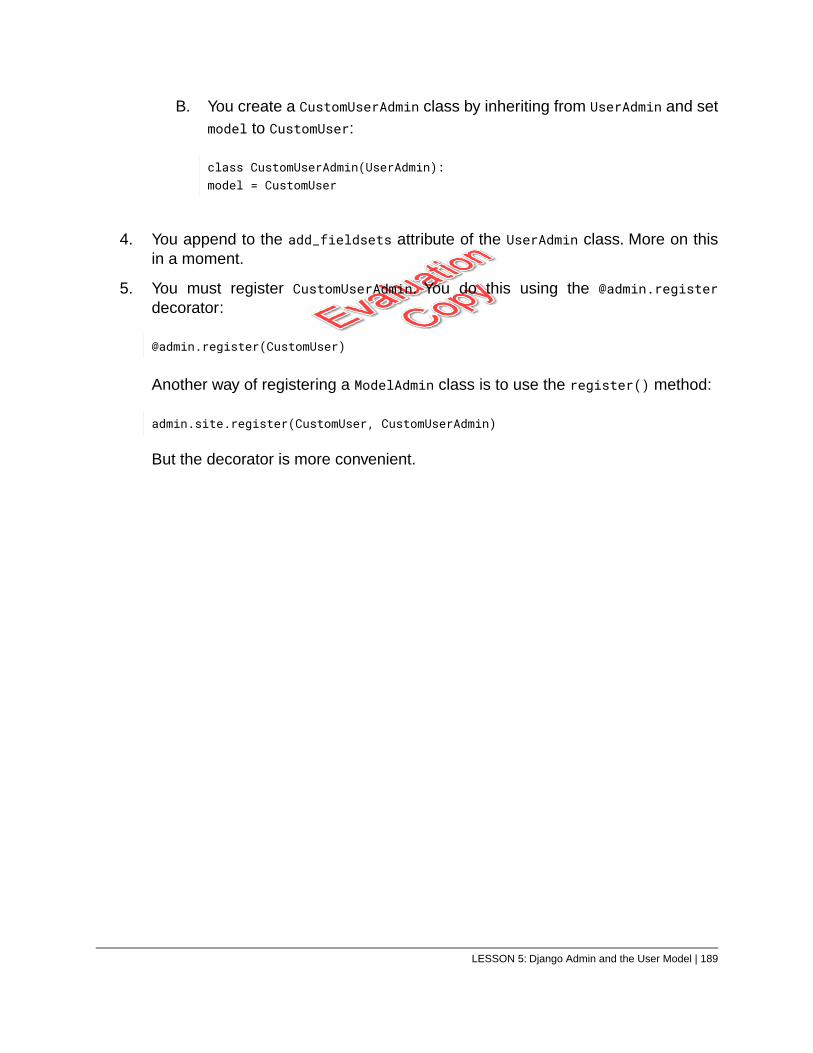
B. You create a CustomUserAdmin class by inheriting from UserAdmin and setmodel to CustomUser:
class CustomUserAdmin(UserAdmin):model = CustomUser
4. You append to the add_fieldsets attribute of the UserAdmin class. More on thisin a moment.
5. You must register CustomUserAdmin. You do this using the @admin.registerdecorator:
@admin.register(CustomUser)
Another way of registering a ModelAdmin class is to use the register() method:
admin.site.register(CustomUser, CustomUserAdmin)
But the decorator is more convenient.
LESSON 5: Django Admin and the User Model | 189
fieldsets and add_fieldsets
The fieldsets and add_fieldsets properties hold the fieldsets that show up in Djangoadmin’s forms:
fieldsets – These are the fieldsets used for updating existing records. Generally,you want this to contain all the fields that can be modified.
add_fieldsets – These are the fieldsets used for creating new records. This onlyneeds to contain the required fields; however, it can contain additional fields thatyou generally want to have data for in new records.
fieldsets and add_fieldsets each holds a tuple, which itself contains one or more2-element tuples:
1. The first element is the fieldset name (or None if the fieldset is unnamed).
2. The second element is a dictionary containing the CSS classes and the fields inthe fieldset.
The add_fieldsets attribute of the built-in UserAdmin class looks like this:
add_fieldsets = ((None, {
'classes': ('wide',),'fields': ('username', 'password1', 'password2'),
}),)
It contains only one tuple, meaning there is only one fieldset. The None value indicatesthat the fieldset has no name. It has one class: “wide” and three fields: “username,”“password1,” and “password2”. The resulting Add User form looks like this:
190 | LESSON 5: Django Admin and the User Model
EVALUATION COPY: Not to be used in class.
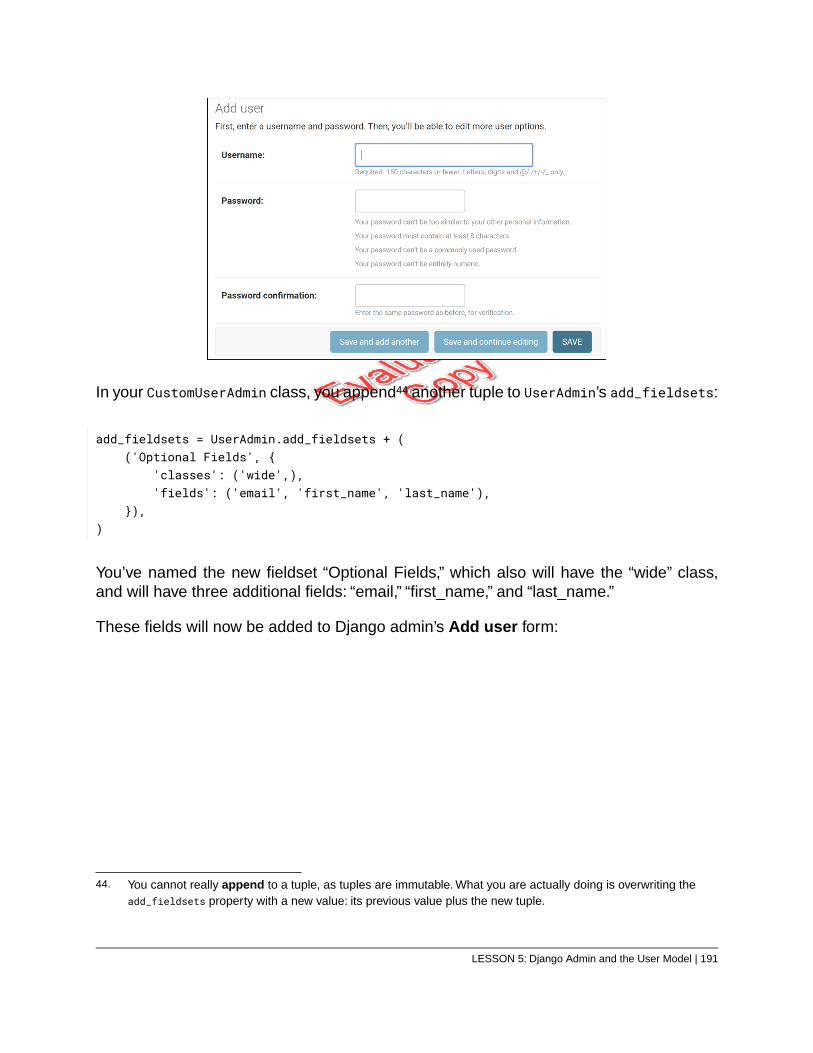
In your CustomUserAdmin class, you append44 another tuple to UserAdmin’s add_fieldsets:
add_fieldsets = UserAdmin.add_fieldsets + (('Optional Fields', {
'classes': ('wide',),'fields': ('email', 'first_name', 'last_name'),
}),)
You’ve named the new fieldset “Optional Fields,” which also will have the “wide” class,and will have three additional fields: “email,” “first_name,” and “last_name.”
These fields will now be added to Django admin’s Add user form:
44. You cannot really append to a tuple, as tuples are immutable. What you are actually doing is overwriting theadd_fieldsets property with a new value: its previous value plus the new tuple.
LESSON 5: Django Admin and the User Model | 191
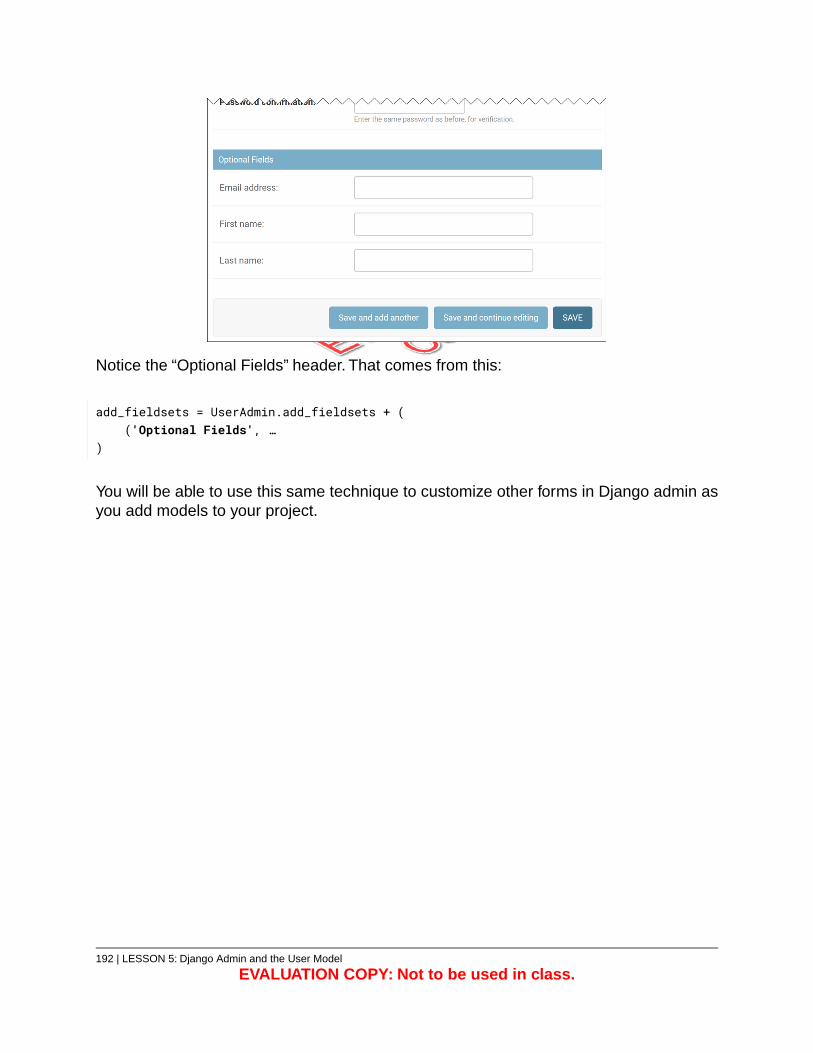
Notice the “Optional Fields” header. That comes from this:
add_fieldsets = UserAdmin.add_fieldsets + (('Optional Fields', …
)
You will be able to use this same technique to customize other forms in Django admin asyou add models to your project.
192 | LESSON 5: Django Admin and the User Model
EVALUATION COPY: Not to be used in class.
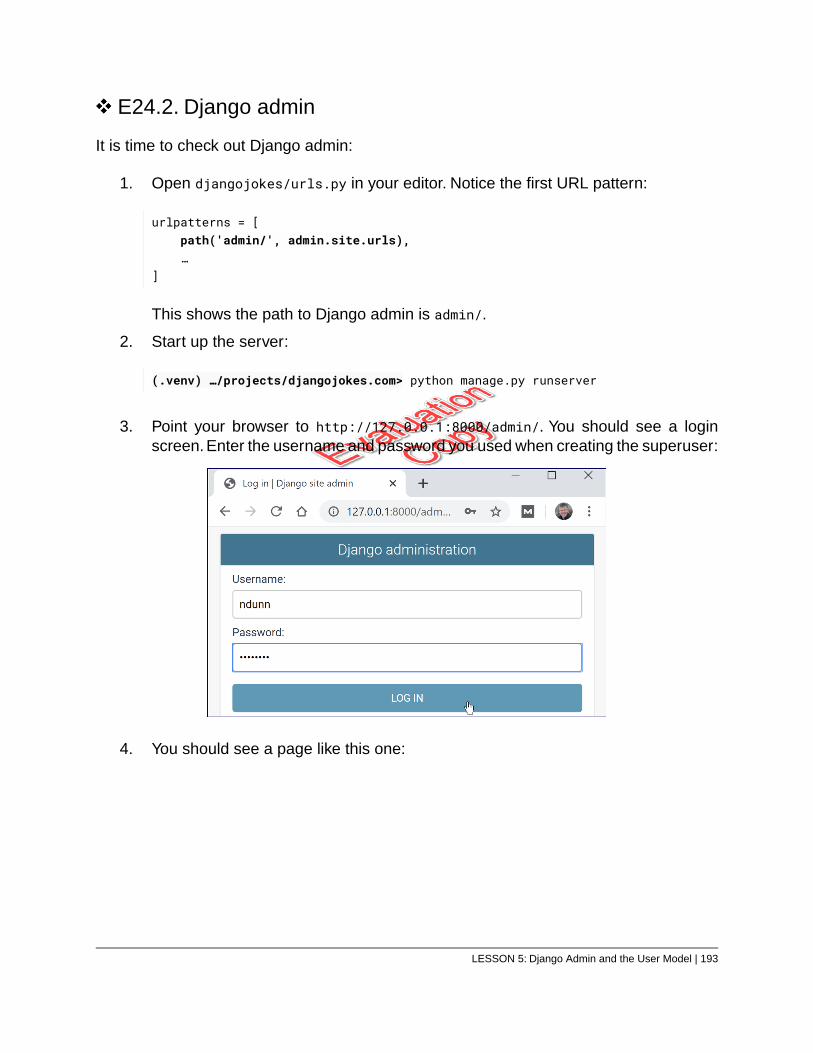
E24.2. Django admin
It is time to check out Django admin:
1. Open djangojokes/urls.py in your editor. Notice the first URL pattern:
urlpatterns = [path('admin/', admin.site.urls),…
]
This shows the path to Django admin is admin/.
2. Start up the server:
(.venv) …/projects/djangojokes.com> python manage.py runserver
3. Point your browser to http://127.0.0.1:8000/admin/. You should see a loginscreen. Enter the username and password you used when creating the superuser:
4. You should see a page like this one:
LESSON 5: Django Admin and the User Model | 193
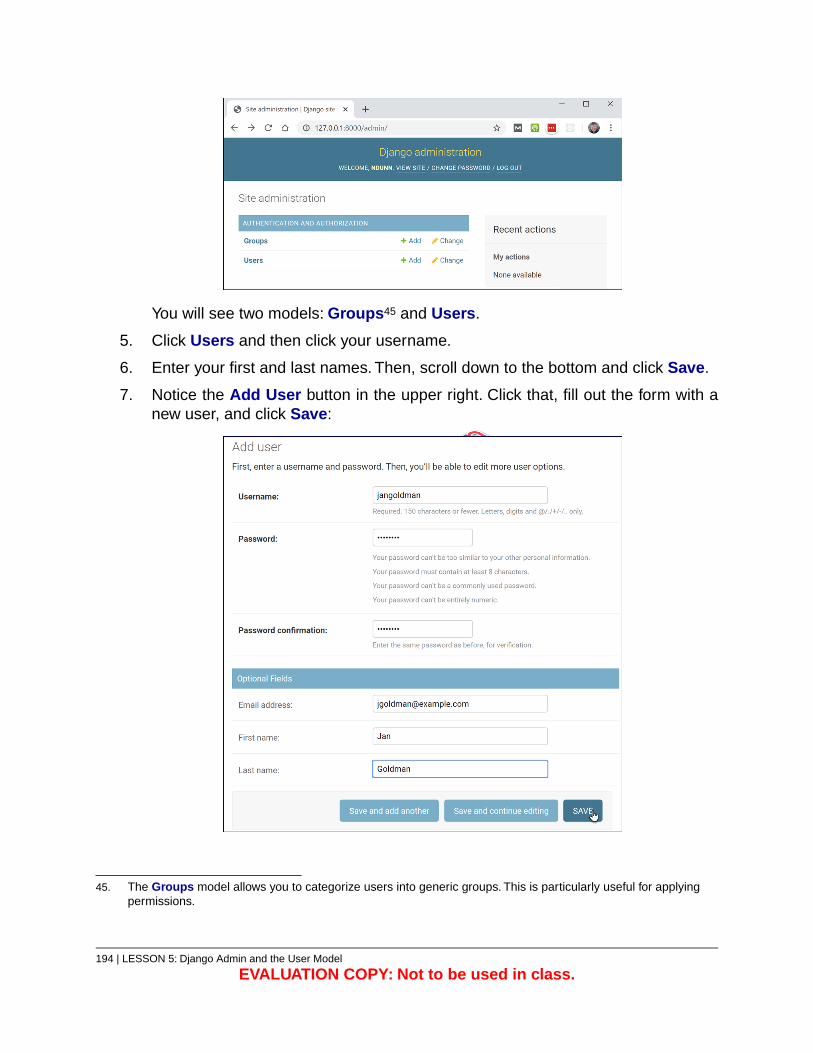
You will see two models: Groups45 and Users.
5. Click Users and then click your username.
6. Enter your first and last names. Then, scroll down to the bottom and click Save.
7. Notice the Add User button in the upper right. Click that, fill out the form with anew user, and click Save:
45. The Groups model allows you to categorize users into generic groups. This is particularly useful for applyingpermissions.
194 | LESSON 5: Django Admin and the User Model
EVALUATION COPY: Not to be used in class.
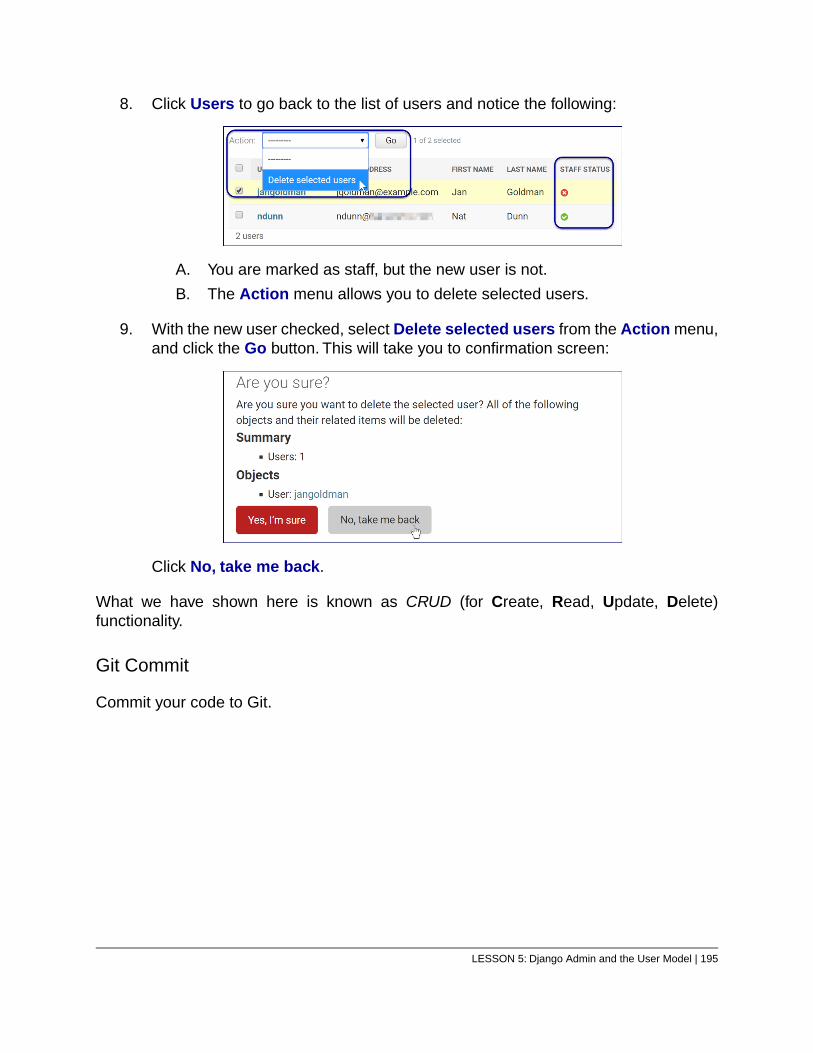
8. Click Users to go back to the list of users and notice the following:
A. You are marked as staff, but the new user is not.
B. The Action menu allows you to delete selected users.
9. With the new user checked, select Delete selected users from the Action menu,and click the Go button. This will take you to confirmation screen:
Click No, take me back.
What we have shown here is known as CRUD (for Create, Read, Update, Delete)functionality.
Git Commit
Commit your code to Git.
LESSON 5: Django Admin and the User Model | 195
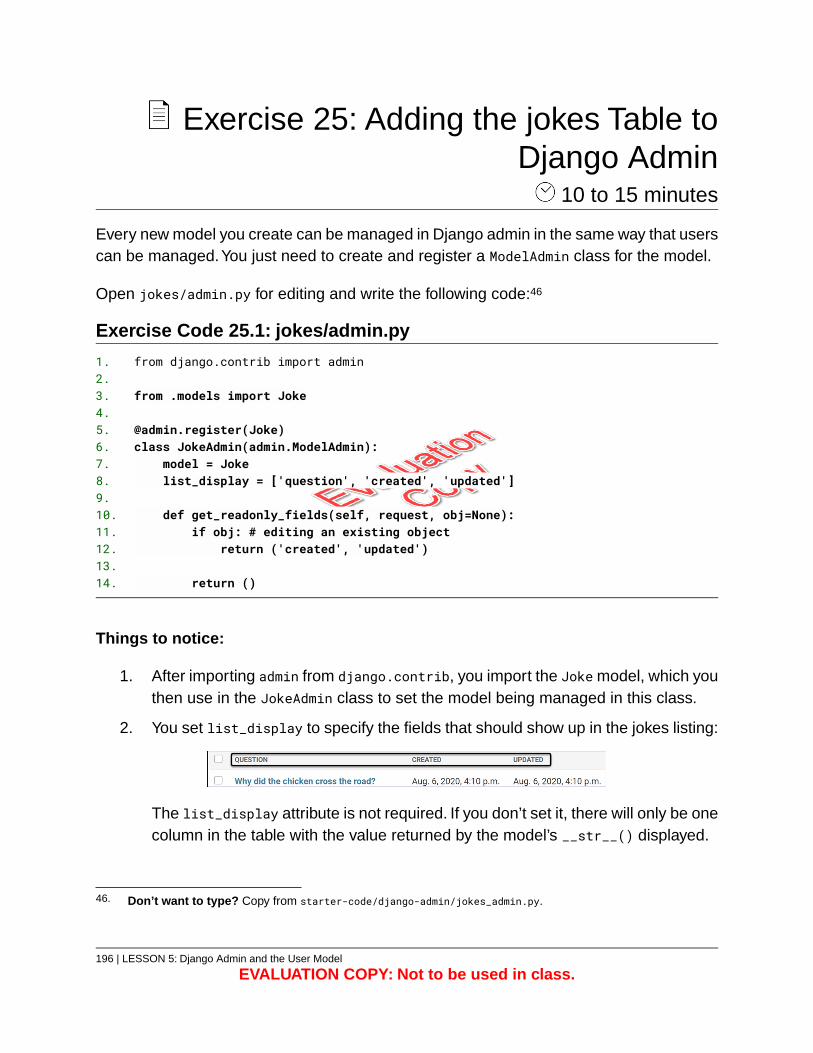
Exercise 25: Adding the jokes Table toDjango Admin
10 to 15 minutes
Every new model you create can be managed in Django admin in the same way that userscan be managed.You just need to create and register a ModelAdmin class for the model.
Open jokes/admin.py for editing and write the following code:46
Exercise Code 25.1: jokes/admin.py
from django.contrib import admin1.2.
from .models import Joke3.4.
@admin.register(Joke)5.class JokeAdmin(admin.ModelAdmin):6.
model = Joke7.list_display = ['question', 'created', 'updated']8.
9.def get_readonly_fields(self, request, obj=None):10.
if obj: # editing an existing object11.return ('created', 'updated')12.
13.return ()14.
Things to notice:
1. After importing admin from django.contrib, you import the Joke model, which youthen use in the JokeAdmin class to set the model being managed in this class.
2. You set list_display to specify the fields that should show up in the jokes listing:
The list_display attribute is not required. If you don’t set it, there will only be onecolumn in the table with the value returned by the model’s __str__() displayed.
46. Don’t want to type? Copy from starter-code/django-admin/jokes_admin.py.
196 | LESSON 5: Django Admin and the User Model
EVALUATION COPY: Not to be used in class.
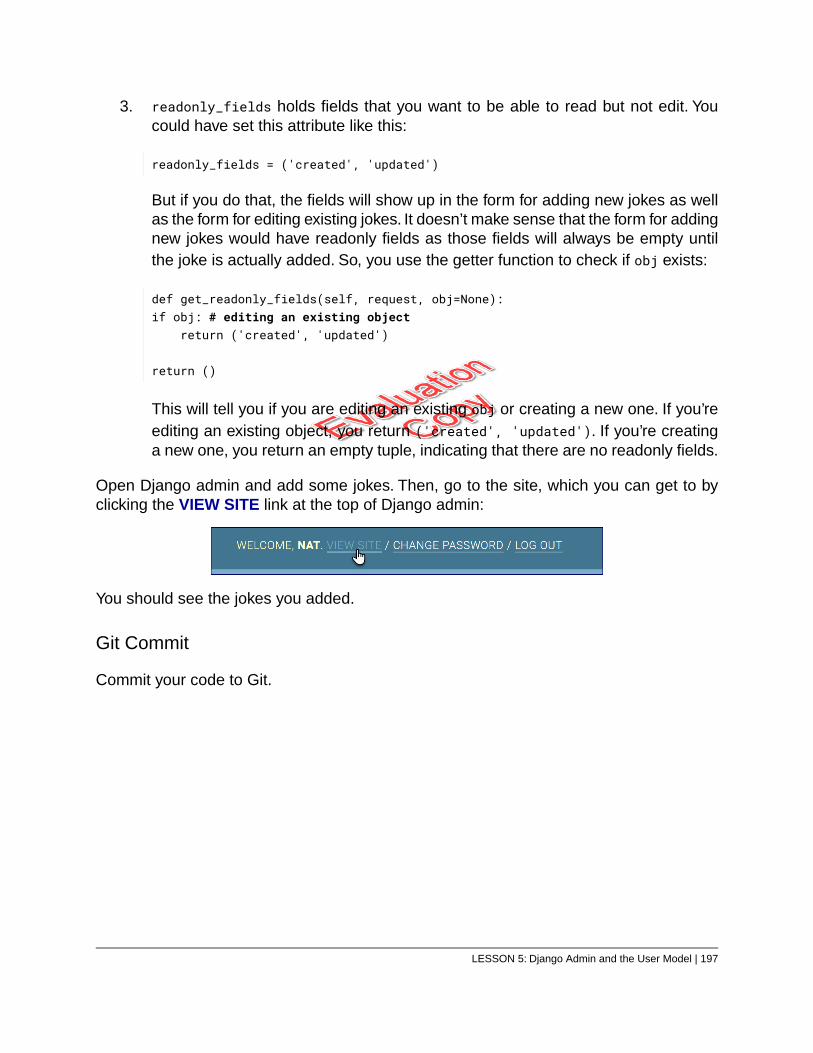
3. readonly_fields holds fields that you want to be able to read but not edit. Youcould have set this attribute like this:
readonly_fields = ('created', 'updated')
But if you do that, the fields will show up in the form for adding new jokes as wellas the form for editing existing jokes. It doesn’t make sense that the form for addingnew jokes would have readonly fields as those fields will always be empty untilthe joke is actually added. So, you use the getter function to check if obj exists:
def get_readonly_fields(self, request, obj=None):if obj: # editing an existing object
return ('created', 'updated')
return ()
This will tell you if you are editing an existing obj or creating a new one. If you’reediting an existing object, you return ('created', 'updated'). If you’re creatinga new one, you return an empty tuple, indicating that there are no readonly fields.
Open Django admin and add some jokes. Then, go to the site, which you can get to byclicking the VIEW SITE link at the top of Django admin:
You should see the jokes you added.
Git Commit
Commit your code to Git.
LESSON 5: Django Admin and the User Model | 197
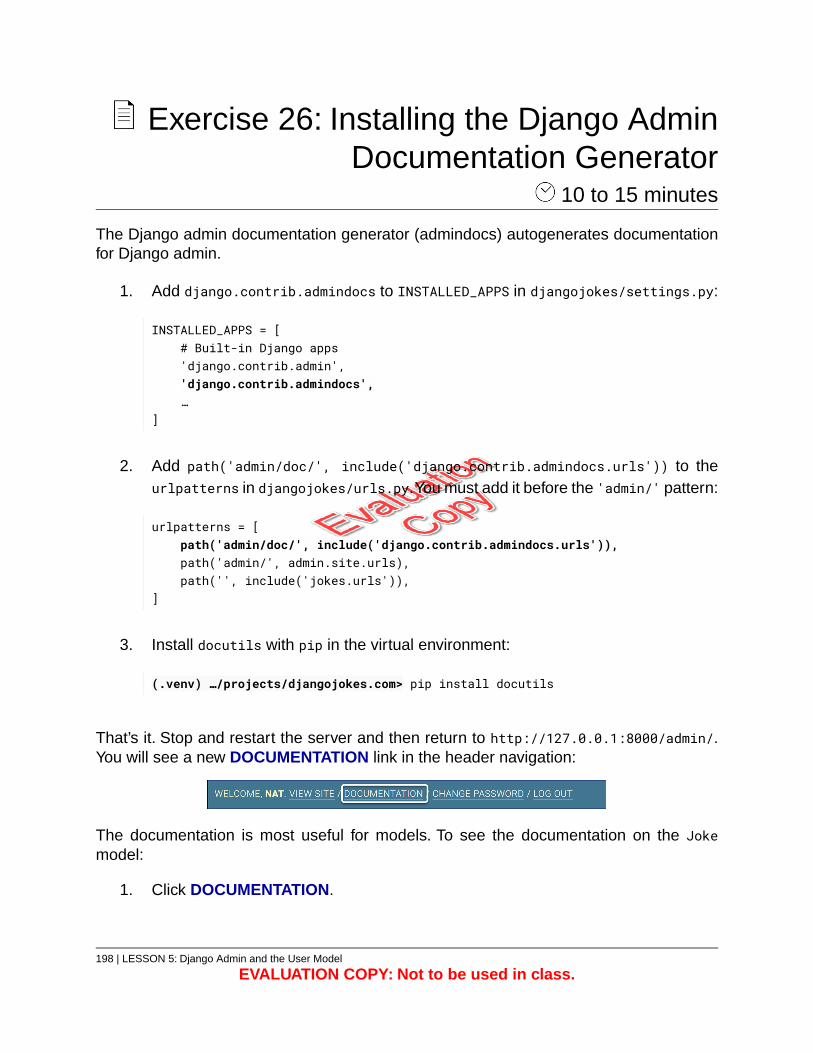
Exercise 26: Installing the Django AdminDocumentation Generator
10 to 15 minutes
The Django admin documentation generator (admindocs) autogenerates documentationfor Django admin.
1. Add django.contrib.admindocs to INSTALLED_APPS in djangojokes/settings.py:
INSTALLED_APPS = [# Built-in Django apps'django.contrib.admin','django.contrib.admindocs',…
]
2. Add path('admin/doc/', include('django.contrib.admindocs.urls')) to theurlpatterns in djangojokes/urls.py.You must add it before the 'admin/' pattern:
urlpatterns = [path('admin/doc/', include('django.contrib.admindocs.urls')),path('admin/', admin.site.urls),path('', include('jokes.urls')),
]
3. Install docutils with pip in the virtual environment:
(.venv) …/projects/djangojokes.com> pip install docutils
That’s it. Stop and restart the server and then return to http://127.0.0.1:8000/admin/.You will see a new DOCUMENTATION link in the header navigation:
The documentation is most useful for models. To see the documentation on the Jokemodel:
1. Click DOCUMENTATION.
198 | LESSON 5: Django Admin and the User Model
EVALUATION COPY: Not to be used in class.
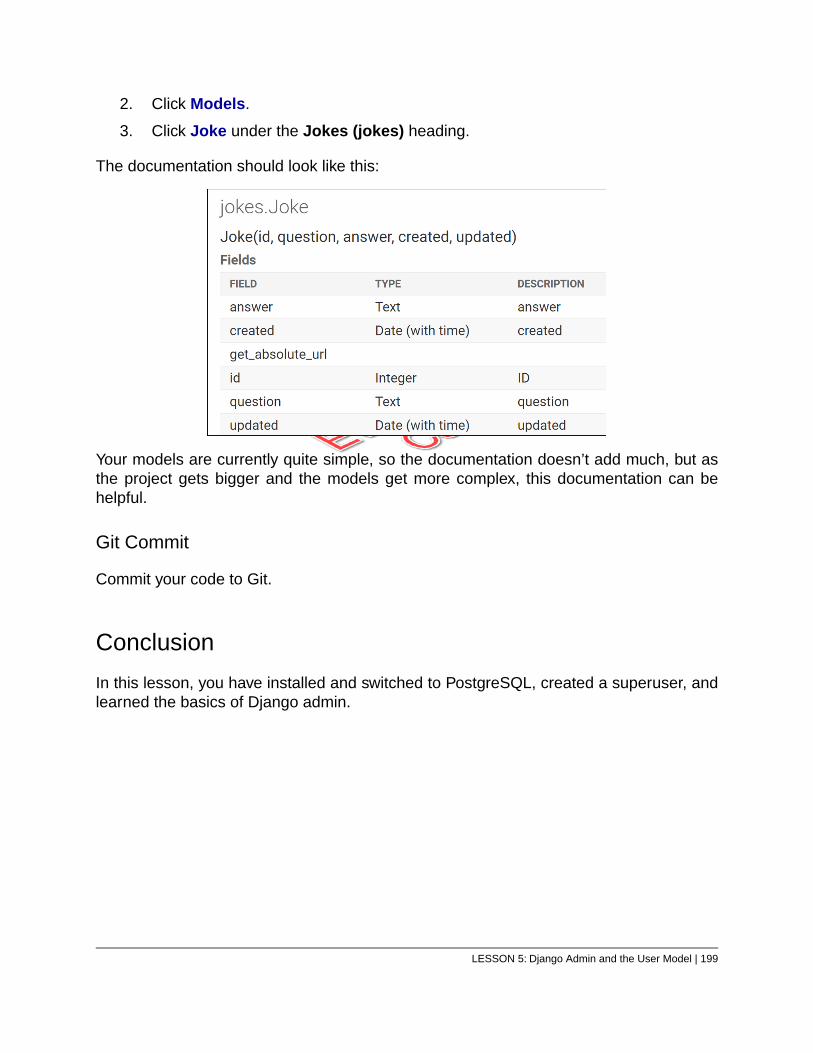
2. Click Models.
3. Click Joke under the Jokes (jokes) heading.
The documentation should look like this:
Your models are currently quite simple, so the documentation doesn’t add much, but asthe project gets bigger and the models get more complex, this documentation can behelpful.
Git Commit
Commit your code to Git.
Conclusion
In this lesson, you have installed and switched to PostgreSQL, created a superuser, andlearned the basics of Django admin.
LESSON 5: Django Admin and the User Model | 199

200 | LESSON 5: Django Admin and the User Model
EVALUATION COPY: Not to be used in class.
LESSON 6URLs and Slugs
Topics Covered
Slugs.
Utility functions.
Overriding models.Model.save().
Introduction
In this lesson, you will learn to create slugs, rather than primary keys, to use in URLs. Indoing so, you will learn to organize and write your own utility functions and to override themodel’s save() method.
❋
6.1. Slugs
A slug is a string used in a URL to uniquely identify a web page. For example, instead of:
http://127.0.0.1:8000/jokes/joke/1/
…the URL to the page with the joke about the chicken crossing the road could be:
http://127.0.0.1:8000/jokes/joke/why-did-the-chicken-cross-the-road/
This provides several benefits over the primary-key approach:
1. Primary keys shouldn’t be exposed as hackers can use that data to try to messwith the database.
2. When you use primary keys as part of the URL, if a joke’s primary key changes,which can happen if a joke is deleted and then re-added, the URL of the joke willalso change. This means that existing links to that joke from other pages will get
LESSON 6: URLs and Slugs | 201
broken. If you use slugs, changes in the primary key will not affect changes in theURL (as long as you keep the slug the same).
3. Some search engines use the URL string to learn what the page is about.“why-did-the-chicken-cross-the-road” is much more meaningful than “1”.
6.1.1. SlugField
Django models include a SlugField field type, which allows for strings that contain letters,numbers, underscores, and hyphens. By default, the maximum length of the string is 50,but that can be changed with the max_length argument.
6.1.2. Implementing Slugs
The steps involved for implementing slugs are:
1. Create a function that automatically generates a unique slug for a model.
2. Add a slug field to the model.
3. Use the function created above to auto-populate the slug field when a record issaved.
4. Modify the URL pattern to use the slug.
If you had started with this approach, that would be it, but as you already have data in ajokes table, you need to do a couple of additional things. Normally, you won’t allow nullvalues for slugs. However, records that already exist in the table won’t have a value forthe new slug field. In some cases, when you need to add a new required field to a model,you can set a default value for the field. All existing records will get that default value.However, if the field must be unique, as is the case with slugs, setting a default value won’twork.
The solution is as follows:
1. Allow for null values when first adding the field.
2. Create unique slugs for all existing records.
3. Change the model to disallow null values.
You will do all of this in the following exercises.
202 | LESSON 6: URLs and Slugs
EVALUATION COPY: Not to be used in class.
Exercise 27: Creating a Slug-generatingFunction
15 to 20 minutes
As you are likely to use slugs in more than one app, it makes sense to create theslug-generating function in the common app. Functions like this are called utility functions,and as your project may end up having a lot of them, it is important to organize them well:
1. Within the djangojokes.com/common folder, create a utils folder. This will be thehome for all your project’s general utility functions.
2. Within the new utils folder, create a file called text.py for utilities that work withtext and add the following content:47
47. Don’t want to type? Copy from starter-code/urls-and-slugs/text.py.
LESSON 6: URLs and Slugs | 203
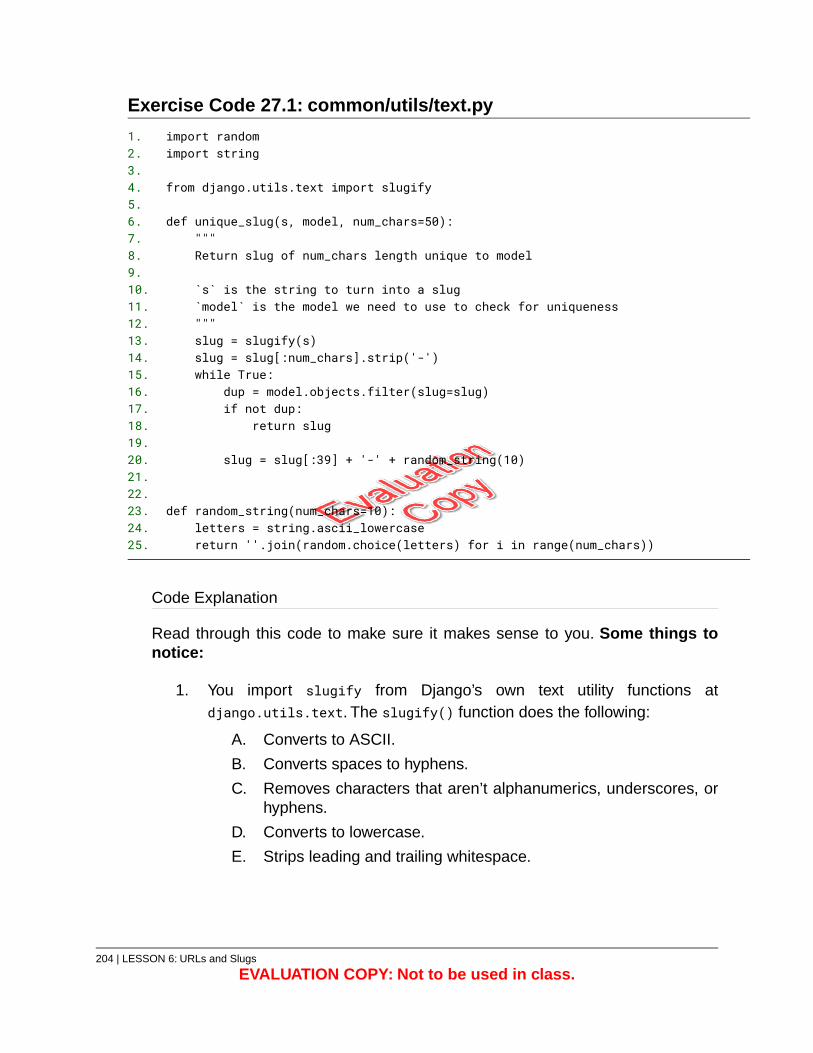
Exercise Code 27.1: common/utils/text.py
import random1.import string2.
3.from django.utils.text import slugify4.
5.def unique_slug(s, model, num_chars=50):6.
"""7.Return slug of num_chars length unique to model8.
9.`s` is the string to turn into a slug10.`model` is the model we need to use to check for uniqueness11."""12.slug = slugify(s)13.slug = slug[:num_chars].strip('-')14.while True:15.
dup = model.objects.filter(slug=slug)16.if not dup:17.
return slug18.19.
slug = slug[:39] + '-' + random_string(10)20.21.22.
def random_string(num_chars=10):23.letters = string.ascii_lowercase24.return ''.join(random.choice(letters) for i in range(num_chars))25.
Code Explanation
Read through this code to make sure it makes sense to you. Some things tonotice:
1. You import slugify from Django’s own text utility functions atdjango.utils.text. The slugify() function does the following:
A. Converts to ASCII.
B. Converts spaces to hyphens.
C. Removes characters that aren’t alphanumerics, underscores, orhyphens.
D. Converts to lowercase.
E. Strips leading and trailing whitespace.
204 | LESSON 6: URLs and Slugs
EVALUATION COPY: Not to be used in class.
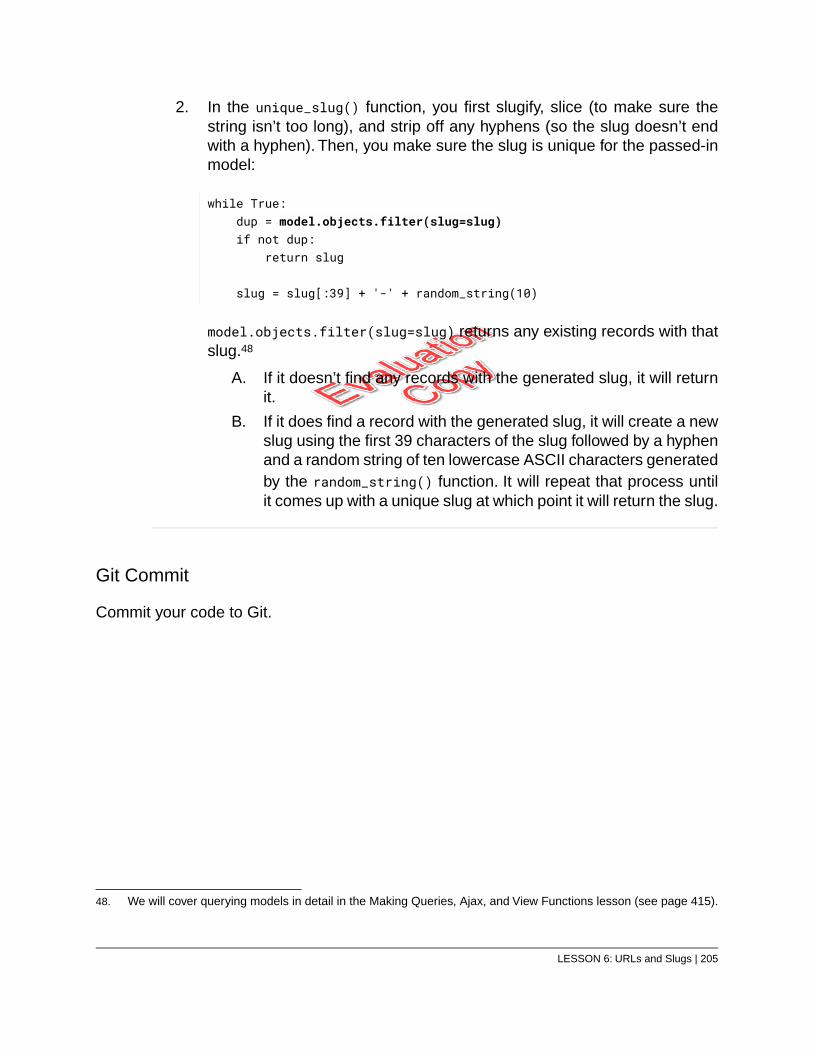
2. In the unique_slug() function, you first slugify, slice (to make sure thestring isn’t too long), and strip off any hyphens (so the slug doesn’t endwith a hyphen). Then, you make sure the slug is unique for the passed-inmodel:
while True:dup = model.objects.filter(slug=slug)if not dup:
return slug
slug = slug[:39] + '-' + random_string(10)
model.objects.filter(slug=slug) returns any existing records with thatslug.48
A. If it doesn’t find any records with the generated slug, it will returnit.
B. If it does find a record with the generated slug, it will create a newslug using the first 39 characters of the slug followed by a hyphenand a random string of ten lowercase ASCII characters generatedby the random_string() function. It will repeat that process untilit comes up with a unique slug at which point it will return the slug.
Git Commit
Commit your code to Git.
48. We will cover querying models in detail in the Making Queries, Ajax, and View Functions lesson (see page 415).
LESSON 6: URLs and Slugs | 205
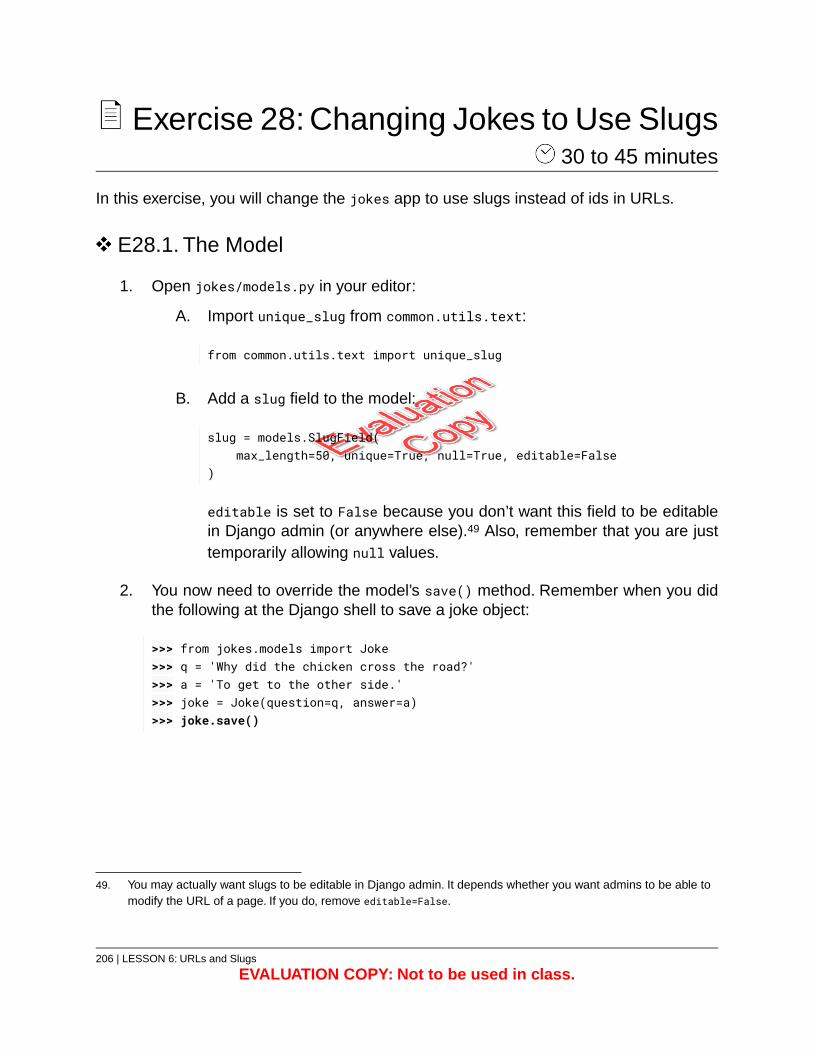
Exercise 28: Changing Jokes to Use Slugs 30 to 45 minutes
In this exercise, you will change the jokes app to use slugs instead of ids in URLs.
E28.1. The Model
1. Open jokes/models.py in your editor:
A. Import unique_slug from common.utils.text:
from common.utils.text import unique_slug
B. Add a slug field to the model:
slug = models.SlugField(max_length=50, unique=True, null=True, editable=False
)
editable is set to False because you don’t want this field to be editablein Django admin (or anywhere else).49 Also, remember that you are justtemporarily allowing null values.
2. You now need to override the model’s save() method. Remember when you didthe following at the Django shell to save a joke object:
>>> from jokes.models import Joke>>> q = 'Why did the chicken cross the road?'>>> a = 'To get to the other side.'>>> joke = Joke(question=q, answer=a)>>> joke.save()
49. You may actually want slugs to be editable in Django admin. It depends whether you want admins to be able tomodify the URL of a page. If you do, remove editable=False.
206 | LESSON 6: URLs and Slugs
EVALUATION COPY: Not to be used in class.
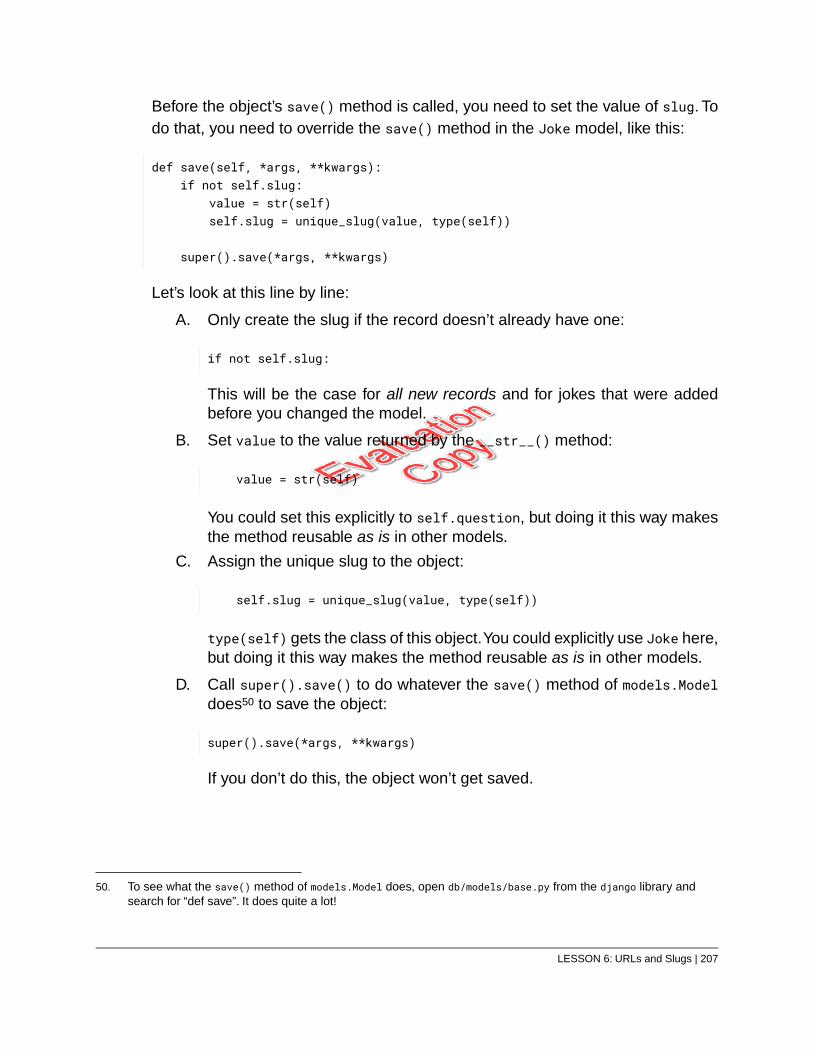
Before the object’s save() method is called, you need to set the value of slug. Todo that, you need to override the save() method in the Joke model, like this:
def save(self, *args, **kwargs):if not self.slug:
value = str(self)self.slug = unique_slug(value, type(self))
super().save(*args, **kwargs)
Let’s look at this line by line:
A. Only create the slug if the record doesn’t already have one:
if not self.slug:
This will be the case for all new records and for jokes that were addedbefore you changed the model.
B. Set value to the value returned by the __str__() method:
value = str(self)
You could set this explicitly to self.question, but doing it this way makesthe method reusable as is in other models.
C. Assign the unique slug to the object:
self.slug = unique_slug(value, type(self))
type(self) gets the class of this object.You could explicitly use Joke here,but doing it this way makes the method reusable as is in other models.
D. Call super().save() to do whatever the save() method of models.Modeldoes50 to save the object:
super().save(*args, **kwargs)
If you don’t do this, the object won’t get saved.
50. To see what the save() method of models.Model does, open db/models/base.py from the django library andsearch for “def save”. It does quite a lot!
LESSON 6: URLs and Slugs | 207
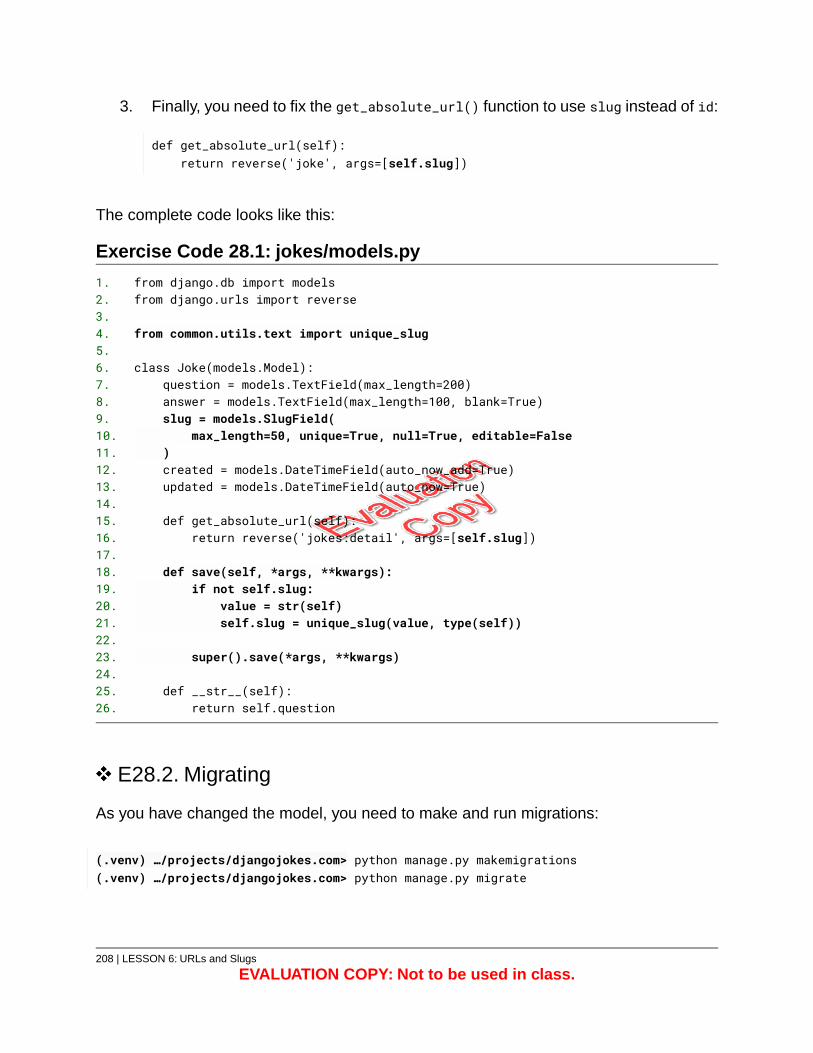
3. Finally, you need to fix the get_absolute_url() function to use slug instead of id:
def get_absolute_url(self):return reverse('joke', args=[self.slug])
The complete code looks like this:
Exercise Code 28.1: jokes/models.py
from django.db import models1.from django.urls import reverse2.
3.from common.utils.text import unique_slug4.
5.class Joke(models.Model):6.
question = models.TextField(max_length=200)7.answer = models.TextField(max_length=100, blank=True)8.slug = models.SlugField(9.
max_length=50, unique=True, null=True, editable=False10.)11.created = models.DateTimeField(auto_now_add=True)12.updated = models.DateTimeField(auto_now=True)13.
14.def get_absolute_url(self):15.
return reverse('jokes:detail', args=[self.slug])16.17.
def save(self, *args, **kwargs):18.if not self.slug:19.
value = str(self)20.self.slug = unique_slug(value, type(self))21.
22.super().save(*args, **kwargs)23.
24.def __str__(self):25.
return self.question26.
E28.2. Migrating
As you have changed the model, you need to make and run migrations:
(.venv) …/projects/djangojokes.com> python manage.py makemigrations(.venv) …/projects/djangojokes.com> python manage.py migrate
208 | LESSON 6: URLs and Slugs
EVALUATION COPY: Not to be used in class.
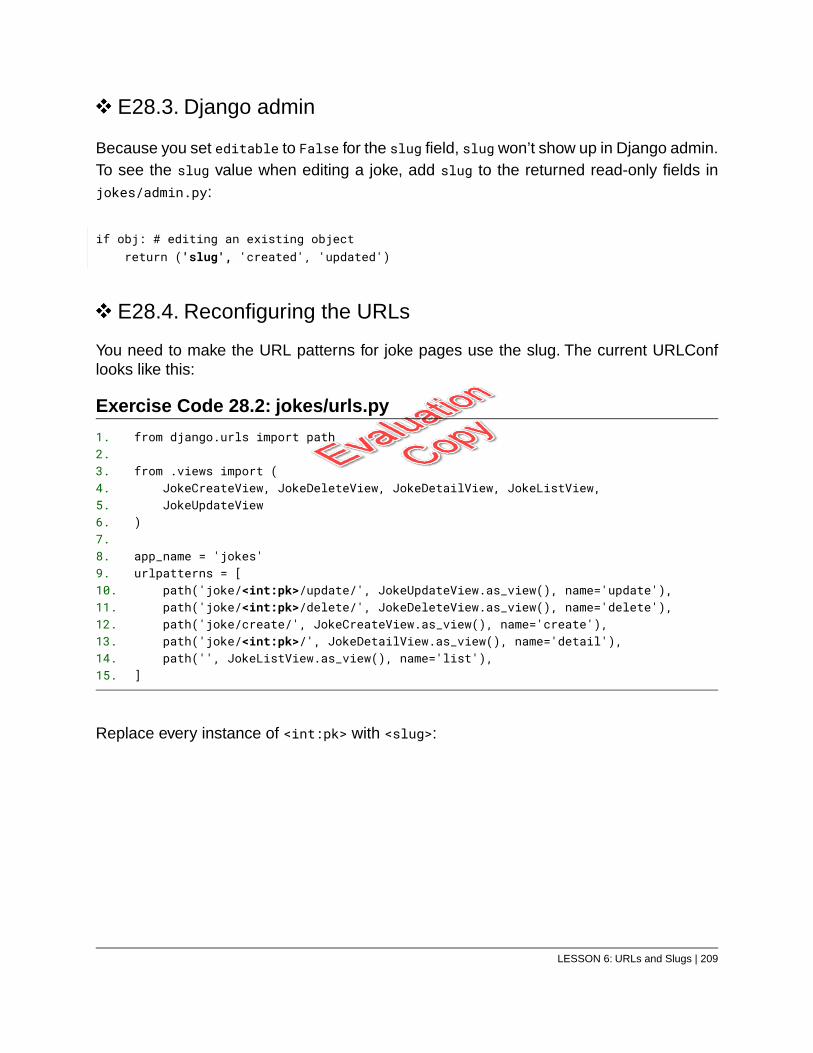
E28.3. Django admin
Because you set editable to False for the slug field, slug won’t show up in Django admin.To see the slug value when editing a joke, add slug to the returned read-only fields injokes/admin.py:
if obj: # editing an existing objectreturn ('slug', 'created', 'updated')
E28.4. Reconfiguring the URLs
You need to make the URL patterns for joke pages use the slug. The current URLConflooks like this:
Exercise Code 28.2: jokes/urls.py
from django.urls import path1.2.
from .views import (3.JokeCreateView, JokeDeleteView, JokeDetailView, JokeListView,4.JokeUpdateView5.
)6.7.
app_name = 'jokes'8.urlpatterns = [9.
path('joke/<int:pk>/update/', JokeUpdateView.as_view(), name='update'),10.path('joke/<int:pk>/delete/', JokeDeleteView.as_view(), name='delete'),11.path('joke/create/', JokeCreateView.as_view(), name='create'),12.path('joke/<int:pk>/', JokeDetailView.as_view(), name='detail'),13.path('', JokeListView.as_view(), name='list'),14.
]15.
Replace every instance of <int:pk> with <slug>:
LESSON 6: URLs and Slugs | 209
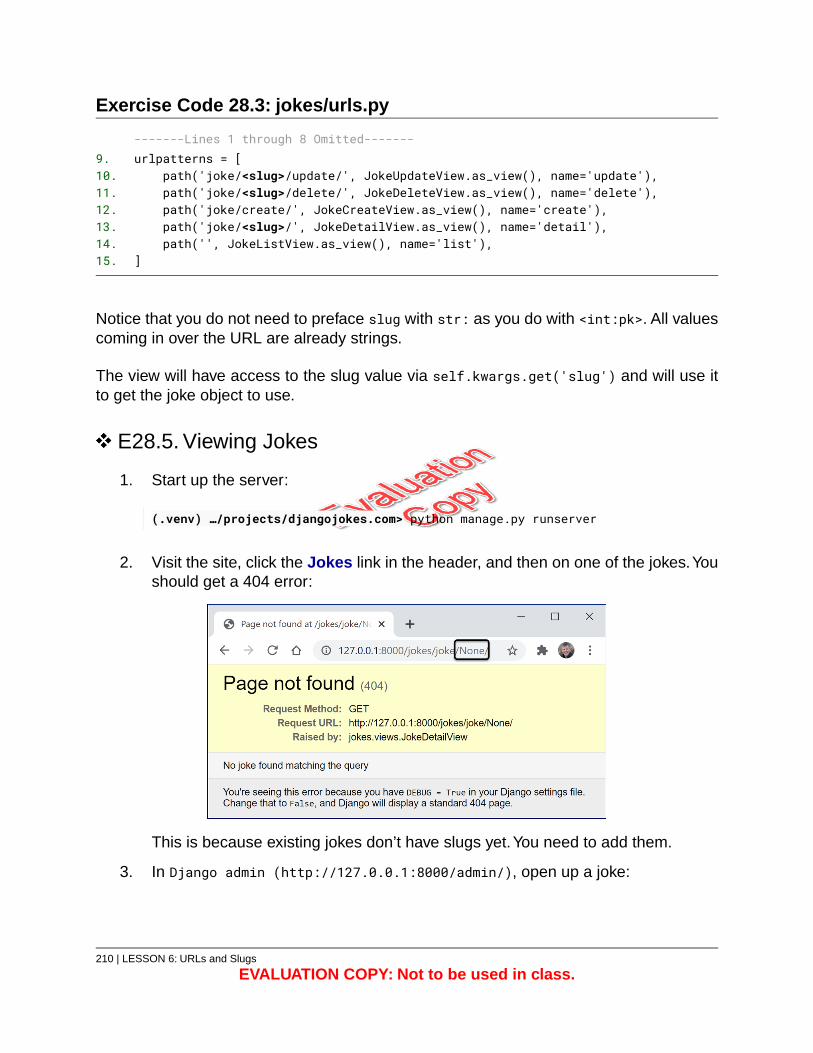
Exercise Code 28.3: jokes/urls.py
-------Lines 1 through 8 Omitted-------urlpatterns = [9.
path('joke/<slug>/update/', JokeUpdateView.as_view(), name='update'),10.path('joke/<slug>/delete/', JokeDeleteView.as_view(), name='delete'),11.path('joke/create/', JokeCreateView.as_view(), name='create'),12.path('joke/<slug>/', JokeDetailView.as_view(), name='detail'),13.path('', JokeListView.as_view(), name='list'),14.
]15.
Notice that you do not need to preface slug with str: as you do with <int:pk>. All valuescoming in over the URL are already strings.
The view will have access to the slug value via self.kwargs.get('slug') and will use itto get the joke object to use.
E28.5. Viewing Jokes
1. Start up the server:
(.venv) …/projects/djangojokes.com> python manage.py runserver
2. Visit the site, click the Jokes link in the header, and then on one of the jokes.Youshould get a 404 error:
This is because existing jokes don’t have slugs yet.You need to add them.
3. In Django admin (http://127.0.0.1:8000/admin/), open up a joke:
210 | LESSON 6: URLs and Slugs
EVALUATION COPY: Not to be used in class.
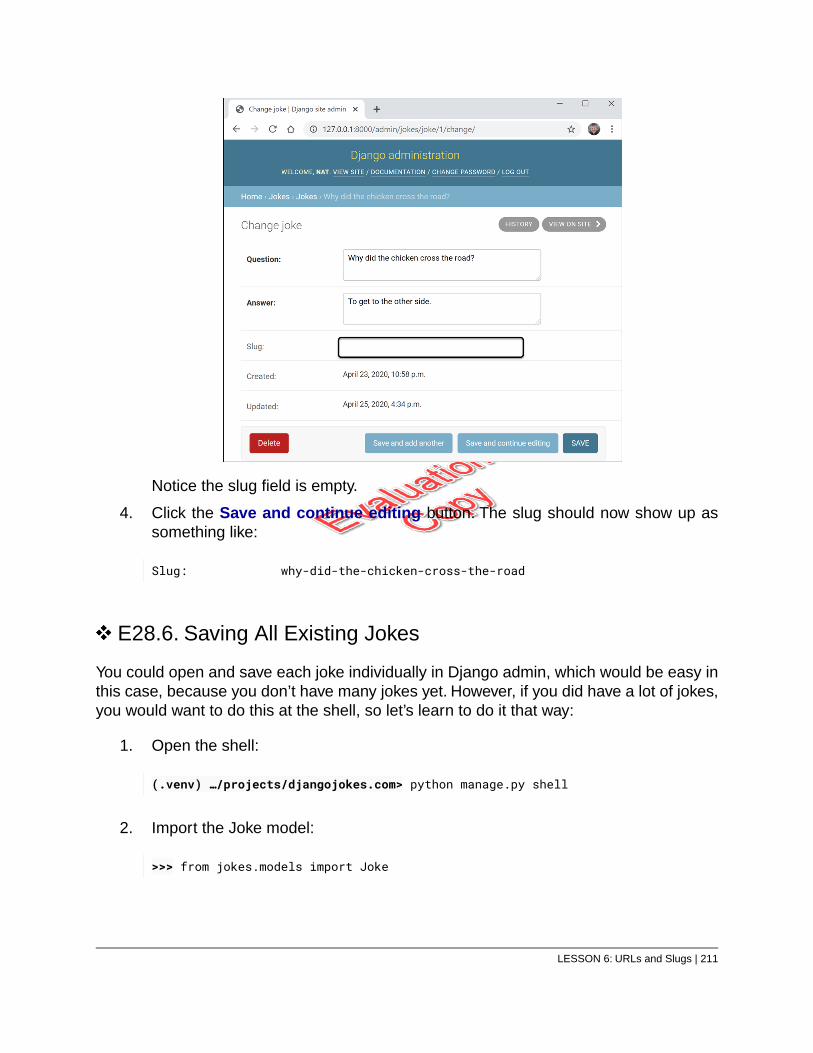
Notice the slug field is empty.
4. Click the Save and continue editing button. The slug should now show up assomething like:
Slug: why-did-the-chicken-cross-the-road
E28.6. Saving All Existing Jokes
You could open and save each joke individually in Django admin, which would be easy inthis case, because you don’t have many jokes yet. However, if you did have a lot of jokes,you would want to do this at the shell, so let’s learn to do it that way:
1. Open the shell:
(.venv) …/projects/djangojokes.com> python manage.py shell
2. Import the Joke model:
>>> from jokes.models import Joke
LESSON 6: URLs and Slugs | 211
3. Loop through all the jokes, saving each one and then exit the shell:
>>> for joke in Joke.objects.all():... joke.save()...>>> exit()
4. Restart the server if necessary:
(.venv) …/projects/djangojokes.com> python manage.py runserver
5. Return to the site, click the Jokes link in the header, and then on one of the jokes.The page should now come up and the URL should be something like:
http://127.0.0.1:8000/jokes/joke/why-did-the-chicken-cross-the-road/
E28.7. Setting null to False for the SlugField
Now that you have updated all the slug values, change the value of null to False for slug:
slug = models.SlugField(max_length=50, unique=True, null=False, editable=False
)
As you have changed the model, you will need to make and run migrations:
(.venv) …/projects/djangojokes.com> python manage.py makemigrations
When you run this you will get a warning and a message with various options.The warningwill say something like “You are trying to change the nullable field 'slug' on joke tonon-nullable without a default; we can't do that.” Django doesn’t appear to know that you’vealready dealt with all the null values. Since you have, you can safely precede, but youwill have to choose one of the options. Enter 1 to provide a one-off default and then enter'foo' (in quotes) or any random string for the default:
212 | LESSON 6: URLs and Slugs
EVALUATION COPY: Not to be used in class.
Select an option: 1Please enter the default value now, as valid PythonThe datetime and django.utils.timezone modules are available, so you can do e.g. time ↵↵zone.nowType 'exit' to exit this prompt>>> 'foo'Migrations for 'jokes':jokes\migrations\0004_auto_20200425_2147.py- Alter field slug on joke
You have made the migrations script. Now, you can run migrations:
(.venv) …/projects/djangojokes.com> python manage.py migrate
E28.8. Update Joke List Template
The joke list template (templates/jokes/joke_list.html), currently still uses joke.pk forthe links to Update and Delete:
<a href="{% url 'jokes:update' joke.pk %}"class="btn btn-info btn-sm float-right mr-2">Update</a>
<a href="{% url 'jokes:delete' joke.pk %}"class="btn btn-danger btn-sm float-right mr-2">Delete</a>
Change those both to joke.slug.
E28.9. Add a New Joke
1. Go to the Jokes listing and click the + New Joke button.
2. Add a new joke and notice that the URL that you’re redirected to for the new jokeuses the joke’s slug.
3. Add this joke (be sure to include spaces before and after the plus sign):
Question: What is 1 + 1?
Answer: 11
Notice that the slug is what-is-1-1.
4. Now, add this joke:
LESSON 6: URLs and Slugs | 213
Question: What is 1 - 1?
Answer: H
Notice that the slug ends with a random string of characters (e.g.,what-is-1-1-jemfemkhxx).
While neither of these last two jokes is funny, they do demonstrate how the unique_slug()function prevents duplicate slugs by adding a random string.
Play around with the site some by adding, updating, and deleting jokes.
Git Commit
Commit your code to Git.
Conclusion
In this lesson, you have learned to create slugs and to override the save() method in yourmodels, so that you can autogenerate slugs when a new record is created.You have alsolearned how to make changes to an existing model.
214 | LESSON 6: URLs and Slugs
EVALUATION COPY: Not to be used in class.
LESSON 7Sending Email with SendGrid
Topics Covered
Development settings.
SendGrid.
Sending email.
Introduction
In this lesson, you will learn to send email with SendGrid. You will also create a utilityfunction for sending email that you can use throughout your apps.
❋
7.1. Transactional Email Services
A transactional email is an automated email triggered by some event, such as:
A new site registration.
A password-reset-form submission.
A contact-form submission.
An online purchase.
There are many transactional email services that include Python libraries you can installwith pip. These include:
SendGrid (https://pypi.org/project/sendgrid).
Amazon Simple Email Service (SES) (https://pypi.org/project/django-amazon-
ses/).
Mailgun (https://pypi.org/project/mailgun2/).
All three of these services include free tiers.You will be using SendGrid.
LESSON 7: Sending Email with SendGrid | 215
Things Change!
Companies often change their registration and setup processes. SendGrid is noexception. If the instructions here do not work, please visit https://www.webucator.com/books/errata.cfm to see if we have posted any updates. If we haven’tposted any updates that help, please email us at [email protected].
216 | LESSON 7: Sending Email with SendGrid
EVALUATION COPY: Not to be used in class.
Exercise 29: Getting a SendGrid Account 45 to 60 minutes
SendGrid is an email service that provides a simple-to-use API for sending emails.
E29.1. Getting Ready
You’re about to sign up for a SendGrid account and get an API key. On production youwill store that API key in an environment variable. You could do the same thing ondevelopment, but we’re going to take a different approach. You will create a local_settings.py file to hold settings specific to development.
1. Open djangojokes.com/djangojokes/settings.py.
2. At the top of the file, above the line importing Path, import os:
import osfrom pathlib import Path
3. At the very bottom of the file, add this:
# BOTTOM OF settings.pyif os.environ.get('ENVIRONMENT') != 'production':
from .local_settings import *# DON'T PUT ANYTHING BELOW THIS
4. Create a new file called local_settings.py in djangojokes. This file will hostsettings that you only want to use on development. You will not put this file onyour production server.
5. Add the following line to local_settings.py:
Exercise Code 29.1: djangojokes/local_settings.py
SENDGRID_API_KEY = 'sendgridapikey'1.
You will soon paste a real SendGrid API key over sendgridapikey.
LESSON 7: Sending Email with SendGrid | 217

E29.2. Getting the API Key
1. Go to https://signup.sendgrid.com/ and register for an account.
2. After registering, go to https://app.sendgrid.com/guide/integrate/langs/python.This is SendGrid’s Python Web API integration guide.
3. Skip to step 2 of the integration guide. This is the only step you need to do. Entera name for your API key. This can be any name you want. You will not use thename in your code. Then, click Create Key:
4. Copy the generated API key:
5. Paste the key in local_settings.py as the value for SENDGRID_API_KEY. This willlook something like:
SENDGRID_API_KEY = 'SG.HloN6rASKCjX6yDkk1GyQ…'
218 | LESSON 7: Sending Email with SendGrid
EVALUATION COPY: Not to be used in class.
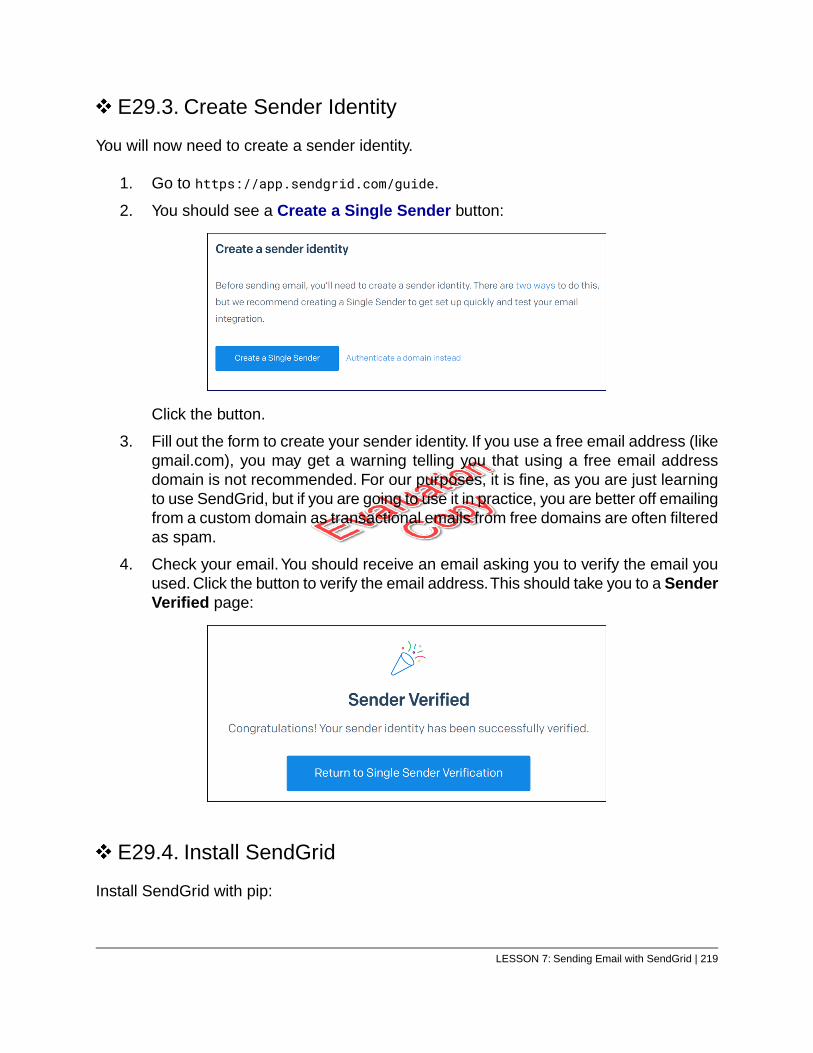
E29.3. Create Sender Identity
You will now need to create a sender identity.
1. Go to https://app.sendgrid.com/guide.
2. You should see a Create a Single Sender button:
Click the button.
3. Fill out the form to create your sender identity. If you use a free email address (likegmail.com), you may get a warning telling you that using a free email addressdomain is not recommended. For our purposes, it is fine, as you are just learningto use SendGrid, but if you are going to use it in practice, you are better off emailingfrom a custom domain as transactional emails from free domains are often filteredas spam.
4. Check your email.You should receive an email asking you to verify the email youused. Click the button to verify the email address.This should take you to a SenderVerified page:
E29.4. Install SendGrid
Install SendGrid with pip:
LESSON 7: Sending Email with SendGrid | 219

(.venv) …/projects/djangojokes.com> pip install sendgrid
E29.5. Try It Out
1. With djangojokes.com open in the terminal, run the following to open the shell:
(.venv) …/projects/djangojokes.com> python manage.py shell
2. Import sendgrid, its To and Mail helpers, and settings:
>>> import sendgrid>>> from sendgrid.helpers.mail import To, Mail>>> from django.conf import settings
3. Create your variables. Replace both instances of '[email protected]' with theemail you verified with SendGrid:
>>> from_email = '[email protected]'>>> to_emails = '[email protected]'>>> subject = 'SendGrid Test'>>> html_content = '<h1>Hello, from SendGrid!</h1>'
4. Prepare and send the email:
>>> mail = Mail(... from_email=from_email,... to_emails=to_emails,... subject=subject,... html_content=html_content... )>>> sg = sendgrid.SendGridAPIClient(settings.SENDGRID_API_KEY)>>> sg.send(mail)
You should get a response similar to this:
<python_http_client.client.Response object at 0x012A51A8>
5. Check your email.You should receive an email similar to this one:
220 | LESSON 7: Sending Email with SendGrid
EVALUATION COPY: Not to be used in class.
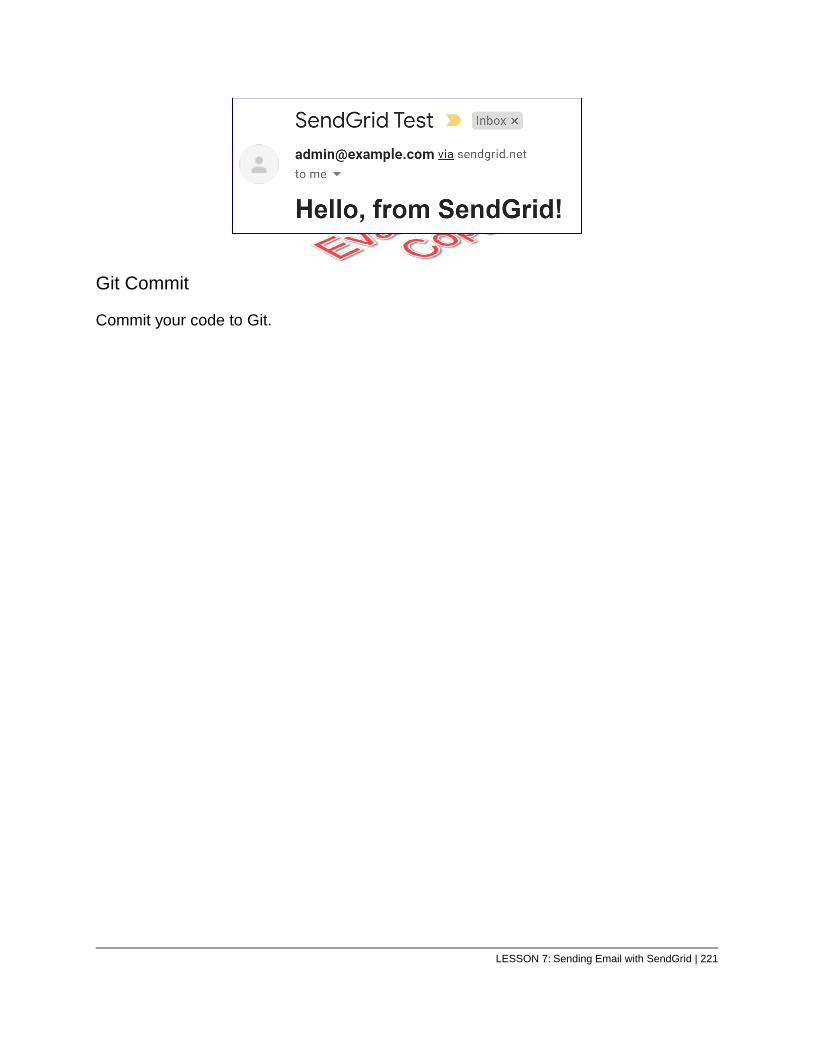
Git Commit
Commit your code to Git.
LESSON 7: Sending Email with SendGrid | 221
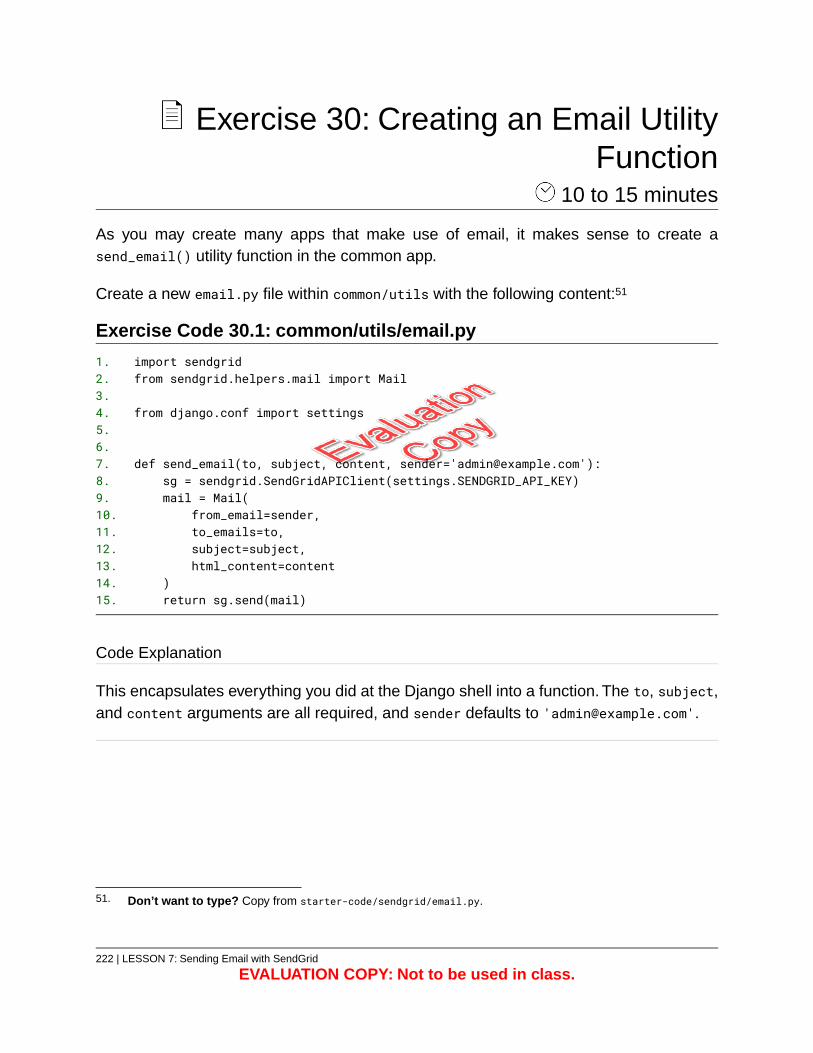
Exercise 30: Creating an Email UtilityFunction
10 to 15 minutes
As you may create many apps that make use of email, it makes sense to create asend_email() utility function in the common app.
Create a new email.py file within common/utils with the following content:51
Exercise Code 30.1: common/utils/email.py
import sendgrid1.from sendgrid.helpers.mail import Mail2.
3.from django.conf import settings4.
5.6.
def send_email(to, subject, content, sender='[email protected]'):7.sg = sendgrid.SendGridAPIClient(settings.SENDGRID_API_KEY)8.mail = Mail(9.
from_email=sender,10.to_emails=to,11.subject=subject,12.html_content=content13.
)14.return sg.send(mail)15.
Code Explanation
This encapsulates everything you did at the Django shell into a function. The to, subject,and content arguments are all required, and sender defaults to '[email protected]'.
51. Don’t want to type? Copy from starter-code/sendgrid/email.py.
222 | LESSON 7: Sending Email with SendGrid
EVALUATION COPY: Not to be used in class.
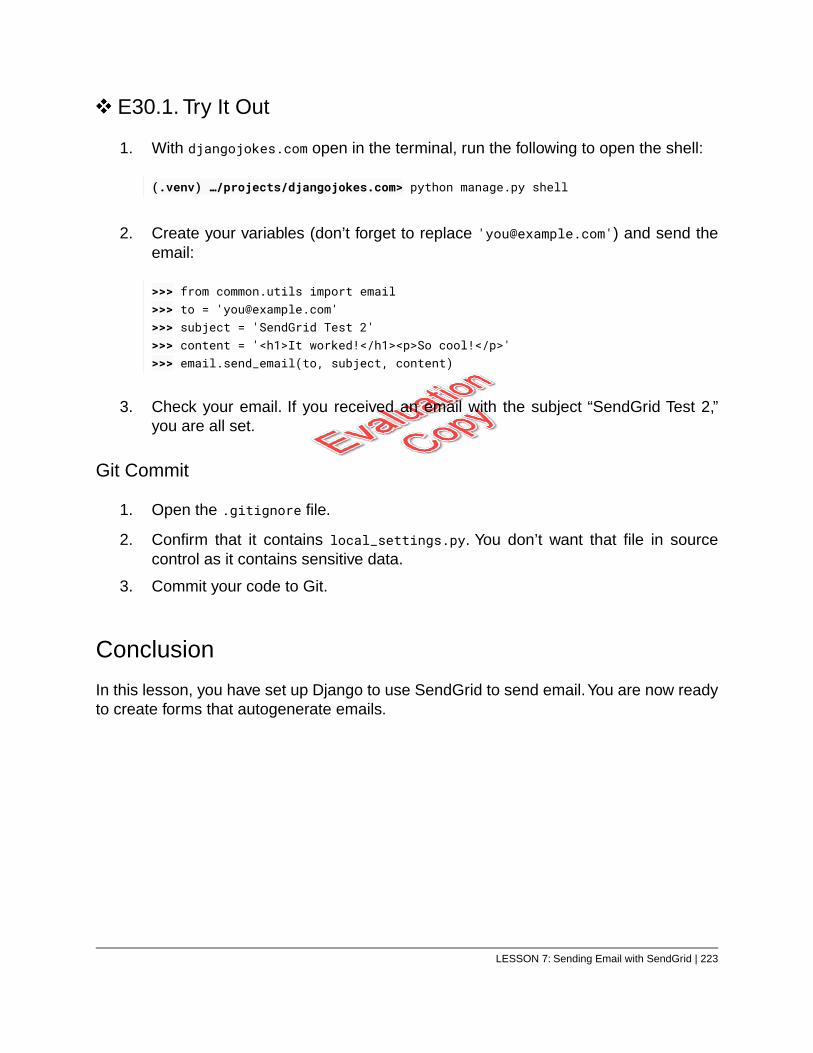
E30.1. Try It Out
1. With djangojokes.com open in the terminal, run the following to open the shell:
(.venv) …/projects/djangojokes.com> python manage.py shell
2. Create your variables (don’t forget to replace '[email protected]') and send theemail:
>>> from common.utils import email>>> to = '[email protected]'>>> subject = 'SendGrid Test 2'>>> content = '<h1>It worked!</h1><p>So cool!</p>'>>> email.send_email(to, subject, content)
3. Check your email. If you received an email with the subject “SendGrid Test 2,”you are all set.
Git Commit
1. Open the .gitignore file.
2. Confirm that it contains local_settings.py. You don’t want that file in sourcecontrol as it contains sensitive data.
3. Commit your code to Git.
Conclusion
In this lesson, you have set up Django to use SendGrid to send email.You are now readyto create forms that autogenerate emails.
LESSON 7: Sending Email with SendGrid | 223

224 | LESSON 7: Sending Email with SendGrid
EVALUATION COPY: Not to be used in class.
LESSON 8Forms and Widgets
Topics Covered
Form processing.
Form fields.
Widgets.
Validators.
Crispy Forms.
Introduction
In this lesson, you will create a job application for the Django Jokes website. In doing so,you will learn to work with Django forms and a third-party library for styling forms.
❋
8.1. Form Processing
In Django, form processing usually works like this:
1. User visits page with form. This is a GET request.
2. User fills out and submits form. This is a POST request.
3. If there are any errors, the form is returned with the form fields still filled in withone or more error messages showing.
4. When the form submission passes validation, the data is processed, and the useris redirected to a success page.
8.1.1. ProcessFormView
Most Django form views (e.g., FormView, CreateView, UpdateView) inherit fromdjango.views.generic.ProcessFormView, which includes get() and post() methods:
LESSON 8: Forms and Widgets | 225
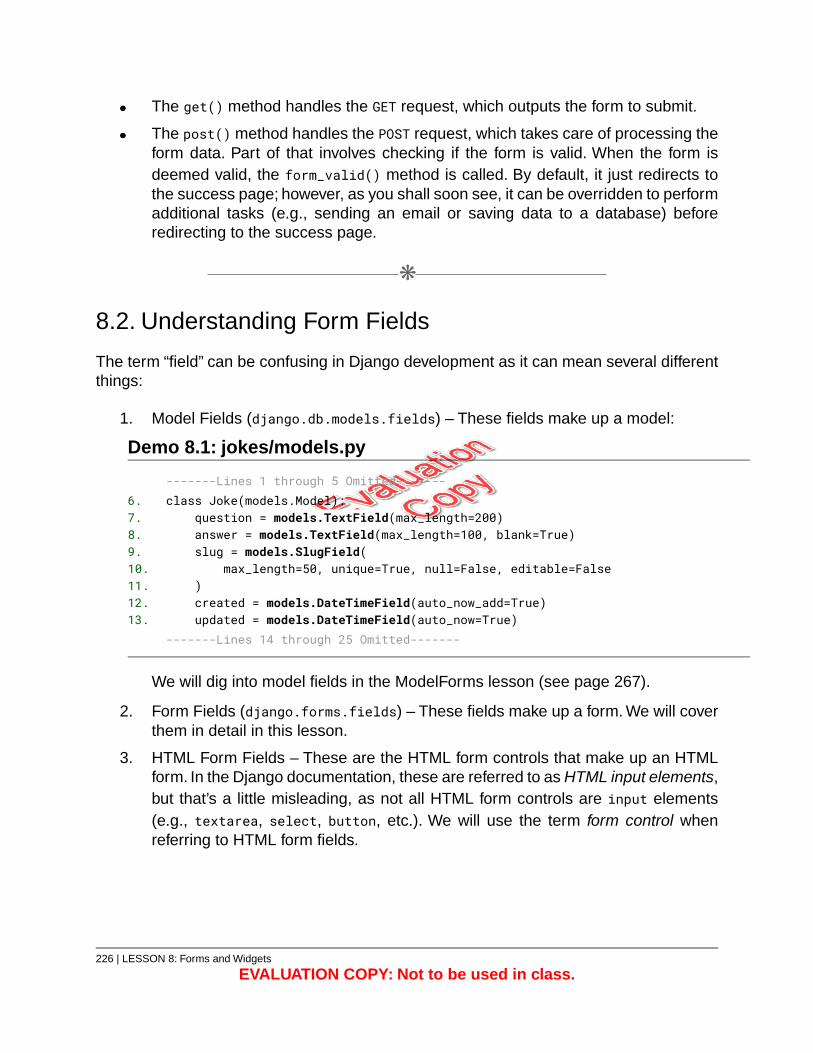
The get() method handles the GET request, which outputs the form to submit.
The post() method handles the POST request, which takes care of processing theform data. Part of that involves checking if the form is valid. When the form isdeemed valid, the form_valid() method is called. By default, it just redirects tothe success page; however, as you shall soon see, it can be overridden to performadditional tasks (e.g., sending an email or saving data to a database) beforeredirecting to the success page.
❋
8.2. Understanding Form Fields
The term “field” can be confusing in Django development as it can mean several differentthings:
1. Model Fields (django.db.models.fields) – These fields make up a model:
Demo 8.1: jokes/models.py
-------Lines 1 through 5 Omitted-------class Joke(models.Model):6.
question = models.TextField(max_length=200)7.answer = models.TextField(max_length=100, blank=True)8.slug = models.SlugField(9.
max_length=50, unique=True, null=False, editable=False10.)11.created = models.DateTimeField(auto_now_add=True)12.updated = models.DateTimeField(auto_now=True)13.
-------Lines 14 through 25 Omitted-------
We will dig into model fields in the ModelForms lesson (see page 267).
2. Form Fields (django.forms.fields) – These fields make up a form. We will coverthem in detail in this lesson.
3. HTML Form Fields – These are the HTML form controls that make up an HTMLform. In the Django documentation, these are referred to as HTML input elements,but that’s a little misleading, as not all HTML form controls are input elements(e.g., textarea, select, button, etc.). We will use the term form control whenreferring to HTML form fields.
226 | LESSON 8: Forms and Widgets
EVALUATION COPY: Not to be used in class.
8.2.1. Default Widgets
Every type of form field has a default widget, which determines the HTML form controlused for the field. Except where noted, form field data is validated on the browser and onthe server.
Simple Fields
forms.BooleanField()
Default Widget: CheckboxInput
Resulting HTML: <input type="checkbox" … >
forms.CharField()
Default Widget: TextInput
Resulting HTML: <input type="text" … >
forms.DateField()
Default Widget: DateInput
Resulting HTML: <input type="text" … >
Format validation is only done on the server.
forms.DateTimeField()
Default Widget: DateTimeInput
Resulting HTML: <input type="text" … >
Format validation is only done on the server.
forms.DecimalField()
Default Widget: NumberInput (TextInput if localize is True)
Resulting HTML: <input type="number" … >
forms.DurationField()
Default Widget: TextInput
Resulting HTML: <input type="text" … >
LESSON 8: Forms and Widgets | 227
The expected input format is DD HH:MM:SS.uuuuuu.52
forms.EmailField()
Default Widget: EmailInput
Resulting HTML: <input type="email" … >
forms.FloatField()
Default Widget: NumberInput (TextInput if localize is True)
Resulting HTML: <input type="number" … >
forms.IntegerField()
Default Widget: NumberInput (TextInput if localize is True)
Resulting HTML: <input type="number" … >
forms.JSONField()53
Default Widget: Textarea
Resulting HTML: <textarea … ></textarea>
forms.RegexField()
Default Widget: TextInput
Resulting HTML: <input type="text" … >
Format validation is only done on the server.
forms.TimeField()
Default Widget: TimeInput
Resulting HTML: <input type="text" … >
Format validation is only done on the server.
forms.URLField()
Default Widget: URLInput
Resulting HTML: <input type="url" … >
52. As of Django 3.1, a comma can also be used as the separator for decimal fractions (DD HH:MM:SS,uuuuuu).53. New in Django 3.1.
228 | LESSON 8: Forms and Widgets
EVALUATION COPY: Not to be used in class.
Date and Time Field Widgets
It may seem odd that the date and time widgets use text instead of HTML’s dateand time form controls. This is because not all browsers have the same level ofsupport for those controls.
Choice Fields
1. forms.ChoiceField
2. forms.MultipleChoiceField
3. forms.NullBooleanField
4. forms.TypedChoiceField
5. forms.TypedMultipleChoiceField
All of these fields except for forms.NullBooleanField take a choices argument, whichmust be an iterable of 2-item tuples or a function that returns such an iterable. A commonpractice is to create a variable holding the choices and then assign that variable to thechoices argument. For example:
BIRDS = ((None, '----------'),('cardinal', 'Cardinal'),('chicken', 'Chicken'),('eagle', 'Eagle')
)
Notice that the BIRDS variable includes an empty option, which you typically will includefor fields that only allow the user to make one selection:
forms.ChoiceField(choices=BIRDS)
Default Widget: Select
LESSON 8: Forms and Widgets | 229
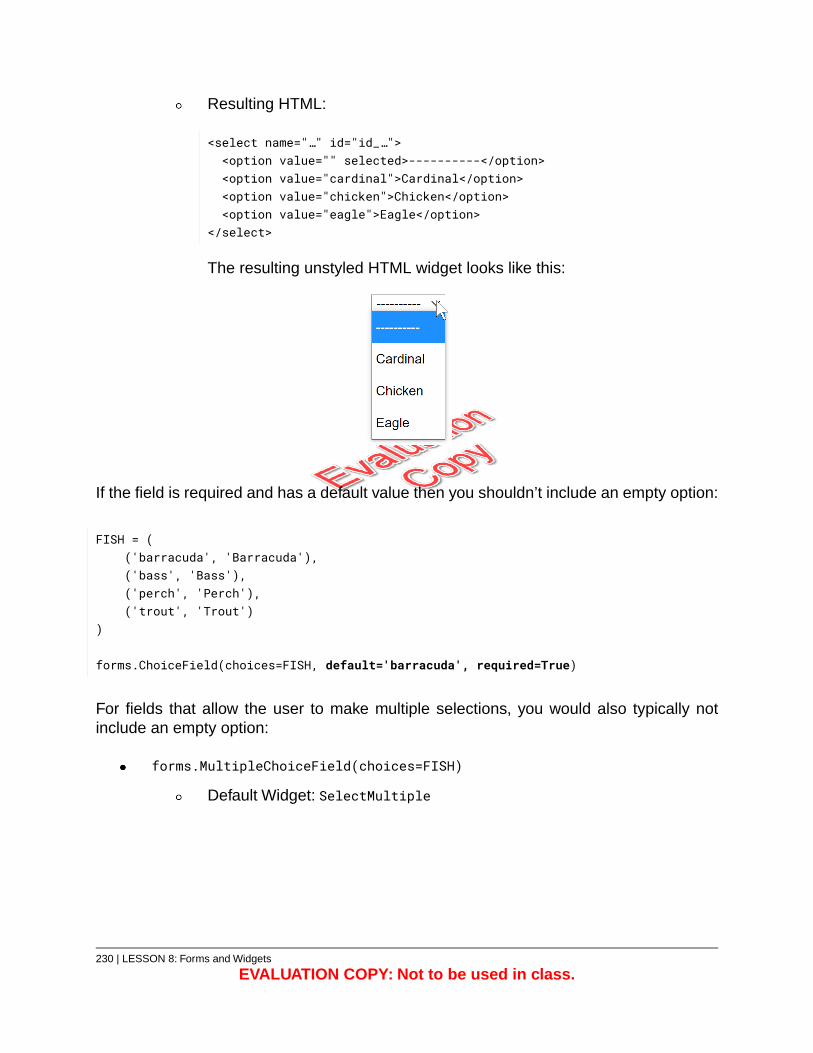
Resulting HTML:
<select name="…" id="id_…"><option value="" selected>----------</option><option value="cardinal">Cardinal</option><option value="chicken">Chicken</option><option value="eagle">Eagle</option>
</select>
The resulting unstyled HTML widget looks like this:
If the field is required and has a default value then you shouldn’t include an empty option:
FISH = (('barracuda', 'Barracuda'),('bass', 'Bass'),('perch', 'Perch'),('trout', 'Trout')
)
forms.ChoiceField(choices=FISH, default='barracuda', required=True)
For fields that allow the user to make multiple selections, you would also typically notinclude an empty option:
forms.MultipleChoiceField(choices=FISH)
Default Widget: SelectMultiple
230 | LESSON 8: Forms and Widgets
EVALUATION COPY: Not to be used in class.
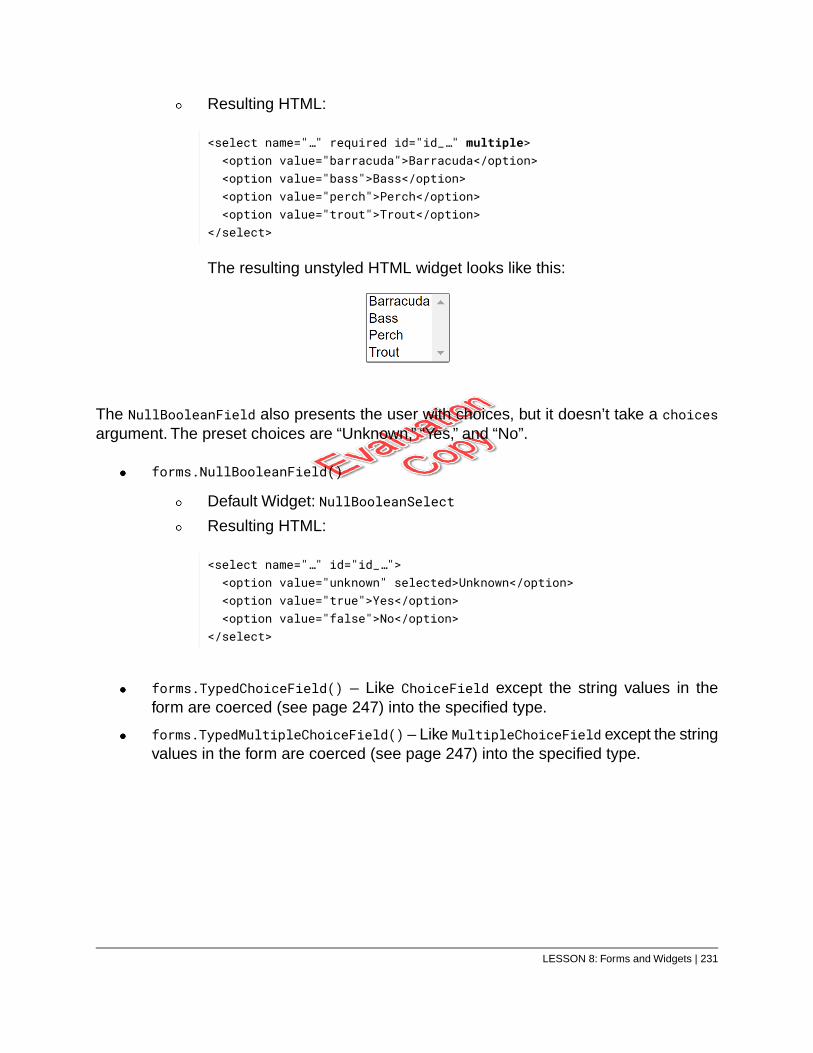
Resulting HTML:
<select name="…" required id="id_…" multiple><option value="barracuda">Barracuda</option><option value="bass">Bass</option><option value="perch">Perch</option><option value="trout">Trout</option>
</select>
The resulting unstyled HTML widget looks like this:
The NullBooleanField also presents the user with choices, but it doesn’t take a choicesargument. The preset choices are “Unknown,” “Yes,” and “No”.
forms.NullBooleanField()
Default Widget: NullBooleanSelect
Resulting HTML:
<select name="…" id="id_…"><option value="unknown" selected>Unknown</option><option value="true">Yes</option><option value="false">No</option>
</select>
forms.TypedChoiceField() – Like ChoiceField except the string values in theform are coerced (see page 247) into the specified type.
forms.TypedMultipleChoiceField() – Like MultipleChoiceField except the stringvalues in the form are coerced (see page 247) into the specified type.
LESSON 8: Forms and Widgets | 231
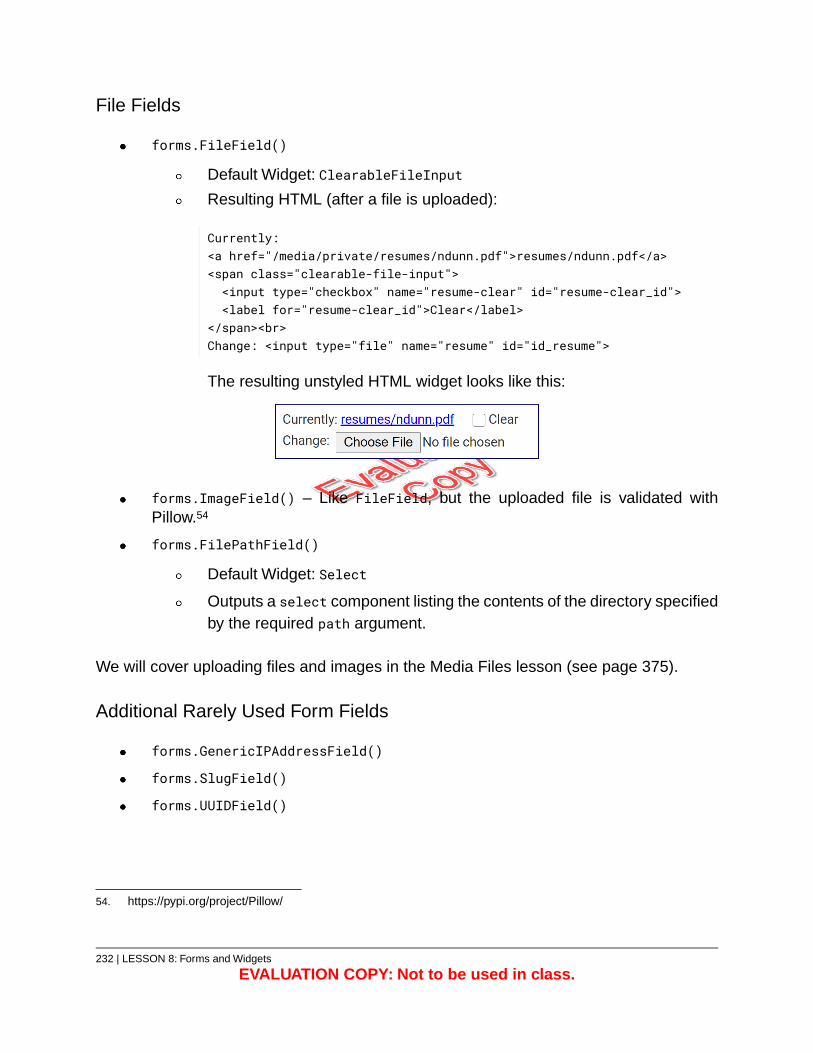
File Fields
forms.FileField()
Default Widget: ClearableFileInput
Resulting HTML (after a file is uploaded):
Currently:<a href="/media/private/resumes/ndunn.pdf">resumes/ndunn.pdf</a><span class="clearable-file-input"><input type="checkbox" name="resume-clear" id="resume-clear_id"><label for="resume-clear_id">Clear</label>
</span><br>Change: <input type="file" name="resume" id="id_resume">
The resulting unstyled HTML widget looks like this:
forms.ImageField() – Like FileField, but the uploaded file is validated withPillow.54
forms.FilePathField()
Default Widget: Select
Outputs a select component listing the contents of the directory specifiedby the required path argument.
We will cover uploading files and images in the Media Files lesson (see page 375).
Additional Rarely Used Form Fields
forms.GenericIPAddressField()
forms.SlugField()
forms.UUIDField()
54. https://pypi.org/project/Pillow/
232 | LESSON 8: Forms and Widgets
EVALUATION COPY: Not to be used in class.
Exercise 31: Creating a Job ApplicationForm
45 to 60 minutes
In this exercise, you will create a job application form for a joke writer. When an applicantsubmits the form, Django will send an email to your email address with the data from theform.
1. Create the scaffolding:
(.venv) …/projects/djangojokes.com> python manage.py startapp jobs
2. Add the new application to the INSTALLED_APPS list in djangojokes/settings.py:
INSTALLED_APPS = […
# Local apps'common.apps.CommonConfig','jobs.apps.JobsConfig',…
]
E31.1. The Form
Create a new forms.py file within the jobs folder and add the following content:
Exercise Code 31.1: jobs/forms.py
from django import forms1.2.
class JobApplicationForm(forms.Form):3.first_name = forms.CharField()4.last_name = forms.CharField()5.email = forms.EmailField()6.
Things to notice:
LESSON 8: Forms and Widgets | 233
1. forms is imported from django.
2. JobApplicationForm inherits from forms.Form.
3. The form includes two CharField fields and one EmailField field.
E31.2. The Views
You will need two views: one for the application form (a FormView) and one for the successpage (a TemplateView). You are already familiar with TemplateView views. FormView
(django.views.generic.edit.FormView) is a generic editing view for creating a form thatis not based on a model.
1. Open jobs/views.py for editing.
2. Remove the line importing render and add the following lines importingreverse_lazy and FormView and TemplateView:
from django.urls import reverse_lazyfrom django.views.generic import FormView, TemplateView
3. Import JobApplicationForm from the forms.py file you created in the same directory:
from .forms import JobApplicationForm
4. Create a new JobAppView that inherits from FormView using the following code:
class JobAppView(FormView):template_name = 'jobs/joke_writer.html'form_class = JobApplicationFormsuccess_url = reverse_lazy('jobs:thanks')
A. template_name identifies the template used to render the form.
B. form_class identifies the Form class, which contains the form fields.
C. success_url points to the URL to open when the form is successfullyprocessed.
This is all you need in the view to get the form to display and submit. The viewcontext will contain a form object with the three fields specified in theJobApplicationForm class.
234 | LESSON 8: Forms and Widgets
EVALUATION COPY: Not to be used in class.
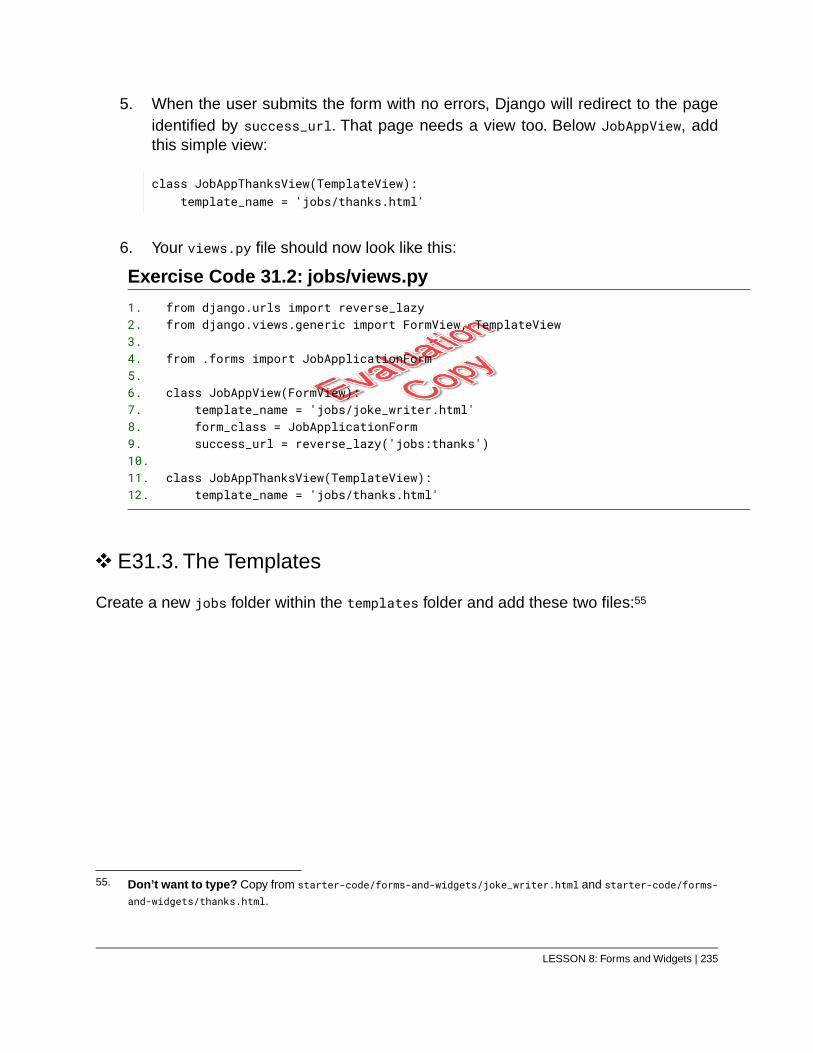
5. When the user submits the form with no errors, Django will redirect to the pageidentified by success_url. That page needs a view too. Below JobAppView, addthis simple view:
class JobAppThanksView(TemplateView):template_name = 'jobs/thanks.html'
6. Your views.py file should now look like this:
Exercise Code 31.2: jobs/views.py
from django.urls import reverse_lazy1.from django.views.generic import FormView, TemplateView2.
3.from .forms import JobApplicationForm4.
5.class JobAppView(FormView):6.
template_name = 'jobs/joke_writer.html'7.form_class = JobApplicationForm8.success_url = reverse_lazy('jobs:thanks')9.
10.class JobAppThanksView(TemplateView):11.
template_name = 'jobs/thanks.html'12.
E31.3. The Templates
Create a new jobs folder within the templates folder and add these two files:55
55. Don’t want to type? Copy from starter-code/forms-and-widgets/joke_writer.html and starter-code/forms-and-widgets/thanks.html.
LESSON 8: Forms and Widgets | 235
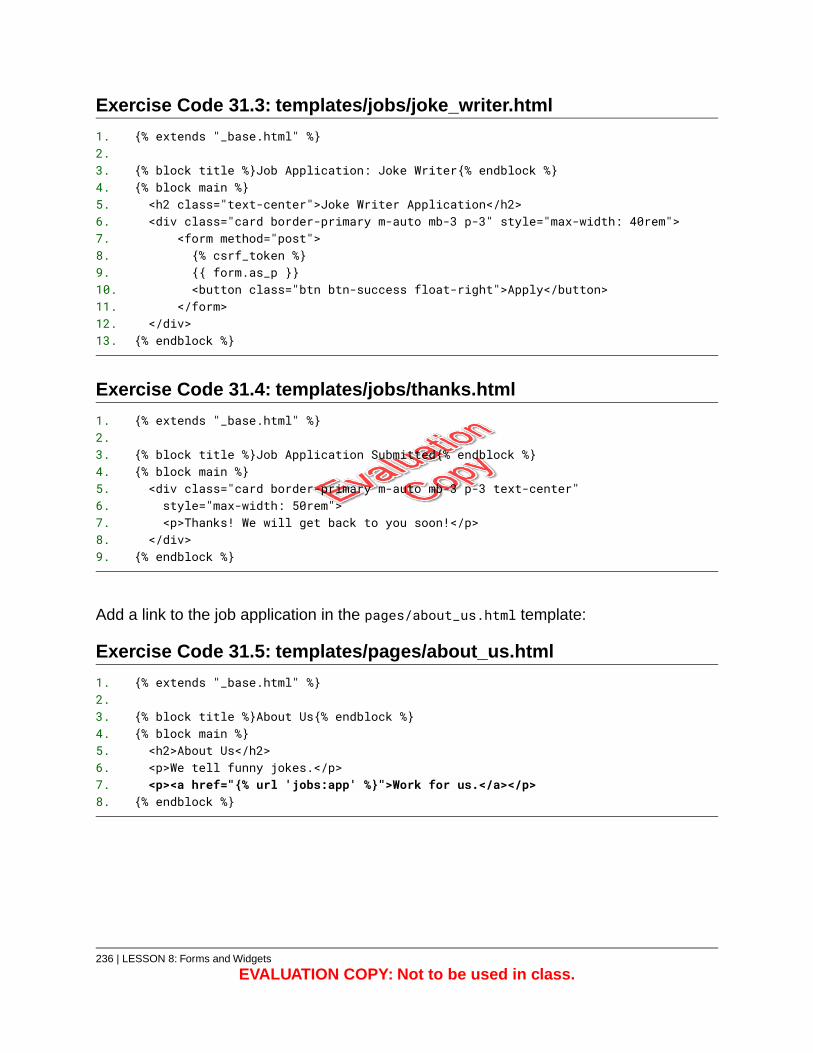
Exercise Code 31.3: templates/jobs/joke_writer.html
{% extends "_base.html" %}1.2.
{% block title %}Job Application: Joke Writer{% endblock %}3.{% block main %}4.<h2 class="text-center">Joke Writer Application</h2>5.<div class="card border-primary m-auto mb-3 p-3" style="max-width: 40rem">6.
<form method="post">7.{% csrf_token %}8.{{ form.as_p }}9.<button class="btn btn-success float-right">Apply</button>10.
</form>11.</div>12.
{% endblock %}13.
Exercise Code 31.4: templates/jobs/thanks.html
{% extends "_base.html" %}1.2.
{% block title %}Job Application Submitted{% endblock %}3.{% block main %}4.<div class="card border-primary m-auto mb-3 p-3 text-center"5.style="max-width: 50rem">6.<p>Thanks! We will get back to you soon!</p>7.
</div>8.{% endblock %}9.
Add a link to the job application in the pages/about_us.html template:
Exercise Code 31.5: templates/pages/about_us.html
{% extends "_base.html" %}1.2.
{% block title %}About Us{% endblock %}3.{% block main %}4.<h2>About Us</h2>5.<p>We tell funny jokes.</p>6.<p><a href="{% url 'jobs:app' %}">Work for us.</a></p>7.
{% endblock %}8.
236 | LESSON 8: Forms and Widgets
EVALUATION COPY: Not to be used in class.
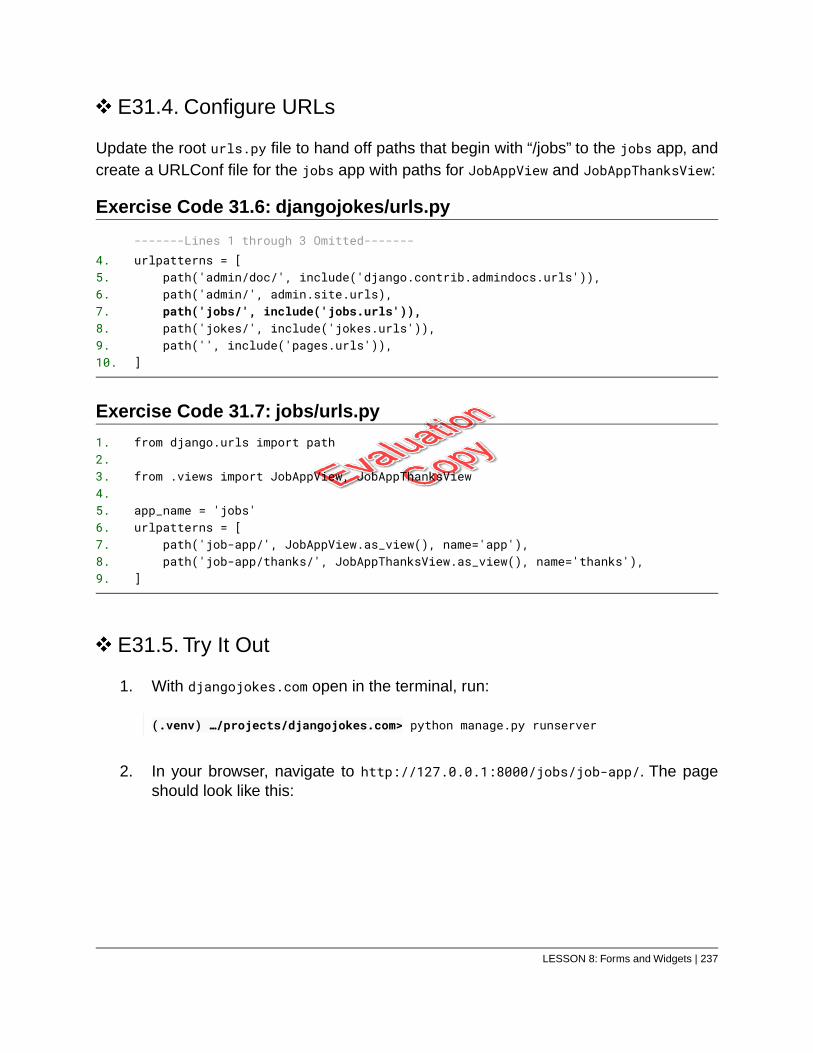
E31.4. Configure URLs
Update the root urls.py file to hand off paths that begin with “/jobs” to the jobs app, andcreate a URLConf file for the jobs app with paths for JobAppView and JobAppThanksView:
Exercise Code 31.6: djangojokes/urls.py
-------Lines 1 through 3 Omitted-------urlpatterns = [4.
path('admin/doc/', include('django.contrib.admindocs.urls')),5.path('admin/', admin.site.urls),6.path('jobs/', include('jobs.urls')),7.path('jokes/', include('jokes.urls')),8.path('', include('pages.urls')),9.
]10.
Exercise Code 31.7: jobs/urls.py
from django.urls import path1.2.
from .views import JobAppView, JobAppThanksView3.4.
app_name = 'jobs'5.urlpatterns = [6.
path('job-app/', JobAppView.as_view(), name='app'),7.path('job-app/thanks/', JobAppThanksView.as_view(), name='thanks'),8.
]9.
E31.5. Try It Out
1. With djangojokes.com open in the terminal, run:
(.venv) …/projects/djangojokes.com> python manage.py runserver
2. In your browser, navigate to http://127.0.0.1:8000/jobs/job-app/. The pageshould look like this:
LESSON 8: Forms and Widgets | 237

Fill out and submit the form. You should get a page with a message reading“Thanks! We will get back to you soon!”.
Don’t worry about the form design.
You will soon learn to make the form prettier.
At this point, there is no way you will be able to get back to applicants soon, because youhaven’t collected any of their information.
E31.6. Emailing the Application
Add the following highlighted code to jobs/views.py (replace '[email protected]' withyour email):
238 | LESSON 8: Forms and Widgets
EVALUATION COPY: Not to be used in class.

Exercise Code 31.8: jobs/views.py
import html1.from django.urls import reverse_lazy2.from django.views.generic import FormView, TemplateView3.
4.from common.utils.email import send_email5.from .forms import JobApplicationForm6.
7.class JobAppView(FormView):8.
template_name = 'jobs/joke_writer.html'9.form_class = JobApplicationForm10.success_url = reverse_lazy('jobs:thanks')11.
12.def form_valid(self, form):13.
data = form.cleaned_data14.to = '[email protected]'15.subject = 'Application for Joke Writer'16.content = f'''<p>Hey HR Manager!</p>17.
<p>Job application received:</p>18.<ol>'''19.
for key, value in data.items():20.label = key.replace('_', ' ').title()21.entry = html.escape(str(value), quote=False)22.content += f'<li>{label}: {entry}</li>'23.
24.content += '</ol>'25.
26.send_email(to, subject, content)27.return super().form_valid(form)28.
-------Lines 29 through 31 Omitted-------
Things to notice:
1. The send_email() utility function you wrote is imported from common.utils.email.
2. The form_valid() function is executed when the form passes validation.form.cleaned_data will contain all the data submitted in the form. Depending onhow the form fields are implemented, some of the data may have been “cleaned,”which is why the variable is called cleaned_data. We had you immediately assigncleaned_data to data, both to have a simpler variable name and to make it clearthat you have access to this data.
LESSON 8: Forms and Widgets | 239
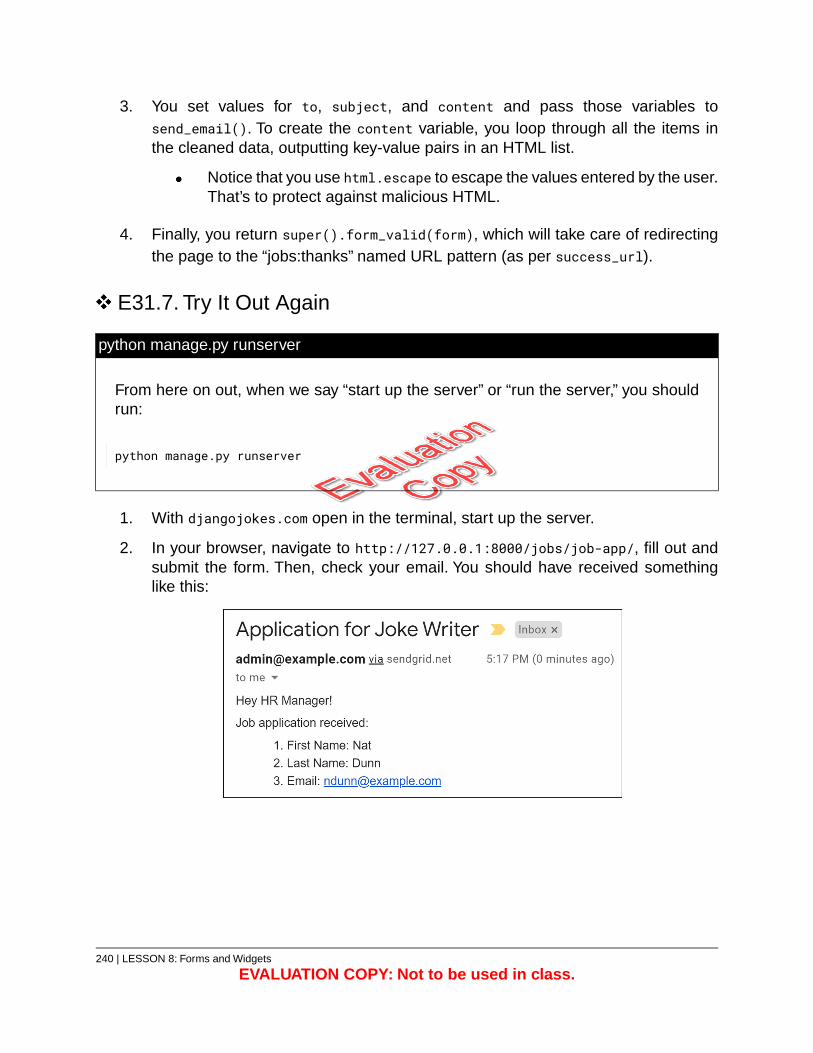
3. You set values for to, subject, and content and pass those variables tosend_email(). To create the content variable, you loop through all the items inthe cleaned data, outputting key-value pairs in an HTML list.
Notice that you use html.escape to escape the values entered by the user.That’s to protect against malicious HTML.
4. Finally, you return super().form_valid(form), which will take care of redirectingthe page to the “jobs:thanks” named URL pattern (as per success_url).
E31.7. Try It Out Again
python manage.py runserver
From here on out, when we say “start up the server” or “run the server,” you shouldrun:
python manage.py runserver
1. With djangojokes.com open in the terminal, start up the server.
2. In your browser, navigate to http://127.0.0.1:8000/jobs/job-app/, fill out andsubmit the form. Then, check your email. You should have received somethinglike this:
240 | LESSON 8: Forms and Widgets
EVALUATION COPY: Not to be used in class.
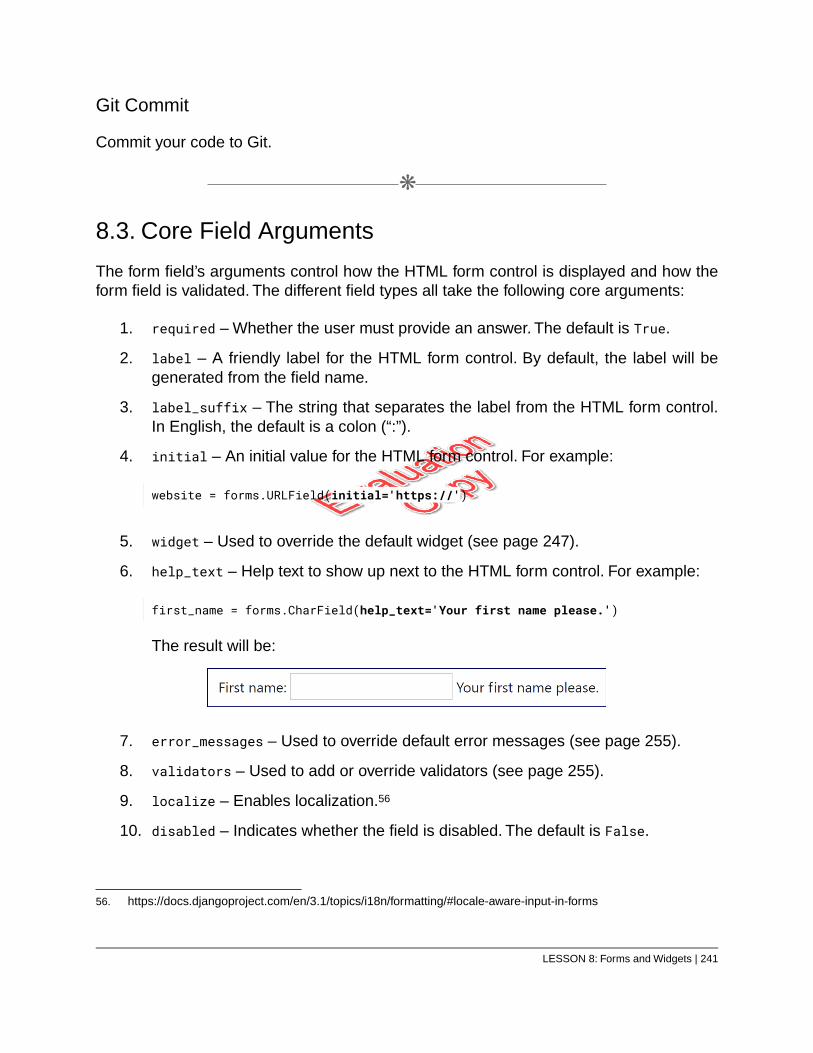
Git Commit
Commit your code to Git.
❋
8.3. Core Field Arguments
The form field’s arguments control how the HTML form control is displayed and how theform field is validated. The different field types all take the following core arguments:
1. required – Whether the user must provide an answer. The default is True.
2. label – A friendly label for the HTML form control. By default, the label will begenerated from the field name.
3. label_suffix – The string that separates the label from the HTML form control.In English, the default is a colon (“:”).
4. initial – An initial value for the HTML form control. For example:
website = forms.URLField(initial='https://')
5. widget – Used to override the default widget (see page 247).
6. help_text – Help text to show up next to the HTML form control. For example:
first_name = forms.CharField(help_text='Your first name please.')
The result will be:
7. error_messages – Used to override default error messages (see page 255).
8. validators – Used to add or override validators (see page 255).
9. localize – Enables localization.56
10. disabled – Indicates whether the field is disabled. The default is False.
56. https://docs.djangoproject.com/en/3.1/topics/i18n/formatting/#locale-aware-input-in-forms
LESSON 8: Forms and Widgets | 241
Some field types take additional arguments. For example, ChoiceField requires a choicesargument.
242 | LESSON 8: Forms and Widgets
EVALUATION COPY: Not to be used in class.

Exercise 32: Building out the Application 45 to 60 minutes
In this exercise, you will build out the job application by adding the following form fields:
1. website – A field for entering a valid URL. This field should be optional.
2. employment_type – A field for choosing an employment type. Options should be“Full-time,” “Part-time,” and “Contract work” and the applicant should only be ableto choose one option.
3. start_date – The date the applicant can start. Provide the following help text:“The earliest date you can start working.”
4. available_days – The days of the week the applicant can work. Options shouldbe “MON,” “TUE,” “WED,” “THU,” and “FRI”. Provide the following help text: “Selectall days that you can work.”
5. desired_hourly_wage – A field for entering a decimal.
6. cover_letter – A field for entering a cover letter. Note that there are no gooddefault options for this one. Use a CharField and you will improve it later.
7. confirmation – A required checkbox. Change the label to “I certify that theinformation I have provided is true.”
Try this on your own before looking at the solution.Test your solution by running the server,visiting http://127.0.0.1:8000/jobs/job-app/, and filling out and submitting the form,which should look like this:
LESSON 8: Forms and Widgets | 243
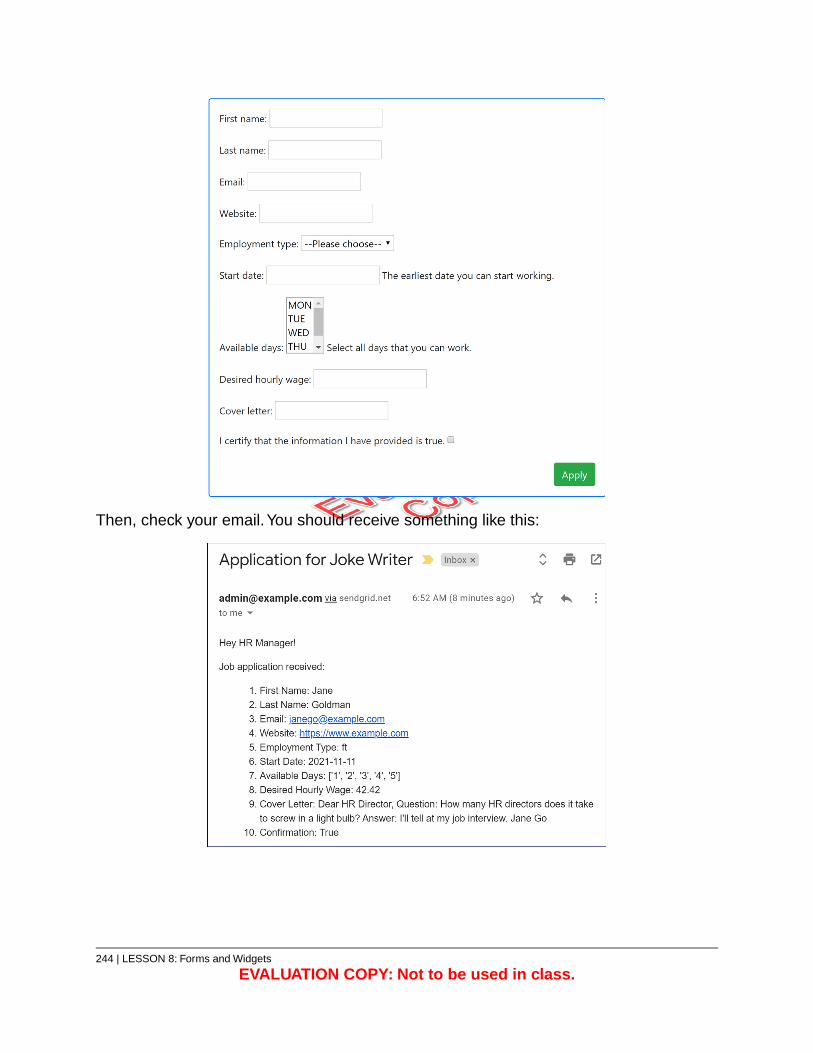
Then, check your email.You should receive something like this:
244 | LESSON 8: Forms and Widgets
EVALUATION COPY: Not to be used in class.
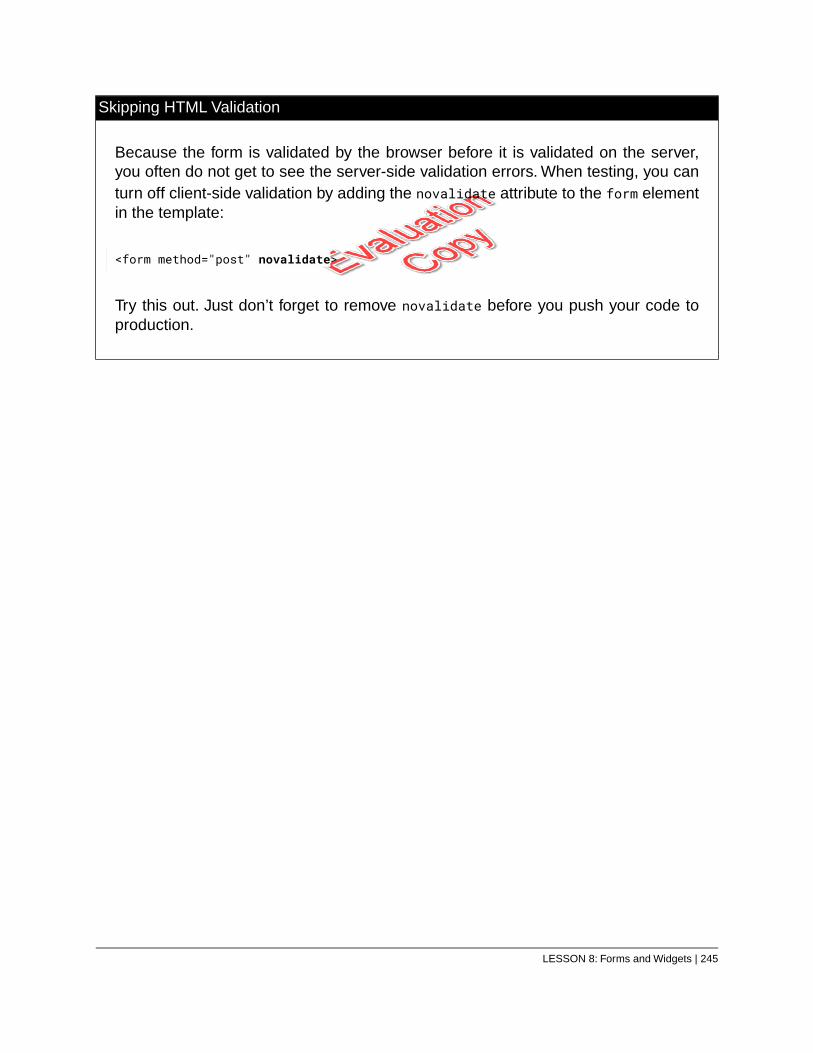
Skipping HTML Validation
Because the form is validated by the browser before it is validated on the server,you often do not get to see the server-side validation errors. When testing, you canturn off client-side validation by adding the novalidate attribute to the form elementin the template:
<form method="post" novalidate>
Try this out. Just don’t forget to remove novalidate before you push your code toproduction.
LESSON 8: Forms and Widgets | 245
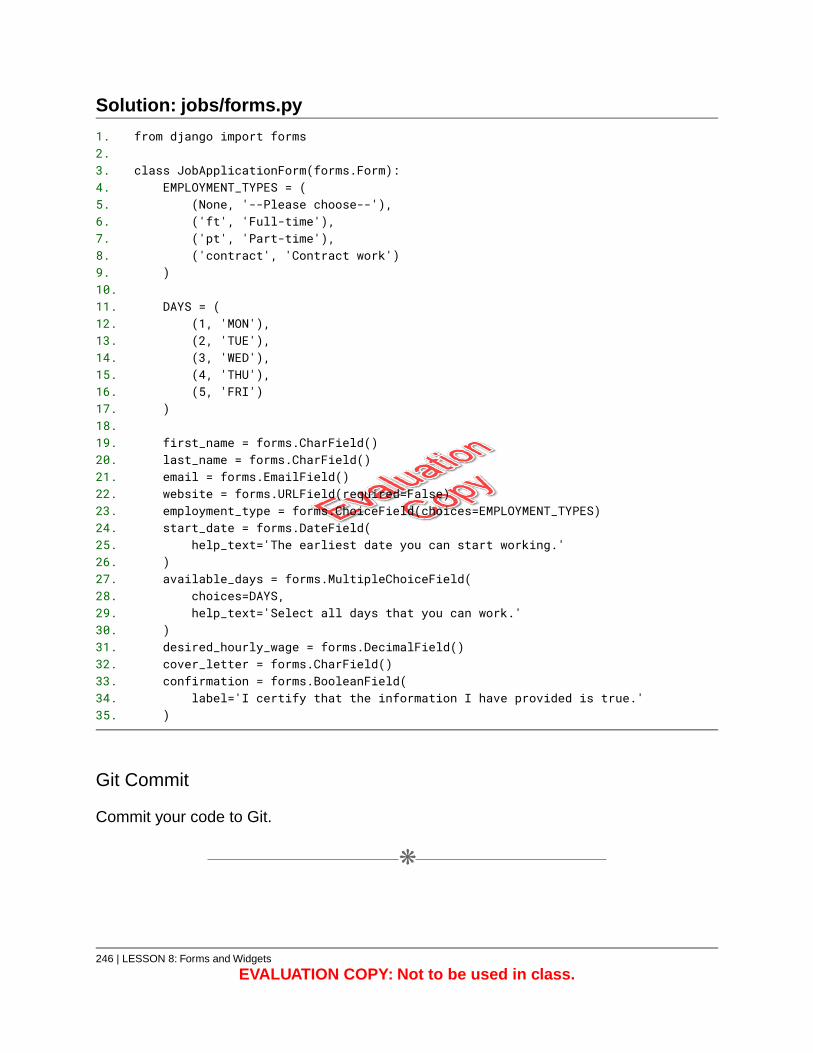
Solution: jobs/forms.py
from django import forms1.2.
class JobApplicationForm(forms.Form):3.EMPLOYMENT_TYPES = (4.
(None, '--Please choose--'),5.('ft', 'Full-time'),6.('pt', 'Part-time'),7.('contract', 'Contract work')8.
)9.10.
DAYS = (11.(1, 'MON'),12.(2, 'TUE'),13.(3, 'WED'),14.(4, 'THU'),15.(5, 'FRI')16.
)17.18.
first_name = forms.CharField()19.last_name = forms.CharField()20.email = forms.EmailField()21.website = forms.URLField(required=False)22.employment_type = forms.ChoiceField(choices=EMPLOYMENT_TYPES)23.start_date = forms.DateField(24.
help_text='The earliest date you can start working.'25.)26.available_days = forms.MultipleChoiceField(27.
choices=DAYS,28.help_text='Select all days that you can work.'29.
)30.desired_hourly_wage = forms.DecimalField()31.cover_letter = forms.CharField()32.confirmation = forms.BooleanField(33.
label='I certify that the information I have provided is true.'34.)35.
Git Commit
Commit your code to Git.
❋
246 | LESSON 8: Forms and Widgets
EVALUATION COPY: Not to be used in class.
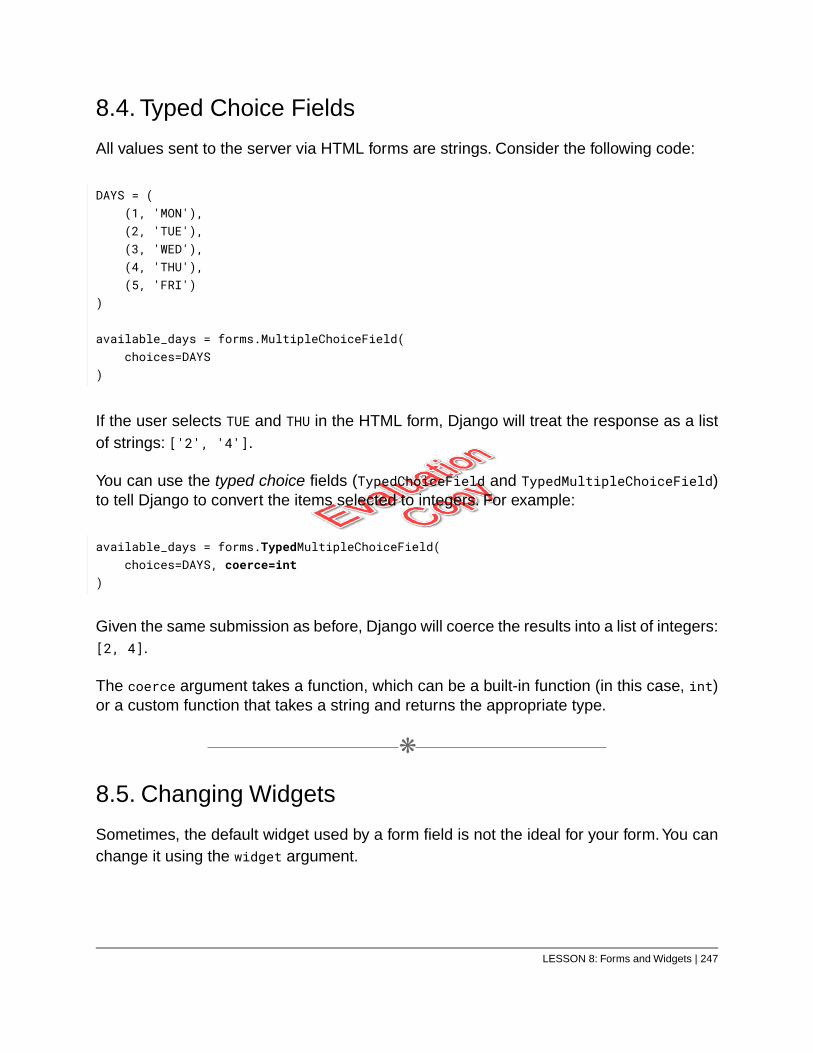
8.4. Typed Choice Fields
All values sent to the server via HTML forms are strings. Consider the following code:
DAYS = ((1, 'MON'),(2, 'TUE'),(3, 'WED'),(4, 'THU'),(5, 'FRI')
)
available_days = forms.MultipleChoiceField(choices=DAYS
)
If the user selects TUE and THU in the HTML form, Django will treat the response as a listof strings: ['2', '4'].
You can use the typed choice fields (TypedChoiceField and TypedMultipleChoiceField)to tell Django to convert the items selected to integers. For example:
available_days = forms.TypedMultipleChoiceField(choices=DAYS, coerce=int
)
Given the same submission as before, Django will coerce the results into a list of integers:[2, 4].
The coerce argument takes a function, which can be a built-in function (in this case, int)or a custom function that takes a string and returns the appropriate type.
❋
8.5. Changing Widgets
Sometimes, the default widget used by a form field is not the ideal for your form.You canchange it using the widget argument.
LESSON 8: Forms and Widgets | 247
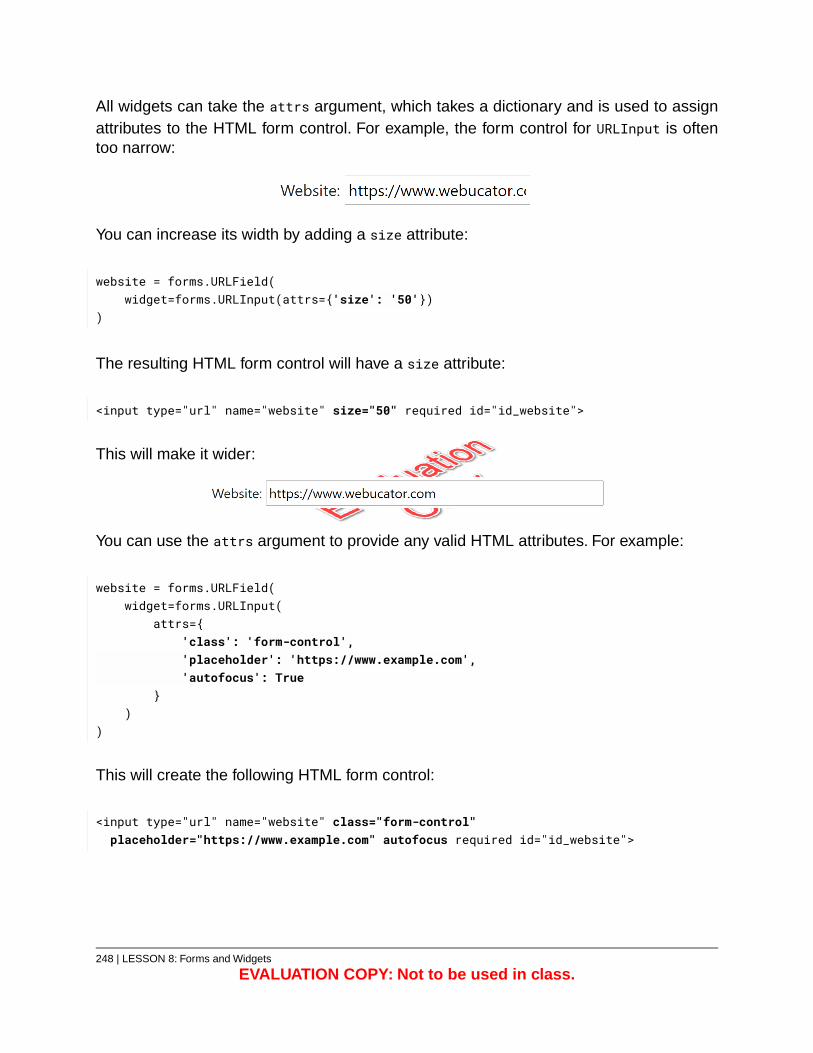
All widgets can take the attrs argument, which takes a dictionary and is used to assignattributes to the HTML form control. For example, the form control for URLInput is oftentoo narrow:
You can increase its width by adding a size attribute:
website = forms.URLField(widget=forms.URLInput(attrs={'size': '50'})
)
The resulting HTML form control will have a size attribute:
<input type="url" name="website" size="50" required id="id_website">
This will make it wider:
You can use the attrs argument to provide any valid HTML attributes. For example:
website = forms.URLField(widget=forms.URLInput(
attrs={'class': 'form-control','placeholder': 'https://www.example.com','autofocus': True
})
)
This will create the following HTML form control:
<input type="url" name="website" class="form-control"placeholder="https://www.example.com" autofocus required id="id_website">
248 | LESSON 8: Forms and Widgets
EVALUATION COPY: Not to be used in class.
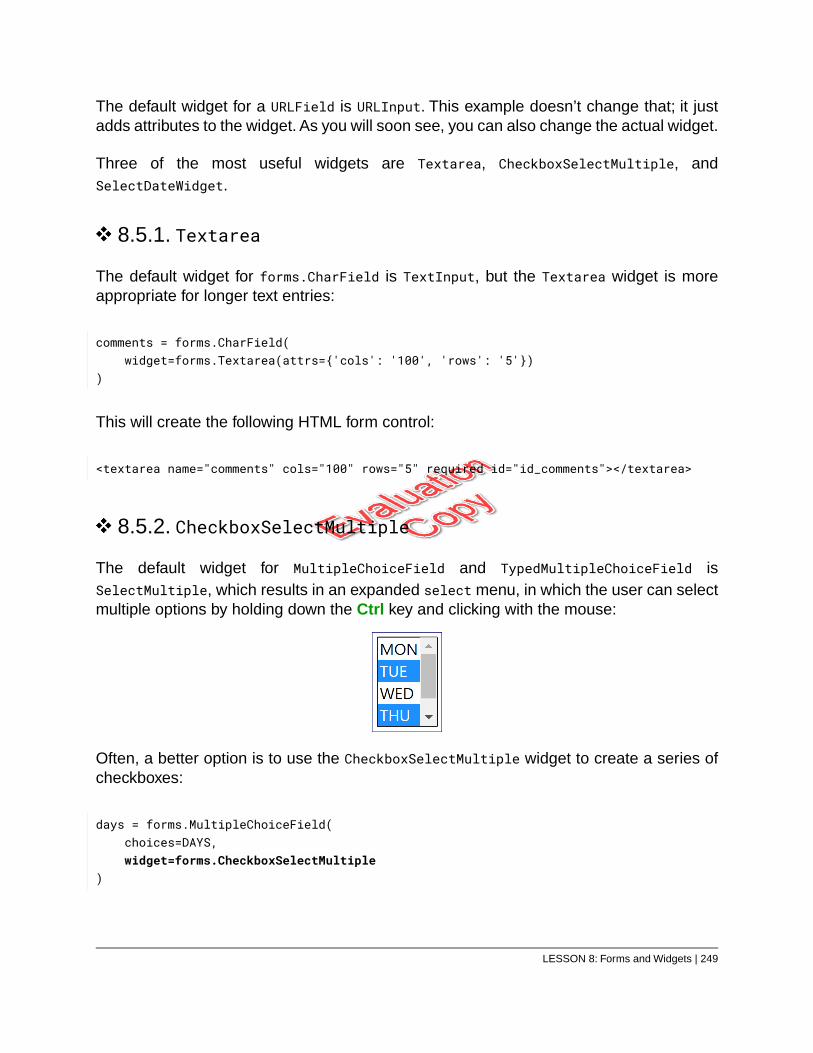
The default widget for a URLField is URLInput. This example doesn’t change that; it justadds attributes to the widget. As you will soon see, you can also change the actual widget.
Three of the most useful widgets are Textarea, CheckboxSelectMultiple, andSelectDateWidget.
8.5.1. Textarea
The default widget for forms.CharField is TextInput, but the Textarea widget is moreappropriate for longer text entries:
comments = forms.CharField(widget=forms.Textarea(attrs={'cols': '100', 'rows': '5'})
)
This will create the following HTML form control:
<textarea name="comments" cols="100" rows="5" required id="id_comments"></textarea>
8.5.2. CheckboxSelectMultiple
The default widget for MultipleChoiceField and TypedMultipleChoiceField isSelectMultiple, which results in an expanded select menu, in which the user can selectmultiple options by holding down the Ctrl key and clicking with the mouse:
Often, a better option is to use the CheckboxSelectMultiple widget to create a series ofcheckboxes:
days = forms.MultipleChoiceField(choices=DAYS,widget=forms.CheckboxSelectMultiple
)
LESSON 8: Forms and Widgets | 249
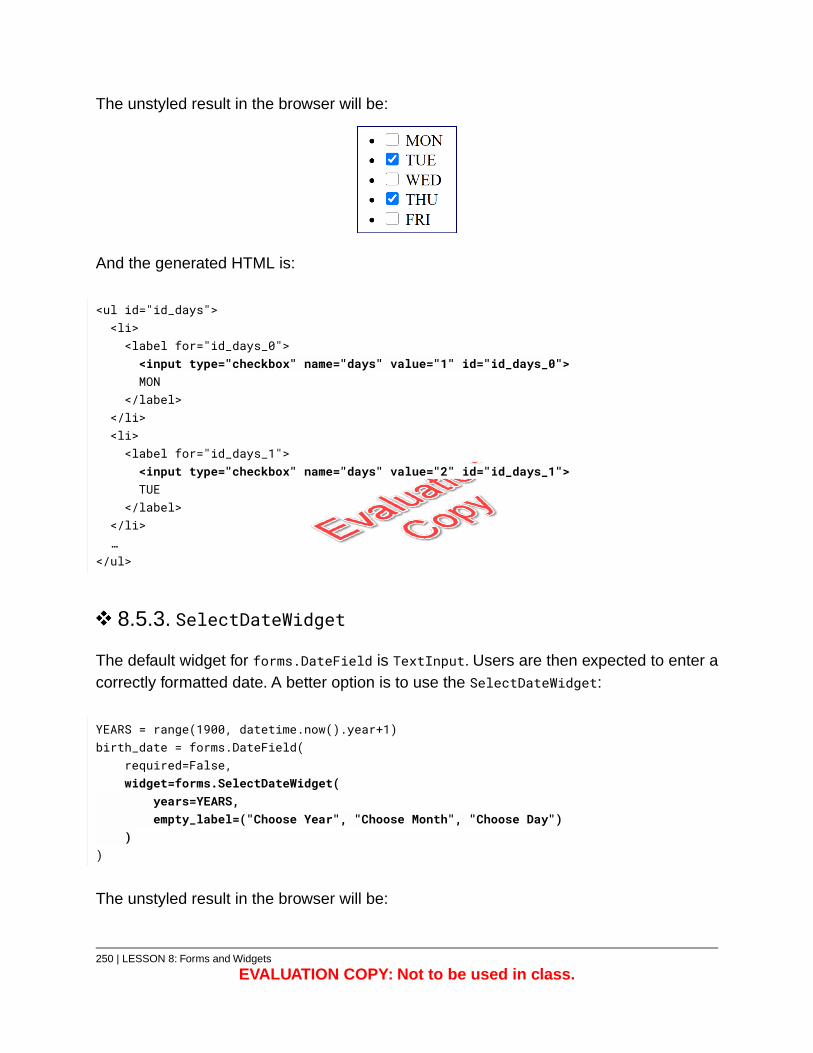
The unstyled result in the browser will be:
And the generated HTML is:
<ul id="id_days"><li><label for="id_days_0"><input type="checkbox" name="days" value="1" id="id_days_0">MON
</label></li><li><label for="id_days_1"><input type="checkbox" name="days" value="2" id="id_days_1">TUE
</label></li>…
</ul>
8.5.3. SelectDateWidget
The default widget for forms.DateField is TextInput. Users are then expected to enter acorrectly formatted date. A better option is to use the SelectDateWidget:
YEARS = range(1900, datetime.now().year+1)birth_date = forms.DateField(
required=False,widget=forms.SelectDateWidget(
years=YEARS,empty_label=("Choose Year", "Choose Month", "Choose Day")
))
The unstyled result in the browser will be:
250 | LESSON 8: Forms and Widgets
EVALUATION COPY: Not to be used in class.
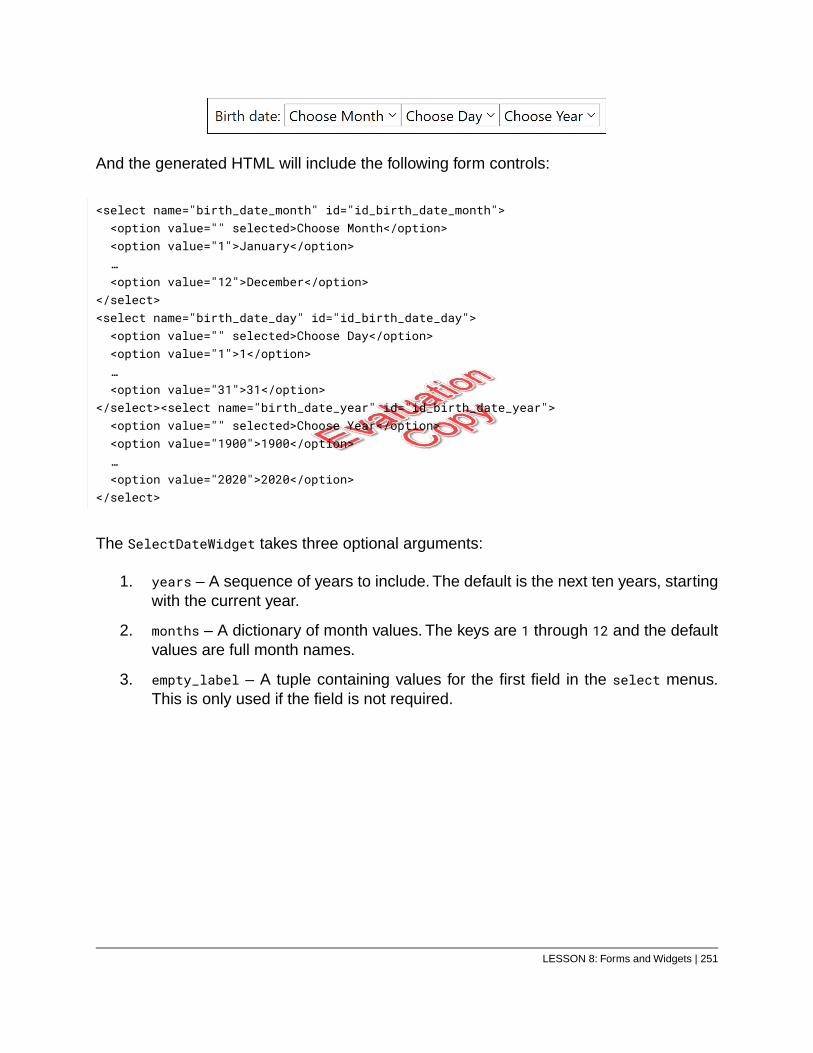
And the generated HTML will include the following form controls:
<select name="birth_date_month" id="id_birth_date_month"><option value="" selected>Choose Month</option><option value="1">January</option>…<option value="12">December</option>
</select><select name="birth_date_day" id="id_birth_date_day"><option value="" selected>Choose Day</option><option value="1">1</option>…<option value="31">31</option>
</select><select name="birth_date_year" id="id_birth_date_year"><option value="" selected>Choose Year</option><option value="1900">1900</option>…<option value="2020">2020</option>
</select>
The SelectDateWidget takes three optional arguments:
1. years – A sequence of years to include. The default is the next ten years, startingwith the current year.
2. months – A dictionary of month values. The keys are 1 through 12 and the defaultvalues are full month names.
3. empty_label – A tuple containing values for the first field in the select menus.This is only used if the field is not required.
LESSON 8: Forms and Widgets | 251
Exercise 33: Improving the Job ApplicationForm
45 to 60 minutes
Make the following improvements to the job application form:
1. Autofocus on the first_name field.
2. Add an “https://www.example.com” placeholder to the website field and add asize attribute with a value of 50.
3. Change the start_date field to use a SelectDateWidget widget with only this yearand next year as options. You can either hard code the years or calculate themusing datetime.
4. Change the available_days field to use a CheckboxSelectMultiple widget. Seeif you can figure out how to have all days checked by default.
5. Add the following attributes to the number HTML form control produced bydesired_hourly_wage:
A. 'min': '10.00'
B. 'max': '100.00'
C. 'step': '.25'
6. Change the cover_letter field to use a Textarea widget. The resulting textareashould have cols set to 75 and rows set to 5.
Try this on your own before looking at the solution.
252 | LESSON 8: Forms and Widgets
EVALUATION COPY: Not to be used in class.

LESSON 8: Forms and Widgets | 253
Solution: jobs/forms.py
from datetime import datetime1.from django import forms2.
3.class JobApplicationForm(forms.Form):4.-------Lines 5 through 19 Omitted-------
YEARS = range(datetime.now().year, datetime.now().year+2)20.21.
first_name = forms.CharField(22.widget=forms.TextInput(attrs={'autofocus': True})23.
)24.last_name = forms.CharField()25.email = forms.EmailField()26.website = forms.URLField(27.
required=False,28.widget=forms.URLInput(29.
attrs={'placeholder':'https://www.example.com', 'size':'50'}30.)31.
)32.employment_type = forms.ChoiceField(choices=EMPLOYMENT_TYPES)33.start_date = forms.DateField(34.
help_text='The earliest date you can start working.',35.widget=forms.SelectDateWidget(36.
years=YEARS,37.)38.
)39.available_days = forms.TypedMultipleChoiceField(40.
choices=DAYS,41.coerce=int,42.help_text='Check all days that you can work.',43.widget=forms.CheckboxSelectMultiple(44.
attrs={'checked':True}45.)46.
)47.desired_hourly_wage = forms.DecimalField(48.
widget=forms.NumberInput(49.attrs={'min':'10.00', 'max':'100.00', 'step':'.25'}50.
)51.)52.cover_letter = forms.CharField(53.
widget=forms.Textarea(attrs={'cols': '75', 'rows': '5'})54.)55.confirmation = forms.BooleanField(56.
label='I certify that the information I have provided is true.'57.)58.
254 | LESSON 8: Forms and Widgets
EVALUATION COPY: Not to be used in class.
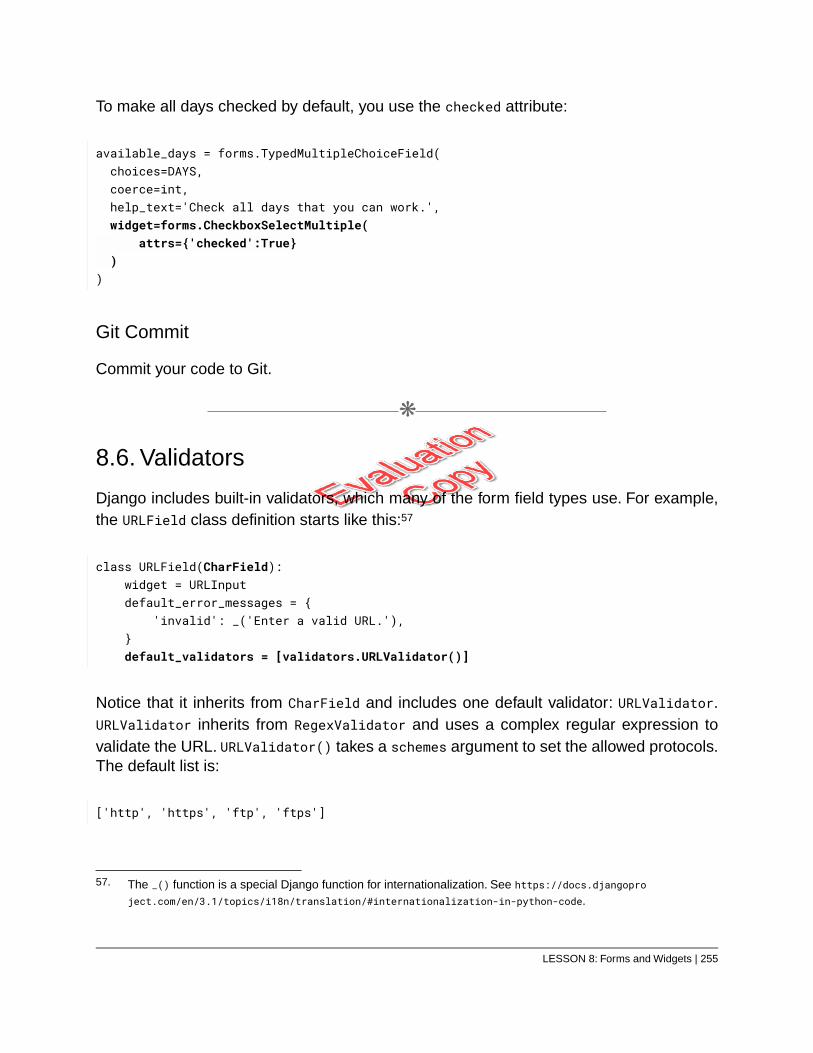
To make all days checked by default, you use the checked attribute:
available_days = forms.TypedMultipleChoiceField(choices=DAYS,coerce=int,help_text='Check all days that you can work.',widget=forms.CheckboxSelectMultiple(
attrs={'checked':True})
)
Git Commit
Commit your code to Git.
❋
8.6. Validators
Django includes built-in validators, which many of the form field types use. For example,the URLField class definition starts like this:57
class URLField(CharField):widget = URLInputdefault_error_messages = {
'invalid': _('Enter a valid URL.'),}default_validators = [validators.URLValidator()]
Notice that it inherits from CharField and includes one default validator: URLValidator.URLValidator inherits from RegexValidator and uses a complex regular expression tovalidate the URL. URLValidator() takes a schemes argument to set the allowed protocols.The default list is:
['http', 'https', 'ftp', 'ftps']
57. The _() function is a special Django function for internationalization. See https://docs.djangoproject.com/en/3.1/topics/i18n/translation/#internationalization-in-python-code.
LESSON 8: Forms and Widgets | 255
In your job application, you may want to require that the website field uses either “http” or“https”:
website = forms.CharField(validators=[URLValidator(schemes=['http', 'https'])]
)
Notice that you used a CharField instead of a URLField. This is because the validatorsget added to the default_validators of the superclass. If you had used a URLField, thefield would have two URLValidators and if both failed, it would give two error messages.58
8.6.1. Custom Validator Functions
You can create your own validators using django.core.exceptions.ValidationError. Forexample, the following code creates a validator function that raises an error if the passed-indate is in the past:
from datetime import datetimefrom django.core.exceptions import ValidationError
def validate_future_date(value):if value < datetime.now().date():
raise ValidationError(message=f'{value} is in the past.', code='past_date')
You can now use this function as a validator:
start_date = forms.DateField(help_text='The earliest date you can start working.',widget=forms.SelectDateWidget(years=YEARS),validators=[validate_future_date]error_messages={'past_date': 'Please enter a future date.'}
)
When the user submits the form with a date that has already passed, they will get thefollowing error message: “Please enter a future date.”
The following code sample shows how to integrate these validators into the job applicationform:
58. See https://docs.djangoproject.com/en/3.1/ref/validators/#built-in-validators for a list of built-in validators.
256 | LESSON 8: Forms and Widgets
EVALUATION COPY: Not to be used in class.
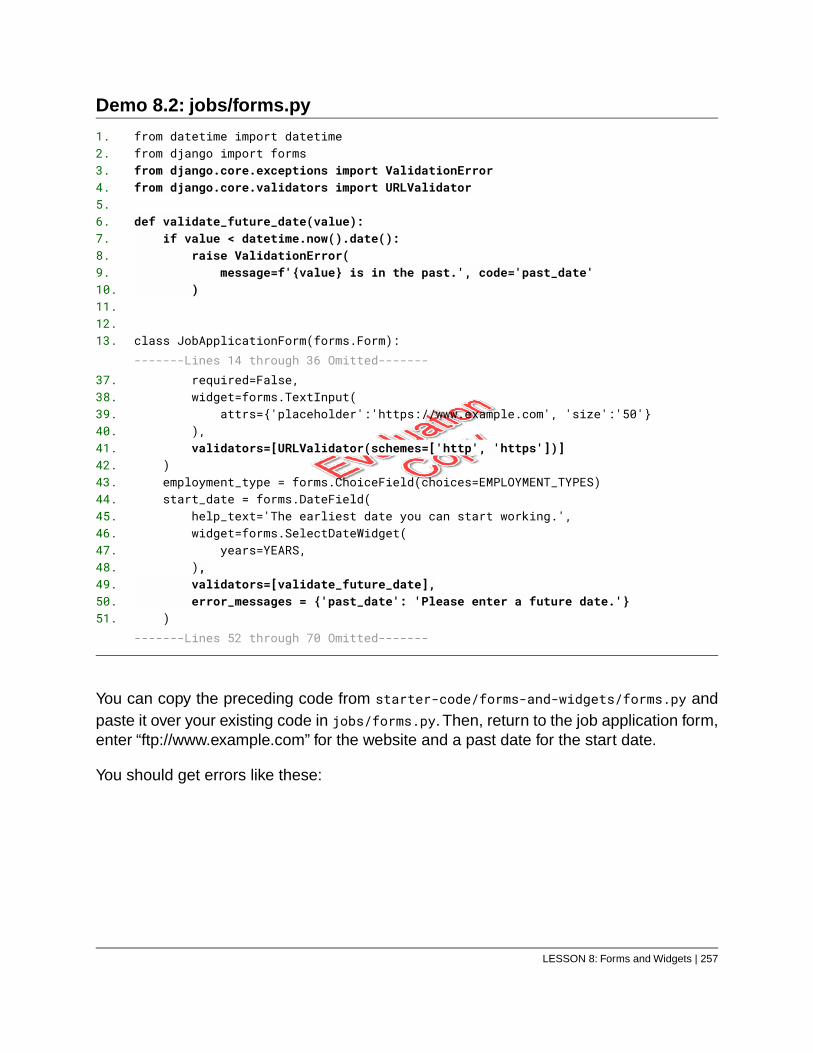
Demo 8.2: jobs/forms.py
from datetime import datetime1.from django import forms2.from django.core.exceptions import ValidationError3.from django.core.validators import URLValidator4.
5.def validate_future_date(value):6.
if value < datetime.now().date():7.raise ValidationError(8.
message=f'{value} is in the past.', code='past_date'9.)10.
11.12.
class JobApplicationForm(forms.Form):13.-------Lines 14 through 36 Omitted-------
required=False,37.widget=forms.TextInput(38.
attrs={'placeholder':'https://www.example.com', 'size':'50'}39.),40.validators=[URLValidator(schemes=['http', 'https'])]41.
)42.employment_type = forms.ChoiceField(choices=EMPLOYMENT_TYPES)43.start_date = forms.DateField(44.
help_text='The earliest date you can start working.',45.widget=forms.SelectDateWidget(46.
years=YEARS,47.),48.validators=[validate_future_date],49.error_messages = {'past_date': 'Please enter a future date.'}50.
)51.-------Lines 52 through 70 Omitted-------
You can copy the preceding code from starter-code/forms-and-widgets/forms.py andpaste it over your existing code in jobs/forms.py. Then, return to the job application form,enter “ftp://www.example.com” for the website and a past date for the start date.
You should get errors like these:
LESSON 8: Forms and Widgets | 257
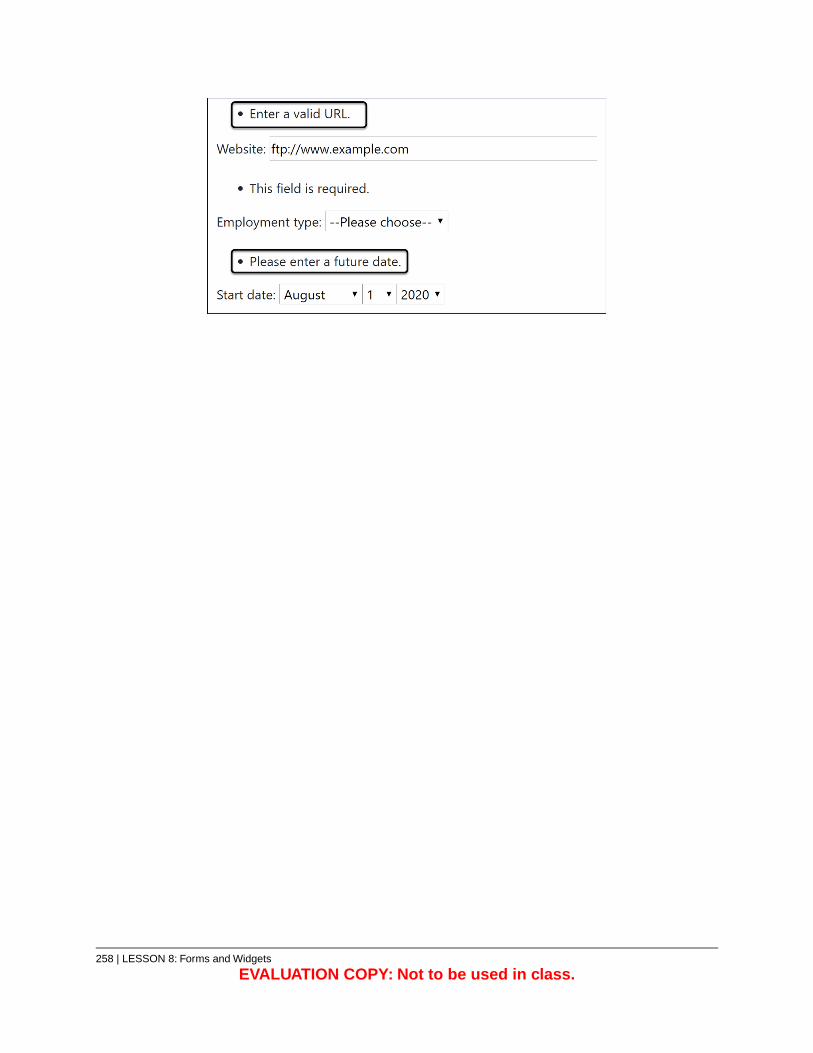
258 | LESSON 8: Forms and Widgets
EVALUATION COPY: Not to be used in class.
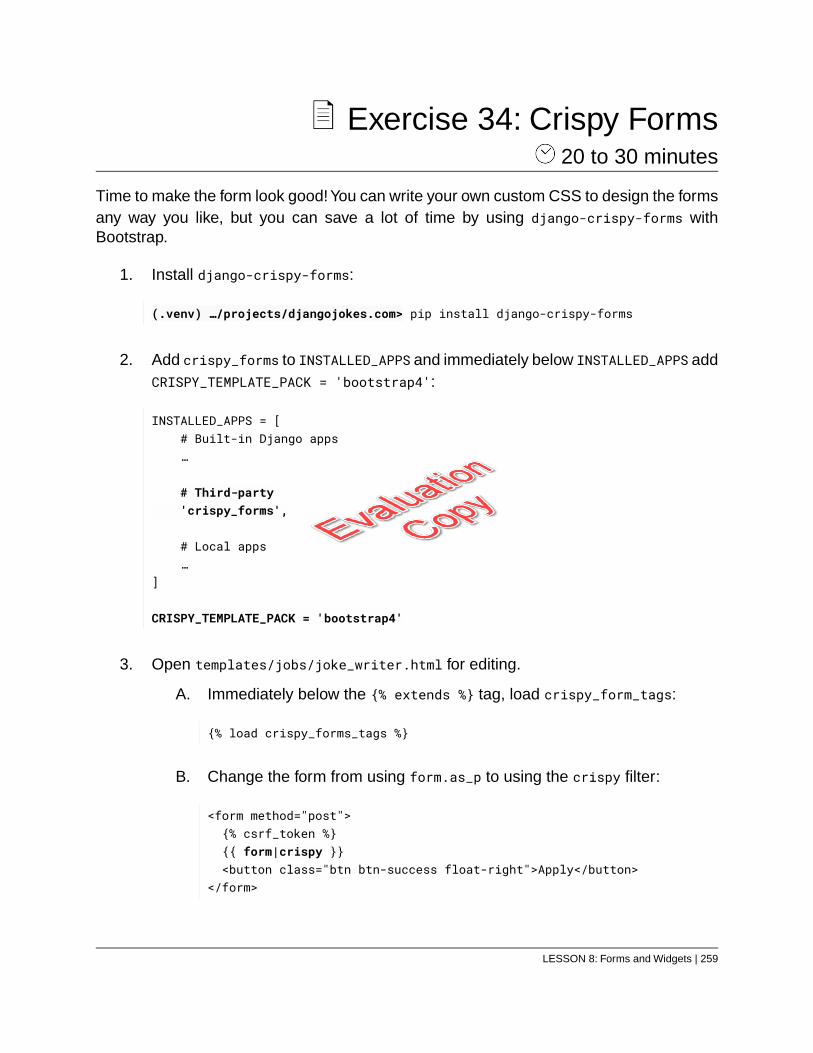
Exercise 34: Crispy Forms 20 to 30 minutes
Time to make the form look good! You can write your own custom CSS to design the formsany way you like, but you can save a lot of time by using django-crispy-forms withBootstrap.
1. Install django-crispy-forms:
(.venv) …/projects/djangojokes.com> pip install django-crispy-forms
2. Add crispy_forms to INSTALLED_APPS and immediately below INSTALLED_APPS addCRISPY_TEMPLATE_PACK = 'bootstrap4':
INSTALLED_APPS = [# Built-in Django apps…
# Third-party'crispy_forms',
# Local apps…
]
CRISPY_TEMPLATE_PACK = 'bootstrap4'
3. Open templates/jobs/joke_writer.html for editing.
A. Immediately below the {% extends %} tag, load crispy_form_tags:
{% load crispy_forms_tags %}
B. Change the form from using form.as_p to using the crispy filter:
<form method="post">{% csrf_token %}{{ form|crispy }}<button class="btn btn-success float-right">Apply</button>
</form>
LESSON 8: Forms and Widgets | 259
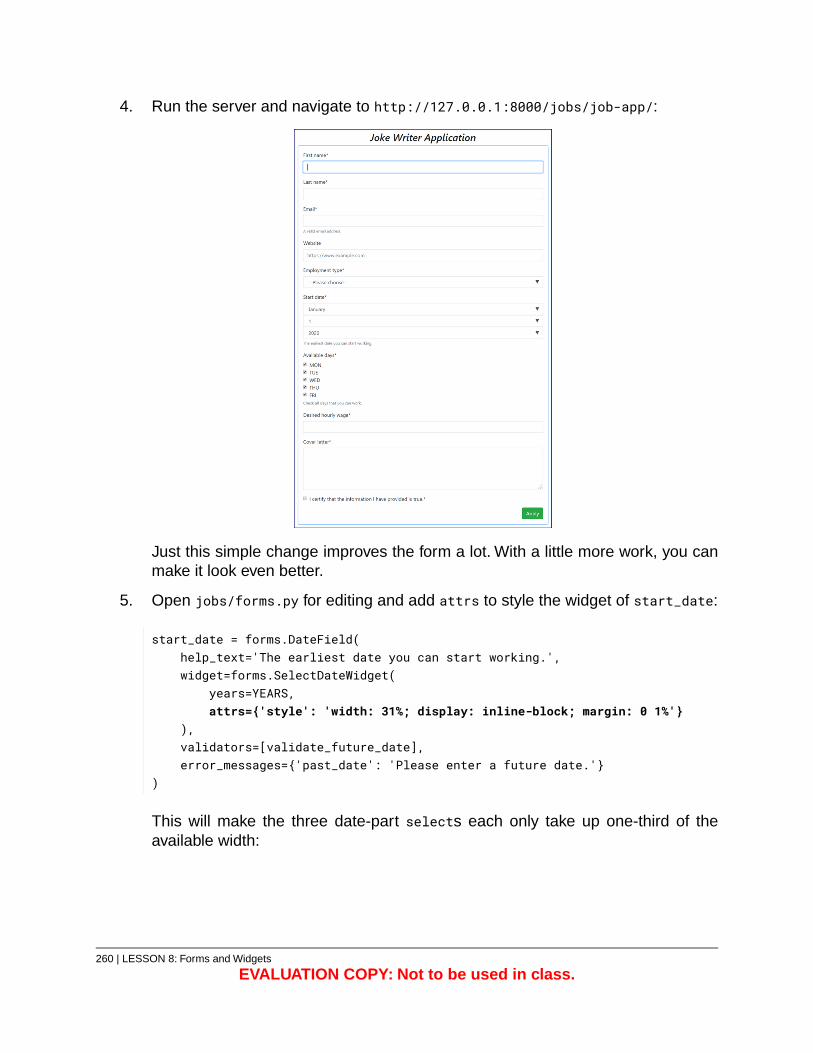
4. Run the server and navigate to http://127.0.0.1:8000/jobs/job-app/:
Just this simple change improves the form a lot. With a little more work, you canmake it look even better.
5. Open jobs/forms.py for editing and add attrs to style the widget of start_date:
start_date = forms.DateField(help_text='The earliest date you can start working.',widget=forms.SelectDateWidget(
years=YEARS,attrs={'style': 'width: 31%; display: inline-block; margin: 0 1%'}
),validators=[validate_future_date],error_messages={'past_date': 'Please enter a future date.'}
)
This will make the three date-part selects each only take up one-third of theavailable width:
260 | LESSON 8: Forms and Widgets
EVALUATION COPY: Not to be used in class.
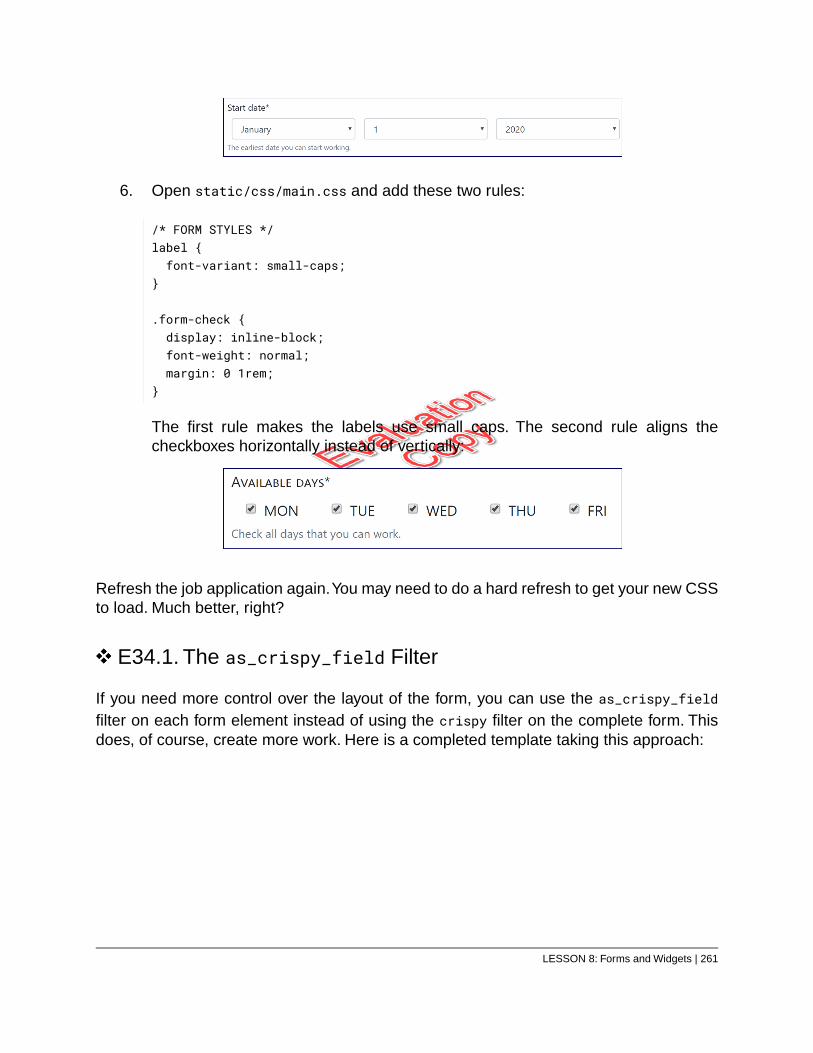
6. Open static/css/main.css and add these two rules:
/* FORM STYLES */label {font-variant: small-caps;
}
.form-check {display: inline-block;font-weight: normal;margin: 0 1rem;
}
The first rule makes the labels use small caps. The second rule aligns thecheckboxes horizontally instead of vertically:
Refresh the job application again.You may need to do a hard refresh to get your new CSSto load. Much better, right?
E34.1. The as_crispy_field Filter
If you need more control over the layout of the form, you can use the as_crispy_fieldfilter on each form element instead of using the crispy filter on the complete form. Thisdoes, of course, create more work. Here is a completed template taking this approach:
LESSON 8: Forms and Widgets | 261
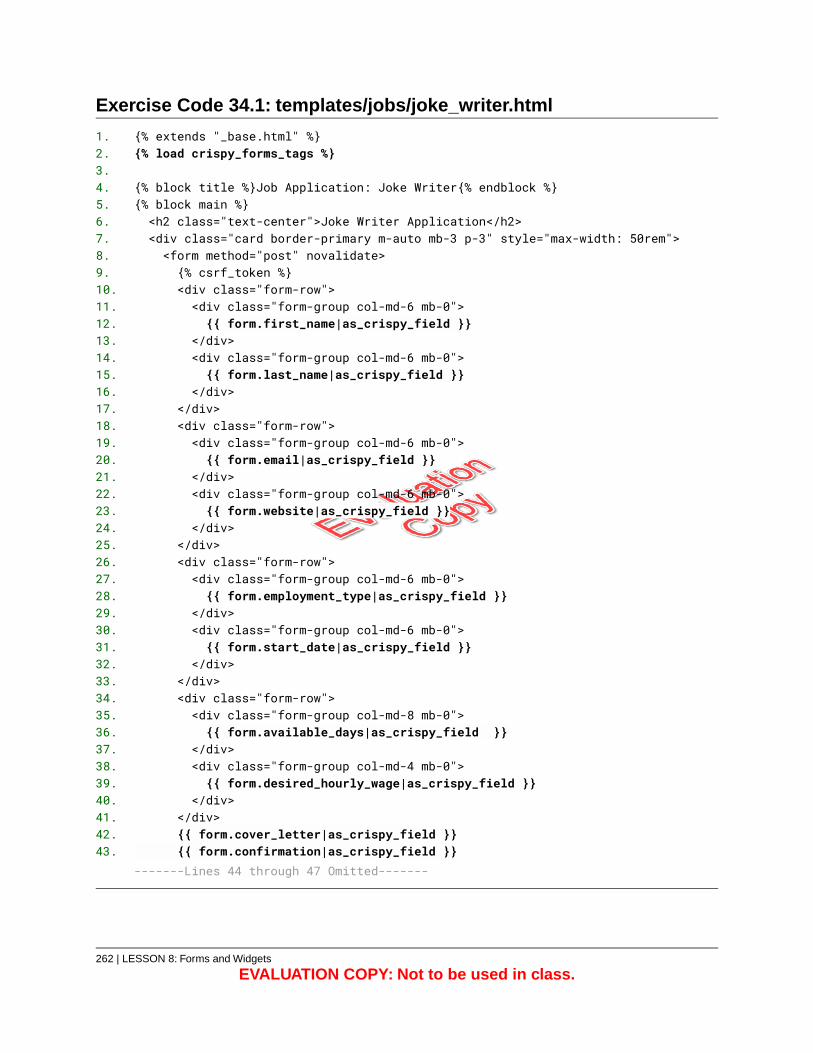
Exercise Code 34.1: templates/jobs/joke_writer.html
{% extends "_base.html" %}1.{% load crispy_forms_tags %}2.
3.{% block title %}Job Application: Joke Writer{% endblock %}4.{% block main %}5.<h2 class="text-center">Joke Writer Application</h2>6.<div class="card border-primary m-auto mb-3 p-3" style="max-width: 50rem">7.<form method="post" novalidate>8.{% csrf_token %}9.<div class="form-row">10.<div class="form-group col-md-6 mb-0">11.{{ form.first_name|as_crispy_field }}12.
</div>13.<div class="form-group col-md-6 mb-0">14.{{ form.last_name|as_crispy_field }}15.
</div>16.</div>17.<div class="form-row">18.<div class="form-group col-md-6 mb-0">19.{{ form.email|as_crispy_field }}20.
</div>21.<div class="form-group col-md-6 mb-0">22.{{ form.website|as_crispy_field }}23.
</div>24.</div>25.<div class="form-row">26.<div class="form-group col-md-6 mb-0">27.{{ form.employment_type|as_crispy_field }}28.
</div>29.<div class="form-group col-md-6 mb-0">30.{{ form.start_date|as_crispy_field }}31.
</div>32.</div>33.<div class="form-row">34.<div class="form-group col-md-8 mb-0">35.{{ form.available_days|as_crispy_field }}36.
</div>37.<div class="form-group col-md-4 mb-0">38.{{ form.desired_hourly_wage|as_crispy_field }}39.
</div>40.</div>41.{{ form.cover_letter|as_crispy_field }}42.{{ form.confirmation|as_crispy_field }}43.
-------Lines 44 through 47 Omitted-------
262 | LESSON 8: Forms and Widgets
EVALUATION COPY: Not to be used in class.
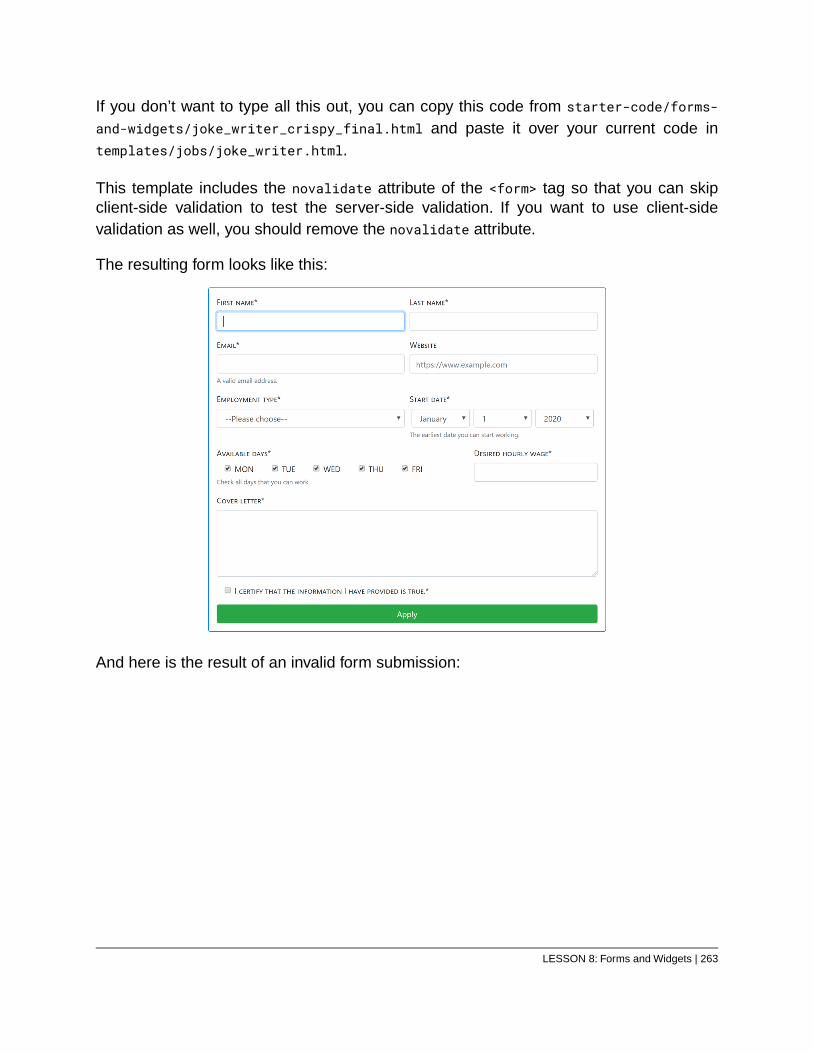
If you don’t want to type all this out, you can copy this code from starter-code/forms-and-widgets/joke_writer_crispy_final.html and paste it over your current code intemplates/jobs/joke_writer.html.
This template includes the novalidate attribute of the <form> tag so that you can skipclient-side validation to test the server-side validation. If you want to use client-sidevalidation as well, you should remove the novalidate attribute.
The resulting form looks like this:
And here is the result of an invalid form submission:
LESSON 8: Forms and Widgets | 263
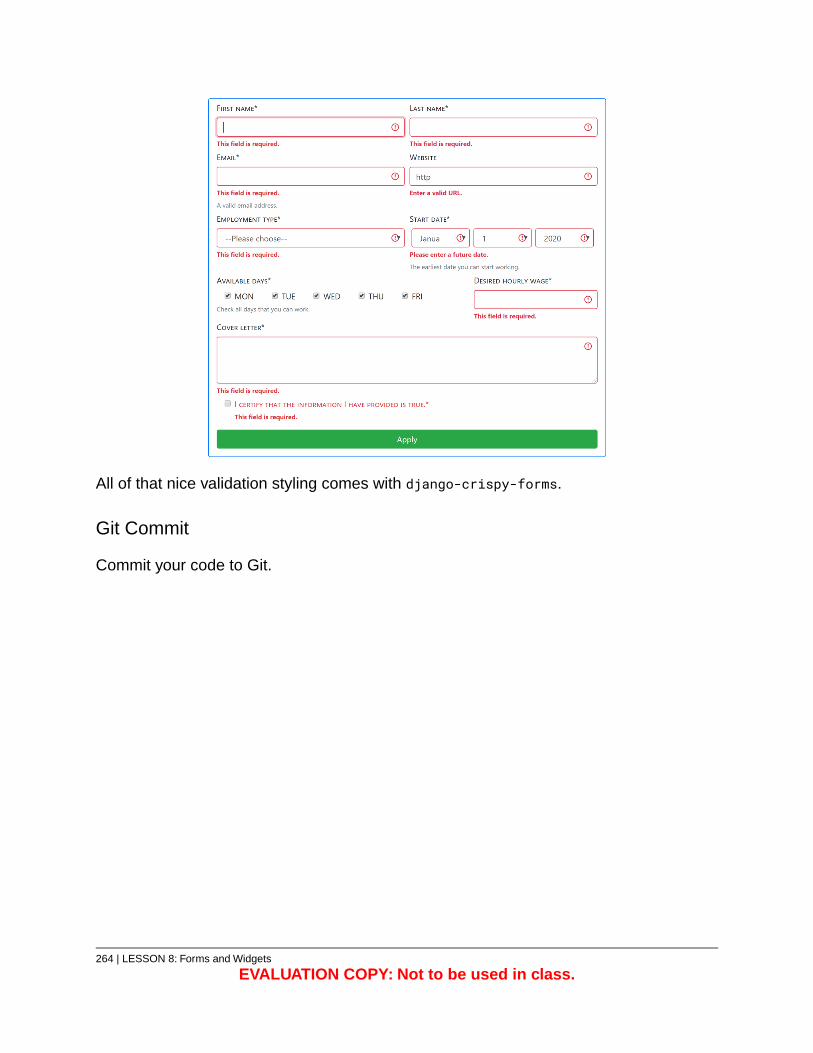
All of that nice validation styling comes with django-crispy-forms.
Git Commit
Commit your code to Git.
264 | LESSON 8: Forms and Widgets
EVALUATION COPY: Not to be used in class.
Exercise 35: Making the Joke Form Crispy 5 to 10 minutes
Open templates/jokes/joke_form.html and modify it to use django-crispy-forms. Youonly need to add one line of code, change another, and delete the opening and closing<table> tags.
Test your solution by visiting http://127.0.0.1:8000/jokes/ and clicking the buttons tocreate a new joke. Or you can update an existing joke. The create and update views usethe same form.
LESSON 8: Forms and Widgets | 265
Solution: templates/jokes/joke_form.html
{% extends "_base.html" %}1.{% load crispy_forms_tags %}2.
3.{% block title %}Add/Update Joke{% endblock %}4.{% block main %}5.<div class="card border-primary m-auto mb-3 p-3"6.style="max-width: 30rem">7.<form method="post">8.{% csrf_token %}9.{{ form|crispy }}10.<button class="btn btn-success float-right">Submit</button>11.
</form>12.</div>13.
{% endblock %}14.
Git Commit
Commit your code to Git.
Conclusion
In this lesson, you have learned to build, process, validate, and style Django forms.
266 | LESSON 8: Forms and Widgets
EVALUATION COPY: Not to be used in class.
LESSON 9ModelForms
Topics Covered
Models revisited.
Model fields.
Model field arguments.
ModelForms.
Many-to-one relationships.
Many-to-many relationships.
Introduction
In this lesson, you will learn to create relationships between models and to use ModelFormsto manage those relationships.
❋
9.1. Models
A model, according to the documentation, is “the single, definitive source of informationabout your data.”59
Some basics:
1. A model maps to a table in a database.
2. Each attribute in the model maps to a field within the table.
3. By default, models are given a primary key id field, which is an auto-incrementinginteger. While this can be overridden, there is generally no reason to do so.
59. https://docs.djangoproject.com/en/3.1/topics/db/models/
LESSON 9: ModelForms | 267
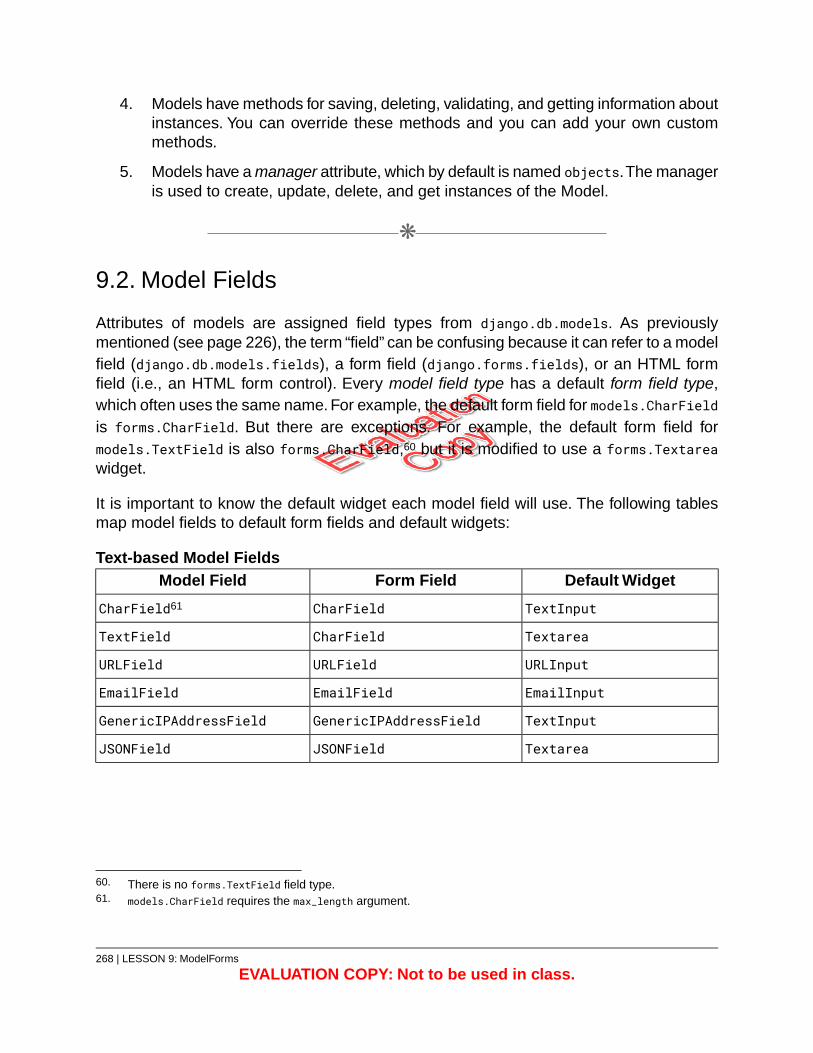
4. Models have methods for saving, deleting, validating, and getting information aboutinstances. You can override these methods and you can add your own custommethods.
5. Models have a manager attribute, which by default is named objects.The manageris used to create, update, delete, and get instances of the Model.
❋
9.2. Model Fields
Attributes of models are assigned field types from django.db.models. As previouslymentioned (see page 226), the term “field” can be confusing because it can refer to a modelfield (django.db.models.fields), a form field (django.forms.fields), or an HTML formfield (i.e., an HTML form control). Every model field type has a default form field type,which often uses the same name. For example, the default form field for models.CharFieldis forms.CharField. But there are exceptions. For example, the default form field formodels.TextField is also forms.CharField,60 but it is modified to use a forms.Textareawidget.
It is important to know the default widget each model field will use. The following tablesmap model fields to default form fields and default widgets:
Text-based Model FieldsDefault WidgetForm FieldModel Field
TextInputCharFieldCharField61
TextareaCharFieldTextField
URLInputURLFieldURLField
EmailInputEmailFieldEmailField
TextInputGenericIPAddressFieldGenericIPAddressField
TextareaJSONFieldJSONField
60. There is no forms.TextField field type.61. models.CharField requires the max_length argument.
268 | LESSON 9: ModelForms
EVALUATION COPY: Not to be used in class.
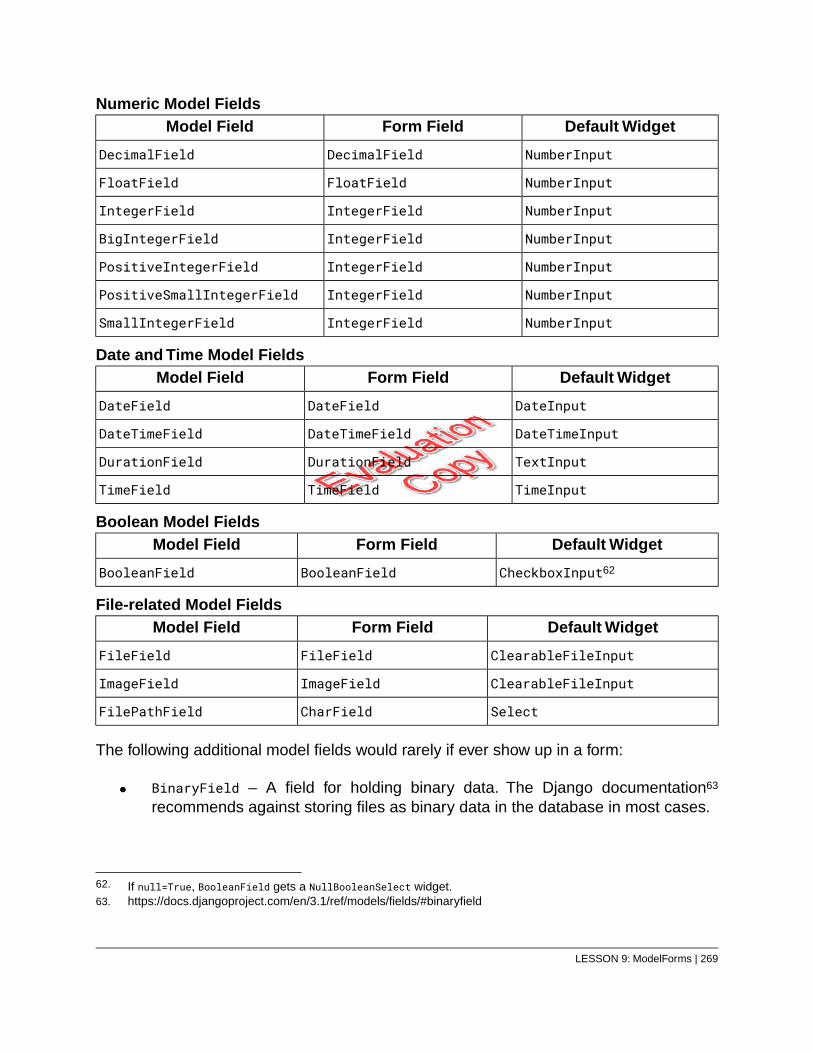
Numeric Model FieldsDefault WidgetForm FieldModel Field
NumberInputDecimalFieldDecimalField
NumberInputFloatFieldFloatField
NumberInputIntegerFieldIntegerField
NumberInputIntegerFieldBigIntegerField
NumberInputIntegerFieldPositiveIntegerField
NumberInputIntegerFieldPositiveSmallIntegerField
NumberInputIntegerFieldSmallIntegerField
Date and Time Model FieldsDefault WidgetForm FieldModel Field
DateInputDateFieldDateField
DateTimeInputDateTimeFieldDateTimeField
TextInputDurationFieldDurationField
TimeInputTimeFieldTimeField
Boolean Model FieldsDefault WidgetForm FieldModel Field
CheckboxInput62BooleanFieldBooleanField
File-related Model FieldsDefault WidgetForm FieldModel Field
ClearableFileInputFileFieldFileField
ClearableFileInputImageFieldImageField
SelectCharFieldFilePathField
The following additional model fields would rarely if ever show up in a form:
BinaryField – A field for holding binary data. The Django documentation63
recommends against storing files as binary data in the database in most cases.
62. If null=True, BooleanField gets a NullBooleanSelect widget.63. https://docs.djangoproject.com/en/3.1/ref/models/fields/#binaryfield
LESSON 9: ModelForms | 269
SlugField – A field for holding slugs. Slugs are usually generated rather thanadded via a form.
UUIDField – A field that is sometimes used in addition to or in place of the defaultauto-incrementing integer primary key to uniquely identify a record. A UUID wouldusually be generated rather than added in a form.
❋
9.3. Model Field Arguments
All field types can take the following arguments:64
default – The default value to use for the field.
blank (boolean) – If set to True, the field can be left blank. The default is False.
unique (boolean) – If set to True, no two records in the table may have the samevalue for this field. The default is False.
null (boolean) – If set to True, null values are allowed in the database and emptyfields will be stored as null. The default is False.
help_text – Help text to be displayed with the form widget and in documentation.You can include HTML as it will not be escaped.
verbose_name – A friendly name for the field. If this isn’t provided, Django will createit by replacing underscores in the attribute name with spaces. For example,first_name will become “first name”. If this is the first argument passed to the fieldtype, it can be passed as a positional argument (i.e., without usingverbose_name="…").
choices – A sequence of 2-item tuples to be used as options within a select list.
Again, all field types can take the preceding arguments, but some can take additionalarguments.
❋
9.4. ModelForms
Let’s take another look at the Joke model you have been working with:
64. There are additional arguments that all field types can take; however, the ones listed here are the most useful.
270 | LESSON 9: ModelForms
EVALUATION COPY: Not to be used in class.
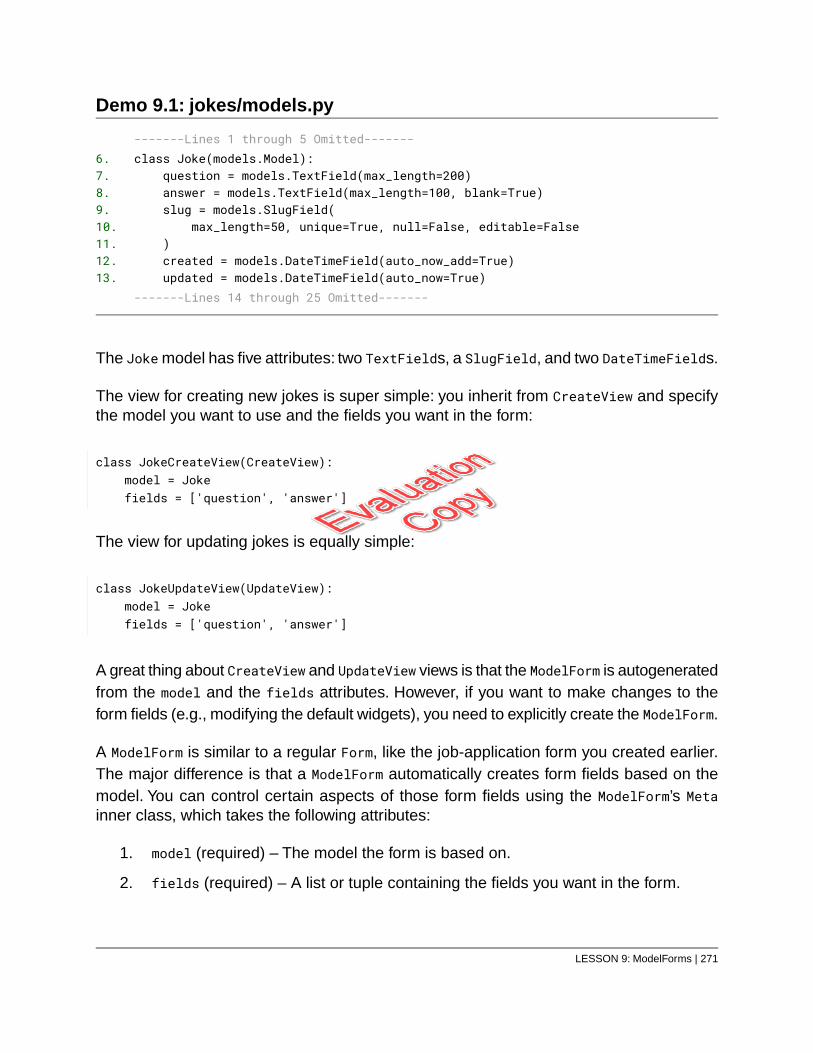
Demo 9.1: jokes/models.py
-------Lines 1 through 5 Omitted-------class Joke(models.Model):6.
question = models.TextField(max_length=200)7.answer = models.TextField(max_length=100, blank=True)8.slug = models.SlugField(9.
max_length=50, unique=True, null=False, editable=False10.)11.created = models.DateTimeField(auto_now_add=True)12.updated = models.DateTimeField(auto_now=True)13.
-------Lines 14 through 25 Omitted-------
The Joke model has five attributes: two TextFields, a SlugField, and two DateTimeFields.
The view for creating new jokes is super simple: you inherit from CreateView and specifythe model you want to use and the fields you want in the form:
class JokeCreateView(CreateView):model = Jokefields = ['question', 'answer']
The view for updating jokes is equally simple:
class JokeUpdateView(UpdateView):model = Jokefields = ['question', 'answer']
A great thing about CreateView and UpdateView views is that the ModelForm is autogeneratedfrom the model and the fields attributes. However, if you want to make changes to theform fields (e.g., modifying the default widgets), you need to explicitly create the ModelForm.
A ModelForm is similar to a regular Form, like the job-application form you created earlier.The major difference is that a ModelForm automatically creates form fields based on themodel. You can control certain aspects of those form fields using the ModelForm’s Metainner class, which takes the following attributes:
1. model (required) – The model the form is based on.
2. fields (required) – A list or tuple containing the fields you want in the form.
LESSON 9: ModelForms | 271
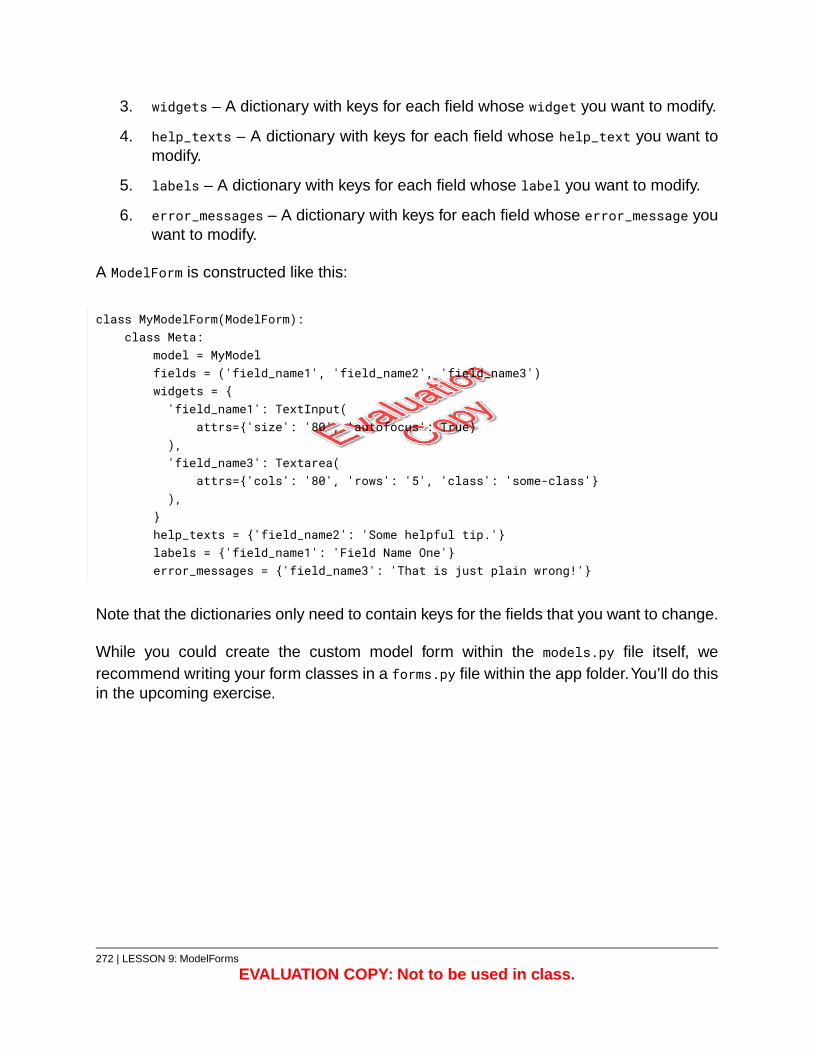
3. widgets – A dictionary with keys for each field whose widget you want to modify.
4. help_texts – A dictionary with keys for each field whose help_text you want tomodify.
5. labels – A dictionary with keys for each field whose label you want to modify.
6. error_messages – A dictionary with keys for each field whose error_message youwant to modify.
A ModelForm is constructed like this:
class MyModelForm(ModelForm):class Meta:
model = MyModelfields = ('field_name1', 'field_name2', 'field_name3')widgets = {'field_name1': TextInput(
attrs={'size': '80', 'autofocus': True}),'field_name3': Textarea(
attrs={'cols': '80', 'rows': '5', 'class': 'some-class'}),
}help_texts = {'field_name2': 'Some helpful tip.'}labels = {'field_name1': 'Field Name One'}error_messages = {'field_name3': 'That is just plain wrong!'}
Note that the dictionaries only need to contain keys for the fields that you want to change.
While you could create the custom model form within the models.py file itself, werecommend writing your form classes in a forms.py file within the app folder.You’ll do thisin the upcoming exercise.
272 | LESSON 9: ModelForms
EVALUATION COPY: Not to be used in class.
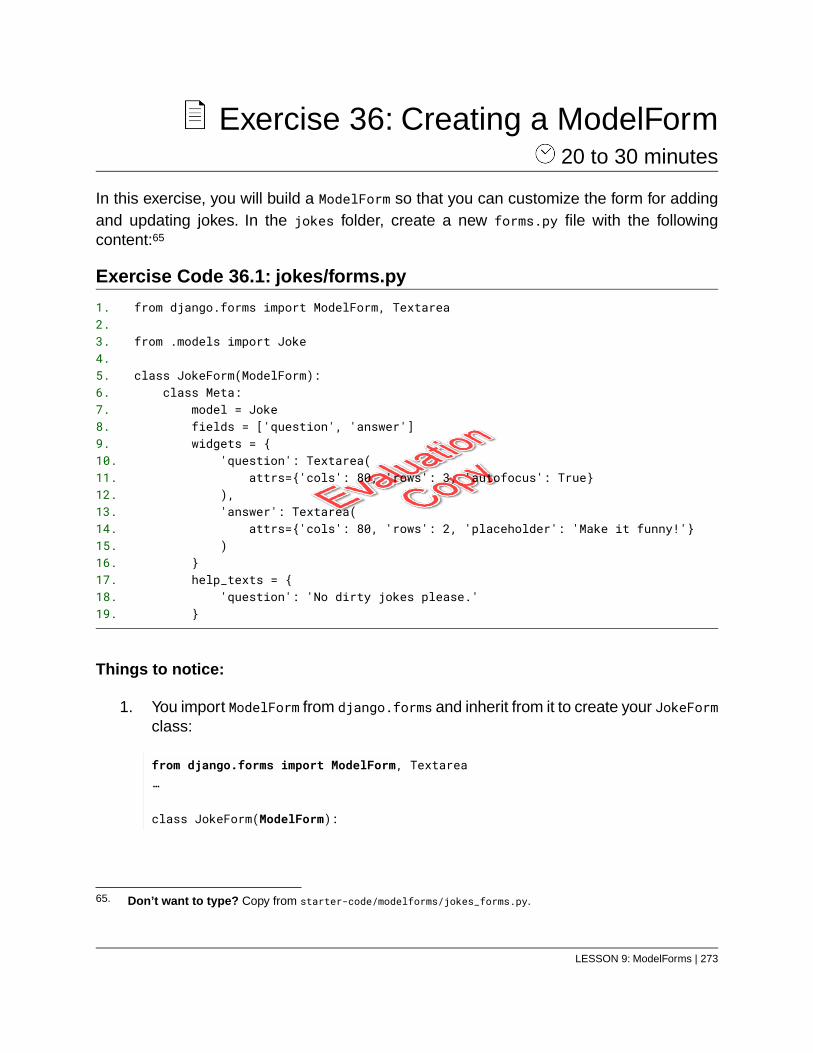
Exercise 36: Creating a ModelForm 20 to 30 minutes
In this exercise, you will build a ModelForm so that you can customize the form for addingand updating jokes. In the jokes folder, create a new forms.py file with the followingcontent:65
Exercise Code 36.1: jokes/forms.py
from django.forms import ModelForm, Textarea1.2.
from .models import Joke3.4.
class JokeForm(ModelForm):5.class Meta:6.
model = Joke7.fields = ['question', 'answer']8.widgets = {9.
'question': Textarea(10.attrs={'cols': 80, 'rows': 3, 'autofocus': True}11.
),12.'answer': Textarea(13.
attrs={'cols': 80, 'rows': 2, 'placeholder': 'Make it funny!'}14.)15.
}16.help_texts = {17.
'question': 'No dirty jokes please.'18.}19.
Things to notice:
1. You import ModelForm from django.forms and inherit from it to create your JokeFormclass:
from django.forms import ModelForm, Textarea…
class JokeForm(ModelForm):
65. Don’t want to type? Copy from starter-code/modelforms/jokes_forms.py.
LESSON 9: ModelForms | 273
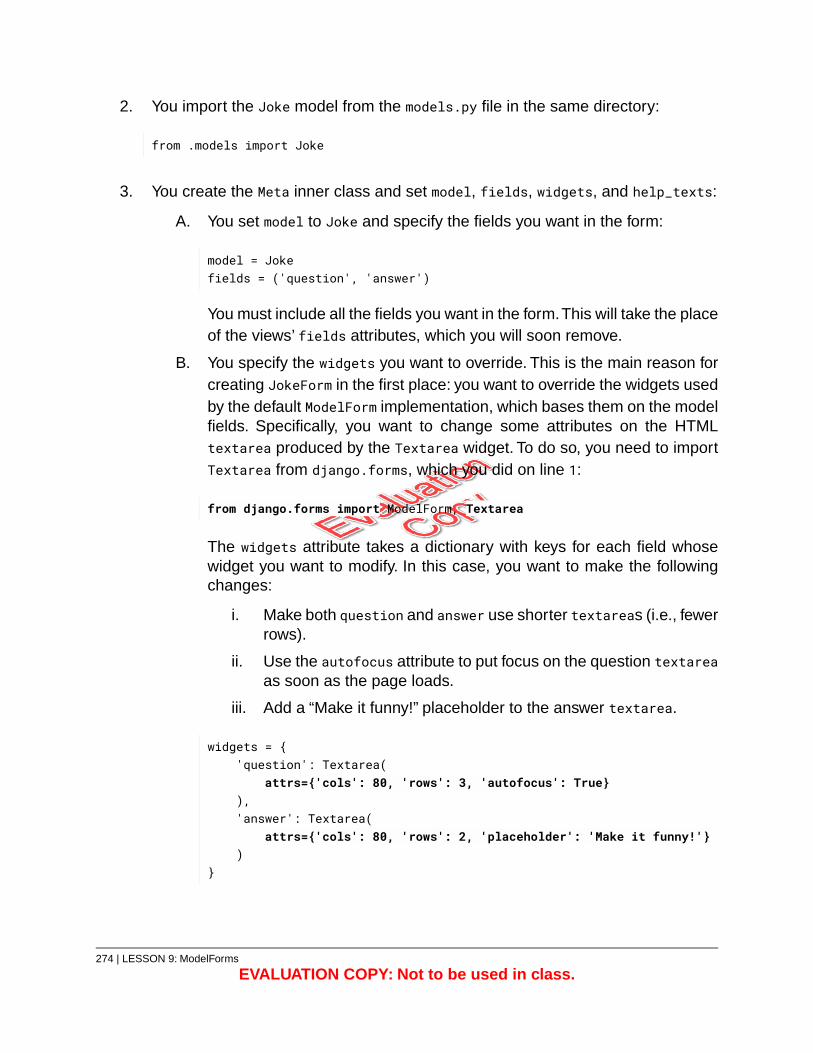
2. You import the Joke model from the models.py file in the same directory:
from .models import Joke
3. You create the Meta inner class and set model, fields, widgets, and help_texts:
A. You set model to Joke and specify the fields you want in the form:
model = Jokefields = ('question', 'answer')
You must include all the fields you want in the form.This will take the placeof the views’ fields attributes, which you will soon remove.
B. You specify the widgets you want to override. This is the main reason forcreating JokeForm in the first place: you want to override the widgets usedby the default ModelForm implementation, which bases them on the modelfields. Specifically, you want to change some attributes on the HTMLtextarea produced by the Textarea widget. To do so, you need to importTextarea from django.forms, which you did on line 1:
from django.forms import ModelForm, Textarea
The widgets attribute takes a dictionary with keys for each field whosewidget you want to modify. In this case, you want to make the followingchanges:
i. Make both question and answer use shorter textareas (i.e., fewerrows).
ii. Use the autofocus attribute to put focus on the question textareaas soon as the page loads.
iii. Add a “Make it funny!” placeholder to the answer textarea.
widgets = {'question': Textarea(
attrs={'cols': 80, 'rows': 3, 'autofocus': True}),'answer': Textarea(
attrs={'cols': 80, 'rows': 2, 'placeholder': 'Make it funny!'})
}
274 | LESSON 9: ModelForms
EVALUATION COPY: Not to be used in class.
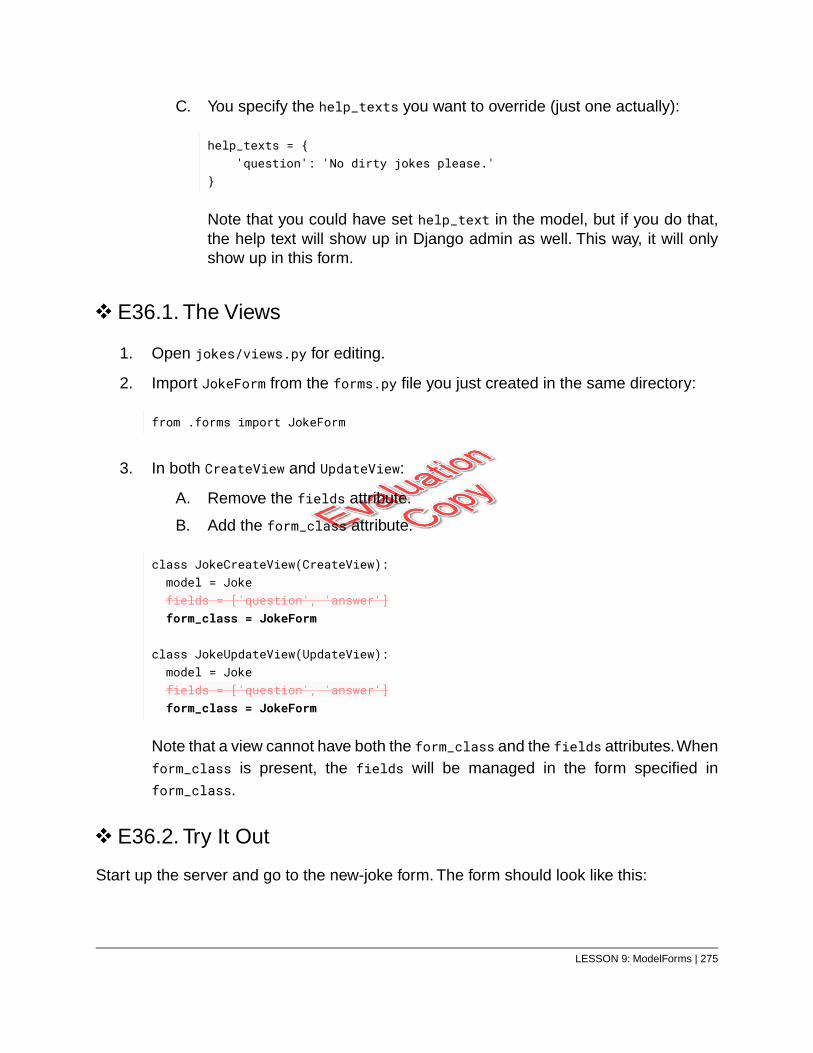
C. You specify the help_texts you want to override (just one actually):
help_texts = {'question': 'No dirty jokes please.'
}
Note that you could have set help_text in the model, but if you do that,the help text will show up in Django admin as well. This way, it will onlyshow up in this form.
E36.1. The Views
1. Open jokes/views.py for editing.
2. Import JokeForm from the forms.py file you just created in the same directory:
from .forms import JokeForm
3. In both CreateView and UpdateView:
A. Remove the fields attribute.
B. Add the form_class attribute.
class JokeCreateView(CreateView):model = Jokefields = ['question', 'answer']form_class = JokeForm
class JokeUpdateView(UpdateView):model = Jokefields = ['question', 'answer']form_class = JokeForm
Note that a view cannot have both the form_class and the fields attributes.Whenform_class is present, the fields will be managed in the form specified inform_class.
E36.2. Try It Out
Start up the server and go to the new-joke form. The form should look like this:
LESSON 9: ModelForms | 275
Notice the resized textareas and the help text below the question textarea. Also noticethat joke field gets focus when the page loads.
Git Commit
Commit your code to Git.
❋
276 | LESSON 9: ModelForms
EVALUATION COPY: Not to be used in class.
9.5. Many-to-One Relationships
Many-to-One relationships are created with ForeignKey fields, like this:
class Author(models.Model):…
class Book(models.Model):author = models.ForeignKey(Author, on_delete=models.CASCADE)
The on_delete argument is required. If it is set to models.CASCADE then all the objects ofa class (e.g., Book) will be deleted when the object referenced by the foreign key (e.g., anAuthor) is deleted. If you want to prevent users from deleting in such cases (e.g., preventauthors who have books in the database from being deleted), set on_delete tomodels.PROTECT. In that case, the user would have to delete all of the author’s book beforedeleting the author.
LESSON 9: ModelForms | 277
Exercise 37: Adding Joke Categories 30 to 45 minutes
1. Open jokes/models.py and add this Category model at the bottom:66
Exercise Code 37.1: jokes/models.py
-------Lines 1 through 28 Omitted-------class Category(models.Model):29.
category = models.CharField(max_length=50)30.slug = models.SlugField(31.
max_length=50, unique=True, null=False, editable=False32.)33.created = models.DateTimeField(auto_now_add=True)34.updated = models.DateTimeField(auto_now=True)35.
36.def get_absolute_url(self):37.
return reverse('jokes:category', args=[self.slug])38.39.
def save(self, *args, **kwargs):40.if not self.slug:41.
value = str(self)42.self.slug = unique_slug(value, type(self))43.
super().save(*args, **kwargs)44.45.
def __str__(self):46.return self.category47.
Make sure you understand the code used to make this model. It is similar to theJoke model.
2. In the Joke model, below the answer field, add a foreign key to the new Categorymodel:
category = models.ForeignKey(Category, on_delete=models.PROTECT)
You use models.PROTECT, because you don’t want to let users delete categoriesthat have jokes in them.
66. Don’t want to type? Copy from starter-code/modelforms/jokes_models.py.
278 | LESSON 9: ModelForms
EVALUATION COPY: Not to be used in class.
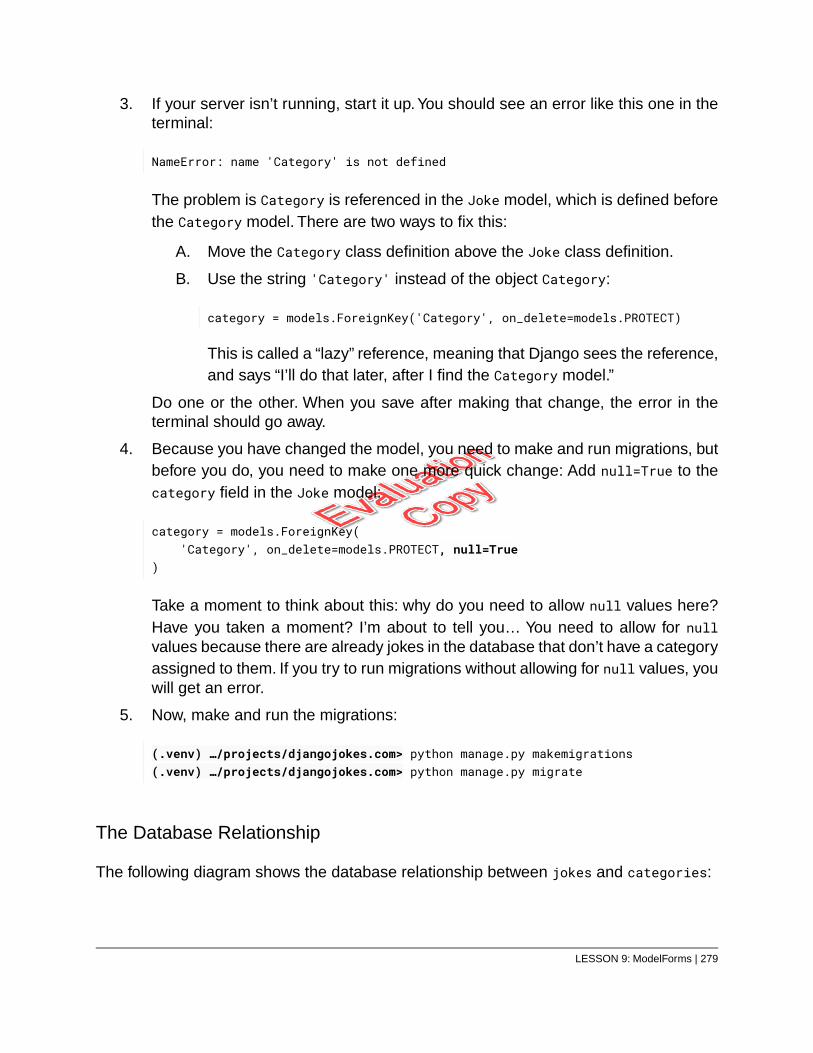
3. If your server isn’t running, start it up.You should see an error like this one in theterminal:
NameError: name 'Category' is not defined
The problem is Category is referenced in the Joke model, which is defined beforethe Category model. There are two ways to fix this:
A. Move the Category class definition above the Joke class definition.
B. Use the string 'Category' instead of the object Category:
category = models.ForeignKey('Category', on_delete=models.PROTECT)
This is called a “lazy” reference, meaning that Django sees the reference,and says “I’ll do that later, after I find the Category model.”
Do one or the other. When you save after making that change, the error in theterminal should go away.
4. Because you have changed the model, you need to make and run migrations, butbefore you do, you need to make one more quick change: Add null=True to thecategory field in the Joke model:
category = models.ForeignKey('Category', on_delete=models.PROTECT, null=True
)
Take a moment to think about this: why do you need to allow null values here?Have you taken a moment? I’m about to tell you… You need to allow for nullvalues because there are already jokes in the database that don’t have a categoryassigned to them. If you try to run migrations without allowing for null values, youwill get an error.
5. Now, make and run the migrations:
(.venv) …/projects/djangojokes.com> python manage.py makemigrations(.venv) …/projects/djangojokes.com> python manage.py migrate
The Database Relationship
The following diagram shows the database relationship between jokes and categories:
LESSON 9: ModelForms | 279
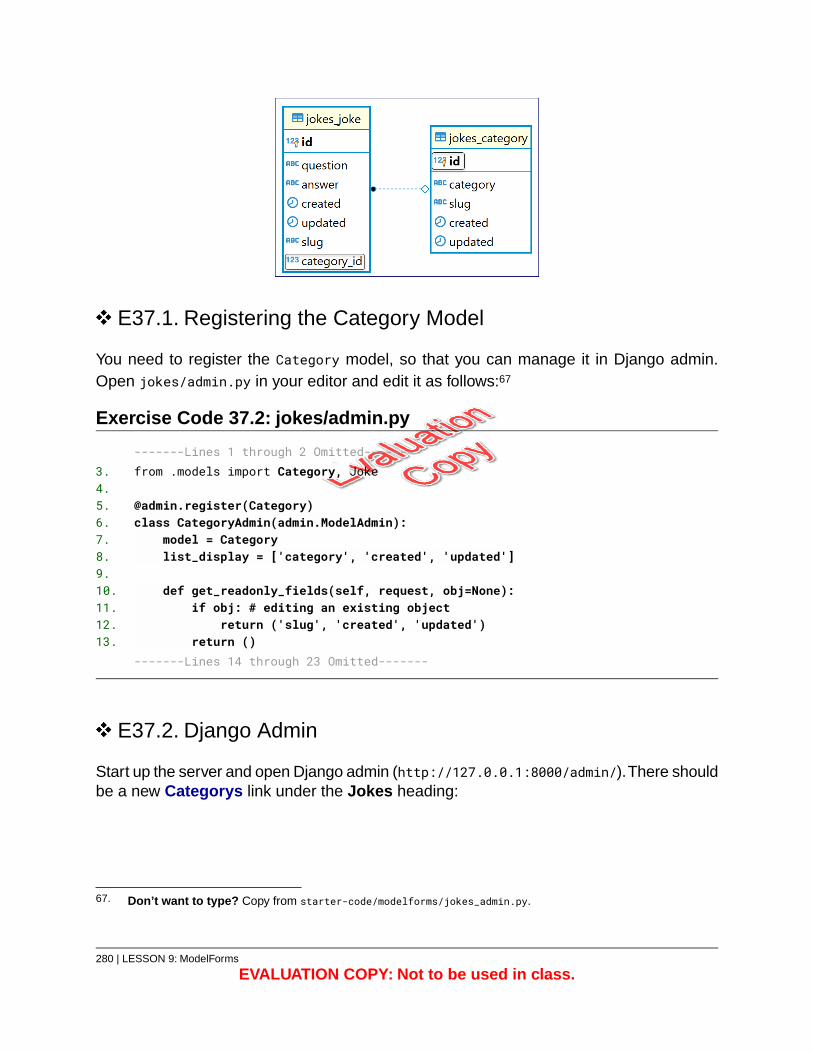
E37.1. Registering the Category Model
You need to register the Category model, so that you can manage it in Django admin.Open jokes/admin.py in your editor and edit it as follows:67
Exercise Code 37.2: jokes/admin.py
-------Lines 1 through 2 Omitted-------from .models import Category, Joke3.
[email protected](Category)5.class CategoryAdmin(admin.ModelAdmin):6.
model = Category7.list_display = ['category', 'created', 'updated']8.
9.def get_readonly_fields(self, request, obj=None):10.
if obj: # editing an existing object11.return ('slug', 'created', 'updated')12.
return ()13.-------Lines 14 through 23 Omitted-------
E37.2. Django Admin
Start up the server and open Django admin (http://127.0.0.1:8000/admin/).There shouldbe a new Categorys link under the Jokes heading:
67. Don’t want to type? Copy from starter-code/modelforms/jokes_admin.py.
280 | LESSON 9: ModelForms
EVALUATION COPY: Not to be used in class.
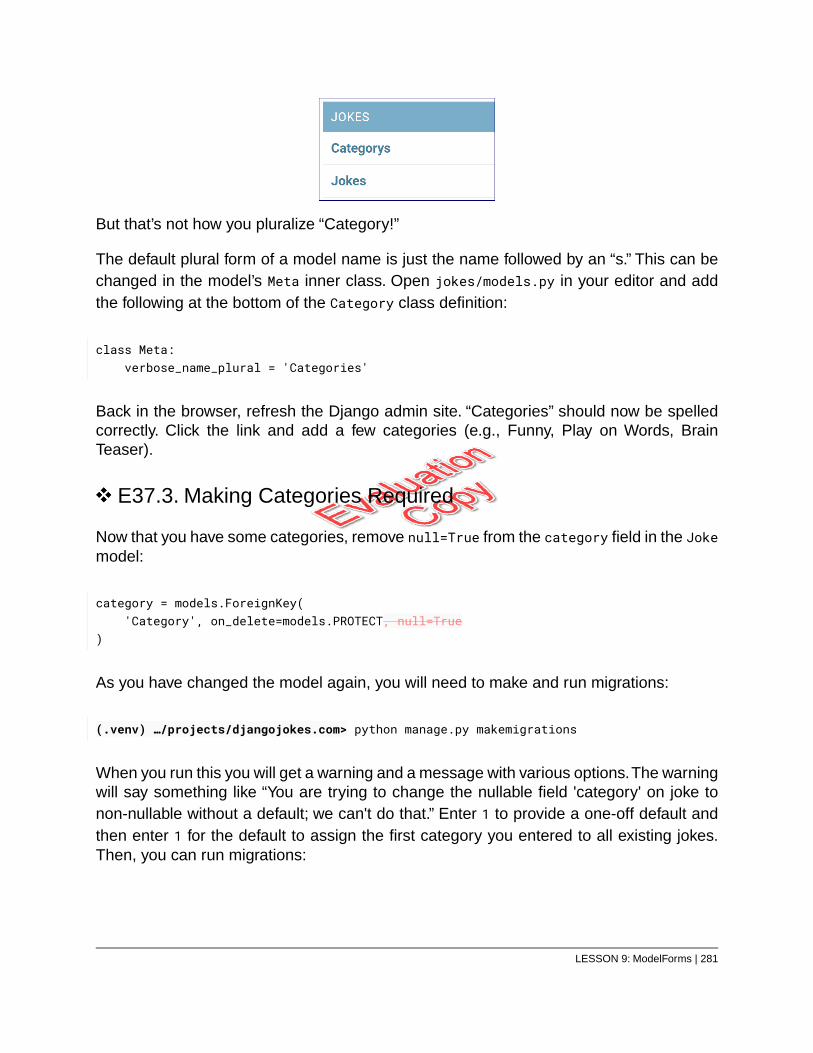
But that’s not how you pluralize “Category!”
The default plural form of a model name is just the name followed by an “s.” This can bechanged in the model’s Meta inner class. Open jokes/models.py in your editor and addthe following at the bottom of the Category class definition:
class Meta:verbose_name_plural = 'Categories'
Back in the browser, refresh the Django admin site. “Categories” should now be spelledcorrectly. Click the link and add a few categories (e.g., Funny, Play on Words, BrainTeaser).
E37.3. Making Categories Required
Now that you have some categories, remove null=True from the category field in the Jokemodel:
category = models.ForeignKey('Category', on_delete=models.PROTECT, null=True
)
As you have changed the model again, you will need to make and run migrations:
(.venv) …/projects/djangojokes.com> python manage.py makemigrations
When you run this you will get a warning and a message with various options.The warningwill say something like “You are trying to change the nullable field 'category' on joke tonon-nullable without a default; we can't do that.” Enter 1 to provide a one-off default andthen enter 1 for the default to assign the first category you entered to all existing jokes.Then, you can run migrations:
LESSON 9: ModelForms | 281
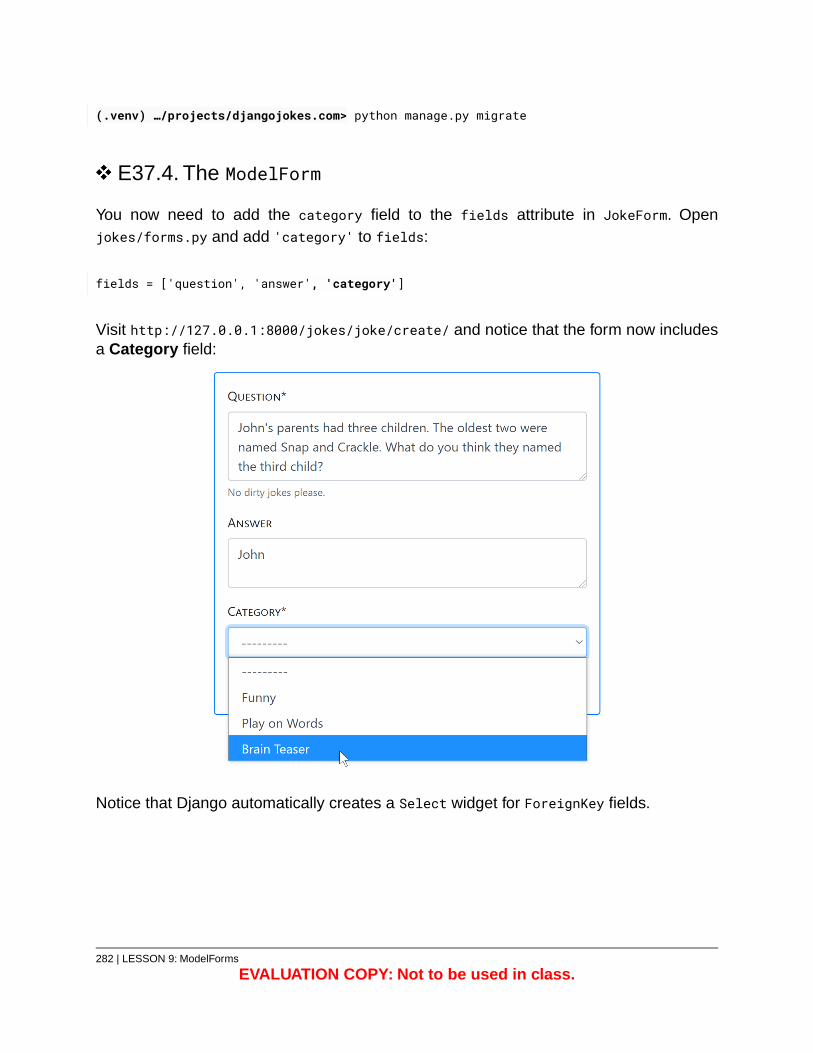
(.venv) …/projects/djangojokes.com> python manage.py migrate
E37.4. The ModelForm
You now need to add the category field to the fields attribute in JokeForm. Openjokes/forms.py and add 'category' to fields:
fields = ['question', 'answer', 'category']
Visit http://127.0.0.1:8000/jokes/joke/create/ and notice that the form now includesa Category field:
Notice that Django automatically creates a Select widget for ForeignKey fields.
282 | LESSON 9: ModelForms
EVALUATION COPY: Not to be used in class.
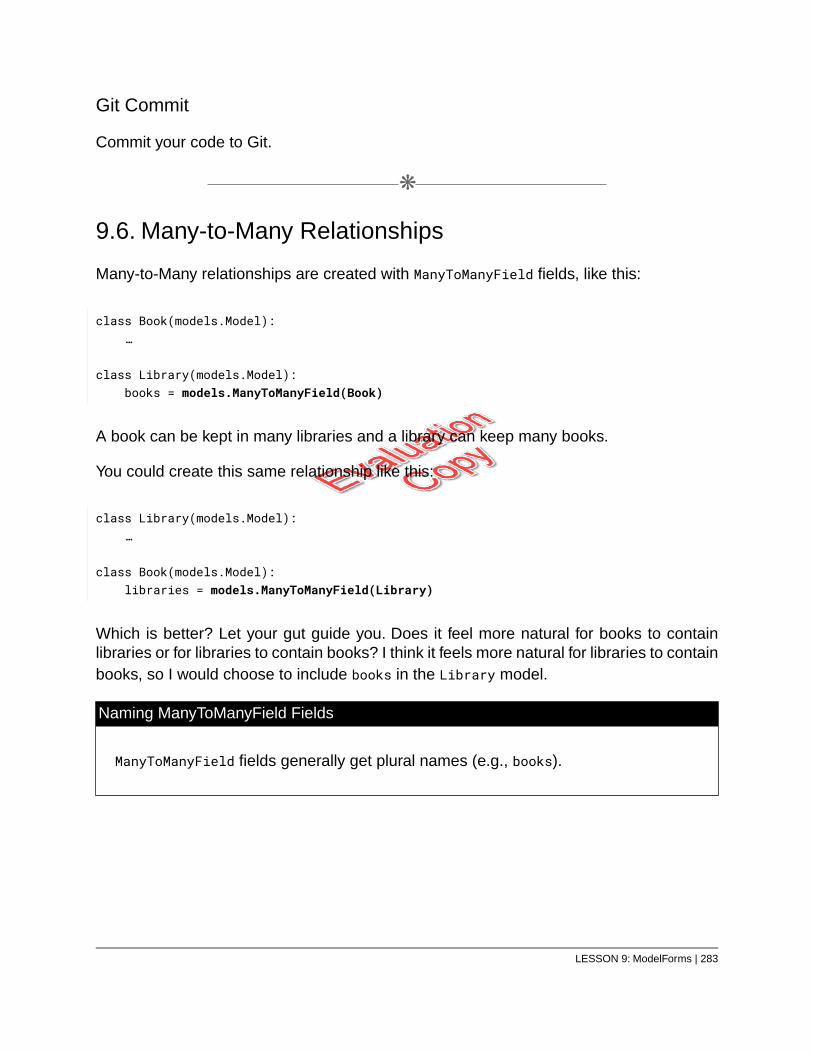
Git Commit
Commit your code to Git.
❋
9.6. Many-to-Many Relationships
Many-to-Many relationships are created with ManyToManyField fields, like this:
class Book(models.Model):…
class Library(models.Model):books = models.ManyToManyField(Book)
A book can be kept in many libraries and a library can keep many books.
You could create this same relationship like this:
class Library(models.Model):…
class Book(models.Model):libraries = models.ManyToManyField(Library)
Which is better? Let your gut guide you. Does it feel more natural for books to containlibraries or for libraries to contain books? I think it feels more natural for libraries to containbooks, so I would choose to include books in the Library model.
Naming ManyToManyField Fields
ManyToManyField fields generally get plural names (e.g., books).
LESSON 9: ModelForms | 283
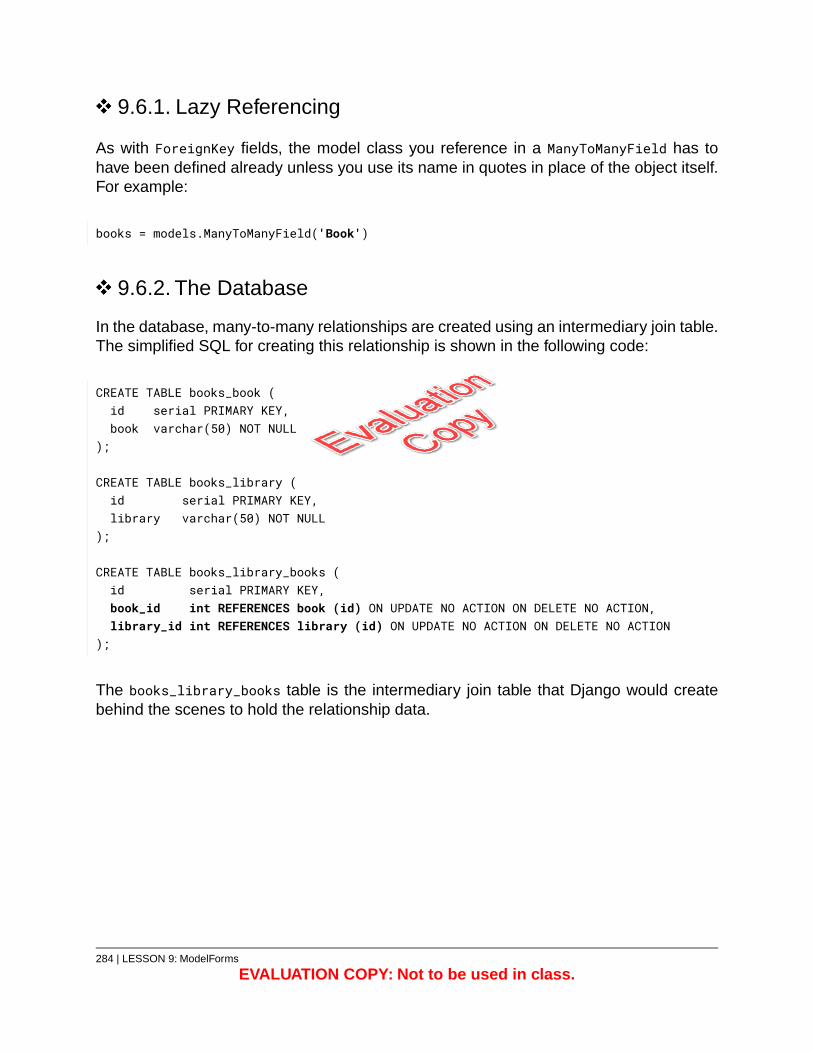
9.6.1. Lazy Referencing
As with ForeignKey fields, the model class you reference in a ManyToManyField has tohave been defined already unless you use its name in quotes in place of the object itself.For example:
books = models.ManyToManyField('Book')
9.6.2. The Database
In the database, many-to-many relationships are created using an intermediary join table.The simplified SQL for creating this relationship is shown in the following code:
CREATE TABLE books_book (id serial PRIMARY KEY,book varchar(50) NOT NULL
);
CREATE TABLE books_library (id serial PRIMARY KEY,library varchar(50) NOT NULL
);
CREATE TABLE books_library_books (id serial PRIMARY KEY,book_id int REFERENCES book (id) ON UPDATE NO ACTION ON DELETE NO ACTION,library_id int REFERENCES library (id) ON UPDATE NO ACTION ON DELETE NO ACTION
);
The books_library_books table is the intermediary join table that Django would createbehind the scenes to hold the relationship data.
284 | LESSON 9: ModelForms
EVALUATION COPY: Not to be used in class.
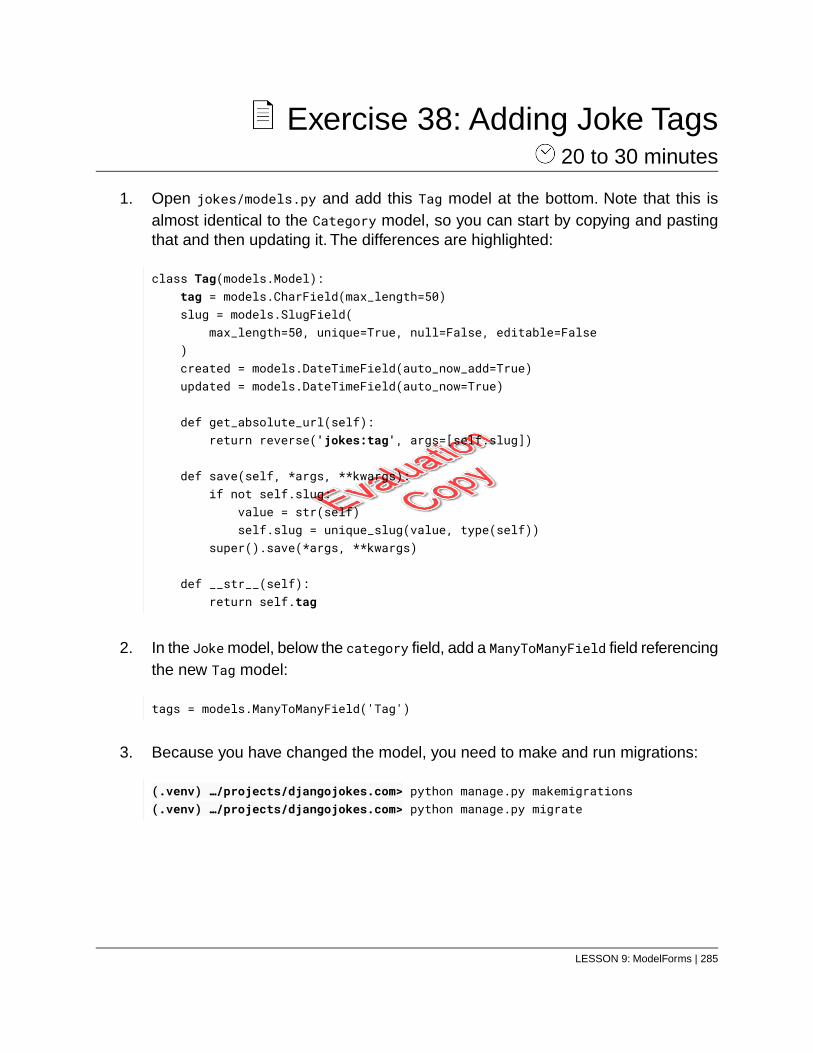
Exercise 38: Adding Joke Tags 20 to 30 minutes
1. Open jokes/models.py and add this Tag model at the bottom. Note that this isalmost identical to the Category model, so you can start by copying and pastingthat and then updating it. The differences are highlighted:
class Tag(models.Model):tag = models.CharField(max_length=50)slug = models.SlugField(
max_length=50, unique=True, null=False, editable=False)created = models.DateTimeField(auto_now_add=True)updated = models.DateTimeField(auto_now=True)
def get_absolute_url(self):return reverse('jokes:tag', args=[self.slug])
def save(self, *args, **kwargs):if not self.slug:
value = str(self)self.slug = unique_slug(value, type(self))
super().save(*args, **kwargs)
def __str__(self):return self.tag
2. In the Joke model, below the category field, add a ManyToManyField field referencingthe new Tag model:
tags = models.ManyToManyField('Tag')
3. Because you have changed the model, you need to make and run migrations:
(.venv) …/projects/djangojokes.com> python manage.py makemigrations(.venv) …/projects/djangojokes.com> python manage.py migrate
LESSON 9: ModelForms | 285
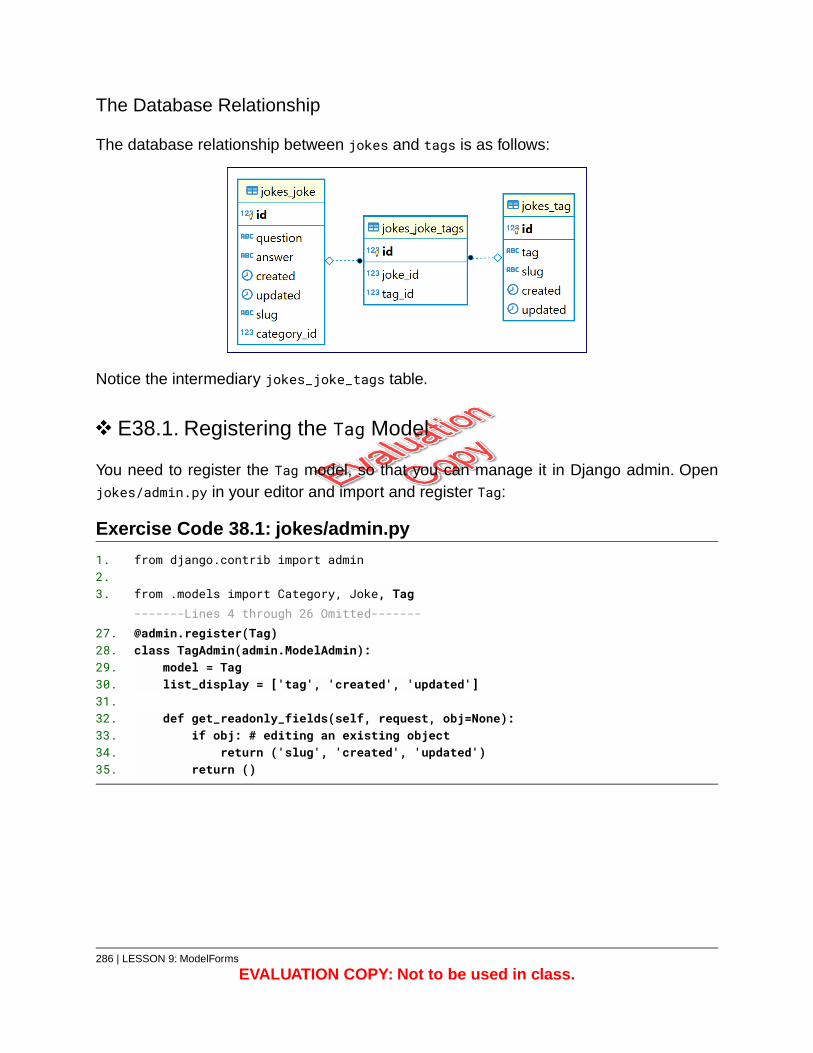
The Database Relationship
The database relationship between jokes and tags is as follows:
Notice the intermediary jokes_joke_tags table.
E38.1. Registering the Tag Model
You need to register the Tag model, so that you can manage it in Django admin. Openjokes/admin.py in your editor and import and register Tag:
Exercise Code 38.1: jokes/admin.py
from django.contrib import admin1.2.
from .models import Category, Joke, Tag3.-------Lines 4 through 26 [email protected](Tag)27.class TagAdmin(admin.ModelAdmin):28.
model = Tag29.list_display = ['tag', 'created', 'updated']30.
31.def get_readonly_fields(self, request, obj=None):32.
if obj: # editing an existing object33.return ('slug', 'created', 'updated')34.
return ()35.
286 | LESSON 9: ModelForms
EVALUATION COPY: Not to be used in class.
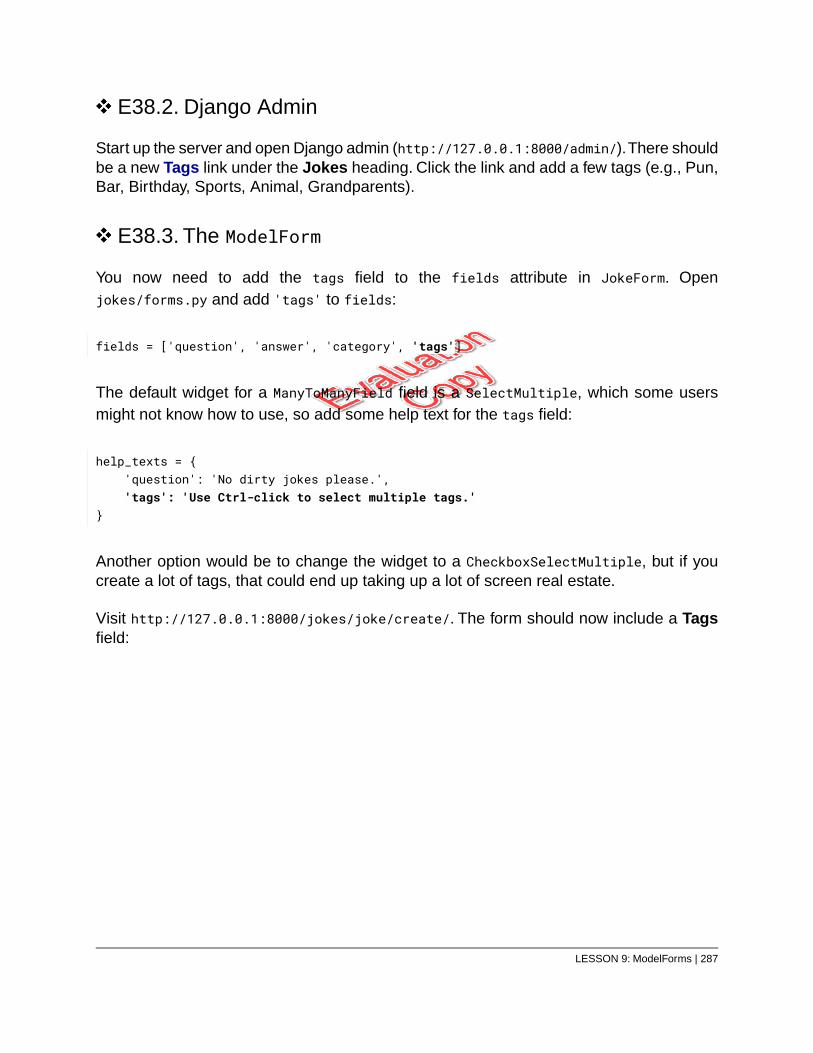
E38.2. Django Admin
Start up the server and open Django admin (http://127.0.0.1:8000/admin/).There shouldbe a new Tags link under the Jokes heading. Click the link and add a few tags (e.g., Pun,Bar, Birthday, Sports, Animal, Grandparents).
E38.3. The ModelForm
You now need to add the tags field to the fields attribute in JokeForm. Openjokes/forms.py and add 'tags' to fields:
fields = ['question', 'answer', 'category', 'tags']
The default widget for a ManyToManyField field is a SelectMultiple, which some usersmight not know how to use, so add some help text for the tags field:
help_texts = {'question': 'No dirty jokes please.','tags': 'Use Ctrl-click to select multiple tags.'
}
Another option would be to change the widget to a CheckboxSelectMultiple, but if youcreate a lot of tags, that could end up taking up a lot of screen real estate.
Visit http://127.0.0.1:8000/jokes/joke/create/. The form should now include a Tagsfield:
LESSON 9: ModelForms | 287
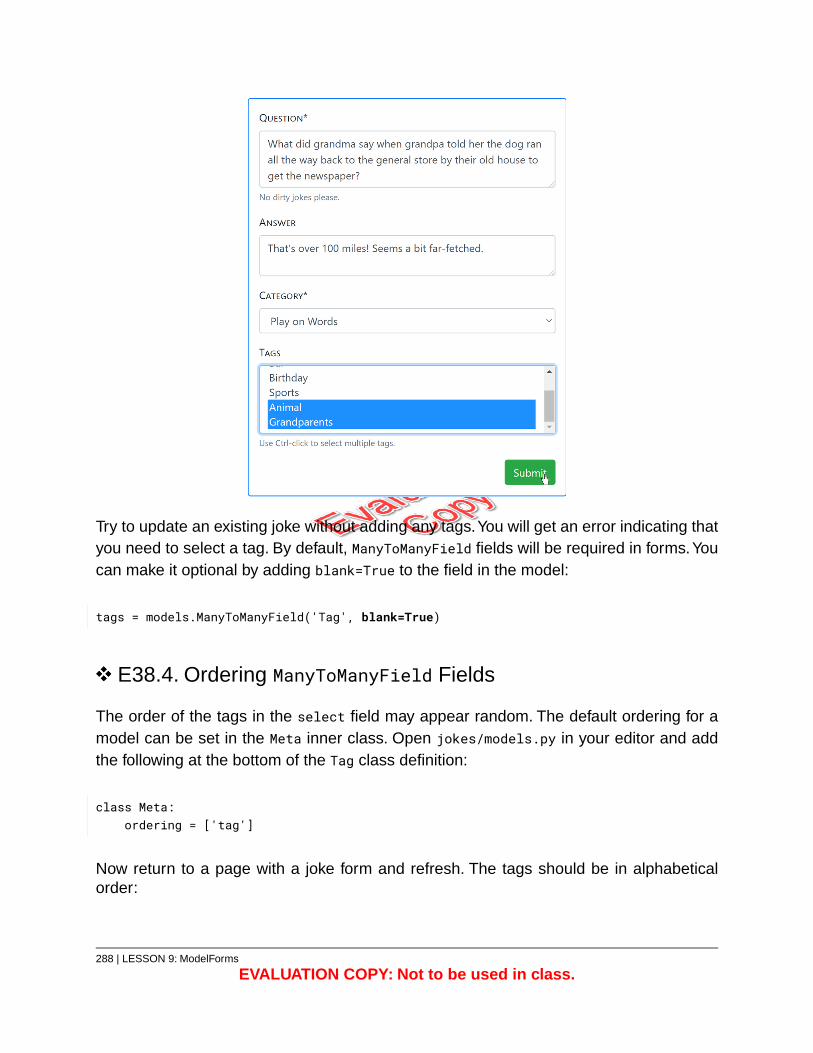
Try to update an existing joke without adding any tags.You will get an error indicating thatyou need to select a tag. By default, ManyToManyField fields will be required in forms.Youcan make it optional by adding blank=True to the field in the model:
tags = models.ManyToManyField('Tag', blank=True)
E38.4. Ordering ManyToManyField Fields
The order of the tags in the select field may appear random. The default ordering for amodel can be set in the Meta inner class. Open jokes/models.py in your editor and addthe following at the bottom of the Tag class definition:
class Meta:ordering = ['tag']
Now return to a page with a joke form and refresh. The tags should be in alphabeticalorder:
288 | LESSON 9: ModelForms
EVALUATION COPY: Not to be used in class.
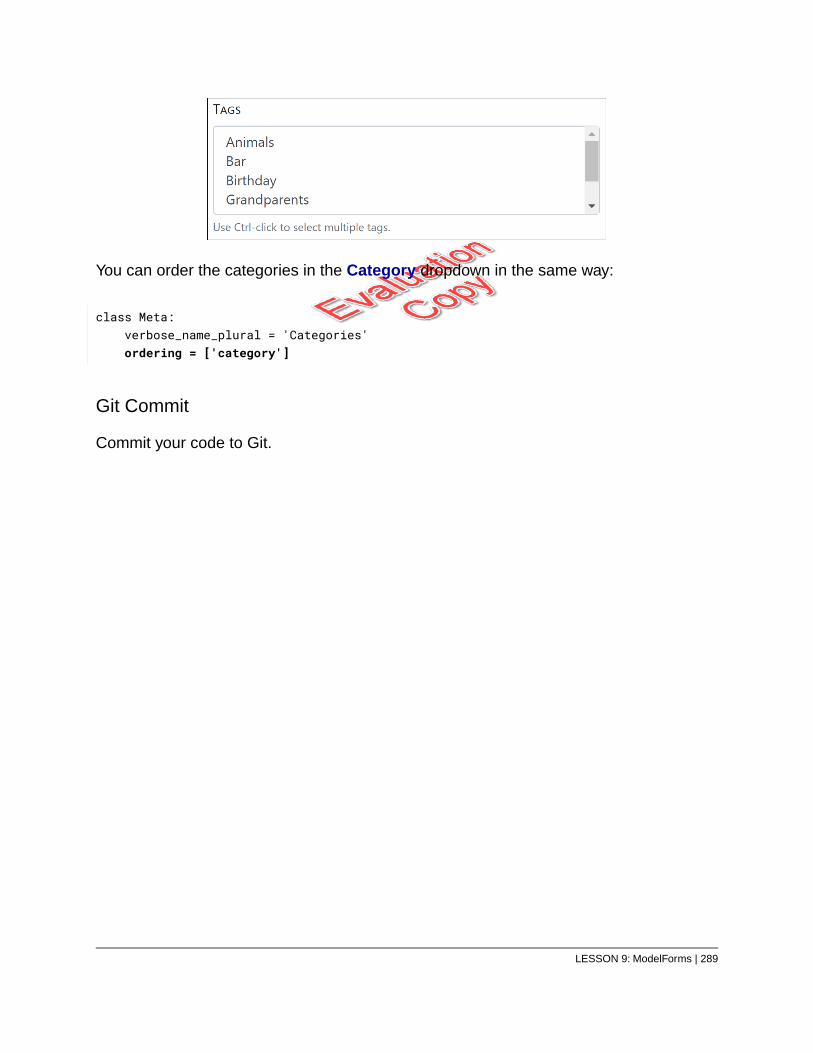
You can order the categories in the Category dropdown in the same way:
class Meta:verbose_name_plural = 'Categories'ordering = ['category']
Git Commit
Commit your code to Git.
LESSON 9: ModelForms | 289
Exercise 39: Updating the Joke Templates 15 to 25 minutes
In this exercise, you will update the joke_detail.html and joke_list.html templates.
Add the following joke:
Question: What did grandma say when grandpa told her the dog ran all the wayback to the general store by their old house to get the newspaper?
Answer: That’s over 100 miles! Seems a bit far-fetched.
Category: Play on Words
Tags: Animal, Grandparents
E39.1. joke_detail.html
Open templates/jokes/joke_detail.html for editing and add the following highlightedcontent:68
68. Don’t want to type? Copy from starter-code/modelforms/joke_detail.html.
290 | LESSON 9: ModelForms
EVALUATION COPY: Not to be used in class.
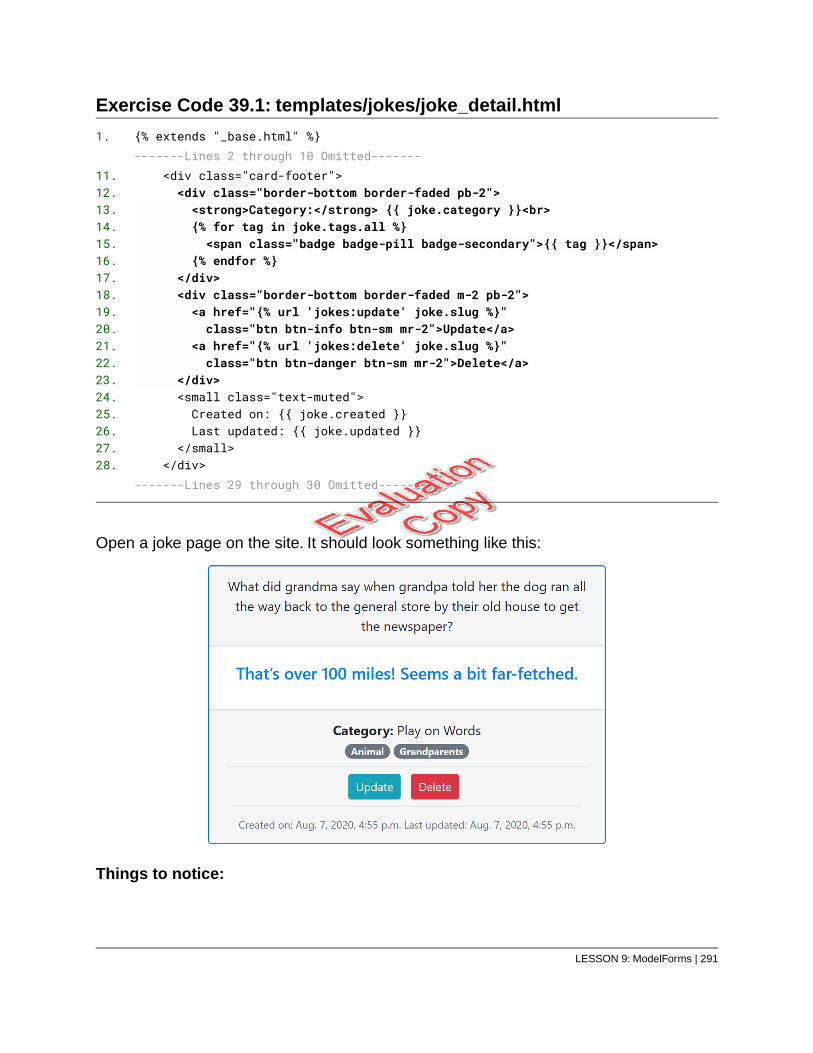
Exercise Code 39.1: templates/jokes/joke_detail.html
{% extends "_base.html" %}1.-------Lines 2 through 10 Omitted-------
<div class="card-footer">11.<div class="border-bottom border-faded pb-2">12.<strong>Category:</strong> {{ joke.category }}<br>13.{% for tag in joke.tags.all %}14.<span class="badge badge-pill badge-secondary">{{ tag }}</span>15.
{% endfor %}16.</div>17.<div class="border-bottom border-faded m-2 pb-2">18.<a href="{% url 'jokes:update' joke.slug %}"19.class="btn btn-info btn-sm mr-2">Update</a>20.
<a href="{% url 'jokes:delete' joke.slug %}"21.class="btn btn-danger btn-sm mr-2">Delete</a>22.
</div>23.<small class="text-muted">24.Created on: {{ joke.created }}25.Last updated: {{ joke.updated }}26.
</small>27.</div>28.
-------Lines 29 through 30 Omitted-------
Open a joke page on the site. It should look something like this:
Things to notice:
LESSON 9: ModelForms | 291
1. Adding the category to the template is straightforward. That’s just an attribute ofthe joke object:
{{ joke.category }}
However, there’s something going on here behind the scenes that may not beimmediately obvious. The category attribute of joke holds the category object,not the category field of that object. When an object is output in the template, itis converted to a string using the class’s __str__() method. For the Categoryclass, that returns the category field:
def __str__(self):return self.category
If someone changes the value that the __str__() method returns, the templatewould reflect that change. So, to be safe, you might want to be more explicit inthe template and use:
{{ joke.category.category }}
2. To output the tags associated with a joke, you loop through joke.tags.all, whichreturns a QuerySet containing all the Tag objects associated with the joke objectthrough the many-to-many relationship. Just as with joke.category, tag will outputthe value returned by the __str__() method of the Tag class. To be safe, youshould change that to tag.tag to explicitly output the value of the tag field:
{% for tag in joke.tags.all %}<span class="badge badge-pill badge-secondary">{{ tag.tag }}</span>
{% endfor %}
3. You have also added Update and Delete buttons so that the joke can be editedfrom the joke-detail page.
E39.2. joke_list.html
For joke_list.html let’s display the jokes in a table instead of a list. While you’re at it,let’s change the Update and Delete buttons to use font-awesome icons:
292 | LESSON 9: ModelForms
EVALUATION COPY: Not to be used in class.
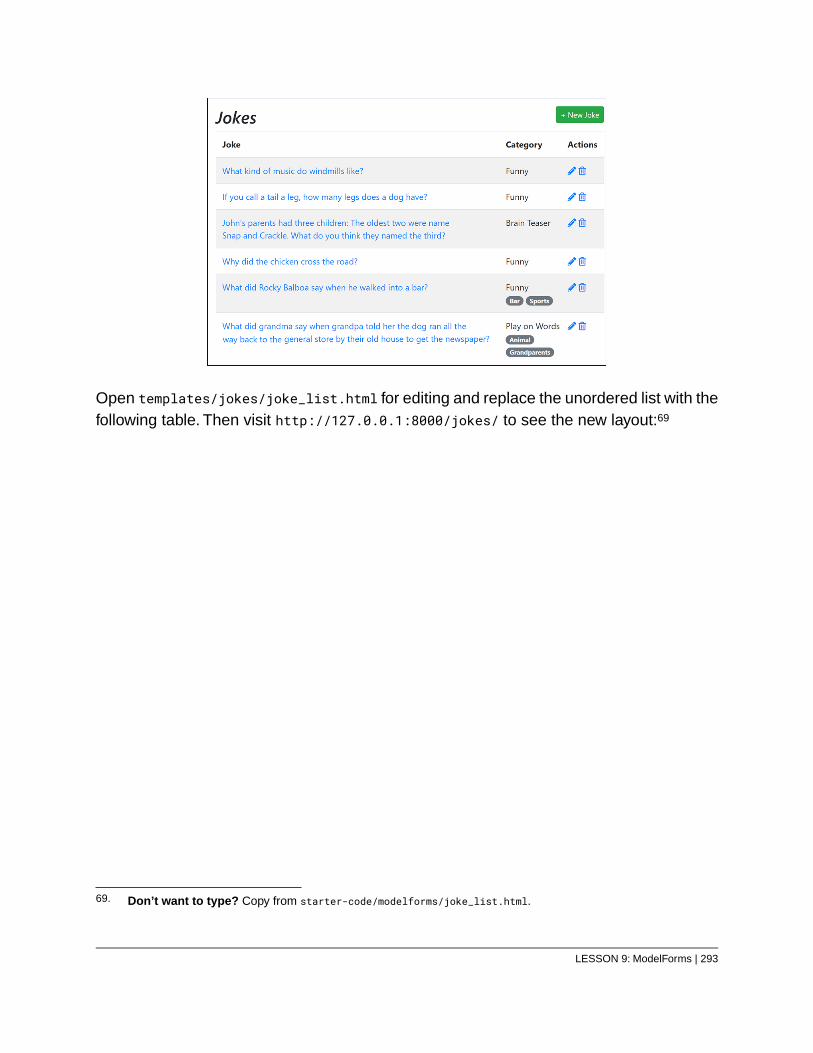
Open templates/jokes/joke_list.html for editing and replace the unordered list with thefollowing table. Then visit http://127.0.0.1:8000/jokes/ to see the new layout:69
69. Don’t want to type? Copy from starter-code/modelforms/joke_list.html.
LESSON 9: ModelForms | 293
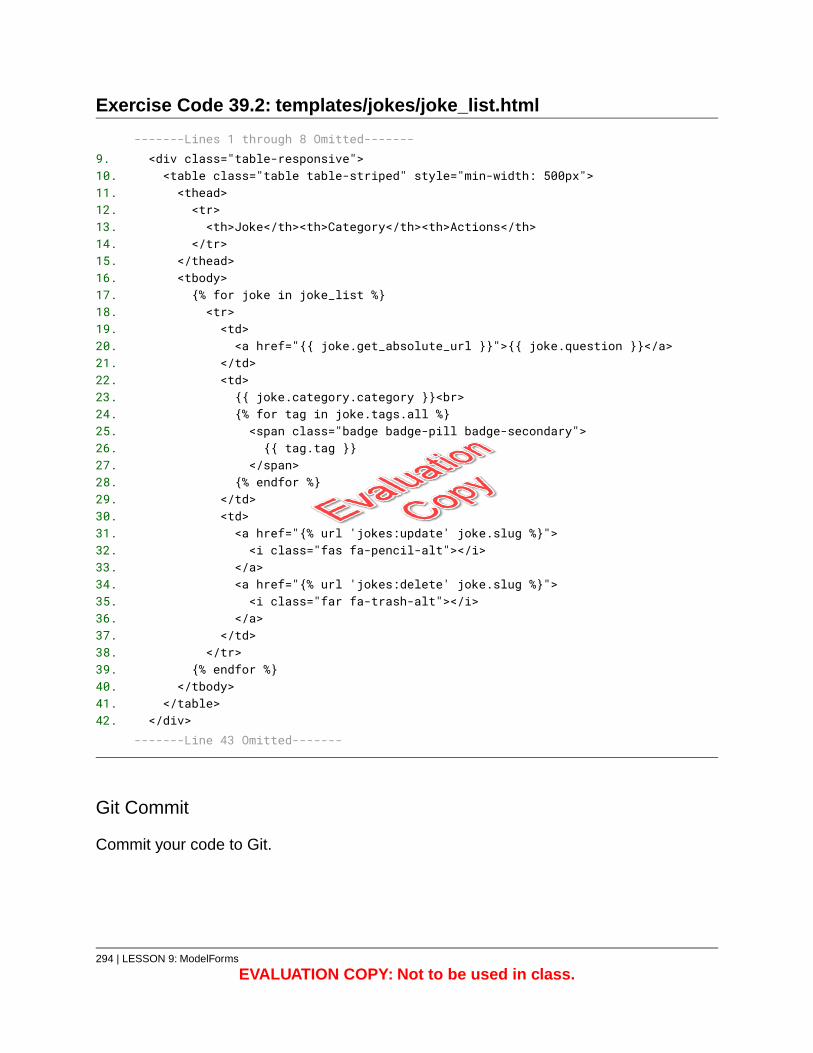
Exercise Code 39.2: templates/jokes/joke_list.html
-------Lines 1 through 8 Omitted-------<div class="table-responsive">9.<table class="table table-striped" style="min-width: 500px">10.<thead>11.<tr>12.<th>Joke</th><th>Category</th><th>Actions</th>13.
</tr>14.</thead>15.<tbody>16.{% for joke in joke_list %}17.<tr>18.<td>19.<a href="{{ joke.get_absolute_url }}">{{ joke.question }}</a>20.
</td>21.<td>22.{{ joke.category.category }}<br>23.{% for tag in joke.tags.all %}24.<span class="badge badge-pill badge-secondary">25.{{ tag.tag }}26.
</span>27.{% endfor %}28.
</td>29.<td>30.<a href="{% url 'jokes:update' joke.slug %}">31.<i class="fas fa-pencil-alt"></i>32.
</a>33.<a href="{% url 'jokes:delete' joke.slug %}">34.<i class="far fa-trash-alt"></i>35.
</a>36.</td>37.
</tr>38.{% endfor %}39.
</tbody>40.</table>41.
</div>42.-------Line 43 Omitted-------
Git Commit
Commit your code to Git.
294 | LESSON 9: ModelForms
EVALUATION COPY: Not to be used in class.
Exercise 40: Tying Job Applications toModels
90 to 120 minutes
In this exercise, you will convert the job application to use a ModelForm. This involvesmodifying the jobs app as follows:
E40.1. The Models
Create models for Job and Applicant:
1. Job fields:
A. title – CharField with max_length set to 200.
B. created – DateTimeField with auto_now_add set to True.
C. updated – DateTimeField with auto_now set to True.
The __str__() method should return the job title.
2. Applicant fields:
A. All the fields that are currently in the JobApplicationForm class:
i. first_name – CharField.
ii. last_name – CharField.
iii. email – EmailField.
iv. website – URLField with URLValidator, which you will need toimport from django.core.validators.
v. employment_type – CharField with choices.
vi. start_date – DateField.
vii. available_days – CharField with choices, but because applicantscan select multiple choices, this needs to be handled in the form,so for the model, it’s just a CharField.
viii. desired_hourly_wage – DecimalField with five total digits, two ofwhich come after the decimal point.
ix. cover_letter – TextField.
LESSON 9: ModelForms | 295
x. confirmation – BooleanField.
Hint: Move all the help_text and validators (including the necessaryimports) into the model.
B. job – A ForeignKey field.
C. created – DateTimeField with auto_now_add set to True.
D. updated – DateTimeField with auto_now set to True.
The __str__() method should return the name of the applicant and the job theyare applying for.
3. Do not forget to run migrations after creating the models.
E40.2. The View
Change JobAppView to inherit from CreateView. Be sure to set the model. Remember thatCreateView views infer the template name from the model name. In this case, the inferredname will be applicant_form.html. Rename the joke_writer.html template in templates/jobs/to applicant_form.html.
E40.3. The Form
Rewrite JobApplicationForm to inherit from forms.ModelForm. Here is some starting code,which you can copy from starter-code/modelforms/jobs_forms_start.py:
296 | LESSON 9: ModelForms
EVALUATION COPY: Not to be used in class.
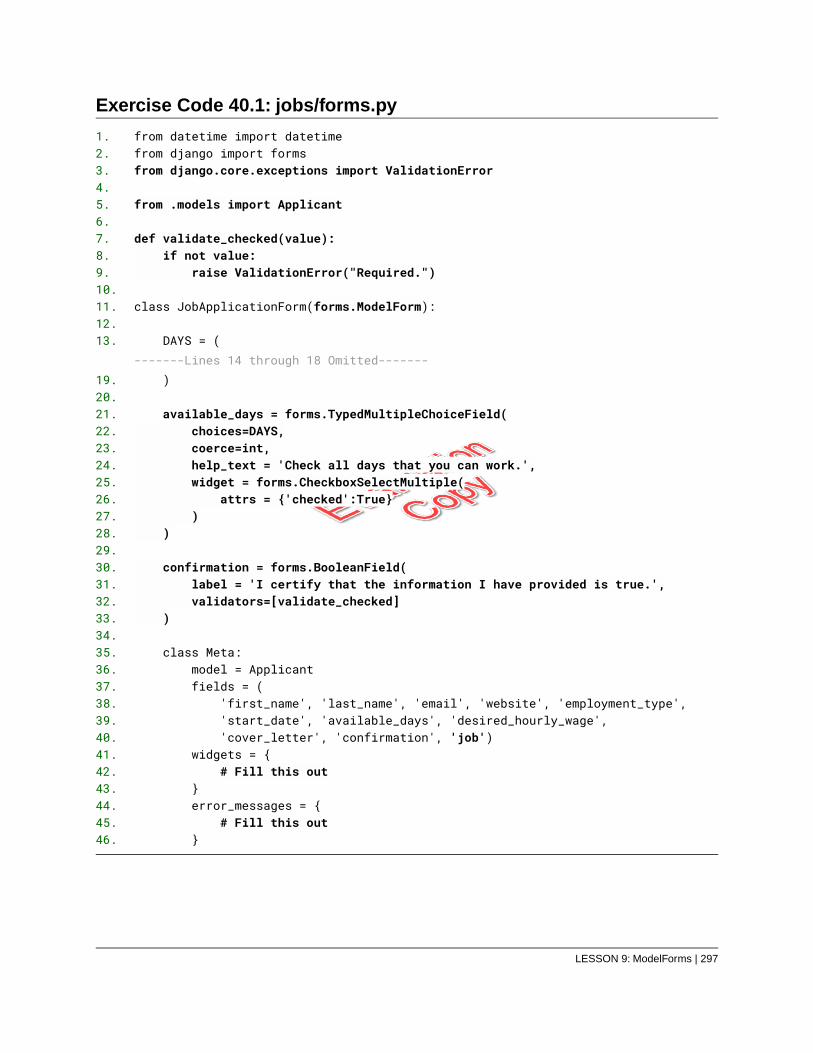
Exercise Code 40.1: jobs/forms.py
from datetime import datetime1.from django import forms2.from django.core.exceptions import ValidationError3.
4.from .models import Applicant5.
6.def validate_checked(value):7.
if not value:8.raise ValidationError("Required.")9.
10.class JobApplicationForm(forms.ModelForm):11.
12.DAYS = (13.
-------Lines 14 through 18 Omitted-------)19.
20.available_days = forms.TypedMultipleChoiceField(21.
choices=DAYS,22.coerce=int,23.help_text = 'Check all days that you can work.',24.widget = forms.CheckboxSelectMultiple(25.
attrs = {'checked':True}26.)27.
)28.29.
confirmation = forms.BooleanField(30.label = 'I certify that the information I have provided is true.',31.validators=[validate_checked]32.
)33.34.
class Meta:35.model = Applicant36.fields = (37.
'first_name', 'last_name', 'email', 'website', 'employment_type',38.'start_date', 'available_days', 'desired_hourly_wage',39.'cover_letter', 'confirmation', 'job')40.
widgets = {41.# Fill this out42.
}43.error_messages = {44.
# Fill this out45.}46.
LESSON 9: ModelForms | 297
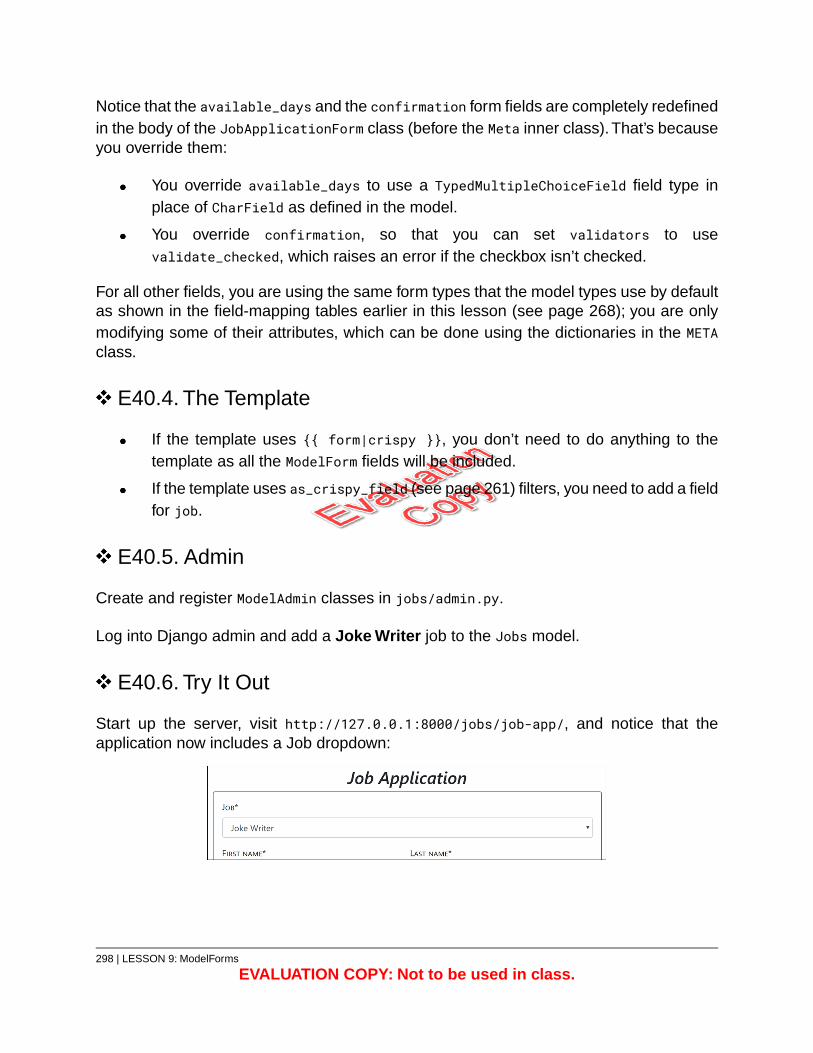
Notice that the available_days and the confirmation form fields are completely redefinedin the body of the JobApplicationForm class (before the Meta inner class).That’s becauseyou override them:
You override available_days to use a TypedMultipleChoiceField field type inplace of CharField as defined in the model.
You override confirmation, so that you can set validators to usevalidate_checked, which raises an error if the checkbox isn’t checked.
For all other fields, you are using the same form types that the model types use by defaultas shown in the field-mapping tables earlier in this lesson (see page 268); you are onlymodifying some of their attributes, which can be done using the dictionaries in the METAclass.
E40.4. The Template
If the template uses {{ form|crispy }}, you don’t need to do anything to thetemplate as all the ModelForm fields will be included.
If the template uses as_crispy_field (see page 261) filters, you need to add a fieldfor job.
E40.5. Admin
Create and register ModelAdmin classes in jobs/admin.py.
Log into Django admin and add a Joke Writer job to the Jobs model.
E40.6. Try It Out
Start up the server, visit http://127.0.0.1:8000/jobs/job-app/, and notice that theapplication now includes a Job dropdown:
298 | LESSON 9: ModelForms
EVALUATION COPY: Not to be used in class.
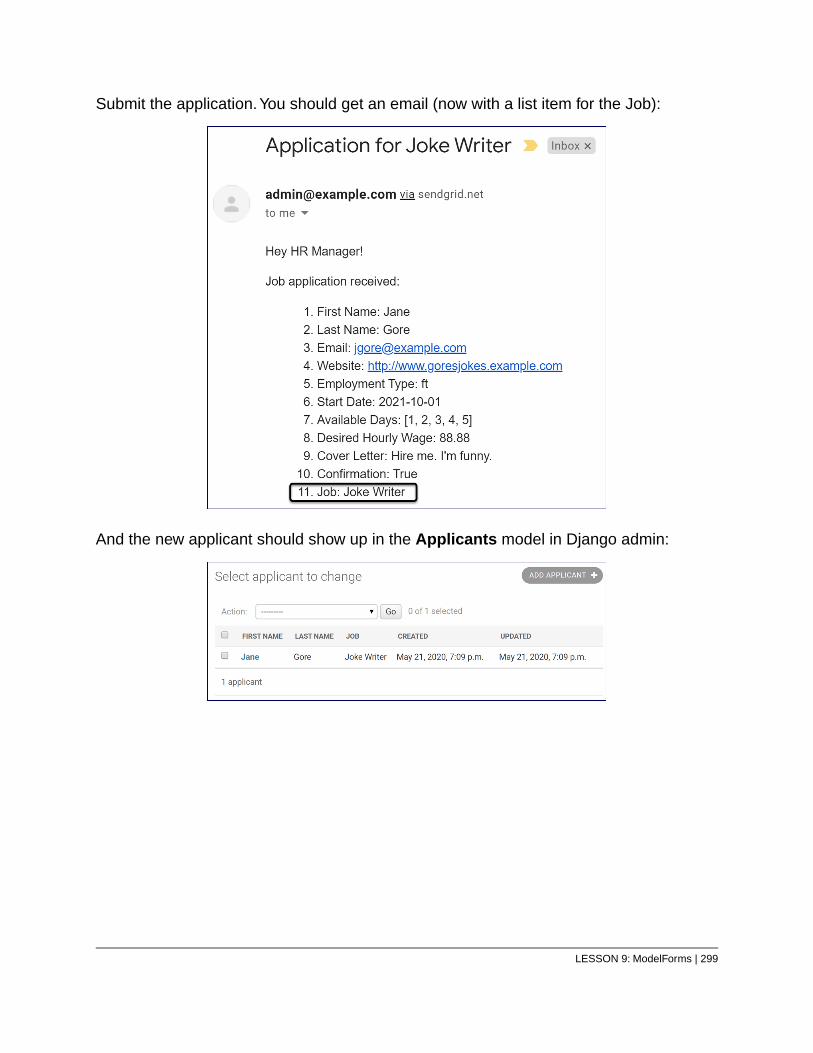
Submit the application.You should get an email (now with a list item for the Job):
And the new applicant should show up in the Applicants model in Django admin:
LESSON 9: ModelForms | 299
Solutions
The solutions that follow are available to copy from:
solutions/modelforms/djangojokes.com/jobs/models.py
solutions/modelforms/djangojokes.com/jobs/views.py
solutions/modelforms/djangojokes.com/jobs/forms.py
solutions/modelforms/djangojokes.com/templates/jobs/applicant_form.html
solutions/modelforms/djangojokes.com/jobs/admin.py
300 | LESSON 9: ModelForms
EVALUATION COPY: Not to be used in class.

LESSON 9: ModelForms | 301
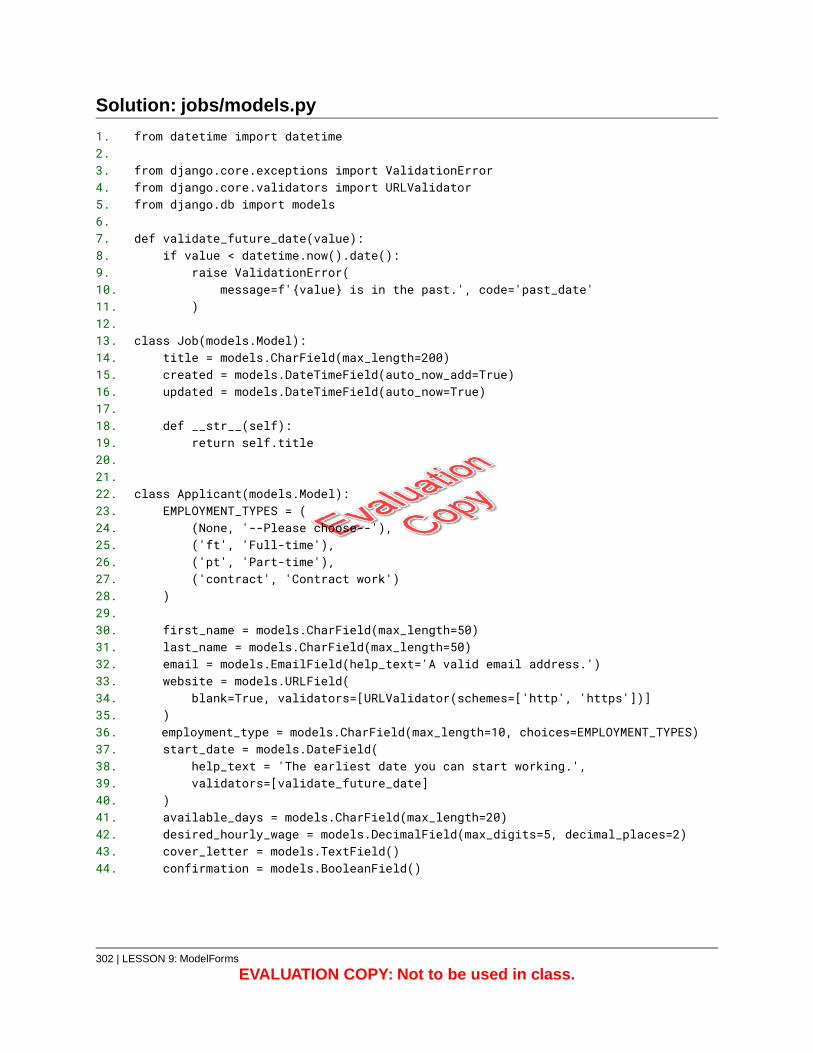
Solution: jobs/models.py
from datetime import datetime1.2.
from django.core.exceptions import ValidationError3.from django.core.validators import URLValidator4.from django.db import models5.
6.def validate_future_date(value):7.
if value < datetime.now().date():8.raise ValidationError(9.
message=f'{value} is in the past.', code='past_date'10.)11.
12.class Job(models.Model):13.
title = models.CharField(max_length=200)14.created = models.DateTimeField(auto_now_add=True)15.updated = models.DateTimeField(auto_now=True)16.
17.def __str__(self):18.
return self.title19.20.21.
class Applicant(models.Model):22.EMPLOYMENT_TYPES = (23.
(None, '--Please choose--'),24.('ft', 'Full-time'),25.('pt', 'Part-time'),26.('contract', 'Contract work')27.
)28.29.
first_name = models.CharField(max_length=50)30.last_name = models.CharField(max_length=50)31.email = models.EmailField(help_text='A valid email address.')32.website = models.URLField(33.
blank=True, validators=[URLValidator(schemes=['http', 'https'])]34.)35.employment_type = models.CharField(max_length=10, choices=EMPLOYMENT_TYPES)36.start_date = models.DateField(37.
help_text = 'The earliest date you can start working.',38.validators=[validate_future_date]39.
)40.available_days = models.CharField(max_length=20)41.desired_hourly_wage = models.DecimalField(max_digits=5, decimal_places=2)42.cover_letter = models.TextField()43.confirmation = models.BooleanField()44.
302 | LESSON 9: ModelForms
EVALUATION COPY: Not to be used in class.
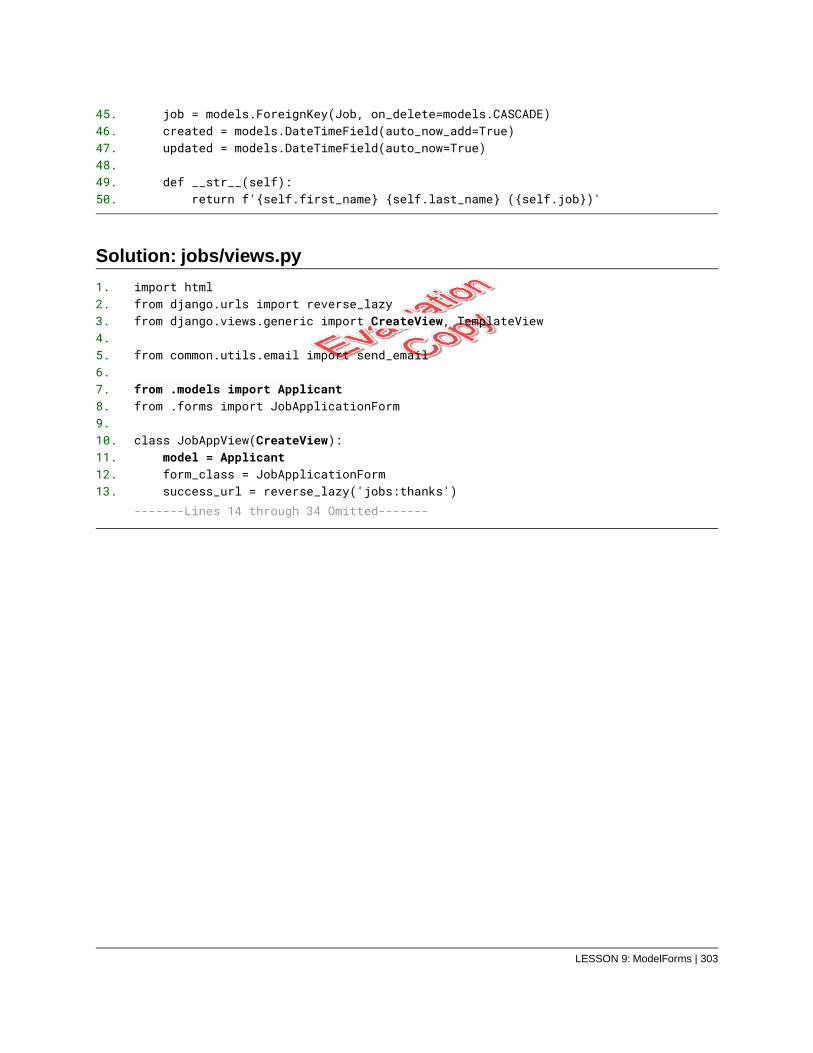
job = models.ForeignKey(Job, on_delete=models.CASCADE)45.created = models.DateTimeField(auto_now_add=True)46.updated = models.DateTimeField(auto_now=True)47.
48.def __str__(self):49.
return f'{self.first_name} {self.last_name} ({self.job})'50.
Solution: jobs/views.py
import html1.from django.urls import reverse_lazy2.from django.views.generic import CreateView, TemplateView3.
4.from common.utils.email import send_email5.
6.from .models import Applicant7.from .forms import JobApplicationForm8.
9.class JobAppView(CreateView):10.
model = Applicant11.form_class = JobApplicationForm12.success_url = reverse_lazy('jobs:thanks')13.
-------Lines 14 through 34 Omitted-------
LESSON 9: ModelForms | 303

Solution: jobs/forms.py
-------Lines 1 through 34 Omitted-------class Meta:35.
model = Applicant36.fields = (37.
'first_name', 'last_name', 'email', 'website', 'employment_type',38.'start_date', 'available_days', 'desired_hourly_wage',39.'cover_letter', 'confirmation', 'job')40.
widgets = {41.'first_name': forms.TextInput(attrs={'autofocus': True}),42.'website': forms.TextInput(43.
attrs = {'placeholder':'https://www.example.com'}44.),45.'start_date': forms.SelectDateWidget(46.
attrs = {47.'style': 'width: 31%; display: inline-block; margin: 0 1%'48.
},49.years = range(datetime.now().year, datetime.now().year+2)50.
),51.'desired_hourly_wage': forms.NumberInput(52.
attrs = {'min':'10.00', 'max':'100.00', 'step':'.25'}53.),54.'cover_letter': forms.Textarea(attrs={'cols': '100', 'rows': '5'})55.
}56.error_messages = {57.
'start_date': {58.'past_date': 'Please enter a future date.'59.
}60.}61.
Solution: templates/jobs/applicant_form.html
-------Lines 1 through 7 Omitted-------<form method="post" novalidate>8.{% csrf_token %}9.{{ form.job|as_crispy_field }}10.<div class="form-row">11.
-------Lines 12 through 48 Omitted-------
304 | LESSON 9: ModelForms
EVALUATION COPY: Not to be used in class.
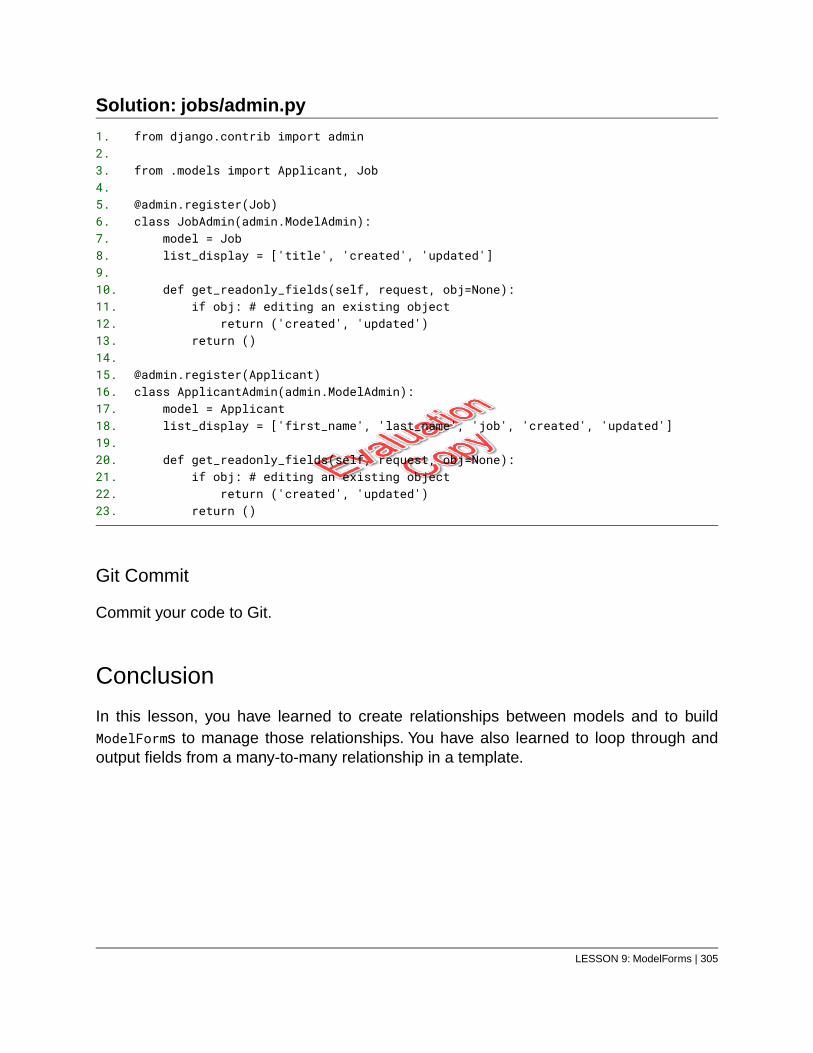
Solution: jobs/admin.py
from django.contrib import admin1.2.
from .models import Applicant, Job3.4.
@admin.register(Job)5.class JobAdmin(admin.ModelAdmin):6.
model = Job7.list_display = ['title', 'created', 'updated']8.
9.def get_readonly_fields(self, request, obj=None):10.
if obj: # editing an existing object11.return ('created', 'updated')12.
return ()13.14.
@admin.register(Applicant)15.class ApplicantAdmin(admin.ModelAdmin):16.
model = Applicant17.list_display = ['first_name', 'last_name', 'job', 'created', 'updated']18.
19.def get_readonly_fields(self, request, obj=None):20.
if obj: # editing an existing object21.return ('created', 'updated')22.
return ()23.
Git Commit
Commit your code to Git.
Conclusion
In this lesson, you have learned to create relationships between models and to buildModelForms to manage those relationships. You have also learned to loop through andoutput fields from a many-to-many relationship in a template.
LESSON 9: ModelForms | 305

306 | LESSON 9: ModelForms
EVALUATION COPY: Not to be used in class.
LESSON 10User Registration
Topics Covered
Registering.
Logging in and out.
Email.
Account management.
Resetting passwords.
Introduction
Now that you have the site working pretty well, it is time to let others in on the game. Inthis lesson, you will learn how to create user registration and login pages.
❋
10.1. The User-Registration Process
The user-registration process generally works something like this:
1. User registers by filling out sign-up form.
2. System sends user email to confirm that they really want to register.
3. User clicks link in email confirming their registration.
4. Database is updated and user is redirected to a login page.
5. User logs in and is redirected to the home page, a profile page, or some otherpage.
But that’s not all there is to user authentication. Additional features include:
Account management.
Password resetting.
Managing failed login attempts.
LESSON 10: User Registration | 307
Remember-me checkbox, so user doesn’t have to log in every time.
Additionally, it’s common for websites today to allow users to authenticate using Google,Facebook, LinkedIn, or some other social account they already have.
As you can imagine, building all this on your own would require a lot of work. Luckily, thereis a free library called django-allauth70 that makes adding user authentication to yourwebsite much easier.
In this lesson, through a series of exercises, you will add many features of the userauthentication process to the Django Jokes website.
70. https://github.com/pennersr/django-allauth
308 | LESSON 10: User Registration
EVALUATION COPY: Not to be used in class.
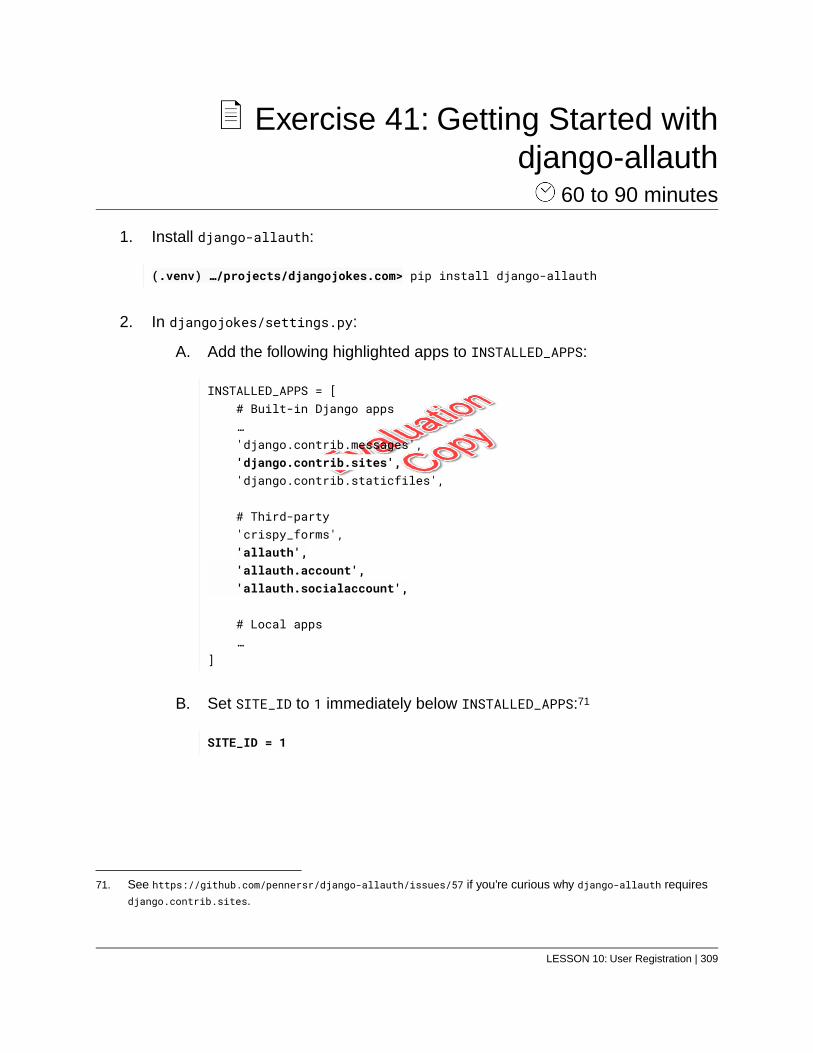
Exercise 41: Getting Started withdjango-allauth
60 to 90 minutes
1. Install django-allauth:
(.venv) …/projects/djangojokes.com> pip install django-allauth
2. In djangojokes/settings.py:
A. Add the following highlighted apps to INSTALLED_APPS:
INSTALLED_APPS = [# Built-in Django apps…'django.contrib.messages','django.contrib.sites','django.contrib.staticfiles',
# Third-party'crispy_forms','allauth','allauth.account','allauth.socialaccount',
# Local apps…
]
B. Set SITE_ID to 1 immediately below INSTALLED_APPS:71
SITE_ID = 1
71. See https://github.com/pennersr/django-allauth/issues/57 if you’re curious why django-allauth requiresdjango.contrib.sites.
LESSON 10: User Registration | 309

C. Set AUTHENTICATION_BACKENDS:
AUTHENTICATION_BACKENDS = (# Needed to login by username in Django admin, even w/o `allauth`'django.contrib.auth.backends.ModelBackend',
# `allauth`-specific auth methods, such as login by e-mail'allauth.account.auth_backends.AuthenticationBackend',
)
To keep authentication settings grouped together, a good place to set thisis right above the AUTH_PASSWORD_VALIDATORS setting.
3. Open djangojokes/urls.py for editing. Remember that this is the project’s rootURLConf file. It references other URLConf files using include() from django.urls.Add this URL pattern to include the allauth URLConf:
path('account/', include('allauth.urls'))
Add some comments to categorize the URL patterns. The file should now looklike this:
Exercise Code 41.1: djangojokes/urls.py
from django.contrib import admin1.from django.urls import path, include2.
3.urlpatterns = [4.
# Admin5.path('admin/doc/', include('django.contrib.admindocs.urls')),6.path('admin/', admin.site.urls),7.
8.# User Management9.path('account/', include('allauth.urls')),10.
11.# Local Apps12.path('jobs/', include('jobs.urls')),13.path('jokes/', include('jokes.urls')),14.path('', include('pages.urls')),15.
]16.
4. The django-allauth apps include models, so you need to migrate. As themigrations files are already created and included when you install django-allauth,
310 | LESSON 10: User Registration
EVALUATION COPY: Not to be used in class.
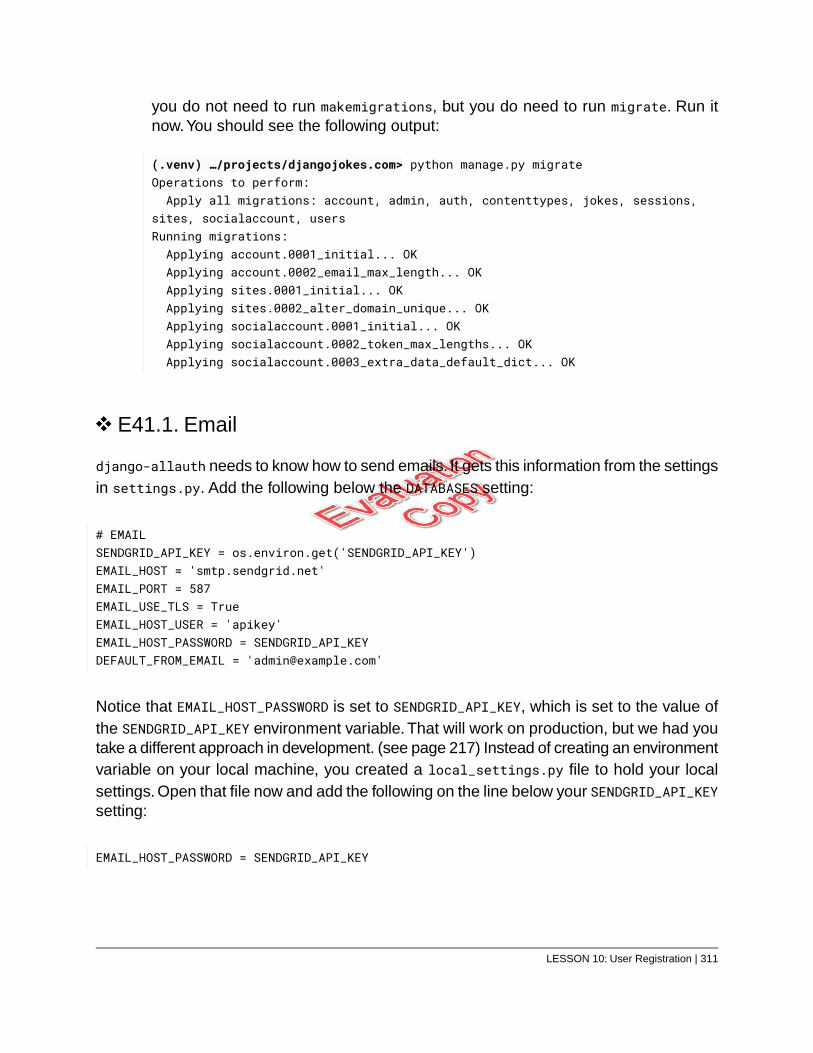
you do not need to run makemigrations, but you do need to run migrate. Run itnow.You should see the following output:
(.venv) …/projects/djangojokes.com> python manage.py migrateOperations to perform:Apply all migrations: account, admin, auth, contenttypes, jokes, sessions,
sites, socialaccount, usersRunning migrations:Applying account.0001_initial... OKApplying account.0002_email_max_length... OKApplying sites.0001_initial... OKApplying sites.0002_alter_domain_unique... OKApplying socialaccount.0001_initial... OKApplying socialaccount.0002_token_max_lengths... OKApplying socialaccount.0003_extra_data_default_dict... OK
E41.1. Email
django-allauth needs to know how to send emails. It gets this information from the settingsin settings.py. Add the following below the DATABASES setting:
# EMAILSENDGRID_API_KEY = os.environ.get('SENDGRID_API_KEY')EMAIL_HOST = 'smtp.sendgrid.net'EMAIL_PORT = 587EMAIL_USE_TLS = TrueEMAIL_HOST_USER = 'apikey'EMAIL_HOST_PASSWORD = SENDGRID_API_KEYDEFAULT_FROM_EMAIL = '[email protected]'
Notice that EMAIL_HOST_PASSWORD is set to SENDGRID_API_KEY, which is set to the value ofthe SENDGRID_API_KEY environment variable. That will work on production, but we had youtake a different approach in development. (see page 217) Instead of creating an environmentvariable on your local machine, you created a local_settings.py file to hold your localsettings. Open that file now and add the following on the line below your SENDGRID_API_KEYsetting:
EMAIL_HOST_PASSWORD = SENDGRID_API_KEY
LESSON 10: User Registration | 311
Now, your email password is set and django-allauth can get the information it needs tosend emails.
E41.2. Authentication Settings
In settings.py, add the following settings below the setting for AUTH_USER_MODEL:72
# AUTHENTICATION SETTINGSAUTH_USER_MODEL = 'users.CustomUser'LOGIN_URL = 'account_login'LOGIN_REDIRECT_URL = 'pages:homepage'
And below that, add the following django-allauth-specific settings:73
## django-allauth settingsACCOUNT_AUTHENTICATION_METHOD = 'email' # Default: 'username'ACCOUNT_EMAIL_CONFIRMATION_EXPIRE_DAYS = 1 # Default: 3ACCOUNT_EMAIL_REQUIRED = True # Default: FalseACCOUNT_EMAIL_VERIFICATION = 'mandatory' # Default: 'optional'ACCOUNT_LOGIN_ATTEMPTS_LIMIT = 5 # Default: 5ACCOUNT_LOGIN_ATTEMPTS_TIMEOUT = 300 # Default 300ACCOUNT_LOGOUT_REDIRECT_URL = 'account_login' # Default: '/'ACCOUNT_USERNAME_REQUIRED = False # Default: True
By default, django-allauth will require a username, but not an email address, and userswill log in using a username/password combination. The settings you have set changethis, so that an email address is required, but a username is not, and users will log in usingan email/password combination.
Here is what each of these settings does:
1. LOGIN_URL – The URL or named URL pattern that Django redirects to when a auser must be logged in to access a page. Django’s default value is'/accounts/login/' (a URL), but django-allauth includes a named URL pattern(“account_login”) referencing its login path ('/account/login/' without the 's').
72. These settings are not specific to django-allauth, but it does make use of them.73. See https://django-allauth.readthedocs.io/en/latest/configuration.html for documentation on all
django-allauth settings.
312 | LESSON 10: User Registration
EVALUATION COPY: Not to be used in class.
2. LOGIN_REDIRECT_URL – The default URL or named URL pattern to redirect to aftera successful login.You have set it to 'pages:homepage' – the named URL patternfor the home page.
3. ACCOUNT_AUTHENTICATION_METHOD – Specifies how the user logs in: 'email','username' (the default), or 'username_email'.You have set it to 'email'.
4. ACCOUNT_EMAIL_CONFIRMATION_EXPIRE_DAYS – When a user registers, they will besent an email with a confirmation link. This setting determines how many daysthat link will be valid. you have set it to 1.
5. ACCOUNT_EMAIL_REQUIRED – Indicates whether an email address is required atregistration. The default is False.You have changed this to True.
6. ACCOUNT_EMAIL_VERIFICATION – Indicates whether the user is required to verifytheir email address. Possible values are:
A. 'optional' (the default) – The user is sent a verification email, but is notrequired to verify.
B. 'mandatory' – The user is sent a verification email and cannot log in untilthey have clicked the link. ACCOUNT_EMAIL_REQUIRED must be True.
C. 'none' – The user is not sent a verification email.
You have set it to 'mandatory'.
7. ACCOUNT_LOGIN_ATTEMPTS_LIMIT (default: 5) and ACCOUNT_LOGIN_ATTEMPTS_TIMEOUT(default: 300) – A user has ACCOUNT_LOGIN_ATTEMPTS_LIMIT tries to log in beforetheir account is locked for ACCOUNT_LOGIN_ATTEMPTS_TIMEOUT seconds. You haveused the defaults.
8. ACCOUNT_LOGOUT_REDIRECT_URL – The URL (or named URL pattern) to redirect towhen the user logs out.The default is '/'.You have changed it to 'account_login',which is the named URL pattern used by django-allauth for the login view.
9. ACCOUNT_USERNAME_REQUIRED – Whether a username is required at sign up. Thedefault is True. When set to False, the username will be derived from the emailaddress or the first_name field if it’s not empty.You have set it to False.
E41.3. Default django-allauth Pages
The default registration and login URLs for django-allauth are:
Registration: http://127.0.0.1:8000/account/signup/
LESSON 10: User Registration | 313
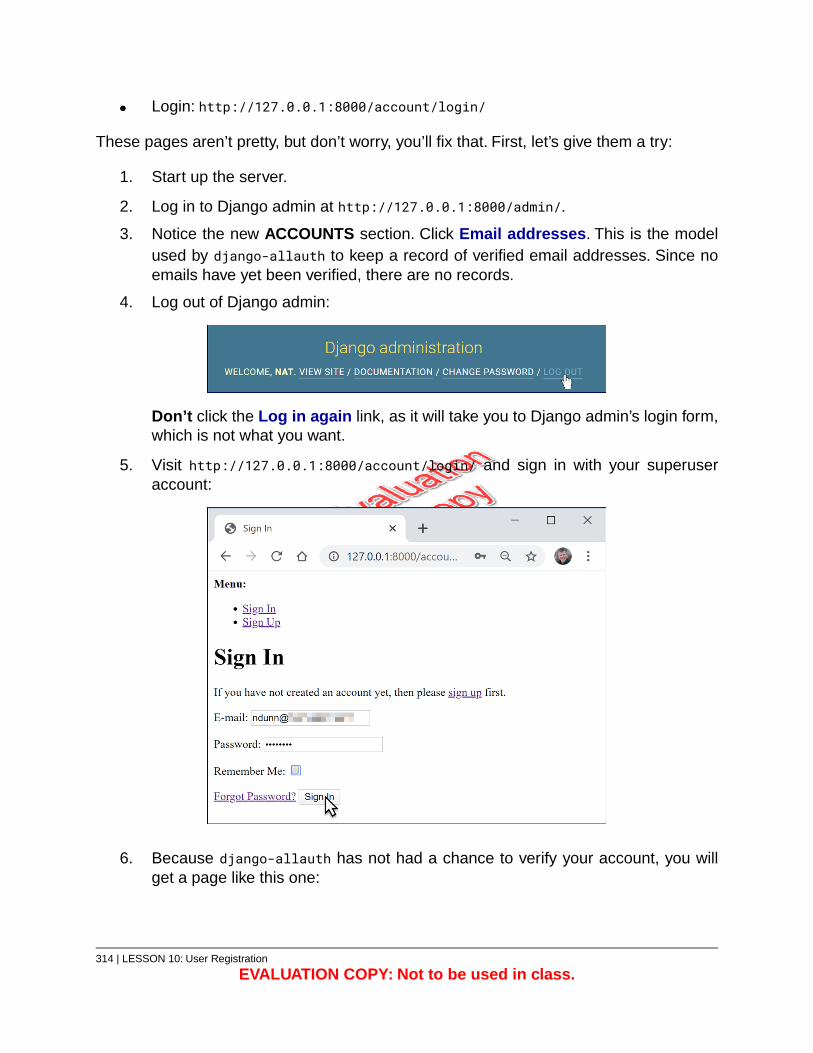
Login: http://127.0.0.1:8000/account/login/
These pages aren’t pretty, but don’t worry, you’ll fix that. First, let’s give them a try:
1. Start up the server.
2. Log in to Django admin at http://127.0.0.1:8000/admin/.
3. Notice the new ACCOUNTS section. Click Email addresses. This is the modelused by django-allauth to keep a record of verified email addresses. Since noemails have yet been verified, there are no records.
4. Log out of Django admin:
Don’t click the Log in again link, as it will take you to Django admin’s login form,which is not what you want.
5. Visit http://127.0.0.1:8000/account/login/ and sign in with your superuseraccount:
6. Because django-allauth has not had a chance to verify your account, you willget a page like this one:
314 | LESSON 10: User Registration
EVALUATION COPY: Not to be used in class.
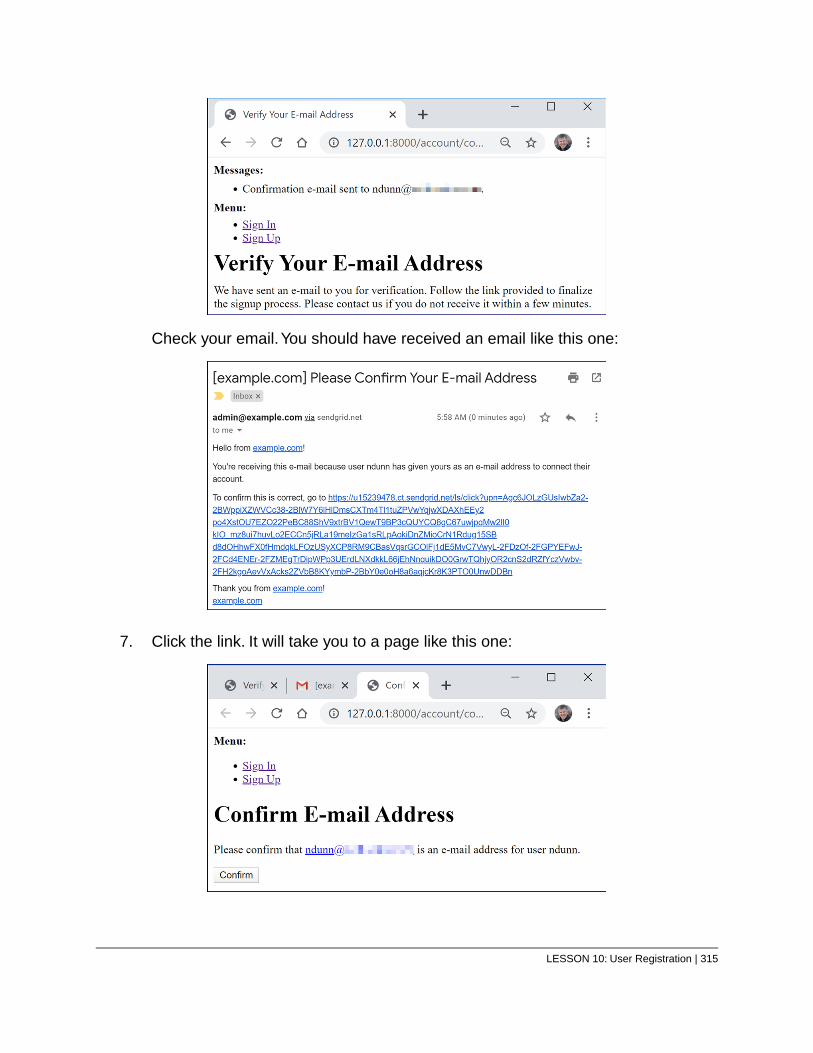
Check your email.You should have received an email like this one:
7. Click the link. It will take you to a page like this one:
LESSON 10: User Registration | 315
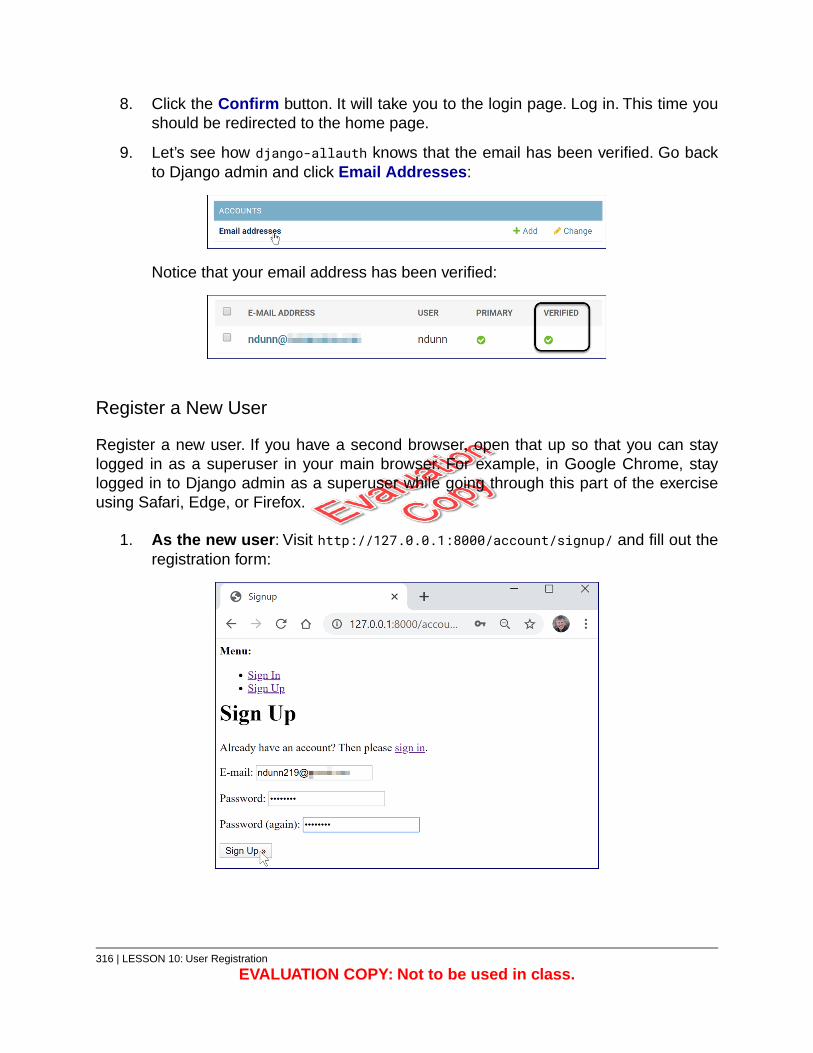
8. Click the Confirm button. It will take you to the login page. Log in. This time youshould be redirected to the home page.
9. Let’s see how django-allauth knows that the email has been verified. Go backto Django admin and click Email Addresses:
Notice that your email address has been verified:
Register a New User
Register a new user. If you have a second browser, open that up so that you can staylogged in as a superuser in your main browser. For example, in Google Chrome, staylogged in to Django admin as a superuser while going through this part of the exerciseusing Safari, Edge, or Firefox.
1. As the new user: Visit http://127.0.0.1:8000/account/signup/ and fill out theregistration form:
316 | LESSON 10: User Registration
EVALUATION COPY: Not to be used in class.
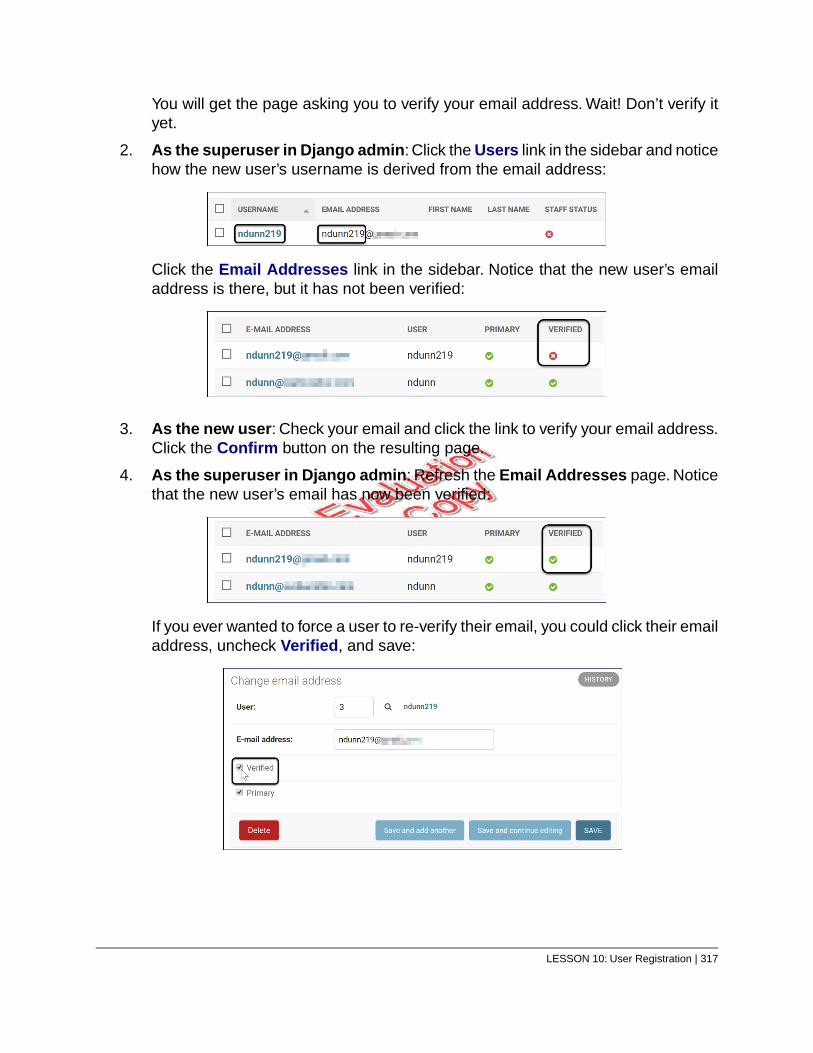
You will get the page asking you to verify your email address. Wait! Don’t verify ityet.
2. As the superuser in Django admin: Click the Users link in the sidebar and noticehow the new user’s username is derived from the email address:
Click the Email Addresses link in the sidebar. Notice that the new user’s emailaddress is there, but it has not been verified:
3. As the new user: Check your email and click the link to verify your email address.Click the Confirm button on the resulting page.
4. As the superuser in Django admin: Refresh the Email Addresses page. Noticethat the new user’s email has now been verified:
If you ever wanted to force a user to re-verify their email, you could click their emailaddress, uncheck Verified, and save:
LESSON 10: User Registration | 317
Git Commit
Commit your code to Git.
❋
10.2. django-allauth Templates
django-allauth includes default templates for all of its web pages and for all of the emailsit sends.You can override all of these.
10.2.1. Web Page Templates
The most commonly used django-allauth web page templates are:
1. account/signup.html – The registration form.
2. account/verification_sent.html – The message shown after the user registersletting them know that they have been sent an email.
3. account/email_confirm.html – The page that shows up when the user clicks thelink in the verification email. This page contains a form to submit to verify that theuser really wants to register.
4. account/login.html – The login form.
5. account/password_reset.html – The password-reset form. This is fornon-authenticated users who cannot remember their password.
6. account/password_reset_done.html – The message shown after a user submitsthe password-reset form.
7. account/password_reset_key.html – The password-change form a user gets afterclicking the link in their email confirming they want to reset their password.
8. account/password_reset_key_done.html – The message shown after a usersubmits the password-change form.
All of the aforementioned templates are for non-authenticated users.The following templateis for authenticated users who want to change their password:
9. account/password_change.html
318 | LESSON 10: User Registration
EVALUATION COPY: Not to be used in class.
10.2.2. The user Object
Django templates have access to the user object, which holds the authenticated userwhen there is one, and AnonymousUser when there is not.You can display user properties(e.g., the user’s username) and you can also use user properties to decide what parts ofthe template to display.
Some of the user properties include:
1. email
2. first_name
3. last_name
4. username
5. is_active
6. is_staff
7. is_superuser
8. is_authenticated – True for authenticated users. False for AnonymousUsers.
9. is_anonymous – True for AnonymousUsers. False for authenticated users.
LESSON 10: User Registration | 319
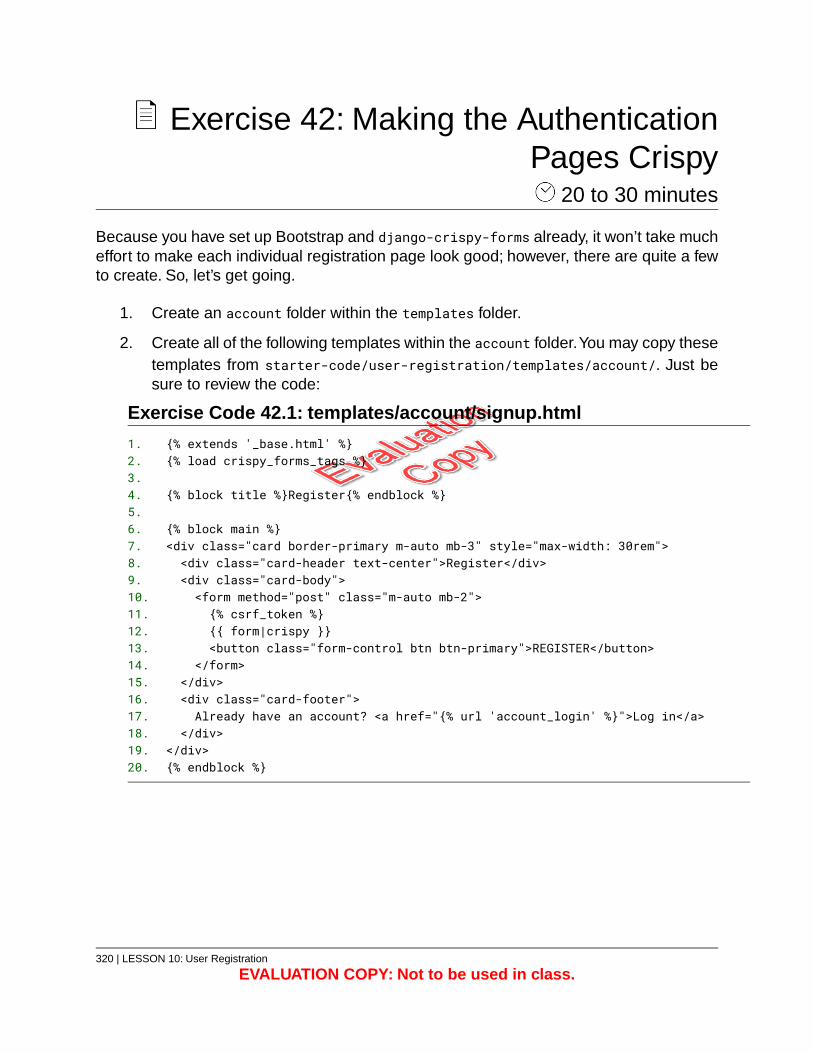
Exercise 42: Making the AuthenticationPages Crispy
20 to 30 minutes
Because you have set up Bootstrap and django-crispy-forms already, it won’t take mucheffort to make each individual registration page look good; however, there are quite a fewto create. So, let’s get going.
1. Create an account folder within the templates folder.
2. Create all of the following templates within the account folder.You may copy thesetemplates from starter-code/user-registration/templates/account/. Just besure to review the code:
Exercise Code 42.1: templates/account/signup.html
{% extends '_base.html' %}1.{% load crispy_forms_tags %}2.
3.{% block title %}Register{% endblock %}4.
5.{% block main %}6.<div class="card border-primary m-auto mb-3" style="max-width: 30rem">7.<div class="card-header text-center">Register</div>8.<div class="card-body">9.<form method="post" class="m-auto mb-2">10.{% csrf_token %}11.{{ form|crispy }}12.<button class="form-control btn btn-primary">REGISTER</button>13.
</form>14.</div>15.<div class="card-footer">16.Already have an account? <a href="{% url 'account_login' %}">Log in</a>17.
</div>18.</div>19.{% endblock %}20.
320 | LESSON 10: User Registration
EVALUATION COPY: Not to be used in class.
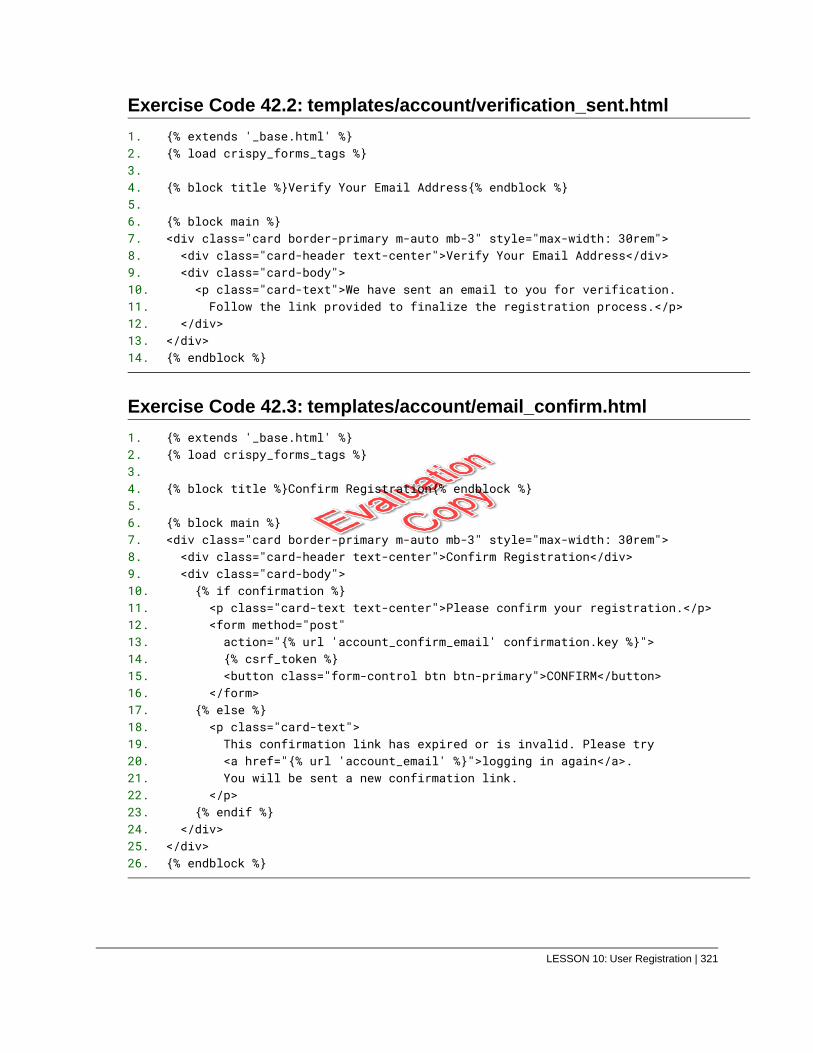
Exercise Code 42.2: templates/account/verification_sent.html
{% extends '_base.html' %}1.{% load crispy_forms_tags %}2.
3.{% block title %}Verify Your Email Address{% endblock %}4.
5.{% block main %}6.<div class="card border-primary m-auto mb-3" style="max-width: 30rem">7.<div class="card-header text-center">Verify Your Email Address</div>8.<div class="card-body">9.<p class="card-text">We have sent an email to you for verification.10.Follow the link provided to finalize the registration process.</p>11.
</div>12.</div>13.{% endblock %}14.
Exercise Code 42.3: templates/account/email_confirm.html
{% extends '_base.html' %}1.{% load crispy_forms_tags %}2.
3.{% block title %}Confirm Registration{% endblock %}4.
5.{% block main %}6.<div class="card border-primary m-auto mb-3" style="max-width: 30rem">7.<div class="card-header text-center">Confirm Registration</div>8.<div class="card-body">9.{% if confirmation %}10.<p class="card-text text-center">Please confirm your registration.</p>11.<form method="post"12.action="{% url 'account_confirm_email' confirmation.key %}">13.{% csrf_token %}14.<button class="form-control btn btn-primary">CONFIRM</button>15.
</form>16.{% else %}17.<p class="card-text">18.This confirmation link has expired or is invalid. Please try19.<a href="{% url 'account_email' %}">logging in again</a>.20.You will be sent a new confirmation link.21.
</p>22.{% endif %}23.
</div>24.</div>25.{% endblock %}26.
LESSON 10: User Registration | 321
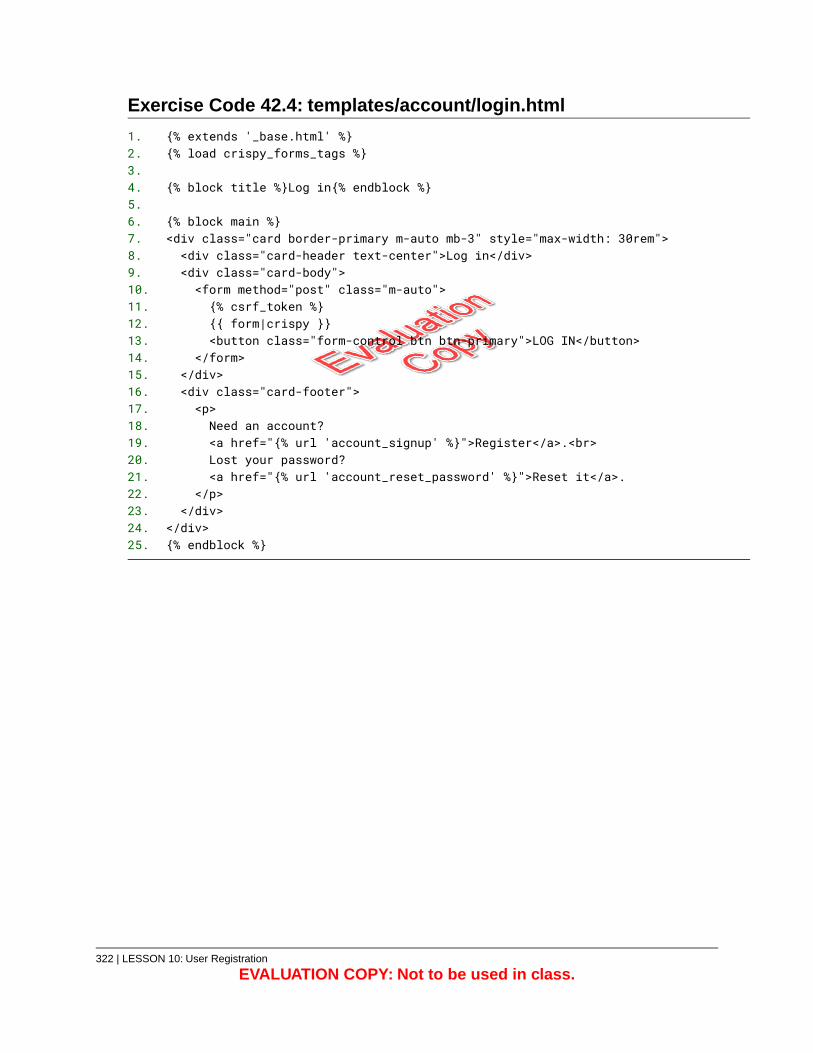
Exercise Code 42.4: templates/account/login.html
{% extends '_base.html' %}1.{% load crispy_forms_tags %}2.
3.{% block title %}Log in{% endblock %}4.
5.{% block main %}6.<div class="card border-primary m-auto mb-3" style="max-width: 30rem">7.<div class="card-header text-center">Log in</div>8.<div class="card-body">9.<form method="post" class="m-auto">10.{% csrf_token %}11.{{ form|crispy }}12.<button class="form-control btn btn-primary">LOG IN</button>13.
</form>14.</div>15.<div class="card-footer">16.<p>17.Need an account?18.<a href="{% url 'account_signup' %}">Register</a>.<br>19.Lost your password?20.<a href="{% url 'account_reset_password' %}">Reset it</a>.21.
</p>22.</div>23.
</div>24.{% endblock %}25.
322 | LESSON 10: User Registration
EVALUATION COPY: Not to be used in class.
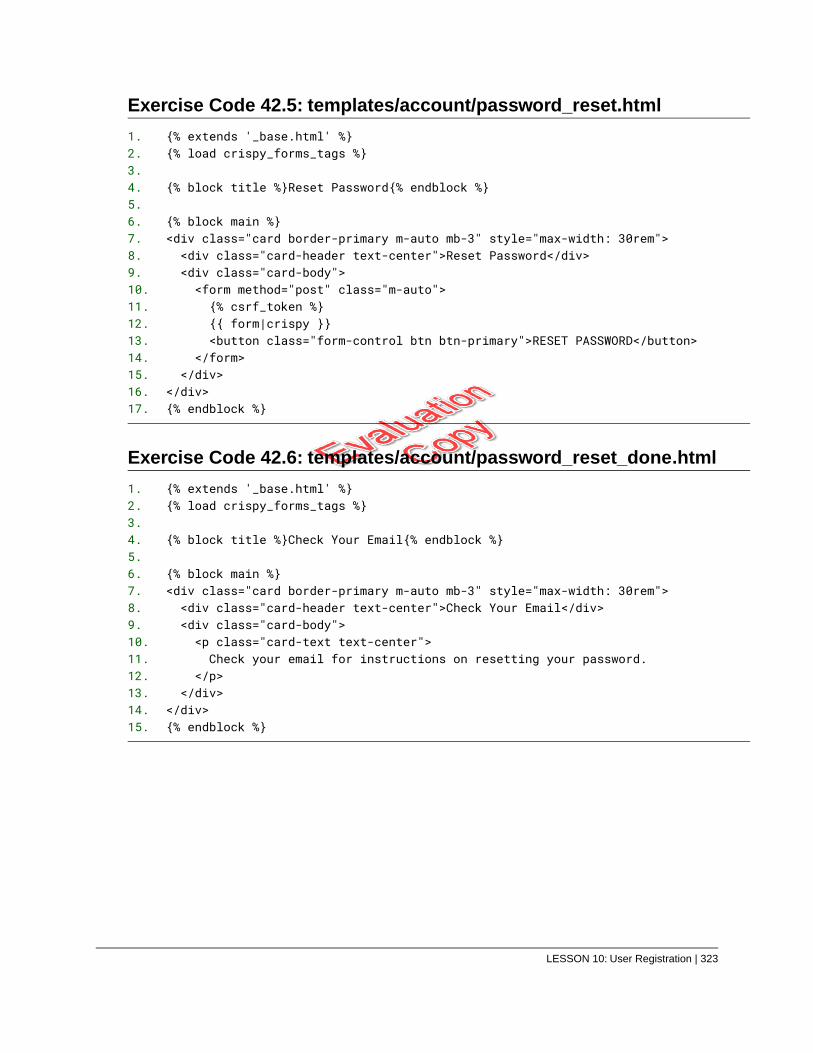
Exercise Code 42.5: templates/account/password_reset.html
{% extends '_base.html' %}1.{% load crispy_forms_tags %}2.
3.{% block title %}Reset Password{% endblock %}4.
5.{% block main %}6.<div class="card border-primary m-auto mb-3" style="max-width: 30rem">7.<div class="card-header text-center">Reset Password</div>8.<div class="card-body">9.<form method="post" class="m-auto">10.{% csrf_token %}11.{{ form|crispy }}12.<button class="form-control btn btn-primary">RESET PASSWORD</button>13.
</form>14.</div>15.
</div>16.{% endblock %}17.
Exercise Code 42.6: templates/account/password_reset_done.html
{% extends '_base.html' %}1.{% load crispy_forms_tags %}2.
3.{% block title %}Check Your Email{% endblock %}4.
5.{% block main %}6.<div class="card border-primary m-auto mb-3" style="max-width: 30rem">7.<div class="card-header text-center">Check Your Email</div>8.<div class="card-body">9.<p class="card-text text-center">10.Check your email for instructions on resetting your password.11.
</p>12.</div>13.
</div>14.{% endblock %}15.
LESSON 10: User Registration | 323
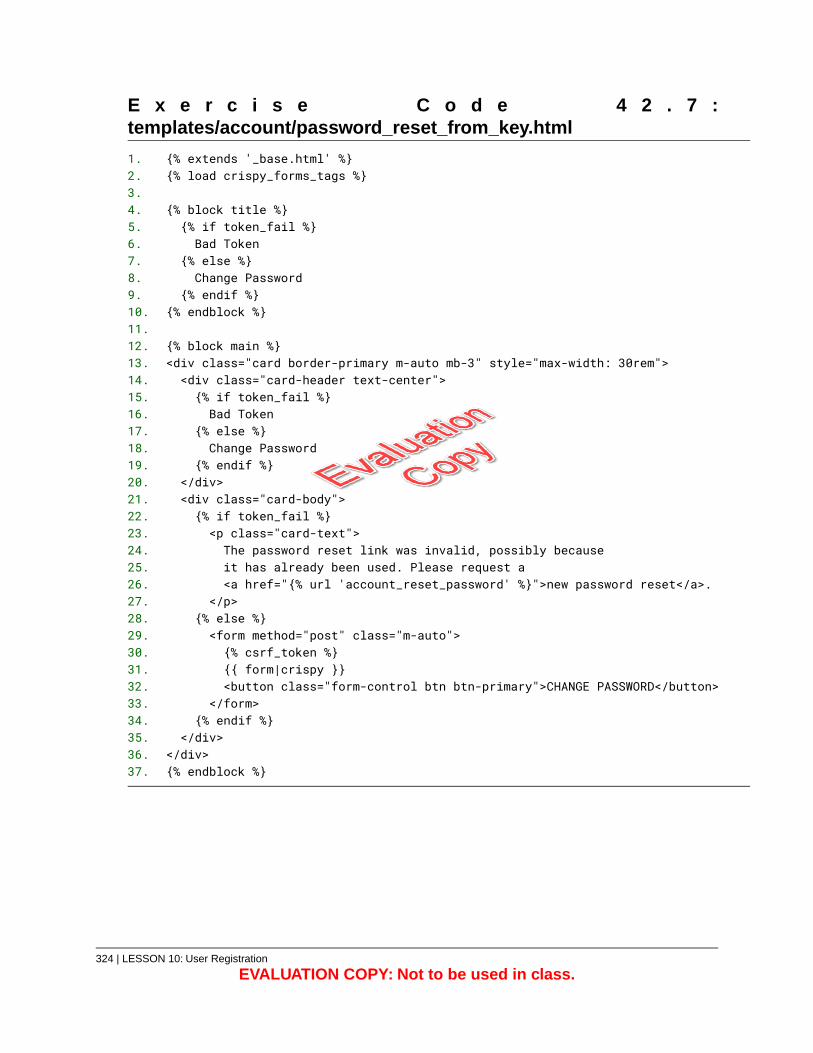
E x e r c i s e C o d e 4 2 . 7 :templates/account/password_reset_from_key.html
{% extends '_base.html' %}1.{% load crispy_forms_tags %}2.
3.{% block title %}4.{% if token_fail %}5.Bad Token6.
{% else %}7.Change Password8.
{% endif %}9.{% endblock %}10.
11.{% block main %}12.<div class="card border-primary m-auto mb-3" style="max-width: 30rem">13.<div class="card-header text-center">14.{% if token_fail %}15.Bad Token16.
{% else %}17.Change Password18.
{% endif %}19.</div>20.<div class="card-body">21.{% if token_fail %}22.<p class="card-text">23.The password reset link was invalid, possibly because24.it has already been used. Please request a25.<a href="{% url 'account_reset_password' %}">new password reset</a>.26.
</p>27.{% else %}28.<form method="post" class="m-auto">29.{% csrf_token %}30.{{ form|crispy }}31.<button class="form-control btn btn-primary">CHANGE PASSWORD</button>32.
</form>33.{% endif %}34.
</div>35.</div>36.{% endblock %}37.
324 | LESSON 10: User Registration
EVALUATION COPY: Not to be used in class.
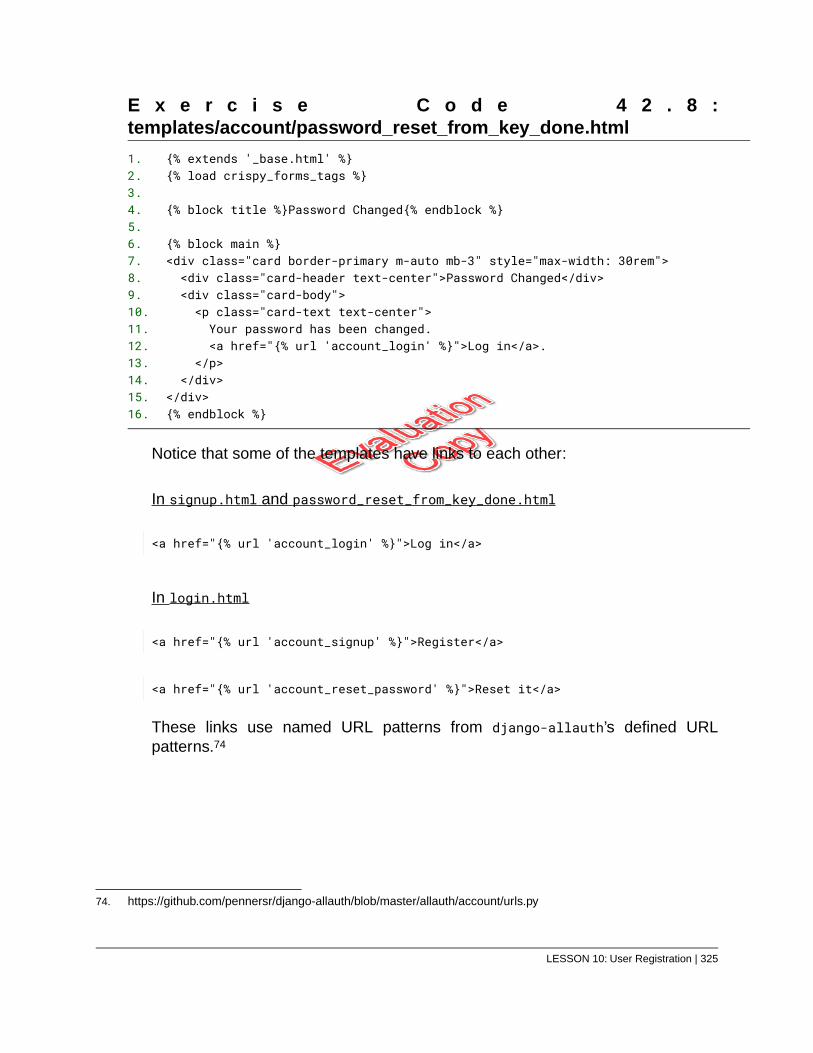
E x e r c i s e C o d e 4 2 . 8 :templates/account/password_reset_from_key_done.html
{% extends '_base.html' %}1.{% load crispy_forms_tags %}2.
3.{% block title %}Password Changed{% endblock %}4.
5.{% block main %}6.<div class="card border-primary m-auto mb-3" style="max-width: 30rem">7.<div class="card-header text-center">Password Changed</div>8.<div class="card-body">9.<p class="card-text text-center">10.Your password has been changed.11.<a href="{% url 'account_login' %}">Log in</a>.12.
</p>13.</div>14.
</div>15.{% endblock %}16.
Notice that some of the templates have links to each other:
In signup.html and password_reset_from_key_done.html
<a href="{% url 'account_login' %}">Log in</a>
In login.html
<a href="{% url 'account_signup' %}">Register</a>
<a href="{% url 'account_reset_password' %}">Reset it</a>
These links use named URL patterns from django-allauth’s defined URLpatterns.74
74. https://github.com/pennersr/django-allauth/blob/master/allauth/account/urls.py
LESSON 10: User Registration | 325
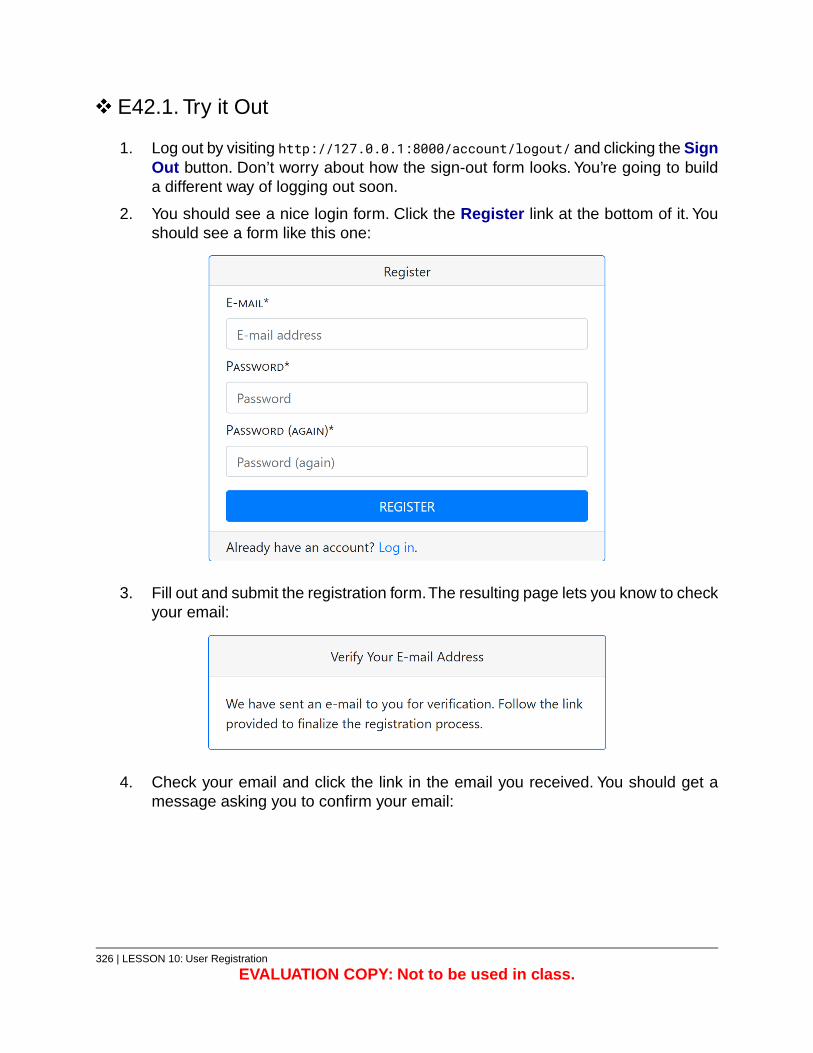
E42.1. Try it Out
1. Log out by visiting http://127.0.0.1:8000/account/logout/ and clicking the SignOut button. Don’t worry about how the sign-out form looks. You’re going to builda different way of logging out soon.
2. You should see a nice login form. Click the Register link at the bottom of it. Youshould see a form like this one:
3. Fill out and submit the registration form.The resulting page lets you know to checkyour email:
4. Check your email and click the link in the email you received. You should get amessage asking you to confirm your email:
326 | LESSON 10: User Registration
EVALUATION COPY: Not to be used in class.

5. Click the Confirm button. That should take you back to the crispy login form:
6. Click the Reset it link to reset your password.This takes you to the password-resetform:
7. Enter your email and submit. This takes you to the password-reset-done page:
LESSON 10: User Registration | 327

8. You should receive an email similar to this one:
9. Click the link in the email. It should take you to a page with a form like this one:
10. Enter your new password twice and submit. You should get a message like thisone:
You can now click the Log in link and log in with your new password.
328 | LESSON 10: User Registration
EVALUATION COPY: Not to be used in class.
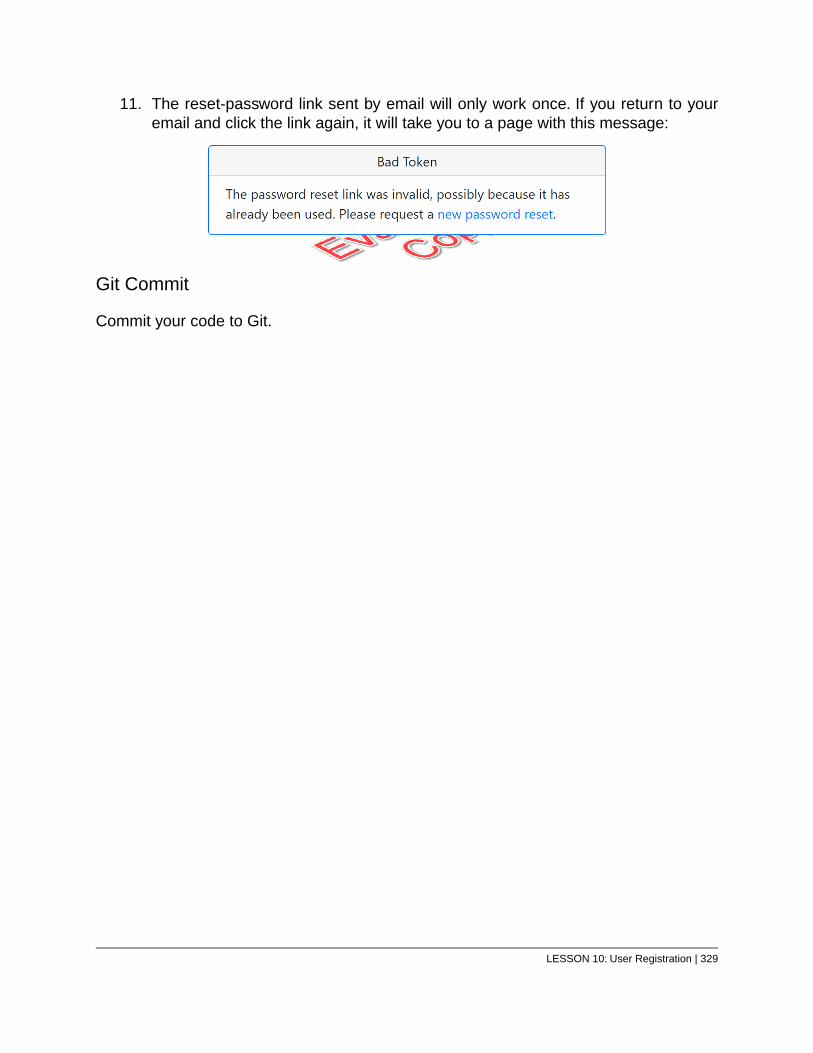
11. The reset-password link sent by email will only work once. If you return to youremail and click the link again, it will take you to a page with this message:
Git Commit
Commit your code to Git.
LESSON 10: User Registration | 329

Exercise 43: Updating the _base.htmlTemplate
30 to 45 minutes
Time to make some updates to the _base.html template. See if you can do the followingon your own before checking the solution:
1. Make the Log in link work. The named URL pattern is “account_login”.
2. Add a Sign up nav item that links to the registration page.The named URL patternis “account_signup”.
3. Change the Log out link to a form. Why? GET requests should not change thestate of the application. As logging out does change the state, it should be doneusing a POST request, which requires a form. Change the link from:
<a class="dropdown-item" href="#">Log out</a>
… to a form using the following code:
<form method="post" action="{% url 'account_logout' %}">{% csrf_token %}<button class="btn dropdown-item">Log out</button>
</form>
4. Use an if-else condition (see page 138) to show the Log in and Sign up nav itemsif the user is not logged in and show the nav item with the dropdown if the useris logged in.You should base this on the value of user.is_authenticated, whichis True if the user is logged in and False otherwise.
5. Change the Contact link in the footer to an Admin link that leads to Django admin(/admin/). Make it so this link only shows up if user.is_staff is True.
E43.1. Try it Out
1. Log into the site with your superuser account. The page should have a headerwith a dropdown navigation:
330 | LESSON 10: User Registration
EVALUATION COPY: Not to be used in class.

…and a footer with an Admin link:
2. Click the Admin link to make sure it takes you to Django admin.
3. Return to the home page and click Log out. It should take you to the Login page,which should include Log in and Sign up links in the header:
And the Admin link should not appear in the footer:
4. Log in as an account that is not staff. The dropdown navigation should show upin the header, but the Admin link should not show up in the footer.
Our solution follows:
LESSON 10: User Registration | 331
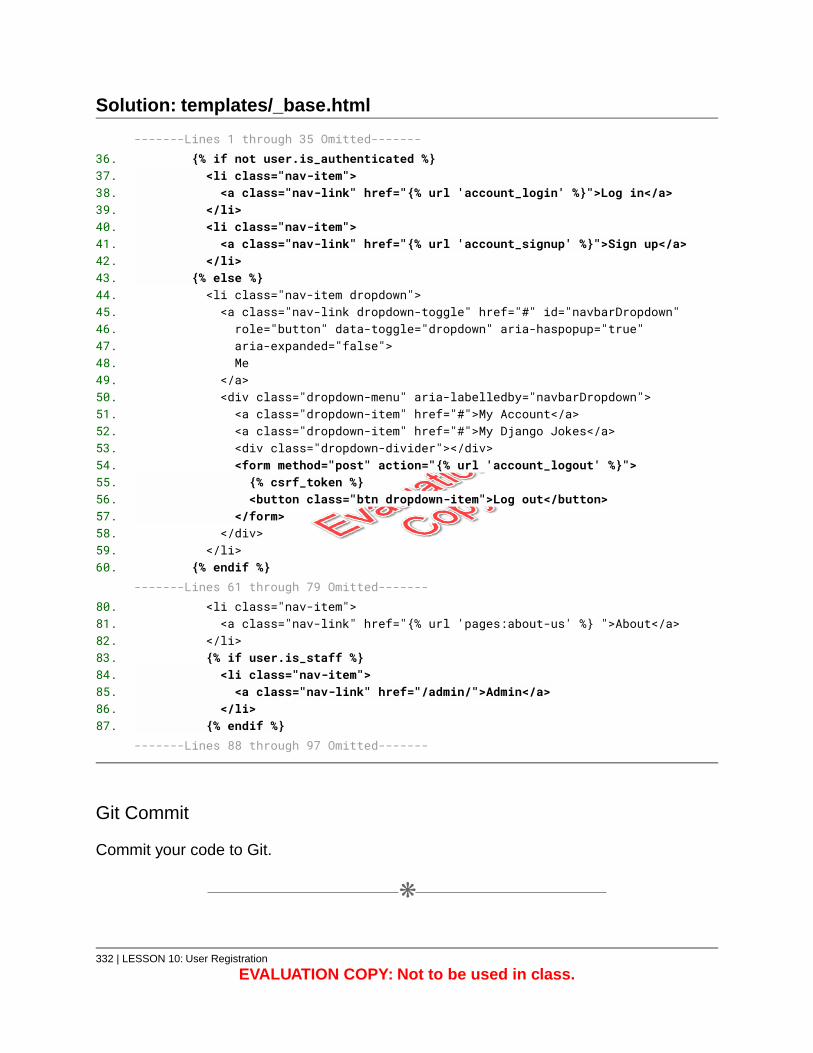
Solution: templates/_base.html
-------Lines 1 through 35 Omitted-------{% if not user.is_authenticated %}36.<li class="nav-item">37.<a class="nav-link" href="{% url 'account_login' %}">Log in</a>38.
</li>39.<li class="nav-item">40.<a class="nav-link" href="{% url 'account_signup' %}">Sign up</a>41.
</li>42.{% else %}43.<li class="nav-item dropdown">44.<a class="nav-link dropdown-toggle" href="#" id="navbarDropdown"45.role="button" data-toggle="dropdown" aria-haspopup="true"46.aria-expanded="false">47.Me48.
</a>49.<div class="dropdown-menu" aria-labelledby="navbarDropdown">50.<a class="dropdown-item" href="#">My Account</a>51.<a class="dropdown-item" href="#">My Django Jokes</a>52.<div class="dropdown-divider"></div>53.<form method="post" action="{% url 'account_logout' %}">54.{% csrf_token %}55.<button class="btn dropdown-item">Log out</button>56.
</form>57.</div>58.
</li>59.{% endif %}60.
-------Lines 61 through 79 Omitted-------<li class="nav-item">80.<a class="nav-link" href="{% url 'pages:about-us' %} ">About</a>81.
</li>82.{% if user.is_staff %}83.<li class="nav-item">84.<a class="nav-link" href="/admin/">Admin</a>85.
</li>86.{% endif %}87.
-------Lines 88 through 97 Omitted-------
Git Commit
Commit your code to Git.
❋
332 | LESSON 10: User Registration
EVALUATION COPY: Not to be used in class.
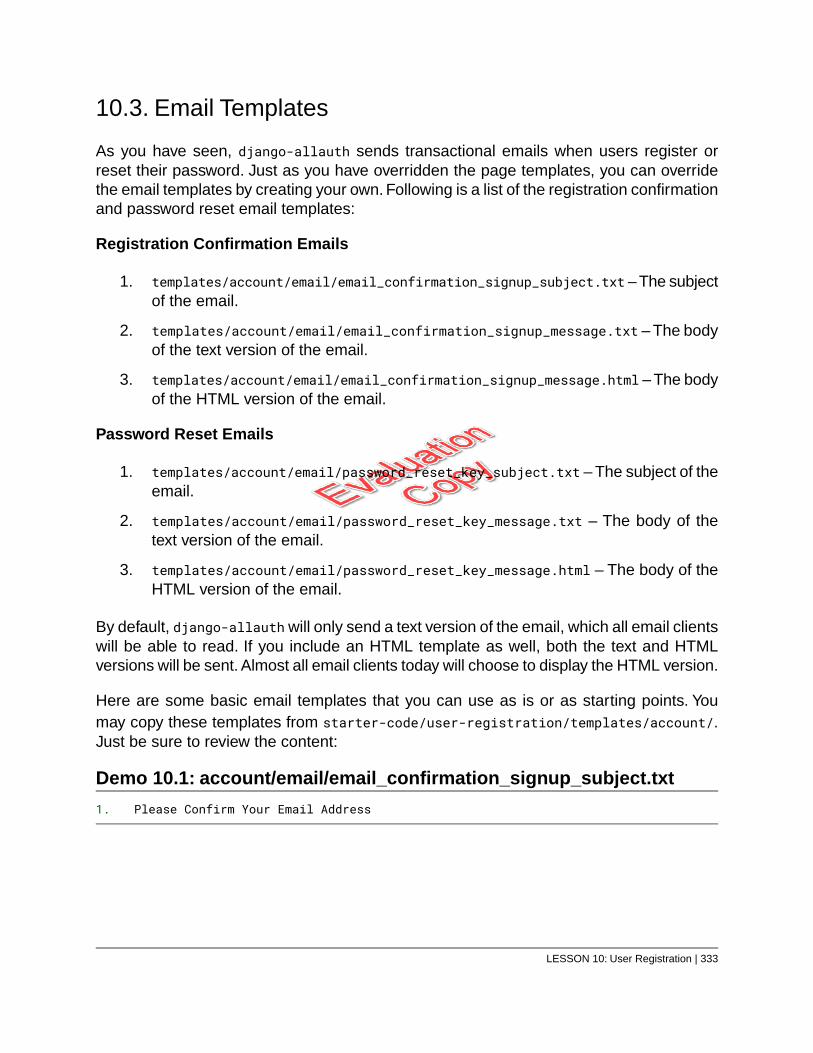
10.3. Email Templates
As you have seen, django-allauth sends transactional emails when users register orreset their password. Just as you have overridden the page templates, you can overridethe email templates by creating your own. Following is a list of the registration confirmationand password reset email templates:
Registration Confirmation Emails
1. templates/account/email/email_confirmation_signup_subject.txt – The subjectof the email.
2. templates/account/email/email_confirmation_signup_message.txt – The bodyof the text version of the email.
3. templates/account/email/email_confirmation_signup_message.html – The bodyof the HTML version of the email.
Password Reset Emails
1. templates/account/email/password_reset_key_subject.txt – The subject of theemail.
2. templates/account/email/password_reset_key_message.txt – The body of thetext version of the email.
3. templates/account/email/password_reset_key_message.html – The body of theHTML version of the email.
By default, django-allauth will only send a text version of the email, which all email clientswill be able to read. If you include an HTML template as well, both the text and HTMLversions will be sent. Almost all email clients today will choose to display the HTML version.
Here are some basic email templates that you can use as is or as starting points. Youmay copy these templates from starter-code/user-registration/templates/account/.Just be sure to review the content:
Demo 10.1: account/email/email_confirmation_signup_subject.txt
Please Confirm Your Email Address1.
LESSON 10: User Registration | 333
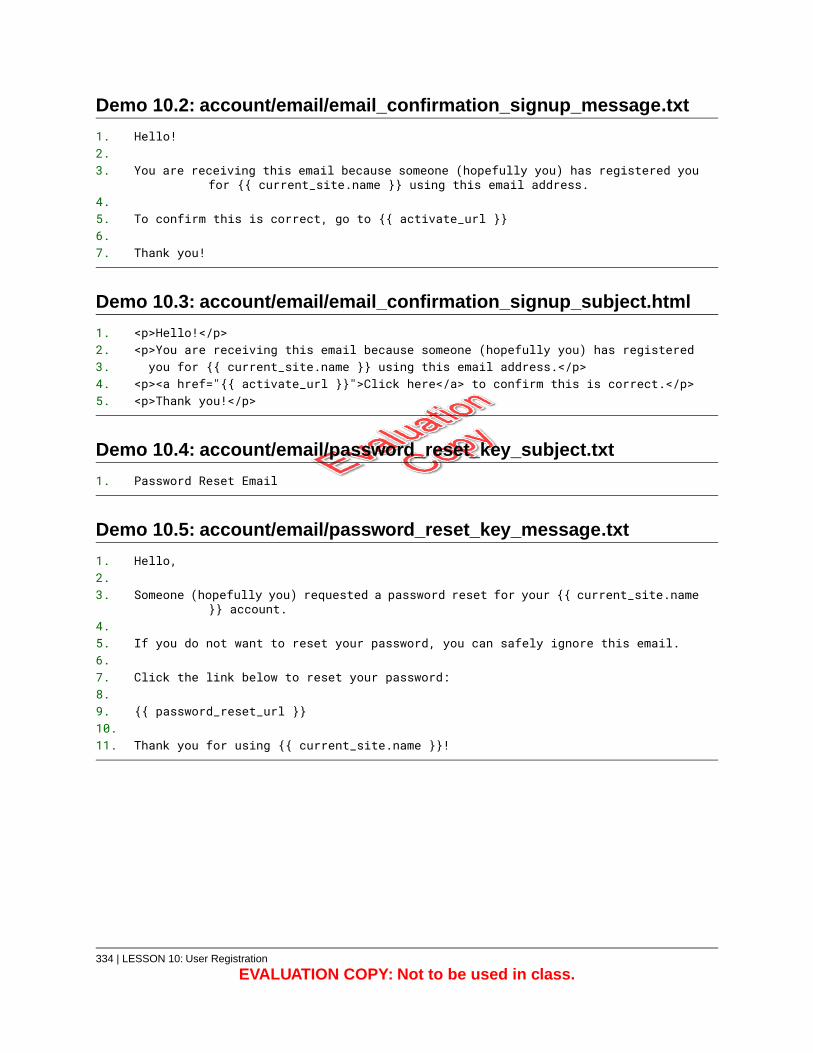
Demo 10.2: account/email/email_confirmation_signup_message.txt
Hello!1.2.
You are receiving this email because someone (hopefully you) has registered youfor {{ current_site.name }} using this email address.
3.
4.To confirm this is correct, go to {{ activate_url }}5.
6.Thank you!7.
Demo 10.3: account/email/email_confirmation_signup_subject.html
<p>Hello!</p>1.<p>You are receiving this email because someone (hopefully you) has registered2.you for {{ current_site.name }} using this email address.</p>3.
<p><a href="{{ activate_url }}">Click here</a> to confirm this is correct.</p>4.<p>Thank you!</p>5.
Demo 10.4: account/email/password_reset_key_subject.txt
Password Reset Email1.
Demo 10.5: account/email/password_reset_key_message.txt
Hello,1.2.
Someone (hopefully you) requested a password reset for your {{ current_site.name}} account.
3.
4.If you do not want to reset your password, you can safely ignore this email.5.
6.Click the link below to reset your password:7.
8.{{ password_reset_url }}9.
10.Thank you for using {{ current_site.name }}!11.
334 | LESSON 10: User Registration
EVALUATION COPY: Not to be used in class.
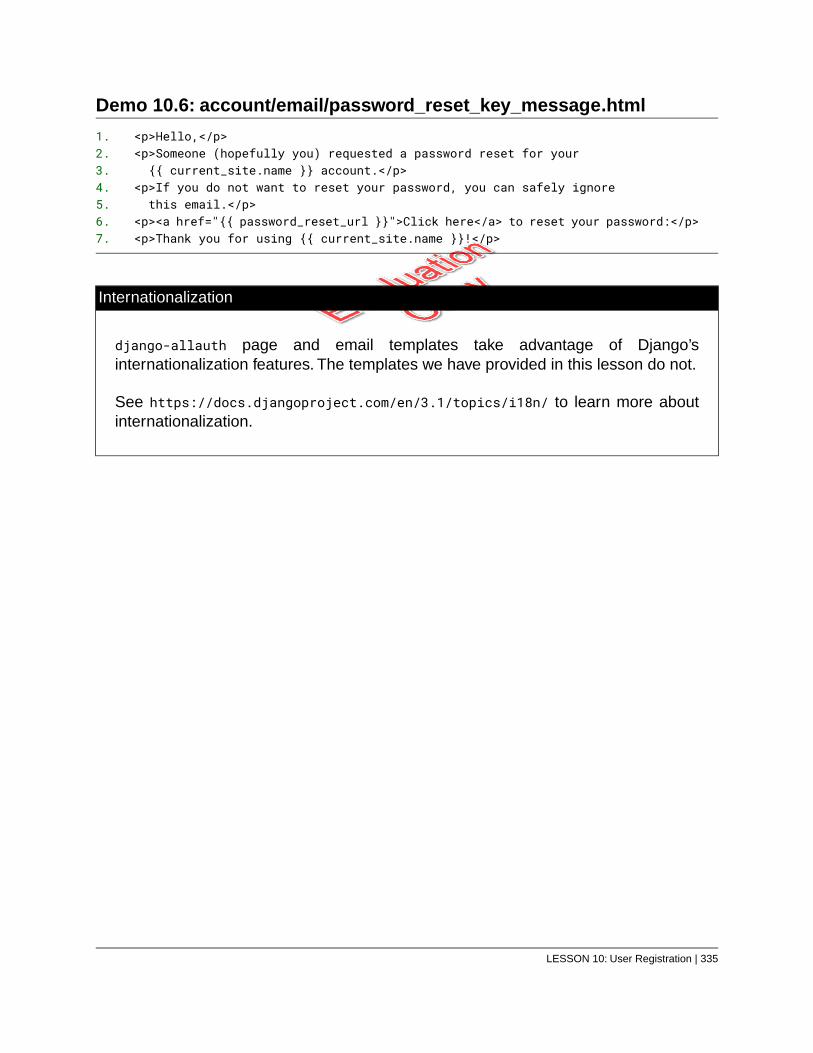
Demo 10.6: account/email/password_reset_key_message.html
<p>Hello,</p>1.<p>Someone (hopefully you) requested a password reset for your2.{{ current_site.name }} account.</p>3.
<p>If you do not want to reset your password, you can safely ignore4.this email.</p>5.
<p><a href="{{ password_reset_url }}">Click here</a> to reset your password:</p>6.<p>Thank you for using {{ current_site.name }}!</p>7.
Internationalization
django-allauth page and email templates take advantage of Django’sinternationalization features. The templates we have provided in this lesson do not.
See https://docs.djangoproject.com/en/3.1/topics/i18n/ to learn more aboutinternationalization.
LESSON 10: User Registration | 335
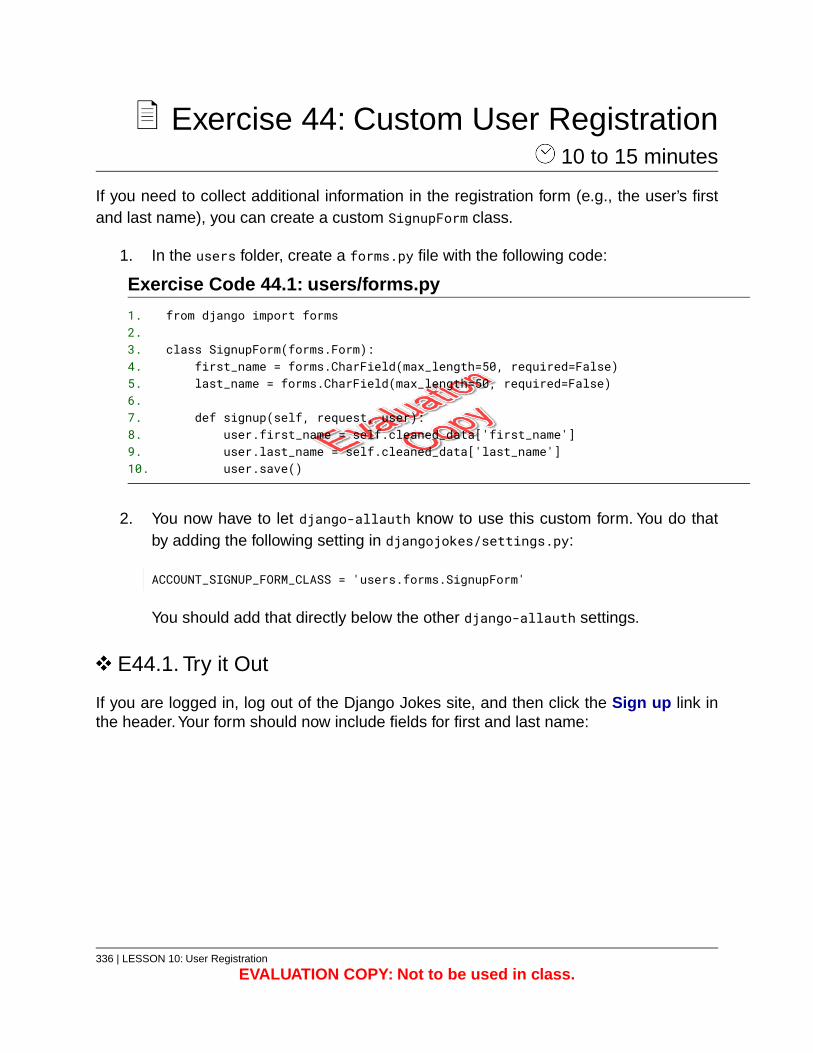
Exercise 44: Custom User Registration 10 to 15 minutes
If you need to collect additional information in the registration form (e.g., the user’s firstand last name), you can create a custom SignupForm class.
1. In the users folder, create a forms.py file with the following code:
Exercise Code 44.1: users/forms.py
from django import forms1.2.
class SignupForm(forms.Form):3.first_name = forms.CharField(max_length=50, required=False)4.last_name = forms.CharField(max_length=50, required=False)5.
6.def signup(self, request, user):7.
user.first_name = self.cleaned_data['first_name']8.user.last_name = self.cleaned_data['last_name']9.user.save()10.
2. You now have to let django-allauth know to use this custom form. You do thatby adding the following setting in djangojokes/settings.py:
ACCOUNT_SIGNUP_FORM_CLASS = 'users.forms.SignupForm'
You should add that directly below the other django-allauth settings.
E44.1. Try it Out
If you are logged in, log out of the Django Jokes site, and then click the Sign up link inthe header.Your form should now include fields for first and last name:
336 | LESSON 10: User Registration
EVALUATION COPY: Not to be used in class.
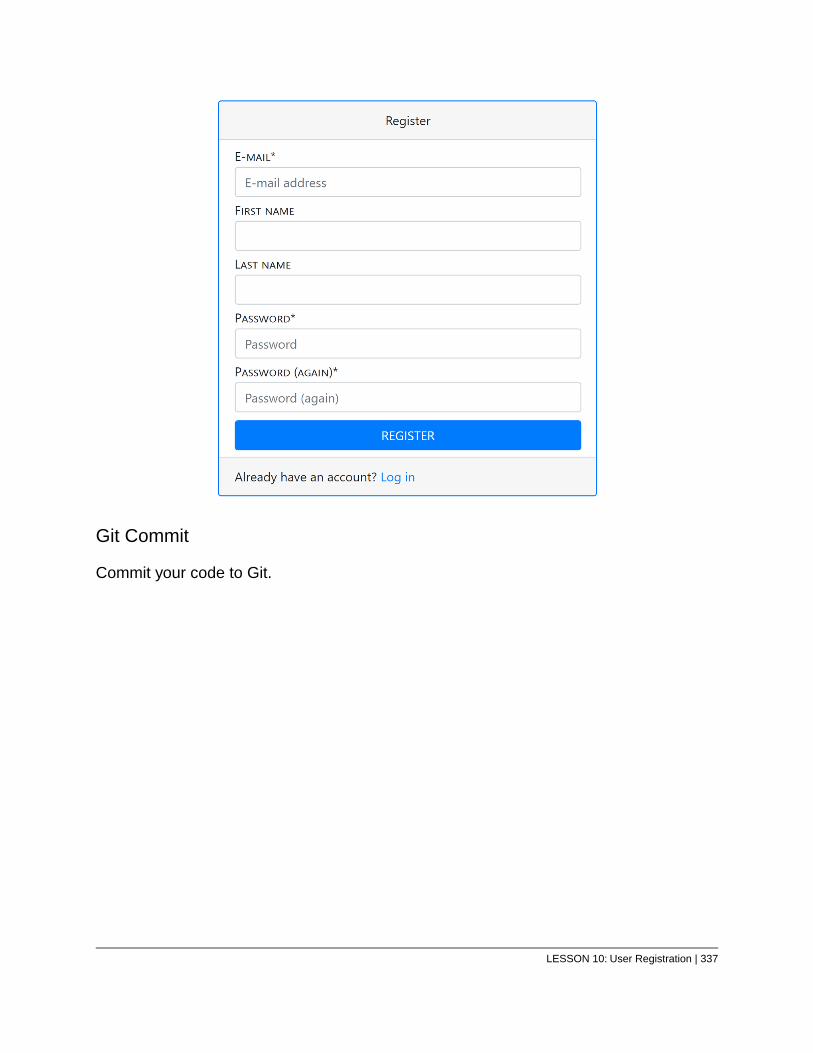
Git Commit
Commit your code to Git.
LESSON 10: User Registration | 337
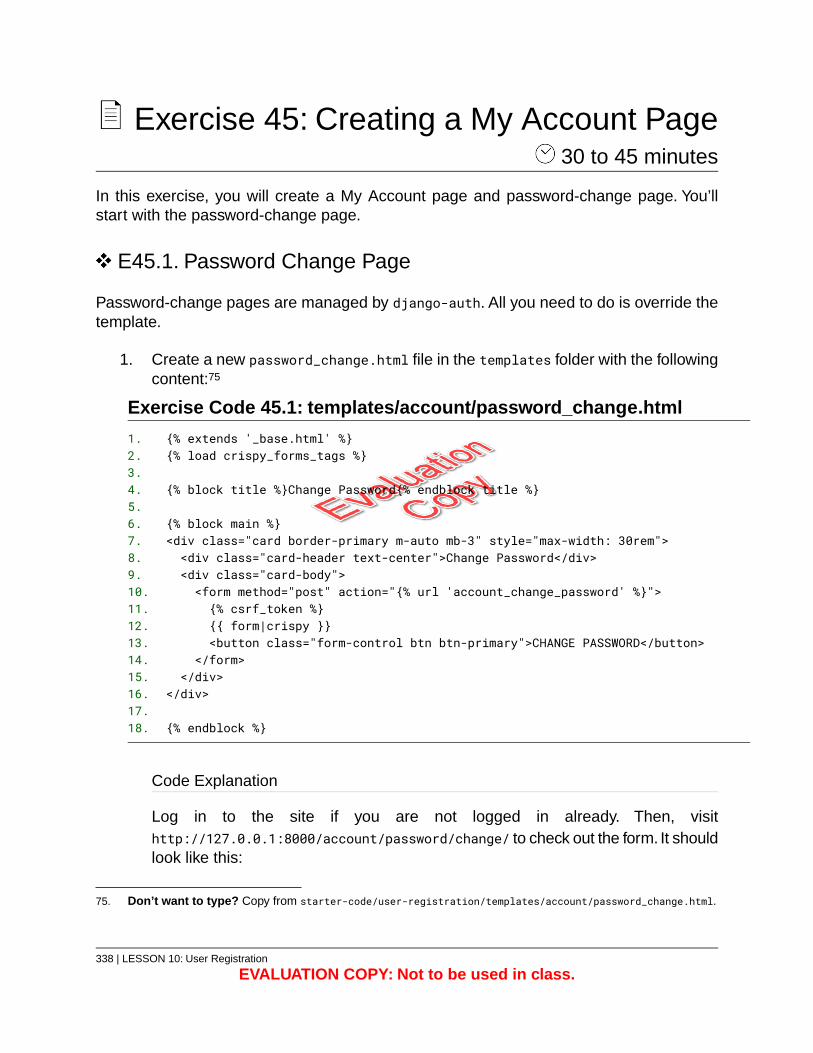
Exercise 45: Creating a My Account Page 30 to 45 minutes
In this exercise, you will create a My Account page and password-change page. You’llstart with the password-change page.
E45.1. Password Change Page
Password-change pages are managed by django-auth. All you need to do is override thetemplate.
1. Create a new password_change.html file in the templates folder with the followingcontent:75
Exercise Code 45.1: templates/account/password_change.html
{% extends '_base.html' %}1.{% load crispy_forms_tags %}2.
3.{% block title %}Change Password{% endblock title %}4.
5.{% block main %}6.<div class="card border-primary m-auto mb-3" style="max-width: 30rem">7.<div class="card-header text-center">Change Password</div>8.<div class="card-body">9.<form method="post" action="{% url 'account_change_password' %}">10.{% csrf_token %}11.{{ form|crispy }}12.<button class="form-control btn btn-primary">CHANGE PASSWORD</button>13.
</form>14.</div>15.
</div>16.17.
{% endblock %}18.
Code Explanation
Log in to the site if you are not logged in already. Then, visithttp://127.0.0.1:8000/account/password/change/ to check out the form. It shouldlook like this:
75. Don’t want to type? Copy from starter-code/user-registration/templates/account/password_change.html.
338 | LESSON 10: User Registration
EVALUATION COPY: Not to be used in class.
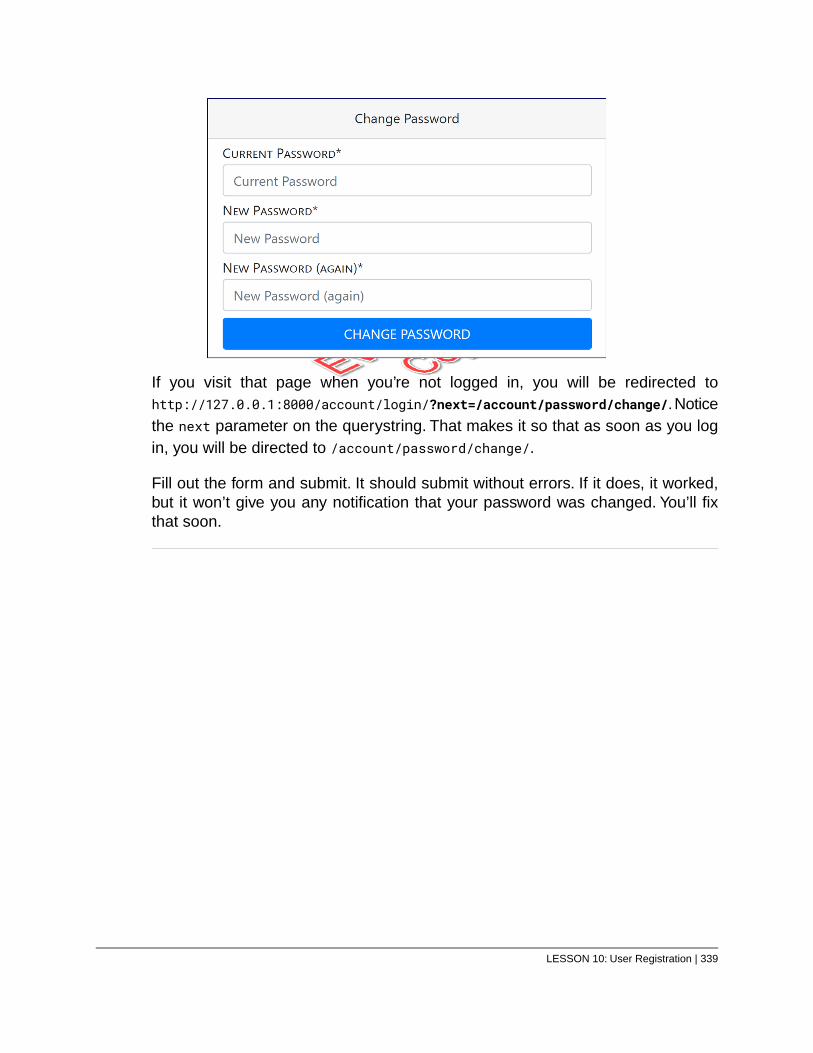
If you visit that page when you’re not logged in, you will be redirected tohttp://127.0.0.1:8000/account/login/?next=/account/password/change/. Noticethe next parameter on the querystring. That makes it so that as soon as you login, you will be directed to /account/password/change/.
Fill out the form and submit. It should submit without errors. If it does, it worked,but it won’t give you any notification that your password was changed. You’ll fixthat soon.
LESSON 10: User Registration | 339

E45.2. My Account Page
My Account pages (often called profile pages) are not managed by django-allauth. So,you’ll have to create the form, view, and URLConf yourself. You are also going to add adob (date of birth) field to the model.
The Model
1. Open users/models.py and add the following highlighted changes:76
Exercise Code 45.2: users/models.py
from django.contrib.auth.models import AbstractUser1.from django.db import models2.from django.urls import reverse3.
4.class CustomUser(AbstractUser):5.
dob = models.DateField(6.verbose_name="Date of Birth", null=True, blank=True7.
)8.9.
def get_absolute_url(self):10.return reverse('my-account')11.
Things to notice:
A. You have added an optional dob field.
B. You have imported reverse from django.urls and used it in theget_absolute_url() method to return the page to redirect to after a useris updated.
2. Because the model has changed, you need to make and run the migrations:
(.venv) …/projects/djangojokes.com> python manage.py makemigrations(.venv) …/projects/djangojokes.com> python manage.py migrate
The Form
django.contrib.auth.forms includes a UserChangeForm class that is used to modify userobjects from the user model.
76. Don’t want to type? Copy from starter-code/user-registration/users_models.py.
340 | LESSON 10: User Registration
EVALUATION COPY: Not to be used in class.
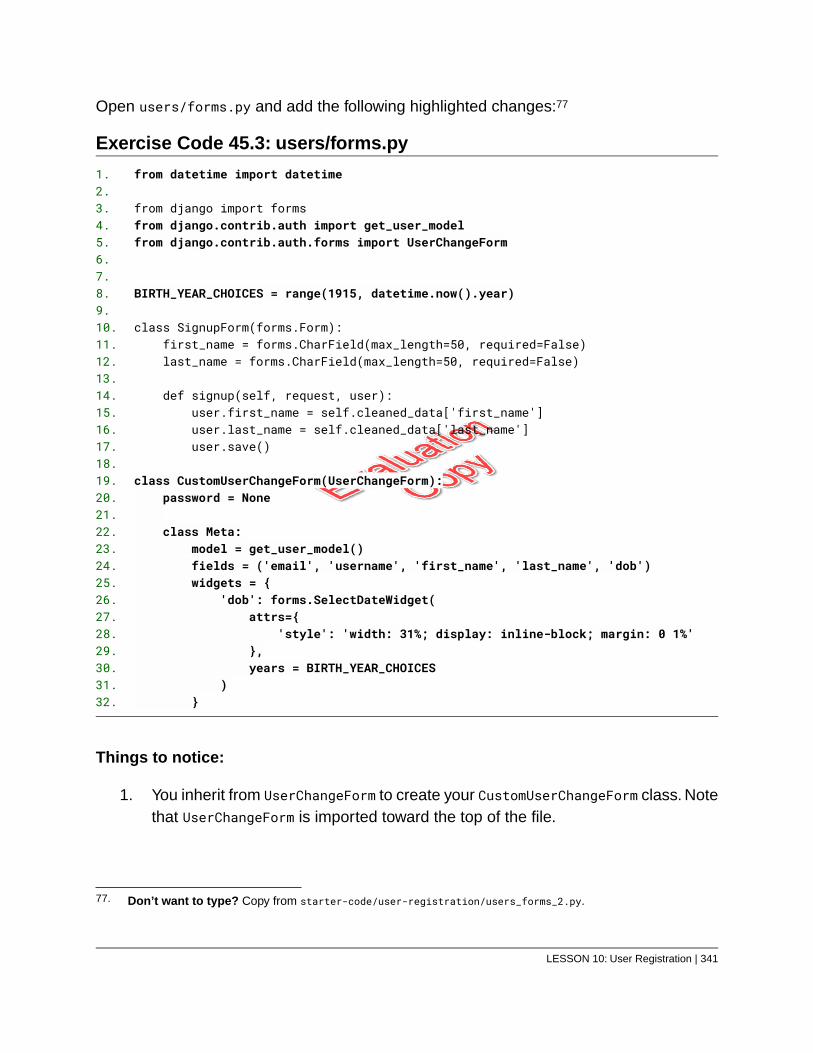
Open users/forms.py and add the following highlighted changes:77
Exercise Code 45.3: users/forms.py
from datetime import datetime1.2.
from django import forms3.from django.contrib.auth import get_user_model4.from django.contrib.auth.forms import UserChangeForm5.
6.7.
BIRTH_YEAR_CHOICES = range(1915, datetime.now().year)8.9.
class SignupForm(forms.Form):10.first_name = forms.CharField(max_length=50, required=False)11.last_name = forms.CharField(max_length=50, required=False)12.
13.def signup(self, request, user):14.
user.first_name = self.cleaned_data['first_name']15.user.last_name = self.cleaned_data['last_name']16.user.save()17.
18.class CustomUserChangeForm(UserChangeForm):19.
password = None20.21.
class Meta:22.model = get_user_model()23.fields = ('email', 'username', 'first_name', 'last_name', 'dob')24.widgets = {25.
'dob': forms.SelectDateWidget(26.attrs={27.
'style': 'width: 31%; display: inline-block; margin: 0 1%'28.},29.years = BIRTH_YEAR_CHOICES30.
)31.}32.
Things to notice:
1. You inherit from UserChangeForm to create your CustomUserChangeForm class. Notethat UserChangeForm is imported toward the top of the file.
77. Don’t want to type? Copy from starter-code/user-registration/users_forms_2.py.
LESSON 10: User Registration | 341
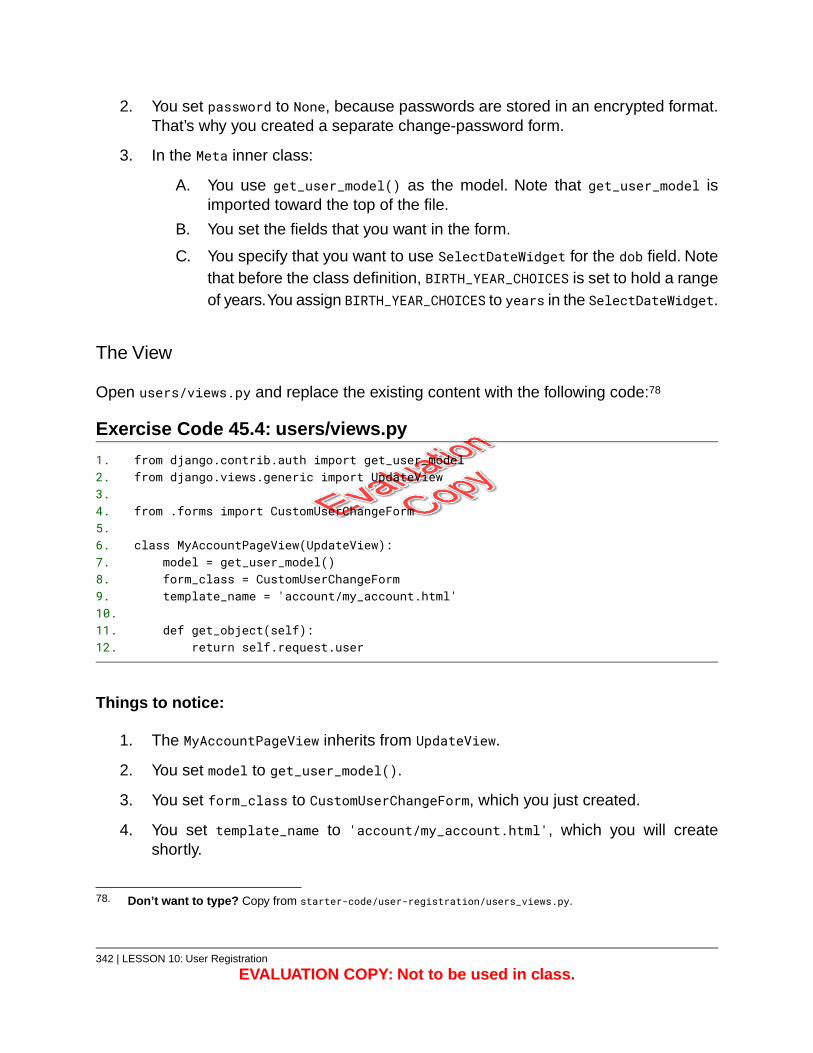
2. You set password to None, because passwords are stored in an encrypted format.That’s why you created a separate change-password form.
3. In the Meta inner class:
A. You use get_user_model() as the model. Note that get_user_model isimported toward the top of the file.
B. You set the fields that you want in the form.
C. You specify that you want to use SelectDateWidget for the dob field. Notethat before the class definition, BIRTH_YEAR_CHOICES is set to hold a rangeof years.You assign BIRTH_YEAR_CHOICES to years in the SelectDateWidget.
The View
Open users/views.py and replace the existing content with the following code:78
Exercise Code 45.4: users/views.py
from django.contrib.auth import get_user_model1.from django.views.generic import UpdateView2.
3.from .forms import CustomUserChangeForm4.
5.class MyAccountPageView(UpdateView):6.
model = get_user_model()7.form_class = CustomUserChangeForm8.template_name = 'account/my_account.html'9.
10.def get_object(self):11.
return self.request.user12.
Things to notice:
1. The MyAccountPageView inherits from UpdateView.
2. You set model to get_user_model().
3. You set form_class to CustomUserChangeForm, which you just created.
4. You set template_name to 'account/my_account.html', which you will createshortly.
78. Don’t want to type? Copy from starter-code/user-registration/users_views.py.
342 | LESSON 10: User Registration
EVALUATION COPY: Not to be used in class.
5. You override the superclass’s get_object() method:
def get_object(self):return self.request.user
Why do you need to override the superclass’s get_object() method? Consider for amoment the view you use to update jokes:
class JokeUpdateView(UpdateView):model = Jokeform_class = JokeForm
How does this view know which joke to update? It gets it from the URL pattern in theURLConf:
path('<slug>/update/', JokeUpdateView.as_view(), name='update')
Class views for single objects (e.g., DetailView, UpdateView, DeleteView) get their objectusing self.kwargs.get('pk') or self.kwargs.get('slug'). If neither “pk” nor “slug” isfound and the queryset attribute is not set explicitly, an exception will be raised. Here isa simplified version of the get_object() method used by these views:79
79. See django/views/generic/detail.py for the full get_object() method.
LESSON 10: User Registration | 343
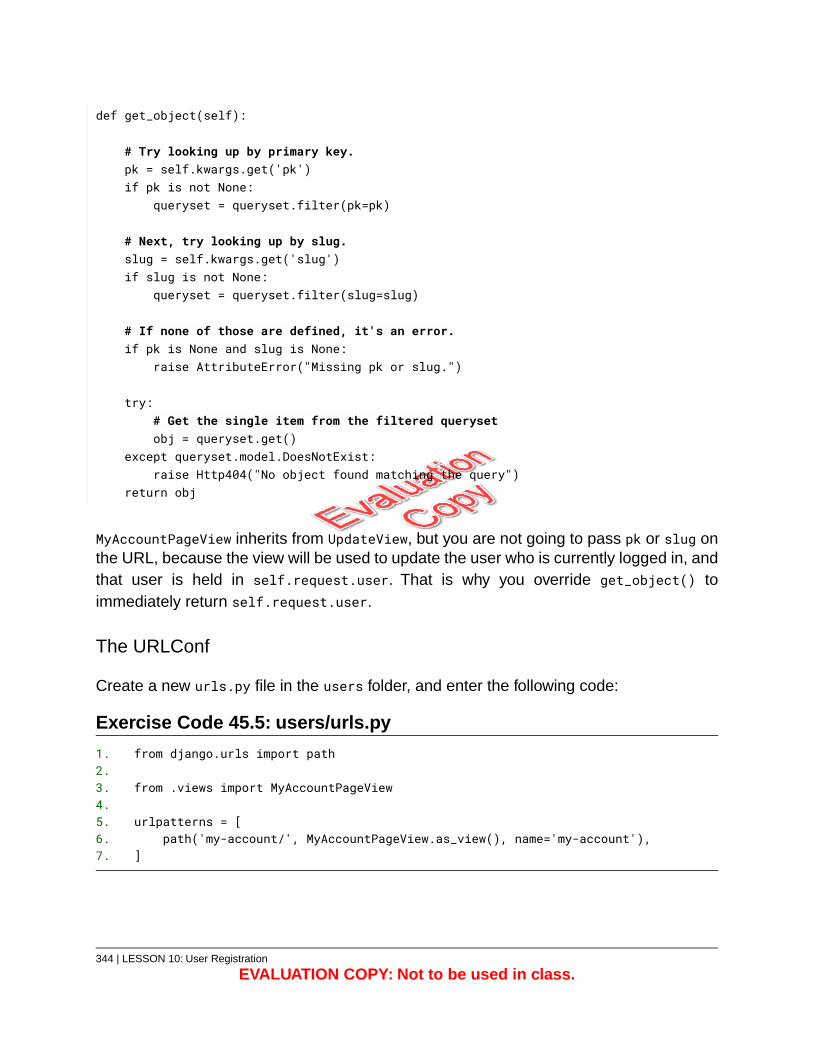
def get_object(self):
# Try looking up by primary key.pk = self.kwargs.get('pk')if pk is not None:
queryset = queryset.filter(pk=pk)
# Next, try looking up by slug.slug = self.kwargs.get('slug')if slug is not None:
queryset = queryset.filter(slug=slug)
# If none of those are defined, it's an error.if pk is None and slug is None:
raise AttributeError("Missing pk or slug.")
try:# Get the single item from the filtered querysetobj = queryset.get()
except queryset.model.DoesNotExist:raise Http404("No object found matching the query")
return obj
MyAccountPageView inherits from UpdateView, but you are not going to pass pk or slug onthe URL, because the view will be used to update the user who is currently logged in, andthat user is held in self.request.user. That is why you override get_object() toimmediately return self.request.user.
The URLConf
Create a new urls.py file in the users folder, and enter the following code:
Exercise Code 45.5: users/urls.py
from django.urls import path1.2.
from .views import MyAccountPageView3.4.
urlpatterns = [5.path('my-account/', MyAccountPageView.as_view(), name='my-account'),6.
]7.
344 | LESSON 10: User Registration
EVALUATION COPY: Not to be used in class.
Include App URLConf in Main URLConf
Next, you need to let your main URLConf know to hand off some paths to the usersURLConf. Open djangojokes/urls.py. Immediately above path('account/',
include('allauth.urls')),, add the following path:
path('account/', include('users.urls')),
Now, for paths that begin with /account/, Django will first check users.urls for matchingpaths. If it doesn’t find a match there, it will check allauth.urls.
LESSON 10: User Registration | 345
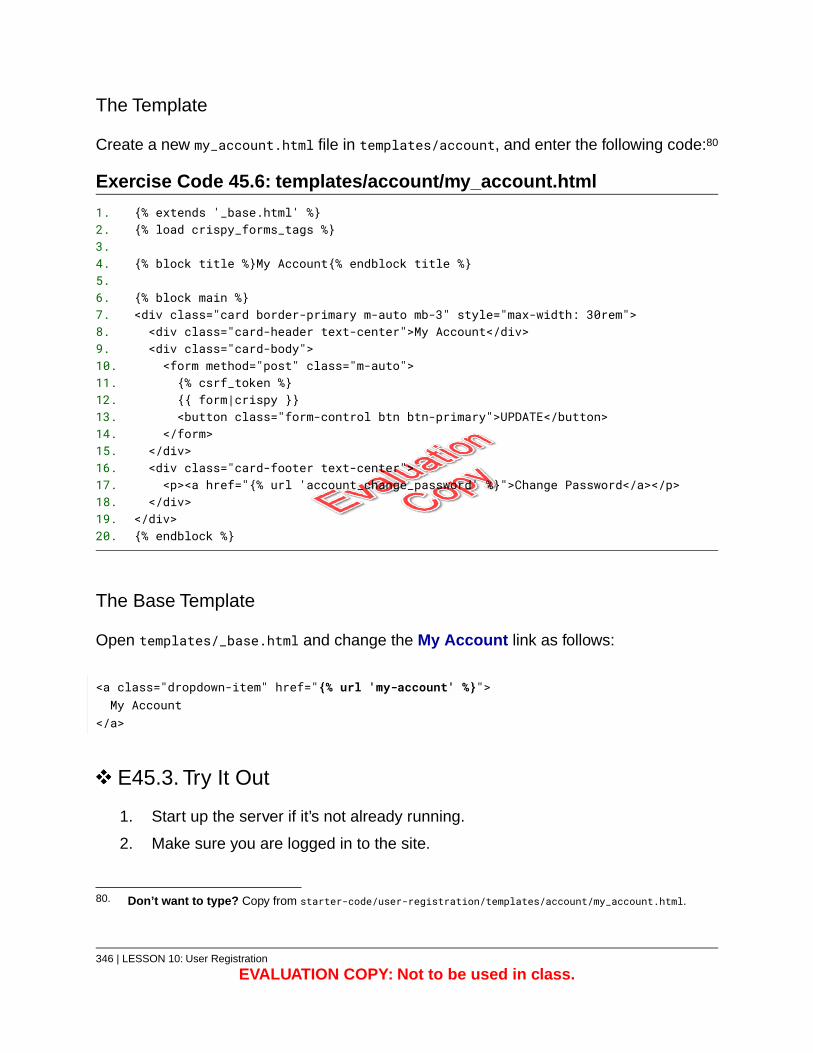
The Template
Create a new my_account.html file in templates/account, and enter the following code:80
Exercise Code 45.6: templates/account/my_account.html
{% extends '_base.html' %}1.{% load crispy_forms_tags %}2.
3.{% block title %}My Account{% endblock title %}4.
5.{% block main %}6.<div class="card border-primary m-auto mb-3" style="max-width: 30rem">7.<div class="card-header text-center">My Account</div>8.<div class="card-body">9.<form method="post" class="m-auto">10.{% csrf_token %}11.{{ form|crispy }}12.<button class="form-control btn btn-primary">UPDATE</button>13.
</form>14.</div>15.<div class="card-footer text-center">16.<p><a href="{% url 'account_change_password' %}">Change Password</a></p>17.
</div>18.</div>19.{% endblock %}20.
The Base Template
Open templates/_base.html and change the My Account link as follows:
<a class="dropdown-item" href="{% url 'my-account' %}">My Account
</a>
E45.3. Try It Out
1. Start up the server if it’s not already running.
2. Make sure you are logged in to the site.
80. Don’t want to type? Copy from starter-code/user-registration/templates/account/my_account.html.
346 | LESSON 10: User Registration
EVALUATION COPY: Not to be used in class.
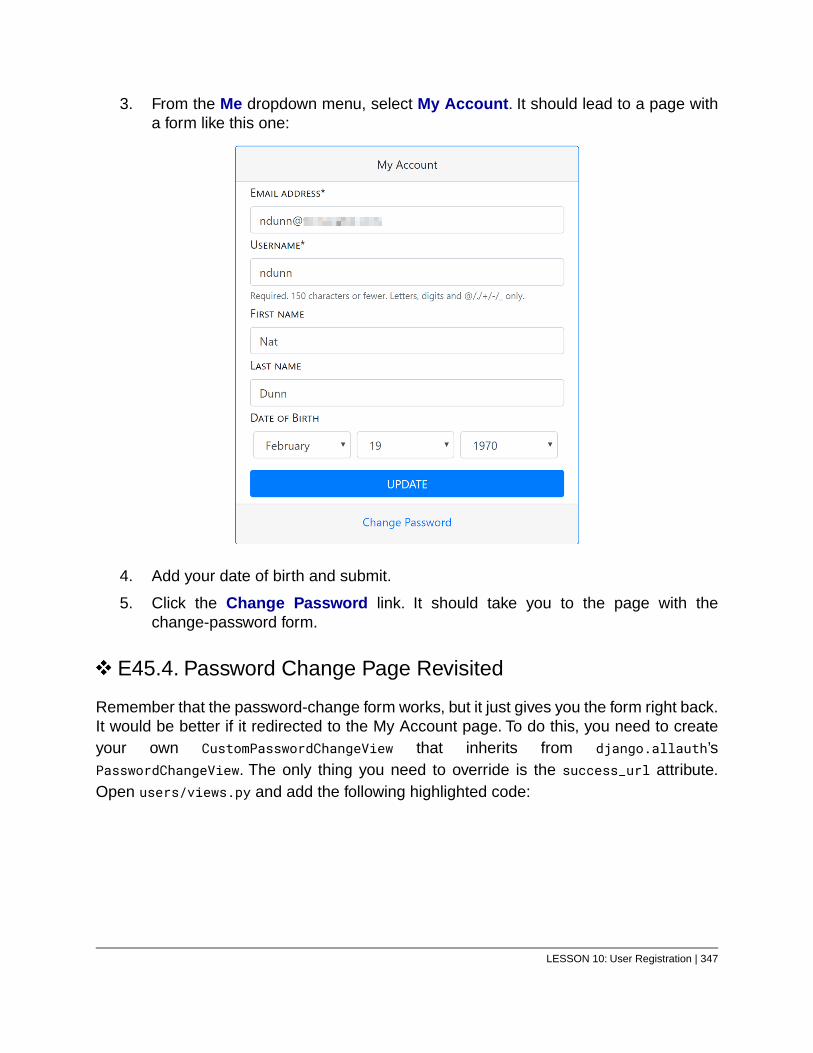
3. From the Me dropdown menu, select My Account. It should lead to a page witha form like this one:
4. Add your date of birth and submit.
5. Click the Change Password link. It should take you to the page with thechange-password form.
E45.4. Password Change Page Revisited
Remember that the password-change form works, but it just gives you the form right back.It would be better if it redirected to the My Account page. To do this, you need to createyour own CustomPasswordChangeView that inherits from django.allauth’sPasswordChangeView. The only thing you need to override is the success_url attribute.Open users/views.py and add the following highlighted code:
LESSON 10: User Registration | 347
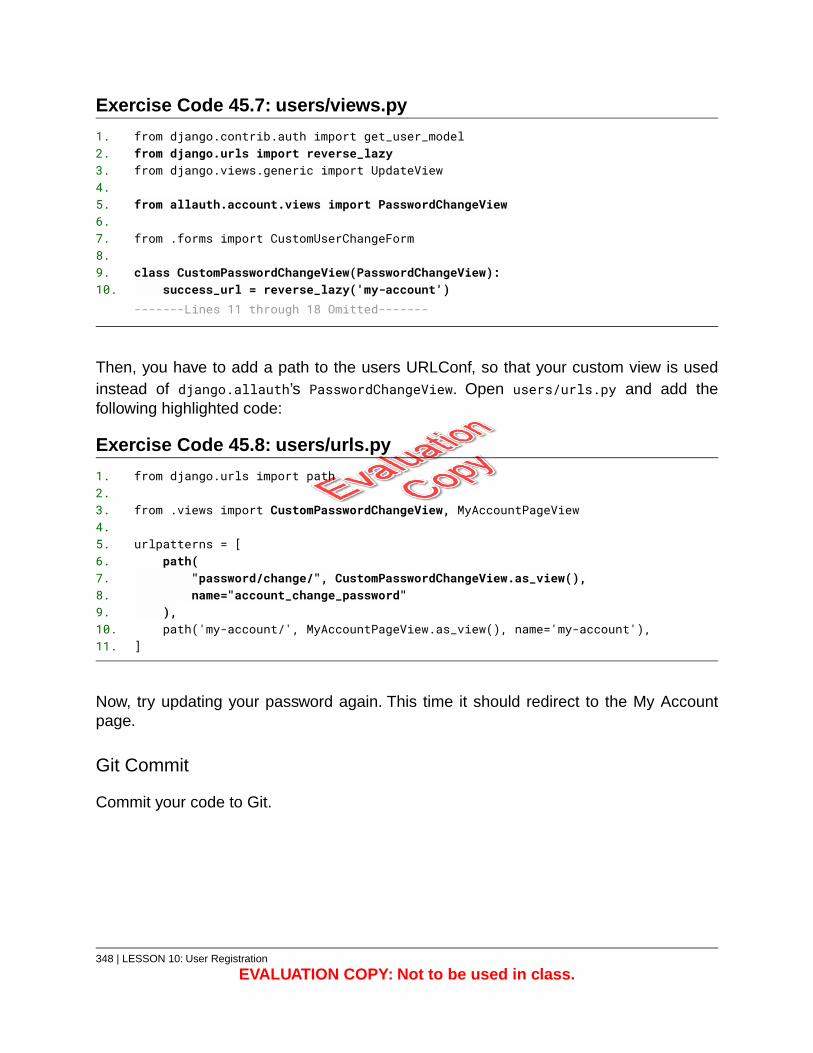
Exercise Code 45.7: users/views.py
from django.contrib.auth import get_user_model1.from django.urls import reverse_lazy2.from django.views.generic import UpdateView3.
4.from allauth.account.views import PasswordChangeView5.
6.from .forms import CustomUserChangeForm7.
8.class CustomPasswordChangeView(PasswordChangeView):9.
success_url = reverse_lazy('my-account')10.-------Lines 11 through 18 Omitted-------
Then, you have to add a path to the users URLConf, so that your custom view is usedinstead of django.allauth’s PasswordChangeView. Open users/urls.py and add thefollowing highlighted code:
Exercise Code 45.8: users/urls.py
from django.urls import path1.2.
from .views import CustomPasswordChangeView, MyAccountPageView3.4.
urlpatterns = [5.path(6.
"password/change/", CustomPasswordChangeView.as_view(),7.name="account_change_password"8.
),9.path('my-account/', MyAccountPageView.as_view(), name='my-account'),10.
]11.
Now, try updating your password again. This time it should redirect to the My Accountpage.
Git Commit
Commit your code to Git.
348 | LESSON 10: User Registration
EVALUATION COPY: Not to be used in class.
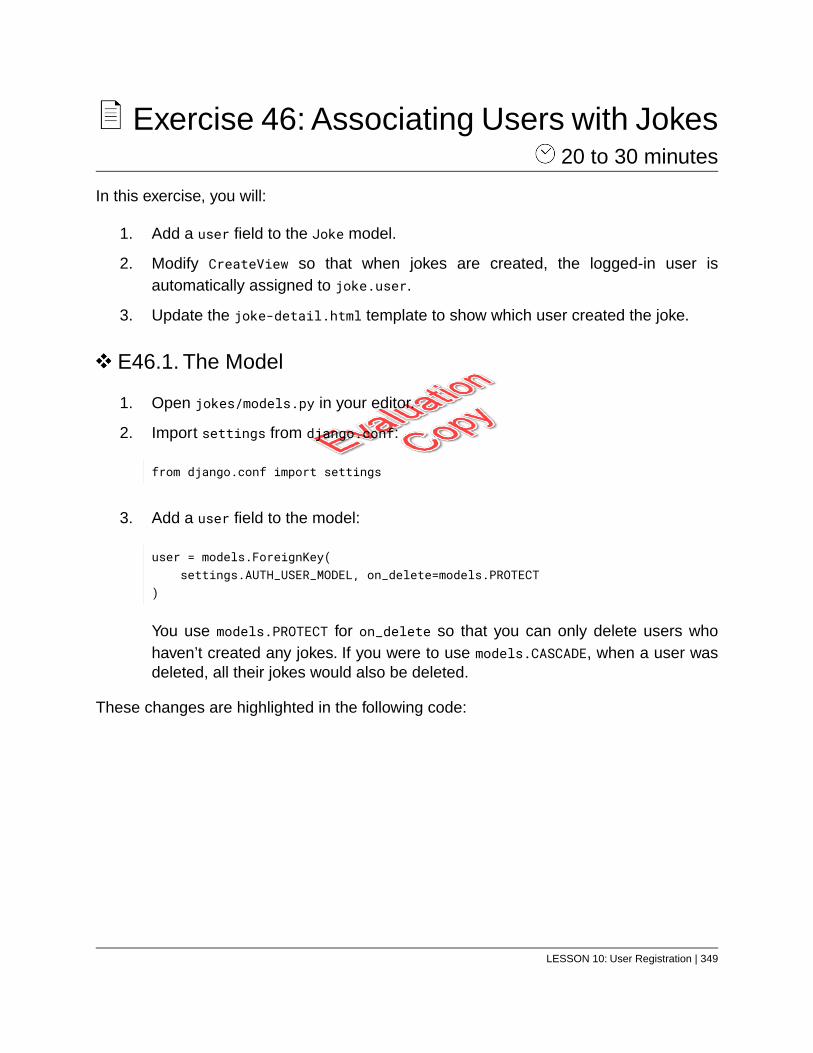
Exercise 46: Associating Users with Jokes 20 to 30 minutes
In this exercise, you will:
1. Add a user field to the Joke model.
2. Modify CreateView so that when jokes are created, the logged-in user isautomatically assigned to joke.user.
3. Update the joke-detail.html template to show which user created the joke.
E46.1. The Model
1. Open jokes/models.py in your editor.
2. Import settings from django.conf:
from django.conf import settings
3. Add a user field to the model:
user = models.ForeignKey(settings.AUTH_USER_MODEL, on_delete=models.PROTECT
)
You use models.PROTECT for on_delete so that you can only delete users whohaven’t created any jokes. If you were to use models.CASCADE, when a user wasdeleted, all their jokes would also be deleted.
These changes are highlighted in the following code:
LESSON 10: User Registration | 349
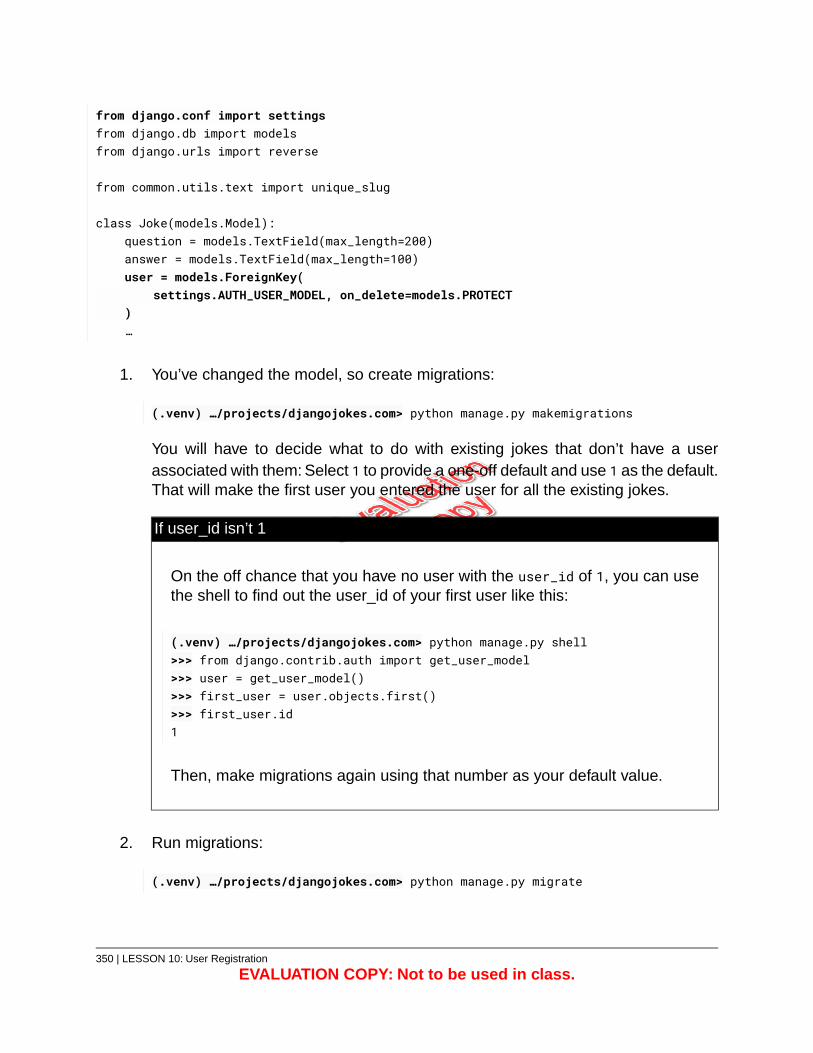
from django.conf import settingsfrom django.db import modelsfrom django.urls import reverse
from common.utils.text import unique_slug
class Joke(models.Model):question = models.TextField(max_length=200)answer = models.TextField(max_length=100)user = models.ForeignKey(
settings.AUTH_USER_MODEL, on_delete=models.PROTECT)…
1. You’ve changed the model, so create migrations:
(.venv) …/projects/djangojokes.com> python manage.py makemigrations
You will have to decide what to do with existing jokes that don’t have a userassociated with them: Select 1 to provide a one-off default and use 1 as the default.That will make the first user you entered the user for all the existing jokes.
If user_id isn’t 1
On the off chance that you have no user with the user_id of 1, you can usethe shell to find out the user_id of your first user like this:
(.venv) …/projects/djangojokes.com> python manage.py shell>>> from django.contrib.auth import get_user_model>>> user = get_user_model()>>> first_user = user.objects.first()>>> first_user.id1
Then, make migrations again using that number as your default value.
2. Run migrations:
(.venv) …/projects/djangojokes.com> python manage.py migrate
350 | LESSON 10: User Registration
EVALUATION COPY: Not to be used in class.
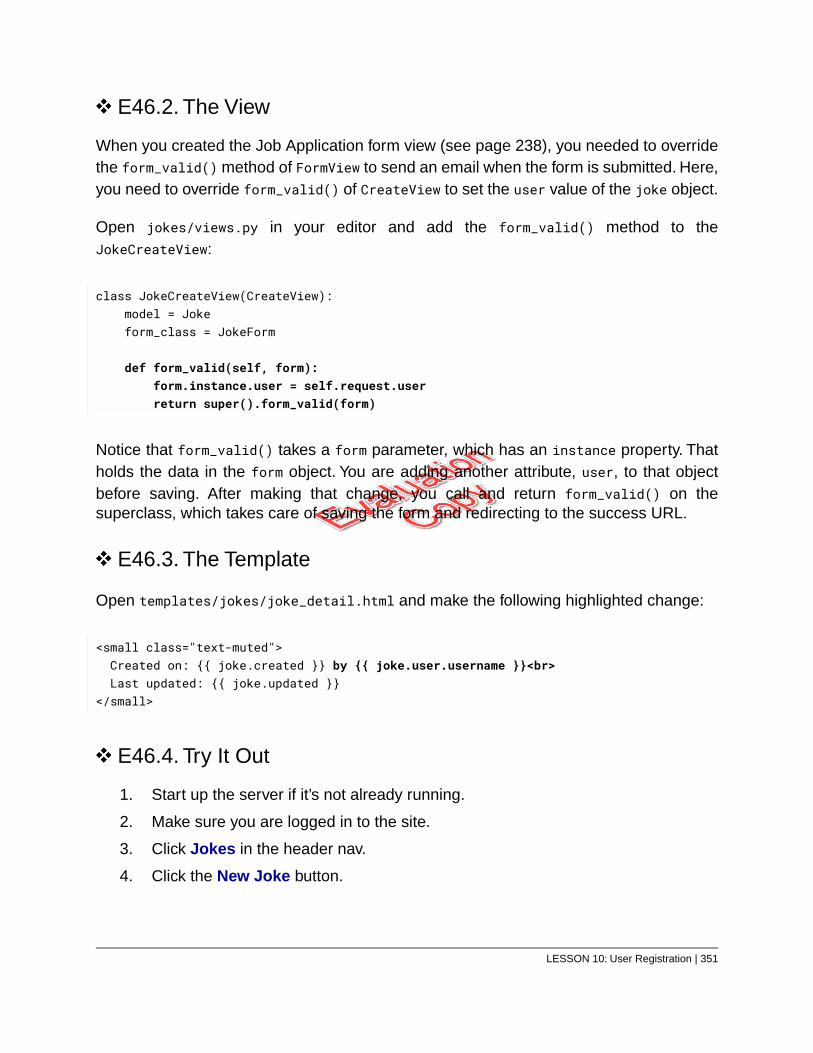
E46.2. The View
When you created the Job Application form view (see page 238), you needed to overridethe form_valid() method of FormView to send an email when the form is submitted. Here,you need to override form_valid() of CreateView to set the user value of the joke object.
Open jokes/views.py in your editor and add the form_valid() method to theJokeCreateView:
class JokeCreateView(CreateView):model = Jokeform_class = JokeForm
def form_valid(self, form):form.instance.user = self.request.userreturn super().form_valid(form)
Notice that form_valid() takes a form parameter, which has an instance property. Thatholds the data in the form object. You are adding another attribute, user, to that objectbefore saving. After making that change, you call and return form_valid() on thesuperclass, which takes care of saving the form and redirecting to the success URL.
E46.3. The Template
Open templates/jokes/joke_detail.html and make the following highlighted change:
<small class="text-muted">Created on: {{ joke.created }} by {{ joke.user.username }}<br>Last updated: {{ joke.updated }}
</small>
E46.4. Try It Out
1. Start up the server if it’s not already running.
2. Make sure you are logged in to the site.
3. Click Jokes in the header nav.
4. Click the New Joke button.
LESSON 10: User Registration | 351
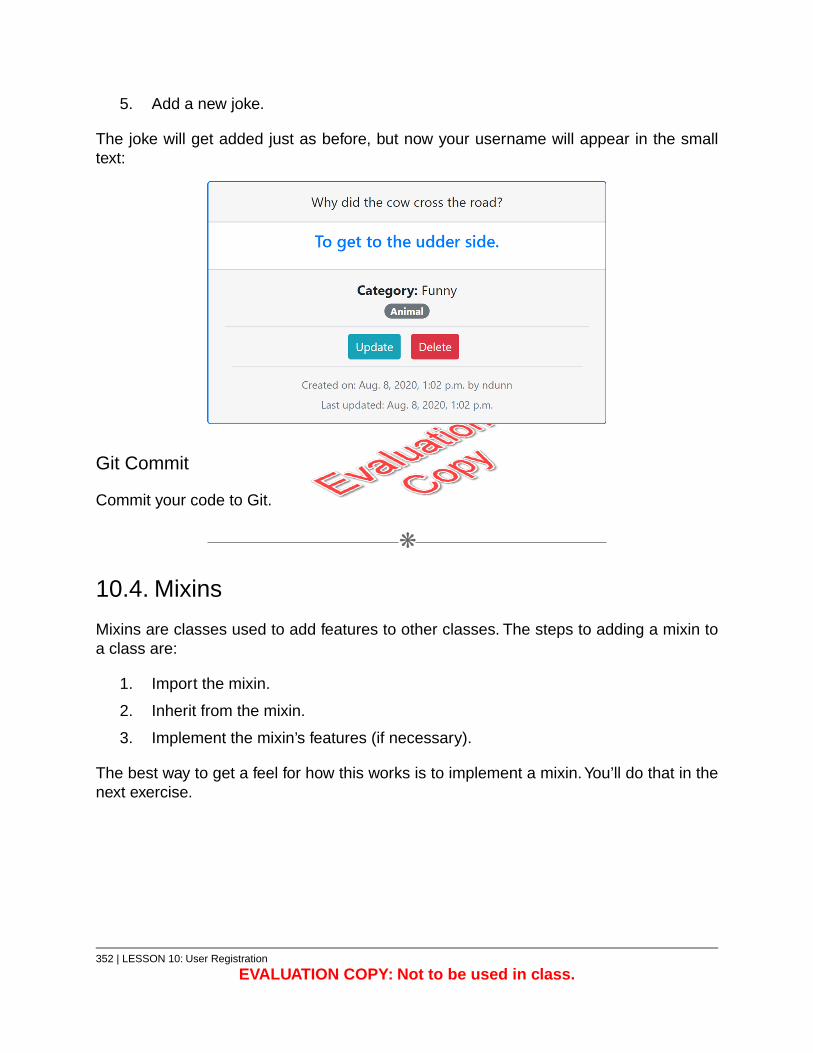
5. Add a new joke.
The joke will get added just as before, but now your username will appear in the smalltext:
Git Commit
Commit your code to Git.
❋
10.4. Mixins
Mixins are classes used to add features to other classes. The steps to adding a mixin toa class are:
1. Import the mixin.
2. Inherit from the mixin.
3. Implement the mixin’s features (if necessary).
The best way to get a feel for how this works is to implement a mixin.You’ll do that in thenext exercise.
352 | LESSON 10: User Registration
EVALUATION COPY: Not to be used in class.
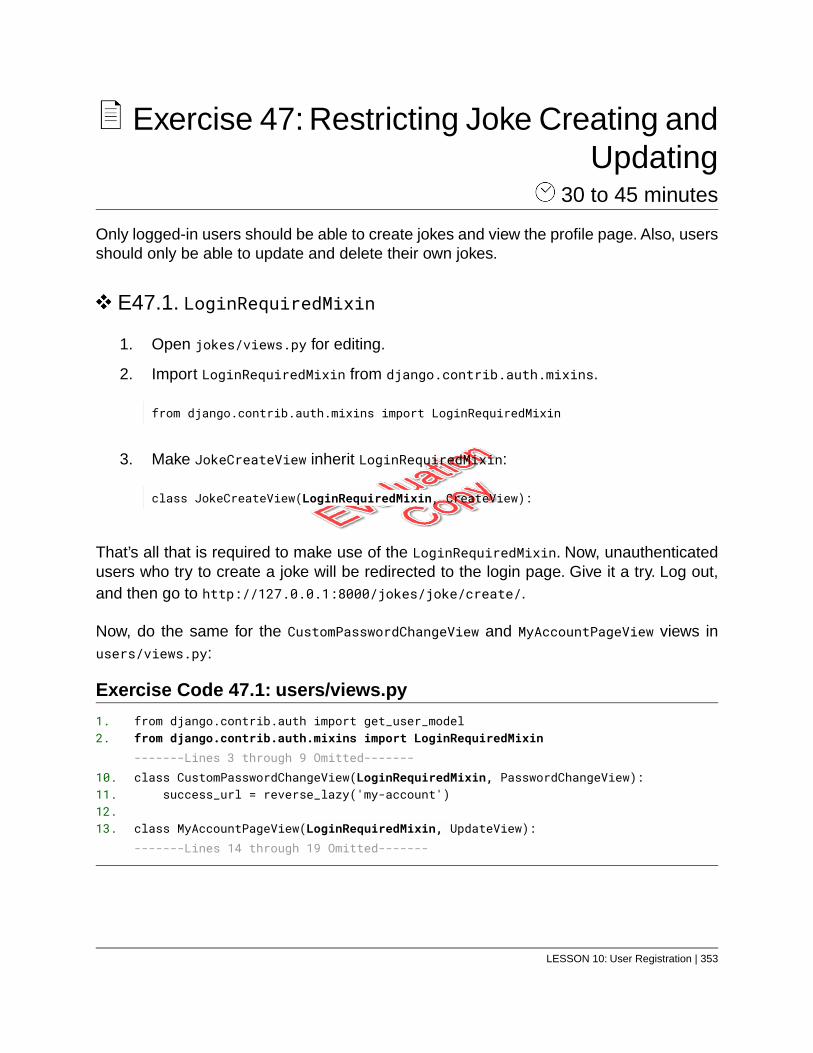
Exercise 47: Restricting Joke Creating andUpdating
30 to 45 minutes
Only logged-in users should be able to create jokes and view the profile page. Also, usersshould only be able to update and delete their own jokes.
E47.1. LoginRequiredMixin
1. Open jokes/views.py for editing.
2. Import LoginRequiredMixin from django.contrib.auth.mixins.
from django.contrib.auth.mixins import LoginRequiredMixin
3. Make JokeCreateView inherit LoginRequiredMixin:
class JokeCreateView(LoginRequiredMixin, CreateView):
That’s all that is required to make use of the LoginRequiredMixin. Now, unauthenticatedusers who try to create a joke will be redirected to the login page. Give it a try. Log out,and then go to http://127.0.0.1:8000/jokes/joke/create/.
Now, do the same for the CustomPasswordChangeView and MyAccountPageView views inusers/views.py:
Exercise Code 47.1: users/views.py
from django.contrib.auth import get_user_model1.from django.contrib.auth.mixins import LoginRequiredMixin2.-------Lines 3 through 9 Omitted-------class CustomPasswordChangeView(LoginRequiredMixin, PasswordChangeView):10.
success_url = reverse_lazy('my-account')11.12.
class MyAccountPageView(LoginRequiredMixin, UpdateView):13.-------Lines 14 through 19 Omitted-------
LESSON 10: User Registration | 353
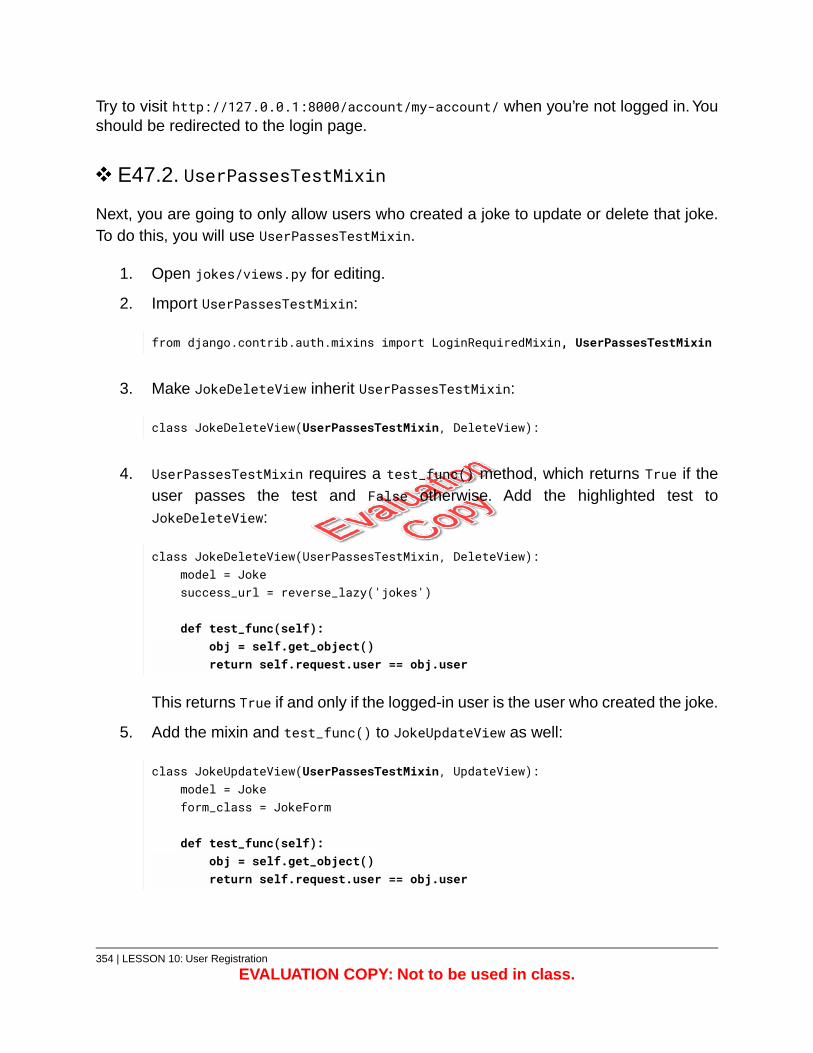
Try to visit http://127.0.0.1:8000/account/my-account/ when you’re not logged in. Youshould be redirected to the login page.
E47.2. UserPassesTestMixin
Next, you are going to only allow users who created a joke to update or delete that joke.To do this, you will use UserPassesTestMixin.
1. Open jokes/views.py for editing.
2. Import UserPassesTestMixin:
from django.contrib.auth.mixins import LoginRequiredMixin, UserPassesTestMixin
3. Make JokeDeleteView inherit UserPassesTestMixin:
class JokeDeleteView(UserPassesTestMixin, DeleteView):
4. UserPassesTestMixin requires a test_func() method, which returns True if theuser passes the test and False otherwise. Add the highlighted test toJokeDeleteView:
class JokeDeleteView(UserPassesTestMixin, DeleteView):model = Jokesuccess_url = reverse_lazy('jokes')
def test_func(self):obj = self.get_object()return self.request.user == obj.user
This returns True if and only if the logged-in user is the user who created the joke.
5. Add the mixin and test_func() to JokeUpdateView as well:
class JokeUpdateView(UserPassesTestMixin, UpdateView):model = Jokeform_class = JokeForm
def test_func(self):obj = self.get_object()return self.request.user == obj.user
354 | LESSON 10: User Registration
EVALUATION COPY: Not to be used in class.
E47.3. Try It Out
Start up the server and log in to the site as a user. Click the Update button of a joke thatthe logged-in user did not write. If the same user wrote all the jokes, then log out, and logback in as a different user. Then, try to update a joke. You should see a page with a big“403 Forbidden” message on it.
Go back to the site and try to delete a joke that the logged-in user didn’t write.You shouldget the big “403 Forbidden” message again.
E47.4. Making the 403 Message Prettier
Directly in the templates folder, create a new file named 403.html with the followingcontent:81
Exercise Code 47.2: templates/403.html
{% extends "_base.html" %}1.2.
{% block title %}403: Permission Denied{% endblock %}3.{% block main %}4.<div class="card border-primary m-auto mb-3 text-center"5.style="max-width: 30rem">6.<div class="card-header">What are you trying to do?</div>7.<div class="card-body text-primary">8.<h5 class="card-title">That’s not funny.</h5>9.
</div>10.<div class="card-footer">11.<small class="text-muted">403: Permission Denied</small>12.
</div>13.</div>14.
{% endblock %}15.
Now, return to the page with the big “403 Forbidden” message and refresh. You shouldnow get a pretty error page like this one:
81. Don’t want to type? Copy from starter-code/user-registration/templates/403.html.
LESSON 10: User Registration | 355
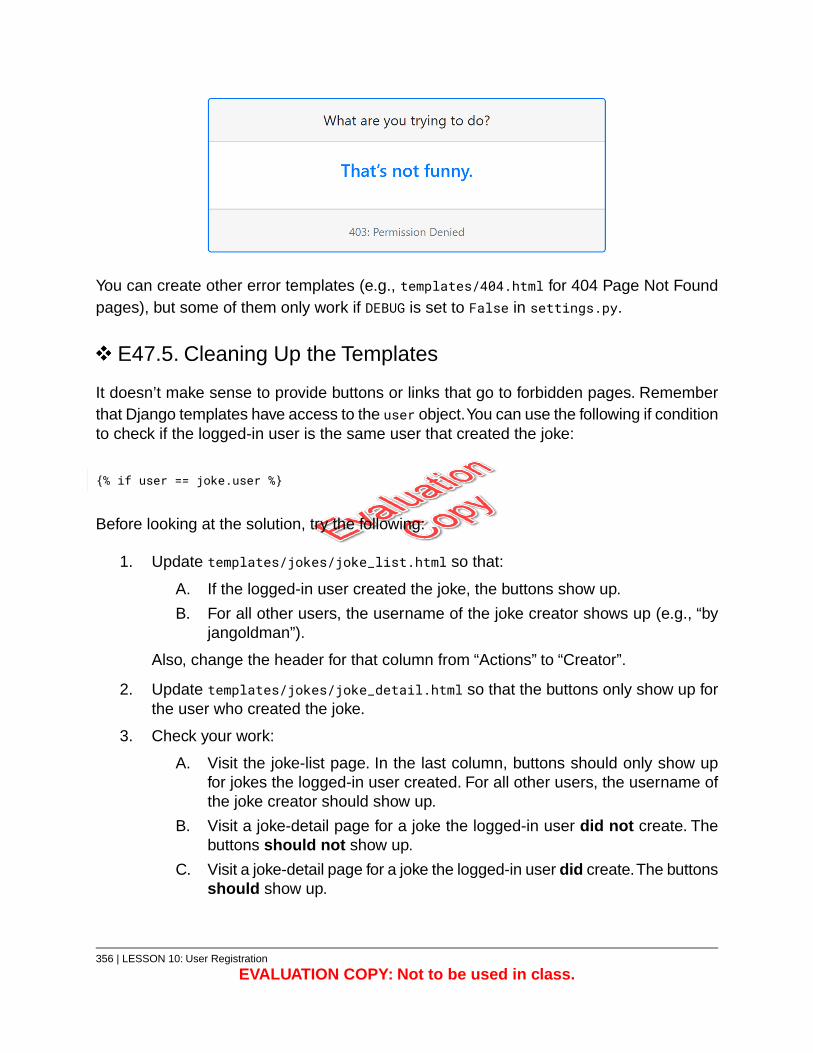
You can create other error templates (e.g., templates/404.html for 404 Page Not Foundpages), but some of them only work if DEBUG is set to False in settings.py.
E47.5. Cleaning Up the Templates
It doesn’t make sense to provide buttons or links that go to forbidden pages. Rememberthat Django templates have access to the user object.You can use the following if conditionto check if the logged-in user is the same user that created the joke:
{% if user == joke.user %}
Before looking at the solution, try the following:
1. Update templates/jokes/joke_list.html so that:
A. If the logged-in user created the joke, the buttons show up.
B. For all other users, the username of the joke creator shows up (e.g., “byjangoldman”).
Also, change the header for that column from “Actions” to “Creator”.
2. Update templates/jokes/joke_detail.html so that the buttons only show up forthe user who created the joke.
3. Check your work:
A. Visit the joke-list page. In the last column, buttons should only show upfor jokes the logged-in user created. For all other users, the username ofthe joke creator should show up.
B. Visit a joke-detail page for a joke the logged-in user did not create. Thebuttons should not show up.
C. Visit a joke-detail page for a joke the logged-in user did create.The buttonsshould show up.
356 | LESSON 10: User Registration
EVALUATION COPY: Not to be used in class.

LESSON 10: User Registration | 357
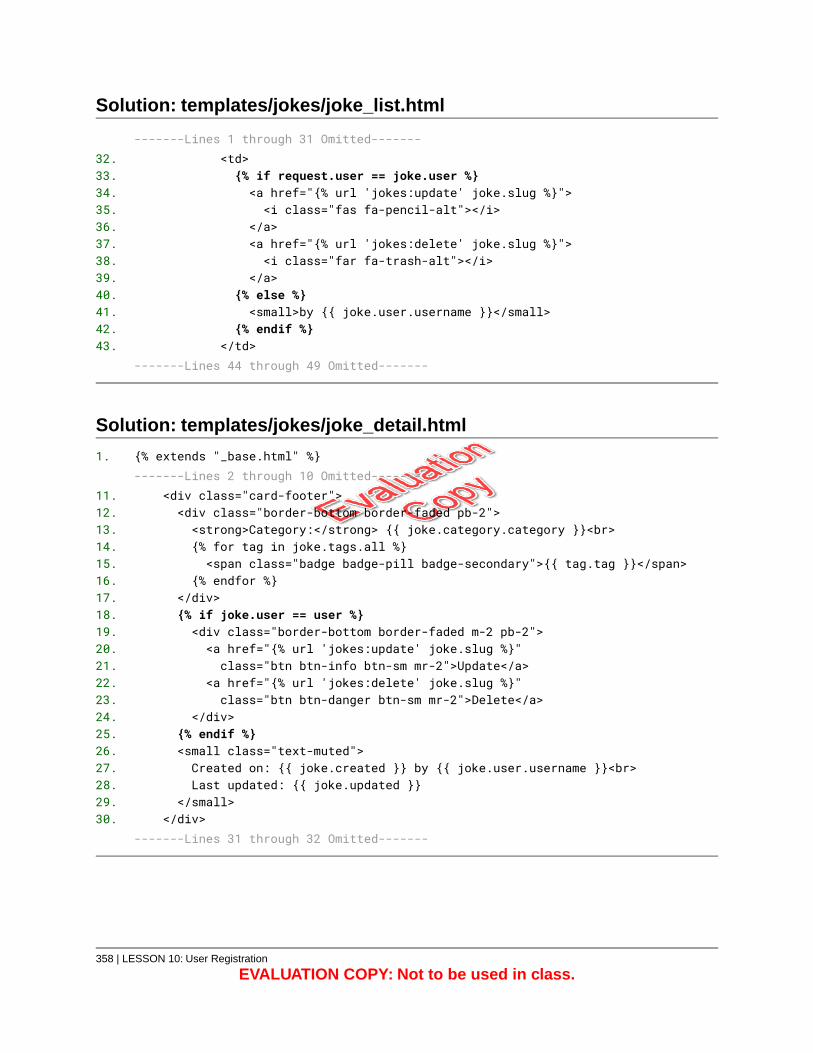
Solution: templates/jokes/joke_list.html
-------Lines 1 through 31 Omitted-------<td>32.{% if request.user == joke.user %}33.<a href="{% url 'jokes:update' joke.slug %}">34.<i class="fas fa-pencil-alt"></i>35.
</a>36.<a href="{% url 'jokes:delete' joke.slug %}">37.<i class="far fa-trash-alt"></i>38.
</a>39.{% else %}40.<small>by {{ joke.user.username }}</small>41.
{% endif %}42.</td>43.
-------Lines 44 through 49 Omitted-------
Solution: templates/jokes/joke_detail.html
{% extends "_base.html" %}1.-------Lines 2 through 10 Omitted-------
<div class="card-footer">11.<div class="border-bottom border-faded pb-2">12.<strong>Category:</strong> {{ joke.category.category }}<br>13.{% for tag in joke.tags.all %}14.<span class="badge badge-pill badge-secondary">{{ tag.tag }}</span>15.
{% endfor %}16.</div>17.{% if joke.user == user %}18.<div class="border-bottom border-faded m-2 pb-2">19.<a href="{% url 'jokes:update' joke.slug %}"20.class="btn btn-info btn-sm mr-2">Update</a>21.
<a href="{% url 'jokes:delete' joke.slug %}"22.class="btn btn-danger btn-sm mr-2">Delete</a>23.
</div>24.{% endif %}25.<small class="text-muted">26.Created on: {{ joke.created }} by {{ joke.user.username }}<br>27.Last updated: {{ joke.updated }}28.
</small>29.</div>30.
-------Lines 31 through 32 Omitted-------
358 | LESSON 10: User Registration
EVALUATION COPY: Not to be used in class.
Git Commit
Commit your code to Git.
Conclusion
In this lesson, you have learned to use django-allauth to register new users, to usemixins, and to customize templates to display different content for different users.
LESSON 10: User Registration | 359

360 | LESSON 10: User Registration
EVALUATION COPY: Not to be used in class.
LESSON 11Messages Framework
Topics Covered
Adding messages to pages.
Introduction
In this lesson, you will learn to use Django’s built-in messages framework.
❋
11.1. Message Framework
Django includes a built-in messages framework to output different types of messages inthe templates. While the framework is customizable, the “out-of-the-box” functionality willbe enough for most websites.
Every message has a level attribute, which is an integer. The framework provides thefollowing constants for the built-in message levels:
1. DEBUG (10)
2. INFO (20)
3. SUCCESS (25)
4. WARNING (30)
5. ERROR (40)
The built-in messages each have a tags attribute that holds the level in all lowercaseletters (e.g., “debug”, “info”, etc.).
The steps for using the message framework are:
1. In your views file, import messages from django.contrib:
from django.contrib import messages
LESSON 11: Messages Framework | 361
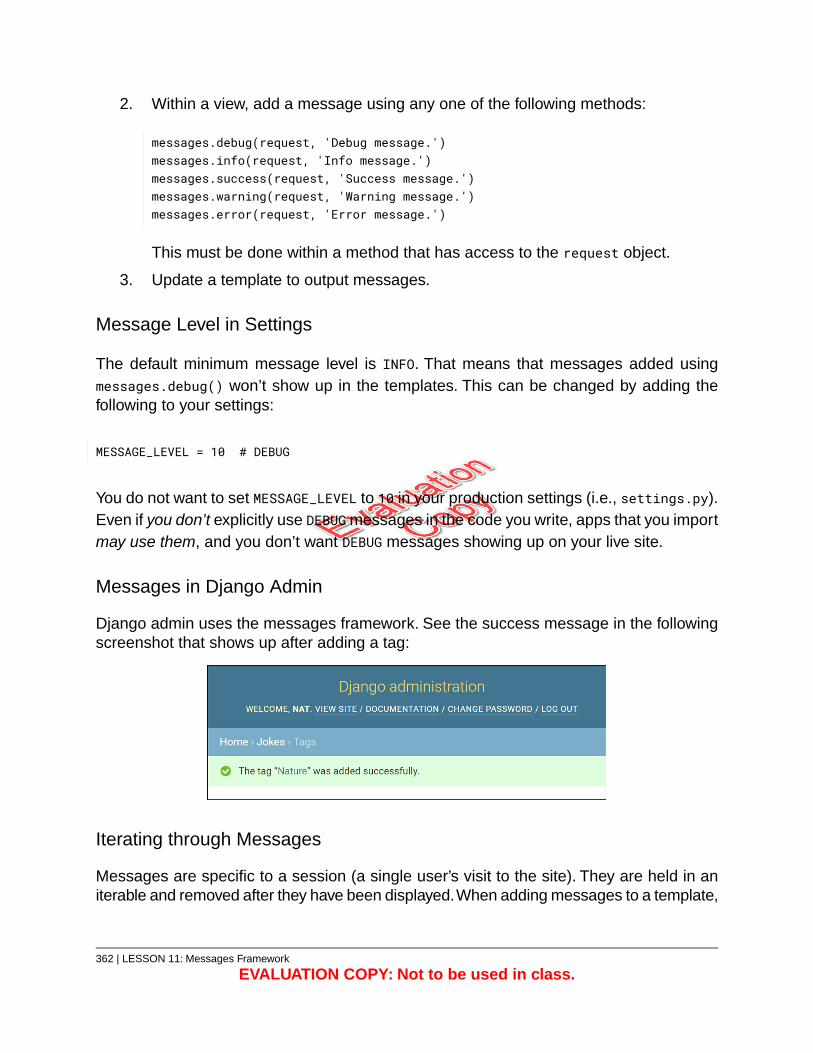
2. Within a view, add a message using any one of the following methods:
messages.debug(request, 'Debug message.')messages.info(request, 'Info message.')messages.success(request, 'Success message.')messages.warning(request, 'Warning message.')messages.error(request, 'Error message.')
This must be done within a method that has access to the request object.
3. Update a template to output messages.
Message Level in Settings
The default minimum message level is INFO. That means that messages added usingmessages.debug() won’t show up in the templates. This can be changed by adding thefollowing to your settings:
MESSAGE_LEVEL = 10 # DEBUG
You do not want to set MESSAGE_LEVEL to 10 in your production settings (i.e., settings.py).Even if you don’t explicitly use DEBUG messages in the code you write, apps that you importmay use them, and you don’t want DEBUG messages showing up on your live site.
Messages in Django Admin
Django admin uses the messages framework. See the success message in the followingscreenshot that shows up after adding a tag:
Iterating through Messages
Messages are specific to a session (a single user’s visit to the site). They are held in aniterable and removed after they have been displayed.When adding messages to a template,
362 | LESSON 11: Messages Framework
EVALUATION COPY: Not to be used in class.
you should first check if there are any messages and then iterate through the messageswith a for loop. The code below shows how this is done in Django admin:
{% if messages %}<ul class="messagelist">{% for message in messages %}<li{% if message.tags %} class="{{ message.tags }}"{% endif %}>{{ message|capfirst }}
</li>{% endfor %}
</ul>{% endif %}
LESSON 11: Messages Framework | 363
Exercise 48: Adding Messages 20 to 30 minutes
In this exercise, you will get a feel for how the messages framework works. Then, you willlearn to use the SuccessMessageMixin, which makes it easy to add success messages toclass-based views.
E48.1. Outputting Messages
Open templates/_base.html in your editor and add the following code right before the“main” template block within the <main> tag:
Exercise Code 48.1: templates/_base.html
-------Lines 1 through 72 Omitted-------<main class="m-4 pb-5">73.{% if messages %}74.<ul>75.{% for message in messages %}76.<div class="alert message{{ message.tags }} alert-dismissible" role="alert">77.
<strong>{{message}}</strong>78.<button type="button" class="close" data-dismiss="alert"79.aria-label="Close">80.<i class="fas fa-window-close"></i>81.
</button>82.</div>83.
{% endfor %}84.</ul>85.
{% endif %}86.{% block main %}<h2>Welcome!</h2>{% endblock %}87.
</main>88.-------Lines 89 through 111 Omitted-------
Things to notice:
1. You put this code in the base template, so that messages will appear on all pagesthat extend _base.html.
364 | LESSON 11: Messages Framework
EVALUATION COPY: Not to be used in class.
2. You use an if condition so that the list is only output if there are any messagesto show:
{% if messages %}
3. You use Bootstrap classes for most of the styling, but you also add your ownmessage… classes using class names derived from the message’s tags attribute:
<div class="alert message{{ message.tags }} alert-dismissible" role="alert">
CSS Rules for the Message Classes
Add the following rules to main.css to style the message levels:82
82. Don’t want to type? Copy from starter-code/messages-framework/main.css.
LESSON 11: Messages Framework | 365
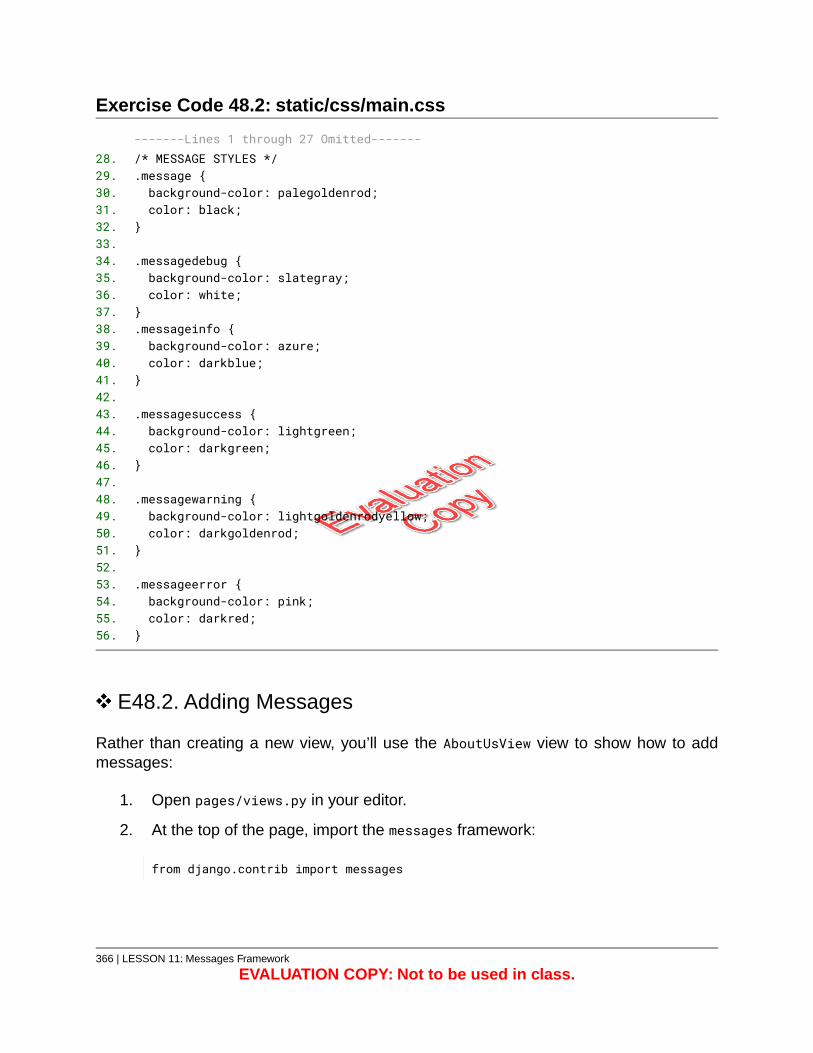
Exercise Code 48.2: static/css/main.css
-------Lines 1 through 27 Omitted-------/* MESSAGE STYLES */28..message {29.background-color: palegoldenrod;30.color: black;31.
}32.33.
.messagedebug {34.background-color: slategray;35.color: white;36.
}37..messageinfo {38.background-color: azure;39.color: darkblue;40.
}41.42.
.messagesuccess {43.background-color: lightgreen;44.color: darkgreen;45.
}46.47.
.messagewarning {48.background-color: lightgoldenrodyellow;49.color: darkgoldenrod;50.
}51.52.
.messageerror {53.background-color: pink;54.color: darkred;55.
}56.
E48.2. Adding Messages
Rather than creating a new view, you’ll use the AboutUsView view to show how to addmessages:
1. Open pages/views.py in your editor.
2. At the top of the page, import the messages framework:
from django.contrib import messages
366 | LESSON 11: Messages Framework
EVALUATION COPY: Not to be used in class.
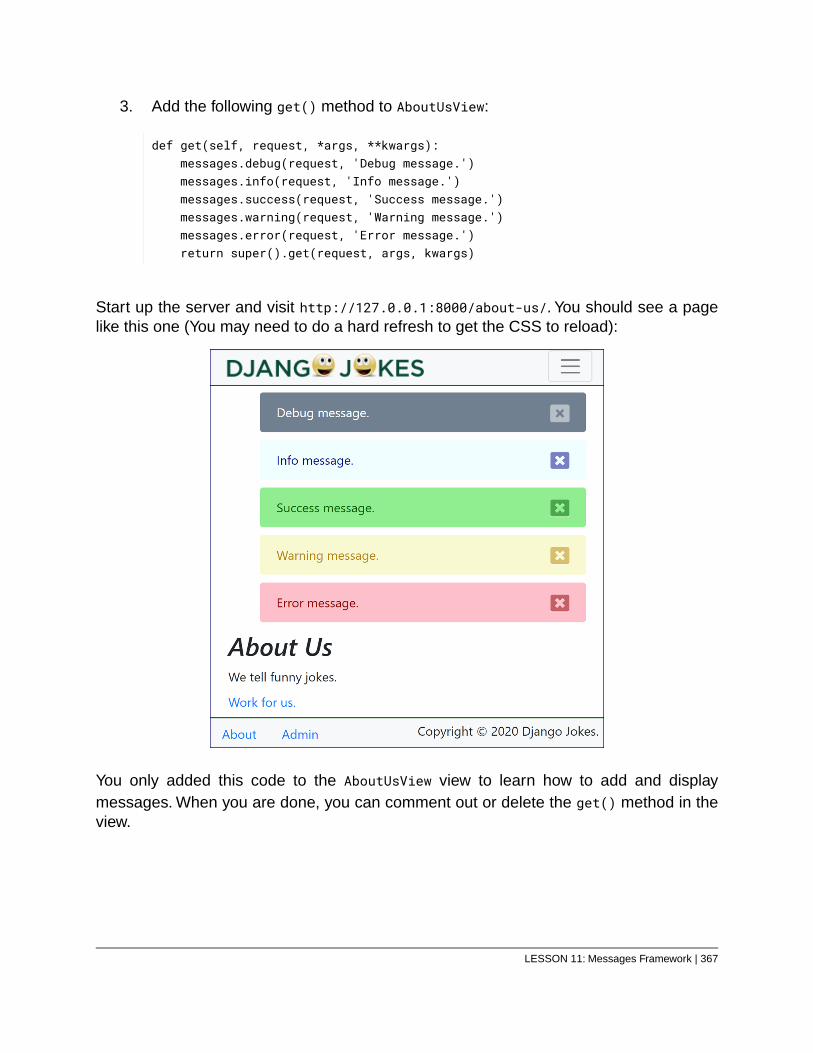
3. Add the following get() method to AboutUsView:
def get(self, request, *args, **kwargs):messages.debug(request, 'Debug message.')messages.info(request, 'Info message.')messages.success(request, 'Success message.')messages.warning(request, 'Warning message.')messages.error(request, 'Error message.')return super().get(request, args, kwargs)
Start up the server and visit http://127.0.0.1:8000/about-us/. You should see a pagelike this one (You may need to do a hard refresh to get the CSS to reload):
You only added this code to the AboutUsView view to learn how to add and displaymessages. When you are done, you can comment out or delete the get() method in theview.
LESSON 11: Messages Framework | 367
Git Commit
Commit your code to Git.
368 | LESSON 11: Messages Framework
EVALUATION COPY: Not to be used in class.
Exercise 49: Using SuccessMessageMixin 10 to 15 minutes
The FormView, CreateView, and UpdateView classes can all inherit fromSuccessMessageMixin, which provides a simple way for adding a success message.
The steps involved are:
1. Import SuccessMessageMixin from django.contrib.messages.views:
from django.contrib.messages.views import SuccessMessageMixin
2. Inherit from SuccessMessageMixin:
class MyUpdateView(SuccessMessageMixin, UpdateView):…
3. Set success_message in the class:
success_message = 'Update Successful'
Let’s give it a try. Open users/views.py and add the following highlighted code:
Exercise Code 49.1: users/views.py
from django.contrib.auth import get_user_model1.from django.contrib.auth.mixins import LoginRequiredMixin2.from django.contrib.messages.views import SuccessMessageMixin3.-------Lines 4 through 13 Omitted-------class MyAccountPageView(SuccessMessageMixin, LoginRequiredMixin, UpdateView):14.
model = get_user_model()15.form_class = CustomUserChangeForm16.success_message = 'Update Successful'17.
-------Lines 18 through 21 Omitted-------
Start up the server and visit http://127.0.0.1:8000/account/my-account/. Submit theform.You should see an “Update Successful” message at the top of the page:
LESSON 11: Messages Framework | 369
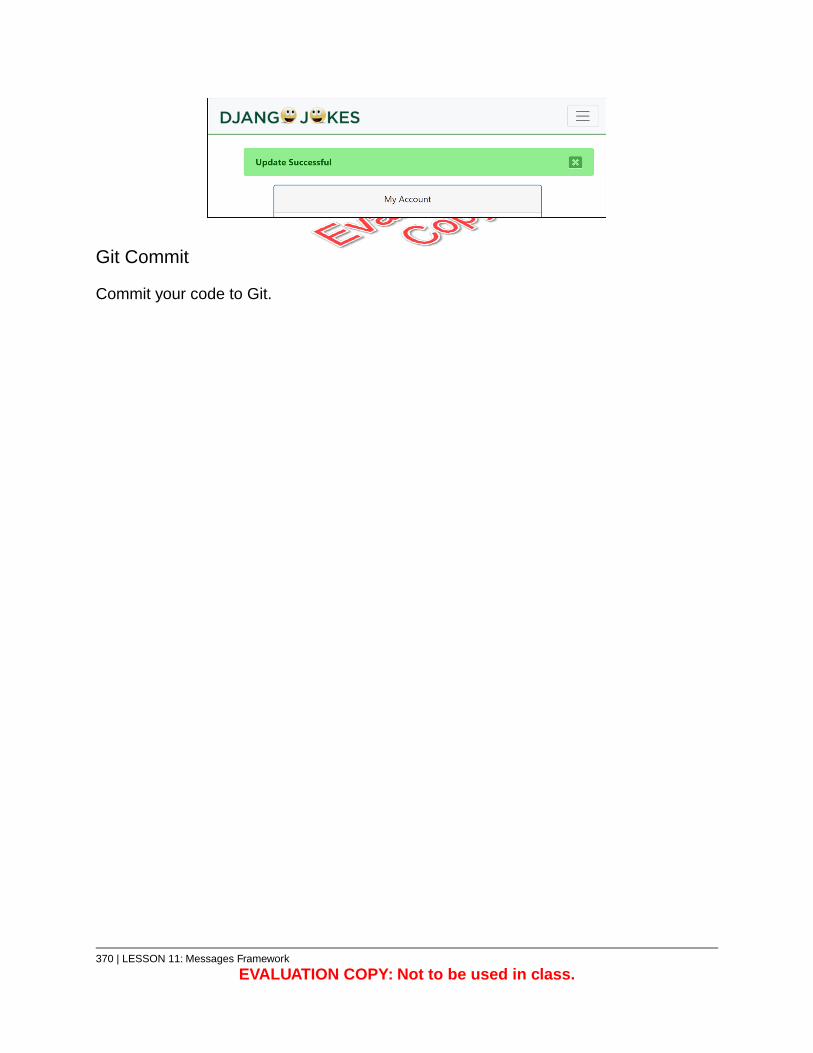
Git Commit
Commit your code to Git.
370 | LESSON 11: Messages Framework
EVALUATION COPY: Not to be used in class.
Exercise 50: Adding Success Messagesto the Joke Views
10 to 15 minutes
Try to do this yourself before looking at the solution:
1. Open jokes/views.py in your editor.
2. Add success messages to JokeCreateView and JokeUpdateView.
3. Create a new joke. Did the success message you added to JokeCreateView showup?
4. Edit the joke. Did the success message you added to JokeUpdateView show up?
LESSON 11: Messages Framework | 371
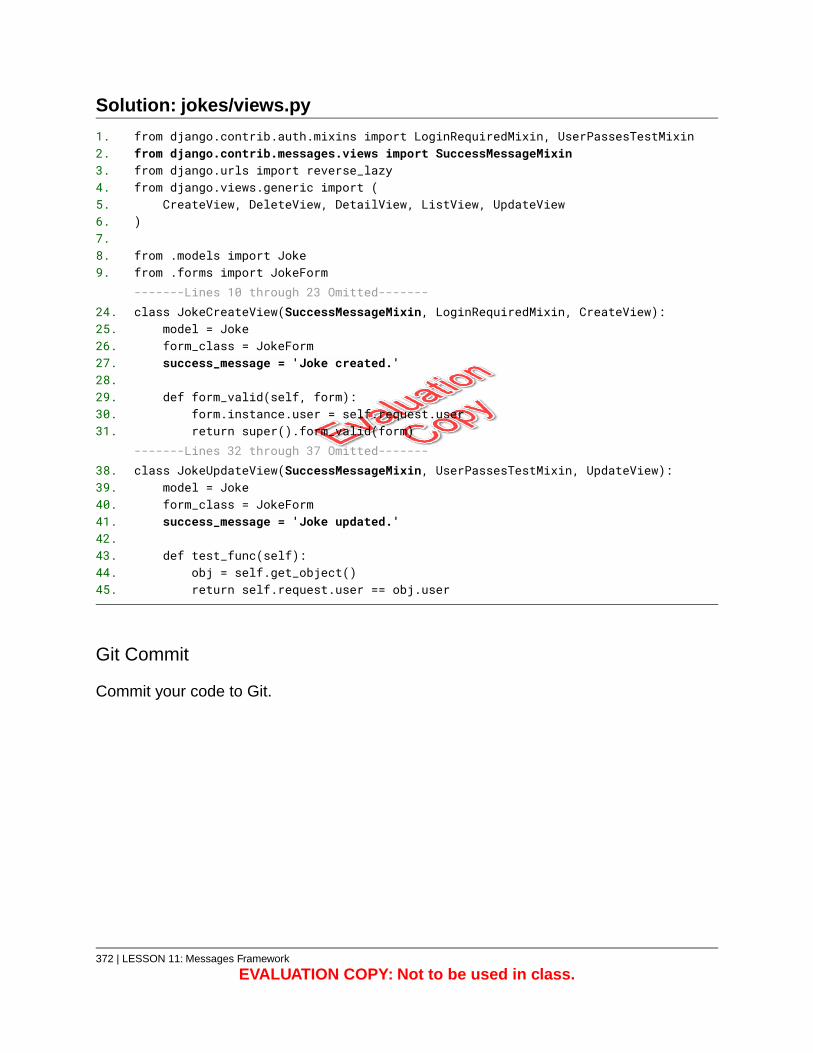
Solution: jokes/views.py
from django.contrib.auth.mixins import LoginRequiredMixin, UserPassesTestMixin1.from django.contrib.messages.views import SuccessMessageMixin2.from django.urls import reverse_lazy3.from django.views.generic import (4.
CreateView, DeleteView, DetailView, ListView, UpdateView5.)6.
7.from .models import Joke8.from .forms import JokeForm9.-------Lines 10 through 23 Omitted-------class JokeCreateView(SuccessMessageMixin, LoginRequiredMixin, CreateView):24.
model = Joke25.form_class = JokeForm26.success_message = 'Joke created.'27.
28.def form_valid(self, form):29.
form.instance.user = self.request.user30.return super().form_valid(form)31.
-------Lines 32 through 37 Omitted-------class JokeUpdateView(SuccessMessageMixin, UserPassesTestMixin, UpdateView):38.
model = Joke39.form_class = JokeForm40.success_message = 'Joke updated.'41.
42.def test_func(self):43.
obj = self.get_object()44.return self.request.user == obj.user45.
Git Commit
Commit your code to Git.
372 | LESSON 11: Messages Framework
EVALUATION COPY: Not to be used in class.
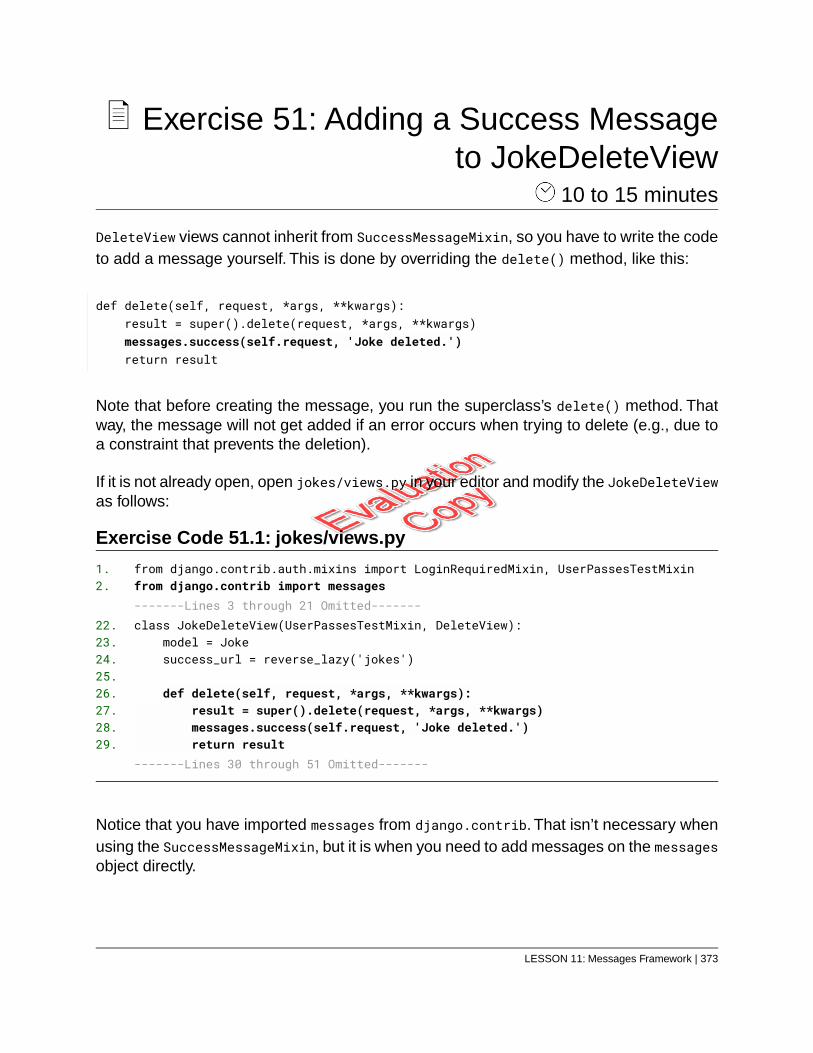
Exercise 51: Adding a Success Messageto JokeDeleteView
10 to 15 minutes
DeleteView views cannot inherit from SuccessMessageMixin, so you have to write the codeto add a message yourself. This is done by overriding the delete() method, like this:
def delete(self, request, *args, **kwargs):result = super().delete(request, *args, **kwargs)messages.success(self.request, 'Joke deleted.')return result
Note that before creating the message, you run the superclass’s delete() method. Thatway, the message will not get added if an error occurs when trying to delete (e.g., due toa constraint that prevents the deletion).
If it is not already open, open jokes/views.py in your editor and modify the JokeDeleteViewas follows:
Exercise Code 51.1: jokes/views.py
from django.contrib.auth.mixins import LoginRequiredMixin, UserPassesTestMixin1.from django.contrib import messages2.-------Lines 3 through 21 Omitted-------class JokeDeleteView(UserPassesTestMixin, DeleteView):22.
model = Joke23.success_url = reverse_lazy('jokes')24.
25.def delete(self, request, *args, **kwargs):26.
result = super().delete(request, *args, **kwargs)27.messages.success(self.request, 'Joke deleted.')28.return result29.
-------Lines 30 through 51 Omitted-------
Notice that you have imported messages from django.contrib. That isn’t necessary whenusing the SuccessMessageMixin, but it is when you need to add messages on the messagesobject directly.
LESSON 11: Messages Framework | 373
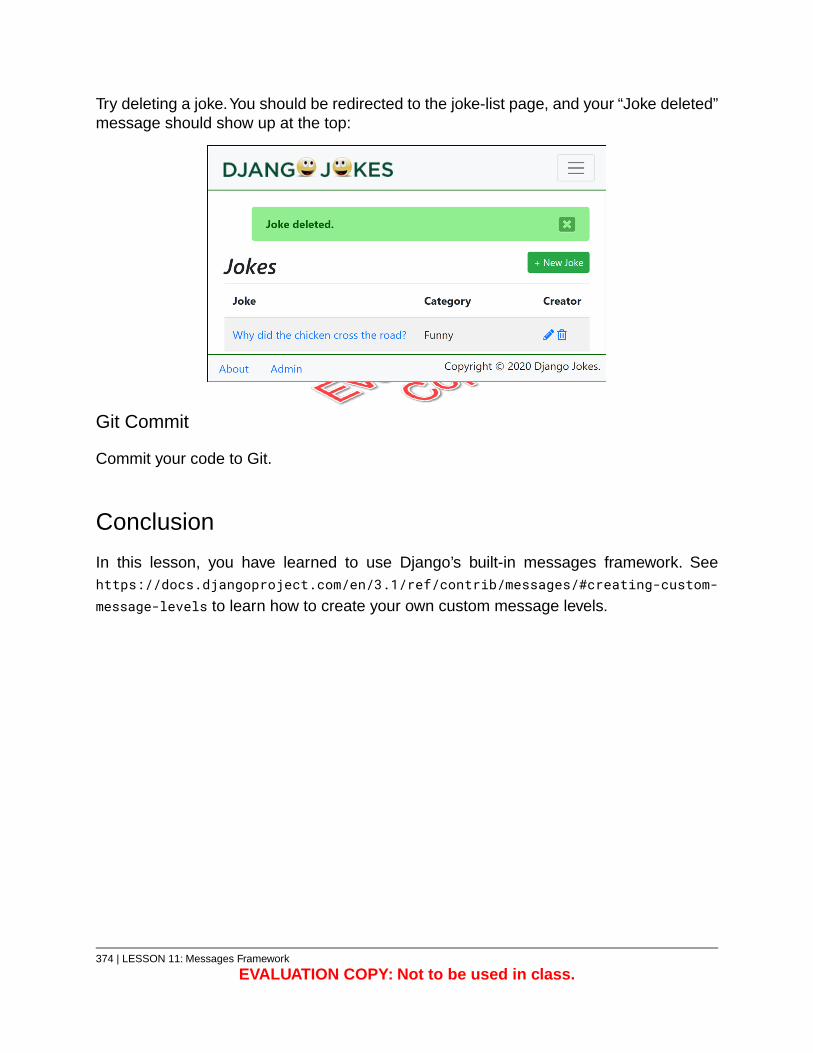
Try deleting a joke.You should be redirected to the joke-list page, and your “Joke deleted”message should show up at the top:
Git Commit
Commit your code to Git.
Conclusion
In this lesson, you have learned to use Django’s built-in messages framework. Seehttps://docs.djangoproject.com/en/3.1/ref/contrib/messages/#creating-custom-
message-levels to learn how to create your own custom message levels.
374 | LESSON 11: Messages Framework
EVALUATION COPY: Not to be used in class.
LESSON 12Media Files
Topics Covered
Media files.
Media settings.
Uploading files.
Cleaning form data.
Safety concerns.
The filetype library.
Keeping uploaded files private.
The django-private-storage library.
FileField and ImageField.
Displaying uploaded images.
Amazon Simple Storage Service (Amazon S3).
Introduction
In this lesson, you will learn to let the user upload files, to make sure those files are safe,to keep private files private, and to display uploaded images in templates.
❋
12.1. Media File Basics
In Django, media files are static files uploaded by users. Unlike Django’s static files (seepage 161), developers cannot trust media files to be safe.There are two major considerationsrelated to user-uploaded files:
LESSON 12: Media Files | 375
1. Is it safe? Is the content really what it purports to be and not some malicious filemasquerading as a PDF?
2. Is it meant to be private? When a user uploads a profile picture, they mayunderstand that it will be seen publicly, but when they upload a resume, theyexpect it to remain private.
Unfortunately, both of these issues are somewhat complex. In this lesson, we will coverthe following through a series of exercises:
1. Adding media settings to settings.py.
2. Configuring media files to be served.
3. Providing a form field for uploading a resume and handling that upload.
4. Ensuring that the uploaded file is really a PDF.
5. Making URLs to resumes only accessible to staff. All others will get a 403:Permission Denied error page.
6. Providing a form field for uploading an avatar (profile picture) on the My Accountpage.
7. Showing users’ avatars on their My Account page and on joke-detail pages.
376 | LESSON 12: Media Files
EVALUATION COPY: Not to be used in class.
Exercise 52: Adding Media Settings 20 to 30 minutes
In this exercise, you will add media settings to settings.py and will configure media filesto be served on development.
Before you can allow users to upload files, you need to determine:
1. The URL path to use to deliver media files on the website. The setting for this isMEDIA_URL.
2. Where those files will get uploaded. The setting for this is MEDIA_ROOT.
The general convention is to use “media” for both of these.
1. Add the following to your settings.py file:
MEDIA_URL = '/media/'MEDIA_ROOT = BASE_DIR / 'media'
A good place to add these settings is right below the static file settings.
2. Add a media directory at the root of the Django Jokes project.
3. Within the media directory, temporarily add a temp.txt file with some dummy text(e.g., “Hello, Media!”).
4. Start up your server and visit http://127.0.0.1:8000/media/temp.txt.You shouldget a Page not found (404) error. That’s because you have not yet configuredmedia files to be served.
E52.1. Serving Media Files
The way in which Django stores files depends on the DEFAULT_FILE_STORAGE setting, whichdefaults to 'django.core.files.storage.FileSystemStorage'. If you leave this default inplace, Django will store the files locally using the MEDIA_URL and MEDIA_ROOT settings thatyou just set. You’ll learn how this configuration works first. Later in the lesson, you willswitch to Amazon Simple Storage Service, which provides a more robust and possiblymore secure way of storing files (see page 395).
1. Open djangojokes/urls.py for editing.
LESSON 12: Media Files | 377
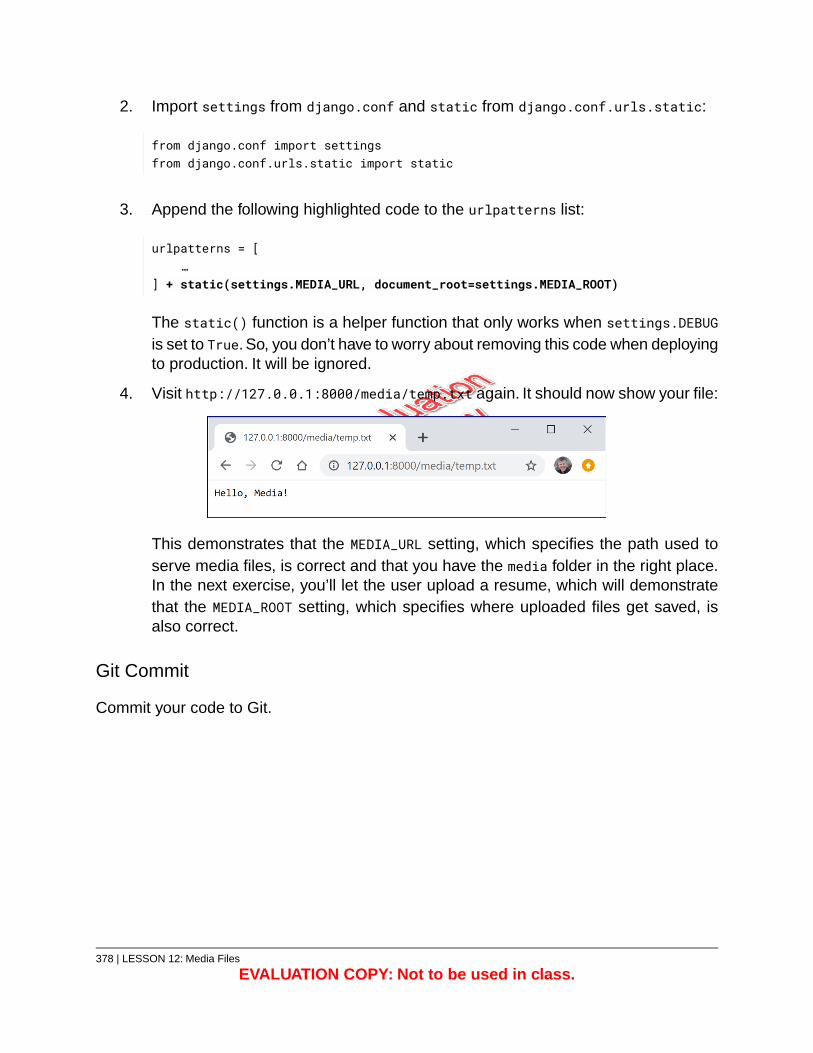
2. Import settings from django.conf and static from django.conf.urls.static:
from django.conf import settingsfrom django.conf.urls.static import static
3. Append the following highlighted code to the urlpatterns list:
urlpatterns = […
] + static(settings.MEDIA_URL, document_root=settings.MEDIA_ROOT)
The static() function is a helper function that only works when settings.DEBUGis set to True. So, you don’t have to worry about removing this code when deployingto production. It will be ignored.
4. Visit http://127.0.0.1:8000/media/temp.txt again. It should now show your file:
This demonstrates that the MEDIA_URL setting, which specifies the path used toserve media files, is correct and that you have the media folder in the right place.In the next exercise, you’ll let the user upload a resume, which will demonstratethat the MEDIA_ROOT setting, which specifies where uploaded files get saved, isalso correct.
Git Commit
Commit your code to Git.
378 | LESSON 12: Media Files
EVALUATION COPY: Not to be used in class.
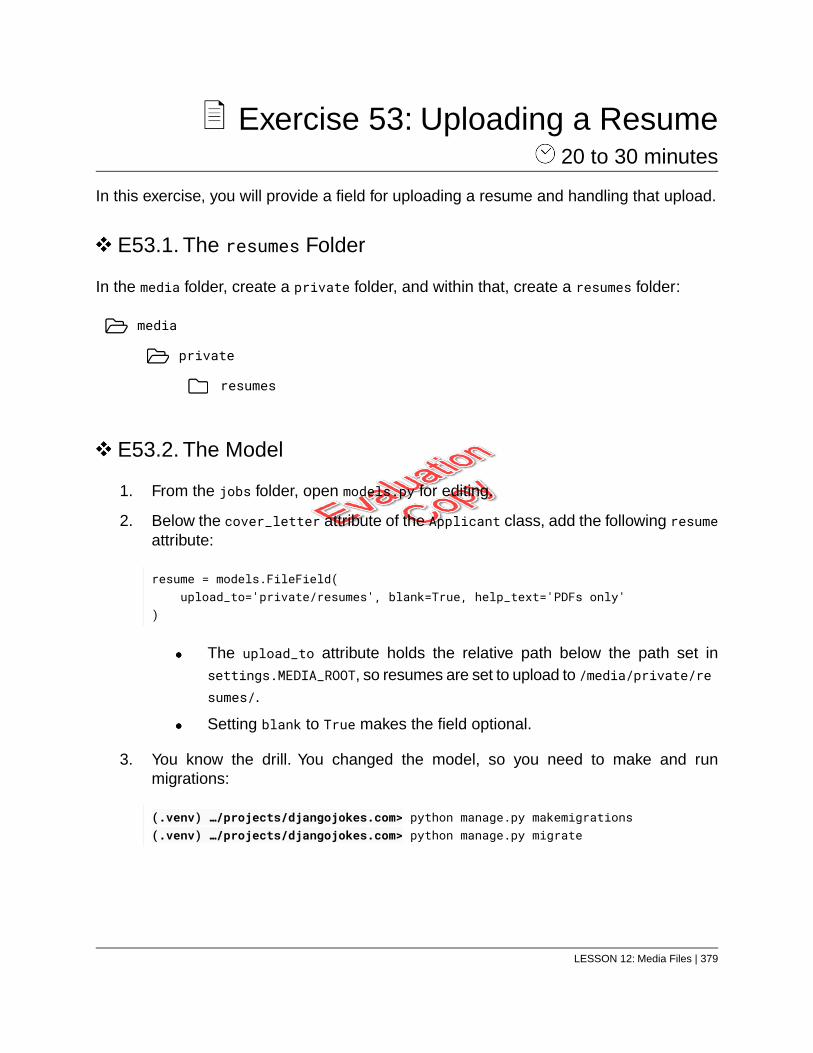
Exercise 53: Uploading a Resume 20 to 30 minutes
In this exercise, you will provide a field for uploading a resume and handling that upload.
E53.1. The resumes Folder
In the media folder, create a private folder, and within that, create a resumes folder:
media
private
resumes
E53.2. The Model
1. From the jobs folder, open models.py for editing.
2. Below the cover_letter attribute of the Applicant class, add the following resumeattribute:
resume = models.FileField(upload_to='private/resumes', blank=True, help_text='PDFs only'
)
The upload_to attribute holds the relative path below the path set insettings.MEDIA_ROOT, so resumes are set to upload to /media/private/resumes/.
Setting blank to True makes the field optional.
3. You know the drill. You changed the model, so you need to make and runmigrations:
(.venv) …/projects/djangojokes.com> python manage.py makemigrations(.venv) …/projects/djangojokes.com> python manage.py migrate
LESSON 12: Media Files | 379
E53.3. The Form
1. From the jobs folder, open forms.py for editing.
2. In the META inner class of JobApplicationForm, add resume to the fields tuple rightafter cover_letter.
3. Below the cover_letter key in the widgets dictionary, add a key for resume:
'resume': forms.FileInput(attrs={'accept':'application/pdf'})
Setting the accept attribute in the widget tells the browser to only allow for PDFs.Not all browsers support this, but modern desktop browsers do. You can checkout the status of browser support at https://caniuse.com/#feat=input-file-accept. As you shall soon see, this should be considered as helpful guidance to theuser, not as protection to you.
E53.4. The Template
1. From the templates/jobs folder, open applicant_form.html for editing.
2. In order to upload a file via an HTML form, the <form> tag must include anenctype="multipart/form-data" attribute. Add that to the <form> tag:
<form method="post" novalidate enctype="multipart/form-data">
Note that you are leaving the novalidate attribute in to bypass HTML validation,so that you see the Django-generated errors.
3. If your file is still using {{ form|crispy }} rather than the as_crispy_field filterwe showed in the Forms and Widgets lesson (see page 261), then you don’t haveto change anything else.
4. If you updated the template to use the as_crispy_field filter, add this line afteroutputting form.cover_letter:
{{ form.resume|as_crispy_field }}
This will create the Resume file upload form control.
380 | LESSON 12: Media Files
EVALUATION COPY: Not to be used in class.
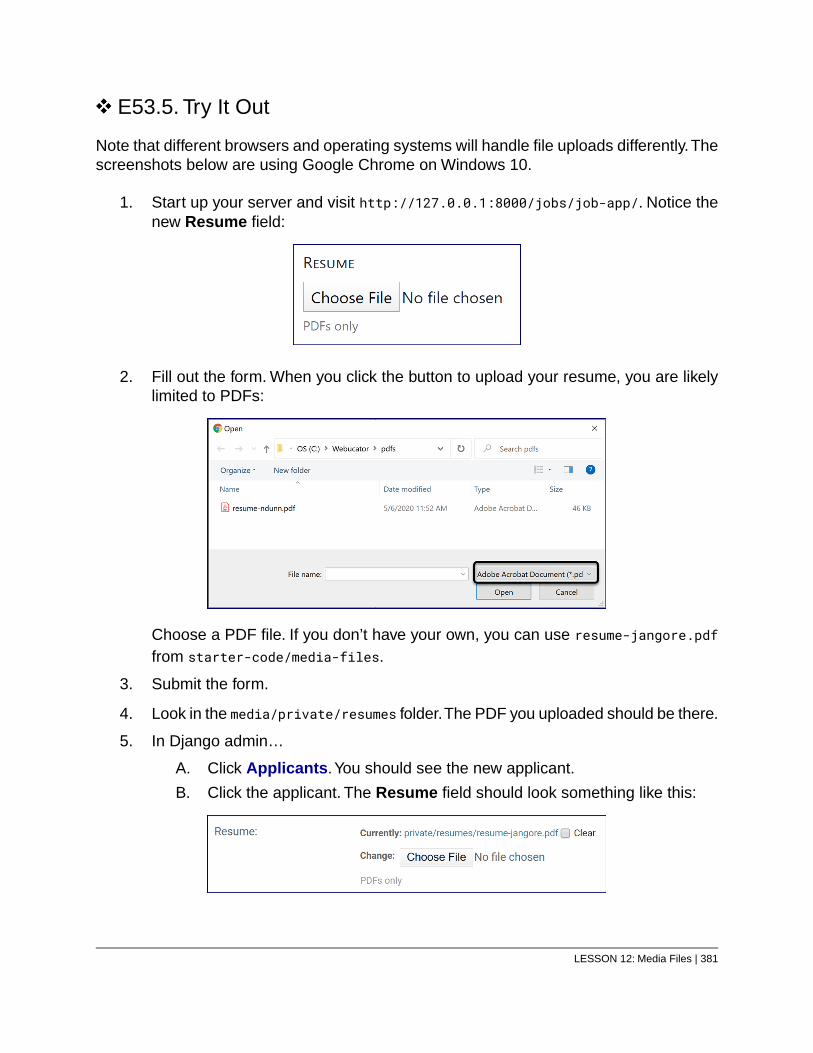
E53.5. Try It Out
Note that different browsers and operating systems will handle file uploads differently.Thescreenshots below are using Google Chrome on Windows 10.
1. Start up your server and visit http://127.0.0.1:8000/jobs/job-app/. Notice thenew Resume field:
2. Fill out the form. When you click the button to upload your resume, you are likelylimited to PDFs:
Choose a PDF file. If you don’t have your own, you can use resume-jangore.pdffrom starter-code/media-files.
3. Submit the form.
4. Look in the media/private/resumes folder.The PDF you uploaded should be there.
5. In Django admin…
A. Click Applicants.You should see the new applicant.
B. Click the applicant. The Resume field should look something like this:
LESSON 12: Media Files | 381
C. Click the link to the PDF. It should open.
Git Commit
Commit your code to Git.
382 | LESSON 12: Media Files
EVALUATION COPY: Not to be used in class.
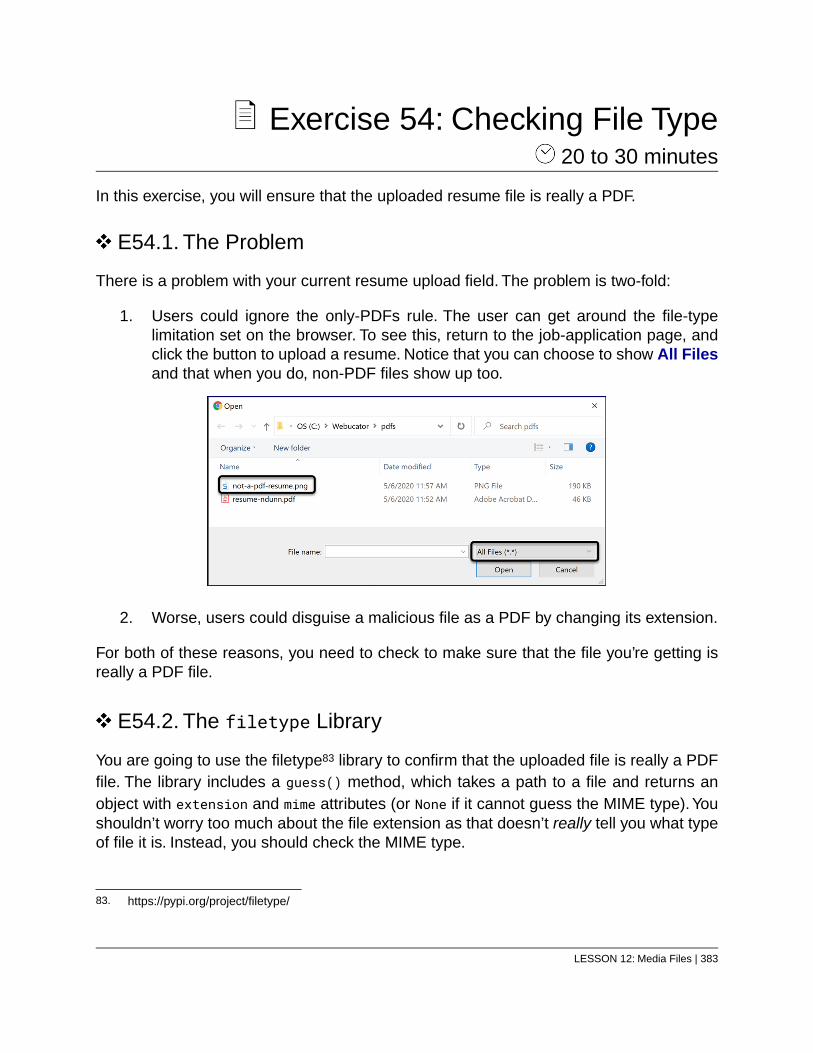
Exercise 54: Checking File Type 20 to 30 minutes
In this exercise, you will ensure that the uploaded resume file is really a PDF.
E54.1. The Problem
There is a problem with your current resume upload field. The problem is two-fold:
1. Users could ignore the only-PDFs rule. The user can get around the file-typelimitation set on the browser. To see this, return to the job-application page, andclick the button to upload a resume. Notice that you can choose to show All Filesand that when you do, non-PDF files show up too.
2. Worse, users could disguise a malicious file as a PDF by changing its extension.
For both of these reasons, you need to check to make sure that the file you’re getting isreally a PDF file.
E54.2. The filetype Library
You are going to use the filetype83 library to confirm that the uploaded file is really a PDFfile. The library includes a guess() method, which takes a path to a file and returns anobject with extension and mime attributes (or None if it cannot guess the MIME type). Youshouldn’t worry too much about the file extension as that doesn’t really tell you what typeof file it is. Instead, you should check the MIME type.
83. https://pypi.org/project/filetype/
LESSON 12: Media Files | 383

Install filetype:
(.venv) …/projects/djangojokes.com> pip install filetype
Let’s see how filetype works:
1. Open the shell and run the following code (if you uploaded a different PDF file,you will need to change the path):
(.venv) …/projects/djangojokes.com> python manage.py shell>>> import filetype>>> from django.conf import settings>>> path_to_file = 'media/private/resumes/resume-jangore.pdf'>>> kind = filetype.guess(path_to_file)>>> if not kind:... print('Cannot guess file type!')... else:... print(f'Extension: {kind.extension}')... print(f'MIME type: {kind.mime}')...Extension: pdfMIME type: application/pdf... exit()
Now, let’s use filetype to validate PDF uploads.
You could validate the file type in the form, but then the validation is specific to that form.In Django admin, for example, you would still be able to upload non-PDF files. To makesure that only PDF files are uploaded to the resume field, you should add a validator tothe model.
1. From the jobs folder, open models.py for editing.
2. At the top of the file, import filetype:
import filetype
384 | LESSON 12: Media Files
EVALUATION COPY: Not to be used in class.
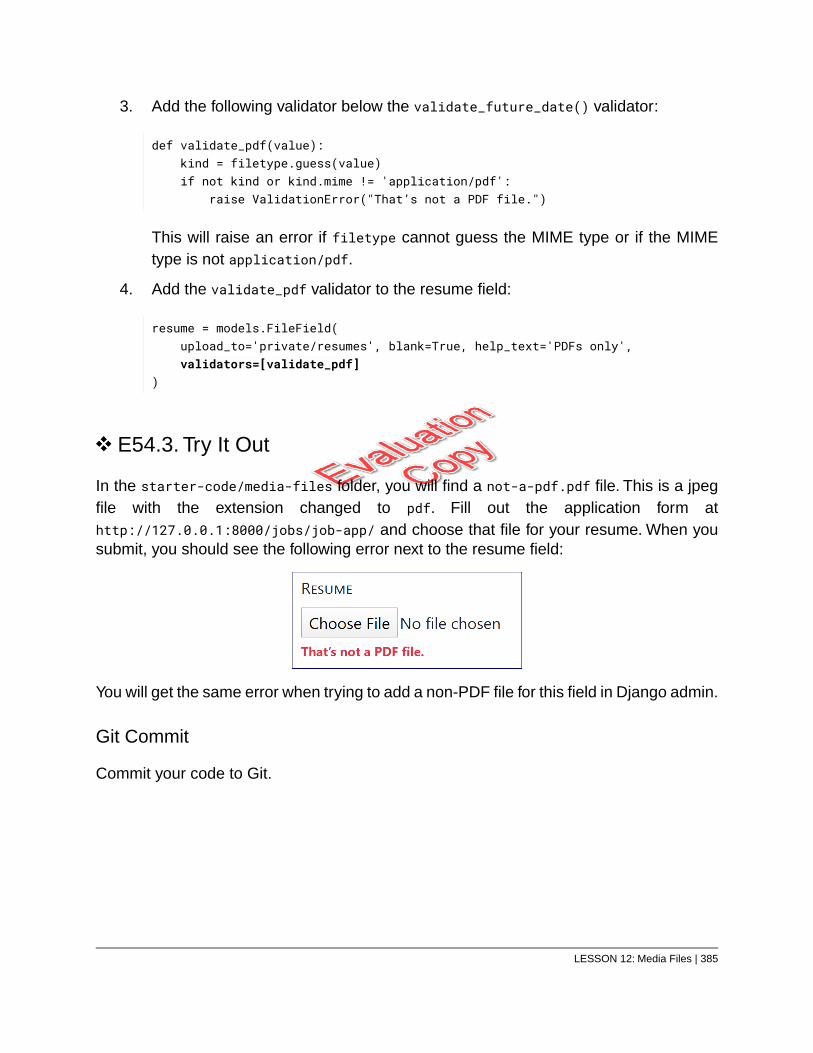
3. Add the following validator below the validate_future_date() validator:
def validate_pdf(value):kind = filetype.guess(value)if not kind or kind.mime != 'application/pdf':
raise ValidationError("That’s not a PDF file.")
This will raise an error if filetype cannot guess the MIME type or if the MIMEtype is not application/pdf.
4. Add the validate_pdf validator to the resume field:
resume = models.FileField(upload_to='private/resumes', blank=True, help_text='PDFs only',validators=[validate_pdf]
)
E54.3. Try It Out
In the starter-code/media-files folder, you will find a not-a-pdf.pdf file. This is a jpegfile with the extension changed to pdf. Fill out the application form athttp://127.0.0.1:8000/jobs/job-app/ and choose that file for your resume. When yousubmit, you should see the following error next to the resume field:
You will get the same error when trying to add a non-PDF file for this field in Django admin.
Git Commit
Commit your code to Git.
LESSON 12: Media Files | 385
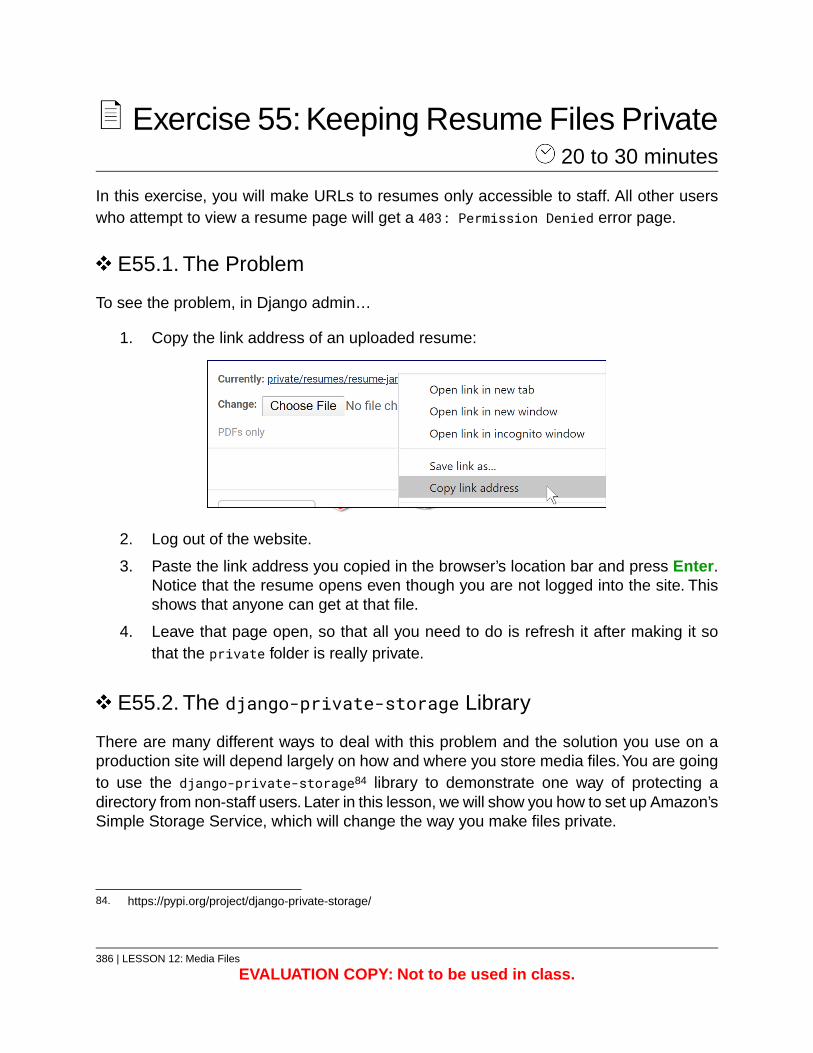
Exercise 55: Keeping Resume Files Private 20 to 30 minutes
In this exercise, you will make URLs to resumes only accessible to staff. All other userswho attempt to view a resume page will get a 403: Permission Denied error page.
E55.1. The Problem
To see the problem, in Django admin…
1. Copy the link address of an uploaded resume:
2. Log out of the website.
3. Paste the link address you copied in the browser’s location bar and press Enter.Notice that the resume opens even though you are not logged into the site. Thisshows that anyone can get at that file.
4. Leave that page open, so that all you need to do is refresh it after making it sothat the private folder is really private.
E55.2. The django-private-storage Library
There are many different ways to deal with this problem and the solution you use on aproduction site will depend largely on how and where you store media files.You are goingto use the django-private-storage84 library to demonstrate one way of protecting adirectory from non-staff users. Later in this lesson, we will show you how to set up Amazon’sSimple Storage Service, which will change the way you make files private.
84. https://pypi.org/project/django-private-storage/
386 | LESSON 12: Media Files
EVALUATION COPY: Not to be used in class.
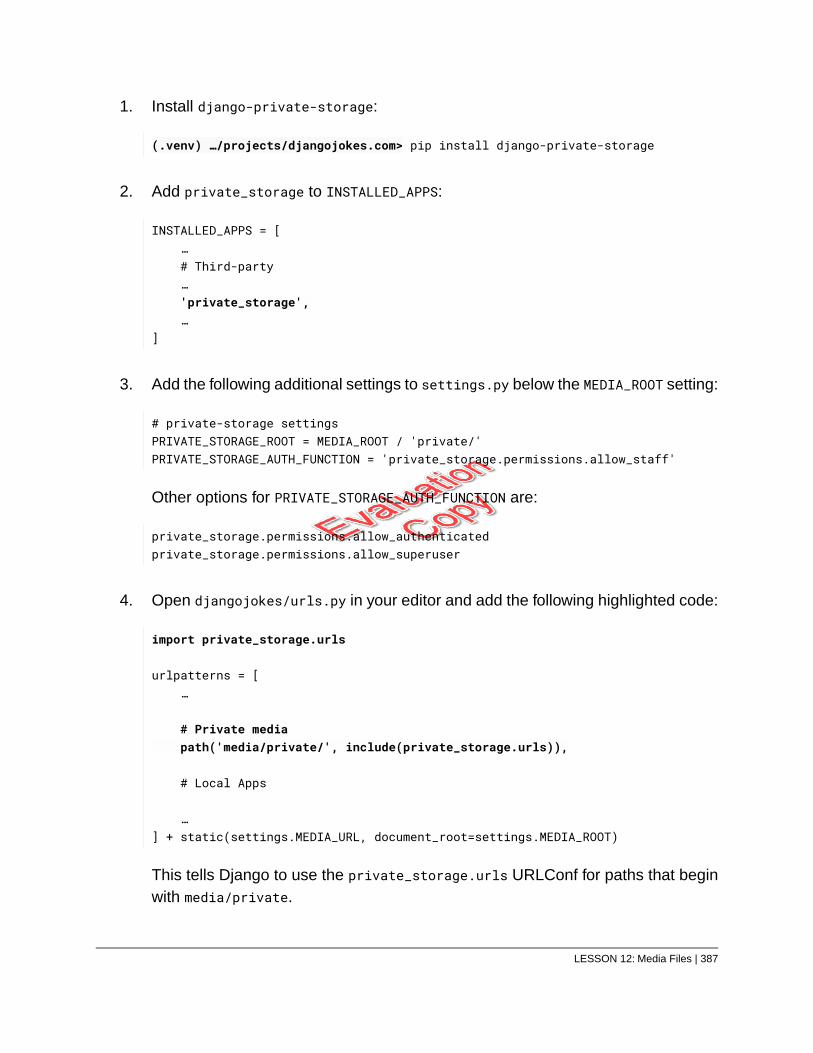
1. Install django-private-storage:
(.venv) …/projects/djangojokes.com> pip install django-private-storage
2. Add private_storage to INSTALLED_APPS:
INSTALLED_APPS = […# Third-party…'private_storage',…
]
3. Add the following additional settings to settings.py below the MEDIA_ROOT setting:
# private-storage settingsPRIVATE_STORAGE_ROOT = MEDIA_ROOT / 'private/'PRIVATE_STORAGE_AUTH_FUNCTION = 'private_storage.permissions.allow_staff'
Other options for PRIVATE_STORAGE_AUTH_FUNCTION are:
private_storage.permissions.allow_authenticatedprivate_storage.permissions.allow_superuser
4. Open djangojokes/urls.py in your editor and add the following highlighted code:
import private_storage.urls
urlpatterns = […
# Private mediapath('media/private/', include(private_storage.urls)),
# Local Apps
…] + static(settings.MEDIA_URL, document_root=settings.MEDIA_ROOT)
This tells Django to use the private_storage.urls URLConf for paths that beginwith media/private.
LESSON 12: Media Files | 387
5. Return to the browser tab that has the resume loaded and refresh the page. Youshould get a 403 Permission Denied page like this one:
Now, change the model so that all future resume files are put in the private directory aswell. You don’t really have to do this, as the field is already set up to store files in theprivate directory, but the advantage of making this change is that if you change whereyou are storing private files in settings, new files will automatically go to the destination.
1. From the jobs folder, open models.py for editing.
2. Import PrivateFileField from private_storage.fields:
from private_storage.fields import PrivateFileField
3. Change the resume field to a PrivateFileField and change the upload_to pathto just resumes as the path is relative to the value insettings.PRIVATE_STORAGE_ROOT, which is MEDIA_ROOT / 'private/':
resume = PrivateFileField(upload_to='private/resumes', blank=True, help_text='PDFs only',validators=[validate_pdf]
)
Note that the PrivateFileField field also includes a content_types attribute, butit just checks the content-type sent by the browser in the request, which may notbe the real content-type of the file, so you should continue to use the validate_pdfvalidator you wrote earlier.
388 | LESSON 12: Media Files
EVALUATION COPY: Not to be used in class.
4. To be sure everything is set up correctly, submit a new job application with aresume and check to make sure the resume landed in the media/private/resumesfolder.
Again, there are different ways of keeping uploaded files private. Usingdjango-private-storage is a good option if you are planning to store your files on thesame server that is hosting your Django application.
Git Commit
Commit your code to Git.
LESSON 12: Media Files | 389
Exercise 56: Adding an ImageField to theModel
15 to 25 minutes
In this exercise, you will add an ImageField to the CustomUser model and provide a formfield for uploading an avatar (profile picture) on the My Account page. You will also makesure the uploaded image is no taller or wider than 200 pixels.
The Pillow image-processing library85 is required for working with ImageField in Django.Install that now:
(.venv) …/projects/djangojokes.com> pip install Pillow
ImageField inherits from FileField. It only allows for valid images and includes heightand width attributes.
E56.1. The Model
1. From the users folder, open models.py for editing.
2. Import ValidationError from django.core.exceptions and get_image_dimensionsfrom django.core.files.images:
from django.core.exceptions import ValidationErrorfrom django.core.files.images import get_image_dimensions
You will use both of these in the validator function.
3. Add the following custom validator function above the CustomUser class:
def validate_avatar(value):w, h = get_image_dimensions(value)if w > 200 or h > 200:
raise ValidationError('Avatar must be no bigger than 200x200 pixels.')
85. https://pypi.org/project/Pillow/
390 | LESSON 12: Media Files
EVALUATION COPY: Not to be used in class.
4. Add the following field to CustomUser:
avatar = models.ImageField(upload_to='avatars/', blank=True,help_text='Image must be 200px by 200px.',validators=[validate_avatar]
)
Remember that the upload_to value for FileField is relative to the value ofsettings.MEDIA_ROOT.ImageField, which inherits from FileField, does not changethis.
5. You changed the model, so you need to make and run migrations:
(.venv) …/projects/djangojokes.com> python manage.py makemigrations(.venv) …/projects/djangojokes.com> python manage.py migrate
E56.2. The Form
You now need to add the avatar field to the form. In users/forms.py, add 'avatar' to thefields tuple.
fields = ('email', 'username', 'first_name', 'last_name', 'dob', 'avatar'
)
E56.3. The Template
Your HTML form needs to be capable of uploading files.
1. From the templates/account folder, open my_account.html for editing.
2. Add the enctype="multipart/form-data" attribute to the <form> tag so that theform can handle file uploading and add the novalidate attribute to bypass HTMLvalidation, so that you see the Django-generated errors:
<form method="post" enctype="multipart/form-data" class="m-auto" novalidate>
LESSON 12: Media Files | 391
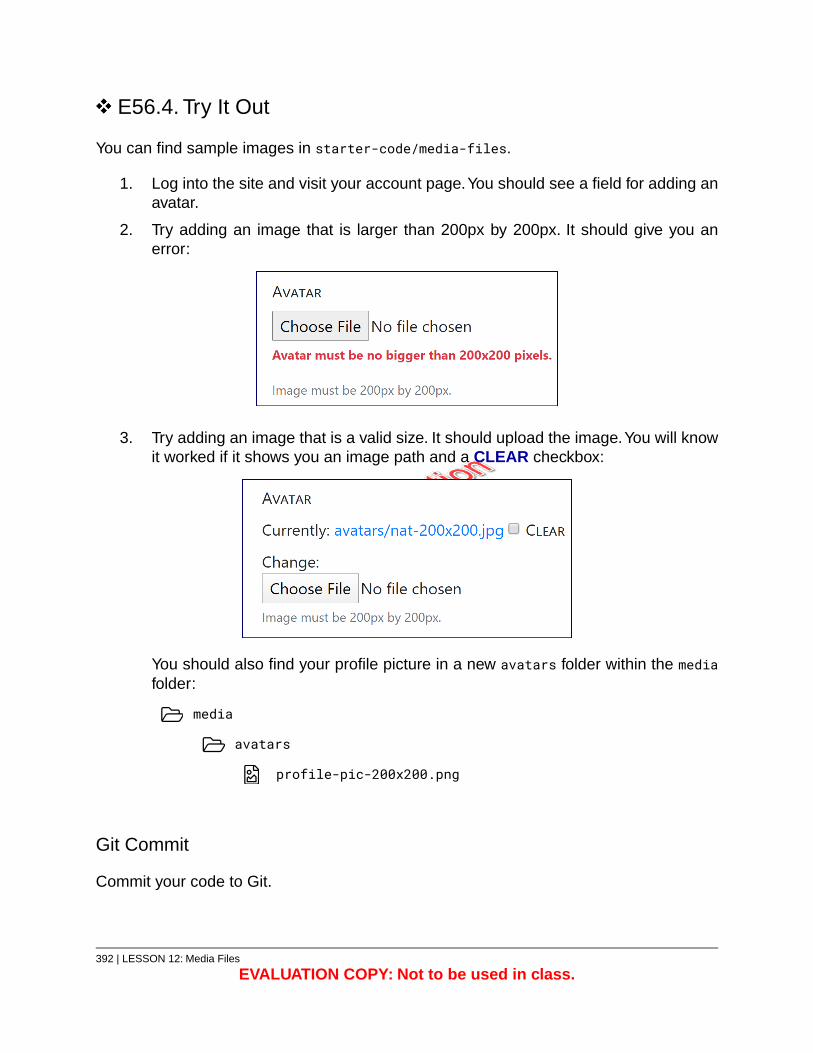
E56.4. Try It Out
You can find sample images in starter-code/media-files.
1. Log into the site and visit your account page.You should see a field for adding anavatar.
2. Try adding an image that is larger than 200px by 200px. It should give you anerror:
3. Try adding an image that is a valid size. It should upload the image.You will knowit worked if it shows you an image path and a CLEAR checkbox:
You should also find your profile picture in a new avatars folder within the mediafolder:
media
avatars
profile-pic-200x200.png
Git Commit
Commit your code to Git.
392 | LESSON 12: Media Files
EVALUATION COPY: Not to be used in class.
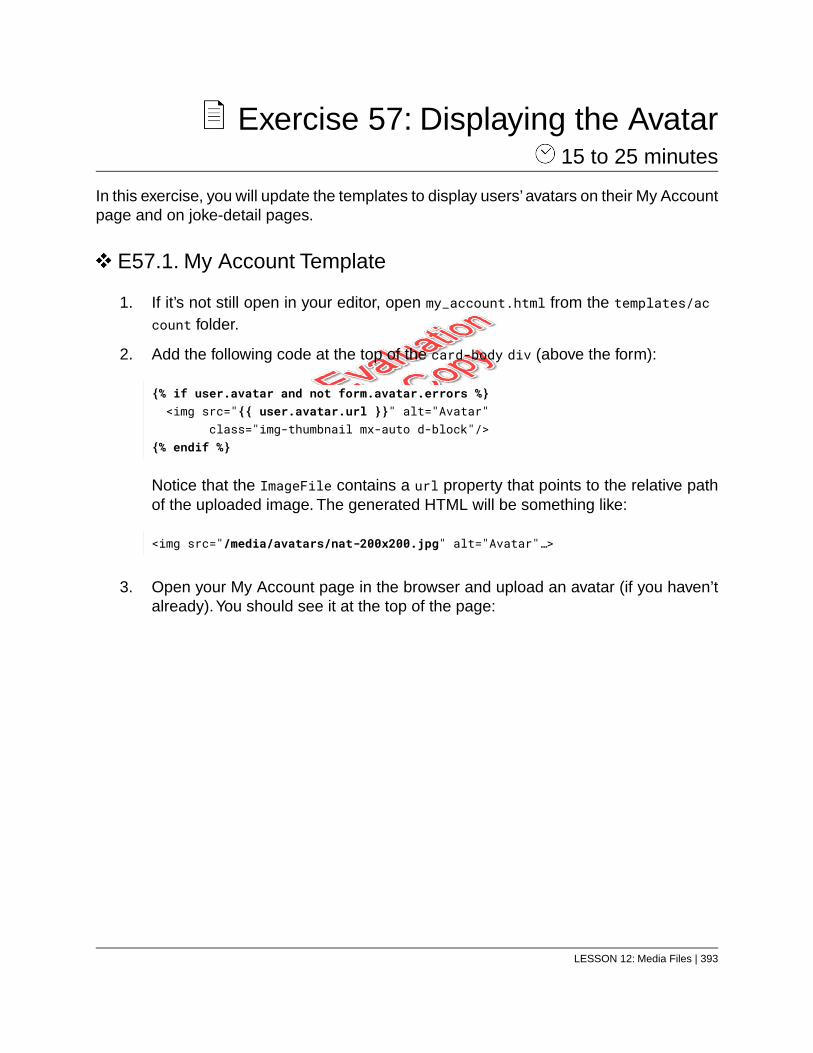
Exercise 57: Displaying the Avatar 15 to 25 minutes
In this exercise, you will update the templates to display users’ avatars on their My Accountpage and on joke-detail pages.
E57.1. My Account Template
1. If it’s not still open in your editor, open my_account.html from the templates/account folder.
2. Add the following code at the top of the card-body div (above the form):
{% if user.avatar and not form.avatar.errors %}<img src="{{ user.avatar.url }}" alt="Avatar"
class="img-thumbnail mx-auto d-block"/>{% endif %}
Notice that the ImageFile contains a url property that points to the relative pathof the uploaded image. The generated HTML will be something like:
<img src="/media/avatars/nat-200x200.jpg" alt="Avatar"…>
3. Open your My Account page in the browser and upload an avatar (if you haven’talready).You should see it at the top of the page:
LESSON 12: Media Files | 393
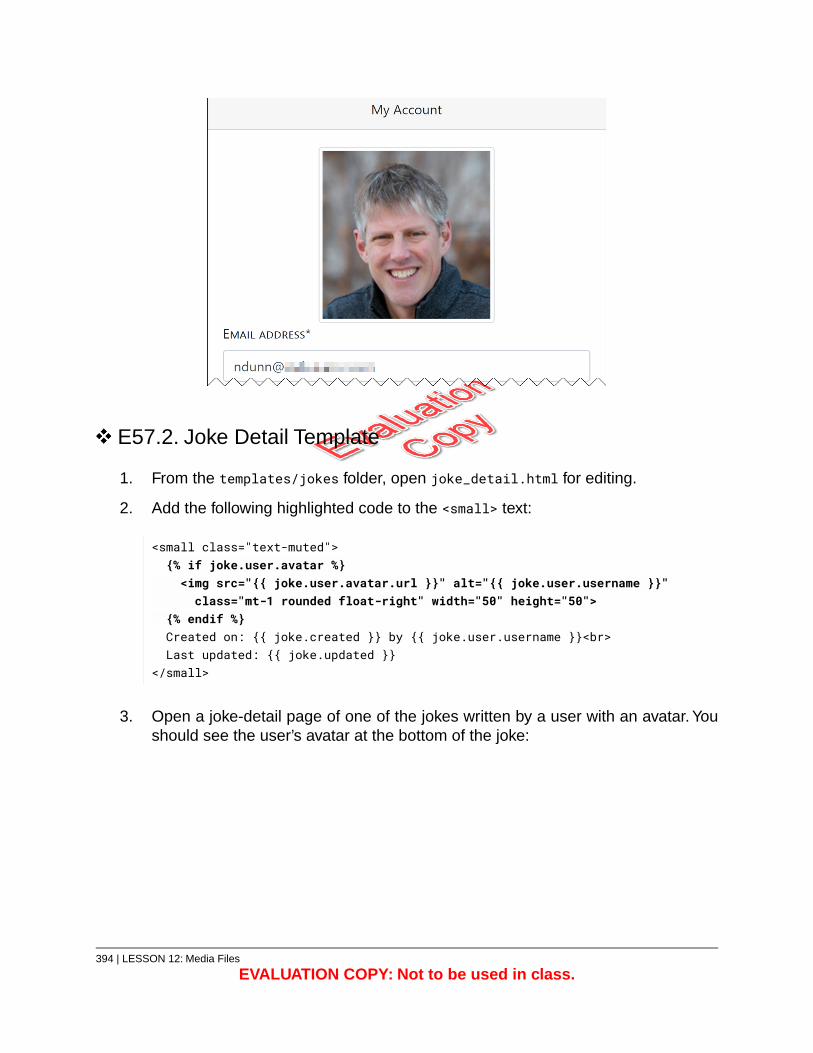
E57.2. Joke Detail Template
1. From the templates/jokes folder, open joke_detail.html for editing.
2. Add the following highlighted code to the <small> text:
<small class="text-muted">{% if joke.user.avatar %}<img src="{{ joke.user.avatar.url }}" alt="{{ joke.user.username }}"class="mt-1 rounded float-right" width="50" height="50">
{% endif %}Created on: {{ joke.created }} by {{ joke.user.username }}<br>Last updated: {{ joke.updated }}
</small>
3. Open a joke-detail page of one of the jokes written by a user with an avatar. Youshould see the user’s avatar at the bottom of the joke:
394 | LESSON 12: Media Files
EVALUATION COPY: Not to be used in class.
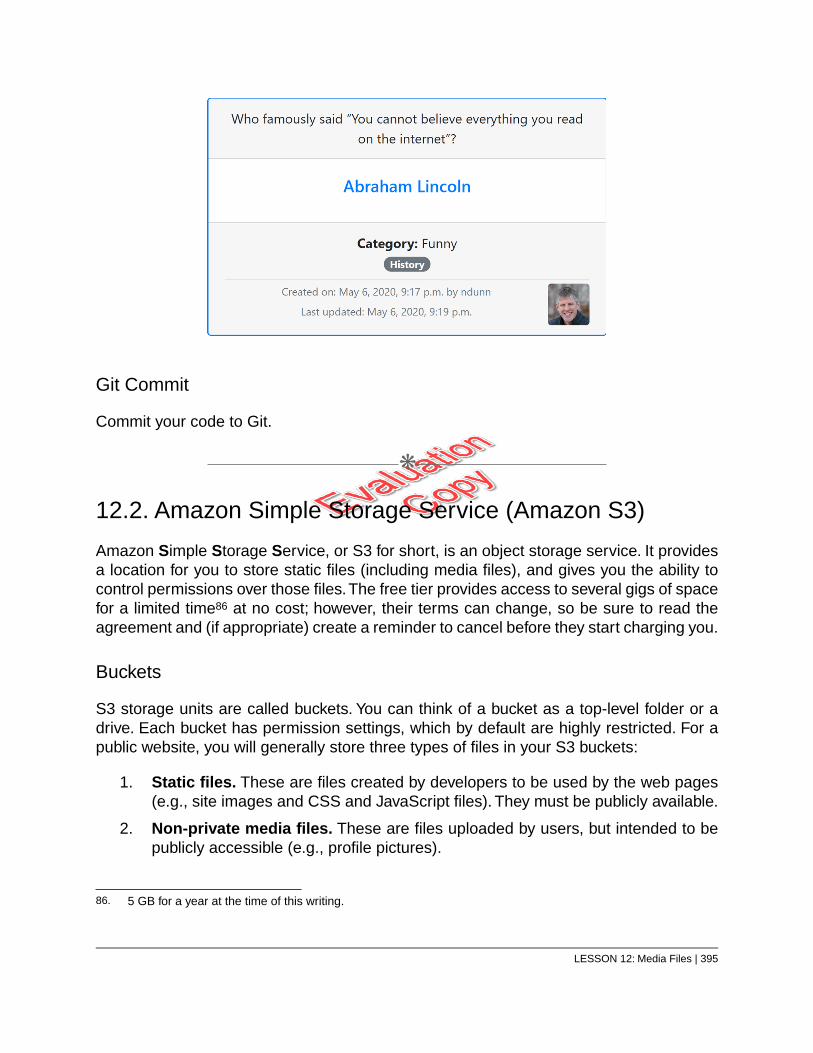
Git Commit
Commit your code to Git.
❋
12.2. Amazon Simple Storage Service (Amazon S3)
Amazon Simple Storage Service, or S3 for short, is an object storage service. It providesa location for you to store static files (including media files), and gives you the ability tocontrol permissions over those files.The free tier provides access to several gigs of spacefor a limited time86 at no cost; however, their terms can change, so be sure to read theagreement and (if appropriate) create a reminder to cancel before they start charging you.
Buckets
S3 storage units are called buckets. You can think of a bucket as a top-level folder or adrive. Each bucket has permission settings, which by default are highly restricted. For apublic website, you will generally store three types of files in your S3 buckets:
1. Static files. These are files created by developers to be used by the web pages(e.g., site images and CSS and JavaScript files). They must be publicly available.
2. Non-private media files. These are files uploaded by users, but intended to bepublicly accessible (e.g., profile pictures).
86. 5 GB for a year at the time of this writing.
LESSON 12: Media Files | 395
3. Private media files. These are files uploaded by users, but not intended to bepublicly accessible (e.g., resumes).
S3 does not permit you to create public folders inside of private buckets. However, youcan create private folders within public buckets. Because of this, for a public website, youneed to make your buckets public and then add restrictions at the folder or file level.87
An AWS Account
You will need an AWS account, which you can get for free at https://aws.amazon.com/free.
In the following exercise, we will walk you through setting up S3 to store both the staticfiles and the media files for the Django Jokes site.
Complexity Warning!
Amazon’s Simple Storage Service isn’t so simple. In fact, setting up S3 is prettycomplex. If you are not storing media files on your site, there are generally simplerapproaches you can take. However, if you are storing media files, you will very likelyuse Amazon’s S3 service, or something similar, to do so.
Things Change!
Companies often change their registration and setup processes. Amazon is noexception. If the instructions here do not work, please visit https://www.webucator.com/books/errata.cfm to see if we have posted any updates. If we haven’tposted any updates that help, please email us at [email protected].
87. An alternative approach is to have multiple buckets with different restriction settings.
396 | LESSON 12: Media Files
EVALUATION COPY: Not to be used in class.
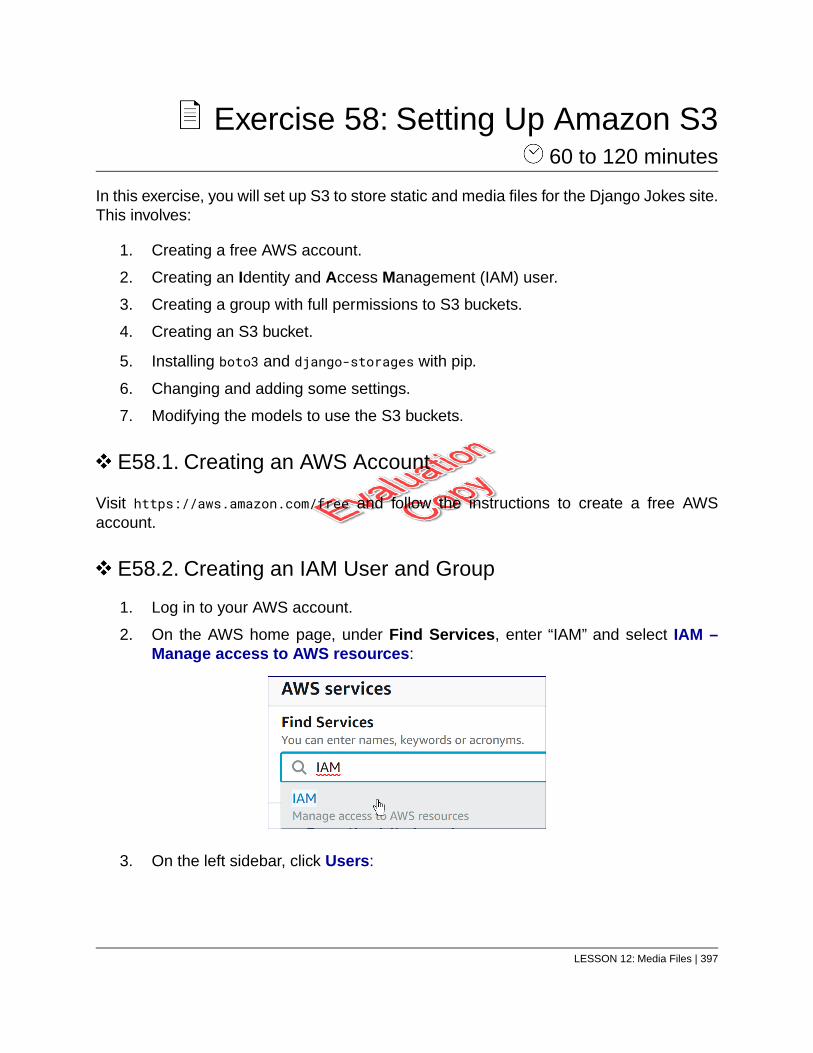
Exercise 58: Setting Up Amazon S3 60 to 120 minutes
In this exercise, you will set up S3 to store static and media files for the Django Jokes site.This involves:
1. Creating a free AWS account.
2. Creating an Identity and Access Management (IAM) user.
3. Creating a group with full permissions to S3 buckets.
4. Creating an S3 bucket.
5. Installing boto3 and django-storages with pip.
6. Changing and adding some settings.
7. Modifying the models to use the S3 buckets.
E58.1. Creating an AWS Account
Visit https://aws.amazon.com/free and follow the instructions to create a free AWSaccount.
E58.2. Creating an IAM User and Group
1. Log in to your AWS account.
2. On the AWS home page, under Find Services, enter “IAM” and select IAM –Manage access to AWS resources:
3. On the left sidebar, click Users:
LESSON 12: Media Files | 397
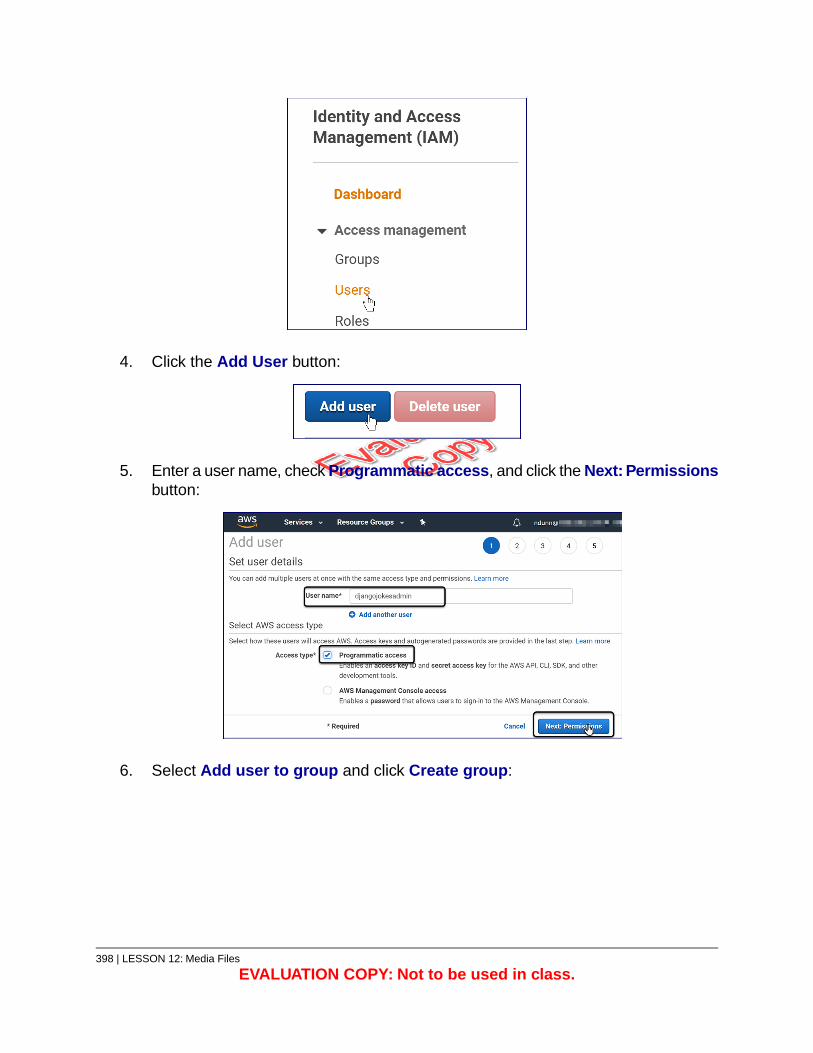
4. Click the Add User button:
5. Enter a user name, check Programmatic access, and click the Next: Permissionsbutton:
6. Select Add user to group and click Create group:
398 | LESSON 12: Media Files
EVALUATION COPY: Not to be used in class.
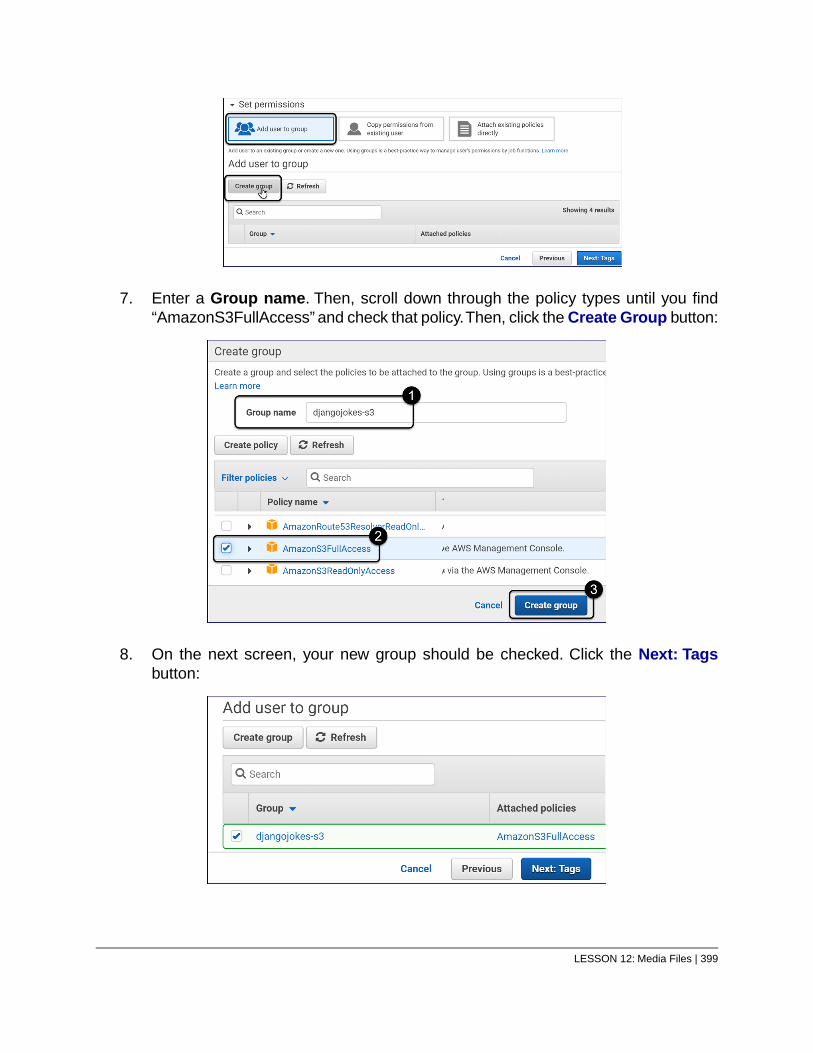
7. Enter a Group name. Then, scroll down through the policy types until you find“AmazonS3FullAccess” and check that policy.Then, click the Create Group button:
8. On the next screen, your new group should be checked. Click the Next: Tagsbutton:
LESSON 12: Media Files | 399
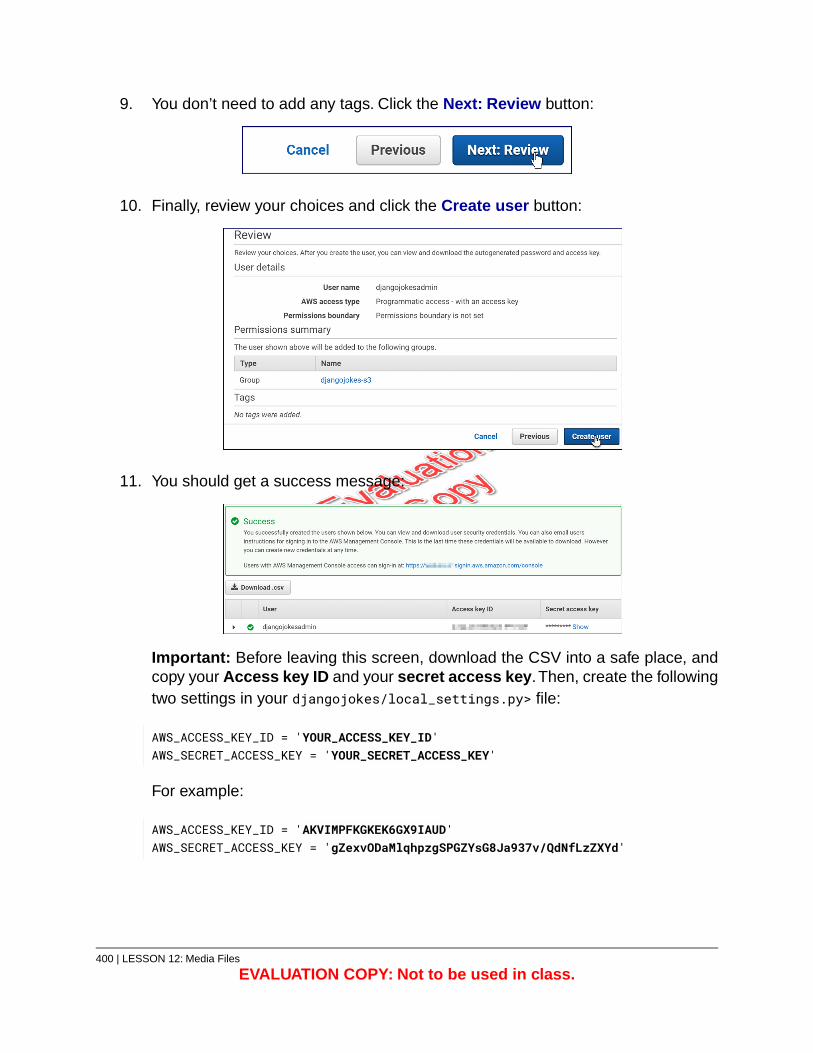
9. You don’t need to add any tags. Click the Next: Review button:
10. Finally, review your choices and click the Create user button:
11. You should get a success message:
Important: Before leaving this screen, download the CSV into a safe place, andcopy your Access key ID and your secret access key.Then, create the followingtwo settings in your djangojokes/local_settings.py> file:
AWS_ACCESS_KEY_ID = 'YOUR_ACCESS_KEY_ID'AWS_SECRET_ACCESS_KEY = 'YOUR_SECRET_ACCESS_KEY'
For example:
AWS_ACCESS_KEY_ID = 'AKVIMPFKGKEK6GX9IAUD'AWS_SECRET_ACCESS_KEY = 'gZexvODaMlqhpzgSPGZYsG8Ja937v/QdNfLzZXYd'
400 | LESSON 12: Media Files
EVALUATION COPY: Not to be used in class.
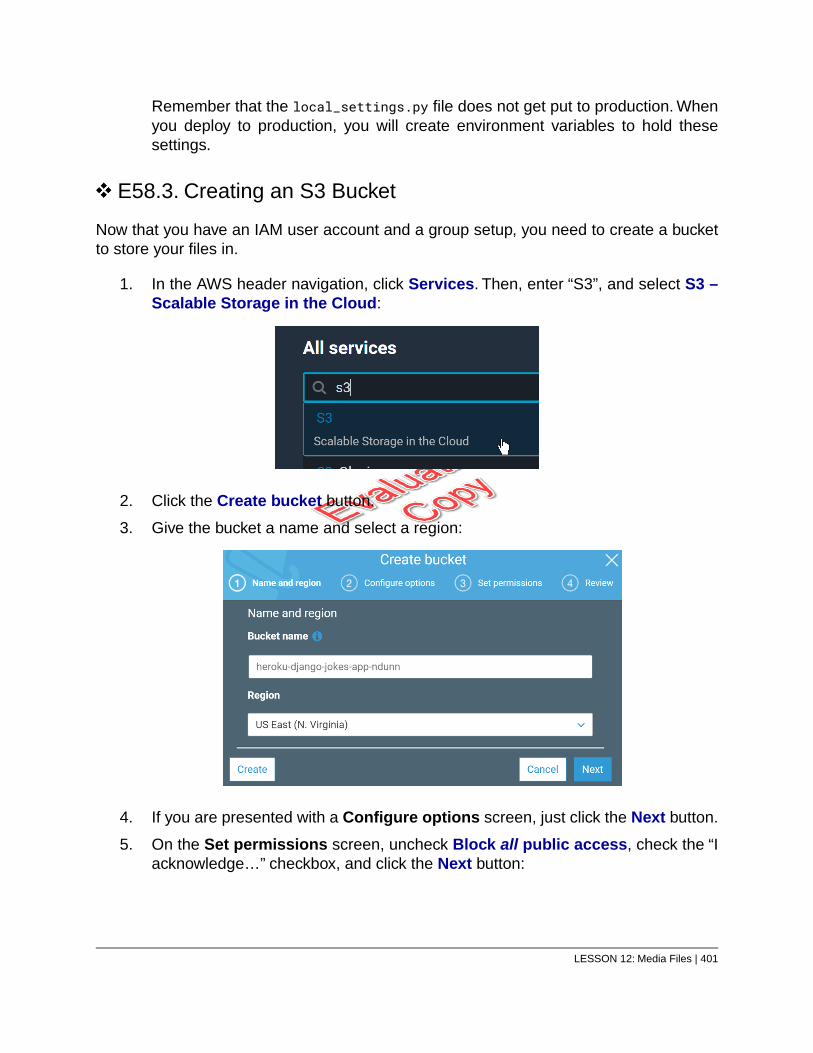
Remember that the local_settings.py file does not get put to production. Whenyou deploy to production, you will create environment variables to hold thesesettings.
E58.3. Creating an S3 Bucket
Now that you have an IAM user account and a group setup, you need to create a bucketto store your files in.
1. In the AWS header navigation, click Services. Then, enter “S3”, and select S3 –Scalable Storage in the Cloud:
2. Click the Create bucket button.
3. Give the bucket a name and select a region:
4. If you are presented with a Configure options screen, just click the Next button.
5. On the Set permissions screen, uncheck Block all public access, check the “Iacknowledge…” checkbox, and click the Next button:
LESSON 12: Media Files | 401
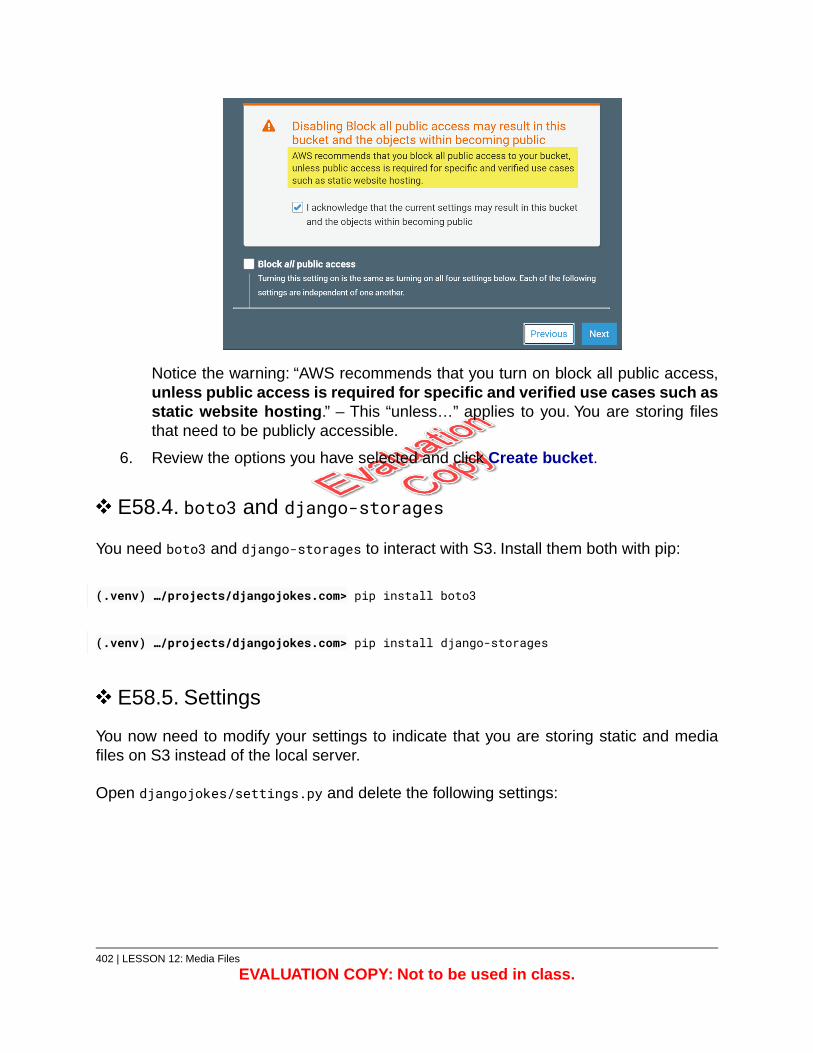
Notice the warning: “AWS recommends that you turn on block all public access,unless public access is required for specific and verified use cases such asstatic website hosting.” – This “unless…” applies to you. You are storing filesthat need to be publicly accessible.
6. Review the options you have selected and click Create bucket.
E58.4. boto3 and django-storages
You need boto3 and django-storages to interact with S3. Install them both with pip:
(.venv) …/projects/djangojokes.com> pip install boto3
(.venv) …/projects/djangojokes.com> pip install django-storages
E58.5. Settings
You now need to modify your settings to indicate that you are storing static and mediafiles on S3 instead of the local server.
Open djangojokes/settings.py and delete the following settings:
402 | LESSON 12: Media Files
EVALUATION COPY: Not to be used in class.
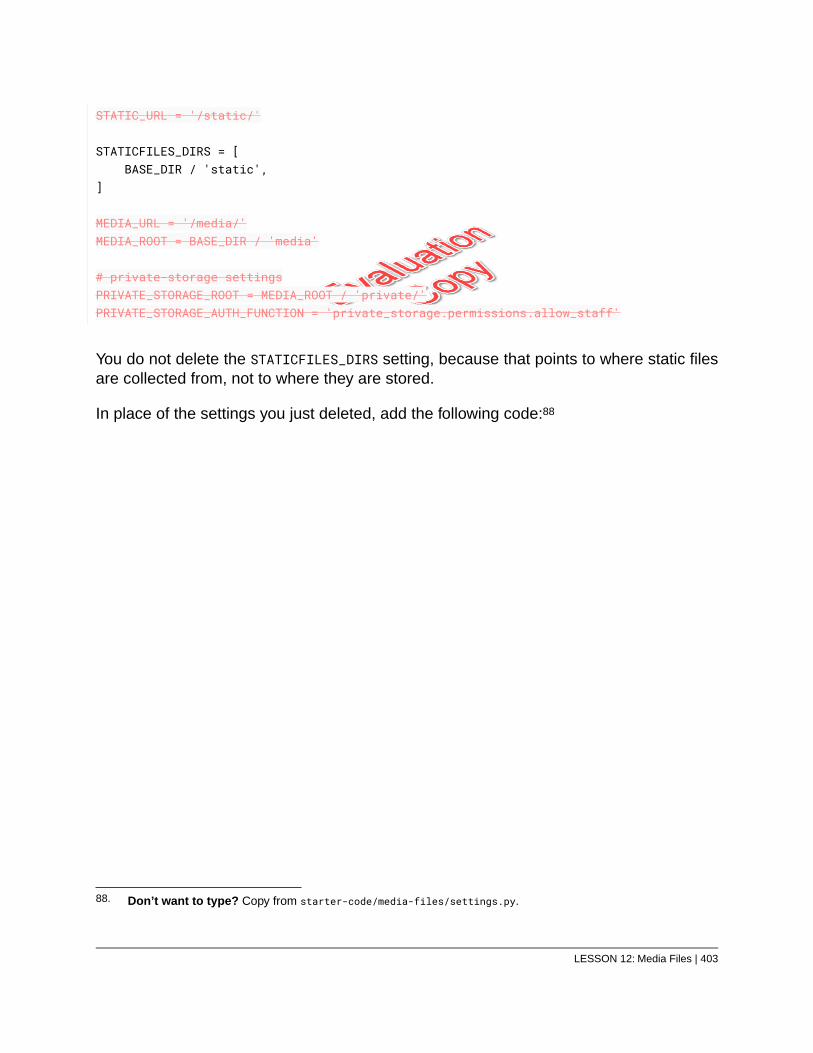
STATIC_URL = '/static/'
STATICFILES_DIRS = [BASE_DIR / 'static',
]
MEDIA_URL = '/media/'MEDIA_ROOT = BASE_DIR / 'media'
# private-storage settingsPRIVATE_STORAGE_ROOT = MEDIA_ROOT / 'private/'PRIVATE_STORAGE_AUTH_FUNCTION = 'private_storage.permissions.allow_staff'
You do not delete the STATICFILES_DIRS setting, because that points to where static filesare collected from, not to where they are stored.
In place of the settings you just deleted, add the following code:88
88. Don’t want to type? Copy from starter-code/media-files/settings.py.
LESSON 12: Media Files | 403
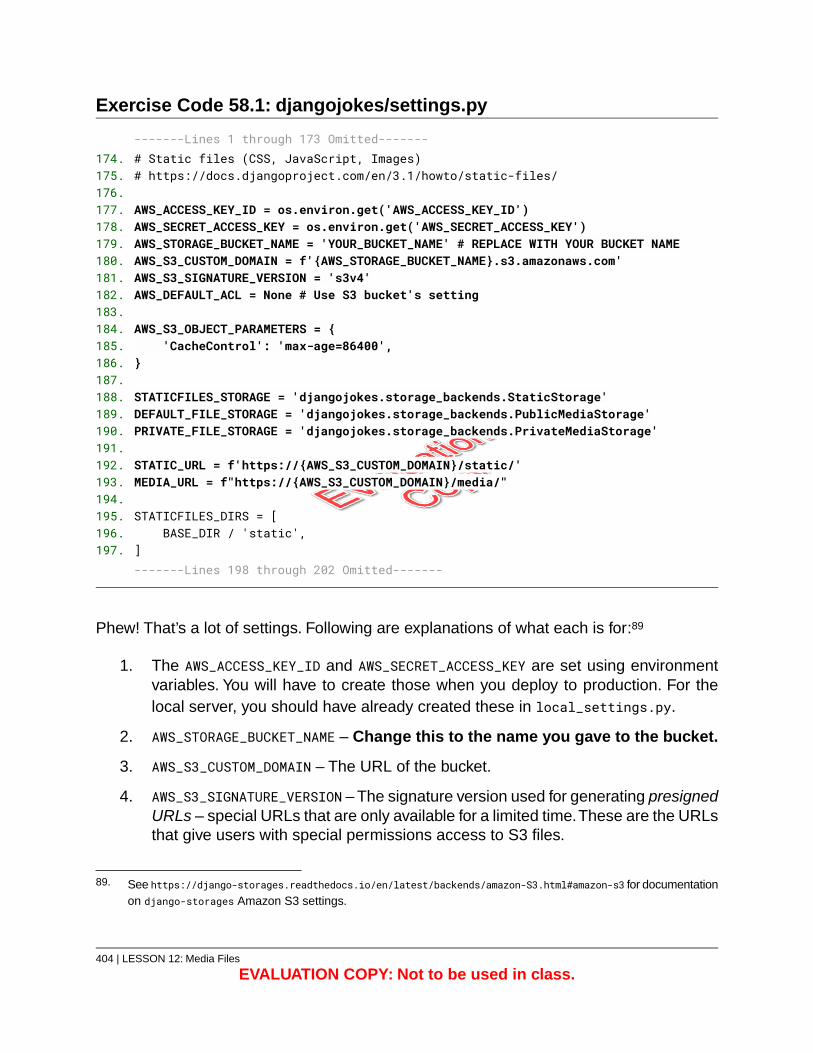
Exercise Code 58.1: djangojokes/settings.py
-------Lines 1 through 173 Omitted-------# Static files (CSS, JavaScript, Images)174.# https://docs.djangoproject.com/en/3.1/howto/static-files/175.
176.AWS_ACCESS_KEY_ID = os.environ.get('AWS_ACCESS_KEY_ID')177.AWS_SECRET_ACCESS_KEY = os.environ.get('AWS_SECRET_ACCESS_KEY')178.AWS_STORAGE_BUCKET_NAME = 'YOUR_BUCKET_NAME' # REPLACE WITH YOUR BUCKET NAME179.AWS_S3_CUSTOM_DOMAIN = f'{AWS_STORAGE_BUCKET_NAME}.s3.amazonaws.com'180.AWS_S3_SIGNATURE_VERSION = 's3v4'181.AWS_DEFAULT_ACL = None # Use S3 bucket's setting182.
183.AWS_S3_OBJECT_PARAMETERS = {184.
'CacheControl': 'max-age=86400',185.}186.
187.STATICFILES_STORAGE = 'djangojokes.storage_backends.StaticStorage'188.DEFAULT_FILE_STORAGE = 'djangojokes.storage_backends.PublicMediaStorage'189.PRIVATE_FILE_STORAGE = 'djangojokes.storage_backends.PrivateMediaStorage'190.
191.STATIC_URL = f'https://{AWS_S3_CUSTOM_DOMAIN}/static/'192.MEDIA_URL = f"https://{AWS_S3_CUSTOM_DOMAIN}/media/"193.
194.STATICFILES_DIRS = [195.
BASE_DIR / 'static',196.]197.-------Lines 198 through 202 Omitted-------
Phew! That’s a lot of settings. Following are explanations of what each is for:89
1. The AWS_ACCESS_KEY_ID and AWS_SECRET_ACCESS_KEY are set using environmentvariables. You will have to create those when you deploy to production. For thelocal server, you should have already created these in local_settings.py.
2. AWS_STORAGE_BUCKET_NAME – Change this to the name you gave to the bucket.
3. AWS_S3_CUSTOM_DOMAIN – The URL of the bucket.
4. AWS_S3_SIGNATURE_VERSION – The signature version used for generating presignedURLs – special URLs that are only available for a limited time.These are the URLsthat give users with special permissions access to S3 files.
89. See https://django-storages.readthedocs.io/en/latest/backends/amazon-S3.html#amazon-s3 for documentationon django-storages Amazon S3 settings.
404 | LESSON 12: Media Files
EVALUATION COPY: Not to be used in class.
5. AWS_DEFAULT_ACL = None – Setting this to None indicates that uploaded files shoulduse the same access control settings as the S3 bucket.
6. AWS_S3_OBJECT_PARAMETERS – The cache-control setting specifies the number ofseconds objects will be kept in cache.90
7. STATICFILES_STORAGE – This is a built-in Django setting pointing to the classresponsible for handling static file storage. It defaults to:
'django.contrib.staticfiles.storage.StaticFilesStorage'
You are changing the value to:
'djangojokes.storage_backends.StaticStorage'
You will create that class shortly.
8. DEFAULT_FILE_STORAGE – This is the built-in Django setting we discussed earlier(see page 377). It points to the class responsible for handling uploaded files. Itdefaults to:
'django.core.files.storage.FileSystemStorage'
You are changing the value to:
'djangojokes.storage_backends.PublicMediaStorage'
You will create that class shortly also.
9. PRIVATE_FILE_STORAGE – This is not a built-in Django setting. You will have toreference it explicitly. You will create the class shortly and then will reference it inthe resume field of the jobs.Applicant model.
10. You have changed STATIC_URL and MEDIA_URL to use the AWS static and mediafolders.
11. As you are no longer storing files on the server, you have removed the STATIC_ROOTand MEDIA_ROOT settings .
12. As you are no longer using private-storage, you have removed thePRIVATE_STORAGE_ROOT and PRIVATE_STORAGE_AUTH_FUNCTION settings.
90. See https://developer.mozilla.org/en-US/docs/Web/HTTP/Headers/Cache-Control for information onCache-Control.
LESSON 12: Media Files | 405
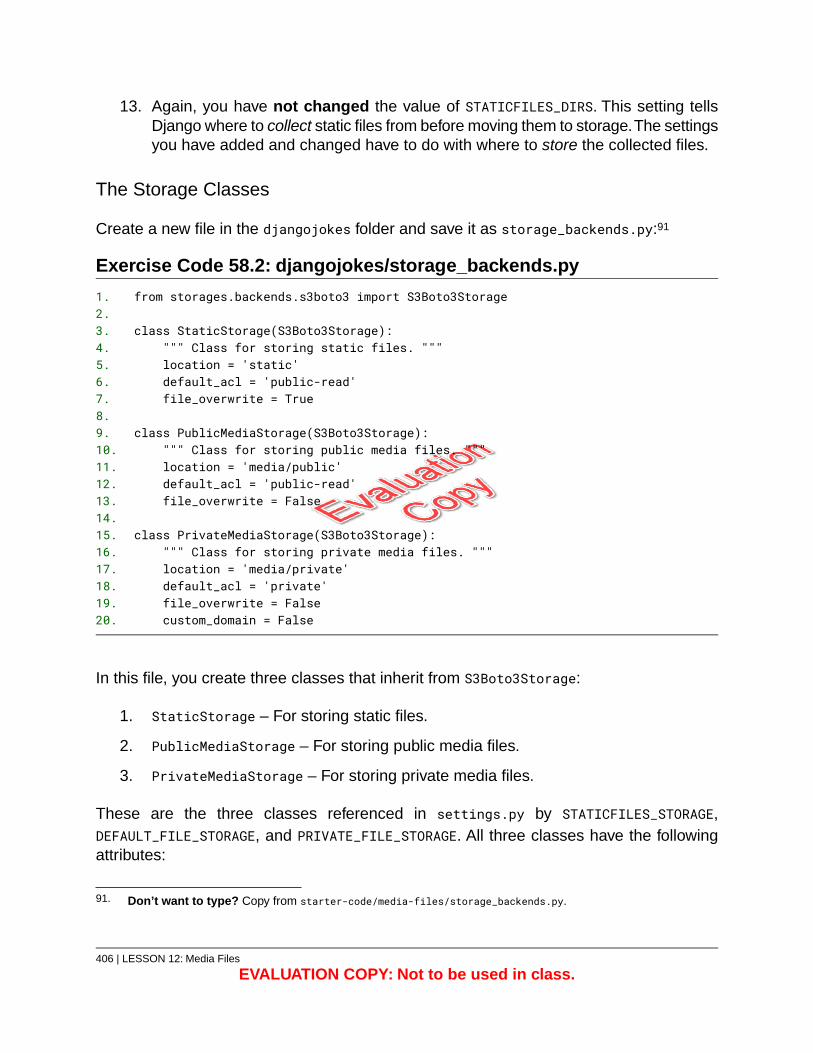
13. Again, you have not changed the value of STATICFILES_DIRS. This setting tellsDjango where to collect static files from before moving them to storage.The settingsyou have added and changed have to do with where to store the collected files.
The Storage Classes
Create a new file in the djangojokes folder and save it as storage_backends.py:91
Exercise Code 58.2: djangojokes/storage_backends.py
from storages.backends.s3boto3 import S3Boto3Storage1.2.
class StaticStorage(S3Boto3Storage):3.""" Class for storing static files. """4.location = 'static'5.default_acl = 'public-read'6.file_overwrite = True7.
8.class PublicMediaStorage(S3Boto3Storage):9.
""" Class for storing public media files. """10.location = 'media/public'11.default_acl = 'public-read'12.file_overwrite = False13.
14.class PrivateMediaStorage(S3Boto3Storage):15.
""" Class for storing private media files. """16.location = 'media/private'17.default_acl = 'private'18.file_overwrite = False19.custom_domain = False20.
In this file, you create three classes that inherit from S3Boto3Storage:
1. StaticStorage – For storing static files.
2. PublicMediaStorage – For storing public media files.
3. PrivateMediaStorage – For storing private media files.
These are the three classes referenced in settings.py by STATICFILES_STORAGE,DEFAULT_FILE_STORAGE, and PRIVATE_FILE_STORAGE. All three classes have the followingattributes:
91. Don’t want to type? Copy from starter-code/media-files/storage_backends.py.
406 | LESSON 12: Media Files
EVALUATION COPY: Not to be used in class.
1. location – The path to which to upload the files.
2. default_acl – The default access control list. For StaticStorage andPublicMediaStorage, it is set to 'public-read', meaning everyone has read accessto these files. For PrivateMediaStorage, it is set to 'private', meaning that specialaccess is needed to read these files. That special access is given by settingcustom_domain, which defaults to the value of the AWS_S3_CUSTOM_DOMAIN setting,to False.
3. file_overwrite – Whether or not to overwrite files. When you modify static files(e.g., add a rule to the CSS), you want to overwrite the existing files, so you setthis to True for StaticStorage. For the other two, you never want to overwriteexisting files, so you set it to False. If someone uploads a file with the same nameas an existing file, the file name will be appended with a random string (e.g., my-resume_o4GtK8l.pdf).
E58.6. Models
1. Open jobs/models.py in your editor.
2. Import PrivateMediaStorage instead of PrivateFileField:
from private_storage.fields import PrivateFileFieldfrom djangojokes.storage_backends import PrivateMediaStorage
3. In the Applicant model, change the field type back to models.FileField and setresume to use PrivateMediaStorage:
resume = models.FileField(storage = PrivateMediaStorage(),upload_to='resumes', blank=True, help_text='PDFs only',validators=[validate_pdf]
)
Now, resumes will be uploaded to the media/private directory in the S3 bucket.
4. You don’t need to change the avatar field in users.CustomUser because thatalready uses the default, which you changed to use S3 by settingDEFAULT_FILE_STORAGE in settings.py.
LESSON 12: Media Files | 407
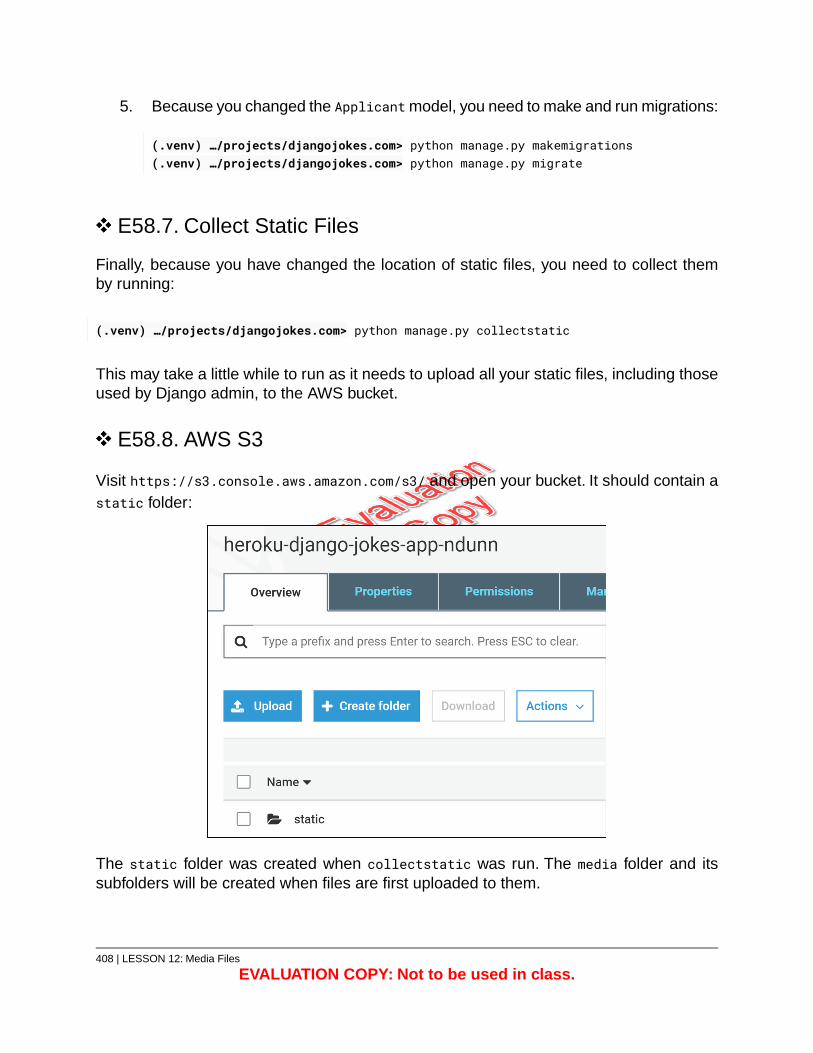
5. Because you changed the Applicant model, you need to make and run migrations:
(.venv) …/projects/djangojokes.com> python manage.py makemigrations(.venv) …/projects/djangojokes.com> python manage.py migrate
E58.7. Collect Static Files
Finally, because you have changed the location of static files, you need to collect themby running:
(.venv) …/projects/djangojokes.com> python manage.py collectstatic
This may take a little while to run as it needs to upload all your static files, including thoseused by Django admin, to the AWS bucket.
E58.8. AWS S3
Visit https://s3.console.aws.amazon.com/s3/ and open your bucket. It should contain astatic folder:
The static folder was created when collectstatic was run. The media folder and itssubfolders will be created when files are first uploaded to them.
408 | LESSON 12: Media Files
EVALUATION COPY: Not to be used in class.
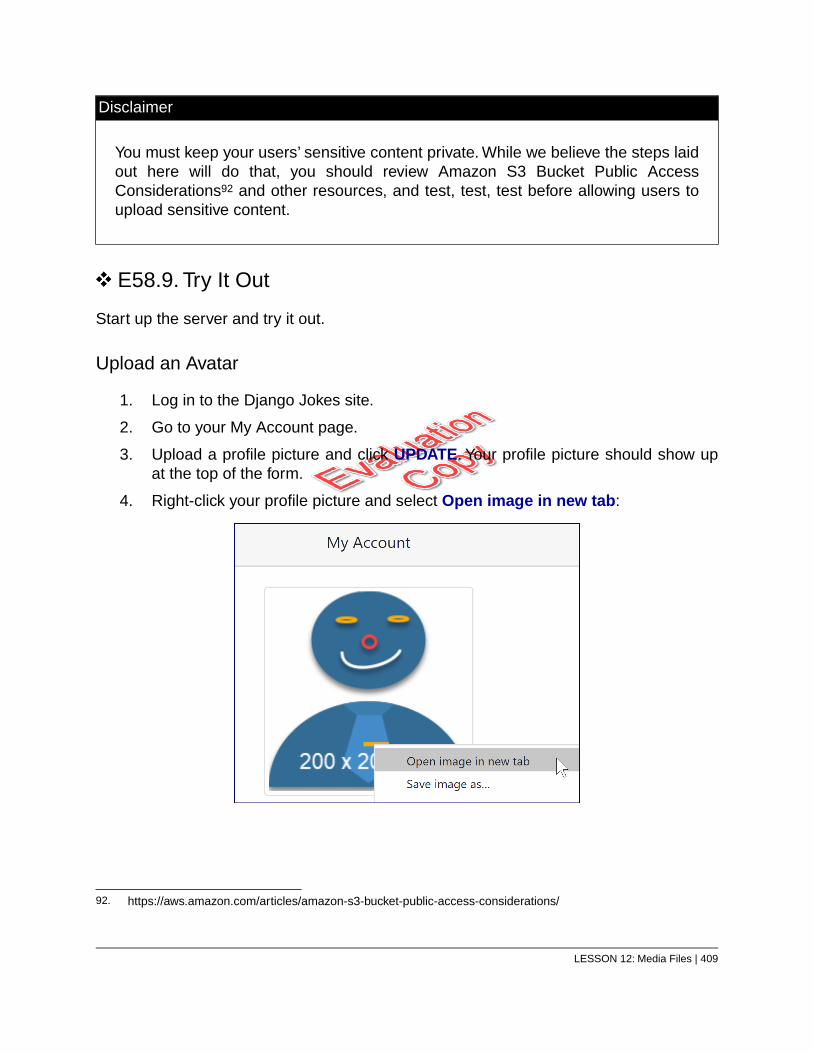
Disclaimer
You must keep your users’ sensitive content private. While we believe the steps laidout here will do that, you should review Amazon S3 Bucket Public AccessConsiderations92 and other resources, and test, test, test before allowing users toupload sensitive content.
E58.9. Try It Out
Start up the server and try it out.
Upload an Avatar
1. Log in to the Django Jokes site.
2. Go to your My Account page.
3. Upload a profile picture and click UPDATE. Your profile picture should show upat the top of the form.
4. Right-click your profile picture and select Open image in new tab:
92. https://aws.amazon.com/articles/amazon-s3-bucket-public-access-considerations/
LESSON 12: Media Files | 409
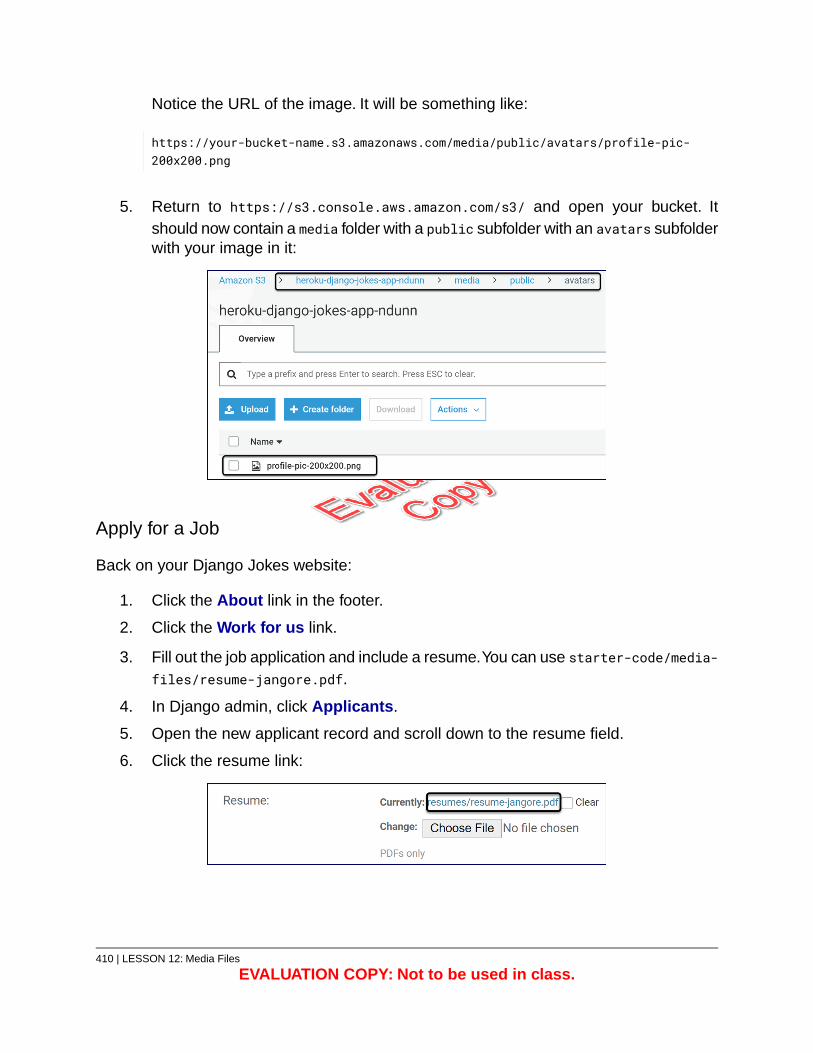
Notice the URL of the image. It will be something like:
https://your-bucket-name.s3.amazonaws.com/media/public/avatars/profile-pic-200x200.png
5. Return to https://s3.console.aws.amazon.com/s3/ and open your bucket. Itshould now contain a media folder with a public subfolder with an avatars subfolderwith your image in it:
Apply for a Job
Back on your Django Jokes website:
1. Click the About link in the footer.
2. Click the Work for us link.
3. Fill out the job application and include a resume.You can use starter-code/media-files/resume-jangore.pdf.
4. In Django admin, click Applicants.
5. Open the new applicant record and scroll down to the resume field.
6. Click the resume link:
410 | LESSON 12: Media Files
EVALUATION COPY: Not to be used in class.
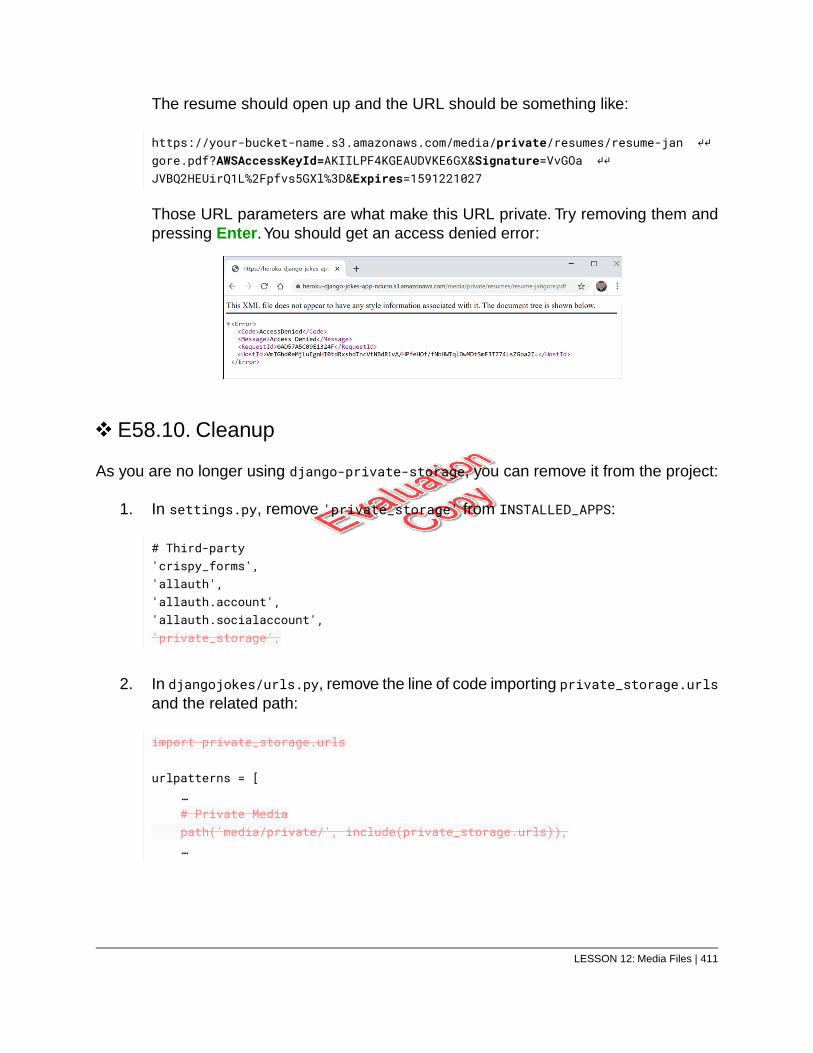
The resume should open up and the URL should be something like:
https://your-bucket-name.s3.amazonaws.com/media/private/resumes/resume-jan ↵↵gore.pdf?AWSAccessKeyId=AKIILPF4KGEAUDVKE6GX&Signature=VvGOa ↵↵JVBQ2HEUirQ1L%2Fpfvs5GXl%3D&Expires=1591221027
Those URL parameters are what make this URL private. Try removing them andpressing Enter.You should get an access denied error:
E58.10. Cleanup
As you are no longer using django-private-storage, you can remove it from the project:
1. In settings.py, remove 'private_storage' from INSTALLED_APPS:
# Third-party'crispy_forms','allauth','allauth.account','allauth.socialaccount','private_storage',
2. In djangojokes/urls.py, remove the line of code importing private_storage.urlsand the related path:
import private_storage.urls
urlpatterns = […# Private Mediapath('media/private/', include(private_storage.urls)),…
LESSON 12: Media Files | 411
Be careful uninstalling libraries!
Now that you are no longer using django-private-storage, it is tempting to uninstallit with pip uninstall; however, this is difficult to do. The problem is that you havealready created and run migrations that use django-private-storage. If you uninstallthe library, you will get an error when you try to migrate. You could try to clean upthe related migration file, but that can lead to other problems. Our recommendationis to leave it alone.
Git Commit
Commit your code to Git.
412 | LESSON 12: Media Files
EVALUATION COPY: Not to be used in class.
Exercise 59: Static Settings inDevelopment
5 to 10 minutes
It would be a pain to have to run collectstatic after every change to a static file duringdevelopment. To avoid this, add the following settings to local_settings.py:
# Local Static File SettingsSTATICFILES_STORAGE = 'django.contrib.staticfiles.storage.StaticFilesStorage'STATIC_URL = '/static/'
This will set your local static settings back to the way they were before you started usingAmazon S3.Your production settings will continue to use S3.
Git Commit
Commit your code to Git.
Conclusion
In this lesson, you have learned to set up media files and to allow users to upload filesand images, both public and private, in a secure way both to the local computer and toAmazon’s Simple Storage Service.
LESSON 12: Media Files | 413

414 | LESSON 12: Media Files
EVALUATION COPY: Not to be used in class.
LESSON 13Making Queries, Ajax, and View Functions
Topics Covered
Querying models.
Adding properties to models.
Ajax.
View functions.
Model constraints.
Introduction
For every model you create in an app, Django creates at least one corresponding tablein the database. While it is possible to query those tables directly using raw SQL,93 it israre that you will need to do so. Instead, you will use Django’s database-abstraction layer,which allows you to perform SQL SELECT, INSERT, UPDATE, and DELETE statements withoutactually writing them.
❋
13.1. Useful Prerequisites
13.1.1. SQL
In this lesson, we show quite a bit of SQL to compare Django queries to raw SQL queries.While you don’t need to have experience with SQL to learn Django (or to go through thislesson), it would certainly be helpful.
93. https://docs.djangoproject.com/en/3.1/topics/db/sql/
LESSON 13: Making Queries, Ajax, and View Functions | 415

13.1.2. JavaScript and Ajax
We also use quite a bit of JavaScript and JSON in this lesson to show how to call a Djangoview without doing a page refresh using a technique known as Ajax. If you don’t knowJavaScript, just try to get an understanding of what the JavaScript is doing and how itinteracts with the Django view and template.
❋
13.2. Managers and QuerySets
SQL
SQL stands for Structured Query Language and is pronounced either ess-que-el orsequel. It is the language used by relational database management systems (RDBMS)to access and manipulate data and to create, structure and destroy databases anddatabase objects. Knowing SQL will give you a deeper understanding of how Djangoworks with databases. In this lesson, we will make direct comparisons to SQL. BasicSQL statements are pretty easy to understand, so read through those SQL statementseven if you have no prior experience with SQL.
Models have managers, and through those managers, you create QuerySets.The manageris held in the model class’s objects attribute. Its main methods are:
1. all() – Retrieves all the objects in the model class. It is the equivalent of a SQLSELECT statement with no WHERE clause.
2. filter(**kwargs) – Retrieves objects in the model class that meet the conditionsspecified in the kwargs. Generally, it is the equivalent of a SQL SELECT statementwith a WHERE clause.
3. exclude(**kwargs) – Like filter(), except that it retrieves all objects that do notmatch the conditions specified in kwargs. It is analogous to a SQL SELECT statementwith a WHERE NOT (…) clause.
4. get(**kwargs) – Retrieves one and only one object (not a QuerySet). If no objectis found that matches the conditions specified in kwargs, it will raise a DoesNotExistexception. If more than one object matches the conditions, it will raise aMultipleObjectsReturned exception.
416 | LESSON 13: Making Queries, Ajax, and View Functions
EVALUATION COPY: Not to be used in class.
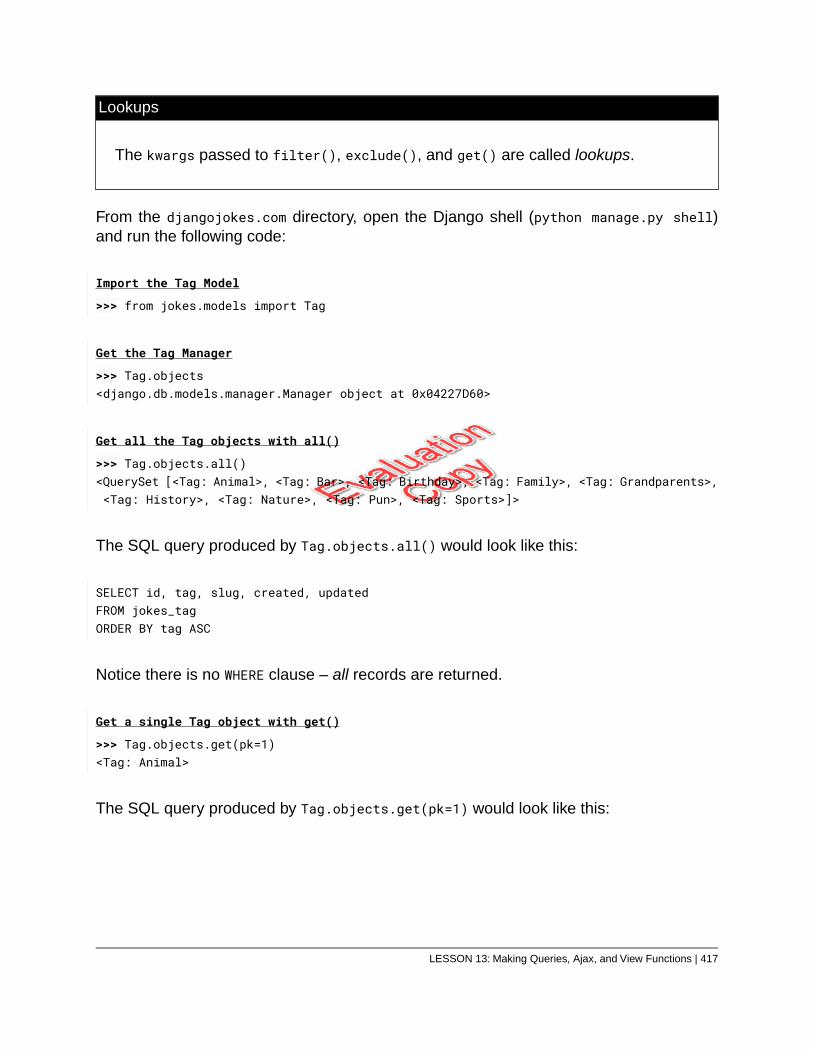
Lookups
The kwargs passed to filter(), exclude(), and get() are called lookups.
From the djangojokes.com directory, open the Django shell (python manage.py shell)and run the following code:
Import the Tag Model
>>> from jokes.models import Tag
Get the Tag Manager
>>> Tag.objects<django.db.models.manager.Manager object at 0x04227D60>
Get all the Tag objects with all()
>>> Tag.objects.all()<QuerySet [<Tag: Animal>, <Tag: Bar>, <Tag: Birthday>, <Tag: Family>, <Tag: Grandparents>,<Tag: History>, <Tag: Nature>, <Tag: Pun>, <Tag: Sports>]>
The SQL query produced by Tag.objects.all() would look like this:
SELECT id, tag, slug, created, updatedFROM jokes_tagORDER BY tag ASC
Notice there is no WHERE clause – all records are returned.
Get a single Tag object with get()
>>> Tag.objects.get(pk=1)<Tag: Animal>
The SQL query produced by Tag.objects.get(pk=1) would look like this:
LESSON 13: Making Queries, Ajax, and View Functions | 417
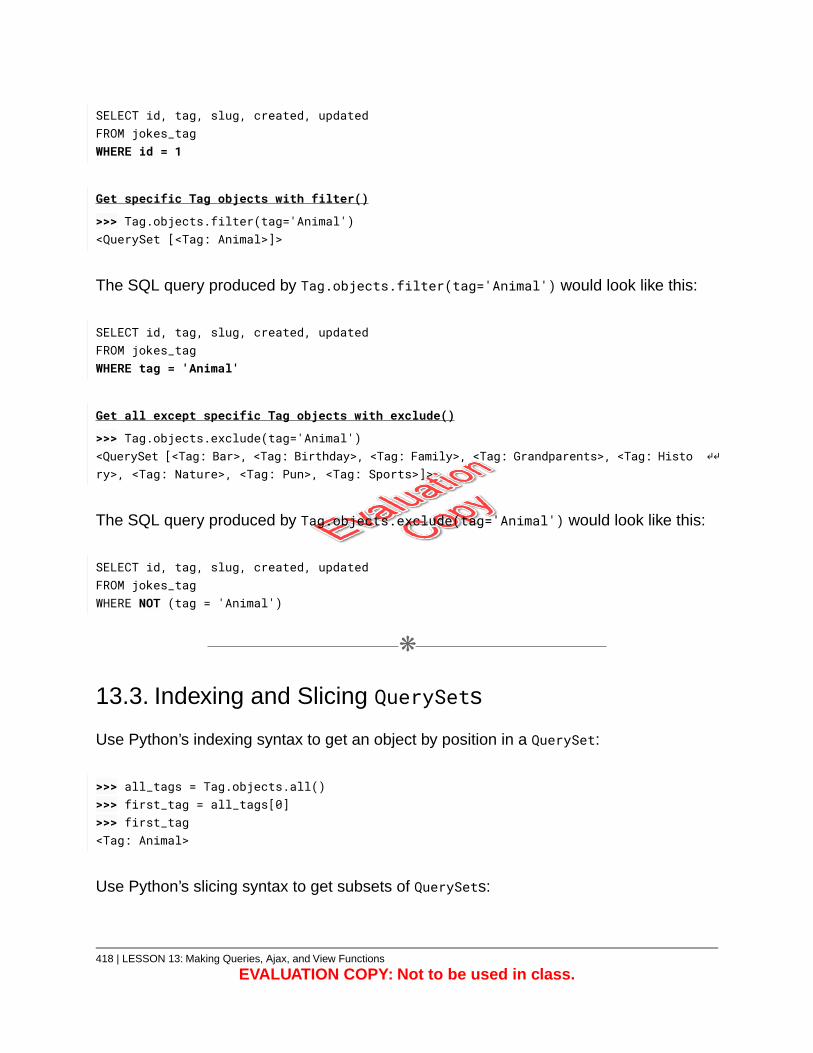
SELECT id, tag, slug, created, updatedFROM jokes_tagWHERE id = 1
Get specific Tag objects with filter()
>>> Tag.objects.filter(tag='Animal')<QuerySet [<Tag: Animal>]>
The SQL query produced by Tag.objects.filter(tag='Animal') would look like this:
SELECT id, tag, slug, created, updatedFROM jokes_tagWHERE tag = 'Animal'
Get all except specific Tag objects with exclude()
>>> Tag.objects.exclude(tag='Animal')<QuerySet [<Tag: Bar>, <Tag: Birthday>, <Tag: Family>, <Tag: Grandparents>, <Tag: Histo ↵↵ry>, <Tag: Nature>, <Tag: Pun>, <Tag: Sports>]>
The SQL query produced by Tag.objects.exclude(tag='Animal') would look like this:
SELECT id, tag, slug, created, updatedFROM jokes_tagWHERE NOT (tag = 'Animal')
❋
13.3. Indexing and Slicing QuerySets
Use Python’s indexing syntax to get an object by position in a QuerySet:
>>> all_tags = Tag.objects.all()>>> first_tag = all_tags[0]>>> first_tag<Tag: Animal>
Use Python’s slicing syntax to get subsets of QuerySets:
418 | LESSON 13: Making Queries, Ajax, and View Functions
EVALUATION COPY: Not to be used in class.
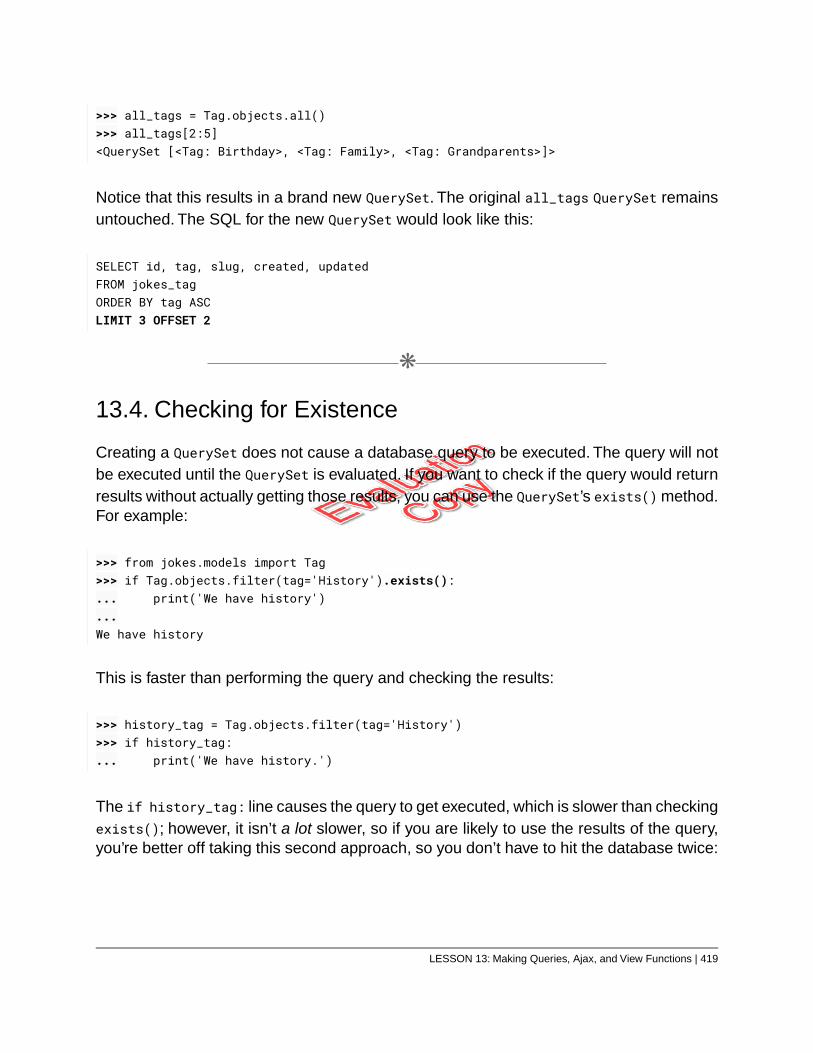
>>> all_tags = Tag.objects.all()>>> all_tags[2:5]<QuerySet [<Tag: Birthday>, <Tag: Family>, <Tag: Grandparents>]>
Notice that this results in a brand new QuerySet. The original all_tags QuerySet remainsuntouched. The SQL for the new QuerySet would look like this:
SELECT id, tag, slug, created, updatedFROM jokes_tagORDER BY tag ASCLIMIT 3 OFFSET 2
❋
13.4. Checking for Existence
Creating a QuerySet does not cause a database query to be executed. The query will notbe executed until the QuerySet is evaluated. If you want to check if the query would returnresults without actually getting those results, you can use the QuerySet’s exists() method.For example:
>>> from jokes.models import Tag>>> if Tag.objects.filter(tag='History').exists():... print('We have history')...We have history
This is faster than performing the query and checking the results:
>>> history_tag = Tag.objects.filter(tag='History')>>> if history_tag:... print('We have history.')
The if history_tag: line causes the query to get executed, which is slower than checkingexists(); however, it isn’t a lot slower, so if you are likely to use the results of the query,you’re better off taking this second approach, so you don’t have to hit the database twice:
LESSON 13: Making Queries, Ajax, and View Functions | 419
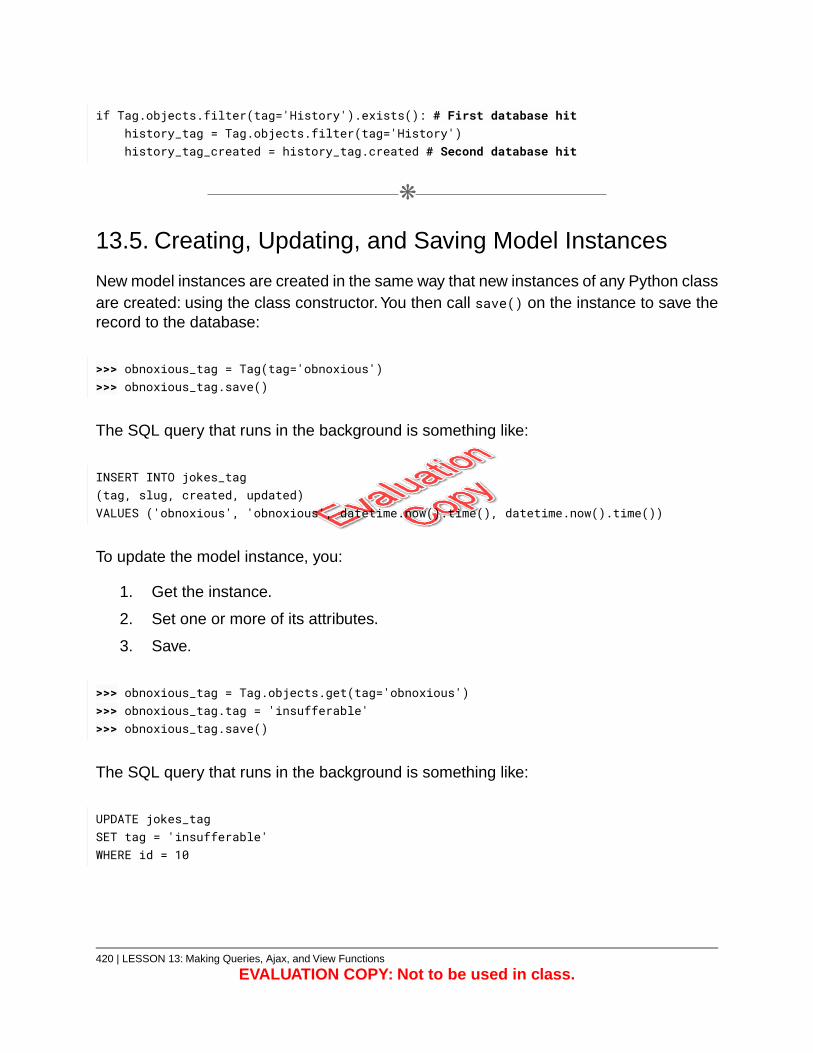
if Tag.objects.filter(tag='History').exists(): # First database hithistory_tag = Tag.objects.filter(tag='History')history_tag_created = history_tag.created # Second database hit
❋
13.5. Creating, Updating, and Saving Model Instances
New model instances are created in the same way that new instances of any Python classare created: using the class constructor.You then call save() on the instance to save therecord to the database:
>>> obnoxious_tag = Tag(tag='obnoxious')>>> obnoxious_tag.save()
The SQL query that runs in the background is something like:
INSERT INTO jokes_tag(tag, slug, created, updated)VALUES ('obnoxious', 'obnoxious', datetime.now().time(), datetime.now().time())
To update the model instance, you:
1. Get the instance.
2. Set one or more of its attributes.
3. Save.
>>> obnoxious_tag = Tag.objects.get(tag='obnoxious')>>> obnoxious_tag.tag = 'insufferable'>>> obnoxious_tag.save()
The SQL query that runs in the background is something like:
UPDATE jokes_tagSET tag = 'insufferable'WHERE id = 10
420 | LESSON 13: Making Queries, Ajax, and View Functions
EVALUATION COPY: Not to be used in class.
Note that when creating and updating model instances, the database is not hit until save()is called.
❋
13.6. QuerySet Methods that Don’t Return QuerySets
The all(), filter(), and exclude() methods all return new QuerySets.The get() methodreturns a single model instance. QuerySets include additional methods that either returnmodel instances or some other non-QuerySet type.
earliest() and latest()
The earliest() and latest() methods take one or more fields as arguments and returnthe record with the smallest (for earliest()) or largest (for latest()) values for thepassed-in fields. Generally, they are used with date fields, but they can take fields of anytype that can be ordered. For example, you can confirm that the “obnoxious” tag wassaved using the following code:
>>> Tag.objects.latest('created')<Tag: obnoxious>
first() and last()
The first() and last() methods return the first and last objects in a QuerySet.
>>> Tag.objects.first()<Tag: Animal>>>> Tag.objects.last()<Tag: Work>
count()
The count() method returns the number of records in the QuerySet:
LESSON 13: Making Queries, Ajax, and View Functions | 421

>>> Tag.objects.count()10
13.6.1. The all() Assumption
Notice that some of these methods are used directly on the objects manager (e.g.,Tag.objects.count()). This is equivalent to Tag.objects.all().count(). If no QuerySetis specified, it gets all the records.
See https://docs.djangoproject.com/en/3.1/ref/models/querysets/#methods-that-
do-not-return-querysets for documentation on other methods that do not return QuerySets.
❋
13.7. One-to-Many Relationships
Remember that the Joke model’s category field is defined like this:
category = models.ForeignKey('Category', on_delete=models.PROTECT)
This creates a one-to-many relationship. Looking up one-to-many relationship with Djangois straightforward:
>>> from jokes.models import Joke>>> first_joke = Joke.objects.first()>>> first_joke.category<Category: Funny>
first_joke.category returns the category model instance. If you were to print that, itwould print the value returned by the Category model’s __str__() method, which is thecategory field value:
>>> print(first_joke.category)Funny
To explicitly get the category field value, you need to do this:
422 | LESSON 13: Making Queries, Ajax, and View Functions
EVALUATION COPY: Not to be used in class.
>>> first_joke.category.category'Funny'
The first occurrence of category (first_joke.category.category) gets the category modelinstance, and the second occurrence of category (first_joke.category.category) gets thecategory field on that instance.
This shows how to get the category of a joke, but how do you go the other way? How doyou get all the jokes in a category?
Backward Relationships
Again, the relationship between the joke and the category is created by the category fieldin the Joke model:
category = models.ForeignKey('Category', on_delete=models.PROTECT)
In the Django Admin and the User Model lesson, you installed the Django admindocumentation generator (see page 198). That can come in useful when looking atrelationships between models.
1. Start up the server, log in as the superuser, and open up Django admin.
2. Click the Documentation link in the top navigation and then click Models.
3. Scroll down to the Jokes section, and click Joke.
4. Notice the description of the category field is “the related jokes.Category object”:
LESSON 13: Making Queries, Ajax, and View Functions | 423

5. Now, go back one page by clicking the Back button and then click the Categorylink.
6. Notice the two joke_set entries:
Remember that the Category model has no joke field. But because it is referencedby the Joke model, its manager gets access to Joke instances through a relatedmanager, which by default is named joke_set (the lowercase name of thereferencing model appended with “_set”).
7. To see the related manager object, run the following code at the Django shell:
>>> from jokes.models import Category>>> first_category = Category.objects.first()>>> first_category.joke_set<django.db.models.fields.related_descriptors.create_reverse_many_to_one_manag ↵↵er.<locals>.RelatedManager object at 0x04C4AB38>
The related manager can be used in the same way as a model’s objects manager.For example, you can use count() to get the number of jokes in a category:
>>> first_category.joke_set.count()5
424 | LESSON 13: Making Queries, Ajax, and View Functions
EVALUATION COPY: Not to be used in class.
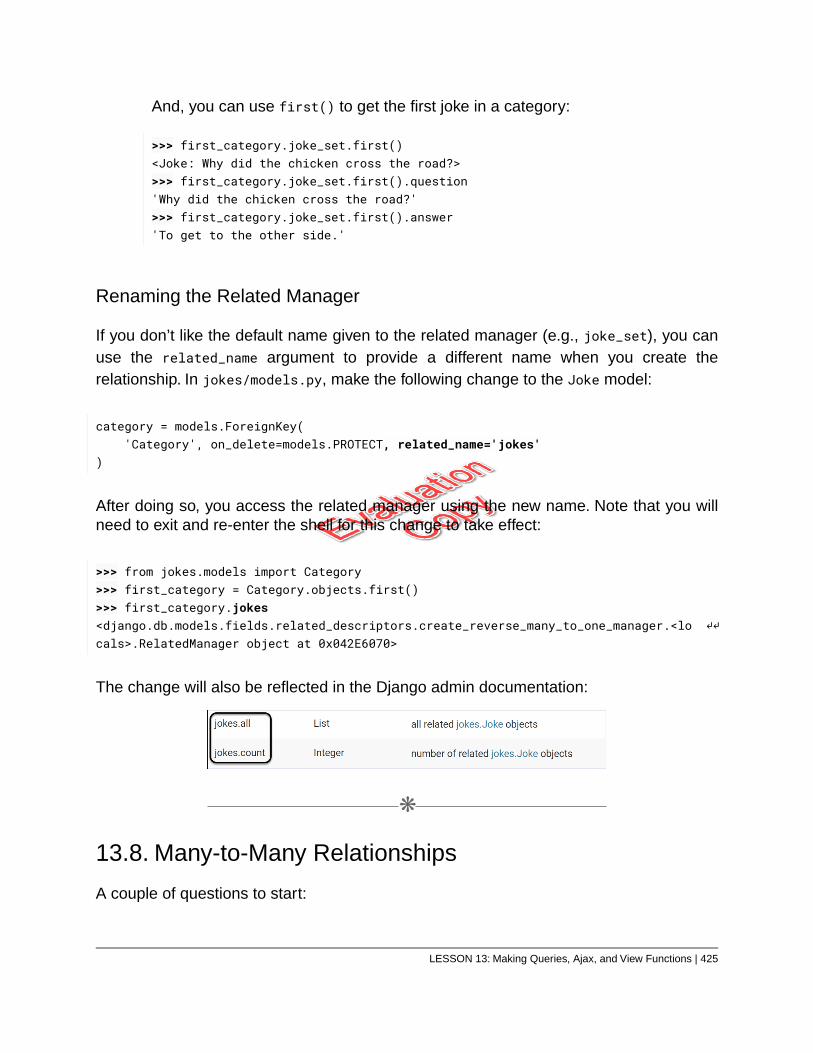
And, you can use first() to get the first joke in a category:
>>> first_category.joke_set.first()<Joke: Why did the chicken cross the road?>>>> first_category.joke_set.first().question'Why did the chicken cross the road?'>>> first_category.joke_set.first().answer'To get to the other side.'
Renaming the Related Manager
If you don’t like the default name given to the related manager (e.g., joke_set), you canuse the related_name argument to provide a different name when you create therelationship. In jokes/models.py, make the following change to the Joke model:
category = models.ForeignKey('Category', on_delete=models.PROTECT, related_name='jokes'
)
After doing so, you access the related manager using the new name. Note that you willneed to exit and re-enter the shell for this change to take effect:
>>> from jokes.models import Category>>> first_category = Category.objects.first()>>> first_category.jokes<django.db.models.fields.related_descriptors.create_reverse_many_to_one_manager.<lo ↵↵cals>.RelatedManager object at 0x042E6070>
The change will also be reflected in the Django admin documentation:
❋
13.8. Many-to-Many Relationships
A couple of questions to start:
LESSON 13: Making Queries, Ajax, and View Functions | 425
1. How many tags does the first joke have?
2. How many jokes are tagged with the “Animal” tag?
Remember that the Joke model’s tags field is defined like this:
tags = models.ManyToManyField('Tag', blank=True)
When we first introduced ManyToManyFields (see page 283), we mentioned that therelationship could be defined on either model. For example, you could have defined thisfield on the Tag model:
jokes = models.ManyToManyField('Joke', blank=True)
We chose to do it the first way, because jokes with tags seems more intuitive than tagswith jokes.
As a result of this choice, you access tags on a joke using the tags attribute, but youaccess jokes on a tag using the joke_set attribute. Run the following code to see this:
Get a joke’s tags related manager
>>> from jokes.models import Joke, Tag>>> first_joke = Joke.objects.first()>>> first_joke.tags <django.db.models.fields.related_descriptors.create_forward_many_to_many_manager.<lo ↵↵cals>.ManyRelatedManager object at 0x04237040>
Get a tag’s joke_set related manager
>>> first_tag = Tag.objects.first()>>> first_tag.joke_set<django.db.models.fields.related_descriptors.create_forward_many_to_many_manager.<lo ↵↵cals>.ManyRelatedManager object at 0x04237D48>
As the choice of model to define the relationship on is somewhat arbitrary, it is a shamethat you have to remember how you did it in order to know how to access the relatedmanager. Fortunately, you don’t. As with ForeignKey fields, you can override the defaultname of the related manager using the related_name argument. Make the following changeto the Joke model:
426 | LESSON 13: Making Queries, Ajax, and View Functions
EVALUATION COPY: Not to be used in class.
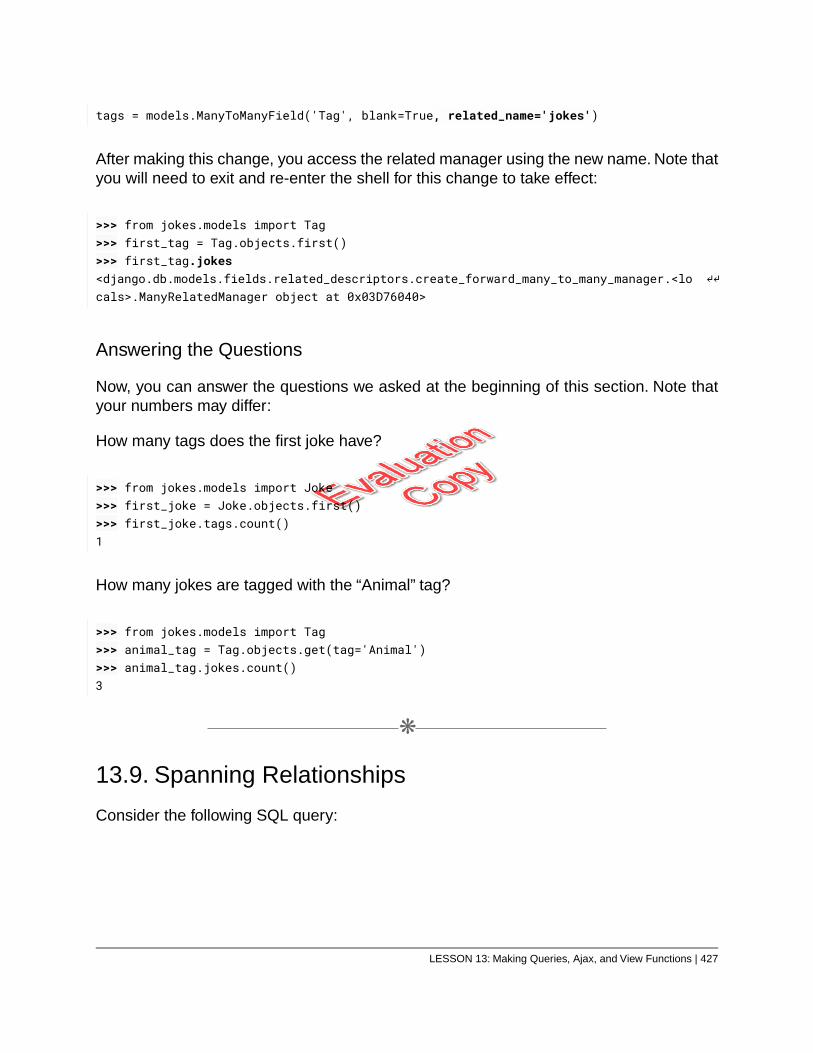
tags = models.ManyToManyField('Tag', blank=True, related_name='jokes')
After making this change, you access the related manager using the new name. Note thatyou will need to exit and re-enter the shell for this change to take effect:
>>> from jokes.models import Tag>>> first_tag = Tag.objects.first()>>> first_tag.jokes<django.db.models.fields.related_descriptors.create_forward_many_to_many_manager.<lo ↵↵cals>.ManyRelatedManager object at 0x03D76040>
Answering the Questions
Now, you can answer the questions we asked at the beginning of this section. Note thatyour numbers may differ:
How many tags does the first joke have?
>>> from jokes.models import Joke>>> first_joke = Joke.objects.first()>>> first_joke.tags.count()1
How many jokes are tagged with the “Animal” tag?
>>> from jokes.models import Tag>>> animal_tag = Tag.objects.get(tag='Animal')>>> animal_tag.jokes.count()3
❋
13.9. Spanning Relationships
Consider the following SQL query:
LESSON 13: Making Queries, Ajax, and View Functions | 427
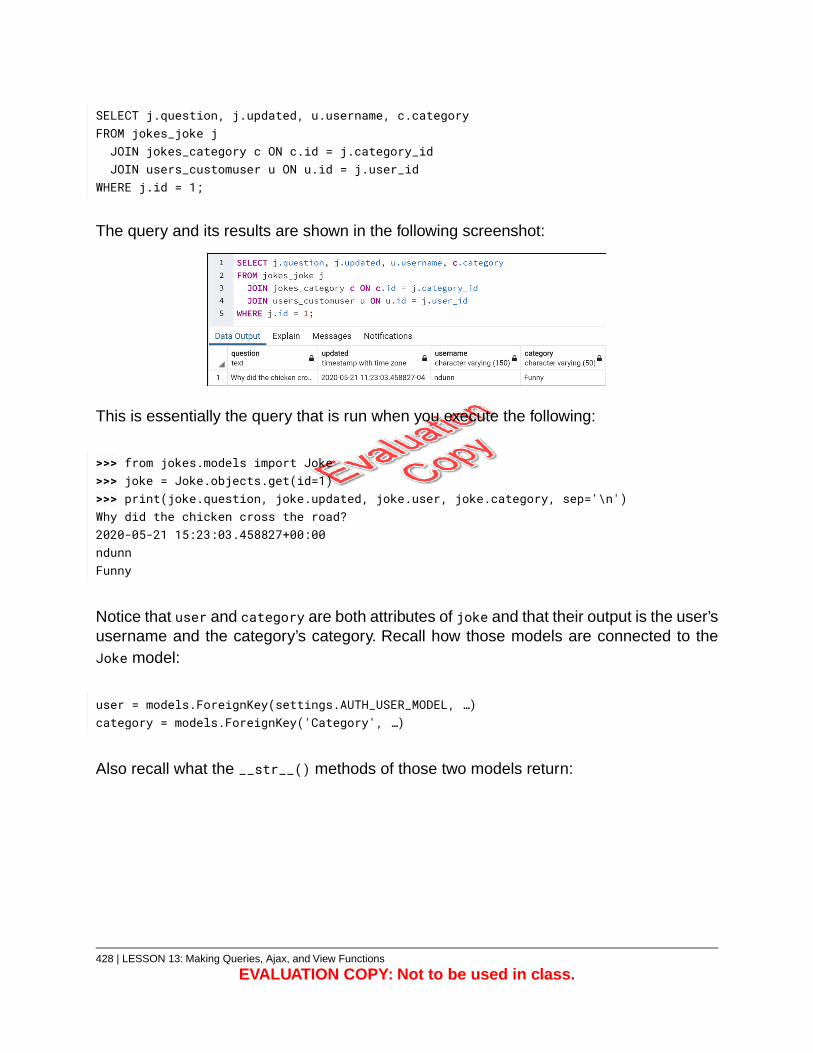
SELECT j.question, j.updated, u.username, c.categoryFROM jokes_joke jJOIN jokes_category c ON c.id = j.category_idJOIN users_customuser u ON u.id = j.user_id
WHERE j.id = 1;
The query and its results are shown in the following screenshot:
This is essentially the query that is run when you execute the following:
>>> from jokes.models import Joke>>> joke = Joke.objects.get(id=1)>>> print(joke.question, joke.updated, joke.user, joke.category, sep='\n')Why did the chicken cross the road?2020-05-21 15:23:03.458827+00:00ndunnFunny
Notice that user and category are both attributes of joke and that their output is the user’susername and the category’s category. Recall how those models are connected to theJoke model:
user = models.ForeignKey(settings.AUTH_USER_MODEL, …)category = models.ForeignKey('Category', …)
Also recall what the __str__() methods of those two models return:
428 | LESSON 13: Making Queries, Ajax, and View Functions
EVALUATION COPY: Not to be used in class.
# Categorydef __str__(self):
return self.category
# CustomUser (inherited from AbstractUser > AbstractBaseUser)def __str__(self):
return self.get_username()
If you were to change the return values of those __str__() methods, those changes wouldbe reflected in the output of joke.user and joke.category. To make sure that the codealways returns the values of the username and category fields, you should make the codeexplicit:
>>> joke.user.username'ndunn'>>> joke.category.category'Funny'
Likewise, to get other fields on joined models, you must explicitly name those fields:
>>> joke.user.first_name'Nat'>>> joke.category.updateddatetime.datetime(2020, 5, 21, 15, 21, 21, 56735, tzinfo=<UTC>)
Lookups Across Relationships
Consider the following SQL query:
SELECT j.question, j.updated, u.username, c.categoryFROM jokes_joke jJOIN jokes_category c ON c.id = j.category_idJOIN users_customuser u ON u.id = j.user_id
WHERE u.id = 1;
This query gets information on all the jokes created by a specific user, identified by theiruser id. The Django equivalent is:
LESSON 13: Making Queries, Ajax, and View Functions | 429

>>> from jokes.models import Joke>>> jokes = Joke.objects.filter(user=1)>>> for j in jokes:... print(joke.question, joke.updated, joke.user, joke.category)
Now, consider this SQL query:
SELECT j.question, j.updated, u.username, c.categoryFROM jokes_joke jJOIN jokes_category c ON c.id = j.category_idJOIN users_customuser u ON u.id = j.user_id
WHERE u.username = 'ndunn';
The only difference between this query and the previous one is that this time the user isidentified by their username instead of their id. Again, the query could be generated withthe QuerySet’s filter() method, but what would you pass to it?
You might try this:
Invalid
Joke.objects.filter(user='ndunn')
But that will result in a ValueError:
ValueError: Field 'id' expected a number but got 'ndunn'.
When a ForeignKey field is used in a lookup, it looks at the field referenced by the foreignkey (usually the id), not the value returned by the model’s __str__() method.
You might also try this:
Also Invalid
Joke.objects.filter(user.username='ndunn')
But that will result in a SyntaxError. In lookups, dots are not used to connect referencefields of related models. Instead, a double underscore (__) is used:
430 | LESSON 13: Making Queries, Ajax, and View Functions
EVALUATION COPY: Not to be used in class.
The Correct Way
>>> Joke.objects.filter(user__username='ndunn')<QuerySet [<Joke: Why did the chicken cross the road?>, …]>
Some additional examples:
All Jokes by Nat Dunn
Joke.objects.filter(user__first_name='Nat', user__last_name='Dunn')
All Jokes by ndunn in the Funny Category
Joke.objects.filter(user__username='ndunn', category__category='Funny')
All Jokes with the Animal Tag
Joke.objects.filter(tags__tag='Animal')
A Gotcha with related_name
Consider again how you defined the relationships between the Joke model and the Categoryand CustomUser models:
user = models.ForeignKey(settings.AUTH_USER_MODEL, on_delete=models.PROTECT
)category = models.ForeignKey(
'Category', on_delete=models.PROTECT, related_name='jokes')
Notice that for category, you overrode the default name of the “backward” relationshipusing related_name, but you didn’t do that for user. That means that you would referencea category’s jokes using category.jokes and you would reference a user’s jokes usinguser.joke_set.
This difference comes into play again in lookup fields:
LESSON 13: Making Queries, Ajax, and View Functions | 431
If you have not used related_name, then you should use the lowercase name ofthe model in the “reverse” relationship:
The User of a Joke by question
User.objects.get(joke__question='What do you call a polar bear in the desert?')
If you have used related_name, then you should use that related_name value inthe “reverse” relationship:
The Category of a Joke by question
Category.objects.get(jokes__question='What do you call a polar bear in thedesert?')
If this confuses you, it is because it is super confusing.The best way to avoid this confusionis to be consistent with how you handle related names: either use them always (ourrecommendation) or don’t use them at all.
So, to be consistent, go ahead and update the user field in the Joke model:
user = models.ForeignKey(settings.AUTH_USER_MODEL, on_delete=models.PROTECT,related_name='jokes'
)
Summary
Backward relationships and related names can be confusing. The following code showsthe relevant fields of the User, Category, Tag, and Joke models:
432 | LESSON 13: Making Queries, Ajax, and View Functions
EVALUATION COPY: Not to be used in class.
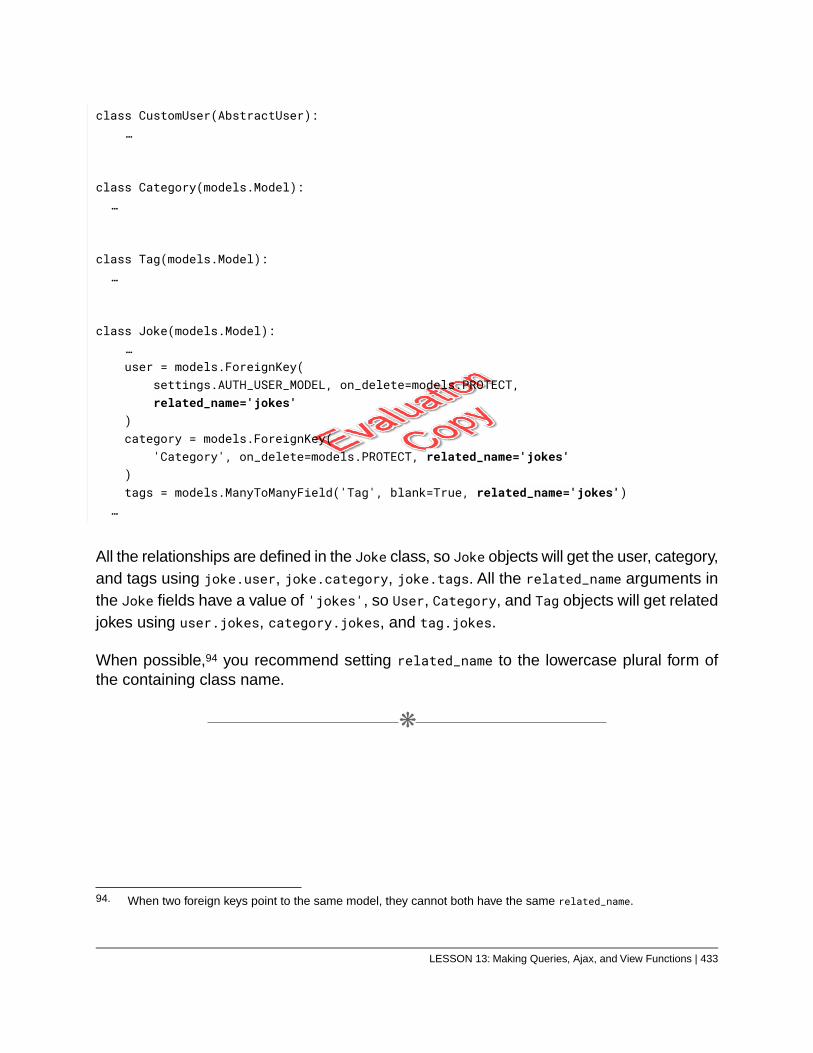
class CustomUser(AbstractUser):…
class Category(models.Model):…
class Tag(models.Model):…
class Joke(models.Model):…user = models.ForeignKey(
settings.AUTH_USER_MODEL, on_delete=models.PROTECT,related_name='jokes'
)category = models.ForeignKey(
'Category', on_delete=models.PROTECT, related_name='jokes')tags = models.ManyToManyField('Tag', blank=True, related_name='jokes')
…
All the relationships are defined in the Joke class, so Joke objects will get the user, category,and tags using joke.user, joke.category, joke.tags. All the related_name arguments inthe Joke fields have a value of 'jokes', so User, Category, and Tag objects will get relatedjokes using user.jokes, category.jokes, and tag.jokes.
When possible,94 you recommend setting related_name to the lowercase plural form ofthe containing class name.
❋
94. When two foreign keys point to the same model, they cannot both have the same related_name.
LESSON 13: Making Queries, Ajax, and View Functions | 433
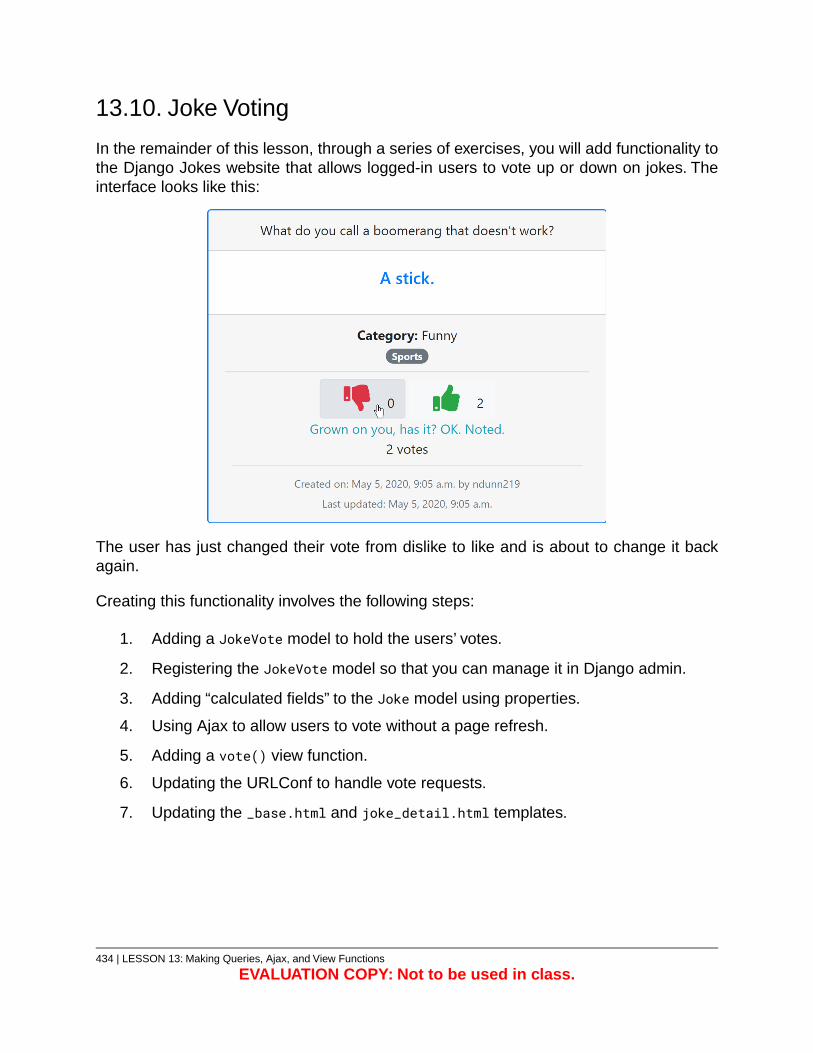
13.10. Joke Voting
In the remainder of this lesson, through a series of exercises, you will add functionality tothe Django Jokes website that allows logged-in users to vote up or down on jokes. Theinterface looks like this:
The user has just changed their vote from dislike to like and is about to change it backagain.
Creating this functionality involves the following steps:
1. Adding a JokeVote model to hold the users’ votes.
2. Registering the JokeVote model so that you can manage it in Django admin.
3. Adding “calculated fields” to the Joke model using properties.
4. Using Ajax to allow users to vote without a page refresh.
5. Adding a vote() view function.
6. Updating the URLConf to handle vote requests.
7. Updating the _base.html and joke_detail.html templates.
434 | LESSON 13: Making Queries, Ajax, and View Functions
EVALUATION COPY: Not to be used in class.
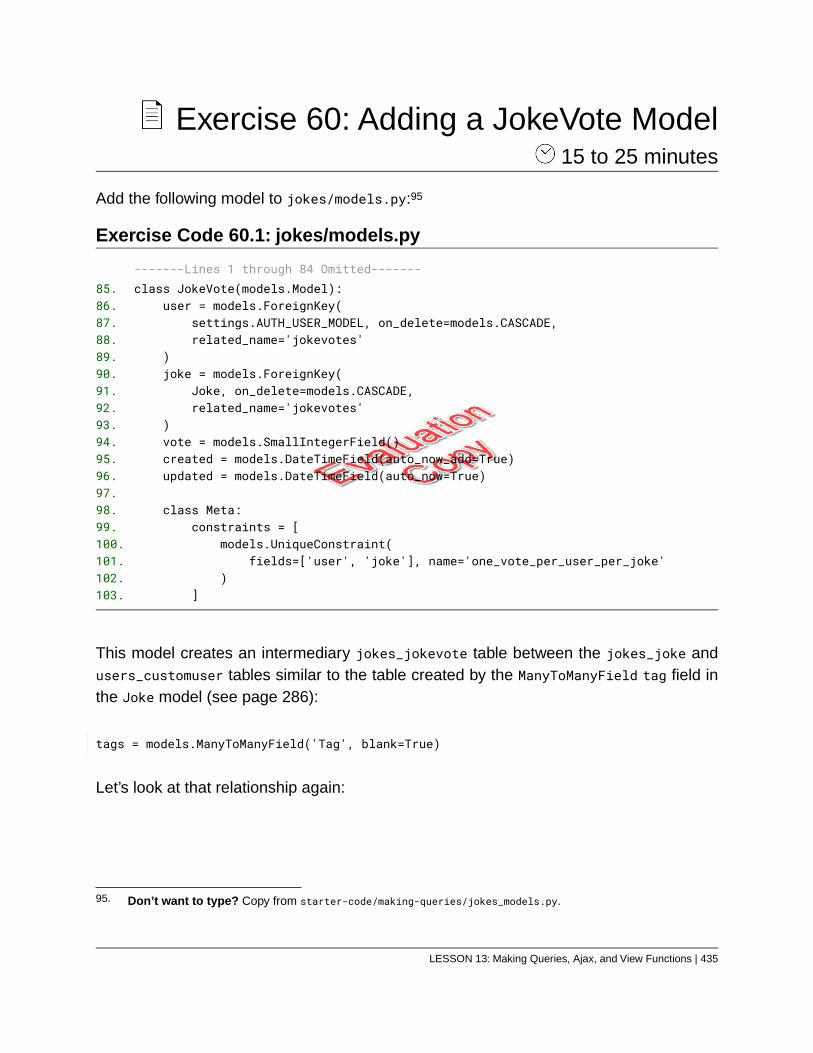
Exercise 60: Adding a JokeVote Model 15 to 25 minutes
Add the following model to jokes/models.py:95
Exercise Code 60.1: jokes/models.py
-------Lines 1 through 84 Omitted-------class JokeVote(models.Model):85.
user = models.ForeignKey(86.settings.AUTH_USER_MODEL, on_delete=models.CASCADE,87.related_name='jokevotes'88.
)89.joke = models.ForeignKey(90.
Joke, on_delete=models.CASCADE,91.related_name='jokevotes'92.
)93.vote = models.SmallIntegerField()94.created = models.DateTimeField(auto_now_add=True)95.updated = models.DateTimeField(auto_now=True)96.
97.class Meta:98.
constraints = [99.models.UniqueConstraint(100.
fields=['user', 'joke'], name='one_vote_per_user_per_joke'101.)102.
]103.
This model creates an intermediary jokes_jokevote table between the jokes_joke andusers_customuser tables similar to the table created by the ManyToManyField tag field inthe Joke model (see page 286):
tags = models.ManyToManyField('Tag', blank=True)
Let’s look at that relationship again:
95. Don’t want to type? Copy from starter-code/making-queries/jokes_models.py.
LESSON 13: Making Queries, Ajax, and View Functions | 435
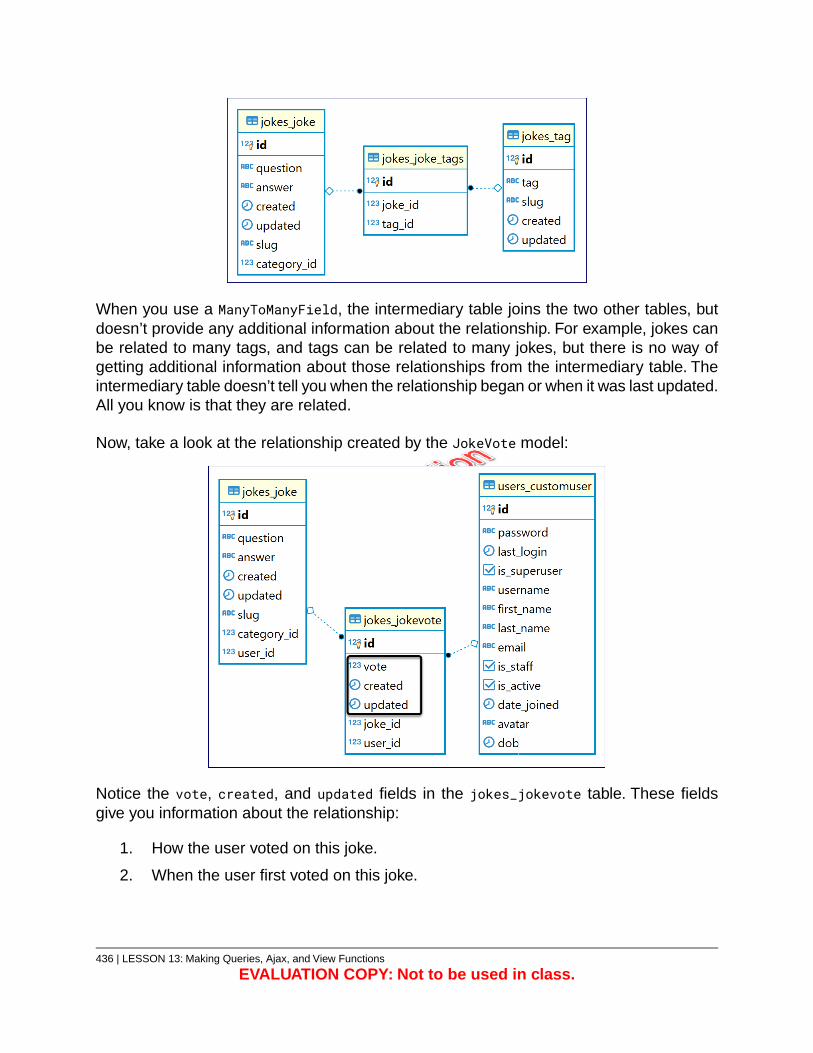
When you use a ManyToManyField, the intermediary table joins the two other tables, butdoesn’t provide any additional information about the relationship. For example, jokes canbe related to many tags, and tags can be related to many jokes, but there is no way ofgetting additional information about those relationships from the intermediary table. Theintermediary table doesn’t tell you when the relationship began or when it was last updated.All you know is that they are related.
Now, take a look at the relationship created by the JokeVote model:
Notice the vote, created, and updated fields in the jokes_jokevote table. These fieldsgive you information about the relationship:
1. How the user voted on this joke.
2. When the user first voted on this joke.
436 | LESSON 13: Making Queries, Ajax, and View Functions
EVALUATION COPY: Not to be used in class.
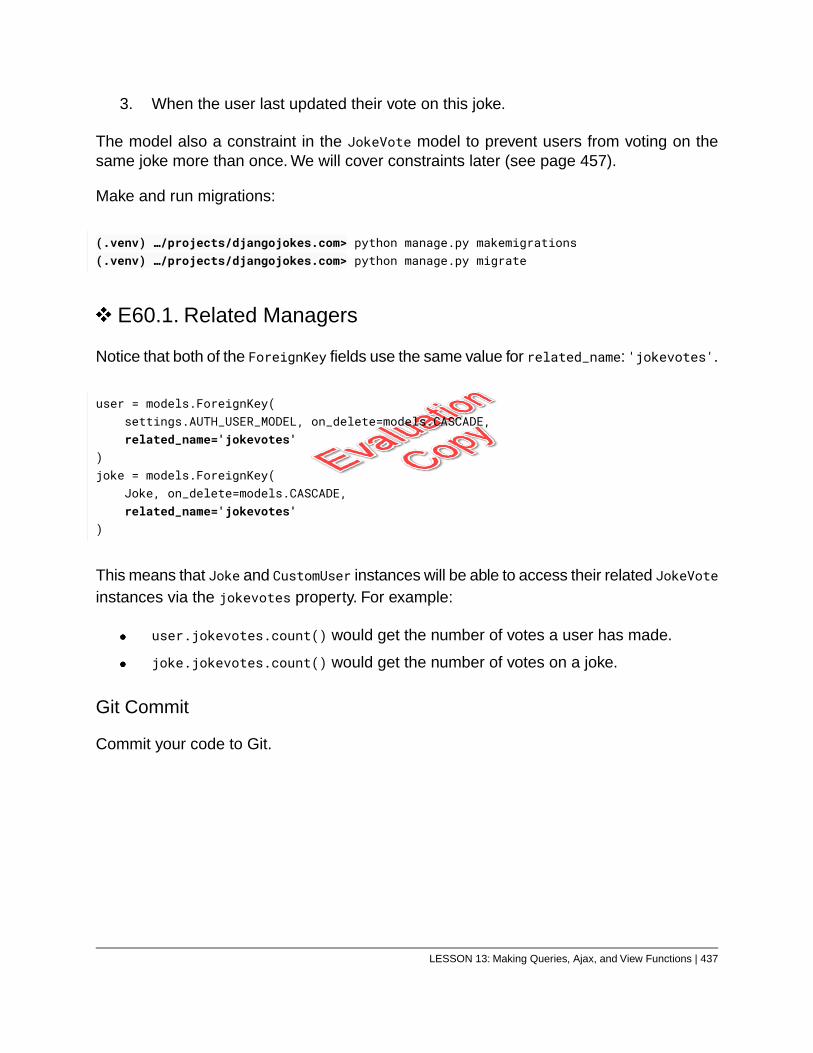
3. When the user last updated their vote on this joke.
The model also a constraint in the JokeVote model to prevent users from voting on thesame joke more than once. We will cover constraints later (see page 457).
Make and run migrations:
(.venv) …/projects/djangojokes.com> python manage.py makemigrations(.venv) …/projects/djangojokes.com> python manage.py migrate
E60.1. Related Managers
Notice that both of the ForeignKey fields use the same value for related_name: 'jokevotes'.
user = models.ForeignKey(settings.AUTH_USER_MODEL, on_delete=models.CASCADE,related_name='jokevotes'
)joke = models.ForeignKey(
Joke, on_delete=models.CASCADE,related_name='jokevotes'
)
This means that Joke and CustomUser instances will be able to access their related JokeVoteinstances via the jokevotes property. For example:
user.jokevotes.count() would get the number of votes a user has made.
joke.jokevotes.count() would get the number of votes on a joke.
Git Commit
Commit your code to Git.
LESSON 13: Making Queries, Ajax, and View Functions | 437
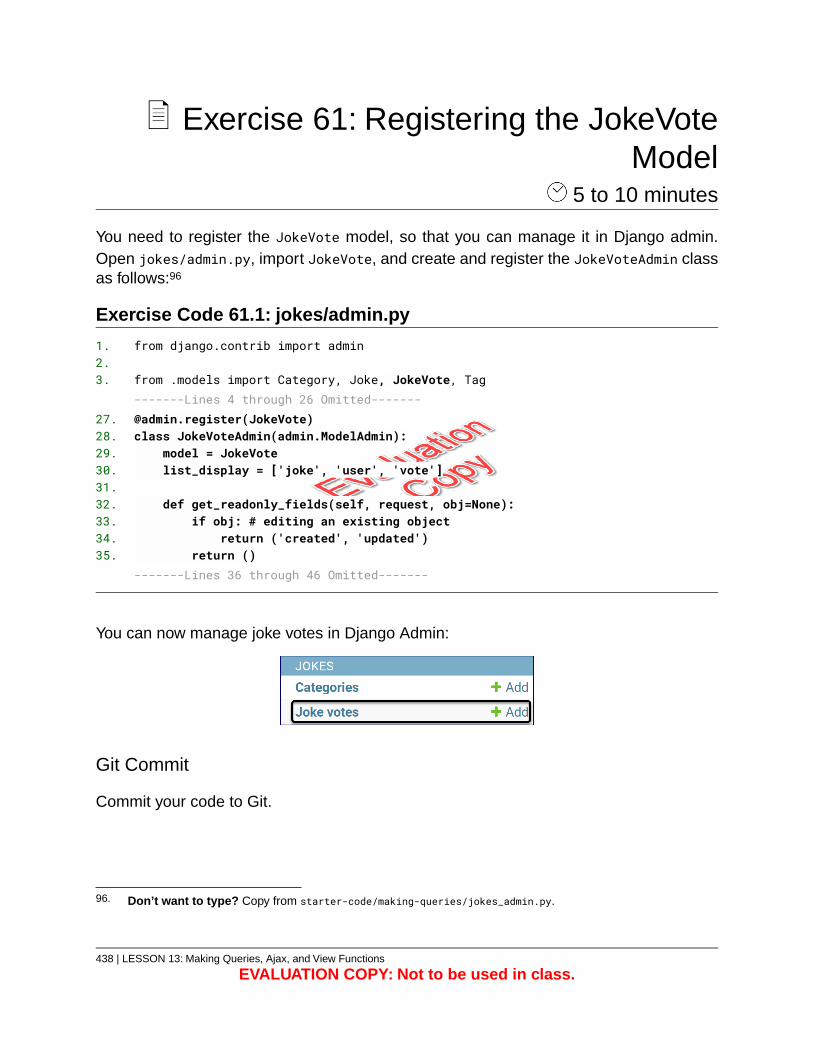
Exercise 61: Registering the JokeVoteModel
5 to 10 minutes
You need to register the JokeVote model, so that you can manage it in Django admin.Open jokes/admin.py, import JokeVote, and create and register the JokeVoteAdmin classas follows:96
Exercise Code 61.1: jokes/admin.py
from django.contrib import admin1.2.
from .models import Category, Joke, JokeVote, Tag3.-------Lines 4 through 26 [email protected](JokeVote)27.class JokeVoteAdmin(admin.ModelAdmin):28.
model = JokeVote29.list_display = ['joke', 'user', 'vote']30.
31.def get_readonly_fields(self, request, obj=None):32.
if obj: # editing an existing object33.return ('created', 'updated')34.
return ()35.-------Lines 36 through 46 Omitted-------
You can now manage joke votes in Django Admin:
Git Commit
Commit your code to Git.
96. Don’t want to type? Copy from starter-code/making-queries/jokes_admin.py.
438 | LESSON 13: Making Queries, Ajax, and View Functions
EVALUATION COPY: Not to be used in class.

Exercise 62: Adding Properties to the JokeModel
15 to 25 minutes
Class properties allow you to access a class method as if it were an attribute. You wantto add the following calculated data to the Joke model, so that you can easily show thisinformation in templates:
1. Number of likes.
2. Number of dislikes.
3. Number of votes.
Open jokes/models.py in your editor and add the following properties to the Joke model:
Exercise Code 62.1: jokes/models.py
-------Lines 1 through 7 Omitted-------class Joke(models.Model):8.
question = models.TextField(max_length=200)9.-------Lines 10 through 21 Omitted-------
updated = models.DateTimeField(auto_now=True)22.23.
@property24.def num_votes(self):25.
return self.jokevotes.count()26.27.
@property28.def num_likes(self):29.
return self.jokevotes.filter(vote=1).count()30.31.
@property32.def num_dislikes(self):33.
return self.jokevotes.filter(vote=-1).count()34.-------Lines 35 through 111 Omitted-------
Let’s see how these properties work. From the djangojokes.com directory, open the Djangoshell (python manage.py shell) and run the following code:
LESSON 13: Making Queries, Ajax, and View Functions | 439

Import Models
>>> from jokes.models import Joke, Category, JokeVote>>> from django.contrib.auth import get_user_model>>> User = get_user_model()
Create Objects
>>> question='What do you a call a camel with no hump?'>>> answer='Humphrey'>>> creator = User.objects.first() # A user to create the new joke>>> category = Category.objects.first() # A category for the new joke>>> joke = Joke(question=question, answer=answer, user=creator, category=category)>>> joke.save()
>>> joke_voter = User.objects.last() # A user to vote on the new joke>>> joke_vote = JokeVote(user=joke_voter, joke=joke, vote=1)>>> joke_vote.save()>>> joke.num_likes1>>> joke.num_dislikes0>>> joke.num_votes1
Now that you have added these properties to the model, you can access them in templatesas attributes of the Joke instance.
Git Commit
Commit your code to Git.
440 | LESSON 13: Making Queries, Ajax, and View Functions
EVALUATION COPY: Not to be used in class.
Exercise 63: Rating Jokes Using Ajax 15 to 25 minutes
You will use Ajax to let users vote on jokes without causing a complete page refresh. Ajaxis a technique that uses JavaScript to make requests of the server and then update thepage based on the server response. The beauty of Ajax is that it doesn’t require a fullpage refresh.
The following JavaScript file is available to copy from starter-code/making-
queries/jokes.js. It should be saved as jokes.js in a js folder within the static folder:
static
js
jokes.js
LESSON 13: Making Queries, Ajax, and View Functions | 441
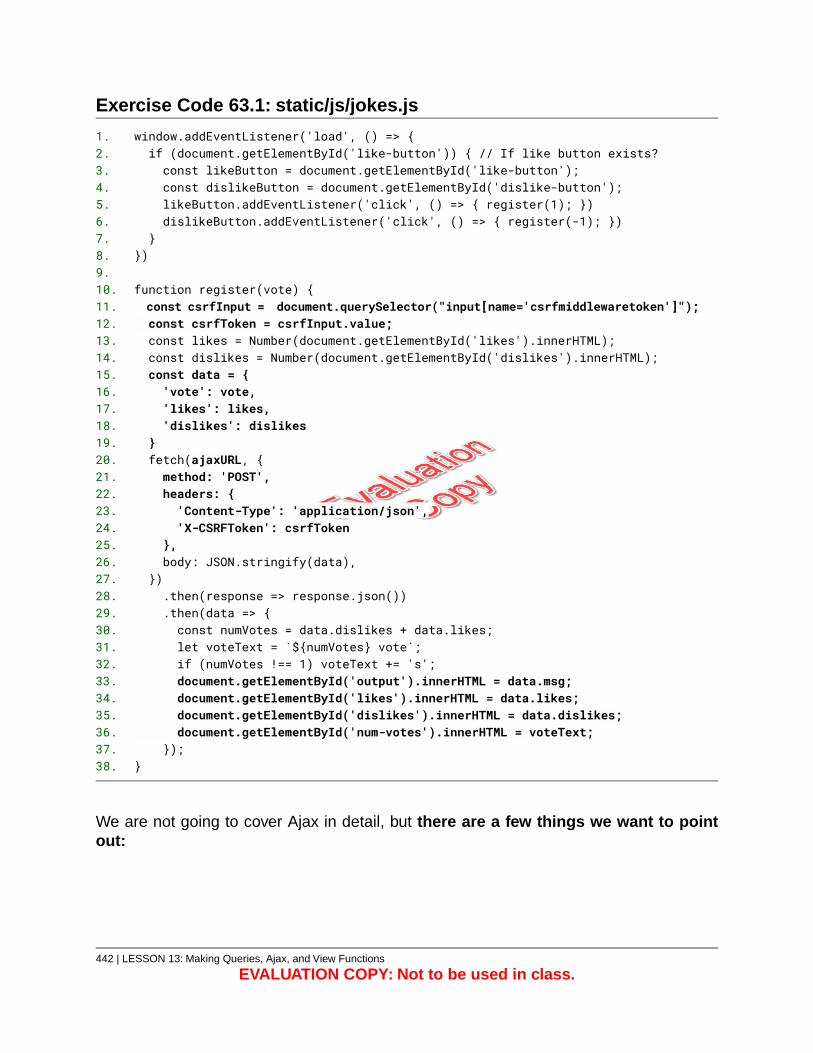
Exercise Code 63.1: static/js/jokes.js
window.addEventListener('load', () => {1.if (document.getElementById('like-button')) { // If like button exists?2.const likeButton = document.getElementById('like-button');3.const dislikeButton = document.getElementById('dislike-button');4.likeButton.addEventListener('click', () => { register(1); })5.dislikeButton.addEventListener('click', () => { register(-1); })6.
}7.})8.
9.function register(vote) {10.const csrfInput = document.querySelector("input[name='csrfmiddlewaretoken']");11.const csrfToken = csrfInput.value;12.const likes = Number(document.getElementById('likes').innerHTML);13.const dislikes = Number(document.getElementById('dislikes').innerHTML);14.const data = {15.'vote': vote,16.'likes': likes,17.'dislikes': dislikes18.
}19.fetch(ajaxURL, {20.method: 'POST',21.headers: {22.'Content-Type': 'application/json',23.'X-CSRFToken': csrfToken24.
},25.body: JSON.stringify(data),26.
})27..then(response => response.json())28..then(data => {29.const numVotes = data.dislikes + data.likes;30.let voteText = `${numVotes} vote`;31.if (numVotes !== 1) voteText += 's';32.document.getElementById('output').innerHTML = data.msg;33.document.getElementById('likes').innerHTML = data.likes;34.document.getElementById('dislikes').innerHTML = data.dislikes;35.document.getElementById('num-votes').innerHTML = voteText;36.
});37.}38.
We are not going to cover Ajax in detail, but there are a few things we want to pointout:
442 | LESSON 13: Making Queries, Ajax, and View Functions
EVALUATION COPY: Not to be used in class.
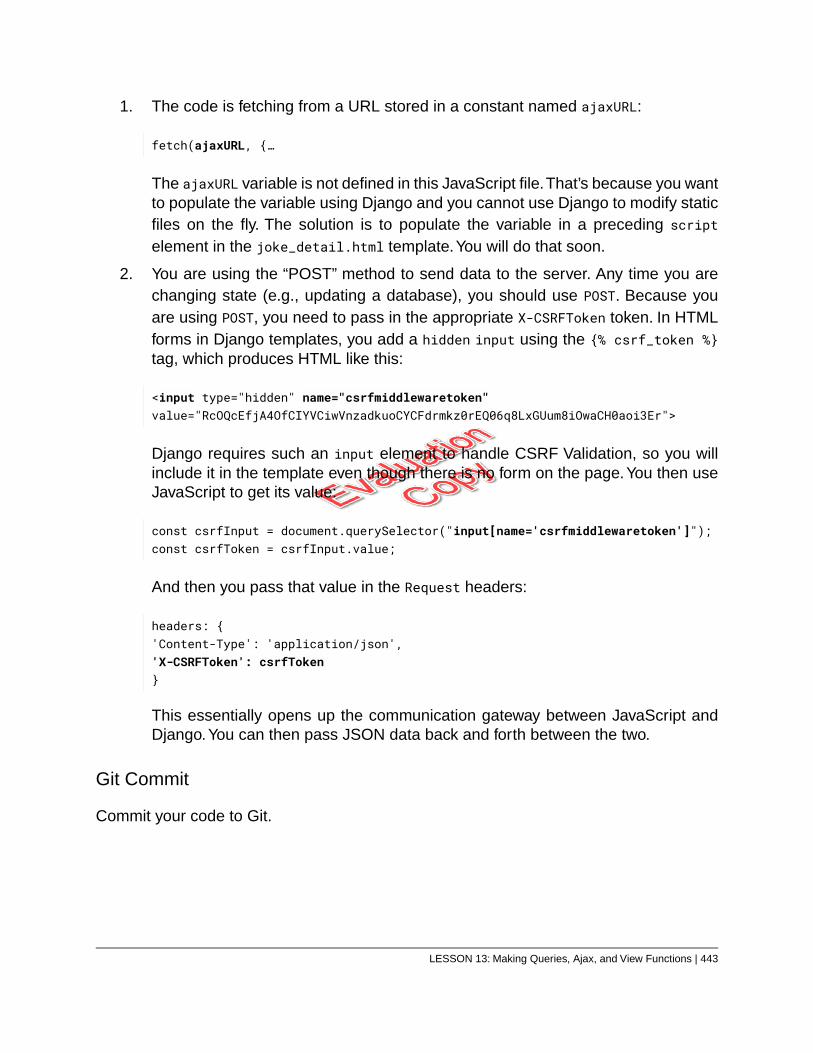
1. The code is fetching from a URL stored in a constant named ajaxURL:
fetch(ajaxURL, {…
The ajaxURL variable is not defined in this JavaScript file.That’s because you wantto populate the variable using Django and you cannot use Django to modify staticfiles on the fly. The solution is to populate the variable in a preceding scriptelement in the joke_detail.html template.You will do that soon.
2. You are using the “POST” method to send data to the server. Any time you arechanging state (e.g., updating a database), you should use POST. Because youare using POST, you need to pass in the appropriate X-CSRFToken token. In HTMLforms in Django templates, you add a hidden input using the {% csrf_token %}tag, which produces HTML like this:
<input type="hidden" name="csrfmiddlewaretoken"value="RcOQcEfjA4OfCIYVCiwVnzadkuoCYCFdrmkz0rEQ06q8LxGUum8iOwaCH0aoi3Er">
Django requires such an input element to handle CSRF Validation, so you willinclude it in the template even though there is no form on the page.You then useJavaScript to get its value:
const csrfInput = document.querySelector("input[name='csrfmiddlewaretoken']");const csrfToken = csrfInput.value;
And then you pass that value in the Request headers:
headers: {'Content-Type': 'application/json','X-CSRFToken': csrfToken}
This essentially opens up the communication gateway between JavaScript andDjango.You can then pass JSON data back and forth between the two.
Git Commit
Commit your code to Git.
LESSON 13: Making Queries, Ajax, and View Functions | 443
Exercise 64: Adding a vote() View Function 20 to 30 minutes
In this exercise, you will add a view for the Ajax request. Up until this point, you have beenworking with class-based views. This will be your first view function. View functions arepassed a request and possibly some keyword arguments from the URL pattern in theURLConf. They then return a web response to be sent to the client. In this case, you willbe sending JSON, but view functions can be used to send HTML, image files, PDFs, aredirect to another web page, or any valid web response.
1. From the jokes folder, open views.py for editing.
2. You will need Python’s json library to convert the JSON string passed in therequest body to a Python object. Import that at the top of the file:
import json
3. You will also need JsonResponse from django.http to return JSON to the browser.Import that too:
from django.http import JsonResponse
4. Import the JokeVote model:
from .models import Joke, JokeVote
5. At the bottom of the file, write the vote view function as shown in the following file.You do not need to include a ll the comments, but you should read them carefully.97
97. Don’t want to type? Copy from starter-code/making-queries/jokes_views.py.
444 | LESSON 13: Making Queries, Ajax, and View Functions
EVALUATION COPY: Not to be used in class.
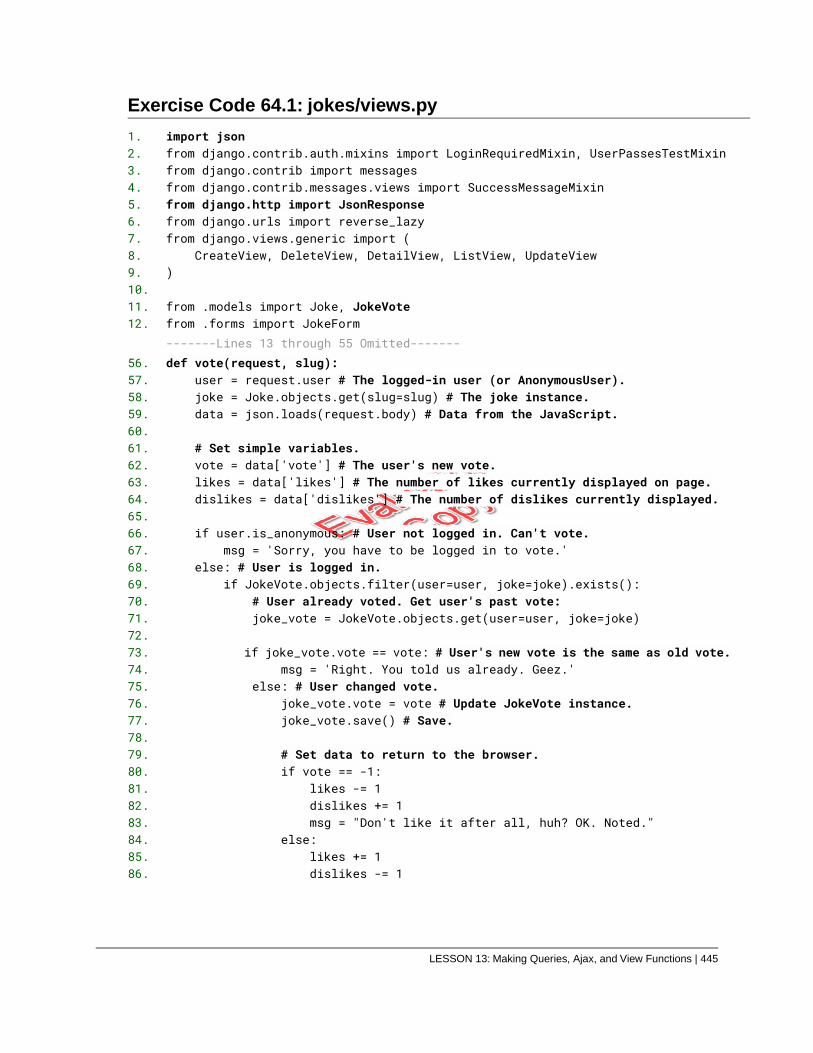
Exercise Code 64.1: jokes/views.py
import json1.from django.contrib.auth.mixins import LoginRequiredMixin, UserPassesTestMixin2.from django.contrib import messages3.from django.contrib.messages.views import SuccessMessageMixin4.from django.http import JsonResponse5.from django.urls import reverse_lazy6.from django.views.generic import (7.
CreateView, DeleteView, DetailView, ListView, UpdateView8.)9.
10.from .models import Joke, JokeVote11.from .forms import JokeForm12.-------Lines 13 through 55 Omitted-------def vote(request, slug):56.
user = request.user # The logged-in user (or AnonymousUser).57.joke = Joke.objects.get(slug=slug) # The joke instance.58.data = json.loads(request.body) # Data from the JavaScript.59.
60.# Set simple variables.61.vote = data['vote'] # The user's new vote.62.likes = data['likes'] # The number of likes currently displayed on page.63.dislikes = data['dislikes'] # The number of dislikes currently displayed.64.
65.if user.is_anonymous: # User not logged in. Can't vote.66.
msg = 'Sorry, you have to be logged in to vote.'67.else: # User is logged in.68.
if JokeVote.objects.filter(user=user, joke=joke).exists():69.# User already voted. Get user's past vote:70.joke_vote = JokeVote.objects.get(user=user, joke=joke)71.
72.if joke_vote.vote == vote: # User's new vote is the same as old vote.73.
msg = 'Right. You told us already. Geez.'74.else: # User changed vote.75.
joke_vote.vote = vote # Update JokeVote instance.76.joke_vote.save() # Save.77.
78.# Set data to return to the browser.79.if vote == -1:80.
likes -= 181.dislikes += 182.msg = "Don't like it after all, huh? OK. Noted."83.
else:84.likes += 185.dislikes -= 186.
LESSON 13: Making Queries, Ajax, and View Functions | 445
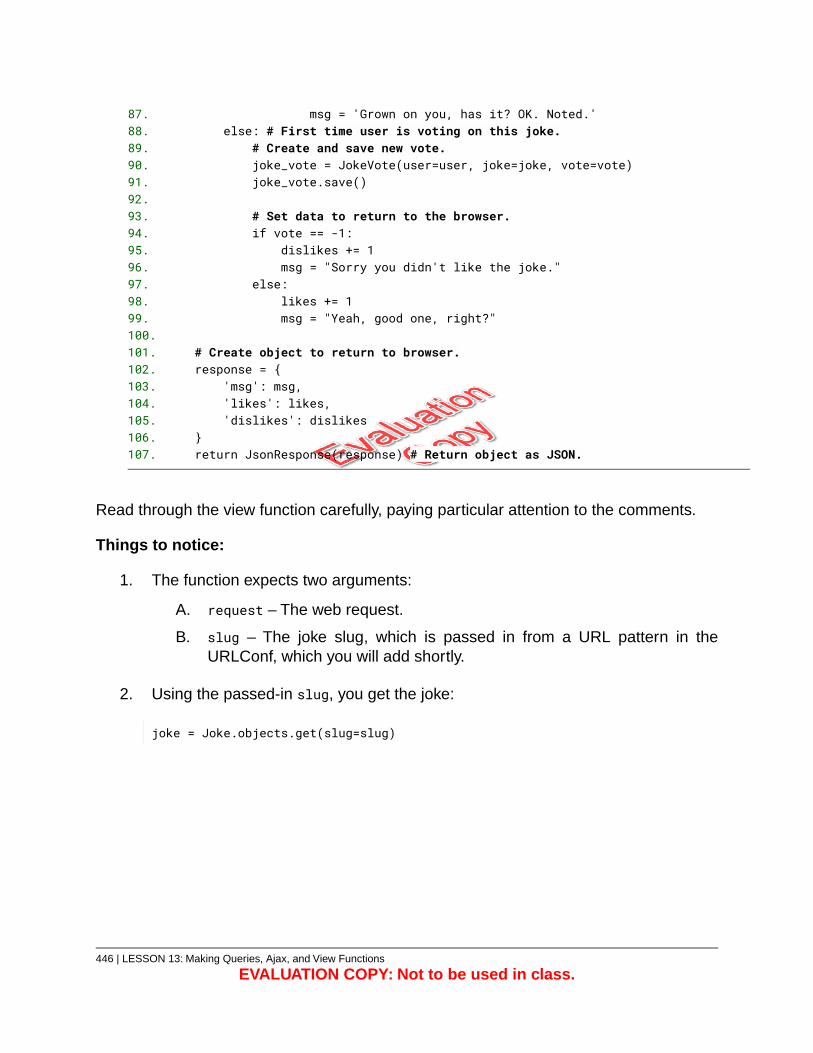
msg = 'Grown on you, has it? OK. Noted.'87.else: # First time user is voting on this joke.88.
# Create and save new vote.89.joke_vote = JokeVote(user=user, joke=joke, vote=vote)90.joke_vote.save()91.
92.# Set data to return to the browser.93.if vote == -1:94.
dislikes += 195.msg = "Sorry you didn't like the joke."96.
else:97.likes += 198.msg = "Yeah, good one, right?"99.
100.# Create object to return to browser.101.response = {102.
'msg': msg,103.'likes': likes,104.'dislikes': dislikes105.
}106.return JsonResponse(response) # Return object as JSON.107.
Read through the view function carefully, paying particular attention to the comments.
Things to notice:
1. The function expects two arguments:
A. request – The web request.
B. slug – The joke slug, which is passed in from a URL pattern in theURLConf, which you will add shortly.
2. Using the passed-in slug, you get the joke:
joke = Joke.objects.get(slug=slug)
446 | LESSON 13: Making Queries, Ajax, and View Functions
EVALUATION COPY: Not to be used in class.
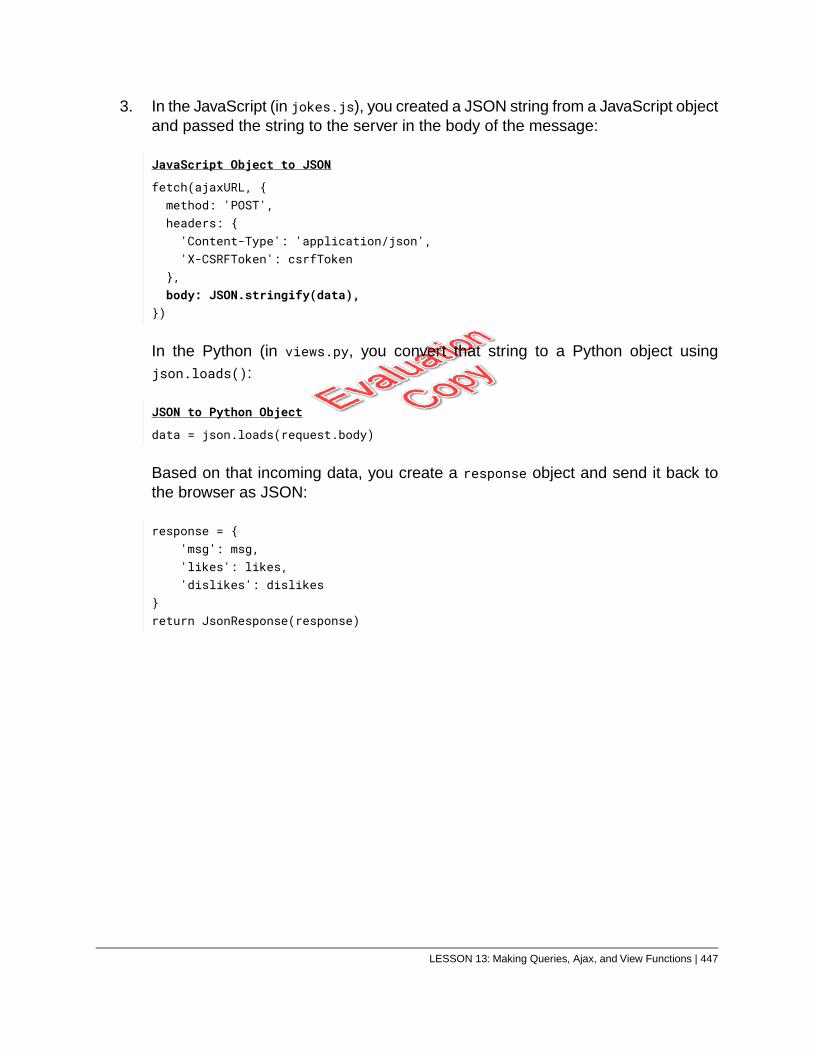
3. In the JavaScript (in jokes.js), you created a JSON string from a JavaScript objectand passed the string to the server in the body of the message:
JavaScript Object to JSON
fetch(ajaxURL, {method: 'POST',headers: {'Content-Type': 'application/json','X-CSRFToken': csrfToken
},body: JSON.stringify(data),
})
In the Python (in views.py, you convert that string to a Python object usingjson.loads():
JSON to Python Object
data = json.loads(request.body)
Based on that incoming data, you create a response object and send it back tothe browser as JSON:
response = {'msg': msg,'likes': likes,'dislikes': dislikes
}return JsonResponse(response)
LESSON 13: Making Queries, Ajax, and View Functions | 447
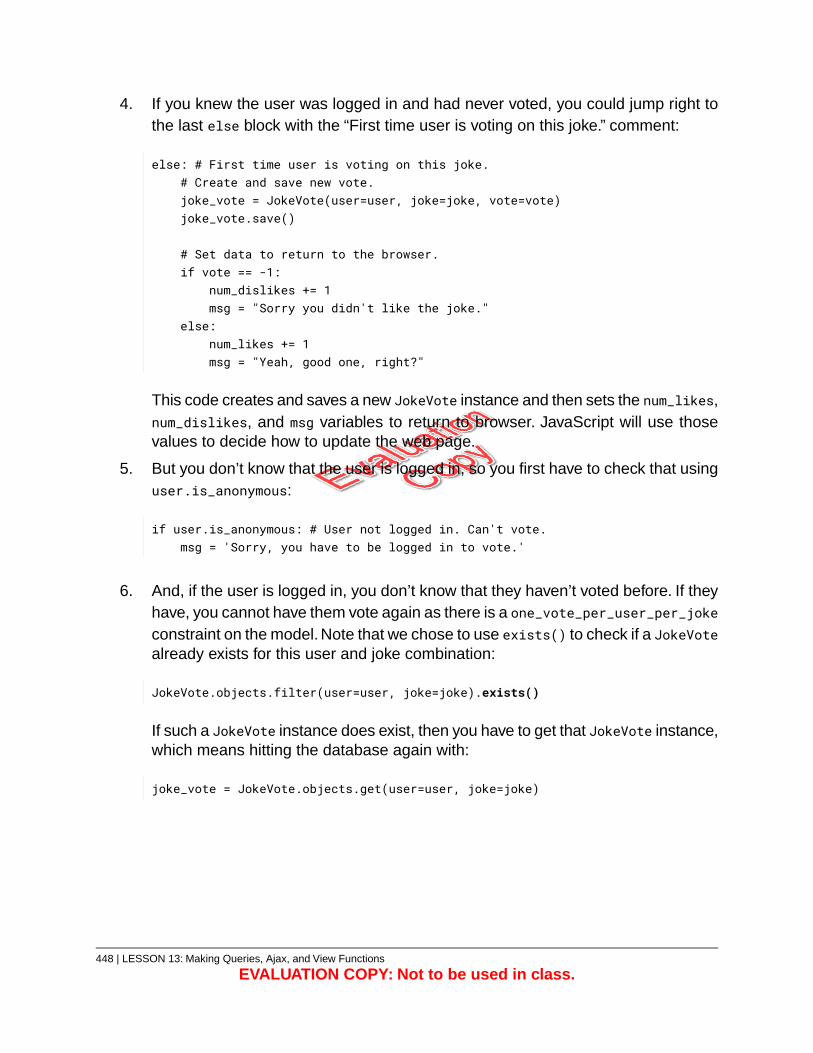
4. If you knew the user was logged in and had never voted, you could jump right tothe last else block with the “First time user is voting on this joke.” comment:
else: # First time user is voting on this joke.# Create and save new vote.joke_vote = JokeVote(user=user, joke=joke, vote=vote)joke_vote.save()
# Set data to return to the browser.if vote == -1:
num_dislikes += 1msg = "Sorry you didn't like the joke."
else:num_likes += 1msg = "Yeah, good one, right?"
This code creates and saves a new JokeVote instance and then sets the num_likes,num_dislikes, and msg variables to return to browser. JavaScript will use thosevalues to decide how to update the web page.
5. But you don’t know that the user is logged in, so you first have to check that usinguser.is_anonymous:
if user.is_anonymous: # User not logged in. Can't vote.msg = 'Sorry, you have to be logged in to vote.'
6. And, if the user is logged in, you don’t know that they haven’t voted before. If theyhave, you cannot have them vote again as there is a one_vote_per_user_per_jokeconstraint on the model. Note that we chose to use exists() to check if a JokeVotealready exists for this user and joke combination:
JokeVote.objects.filter(user=user, joke=joke).exists()
If such a JokeVote instance does exist, then you have to get that JokeVote instance,which means hitting the database again with:
joke_vote = JokeVote.objects.get(user=user, joke=joke)
448 | LESSON 13: Making Queries, Ajax, and View Functions
EVALUATION COPY: Not to be used in class.
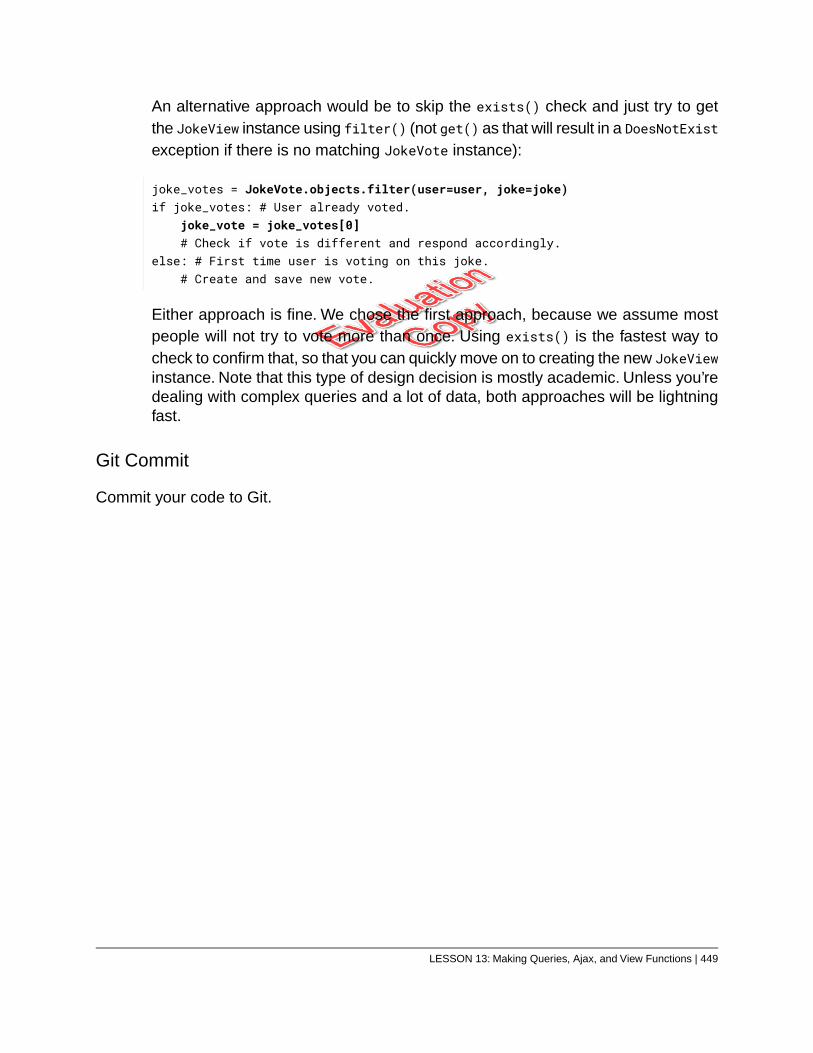
An alternative approach would be to skip the exists() check and just try to getthe JokeView instance using filter() (not get() as that will result in a DoesNotExistexception if there is no matching JokeVote instance):
joke_votes = JokeVote.objects.filter(user=user, joke=joke)if joke_votes: # User already voted.
joke_vote = joke_votes[0]# Check if vote is different and respond accordingly.
else: # First time user is voting on this joke.# Create and save new vote.
Either approach is fine. We chose the first approach, because we assume mostpeople will not try to vote more than once. Using exists() is the fastest way tocheck to confirm that, so that you can quickly move on to creating the new JokeViewinstance. Note that this type of design decision is mostly academic. Unless you’redealing with complex queries and a lot of data, both approaches will be lightningfast.
Git Commit
Commit your code to Git.
LESSON 13: Making Queries, Ajax, and View Functions | 449
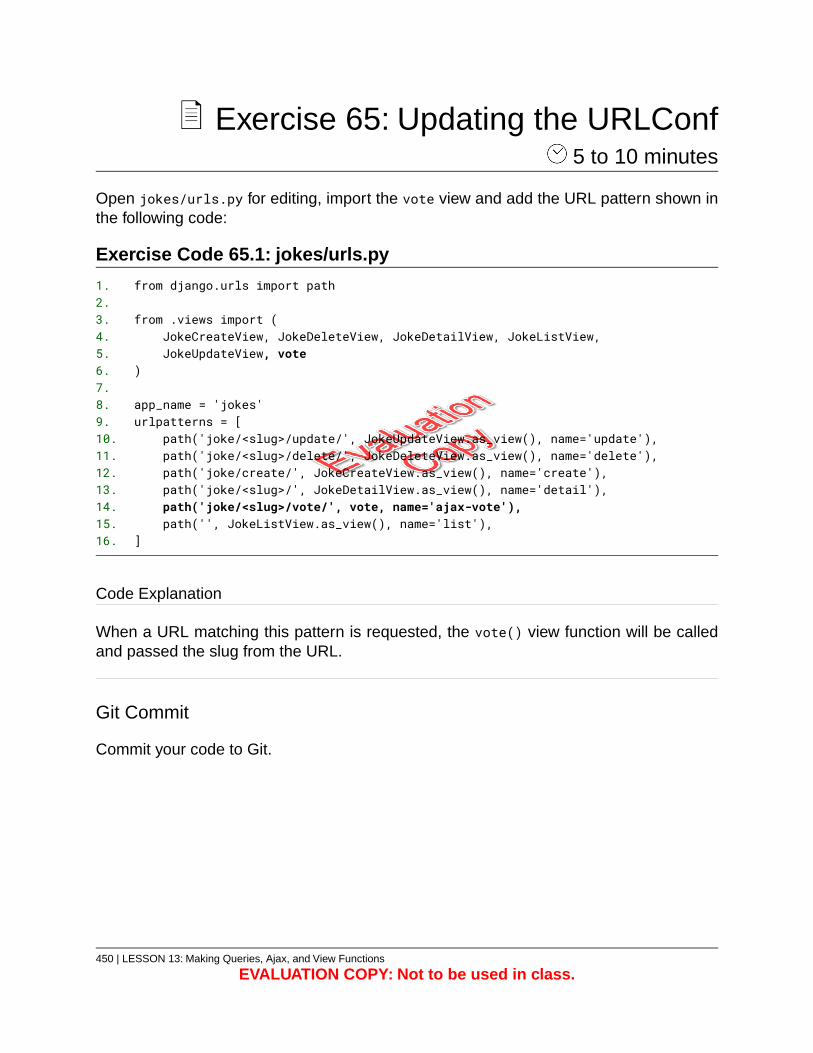
Exercise 65: Updating the URLConf 5 to 10 minutes
Open jokes/urls.py for editing, import the vote view and add the URL pattern shown inthe following code:
Exercise Code 65.1: jokes/urls.py
from django.urls import path1.2.
from .views import (3.JokeCreateView, JokeDeleteView, JokeDetailView, JokeListView,4.JokeUpdateView, vote5.
)6.7.
app_name = 'jokes'8.urlpatterns = [9.
path('joke/<slug>/update/', JokeUpdateView.as_view(), name='update'),10.path('joke/<slug>/delete/', JokeDeleteView.as_view(), name='delete'),11.path('joke/create/', JokeCreateView.as_view(), name='create'),12.path('joke/<slug>/', JokeDetailView.as_view(), name='detail'),13.path('joke/<slug>/vote/', vote, name='ajax-vote'),14.path('', JokeListView.as_view(), name='list'),15.
]16.
Code Explanation
When a URL matching this pattern is requested, the vote() view function will be calledand passed the slug from the URL.
Git Commit
Commit your code to Git.
450 | LESSON 13: Making Queries, Ajax, and View Functions
EVALUATION COPY: Not to be used in class.
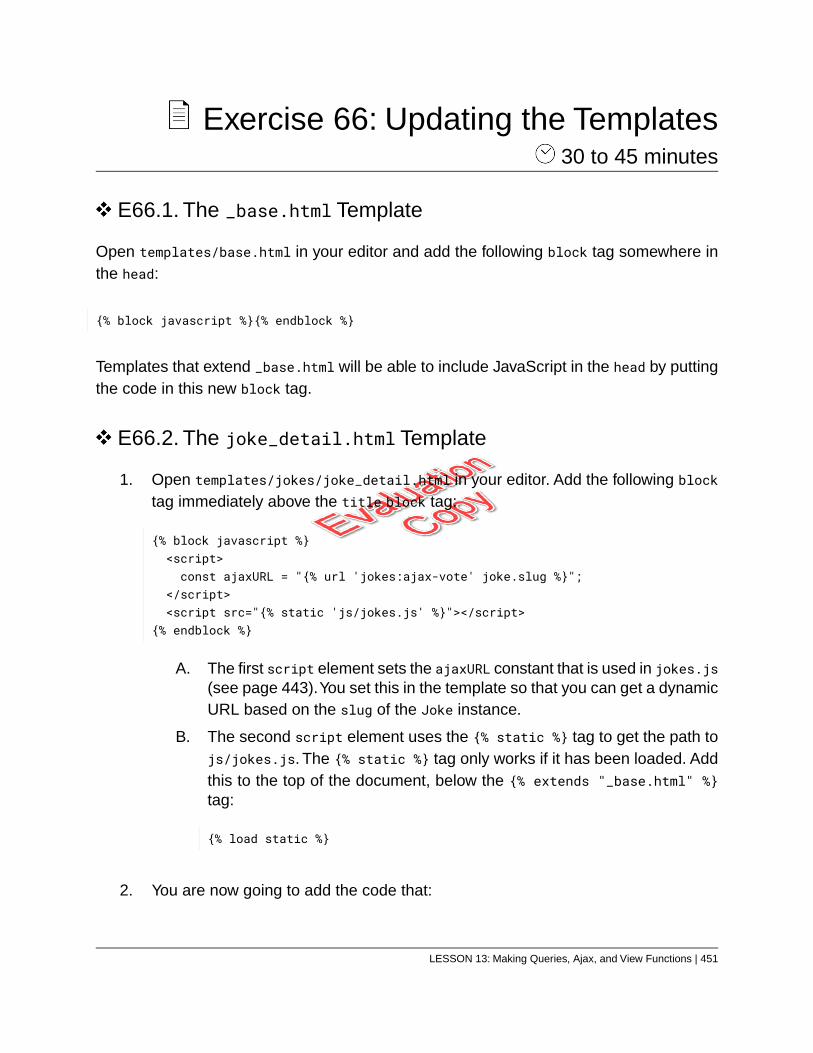
Exercise 66: Updating the Templates 30 to 45 minutes
E66.1. The _base.html Template
Open templates/base.html in your editor and add the following block tag somewhere inthe head:
{% block javascript %}{% endblock %}
Templates that extend _base.html will be able to include JavaScript in the head by puttingthe code in this new block tag.
E66.2. The joke_detail.html Template
1. Open templates/jokes/joke_detail.html in your editor. Add the following blocktag immediately above the title block tag:
{% block javascript %}<script>const ajaxURL = "{% url 'jokes:ajax-vote' joke.slug %}";
</script><script src="{% static 'js/jokes.js' %}"></script>
{% endblock %}
A. The first script element sets the ajaxURL constant that is used in jokes.js(see page 443).You set this in the template so that you can get a dynamicURL based on the slug of the Joke instance.
B. The second script element uses the {% static %} tag to get the path tojs/jokes.js. The {% static %} tag only works if it has been loaded. Addthis to the top of the document, below the {% extends "_base.html" %}tag:
{% load static %}
2. You are now going to add the code that:
LESSON 13: Making Queries, Ajax, and View Functions | 451
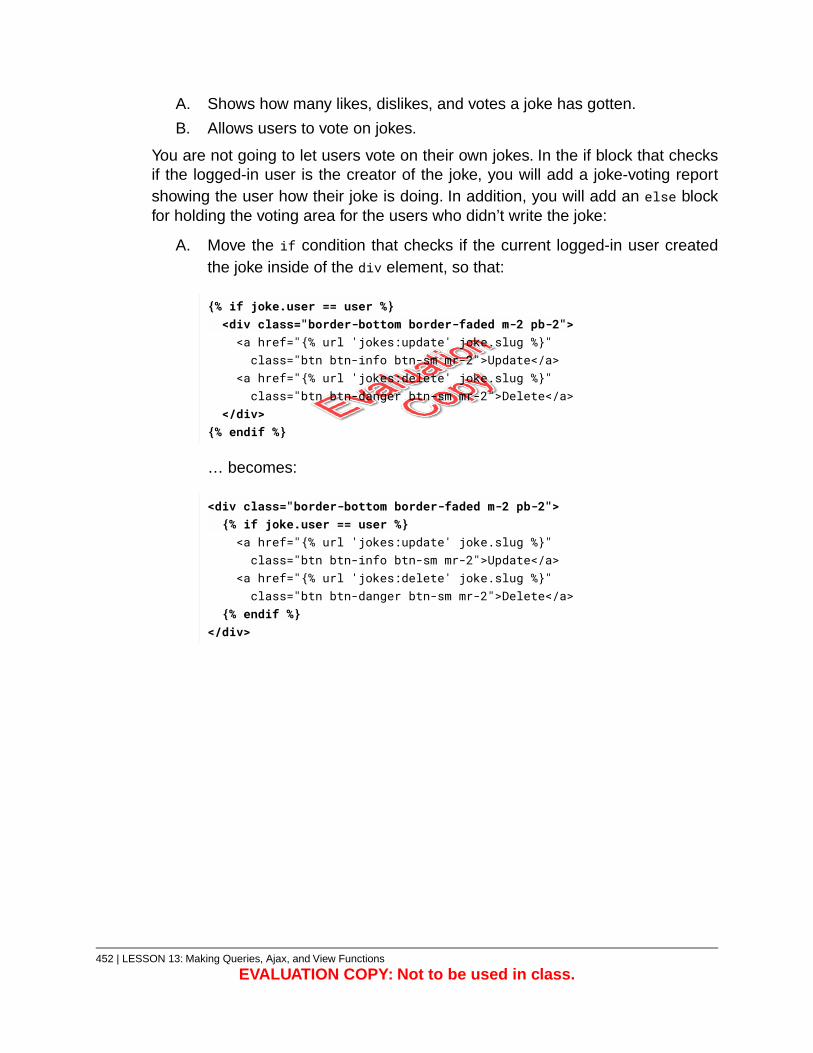
Shows how many likes, dislikes, and votes a joke has gotten.A.
B. Allows users to vote on jokes.
You are not going to let users vote on their own jokes. In the if block that checksif the logged-in user is the creator of the joke, you will add a joke-voting reportshowing the user how their joke is doing. In addition, you will add an else blockfor holding the voting area for the users who didn’t write the joke:
A. Move the if condition that checks if the current logged-in user createdthe joke inside of the div element, so that:
{% if joke.user == user %}<div class="border-bottom border-faded m-2 pb-2"><a href="{% url 'jokes:update' joke.slug %}"class="btn btn-info btn-sm mr-2">Update</a>
<a href="{% url 'jokes:delete' joke.slug %}"class="btn btn-danger btn-sm mr-2">Delete</a>
</div>{% endif %}
… becomes:
<div class="border-bottom border-faded m-2 pb-2">{% if joke.user == user %}<a href="{% url 'jokes:update' joke.slug %}"class="btn btn-info btn-sm mr-2">Update</a>
<a href="{% url 'jokes:delete' joke.slug %}"class="btn btn-danger btn-sm mr-2">Delete</a>
{% endif %}</div>
452 | LESSON 13: Making Queries, Ajax, and View Functions
EVALUATION COPY: Not to be used in class.
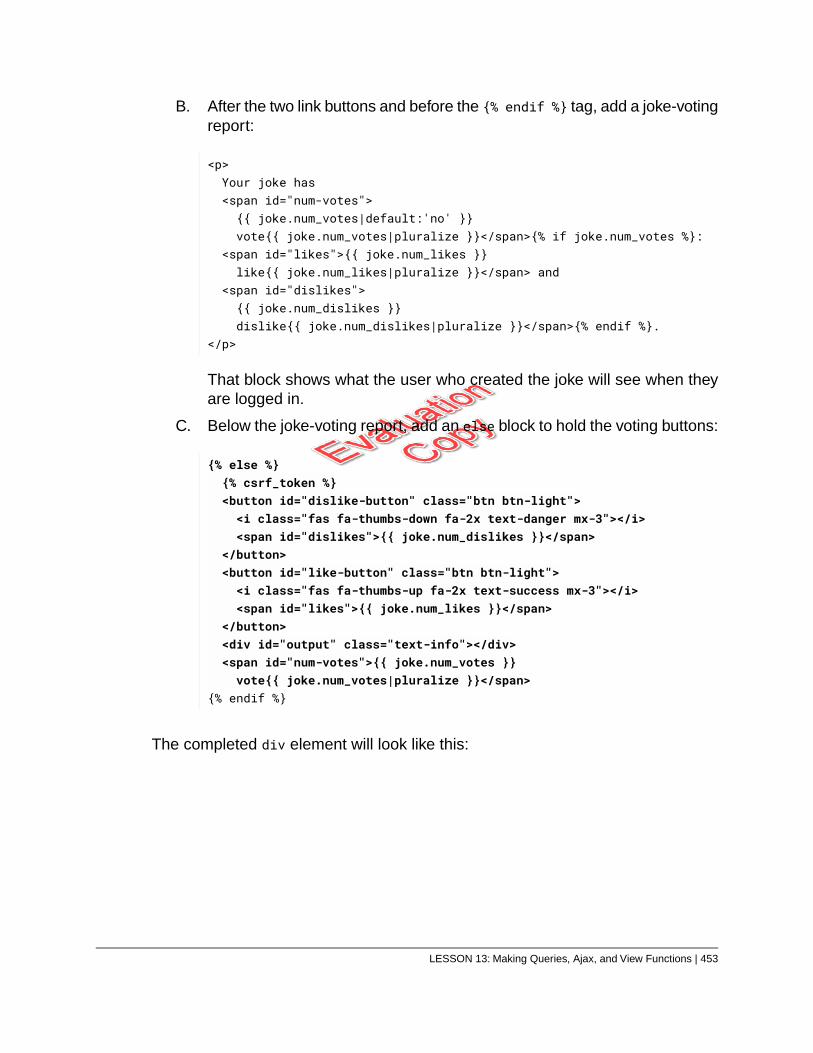
B. After the two link buttons and before the {% endif %} tag, add a joke-votingreport:
<p>Your joke has<span id="num-votes">{{ joke.num_votes|default:'no' }}vote{{ joke.num_votes|pluralize }}</span>{% if joke.num_votes %}:
<span id="likes">{{ joke.num_likes }}like{{ joke.num_likes|pluralize }}</span> and
<span id="dislikes">{{ joke.num_dislikes }}dislike{{ joke.num_dislikes|pluralize }}</span>{% endif %}.
</p>
That block shows what the user who created the joke will see when theyare logged in.
C. Below the joke-voting report, add an else block to hold the voting buttons:
{% else %}{% csrf_token %}<button id="dislike-button" class="btn btn-light"><i class="fas fa-thumbs-down fa-2x text-danger mx-3"></i><span id="dislikes">{{ joke.num_dislikes }}</span>
</button><button id="like-button" class="btn btn-light"><i class="fas fa-thumbs-up fa-2x text-success mx-3"></i><span id="likes">{{ joke.num_likes }}</span>
</button><div id="output" class="text-info"></div><span id="num-votes">{{ joke.num_votes }}vote{{ joke.num_votes|pluralize }}</span>
{% endif %}
The completed div element will look like this:
LESSON 13: Making Queries, Ajax, and View Functions | 453
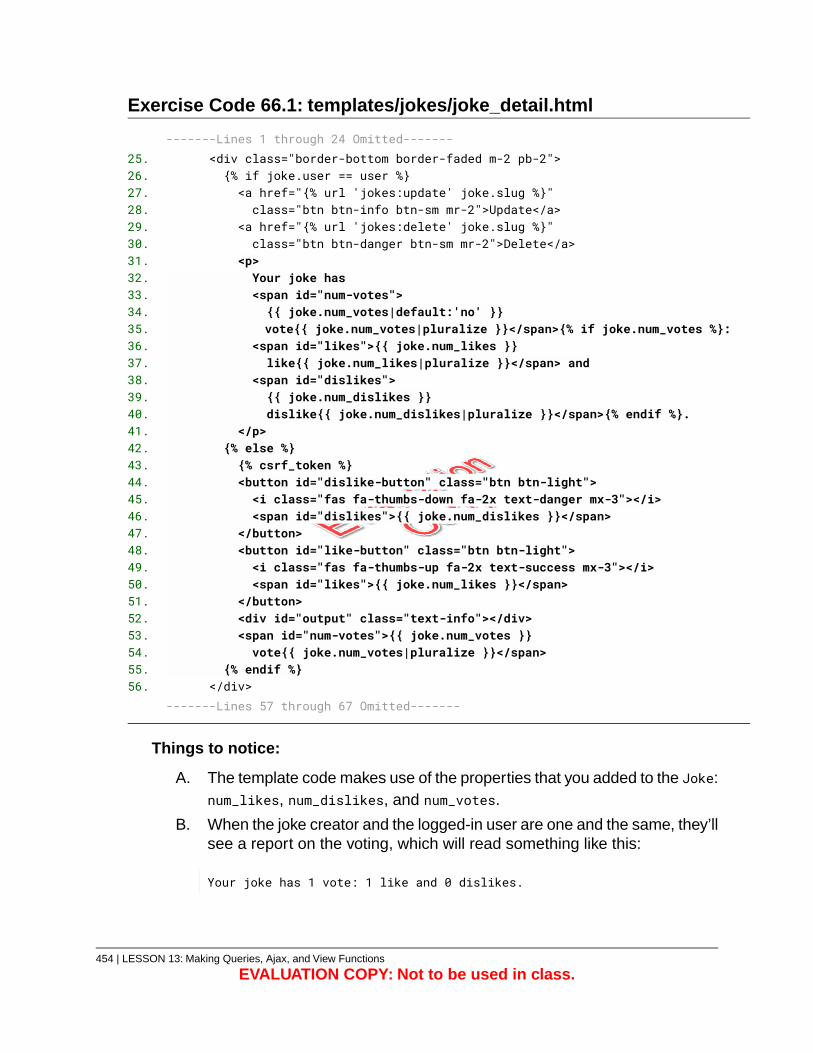
Exercise Code 66.1: templates/jokes/joke_detail.html
-------Lines 1 through 24 Omitted-------<div class="border-bottom border-faded m-2 pb-2">25.{% if joke.user == user %}26.<a href="{% url 'jokes:update' joke.slug %}"27.class="btn btn-info btn-sm mr-2">Update</a>28.
<a href="{% url 'jokes:delete' joke.slug %}"29.class="btn btn-danger btn-sm mr-2">Delete</a>30.
<p>31.Your joke has32.<span id="num-votes">33.{{ joke.num_votes|default:'no' }}34.vote{{ joke.num_votes|pluralize }}</span>{% if joke.num_votes %}:35.
<span id="likes">{{ joke.num_likes }}36.like{{ joke.num_likes|pluralize }}</span> and37.
<span id="dislikes">38.{{ joke.num_dislikes }}39.dislike{{ joke.num_dislikes|pluralize }}</span>{% endif %}.40.
</p>41.{% else %}42.{% csrf_token %}43.<button id="dislike-button" class="btn btn-light">44.<i class="fas fa-thumbs-down fa-2x text-danger mx-3"></i>45.<span id="dislikes">{{ joke.num_dislikes }}</span>46.
</button>47.<button id="like-button" class="btn btn-light">48.<i class="fas fa-thumbs-up fa-2x text-success mx-3"></i>49.<span id="likes">{{ joke.num_likes }}</span>50.
</button>51.<div id="output" class="text-info"></div>52.<span id="num-votes">{{ joke.num_votes }}53.vote{{ joke.num_votes|pluralize }}</span>54.
{% endif %}55.</div>56.
-------Lines 57 through 67 Omitted-------
Things to notice:
A. The template code makes use of the properties that you added to the Joke:num_likes, num_dislikes, and num_votes.
B. When the joke creator and the logged-in user are one and the same, they’llsee a report on the voting, which will read something like this:
Your joke has 1 vote: 1 like and 0 dislikes.
454 | LESSON 13: Making Queries, Ajax, and View Functions
EVALUATION COPY: Not to be used in class.
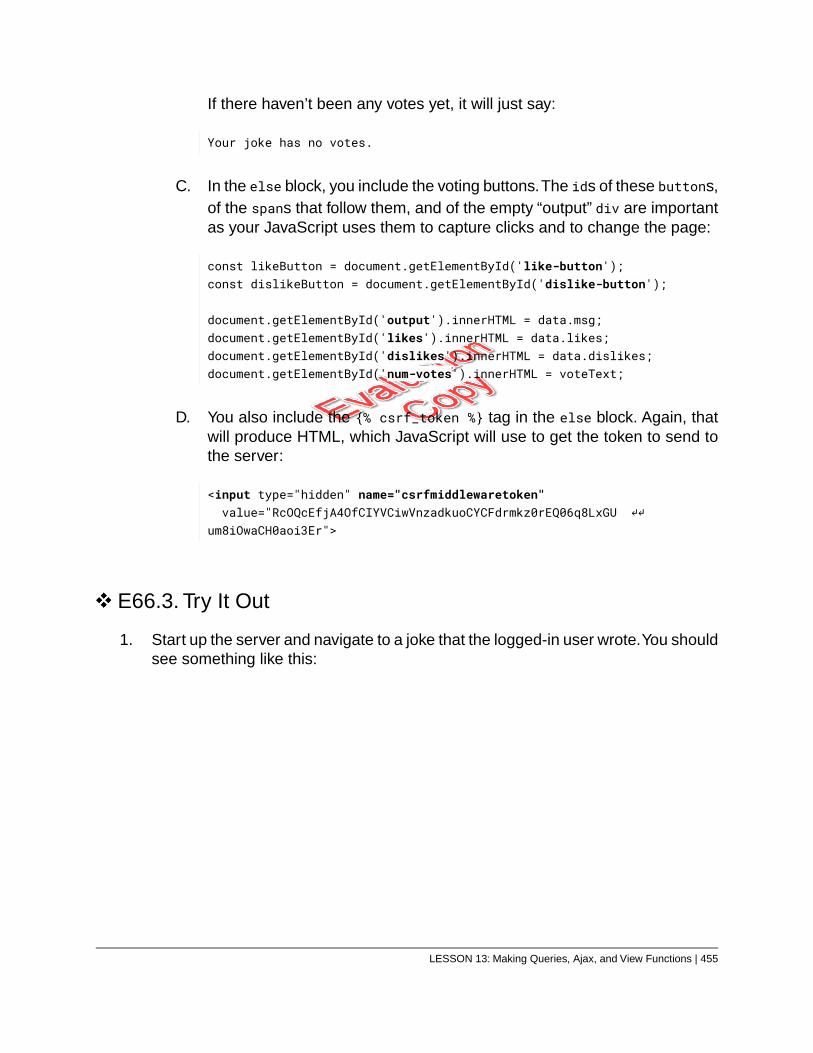
If there haven’t been any votes yet, it will just say:
Your joke has no votes.
C. In the else block, you include the voting buttons.The ids of these buttons,of the spans that follow them, and of the empty “output” div are importantas your JavaScript uses them to capture clicks and to change the page:
const likeButton = document.getElementById('like-button');const dislikeButton = document.getElementById('dislike-button');
document.getElementById('output').innerHTML = data.msg;document.getElementById('likes').innerHTML = data.likes;document.getElementById('dislikes').innerHTML = data.dislikes;document.getElementById('num-votes').innerHTML = voteText;
D. You also include the {% csrf_token %} tag in the else block. Again, thatwill produce HTML, which JavaScript will use to get the token to send tothe server:
<input type="hidden" name="csrfmiddlewaretoken" value="RcOQcEfjA4OfCIYVCiwVnzadkuoCYCFdrmkz0rEQ06q8LxGU ↵↵um8iOwaCH0aoi3Er">
E66.3. Try It Out
1. Start up the server and navigate to a joke that the logged-in user wrote.You shouldsee something like this:
LESSON 13: Making Queries, Ajax, and View Functions | 455
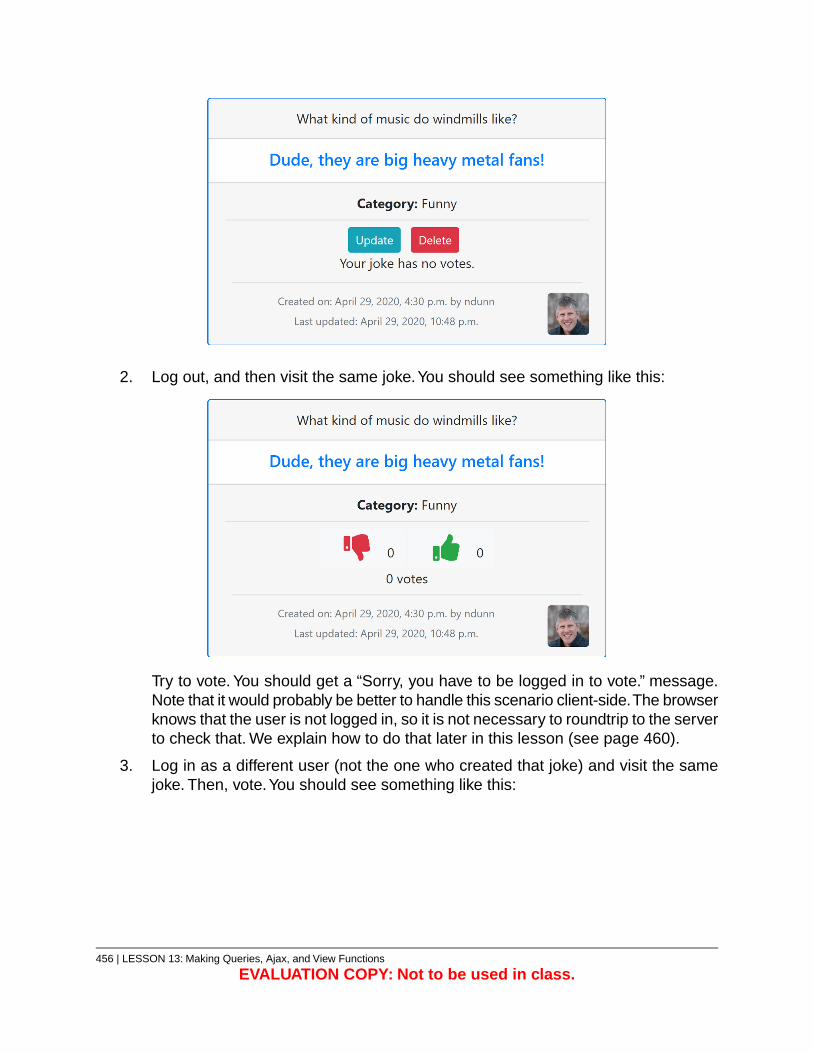
2. Log out, and then visit the same joke.You should see something like this:
Try to vote. You should get a “Sorry, you have to be logged in to vote.” message.Note that it would probably be better to handle this scenario client-side.The browserknows that the user is not logged in, so it is not necessary to roundtrip to the serverto check that. We explain how to do that later in this lesson (see page 460).
3. Log in as a different user (not the one who created that joke) and visit the samejoke. Then, vote.You should see something like this:
456 | LESSON 13: Making Queries, Ajax, and View Functions
EVALUATION COPY: Not to be used in class.

Vote again the same way you just voted. You should get a “Right. You told usalready. Geez.” message. Change your vote several times. The message shouldtoggle between “Don't like it after all, huh? OK. Noted.” and “Grown on you, hasit? OK. Noted.”
Git Commit
Commit your code to Git.
❋
13.11. Model Constraints
Model field definitions control the type of data that can be entered in the field. For example,models.URLField must contain a valid URL, models.PositiveIntegerField must containa positive integer, models.DateField must contain a valid date. You can pass arguments(e.g., max_length, unique, and choices) to further limit the type of content that can beentered for the field. Sometimes, however, you want to add additional constraints on fieldvalues.
Additional constraints are added to a model in the models Meta inner class:
LESSON 13: Making Queries, Ajax, and View Functions | 457
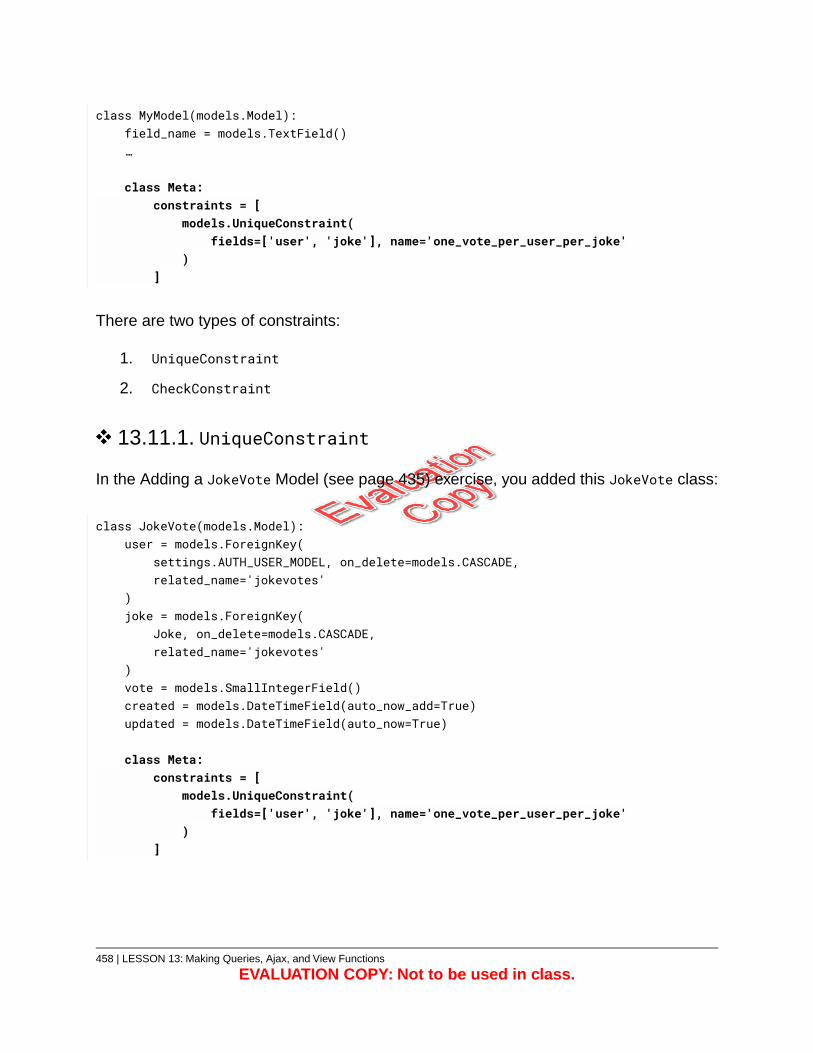
class MyModel(models.Model):field_name = models.TextField()…
class Meta:constraints = [
models.UniqueConstraint(fields=['user', 'joke'], name='one_vote_per_user_per_joke'
)]
There are two types of constraints:
1. UniqueConstraint
2. CheckConstraint
13.11.1. UniqueConstraint
In the Adding a JokeVote Model (see page 435) exercise, you added this JokeVote class:
class JokeVote(models.Model):user = models.ForeignKey(
settings.AUTH_USER_MODEL, on_delete=models.CASCADE,related_name='jokevotes'
)joke = models.ForeignKey(
Joke, on_delete=models.CASCADE,related_name='jokevotes'
)vote = models.SmallIntegerField()created = models.DateTimeField(auto_now_add=True)updated = models.DateTimeField(auto_now=True)
class Meta:constraints = [
models.UniqueConstraint(fields=['user', 'joke'], name='one_vote_per_user_per_joke'
)]
458 | LESSON 13: Making Queries, Ajax, and View Functions
EVALUATION COPY: Not to be used in class.
This prevents the same user from voting on the same joke more than once. In other words,joke and user must be unique together. UniqueConstraint must take a fields argumentlisting the fields that must be unique together, and a name argument, which will be outputin the error message when this constraint is violated.
UniqueConstraint can take additional arguments. See the documentation98 for moreinformation.
13.11.2. CheckConstraint
CheckConstraint gives you a lot of control over the content of a field or multiple fields. Ittakes a check argument with a Q object, which we will cover later (see page 493). Anycontent that fails to pass the tests in the Q object will be rejected. For example, if youwanted to prevent this author from creating an account on your site, you could use thefollowing constraint:
class Meta:constraints = [
models.CheckConstraint(check=~Q(first_name='Nat') & ~Q(last_name='Dunn'),name='no_nat_dunn'
)]
After adding this constraint (and running migrations), if you try to add the user “Nat Dunn,”you will get this error:
django.db.utils.IntegrityError: new row for relation "users_customuser" violates checkconstraint "no_nat_dunn"
As of Django 3.1, CheckConstraint can also take a boolean Expression. See thedocumentation99 for more information.
❋
98. https://docs.djangoproject.com/en/3.1/ref/models/constraints/#uniqueconstraint99. https://docs.djangoproject.com/en/3.1/ref/models/constraints/#checkconstraint
LESSON 13: Making Queries, Ajax, and View Functions | 459
13.12. Letting JavaScript Know if the User is Logged In
Earlier (see page 456), we mentioned that you don’t need to roundtrip to the server to letJavaScript know that the user is not logged in. You can handle that in the template usinga JavaScript constant that is set to {{ user.is_authenticated|lower }}. It is import tolowercase the value of user.is_authenticated, because Python’s booleans are True/Falseand JavaScript’s booleans are true/false.
So, in templates/jokes/joke-detail.html, you would add the following highlighted code:
{% block javascript %}<script>const ajaxURL = "{% url 'jokes:ajax-vote' joke.slug %}";const isAuthenticated = {{ user.is_authenticated|lower }};
</script><script src="{% static 'js/jokes.js' %}"></script>
{% endblock %}
And then in static/js/jokes.js, you would check the value of isAuthenticated. If theuser is not authenticated, you would set the message of the “output” div and leave thefunction:
function register(vote) {if (!isAuthenticated) {const outputDiv = document.getElementById('output');outputDiv.innerHTML = 'Sorry, only logged-in users can vote.';return false;
}
13.12.1. @login_required Decorator
If you are handling non-authenticated users client-side, you no longer have to give themaccess to the vote method at all.You can add the @login_required decorator to the votefunction (or any view function) to make the view only accessible to logged-in users:
@login_requireddef vote(request, slug):
…
460 | LESSON 13: Making Queries, Ajax, and View Functions
EVALUATION COPY: Not to be used in class.
This is to prevent scoundrels from adding votes by posting directly to the voting URL.
Conclusion
In this lesson, you have learned to query models across relationships, to add “calculatedfields” to models via properties, to create view functions, and to use Ajax with Django.
LESSON 13: Making Queries, Ajax, and View Functions | 461

462 | LESSON 13: Making Queries, Ajax, and View Functions
EVALUATION COPY: Not to be used in class.
LESSON 14Pagination and Ordering
Topics Covered
Loading data with fixtures.
Pagination.
Sorting.
Introduction
You are finished with your models. Now, we have bunch of data for you to load into thedatabase. Once you have loaded that data, you will add pagination and ordering to yourjoke-list template.
❋
LESSON 14: Pagination and Ordering | 463
14.1. Fixtures
You will use fixtures to load initial data into the database, so that you can test paginationand sorting, advanced querying, and search. A fixtures is just a collection of structureddata that Django can import into the database. The data can be JSON, XML, or YAML100.You will be using JSON.
dumpdata
Although you won’t need to create any fixtures for the Django Jokes website, we will giveyou a quick overview of how fixtures are created with the dumpdata command:
python manage.py dumpdata
Without any arguments or flags, this command will output all the data in all the apps in theINSTALLED_APPS setting of the project settings.
To limit the dump to the specific apps you want to include, list those apps, separated byspaces, after the dumpdata command:
python manage.py dumpdata app_name1 app_name2
To exclude certain apps, use the --exclude flag, like this:
python manage.py dumpdata --exclude app_name1 --exclude app_name2
You can also specify the models you want to dump:
python manage.py dumpdata app_name.Model1 app_name.Model2
To write the output to a file instead of to the standard output, use the -o flag:
python manage.py dumpdata app_name1 -o datadump.json
100. https://yaml.org/
464 | LESSON 14: Pagination and Ordering
EVALUATION COPY: Not to be used in class.
By default, the output will all be on a single line, which is fine if you are just getting thisdata to load somewhere else. But if you want to be able to read the data, you can formatthe JSON using the --indent flag followed by the number of spaces you want to indent:
python manage.py dumpdata app_name1 --indent 2 -o datadump.json
loaddata
To load data from fixtures, use the loaddata command:
python manage.py loaddata path/to/my/fixture.json
If you don’t specify a path, Django will look in each installed app folder for a fixturesfolder. You can also set the FIXTURE_DIRS setting in settings.py to specify a directorythat Django should search for fixtures.
Fixtures are meant to be used with initial data, so, if you’re planning to use them, youshould use them before adding any real data into the database.
LESSON 14: Pagination and Ordering | 465
Exercise 67: Loading Data from a Fixture 20 to 30 minutes
The fixture we have created uses JSON data, which includes:
1. 50 users, including one superuser, and five additional staff. The superuser datais:
first_name: Janelast_name: Gouldusername: jgouldemail: [email protected]
All users, including the superuser, have the same password: DjangoP@$$
2. Verified email addresses for all users.
3. Four categories:
A. Funny
B. Brain Teaser
C. Play on Words
D. Uncategorized
4. 34 tags.
5. 595 jokes.
6. 10,000 votes.
Before you import this data though, you need to make sure the current database doesn’tcontain any conflicting data. The only safe way to do this is to remove all data that mightconflict, and the easiest way to do that is to start with a new database, which is what youwill do:
E67.1. Recreating the Database
1. Stop your server if it is running.
2. Open pgAdmin.
A. Right-click the Jokes database and select Properties:
466 | LESSON 14: Pagination and Ordering
EVALUATION COPY: Not to be used in class.
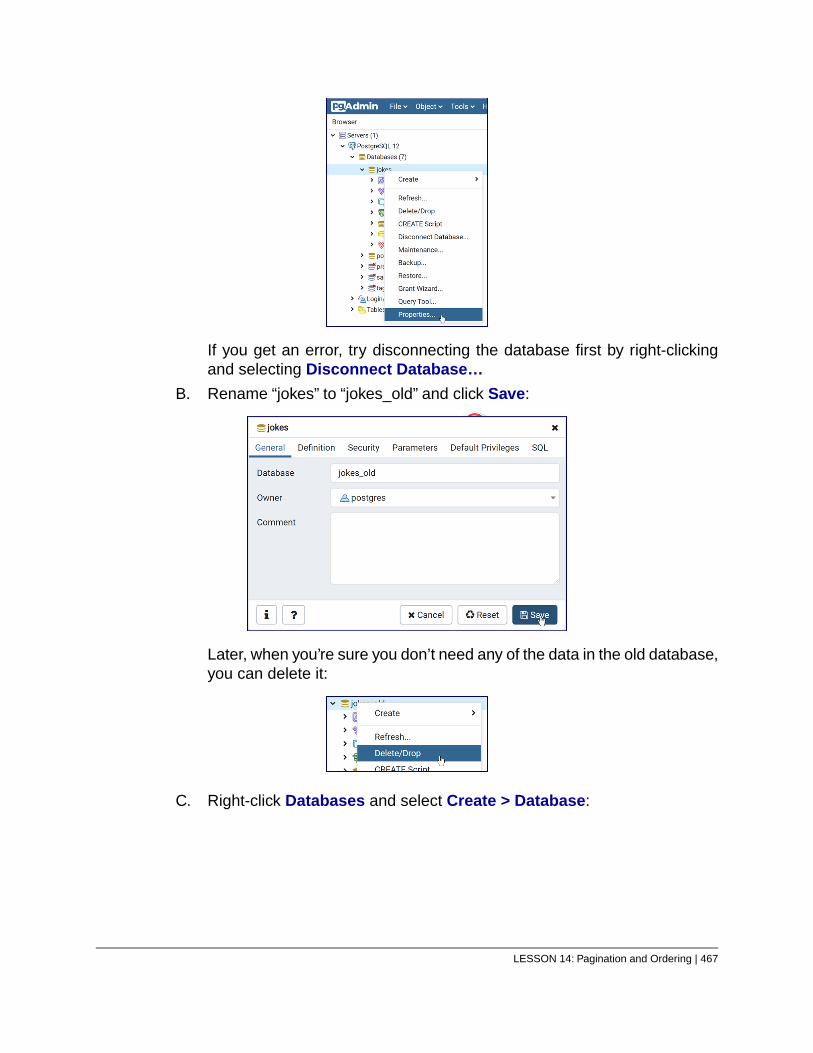
If you get an error, try disconnecting the database first by right-clickingand selecting Disconnect Database…
B. Rename “jokes” to “jokes_old” and click Save:
Later, when you’re sure you don’t need any of the data in the old database,you can delete it:
C. Right-click Databases and select Create > Database:
LESSON 14: Pagination and Ordering | 467
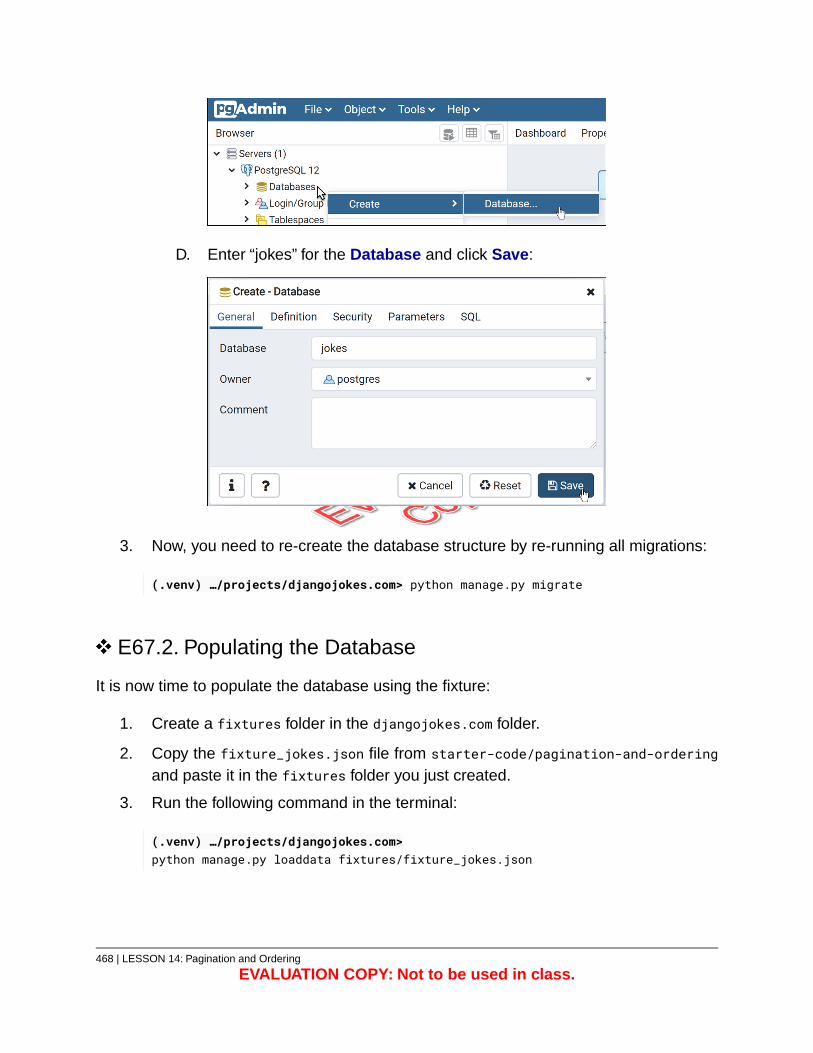
D. Enter “jokes” for the Database and click Save:
3. Now, you need to re-create the database structure by re-running all migrations:
(.venv) …/projects/djangojokes.com> python manage.py migrate
E67.2. Populating the Database
It is now time to populate the database using the fixture:
1. Create a fixtures folder in the djangojokes.com folder.
2. Copy the fixture_jokes.json file from starter-code/pagination-and-orderingand paste it in the fixtures folder you just created.
3. Run the following command in the terminal:
(.venv) …/projects/djangojokes.com>python manage.py loaddata fixtures/fixture_jokes.json
468 | LESSON 14: Pagination and Ordering
EVALUATION COPY: Not to be used in class.
After a little bit, you should get a message like this one:
Installed 10733 object(s) from 1 fixture(s)
E67.3. Try it Out
1. Start up the server and visit the site.
2. Click the Jokes link in the header. This may take a few moments to load as it willshow all the jokes on the same page.You’ll add pagination soon.
3. Open the site and log in as the superuser using the following credentials:
Email: [email protected]
Password: DjangoP@$$
4. Change your email to your real email, and if you would prefer a different password,update your password. You can do this on the My Account page or in Djangoadmin.
Git Commit
Commit your code to Git.
LESSON 14: Pagination and Ordering | 469
Exercise 68: Pagination 20 to 30 minutes
Django makes adding pagination to a ListView super easy.
1. Open jokes/views.py in your editor.
2. Add to JokeListView:
class JokeListView(ListView):model = Jokepaginate_by = 10
3. Visit http://127.0.0.1:8000/jokes/. Notice that only ten jokes show up on thepage.
4. Visit http://127.0.0.1:8000/jokes/?page=2. Notice a different ten jokes showup.
5. You need to update the template to add links to previous and next pages to allowusers to go from page to page. Open templates/jokes/joke_list.html in youreditor.
6. Add the following code right above the closing {% endblock %} tag:101
101. Don’t want to type? Copy from starter-code/pagination-and-ordering/joke_list_pagination.html.
470 | LESSON 14: Pagination and Ordering
EVALUATION COPY: Not to be used in class.
Exercise Code 68.1: templates/joke_list.html
-------Lines 1 through 57 Omitted-------<nav aria-label="pagination">58.<ul class="pagination justify-content-center">59.{% if page_obj.has_previous %}60.<li class="page-item">61.<a class="page-link" href="?page=1">« 1…</a>62.
</li>63.{% if page_obj.previous_page_number != 1 %}64.<li class="page-item">65.<a class="page-link"66.href="?page={{ page_obj.previous_page_number }}">67.{{ page_obj.previous_page_number }}68.
</a>69.</li>70.
{% endif %}71.{% endif %}72.<li class="page-item active">73.<span class="page-link">74.{{ page_obj.number }}75.
</span>76.</li>77.{% if page_obj.has_next %}78.{% if page_obj.next_page_number != page_obj.paginator.num_pages %}79.<li class="page-item">80.<a class="page-link" href="?page={{ page_obj.next_page_number }}">81.{{ page_obj.next_page_number }}82.
</a>83.</li>84.
{% endif %}85.<li class="page-item">86.<a class="page-link" href="?page={{ page_obj.paginator.num_pages }}">87.
…{{ page_obj.paginator.num_pages }} »88.</a>89.
</li>90.{% endif %}91.
</ul>92.</nav>93.
{% endblock %}94.
When you add the paginate_by attribute to the ListView, you get access to a newpage_obj in the context. The page_obj object includes the following properties:
A. page_obj.has_previous – True if the current page is not the first page.
B. page_obj.previous_page_number – The number of the previous page.
LESSON 14: Pagination and Ordering | 471
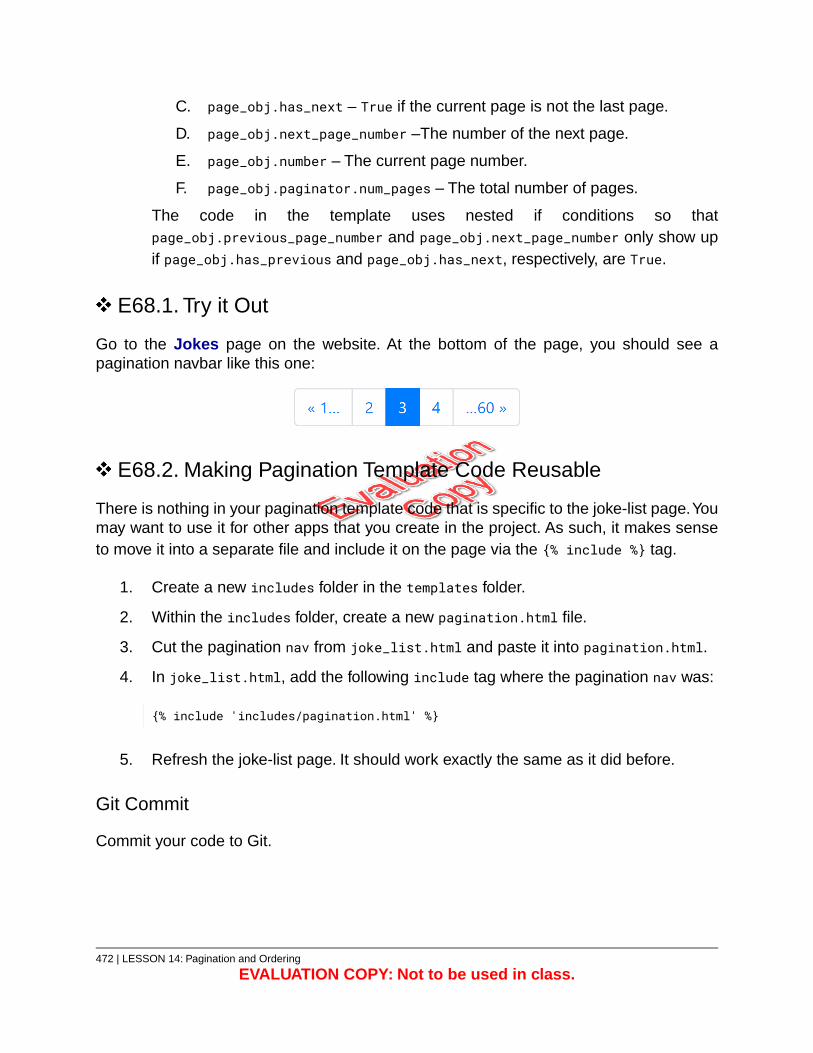
C. page_obj.has_next – True if the current page is not the last page.
D. page_obj.next_page_number –The number of the next page.
E. page_obj.number – The current page number.
F. page_obj.paginator.num_pages – The total number of pages.
The code in the template uses nested if conditions so thatpage_obj.previous_page_number and page_obj.next_page_number only show upif page_obj.has_previous and page_obj.has_next, respectively, are True.
E68.1. Try it Out
Go to the Jokes page on the website. At the bottom of the page, you should see apagination navbar like this one:
E68.2. Making Pagination Template Code Reusable
There is nothing in your pagination template code that is specific to the joke-list page.Youmay want to use it for other apps that you create in the project. As such, it makes senseto move it into a separate file and include it on the page via the {% include %} tag.
1. Create a new includes folder in the templates folder.
2. Within the includes folder, create a new pagination.html file.
3. Cut the pagination nav from joke_list.html and paste it into pagination.html.
4. In joke_list.html, add the following include tag where the pagination nav was:
{% include 'includes/pagination.html' %}
5. Refresh the joke-list page. It should work exactly the same as it did before.
Git Commit
Commit your code to Git.
472 | LESSON 14: Pagination and Ordering
EVALUATION COPY: Not to be used in class.
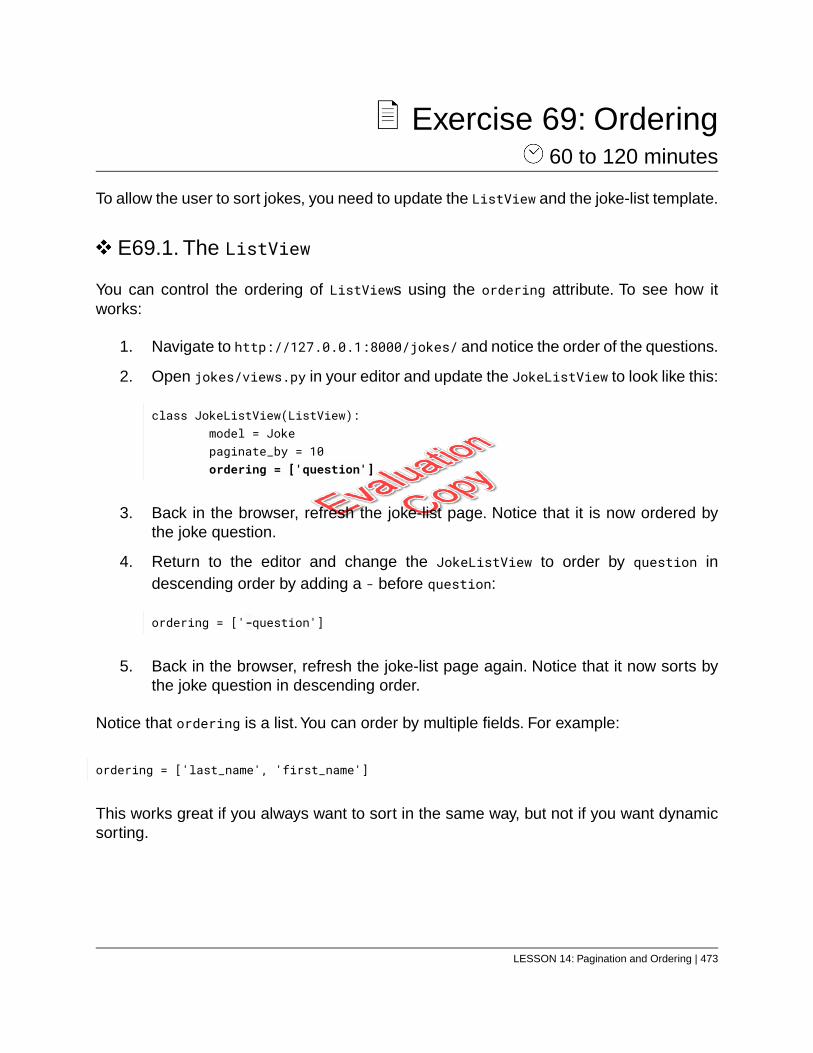
Exercise 69: Ordering 60 to 120 minutes
To allow the user to sort jokes, you need to update the ListView and the joke-list template.
E69.1. The ListView
You can control the ordering of ListViews using the ordering attribute. To see how itworks:
1. Navigate to http://127.0.0.1:8000/jokes/ and notice the order of the questions.
2. Open jokes/views.py in your editor and update the JokeListView to look like this:
class JokeListView(ListView):model = Jokepaginate_by = 10ordering = ['question']
3. Back in the browser, refresh the joke-list page. Notice that it is now ordered bythe joke question.
4. Return to the editor and change the JokeListView to order by question indescending order by adding a - before question:
ordering = ['-question']
5. Back in the browser, refresh the joke-list page again. Notice that it now sorts bythe joke question in descending order.
Notice that ordering is a list.You can order by multiple fields. For example:
ordering = ['last_name', 'first_name']
This works great if you always want to sort in the same way, but not if you want dynamicsorting.
LESSON 14: Pagination and Ordering | 473
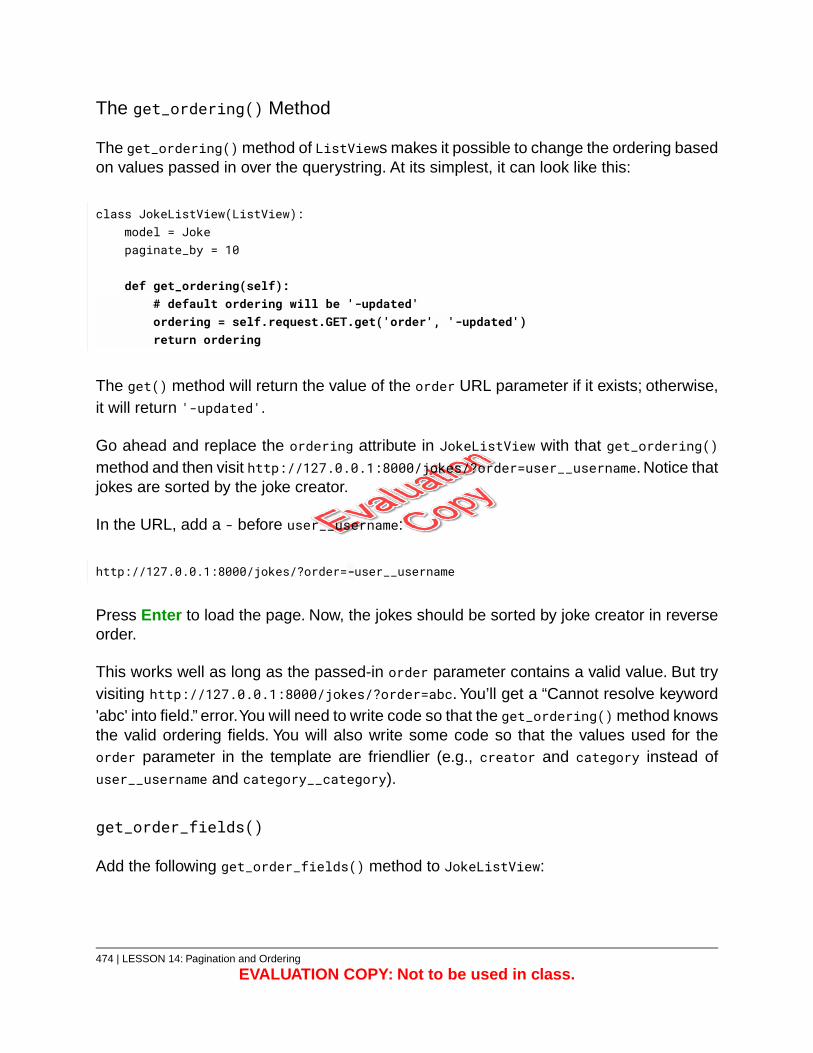
The get_ordering() Method
The get_ordering() method of ListViews makes it possible to change the ordering basedon values passed in over the querystring. At its simplest, it can look like this:
class JokeListView(ListView):model = Jokepaginate_by = 10
def get_ordering(self):# default ordering will be '-updated'ordering = self.request.GET.get('order', '-updated')return ordering
The get() method will return the value of the order URL parameter if it exists; otherwise,it will return '-updated'.
Go ahead and replace the ordering attribute in JokeListView with that get_ordering()method and then visit http://127.0.0.1:8000/jokes/?order=user__username. Notice thatjokes are sorted by the joke creator.
In the URL, add a - before user__username:
http://127.0.0.1:8000/jokes/?order=-user__username
Press Enter to load the page. Now, the jokes should be sorted by joke creator in reverseorder.
This works well as long as the passed-in order parameter contains a valid value. But tryvisiting http://127.0.0.1:8000/jokes/?order=abc. You’ll get a “Cannot resolve keyword'abc' into field.” error.You will need to write code so that the get_ordering() method knowsthe valid ordering fields. You will also write some code so that the values used for theorder parameter in the template are friendlier (e.g., creator and category instead ofuser__username and category__category).
get_order_fields()
Add the following get_order_fields() method to JokeListView:
474 | LESSON 14: Pagination and Ordering
EVALUATION COPY: Not to be used in class.
def get_order_fields(self):"""Returns a dict mapping friendly names to field names and lookups."""return {
'joke': 'question','category': 'category__category','creator': 'user__username','created': 'created','updated': 'updated','default_key': 'updated'
}
This method returns a dictionary:
The dictionary keys are friendly names, which you will use in the template.
The dictionary values are field names (and lookups), which you will use to set theordering.
The final key, 'default_key', holds the default field to order by if order_key iseither unspecified or invalid.
Note that get_order_fields() is not a built-in method of ListView. It is a custom methodthat you have added to JokeListView.
Update get_ordering()
Soon, you will add both a sorting form and sorting links to the joke-list template. Thesewill pass in two parameters:
1. order – The order key. In the view, you will get this value using:
order_fields = self.get_order_fields()default_order_key = order_fields['default_key']order_key = self.request.GET.get('order', default_order_key)
If the order parameter is not passed in, order_key will get the default order key.
2. direction – The order direction: 'asc' or 'desc'. In the view, you will get thisvalue using:
direction = self.request.GET.get('dir', 'desc')
LESSON 14: Pagination and Ordering | 475
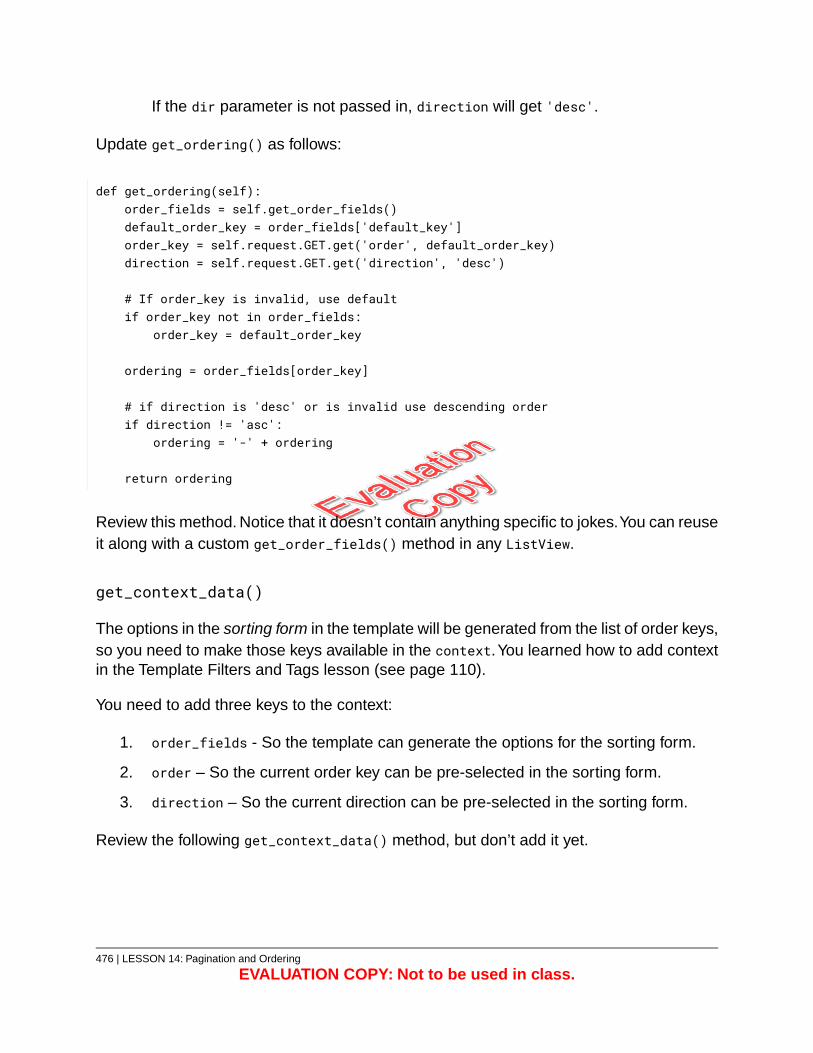
If the dir parameter is not passed in, direction will get 'desc'.
Update get_ordering() as follows:
def get_ordering(self):order_fields = self.get_order_fields()default_order_key = order_fields['default_key']order_key = self.request.GET.get('order', default_order_key)direction = self.request.GET.get('direction', 'desc')
# If order_key is invalid, use defaultif order_key not in order_fields:
order_key = default_order_key
ordering = order_fields[order_key]
# if direction is 'desc' or is invalid use descending orderif direction != 'asc':
ordering = '-' + ordering
return ordering
Review this method. Notice that it doesn’t contain anything specific to jokes.You can reuseit along with a custom get_order_fields() method in any ListView.
get_context_data()
The options in the sorting form in the template will be generated from the list of order keys,so you need to make those keys available in the context.You learned how to add contextin the Template Filters and Tags lesson (see page 110).
You need to add three keys to the context:
1. order_fields - So the template can generate the options for the sorting form.
2. order – So the current order key can be pre-selected in the sorting form.
3. direction – So the current direction can be pre-selected in the sorting form.
Review the following get_context_data() method, but don’t add it yet.
476 | LESSON 14: Pagination and Ordering
EVALUATION COPY: Not to be used in class.

def get_context_data(self, **kwargs):context = super().get_context_data(**kwargs)
order_fields = self.get_order_fields()default_order_key = order_fields['default_key']order_key = self.request.GET.get('order', default_order_key)direction = self.request.GET.get('direction', 'desc')
# If order_key is invalid, use defaultif order_key not in order_fields:
order_key = default_order_key
context['order'] = order_keycontext['direction'] = direction
# get all but the last order key, which is 'default'context['order_fields'] = list(order_fields.keys())[:-1]
return context
Notice that the highlighted section also appears in the get_ordering() method. To followthe DRY102 principle, move that functionality into a separate method:
def get_order_settings(self):order_fields = self.get_order_fields()default_order_key = order_fields['default_key']order_key = self.request.GET.get('order', default_order_key)direction = self.request.GET.get('direction', 'desc')
# If order_key is invalid, use defaultif order_key not in order_fields:
order_key = default_order_key
return (order_fields, order_key, direction)
The get_order_settings() method returns a tuple, which you can assign to order_fields,order_key, and direction in both the get_ordering() and the get_context_data() methodslike this:
102. Don’t Repeat Yourself
LESSON 14: Pagination and Ordering | 477
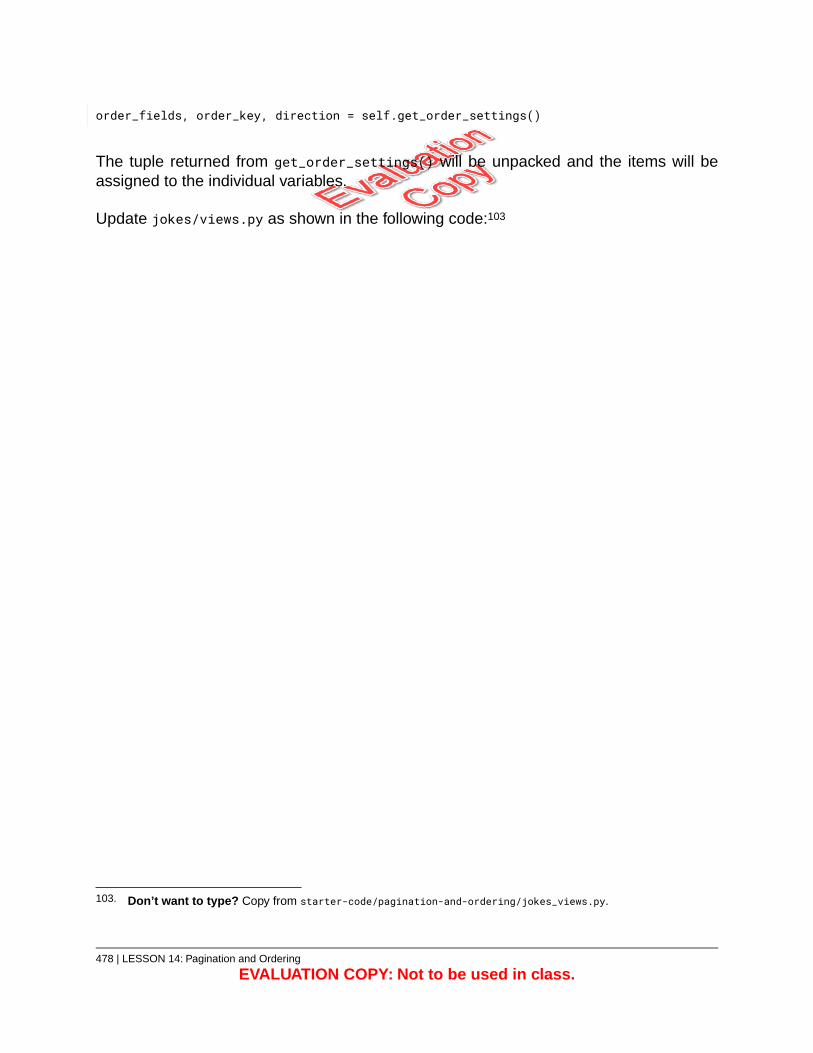
order_fields, order_key, direction = self.get_order_settings()
The tuple returned from get_order_settings() will be unpacked and the items will beassigned to the individual variables.
Update jokes/views.py as shown in the following code:103
103. Don’t want to type? Copy from starter-code/pagination-and-ordering/jokes_views.py.
478 | LESSON 14: Pagination and Ordering
EVALUATION COPY: Not to be used in class.
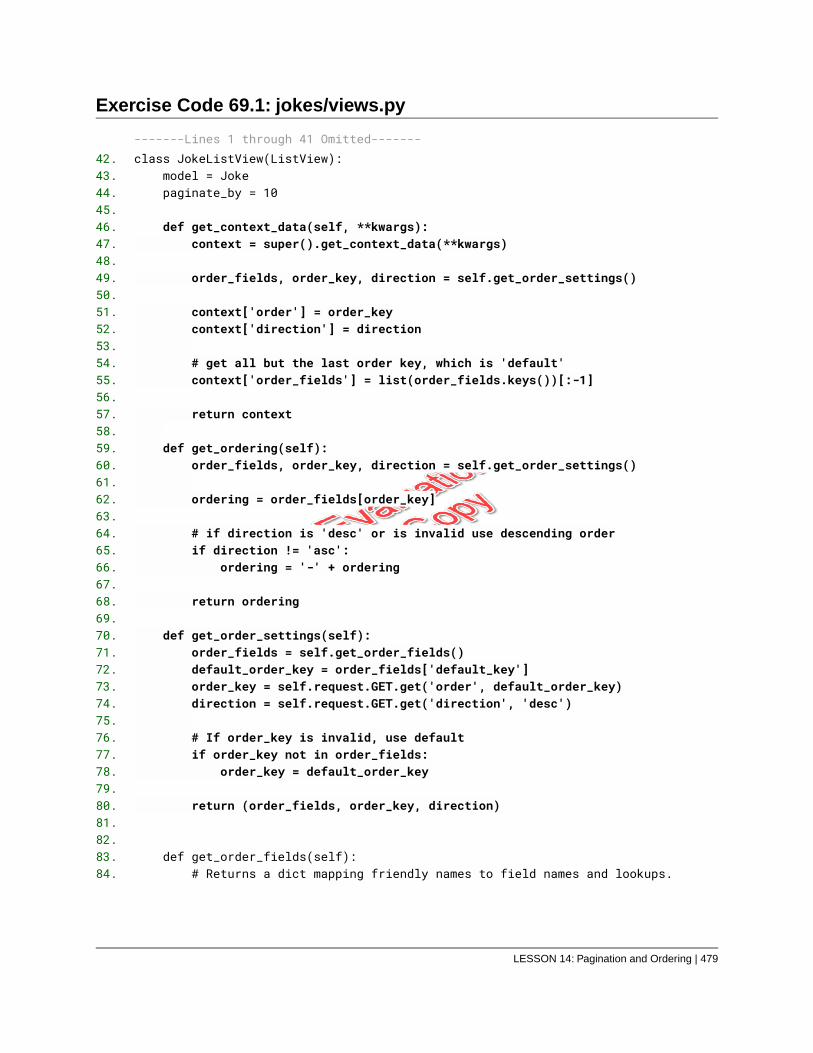
Exercise Code 69.1: jokes/views.py
-------Lines 1 through 41 Omitted-------class JokeListView(ListView):42.
model = Joke43.paginate_by = 1044.
45.def get_context_data(self, **kwargs):46.
context = super().get_context_data(**kwargs)47.48.
order_fields, order_key, direction = self.get_order_settings()49.50.
context['order'] = order_key51.context['direction'] = direction52.
53.# get all but the last order key, which is 'default'54.context['order_fields'] = list(order_fields.keys())[:-1]55.
56.return context57.
58.def get_ordering(self):59.
order_fields, order_key, direction = self.get_order_settings()60.61.
ordering = order_fields[order_key]62.63.
# if direction is 'desc' or is invalid use descending order64.if direction != 'asc':65.
ordering = '-' + ordering66.67.
return ordering68.69.
def get_order_settings(self):70.order_fields = self.get_order_fields()71.default_order_key = order_fields['default_key']72.order_key = self.request.GET.get('order', default_order_key)73.direction = self.request.GET.get('direction', 'desc')74.
75.# If order_key is invalid, use default76.if order_key not in order_fields:77.
order_key = default_order_key78.79.
return (order_fields, order_key, direction)80.81.82.
def get_order_fields(self):83.# Returns a dict mapping friendly names to field names and lookups.84.
LESSON 14: Pagination and Ordering | 479
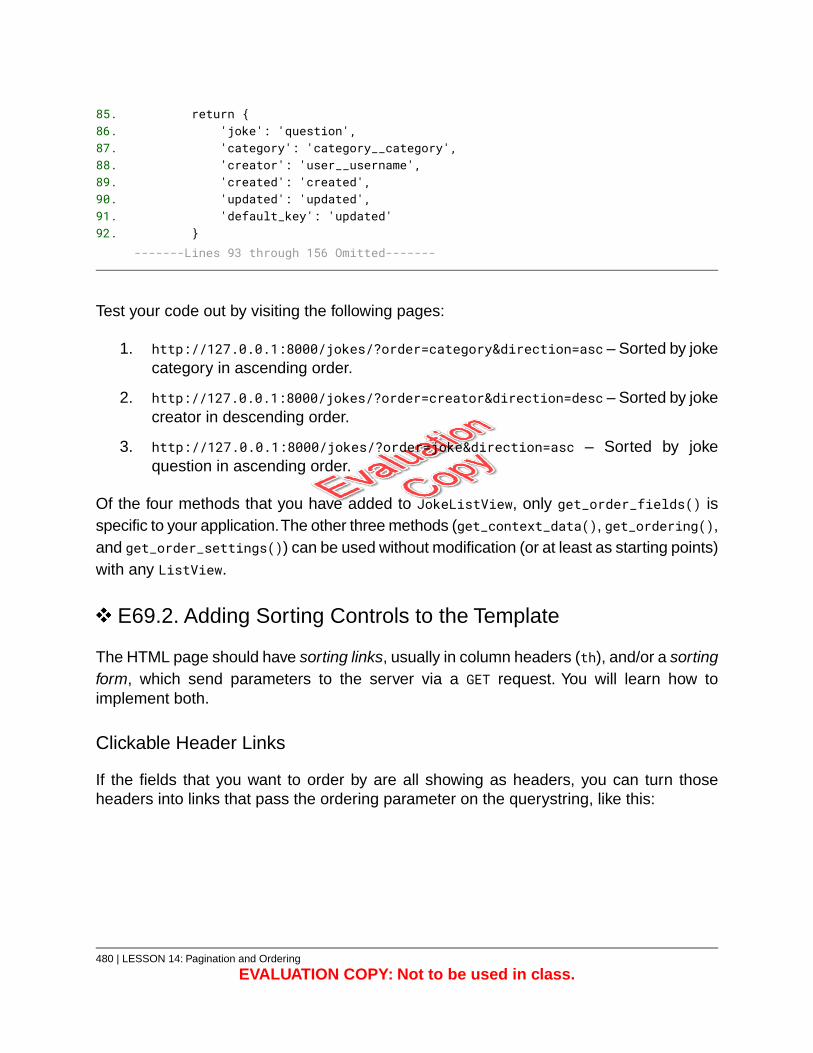
return {85.'joke': 'question',86.'category': 'category__category',87.'creator': 'user__username',88.'created': 'created',89.'updated': 'updated',90.'default_key': 'updated'91.
}92.-------Lines 93 through 156 Omitted-------
Test your code out by visiting the following pages:
1. http://127.0.0.1:8000/jokes/?order=category&direction=asc – Sorted by jokecategory in ascending order.
2. http://127.0.0.1:8000/jokes/?order=creator&direction=desc – Sorted by jokecreator in descending order.
3. http://127.0.0.1:8000/jokes/?order=joke&direction=asc – Sorted by jokequestion in ascending order.
Of the four methods that you have added to JokeListView, only get_order_fields() isspecific to your application.The other three methods (get_context_data(), get_ordering(),and get_order_settings()) can be used without modification (or at least as starting points)with any ListView.
E69.2. Adding Sorting Controls to the Template
The HTML page should have sorting links, usually in column headers (th), and/or a sortingform, which send parameters to the server via a GET request. You will learn how toimplement both.
Clickable Header Links
If the fields that you want to order by are all showing as headers, you can turn thoseheaders into links that pass the ordering parameter on the querystring, like this:
480 | LESSON 14: Pagination and Ordering
EVALUATION COPY: Not to be used in class.
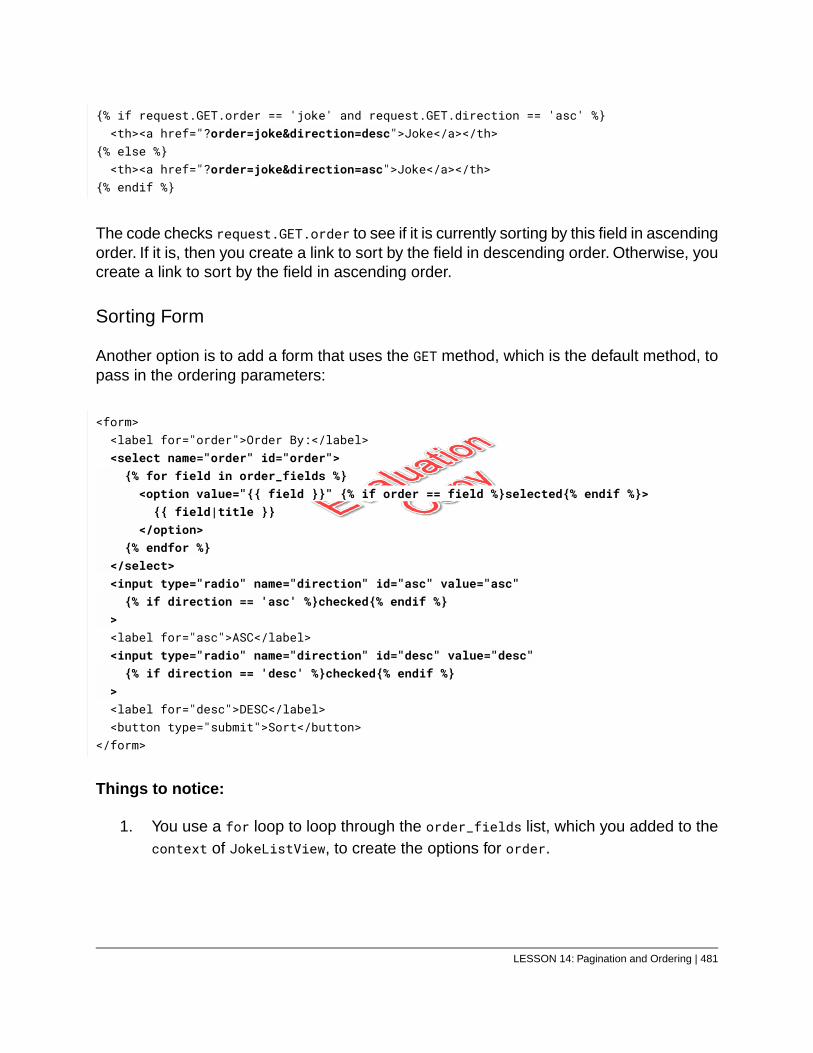
{% if request.GET.order == 'joke' and request.GET.direction == 'asc' %}<th><a href="?order=joke&direction=desc">Joke</a></th>
{% else %}<th><a href="?order=joke&direction=asc">Joke</a></th>
{% endif %}
The code checks request.GET.order to see if it is currently sorting by this field in ascendingorder. If it is, then you create a link to sort by the field in descending order. Otherwise, youcreate a link to sort by the field in ascending order.
Sorting Form
Another option is to add a form that uses the GET method, which is the default method, topass in the ordering parameters:
<form><label for="order">Order By:</label><select name="order" id="order">{% for field in order_fields %}<option value="{{ field }}" {% if order == field %}selected{% endif %}>{{ field|title }}
</option>{% endfor %}
</select><input type="radio" name="direction" id="asc" value="asc"{% if direction == 'asc' %}checked{% endif %}
><label for="asc">ASC</label><input type="radio" name="direction" id="desc" value="desc"{% if direction == 'desc' %}checked{% endif %}
><label for="desc">DESC</label><button type="submit">Sort</button>
</form>
Things to notice:
1. You use a for loop to loop through the order_fields list, which you added to thecontext of JokeListView, to create the options for order.
LESSON 14: Pagination and Ordering | 481
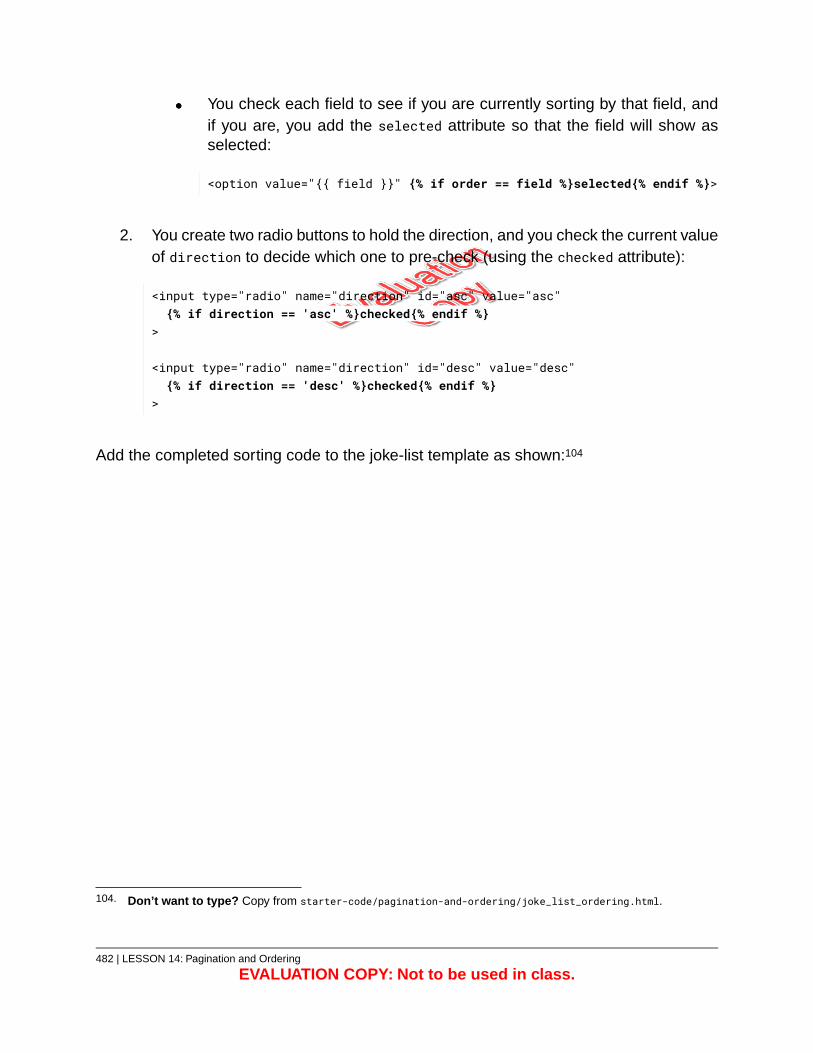
You check each field to see if you are currently sorting by that field, andif you are, you add the selected attribute so that the field will show asselected:
<option value="{{ field }}" {% if order == field %}selected{% endif %}>
2. You create two radio buttons to hold the direction, and you check the current valueof direction to decide which one to pre-check (using the checked attribute):
<input type="radio" name="direction" id="asc" value="asc"{% if direction == 'asc' %}checked{% endif %}
>
<input type="radio" name="direction" id="desc" value="desc"{% if direction == 'desc' %}checked{% endif %}
>
Add the completed sorting code to the joke-list template as shown:104
104. Don’t want to type? Copy from starter-code/pagination-and-ordering/joke_list_ordering.html.
482 | LESSON 14: Pagination and Ordering
EVALUATION COPY: Not to be used in class.
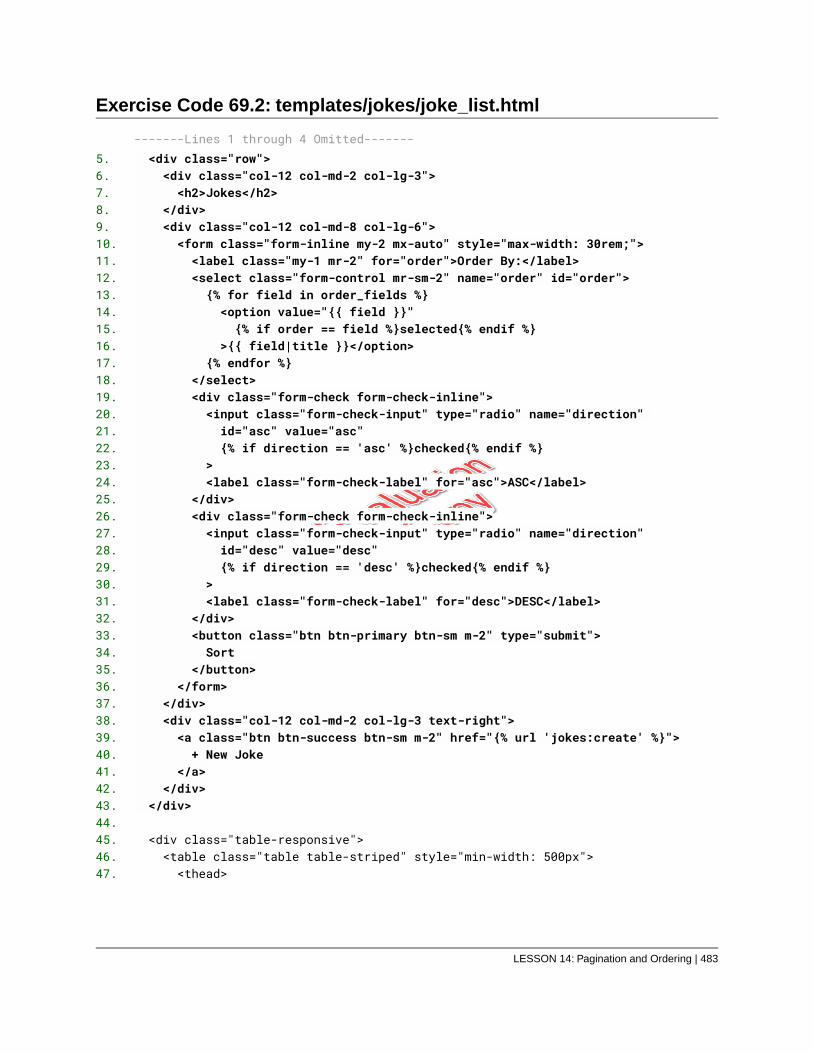
Exercise Code 69.2: templates/jokes/joke_list.html
-------Lines 1 through 4 Omitted-------<div class="row">5.<div class="col-12 col-md-2 col-lg-3">6.<h2>Jokes</h2>7.
</div>8.<div class="col-12 col-md-8 col-lg-6">9.<form class="form-inline my-2 mx-auto" style="max-width: 30rem;">10.<label class="my-1 mr-2" for="order">Order By:</label>11.<select class="form-control mr-sm-2" name="order" id="order">12.{% for field in order_fields %}13.<option value="{{ field }}"14.{% if order == field %}selected{% endif %}15.
>{{ field|title }}</option>16.{% endfor %}17.
</select>18.<div class="form-check form-check-inline">19.<input class="form-check-input" type="radio" name="direction"20.id="asc" value="asc"21.{% if direction == 'asc' %}checked{% endif %}22.
>23.<label class="form-check-label" for="asc">ASC</label>24.
</div>25.<div class="form-check form-check-inline">26.<input class="form-check-input" type="radio" name="direction"27.id="desc" value="desc"28.{% if direction == 'desc' %}checked{% endif %}29.
>30.<label class="form-check-label" for="desc">DESC</label>31.
</div>32.<button class="btn btn-primary btn-sm m-2" type="submit">33.Sort34.
</button>35.</form>36.
</div>37.<div class="col-12 col-md-2 col-lg-3 text-right">38.<a class="btn btn-success btn-sm m-2" href="{% url 'jokes:create' %}">39.+ New Joke40.
</a>41.</div>42.
</div>43.44.
<div class="table-responsive">45.<table class="table table-striped" style="min-width: 500px">46.<thead>47.
LESSON 14: Pagination and Ordering | 483
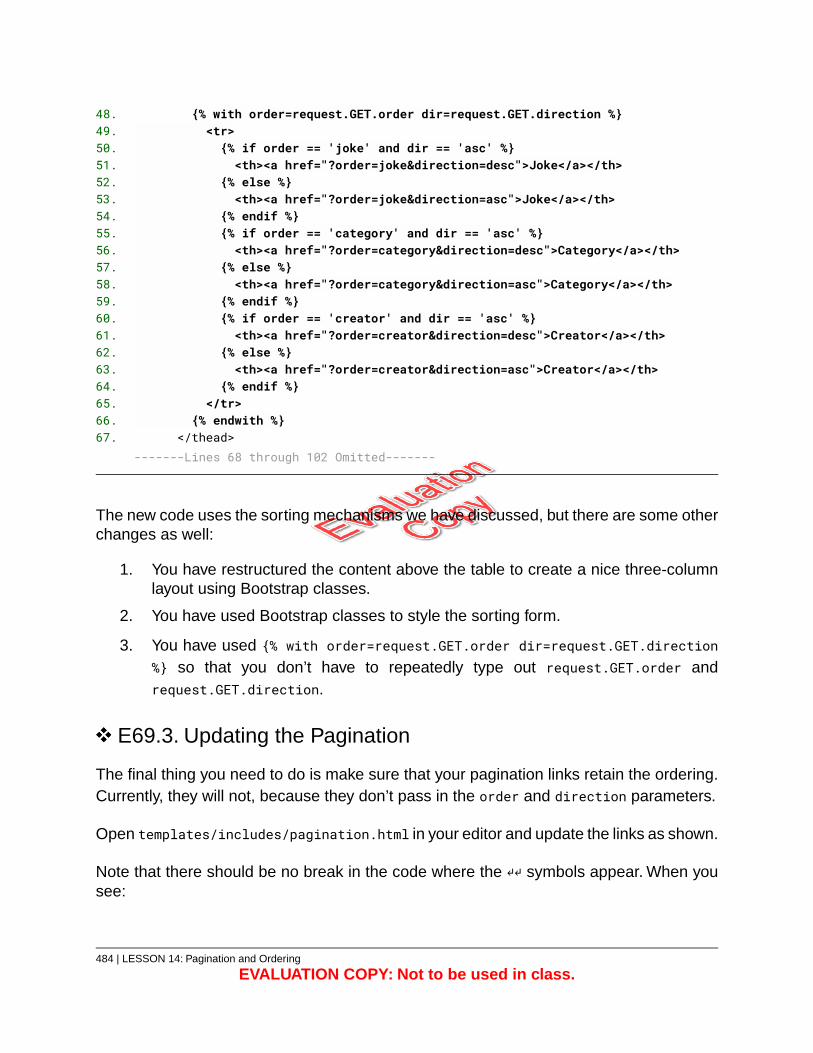
{% with order=request.GET.order dir=request.GET.direction %}48.<tr>49.{% if order == 'joke' and dir == 'asc' %}50.<th><a href="?order=joke&direction=desc">Joke</a></th>51.
{% else %}52.<th><a href="?order=joke&direction=asc">Joke</a></th>53.
{% endif %}54.{% if order == 'category' and dir == 'asc' %}55.<th><a href="?order=category&direction=desc">Category</a></th>56.
{% else %}57.<th><a href="?order=category&direction=asc">Category</a></th>58.
{% endif %}59.{% if order == 'creator' and dir == 'asc' %}60.<th><a href="?order=creator&direction=desc">Creator</a></th>61.
{% else %}62.<th><a href="?order=creator&direction=asc">Creator</a></th>63.
{% endif %}64.</tr>65.
{% endwith %}66.</thead>67.
-------Lines 68 through 102 Omitted-------
The new code uses the sorting mechanisms we have discussed, but there are some otherchanges as well:
1. You have restructured the content above the table to create a nice three-columnlayout using Bootstrap classes.
2. You have used Bootstrap classes to style the sorting form.
3. You have used {% with order=request.GET.order dir=request.GET.direction
%} so that you don’t have to repeatedly type out request.GET.order andrequest.GET.direction.
E69.3. Updating the Pagination
The final thing you need to do is make sure that your pagination links retain the ordering.Currently, they will not, because they don’t pass in the order and direction parameters.
Open templates/includes/pagination.html in your editor and update the links as shown.
Note that there should be no break in the code where the ↵↵ symbols appear. When yousee:
484 | LESSON 14: Pagination and Ordering
EVALUATION COPY: Not to be used in class.
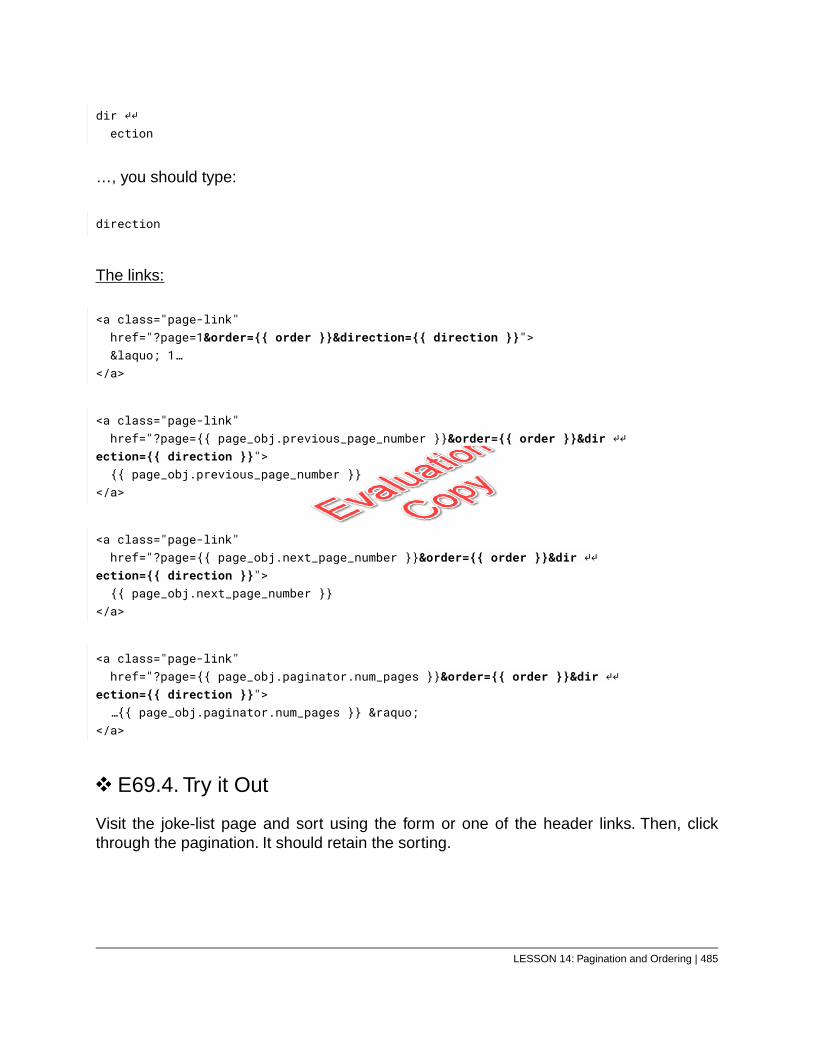
dir ↵↵ ection
…, you should type:
direction
The links:
<a class="page-link"href="?page=1&order={{ order }}&direction={{ direction }}">« 1…
</a>
<a class="page-link"href="?page={{ page_obj.previous_page_number }}&order={{ order }}&dir ↵↵
ection={{ direction }}">{{ page_obj.previous_page_number }}
</a>
<a class="page-link"href="?page={{ page_obj.next_page_number }}&order={{ order }}&dir ↵↵
ection={{ direction }}">{{ page_obj.next_page_number }}
</a>
<a class="page-link"href="?page={{ page_obj.paginator.num_pages }}&order={{ order }}&dir ↵↵
ection={{ direction }}">…{{ page_obj.paginator.num_pages }} »
</a>
E69.4. Try it Out
Visit the joke-list page and sort using the form or one of the header links. Then, clickthrough the pagination. It should retain the sorting.
LESSON 14: Pagination and Ordering | 485
Git Commit
Commit your code to Git.
Conclusion
In this lesson, you have learned to add pagination and ordering to a ListView. You havealso learned to load data from fixtures.
486 | LESSON 14: Pagination and Ordering
EVALUATION COPY: Not to be used in class.
LESSON 15Advanced Querying and Search
Topics Covered
Advanced querying.
Field Lookups.
Q Objects.
Search.
Aggregation.
Annotation.
The Django Debug Toolbar.
Prefetching queries.
Introduction
In this lesson, you will learn to use advanced querying, to implement search, and to getjoke ratings by averaging aggregate data. You will also learn to optimize your code usinga third-party app called Django Debug Toolbar.
❋
LESSON 15: Advanced Querying and Search | 487
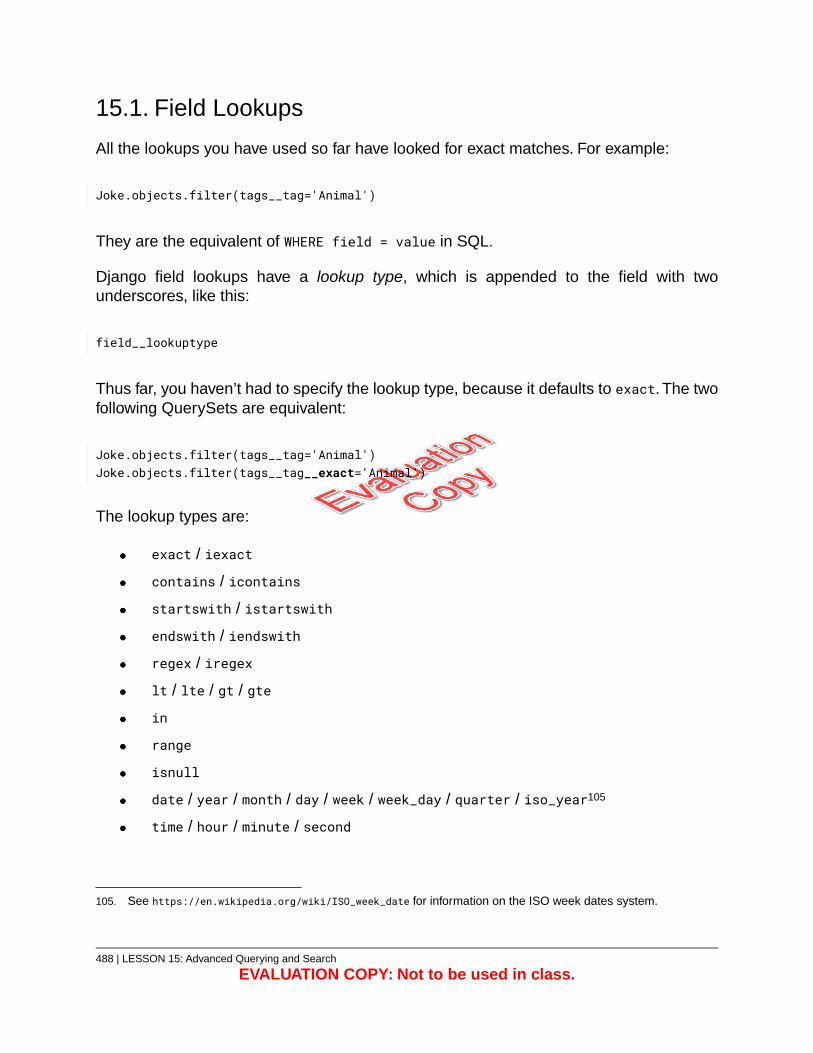
15.1. Field Lookups
All the lookups you have used so far have looked for exact matches. For example:
Joke.objects.filter(tags__tag='Animal')
They are the equivalent of WHERE field = value in SQL.
Django field lookups have a lookup type, which is appended to the field with twounderscores, like this:
field__lookuptype
Thus far, you haven’t had to specify the lookup type, because it defaults to exact. The twofollowing QuerySets are equivalent:
Joke.objects.filter(tags__tag='Animal')Joke.objects.filter(tags__tag__exact='Animal')
The lookup types are:
exact / iexact
contains / icontains
startswith / istartswith
endswith / iendswith
regex / iregex
lt / lte / gt / gte
in
range
isnull
date / year / month / day / week / week_day / quarter / iso_year105
time / hour / minute / second
105. See https://en.wikipedia.org/wiki/ISO_week_date for information on the ISO week dates system.
488 | LESSON 15: Advanced Querying and Search
EVALUATION COPY: Not to be used in class.
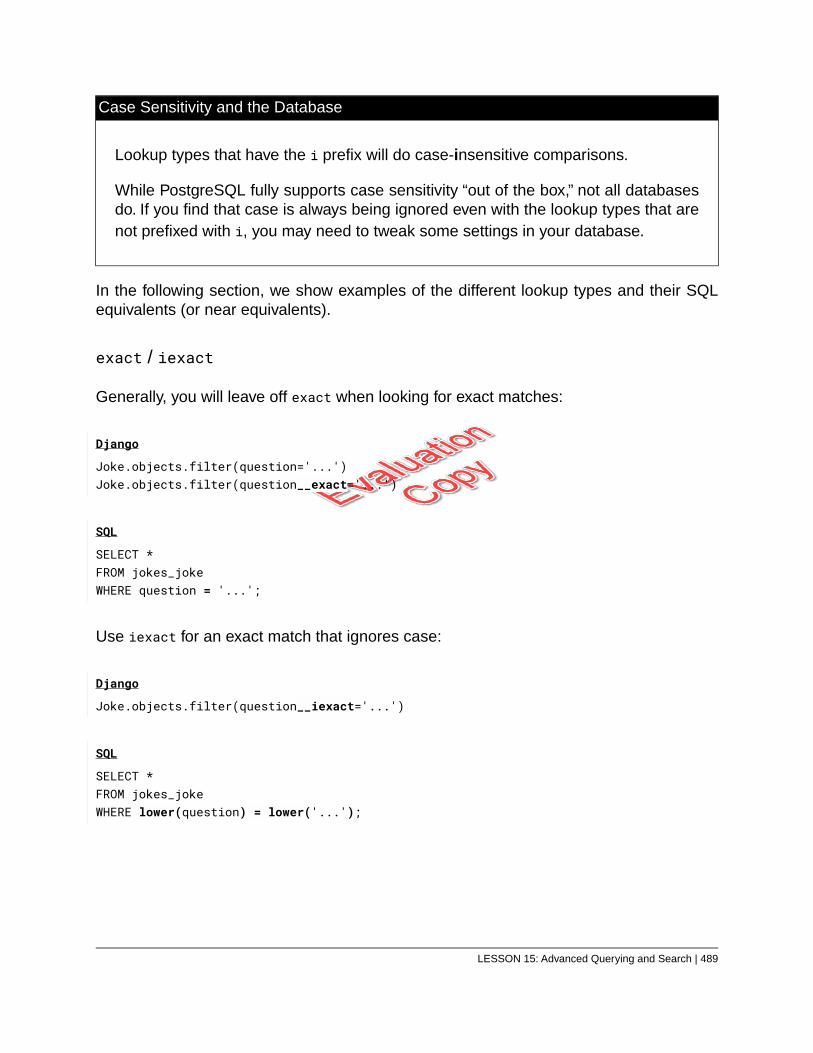
Case Sensitivity and the Database
Lookup types that have the i prefix will do case-insensitive comparisons.
While PostgreSQL fully supports case sensitivity “out of the box,” not all databasesdo. If you find that case is always being ignored even with the lookup types that arenot prefixed with i, you may need to tweak some settings in your database.
In the following section, we show examples of the different lookup types and their SQLequivalents (or near equivalents).
exact / iexact
Generally, you will leave off exact when looking for exact matches:
Django
Joke.objects.filter(question='...')Joke.objects.filter(question__exact='...')
SQL
SELECT *FROM jokes_jokeWHERE question = '...';
Use iexact for an exact match that ignores case:
Django
Joke.objects.filter(question__iexact='...')
SQL
SELECT *FROM jokes_jokeWHERE lower(question) = lower('...');
LESSON 15: Advanced Querying and Search | 489
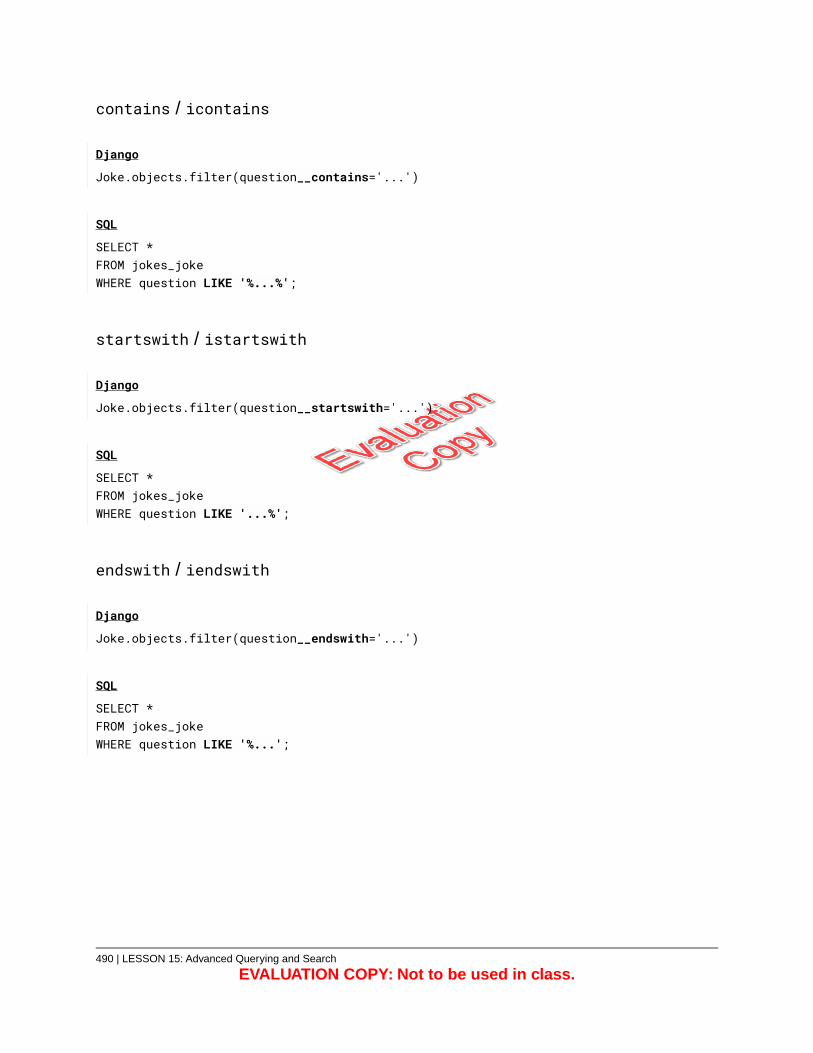
contains / icontains
Django
Joke.objects.filter(question__contains='...')
SQL
SELECT *FROM jokes_jokeWHERE question LIKE '%...%';
startswith / istartswith
Django
Joke.objects.filter(question__startswith='...')
SQL
SELECT *FROM jokes_jokeWHERE question LIKE '...%';
endswith / iendswith
Django
Joke.objects.filter(question__endswith='...')
SQL
SELECT *FROM jokes_jokeWHERE question LIKE '%...';
490 | LESSON 15: Advanced Querying and Search
EVALUATION COPY: Not to be used in class.
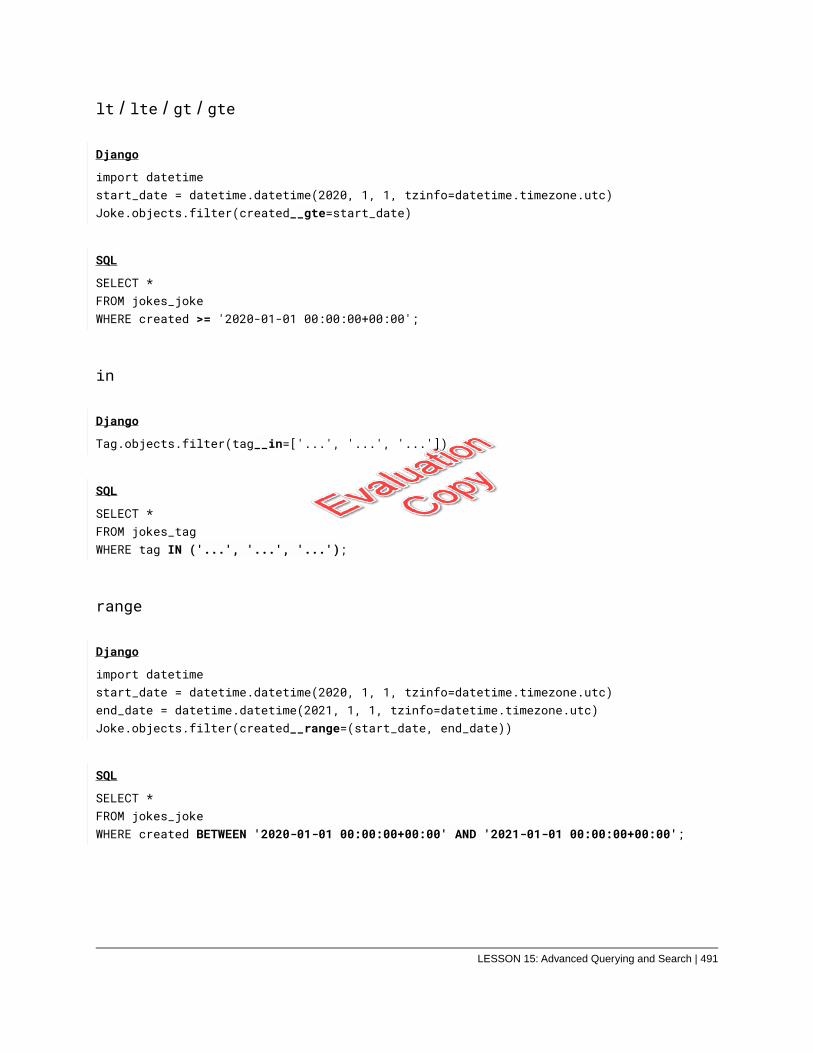
lt / lte / gt / gte
Django
import datetimestart_date = datetime.datetime(2020, 1, 1, tzinfo=datetime.timezone.utc)Joke.objects.filter(created__gte=start_date)
SQL
SELECT *FROM jokes_jokeWHERE created >= '2020-01-01 00:00:00+00:00';
in
Django
Tag.objects.filter(tag__in=['...', '...', '...'])
SQL
SELECT *FROM jokes_tagWHERE tag IN ('...', '...', '...');
range
Django
import datetimestart_date = datetime.datetime(2020, 1, 1, tzinfo=datetime.timezone.utc)end_date = datetime.datetime(2021, 1, 1, tzinfo=datetime.timezone.utc)Joke.objects.filter(created__range=(start_date, end_date))
SQL
SELECT *FROM jokes_jokeWHERE created BETWEEN '2020-01-01 00:00:00+00:00' AND '2021-01-01 00:00:00+00:00';
LESSON 15: Advanced Querying and Search | 491
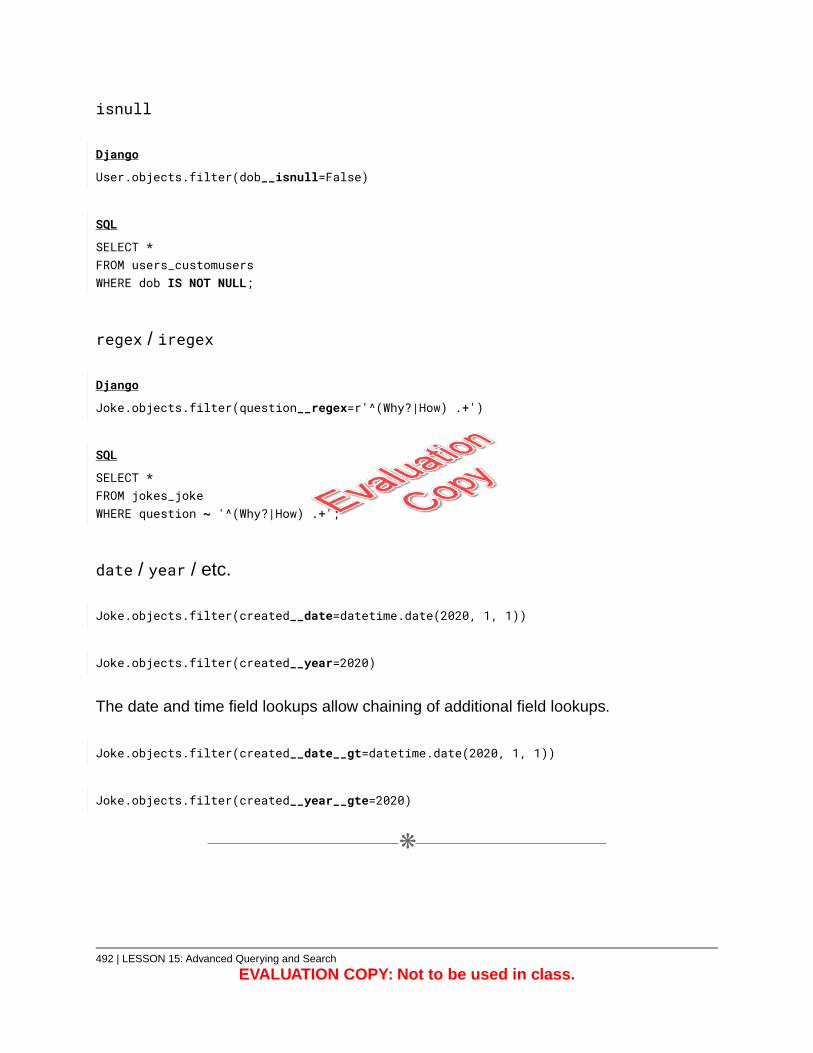
isnull
Django
User.objects.filter(dob__isnull=False)
SQL
SELECT *FROM users_customusersWHERE dob IS NOT NULL;
regex / iregex
Django
Joke.objects.filter(question__regex=r'^(Why?|How) .+')
SQL
SELECT *FROM jokes_jokeWHERE question ~ '^(Why?|How) .+';
date / year / etc.
Joke.objects.filter(created__date=datetime.date(2020, 1, 1))
Joke.objects.filter(created__year=2020)
The date and time field lookups allow chaining of additional field lookups.
Joke.objects.filter(created__date__gt=datetime.date(2020, 1, 1))
Joke.objects.filter(created__year__gte=2020)
❋
492 | LESSON 15: Advanced Querying and Search
EVALUATION COPY: Not to be used in class.
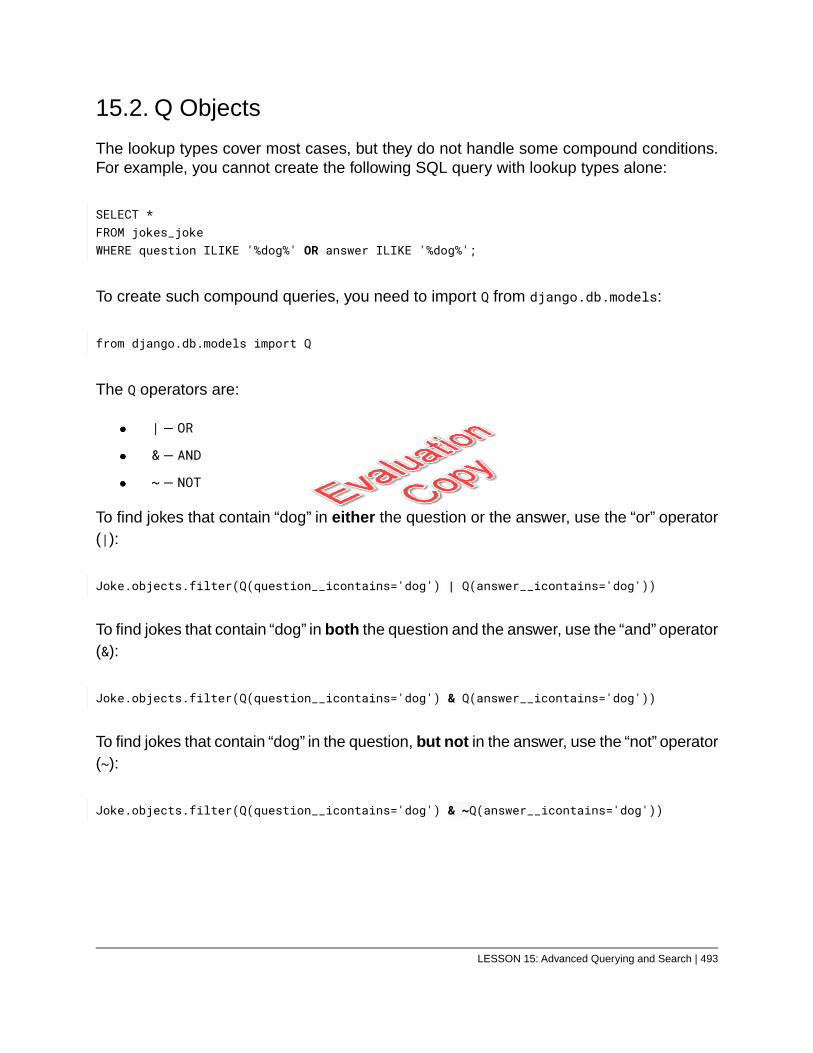
15.2. Q Objects
The lookup types cover most cases, but they do not handle some compound conditions.For example, you cannot create the following SQL query with lookup types alone:
SELECT *FROM jokes_jokeWHERE question ILIKE '%dog%' OR answer ILIKE '%dog%';
To create such compound queries, you need to import Q from django.db.models:
from django.db.models import Q
The Q operators are:
| – OR
& – AND
~ – NOT
To find jokes that contain “dog” in either the question or the answer, use the “or” operator(|):
Joke.objects.filter(Q(question__icontains='dog') | Q(answer__icontains='dog'))
To find jokes that contain “dog” in both the question and the answer, use the “and” operator(&):
Joke.objects.filter(Q(question__icontains='dog') & Q(answer__icontains='dog'))
To find jokes that contain “dog” in the question, but not in the answer, use the “not” operator(~):
Joke.objects.filter(Q(question__icontains='dog') & ~Q(answer__icontains='dog'))
LESSON 15: Advanced Querying and Search | 493
Exercise 70: Limiting Results by Category,Tag, or Creator
20 to 30 minutes
In this exercise, you will add paths to the URLConf to list jokes in a specific category, witha specific tag, or created by a specific user.You will then use the get_queryset() methodof the ListView to appropriately limit the QuerySet.
E70.1. URLConf
Open jokes/urls.py and add the following three paths to the end of urlpatterns:
path('category/<slug>/', JokeListView.as_view(), name='category'),path('tag/<slug>/', JokeListView.as_view(), name='tag'),path('creator/<username>/', JokeListView.as_view(), name='creator'),
Notice that all the paths use JokeListView.as_view(). You will need to modify that viewso that it returns the appropriate QuerySet for the given path.
E70.2. JokeListView
The default QuerySet for a ListView is model.objects.all() where model is the value ofthe model attribute. For example, JokeListView begins with:
class JokeListView(ListView):model = Joke
The implied QuerySet for the view is Joke.objects.all().
The QuerySet can be changed using the get_queryset() method. In jokes/views.py, addthe following method to JokeListView:
494 | LESSON 15: Advanced Querying and Search
EVALUATION COPY: Not to be used in class.

def get_queryset(self):ordering = self.get_ordering()qs = Joke.objects.all()
if 'slug' in self.kwargs: # Filter by category or tagslug = self.kwargs['slug']if '/category' in self.request.path_info:
qs = qs.filter(category__slug=slug)if '/tag' in self.request.path_info:
qs = qs.filter(tags__slug=slug)elif 'username' in self.kwargs: # Filter by joke creator
username = self.kwargs['username']qs = qs.filter(user__username=username)
return qs.order_by(ordering)
Things to notice:
1. You use the view’s get_ordering() method that you wrote earlier to get theordering.
2. You assign Joke.objects.all() to qs to get the unfiltered queryset.
3. If 'slug' is in self.kwargs, then the path is one of these two:
path('category/<slug>/', JokeListView.as_view(), name='category'),path('tag/<slug>/', JokeListView.as_view(), name='tag'),
To figure out which one it is, you look in self.request.path_info, which is a stringcontaining the full path from the web root (e.g., /jokes/tag/animal/). And thenyou filter accordingly:
if '/category' in self.request.path_info:qs = qs.filter(category__slug=slug)
if '/tag' in self.request.path_info:qs = qs.filter(tags__slug=slug)
4. Otherwise, you check to see if 'username' is in self.kwargs, which will be Truefor this path:
path('creator/<username>/', JokeListView.as_view(), name='creator')
LESSON 15: Advanced Querying and Search | 495
In this case, you limit the QuerySet to jokes created by the specified creator:
username = self.kwargs['username']qs = qs.filter(user__username=username)
5. If neither 'slug' nor 'username' show up in self.kwargs then you leave the defaultquery as is and it will return all the jokes.
6. Finally, you return the ordered QuerySet:
return qs.order_by(ordering)
E70.3. The Templates
1. Open templates/_base.html in your editor.
2. Modify the link with the text “My Django Jokes” as follows:
<a class="dropdown-item"href="{% url 'jokes:creator' user.username %}?order={{ order }}&dir ↵↵
ection={{ direction }}">My Django Jokes
</a>
Now, when you visit that link, it will list the jokes you have created. Notice that theURL in the link includes the order and direction parameters, so that the sortingis maintained when the link is clicked.
3. Open templates/jokes/joke_list.html in your editor.
4. Wrap {{ joke.category.category }}, {{ tag.tag }}, and {{ joke.user.username
}} in links:
<a href="{% url 'jokes:category' joke.category.slug %}?order={{ order }}&dir ↵↵ection={{ direction }}">{{ joke.category.category }}
</a>
496 | LESSON 15: Advanced Querying and Search
EVALUATION COPY: Not to be used in class.
For the tag link, replace the existing span element with an a element:
<a href="{% url 'jokes:tag' tag.slug %}?order={{ order }}&dir ↵↵ection={{ direction }}"class="badge badge-pill badge-secondary">{{ tag.tag }}</a>
<a href="{% url 'jokes:creator' joke.user.username %}?order={{ order }}&dir ↵↵ection={{ direction }}">{{ joke.user.username }}
</a>
E70.4. Try it Out
From the jokes-list page, click a category, tag, or username. The jokes should be filteredaccordingly. If there is an error or the jokes do not appear to be filtering correctly, examinethe URL. These are some examples of valid URLs:
1. http://127.0.0.1:8000/jokes/creator/nbeasley/?order=updated&direction=desc
2. http://127.0.0.1:8000/jokes/tag/animal/?order=category&direction=asc
3. http://127.0.0.1:8000/jokes/category/brain-teaser/?order=joke&direction=de
sc
Git Commit
Commit your code to Git.
LESSON 15: Advanced Querying and Search | 497
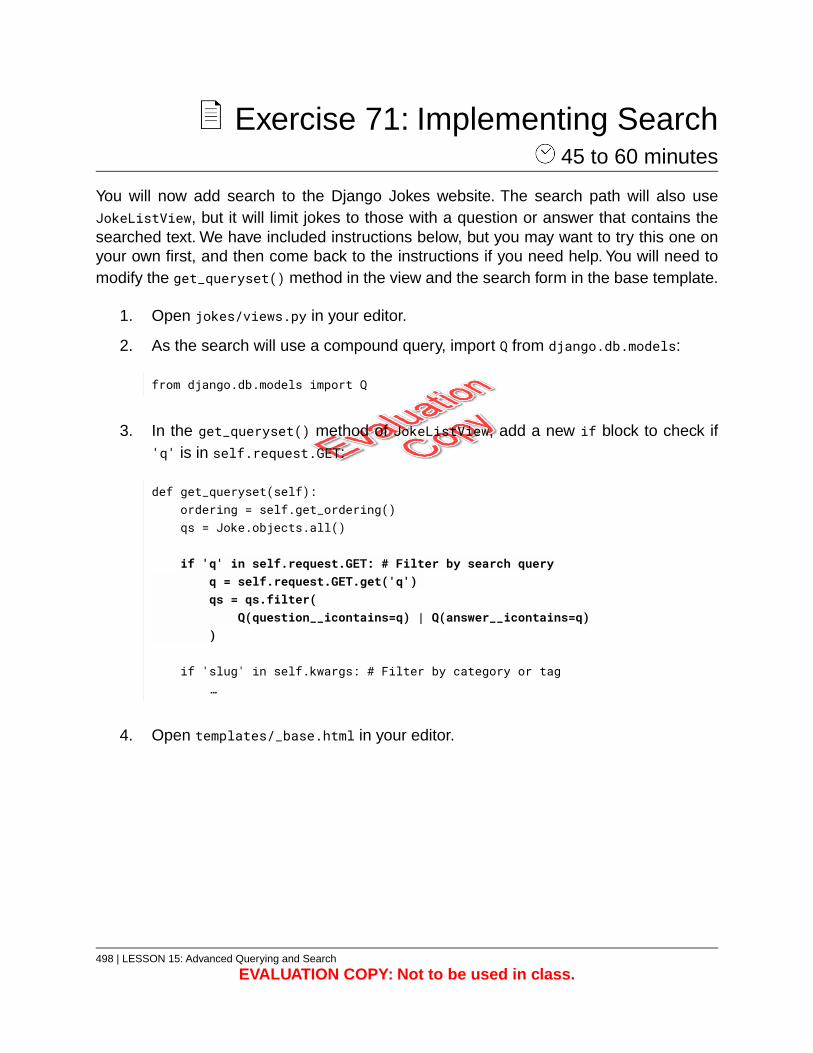
Exercise 71: Implementing Search 45 to 60 minutes
You will now add search to the Django Jokes website. The search path will also useJokeListView, but it will limit jokes to those with a question or answer that contains thesearched text. We have included instructions below, but you may want to try this one onyour own first, and then come back to the instructions if you need help. You will need tomodify the get_queryset() method in the view and the search form in the base template.
1. Open jokes/views.py in your editor.
2. As the search will use a compound query, import Q from django.db.models:
from django.db.models import Q
3. In the get_queryset() method of JokeListView, add a new if block to check if'q' is in self.request.GET:
def get_queryset(self):ordering = self.get_ordering()qs = Joke.objects.all()
if 'q' in self.request.GET: # Filter by search queryq = self.request.GET.get('q')qs = qs.filter(
Q(question__icontains=q) | Q(answer__icontains=q))
if 'slug' in self.kwargs: # Filter by category or tag…
4. Open templates/_base.html in your editor.
498 | LESSON 15: Advanced Querying and Search
EVALUATION COPY: Not to be used in class.
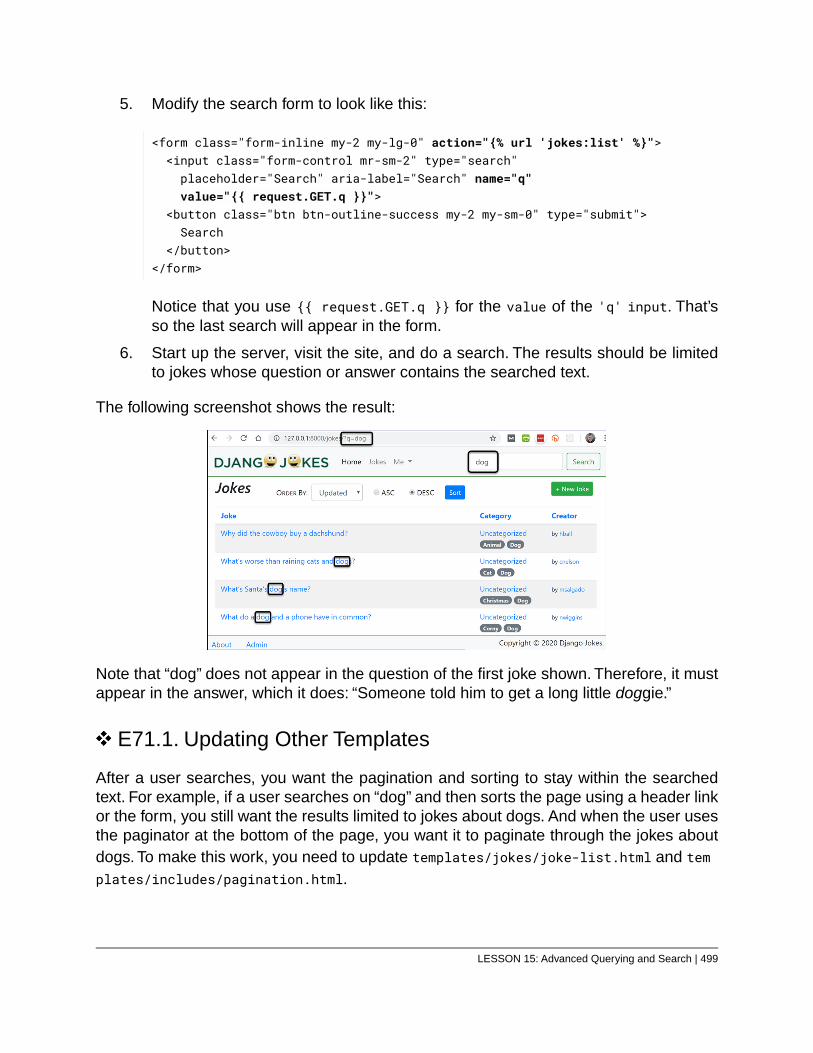
5. Modify the search form to look like this:
<form class="form-inline my-2 my-lg-0" action="{% url 'jokes:list' %}"><input class="form-control mr-sm-2" type="search"placeholder="Search" aria-label="Search" name="q"value="{{ request.GET.q }}">
<button class="btn btn-outline-success my-2 my-sm-0" type="submit">Search
</button></form>
Notice that you use {{ request.GET.q }} for the value of the 'q' input. That’sso the last search will appear in the form.
6. Start up the server, visit the site, and do a search. The results should be limitedto jokes whose question or answer contains the searched text.
The following screenshot shows the result:
Note that “dog” does not appear in the question of the first joke shown. Therefore, it mustappear in the answer, which it does: “Someone told him to get a long little doggie.”
E71.1. Updating Other Templates
After a user searches, you want the pagination and sorting to stay within the searchedtext. For example, if a user searches on “dog” and then sorts the page using a header linkor the form, you still want the results limited to jokes about dogs. And when the user usesthe paginator at the bottom of the page, you want it to paginate through the jokes aboutdogs. To make this work, you need to update templates/jokes/joke-list.html and templates/includes/pagination.html.
LESSON 15: Advanced Querying and Search | 499
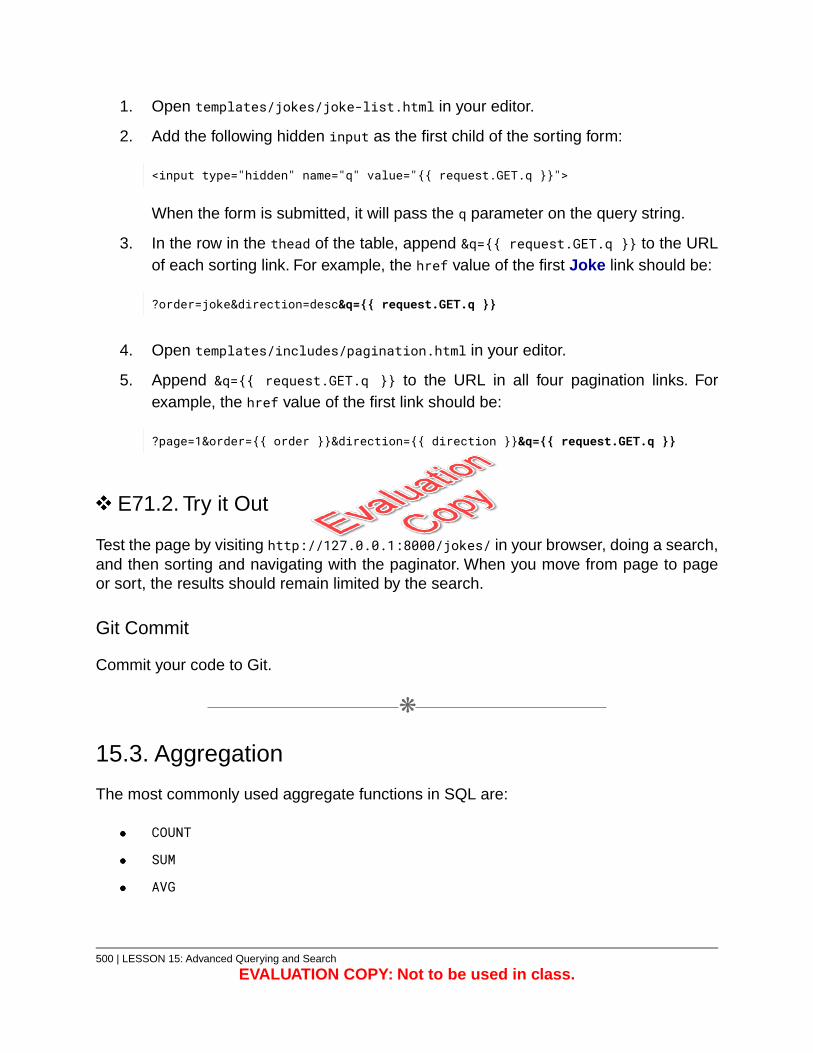
1. Open templates/jokes/joke-list.html in your editor.
2. Add the following hidden input as the first child of the sorting form:
<input type="hidden" name="q" value="{{ request.GET.q }}">
When the form is submitted, it will pass the q parameter on the query string.
3. In the row in the thead of the table, append &q={{ request.GET.q }} to the URLof each sorting link. For example, the href value of the first Joke link should be:
?order=joke&direction=desc&q={{ request.GET.q }}
4. Open templates/includes/pagination.html in your editor.
5. Append &q={{ request.GET.q }} to the URL in all four pagination links. Forexample, the href value of the first link should be:
?page=1&order={{ order }}&direction={{ direction }}&q={{ request.GET.q }}
E71.2. Try it Out
Test the page by visiting http://127.0.0.1:8000/jokes/ in your browser, doing a search,and then sorting and navigating with the paginator. When you move from page to pageor sort, the results should remain limited by the search.
Git Commit
Commit your code to Git.
❋
15.3. Aggregation
The most commonly used aggregate functions in SQL are:
COUNT
SUM
AVG
500 | LESSON 15: Advanced Querying and Search
EVALUATION COPY: Not to be used in class.
MAX
MIN
Django QuerySets include an aggregate() method to create aggregate queries. To use it,you must first import the aggregate methods you want to use from django.db.models.Open the Django shell and run the following code:
(.venv) …/projects/djangojokes.com> python manage.py shell>>> from django.db.models import Avg, Count, Max, Min, Sum
Now, import JokeVote:
>>> from jokes.models import JokeVote
The following code gets the average vote for all JokeVotes:
>>> JokeVote.objects.aggregate(Avg('vote')){'vote__avg': -0.0106}
The generated SQL would look something like this:
SELECT AVG(vote) AS vote__avgFROM jokes_jokevote;
Notice that the aggregate() method returns a dictionary, so it is terminal, meaning thatyou cannot chain additional filters after it. Default names for the dictionary keys are createdusing the field name and the lowercase aggregate method name separated by a doubleunderscore (e.g., “vote__avg”). However, you can assign key names like this:
>>> JokeVote.objects.aggregate(average_vote=Avg('vote')){'average_vote': -0.0106}
You can get multiple aggregate fields at a time:
>>> JokeVote.objects.aggregate(average_vote=Avg('vote'), num_votes=Count('vote')){'average_vote': -0.0106, 'num_votes': 10000}
LESSON 15: Advanced Querying and Search | 501
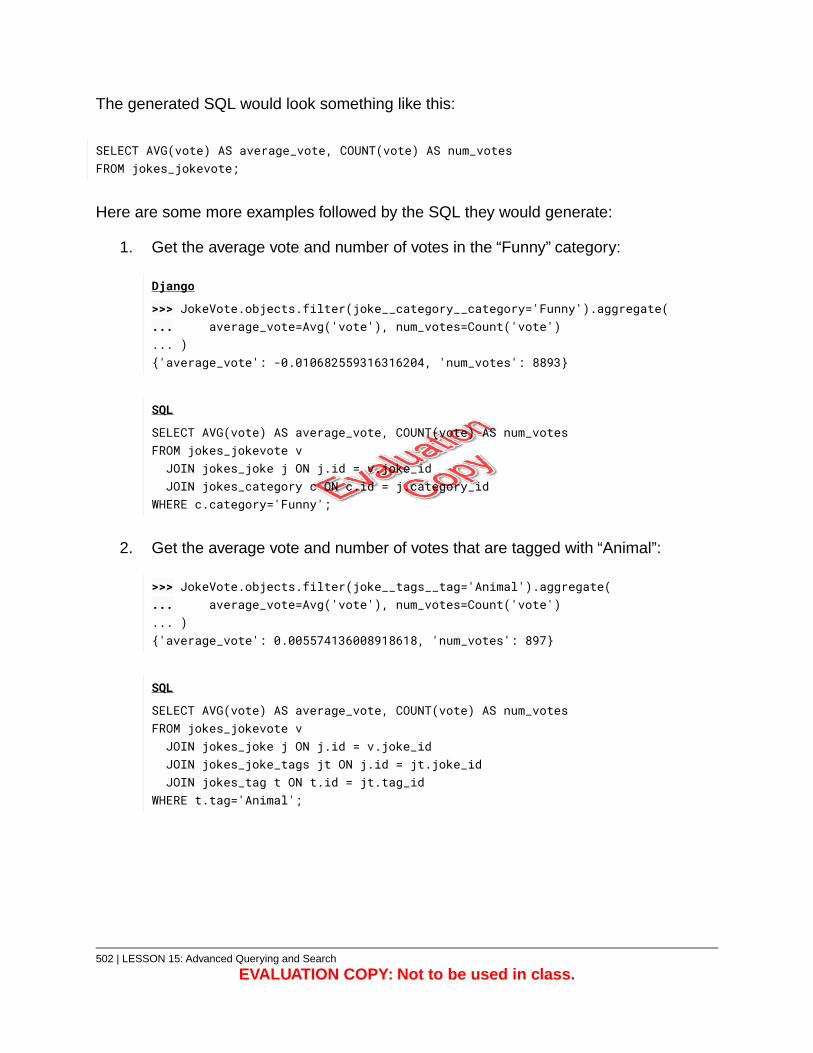
The generated SQL would look something like this:
SELECT AVG(vote) AS average_vote, COUNT(vote) AS num_votesFROM jokes_jokevote;
Here are some more examples followed by the SQL they would generate:
1. Get the average vote and number of votes in the “Funny” category:
Django
>>> JokeVote.objects.filter(joke__category__category='Funny').aggregate(... average_vote=Avg('vote'), num_votes=Count('vote')... ){'average_vote': -0.010682559316316204, 'num_votes': 8893}
SQL
SELECT AVG(vote) AS average_vote, COUNT(vote) AS num_votesFROM jokes_jokevote vJOIN jokes_joke j ON j.id = v.joke_idJOIN jokes_category c ON c.id = j.category_id
WHERE c.category='Funny';
2. Get the average vote and number of votes that are tagged with “Animal”:
>>> JokeVote.objects.filter(joke__tags__tag='Animal').aggregate(... average_vote=Avg('vote'), num_votes=Count('vote')... ){'average_vote': 0.005574136008918618, 'num_votes': 897}
SQL
SELECT AVG(vote) AS average_vote, COUNT(vote) AS num_votesFROM jokes_jokevote vJOIN jokes_joke j ON j.id = v.joke_idJOIN jokes_joke_tags jt ON j.id = jt.joke_idJOIN jokes_tag t ON t.id = jt.tag_id
WHERE t.tag='Animal';
502 | LESSON 15: Advanced Querying and Search
EVALUATION COPY: Not to be used in class.
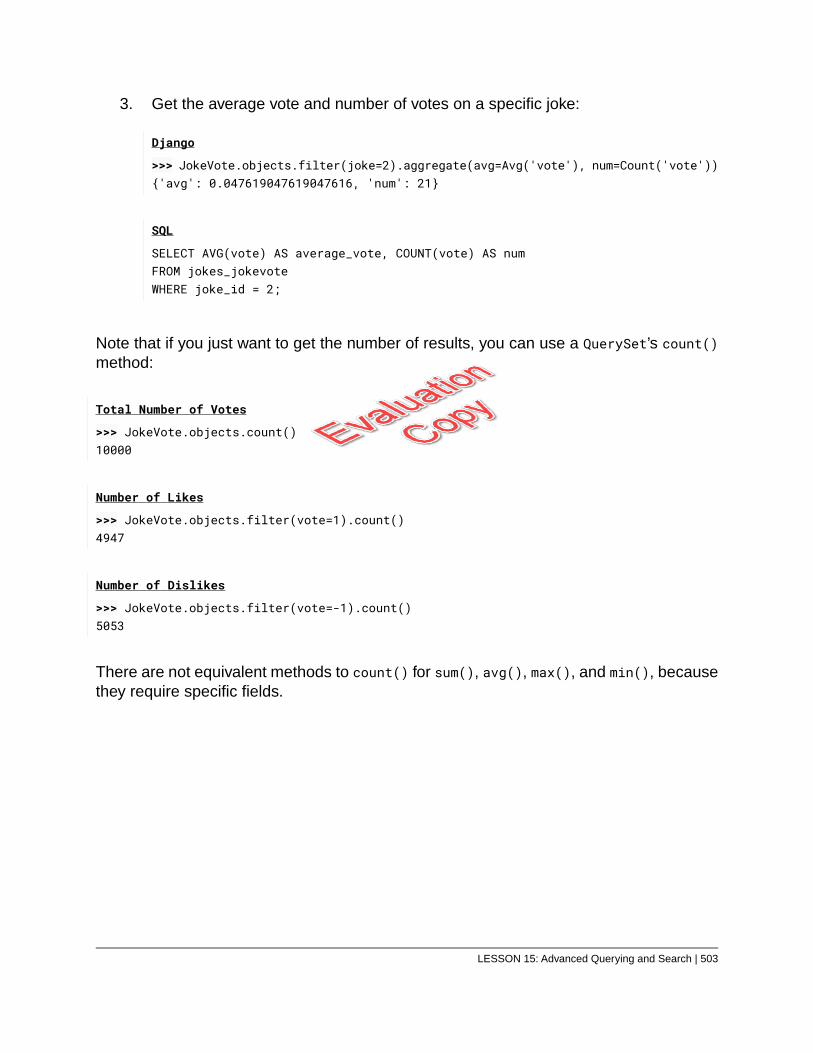
3. Get the average vote and number of votes on a specific joke:
Django
>>> JokeVote.objects.filter(joke=2).aggregate(avg=Avg('vote'), num=Count('vote')){'avg': 0.047619047619047616, 'num': 21}
SQL
SELECT AVG(vote) AS average_vote, COUNT(vote) AS numFROM jokes_jokevoteWHERE joke_id = 2;
Note that if you just want to get the number of results, you can use a QuerySet’s count()method:
Total Number of Votes
>>> JokeVote.objects.count()10000
Number of Likes
>>> JokeVote.objects.filter(vote=1).count()4947
Number of Dislikes
>>> JokeVote.objects.filter(vote=-1).count()5053
There are not equivalent methods to count() for sum(), avg(), max(), and min(), becausethey require specific fields.
LESSON 15: Advanced Querying and Search | 503
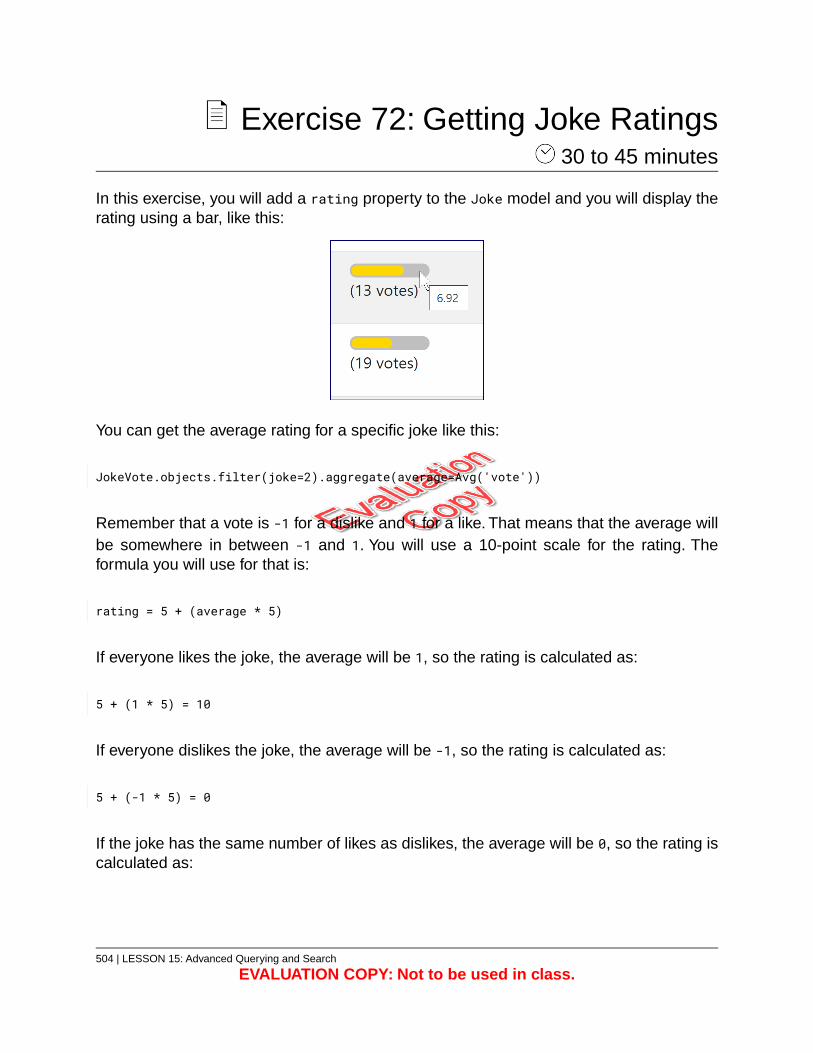
Exercise 72: Getting Joke Ratings 30 to 45 minutes
In this exercise, you will add a rating property to the Joke model and you will display therating using a bar, like this:
You can get the average rating for a specific joke like this:
JokeVote.objects.filter(joke=2).aggregate(average=Avg('vote'))
Remember that a vote is -1 for a dislike and 1 for a like. That means that the average willbe somewhere in between -1 and 1. You will use a 10-point scale for the rating. Theformula you will use for that is:
rating = 5 + (average * 5)
If everyone likes the joke, the average will be 1, so the rating is calculated as:
5 + (1 * 5) = 10
If everyone dislikes the joke, the average will be -1, so the rating is calculated as:
5 + (-1 * 5) = 0
If the joke has the same number of likes as dislikes, the average will be 0, so the rating iscalculated as:
504 | LESSON 15: Advanced Querying and Search
EVALUATION COPY: Not to be used in class.
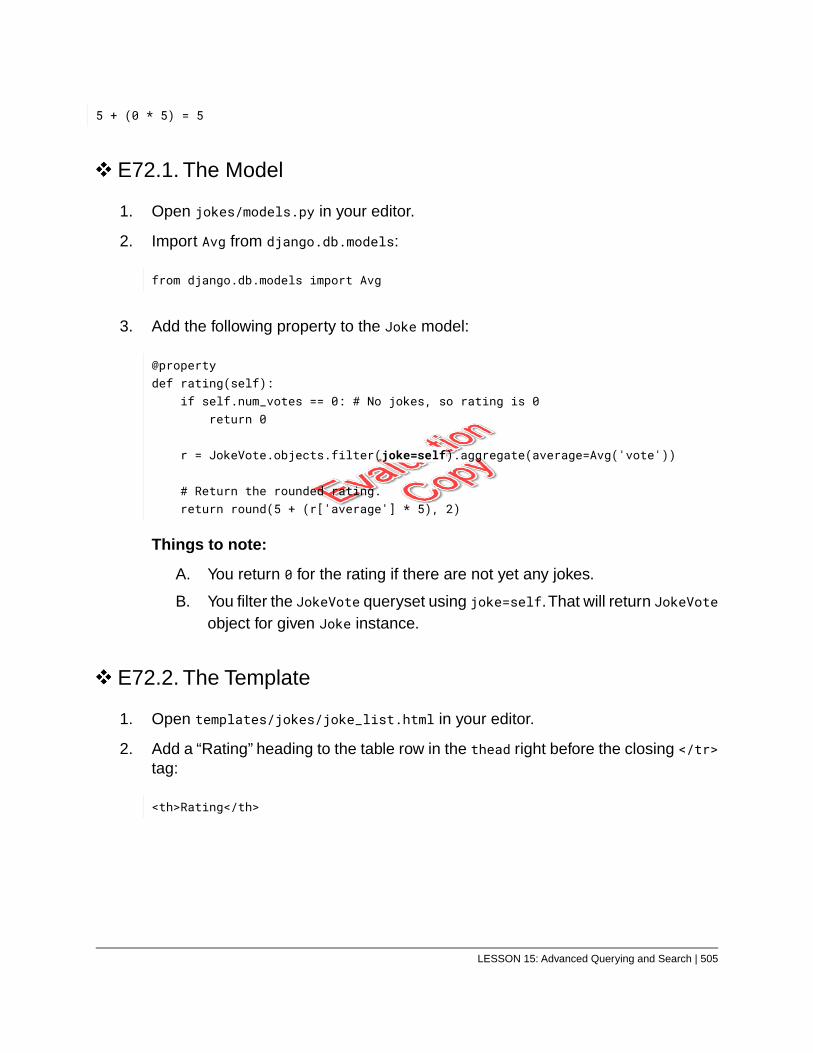
5 + (0 * 5) = 5
E72.1. The Model
1. Open jokes/models.py in your editor.
2. Import Avg from django.db.models:
from django.db.models import Avg
3. Add the following property to the Joke model:
@propertydef rating(self):
if self.num_votes == 0: # No jokes, so rating is 0return 0
r = JokeVote.objects.filter(joke=self).aggregate(average=Avg('vote'))
# Return the rounded rating.return round(5 + (r['average'] * 5), 2)
Things to note:
A. You return 0 for the rating if there are not yet any jokes.
B. You filter the JokeVote queryset using joke=self.That will return JokeVoteobject for given Joke instance.
E72.2. The Template
1. Open templates/jokes/joke_list.html in your editor.
2. Add a “Rating” heading to the table row in the thead right before the closing </tr>tag:
<th>Rating</th>
LESSON 15: Advanced Querying and Search | 505
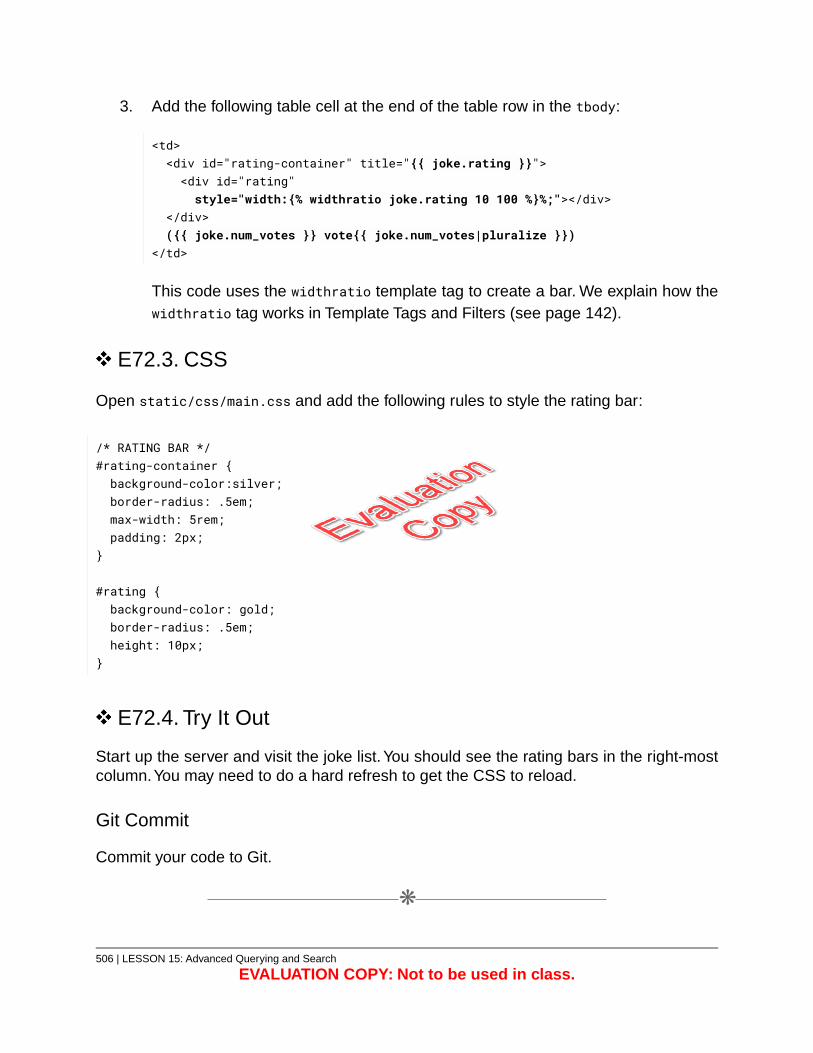
3. Add the following table cell at the end of the table row in the tbody:
<td><div id="rating-container" title="{{ joke.rating }}"><div id="rating"style="width:{% widthratio joke.rating 10 100 %}%;"></div>
</div>({{ joke.num_votes }} vote{{ joke.num_votes|pluralize }})
</td>
This code uses the widthratio template tag to create a bar. We explain how thewidthratio tag works in Template Tags and Filters (see page 142).
E72.3. CSS
Open static/css/main.css and add the following rules to style the rating bar:
/* RATING BAR */#rating-container {background-color:silver;border-radius: .5em;max-width: 5rem;padding: 2px;
}
#rating {background-color: gold;border-radius: .5em;height: 10px;
}
E72.4. Try It Out
Start up the server and visit the joke list. You should see the rating bars in the right-mostcolumn.You may need to do a hard refresh to get the CSS to reload.
Git Commit
Commit your code to Git.
❋
506 | LESSON 15: Advanced Querying and Search
EVALUATION COPY: Not to be used in class.
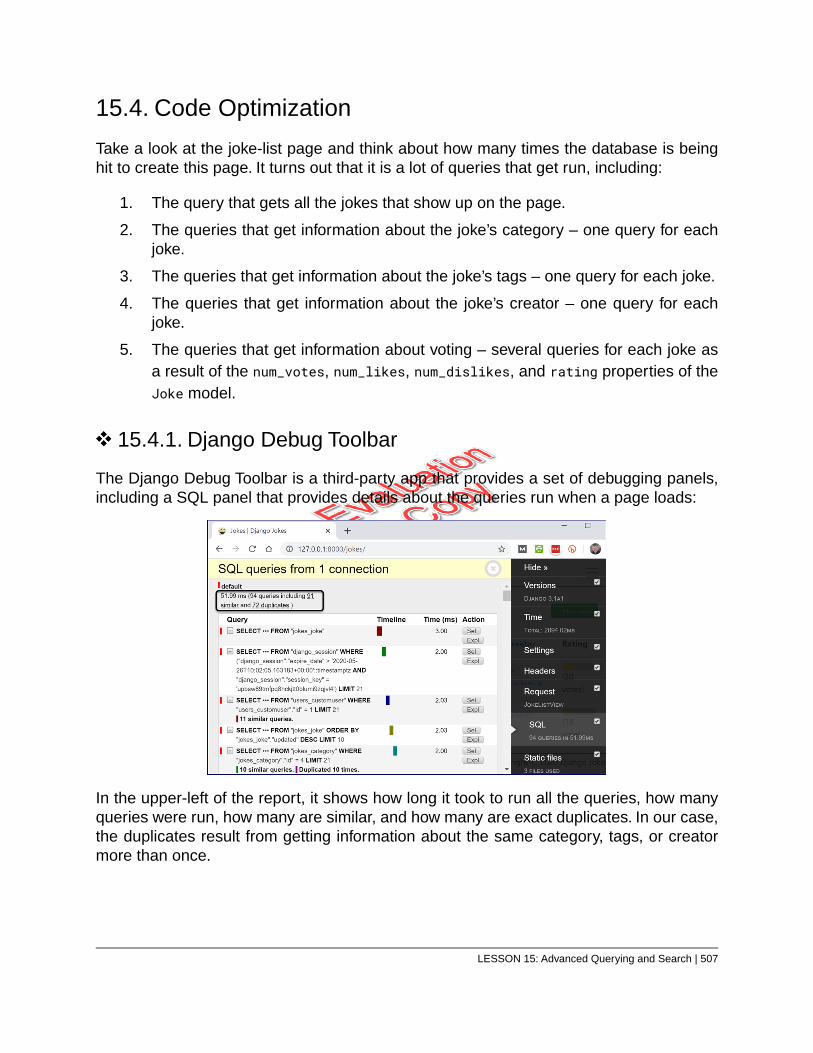
15.4. Code Optimization
Take a look at the joke-list page and think about how many times the database is beinghit to create this page. It turns out that it is a lot of queries that get run, including:
1. The query that gets all the jokes that show up on the page.
2. The queries that get information about the joke’s category – one query for eachjoke.
3. The queries that get information about the joke’s tags – one query for each joke.
4. The queries that get information about the joke’s creator – one query for eachjoke.
5. The queries that get information about voting – several queries for each joke asa result of the num_votes, num_likes, num_dislikes, and rating properties of theJoke model.
15.4.1. Django Debug Toolbar
The Django Debug Toolbar is a third-party app that provides a set of debugging panels,including a SQL panel that provides details about the queries run when a page loads:
In the upper-left of the report, it shows how long it took to run all the queries, how manyqueries were run, how many are similar, and how many are exact duplicates. In our case,the duplicates result from getting information about the same category, tags, or creatormore than once.
LESSON 15: Advanced Querying and Search | 507
The prefetch_related() Method
The prefetch_related() method of QuerySets is used to get data about the related objectsat the same time as it gets the data for the main object, thereby reducing the number ofseparate queries.
In the next exercise, you will install and use the Django Debug Toolbar and useprefetch_related() to reduce the number of times the database is hit.
508 | LESSON 15: Advanced Querying and Search
EVALUATION COPY: Not to be used in class.
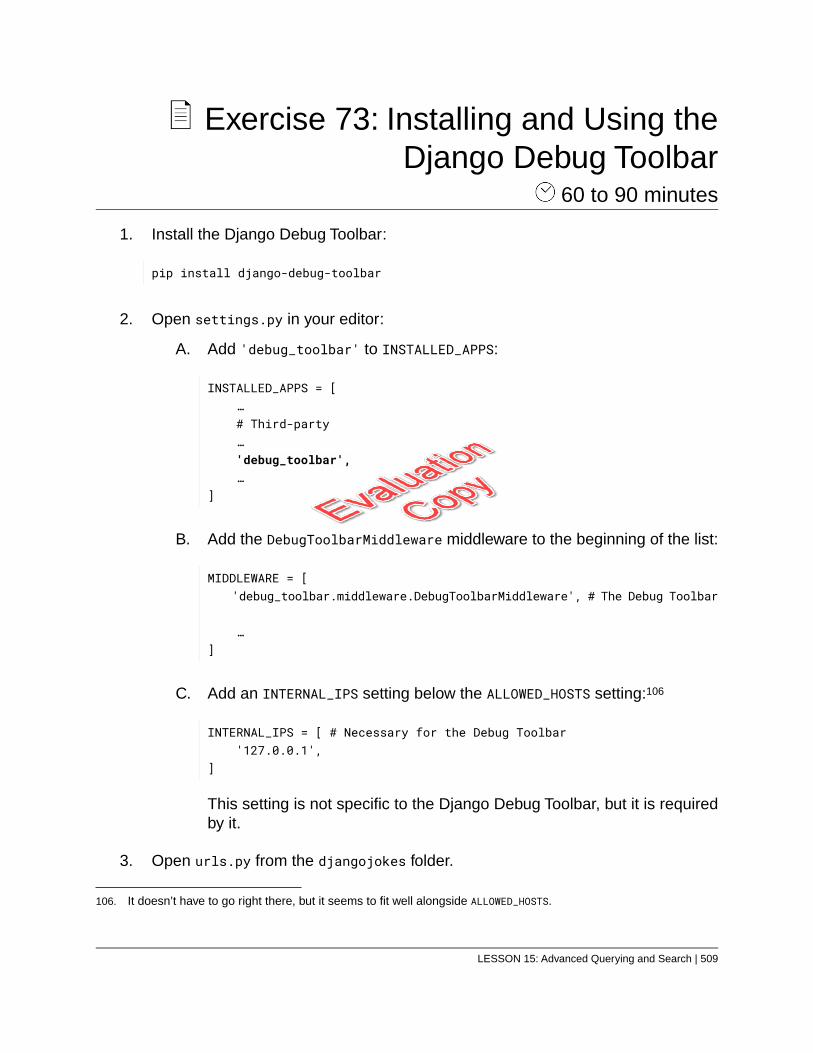
Exercise 73: Installing and Using theDjango Debug Toolbar
60 to 90 minutes
1. Install the Django Debug Toolbar:
pip install django-debug-toolbar
2. Open settings.py in your editor:
A. Add 'debug_toolbar' to INSTALLED_APPS:
INSTALLED_APPS = […# Third-party…'debug_toolbar',…
]
B. Add the DebugToolbarMiddleware middleware to the beginning of the list:
MIDDLEWARE = ['debug_toolbar.middleware.DebugToolbarMiddleware', # The Debug Toolbar
…]
C. Add an INTERNAL_IPS setting below the ALLOWED_HOSTS setting:106
INTERNAL_IPS = [ # Necessary for the Debug Toolbar'127.0.0.1',
]
This setting is not specific to the Django Debug Toolbar, but it is requiredby it.
3. Open urls.py from the djangojokes folder.
106. It doesn’t have to go right there, but it seems to fit well alongside ALLOWED_HOSTS.
LESSON 15: Advanced Querying and Search | 509
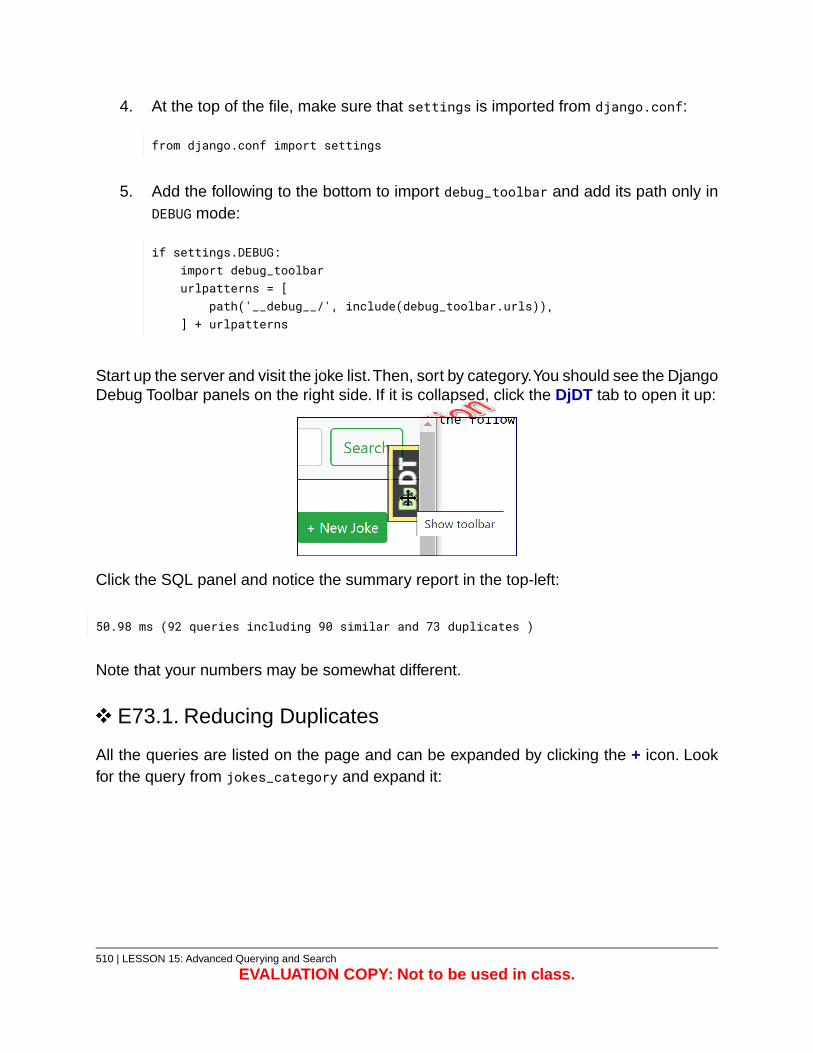
4. At the top of the file, make sure that settings is imported from django.conf:
from django.conf import settings
5. Add the following to the bottom to import debug_toolbar and add its path only inDEBUG mode:
if settings.DEBUG:import debug_toolbarurlpatterns = [
path('__debug__/', include(debug_toolbar.urls)),] + urlpatterns
Start up the server and visit the joke list.Then, sort by category.You should see the DjangoDebug Toolbar panels on the right side. If it is collapsed, click the DjDT tab to open it up:
Click the SQL panel and notice the summary report in the top-left:
50.98 ms (92 queries including 90 similar and 73 duplicates )
Note that your numbers may be somewhat different.
E73.1. Reducing Duplicates
All the queries are listed on the page and can be expanded by clicking the + icon. Lookfor the query from jokes_category and expand it:
510 | LESSON 15: Advanced Querying and Search
EVALUATION COPY: Not to be used in class.
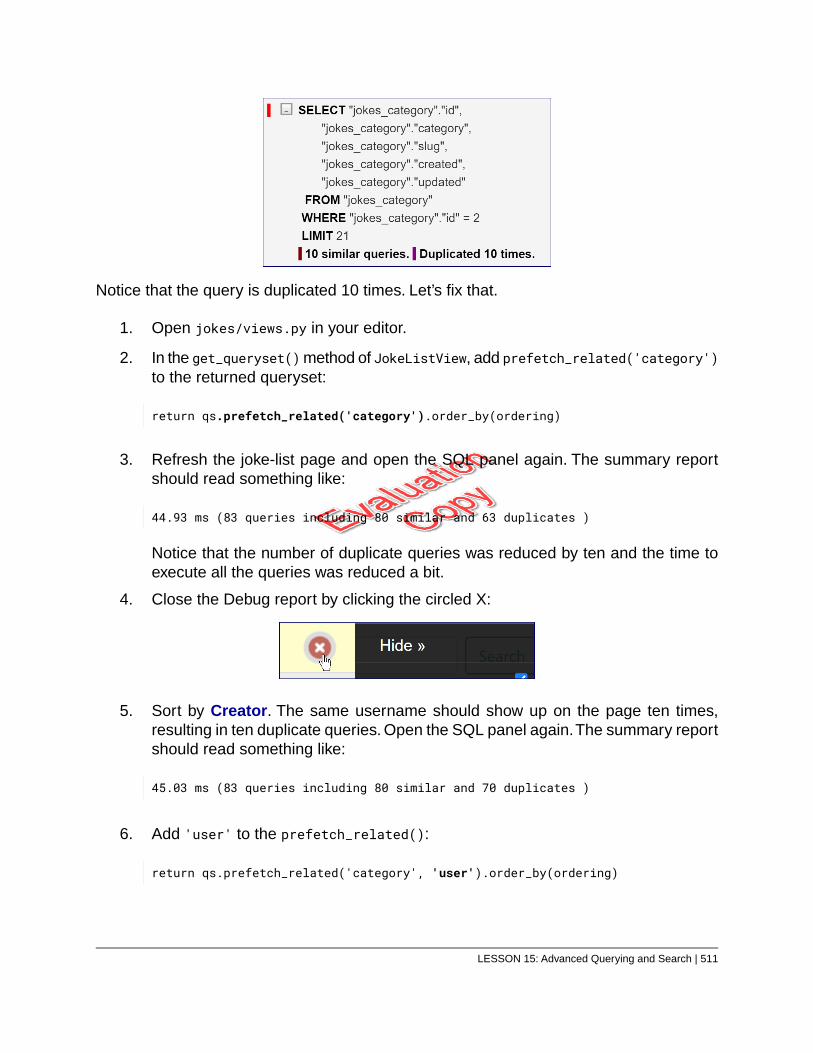
Notice that the query is duplicated 10 times. Let’s fix that.
1. Open jokes/views.py in your editor.
2. In the get_queryset() method of JokeListView, add prefetch_related('category')to the returned queryset:
return qs.prefetch_related('category').order_by(ordering)
3. Refresh the joke-list page and open the SQL panel again. The summary reportshould read something like:
44.93 ms (83 queries including 80 similar and 63 duplicates )
Notice that the number of duplicate queries was reduced by ten and the time toexecute all the queries was reduced a bit.
4. Close the Debug report by clicking the circled X:
5. Sort by Creator. The same username should show up on the page ten times,resulting in ten duplicate queries. Open the SQL panel again.The summary reportshould read something like:
45.03 ms (83 queries including 80 similar and 70 duplicates )
6. Add 'user' to the prefetch_related():
return qs.prefetch_related('category', 'user').order_by(ordering)
LESSON 15: Advanced Querying and Search | 511
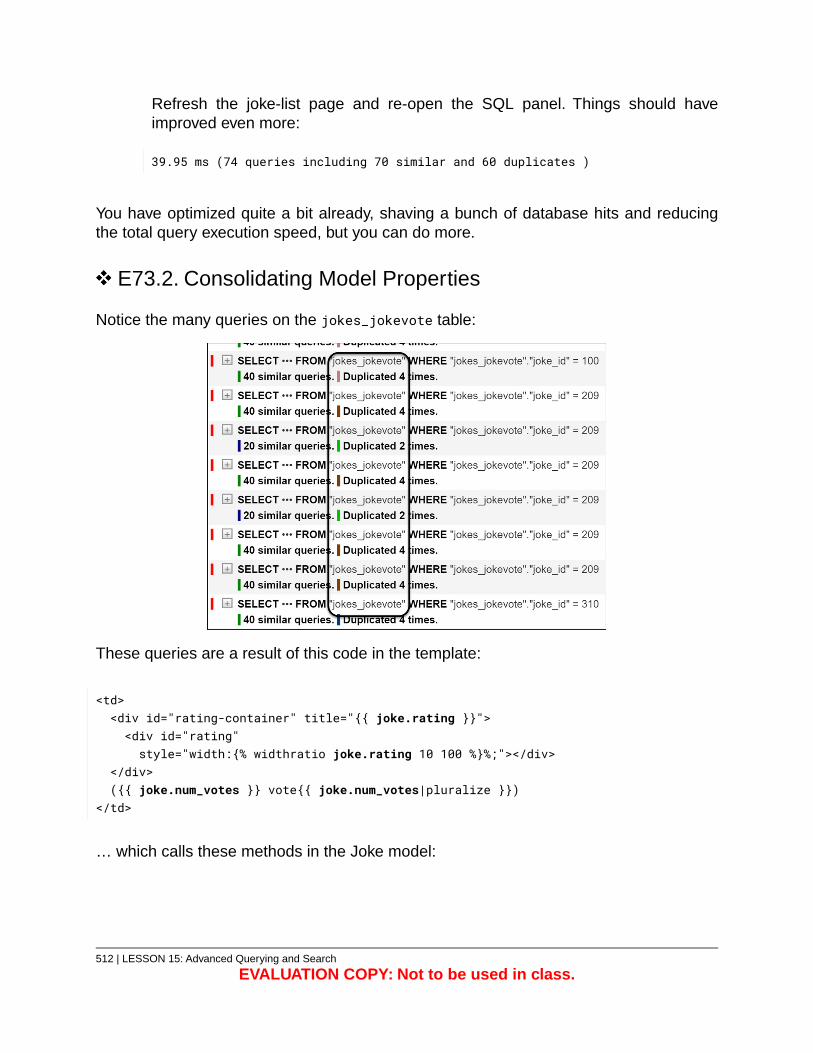
Refresh the joke-list page and re-open the SQL panel. Things should haveimproved even more:
39.95 ms (74 queries including 70 similar and 60 duplicates )
You have optimized quite a bit already, shaving a bunch of database hits and reducingthe total query execution speed, but you can do more.
E73.2. Consolidating Model Properties
Notice the many queries on the jokes_jokevote table:
These queries are a result of this code in the template:
<td><div id="rating-container" title="{{ joke.rating }}"><div id="rating"style="width:{% widthratio joke.rating 10 100 %}%;"></div>
</div>({{ joke.num_votes }} vote{{ joke.num_votes|pluralize }})
</td>
… which calls these methods in the Joke model:
512 | LESSON 15: Advanced Querying and Search
EVALUATION COPY: Not to be used in class.
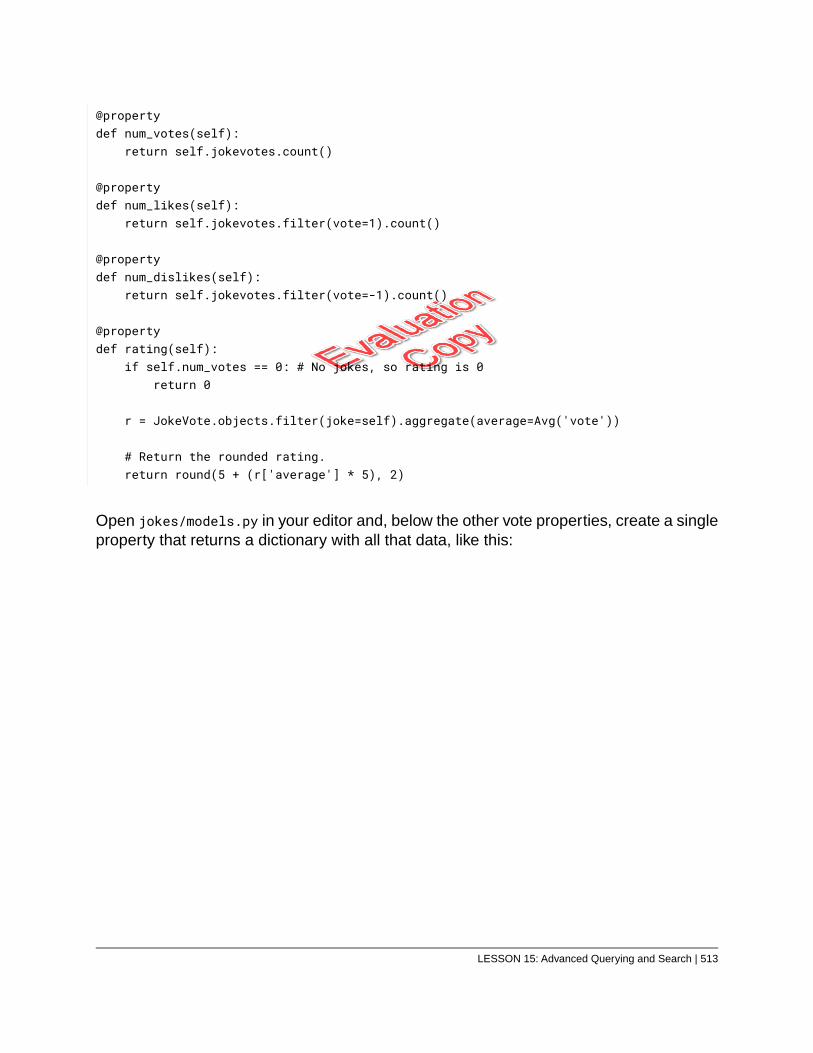
@propertydef num_votes(self):
return self.jokevotes.count()
@propertydef num_likes(self):
return self.jokevotes.filter(vote=1).count()
@propertydef num_dislikes(self):
return self.jokevotes.filter(vote=-1).count()
@propertydef rating(self):
if self.num_votes == 0: # No jokes, so rating is 0return 0
r = JokeVote.objects.filter(joke=self).aggregate(average=Avg('vote'))
# Return the rounded rating.return round(5 + (r['average'] * 5), 2)
Open jokes/models.py in your editor and, below the other vote properties, create a singleproperty that returns a dictionary with all that data, like this:
LESSON 15: Advanced Querying and Search | 513
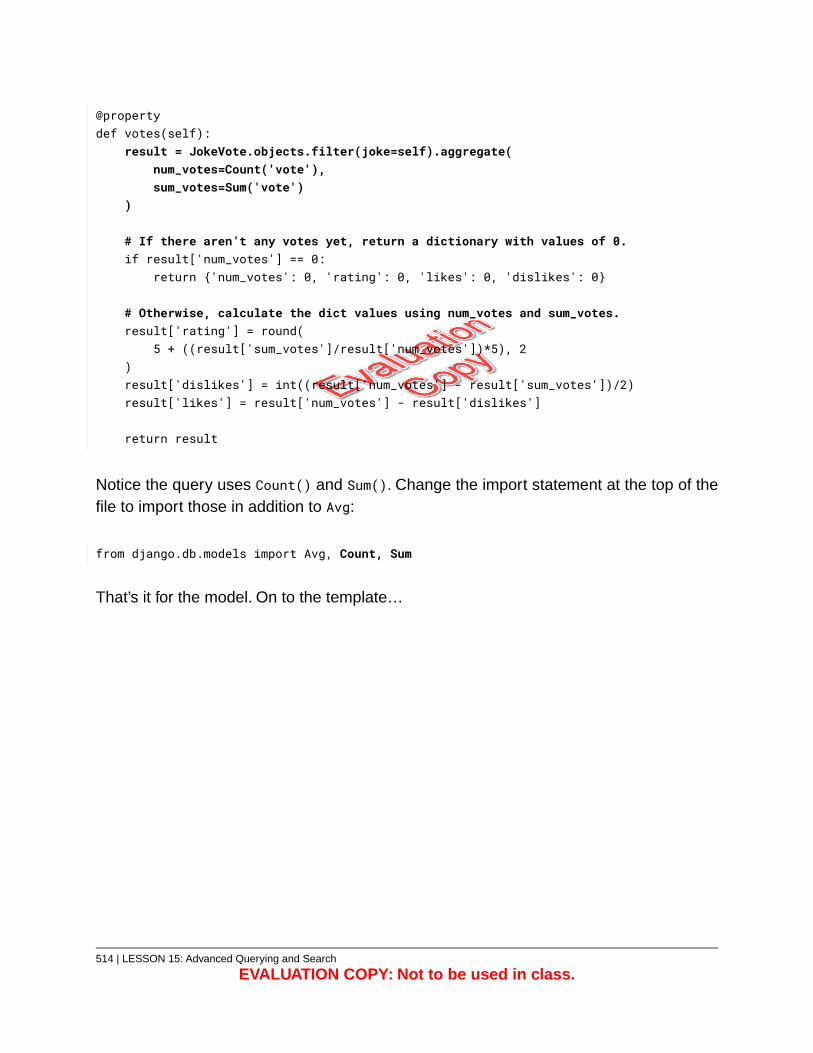
@propertydef votes(self):
result = JokeVote.objects.filter(joke=self).aggregate(num_votes=Count('vote'),sum_votes=Sum('vote')
)
# If there aren’t any votes yet, return a dictionary with values of 0.if result['num_votes'] == 0:
return {'num_votes': 0, 'rating': 0, 'likes': 0, 'dislikes': 0}
# Otherwise, calculate the dict values using num_votes and sum_votes.result['rating'] = round(
5 + ((result['sum_votes']/result['num_votes'])*5), 2)result['dislikes'] = int((result['num_votes'] - result['sum_votes'])/2)result['likes'] = result['num_votes'] - result['dislikes']
return result
Notice the query uses Count() and Sum(). Change the import statement at the top of thefile to import those in addition to Avg:
from django.db.models import Avg, Count, Sum
That’s it for the model. On to the template…
514 | LESSON 15: Advanced Querying and Search
EVALUATION COPY: Not to be used in class.

E73.3. The joke_list.html Template
1. Open joke_list.html from templates/jokes.
2. Modify the “rating-container” div to use the new votes property dictionary in themodel:
<td>{% with votes=joke.votes %}<div id="rating-container" title="{{ votes.rating }}"><div id="rating"style="width:{% widthratio votes.rating 10 100 %}%;"></div>
</div>({{ votes.num_votes }} vote{{ votes.num_votes|pluralize }}){% endwith %}
</td>
Notice how this code uses the with tag to save the results of joke.votes into alocal variable, so that the template doesn’t repeatedly go back to the model (andthen to the database) to get the votes.
With these changes in place, visit http://127.0.0.1:8000/jokes/ again.You should noticea dramatic reduction in the number of queries run:
24.84 ms (24 queries including 20 similar )
E73.4. The joke_detail.html Template
You need to update the joke_detail.html template to use your new votes property:107
107. Don’t want to type? Copy from starter-code/advanced-querying-and-search/joke_detail.html.
LESSON 15: Advanced Querying and Search | 515
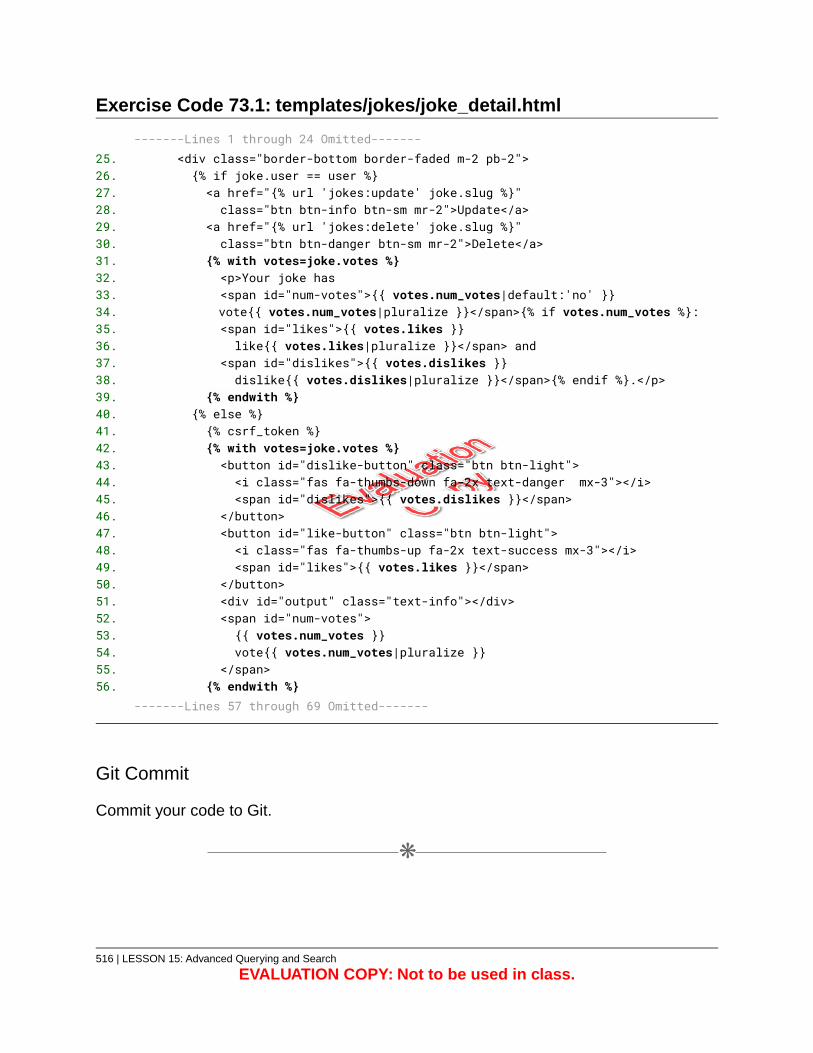
Exercise Code 73.1: templates/jokes/joke_detail.html
-------Lines 1 through 24 Omitted-------<div class="border-bottom border-faded m-2 pb-2">25.{% if joke.user == user %}26.<a href="{% url 'jokes:update' joke.slug %}"27.class="btn btn-info btn-sm mr-2">Update</a>28.
<a href="{% url 'jokes:delete' joke.slug %}"29.class="btn btn-danger btn-sm mr-2">Delete</a>30.
{% with votes=joke.votes %}31.<p>Your joke has32.<span id="num-votes">{{ votes.num_votes|default:'no' }}33.vote{{ votes.num_votes|pluralize }}</span>{% if votes.num_votes %}:34.<span id="likes">{{ votes.likes }}35.like{{ votes.likes|pluralize }}</span> and36.
<span id="dislikes">{{ votes.dislikes }}37.dislike{{ votes.dislikes|pluralize }}</span>{% endif %}.</p>38.
{% endwith %}39.{% else %}40.{% csrf_token %}41.{% with votes=joke.votes %}42.<button id="dislike-button" class="btn btn-light">43.<i class="fas fa-thumbs-down fa-2x text-danger mx-3"></i>44.<span id="dislikes">{{ votes.dislikes }}</span>45.
</button>46.<button id="like-button" class="btn btn-light">47.<i class="fas fa-thumbs-up fa-2x text-success mx-3"></i>48.<span id="likes">{{ votes.likes }}</span>49.
</button>50.<div id="output" class="text-info"></div>51.<span id="num-votes">52.{{ votes.num_votes }}53.vote{{ votes.num_votes|pluralize }}54.
</span>55.{% endwith %}56.
-------Lines 57 through 69 Omitted-------
Git Commit
Commit your code to Git.
❋
516 | LESSON 15: Advanced Querying and Search
EVALUATION COPY: Not to be used in class.
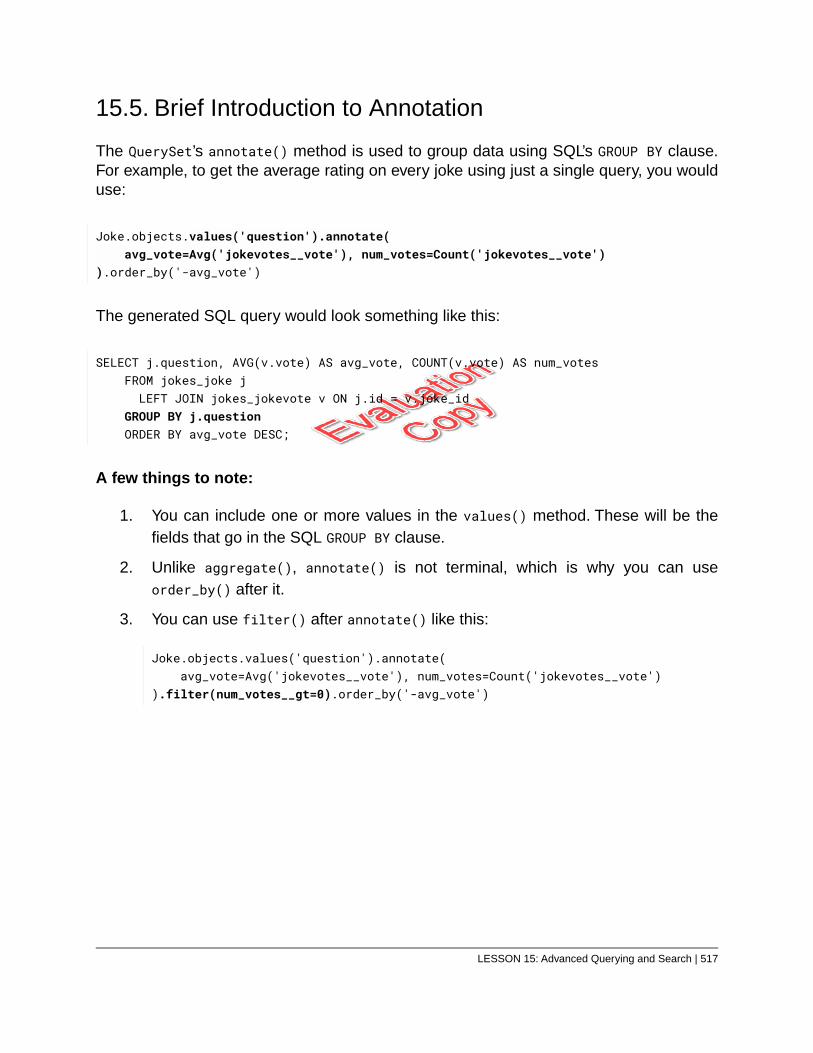
15.5. Brief Introduction to Annotation
The QuerySet’s annotate() method is used to group data using SQL’s GROUP BY clause.For example, to get the average rating on every joke using just a single query, you woulduse:
Joke.objects.values('question').annotate(avg_vote=Avg('jokevotes__vote'), num_votes=Count('jokevotes__vote')
).order_by('-avg_vote')
The generated SQL query would look something like this:
SELECT j.question, AVG(v.vote) AS avg_vote, COUNT(v.vote) AS num_votesFROM jokes_joke jLEFT JOIN jokes_jokevote v ON j.id = v.joke_id
GROUP BY j.questionORDER BY avg_vote DESC;
A few things to note:
1. You can include one or more values in the values() method. These will be thefields that go in the SQL GROUP BY clause.
2. Unlike aggregate(), annotate() is not terminal, which is why you can useorder_by() after it.
3. You can use filter() after annotate() like this:
Joke.objects.values('question').annotate(avg_vote=Avg('jokevotes__vote'), num_votes=Count('jokevotes__vote')
).filter(num_votes__gt=0).order_by('-avg_vote')
LESSON 15: Advanced Querying and Search | 517
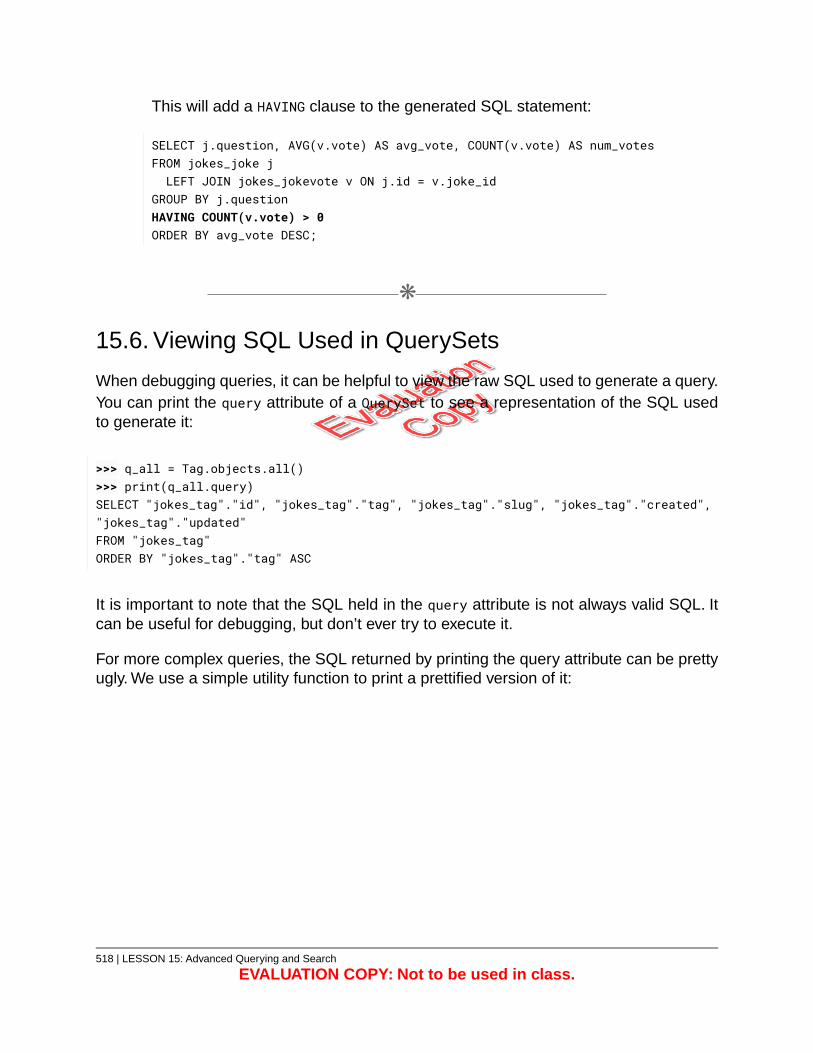
This will add a HAVING clause to the generated SQL statement:
SELECT j.question, AVG(v.vote) AS avg_vote, COUNT(v.vote) AS num_votesFROM jokes_joke jLEFT JOIN jokes_jokevote v ON j.id = v.joke_id
GROUP BY j.questionHAVING COUNT(v.vote) > 0ORDER BY avg_vote DESC;
❋
15.6. Viewing SQL Used in QuerySets
When debugging queries, it can be helpful to view the raw SQL used to generate a query.You can print the query attribute of a QuerySet to see a representation of the SQL usedto generate it:
>>> q_all = Tag.objects.all()>>> print(q_all.query)SELECT "jokes_tag"."id", "jokes_tag"."tag", "jokes_tag"."slug", "jokes_tag"."created","jokes_tag"."updated"FROM "jokes_tag"ORDER BY "jokes_tag"."tag" ASC
It is important to note that the SQL held in the query attribute is not always valid SQL. Itcan be useful for debugging, but don’t ever try to execute it.
For more complex queries, the SQL returned by printing the query attribute can be prettyugly. We use a simple utility function to print a prettified version of it:
518 | LESSON 15: Advanced Querying and Search
EVALUATION COPY: Not to be used in class.
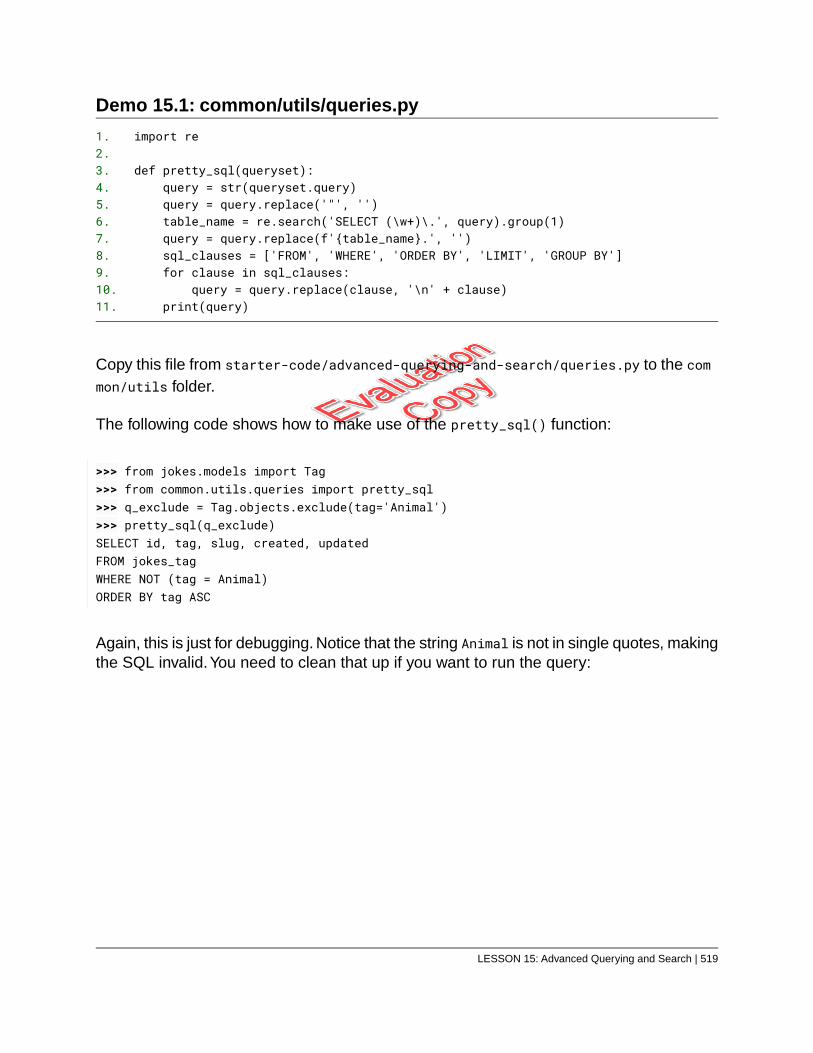
Demo 15.1: common/utils/queries.py
import re1.2.
def pretty_sql(queryset):3.query = str(queryset.query)4.query = query.replace('"', '')5.table_name = re.search('SELECT (\w+)\.', query).group(1)6.query = query.replace(f'{table_name}.', '')7.sql_clauses = ['FROM', 'WHERE', 'ORDER BY', 'LIMIT', 'GROUP BY']8.for clause in sql_clauses:9.
query = query.replace(clause, '\n' + clause)10.print(query)11.
Copy this file from starter-code/advanced-querying-and-search/queries.py to the common/utils folder.
The following code shows how to make use of the pretty_sql() function:
>>> from jokes.models import Tag>>> from common.utils.queries import pretty_sql>>> q_exclude = Tag.objects.exclude(tag='Animal')>>> pretty_sql(q_exclude)SELECT id, tag, slug, created, updatedFROM jokes_tagWHERE NOT (tag = Animal)ORDER BY tag ASC
Again, this is just for debugging. Notice that the string Animal is not in single quotes, makingthe SQL invalid.You need to clean that up if you want to run the query:
LESSON 15: Advanced Querying and Search | 519
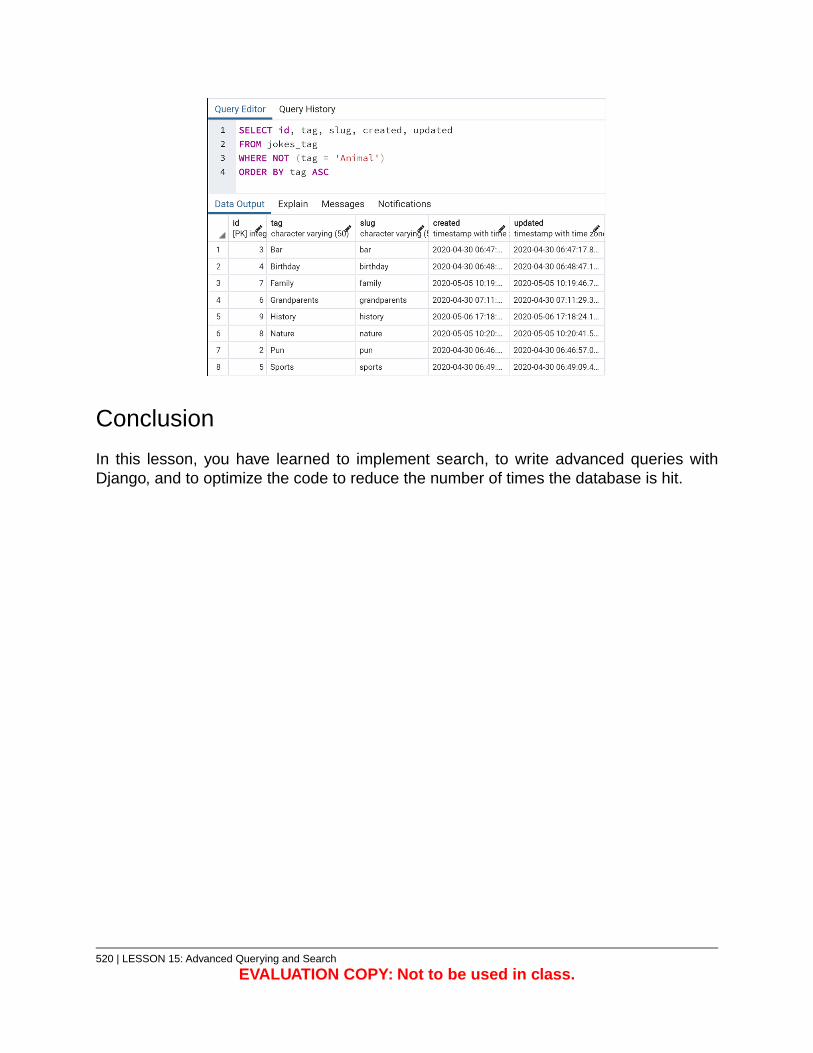
Conclusion
In this lesson, you have learned to implement search, to write advanced queries withDjango, and to optimize the code to reduce the number of times the database is hit.
520 | LESSON 15: Advanced Querying and Search
EVALUATION COPY: Not to be used in class.
LESSON 16Deploying your Website to Production
Topics Covered
Deploying to Heroku.
Introduction
In this lesson, you will learn to deploy the Django Jokes website to production using Heroku,a popular Platform as a Service (PaaS) for hosting Django websites.
❋
16.1. Where to Host Your Django Site
When it’s time to go live with your website, you need to decide where to host it. There areplenty of options, including big ones like AWS Elastic Beanstalk, Google Cloud, andMicrosoft Azure. We have chosen to use Heroku, because…
1. It is relatively easy to set up.
2. It has a free tier.
3. It integrates nicely with GitHub.
4. It gives you full control over the environment.
LESSON 16: Deploying your Website to Production | 521
Exercise 74: Deploying to Heroku 90 to 120 minutes
First, you need to prepare your local environment to work with Heroku. Then, you willcreate a Heroku account, log into it, and set it up to pull from the GitHub repository.
Warning!
Setting up a production environment is tricky. The hosting sites are picky to beginwith and always making changes/improvements to their systems. Heroku is noexception. Follow along closely with the instructions here, and be prepared to useGoogle and StackOverflow108 to debug. If you find anything that has changed sincethis was published, please check out https://www.webucator.com/books/errata.cfmto see if we have posted any updates. If we haven’t posted any updates that help,please email us at [email protected].
E74.1. Setting Up Heroku
1. Sign up for a free Heroku account at https://signup.heroku.com/dc.
2. Download and install the appropriate Heroku Command Line Interface (CLI) foryour operating system at https://devcenter.heroku.com/articles/heroku-cli
3. Test your installation by running heroku --version:
(.venv) …/projects/djangojokes.com> heroku --versionheroku/7.41.1 win32-x64 node-v12.16.2
4. Log in to Heroku:
heroku login
You will be prompted to open a browser and log in to the following URL:
https://cli-auth.heroku.com/auth/browser/
108. https://www.stackoverflow.com
522 | LESSON 16: Deploying your Website to Production
EVALUATION COPY: Not to be used in class.
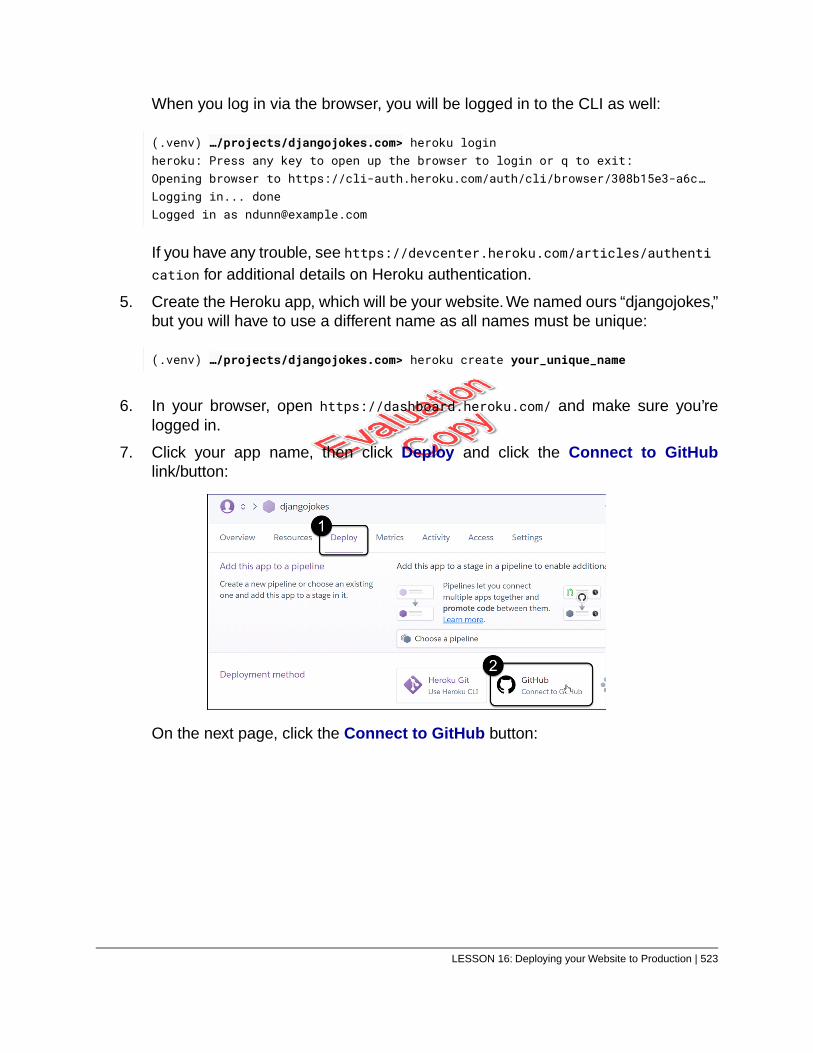
When you log in via the browser, you will be logged in to the CLI as well:
(.venv) …/projects/djangojokes.com> heroku loginheroku: Press any key to open up the browser to login or q to exit:Opening browser to https://cli-auth.heroku.com/auth/cli/browser/308b15e3-a6c…Logging in... doneLogged in as [email protected]
If you have any trouble, see https://devcenter.heroku.com/articles/authentication for additional details on Heroku authentication.
5. Create the Heroku app, which will be your website.We named ours “djangojokes,”but you will have to use a different name as all names must be unique:
(.venv) …/projects/djangojokes.com> heroku create your_unique_name
6. In your browser, open https://dashboard.heroku.com/ and make sure you’relogged in.
7. Click your app name, then click Deploy and click the Connect to GitHublink/button:
On the next page, click the Connect to GitHub button:
LESSON 16: Deploying your Website to Production | 523
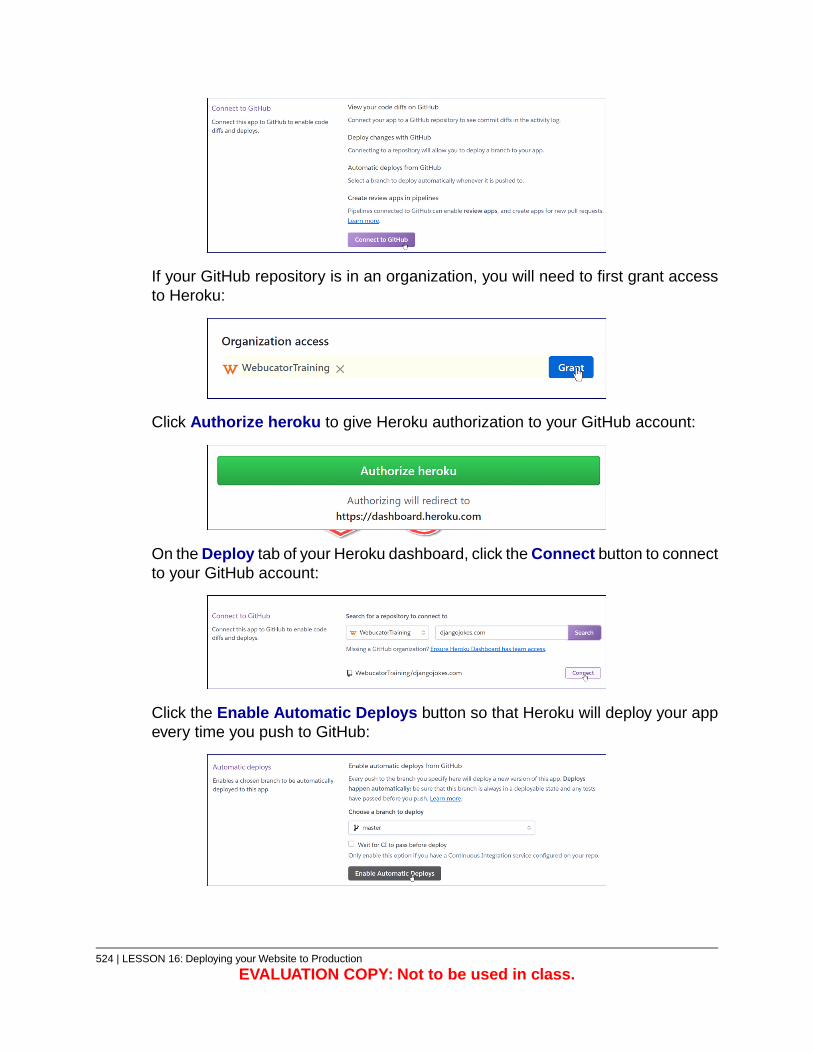
If your GitHub repository is in an organization, you will need to first grant accessto Heroku:
Click Authorize heroku to give Heroku authorization to your GitHub account:
On the Deploy tab of your Heroku dashboard, click the Connect button to connectto your GitHub account:
Click the Enable Automatic Deploys button so that Heroku will deploy your appevery time you push to GitHub:
524 | LESSON 16: Deploying your Website to Production
EVALUATION COPY: Not to be used in class.
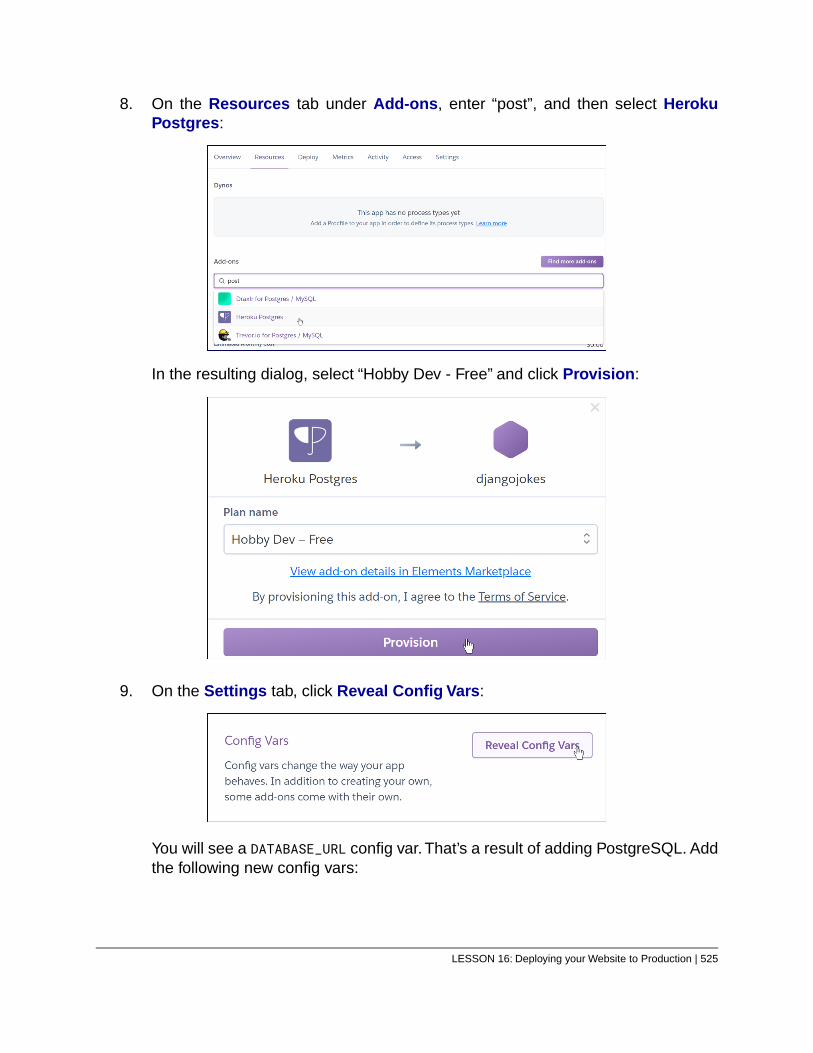
8. On the Resources tab under Add-ons, enter “post”, and then select HerokuPostgres:
In the resulting dialog, select “Hobby Dev - Free” and click Provision:
9. On the Settings tab, click Reveal Config Vars:
You will see a DATABASE_URL config var. That’s a result of adding PostgreSQL. Addthe following new config vars:
LESSON 16: Deploying your Website to Production | 525
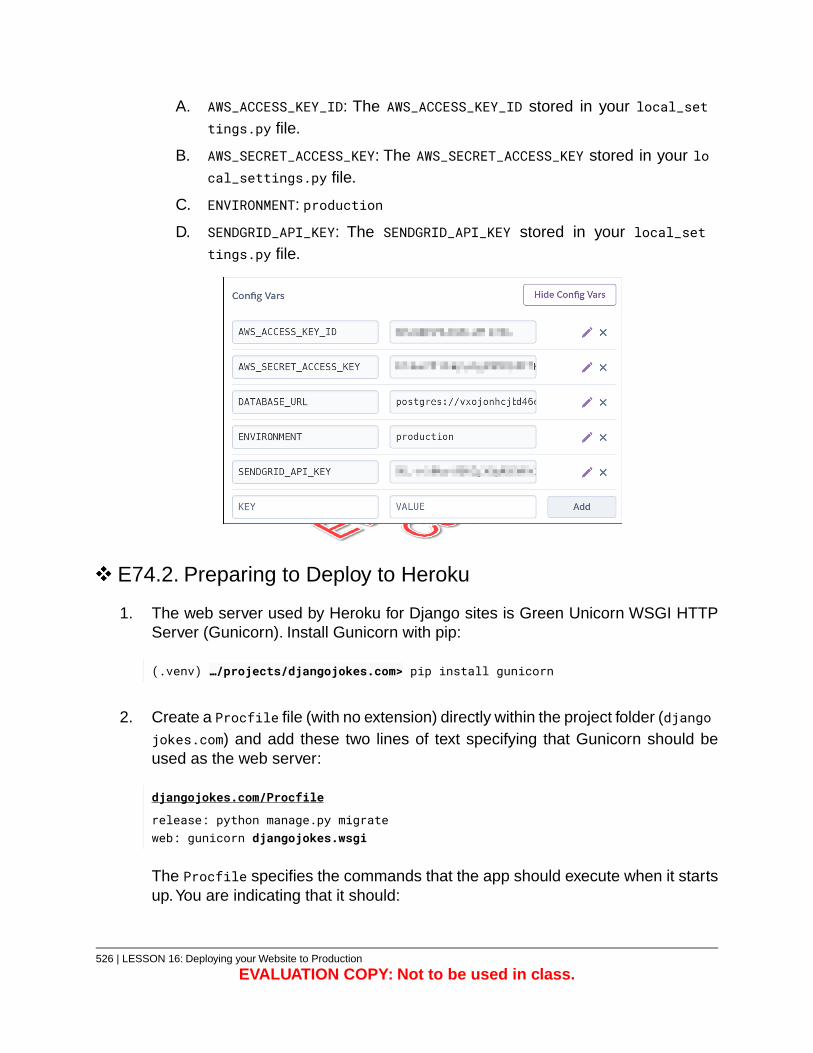
A. AWS_ACCESS_KEY_ID: The AWS_ACCESS_KEY_ID stored in your local_settings.py file.
B. AWS_SECRET_ACCESS_KEY: The AWS_SECRET_ACCESS_KEY stored in your local_settings.py file.
C. ENVIRONMENT: production
D. SENDGRID_API_KEY: The SENDGRID_API_KEY stored in your local_settings.py file.
E74.2. Preparing to Deploy to Heroku
1. The web server used by Heroku for Django sites is Green Unicorn WSGI HTTPServer (Gunicorn). Install Gunicorn with pip:
(.venv) …/projects/djangojokes.com> pip install gunicorn
2. Create a Procfile file (with no extension) directly within the project folder (djangojokes.com) and add these two lines of text specifying that Gunicorn should beused as the web server:
djangojokes.com/Procfile
release: python manage.py migrateweb: gunicorn djangojokes.wsgi
The Procfile specifies the commands that the app should execute when it startsup.You are indicating that it should:
526 | LESSON 16: Deploying your Website to Production
EVALUATION COPY: Not to be used in class.
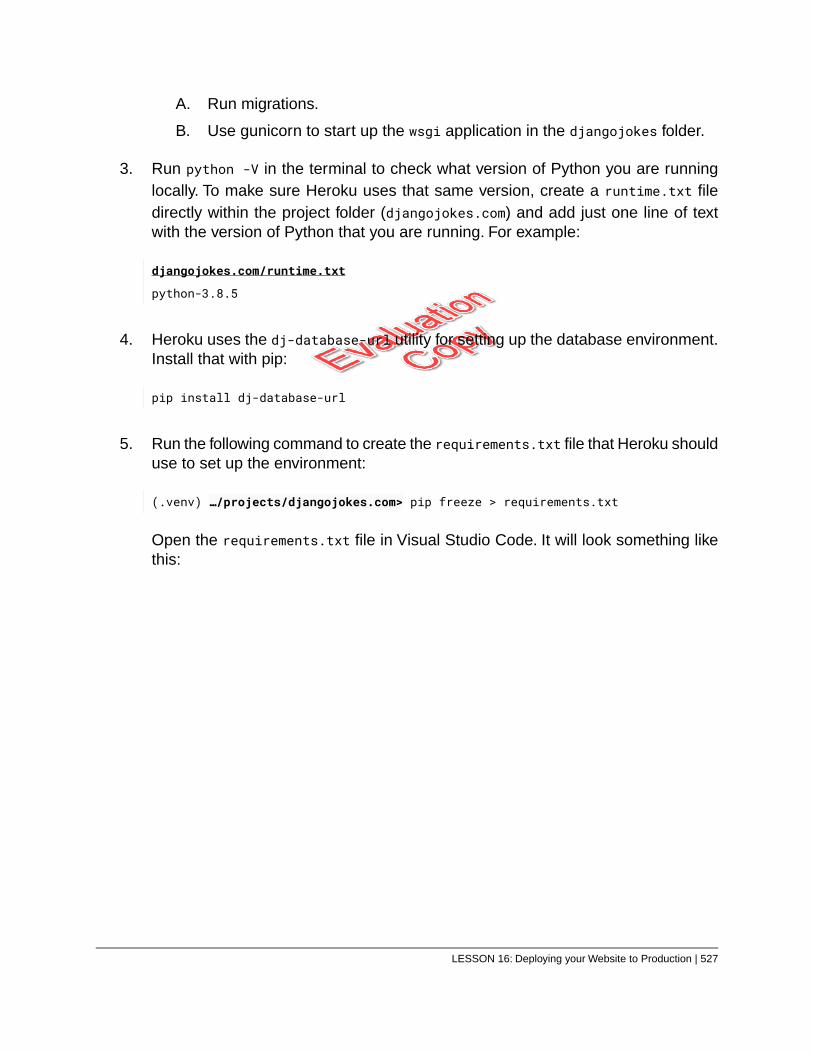
A. Run migrations.
B. Use gunicorn to start up the wsgi application in the djangojokes folder.
3. Run python -V in the terminal to check what version of Python you are runninglocally. To make sure Heroku uses that same version, create a runtime.txt filedirectly within the project folder (djangojokes.com) and add just one line of textwith the version of Python that you are running. For example:
djangojokes.com/runtime.txt
python-3.8.5
4. Heroku uses the dj-database-url utility for setting up the database environment.Install that with pip:
pip install dj-database-url
5. Run the following command to create the requirements.txt file that Heroku shoulduse to set up the environment:
(.venv) …/projects/djangojokes.com> pip freeze > requirements.txt
Open the requirements.txt file in Visual Studio Code. It will look something likethis:
LESSON 16: Deploying your Website to Production | 527
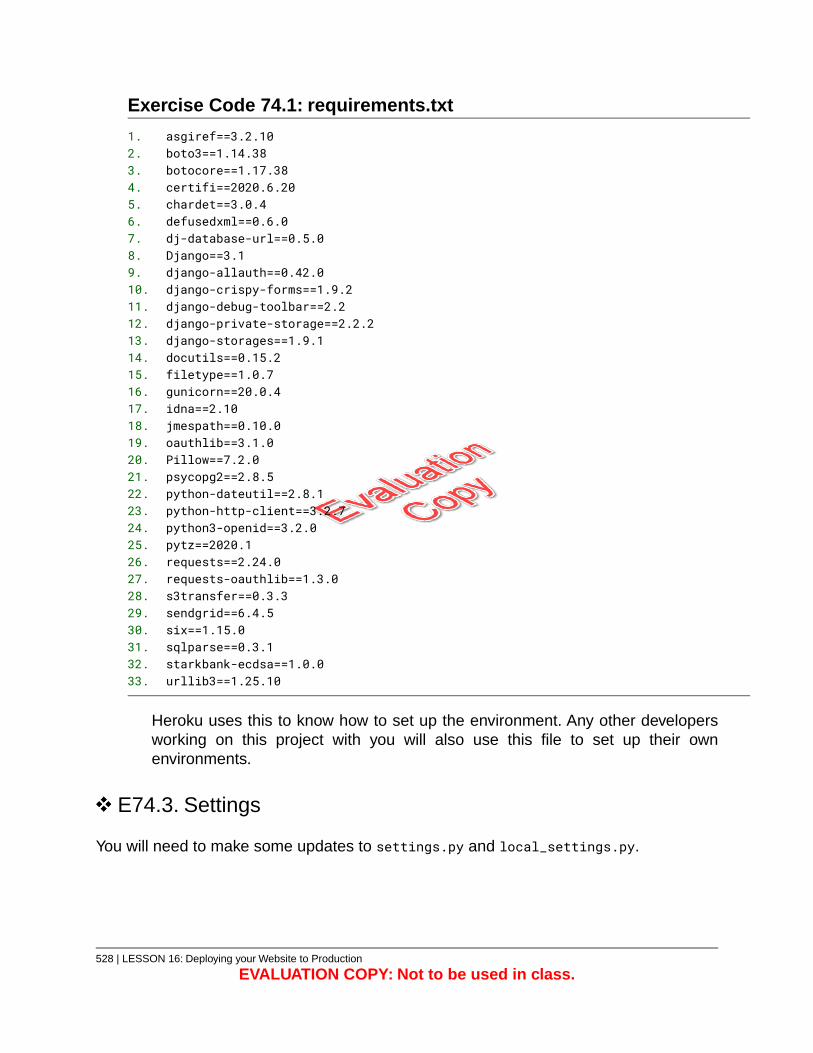
Exercise Code 74.1: requirements.txt
asgiref==3.2.101.boto3==1.14.382.botocore==1.17.383.certifi==2020.6.204.chardet==3.0.45.defusedxml==0.6.06.dj-database-url==0.5.07.Django==3.18.django-allauth==0.42.09.django-crispy-forms==1.9.210.django-debug-toolbar==2.211.django-private-storage==2.2.212.django-storages==1.9.113.docutils==0.15.214.filetype==1.0.715.gunicorn==20.0.416.idna==2.1017.jmespath==0.10.018.oauthlib==3.1.019.Pillow==7.2.020.psycopg2==2.8.521.python-dateutil==2.8.122.python-http-client==3.2.723.python3-openid==3.2.024.pytz==2020.125.requests==2.24.026.requests-oauthlib==1.3.027.s3transfer==0.3.328.sendgrid==6.4.529.six==1.15.030.sqlparse==0.3.131.starkbank-ecdsa==1.0.032.urllib3==1.25.1033.
Heroku uses this to know how to set up the environment. Any other developersworking on this project with you will also use this file to set up their ownenvironments.
E74.3. Settings
You will need to make some updates to settings.py and local_settings.py.
528 | LESSON 16: Deploying your Website to Production
EVALUATION COPY: Not to be used in class.
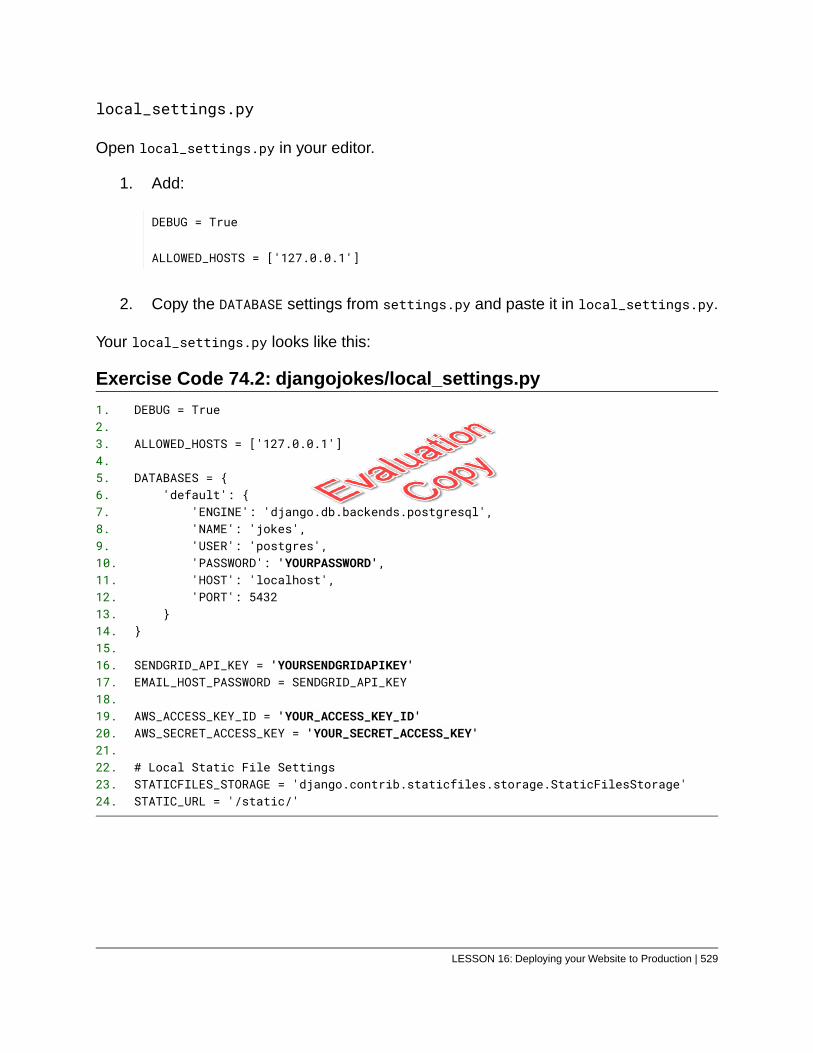
local_settings.py
Open local_settings.py in your editor.
1. Add:
DEBUG = True
ALLOWED_HOSTS = ['127.0.0.1']
2. Copy the DATABASE settings from settings.py and paste it in local_settings.py.
Your local_settings.py looks like this:
Exercise Code 74.2: djangojokes/local_settings.py
DEBUG = True1.2.
ALLOWED_HOSTS = ['127.0.0.1']3.4.
DATABASES = {5.'default': {6.
'ENGINE': 'django.db.backends.postgresql',7.'NAME': 'jokes',8.'USER': 'postgres',9.'PASSWORD': 'YOURPASSWORD',10.'HOST': 'localhost',11.'PORT': 543212.
}13.}14.
15.SENDGRID_API_KEY = 'YOURSENDGRIDAPIKEY'16.EMAIL_HOST_PASSWORD = SENDGRID_API_KEY17.
18.AWS_ACCESS_KEY_ID = 'YOUR_ACCESS_KEY_ID'19.AWS_SECRET_ACCESS_KEY = 'YOUR_SECRET_ACCESS_KEY'20.
21.# Local Static File Settings22.STATICFILES_STORAGE = 'django.contrib.staticfiles.storage.StaticFilesStorage'23.STATIC_URL = '/static/'24.
LESSON 16: Deploying your Website to Production | 529
Be sure to replace YOURPASSWORD, YOURSENDGRIDAPIKEY, YOUR_ACCESS_KEY_ID, andYOUR_SECRET_ACCESS_KEY with your database password, SendGrid API Key, and AWSsettings.
settings.py
Make the following changes/additions to settings.py:
1. Set DEBUG to False:
DEBUG = False
2. Add your herokuapp.com URL to ALLOWED_HOSTS:
ALLOWED_HOSTS = ['your_unique_name.herokuapp.com']
Replace “your_unique_name” with the name you chose for your Heroku app.
3. Replace your DATABASES setting with the following:
import dj_database_url
DATABASES = { 'default' : dj_database_url.config()}
Heroku will manage your database settings for you, so you don’t have to putsensitive information (e.g., the database username and password) in the settings.py file.
4. You may want to change your DEFAULT_FROM_EMAIL to a real email address. To doso, you will have to give SendGrid permission to send email on your behalf.109
In the Static Files lesson (see page 163), we mentioned that you would need to run pythonmanage.py collectstatic to collect all the static files into one location. Heroku takes careof collecting the static files as part of the build process, so you don’t have to worry aboutdoing it explicitly.
109. https://sendgrid.com/docs/ui/account-and-settings/how-to-set-up-domain-authentication/
530 | LESSON 16: Deploying your Website to Production
EVALUATION COPY: Not to be used in class.
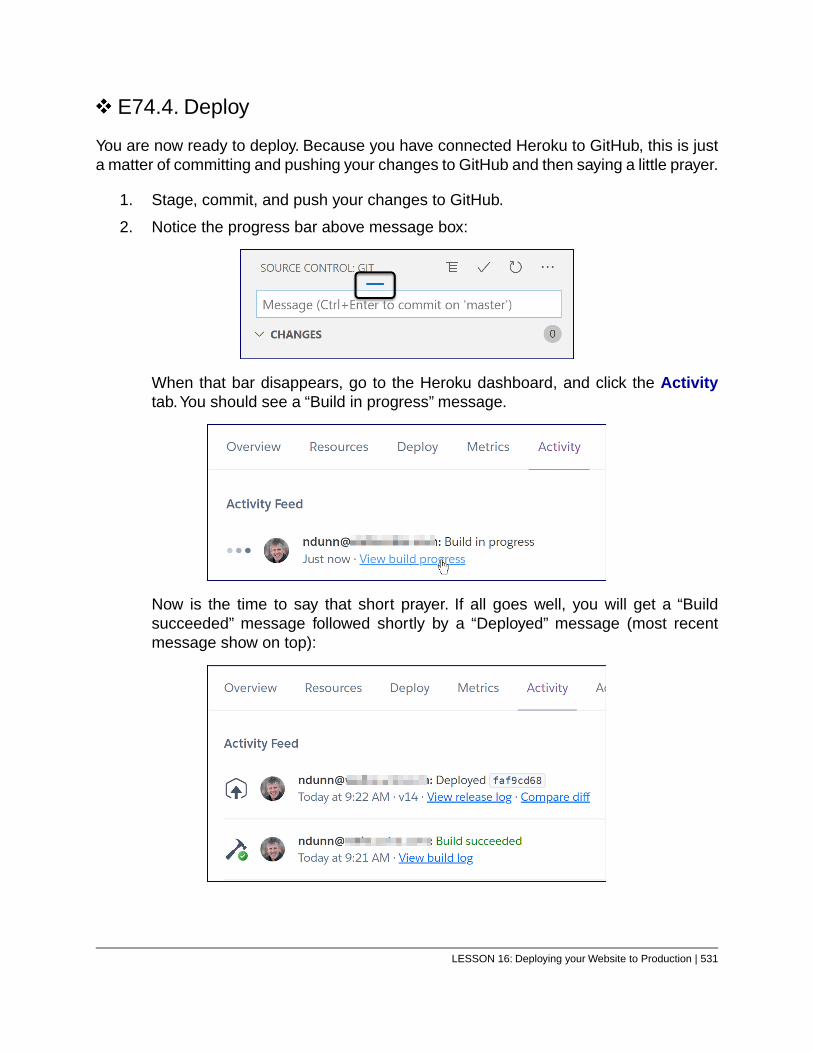
E74.4. Deploy
You are now ready to deploy. Because you have connected Heroku to GitHub, this is justa matter of committing and pushing your changes to GitHub and then saying a little prayer.
1. Stage, commit, and push your changes to GitHub.
2. Notice the progress bar above message box:
When that bar disappears, go to the Heroku dashboard, and click the Activitytab.You should see a “Build in progress” message.
Now is the time to say that short prayer. If all goes well, you will get a “Buildsucceeded” message followed shortly by a “Deployed” message (most recentmessage show on top):
LESSON 16: Deploying your Website to Production | 531
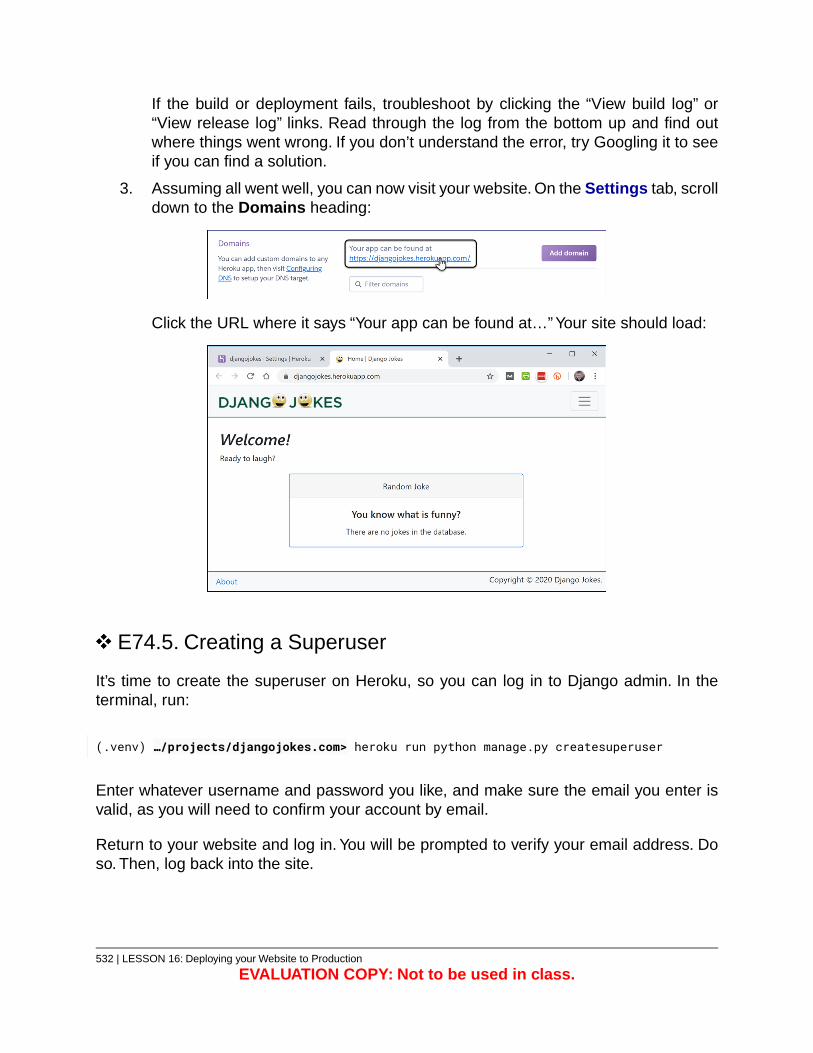
If the build or deployment fails, troubleshoot by clicking the “View build log” or“View release log” links. Read through the log from the bottom up and find outwhere things went wrong. If you don’t understand the error, try Googling it to seeif you can find a solution.
3. Assuming all went well, you can now visit your website. On the Settings tab, scrolldown to the Domains heading:
Click the URL where it says “Your app can be found at…” Your site should load:
E74.5. Creating a Superuser
It’s time to create the superuser on Heroku, so you can log in to Django admin. In theterminal, run:
(.venv) …/projects/djangojokes.com> heroku run python manage.py createsuperuser
Enter whatever username and password you like, and make sure the email you enter isvalid, as you will need to confirm your account by email.
Return to your website and log in. You will be prompted to verify your email address. Doso. Then, log back into the site.
532 | LESSON 16: Deploying your Website to Production
EVALUATION COPY: Not to be used in class.
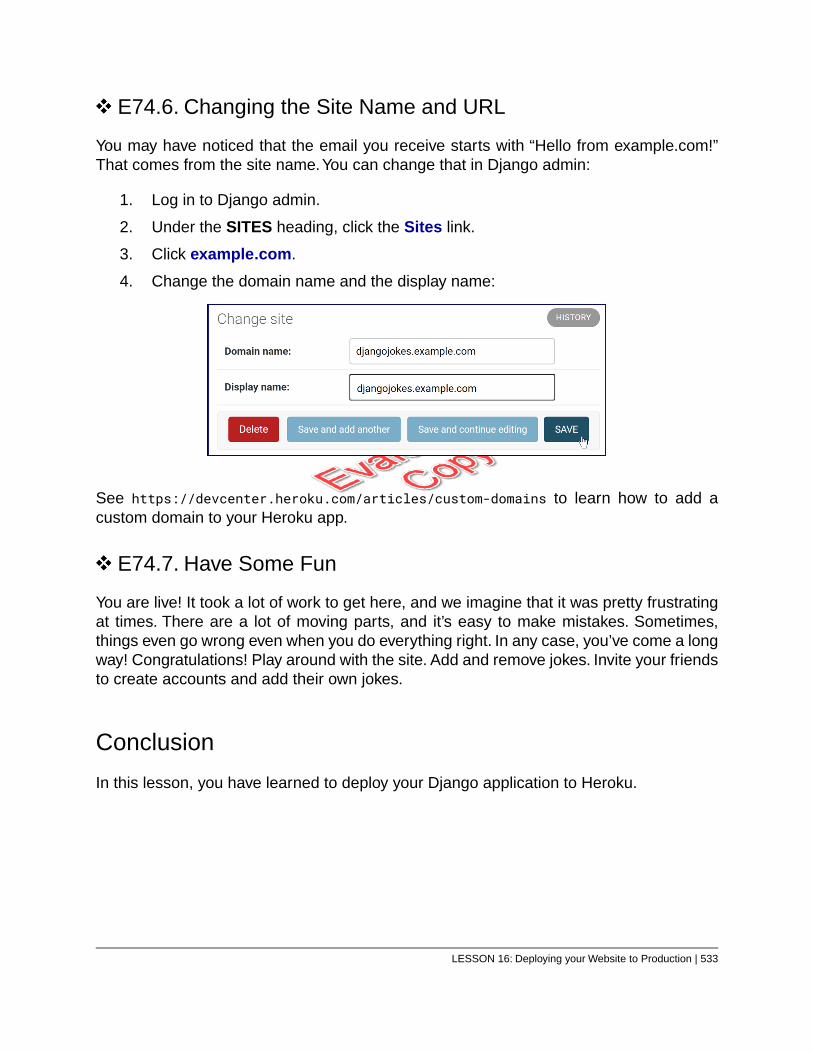
E74.6. Changing the Site Name and URL
You may have noticed that the email you receive starts with “Hello from example.com!”That comes from the site name.You can change that in Django admin:
1. Log in to Django admin.
2. Under the SITES heading, click the Sites link.
3. Click example.com.
4. Change the domain name and the display name:
See https://devcenter.heroku.com/articles/custom-domains to learn how to add acustom domain to your Heroku app.
E74.7. Have Some Fun
You are live! It took a lot of work to get here, and we imagine that it was pretty frustratingat times. There are a lot of moving parts, and it’s easy to make mistakes. Sometimes,things even go wrong even when you do everything right. In any case, you’ve come a longway! Congratulations! Play around with the site. Add and remove jokes. Invite your friendsto create accounts and add their own jokes.
Conclusion
In this lesson, you have learned to deploy your Django application to Heroku.
LESSON 16: Deploying your Website to Production | 533

534 | LESSON 16: Deploying your Website to Production
EVALUATION COPY: Not to be used in class.
LESSON 17Customizing Django Admin
Topics Covered
Django admin views.
Customizing title text, change lists, forms, and fieldsets.
Unregistering models.
Groups and permissions.
Introduction
In this lesson, you will learn to customize Django admin for your project.
❋
17.1. Django Admin Views
The most important views used in Django admin are:
1. changelist_view – the view for listing model instances.
2. change_view – the view for changing an existing model instance.
3. add_view – the view for adding a new model instance.
There are other views as well, but these are the ones you are most likely to want tocustomize. For simplicity, we will refer to the changelist_view as the Django admin listview and to change_view and add_view as the Django admin form views.
LESSON 17: Customizing Django Admin | 535
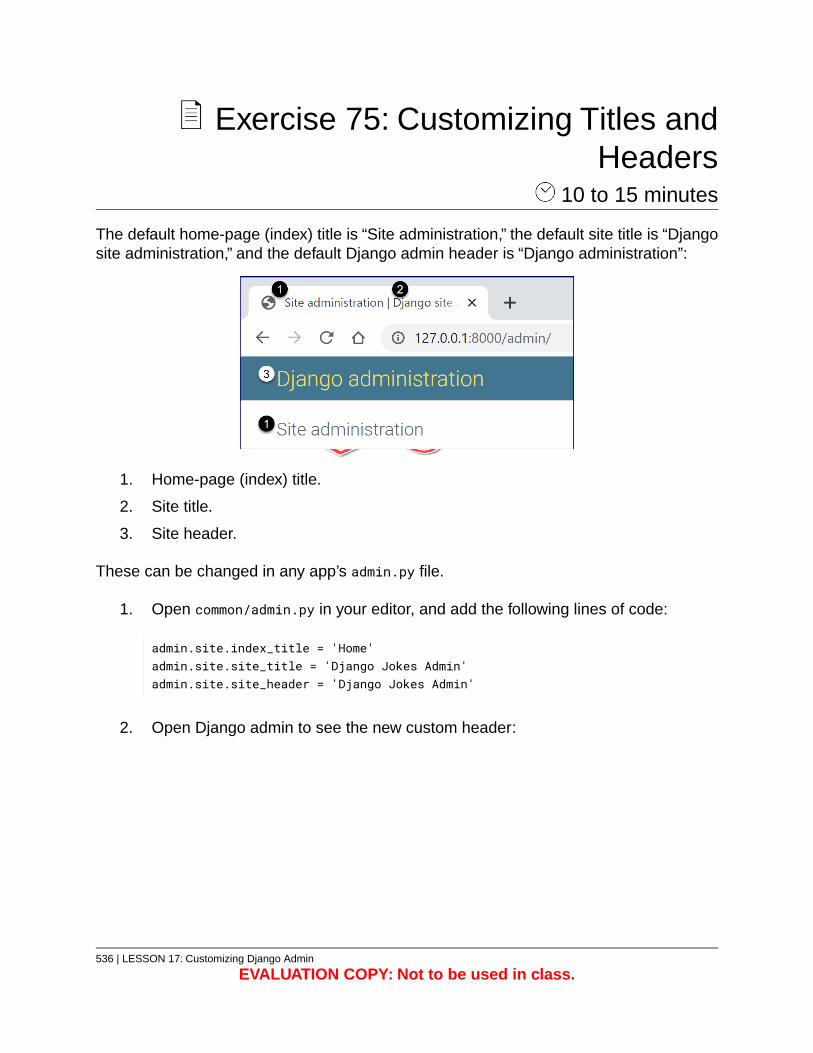
Exercise 75: Customizing Titles andHeaders
10 to 15 minutes
The default home-page (index) title is “Site administration,” the default site title is “Djangosite administration,” and the default Django admin header is “Django administration”:
1. Home-page (index) title.
2. Site title.
3. Site header.
These can be changed in any app’s admin.py file.
1. Open common/admin.py in your editor, and add the following lines of code:
admin.site.index_title = 'Home'admin.site.site_title = 'Django Jokes Admin'admin.site.site_header = 'Django Jokes Admin'
2. Open Django admin to see the new custom header:
536 | LESSON 17: Customizing Django Admin
EVALUATION COPY: Not to be used in class.
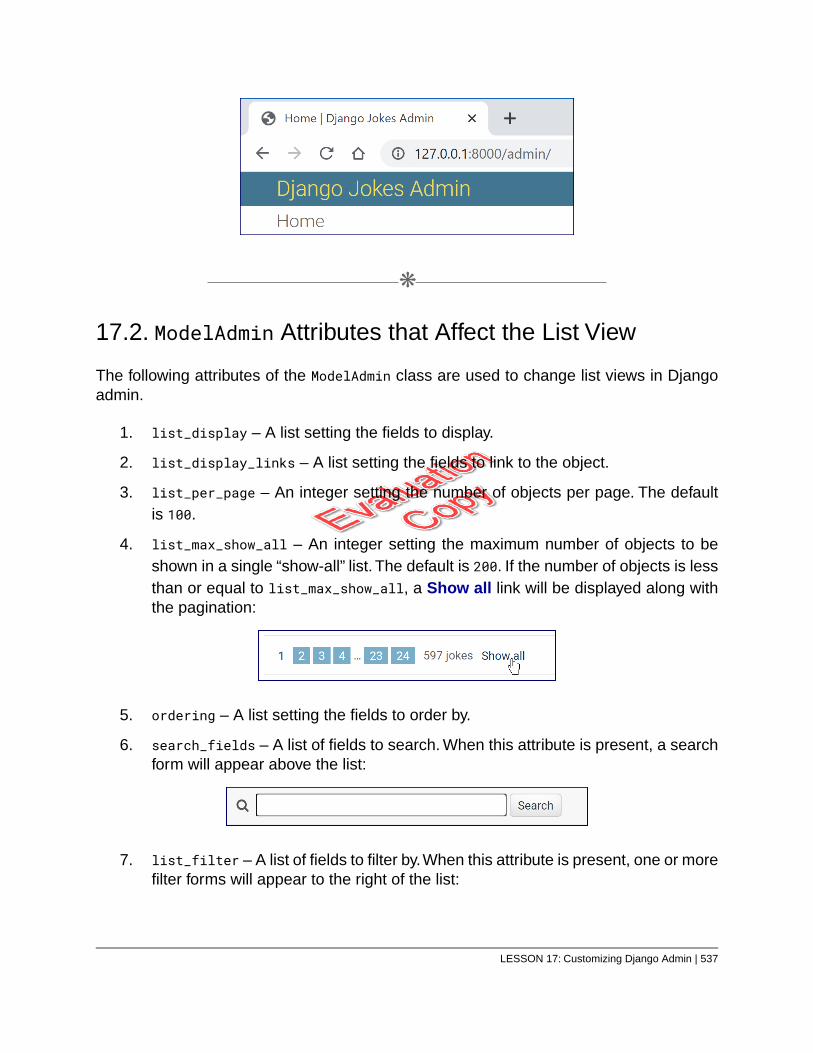
❋
17.2. ModelAdmin Attributes that Affect the List View
The following attributes of the ModelAdmin class are used to change list views in Djangoadmin.
1. list_display – A list setting the fields to display.
2. list_display_links – A list setting the fields to link to the object.
3. list_per_page – An integer setting the number of objects per page. The defaultis 100.
4. list_max_show_all – An integer setting the maximum number of objects to beshown in a single “show-all” list. The default is 200. If the number of objects is lessthan or equal to list_max_show_all, a Show all link will be displayed along withthe pagination:
5. ordering – A list setting the fields to order by.
6. search_fields – A list of fields to search. When this attribute is present, a searchform will appear above the list:
7. list_filter – A list of fields to filter by.When this attribute is present, one or morefilter forms will appear to the right of the list:
LESSON 17: Customizing Django Admin | 537
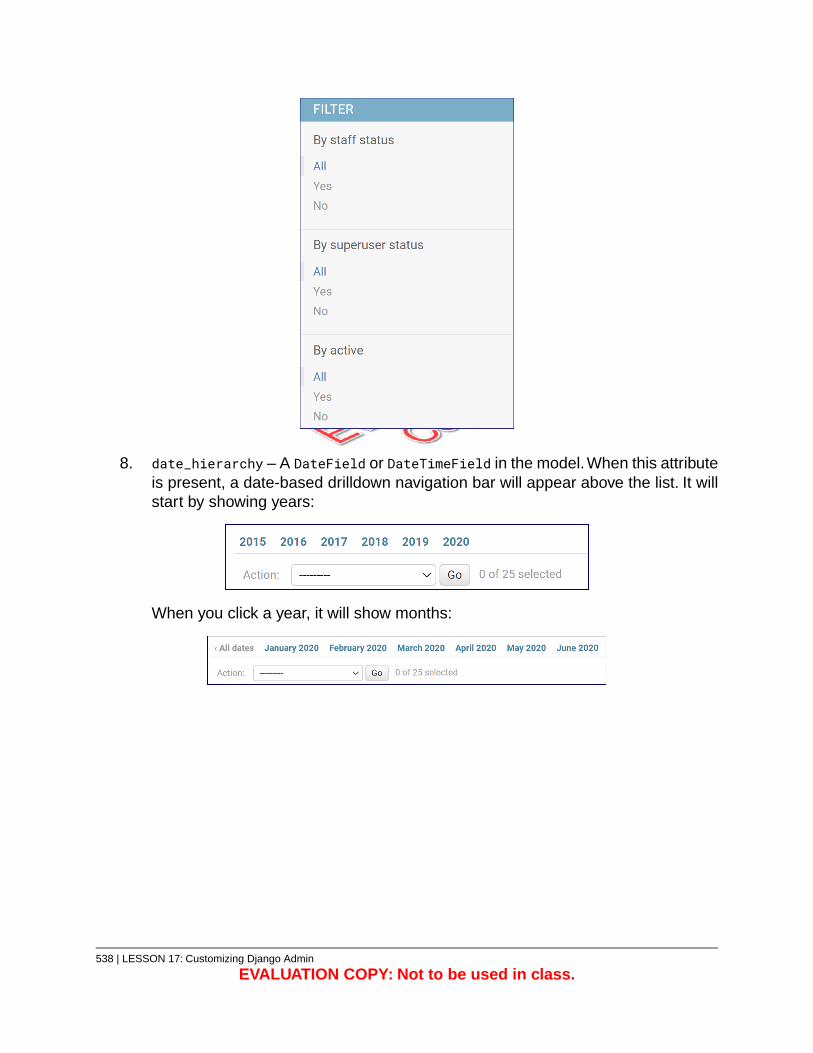
8. date_hierarchy – A DateField or DateTimeField in the model.When this attributeis present, a date-based drilldown navigation bar will appear above the list. It willstart by showing years:
When you click a year, it will show months:
538 | LESSON 17: Customizing Django Admin
EVALUATION COPY: Not to be used in class.
Exercise 76: Creating a CustomModelAdmin Base Class
10 to 15 minutes
You may want to have more control over default values for ModelAdmin attributes. A goodway to handle this is to create a custom ModelAdmin class that all of your other ModelAdminclasses inherit from.
1. Start up the server and open Django admin.
2. On the side navigation, click Jokes.
3. Notice that it shows 100 jokes per page. You can tell by looking at the paginator,which shows 595 jokes broken into six pages (your numbers may differ):
4. On the side navigation, click Users.
5. Notice that all 50 users show up on a single page.
6. Open common/admin.py in your editor, and add the following DjangoJokesAdminclass:
class DjangoJokesAdmin(admin.ModelAdmin):list_per_page = 25
You will set all your other ModelAdmin classes to inherit from this class.
7. Open users/admin.py in you editor:
A. Import the DjangoJokesAdmin class you just created:
from common.admin import DjangoJokesAdmin
B. Make CustomUserAdmin inherit from DjangoJokesAdmin in addition toUserAdmin:
class CustomUserAdmin(DjangoJokesAdmin, UserAdmin):
LESSON 17: Customizing Django Admin | 539
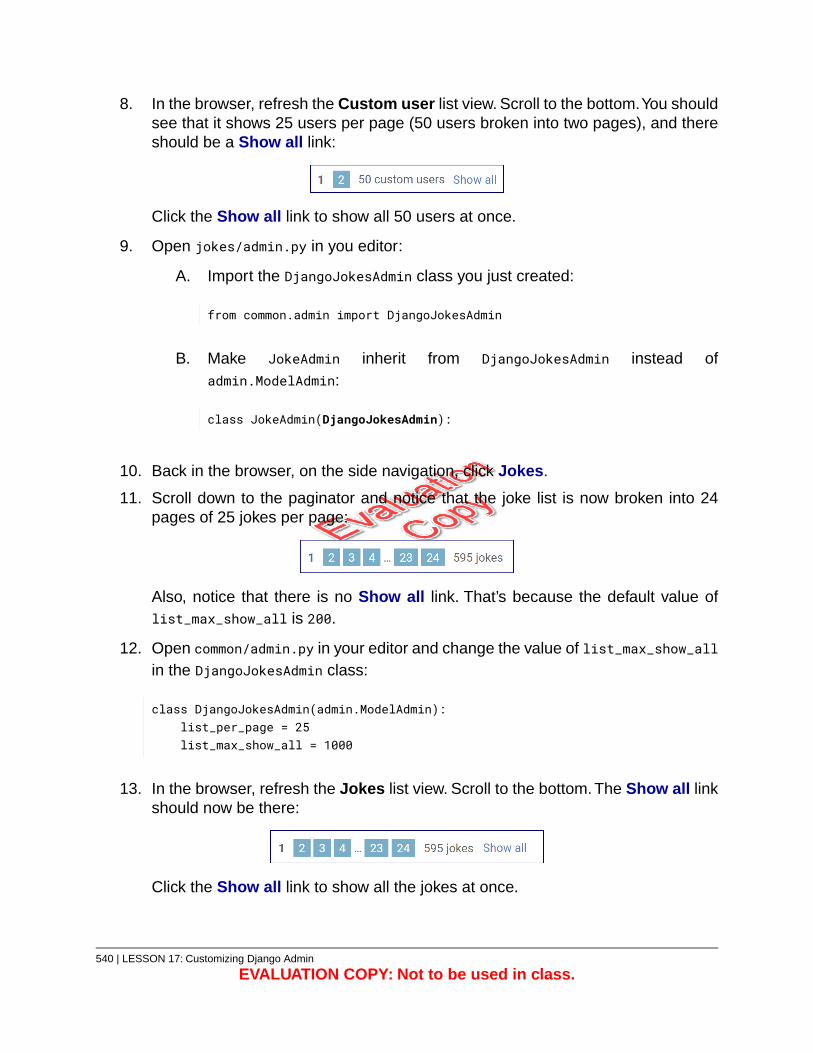
8. In the browser, refresh the Custom user list view. Scroll to the bottom.You shouldsee that it shows 25 users per page (50 users broken into two pages), and thereshould be a Show all link:
Click the Show all link to show all 50 users at once.
9. Open jokes/admin.py in you editor:
A. Import the DjangoJokesAdmin class you just created:
from common.admin import DjangoJokesAdmin
B. Make JokeAdmin inherit from DjangoJokesAdmin instead ofadmin.ModelAdmin:
class JokeAdmin(DjangoJokesAdmin):
10. Back in the browser, on the side navigation, click Jokes.
11. Scroll down to the paginator and notice that the joke list is now broken into 24pages of 25 jokes per page:
Also, notice that there is no Show all link. That’s because the default value oflist_max_show_all is 200.
12. Open common/admin.py in your editor and change the value of list_max_show_allin the DjangoJokesAdmin class:
class DjangoJokesAdmin(admin.ModelAdmin):list_per_page = 25list_max_show_all = 1000
13. In the browser, refresh the Jokes list view. Scroll to the bottom. The Show all linkshould now be there:
Click the Show all link to show all the jokes at once.
540 | LESSON 17: Customizing Django Admin
EVALUATION COPY: Not to be used in class.
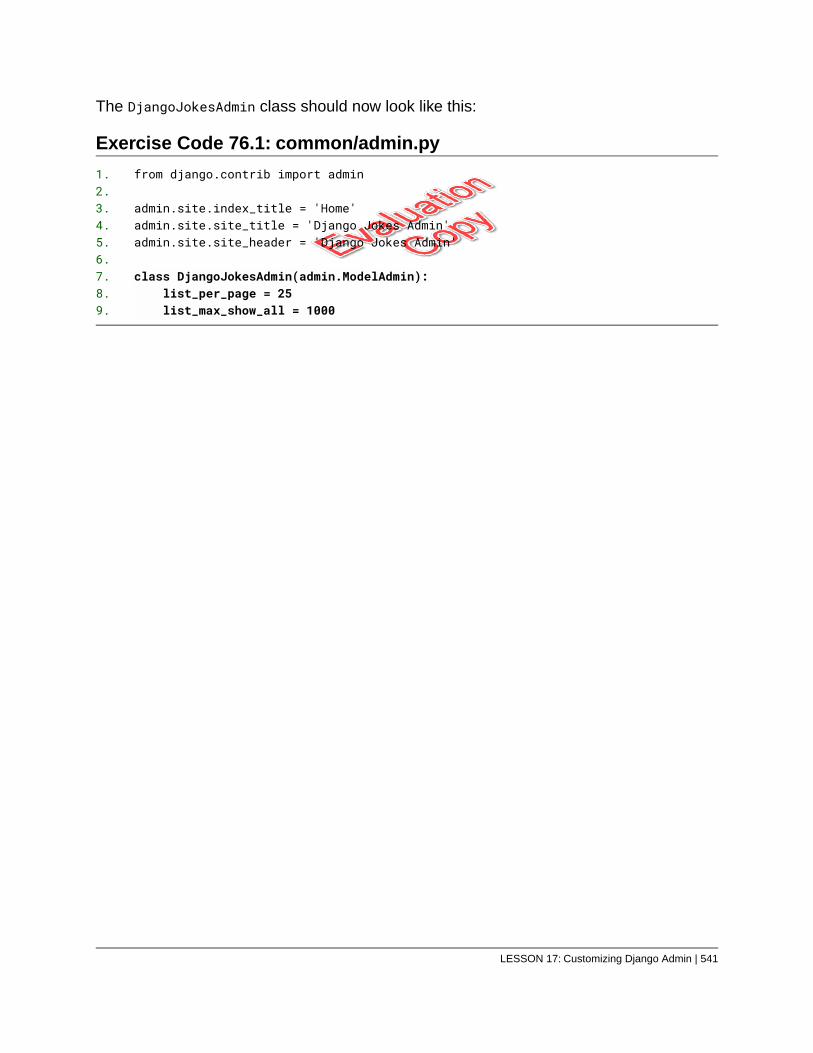
The DjangoJokesAdmin class should now look like this:
Exercise Code 76.1: common/admin.py
from django.contrib import admin1.2.
admin.site.index_title = 'Home'3.admin.site.site_title = 'Django Jokes Admin'4.admin.site.site_header = 'Django Jokes Admin'5.
6.class DjangoJokesAdmin(admin.ModelAdmin):7.
list_per_page = 258.list_max_show_all = 10009.
LESSON 17: Customizing Django Admin | 541
Exercise 77: Customizing the DjangoAdmin List View
45 to 60 minutes
In this exercise, you will add more attributes to JokeAdmin that affect the Django admin listview.
1. Open jokes/admin.py in your editor and modify all the admin classes, so that theyinherit from DjangoJokesAdmin instead of admin.ModelAdmin.
2. Make the following changes to the JokeAdmin class:
A. Add the search_fields attribute:
search_fields = ['question', 'answer']
Refresh the jokes list in Django admin and try some searches. Notice thatit searches both the question and answer fields of jokes.
B. Add the ordering attribute to show the most recently updated first bydefault:
ordering = ['-updated']
C. Add the list_filter attribute to add some filters:
list_filter = ['updated', 'category', 'tags']
Refresh the jokes list in Django admin. The By category and By tagsfilters just list out category and tag links, but By updated is a date filter,and date filters provide segments of time:
542 | LESSON 17: Customizing Django Admin
EVALUATION COPY: Not to be used in class.
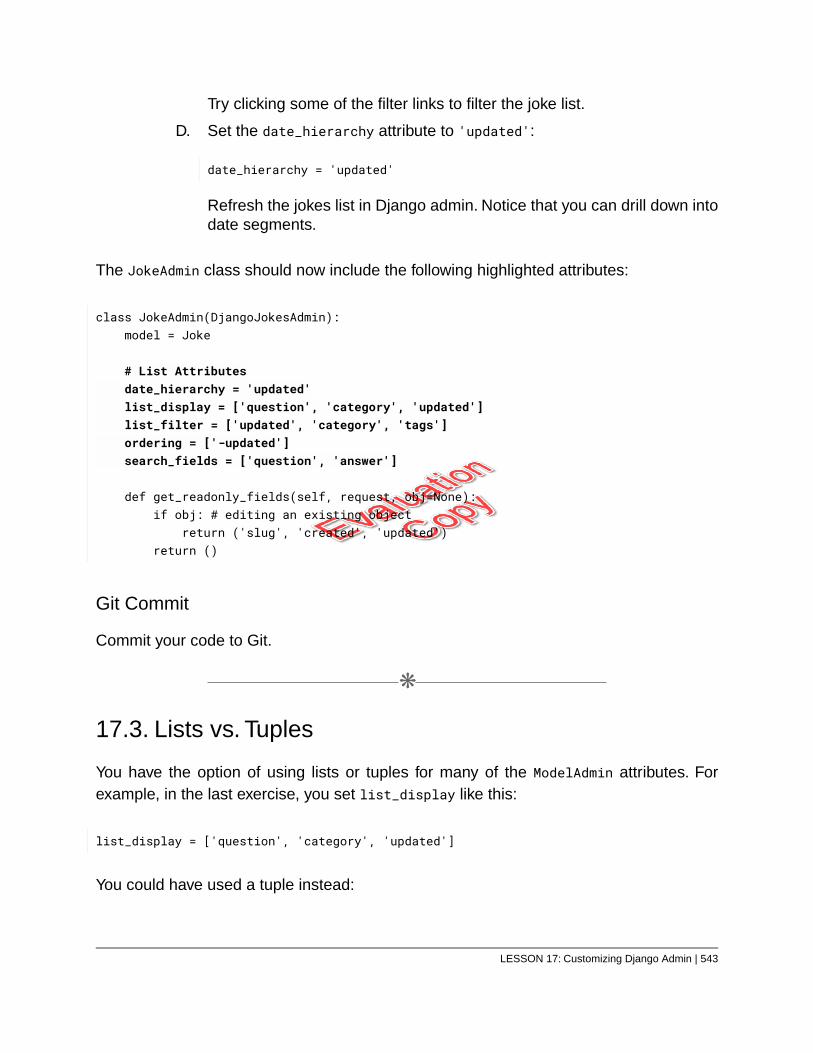
Try clicking some of the filter links to filter the joke list.
D. Set the date_hierarchy attribute to 'updated':
date_hierarchy = 'updated'
Refresh the jokes list in Django admin. Notice that you can drill down intodate segments.
The JokeAdmin class should now include the following highlighted attributes:
class JokeAdmin(DjangoJokesAdmin):model = Joke
# List Attributesdate_hierarchy = 'updated'list_display = ['question', 'category', 'updated']list_filter = ['updated', 'category', 'tags']ordering = ['-updated']search_fields = ['question', 'answer']
def get_readonly_fields(self, request, obj=None):if obj: # editing an existing object
return ('slug', 'created', 'updated')return ()
Git Commit
Commit your code to Git.
❋
17.3. Lists vs. Tuples
You have the option of using lists or tuples for many of the ModelAdmin attributes. Forexample, in the last exercise, you set list_display like this:
list_display = ['question', 'category', 'updated']
You could have used a tuple instead:
LESSON 17: Customizing Django Admin | 543
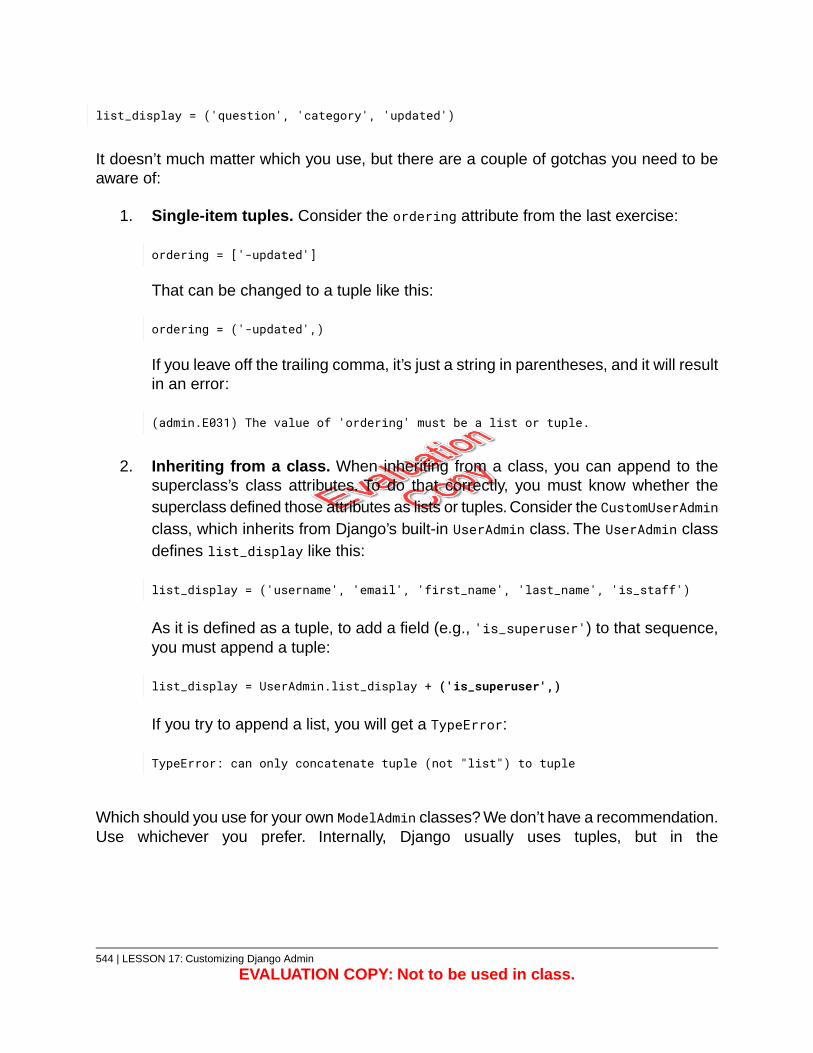
list_display = ('question', 'category', 'updated')
It doesn’t much matter which you use, but there are a couple of gotchas you need to beaware of:
1. Single-item tuples. Consider the ordering attribute from the last exercise:
ordering = ['-updated']
That can be changed to a tuple like this:
ordering = ('-updated',)
If you leave off the trailing comma, it’s just a string in parentheses, and it will resultin an error:
(admin.E031) The value of 'ordering' must be a list or tuple.
2. Inheriting from a class. When inheriting from a class, you can append to thesuperclass’s class attributes. To do that correctly, you must know whether thesuperclass defined those attributes as lists or tuples. Consider the CustomUserAdminclass, which inherits from Django’s built-in UserAdmin class. The UserAdmin classdefines list_display like this:
list_display = ('username', 'email', 'first_name', 'last_name', 'is_staff')
As it is defined as a tuple, to add a field (e.g., 'is_superuser') to that sequence,you must append a tuple:
list_display = UserAdmin.list_display + ('is_superuser',)
If you try to append a list, you will get a TypeError:
TypeError: can only concatenate tuple (not "list") to tuple
Which should you use for your own ModelAdmin classes? We don’t have a recommendation.Use whichever you prefer. Internally, Django usually uses tuples, but in the
544 | LESSON 17: Customizing Django Admin
EVALUATION COPY: Not to be used in class.
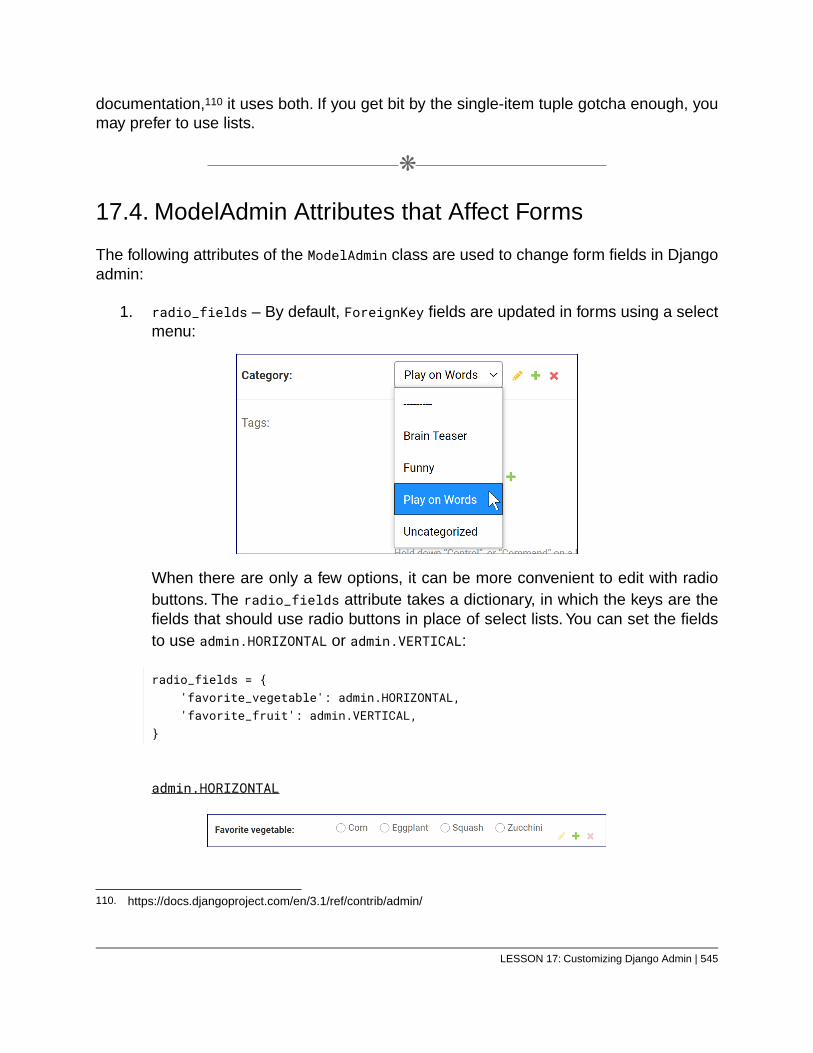
documentation,110 it uses both. If you get bit by the single-item tuple gotcha enough, youmay prefer to use lists.
❋
17.4. ModelAdmin Attributes that Affect Forms
The following attributes of the ModelAdmin class are used to change form fields in Djangoadmin:
1. radio_fields – By default, ForeignKey fields are updated in forms using a selectmenu:
When there are only a few options, it can be more convenient to edit with radiobuttons. The radio_fields attribute takes a dictionary, in which the keys are thefields that should use radio buttons in place of select lists. You can set the fieldsto use admin.HORIZONTAL or admin.VERTICAL:
radio_fields = {'favorite_vegetable': admin.HORIZONTAL,'favorite_fruit': admin.VERTICAL,
}
admin.HORIZONTAL
110. https://docs.djangoproject.com/en/3.1/ref/contrib/admin/
LESSON 17: Customizing Django Admin | 545

admin.VERTICAL
2. By default, ManyToManyFields are updated in forms using a SelectMultiple widget:
Multiple select form controls can be difficult to use. Django admin provides a fewalternatives, all of which take lists of fields:
A. filter_horizontal
B. filter_vertical
546 | LESSON 17: Customizing Django Admin
EVALUATION COPY: Not to be used in class.
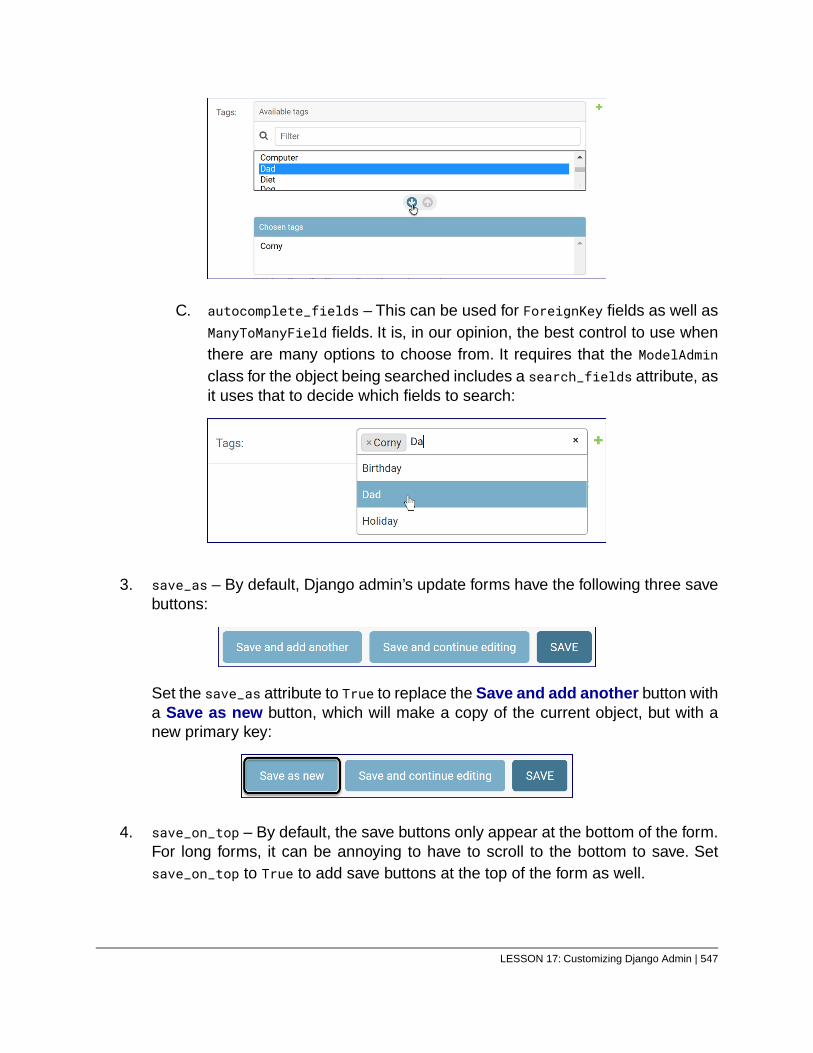
C. autocomplete_fields – This can be used for ForeignKey fields as well asManyToManyField fields. It is, in our opinion, the best control to use whenthere are many options to choose from. It requires that the ModelAdminclass for the object being searched includes a search_fields attribute, asit uses that to decide which fields to search:
3. save_as – By default, Django admin’s update forms have the following three savebuttons:
Set the save_as attribute to True to replace the Save and add another button witha Save as new button, which will make a copy of the current object, but with anew primary key:
4. save_on_top – By default, the save buttons only appear at the bottom of the form.For long forms, it can be annoying to have to scroll to the bottom to save. Setsave_on_top to True to add save buttons at the top of the form as well.
LESSON 17: Customizing Django Admin | 547
You will make these customizations in the next exercise.
548 | LESSON 17: Customizing Django Admin
EVALUATION COPY: Not to be used in class.
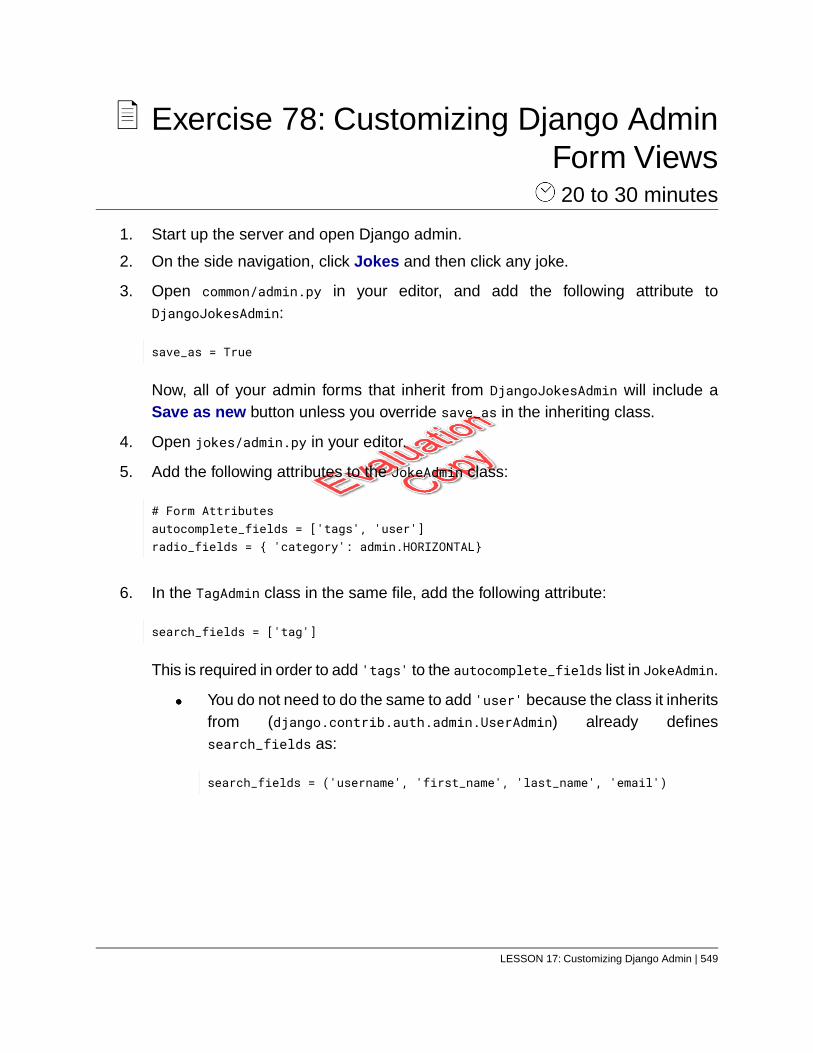
Exercise 78: Customizing Django AdminForm Views 20 to 30 minutes
1. Start up the server and open Django admin.
2. On the side navigation, click Jokes and then click any joke.
3. Open common/admin.py in your editor, and add the following attribute toDjangoJokesAdmin:
save_as = True
Now, all of your admin forms that inherit from DjangoJokesAdmin will include aSave as new button unless you override save_as in the inheriting class.
4. Open jokes/admin.py in your editor.
5. Add the following attributes to the JokeAdmin class:
# Form Attributesautocomplete_fields = ['tags', 'user']radio_fields = { 'category': admin.HORIZONTAL}
6. In the TagAdmin class in the same file, add the following attribute:
search_fields = ['tag']
This is required in order to add 'tags' to the autocomplete_fields list in JokeAdmin.
You do not need to do the same to add 'user' because the class it inheritsfrom (django.contrib.auth.admin.UserAdmin) already definessearch_fields as:
search_fields = ('username', 'first_name', 'last_name', 'email')
LESSON 17: Customizing Django Admin | 549
7. Open users/models.py in your editor and add the following __str__() method tothe CustomUser class:
def __str__(self):return f'{self.first_name} {self.last_name} ({self.username})'
This will be used to populate the user dropdown in the joke form.
8. Refresh the joke in Django admin. The three fields affected by your changes areuser, category, and tags. They should appear as follows:
You should also have a Save as new button in the bottom navigation.
❋
17.5. Customizing Fieldsets
In Django Admin and the User Model (see page 188), we showed how you can customizethe forms in Django admin. Django admin forms are broken into fieldsets. When inheritingfrom a model, you sometimes want to append fields to an existing fieldset, to move fieldsfrom one fieldset to another, or to add a new fieldset. For example, you appended an“Optional Fields” fieldset to the UserAdmin class like this:
add_fieldsets = UserAdmin.add_fieldsets + (('Optional Fields', {
'classes': ('wide',),'fields': ('email', 'first_name', 'last_name'),
}),)
The following utility functions make it easier to make such changes. The complete file isavailable at starter-code/customizing-django-admin/utils_admin.py. In the common/utilsdirectory, create a new admin.py file and paste the content from utils_admin.py in it.
Read through the docstrings.You will use these functions in the next exercise:
550 | LESSON 17: Customizing Django Admin
EVALUATION COPY: Not to be used in class.
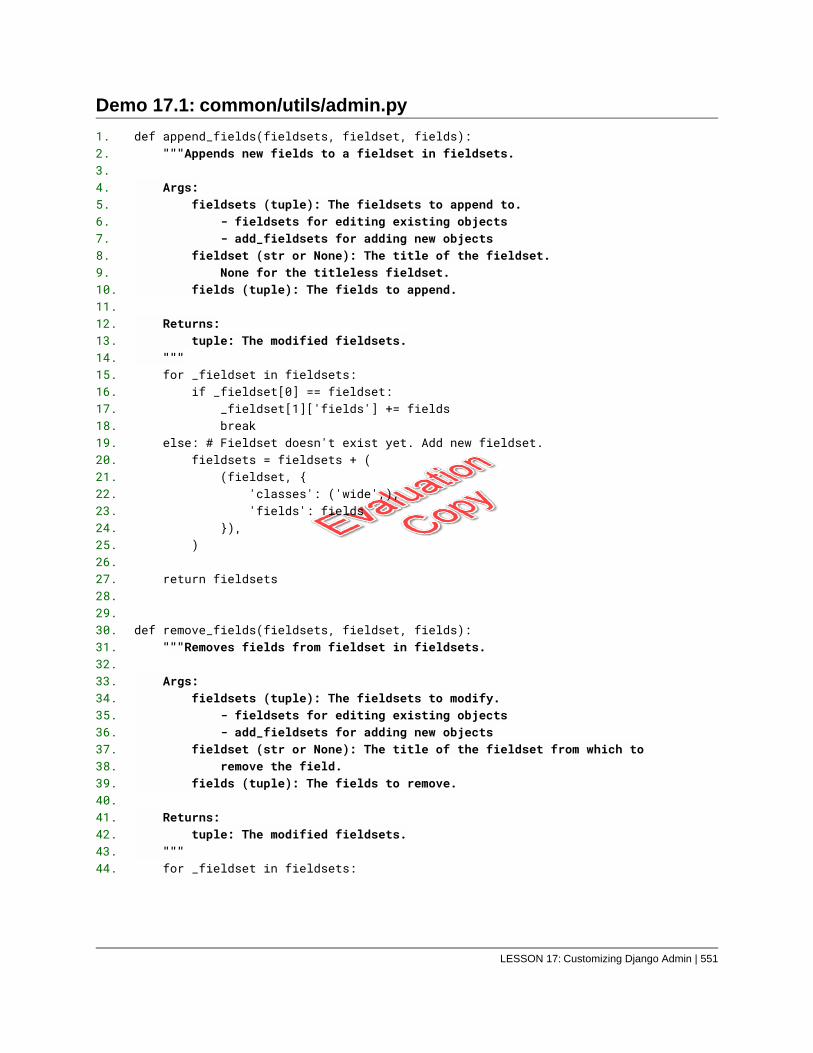
Demo 17.1: common/utils/admin.py
def append_fields(fieldsets, fieldset, fields):1."""Appends new fields to a fieldset in fieldsets.2.
3.Args:4.
fieldsets (tuple): The fieldsets to append to.5.- fieldsets for editing existing objects6.- add_fieldsets for adding new objects7.
fieldset (str or None): The title of the fieldset.8.None for the titleless fieldset.9.
fields (tuple): The fields to append.10.11.
Returns:12.tuple: The modified fieldsets.13.
"""14.for _fieldset in fieldsets:15.
if _fieldset[0] == fieldset:16._fieldset[1]['fields'] += fields17.break18.
else: # Fieldset doesn't exist yet. Add new fieldset.19.fieldsets = fieldsets + (20.
(fieldset, {21.'classes': ('wide',),22.'fields': fields23.
}),24.)25.
26.return fieldsets27.
28.29.
def remove_fields(fieldsets, fieldset, fields):30."""Removes fields from fieldset in fieldsets.31.
32.Args:33.
fieldsets (tuple): The fieldsets to modify.34.- fieldsets for editing existing objects35.- add_fieldsets for adding new objects36.
fieldset (str or None): The title of the fieldset from which to37.remove the field.38.
fields (tuple): The fields to remove.39.40.
Returns:41.tuple: The modified fieldsets.42.
"""43.for _fieldset in fieldsets:44.
LESSON 17: Customizing Django Admin | 551
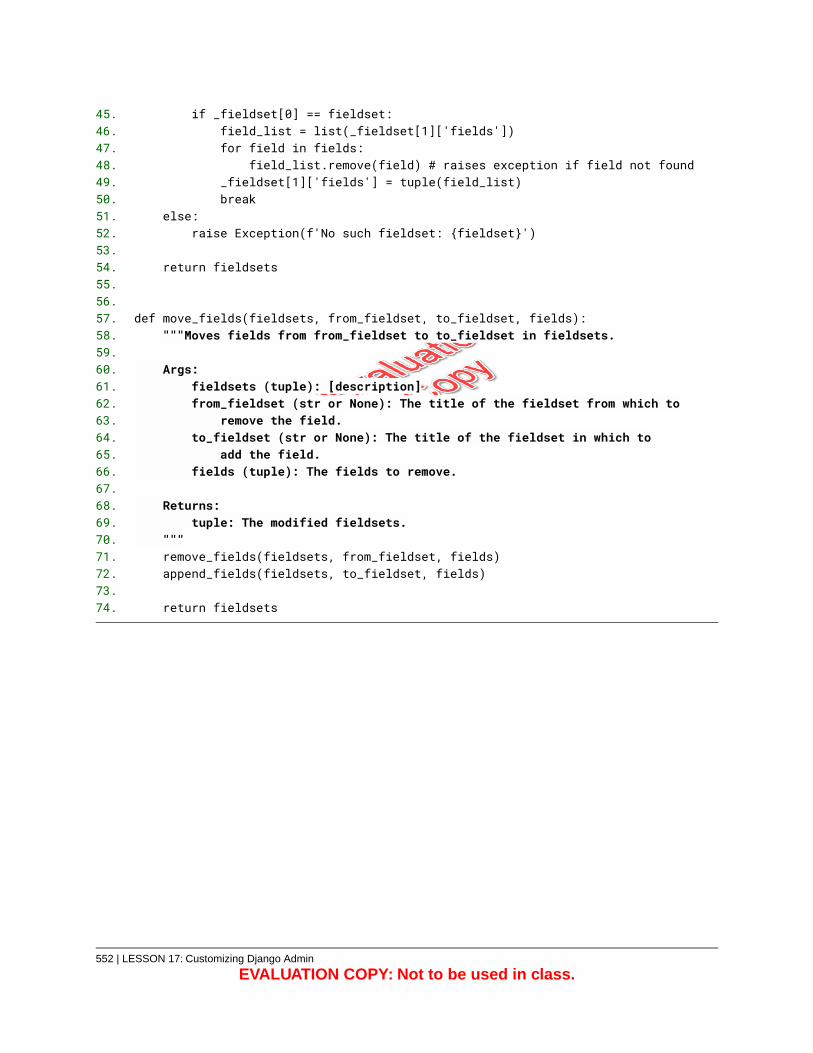
if _fieldset[0] == fieldset:45.field_list = list(_fieldset[1]['fields'])46.for field in fields:47.
field_list.remove(field) # raises exception if field not found48._fieldset[1]['fields'] = tuple(field_list)49.break50.
else:51.raise Exception(f'No such fieldset: {fieldset}')52.
53.return fieldsets54.
55.56.
def move_fields(fieldsets, from_fieldset, to_fieldset, fields):57."""Moves fields from from_fieldset to to_fieldset in fieldsets.58.
59.Args:60.
fieldsets (tuple): [description]61.from_fieldset (str or None): The title of the fieldset from which to62.
remove the field.63.to_fieldset (str or None): The title of the fieldset in which to64.
add the field.65.fields (tuple): The fields to remove.66.
67.Returns:68.
tuple: The modified fieldsets.69."""70.remove_fields(fieldsets, from_fieldset, fields)71.append_fields(fieldsets, to_fieldset, fields)72.
73.return fieldsets74.
552 | LESSON 17: Customizing Django Admin
EVALUATION COPY: Not to be used in class.
Exercise 79: Modifying theCustomUserAdmin Class
45 to 60 minutes
Currently, the CustomUserAdmin class looks like this:
Exercise Code 79.1: users/admin.py
from django.contrib import admin1.from django.contrib.auth import get_user_model2.from django.contrib.auth.admin import UserAdmin3.
4.from common.admin import DjangoJokesAdmin5.
6.CustomUser = get_user_model()7.
[email protected](CustomUser)9.class CustomUserAdmin(DjangoJokesAdmin, UserAdmin):10.
model = CustomUser11.12.
add_fieldsets = UserAdmin.add_fieldsets + (13.('Optional Fields', {14.
'classes': ('wide',),15.'fields': ('email', 'first_name', 'last_name'),16.
}),17.)18.
In this exercise, you will make the following modifications to the CustomUserAdmin class:
1. Add list_display and list_display_links attributes.
2. Use the admin utility functions to add, move, and remove fields in the Add userand Change user forms.
3. Add a link to the Password change form.
4. Make it so that the save buttons show up at the top of the Change user form, butnot at the top of the Add user form.
E79.1. List Attributes
You will start with the list attributes, and then modify the forms.
LESSON 17: Customizing Django Admin | 553
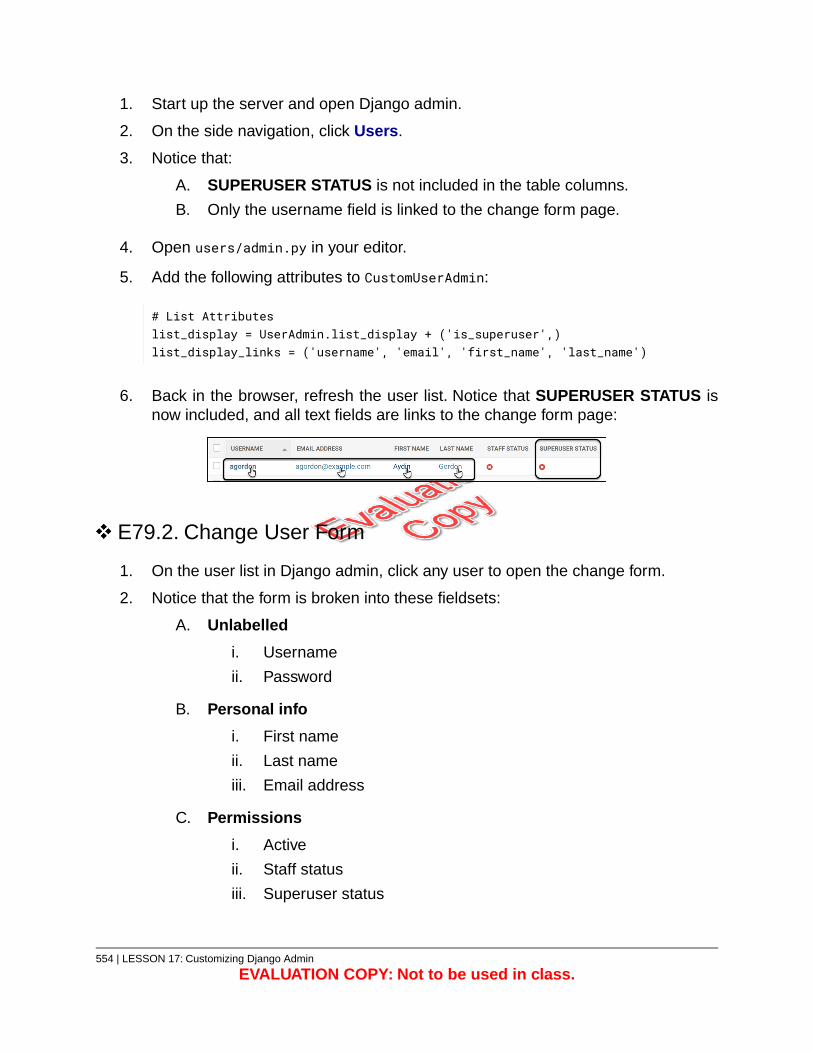
1. Start up the server and open Django admin.
2. On the side navigation, click Users.
3. Notice that:
A. SUPERUSER STATUS is not included in the table columns.
B. Only the username field is linked to the change form page.
4. Open users/admin.py in your editor.
5. Add the following attributes to CustomUserAdmin:
# List Attributeslist_display = UserAdmin.list_display + ('is_superuser',)list_display_links = ('username', 'email', 'first_name', 'last_name')
6. Back in the browser, refresh the user list. Notice that SUPERUSER STATUS isnow included, and all text fields are links to the change form page:
E79.2. Change User Form
1. On the user list in Django admin, click any user to open the change form.
2. Notice that the form is broken into these fieldsets:
A. Unlabelled
i. Username
ii. Password
B. Personal info
i. First name
ii. Last name
iii. Email address
C. Permissions
i. Active
ii. Staff status
iii. Superuser status
554 | LESSON 17: Customizing Django Admin
EVALUATION COPY: Not to be used in class.
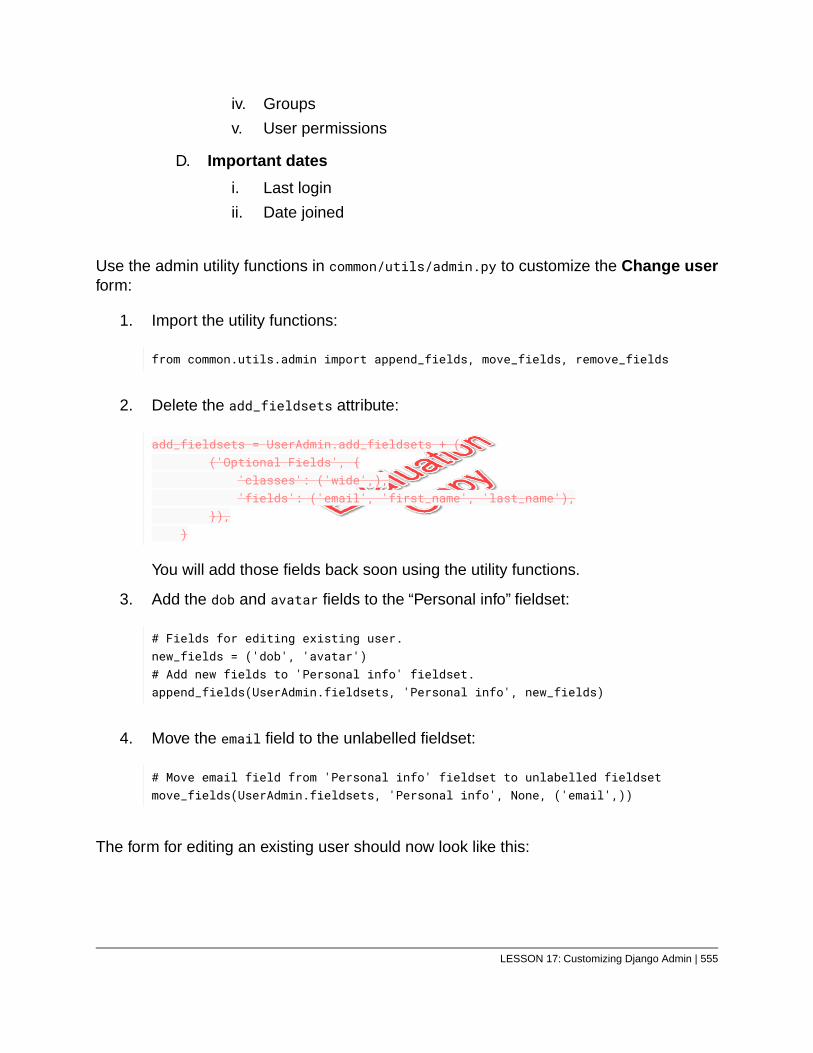
iv. Groups
v. User permissions
D. Important dates
i. Last login
ii. Date joined
Use the admin utility functions in common/utils/admin.py to customize the Change userform:
1. Import the utility functions:
from common.utils.admin import append_fields, move_fields, remove_fields
2. Delete the add_fieldsets attribute:
add_fieldsets = UserAdmin.add_fieldsets + (('Optional Fields', {
'classes': ('wide',),'fields': ('email', 'first_name', 'last_name'),
}),)
You will add those fields back soon using the utility functions.
3. Add the dob and avatar fields to the “Personal info” fieldset:
# Fields for editing existing user.new_fields = ('dob', 'avatar')# Add new fields to 'Personal info' fieldset.append_fields(UserAdmin.fieldsets, 'Personal info', new_fields)
4. Move the email field to the unlabelled fieldset:
# Move email field from 'Personal info' fieldset to unlabelled fieldsetmove_fields(UserAdmin.fieldsets, 'Personal info', None, ('email',))
The form for editing an existing user should now look like this:
LESSON 17: Customizing Django Admin | 555

Notice that the email field has been moved to the unlabelled fieldset and the dob andavatar fields have been added to the “Personal info” fieldset.
E79.3. The Password Field
The password field takes up a lot of space and the only useful part of it is the this formlink, which links to a password-change form:
Remove the password field using the remove_fields() method:
# Remove password field.remove_fields(UserAdmin.fieldsets, None, ('password',))
That removes the password field, but it also removes the link to the password form. Youwill add that back shortly.
556 | LESSON 17: Customizing Django Admin
EVALUATION COPY: Not to be used in class.
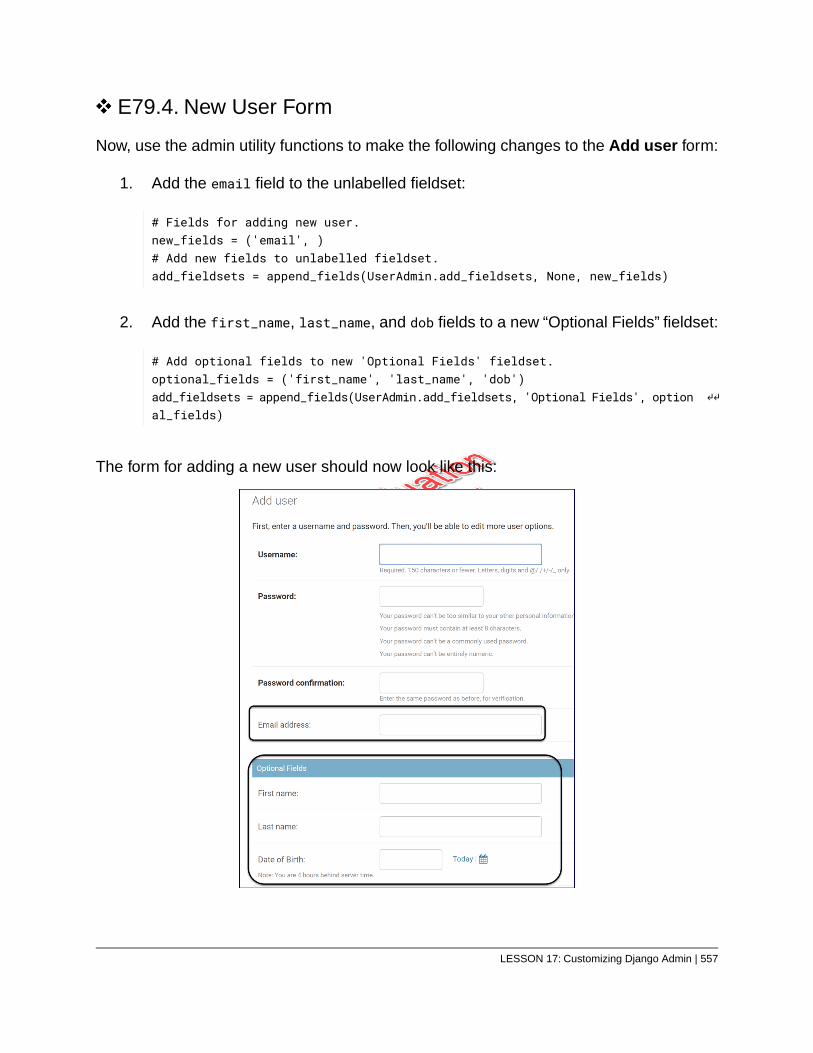
E79.4. New User Form
Now, use the admin utility functions to make the following changes to the Add user form:
1. Add the email field to the unlabelled fieldset:
# Fields for adding new user.new_fields = ('email', )# Add new fields to unlabelled fieldset.add_fieldsets = append_fields(UserAdmin.add_fieldsets, None, new_fields)
2. Add the first_name, last_name, and dob fields to a new “Optional Fields” fieldset:
# Add optional fields to new 'Optional Fields' fieldset.optional_fields = ('first_name', 'last_name', 'dob')add_fieldsets = append_fields(UserAdmin.add_fieldsets, 'Optional Fields', option ↵↵al_fields)
The form for adding a new user should now look like this:
LESSON 17: Customizing Django Admin | 557
Notice that the email field has been added to the unlabelled fieldset and the first_name,last_name, and dob fields have been added a new “Optional Fields” fieldset.
E79.5. Save Buttons Placement
The Change user form is pretty long, so it would be convenient to have save buttons atboth the top and bottom of the form. The Add user form, however, is not that long, so itonly needs save buttons on the bottom.
The get_form() method of the ModelAdmin class gets the form used in both the add_viewand the change_view. You can override this method to conditionally change the value ofsave_on_top:
def get_form(self, request, obj=None, **kwargs):self.save_on_top = obj is not Nonereturn super().get_form(request, obj, **kwargs)
This will set save_on_top to True when obj exists and to False when it does not. Add themethod to the CustomUserAdmin class.
The modified code in the CustomUserAdmin class follows:
558 | LESSON 17: Customizing Django Admin
EVALUATION COPY: Not to be used in class.
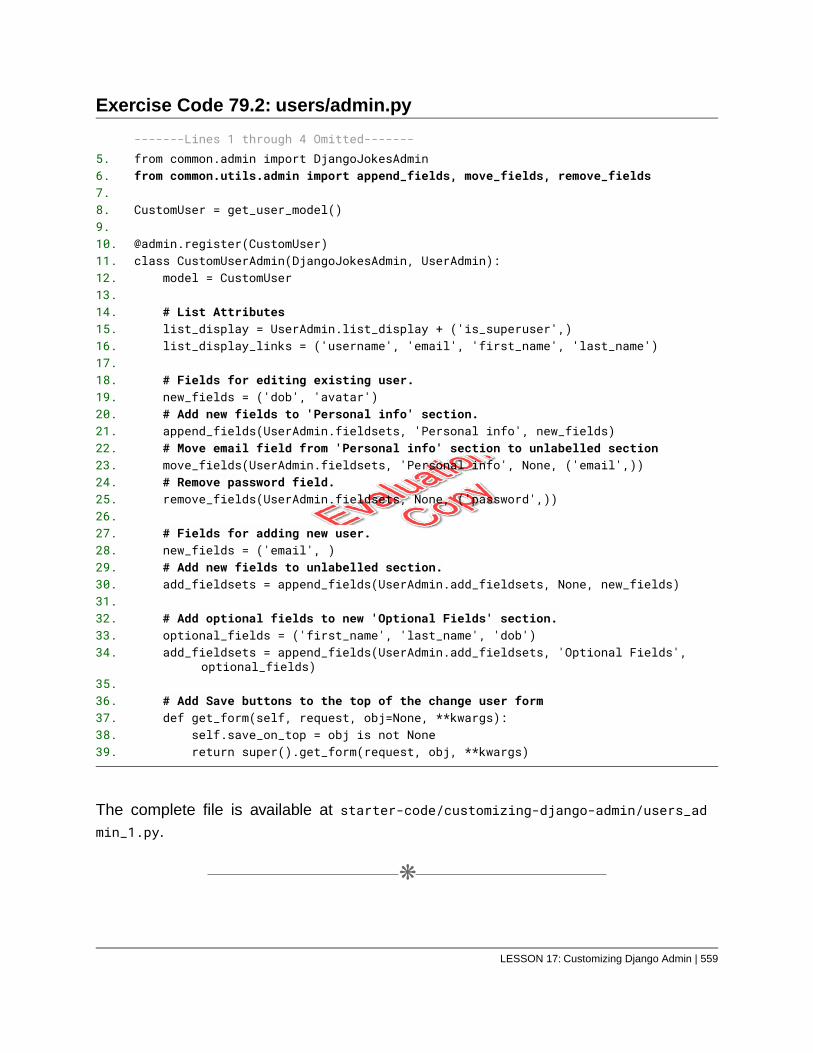
Exercise Code 79.2: users/admin.py
-------Lines 1 through 4 Omitted-------from common.admin import DjangoJokesAdmin5.from common.utils.admin import append_fields, move_fields, remove_fields6.
7.CustomUser = get_user_model()8.
[email protected](CustomUser)10.class CustomUserAdmin(DjangoJokesAdmin, UserAdmin):11.
model = CustomUser12.13.
# List Attributes14.list_display = UserAdmin.list_display + ('is_superuser',)15.list_display_links = ('username', 'email', 'first_name', 'last_name')16.
17.# Fields for editing existing user.18.new_fields = ('dob', 'avatar')19.# Add new fields to 'Personal info' section.20.append_fields(UserAdmin.fieldsets, 'Personal info', new_fields)21.# Move email field from 'Personal info' section to unlabelled section22.move_fields(UserAdmin.fieldsets, 'Personal info', None, ('email',))23.# Remove password field.24.remove_fields(UserAdmin.fieldsets, None, ('password',))25.
26.# Fields for adding new user.27.new_fields = ('email', )28.# Add new fields to unlabelled section.29.add_fieldsets = append_fields(UserAdmin.add_fieldsets, None, new_fields)30.
31.# Add optional fields to new 'Optional Fields' section.32.optional_fields = ('first_name', 'last_name', 'dob')33.add_fieldsets = append_fields(UserAdmin.add_fieldsets, 'Optional Fields',
optional_fields)34.
35.# Add Save buttons to the top of the change user form36.def get_form(self, request, obj=None, **kwargs):37.
self.save_on_top = obj is not None38.return super().get_form(request, obj, **kwargs)39.
The complete file is available at starter-code/customizing-django-admin/users_admin_1.py.
❋
LESSON 17: Customizing Django Admin | 559
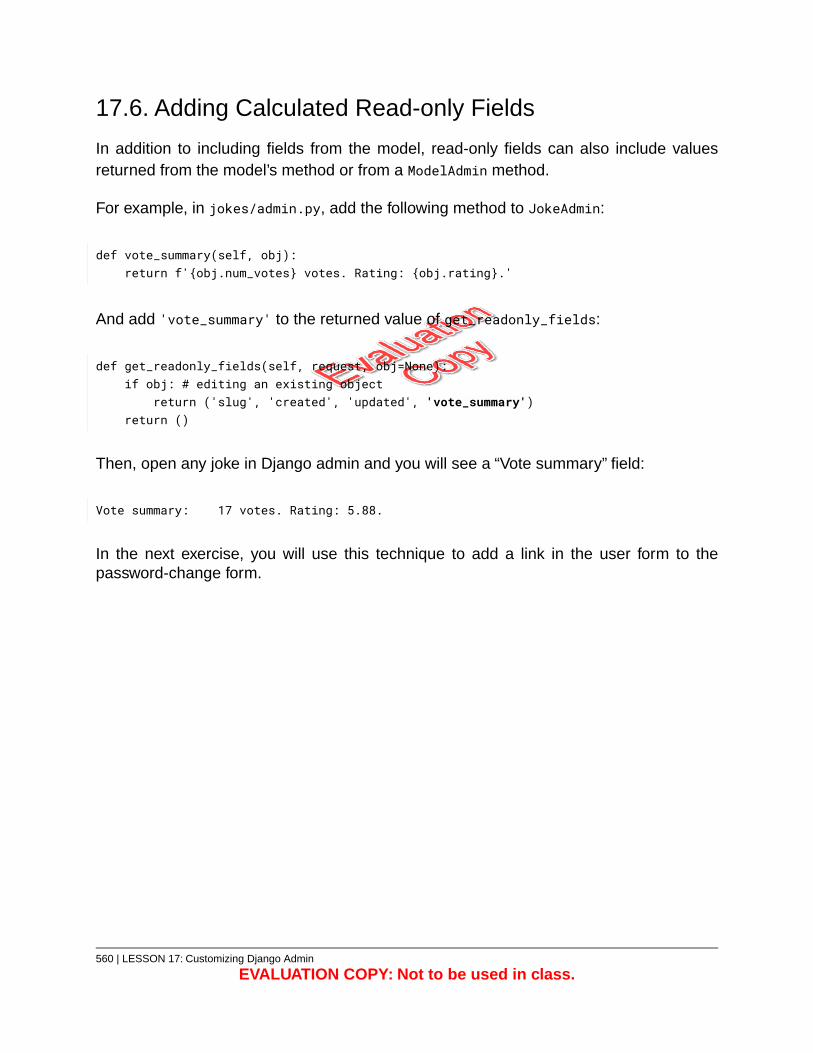
17.6. Adding Calculated Read-only Fields
In addition to including fields from the model, read-only fields can also include valuesreturned from the model’s method or from a ModelAdmin method.
For example, in jokes/admin.py, add the following method to JokeAdmin:
def vote_summary(self, obj):return f'{obj.num_votes} votes. Rating: {obj.rating}.'
And add 'vote_summary' to the returned value of get_readonly_fields:
def get_readonly_fields(self, request, obj=None):if obj: # editing an existing object
return ('slug', 'created', 'updated', 'vote_summary')return ()
Then, open any joke in Django admin and you will see a “Vote summary” field:
Vote summary: 17 votes. Rating: 5.88.
In the next exercise, you will use this technique to add a link in the user form to thepassword-change form.
560 | LESSON 17: Customizing Django Admin
EVALUATION COPY: Not to be used in class.
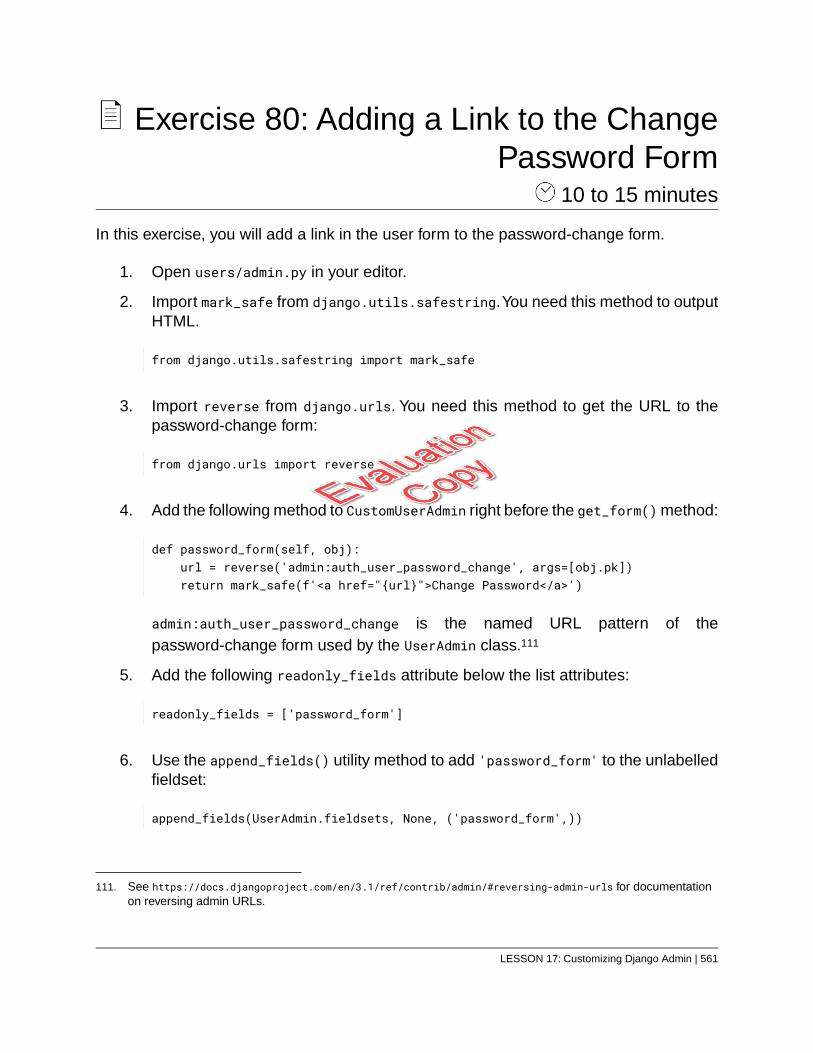
Exercise 80: Adding a Link to the ChangePassword Form
10 to 15 minutes
In this exercise, you will add a link in the user form to the password-change form.
1. Open users/admin.py in your editor.
2. Import mark_safe from django.utils.safestring.You need this method to outputHTML.
from django.utils.safestring import mark_safe
3. Import reverse from django.urls. You need this method to get the URL to thepassword-change form:
from django.urls import reverse
4. Add the following method to CustomUserAdmin right before the get_form() method:
def password_form(self, obj):url = reverse('admin:auth_user_password_change', args=[obj.pk])return mark_safe(f'<a href="{url}">Change Password</a>')
admin:auth_user_password_change is the named URL pattern of thepassword-change form used by the UserAdmin class.111
5. Add the following readonly_fields attribute below the list attributes:
readonly_fields = ['password_form']
6. Use the append_fields() utility method to add 'password_form' to the unlabelledfieldset:
append_fields(UserAdmin.fieldsets, None, ('password_form',))
111. See https://docs.djangoproject.com/en/3.1/ref/contrib/admin/#reversing-admin-urls for documentationon reversing admin URLs.
LESSON 17: Customizing Django Admin | 561
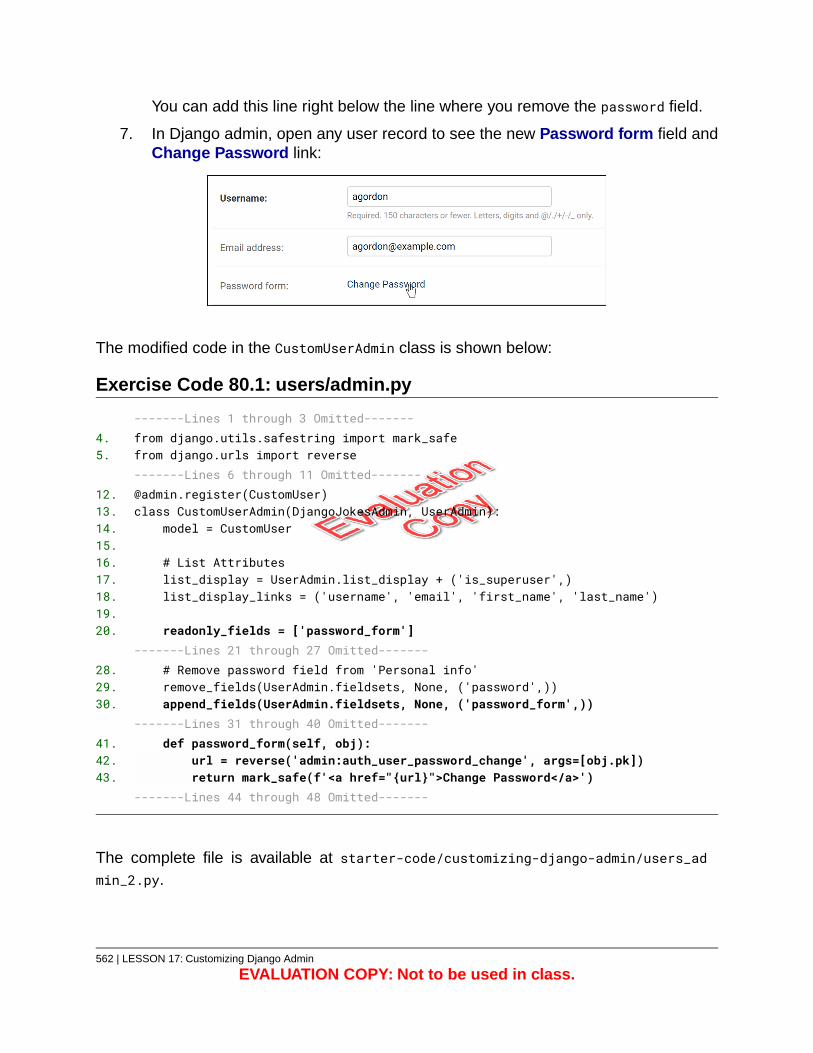
You can add this line right below the line where you remove the password field.
7. In Django admin, open any user record to see the new Password form field andChange Password link:
The modified code in the CustomUserAdmin class is shown below:
Exercise Code 80.1: users/admin.py
-------Lines 1 through 3 Omitted-------from django.utils.safestring import mark_safe4.from django.urls import reverse5.-------Lines 6 through 11 [email protected](CustomUser)12.class CustomUserAdmin(DjangoJokesAdmin, UserAdmin):13.
model = CustomUser14.15.
# List Attributes16.list_display = UserAdmin.list_display + ('is_superuser',)17.list_display_links = ('username', 'email', 'first_name', 'last_name')18.
19.readonly_fields = ['password_form']20.
-------Lines 21 through 27 Omitted-------# Remove password field from 'Personal info'28.remove_fields(UserAdmin.fieldsets, None, ('password',))29.append_fields(UserAdmin.fieldsets, None, ('password_form',))30.
-------Lines 31 through 40 Omitted-------def password_form(self, obj):41.
url = reverse('admin:auth_user_password_change', args=[obj.pk])42.return mark_safe(f'<a href="{url}">Change Password</a>')43.
-------Lines 44 through 48 Omitted-------
The complete file is available at starter-code/customizing-django-admin/users_admin_2.py.
562 | LESSON 17: Customizing Django Admin
EVALUATION COPY: Not to be used in class.
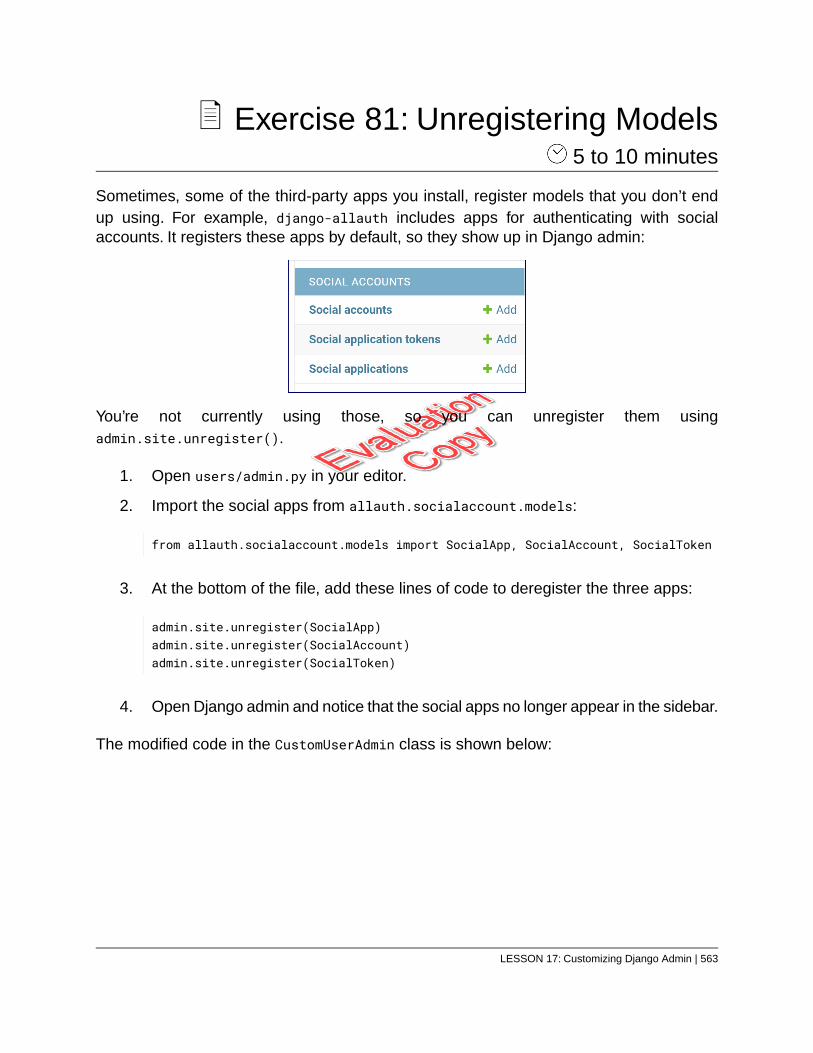
Exercise 81: Unregistering Models 5 to 10 minutes
Sometimes, some of the third-party apps you install, register models that you don’t endup using. For example, django-allauth includes apps for authenticating with socialaccounts. It registers these apps by default, so they show up in Django admin:
You’re not currently using those, so you can unregister them usingadmin.site.unregister().
1. Open users/admin.py in your editor.
2. Import the social apps from allauth.socialaccount.models:
from allauth.socialaccount.models import SocialApp, SocialAccount, SocialToken
3. At the bottom of the file, add these lines of code to deregister the three apps:
admin.site.unregister(SocialApp)admin.site.unregister(SocialAccount)admin.site.unregister(SocialToken)
4. Open Django admin and notice that the social apps no longer appear in the sidebar.
The modified code in the CustomUserAdmin class is shown below:
LESSON 17: Customizing Django Admin | 563
Exercise Code 81.1: users/admin.py
-------Lines 1 through 6 Omitted-------from allauth.socialaccount.models import SocialApp, SocialAccount, SocialToken7.-------Lines 8 through 13 [email protected](CustomUser)14.class CustomUserAdmin(DjangoJokesAdmin, UserAdmin):15.
model = CustomUser16.-------Lines 17 through 52 Omitted-------admin.site.unregister(SocialApp)53.admin.site.unregister(SocialAccount)54.admin.site.unregister(SocialToken)55.
The complete file is available at starter-code/customizing-django-admin/users_admin_3.py.
564 | LESSON 17: Customizing Django Admin
EVALUATION COPY: Not to be used in class.
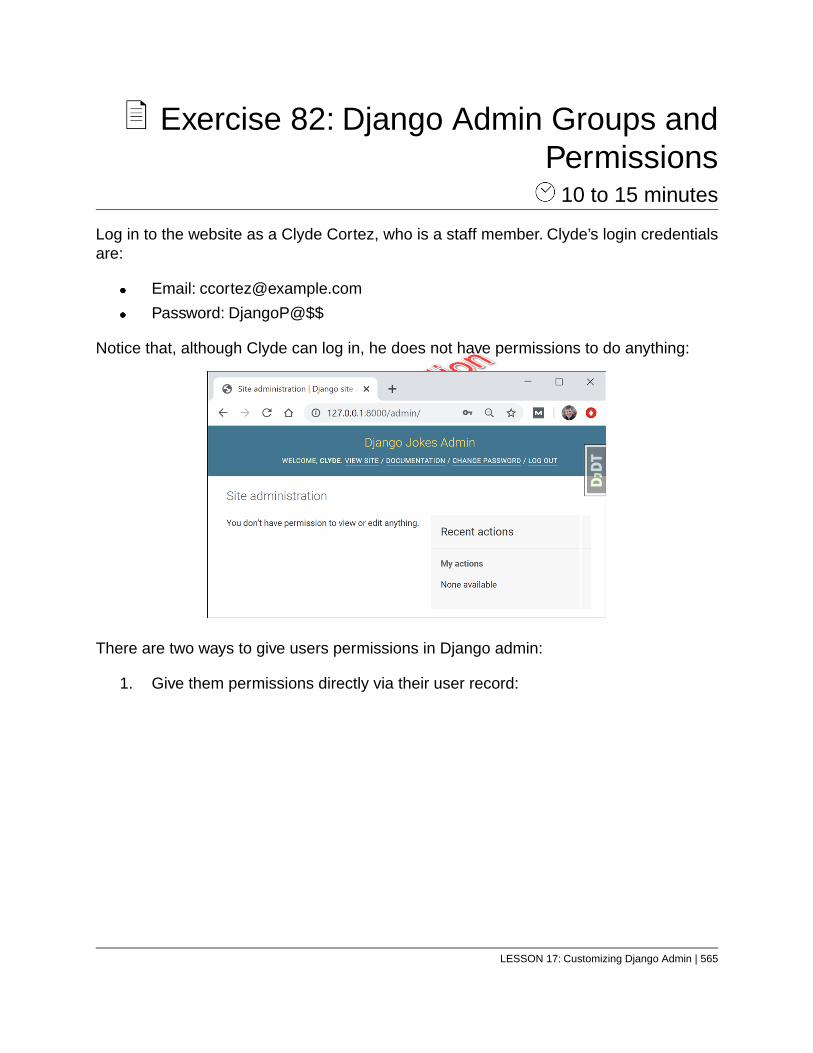
Exercise 82: Django Admin Groups andPermissions 10 to 15 minutes
Log in to the website as a Clyde Cortez, who is a staff member. Clyde’s login credentialsare:
Email: [email protected]
Password: DjangoP@$$
Notice that, although Clyde can log in, he does not have permissions to do anything:
There are two ways to give users permissions in Django admin:
1. Give them permissions directly via their user record:
LESSON 17: Customizing Django Admin | 565
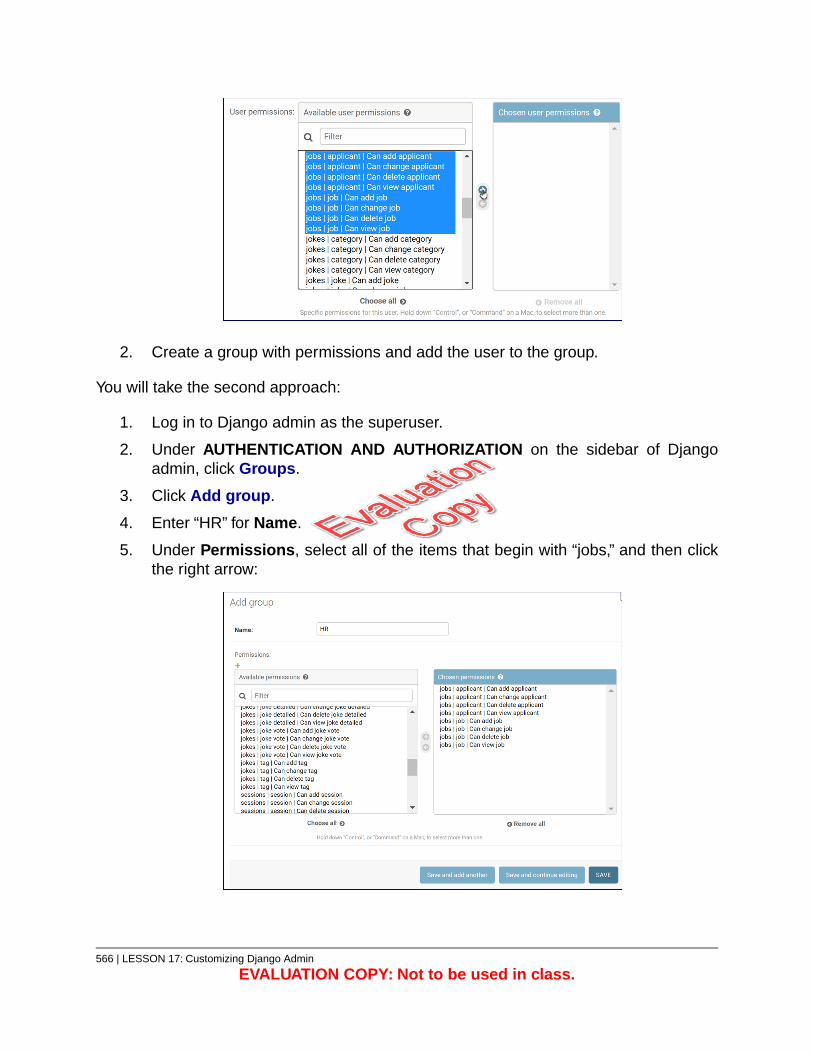
2. Create a group with permissions and add the user to the group.
You will take the second approach:
1. Log in to Django admin as the superuser.
2. Under AUTHENTICATION AND AUTHORIZATION on the sidebar of Djangoadmin, click Groups.
3. Click Add group.
4. Enter “HR” for Name.
5. Under Permissions, select all of the items that begin with “jobs,” and then clickthe right arrow:
566 | LESSON 17: Customizing Django Admin
EVALUATION COPY: Not to be used in class.
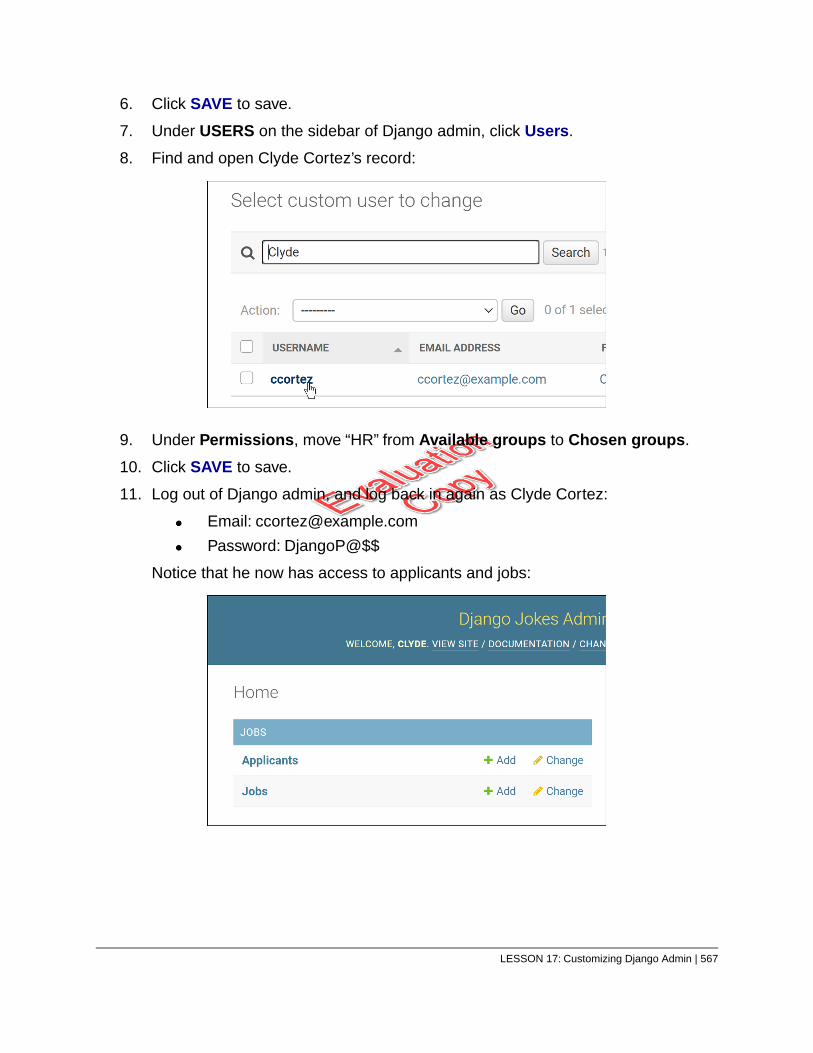
6. Click SAVE to save.
7. Under USERS on the sidebar of Django admin, click Users.
8. Find and open Clyde Cortez’s record:
9. Under Permissions, move “HR” from Available groups to Chosen groups.
10. Click SAVE to save.
11. Log out of Django admin, and log back in again as Clyde Cortez:
Email: [email protected]
Password: DjangoP@$$
Notice that he now has access to applicants and jobs:
LESSON 17: Customizing Django Admin | 567
Conclusion
In this lesson, you have learned some ways to customize Django admin. For additionalinformation, see https://docs.djangoproject.com/en/3.1/ref/contrib/admin/
568 | LESSON 17: Customizing Django Admin
EVALUATION COPY: Not to be used in class.
LESSON 18Additional Topics
Topics Covered
Additional learning.
Projects for practice.
Introduction
In this lesson, we give you some ideas for additional learning and some project ideas youcan do to practice your skills.
❋
18.1. Additional Learning
18.1.1. Testing
As a rule, developers should write tests for every new feature they add. So, yourdevelopment process looks something like this:
1. Decide to add a feature.
2. Write a test to test the feature you’re about to add.
3. Run the test. It should fail, because you haven’t added the feature yet.
4. Add the feature.
5. Run the test again. If it fails, keep working on the feature until the test passes.
6. Decide to add another feature…
But writing good tests is an art, and writing bad tests can lead to disaster. There shouldbe a book dedicated to test-driven development with Django. And, luckily, there is: HarryPercival’s Test-Driven Development with Python. You can read it online for free athttps://www.obeythetestinggoat.com or purchase a print version on Amazon.
LESSON 18: Additional Topics | 569
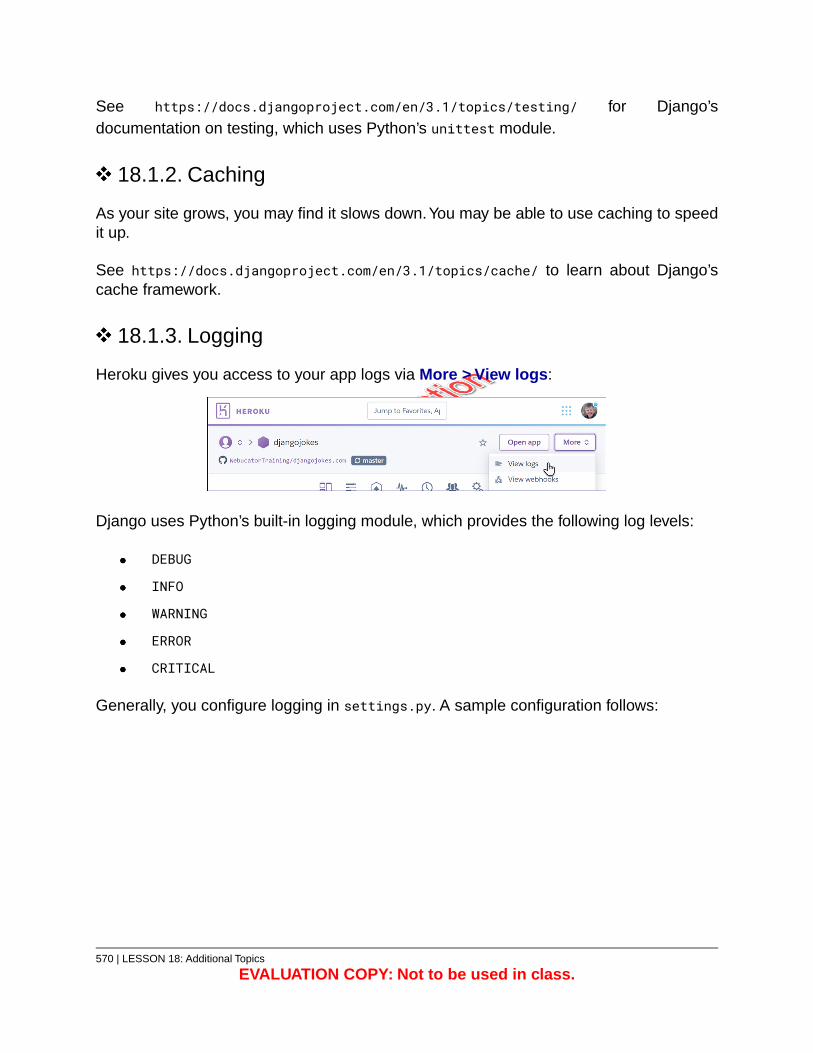
See https://docs.djangoproject.com/en/3.1/topics/testing/ for Django’sdocumentation on testing, which uses Python’s unittest module.
18.1.2. Caching
As your site grows, you may find it slows down.You may be able to use caching to speedit up.
See https://docs.djangoproject.com/en/3.1/topics/cache/ to learn about Django’scache framework.
18.1.3. Logging
Heroku gives you access to your app logs via More > View logs:
Django uses Python’s built-in logging module, which provides the following log levels:
DEBUG
INFO
WARNING
ERROR
CRITICAL
Generally, you configure logging in settings.py. A sample configuration follows:
570 | LESSON 18: Additional Topics
EVALUATION COPY: Not to be used in class.
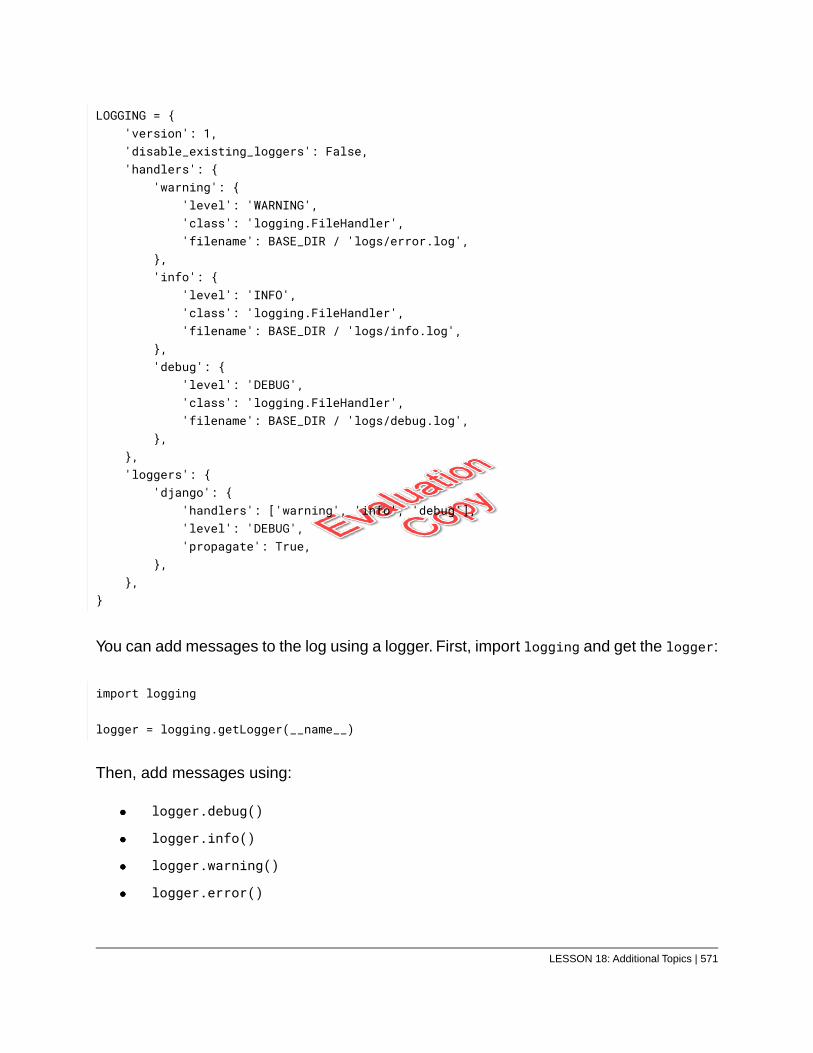
LOGGING = {'version': 1,'disable_existing_loggers': False,'handlers': {
'warning': {'level': 'WARNING','class': 'logging.FileHandler','filename': BASE_DIR / 'logs/error.log',
},'info': {
'level': 'INFO','class': 'logging.FileHandler','filename': BASE_DIR / 'logs/info.log',
},'debug': {
'level': 'DEBUG','class': 'logging.FileHandler','filename': BASE_DIR / 'logs/debug.log',
},},'loggers': {
'django': {'handlers': ['warning', 'info', 'debug'],'level': 'DEBUG','propagate': True,
},},
}
You can add messages to the log using a logger. First, import logging and get the logger:
import logging
logger = logging.getLogger(__name__)
Then, add messages using:
logger.debug()
logger.info()
logger.warning()
logger.error()
LESSON 18: Additional Topics | 571
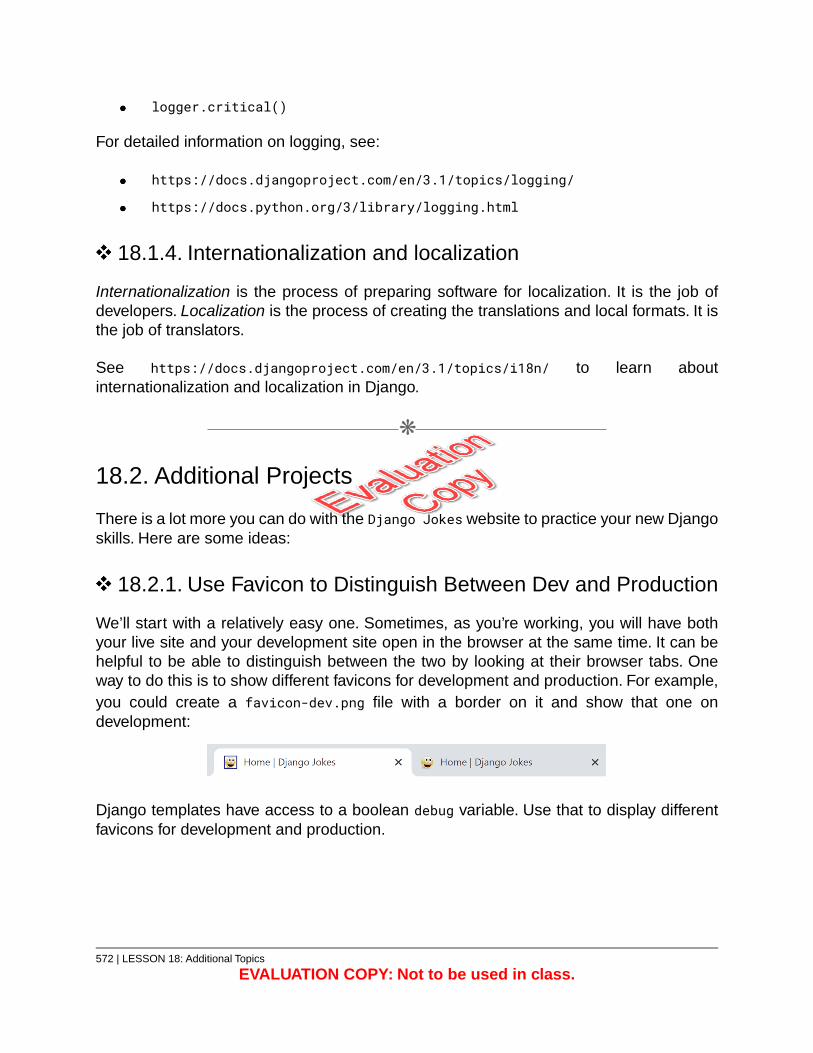
logger.critical()
For detailed information on logging, see:
https://docs.djangoproject.com/en/3.1/topics/logging/
https://docs.python.org/3/library/logging.html
18.1.4. Internationalization and localization
Internationalization is the process of preparing software for localization. It is the job ofdevelopers. Localization is the process of creating the translations and local formats. It isthe job of translators.
See https://docs.djangoproject.com/en/3.1/topics/i18n/ to learn aboutinternationalization and localization in Django.
❋
18.2. Additional Projects
There is a lot more you can do with the Django Jokes website to practice your new Djangoskills. Here are some ideas:
18.2.1. Use Favicon to Distinguish Between Dev and Production
We’ll start with a relatively easy one. Sometimes, as you’re working, you will have bothyour live site and your development site open in the browser at the same time. It can behelpful to be able to distinguish between the two by looking at their browser tabs. Oneway to do this is to show different favicons for development and production. For example,you could create a favicon-dev.png file with a border on it and show that one ondevelopment:
Django templates have access to a boolean debug variable. Use that to display differentfavicons for development and production.
572 | LESSON 18: Additional Topics
EVALUATION COPY: Not to be used in class.
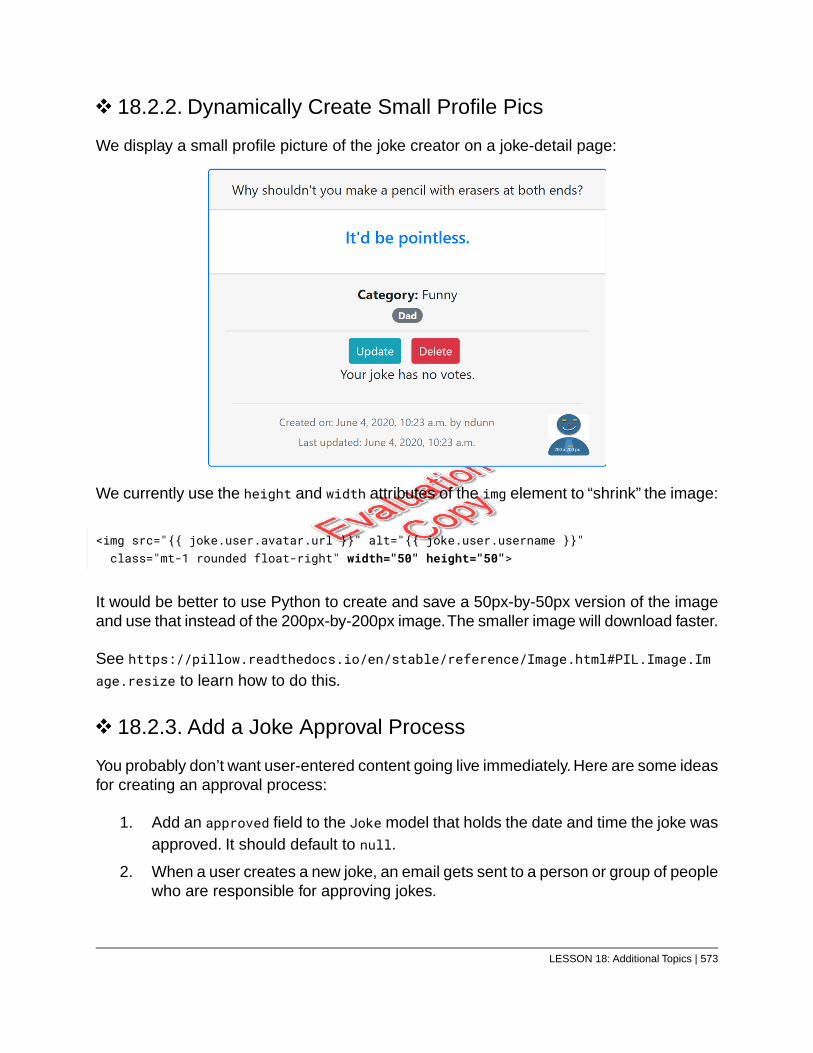
18.2.2. Dynamically Create Small Profile Pics
We display a small profile picture of the joke creator on a joke-detail page:
We currently use the height and width attributes of the img element to “shrink” the image:
<img src="{{ joke.user.avatar.url }}" alt="{{ joke.user.username }}"class="mt-1 rounded float-right" width="50" height="50">
It would be better to use Python to create and save a 50px-by-50px version of the imageand use that instead of the 200px-by-200px image.The smaller image will download faster.
See https://pillow.readthedocs.io/en/stable/reference/Image.html#PIL.Image.Image.resize to learn how to do this.
18.2.3. Add a Joke Approval Process
You probably don’t want user-entered content going live immediately. Here are some ideasfor creating an approval process:
1. Add an approved field to the Joke model that holds the date and time the joke wasapproved. It should default to null.
2. When a user creates a new joke, an email gets sent to a person or group of peoplewho are responsible for approving jokes.
LESSON 18: Additional Topics | 573
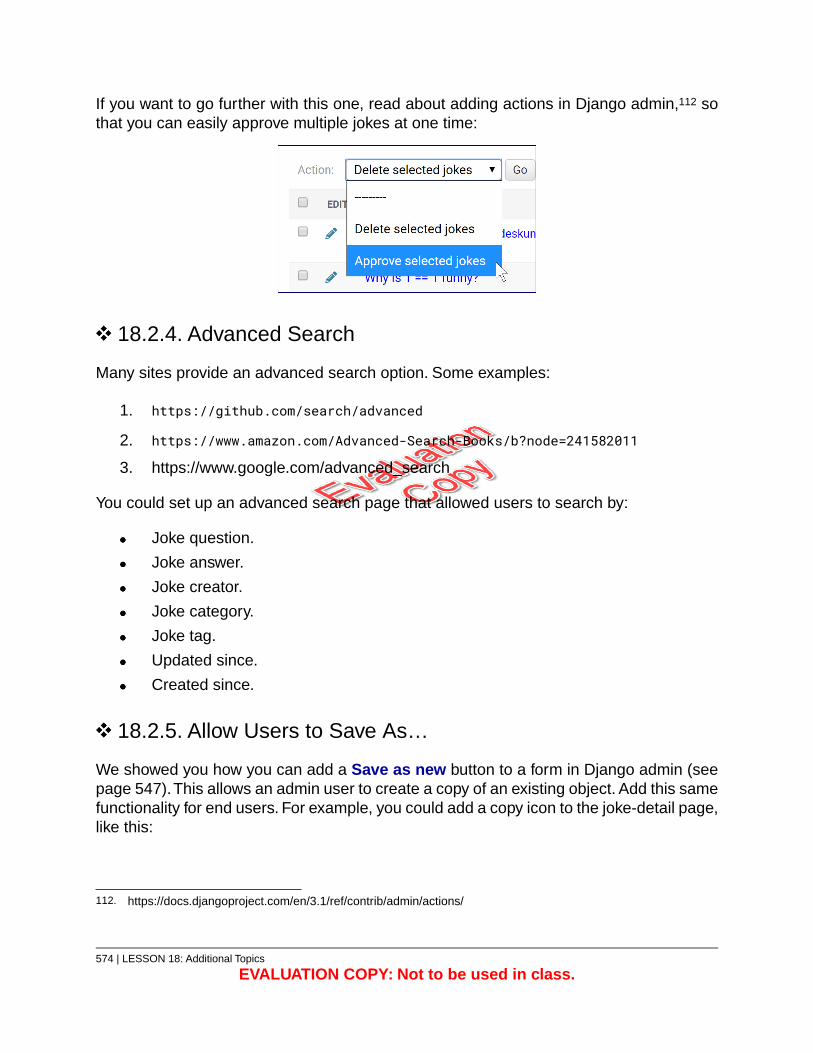
If you want to go further with this one, read about adding actions in Django admin,112 sothat you can easily approve multiple jokes at one time:
18.2.4. Advanced Search
Many sites provide an advanced search option. Some examples:
1. https://github.com/search/advanced
2. https://www.amazon.com/Advanced-Search-Books/b?node=241582011
3. https://www.google.com/advanced_search
You could set up an advanced search page that allowed users to search by:
Joke question.
Joke answer.
Joke creator.
Joke category.
Joke tag.
Updated since.
Created since.
18.2.5. Allow Users to Save As…
We showed you how you can add a Save as new button to a form in Django admin (seepage 547).This allows an admin user to create a copy of an existing object. Add this samefunctionality for end users. For example, you could add a copy icon to the joke-detail page,like this:
112. https://docs.djangoproject.com/en/3.1/ref/contrib/admin/actions/
574 | LESSON 18: Additional Topics
EVALUATION COPY: Not to be used in class.
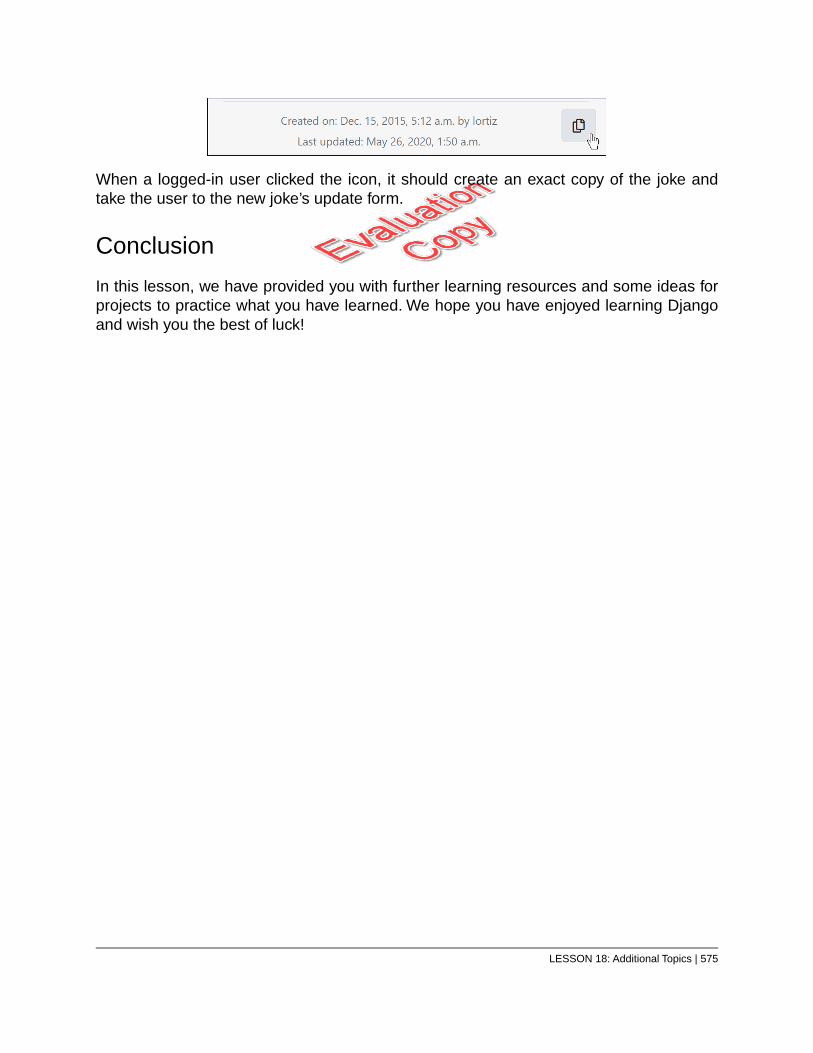
When a logged-in user clicked the icon, it should create an exact copy of the joke andtake the user to the new joke’s update form.
Conclusion
In this lesson, we have provided you with further learning resources and some ideas forprojects to practice what you have learned. We hope you have enjoyed learning Djangoand wish you the best of luck!
LESSON 18: Additional Topics | 575
Related Documents