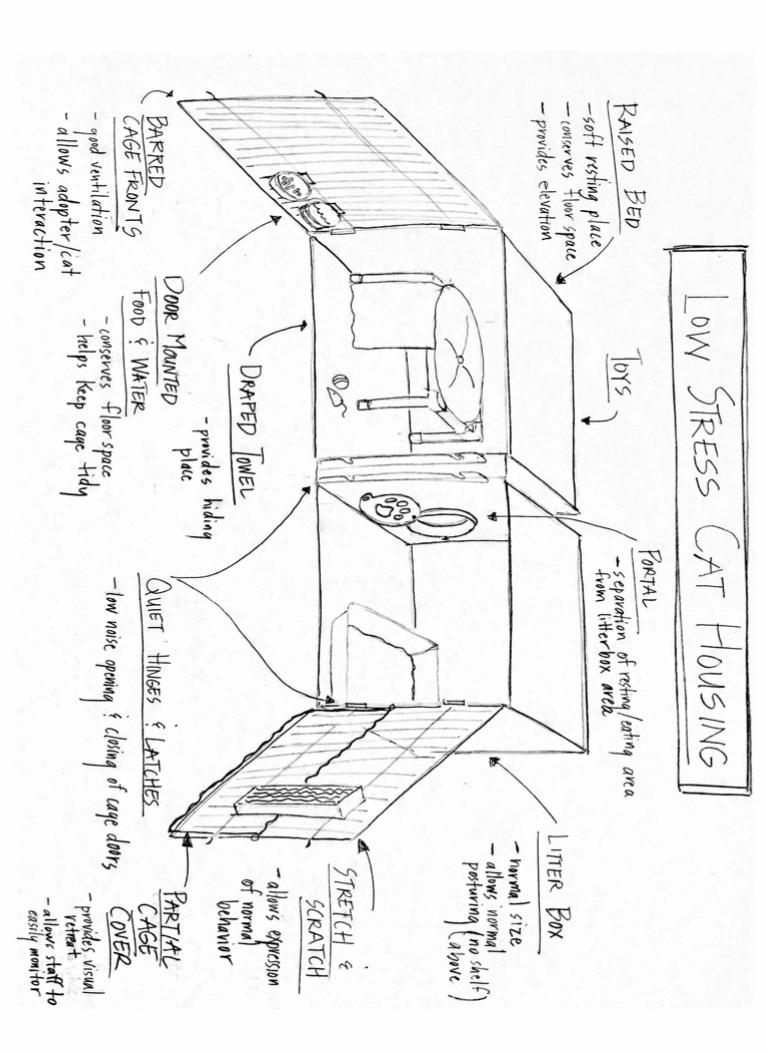
ALL YOU NEED TO KNOW TO MAKE YOUR SHELTER'S HOUSING MORE HUMANE KORET SHELTER MEDICINE PROGRAM CALLING ALL MAKERS! DIY HOUSING ACCESSORIES FOR ANIMAL SHELTERS

Welcome message from author
This document is posted to help you gain knowledge. Please leave a comment to let me know what you think about it! Share it to your friends and learn new things together.
Transcript

ALL YOU NEED TO KNOW TO MAKE YOURSHELTER'S HOUSING MORE HUMANE
KORET SHELTER MEDICINE PROGRAM
CALLING ALL MAKERS!
DIYHOUSING
ACCESSORIES FOR ANIMAL SHELTERS

Eve��t���g yo� ne�� fo� an����s�e�t�� ho����g ac���s��i�� is he��
in DI� fa����n.
We ha� fu� ma���g t�e�� an� wek�o� yo� wi�� to�!
Second editionApril 2019

PVC Portals
Hidey Box
Feline Housing Accessories
Curtailments
Raised Beds
Some privacy, please?I just need a little break
To be my best self
I love my portalAdopters will fall in love
Now I can woo them
Up on my raised bedDown below my hidey-hole
Raised bed, happy cat!
Peek-a-boo kitty!For sleeping, hiding, or play--
Forts aren't just for kids!
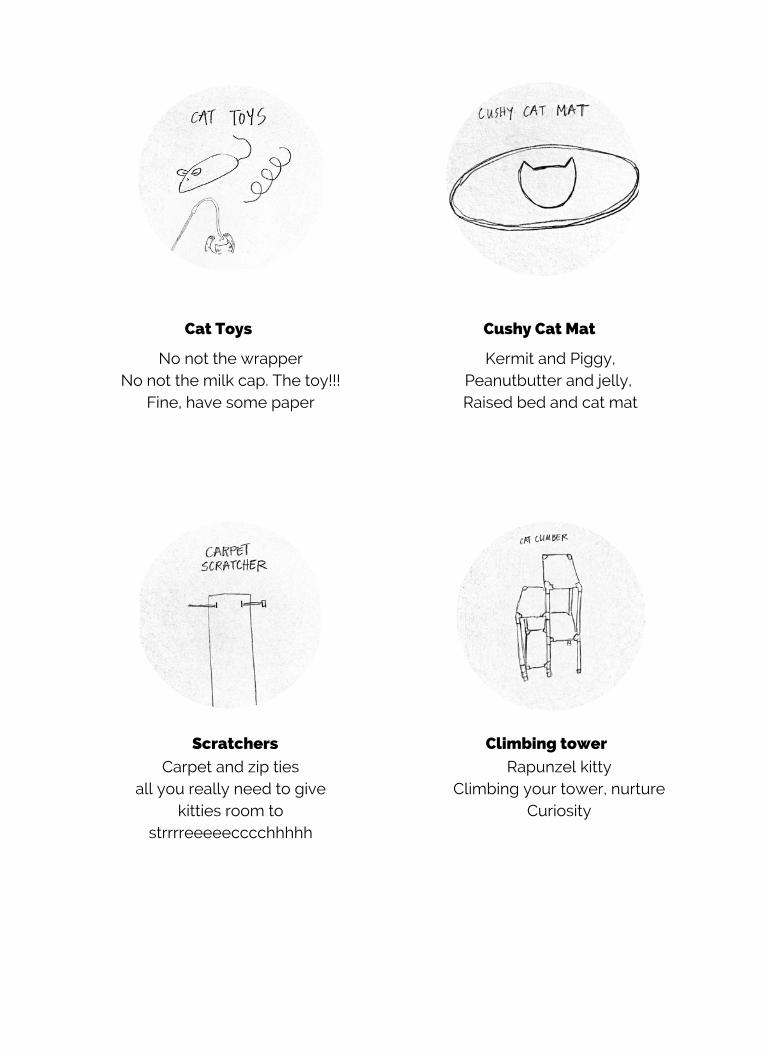
Scratchers
Cat Toys
Climbing tower
Cushy Cat Mat No not the wrapper
No not the milk cap. The toy!!!Fine, have some paper
Kermit and Piggy,Peanutbutter and jelly, Raised bed and cat mat
Carpet and zip tiesall you really need to give
kitties room tostrrrreeeeecccchhhhh
Rapunzel kittyClimbing your tower, nurture
Curiosity
Cur����me��s
We know, curtailments seem a little "cutesy". But don'tbe fooled, they are as effective as they are fun. Wouldyou want to stay in a hotel that had no room doors orshower curtains? We all want a little privacy, especiallywhen we are someplace new.
Castle Door: fits under a raised bed (homemade or Kuranda)
1 yard of fabric (45” wide): cotton iseasy to work with, but any material willdo (second hand sheets, old dresses,muumuus, etc.) ¼“ or ⅜” flat elastic (either will work).You'll need close to a foot.
Mat���a�s1 yard of fabric (45” wide): cotton iseasy to work with, but any material willdo (second hand sheets, old dresses,muumuus, etc.)¼“ or ⅜” flat elastic (either will work).You'll need close to a foot.
Types of Curtailments
Giving cats the ability to retreat helps relieve fear and stress. Lowering stress canmean the difference between a healthy cat and a sick cat. A simple curtain on acage door or on a raised bed can help provide visual choice and retreat space.
News to No One: Cats like to have a choice.
Round elastic cord ~18” Two buttons (¾" to 1” work well)Scissors
Tape measure
Partial Cage door cover: fits on a 2x2 cage door Directions for both curtailment types (we recommend reading through beforestarting a curtailment project)
1. Cut. Cut 1 yard of 45” wide fabric into 4 rectanglesof about 18” by 22.5”. One yard of material will make4 curtailments this size.
2. Hem. Hem all raw edges. For each single curtain,fold under the edges of the fabric ¼” then again ¼”so no raw edges can be seen along interior edgeof fold.
Sewing machine
Great one-timevolunteer opportunity!
Cos�: Co�p�� bu��sTim�: 30 mi��Ski�� Lev��: Bas�� se���g k�o�l����Cur������� m�m� e��s�s�
We knobe fooleyou wanshowerwhen w
News to No One: Cats like to have
Cos�: CoTiTiT mimi �: 3SkSkS i�i�i ���� Lev
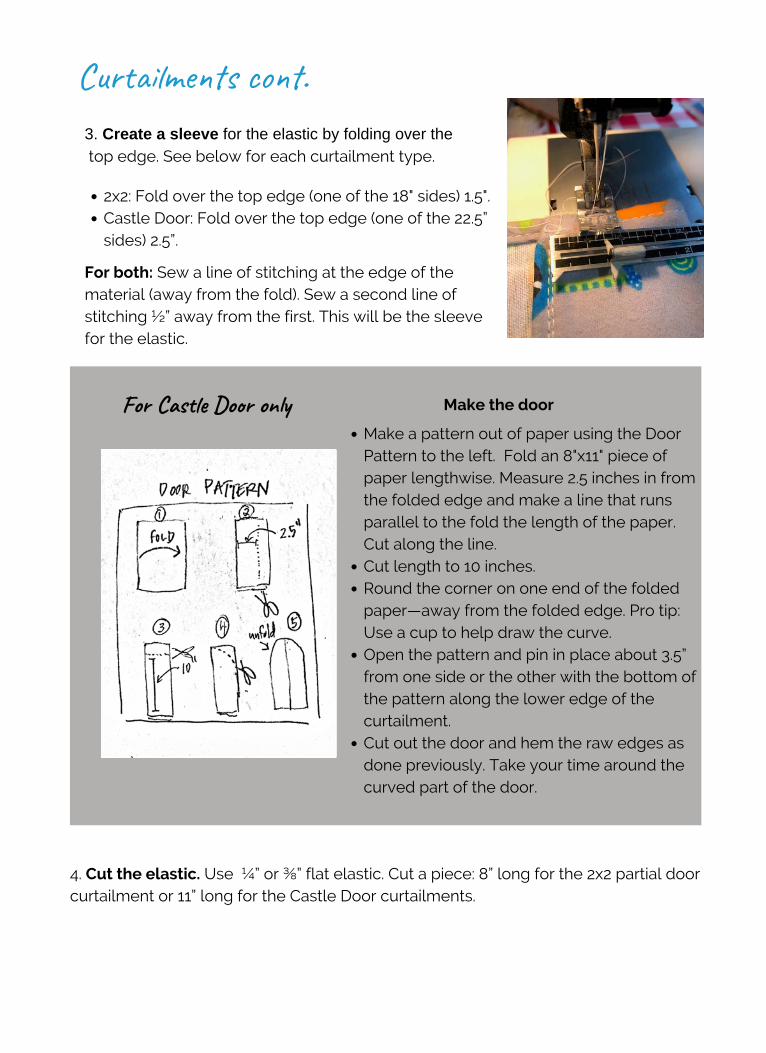
2x2: Fold over the top edge (one of the 18" sides) 1.5". Castle Door: Fold over the top edge (one of the 22.5”sides) 2.5”.
3. Create a sleeve for the elastic by folding over the top edge. See below for each curtailment type.
Make a pattern out of paper using the DoorPattern to the left. Fold an 8"x11" piece ofpaper lengthwise. Measure 2.5 inches in fromthe folded edge and make a line that runsparallel to the fold the length of the paper.Cut along the line. Cut length to 10 inches.Round the corner on one end of the foldedpaper—away from the folded edge. Pro tip:Use a cup to help draw the curve. Open the pattern and pin in place about 3.5”from one side or the other with the bottom ofthe pattern along the lower edge of thecurtailment. Cut out the door and hem the raw edges asdone previously. Take your time around thecurved part of the door.
Cur����me��s co��.
For Cas��� Do�r on�� Make the door
4. Cut the elastic. Use ¼” or ⅜” flat elastic. Cut a piece: 8” long for the 2x2 partial doorcurtailment or 11” long for the Castle Door curtailments.
For both: Sew a line of stitching at the edge of thematerial (away from the fold). Sew a second line ofstitching ½” away from the first. This will be the sleevefor the elastic.
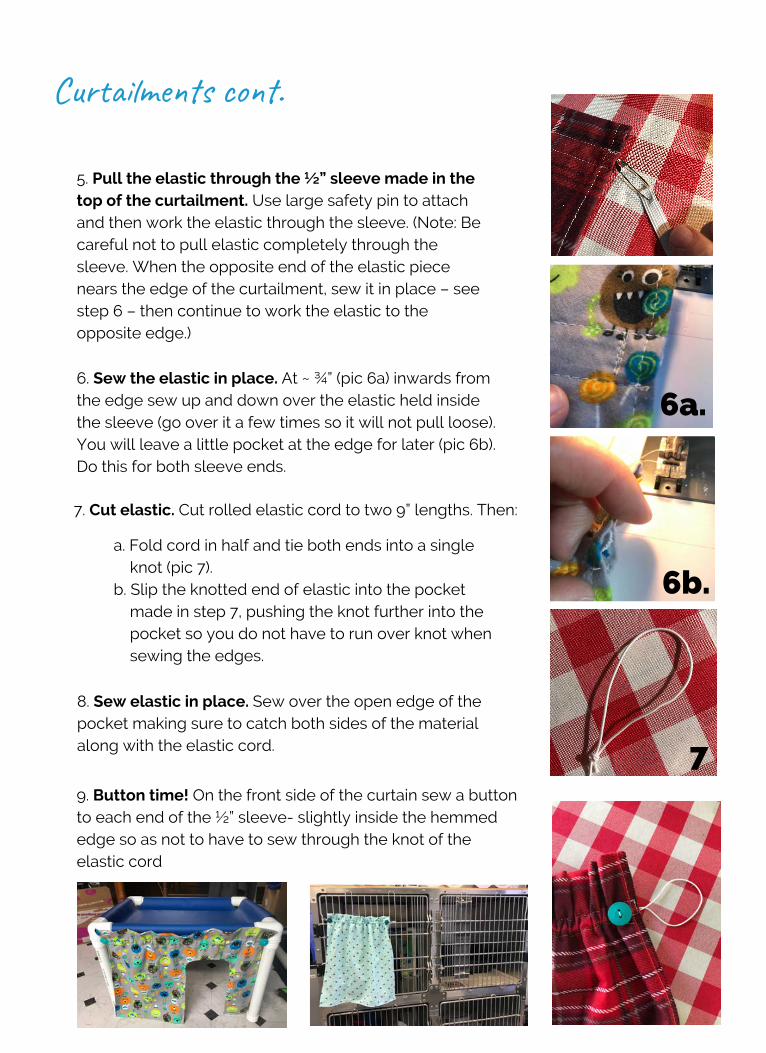
6. Sew the elastic in place. At ~ ¾” (pic 6a) inwards fromthe edge sew up and down over the elastic held insidethe sleeve (go over it a few times so it will not pull loose).You will leave a little pocket at the edge for later (pic 6b).Do this for both sleeve ends.
a. Fold cord in half and tie both ends into a singleknot (pic 7).
b. Slip the knotted end of elastic into the pocketmade in step 7, pushing the knot further into thepocket so you do not have to run over knot whensewing the edges.
7. Cut elastic. Cut rolled elastic cord to two 9” lengths. Then:
5. Pull the elastic through the ½” sleeve made in thetop of the curtailment. Use large safety pin to attachand then work the elastic through the sleeve. (Note: Becareful not to pull elastic completely through thesleeve. When the opposite end of the elastic piecenears the edge of the curtailment, sew it in place – seestep 6 – then continue to work the elastic to theopposite edge.)
8. Sew elastic in place. Sew over the open edge of thepocket making sure to catch both sides of the materialalong with the elastic cord.
9. Button time! On the front side of the curtain sew a buttonto each end of the ½” sleeve- slightly inside the hemmededge so as not to have to sew through the knot of theelastic cord
Cur����me��s co��.
6a.
6b.
7
H66 glue for vinylClear PVC glue
The finished product measures approximately 20” long, 14” deep and 14” high. It willfit into a standard 2’ x 2’ or larger cage. Measure the inside dimensions of your cage toensure the bed will fit. Adjustments can be made easily by changing the dimensionsof your bed to fit the size cage you have. Maximize the length of the bed when youcan and try not to make it much skinnier as cats need space to lie comfortably.
1. Cut the PVC to the following lengths:2 pieces: 11 ½ ” (ends)4 pieces: 12 ½ ” (legs)2 pieces: 17 ½" (sides)
H66 glue for vinylClear PVC glue
Mat���a�sSaw to cut the PVCPPE - safety glasses,hearing protection,gloves
2. Glue. Glue one 12 ½” leg into each of the 3-way fittings.
3. Assemble the bed frame. No need to glue further unless you want to—but don’t do itquite yet. When attached, the vinyl bed will keep the frame together.
4. Add the end caps. Attach 1” end caps to the leg ends.
5. Check your work. Try out the bed frame in your cage. Make sure it fits before gluing oradding the vinyl or making a bunch more—if it's a tight fit, take a little (1/4" or so) off eachof the 17 ½“ PVC pieces until the bed fits.
If you want to glue the frame do it at this time. To prevent wobbling, make sure thebed frame will sit squarely on a flat surface before you glue. The PVC glue sets veryquickly.
Ra�s�� ca� be�
When space is at a premium, you can keep cats healthy and comfortable by openingup usable floor space with a raised bed. The top bunk is for lounging (the better foradopters to see you, My Dear) while the space underneath provides a place to retreatwhen cats need a little break.
Sharpie pen Scissors Paper towelsOld tablecloth (toprotect surfaces)
Making the bed frame:
Tim�: Abo�� an ho��Tim�: $20Ski�� Lev��: Med���
um you can keep ca
Four 1” end caps1, 10 foot, 1” PVC
4 - 3 way PVC fittings(Furniture grade PVC fittingsare fine.)
One yard of 18 oz vinylcoated fabric
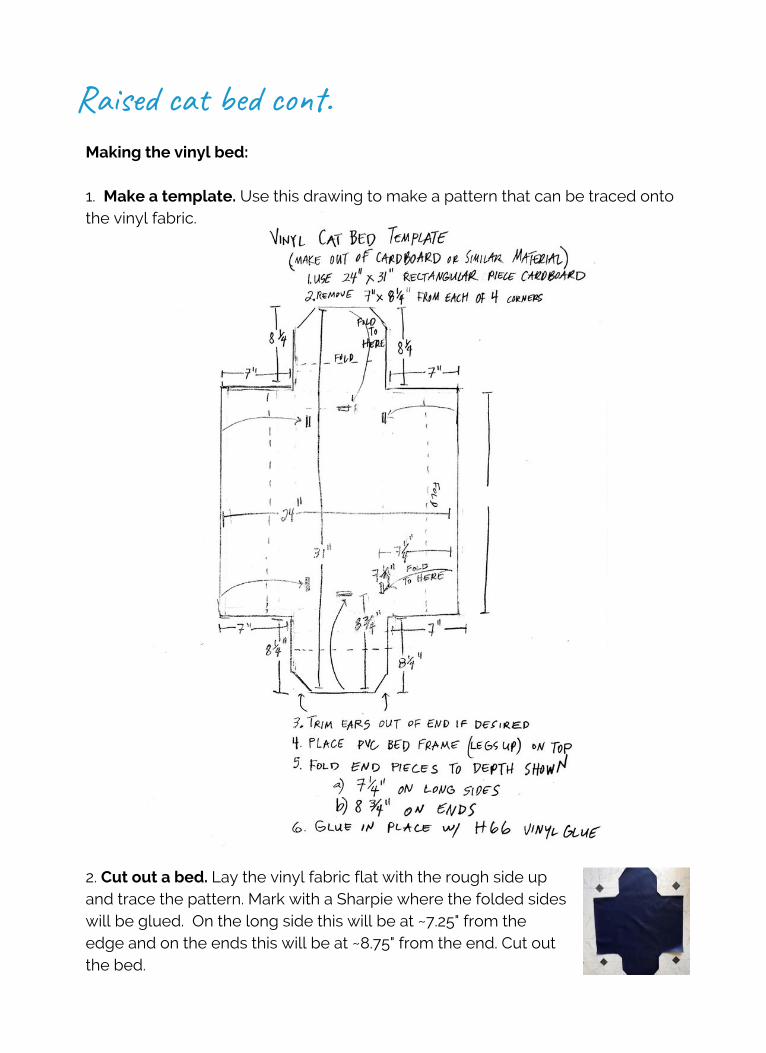
Ra�s�� ca� be� co��. Making the vinyl bed: 1. Make a template. Use this drawing to make a pattern that can be traced ontothe vinyl fabric.
2. Cut out a bed. Lay the vinyl fabric flat with the rough side upand trace the pattern. Mark with a Sharpie where the folded sideswill be glued. On the long side this will be at ~7.25" from theedge and on the ends this will be at ~8.75" from the end. Cut outthe bed.
Ra�s�� ca� be� co��.
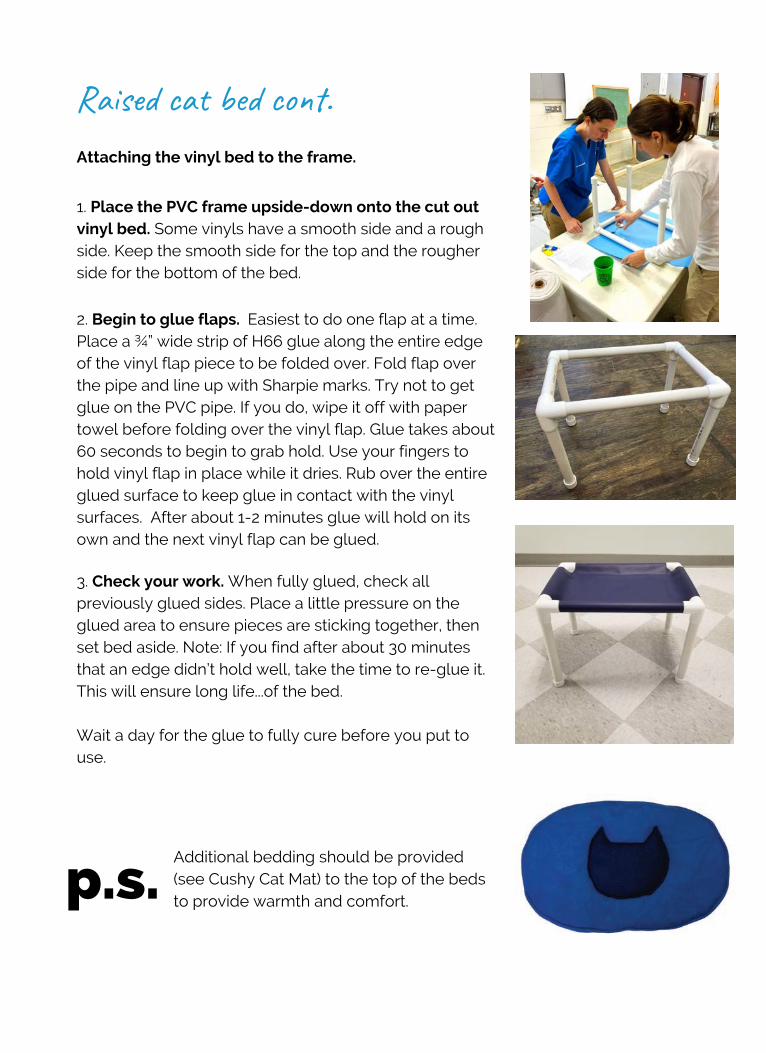
1. Place the PVC frame upside-down onto the cut outvinyl bed. Some vinyls have a smooth side and a roughside. Keep the smooth side for the top and the rougherside for the bottom of the bed.
Additional bedding should be provided(see Cushy Cat Mat) to the top of the bedsto provide warmth and comfort.
Attaching the vinyl bed to the frame.
2. Begin to glue flaps. Easiest to do one flap at a time. Place a ¾” wide strip of H66 glue along the entire edgeof the vinyl flap piece to be folded over. Fold flap overthe pipe and line up with Sharpie marks. Try not to getglue on the PVC pipe. If you do, wipe it off with papertowel before folding over the vinyl flap. Glue takes about60 seconds to begin to grab hold. Use your fingers tohold vinyl flap in place while it dries. Rub over the entireglued surface to keep glue in contact with the vinylsurfaces. After about 1-2 minutes glue will hold on itsown and the next vinyl flap can be glued.
3. Check your work. When fully glued, check allpreviously glued sides. Place a little pressure on theglued area to ensure pieces are sticking together, thenset bed aside. Note: If you find after about 30 minutesthat an edge didn’t hold well, take the time to re-glue it.This will ensure long life...of the bed. Wait a day for the glue to fully cure before you put touse.
p.s.

Cut 1" PVC pipe.Note: Mark each piece with its length nearone end or the other of the pipe (themarking will get covered by the fittings if itis within about 1" of either end).
Clear PVC gluePVC pipe and fittings: Seebreakdown below2 yards of 18 oz vinylcoated fabric
Cos�: $75.00Tim�: 2 Ho�r�Ski�� Lev��: Med��� to ha��
Clear PVC gluePVC pipe and fittings: Seebreakdown below2 yards of 18 oz vinylcoated fabric
Mat���a�sSaw to cut the PVC Heavy duty scissors
Sharpie penPaper towel MalletH66 glue for vinyl material
Directions:
Cat c�i�b��� to��� Looking for a building challenge or an opportunity to show off your crafty skills?Give the climbing tower a try! These are fun to build and provide four levels ofglorious wild kitty antics, sleepy spots, plus they just look so dang cool! Up for thechallenge? Don't forget to send photos of your tower to us [email protected]
Fittings: All fittings are for 1” PVC pipe (furniture grade is fine).
4 pieces 11.25”6 pieces 10.5”4 pieces 22.5"2 pieces 23.25”8 pieces 17.5”8 pieces 11.5”
Pro Tip: Re�d t��o�g� in��r����on� co��l����y be���� ma���g t�i� - ithe��s to re���� mi���k�� on t�i� on�.
6, 3-way 10, 4 way 6, end caps
PVC pipe can be found at home improvement stores in the plumbingsection (these are generally 10 feet long).
PVC Pipe: 4, 1” PVC pipe 10’ long.
CosTiTiT mimiSkSkS i��
ge or an opportunity t
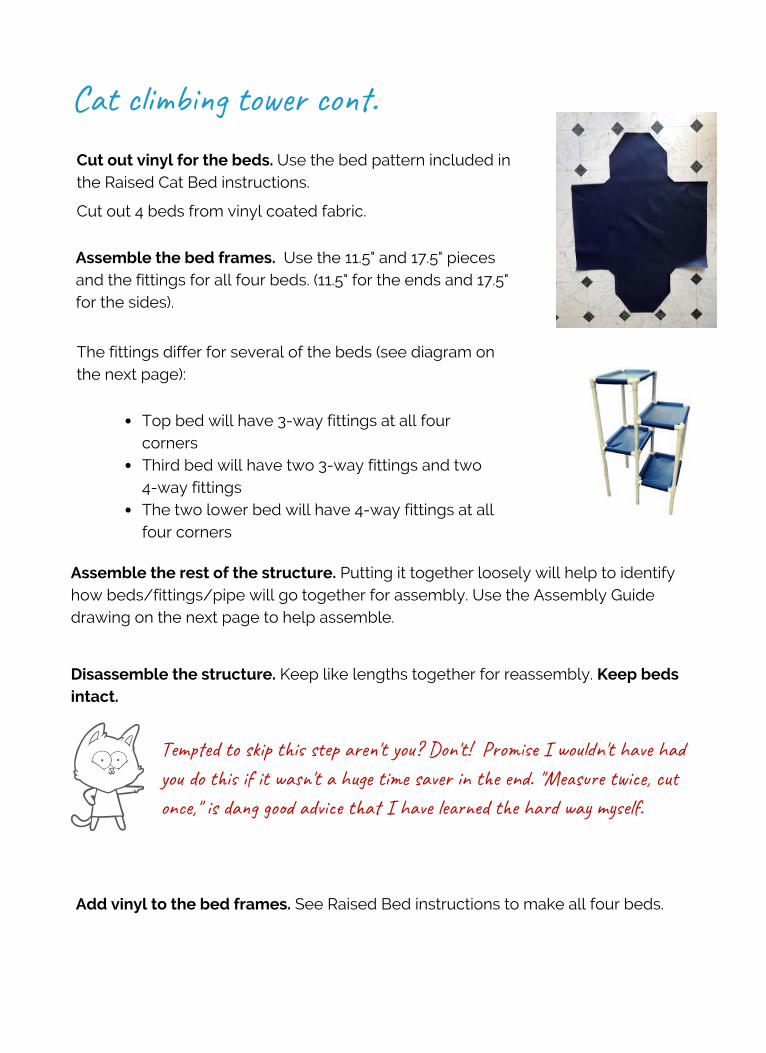
Cat c�i�b��� to��� co��.Cut out vinyl for the beds. Use the bed pattern included inthe Raised Cat Bed instructions. Cut out 4 beds from vinyl coated fabric.
Assemble the bed frames. Use the 11.5" and 17.5" piecesand the fittings for all four beds. (11.5" for the ends and 17.5"for the sides).
Top bed will have 3-way fittings at all fourcorners Third bed will have two 3-way fittings and two4-way fittingsThe two lower bed will have 4-way fittings at allfour corners
The fittings differ for several of the beds (see diagram onthe next page):
Assemble the rest of the structure. Putting it together loosely will help to identifyhow beds/fittings/pipe will go together for assembly. Use the Assembly Guidedrawing on the next page to help assemble.
Disassemble the structure. Keep like lengths together for reassembly. Keep bedsintact.
Add vinyl to the bed frames. See Raised Bed instructions to make all four beds.
Tem���d to s�i� t�i� s�e� ar��'t yo�? Don't! Pro���� I wo���n't ha�� ha�yo� do t�i� if it wa��'t a hu�� ti�� sa��� in t�e en�. "Me�s��e t�i��, cu�on��," is da�� go�� ad���� t�a� I ha�� le����d t�e ha�� wa� m��el�.
Cat c�i�b��� to��� co��.
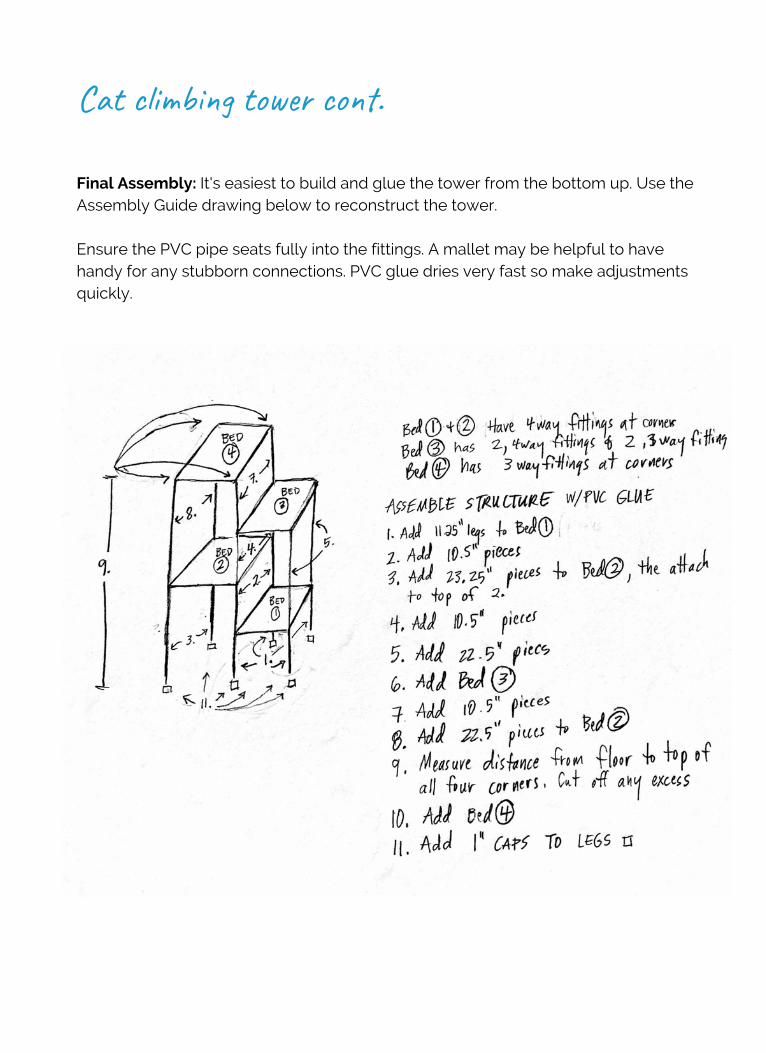
Final Assembly: It's easiest to build and glue the tower from the bottom up. Use theAssembly Guide drawing below to reconstruct the tower. Ensure the PVC pipe seats fully into the fittings. A mallet may be helpful to havehandy for any stubborn connections. PVC glue dries very fast so make adjustmentsquickly.
1. Make a bed pattern out of newspaper. Take a piece of newspaper or other 21" x14" rectangular shaped paper, fold it in half and then in half again. On the edge thathas all four corners of the paper free, round the edges off with a scissors to get theround shape of the bed.2. Cut the fabric. Pin the pattern you just made to the Polar fleece and cut 2 pieces. 3. Cut the batting. Using the pattern again, cut 1 piece from the 1" polyester batting.Then trim off an extra ¼” from the batting edge all the way around to make it a littlesmaller than the pattern.4. Sew fabric together. Place two pieces of fleece on top of each other with rightsides together (the sides you want to face outward should be touching) and sewaround the edges with a 1/4" seam. Leave a 10” section open.5. Turn the bed right side out. 6. Insert the batting. Insert the batting through the open edge. Gently lay the battinginside the bed, making sure that it is smooth and free of wrinkles.7. Sew it shut. Fold under the edge at the opening, pin to hold in place, and sewover. Sew close enough to the edge to catch both edges. Continue to sew aroundthe edge of the entire bed.8. Make a design. Simply stitch the center of the bed with a shape of a cat head (seetemplate) or cut the cat head out of a separate piece of polar fleece and sew alongits edge in the center of the bed. This will help to keep the batting in place as it'sused and washed.
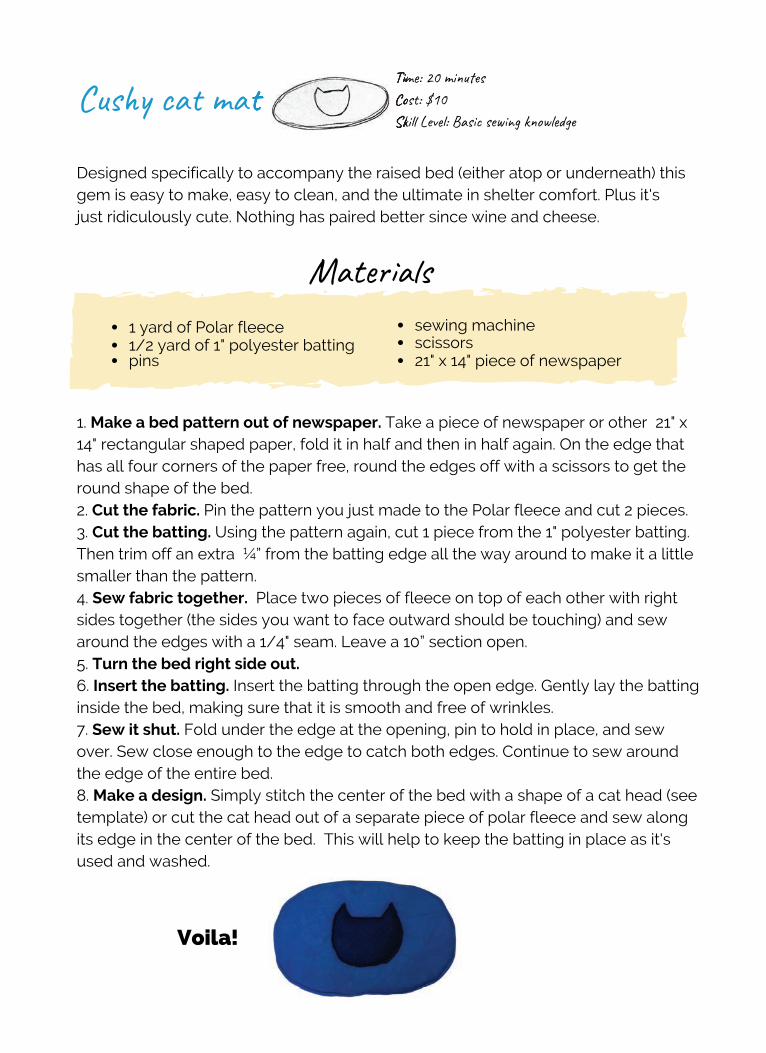
Cus�� ca� ma�Tim�: 20 mi����sCos�: $10Ski�� Lev��: Bas�� se���g k�o�l����
Mat���a�s
1/2 yard of 1" polyester batting21" x 14" piece of newspaperpinsscissors
Voila!
Designed specifically to accompany the raised bed (either atop or underneath) thisgem is easy to make, easy to clean, and the ultimate in shelter comfort. Plus it'sjust ridiculously cute. Nothing has paired better since wine and cheese.
sewing machine 1 yard of Polar fleece
p
�TiTiT mimiCoSkSkS
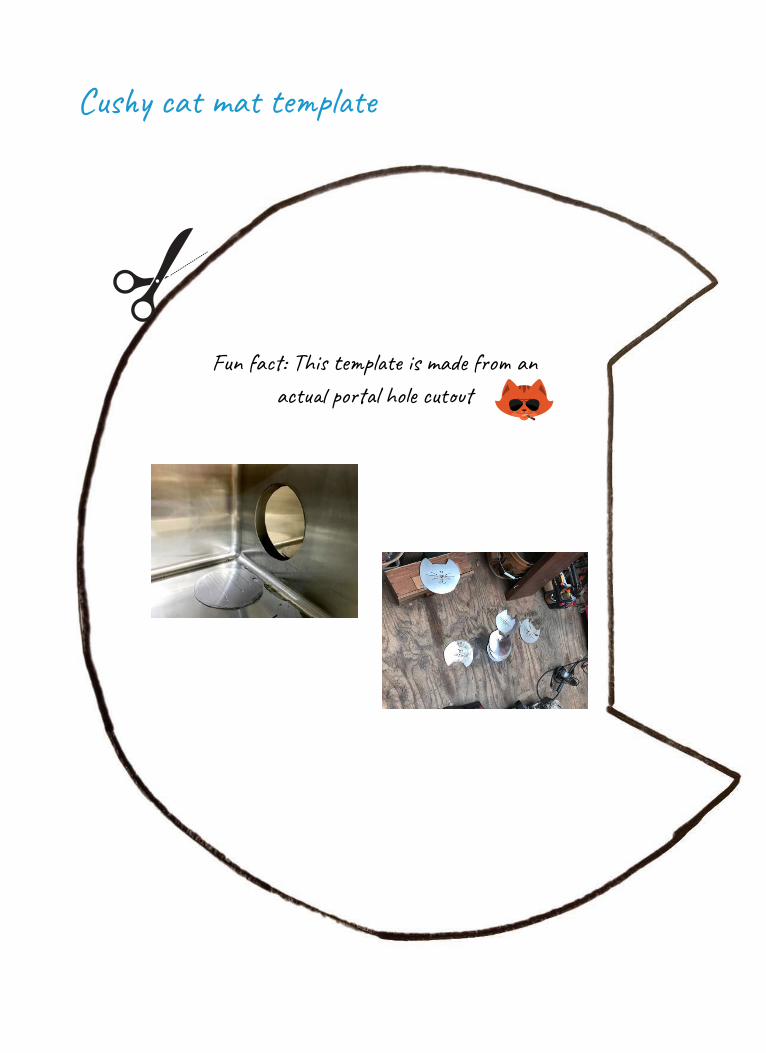
Cus�� ca� ma� te��l���
Fun fa��: Thi� te��l��� is ma�� f�o� an ac���� po���l ho�� cu����
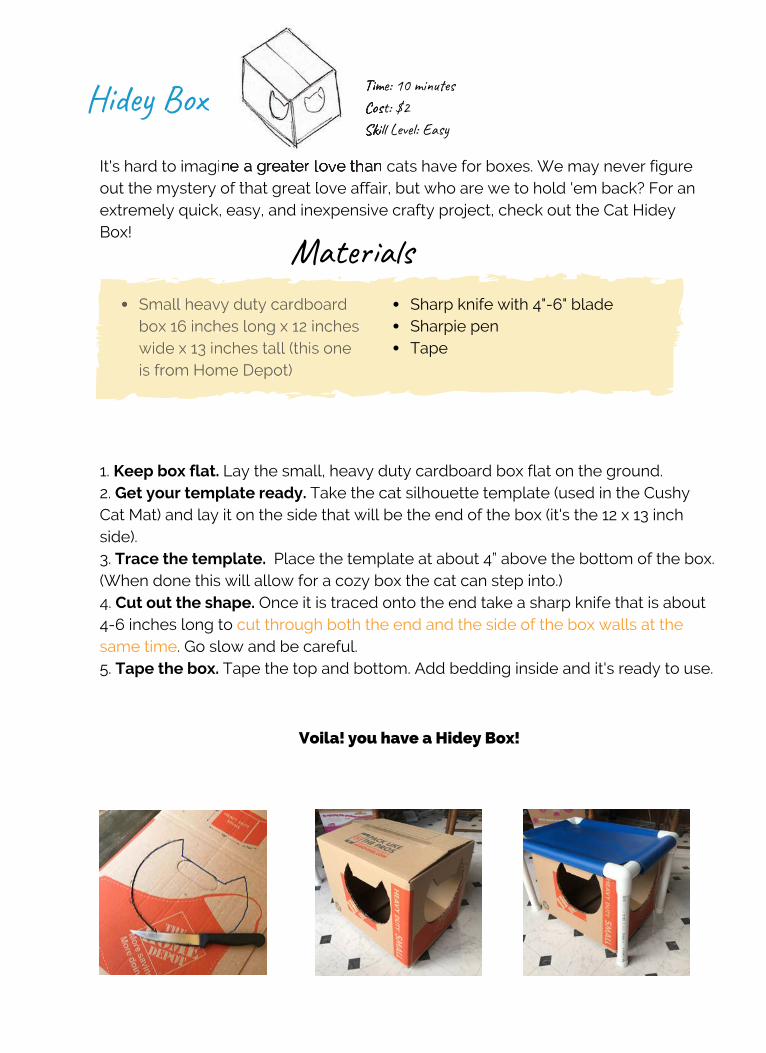
1. Keep box flat. Lay the small, heavy duty cardboard box flat on the ground. 2. Get your template ready. Take the cat silhouette template (used in the CushyCat Mat) and lay it on the side that will be the end of the box (it's the 12 x 13 inchside).3. Trace the template. Place the template at about 4” above the bottom of the box.(When done this will allow for a cozy box the cat can step into.)4. Cut out the shape. Once it is traced onto the end take a sharp knife that is about4-6 inches long to cut through both the end and the side of the box walls at thesame time. Go slow and be careful.5. Tape the box. Tape the top and bottom. Add bedding inside and it's ready to use.
Hid�� Box
Small heavy duty cardboardbox 16 inches long x 12 incheswide x 13 inches tall (this oneis from Home Depot)
Small heavy duty cardboardbox 16 inches long x 12 incheswide x 13 inches tall (this oneis from Home Depot)
Mat���a�s
It's hard to imagine a greater love than cats have for boxes. We may never figureout the mystery of that great love affair, but who are we to hold 'em back? For anextremely quick, easy, and inexpensive crafty project, check out the Cat HideyBox!
Tim�: 10 mi����sCos�: $2Ski�� Lev��: Eas�
Sharpie penTape
Voila! you have a Hidey Box!
Sharp knife with 4"-6" blade
ne a greater love thanf th t t l fffff i
TiTiT mimiCosSkSkS i�i�i
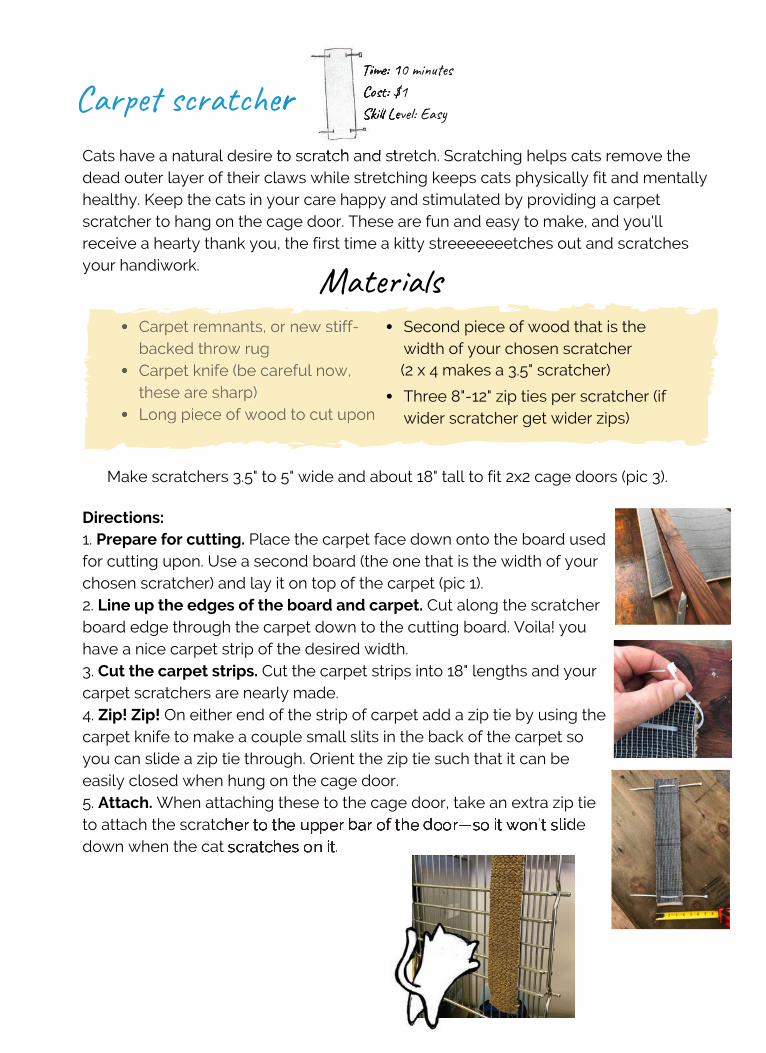
1. Prepare for cutting. Place the carpet face down onto the board usedfor cutting upon. Use a second board (the one that is the width of yourchosen scratcher) and lay it on top of the carpet (pic 1).2. Line up the edges of the board and carpet. Cut along the scratcherboard edge through the carpet down to the cutting board. Voila! youhave a nice carpet strip of the desired width. 3. Cut the carpet strips. Cut the carpet strips into 18" lengths and yourcarpet scratchers are nearly made. 4. Zip! Zip! On either end of the strip of carpet add a zip tie by using thecarpet knife to make a couple small slits in the back of the carpet soyou can slide a zip tie through. Orient the zip tie such that it can beeasily closed when hung on the cage door. 5. Attach. When attaching these to the cage door, take an extra zip tieto attach the scratcher to the upper bar of the door—so it won't slidedown when the cat scratches on it.
Car��� s��at���r
Carpet remnants, or new stiff-backed throw rugCarpet knife (be careful now,these are sharp)Long piece of wood to cut upon
Carpet remnants, or new stifffff -backed throw rugCarpet knife (be careful now,these are sharp)Long piece of wood to cut upon
Mat���a�s
Make scratchers 3.5" to 5" wide and about 18" tall to fit 2x2 cage doors (pic 3).
Directions:
Second piece of wood that is thewidth of your chosen scratcher
Tim�: 10 mi����s Cos�: $1Ski�� Lev��: Eas�
Cats have a natural desire to scratch and stretch. Scratching helps cats remove thedead outer layer of their claws while stretching keeps cats physically fit and mentallyhealthy. Keep the cats in your care happy and stimulated by providing a carpetscratcher to hang on the cage door. These are fun and easy to make, and you'llreceive a hearty thank you, the first time a kitty streeeeeeetches out and scratchesyour handiwork.
cher to the upper bar of the door—so it won't slidscratches on it.
�rTiTiT mimi �: 1Cos�: $SkSkS i�i�i ���� Le
to scratch and st
(2 x 4 makes a 3.5" scratcher)
Three 8"-12" zip ties per scratcher (ifwider scratcher get wider zips)

1. Cut the cardboard. Cut about 25-30 pieces of cardboard for each scratcher you intendto make. The thinner the cardboard, the easier to cut; although you’ll need more piecesthe thinner it is.Pieces should be approximately 1-2 inches wide and 8 inches long—it is most efficient tomake the initial cuts with box cutters and then follow the lines to make final cuts withscissors.2. Glue the cardboard. After all the pieces have been cut, use non-toxic glue to gluepieces together. Glue pieces so they are stacked on top of each other. 3. Dry. Let dry overnight.4. Choose delivery method. Hanging or freestanding? See below. 5. Spice it up. Sprinkle catnip on the completed cat scratcher.6. Live it up. Give to cat to enjoy!
Car����r� Sc�a�c���
Mat���a�sBox cuttersScissors
Tim�: 10 mi����s Cos�: $1Ski�� Lev��: Eas�
Cats have a natural desire to scratch and stretch. Scratching helps cats remove thedead outer layer of their claws while stretching keeps cats physically fit and mentallyhealthy. Keep the cats in your care happy and stimulated by providing a cardboardscratcher to hang on the cage door. These are fun and easy to make, and you'llreceive a hearty thank you, the first time a kitty streeeeeeetches out and scratchesyour handiwork.
CardboardNon-toxic glueCatnip
Freestanding: You may use a shoe box cover orany piece of cardboard to act as your base. Simplyfollow all the above steps, but on Step 2 you willalso need to glue the side of your scratcher to yourbase. Hanging: Without a base, you may use a zip-tie tohang the scratcher to a cage door. Glue a smallsquare of cardboard (½ inch by ½ inch) to the topand bottom of the scratcher diagonally (so the toppiece is off-center to the left and the bottom pieceis off-center to the right). Once the glue is dry, use ahole puncher so you can tie the scratcher to a cagedoor.
Tha��s In�i��� Hum���, t�e�� ar� su�� fu�!
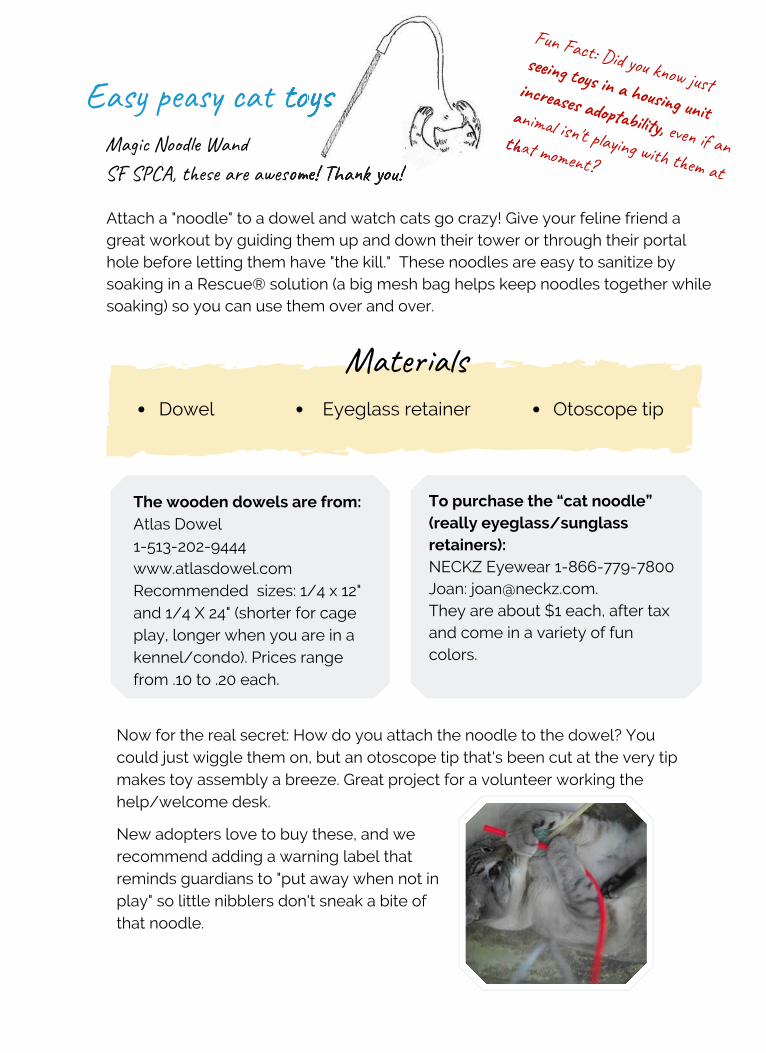
Now for the real secret: How do you attach the noodle to the dowel? Youcould just wiggle them on, but an otoscope tip that's been cut at the very tipmakes toy assembly a breeze. Great project for a volunteer working thehelp/welcome desk.
Mag�� No�d�� Wan�S� S��A, t�e�� ar� aw����e! Tha�� yo�!
Eas� pe��� ca� to��
Fun Fac�: Did yo� k�o� ju��se���� to�� in a ho����g un��
in����se� ad����bi���y, ev�� if anan���� is�'t p�a��n� wi�� t�e� at
t�a� mo���t? ��e! ThThT a�� yo�!
to�o�o � ian
t�a
Mat���a�sDowel
Attach a "noodle" to a dowel and watch cats go crazy! Give your feline friend agreat workout by guiding them up and down their tower or through their portalhole before letting them have "the kill." These noodles are easy to sanitize bysoaking in a Rescue® solution (a big mesh bag helps keep noodles together whilesoaking) so you can use them over and over.
Eyeglass retainer Otoscope tip
The wooden dowels are from:Atlas Dowel 1-513-202-9444 www.atlasdowel.comRecommended sizes: 1/4 x 12"and 1/4 X 24" (shorter for cageplay, longer when you are in akennel/condo). Prices rangefrom .10 to .20 each.
To purchase the “cat noodle”(really eyeglass/sunglassretainers):NECKZ Eyewear 1-866-779-7800Joan: [email protected]. They are about $1 each, after taxand come in a variety of funcolors.
New adopters love to buy these, and werecommend adding a warning label thatreminds guardians to "put away when not inplay" so little nibblers don't sneak a bite ofthat noodle.
Eas� pe��� ca� to�� co��.
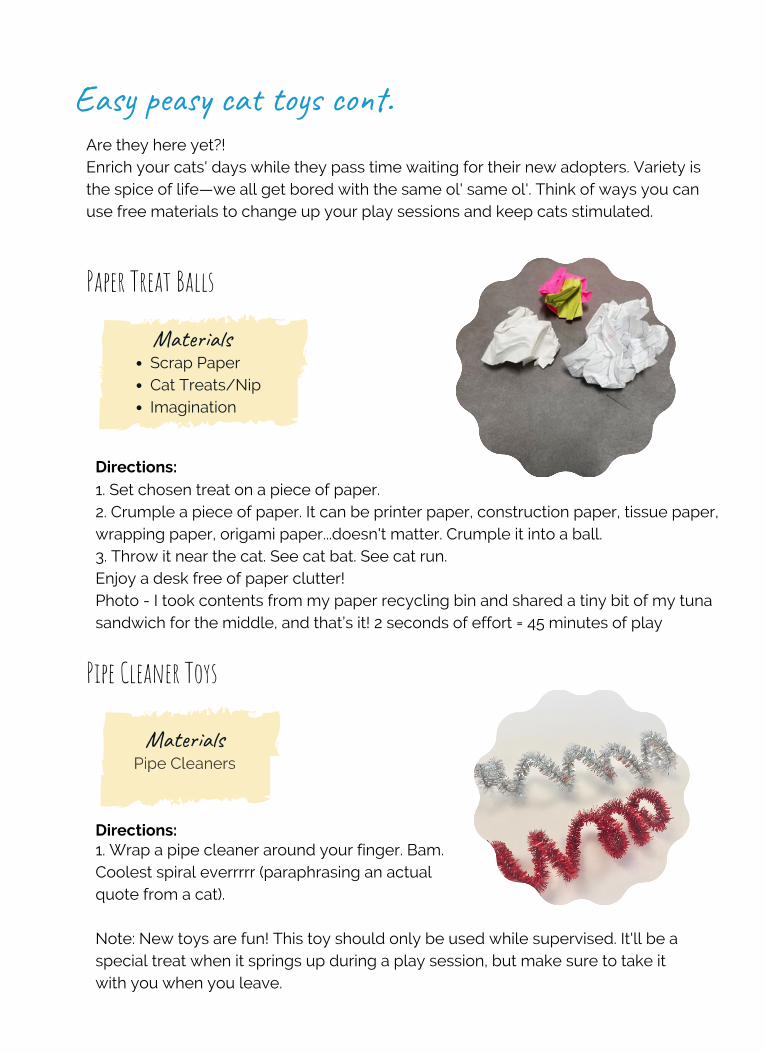
Paper Treat Balls
1. Set chosen treat on a piece of paper.2. Crumple a piece of paper. It can be printer paper, construction paper, tissue paper,wrapping paper, origami paper...doesn't matter. Crumple it into a ball.3. Throw it near the cat. See cat bat. See cat run. Enjoy a desk free of paper clutter!Photo - I took contents from my paper recycling bin and shared a tiny bit of my tunasandwich for the middle, and that’s it! 2 seconds of effort = 45 minutes of play
1. Wrap a pipe cleaner around your finger. Bam. Coolest spiral everrrrr (paraphrasing an actual quote from a cat). Note: New toys are fun! This toy should only be used while supervised. It'll be aspecial treat when it springs up during a play session, but make sure to take itwith you when you leave.
Pipe Cleaner Toys
Pipe Cleaners
Directions:
Directions:
Scrap PaperCat Treats/NipImagination
Pipe Cleaners
Mat���a�s
Are they here yet?! Enrich your cats' days while they pass time waiting for their new adopters. Variety isthe spice of life—we all get bored with the same ol' same ol'. Think of ways you canuse free materials to change up your play sessions and keep cats stimulated.
Mat���a�s

DI� P�� po���l
Portals convert cramped single-compartment housing to spiffy double-compartmentcondos that give cats more usable floor space, allow for separation of eating andelimination areas and make cleaning time easier for cats and staff alike.
Tim�: 1-2 ho���Cos�: $12Ski�� Lev��: Kin�� ha��, bu� yo�'ve go� t�i�!
Homemade portals made out of PVC pipe work well, and are sometimes preferredwhen the distance between cages is unusual; however, the manufactured KatPortals that we developed and are now made and distributed by SHOR-LINE comein three sizes: skinny, standard and wide. So nearly every cage type can now beportalized with the easy to install premade portals. Still determined to make your own? (You know we love that!) Check out our DIYinstruction sheet at sheltermedicine.com by searching "PVC Portal"
Dog Double Bed
PVC Dog Toy Sometimes I need toRecharge just like the hoomans do I'll be with you soon
Dog Retreat
Dog Curtailment
Canine Housing Accessories
Dog Bed
Lots of hours in hereDelayed gratificationHelps my mind engage
A dry place to sleepNo more wet, messy blanketsGoodnight sweet puppy
*No apologies For our excessive use of Haikus. Can't stop, won't.
Perched on my lookoutOr while snuggled down below I love my bunk bed
I'd like to say hiBut I'm a bit overwhelmedQuiet time will help me
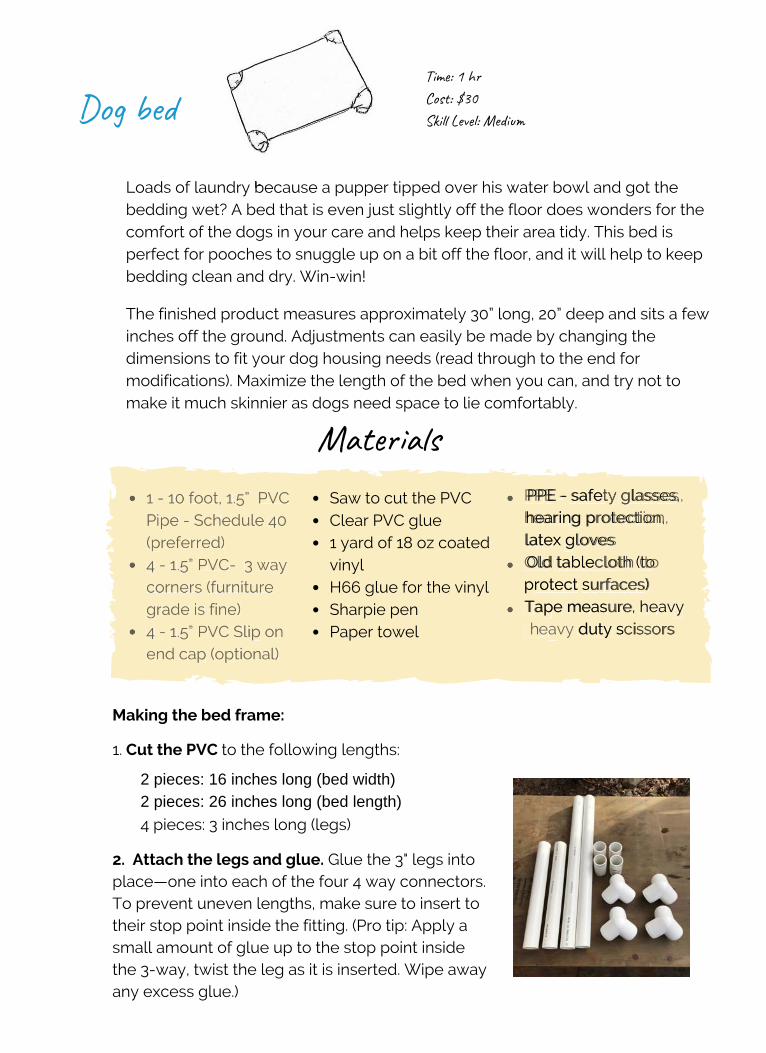
Dog be�
1 - 10 foot, 1.5” PVCPipe - Schedule 40(preferred)4 - 1.5” PVC- 3 waycorners (furnituregrade is fine)4 - 1.5” PVC Slip onend cap (optional)
The finished product measures approximately 30” long, 20” deep and sits a fewinches off the ground. Adjustments can easily be made by changing thedimensions to fit your dog housing needs (read through to the end formodifications). Maximize the length of the bed when you can, and try not tomake it much skinnier as dogs need space to lie comfortably.
1. Cut the PVC to the following lengths:
1 - 10 foot, 1.5” PVCPipe - Schedule 40(preferred)4 - 1.5” PVC- 3 waycorners (furnituregrade is fine)4 - 1.5” PVC Slip onend cap (optional)
PPE - safePPE - safety glasses,ty glasses, hearing phearing protection,rotection, latex glatex gloveslovesOld tableOld tablecloth (tocloth (to protect sprotect surfaces)urfaces) Tape measTape measure, heavyure heavy duty sduty scissorscissors
Mat���a�sSaw to cut the PVC
Tim�: 1 h�Cos�: $30 Ski�� Lev��: Med���
Loads of laundry because a pupper tipped over his water bowl and got thebedding wet? A bed that is even just slightly off the floor does wonders for thecomfort of the dogs in your care and helps keep their area tidy. This bed isperfect for pooches to snuggle up on a bit off the floor, and it will help to keepbedding clean and dry. Win-win!
Clear PVC glue1 yard of 18 oz coatedvinylH66 glue for the vinylSharpie penPaper towel
Making the bed frame:
2 pieces: 16 inches long (bed width)2 pieces: 26 inches long (bed length)4 pieces: 3 inches long (legs)
2. Attach the legs and glue. Glue the 3" legs into place—one into each of the four 4 way connectors. To prevent uneven lengths, make sure to insert to their stop point inside the fitting. (Pro tip: Apply a small amount of glue up to the stop point inside the 3-way, twist the leg as it is inserted. Wipe away any excess glue.)
b
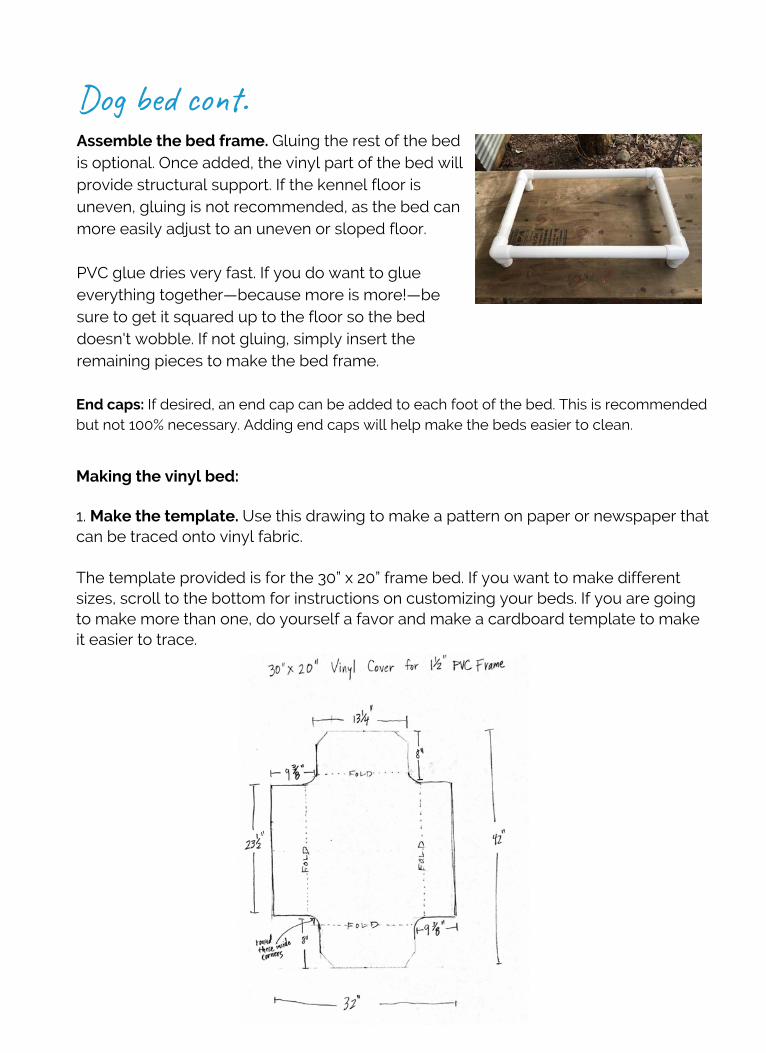
Dog be� co��.Assemble the bed frame. Gluing the rest of the bed is optional. Once added, the vinyl part of the bed will provide structural support. If the kennel floor is uneven, gluing is not recommended, as the bed can more easily adjust to an uneven or sloped floor.
PVC glue dries very fast. If you do want to glue everything together—because more is more!—be sure to get it squared up to the floor so the bed doesn't wobble. If not gluing, simply insert the remaining pieces to make the bed frame.
End caps: If desired, an end cap can be added to each foot of the bed. This is recommended but not 100% necessary. Adding end caps will help make the beds easier to clean.
Making the vinyl bed:
1. Make the template. Use this drawing to make a pattern on paper or newspaper that can be traced onto vinyl fabric.
The template provided is for the 30” x 20” frame bed. If you want to make different sizes, scroll to the bottom for instructions on customizing your beds. If you are going to make more than one, do yourself a favor and make a cardboard template to make it easier to trace.
1. Place the PVC frame upside down onto the cut out vinyl bed. (Cover the workspace to protect the surface from glue drips.) Lay the vinyl material right side down (smooth side down) on the floor or work table—leave rough side facing up. Place the PVC bed frame onto the vinyl with the feet facing up. Center the frame over the vinyl bed.
2. Begin to glue flaps. Easiest to do one flap at a time: Apply a 1” strip of glue along the outside edge of the vinyl for the entire length. Try not to get glue onto the PVC frame—if this happens wipe it off with some paper towel. Fold the vinyl flap over the PVC towards the inside (don’t make it too tight), keeping the flap parallel to the frame. Use your finger to hold flap in place while the glue dries—about 1 minute. Rub the entire glued surface to keep glue in contact with the vinyl surfaces. After about 1-2 minutes glue will hold on its own and the next vinyl flap can be glued. Repeat this for all bed sides.
3. Check your work. Check the previous glued flaps—look for areas that aren’t holding and reapply glue and hold in place.The flaps need to be well-glued to ensure the bed will hold up for shelter use—do a fantastically good job gluing and this bed should last.
Wait a day for glue to cure fully before you put the bed to use.
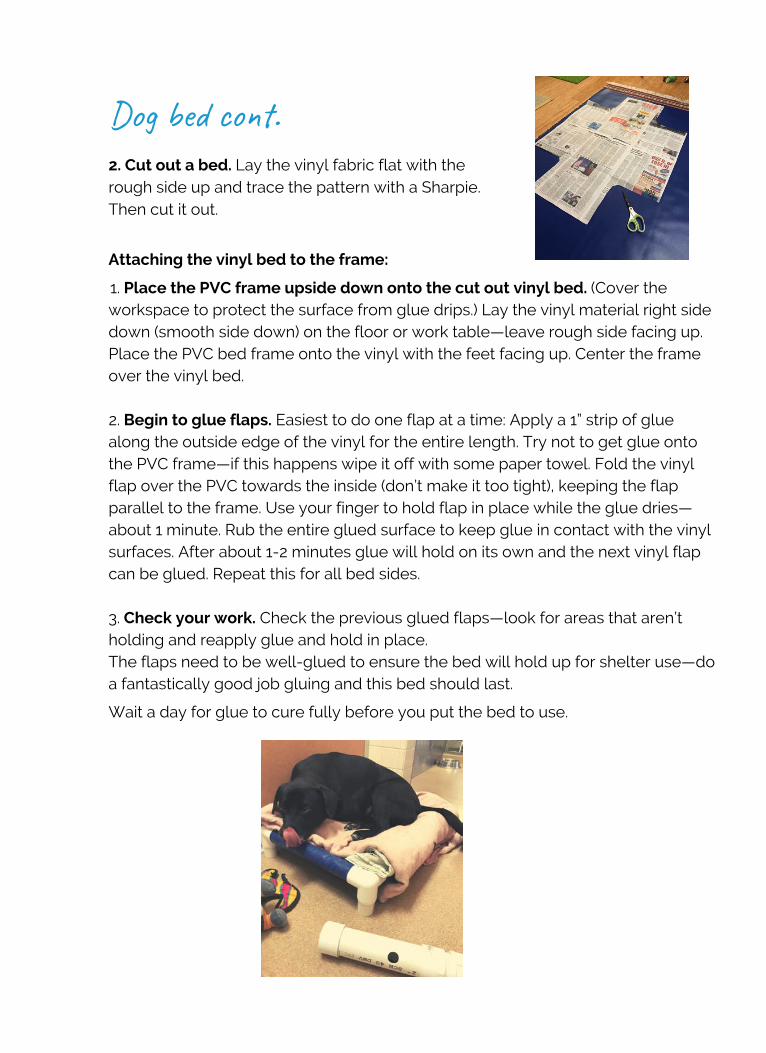
Dog be� co��.2. Cut out a bed. Lay the vinyl fabric flat with therough side up and trace the pattern with a Sharpie.Then cut it out.
Attaching the vinyl bed to the frame:
Dog be� co��.
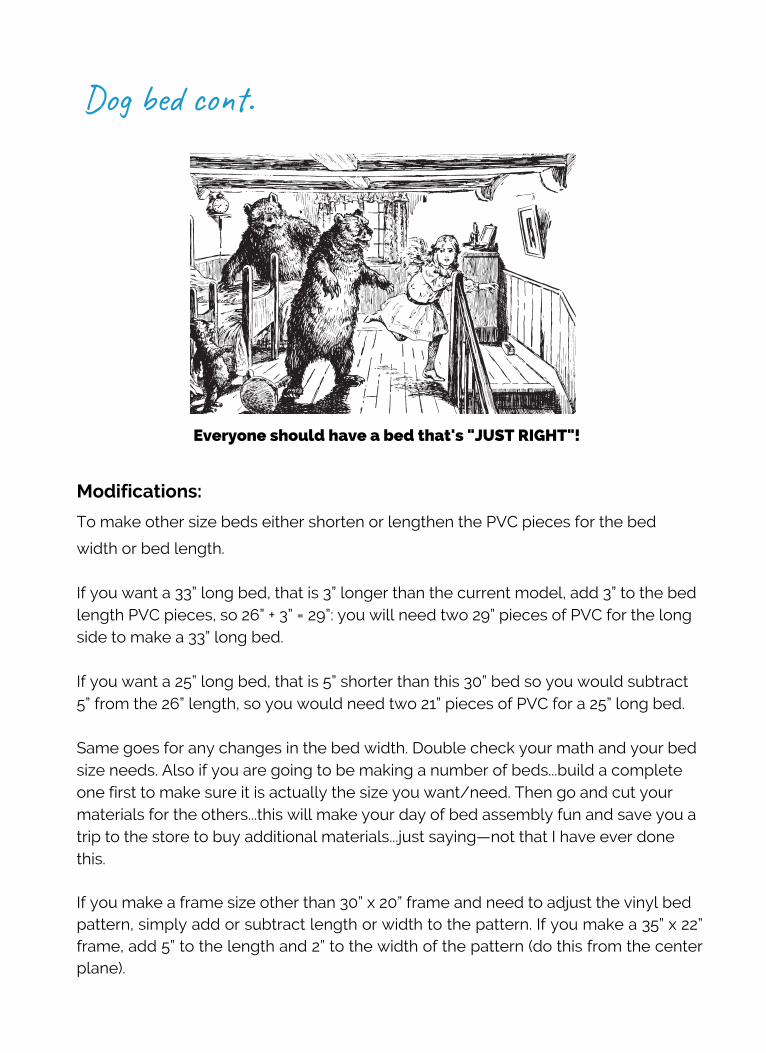
Everyone should have a bed that's "JUST RIGHT"!
Modifications: To make other size beds either shorten or lengthen the PVC pieces for the bed
width or bed length.
If you want a 33” long bed, that is 3” longer than the current model, add 3” to the bed length PVC pieces, so 26” + 3” = 29”: you will need two 29” pieces of PVC for the long side to make a 33” long bed.
If you want a 25” long bed, that is 5” shorter than this 30” bed so you would subtract 5” from the 26” length, so you would need two 21” pieces of PVC for a 25” long bed.
Same goes for any changes in the bed width. Double check your math and your bed size needs. Also if you are going to be making a number of beds...build a complete one first to make sure it is actually the size you want/need. Then go and cut your materials for the others...this will make your day of bed assembly fun and save you a trip to the store to buy additional materials...just saying—not that I have ever done this.
If you make a frame size other than 30” x 20” frame and need to adjust the vinyl bed pattern, simply add or subtract length or width to the pattern. If you make a 35” x 22” frame, add 5” to the length and 2” to the width of the pattern (do this from the center plane).
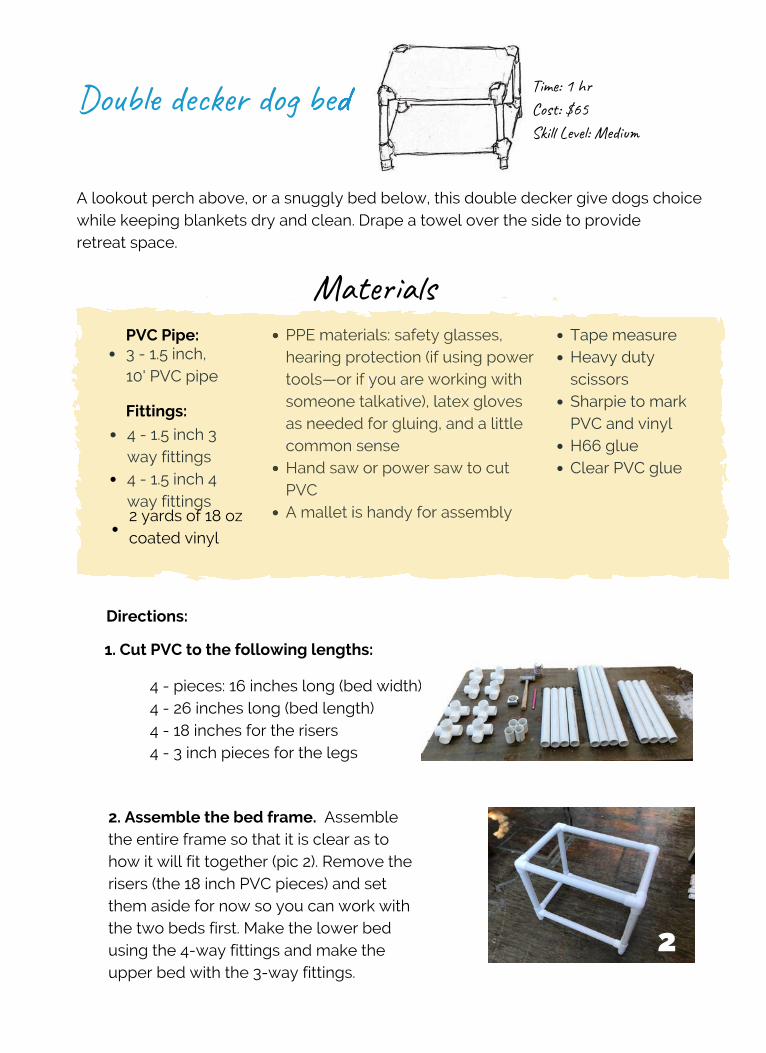
Do�b�� de���r do� be�
PPE materials: safety glasses,hearing protection (if using powertools—or if you are working withsomeone talkative), latex glovesas needed for gluing, and a littlecommon senseHand saw or power saw to cutPVCA mallet is handy for assembly
4 - pieces: 16 inches long (bed width)4 - 26 inches long (bed length)4 - 18 inches for the risers4 - 3 inch pieces for the legs
PPE materials: safety glasses,hearing protection (if using powertools—or if you are working withsomeone talkative), latex glovesas needed for gluing, and a littlecommon senseHand saw or power saw to cutPVCA mallet is handy for assembly
Mat���a�s
1. Cut PVC to the following lengths:
Directions:
Tape measureHeavy dutyscissorsSharpie to markPVC and vinylH66 glueClear PVC glue
Fittings:
PVC Pipe:
4 - 1.5 inch 3way fittings4 - 1.5 inch 4way fittings
3 - 1.5 inch,10' PVC pipe
2 yards of 18 ozcoated vinyl
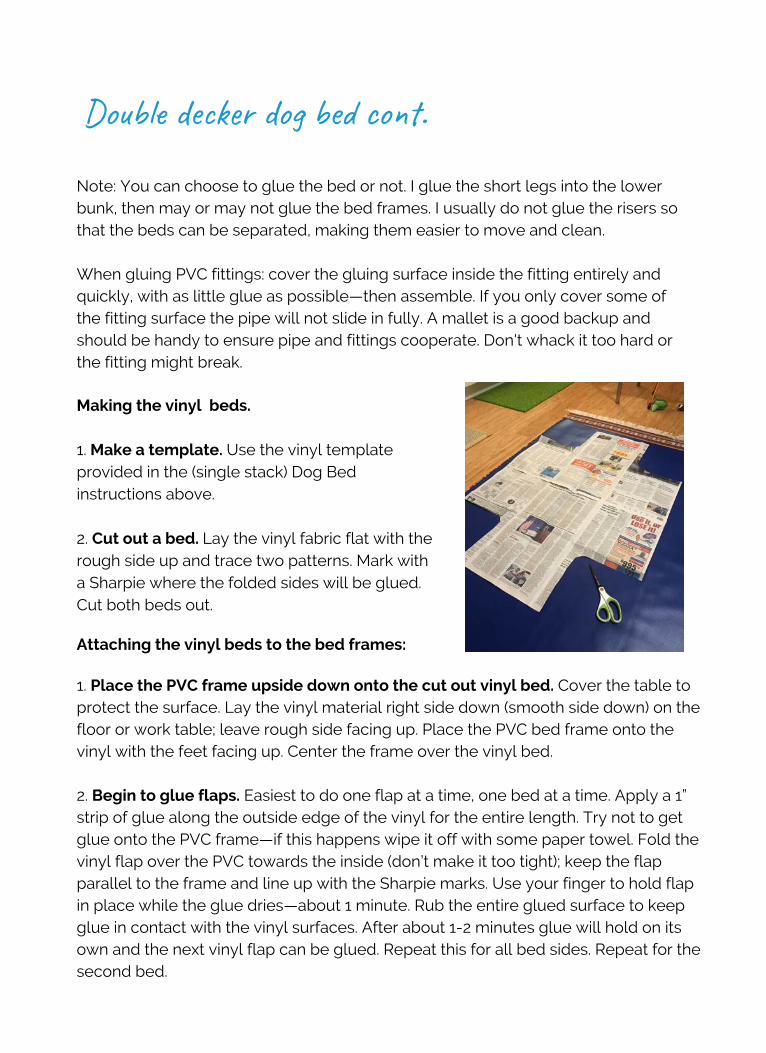
2. Assemble the bed frame. Assemblethe entire frame so that it is clear as tohow it will fit together (pic 2). Remove therisers (the 18 inch PVC pieces) and setthem aside for now so you can work withthe two beds first. Make the lower bedusing the 4-way fittings and make theupper bed with the 3-way fittings.
� Tim�: 1 h�Cos�: $65Ski�� Lev��: Med���
A lookout perch above, or a snuggly bed below, this double decker give dogs choice while keeping blankets dry and clean. Drape a towel over the side to provideretreat space.
2
Making the vinyl beds.
1. Make a template. Use the vinyl templateprovided in the (single stack) Dog Bedinstructions above.
2. Cut out a bed. Lay the vinyl fabric flat with therough side up and trace two patterns. Mark witha Sharpie where the folded sides will be glued.Cut both beds out.
Do�b�� de���r do� be� co��.
Note: You can choose to glue the bed or not. I glue the short legs into the lowerbunk, then may or may not glue the bed frames. I usually do not glue the risers sothat the beds can be separated, making them easier to move and clean.
When gluing PVC fittings: cover the gluing surface inside the fitting entirely andquickly, with as little glue as possible—then assemble. If you only cover some ofthe fitting surface the pipe will not slide in fully. A mallet is a good backup andshould be handy to ensure pipe and fittings cooperate. Don't whack it too hard orthe fitting might break.
Attaching the vinyl beds to the bed frames:
1. Place the PVC frame upside down onto the cut out vinyl bed. Cover the table toprotect the surface. Lay the vinyl material right side down (smooth side down) on thefloor or work table; leave rough side facing up. Place the PVC bed frame onto thevinyl with the feet facing up. Center the frame over the vinyl bed.
2. Begin to glue flaps. Easiest to do one flap at a time, one bed at a time. Apply a 1”strip of glue along the outside edge of the vinyl for the entire length. Try not to getglue onto the PVC frame—if this happens wipe it off with some paper towel. Fold thevinyl flap over the PVC towards the inside (don’t make it too tight); keep the flapparallel to the frame and line up with the Sharpie marks. Use your finger to hold flapin place while the glue dries—about 1 minute. Rub the entire glued surface to keepglue in contact with the vinyl surfaces. After about 1-2 minutes glue will hold on itsown and the next vinyl flap can be glued. Repeat this for all bed sides. Repeat for thesecond bed.

Do�b�� de���r do� be� co��.
3. Check your work. Check the previously glued flaps looking for areas that aren’tholding. Reapply glue and hold in place as needed.
4. Turn the two beds into a bunk bed. Place the bottom bed right side up, add therisers and then add the top bunk. Push together so they are nice and tight.
Note: If you need to get the beds apart, put your foot on the bottom bed frame andpull on the top one. You may need to go around the bed as you pull to loosen up,but eventually they'll come apart .
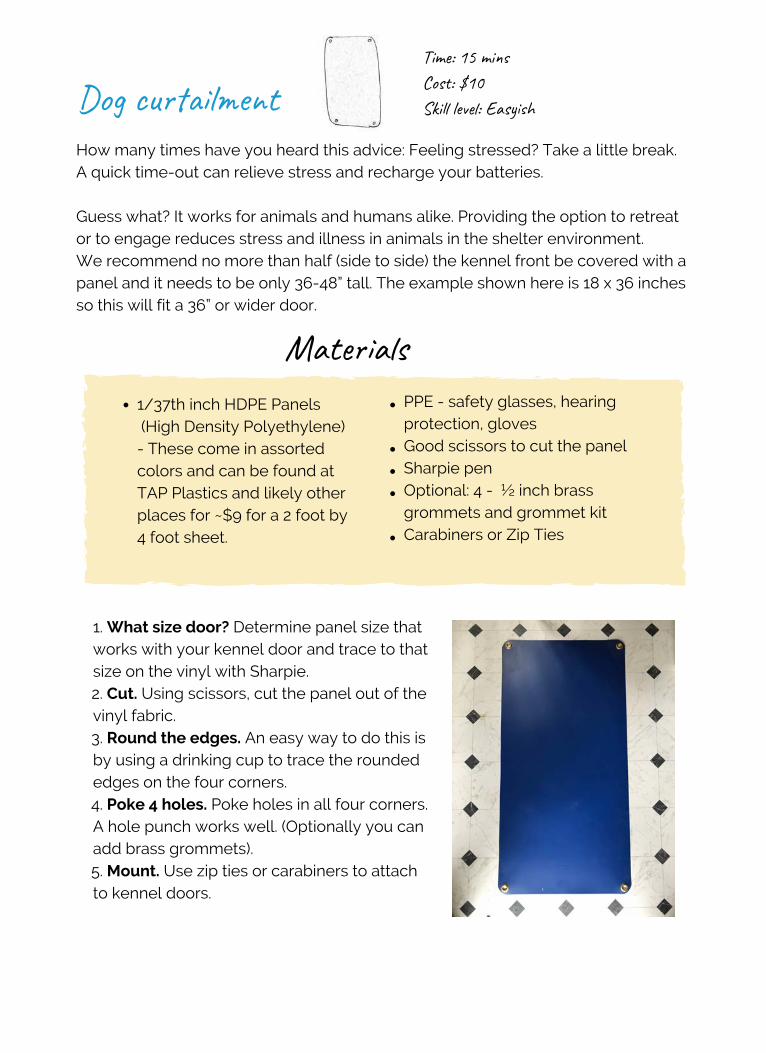
1. What size door? Determine panel size that works with your kennel door and trace to that size on the vinyl with Sharpie.2. Cut. Using scissors, cut the panel out of the vinyl fabric.3. Round the edges. An easy way to do this is by using a drinking cup to trace the rounded edges on the four corners.4. Poke 4 holes. Poke holes in all four corners. A hole punch works well. (Optionally you can add brass grommets).5. Mount. Use zip ties or carabiners to attach to kennel doors.
Dog cu����l�e�t
Mat���a�s1/37th inch HDPE Panels (High Density Polyethylene)- These come in assortedcolors and can be found atTAP Plastics and likely otherplaces for ~$9 for a 2 foot by4 foot sheet.
PPE - safety glasses, hearing protection, glovesGood scissors to cut the panel Sharpie penOptional: 4 - ½ inch brass grommets and grommet kitCarabiners or Zip Ties
How many times have you heard this advice: Feeling stressed? Take a little break.A quick time-out can relieve stress and recharge your batteries.
Guess what? It works for animals and humans alike. Providing the option to retreator to engage reduces stress and illness in animals in the shelter environment. We recommend no more than half (side to side) the kennel front be covered with apanel and it needs to be only 36-48” tall. The example shown here is 18 x 36 inchesso this will fit a 36” or wider door.
Tim�: 15 mi�� Cos�: $10Ski�� le���: Eas���h
Determine the size(s) of toy wanted and purchase the corresponding PVC pipe size. 1” for small pipe diameter toys 1.5” for medium diameter toys 2” for large pipe diameter toys
Tre�� di���n���g do� to�
dishwasher safe
Slip cap - for the non-openingendPPE - safety glasses, hearingprotection, glovesSaw to cut PVC – hand saw,miter saw, etc.Power drillDrill bit the size you want thefood dispensing holes to beClear PVC glueSmall piece of sandpaper
Cos�: Les� t�a� $10Tim�: ab��� 10 mi����sSki�� Lev��: Eas�
PVC pipe (Your choice: 1", 1.5", 2")A pair of adapter/screw caps. Theadapters and screw caps come inmale or female. Either will work; justmake sure you have a pair (i.e., afemale adaptor with male screwcap, or a male adaptor with femalescrew cap). Note: We do not recommend ABSpipe (black pipe). It's more brittlethan PVC.
Mat���a�s
� to�o�o Cos�TiTiT mimi �: abSkSkS i�i�i ����
Slip cap - for the non-openingendPPE - safety glasses, hearingprotection, glovesSaw to cut PVC – hand saw,miter saw, etc.Power drillDrill bit the size you want thefood dispensing holes to beClear PVC glueSmall piece of sandpaper
PVC pipe (Your choice: 1", 1.5", 2")A pair of adapter/screw caps. Theadapters and screw caps come inmale or female. Either will work; justmake sure you have a pair (i.e., afemale adaptor with male screwcap, or a male adaptor with femalescrew cap).Note: We do not recommend ABSpipe (black pipe). It's more brittlethan PVC.
1. Cut. Cut the PVC pipe to desired length:
Directions:
~ 4” for small pipe diameter toys (using 1” pipe)~ 6” for medium diameter toys (using 1.5" pipe)~ 8” for large pipe diameter toys (using 2" pipe)
What do dogs love more than eating dinner? Getting food, enrichment, mentalstimulation and play all at the same time! Not to mention, you are stretching out thefun (getting treats!) and delaying gratification.
Tre�� di���n���g do� to� co��.
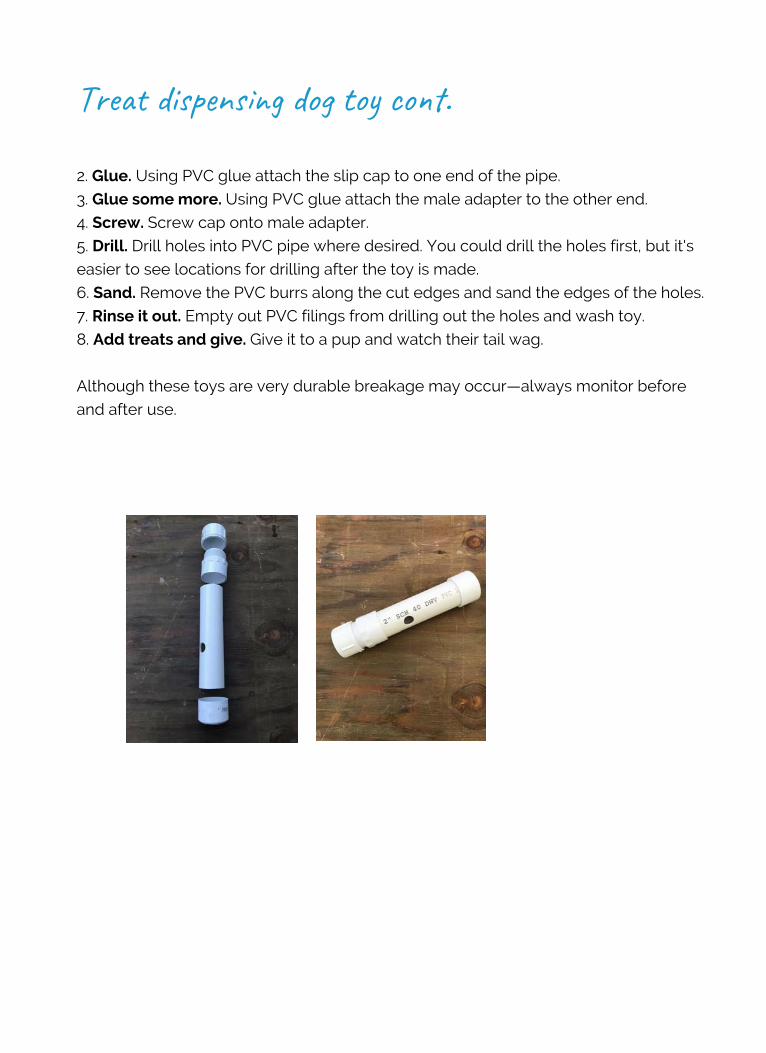
2. Glue. Using PVC glue attach the slip cap to one end of the pipe.
3. Glue some more. Using PVC glue attach the male adapter to the other end.
4. Screw. Screw cap onto male adapter.
5. Drill. Drill holes into PVC pipe where desired. You could drill the holes first, but it's
easier to see locations for drilling after the toy is made.
6. Sand. Remove the PVC burrs along the cut edges and sand the edges of the holes.
7. Rinse it out. Empty out PVC filings from drilling out the holes and wash toy.
8. Add treats and give. Give it to a pup and watch their tail wag.
Although these toys are very durable breakage may occur—always monitor before
and after use.
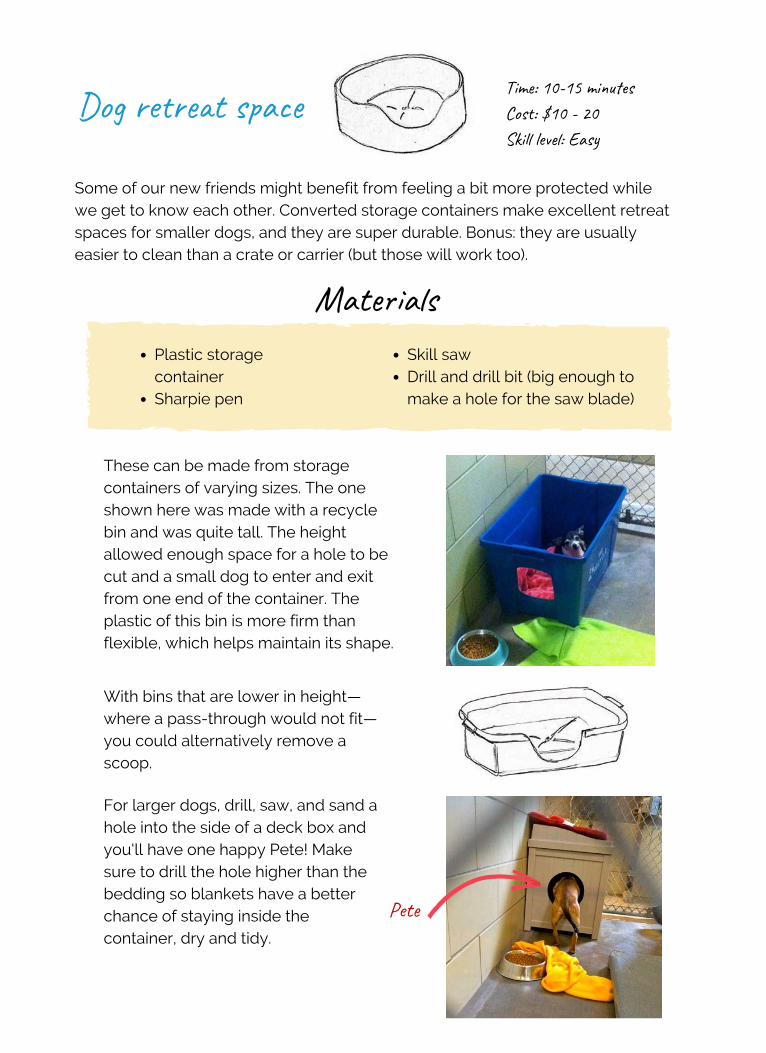
These can be made from storagecontainers of varying sizes. The oneshown here was made with a recyclebin and was quite tall. The heightallowed enough space for a hole to becut and a small dog to enter and exitfrom one end of the container. Theplastic of this bin is more firm thanflexible, which helps maintain its shape.
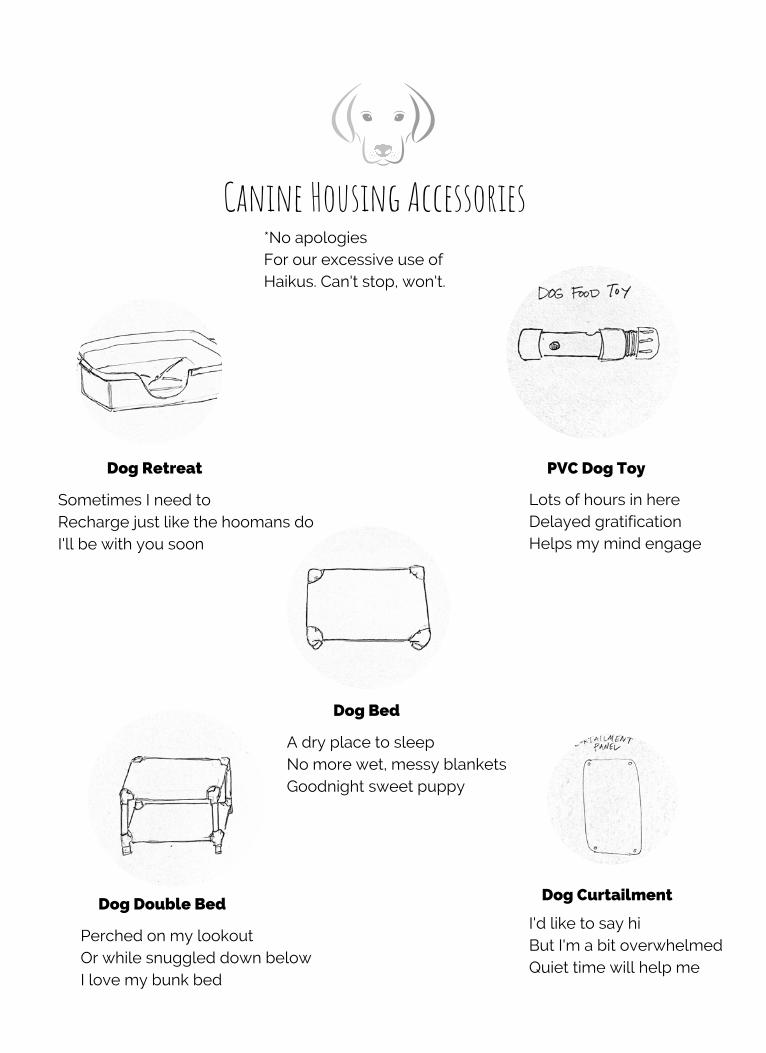
Dog re����t s�a��
Mat���a�sPlastic storagecontainerSharpie pen
Some of our new friends might benefit from feeling a bit more protected whilewe get to know each other. Converted storage containers make excellent retreatspaces for smaller dogs, and they are super durable. Bonus: they are usuallyeasier to clean than a crate or carrier (but those will work too).
Skill sawDrill and drill bit (big enough tomake a hole for the saw blade)
Tim�: 10-15 mi����sCos�: $10 - 20Ski�� le���: Eas�
With bins that are lower in height—where a pass-through would not fit—you could alternatively remove ascoop.
For larger dogs, drill, saw, and sand a hole into the side of a deck box and you'll have one happy Pete! Make sure to drill the hole higher than the bedding so blankets have a betterchance of staying inside the container, dry and tidy.
Pet�

WWW.SHELTERMEDICINE.COM
KORET SHELTER MEDICINE PROGRAM
Related Documents