Office, Storage & Display: 3 – 9 Cook Rd, Marrickville, NSW, 2204 P: (02) 9519 8785 or M: 0414 266 267 F: (02) 9519 9810 Email: [email protected] Warehouse number a DIY GYM Installing your gym rubber flooring is no room can be completed in just a few ho preparations have been completed. As end result depends upon using the righ preparation to completion. This Guide is intended to give you an un fundamentals of laying your Gym Rubb tips on how to get it right the first time We will now attempt to explain to you project to proceed from start to finish. Tools for the Job. So you have gone to Carpet tiles 1 and items you should have on your shoppin A heavy duty utility knife or “Stanley knife” with extra brand new heavy duty blades. A solid scrape or sanding eq need to remo glue. A marker pen. A wooden surface or dedicated cutting mat to cut and trim down your Gym Rubber tiles if needed. Business H Monday to F Saturday – 9 including Su appointmen Call Vince Pe and mobile number will be answered 7 days & 7 nights per M RUBBER INSTALLATION GUID ot difficult and an average ours after the necessary s with all DIY projects the ht tools and methods from nderstanding of the ber Tiles and give you some e. the logical order for your purchased your Gym Rubber Tiles. What are som ng list? Consider this list: er, heat gun and / quipment if you ove stubborn old A metal straight edge to cut alo (at least) or at best a straight m edge with a right angle, like a “T Square” that carpenters use (OPTIONAL) d 1.5mm Notched Trowel If you are gluing down. ( the above picture has bigger notches to illustrate only ) Pressure Sensitive glu The specialised glue s by Carpet Tiles1 is an adhesive specifically designed for Gym Rubber flooring Hours: Friday – 9am to 5pm 9am to 3pm. Other times undays can be arranged by nt. erry on Mobile: 0414 266 267 r week. DE me of the other essential ong metal Try A chalk line for finding and marking the centre of your room. (more on this later) ue. - sold n For a professional finish it’s worth hiring a roller from a hire company to bed the Rubber tiles to the glue properly.

Welcome message from author
This document is posted to help you gain knowledge. Please leave a comment to let me know what you think about it! Share it to your friends and learn new things together.
Transcript
Office, Storage & Display: 3 – 9 Cook Rd, Marrickville, NSW, 2204
P: (02) 9519 8785 or M: 0414 266 267
F: (02) 9519 9810
Email: [email protected] Warehouse number an
DIY GYM RUBBER
Installing your gym rubber flooring is not difficult and an average
room can be completed in just a few hours after the necessary
preparations have been completed. As with all DIY projects the
end result depends upon using the right tools and methods from
preparation to completion.
This Guide is intended to give you an understanding of the
fundamentals of laying your Gym Rubber Tiles and give you some
tips on how to get it right the first time.
We will now attempt to explain to you the logical order for your
project to proceed from start to finish.
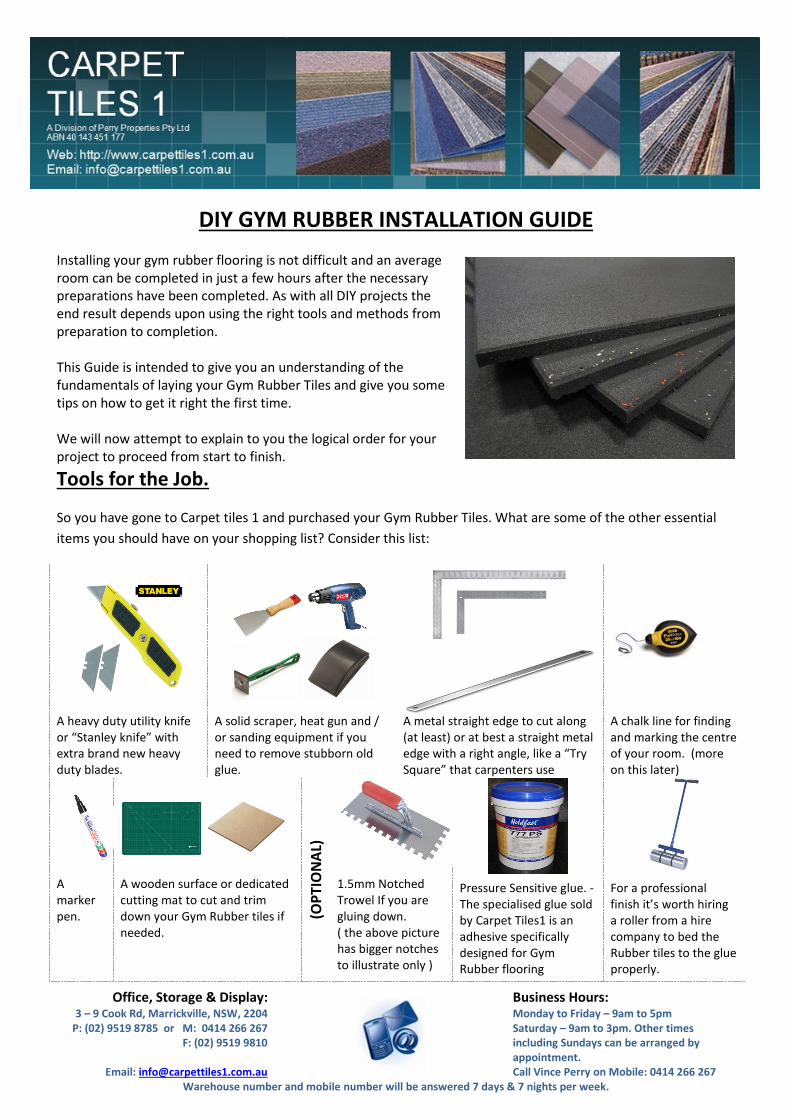
Tools for the Job.
So you have gone to Carpet tiles 1 and purchased your
items you should have on your shopping list? C
A heavy duty utility knife
or “Stanley knife” with
extra brand new heavy
duty blades.
A solid scraper, heat gun and /
or sanding equipment if you
need to remove stubborn old
glue.
A
marker
pen.
A wooden surface or dedicated
cutting mat to cut and trim
down your Gym Rubber tiles if
needed.
Business HoursMonday to Friday
Saturday – 9am to 3pm. Other times
including Sundays can be arranged by
appointment.
Call Vince Per
er and mobile number will be answered 7 days & 7 nights per
GYM RUBBER INSTALLATION GUIDE
Installing your gym rubber flooring is not difficult and an average
room can be completed in just a few hours after the necessary
preparations have been completed. As with all DIY projects the
the right tools and methods from
This Guide is intended to give you an understanding of the
fundamentals of laying your Gym Rubber Tiles and give you some
tips on how to get it right the first time.
ain to you the logical order for your
tiles 1 and purchased your Gym Rubber Tiles. What are some of
items you should have on your shopping list? Consider this list:
A solid scraper, heat gun and /
or sanding equipment if you
need to remove stubborn old
A metal straight edge to cut along
(at least) or at best a straight metal
edge with a right angle, like a “Try
Square” that carpenters use
(OP
TIO
NA
L)
A wooden surface or dedicated
if
1.5mm Notched
Trowel If you are
gluing down.
( the above picture
has bigger notches
to illustrate only )
Pressure Sensitive glue
The specialised glue sold
by Carpet Tiles1 is an
adhesive specifically
designed for Gym
Rubber flooring
Business Hours: onday to Friday – 9am to 5pm
9am to 3pm. Other times
including Sundays can be arranged by
appointment. Perry on Mobile: 0414 266 267 per week.
INSTALLATION GUIDE
some of the other essential
A metal straight edge to cut along
t) or at best a straight metal
ge with a right angle, like a “Try
A chalk line for finding
and marking the centre
of your room. (more
on this later)
Pressure Sensitive glue. -
The specialised glue sold
iles1 is an
For a professional
finish it’s worth hiring
a roller from a hire
company to bed the
Rubber tiles to the glue
properly.
Office, Storage & Display:
Business Hours: 3 – 9 Cook Rd, Marrickville, NSW, 2204
P: (02) 9519 8785 or M: 0414 266 267
F: (02) 9519 9810
Monday to Friday – 9am to 5pm
Saturday – 9am to 3pm. Other times
including Sundays can be arranged by
appointment. Email: [email protected] Call Vince Perry on Mobile: 0414 266 267
Warehouse number and mobile number will be answered 7 days & 7 nights per week.
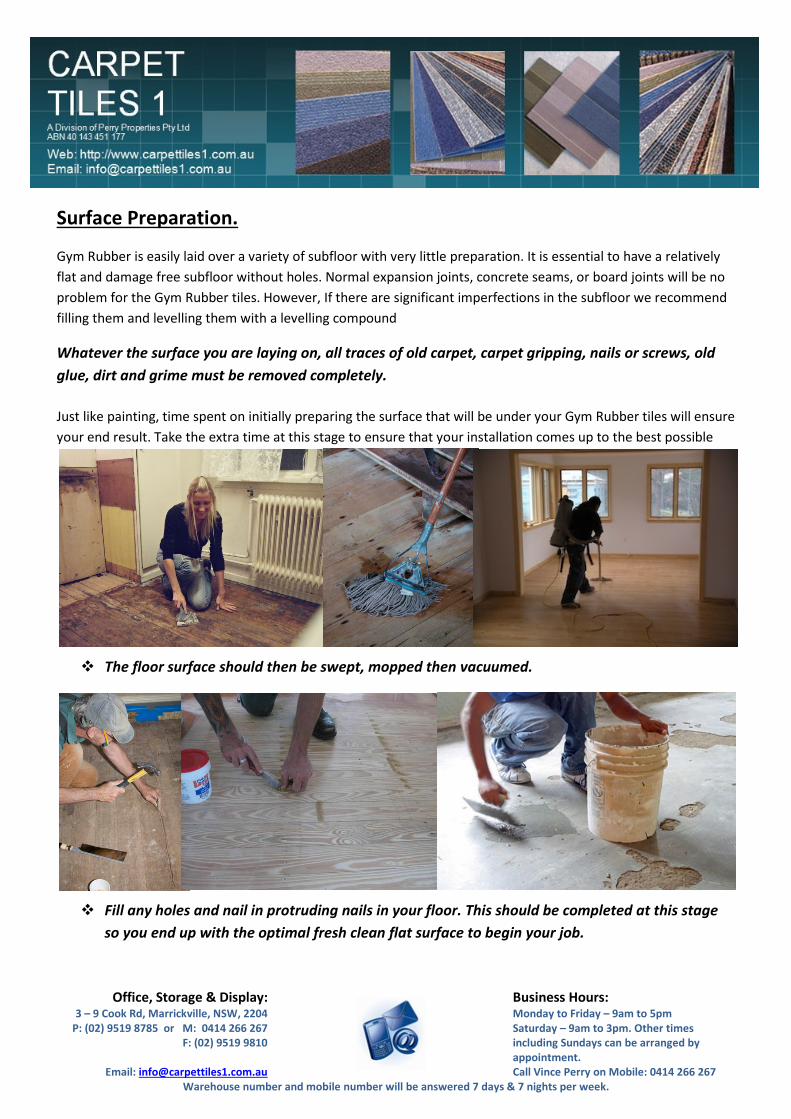
Surface Preparation.
Gym Rubber is easily laid over a variety of subfloor with very little preparation. It is essential to have a relatively
flat and damage free subfloor without holes. Normal expansion joints, concrete seams, or board joints will be no
problem for the Gym Rubber tiles. However, If there are significant imperfections in the subfloor we recommend
filling them and levelling them with a levelling compound
Whatever the surface you are laying on, all traces of old carpet, carpet gripping, nails or screws, old
glue, dirt and grime must be removed completely.
Just like painting, time spent on initially preparing the surface that will be under your Gym Rubber tiles will ensure
your end result. Take the extra time at this stage to ensure that your installation comes up to the best possible
� The floor surface should then be swept, mopped then vacuumed.
� Fill any holes and nail in protruding nails in your floor. This should be completed at this stage
so you end up with the optimal fresh clean flat surface to begin your job.
Office, Storage & Display:
Business Hours: 3 – 9 Cook Rd, Marrickville, NSW, 2204
P: (02) 9519 8785 or M: 0414 266 267
F: (02) 9519 9810
Monday to Friday – 9am to 5pm
Saturday – 9am to 3pm. Other times
including Sundays can be arranged by
appointment. Email: [email protected] Call Vince Perry on Mobile: 0414 266 267
Warehouse number and mobile number will be answered 7 days & 7 nights per week.
Always allow your gym rubber tiles to acclimatise to their
new environment before installing.
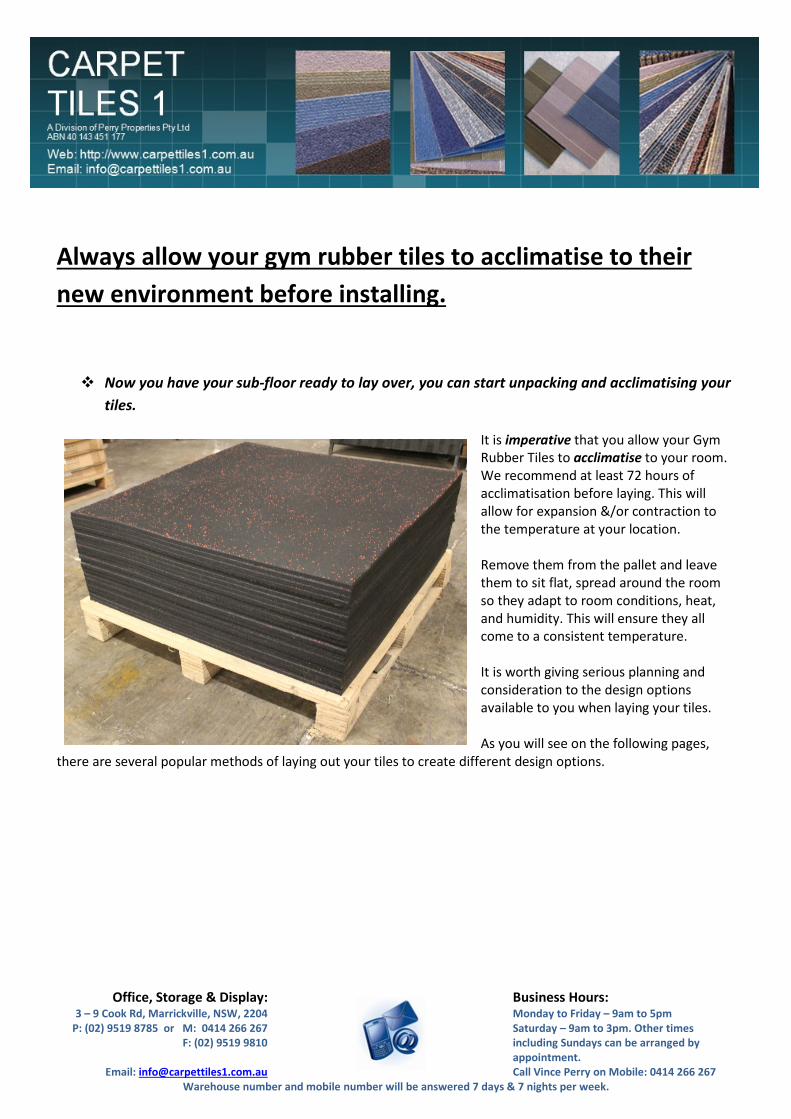
� Now you have your sub-floor ready to lay over, you can start unpacking and acclimatising your
tiles.
It is imperative that you allow your Gym
Rubber Tiles to acclimatise to your room.
We recommend at least 72 hours of
acclimatisation before laying. This will
allow for expansion &/or contraction to
the temperature at your location.
Remove them from the pallet and leave
them to sit flat, spread around the room
so they adapt to room conditions, heat,
and humidity. This will ensure they all
come to a consistent temperature.
It is worth giving serious planning and
consideration to the design options
available to you when laying your tiles.
As you will see on the following pages, there are several popular methods of laying out your tiles to create different design options.

Office, Storage & Display:
Business Hours: 3 – 9 Cook Rd, Marrickville, NSW, 2204
P: (02) 9519 8785 or M: 0414 266 267
F: (02) 9519 9810
Monday to Friday – 9am to 5pm
Saturday – 9am to 3pm. Other times
including Sundays can be arranged by
appointment. Email: [email protected] Call Vince Perry on Mobile: 0414 266 267
Warehouse number and mobile number will be answered 7 days & 7 nights per week.
We recommend laying your tiles in "Brick Style" as shown
below.
The rationale for this is that over any larger area you will get some variations in temperature which will cause
some movement in the tiles over time. Brick style laying in gym rubber will minimise the subtle changes in
appearance caused by movement, most effectively out of all of the installation methods covered below.
The remaining options are provided to indicate the other choices available in laying styles.
“Brick Style" –
This is where tiles
are laid offset to
create a stepped or
staggered look.
Where a room is
not perfectly
square, this method is great to disguise
the problem.
“Two Tone /
Diamond” – Use
two different fleck
colours to create
a diagonal
checkerboard
effect. It is an
effective way to
break up colour so
as to not overwhelm a room.
It can also be highlighted with a
border around the main floor area.
Installation is the same as above; just
select a different fleck colour for each
alternating Gym Rubber tile.
After discussion with our installers, they have drawn attention to the fact that in checker pattern installations, the
eye is drawn to tiles that are not cut even or balanced from side to side. The best solution is to make sure that the
main area, uses only whole tiles, and that a border is added around the edge in one of the two fleck colours.
2
1
2
2
2
2
1
1 1
Office, Storage & Display:
Business Hours: 3 – 9 Cook Rd, Marrickville, NSW, 2204
P: (02) 9519 8785 or M: 0414 266 267
F: (02) 9519 9810
Monday to Friday – 9am to 5pm
Saturday – 9am to 3pm. Other times
including Sundays can be arranged by
appointment. Email: [email protected] Call Vince Perry on Mobile: 0414 266 267
Warehouse number and mobile number will be answered 7 days & 7 nights per week.
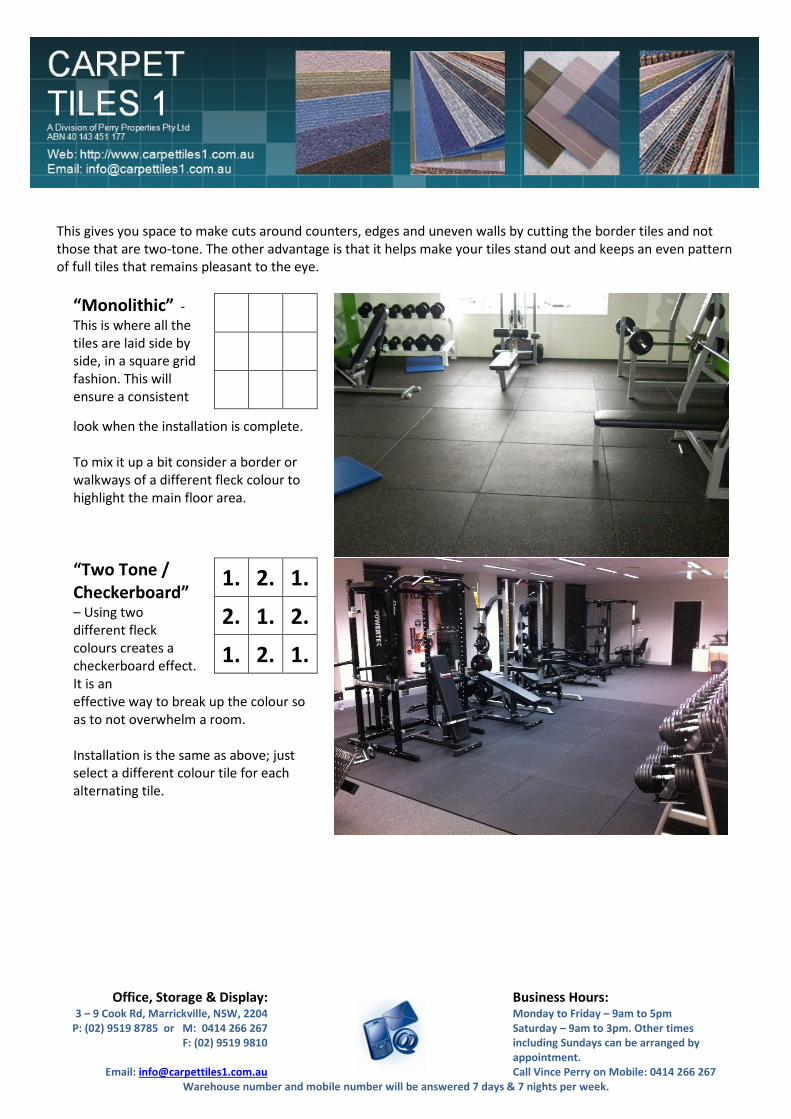
This gives you space to make cuts around counters, edges and uneven walls by cutting the border tiles and not
those that are two-tone. The other advantage is that it helps make your tiles stand out and keeps an even pattern
of full tiles that remains pleasant to the eye.
“Monolithic” -
This is where all the
tiles are laid side by
side, in a square grid
fashion. This will
ensure a consistent
look when the installation is complete.
To mix it up a bit consider a border or
walkways of a different fleck colour to
highlight the main floor area.
“Two Tone /
Checkerboard”
– Using two
different fleck
colours creates a
checkerboard effect.
It is an
1. 2. 1.
2. 1. 2.
1. 2. 1.
effective way to break up the colour so
as to not overwhelm a room.
Installation is the same as above; just
select a different colour tile for each
alternating tile.

Office, Storage & Display:
Business Hours: 3 – 9 Cook Rd, Marrickville, NSW, 2204
P: (02) 9519 8785 or M: 0414 266 267
F: (02) 9519 9810
Monday to Friday – 9am to 5pm
Saturday – 9am to 3pm. Other times
including Sundays can be arranged by
appointment. Email: [email protected] Call Vince Perry on Mobile: 0414 266 267
Warehouse number and mobile number will be answered 7 days & 7 nights per week.
� Find and Mark the middle of the room.
Using your chalk line its time to work out the centre of the room.
Measure along the length of your walls and mark the centre point of
each of the walls.
It is important to measure each wall as often rooms are not exactly
square and can be slightly out.
Position your chalk line and mark lines across the floor from side to
side.
Doing this across all walls should end up with a cross point in the centre
of the room. It is important that these lines are square as they will be
the guide for all your future efforts. Take a moment and determine if
they are square using the following methods.
If you do have a “Try Square” available, use it to place along the lines
and make sure they line up square.
If you do not have a Try Square, it is not a problem as there is a simple
way to work out if your lines are square.
Using a tape or ruler, measure and mark from the cross point out 40
centimetres. Now measure and mark along the other line out from the
cross point out 30 centimetres.
Finally measure from one mark to the other mark. The distance
between the two should be 50cm.
If it is not 50cm or your try square does not line up with your lines on
both sides, your lines and room are not square and your tiles will not
line up exactly with the walls. It is very common for rooms to be slightly
out from square so do not worry if this is the case.
Assuming that your room is not square, there are several techniques you can use to mark your start lines square.
Following on from above we will use the same techniques described above to measure out points and mark lines
that are square.
30cm
Try
Square
40cm 50cm
Office, Storage & Display:
Business Hours: 3 – 9 Cook Rd, Marrickville, NSW, 2204
P: (02) 9519 8785 or M: 0414 266 267
F: (02) 9519 9810
Monday to Friday – 9am to 5pm
Saturday – 9am to 3pm. Other times
including Sundays can be arranged by
appointment. Email: [email protected] Call Vince Perry on Mobile: 0414 266 267
Warehouse number and mobile number will be answered 7 days & 7 nights per week.
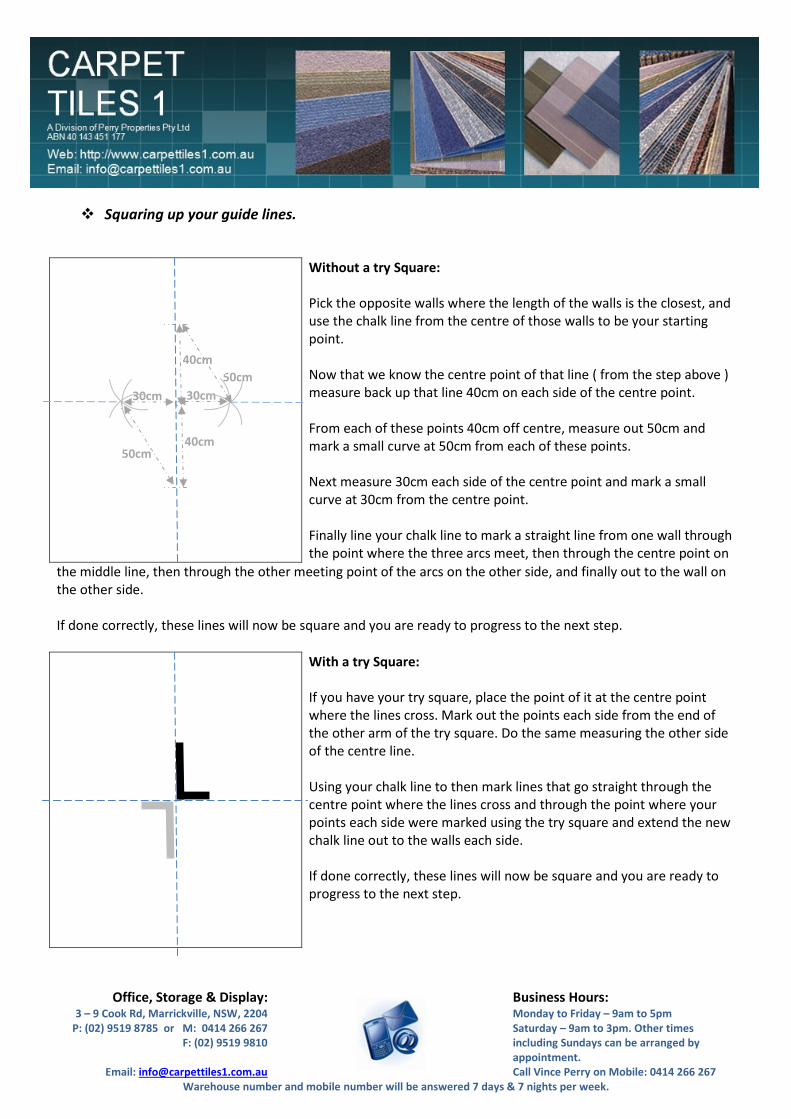
� Squaring up your guide lines.
Without a try Square:
Pick the opposite walls where the length of the walls is the closest, and
use the chalk line from the centre of those walls to be your starting
point.
Now that we know the centre point of that line ( from the step above )
measure back up that line 40cm on each side of the centre point.
From each of these points 40cm off centre, measure out 50cm and
mark a small curve at 50cm from each of these points.
Next measure 30cm each side of the centre point and mark a small
curve at 30cm from the centre point.
Finally line your chalk line to mark a straight line from one wall through
the point where the three arcs meet, then through the centre point on
the middle line, then through the other meeting point of the arcs on the other side, and finally out to the wall on
the other side.
If done correctly, these lines will now be square and you are ready to progress to the next step.
With a try Square:
If you have your try square, place the point of it at the centre point
where the lines cross. Mark out the points each side from the end of
the other arm of the try square. Do the same measuring the other side
of the centre line.
Using your chalk line to then mark lines that go straight through the
centre point where the lines cross and through the point where your
points each side were marked using the try square and extend the new
chalk line out to the walls each side.
If done correctly, these lines will now be square and you are ready to
progress to the next step.
50cm
30cm
40cm
40cm
30cm
50cm

Office, Storage & Display:
Business Hours: 3 – 9 Cook Rd, Marrickville, NSW, 2204
P: (02) 9519 8785 or M: 0414 266 267
F: (02) 9519 9810
Monday to Friday – 9am to 5pm
Saturday – 9am to 3pm. Other times
including Sundays can be arranged by
appointment. Email: [email protected] Call Vince Perry on Mobile: 0414 266 267
Warehouse number and mobile number will be answered 7 days & 7 nights per week.
� Lay your tiles.
Taking your loose tiles, start at the centre and loose lay then out from
the centre and work out the best fit for your room.
Determine if you are better laying your tiles along the centre line, or
down the middle of the centre line.
Lay tiles out from the centre and work out how many to each wall, and
determine if you will need to trim tiles to fit to your room.
In the example to the left, if we laid the vertical centre row with the tile
edge along the centre line, then we would need to cut each tile at the
top and bottom in half to fit the room.
It is best to take the time now and plan out what looks best for your
circumstances.
If you are going to lay your tiles in Diamond Pattern ( with or without a border ) loose lay your tiles and determine
if the centre point of the room will be in the centre of a tile, or if it will be where four tiles intersect.
Lay your tiles until the last full sized tile. When doing Diamond Pattern installations, it is critical that you remain
square.
It is best to determine
this beforehand, and
base the decision on
which will give you
the most whole tiles
in your individual
room.
Lay your square tiles
out with their corners
lined up along your
lines to keep square.
Office, Storage & Display:
Business Hours: 3 – 9 Cook Rd, Marrickville, NSW, 2204
P: (02) 9519 8785 or M: 0414 266 267
F: (02) 9519 9810
Monday to Friday – 9am to 5pm
Saturday – 9am to 3pm. Other times
including Sundays can be arranged by
appointment. Email: [email protected] Call Vince Perry on Mobile: 0414 266 267
Warehouse number and mobile number will be answered 7 days & 7 nights per week.
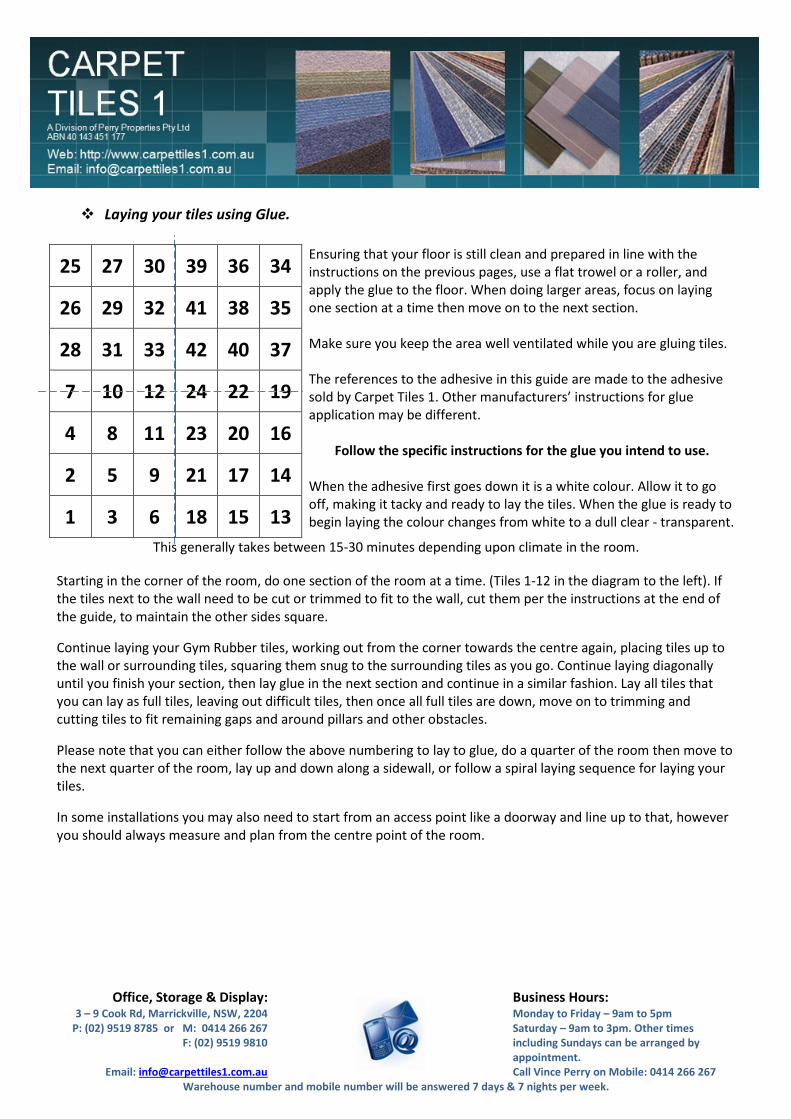
� Laying your tiles using Glue.
25 27 30 39 36 34 Ensuring that your floor is still clean and prepared in line with the
instructions on the previous pages, use a flat trowel or a roller, and
apply the glue to the floor. When doing larger areas, focus on laying
one section at a time then move on to the next section.
Make sure you keep the area well ventilated while you are gluing tiles.
The references to the adhesive in this guide are made to the adhesive
sold by Carpet Tiles 1. Other manufacturers’ instructions for glue
application may be different.
Follow the specific instructions for the glue you intend to use.
When the adhesive first goes down it is a white colour. Allow it to go
off, making it tacky and ready to lay the tiles. When the glue is ready to
begin laying the colour changes from white to a dull clear - transparent.
26 29 32 41 38 35
28 31 33 42 40 37
7 10 12 24 22 19
4 8 11 23 20 16
2 5 9 21 17 14
1 3 6 18 15 13
This generally takes between 15-30 minutes depending upon climate in the room.
Starting in the corner of the room, do one section of the room at a time. (Tiles 1-12 in the diagram to the left). If
the tiles next to the wall need to be cut or trimmed to fit to the wall, cut them per the instructions at the end of
the guide, to maintain the other sides square.
Continue laying your Gym Rubber tiles, working out from the corner towards the centre again, placing tiles up to
the wall or surrounding tiles, squaring them snug to the surrounding tiles as you go. Continue laying diagonally
until you finish your section, then lay glue in the next section and continue in a similar fashion. Lay all tiles that
you can lay as full tiles, leaving out difficult tiles, then once all full tiles are down, move on to trimming and
cutting tiles to fit remaining gaps and around pillars and other obstacles.
Please note that you can either follow the above numbering to lay to glue, do a quarter of the room then move to
the next quarter of the room, lay up and down along a sidewall, or follow a spiral laying sequence for laying your
tiles.
In some installations you may also need to start from an access point like a doorway and line up to that, however
you should always measure and plan from the centre point of the room.
Office, Storage & Display:
Business Hours: 3 – 9 Cook Rd, Marrickville, NSW, 2204
P: (02) 9519 8785 or M: 0414 266 267
F: (02) 9519 9810
Monday to Friday – 9am to 5pm
Saturday – 9am to 3pm. Other times
including Sundays can be arranged by
appointment. Email: [email protected] Call Vince Perry on Mobile: 0414 266 267
Warehouse number and mobile number will be answered 7 days & 7 nights per week.
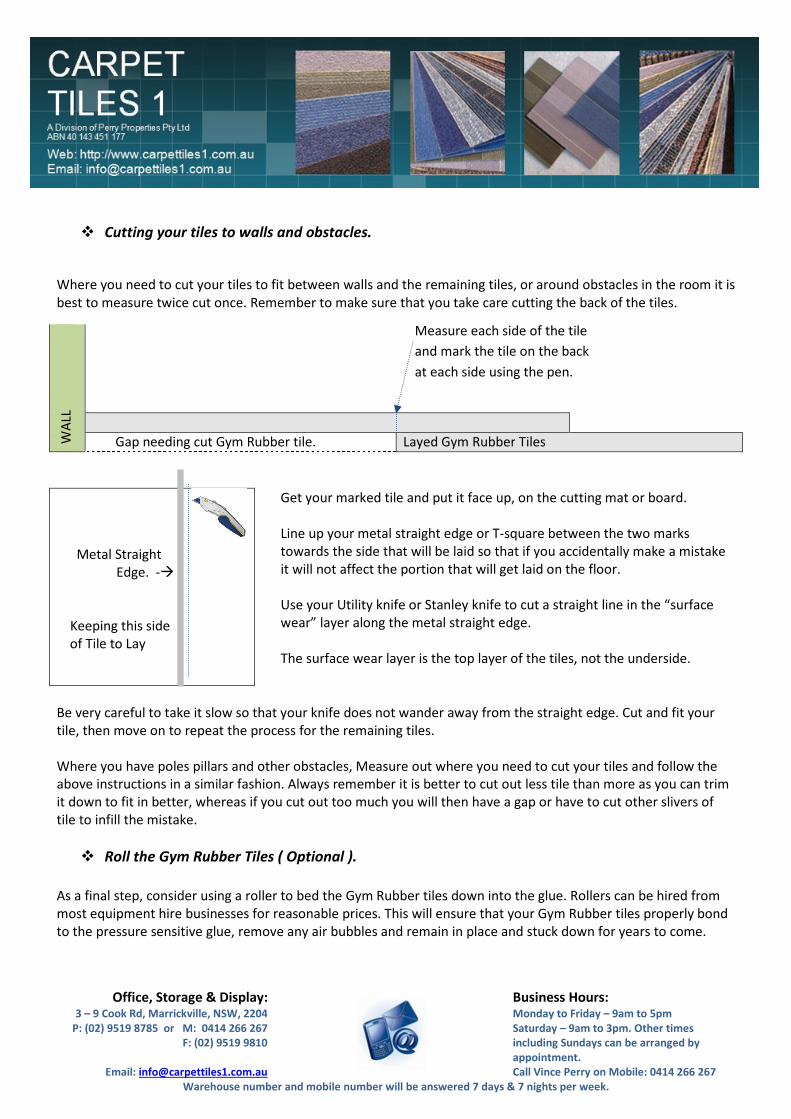
� Cutting your tiles to walls and obstacles.
Where you need to cut your tiles to fit between walls and the remaining tiles, or around obstacles in the room it is
best to measure twice cut once. Remember to make sure that you take care cutting the back of the tiles.
WA
LL
Gap needing cut Gym Rubber tile. Layed Gym Rubber Tiles
Metal Straight
Edge. -�
Keeping this side
of Tile to Lay
Get your marked tile and put it face up, on the cutting mat or board.
Line up your metal straight edge or T-square between the two marks
towards the side that will be laid so that if you accidentally make a mistake
it will not affect the portion that will get laid on the floor.
Use your Utility knife or Stanley knife to cut a straight line in the “surface
wear” layer along the metal straight edge.
The surface wear layer is the top layer of the tiles, not the underside.
Be very careful to take it slow so that your knife does not wander away from the straight edge. Cut and fit your
tile, then move on to repeat the process for the remaining tiles.
Where you have poles pillars and other obstacles, Measure out where you need to cut your tiles and follow the
above instructions in a similar fashion. Always remember it is better to cut out less tile than more as you can trim
it down to fit in better, whereas if you cut out too much you will then have a gap or have to cut other slivers of
tile to infill the mistake.
� Roll the Gym Rubber Tiles ( Optional ).
As a final step, consider using a roller to bed the Gym Rubber tiles down into the glue. Rollers can be hired from
most equipment hire businesses for reasonable prices. This will ensure that your Gym Rubber tiles properly bond
to the pressure sensitive glue, remove any air bubbles and remain in place and stuck down for years to come.
Measure each side of the tile
and mark the tile on the back
at each side using the pen.

Office, Storage & Display: 3 – 9 Cook Rd, Marrickville, NSW, 2204
P: (02) 9519 8785 or M: 0414 266 267
F: (02) 9519 9810
Email: [email protected] Warehouse number an
� Apply Gym Rubber Sealer ( Optional )
Depending upon your ventilation, you
may wish to apply a Gym Rubber Sealant
to your tiles.
Some of the advantages of a sealant are
that it adds a sacrificial layer to your tiles,
helps seal in VOC Gasses from the rubber
binder, and assists in repelling water,
moisture and sweat from your tiles.
Due to demand we have now started
stocking sealer.
Call us on 02 9519 8785 or 0414 266 267
to discuss sealing your tiles.
The sealers we sell come in two sizes ( 5 Ltr and 15 Ltr ) and cover 50
Carpet Tiles 1 are always happy to answer any questions you may have about installing your
ensure you get the best installation possible for your room. If you have any questions give us a call on
02 9519 8785 or 0414 266267 and we will gladly answer your questions.
Business HoursMonday to Friday
Saturday – 9am to 3pm. Other times
including Sundays can be arranged by
appointment.
Call Vince Per
er and mobile number will be answered 7 days & 7 nights per
Apply Gym Rubber Sealer ( Optional ).
may wish to apply a Gym Rubber Sealant
Some of the advantages of a sealant are
s a sacrificial layer to your tiles,
helps seal in VOC Gasses from the rubber
Call us on 02 9519 8785 or 0414 266 267
The sealers we sell come in two sizes ( 5 Ltr and 15 Ltr ) and cover 50-60 Sqm ( 5Ltr) and
Carpet Tiles 1 are always happy to answer any questions you may have about installing your
ensure you get the best installation possible for your room. If you have any questions give us a call on
02 9519 8785 or 0414 266267 and we will gladly answer your questions.
Business Hours: onday to Friday – 9am to 5pm
9am to 3pm. Other times
including Sundays can be arranged by
appointment. Perry on Mobile: 0414 266 267 per week.
60 Sqm ( 5Ltr) and 150-180Sqm ( 15 Ltr).
Carpet Tiles 1 are always happy to answer any questions you may have about installing your Gym Rubber tiles, to
ensure you get the best installation possible for your room. If you have any questions give us a call on
Vince Perry.
Related Documents