P.O. BOX 3448 • OMAHA, NEBRASKA 68103-0448 • (800) 228-9882 I-1 of 20 01-13F REV. AW 67312 7/2011 Lozier® Corporation 2011 Base Front (CBF) ∗ EQUIPMENT CHECKLIST — Leveling Leg Wrench — Rubber Mallet and (provided) Hammer — Carpenter’s Level — Measuring Tape — Screwdriver (Standard) — Chalkline — Wedges (not provided) — String or Dry Line See Step 9 on page 13 for size ∗ NOTE: Low Base Components have LB after part numbers. 06 Base Components have 06 after part numbers. COMPONENTS Base End Trim (BET) ∗ Back (BE) Uprite End Trim (UET) Shelf Back (BE) Base Bracket (BB) ∗ Top Rail (R-T) Center Rail (R-C) Splicer Rail (R-S) 78”H to 120”H only Uprite (U) ∗ Center Rail (R-C) 96”H to 120”H only Bottom Rail (R-B) Call Toll Free 800-228-9882 (Canada - Call Toll Free 800-248-6930) Base Deck (SD) RAILS Top Rail (R-T) Center Rail (R-C) Splicer Rail (R-S) Bottom Rail (R-B) Heavy Duty Bottom Rail (R-HDB) (Optional) Display Shelving Installation Instructions

Welcome message from author
This document is posted to help you gain knowledge. Please leave a comment to let me know what you think about it! Share it to your friends and learn new things together.
Transcript

P.O. BOX 3448 • OMAHA, NEBRASKA 68103-0448 • (800) 228-9882
I-1of 20
01-13F REV. AW 67312 7/2011 Lozier® Corporation 2011
Base Front(CBF)∗
EQUIPMENT CHECKLIST — Leveling Leg Wrench — Rubber Mallet and (provided) Hammer — Carpenter’s Level — Measuring Tape — Screwdriver (Standard) — Chalkline — Wedges (not provided) — String or Dry Line See Step 9 on page 13 for size
∗ NOTE: Low Base Components have LB after part numbers. 06 Base Components have 06 after part numbers.
COMPONENTS
Base End Trim(BET)∗
Back(BE)
Uprite End Trim(UET)
Shelf
Back(BE)
Base Bracket(BB) ∗
Top Rail(R-T)
Center Rail(R-C)
Splicer Rail(R-S)
78”H to 120”H only
Uprite(U) ∗
Center Rail(R-C)
96”H to 120”H only
Bottom Rail(R-B)
Call Toll Free 800-228-9882(Canada - Call Toll Free 800-248-6930)
Base Deck(SD)
RAILS
Top Rail (R-T)
Center Rail (R-C)
Splicer Rail (R-S)
Bottom Rail (R-B)
Heavy Duty Bottom Rail (R-HDB)
(Optional)
Display Shelving Installation Instructions
I-2of 20
P.O. BOX 3448 • OMAHA, NEBRASKA 68103-0448 • (800) 228-9882
01-13F REV. AW 67312 7/2011 Lozier® Corporation 2011
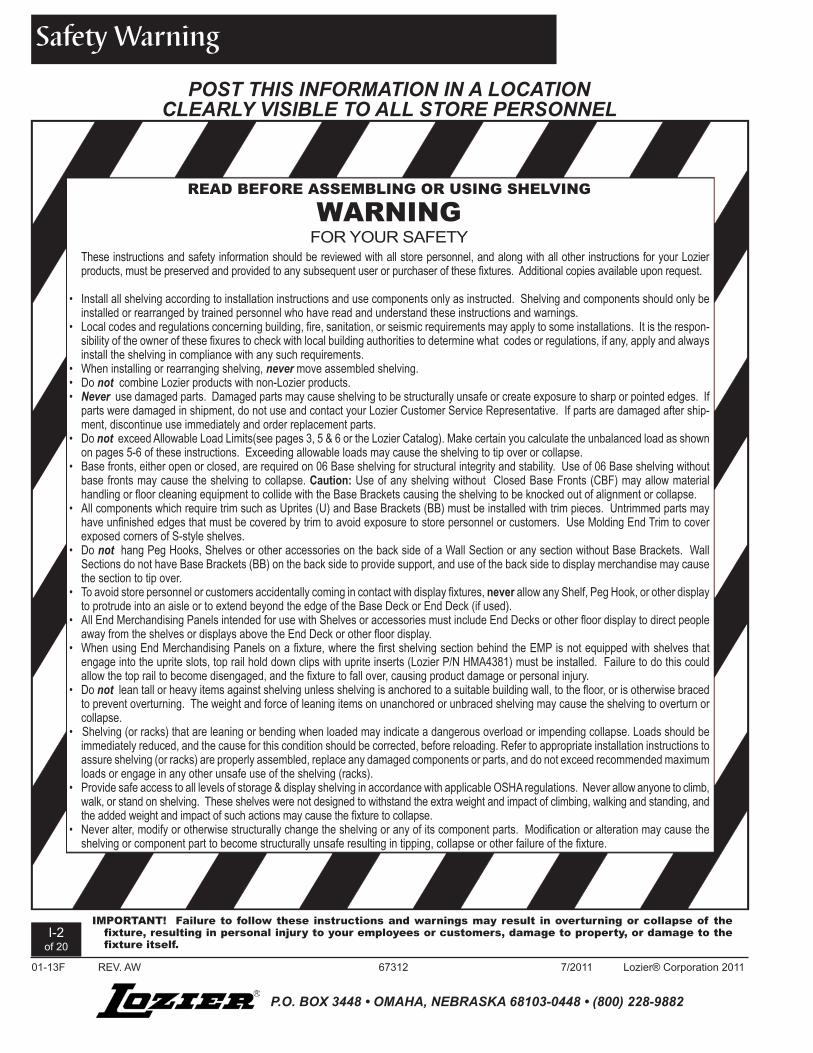
POST THIS INFORMATION IN A LOCATION CLEARLY VISIBLE TO ALL STORE PERSONNEL
READ BEFORE ASSEMBLING OR USING SHELVING
These instructions and safety information should be reviewed with all store personnel, and along with all other instructions for your Lozier products, must be preserved and provided to any subsequent user or purchaser of these fixtures. Additional copies available upon request.
• Install all shelving according to installation instructions and use components only as instructed. Shelving and components should only be installed or rearranged by trained personnel who have read and understand these instructions and warnings.
• Local codes and regulations concerning building, fire, sanitation, or seismic requirements may apply to some installations. It is the respon-sibility of the owner of these fixures to check with local building authorities to determine what codes or regulations, if any, apply and always install the shelving in compliance with any such requirements.
• When installing or rearranging shelving, never move assembled shelving.• Do not combine Lozier products with non-Lozier products.• Never use damaged parts. Damaged parts may cause shelving to be structurally unsafe or create exposure to sharp or pointed edges. If
parts were damaged in shipment, do not use and contact your Lozier Customer Service Representative. If parts are damaged after ship-ment, discontinue use immediately and order replacement parts.
• Do not exceed Allowable Load Limits(see pages 3, 5 & 6 or the Lozier Catalog). Make certain you calculate the unbalanced load as shown on pages 5-6 of these instructions. Exceeding allowable loads may cause the shelving to tip over or collapse.
• Base fronts, either open or closed, are required on 06 Base shelving for structural integrity and stability. Use of 06 Base shelving without base fronts may cause the shelving to collapse. Caution: Use of any shelving without Closed Base Fronts (CBF) may allow material handling or floor cleaning equipment to collide with the Base Brackets causing the shelving to be knocked out of alignment or collapse.
• All components which require trim such as Uprites (U) and Base Brackets (BB) must be installed with trim pieces. Untrimmed parts may have unfinished edges that must be covered by trim to avoid exposure to store personnel or customers. Use Molding End Trim to cover exposed corners of S-style shelves.
• Do not hang Peg Hooks, Shelves or other accessories on the back side of a Wall Section or any section without Base Brackets. Wall Sections do not have Base Brackets (BB) on the back side to provide support, and use of the back side to display merchandise may cause the section to tip over.
• To avoid store personnel or customers accidentally coming in contact with display fixtures, never allow any Shelf, Peg Hook, or other display to protrude into an aisle or to extend beyond the edge of the Base Deck or End Deck (if used).
• All End Merchandising Panels intended for use with Shelves or accessories must include End Decks or other floor display to direct people away from the shelves or displays above the End Deck or other floor display.
• When using End Merchandising Panels on a fixture, where the first shelving section behind the EMP is not equipped with shelves that engage into the uprite slots, top rail hold down clips with uprite inserts (Lozier P/N HMA4381) must be installed. Failure to do this could allow the top rail to become disengaged, and the fixture to fall over, causing product damage or personal injury.
• Do not lean tall or heavy items against shelving unless shelving is anchored to a suitable building wall, to the floor, or is otherwise braced to prevent overturning. The weight and force of leaning items on unanchored or unbraced shelving may cause the shelving to overturn or collapse.
• Shelving (or racks) that are leaning or bending when loaded may indicate a dangerous overload or impending collapse. Loads should be immediately reduced, and the cause for this condition should be corrected, before reloading. Refer to appropriate installation instructions to assure shelving (or racks) are properly assembled, replace any damaged components or parts, and do not exceed recommended maximum loads or engage in any other unsafe use of the shelving (racks).
• Provide safe access to all levels of storage & display shelving in accordance with applicable OSHA regulations. Never allow anyone to climb, walk, or stand on shelving. These shelves were not designed to withstand the extra weight and impact of climbing, walking and standing, and the added weight and impact of such actions may cause the fixture to collapse.
• Never alter, modify or otherwise structurally change the shelving or any of its component parts. Modification or alteration may cause the shelving or component part to become structurally unsafe resulting in tipping, collapse or other failure of the fixture.
Safety Warning
WARNINGFOR YOUR SAFETY
IMPORTANT! Failure to follow these instructions and warnings may result in overturning or collapse of the fixture, resulting in personal injury to your employees or customers, damage to property, or damage to the fixture itself.
P.O. BOX 3448 • OMAHA, NEBRASKA 68103-0448 • (800) 228-9882
I-3of 20
01-13F REV. AW 67312 7/2011 Lozier® Corporation 2011
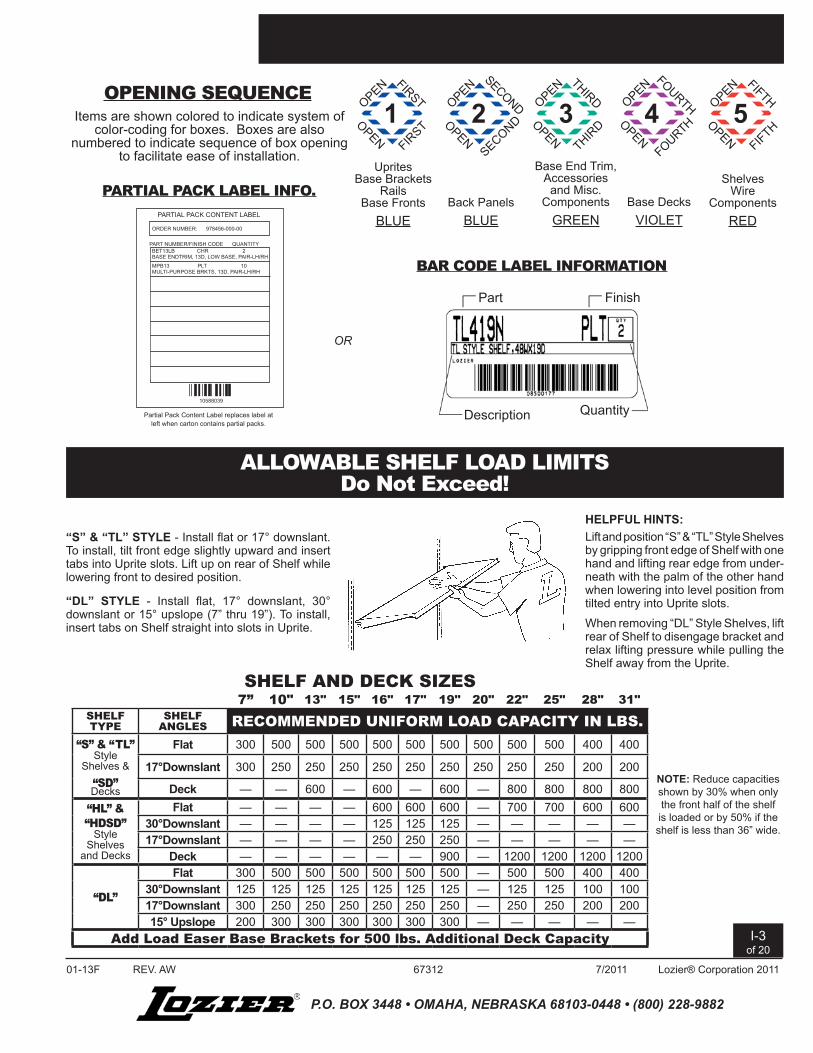
“S” & “TL” STYLE - Install flat or 17° downslant. To install, tilt front edge slightly upward and insert tabs into Uprite slots. Lift up on rear of Shelf while lowering front to desired position.
“DL” STYLE - Install flat, 17° downslant, 30° downslant or 15° upslope (7” thru 19”). To install, insert tabs on Shelf straight into slots in Uprite.
NOTE: Reduce capacities shown by 30% when only the front half of the shelf is loaded or by 50% if the shelf is less than 36” wide.
Items are shown colored to indicate system of color-coding for boxes. Boxes are also
numbered to indicate sequence of box opening to facilitate ease of installation.
OPENING SEQUENCE
ALLOWABLE SHELF LOAD LIMITSDo Not Exceed!
BAR CODE LABEL INFORMATION
Quantity
FinishPart
Description
OR
PARTIAL PACK CONTENT LABEL
PART NUMBER/FINISH CODE QUANTITY
ORDER NUMBER: 978456-000-00
10588039
Partial Pack Content Label replaces label at left when carton contains partial packs.
BET13LB CHR 2BASE ENDTRIM, 13D, LOW BASE, PAIR-LH/RH
MPB13 PLT 10MULTI-PURPOSE BRKTS, 13D, PAIR-LH/RH
PARTIAL PACK LABEL INFO.
Base End Trim, Accessories and Misc.
ComponentsGREEN
Base DecksVIOLET
ShelvesWire
ComponentsRED
UpritesBase Brackets
RailsBase Fronts
BLUEBack Panels
BLUE
1 2 3 4 5OPEN
FIRSTOPEN
FIRST OPEN
SECONDOPEN
SECOND OPEN
THIRDOPEN
THIRD OPEN
FOURTHOPEN
FOURTH OPEN
FIFTHOPEN
FIFTH
SHELF AND DECK SIZES7” 10" 13" 15" 16" 17" 19" 20" 22" 25" 28" 31"
SHELF TYPE
SHELF ANGLES RECOMMENDED UNIFORM LOAD CAPACITY IN LBS.
“S” & “TL”Style
Shelves &“SD”Decks
Flat 300 500 500 500 500 500 500 500 500 500 400 400
17°Downslant 300 250 250 250 250 250 250 250 250 250 200 200
Deck — — 600 — 600 — 600 — 800 800 800 800“HL” & “HDSD”
StyleShelves
and Decks
Flat — — — — 600 600 600 — 700 700 600 60030°Downslant — — — — 125 125 125 — — — — —17°Downslant — — — — 250 250 250 — — — — —
Deck — — — — — — 900 — 1200 1200 1200 1200
“DL”
Flat 300 500 500 500 500 500 500 — 500 500 400 40030°Downslant 125 125 125 125 125 125 125 — 125 125 100 10017°Downslant 300 250 250 250 250 250 250 — 250 250 200 20015° Upslope 200 300 300 300 300 300 300 — — — — —
Add Load Easer Base Brackets for 500 lbs. Additional Deck Capacity
HELPFUL HINTS:Lift and position “S” & “TL” Style Shelves by gripping front edge of Shelf with one hand and lifting rear edge from under-neath with the palm of the other hand when lowering into level position from tilted entry into Uprite slots.
When removing “DL” Style Shelves, lift rear of Shelf to disengage bracket and relax lifting pressure while pulling the Shelf away from the Uprite.

I-4of 20
P.O. BOX 3448 • OMAHA, NEBRASKA 68103-0448 • (800) 228-9882
01-13F REV. AW 67312 7/2011 Lozier® Corporation 2011
BE30BE36
BE42BE48
BE54BE60
BE66BE36
BE48BE48
BE48
BE36
BE48
35 13
/ 16”
29 13
/ 16”
35 13
/ 16”
41 13
/ 16”
65 13
/ 16”
65 13
/ 16”
35 13
/ 16”
35 13
/ 16”
47 13
/ 16” 47
13/ 16
”
47 13
/ 16”
BE36BE30BE36
BE42BE66
BE66
78” thru 120” are two pieces with Splicer Rail2’ Wide = 22 17/32”
3’ Wide = 34 17/32”4’ Wide = 46 17/32”
IndicatesCenter Rail
47 13
/ 16”
41 13
/ 16”
35 13
/ 16”
29 13
/ 16”
60”
47 13
/ 16”
96”
84”78”
72”
54”48”
42”36”
66”
90”
108”
120”
65 13
/ 16”
59 13
/ 16”
53 13
/ 16”
RAIL INFORMATIONNOTE: Center Rails will occasionally be
painted in other neutral colors at random(including galvanized).
R-T(Top Rail)
R-S(Splicer Rail)For Two-Piece Backs
R-C(Center Rail)Lower Center Railfor 96”H to 120”H only.Locate near center of back.
R-B(Bottom Rail)
R-C(Center Rail)Locate near center of back.
NOTE: If Telescopic Uprites (TEL) are being installed, the Center Rail must be in-stalled in the third lance (12”) down from the top of the Uprite. If used with Uprites 60” through 72” high, a Center Rail must be installed in the third lance down and another installed at mid-height of uprite. Bend all tabs outward (Detail 4a on pages I-11 and I-16) at each end of the Center Rail.
BACK PANEL INFORMATION
IMPORTANT! Top of Pegboard Backs are marked with a paint stripe. First row of holes are 7/8” from top edge.
Remove merchandise and shelves. Remove base deck and base front from one sec-tion on each side of base bracket being removed. (If uprite is lagged to wall, adjust leveling leg up 1/8”-1/4” to relieve preload on bracket.) 1) Pull latch tabs away from uprite. It may be necessary to pull tabs on each side of Base Bracket simultaneously in order to disengage latch. 2) Lift bracket up and out of uprite. Install replacement base bracket immediately. Reinstall base front and base deck. Proceed to next base bracket.
Work on one side of island at a time. Remove merchandise and shelves. Remove base deck and base front from one section on each side of the base bracket being removed. Make sure that uprite leveling leg is touching floor. Adjust bracket leveling leg 1/8”-1/4” off floor to relieve preload on bracket. 1) Pull bracket latch tabs away from uprite. It may be necessary to pull tabs on each side of Base Bracket simultaneously in order to disengage latch. 2) Lift bracket up and out of uprite. Install replacement base bracket immediately. Reinstall base front and base deck. Proceed to next base bracket.
WALL SECTIONS:
ISLAND SECTIONS:IMPORTANT! These instructions must be followed to prevent collapse of the system.WARNING! Be sure to unload heavy side of island first, to prevent overturning. Be sure that, at no time, the unbalanced load rating (see pages 5 & 6) is exceeded as a result of unloading.
IMPORTANT! These instructions must be followed to prevent collapse of the system. A crew of two (minimum) is required. One crew member must hold the uprite while the other is removing and replacing the base bracket on that uprite.
Base Bracket Removal & Replacement

P.O. BOX 3448 • OMAHA, NEBRASKA 68103-0448 • (800) 228-9882
I-5of 20
01-13F REV. AW 67312 7/2011 Lozier® Corporation 2011
This loading situation may be represented by two separate loading sections, shown below as Section A & Secion B.
SAMPLE CALCULATION
1.Assume no shelves on Side 1 of Section B
Find the Unbalanced inch-pounds acting on this Uprite.
500#
500#
28”
25”
500#
25”
500#
28”
200#
25”
200#
28”
SIDE 1SIDE 2 SECTION A
SECTION B
2.
SECTION A SECTION B
SIDE 1 SIDE 2 SIDE 1 SIDE 2
Deck Load does not contribute to unbalanced load.
14”
500#
25”
28”
500#200#
12.5”
25” 25”
500#200#14” 14”
28” 28”
500#
12.5”12.5”
When heavily loading wall shelving or loading or unloading island shelving, it is important to determine if you are creating an unbalanced load that exceeds the maximum 12,000 inch-pounds. The sample calculation below illustrates how you can determine your unbalanced load in inch-pounds.
NOTE: Inch-pounds are a measure of the shelf loads acting at a distance (1/2 shelf depth) from the Uprite.
Unbalanced Load Calculations
I-6of 20
P.O. BOX 3448 • OMAHA, NEBRASKA 68103-0448 • (800) 228-9882
01-13F REV. AW 67312 7/2011 Lozier® Corporation 2011
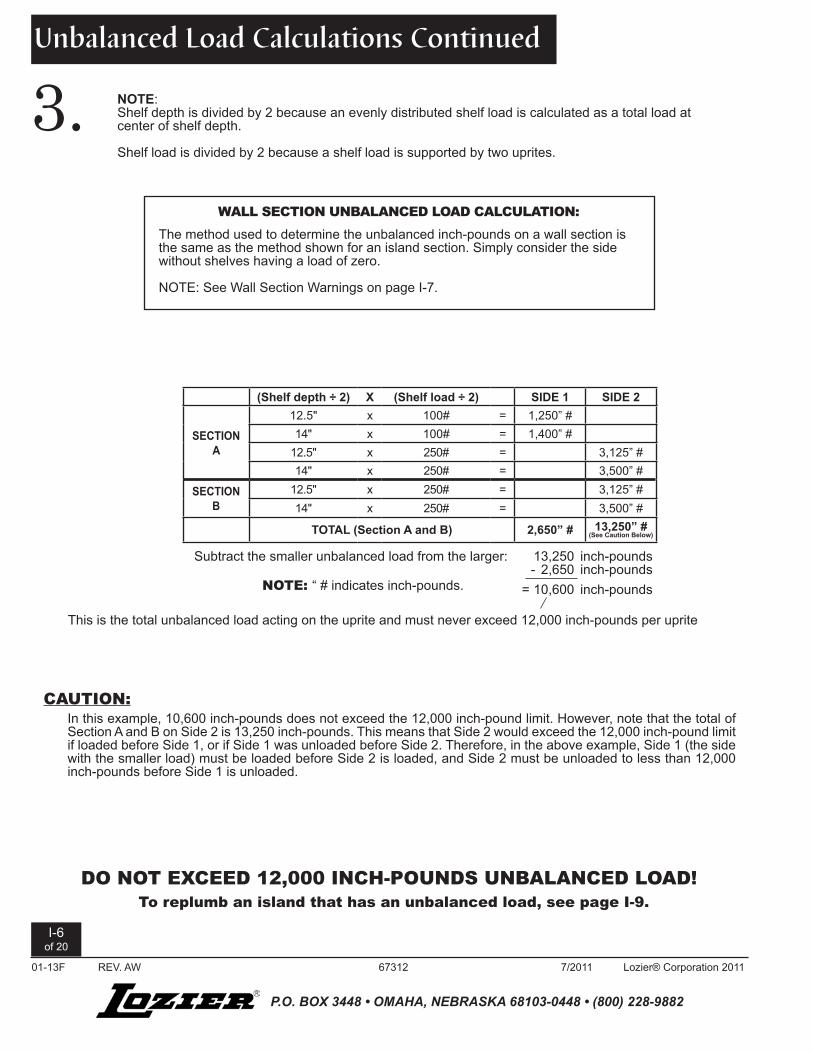
3. NOTE: Shelf depth is divided by 2 because an evenly distributed shelf load is calculated as a total load at center of shelf depth.
Shelf load is divided by 2 because a shelf load is supported by two uprites.
WALL SECTION UNBALANCED LOAD CALCULATION:
The method used to determine the unbalanced inch-pounds on a wall section is the same as the method shown for an island section. Simply consider the side without shelves having a load of zero.
NOTE: See Wall Section Warnings on page I-7.
NOTE: “ # indicates inch-pounds.
Subtract the smaller unbalanced load from the larger: 13,250 inch-pounds - 2,650 inch-pounds = 10,600 inch-pounds
This is the total unbalanced load acting on the uprite and must never exceed 12,000 inch-pounds per uprite
CAUTION: In this example, 10,600 inch-pounds does not exceed the 12,000 inch-pound limit. However, note that the total of Section A and B on Side 2 is 13,250 inch-pounds. This means that Side 2 would exceed the 12,000 inch-pound limit if loaded before Side 1, or if Side 1 was unloaded before Side 2. Therefore, in the above example, Side 1 (the side with the smaller load) must be loaded before Side 2 is loaded, and Side 2 must be unloaded to less than 12,000 inch-pounds before Side 1 is unloaded.
DO NOT EXCEED 12,000 INCH-POUNDS UNBALANCED LOAD!To replumb an island that has an unbalanced load, see page I-9.
Unbalanced Load Calculations Continued
(Shelf depth ÷ 2) X (Shelf load ÷ 2) SIDE 1 SIDE 2
SECTIONA
12.5" x 100# = 1,250” #14" x 100# = 1,400” #
12.5" x 250# = 3,125” #14" x 250# = 3,500” #
SECTIONB
12.5" x 250# = 3,125” #14" x 250# = 3,500” #
TOTAL (Section A and B) 2,650” # 13,250” #(See Caution Below)

P.O. BOX 3448 • OMAHA, NEBRASKA 68103-0448 • (800) 228-9882
I-7of 20
01-13F REV. AW 67312 7/2011 Lozier® Corporation 2011
To help avoid overturning: • The height of the Uprite (including Extension Uprites, if any) must not exceed the leveler spacing by a ratio of 6:1 when unan-
chored (see the charts). CAUTION: Tall unanchored Island Sections using 13"-16" bases and heavily loaded on one side must not exceed the following load limits:
• 13" base with Uprite height greater than 78", unbalanced load not to exceed 6,000 in-lbs • 16" base with Uprite height greater than 102", unbalanced load not to exceed 6,000 in lbs • If Uprites on Wall Sections exceed the heights listed, the Base Bracket and the Uprite levelers must be anchored to the floor or
otherwise braced. • Contact local building official for anchoring requirements in seismic zones. • Maximum shelf depth cannot exceed Base Deck depth. • Do not hang Peg Hooks, Shelves, or other accessories on the back side of a Wall Section or any section without Base Brackets.
Wall Sections do not have Base Brackets on the back side to provide support, and use of the back side to display merchandise may cause the section to tip over.
• Do not lean tall or heavy items against shelving unless shelving is anchored to a suitable building wall, to the floor, or otherwise braced to prevent overturning. The weight and force of leaning items on unanchored or unbraced shelving may cause the shelv-ing to overturn or collapse.
Important Notice for Free Standing Units
- If Glass Doorkits are used on Wall Sec-tion or on one side only of Island Section, reduce maximum height by 12”
- If fixture is on carpet, reduce maximum
height by 12”
Floor Anchoring
IMPORTANT! Failure to follow these instructions and warnings may result in overturning or collapse of the fixture resulting in personal injury to your employees or customers, damage to property, or damage to the fixture itself.
UPRITENOMINAL HEIGHT
Shelf must not exceed deck
depth
(B)
Island Section
TALLEST BASE LEVELER UNANCHORED SIZE SPACING(A) UPRITE
13”16”19”22”25”28”
9 3/4”12 3/4”15 3/4”18 3/4”21 3/4”24 3/4”
NOTE: For Uprite applications taller than 144”, contact Marketing.
WALL
54”72”90”
108”120”144”
UPRITENOMINAL HEIGHT
Shelf must not exceed deck
depth
(A)
Wall Section
Special Warnings
Overturning Warnings
NOTE: For Uprite applications taller than 144”, contact Marketing.
ISLAND
BASE SIZE
LEVELERSPACING(B)
TALLEST UNANCHORED
UPRITE13"/13" 19 1/2" 114"13"/16" 22 1/2" 132"13"/19" 25 1/2" 144"16"/16" 25 1/2" 144"
EXTENSION UPRITES - The maximum unbalanced load on shelves above the joint on an Extension Uprite should not exceed 2500 inch-pounds. Exceeding this maximum load may cause shelving to tip over resulting in personal injury or property damage. PEGBOARD BACK LOADS - The load applied to Pegboard Backs with a standard Bottom Rail should not exceed 150 lbs. in total, 50 lbs. in any single square foot area, or 10 lbs. per hook. With heavy duty Bottom Rails, the load applied should not exceed 350 lbs. in total, 50 lbs. in any single square foot area, or 20 lbs. per hook. Excessive loading of Pegboard Backs can cause the Backs to fracture and/or become dislodged which could result in personal injury to employees or customers, damage to property, or damage to the fixture itself.
I-8of 20
P.O. BOX 3448 • OMAHA, NEBRASKA 68103-0448 • (800) 228-9882
01-13F REV. AW 67312 7/2011 Lozier® Corporation 2011
ALL TYPES OF WALL WITH
BLOCKINGDIRECTLY TO
CONCRETE WALL
2 x 4 Blocking (See above)
WALL MOUNTBRACKET
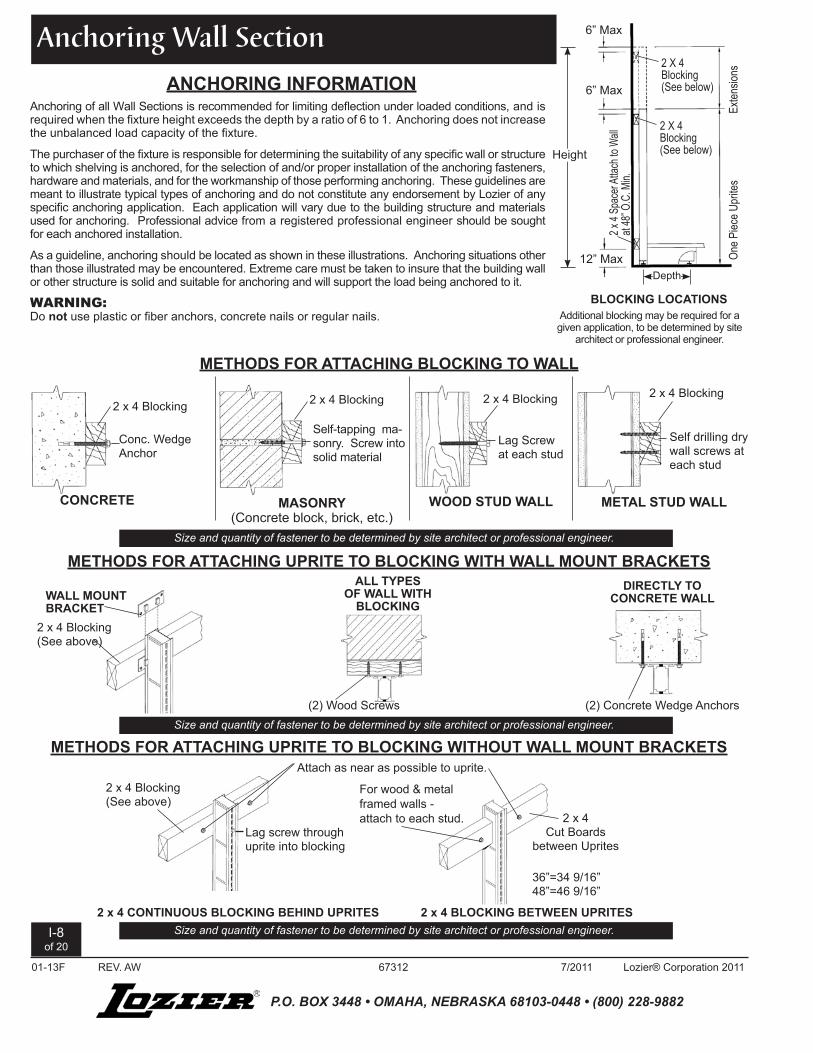
Anchoring of all Wall Sections is recommended for limiting deflection under loaded conditions, and is required when the fixture height exceeds the depth by a ratio of 6 to 1. Anchoring does not increase the unbalanced load capacity of the fixture.
The purchaser of the fixture is responsible for determining the suitability of any specific wall or structure to which shelving is anchored, for the selection of and/or proper installation of the anchoring fasteners, hardware and materials, and for the workmanship of those performing anchoring. These guidelines are meant to illustrate typical types of anchoring and do not constitute any endorsement by Lozier of any specific anchoring application. Each application will vary due to the building structure and materials used for anchoring. Professional advice from a registered professional engineer should be sought for each anchored installation.
As a guideline, anchoring should be located as shown in these illustrations. Anchoring situations other than those illustrated may be encountered. Extreme care must be taken to insure that the building wall or other structure is solid and suitable for anchoring and will support the load being anchored to it.
WARNING:Do not use plastic or fiber anchors, concrete nails or regular nails.
ANCHORING INFORMATION
2 x 4 Blocking
Self drilling dry wall screws at each stud
2 x 4 Blocking
Conc. Wedge Anchor
CONCRETE METAL STUD WALL
2 x 4 Blocking
MASONRY (Concrete block, brick, etc.)
Self-tapping ma-sonry. Screw into solid material
Lag Screw at each stud
WOOD STUD WALL
2 x 4 Blocking
Lag screw through uprite into blocking
2 x 4 Cut Boards
between Uprites
36”=34 9/16”48”=46 9/16”
Attach as near as possible to uprite.
For wood & metal framed walls -attach to each stud.
2 x 4 BLOCKING BETWEEN UPRITES2 x 4 CONTINUOUS BLOCKING BEHIND UPRITES
METHODS FOR ATTACHING BLOCKING TO WALL
METHODS FOR ATTACHING UPRITE TO BLOCKING WITH WALL MOUNT BRACKETS
METHODS FOR ATTACHING UPRITE TO BLOCKING WITHOUT WALL MOUNT BRACKETS
(2) Wood Screws (2) Concrete Wedge Anchors
2 x 4 Blocking (See above)
Anchoring Wall Section
BLOCKING LOCATIONS
6” Max
6” Max
12” Max One P
iece U
prite
s
2 X 4Blocking(See below)
2 X 4Blocking(See below)
2 x 4
Spac
er At
tach t
o Wall
at 48
” O.C
. Min.
Exten
sions
Height
Depth
Size and quantity of fastener to be determined by site architect or professional engineer.
Size and quantity of fastener to be determined by site architect or professional engineer.
Size and quantity of fastener to be determined by site architect or professional engineer.
Additional blocking may be required for a given application, to be determined by site
architect or professional engineer.

P.O. BOX 3448 • OMAHA, NEBRASKA 68103-0448 • (800) 228-9882
I-9of 20
01-13F REV. AW 67312 7/2011 Lozier® Corporation 2011
Repeat Steps 2-6 for each Uprite that needs to be rep-lumbed. Sight down the tops of the Uprites to assure that the island is straight.
Check to be sure Uprite is plumb with the Level. Repeat Steps 2-6, if necessary, until the Uprite is plumb.
6. 7.
5.Have the second person push on the Uprite face (heavy side) with the push bar. This will reduce the pressure on the Leveling Leg which is about to be extended.
DO NOT ATTEMPT TO EXTEND THE LEVELING LEG WITHOUT RELIEVING THE PRESSURE ON IT.
As the person pushing relieves the pressure on the Leveling Leg, use the Leveling Leg wrench to slowly extend the Leveling Leg clockwise, by the same number of turns as the Leveler on the opposite was retracted - plus 2 turns.
CAUTION: Do not extend the Base Bracket Leveling Leg more than 1 7/16” past the bottom of the Bracket.
1. Identify the Uprites that need to be replumbed by observing shelf gaps (as shown below) or by sighting down the line of Uprites. Estimate how far out of plumb each Uprite is.
Shelf Gap
2. Move to the lightly loaded side of the island and find the first Uprite to be rep-lumbed. Pry the Closed Base Front (CBF) up about 1/2” to access the Base Bracket Leveling Leg.
1/2”
3. Using the leveling wrench, screw in (retract) the Leveling Leg counter-clockwise about 1 turn for each 1/16” the Uprite is out of plumb.
Before starting, the following are required:• Two people (one for pushing and one for adjusting levelers) • Carpenter’s Level• Leveling Leg Wrench or 7/ 8” Open End Wrench • A Length of 2 x 4 or other similar material to aid in pushing against Uprite.
WARNING: Before beginning, determine the unbalanced load on the wall or island to be sure it does not exceed 12,000 in. lbs. See Unbalanced Load Calculation.
WARNING: A fully merchandised island will often contain several tons of merchandise. Extreme caution should be exercised to avoid shelving collapse or falling merchandise, which could result in serious injury. Shoppers and other persons not involved in adjusting the island should be denied access to the area during this procedure.
WARNING: Do not remove the Closed Base Fronts or Base Decks from a loaded island, as this may cause shelving collapse.
Do not attempt to replumb an island that is overloaded!(exceeding 12,000 inch-pounds unbalanced load)
The Lozier Uprite and Base Bracket System is designed to function well under most merchandising circumstances. However, oc-casionally one side of an island becomes more heavily loaded than the other, which causes the uprites to lean toward the heavy side. This may cause gaps between shelves on the heavy side. It is important to read all warnings prior to replumbing an island.
1/2”
4. Move to the heavily loaded side of the island and locate the same Up-rite. Pry up the CBF to access the Base Bracket Leveling Leg.
DO NOT TURN THE LEVELER YET!
Replumbing an Island that has an Unbalanced Load
I-10of 20
P.O. BOX 3448 • OMAHA, NEBRASKA 68103-0448 • (800) 228-9882
01-13F REV. AW 67312 7/2011 Lozier® Corporation 2011
3’ or 4’
WallUprites
Base Brackets
Chalkline
Base FrontsBottom Rails
Center Rails
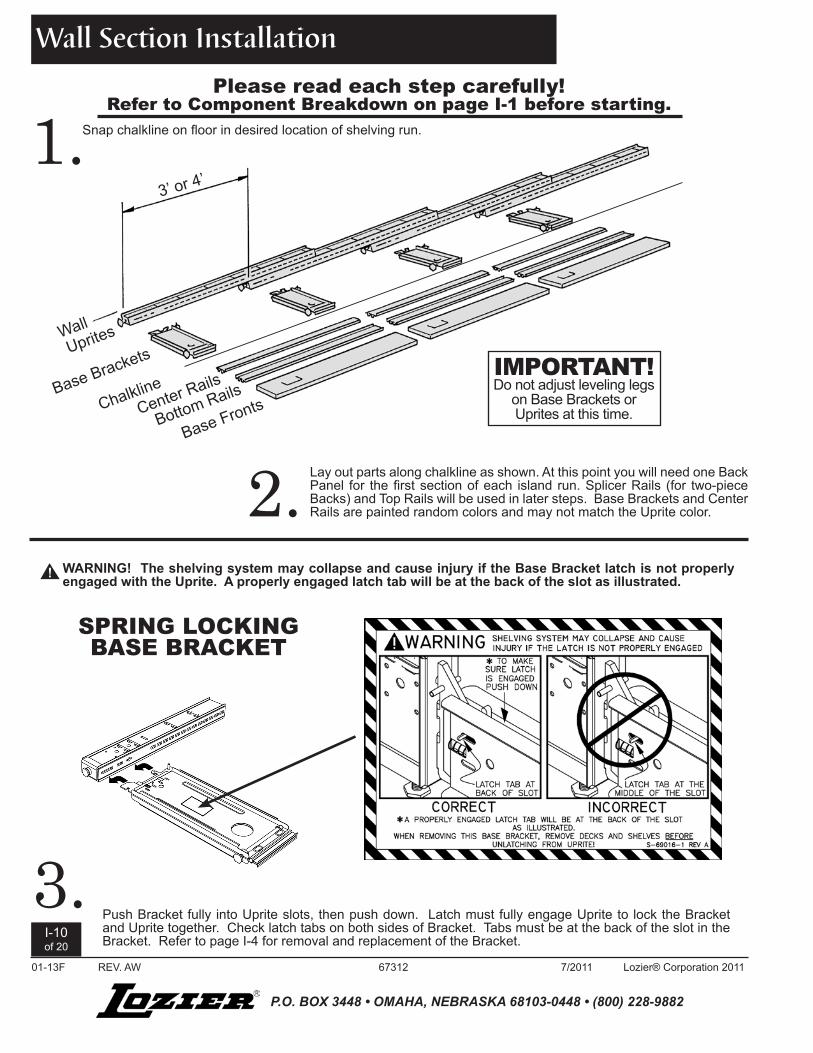
Please read each step carefully!Refer to Component Breakdown on page I-1 before starting.
Snap chalkline on floor in desired location of shelving run.1.
2. Lay out parts along chalkline as shown. At this point you will need one Back Panel for the first section of each island run. Splicer Rails (for two-piece Backs) and Top Rails will be used in later steps. Base Brackets and Center Rails are painted random colors and may not match the Uprite color.
Push Bracket fully into Uprite slots, then push down. Latch must fully engage Uprite to lock the Bracket and Uprite together. Check latch tabs on both sides of Bracket. Tabs must be at the back of the slot in the Bracket. Refer to page I-4 for removal and replacement of the Bracket.
WARNING! The shelving system may collapse and cause injury if the Base Bracket latch is not properly engaged with the Uprite. A properly engaged latch tab will be at the back of the slot as illustrated.
SPRING LOCKING BASE BRACKET
3.
Wall Section Installation
IMPORTANT!Do not adjust leveling legs
on Base Brackets or Uprites at this time.
!
P.O. BOX 3448 • OMAHA, NEBRASKA 68103-0448 • (800) 228-9882
I-11of 20
01-13F REV. AW 67312 7/2011 Lozier® Corporation 2011
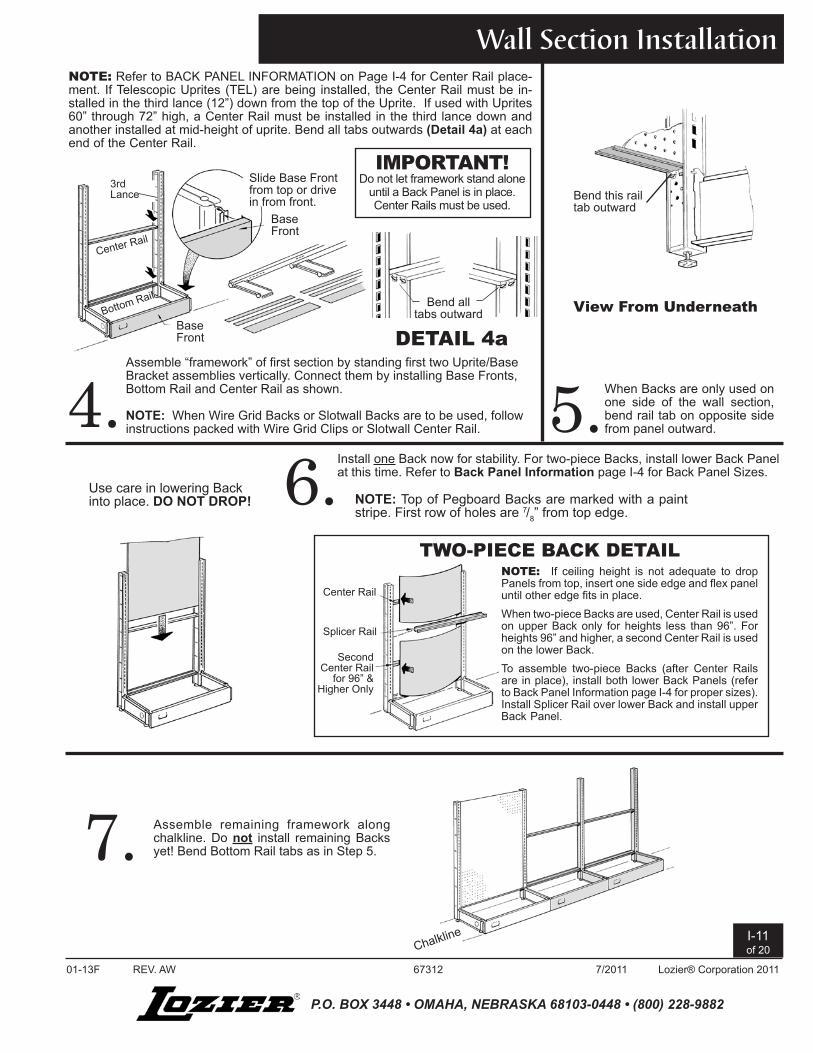
4.
NOTE: Refer to BACK PANEL INFORMATION on Page I-4 for Center Rail place-ment. If Telescopic Uprites (TEL) are being installed, the Center Rail must be in-stalled in the third lance (12”) down from the top of the Uprite. If used with Uprites 60” through 72” high, a Center Rail must be installed in the third lance down and another installed at mid-height of uprite. Bend all tabs outwards (Detail 4a) at each end of the Center Rail.
Bottom Rail
BaseFront
Slide Base Frontfrom top or drivein from front.
BaseFront
Center Rail
3rd Lance
Assemble “framework” of first section by standing first two Uprite/Base Bracket assemblies vertically. Connect them by installing Base Fronts, Bottom Rail and Center Rail as shown.
NOTE: When Wire Grid Backs or Slotwall Backs are to be used, follow instructions packed with Wire Grid Clips or Slotwall Center Rail.
IMPORTANT!Do not let framework stand alone
until a Back Panel is in place. Center Rails must be used.
DETAIL 4a
Bend alltabs outward
NOTE: Top of Pegboard Backs are marked with a paint stripe. First row of holes are 7/8” from top edge.
TWO-PIECE BACK DETAILNOTE: If ceiling height is not adequate to drop Panels from top, insert one side edge and flex panel until other edge fits in place.When two-piece Backs are used, Center Rail is used on upper Back only for heights less than 96”. For heights 96” and higher, a second Center Rail is used on the lower Back.To assemble two-piece Backs (after Center Rails are in place), install both lower Back Panels (refer to Back Panel Information page I-4 for proper sizes). Install Splicer Rail over lower Back and install upper Back Panel.
Center Rail
Splicer Rail
Second Center Rail
for 96” & Higher Only
Install one Back now for stability. For two-piece Backs, install lower Back Panel at this time. Refer to Back Panel Information page I-4 for Back Panel Sizes.6.Use care in lowering Back
into place. DO NOT DROP!
5.When Backs are only used on one side of the wall section, bend rail tab on opposite side from panel outward.
Bend this rail tab outward
View From Underneath
Wall Section Installation
7.Chalkline
Assemble remaining framework along chalkline. Do not install remaining Backs yet! Bend Bottom Rail tabs as in Step 5.

I-12of 20
P.O. BOX 3448 • OMAHA, NEBRASKA 68103-0448 • (800) 228-9882
01-13F REV. AW 67312 7/2011 Lozier® Corporation 2011
String Line
Same Number of Slots Both
Ends
Same Number of Slots Both
Ends
Highest
8.1
8.28.1
Leveling Leg Wrench
8.3
8.3
8.Wall Section Installation
The purpose of the leveling procedure is to have all the Uprites plumb and at the same level along a string line with the Base Bracket leveling legs extended the least amount possible to achieve this result.
8.1 Stretch a string line tightly between the end Uprites using a leveling leg wrench placed in the same slot on each end Uprite.
8.2 Find the highest Uprite in the run (it will have the most slots above the string line). By adjusting the Uprite leveling leg, lower this Uprite so the string line matches the same slot as the end Uprites or as low as it can go, whichever comes first.
8.3 At this time also make sure that this Uprite is plumb, using a carpenter’s level on the face of the Uprite, by adjusting the Base Bracket leveling leg (with a screw driver inserted into the Base Bracket above the leveling leg) to make the Uprite plumb.
8.3.1 NOTE: A rearward Uprite tilt of about 3/4” is recommended for Wall Sections that will be heavily loaded. See illustration below.8.4 Adjust all the other Uprites up or down to the same slot on the string line as the
Uprite in 8.2 above (including the end Uprites if the Uprite in 8.2 was not able to be lowered enough to match the same slot on the end Uprites). Also make sure that each Uprite is plumb or equally tilted back, as described in 8.3 above.
8.5 When done, the string will be aligned with the same slot on every Uprite and all Uprites will be plumb or equally tilted back when checked with a carpenter’s level.
Leveling Procedure Important For Safe Use of the Gondola and For Proper Fit of Trim and Accessories
WARNING:Gondola must be leveled and correctly adjusted. Failure to do so may cause shelving collapse and personal injury.
!
! WARNING:Do not extend Uprite leveling leg more than 1” and Base Bracket leveling leg more than 1 7/16”, as shown in illustration to right. Against Wall
A d j u s t B a s e Bracket Leveling Legs to tilt Uprites against wall.
3/4”
LEVELING
Uprite
1” MaxLevelingLeg
1 7/16” MaxLevelingLeg
Base Bracket
Leveling Leg Wrench
1/16" thick end
Questions about leveling? Call 800-228-9882, ask for Installation.
P.O. BOX 3448 • OMAHA, NEBRASKA 68103-0448 • (800) 228-9882
I-13of 20
01-13F REV. AW 67312 7/2011 Lozier® Corporation 2011
9.
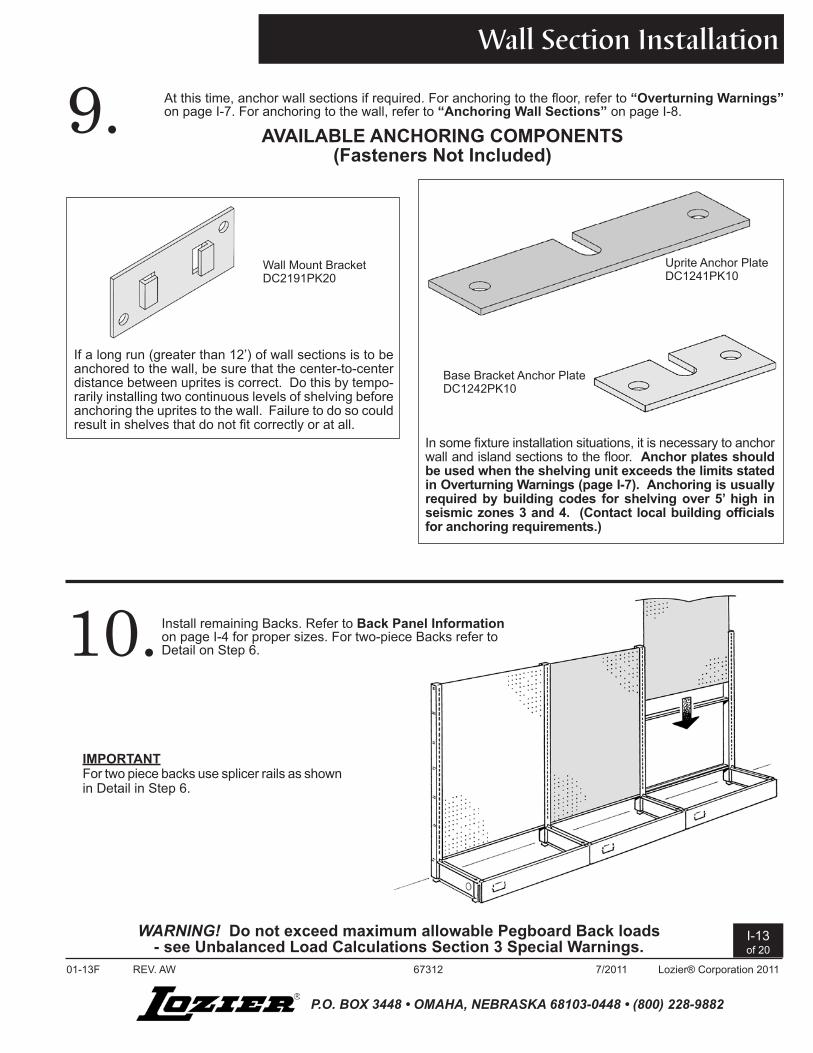
10. Install remaining Backs. Refer to Back Panel Information on page I-4 for proper sizes. For two-piece Backs refer to Detail on Step 6.
IMPORTANTFor two piece backs use splicer rails as shown in Detail in Step 6.
At this time, anchor wall sections if required. For anchoring to the floor, refer to “Overturning Warnings” on page I-7. For anchoring to the wall, refer to “Anchoring Wall Sections” on page I-8.
In some fixture installation situations, it is necessary to anchor wall and island sections to the floor. Anchor plates should be used when the shelving unit exceeds the limits stated in Overturning Warnings (page I-7). Anchoring is usually required by building codes for shelving over 5’ high in seismic zones 3 and 4. (Contact local building officials for anchoring requirements.)
Base Bracket Anchor PlateDC1242PK10
Uprite Anchor PlateDC1241PK10
AVAILABLE ANCHORING COMPONENTS(Fasteners Not Included)
Wall Mount Bracket DC2191PK20
If a long run (greater than 12’) of wall sections is to be anchored to the wall, be sure that the center-to-center distance between uprites is correct. Do this by tempo-rarily installing two continuous levels of shelving before anchoring the uprites to the wall. Failure to do so could result in shelves that do not fit correctly or at all.
Wall Section Installation
WARNING! Do not exceed maximum allowable Pegboard Back loads - see Unbalanced Load Calculations Section 3 Special Warnings.

I-14of 20
P.O. BOX 3448 • OMAHA, NEBRASKA 68103-0448 • (800) 228-9882
01-13F REV. AW 67312 7/2011 Lozier® Corporation 2011
Install Base End Trims, Uprite End Trims and Top Rails.11.
Hook top of Uprite End Trim over top of Uprite, then press on working toward floor.
Top Rails - Tabs on Top Rail must lock in place.
BET - Slide over Base Bracket until Stop Tab on BET rests on top of Base Bracket (see Detail below).
Plan View ofBase Bracket
IMPORTANTBase Bracket End Trim (BET) must be installed before installing Base Decks.
1. Insert front flange into front of BB adjacent to the CBF
IMPORTANTSee Plan View of Base Bracket above for seating Base Bracket End Trim
2. Put rear flange against BB hook slide shown
12.NOTICE:
If Trim or Shelves do not fit properly, check to be sure unit is leveled properly. If the Uprites are not plumb and/or at proper height, redo Step 8.
To install Decks, tilt upward and hook rear molding behind deck hold down pin.
Deck HoldDown Pin
Install Base Decks and Shelves as shown. Be sure Base End Trim (BET) is installed before installing Base Decks (see Step 11). Refer to Allowable Shelf Load Limits on page I-3 for shelf information.
Deck must sit on lock tab on BET
BET must slide behind front and rear flanges on Base Bracket to be properly seated
Wall Section InstallationTo remove Top Rail pull toward Uprite and lift up. Or, insert screwdriver through Top Rail slot, press its blade against one Top Rail tab, twist Top Rail to disconnect tab. Repeat for other tab.

P.O. BOX 3448 • OMAHA, NEBRASKA 68103-0448 • (800) 228-9882
I-15of 20
01-13F REV. AW 67312 7/2011 Lozier® Corporation 2011
1. Snap chalkline on floor for desired locations of all island runs.
2. Lay out parts along chalkline as shown. At this point you will need one Back Panel for the first section of each island run. Splicer Rails (for two-piece Backs) and Top Rails will be used in later steps. Base Brackets and Center Rails are painted random colors and may not match the Uprite color.
3’ or 4’
BaseFronts
Base
Brackets
Uprites
Base
Brackets
ChalklineCenter Rails
Bottom Rails
Base Fronts
Island Section Installation
Please read each step carefully!Refer to Component Breakdown on page I-1 before starting.
IMPORTANT!Do not adjust leveling legs
on Base Brackets or Uprites at this time.

I-16of 20
P.O. BOX 3448 • OMAHA, NEBRASKA 68103-0448 • (800) 228-9882
01-13F REV. AW 67312 7/2011 Lozier® Corporation 2011
4.
IMPORTANT!Do not let framework stand alone
until a Back Panel is in place. Center Rails must be used.
DETAIL 4a
NOTE: Refer to BACK PANEL INFORMATION on page 1-4 for Center Rail placement. If Telescopic Uprites (TEL) are being installed, the Center Rail must be installed in the third lance (12”) down from the top of the Uprite. If used with Uprites 60” through 72” high, a Center Rail must be installed in the third lance down and another installed at mid-height of uprite. Bend all tabs outward (Detail 4a) at each end of the Center Rail.
Slide Base Frontfrom top or drivein from front.
BaseFront
Bottom Rail
BaseFront
Center Rail
3rd Lance
Bend alltabs outward
Assemble “framework” of first section by standing first two Uprite/Base Bracket assemblies vertically. Connect them by installing Base Fronts, Bottom Rail and Center Rail as shown. NOTE: When Wire Grid Backs or Slotwall Backs are to be used, follow instructions packed with Wire Grid Clips or Slotwall Center Rail.
Island Section Installation
3. Push Bracket fully into Uprite slots, then push down. Latch must fully engage Uprite to lock the Bracket and Uprite together. Check latch tabs on both sides of Bracket. Tabs must be at the back of the slot in the Bracket. Refer to page I-4 for removal and replacement of the Bracket.
WARNING! The shelving system may collapse and cause injury if the Base Bracket latch is not properly engaged with the Uprite. A properly engaged latch tab will be at the back of the slot as illustrated.
SPRING LOCKING BASE BRACKET!

P.O. BOX 3448 • OMAHA, NEBRASKA 68103-0448 • (800) 228-9882
I-17of 20
01-13F REV. AW 67312 7/2011 Lozier® Corporation 2011
5. Install one Back now for stability. For two-piece Backs, install lower Back Panel only at this time. Refer to Back Panel Information on page 1-4 for Back Panel Sizes.
Chalkline
Use care in lowering Backinto place. DO NOT DROP!
NOTE: Top of Pegboard Backs are marked with a paint stripe. First row of holes are 7/8” from top edge.
TWO-PIECE BACK DETAIL
NOTE: If ceiling height is not adequate to drop Panels from top, insert one side edge and flex panel until other edge fits in place.
When two-piece Backs are used, Center Rail is used on upper Back only for heights less than 96”. For heights 96” and higher, a second Center Rail is used on the lower Back.
To assemble two-piece Backs (after Center Rails are in place), install both lower Back Panels (refer to Back Panel Information on page 1-4 for proper sizes). Install Splicer Rail over lower Backs and install upper Back Panels.
Center Rail
Splicer Rail
Second Cen-ter Rail for
96” & Higher Only
Assemble remaining framework along chalkline. Do not install remaining Backs yet!6.
Chalkline
Island Section Installation

I-18of 20
P.O. BOX 3448 • OMAHA, NEBRASKA 68103-0448 • (800) 228-9882
01-13F REV. AW 67312 7/2011 Lozier® Corporation 2011
7.Island Section Installation
Leveling Procedure Important For Safe Use of the Gondola and For Proper Fit of Trim and Accessories
WARNING:Gondola must be leveled and correctly adjusted. Failure to do so may cause shelving collapse and personal injury.
!
! WARNING:Do not extend Uprite leveling leg more than 1” and Base Bracket leveling leg more than 1 7/16”, as shown in illustration to right.
The purpose of the leveling procedure is to have all the Uprites plumb at the same level along a string line with the Base Bracket leveling legs extended the least amount possible to achieve this result (Do not adjust the Uprite leveling leg during this procedure, see Step 8 for this adjustment).
7.1 Stretch a string line tightly between the end Uprites using a leveling leg wrench placed in the same slot on each end Uprite.
7.2 Find the highest Uprite in the run (it will have the most slots above the string line). By adjusting both Base Bracket leveling legs (with a screw driver inserted into the Base Bracket above the leveling leg) lower the highest Uprite in the run so the string line matches the same slot as the end Uprites or as low as it can go, whichever comes first.
7.3 At this time also make sure that this Uprite is plumb, using a carpenter’s level on the face of the Uprite, by adjusting both Base Bracket leveling legs in opposite directions until the Uprite is plumb.
7.4 Adjust all the other Uprites up or down to the same slot on the string line as the Uprite in 7.2 above (including the end Uprites if the Uprite in 7.2 was not able to be lowered enough to match the same slot on the end Uprites). Also make sure that each Uprite is plumb, as described in 7.3 above.
7.5 When done, the string will be aligned with the same slot on every Uprite and all Uprites will be plumb when checked with a carpenter’s level.
String Line
7.1
7.1
7.2
7.3
HighestSame Number of Slots Both
Ends
Leveling Leg Wrench
Same Number of Slots Both
Ends
7.3
Questions about leveling? Call 800-228-9882, ask for Installation.
LEVELING
Leveling Leg Wrench
1/16" thick end
Uprite
1” MaxLevelingLeg
1 7/16” MaxLevelingLeg
Base Bracket

P.O. BOX 3448 • OMAHA, NEBRASKA 68103-0448 • (800) 228-9882
I-19of 20
01-13F REV. AW 67312 7/2011 Lozier® Corporation 2011
NOTE:At this point, the Gondola must be level and the Uprites must be
plumb. Do not adjust Base Bracket leveling legs. They should be properly set from the proceeding step.8.
Install remaining Backs. Refer to Back Panel Information on page I-4 for proper sizes. For two-piece Backs refer to Detail on page I-17, Step 5.9.
IMPORTANTFor two piece backs use splicer rails as shown in Detail on page I-17, Step 5.
Island Section Installation
WARNING! Do not exceed maximum allowable Pegboard Back loads - see Unbalanced Load Calculations Section 3 Special Warnings.
!
Adjust the Uprite Leveling Legs on each Uprite so that the gap between the leg and floor is 1/16”. Set the gap using the leveling leg wrench handle, which is 1/16” thick.
! WARNING! The gap between the Uprite leveling leg and floor must be adjusted to 1/16”. Failure to do so may cause shelving collapse and personal injury.
Leveling Leg Wrench
1/16" thick end Uprite Leveling
Leg
I-20of 20
P.O. BOX 3448 • OMAHA, NEBRASKA 68103-0448 • (800) 228-9882
01-13F REV. AW 67312 7/2011 Lozier® Corporation 2011
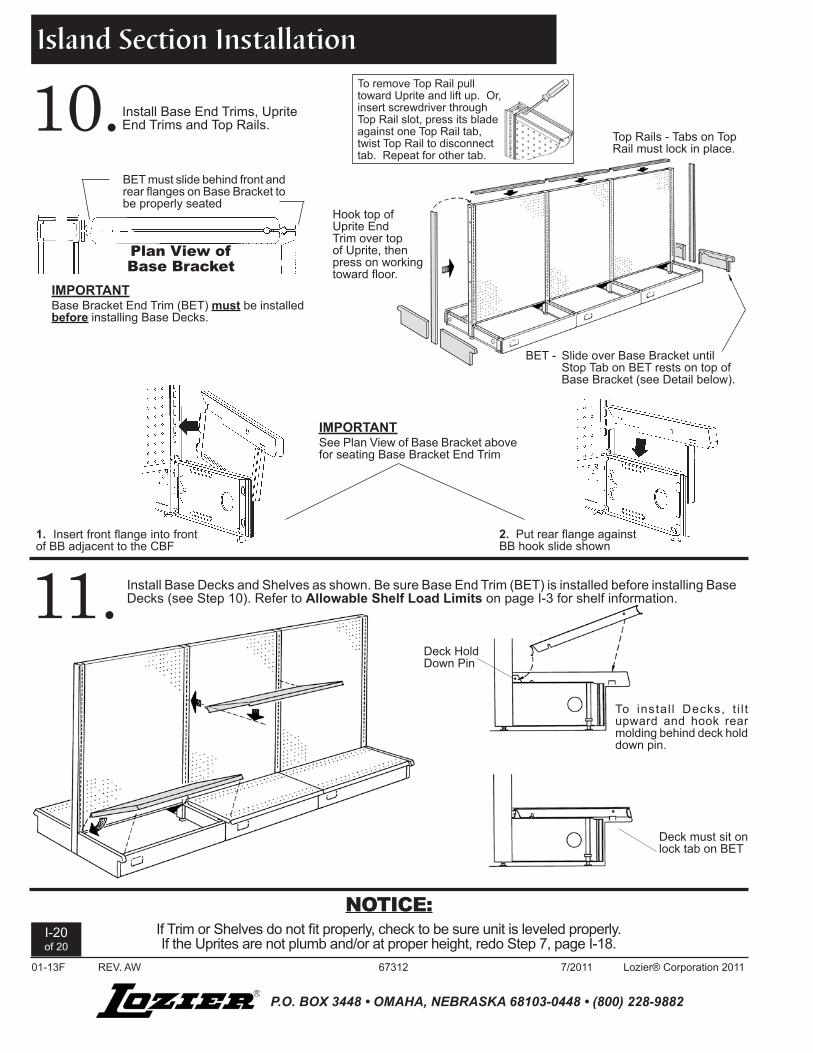
10. Install Base End Trims, Uprite End Trims and Top Rails.
Top Rails - Tabs on Top Rail must lock in place.
BET - Slide over Base Bracket until Stop Tab on BET rests on top of Base Bracket (see Detail below).
Hook top of Uprite End Trim over top of Uprite, then press on working toward floor.
11. Install Base Decks and Shelves as shown. Be sure Base End Trim (BET) is installed before installing Base Decks (see Step 10). Refer to Allowable Shelf Load Limits on page I-3 for shelf information.
To instal l Decks, t i l t upward and hook rear molding behind deck hold down pin.
Deck HoldDown Pin
Deck must sit on lock tab on BET
IMPORTANTSee Plan View of Base Bracket above for seating Base Bracket End Trim
1. Insert front flange into front of BB adjacent to the CBF
2. Put rear flange against BB hook slide shown
Plan View ofBase Bracket
BET must slide behind front and rear flanges on Base Bracket to be properly seated
IMPORTANTBase Bracket End Trim (BET) must be installed before installing Base Decks.
Island Section Installation
NOTICE:If Trim or Shelves do not fit properly, check to be sure unit is leveled properly. If the Uprites are not plumb and/or at proper height, redo Step 7, page I-18.
To remove Top Rail pull toward Uprite and lift up. Or, insert screwdriver through Top Rail slot, press its blade against one Top Rail tab, twist Top Rail to disconnect tab. Repeat for other tab.
Related Documents