DISPLAY PLUS SOFTWARE INSTALLATION MANUAL

Welcome message from author
This document is posted to help you gain knowledge. Please leave a comment to let me know what you think about it! Share it to your friends and learn new things together.
Transcript

DISPLAY PLUS SOFTWARE
INSTALLATION MANUAL

Page 2
DISPLAY
DISPLAY Software applicationCode 97830I V04_22
This technical document of an informative nature is published by FERMAX ELECTRONICA, who reserves the right to modify the technical characteristics of the products referred to herein at any time and without prior notice. These changes will be reflected in subsequent editions of this document.

Page 3
DISPLAY
TABLE OF CONTENTS1. INTRODUCTION .................................................................................................................................. 5
2. INSTALLING THE SOFTWARE 52.1 Recommended requirements .........................................................................................................5
3. QUICK CONFIGURATION GUIDE ......................................................................................................6
4. INSTALLING THE SOFTWARE «Display» ..........................................................................................8
5. UNINSTALLING THE SOFTWARE «Display» ...................................................................................11
6. START - Login and Password Request Screen ............................................................................12
7. MAIN SCREEN of the Display application .................................................................................... 12
8. APPLICATION SETTINGS ................................................................................................................. 148.1 Language .....................................................................................................................................148.2 Serial port (communications port) ................................................................................................14
8.2.1 PC connections port (PC Interface) ....................................................................................15
9. LOGIN .................................................................................................................................................179.1 Description ...................................................................................................................................179.2 Add new login .............................................................................................................................179.3 Edit login ......................................................................................................................................179.4 Delete login .................................................................................................................................18
10. SITE.....................................................................................................................................................1810.1 Description .................................................................................................................................1810.2 Add new site ..............................................................................................................................1810.3 Edit site .....................................................................................................................................1910.4 Delete site .................................................................................................................................1910.5 Select site .................................................................................................................................19
11. DIRECTORY ........................................................................................................................................2011.1 Description .................................................................................................................................2011.2 Add or Edit directory ....................................................................................................................2011.3 Delete directory .........................................................................................................................2111.4 Export directory .........................................................................................................................2111.5 Import directory .........................................................................................................................2211.6 Directory format files (for export/import) .....................................................................................23
12. DIRECTORY MANAGEMENT ...........................................................................................................2412.1 Description .................................................................................................................................2412.2 New directory (empty) .................................................................................................................2412.3 Edit directory ...............................................................................................................................2512.4.Add User ....................................................................................................................................2512.5.Edit User ....................................................................................................................................2712.6. Delete User ...............................................................................................................................2812.7 Receive directory ........................................................................................................................2812.8 Send directory .............................................................................................................................3012.9 Status ..........................................................................................................................................31
Page 4
DISPLAY
13. PANELS .............................................................................................................................................3113.1 Description .................................................................................................................................3113.2 Test .............................................................................................................................................3213.3 Upload images ............................................................................................................................3313.4.Date and Time ...........................................................................................................................3513.5 Firmware .....................................................................................................................................3513.6 Custom languages ......................................................................................................................36
13.6.1 File format of custom languages ......................................................................................37
14. PARAMETERS ....................................................................................................................................3814.1 Description .................................................................................................................................3814.2 Calls ............................................................................................................................................3914.3 Access control .............................................................................................................................4014.4 Screen ........................................................................................................................................4114.5 Clock .........................................................................................................................................42
15. BACKUP .............................................................................................................................................4315.1 Description .................................................................................................................................4315.2 Restore back-up copy .................................................................................................................4415.3 Save back-up copy .....................................................................................................................44
Page 5
DISPLAY
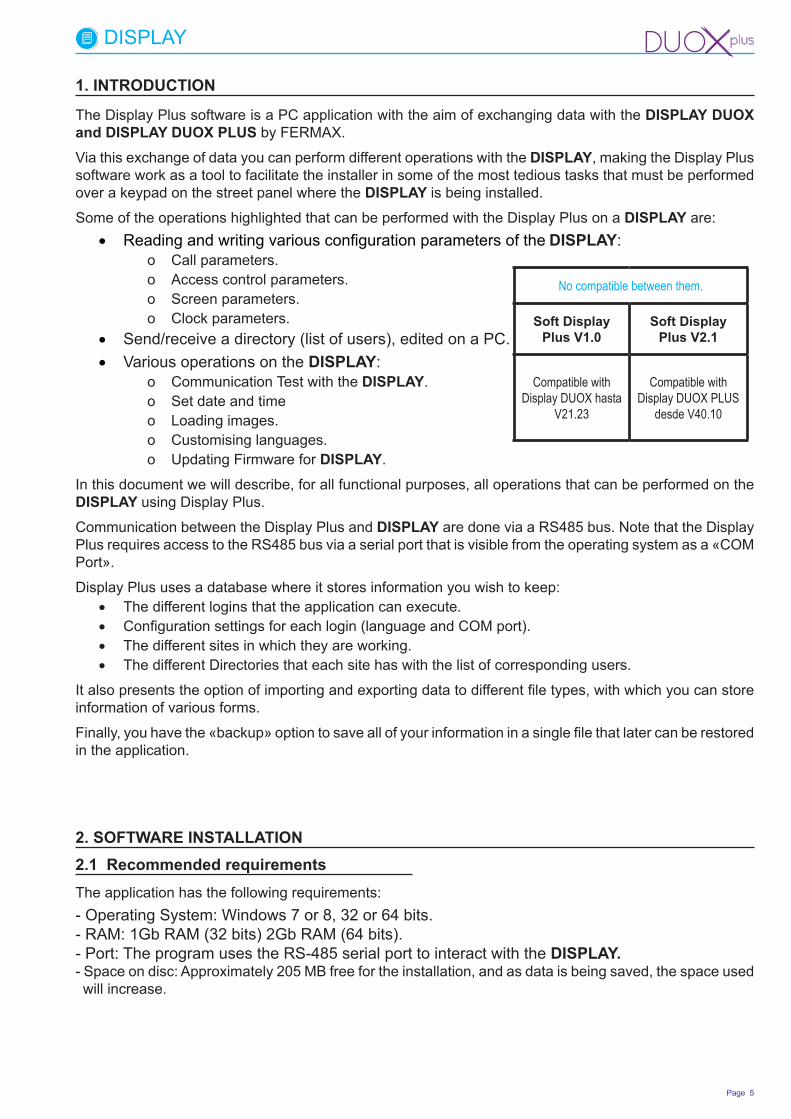
1. INTRODUCTION
The Display Plus software is a PC application with the aim of exchanging data with the DISPLAY DUOX and DISPLAY DUOX PLUS by FERMAX.
Via this exchange of data you can perform different operations with the DISPLAY, making the Display Plus software work as a tool to facilitate the installer in some of the most tedious tasks that must be performed over a keypad on the street panel where the DISPLAY is being installed.
Some of the operations highlighted that can be performed with the Display Plus on a DISPLAY are:• Reading and writing various configuration parameters of the DISPLAY:
o Call parameters.o Access control parameters.o Screen parameters.o Clock parameters.
• Send/receive a directory (list of users), edited on a PC.• Various operations on the DISPLAY:
o Communication Test with the DISPLAY.o Set date and timeo Loading images.o Customising languages.o Updating Firmware for DISPLAY.
In this document we will describe, for all functional purposes, all operations that can be performed on the DISPLAY using Display Plus.
Communication between the Display Plus and DISPLAY are done via a RS485 bus. Note that the Display Plus requires access to the RS485 bus via a serial port that is visible from the operating system as a «COM Port».
Display Plus uses a database where it stores information you wish to keep: • The different logins that the application can execute.• Configuration settings for each login (language and COM port).• The different sites in which they are working.• The different Directories that each site has with the list of corresponding users.
It also presents the option of importing and exporting data to different file types, with which you can store information of various forms.
Finally, you have the «backup» option to save all of your information in a single file that later can be restored in the application.
2. SOFTWARE INSTALLATION
The application has the following requirements: - Operating System: Windows 7 or 8, 32 or 64 bits.- RAM: 1Gb RAM (32 bits) 2Gb RAM (64 bits).- Port: The program uses the RS-485 serial port to interact with the DISPLAY.- Space on disc: Approximately 205 MB free for the installation, and as data is being saved, the space used will increase.
2.1 Recommended requirements
No compatible between them.
Soft Display Plus V1.0
Soft Display Plus V2.1
Compatible with Display DUOX hasta
V21.23
Compatible with Display DUOX PLUS
desde V40.10

Page 6
DISPLAY
3. QUICK CONFIGURATION GUIDE
Below we will indicate the steps to follow to perform the basic operations with the Display Plus application and the panels with the DISPLAY. In the different points we reference later chapters where all options are described in detail.
1) Configure a communications serial port (chapter 8. Application settings/ 8.2 Serial port).Select the serial port to be used to make the communications with the different panels, from the corresponding drop-down menu.Select the port and check that this is the one really used. If no port is selected you can not interact with the panels, (see chapter: 13. Panels / 13.2 Test).
2) Carry out panels test (chapter 13. Panels / 13.2 Test).Fill in all fields in the panel's address with the values permitted in the Test, to test if the connection with the selected panel works. Upon testing the panel, an information exchange is performed with it, returning if correct, or if there has been a problem.Once the communication with this panel is confirmed, select the the current panel, that is, the default panel. After reaching this point, now you can use the remaining panel options, to configure the different values and parameters.2a) Panels: Drop-down menu that allows you to configure various functions to interact with the panels:
- Test.- Upload images.- Date and time.- Firmware.- Custom language.
(See chapter: 13. Panels).2b) Parameters: Window that allows you to program other parameters that are not contemplated in the
panel's previously mentioned drop-down menu: Panels. This allows you to interact with the panel to receive and send these parameters. The parameters are distributed in different selectable tabs:- Calls.- Access Control.- Screen.- Clock.
(See chapter: 14. Parameters).
IF YOU NEED TO CREATE DIRECTORIES, YOU NEED TO PERFORM THE ADDITIONAL STEPS DETAILED BELOW.Display Plus software's work philosophy is that a site corresponds to a real installation (condominium, residential complex). Keeping in mind that a condominium can have several street panels, each with its DISPLAY, and each DISPLAY can require saving a different directory (different blocks of neighbours, general entrance), then it is easy to deduce that if the Directories are saved in their corresponding sites, the information is always easy to locate in the future. This is crucial when performing periodic maintenance of Directories on DISPLAYS in a real residential complex.
3) Create a new Site.Within the Display Plus software, a site is an element that allows you to store different Directories inside (user lists). Once created, you must select one of the sites, like current site (various may exist), to define these in the Directories.
(See chapter: 10. Project).

Page 7
DISPLAY
4) Create a new directory.Add a directory in the Directories list, (chapter 11. Agenda). To be able to create a directory, you must have previously created at least one site, so as to store large Directories within the site and establish it as a «current site.»2a) Create Users.
Once the directory(s) on the directory list are defined, to create users you must select one and edit it.Each directory has the users. Each directory belongs to its site.
(See chapter: 12. Manage Directory/ 12.4 Add neighbour).
2b) Send Directory.Once users are defined in the directory, they can be sent to the available panels, when desired, (panel selected as current panel).
(See chapter: 12. Editing directory / 12.8 Sending directory).(See chapter: 13. Panels / 13.2 Test).
5) Create backup.Save backup copies.(See chapter: 15. Backup / 15.3 Save back-up copy
OPTIONAL
6) Create new logins and passwords.This allows you to define the different logins and passwords used on the application.(See chapter: 9. Login).
Page 8
DISPLAY
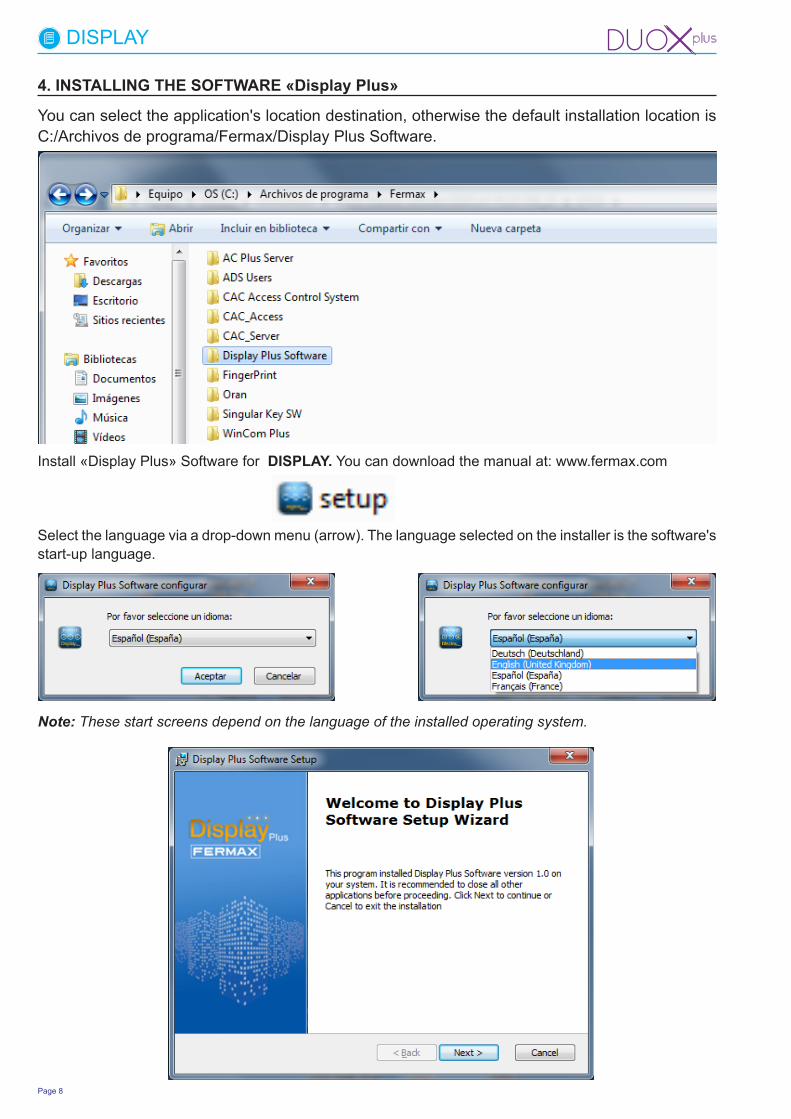
4. INSTALLING THE SOFTWARE «Display Plus»
You can select the application's location destination, otherwise the default installation location is C:/Archivos de programa/Fermax/Display Plus Software.
Select the language via a drop-down menu (arrow). The language selected on the installer is the software's start-up language.
Note: These start screens depend on the language of the installed operating system.
Install «Display Plus» Software for DISPLAY. You can download the manual at: www.fermax.com

Page 9
DISPLAY
Default route

Page 10
DISPLAY

Page 11
DISPLAY
5. UNINSTALLING THE «Display Plus» SOFTWARE
To uninstall the application, we must run the direct access Uninstaller that has created the program within the start menu / programs / FERMAX / Display Plus.
Once pressed, the following screens appear:
Important note: Upon uninstalling the application, the back-up copy will be deleted.
Via this screen it indicates the time remaining for the complete uninstallation.
Note: These start screens depend on the language of the installed operating system.

Page 12
DISPLAY
6. START - Login and Password Request Screen
Start the Display Plus Application:
Login: systemPassword: fermax
Notes:- The first time accessing use the default Login Password. Later the default values no longer have to be used if new ones are set, (see chapter 9. Logins).
- If the login is not entered correctly, a screen appears again to re-enter the data. - Both the login and password are case sensitive.
To access the Display Plus application you must enter a login and password, which are set to default as:
7. MAIN SCREEN of the Display Plus application
Once the password has been entered, the application starts up and shows the main screen.The application comes programmed with the following structure, which is flexible and can be adapted according to the user’s preferences. The application is divided into the following areas:On the top part we find the application's logos along with the connected login, with a disconnect and back button to return to the access window, a drop-down menu where you can select between various sites entered to select the one you are currently operating, and finally, another field indicating the selected panel with which you will work on, except if changed manually. Located just underneath we find the menu bar, where the different buttons and drop-down menus allow us to enter into the different tabs or windows, from which we perform the desired tasks.
•Logins: This allows you to define the different logins and passwords used on the application.•Project: A site is a collection of files, configurations and databases which represent each of the systems
in place. This allows you to add sites, change the active site (selected), edit or delete it. •Agenda: This allows you to define the list of Directories to facilitate assigning and managing the users
in different panels of the installation via the site. Each directory has a list of users. It allows you to open/consult a directory, change Directories of the current site, rename, delete and close a directory.
•Properties: relative to the selected element, it displays each of their properties.•Incidents: contains the actions taken by the users along with the incidents received from the readers.•Communication ports: list of serial ports through which the reader communication passes.•Groups: this allows you to define the list of readers to facilitate assigning and managing the users in the different readers throughout the installation.

Page 13
DISPLAY
•Panels: Drop-down menu that allows you to configure various functions to interact with the panels:- Test.- Upload images.- Date and time.- Firmware.- Custom language.
•Parameters: Window that allows you to program other panel displays that are not contemplated in the panel's previously mentioned drop-down menu . This allows you to interact with the panel to receive and send these parameters. The parameters are distributed in four tabs:- Calls.- Access Control.- Screen.- Clock.
•Backup: This allows you to save and restore backup copies.•Application adjustments: Window with the options:
- Language: Permits selection of the language of the application.- Serial Port: Allows you to select the serial port to be used to make the communications with the different panels.
loginconnected
buttondisconnect
drop-down menusites selected panel
drop-down menu
logo logo
As you can see in the image displayed here, the tabs marked in black correspond to the lists of Directories, sites and logins, while the tabs marked in red are other open Directories.

Page 14
DISPLAY
8. APPLICATION SETTINGS
Communication between the Display Plus and DISPLAY are done via a RS485 bus. Note that the Display Plus requires access to the RS485 bus via a serial port that is visible from the operating system as a «COM Port».That is why we must use an FERMAX RS485 adapter connected to a PC:
· Ref. 24661 USB to RS485· Ref. 2466 RS232 to RS485. · Ref. 1087 Tibbo + 2466 (TCP/IP to RS485).
The Serial Port field allows you to select the serial port to be used for communications with the different panels via a drop-down menu. Appears on the list. It is very important to select the correct port, since if there is no selected port we can not interact with the panels, (see chapter: 13. Panels / 13.2 Test).
• Serial Ports: connectors via a real serial port (or virtual, USB, Tibbo, etc).
Previous considerations if using the TIBBO adaptor:Important Note:For the Tibbo to function properly, when installed, the following parameters must be configured:
Speed (Baud Rate): 115200.• Parity: no parity.See the Tibbo Manual code. 94571. * See detail.
8.2 Serial port (communications port)
* Detail: TIBBO: DS Manager-> Settings / Serial Port
Recommended requirements
Upon pressing this button you open a window with only two fields: Language and Serial Port.
This allows you to select the application language via a drop-down menu. Once a language is selected, the application will fully restart, closing any open tabs and returning to the start tab.
8.1 Language
Note: These Application Settings are independent for each Login and Password, that is, it saves the language for each Login/Password and the established port.
You need to configure the port as UDP:VSP Manager-> VSP Properties

Page 15
DISPLAY
� ���
� � ��
���������
������
���
��� ���������
� ����� � ��������� �
���
�������
����� ���
����� ������� �� �������� ����
� �������������������������������� ���
������������
���
��
���������������
�����
�������� �
���� �
�
� �
� �������
��
� �
�����
����������������
��������
���������������������������
������������������
�������� ��
��
��
����
������
��
��������
��
� �������
��
� �
�����
����������������
��������
���������������������������
������������������
�������� ��
��
��
����
��
8.2.1 PC connections port (PC Interface)
• Interface PC ref. 2466
�� �� ��
����
���������
������
�����������������������
��
� ���
� � ��
�� ������
������
�
�� � �������
������� ����������
��
��������
���������
����������������������� �����
���������������� ������������� ����
��������
��
��
���������� ���
����
����������
�� �� ��
���� �
�
�� ����
������
��������
���������
�����������
� ���
� � ��
���������
������
���
��� ���������
� ����� � ��������� �
���
�������
����� ���
����� ������� �� �������� ����
� �������������������������������� ���
������������
���
��
���������������
�����
�������� �
�� �� �
���� �
�
� ����
�� �����
������
��� ����
�������
�������
�� �� �
• Interface PC [ref. 2466 + ref. 1087]
• Interface PC ref. 24661
green
green
green
green
green
green
greenbrown
brown
brown
brown
brown
brown
brown
yellowwhite
yellow
white
yellow
white

Page 16
DISPLAY
����
���
��
��
��
����
��
��
�
��
�
��
� ��
�
��
�� �
��
�
���
�����
�����
��
��
��
��
���
�
������
�����
���
�
��
��� �
��
������
���
�����
���
���
���
��
��
���
����
�����
�����
����
���
���������
����
����
��
���
��
��
��
�
��� ��
���
����
�
���
���
������
��
����
��
��
�
��
�
��
� ��
�
��
�� �
��
�
���
�����
�����
��
��
��
��
���
�
������
�����
���
�
��
��� �
��
������
���
�����
���
���
���
��
��
���
����
�����
�����
����
���
���������
����
����
��
���
��
��
��
�
��� ��
���
����
�
���
���
������
��
����
��
��
�
��
�
��
� ��
�
��
�� �
��
�
���
�����
�����
��
��
��
��
���
�
������
�����
���
�
��
��� �
��
������
���
�����
���
���
���
��
��
���
����
�����
�����
����
���
���������
����
����
��
���
��
��
��
�
��� ��
���
����
�
���
���
������
��
����
��
��
�
��
�
��
� ��
�
��
�� �
��
�
���
�����
�����
��
��
��
��
���
�
������
�����
���
�
��
��� �
��
������
���
�����
���
���
���
��
��
���
����
�����
�����
����
���
���������
����
����
��
���
��
��
��
�
��� ��
���
����
�
���
���
������
��
�� �
��
�
���
������
������
���
���
��
���
���
�
� �����
��������
��
�
���
����
���
�����
���
�����
����
���
��
���
���
��
����
� ����
������
����
���
����������
����
� ���
���
���
���
���
���
��
�����
�����
����
�
�����
����
���� �
• General installation
Not
e: T
he p
anel
s' a
ddre
ss m
ust b
e co
nfigu
red
prev
ious
ly o
n th
e pa
nels
them
selv
es (D
ISPL
AY)
Page 17
DISPLAY
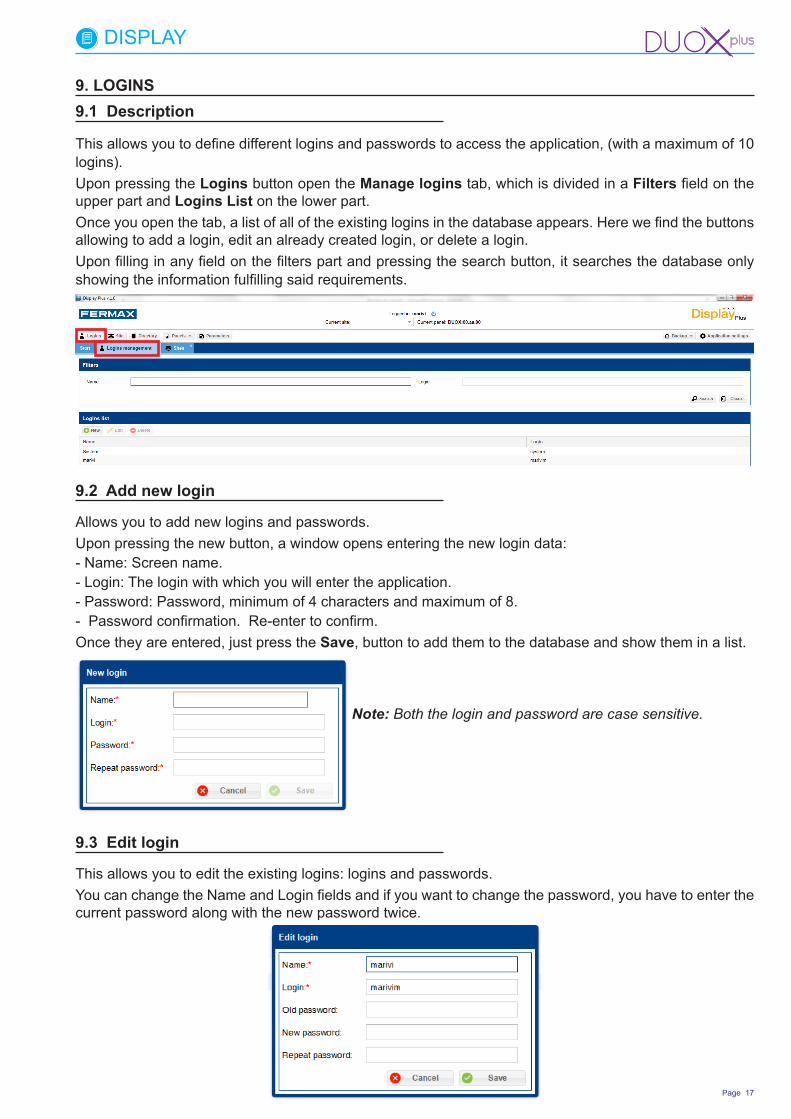
9. LOGINS
This allows you to define different logins and passwords to access the application, (with a maximum of 10 logins).Upon pressing the Logins button open the Manage logins tab, which is divided in a Filters field on the upper part and Logins List on the lower part.Once you open the tab, a list of all of the existing logins in the database appears. Here we find the buttons allowing to add a login, edit an already created login, or delete a login. Upon filling in any field on the filters part and pressing the search button, it searches the database only showing the information fulfilling said requirements.
9.1 Description
9.2 Add new login
Allows you to add new logins and passwords.Upon pressing the new button, a window opens entering the new login data:- Name: Screen name.- Login: The login with which you will enter the application. - Password: Password, minimum of 4 characters and maximum of 8.- Password confirmation. Re-enter to confirm.Once they are entered, just press the Save, button to add them to the database and show them in a list.
9.3 Edit login
This allows you to edit the existing logins: logins and passwords.You can change the Name and Login fields and if you want to change the password, you have to enter the current password along with the new password twice.
Note: Both the login and password are case sensitive.

Page 18
DISPLAY
9.4 Delete login
This allows you to delete the existing logins.To delete a user, just select it and press the delete button, except if a login with which we have opened the application. A window appears to confirm the action.
10. SITE
A site is a collection of files, configurations and databases which represent each of the systems in place. This allows you to add sites, change the active site (selected), edit or delete it.Within the Display Plus software, a site is an element that allows you to store different Directories inside (user lists),(see chapter 11. Agenda).Upon pressing the Logins button open the Manage logins tab, which is divided in a Filters field on the upper part and Sites List on the lower part.Upon filling in any field on the filters part and pressing the search button, it searches the database only showing the information fulfilling said requirements.In the lower list it shows the information pertaining to the different sites. It indicates which is the selected site currently marked with a «tick» in the selected column. It also shows the currently selected site name in the upper part of the application.The selected site displayed on the upper part, if you want to change it for another one, just select it via the drop-down menu.
10.1 Description
10.2 Add new site
This allows you to add new sites.Upon pressing the new button, a window opens for entering the new site data:- Name. - Description. - Address.Once the data is entered, just press the save button, and the information is saved in the database, loading the list and showing the changes made.

Page 19
DISPLAY
Note: You can not enter two sites with the same name into the system. Upon trying to do so, an exclamation point appears next to the name, as a warning.
10.3 Edit site
This allows you to edit an existing site.Once the data is changed, just press the save button, and the information is saved in the database, loading the list and showing the changes made.
Note: You can not enter two sites with the same name into the system. Upon trying to do so, an exclamation point appears next to the name as a warning. The application allows you to edit a site and save it with the same name it previously had, the restriction occurs when trying to change a site name with another already existing one.
10.4 Delete site
Here you can delete the existing sites.To delete a site just select it and press the delete button. A window appears confirming the action, if accepted, a second window appears indicating that the upon deleting the site all associated directories and users will be deleted.
10.5 Select site
Here you can establish the current site. Via the drop-down menu you can select/change the current site, see in the previous page 10. PROJECT / 10.1 Description. Once the change has been made, all open directory tabs are closed, since they depend on the site being worked on.

Page 20
DISPLAY
11. DIRECTORY
Here you can manage the directories lists for each site. Each directory has a list of users. You can open/see, rename, delete and close a directory. Upon pressing the Directory button open the Manage Directories tab, which is divided in a Filters field on the upper part and Directories List on the lower part. The Directories that can be viewed correspond to the current site. If the current site has a directory, it is displayed in the list upon entering, otherwise it is empty.Upon filling the field on the filters part and pressing the search button, it searches the database only showing the information fulfilling said requirements.In the lower list, all directories are shown organized according to the selected preference; by default they appear in alphabetical order and ten per page. The new, edit and delete buttons are also displayed.
11.1 Description
To add or edit directories.Upon pressing the new button, a new tab opens up, to the right of the existing ones, in the field enter name and press save. Adds a directory to the Directories list.
Note: Under the buttons we find the titles of the columns where it displays the information. These fields can be organized in ascending, descending order, be shown or hidden and also change in size. To change the size just place the cursor at the border of two fields, you can then see how to change it with horizontal arrows, then you can left click and move the field to the desired location. Both for organizing and displaying or hiding, just press the arrow to the right of the field and select the desired option.
Note: To be able to create a directory, you must have previously created at least one site and have established it as a «current site», to be able to store the directories within said site, (see chapter 10. Site).
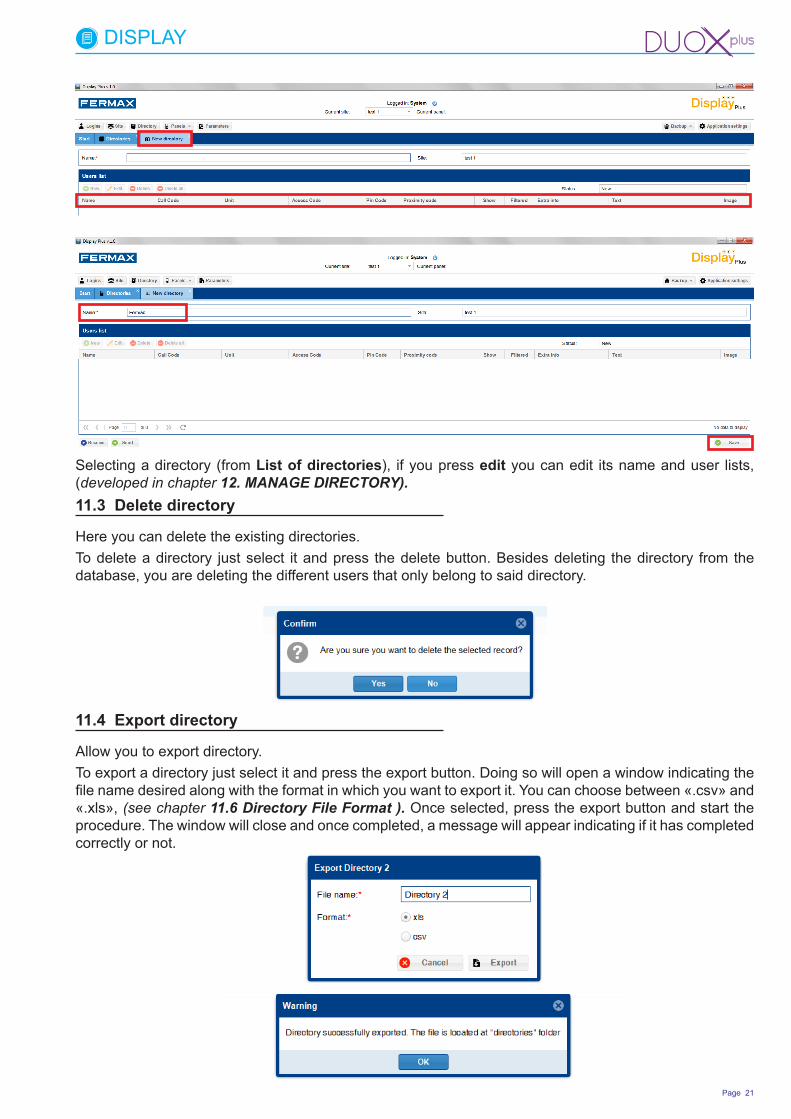
11.2 Add or Edit directory
Page 21
DISPLAY
11.3 Delete directory
Here you can delete the existing directories.To delete a directory just select it and press the delete button. Besides deleting the directory from the database, you are deleting the different users that only belong to said directory.
11.4 Export directory
Allow you to export directory.To export a directory just select it and press the export button. Doing so will open a window indicating the file name desired along with the format in which you want to export it. You can choose between «.csv» and «.xls», (see chapter 11.6 Directory File Format ). Once selected, press the export button and start the procedure. The window will close and once completed, a message will appear indicating if it has completed correctly or not.
Selecting a directory (from List of directories), if you press edit you can edit its name and user lists, (developed in chapter 12. MANAGE DIRECTORY).

Page 22
DISPLAY
11.5 Import directory
Allow you to import directory.To import a directory just select it and press the import button. A window appears where you select the file with the directory data. Upon performing this operation, we create a new directory, within the Current site.You must be careful with not repeating names within the same site. The name to be assigned is not the file name, it is the existing name in the first row of the first column of the file to import DIR_NAME, (See chapter 11.6 Directory files format).
Once you have selected the file, press the import button, the window will close and it will save the data on the database. Upon completing this, it will notify you of the result, keeping that it can not have the same name as an already existing directory.
Note: One of the most common reasons for not exporting correctly is having open the «.csv» or «.xls» file we are wanting to export to.
For example, directory 2 file was exported in the previous chapter, so to import it, you must change the text on the first row of the column DIR_NAME.
If correct, it indicates that the file is in the «directories» folder within the application's folder. The default location is: C:\Archivos de programa\Fermax\Display Plus Software\directories.
Note: The exact route by default depends on the operating system's language and the bits (32/64).

Page 23
DISPLAY
Once changed, for example: directory 2 test, you can select the file and press the import button. Upon completing it, it notifies you of the result.
11.6 Directory format files (for export/import)
Both the «.xls» and «.csv» files have the same format. The first row are the headers of the different columns, the other rows indicate a neighbour in each one. The only necessary name for the directory is the first row of data in the DIR_NAME column, since once it is created, you don't need this field, but the there must be a first one. We must also remember that both the neighbour name field (NEI_NAME) and unit name (NEI_UNIT) are required fields when entering neighbours into the database, so that if they remain empty, their insertion will fail, or for a unit, the neighbour in question will be passed up. The table has eleven columns:
1. Directory name: (DIR_NAME).a) The name entered into the directory, once imported, is the name of the first row of data in the
DIR_NAME column. See the example in chapter 11.5 Import directory.2. Neighbour name: (NEI_NAME).3. Neighbour visibility. (NEI_VISIBLE).4. Filtering. (NEI_FILTERED).5. Call Code. (NEI_CALL_CODE).6. Unit. (NEI_UNIT).7. Access code. (NEI_ACCESS_CODE).8. PIN CODE. (NEI_PIN_CODE).9. Proximity Code. (NEI_PROX_CODE).10. Extra information identifier. (DEI_ID).11. Extra information text. (NEI_EXTRA_INFORMATION_TEXT).12. Extra information image. (NEI_EXTRA_INFORMATION_IMAGE).

Page 24
DISPLAY
12. MANAGE DIRECTORY
Here you can edit the user list for each directory. Assign, manage and user data, along with the each directories name. By pressing the Edit or New button in the Directory List we reach the directory editing. See chapter 11. DIRECTORY / 11.1 Description.
12.1 Description
12.2 New directory (empty)
If this is a new directory, the list of users is empty. In site it will show the current site.Note: You must fill in the field name and press save to continue. The screen is divided into several fields. In the upper part: Name of the directory and theSite it belongs to, in the middle is the User list of the directory and on the bottom the Receive, Send andSave buttons.Note: The Name of the directory must be unique within the set of existing directories in the selected site.
Note: Export/Import directory: Format .csv. You can edit an exported directory file from Display Plus by using an external editing tool. In this case, if you respect the file format, described in section 11.5 Import directory, you can import the new directory file into Display Plus.If you are using EXCEL to edit the file, we recommend working with the .xls format when exporting (format native EXCEL), and not the .csv file, since if exporting a directory as .csv and editing in EXCEL, when you save the changes you may have importing errors in Display Plus, since EXCEL changes the .csv file's data, like deleting the zeros on the left and considering them as «numbers.» This can occur frequently in the following fields: Unit, Call code, Proximity code, PIN code, etc. , which may have zeros to the left of its value.

Page 25
DISPLAY
12.3 Edit directory
If you are editing the directory, all information associated to it in the database appears: name and different users linked to the directory.The screen is divided into several fields. In the upper part: Name of the directory and the Site it belongs to, in the middle is the User list of the directory and on the bottom the Receive, Send andSave buttons.
12.4.- Add user
Here you can enter the user data, with name and unit as required fields. The maximum number of users per directory is 10000.The fields are:- Name: User name. You can use up to 16 characters of any type.- Unit: Unit Number. Only up to 6 digits.Note: Note: If the system is VDS or BUS2 the maximum number of digits is 3 (1...199) and if DUOX you can reach up to 6.
- Call codes: Encoding the calls with any character up to a maximum of 6 (mapped). - Proximity codes: Personalized access code with a proximity card. This field should always have 9 digits.- PIN code: Additionally you can combine the validity of user devices with a keypad entered PIN code. This
code should always have 4 digits.- Access code: Personalized access code with a keypad. Only up to 6 digits.- Show: Only the units in the Directory with this option selected can be called (users), see 14.2 Calls, Call
Filter section.- Filtered: In combination with the restricted call option it allows you to filter or restrict the call to certain
users. See 14.2 Calls, Restricted call section.- Extra information: Fields for extra information: Action, Text and Image.
•Action: Type of action with which the information is viewed: Never, Call, Door opening (from the unit) or Directory (Text or Image). •Text: Text that appears. Image: To select the image that appears. Up to 10 images (A1... A10). Slots A1... A10, are reserved for loading images that can be shown as each user's extra information. These images would have been previously loaded 13. Panels / 13.3 Upload images.
Note: In general, for more information on the fields discussed above see chapters 14. Parameters/ 14.2 Calls / 14.3 Access Control / 14.4 Screen.

Page 26
DISPLAY
Note: If you have an incorrect value, the application will display it by marking it with a red rectangle and by placing the cursor above it, where you can see the error in question.
Page 27
DISPLAY
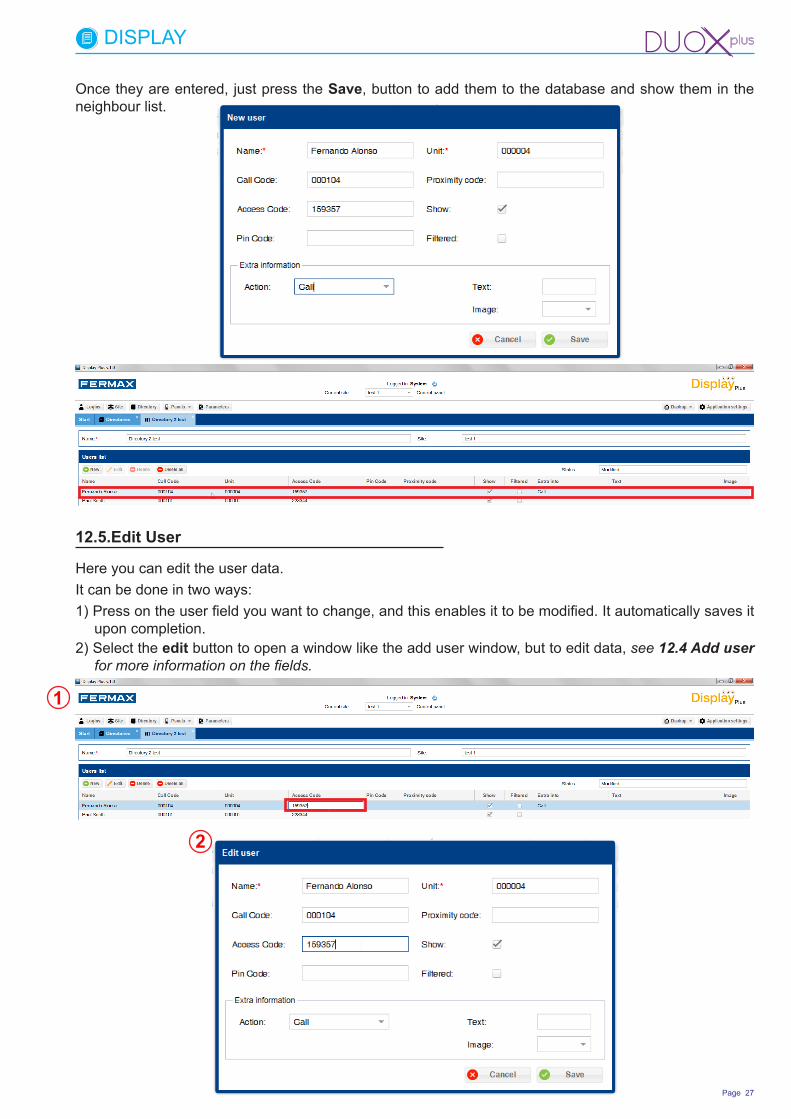
Once they are entered, just press the Save, button to add them to the database and show them in the neighbour list.
12.5.Edit User
Here you can edit the user data.It can be done in two ways: 1) Press on the user field you want to change, and this enables it to be modified. It automatically saves it
upon completion.2) Select the edit button to open a window like the add user window, but to edit data, see 12.4 Add user
for more information on the fields.
1
2

Page 28
DISPLAY
This allows you to receive a panel's directory (DISPLAY). Upon pressing the receive button a window opens where a panel appears with the current panel address if you have selected one or with the empty fields. To assign current panel see chapter: 13. Panels / 13.2 Test.
12.6. Delete User
This allows you to delete users (entries).It can be done in two ways: 1) Individually: Select the user entry to delete and press delete, a screen appears confirming the action. It
automatically deletes the entry upon completion.2) All: There is a delete all button which deletes all users, but does not change the directory name.
1
2
12.7 Receive directory

Page 29
DISPLAY
A field also appears where you can put the name you want for the received directory. Once the necessary information is filled and valid, press the receive button. A downloading message appears that blocks the rest of the application.
Once the process is complete, the list appears with the existing users in the device, along with the already existing ones on the directory, if any, or if there has been a problem in this action. If negative, the receive directory screen is hidden and all fields are emptied.

Page 30
DISPLAY
This allows you to send a panel a directory (DISPLAY).Upon pressing the send button a window opens where a panel appears with the current panel address if you have selected one or with the empty fields. To assign current panel see chapter: 13. Panels / 13.2 Test.
12.8 Send directory
Once the necessary information is filled and valid, press the send button. A loading message appears that blocks the rest of the application. When it finishes, it displays a message indicating if it has worked, or otherwise if there was an error. If satisfactory, the existing users in the selected panel are deleted and the new ones from the selected directory are inserted.

Page 31
DISPLAY
This field indicates the directory's status.There are four possible status': - New: This is displayed upon creating the directory.- Changed: This is displayed when a directory has changed a user data.- Received: This indicates that the directory in question has been received from a panel.- Sent: This is when the directory has been sent to a panel.The field is in the row of buttons above the list, on the right of the screen.
12.9 Status
13. PANELS
Drop-down menu that allows you to perform different actions on the panels displays:These are:- Test.- Upload images.- Date and time.- Firmware.- Personalised language.
13.1 Description
selected field
changed field

Page 32
DISPLAY
This allows you to test for a connection/communication with a panel (DISPLAY). Screen with different fields concerning the Panel address:- System: Drop-down menu to select the type of system we are using: VDS or DUOX.- Panel: You must enter the panel number, as it is configured. (2 digits).Depending on the system, the range of values is:•DUOX: 00...09.•VDS: 00...31.
- Block: Enter the block number the panel belongs to. (2 digits).•DUOX:
o If a panel belongs to a Block (block number): 00...99.o If a panel belongs to a General Entrance: AA. If a panel belongs to a Sub-Block (block number it belongs to): 00...99.
•VDS: 00.- Sub block (2 digits): •DUOX:
o If a panel belongs to a Block: 0A.o If a panel belongs to a General Entrance: 00.o If a panel belongs to a sub-block (sub-block number): 00...99.
•VDS: 00.Once all fields are entered with permitted values, we can test if the connection to the selected panel is ok, and select the panel as current. Upon testing the panel, an information exchange is performed with it, returning if correct, or if there has been a problem.
13.2 Test
Testcorrect communication (green bar)
There has been a problem(red bar)
To establish the panel as current panel
Page 33
DISPLAY
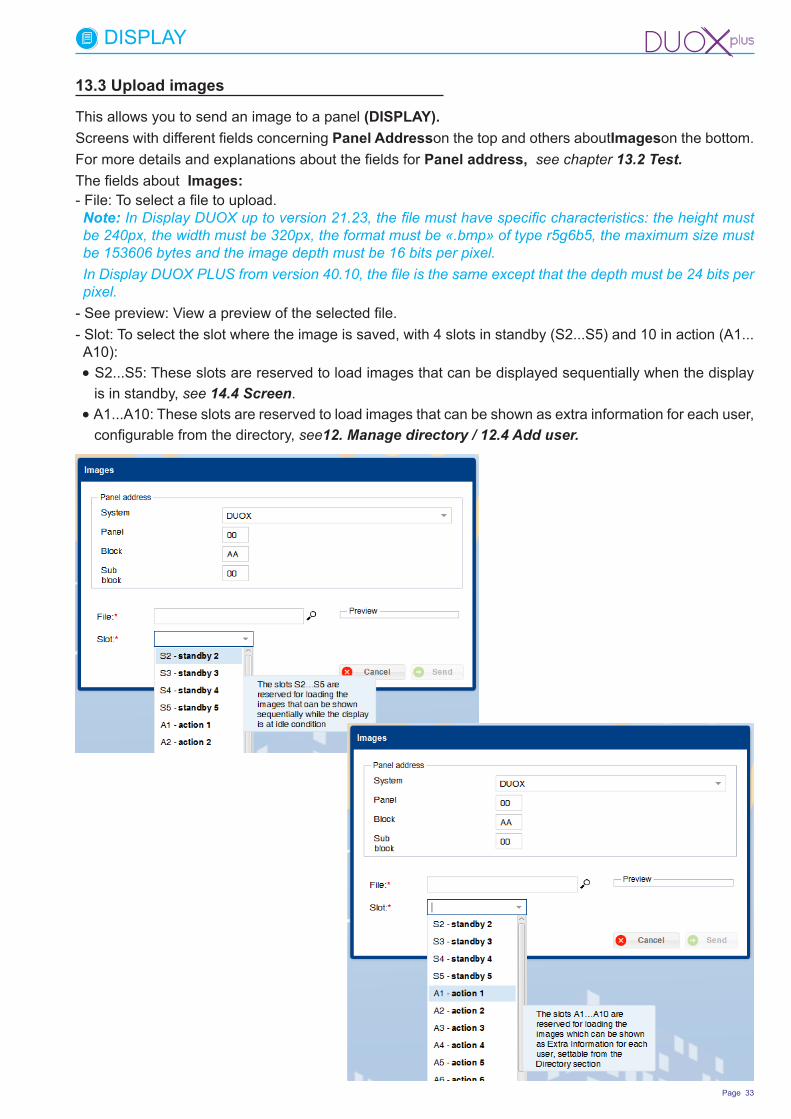
This allows you to send an image to a panel (DISPLAY). Screens with different fields concerning Panel Addresson the top and others aboutImageson the bottom.For more details and explanations about the fields for Panel address, see chapter 13.2 Test.The fields about Images:- File: To select a file to upload.Note: In Display DUOX up to version 21.23, the file must have specific characteristics: the height must be 240px, the width must be 320px, the format must be «.bmp» of type r5g6b5, the maximum size must be 153606 bytes and the image depth must be 16 bits per pixel.In Display DUOX PLUS from version 40.10, the file is the same except that the depth must be 24 bits per pixel.
- See preview: View a preview of the selected file.- Slot: To select the slot where the image is saved, with 4 slots in standby (S2...S5) and 10 in action (A1...A10):•S2...S5: These slots are reserved to load images that can be displayed sequentially when the display
is in standby, see 14.4 Screen.•A1...A10: These slots are reserved to load images that can be shown as extra information for each user,
configurable from the directory, see12. Manage directory / 12.4 Add user.
13.3 Upload images

Page 34
DISPLAY
With all fields complete, you can press the send button and loading message appears, upon completing the process a window appears indicating its result. If satisfactory, the panel restarts.

Page 35
DISPLAY
This allows you to change the date and time displayed by the selected panel (DISPLAY). Screens with different fields concerning Panel Addresson the top and others aboutDate and time on the bottom.For more details and explanations about the fields for Panel address, see chapter 13.2 Test.Note: Upon opening the window, the current date and time fields are filled (PC).The fields for Date and Time:- Date: To enter the date. You can enter the date manually (the format must be day/month/year) or by pressing
the calendar icon in the field, which opens up a small calendar where you can select the desired date.- Time: To enter the time. You can enter the desired time in the HH:MM format.With the desired data, press the change button, which will display a loading message and upon completing the process a window appears indicating the result, if the time has been changed or if there was a problem.
13.4.Date and Time
This allows you to change the DISPLAY firmware on the selected panel. Screens with different fields concerning Panel Addresson the top and others aboutFirmware on the bottom.For more details and explanations about the fields for Panel address, see chapter 13.2 Test.The Firmware field works to select the firmware file to install in the devices.Note: This file must be in a .hex format and not be larger than 917503 bytes.Once selected, press the update button and wait for the process to update. The updating message appears and upon completion it shows a window that indicates the same result.
13.5 Firmware

Page 36
DISPLAY
The Language fields:- File: File in which the language and its texts are stored, DISPLAY.Note: The file must be in .csv and be composed of 150 lines with the information, see chapter 13.6.1 file format for custom languages.Upon installing the application, a set of files is attached, one per language, with the default texts to help out (software Display Plus, folder custom Texts).
13.6 Custom Languages
The DISPLAY offers the option of customizing two of its languages, called: Custom 1 and Custom 2, with the option of changing the texts displayed on the screens of DISPLAY. For this you must load the language file from you PC on to the DISPLAY using the Display Plus software.Once a language file for a custom language has been loaded, this language is available upon selecting one of the languages «Custom 1» or «Custom 2» as the current language from the DISPLAY.We supply a game of language files with the default texts on the DISPLAY. One file per available language in the DISPLAY. This way we offer the user a set of texts to customize the messages in your language.This screen allows you to load files for custom languages in Custom 1 and Custom 2 on the selected panel (DISPLAY).Screens with different fields concerning Panel Address on the top and others about Language on the bottom.For more details and explanations about the fields for Panel address, see chapter 13.2 Test.
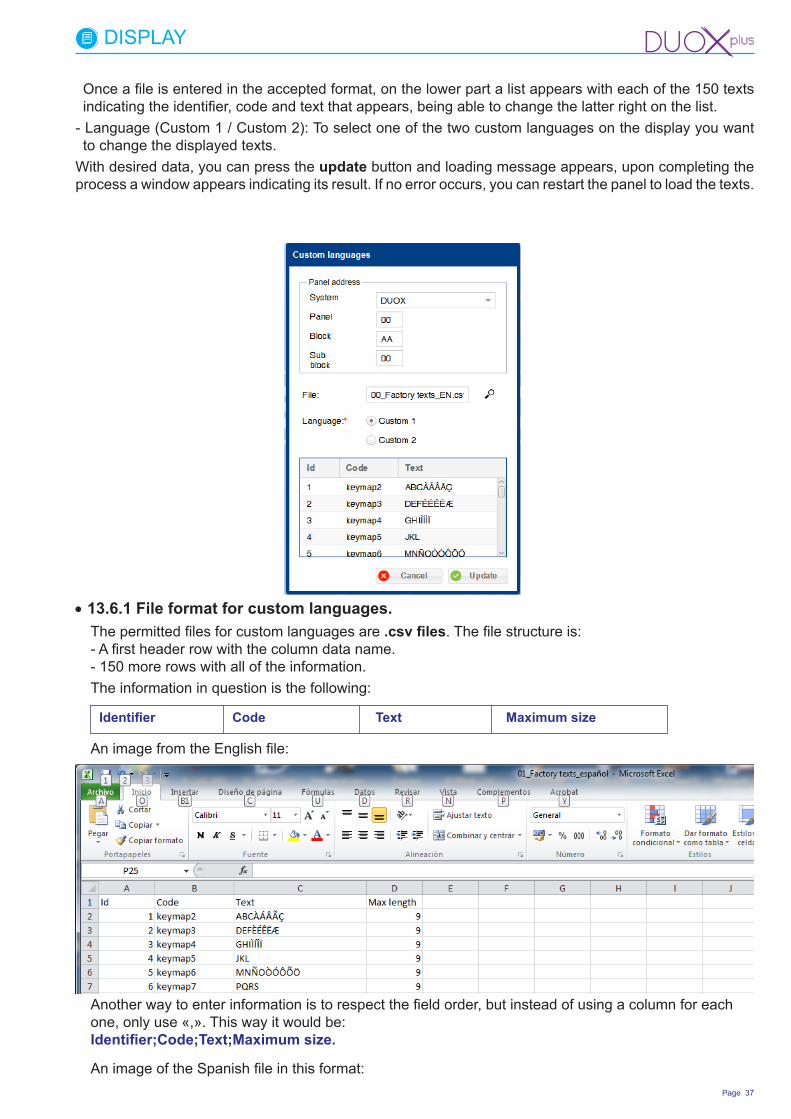
Page 37
DISPLAY
Once a file is entered in the accepted format, on the lower part a list appears with each of the 150 texts indicating the identifier, code and text that appears, being able to change the latter right on the list.
- Language (Custom 1 / Custom 2): To select one of the two custom languages on the display you want to change the displayed texts.
With desired data, you can press the update button and loading message appears, upon completing the process a window appears indicating its result. If no error occurs, you can restart the panel to load the texts.
• 13.6.1 File format for custom languages.The permitted files for custom languages are .csv files. The file structure is:- A first header row with the column data name.- 150 more rows with all of the information.The information in question is the following:
Identifier Code Text Maximum size
An image from the English file:
Another way to enter information is to respect the field order, but instead of using a column for each one, only use «,». This way it would be:Identifier;Code;Text;Maximum size.
An image of the Spanish file in this format:

Page 38
DISPLAY
14. PARAMETERS
Screen developed to allow for interaction with the parameters on the panel's DISPLAY, (receive/ send).The screen has different fields concerning Panel Address on the top and others aboutParameters on the bottom.For more details and explanations about the fields for Panel address, see chapter 13.2 Test.The parameters are distributed in four selectable tabs:- Calls.- Access Control.- Screen.- Clock.Once the fields are established for Panel address, it can receive/send by pressing the corresponding button.- Receive: You can receive the panel parameters. Once the operation is complete, if no error has occurred, the parameters configured on the panel are automatically filled
After the changes have been made, or if the information has been filled in all required fields correctly, you can send the screen parameters to the panel.- Send: You can send the parameters to the panel. Once the sending operation is complete, the panel will restart and operate with the new values.
Note: There are parameters that are only present in certain systems, which will be disabled according to to the screen, automatically.
14.1 Description
01_Factory texts_english: Notepad

Page 39
DISPLAY
14.2 Calls.
This allows you to change/select the different fields concerning the Calls from the selected panel (DISPLAY). Screens with different fields concerning Panel Addresson the top and others aboutCalls on the bottom.For more details and explanations about the fields for Panel address, see chapter 13.2 Test.Screens with different fields concerning Calls: - Restricted Call (only the units with the «filtered» field ticked in the Directory can be called). This field
selected allows you to filter the calls in the Directory.- Alphanumerical call (enables the input of characters): Call with only digits and letters (mapped).- Mapped Call: The mapping is a function of advanced programming that allows for changing the assigned
call code inherent to the system by another one to cover all of the encoding needs. - Button/Code. It displays a list where we can enter a unit code as desired to each of the call buttons with which the call panel can be equipped. A panel with a DISPLAY + Button module (up to 8 call buttons maximum).
Notes: - The Restricted call field is related to the users, see chapter 12.4 Add user Filtered section.- The alphanumeric call fields and Mapped calls are related to the users, see chapter 12.4 Add user call code section.
- The Button/Code call field is related to the users, see chapter 12.4 Add user Call and unit code fields section. • If using the VDS/BUS2, the permitted range for the button code is [001-199].• For the DUOX, the range is [000001-999999]. Keep in mind that even though you must always fill in the
6 digits, depending on the type of panel, the DISPLAY does not consider all of the digits when making the call: o General Entrance: using the 6 digits to call (not auto-fill).o Block entrance: using the 4 last digits to call, it auto-fills the first two with the block num. to call.o Sub-block entrance: using the 2 last digits to call, it auto-fills the first two with the block num. and the
following 2 with the sub-block num. to call.

Page 40
DISPLAY
14.3 Access control
This allows you to change/select the different fields concerning the Access control from the selected panel (DISPLAY). Screens with different fields concerning Panel Addresson the top and others about Access control on the bottom.For more details and explanations about the fields for Panel address, see chapter 13.2 Test.Screens with different fields concerning Access control: - Door open time (Seconds). Door opening time from the home and keypad (if programmed). Programmable
time: 1...99 seconds. - Exit button open time (Seconds). - Opening time corresponding to the button located inside the building
which serves to activate the lock-release function (providing it has been installed). Programmable time: 0...99 seconds. The 0 value disables the button.
- Reader Protocol: Drop-down menu to select the protocol for the reader communication: Data/Clock or Wiegand-26. See reader protocols in its corresponding manual.
- Access control using the keypad. Selecting this field allows you to open it via the custom access codes on the keypad. Only up to 6 digits.
- Length of keypad codes (digits). To establish the keypad codes length. Only up to 6 digits. You can select the value with the arrows.
- Door Sensor alarm. By selecting this field, you send a message when the defined time passes in Alarm Time.
- Alarm Time (seconds): To define alarm time. Maximum time that the door can remain open before generating an alarm (if the Door sensor alarm option is selected). Programmable time: 1...250 seconds. You can select the value with the arrows. This is disabled if the option is not selected: Door Sensor alarm.Note: The alarm time must be greater than the door open time.
- Panel special codes: This allows you to enter the different displayed codes, which must be 5 digits.•Installer: The programming access code, via which you can access all the programming options.•Administrator: The programming access code, via which you can access certain programming options. •Concierge: The Concierge access code, via which you can access certain programming options.
- Prox + PIN codes: Selecting this box, you can use the additional combination of the user's device's validity with a PIN code on the keypad.
Notes: - There are parameters that can only be on certain systems, but on the screen, when selecting the system, they are disabled.
- The Access control via keypad field are related to the users, see chapter 12.4 Add user Access code section.
- The Prox + PIN field is related to the users, see chapter 12.4 Add user PIN code section.

Page 41
DISPLAY
14.4. Screen
This allows you to establish specific fields concerning the Screens from the selected panel (DISPLAY). Window with different fields concerning Panel Addresson the top and others about theScreen on the bottom.For more details and explanations about the fields for Panel address, see chapter 13.2 Test.Window with different fields concerning Screens: - Screen Activation. Screen activation mode (DISPLAY). Drop-down menu where you can select the
following options:•Upon pressing a keypad. •Key or presence detector.
- Directory Mode: (Viewing the Directory) Drop-down menu where you can select the following options:•One name per page. •Four names per page.
- Time between images. View images. Programmable time: 1...20 seconds. You can select the value with the arrows. See chapter 13. PANELS / 13.3 Upload images.
- Building name. To enter the text to view on the screen, maximum length of 16 characters. - Language. Language in DISPLAY on the panel.- Temperature scale. Drop-down menu on which you can select the temperature scale: Centigrade or Fahrenheit.

Page 42
DISPLAY
14.5.Clock
This allows you to establish specific fields concerning the Clock (date and time) from the selected panel (DISPLAY). Screens with different fields concerning Panel Address on the top and others about Clock (Date and time ) on the bottom.For more details and explanations about the fields for Panel address, see chapter 13.2 Test.Screens with different fields concerning the Clock (date and time): - Display date and time. If this field is selected, you must fill in the time and date format used.- Time Format. Drop-down menu where you can select the time format: 12 or 24 hour.- Date Format. Drop-down menu where you can select the date format from the following:
•DD/MM/YYYY (Europe).•MM/DD/YYYY (China).•YYYY/MM/DD (USA).•YYYY/DD/MM (Other).
- Daylights savings time. Drop-down menu where you can select the following zones:•Europe. •USA. •Manual. If choosing the field manually, you must fill in:
- Start Summer or Start winter time (fields: date/ time):o Date field: To enter the date. Press on the calendar icon in the field to open a calendar to select the
desired date.oDate field: To enter the time. You can enter the desired time in the HH:MM format.
- Night time. If this field is selected you must fill in the Start / End/ Volume level:•Start/ End: To enter the time. You can enter the desired time in the HH:MM format.•Volume level: To enter the volume level with a range of 0 to 9. You can select the value with the arrows.
Page 43
DISPLAY
15. BACKUP
This allows you to save and restore backup copies. Drop-down menu where you can select the screens:- Restore backup copies.- Save backup copies.
15.1 Description

Page 44
DISPLAY
15.2 Restore back-up copy
15.3 Save back-up copy
This allows you to make a backup.Upon pressing this button you open a window with only two fields:- File name. Fill in the name with which you want to save the backup copy. The existing data on the
application are saved. - Format. The format to use can be either .csv or .xls.Once you press the export button a loading message appears, upon completing the process a window appears indicating its result.If correct, the file is in the database folder within the default software installation file: «C:\Archivos de programa\Fermax\Display Plus Software\database».
Note: The exact route by default depends on the operating system's language and the bits (32/64).
This allows you to make a backup.Upon selecting this option you can open a window with a field to select the file from which you want to restore a backup copy. The file must be in the .xls or .csv format and have the same format as the file created to make the backup copy, see chapter 15.3 Save a backup copy.Upon pressing the Import button, before starting to restore the data on the file, it deletes all data currently in the database, including logins.
Note: Once the restore back-up process is complete, a message appears indicating the result (import correct or not), and if the database has imported correctly, it closes the application to avoid conflictive situations, like maintaining a login in the application as «login» that no longer exists after the restore, or having a site or directory open that no longer exits...etc.

Page 45
DISPLAY

Page 46
DISPLAY

Page 47
DISPLAY

Avd. Tres Cruces, 13346017 Valencia
Spain
Related Documents