CompTIA A+ Disk Partitioning Methods and File Systems Introduction Lab Topology Exercise 1 - Perform Disk Partitioning Exercise 2 - Work with Different File Systems Review Introduction Disk partitioning Files Systems Partitions A+ Welcome to the Disk Partitioning Methods and File Systems Practice Lab. In this module you will be provided with the instructions and devices needed to develop your hands-on skills. Learning Outcomes In this module, you will complete the following exercises: Exercise 1 - Perform Disk Partitioning Exercise 2 - Work with Different File Systems After completing this lab, you will be able to: Create a Dynamic Partition Create a Primary Partition Create an Extended and Logical Partition Convert to MBR or GPT Disk Create FAT32 and NTFS File Systems

Welcome message from author
This document is posted to help you gain knowledge. Please leave a comment to let me know what you think about it! Share it to your friends and learn new things together.
Transcript

CompTIA A+
Disk Partitioning Methods and File Systems
IntroductionLab TopologyExercise 1 - Perform Disk PartitioningExercise 2 - Work with Different File SystemsReview
Introduction
Disk partitioningFiles SystemsPartitionsA+
Welcome to the Disk Partitioning Methods and File Systems Practice Lab. In thismodule you will be provided with the instructions and devices needed to develop yourhands-on skills.
Learning Outcomes
In this module, you will complete the following exercises:
Exercise 1 - Perform Disk PartitioningExercise 2 - Work with Different File Systems
After completing this lab, you will be able to:
Create a Dynamic PartitionCreate a Primary PartitionCreate an Extended and Logical PartitionConvert to MBR or GPT DiskCreate FAT32 and NTFS File Systems

Configure the Network File System (NFS)View the Swap Partition on CentOSView the Swap File in Windows 10
Exam Objectives
The following exam objectives are covered in this lab:
220-1002: 1.4 - Partitioning and file system
Note: Our main focus is to cover the practical, hands-on aspects of the examobjectives. We recommend referring to course material or a search engine toresearch theoretical topics in more detail.
Lab Duration
It will take approximately 45 minutes to complete this lab.
Help and Support
For more information on using Practice Labs, please see our Help and Support page.You can also raise a technical support ticket from this page.
Click Next to view the Lab topology used in this module.
Lab Topology
During your session, you will have access to the following lab configuration.

Depending on the exercises, you may or may not use all of the devices, but they areshown here in the layout to get an overall understanding of the topology of the lab.
PLABDC01 - (Windows Server 2016 - Domain Controller)PLABWIN10 - (Windows 10 - Domain Member)PLABCENTOS - (CentOS Server)PLABWIN810 - (Windows 8.1 - Domain Member)PLABWIN701 - (Windows 7 - Domain Member)
Click Next to proceed to the first exercise.
Exercise 1 - Perform Disk Partitioning

Disk partitioning is performed to create logically separate compartments inside the harddrive.
There are three types of disk partitions: Primary, logical and extended. A hard drive canhave a maximum of four primary partitions or three primary and one extended partition.Logical partitions are created on the extended partition. The primary partition with theACTIVE status is used for booting the system with an operating system. You cannot boota system from a logical partition as it cannot be made ACTIVE.
Disk partitions are useful from a data security point of view. Formatting and erasing datafrom one partition does not affect the data stored in another partition. If the hard drivewith multiple partitions fails, the data on all partitions is impacted.
In this exercise, you will learn about disk partitioning.
Learning Outcomes
After completing this exercise, you will be able to:
Create a Dynamic PartitionCreate a Primary PartitionCreate an Extended and Logical PartitionConvert to MBR or GPT Disk
Your Devices
You will be using the following device in this lab. Please power on the device now.
PLABWIN10 - (Windows 10 - Domain Member)
Task 1 - Create a Dynamic Partition

A basic disk works with partitions. Each partition is independent and cannot share orspan data over other partitions. A dynamic disk can use dynamic volumes that can spanacross multiple hard drives in a single system.
This is possible because the dynamic disk partition does not create a partition table likethe regular partition method. Dynamic partitioning uses a method called logical diskmanager (LDM). LDM keeps track of the sectors of the dynamic partition. A basic diskcan be converted to dynamic disk and vice versa.
In this task you will create a dynamic partition.
Step 1Ensure that the required devices are powered on and connect to PLABWIN10.
In the Type here to search text box, type the following:
Disk management
Select the Create and format hard disk partitions from the search results.

Figure 1.1 Screenshot of PLABWIN10: Selecting Create and format hard diskpartitions from the search results.
Step 2The Disk Management window is displayed.
Right-click Disk 1 and select Convert to Dynamic Disk from the context menu.
Alert: Ensure you click in the Grey area on the left side. Clicking on the drive labelbox will not provide this option in the context menu.

Figure 1.2 Screenshot of PLABWIN10: Right-clicking Disk 1 and selectingConvert to Dynamic Disk from the context menu.
Step 3The Convert to Dynamic Disk dialog box is displayed.
Ensure that Disk 1 is selected. Click OK.

Figure 1.3 Screenshot of PLABWIN10: Selecting e disk drive to convert to adynamic disk in the Disk Management.
Step 4The Disk to Convert dialog box is displayed.
Click Convert.

Figure 1.4 Screenshot of PLABWIN10: Clicking the Convert button in the Disksto Convert dialog box.
Step 5Notice that the Disk 1 status is set to Basic.
The Disk Management dialog box is displayed.
Click Yes.

Figure 1.5 Screenshot of PLABWIN10: Showing the warning message in theDisk Management dialog box.
Step 6You are back on the Disk Management window. Notice that the Disk 1 status has nowchanged to Dynamic.
Keep the Disk Management window open.

Figure 1.6 Screenshot of PLABWIN10: Showing the dynamic disk afterconversion.
Task 2 - Create a Primary Partition
Basic disk partitioning is the most commonly used type of disk partitioning method. Onlytwo types of drives can be created using the basic disk partition method. They arePrimary and logical.
The basic file system formats disks using one of the two: Master Boot Record (MBR) orGUID partition table. MBR method makes use of a partition table, which contains a list oflocations, where partitions are present. A primary partition, which is marked Active, isthe one in which an operating system can be installed.
In this task, you will create a primary partition.
Step 1

Ensure you are connected to PLABWIN10 and that the Disk Management window isopen.
To create a new partition, you require empty space on a hard drive. At present, there is noempty space on any of the hard drives. To create a partition, you need first to createempty space.
Right-click USB (D:) in the right pane and then select Delete volume.
Figure 1.7 Screenshot of PLABWIN10: Selecting the Delete Volume option fromthe context menu.
Step 2The Delete simple volume dialog box is displayed. Click Yes.

Figure 1.8 Screenshot of PLABWIN10: Showing a warning message in theDelete simple volume dialog box. Yes is selected.
Step 3Notice that the USB (D:) name is no longer visible. This space is now empty and can beused for creating a partition.
Disk 1 currently has no partitions, and it is marked as Unallocated.
Right-click on Unallocated and then select New Simple Volume from the contextmenu.

Figure 1.9 Screenshot of PLABWIN10: Selecting the New Simple Volume optionfrom the context menu.
Step 4The New Simple Volume Wizard is displayed.
On the Welcome to the New Simple Volume Wizard page, click Next.

Figure 1.10 Screenshot of PLABWIN10: Showing the Welcome page of the NewSimple Volume Wizard.
Step 5On the Specify Volume Size page, keep the default volume size and click Next.

Figure 1.11 Screenshot of PLABWIN10: Setting the size of the simple volume onthe Specify Volume Size page.
Step 6On the Assign Drive Letter or Path page, keep the default selection for the driveletter and click Next.

Figure 1.12 Screenshot of PLABWIN10: Assigning the drive letter on the AssignDrive Letter or Path page.
Step 7On the Format Partition page, keep the default options and click Next.

Figure 1.13 Screenshot of PLABWIN10: Setting the format options on theFormat Partition page.
Step 8On the Completing the New Simple Volume Wizard page, click Finish.

Figure 1.14 Screenshot of PLABWIN10: Showing the completion of the NewSimple Volume Wizard.
Step 9You are back on the Disk Management window. A new primary partition has beencreated.
Keep the Disk Management window open.

Figure 1.15 Screenshot of PLABWIN10: Showing the newly created volume inDisk Management.
Task 3 - Create a Primary and Logical Partition
A hard disk can only contain a single extended partition. A single extended partition maycontain multiple logical partitions. A logical partition is a sub-division of an extendedpartition.
Creating an extended partition is possible only on an MBR type of disk.
In this task, you will create an primary partitions aswell as a logical partition.
Note: Before creating a standard partition, three primary partitions need to bepresent.

Step 1Ensure you are connected to PLABWIN10 and that the Disk Management window isopen.
Right-click the New Volume (D:) partition and select Delete Volume.
Figure 1.16 Screenshot of PLABWIN10: Selecting the Delete Volume optionfrom the context menu.
Step 2The Delete simple volume dialog box is displayed. Click Yes.

Figure 1.17 Screenshot of PLABWIN10: Displaying a warning on the Deletesimple volume dialog box.
Step 3Disk 1 currently has no partitions, and it is marked as Unallocated.
Right-click Disk 1, and then select Convert to MBR Disk from the context menu.

Figure 1.18 Screenshot of PLABWIN10: Selecting the Convert to MBR Diskoption from the context menu.
Step 4Right-click the Unallocated space, and then select New Simple Volume from thecontext menu.

Figure 1.19 Screenshot of PLABWIN10: Selecting the New Simple Volumeoption from the context menu.
Step 5The New Simple Volume Wizard is displayed.
On the Welcome to the New Simple Volume Wizard page, click Next.

Figure 1.20 Screenshot of PLABWIN10: Showing the welcome page of the NewSimple Volume Wizard.
Step 6On the Specify Volume Size page, enter the following value in the Simple volumesize in MB text box:
500
Then, click Next.

Figure 1.21 Screenshot of PLABWIN10: Setting the size of the simple volume onthe Specify Volume Size page.
Step 7On the Assign Drive Letter or Path page, keep the default values and click Next.

Figure 1.22 Screenshot of PLABWIN10: Assigning the drive letter on the AssignDrive Letter or Path page.
Step 8On the Format Partition page, keep the default values and click Next.

Figure 1.23 Screenshot of PLABWIN10: Setting the format options on theFormat Partition page.
Step 9On the Completing the New Simple Volume Wizard page, click Finish.

Figure 1.24 Screenshot of PLABWIN10: Showing the completion of the NewSimple Volume Wizard.
Step 10Create two more primary partitions. To summarize:
Right-click the Unallocated space, and then select New Simple Volume fromthe context menu.Click Next when prompted.Enter the value 500 in the Simple volume size in MB text box.Click Next when prompted, then Finish.
Note: For more detailed instructions, please follow steps 4-9 in this task.
Then, create one more partition.

Notice that this partition will automatically be marked as Logical. The first threepartitions are marked as Primary.
Keep the Disk Management window open.
Figure 1.25 Screenshot of PLABWIN10: Showing Disk Management with newlycreated primary and logical partitions.
Task 4 - Convert to MBR or GPT Disk
GPT stands for a GUID Partition Table. A standard called EFI (Extensible FirmwareInterface) defines the structure of the partition table.
GPT is a part of the EFI standard. GPT is an enhanced version of the MBR (Master BootRecord) partitioning system.
By using GPT, it is possible to overcome the limitations of an MBR partitioning system.

Step 1Ensure you are connected to PLABWIN10.
Scroll down the page to right-click Disk 2, then select the Convert to MBR Disk fromthe context menu.
Figure 1.26 Screenshot of PLABWIN10: Selecting the Convert to MBR Diskfrom the context menu.
Step 2Now that the disk is in the MBR format, it can be converted back to the GPT format.Right-click on the Disk 2 again, then select Convert to GPT Disk from the contextmenu.

Figure 1.27 Screenshot of PLABWIN10: Selecting Convert to GPT Disk from thecontext menu.
Step 3The Disk 2 is set as GPT disk. Visually, you will not be able to differentiate between theMBR or GPT disk.
Keep the Disk Management window open.

Figure 1.28 Screenshot of PLABWIN10: Showing Disk 2 after converting it toGPT disk.
Exercise 2 - Work with Different File Systems
ExFAT stands for Extended File Allocation Table. ExFAT is ideal for USB flash drivessince it is optimized for external storage devices. ExFAT is lightweight and does not haveas many features like NTFS. ExFAT doesn’t have the limitations FAT32 does - themaximum file size limitation is much larger in the ExFAT than in FAT32. All modernversions of the Windows operating system and Mac OS extension support ExFAT.
CDFS stands for Compact Disk File Format. CDFS is present in the Linux and Windowsoperating systems. In Linux, CDFS is used to transfer tracks and bootable images to thecompact disk. In windows, CDFS acts as a driver to CD-ROM players. The job of the

driver software is to facilitate the use of a CD-ROM drive. Without CDFS being available,it is not possible to use a CD-ROM drive on the Windows operating system.
Ex3 stand for third extended files system and Ex4 stands for the fourth extended filesystem. Ex3 and Ex4 are Linux file systems. These files systems are not supported onother platforms, like Windows and Mac OS. The maximum file size in Ex3 file system isbetween 16 GB and 2TB, and in Ex4, it is 16 TB. The maximum volume size in Ex3 is 2 TBto 32 TB. In Ex4, the maximum volume size is 1EB. The maximum number of files thatcan be stored using the Ex3 system varies. For Ex4 system, this number is 4 billion.
Note: The ExFAT, Ex3/Ex4, and CDFS file systems cannot be covered in the labenvironment due to hardware restrictions.
Learning Outcomes
After completing this exercise, you will be able to:
Create FAT32 and NTFS File SystemsConfigure the Network File System (NFS)View the Swap Partition on CentOSView the Swap File in Windows 10
Your Devices
You will be using the following device in this lab. Please power on this device.
PLABWIN10 - (Windows 10 - Domain Member)PLABDC01 - (Windows Server 2016 - Domain Controller)
Task 1 - Create FAT32 and NTFS File Systems

FAT32 is the oldest file system supported by Windows operating system. Most of the USBflash drives are formatted using FAT32 when they are manufactured. FAT32 is ideal for adevice that must be used with a variety of other devices, such as computers, televisionssets, games consoles, etc. However, the FAT32 file system has a few limitations. Firstly,the maximum file size in FAT32 system cannot exceed 4GB. Secondly, a maximum drivesize in FAT32 system cannot be more than 8TB.
NTFS is the default file system on the recent version of Windows. NTFS has manyadvantages over FAT32 and ExFAT systems. Some of these features are access rights,backup copies, encryption, and hard links. The partition containing the Windowsoperating system must be NTFS.
In this exercise, you will learn to create FAT32 and NTFS file systems.
Step 1Ensure that the Disk Management window is open.
Right-click New Volume (D:) and select Format from the context menu.

Figure 2.1 Screenshot of PLABWIN10: Selecting Format from the contextmenu.
Step 2The Format D: dialog box is displayed.
Enter the following name in the Volume label text box:
PLAB
From the File system drop-down, select FAT32.

Figure 2.2 Screenshot of PLABWIN10: Showing the setting of a volume labeland file system in the Format D: dialog box.
Step 3Ensure that the Perform a quick format checkbox is ticked. Click OK.
Note: The Quick Format and Full Format work in the same manner. Both of theseformat the partition. The only difference is that Quick Format does not check thedisk for errors and therefore, formats the partition quickly. On the other hand, theFull Format checks the partition for errors like bad sectors.

Figure 2.3 Screenshot of PLABWIN10: Clicking OK on the Format D: dialogbox.
Step 4A Format D: warning is displayed. Click OK.

Figure 2.4 Screenshot of PLABWIN10: Displaying a warning in the Format D:dialog box.
Step 5You are back on the Disk Management window. Notice that the partition is nowmarked as PLAB. Also, notice that the other partitions are marked as NTFS.
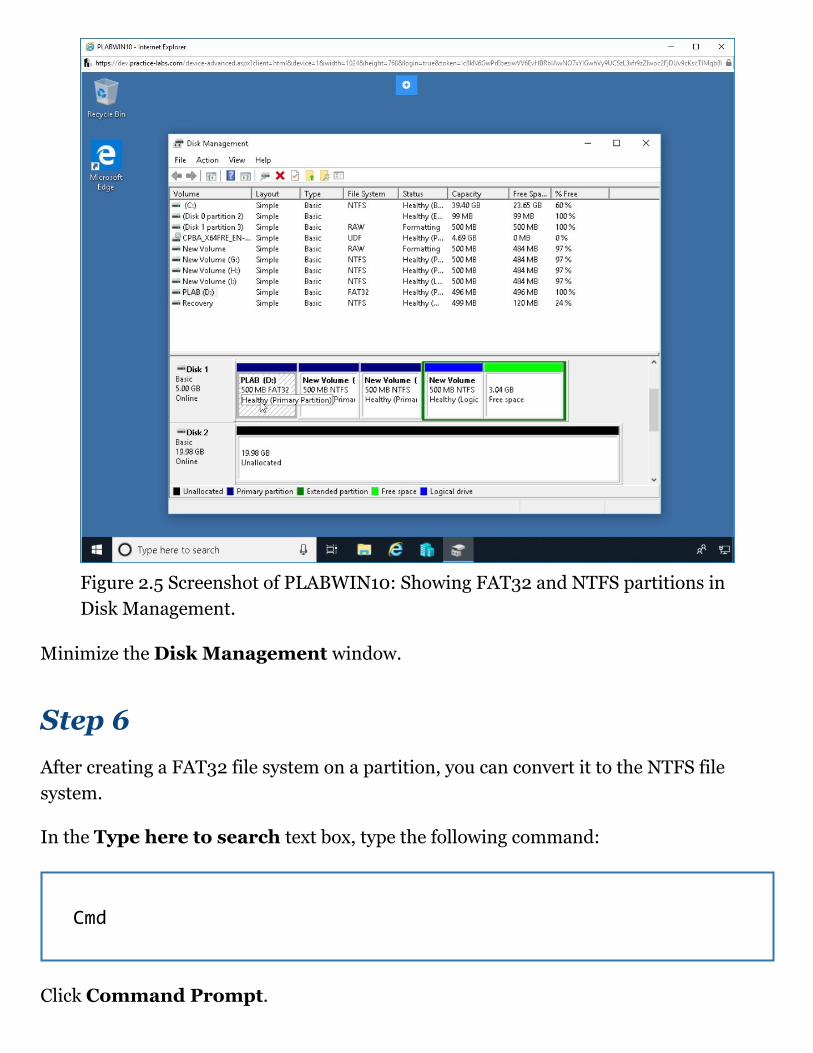
Figure 2.5 Screenshot of PLABWIN10: Showing FAT32 and NTFS partitions inDisk Management.
Minimize the Disk Management window.
Step 6After creating a FAT32 file system on a partition, you can convert it to the NTFS filesystem.
In the Type here to search text box, type the following command:
Cmd
Click Command Prompt.

Figure 2.6 Screenshot of PLABWIN10: Command Prompt is shown in thesearch results.
Step 7The Administrator: Command Prompt window is displayed.
Type the following command:
convert d: /FS:NTFS
Press Enter.

Alert: You can convert a FAT32 file system to NTFS file system, but you cannotreverse it. You will need to format the partition.
Figure 2.7 Screenshot of PLABWIN10: Converting the FAT32 partition to NTFSpartition using the convert command.
Step 8You will be prompted to enter the volume label.
Type the following:
PLAB

Press Enter. Conversion is quick in this case.
Figure 2.8 Screenshot of PLABWIN10: Entering the name of the partition toconvert and then showing the conversion.
Close the command prompt window.
Step 9Restore the Disk Management window. The D drive displays NTFS instead ofFAT32.

Figure 2.9 Screenshot of PLABWIN10: Showing the converted partition asNTFS partition.
Task 2- Configure the Network File System (NFS)
NFS stands for Network File System. NFS makes it possible to share/transfer files fromcomputers running Windows server and Linux operating system by using the NFSprotocol. By using NFS, it is possible to access a remote location and use files stored atthat location. NFS uses a methodology known as Remote Procedure Call (RPC) tofacilitate file transfer. NFS now allows parallel access across multiple servers.
In this task, you will configure NFS.
Step 1Connect to PLABDC01.

Click the Start charm and then select Server Manager.
Figure 2.10 Screenshot of PLABDC01: Selecting Server Manager from the Startmenu.
Step 2The Server Manager window is displayed. Click the Add roles and features link.

Figure 2.11 Screenshot of PLABWIN10: Clicking the Add roles and features link.
Step 3The Add Roles and Features Wizard is displayed.
On the Before you begin page, click Next.

Figure 2.12 Screenshot of PLABDC01: Showing the Before you begin page in theAdd Roles and Features Wizard.
Step 4On the Select installation type page, keep the default selection and click Next.

Figure 2.13 Screenshot of PLABDC01: Showing the selection of Role-based orfeature-based installation option on the Select installation type page.
Step 5On the Select destination server page, keep the default selection and click Next.

Figure 2.14 Screenshot of PLABDC01: Showing the selection of the server nameon the Select destination server page.
Step 6On the Select server roles page, expand File and Storage Services and thenexpand Files and iSCSI Services. Tick Server for NFS.

Figure 2.15 Screenshot of PLABDC01: Selecting the Server for NFS option onthe Select server roles option.
Step 7The Add Roles and Features Wizard dialog box is displayed.
Click Add Features.

Figure 2.16 Screenshot of PLABDC01: Clicking the Add Features button theAdd Roles and Features Wizard dialog box.
Step 8On the Select server roles page, notice that Server for NFS is now selected. ClickNext.

Figure 2.17 Screenshot of PLABDC01: Showing the selection for Server for NFSoption on the Select server roles page.
Step 9On the Select features page, click Next.

Figure 2.18 Screenshot of PLABDC01: Clicking Next on the Select features page.
Step 10On the Confirm installation selections page, click Install.

Figure 2.19 Screenshot of PLABDC01: Clicking Install on the Confirminstallation selections page.
Step 11On the Installation progress page, the feature installation progress is displayed.

Figure 2.20 Screenshot of PLABDC01: Showing the installation on theInstallation progress page.
Step 12On the Installation progress page, after the installation is completed, click Close.

Figure 2.21 Screenshot of PLABDC01: Clicking Close on the Installationprogress page.
Step 13You are back on the Server Manager window.
Click the File and Storage services link in the left pane.

Figure 2.22 Screenshot of PLABDC01: Clicking the File and Storage Service linkin the left pane of Server Manager.
Step 14Ensure that PLABDC01 is selected in the right pane.
From the sliding menu, click Shares.

Figure 2.23 Screenshot of PLABDC01: Clicking the Shares option in the menu.
Step 15Click the TASKS drop-down menu and then select New Share.

Figure 2.24 Screenshot of PLABDC01: Selecting the New Share option from theTASKS drop-down.
Step 16The New Share Wizard is displayed. Select SMB share - Quick in the File shareprofile list box.
Then, click Next.

Figure 2.25 Screenshot of PLABDC01: Selecting the SMB Share - Quick optionon the Select the profile for this share page.
Step 17On the Select the server and path for this share page, in the Select by volumesection, select E:.
Click Next.

Figure 2.26 Screenshot of PLABDC01: Selecting the E drive on the Select theserver and path for this share page.
Step 18On the Specify share name page, type the following in the Share name text box:
Newshare
Click Next.

Figure 2.27 Screenshot of PLABDC01: Specifying the name in the Share nametext box on the Specify share name page.
Step 19On the Configure share settings page, tick Enable access-based enumeration.
Click Next.

Figure 2.28 Screenshot of PLABDC01: Selecting the Enable access-basedenumeration on the Configure share settings page.
Step 20On the Specify permissions to control access page, select BUILTIN\Users (withthe access Read & execu…).
Click Next.

Figure 2.29 Screenshot of PLABDC01: Selecting permissions for users on theSpecify permissions to control access page.
Step 21On the Confirm selections page, click Create.

Figure 2.30 Screenshot of PLABDC01: Clicking Create on the Confirmselections page.
Step 22On the View results page, click Close.

Figure 2.31 Screenshot of PLABDC01: Clicking Close on the View results page.
Step 23You are back on the Server Manager.
Notice that a new share with the name Newshare has been created.

Figure 2.32 Screenshot of PLABDC01: Showing the newly created share in theServer Manager window.
Step 24Let’s now connect to the NFS share from PLABWIN10.
Connect to the PLABWIN10 device.
Open File Explorer from the Windows taskbar.
From the left pane, right-click This PC and select Map network drive… from thecontext menu.

Figure 2.33 Screenshot of PLABWIN10: Selecting the Map network driveoption from the context menu.
Step 25The Map Network Drive dialog box is displayed.
In the Folder drop-down, type the following path:
\\plabdc01\Newshare
Click Finish.

Figure 2.34 Screenshot of PLABWIN10: Entering the path in the Folder drop-down on the Map Network Drive dialog box.
Step 26A new File Explorer window is displayed. You have successfully connected with theSMB (Server Message Block) share.

Figure 2.35 Screenshot of PLABWIN10: Showing the share that is accessible.
Step 27Close all open windows.
Task 3 - View the Swap Partition on CentOS
A swap partition is a part of the hard disk space. This space is used as an extension of theRAM in a computer system. The swap partition is a way to overcome RAM limitations ofyour system.
When applications demand memory, and there is no physical memory available, then theswap partition is used. The swap partition works like additional memory in the system.However, it is important to note that a swap partition is NOT the replacement forphysical memory.

The most recently used files are in the RAM, and the least recently used files are kept inthe swap partition. When a new file is to be swapped into the RAM, the least recentlyused file is swapped out of it and moved to the swap partition.
A swap partition is created on the hard drive, and therefore, it can increase the wear andtear of the hard drive.
In this task, you will view the swap partition in CentOS.
Step 1Connect to PLABCENTOS.
On the desktop, right-click and select Open Terminal.
Figure 2.36 Screenshot of PLABCENTOS: Selecting the Open Terminal optionfrom the context menu.

Step 2The terminal window is displayed. Type the following command:
su -
Press Enter.
At the Password prompt, type the following password:
Passw0rd
Press Enter.
Step 3To view the swap partition, type the following command:
swapon -s
Press Enter. Notice that CentOS has a 209174 KB of the swap partition. This numbermay vary in the lab enviroment.

Figure 2.38 Screenshot of PLABCENTOS: viewing the swap partition with theswapon -s command.
Task 4 - View the Swap File in Windows 10
Windows does not contain a swap partition, but it contains a swap file, which is known aspagefile.sys. It serves the same purpose as the swap partition. You can store thepagefile.sys in its default location, create a new partition and store the pagefile.sys there,or configure the pagefile.sys to be stored on all partitions.
In this task, you will view the swap partition in Windows 10.
Step 1Connect back to PLABWIN10. In the Type here to search text box, type the followingcommand:

Control Panel
Select Control Panel from the search results.
Figure 2.39 Screenshot of PLABWIN10: Selecting Control Panel from thesearch results.
Step 2The Control Panel window is displayed. Select System and Security.

Figure 2.40 Screenshot of PLABWIN10: Selecting System and Security from theControl Panel window.
Step 3Click System from the System and Security window.

Figure 2.41 Screenshot of PLABWIN10: Selecting System from the System andSecurity window.
Step 4The System window is displayed. In the left pane, click the Advanced systemsettings link.

Figure 2.42 Screenshot of PLABWIN10: Clicking the Advanced system settingslink in the left pane.
Step 5The System Properties dialog box is displayed. On the Advanced tab, click Settingsin the Performance section.

Figure 2.43 Screenshot of PLABWIN10: Clicking Settings on the Advanced tabof the System Properties dialog box.
Step 6The Performance Options dialog box is displayed. Click the Advanced tab, and thenclick Change in the Virtual memory section.

Figure 2.44 Screenshot of PLABWIN10: Clicking Change on the Advanced tabof the Performance Options dialog box.
Step 7The Virtual Memory dialog box is displayed.
Notice that Automatically manage paging file size for all drives is selected bydefault. When this option is selected, there is no manual intervention required to set thepaging file size. Windows, depending on the RAM installed, configures the size of thepagefile.sys file.
If you deselect this option, then you should select the Custom size and set the page filesize on a single partition or multiple partitions/hard drives.
Also notice that the Total paging file size for all drives is displayed in the Virtualmemory section.

Figure 2.45 Screenshot of PLABWIN10: Showing the Virtual Memory dialogbox with the page file configuration.
Step 8Close all open dialog boxes and windows.
Review
Well done, you have completed the Disk Partitioning Methods and File SystemsPractice Lab.
Summary

You completed the following exercises:
Exercise 1 - Perform Disk PartitioningExercise 2 - Work with Different File Systems
You should now be able to:
Create a Dynamic PartitionCreate a Primary PartitionCreate an Extended and Logical PartitionConvert to MBR or GPT DiskCreate FAT32 and NTFS File SystemsConfigure the Network File System (NFS)View the Swap Partition on CentOSView the Swap File in Windows 10
Feedback
Shutdown all virtual machines used in this lab. Alternatively, you can log out of thelab platform.
Related Documents


