E Service Manual Service Manual Manual LFT 228-320 - 321 Edition 2007.10.15 Language English DISHWASHER PLATFORM EOS. BUILT IN Model. Comm. Covered Code LFT 228 A/HA 46454 LFT 320 HX/HA 46455 LFT 321 HX/HA 46456 LFT 228 AUK 49044 LFT 321 HXUK 49045 ISSUE 1 - OTT. 2007

Welcome message from author
This document is posted to help you gain knowledge. Please leave a comment to let me know what you think about it! Share it to your friends and learn new things together.
Transcript

Service ManualManual LFT 228-320 - 321
Edition2007.10.15
LanguageEnglish
E
ServiceManual
Service ManualManual LFT 228-320 - 321
Edition2007.10.15
LanguageEnglish
DISHWASHERPLATFORM EOS.
BUILT IN
Model. Comm.Covered CodeLFT 228 A/HA 46454LFT 320 HX/HA 46455LFT 321 HX/HA 46456LFT 228 AUK 49044LFT 321 HXUK 49045
ISSUE 1 - OTT. 2007

Service ManualManual LFT 228-320 - 321
Edition2007.10.15
LanguageEnglish
2
INDEXChapter 1 Description of Product 3Chapter 2 General Information 3
2.1 Captions 3 2.2 Dashboard 4 2.3 General Technical Data 5Chapter 3 Installation of Product 5Chapter 4 Description of Product 8 4.1 Programmes 8 4.2 Technical Programme-Features 9 4.3 Washing-Option 9 4.4 Method of Use 10 4.5 Innovative features 11Chapter 5 Components 14Chapter 6 Eletrical Layout 18Chapter 7 Help-mode 18 7.1 Demo-mode 18 7.2 Self-test mode 18 7.2.1 Self-Activation Test Sequence “SAT” 18 7.2.2 Machine Sequence Procedure 19 7.2.3 How to visualise faults 20 7.2.4 Fault Table 20 7.3 Dr. (PC,Palm,Smart Reader) 21Chapter 8 Dismantling 22
IDENTIFICATION PRODUCT-PLATE
1 Industrial Bar-code: 37 46454 0200Commercial/Technological ModificationsCommercial Bar-code numberPlant Bar-code Number
2 Serial Number: 7 06 14 1476Plant Sequence NumberDay of manufactureMonth of ManufactureYear of Manufacture
Service ManualManual LFT 228-320 - 321
Edition2007.10.15
LanguageEnglish
3
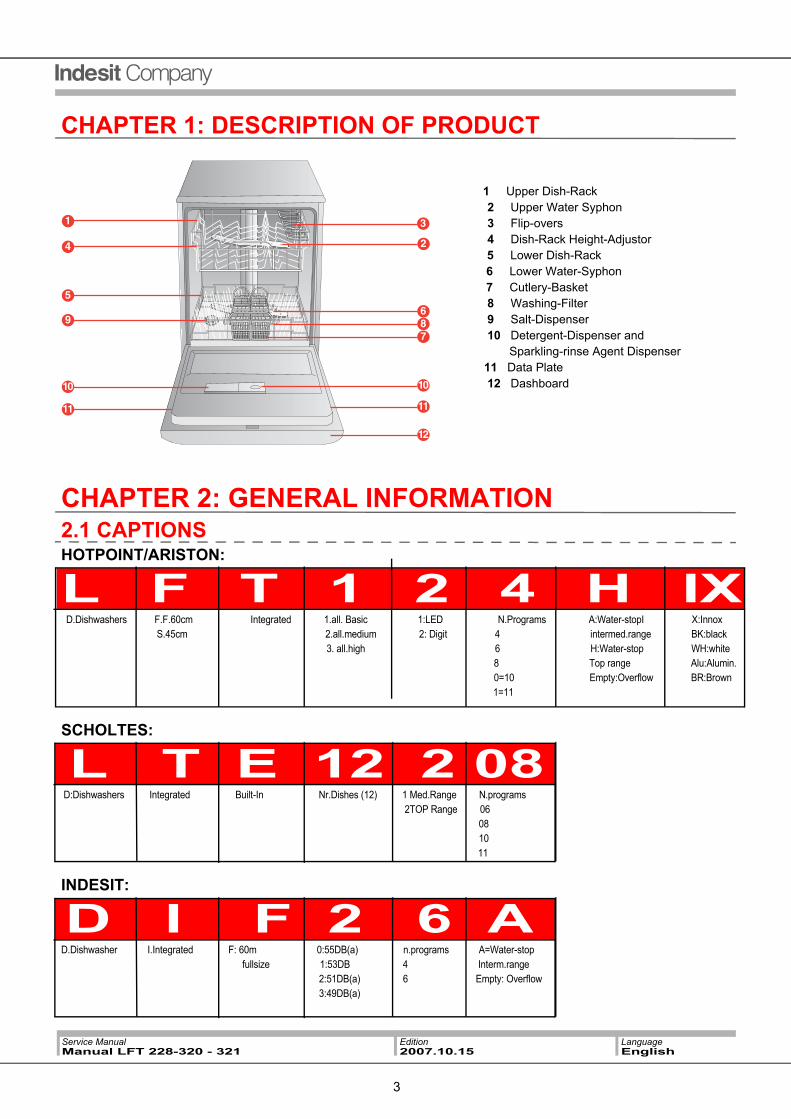
CHAPTER 1: DESCRIPTION OF PRODUCT
1 Upper Dish-Rack 2 Upper Water Syphon
3 Flip-overs4 Dish-Rack Height-Adjustor5 Lower Dish-Rack
6 Lower Water-Syphon 7 Cutlery-Basket
8 Washing-Filter9 Salt-Dispenser10 Detergent-Dispenser and
Sparkling-rinse Agent Dispenser 11 Data Plate
12 Dashboard
CHAPTER 2: GENERAL INFORMATION2.1 CAPTIONSHOTPOINT/ARISTON:
L F T 1 2 4 H IX D.Dishwashers F.F.60cm Integrated 1.all. Basic 1:LED N.Programs A:Water-stopI X:Innox
S.45cm 2.all.medium 2: Digit 4 intermed.range BK:black 3. all.high 6 H:Water-stop WH:white
8 Top range Alu:Alumin. 0=10 Empty:Overflow BR:Brown
1=11
SCHOLTES:
L T E 12 2 08 D:Dishwashers Integrated Built-In Nr.Dishes (12) 1 Med.Range N.programs
2TOP Range 06 08 10
11
INDESIT:
D I F 2 6 AD.Dishwasher I.Integrated F: 60m 0:55DB(a) n.programs A=Water-stop
fullsize 1:53DB 4 Interm.range 2:51DB(a) 6 Empty: Overflow 3:49DB(a)

Service ManualManual LFT 228-320 - 321
Edition2007.10.15
LanguageEnglish
4
2.2 DASHBOARDMachines that have “Digit” interfacing are available with three different types of dashboards depending on the model. Herebelow are the dashboards available on the models “Full Integrated”:
Function Selector Defintions
1. ON/OFF Light-indicator Switch 10. Shortime Option Mode2. Programme Selector 11. Multi-function Tablet Selector3. No Sparkling-agent indicator 12. Half-fill up Selector 4. Upper Half-fill up indicator 13 Delay Start selector5. Lower Half-fill up indicator 14 Delay Start indicator6. Multi-function Tablet indicator 15 Fluorescent Programme-number Selector7. Shortime Mode indicator 16 No-salt indicator8. Good-Night Option Mode 17 On-Off/Reset Selector9. Good-Night Option Selector
Service ManualManual LFT 228-320 - 321
Edition2007.10.15
LanguageEnglish
5
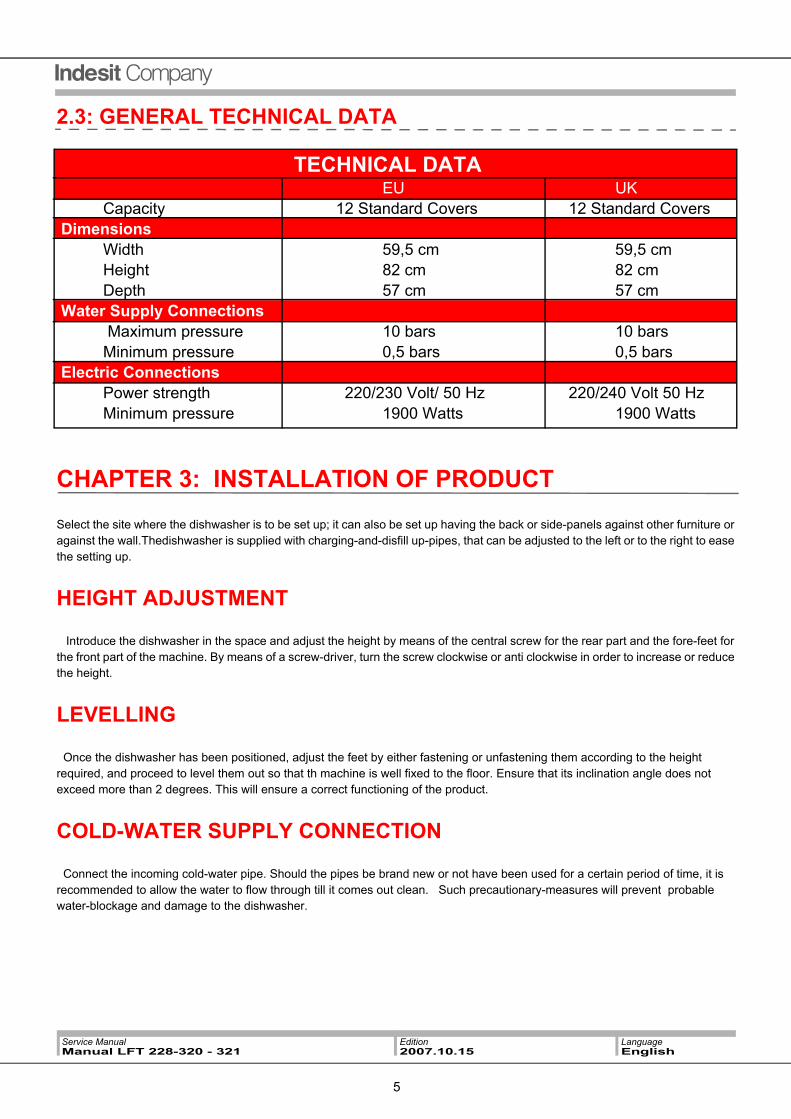
2.3: GENERAL TECHNICAL DATA
TECHNICAL DATAEU UK
Capacity 12 Standard Covers 12 Standard Covers Dimensions
Width 59,5 cm 59,5 cmHeight 82 cm 82 cmDepth 57 cm 57 cm
Water Supply Connections Maximum pressure 10 bars 10 bars Minimum pressure 0,5 bars 0,5 bars Electric Connections Power strength 220/230 Volt/ 50 Hz 220/240 Volt 50 Hz Minimum pressure 1900 Watts 1900 Watts
CHAPTER 3: INSTALLATION OF PRODUCT
Select the site where the dishwasher is to be set up; it can also be set up having the back or side-panels against other furniture or against the wall.Thedishwasher is supplied with charging-and-disfill up-pipes, that can be adjusted to the left or to the right to ease the setting up.
HEIGHT ADJUSTMENT
Introduce the dishwasher in the space and adjust the height by means of the central screw for the rear part and the fore-feet for the front part of the machine. By means of a screw-driver, turn the screw clockwise or anti clockwise in order to increase or reduce the height.
LEVELLING
Once the dishwasher has been positioned, adjust the feet by either fastening or unfastening them according to the height required, and proceed to level them out so that th machine is well fixed to the floor. Ensure that its inclination angle does not exceed more than 2 degrees. This will ensure a correct functioning of the product.
COLD-WATER SUPPLY CONNECTION
Connect the incoming cold-water pipe. Should the pipes be brand new or not have been used for a certain period of time, it is recommended to allow the water to flow through till it comes out clean. Such precautionary-measures will prevent probable water-blockage and damage to the dishwasher.

Service ManualManual LFT 228-320 - 321
Edition2007.10.15
LanguageEnglish
6
DISCHARGING PIPE CONNECTION
StandhoseEnsure that the flexible discharging-pipe has not been introduced too deep inside the standhose. Should the discharging-pipe be equipped with “support-flaps”, ensure that they too be completely introduced into the standhose.
Above illustration: Recommended height of the standhose 500m (20”)
This will prevent the hose from tipping-over during setting-up and use.Donot place the standhose near to electric-sockets and ENSURE that it is uncoiled and is placed in the direction as shown in the illstration above.The standhose must be provided with a hole measuring at least 38mm (1 1/2”). It must be set up as illustrated above, be provided with a syphon and must discharge into the discharging plumbing system. However, it MUST NOT be connected to the discharging-hose connections of the water-basin.
FILLING UP BASIN SYSTEMRegarding discharging plumbing-system under the basin:Before connecting the flexible discharging-hose, it is recommended to get rid off any internal residuals in the hose which could
give rise to hose blockages.
ILLUSTRATION: Tap-height 600mm min. Secure discharge-hose using a Jubillee-type clip.

Service ManualManual LFT 228-320 - 321
Edition2007.10.15
LanguageEnglish
7
Eliminate any residuals on the discharge-syphon and ensure that the sealing-cap has been removed. The flexible hose must be directed and placed at a minimum height of 800mm (3 ½ “)
NB: Ensure that the diameter of the water-basin discharge-hose measure at least 32mm.1. Uncoil the extreme end of the flexible GREY hose from the back of the machine.2. Position the flexible GREY discharge-hose on the supporting-elbow as shown above.3. Set up a discharge system under the wash-basin, cut away the membrane, the obstruction or cap.4. Secure the flexibledischarge-hose to the discharge system under water-basin.
INSTRUCTIONS ON INSTALLATION OF INTEGRATED DISHWASHER
Important
The dishwasher must be well-secured to the built-in top in order to avoid it tilting over while extracting full dish-racks.
Adjusting posterior legs
Fit the dishwasher in the space and adjust the height by working on the screw placed on the front part at theback and on the fore-legs. By using a screwdriver, turn the screw in a clockwise direction in order to lift the dishwasher and in an anti-clockwise direction to lower it.
Tape no-condensation
Some models have been provided with a transparent condensation-proof tape. It must be secured onto the lower part of the wooden work-surface, in order to protect it against condensation- formation.
Should it not be envisaged on the model-type, it may be ordered as a spare-part from authorised dealers.

Service ManualManual LFT 228-320 - 321
Edition2007.10.15
LanguageEnglish
8
CHAPTER 4: DESCRIPTION OF THE PRODUCT4.1 PROGRAMMES
NB:1. The Programme number and type may vary depending on the dishwasher model2. To find out which of the optons are compatible to the programmes, consult the Option-Table.3. Washing-Time cycle” is automatically modified according to different options selected by user and depending to
what extent the dishes are dirty.
Indications for Programme-
selection
Programmes Detergent (A)=Dispenser A (B)=Dispenser B
Programmes that envisage drying
mode
Compatile options
Prog.Time -+10% tollerance Hrs/mins
Powder Liquid Tablet
Very dirty dishes +pots (not indicated for fragile ware
1.Self-Intensive
30g (A) 30ml (A)
1(A) Yes A-B-C-D 2-15'
Ordinary dirty pots + dishes standard-daily programme
2. Self-Normal
30g(A) 30ml (A)
1(A) Yes A-B-C-D-E 1:43'
Daily Dirty DishesLimited Q.ty (4 Dishes + 1 Pot +1Pan)
3. Daily
25g(A) 25ml(A) 1(A No A-B-C 1:00'
Pre-cycle Washing-machine on standb for next fill up
4.Soak
No No No No A-B 0:08'
Ecological +low Energy Consumption ideal for Dishes+ Pans
5. Ecological
25g(A)5g(B)
25ml(A)5ml(B)
1 (A) Yes A-B-C-E 2:35'
Quick Time-Energy saving Cycle not very dirty dishes soon after use: 2 dishes, 2glasses + nos.4 cutlery + 1 pot + 1 small pan
6. Quick
25mg (A)
25ml (A)
1 (A) No A-C 0.25'-0.35'
Quick Time + energy saving cycle indicated for fragile ware soon after use (12 Wine/Champagne glasses + fragile dishes.
7. Crystal Ware
30g (A)
30ml(A) 1(A) Yes A-B-C 1-30'
Different washing-processes for both racks: Fragile-ware: Crystal+glasses on top+intense for pots on bottom 8.Self-dual wash
30g (A)
30ml(A) 1(A) Yes A-B-D 1:43'
Very dirty pots with dried food-residual
9. Ultra-Intensive
30g(A)5g(B)
30ml(A5ml(B)
1(A)1(Bott
om Dispen
ser
Yes A-B-C 2.07'
Rinse + drying only for dusty ware
10.Special Guests
No No No Yes A-B 0.32'
Hygienic wash especially for Baby Bottles,Rings, Dummies cutlery.fill up only on top rack 11.Baby cycle
20g (A)
20ml(A) No No A 1:20'
Service ManualManual LFT 228-320 - 321
Edition2007.10.15
LanguageEnglish
9
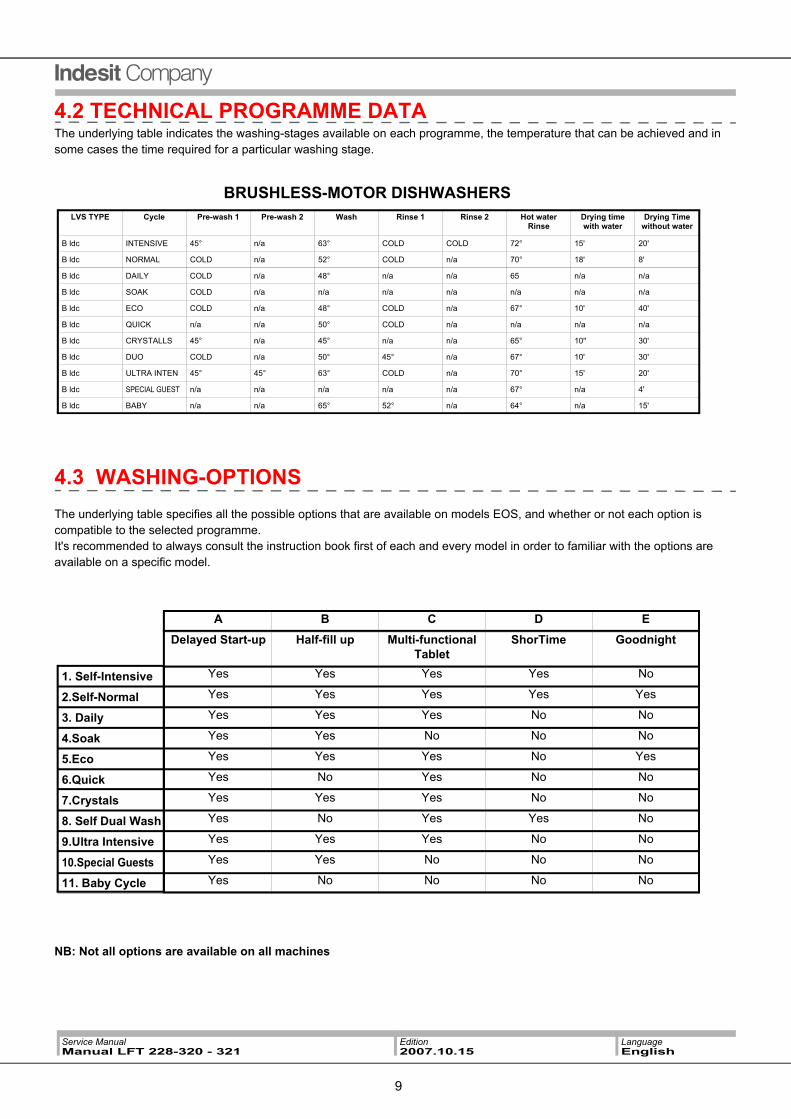
4.2 TECHNICAL PROGRAMME DATAThe underlying table indicates the washing-stages available on each programme, the temperature that can be achieved and in some cases the time required for a particular washing stage.
BRUSHLESS-MOTOR DISHWASHERS
4.3 WASHING-OPTIONSThe underlying table specifies all the possible options that are available on models EOS, and whether or not each option is compatible to the selected programme.It's recommended to always consult the instruction book first of each and every model in order to familiar with the options are available on a specific model.
NB: Not all options are available on all machines
LVS TYPE Cycle Pre-wash 1 Pre-wash 2 Wash Rinse 1 Rinse 2 Hot water Rinse
Drying time with water
Drying Time without water
B ldc INTENSIVE 45° n/a 63° COLD COLD 72° 15' 20'
B ldc NORMAL COLD n/a 52° COLD n/a 70° 18' 8'
B ldc DAILY COLD n/a 48° n/a n/a 65 n/a n/a
B ldc SOAK COLD n/a n/a n/a n/a n/a n/a n/a
B ldc ECO COLD n/a 48° COLD n/a 67° 10' 40'
B ldc QUICK n/a n/a 50° COLD n/a n/a n/a n/a
B ldc CRYSTALLS 45° n/a 45° n/a n/a 65° 10'' 30'
B ldc DUO COLD n/a 50° 45° n/a 67° 10' 30'
B ldc ULTRA INTEN 45° 45° 63° COLD n/a 70° 15' 20'
B ldc SPECIAL GUEST n/a n/a n/a n/a n/a 67° n/a 4'
B ldc BABY n/a n/a 65° 52° n/a 64° n/a 15'
A B C D EDelayed Start-up Half-fill up Multi-functional
TabletShorTime Goodnight
1. Self-Intensive Yes Yes Yes Yes No
2.Self-Normal Yes Yes Yes Yes Yes
3. Daily Yes Yes Yes No No
4.Soak Yes Yes No No No
5.Eco Yes Yes Yes No Yes
6.Quick Yes No Yes No No
7.Crystals Yes Yes Yes No No
8. Self Dual Wash Yes No Yes Yes No
9.Ultra Intensive Yes Yes Yes No No
10.Special Guests Yes Yes No No No
11. Baby Cycle Yes No No No No
Service ManualManual LFT 228-320 - 321
Edition2007.10.15
LanguageEnglish
10
This mode allows to reduce the washing-cycle by approximately 30% (depending on the programme that has been selected) ““Class A” washing-cycle is maintained; in order to do so it is just sufficient to increase the water-pressure through BLDC (Controlled Motor Management) which permits this process. “Shortime” Programme can be used on the following programmes:- Auto Superwash- Auto Normal- Auto Duowash
The BLDC motor reduces and keeps the water-pressure under control during the washing-cycle, and hence it reduces noise allowing use of the dishwasher at night as well. This mode increases the washing-cycle by approxiOpen the dishwasher-door paying attention to any water that may leak out.mately 40%, nevertheless maintaining optimal performance in the washing-cycle.This mode may be used on the “Auto-Normal” Cycle.
4.4 HOW TO USE
Starting a Programme-Cycle:Press consecutively push-button “P” and close dishwasher. After a few seconds a “Beep” will be heard signalling that the selected programme is about to start.
How to reset a programme-cycle underwayOpen the dishwasher-door paying attention to any water that may leak out. Keep the On/Off-button pressed for a while, a long sounding “Beep” will be given signalling that the programme has been reset. NB: On the previous model EVO3, the programme was reset by pressing button “P”, which is the button used to select the programme, for a while. A REMINDER: BY PRESSING “P” ON MODEL EOS, THE MODE ON WATER-HARDNESS WILL HAVE BEEN SELECTED AND NOT THAT THE PROGRAMME WILL HAVE BEEN RESET.
Modifying a programme:Open the dishwasher door paying attention to any water that may leak out. Keep the On/off button pressed for a while,a long-sounding “Beep” will be given. Switch the LVS on again, select the new programme and close the dish-washer door.
Adding more dishes to wash up:Open the dishwasher door, paying attention to any water that may leak out. Put in the dishes and close the door.
Accidental InterruptionsInterruptions will occur whenever the door is opened, or whenever the electricity has been cut off. Once the door has
been closed again and the electricity is back, the dishwasher will take up functioning again from where it had left off.

Service ManualManual LFT 228-320 - 321
Edition2007.10.15
LanguageEnglish
11
4.5 INNOVATIVE FEATURES
Filling up with Water:Once a programme has been set, the first thing that the LVS will proceed to do is discharge the water. Following this, it will start to fill up with water in two stages:
1. Static Filling up: the Main-board will order the electro-valve to open which will allow from 2.5 to 3 litres of water to flow in(depending on the machine)which in turn is controlled by the Turbine Litre-count. On having achieved the prescribed lelvel, the Main-board will proceed to check whether the ” full pressostat status” has been achieved.Under normal working conditions, should “full Pressostat”status be achieved, then it will proceed to fill up dynamically; if not, it will proceed to fill up more water: approximately 100cc more. Another possibility would be either the “full Pressostat” has been achieved, and if so, it will proceed to fill up dynamically, if not, it could go in alarm and indicate the reading “Pressostat not Compliant”. 2. Dynamic filling up: Once the “full Pressostat” has been ensured, then the Main-board will start the motor working and will open the electro-valve thus permitting to fill up up to 4 litres of water. Should the Main-board, following the second filling-up stage detect “Full Presostat” then the dishwasher will proceed to wash; otherwise, it will continue filling up water till it has achieved “full Pressostat” or up to 5.5 litres of water-capacity (depending on which of the circumstances take place first.). Either it will proceed to wash normally having achieved the status of “full” or it will proceed to discharge the water in the following phase.
NB: The manual filling up of water in the dishwasher basins has not been envisaged on Models EOS, but only “Alarm Turbine”. The Turbine Litre-count and the Pressostat, donot work together, hence the results given by either one of them, must be confirmed by the other. If water is fill ed up manually, the Pressostat will detect the status of “full”and the Turbine will indicate that the water has not been filled up because the latter has not detected the water flowing into the dishwasher, thus provoking a sort of conflicting circumstance that will make the dishwasher go in alarm.
The Salt-check-via LED
The salt-quantity is administered via a visual sensor represented by Led that emits and one that receives. It is important to note that the sensors have not been placed at the bottom of the sweetener, but halfway. This has been done in order to prevent the presence of impurities in the salt to give a false reading.
Any presence of salt, will interrupt the beam of light, suggesting to the Main-board that there's salt in the sweetener. When the salt goes below the level prescribed by the sensor, the Main-board will receive the message that sthere is no salt. As the sensor is not placed at the bottom of the sweetener, other regenerating processes can be made, and the main-board will switch the Led on after six regenerating stages starting from the moment it received the indication that the holder was empty.
N.B: When the LED is on, the dishwasher will not proceed to “regenerate”. Should the salt-connection not be plugged in, the Main-board will receive the message that the salt-holder is full, hence the LED will not go on. If the technician had to plug in the connection, the LED will not go on immediately. The Main-board will detect this status, and hence will start calculating from six long “regenerating” cycles, and only following this will the Led go on.If the salt-Led is on, the dishwasher will not proceed to “regenerate” even though the figures indicating the quantity exceeds the limits prescribed by Editor.

Service ManualManual LFT 228-320 - 321
Edition2007.10.15
LanguageEnglish
12
Sparkleing Rinse Agent check via LED
The administering of Sparkling-rinse agents on Model EOS is done through a “Magnetic Read”sensor, mounted right inside the dispenser. It detects the presence or absence of the Sparkle-agent by means of a floating-ball. The User-Interface will read the message and will transmit it directly to the Main-board; which in turn will decide whether or not it should switch the Led on or off at the same time, informing the User-Interface of its decision.
Setting Hard-Water:Whereas in the previous model, the “regenerating” process was done at the end of each washing-cycle (except in the soak-cycle), on model EOS, the regenerating-process depends on the “settings/conditions” of the dishwasher.
Thus when first setting up the dishwasher or whenever the Main-board's being replaced, it's important to set the water-hardness in order to prevent the resines used in the sweetening of the water from being used up and which would lead to bad functioning of the dishwasher.Dishwashers coming out from plants are on default and set on “3” and “30” for the French, and the “regenerating” cycle is done every 65 litres that have been filled up.
When using multi-functional tablets: The water-hardness should always be indicated, as should be done whenever another type of detergent is being used; when multifunctional tablets are being used, the salt-container should always be filled up.
It is recommended not to add salt from 0°f to 10°f.
HOW TO SET WATER-HARDNESS ON THE MACHINEFirst check to see that the dishwahser is not on and that the door is open.1. Switch on the dishwasher on “Power On”.2. Soon after, press button “P” and keep pressed for about 6 seconds. A number relating to the level that as been set will come on display.3. By pressing button “P”, the water-hardness may be modified: 1-2-3-4-5; and by keeping it pressed it will go back repeating 1-2-3-4-5-12-3-...etc.4. Once the selection has been made, a further 10 seconds must be waited till the machine takes up the reading automatically.
NB: The “regenerating” cycle of the resines is not done as frequently as on previous models but as according to the hardness of the water and quantities of water that have gone to fill up the dishwasher, and ONLY where it had been envisaged on certain programmes, therefore not on the “soak cycle”. Should the quantity of water filled up into the dishwasher exceed the quantity established by Editor (consult enclosed Table), once having reached the prescribed-level at the end of the cycle, the dishwasher will automatically proceed with the “regenerating” of resines.

Service ManualManual LFT 228-320 - 321
Edition2007.10.15
LanguageEnglish
13
THE “REGENERATING” PROCESS1. Fill up a certain quantity of water (about 90cc), which will activate the process and fill up electro-valve which will send the
water onto the salt. Consequently the salt-water will be sent onto the resines, and the electro-valves will then close.2. Wait for about 10 minutes.3. Fill up a second quantity of water into the machine (about 190cc) following the same procedures.4. Wait a further 5 minutes.5. Proceed to rinse the resines, allowing one to two litres water to flow over the resines by activating only the fillin-up
solenoid-valve and not the “regenerating” one.6. Finally discharge the water.
NB: Whenever the main-board is replaced, the litre-count important in the administering of water-hardness and sparkling rinse-agent, will be lost and hence the dishwasher must be set again. It may be found that the quality of the sweetener in some cycles has not quite reached optimum level.
Drying Cycle:The drying-cycle is based on the same principle used on models EVO3. In the last stage the dishwasher will rinse up using hot water obtained by activating the heating-element. The water will reach high temperatures, depending on the programme that has been selected: eg it may reach 70°C on certain programmes or it may not even exceed 64°C as on “Baby Cycle”! Following this, the plates will be allowed to drip-dry, with water still in the basins, waiting for the water-vapour on the sides to condensate. The sparkling-rinse agent, introduced by the User has an important function in the drying-cycle, in allowing the water-drops to drip away from the dishes.The drying-cycle does also envisage a certain time-lapse without water in the basins.NB: Optimum results may be obtained when using washing-powder soap and a liquid sparkling-rinse agent.
Blocked Filters:Should the filters be blocked, or should the User introduce a pot having the opening facing upwards, the Pressostat could indicate “empty” status. In this circumstance, the models EVO3 and LVS would move onto Filter-cleaning stage- However this procedure is not available on this model, consequently, the machine will either continue filling up water till the pressostat has reached full status or it will proceed to fill up to 5.5 litres. In the latter case, i.e. 5.5 litres, the LVS will discharge the water and proceed onto the next washing-cycle. Should “blocked filters” still persist, the user could call up saying that the dishes were still dirty at the end of the washing-cycle.
The Call-Center must be advised to recommend:Washing the filtersPlacing pots and pans facing downwards and starting the wash-cycle again.

Service ManualManual LFT 228-320 - 321
Edition2007.10.15
LanguageEnglish
14
CHAPTER 5: COMPONENTS
The Base:The base is in plastic and contains all the functional-parts of the dishwasher as well as acting as support for the wash-basin.Built-in dishwashers are provided with three legs that are for the purpose of levelling out the machine: two are on the fore-front and one at the back in the middle of the machine which is equipped with an adjustable-nut.One of the advantages provided by the new type of base is that it facilitates access to the motor-room from the front-door opening via two locking-hooks.The small Basin placed under the dishwasher, may be removed by unfastening further two hooks and extracting it towards the front part of the machine.NB: Should the hooks that lock the front-door of the base or the basin be damaged, the base has been equipped with self-rivetting screws, which will seal the components well and so avoid having to replace the entire base.
Adjustable Legs:Three legs serve to adjust the height of the machine and to level it out horizontally. The front-panels must be adjusted directly by the leg. The back-leg of the dishwasher may be adjusted by means of a hexagonal screw placed in the middle front part of the machine, under the connecting Hardware-key hole.
“Brushless” Motorpump for Washing-cycle (BLDC):Introduced on machines in the top range. The main feature is its silent motor.Another specific feature of this motor is given by the fact that it is possible to keep control of the rotational speed thus modifying the water-pressure favouring the additionof other options as on this model eg. GOOD NIGHT AND SHORTIME.
Alternate Washing MotorIts principle function is to control the washing in both drives. It pushes the water only towards the upper syphon, and then on the lower one and so forth and so on.If the programme is to last less than an hour, both rotors are made to work simltaneously in order to ensure high quality in the performance. It also permits the User to choose just one rack to wash the dishes in.
Water Heater:The water-heater has been mounted on the Archimedian water-pump.To disconnect or replace the water-heater, one needs only to rotate the Water-heater/motor in an anti-clockwise direction and to draw it out.The “O-Ring” serves to prevent any water-leakages from taking place; so care must be taken when fixing it back into place again and it must often be checked for water-leakages.
Water Stop:Placed at the beginning of the water-pump, it serves to check the inflow of water into the dishwasher, as well as preventing any water from flowing in should there be an anomaly on the machine.The fill-capacity has been reduced to 2.5 litres a minute, thus the filling-time has been prolonged favouring less noise. It is controlled by an eletronic-board by means of a triac.)
Airbreak:The Airbreak is placed on the left-hand side of the machine and its functions are:1.To prevent the water from going back into the water-supply system once it has entered the machine.2.Airbreak (venthole)3.To allow at least 3% unsweentened water to be introduced which will prevent excessive formation of foam.4.To contain the Turbine Litre-count As compared to the former one, this Airbreak does not store any water. It must be remembered that the regeneration-cycle of the resines on this model, differs to the previous one.

Service ManualManual LFT 228-320 - 321
Edition2007.10.15
LanguageEnglish
15
Turbine Litre-count As on Model EVO3, it serves to check the quantity of water that enters the machine. The information in turn is assessed by the pressostat.Every 270 impulses emmitted by the turbine, are equivalent to a litre of water. This calibration has approximately a 2% tollerance margin. When the water-pressure is less than 1 bar, the tollerance-margin is 6%.NB: Should the pressure be less than 0,5 Bar, the turbine reading-detector may not function correctly.
The Regenerating Solenoid-valvc:It has been fixed onto the sweetener and serves to allow the water to flow in through a salt-container which will turn it into salt-water used in turn, to regenerate the resines.
The Pressostat:Even though it is similar to the one on the EVO3 model, it has different calibrations and therefore it's not interchangeable.
The Pressostat Pump: Suitable hooks have been made with the purpose of keeping the pressostat-pump well-fixed, to prevent either fom falling or from filling up with water. It must not be mounted tightly.
Plug and noise-proof filter:Two types of electric-plugs are available: one is for the European market and the other is for the U.K-market. Two types of filters are also available: one is for the synchro-motor and the other for the BLDC-motor: consequently, there are four different types of spare-part codes.
Cable:The cable is specific to each type of dishwasher and may be obtained in pieces from the spare-part warehouses (as is the case in washing-machines and EVO2).
Water-Collector:As compared to EVO3, the basin on this model instead is fixed directly onto the basin by means of 4 screws. It serves to “host” other components as for example: the discharging-pump, unclean-water sensor, Discharging-pipe, Alternate Washing-motor, NTC, Air-break.
Sensor for Unclean Water:Even though it appears to be different, its functions are similar to thoseon model EVO3 i.e. The capacity of understanding to what extent the dishes are dirty and hence the programme to select. It has been placed in the water-collector and is in direct contact with the water.
The Spoiler and Water-Deviator:Serves to supervise over the process of water-suction during the washing-cycle, thus preventing the motor to function without water as well as using glass-filters in all the filtering area.

Service ManualManual LFT 228-320 - 321
Edition2007.10.15
LanguageEnglish
16
Discharging Pipe:The discharging-pump is sealed by compression to the water-collector and is fastened into place by means of two O-Rings. It is prevented from unhooking by means of a pipe fixed across a mechanical blocking device placed transversely on the bottom at the back of the dishwasher.
Hinges:Hinges assembled on built-in products are self-balanced through a wooden panel (or other material) weighing from between 2 to 8 kg.The right-hand side hinge differs to the left-hand side one and may be easily dismantled andviceversa as compared to the previous models. They are mounted between the dish-rack and the plastic supporting-device.
Discharging Pump:The Archimedian Discharging-pump is not completely mounted hence the driving water- palletes will be uncovered. It should be mounted directly onto the water-collector. The discharging-pipe is attached directly onto the water-collector and not onto the pump, as was the case on previous models.A small hole has been made on the upper part where the discharging-pump is to be fixed, for the purpose of preventing water-bubble formations, that would make the dishwasher work without driving water.
Detergent Dispenser:It is similar to the EVO3 in appearance and functioning. It works on a double-click withdrawing system: the first opens the “door” and the second “double” pours in the sparkling-rinse agent.
Leak-Proof Floating Ball:Different in apearance but similar in working to the one mounted on EVO3.However, electrically speaking, it's normally closed, as compared to the one on EVO3.Should it be activated whilst having water in the basin (via the electric-switch), the LVS will proceed to discharge the water and will give the alarm reading:”Overflow”.
Filters:There are three filters: the first (1) is in stainless steel, flat and larger than the ones on previous models, in order to prevent it from blocking up easily.The second (2) has a glass-shape, similar to the one on the previous model; and the last (3) viz. the Microfilter which isn't self-rotating but fastened.A small “spoiler” has been introduced right in the water-collector with the purpose of allowing these two last filters to draw water from the entire area around them.

Service ManualManual LFT 228-320 - 321
Edition2007.10.15
LanguageEnglish
17
Further Components:Other components are different in appearance but have the same functions as the ones on the previous model EVO3. This does not necessarily mean that they are interchangeable, as their techinical features are quite different eg. as in the Pressostat.
(1) The Brushless motor cannot be controlled. The motor is controlled by an electronic-main-board inside.(2) Thermo-protector: 95°C +/-5°C - Thermofuse 206C +/- 10°C(3) Thermo-protector: 95°C +/-5°C - Thermofuse 206C +/- 10°C (4) Thermo-protector: 95°C +/-5°C - Thermofuse 206C +/- 10°C
Electric Component
Volts Frequency Watts Ohm Amp
Electric-valve charge
220/240 50/60 Hz +/- 8 W 3720 Ω 0,03
Electric-valve Water-stop
220/240 50/60 Hz +/- 8 W 4130 Ω+/-10% (20°C)
0,03
Electric-valve Regenerator
220/240 50/60 Hz +/- 7W 4109 Ω 0,02
Solenoid-Dispenser
220/240 50Hz --- 1619 Ω 0,03
Discharging Pump
220/240 50Hz 26 W 216 Ω +/-7% 0,19
Synchro-heating element (all
mkts)(3)
220/240 50Hz 1800 W+/-5% 29.2 Ω +/-5% 8
Synchro-heating element (UK)(2)
220/240 50Hz 1800 W+/-5% 31,8 Ω+/- 5% 8
Heating-element BLDC
220/240 50 Hz 1800 W+/-5% 31.5 Ω +/- 5% 8
Brushless Motor(1)
---- --- ---- ---- ----

Service ManualManual LFT 228-320 - 321
Edition2007.10.15
LanguageEnglish
18
CHAPTER 6: ELECTRIC-CIRCUIT (ELC PLATFORM)
BRUSHLESS MOTOR (BLDC)
Table of captions: A Supply network F Washing Water-element P Turbine Litre-Count B Noise-proof Filter G Thermo-protector (95°C) Q Alternate Wash-motor C Door switch H Discharge Pump R Soiled water sensor D Pressostat I Wash motor-Pump S Dispenser solenoid valve
1 Conventional L Read salt T Interfacing 2 Full M filling up solenoid-valve U Read Sparkling-Rinse ag. 3 Empty N Regenerate solenoid valve V NTC
E Thermofuse (206°C) O “Overflow” Switch
CHAPTER 7: ASSISTANCE
7.1 DEMO MODEAs usually is the case, Demo mode is normally not envisaged on machines having Interfacing LED (on lower range) or
on completely built-in models.
7.2 SELF-TESTThe recent electronic EOS models have not been envisaged with the long Self-test mode that is familiar to us as “ROD”,
it simply permits to perform the SAT test, viz a shorter procedure which will be explained how to activate further on.
Service ManualManual LFT 228-320 - 321
Edition2007.10.15
LanguageEnglish
19
7.2.1 ACTIVATION OF SELF-TEST PROCEDURE “SAT”The machine must be off and the door must be opened:1. Switch on the dishwasher (Press On/Off button)2. Switch off the dishwasher(Press On/Off button)3. Keep button “P” pressed for 3 seconds till a “beep” is heard.4. Switch on the dishwasher (Press On/Off Button, the Led will flash slowly and on the Digit display the number
“2” will appear constantly.5. Close the door, and after 4 seconds a “Beep” will be heard again and the Self-Test procedure will start
automatically after 6 seconds.NB: Should the door be opened during the Self-test procedure, the dishwasher will keep running and consequently the On/Off Led and the figure “2” on the digit display will stay on.
7.2.2. PROCEDURE FOLLOWED BY THE MACHINE
Should the machine not have registered any fault on “Last Fault” in its memory, then once the Self-Test has been started the machine will follow these steps:
1. Discharge till Pressostat is empty + 30 seconds2. Position to “zero” Alternate Washing-Motor (both drives must be open)3. Static filling up of 3.1litres of water4. Dynamic filling up of 1.1 litres of water 5. Functioning of washing-pump for 60 seconds with pressostat-rabbocco, maximum total filling up up to 5.5 litres of water.6. The washing-pump stops.7. Activation of water-heater for 10 seconds8. Activation of Dispenser for 10 seconds.9. Activation ofwahing-pump for 10 seconds.10. Activation of regenerating solenoid-valve for 15 seconds (on its own)11. Empty discharge of Pressostat + 5 seconds.12. Activation of “Turbo-Dry” for 10 seconds(only if envisaged on the machine otherwise it will stay on standby for
10 seconds.13. It will activate the discharge-pump and the charging electro-valve simultaneously for 20 seconds (Airbreak in line with
the production in order to empty out the hydraulic circuit.
Should the dishwasher detect a fault during the Self-test procedure, it will stop and the fault will be seen on the Digit-display.
Whereas, should the machine have registered a Fault on the memory “last Fault”, once the “Self-Test” procedure has been activated, the machine will display the fault for the first 15 seconds, folowing this the procedure described above will be taken up.
The Fault will be cancelled at the end of the Self-Test procedure. On the contrary, should the Self-test procedure be interrupted during performance the last Fault will be displayed on the memory and will be displayed again when the dishwasher takes up the Self-test again.

Service ManualManual LFT 228-320 - 321
Edition2007.10.15
LanguageEnglish
20
7.2.3. HOW FAULTS ARE DISPLAYEDDishwashers envisaged with a Digit Display, will show the fault in writing on the digit-display as for example Fault 05 will display number “5” which will flash and so with Fault “11” so forth and so on.
7.2.4. THE FAULT-TABLE

Service ManualManual LFT 228-320 - 321
Edition2007.10.15
LanguageEnglish
21
7.3 PC, PALM, SMART READERElectronic dishwasher models EOS have been envisaged with a Main-board DEA 601; which has been evolved from the DEA 600 used on Seven Digit machines.Two types are available: one used on LVS with synchro-motors and another on machines with BLDC motors. In Built-In dishwashers, the Main Board is accessible by removing the hooks fastening the front-panel (under the machine) and opening it. The Main-Board is to be found at the back of the panel and is fastened by a clicking-device. In order to remove it, it issufficient to slightly press the board on the side of the connectors.
How is the Main-board administered?The Main-board comes unprogrammed, consequently, those markets that donot have at their disposal Palms or Pcs, a Smart Card, specific to the model, as well as the Main-board will be provided to the technicians on request to the spare-part warehouses. It ill not be deemed necessary to use Eeprom. The Setting-File will be registered directly onto the micro-processor of the main-board. The main-board will need to be fitted, strictly adhering to safety-regulations, and then only can it be programmed. In each and every case it is highly recommended to consult relating literature on use on programming-device which is being used.
Important:On having completed work on the Main-board, the front door panel must be well closed; careful attention must be paid that the Main-board wires donot get caught in the mechanical working of the floating-ball, which could block it.

Service ManualManual LFT 228-320 - 321
Edition2007.10.15
LanguageEnglish
22
CHAPTER 8: DISMANTLING
Detergent Dispenser:1. Unfasten the 2 screws placed on the sides of the innerdoor and remove the Frontpanel.2. Unfasten the 2 screws placed infront of the door, behind the external finished panel.3. Disconnect the dispenser cables and unscre the 6 screws that fix it to the inner door-panel.4. Remove by lifting the dispenser from the inner door-panel.
Display Board:1. Unfasten the 6 screws placed on the inner-door panel.2. Disconnect the cables from the display-board.3. Press by means of a flat-tipped screw-driver the “wedge” which fixes a group of commands of the board-display,
in order to remove it by lifting it.4. Repeat th whole procedure with the screw-driver on the other “wedge”, in order to remove the support.
Inner-Door and Hinges1. Proceed dismantling the front-panel.2. Proceed dismantling following steps described in dismantling the display-board3. Insert a screw-driver in the hinge-hole (on both sides of the machine) in order to block the half-open door
(for safety reasons)4. By means of pliers, remove the tirante by making it turn in the hole where it is fixed.5. Remove the ground-fastonwhich is connected to the hinge.6. Unfasten the 4 lateral screws (2 on each side) that fix the hinges on the inner-door and remove.7. Remove the inner-door by lifting it.8. Disconnect the ground-fastons on the hinges.9. Unfasten the screws (one on the left and one on the right) in the machine, which fix the hinges onto the wash-basket.10. Unfasten the 4 screws (2 on each hinge), fixing the hinges onto the base of the dishwasher.
Pressostat1. Unfasten the 4 screws (2 on the front and 2 behind) fixing the side-panel to th back of the machine.2. Unhook the panel with the aid of a flat-tipped screw-driver (2 hooks are present: one is on the front of the machine
an one is at the back.3. Remove the pressostat with the aid of a flat-tipped scre-driver.4. Disconnect the pressostat cable.NB: Care must be taken that th tube is correctly positioned back onto the hooks whn assembling the pressostat .
Floating-ball1. Remove the board taking care not to disconnect the cable.2. Unhook the floating-ball by unfastening the hook and removing it in the direction of the water-collector.3. Disconnect the connector of the floating-ball.
Noise-proof filter and Support:1. Unfasten the 4 screws (2 on the front and 2 at the back) fixing the lateral right-hand side panel.2. Pull out the filter by moving it along the support-grooves.3. Disconnect the nise-proof cable.4. Insert a small screw-driver or tester in the hole positioned next to the support in order to lift the hook fixing the
support in place, and allow it to slide in the direction indicated by the arrow. NB: Pay caution to the cable when dismantling and re-assembling.
Service ManualManual LFT 228-320 - 321
Edition2007.10.15
LanguageEnglish
23
Charging-and-discharging Pipe:1. Unfasten the 4 screws (2 on the front and 2 at the back) fixing the right hand side-panel and remove it.2. Turn the machine upside-down.3. Remove the basket by unhooking the “teeth” blocking the lower support fixing the pipes and pulling it out towards
the front part of the dishwasher.4. Insert a sharp-end screw-driver and attempt to unhook the wedge fixing the support fixing the pipes into place.5. Lift the cover and pull out.6. Pull out the discharge-pipe which has been positioned into place under pressure.7. Remove the tape fixing the charging pipe to the Airbreak and pull out.
Airbreak and Sweetener:1. Unfasten the 4 screws (2 on the front and 2 at the back) fixing the right-hand side-panel and remove it. 2. Unfasten the metal-ring fixing the Airbreak to the dish-rack of the LVS.3. Pull out the connector from the Turbine Litre-count .4. Pull out the Airbreak.5. Remove the tape fixing the pipe onto the Airbreak.6. Unscrew the top and the metal-ring of the sweetener.7. Disconnect the the regenerating-valve and free the sweetener from the supporting-hook.8. Turn the sweetener by lifting it so that it can be removed sideways.
NB: Caution must be paid to the Airbreak Charging-pipe: it should be pushed towards the inside of the base inorder to prevent the sweetener to fall out.
9. Disconnect the salt reading-module.10. Remove the tape fixed onto the water-collector sweetener.11. Remove the sweetener.
Water-Collector:1. Remove the filters and the lower rotor.2. Unscrew the 2 pipe support-screws for the upper drive in order to uncouple the parts.3. Unscrew the 4 screws on the water-collector metal-ring and extract.4. Turn the machine upside down and unhook the basket.5. Proceed with the dismantling the alternate washing-motor.6. Proceed with the dismantling of the electro-washing pump.7. Extract the discharging pipe and unscrew the discharging pump.8. Disconnect the conductivity sensor.9. Remove the NTC.10. Extract the water-collector.
Top Rotor Drive:1. Remove the racks.2. Remove the filters and lower rotor-drive3. Unscrew the 2 screws from the top rotor-drive pipe-support to uncouple the parts.4. With the aid of a flat-tipped screw free the top rotor-drive pipe-system .

Service ManualManual LFT 228-320 - 321
Edition2007.10.15
LanguageEnglish
24
Washing Electro-pump1. Turn the machine upside-down.2. Unhook the basket3. Unhook the floating-ball4. Unfasten the tape using pliers5. Pull out the electro-pump by removing the rubber-support.6. Disconnect the ground heating-element.7. Disconnect the supply-element8. Diconnect the motor feed-back cable9. Disconnect the motor-supply.10. Pull out the electro-pump.
Dismantling the motor:
1. Turn the machine upside-down.2. Unhook the rack3. Extract the adjustment-rod of rear leg.4. Unfasten the tape and extract the alternate washing motor-pipe5. Unfasten the motor-clamp.6. Remove the alterante washing-motor, paying attention to the fastening O-Rings.

Service ManualManual LFT 228-320 - 321
Edition2007.10.15
LanguageEnglish
Service ManualManual LFT 228-320 - 321
Edition2007.10.15
LanguageEnglish
E
Related Documents