6922 Hollywood Blvd ▪ Hollywood CA 90028 ▪ tel: 323.860.9200 ▪ fax: 323.860.9201 DISASTER-RECOVERY USER GUIDE VERSION: 7.93 AUTHOR: j2 Cloud Services, Inc. DOCUMENT RELEASE DATE: June, 2018 SOFTWARE RELEASE DATE: June, 2018

Welcome message from author
This document is posted to help you gain knowledge. Please leave a comment to let me know what you think about it! Share it to your friends and learn new things together.
Transcript
6922 Hollywood Blvd ▪ Hollywood CA 90028 ▪ tel: 323.860.9200 ▪ fax: 323.860.9201
DISASTER-RECOVERY
USER GUIDE
VERSION: 7.93
AUTHOR: j2 Cloud Services, Inc.
DOCUMENT RELEASE DATE: June, 2018
SOFTWARE RELEASE DATE: June, 2018

Legal Notices
© 2018 j2 Global, Inc. and affiliates. All rights reserved. eFax Secure™ is a trademark of j2 Cloud Services, Inc.
These materials are confidential and access-restricted. Use and distribution is limited solely to authorized personnel and select j2 partners.
j2 Cloud Services, Inc. strictly prohibits the use, disclosure, reproduction, modification, transfer, or transmittal of these materials for any
purpose in any form and by any means without prior written permission.
Trademark Notices
Microsoft is a registered trademark, and MS-DOS, Windows, Windows 95, Windows NT, SharePoint, and other Microsoft products referenced herein are trademarks of Microsoft Corporation. UNIX is a registered trademark of The Open Group. AvantGo is a trademark of AvantGo, Inc. Epicentric Foundation Server is a trademark of Epicentric, Inc. Documentum and eRoom are trademarks of Documentum, a division of EMC Corp. FileNet is a trademark of FileNet Corporation. Lotus Notes is a trademark of Lotus Development Corporation. mySAP Enterprise Portal is a trademark of SAP AG. Oracle is a trademark of Oracle Corporation. Adobe is a trademark of Adobe Systems Incorporated. Novell is a trademark of Novell, Inc. Stellent is a trademark of Stellent, Inc. Android is a trademark of Google Inc. All other trademarks are the property of their respective owners.
Disaster-Recovery Guide Table of Contents
Version: 7.93 Page i © 2018 j2 Global®, Inc. and affiliates (collectively, “j2”). All rights reserved.
TABLE OF CONTENTS
Support .................................................................................................................................................................. 1
Part 1: Plan and Prepare for Disaster Recovery ...................................................................................................... 2
Chapter 1: Introduction to Disaster Recovery ............................................................................................................ 2
Chapter 2: Plan for Disaster Recovery ....................................................................................................................... 4
Chapter 3: Practicing Disaster Recovery .................................................................................................................. 11
Part 2: Disaster-Recovery Scenarios .................................................................................................................... 30
Chapter 4: Recover a Windows Server ..................................................................................................................... 30
Chapter 5: Recover an Exchange Server on Windows 2003 ..................................................................................... 46
Chapter 6: Recover an Exchange Server on Windows 2008 (and Later) .................................................................. 63
Chapter 7: Recover an SQL Server ............................................................................................................................ 78
Chapter 8: Recover a Virtual Machine ..................................................................................................................... 95
Chapter 9: Recover a Windows 2003 Small-Business Server ................................................................................. 104
Chapter 10: Recover a DPM Server ........................................................................................................................ 120
Appendix A: Disaster-Recovering Planning Worksheets .................................................................................... 129
Basic Computer Information .................................................................................................................................. 129
Drive Letter Information ........................................................................................................................................ 129
Domain Information .............................................................................................................................................. 130
Application Information ......................................................................................................................................... 130
LiveVault Information ............................................................................................................................................ 130
Appendix B: Restore a Domain Controller .......................................................................................................... 132
Determine the Global Catalog Server .................................................................................................................... 132
Determine If a Global Catalog Server exists........................................................................................................... 133
Repair the SYSVOL information.............................................................................................................................. 133
Perform an Authoritative Restore .......................................................................................................................... 134
Seize the Five FSMO Roles...................................................................................................................................... 135
Delete (DEMOTE) the Other Comain Controller (ITSTORAGE) ............................................................................... 136
Disaster-Recovery problems Observed But Not Fully Diagnosed ........................................................................... 136
Appendix C: Authoritative System-State Restore .............................................................................................. 137
Terminology ...................................................................................................................................................... 142

Disaster-Recovery Guide Support
Version: 7.93 Page 1 © 2018 j2 Global®, Inc. and affiliates (collectively, “j2”). All rights reserved.
SUPPORT
To access j2 LiveVault® Customer Support by email or phone
Phone
US toll free: 844-LIVE-VLT (844-548-3858) US direct: 508-422-7624 Europe: +44 12 082 12038
Part. 1: Plan and Prepare for Disaster Recovery Chapter 1: Introduction to Disaster Recovery
Page 2 Version: 7.93 © 2018 j2 Global®, Inc. and affiliates (collectively, “j2”). All rights reserved.
PART 1: PLAN AND PREPARE FOR DISASTER RECOVERY
The following chapters guide you through the planning stages for disaster recovery―and for practicing the disaster-recovery procedures by performing test recoveries.
What do you want to see?
Chapter 1: Introduction to Disaster Recovery.
Chapter 2: Plan for Disaster Recovery
Chapter 3: Practicing Disaster Recovery
CHAPTER 1: INTRODUCTION TO DISASTER RECOVERY
Recovering an entire computer is a disaster recovery. You can perform a disaster recovery of your computer in the event of a disaster, such as a hard-disk failure or corruption, the inability of the operating system to start, a corrupted operating system, or a physical machine loss.
A disaster recovery includes rebuilding the server, reinstalling the operating system, then restoring all the data, as well as the system state that was backed up with LiveVault. The restoration includes the full operating system with configuration information, your applications and configuration information, and all of your data―provided this information was backed up.
ASSUMPTIONS
The following assumptions are made in this guide.
You configured your backup to protect the system state, system volume, all other volumes, directories and files, and their databases and applications.
IMPORTANT! It is critical to protect and back up the system state and the system volume, as well as all
data volumes (with the exception of certain files and directories that are excluded) to ensure the success of
the disaster recovery. (For more information about excluded files, see the Automatic and Recommended Backup Exclusions help topic in the LiveVault Web-Management Portal help system.)
For application-aware servers (such as Exchange, or SQL, Server), you configured Exchange or SQL Server backup policies to protect the databases (at a similar point in time)―to configuring system-state and file-system backup.
You completed the initial synchronization completed for the computer. (LiveVault can restore only files, directories, system state, and metadata that you have backed up with LiveVault.)
You have the encryption-key password for the original computer’s LiveVault agent software.
IMPORTANT! You must remember this password. It is critical to perform a disaster recovery.
All Windows functions worked before the disaster occurred.
All database, and application, functions worked before the disaster occurred.
For Windows Server 2012 (and later) data-deduplicated volumes, you configured backup to protect the volume(s) as optimized or unoptimized. (For more information on Windows Server data-deduplicated volumes, see your Windows Server documentation. For more information on protecting these volumes with LiveVault, see the LiveVault Agent Guide or the LiveVault Web-Management Portal help system.)
Chapter 1: Introduction to Disaster Recovery Part 1: Plan and Prepare for Disaster-Recovery
Version: 7.93 Page 3 © 2018 j2 Global®, Inc. and affiliates (collectively, “j2”). All rights reserved.
DISASTER-RECOVERY CONSIDERATIONS
MICROSOFT CLUSTER-SERVER (MCSC) CLUSTER NODE
Disaster recovery for cluster nodes is not supported. Instead, rebuild the computer, then submit a restore request for the computer's data.
LINUX AGENTS
Disaster recovery for Linux agents is not supported.
MICROSOFT SMALL-BUSINESS SERVER (SBS)
Disaster-recovery support of Small-Business Server (SBS) is limited to SBS 2003 only.
WINDOWS STORAGE SERVER
Disaster recovery of the Windows Storage Server is not supported or recommended.
Due to differences in the hardware supplied by original-equipment manufacturers (OEMs), LiveVault recommends that you configure backup to protect volume and folder data only. Do not configure backup to protect the system state and operating-system volume.
To recover a Windows Storage Server computer, rebuild the computer with the assistance of your OEM; then submit a restore request for the computer's data.
SQL SERVER WITH ALWAYSON AVAILABILITY GROUPS
Disaster recovery for cluster nodes participating in a SQL Server AlwaysOn Availability Group is not supported.
For an AlwaysOn Availability Group node, rebuild the computer, install SQL Server, add the node to the availability group, and allow SQL to replicate the databases to the rebuilt node.
If more than one node of the availability group has failed or the SQL data cannot be replicated, rebuild the nodes, then submit a restore request for the SQL data. After the SQL data is restored, add the database(s) to the availability group; and allow SQL to replicate the databases.
(For more information, see your Windows documentation and SQL Server documentation.)
RECOVER A VMWARE COMPUTER
If your VMWare host fails, recover the host before you recover the guest operating systems.
If you are recovering a VMware virtual machine backed up with a virtual-machine backup policy, recover the virtual machine to the vCenter. (For more information, see Chapter 8: Recover a Virtual Machine.)

Part 1: Plan and Prepare for Disaster Recovery Chapter 2: Plan for Disaster Recovery
Page 4 Version: 7.93 © 2018 j2 Global®, Inc. and affiliates (collectively, “j2”). All rights reserved.
CHAPTER 2: PLAN FOR DISASTER RECOVERY
This chapter has information you need BEFORE you start the disaster-recovery process. It includes gathering specific as-built-configuration information and selecting the correct disaster-recovery procedure for your scenario.
NOTE: Because several disaster-recovery procedures differ in the details, your disaster-recovery scenario
may require additional configuration.
Identify the disaster-recovery procedure in this guide that best matches your situation, then print that chapter to use as a checklist.
GATHER AS-BUILT CONFIGURATION INFORMATION
In preparing and planning for a disaster, you must gather and record the following information―for each original computer―into an as-built profile.
NOTE: It is good practice to keep complete (as possible) as-built information (i.e., profiles) for your
computers. Keep them in a separate location for easy retrieval in the event of a disaster or failure. (See
Appendix A: Disaster-Recovery Planning Worksheets for assistance in recording as-built
configurations.)
Each profile should include
Operating system version (for example, Windows Server 2012)
Operating system edition (for example, Windows Server 2012 Enterprise Edition)
Windows installation directory (for example, C:\Windows)
Windows Service Pack version (for example, Windows 2008 Enterprise Server with SP 1.)
Hardware configuration, including:
o Whether dual NICs are configured
o The computer name and domain membership
o Video card and video bus
NOTE: You cannot recover a computer with an AGP card to a computer with a PCI-based card,
and vice-versa.
Disk subsystem – Gather disk and volume information, including:
o Volumes and drive letters (for example, C:, D: and E:)
o Size of each volume.
o Volume file-system information (for example, NTFS or resilient file system [ReFS] on Windows Server 2012 and later)

Part 1: Plan and Prepare for Disaster-Recovery Chapter 2: Plan for Disaster Recovery
Version: 7.93 Page 5 © 2018 j2 Global®, Inc. and affiliates (collectively, “j2”). All rights reserved.
Volume data-deduplication information – For Windows Server 2012 (and later) computers:
o Determine if the data-deduplication role exists.
o Determine which volume(s) are optimized for data deduplication.
During the rebuild of the deduplicated volumes: Record the drive letters of volumes optimized for data deduplication, for future reference.
Primary, or backup, domain controller – Determine if the computer is a primary, or backup, domain controller. Also:
o Determine if Windows Active Directory is installed.
o Record the Active Directory structure, including portion/subtree names.
Applications – Gather information about all installed applications on the computer; and verify that all database, and application, functions work.
Internet Information Services (IIS) components.
o For Windows 2003 computers, determine if IIS components are installed.
o For Windows 2008 (and later) computers, determine if the Web Server Role is added.
Roles and Features – For Windows 2008 (and later) computers, determine which roles and features are installed.
Local administrator’s password
Domain administrator’s password
Original Installation-media information – Is important because, if a computer was installed with LiveVault disks (for instance), then a disaster recovery to a Dell computer can fail.
Location of systemroot when the system-state backup was taken. (By default, this is C:\Windows.
See your Microsoft documentation for more information on recovering a computer with a nonstandard location for systemroot.)
Location of the LiveVault agent-software installation – Record the installation location of the LiveVault agent software.
LiveVault encryption-key password – You must record the LiveVault encryption-key password from the original computer in order to plan for a disaster recovery.
NOTE: If you do not remember this password, you won’t be able to provision the recovery computer
while performing the disaster recovery.
Determination on if the virtual machine still exists in vCenter – For virtual machines protected by virtual-machine backup policies, determine if the original virtual machine you wish to recover still exists in the vCenter. If it does, the recovery will fail unless you select specific options to overwrite the virtual machine.
For more information, see Chapter 8: Recover a Virtual Machine.

Chapter 2: Plan for Disaster Recovery Part 1: Plan and Prepare for Disaster-Recovery
Page 6 Version: 7.93 © 2018 j2 Global®, Inc. and affiliates (collectively, “j2”). All rights reserved.
REQUIREMENTS FOR DISASTER RECOVERY
The items in this section are required for any disaster-recovery process.
Replacement hardware for the recovering computer (This may include replacement drives, or newly built server hardware.)
As-built configuration information from the original computer (For detailed information on gathering the as-built configuration, see Gather As-Built Configuration Information.)
The LiveVault encryption-key password from the original computer
The LiveVault agent software to install on the recovering computer – Obtain the latest LiveVault agent software from the LiveVault Web-Management Portal.
LiveVault account credentials – Use your LiveVault service username and password during the installation of the agent software.
You must also verify configuration information (as stated in the next section).
VERIFY CONFIGURATION INFORMATION
Before beginning the disaster-recovery process for a failed computer, verify the following information:
The as-built hardware configuration – If you are using new hardware, ensure you have the original computer's hardware and operating system’s “as-built” configuration information.
The correct operating-system version – Have the appropriate operating-system installation (for example, Windows Server 2012 Enterprise Edition).
IMPORTANT! This must be the same operating-system version and edition that was on the computer
before the disaster occurred, preferably from the original media that came with the hardware itself.
NOTE: If you use a virtual machine as the recovering computer, ensure that you either freshly install the
correct operating system or that your virtual-machine template meets all of the as-built configuration
requirements necessary to perform the disaster recovery. Failure to use a clean virtual machine or template
may compromise the disaster recovery.
Remove conflicting software:
NOTE: Please ensure that these services have been reverted back to their normal settings before enabling them or restarting them again.
o Windows Defender needs to be removed. o Windows Update Service needs to be stopped. o Disable Windows Module Installer Service if it’s present. Note that in Windows 2016,
Windows Module Installer is on by default.

Part 1: Plan and Prepare for Disaster-Recovery Chapter 2: Plan for Disaster Recovery
Version: 7.93 Page 7 © 2018 j2 Global®, Inc. and affiliates (collectively, “j2”). All rights reserved.
VMware – If you are recovering a VMware operating system backed up with a standard backup policy, it must be a guest computer, not the VMware host. If your VMware host fails, you must recover that separately before recovering the guests.
NOTES:
If you use a virtual machine as the recovering computer, ensure that the recovering virtual
machine has the same level of virtual-machine tools as the original computer.
If you are recovering a VMware virtual machine backed up with a virtual-machine backup policy,
recover the virtual machine to the vCenter. (For more information, see Chapter 8: Recover a Virtual Machine.)
Restore method – Determine if data and system-state will be delivered on a restore device or over the Internet.
NOTES:
A media restore device is used when you do not have a TurboRestore Appliance or sufficient
bandwidth to retrieve all the data from the offsite vaults over the Internet. The device lets you
restore your data at LAN speed.
In some instances, if the amount of data is small and your bandwidth is sufficient, you can restore
the data over the Internet. If the amount of data is large, it can take many days to restore over
the Internet. Having a restore device shipped to you is better for your needs. This device can
usually be shipped in two to three days, depending on the build time and shipment method.
Knowing how fast and how much data can be retrieved across the internet in a timely way should
be tested out in advance by using test data restores and the network-usage report.
Ordering a media restore device incurs an additional charge. For more information, see your
contract.
Current, or historic, backup version – Determine if you want to restore the most current version of the data―or a historic version.
NOTES:
If a hardware crash led to this disaster, most likely the hardware was experiencing problems for
days or weeks before the actual crash. Select a version that occurred before any hardware
problems became apparent.
If possible, start the original computer in safe mode and check the logs (for example, the system-
application log).
Verify if input/output (I/O), permissions, or disk errors are evident in the days preceding the
disaster. If possible, select a version that you backed up before these errors started to occur.
Chapter 2: Plan for Disaster Recovery Part 1: Plan and Prepare for Disaster-Recovery
Page 8 Version: 7.93 © 2018 j2 Global®, Inc. and affiliates (collectively, “j2”). All rights reserved.
SELECT THE CORRECT DISASTER-RECOVERY PROCEDURE
Although the general preparation stated above applies to almost any disaster-recovery scenario, specific disaster-recovery procedures can differ, depending on the following conditions:
The operating system on the original computer
The type of server are you backing up
The backup-policy types you used to back up the original computer
The applications you are recovering
DISASTER-RECOVERY SCENARIOS
The following chapters provide different types of disaster-recovery procedures, depending on the operating system you are using and what type of server you are recovering.
To recover a… See…
Test recovery with non-production machines
“Test the Disaster-Recovery Scenario” (part of Chapter 3: Practicing Disaster Recovery).
Windows Server Chapter 4: Recover a Windows Server
Exchange Server on Windows 2003 Chapter 5: Recover an Exchange Server on Windows 2003
Exchange Server on Windows 2008 and later Chapter 6: Recover an Exchange Server on Windows 2008 (and Later)
SQL Server Chapter 7: Recover an SQL Server
VMware virtual machine backed up with a virtual-machine backup policy
Chapter 8: Recover a Virtual Machine
Windows 2003 Small Business Server (SBS) Chapter 9: Recover a Windows 2003 Small-Business Server
Data Protection Manager (DPM) Server Chapter 10: Recover a DPM Server
To recover a specific server, only print out the chapter you need; and use it as a checklist.
PRACTICE THE DISASTER-RECOVERY PROCEDURE
BEFORE it’s needed, LiveVault recommends that you practice the disaster-recovery procedure by performing disaster-recovery tests with non-production servers―and LiveVault also strongly recommends that you practice these tests in an environment isolated from your production environment, where you can simulate different failure scenarios and recoveries.
IMPORTANT! Performing a disaster-recovery test with test machines differs, in several respects, from a real
disaster-recovery situation in a production environment. HOWEVER, it is important that you use the correct
procedure when performing the real disaster recovery. (For more information, see “Select the Correct Disaster-
Recovery Procedure” [part of Chapter 2: Plan for Disaster Recovery].

Part 1: Plan and Prepare for Disaster-Recovery Chapter 2: Plan for Disaster Recovery
Version: 7.93 Page 9 © 2018 j2 Global®, Inc. and affiliates (collectively, “j2”). All rights reserved.
COMMON CAUSES OF SYSTEM-RECOVERY FAILURE
There are many factors to achieving a successful disaster recovery, and some difficulties can arise if there are mismatches or oversights in configuration (as stated in the next two sections).
HARDWARE MISMATCHES ON THE RECOVERING COMPUTER
When performing the recovery to the recovering computer hardware, the following mismatches are the most common causes of system-recovery failure:
Hardware-abstraction layer (HAL; to find the HAL, go to Computer Management>Device Manager > Computer.)
Video card
RAID device
Keyboard type (PS/2 or USB)
Mouse type (PS/2 or USB)
As-built information required for recovery
Operating-system version, edition, and service pack
Drive letters
Virtual-machine state or virtual-machine tools installation
Ensure that you verify the as-built configuration of the original computer and match the recovering computer to it as close as possible.
Conditions on the Recovering Computer
The following conditions commonly cause a disaster recovery to fail. (When this happens, you must start the disaster-recovery process from the beginning.)
Failure to protect the entire system volume, plus system state, for the original computer – Ensure that you protect the entire system volume (usually, C:) plus the system state.
Failure to build the recovering computer with the same operating-system version and edition – Ensure that you build the recovering computer to the specifications of the as-built configuration.
Failure to perform the required disaster-recovery steps in order – Ensure that you perform the steps in order. That is, do not skip any steps, unless instructed to do so.
Incorrect path to the LiveVault agent software during installation – Ensure that the path to the LiveVault agent software matches the original computer's path. For example, if the original computer's software installation was to C:\Program Files\Autonomy\BackupEngine and D:\LiveVaultData―then ensure that you install the software to the same locations on the recovering computer. Failure to do so will cause the restore of the system state to fail.
NOTE: By default, the installation program installs the LiveVaultData directory to the volume with
the largest amount of free disk space.
Chapter 2: Plan for Disaster Recovery Part 1: Plan and Prepare for Disaster-Recovery
Page 10 Version: 7.93 © 2018 j2 Global®, Inc. and affiliates (collectively, “j2”). All rights reserved.
Insufficient disk space on the recovering computer – Ensure that the recovering computer has sufficient disk space on each volume.
Not using the same drive letters – Ensure that the recovering computer’s drive letters are configured to be identical to the original computer’s as-built configuration.
Different Netbios name of the recovering computer – Ensure that the Netbios name of the recovering computer is the same as the original computer.
Not having the same workgroup membership – Ensure that the recovering computer is a member of the Workgroup during the disaster-recovery process.
Failure to start in Directory Services Recovery Mode (DSRM) – Ensure that the recovering computer starts in DSRM before performing the restore.
Not knowing the LiveVault encryption-key password – Ensure that you have the encryption-key password from the original computer. If you don’t know/remember it, you won’t be able to provision the recovering computer while performing the disaster recovery.
NOTE: The encryption-key password may have been escrowed with LiveVault at the point of the
original computer’s installation. Contact LiveVault Support to verify this and to request the password.
The recovering computer is a virtual-machine template of unknown state – Ensure that any virtual machines or templates that you use as a recovering computer meet all of the as-built configuration parameters as the original computer. This includes operating-system version, service-pack level, file systems, and any virtual-machine tools. (For more information, see Verify Configuration Information
Cancellation of a disaster-recovery restore job – Cancelling a running disaster-recovery restore job leaves the recovering computer in an inconsistent, unstable state. If you must cancel a running restore job, you must start the disaster recovery from the beginning.
Part 1: Plan and Prepare for Disaster Recovery Chapter 3: Practicing Disaster Recovery
Page 11 Version: 7.93 © 2018 j2 Global®, Inc. and affiliates (collectively, “j2”). All rights reserved.
CHAPTER 3: PRACTICING DISASTER RECOVERY
LiveVault strongly recommends that you practice the disaster-recovery procedure in an environment isolated from your production environment and network, where you can simulate different failure scenarios and recoveries.
IMPORTANT! Performing a disaster-recovery (DR) test differs in several important aspects from a real
disaster-recovery scenario in a production environment. Disaster-recovery tests are more difficult and complicated
because of the requirement to isolate your test server and network from your production servers and network.
Failure to properly isolate your test system from your original production systems during a DR test will result in the
recovered system assuming the identity of the original system within your production environment and possibly
compromising your production environment.
It is important that you use the correct disaster-recovery procedure when performing the real disaster recovery.
For more information, see “Select the Correct Disaster-Recovery Procedure” (part of Chapter 2: Plan for Disaster
Recovery) on page 8.
WARNINGS!
Do NOT use the recovering machine during the restore process (e.g. RDP/connect to, change files, start
applications etc..,) or do anything with the machine until AFTER you reboot it for the first time, following the
restore.
In addition, BEFORE the restore begins, you should close as many applications and stop as many services as
possible on the recovering machine. This is done to eliminate the factors that could interfere with LiveVault’s
recovery process.
ASSUMPTIONS
The following items are assumed as part of the disaster-recovery scenarios for the original system under test.
The system is not currently joined to a domain. (See “Considerations for Production-to-Test-Environment Disaster-Recovery Tests” [part of Chapter 3: Practicing Disaster Recovery] on page 12 for more information.)
The system is not running antivirus, or other security, software that will interfere with the restoration of files.
The system is not running disk-encryption software.
There are no remnants of any previous LiveVault software installation on the system before installing it for this test.
o If you are creating a system for the test by freshly installing the operating system, there is no LiveVault software installed.
o If you are using a virtual-machine template, ensure that the LiveVault agent software is not installed on the template.

Chapter 3: Practicing Disaster Recovery Part 1: Plan and Prepare for Disaster Recovery
Page 12 Version: 7.93 © 2018 j2 Global®, Inc. and affiliates (collectively, “j2”). All rights reserved.
CONSIDERATIONS FOR PRODUCTION-TO-TEST-ENVIRONMENT DISASTER-RECOVERY TESTS
If you must perform disaster-recovery tests from a production environment to a test environment, consider the following carefully. Production disaster-recovery tests are performed to meet internal or external compliance requirements. Periodically test a site, or system, disaster for recovery times, procedures, data, and so forth.
Ensure that your recovering system is not on the same network as your production servers.
Alternately, power off the production server for the duration of the test.
WARNING! LiveVault strongly recommends that you isolate your recovering system from the production
network during the test, while maintaining Internet connectivity to the on-premises TurboRestore appliance
or the offsite vaults.
Failure to properly isolate your test system from your original production systems during a DR test will result
in the recovered system assuming the identity of the original system within your production environment and
possibly compromising your production environment.
DISASTER-RECOVERY TEST CONSIDERATIONS
LiveVault strongly recommends you practice disaster-recovery scenarios using the simplest configurations first―to become familiar with the basic procedures―before moving on to more complex scenarios. For example, back up and recover a file server in a simple configuration before attempting to recover an application server.
TEST THE DISASTER-RECOVERY SCENARIO
You can simulate failures and practice the disaster recovery procedures without impacting your production servers. For instance, create a new machine to be the recovering system; or use a virtual machine template based on the as-built configuration of the original machine.
NOTE: Ensure that you either freshly install the correct operating system or that your virtual-machine template
meets all of the as-built configuration requirements necessary to perform the disaster recovery. Failure to use a
clean virtual machine or template may compromise the disaster recovery.
EXAMPLE: DISASTER-RECOVERY TEST TO A NEW SYSTEM
In this example, you can create a new system to be the recovering system―or you can use a virtual-machine template based on the as-built configuration of the original system (for more information, see "Gather As-Built Configuration Information” [part of Chapter 2: Plan for Disaster Recovery].
NOTE: Ensure that you either freshly install the correct operating system or that your virtual-machine template
meets all of the as-built configuration requirements necessary to perform the disaster recovery. Failure to use a clean
system or virtual-machine template may compromise the disaster recovery.

Part 1: Plan and Prepare for Disaster Recovery Chapter 3: Practicing Disaster Recovery
Version: 7.93 Page 13 © 2018 j2 Global®, Inc. and affiliates (collectively, “j2”). All rights reserved.
The processes included in the following table are comprised of the following:
1. Rename the original computer in the management console.
2. Stop and disable the LiveVault® service.
3. Verify the keyboard and mouse type.
4. Verify the original computer’s as-built configuration.
5. Install the operating system on the recovering computer.
6. Isolate the recovering computer from the production environment.
7. Install the same service packs as on the original computer.
8. Verify the recovering computer’s name.
9. Restart the computer.
10. Configure the disks and drive letters.
11. Remove the IIS components from the recovering computer.
12. On Windows 2003 computers, copy the boot.ini file.
13. Disable the screen saver and password-protect.
14. Install the agent software on the recovering computer.
15. Restart the recovering computer in DSRM.
16. Log into the recovering computer.
IMPORTANT! After you log in, do not log off or lock the computer for the remainder of the procedures listed
below.
A. Import encryption keys to enable a redirected restore.
B. Configure the recovering computer as “Restore Only”.
C. Define and run a redirected-restore policy.
D. On Windows 2003, compare boot.ini files.
E. Restart the recovering computer in normal mode.
F. The recovering computer assumes the identity of the original computer.
G. Test the recovered computer.
H. Complete the disaster-recovery test.
I. Resume backups on the recovered computer.

Chapter 3: Practicing Disaster Recovery Part 1: Plan and Prepare for Disaster Recovery
Page 14 Version: 7.93 © 2018 j2 Global®, Inc. and affiliates (collectively, “j2”). All rights reserved.
TESTING A NEW SYSTEM: PROCESS AND STEPS
Rename the Original Computer in the Management Console
By default, the original computer was provisioned to the LiveVault Web-Management Portal by its hostname. However, for the duration of this disaster-recovery test, you must temporarily rename it. Renaming the computer in the portal lets a recovering computer provision to the LiveVault service as a new identity with the same hostname as the original computer. When the disaster-recovery test is complete, you can rename the computer back to the original name in the web-management portal.
To rename the original computer in the LiveVault Web-Management Portal:
1. In the left pane of the portal, select the original computer. The Computer Summary page appears.
2. In the right-pane, click Properties. The Computer Properties page appears.
a. Click Edit Properties. The Edit Properties page appears.
b. Type a new name in the Computer Name box.
Continued on next page

Part 1: Plan and Prepare for Disaster Recovery Chapter 3: Practicing Disaster Recovery
Version: 7.93 Page 15 © 2018 j2 Global®, Inc. and affiliates (collectively, “j2”). All rights reserved.
Rename the Original Computer in the Management Console (Cont.)
TIP: For best results, append the text "-original" to the name, to
assist in identifying and resetting the computer name after the test is
complete. For example, rename it to <hostname>-original for the
duration of the test.
c. Click Save. The computer name is changed.
Stop and Disable the LiveVault® Service
If you are recovering the computer to a newly built machine, and the original computer is still partially operable and connected to the LiveVault service, you must stop and disable the LiveVault backup service.
WARNING! Failure to stop and disable the LiveVault backup service on the
original computer while performing the disaster recovery to a newly built recovering
computer will result in a duplicate system connecting to the LiveVault service. There
are significant risks of data corruption associated with duplicate systems attempting to
back up to the LiveVault service.
To stop the LiveVault Backup service (i.e., LVBackupservice): Select one of
the following methods:
o Enter the following command: net stop lvbackupservice. The LiveVault Backup service stops.
o Click Start or press the Windows Start key, then select Administrative Tools > Computer Management >Services. Select LiveVault Backup Service. Select Stop the service. The LiveVault Backup Service stops.
After the LiveVault backup service has stopped, you must disable it so it does not restart automatically.
To disable the LiveVault Backup Service: Enter the following command: sc
config lvbackupservice start= disabled. The LiveVault Backup Service is set to Disabled.
Verify the Keyboard and Mouse Type
If possible, use the same type of keyboard and mouse on the target computer as those on the original computer―either USB or PS/2.
Verify the Original Computer’s As-Built Configuration
Review and verify the as-built configuration for the original computer that you prepared as part of planning for disaster recovery. (For more information, see “Verify Configuration Information” [part of Chapter 2: Plan for Disaster Recovery].
Install the Operating System on the Recovering Computer
According to the following instructions, install the Windows operating system on the recovering computer. If possible, use the same media used to install the operating system on the failed computer.
1. Install the same operating-system version and edition of Windows that existed on the original computer. (For example, if the Windows Server 2008 R2 Enterprise Edition was installed on the original computer, install this version to the recovering computer.)
IMPORTANT! For disaster-recovery purposes, operating-system versions
and editions are not interchangeable. (For more information, see your Windows

Chapter 3: Practicing Disaster Recovery Part 1: Plan and Prepare for Disaster Recovery
Page 16 Version: 7.93 © 2018 j2 Global®, Inc. and affiliates (collectively, “j2”). All rights reserved.
documentation.)
2. Name the computer to the same Netbios name as the original computer’s. (The Windows setup program provides a suggested computer name by default; for example, w2008xr1fan. However, if the original computer was named corporate.mycompany.com, you must assign the computer name corporate to the recovering computer.)
IMPORTANT! The recovering computer’s name must be the same as the
original computer’s. Otherwise, the recovering computer will not start correctly,
the disaster-recovery procedure will fail, and you will need to start the process
over from the beginning.
3. Specify the time zone for the recovering computer to be the same as the original computer―and verify the correct system time once the timezone is set.
4. Regarding workgroup membership, join the computer as a member of a workgroup.
NOTE: Do not join a domain at this time.
5. Install Windows to the same directory on the recovering computer as on the original computer. (For example, if the original computer's installation directory
was c:\Windows, then install Windows to c:\Windows on the recovering computer.)
Continued on next page
Part 1: Plan and Prepare for Disaster Recovery Chapter 3: Practicing Disaster Recovery
Version: 7.93 Page 17 © 2018 j2 Global®, Inc. and affiliates (collectively, “j2”). All rights reserved.
Install the Operating System on the Recovering Computer (Cont.)
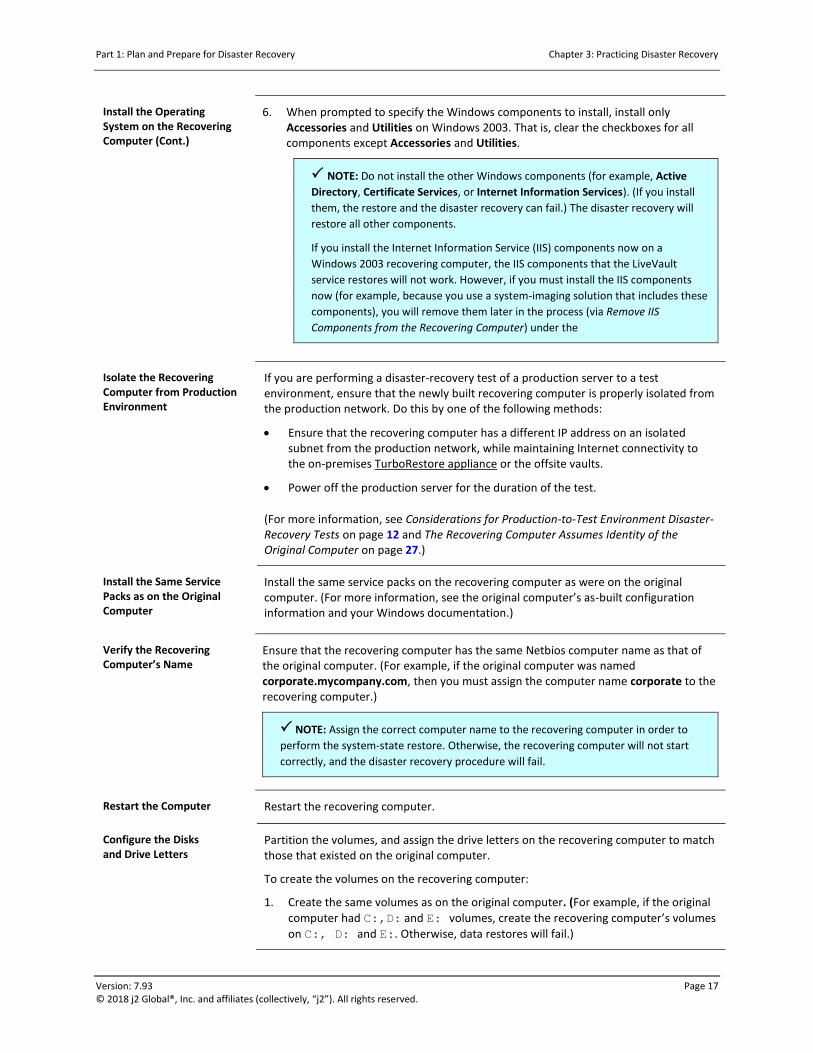
6. When prompted to specify the Windows components to install, install only Accessories and Utilities on Windows 2003. That is, clear the checkboxes for all components except Accessories and Utilities.
NOTE: Do not install the other Windows components (for example, Active
Directory, Certificate Services, or Internet Information Services). (If you install
them, the restore and the disaster recovery can fail.) The disaster recovery will
restore all other components.
If you install the Internet Information Service (IIS) components now on a
Windows 2003 recovering computer, the IIS components that the LiveVault
service restores will not work. However, if you must install the IIS components
now (for example, because you use a system-imaging solution that includes these
components), you will remove them later in the process (via Remove IIS
Components from the Recovering Computer) under the
Isolate the Recovering Computer from Production Environment
If you are performing a disaster-recovery test of a production server to a test environment, ensure that the newly built recovering computer is properly isolated from the production network. Do this by one of the following methods:
Ensure that the recovering computer has a different IP address on an isolated subnet from the production network, while maintaining Internet connectivity to the on-premises TurboRestore appliance or the offsite vaults.
Power off the production server for the duration of the test.
(For more information, see Considerations for Production-to-Test Environment Disaster-Recovery Tests on page 12 and The Recovering Computer Assumes Identity of the Original Computer on page 27.)
Install the Same Service Packs as on the Original Computer
Install the same service packs on the recovering computer as were on the original computer. (For more information, see the original computer’s as-built configuration information and your Windows documentation.)
Verify the Recovering Computer’s Name
Ensure that the recovering computer has the same Netbios computer name as that of the original computer. (For example, if the original computer was named corporate.mycompany.com, then you must assign the computer name corporate to the recovering computer.)
NOTE: Assign the correct computer name to the recovering computer in order to
perform the system-state restore. Otherwise, the recovering computer will not start
correctly, and the disaster recovery procedure will fail.
Restart the Computer Restart the recovering computer.
Configure the Disks and Drive Letters
Partition the volumes, and assign the drive letters on the recovering computer to match those that existed on the original computer.
To create the volumes on the recovering computer:
1. Create the same volumes as on the original computer. (For example, if the original
computer had C:,D: and E: volumes, create the recovering computer’s volumes
on C:, D: and E:. Otherwise, data restores will fail.)

Chapter 3: Practicing Disaster Recovery Part 1: Plan and Prepare for Disaster Recovery
Page 18 Version: 7.93 © 2018 j2 Global®, Inc. and affiliates (collectively, “j2”). All rights reserved.
2. Format the recovering computer's volumes to be the same file-system format as the original computer's volumes. (For example, format the volumes to NTFS, ReFS, and so on.)
3. Use adequately sized volumes. That is, ensure that the new volumes have adequate size to handle the restored data. (For example, the recovering computer's volumes must be at least as large as the original computer's volumes.)
Remove IIS Components from the Recovering Computer
For a recovering Windows 2008 (and later computer), determine if any Web Server roles were installed.
For a recovering Windows 2003 computer, determine if any Internet Information Services (IIS) components were installed during the Windows installation.
(For more information on removing IIS components or Web Server roles, see your Windows documentation.)
On Windows 2003 Computers, Copy the Boot.ini File
On a Windows 2003 recovering computer, you must copy the boot.ini for later use in verifying the restore.
NOTE: This procedure applies to Windows 2003 recovering computers only. For
recovering Windows 2008 (and later), skip to “Disable the Screen Saver and Password-
Protect below.
To copy the boot.ini file:
1. Copy the boot.ini file. (The boot.ini is located in the recovering computer’s root directory.)
2. Name the copy something similar to BootFromCD_101512.ini (where
101512 represents the current date) to ensure no confusion exists between the
copy and the restored boot.ini file―and to differentiate this copy from any other copies.
3. Take note of the name of the boot.ini copy. The copy will be referenced later during the disaster-recovery process.
Disable the Screen Saver and Password-Protect
To disable the screen saver and password-protect before entering the Directory Services Recovery Mode (DSRM).
1. Disable the screen saver.
NOTE: You cannot disable the screen saver after entering Directory Services
Recovery Mode (DSRM).
2. In the Power Options, disable the password-protect. (The password might change due to the restore.)
Part 1: Plan and Prepare for Disaster Recovery Chapter 3: Practicing Disaster Recovery
Version: 7.93 Page 19 © 2018 j2 Global®, Inc. and affiliates (collectively, “j2”). All rights reserved.
Install Agent Software on the Recovering Computer
As well as installing the LiveVault agent software on the recovering computer, you can also use the LiveVault Configuration Wizard to generate an encryption key and to provision the agent to the LiveVault service.
To install the LiveVault agent software on the recovering computer:
1. Log into the LiveVault Web-Management Portal.
2. Click Downloads in the top menu. The Downloads page appears.
3. Select the appropriate Agent installation kit for your operating system, and click Download. (Do NOT select Run on Download.)
4. Save the kit to a location on the recovering computer, then run it.
5. Install the agent software to the same location on the recovering computer as it was on the original computer. (To change the location from the default, click Change and type a new location.)
6. Install the LiveVaultData directory to the same location as the original computer.
NOTES:
By default, the installation program installs the LiveVaultData
directory to the volume with the largest amount of free disk space. To
change the location from the default, click Change and type a new location.
Ensure that the path to the LiveVault agent software matches the original
computer’s path. For example, if the original computer’s software
installation was to C:\Program Files\Autonomy\
BackupEngine and D:\LiveVaultData, then ensure that you
install the software to the same locations on the recovering computer.
Failure to do so will cause the system-state restore to fail.
7. Click Finish; then click Configure. The Configuration Wizard appears.
a. To validate your account, type your user name and password credentials; then click Next. The Installation page appears.
b. Select New Server Being Added to the backup service; then click Next. The Configuration page appears.
c. Select Create a standard backup agent; then click Next. The Password Required page appears.
d. Type and confirm an encryption-key password; then click Next. (The wizard generates the key. This process may take up to several minutes due to the random nature of cryptographic key generation.) The Configuration page appears. (This page lets users configure the agent for standard backup or as a CIFS-only agent.)
e. Select Create a standard backup agent.
f. Click Finish. The Service Configuration dialog appears.
Continued on next page

Chapter 3: Practicing Disaster Recovery Part 1: Plan and Prepare for Disaster Recovery
Page 20 Version: 7.93 © 2018 j2 Global®, Inc. and affiliates (collectively, “j2”). All rights reserved.
Install Agent Software on the Recovering Computer (Cont.)
8. Click Cancel to restart later.
NOTE: Do not restart the computer now at the completion of LiveVault service
configuration. Instead, you must configure the computer to restart in Directory
Services Recovery Mode (DSRM) in order to proceed with the disaster recovery.
The service configuration exits.
Restart the Recovering Computer in DSRM
NOTE: Restart the recovering computer in safe mode.
To use the BCDEDIT utility on Windows 2008 or later, see the first bullet below. To restart Windows 2003 in DSRM mode, see the second bullet below.
To use the BCDEDIT utility on Windows 2008 (and later):
1. In Windows: Click Start, or press the Windows Start key; then click Run. The Run window opens.
2. Type cmd, and press Enter. The Command Prompt window opens.
3. Enter the following command: BCDEDIT /set safeboot dsrepair; then press Enter. The command completes successfully.
4. Restart the computer. (The computer restarts in safe mode.)
To restart Windows 2003 in DSRM mode:
1. Restart the computer.
2. During the normal start-up process, look for the Windows start-up options message at the bottom of the window; for example: For troubleshooting and advanced startup options for
Windows 2003, press F8.
3. When you see this message, press F8. (You will only see this message for a few seconds. Press F8 while you can see it.)
NOTE:
If you are able to press F8 before it disappears, continue to step 4.
on the next page.
If you missed the opportunity to press F8, you need to configure
the boot.ini file to boot into DSRM. To do so, see Restart the
Recovering Computer in DSRM process under the Testing a New
System: Process and Steps table.
Continued on next page

Part 1: Plan and Prepare for Disaster Recovery Chapter 3: Practicing Disaster Recovery
Version: 7.93 Page 21 © 2018 j2 Global®, Inc. and affiliates (collectively, “j2”). All rights reserved.
Restart the Recovering Computer in DSRM (Cont.)
4. From the Windows Advanced Options menu: Select Directory Services Restore Mode, and press Enter. The computer starts in DSRM.
NOTE: Stay in DSRM until you are instructed to restart into normal mode.
To restart Windows 2003 in DSRM if you did not press F8:
1. Open the boot.ini file in the recovering computer's root directory.
2. In the [operating systems] section, add the following switch to the
end of the line that specifies the start path: /safeboot:dsrepair /sos. For example:
operating systems]
multi(0)disk(0)rdisk(0)partition(1)\WINNT=;Microsoft
Windows 2003 Server; /fastdetect /safeboot:dsrepair
/sos
3. Restart the recovering computer. The computer starts in DSRM.
Log Into the Recovering Computer
After the computer restarts: Log into Windows, with local administrator rights.
IMPORTANT! After you log in, do not log off or lock the computer for the
remainder of this recovery process (as indicated in the remaining procedures below, in
this chapter).
Import the Encryption Keys to Enable a Redirected Restore
To enable the redirected restore of data, use the LiveVault Configuration Wizard to import the necessary encryption keys from the original computer to the recovering computer.
To import the encryption keys:
1. Run the LVRegister Configuration Wizard utility from the Start > Programs > LiveVault Backup > LiveVault Configuration Wizard menu.
Import the Encryption Keys to Enable a Redirected Restore (Cont.)
1. Select Retrieve Encryption keys from another computer to enable restore, and click Next.

Chapter 3: Practicing Disaster Recovery Part 1: Plan and Prepare for Disaster Recovery
Page 22 Version: 7.93 © 2018 j2 Global®, Inc. and affiliates (collectively, “j2”). All rights reserved.
2. From the Choose the source computer list, select the source computer.
3. Enter the encryption-key password for the source computer. (You must know the password for the source computer in order to perform this task.)
4. Click Next, then click Finish. The keys are retrieved.
Configure the Recovering Computer as “Restore Only”
Add the recovering computer to the LiveVault Web-Management Portal in a mode that allows data restoration only. This lets you easily track the progress of the data restoration and retrieve restore logs for the disaster-recovery test.
To add the recovering computer as Restore Only:
1. In the web-management portal, select the recovering computer. The New-Computer Wizard opens.

Part 1: Plan and Prepare for Disaster Recovery Chapter 3: Practicing Disaster Recovery
Version: 7.93 Page 23 © 2018 j2 Global®, Inc. and affiliates (collectively, “j2”). All rights reserved.
Configure the Recovering Computer as “Restore Only” (Cont.)
2. Select Only Restore data to this computer. (This option lets the computer receive data restoration but not to back up.)
3. Click Save. The Computer Summary page appears.
Define and Run a Redirected-Restore Policy
Define and run a restore job (that restores all of your system volume, files, directories, and the system state) as a redirected restore to the recovering virtual machine.
NOTE: Because the recovering virtual machine is provisioned to the service under a
new identity, you must perform a redirected restore. (For more information on
redirecting restores, see the LiveVault Web-Management Portal help system.)
To create the restore job:
1. In the web-management portal, select the original computer. The Summary tab appears.
NOTE: You must select the original computer, because all redirected restore
policies must be requested from the computer that backed up the data.
2. Click the Restore tab, then New Restore. The Restore wizard appears.
a. Select Restore data over the Internet. The Selection tab appears.
b. Type a restore name in the Name to use for this restore request textbox.
Chapter 3: Practicing Disaster Recovery Part 1: Plan and Prepare for Disaster Recovery
Page 24 Version: 7.93 © 2018 j2 Global®, Inc. and affiliates (collectively, “j2”). All rights reserved.
Define and Run a Redirected-Restore Policy (Cont.)
c. From the Policy filter list, select All policies.
NOTE: You can also select individual policies from the list―and select
the corresponding version, by date and time, from the Version list.
d. From the Version list, select the version by selecting the date and time.
e. In the left pane, click the computer name to display all of the volumes; then
select all volumes from the right pane (for example, select C:, D: , and
E:.)
f. Check the Restore system state box to restore the system state.
NOTE: You must restore the system state when you restore your
system volume, files, and directories.
g. Optional: Select Rebuild deduplicated volume to rebuild any Windows Server 2012 deduplicated volumes as part of the disaster recovery. (If the server is not Windows Server 2012 or does not have data deduplication enabled on the volume(s), skip to step 2.h. below. For more information on Windows Server 2012 volumes optimized for data deduplication, see your Windows Server 2012 documentation.)
NOTES:
You must restore the system state when you restore your system
volume, files and directories.
To ensure consistency of the dedupe store, do not enable
deduplication on the new volume before the restore occurs. (If
deduplication is enabled on the volume[s], the restore will fail.)
h. Click the Options tab. The Restore Options tab appears. (By default. the Overwrite existing file even if restored files is older option is selected.)
i. Select Overwrite open files when the computer is rebooted.
j. Select Redirect restored data to a different computer. Then―from the list, select the name of the recovering computer.
Continued on next page
Part 1: Plan and Prepare for Disaster Recovery Chapter 3: Practicing Disaster Recovery
Version: 7.93 Page 25 © 2018 j2 Global®, Inc. and affiliates (collectively, “j2”). All rights reserved.
Define and Run a Redirected-Restore Policy (Cont.)
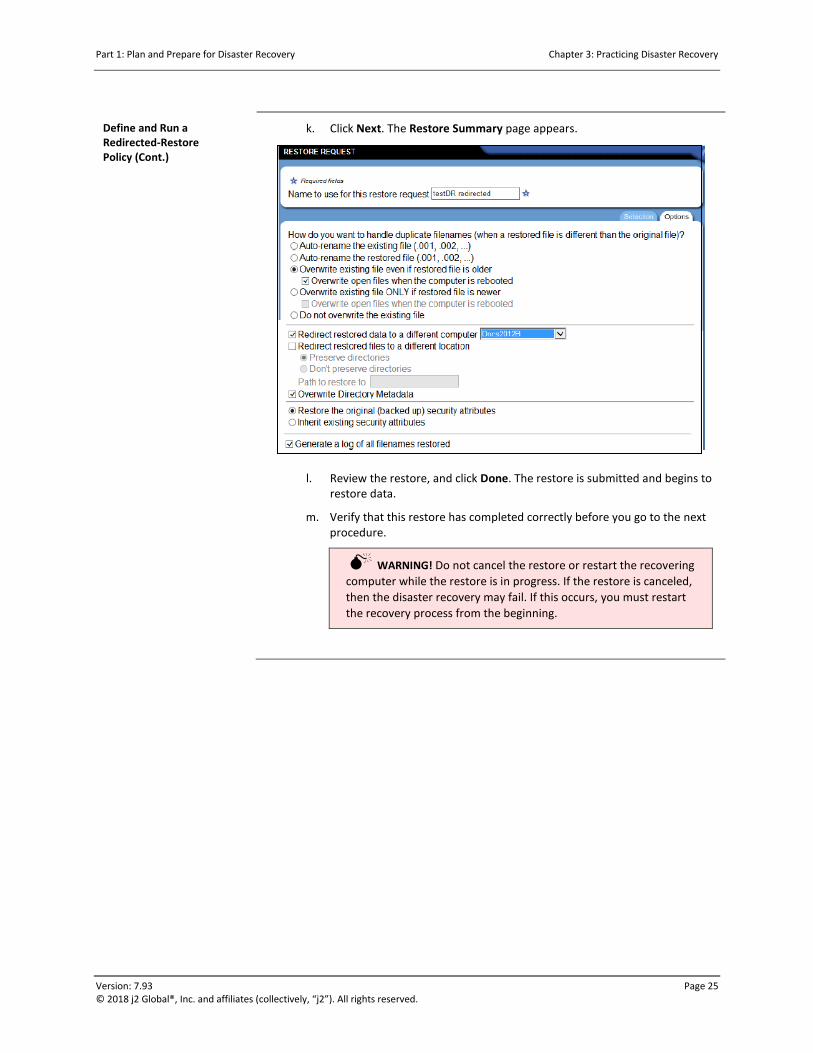
k. Click Next. The Restore Summary page appears.
l. Review the restore, and click Done. The restore is submitted and begins to restore data.
m. Verify that this restore has completed correctly before you go to the next procedure.
WARNING! Do not cancel the restore or restart the recovering
computer while the restore is in progress. If the restore is canceled,
then the disaster recovery may fail. If this occurs, you must restart
the recovery process from the beginning.
Chapter 3: Practicing Disaster Recovery Part 1: Plan and Prepare for Disaster Recovery
Page 26 Version: 7.93 © 2018 j2 Global®, Inc. and affiliates (collectively, “j2”). All rights reserved.
On Windows 2003, Compare Boot.ini
Files
On Windows 2003 recovering systems, compare the boot.ini files to verify that boot information is consistent.
NOTE: This procedure applies to Windows 2003 recovering computers only. On
Windows 2008 (and later) recovering systems, Restart the Computer.
To compare the restored boot.ini file and the copy of the boot.ini file:
1. Go to the computer's root directory, and open both the restored boot.ini file
(for example, boot.ini―and the copy of the boot.ini file (for example,
BootFromCD_101504.ini) that you made earlier in this procedure.
2. Compare the boot-drive value (that is, the number of the partition from which the computer will start―for example: partition (1)).
o If the boot-drive values in these files match, then skip to Restart the Computer.
o If the boot drive values in these files do not match, continue with this procedure.
3. The restored boot.ini file's (for example, boot.ini) read-only attribute is set. To clear this attribute, complete the following steps:
a. In Windows Explorer, select the file.
b. Right-click the file, and select Properties.
c. In the Properties dialog box, on the General tab, in the Attributes group: Clear the Read-only box.
d. Click OK.
4. Change the value in the restored boot.ini file (for example, boot.ini) to
match the value specified in the copy of the boot.ini file (for example,
BootFromCD_101504.ini).
NOTE: Your boot.ini configuration might require you to update the boot-
drive value for multiple lines in the restored boot.ini file.
WARNING! If you fail to update the restored boot.ini file, you
cannot restart the computer.

Part 1: Plan and Prepare for Disaster Recovery Chapter 3: Practicing Disaster Recovery
Version: 7.93 Page 27 © 2018 j2 Global®, Inc. and affiliates (collectively, “j2”). All rights reserved.
Restart the Recovering Computer in Normal Mode
To restart Windows 2008 (and later) computers:
1. In Windows: Click Start, or press the Windows Start key; and then Run. The Run window opens.
2. Type cmd, and press Enter. The Command Prompt window opens.
3. Enter the following command: BCDEDIT /deletevalue safeboot
4. Press Enter. The command completes successfully.
5. Reboot the computer. The computer restarts in normal mode.
To restart Windows 2003 computers: Restart the recovering computer in normal mode.
If you receive a Windows message that indicates that you must restart the computer because it has found new devices, restart the computer again as specified. (For example, when Windows finds all devices as new hardware, some services might not restart. So, you will receive a prompt to restart the computer again―possibly multiple times―as the computer finds new devices. In this case, do not restart the computer each time you receive a prompt. That is, after Windows finds all devices, then restart the computer.
Recovering Computer Assumes Identity of the Original Computer
It is important to note that after the recovering computer (under test) is restarted after the disaster-recovery test, it assumes the identity of the original production computer on the network.
IMPORTANT! If the recovering computer under test is not properly isolated
from the production network, it will attempt to continue to perform the tasks the
real production server was performing at the time of the test.
Possible behaviors may include:
DNS is updated, pointing internal and external systems to the test server―thus affecting production applications, production web servers, and so on.
The active directory may become compromised. if the computer under test communicates with any real domain controllers.
An Exchange server may try to send out email that was pending when the backup occurred.
Chapter 3: Practicing Disaster Recovery Part 1: Plan and Prepare for Disaster Recovery
Page 28 Version: 7.93 © 2018 j2 Global®, Inc. and affiliates (collectively, “j2”). All rights reserved.
Test the Recovered Computer
If the recovered computer fails to appear on the network, verify the following indicators:
Analyze the ipconfig output for errors.
Analyze the Device Manager for errors.
Analyze the system logs for errors.
Analyze the application logs for errors.
For more information, see your Windows documentation.
Complete the Disaster-Recovery Test
NOTE: After you have completed the disaster-recovery test: Power off the
recovering machine; and in the LiveVault Web-Management Portal, rename both
computers.
To complete the disaster-recovery test:
1. Rename the recovered computer to another name.
NOTE: Because the hostname was used during the provisioning step, the
computer name now needs to be changed to avoid confusion in your LiveVault
environment. For example, rename the recovered computer; and append -test
to the end of the computer name. (For more information, see Rename the Original
Computer in the Management Console on page 14.)
2. Change the original computer back to its original computer name in the web-
management portal. (For example, if you renamed your computer to myServer-
original, rename it back to myServer.)
3. If you no longer require the recovered computer (under test) to be connected to the LiveVault service: Uninstall the LiveVault agent software, and delete the computer from the LiveVault Web-Management Portal. (For more information, see the LiveVault Web-Management Portal help system.)
Part 1: Plan and Prepare for Disaster Recovery Chapter 3: Practicing Disaster Recovery
Version: 7.93 Page 29 © 2018 j2 Global®, Inc. and affiliates (collectively, “j2”). All rights reserved.
Resume Backups on the Recovered Computer
To resume backups:
1. In the web-management portal, select the recovering computer.
2. In the right-pane, click Properties. The Properties page appears.
3. Click Edit properties. The Edit Properties page appears.
4. Check the Resume backup box.
5. Click Save. The agent resumes backing up the computer according to the backup schedule.

Part 2: Disaster-Recovery Scenarios
Page 30 Version: 7.93 © 2018 j2 Global®, Inc. and affiliates (collectively, “j2”). All rights reserved.
PART 2: DISASTER-RECOVERY SCENARIOS
The following chapters guide you through the various disaster-recovery scenarios and procedures.
What do you want to see?
Chapter 4: Recover a Windows Server
Chapter 5: Recover an Exchange Server on Windows 2003
Chapter 6: Recover an Exchange Server on Windows 2008 (and Later)
Chapter 7: Recover an SQL Server
Chapter 8: Recover a Virtual Machine
Chapter 9: Recover a Windows 2003 Small-Business Server
Chapter 10: Recover a DPM Server
CHAPTER 4: RECOVER A WINDOWS SERVER
This chapter explains how to perform a disaster recovery for the following operating systems. (You can recover Active Directory domain controllers and member servers, file and print servers, as well as database servers. For more information on selecting the correct disaster-recovery procedure for your server, see “Select the Correct Disaster-Recovery Procedure” [part of Chapter 2: Plan for Disaster Recovery].
Windows Server 2012 R2
Windows Server 2012
Windows Server 2008 R2
Windows Server 2008
Windows Server 2003
IMPORTANT! To recover your computer from a disaster, complete the following procedures in the order that
they are presented. To reiterate:
To ensure the highest success rate, you must complete the following tasks exactly and in order.
Do not omit or skip any step, unless instructed to do so.
Failure to follow the steps in order will cause the recovery to fail, and you must start the recovery process
from the beginning.
LiveVault recommends that you print out this chapter, and use it as a checklist for your disaster-recovery process.
The recovery procedures are:
1. Submit a media-restore-device request.
2. Suspend backups on the original computer.
3. Stop and disable the LiveVault service.
4. Disable the secondary NIC on the recovering computer.

Chapter 4: Recover a Windows Server Part 2: Disaster-Recovery Scenarios
Version: 7.93 Page 31 © 2018 j2 Global®, Inc. and affiliates (collectively, “j2”). All rights reserved.
5. Verify the keyboard and mouse type.
6. Verify the original computer’s as-built configuration.
7. Install the operating system on the recovering computer.
8. Install the same service packs as on the original computer.
9. Verify the recovering computer’s name.
10. Restart the computer.
11. Configure the disks and drive letters.
12. Remove IIS components from recovering computer.
13. On Windows 2003 computers, copy the boot.ini file.
14. Disable the screen saver and password-protect.
15. Install the agent software on the recovering computer.
16. Restart the recovering computer in DSRM.
17. Log into the recovering computer.
IMPORTANT! After you log in, do not log off or lock the computer for the remainder of the procedures listed
below.
A. Define and run a restore policy.
B. On Windows 2003, compare boot.ini files.
C. Restart the recovering computer in normal mode.
D. Determine if the recovering computer is a domain controller.
E. Enable the NIC.
F. Test the recovered computer.
G. Resolve short-name issues.
H. Update or repair the agent software.
I. Resume backups on the recovered computer.
Submit a
Media-Restore-Device
Request
Optional: Request a media restore device containing the backup versions from a specific time range.
When you request a restore device, it takes a certain amount of time to build and ship the device―and depends on the data size and shipment method. (For more information on restore devices, see your LiveVault service contract.)
NOTE: Requesting a media restore device incurs an additional charge. Refer to your
contract for cost and shipping information.
Part 2: Disaster-Recovery Scenarios Chapter 4: Recover a Windows Server
Page 32 Version: 7.93 © 2018 j2 Global®, Inc. and affiliates (collectively, “j2”). All rights reserved.
Suspend Backups on the Original Computer
Suspend backups on the original computer to ensure that no additional backup versions are sent from the original computer during the recovery process.
To suspend backups:
1. In the left pane of the LiveVault Web-Management Portal, select the original computer. The Computer Summary page appears.
2. In the right pane, click Properties. The Computer Properties page appears.
3. Click Edit properties. The Edit Properties page appears.
4. Check the Suspend backup box, then click Save. Backups are suspended.
Stop and Disable the LiveVault® Service
If you are recovering the computer to a newly built machine, and the original computer is still partially operable and connected to the LiveVault service, you must stop and disable the LiveVault backup service.
If you are performing a disaster-recovery test to a newly built machine, you must stop and disable the LiveVault backup service on the original computer.
WARNING! Failure to stop and disable the LiveVault backup service on the
original computer while performing the disaster recovery to a newly built
recovering computer will result in a duplicate system connecting to the LiveVault
service. There are significant risks of data corruption associated with duplicate
systems attempting to back up to the LiveVault service.
To stop the LVBackupservice, choose one of the following methods:
Enter the following command: net stop lvbackupservice. The LiveVault backup service stops.
Click Start or press the Windows Start key, then select Administrative Tools > Computer Management > Services. Select LiveVault Backup Service. Select Stop the service. The LiveVault backup Service stops.
After the backup service has stopped, you must disable it so it does not restart automatically.
To disable the LiveVault backup service, enter the following command: sc config
lvbackupservice start= disabled. The LiveVault backup service is set to Disabled.

Chapter 4: Recover a Windows Server Part 2: Disaster-Recovery Scenarios
Version: 7.93 Page 33 © 2018 j2 Global®, Inc. and affiliates (collectively, “j2”). All rights reserved.
Disable the Secondary NIC on the Recovering Computer
If the recovering computer contains two network-interface cards (NICs), disable one of them.
To disable a secondary NIC:
1. If the NIC is a separate card that you can remove, remove it. If it is an onboard NIC, disable it by using the BIOS interface. (For more information, see the hardware vendor’s documentation.)
2. Otherwise, disable the NIC through the Windows Device Manager after you install the Windows operating system. (You do not need to restart the computer after you disable the NIC.)
Verify the Keyboard and Mouse Type
If possible, use the same type of keyboard and mouse on the target computer as those on the original computer― either USB or PS/2.
Verify the As-Built Configuration of the Original Computer
Review and verify the as-built configuration for the original computer that you prepared as part of planning for disaster recovery. (For more information, see “Verify Configuration Information” [part of Chapter 2: Plan for Disaster Recovery] on pg. 6.)
Install the Operating System on the Recovering Computer
According to the following instructions, install the Windows operating system on the recovering computer. If possible, use the same media used to install the operating system on the failed computer.
1. Install the same operating system version and edition of Windows that existed on the original computer. (For example, if Windows Server 2008 R2 Enterprise Edition was installed on the original computer, install this version to the recovering computer.)
IMPORTANT! For disaster-recovery purposes, operating-system versions
and editions are not interchangeable. (For more information, see your Windows
documentation.)

Part 2: Disaster-Recovery Scenarios Chapter 4: Recover a Windows Server
Page 34 Version: 7.93 © 2018 j2 Global®, Inc. and affiliates (collectively, “j2”). All rights reserved.
Install the Operating System on the Recovering Computer (Cont.)
2. Name the computer to the same Netbios name as the original computer’s. (The Windows setup program provides a suggested computer name by default; for example, w2008xr1fan. If the original computer was named corporate.mycompany.com, you must assign the computer name corporate to the recovering computer.)
IMPORTANT! The recovering computer’s name must be the same as the
original computer’s. Otherwise, the recovering computer will not start correctly,
the disaster-recovery procedure will fail, and you will need to start the process
over from the beginning.
3. Specify the timezone for the recovering computer to be the same as the original computer―and verify the correct system time once the timezone is set.
4. Regarding workgroup membership, join the computer as a member of a workgroup.
NOTE: Do not join a domain at this time.
5. Install Windows to the same directory on the recovering computer as on the original computer. (For example, if the original computer's installation directory was
c:\Windows, then install Windows to c:\Windows on the recovering computer.)
6. Install only Accessories and Utilities on Windows 2003 when prompted to specify the Windows components to install. Clear the check boxes for all components except Accessories and Utilities.
NOTE: Do not install the other Windows components (for example, Active
Directory, Certificate Services, or Internet Information Services). (If you install
them, the restore and the disaster recovery can fail.) The disaster recovery will
restore all other components.
If you install the Internet Information Service (IIS) components now on a Windows
2003 recovering computer, the IIS components that the LiveVault service restores
will not work. However, if you must install the IIS components now (for example,
because you use a system-imaging solution that includes these components), you
will remove them later in the process (via Remove IIS Components from the
Recovering Computer on pg. 35).
Install the Same Service Packs as on the Original Computer
Install the same service packs on the recovering computer as were on the original computer. (For more information, see the original computer’s as-built configuration information and your Windows documentation.)
Chapter 4: Recover a Windows Server Part 2: Disaster-Recovery Scenarios
Version: 7.93 Page 35 © 2018 j2 Global®, Inc. and affiliates (collectively, “j2”). All rights reserved.
Verify the Recovering Computer’s Name
Ensure that the recovering computer has the same Netbios computer name as that of the original computer. (For example, if the original computer was named corporate.mycompany.com, then you must assign the computer name corporate to the recovering computer.)
NOTE: Assign the correct computer name to the recovering computer in order to
perform the system-state restore. Otherwise, the recovering computer will not start
correctly, and the disaster-recovery procedure will fail.
Restart the Computer Restart the recovering computer.
Configure the Disks and Drive Letters
Partition the volumes, and assign the drive letters on the recovering computer to match those that existed on the original computer.
To create the volumes on the recovering computer:
1. Create the same volumes. (For example, if the original computer had C:, D: , and E:
volumes, create the recovering computer’s volumes on C:, D: , and E:. Otherwise, data restores will fail.)
2. Format the recovering computer's volumes to be the same file-system format as the original computer's volumes. (For example, format the volumes to NTFS, ReFS and so on.)
3. Ensure that the new volumes have adequate size to handle the restored data. (For example, the recovering computer's volumes must be at least as large as the original computer's volumes.)
Remove IIS Components from the Recovering Computer
For a recovering Windows 2008 (and later) computer, determine if any Web Server roles were installed.
For a recovering Windows 2003 computer, determine if any Internet Information Services (IIS) components were installed during the Windows installation.
(For more information on removing IIS components or Web Server roles, see your Windows documentation.)

Part 2: Disaster-Recovery Scenarios Chapter 4: Recover a Windows Server
Page 36 Version: 7.93 © 2018 j2 Global®, Inc. and affiliates (collectively, “j2”). All rights reserved.
On Windows 2003 Computers, Copy the Boot.ini File
On a Windows 2003 recovering computer, you must copy the boot.ini for later use in verifying the restore.
NOTE: This procedure applies to Windows 2003 recovering computers only. For
recovering Windows 2008 and later, skip to Disable the Screen Saver and Password-
Protect below.
To copy the boot.ini file:
1. Copy the boot.ini file. (The boot.ini is located in the recovering computer’s root directory.)
2. Name the copy something similar to BootFromCD_101512.ini (where 101512 represents the current date) to ensure no confusion exists between the copy and the
restored boot.ini file―and to differentiate this copy from any other copies.
3. Take note of the name of the boot.ini copy. The copy will be referenced later during the disaster-recovery process.
Disable the Screen Saver and Password-Protect
NOTE: Disable the screen saver and password-protect before entering Directory
Services Recovery Mode (DSRM).
1. Disable the screen saver.
NOTE: You cannot disable the screen saver after entering DSRM.
2. In the Power Options, disable the password-protect. (The password might change due to the restore.)
Install the Agent Software on the Recovering Computer
You can install the LiveVault agent software on the recovering computer and also use the LiveVault Configuration Wizard to generate an encryption key and to provision the agent to the LiveVault service.
To install the LiveVault agent software:
1. Log into the LiveVault Web-Management Portal.
2. Click Downloads in the top menu. The Downloads page appears.
3. Select the appropriate Agent installation kit for your operating system, and click Download. (Do NOT select Run on Download.)
Continued on next page

Chapter 4: Recover a Windows Server Part 2: Disaster-Recovery Scenarios
Version: 7.93 Page 37 © 2018 j2 Global®, Inc. and affiliates (collectively, “j2”). All rights reserved.
Install the Agent Software on the Recovering Computer
4. Save the kit to a location on the recovering computer, then run it.
5. Install the agent software to the same location on the recovering computer as it was on the original computer. (To change the location from the default, click Change and type a new location.)
6. Install the LiveVaultData directory to the same location as the original computer.
NOTES:
By default, the installation program installs the LiveVaultData
directory to the volume with the largest amount of free disk space. To
change the location from the default, click Change and type a new
location.
Ensure that the path to the LiveVault agent software matches the
original computer’s path. For example, if the original computer’s
software installation was to C:\Program Files\Autonomy\
BackupEngine and D:\LiveVaultData, ensure that you install
the software to the same locations on the recovering computer.
Failure to do so will cause the system-state restore to fail.
7. Click Finish.
8. Click Configure. The Configuration Wizard appears.
a. To validate your account, type your user name and password credentials; then click Next. The Installation page appears.
b. Select Recovering a complete system.
c. From the Select System list, select the name of the original computer you are recovering.
d. Click Next. The Password Required page appears.
e. Type the encryption-key password. (This is the encryption-key password that you entered when you first provisioned the LiveVault agent software on the original computer.)
NOTES:
If you do not remember the encryption-key password from the original
computer, you will not be able to provision the recovering computer
while performing the disaster recovery.
Ensure that you have the encryption-key password from the original
computer.
The encryption-key password may have been escrowed with
autonomy at the point of the original computer’s installation. Contact
LiveVaultSupport to verify this and to request the password.
Continued on next page
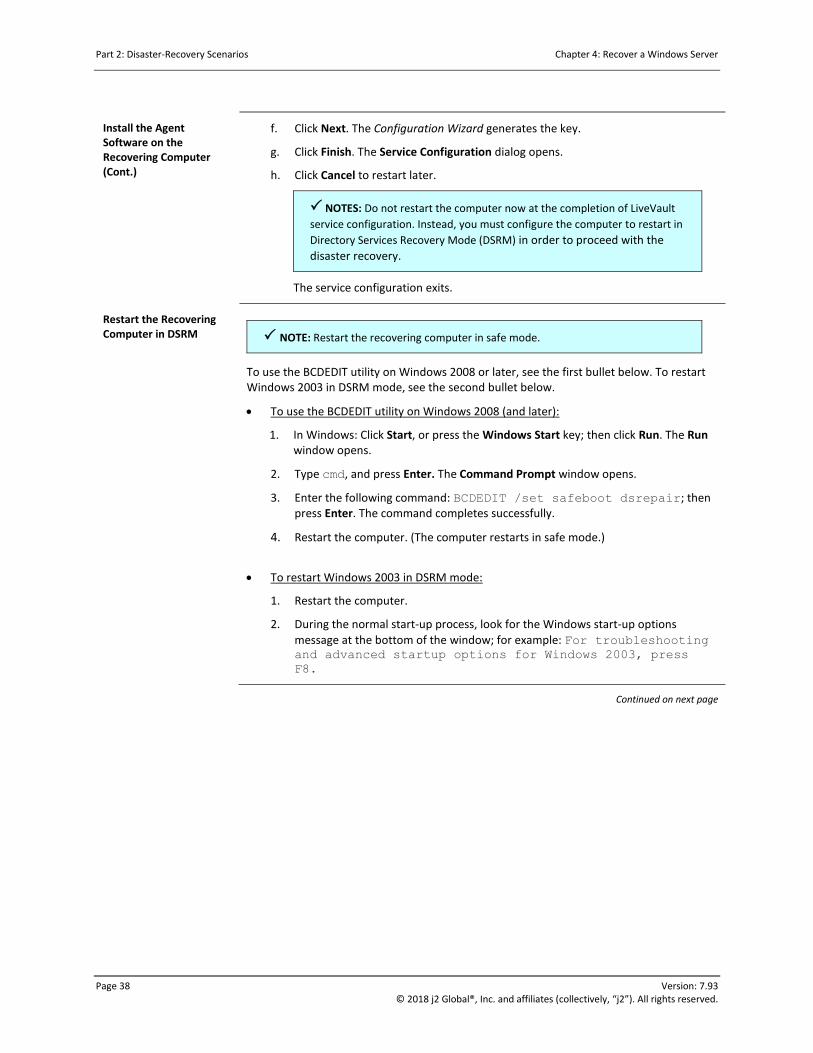
Part 2: Disaster-Recovery Scenarios Chapter 4: Recover a Windows Server
Page 38 Version: 7.93 © 2018 j2 Global®, Inc. and affiliates (collectively, “j2”). All rights reserved.
Install the Agent Software on the Recovering Computer (Cont.)
f. Click Next. The Configuration Wizard generates the key.
g. Click Finish. The Service Configuration dialog opens.
h. Click Cancel to restart later.
NOTES: Do not restart the computer now at the completion of LiveVault
service configuration. Instead, you must configure the computer to restart in
Directory Services Recovery Mode (DSRM) in order to proceed with the
disaster recovery.
The service configuration exits.
Restart the Recovering Computer in DSRM
NOTE: Restart the recovering computer in safe mode.
To use the BCDEDIT utility on Windows 2008 or later, see the first bullet below. To restart Windows 2003 in DSRM mode, see the second bullet below.
To use the BCDEDIT utility on Windows 2008 (and later):
1. In Windows: Click Start, or press the Windows Start key; then click Run. The Run window opens.
2. Type cmd, and press Enter. The Command Prompt window opens.
3. Enter the following command: BCDEDIT /set safeboot dsrepair; then press Enter. The command completes successfully.
4. Restart the computer. (The computer restarts in safe mode.)
To restart Windows 2003 in DSRM mode:
1. Restart the computer.
2. During the normal start-up process, look for the Windows start-up options
message at the bottom of the window; for example: For troubleshooting and advanced startup options for Windows 2003, press
F8.
Continued on next page

Chapter 4: Recover a Windows Server Part 2: Disaster-Recovery Scenarios
Version: 7.93 Page 39 © 2018 j2 Global®, Inc. and affiliates (collectively, “j2”). All rights reserved.
Restart the Recovering Computer in DSRM (Cont.)
To restart Windows 2003 in DSRM mode: (Cont.)
3. When you see this message, press F8. (You will only see this message for a few seconds. Press F8 while you can see it.)
NOTES:
If you are able to press F8 before it disappears, continue to step 4.
below.
If you missed the opportunity to press F8, you need to configure the
boot.ini file to boot into DSRM. To do so, see the next bullet
below.
4. From the Windows Advanced Options menu: Select Directory Services Restore Mode, and press Enter. The computer starts in DSRM.
NOTE: Stay in DSRM until you are instructed to restart into normal mode.
To restart Windows 2003 in DSRM if you did not press F8:
1. Open the boot.ini file in the recovering computer's root directory.
2. In the [operating systems] section, add the following switch to the end
of the line that specifies the start path: /safeboot:dsrepair /sos. For example:
operating systems]
multi(0)disk(0)rdisk(0)partition(1)\WINNT=;Microsoft
Windows 2003 Server; /fastdetect /safeboot:dsrepair
/sos
3. Restart the recovering computer. The computer starts in DSRM.
Log Into the Recovering Computer
After the computer restarts: Log into Windows, with local administrator rights.
IMPORTANT! After you log in, do not log off or lock the computer for the
remainder of this recovery process (as indicated in the remaining procedures below, in
this chapter).

Part 2: Disaster-Recovery Scenarios Chapter 4: Recover a Windows Server
Page 40 Version: 7.93 © 2018 j2 Global®, Inc. and affiliates (collectively, “j2”). All rights reserved.
Define and Run a Restore Policy
Define and run a restore job that restores all of your system volume, files, directories, and the system state.
NOTE: You must restore the system state when you restore your system volume,
files, and directories.
To create a restore job:
1. In the web-management portal, select the recovering computer. The Summary tab appears.
2. Click the Restore tab, then click New Restore. The Restore wizard appears.
o If you requested a restore device earlier, you must wait for your restore device to arrive. After it arrives, attach the device, and select Restore from device on network.
o If you are restoring over the Internet, select Restore data over the internet.
The Selection tab appears.
a. Type a restore name in the Name to use for this restore request box.
b. Select All policies from the Policy filter list.
NOTE: You can also select individual policies from this list―and select the
corresponding version by date and time, from the Version list.
c. Select the version by selecting the date and time from the Version list.
d. In the left pane, click the computer name to display all of the volumes; then in the
right pane, select all the volumes. (For example, select C:, D:, and E:).
e. Optional: Select Rebuild deduplicated volume to rebuild any Windows Server 2012 deduplicated volumes as part of the disaster recovery. (If the server is not Windows Server 2012 or does not have data deduplication enabled on the volume(s), proceed to step 2.f in the table under CHAPTER 4: RECOVER A WINDOWS SERVER
For more information on Windows Server 2012 volumes optimized for data deduplication, see your Windows Server 2012 documentation.)
NOTE: Ensure that the destination volume(s) for rebuilding the
deduplicated volume(s) is an empty, formatted volume of sufficient size. To
ensure consistency of the dedupe store, do not enable deduplication on the
new volume before the restore occurs. If deduplication is enabled on the
volume(s), the restore will fail.
Continued on next page
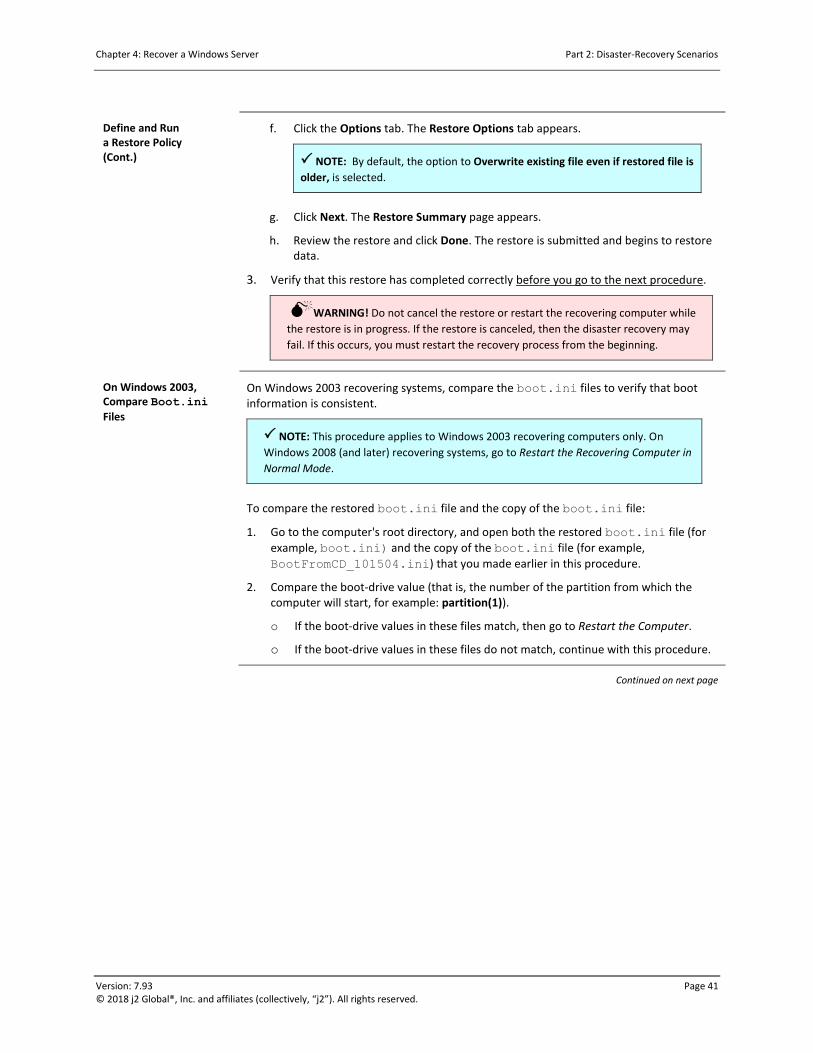
Chapter 4: Recover a Windows Server Part 2: Disaster-Recovery Scenarios
Version: 7.93 Page 41 © 2018 j2 Global®, Inc. and affiliates (collectively, “j2”). All rights reserved.
Define and Run a Restore Policy (Cont.)
f. Click the Options tab. The Restore Options tab appears.
NOTE: By default, the option to Overwrite existing file even if restored file is
older, is selected.
g. Click Next. The Restore Summary page appears.
h. Review the restore and click Done. The restore is submitted and begins to restore data.
3. Verify that this restore has completed correctly before you go to the next procedure.
WARNING! Do not cancel the restore or restart the recovering computer while
the restore is in progress. If the restore is canceled, then the disaster recovery may
fail. If this occurs, you must restart the recovery process from the beginning.
On Windows 2003, Compare Boot.ini
Files
On Windows 2003 recovering systems, compare the boot.ini files to verify that boot information is consistent.
NOTE: This procedure applies to Windows 2003 recovering computers only. On
Windows 2008 (and later) recovering systems, go to Restart the Recovering Computer in
Normal Mode.
To compare the restored boot.ini file and the copy of the boot.ini file:
1. Go to the computer's root directory, and open both the restored boot.ini file (for
example, boot.ini) and the copy of the boot.ini file (for example,
BootFromCD_101504.ini) that you made earlier in this procedure.
2. Compare the boot-drive value (that is, the number of the partition from which the computer will start, for example: partition(1)).
o If the boot-drive values in these files match, then go to Restart the Computer.
o If the boot-drive values in these files do not match, continue with this procedure.
Continued on next page

Part 2: Disaster-Recovery Scenarios Chapter 4: Recover a Windows Server
Page 42 Version: 7.93 © 2018 j2 Global®, Inc. and affiliates (collectively, “j2”). All rights reserved.
On Windows 2003, Compare Boot.ini
Files (Cont.)
3. The restored boot.ini file's (for example, boot.ini) read-only attribute is set. To clear the read-only attribute, complete the following steps:
a. In Windows Explorer, select the file.
b. Right-click the file, and select Properties.
c. In the Properties dialog box, on the General tab, in the Attributes group: Clear the Read-only box.
d. Click OK.
4. Change the value in the restored boot.ini file (for example, boot.ini) to match
the value specified in the copy of the boot.ini file (for example,
BootFromCD_101504.ini).
NOTE: Your boot.ini configuration might require you to update the boot-
drive value for multiple lines in the restored boot.ini file.
WARNING! If you fail to update the restored boot.ini file, you
cannot restart the computer.
Restart the Recovering Computer in Normal Mode
To restart Windows 2008 (and later) computers:
1. In Windows: Click Start or press the Windows Start key, then Run. The Run window opens.
2. Type cmd and press Enter. The Command Prompt window opens.
3. Enter the following command: BCDEDIT /deletevalue safeboot; then press Enter. The command completes successfully.
4. Reboot the computer. The computer restarts in normal mode.
To restart Windows 2003 computers: Restart the recovering computer in normal mode.
If you receive a Windows message that indicates that you must restart the computer because it has found new devices, restart the computer again as specified. (For example, when Windows finds all devices as new hardware, some services might not restart. So, you will receive a prompt to restart the computer again―possibly multiple times―as the computer finds new devices. In this case, do not restart the computer each time you receive a prompt. That is, after Windows finds all devices, then restart the computer.
Chapter 4: Recover a Windows Server Part 2: Disaster-Recovery Scenarios
Version: 7.93 Page 43 © 2018 j2 Global®, Inc. and affiliates (collectively, “j2”). All rights reserved.
Determine If This Is a Domain Controller
If the recovering computer is not a domain controller, skip to Enable the NIC on below.
If the computer is a domain controller: Click the Start menu, and select Administrative Tools>Active Directory Users and Computers.
o If only one domain controller is listed, skip to Enable the NIC on below.
o If other domain controllers are present and running, skip to Enable the NIC below.
o If the recovering computer is the first domain controller of a multi-domain environment, see Appendix B: Restore a Domain Controller.
Enable the NIC If you had to disable an NIC for the disaster recovery, complete the following steps to enable that NIC:
If the NIC is a separate card that was removed, insert the card.
If it is an onboard NIC, use the BIOS interface to enable the NIC. (For more information, see the hardware vendor’s documentation.)
If you disabled the NIC through the Windows Device Manager, it might be enabled for you. Verify the NIC's status in Device Manager, and enable it if necessary.
After you enable the NIC, you might need to restart the recovered computer, then configure the NIC.
Test the Recovered Computer
If the recovered computer fails to appear on the network, verify the following indicators:
Analyze the ipconfig output for errors.
Analyze Device Manager for errors.
Analyze the system logs for errors.
Analyze the application logs for errors.
For more information, see your Windows documentation.
Part 2: Disaster-Recovery Scenarios Chapter 4: Recover a Windows Server
Page 44 Version: 7.93 © 2018 j2 Global®, Inc. and affiliates (collectively, “j2”). All rights reserved.
Resolve Short-Name Issues
If the SQL service fails to restart following a restore, there might be a short-name discrepancy. To determine if there is:
1. In Windows: Click Start, then Settings > Control Panel > Administrative Tools > Services.
2. In the list of services on the right of the pane, right-click mssqlserver, and select Properties.
3. Note the path and folder that Windows is looking in for the program.
4. In Windows, or at a command prompt: Navigate to the folder above, and note if the program exists in that folder.
o If the program is there, the failure of SQL to launch is not due to a short-name discrepancy. (For more information, consult your SQL documentation.)
o If the program is not there, you have a short-name discrepancy. Continue to the next step.
5. To open a command prompt, complete the steps below.
a. In Windows: Click Start, and then Run. The Run window opens.
b. Type cmd and press Enter. The Command Prompt window opens.
c. Enter the following command to change the directory to Program Files: cd \Program Files
d. Then, enter the following command: dir/x micro*, and press Enter.
6. Browse to each folder until you locate the SQL program―then, temporarily rename the folder that contains the SQL program. (For example, if the folder containing the
SQL program is Micros~1, rename Micros~1 to Temp_Micros~1. This forces Windows to reassign a new short name to that folder.)
7. Temporarily rename the folder that Windows associates with the SQL program. (For example, if the service is looking in Micros~4 to launch the program, rename
Micros~4 to Temp_Micros~4. This forces Windows to reassign a new short name to that folder, which reestablishes the proper sequence of short names, so that SQL can find the correct folder and execute. You might also have to temporarily rename other short-name folders as well, until the correct folder shuffles to the correct place
in the numbering sequence. Another example is: When you rename Micros~1, the
old Micros~2 becomes Micros~1―and the old Micros~3 becomes Micros~2. Keep track of the folders to avoid creating other discrepancies.)
8. Rename the folder that contains the program, to its original name (Windows dynamically reassigns the proper short name to this folder). Then, rename the other folder to its original name (Windows dynamically reassigns another short name to this folder).

Chapter 4: Recover a Windows Server Part 2: Disaster-Recovery Scenarios
Version: 7.93 Page 45 © 2018 j2 Global®, Inc. and affiliates (collectively, “j2”). All rights reserved.
Update or Repair the Agent Software
It is possible that the restore might have caused older files to be installed on the recovering system, which can cause a LiveVault agent software conflict. To ensure there is no LiveVault Agent software conflict:
1. Upgrade your computer to the most recent version of the agent software.
2. If you receive an option to Repair, select it.
3. When you are prompted to restart, restart the computer.
Resume Backups on the Recovered Computer
To resume backups:
1. In the web-management portal, select the recovering computer.
2. In the right-pane, click Properties. The Properties page appears.
3. Click Edit properties. The Edit Properties page appears.
4. Check the Resume backup box, then click Save. The agent resumes backing up the computer according to the backup schedule.

Part 2: Disaster-Recovery Scenarios
Page 46 Version: 7.93 © 2018 j2 Global®, Inc. and affiliates (collectively, “j2”). All rights reserved.
CHAPTER 5: RECOVER AN EXCHANGE SERVER ON WINDOWS 2003
This chapter explains how to perform a disaster recovery for a Microsoft Exchange Server 2003 (or 2007) on a Windows 2003 server.
Backup and recovery of Exchange 2003 SP1 is only supported on Windows 2003 SP1 and later.
Backup and recovery of Exchange 2007 is supported on all operating systems on which Exchange 2007 runs.
NOTE: To recover Exchange 2007/2010/2013 on Windows Server 2008 and later, see Chapter 6: Recover an Exchange Server on Windows 2008 (and Later).
IMPORTANT! To recover your computer from a disaster, complete the following procedures in the order that
they are presented. To reiterate:
To ensure the highest success rate, you must complete the following tasks exactly and in order.
Do not omit or skip any step, unless instructed to do so.
Failure to follow the steps in order will cause the recovery to fail, and you must start the recovery process
from the beginning.
LiveVault recommends that you print out this chapter, and use it as a checklist for your disaster-recovery process.
The recovery procedures are:
1. Submit a media-resource-device request.
2. Suspend backups on the original computer.
3. Stop and disable the LiveVault service.
4. Disable the secondary NIC on the recovering computer.
5. Verity the keyboard and mouse type.
6. Verify the original computer’s as-built configuration.
7. Install the operating system on the recovering computer.
8. Install the same service packs as on the original computer.
9. Verify the recovering computer’s name.
10. Restart the computer.
11. Configure the disks and drive letters.
12. Remove the IIS components from the recovering computer.
13. On Windows 2003 computers, copy the boot.ini file.
14. Disable the screen saver and password-protect.
15. Install the agent software on the recovering computer.
16. Restart the recovering computer in DSRM.
Chapter 5: Recover an Exchange Server on Windows 2003 Part 2: Disaster-Recovery Scenarios
Version: 7.93 Page 47 © 2018 j2 Global®, Inc. and affiliates (collectively, “j2”). All rights reserved.
17. Log into the recovering computer.
IMPORTANT! After you log in, do not log off or lock the computer for the remainder of the procedures listed
below.
A. Define and run a restore policy.
B. Define and run an Exchange-server restore policy.
C. Compare boot.ini files.
D. Restart the recovered computer in normal mode.
E. Enable the NIC.
F. Test the recovered computer.
G. Complete the recovery on Exchange-2007 CCR configurations.
H. Update or repair the agent software.
I. Resume backups on the recovered computer.
ASSUMPTIONS AND PROCEDURES
The following assumptions are made in this chapter’s procedures:
You configured your backup to protect the full computer (including its general files and directories, its databases and applications, and its system state)―and that the initial synchronization has been completed for the computer. LiveVault can restore only files, directories, system state, and metadata that you have backed up with LiveVault.
You configured an Exchange backup policy to protect your Exchange data in a transactionally safe manner.
For more information on backing up Exchange data with Exchange backup policies, see the LiveVault Web- Management Help system.
All Windows functions worked before the disaster occurred.
All databases and applications functions worked before the disaster occurred.
Submit a Media-Restore-Device Request
Optional: Request a media restore device containing the backup versions from a specific time range.
When you request a restore device, it takes a certain amount of time to build and ship the device―and depends on the data size and shipment method. (For more information on restore devices, see your LiveVault service contract.)
NOTE: Requesting a media restore device incurs an additional charge. Refer to your
contract for cost and shipping information.
Part 2: Disaster-Recovery Scenarios Chapter 5: Recover an Exchange Server on Windows 2003
Page 48 Version: 7.93 © 2018 j2 Global®, Inc. and affiliates (collectively, “j2”). All rights reserved.
Suspend Backups on the Original Computer
Suspend backups on the original computer to ensure that no additional backup versions are sent from the original computer during the recovery process.
To suspend backups:
1. In the left pane of the LiveVault Web-Management Portal, select the original computer. The Computer Summary page appears.
2. In the right pane, click Properties. The Computer Properties page appears.
3. Click Edit properties. The Edit Properties page appears.
4. Check the Suspend backup box, then click Save. Backups are suspended.
Stop and Disable the LiveVault® Service
If you are recovering the computer to a newly built machine, and the original computer is still partially operable and connected to the LiveVault service, you must stop and disable the LiveVault backup service.
If you are performing a disaster-recovery test to a newly built machine, you must stop and disable the LiveVault backup service on the original computer.
WARNING! Failure to stop and disable the LiveVault backup service on the
original computer while performing the disaster recovery to a newly built
recovering computer will result in a duplicate system connecting to the LiveVault
service. There are significant risks of data corruption associated with duplicate
systems attempting to back up to the LiveVault service.
To stop the LVBackupservice, choose one of the following methods:
Enter the following command: net stop lvbackupservice. The LiveVault backup service stops.
Click Start or press the Windows Start key, then select Administrative Tools > Computer Management > Services. Select LiveVault Backup Service. Select Stop the service. The LiveVault backup service stops.
After the backup service has stopped, you must disable it so it does not restart automatically.
To disable the LiveVault backup service, enter the following command: sc config
lvbackupservice start= disabled. The LiveVault backup service is set to Disabled.
Chapter 5: Recover an Exchange Server on Windows 2003 Part 2: Disaster-Recovery Scenarios
Version: 7.93 Page 49 © 2018 j2 Global®, Inc. and affiliates (collectively, “j2”). All rights reserved.
Disable the Secondary NIC on the Recovering Computer
If the recovering computer contains two network-interface cards (NICs), disable one of them.
To disable a secondary NIC:
1. If the NIC is a separate card that you can remove, remove it. If it is an onboard NIC, disable it by using the BIOS interface. (For more information, see the hardware vendor’s documentation.)
2. Otherwise, disable the NIC through the Windows Device Manager after you install the Windows operating system. (You do not need to restart the computer after you disable the NIC.)
Verify the Keyboard and Mouse Type
If possible, use the same type of keyboard and mouse on the target computer as those on the original computer― either USB or PS/2.
Verify the As-Built Configuration of the Original Computer
Review and verify the as-built configuration for the original computer that you prepared as part of planning for disaster recovery. (For more information, see “Verify Configuration Information” [part of Chapter 2: Plan for Disaster Recovery] on pg. 6.)
Install the Operating System on the Recovering Computer
According to the following instructions, install the Windows operating system on the recovering computer. If possible, use the same media used to install the operating system on the failed computer.
1. Install the same operating-system version of Windows that existed on the original computer.
2. Name the computer to the same Netbios name as the original computer’s. (The Windows setup program provides a suggested computer name by default; for example, w2008xr1fan. However, if the original computer was named corporate.mycompany.com, you must assign the computer name corporate to the recovering computer.)
IMPORTANT! The recovering computer’s name must be the same as the
original computer’s. Otherwise, the recovering computer will not start correctly,
the disaster-recovery procedure will fail, and you will need to start the process
over from the beginning.
Continued on next page

Part 2: Disaster-Recovery Scenarios Chapter 5: Recover an Exchange Server on Windows 2003
Page 50 Version: 7.93 © 2018 j2 Global®, Inc. and affiliates (collectively, “j2”). All rights reserved.
Install the Operating System on the Recovering Computer (Cont.)
3. Regarding workgroup membership, join the computer as a member of a workgroup.
NOTE: Do not join a domain at this time.
4. Install Windows to the same directory on the recovering computer as on the original computer.
5. When prompted to specify the Windows components to install, install only Accessories and Utilities on Windows 2003. That is, clear the checkboxes for all components except Accessories and Utilities.
NOTE: Do not install the other Windows components (for example, Active
Directory, Certificate Services, or Internet Information Services). (If you install
them, the restore and the disaster recovery can fail.) The disaster recovery will
restore all other components.
If you install the Internet Information Service (IIS) components now on a
Windows 2003 recovering computer, the IIS components that the LiveVault
service restores will not work. However, if you must install the IIS components
now (for example, because you use a system-imaging solution that includes these
components), you will remove them later in the process (via Remove IIS
Components from the Recovering Computer on pg. 51).
Install the Same Service Packs as on the Original Computer
Install the same service packs on the recovering computer as were on the original computer. (For more information, see the original computer’s as-built configuration information and your Windows documentation.)
Verify the Recovering Computer’s Name
Ensure that the recovering computer has the same Netbios computer name as that of the original computer. (For example, if the original computer was named corporate.mycompany.com, then you must assign the computer name corporate to the recovering computer.)
NOTE: Assign the correct computer name to the recovering computer in order to
perform the system-state restore. Otherwise, the recovering computer will not start
correctly, and the disaster-recovery procedure will fail.

Chapter 5: Recover an Exchange Server on Windows 2003 Part 2: Disaster-Recovery Scenarios
Version: 7.93 Page 51 © 2018 j2 Global®, Inc. and affiliates (collectively, “j2”). All rights reserved.
Restart the Computer Restart the recovering computer.
Configure the Disks and Drive Letters
Partition the volumes, and assign the drive letters on the recovering computer to match those that existed on the original computer.
To create the volumes on the recovering computer:
1. Create the same volumes. (For example, if the original computer had C: , D: , and E:
volumes, create the recovering computer’s volumes on C:, D: , and E:. Otherwise, data restores will fail.)
2. Format the recovering computer's volumes to be the same file-system format as the original computer's volumes. (For example, format the volumes to NTFS, ReFS and so on.)
3. Ensure that the new volumes have adequate size to handle the restored data. (For example, the recovering computer's volumes must be at least as large as the original computer's volumes.)
Remove IIS Components from the Recovering Computer
For a recovering Windows 2003 computer, determine if any Internet Information Services (IIS) components were installed during the Windows installation. (For more information on removing IIS components or Web Server roles, see your Windows documentation.
On Windows 2003 Computers, Copy the Boot.ini File
On a Windows 2003 recovering computer, you must copy the boot.ini for later use in verifying the restore.
NOTE: This procedure applies to Windows 2003 recovering computers only.
To copy the boot.ini file:
1. Copy the boot.ini file. (The boot.ini is located in the recovering computer’s root directory.)
2. Name the copy something similar to BootFromCD_101504.ini (where 101504 represents the current date) to ensure no confusion exists between the copy and the restored boot.ini file―and to differentiate this copy from any other copies.
3. Take note of the name of the boot.ini copy. The copy will be referenced later during the disaster-recovery process.
Disable the Screen Saver and Password-Protect
NOTE: Disable the screen saver and password-protect before entering Directory
Services Recovery Mode (DSRM).
1. Disable the screen saver.
NOTE: You cannot disable the screen saver after entering DSRM.
2. In the Power Options, disable the password-protect. (The password might change due to the restore.)

Part 2: Disaster-Recovery Scenarios Chapter 5: Recover an Exchange Server on Windows 2003
Page 52 Version: 7.93 © 2018 j2 Global®, Inc. and affiliates (collectively, “j2”). All rights reserved.
Install the Agent Software on the Recovering Computer
You can install the LiveVault agent software on the recovering computer and also use the LiveVault Configuration Wizard to generate an encryption key and to provision the agent to the LiveVault service.
To install the LiveVault agent software:
1. Log into the LiveVault Web-Management Portal.
2. Click Downloads in the top menu. The Downloads page appears.
3. Select the appropriate Agent installation kit for your operating system, and click Download. (Do NOT select Run on Download.)
4. Save the kit to a location on the recovering computer, then run it.
5. Install the agent software to the same location on the recovering computer as it was on the original computer. (To change the location from the default, click Change and type a new location.)
6. Install the LiveVaultData directory to the same location as the original computer.
NOTES:
By default, the installation program installs the LiveVaultData
directory to the volume with the largest amount of free disk space. To
change the location from the default, click Change and type a new
location.
Ensure that the path to the LiveVault agent software matches the
original computer’s path. For example, if the original computer’s
software installation was to C:\Program Files\Autonomy\
BackupEngine and D:\LiveVaultData, ensure that you install
the software to the same locations on the recovering computer.
Failure to do so will cause the system-state restore to fail.
7. Click Finish.
Continued on next page

Chapter 5: Recover an Exchange Server on Windows 2003 Part 2: Disaster-Recovery Scenarios
Version: 7.93 Page 53 © 2018 j2 Global®, Inc. and affiliates (collectively, “j2”). All rights reserved.
Install the Agent Software on the Recovering Computer (Cont.)
8. Click Configure. The Configuration Wizard appears.
a. To validate your account, type your user name and password credentials; then click Next. The Installation page appears.
b. Select Recovering a complete system.
c. From the Select System list, select the name of the original computer you are recovering.
d. Click Next. The Password Required page appears.
e. Type the encryption-key password. (This is the encryption-key password that you entered when you first provisioned the LiveVault agent software on the original computer.)
NOTES:
If you do not remember the encryption-key password from the original
computer, you will not be able to provision the recovering computer
while performing the disaster recovery.
Ensure that you have the encryption-key password from the original
computer.
The encryption-key password may have been escrowed with
autonomy at the point of the original computer’s installation. Contact
LiveVaultSupport to verify this and to request the password.
f. Click Next. The Configuration Wizard generates the key.
g. Click Finish. The Service Configuration dialog opens.
h. Click Cancel to restart later.
NOTE: Do not restart the computer now at the completion of LiveVault
service configuration. Instead, you must configure the computer to restart in
Directory Services Recovery Mode (DSRM) in order to proceed with the
disaster recovery.
The service configuration exits.
Restart the Recovering Computer in DSRM
NOTE: On Windows 2003 computers, use the Directory Services Restore Mode
(DSRM) even if the computer is not a domain controller. (For more information on
DSRM, see your Windows documentation.
Continued on next page
Part 2: Disaster-Recovery Scenarios Chapter 5: Recover an Exchange Server on Windows 2003
Page 54 Version: 7.93 © 2018 j2 Global®, Inc. and affiliates (collectively, “j2”). All rights reserved.
Restart the Recovering Computer in DSRM (Cont.)
To restart Windows 2003 in DSRM mode:
1. Restart the computer.
2. During the normal start-up process, look for the Windows start-up options
message at the bottom of the window; for example: For troubleshooting and advanced startup options for Windows 2003, press
F8.
3. When you see this message, press F8. (You will only see this message for a few seconds. Press F8 while you can see it.)
NOTES:
If you are able to press F8 before it disappears, continue to step 4.
below.
If you missed the opportunity to press F8, you need to configure the
boot.ini file to boot into DSRM. To do so, see the next bullet
below.
4. From the Windows Advanced Options menu: Select Directory Services Restore Mode, and press Enter. The computer starts in DSRM.
NOTE: Stay in DSRM until you are instructed to restart into normal mode.
To restart Windows 2003 in DSRM if you did not press F8:
1. Open the boot.ini file in the recovering computer's root directory.
2. In the [operating systems] section, add the following switch to the end
of the line that specifies the start path: /safeboot:dsrepair /sos. For example:
operating systems]
multi(0)disk(0)rdisk(0)partition(1)\WINNT=;Microsoft
Windows 2003 Server; /fastdetect /safeboot:dsrepair
/sos
3. Restart the recovering computer. The computer starts in DSRM.
Log Into the Recovering Computer
After the computer restarts: Log into Windows, with local administrator rights.
IMPORTANT! After you log in, do not log off or lock the computer for the
remainder of this recovery process (as indicated in the remaining procedures below, in
this chapter).
Chapter 5: Recover an Exchange Server on Windows 2003 Part 2: Disaster-Recovery Scenarios
Version: 7.93 Page 55 © 2018 j2 Global®, Inc. and affiliates (collectively, “j2”). All rights reserved.
Define and Run a Restore Policy
Define and run a restore job that restores all of your system volume, files, directories, and the system state.
NOTE: You must restore the system state when you restore your system volume,
files, and directories.
To create a restore job:
1. In the web-management portal, select the recovering computer. The Summary tab appears.
2. Click the Restore tab, then click New Restore. The Restore wizard opens.
o If you requested a restore device earlier, you must wait for your restore device to arrive. After it arrives, attach the device, and select Restore from device on network.
o If you are restoring over the Internet, select Restore data over the internet.
The Selection tab appears.
a. Type a restore name in the Name to use for this restore request textbox.
b. Select All policies from the Policy filter list.
NOTE: You can also select individual policies from this list―and select the
corresponding version by date and time, from the Version list.
c. Select the version by selecting the date and time from the Version list.
d. In the left pane, click the computer name to display all of the volumes; then in the
right pane, select all the volumes. (For example, select C:, D:, and E:).
e. Check the Restore system state box to restore the system state.
f. Optional: Select Rebuild deduplicated volume to rebuild any Windows Server 2012 deduplicated volumes as part of the disaster recovery. (If the server is not Windows Server 2012 or does not have data deduplication enabled on the volume(s), proceed to step 2.g on pg. 56. For more information on Windows Server 2012 volumes optimized for data deduplication, see your Windows Server 2012 documentation.)
NOTE: Ensure that the destination volume(s) for rebuilding the
deduplicated volume(s) is an empty, formatted volume of sufficient size. To
ensure consistency of the dedupe store, do not enable deduplication on the
new volume before the restore occurs. If deduplication is enabled on the
volume(s), the restore will fail.
Continued on next page
Part 2: Disaster-Recovery Scenarios Chapter 5: Recover an Exchange Server on Windows 2003
Page 56 Version: 7.93 © 2018 j2 Global®, Inc. and affiliates (collectively, “j2”). All rights reserved.
Define and Run a Restore Policy (Cont.)
g. Click the Options tab. The Restore Options tab appears.
NOTES:
By default, the option Overwrite existing file even if restored files is
older is selected.
Also by default, the option Overwrite open files when the computer is
rebooted is selected.
h. Click Next. The Restore Summary page appears.
i. Review the restore and click Done. The restore is submitted and begins to restore data.
3. Verify that this restore has completed correctly before you go to the next procedure.
WARNING! Do not cancel the restore or restart the recovering computer while
the restore is in progress. If the restore is canceled, then the disaster recovery may
fail. If this occurs, you must restart the recovery process from the beginning.
Define and Run an Exchange-Restore Policy
You can restore the Exchange data files with an Exchange file restore.
To restore an Exchange policy:
1. In the LiveVault Web-Management Portal, select the recovering computer. The Summary tab appears.
2. Click the Restore tab, then click New Restore. The Restore wizard page appears.
o If you requested a restore device earlier, you must wait for your restore device to arrive. After it arrives, attach the device, and select Restore from device on network.
o If you are restoring over the Internet, select Restore data over the internet.
The What would you like to restore page appears.
a. Select Exchange Server, then click Next.
b. In the Name to use for this restore request textbox, type a restore name.
c. Select the version by selecting the date and time from the Version list. (The most recent version is the default.)
d. Click the computer name in the left pane to display all of the Exchange data. Then, select the top-level object in the right pane of your Exchange Server's backed-up file structure. (This ensures that you restore all of the required storage groups and mailbox stores.)
e. Click the Options tab. The Restore Options page appears.
Continued on next page

Chapter 5: Recover an Exchange Server on Windows 2003 Part 2: Disaster-Recovery Scenarios
Version: 7.93 Page 57 © 2018 j2 Global®, Inc. and affiliates (collectively, “j2”). All rights reserved.
Define and Run an Exchange-Restore Policy (Cont.)
f. Select File Restore.
NOTE: You must select the File Restore option to recover the Exchange
data as files. Because the disaster recovery is not complete at this point, the
recovering computer does not yet have the Exchange VSS writers available to
process an Exchange-aware restore.
g. Select Overwrite existing files even if restored file is older.
h. Select Overwrite open files when the computer is rebooted.
i. Selected Restore the Original Backup Security Attributes.
j. Click Next. The Restore Summary page appears.
k. Review your selections, then click Done. The restore is submitted and begins to restore Exchange data.
3. Review the restore-job log on the Exchange Server computer to which you restored the files, and verify that the Mailbox and/or Public Folder Store was restored as expected.
4. To restore a different version: Perform this procedure again, and choose an older version.
Compare Boot.ini
Files Compare the boot.ini files to verify that boot information is consistent.
NOTE: This procedure applies to Windows 2003 recovering computers only.
1. Go to the computer's root directory, and open both the restored boot.ini file (for
example, boot.ini)―and the copy of the boot.ini file (for example,
BootFromCD_101504.ini) that you made earlier in this procedure.
2. Compare the boot-drive value (that is, the number of the partition from which the computer will start, for example: partition(1)).
o If the boot-drive values in these files match, then skip to Restart the Computer on pg. 51.
o If the boot-drive values in these files do not match, continue to step 3.
3. The restored boot.ini file's (for example, boot.ini) read-only attribute is set. To clear the read-only attribute, complete the following steps:
a. In Windows Explorer, select the file.
b. Right-click the file, and select Properties.
c. On the Properties page, on the General tab, in the Attributes group: Clear the Read-only box; then click OK.
Continued on next page
Part 2: Disaster-Recovery Scenarios Chapter 5: Recover an Exchange Server on Windows 2003
Page 58 Version: 7.93 © 2018 j2 Global®, Inc. and affiliates (collectively, “j2”). All rights reserved.
Compare Boot.ini
Files (Cont.) 4. Change the value in the restored boot.ini file (for example, boot.ini) to match
the value specified in the copy of the boot.ini file (for example,
BootFromCD_101504.ini).
NOTES:
Your boot.ini configuration might require you to update the boot-
drive value for multiple lines in the restored boot.ini file.
If you fail to update the restored boot.ini file, you cannot restart
the computer.
Restart the Recovered Computer in Normal Mode
Restart the recovering computer in normal mode.
If you receive a Windows message that indicates that you must restart the computer because the computer has found new devices, restart the computer again as specified.
After Windows finds all devices, restart the computer.
Enable the NIC If you had to disable an NIC for the disaster recovery, complete the following steps to enable that NIC:
If the NIC is a separate card that was removed, insert the card.
If it is an onboard NIC, use the BIOS interface to enable the NIC. (For more information, see the hardware vendor’s documentation.)
If you disabled the NIC through the Windows Device Manager, it might be enabled for you. Verify the NIC's status in Device Manager, and enable it if necessary.
After you enable the NIC, you might need to restart the recovered computer, and then configure the NIC.
Test the Recovered Computer
If the recovered computer fails to appear on the network, verify the following indicators:
Analyze the ipconfig output for errors.
Analyze Device Manager for errors.
Analyze the system log for errors.
Analyze the restore-agent reports for errors.
Continued on next page
Chapter 5: Recover an Exchange Server on Windows 2003 Part 2: Disaster-Recovery Scenarios
Version: 7.93 Page 59 © 2018 j2 Global®, Inc. and affiliates (collectively, “j2”). All rights reserved.
Test the Recovered Computer (Cont.)
Verify that the databases are mounted correctly.
After the reboot, look for errors in the Windows Event Viewer related to MSExchange, MSExchangeRepl, or VSS.
If this is a Cluster Continuous Replication (CCR) configuration, take the following extra precautions:
o Let the Exchange CCR replication finish copying the log files to the passive node. (During this time, the replication status might display as Initializing.)
o Verify that the replication status is shown as Healthy on the Active and Passive nodes.
(For more information, refer to your Windows documentation.)
Complete the Recovery on Exchange-2007 CCR Configurations
If you are recovering a node in an Exchange 2007 CCR configuration, you may need to take additional steps to get the node back up and running. To do so, see:
Verify the cluster’s status (below).
Verify databases and replication.
Manually copy Exchange files.
Seed the Exchange database.
Remount the Public Store database.
Search for replication-event errors.
Verify the Cluster’s Status
After your restore, open the Exchange Failover Cluster Manager console, and verify the following conditions:
All storage resources (disks) are online.
All network interfaces (public and private) are online.
Services and Applications for Exchange are online.
Both nodes of the configuration are online.
Continued on next page
Part 2: Disaster-Recovery Scenarios Chapter 5: Recover an Exchange Server on Windows 2003
Page 60 Version: 7.93 © 2018 j2 Global®, Inc. and affiliates (collectively, “j2”). All rights reserved.
Complete the Recovery on Exchange 2007 CCR Configurations (Cont.)
Verify Databases and Replication
After performing the Exchange restore, verify that all appropriate databases are mounted―and replication is in a state that allows the agent to resume backups. Backups can take place successfully when replication is in the following states, depending on which node the agent is installed on:
Active state
o Healthy
o ServiceDown
o Failed
o Unknown
Passive state
o Healthy
Manually Copy Exchange Files
If you perform a redirected restore to a different folder on the same computer, you may have to manually copy Exchange files to make Exchange functional again after the restore. (See your Microsoft Exchange documentation for instructions on manually dismounting the databases, copying Exchange files from one location to another, and remounting the databases.)
Seed the Exchange Database
If the Exchange CCR replication is not synchronized after a successful restore and has a Failed status: Update the storage-group copy to reseed the databases, update the storage-group copy status, and delete the existing files.
If the state indicates Initializing, you must wait until the logs are copied over from the Active node to the Passive node before replication is functional. (See your Microsoft Exchange documentation for instructions on updating the storage-group status and seeding the Exchange database.)
Remount the Public-Store Database
If the public-store database is down after a successful restore, and replication status is Unknown or ServiceDown, remount the database to resume backups. (For more information, see the Microsoft articles on planning for Cluster Continuous Replication and Cluster Continuous Replication and Public-Folder Databases.)
Continued on next page
Chapter 5: Recover an Exchange Server on Windows 2003 Part 2: Disaster-Recovery Scenarios
Version: 7.93 Page 61 © 2018 j2 Global®, Inc. and affiliates (collectively, “j2”). All rights reserved.
Complete the Recovery on Exchange 2007 CCR Configurations (Cont.)
Search for Replication-Event Errors
After performing a disaster recovery, the replication status might not have a Healthy status. This occurs when the passive node is unable to perform an incremental re-seed of the passive node―or if logs are missing. Analyze the Windows Event viewer to look for the following events:
MSExchangeRepl 2056: The Exchange Replication service could not perform an incremental reseed of the passive node, because the logs on the active node have diverged too widely from the logs on the passive node.
MSExchangeRepl 2057: The Exchange Replication service could not perform an incremental reseed of the passive database copy, because replication was suspended for the storage group specified in the event description. This event is caused when an incremental reseed must be initiated ,but the storage group copy is currently suspended.
MSExchangeRepl 2058: The Exchange Replication service could not perform an incremental reseed of the passive node, because the service encountered an error (as specified by the error code in the event description).
MSExchangeRepl 2081: The Exchange Replication service could not perform an incremental reseed of the storage group on the passive node, because the service could not compare a required log file (that is located on the active node) with the log file of the same generation ID (that is located on the passive node).
If any of these events occur, you might need to manually re-seed the database. (For more information about seeding the database, see MSDN Exchange 2007 documentation.)
Update or Repair the Agent Software
It is possible that the restore might have caused older files to be installed on the recovering system, which can cause a LiveVault agent software conflict. To ensure there is no LiveVault Agent software conflict:
1. Upgrade your computer to the most recent version of Agent software.
2. If you receive an option to Repair, select it.
3. When you are prompted to restart, restart the computer.

Part 2: Disaster-Recovery Scenarios Chapter 5: Recover an Exchange Server on Windows 2003
Page 62 Version: 7.93 © 2018 j2 Global®, Inc. and affiliates (collectively, “j2”). All rights reserved.
Resume Backups on the Recovered Computer
To resume backups:
1. In the web-management portal, select the recovering computer.
2. In the right-pane, click Properties. The Properties page appears.
a. Click Edit properties. The Edit Properties page appears.
b. Select the Resume backup check box.
c. Click Save. The agent resumes backing up the computer according to the backup schedule.

Part 2: Disaster-Recovery Scenarios
Page 63 Version: 7.93 © 2018 j2 Global®, Inc. and affiliates (collectively, “j2”). All rights reserved.
CHAPTER 6: RECOVER AN EXCHANGE SERVER ON WINDOWS 2008 (AND LATER)
This chapter explains how to perform a disaster recovery for the following Microsoft Exchange Server versions:
Exchange 2007 on Windows 2008 and later.
Exchange 2010 on Windows 2008 and later.
Exchange 2013 on Windows 2008 R2 and later.
NOTE: To recover Exchange 2003 and 2007 on Windows Server 2003, see Chapter 5: Recover an Exchange Server
on Windows 2003 on page 46.
IMPORTANT! To recover your computer from a disaster, complete the following procedures in the order that
they are presented. To reiterate:
To ensure the highest success rate, you must complete the following tasks exactly and in order.
Do not omit or skip any step, unless instructed to do so.
Failure to follow the steps in order will cause the recovery to fail, and you must start the recovery process
from the beginning.
LiveVault recommends that you print out this chapter, and use it as a checklist for your disaster-recovery process.
The recovery procedures are:
1. Submit a media-resource-device request.
2. Suspend backups on the original computer.
3. Stop and disable the LiveVault service.
4. Disable the secondary NIC on the recovering computer.
5. Verity the keyboard and mouse type.
6. Verify the original computer’s as-built configuration.
7. Install the operating system on the recovering computer.
8. Install the same service packs as on the original computer.
9. Verify the recovering computer’s name.
10. Restart the computer.
11. Configure the disks and drive letters.
12. Remove roles from the recovering computer.
13. Disable the screen saver and password-protect.
14. Install the agent software on the recovering computer.
15. Restart the recovering computer in DSRM.

Chapter 7: Recover an SQL Server Part 2: Disaster-Recovery Scenarios
Page 64 Version: 7.93 © 2018 j2 Global®, Inc. and affiliates (collectively, “j2”). All rights reserved.
16. Log into the recovering computer.
IMPORTANT! After you log in, do not log off or lock the computer for the remainder of the procedures listed
below.
A. Define and run a restore policy.
B. Define and run an Exchange restore policy.
C. Restart the recovered computer in normal mode.
D. Enable the NIC.
E. Test the recovered computer.
F. Complete the recovery on stand-alone Exchange configurations.
G. Complete the recovery on Exchange 2010/2013 DAG configurations.
H. Complete the recovery on Exchange 2007 CCR configurations.
I. Update or repair the agent software.
J. Resume backups on the recovered computer.
ASSUMPTIONS AND PROCEDURES
The following assumptions are made in these procedures:
You configured your backup to protect the full computer (including its general files and directories, its databases and applications, and its system state)―and that the initial synchronization has been completed for the computer. LiveVault can restore only files, directories, system state, and metadata that you have backed up with LiveVault.
You configured one or more Exchange backup policies to protect your Exchange data in a transactionally-safe manner. (For more information on backing up Exchange data with Exchange backup policies, see the LiveVault Web-Management help system.)
All Windows functions worked before the disaster occurred.
All databases and applications functions worked before the disaster occurred.
Submit a Media-Restore-Device Request
Optional: Request a media restore device containing the backup versions from a specific time range.
When you request a restore device, it takes a certain amount of time to build and ship the device―and depends on the data size and shipment method. (For more information on restore devices, see your LiveVault service contract.)
NOTE: Requesting a media restore device incurs an additional charge. Refer to your
contract for cost and shipping information.

Part 2: Disaster-Recovery Scenarios Chapter 7: Recover an SQL Server
Version: 7.93 Page 65 © 2018 j2 Global®, Inc. and affiliates (collectively, “j2”). All rights reserved.
Suspend Backups on the Original Computer
Suspend backups on the original computer to ensure that no additional backup versions are sent from the original computer during the recovery process.
To suspend backups:
1. In the left pane of the LiveVault Web-Management Portal, select the original computer. The Computer Summary page appears.
2. In the right pane, click Properties. The Computer Properties page appears.
3. Click Edit properties. The Edit Properties page appears.
4. Check the Suspend backup box, then click Save. Backups are suspended.
Stop and Disable the LiveVault® Service
If you are recovering the computer to a newly built machine, and the original computer is still partially operable and connected to the LiveVault service, you must stop and disable the LiveVault backup service.
If you are performing a disaster-recovery test to a newly built machine, you must stop and disable the LiveVault backup service on the original computer.
WARNING! Failure to stop and disable the LiveVault backup service on the
original computer while performing the disaster recovery to a newly built recovering
computer will result in a duplicate system connecting to the LiveVault service. There
are significant risks of data corruption associated with duplicate systems attempting
to back up to the LiveVault service.
To stop the LVBackupservice, choose one of the following methods:
Enter the following command: net stop lvbackupservice. The LiveVault backup service stops.
Click Start or press the Windows Start key, then select Administrative Tools > Computer Management > Services. Select LiveVault Backup Service. Select Stop the service. The LiveVault backup service stops.
After the backup service has stopped, you must disable it so it does not restart automatically.
To disable the LiveVault backup service, enter the following command: sc config
lvbackupservice start= disabled. The LiveVault backup service is set to Disabled.

Chapter 7: Recover an SQL Server Part 2: Disaster-Recovery Scenarios
Page 66 Version: 7.93 © 2018 j2 Global®, Inc. and affiliates (collectively, “j2”). All rights reserved.
Disable the Secondary NIC on the Recovering Computer
If the recovering computer contains two network-interface cards (NICs), disable one of them.
To disable a secondary NIC:
1. If the NIC is a separate card that you can remove, remove it. If it is an onboard NIC, disable it by using the BIOS interface. (For more information, see the hardware vendor’s documentation.)
2. Otherwise, disable the NIC through the Windows Device Manager after you install the Windows operating system. (You do not need to restart the computer after you disable the NIC.)
Verify the Keyboard and Mouse Type
If possible, use the same type of keyboard and mouse on the target computer as those on the original computer― either USB or PS/2.
Verify the As-Built Configuration of the Original Computer
Review and verify the as-built configuration for the original computer that you prepared as part of planning for disaster recovery. (For more information, see “Verify Configuration Information” [part of Chapter 2: Plan for Disaster Recovery] on pg. 6.)
Install the Operating System on the Recovering Computer
According to the following instructions, install the Windows operating system on the recovering computer. If possible, use the same media used to install the operating system on the failed computer.
1. Install the same operating-system version of Windows that existed on the original computer.
2. Name the computer to the same Netbios name as the original computer’s. (The Windows setup program provides a suggested computer name by default; for
example, w2008xr1fan. However, if the original computer was named corporate.mycompany.com, you must assign the computer name corporate to the recovering computer.)
IMPORTANT! The recovering computer’s name must be the same as the
original computer’s. Otherwise, the recovering computer will not start correctly,
the disaster-recovery procedure will fail, and you will need to start the process
over from the beginning.
Install the Operating System on the Recovering Computer (Cont.)
3. Regarding workgroup membership, join the computer as a member of a workgroup.
NOTE: Do not join a domain at this time.
4. Install Windows to the same directory on the recovering computer as on the original computer. (For example, if the original computer’s installation was c:/Windows,
then install Windows to c:/Windows on the recovering computer.)
Install the Same Service Packs as on the Original Computer
Install the same service packs on the recovering computer as were on the original computer. (For more information, see the original computer’s as-built configuration information and your Windows documentation.)
Part 2: Disaster-Recovery Scenarios Chapter 7: Recover an SQL Server
Version: 7.93 Page 67 © 2018 j2 Global®, Inc. and affiliates (collectively, “j2”). All rights reserved.
Verify the Recovering Computer’s Name
Ensure that the recovering computer has the same Netbios computer name as that of the original computer. (For example, if the original computer was named corporate.mycompany.com, then you must assign the computer name corporate to the recovering computer.)
NOTE: Assign the correct computer name to the recovering computer in order to
perform the system-state restore. Otherwise, the recovering computer will not start
correctly, and the disaster-recovery procedure will fail.
Restart the Computer Restart the recovering computer.
Configure the Disks and Drive Letters
Partition the volumes, and assign the drive letters on the recovering computer to match those that existed on the original computer.
To create the volumes on the recovering computer:
Configure the Disks and Drive Letters (Cont.)
1. Create the same volumes. (For example, if the original computer had C:, D:, and E:
volumes, create the recovering computer’s volumes on C:, D:, and E:. Otherwise, data restores will fail.)
2. Format the recovering computer's volumes to be the same file-system format as the original computer's volumes. (For example, format the volumes to NTFS, ReFS and so on.)
3. Ensure that the new volumes have adequate size to handle the restored data. (For example, the recovering computer's volumes must be at least as large as the original computer's volumes.)
Remove Roles from the Recovering Computer
For a recovering Windows 2003 computer, determine if any Web Server roles or Internet Information Services (IIS) components were installed during the Windows installation. To remove roles, start Server Manager and remove any Web Server, or IIS, roles. (For more information, see your Windows documentation.)
Disable the Screen Saver and Password-Protect
NOTE: Disable the screen saver and password-protect before entering Directory
Services Recovery Mode (DSRM).
1. Disable the screen saver.
NOTE: You cannot disable the screen saver after entering DSRM.
2. In the Power Options, disable the password-protect. (The password might change due to the restore.)

Chapter 7: Recover an SQL Server Part 2: Disaster-Recovery Scenarios
Page 68 Version: 7.93 © 2018 j2 Global®, Inc. and affiliates (collectively, “j2”). All rights reserved.
Install the Agent Software on the Recovering Computer
You can install the LiveVault agent software on the recovering computer and also use the LiveVault Configuration Wizard to generate an encryption key and to provision the agent to the LiveVault service.
To install the LiveVault agent software:
1. Log into the LiveVault Web-Management Portal.
2. Click Downloads in the top menu. The Downloads page appears.
3. Select the appropriate Agent installation kit for your operating system, and click Download. (Do NOT select Run on Download.)

Part 2: Disaster-Recovery Scenarios Chapter 7: Recover an SQL Server
Version: 7.93 Page 69 © 2018 j2 Global®, Inc. and affiliates (collectively, “j2”). All rights reserved.
Install the Agent Software on the Recovering Computer (Cont.)
4. Save the kit to a location on the recovering computer, then run it.
5. Install the agent software to the same location on the recovering computer as it was on the original computer. (To change the location from the default, click Change and type a new location.)
6. Install the LiveVaultData directory to the same location as the original computer.
NOTES:
By default, the installation program installs the LiveVaultData
directory to the volume with the largest amount of free disk space. To
change the location from the default, click Change and type a new
location.
Ensure that the path to the LiveVault agent software matches the original
computer’s path. For example, if the original computer’s software
installation was to C:\Program Files\Autonomy\
BackupEngine and D:\LiveVaultData, ensure that you install the
software to the same locations on the recovering computer. Failure to do
so will cause the system-state restore to fail.
7. Click Finish.
8. Click Configure. The Configuration Wizard appears.
a. To validate your account, type your user name and password credentials; then click Next. The Installation page appears.
b. Select Recovering a complete system.
c. From the Select System list, select the name of the original computer you are recovering.
d. Click Next. The Password Required page appears.
e. Type the encryption-key password. (This is the encryption-key password that you entered when you first provisioned the LiveVault agent software on the original computer.)
NOTES:
If you do not remember the encryption-key password from the original
computer, you will not be able to provision the recovering computer
while performing the disaster recovery.
Ensure that you have the encryption-key password from the original
computer.
The encryption-key password may have been escrowed with
autonomy at the point of the original computer’s installation. Contact
LiveVaultSupport to verify this and to request the password.
f. Click Next. The Configuration Wizard generates the key.
g. Click Finish. The Service Configuration dialog opens.
Continued on next page

Chapter 7: Recover an SQL Server Part 2: Disaster-Recovery Scenarios
Page 70 Version: 7.93 © 2018 j2 Global®, Inc. and affiliates (collectively, “j2”). All rights reserved.
Install the Agent Software on the Recovering Computer (Cont.)
h. Click Cancel to restart later.
NOTE: Do not restart the computer now at the completion of LiveVault
service configuration. Instead, you must configure the computer to restart in
Directory Services Recovery Mode (DSRM) in order to proceed with the
disaster recovery.
The service configuration exits.
Restart the Recovering Computer in DSRM
To restart the recovering computer in Directory Services Recovery Mode (DSRM) by using the BCDEDIT utility:
1. In Windows: Click Start, then click Run. The Run window opens.
2. Type cmd, and press Enter. The Command Prompt window opens.
a. Enter the following command: BCDEDIT /set safeboot dsrepair
b. Press Enter. The command completes successfully.
3. Restart the computer. The computer restarts in safe mode.
Log Into the Recovering Computer
After the computer restarts: Log into Windows, with local administrator rights.
IMPORTANT! After you log in, do not log off or lock the computer for the
remainder of this recovery process (as indicated in the remaining procedures below, in
this chapter).
Define and Run a Restore Policy
Define and run a restore job that restores all of your system volume, files, directories, and the system state.
NOTE: You must restore the system state when you restore your system volume,
files, and directories.
To create a restore job:
1. In the web-management portal, select the recovering computer. The Summary tab appears.
Continued on next page

Part 2: Disaster-Recovery Scenarios Chapter 7: Recover an SQL Server
Version: 7.93 Page 71 © 2018 j2 Global®, Inc. and affiliates (collectively, “j2”). All rights reserved.
Define and Run a Restore Policy (Cont.)
2. Click the Restore tab, then click New Restore. The Restore wizard opens.
o If you requested a restore device earlier, you must wait for your restore device to arrive. After it arrives, attach the device, and select Restore from device on network.
o If you are restoring over the Internet, select Restore data over the internet.
3. Click Standard policy restore. The Selection tab appears.
a. In the Name to use for this restore request textbox, type a restore name
b. Select All policies from the Policy filter list.
c. Select the version by selecting the date and time from the Version list.
d. In the left pane, click the computer name to display all of the volumes; then in the right pane, select all the volumes. (For example, select C:, D:, and E:).
e. Check the Restore system state box to restore the system state.
f. Optional: Select Rebuild deduplicated volume to rebuild any Windows Server 2012 deduplicated volumes as part of the disaster recovery. (If the server is not Windows Server 2012 or does not have data deduplication enabled on the volume(s), proceed to step 2.g. Also, for more information on Windows Server 2012 volumes optimized for data deduplication, see your Windows Server 2012 documentation.)
NOTE: Ensure that the destination volume(s) for rebuilding the
deduplicated volume(s) is an empty, formatted volume of sufficient size. To
ensure consistency of the dedupe store, do not enable deduplication on the
new volume before the restore occurs. If deduplication is enabled on the
volume(s), the restore will fail.
4. Click the Options tab. The Restore Options tab appears.
a. Check the Overwrite open files when the computer is rebooted box, then click Next. The Restore Summary page appears.
b. Review the restore, then click Done. The restore is submitted and begins to restore the data.
5. Verify that this restore has completed correctly before you go to the next procedure.
WARNING! Do not cancel the restore or restart the recovering computer while
the restore is in progress. If the restore is canceled, then the disaster recovery may
fail. If this occurs, you must restart the recovery process from the beginning.
Chapter 7: Recover an SQL Server Part 2: Disaster-Recovery Scenarios
Page 72 Version: 7.93 © 2018 j2 Global®, Inc. and affiliates (collectively, “j2”). All rights reserved.
Define and Run an Exchange-Restore Policy
You can restore the Exchange data files with an Exchange restore policy.
To restore an Exchange policy:
1. In the LiveVault Web-Management Portal, select the recovering computer. The Summary tab appears.
2. Click the Restore tab, then click New Restore. The Restore wizard page appears.
o If you requested a restore device earlier, you must wait for your restore device to arrive. After it arrives, attach the device, and select Restore from device on network.
o If you are restoring over the Internet, select Restore data over the internet.
The What would you like to restore page appears.
a. Select Exchange Server, then click Next.
b. In the Name to use for this restore request textbox, type a restore name.
c. Select the version by selecting the date and time from the Version list. (The most recent version is the default.)
d. Click the computer name in the left pane to display all of the Exchange data. Then, select the top-level object in the right pane of your Exchange Server's backed-up file structure. (This ensures that you restore all of the required storage groups and mailbox stores.)
e. Click the Options tab. The Restore Options page appears.
f. Select File Restore.
NOTE: You must select the File Restore option to recover the Exchange
data as files. Because the disaster recovery is not complete at this point, the
recovering computer does not yet have the Exchange VSS writers available to
process an Exchange-aware restore.
g. Select Overwrite existing files even if restored file is older.
h. Select Overwrite open files when the computer is rebooted.
i. Selected Restore the Original Backup Security Attributes.
j. Click Next. The Restore Summary page appears.
k. Review your selections, then click Done. The restore is submitted and begins to restore Exchange data.
3. Review the restore-job log on the Exchange Server computer to which you restored the files, and verify that the Mailbox and/or Public Folder Store was restored as expected.

Part 2: Disaster-Recovery Scenarios Chapter 7: Recover an SQL Server
Version: 7.93 Page 73 © 2018 j2 Global®, Inc. and affiliates (collectively, “j2”). All rights reserved.
Restart the Recovered Computer in Normal Mode
To resume normal startup:
1. In Windows, click Start, then Run. The Run window opens.
2. Type cmd, and press Enter. The Command Prompt window opens.
4. Enter the following command: BCDEDIT /deletevalue safeboot
5. Press Enter. The command completes successfully.
6. Reboot the computer. The computer restarts in normal mode.
Enable the NIC If you had to disable an NIC for the disaster recovery, complete the following steps to enable that NIC:
If the NIC is a separate card that was removed, insert the card.
If it is an onboard NIC, use the BIOS interface to enable the NIC. (For more information, see the hardware vendor’s documentation.)
If you disabled the NIC through the Windows Device Manager, it might be enabled for you. Verify the NIC's status in Device Manager, and enable it if necessary.
After you enable the NIC, you might need to restart the recovered computer, and then configure the NIC.
Test the Recovered Computer
If the recovered computer fails to appear on the network, verify the following indicators:
Analyze the ipconfig output for errors.
Analyze Device Manager for errors.
Analyze the system log for errors.
Analyze the restore-agent reports for errors.
Verify that the databases are mounted correctly.
After the reboot, look for errors in the Windows Event Viewer related to MSExchange, MSExchangeRepl, or VSS.
If this is a Database Replication Group (DAG), or Cluster Continuous Replication (CCR), configuration, take the following extra precautions:
o Let the Exchange DAG/CCR replication finish copying the log files to the passive databases. (During this time, the replication status might display as Initializing.)
o Verify that the replication status is shown as Healthy on the Active and Passive nodes.
(For more information, refer to your Windows documentation.)
Chapter 7: Recover an SQL Server Part 2: Disaster-Recovery Scenarios
Page 74 Version: 7.93 © 2018 j2 Global®, Inc. and affiliates (collectively, “j2”). All rights reserved.
Complete the Recovery on Stand-Alone Exchange Configurations
If you are recovering in a single stand-alone Exchange database, the mailbox database
status should be Mounted. However, if the status is Dismounted:
1. Attempt to mount the database manually.
2. In the Windows event viewer, verify the mounting-failure logs.
Complete the Recovery on Exchange 2010/2013 DAG Configurations
If you are recovering an Exchange server in a DAG configuration, you may need to take additional steps to get the server back up and running. To do so, see:
Verify the group status (below).
Verify databases and replication (see below).
Manually copy Exchange files (pg. 75).
Seed the Exchange database (pg. 75).
Remount the Public Store database (pg. 75).
Search for replication-event errors (pg. 75).
Verify the Group Status After your restore, open the Exchange Failover Cluster Manager console, and verify the following conditions:
All storage resources (disks) are online.
All network interfaces (public and private) are online.
Services and Applications for Exchange are online.
All databases of the configuration are online.
Verify Databases and Replication
After performing the Exchange restore, verify that all appropriate databases are mounted―and replication is in a state that allows the agent to resume backups. Backups can take place successfully when replication is in the following states, depending on which node the agent is installed on:
Active state
o Mounted
Passive state
o Healthy
Continued on next page
Part 2: Disaster-Recovery Scenarios Chapter 7: Recover an SQL Server
Version: 7.93 Page 75 © 2018 j2 Global®, Inc. and affiliates (collectively, “j2”). All rights reserved.
Complete the Recovery on Exchange 2010/2013 DAG Configurations (Cont.)
Manually Copy Exchange Files
If you perform a redirected restore to a different folder on the same computer, you may have to manually copy Exchange files to make Exchange functional again after the restore. (See your Microsoft Exchange documentation for instructions on manually dismounting the databases, copying Exchange files from one location to another, and remounting the databases.)
Seed the Exchange Database
If the Exchange replication is not synchronized after a successful restore and has a Failed status: Update the storage-group copy to reseed the nodes or databases, update the storage-group copy status, and delete the existing files.
If the state indicates Initializing, you must wait until the logs are copied over from the Active to the Passive nodes/databases before replication is functional. (See your Microsoft Exchange documentation for instructions on updating the storage-group status and seeding the Exchange database.)
Remount the Public-Store Database
If the mailbox database has a Failed or Suspended status: To display it as Healthy, update the mailbox-database copy by using the Update Database Copy option (for reseeding).
Search for Replication-Event Errors
After performing a disaster recovery, the replication status might not have a Healthy status. This occurs when the passive node is unable to perform an incremental re-seed of the passive database―or if logs are missing. Analyze the Windows Event viewer to look for related events. (You may need to manually re-seed the database. For more information about seeding the database, see your Exchange Server, and MSDN, documentation.)
Complete the Recovery on Exchange 2007 CCR Configurations
If you are recovering a node in an Exchange 2007 CCR configuration, you may need to take additional steps to get the node back up and running. To do so, see:
Verify the cluster’s status.
Verify databases and replication.
Manually copy Exchange files.
Seed the Exchange database.
Remount the Public Store database.
Search for replication-event errors.
Continued on next page

Chapter 7: Recover an SQL Server Part 2: Disaster-Recovery Scenarios
Page 76 Version: 7.93 © 2018 j2 Global®, Inc. and affiliates (collectively, “j2”). All rights reserved.
Complete the Recovery on Exchange 2007 CCR Configurations (Cont.)
Verify the Cluster’s Status
After your restore, open the Exchange Failover Cluster Manager console, and verify the following conditions:
All storage resources (disks) are online.
All network interfaces (public and private) are online.
Services and Applications for Exchange are online.
Both nodes of the configuration are online.
Verify Databases and Replication
After performing the Exchange restore, verify that all appropriate databases are mounted―and replication is in a state that allows the agent to resume backups. Backups can take place successfully when replication is in the following states, depending on which node the agent is installed on:
Active state
o Healthy
o ServiceDown
o Failed
o Unknown
Passive state
o Healthy
Manually Copy Exchange Files
If you perform a redirected restore to a different folder on the same computer, you may have to manually copy Exchange files to make Exchange functional again after the restore. (See your Microsoft Exchange documentation for instructions on manually dismounting the databases, copying Exchange files from one location to another, and remounting the databases.)
Seed the Exchange Database
If the Exchange CCR replication is not synchronized after a successful restore and has a Failed status: Update the storage-group copy to reseed the databases, update the storage-group copy status, and delete the existing files.
If the state indicates Initializing, you must wait until the logs are copied over from the Active node to the Passive node before replication is functional. (See your Microsoft Exchange documentation for instructions on updating the storage-group status and seeding the Exchange database.)
Continued on next page
Part 2: Disaster-Recovery Scenarios Chapter 7: Recover an SQL Server
Version: 7.93 Page 77 © 2018 j2 Global®, Inc. and affiliates (collectively, “j2”). All rights reserved.
Complete the Recovery on Exchange 2007 CCR Configurations (Cont.)
Remount the Public-Store Database
If the public-store database is down after a successful restore,
and replication status is Unknown or ServiceDown, remount the database to resume backups. (For more information about remounting the public-store database, see your Exchange Server documentation.)
Search for Replication-Event Errors
After performing a disaster recovery, the replication status might
not have a Healthy status. This occurs when the passive node is unable to perform an incremental re-seed of the passive node―or if logs are missing. Analyze the Windows Event viewer to look for the following events:
MSExchangeRepl 2056: The Exchange Replication service could not perform an incremental reseed of the passive node, because the logs on the active node have diverged too widely from the logs on the passive node.
MSExchangeRepl 2057: The Exchange Replication service could not perform an incremental reseed of the passive database copy, because replication was suspended for the storage group specified in the event description. This event is caused when an incremental reseed must be initiated , but the storage group copy is currently suspended.
MSExchangeRepl 2058: The Exchange Replication service could not perform an incremental reseed of the passive node, because the service encountered an error (as specified by the error code in the event description).
MSExchangeRepl 2081: The Exchange Replication service could not perform an incremental reseed of the storage group on the passive node, because the service could not compare a required log file (that is located on the active node) with the log file of the same generation ID (that is located on the passive node).
If any of these events occur, you might need to manually re-seed the database. (For more information about seeding the database, see MSDN Exchange documentation.)
Update or Repair the Agent Software
It is possible that the restore might have caused older files to be installed on the recovering system, which can cause a LiveVault agent software conflict. To ensure there is no LiveVault Agent software conflict
Upgrade your computer to the most recent version of Agent software.
If you receive an option to Repair, select it.
When you are prompted to restart, restart the computer.
Chapter 7: Recover an SQL Server Part 2: Disaster-Recovery Scenarios
Page 78 Version: 7.93 © 2018 j2 Global®, Inc. and affiliates (collectively, “j2”). All rights reserved.
Resume Backups on the Recovered Computer
To resume backups:
1. In the web-management portal, select the recovering computer.
2. In the right-pane, click Properties. The Properties page appears.
3. Click Edit properties. The Edit Properties page appears.
4. Check the Resume backup box, then click Save. The agent resumes backing up the computer according to the backup schedule.
CHAPTER 7: RECOVER AN SQL SERVER
This chapter explains how to perform a disaster recovery for a Microsoft SQL Server that was backed up with one or more SQL policies.
NOTE: To recover Exchange 2003 and 2007 on Windows Server 2003, see Chapter 5: Recover an Exchange Server
on Windows 2003.
IMPORTANT! To recover your computer from a disaster, complete the following procedures in the order that
they are presented. To reiterate:
To ensure the highest success rate, you must complete the following tasks exactly and in order.
Do not omit or skip any step, unless instructed to do so.
Failure to follow the steps in order will cause the recovery to fail, and you must start the recovery process
from the beginning.
LiveVault recommends that you print out this chapter, and use it as a checklist for your disaster-recovery process.
Part 2: Disaster-Recovery Scenarios Chapter 7: Recover an SQL Server
Version: 7.93 Page 79 © 2018 j2 Global®, Inc. and affiliates (collectively, “j2”). All rights reserved.
The recovery procedures are:
1. Submit a media-resource-device request.
2. Suspend backups on the original computer.
3. Stop and disable the LiveVault service.
4. Disable the secondary NIC on the recovering computer.
5. Verity the keyboard and mouse type.
6. Verify the original computer’s as-built configuration.
7. Install the operating system on the recovering computer.
8. Install the same service packs as on the original computer.
9. Verify the recovering computer’s name.
10. Restart the computer.
11. Configure the disks and drive letters.
12. Remove IIS components from the recovering computer.
13. On Windows 2003 computers, copy the boot.ini file.
14. Disable the screen saver and password-protect.
15. Install the agent software on the recovering computer.
16. Restart the recovering computer in DSRM.
17. Log into the recovering computer.
IMPORTANT! After you log in, do not log off or lock the computer for the remainder of the procedures listed
below.
A. Define and run a restore policy.
B. Define and run an SQL-file restore policy.
C. On Windows 2003, compare boot.ini files.
D. Restart the recovered computer in normal mode.
E. Enable the NIC.
F. Test the recovered computer.
G. Resolve short-name issues.
H. Update or repair the agent software.
I. Resume backups on the recovered computer.
J. Post-restore considerations.
Chapter 7: Recover an SQL Server Part 2: Disaster-Recovery Scenarios
Page 80 Version: 7.93 © 2018 j2 Global®, Inc. and affiliates (collectively, “j2”). All rights reserved.
ASSUMPTIONS AND PROCEDURES
The following assumptions are made in these procedures:
You configured your backup to protect the full computer (including its general files and directories, its databases and applications, and its system state)―and that the initial synchronization has been completed for the computer. LiveVault can restore only files, directories, system state, and metadata that you have backed up with LiveVault.
You configured one or more SQL backup policies to protect your SQL databases in a transactionally safe manner. (For more information on backing up SQL databases with SQL backup policies, see the LiveVault Web-Management help system.)
All Windows functions worked before the disaster occurred.
All databases and applications functions worked before the disaster occurred.
Submit a Media-Restore-Device Request
Optional: Request a media restore device containing the backup versions from a specific time range.
When you request a restore device, it takes a certain amount of time to build and ship the device―and depends on the data size and shipment method. (For more information on restore devices, see your LiveVault service contract.)
NOTE: Requesting a media restore device incurs an additional charge. Refer to your
contract for cost and shipping information.
Part 2: Disaster-Recovery Scenarios Chapter 7: Recover an SQL Server
Version: 7.93 Page 81 © 2018 j2 Global®, Inc. and affiliates (collectively, “j2”). All rights reserved.
Suspend Backups on the Original Computer
Suspend backups on the original computer to ensure that no additional backup versions are sent from the original computer during the recovery process.
To suspend backups:
1. In the left pane of the LiveVault Web-Management Portal, select the original computer. The Computer Summary page appears.
2. In the right pane, click Properties. The Computer Properties page appears.
3. Click Edit properties. The Edit Properties page appears.
4. Check the Suspend backup box, then click Save. Backups are suspended.
Stop and Disable the LiveVault® Service
If you are recovering the computer to a newly built machine, and the original computer is still partially operable and connected to the LiveVault service, you must stop and disable the LiveVault backup service.
If you are performing a disaster-recovery test to a newly built machine, you must stop and disable the LiveVault backup service on the original computer.
WARNING! Failure to stop and disable the LiveVault backup service on the
original computer while performing the disaster recovery to a newly built recovering
computer will result in a duplicate system connecting to the LiveVault service. There
are significant risks of data corruption associated with duplicate systems attempting
to back up to the LiveVault service.
To stop the LVBackupservice, choose one of the following methods:
Enter the following command: net stop lvbackupservice. The LiveVault backup service stops.
Click Start or press the Windows Start key, then select Administrative Tools > Computer Management > Services. Select LiveVault Backup Service. Select Stop the service. The LiveVault backup service stops.
After the backup service has stopped, you must disable it so it does not restart automatically.
To disable the LiveVault backup service, enter the following command: sc config
lvbackupservice start= disabled. The LiveVault backup service is set to Disabled.

Chapter 7: Recover an SQL Server Part 2: Disaster-Recovery Scenarios
Page 82 Version: 7.93 © 2018 j2 Global®, Inc. and affiliates (collectively, “j2”). All rights reserved.
Disable the Secondary NIC on the Recovering Computer
If the recovering computer contains two network-interface cards (NICs), disable one of them.
To disable a secondary NIC:
1. If the NIC is a separate card that you can remove, remove it. If it is an onboard NIC, disable it by using the BIOS interface. (For more information, see the hardware vendor’s documentation.)
2. Otherwise, disable the NIC through the Windows Device Manager after you install the Windows operating system. (You do not need to restart the computer after you disable the NIC.)
Verify the Keyboard and Mouse Type
If possible, use the same type of keyboard and mouse on the target computer as those on the original computer― either USB or PS/2.
Verify the As-Built Configuration of the Original Computer
Review and verify the as-built configuration for the original computer that you prepared as part of planning for disaster recovery. (For more information, see “Verify Configuration Information” [part of Chapter 2: Plan for Disaster Recovery] on pg. 6.)
Install the Operating System on the Recovering Computer
According to the following instructions, install the Windows operating system on the recovering computer. If possible, use the same media used to install the operating system on the failed computer.
1. Install the same operating-system version of Windows that existed on the original computer.
2. Name the computer to the same Netbios name as the original computer’s. (The Windows setup program provides a suggested computer name by default; for
example, w2008xr1fan. However, if the original computer was named corporate.mycompany.com, you must assign the computer name corporate to the recovering computer.)
IMPORTANT! The recovering computer’s name must be the same as the
original computer’s. Otherwise, the recovering computer will not start correctly,
the disaster-recovery procedure will fail,; and you will need to start the process
over from the beginning.
Continued on next page

Part 2: Disaster-Recovery Scenarios Chapter 7: Recover an SQL Server
Version: 7.93 Page 83 © 2018 j2 Global®, Inc. and affiliates (collectively, “j2”). All rights reserved.
Install the Operating System on the Recovering Computer (Cont.)
3. Regarding workgroup membership, join the computer as a member of a workgroup.
NOTE: Do not join a domain at this time.
4. Install Windows to the same directory on the recovering computer as on the original
computer. (For example, if the original computer’s installation was c:/Windows,
then install Windows to c:/Windows on the recovering computer.)
5. When prompted to specify the Windows components to install, install only Accessories and Utilities on Windows 2003. That is, clear the checkboxes for all components except Accessories and Utilities.
NOTE: Do not install the other Windows components (for example, Active
Directory, Certificate Services, or Internet Information Services). (If you install
them, the restore and the disaster recovery can fail.) The disaster recovery will
restore all other components.
If you install the Internet Information Service (IIS) components now on a
Windows 2003 recovering computer, the IIS components that the LiveVault
service restores will not work. However, if you must install the IIS components
now (for example, because you use a system-imaging solution that includes these
components), you will remove them later in the process (via Remove IIS
Components from the Recovering Computer on pg. 84).
Install the Same Service Packs as on the Original Computer
Install the same service packs on the recovering computer as were on the original computer. (For more information, see the original computer’s as-built configuration information and your Windows documentation.)
Verify the Recovering Computer’s Name
Ensure that the recovering computer has the same Netbios computer name as that of the original computer. (For example, if the original computer was named corporate.mycompany.com, then you must assign the computer name corporate to the recovering computer.)
NOTE: Assign the correct computer name to the recovering computer in order to
perform the system-state restore. Otherwise, the recovering computer will not start
correctly, and the disaster-recovery procedure will fail.

Chapter 7: Recover an SQL Server Part 2: Disaster-Recovery Scenarios
Page 84 Version: 7.93 © 2018 j2 Global®, Inc. and affiliates (collectively, “j2”). All rights reserved.
Restart the Computer Restart the recovering computer.
Configure the Disks and Drive Letters
Partition the volumes, and assign the drive letters on the recovering computer to match those that existed on the original computer.
To create the volumes on the recovering computer:
1. Create the same volumes. (For example, if the original computer had C:, D:, and E:
volumes, create the recovering computer’s volumes on C:, D:, and E:. Otherwise, data restores will fail.)
2. Format the recovering computer's volumes to be the same file-system format as the original computer's volumes. (For example, format the volumes to NTFS, ReFS and so on.)
3. Ensure that the new volumes have adequate size to handle the restored data. (For example, the recovering computer's volumes must be at least as large as the original computer's volumes.)
Remove IIS Components from the Recovering Computer
For a recovering Windows 2008 (and later) computer, determine if any Web Server roles were installed.
For a recovering Windows 2003 computer, determine if any Internet Information Services (IIS) components were installed during the Windows installation.
(For more information on removing IIS components or Web Server roles, see your Windows documentation.)
On Windows 2003 Computers, Copy the Boot.ini File
On a Windows 2003 recovering computer, you must copy the boot.ini for later use in verifying the restore.
NOTE: This procedure applies to Windows 2003 recovering computers only. On a
Windows 2008/2012 recovering computer, skip this step.
To copy the boot.ini file:
1. Copy the boot.ini file. (The boot.ini is located in the recovering computer’s root directory.)
Continued on next page
Part 2: Disaster-Recovery Scenarios Chapter 7: Recover an SQL Server
Version: 7.93 Page 85 © 2018 j2 Global®, Inc. and affiliates (collectively, “j2”). All rights reserved.
On Windows 2003 Computers, Copy the Boot.ini File (Cont.)
2. Name the copy something similar to BootFromCD_101504.ini (where 101504 represents the current date) to ensure no confusion exists between the copy and the
restored boot.ini file―and to differentiate this copy from any other copies.
3. Take note of the name of the boot.ini copy. The copy will be referenced later during the disaster-recovery process.
Disable the Screen Saver and Password-Protect
NOTE: Disable the screen saver and password-protect before entering Directory
Services Recovery Mode (DSRM).
1. Disable the screen saver.
NOTE: You cannot disable the screen saver after entering DSRM.
2. In the Power Options, disable the password-protect. (The password might change due to the restore.)
Install the Agent Software on the Recovering Computer
You can install the LiveVault agent software on the recovering computer and also use the LiveVault Configuration Wizard to generate an encryption key and to provision the agent to the LiveVault service.
To install the LiveVault agent software:
1. Log into the LiveVault Web-Management Portal.
2. Click Downloads in the top menu. The Downloads page appears.
3. Select the appropriate Agent installation kit for your operating system, and click Download. (Do NOT select Run on Download.)
4. Save the kit to a location on the recovering computer, then run it with administrator rights. (On Windows 2008 and later, right-click the installation program, and select Run as Administrator).
5. To run the install wizard, select Run.
6. Install the agent software to the same location on the recovering computer as it was on the original computer. (To change the location from the default, click Change and type a new location.)
Continued on next page
Chapter 7: Recover an SQL Server Part 2: Disaster-Recovery Scenarios
Page 86 Version: 7.93 © 2018 j2 Global®, Inc. and affiliates (collectively, “j2”). All rights reserved.
Install the Agent Software on the Recovering Computer (Cont.)
7. Install the LiveVaultData directory to the same location as the original computer.
NOTES:
By default, the installation program installs the LiveVaultData
directory to the volume with the largest amount of free disk space. To
change the location from the default, click Change and type a new
location.
Ensure that the path to the LiveVault agent software matches the original
computer’s path. For example, if the original computer’s software
installation was to C:\Program Files\Autonomy\
BackupEngine and D:\LiveVaultData, ensure that you install the
software to the same locations on the recovering computer. Failure to do
so will cause the system-state restore to fail.
8. Click Finish.
9. Click Configure. The Configuration Wizard appears.
a. To validate your account, type your user name and password credentials; then click Next. The Installation page appears.
b. Select Recovering a complete system.
c. From the Select System list, select the name of the original computer you are recovering.
d. Click Next. The Password Required page appears.
e. Type the encryption-key password. (This is the encryption-key password that you entered when you first provisioned the LiveVault agent software on the original computer.)
NOTES:
If you do not remember the encryption-key password from the original
computer, you will not be able to provision the recovering computer
while performing the disaster recovery.
Ensure that you have the encryption-key password from the original
computer.
The encryption-key password may have been escrowed with
autonomy at the point of the original computer’s installation. Contact
LiveVault Support to verify this and to request the password.
f. Click Next. The Configuration Wizard generates the key.
g. Click Finish. The Service Configuration dialog opens.
Continued on next page

Part 2: Disaster-Recovery Scenarios Chapter 7: Recover an SQL Server
Version: 7.93 Page 87 © 2018 j2 Global®, Inc. and affiliates (collectively, “j2”). All rights reserved.
Install the Agent Software on the Recovering Computer (Cont.)
h. Click Cancel to restart later.
NOTE: Do not restart the computer now at the completion of LiveVault
service configuration. Instead, you must configure the computer to restart in
Directory Services Recovery Mode (DSRM) in order to proceed with the
disaster recovery.
The service configuration exits.
Restart the Recovering Computer in DSRM
Restart the recovering computer in safe mode.
Restart Windows 2008 (and later) in safe mode, with the BCDEDIT utility
1. In Windows: Click Start, then click Run. The Run window opens.
2. Type cmd, and press Enter. The Command Prompt window opens.
a. Enter the following command: BCDEDIT /set safeboot dsrepair
b. Press Enter. The command completes successfully.
3. Restart the computer. The computer restarts in safe mode.
Restart Windows 2003 in DSRM
On Windows 2003 computers, use Directory Services Restore Mode (DSRM) even if the computer is not a domain controller. For more information about Directory Services Restore Mode, see your Windows documentation.
To restart the computer in DSRM mode:
1. Restart the computer.
2. During the normal start-up process, look for the Windows start-up options
message at the bottom of the window; for example: For troubleshooting and advanced startup options for Windows 2003, press
F8.
3. When you see this message, press F8. (You will only see this message for a few seconds. Press F8 while you can see it.)
NOTE:
If you are able to press F8 before it disappears, continue to step 4.
on the next page.
If you missed the opportunity to press F8, you need to configure
the boot.ini file to boot into DSRM. To do so, see the bullet on
pg. 88.

Chapter 7: Recover an SQL Server Part 2: Disaster-Recovery Scenarios
Page 88 Version: 7.93 © 2018 j2 Global®, Inc. and affiliates (collectively, “j2”). All rights reserved.
Restart the Recovering Computer in DSRM (Cont.)
4. From the Windows Advanced Options menu: Select Directory Services Restore Mode, and press Enter. The computer starts in DSRM.
NOTE: Stay in DSRM until you are instructed to restart into normal mode.
To restart in DSRM if you did not press F8:
1. Open the boot.ini file in the recovering computer's root directory.
2. In the [operating systems] section, add the following switch to the end
of the line that specifies the start path: /safeboot:dsrepair /sos. For example:
operating systems]
multi(0)disk(0)rdisk(0)partition(1)\WINNT=;Microsoft
Windows 2003 Server; /fastdetect /safeboot:dsrepair
/sos
3. Restart the recovering computer. The computer starts in DSRM.
Log Into the Recovering Computer
After the computer restarts: Log into Windows, with local administrator rights.
IMPORTANT! After you log in, do not log off or lock the computer for the
remainder of this recovery process (as indicated in the remaining procedures below, in
this chapter).
Define and Run a Restore Policy
Define and run a restore job that restores all of your system volume, files, directories, and the system state.
NOTE: You must restore the system state when you restore your system volume,
files, and directories.
To create the restore job:
1. In the web-management portal, select the recovering computer. The Summary tab appears.
Continued on next page
Part 2: Disaster-Recovery Scenarios Chapter 7: Recover an SQL Server
Version: 7.93 Page 89 © 2018 j2 Global®, Inc. and affiliates (collectively, “j2”). All rights reserved.
Define and Run a Restore Policy (Cont.)
2. Click the Restore tab, then click New Restore. The Restore wizard opens.
o If you requested a restore device earlier, you must wait for your restore device to arrive. After it arrives, attach the device, and select Restore from device on network.
o If you are restoring over the Internet, select Restore data over the internet.
The Selection tab appears.
a. In the Name to use for this restore request textbox, type a restore name
b. Select All policies from the Policy filter list.
c. Select the version by selecting the date and time from the Version list.
d. In the left pane, click the computer name to display all of the volumes; then in the right pane, select all the volumes. (For example, select C:, D:, and E:).
e. Check the Restore system state box to restore the system state.
f. Optional: Select Rebuild deduplicated volume to rebuild any Windows Server 2012 deduplicated volumes as part of the disaster recovery. (If the server is not Windows Server 2012 or does not have data deduplication enabled on the volume(s), proceed to step 2.g. below. Also, for more information on Windows Server 2012 volumes optimized for data deduplication, see your Windows Server 2012 documentation.)
NOTE: Ensure that the destination volume(s) for rebuilding the
deduplicated volume(s) is an empty, formatted volume of sufficient size. To
ensure consistency of the dedupe store, do not enable deduplication on the
new volume before the restore occurs. If deduplication is enabled on the
volume(s), the restore will fail.
g. Click the Options tab. The Restore Options tab appears.
h. Check the Overwrite open files when the computer is rebooted box, then click Next. The Restore Summary page appears.
i. Review the restore, then click Done. The restore is submitted and begins to restore the data.
3. Verify that this restore has completed correctly before you go to the next procedure.
WARNING! Do not cancel the restore or restart the recovering computer while
the restore is in progress. If the restore is canceled, then the disaster recovery may
fail. If this occurs, you must restart the recovery process from the beginning.
Chapter 7: Recover an SQL Server Part 2: Disaster-Recovery Scenarios
Page 90 Version: 7.93 © 2018 j2 Global®, Inc. and affiliates (collectively, “j2”). All rights reserved.
Define and Run an SQL-File Restore Policy
Define and run an SQL-file restore policy to restore the SQL data
To create the restore job:
1. In the web-management portal, select the recovering computer. The Summary tab appears.
2. Click the Restore tab, then New Restore. The Restore wizard opens.
o If you requested a restore device earlier, you must wait for your restore device to arrive. After it arrives, attach the device, and select Restore from device on network.
o If you are restoring over the Internet, select Restore data over the internet.
The What would you like to restore page appears.
a. Select SQL Server, then click Next.
b. Type a restore name in the Name to use for this restore request textbox.
c. Select All policies from the Policy filter list.
d. Select the version by selecting the date and time from the Version list. (The most recent version is the default.)
e. In the left pane, click the computer name to display all of the SQL objects; then select the top-level object in the right pane of your SQL server’s back-up file structure (this ensures that you restore all of the required databases).
f. Select the Options tab. The Restore Options page appears.
g. Select File Restore.
NOTE: You must select the File Restore option to recover the SQL data as
files. Because the disaster recovery is not complete at this point, the
recovering computer does not yet have the SQL VSS writers available to
process an SQL-aware restore.
h. Select Overwrite existing files even if restored file is older.
i. Select Overwrite open files when the computer is rebooted.
j. Selected Restore the Original Backup Security Attributes.
k. Click Next. The Restore Summary page appears.
l. Review your selections, then click Done. The restore is submitted and begins to restore Exchange data.
3. Review the restore-job log on the SQL Server computer to which you restored the files, and verify that the SQL server was restored as expected.
4. To restore a different version: Perform this procedure again, and choose an older version.

Part 2: Disaster-Recovery Scenarios Chapter 7: Recover an SQL Server
Version: 7.93 Page 91 © 2018 j2 Global®, Inc. and affiliates (collectively, “j2”). All rights reserved.
On Windows 2003, Compare Boot.ini
Files
On Windows 2003 recovering systems, compare the boot.ini files to verify that boot information is consistent.
NOTE: This procedure applies to Windows 2003 recovering computers only. On
Windows 2008 (and later) recovering systems, skip to Restart the Recovering Computer
in Normal Mode on pg. 92.
To compare the restored boot.ini file and the copy of the boot.ini file:
1. Go to the computer's root directory, and open both the restored boot.ini file (for
example, boot.ini) and the copy of the boot.ini file (for example,
BootFromCD_101504.ini) that you made earlier in this procedure.
2. Compare the boot-drive value (that is, the number of the partition from which the computer will start, for example: partition(1)).
o If the boot-drive values in these files match, then skip to Restart the Computer on pg. 84.
o If the boot-drive values in these files do not match, continue with this procedure.
3. The restored boot.ini file's (for example, boot.ini) read-only attribute is set. To clear this attribute, complete the following steps:
a. In Windows Explorer, select the file.
b. Right-click the file, and select Properties.
c. In the Properties dialog box, on the General tab, in the Attributes group: Clear the Read-only box.
d. Click OK.
4. Change the value in the restored boot.ini file (for example, boot.ini) to match
the value specified in the copy of the boot.ini file (for example,
BootFromCD_101504.ini).
NOTE: Your boot.ini configuration might require you to update the boot-
drive value for multiple lines in the restored boot.ini file.
WARNING! If you fail to update the restored boot.ini file, you
cannot restart the computer.
Chapter 7: Recover an SQL Server Part 2: Disaster-Recovery Scenarios
Page 92 Version: 7.93 © 2018 j2 Global®, Inc. and affiliates (collectively, “j2”). All rights reserved.
Restart the Recovering Computer in Normal Mode
Restart Windows 2008 (and later) computers in normal mode
To resume normal start-up:
1. In Windows: Click Start, then Run. The Run window opens.
2. Type cmd, and press Enter. The Command Prompt window opens.
3. Enter the following command: BCDEDIT /deletevalue safeboot
4. Press Enter. The command completes successfully.
5. Reboot the computer. The computer restarts in normal mode.
Restart Windows 2003 computers in normal mode: Restart the recovering computer in normal mode.
If you receive a Windows message that indicates that you must restart the computer because it has found new devices, restart the computer again as specified. After Windows finds all devices, then restart the computer.
Enable the NIC If you had to disable an NIC for the disaster recovery, complete the following steps to enable that NIC:
If the NIC is a separate card that was removed, insert the card.
If it is an onboard NIC, use the BIOS interface to enable the NIC. (For more information, see the hardware vendor’s documentation.)
If you disabled the NIC through the Windows Device Manager, it might be enabled for you. Verify the NIC's status in Device Manager, and enable it if necessary.
After you enable the NIC, you might need to restart the recovered computer, then configure the NIC.
Test the Recovered Computer
If the recovered computer fails to appear on the network, verify the following indicators:
Analyze the ipconfig output for errors.
Analyze Device Manager for errors.
Analyze the system log for errors.
Analyze the restore-agent reports for errors.
Continued on next page

Part 2: Disaster-Recovery Scenarios Chapter 7: Recover an SQL Server
Version: 7.93 Page 93 © 2018 j2 Global®, Inc. and affiliates (collectively, “j2”). All rights reserved.
Test the Recovered Computer (Cont.)
Verify that the databases are mounted correctly.
Look for SQL-related errors in the Windows Event log.
(For more information, refer to your Windows documentation.)
Resolve Short-Name Issues
If the SQL service fails to restart following a restore, there might be a short-name discrepancy. To determine if there is:
1. In Windows, click Start, and then Settings > Control Panel > Administrative Tools > Services.
2. In the list of services on the right of the panel, right-click mssqlserver and select Properties.
3. Note the path and folder that Windows is looking in for the program. That is: In Windows (or at a command prompt), navigate to that folder, and note if the program exists in that folder.
o If the program is there, the failure of SQL to launch is not due to a short-name discrepancy. (For more information, consult your SQL documentation.)
o If the program is not there, you have a short-name discrepancy. Continue to step 4.
4. Complete the steps below to open a command prompt.
a. In Windows, click Start, and then Run. The Run window opens.
b. Type cmd, and press Enter. The Command Prompt window opens.
c. Enter the following command to change the directory to Program Files: cd \Program Files
d. Enter the following command: dir/x micro*
e. Press Enter.
5. Browse to each folder until you locate the SQL program. Then, temporarily rename the folder that contains the SQL program. (For example, if the folder containing the SQL
program is Micros~1, rename Micros~1 to Temp_Micros~1. This forces Windows to reassign a new short name to that folder.)
6. Temporarily rename the folder that Windows associates with the SQL program. (For example, if the service is looking in Micros~4 to launch the program, rename
Micros~4 to Temp_Micros~4. This forces Windows to reassign a new short name to that folder, which reestablishes the proper sequence of short names so that SQL can find the correct folder and execute. You might have to temporarily rename other short-name folders as well, until the correct folder shuffles to the correct place in the numbering sequence. Another example would be: When you rename Micros~1, the
old Micros~2 becomes Micros~1 and the old Micros~3 becomes Micros~2. Keep track of the folders to avoid creating other discrepancies.)
Continued on next page

Chapter 7: Recover an SQL Server Part 2: Disaster-Recovery Scenarios
Page 94 Version: 7.93 © 2018 j2 Global®, Inc. and affiliates (collectively, “j2”). All rights reserved.
Resolve Short-Name Issues (Cont.)
7. Rename the folder that contains the program to its original name (Windows dynamically reassigns the proper short name to this folder.) Then, rename the other folder to its original name (Windows dynamically reassigns another short name to this folder).
Update or Repair the Agent Software
It is possible that the restore might have caused older files to be installed on the recovering system, which can cause a LiveVault agent software conflict. To ensure there is no LiveVault Agent software conflict:
1. Upgrade your computer to the most recent version of the agent software.
2. If you receive an option to Repair, select it.
3. When you are prompted to restart, restart the computer.
Resume Backups on the Recovered Computer
To resume backups:
1. In the web-management portal, select the recovering computer.
2. In the right-pane, click Properties. The Properties page appears.
3. Click Edit properties. The Edit Properties page appears.
4. Check the Resume backup box, then click Save. The agent resumes backing up the computer according to the backup schedule.
Post-Restore Considerations
If you made changes to any of the SQL databases you restored after they were backed up, there may be discrepancies in them. Consider the following factors as you determine the status of your SQL environment:
Any database created after the backup policy that you restored must be manually attached―or restored separately.
Any user-login changes made after the backup was created are lost. You must redo these changes in the restored databases.
On rare occasions, some databases might be stuck in a "restoring..." state. You must manually detach these databases and reattach them―or restore them again.
To manually detach a database: Open SQL Server Management Studio, and run the
following store procedure: sp_detach_db @dbname='[database_name]'. The database detaches.
Part 2: Disaster-Recovery Scenarios
Page 95 Version: 7.93 © 2018 j2 Global®, Inc. and affiliates (collectively, “j2”). All rights reserved.
CHAPTER 8: RECOVER A VIRTUAL MACHINE
This chapter explains how to recover a virtual machine backed up with a virtual-machine backup policy. (For more information, see “Select the Correct Disaster-Recovery Procedure” [part of Chapter 2: Plan for Disaster Recovery]
VIRTUAL-MACHINE RESTORE SCENARIOS
You would use LiveVault to restore a virtual machine in several scenarios.
A virtual machine was inadvertently deleted or no longer exists in the VMware vCenter.
An existing virtual machine has become unstable or inoperable.
A virtual machine experiences significant data loss, and you must restore it back to a previous time in order to recover the data.
A portion of the VMware infrastructure is only partially available; for example, due to the loss of a data store. Restore the virtual machine to the same virtual-machine name but at a different location within the vCenter.
A test restore of the virtual machine as files to a directory location on the LiveVault virtual-machine collector or to a shared UNC path. (This scenario ensures that the virtual machines in the vCenter are not impacted by the test.)
ASSUMPTIONS
The following assumptions are made in these procedures:
You configured a LiveVault virtual-machine backup policy to protect your virtual machines in a transactionally safe manner. (For more information, see the LiveVault Web-Management help system or the LiveVault LiveVault Collector Agent Guide for VMware.)
You determined if the virtual machine still exists in vCenter. For virtual machines protected by virtual-machine backup policies, determine if the original virtual machine you wish to recover still exists in the vCenter. If it does, the recovery will fail unless you select specific restore options to overwrite the virtual machine.
RESTORE-OPTIONS OVERVIEW
Depending on your needs, select an appropriate option for restoring the virtual machine.
Restore to the original location. The default option is to restore the virtual machine to the original location in the data center. (For more information, see Restore a Virtual Machine to the Original Location on pg. 99.)
Restore to an alternate location. This option restores the virtual machine to an alternate location within the same vCenter. This is useful for scenarios were a portion of the VMware infrastructure is only partially available; for example, due to the loss of a data store. (For more information, see Restore a Virtual Machine to an Alternate Location on pg. 100.)
Overwrite the existing virtual machine. If a virtual machine of the same name or iUUID exists in the vCenter, restore of the virtual machine will fail. Use this option to ensure that the existing virtual machine is overwritten with the requested restore version.

Chapter 8: Recover a Virtual Machine Part 2: Disaster-Recovery Scenarios
Page 96 Version: 7.93 © 2018 j2 Global®, Inc. and affiliates (collectively, “j2”). All rights reserved.
Restore virtual machine as files. This option restores the files (that comprise a virtual machine) to a directory on your LiveVault virtual-machine collector or to a shared UNC path. After the files are restored to a directory, you must perform additional configuration tasks in vSphere to create a new virtual machine and attach the restored virtual-machine disks.
TIP: LiveVault recommends you use this option in order to perform test restores, as it does not impact your
vCenter infrastructure. Because you are restoring the virtual machine as a set of files, you create a new virtual-
machine object in vSphere and attach the restored virtual-machine disks.
RESTORE CONSIDERATIONS
Consider the following items when preparing to restore.
RESTORE CONFLICT HANDLING
There are two scenarios where restore conflicts handling may occur.
Instance UUID (iUUID). A virtual machine with the backed up iUUID already exists in the vCenter at the time the restore is requested.
If a virtual machine of the same instance UUID (i.e., iUUID) exists in the vCenter, the LiveVault software needs to find and delete the virtual machine based on the iUUID even if it was renamed or moved out to different folder―or even datacenter (but still in the same vCenter).
Inventory conflict. A different virtual machine with the same name now exists in the same inventory path as the backed-up virtual machine.
With the 7.76 release, in an inventory conflict, LiveVault renames the virtual machine it finds in the restore inventory path and restores the backed-up virtual machine to the restore inventory path.
For virtual-machine collectors running LiveVault versions prior to 7.76, in the event of an inventory conflict, LiveVault deletes the virtual machine even though it has a different iUUID if it is in the restore inventory path.
NOTE: Independent disks are not backed up, because it is not possible to provide consistent data. During the
restore, an existing virtual machine with independent disks will not be renamed or removed. It will be shut down
and only backed-up disks and configuration will be overwritten. This is done to obtain existing independent disks
and prevent data loss.
SAN TRANSPORTATION MODE
To use the SAN transportation mode for restore, perform the following tasks:
1. Select a physical virtual-machine collector for a restore session.
7. Ensure that the storage volumes that are presented to both the virtual-machine collector and ESX(i) Server systems are not read-only. (For more information, see your VMware documentation.)
Part 2: Disaster-Recovery Scenarios Chapter 8: Recover a Virtual Machine
Version: 7.93 Page 97 © 2018 j2 Global®, Inc. and affiliates (collectively, “j2”). All rights reserved.
8. Ensure that the storage-volume size is a multiple of the underlying VMFS block size. Otherwise, the Write operation to the remainder fails. For example, if the storage-volume size is 16.3 MB and the block size is 1 MB, writing to the remaining 0.3 MB fails. (For more information, see the VMware Knowledge Base documentation.)
The SAN transportation mode automatically switches to LAN if the virtual-machine collector is a virtual machine.
PROCEDURES
IMPORTANT! To recover your virtual machine from a disaster, complete the following procedures in the order
that they are presented. To reiterate:
To ensure the highest success rate, you must complete the following tasks exactly and in order.
Do not omit or skip any step, unless instructed to do so.
Failure to follow the steps in order will cause the recovery to fail, and you must start the recovery process
from the beginning.
LiveVault recommends that you print out this chapter, and use it as a checklist for your disaster-recovery process.
The recovery procedures are:
Create a virtual-machine restore policy (see below).
Virtual-machine restore options:
o Restore a virtual machine to the original location (pg. 99).
o Restore a virtual machine to an alternate location (pg. 100).
o Restore a virtual machine as files (pg. 101).
Create a Virtual-Machine Restore Policy
The LiveVault Web-Management Portal guides you through creating a restore request. You can restore files from the appliance or offsite; the restore will be transferred from the appliance unless the version you select is only on the offsite vaults. You can also have a media-restore device containing a range of restore versions shipped to you.
After you determine the restore method, you select a virtual machine and options on the Restore Request page.
To request a virtual-machine restore:
1. In the LiveVault Web-Management Portal, select the virtual-machine collector that backed up the virtual machine. The Virtual-Machine Collector Summary page opens.
NOTE: To request a restore, you must select the virtual-machine collector that
originally backed up the data. virtual-machine collectors do not coordinate restore
policies.
Continued on next page
Chapter 8: Recover a Virtual Machine Part 2: Disaster-Recovery Scenarios
Page 98 Version: 7.93 © 2018 j2 Global®, Inc. and affiliates (collectively, “j2”). All rights reserved.
Create a Virtual-Machine Restore Policy (Cont.)
2. Select the Restore section by clicking the arrow. The Virtual-Machine Collector Restore section expands.
3. Click Create virtual machine restore policy. The Restore wizard page opens.
a. Select one of the following options:
o Restore from appliance/offsite (The Restore Request page appears. To continue with this process, see step 3.b.)
o Have a Media Restore Device shipped to you.
NOTE: Ordering a media-restore device incurs an additional charge. For
more information, see your contract.
The Restore Wizard Decision page opens for you to select the date and time to restore from, and the shipping method. When the restore device arrives, you attach it to your network. You can then restore the backed up files from the restore device and ship it back to LiveVault.
b. Click Next. The Restore Request selection page appears.
c. In the Name box, type a name for the restore job.
d. Select a backup version date from the Version calendar. (By default, the most recent version displays.)
e. Select a backup time from the Version list.
f. In the object tree in the left pane, select or expand the virtual-machine collector object. The selection pane on the right displays the vCenter associated with the collector agent.
g. In the selection tree, select or expand the vCenter object. (The selection pane on the right displays the datacenters, hosts and clusters, and virtual machines associated with the selected level in the hierarchy.)
Click to expand or collapse the icon preceding a Collector Agent icon to display or hide the objects.
Click on an object to display its contents in the selection pane.
TIP: The virtual machine’s instance UUID (iUUID) displays to assist
in differentiating virtual machines that may have the same name in
the Host and Clusters view of your vSphere. (For example, if there are
two virtual machines named MyVirtualMachine, the iUUID helps in
determining which to restore.)
Continued on next page

Part 2: Disaster-Recovery Scenarios Chapter 8: Recover a Virtual Machine
Version: 7.93 Page 99 © 2018 j2 Global®, Inc. and affiliates (collectively, “j2”). All rights reserved.
Create a Virtual-Machine Restore Policy (Cont.)
h. Select a virtual machine to restore by checking the box next to the item. (Once you select a virtual machine for restore, the only way you can change the date or time of the version is to clear the virtual-machine selection.)
i. Click Next. The Restore Options page opens.
Virtual –Machine Restore Options
Depending on your needs, select an appropriate option for restoring the virtual machine.
Restore a Virtual Machine to the Original Location
The default option is to restore the virtual machine to its original location in the vCenter. The original location is the location of the virtual machine at the time it was backed up.
To restore to the default location:
1. On the Restore Options page, select Restore to original location.
2. Optionally, select Overwrite with this restore to overwrite an existing virtual machine with the requested restore version.
NOTE: Selecting Overwrite with this restore will overwrite an existing virtual
machine, if found, in your vCenter environment with the restored version.
Continued on next page

Chapter 8: Recover a Virtual Machine Part 2: Disaster-Recovery Scenarios
Page 100 Version: 7.93 © 2018 j2 Global®, Inc. and affiliates (collectively, “j2”). All rights reserved.
Restore a Virtual Machine to the Original Location
3. Click Next. The Restore Confirmation page appears.
4. Click Allow the virtual machine backup policy to be disabled.
5. Click Done. The restore request is submitted, and the virtual machine is restored to the original location in the vCenter.
Restore a Virtual Machine to an Alternate Location
You can restore a virtual machine to a different location than the original location.
To restore to an alternate location:
1. On the Restore Options page, select Restore to an alternate location.
2. Select a datacenter from the Datacenter list.
3. Select a host or cluster from the Host/Cluster list. (If you select a cluster from the Host/Cluster list, select a specific host from the Specific Host list.)
NOTE: For non-DRS-enabled clusters, the Specific Host selection is required; for
DRS enabled clusters, the Specific Host selection is optional.
4. Optional: Select a resource-pool location from the Resource pool list.
NOTE: If the selected datacenter and host does not have resource pools, this list
will be disabled.
5. Select a datastore location from the Datastore list.
NOTE: If the selected datacenter does not have datastores, this list will be
disabled.
6. Optional: Select Overwrite with this restore to overwrite an existing virtual machine with the requested restore version.
NOTE: Selecting Overwrite with this restore will overwrite an existing virtual
machine, if found, in your vCenter environment with the restored version.
7. Click Next. The Restore Confirmation page appears.
8. Click Allow the virtual machine backup policy to be disabled, then click Done. The restore request is submitted, and the virtual machine is restored to the alternate location in the vCenter.

Part 2: Disaster-Recovery Scenarios Chapter 8: Recover a Virtual Machine
Version: 7.93 Page 101 © 2018 j2 Global®, Inc. and affiliates (collectively, “j2”). All rights reserved.
Restore a Virtual Machine to Files
You can restore the files that comprise a virtual machine to a directory location on your LiveVault virtual-machine collector or to a shared UNC path. Afterwards, you must perform additional configuration tasks in vSphere to create a new virtual machine and attach the restored virtual-machine disks.
To restore a virtual machine as files, you must: 1) Request a restore job from LiveVault® to restore the virtual-machine files to a file location (see the bullet below). 2) Move the restored virtual-machine files to a datastore (see the bullet on pg. 102). 3) Create a virtual machine in the vSphere client, and attach the restored virtual-disk files (see the bullet on pg. 103). Then, there is an example restore for your review (pg. 102).
Request the restore as files
Request a restore job from LiveVault to restore the virtual machine files to a directory location on your virtual-machine collector or to a UNC path.
To restore a virtual machine as files:
1. On the Restore Options page, select Restore Virtual Machine as Files.
2. Type a directory path in the File path box. (The directory path can exist on the virtual-machine collector itself or can be a shared UNC path.) If using a UNC path, type the UNC path as follows: \\<mySharedServer>\<mySharedFolder>
…where <mySharedServer> is the hostname of the network shared server,
and <mySharedFolder> is the shared folder.
NOTE: Ensure that the shared folder has appropriate Read and Write
permissions. Before performing the restore, check that the shared folder is
accessible and that Write operations are permitted. A restore to an
administrative share, such as \\mySharedServer\C$, is not supported.
3. Click Next. The Restore Confirmation page appears.
4. Click Done. The restore request is submitted, and the virtual-machine files are restored to the LiveVault virtual-machine collector at the directory location you specified.
o Subdirectories are created with names corresponding to those of the datastores where the virtual machines and disks resided at the time of backup.
o The files related to the virtual disks are restored to their respective subdirectories.
NOTE: Ensure that the restore location on the LiveVault virtual-machine
collector or the UNC path has sufficient space to accommodate the restored
.vmdk files. Restoring the virtual machine as files restores the .vmdk files
to their original provisioned size, even if they were optimized during back up
with changed-block tracking (CBT). To verify the original provisioned size of
the.vmdk files, see your vCenter environment.
Continued on next page
Chapter 8: Recover a Virtual Machine Part 2: Disaster-Recovery Scenarios
Page 102 Version: 7.93 © 2018 j2 Global®, Inc. and affiliates (collectively, “j2”). All rights reserved.
Restore a Virtual Machine to Files (Cont.)
Move the Restored Virtual-Machine Disk Files
After a restore of the virtual machine files to your virtual-machine collector or UNC shared-folder location, the virtual machine is not functional. You must manually move the restored virtual machine files to an ESX(i) Server system.
Create a New Virtual Machine in vSphere
To recover a virtual machine restored to a file-system location, perform the following tasks in vSphere:
1. Move the virtual-disk files (.vmdk) that comprise the restored virtual machine to a datastore within your vCenter.
2. Using the vSphere client, create a new virtual machine.
a. Select Custom configuration.
b. Select the appropriate virtual processor, memory, and network-connection settings for the new machine.
c. When selecting disks, select Use an existing virtual disk.
d. Browse to the vmdk path in the datastore, and select the appropriate
.vmdks.
e. Complete the configuration of the new virtual machine.
(For more information, see your VMware and vSphere documentation.)
Example Restore:
The following is an example of a virtual machine restored as files.
1. The virtual machine named Windows_XP was backed up.
2. Restore the virtual machine Windows_XP to the directory
x:\RestoreDirectory\ on the virtual-machine collector.
3. Display the content of the x:\RestoreDirectory\Windows_XP directory
to determine the .vmdk files to select:
o scsi0-0.meta
o XP_1disk.vmdk
o XP_1disk_flat.vmdk
4. Upload the XP_1disk_flat.vmdk file to the VMware vCenter datastore of your choice. (For more information on uploading files to VMware, see your VMware documentation.)
5. In the vSphere client, create a new virtual machine named, for example, restoredWindowsXP.
Continued on next page

Part 2: Disaster-Recovery Scenarios Chapter 8: Recover a Virtual Machine
Version: 7.93 Page 103 © 2018 j2 Global®, Inc. and affiliates (collectively, “j2”). All rights reserved.
Restore a Virtual Machine to Files (Cont.)
Example Restore : (Cont.)
6. Select Custom configuration.
7. Select the appropriate virtual processor, memory, and network-connection settings for the new VM.
8. When selecting disks, select Use an existing virtual disk.
9. Browse to the vmdk path in the datastore for the XP_1disk_flat.vmdk.
Part 2: Disaster-Recovery Scenarios
Page 104 Version: 7.93 © 2018 j2 Global®, Inc. and affiliates (collectively, “j2”). All rights reserved.
CHAPTER 9: RECOVER A WINDOWS 2003 SMALL-BUSINESS SERVER
This procedure explains how to perform a disaster recovery for a Windows 2003 Small-Business Server (SBS).
Perform a disaster recovery in the event of a computer failure or disaster, such as:
Hard-disk failure or corruption, requiring you to rebuild the system drive
Windows cannot start or has been corrupted
Physical-computer loss
ASSUMPTIONS AND PROCEDURES
The following assumptions are made in these procedures:
You configured your backup to protect the full computer (including its general files and directories, its databases and applications, and its system state)―and that the initial synchronization has been completed for the computer. LiveVault can restore only files, directories, system state, and metadata that you have backed up with LiveVault.
You optionally configured an Exchange backup policy to protect your Exchange data in a transactionally safe manner.
You optionally configured SQL backup policies to protect your SQL data in a transactionally safe manner.
All Windows functions worked before the disaster occurred.
All databases and applications functions worked before the disaster occurred.
IMPORTANT! To recover your computer from a disaster, complete the following procedures in the order that
they are presented. To reiterate:
To ensure the highest success rate, you must complete the following tasks exactly and in order.
Do not omit or skip any step, unless instructed to do so.
Failure to follow the steps in order will cause the recovery to fail, and you must start the recovery process
from the beginning.
LiveVault recommends that you print out this chapter, and use it as a checklist for your disaster-recovery process.
The recovery procedures are:
1. Submit a media-resource-device request (pg. 105).
2. Suspend backups on the original computer (pg. 106).
3. Stop and disable the LiveVault service (pg. 106).
4. Disable the secondary NIC on the recovering computer (pg. 107).
5. Verity the keyboard and mouse type (pg. 107).
6. Verify the original computer’s as-built configuration (pg. 107).
7. Install the operating system on the recovering computer (pg. 107).
Part 2: Disaster-Recovery Scenarios Chapter 9: Recover a Windows 2003 Small-Business Server (SBS)
Version: 7.93 Page 105 © 2018 j2 Global®, Inc. and affiliates (collectively, “j2”). All rights reserved.
8. Install the same service packs as on the original computer (pg. 109).
9. Verify the recovering computer’s name (pg. 108).
10. Restart the computer (pg. 109).
11. Configure the disks and drive letters (pg. 109).
12. Remove IIS components from the recovering computer (pg. 109).
13. Copy the boot.ini file (pg. 110).
14. Disable the screen saver and password-protect (pg. 110).
15. Install the agent software on the recovering computer (pg. 110).
16. Restart the recovering computer in DSRM (pg. 112).
17. Log into the recovering computer (pg. 113).
IMPORTANT! After you log in, do not log off or lock the computer for the remainder of the procedures listed
below.
A. Define and run a restore policy (pg. 113).
B. Compare boot.ini files (pg. 115).
C. Define and run an Exchange-file restore (pg. 115).
D. Define and run an SQL-file restore (pg. 116).
E. Restart the recovered computer in normal mode (pg. 117).
F. Determine if you need an authoritative system-state restore (pg. 118).
G. Enable the NIC (pg. 118).
H. Test the recovered computer (pg. 118).
Submit a Media-Restore-Device Request
Optional: Request a media restore device containing the backup versions from a specific time range.
When you request a restore device, it takes a certain amount of time to build and ship the device―and depends on the data size and shipment method. (For more information on restore devices, see your LiveVault service contract.)
NOTE: Requesting a media restore device incurs an additional charge. Refer to your
contract for cost and shipping information.

Chapter 9: Recover a Windows 2003 Small-Business Server (SBS) Part 2: Disaster-Recovery Scenarios
Page 106 Version: 7.93 © 2018 j2 Global®, Inc. and affiliates (collectively, “j2”). All rights reserved.
Suspend Backups on the Original Computer
Suspend backups on the original computer to ensure that no additional backup versions are sent from the original computer during the recovery process.
To suspend backups:
1. In the left pane of the LiveVault Web-Management Portal, select the original computer. The Computer Summary page appears.
2. In the right pane, click Properties. The Computer Properties page appears.
3. Click Edit properties. The Edit Properties page appears.
4. Check the Suspend backup box, then click Save. Backups are suspended.
Stop and Disable the LiveVault® Service
If you are recovering the computer to a newly built machine, and the original computer is still partially operable and connected to the LiveVault service, you must stop and disable the LiveVault backup service.
If you are performing a disaster-recovery test to a newly built machine, you must stop and disable the LiveVault backup service on the original computer.
WARNING! Failure to stop and disable the LiveVault backup service on the
original computer while performing the disaster recovery to a newly built recovering
computer will result in a duplicate system connecting to the LiveVault service. There
are significant risks of data corruption associated with duplicate systems attempting
to back up to the LiveVault service.
To stop the LVBackupservice, choose one of the following methods:
Enter the following command: net stop lvbackupservice. The LiveVault backup service stops.
Click Start or press the Windows Start key, then select Administrative Tools > Computer Management > Services. Select LiveVault Backup Service. Select Stop the service. The LiveVault backup service stops.
After the backup service has stopped, you must disable it so it does not restart automatically.
To disable the LiveVault backup service, enter the following command: sc config
lvbackupservice start= disabled. The LiveVault backup service is set to Disabled.

Part 2: Disaster-Recovery Scenarios Chapter 9: Recover a Windows 2003 Small-Business Server (SBS)
Version: 7.93 Page 107 © 2018 j2 Global®, Inc. and affiliates (collectively, “j2”). All rights reserved.
Disable the Secondary NIC on the Recovering Computer
If the recovering computer contains two network-interface cards (NICs), disable one of them.
To disable a secondary NIC:
1. If the NIC is a separate card that you can remove, remove it. If it is an onboard NIC, disable it by using the BIOS interface. (For more information, see the hardware vendor’s documentation.)
2. Otherwise, disable the NIC through the Windows Device Manager after you install the Windows operating system. (You do not need to restart the computer after you disable the NIC.)
Verify the Keyboard and Mouse Type
If possible, use the same type of keyboard and mouse on the target computer as those on the original computer― either USB or PS/2.
Verify the As-Built Configuration of the Original Computer
Review and verify the as-built configuration for the original computer that you prepared as part of planning for disaster recovery. (For more information, see “Verify Configuration Information” [part of Chapter 2: Plan for Disaster Recovery] on pg. 6.)
Install the Operating System on the Recovering Computer
According to the following instructions, install the Windows operating system on the recovering computer. If possible, use the same media used to install the operating system on the failed computer.
1. Install the same operating-system version of Windows that existed on the original computer.
2. Name the computer to the same Netbios name as the original computer’s. (The Windows setup program provides a suggested computer name by default; for
example, w2008xr1fan. However, if the original computer was named corporate.mycompany.com, you must assign the computer name corporate to the recovering computer.)
IMPORTANT! The recovering computer’s name must be the same as the
original computer’s. Otherwise, the recovering computer will not start correctly,
the disaster-recovery procedure will fail, and you will need to start the process
over from the beginning.
Continued on next page
Chapter 9: Recover a Windows 2003 Small-Business Server (SBS) Part 2: Disaster-Recovery Scenarios
Page 108 Version: 7.93 © 2018 j2 Global®, Inc. and affiliates (collectively, “j2”). All rights reserved.
Install the Operating System on the Recovering Computer (Cont.)
3. Regarding workgroup membership, join the computer as a member of a workgroup.
NOTE: Do not join a domain at this time.
4. Install Windows to the same directory on the recovering computer as on the original
computer. (For example, if the original computer’s installation was c:/Windows,
then install Windows to c:/Windows on the recovering computer.)
The computer restarts. When the installation restarts after the initial part of the installation, the system displays a Continuing Microsoft Windows Small Business Server Setup page.
5. Click Cancel.
WARNING! You must cancel out of the component installation at this time.
Otherwise, you will have to repeat this disaster-recovery process.
6. Verify that the recovering computer meets the following criteria at this point:
o The recovering computer is not a domain controller.
o The recovering computer is not a DNS, or DHCP, server.
o Exchange Server is not installed.
o SQL Server is not installed.
NOTE: Do not install the other Windows components (for example, Active
Directory, Certificate Services, or Internet Information Services). (If you install
them, the restore and the disaster recovery can fail.) The disaster recovery will
restore all other components.
If you install the Internet Information Service (IIS) components now on a
Windows 2003 recovering computer, the IIS components that the LiveVault
service restores will not work. However, if you must install the IIS components
now (for example, because you use a system-imaging solution that includes these
components), you will remove them later in the process (via Remove IIS
Components from the Recovering Computer on pg. 109).
Verify the Recovering Computer’s Name
Ensure that the recovering computer has the same Netbios computer name as that of the original computer’. (For example, if the original computer was named corporate.mycompany.com, then you must assign the computer name corporate to the recovering computer.)
NOTE: Assign the correct computer name to the recovering computer in order to
perform the system-state restore. Otherwise, the recovering computer will not start
correctly, and the disaster-recovery procedure will fail.

Part 2: Disaster-Recovery Scenarios Chapter 9: Recover a Windows 2003 Small-Business Server (SBS)
Version: 7.93 Page 109 © 2018 j2 Global®, Inc. and affiliates (collectively, “j2”). All rights reserved.
Install the Same Service Packs as on the Original Computer
Install the same service packs on the recovering computer as were on the original computer. (For more information, see the original computer’s as-built configuration information and your Windows documentation.)
Restart the Computer Restart the recovering computer.
Configure the Disks and Drive Letters
Partition the volumes, and assign the drive letters on the recovering computer to match those that existed on the original computer.
To create the volumes on the recovering computer:
1. Create the same volumes. (For example, if the original computer had C:, D:, and E:
volumes, create the recovering computer’s volumes on C:, D:, and E:. Otherwise, data restores will fail.)
2. Format the recovering computer's volumes to be the same file-system format as the original computer's volumes. (For example, format the volumes to NTFS, ReFS and so on.)
3. Ensure that the new volumes have adequate size to handle the restored data. (For example, the recovering computer's volumes must be at least as large as the original computer's volumes.)
Remove IIS Components from the Recovering Computer
For a recovering Windows 2003 Small-Business Server computer, determine if any Internet Information Services (IIS) components were installed during the Windows installation; and remove them. (For more information on removing IIS components or Web Server roles, see your Windows documentation.)
Chapter 9: Recover a Windows 2003 Small-Business Server (SBS) Part 2: Disaster-Recovery Scenarios
Page 110 Version: 7.93 © 2018 j2 Global®, Inc. and affiliates (collectively, “j2”). All rights reserved.
Copy the Boot.ini
File On the recovering computer, you must copy the boot.ini for later use in verifying the restore.
NOTE: This procedure applies to Windows 2003 recovering computers only. On a
Windows 2008/2012 recovering computer, skip this step.
To copy the boot.ini file:
1. Copy the boot.ini file. (The boot.ini is located in the recovering computer’s root directory.)
2. Name the copy something similar to BootFromCD_101504.ini (where 101504 represents the current date) to ensure no confusion exists between the copy and the
restored boot.ini file―and to differentiate this copy from any other copies.
3. Take note of the name of the boot.ini copy. The copy will be referenced later during the disaster-recovery process.
Disable the Screen Saver and Password-Protect
NOTE: Disable the screen saver and password-protect before entering Directory
Services Recovery Mode (DSRM).
1. Disable the screen saver.
NOTE: You cannot disable the screen saver after entering DSRM.
2. In the Power Options, disable the password-protect. (The password might change due to the restore.)
Install the Agent Software on the Recovering Computer
You can install the LiveVault agent software on the recovering computer and also use the LiveVault Configuration Wizard to generate an encryption key and to provision the agent to the LiveVault service.
To install the LiveVault agent software:
1. Log into the LiveVault Web-Management Portal.
2. Click Downloads in the top menu. The Downloads page appears.
3. Select the appropriate Agent installation kit for your operating system, and click Download. (Do NOT select Run on Download.)
Continued on next page
Part 2: Disaster-Recovery Scenarios Chapter 9: Recover a Windows 2003 Small-Business Server (SBS)
Version: 7.93 Page 111 © 2018 j2 Global®, Inc. and affiliates (collectively, “j2”). All rights reserved.
Install the Agent Software on the Recovering Computer (Cont.)
4. Save the file to a location on the recovering computer, then run it with administrator rights.
5. To run the install wizard, select Run. Then:
a. Install the agent software to the same location on the recovering computer as it was on the original computer. (To change the location from the default, click Change and type a new location.)
b. Install the LiveVaultData directory to the same location as the original computer.
NOTES:
By default, the installation program installs the LiveVaultData
directory to the volume with the largest amount of free disk space. To
change the location from the default, click Change and type a new
location.
Ensure that the path to the LiveVault agent software matches the original
computer’s path. For example, if the original computer’s software
installation was to C:\Program Files\Autonomy\
BackupEngine and D:\LiveVaultData, ensure that you install the
software to the same locations on the recovering computer. Failure to do
so will cause the system-state restore to fail.
6. Click Finish.
7. Click Configure. The Configuration Wizard appears.
a. To validate your account, type your user name and password credentials; then click Next. The Installation page appears.
b. Select Recovering a complete system.
c. From the Select System list, select the name of the original computer you are recovering.
d. Click Next. The Password Required page appears.
e. Type the encryption-key password. (This is the encryption-key password that you entered when you first provisioned the LiveVault agent software on the original computer.)
NOTES:
If you do not remember the encryption-key password from the original
computer, you will not be able to provision the recovering computer
while performing the disaster recovery.
Ensure that you have the encryption-key password from the original
computer.
The encryption-key password may have been escrowed with LiveVault
at the point of the original computer’s installation. Contact LiveVault
Support to verify this and to request the password.
Continued on next page

Chapter 9: Recover a Windows 2003 Small-Business Server (SBS) Part 2: Disaster-Recovery Scenarios
Page 112 Version: 7.93 © 2018 j2 Global®, Inc. and affiliates (collectively, “j2”). All rights reserved.
Install the Agent Software on the Recovering Computer (Cont.)
f. Click Next. The Configuration Wizard generates the key.
g. Click Finish. The Service Configuration dialog opens.
h. Click Cancel to restart later.
NOTE: Do not restart the computer now at the completion of LiveVault
service configuration. Instead, you must configure the computer to restart in
Directory Services Recovery Mode (DSRM) in order to proceed with the
disaster recovery.
The service configuration exits.
Restart the Recovering Computer in DSRM
Use Directory Services Restore Mode (DSRM) even if the computer is not a domain controller. For more information about Directory Services Restore Mode, see your Windows documentation.
To restart the computer in DSRM mode:
1. Restart the computer.
2. During the normal start-up process, look for the Windows start-up options
message at the bottom of the window; for example: For troubleshooting and advanced startup options for Windows 2003, press
F8.
3. When you see this message, press F8. (You will only see this message for a few seconds. Press F8 while you can see it.)
NOTE:
If you are able to press F8 before it disappears, continue to step 4.
on the next page.
If you missed the opportunity to press F8, you need to configure
the boot.ini file to boot into DSRM. To do so, see the bullet on
pg. 113.
Continued on next page
Part 2: Disaster-Recovery Scenarios Chapter 9: Recover a Windows 2003 Small-Business Server (SBS)
Version: 7.93 Page 113 © 2018 j2 Global®, Inc. and affiliates (collectively, “j2”). All rights reserved.
Restart the Recovering Computer in DSRM (Cont.)
4. From the Windows Advanced Options menu: Select Directory Services Restore Mode, and press Enter. The computer starts in DSRM.
NOTE: Stay in DSRM until you are instructed to restart into normal mode.
To restart in DSRM if you did not press F8:
1. Open the boot.ini file in the recovering computer's root directory.
2. In the [operating systems] section, add the following switch to the end
of the line that specifies the start path: /safeboot:dsrepair /sos. For example:
operating systems]
multi(0)disk(0)rdisk(0)partition(1)\WINNT=;Microsoft
Windows 2003 Server; /fastdetect /safeboot:dsrepair
/sos
3. Restart the recovering computer. The computer starts in DSRM.
Log Into the Recovering Computer
After the computer restarts: Log into Windows, with local administrator rights.
IMPORTANT! After you log in, do not log off or lock the computer for the
remainder of this recovery process (as indicated in the remaining procedures below, in
this chapter).
Define and Run a Restore Policy
Define and run a restore job that restores all of your system volume, files, directories, and the system state.
NOTE: You must restore the system state when you restore your system volume,
files, and directories.
To create a restore job:
1. In the web-management portal, select the recovering computer. The Summary tab appears.
Continued on next page
Chapter 9: Recover a Windows 2003 Small-Business Server (SBS) Part 2: Disaster-Recovery Scenarios
Page 114 Version: 7.93 © 2018 j2 Global®, Inc. and affiliates (collectively, “j2”). All rights reserved.
Define and Run a Restore Policy (Cont.)
2. Click the Restore tab, then click New Restore. The Restore wizard appears.
o If you requested a restore device earlier, you must wait for your restore device to arrive. After it arrives, attach the device, and select Restore from device on network.
o If you are restoring over the Internet, select Restore data over the internet.
Then:
a. Click Standard Policy Restore. The Selection tab appears.
b. Type a restore name in the Name to use for this restore request box.
c. Select All policies from the Policy filter list.
d. Select the version by selecting the date and time from the Version list.
e. In the left pane, click the computer name to display all of the volumes; then in the
right pane, select all the volumes. (For example, select C:, D:, and E:).
f. To restore system state, check the Restore System State box.
g. Optional: Select Rebuild deduplicated volume to rebuild any Windows Server 2012 deduplicated volumes as part of the disaster recovery. (If the server is not Windows Server 2012 or does not have data deduplication enabled on the volume(s), proceed to step 2.g below. For more information on Windows Server 2012 volumes optimized for data deduplication, see your Windows Server 2012 documentation.)
NOTE: Ensure that the destination volume(s) for rebuilding the
deduplicated volume(s) is an empty, formatted volume of sufficient size. To
ensure consistency of the dedupe store, do not enable deduplication on the
new volume before the restore occurs. If deduplication is enabled on the
volume(s), the restore will fail.
h. Click the Options tab. The Restore Options tab appears.
i. Check the Overwrite open files when the computer is rebooted box, then click Next. The Restore Summary page appears.
j. Review the restore, and click Done. The restore is submitted and begins to restore data.
3. Verify that this restore has completed correctly before you go to the next procedure.
WARNING! Do not cancel the restore or restart the recovering computer while
the restore is in progress. If the restore is canceled, then the disaster recovery may
fail. If this occurs, you must restart the recovery process from the beginning.
Part 2: Disaster-Recovery Scenarios Chapter 9: Recover a Windows 2003 Small-Business Server (SBS)
Version: 7.93 Page 115 © 2018 j2 Global®, Inc. and affiliates (collectively, “j2”). All rights reserved.
Compare Boot.ini Files
Compare the boot.ini files to verify that boot information is consistent.
To compare the restored boot.ini file and the copy of the boot.ini file:
1. Go to the computer's root directory, and open both the restored boot.ini file (for
example, boot.ini) and the copy of the boot.ini file (for example,
BootFromCD_101504.ini) that you made earlier in this procedure.
2. Compare the boot-drive value (that is, the number of the partition from which the computer will start, for example: partition(1)).
o If the boot-drive values in these files match, then skip to Restart the Computer on pg. 109.
o If the boot-drive values in these files do not match, continue with this procedure.
3. The restored boot.ini file's (for example, boot.ini) read-only attribute is set. To clear this attribute, complete the following steps:
a. In Windows Explorer, select the file.
b. Right-click the file, and select Properties.
c. In the Properties dialog box, on the General tab, in the Attributes group: Clear the Read-only box.
d. Click OK.
4. Change the value in the restored boot.ini file (for example, boot.ini) to match
the value specified in the copy of the boot.ini file (for example,
BootFromCD_101504.ini).
NOTE: Your boot.ini configuration might require you to update the boot-
drive value for multiple lines in the restored boot.ini file.
WARNING! If you fail to update the restored boot.ini file, you
cannot restart the computer.
Define and Run an Exchange-File Restore
If you backed up Exchange data with a standard backup policy, skip to "Restart the recovering computer in normal mode".
If you backed up Exchange data with an Exchange backup policy, you can perform a file restore of Exchange data.
Continued on next page
Chapter 9: Recover a Windows 2003 Small-Business Server (SBS) Part 2: Disaster-Recovery Scenarios
Page 116 Version: 7.93 © 2018 j2 Global®, Inc. and affiliates (collectively, “j2”). All rights reserved.
Define and Run an Exchange-File Restore (Cont.)
If you backed up Exchange data with a standard backup policy, skip to Restart the Recovering Computer in Normal Mode on pg. 117.
If you backed up Exchange data with an Exchange backup policy, you can perform a file restore of Exchange data.
To restore an Exchange data backed up with an Exchange backup policy:
1. Click New Restore. The Restore wizard page appears.
o If you requested a restore device earlier, you must wait for your restore device to arrive. After it arrives, attach the device, and select Restore from device on network.
o If you are restoring over the Internet, select Restore data over the internet.
2. Click Next.
3. Select Exchange Server to restore data from the Exchange backup policies.
4. In the Name to use for this restore request textbox, type a restore name.
5. Select the version by selecting the date and time from the Version list. (The most recent version is the default.)
6. Click the computer name in the left pane to display all of the Exchange data. Then, select the top-level object in the right pane of your Exchange Server's backed-up file structure. (This ensures that you restore all of the required storage groups and mailbox stores.)
7. Click the Options tab. The Restore Options page appears.
8. Select File Restore.
9. Check the Overwrite open files when the computer is restarted box.
10. Click Next. The Restore Summary page appears.
11. Click Done. The restore is submitted, and you return to the Restore Summary page.
12. Ensure that this restore has completed correctly BEFORE you continue to the next procedure.
NOTE: Also, do NOT restart the recovering computer before you continue with
the next procedure, Define and Run an SQL-File Restore.
Define and Run an SQL-File Restore
If you backed up SQL databases with a standard backup policy, skip to Restart the Recovering Computer in Normal Mode on pg. 117.
If you backed up SQL databases with an SQL backup policy, you can perform a file restore of Exchange data.
Continued on next page

Part 2: Disaster-Recovery Scenarios Chapter 9: Recover a Windows 2003 Small-Business Server (SBS)
Version: 7.93 Page 117 © 2018 j2 Global®, Inc. and affiliates (collectively, “j2”). All rights reserved.
Define and Run an SQL-File Restore (Cont.)
To restore SQL data backed up with an SQL backup policy:
1. Click New Restore. The Restore wizard opens.
2. If you requested a restore device earlier, you must wait for your restore device to arrive. After it arrives, attach the device, and select Restore from device on network.
3. If you are restoring over the Internet, select Restore data over the internet.
4. Click Next.
5. Select SQL Server to restore data from the SQL backup policies.
6. Type a restore name in the Name to use for this restore request textbox.
7. Select the version by selecting the date and time from the Version list. (The most recent version is the default.)
8. In the left pane, click the computer name to display all of the SQL data; then select the top-level object in the right pane of your SQL server’s back-up file structure (this ensures that you restore all of the required databases).
9. Select the Options tab. The Restore Options page appears.
10. Select File Restore.
11. Check the Overwrite open files when the computer is rebooted box.
12. Click Next. The Restore Summary page appears.
13. Click Done. The restore is submitted, and you return to the Restore Summary page.
14. Ensure that this restore has completed correctly BEFORE you continue to the next procedure.
NOTE: Also, do NOT restart the recovering computer before you continue with the next procedure, Restart the Recovering Computer in Normal Mode.
Restart the Recovering Computer in Normal Mode
Restart the recovering computer in normal mode.
If you receive a Windows message that indicates that you must restart the computer because it has found new devices, restart the computer again as specified.
You may receive a prompt to restart the computer again―possibly multiple times―as the computer finds new devices. In this case, do not restart the computer each time you receive a prompt. That is, after Windows finds all devices, then restart the computer.
Chapter 9: Recover a Windows 2003 Small-Business Server (SBS) Part 2: Disaster-Recovery Scenarios
Page 118 Version: 7.93 © 2018 j2 Global®, Inc. and affiliates (collectively, “j2”). All rights reserved.
Determine If You Need an Authoritative System-State Restore
NOTE: If the original computer is not a primary domain controller, skip this
procedure.
If the original computer is a primary domain controller (PDC), determine if you need to perform an authoritative system-state restore.
To determine if the computer is a PDC:
1. Click the Start menu; then select Administrative > Tools > Active Directory Users and Computers. A list of computers opens.
o If only one domain controller is listed, this is the PDC.
o If multiple domain controllers are listed, contact your system administrator to determine is the recovering computer is the PDC.
NOTE: In most cases, you do not need to perform an authoritative system state
restore. Performing an authoritative system state restore is complex and, if
performed unnecessarily or incorrectly, can make your computer unusable.
2. Use the following table to help you to determine if an authoritative restore is necessary. (If you have any questions or concerns, contact LiveVault Support for assistance.)
Enable the NIC If you had to disable an NIC for the disaster recovery, complete the following steps to enable that NIC:
If the NIC is a separate card that was removed, insert the card.
If it is an onboard NIC, use the BIOS interface to enable the NIC. (For more information, see the hardware vendor’s documentation.)
If you disabled the NIC through the Windows Device Manager, it might be enabled for you. Verify the NIC's status in Device Manager, and enable it if necessary.
After you enable the NIC, you might need to restart the recovered computer, then configure the NIC.
Test the Recovered Computer
Perform the following tests to determine whether the recovered computer is working properly.
Examine the Windows Event Viewer logs.
Continued on next page
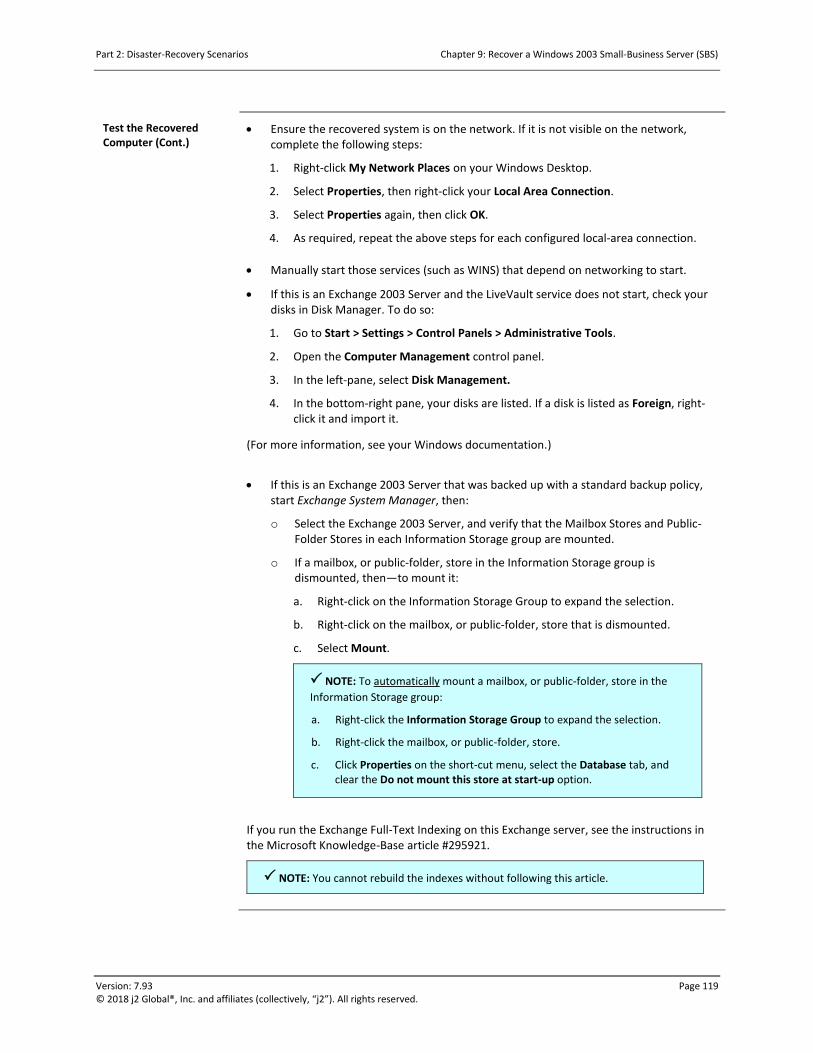
Part 2: Disaster-Recovery Scenarios Chapter 9: Recover a Windows 2003 Small-Business Server (SBS)
Version: 7.93 Page 119 © 2018 j2 Global®, Inc. and affiliates (collectively, “j2”). All rights reserved.
Test the Recovered Computer (Cont.)
Ensure the recovered system is on the network. If it is not visible on the network, complete the following steps:
1. Right-click My Network Places on your Windows Desktop.
2. Select Properties, then right-click your Local Area Connection.
3. Select Properties again, then click OK.
4. As required, repeat the above steps for each configured local-area connection.
Manually start those services (such as WINS) that depend on networking to start.
If this is an Exchange 2003 Server and the LiveVault service does not start, check your disks in Disk Manager. To do so:
1. Go to Start > Settings > Control Panels > Administrative Tools.
2. Open the Computer Management control panel.
3. In the left-pane, select Disk Management.
4. In the bottom-right pane, your disks are listed. If a disk is listed as Foreign, right-click it and import it.
(For more information, see your Windows documentation.)
If this is an Exchange 2003 Server that was backed up with a standard backup policy, start Exchange System Manager, then:
o Select the Exchange 2003 Server, and verify that the Mailbox Stores and Public-Folder Stores in each Information Storage group are mounted.
o If a mailbox, or public-folder, store in the Information Storage group is dismounted, then―to mount it:
a. Right-click on the Information Storage Group to expand the selection.
b. Right-click on the mailbox, or public-folder, store that is dismounted.
c. Select Mount.
NOTE: To automatically mount a mailbox, or public-folder, store in the
Information Storage group:
a. Right-click the Information Storage Group to expand the selection.
b. Right-click the mailbox, or public-folder, store.
c. Click Properties on the short-cut menu, select the Database tab, and clear the Do not mount this store at start-up option.
If you run the Exchange Full-Text Indexing on this Exchange server, see the instructions in the Microsoft Knowledge-Base article #295921.
NOTE: You cannot rebuild the indexes without following this article.

Part 2: Disaster-Recovery Scenarios
Page 120 Version: 7.93 © 2018 j2 Global®, Inc. and affiliates (collectively, “j2”). All rights reserved.
CHAPTER 10: RECOVER A DPM SERVER
This chapter explains how to recover a failed Microsoft Data-Protection Manager (DPM) server.
ASSUMPTIONS AND PROCEDURES
To ensure that you can recover your DPM server, you must have backed up all the data sources on the server, as well as the the SQL database for the DPM server. This is the only way to ensure that your backup is configured to fully protect your servers and data.
After recovering the server, you might need to take further steps to fully restore DPM. (For more information, see
"Synchronize a Restored Database in a Changed Environment on pg. 126.)
IMPORTANT! To recover your computer from a disaster, complete the following procedures in the order that
they are presented. To reiterate:
To ensure the highest success rate, you must complete the following tasks exactly and in order.
Do not omit or skip any step, unless instructed to do so.
Failure to follow the steps in order will cause the recovery to fail, and you must start the recovery process
from the beginning.
LiveVault recommends that you print out this chapter, and use it as a checklist for your disaster-recovery process.
The recovery procedures are:
1. Suspend backups on the original computer (pg. 121).
2. Install DPM on the recovering computer (pg. 122).
3. Install the agent software on the recovering computer (pg. 122).
4. Restore the DPM SQL database (pg. 123).
5. Synchronize the database (pg. 124).
6. Re-allocate missing data-source volumes (pg. 125).
7. Restore missing data resources (pg. 125).
8. Verify DPM consistency (pg. 125).
9. Resume backups on the recovered computer? (pg. 126).
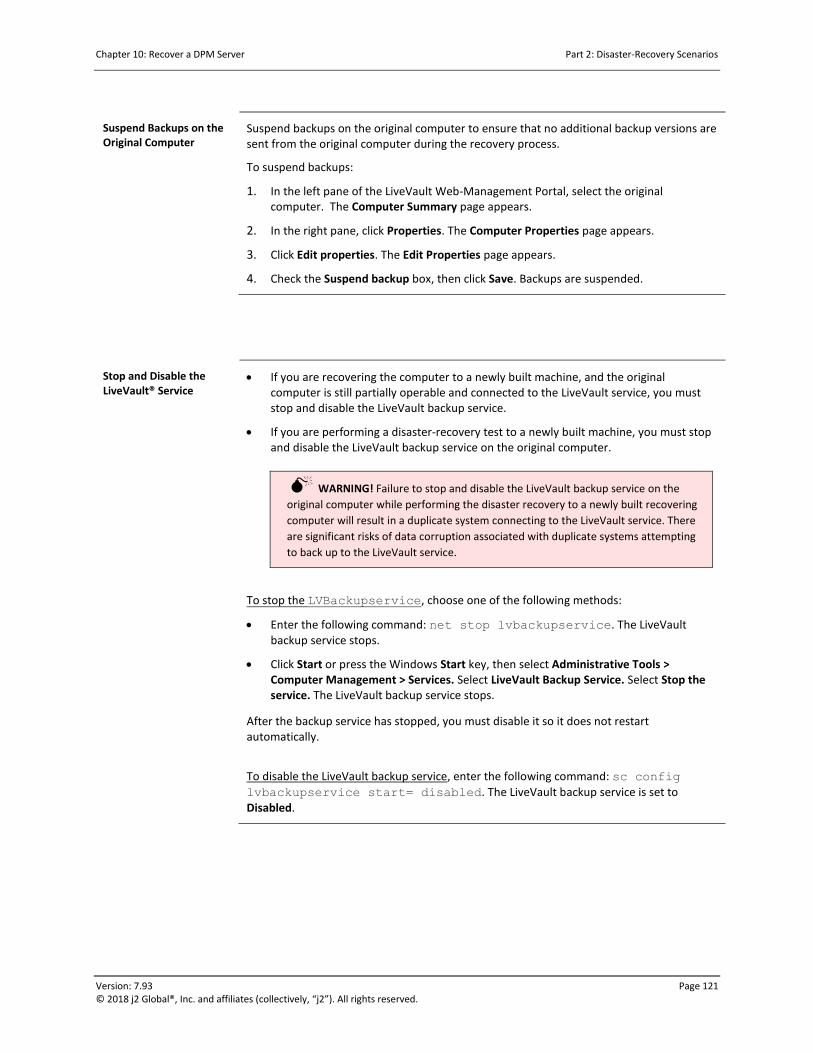
Chapter 10: Recover a DPM Server Part 2: Disaster-Recovery Scenarios
Version: 7.93 Page 121 © 2018 j2 Global®, Inc. and affiliates (collectively, “j2”). All rights reserved.
Suspend Backups on the Original Computer
Suspend backups on the original computer to ensure that no additional backup versions are sent from the original computer during the recovery process.
To suspend backups:
1. In the left pane of the LiveVault Web-Management Portal, select the original computer. The Computer Summary page appears.
2. In the right pane, click Properties. The Computer Properties page appears.
3. Click Edit properties. The Edit Properties page appears.
4. Check the Suspend backup box, then click Save. Backups are suspended.
Stop and Disable the LiveVault® Service
If you are recovering the computer to a newly built machine, and the original computer is still partially operable and connected to the LiveVault service, you must stop and disable the LiveVault backup service.
If you are performing a disaster-recovery test to a newly built machine, you must stop and disable the LiveVault backup service on the original computer.
WARNING! Failure to stop and disable the LiveVault backup service on the
original computer while performing the disaster recovery to a newly built recovering
computer will result in a duplicate system connecting to the LiveVault service. There
are significant risks of data corruption associated with duplicate systems attempting
to back up to the LiveVault service.
To stop the LVBackupservice, choose one of the following methods:
Enter the following command: net stop lvbackupservice. The LiveVault backup service stops.
Click Start or press the Windows Start key, then select Administrative Tools > Computer Management > Services. Select LiveVault Backup Service. Select Stop the service. The LiveVault backup service stops.
After the backup service has stopped, you must disable it so it does not restart automatically.
To disable the LiveVault backup service, enter the following command: sc config
lvbackupservice start= disabled. The LiveVault backup service is set to Disabled.

Part 2: Disaster-Recovery Scenarios Chapter 10: Recover a DPM Server
Page 122 Version: 7.93 © 2018 j2 Global®, Inc. and affiliates (collectively, “j2”). All rights reserved.
Install DPM on the Recovering Computer
On the recovering computer, install Microsoft Data-Protection Manager (DPM) 2007, Service Pack 1―or Microsoft DPM 2010. (For more information, see your Windows, and Data-Protection Manager (DPM), documentation.)
Install the Agent Software on the Recovering Computer
You can install the LiveVault agent software on the recovering computer and also use the LiveVault Configuration Wizard to generate an encryption key and to provision the agent to the LiveVault service.
To install the LiveVault agent software:
1. Log into the LiveVault Web-Management Portal.
2. Click Downloads in the top menu. The Downloads page appears.
3. Select the appropriate Agent installation kit for your operating system, and click Download. (Do NOT select Run on Download.)
4. Save the file to a location on the recovering computer, then run it with administrator rights.
NOTE: On Windows 2008/2012, right-click the installation program and select
Run as Administrator.
5. To run the install wizard, select Run. Then:
a. Install the agent software to the same location on the recovering computer as it was on the original computer. (To change the location from the default, click Change and type a new location.)
b. Install the LiveVaultData directory to the same location as the original computer. (To change the location from the default, click Change and type a new location.)
6. Click Finish.
7. Click Configure. The Configuration Wizard appears.
a. To validate your account, type your user name and password credentials; then click Next. The Installation page appears.
b. Select Recovering a complete system.
c. From the Select System list, select the name of the original computer you are recovering.
d. Click Next. The Password Required page appears.
Continued on next page

Chapter 10: Recover a DPM Server Part 2: Disaster-Recovery Scenarios
Version: 7.93 Page 123 © 2018 j2 Global®, Inc. and affiliates (collectively, “j2”). All rights reserved.
Install the Agent Software on the Recovering Computer (Cont.)
e. Type the encryption-key password. (This is the encryption-key password that you entered when you first provisioned the LiveVault agent software on the original computer.)
NOTES:
If you do not remember the encryption-key password from the original
computer, you will not be able to provision the recovering computer
while performing the disaster recovery.
Ensure that you have the encryption-key password from the original
computer.
The encryption-key password may have been escrowed with LiveVault
at the point of the original computer’s installation. Contact LiveVault
Support to verify this and to request the password.
f. Click Next. The Configuration Wizard generates the key.
g. Click OK to restart. The recovering server restarts.
Restore the DPM SQL Database
To restore the DPM SQL database:
1. Log into the web-management portal.
2. In the left pane, select the Agent you installed on the recovering DPM server.
3. In the right pane, select the Restore tab, then click New Restore. The Restore wizard opens.
4. Select one of the following options, based on how much data you are restoring, what bandwidth is available, and your budget.
o Restore data over the Internet.
The Restore Request page appears, and lets you select the files you want to restore over the internet. (Although there is a cost to having a media device shipped to you, it can take several days to restore data over the Internet.)
o Have media device shipped to you.
The Restore Decision page appears, where you can select the version of data to restore and the shipping method. Click Next. The Restore Wizard Shipping Information page appears and requests the address for shipment of the appliance. (When the restore device arrives, attach it to your network. You can then restore the backed-up files.)
NOTE: Ordering a media restore device incurs an additional charge. For more information, see your contract.
Continued on next page

Part 2: Disaster-Recovery Scenarios Chapter 10: Recover a DPM Server
Page 124 Version: 7.93 © 2018 j2 Global®, Inc. and affiliates (collectively, “j2”). All rights reserved.
Restore the DPM SQL Database (Cont.)
5. Select DPM SQL Database policy restore. The Selection page appears.
6. In the Name to use for this restore request textbox, type a restore name.
7. Select the version by selecting the date and time from the Version list.
NOTE: By default, the most recent version is restored, but consider carefully before accepting the default. If hardware problems led to the disaster, recent versions might be corrupted. You might want to select a version that occurred before any hardware problems became apparent.
8. Select the Options tab. The Restore Options page opens.
9. Select Redirect restored file to a different location.
10. Select Don’t preserve directories.
11. Specify a path where the file will be restored; for example: C:\restoredDB.
12. Click Next. The Restore Summary page appears.
13. Review the restore, and click Done. The restore is submitted and begins to restore data.
NOTE: Wait for the restore job to complete BEFORE moving on to the next procedure.
Synchronize the Database
To synchronize the database on the recovering DPM server
1. At the recovering DPM server, open the DPM Management shell.
2. In the DPM Management shell, enter the following command:
Run DpmSync -RestoreDb -DbLoc [fully qualified path to the database you
restored]
For example: DpmSync -RestoreDb -DbLoc C:\RestoredDB\DPMDB2007RTM.mdf
3. In the DPM Management shell, enter the following command:
Run DPMSync.exe –sync
The DPM database synchronization completes successfully.

Chapter 10: Recover a DPM Server Part 2: Disaster-Recovery Scenarios
Version: 7.93 Page 125 © 2018 j2 Global®, Inc. and affiliates (collectively, “j2”). All rights reserved.
Re-Allocate Missing Data-Source Volumes
To reallocate any missing data-source volumes, using the DPM Management shell, enter the the following command:
DPMSync.exe –reallocatereplica
Any missing data source volumes are reallocated.
Restore Missing Data Sources
After you have reallocated any missing data source volumes, restore any missing data sources with a LiveVault DPM recovery.
To restore missing data sources:
1. Log in to the web-management portal.
2. In the left pane, select the recovering DPM server.
3. Click the Restore tab, then click Restore. The Restore wizard opens.
a. Select DPM policy restore. The Choose DPM Restore Type page appears.
b. Select DPM recovery. The Selection page appears.
c. In the Name to use for this restore request textbox, type a restore name.
d. Select the version by selecting the date and time from the Version list.
e. In the object tree in the left pane, navigate to the failed DPM server that contains the data sources you want to restore; then, to specify data sources to restore― select and clear the check boxes next to the data sources (in the selection pane on the right).
f. Click Next. The Restore Summary page appears.
g. Review the restore, and click Done. The restore is submitted and begins to restore data.
NOTE: Verify that this restore has completed correctly BEFORE you go to the next procedure.
Verify DPM Consistency
Using the DPM Management Console, ensure that all restored data sources are consistent. If there are warnings or errors, run consistency checks on the listed data sources.

Part 2: Disaster-Recovery Scenarios Chapter 10: Recover a DPM Server
Page 126 Version: 7.93 © 2018 j2 Global®, Inc. and affiliates (collectively, “j2”). All rights reserved.
Resume Backups To resume backups on the recovered DPM server:
1. In the web-management portal, select the recovering computer.
2. In the right-pane, click Properties. The Properties page appears.
3. Click Edit properties. The Edit Properties page appears.
4. Check the Resume backup box, then click Save. The agent resumes backing up the computer according the schedule in the backup policy.
SYNCHRONIZE A RESTORED DATABASE IN A CHANGED ENVIRONMENT
The LiveVault service can back up and restore the SQL database that contains the DPM metadata. If you need to restore a backed-up DPM SQL database, there are special considerations, described below.
Two scenarios when you might restore DPM’s SQL database are:
Recovering a failed DPM server
In this case, you restore the database and the data sources (replicas) from an earlier time. After the restore, there are likely to be inconsistencies between the DPM server (database and data sources) and the current state of the DPM-protected servers. It is also possible that the restored data sources are not in sync with the restored database, because the database and the data sources may have been backed up at slightly different times.
To recover from a corruption or user error on the DPM server that affects the database
In this scenario, the database is restored; and the data sources on the DPM server are left intact. It is possible that the data sources are not in sync with the restored database, because the database was restored at an earlier time.
This section covers various scenarios that might occur if a DPM environment changed after the last backup of the DPM database taken. These procedures address the following scenarios:
Data sources and agent are out of sync.
Various parameters―such as schedule, recovery points, disk allocation, settings, and reports―are out of sync.
Protected directories are out of sync.
DATA SOURCES ARE OUT OF SYNC
This situation can occur if a DPM administrator adds or removes data sources after the date that the LiveVault service backed up the DPM SQL database you are restoring.
After you restore the SQL database, you might see an error at the DPM Management console similar to "Volume missing" or "missing" for the data source that you removed, but the error would have no information about the data source that you added.
Chapter 10: Recover a DPM Server Part 2: Disaster-Recovery Scenarios
Version: 7.93 Page 127 © 2018 j2 Global®, Inc. and affiliates (collectively, “j2”). All rights reserved.
To update the database with the current environment:
1. On the DPM management console, remove the data source you previously removed from protection―or add the data source you had previously added as a protected volume.
2. Run a consistency check.
DPM AGENTS ARE OUT OF SYNC
This situation might occur if you deleted a DPM agent from protection after the date of the SQL database that you restored. After you restore the SQL database, the DPM management console shows the agent with status as Error, along with the following information:
“The agent operation failed because DPM could not communicate with the agent. The computer might be protected by another DPM server, or the protection agent
might have been uninstalled on the protected computer.”
To reinstate the agent:
1. Run DpmAgentInstaller.exe with this DPM computer as a parameter; for example:
DpmAgentInstaller.exe <dpm server name>
2. Install any service packs that were present before the restore.
(For more information, see your Data-Protection Manager documentation.) After you restart, the agent should connect to the DPM server and show its status as OK.
NEW DPM AGENT WAS ADDED AFTER DB BACKUP
This situation can occur if you install a new DPM agent after the date of the SQL database that you restored. After you restore the SQL database, the DPM management console does not show the new agent, even though it exists on the agent’s machine.
The DPM Agent is now available for use.
(For more information on re-attaching the agent to DPM, see your Microsoft DPM documentation.)
PARAMETERS ARE OUT OF SYNC
This situation can occur if you change the DPM environment after the date of the SQL database that you restored. It can occur if you changed the backup schedule, recovery points, volume-data source size, performance- optimization settings, and reports.
After you restore the SQL database, you will see the following results:
The schedule reverts back to the old values after the DB restore.
Older recovery points at the DB backup time are available. The DPM restore can finish successfully.

Part 2: Disaster-Recovery Scenarios Chapter 10: Recover a DPM Server
Page 128 Version: 7.93 © 2018 j2 Global®, Inc. and affiliates (collectively, “j2”). All rights reserved.
The new volume replica sizes are shown in the DPM management console. DPM adjusts the replica volume size based on the disk and not what can be stored in the DB (if any).
You lose the changes made to the Optimize Performance dialog box after the DB backup.
All reporting data is lost after the DB restore.
PROTECTED DIRECTORIES ARE DIFFERENT
This situation can occur if you have different directories protected in the DPM environment than you had when the last SQL DB backup completed. After you restore the SQL database, directories that you had protected before DPM DB backup are present. Directories you added to protection after the DPM DB backup are missing.
To update the database to the changed environment:
1. In the DPM Management Console, modify the protection group to remove the deleted directories, then add the new directories.
2. Run a consistency check.

Disaster-Recovery Guide App A: Disaster-Recovery Planning Worksheets
Page 129 Version: 7.93 © 2018 j2 Global®, Inc. and affiliates (collectively, “j2”). All rights reserved.
APPENDIX A: DISASTER-RECOVERING PLANNING WORKSHEETS
This appendix contains worksheets that you can use to record information that you need, regarding your original LiveVault® computers, when you prepare for disaster recovery. Use them as a template for gathering the as-built configuration information needed to recover your computers in the event of a failure.
(For more information, see Gather As-Built Configuration Information [part of “Chapter 2: Plan for Disaster Recovery”] on page 4.
BASIC COMPUTER INFORMATION
Use the following table to track basic information for your computer.
Item Description
Hostname (NetBIOS name)
IP Address(es)
Operating-System Version
Operating-System Edition
Operating-System Service-Pack Level
Windows Installation Directory
System Locale
Operating-System Version
Local Administrator Credentials Saved?
Virtual Machine Yes / No
DRIVE LETTER INFORMATION
Use the following table to track the drive letter and purpose for each disk drive on your computer.
Drive Letter Contents Size (GB) File System

App A: Disaster-Recovery Planning Worksheets Disaster-Recovery Guide
Page 130 Version: 7.93 © 2018 j2 Global®, Inc. and affiliates (collectively, “j2”). All rights reserved.
DOMAIN INFORMATION
Use the following table to record domain information, such as the domain name and if this original computer is a primary, or secondary, domain controller.
Item Description
Domain name
Primary Domain Controller? Yes / No
Backup Domain Controller? Yes / No
Active Directory installed? Yes / No
Active Directory Structure Recorded Yes / No
Domain-Administrator Credentials Saved
APPLICATION INFORMATION
Use the following table to record application information, such as application version, file locations; or other important information about the applications on your computer.
Application Information
LIVEVAULT INFORMATION
Use the following table to record information about LiveVault software installation locations, credentials, and backup policies.
Item Description
LiveVault Software-Installation Location
LiveVault® Data-Directory Installation Location
Continued on next page

Disaster-Recovery Guide App A: Disaster-Recovery Planning Worksheets
Version: 7.93 Page 131 © 2018 j2 Global®, Inc. and affiliates (collectively, “j2”). All rights reserved.
Item Description
LiveVault Encryption-Key Password Recorded
LiveVault Encryption-Key Password Escrowed with LiveVault
Yes / No
LiveVault User Credentials Recorded (for Web- Management Portal access)
LiveVault Agent-Software Version at Time of Installation
Use the following table to record LiveVault backup-policy configuration information.
LiveVault® Backup Policies Backup Policy Created
Backup Policy for System Volume
System-State Backup Policy
Backup Policy for Volume Data
Backup Policy for Windows 2012 Deduplicated Volumes
Exchange Backup Policy (for Exchange Servers)
SQL Backup Policy (for SQL Servers)
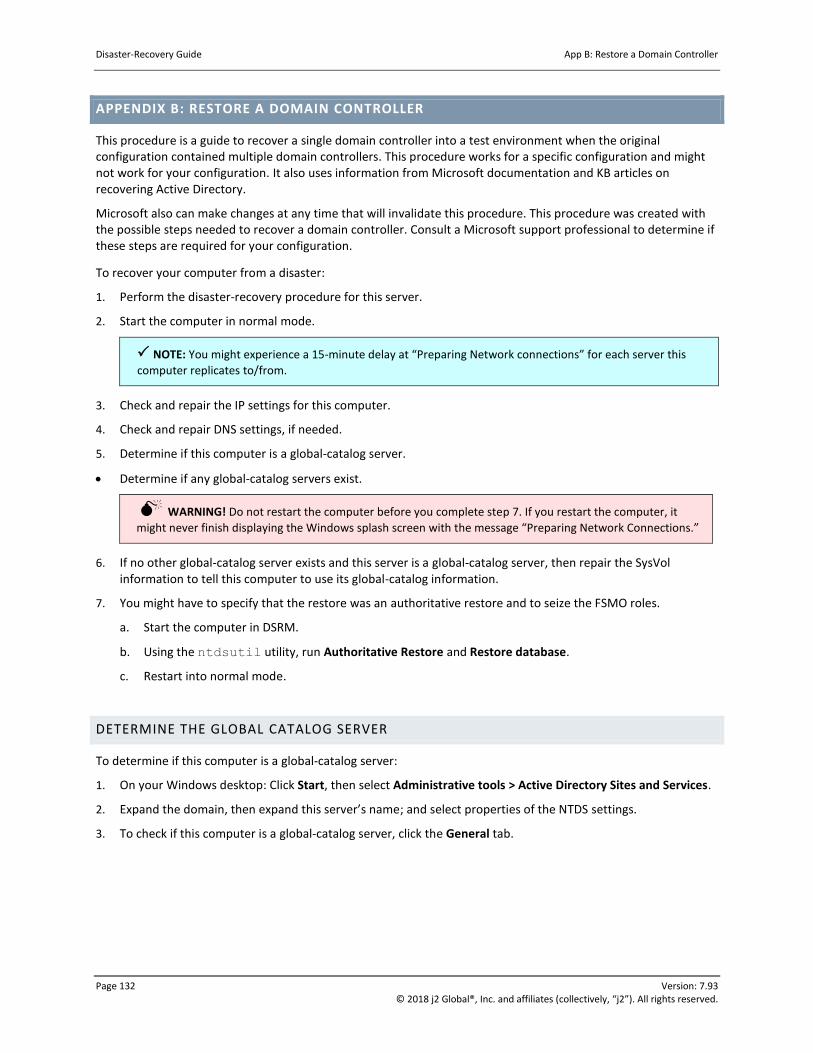
Disaster-Recovery Guide App B: Restore a Domain Controller
Page 132 Version: 7.93 © 2018 j2 Global®, Inc. and affiliates (collectively, “j2”). All rights reserved.
APPENDIX B: RESTORE A DOMAIN CONTROLLER
This procedure is a guide to recover a single domain controller into a test environment when the original configuration contained multiple domain controllers. This procedure works for a specific configuration and might not work for your configuration. It also uses information from Microsoft documentation and KB articles on recovering Active Directory.
Microsoft also can make changes at any time that will invalidate this procedure. This procedure was created with the possible steps needed to recover a domain controller. Consult a Microsoft support professional to determine if these steps are required for your configuration.
To recover your computer from a disaster:
1. Perform the disaster-recovery procedure for this server.
2. Start the computer in normal mode.
NOTE: You might experience a 15-minute delay at “Preparing Network connections” for each server this
computer replicates to/from.
3. Check and repair the IP settings for this computer.
4. Check and repair DNS settings, if needed.
5. Determine if this computer is a global-catalog server.
Determine if any global-catalog servers exist.
WARNING! Do not restart the computer before you complete step 7. If you restart the computer, it
might never finish displaying the Windows splash screen with the message “Preparing Network Connections.”
6. If no other global-catalog server exists and this server is a global-catalog server, then repair the SysVol information to tell this computer to use its global-catalog information.
7. You might have to specify that the restore was an authoritative restore and to seize the FSMO roles.
a. Start the computer in DSRM.
b. Using the ntdsutil utility, run Authoritative Restore and Restore database.
c. Restart into normal mode.
DETERMINE THE GLOBAL CATALOG SERVER
To determine if this computer is a global-catalog server:
1. On your Windows desktop: Click Start, then select Administrative tools > Active Directory Sites and Services.
2. Expand the domain, then expand this server’s name; and select properties of the NTDS settings.
3. To check if this computer is a global-catalog server, click the General tab.

App B: Restore a Domain Controller Disaster-Recovery Guide
Version: 7.93 Page 133 © 2018 j2 Global®, Inc. and affiliates (collectively, “j2”). All rights reserved.
DETERMINE IF A GLOBAL CATALOG SERVER EXISTS
To determine if a global-catalog server can be found:
1. Read the Directory Services Event Log entry that follows the most recent restart.
2. Look for an event that indicates a global-catalog server was not found; for example:
Event ID: 1126
Source: NTDS General Description: Unable to establish connection with Global Catalog.
REPAIR THE SYSVOL INFORMATION
Perform this procedure if the following two errors are reported in the File-Replication-Service Event log.
Event ID: 13565
Source: NtFrs
Description: File Replication Service is initializing the system volume
with data from another domain controller. Computer LV-AD1 cannot become a
domain controller until this process finishes. The system volume will
then be shared as SYSVOL.
To check for the SYSVOL share, enter the following command at the command prompt: net share. When the file-replication service completes the initialization process, the SYSVOL share will appear.
The initialization of the system volume can take some time. The time depends on the following factors:
The amount of data in the system volume.
The availability of other domain controllers.
The replication interval between domain controllers.
Event ID: 13520
Source: NtFrs
Description: \NtFrs_PreExisting___See_EventLog. Copying the files into
c:\winnt\sysvol\domain can lead to name conflicts if the files already
exist on another replicating partner.
In some cases, the File Replication Service might copy a file from
c:\winnt\sysvol\domain\NtFrs_PreExisting___See_EventLog into
c:\winnt\sysvol\domain instead of replicating the file from another
replicating partner.
To recover space at any time:
1. Delete the files in the following location:

Disaster-Recovery Guide App B: Restore a Domain Controller
Page 134 Version: 7.93 © 2018 j2 Global®, Inc. and affiliates (collectively, “j2”). All rights reserved.
2. Stop the NTFRS service with the following command: Net stop ntfrs
3. Open Windows Explorer, and go to the \Windows\sysvol\domain directory.
4. If a directory with a name similar to NtFrs PreExisting ___See_Eventlog exists, move the directories under this directory into the domain directory.
5. Delete the empty directory NtFrs PreExisting ___See_Eventlog.
6. At a command prompt, type REGEDIT to open the REGEDIT utility.
7. Navigate to the following location:
HKLM\System\CurrentControlSet\Services\NtFrs\Parameters\Backup/Restore\Proce
ss at Startup
8. Set the key to the following value: BURFLAGS = 0xD4
9. Restart the NtFrs service by typing Net start ntfrs.
10. Examine the file-replication event log for an event that indicates this computer can now run as a domain controller.
11. Search for the following event ID:
Event ID: 13516
Source: NtFrs
Description: The File Replication Service no longer prevents the computer LV-AD1 from becoming a domain controller. The system volume has been initialized, and the Netlogon service has been notified that the system volume now can be shared as SYSVOL.
12. To check for the SYSVOL share, type NET SHARE.
13. If event ID 13516 exists, restart in DSRM mode. Otherwise, repeat steps 1-12.
PERFORM AN AUTHORITATIVE RESTORE
To perform an authoritative restore on Windows 2003:
1. Start the computer in DSRM mode.
2. At a command prompt, type ntdsutil, then press Enter.
3. At the ntdsutil prompt, type authoritative restore, and press Enter:
4. At the authoritative-restore prompt, enter one of the following commands; and press Enter:
o To restore the entire directory, type Restore database.
o To restore a portion or subtree of the directory (for example, a specific organizational unit), type
Restore subtree <subtree distinguished name>.
5. To exit the ntdsutil, type quit and press Enter.
6. Type quit and press Enter. (For additional help and options for ntdsutil, see your Windows and Active Directory documentation.)
7. Restart into normal mode.
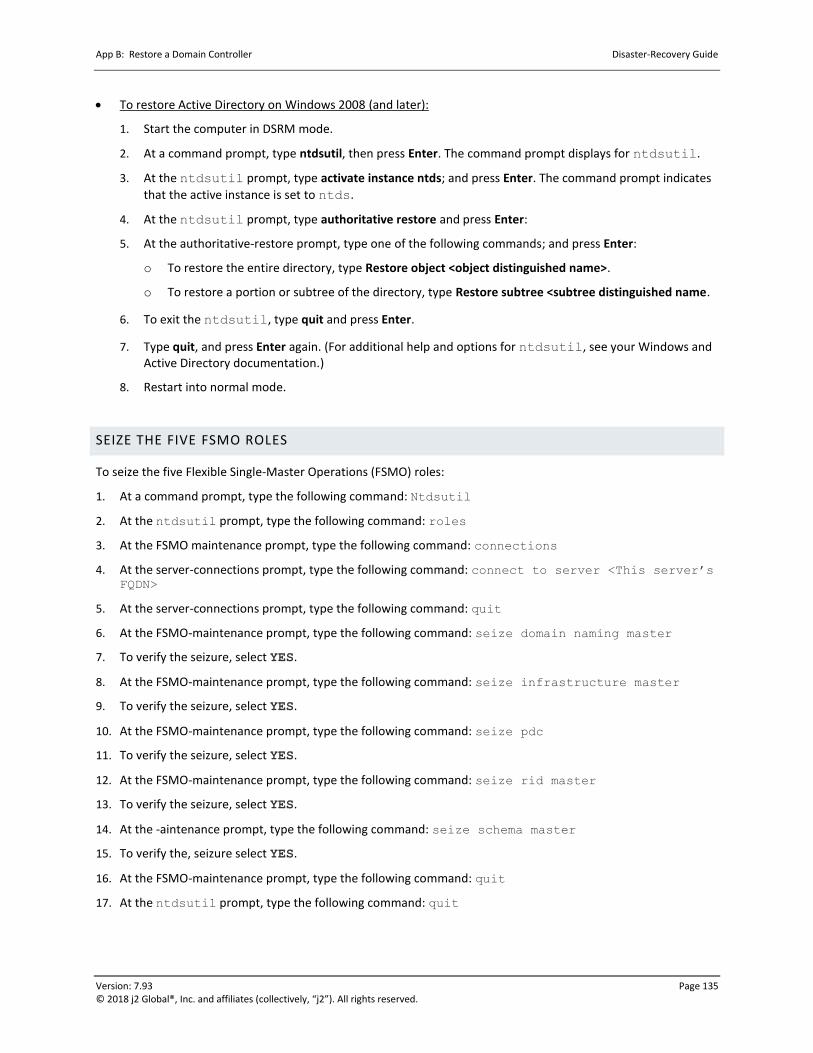
App B: Restore a Domain Controller Disaster-Recovery Guide
Version: 7.93 Page 135 © 2018 j2 Global®, Inc. and affiliates (collectively, “j2”). All rights reserved.
To restore Active Directory on Windows 2008 (and later):
1. Start the computer in DSRM mode.
2. At a command prompt, type ntdsutil, then press Enter. The command prompt displays for ntdsutil.
3. At the ntdsutil prompt, type activate instance ntds; and press Enter. The command prompt indicates
that the active instance is set to ntds.
4. At the ntdsutil prompt, type authoritative restore and press Enter:
5. At the authoritative-restore prompt, type one of the following commands; and press Enter:
o To restore the entire directory, type Restore object <object distinguished name>.
o To restore a portion or subtree of the directory, type Restore subtree <subtree distinguished name.
6. To exit the ntdsutil, type quit and press Enter.
7. Type quit, and press Enter again. (For additional help and options for ntdsutil, see your Windows and Active Directory documentation.)
8. Restart into normal mode.
SEIZE THE FIVE FSMO ROLES
To seize the five Flexible Single-Master Operations (FSMO) roles:
1. At a command prompt, type the following command: Ntdsutil
2. At the ntdsutil prompt, type the following command: roles
3. At the FSMO maintenance prompt, type the following command: connections
4. At the server-connections prompt, type the following command: connect to server <This server’s FQDN>
5. At the server-connections prompt, type the following command: quit
6. At the FSMO-maintenance prompt, type the following command: seize domain naming master
7. To verify the seizure, select YES.
8. At the FSMO-maintenance prompt, type the following command: seize infrastructure master
9. To verify the seizure, select YES.
10. At the FSMO-maintenance prompt, type the following command: seize pdc
11. To verify the seizure, select YES.
12. At the FSMO-maintenance prompt, type the following command: seize rid master
13. To verify the seizure, select YES.
14. At the -aintenance prompt, type the following command: seize schema master
15. To verify the, seizure select YES.
16. At the FSMO-maintenance prompt, type the following command: quit
17. At the ntdsutil prompt, type the following command: quit

Disaster-Recovery Guide App B: Restore a Domain Controller
Page 136 Version: 7.93 © 2018 j2 Global®, Inc. and affiliates (collectively, “j2”). All rights reserved.
DELETE (DEMOTE) THE OTHER COMAIN CONTROLLER (ITSTORAGE)
To delete the other domain controller:
1. Select Start > Administrative tools >Active Directory Sites and Services. The Active Directory Sites and Services control panel opens.
2. Under the ITSTORAGE object, right-click NTDS and then click Delete. Windows displays three options.
3. One of the options indicates ITSTORAGE is offline and will not come back. Select this option.
4. Restart the computer.
DISASTER-RECOVERY PROBLEMS OBSERVED BUT NOT FULLY DIAGNOSED
If the computer crashes, check the following indicators:
If any network-interface cards (NICs) are configured with a static IP address on a domain controller―and DHCP is disabled: The computer might hang when you start it normally―or when you start it in DSRM mode with networking, at the Windows splash screen.
You will receive the following message-window showing Preparing network connections. The computer successfully starts in DSRM mode (plyad1). To work around this problem, pull the network cable off the computer; then edit the registry to enable Dynamic Host Configuration Protocol (DHCP) on all network-interface cards (NICs).

Disaster-Recovery Guide App C: Authoritative System-State Restore
Version: 7.93 Page 137 © 2018 j2 Global®, Inc. and affiliates (collectively, “j2”). All rights reserved.
APPENDIX C: AUTHORITATIVE SYSTEM-STATE RESTORE
If you restore a computer's Windows system-state incorrectly, the computer might become unusable. As a result, you have to reinstall the operating system. Restore the system state only after you recover the entire computer as part of a disaster recovery.
You typically do not need to perform an authoritative system-state restore. However, there are scenarios where it is necessary―for example, if a user or application deletes or modifies your replicated Active Directory objects, or if your backup domain-database is corrupt. The authoritative restore lets you repair the system-state data (such as Active Directory service) to your primary domain controller, which can replicate it to your other domain controllers.
You were directed to this appendix from one of the disaster-recovery procedures in this guide. After you perform the authoritative-restore steps in this procedure, return to that disaster-recovery procedure; and complete the recovery process.
If your backup domain-database is corrupt, you might need to perform these steps several times, restoring historical versions until you find a version that precedes the corruption.
NOTE: The Active Directory and Certificate Services must not be running on the domain controller during the
restore process.
To restore a Windows Domain controller over the Internet, you must complete the following tasks.
1. Restart the computer in DSRM mode (below).
2. Copy the boot.ini file (Windows 2003). (pg. 138)
3. Restore the system state (pg. 138).
4. Use the ntdsutil utility to restore Active Directory (pg. 139).
5. Compare the restored and original boot.ini files (Windows 2003). (pg. 140).
6. Verify that Active Directory was restored successfully (pg. 141).
Restart the Computer in DSRM Mode
To restart the computer in DSRM mode:
1. Restart the computer.
2. During the normal start-up process, the following message displays: For troubleshooting and advanced startup options for Windows
2003, press F8.
3. When you see this message, press F8 immediately! (You will only see this message for a few seconds. Press F8 while you can see it.)
Continued on next page

App C: Authoritative System-State Restore Disaster-Recovery Guide
Page 138 Version: 7.93 © 2018 j2 Global®, Inc. and affiliates (collectively, “j2”). All rights reserved.
Restart the Computer in DSRM Mode (Cont.)
4. From the Windows Advanced Options menu: Select Directory Services Restore Mode, and press Enter. (For more information about Directory Services Restore Mode, see your Windows documentation.)
NOTE: Stay in DSRM until you are instructed to restart into normal mode.
5. After the computer restarts in DSRM mode: Log into the computer, with local administrator rights.
Copy the Boot.ini
File (Windows 2003)
NOTE: If you are restoring the system state to a Windows 2008 (or later) computer
other than the original agent, skip this step.
If you are restoring the system state to a Windows 2003 computer other than the original agent, copy the boot.ini file in the recovering computer's root directory. To ensure you
do not confuse the copy with the restored boot.ini file―and to differentiate this copy
from any others, name the copy something similar to BootFromCD_101503.ini, where 101503 represents the current date.
NOTE: This copy of the boot.ini file will be referenced later during the disaster
recovery, so remember the name of the file and where you stored it.
Restore the System State
To restore the system state for the computer:
1. Log into the LiveVault Web-Management Portal.
2. In the navigation pane, select the computer whose system state that you want to restore.
3. Select the Restore tab.
4. Click New Restore. The Restore wizard page opens.
a. Select one of the following options:
Restore data over the Internet.
Have a media restore device shipped to you.
Continued on next page
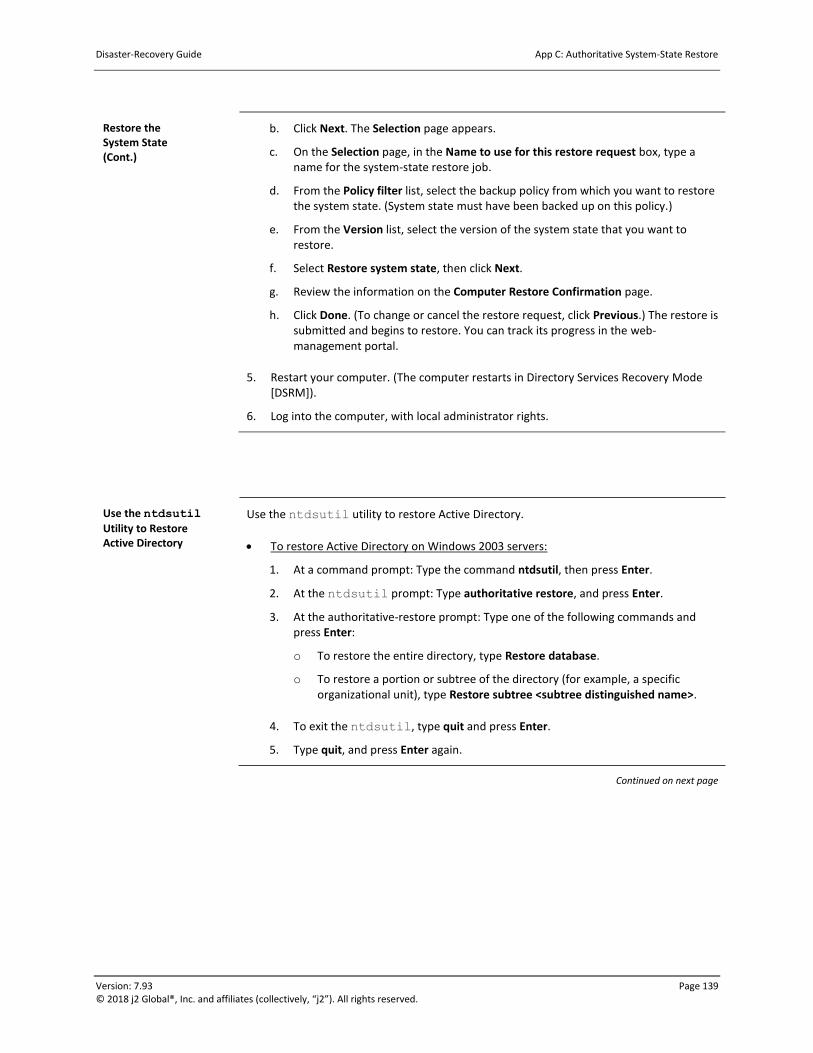
Disaster-Recovery Guide App C: Authoritative System-State Restore
Version: 7.93 Page 139 © 2018 j2 Global®, Inc. and affiliates (collectively, “j2”). All rights reserved.
Restore the System State (Cont.)
b. Click Next. The Selection page appears.
c. On the Selection page, in the Name to use for this restore request box, type a name for the system-state restore job.
d. From the Policy filter list, select the backup policy from which you want to restore the system state. (System state must have been backed up on this policy.)
e. From the Version list, select the version of the system state that you want to restore.
f. Select Restore system state, then click Next.
g. Review the information on the Computer Restore Confirmation page.
h. Click Done. (To change or cancel the restore request, click Previous.) The restore is submitted and begins to restore. You can track its progress in the web-management portal.
5. Restart your computer. (The computer restarts in Directory Services Recovery Mode [DSRM]).
6. Log into the computer, with local administrator rights.
Use the ntdsutil
Utility to Restore Active Directory
Use the ntdsutil utility to restore Active Directory.
To restore Active Directory on Windows 2003 servers:
1. At a command prompt: Type the command ntdsutil, then press Enter.
2. At the ntdsutil prompt: Type authoritative restore, and press Enter.
3. At the authoritative-restore prompt: Type one of the following commands and press Enter:
o To restore the entire directory, type Restore database.
o To restore a portion or subtree of the directory (for example, a specific organizational unit), type Restore subtree <subtree distinguished name>.
4. To exit the ntdsutil, type quit and press Enter.
5. Type quit, and press Enter again.
Continued on next page

App C: Authoritative System-State Restore Disaster-Recovery Guide
Page 140 Version: 7.93 © 2018 j2 Global®, Inc. and affiliates (collectively, “j2”). All rights reserved.
Use the ntdsutil
Utility to Restore Active Directory (Cont.)
To restore Active Directory on Windows 2008 (and later):
1. At a command prompt: Type the command ntdsutil, then press Enter. The command prompt displays for ntdsutil.
2. At the ntdsutil prompt: Type activate instance ntds, and press Enter. The
command prompt indicates that the active instance is set to ntds.
3. At the ntdsutil prompt: Type authoritative restore, and press Enter:
4. At the authoritative-restore prompt: Type one of the following commands, and press Enter:
o To restore the entire directory, type Restore object <object distinguished name>.
o To restore a portion or subtree of the directory, type Restore subtree <subtree distinguished name>.
5. To exit the ntdsutil, type quit and press Enter.
6. Type quit and press Enter.
(For additional help and options for ntdsutil, see your Windows and Active Directory documentation.)
Compare the Restored and Original Boot.ini
Files (Windows 2003)
NOTES: If you are restoring the system state to a Windows 2008 and later
computer other than the original computer, skip this step.
If you restore the system state to a Windows 2003 computer other than the original
computer, compare the restored boot.ini file to the copy of the boot.ini file.
To compare the restored boot.ini to the original boot.ini:
1. Go to the computer's root directory, and open both the restored boot.ini file (for
example, boot.ini)―and the copy of the boot.ini file (for example,
BootFromCD_101503.ini) that you made earlier in this procedure.
2. Compare the boot-drive value from each boot.ini file. (This is the number of the partition that the computer starts from; for example partition(1)).
o If the boot-drive values in these files match, continue to Verify that Active Directory was Restored Successfully on pg. 141.
o If the boot-drive values in these files do not match, continue to step 3.
Continued on next page

Disaster-Recovery Guide App C: Authoritative System-State Restore
Version: 7.93 Page 141 © 2018 j2 Global®, Inc. and affiliates (collectively, “j2”). All rights reserved.
Compare the Restored and Original Boot.ini
Files (Windows 2003) (Cont.)
3. Clear the read-only attribute on the boot.ini file.
4. Change the value in the restored boot.ini to match the value specified in the copy
of the boot.ini file (for example, BootFromCD_101503.ini).
5. Your boot.ini configuration might require you to update the boot drive value for
multiple lines in the restored boot.ini file.
WARNING! Failure to stop and disable the LiveVault backup service on the
original computer while performing the disaster recovery to a newly built recovering
computer will result in a duplicate system connecting to the LiveVault service. There are
significant risks of data corruption associated with duplicate systems attempting to
back up to the LiveVault service.
6. Restart the computer in normal mode.
Verify That Active Directory was Restored Successfully
To verify that you restored Active Directory successfully, browse Active Directory; and check that the expected objects such as user objects are available. (For more information about Active Directory, refer your Windows documentation.)
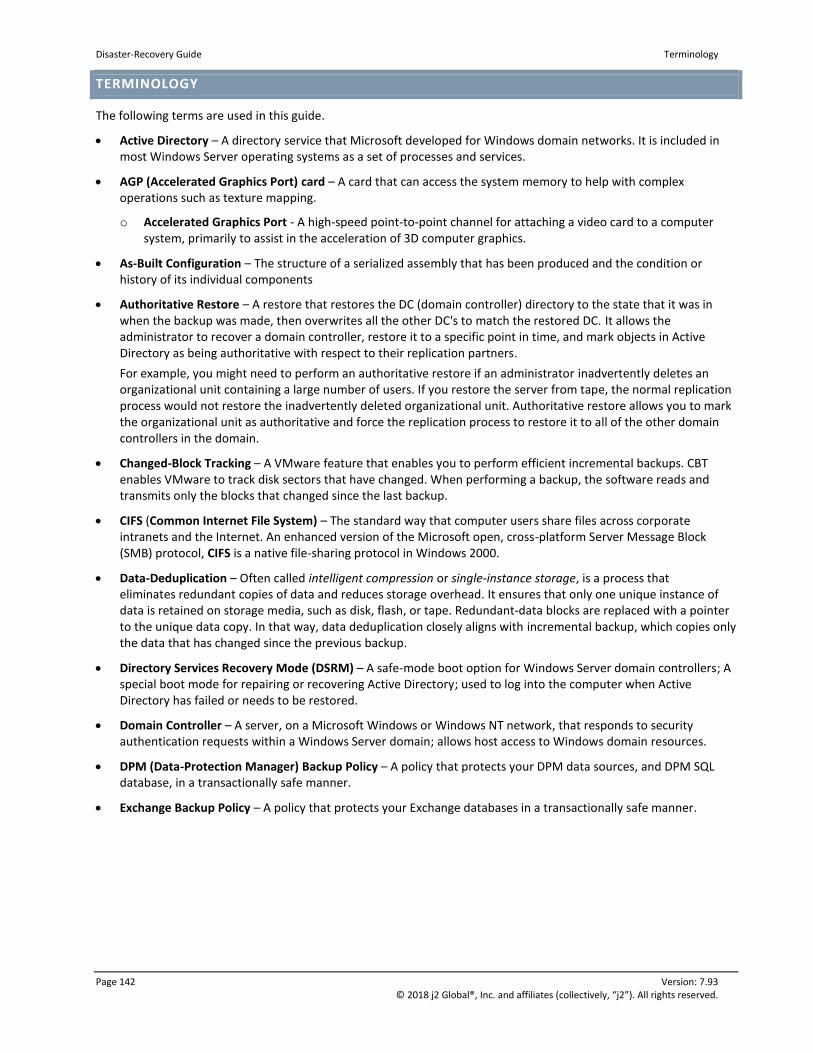
Disaster-Recovery Guide Terminology
Page 142 Version: 7.93 © 2018 j2 Global®, Inc. and affiliates (collectively, “j2”). All rights reserved.
TERMINOLOGY
The following terms are used in this guide.
Active Directory – A directory service that Microsoft developed for Windows domain networks. It is included in most Windows Server operating systems as a set of processes and services.
AGP (Accelerated Graphics Port) card – A card that can access the system memory to help with complex operations such as texture mapping.
o Accelerated Graphics Port - A high-speed point-to-point channel for attaching a video card to a computer system, primarily to assist in the acceleration of 3D computer graphics.
As-Built Configuration – The structure of a serialized assembly that has been produced and the condition or history of its individual components
Authoritative Restore – A restore that restores the DC (domain controller) directory to the state that it was in when the backup was made, then overwrites all the other DC's to match the restored DC. It allows the administrator to recover a domain controller, restore it to a specific point in time, and mark objects in Active Directory as being authoritative with respect to their replication partners.
For example, you might need to perform an authoritative restore if an administrator inadvertently deletes an organizational unit containing a large number of users. If you restore the server from tape, the normal replication process would not restore the inadvertently deleted organizational unit. Authoritative restore allows you to mark the organizational unit as authoritative and force the replication process to restore it to all of the other domain controllers in the domain.
Changed-Block Tracking – A VMware feature that enables you to perform efficient incremental backups. CBT enables VMware to track disk sectors that have changed. When performing a backup, the software reads and transmits only the blocks that changed since the last backup.
CIFS (Common Internet File System) – The standard way that computer users share files across corporate intranets and the Internet. An enhanced version of the Microsoft open, cross-platform Server Message Block (SMB) protocol, CIFS is a native file-sharing protocol in Windows 2000.
Data-Deduplication – Often called intelligent compression or single-instance storage, is a process that eliminates redundant copies of data and reduces storage overhead. It ensures that only one unique instance of data is retained on storage media, such as disk, flash, or tape. Redundant-data blocks are replaced with a pointer to the unique data copy. In that way, data deduplication closely aligns with incremental backup, which copies only the data that has changed since the previous backup.
Directory Services Recovery Mode (DSRM) – A safe-mode boot option for Windows Server domain controllers; A special boot mode for repairing or recovering Active Directory; used to log into the computer when Active Directory has failed or needs to be restored.
Domain Controller – A server, on a Microsoft Windows or Windows NT network, that responds to security authentication requests within a Windows Server domain; allows host access to Windows domain resources.
DPM (Data-Protection Manager) Backup Policy – A policy that protects your DPM data sources, and DPM SQL database, in a transactionally safe manner.
Exchange Backup Policy – A policy that protects your Exchange databases in a transactionally safe manner.

Terminology Disaster-Recovery Guide
Version: 7.93 Page 143 © 2018 j2 Global®, Inc. and affiliates (collectively, “j2”). All rights reserved.
Global-catalog server – A domain controller that stores a full copy of all objects in the directory, for its host domain―and a partial, read-only copy of all objects, for all other domains in the forest.
o Global catalog – The set of all objects in an Active-Directory Domain Services (AD DS) forest.
o AD DS - Stores directory data and manages communication between users and domains, including user-logon processes, authentication, and directory searches
Hardware-abstraction level (HAL) – A layer of programming that lets a computer operating system interact with a hardware device at a general (i.e., abstract) level rather than at a detailed hardware level. Windows 2000 is one of several operating systems that include a hardware abstraction layer.
Internet Information Services (IIS) – An extensible web server created by Microsoft for use with Windows NT family; supports HTTP, HTTPS, FTP, FTPS, SMTP and NNTP. It has been an integral part of the Windows NT family since Windows NT 4.0, though it may be absent from some editions (e.g. Windows XP Home edition), and is not active by default.
LAN (Local-Area Network) – A group of computers and associated devices that share a common communications line or wireless link to a server; a computer network that interconnects computers within a limited area―such as a residence, school, laboratory, university campus or office building―and has its network equipment and interconnects locally managed
Media Restore Device – A device that lets you restore your data at LAN speed. It’s used when you do not have a TurboRestore appliance or sufficient bandwidth to retrieve all the data from the offsite vaults over the Internet.
Netbios – Network Basic Input/Output System; a program that allows applications on different computers to communicate within a local area network (LAN). It was created by IBM for its early PC Network, was adopted by Microsoft, and has since become a de facto industry standard.
NIC (Network-interface controller) – a computer hardware component that connects a computer to a computer network.
NTFS (New Technology File System) – The file system that the Windows NT operating system uses for storing and retrieving files on a hard disk.
Original Computer – The computer that experienced a failure or has been lost due to a disaster
RAID Device – A “block" device, like an ordinary disks or disk partition. A RAID device is "built" from a number of other block devices; for example, a RAID-1 could be built from two ordinary disks or from two disk partitions
RAID – Originally, “redundant array of inexpensive disks”, now commonly referred to as “redundant array of independent disks”; is a data-storage virtualization technology that combines multiple physical-disk drive components into a single logical unit for the purposes of data redundancy, performance improvement, or both.
Recovering Computer/Recovered Computer – The computer you are building as part of the disaster-recovery procedures
NOTES:
When you complete the disaster-recovery procedure, the recovering computer will be your computer
running the LiveVault agent software.
Depending on the failure circumstances, the original computer and recovering computer can be the
same or different physical computers. The failure circumstances affect the disaster-recovery procedure,
so consider carefully whether you will build a new recovering computer or will restore to the original
computer hardware.
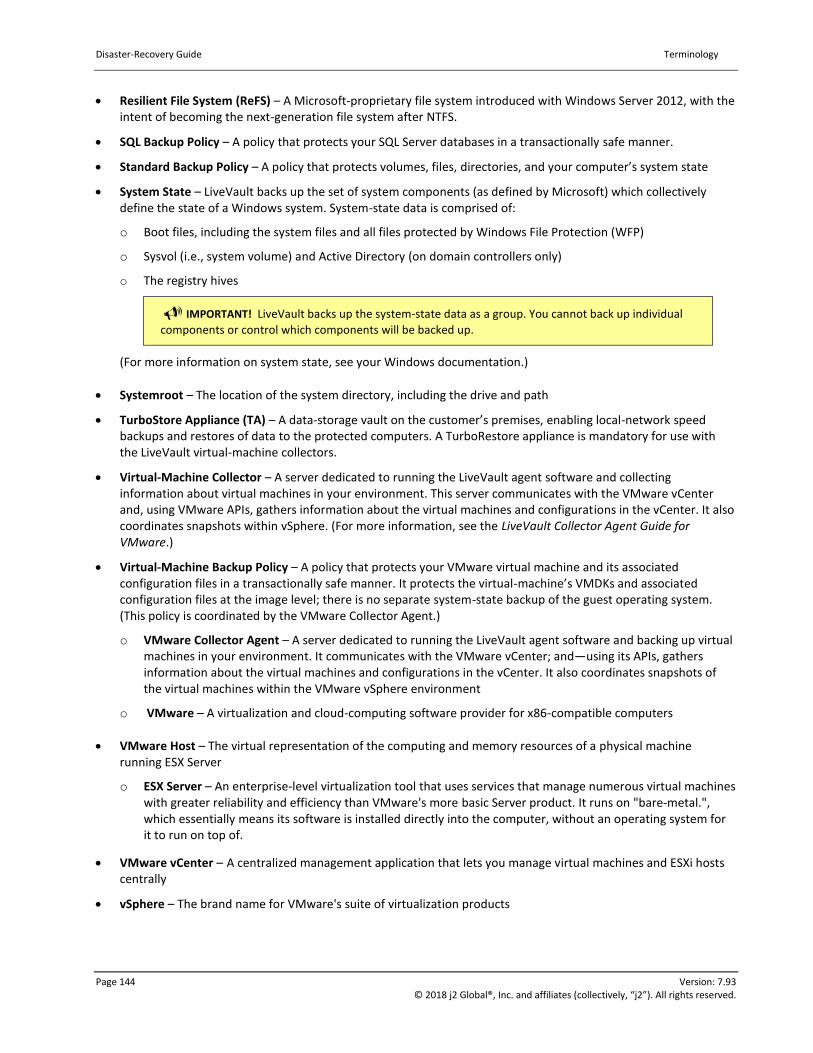
Disaster-Recovery Guide Terminology
Page 144 Version: 7.93 © 2018 j2 Global®, Inc. and affiliates (collectively, “j2”). All rights reserved.
Resilient File System (ReFS) – A Microsoft-proprietary file system introduced with Windows Server 2012, with the intent of becoming the next-generation file system after NTFS.
SQL Backup Policy – A policy that protects your SQL Server databases in a transactionally safe manner.
Standard Backup Policy – A policy that protects volumes, files, directories, and your computer’s system state
System State – LiveVault backs up the set of system components (as defined by Microsoft) which collectively define the state of a Windows system. System-state data is comprised of:
o Boot files, including the system files and all files protected by Windows File Protection (WFP)
o Sysvol (i.e., system volume) and Active Directory (on domain controllers only)
o The registry hives
IMPORTANT! LiveVault backs up the system-state data as a group. You cannot back up individual
components or control which components will be backed up.
(For more information on system state, see your Windows documentation.)
Systemroot – The location of the system directory, including the drive and path
TurboStore Appliance (TA) – A data-storage vault on the customer’s premises, enabling local-network speed backups and restores of data to the protected computers. A TurboRestore appliance is mandatory for use with the LiveVault virtual-machine collectors.
Virtual-Machine Collector – A server dedicated to running the LiveVault agent software and collecting information about virtual machines in your environment. This server communicates with the VMware vCenter and, using VMware APIs, gathers information about the virtual machines and configurations in the vCenter. It also coordinates snapshots within vSphere. (For more information, see the LiveVault Collector Agent Guide for VMware.)
Virtual-Machine Backup Policy – A policy that protects your VMware virtual machine and its associated configuration files in a transactionally safe manner. It protects the virtual-machine’s VMDKs and associated configuration files at the image level; there is no separate system-state backup of the guest operating system. (This policy is coordinated by the VMware Collector Agent.)
o VMware Collector Agent – A server dedicated to running the LiveVault agent software and backing up virtual machines in your environment. It communicates with the VMware vCenter; and―using its APIs, gathers information about the virtual machines and configurations in the vCenter. It also coordinates snapshots of the virtual machines within the VMware vSphere environment
o VMware – A virtualization and cloud-computing software provider for x86-compatible computers
VMware Host – The virtual representation of the computing and memory resources of a physical machine running ESX Server
o ESX Server – An enterprise-level virtualization tool that uses services that manage numerous virtual machines with greater reliability and efficiency than VMware's more basic Server product. It runs on "bare-metal.", which essentially means its software is installed directly into the computer, without an operating system for it to run on top of.
VMware vCenter – A centralized management application that lets you manage virtual machines and ESXi hosts centrally
vSphere – The brand name for VMware's suite of virtualization products
Related Documents


![Disaster Recovery Center (Disaster Assistance … Library/Disaster Recovery Center...Disaster Recovery Center (Disaster Assistance Center) Standard Operating Guide [Appendix to: ]](https://static.cupdf.com/doc/110x72/5b0334ba7f8b9a2d518bd9d9/disaster-recovery-center-disaster-assistance-librarydisaster-recovery-centerdisaster.jpg)