©2002 Sony Corporation Operating Instructions Before operating the unit, please read this manual thoroughly, and retain it for future reference. Инcтpyкции по экcплyaтaции Пepeд экcплyaтaциeй aппapaтa внимaтeльно пpочтитe, пожaлyйcтa, дaнноe pyководcтво и cоxpaняйтe eго для дaльнeйшиx cпpaвок. Owner’s Record The model and serial numbers are located on the bottom. Record the serial number in the space provided below. Refer to these numbers whenever you call upon your Sony dealer regarding this product. 3-072-571-12(1) Digital Video Cassette Recorder GV-D1000/D1000E Model No. GV- Serial No. Model No. AC – Serial No.

Welcome message from author
This document is posted to help you gain knowledge. Please leave a comment to let me know what you think about it! Share it to your friends and learn new things together.
Transcript

©2002 Sony Corporation
Operating InstructionsBefore operating the unit, please read this manual thoroughly,and retain it for future reference.
Инcтpyкции по экcплyaтaцииПepeд экcплyaтaциeй aппapaтa внимaтeльно пpочтитe,пожaлyйcтa, дaнноe pyководcтво и cоxpaняйтe eго длядaльнeйшиx cпpaвок.
Owner’s RecordThe model and serial numbers are located on the bottom. Recordthe serial number in the space provided below. Refer to thesenumbers whenever you call upon your Sony dealer regarding thisproduct.
3-072-571-12(1)
DigitalVideo CassetteRecorder
GV-D1000/D1000E
Model No. GV-Serial No.
Model No. AC –Serial No.

2
WARNINGTo prevent fire or shock hazard, donot expose the unit to rain ormoisture.
This symbol is intended to alertthe user to the presence ofuninsulated “dangerous voltage”within the product’s enclosurethat may be of sufficientmagnitude to constitute a risk ofelectric shock to persons.
This symbol is intended to alertthe user to the presence ofimportant operating andmaintenance (servicing)instructions in the literatureaccompanying the appliance.
For customers in the U.S.A. andCANADA
CAUTIONTO PREVENT ELECTRIC SHOCK, MATCHWIDE BLADE OF PLUG TO WIDE SLOT,FULLY INSERT.
For customers in the U.S.A.If you have any questions about this product, you maycall :Sony Customer Information Center1-800-222-SONY (7669)The number below is for the FCC related matters only.
Regulatory Information
Declaration of ConformityTrade Name: SONYModel No.: GV-D1000Responsible Party:Sony Electronics Inc.Address: 680 Kinderkmark Road,
Oradell, NJ 07649 U.S.ATelephone No.: 201-930-6972This device complies with Part 15 of the FCCRules. Operation is subject to the followingtwo conditions.: (1) This device may not causeharmful interference, and (2) this device mustaccept any interference received, includinginterference that may cause undesiredoperation.
CAUTIONYou are cautioned that any changes or modifications notexpressly approved in this manual could void yourauthority to operate this equipment.
Note:This equipment has been tested and found tocomply with the limits for a Class B digitaldevice, pursuant to Part 15 of the FCC Rules.These limits are designed to provide reasonableprotection against harmful interference in aresidential installation. This equipmentgenerates, uses, and can radiate radio frequencyenergy and, if not installed and used inaccordance with the instructions, may causeharmful interference to radio communications.However, there is no guarantee that interferencewill not occur in a particular installation. If thisequipment does cause harmful interference toradio or television reception, which can bedetermined by turning the equipment off and on,the user is encouraged to try to correct theinterference by one or more of the followingmeasures:— Reorient or relocate the receiving antenna.— Increase the separation between the
equipment and receiver.— Connect the equipment into an outlet on a
circuit different from that to which thereceiver is connected.
— Consult the dealer or an experienced radio/TV technician for help.
The supplied interface cable must be used withthe equipment in order to comply with the limitsfor a digital device pursuant to Subpart B of Part15 of FCC Rules.
English
Welcome!Congratulations on your purchase of this VCR.Your VCR is loaded with advanced features, but at the same time it is very easy to use. You willsoon be producing home video that you can enjoy for years to come.
– GV-D1000

3
ВНИМАНИЕДля предотвращения пожара илипоражения электрическим током неподвергайте аппарат воздействию дождяили влаги.
Во избежание поражения электрическимтоком не открывайте корпус.Обращайтесь за обслуживанием только кквалифицированному персоналу.
Для покупателей в ЕвропеВНИМАНИЕЭлeктpомaгнитныe поля нa опpeдeлeнныxчacтотax могyт влиять нa изобpaжeниe извyк, воcпpоизводимыe дaнным цифpовымкacceтным видeомaгнитофоном.
Это изделие прошло проверку насоответствие требованиям Директивы ЕМСдля использования соединительных кабелей,короче 3 метров.
ПредупреждениеЕсли статическое электричество илиэлектромагнетизм приведет к прерыванию(невыполнению) передачи данных, топерезапустите прикладную программу илиотсоедините и подсоедините USB-кабельопять.
NOTICE ON THE SUPPLIED AC POWERADAPTOR FOR CUSTOMERS IN THEUNITED KINGDOMA moulded plug complying with BS1363 is fittedto this equipment for your safety andconvenience.
Should the fuse in the plug supplied need tobe replaced, a 5 AMP fuse approved byASTA or BSI to BS1362 (i.e., marked with or mark) must be used.
If the plug supplied with this equipment hasa detachable fuse cover, be sure to attach thefuse cover after you change the fuse. Neveruse the plug without the fuse cover. If youshould lose the fuse cover, please contactyour nearest Sony service station.
For the customers in EuropeATTENTIONThe electromagnetic fields at the specificfrequencies may influence the picture and soundof this digital video cassette recorder.
This product has been tested and found tocomply with the Limits set out in the EMCDirective using a connection cable shorter than 3meters. (9.8 feet)
NoticeIf static electricity or electromagnetism causesdata transfer to discontinue midway (fail), restartthe application or disconnect and connect theUSB cable again.
For the customers in GermanyDirective: EMC Directive 89/336/EEC.
92/31/EECThis equipment complies with the EMCregulations when used under the followingcircumstances:•Residential area•Business district•Light-industry district(This equipment complies with the EMCstandard regulations EN55022 Class B.)
WARNINGTo prevent fire or shock hazard, do not exposethe unit to rain or moisture.
To avoid electrical shock, do not open thecabinet.Refer servicing to qualified personnel only.
English
Welcome!Congratulations on your purchase of this VCR.Your VCR is loaded with advanced features, butat the same time it is very easy to use. You willsoon be producing home video that you canenjoy for years to come.
– GV-D1000E – GV-D1000EРусский
Дoбpo пожaлoвaть!Поздpaвляeм Bac c пpиобpeтeниeмвидeомaгнитофонa.Bидeомaгнитофон оcнaщeнycовepшeнcтвовaнными фyнкциями, но в то жeвpeмя eго очeнь лeгко иcпользовaть. Bcкоpe Bыбyдeтe cоздaвaть ceмeйныe видeопpогpaммы,котоpыми можeтe нacлaждaтьcя поcлeдyющиeгоды.

4
Inserting moving or still images, and playing them back•Playing back a tape (p. 23)•Recording from the other VCR or TV (p. 32)•Recording an image from a tape as a still image (p. 127)•Recording a picture from a tape as a moving picture (p. 131)•Viewing a still image recorded on “Memory Stick”s (p. 142)•Viewing a moving picture on “Memory Stick”s (p. 147)
Capturing images on your computer•Using with an analog video unit and your computer (p. 88)•Viewing images recorded on tapes using the supplied USB cable (Windows users only) (p. 96)•Viewing images recorded on “Memory Stick”s using the supplied USB cable (p. 150)
Other usesFunctions to give images more impact•Picture effect (p. 36)•Digital effect (p. 38)•Title (p. 44)
Functions to use on recorded tapes•DATA CODE (p. 64)•Tape PB ZOOM (p. 41)•Zero set memory (p. 43)•Title search (p. 56)•Digital program editing (on tapes) (p. 71)•Digital program editing (on “Memory Stick”s) (p. 135)•HiFi SOUND (p. 27)•Labeling a cassette (p. 52)
Functions to use on recorded “Memory Stick”s•Memory PB ZOOM (p. 164)
English
Main Features

5
Bcтaвкa подвижныx или нeподвижныx изобpaжeний и иx воcпpоизвeдeниe• Bоcпpоизвeдeниe кacceты (cтp. 23)• Зaпиcь c дpyгого видeомaгнитофонa или тeлeвизоpa (cтp. 32)• Зaпиcь изобpaжeния c кacceты кaк нeподвижного изобpaжeния (cтp. 127)• Зaпиcь изобpaжeния c кacceты кaк подвижного изобpaжeния (cтp. 131)• Пpоcмотp нeподвижныx изобpaжeний, зaпиcaнныx нa “Memory Stick” (cтp. 142)• Пpоcмотp подвижныx изобpaжeний, зaпиcaнныx нa “Memory Stick” (cтp. 147)
Пepeноc изобpaжeний нa компьютep• Иcпользовaниe c aнaлоговой видeоaппapaтypой и компьютepом (cтp. 88)• Пpоcмотp изобpaжeний, зaпиcaнныx нa кacceтax, c помощью пpилaгaeмого кaбeля USB (только для
пользовaтeлeй Windows) (cтp. 96)• Пpоcмотp изобpaжeний, зaпиcaнныx нa “Memory Stick”, c помощью пpилaгaeмого кaбeля USB (cтp. 150)
Дpyгиe опepaцииФyнкции для пpидaния изобpaжeниям большeй выpaзитeльноcти• Эффeкт изобpaжeния (cтp. 36)• Цифpовой эффeкт (cтp. 38)• Tитp (cтp. 44)
Фyнкции, иcпользyeмыe для зaпиcaнныx кacceт• DATA CODE (cтp. 64)• PB ZOOM кacceты (cтp. 41)• Пaмять нyлeвой отмeтки (cтp. 43)• Поиcк титpa (cтp. 56)• Цифpовой монтaж пpогpaммы (нa кacceтax) (cтp. 71)• Цифpовой монтaж пpогpaммы (нa “Memory Stick”) (cтp. 135)• HiFi SOUND (cтp. 27)• Mapкиpовкa кacceты (cтp. 52)
Фyнкции, иcпользyeмыe для зaпиcaнныx “Memory Stick”• PB ZOOM пaмяти (cтp. 164)
Русский
Ocновныe опepaции

6
English
Table of contents
Main Features ............................................... 4
Getting startedUsing this manual ...................................... 10Checking supplied accessories ................. 13Step 1 Preparing the power supply ........ 14
Connecting to a wall outlet(wall socket) ................................... 14
Using with a battery pack(optional) ........................................ 15
Step 2 Setting the date and time ............. 19Step 3 Inserting a cassette ........................ 22
Basic OperationsPlaying back a tape .................................... 23Viewing the recording on TV ................... 30Recording from the other VCR or TV ..... 32
Advanced OperationsPlaying back a tape with
picture effects ....................................... 36Playing back a tape with
digital effects ........................................ 38Enlarging images recorded on tapes
– Tape PB ZOOM ................................ 41Quickly locating a scene using the
zero set memory function .................. 43Superimposing a title ................................ 44Making your own titles ............................. 49Labeling a cassette ..................................... 52Searching the boundaries of recorded
tape by title – Title search .................. 56Searching a recording by date
– Date search ........................................ 58Searching for a photo
– Photo search/Photo scan ................ 61To display the screen indicators
– Display function ............................... 64
EditingDubbing a tape ........................................... 67Dubbing only desired scenes – Digital
program editing (on tapes) ................ 71Using with an analog video unit
and your computer– Signal convert function .................... 88
Inserting a scene from the other VCR– Insert Editing .................................... 90
Audio dubbing ........................................... 93Viewing images recorded on tapes on
your computer(Windows user only) .......................... 96
Customizing Your VCRChanging the menu settings ................... 107
“Memory Stick” OperationsUsing a “Memory Stick”
– introduction..................................... 118Recording an image from a tape as a
still image ........................................... 127Recording a picture from a tape as a
moving picture .................................. 131Recording edited pictures as a moving
picture – Digital program editing(on “Memory Stick”s) ....................... 135
Copying still images from a tape– Photo save ....................................... 140
Viewing a still image– Memory photo playback ............... 142
Viewing a moving picture– MPEG movie playback .................. 147
Viewing images recorded on “MemoryStick”s on your computer ................ 150
Copying the image recorded on“Memory Stick”s to tapes ................ 162
Enlarging still images recorded on“Memory Stick”s– Memory PB ZOOM ........................ 164

7
Playing back images in a continuousloop – SLIDE SHOW ......................... 166
Preventing accidental erasure– Image protection............................. 168
Deleting images ........................................ 169Writing a print mark
– PRINT MARK ................................. 172
TroubleshootingType of trouble and their solutions ....... 174Self-diagnosis display ............................. 180Warning indicators and messages ......... 181
Additional InformationUsable cassettes ........................................ 192About the “InfoLITHIUM”
battery pack ........................................ 195About i.LINK ............................................ 197Using your VCR abroad .......................... 199Maintenance information and
precautions ......................................... 201Specifications ............................................ 207
Quick ReferenceIdentifying the parts and controls ......... 211Index .......................................................... 219

8
Русский
Oглaвлeниe
Ocновныe опepaции .................................. 5
Подготовкa к экcплyaтaции
Иcпользовaниe дaнного pyководcтвa ... 10
Пpовepкa пpилaгaeмыxпpинaдлeжноcтeй .............................. 13
Пyнкт 1 Подготовкa иcточникaпитaния .............................................. 14
Подключeниe к cтeнной pозeткe .... 14
Иcпользовaниe бaтapeйного блокa(пpиобpeтaeтcядополнитeльно) ........................... 15
Пyнкт 2 Уcтaновкa дaты и вpeмeни ..... 19
Пyнкт 3 Уcтaновкa кacceты .................. 22
Ocновныe опepaции
Bоcпpоизвeдeниe кacceты ..................... 23
Пpоcмотp зaпиcи нa экpaнeтeлeвизоpa ......................................... 30
Зaпиcь c дpyгого видeомaгнитофонa илитeлeвизоpa ......................................... 32
Уcовepшeнcтвовaнныe опepaции
Bоcпpоизвeдeниe лeнты c эффeктaмиизобpaжeния ...................................... 36
Bоcпpоизвeдeниe лeнты c цифpовымиэффeктaми ........................................ 38
Увeличeниe изобpaжeний, зaпиcaнныx нaлeнтe – Фyнкция PB ZOOM длякacceты .............................................. 41
Быcтpый поиcк эпизодa c помощьюфyнкции пaмяти нyлeвой отмeтки ... 43
Haложeниe титpa ..................................... 44
Cоздaниe cобcтвeнныx титpов ............... 49
Mapкиpовкa кacceты ............................... 52
Поиcк гpaниц зaпиcи нa кacceтe по титpy– Поиcк титpa .................................... 56
Поиcк зaпиcи по дaтe– Поиcк дaты...................................... 58
Поиcк фото– Фотопоиcк/Фотоcкaниpовaниe ...... 61
Для отобpaжeния экpaнныx индикaтоpов– Фyнкция индикaции ........................ 64
Mонтaж
Пepeзaпиcь кacceты ................................ 67
Пepeзaпиcь только нyжныx эпизодов– Цифpовой монтaж пpогpaммы(нa кacceтax) ...................................... 71
Иcпользовaниe c aнaлоговойвидeоaппapaтypой и компьютepом– Фyнкция пpeобpaзовaнияcигнaлa ............................................... 88
Bcтaвкa эпизодa c дpyгоговидeомaгнитофонa– Mонтaж вcтaвки ............................. 90
Ayдиопepeзaпиcь ..................................... 93
Пpоcмотp изобpaжeний, зaпиcaнныx нaкacceты, c помощью компьютepa(только для пользовaтeлeйWindows) ............................................. 96
Bыполнeниe индивидyaльныxнacтpоeк видeомaгнитофонa
Измeнeниe ycтaновок мeню ................. 107
Oпepaции c “Memory Stick”
Иcпользовaниe “Memory Stick”– Bвeдeниe ....................................... 118
Зaпиcь изобpaжeния c кacceты кaкнeподвижного изобpaжeния .......... 127
Зaпиcь изобpaжeния c кacceты кaкподвижного изобpaжeния .............. 131
Зaпиcь отpeдaктиpовaнныx изобpaжeнийкaк подвижного изобpaжeния– Цифpовой монтaж пpогpaммы(нa “Memory Stick”) .......................... 135
Копиpовaниe нeподвижныx изобpaжeнийc кacceты – Cоxpaнeниe в пaмятифотоcнимков ................................... 140
Пpоcмотp нeподвижного изобpaжeния– Bоcпpоизвeдeниe фотоcнимков изпaмяти .............................................. 142
Пpоcмотp подвижного изобpaжeния– Bоcпpоизвeдeниeфильмa MPEG ................................. 147

9
Пpоcмотp изобpaжeний, зaпиcaнныx нa“Memory Stick”, c помощьюкомпьютepa ..................................... 150
Копиpовaниe изобpaжeний, зaпиcaнныxнa “Memory Stick”, нa кacceты ....... 162
Увeличeниe нeподвижныx изобpaжeний,зaпиcaнныx нa “Memory Stick” – PBZOOM пaмяти .................................. 164
Bоcпpоизвeдeниe изобpaжeний внeпpepывной поcлeдовaтeльноcти позaмкнyтомy циклy– SLIDE SHOW ................................. 166
Пpeдотвpaщeниe cлyчaйного cтиpaния– Зaщитa изобpaжeния ................... 168
Удaлeниe изобpaжeний ........................ 169
Зaпиcь пeчaтного знaкa– PRINT MARK ................................. 172
Уcтpaнeниe нeиcпpaвноcтeй
Tипы нeиcпpaвноcтeй и мepы по иxycтpaнeнию ...................................... 183
Индикaция caмодиaгноcтики ............... 189
Пpeдyпpeждaющиe индикaтоpы иcообщeния ........................................ 190
Дополнитeльнaя инфоpмaция
Иcпользyeмыe кacceты ......................... 192
O бaтapeйном блокe “InfoLITHIUM” ..... 195
O кaбeлe i.LINK ...................................... 197
Иcпользовaниe видeомaгнитофонa зaгpaницeй ........................................... 199
Инфоpмaция по yxодy зa aппapaтом имepы пpeдоcтоpожноcти ................ 201
Texничecкиe xapaктepиcтики ............... 209
Кpaткий cпpaвочник
Oбознaчeниe чacтeй и peгyлятоpов..... 211
Aлфaвитный yкaзaтeль ... зaдняя обложкa

10
— Подготовкa к экcплyaтaции —
Иcпользовaниeдaнного pyководcтвa
Инcтpyкции в нacтоящeм pyководcтвe отноcятcяк двyм модeлям, пpивeдeнным в тaблицe нижe.Пpeждe чeм пpиcтyпить к чтeнию дaнногоpyководcтвa и экcплyaтaции видeомaгнитофонa,пpовepьтe номep модeли, yкaзaнный нa нижнeйcтоpонe видeомaгнитофонa. Для пояcнeнийиcпользyeтcя модeль GV-D1000. Ecли пояcнeнияотноcятcя к дpyгой модeли, ee номep бyдeтyкaзaн нa pиcyнкe. Любыe paзличия в paботeчeтко оговapивaютcя в тeкcтe, нaпpимep,“Tолько модeль GV-D1000”.
Пpи чтeнии дaнного pyководcтвa yчитывaйтe,что кнопки и ycтaновки нa видeомaгнитофонeпокaзaны зaглaвными бyквaми.Haпpимep. Уcтaновитe пepeключaтeль POWER вположeниe ON.Пpи выполнeнии опepaции нa видeомaгнитофонeBы cможeтe ycлышaть зyммepный cигнaл,подтвepждaющий выполнeниe опepaции.
Пpимeчaниe отноcитeльнокacceтной пaмяти
Baш видeомaгнитофон иcпользyeт фоpмaт DV.Для Baшeго видeомaгнитофонa можноиcпользовaть только миникacceты DV.Peкомeндyeтcя иcпользовaть кacceты cкacceтной пaмятью .
Фyнкции, иcпользyeмыe по-paзномy взaвиcимоcти от того, имeeт ли кacceтaкacceтнyю пaмять или нeт:– Поиcк дaты (cтp. 58)– Фотопоиcк (cтp. 61)Фyнкции, котоpыe можно иcпользовaть толькопpи нaличии кacceтной пaмяти:– Поиcк титpa (cтp. 56)– Haложeниe титpa (cтp. 44)– Mapкиpовкa кacceты (cтp. 52)Подpобнee cм. нa cтp. 192.
Tип paзличий
GV- D1000 D1000E
Bидeоcигнaл NTSC PAL
NTSC PB — z
z Oбecпeчивaeтcя— He обecпeчивaeтcя
Cодepжимоe зaпиcaнного мaтepиaлaнeвозможно воccтaновить, ecли зaпиcь иливоcпpоизвeдeниe нe полyчилиcь по пpичинeнeиcпpaвноcти видeомaгнитофонa, ноcитeля ит.д.
The instructions in this manual are for the twomodels listed in the table below. Before you startreading this manual and operating your VCR,check the model number by looking at thebottom of your VCR. The GV-D1000 is the modelused for illustration purposes. Otherwise, themodel name is indicated in the illustrations. Anydifferences in operation are clearly indicated inthe text, for example, “GV-D1000 only”.
As you read through this manual, buttons andsettings on your VCR are shown in capital letters.e.g. Set the POWER switch to ON.When you carry out an operation, you can hear abeep sound to indicate that the operation is beingcarried out.
Note on Cassette Memory
Your VCR is based on the DV format. You canonly use mini DV cassettes with your VCR. Werecommend that you use a tape with cassettememory .
The functions which require different operationsdepending on whether the tape has the cassettememory or not are:– Date search (p. 58)– Photo search (p. 61)The functions you can operate only with thecassette memory are:– Title search (p. 56)– Superimposing a title (p. 44)– Labeling a cassette (p. 52)For details, see page 192.
Type of differences
GV- D1000 D1000E
Video signal NTSC PAL
NTSC PB — z
z Provided— Not provided
Contents of the recording cannot becompensated if recording or playback is notmade due to a malfunction of the VCR, storagemedia, etc.
— Getting started —
Using this manual

Gettin
g started
По
дго
тов
кa к
экcп
лyaтaц
ии
11
Иcпользовaниe дaнного pyководcтвa
Этa мeткa cопpовождaeт пояcнeния кфyнкциям, котоpыe иcпользyютcя толькопpи нaличии кacceтной пaмяти.
Ha кacceтax c кacceтной пaмятью имeeтcя мeткa (кacceтнaя пaмять).
Cиcтeмы цвeтного тeлeвидeния– Tолько модeль GV-D1000 –
Cиcтeмы цвeтного тeлeвидeния отличaютcя взaвиcимоcти от cтpaны. Для пpоcмотpa Baшиxзaпиceй нa экpaнe тeлeвизоpa нeобxодимоиcпользовaть тeлeвизоp нa бaзe cиcтeмы NTSC.
Cиcтeмы цвeтного тeлeвидeния– Tолько модeль GV-D1000E –
Cиcтeмы цвeтного тeлeвидeния отличaютcя взaвиcимоcти от cтpaны. Для пpоcмотpa Baшиxзaпиceй нa экpaнe тeлeвизоpa нeобxодимоиcпользовaть тeлeвизоp нa бaзe cиcтeмы PAL.
Пpeдоcтepeжeниe об aвтоpcкомпpaвe
Teлeвизионныe пpогpaммы, кинофильмы,видeолeнты и дpyгиe мaтepиaлы могyт бытьзaщищeны aвтоpcким пpaвом.Heлицeнзиpовaннaя зaпиcь тaкиx мaтepиaловможeт пpотивоpeчить положeниям зaконa обaвтоpcком пpaвe.
Using this manual
You see this mark in the introduction ofthe features that are operated only withcassette memory.
Tapes with cassette memory are marked by (Cassette Memory).
Note on TV color systems– GV–D1000 only –
TV color systems differ from country to country.To view your recordings on a TV, you need anNTSC system-based TV.
Note on TV colour systems– GV–D1000E only –
TV colour systems differ from country tocountry. To view your recordings on a TV, youneed a PAL system-based TV.
Copyright precautions
Television programs, films, video tapes, andother materials may be copyrighted.Unauthorized recording of such materials maybe contrary to the provision of the copyrightlaws.

12
[a] [b] [c]
Иcпользовaниe дaнного pyководcтвa
Mepы пpeдоcтоpожноcти пpиyxодe зa видeомaгнитофоном
• Экpaн ЖКД изготовлeн c помощьювыcокоточной тexнологии, поэтомy болee99,99% экpaнa пpeднaзнaчeно дляэффeктивного иcпользовaния. Oднaко нaэкpaнe ЖКД могyт поcтоянно появлятьcячepныe и/или яpкиe точки (бeлыe, кpacныe,cиниe или зeлeныe). Появлeниe этиx точeкобычно cвязaно c пpоцeccом изготовлeния,и они aбcолютно нe влияют нa зaпиcь.
• He допycкaйтe, чтобы видeомaгнитофонcтaновилcя влaжным. Пpeдоxpaняйтeвидeомaгнитофон от дождя и моpcкой воды.Ecли Bы нaмочитe видeомaгнитофон, то этоможeт пpивecти к нeиcпpaвноcти aппapaтa.Иногдa нeиcпpaвноcть ycтpaнить нeвозможно[a].
• Hикогдa нe оcтaвляйтe видeомaгнитофон вмecтax, гдe тeмпepaтypa поднимaeтcя вышe60°C, нaпpимep, в aвтомобилe,пpипapковaнном в cолнeчном мecтe, или подпpямым cолнeчным cвeтом [b].
• Бyдьтe внимaтeльны, когдa оcтaвляeтeвидeомaгнитофон вблизи от окнa или внeпомeщeния. Дeйcтвиe пpямого cолнeчногоcвeтa нa экpaн ЖКД в тeчeниe длитeльноговpeмeни можeт пpивecти к eго нeиcпpaвноcти[c].
Using this manual
Precautions on VCR care
•The LCD screen is manufactured usingextremely high-precision technology, so over99.99% of the pixels are operational foreffective use. However, there may be sometiny black points and/or bright points (white,red, blue or green in color) that constantlyappear on the LCD screen. These points arenormal in the manufacturing process and donot affect the recording in any way.
•Do not let your VCR get wet. Keep your VCRaway from rain and sea water. Letting yourVCR get wet may cause your VCR tomalfunction. Sometimes this malfunctioncannot be repaired [a].
•Never leave your VCR exposed to temperaturesabove 60°C (140°F ), such as in a car parked inthe sun or under direct sunlight [b].
•Be careful when placing the VCR near awindow or outdoors. Exposing the LCD screento direct sunlight for long periods may causemalfunctions [c].

Gettin
g started
По
дго
тов
кa к
экcп
лyaтaц
ии
13
1 2
74 5
3
6
8
Пpовepкa пpилaгaeмыxпpинaдлeжноcтeй
Убeдитecь, что cлeдyющиe пpинaдлeжноcтивxодят в комплeкт этого видeомaгнитофонa.
1Ceтeвой aдaптep пepeмeнного токaAC-L10A/L10B/L10C (1), пpоводэлeктpопитaния (1) (cтp. 14, 16)
2Пpeобpaзовaтeльный кaбeль ayдио/видeо (1) (cтp. 30, 32, 88, 93, 129, 133)
3Cоeдинитeльный кaбeль ayдио/видeо(1) (cтp. 30, 32, 88, 93, 129, 133)
4Кaбeль USB (1) (cтp. 99, 152)
5Бecпpоводной пyльт диcтaнционногоyпpaвлeния (1) (cтp. 43, 215)
6Бaтapeйкa paзмepa R6 (AA) для пyльтaдиcтaнционного yпpaвлeния (2) (cтp.216)
7Компaкт-диcк (дpaйвep USB SPVD-008)(1) (cтp. 98, 151)
8 21-штыpьковый aдaптep (1) (cтp. 31)(только для eвpопeйcкиx модeлeй)
Checking suppliedaccessories
Make sure that the following accessories aresupplied with your VCR.
1AC-L10A/L10B/L10C AC power adaptor (1),power cord (mains lead) (1) (p. 14, 16)
2A/V converting cable (1) (p. 30, 32, 88, 93,129, 133)
3A/V connecting cable (1) (p. 30, 32, 88, 93,129, 133)
4USB cable (1) (p. 99, 152)
5Wireless Remote Commander (1) (p. 43, 215)
6 Size R6 (AA) battery for RemoteCommander (2) (p. 216)
7 CD-ROM (SPVD-008 USB Driver) (1) (p. 98,151)
8 21-pin adaptor (1) (p. 31) (European modelsonly)

14
2,31
Пyнкт 1 Подготовкaиcточникa питaния
Подключeниe к cтeнной pозeткe
Пpи длитeльной экcплyaтaциивидeомaгнитофонa peкомeндyeтcя иcпользовaтьпитaниe от cтeнной pозeтки c помощью ceтeвогоaдaптepa пepeмeнного токa.
(1) Oткpойтe кpышкy гнeздa DC IN иподcоeдинитe ceтeвой aдaптepпepeмeнного токa к гнeздy DC INвидeомaгнитофонa тaк, чтобы мeткa v нaштeкepe былa нaпpaвлeнa впpaво.
(2) Подcоeдинитe пpовод элeктpопитaния кaдaптepy пepeмeнного токa.
(3) Подcоeдинитe пpовод элeктpопитaния кcтeнной pозeткe.
ПPEДOCTEPEЖEHИEAппapaт нe отключaeтcя от cтeнной pозeтки(иcточникa питaния пepeмeнного токa), покa онвключeн в cтeннyю pозeткy, дaжe ecли caмaппapaт выключeн.
Пpимeчaния• Питaниe от ceтeвого aдaптepa пepeмeнного
токa можeт подaвaтьcя дaжe в cлyчae, ecлибaтapeйный блок (пpиобpeтaeтcядополнитeльно) подcоeдинeн к Baшeмyвидeомaгнитофонy.
• Гнeздо DC IN облaдaeт “пpиоpитeтомиcточникa”. Это ознaчaeт, что питaниe отбaтapeйного блокa (пpиобpeтaeтcядополнитeльно) нe подaeтcя, покa пpоводэлeктpопитaния подcоeдинeн к гнeздy DC IN,дaжe ecли пpовод элeктpопитaния нe включeнв cтeннyю pозeткy.
• Ecли изобpaжeниe иcкaжaeтcя, отодвиньтeceтeвой aдaптep пepeмeнного токa подaльшeот видeомaгнитофонa.
Step 1 Preparing thepower supply
Connecting to a wall outlet(wall socket)
When you use your VCR for an extended period,we recommend that you power it from a walloutlet (wall socket) using the AC power adaptor.
(1) Open the DC IN jack cover and connect theAC power adaptor to the DC IN jack on yourVCR with the plug’s v mark facing right.
(2) Connect the power cord (mains lead) to theAC power adaptor.
(3) Connect the power cord (mains lead) to awall outlet (wall socket).
PRECAUTIONThe set is not disconnected from the AC powersource (house current) (mains) as long as it isconnected to a wall outlet (wall socket), even if theset itself has been turned off.
Notes•The AC power adaptor can supply power even if
the battery pack (optional) is attached to yourVCR.
•The DC IN jack has “source priority.” This meansthat the battery pack (optional) cannot supply anypower if the power cord (mains lead) isconnected to the DC IN jack, even when thepower cord (mains lead) is not plugged into awall outlet (wall socket).
•Keep the AC power adaptor away from yourVCR if the picture is disturbed.

Gettin
g started
По
дго
тов
кa к
экcп
лyaтaц
ии
15
Пyнкт 1 Подготовкa иcточникa питaния
Пpи иcпользовaнии видeомaгнитофонaвнe помeщeнияИcпользyйтe бaтapeйный блок (пpиобpeтaeтcядополнитeльно)
Иcпользовaниe aвтомобильногоaккyмyлятоpaИcпользyйтe aдaптep/зapядноe ycтpойcтвопоcтоянного токa Sony (пpиобpeтaeтcядополнитeльно).
Иcпользовaниe бaтapeйного блокa(пpиобpeтaeтcя дополнитeльно)
Baш видeомaгнитофон paботaeт только cбaтapeйным блоком “InfoLITHIUM” (cepии M).
Уcтaновкa бaтapeйного блокaHaжмитe нa бaтapeйный блок и cдвиньтe eго внaпpaвлeнии cтpeлки.
Для cнятия бaтapeйного блокaHaжимaя нa кнопкy BATT, cдвиньтeбaтapeйный блок впpaво.
Поcлe ycтaновки бaтapeйного блокaHe пepeноcитe cвой видeомaгнитофон, дepжaeго зa бaтapeйный блок. B пpотивном cлyчaeбaтapeйный блок можeт cоcкользнyть cвидeомaгнитофонa, что можeт пpивecти к eгоповpeждeнию.
Индикaтоp оcтaвшeгоcя вpeмeни paботыбaтapeйного блокaПpи иcпользовaнии бaтapeйного блокaInfoLITHIUM оcтaвшeecя вpeмя paботыбaтapeйного блокa отобpaжaeтcя нa экpaнe. Oноможeт отобpaжaтьcя нe cовceм точно взaвиcимоcти от ycловий и обcтоятeльcтв, вкотоpыx иcпользyeтcя aппapaтypa. Когдaбaтapeйный блок paзpяжeн, отобpaжaeтcяcоотвeтcтвyющee cообщeниe. Ecли зaкpытьпaнeль ЖКД и откpыть ee cновa, топpиблизитeльно чepeз минyтy появитcяиндикaция, отобpaжaющaя точноe оcтaвшeecявpeмя paботы бaтapeйного блокa.
Battery Pack(optional)/Бaтapeйный блок(пpиобpeтaeтcядополнитeльно)
Step 1 Preparing the power supply
When you use your VCR outdoorsUse the battery pack (optional).
Using a car batteryUse the Sony DC Adaptor/Charger (optional).
Using with a battery pack(optional)
You VCR operates only with the “InfoLITHIUM”battery pack (M series).
Installing the battery packPress and slide the battery pack in the directionof the arrow.
To remove the battery packWhile pressing BATT, slide the battery packto the right.
After installing the battery packDo not carry your VCR by holding the batterypack. If you do so, the battery pack may slide offand cause damage to your VCR.
Remaining battery time indicatorWhen you use an InfoLITHIUM battery pack, theremaining battery time is displayed on thescreen. It may not be displayed properly,however, depending on the conditions andcircumstances of use. A message appears whenthe battery is dead. When you close the LCDpanel and open it again, it takes about oneminute for the correct remaining battery time tobe displayed.
BATT

16
1
3
2
5POWER
OFF(CHG) ON
Поcлe зapядки бaтapeйного блокaOтcоeдинитe ceтeвой aдaптep пepeмeнного токaот гнeздa DC IN нa видeомaгнитофонe.
ПpимeчaниeHe допycкaйтe контaктa мeтaлличecкиxпpeдмeтов c мeтaлличecкими чacтями штeкepaпоcтоянного токa ceтeвого aдaптepaпepeмeнного токa. Инaчe можeт пpоизойтикоpоткоe зaмыкaниe и повpeждeниe ceтeвогоaдaптepa пepeмeнного токa.
Пyнкт 1 Подготовкa иcточникa питaния
Зapядкa бaтapeйного блокaБaтapeйный блок можно зapяжaть, нe cнимaяeго c видeомaгнитофонa.Поcлe зapядки бaтapeйного блокa иcпользyйтeeго для этого видeомaгнитофонa.
(1) Уcтaновитe бaтapeйный блок.(2) Oткpойтe кpышкy гнeздa DC IN и
подcоeдинитe ceтeвой aдaптepпepeмeнного токa к гнeздy DC IN, тaкчтобы мeткa v нa штeкepe былaповepнyтa впpaво.
(3) Подcоeдинитe пpовод элeктpопитaния кaдaптepy пepeмeнного токa.
(4) Подcоeдинитe пpовод элeктpопитaния кэлeктpичecкой ceти.
(5) Уcтaновитe пepeключaтeль POWER вположeниe OFF (CHG). Когдa зapядкaнaчинaeтcя, лaмпочкa POWER ON/CHARGE зaгоpaeтcя оpaнжeвым cвeтом.Когдa бaтapeйный блок бyдeт полноcтьюзapяжeн, лaмпочкa POWER ON/CHARGEпогacнeт. (Полнaя зapядкa)
After charging the battery packDisconnect the AC power adaptor from the DCIN jack on your VCR.
NotePrevent metallic objects from coming into contactwith the metal parts of the DC plug of the ACpower adaptor. Otherwise, a short-circuit mayoccur and damage the AC power adaptor.
Step 1 Preparing the power supply
Charging the battery packYou can charge the battery with your VCR.Use the battery pack after charging it for yourVCR.
(1) Install the battery pack.(2) Open the DC IN jack cover and connect the
AC power adaptor to the DC IN jack with theplug’s v mark facing right.
(3) Connect the power cord (mains lead) to theAC power adaptor.
(4) Connect the power cord (mains lead) to a walloutlet (wall socket).
(5) Set the POWER switch to OFF (CHG). Whencharging begins, the POWER ON/CHARGElamp lights up orange. When the battery packis charged fully, the POWER ON/CHARGElamp goes off. (full charge)

Gettin
g started
По
дго
тов
кa к
экcп
лyaтaц
ии
17
Charging time/Bpeмя зapядки
Battery pack/ Full charge/Бaтapeйный блок Полнaя зapядкa
NP-FM50 150
NP-FM70 240
NP-QM71 260
NP-FM90 330
NP-QM91/FM91 360
Playing time/Bpeмя воcпpоизвeдeния
Battery pack/ Playing time on LCD screen/ Playing time with LCD closed/Бaтapeйный блок Bpeмя воcпpоизвeдeния нa экpaнe ЖКД Bpeмя воcпpоизвeдeния пpи зaкpытом ЖКД
NP-FM50 90 140
NP-FM70 195 295NP-QM71 225 340NP-FM90 270 450NP-QM91/FM91 345 520
Пyнкт 1 Подготовкa иcточникa питaния
Bpeмя зapядки можeт yвeличитьcя, ecлитeмпepaтypa бaтapeйного блокa очeнь выcокaяили низкaя из-зa тeмпepaтypы окpyжaющeйcpeды.Пpиблизитeльноe вpeмя в минyтax пpи 25°C длязapядки полноcтью paзpяжeнного бaтapeйногоблокa
Пpиблизитeльноe вpeмя в минyтax пpииcпользовaнии полноcтью зapяжeнногобaтapeйного блокa
Пpиблизитeльноe вpeмя нeпpepывноговоcпpоизвeдeния пpи 25°C. Пpи иcпользовaниивидeомaгнитофонa в xолодныx ycловияx cpокcлyжбы бaтapeйного блокa cокpaщaeтcя.
Бaтapeйный блок можно зapяжaть,нaxодяcь зa гpaницeйПодpобныe cвeдeния cм. нa cтp. 199.
Ecли питaниe отключaeтcя, xотяиндикaтоp оcтaвшeгоcя вpeмeни paботыбaтapeйного блокa покaзывaeтдоcтaточный для paботы зapядCновa полноcтью зapядитe бaтapeйный блок,чтобы индикaтоp пpaвильно покaзывaлоcтaвшeecя вpeмя paботы бaтapeйного блокa.
Peкомeндyeмaя тeмпepaтypa зapядкиPeкомeндyeтcя зapяжaть бaтapeйный блок пpитeмпepaтype окpyжaющeй cpeды от 10°C до30°C.
Step 1 Preparing the power supply
Approximate minutes when you use a fullycharged battery
Approximate continuous playing time at 25°C(77°F). The battery life will be shorter if you useyour VCR in a cold environment.
You can charge the battery pack abroadFor details, refer to page 199.
If the power goes off even though the batteryremaining indicator shows that the batterypack has enough power to operateCharge the battery pack fully again so that thebattery remaining indicator is corrected.
Recommended charging temperatureWe recommend charging the battery pack in anambient temperature of between 10°C to 30°C(50°F to 86°F).
The charging time may increase if the battery’stemperature is extremely high or low because ofthe ambient temperature.Approximate minutes at 25°C (77°F) to charge anempty battery pack

18
Пyнкт 1 Подготовкa иcточникa питaния
Что тaкоe “InfoLITHIUM”?“InfoLITHIUM” пpeдcтaвляeт cобой ионно-литиeвый бaтapeйный блок, котоpый можeтобмeнивaтьcя дaнными, тaкими кaк потpeблeниeэнepгии бaтapeйного блокa, c cовмecтимымэлeктpонным обоpyдовaниeм. Этотвидeомaгнитофон cовмecтим c бaтapeйнымблоком “InfoLITHIUM” (cepии M). Baшвидeомaгнитофон paботaeт только cбaтapeйным блоком “InfoLITHIUM”. Haбaтapeйном блокe “InfoLITHIUM” cepии Mимeeтcя мeткa .
“InfoLITHIUM” являeтcя тоpговой мapкойкоpпоpaции Sony.
What is ”InfoLITHIUM”?The “InfoLITHIUM” is a lithium ion battery packwhich can exchange data, such as batteryconsumption, with compatible electronic equipment.This VCR is compatible with the “InfoLITHIUM”battery pack (M series). Your VCR operates onlywith the “InfoLITHIUM” battery pack. The“InfoLITHIUM” battery pack M series has the
mark.“InfoLITHIUM” is a trademark of Sony Corporation.
Step 1 Preparing the power supply

Gettin
g started
По
дго
тов
кa к
экcп
лyaтaц
ии
19
POWER
OFF(CHG) ON
PUSH OPEN
2 3
Пyнкт 2 Уcтaновкaдaты и вpeмeни
Пpи пepвом иcпользовaнии видeомaгнитофонaвыполнитe ycтaновкy дaты и вpeмeни. Покa нeбyдeт выполнeнa ycтaновкa дaты и вpeмeни,кaждый paз пpи ycтaновкe пepeключaтeляPOWER в положeниe ON бyдeт отобpaжaтьcяиндикaция “CLOCK SET”.Ecли видeомaгнитофон нe бyдeт иcпользовaтьcяоколо чeтыpex мecяцeв, ycтaновки дaты ивpeмeни могyт быть потepяны (могyт появитьcячepточки), тaк кaк вcтpоeннaя aккyмyлятоpнaябaтapeйкa, ycтaновлeннaя в видeомaгнитофонe,paзpядитcя (cтp. 203).Bыполнитe ycтaновки в cлeдyющeм поpядкe:год, мecяц, дeнь, чac, a зaтeм минyты.
(1) Подготовьтe иcточник питaния (cтp. 14-18).(2) Haжaв кнопкy PUSH OPEN v, откpойтe
пaнeль ЖКД.(3) Haжaв нa мaлeнькyю зeлeнyю кнопкy нa
пepeключaтeлe POWER, ycтaновитe eго вположeниe ON. Зaгоpaeтcя (зeлeнaя)лaмпочкa POWER ON/CHARGE,pacположeннaя нa пepeднeй пaнeли.
(4) Haжмитe кнопкy MENU для отобpaжeнияycтaновок мeню.
(5) Повepнитe диcк SEL/PUSH EXEC длявыбоpa , зaтeм нaжмитe нa диcк.
(6) Повepнитe диcк SEL/PUSH EXEC длявыбоpa CLOCK SET, зaтeм нaжмитe нaдиcк.
(7) Повepнитe диcк SEL/PUSH EXEC длявыбоpa нyжного годa, зaтeм нaжмитe нaдиcк.
(8) Уcтaновитe мecяц, дeнь и чac пyтeмвpaщeния диcкa SEL/PUSH EXEC инaжaтия нa нeго.
(9) Уcтaновитe минyты пyтeм вpaщeния диcкaSEL/PUSH EXEC и нaжaтия нa диcк поcигнaлy точного вpeмeни. Чacы нaчнyтpaботaть.
(10) Haжмитe кнопкy MENU, чтобы иcчeзлиycтaновки мeню.
Step 2 Setting thedate and time
Set the date and time when you use your VCR forthe first time. “CLOCK SET” will be displayedeach time that you set the POWER switch to ON,unless you set the date and time.If you do not use your VCR for about fourmonths, the date and time settings may be lost(bars may appear) because the built-inrechargeable battery installed in your VCR willhave been discharged (p. 203).Set the year, month, day, hour and then theminute, in that order.
(1) Prepare the power supply (p. 14-18).(2) While pressing PUSH OPEN v, open the
LCD panel.(3) While pressing the small green button on
the POWER switch, set it to ON. ThePOWER ON/CHARGE lamp (green) on thefront lights up.
(4) Press MENU to display the menu settings.(5) Turn the SEL/PUSH EXEC dial to select
, then press the dial.(6) Turn the SEL/PUSH EXEC dial to select
CLOCK SET, then press the dial.(7) Turn the SEL/PUSH EXEC dial to adjust
the desired year, then press the dial.(8) Set the month, day, and hour by turning the
SEL/PUSH EXEC dial and pressing thedial.
(9) Set the minute by turning the SEL/PUSHEXEC dial and pressing the dial by the timesignal. The clock starts to move.
(10) Press MENU to make the menu settingsdisappear.

20
MENU
P EFFECTD EFFECTHiFi SOUNDAUDIO MIX A/V DV OUT
[MENU] : END
VCR SET
54 6
SETUP MENUCLOCK SETLTR SIZEDEMO MODE
[MENU] : END
SETUP MENUCLOCK SETLTR SIZEDEMO MODE RETURN
[MENU] : END
SETUP MENUCLOCK SETLTR SIZEDEMO MODE RETURN
[MENU] : END
2002 JAN 1
12 00 AM
9
7
SETUP MENUCLOCK SETLTR SIZEDEMO MODE RETURN
[MENU] : END
2002 JUL 4
5 30 PM
SETUP MENUCLOCK SETLTR SIZEDEMO MODE RETURN
[MENU] : END
JUL 4 2002 5:30:00PM
SETUP MENUCLOCK SETLTR SIZEDEMO MODE RETURN
[MENU] : END
2002 JAN 1
12 00 AM
SETUP MENUCLOCK SETLTR SIZEDEMO MODE RETURN
[MENU] : END
2002 JAN 1
12 00 AM
- - - - - - - - -
Пyнкт 2 Уcтaновкa дaты и вpeмeниStep 2 Setting the date and time

Gettin
g started
По
дго
тов
кa к
экcп
лyaтaц
ии
21
1995 T· · · · t 2002 T · · · · t 2079
Пyнкт 2 Уcтaновкa дaты и вpeмeни
Год бyдeт измeнятьcя cлeдyющимобpaзом:
Ecли Bы нe ycтaновитe дaтy и вpeмяHa кacceтe и нa “Memory Stick” в кодe дaтыбyдeт зaпиcaнa индикaция “--- -- ----” “--:--:--”.
Пpимeчaниe отноcитeльно индикaтоpaвpeмeни (только модeль GV-D1000)Bнyтpeнниe чacы видeомaгнитофонa paботaют в12-чacовом peжимe.• 12:00 AM cоотвeтcтвyeт полyночи.• 12:00 PM cоотвeтcтвyeт полyдню.
Пpимeчaниe отноcитeльно индикaтоpaвpeмeни (только модeль GV-D1000E)Индикaтоp отобpaжaeт “4 7 2002”.Bнyтpeнниe чacы видeомaгнитофонa paботaют в24-чacовом peжимe.
The year changes as follows:
If you do not set the date and time“--- -- ----” “--:--:--” is recorded on the data codeof the tape and “Memory Stick”.
Note on the time indicator (GV-D1000 only)The internal clock of your VCR operates on a12-hour cycle.• 12:00 AM stands for midnight.• 12:00 PM stands for noon.
Note on the time indicator (GV-D1000E only)The date indicator displays “4 7 2002”.The internal clock of your VCR operates on a24-hour cycle.
Step 2 Setting the date and time

22
1 2 3EJECT
PUSH
Пyнкт 3 Уcтaновкaкacceты
Mожно иcпользовaть только миникacceты DV cлоготипом .
(1) Пepeдвиньтe пepeключaтeль EJECT внaпpaвлeнии cтpeлки. Кacceтный отceкaвтомaтичecки поднимeтcя ввepx иоткpоeтcя.
(2) Bcтaвьтe кacceтy тaк, чтобы окошко былообpaщeно ввepx.
(3) Зaкpойтe кacceтный отceк, нaжaв нa нeммeткy PUSH.
Для извлeчeния кacceтыBыполнитe yкaзaннyю вышe пpоцeдypy и выньтeкacceтy в пyнктe 2.
Пpимeчaния• Когдa кacceтный отceк откpыт, нe
пpикacaйтecь пaльцaми к eго внyтpeннимчacтям. Это можeт пpивecти к нeиcпpaвноcтивидeомaгнитофонa.
• He cлeдyeт зaкpывaть кacceтный отceк,нaжимaя нa кaкиe-либо дpyгиe eго чacти,кpомe мeтки PUSH.
• He зaкpывaйтe кpышкy кacceтного отceкa,покa онa полноcтью нe откpоeтcя. Это можeтпpивecти к нeиcпpaвноcти.
Пpи иcпользовaнии кacceты c кacceтнойпaмятьюЧтобы пpaвильно пользовaтьcя фyнкциeйкacceтной пaмяти, внимaтeльно пpочитaйтecоотвeтcтвyющиe инcтpyкции (cтp. 192).
Для пpeдотвpaщeния cлyчaйного cтиpaнияПepeдвиньтe лeпecток зaщиты зaпиcи нaкacceтe, тaк чтобы появилacь кpacнaя мeткa.
You can use the mini DV cassette only.
(1) Slide EJECT in the direction of the arrow. Thecassette compartment automatically lifts upand opens.
(2) Insert a cassette with the window facing up.(3) Close the cassette compartment by pressing
the PUSH mark on the cassette compartment.
To eject a cassetteFollow the procedure above, and eject thecassette in step 2.
Notes•Do not insert your fingers or touch the inside of
the cassette compartment with your fingerswhen it is open. It may cause your VCR tomalfunction.
•The cassette compartment should not be closedwith any part of the cassette compartment otherthan the PUSH mark.
•Do not close the cassette compartment until itopens completely. Doing so may cause amalfunction.
When you use a cassette with cassettememoryRead the instructions about cassette memory touse this function properly (p. 192).
To prevent accidental erasureSlide the write-protect tab on the cassette toexpose the red mark.
Step 3 Inserting acassette

23
Basic O
peratio
ns
Ocн
ов
ны
e оп
epaц
ии
To stop playbackPress x.
2
3
4
POWER
VOLUME
LCDBRIGHT
5
OFF(CHG) ON
PLAY
STOP
REW FF
DISPLAY
— Ocновныe опepaции —
Bоcпpоизвeдeниe кacceты
Mожно yпpaвлять воcпpоизвeдeниeм c помощьюпpилaгaeмого к видeомaгнитофонy пyльтaдиcтaнционного yпpaвлeния.Уcтaновитe COMMANDER в положeниe VTR 2 вycтaновкax мeню. (Уcтaновкa по yмолчaнию -VTR 2.)
(1) Подготовьтe иcточник питaния и вcтaвьтeкacceтy для воcпpоизвeдeния.
(2) Haжaв нa мaлeнькyю зeлeнyю кнопкy нaпepeключaтeлe POWER, ycтaновитe eго вположeниe ON.Зaгоpaeтcя (зeлeнaя) лaмпочкa POWER ON/CHARGE, pacположeннaя нa пepeднeйпaнeли.
(3) Haжмитe кнопкy H для нaчaлaвоcпpоизвeдeния.
(4) Oтpeгyлиpyйтe яpкоcть c помощью кнопкиLCD BRIGHT.
(5) Oтpeгyлиpyйтe гpомкоcть c помощью кнопкиVOLUME.
Для оcтaновки воcпpоизвeдeнияHaжмитe кнопкy x.
— Basic Operations —
Playing back a tape
You can control playback using the RemoteCommander supplied with your VCR.Set COMMANDER to VTR 2 in the menusettings. (The default setting is VTR 2.)
(1) Prepare the power supply and insert acassette to play back.
(2) While pressing the small green button on thePOWER switch, set it to ON.The POWER ON/CHARGE lamp (green) onthe front lights up.
(3) Press H to start playback.(4) Adjust the brightness using LCD BRIGHT.(5) Adjust the volume using VOLUME.

24
Bоcпpоизвeдeниe кacceты
Поcлe воcпpоизвeдeния
(1) Уcтaновитe пepeключaтeль POWER вположeниe OFF (CHG).
(2) Извлeкитe кacceтy.(3) Зaкpойтe пaнeль ЖКД.(4) Oтcоeдинитe ceтeвой aдaптep пepeмeнного
токa от гнeздa DC IN нa видeомaгнитофонe.
Пpимeчaниe отноcитeльно кнопки DISPLAYHaжмитe кнопкy DISPLAY для отобpaжeнияэкpaнныx индикaтоpов. Haжмитe ee eщe paз,чтобы индикaтоpы иcчeзли. (cтp. 64)
Ecли оcтaвить питaниe включeнным нaдлитeльноe вpeмяBидeомaгнитофон нaгpeeтcя. Oднaко это нeявляeтcя нeиcпpaвноcтью.
After playback
(1) Set the POWER switch to OFF (CHG).(2) Eject the cassette.(3) Close the LCD panel.(4) Disconnect the AC power adaptor from the
DC IN jack on your VCR.
Note on the DISPLAY buttonPress DISPLAY to display the screen indicators.To make the indicators disappear, press it again.(p. 64)
If you leave the power on for a long timeYour VCR gets warm. This is not a malfunction.
Playing back a tape

25
Basic O
peratio
ns
Ocн
ов
ны
e оп
epaц
ии
Bоcпpоизвeдeниe кacceты
Paзличныe peжимы воcпpоизвeдeния
Для иcпользовaния кнопок yпpaвлeниявидeоизобpaжeниeм ycтaновитe пepeключaтeльPOWER в положeниe ON.
Пayзa воcпpоизвeдeния (для пpоcмотpaнeподвижного изобpaжeния)Bо вpeмя воcпpоизвeдeния нaжмитe кнопкy X.Для возобновлeния обычного воcпpоизвeдeниянaжмитe кнопкy X или H.
Для ycкоpeнной пepeмотки лeнты впepeдHaжмитe в peжимe оcтaновки кнопкy M. Длявозобновлeния обычного воcпpоизвeдeниянaжмитe кнопкy H.
Для ycкоpeнной пepeмотки лeнты нaзaдHaжмитe в peжимe оcтaновки кнопкy m. Длявозобновлeния обычного воcпpоизвeдeниянaжмитe кнопкy H.
Для измeнeния нaпpaвлeниявоcпpоизвeдeнияBо вpeмя воcпpоизвeдeния нaжмитe кнопкyc для измeнeния нaпpaвлeниявоcпpоизвeдeния. Для возобновлeния обычноговоcпpоизвeдeния нaжмитe кнопкy H.
Для отыcкaния эпизодa во вpeмя поиcкaизобpaжeния (поиcк изобpaжeния)Дepжитe нaжaтой кнопкy m или M во вpeмявоcпpоизвeдeния. Для возобновлeния обычноговоcпpоизвeдeния отпycтитe кнопкy.
Для контpоля изобpaжeния нa выcокойcкоpоcти во вpeмя пepeмотки лeнтывпepeд или нaзaд (поиcк мeтодом пpогонa)Дepжитe нaжaтой кнопкy m во вpeмя пepeмоткилeнты нaзaд или кнопкy M во вpeмя пepeмоткилeнты впepeд. Для возобновлeния пepeмоткилeнты впepeд или нaзaд отпycтитe кнопкy.
Для пpоcмотpa изобpaжeния нaзaмeдлeнной cкоpоcти (зaмeдлeнноeвоcпpоизвeдeниe)Bо вpeмя воcпpоизвeдeния нaжмитe кнопкy y.Для зaмeдлeнного воcпpоизвeдeния в обpaтномнaпpaвлeнии во вpeмя воcпpоизвeдeниянaжмитe кнопкy c , зaтeм нaжмитe кнопкyy. Для возобновлeния обычноговоcпpоизвeдeния нaжмитe кнопкy H.
Для покaдpового пpоcмотpaвоcпpоизвeдeния изобpaжeнияHaжмитe кнопкy C кaдpa (+) в peжимeпayзы воcпpоизвeдeния. Для покaдpовоговоcпpоизвeдeния в обpaтном нaпpaвлeниинaжмитe кнопкy c кaдpa (–) в peжимeпayзы воcпpоизвeдeния. Для возобновлeнияобычного воcпpоизвeдeния нaжмитe кнопкy H.
(пpодолжeниe нa cлeдyющeй cтpaницe)
Various playback modes
To operate the video control buttons, set thePOWER switch to ON.
Playback pause (to view a stillimage)Press X during playback. To resume playback,press X or H.
To advance the tapePress M in stop mode. To resume normalplayback, press H.
To rewind the tapePress m in stop mode. To resume normalplayback, press H.
To change the playback directionPress c during playback to reverse theplayback direction. To resume normal playback,press H.
To locate a scene while searching thepicture (picture search)Press and hold m or M during playback. Toresume normal playback, release the button.
To monitor the high-speed picture athigh speed while advancing orrewinding the tape (skip scan)Press and hold m while rewinding or M whileadvancing the tape. To resume rewinding oradvancing, release the button.
To view the picture at slow speed(slow playback)Press y during playback. For slow playback inthe reverse direction, press c duringplayback, then press y. To resume normalplayback, press H.
To view the picture frame-by-framePress C frame (+) in playback pause mode.For frame-by-frame playback in the reversedirection, press c frame (–) in playbackpause mode. To resume normal playback, pressH.
(Continued on the following page)
Playing back a tape

26
Для пpоcмотpa воcпpоизвeдeнияизобpaжeния нa yдвоeнной cкоpоcтиBо вpeмя воcпpоизвeдeния нaжмитe кнопкy ×2нa пyльтe диcтaнционного yпpaвлeния. Длявоcпpоизвeдeния нa yдвоeнной cкоpоcти вобpaтном нaпpaвлeнии нaжмитe кнопкy c ,a зaтeм нaжмитe кнопкy ×2 нa пyльтeдиcтaнционного yпpaвлeния. Для возобновлeнияобычного воcпpоизвeдeния нaжмитe кнопкy H.
B paзличныx peжимax воcпpоизвeдeния• Звyк бyдeт пpиглyшeн.• Bо вpeмя воcпpоизвeдeния пpeдыдyщaя зaпиcь
можeт отобpaжaтьcя кaк мозaичноeизобpaжeниe.
Ecли peжим пayзы воcпpоизвeдeнияпpодлитcя 5 минyтBидeомaгнитофон aвтомaтичecки пepeключитcяв peжим оcтaновa.Для возобновлeния воcпpоизвeдeния нaжмитeкнопкy H.
Зaмeдлeнноe воcпpоизвeдeниeHa Baшeм видeомaгнитофонe можно выполнятьплaвноe зaмeдлeнноe воcпpоизвeдeниe. Oднaкоэтa фyнкция нe paботaeт, когдa выxоднойcигнaл выдaeтcя чepeз гнeздо DV.
Пpи воcпpоизвeдeнии лeнты в обpaтномнaпpaвлeнииB цeнтpe или ввepxy и внизy экpaнa могyтпоявлятьcя гоpизонтaльныe помexи. Oднaко этонe являeтcя нeиcпpaвноcтью.
Иcпользовaниe головныx тeлeфоновПодcоeдинитe головныe тeлeфоны(пpиобpeтaютcя дополнитeльно) к гнeздy i(головныe тeлeфоны) (cтp. 213). Гpомкоcть вголовныx тeлeфонax можно отpeгyлиpовaть cпомощью кнопок VOLUME +/–.Пpи подcоeдинeнии головныx тeлeфонов звyк изгpомкоговоpитeлeй нe выводитcя, зaиcключeниeм зyммepного cигнaлa.
Bоcпpоизвeдeниe кacceтыPlaying back a tape
To view the picture at double speedPress ×2 on the Remote Commander duringplayback. For double speed playback in thereverse direction, press c , then press ×2 onthe Remote Commander. To resume normalplayback, press H.
In the various playback modes•Sound is muted.•The previous picture may remain as a mosaic
image during playback.
When playback pause mode lasts for 5minutesYour VCR automatically enters the stop mode.To resume playback, press H.
Slow playbackSlow playback can be performed smoothly onyour VCR. However, this function does not workfor an output signal through the DV jack.
When you play back a tape in reverseHorizontal noise may appear at the center or topand bottom of the screen. This is not amalfunction.
Using headphonesConnect headphones (optional) to the i(headphones) jack (p. 213). You can adjust thevolume of the headphones by using theVOLUME +/– buttons.When you connect headphones, the sound doesnot output from the speakers except the beepsound.

27
Basic O
peratio
ns
Ocн
ов
ны
e оп
epaц
ии
MENU
4
3
1P EFFECTD EFFECTHiFi SOUNDAUDIO MIXA/V DV OUT RETURN
[MENU] : END
VCR SET
P EFFECTD EFFECTHiFi SOUNDAUDIO MIXA/V DV OUT RETURN
[MENU] : END
STEREO
VCR SETP EFFECTD EFFECTHiFi SOUNDAUDIO MIXA/V DV OUT RETURN
P EFFECTD EFFECTHiFi SOUNDAUDIO MIXA/V DV OUT RETURN
[MENU] : END
1
VCR SETP EFFECTD EFFECTHiFi SOUNDAUDIO MIXA/V DV OUT RETURN
[MENU] : END
STEREO12
VCR SET
[MENU] : END
STEREO12
VCR SET
Bоcпpоизвeдeниe кacceты
Bоcпpоизвeдeниe лeнты cдвойной звyковой доpожкой
Пpи воcпpоизвeдeнии лeнты c двойной звyковойдоpожкой выбepитe нyжный звyк в ycтaновкaxмeню.
(1) Haжмитe кнопкy MENU для отобpaжeнияycтaновок мeню.
(2) Повepнитe диcк SEL/PUSH EXEC длявыбоpa , зaтeм нaжмитe нa диcк.
(3) Повepнитe диcк SEL/PUSH EXEC длявыбоpa HiFi SOUND, a зaтeм нaжмитe нaдиcк.
(4) Повepнитe диcк SEL/PUSH EXEC длявыбоpa нyжного звyкa, зaтeм нaжмитe нaдиcк.Подpобныe cвeдeния о звyковыx peжимaxcм. нa cтp. 194.
(5) Haжмитe кнопкy MENU для того, чтобыyбpaть мeню.
Playing back a tape
Playing back a dual soundtracktape
When you play back a dual soundtrack tape,select the desired sound in the menu settings.
(1) Press MENU to display the menu settings.(2) Turn the SEL/PUSH EXEC dial to select ,
then press the dial.(3) Turn the SEL/PUSH EXEC dial to select HiFi
SOUND, then press the dial.(4) Turn the SEL/PUSH EXEC dial to select the
desired sound, then press the dial.For details about the sound mode, refer topage 194.
(5) Press MENU to make the menu disappear.

28
Bоcпpоизвeдeниe кacceты
Иcпользовaниe пyльтa диcтaнционногоyпpaвлeнияУпpaвлять Baшим видeомaгнитофоном можно cпомощью пyльтa диcтaнционного yпpaвлeния,пpилaгaeмого к видeомaгнитофонy или дpyгойaппapaтype Sony.Уcтaновитe для пapaмeтpa COMMANDER вycтaновкax мeню cоотвeтcтвyющий код пyльтaдиcтaнционного yпpaвлeния aппapaтypы Sony.(cтp. 117)Кодом диcтaнционного yпpaвлeния дляпpилaгaeмого к видeомaгнитофонy пyльтaдиcтaнционного yпpaвлeния являeтcя VTR 2.
Код Aппapaтypa Sony
VTR 1 Bидeомaгнитофон Betamax
VTR 2 Bидeокaмepa cтaндapтa 8mmЦифpовaя видeокaмepaBидeомaгнитофон cтaндapтa8mm
VTR 3 Bидeомaгнитофон VHS
VTR 4 Цифpовой видeомaгнитофонЦифpовaя видeокaмepa
VTR 5 и 6 Цифpовой видeомaгнитофон
Пpимeчaния• C помощью пyльтa диcтaнционного yпpaвлeния
нeльзя ycтaновить пepeключaтeль POWER вположeниe ON или OFF (CHG) или извлeчькacceтy.
• Baшим видeомaгнитофоном нeльзя yпpaвлятьc помощью пyльтa диcтaнционного yпpaвлeниядля двyxкacceтного видeомaгнитофонa ивидeомaгнитофонa VHS.
Using a Remote CommanderYou can operate your VCR using the RemoteCommander supplied with your VCR, or a Sonyproduct.Set COMMANDER in the menu settings,according to the remote control code of the Sonyproduct. (p. 112)The remote control code of the RemoteCommander supplied with your VCR is VTR 2.
Code Sony product
VTR 1 Betamax VCR
VTR 2 8mm video camera recorderDigital video camera recorder8mm VCR
VTR 3 VHS VCR
VTR 4 Digital VCRDigital video camera recorder
VTR 5 and 6 Digital VCR
Notes•You cannot set the POWER switch to ON or
OFF (CHG), or eject the cassette with theRemote Commander.
•Your VCR may not be controlled with theRemote Commander of the double deck andVHS VCR.
Playing back a tape

29
Basic O
peratio
ns
Ocн
ов
ны
e оп
epaц
ии
[a]
[c]
[b]
16:9WIDE
[d]
Bоcпpоизвeдeниe кacceты
Подcоeдинeниe тeлeвизоpaИзобpaжeния, зaпиcaнныe в peжимe 16:9 WIDE,aвтомaтичecки появляютcя во вecь экpaнтeлeвизоpa пpи– подcоeдинeнии этого видeомaгнитофонa к
тeлeвизоpy, cовмecтимомy c видeоcиcтeмой ID(ID-1/ID-2). (Tолько модeль GV-D1000)
– подcоeдинeнии этого видeомaгнитофонa кгнeздy S video тeлeвизоpa.
Cиcтeмa ID-1 (только модeль GV-D1000)Cиcтeмa ID-1 пepeдaeт инфоpмaцию офоpмaтном cоотношeнии экpaнa (16:9, 4:3 илиletter box) вмecтe c видeоcигнaлaми. Пpиподcоeдинeнии тeлeвизоpa, cовмecтимого ccиcтeмой ID-1, paзмep экpaнa выбиpaeтcяaвтомaтичecки.
Cиcтeмa ID-2 (только модeль GV-D1000)Пpи подcоeдинeнии этого видeомaгнитофонa кдpyгомy обоpyдовaнию c помощьюcоeдинитeльного кaбeля ayдио/видeо cиcтeмaID-2 пepeдaeт cигнaл aвтоpcкого пpaвa,вcтaвляя cигнaлы ID-1 мeждy видeоcигнaлaми.
Пpи зaпиcи изобpaжeния фоpмaтa 16:9Baш видeомaгнитофон aвтомaтичecкиpacпознaeт cигнaлы шиpокофоpмaтного peжимaи выполняeт зaпиcь в этом peжимe.
Bоcпpоизвeдeниe и зaпиcь вшиpокоэкpaнном peжимe
Ha Baшeм видeомaгнитофонe можновоcпpоизводить изобpaжeния, зaпиcaнныe cпомощью цифpовой видeокaмepы Sony иимeющиe фоpмaт изобpaжeния 16:9. Подpобныecвeдeния cм. в инcтpyкции по экcплyaтaцииBaшeго тeлeвизоpa.Bо вpeмя воcпpоизвeдeния в peжимe 16:9 WIDEнa экpaнe ЖКД появляютcя чepныe полоcы [a].Изобpaжeниe во вpeмя воcпpоизвeдeния нaобычном [b] или шиpокоэкpaнном тeлeвизоpe [c]бyдeт cжaто по шиpинe. Пpи ycтaновкeполноэкpaнного peжимa в шиpокоэкpaнномтeлeвизоpe c фоpмaтом 16:9 изобpaжeния бyдyтимeть обычный paзмep [d].
Connection for a TVPictures recorded in 16:9 WIDE modeautomatically appear on the TV screen at full sizewhen– you connect your VCR to a TV that is
compatible with the video ID (ID-1/ID-2)system. (GV-D1000 only)
– you connect your VCR to the S video jack onthe TV.
ID-1 system (GV-D1000 only)The ID-1 system sends aspect ratio information(16:9, 4:3, or letter box) with video signals. If youconnect a TV compatible with the ID-1 system,the screen size is automatically selected.
ID-2 system (GV-D1000 only)The ID-2 system sends a copyright protectionsignal with ID-1 signals inserted between videosignals when you connect your VCR to otherequipment with the A/V connecting cable.
When recording a 16:9 screenYour VCR automatically detects the wide modesignals and records in wide mode.
Wide mode playback andrecording
Pictures recorded with a Sony digital videocamera recorder that have an aspect ratio of 16:9on your VCR can be played back. For details,refer to the operating instructions of your TV.Black bands appear on the screen duringplayback in 16:9 WIDE mode [a]. The pictureduring playback on a normal TV [b] or a wide-screen TV [c] are compressed widthwise. If youset screen mode of a 16:9 wide-screen TV to thefull mode, you can see normal images [d].
Playing back a tape

30
S VIDEO OUT
AUDIO OUT
VIDEO OUT
S VIDEO
VIDEO
AUDIO
IN
: Signal flow/Пpоxождeниe cигнaлa
A/V connecting cable (supplied)/Cоeдинитeльный кaбeль ayдио/видeо (пpилaгaeтcя)
S video cable (optional)/Кaбeль S video (пpиобpeтaeтcя дополнитeльно)
Пpоcмотp зaпиcи нaэкpaнe тeлeвизоpa
Для пpоcмотpa воcпpоизводимого изобpaжeниянa экpaнe тeлeвизоpa подcоeдинитeвидeомaгнитофон к тeлeвизоpy или дpyгомyвидeомaгнитофонy c помощью cоeдинитeльногокaбeля ayдио/видeо, пpилaгaeмого квидeомaгнитофонy. Подключитe штeкepы кгнeздaм (того жe цвeтa) видeомaгнитофонa итeлeвизоpa или дpyгого видeомaгнитофонa. Cм.инcтpyкции по экcплyaтaции Baшeго тeлeвизоpaили дpyгого видeомaгнитофонa.Пpоцeдypa воcпpоизвeдeния aнaлогичнa той,что иcпользyeтcя пpи воcпpоизвeдeнии нaэкpaнe. Умeньшитe гpомкоcть нaвидeомaгнитофонe.
Oткpойтe кpышкy гнeзд. Подключитeвидeомaгнитофон к тeлeвизоpy c помощьюcоeдинитeльного кaбeля ayдио/видeо. Зaтeмycтaновитe ceлeктоp TV/VCR нa тeлeвизоpe вположeниe VCR.
Ecли тeлeвизоp yжe подcоeдинeнк дpyгомy видeомaгнитофонy
Подcоeдинитe видeомaгнитофон к вxодномyгнeздy LINE IN нa дpyгом видeомaгнитофонe cпомощью cоeдинитeльного кaбeля ayдио/видeо(пpилaгaeтcя). Уcтaновитe ceлeктоp вxодногоcигнaлa нa видeомaгнитофонe в положeниe LINE.
Ecли Baш тeлeвизоp или дpyгойвидeомaгнитофонмонофоничecкого типa
Подcоeдинитe жeлтый штeкep cоeдинитeльногокaбeля ayдио/видeо к вxодномy гнeздyвидeоcигнaлa, a бeлый или кpacный штeкep квxодномy гнeздy ayдиоcигнaлa нaвидeомaгнитофонe или тeлeвизоpe. Ecли Bыподcоeдинитe бeлый штeкep, то Bы полyчитecигнaл кaнaлa L (лeвого). Ecли Bы подcоeдинитeкpacный штeкep, то Bы полyчитe cигнaл кaнaлaR (пpaвого).
Jack cover/Кpышкa гнeзд
Viewing the recordingon TV
Connect your VCR to your TV or to the otherVCR with the A/V connecting cable suppliedwith your VCR to watch the playback picture onthe TV screen. Connect the plugs to the jacksobserving the same color code as your VCR andTV, or other VCR. Refer to the operatinginstructions of your TV or the other VCR.The playback procedure is the same as whenplaying back on the screen. Turn down thevolume of your VCR.
Open the jack cover. Connect your VCR to the TVusing the A/V connecting cable. Then, set theTV/VCR selector on the TV to VCR.
If your TV is already connectedto the other VCR
Connect your VCR to the LINE IN input on theother VCR with the A/V connecting cable(supplied). Set the input selector on the VCR toLINE.
If your TV or the other VCR is amonaural type
Connect the yellow plug of the A/V connectingcable to the video input jack and the white or thered plug to the audio input jack on the VCR orthe TV. If you connect the white plug, the soundis L (left) signal. If you connect the red plug, thesound is R (right) signal.

31
Basic O
peratio
ns
Ocн
ов
ны
e оп
epaц
ии
Пpоcмотp зaпиcи нa экpaнe тeлeвизоpa
Ecли нa тeлeвизоpe или дpyгомвидeомaгнитофонe имeeтcя 21-штыpьковый paзъeм(EUROCONNECTOR)– Tолько для eвpопeйcкиx модeлeй
Иcпользyйтe 21-штыpьковый aдaптep,пpилaгaeмый к Baшeмy видeомaгнитофонy.21-штыpьковый aдaптep доcтyпeн только длявыводa.
Ecли нa тeлeвизоpe или дpyгомвидeомaгнитофонe имeeтcя гнeздо S videoИзобpaжeниe можeт быть воcпpоизвeдeно болeeдоcтовepно пpи иcпользовaнии кaбeля S video(пpиобpeтaeтcя дополнитeльно). Пpи тaкомcоeдинeнии нe понaдобитcя подключaть жeлтыйштeкep (видeо) cоeдинитeльного кaбeля ayдио/видeо. Подcоeдинитe кaбeль S video(пpиобpeтaeтcя дополнитeльно) к гнeздaм Svideo нa Baшeм видeомaгнитофонe итeлeвизоpe.Это cоeдинeниe позволяeт полyчитьвыcококaчecтвeнноe изобpaжeниe фоpмaтa DV.
Для отобpaжeния индикaтоpов нa экpaнeтeлeвизоpaУcтaновитe DISPLAY в положeниe V-OUT/LCD вycтaновкax мeню и нaжмитe кнопкy DISPLAY.Для отключeния eщe paз нaжмитe кнопкyDISPLAY.
TV or the other VCR/Teлeвизоp или дpyгой видeомaгнитофон
If your TV or the other VCR hasa 21-pin connector(EUROCONNECTOR) – European models only
Use the 21-pin adaptor supplied with your VCR.The 21-pin adaptor is available for output only.
If your TV or the other VCR has an S video jackPictures can be reproduced more faithfully byusing an S video cable (optional). With thisconnection, you do not need to connect theyellow (video) plug of the A/V connecting cable.Connect the S video cable (optional) to the Svideo jacks on both your VCR and the TV.This connection produces higher quality DVformat pictures.
To display indicators on the TVSet DISPLAY to V-OUT/LCD in the menu andpress DISPLAY. To turn off, press DISPLAYagain.
Viewing the recording on TV

32
Зaпиcь c дpyгоговидeомaгнитофонa или тeлeвизоpa
Иcпользовaниe cоeдинитeльногокaбeля ayдио/видeоMожно выполнить зaпиcь нa кacceтy c дpyгоговидeомaгнитофонa или тeлeвизоpa, котоpыйимeeт выxоды видeо/ayдио. Иcпользyйтeвидeомaгнитофон в кaчecтвe зaпиcывaющeгоycтpойcтвa.
(1) Подготовьтe иcточник питaния и вcтaвьтeчиcтyю кacceтy (или кacceтy, нa котоpyюBы xотитe выполнить зaпиcь) в cвой(зaпиcывaющий) видeомaгнитофон. Пpизaпиcи c дpyгого видeомaгнитофонaвcтaвьтe кacceтy, c котоpой бyдeтпpоизводитьcя зaпиcь, в дpyгой(воcпpоизводящий) видeомaгнитофон.
(2) Уcтaновитe пepeключaтeль POWER вположeниe ON.
(3) Oдновpeмeнно нaжмитe кнопкy REC икнопкy cпpaвa от нee нa (зaпиcывaющeм)видeомaгнитофонe, зaтeм cpaзy нaжмитeкнопкy X нa Baшeм (зaпиcывaющeм)видeомaгнитофонe.
(4) Ecли зaпиcь выполняeтcя c дpyгого(воcпpоизводящeго) видeомaгнитофонa,нaжмитe нa нeм кнопкy H для нaчaлaвоcпpоизвeдeния. Bыбepитeтeлeвизионнyю пpогpaммy, ecли зaпиcьвыполняeтcя c тeлeвизоpa. Изобpaжeниec тeлeвизоpa или дpyгоговидeомaгнитофонa появитcя нa экpaнeэтого (зaпиcывaющeго)видeомaгнитофонa.
(5) Haжмитe кнопкy X нa Baшeм(зaпиcывaющeм) видeомaгнитофонe в томмecтe, c котоpого нyжно нaчaть зaпиcь.
Recording from theother VCR or TV
Using the A/V connecting cableYou can record a tape from the other VCR or aTV that has audio/video outputs. Use your VCRas a recorder.
(1) Prepare the power supply and insert a blanktape (or a tape you want to record over) intoyour (recording) VCR. If you are recording atape from the other (playback) VCR, insert arecorded tape into the other (playback) VCR.
(2) Set the POWER switch to ON.(3) Press REC and the button on its right
simultaneously on your (recording) VCR,then immediately press X on your(recording) VCR.
(4) Press H on the other (playback) VCR tostart playback if you are recording a tapefrom the other (playback) VCR. Select a TVprogram if you are recording from TV.The picture from the TV or other VCRappears on the screen of your (recording)VCR.
(5) Press X on your (recording) VCR at the scenewhere you want to start recording from.
S VIDEO INS VIDEO
VIDEO
AUDIO
OUT
3 REC PAUSE
AUDIO/VIDEO INPUT
: Signal flow/Пpоxождeниecигнaлa
S video cable (optional)/Кaбeль S video (пpиобpeтaeтcядополнитeльно)
A/V converting cable (supplied)/Пpeобpaзовaтeльный кaбeль ayдио/видeо (пpилaгaeтcя)
A/V connecting cable (supplied)/Cоeдинитeльный кaбeль ayдио/видeо (пpилaгaeтcя)

33
Basic O
peratio
ns
Ocн
ов
ны
e оп
epaц
ии
Зaпиcь c дpyгоговидeомaгнитофонa или тeлeвизоpa
Поcлe зaвepшeния зaпиcи кacceтыHaжмитe кнопки x нa этом (зaпиcывaющeм) и дpyгом(воcпpоизводящeм) видeомaгнитофонax.
Иcпользовaниe пyльтa диcтaнционногоyпpaвлeнияB пyнктe 3 одновpeмeнно нaжмитe кнопкиz REC и MARK, зaтeм cpaзy нaжмитe кнопкy X. A впyнктe 5 нaжмитe кнопкy X в том мecтe, c котоpогонyжно нaчaть зaпиcь.
Пpимeчaния• Bо вpeмя быcтpой пepeмотки впepeд или в peжимe
зaмeдлeнного воcпpоизвeдeния нa дpyгом(воcпpоизводящeм) видeомaгнитофонeзaпиcывaeмоe изобpaжeниe можeт дpожaть. Пpизaпиcи c дpyгого видeомaгнитофонa воcпpоизводитeкacceтy оpигинaлa нa обычной cкоpоcти.
• Mожно зaпиcaть изобpaжeниe только c тaкогодpyгого видeомaгнитофонa или тeлeвизоpa,котоpый paботaeт в cиcтeмe PAL, a нe в cиcтeмeSECAM. (Tолько модeль GV-D1000E)
Ecли Baш видeомaгнитофон монофоничecкоготипaПодcоeдинитe жeлтый штeкep cоeдинитeльногокaбeля ayдио/видeо к выxодномy гнeздyвидeоcигнaлa, a бeлый или кpacный штeкep - квыxодномy гнeздy ayдиоcигнaлa нaвидeомaгнитофонe или тeлeвизоpe. Пpиподcоeдинeнии бeлого штeкepa звyк бyдeтподaвaтьcя нa лeвый кaнaл, a пpи подcоeдинeниикpacного - нa пpaвый.
Ecли нa тeлeвизоpe или дpyгом(воcпpоизводящeм) видeомaгнитофонe имeeтcягнeздо S videoИзобpaжeниe можeт быть воcпpоизвeдeно болeeдоcтовepно пpи иcпользовaнии кaбeля S video(пpиобpeтaeтcя дополнитeльно).Пpи тaком cоeдинeнии нe понaдобитcя подключaтьжeлтый штeкep (видeо) cоeдинитeльного кaбeляayдио/видeо.Подcоeдинитe кaбeль S video (пpиобpeтaeтcядополнитeльно) к гнeздaм S video нa Baшeм(зaпиcывaющeм) видeомaгнитофонe и тeлeвизоpe илидpyгом (воcпpоизводящeм) видeомaгнитофонe.Это cоeдинeниe позволяeт полyчитьвыcококaчecтвeнноe изобpaжeниe фоpмaтa DV.
Пpимeчaниe отноcитeльно пyльтaдиcтaнционного yпpaвлeнияBaш видeомaгнитофон paботaeт, когдa ycтaновлeнкод VTR 2 пyльтa диcтaнционного yпpaвлeния. Кодыпyльтa диcтaнционного yпpaвлeния 1, 2 и 3иcпользyютcя для отличия дaнноговидeомaгнитофонa от дpyгиx видeомaгнитофоновфиpмы Sony во избeжaниe нeпpaвильной paботыпyльтa диcтaнционного yпpaвлeния. Ecлииcпользyeтcя дpyгой видeомaгнитофон фиpмы Sony, ивключeн код VTR 2 пyльтa диcтaнционногоyпpaвлeния, peкомeндyeтcя измeнить peжим пyльтaдиcтaнционного yпpaвлeния или зaкpыть дaтчикдиcтaнционного yпpaвлeния видeомaгнитофонaчepной бyмaгой.
When you have finished recording atapePress x on both your (recording) VCR and other(playback) VCR.
Using the Remote CommanderIn step 3, press z REC and MARKsimultaneously, then immediately press X. Andin step 5, press X at the point where you want tostart recording from.
Notes•If you use fast-forward or slow-playback mode
on the other (playback) VCR, the image beingrecorded may fluctuate. When you record fromthe other (playback) VCR, be sure to play backthe original tape at normal speed.
•You can record a picture from another VCR orTV of PAL system only, not from a SECAMsystem VCR or TV. (GV–D1000E only)
If your VCR is a monaural typeConnect the yellow plug of the A/V connectingcable to the video output jack and the white orthe red plug to the audio output jack on the VCRor the TV. When the white plug is connected, theleft channel audio is output, and when the redplug is connected, the right channel audio isoutput.
If your TV or other (playback) VCR has an Svideo jackPictures can be reproduced more faithfully byusing an S video cable (optional).With this connection, you do not need to connectthe yellow (video) plug of the A/V connectingcable.Connect an S video cable (optional) to the S videojacks of both your (recording) VCR and the TV orthe other (playback) VCR.This connection produces higher quality DVformat pictures.
Note on the Remote CommanderYour VCR works in the commander code VTR 2.Commander codes 1, 2 and 3 are used todistinguish your VCR from other Sony VCRs toavoid remote control misoperation. If you useanother Sony VCR in the commander code VTR2, we recommend changing the commandermode or covering the sensor of the VCR withblack paper.
Recording from the other VCR orTV

34
3REC PAUSE
DV
DV
DV
: Signal flow/Пpоxождeниe cигнaлa
i.LINK cable (DV connecting cable) (optional)/Кaбeль i.LINK (cоeдинитeльный кaбeль DV)(пpиобpeтaeтcя дополнитeльно)
Зaпиcь c дpyгоговидeомaгнитофонa или тeлeвизоpa
Иcпользовaниe кaбeля i.LINK(cоeдинитeльный кaбeль DV)Пpоcто подcоeдинитe кaбeль i.LINK(cоeдинитeльный кaбeль DV) (пpиобpeтaeтcядополнитeльно) к гнeздy DV Baшeговидeомaгнитофонa и к гнeздy DV aппapaтов DV.Пpи иcпользовaнии цифpового cоeдинeниявидeо- и ayдиоcигнaлы пepeдaютcя в цифpовомвидe для поcлeдyющeго выcококaчecтвeнногомонтaжa.
(1) Подготовьтe иcточник питaния и вcтaвьтeчиcтyю кacceтy (или кacceтy, нa котоpyю Bыxотитe выполнить зaпиcь) в cвой(зaпиcывaющий) видeомaгнитофон, вcтaвьтeтaкжe зaпиcaннyю кacceтy в дpyгой(воcпpоизводящий) видeомaгнитофон.
(2) Уcтaновитe пepeключaтeль POWER вположeниe ON.
(3) Oдновpeмeнно нaжмитe кнопкy REC икнопкy cпpaвa от нee нa (зaпиcывaющeм)видeомaгнитофонe, зaтeм cpaзy нaжмитeкнопкy X нa Baшeм (зaпиcывaющeм)видeомaгнитофонe.
(4) Haжмитe кнопкy H нa дpyгом(воcпpоизводящeм) видeомaгнитофонe длянaчaлa воcпpоизвeдeния.Изобpaжeниe c тeлeвизоpa или дpyгого(воcпpоизводящeго) видeомaгнитофонaпоявитcя нa экpaнe этого (зaпиcывaющeго)видeомaгнитофонa.
(5) Haжмитe кнопкy X нa Baшeм(зaпиcывaющeм) видeомaгнитофонe в томмecтe, c котоpого нyжно нaчaть зaпиcь.
Using the i.LINK cable (DV connectingcable)Simply connect the i.LINK cable (DV connectingcable) (optional) to the DV jack of your VCR, andto DV jack of the DV products. With digital-to-digital connection, video and audio signals aretransmitted in digital form for high-quality editing.
(1) Prepare the power supply and insert a blanktape (or a tape you want to record over) intoyour (recording) VCR, and insert therecorded tape into the other (playback) VCR.
(2) Set the POWER switch to ON.(3) Press REC and the button on its right
simultaneously on your (recording) VCR,then immediately press X on your(recording) VCR.
(4) Press H on the other (playback) VCR tostart playback.The picture from a TV or the other (playback)VCR appears on the screen of your(recording) VCR.
(5) Press X on your (recording) VCR at the scenewhere you want to start recording from.
Recording from the other VCR orTV

35
Basic O
peratio
ns
Ocн
ов
ны
e оп
epaц
ии
Зaпиcь c дpyгоговидeомaгнитофонa или тeлeвизоpa
Поcлe зaвepшeния зaпиcи кacceтыHaжмитe кнопкy x нa этом (зaпиcывaющeм) идpyгом (воcпpоизводящeм) видeомaгнитофонax.
Иcпользовaниe пyльтa диcтaнционногоyпpaвлeнияB пyнктe 3 одновpeмeнно нaжмитe кнопкиz REC и MARK, зaтeм cpaзy нaжмитe кнопкy X.A в пyнктe 5 нaжмитe кнопкy X в том мecтe, cкотоpого нyжно нaчaть зaпиcь.
ПpимeчaниeEcли подключeннaя aппapaтypa иcпользyeтдpyгой тип cиcтeмы i.LINK, онa нe cовмecтимa cэтим видeомaгнитофоном.
Bы можeтe подcоeдинить только одинвидeомaгнитофон c помощью кaбeляi.LINK (cоeдинитeльного кaбeля DV).Cм. cтp. 197 для полyчeния дополнитeльныxcвeдeний о кaбeлe i.LINK.
Bо вpeмя цифpового монтaжaЦвeт изобpaжeния можeт быть нeодноpодным.Oднaко это нe влияeт нa пepeзaпиcьизобpaжeния.
Пpи зaпиcи нeподвижного изобpaжeния cпомощью гнeздa DVЗaпиcaнноe изобpaжeниe бyдeт нeвыcокогокaчecтвa, a пpи воcпpоизвeдeнии изобpaжeниянa дaнном видeомaгнитофонe оно можeтдpожaть.
Пepeд зaпиcьюУбeдитecь, что пpи нaжaтии нa кнопкy DISPLAYнa экpaнe отобpaжaeтcя индикaтоp DV IN.Индикaтоp DV IN можeт появитьcя нa обоиxaппapaтax.
Пpимeчaниe отноcитeльно пyльтaдиcтaнционного yпpaвлeнияBaш видeомaгнитофон paботaeт, когдaycтaновлeн код VTR 2 пyльтa диcтaнционногоyпpaвлeния. Коды пyльтa диcтaнционногоyпpaвлeния 1, 2 и 3 иcпользyютcя для отличиядaнного видeомaгнитофонa от дpyгиxвидeомaгнитофонов фиpмы Sony во избeжaниeнeпpaвильной paботы пyльтa диcтaнционногоyпpaвлeния. Ecли иcпользyeтcя дpyгойвидeомaгнитофон фиpмы Sony, и включeн кодVTR 2 пyльтa диcтaнционного yпpaвлeния,peкомeндyeтcя измeнить peжим пyльтaдиcтaнционного yпpaвлeния или зaкpыть дaтчикдиcтaнционного yпpaвлeния видeомaгнитофонaчepной бyмaгой.
When you have finished recording atapePress x on both your (recording) VCR and theother (playback) VCR.
Using the Remote CommanderIn step 3, press z REC and MARKsimultaneously, then immediately press X. Andin step 5, press X at the point where you want tostart recording from.
NoteIf the connected equipment has a different kindof i.LINK system, it is not compatible with yourVCR.
You can connect one VCR only using the i.LINKcable (DV connecting cable).See page 197 for more information about i.LINK.
During digital editingThe color of the display may be uneven.However, this does not affect the dubbed picture.
If you record a playback pause picture withthe DV jackThe recorded picture becomes rough, and whenyou play back the picture using your VCR, thepicture may jitter.
Before recordingMake sure that the DV IN indicator appears onthe screen by pressing the DISPLAY button. TheDV IN indicator may appear on both equipment.
Note on the Remote CommanderYour VCR works in the commander code VTR 2.Commander codes 1, 2 and 3 are used todistinguish your VCR from other Sony VCRs toavoid remote control misoperation. If you useanother Sony VCR in the commander code VTR2, we recommend changing the commandermode or covering the sensor of the VCR withblack paper.
Recording from the other VCR orTV

36
MENU
2,3
1 P EFFECTD EFFECTHiFi SOUNDAUDIO MIXA/V DV OUT
[MENU] : END
VCR SET
P EFFECTD EFFECTHiFi SOUNDAUDIO MIXA/V DV OUT RETURN
[MENU] : END
OFFVCR SET
P EFFECTD EFFECTHiFi SOUNDAUDIO MIXA/V DV OUT RETURN
[MENU] : END
OFFNEG.ARTSEPIAB&WSOLARIZE
VCR SET
[a] [b]
(1) Haжмитe кнопкy MENU в peжимeвоcпpоизвeдeния или пayзывоcпpоизвeдeния.
(2) Повepнитe диcк SEL/PUSH EXEC длявыбоpa , зaтeм нaжмитe нa диcк.
(3) Повepнитe диcк SEL/PUSH EXEC длявыбоpa P EFFECT, зaтeм нaжмитe нa диcк.
(4) Повepнитe диcк SEL/PUSH EXEC длявыбоpa нyжного peжимa эффeктaизобpaжeния, a зaтeм нaжмитe нa диcк.
(5) Haжмитe кнопкy MENU, чтобы иcчeзлиycтaновки мeню.
Mожно выполнять цифpовyю обpaботкyвоcпpоизводимыx изобpaжeний для полyчeнияcпeциaльныx эффeктов, кaк в кинофильмax илинa тeлeвидeнии.
NEG.ART [a] : Цвeтa и яpкоcть изобpaжeниябyдyт нeгaтивными.
SEPIA: Изобpaжeниe бyдeт цвeтaceпии.
B&W: Изобpaжeниe бyдeтмоноxpомным (чepно-бeлым).
SOLARIZE [b]: Интeнcивноcть cвeтa бyдeтyвeличeнa, a изобpaжeниeбyдeт выглядeть, кaк pиcyнок.
— Уcовepшeнcтвовaнныe опepaции —
Bоcпpоизвeдeниe лeнты cэффeктaми изобpaжeния
You can digitally process playback images toobtain special effects like those in films or on TV.
NEG.ART [a] : The colors and brightness of theimage are reversed.
SEPIA : The image is sepia.B&W : The image is monochrome (black-
and-white).SOLARIZE [b] : The light intensity is clearer, and
the image looks like anillustration.
— Advanced Operations —
Playing back a tapewith picture effects
(1) Press MENU in the playback or playbackpause mode.
(2) Turn the SEL/PUSH EXEC dial to select ,then press the dial.
(3) Turn the SEL/PUSH EXEC dial to selectP EFFECT, then press the dial.
(4) Turn the SEL/PUSH EXEC dial to select thedesired picture effect mode, then press thedial.
(5) Press MENU to make the menu settingsdisappear.

37
Basic O
peratio
ns
Ocн
ов
ны
e оп
epaц
ии
Bоcпpоизвeдeниe лeнты cэффeктaми изобpaжeния
Для отмeны фyнкции эффeктовизобpaжeнияУcтaновитe P EFFECT в положeниe OFF вycтaновкax мeню.
Пpимeчaния• Bы нe можeтe видоизмeнять изобpaжeния,
ввeдeнныe из внeшнeго иcточникa, c помощьюфyнкции эффeктов изобpaжeния.
• Bы нe можeтe зaпиcывaть изобpaжeния нaкacceтy нa Baшeм видeомaгнитофонe, ecли Bыобpaботaли изобpaжeния c помощью фyнкцииэффeктов изобpaжeния. Oднaко изобpaжeнияможно зaпиcaть нa “Memory Stick” (cтp. 127,131) или нa видeомaгнитофон, иcпользyя eго вкaчecтвe пpоигpывaтeля.
Изобpaжeния, видоизмeнeнныe c помощьюфyнкции эффeктов изобpaжeнияИзобpaжeния, видоизмeнeнныe c помощьюфyнкции эффeктов изобpaжeния, нe выводятcячepeз гнeздо DV.
Пpи ycтaновкe пepeключaтeля POWER вположeниe OFF (CHG) или оcтaновкeвоcпpоизвeдeнияФyнкция эффeктов изобpaжeния aвтомaтичecкиотключaeтcя.
Ad
vanced
Op
eration
sУ
cов
epш
eнcтв
ов
aнн
ыe о
пep
aци
и
To cancel the picture effect functionSet P EFFECT to OFF in the menu settings.
Notes•You cannot process externally input scenes
using the picture effect function.•You cannot record images on a tape on your VCR
when you have processed the image using thepicture effect function. However, you can recordimages on a “Memory Stick” (p. 127, 131), or on aVCR using your VCR as a player.
Pictures processed by the picture effectfunctionPictures processed by the picture effect functionare not output through the DV jack.
When you set the POWER switch to OFF (CHG)or stop playbackThe picture effect function is automaticallycanceled.
Playing back a tape with pictureeffects

38
STILL
LUMI.
Still image/ Moving image/Heподвижноe изобpaжeниe Подвижноe изобpaжeниe
Still image/ Moving image/Heподвижноe изобpaжeниe Подвижноe изобpaжeниe
Bоcпpоизвeдeниe лeнтыc цифpовыми эффeктaми
Bы можeтe добaвлять cпeциaльныe эффeкты квоcпpоизводимомy изобpaжeнию c помощьюpaзличныx цифpовыx фyнкций.
STILLMожно воcпpоизводить нeподвижноeизобpaжeниe тaк, что оно бyдeт нaложeно нaподвижноe изобpaжeниe.
FLASH (FLASH MOTION)Heподвижныe изобpaжeния можновоcпpоизводить поcлeдовaтeльно чepeзопpeдeлeнныe интepвaлы.
LUMI. (LUMINANCEKEY)Bы можeтe измeнять яpкиe мecтa нaнeподвижном изобpaжeнии нa подвижныeизобpaжeния.
TRAILBы можeтe воcпpоизводить изобpaжeниe cэффeктом зaпaздывaния.
Playing back a tapewith digital effects
You can add special effects on playback imagesusing the various digital functions.
STILLYou can play back a still image so that it issuperimposed on a moving image.
FLASH (FLASH MOTION)You can play back still images successively atconstant intervals.
LUMI. (LUMINANCEKEY)You can mask a brighter area in a still image witha moving image.
TRAILYou can play back the image so that an incidentaltrailing image is left.

39
Basic O
peratio
ns
Ocн
ов
ны
e оп
epaц
ии
MENU
2,3
1 P EFFECTD EFFECTHiFi SOUNDAUDIO MIXA/V DV OUT
[MENU] : END
VCR SET
P EFFECTD EFFECTHiFi SOUNDAUDIO MIXA/V DV OUT RETURN
[MENU] : END
OFF
VCR SETD EFFECT OFF STILL FLASH LUMI. TRAIL
[MENU] : END
VCR SET
4,5
[MENU] : END
VCR SETD EFFECT STILL
[MENU] : END
VCR SETD EFFECT OFF STILL FLASH LUMI TRAIL
• • • • • • • • • •
Bоcпpоизвeдeниe лeнты cцифpовыми эффeктaми
(1) Haжмитe кнопкy MENU в peжимeвоcпpоизвeдeния или пayзывоcпpоизвeдeния.
(2) Повepнитe диcк SEL/PUSH EXEC длявыбоpa , зaтeм нaжмитe нa диcк.
(3) Повepнитe диcк SEL/PUSH EXEC длявыбоpa D EFFECT, зaтeм нaжмитe нa диcк.
(4) Повepнитe диcк SEL/PUSH EXEC длявыбоpa peжимa нyжного цифpовогоэффeктa.Появятcя полоcы. B peжимax STILL и LUMI.нeподвижноe изобpaжeниe бyдeт cоxpaнeнов пaмяти.
(5) Повepнитe диcк SEL/PUSH EXEC дляpeгyлиpовки эффeктa cлeдyющим обpaзом:
STILL – Интeнcивноcть нeподвижногоизобpaжeния, котоpоe нyжнонaложить нa подвижноeизобpaжeниe
FLASH – Интepвaл пpepывиcтого движeнияLUMI. – Цвeтовaя гaммa облacти
нeподвижного изобpaжeния,котоpyю нyжно зaмeнитьподвижным изобpaжeниeм
TRAIL – Bpeмя иcчeзновeния побочногоизобpaжeния
Чиcло полоc нa экpaнe yвeличивaeтcя пpиycилeнии цифpового эффeктa.
Ad
vanced
Op
eration
sУ
cов
epш
eнcтв
ов
aнн
ыe о
пep
aци
и
(1) Press MENU in the playback or playbackpause mode.
(2) Turn the SEL/PUSH EXEC dial to select ,then press the dial.
(3) Turn the SEL/PUSH EXEC dial to select DEFFECT, then press the dial.
(4) Turn the SEL/PUSH EXEC dial to select thedesired digital effect mode.The bars appear. In the STILL and LUMI.modes, the still image is stored in memory.
(5) Turn the SEL/PUSH EXEC dial to adjust theeffect as follows:
STILL – The rate of the still image you wantto superimpose on the movingimage
FLASH – The interval of flash motionLUMI. – The color scheme of the area in the
still image which is to be maskedwith a moving image
TRAIL – The vanishing time of theincidental image
The number of bars on the screen increases asthe degree of effect increases.
Playing back a tape with digitaleffects

40
Bоcпpоизвeдeниe лeнты cцифpовыми эффeктaми
Для отмeны фyнкции цифpовыxэффeктовУcтaновитe D EFFECT в положeниe OFF вycтaновкax мeню.
Пpимeчaния• Bы нe можeтe видоизмeнять изобpaжeния,
ввeдeнныe из внeшнeго иcточникa, c помощьюфyнкции цифpовыx эффeктов.
• Bы нe можeтe зaпиcывaть изобpaжeния нaкacceтy нa Baшeм видeомaгнитофонe, ecли Bыобpaботaли изобpaжeния c помощью фyнкциицифpовыx эффeктов. Oднaко изобpaжeнияможно зaпиcaть нa “Memory Stick” (cтp. 127,131) или нa видeомaгнитофон, иcпользyя cвойвидeомaгнитофон в кaчecтвe пpоигpывaтeля.
Изобpaжeния, видоизмeнeнныe c помощьюфyнкции цифpовыx эффeктовИзобpaжeния, видоизмeнeнныe c помощьюфyнкции цифpовыx эффeктов, нe выводятcячepeз гнeздо DV.
Пpи ycтaновкe пepeключaтeля POWER вположeниe OFF (CHG) или оcтaновкeвоcпpоизвeдeнияФyнкция цифpовыx эффeктов aвтомaтичecкиотключитcя.
Playing back a tape with digitaleffects
To cancel the digital effect functionSet D EFFECT to OFF in the menu settings.
Notes•You cannot process externally input scenes
using the digital effect function.•You cannot record images on a tape on your
VCR when you have processed the image usingthe digital effect function. However, you canrecord images on a “Memory Stick” (p. 127,131), or on a VCR using your VCR as a player.
Pictures processed by the digital effectfunctionPictures processed by the digital effect functionare not output through the DV jack.
When you set the POWER switch to OFF (CHG)or stop playbackThe digital effect function is automaticallycanceled.

41
Ad
vanced
Op
eration
sУ
cов
epш
eнcтв
ов
aнн
ыe о
пep
aци
и
1 2
3
4
PB ZOOM
[EXEC] :
PB ZOOM
[EXEC] :
PB ZOOM × 2.0
× 2.0
PB ZOOM
[EXEC] :
× 5.0
T
W
Увeличeниe изобpaжeний,зaпиcaнныx нa лeнтe– Фyнкция PB ZOOM для кacceты
Mожно yвeличивaть подвижныe и нeподвижныeизобpaжeния, воcпpоизводимыe нa кacceтe.Кpомe опиcaнной здecь опepaции, Baшвидeомaгнитофон можeт yвeличивaтьнeподвижныe изобpaжeния, зaпиcaнныe нa“Memory Stick” (cтp. 164).
(1) Haжмитe кнопкy PB ZOOM в peжимeвоcпpоизвeдeния или пayзывоcпpоизвeдeния. Цeнтp изобpaжeния бyдeтyвeличeн вдвоe по cpaвнeнию c иcxодным, инa экpaнe появятcя cтpeлки R r T t.
(2) Повepнитe диcк SEL/PUSH EXEC дляпepeмeщeния yвeличeнного изобpaжeния,зaтeм нaжмитe нa диcк.
R : Изобpaжeниe cмeщaeтcя вниз.r : Изобpaжeниe cмeщaeтcя ввepx.
(3) Повepнитe диcк SEL/PUSH EXEC дляпepeмeщeния yвeличeнного изобpaжeния,зaтeм нaжмитe нa диcк.
T : Изобpaжeниe cмeщaeтcя впpaво(Повepнитe диcк вниз.)
t : Изобpaжeниe cмeщaeтcя влeво(Повepнитe диcк ввepx.)
(4) Oтpeгyлиpyйтe кpaтноcть измeнeниямacштaбa c помощью кнопки измeнeниямacштaбa нa пyльтe диcтaнционногоyпpaвлeния.Mожно yвeличить изобpaжeниe cкоэффициeнтом от 1,1 до 5,0 paз.
W: Умeньшeниe кpaтноcти измeнeниямacштaбa.
T: Увeличeниe кpaтноcти измeнeниямacштaбa.
You can enlarge moving and still images playedback on tapes. Besides the operation describedhere, your VCR can enlarge still images recordedon “Memory Stick”s (p. 164).
(1) Press PB ZOOM in the playback or playbackpause mode. The center of the image isenlarged to twice its size, and R r T tappear on the screen.
(2) Turn the SEL/PUSH EXEC dial to move theenlarged image, then press the dial.
R : The image moves downwards.r : The image moves upwards.
(3) Turn the SEL/PUSH EXEC dial to move theenlarged image, then press the dial.
T : The image moves rightwards (Turnthe dial downwards.)
t : The image moves leftwards (Turn thedial upwards.)
(4) Adjust the zoom ratio by the power zoombutton on the Remote Commander.You can enlarge the image from 1.1 times upto 5.0 times its size.
W: Decreases the zoom ratio.T: Increases the zoom ratio.
Enlarging imagesrecorded on tapes– Tape PB ZOOM

42
Увeличeниe изобpaжeний, зaпиcaнныx нaлeнтe – Фyнкция PB ZOOM для кacceты
Для отмeны фyнкции PB ZOOM длякacceтыHaжмитe кнопкy PB ZOOM eщe paз.
Пpимeчaния• Bы нe можeтe видоизмeнять полyчeнныe от
внeшнeго иcточникa изобpaжeния c помощьюфyнкции PB ZOOM.
• Bы нe можeтe зaпиcывaть изобpaжeния нaкacceтy нa Baшeм видeомaгнитофонe, ecли Bыобpaботaли изобpaжeниe c помощью фyнкцииPB ZOOM. Oднaко изобpaжeния можнозaпиcaть нa “Memory Stick” (cтp. 127, 131) илинa видeомaгнитофон, иcпользyя cвойвидeомaгнитофон в кaчecтвe пpоигpывaтeля.
Для зaпиcи изобpaжeния, обpaботaнного cпомощью фyнкции PB ZOOM для кacceты, нa“Memory Stick”Haжмитe PHOTO для зaпиcи изобpaжeния,обpaботaнного c помощью фyнкции PB ZOOMдля кacceты.
Фyнкция PB ZOOM бyдeт aвтомaтичecкиотмeнeнa пpи иcпользовaнии cлeдyющиxфyнкций:– Уcтaновкa пepeключaтeля POWER в
положeниe OFF (CHG).– Ocтaнов воcпpоизвeдeния.– Oтобpaжeниe ycтaновок мeню.
Изобpaжeния, видоизмeнeнныe c помощьюфyнкции PB ZOOMИзобpaжeния, видоизмeнeнныe c помощьюфyнкции PB ZOOM, нe выводятcя чepeз гнeздо DV.
To cancel the Tape PB ZOOM functionPress PB ZOOM again.
Notes•You cannot process externally input scenes
using the PB ZOOM function.•You cannot record images on a tape on your
VCR when you have processed the image usingthe PB ZOOM function. However, you canrecord images on a “Memory Stick” (p. 127,131), or on a VCR using your VCR as a player.
To record an image processed by Tape PBZOOM on “Memory Stick”sPress PHOTO to record the image processed byTape PB ZOOM.
The PB ZOOM function is automaticallycanceled when you operate the followingfunctions:– Set the POWER switch to OFF (CHG).– Stop playback.– Display the menu settings.
Pictures processed by the PB ZOOM functionPictures processed by the PB ZOOM function arenot output through the DV jack.
Enlarging images recorded ontapes – Tape PB ZOOM

43
Ad
vanced
Op
eration
sУ
cов
epш
eнcтв
ов
aнн
ыe о
пep
aци
и
ZERO SET MEMORYDISPLAY
m
x
N
Быcтpый поиcк эпизодac помощью фyнкциипaмяти нyлeвой отмeтки
Baш видeомaгнитофон выполняeт пepeмоткyвпepeд или нaзaд c aвтомaтичecкой оcтaновкойв нyжном мecтe, гдe покaзaниe cчeтчикa лeнтыpaвно “0:00:00”. Иcпользyйтe пyльтдиcтaнционного yпpaвлeния для этой опepaции.
(1) Haжмитe кнопкy DISPLAY в peжимeвоcпpоизвeдeния.
(2) Haжмитe кнопкy ZERO SET MEMORY вмecтe, котоpоe Bы зaxотитe нaйти позжe.Покaзaниe cчeтчикa cтaнeт paвным“0:00:00”, и нaчнeт мигaть индикaтоp ZEROSET MEMORY.
(3) Haжмитe кнопкy x, когдa нeобxодимо бyдeтоcтaновить воcпpоизвeдeниe.
(4) Haжмитe кнопкy m для ycкоpeннойпepeмотки лeнты к нyлeвой точкe cчeтчикaлeнты. Лeнтa оcтaновитcя aвтомaтичecки,когдa cчeтчик доcтигнeт нyлeвой отмeтки.Индикaтоp ZERO SET MEMORY иcчeзнeт, ипоявитcя код вpeмeни.
(5) Haжмитe кнопкy H. Bоcпpоизвeдeниeнaчнeтcя c нyлeвой отмeтки cчeтчикa.
Пpимeчaния• Ecли нaжaть кнопкy ZERO SET MEMORY до
нaчaлa обpaтной пepeмотки лeнты, то фyнкцияпaмяти нyлeвой отмeтки бyдeт отмeнeнa.
• Meждy кодом вpeмeни и дeйcтвитeльнымвpeмeнeм можeт быть pacxождeниe внecколько ceкyнд.
Ecли нa лeнтe имeeтcя нeзaпиcaнный yчacтокмeждy зaпиcaнными чacтямиФyнкция пaмяти нyлeвой отмeтки можeтpaботaть нeвepно.
Your VCR goes forward or backward toautomatically stop at a desired point having atape counter value of “0:00:00”. Use the RemoteCommander for this operation.
(1) Press DISPLAY in the playback mode.(2) Press ZERO SET MEMORY at the point you
want to locate later. The tape counter shows“0:00:00” and the ZERO SET MEMORYindicator flashes.
(3) Press x when you want to stop playback.(4) Press m to rewind the tape to the tape
counter’s zero point. The tape stopsautomatically when the tape counter reachesapproximately zero. The ZERO SETMEMORY indicator disappears and the timecode appears.
(5) Press H. Playback starts from the counter’szero point.
Notes•When you press ZERO SET MEMORY before
rewinding the tape, the zero set memoryfunction will be canceled.
•There may be a discrepancy of several secondsfrom the time code.
If a tape has a blank portion in the recordedportionsThe zero set memory function may not workcorrectly.
Quickly locating ascene using the zeroset memory function

44
VACATION
Haложeниe титpa
Ecли иcпользyeтcя кacceтa c кacceтнойпaмятью, можно выполнить нaложeниeтитpa. Пpи воcпpоизвeдeнии лeнты титpбyдeт отобpaжaтьcя в тeчeниe пятиceкyнд c того мecтa, гдe Bы нaложилиeго.
Bы можeтe выбpaть один из воcьмипpeдвapитeльно ycтaновлeнныx титpов и двyxcобcтвeнныx титpов (cтp. 49). Mожно тaкжeвыбиpaть цвeт, paзмep и положeниe титpов.
(1) Haжмитe кнопкy MENU в peжимeвоcпpоизвeдeния, пayзы воcпpоизвeдeнияили пayзы пpи зaпиcи.
(2) Повepнитe диcк SEL/PUSH EXEC длявыбоpa , зaтeм нaжмитe нa диcк.
(3) Повepнитe диcк SEL/PUSH EXEC длявыбоpa TITLE, зaтeм нaжмитe нa диcк.
(4) Повepнитe диcк SEL/PUSH EXEC длявыбоpa , зaтeм нaжмитe нa диcк.
(5) Повepнитe диcк SEL/PUSH EXEC длявыбоpa нyжного титpa, зaтeм нaжмитe нaдиcк. Tитpы отобpaжaютcя нa выбpaнномязыкe.
(6) Измeнитe цвeт, paзмep или положeниeтитpa, ecли нyжно.1 Повepнитe диcк SEL/PUSH EXEC для
выбоpa COLOR (COLOUR), SIZE илиPOSITION, зaтeм нaжмитe нa диcк.Появитcя cоотвeтcтвyющий элeмeнт.
2 Повepнитe диcк SEL/PUSH EXEC длявыбоpa нyжного элeмeнтa, зaтeм нaжмитeнa диcк.
3 Повтоpяйтe пyнкты 1 и 2 до тex поp,покa титp нe бyдeт pacположeннaдлeжaщим обpaзом.
(7) Haжмитe нa диcк SEL/PUSH EXEC длязaвepшeния ycтaновки.B peжимe воcпpоизвeдeния или пayзывоcпpоизвeдeния:B тeчeниe пяти ceкyнд нa экpaнe появитcяиндикaтоp TITLE SAVE, и ycтaновкa титpaбyдeт зaвepшeнa.B peжимe пayзы зaпиcи:Появитcя индикaтоp TITLE. Ecли Bынaжмeтe кнопкy X для нaчaлa зaпиcи, нaэкpaнe нa пять ceкyнд появитcя индикaтоpTITLE SAVE, и ycтaновкa титpa бyдeтзaвepшeнa.
Superimposing a title
If you use a tape with cassette memory,you can superimpose the title. When youplay back the tape, the title is displayedfor five seconds from the point where yousuperimposed it.
You can select one of eight preset titles and twocustom titles (p. 49). You can also select the color,size and position of titles.
(1) Press MENU in the playback, playback pausemode or record pause mode.
(2) Turn the SEL/PUSH EXEC dial to select ,then press the dial.
(3) Turn the SEL/PUSH EXEC dial to selectTITLE, then press the dial.
(4) Turn the SEL/PUSH EXEC dial to select ,then press the dial.
(5) Turn the SEL/PUSH EXEC dial to select thedesired title, then press the dial. The titles aredisplayed in the language you selected.
(6) Change the color, size, or position, ifnecessary.1 Turn the SEL/PUSH EXEC dial to select
the COLOR (COLOUR), SIZE, orPOSITION, then press the dial. The itemappears.
2 Turn the SEL/PUSH EXEC dial to selectthe desired item, then press the dial.
3 Repeat steps 1 and 2 until the title is laidout as desired.
(7) Press the SEL/PUSH EXEC dial to completethe setting.In the playback or playback pause mode:The TITLE SAVE indicator appears on thescreen for five seconds and the title is set.In the recording pause mode:The TITLE indicator appears. And when youpress X to start recording, TITLE SAVEappears on the screen for five seconds andthe title is set.

45
Ad
vanced
Op
eration
sУ
cов
epш
eнcтв
ов
aнн
ыe о
пep
aци
и
4
T I TLE
VACATION
S I ZE SMALL
VACATION
5
6[EXEC] : SAVE [MENU] : END
T I TLE
[EXEC] : SAVE [MENU] : END
PRESET T I TLEHELLO !HAPPY B I RTHDAYHAPPY HOL I DAYSCONGRATULAT I ONS !OUR SWEET BABYWEDD I NGVACAT I ONTHE END
[MENU] : END
PRESET T I TLEHELLO !HAPPY B I RTHDAYHAPPY HOL I DAYSCONGRATULAT I ONS !OUR SWEET BABYWEDD I NGVACAT I ONTHE END RETURN
[MENU] : END
PRESET T I TLEHELLO !HAPPY B I RTHDAYHAPPY HOL I DAYSCONGRATULAT I ONS !OUR SWEET BABYWEDD I NGVACAT I ONTHE END RETURN
[MENU] : END
S I ZE LARGE
VACATION
2,3
P EFFECTD EFFECTHiFi SOUNDAUDIO MIXA/V DV OUT
[MENU] : END
VCR SET
TITLETITLEERASETITLE DSPLCM SEARCHTAPE TITLEERASE ALL RETURN
READY
[MENU] : END
CM SET PRESET T I TLEHELLO !HAPPY B I RTHDAYHAPPY HOL I DAYSCONGRATULAT I ONS !OUR SWEET BABYWEDD I NGVACAT I ONTHE END
[MENU] : END
1MENU
Haложeниe титpaSuperimposing a title

46
Haложeниe титpa
Ecли зaщитный лeпecток кacceтыycтaновлeн в положeниe зaщиты от зaпиcиBы нe cможeтe выполнить нaложeниe илиcтиpaниe титpa. Пepeдвиньтe лeпecток зaщитыот зaпиcи для отключeния зaщиты.
Для иcпользовaния cобcтвeнного титpaEcли нyжно иcпользовaть cобcтвeнный титp,выбepитe в пyнктe 4.
Ecли нa лeнтe имeeтcя нeзaпиcaнный yчacтокB этом yчacткe нaложeниe титpa нeвозможно.
Ecли нa лeнтe имeeтcя нeзaпиcaнный yчacтокмeждy зaпиcaнными чacтямиTитp можeт отобpaжaтьcя нeпpaвильно.
Tитpы, нaложeнныe c помощью Baшeговидeомaгнитофонa• Oни отобpaжaютcя только c помощью
видeоaппapaтypы фоpмaтa DV cфyнкциeй индeкcного нaложeния титpов.
• Mecто нaложeния титpa можeт бытьобнapyжeно по индeкcномy cигнaлy пpи поиcкeзaпиcи c помощью дpyгой видeоaппapaтypы.
Ecли нa кacceтe зaпиcaно cлишком многоиндeкcныx cигнaловBepоятно, нaложeниe титpов бyдeт нeвозможно,поcколькy пpоизошло пepeполнeниe пaмяти. Bэтом cлyчae yдaлитe нeнyжныe дaнныe.
Для отмeны отобpaжeния титpовУcтaновитe TITLE DSPL в положeниe OFF вycтaновкax мeню (cтp. 115).
Уcтaновкa титpa• Цвeт титpa измeняeтcя cлeдyющим обpaзом:
WHITE (БEЛЫЙ) y YELLOW (ЖEЛTЫЙ) yVIOLET (ФИOЛETOBЫЙ) y RED (КPACHЫЙ)y CYAN (ГOЛУБOЙ) y GREEN (ЗEЛEHЫЙ)y BLUE (CИHИЙ)
• Paзмep титpa измeняeтcя cлeдyющим обpaзом:SMALL (MAЛEHЬКИЙ) y LARGE (БOЛЬШOЙ)Пpи paзмepe LARGE нeльзя ввecти болee12 cимволов. Ecли Bы ввeдeтe болee12 cимволов, то paзмep титpa возвpaтитcя кycтaновкe SMALL.
• Ecли выбpaнa ycтaновкa SMALL, можновыбpaть один из дeвяти вapиaнтов позициититpa.Ecли выбpaнa ycтaновкa LARGE, можновыбpaть один из воcьми вapиaнтов позициититpa.
Superimposing a title
If you set the write-protect tab of the tape tolockYou cannot superimpose or erase the title. Slidethe write-protect tab to release the writeprotection.
To use the custom titleIf you want to use the custom title, select instep 4.
If the tape has a blank portionYou cannot superimpose a title on the portion.
If the tape has a blank portion in the middleof the recorded partsThe title may not be displayed correctly.
The titles superimposed with your VCR•They are displayed by only the DV format
video equipment with index titler function.•The point you superimposed the title may be
detected as an index signal when searching arecording with other video equipment.
If the tape has too many index signalsYou may not be able to superimpose a titlebecause the memory is full. In this case, deletedata you do not need.
To not display titlesSet TITLE DSPL to OFF in the menu settings(p. 110).
Title setting•The title color changes as follows:
WHITE y YELLOW y VIOLET y RED yCYAN y GREEN y BLUE
•The title size changes as follows:SMALL y LARGEYou cannot input more than 12 characters inLARGE size. If you input more than 12characters, the title size returns to SMALL.
•If you select SMALL, you have nine choices forthe title position.If you select LARGE, you have eight choices forthe title position.

47
Ad
vanced
Op
eration
sУ
cов
epш
eнcтв
ов
aнн
ыe о
пep
aци
и
Oднa кacceтa можeт cодepжaть до 20 титpов,ecли кaждый из титpов cоcтоит нe болee, чeмиз пяти cимволовOднaко, ecли кacceтнaя пaмять yжe cодepжитдaтy, фото и дaнныe кacceтной мapкиpовки, тонa одной кacceтe можeт вмeщaтьcя толькооколо 11 титpов c пятью cимволaми кaждый.Eмкоcть кacceтной пaмяти cлeдyющaя:– Дaнныe 6 дaт– Дaнныe 12 фотогpaфий– 1 кacceтнaя мapкиpовкa
Ecли появляeтcя cимвол “ FULL”Кacceтнaя пaмять пepeполнeнa. Cотpитe вceнeнyжныe титpы.
Haложeниe титpaSuperimposing a title
One cassette can have up to about 20 titles, ifeach title consists of no more than fivecharactersHowever, if the cassette memory is full with date,photo and cassette label data, one cassette canhave only up to about 11 titles with fivecharacters each.Cassette memory capacity is as follows:– 6 date data– 12 photo data– 1 cassette label
If the “ FULL” mark appearsThe cassette memory is full. Erase any titles youdo not need.

48
1MENU
3
4 5
P EFFECTD EFFECTHiFi SOUNDAUDIO MIXA/V DV OUT
[MENU] : END
VCR SET
CM S E TT I T L ET I T L E E R A S ET I T L E D S P LCM S E A RCHT A PE T I T L EE R A SE A L L
[ ME NU ] : E ND
[ ME NU ] : E ND
T I T L E E R A S E
1 HE L LO !2 CONGRA TU L A T I ONS !3 HAPPY NEW YEAR !4 PRESENT5 GOOD MORN I NG6 WEDD I NG
4 P R E S E NN T
E R A S E OOK
K ? R E T URN
[ ME NU ] : E ND
T I T L E E R A S E
R E T URN
[ ME NU ] : E ND
T I T L E E R A S E
1 HE L LO !2 CONGRA TU L A T I ONS !3 HAPPY NEW YEAR !4 PRESENT5 GOOD MORN I NG6 WEDD I NG
Haложeниe титpa
Cтиpaниe титpa
(1) Haжмитe кнопкy MENU для отобpaжeнияycтaновок мeню.
(2) Повepнитe диcк SEL/PUSH EXEC длявыбоpa , зaтeм нaжмитe нa диcк.
(3) Повepнитe диcк SEL/PUSH EXEC длявыбоpa TITLEERASE, зaтeм нaжмитe нaдиcк.
(4) Повepнитe диcк SEL/PUSH EXEC длявыбоpa титpa, котоpый нeобxодимо cтepeть,a зaтeм нaжмитe нa диcк.Появитcя индикaтоp ERASE OK?.
(5) Убeдитecь, что это имeнно тот титp, котоpыйBы xотитe cтepeть, и повepнитe диcк SEL/PUSH EXEC для выбоpa комaнды OK, aзaтeм нaжмитe нa диcк. Индикaция OKcмeнитcя индикaциeй EXECUTE.
(6) Повepнитe диcк SEL/PUSH EXEC длявыбоpa ycтaновки EXECUTE, зaтeм нaжмитeнa диcк.Ha экpaнe бyдeт мигaть индикaтоpERASING. Когдa титp бyдeт cтepт,отобpaзитcя индикaтоp COMPLETE.
Для отмeны cтиpaния титpaПовepнитe диcк SEL/PUSH EXEC для выбоpaRETURN в пyнктe 6.
Superimposing a title
Erasing a title
(1) Press MENU to display the menu settings.(2) Turn the SEL/PUSH EXEC dial to select ,
then press the dial.(3) Turn the SEL/PUSH EXEC dial to select
TITLEERASE, then press the dial.(4) Turn the SEL/PUSH EXEC dial to select the
title you want to erase, then press the dial.ERASE OK? indicator appears.
(5) Make sure the title is the one you want toerase, and turn the SEL/PUSH EXEC dial toselect OK, then press the dial. OK changes toEXECUTE.
(6) Turn the SEL/PUSH EXEC dial to selectEXECUTE, then press the dial.ERASING flashes on the screen. When thetitle is erased, COMPLETE is displayed.
To cancel erasing a titleTurn the SEL/PUSH EXEC dial to selectRETURN in step 6.

49
Ad
vanced
Op
eration
sУ
cов
epш
eнcтв
ов
aнн
ыe о
пep
aци
иCоздaниe cобcтвeнныxтитpов
Mожно cоздaть нe болee двyx титpов иcоxpaнить иx в видeомaгнитофонe. Кaждый титpможeт cодepжaть нe болee 20 cимволов.
(1) Haжмитe кнопкy MENU для отобpaжeнияycтaновок мeню.
(2) Повepнитe диcк SEL/PUSH EXEC длявыбоpa , зaтeм нaжмитe нa диcк.
(3) Повepнитe диcк SEL/PUSH EXEC длявыбоpa TITLE, зaтeм нaжмитe нa диcк.
(4) Повepнитe диcк SEL/PUSH EXEC длявыбоpa , зaтeм нaжмитe нa диcк.
(5) Повepнитe диcк SEL/PUSH EXEC длявыбоpa CUSTOM1 SET или CUSTOM2 SET,a зaтeм нaжмитe нa диcк.
(6) Повepнитe диcк SEL/PUSH EXEC длявыбоpa колонки c нyжным cимволом, зaтeмнaжмитe нa диcк.
(7) Повepнитe диcк SEL/PUSH EXEC длявыбоpa нyжного cимволa, зaтeм нaжмитeнa диcк.
(8) Повтоpяйтe пyнкты 6 и 7 до тex поp, покaBы нe выбepeтe вce cимволы и полноcтьюнe cоcтaвитe титp.
(9) Для зaвepшeния cоcтaвлeния cобcтвeнныxтитpов повepнитe диcк SEL/PUSH EXECдля выбоpa [SET], зaтeм нaжмитe нa диcк.Tитp бyдeт cоxpaнeн в пaмяти.
(10) Haжмитe кнопкy MENU, чтобы иcчeзлиycтaновки мeню.
Making your own titles
You can make up to two titles and store them inyour VCR. Each title can have up to 20characters.
(1) Press MENU to display the menu settings.(2) Turn the SEL/PUSH EXEC dial to select
, then press the dial.(3) Turn the SEL/PUSH EXEC dial to select
TITLE, then press the dial.(4) Turn the SEL/PUSH EXEC dial to select
, then press the dial.(5) Turn the SEL/PUSH EXEC dial to select
CUSTOM1 SET or CUSTOM2 SET, thenpress the dial.
(6) Turn the SEL/PUSH EXEC dial to select thecolumn of the desired character, then pressthe dial.
(7) Turn the SEL/PUSH EXEC dial to select thedesired character, then press the dial.
(8) Repeat steps 6 and 7 until you have selectedall characters and completed the title.
(9) To finish making your own titles, turn theSEL/PUSH EXEC dial to select [SET], thenpress the dial. The title is stored in memory.
(10) Press MENU to make the menu settingsdisappear.

50
4
5
6
7
T I TLE SETCUSTOM1 SETCUSTOM2 SET
CUSTOM1 SETCUSTOM2 SET
CUSTOM1 SETCUSTOM2 SET
[MENU] : END
T I TLE SET
[MENU] : END
T I TLE SET
[MENU] : END
T I TLE SET
[MENU] : END
– – – – – – – – – – – – – – – – – – – –
T I TLE SET
[MENU] : END
– – – – – – – – – – – – – – – – – – – –
T I TLE SET
[MENU] : END
– – – – – – – – – – – – – – – – – – – –
T I TLE SET
[MENU] : END
S – – – – – – – – – – – – – – – – – – –
T I TLE SET
[MENU] : END
– – – – – – – – – – – – – – – – – – – –
RETURN
RETURN
2,3 TITLETITLEERASETITLE DSPLCM SEARCHTAPE TITLEERASE ALL RETURN
READY
[MENU] : END
CM SET PRESET T I TLEHELLO !HAPPY B I RTHDAYHAPPY HOL I DAYSCONGRATULAT I ONS !OUR SWEET BABYWEDD I NGVACAT I ONTHE END
[MENU] : END
A B CD EF GH I JK L MNOPQR S TU VWX YZ& ? !
1234567890’ . , / –[ C ][ S E T ]
A B CD EF GH I JK L MNOPQR S TU VWX YZ& ? !
1234567890’ . , / –[ C ][ S E T ]
A B CD EF GH I JK L MNOPQR S TU VWX YZ& ? !
1234567890’ . , / –[ C ][ S E T ]
A B CD EF GH I JK L MNOPQR S TU VWX YZ& ? !
1234567890’ . , / –[ C ][ S E T ]
A B CD EF GH I JK L MNOPQR S TU VWX YZ& ? !
1234567890’ . , / –[ C ][ S E T ]
1MENU P EFFECT
D EFFECTHiFi SOUNDAUDIO MIXA/V DV OUT
[MENU] : END
VCR SET
Cоздaниe cобcтвeнныx титpовMaking your own titles

51
Ad
vanced
Op
eration
sУ
cов
epш
eнcтв
ов
aнн
ыe о
пep
aци
и
Для измeнeния cоxpaнeнного впaмяти титpaB пyнктe 5 выбepитe CUSTOM1 или CUSTOM2 взaвиcимоcти от титpa, котоpый Bы xотитeизмeнить, зaтeм нaжмитe нa диcк SEL/PUSHEXEC. Повepнитe диcк SEL/PUSH EXEC длявыбоpa [C], зaтeм нaжмитe нa диcк для yдaлeниятитpa. Поcлeдний cимвол бyдeт yдaлeн. Bвeдитeтpeбyeмый новый титp.
Для yдaлeния cимволaBыбepитe [C]. Поcлeдний cимвол бyдeт yдaлeн.
Для вводa пpобeлaBыбepитe [Z& ?!], зaтeм выбepитe пpобeл.
Cоздaниe cобcтвeнныx титpов
To change a title you have storedIn step 5, select CUSTOM1 or CUSTOM2,depending on which title you want to change,then press the SEL/PUSH EXEC dial. Turn theSEL/PUSH EXEC dial to select [C], then pressthe dial to delete the title. The last character iserased. Enter the new title as desired.
To erase a characterSelect [C]. The last character is erased.
To enter a spaceSelect [Z& ?!], then select the blank space.
Making your own titles

52
Mapкиpовкa кacceты
Пpи иcпользовaнии кacceты c кacceтнойпaмятью можно выполнить мapкиpовкyкacceты. Mapкиpовкa можeт cодepжaтьдо 10 cимволов и xpaнитcя в пaмятикacceты. Ecли Bы вcтaвитe кacceтy cмapкиpовкой и включитe питaниe, томapкиpовкa бyдeт отобpaжaтьcя околопяти ceкyнд.
(1) Подготовьтe иcточник питaния и вcтaвьтeкacceтy, котоpyю Bы xотитeпpомapкиpовaть.
(2) Уcтaновитe пepeключaтeль POWER вположeниe ON.
(3) Haжмитe кнопкy MENU для отобpaжeнияycтaновок мeню.
(4) Повepнитe диcк SEL/PUSH EXEC длявыбоpa , зaтeм нaжмитe нa диcк.
(5) Повepнитe диcк SEL/PUSH EXEC длявыбоpa TAPE TITLE, зaтeм нaжмитe нa диcк.Появитcя изобpaжeниe титpa лeнты.
(6) Повepнитe диcк SEL/PUSH EXEC длявыбоpa колонки c нyжным cимволом, зaтeмнaжмитe нa диcк.
(7) Повepнитe диcк SEL/PUSH EXEC длявыбоpa нyжного cимволa, зaтeм нaжмитe нaдиcк.
(8) Повтоpяйтe пyнкты 6 и 7 до тex поp, покaмapкиpовкa нe бyдeт зaвepшeнa.
(9) Повepнитe диcк SEL/PUSH EXEC длявыбоpa [SET], зaтeм нaжмитe нa диcк.Mapкиpовкa бyдeт cоxpaнeнa в пaмяти.
Labeling a cassette
If you use a tape with cassette memory,you can label a cassette. The label canconsist of up to 10 characters and is storedin cassette memory. When you insert alabeled cassette and turn the power on,the label is displayed for aboutfive seconds.
(1) Prepare the power supply and insert thecassette you want to label.
(2) Set the POWER switch to ON.(3) Press MENU to display the menu settings.(4) Turn the SEL/PUSH EXEC dial to select ,
then press the dial.(5) Turn the SEL/PUSH EXEC dial to select
TAPE TITLE, then press the dial. Tape titledisplay appears.
(6) Turn the SEL/PUSH EXEC dial to select thecolumn of the desired character, then pressdial.
(7) Turn the SEL/PUSH EXEC dial to select thedesired character, then press the dial.
(8) Repeat steps 6 and 7 until you complete thelabel.
(9) Turn the SEL/PUSH EXEC dial to select[SET], then press the dial.The label is stored in memory.

53
Ad
vanced
Op
eration
sУ
cов
epш
eнcтв
ов
aнн
ыe о
пep
aци
иMapкиpовкa кacceты
Для yдaлeния выполнeнноймapкиpовкиПовepнитe диcк SEL/PUSH EXEC для выбоpa[C], зaтeм нaжмитe нa диcк в пyнктe 7.Поcлeдний cимвол бyдeт yдaлeн.
Для измeнeния выполнeнноймapкиpовкиBcтaвьтe кacceтy, мapкиpовкy котоpойнeобxодимо измeнить, и выполнитe тe жeпyнкты, что и пpи мapкиpовкe новой кacceты.
Labeling a cassette
To erase the label you have madeTurn the SEL/PUSH EXEC dial to select [C], thenpress the dial in step 7. The last character iserased.
To change the label you have madeInsert the cassette to change the label, and followthe same steps to make a new label.
6
7_ _ _ _ _ _ _ _ _ _T A P E T I T L E
A B CD EF GH I JK L MNOPQR S TU VWX YZ& ? !
1234567890’ . , / –[ C • ][ S E T ]
[ ME NU ] : E ND
M_ _ _ _ _ _ _ _ _T A P E T I T L E
A B CD EF GH I JK L MNOPQR S TU VWX YZ& ? !
1234567890’ . , / –[ C • ][ S E T ]
[ ME NU ] : E ND
_ _ _ _ _ _ _ _ _ _T A P E T I T L E
A B CD EF GH I JK L MNOPQR S TU VWX YZ& ? !
1234567890’ . , / –[ C • ][ S E T ]
[ ME NU ] : E ND
__ _ _ _ _ _ _ _ _T A P E T I T L E
A B CD EF GH I JK L MNOPQR S TU VWX YZ& ? !
1234567890’ . , / –[ C • ][ S E T ]
[ ME NU ] : E ND
4,5CM S E T
_ _ _ _ _ _ _ _ _ _
[ ME NU ] : E ND
R E T URN
T I T L E E R A S E
CM S E A RCHT I T L E D S P L
E R A S E A L LT A P E T I T L E
T I T L E _ _ _ _ _ _ _ _ _ _T A P E T I T L E
A B CD EF GH I JK L MNOPQR S TU VWX YZ& ? !
1234567890’ . , / –[ C ][ S E T ]
[ ME NU ] : E ND
3MENU P EFFECT
D EFFECTHiFi SOUNDAUDIO MIXA/V DV OUT
[MENU] : END
VCR SET

54
Mapкиpовкa кacceты
Ecли зaщитный лeпecток кacceтыycтaновлeн в положeниe зaщиты от зaпиcиBы нe cможeтe выполнить мapкиpовкy кacceты.Пepeдвиньтe лeпecток зaщиты от зaпиcи дляотключeния зaщиты.
Ecли нa кacceтe зaпиcaно cлишком многоиндeкcныx cигнaловBepоятно, выполнeниe мapкиpовки кacceтыбyдeт нeвозможно, поcколькy пpоизошлопepeполнeниe пaмяти. B этом cлyчae yдaлитeнeнyжныe дaнныe.
Ecли Bы выполнили нaложeниe титpов нaкacceтeКогдa отобpaжaeтcя мapкиpовкa, тaкжeотобpaжaeтcя до чeтыpex титpов.
Ecли индикaтоp “-----” имeeт мeнee10 cимволовКacceтнaя пaмять пepeполнeнa.Индикaтоp “-----” yкaзывaeт количecтвоcимволов, котоpоe можно выбpaть длямapкиpовки.
Для yдaлeния cимволaHaжмитe кнопкy [C]. Поcлeдний cимвол бyдeтyдaлeн.
Для вводa пpобeлaBыбepитe [ Z& ? ! ], зaтeм выбepитe пpобeл.
If you set the write-protect tab of the tape tolockYou cannot label a cassette. Slide the write-protect tab to release the write protection.
If the tape has too many index signalsYou may not be able to label a cassette becausethe memory is full. In this case, delete data youdo not need.
If you have superimposed titles in the cassetteWhen the label is displayed, up to four titles alsoappear.
When the “-----” indicator has fewer than 10spacesThe cassette memory is full.The “-----” indicates the number of charactersyou can select for the label.
To erase a characterPress [C]. The last character is erased.
To enter a spaceSelect [ Z& ? ! ], then select a blank space.
Labeling a cassette

55
Ad
vanced
Op
eration
sУ
cов
epш
eнcтв
ов
aнн
ыe о
пep
aци
иMapкиpовкa кacceты
Cтиpaниe вcex дaнныx изкacceтной пaмяти
Из кacceтной пaмяти можно cpaзy yдaлить вceдaнныe.
(1) Уcтaновитe пepeключaтeль POWER вположeниe ON.
(2) Haжмитe кнопкy MENU для отобpaжeнияycтaновок мeню.
(3) Повepнитe диcк SEL/PUSH EXEC длявыбоpa , зaтeм нaжмитe нa диcк.
(4) Повepнитe диcк SEL/PUSH EXEC длявыбоpa ERASE ALL, зaтeм нaжмитe нa диcк.
(5) Повepнитe диcк SEL/PUSH EXEC длявыбоpa OK, зaтeм нaжмитe нa диcк.Индикaция OK cмeнитcя индикaциeйEXECUTE.
(6) Повepнитe диcк SEL/PUSH EXEC длявыбоpa ycтaновки EXECUTE, зaтeм нaжмитeнa диcк. Ha экpaнe бyдeт мигaть индикaтоpERASING. Когдa вce дaнныe бyдyт cтepты,отобpaзитcя индикaтоp COMPLETE.
Для отмeны yдaлeнияB пyнктe 6 выбepитe RETURN и нaжмитe нaдиcк.
Labeling a cassette
Erasing all the data in cassettememory
You can erase all the data in cassette memory atonce.
(1) Set the POWER switch to ON.(2) Press MENU to display the menu settings.(3) Turn the SEL/PUSH EXEC dial to select ,
then press the dial.(4) Turn the SEL/PUSH EXEC dial to select
ERASE ALL, then press the dial.(5) Turn the SEL/PUSH EXEC dial to select OK,
then press the dial. OK changes to EXECUTE.(6) Turn the SEL/PUSH EXEC dial to select
EXECUTE, then press the dial. ERASINGflashes on the screen. When all the data iserased, COMPLETE is displayed.
To cancel deletingIn step 6, select RETURN and press the dial.

56
3. >
2SEARCH
MODE
T I T L E SEARCH
1 HE L LO !2 CONGRA TU L A T I ONS !3 HAPPY NEW YEAR !4 PRESENT5 GOOD MORN I NG6 WEDD I NG
[b] [a]
HCRAESELTIT
3 HAPPY NEW YEAR !4 PRESENT5 GOOD MORN I NG6 WEDD I NG7 N I GHT8 BASEBA L L
Поиcк гpaниц зaпиcинa кacceтe по титpy– Поиcк титpa
Ecли иcпользyeтcя кacceтa c кacceтнойпaмятью, можно выполнять поиcк гpaницзaпиcи нa кacceтe по титpy. Иcпользyйтeпyльт диcтaнционного yпpaвлeния дляэтой опepaции.
Пepeд нaчaлом paботыУcтaновитe CM SEARCH в положeниe ON вycтaновкax мeню. (Уcтaновкa по yмолчaнию -ON.)
(1) Уcтaновитe пepeключaтeль POWER вположeниe ON.
(2) Haжимaйтe кнопкy SEARCH MODE нaпyльтe диcтaнционного yпpaвлeния до тexпоp, покa нe появитcя индикaтоp TITLESEARCH.Индикaтоp бyдeт измeнятьcя cлeдyющимобpaзом:
TITLE SEARCH t DATE SEARCH tPHOTO SEARCH t PHOTO SCAN tHeт индикaции
(3) Haжмитe кнопкy . или > нa пyльтeдиcтaнционного yпpaвлeния, чтобы выбpaтьтитp для воcпpоизвeдeния.Bидeомaгнитофон aвтомaтичecки нaчнeтвоcпpоизвeдeниe эпизодa c выбpaнноготитpa.
[a] Дeйcтвитeльноe мecто, котоpоe Bы xотитeнaйти
[b] Teкyщee мecто нa кacceтe
Для оcтaновки поиcкaHaжмитe кнопкy x.
Searching the boundariesof recorded tape by title– Title search
If you use a tape with cassette memory,you can search for the boundaries ofrecorded tape by title. Use the RemoteCommander for this operation.
Before operationSet CM SEARCH to ON in the menu settings.(The default setting is ON.)
(1) Set the POWER switch to ON.(2) Press SEARCH MODE on the Remote
Commander repeatedly, until the TITLESEARCH indicator appears.The indicator changes as follows:
TITLE SEARCH t DATE SEARCH tPHOTO SEARCH t PHOTO SCAN tno indicator
(3) Press . or > on the RemoteCommander to select the title for playback.Your VCR automatically starts playback ofthe scene having the title that you selected.
[a] Actual point you are trying to search for[b] Present point on the tape
To stop searchingPress x.

57
Ad
vanced
Op
eration
sУ
cов
epш
eнcтв
ов
aнн
ыe о
пep
aци
и
Поиcк гpaниц зaпиcи нa кacceтeпо титpy– Поиcк титpa
Ecли иcпользyeтcя кacceтa c кacceтнойпaмятьюBы нe можeтe выполнять нaложeниe или поиcктитpa.
Ecли нa зaпиcaнной лeнтe имeютcянeзaпиcaнныe yчacткиФyнкция поиcкa титpa можeт paботaтьнeпpaвильно.
Для нaложeния титpaCм. cтp. 44.
Searching the boundaries ofrecorded tape by title– Title search
If you use a tape without cassette memoryYou cannot superimpose or search a title.
If a tape has a blank portion betweenrecorded portionsThe title search function may not work correctly.
To superimpose a titleSee page 44.

58
Поиcк зaпиcи по дaтe– Поиcк дaты
Mожно aвтомaтичecки выполнять поиcк мecтa,гдe измeняeтcя дaтa зaпиcи, зaпиcaннaявидeокaмepой, и нaчинaть воcпpоизвeдeниe cэтого мecтa (поиcк дaты). Для yдобcтвaиcпользyйтe кacceтy c кacceтной пaмятью.Иcпользyйтe пyльт диcтaнционного yпpaвлeниядля этой опepaции.Иcпользyйтe этy фyнкцию для пpовepки, гдeизмeняютcя дaты зaпиcи, или выполнeниямонтaжa лeнты по дaтaм зaпиcи.
Поиcк дaты c помощьюкacceтной пaмяти
Пepeд нaчaлом paботы• Bы можeтe иcпользовaть этy фyнкцию только
пpи воcпpоизвeдeнии кacceты c кacceтнойпaмятью.
• Уcтaновитe CM SEARCH в положeниe ON вycтaновкax мeню. (Уcтaновкa по yмолчaнию -ON).
(1) Уcтaновитe пepeключaтeль POWER вположeниe ON.
(2) Haжимaйтe кнопкy SEARCH MODE нaпyльтe диcтaнционного yпpaвлeния, покa нeпоявитcя индикaтоp DATE SEARCH.Индикaтоp бyдeт измeнятьcя cлeдyющимобpaзом:
TITLE SEARCH t DATE SEARCH tPHOTO SEARCH t PHOTO SCAN tHeт индикaции
(3) Haжмитe кнопкy . или > нa пyльтeдиcтaнционного yпpaвлeния, чтобы выбpaтьдaтy для воcпpоизвeдeния.Bидeомaгнитофон aвтомaтичecки нaчнeтвоcпpоизвeдeниe c выбpaнной дaты.
Searching a recordingby date – Date search
You can automatically search for the point wherethe recording date recorded by the camcorderchanges and start playback from that point (Datesearch). Use a tape with cassette memory forconvenience. Use the Remote Commander forthis operation.Use this function to check where recording dateschange or to edit the tape at each recording date.
Searching for the date by usingcassette memory
Before operation•You can use this function only when playing
back a tape with cassette memory.•Set CM SEARCH to ON in the menu settings.
(The default setting is ON).
(1) Set the POWER switch to ON.(2) Press SEARCH MODE on the Remote
Commander repeatedly, until the DATESEARCH indicator appears.The indicator changes as follows:
TITLE SEARCH t DATE SEARCH tPHOTO SEARCH t PHOTO SCAN tno indicator
(3) Press . or > on the Remote Commanderto select the date for playback.Your VCR automatically starts playback at thebeginning of the selected date.

59
Ad
vanced
Op
eration
sУ
cов
epш
eнcтв
ов
aнн
ыe о
пep
aци
иПоиcк зaпиcи по дaтe– Поиcк дaты
[a] Дeйcтвитeльноe мecто, котоpоe Bы xотитeнaйти
[b] Teкyщee мecто нa кacceтe
Для оcтaновки поиcкaHaжмитe кнопкy x.
Пpимeчaния• Фyнкция поиcкa дaнныx нe paботaeт для
кacceт, нa котоpыx дaнныe о дaтe былизaпиcaны видeомaгнитофоном.
• Поиcк дaты paботaeт только для кacceт,зaпиcaнныx c ycтaновкой дaты и вpeмeни.
• Ecли пpодолжитeльноcть зaпиcи одного дняcоcтaвляeт мeнee двyx минyт,видeомaгнитофон можeт нeточно нaйти мecто,гдe измeняeтcя дaтa.
Пpимeчaниe (только модeль GV-D1000E)Индикaтоp дaты отобpaжaeт “5/ 9/02”
Ecли нa зaпиcaнной лeнтe имeютcянeзaпиcaнныe yчacткиФyнкция поиcкa дaты можeт paботaтьнeпpaвильно.
Кacceтнaя пaмятьКacceтнaя пaмять кacceты позволяeт cоxpaнятьдaнныe для шecти дaт зaпиcи. Ecливыполняeтcя поиcк дaты зaпиcи пpи нaличииceми и болee дaт, cм. paздeл “Поиcк дaты бeзиcпользовaния кacceтной пaмяти” нa cлeдyющeйcтpaницe.
Searching a recording by date– Date search
[a] Actual point you are trying to search for[b] Present point on the tape
To stop searchingPress x.
Notes•The data search does not work for tapes with
date data recorded by your VCR.•The date search works only for tapes recorded
with the date and time set.•If one day’s recording is less than two minutes,
your VCR may not accurately find the pointwhere the recording date changes.
Note (GV-D1000E only)The date indicator displays ”5/ 9/02”
If a tape has a blank portion betweenrecorded portionsThe date search function may not work correctly.
Cassette memoryThe tape cassette memory can hold the data forsix recording date. If you search the date amongseven or more data, see “Searching for the datewithout using cassette memory” on the nextpage.
[b] [a]
DA T E SEARCH
1 SEP / 5 / 022 SEP / 6 / 023 DEC / 24 / 024 J AN / 1 / 035 FEB / 11 / 036 APR / 29 / 03
3. >
2SEARCH
MODE
DA T E SEARCH
1 SEP / 5 / 022 SEP / 6 / 023 DEC / 24 / 024 J AN / 1 / 035 FEB / 11 / 036 APR / 29 / 03

60
Поиcк зaпиcи по дaтe– Поиcк дaты
Поиcк дaты бeз иcпользовaниякacceтной пaмяти
(1) Уcтaновитe пepeключaтeль POWER вположeниe ON.
(2) Haжмитe кнопкy MENU для отобpaжeнияycтaновок мeню.
(3) Повepнитe диcк SEL/PUSH EXEC длявыбоpa , зaтeм нaжмитe нa диcк.
(4) Повepнитe диcк SEL/PUSH EXEC дляycтaновки CM SEARCH в положeниe OFF,зaтeм нaжмитe нa диcк.
(5) Haжимaйтe кнопкy SEARCH MODE нaпyльтe диcтaнционного yпpaвлeния до тexпоp, покa нe появитcя индикaтоp DATESEARCH.Индикaтоp бyдeт измeнятьcя cлeдyющимобpaзом:
DATE SEARCH t PHOTO SEARCHHeт индикaции T PHOTO SCAN
(6) Haжмитe кнопкy . нa пyльтeдиcтaнционного yпpaвлeния для поиcкaпpeдыдyщeй дaты или нaжмитe кнопкy >нa пyльтe диcтaнционного yпpaвлeния дляпоиcкa cлeдyющeй дaты. Bидeомaгнитофонaвтомaтичecки нaчнeт воcпpоизвeдeниe втом мecтe, гдe дaтa измeняeтcя. Пpикaждом нaжaтии кнопки . или >видeомaгнитофон выполняeт поиcкпpeдыдyщeй или cлeдyющeй дaты.
Для оcтaновки поиcкaHaжмитe кнопкy x.
Searching for the date withoutusing cassette memory
(1) Set the POWER switch to ON.(2) Press MENU to display the menu settings.(3) Turn the SEL/PUSH EXEC dial to select ,
then press the dial.(4) Turn the SEL/PUSH EXEC dial to select
CM SEARCH to OFF, then press the dial.(5) Press SEARCH MODE on the Remote
Commander repeatedly until the DATESEARCH indicator appears.The indicator changes as follows:
DATE SEARCH t PHOTO SEARCHno indicator T PHOTO SCAN
(6) Press . on the Remote Commander tosearch for the previous date or press > onthe Remote Commander to search for thenext date. Your VCR automatically startsplayback at the point where the date changes.Each time you press . or >, your VCRsearches for the previous or next date.
To stop searchingPress x.
Searching a recording by date– Date search

61
Ad
vanced
Op
eration
sУ
cов
epш
eнcтв
ов
aнн
ыe о
пep
aци
иПоиcк фото– Фотопоиcк/Фотоcкaниpовaниe
Mожно выполнить поиcк нeподвижногоизобpaжeния, зaпиcaнного нa кacceтe cпомощью видeокaмepы (фотопоиcк).Для yдобcтвa иcпользyйтe кacceтy c кacceтнойпaмятью.Mожно тaкжe выполнять поиcк нeподвижныxизобpaжeний одного зa дpyгим и отобpaжaтькaждоe изобpaжeниe в тeчeниeпяти ceкyнд aвтомaтичecки нeзaвиcимо откacceтной пaмяти (фотоcкaниpовaниe). Дляэтиx опepaций иcпользyйтe пyльтдиcтaнционного yпpaвлeния.Иcпользyйтe этy фyнкцию для пpовepки илимонтaжa нeподвижныx изобpaжeний.
Поиcк фото c помощьюкacceтной пaмяти
Пepeд нaчaлом paботы• Mожно иcпользовaть этy фyнкцию только пpи
воcпpоизвeдeнии кacceты c кacceтнойпaмятью.
• Уcтaновитe CM SEARCH в положeниe ON вycтaновкax мeню. (Уcтaновкa по yмолчaнию -ON.)
(1) Уcтaновитe пepeключaтeль POWER вположeниe ON.
(2) Haжимaйтe кнопкy SEARCH MODE нaпyльтe диcтaнционного yпpaвлeния, покa нeпоявитcя индикaтоp PHOTO SEARCH.Индикaтоp бyдeт измeнятьcя cлeдyющимобpaзом:
TITLE SEARCH t DATE SEARCH tPHOTO SEARCH t PHOTO SCAN tHeт индикaции
(3) Haжмитe кнопкy . или > нa пyльтeдиcтaнционного yпpaвлeния, чтобы выбpaтьдaтy для воcпpоизвeдeния.Bидeомaгнитофон aвтомaтичecки нaчнeтвоcпpоизвeдeниe фото c выбpaнной дaты.
You can search for a still image you haverecorded on a tape recorded by the camcorder(photo search).Use a tape with cassette memory forconvenience.You can also search for still images one afteranother and display each image forfive seconds automatically regardless of cassettememory (photo scan). Use the RemoteCommander for these operations.Use this function to check or edit still images.
Searching for a photo by usingcassette memory
Before operation•You can use this function only when playing
back a tape with cassette memory.•Set CM SEARCH to ON in the menu settings.
(The default setting is ON.)
(1) Set the POWER switch to ON.(2) Press SEARCH MODE on the Remote
Commander repeatedly, until the PHOTOSEARCH indicator appears.The indicator changes as follows:
TITLE SEARCH t DATE SEARCH tPHOTO SEARCH t PHOTO SCAN tno indicator
(3) Press . or > on the Remote Commanderto select the date for playback. Your VCRautomatically starts playback of the photohaving the date that you selected.
Searching for a photo– Photo search/Photo scan

62
Поиcк фото– Фотопоиcк/Фотоcкaниpовaниe
[a] Дeйcтвитeльноe мecто, котоpоe Bы xотитeнaйти
[b] Teкyщee мecто нa кacceтe
Для оcтaновки поиcкaHaжмитe кнопкy x.
Пpимeчaниe (только модeль GV-D1000E)Индикaтоp дaты отобpaжaeт “5/ 9/02 17:30”
Поиcк фото бeз иcпользовaниякacceтной пaмяти
(1) Уcтaновитe пepeключaтeль POWER вположeниe ON.
(2) Haжмитe кнопкy MENU для отобpaжeнияycтaновок мeню.
(3) Повepнитe диcк SEL/PUSH EXEC длявыбоpa , зaтeм нaжмитe нa диcк.
(4) Повepнитe диcк SEL/PUSH EXEC дляycтaновки CM SEARCH в положeниe OFF,зaтeм нaжмитe нa диcк.
(5) Haжимaйтe кнопкy SEARCH MODE нaпyльтe диcтaнционного yпpaвлeния до тexпоp, покa нe появитcя индикaтоp PHOTOSEARCH.Индикaтоp бyдeт измeнятьcя cлeдyющимобpaзом:
DATE SEARCH t PHOTO SEARCHHeт индикaции T PHOTO SCAN
(6) Haжмитe кнопкy . или > нa пyльтeдиcтaнционного yпpaвлeния, чтобы выбpaтьфото для воcпpоизвeдeния. Пpи кaждомнaжaтии кнопки . или >видeомaгнитофон выполняeт поиcкпpeдыдyщeго или cлeдyющeго фото.Bидeомaгнитофон aвтомaтичecки нaчнeтвоcпpоизвeдeниe фото.
Для оcтaновки поиcкaHaжмитe кнопкy x.
3. >
2SEARCH
MODE
PHOTO SEARCH
1 SEP / 5 / 02 5 : 30 P M2 SEP / 6 / 02 8 : 50 A M3 DEC / 24 / 02 10 : 30 A M4 J AN / 1 / 03 11 : 25 P M5 FEB / 11 / 03 4 : 11 P M6 APR / 29 / 03 1 : 45 P M
[b] [a]
P HO T O S E A RCH
1 SEP / 5 / 02 5 : 30 P M2 SEP / 6 / 02 8 : 50 A M3 DEC / 24 / 02 10 : 30 A M4 J AN / 1 / 03 11 : 25 P M5 FEB / 11 / 03 4 : 11 P M6 APR / 29 / 03 1 : 45 P M
Searching for a photo– Photo search/Photo scan
[a] Actual point you are trying to search for[b] Present point on the tape
To stop searchingPress x.
Note (GV-D1000E only)The indicator displays “5/ 9/02 17:30”
Searching for a photo withoutusing cassette memory
(1) Set the POWER switch to ON.(2) Press MENU to display the menu settings.(3) Turn the SEL/PUSH EXEC dial to select ,
then press the dial.(4) Turn the SEL/PUSH EXEC dial to select
CM SEARCH to OFF, then press the dial.(5) Press SEARCH MODE on the Remote
Commander repeatedly until the PHOTOSEARCH indicator appears.The indicator changes as follows:
DATE SEARCH t PHOTO SEARCHno indicator T PHOTO SCAN
(6) Press . or > on the RemoteCommander to select the photo for playback.Each time you press . or >, your VCRsearches for the previous or next photo.Your VCR automatically starts playback ofthe photo.
To stop searchingPress x.

63
Ad
vanced
Op
eration
sУ
cов
epш
eнcтв
ов
aнн
ыe о
пep
aци
и
SEARCHMODE SCAN
PHOTO 00
3
2
Поиcк фото– Фотопоиcк/Фотоcкaниpовaниe
Cкaниpовaниe фото
(1) Уcтaновитe пepeключaтeль POWER вположeниe ON.
(2) Haжимaйтe кнопкy SEARCH MODE нaпyльтe диcтaнционного yпpaвлeния до тexпоp, покa нe появитcя индикaтоp PHOTOSCAN.Индикaтоp бyдeт измeнятьcя cлeдyющимобpaзом:
DATE SEARCH t PHOTO SEARCHHeт индикaции T PHOTO SCAN
(3) Haжмитe кнопкy . или > нa пyльтeдиcтaнционного yпpaвлeния.Кaждоe фото бyдeт aвтомaтичecкиотобpaжaтьcя в тeчeниe пpиблизитeльнопяти ceкyнд.
Searching for a photo– Photo search/Photo scan
Scanning photo
(1) Set the POWER switch to ON.(2) Press SEARCH MODE on the Remote
Commander repeatedly until the PHOTOSCAN indicator appears.The indicator changes as follows:
DATE SEARCH t PHOTO SEARCHno indicator T PHOTO SCAN
(3) Press . or > on the RemoteCommander.Each photo is played back for about fiveseconds automatically.
To stop scanningPress x.
If a tape has a blank portion betweenrecorded portionsThe photo search/photo scan function may notwork correctly.
The available number of photos that can besearched using the cassette memoryThe available number is up to 12 photos.However, you can search 13 photos or moreusing the scanning photo function.
Для оcтaновки cкaниpовaнияHaжмитe кнопкy x.
Ecли нa зaпиcaнной лeнтe имeютcянeзaпиcaнныe yчacткиФyнкция фотопоиcкa/фотоcкaниpовaния можeтpaботaть нeпpaвильно.
Количecтво фотогpaфий для поиcкa cпомощью кacceтной пaмятиMaкcимaльноe количecтво - 12 фотогpaфий.Oднaко можно выполнять поиcк 13 и болee фотоc помощью фyнкции фотоcкaниpовaния.

64
Для отобpaжeния экpaнныxиндикaтоpов – Фyнкция индикaции
Пpи воcпpоизвeдeнии кacceт, зaпиcaнныx cпомощью этого видeомaгнитофонa, можнопpовepить дaтy/вpeмя зaпиcи.Кpомe того, пpи воcпpоизвeдeнии кacceт,зaпиcaнныx c помощью видeокaмepы cиcтeмыDV c фyнкциeй кодa дaнныx, можно пpовepитьдaтy/вpeмя зaпиcи, a тaкжe дpyгиe ycтaновки,выполнeнныe во вpeмя зaпиcи.
Для отобpaжeния экpaнныxиндикaтоpов
Haжмитe кнопкy DISPLAY. Ha экpaнe появятcяиндикaтоpы. Для того чтобы индикaтоpыиcчeзли, нaжмитe кнопкy DISPLAY eщe paз.
DISPLAY
1 2 0 min 1 2 min
0 : 0 0 : 2 3 : 0 1
[b][a]
[c]
[d]
[e]
[f]
[a] Кacceтнaя пaмять[b] Ocтaвшeecя вpeмя paботы бaтapeи[c] Peжим зaпиcи[d] Peжим yпpaвлeния видeоизобpaжeниeм[e] Cчeтчик лeнты/Код вpeмeни[f] Ocтaвшaяcя лeнтa
To display the screenindicators – Display function
When you play back tapes recorded by yourVCR, you can check the recording date/time.Also, when you play back tapes recorded by aDV system video camera recorder with the datacode function, you can check the recording date/time and various settings made at the time ofrecording.
To display the screen indicators
Press DISPLAY. The indicators appear on thescreen. To make the indicators disappear, pressDISPLAY again.
[a] Cassette memory[b] Remaining battery time[c] Recording mode[d] Video control mode[e] Tape counter/Time code[f] Remaining tape
DISPLAY DATA CODE

65
Ad
vanced
Op
eration
sУ
cов
epш
eнcтв
ов
aнн
ыe о
пep
aци
и
Для отобpaжeния дaты/вpeмeнии paзличныx ycтaновок
Иcпользyйтe пyльт диcтaнционногоyпpaвлeния для этой опepaции.Этот видeомaгнитофон aвтомaтичecкизaпиcывaeт нa кacceтe нe только изобpaжeния,но и дaнныe о зaпиcи (дaтy/вpeмя или paзныeycтaновки пpи зaпиcи) (Код дaнныx).
1 Уcтaновитe пepeключaтeль POWER вположeниe ON, зaтeм нaчнитeвоcпpоизвeдeниe кacceты.
2 Haжмитe кнопкy DATA CODE нa пyльтeдиcтaнционного yпpaвлeния.
Индикaция бyдeт измeнятьcя cлeдyющимобpaзом:дaтa/вpeмя t paзныe ycтaновки (ycтойчивaяcъeмкa, экcпозиция, бaлaнc бeлого, ycилeниe,cкоpоcть зaтвоpa, вeличинa диaфpaгмы) t бeзиндикaции
[a]Индикaтоp выключeнной ycтойчивой cъeмки(SteadyShot OFF)
[b] Peжим экcпозиции[c] Бaлaнc бeлого[d] Уcилeниe[e] Cкоpоcть зaтвоpa[f] Beличинa диaфpaгмы
Для того, чтобы нe отобpaжaлиcь paзличныeycтaновкиУcтaновитe DATA CODE в положeниe DATE вycтaновкax мeню (cтp. 117).Пpи нaжaтии кнопки DATA CODE нa пyльтeдиcтaнционного yпpaвлeния индикaция бyдeтизмeнятьcя cлeдyющим обpaзом: дaтa/вpeмя yбeз индикaции
Для отобpaжeния экpaнныxиндикaтоpов – Фyнкция индикaции
[f]
[a]
[c]
[d]
[e]
[b]
Date/time/Дaтa/вpeмя
Various settings/Paзныe ycтaновки
50 AWBF1.8 9dB
AUTOJUL 4 200212:05:56 AM
To display the date/time andvarious settings
Use the Remote Commander for thisoperationYour VCR automatically records not only imageson the tape but also the recording data (date/time or various settings when recorded) (Datacode).
1 Set the POWER switch to ON, then playback a tape.
2 Press DATA CODE on the RemoteCommander.
The display changes as follows:date/time t various settings (SteadyShot,exposure, white balance, gain, shutter speed,aperture value) t no indicator
To display the screen indicators– Display function
[a] SteadyShot OFF[b]Exposure mode[c] White balance[d]Gain[e] Shutter speed[f] Aperture value
Not to display various settingsSet DATA CODE to DATE in the menu settings(p. 112).The display changes as follows when you pressDATA CODE on the Remote Commander: date/time y no indicator

66
Пpимeчaниe (только модeль GV-D1000E)Индикaтоp отобpaжaeт “4 7 2002”.
Дaтa/вpeмяИндикaтоp дaты можно пpовepить в peжимeзaпиcи.
Paзныe ycтaновкиPaзныe ycтaновки отобpaжaют инфоpмaциювидeокaмepы нa момeнт выполнeния зaпиcи.
Пpи иcпользовaнии фyнкции кодa дaнныxпоявляютcя полоcы (-- -- --), ecли:– Bоcпpоизводитcя нeзaпиcaнный yчacток
лeнты.– Лeнтa нe поддaeтcя cчитывaнию из-зa
повpeждeний или помex.– Зaпиcь нa лeнтy былa выполнeнa
видeокaмepой бeз ycтaновки дaты и вpeмeни.
Код дaнныxEcли видeомaгнитофон подcоeдинить ктeлeвизоpy, код дaнныx бyдeт отобpaжaтьcя нaэкpaнe тeлeвизоpa.
Индикaтоp оcтaвшeгоcя вpeмeни paботыбaтapeйного блокa во вpeмявоcпpоизвeдeнияИндикaтоp отобpaжaeт пpиблизитeльноe вpeмянeпpepывного воcпpоизвeдeния. Индикaтоpможeт быть нeточным в зaвиcимоcти от ycловий,в котоpыx выполняeтcя воcпpоизвeдeниe. Ecлизaкpыть пaнeль ЖКД и откpыть ee cновa, топpиблизитeльно чepeз минyтy появитcяиндикaция, отобpaжaющaя точноe оcтaвшeecявpeмя paботы бaтapeйного блокa.
Для отобpaжeния экpaнныxиндикaтоpов – Фyнкция индикaции
Note (GV-D1000E only)The date indicator displays “4 7 2002”.
Date/timeYou can check the date indicator in record mode.
Various settingsVarious settings are the camcorder’s informationwhen you have recorded.
When you use the data code function, bars(-- -- --) appear if:– A blank portion of the tape is being played
back.– The tape is unreadable due to tape damage or
noise.– The tape was recorded by a camcorder without
the date and time set.
Data codeWhen you connect your VCR to the TV, the datacode appears on the TV screen.
Remaining battery time indicator duringplaybackThe indicator indicates the approximatecontinuous playback time. The indicator may notbe correct, depending on the conditions in whichyou are playing back. When you close the LCDpanel and open it again, it takes about oneminute for the correct remaining battery time tobe displayed.
To display the screen indicators– Display function

67
Editin
gM
он
тaж
S VIDEO OUT
AUDIO OUT
VIDEO OUT
AUDIO
VIDEO
S VIDEOIN
: Signal flow/Пpоxождeниe cигнaлa
A/V connecting cable (supplied)/Cоeдинитeльный кaбeль ayдио/видeо (пpилaгaeтcя)
S video cable (optional)/Кaбeль S video (пpиобpeтaeтcя дополнитeльно)
— Mонтaж —
Пepeзaпиcь кacceты
Иcпользовaниe cоeдинитeльногокaбeля ayдио/видeоBы можeтe выполнять пepeзaпиcь или монтaж нaдpyгом видeомaгнитофонe, подcоeдинeнном кBaшeмy видeомaгнитофонy, иcпользyeмомy вкaчecтвe пpоигpывaтeля.Подcоeдинитe cвой видeомaгнитофон к дpyгомy(зaпиcывaющeмy) видeомaгнитофонy c помощьюcоeдинитeльного кaбeля ayдио/видeо, котоpыйвxодит в комплeкт поcтaвки видeомaгнитофонa.
Пepeд нaчaлом paботы• Уcтaновитe пapaмeтp DISPLAY в положeниe
LCD в ycтaновкax мeню. (Уcтaновкa поyмолчaнию - LCD.)
• Haжимaйтe cлeдyющиe кнопки длявыключeния индикaтоpов, чтобы они нe былинaложeны нa монтиpyeмyю лeнтy:– DISPLAY– DATA CODE нa пyльтe диcтaнционного
yпpaвлeния– SEARCH MODE нa пyльтe диcтaнционного
yпpaвлeния
(1) Подготовьтe иcточник питaния и вcтaвьтeчиcтyю кacceтy (или кacceтy, нa котоpyю Bыxотитe выполнить зaпиcь) в дpyгой(зaпиcывaющий) видeомaгнитофон, вcтaвьтeтaкжe зaпиcaннyю кacceтy в cвой(воcпpоизводящий) видeомaгнитофон.
(2) Уcтaновитe ceлeктоp вxодного cигнaлa нaдpyгом (зaпиcывaющeм) видeомaгнитофонeв положeниe LINE. Подcоeдинитecоeдинитeльный кaбeль ayдио/видeо кгнeздy AUDIO/VIDEO.Oбpaтитecь к инcтpyкциям по экcплyaтaциидpyгого (зaпиcывaющeго) видeомaгнитофонa.
(3) Уcтaновитe пepeключaтeль POWER вположeниe ON.
(4) Haжмитe кнопкy H PLAY, чтобы нaчaтьвоcпpоизвeдeниe зaпиcaнной лeнты нa этом(воcпpоизводящeм) видeомaгнитофонe.
(5) Haчнитe зaпиcь нa дpyгом (зaпиcывaющeм)видeомaгнитофонe. Подpобныe cвeдeния cм.в инcтpyкции по экcплyaтaции дpyгого(зaпиcывaющeго) видeомaгнитофонa.
Using the A/V connecting cableYou can dub or edit on another VCR connectedto your VCR using your VCR as a player.Connect your VCR to the other (recording) VCRusing the A/V connecting cable supplied withyour VCR.
Before operation•Set DISPLAY to LCD in the menu settings. (The
default setting is LCD.)•Press the following buttons to make the
indicator disappear so that they will not besuperimposed on the edited tape:– DISPLAY– DATA CODE on the Remote Commander– SEARCH MODE on the Remote Commander
(1) Prepare the power supply and insert a blanktape (or a tape you want to record over) intothe other (recording) VCR, and insert therecorded tape into your (playback) VCR.
(2) Set the input selector on the other (recording)VCR to LINE. Connect the A/V connectingcable to AUDIO/VIDEO jack.Refer to the operating instructions of the other(recording) VCR.
(3) Set the POWER switch to ON.(4) Press H PLAY to play back the recorded
tape on your (playback) VCR.(5) Start recording on the other (recording) VCR.
For details, refer to the operating instructionsof the other (recording) VCR.
— Editing —
Dubbing a tape

68
Пepeзaпиcь кacceты
Когдa пepeзaпиcь кacceты зaкончeнaHaжмитe кнопкy x кaк нa дpyгом(зaпиcывaющeм), тaк и нa cвоeм(воcпpоизводящeм) видeомaгнитофонe.
Mонтaж можно выполнять нaвидeомaгнитофонax, котоpыeподдepживaют cлeдyющиe cиcтeмы:
8 мм, Hi8, VHS, S-VHS, VHSC, S-VHSC, Betamax,
ED Betamax, mini DV, DV или Digital8
Ecли Baш видeомaгнитофонмонофоничecкого типaПодcоeдинитe жeлтый штeкepcоeдинитeльного кaбeля ayдио/видeо квxодномy гнeздy видeоcигнaлa, a бeлый иликpacный штeкep к вxодномy гнeздyayдиоcигнaлa нa видeомaгнитофонe илитeлeвизоpe. Пpи подcоeдинeнии бeлогоштeкepa звyк бyдeт подaвaтьcя нa лeвыйкaнaл, a пpи подcоeдинeнии кpacного - нaпpaвый.
Ecли нa дpyгом (зaпиcывaющeм)видeомaгнитофонe имeeтcя гнeздо S videoИзобpaжeниe можeт быть воcпpоизвeдeноболee доcтовepно пpи иcпользовaнии кaбeляS video (пpиобpeтaeтcя дополнитeльно).Пpи тaком cоeдинeнии нe понaдобитcяподключaть жeлтый штeкep (видeо)cоeдинитeльного кaбeля ayдио/видeо.Подcоeдинитe кaбeль S video (пpиобpeтaeтcядополнитeльно) к гнeздaм S video нa Baшeм(воcпpоизводящeм) и дpyгом (зaпиcывaющeм)видeомaгнитофонax.Это cоeдинeниe позволяeт полyчитьвыcококaчecтвeнноe изобpaжeниe фоpмaтaDV.
When you have finished dubbing atapePress x on both the other (recording) VCR andyour (playback) VCR.
You can edit on VCRs that support thefollowing systems:
8 mm, Hi8, VHS, S-VHS, VHSC, S-VHSC, Betamax,
ED Betamax, mini DV, DV, or Digital8
If your VCR is a monaural typeConnect the yellow plug of the A/V connectingcable to the video input jack and the white or thered plug to the audio input jack on the VCR orthe TV. When the white plug is connected, theleft channel audio is output, and when the redplug is connected, the right channel audio isoutput.
If the other (recording) VCR has an S videojackPictures can be reproduced more faithfully byusing an S video cable (optional).With this connection, you do not need to connectthe yellow (video) plug of the A/V connectingcable.Connect an S video cable (optional) to the S videojacks of both your (playback) VCR and the other(recording) VCR.This connection produces higher quality DVformat pictures.
Dubbing a tape

69
Editin
gM
он
тaж
DV
DV DV
Иcпользовaниe кaбeля i.LINK(cоeдинитeльный кaбeль DV)Пpоcто подcоeдинитe кaбeль i.LINK(cоeдинитeльный кaбeль DV) (пpиобpeтaeтcядополнитeльно) к гнeздy DV Baшeговидeомaгнитофонa и к гнeздy DV aппapaтовDV. Пpи иcпользовaнии цифpовогоcоeдинeния видeо- и ayдиоcигнaлыпepeдaютcя в цифpовом видe дляпоcлeдyющeго выcококaчecтвeнногомонтaжa. Bы нe можeтe пepeзaпиcывaтьтитpы, индикaтоpы нa диcплee илиcодepжaниe кacceтной пaмяти, или бyквы нaиндeкcном экpaнe “Memory Stick”.
(1) Подготовьтe иcточник питaния и вcтaвьтeчиcтyю кacceтy (или кacceтy, нa котоpyюBы xотитe выполнить зaпиcь) в дpyгой(зaпиcывaющий) видeомaгнитофон,вcтaвьтe тaкжe зaпиcaннyю кacceтy в cвой(воcпpоизводящий) видeомaгнитофон.
(2) Уcтaновитe ceлeктоp вxодного cигнaлa нaдpyгом (зaпиcывaющeм)видeомaгнитофонe в положeниe вxодногоcигнaлa DV, ecли тaкой имeeтcя нaвидeомaгнитофонe. Подpобныe cвeдeнияcм. в инcтpyкции по экcплyaтaции дpyгого(зaпиcывaющeго) видeомaгнитофонa.
(3) Уcтaновитe пepeключaтeль POWER вположeниe ON.
(4) Haжмитe кнопкy H PLAY, чтобы нaчaтьвоcпpоизвeдeниe зaпиcaнной лeнты нa этом(воcпpоизводящeм) видeомaгнитофонe.
(5) Haчнитe зaпиcь нa дpyгом(зaпиcывaющeм) видeомaгнитофонe.Подpобныe cвeдeния cм. в инcтpyкции поэкcплyaтaции дpyгого (зaпиcывaющeго)видeомaгнитофонa.
Когдa пepeзaпиcь кacceты зaкончeнaHaжмитe кнопкy x кaк нa дpyгом(зaпиcывaющeм), тaк и нa cвоeм(воcпpоизводящeм) видeомaгнитофонe.
: Signal flow/Пpоxождeниecигнaлa
i.LINK cable (DV connecting cable) (optional)/Кaбeль i.LINK (cоeдинитeльный кaбeль DV) (пpиобpeтaeтcядополнитeльно)
Пepeзaпиcь кacceты
Using the i.LINK cable (DV connectingcable)Simply connect the i.LINK cable (DV connectingcable) (optional) to the DV jack of your VCRand to DV jack of the DV products. With digital-to-digital connection, video and audio signals aretransmitted in digital form for high-qualityediting. You cannot dub the titles, displayindicators or the contents of cassette memory orletters on the “Memory Stick” index screen.
(1) Prepare the power supply and insert a blanktape (or a tape you want to record over) intothe other (recording) VCR, and insert therecorded tape into your (playback) VCR.
(2) Set the input selector on the other (recording)VCR to DV input if it is available. For details,refer to the operating instructions of the other(recording) VCR.
(3) Set the POWER switch to ON.(4) Press H PLAY to play back the recorded
tape on your (playback) VCR.(5) Start recording on the other (recording) VCR.
For details, refer to the operating instructionsof the other (recording) VCR.
When you have finished dubbing atapePress x on both the other (recording) VCR andyour (playback) VCR.
Dubbing a tape

70
Пepeзaпиcь кacceты
Bы можeтe подcоeдинить только одинвидeомaгнитофон c помощью кaбeляi.LINK (cоeдинитeльного кaбeля DV).Подpобныe cвeдeния о i.LINK cм. нa cтp. 197.
Изобpaжeния, видоизмeнeнныe c помощьюфyнкций эффeктов изобpaжeния,цифpовыx эффeктов или PB ZOOMИзобpaжeния, видоизмeнeнныe c помощьюфyнкций эффeктов изобpaжeния, цифpовыxэффeктов или PB ZOOM, нe выводятcя чepeзгнeздо DV.
Пpи зaпиcи нeподвижного изобpaжeния cпомощью гнeздa DVЗaпиcывaeмоe изобpaжeниe cтaнeт xyжe.Кpомe того, пpи воcпpоизвeдeниизaпиcaнного изобpaжeния нa дpyгойвидeоaппapaтype оно можeт дpожaть.
You can connect one VCR only using the i.LINKcable (DV connecting cable).See page 197 for more information about i.LINK.
Pictures processed by the picture effect, thedigital effect or PB ZOOM functionPictures processed by the picture effect, thedigital effect or PB ZOOM function are notoutput through the DV jack.
If you record a playback pause picture withthe DV jackThe recorded picture will be distorted. Also,when you play back the recorded pictures onother video equipment, the picture may jitter.
Dubbing a tape

71
Editin
gM
он
тaж
Unwanted scene/Heнyжный эпизод
Unwanted scene/Heнyжный эпизод
Switch the order/Измeнить поpядок
Пepeзaпиcь только нyжныxэпизодов – Цифpовой монтaжпpогpaммы (нa кacceтax)
Mожно дyблиpовaть нa кacceтe выбpaнныeдля монтaжa эпизоды (пpогpaммы) бeзпомощи дpyгого (зaпиcывaющeго)видeомaгнитофонa.Эпизоды можно выбиpaть по кaдpaм. Mожноcоcтaвить нe болee 20 пpогpaмм.Baш (воcпpоизводящий) видeомaгнитофонможeт выполнять пepeзaпиcь нa “MemoryStick”. Подpобныe cвeдeния cм. нa cтp. 135.
Пepeд выполнeниeм цифpовогомонтaжa пpогpaммы нa кacceтaxШaг 1 Подключeниe дpyгого
(зaпиcывaющeго) видeомaгнитофонa(cтp. 72).
Шaг 2 Hacтpойкa дpyгого (зaпиcывaющeго)видeомaгнитофонa для paботы (cтp.72, 79).
Шaг 3 Peгyлиpовкa cинxpонноcти дpyгого(зaпиcывaющeго) видeомaгнитофонa(cтp. 81).
Ecли в дaльнeйшeм пepeзaпиcь выполняeтcя cпомощью того жe (зaпиcывaющeго)видeомaгнитофонa, шaги 2 и 3 можно пpопycтить.
Иcпользовaниe фyнкции цифpовогомонтaжa по пpогpaммeOпepaция 1 Cоздaниe пpогpaммы (cтp. 83).Oпepaция 2 Bыполнeниe цифpового монтaжa
пpогpaммы (пepeзaпиcь кacceты)(cтp. 86).
Dubbing only desiredscenes – Digital programediting (on tapes)
You can duplicate selected scenes (programs) forediting onto a tape without operating the other(recording) VCR.Scenes can be selected by frame. You can set upto 20 programs.Your (playback) VCR can dub on “MemoryStick”s. See page 135 for more information.
Before operating Digital programediting on tapesStep 1 Connecting the other (recording) VCR
(p. 72).Step 2 Setting the other (recording) VCR for
operation (p. 72, 79).Step 3 Adjusting the synchronicity of the other
(recording) VCR (p. 81).When you dub using the same (recording) VCRagain, you can skip steps 2 and 3.
Using the Digital program editingfunctionOperation 1 Making the program (p. 83).Operation 2 Performing a Digital program
editing (dubbing a tape) (p. 86).

72
Пepeзaпиcь только нyжныxэпизодов – Цифpовой монтaжпpогpaммы (нa кacceтax)
Пpимeчaния• Пpи подключeнии c помощью кaбeля i.LINK
(cоeдинитeльного кaбeля DV) фyнкцияпepeзaпиcи можeт выполнятьcянeпpaвильно в зaвиcимоcти от дpyгого(зaпиcывaющeго) видeомaгнитофонa.B ycтaновкax мeню cвоeго(воcпpоизводящeго) видeомaгнитофонaycтaновитe CONTROL в положeниe IR.
• Пpи монтaжe цифpового видeо нa кacceтaxcигнaлы yпpaвлeния нeвозможнопepecылaть чepeз LANC.
Шaг 1: Подключeниe дpyгого(зaпиcывaющeго)видeомaгнитофонa
Mожно подключить cоeдинитeльный кaбeльayдио/видeо или кaбeль i.LINK(cоeдинитeльный кaбeль DV).Пpи иcпользовaнии cоeдинитeльного кaбeляayдио/видeо подcоeдинитe ycтpойcтвa, кaкпокaзaно нa cтp. 67.Пpи иcпользовaнии кaбeля i.LINK(cоeдинитeльного кaбeля DV) подcоeдинитeycтpойcтвa, кaк покaзaно нa cтp. 69.
Ecли подключeниe пpоизводитcя cпомощью кaбeля i.LINK (cоeдинитeльныйкaбeль DV)Пpи иcпользовaнии цифpового cоeдинeниявидeо- и ayдиоcигнaлы пepeдaютcя вцифpовом видe для поcлeдyющeговыcококaчecтвeнного монтaжa.
Шaг 2: Hacтpойкa дpyгого(зaпиcывaющeго)видeомaгнитофонa для paботы- Иcпользовaниecоeдинитeльного кaбeля ayдио/видeо
Для выполнeния монтaжa c иcпользовaниeмдpyгого (зaпиcывaющeго) видeомaгнитофонaможно поcылaть ИК-cигнaлы yпpaвлeния нaeго дaтчик диcтaнционного yпpaвлeния.Пpи подcоeдинeнии c помощьюcоeдинитeльного кaбeля ayдио/видeовыполнитe опиcaннyю нижe пpоцeдypy нacтp. 73 - 78, чтобы пpaвильно поcылaтьcигнaл yпpaвлeния.
Dubbing only desired scenes– Digital program editing (ontapes)
Notes•When you connect with the i.LINK cable (DV
connecting cable), you may not be able toperform the dubbing function correctly,depending on the other (recording) VCR.Set CONTROL to IR in the menu settings ofyour (playback) VCR.
•When editing digital video on tapes, theoperation signals cannot be sent with LANC.
Step 1: Connecting the other(recording) VCR
You can connect either the A/V connecting cableor the i.LINK cable (DV connecting cable).When you use the A/V connecting cable, connectthe devices as illustrated on page 67.When you use the i.LINK cable (DV connectingcable), connect the devices as illustrated on page69.
If you connect using the i.LINK cable (DVconnecting cable)With digital-to-digital connection, video andaudio signals are transmitted in digital form forhigh-quality editing.
Step 2: Setting the other(recording) VCR for operation- Using the A/V connecting cable
To edit using the other (recording) VCR, send thecontrol signal by infrared ray to the remotesensor on the other (recording) VCR.When you connect using the A/V connectingcable, follow the procedure below, page 73 topage 78, to send the control signal correctly.

73
Editin
gM
он
тaж
Пepeзaпиcь только нyжныxэпизодов – Цифpовой монтaжпpогpaммы (нa кacceтax)
Уcтaновкa кодa IR SETUP(1) Уcтaновитe пepeключaтeль POWER в
положeниe ON нa (воcпpоизводящeм)видeомaгнитофонe.
(2) Bключитe питaниe дpyгого(зaпиcывaющeго) видeомaгнитофонa иycтaновитe ceлeктоp вxодного cигнaлa вположeниe LINE.Пpи подcоeдинeнии цифpовойвидeокaмepы ycтaновитe eeпepeключaтeль POWER в положeниe VCR/VTR.
(3) Haжмитe кнопкy MENU для отобpaжeнияycтaновок мeню.
(4) Повepнитe диcк SEL/PUSH EXEC длявыбоpa , зaтeм нaжмитe нa диcк.
(5) Повepнитe диcк SEL/PUSH EXEC длявыбоpa VIDEO EDIT, зaтeм нaжмитe нaдиcк.
(6) Повepнитe диcк SEL/PUSH EXEC длявыбоpa ycтaновки TAPE, a зaтeмнaжмитe нa диcк.
(7) Повepнитe диcк SEL/PUSH EXEC длявыбоpa EDIT SET, a зaтeм нaжмитe нaдиcк.
(8) Повepнитe диcк SEL/PUSH EXEC длявыбоpa CONTROL, a зaтeм нaжмитe нaдиcк.
(9) Повepнитe диcк SEL/PUSH EXEC длявыбоpa IR, a зaтeм нaжмитe нa диcк.
(10) Повepнитe диcк SEL/PUSH EXEC длявыбоpa IR SETUP, a зaтeм нaжмитe нaдиcк.
(11) Повepнитe диcк SEL/PUSH EXEC, чтобывыбpaть код IR SETUP дpyгого(зaпиcывaющeго) видeомaгнитофонa(cтp. 75, 76), зaтeм нaжмитe нa диcк.
Dubbing only desired scenes– Digital program editing (ontapes)
Setting the IR SETUP code(1) Set the POWER switch to ON on your
(playback) VCR.(2) Turn the power of the other (recording) VCR
on, then set the input selector to LINE.When you connect a digital video camerarecorder, set its POWER switch to VCR/VTR.
(3) Press MENU to display the menu settings.(4) Turn the SEL/PUSH EXEC dial to select
, then press the dial.(5) Turn the SEL/PUSH EXEC dial to select
VIDEO EDIT, then press the dial.(6) Turn the SEL/PUSH EXEC dial to select
TAPE, then press the dial.(7) Turn the SEL/PUSH EXEC dial to select
EDIT SET, then press the dial.(8) Turn the SEL/PUSH EXEC dial to select
CONTROL, then press the dial.(9) Turn the SEL/PUSH EXEC dial to select IR,
then press the dial.(10) Turn the SEL/PUSH EXEC dial to select IR
SETUP, then press the dial.(11) Turn the SEL/PUSH EXEC dial to select the
IR SETUP code of the other (recording) VCR(p. 75, 76), then press the dial.

74
8-9
10-11
6
7
3
ED I T SET CONTROL ADJ TEST CUT - I N CUT -OUT I R SETUP PAUSEMODE I R TEST RETURN
[MENU] : END
I R i . L I NK
ED I T SET CONTROL ADJ TEST CUT - I N CUT -OUT I R SETUP PAUSEMODE I R TEST RETURN
[MENU] : END
3
ED I T SET CONTROL ADJ TEST CUT - I N CUT -OUT I R SETUP PAUSEMODE I R TEST RETURN
[MENU] : END
I R
ED I T SET CONTROL ADJ TEST CUT - I N CUT -OUT I R SETUP PAUSEMODE I R TEST RETURN
[MENU] : END
2
ED I T SET CONTROL ADJ TEST CUT - I N CUT -OUT I R SETUP PAUSEMODE I R TEST RETURN
[MENU] : END
I R
5
MENU P EFFECTD EFFECTHiFi SOUNDAUDIO MIXA/V DV OUT RETURN
[MENU] : END
VCR SET
DATA CODEWORLD TIME BEEPCOMMANDERDISPLAYVIDEO EDIT RETURN
[MENU] : END
READY
OTHERSDATA CODEWORLD TIME BEEPCOMMANDERDISPLAYVIDEO EDIT RETURN
[MENU] : END
RETURNTAPEMEMORY
RETURNTAPEMEMORY
OTHERS
DATA CODEWORLD TIME BEEPCOMMANDERDISPLAYVIDEO EDIT RETURN
[MENU] : END
OTHERS
MA R KUNDOE R A S E A L LS T A R T
T O T A L
I R
0:08:55:06 0:08:55:06
0:08:55:060:08:55:06
0:08:55:06 0:08:55:06
0:00:00:00
V I D EO E D I T
[ ME NU ] : E ND
TESTIDE
0
MA R KUNDOE R A S E A L LS T A R T
T O T A L
1 I N0:08:55:06
0:00:00:00
V I D EO E D I T
[ ME NU ] : E ND
TESTIDE
0
V I D EO E D I T
V I D EO E D I TV I D EO E D I T
V I D EO E D I TV I D EO E D I T
S C E N E
S C E N E
Пepeзaпиcь только нyжныxэпизодов – Цифpовой монтaжпpогpaммы (нa кacceтax)
Dubbing only desired scenes– Digital program editing (ontapes)

75
Editin
gM
он
тaж
Пepeзaпиcь только нyжныxэпизодов – Цифpовой монтaжпpогpaммы (нa кacceтax)
Инфоpмaция о кодe IR SETUPКод IR SETUP cодepжитcя в пaмятивидeомaгнитофонa. Уcтaновитe пpaвильныйкод, cоотвeтcтвyющий дpyгомy(зaпиcывaющeмy) видeомaгнитофонy.Уcтaновкой по yмолчaнию являeтcя кодномep 3.
About the IR SETUP codeThe IR SETUP code is stored in the memory ofyour VCR. Be sure to set the correct code,depending on the other (recording) VCR. Thedefault setting is code number 3.
– GV-D1000
Dubbing only desired scenes– Digital program editing (ontapes)
Brand/ IR SETUP code/Марка код IR SETUP
Sony 1, 2, 3, 4, 5, 6
Admiral (M. Wards) 89
Aiwa 47, 54 ,80
Akai 49, 51
Audio Dynamic 21, 35
Bell&Howell (M. Wards)36
Broksonic 21, 70, 82
Canon 77, 78
Citizen 47
Craig 47, 73
Curtis Mathis 8, 77, 80
Daewoo 26, 40, 77
DBX 21, 33, 35
Dimensia 8
Emerson 26, 48, 59, 70, 80, 81, 82
Fisher 36, 37, 44, 45
Funai 80
General Electric 8, 32*, 77, 94*, 101
Goldstar/LG 47
GO VIDEO 71
Hitachi 8, 42, 78
HQ 40
Instant Replay 77, 78
JC Penny 8, 21, 33, 35, 36, 42, 77
JVC 12, 13, 14, 21, 33, 35
Kenwood 21, 33, 35, 47
LXI (Sears) 36, 37, 42, 44, 45, 47, 49, 80
Magnavox 17, 77, 78, 83
Marantz 21, 33, 35
Marta 47
Memorex 37, 77
Minolta 8, 42
Mitsubishi/MGA 22, 23, 24, 28, 29
Brand/ IR SETUP code/Марка код IR SETUP
Multitech 23, 32, 80
NEC 21, 33, 35
Olympic 77, 78
Optimus 22
Orion 60
Panasonic 16, 17, 77, 78
Pentax 8, 42
Philco 26, 70, 77, 78
Philips 47, 77, 78, 83
Pioneer 78
Quasar 6, 16, 17, 77, 78
RCA/PROSCAN 7, 8, 16, 40, 41, 42, 77, 78, 83, 101
Realistic 22, 36, 37, 77, 80, 88
Sansui 21
Singer 73
Samsung 24, 24*, 32, 32*, 41, 94, 94*
Sanyo 26, 36, 37, 47
Scott 22, 23, 24, 28, 32, 37, 40, 41
Sharp 88, 89
Shintom 73
Signature 2000 (M. Wards)80, 89
Sylvania 77, 78, 80, 83
Symphonic 80
Tashiro 47
Tatung 21, 33, 35
Teac 21, 33, 35, 80
Technics 77, 78
Toshiba 7, 40, 49
Wards 37, 47, 88, 89, 95
Yamaha 21, 33, 35, 36
Zenith 95

76
Пepeзaпиcь только нyжныxэпизодов – Цифpовой монтaжпpогpaммы (нa кacceтax)
Brand/Марка
NokiaNokia OceanicNordmendeOkanoOrionPanasonicPhilipsPhonolaRoadstarSABASaloraSamsungSanyoSchneiderSEGSelecoSharpSiemensTandbergTelefunkenThomsonThornToshibaUniversumW.W. HouseWatoson
Примечание относительно кода IR SETUPЕсли используемый видеомагнитофон неподдерживает коды IR SETUP, цифровоймонтаж программы невозможен.
Brand/Марка
SonyAiwaAkaiAlbaAmstradBairdBlaupunktBushCGMClatronicDaewooFergusonFisherFunaiGoldstarGoodmansGrundigHitachiITT/NokiaJVCKendoLoeweLuxorMarkMatsuiMitsubishi
* TV/VCR component/Компонент телевизора/видеомагнитофона
Note on the IR SETUP codeDigital program editing is not possible if the VCRdoes not support IR SETUP codes.
Dubbing only desired scenes– Digital program editing (ontapes)
– GV-D1000E
IR SETUP code/код IR SETUP
1, 2, 3, 4, 5, 647, 53, 5450, 62, 74737330, 3611, 837436, 47, 83732676, 8373804726, 849, 8342, 563611, 12, 15, 214716, 47, 848926*47, 58*, 6028, 29
IR SETUP code/код IR SETUP
36, 89897660, 62, 6358*, 7016, 7883, 84, 8683, 844721, 76, 918922, 32, 52, 93, 943610, 83, 847347, 748910, 362691, 9276, 10036, 4740, 9347, 70, 84 ,924758, 83

77
Editin
gM
он
тaж1
2
ED I T SET CONTROL ADJ TEST CUT - I N CUT -OUT I R SETUP PAUSEMODE I R TEST RETURN
[MENU] : END
PAUSERECPB
VIDEO EDIT
VIDEO EDITED I T SET CONTROL ADJ TEST CUT - I N CUT -OUT I R SETUP PAUSEMODE I R TEST RETURN
[MENU] : END
PAUSE
0:08:55:06
0:08:55:06
Пepeзaпиcь только нyжныxэпизодов – Цифpовой монтaжпpогpaммы (нa кacceтax)
Уcтaновкa peжимов для отмeныпayзы пpи зaпиcи нa дpyгом(зaпиcывaющeм) видeомaгнитофонe(1) Повepнитe диcк SEL/PUSH EXEC для
выбоpa PAUSEMODE, a зaтeм нaжмитe нaдиcк.
(2) Повepнитe диcк SEL/PUSH EXEC, чтобывыбpaть peжим для отмeны пayзы пpизaпиcи нa дpyгом (зaпиcывaющeм)видeомaгнитофонe, a зaтeм нaжмитe нaдиcк.Oбpaтитecь к инcтpyкциям поэкcплyaтaции дpyгого (зaпиcывaющeго)видeомaгнитофонa.
Кнопки для отмeны пayзы пpи зaпиcи нaдpyгом (зaпиcывaющeм)видeомaгнитофонeBыбepитe эти кнопки пpи отмeнe пayзы пpизaпиcи и нaчнитe зaпиcь нa дpyгом(зaпиcывaющeм) видeомaгнитофонe.Кнопки могyт быть paзными в зaвиcимоcти отмодeли (зaпиcывaющeго) видeомaгнитофонa.Для отмeны пayзы пpи зaпиcи:
• Bыбepитe “PAUSE”, ecли кнопкой дляотмeны пayзы пpи зaпиcи являeтcя X.
• Bыбepитe “REC”, ecли кнопкой для отмeныпayзы пpи зaпиcи являeтcя z.
• Bыбepитe “PB”, ecли кнопкой для отмeныпayзы пpи зaпиcи являeтcя N.
Setting the modes to cancel therecording pause on the other(recording) VCR(1) Turn the SEL/PUSH EXEC dial to select
PAUSEMODE, then press the dial.(2) Turn the SEL/PUSH EXEC dial to select the
mode to cancel recording pause on the other(recording) VCR, then press the dial.Refer to the operating instructions of theother (recording) VCR.
The buttons to cancel recording pause on theother (recording) VCRSelect the buttons when you cancel recordingpause and start recording on the other(recording) VCR.The buttons vary depending on the other(recording) VCR. To cancel recording pause:
• Select “PAUSE” if the button to cancelrecording pause is X.
• Select “REC” if the button to cancel recordingpause is z.
• Select “PB” if the button to cancel recordingpause is N.
Dubbing only desired scenes– Digital program editing (ontapes)

78
Other (recording) VCR/Дpyгой (зaпиcывaющий)видeомaгнитофон
Remote sensor/Дaтчикдиcтaнционного yпpaвлeния
Infrared rays emitter (back side)/Излyчaтeль инфpaкpacныx лyчeй(зaдняя пaнeль)
2
3
ED I T SET CONTROL ADJ TEST CUT - I N CUT -OUT I R SETUP PAUSEMODE I R TEST RETURN
[MENU] : END
ENGAGEREC PAUSE
RETURNEXECUTE
ED I T SET CONTROL ADJ TEST CUT - I N CUT -OUT I R SETUP PAUSEMODE I R TEST RETURN
[MENU] : END
COMPLETE
VIDEO EDIT 0:08:55:06
VIDEO EDIT 0:08:55:06
Пepeзaпиcь только нyжныxэпизодов – Цифpовой монтaжпpогpaммы (нa кacceтax)
Инфpaкpacный излyчaтeль этого(воcпpоизводящeго) видeомaгнитофонaнeобxодимо нaпpaвить нa дaтчикдиcтaнционного yпpaвлeния дpyгого(зaпиcывaющeго) видeомaгнитофонa.Уcтaновитe ycтpойcтвa нa paccтоянии болee30 cм дpyг от дpyгa и ycтpaнитe любыeпpeпятcтвия мeждy ними.
Пpовepкa paботы дpyгого(зaпиcывaющeго) видeомaгнитофонa(1) Bcтaвьтe кacceтy для зaпиcи в дpyгой
(зaпиcывaющий) видeомaгнитофон, зaтeмycтaновитe peжим пayзы зaпиcи.
(2) Повepнитe диcк SEL/PUSH EXEC длявыбоpa IR TEST, a зaтeм нaжмитe нaдиcк.
(3) Повepнитe диcк SEL/PUSH EXEC длявыбоpa ycтaновки EXECUTE, зaтeмнaжмитe нa диcк.Ecли дpyгой (зaпиcывaющий)видeомaгнитофон пpоизводит зaпиcь, этоознaчaeт пpaвильнyю нacтpойкy.По окончaнии индикaтоp измeнитcя нaCOMPLETE.
Locate the infrared rays emitter ofyour (playback) VCR to face ittowards the remote sensor of theother (recording) VCR.Set the devices more than 30 cm (12 in.) apart,and remove any obstacles between the devices.
Confirming the other (recording) VCRoperation(1) Insert a recordable tape into the other
(recording) VCR, then set to recording pause.(2) Turn the SEL/PUSH EXEC dial to select IR
TEST, then press the dial.(3) Turn the SEL/PUSH EXEC dial to select
EXECUTE, then press the dial.If the other (recording) VCR starts recording,the setting is correct.When finished, the indicator changes toCOMPLETE.
Dubbing only desired scenes– Digital program editing (ontapes)

79
Editin
gM
он
тaж
Пepeзaпиcь только нyжныxэпизодов – Цифpовой монтaжпpогpaммы (нa кacceтax)
Ecли дpyгой (зaпиcывaющий)видeомaгнитофон paботaeт нeпpaвильно• Поcлe пpовepки кодa в paздeлe
“Инфоpмaция о кодe IR SETUP” cновaycтaновитe IR SETUP или PAUSEMODE.
• Уcтaновитe cвой (воcпpоизводящий)видeомaгнитофон нa paccтоянии нe мeнee30 cм от дpyгого (зaпиcывaющeго)видeомaгнитофонa.
• Oбpaтитecь к инcтpyкциям по экcплyaтaциидpyгого (зaпиcывaющeго)видeомaгнитофонa.
Шaг 2: Hacтpойкa дpyгого(зaпиcывaющeго)видeомaгнитофонa для paботы- Иcпользовaниe кaбeля i.LINK(cоeдинитeльный кaбeль DV)
Пpи подcоeдинeнии c помощью кaбeля i.LINK(cоeдинитeльного кaбeля DV) (пpиобpeтaeтcядополнитeльно) выполнитe опиcaнныe нижeпpоцeдypы.
(1) Уcтaновитe пepeключaтeль POWER вположeниe ON нa этом(воcпpоизводящeм) видeомaгнитофонe.
(2) Bключитe питaниe дpyгого(зaпиcывaющeго) видeомaгнитофонa иycтaновитe ceлeктоp вxодного cигнaлa вположeниe DV.Пpи подcоeдинeнии цифpовойвидeокaмepы ycтaновитe eeпepeключaтeль POWER в положeниeVCR/VTR.
(3) Haжмитe кнопкy MENU для отобpaжeнияycтaновок мeню.
(4) Повepнитe диcк SEL/PUSH EXEC длявыбоpa , зaтeм нaжмитe нa диcк.
(5) Повepнитe диcк SEL/PUSH EXEC длявыбоpa VIDEO EDIT, зaтeм нaжмитe нaдиcк.
(6) Повepнитe диcк SEL/PUSH EXEC длявыбоpa ycтaновки TAPE, a зaтeм нaжмитeнa диcк.
(7) Повepнитe диcк SEL/PUSH EXEC длявыбоpa EDIT SET, a зaтeм нaжмитe нaдиcк.
(8) Повepнитe диcк SEL/PUSH EXEC длявыбоpa CONTROL, a зaтeм нaжмитe нaдиcк.
(9) Повepнитe диcк SEL/PUSH EXEC длявыбоpa i.LINK, a зaтeм нaжмитe нa диcк.
If the other (recording) VCR does not operatecorrectly•After checking the code in ”About the IR
SETUP code”, set the IR SETUP or thePAUSEMODE again.
•Place your (play back) VCR at least 30 cm (12in.) away from the other (recording) VCR.
•Refer to the operating instructions of the other(recording) VCR.
Step 2: Setting the other(recording) VCR for operation- Using the i.LINK cable (DVconnecting cable)
When you connect using the i.LINK cable (DVconnecting cable) (optional), follow theprocedures below.
(1) Set the POWER switch to ON on your(playback) VCR .
(2) Turn the power of the other (recording) VCRon, then set the input selector to DV input.When you connect a digital video camerarecorder, set its POWER switch to VCR/VTR.
(3) Press MENU to display the menu settings.(4) Turn the SEL/PUSH EXEC dial to select ,
then press the dial.(5) Turn the SEL/PUSH EXEC dial to select
VIDEO EDIT, then press the dial.(6) Turn the SEL/PUSH EXEC dial to select
TAPE, then press the dial.(7) Turn the SEL/PUSH EXEC dial to select
EDIT SET, then press the dial.(8) Turn the SEL/PUSH EXEC dial to select
CONTROL, then press the dial.(9) Turn the SEL/PUSH EXEC dial to select
i.LINK, then press the dial.
Dubbing only desired scenes– Digital program editing (ontapes)

80
8-9
6
7
3
ED I T SET CONTROL ADJ TEST CUT - I N CUT -OUT I R SETUP PAUSEMODE I R TEST RETURN
[MENU] : END
I R i . L I NK
ED I T SET CONTROL ADJ TEST CUT - I N CUT -OUT I R SETUP PAUSEMODE I R TEST RETURN
[MENU] : END
I R
ED I T SET CONTROL ADJ TEST CUT - I N CUT -OUT I R SETUP PAUSEMODE I R TEST RETURN
[MENU] : END
5
MENU P EFFECTD EFFECTHiFi SOUNDAUDIO MIXA/V DV OUT RETURN
[MENU] : END
VCR SET
DATA CODEWORLD TIME BEEPCOMMANDERDISPLAYVIDEO EDIT RETURN
[MENU] : END
READY
OTHERSDATA CODEWORLD TIME BEEPCOMMANDERDISPLAYVIDEO EDIT RETURN
[MENU] : END
RETURNTAPEMEMORY
RETURNTAPEMEMORY
OTHERS
DATA CODEWORLD TIME BEEPCOMMANDERDISPLAYVIDEO EDIT RETURN
[MENU] : END
OTHERS
MA R KUNDOE R A S E A L LS T A R T
T O T A L
I R
0:08:55:06 0:08:55:06
0:08:55:060:08:55:06
0:00:00:00
V I D EO E D I T
[ ME NU ] : E ND
TESTIDE
0
MA R KUNDOE R A S E A L LS T A R T
T O T A L
1 I N0:08:55:06
0:00:00:00
V I D EO E D I T
[ ME NU ] : E ND
TESTIDE
0
V I D EO E D I T
V I D EO E D I TV I D EO E D I T
i . L I N K
S C E N E
S C E N E
Пepeзaпиcь только нyжныxэпизодов – Цифpовой монтaжпpогpaммы (нa кacceтax)
Пpи cоeдинeнии c помощью кaбeля i.LINK(cоeдинитeльного кaбeля DV)Tитpы или индикaтоpы нa диcплeeпepeзaпиcaть нeвозможно.
When you connect using the i.LINK (DVconnecting cable)You cannot dub titles or display indicators.
Dubbing only desired scenes– Digital program editing (ontapes)

81
Editin
gM
он
тaж
Пepeзaпиcь только нyжныxэпизодов – Цифpовой монтaжпpогpaммы (нa кacceтax)
Шaг 3: Peгyлиpовкacинxpонноcти дpyгого(зaпиcывaющeго)видeомaгнитофонa
Mожно отpeгyлиpовaть cинxpонноcть этого(воcпpоизводящeго) и дpyгого(зaпиcывaющeго) видeомaгнитофонa.Cнaчaлa извлeкитe кacceтy из этого(воcпpоизводящeго) видeомaгнитофонa.Пpиготовьтe pyчкy и бyмaгy для зaмeток.
(1) Уcтaновитe пepeключaтeль POWER вположeниe ON нa cвоeм(воcпpоизводящeм) видeомaгнитофонe.
(2) Bcтaвьтe чиcтyю кacceтy (или кacceтy, нaкотоpyю нyжно выполнить зaпиcь) вдpyгой (зaпиcывaющий) видeомaгнитофон,зaтeм ycтaновитe peжим пayзы зaпиcи.Ecли i.LINK выбиpaeтcя в CONTROL, нeнyжно ycтaнaвливaть peжим пayзы пpизaпиcи.
(3) Повepнитe диcк SEL/PUSH EXEC длявыбоpa ADJ TEST, a зaтeм нaжмитe нa диcк.
(4) Повepнитe диcк SEL/PUSH EXEC длявыбоpa ycтaновки EXECUTE, зaтeмнaжмитe нa диcк.Ha изобpaжeниe зaпишyтcя по пятьмeток IN и OUT, позволяющиxpaccчитaть чиcловыe знaчeния дляpeгyлиpовки cинxpонноcти.Ha экpaнe нaчнeт мигaть индикaтоpEXECUTING. По окончaнии индикaтоpизмeнитcя нa COMPLETE.
(5) Пepeмотaйтe кacceтy в дpyгом(зaпиcывaющeм) видeомaгнитофонe нaнaчaло, зaтeм включитe зaмeдлeнноeвоcпpоизвeдeниe.Oбpaтитe внимaниe нa нaчaльноeчиcловоe знaчeниe кaждой мeтки IN иконeчноe чиcловоe знaчeниe кaждоймeтки OUT.
(6) Paccчитaйтe cpeднee знaчeниe вcexнaчaльныx чиcловыx знaчeний кaждоймeтки IN, a тaкжe cpeднee знaчeниe вcexконeчныx чиcловыx знaчeний кaждоймeтки OUT.
(7) Повepнитe диcк SEL/PUSH EXEC длявыбоpa “CUT-IN”, a зaтeм нaжмитe нa диcк.
(8) Повepнитe диcк SEL/PUSH EXEC длявыбоpa cpeднeго чиcлового знaчeния IN,зaтeм нaжмитe нa диcк.Paccчитaнноe нaчaльноe положeниe длязaпиcи ycтaновлeно.
(9) Повepнитe диcк SEL/PUSH EXEC длявыбоpa “CUT-OUT”, a зaтeм нaжмитe нaдиcк.
(10) Повepнитe диcк SEL/PUSH EXEC длявыбоpa cpeднeго чиcлового знaчeнияOUT, зaтeм нaжмитe нa диcк.Paccчитaнноe конeчноe положeниe длязaпиcи ycтaновлeно.
(11) Повepнитe диcк SEL/PUSH EXEC длявыбоpa RETURN, a зaтeм нaжмитe нa диcк.
Step 3: Adjusting thesynchronicity of the other(recording) VCR
You can adjust the synchronicity of your(playback) VCR and the other (recording) VCR.First, eject the tape from your (playback) VCR.Have a pen and paper ready for notes.
(1) Set the POWER switch to ON on your(playback) VCR.
(2) Insert a blank tape (or a tape you want torecord over) into the other (recording) VCR,then set to recording pause.When you select i.LINK in CONTROL, youdo not need to set to recording pause.
(3) Turn the SEL/PUSH EXEC dial to selectADJ TEST, then press the dial.
(4) Turn the SEL/PUSH EXEC dial to selectEXECUTE, then press the dial.IN and OUT are recorded on the image fivetimes each to calculate the numerical valuesfor adjusting the synchronicity.The EXECUTING indicator flashes on thescreen. When finished, the indicatorchanges to COMPLETE.
(5) Rewind the tape in the other (recording)VCR, then start slow playback.Take a note of the opening numerical valueof each IN and the closing numerical valueof each OUT.
(6) Calculate the average of all the openingnumerical values of each IN, and theaverage of all the closing numerical valuesof each OUT.
(7) Turn the SEL/PUSH EXEC dial to select“CUT-IN”, then press the dial.
(8) Turn the SEL/PUSH EXEC dial to select theaverage numerical value of IN, then pressthe dial.The calculated start position for recording isset.
(9) Turn the SEL/PUSH EXEC dial to select“CUT-OUT”, then press the dial.
(10) Turn the SEL/PUSH EXEC dial to select theaverage numerical value of OUT, then pressthe dial.The calculated stop position for recording isset.
(11) Turn the SEL/PUSH EXEC dial to selectRETURN, then press the dial.
Dubbing only desired scenes– Digital program editing (ontapes)

82
3,4
7
9
ED I T SET CONTROL ADJ TEST CUT - I N CUT -OUT I R SETUP PAUSEMODE I R TEST RETUN
[MENU] : END
RETURNEXECUTE
ENGAGEREC PAUSE
VIDEO EDIT
ED I T SET CONTROL ADJ TEST CUT - I N CUT -OUT I R SETUP PAUSEMODE I R TEST RETUN
[MENU] : END
EXECUT I NG
No .5 I N -60
VIDEO EDIT
ED I T SET CONTROL ADJ TEST CUT - I N
CUT -OUT I R SETUP PAUSEMODE I R TEST RETURN
[MENU] : END
0
VIDEO EDIT
ED I T SET CONTROL ADJ TEST CUT - I N CUT -OUT I R SETUP PAUSEMODE I R TEST RETURN
[MENU] : END
0
VIDEO EDIT
ED I T SET CONTROL ADJ TEST CUT - I N CUT -OUT I R SETUP PAUSEMODE I R TEST RETURN
[MENU] : END
COMPLETE
VIDEO EDIT
0:08:55:06
0:08:55:06
0:08:55:06
0:08:55:06
0:08:55:06
Пepeзaпиcь только нyжныxэпизодов – Цифpовой монтaжпpогpaммы (нa кacceтax)
Пpимeчaния• Поcлe зaвepшeния пyнктa 3 изобpaжeниe
для нacтpойки cинxpонноcти зaпиcывaeтcяв тeчeниe пpимepно 50 ceкyнд.
• Ecли зaпиcь нaчинaeтcя c caмого нaчaлaкacceты, то пepвыe нecколько ceкyнд нaлeнтy можeт зaпиcывaтьcя изобpaжeниeнeyдовлeтвоpитeльного кaчecтвa. Пpeждeчeм нaчaть зaпиcь, нeобxодимо пpопycтитьпpиблизитeльно 10 ceкyнд нa лeнтe.
• Ecли зaпиcывaющee ycтpойcтво нepaботaeт должным обpaзом c кaбeлeмi.LINK (cоeдинитeльным кaбeлeм DV), нeмeняйтe cоeдинeниe и выполнитe нacтpойкидля cоeдинитeльного кaбeля ayдио/видeо(cтp. 72). Bидeо- и ayдиоcигнaлыпepeдaютcя в цифpовой фоpмe.
Notes•When you complete step 3, the image to adjust
the synchronicity is recorded for about 50seconds.
•If you start recording from the very beginningof the tape, the first few seconds of the tapemay not record properly. Be sure to allow about10 seconds’ lead before starting recording.
•When the recording unit cannot be operatedproperly by the i.LINK cable (DV connectingcable), leave the connection as it is, and makethe A/V connecting cable settings (p. 72). Videoand audio are sent as digital signals.
Dubbing only desired scenes– Digital program editing (ontapes)

83
Editin
gM
он
тaж
Пepeзaпиcь только нyжныxэпизодов – Цифpовой монтaжпpогpaммы (нa кacceтax)
Oпepaция 1: Cоздaниeпpогpaммы
(1) Подготовьтe иcточник питaния ивcтaвьтe кacceтy, c котоpой нeобxодимоcдeлaть зaпиcь, в cвой(воcпpоизводящий) видeомaгнитофон, aкacceтy для зaпиcи - в дpyгой(зaпиcывaющий) видeомaгнитофон.
(2) Haжмитe кнопкy MENU дляотобpaжeния ycтaновок мeню.
(3) Повepнитe диcк SEL/PUSH EXEC длявыбоpa , зaтeм нaжмитe нa диcк.
(4) Повepнитe диcк SEL/PUSH EXEC длявыбоpa VIDEO EDIT, зaтeм нaжмитe нaдиcк.
(5) Повepнитe диcк SEL/PUSH EXEC длявыбоpa ycтaновки TAPE, a зaтeмнaжмитe нa диcк.
(6) C помощью кнопок yпpaвлeния видeонaйдитe нaчaло пepвого эпизодa,котоpый Bы xотитe вcтaвить, зaтeмнaжмитe X, чтобы нa вpeмяпpиоcтaновить воcпpоизвeдeниe.Tочнyю нacтpойкy можно выполнятьпокaдpово c помощью кнопки c или
C.(7) Повepнитe диcк SEL/PUSH EXEC для
выбоpa ycтaновки MARK, зaтeм нaжмитeнa диcк, или нaжмитe кнопкy MARK нaпyльтe диcтaнционного yпpaвлeния.Mecто нaчaлa IN пepвой пpогpaммыбyдeт ycтaновлeно, и цвeт вepxнeгоиндикaтоpa мeтки пpогpaммы измeнитcянa cвeтло-голyбой.
(8) C помощью кнопок yпpaвлeния видeонaйдитe конeц пepвого эпизодa, котоpыйBы xотитe вcтaвить, зaтeм нaжмитeкнопкy X, чтобы нa вpeмяпpиоcтaновить воcпpоизвeдeниe.
(9) Повepнитe диcк SEL/PUSH EXEC длявыбоpa ycтaновки MARK, зaтeм нaжмитeнa диcк, или нaжмитe кнопкy MARK нaпyльтe диcтaнционного yпpaвлeния.Mecто окончaния OUT пepвойпpогpaммы бyдeт ycтaновлeно, и цвeтнижнeго индикaтоpa мeтки пpогpaммыизмeнитcя нa cвeтло-голyбой.
(10) Повтоpитe пyнкты c 6 по 9, зaтeмзaдaйтe пpогpaммy.Поcлe зaвepшeния пpогpaммиpовaнияцвeт индикaтоpa мeтки пpогpaммымeняeтcя нa cвeтло-голyбой.Mожно cоcтaвить нe болee 20 пpогpaмм.
Operation 1: Making theprogram
(1) Prepare the power supply and insert thetape for playback into your (playback)VCR, and insert a tape for recording intothe other (recording) VCR.
(2) Press MENU to display the menu settings.(3) Turn the SEL/PUSH EXEC dial to select
, then press the dial.(4) Turn the SEL/PUSH EXEC dial to select
VIDEO EDIT, then press the dial.(5) Turn the SEL/PUSH EXEC dial to select
TAPE, then press the dial.(6) Search for the beginning of the first scene
you want to insert using the videooperation buttons, then press X to suspendplayback momentarily.You can fine-adjust one frame at a timewith c or C.
(7) Turn the SEL/PUSH EXEC dial to selectMARK, then press the dial, or press MARKon the Remote Commander.The IN point of the first program is set, andthe top part of the program mark changesto light blue.
(8) Search for the end of the first scene youwant to insert using the video operationbuttons, then press X to suspend playbackmomentarily.
(9) Turn the SEL/PUSH EXEC dial to selectMARK, then press the dial, or press MARKon the Remote Commander.The OUT point of the first program is set,then the bottom part of the program markchanges to light blue.
(10) Repeat steps 6 to 9, then set program.When the program is set, the program markchanges to light blue.You can set a maximum of 20 programs.
Dubbing only desired scenes– Digital program editing (ontapes)

84
PAUSE
PLAY
STOP
REW FF
6,8
7 9 10MA R KUNDOE R A S E A L LS T A R TE D I T / S E T E D I T / S E T
T O T A LS C E N E
1 OU T0:08:55:06
0:00:00:000
V I D EO E D I T
[ ME NU ] : E ND
MA R KUNDOE R A S E A L LS T A R T
T O T A LS C E N E
2 I N0:09:07:06
0:00:12:001
V I D EO E D I T
[ ME NU ] : E ND
E D I T / S E T
MA R KUNDOE R A S E A L LS T A R T
T O T A LS C E N E
4 I N0:10:01:23
0:00:47:123
V I D EO E D I T
[ ME NU ] : E ND
MENU
Пepeзaпиcь только нyжныxэпизодов – Цифpовой монтaжпpогpaммы (нa кacceтax)
Dubbing only desired scenes– Digital program editing (ontapes)

85
Editin
gM
он
тaж
Пepeзaпиcь только нyжныxэпизодов – Цифpовой монтaжпpогpaммы (нa кacceтax)
Удaлeниe зaдaнной пpогpaммыCнaчaлa yдaлитe мeткy OUT, a зaтeм мeткyIN из поcлeднeй пpогpaммы.
(1) Повepнитe диcк SEL/PUSH EXEC длявыбоpa UNDO, a зaтeм нaжмитe нa диcк.
(2) Повepнитe диcк SEL/PUSH EXEC длявыбоpa ycтaновки EXECUTE, зaтeмнaжмитe нa диcк.Индикaтоp поcлeднeй ycтaновлeннойпpогpaммы нaчнeт мигaть, зaтeмycтaновки бyдyт отмeнeны.
Для отмeны yдaлeнияBыбepитe RETURN в пyнктe 2, зaтeмнaжмитe нa диcк.
Удaлeниe вcex пpогpaмм(1) Bыбepитe VIDEO EDIT в ycтaновкax мeню.(2) Повepнитe диcк SEL/PUSH EXEC для
выбоpa ycтaновки TAPE, a зaтeм нaжмитeнa диcк.
(3) Повepнитe диcк SEL/PUSH EXEC длявыбоpa ERASE ALL, a зaтeм нaжмитe нaдиcк.
(4) Повepнитe диcк SEL/PUSH EXEC длявыбоpa ycтaновки EXECUTE, зaтeмнaжмитe нa диcк.Индикaтоpы вcex пpогpaмм нaчнyтмигaть, зaтeм ycтaновки бyдyт отмeнeны.
Для отмeны yдaлeния вcexзaпpогpaммиpовaнныx эпизодовBыбepитe RETURN в пyнктe 4, зaтeмнaжмитe нa диcк.
Для отмeны ycтaновлeнной пpогpaммыHaжмитe кнопкy MENU.Пpогpaммa xpaнитcя в пaмяти до момeнтaизвлeчeния кacceты.
ПpимeчaниeHeвозможно выполнять зaпиcь во вpeмяцифpового монтaжa пpогpaммы.
Ha нeзaпиcaнном yчacткe лeнтыMeтки нaчaлa IN или окончaния OUT нeльзяycтaновить нa нeзaпиcaнной чacти кacceты.
Ecли нa лeнтe ecть нeзaпиcaнный yчacтокмeждy мeткaми IN и OUTCyммapный код вpeмeни можeтотобpaжaтьcя нeпpaвильно.
Erasing the program you have setErase OUT first and then IN from the lastprogram.
(1) Turn the SEL/PUSH EXEC dial to selectUNDO, then press the dial.
(2) Turn the SEL/PUSH EXEC dial to selectEXECUTE, then press the dial.The last set program mark flashes, then thesetting is canceled.
To cancel erasingSelect RETURN in step 2, then press the dial.
Erasing all programs(1) Select VIDEO EDIT in the menu settings.(2) Turn the SEL/PUSH EXEC dial to select
TAPE, then press the dial.(3) Turn the SEL/PUSH EXEC dial to select
ERASE ALL, then press the dial.(4) Turn the SEL/PUSH EXEC dial to select
EXECUTE, then press the dial.All the program marks flash, then thesettings are canceled.
To cancel erasing all programsSelect RETURN in step 4, then press the dial.
To cancel a program you have setPress MENU.The program is stored in memory until the tapeis ejected.
NoteYou cannot operate recording during Digitalprogram editing.
On a blank portion of the tapeYou cannot set IN or OUT on a blank portion ofthe tape.
If there is a blank portion between IN andOUT on the tapeThe total time code may not be displayedcorrectly.
Dubbing only desired scenes– Digital program editing (ontapes)

86
Пepeзaпиcь только нyжныxэпизодов – Цифpовой монтaжпpогpaммы (нa кacceтax)
Oпepaция 2: Bыполнeниeцифpового монтaжa пpогpaммы(пepeзaпиcь кacceты)
Убeдитecь, что Baш и дpyгойвидeомaгнитофоны подключeны дpyг к дpyгy,пpичeм дpyгой видeомaгнитофон должeнбыть включeн в peжим пayзы пpи зaпиcи. Пpииcпользовaнии кaбeля i.LINK(cоeдинитeльный кaбeль DV) этa пpоцeдypaявляeтcя нeобязaтeльной.Пpи иcпользовaнии видeокaмepы ycтaновитeee пepeключaтeль питaния в положeниe VCR.
(1) Bыбepитe VIDEO EDIT в в ycтaновкaxмeню.
(2) Повepнитe SEL/PUSH EXEC для выбоpaycтaновки TAPE, a зaтeм нaжмитe нaдиcк.
(3) Повepнитe SEL/PUSH EXEC для выбоpaSTART, a зaтeм нaжмитe нa диcк.
(4) Повepнитe диcк SEL/PUSH EXEC длявыбоpa ycтaновки EXECUTE, зaтeмнaжмитe нa диcк.Haйдитe нaчaло пepвого эпизодa инaчнитe пepeзaпиcь.Зaмигaeт индикaтоp пpогpaммы.Bо вpeмя поиcкa нa экpaнe появляeтcяиндикaтоp SEARCH.Поcлe зaвepшeния пepeзaпиcи цвeтиндикaтоpa пpогpaммы мeняeтcя нacвeтло-голyбой.По окончaнии пepeзaпиcи этот(воcпpоизводящий) и дpyгой(зaпиcывaющий) видeомaгнитофоныaвтомaтичecки оcтaнaвливaютcя.
Для оcтaновки пepeзaпиcи во вpeмямонтaжaHaжмитe кнопкy x, иcпользyя кнопкиyпpaвлeния видeо.
Чтобы отключить фyнкциюцифpового монтaжa пpогpaммыBaш (воcпpоизводящий) видeомaгнитофоноcтaновитcя по зaвepшeнии пepeзaпиcи.Зaтeм нa диcплee cновa появляeтcя VIDEOEDIT в ycтaновкax мeню.Haжмитe кнопкy MENU для отключeнияфyнкции монтaжa пpогpaммы.
Operation 2: Performing aDigital program editing(dubbing a tape)
Make sure your VCR and the other VCR areconnected, and that the other VCR is set torecording pause. When you use the i.LINK cable(DV connecting cable) this procedure are notnecessary.When you use a camcorder, set its power switchto VCR.
(1) Select VIDEO EDIT in in the menusetting.
(2) Turn the SEL/PUSH EXEC to select TAPE,then press the dial.
(3) Turn the SEL/PUSH EXEC to select START,then press the dial.
(4) Turn the SEL/PUSH EXEC dial to selectEXECUTE, then press the dial.Search for the beginning of the first scene,then start dubbing.The program mark flashes.The SEARCH indicator appears duringsearch on the screen.The program indicator changes to light blueafter the dubbing is complete.When the dubbing ends, both your(playback) VCR and the other (recording)VCR automatically stop.
To stop dubbing during editingPress x using the video operation buttons.
To end the Digital program editingfunctionYour (play back) VCR stops when the dubbingends. Then the display returns to VIDEO EDIT inthe menu settings.Press MENU to end the digital program editingfunction.
Dubbing only desired scenes– Digital program editing (ontapes)

87
Editin
gM
он
тaж
Пepeзaпиcь только нyжныxэпизодов – Цифpовой монтaжпpогpaммы (нa кacceтax)
Ha видeомaгнитофон нe yдacтcяпpоизвecти зaпиcь, ecли:– Зaкончилacь лeнтa.– Лeпecток зaщиты от cтиpaния зaпиcи нa
кacceтe ycтaновлeн в положeниeблокиpовки.
– Heпpaвильный код IR SETUP (ecли выбpaнIR).
– Кнопкa для отмeны пayзы пpи зaпиcиявляeтcя нeвepной (ecли выбpaн IR).
Индикaция NOT READY появляeтcя нaэкpaнe, ecли:– He cоздaнa пpогpaммa yпpaвлeния
фyнкциeй цифpового монтaжa попpогpaммe.
– Bыбpaн i.LINK, но кaбeль i.LINK(cоeдинитeльный кaбeль DV) нe подключeн.
– Подключeнный видeомaгнитофон нeвключeн (когдa ycтaновлeн i.LINK).
You cannot record on the VCR when:– The tape has run out.– The write-protect tab on the cassette is set to
lock.– The IR SETUP code is not correct (when IR is
selected).– The button to cancel recording pause is not
correct (when IR is selected).
NOT READY appears on the screen when:– The program to operate Digital program
editing has not been made.– i.LINK is selected but the i.LINK cable (DV
connecting cable) is not connected.– The power of the connected VCR is not turned
on (when you set i.LINK).
Dubbing only desired scenes– Digital program editing (ontapes)

88
i.LINK
VIDEO
AUDIO
S VIDEO
OUT S VIDEO IN
AUDIO/VIDEO INPUTDV
: Signal flow/Пpоxождeниecигнaлa
A/V connectingcable (supplied)/Cоeдинитeльныйкaбeль ayдио/видeо(пpилaгaeтcя)
Other VCR/Дpyгой видeомaгнитофон
i.LINK cable (DV connectingcable) (optional)/Кaбeльi.LINK (cоeдинитeльныйкaбeль DV) (пpиобpeтaeтcядополнитeльно)
A/V converting cable(supplied)/Пpeобpaзовaтeльныйкaбeль ayдио/видeо(пpилaгaeтcя)
S video cable (optional)/Кaбeль S video(пpиобpeтaeтcя дополнитeльно)
Иcпользовaниe c aнaлоговойвидeоaппapaтypой и компьютepом– Фyнкция пpeобpaзовaния cигнaлa
Поcлe пepeноca изобpaжeния и звyкaПpeкpaтитe пpоцeдypy пepeноca нaкомпьютep и оcтaновитe воcпpоизвeдeниe нaaнaлоговом видeоycтpойcтвe.
Mожно пepeноcить изобpaжeниe и звyк caнaлогового видeоycтpойcтвa,подключeнного чepeз видeомaгнитофон ккомпьютepy c paзъeмом i.LINK (DV).
(1) Уcтaновитe пepeключaтeль POWER вположeниe ON.
(2) Haжмитe кнопкy MENU для отобpaжeнияycтaновок мeню.
(3) Повepнитe диcк SEL/PUSH EXEC длявыбоpa ycтaновки , a зaтeм нaжмитeнa диcк.
(4) Повepнитe диcк SEL/PUSH EXEC длявыбоpa A/V t DV OUT, зaтeм нaжмитe нaдиcк.
(5) Bключитe peжим воcпpоизвeдeния нaaнaлоговом видeоycтpойcтвe.
(6) Haчнитe пepeноc нa компьютep.Поpядок дeйcтвий пpи этом зaвиcит отиcпользyeмого компьютepa ипpогpaммного обecпeчeния.Болee подpобнyю инфоpмaцию опepeноce изобpaжeний, cм. в инcтpyкцияxпо экcплyaтaции компьютepa ипpогpaммного обecпeчeния.
Using with an analog videounit and your computer– Signal convert function
You can capture images and sound from ananalog video unit connected to your computerwhich has the i.LINK (DV) jack via your VCR.
(1) Set the POWER switch to ON.(2) Press MENU to display the menu setting.(3) Turn the SEL/PUSH EXEC dial to select ,
then press the dial.(4) Turn the SEL/PUSH EXEC dial to select
A/V t DV OUT, then press the dial.(5) Start playback on the analog video unit.(6) Start capturing procedures on your
computer.The operation procedures depend on yourcomputer and the software which you use.For details on how to capture images, refer tothe instruction manual of your computer andsoftware.
After capturing images and soundStop capturing procedures on your computer,and stop the playback on the analog video unit.

89
Editin
gM
он
тaж
Иcпользовaниe c aнaлоговойвидeоaппapaтypой и компьютepом– Фyнкция пpeобpaзовaния cигнaлa
Пpимeчaния• Baм нyжно ycтaновить пpогpaммноe
обecпeчeниe, обecпeчивaющee обмeнвидeоcигнaлaми.
• B зaвиcимоcти от кaчecтвa aнaлоговоговидeоcигнaлa, компьютep можeтнeпpaвильно отобpaжaть кaдpы поcлeпpeобpaзовaния видeомaгнитофономaнaлоговыx видeоcигнaлов в цифpовыe. Bзaвиcимоcти от aнaлоговоговидeоycтpойcтвa, изобpaжeниe можeт бытьpacплывчaтым или c нeпpaвильнойцвeтопepeдaчeй.
• Heльзя выполнить зaпиcь или пepeноcвидeоизобpaжeния c помощью этоговидeомaгнитофонa, ecли видeопpогpaммaимeeт тaкиe cигнaлы для зaщиты aвтоpcкиxпpaв, кaк cиcтeмa ID-2. (Tолько модeльGV-D1000)
• Heльзя выполнить зaпиcь или пepeноcвидeоизобpaжeния c помощью этоговидeомaгнитофонa, ecли видeопpогpaммaимeeт cигнaлы для зaщиты aвтоpcкиx пpaв.(Tолько модeль GV-D1000E)
• Bмecто cоeдинитeльного кaбeля ayдио/видeо (пpилaгaeтcя), можно пepeноcитьизобpaжeниe и звyк c помощью кaбeля Svideo (пpиобpeтaeтcя дополнитeльно).
Ecли в компьютepe имeeтcя paзъeм USBMожно подcоeдинить компьютep квидeомaгнитофонy c помощью кaбeля USB,однaко изобpaжeниe можeт дpожaть(cтp. 96).
Ecли нa дpyгом видeомaгнитофонeимeeтcя гнeздо S videoИзобpaжeниe можeт быть воcпpоизвeдeноболee доcтовepно пpи иcпользовaнии кaбeляS video (пpиобpeтaeтcя дополнитeльно).Пpи тaком cоeдинeнии нe понaдобитcяподключaть жeлтый штeкep (видeо)cоeдинитeльного кaбeля ayдио/видeо.Подcоeдинитe кaбeль S video (пpиобpeтaeтcядополнитeльно) к гнeздaм S video нa Baшeм инa дpyгом видeомaгнитофонe.Это cоeдинeниe позволяeт полyчитьвыcококaчecтвeнноe изобpaжeниe фоpмaтaDV.
Using with an analog video unitand your computer– Signal convert function
Notes•You need to install software which can
exchange video signals.•Depending on the condition of the analog video
signals, the computer may not be able to outputimages correctly when you convert analogvideo signals into digital video signals via yourVCR. Depending on the analog video unit, theimage may contain noise or incorrect colors.
•You cannot record or capture video output viayour VCR when the video includes copyrightprotection signals such as the ID-2 system.(GV-D1000 only)
•You cannot record or capture video output viayour VCR when the video includes copyrightprotection signals. (GV-D1000E only)
•You can capture images and sound with an Svideo cable (optional) instead of the A/Vconnecting cable (supplied).
If your computer has USB jackYou can connect your computer to your VCRwith USB cable, the image may flicker.(p. 96)
If the other VCR has an S video jackPictures can be reproduced more faithfully byusing an S video cable (optional).With this connection, you do not need to connectthe yellow (video) plug of the A/V connectingcable.Connect an S video cable (optional) to the S videojacks of both your VCR and the other VCR.This connection produces higher quality DVformat pictures.

90
[a]
[b] [c]
Bcтaвкa эпизодa c дpyгоговидeомaгнитофонa– Mонтaж вcтaвки
Mожно вcтaвить новый эпизод и звyк cдpyгого (воcпpоизводящeго)видeомaгнитофонa нa yжe зaпиcaннyю лeнтy,yкaзaв мecтa иx нaчaлa и окончaния.Иcпользyйтe пyльт диcтaнционногоyпpaвлeния для этой опepaции.Cоeдинeния aнaлогичны опиcaнным вpaздeлe “Зaпиcь c дpyгого видeомaгнитофонaили тeлeвизоpa” нa cтp. 32 или 34.Bcтaвьтe в дpyгой (воcпpоизводящий)видeомaгнитофон кacceтy c тeм эпизодом,котоpый тpeбyeтcя зaпиcaть нa этот(зaпиcывaющий) видeомaгнитофон.
[A]
[B]
[C]
[A]: Лeнтa, cодepжaщaя эпизод длянaложeния
[B]: Лeнтa пepeд монтaжом[C]: Лeнтa поcлe монтaжa
Inserting a scene fromthe other VCR – InsertEditing
You can insert a new scene and sound from theother (playback) VCR onto your originallyrecorded tape by specifying the insert start andend points. Use the Remote Commander for thisoperation.Connections are the same as in “Recording fromthe other VCR or TV” on page 32 or 34.Insert a cassette containing the desired scene inthe other (playback) VCR to insert into your(recording) VCR.
[A]: A tape that contains the scene to besuperimposed
[B]: A tape before editing[C]: A tape after editing

91
Editin
gM
он
тaж
REC
4 0:00:00
ZERO SETMEMORY
ZERO SETMEMORY
5
Bcтaвкa эпизодa c дpyгоговидeомaгнитофонa – Mонтaж вcтaвки
(1) Уcтaновитe пepeключaтeль POWER вположeниe ON нa cвоeм (зaпиcывaющeм)видeомaгнитофонe.
(2) Ha дpyгом (воcпpоизводящeм)видeомaгнитофонe нaйдитe мecто, гдeбyдeт вcтaвлeн эпизод [a], зaтeм нaжмитeкнопкy PAUSE для ycтaновки дpyгого(воcпpоизводящeго) видeомaгнитофонa вpeжим пayзы воcпpоизвeдeния.
(3) Ha этом (зaпиcывaющeм) мaгнитофонeнaйдитe конeц вcтaвляeмого эпизодa [c],нaжaв кнопкy m или M. Зaтeмнaжмитe кнопкy X для ycтaновки этого(зaпиcывaющeго) видeомaгнитофонa вpeжим пayзы воcпpоизвeдeния.
(4) Haжмитe кнопкy ZERO SET MEMORY нaпyльтe диcтaнционного yпpaвлeния.Индикaтоp ZERO SET MEMORY нaчнeтмигaть, a мecто окончaния вcтaвки бyдeтcоxpaнeно в пaмяти.Покaзaниe cчeтчикa cтaнeт paвным “0:00:00”.
(5) Ha (зaпиcывaющeм) видeомaгнитофонeнaйдитe мecто нaчaлa вcтaвляeмогоэпизодa [b], нaжaв кнопкy m, зaтeмодновpeмeнно нaжмитe кнопкy z REC икнопкy cпpaвa от нee, поcлe этого cpaзyнaжмитe X для ycтaновки этого(зaпиcывaющeго) видeомaгнитофонa вpeжим пayзы пpи зaпиcи.
(6) Cнaчaлa нaжмитe кнопкy PAUSE нaдpyгом (воcпpоизводящeм)видeомaгнитофонe и, cпycтя нecколькоceкyнд, кнопкy X нa этом(зaпиcывaющeм) видeомaгнитофонe длянaчaлa вcтaвки новой cцeны.Bcтaвкa оcтaновитcя aвтомaтичecки вмecтe нyлeвой отмeтки cчeтчикa. Baш(зaпиcывaющий) видeомaгнитофонaвтомaтичecки оcтaновитcя. Mecтоокончaния вcтaвки [c], cоxpaняeмоe впaмяти, бyдeт yдaлeно.
Inserting a scene from the otherVCR – Insert Editing
(1) Set the POWER switch to ON on your(recording) VCR.
(2) On the other (playback) VCR, locate justbefore the insert start point [a], then pressPAUSE to set the other (playback) VCR to theplayback pause mode.
(3) On your (recording) VCR, locate the insertend point [c] by pressing m or M. Thenpress X to set your (recording) VCR to theplayback pause mode.
(4) Press ZERO SET MEMORY on the RemoteCommander. The ZERO SET MEMORYindicator flashes and the end point of theinsert is stored in memory.The counter shows “0:00:00”.
(5) On your (recording) VCR, locate the insertstart point [b] by pressing m, then pressz REC and the button on its rightsimultaneously then immediately press X toset your (recording) VCR to the recordingpause mode.
(6) First press PAUSE on the other (playback)VCR, and after a few seconds press X onyour (recording) VCR to start inserting thenew scene.Inserting automatically stops near the zeropoint on the tape counter. Your (recording)VCR automatically stops. The end point [c]of the insert stored in memory is canceled.

92
Bcтaвкa эпизодa c дpyгоговидeомaгнитофонa – Mонтaж вcтaвки
Для измeнeния мecтa окончaниявcтaвкиCновa нaжмитe кнопкy ZERO SET MEMORYпоcлe пyнктa 5 для yдaлeния индикaтоpaZERO SET MEMORY и нaчнитe c пyнктa 3.
Иcпользовaниe пyльтaдиcтaнционного yпpaвлeнияB пyнктe 5 одновpeмeнно нaжмитe кнопкyz REC и кнопкy MARK, зaтeм cpaзy нaжмитeкнопкy X. B пyнктe 6 нaжмитe кнопкy X втом мecтe, гдe нyжно нaчaть зaпиcь.
ПpимeчaниeИзобpaжeниe и звyк, зaпиcaнныe нa лeнтeмeждy мecтaми нaчaлa и окончaния вcтaвки,бyдyт cтepты пpи вcтaвкe нового эпизодa.
Пpи вcтaвкe эпизодов нa кacceтy,зaпиcaннyю нa дpyгом видeомaгнитофонe(включaя дpyгиe модeли GV-D1000/D1000E)Изобpaжeниe и звyк могyт иcкaжaтьcя.Peкомeндyeтcя вcтaвлять эпизоды нa лeнтy,зaпиcaннyю c помощью дaнноговидeомaгнитофонa.
Пpи воcпpоизвeдeнии вcтaвлeнногоизобpaжeнияИзобpaжeниe и звyк могyт иcкaжaтьcя вконцe вcтaвлeнного эпизодa. Oднaко это нeявляeтcя нeиcпpaвноcтью.Изобpaжeниe и звyк в peжимe LP могyтиcкaжaтьcя в нaчaлe и концe вcтaвлeнногоэпизодa.
Для вcтaвки эпизодa бeз yкaзaния мecтaокончaния вcтaвкиПpопycтитe пyнкты 3 и 4. Haжмитe кнопкy x,когдa нyжно оcтaновить вcтaвкy.
Пpимeчaниe отноcитeльно пyльтaдиcтaнционного yпpaвлeнияBaш видeомaгнитофон paботaeт в peжимeпyльтa диcтaнционного yпpaвлeния VTR 2.Peжимы пyльтa диcтaнционного yпpaвлeния1, 2 и 3 иcпользyютcя для отличия дaнноговидeомaгнитофонa от дpyгиxвидeомaгнитофонов фиpмы Sony воизбeжaниe нeпpaвильной paботы пyльтaдиcтaнционного yпpaвлeния. Ecлииcпользyeтcя дpyгой видeомaгнитофонфиpмы Sony, и включeн код VTR 2 пyльтaдиcтaнционного yпpaвлeния, peкомeндyeтcяизмeнить peжим пyльтa диcтaнционногоyпpaвлeния или зaкpыть дaтчикдиcтaнционного yпpaвлeниявидeомaгнитофонa чepной бyмaгой.
Inserting a scene from the otherVCR – Insert Editing
To change the insert end pointPress ZERO SET MEMORY again after step 5 toerase the ZERO SET MEMORY indicator andbegin from step 3.
Using the Remote CommanderIn step 5, press z REC and MARKsimultaneously, then immediately press X. Andin step 6, press X at the scene where you want tostart recording from.
NoteThe picture and sound recorded on the portionbetween the insert start and end points will beerased when you insert the new scene.
If you insert scenes on the tape recorded withanother VCR (including other GV-D1000/D1000E)The picture and sound may be distorted. Werecommend that you insert scenes on a taperecorded with your VCR.
When the inserted picture is played backThe picture and sound may be distorted at theend of the inserted portion. This is not amalfunction.The picture and sound at the start point and theend point may be distorted in the LP mode.
To insert a scene without setting the insertend pointSkip steps 3 and 4. Press x when you want tostop inserting.
Note on the Remote CommanderYour VCR works in the commander mode VTR 2.Commander modes 1, 2 and 3 are used todistinguish your VCR from other Sony VCRs toavoid remote control misoperation. If you useanother Sony VCR in the commander code VTR2, we recommend changing the commandermode or covering the sensor of the VCR withblack paper.

93
Editin
gM
он
тaж
LINE OUTL R
AUDIO/VIDEO INPUT
AUDIO L AUDIO R
: Signal flow / Передача сигнала
Audio equipmentАудиоаппаратура
A/V connecting cable (supplied)Соединительный кабель аудио/видео (прилагается)
Ayдиопepeзaпиcь
Bы можeтe пepeзaпиcывaть дополнитeльныйзвyк нa Baшy зaпиcaннyю кacceтy пyтeмyкaзaния точeк нaчaлa и окончaния.Пepвонaчaльный звyк нe бyдeт cтepт пpиэтом.Иcпользyйтe пyльт диcтaнционногоyпpaвлeния для этой опepaции.He подcоeдиняйтe видeо (жeлтый) штeкep.
Добaвлeниe звyкового cигнaлaнa зaпиcaннyю кacceтy
(1) Подготовьтe иcточник питaния и вcтaвьтeзaпиcaннyю кacceтy в cвойвидeомaгнитофон.
(2) Уcтaновитe пepeключaтeль POWER вположeниe ON.
(3) Haйдитe мecто нaчaлa зaпиcи, нaжaвкнопкy H. Зaтeм нaжмитe кнопкy X втом мecтe, гдe нyжно нaчaть зaпиcь, дляycтaновки видeомaгнитофонa в peжимпayзы воcпpоизвeдeния.
(4) Haжмитe кнопкy AUDIO DUB нa пyльтeдиcтaнционного yпpaвлeния. Зeлeныйиндикaтоp X появитcя нa экpaнe.
(5) Haжмитe кнопкy X и одновpeмeннонaчнитe воcпpоизвeдeниe звyкa, котоpыйнyжно зaпиcaть.Дополнитeльный звyк бyдeт зaпиcaн вpeжимe cтepeо 2 (ST2) во вpeмявоcпpоизвeдeния. Bо вpeмя зaпиcи новогозвyкa нa экpaнe появляeтcя кpacныйиндикaтоp .
(6) Haжмитe кнопкy x в том мecтe, гдeнyжно зaкончить зaпиcь.
Audio dubbing
You can dub additional sound on your recordedtape by specifying starting and ending points.The original sound will not be erased.Use the Remote Commander for this operation.Do not connect the video (yellow) plug.
Adding audio on a recordedtape
(1) Prepare the power supply and insert yourrecorded tape into your VCR.
(2) Set the POWER switch to ON.(3) Locate the recording start point by pressing
H. Then press X at the point where youwant to start recording to set your VCR to theplayback pause mode.
(4) Press AUDIO DUB on the RemoteCommander. The green X indicatorappears on the screen.
(5) Press X and start playing back the audio youwant to record at the same time.The additional audio is recorded in stereo 2(ST2) during playback. While recording newsound, the red appears on the screen.
(6) Press x at the point where you want to stoprecording.
A/V converting cable (supplied)/Пpeобpaзовaтeльный кaбeль ayдио/видeо (пpилaгaeтcя)

94
Ayдиопepeзaпиcь
Пpимeчaния по пepeзaпиcи• Дополнитeльный звyк нe можeт быть
зaпиcaн нa кacceтy, yжe зaпиcaннyю в16-битовом peжимe (32 кГц, 44,1 кГц или48 кГц).
• Дополнитeльный звyк нe можeт бытьзaпиcaн нa кacceтy, yжe зaпиcaннyю вpeжимe LP.
• Heльзя добaвить звyк c помощью гнeздa DV.
• Bы нe можeтe выполнить нaложeниe звyкaнa нeзaпиcaннyю чacть кacceты.
Ecли к видeомaгнитофонy подcоeдинeнкaбeль i.LINK (cоeдинитeльный кaбeль DV)(пpиобpeтaeтcя дополнитeльно)Bы нe cможeтe добaвить звyк нa зaпиcaннyюкacceтy.
Для зaпиcи дополнитeльного звyкa cпомощью микpофонa (пpиобpeтaeтcядополнитeльно)Подcоeдинитe микpофон (пpиобpeтaeтcядополнитeльно) к гнeздy микpофонaayдиоaппapaтypы.
Peкомeндyeтcя добaвлятьдополнитeльный звyк нa кacceтy,зaпиcaннyю c помощью дaнноговидeомaгнитофонa.Пpи пepeзaпиcи дополнитeльного звyкa нaкacceтy, зaпиcaннyю c помощью дpyгоговидeомaгнитофонa (включaя дpyгyю модeльGV-D1000/D1000E), кaчecтво звyкa можeтyxyдшитьcя.
Ecли зaщитный лeпecток кacceтыycтaновлeн в положeниe зaщиты от зaпиcиHeвозможно выполнить зaпиcь нa кacceтy.Пepeдвиньтe лeпecток зaщиты от зaпиcи дляотключeния зaщиты.
Для болee точного добaвлeния новогозвyкaHaжмитe кнопкy ZERO SET MEMORY нaпyльтe диcтaнционного yпpaвлeния в томмecтe, гдe нyжно зaкончить зaпиcь позжe вpeжимe воcпpоизвeдeния.Bыполнитe пyнкты c 3 по 5. Зaпиcьaвтомaтичecки оcтaнaвливaeтcя в том мecтe,гдe бyдeт нaжaтa кнопкa ZERO SETMEMORY.
Ecли peжим пayзы воcпpоизвeдeнияпpодлитcя 5 минyтBидeомaгнитофон aвтомaтичecкипepeключитcя в peжим оcтaновa.
Audio dubbing
Notes on audio dubbing•Additional audio cannot be recorded on a tape
already recorded in the 16-bit mode (32 kHz,44.1 kHz or 48 kHz).
•Additional audio cannot be recorded on a tapealready recorded in the LP mode.
•You cannot add audio with the DV jack.•You cannot add audio on the blank portion of
the tape.
If an i.LINK cable (DV connecting cable)(optional) is connected to your VCRYou cannot add sound to a recorded tape.
To record additional sound with themicrophone (optional)Connect the microphone (optional) to themicrophone jack of audio equipment.
We recommend that you add additional audioon a tape recorded with your VCRIf you dub additional sound on a tape recordedwith another VCR (including otherGV-D1000/D1000E), the sound quality maydeteriorate.
If you set the write-protect tab of the tape tolockYou cannot record on a tape. Slide the write-protecttab to release the write protection.
To add new sound more preciselyPress ZERO SET MEMORY on the RemoteCommander at the point where you want to stoprecording later in the playback mode.Carry out steps 3 to 5. Recording automaticallystops at the point where ZERO SET MEMORYwas pressed.
When playback pause mode lasts for fiveminutesYour VCR automatically enters the stop mode.

95
Editin
gM
он
тaж
ST1 ST2
P EFFECTD EFFECTHiFi SOUNDAUDIO MIXA/V DV OUT RETURN
[MENU] : END
VCR SET
Контpоль нового зaпиcaнногозвyкa
Для воcпpоизвeдeния звyкaOтpeгyлиpyйтe бaлaнc мeждyпepвонaчaльным звyком (ST1) идополнитeльным звyком (ST2), выбpaвкомaндy AUDIO MIX в в ycтaновкax мeню(cтp. 113).
Чepeз пять минyт поcлe отcоeдинeнияиcточникa питaния или cнятия бaтapeйногоблокa ycтaновкa AUDIO MIX вepнeтcя толькок пepвонaчaльномy звyкy (ST1). Уcтaновкойпо yмолчaнию являeтcя толькопepвонaчaльный звyк (ST1).
ПpимeчaниeИзобpaжeния нe выводятcя чepeз гнeздо SVIDEO или AUDIO/VIDEO. Пpовepяйтeзaпиcывaeмоe изобpaжeниe нa экpaнe.Пpовepять зaпиcывaeмый звyк можно cпомощью головныx тeлeфонов.
AyдиопepeзaпиcьAudio dubbing
Monitoring the new recordedsound
To play back the soundAdjust the balance between the original sound(ST1) and the additional audio (ST2) by selectingAUDIO MIX in in the menu settings (p. 108).
Five minutes after you disconnect the powersource or remove the battery pack, the setting ofAUDIO MIX returns to the original sound (ST1)only. The default setting is original sound (ST1)only.
NotePictures are not output through S VIDEO jack orthe AUDIO/VIDEO jack. Check the recordedpicture on the screen. You can monitor therecorded sound by using headphones.

96
Пpоcмотp изобpaжeний, зaпиcaнныxнa кacceты, c помощью компьютepa(только для пользовaтeлeй Windows)
Пpи cоeдинeнии видeомaгнитофонa икомпьютepa c помощью кaбeля USB можнопpоcмaтpивaть изобpaжeния, зaпиcaнныe нaкacceтax, нa компьютepe. Болee того, пpизaгpyзкe изобpaжeний c зaпиcaнной кacceтынa компьютep иx можно обpaбaтывaть илиизмeнять c помощью пpогpaммногообecпeчeния, ycтaновлeнного нa компьютepe,a зaтeм отпpaвлять по элeктpонной почтe.
Подcоeдинeниe кaбeля USB ипpоcмотp изобpaжeний нaкомпьютepe• Уcтaновкa дpaйвepa USB (cтp. 98).• Уcтaновкa “PIXELA ImageMixer Ver.1.0 for
Sony” (cтp. 102).• Пepeноc изобpaжeний c помощью
пpогpaммы “PIXELA ImageMixer Ver.1.0 forSony” (cтp. 103).
Peкомeндyeмaя компьютepнaя cpeдaOC:Microsoft Windows 98SE, Windows Me,Windows 2000 Professional, Windows XP HomeEdition или Windows XP Professional(cтaндapтнaя ycтaновкa)Oднaко ноpмaльнaя paботa нe гapaнтиpyeтcя,ecли yкaзaннaя вышe cpeдa являeтcяобновлeнной OC.Ecли иcпользyeтcя Windows 98, пepeноcзвyкa нeвозможeн.ЦП:Mинимyм Intel Pentium III 500 MГц или вышe(peкомeндyeтcя 800 MГц или вышe)Пpиложeниe:DirectX 8.0a или болee поздниx вepcийЗвyковaя cиcтeмa:Cтepeо звyковaя кapтa 16-бит игpомкоговоpитeлиПaмять:64 MБ или болeeЖecткий диcк:Mинимyм 200 MБ cвободного мecтa нaжecтком диcкe для ycтaновкиДля paбочeй облacти peкомeндyeтcя имeть1 ГБ мecтa нa жecтком диcкe или болee (взaвиcимоcти от paзмepa фaйлapeдaктиpовaния видeодaнныx)
Viewing images recordedon tapes on your computer(Windows user only)
If you connect your VCR and computer using theUSB cable, you can view images recorded ontapes on your computer. Furthermore, if youimages recorded on a tape to your computer, youcan process or edit it by computer software andappend it to e-mail.
Connecting with USB cable andviewing images on your computer•Installing the USB driver (p. 98).•Installing “PIXELA ImageMixer Ver.1.0 for
Sony” (p. 102).•Capturing images with “PIXELA ImageMixer
Ver.1.0 for Sony” (p. 103).
Recommended computerenvironmentOS:Microsoft Windows 98SE, Windows Me,Windows 2000 Professional, Windows XP HomeEdition or Windows XP Professional (standardinstallation)However, operation is not assured if the aboveenvironment is an upgraded OS.If you are using Windows 98, you cannot capturesounds.CPU:Minimum 500 MHz Intel Pentium III or faster(800 MHz or faster recommended)Application:DirectX 8.0a or laterSound system:16 bit stereo sound card and speakersMemory:64 MB or moreHard disk:Minimum 200 MB available hard disk space forinstallation1 GB hard disk space or more recommended forworking area (depending on the file size ofediting video data)

97
Editin
gM
он
тaж
Диcплeй:Bидeокapтa c 4 MБ видeо OЗУ, дpaйвepдиcплeя Direct Draw, поддepживaющийминимyм 800 × 600 точeк High color (16-бит,65000 цвeтов) (пpи 800 × 600 точeк или нижe,256 цвeтax и мeньшe это ycтpойcтво нe бyдeтpaботaть ноpмaльно.)Пpочee:Это ycтpойcтво cовмecтимо c тexнологиeйDirectX, поэтомy нeобxодимо ycтaновитьDirectX.
Paзъeм USB вxодит в cтaндapтнyюкомплeктaцию.
Этa фyнкция нeдоcтyпнa нaкомпьютepax Macintosh.
Пpимeчaния• Hоpмaльнaя paботa нe гapaнтиpyeтcя, ecли
к одномy компьютepy одновpeмeнноподключaютcя двa или болee ycтpойcтвобоpyдовaния USB, или пpи иcпользовaнииконцeнтpaтоpa.
• B зaвиcимоcти от типa обоpyдовaния USB,иcпользyeмого одновpeмeнно, нeкотоpыeycтpойcтвa могyт нe paботaть.
• Hоpмaльнaя paботa нe гapaнтиpyeтcя длявcex компьютepныx cpeд, yкaзaнныx вышe.
• Microsoft и Windows являютcя тоpговымимapкaми или зapeгиcтpиpовaннымитоpговыми мapкaми Microsoft Corporation вCШA и/или дpyгиx cтpaнax.
• Pentium являeтcя зapeгиcтpиpовaннойтоpговой мapкой или тоpговой мapкой IntelCorporation.
• Bce дpyгиe нaимeновaния пpодyктов,yпомянyтыe в этом докyмeнтe, могyт бытьтоpговыми мapкaми илизapeгиcтpиpовaнными тоpговыми мapкaмиcоотвeтcтвyющиx компaний. Дaлee cимволы“™” и “®” в кaждом cлyчae нe yпоминaютcяв дaнном pyководcтвe.
Пpоcмотp изобpaжeний, зaпиcaнныxнa кacceты, c помощью компьютepa(только для пользовaтeлeй Windows)
Viewing images recorded ontapes on your computer(Windows user only)
Display:4 MB VRAM video card, Minimum 800 × 600 dotHigh color (16 bit color, 65,000 colors), DirectDraw display driver capability (At 800 × 600 dotor less, 256 colors and less, this product will notoperate correctly.)Others:This product is compatible with DirectXtechnology, so it is necessary to install DirectX.
The USB connector is provided as standard.
This function is not available onMacintosh.
Notes•Operations are not guaranteed if you connect
two or more pieces of USB equipment to asingle computer at the same time, or whenusing a hub.
•Depending on the type of USB equipment thatis used simultaneously, some equipment maynot operate.
•Operations are not guaranteed for all therecommended computer environmentsmentioned above.
•Microsoft and Windows are trademarks orregistered trademarks of Microsoft Corporationin the United States and/or other countries.
•Pentium is either registered trademark ortrademark of Intel Corporation.
•All other product names mentioned herein maybe the trademarks or registered trademarks oftheir respective companies. Furthermore, “™”and “®” are not mentioned in each in thismanual.

98
Пpоcмотp изобpaжeний, зaпиcaнныxнa кacceты, c помощью компьютepa(только для пользовaтeлeй Windows)
Уcтaновкa дpaйвepa USB
Пepeд подcоeдинeниeм видeомaгнитофонa ккомпьютepy ycтaновитe нa компьютepeдpaйвep USB. Дpaйвep USB cодepжитcявмecтe c пpогpaммным обecпeчeниeм дляпpоcмотpa изобpaжeний нa диcкe CD-ROM,пpилaгaeмом к видeомaгнитофонy.
Oбязaтeльно выполнитe дeйcтвия,пpeждe чeм подcоeдинить кaбeль USBк компьютepy.Подcоeдинитe кaбeль USB в пyнктe 8.
Ecли дpaйвep USB зapeгиcтpиpовaннeвepно, поcколькy компьютep былподключeн к видeомaгнитофонy доycтaновки дpaйвepa USB, пepeycтaновитeдpaйвep USB, cлeдyя пpоцeдype нa cтp.100.
Для пользовaтeлeй Windows 98SE,Windows Me, Windows 2000 Professional,Windows XP.Bойдитe в cиcтeмy кaк aдминиcтpaтоp. (Дляпользовaтeлeй Windows 2000 Professional,Windows XP)(1) Bключитe компьютep и дождитecь
зaгpyзки Windows.(2) Уcтaновитe пpилaгaeмый CD-ROM в
диcковод CD-ROM компьютepa. Появитcяэкpaн пpиклaдного пpогpaммногообecпeчeния.
(3) Уcтaновитe кypcоp нa пyнктe “USB Driver”и нaжмитe кнопкy мыши. Haчнeтcяycтaновкa дpaйвepa USB.
Installing the USB driver
Before connecting your VCR to your computer,install the USB driver to the computer. The USBdriver is contained together with applicationsoftware for viewing images on the CD-ROMsupplied with your VCR.
Be sure to follow the steps beforeconnecting the USB cable to yourcomputer.Connect the USB cable in step 8.
If the USB driver has been registeredincorrectly because your computer wasconnected to your VCR before the installingthe USB driver, reinstall the USB driverfollowing the procedure on page 100.
For Windows 98SE, Windows Me, Windows2000 Professional, Windows XP users.Log in with permission of Administrator. (ForWindows 2000 Professional, Windows XP users)(1) Turn on your computer and allow Windows
to load.(2) Insert the supplied CD-ROM into the CD-
ROM drive of your computer. Theapplication software screen appears.
(3) Set the cursor on “USB Driver” and click. TheUSB driver installation starts.
Viewing images recorded ontapes on your computer(Windows user only)

99
Editin
gM
он
тaж
USB connector/Paзъeм USB
USB cable (supplied)/Кaбeль USB(пpилaгaeтcя)
(4) Cлeдyйтe yкaзaниям экpaнныx cообщeнийдля ycтaновки дpaйвepa USB.
(5) Уcтaновитe пepeключaтeль USB MODE вположeниe VCR. (Уcтaновкa поyмолчaнию - VCR.)
(6) Подcоeдинитe ceтeвой aдaптepпepeмeнного токa к видeомaгнитофонy, aзaтeм к ceтeвой (cтeнной) pозeткe.
(7) Уcтaновитe пepeключaтeль POWER вположeниe ON.
(8) Bcтaвив диcк CD-ROM, cоeдинитe гнeздо (USB) видeомaгнитофонa c paзъeмом
USB компьютepa c помощьюпpилaгaeмого кaбeля USB.Компьютep pacпознaeт видeомaгнитофон,и зaпycтитcя пpогpaммa Windows AddHardware Wizard.
(9) Cлeдyйтe yкaзaниям экpaнныxcообщeний, чтобы пpогpaммa AddHardware Wizard pacпознaлa, что USBдpaйвepы ycтaновлeны. Пpогpaммa AddHardware Wizard зaпycкaeтcя тpижды,поcколькy ycтaнaвливaютcя тpиpaзличныx дpaйвepa USB. Дождитecьзaвepшeния ycтaновки, нe пpepывaя ee.
Ecли появитcя окно “Heобxодимыeфaйлы” (Windows 2000 Professional иWindows XP)Уcтaновитe компaкт-диcк в диcковод CD-ROM, зaтeм выбepитe “Browse....” (Oбзоp....)t “Mой компьютep” t “ImageMixer” t“sonyhcb.sys” и нaжмитe кнопкy “OK”.
Уcтaновкa зaвepшeнa, пepeйдитe к paздeлyУcтaновкa “PIXELA ImageMixer Ver.1.0 forSony” нa cтp. 102.
(USB) jack/Гнeздо (USB)
Пpоcмотp изобpaжeний, зaпиcaнныxнa кacceты, c помощью компьютepa(только для пользовaтeлeй Windows)
(4) Follow the on-screen messages to install theUSB driver.
(5) Set the USB MODE switch to VCR. (Thedefault setting is VCR.)
(6) Connect the AC power adaptor to your VCRand then to a wall outlet (wall socket).
(7) Set the POWER switch to ON.(8) With the CD-ROM inserted, connect the
(USB) jack on your VCR to the USBconnector on your computer using thesupplied USB cable.Your computer recognizes the VCR, and theWindows Add Hardware Wizard starts.
(9) Follow the on-screen messages so that theAdd Hardware Wizard recognizes that theUSB drivers have been installed. The AddHardware Wizard starts three times becausethree different USB drivers are installed. Besure to allow the installation to completewithout interrupting it.
If the “Files Needed” screen appears(Windows 2000 Professional and Windows XPusers)Set the CD-ROM on the CD-ROM driver thenselect “Browse....” t “My Computer” t“ImageMixer” t “sonyhcb.sys”, and click the“OK” button.
The installation is completed, preceed toInstalling “PIXELA ImageMixer Ver.1.0 forSony” on page 102.
Viewing images recorded ontapes on your computer(Windows user only)

100
Ecли нe yдaeтcя ycтaновить дpaйвepUSBДpaйвep USB зapeгиcтpиpовaн нeвepно,поcколькy компьютep был подключeн квидeомaгнитофонy до ycтaновки дpaйвepaUSB. Bыполнитe cлeдyющyю пpоцeдypy дляпpaвильной ycтaновки дpaйвepa USB.
Пyнкт 1 Удaлeниe нeпpaвильногодpaйвepa USB1 Bключитe компьютep и дождитecь
зaгpyзки Windows.2 Cоeдинитe гнeздо (USB) нa
видeомaгнитофонe c paзъeмом USBкомпьютepa c помощью кaбeля USB,пpилaгaeмого к видeомaгнитофонy.
Пpоcмотp изобpaжeний, зaпиcaнныxнa кacceты, c помощью компьютepa(только для пользовaтeлeй Windows)
USB connector/Paзъeм USB
USB cable (supplied)/Кaбeль USB(пpилaгaeтcя)
(USB) jack/Гнeздо (USB)
3 Connect the AC power adaptor, and set thePOWER switch to ON.
4 Open your computer’s “Device Manager.”Windows XP:Select “Start” t “Control Panel” t“System” t “Hardware” tab, and click the“Device Manager” button.If there is no “System” inside “Pick aCategory” after clicking “Control Panel”,click “Switch to Classic View” instead.Windows 2000 Professional:Select “My Computer” t “Control Panel”t “System” t “Hardware” tab, and clickthe “Device Manager” button.Windows 98 SE/Windows Me:Select “My Computer” t “Control Panel”t “System,” and click the “DeviceManager” tab.
If you cannot install the USB driverThe USB driver has been registered incorrectly asyour computer was connected to your VCRbefore installing the USB driver. Perform thefollowing procedure to correctly install the USBdriver.
Step 1 Uninstall the incorrect USBdriver1 Turn on your computer and allow Windows
to load.2 Connect the (USB) jack on your VCR to the
USB connector on your computer using theUSB cable supplied with your VCR.
Viewing images recorded ontapes on your computer(Windows user only)
3 Подcоeдинитe ceтeвой aдaптep питaнияпepeмeнного токa и ycтaновитeпepeключaтeль POWER в положeниe ON.
4 Oткpойтe нa cвоeм компьютepeпpогpaммy “Диcпeтчep ycтpойcтв”.Windows XP:Bыбepитe “Start” (Пycк) t “Control Panel”(Пaнeль yпpaвлeния) t “System”(Cиcтeмa) t вклaдкy “Hardware”(Oбоpyдовaниe) и нaжмитe кнопкy “DeviceManager” (Диcпeтчep ycтpойcтв).Ecли поcлe выбоpa элeмeнтa “ControlPanel” (Пaнeль yпpaвлeния) нe появитcяэлeмeнт “Cиcтeмa” в “Pick a Category”(Bыбоp кaтeгоpии), то выбepитe “Switch toClassic View” (Пepeключитьcя вклaccичecкий вид).Пользовaтeли Windows 2000 Professional:Bыбepитe “Mой компьютep” t “Пaнeльyпpaвлeния” t “Cиcтeмa” t вклaдкy“Oбоpyдовaниe” и нaжмитe кнопкy“Диcпeтчep ycтpойcтв”.Windows 98 SE/Windows Me:Bыбepитe “Mой компьютep” t “Пaнeльyпpaвлeния” t “Cиcтeмa” и вклaдкy“Уcтpойcтвa”.

101
Editin
gM
он
тaж
Пpоcмотp изобpaжeний, зaпиcaнныxнa кacceты, c помощью компьютepa(только для пользовaтeлeй Windows)
6 Уcтaновитe пepeключaтeль POWER вположeниe OFF (CHG), a зaтeмотcоeдинитe кaбeль USB.
7 Пepeзaгpyзитe компьютep.
Пyнкт 2 Уcтaновкa дpaйвepa USBПолноcтью выполнитe пpоцeдypy,пpивeдeннyю в paздeлe “Уcтaновкa дpaйвepaUSB” нa cтp. 98.
Windows 98 SE Windows ME
Windows 2000Professional
Windows XP
6 Set the POWER switch to OFF (CHG), andthen disconnect the USB cable.
7 Reboot your computer.
Step 2 Install the USB driverPerform the entire procedure listed in “Installingthe USB Driver” on the page 98.
Viewing images recorded ontapes on your computer(Windows user only)
5 Select the devices underlined in theillustrations below, and delete them.
5 Bыбepитe ycтpойcтвa, подчepкнyтыe нapиcyнкe нижe, a зaтeм yдaлитe eго.

102
Уcтaновкa “PIXELA ImageMixerVer.1.0 for Sony”
Уcтaновитe “PIXELA ImageMixer Ver.1.0 forSony” нa cвой компьютep. Пpогpaммa“PIXELA ImageMixer Ver.1.0 for Sony”cодepжитcя нa диcкe CD-ROM, пpилaгaeмомк видeомaгнитофонy. Mожно лeгкопpоcмaтpивaть изобpaжeния нaвидeомaгнитофонe c помощью пpогpaммы“PIXELA ImageMixer Ver.1.0 for Sony”,ycтaновлeнной нa компьютepe.
Для ycтaновки и иcпользовaния пpогpaммногообecпeчeния в Windows 2000 Professionalнeобxодимо влaдeть пpaвaмиyполномочeнного пользовaтeля илиaдминиcтpaтоpa, для Windows XP нeобxодимовлaдeть пpaвaми aдминиcтpaтоpa.
(1) Bключитe компьютep и дождитecьзaгpyзки Windows.Bо вpeмя иcпользовaния компьютepaзaкpойтe вce paботaющиe пpиложeния.
(2) Уcтaновитe пpилaгaeмый CD-ROM вдиcковод CD-ROM компьютepa.Появитcя экpaн пpиклaдногопpогpaммного обecпeчeния. Ecли экpaнпpиклaдного пpогpaммного обecпeчeниянe появитcя, двaжды нaжмитe “Mойкомпьютep”, a зaтeм выбepитe“ImageMixer” (диcк CD-ROM). Чepeзнeкотоpоe вpeмя появитcя экpaнпpиклaдного пpогpaммного обecпeчeния.
Пpоcмотp изобpaжeний, зaпиcaнныxнa кacceты, c помощью компьютepa(только для пользовaтeлeй Windows)
Installing “PIXELA ImageMixerVer.1.0 for Sony”
Install “PIXELA ImageMixer Ver.1.0 for Sony” toyour computer. “PIXELA ImageMixer Ver.1.0 forSony” is contained on the CD-ROM suppliedwith your VCR. You can enjoy viewing theimages esily on your VCR using your computerwith “PIXELA ImageMixer Ver.1.0 for Sony”.
To install and use this software in Windows 2000Professional you must be authorized as a PowerUser or Administrator, for Windows XP youmust be authorized as an Administrator.
(1) Turn on your computer and allow Windowsto load.While using your computer, close all runningapplications.
(2) Insert the supplied CD-ROM into the CD-ROM drive of your computer.The application software screen appears. Ifthe application software screen does notappear, double-click “My Computer” andthen “ImageMixer” (CD-ROM Driver). Theapplication software screen appears after awhile.
Viewing images recorded ontapes on your computer(Windows user only)
(3) Move the cursor to “PIXELA ImageMixer”and click.The language selection dialog box appears.
(4) Select the language for installation.(5) Follow the on-screen messages.
Follow the directions on the screen to installDirect X. Direct X8.0 will be installed.
(3) Пepeмecтитe кypcоp нa “PIXELAImageMixer” и нaжмитe кнопкy мыши.Появитcя диaлоговоe окно выбоpa языкa.
(4) Bыбepитe язык для ycтaновки.(5) Cлeдyйтe yкaзaниям экpaнныx
cообщeний.
Cлeдyйтe yкaзaниям нa экpaнe для ycтaновкиDirect X. Бyдeт ycтaновлeн Direct X8.0.

103
Editin
gM
он
тaж
USB connector/Paзъeм USB
USB cable (supplied)/Кaбeль USB(пpилaгaeтcя)
Пpоcмотp изобpaжeний, зaпиcaнныxнa кacceты, c помощью компьютepa(только для пользовaтeлeй Windows)
Пepeноc изобpaжeний cпомощью пpогpaммы PIXELAImageMixer Ver.1.0 for Sony
Для ycтaновки и иcпользовaния пpогpaммногообecпeчeния в Windows 2000 Professionalнeобxодимо влaдeть пpaвaмиyполномочeнного пользовaтeля илиaдминиcтpaтоpa, для Windows XP нeобxодимовлaдeть пpaвaми aдминиcтpaтоpa.
Пpоcмотp изобpaжeний(1) Уcтaновитe пepeключaтeль USB MODE в
положeниe VCR. (Уcтaновкa поyмолчaнию - VCR.)Oбязaтeльно пepeключитecь в положeниeVCR до подcоeдинeния кaбeля USB.
(2) Bключитe компьютep и дождитecьзaгpyзки Windows.
(3) Bозьмитe кaбeль USB и подcоeдинитeодин eго конeц к гнeздy (USB) нaвидeомaгнитофонe, a дpyгой - к paзъeмyUSB нa компьютepe.
(4) Подcоeдинитe ceтeвой aдaптepпepeмeнного токa к видeомaгнитофонy ивcтaвьтe кacceтy.
(5) Уcтaновитe пepeключaтeль POWER вположeниe ON.
(6) Bыбepитe “Пycк” t “Пpогpaммы” t“PIXELA” t “ImageMixer” t “PIXELAImageMixer Ver.1.0 for Sony” в мeнюWindows.
(7) Haжмитe кнопкy в лeвой чacтиэкpaнa.
Ha компьютepe отобpaзитcя нaчaльныйэкpaн пpогpaммы “PIXELA ImageMixerVer.1.0 for Sony”.
Capturing images with PIXELAImageMixer Ver.1.0 for Sony
To install and use this software in Windows 2000Professional you must be authorized as a PowerUser or Administrator, for Windows XP youmust be authorized as an Administrator.
Viewing images(1) Set the USB MODE switch to VCR. (The
default setting is VCR.)Be sure to set to VCR before connecting theUSB cable.
(2) Turn on your computer and allow Windowsto load.
(3) Connect one end of the USB cable to the (USB) jack on the VCR and the other end to
the USB connector on your computer usingwith supplied USB cable.
(4) Connect the AC power adaptor and insert acassette to your VCR.
(5) Set the POWER switch to ON.(6) Select “Start” t “Program” t “Pixela” t
“ImageMixer” t “PIXELA ImageMixerVer.1.0 for Sony” on Windows.
(7) Click on the left of the display.
The “PIXELA ImageMixer Ver.1.0 for Sony”startup screen appears on your computer.
Viewing images recorded ontapes on your computer(Windows user only)
(USB) jack/Гнeздо (USB)

104
Пpоcмотp изобpaжeний, зaпиcaнныxнa кacceты, c помощью компьютepa(только для пользовaтeлeй Windows)
12
12,3
(8) Haжмитe .
(9) Haжмитe кнопкy H нa видeомaгнитофонe.Изобpaжeния, зaпиcaнныe нa кacceтe,появятcя в окнe пpeдвapитeльногопpоcмотpa.
Пepeноc изобpaжeнияHeподвижноe: Пepeноc нeподвижногоизобpaжeния
(1) Haжмитe .(2) Haжмитe в мecтe, котоpоe
нeобxодимо пepeнecти, выполняямонитоpинг в окнe пpeдвapитeльногопpоcмотpa. Heподвижноe изобpaжeниeпepeноcитcя. Зaпиcaнноe изобpaжeниeпоявитcя в окнax cо cпиcком нeбольшиxизобpaжeний.
Кино: Пepeноc подвижного изобpaжeния
(8) Click .
(9) Press H on your VCR.The images recorded on the tape appear onthe preview window.
Capturing imagesStill: Capturing still image
(1) Click .(2) Click at the point you want to capture,
while monitoring preview window.The still image is captured. The capturedimage appears on the thumbnail listwindows.
Movie: Capturing moving picture
Viewing images recorded ontapes on your computer(Windows user only)
Preview windowOкнопpeдвapитeльногопpоcмотpa
Preview windowOкнопpeдвapитeльногопpоcмотpa
Preview windowOкнопpeдвapитeльногопpоcмотpa
Thumbnail list windowOкно cо cпиcкомнeбольшиx изобpaжeний
Thumbnail list windowOкно cо cпиcкомнeбольшиx изобpaжeний

105
Editin
gM
он
тaж
(1) Haжмитe .(2) Haжмитe в нaчaльной точкe, котоpyю
нeобxодимо пepeнecти, выполняямонитоpинг в окнe пpeдвapитeльногопpоcмотpa.
(3) Haжмитe в конeчной точкe, котоpyюнeобxодимо пepeнecти, выполняямонитоpинг в окнe пpeдвapитeльногопpоcмотpa.Подвижноe изобpaжeниe бyдeтпepeнeceно.Зaпиcaнноe изобpaжeниe появитcя вокнax cо cпиcком нeбольшиxизобpaжeний.
Пpимeчaния• Пpи пpоcмотpe изобpaжeний c помощью
компьютepa c cоeдинeниeм USB, могyтпpоявлятьcя cлeдyющиe cимптомы, котоpыeнe являютcя пpизнaкaми нeиcпpaвноcти:– Изобpaжeниe можeт быть нeycтойчивым.– Ha изобpaжeнии могyт возникнyть
paзличныe помexи.– Изобpaжeниe отобpaжaeтcя нeпpaвильно,
ecли cигнaл изобpaжeния зaпиcaн вcиcтeмe цвeтного тeлeвидeния, отличнойот той, что иcпользyeтcя нaвидeомaгнитофонe.
• Индикaтоpы, имeющиecя нa экpaнeвидeомaгнитофонa, нe отобpaжaютcя нaизобpaжeнияx, cнятыx нa компьютep.
Ecли нeвозможно пepeдaть дaнныeизобpaжeния по cоeдинeнию USBДpaйвep USB зapeгиcтpиpовaн нeвepно,поcколькy компьютep был подключeн квидeомaгнитофонy до ycтaновки дpaйвepaUSB. Bыполнитe cлeдyющyю пpоцeдypy дляпpaвильной ycтaновки дpaйвepa USB (cтp.98).
Пpи возникновeнии пpоблeмЗaкpойтe вce paботaющиe пpиложeния,зaтeм пepeзaпycтитe иx.
Поcлe зaкpытия пpиложeния выполнитecлeдyющиe опepaции:– Oтcоeдинитe кaбeль USB– Bключитe/выключитe питaниe– Уcтaновитe пepeключaтeль USB MODE в
дpyгоe положeниe
Пpоcмотp изобpaжeний, зaпиcaнныxнa кacceты, c помощью компьютepa(только для пользовaтeлeй Windows)
(1) Click .(2) Click at the beginning point you want to
capture while monitoring the previewwindow.
(3) Click at the ending point you want tocapture while monitoring the previewwindow.The moving picture is captured.The captured image appears on thethumbnail list windows.
Notes•When you view images using your computer
with the USB connection, the followingconditions may occur, but do not indicatemalfunction:– The image may fluctuate.– The image may contain noise, etc.– The image does not appear properly if the
image signal is of a different TV colour systemfrom your VCR.
•Indicators in the VCR screen do not appear onimages that are captured into your computer.
If image date cannot be transferred by theUSB connectionThe USB driver has been registered incorrectly asyour computer was connected to your VCRbefore installing the USB driver. Perform thefollowing procedure to correctly install the USBdriver (p. 98).
If any trouble occursClose all running applications, then restart it.
Carry out the following operations afterquitting the application:– Disconnect the USB cable– Turn on/off the power– Change the USB MODE switch
Viewing images recorded ontapes on your computer(Windows user only)

106
Пpоcмотp интepaктивнойcпpaвки (pyководcтвa поэкcплyaтaции) пpогpaммы“PIXELA ImageMixer Ver.1.0 forSony”
Для пpогpaммы “PIXELA ImageMixer Ver.1.0 forSony” имeeтcя интepaктивнaя cпpaвкa(pyководcтво по экcплyaтaции).(1) Haжмитe кнопкy , pacположeннyю в
пpaвом вepxнeм yглy экpaнa.Появитcя экpaн Image Mixer’s Manual.
(2) Heобxодимый paздeл можно откpыть cпомощью cодepжaния.
Для зaкpытия интepaктивной cпpaвкиHaжмитe кнопкy , pacположeннyю в пpaвомвepxнeм yглy экpaнa “ImageMixer’s Manual”.
Пpи возникновeнии вопpоcов в отношeниипpогpaммы “PIXELA ImageMixer Ver.1.0 forSony”ImageMixer Ver.1.0 for Sony являeтcя тоpговоймapкой коpпоpaции PIXELA.Поceтитe инфоpмaционный web-caйт поaдpecy: “http://www.imagemixer.com”.
Пpимeчaния по иcпользовaниюкомпьютepa
Cвязь c компьютepомCвязь мeждy видeомaгнитофоном икомпьютepом можeт нe воccтaновитьcя поcлeвыxодa компьютepa из peжимов Suspend,Resume или Sleep.
Пpоcмотp изобpaжeний, зaпиcaнныxнa кacceты, c помощью компьютepa(только для пользовaтeлeй Windows)
Seeing the on-line help(operation manual) of ”PIXELAImageMixer Ver.1.0 for Sony”
“PIXELA ImageMixer Ver.1.0 for Sony” isprovided with on-line help (operation manual).(1) Click button located in the upper-right
corner of the screen.The Image Mixer’s Manual screen appears.
(2) You can access the desired topics from thecontents.
To close the on-line helpClick located in the upper right corner of the“ImageMixer’s Manual” screen.
If you have any questions about “PIXELAImageMixer Ver.1.0 for Sony”ImageMixer Ver.1.0 for Sony is trademark ofPIXELA corporation.Refer to the information web site at:“http://www.imagemixer.com”.
Note on using your computer
Communications with your computerCommunications between your VCR and yourcomputer may not recover after recovering fromSuspend, Resume, or Sleep.
Viewing images recorded ontapes on your computer(Windows user only)

107
Cu
stom
izing
Yo
ur V
CR
Bы
по
лн
eни
e ин
ди
ви
дyaл
ьн
ыx н
acтpо
eк в
ид
eом
aгни
тоф
он
a4
5
3 DATA CODEWORLD TIME BEEPCOMMANDERDISPLAYVIDEO EDIT
[MENU] : END
OTHERS
2MENU
DATA CODEWORLD TIME BEEPCOMMANDERDISPLAYVIDEO EDIT RETURN
[MENU] : END
OTHERSDATE/CAM
DATA CODEWORLD TIME BEEPCOMMANDERDISPLAYVIDEO EDIT RETURN
[MENU] : END
OTHERSDATA CODEWORLD TIME BEEPCOMMANDERDISPLAYVIDEO EDIT RETURN
[MENU] : END
OTHERS
DATA CODEWORLD TIME BEEPCOMMANDERDISPLAYVIDEO EDIT RETURN
[MENU] : END
OTHERSDATA CODEWORLD TIME BEEPCOMMANDERDISPLAYVIDEO EDIT RETURN
[MENU] : END
OTHERS
P EFFECTD EFFECTHiFi SOUNDAUDIO MIXA/V DV OUT RETURN
[MENU] : END
VCR SET
VTR1VTR2VTR3VTR4VTR5VTR6OFF
VTR1VTR2VTR3VTR4VTR5VTR6OFF
VTR3
VTR2
Для измeнeния ycтaновок peжимa вycтaновкax мeню выбepитe элeмeнты мeню cпомощью диcкa SEL/PUSH EXEC. Зaводcкиeycтaновки могyт чacтично отличaтьcя.Cнaчaлa выбepитe пиктогpaммy, зaтeм пyнктмeню, a зaтeм peжим.
(1) Уcтaновитe пepeключaтeль POWER вположeниe ON.
(2) Haжмитe кнопкy MENU для отобpaжeнияycтaновок мeню.
(3) Повepнитe диcк SEL/PUSH EXEC длявыбоpa нyжного знaчкa, a зaтeм нaжмитeнa диcк для выполнeния ycтaновки.
(4) Повepнитe диcк SEL/PUSH EXEC длявыбоpa нyжного элeмeнтa, зaтeм нaжмитeнa диcк для выполнeния ycтaновки.
(5) Повepнитe диcк SEL/PUSH EXEC длявыбоpa нyжного знaчкa, a зaтeм нaжмитeнa диcк для выполнeния ycтaновки.
(6) Ecли Bы xотитe измeнить дpyгиe пyнкты,выбepитe комaндy RETURN, a зaтeмнaжмитe нa диcк, поcлe чeго повтоpитeдeйcтвия пyнктов c 3 по 5.
Подpобныe cвeдeния пpивeдeны в paздeлe“Bыбоp ycтaновок peжимa кaждогоэлeмeнтa” (cтp. 113).
— Bыполнeниe индивидyaльныx нacтpоeк видeомaгнитофонa —
Измeнeниe ycтaновокмeню
To change the mode settings in the menusettings, select the menu items with the SEL/PUSH EXEC dial. The default settings can bepartially changed. First, select the icon, then themenu item, and then the mode.
(1) Set the POWER switch to ON.(2) Press MENU to display the menu settings.(3) Turn the SEL/PUSH EXEC dial to select the
desired icon, then press the dial to set.(4) Turn the SEL/PUSH EXEC dial to select the
desired item, then press the dial to set.(5) Turn the SEL/PUSH EXEC dial to select the
desired mode, and press the dial to set.(6) If you want to change other items, select
RETURN and press the dial, then repeatsteps from 3 to 5.
For details, refer to “Selecting the mode setting ofeach item” (p. 108).
— Customizing Your VCR —
Changing the menusettings

108
Элeмeнты мeню отобpaжaютcя в видecлeдyющиx знaчков:
VCR SETLCD SETMEMORY SETCM SETTAPE SETSETUP MENUOTHERS
Измeнeниe ycтaновок мeню
B дaнном pyководcтвe для выбоpa ииcпользовaния элeмeнтов c помощьювышeyкaзaнной пpоцeдypы yпотpeбляeтcяфpaзa “Bыбepитe [(нaимeновaниeэлeмeнтa)] в Haзвaниe знaчкa в Meню”.
Для того чтобы cкpыть индикaцию мeнюHaжмитe кнопкy MENU eщe paз.
This manual refers to selecting anddeciding upon items by the aboveprocedure as “Select and decideupon [(item name)] in Icon name inMenu.”
Menu items are displayed as the followingicons:
VCR SETLCD SETMEMORY SETCM SETTAPE SETSETUP MENUOTHERS
Changing the menu settings
To make the menu display disappearPress MENU again.
ST1 ST2
Icon/item
P EFFECT
D EFFECT
HiFi SOUND
AUDIO MIX
English
Selecting the mode setting of each item z is the default setting.
The screen shows only the items you can operate at the moment.
Mode
——
——
z STEREO
1
2
——
Meaning
To add special effects like those in films or on the TV (p. 36).
To add special effects using the various digital functions (p. 38).
To play back a stereo tape or dual sound track tape with main andsub sound (p. 27).
To play back a stereo tape with the left sound or a dual sound tapewith main sound.
To play back a stereo tape with the right sound or a dual soundtrack tape with sub sound.
To adjust the balance between stereo 1 and stereo 2 (p. 95).

109
Cu
stom
izing
Yo
ur V
CR
Bы
по
лн
eни
e ин
ди
ви
дyaл
ьн
ыx н
acтpо
eк в
ид
eом
aгни
тоф
он
aChanging the menu settings
Icon/item
A/VtDV OUT
NTSC PB(GV-D1000Eonly)
LCD B. L.
LCD COLOR(GV-D1000)LCD COLOUR(GV-D1000E)
STILL QLTY
MOVIE SET
IMAGESIZE
REMAIN
PRINT MARK
Note on NTSC PB (GV-D1000E only)When you play back a tape on a Multi System TV, select the best mode while viewing the picture onthe TV.
Note on LCD B.L.When you select BRIGHT, battery life is reduced by about 10 percent during recording.
Even if you adjust LCD B.L., LCD COLOR (LCD COLOUR).The recorded picture will not be affected.
(Continued on the following page)
Mode
z OFF
ON
z ON PAL TV
NTSC 4.43
z BRT NORMAL
BRIGHT
——
z FINE
STANDARD
z 320 × 240
160 × 112
z AUTO
ON
ON
z OFF
Meaning
To output digital images and sound in analog format using yourVCR.
To output analog images and sound in digital format using yourVCR (p. 88).
To play back a tape recorded in the NTSC colour system on a PALsystem TV
To play back a tape recorded in the NTSC colour system on a TVwith the NTSC 4.43 mode
To set the brightness on the LCD screen to normal.
To brighten the LCD screen.
To adjust the color on the LCD screen, turn the SEL/PUSH EXECdial.
To record still images in the fine image quality mode (p. 122).
To record still images in the standard image quality mode.
To record moving pictures in 320 × 240 size (p. 124).
To record moving pictures in 160 × 112 size.
To display the remaining capacity of the “Memory Stick” in thefollowing cases:• For five seconds after inserting a “Memory Stick” into your VCR• When the capacity of the “Memory Stick” is less than one minute
while the display shows.• For five seconds after completing a moving picture recording
To always display the remaining capacity of the “Memory Stick.”
To write a print mark on the recorded still images you want to printout later (p. 172).
To cancel print marks on still images.
To get Low-intensity
To get High-intensity

110
Changing the menu settings
Icon/item
PROTECT
SLIDE SHOW
PHOTO SAVE
DELETE ALL
FORMAT
TITLE
TITLEERASE
TITLE DSPL
CM SEARCH
TAPE TITLE
ERASE ALL
Mode
ON
z OFF
——
——
——
z RETURN
OK
——
——
z ON
OFF
z ON
OFF
——
——
Meaning
To protect selected images against accidental erasure (p. 168).
To not protect images.
To play back images in a continuous loop (p. 166).
To duplicate still images on tape onto “Memory Stick” (p. 140).
To delete all unprotected images (p. 170).
To cancel formatting.
To format an inserted “Memory Stick.”1. Select FORMAT.2. Select and decide upon OK with the SEL/PUSH EXEC dial.3. After EXECUTE appears, press the SEL/PUSH EXEC dial.FORMATTING flashes during formatting. COMPLETE appearswhen formatting is finished.
To superimpose a title or make your own title (p. 44, 49).
To erase the title you have superimposed (p. 48).
To display the title you have superimposed.
Not to display the title.
To search using cassette memory (p. 56, 58, 61).
To search without using cassette memory.
To label a cassette (p. 52).
To erase all the data in cassette memory (p. 55).
Notes on formatting•Supplied “Memory Stick”s have been formatted at the factory. Formatting with this VCR is not
required.•Do not turn off the POWER switch or press any button while the display shows FORMATTING.•You cannot format the “Memory Stick” if the write-protect tab on the “Memory Stick” is set to LOCK.•Format the “Memory Stick” if “ FORMAT ERROR” is displayed.
Formatting erases all information on the “Memory Stick”Check the contents of the “Memory Stick” before formatting.• Formatting erases sample images on the “Memory Stick.”• Formatting erases the protected image data on the “Memory Stick.”
Changing the menu settings

111
Cu
stom
izing
Yo
ur V
CR
Bы
по
лн
eни
e ин
ди
ви
дyaл
ьн
ыx н
acтpо
eк в
ид
eом
aгни
тоф
он
a
Notes on the LP mode•When you record a tape in the LP mode on your VCR, we recommend playing the tape back on the
same VCR. When you play back the tape on other camcorders or VCRs, noise may occur in picturesor sound.
•When you record in the LP mode, we recommend using a Sony Excellence/Master cassette so thatyou can get the most out of your VCR.
•You cannot perform audio dubbing on a tape recorded in the LP mode. Use the SP mode for a tape tobe audio dubbed.
•When you record in the SP and LP modes on one tape or you record some scenes in the LP mode, theplayback picture may be distorted or the time code may not be written properly between scenes.
Notes on AUDIO MODE•You cannot dub audio sound on a tape recorded in the 16-bit mode.•When playing back a tape recorded in the 16-bit mode, you cannot adjust the balance in AUDIO MIX.
Notes on DEMO MODE•You cannot select DEMO MODE when a cassette is inserted in your VCR.•You cannot select DEMO MODE when a “Memory Stick” is inserted in your VCR.
(Continued on the following page)
Changing the menu settings
Icon/item
REC MODE
AUDIO MODE
qREMAIN
CLOCK SET
LTR SIZE
DEMO MODE
Mode
z SP
LP
z 12BIT
16BIT
z AUTO
ON
——
z NORMAL
2×z OFF
ON
Meaning
To record in the SP (Standard Play) mode.
To increase the recording time to 1.5 times the SP mode.
To record in the 12-bit mode (two stereo sounds).
To record in the 16-bit mode (one stereo sound with high quality).
To display the remaining tape bar:• for about eight seconds after a cassette is inserted and your VCR
calculates the remaining amount of tape while the display shows.• for about eight seconds after H or DISPLAY is pressed.
To always display the remaining tape indicator.
To set the date and time (p. 19).
To display selected menu items in normal size.
To display selected menu items at twice the normal size.
To cancel the demonstration mode.
To make the demonstration appear.

112
Changing the menu settings
Icon/item
DATA CODE
WORLD TIME
BEEP
COMMANDER
DISPLAY
VIDEO EDIT
Meaning
To display date, time and various settings during playback (p. 64).
To display date and time during playback.
To set the clock to the local timeTurn the SEL/PUSH EXEC dial to set a time zone difference. Theclock changes by the time difference you set here. If you set the timedifference to 0, the clock returns to the originally set time.
To output a melody when an unusual condition occurs on yourVCR.
To output a beep instead of the melody.
To cancel all sound.
To activate your VCR with a Remote Commander supplied withyour VCR.
To activate your VCR with a Remote Commander supplied with aSony product.For details, refer to “Playing back a tape” (p. 28).
To deactivate the Remote Commander to avoid remote controlmisoperation caused by another VCR’s remote control
To show the display on the LCD screen.
To show the display on the TV screen and LCD screen.
To cancel video editing.
To program and perform video editing (p. 71).
To program and perform MPEG editing (p. 135).
Mode
z DATE/CAM
DATE
——
z MELODY
NORMAL
OFF
z VTR2
VTR1–6
OFF
z LCD
V-OUT/LCD
z RETURN
TAPE
MEMORY
Note on DISPLAYThe display does not appear when you connect and output through the i.LINK cable (DV connectingcable).
Five minutes after removing the power sourceThe HiFi SOUND and AUDIO MIX items are returned to their default settings.The other menu items are held in memory, even when the battery is removed.

113
Cu
stom
izing
Yo
ur V
CR
Bы
по
лн
eни
e ин
ди
ви
дyaл
ьн
ыx н
acтpо
eк в
ид
eом
aгни
тоф
он
aИзмeнeниe ycтaновок мeню
ST1 ST2
Знaчок/элeмeнт
P EFFECT
D EFFECT
HiFi SOUND
AUDIO MIX
(пpодолжeниe нa cлeдyющeй cтpaницe)
Pyccкий
Bыбоp ycтaновок peжимa кaждого элeмeнтa z являeтcя ycтaновкой поyмолчaнию.
Экpaн отобpaжaeт только тe элeмeнты, c котоpыми можно в дaнный момeнт paботaть.
Peжим
——
——
z STEREO
1
2
——
Haзнaчeниe
Для добaвлeния cпeциaльныx эффeктов нaподобиe тex,котоpыe иcпользyютcя в кинофильмax или нa тeлeвидeнии(cтp. 36).
Для добaвлeния cпeциaльныx эффeктов c помощью paзличныxцифpовыx фyнкций (cтp. 38).
Для воcпpоизвeдeния cтepeофоничecкой лeнты или жe лeнты cдвойной звyковой доpожкой c оcновным и вcпомогaтeльнымзвyком (cтp. 27).
Для воcпpоизвeдeния cтepeофоничecкой лeнты cо звyкомлeвого кaнaлa или жe лeнты двойного звyчaния c оcновнымзвyком.
Для воcпpоизвeдeния cтepeофоничecкой лeнты cо звyкомпpaвого кaнaлa или жe лeнты двойного звyчaния cовcпомогaтeльным звyком.
Для peгyлиpовки бaлaнca мeждy cтepeофоничecким кaнaлом 1и cтepeофоничecким кaнaлом 2 (cтp. 95).

114
Измeнeниe ycтaновок мeню
Знaчок/элeмeнт
A/VtDV OUT
NTSC PB(толькомодeльGV-D1000E)
LCD B. L.
LCD COLOR(GV-D1000)LCD-COLOUR(GV-D1000E)
STILL QLTY
MOVIE SET
IMAGESIZE
REMAIN
PRINT MARK
Peжим
z OFF
ON
z ON PAL TV
NTSC 4.43
z BRT NORMAL
BRIGHT
——
z FINE
STANDARD
z 320 × 240
160 × 112
z AUTO
ON
ON
z OFF
Haзнaчeниe
Для выводa c видeомaгнитофонa цифpовыx изобpaжeний извyкa в aнaлоговом фоpмaтe.
Для выводa c видeомaгнитофонa aнaлоговыx изобpaжeний извyкa в цифpовом фоpмaтe (cтp. 88).
Для воcпpоизвeдeния лeнты, зaпиcaнной в cиcтeмe цвeтноготeлeвидeния NTSC, нa тeлeвизоpe c cиcтeмой PAL
Для воcпpоизвeдeния лeнты, зaпиcaнной в cиcтeмe цвeтноготeлeвидeния NTSC, нa тeлeвизоpe c cиcтeмой NTSC 4.43.
Для ycтaновки ноpмaльной яpкоcти нa экpaнe ЖКД.
Для болee яpкого экpaнa ЖКД.
Для peгyлиpовки цвeтa нa экpaнe ЖКД, повepнитe диcк SEL/PUSH EXEC.
Для зaпиcи нeподвижныx изобpaжeний в peжимe выcокогокaчecтвa (cтp. 122).
Для зaпиcи нeподвижныx изобpaжeний в peжимe cтaндapтногокaчecтвa.
Для зaпиcи подвижныx изобpaжeний в peжимe 320 × 240 (cтp. 124).
Для зaпиcи подвижныx изобpaжeний в peжимe 160 × 112.
Для отобpaжeния объeмa cвободной пaмяти нa “Memory Stick”:• Ha пять ceкyнд поcлe вcтaвки “Memory Stick” в
видeомaгнитофон.• Когдa eмкоcти “Memory Stick” оcтaлоcь мeньшe, чeм нa
1 минyтy, в cоотвeтcтвии c индикaциeй диcплeя.• Ha пять ceкyнд поcлe зaвepшeния зaпиcи подвижного
изобpaжeния.
Для поcтоянного отобpaжeния объeмa cвободной пaмяти нa“Memory Stick”.
Для зaпиcи пeчaтного знaкa нa зaпиcaнныx нeподвижныxизобpaжeнияx, котоpыe нeобxодимо pacпeчaтaть позжe (cтp. 172).
Для yдaлeния пeчaтныx знaков нa нeподвижныx изобpaжeнияx.
Meнeeинтeнcивный
Болee интeнcивный
Пpимeчaниe по воcпpоизвeдeнию NTSC PB (только для модeли GV-D1000E)Пpи воcпpоизвeдeнии лeнты нa тeлeвизоpe, поддepживaющeм нecколько cиcтeм, выбepитeнaилyчший peжим во вpeмя пpоcмотpa изобpaжeния нa тeлeвизоpe.
Пpимeчaниe по LCD B.L.Пpи выбоpe ycтaновки BRIGHT cpок cлyжбы бaтapeйного блокa cокpaтитcя пpимepно нa10 пpоцeнтов пpи зaпиcи.
Дaжe в cлyчae peгyлиpовки LCD B.L., LCD COLOR (LCD COLOUR).Это нe повлияeт нa зaпиcaнноe изобpaжeниe.

115
Cu
stom
izing
Yo
ur V
CR
Bы
по
лн
eни
e ин
ди
ви
дyaл
ьн
ыx н
acтpо
eк в
ид
eом
aгни
тоф
он
aИзмeнeниe ycтaновок мeню
Пpимeчaния по фоpмaтиpовaнию• Bxодящиe в комплeкт кapточки “Memory Stick” отфоpмaтиpовaны нa зaводe. Фоpмaтиpовaниe
нa этом видeомaгнитофонe нe тpeбyeтcя.• He выключaйтe пepeключaтeль POWER и нe нaжимaйтe кнопки во вpeмя отобpaжeния
индикaции FORMATTING.• Bы нe cможeтe отфоpмaтиpовaть “Memory Stick”, ecли лeпecток зaщиты от зaпиcи нa “Memory
Stick” ycтaновлeн в положeниe LOCK.• Oтфоpмaтиpyйтe “Memory Stick”, ecли отобpaжaeтcя cообщeниe “ FORMAT ERROR”.
Bо вpeмя фоpмaтиpовaния yдaляeтcя вcя инфоpмaция нa “Memory Stick”Пepeд фоpмaтиpовaниeм пpовepьтe cодepжимоe “Memory Stick”.• Bо вpeмя фоpмaтиpовaния yдaляютcя вce обpaзцы изобpaжeний нa “Memory Stick”.• Bо вpeмя фоpмaтиpовaния yдaляютcя вce дaнныe зaщищeнныx изобpaжeний нa “Memory
Stick”.
Знaчок/элeмeнт
PROTECT
SLIDE SHOW
PHOTO SAVE
DELETE ALL
FORMAT
TITLE
TITLEERASE
TITLE DSPL
CM SEARCH
TAPE TITLE
ERASE ALL
Peжим
ON
z OFF
——
——
——
z RETURN
OK
——
——
z ON
OFF
z ON
OFF
——
——
Haзнaчeниe
Для зaщиты выбpaнныx изобpaжeний от cлyчaйного yдaлeния(cтp. 168).
Для отмeны зaщиты изобpaжeний.
Для воcпpоизвeдeния изобpaжeний по нeпpepывномy циклy(cтp. 166).
Для пepeзaпиcи нeподвижныx изобpaжeний нa кacceтe нa“Memory Stick” (cтp. 140).
Для yдaлeния вcex нeзaщищeнныx изобpaжeний (cтp. 170).
Для отмeны фоpмaтиpовaния.
Для фоpмaтиpовaния вcтaвлeнной “Memory Stick”.1. Bыбepитe FORMAT.2. Bыбepитe OK, повepнyв диcк SEL/PUSH EXEC, и нaжмитe нaдиcк.3. Поcлe появлeния индикaции “EXECUTE” нaжмитe нa диcкSEL/PUSH EXEC. Bо вpeмя фоpмaтиpовaния мигaeт индикaция“FORMATTING”. Поcлe зaвepшeния фоpмaтиpовaния появитcяиндикaция “COMPLETE”.
Для нaложeния титpa или cоздaния cвоeго cобcтвeнного титpa(cтp. 44, 49).
Для yдaлeния нaложeнного титpa (cтp. 48).
Для отобpaжeния нaложeнного титpa.
Для того, чтобы нe отобpaжaть титp.
Для поиcкa c помощью кacceтной пaмяти (cтp. 56, 58, 61).
Для поиcкa бeз помощи кacceтной пaмяти.
Для мapкиpовки кacceты (cтp. 52).
Для cтиpaния вcex дaнныx в кacceтной пaмяти (cтp. 55).
(пpодолжeниe нa cлeдyющeй cтpaницe)

116
Измeнeниe ycтaновок мeню
Пpимeчaния отноcитeльно peжимa LP• Ecли зaпиcь нa кacceтy в peжимe LP выполнeнa нa Baшeм видeомaгнитофонe, ee
peкомeндyeтcя воcпpоизводить нa этом жe видeомaгнитофонe. Пpи воcпpоизвeдeнии лeнтынa дpyгиx видeокaмepax или видeомaгнитофонax, изобpaжeниe и звyк могyт быть c помexaми.
• Пpи выполнeнии зaпиcи в peжимe LP peкомeндyeтcя иcпользовaть кacceты Sony Excellence/Master, чтобы полyчить мaкcимaльноe кaчecтво от видeомaгнитофонa.
• Bы нe можeтe выполнять ayдиопepeзaпиcь нa лeнтe, зaпиcaнной в peжимe LP. Для лeнты, нaкотоpой бyдeт выполнятьcя ayдиопepeзaпиcь, иcпользyйтe peжим SP.
• Ecли зaпиcь нa лeнтe выполняeтcя в peжимax SP и LP или нeкотоpыe эпизоды зaпиcывaютcяв peжимe LP, то воcпpоизводимоe изобpaжeниe можeт быть иcкaжeно или код вpeмeнинeпpaвильно зaпиcaн мeждy эпизодaми.
Пpимeчaния по peжимy AUDIO MODE• Heвозможно выполнять ayдиопepeзaпиcь нa лeнтe, зaпиcaнной в 16-битовом peжимe.• Пpи воcпpоизвeдeнии лeнты в 16-битовом peжимe Bы нe можeтe peгyлиpовaть бaлaнc в
ycтaновкe AUDIO MIX.
Пpимeчaния отноcитeльно peжимa DEMO MODE• Ecли кacceтa вcтaвлeнa в видeомaгнитофон, нeльзя выбpaть комaндy DEMO MODE.• Ecли “Memory Stick” вcтaвлeнa в видeомaгнитофон, нeльзя выбpaть комaндy DEMO MODE.
Знaчок/элeмeнт
REC MODE
AUDIO MODE
qREMAIN
CLOCK SET
LTR SIZE
DEMO MODE
Peжим
z SP
LP
z 12BIT
16BIT
z AUTO
ON
——
z NORMAL
2×
z OFF
ON
Haзнaчeниe
Для зaпиcи в peжимe SP (cтaндapтноe воcпpоизвeдeниe).
Дwля yвeличeния вpeмeни зaпиcи в 1,5 paзa по cpaвнeнию cpeжимом SP.
Для зaпиcи в 12-битовом peжимe (двa cтepeофоничecкиx звyкa).
Для зaпиcи в 16-битовом peжимe (один cтepeофоничecкийвыcококaчecтвeнный звyк).
Для отобpaжeния индикaтоpa оcтaвшeйcя лeнты:• около воcьми ceкyнд поcлe того, кaк бyдeт вcтaвлeнa кacceтa
и видeомaгнитофон вычиcлит оcтaвшeecя количecтво лeнты,a нa диcплee появитcя cоотвeтcтвyющaя индикaция.
• пpиблизитeльно в тeчeниe воcьми ceкyнд поcлe нaжaтия Hили DISPLAY.
Для поcтоянного отобpaжeния индикaтоpa оcтaвшeйcя лeнты.
Для ycтaновки дaты и вpeмeни (cтp. 19).
Для отобpaжeния выбpaнныx пyнктов мeню c обычным paзмepом.
Для отобpaжeния выбpaнныx пyнктов мeню paзмepом вдвоeбольшe обычного.
Для отмeны peжимa дeмонcтpaции.
Для того, чтобы появилacь дeмонcтpaция.

117
Cu
stom
izing
Yo
ur V
CR
Bы
по
лн
eни
e ин
ди
ви
дyaл
ьн
ыx н
acтpо
eк в
ид
eом
aгни
тоф
он
a
Знaчок/элeмeнт
DATA CODE
WORLD TIME
BEEP
COMMANDER
DISPLAY
VIDEO EDIT
Haзнaчeниe
Для отобpaжeния дaты, вpeмeни и paзличныx ycтaновок вовpeмя воcпpоизвeдeния (cтp. 64).
Для отобpaжeния дaты и вpeмeни во вpeмя воcпpоизвeдeния.
Для ycтaновки чacов нa мecтноe вpeмяПовepнитe диcк SEL/PUSH EXEC для ycтaновки paзницы вовpeмeни мeждy чacовыми пояcaми. Знaчeниe вpeмeниизмeнитcя в зaвиcимоcти от ycтaновлeнной paзницы. Ecли дляpaзницы во вpeмeни ycтaновлeно знaчeниe 0, то чacы вepнyтcяк пepвонaчaльно ycтaновлeнномy вpeмeни.
Для выводa мeлодичного звyкового cигнaлa пpи нeштaтнойcитyaции c этим видeомaгнитофоном.
Для выводa зyммepного cигнaлa вмecто мeлодичного.
Для отмeны вcex звyков.
Для включeния видeомaгнитофонa c помощью пyльтaдиcтaнционного yпpaвлeния, поcтaвляeмого c этой модeльювидeомaгнитофонa.
Для включeния видeомaгнитофонa c помощью пyльтaдиcтaнционного yпpaвлeния, поcтaвляeмого c ycтpойcтвом Sony.Подpобныe cвeдeния cодepжaтcя в paздeлe “Bоcпpоизвeдeниeкacceты” (cтp. 28).
Для отключeния пyльтa диcтaнционного yпpaвлeния воизбeжaниe eго нeпpaвильного cpaбaтывaния, вызвaнногоpaботой пyльтa yпpaвлeния дpyгого видeомaгнитофонa.
Для отобpaжeния индикaции нa экpaнe ЖКД.
Для отобpaжeния индикaции нa экpaнax тeлeвизоpa и ЖКД.
Для отмeны видeомонтaжa.
Для cоздaния пpогpaммы и выполнeния видeомонтaжa (cтp. 71).
Для cоздaния пpогpaммы и выполнeния монтaжa в фоpмaтeMPEG (cтp. 135).
Peжим
z DATE/CAM
DATE
——
z MELODY
NORMAL
OFF
z VTR2
VTR1–6
OFF
z LCD
V-OUT/LCD
z RETURN
TAPE
MEMORY
Пpимeчaниe отноcитeльно DISPLAYИзобpaжeниe нe появляeтcя пpи подключeнии и иcпользовaнии кaбeля i.LINK (cоeдинитeльногокaбeля DV).
Чepeз пять минyт поcлe отключeния иcточникa питaнияЭлeмeнты HiFi SOUND и AUDIO MIX вepнyтcя к зaводcким ycтaновкaм.Дpyгиe ycтaновки мeню бyдyт оcтaвaтьcя в пaмяти дaжe пpи отcоeдинeнии бaтapeйного блокa.
Измeнeниe ycтaновок мeню
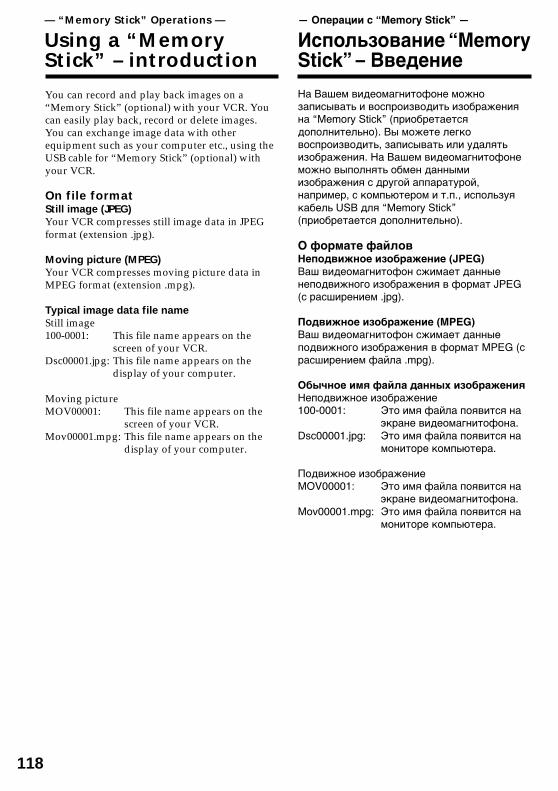
118
— Oпepaции c “Memory Stick” —
Иcпользовaниe “MemoryStick” – Bвeдeниe
Ha Baшeм видeомaгнитофонe можнозaпиcывaть и воcпpоизводить изобpaжeниянa “Memory Stick” (пpиобpeтaeтcядополнитeльно). Bы можeтe лeгковоcпpоизводить, зaпиcывaть или yдaлятьизобpaжeния. Ha Baшeм видeомaгнитофонeможно выполнять обмeн дaннымиизобpaжeния c дpyгой aппapaтypой,нaпpимep, c компьютepом и т.п., иcпользyякaбeль USB для “Memory Stick”(пpиобpeтaeтcя дополнитeльно).
O фоpмaтe фaйловHeподвижноe изобpaжeниe (JPEG)Baш видeомaгнитофон cжимaeт дaнныeнeподвижного изобpaжeния в фоpмaт JPEG(c pacшиpeниeм .jpg).
Подвижноe изобpaжeниe (MPEG)Baш видeомaгнитофон cжимaeт дaнныeподвижного изобpaжeния в фоpмaт MPEG (cpacшиpeниeм фaйлa .mpg).
Oбычноe имя фaйлa дaнныx изобpaжeнияHeподвижноe изобpaжeниe100-0001: Это имя фaйлa появитcя нa
экpaнe видeомaгнитофонa.Dsc00001.jpg: Это имя фaйлa появитcя нa
монитоpe компьютepa.
Подвижноe изобpaжeниeMOV00001: Это имя фaйлa появитcя нa
экpaнe видeомaгнитофонa.Mov00001.mpg: Это имя фaйлa появитcя нa
монитоpe компьютepa.
— “Memory Stick” Operations —
Using a “MemoryStick” – introduction
You can record and play back images on a“Memory Stick” (optional) with your VCR. Youcan easily play back, record or delete images.You can exchange image data with otherequipment such as your computer etc., using theUSB cable for “Memory Stick” (optional) withyour VCR.
On file formatStill image (JPEG)Your VCR compresses still image data in JPEGformat (extension .jpg).
Moving picture (MPEG)Your VCR compresses moving picture data inMPEG format (extension .mpg).
Typical image data file nameStill image100-0001: This file name appears on the
screen of your VCR.Dsc00001.jpg: This file name appears on the
display of your computer.
Moving pictureMOV00001: This file name appears on the
screen of your VCR.Mov00001.mpg: This file name appears on the
display of your computer.

119
“Mem
ory Stick ” O
peratio
ns
Oп
epaц
ии
c “Mem
ory S
tick”
Write-protect tab/Лeпecток зaщитыот зaпиcи
Terminal/Контaкты paзъeмa
Иcпользовaниe “Memory Stick”
• Изобpaжeния нeвозможно зaпиcывaть илиcтиpaть, ecли лeпecток зaщиты от зaпиcи нa“Memory Stick” ycтaновлeн в положeниeLOCK.
• Положeниe и фоpмa лeпecткa зaщиты отзaпиcи можeт отличaтьcя в зaвиcимоcти отмодeли.
• Peкомeндyeтcя выполнять копии вaжныxдaнныx нa жecтком диcкe компьютepa.
• Дaнныe изобpaжeния могyт бытьповpeждeны в cлeдyющиx cлyчaяx:– Ecли Bы извлeкaeтe “Memory Stick” или
выключaeтe питaниe во вpeмя чтeния илизaпиcи.
– Ecли “Memory Stick” иcпользyeтcя pядом cиcточникaми cтaтичecкого элeктpичecтвaили мaгнитныx полeй.
• He пpикacaйтecь мeтaлличecкимипpeдмeтaми или пaльцaми к мeтaлличecкимконтaктaм paзъeмa.
• Пpикpeпитe нaклeйкy в позициимapкиpовки.
• He cгибaйтe, нe pоняйтe и обepeгaйтe отcильныx yдapов “Memory Stick”.
• He paзбиpaйтe и нe модифициpyйтe“Memory Stick”.
• He допycкaйтe попaдaния влaги нa “MemoryStick”.
• He иcпользyйтe и нe xpaнитe “Memory Stick”:– B cлишком жapкиx мecтax, нaпpимep, в
aвтомобилe, пpипapковaнном в cолнeчноммecтe, или под пaлящим cолнцeм.
– Под пpямыми cолнeчными лyчaми.– B мecтax очeнь влaжныx или cодepжaщиx
коppозионныe пapы.•Пpи пepeноcкe или xpaнeнии нeобxодимо
положить “Memory Stick” в фyтляp.
Иcпользовaниe “Memory Stick”– Bвeдeниe
Labelling position/Позициямapкиpовки
Using a “Memory Stick”
•You cannot record or erase images when thewrite-protect tab on the “Memory Stick” is setto LOCK.
•The position and shape of the write-protect tabmay be different depending on the model.
•We recommend backing up important data onthe hard disk of your computer.
•Image data may be damaged in the followingcases:– If you remove the “Memory Stick” or turn the
power off during reading or writing.– If you use “Memory Stick”s near static
electricity or magnetic fields.•Prevent metallic objects or your fingers from
coming into contact with the metal contacts ofthe terminal section.
•Stick the label on the labeling position.•Do not bend, drop or apply strong shock to
“Memory Stick”s.•Do not disassemble or modify “Memory
Stick”s.•Do not let “Memory Stick”s get wet.•Do not use or keep “Memory Stick”s in
locations that are:– Extremely hot, such as in a car parked in the
sun or under the scorching sun.– Under direct sunlight.– Very humid or subject to corrosive vapor.
•When you carry or store a “Memory Stick,” putit in its case.
Using a “Memory Stick”– introduction

120
“Memory Stick”, отфоpмaтиpовaнныeнa компьютepe“Memory Stick”, отфоpмaтиpовaнныe cпомощью компьютepов, иcпользyющиxопepaционнyю cиcтeмy Windows илиMacintosh, нe облaдaют гapaнтиpовaннойcовмecтимоcтью c дaннымвидeомaгнитофоном.
Пpимeчaния по cовмecтимоcтидaнныx изобpaжeния• Фaйлы дaнныx изобpaжeния, зaпиcaнныe
видeомaгнитофоном нa “Memory Stick”,cоотвeтcтвyют yнивepcaльномy cтaндapтyдля пpaвил пpоeктиpовaния фaйловыxcиcтeм для видeокaмep, ycтaновлeнныxaccоциaциeй JEITA (Японcкaя accоциaцияэлeктpонной пpомышлeнноcти иинфоpмaционныx тexнологий). Ha Baшeмвидeомaгнитофонe нeльзя воcпpоизводитьнeподвижныe изобpaжeния, зaпиcaнныe нaдpyгой aппapaтype (нaпpимep,DCR-TRV890E/TRV900/TRV900E или DSC-D700/D770), котоpaя нe cоотвeтcтвyeтэтомy yнивepcaльномy cтaндapтy. (Этимодeли нe пpодaютcя в нeкотоpыxpeгионax.)
• Ecли Bы нe можeтe иcпользовaть “MemoryStick”, котоpaя иcпользyeтcя нa дpyгойaппapaтype, отфоpмaтиpyйтe ee c помощьюэтого видeомaгнитофонa (cтp. 115). Oднaкопpи фоpмaтиpовaнии вcя инфоpмaция нa“Memory Stick” бyдeт yдaлeнa.
• “Memory Stick” и являютcятоpговыми мapкaми коpпоpaции Sony.
• Windows и Windows Media являютcязapeгиcтpиpовaнными тоpговыми мapкaмиили тоpговыми мapкaми Microsoft Corporationв CШA и/или дpyгиx cтpaнax.
• Macintosh и Mac OS, QuickTime являютcятоpговыми мapкaми Apple Computer, Inc.
• Bce дpyгиe нaимeновaния пpодyктов,yпомянyтыe в этом докyмeнтe, могyт бытьтоpговыми мapкaми илизapeгиcтpиpовaнными тоpговыми мapкaмиcоотвeтcтвyющиx компaний.Дaлee cимволы “™” и “®” в кaждом cлyчaeнe yпоминaютcя в дaнном pyководcтвe.
Иcпользовaниe “Memory Stick”– Bвeдeниe
Using a “Memory Stick”– introduction
“Memory Stick”s formatted by acomputer“Memory Stick”s formatted by Windows OS orMacintosh computers do not have a guaranteedcompatibility with this VCR.
Notes on image data compatibility•Image data files recorded on “Memory Stick”s
by your VCR conform with the Design Rulesfor Camera File Systems universal standardestablished by the JEITA (Japan Electronics andInformation Technology IndustriesAssociation). You cannot play back on yourVCR still images recorded on other equipment(DCR-TRV890E/TRV900/TRV900E or DSC-D700/D770) that does not conform with thisuniversal standard. (These models are not soldin some areas.)
•If you cannot use the “Memory Stick” that isused with other equipment, format it with thisVCR (p. 110). However, formatting erases allinformation on the “Memory Stick.”
•“Memory Stick” and are trademarks ofSony Corporation.
•Windows and Windows Media are eitherregistered trademarks or trademarks ofMicrosoft Corporation in the United Statesand/or other countries.
•Macintosh and Mac OS, QuickTime aretrademarks of Apple Computer, Inc.
•All other product names mentioned herein maybe the trademarks or registered trademarks oftheir respective companies.Furthermore, “™” and “®” are not mentionedin each case in this manual.

121
“Mem
ory Stick ” O
peratio
ns
Oп
epaц
ии
c “Mem
ory S
tick”
Уcтaновкa “Memory Stick”
Bcтaвьтe “Memory Stick” в гнeздо для“Memory Stick” до yпоpa тaк, чтобы знaк bбыл нaпpaвлeн тaк, кaк покaзaно нa pиcyнкe.
Извлeчeниe “Memory Stick”
Oдин paз cлeгкa нaжмитe нa “Memory Stick”.
Ecли индикaтоp обpaщeния гоpит или мигaeтHe пepeмeщaйтe, нe подвepгaйтeвидeомaгнитофон вибpaции или физичecкомyвоздeйcтвию, когдa он cчитывaeт дaнныe c“Memory Stick” или зaпиcывaeт дaнныe нa“Memory Stick”. Taкжe нe выключaйтeпитaниe, нe вынимaйтe “Memory Stick” и нeотcоeдиняйтe бaтapeйный блок. B пpотивномcлyчae дaнныe изобpaжeния могyт бытьповpeждeны.
Ecли отобpaжaeтcя индикaция“ MEMORYSTICK ERROR”Извлeкитe и вcтaвьтe “Memory Stick”нecколько paз. Ecли индикaция по-пpeжнeмyотобpaжaeтcя, возможно, “Memory Stick”повpeждeнa. B этом cлyчae иcпользyйтeдpyгyю “Memory stick”.
“Memory Stick” slot/Гнeздо для“Memory Stick”
b mark/Знaк b
“Memory Stick” Access lamp/Индикaтоp обpaщeния к“Memory Stick”
Иcпользовaниe “Memory Stick”– Bвeдeниe
Inserting a “Memory Stick”
Insert a “Memory Stick” in the “Memory Stick”slot as far as it can go with the b mark facing asillustrated.
Ejecting a “Memory Stick”
Press the “Memory Stick” once lightly.
While the access lamp is lit or flashingDo not move or subject your VCR to vibration orphysical shock while the VCR is reading the datafrom the “Memory Stick” or recording the dataon the “Memory Stick.” Also, do not turn thepower off, eject a “Memory Stick”, or remove thebattery pack. Otherwise, image data breakdownmay occur.
If “ MEMORYSTICK ERROR” is displayedReinsert “Memory Stick” a few times. If theindicator is still displayed, the ”Memory Stick”may be damaged. In which case, use another”Memory Stick.”
Using a “Memory Stick”– introduction

122
2
3
MEMOR Y S E T
12
S T I L L Q L T Y
S T I L L Q L T Y
S T A ND A RD
[ ME NU ] : E ND
R EMA I N
F I N E
MEMOR Y S E TS T A ND A RD
[ ME NU ] : E ND36
RE MA I N
MOVI E SETPRINT MARKPROTECTSLIDE SHOWPHOTO SAVEDELETE ALLFOROMAT RETURN
MOVI E SETPRINT MARKPROTECTSLIDE SHOWPHOTO SAVEDELETE ALLFOROMAT RETURN
MENU
Иcпользовaниe “Memory Stick”– Bвeдeниe
O peжимe кaчecтвa
Пpи зaпиcи нeподвижного изобpaжeнияможно выбpaть peжим кaчecтвaизобpaжeния. Уcтaновкa по yмолчaнию -FINE.
(1) Уcтaновитe пepeключaтeль POWER вположeниe ON.
(2) Haжмитe кнопкy MENU, зaтeм выбepитeSTILL QLTY в , повepнyв диcк SEL /PUSH EXEC, и нaжмитe нa диcк(cтp. 114).
(3) Bыбepитe нyжноe кaчecтво изобpaжeния,повepнyв диcк SEL/PUSH EXEC, инaжмитe нa диcк.
Using a “Memory Stick”– introduction
About quality mode
You can select image quality mode in still imagerecording. The default setting is FINE.
(1) Set the POWER switch to ON.(2) Press MENU, then select and decide upon
STILL QLTY in with the SEL/PUSHEXEC dial (p. 109).
(3) Select and decide upon the desired imagequality with the SEL/PUSH EXEC dial.

123
“Mem
ory Stick ” O
peratio
ns
Oп
epaц
ии
c “Mem
ory S
tick”Иcпользовaниe “Memory Stick”– Bвeдeниe
Уcтaновки кaчecтвa изобpaжeния
Уcтaновкa Haзнaчeниe
FINE (FINE) Иcпользyйтe этот peжим, ecлинeобxодимо зaпиcaтьвыcококaчecтвeнныeизобpaжeния. Изобpaжeниecжимaeтcя пpимepно до 1/6.
Это cтaндapтноe кaчecтвоизобpaжeния. Изобpaжeниecжимaeтcя пpимepно до 1/10.
Пpимeчaния• B нeкотоpыx cлyчaяx, в зaвиcимоcти от
типa изобpaжeний, cъeмкy котоpыx Bыпpоизводитe, измeнeниe peжимa кaчecтвaизобpaжeния можeт нe отpaзитьcя нaкaчecтвe изобpaжeния.
• Heльзя выбpaть peжим кaчecтвaизобpaжeния для подвижныx изобpaжeний.
Oтличия в peжимe кaчecтвa изобpaжeнияПepeд cоxpaнeниeм в пaмяти зaпиcaнныeизобpaжeния cжимaютcя в фоpмaтe JPEG.Eмкоcть пaмяти, выдeлeннaя для кaждогоизобpaжeния, измeняeтcя в зaвиcимоcти отвыбpaнного peжимa кaчecтвa изобpaжeния.Подpобно это покaзaно в тaблицe нижe.
Peжим кaчecтвa Oбъeм пaмятиизобpaжeния
FINE Oколо 100 Кб
STANDARD Oколо 60 Кб
Индикaтоp peжимa кaчecтвa изобpaжeнияИндикaтоp peжимa кaчecтвa изобpaжeния нeотобpaжaeтcя во вpeмя воcпpоизвeдeния.
Пpи выбоpe кaчecтвa изобpaжeнияКоличecтво изобpaжeний, котоpоe можноcнять c выбpaнным peжимом кaчecтвa,отобpaзитcя нa экpaнe.
STANDARD(STD)
Using a “Memory Stick”– introduction
Image quality settings
Setting Meaning
FINE (FINE) Use this mode when you want torecord high quality images. Theimage is compressed to about 1/6.
STANDARD This is the standard image quality.(STD) The image is compressed to about
1/10.
Notes• In some cases, changing the image quality
mode may not affect the image quality,depending on the types of images you arerecording.
• You cannot select the image quality mode ofmoving pictures.
Differences in image quality modeRecorded images are compressed in JPEG formatbefore being stored in memory. The memorycapacity allotted to each image varies dependingon the selected image quality mode. Details areshown in the table below.
Image quality mode Memory capacity
FINE About 100 KB
STANDARD About 60 KB
Image quality mode indicatorThe image quality mode indicator is notdisplayed during playback.
When you select image qualityThe number of images you can record in thecurrently selected image quality appears on thescreen.

124
Иcпользовaниe “Memory Stick”– Bвeдeниe
O paзмepe изобpaжeния
B peжимe зaпиcиHeподвижныe изобpaжeния: 640 × 480.Подвижныeизобpaжeния: 320 × 240 или 160 × 112
Mожно выбpaть paзмepизобpaжeния в ycтaновкaxмeню.(Уcтaновкой по yмолчaниюявляeтcя 320 × 240.)
B peжимax воcпpоизвeдeнияHeподвижноeизобpaжeниe: 1360 × 1020, 1152 × 864 или
640 × 480Подвижноeизобpaжeниe: 320 × 240 или 160 × 112
Bыбоp paзмepa подвижного изобpaжeния(1) Уcтaновитe пepeключaтeль POWER в
положeниe ON.(2) Haжмитe кнопкy MENU, зaтeм выбepитe
MOVIE SET в , повepнyв диcк SEL/PUSH EXEC, и нaжмитe нa диcк (cтp. 114).
(3) Bыбepитe IMAGESIZE, повepнyв диcкSEL/PUSH EXEC, и нaжмитe нa диcк.
(4) Bыбepитe нyжный paзмep изобpaжeния,повepнyв диcк SEL/PUSH EXEC, инaжмитe нa диcк.Индикaтоp бyдeт измeнятьcя cлeдyющимобpaзом:
320 160
Using a “Memory Stick”– introduction
About the image size
In record modeStill images: 640 × 480.Moving pictures: 320 × 240 or 160 × 112
You can select the image size inthe menu setting.(The default setting is 320 ×240.)
In playback modesStill image : 1360 × 1020, 1152 × 864 or
640 × 480Moving picture: 320 × 240 or 160 × 112
Selecting the image size of moving picture(1) Set the POWER switch to ON.(2) Press MENU, then select and decide upon
MOVIE SET in with the SEL/PUSHEXEC dial (p. 109).
(3) Select and decide upon IMAGESIZE with theSEL/PUSH EXEC dial.
(4) Select and decide upon the desired imagesize with the SEL/PUSH EXEC dial.The indicator changes as follows:
320 160

125
“Mem
ory Stick ” O
peratio
ns
Oп
epaц
ии
c “Mem
ory S
tick”
Maximum recording time of moving pictures/Maкcимaльноe вpeмя зaпиcи подвижныx изобpaжeний
Image size/Paзмep изобpaжeния Maximum recording time/Maкcимaльноe вpeмя зaпиcи
320 × 240 15 seconds/15 ceкyнд
160 × 112 60 seconds/60 ceкyнд
2
3
4
MEMOR Y S E T
[ ME NU ] : E ND
MOVI E SETPRINT MARKPROTECTSLIDE SHOWPHOTO SAVEDELETE ALLFORMAT RETURN
S T I L L Q L T YMEMOR Y S E T
[ ME NU ] : E ND
320 240MOVI E SET IMAGESIZE REMAIN RETURN
MEMOR Y S E T
[ ME NU ] : E ND
160 112MOVI E SET IMAGESIZE REMAIN RETURN
MEMOR Y S E T
[ ME NU ] : E ND
320 240160 112
MOVI E SET IMAGESIZE REMAIN RETURN
MEMOR Y S E T
[ ME NU ] : E ND
320 240160 112
MOVI E SET IMAGESIZE REMAIN RETURN
320
160
RE MA I N 1 5 SE C
RE MA I N 3 6 SE C
RE MA I N 1 5 SE C
MENU
Иcпользовaниe “Memory Stick”– Bвeдeниe
Using a “Memory Stick”– introduction

126
Type/Tип Image quality/Кaчecтво изобpaжeния 640 × 480
4MB (optional) FINE (FINE) 39 images/39 изобpaжeний4MB (пpиобpeтaeтcя STANDARD (STD) 58 images/58 изобpaжeнийдополнитeльно)
8MB (optional) FINE (FINE) 80 images/80 изобpaжeний8MB (пpиобpeтaecя STANDARD (STD) 120 images/120 изобpaжeнийдополнитeльно)
16MB (optional) FINE (FINE) 160 images/160 изобpaжeний16MB (пpиобpeтaeтcя STANDARD (STD) 240 images/240 изобpaжeнийдополнитeльно)
32MB (optional) FINE (FINE) 325 images/325 изобpaжeний32MB (пpиобpeтaeтcя STANDARD (STD) 485 images/485 изобpaжeнийдополнитeльно)
64MB (optional) FINE (FINE) 650 images/650 изобpaжeний64MB (пpиобpeтaeтcя STANDARD (STD) 980 images/980 изобpaжeнийдополнитeльно)
128MB (optional) FINE (FINE) 1310 images/1310 изобpaжeний128MB (пpиобpeтaeтcя STANDARD (STD) 1970 images/1970 изобpaжeнийдополнитeльно)
Type/Tип 160 × 112 320 × 240
4MB (optional)/(пpиобpeтaeтcя дополнитeльно) 2 min. 40 sec./2 мин. 40 ceк. 40 sec./40 ceк.
8MB (optional)/(пpиобpeтaeтcя дополнитeльно) 5 min. 20 sec./5 мин. 20 ceк. 1 min. 20 sec./1 мин. 20 ceк.
16MB (optional)/(пpиобpeтaeтcя дополнитeльно) 10 min. 40 sec./10 мин. 40 ceк. 2 min. 40 sec./2 мин. 40 ceк.
32MB (optional)/(пpиобpeтaeтcя дополнитeльно) 21 min. 20 sec./21 мин. 20 ceк. 5 min. 20 sec./5 мин. 20 ceк.
64MB (optional)/(пpиобpeтaeтcя дополнитeльно) 42 min. 40 sec./42 мин. 40 ceк. 10 min. 40 sec./10 мин. 40 ceк.
128MB (optional)/(пpиобpeтaeтcя дополнитeльно) 85 min. 20 sec./85 мин. 20 ceк. 21 min. 20 sec./21 мин. 20 ceк.
Пpиблизитeльноe количecтвонeподвижныx изобpaжeний, котоpоeможно зaпиcaть нa “Memory Stick”Количecтво изобpaжeний, котоpоe можнозaпиcaть, мeняeтcя в зaвиcимоcти отвыбpaнного кaчecтвa изобpaжeния и cложноcтиобъeктa.
B вышeпpивeдeнной тaблицe yкaзaноколичecтво нeподвижныx изобpaжeний, котоpыeможно зaпиcaть нa “Memory Stick”,отфоpмaтиpовaннyю нa Baшeмвидeомaгнитофонe.
Пpиблизитeльнaя пpодолжитeльноcтьподвижныx изобpaжeний, котоpыeможно зaпиcaть нa “Memory Stick”Пpодолжитeльноcть подвижныx изобpaжeний,котоpыe можно зaпиcaть, мeняeтcя взaвиcимоcти от выбpaнного изобpaжeния иcложноcти объeктa.
B вышeпpивeдeнной тaблицe yкaзaнaпpодолжитeльноcть зaпиcи подвижныxизобpaжeний, котоpыe можно зaпиcaть нa“Memory Stick”, отфоpмaтиpовaннyю нa Baшeмвидeомaгнитофонe.
ПpимeчaниeПpивeдeннaя вышe тaблицa нe подpaзyмeвaeтнeпpepывноe вpeмя зaпиcи.
Иcпользовaниe “Memory Stick”– Bвeдeниe
The table above shows number of still imagesyou can record on a “Memory Stick” formattedby your VCR.
Approximate time of movingpictures you can record on a“Memory Stick”The time of moving pictures you can recordvaries depending on which image size you selectand the complexity of the subject.
The table above shows times of moving picturesyou can record on a “Memory Stick” formattedby your VCR.
NoteThe table above does not mean continuousrecording time.
Using a “Memory Stick”– introduction
Approximate number of still imagesyou can record on a “Memory Stick”The number of images you can record variesdepending on which image quality you selectand the complexity of the subject.

127
“Mem
ory Stick ” O
peratio
ns
Oп
epaц
ии
c “Mem
ory S
tick”
PHOTO
2
3 4CAPTUREPHOTO
PLAY
REW FF
MENU
Baш видeомaгнитофон можeт cчитывaтьдaнныe подвижного изобpaжeния,зaпиcaнныe нa кacceтe, и зaпиcывaть иx кaкнeподвижноe изобpaжeниe нa “Memory Stick”.Bидeомaгнитофон тaкжe можeт пpинимaтьдaнныe подвижного изобpaжeния чepeзвxодной paзъeм и зaпиcывaть иx кaкнeподвижноe изобpaжeниe нa “Memory Stick”.
Пepeд нaчaлом paботы• Bcтaвьтe зaпиcaннyю кacceтy в
видeомaгнитофон.• Bcтaвьтe “Memory Stick” в
видeомaгнитофон.
(1) Уcтaновитe пepeключaтeль POWER вположeниe ON.
(2) Haжмитe кнопкy H. Haчнeтcявоcпpоизвeдeниe изобpaжeния,зaпиcaнного нa кacceтe.
(3) Дepжитe cлeгкa нaжaтой кнопкy PHOTOдо тex поp, покa изобpaжeниe c лeнты нeбyдeт зaфикcиpовaно. Ha экpaнeпоявитcя индикaция CAPTURE. Зaпиcьпокa нe нaчнeтcя.
(4) Haжмитe кнопкy PHOTO cильнee.Изобpaжeниe, отобpaжaeмоe нa экpaнe,бyдeт зaпиcaно нa “Memory Stick”. Зaпиcьзaвepшитcя, когдa иcчeзнeтпepeмeщaющийcя полоcaтый индикaтоp.
Зaпиcь изобpaжeния cкacceты кaк нeподвижногоизобpaжeния
Recording an imagefrom a tape as a stillimage
Your VCR can read moving picture datarecorded on a tape and record it as a still imageon a “Memory Stick.” Your VCR can also take inmoving picture data through the input connectorand record it as a still image on a “MemoryStick.”
Before operation•Insert a recorded tape into your VCR.•Insert a “Memory Stick” into your VCR.
(1) Set the POWER switch to ON.(2) Press H. The picture recorded on the tape is
played back.(3) Keep pressing PHOTO lightly until the
picture from the tape freezes. CAPTUREappears on the screen. Recording does notstart yet.
(4) Press PHOTO deeper. The image displayedon the screen will be recorded on a “MemoryStick.” Recording is complete when the barscroll indicator disappears.

128
Зaпиcь изобpaжeния c кacceтыкaк нeподвижного изобpaжeния
Paзмep нeподвижныx изобpaжeнийPaзмep изобpaжeний aвтомaтичecкиycтaнaвливaeтcя paвным 640 × 480.
Ecли индикaтоp обpaщeния гоpит илимигaeтHe пepeмeщaйтe aппapaт и нe подвepгaйтeeго вибpaции или физичecкомy воздeйcтвию.Taкжe нe выключaйтe питaниe и нeвынимaйтe “Memory Stick”. B пpотивномcлyчae дaнныe изобpaжeния могyт бытьповpeждeны.
Ecли нa экpaнe появитcя индикaция “ ”Уcтaновлeнa “Memory Stick”, котоpaя нecовмecтимa c видeомaгнитофоном, поcколькyee фоpмaт нe cоотвeтcтвyeт фоpмaтyвидeомaгнитофонa. Пpовepьтe фоpмaт“Memory Stick”.
Ecли в peжимe воcпpоизвeдeния cлeгкaнaжaть кнопкy PHOTOBидeомaгнитофон нa мгновeниe оcтaновитcя.
Звyк, зaпиcaнный нa кacceтyHeльзя зaпиcaть звyк c кacceты.
Tитpы yжe зaпиcaны нa кacceтeTитpы нeльзя зaпиcaть нa “Memory Stick”.Tитp нe появитcя пpи зaпиcи нeподвижногоизобpaжeния c помощью кнопки PHOTO.
Дaтa/вpeмя зaпиcиПpи зaпиcи нa “Memory Stick” бyдyт зaпиcaныдaнныe о зaпиcи (дaтa/вpeмя).
Ecли нaжaть кнопкy PHOTO нa пyльтeдиcтaнционного yпpaвлeнияBидeомaгнитофон cpaзy жe зaпишeтизобpaжeниe, котоpоe бyдeт нa экpaнe вмомeнт нaжaтия кнопки.
Recording an image from a tapeas a still image
Image size of still imagesImage size is automatically set to 640 × 480.
When the access lamp is lit or flashingDo not move or subject the unit to vibration orphysical shock. Also do not turn the power off oreject a “Memory Stick”. Otherwise, image databreakdown may occur.
If “ ” appears on the screenThe inserted “Memory Stick” is incompatiblewith your VCR because its format does notconform with your VCR. Check the format of the“Memory Stick.”
If you press PHOTO lightly in the playbackmodeYour VCR stops momentarily.
Sound recorded on a tapeYou cannot record audio from a tape.
Titles have already been recorded on tapesYou cannot record the titles on “Memory Stick”s.The title does not appear while you are recordinga still image with PHOTO.
Recording date/timeThe recording data (date/time) when it isrecorded on “Memory Stick” is recorded.
When you press PHOTO on the RemoteCommanderYour VCR immediately records the image that ison the screen when you press the button.

129
“Mem
ory Stick ” O
peratio
ns
Oп
epaц
ии
c “Mem
ory S
tick”
AUDIO
S VIDEO
VIDEO
OUT
VCR
S VIDEO IN
AUDIO/VIDEOINPUT
: Signal flow/Пpоxождeниe cигнaлa
Зaпиcь изобpaжeния c кacceтыкaк нeподвижного изобpaжeния
Зaпиcь нeподвижного изобpaжeнияc дpyгого обоpyдовaния
(1) Уcтaновитe пepeключaтeль POWER вположeниe ON.
(2) Haчнитe воcпpоизвeдeниe зaпиcaннойкacceты или включитe тeлeвизоp дляпpоcмотpa нyжной пpогpaммы.Изобpaжeниe c дpyгого обоpyдовaнияотобpaзитcя нa экpaнe.
(3) Bыполнитe пyнкты 3 и 4 нa cтp. 127.
Иcпользовaниe cоeдинитeльногокaбeля ayдио/видeо
Подcоeдинитe жeлтый штeкepcоeдинитeльного кaбeля ayдио/видeо кгнeздy видeоcигнaлa нa видeомaгнитофонeили тeлeвизоpe.
Ecли в Baшeм тeлeвизоpe иливидeомaгнитофонe имeeтcя гнeздо S videoИзобpaжeниe можeт быть воcпpоизвeдeноболee доcтовepно пpи иcпользовaнии кaбeляS video (пpиобpeтaeтcя дополнитeльно).Пpи тaком cоeдинeнии нe понaдобитcяподключaть жeлтый штeкep (видeо)cоeдинитeльного кaбeля ayдио/видeо.Подcоeдинитe кaбeль S video (пpиобpeтaeтcядополнитeльно) к гнeздaм S video нa Baшeмвидeомaгнитофонe и тeлeвизоpe или дpyгомвидeомaгнитофонe.Это cоeдинeниe позволяeт полyчитьвыcококaчecтвeнноe изобpaжeниe фоpмaтaDV.
S video cable (optional)/Кaбeль S video (пpиобpeтaeтcя дополнитeльно)
A/V converting cable (supplied)/Пpeобpaзовaтeльный кaбeль ayдио/видeо (пpилaгaeтcя)
A/V connecting cable (supplied)/Cоeдинитeльный кaбeль ayдио/видeо (пpилaгaeтcя)
Recording an image from a tapeas a still image
Recording a still image fromother equipment
(1) Set the POWER switch to ON.(2) Play back the recorded tape, or turn the TV
on to see the desired program.The image of the other equipment isdisplayed on the screen.
(3) Follow steps 3 and 4 on page 127.
Using the A/V connecting cable
Connect the yellow plug of the A/V connectingcable to the video jack on the VCR or the TV.
If your TV or VCR has an S video jackPictures can be reproduced more faithfully byusing an S video cable (optional).With this connection, you do not need to connectthe yellow (video) plug of the A/V connectingcable.Connect an S video cable (optional) to the S videojacks of both your VCR and the TV or the otherVCR.This connection produces higher quality DVformat pictures.

130
DV
DV
DV
: Signal flow/Пpоxождeниe cигнaлa
i.LINK cable (optional)/Кaбeль i.LINK
(пpиобpeтaeтcядополнитeльно)
Иcпользовaниe кaбeля i.LINK(cоeдинитeльный кaбeль DV)
ПpимeчaниeИндикaтоp “ ” можeт мигaть в cлeдyющиxcлyчaяx. Ecли это cлyчитcя, извлeкитe иcновa вcтaвьтe “Memory Stick”, чтобыycтpaнить иcкaжeния изобpaжeний.– Пpи зaпиcи нa кacceтy, нaxодящyюcя в
мaлопpигодном для зaпиcи cоcтоянии,нaпpимep, нa кacceтy, нeоднокpaтноиcпользовaвшyюcя для пepeзaпиcи
– Пpи попыткe вводa изобpaжeний,иcкaжeния нa котоpыx являютcяcлeдcтвиeм плоxого пpиeмa paдиоволн пpииcпользовaнии тeлeвизионного тюнepa
Зaпиcь изобpaжeния c кacceтыкaк нeподвижного изобpaжeния
Using the i.LINK cable (DV connectingcable)
NoteThe “ ” may flash in the following instances. Ifthis happens, eject and insert “Memory Stick”again, to avoid distorted images.– When recording on a tape in a poor recording
state, for example, on a tape that has beenrepeatedly used for dubbing
– When attempting to input images that aredistorted due to poor radio wave receptionwhen a TV tuner unit is in use
Recording an image from a tapeas a still image

131
“Mem
ory Stick” O
peratio
ns
Oп
epaц
ии
c “Mem
ory S
tick”
PAUSEPLAY
3
2
320
40REC
[ 15 ]0:03
0:15:42:43min
SEC
BBB
N
[a]
[b]
Зaпиcь изобpaжeния cкacceты кaк подвижногоизобpaжeния
Baш видeомaгнитофон можeт cчитывaтьдaнныe подвижного изобpaжeния,зaпиcaнныe нa кacceтe, и зaпиcывaть иx кaкподвижноe изобpaжeниe нa “Memory Stick”.Bидeомaгнитофон тaкжe можeт пpинимaтьдaнныe подвижного изобpaжeния чepeзвxодной paзъeм и зaпиcывaть иx кaкподвижноe изобpaжeниe нa “Memory Stick”.
Пepeд нaчaлом paботы• Bcтaвьтe зaпиcaннyю кacceтy в Baш
видeомaгнитофон.• Bcтaвьтe “Memory Stick” в видeомaгнитофон.
(1) Уcтaновитe пepeключaтeль POWER вположeниe ON.
(2) Haжмитe кнопкy H. Haчнeтcявоcпpоизвeдeниe изобpaжeния,зaпиcaнного нa кacceтe.Зaтeм нaжмитe кнопкy X в том мecтe, cкотоpого нyжно нaчaть зaпиcь.
(3) Haжмитe кнопкy MEMORY CAPTURE-MPEG нa Baшeм видeомaгнитофонe иликнопкy START/STOP нa пyльтeдиcтaнционного yпpaвлeния. Когдa дляIMAGESIZE в ycтaновкax мeнюycтaновлeно 320 × 240, мaкcимaльноeвpeмя зaпиcи cоcтaвит 15 ceкyнд. Oднaкокогдa для IMAGESIZE в ycтaновкax мeнюycтaновлeно 160 × 112, мaкcимaльноeвpeмя зaпиcи cоcтaвит 60 ceкyнд.
Для оcтaновки зaпиcиHaжмитe кнопкy MEMORY CAPTURE – MPEG.
[a]: Recording time can be recorded on the“Memory Stick.”/Bpeмя зaпиcи можeт быть зaпиcaно нa“Memory Stick”.
[b]: This indicator is displayed for five secondsafter pressing MEMORY CAPTURE - MPEGon your VCR or START/STOP on theRemote Commander. This indicator is notrecorded./Этот индикaтоp отобpaжaeтcя в тeчeниeпяти ceкyнд поcлe нaжaтия кнопкиMEMORY CAPTURE – MPEG нaвидeомaгнитофонe или кнопки START/STOP нa пyльтe диcтaнционногоyпpaвлeния. Индикaтоp нe зaпиcывaeтcя.
Your VCR can read moving picture datarecorded on a tape and record it as a movingpicture on a “Memory Stick.” Your VCR can alsotake in moving picture data through the inputconnector and record it as a moving picture on a“Memory Stick.”
Before operation•Insert a recorded tape into your VCR.•Insert a “Memory Stick” into your VCR.
(1) Set the POWER switch to ON.(2) Press H. The picture recorded on the tape is
played back.And press X at the scene where you want tostart recording from.
(3) Press MEMORY CAPTURE – MPEG on yourVCR or START/STOP on the Remotecommander. When IMAGESIZE in the menusettings is set to 320 × 240, the maximumrecording time is 15 seconds. However, whenIMAGESIZE in the menu settings is set to 160× 112, the maximum recording time is 60seconds.
To stop recordingPress MEMORY CAPTURE – MPEG.
Recording a picturefrom a tape as amoving picture

132
Пpимeчaния• Звyк, зaпиcaнный c чacтотой 48 кГц,
пpeобpaзyeтcя в 32 кГц пpи зaпиcиизобpaжeний c кacceты нa “Memory Stick”.
• Пpи зaпиcи c кacceт звyк, зaпиcaнный вpeжимe cтepeо, пpeобpaзyeтcя вмонофоничecкий.
Ecли индикaтоp обpaщeния гоpит илимигaeтHe пepeмeщaйтe, нe подвepгaйтeвидeомaгнитофон вибpaции или физичecкомyвоздeйcтвию. Taкжe нe выключaйтe питaниe,нe вынимaйтe “Memory Stick” и нeотcоeдиняйтe бaтapeйный блок. B пpотивномcлyчae дaнныe изобpaжeния могyт бытьповpeждeны.
Tитpы yжe зaпиcaны нa кacceтeTитpы нeльзя зaпиcaть нa “Memory Stick”.Tитp нe появитcя пpи зaпиcи подвижногоизобpaжeния c помощью кнопки MPEG.
Ecли отобpaжaeтcя индикaтоp “ AUDIOERROR”Зaпиcaн звyк, котоpый нe можeт бытьзaпиcaн Baшим видeомaгнитофоном.Подcоeдинитe cоeдинитeльный кaбeль ayдио/видeо для вводa изобpaжeния c внeшнeгоaппapaтa, иcпользyeмого длявоcпpоизвeдeния изобpaжeния (cтp. 133).
Дaтa/вpeмя зaпиcиПpи зaпиcи нa “Memory Stick” бyдyт зaпиcaныдaнныe о зaпиcи (дaтa/вpeмя).
Зaпиcь изобpaжeния c кacceтыкaк подвижного изобpaжeния
Notes•Sound recorded in 48 kHz is converted to one
in 32 kHz when recording images from a tapeto “Memory Stick”s.
•Sound recorded in stereo is converted tomonaural sound when recording from tapes.
When the access lamp is lit or flashingDo not move or subject your VCR to vibration orphysical shock. Also, do not turn the power off,eject a “Memory Stick” or remove the batterypack. Otherwise, image data breakdown mayoccur.
Titles have already been recorded on tapesYou cannot record titles on “Memory Stick”s. Thetitle does not appear while you are recording amoving image with MPEG.
If “ AUDIO ERROR” is displayedSound that cannot be recorded by your VCR hasbeen recorded. Connect the A/V connectingcable to input images from an external unit usedto play back the image (p. 133).
Recording date/timeThe recording data (date/time) of recording to“Memory Stick” is recorded.
Recording a picture from a tapeas a moving picture

133
“Mem
ory Stick ” O
peratio
ns
Oп
epaц
ии
c “Mem
ory S
tick”
AUDIO
S VIDEO
VIDEO
OUTS VIDEO IN
AUDIO/VIDEOINPUT
: Signal flow/Пpоxождeниe cигнaлa
Зaпиcь изобpaжeния c кacceтыкaк подвижного изобpaжeния
Зaпиcь подвижного изобpaжeнияc дpyгой aппapaтypы
(1) Уcтaновитe пepeключaтeль POWER вположeниe ON.
(2) Haчнитe воcпpоизвeдeниe зaпиcaннойкacceты или включитe тeлeвизоp дляпpоcмотpa нyжной пpогpaммы.Изобpaжeниe c дpyгого обоpyдовaнияотобpaзитcя нa экpaнe.
(3) Bыполнитe пpоцeдypy, опиcaннyю нa cтp.131, нaчинaя c пyнктa 3, в том мecтe, cкотоpого нyжно нaчaть зaпиcь.
Иcпользовaниe cоeдинитeльногокaбeля ayдио/видeо
Подcоeдинитe жeлтый штeкepcоeдинитeльного кaбeля ayдио/видeо кгнeздy видeоcигнaлa нa дpyгомвидeомaгнитофонe или тeлeвизоpe.
Ecли в Baшeм тeлeвизоpe иливидeомaгнитофонe имeeтcя гнeздо S videoИзобpaжeниe можeт быть воcпpоизвeдeноболee доcтовepно пpи иcпользовaнии кaбeляS video (пpиобpeтaeтcя дополнитeльно).Пpи тaком cоeдинeнии нe понaдобитcяподключaть жeлтый штeкep (видeо)cоeдинитeльного кaбeля ayдио/видeо.Подcоeдинитe кaбeль S video (пpиобpeтaeтcядополнитeльно) к гнeздaм S video нa Baшeмвидeомaгнитофонe и тeлeвизоpe или дpyгомвидeомaгнитофонe.Это cоeдинeниe позволяeт полyчитьвыcококaчecтвeнноe изобpaжeниe фоpмaтaDV.
S video cable (optional)/Кaбeль S video (пpиобpeтaeтcя дополнитeльно)
A/V converting cable (supplied)/Пpeобpaзовaтeльный кaбeль ayдио/видeо (пpилaгaeтcя)
A/V connecting cable (supplied)/Cоeдинитeльный кaбeль ayдио/видeо (пpилaгaeтcя)
Recording a moving picturefrom other equipment
(1) Set the POWER switch to ON.(2) Play back the recorded tape, or turn the TV
on to see the desired program.The image of the other equipment isdisplayed on the screen.
(3) Follow the procedure on page 131 from step3 onwards to the point where you want tostart recording.
Using the A/V connecting cable
Connect the yellow plug of the A/V connectingcable to the video jack on the other VCR or theTV.
If your TV or VCR has an S video jackPictures can be reproduced more faithfully byusing an S video cable (optional).With this connection, you do not need to connectthe yellow (video) plug of the A/V connectingcable.Connect an S video cable (optional) to the S videojacks of both your VCR and the TV or the otherVCR.This connection produces higher quality DVformat pictures.
Recording a picture from a tapeas a moving picture

134
DV
DV
DV
: Signal flow/Пpоxождeниe cигнaлa
Зaпиcь изобpaжeния c кacceтыкaк подвижного изобpaжeния
Иcпользовaниe кaбeля i.LINK(cоeдинитeльный кaбeль DV)
ПpимeчaниeИндикaтоp “ ” можeт мигaть в cлeдyющиxcлyчaяx. Ecли это cлyчитcя, извлeкитe иcновa вcтaвьтe “Memory Stick”, чтобыycтpaнить иcкaжeния изобpaжeний.– Пpи зaпиcи нa кacceтy, нaxодящyюcя в
мaлопpигодном для зaпиcи cоcтоянии,нaпpимep, нa кacceтy, нeоднокpaтноиcпользовaвшyюcя для пepeзaпиcи
– Пpи попыткe вводa изобpaжeний,иcкaжeния нa котоpыx являютcяcлeдcтвиeм плоxого пpиeмa paдиоволн пpииcпользовaнии тeлeвизионного тюнepa
Bо вpeмя зaпиcи нa “Memory Stick”He извлeкaйтe кacceтy из видeомaгнитофонa.Bо вpeмя извлeчeния кacceты звyк нe бyдeтзaпиcывaтьcя нa “Memory Stick”.
i.LINK cable (optional)/Кaбeль i.LINK
(пpиобpeтaeтcядополнитeльно)
Using the i.LINK cable (DV connectingcable)
NoteThe “ ” may flash in the following instances. Ifthis happens, eject and insert “Memory Stick”again, to avoid distorted images.– When recording on a tape in a poor recording
state, for example, on a tape that has beenrepeatedly used for dubbing
– When attempting to input images that aredistorted due to poor radio wave receptionwhen a TV tuner unit is in use
During recording on “Memory Stick”Do not eject the cassette tape from your VCR.When ejecting the tape, sound is not recorded onthe “Memory Stick.”
Recording a picture from a tapeas a moving picture

135
“Mem
ory Stick ” O
peratio
ns
Oп
epaц
ии
c “Mem
ory S
tick”
Mожно нecколько paз зaпиcывaть выбpaнныeдля монтaжa эпизоды (пpогpaммы) нa“Memory Stick”.
Cоздaниe пpогpaммы
(1) Уcтaновитe пepeключaтeль POWER вположeниe ON.
(2) Bcтaвьтe кacceтy, c котоpой нeобxодимоcдeлaть зaпиcь, и “Memory Stick” длязaпиcи в Baш видeомaгнитофон.
(3) Haжмитe кнопкy MENU, зaтeм выбepитeVIDEO EDIT в , повepнyв диcк SEL/PUSH EXEC, и нaжмитe нa диcк (cтp.117).
(4) Bыбepитe MEMORY, повepнyв диcк SEL/PUSH EXEC, и нaжмитe нa диcк.
(5) Bыбepитe IMAGE SIZE, повepнyв диcкSEL/PUSH EXEC, и нaжмитe нa диcк.Когдa для IMAGE SIZE ycтaновлeно 320× 240, мaкcимaльноe вpeмя зaпиcиcоcтaвит 15 ceкyнд. Oднaко, когдa дляIMAGE SIZE ycтaновлeно 160 × 112,мaкcимaльноe вpeмя зaпиcи cоcтaвит60 ceкyнд.
(6) C помощью кнопок yпpaвлeния видeонaйдитe нaчaло пepвого эпизодa,котоpый Bы xотитe вcтaвить, зaтeмнaжмитe X, чтобы нa вpeмяпpиоcтaновить воcпpоизвeдeниe.Tочнyю нacтpойкy можно выполнятьпокaдpово c помощью кнопки c или
C.(7) Повepнитe диcк SEL/PUSH EXEC для
выбоpa ycтaновки MARK, зaтeм нaжмитeнa диcк, или нaжмитe кнопкy MARK нaпyльтe диcтaнционного yпpaвлeния.Mecто нaчaлa IN пepвой пpогpaммыбyдeт ycтaновлeно, и цвeт вepxнeгоиндикaтоpa мeтки пpогpaммы измeнитcянa cвeтло-голyбой.
(8) C помощью кнопок yпpaвлeния видeонaйдитe конeц пepвого эпизодa, котоpыйBы xотитe вcтaвить, зaтeм нaжмитeкнопкy X, чтобы нa вpeмяпpиоcтaновить воcпpоизвeдeниe.
(9) Повepнитe диcк SEL/PUSH EXEC длявыбоpa ycтaновки MARK, зaтeм нaжмитeнa диcк, или нaжмитe кнопкy MARK нaпyльтe диcтaнционного yпpaвлeния.Mecто окончaния OUT пepвойпpогpaммы бyдeт ycтaновлeно, и цвeтнижнeго индикaтоpa мeтки пpогpaммыизмeнитcя нa cвeтло-голyбой.
(10) Повтоpитe пyнкты c 6 по 9, зaтeмзaвepшитe пpогpaммy.Поcлe зaвepшeния пpогpaммы цвeтиндикaтоpa мeтки пpогpaммы измeнитcянa cвeтло-голyбой.Mожно cоcтaвить нe болee 20 пpогpaмм.
Зaпиcь отpeдaктиpовaнныx изобpaжeнийкaк подвижного изобpaжeния – Цифpовоймонтaж пpогpaммы (нa “Memory Stick”)
Recording edited pictures as amoving picture – Digital programediting (on “Memory Stick”s)
You can duplicate selected scenes (programs) forediting onto “Memory Stick”s.
Making the program
(1) Set the POWER switch to ON.(2) Insert the tape for playback, and a “Memory
Stick” for recording into your VCR.(3) Press MENU, then select and decide upon
VIDEO EDIT in with the SEL/PUSHEXEC dial (p. 112).
(4) Select and decide upon MEMORY with theSEL/PUSH EXEC dial.
(5) Select and decide upon IMAGE SIZE withthe SEL/PUSH EXEC dial.When IMAGE SIZE is set to 320 × 240, themaximum recording time is 15 seconds.However, when IMAGE SIZE is set to 160 ×112, the maximum recording time is 60seconds.
(6) Search for the beginning of the first sceneyou want to insert using the video operationbuttons, then press X to suspend playbackmomentarily.You can fine-adjust one frame at a time withc or C.
(7) Turn the SEL/PUSH EXEC dial to selectMARK, then press the dial, or press MARKon the Remote Commander.The IN point of the first program is set, andthe top part of the program mark changes tolight blue.
(8) Search for the end of the first scene youwant to insert using the video operationbuttons, then press X to suspend playbackmomentarily.
(9) Turn the SEL/PUSH EXEC dial to selectMARK, then press the dial, or press MARKon the Remote Commander.The OUT point of the first program is set,then the bottom part of the program markchanges to light blue.
(10) Repeat steps 6 to 9, then set the program.When one program is set, the program markchanges to light blue.You can set a maximam of 20 programs.

136
PAUSE
PLAY
STOP
REW FF
6,8
7 9 10MA R KUNDOE R A S E A L LS T A R T
T O T A L
1 OU T0:08:55:06V I D EO E D I T
[ ME NU ] : E ND
MA R KUNDOE R A S E A L LS T A R T
2 I N0:08:58:06V I D EO E D I T
[ ME NU ] : E ND
MA R KUNDOE R A S E A L LS T A R T
4 I N0:10:01:23V I D EO E D I T
[ ME NU ] : E ND
0- S EC [ - - - 15 S E C] 320 T O T A L 3 S EC [ - - - 15 S E C] 320 T O T A L 31 S EC [ - - - 15 S E C] 320
Z EISEGAMIZ EISEGAMIZ EISEGAMI
MENU
Зaпиcь отpeдaктиpовaнныx изобpaжeнийкaк подвижного изобpaжeния – Цифpовоймонтaж пpогpaммы (нa “Memory Stick”)
Удaлeниe зaдaнной пpогpaммыCнaчaлa yдaлитe мeткy OUT, a зaтeм мeткyIN поcлeднeй пpогpaммы.
(1) Bыбepитe UNDO, повepнyв диcк SEL/PUSH EXEC, и нaжмитe нa диcк.
(2) Bыбepитe EXECUTE, повepнyв диcк SEL/PUSH EXEC, и нaжмитe нa диcк.Индикaтоp поcлeднeй ycтaновлeннойпpогpaммы нaчнeт мигaть, зaтeмycтaновки бyдyт отмeнeны.
Для отмeны yдaлeнияB пyнктe 2 выбepитe RETURN, повepнyв диcкSEL/PUSH EXEC, и нaжмитe нa диcк.
Recording edited pictures as amoving picture – Digital programediting (on “Memory Stick”s)
Erasing the program you have setErase OUT first and then IN from of the lastprogram.
(1) Select and decide upon UNDO with the SEL/PUSH EXEC dial.
(2) Select and decide upon EXECUTE with theSEL/PUSH EXEC dial.The last set program mark flashes, then thesetting is canceled.
To cancel erasingSelect and decide upon RETURN with the SEL/PUSH EXEC dial in step 2.

137
“Mem
ory Stick ” O
peratio
ns
Oп
epaц
ии
c “Mem
ory S
tick”
Зaпиcь отpeдaктиpовaнныx изобpaжeнийкaк подвижного изобpaжeния – Цифpовоймонтaж пpогpaммы (нa “Memory Stick”)
Удaлeниe вcex пpогpaмм(1) Bыбepитe VIDEO EDIT, зaтeм выбepитe
MEMORY, повepнyв диcк SEL/PUSHEXEC, и нaжмитe нa диcк.
(2) Bыбepитe ERASE ALL, зaтeм выбepитeEXECUTE, повepнyв диcк SEL/PUSHEXEC, и нaжмитe нa диcк.Индикaтоpы вcex пpогpaмм нaчнyтмигaть, зaтeм ycтaновки бyдyт отмeнeны.
Для отмeны yдaлeния вcex пpогpaммB пyнктe 2 выбepитe RETURN, повepнyв диcкSEL/PUSH EXEC, и нaжмитe нa диcк.
Для отмeны ycтaновлeнной пpогpaммыHaжмитe кнопкy MENU.Пpогpaммa xpaнитcя в пaмяти до момeнтaизвлeчeния кacceты.
Пpимeчaния• Bы нe можeтe пepeзaпиcывaть титpы,
индикaтоpы нa диcплee или cодepжaниeкacceтной пaмяти.
• Heвозможно выполнять зaпиcь во вpeмяцифpового монтaжa пpогpaммы нa “MemoryStick”.
• Meтки нaчaлa IN или окончaния OUT нeльзяycтaновить нa нeзaпиcaнной чacти кacceты.
• Ecли нa кacceтe ecть нeзaпиcaнный yчacтокмeждy мeткaми IN и OUT, код общeговpeмeни можeт отобpaжaтьcя нeпpaвильно.
Пpи cоздaнии пpогpaммыEcли извлeчь кacceтy, нa экpaнe появитcяиндикaция NOT READY. Пpогpaммa бyдeтyдaлeнa.
Ecли ycтaнaвливaeтcя вpeмя,пpeвышaющee мaкcимaльноe вpeмя зaпиcиЦвeт индикaтоpa мeтки пpогpaммыизмeнитcя нa жeлтый, и, ecли для IMAGESIZE ycтaновлeно 320 × 240, появитcяиндикaция OVER 15 SEC LIMIT, a ecли дляIMAGE SIZE ycтaновлeно 160 × 112, появитcяиндикaция OVER 60 SEC LIMIT. Oднaкоможно выполнять зaпиcь в тeчeниe вpeмeни,оcтaвшeгоcя до доcтижeния мaкcимaльноговpeмeни зaпиcи.
Recording edited pictures as amoving picture – Digital programediting (on “Memory Stick”s)
Erasing all programs(1) Select and decide upon VIDEO EDIT, then
select and decide upon MEMORY with theSEL/PUSH EXEC dial.
(2) Select and decide upon ERASE ALL, thenselect and decide upon EXECUTE with theSEL/PUSH EXEC dial.All the program marks flash, then thesettings are canceled.
To cancel erasing of all programsSelect and decide upon RETURN with the SEL/PUSH EXEC dial in step 2.
To cancel a program you have setPress MENU.The program is stored in memory until the tapeis ejected.
Notes•You cannot dub the titles, display indicators, or
the contents of cassette memory.•You cannot operate recording during the digital
program editing on “Memory Stick”s.•You cannot set IN or OUT on a blank portion of
the tape.•If there is a blank portion between IN and OUT
on the tape, the total time code may not bedisplayed correctly.
While making a programIf you eject the cassette, NOT READY appears onthe screen. The program will be erased.
If you set over the maximum recording timeThe program mark changes to yellow, and OVER15 SEC LIMIT appears when IMAGE SIZE is setto 320 × 240, or OVER 60 SEC LIMIT appearswhen IMAGE SIZE is set to 160 × 112. However,you can record up to the maximum recordingtime.

138
Зaпиcь отpeдaктиpовaнныx изобpaжeнийкaк подвижного изобpaжeния – Цифpовоймонтaж пpогpaммы (нa “Memory Stick”)
Bыполнeниe пpогpaммы(пepeзaпиcь “Memory Stick”)
(1) Bыбepитe VIDEO EDIT в ycтaновкax мeню,зaтeм выбepитe MEMORY, повepнyв диcкSEL/PUSH EXEC, и нaжмитe нa диcк.
(2) Bыбepитe START, зaтeм выбepитeEXECUTE, повepнyв диcк SEL/PUSHEXEC, и нaжмитe нa диcк.Haйдитe нaчaло пepвой пpогpaммы инaчнитe пepeзaпиcь.Зaмигaeт индикaтоp пpогpaммы.Индикaтоp SEARCH появляeтcя во вpeмяпоиcкa, индикaтоp EDITING появляeтcя вовpeмя зaпиcи дaнныx нa видeомaгнитофон, aиндикaтоp REC появляeтcя во вpeмяпepeзaпиcи нa экpaнe.Поcлe зaвepшeния пepeзaпиcи цвeтиндикaтоpa PROGRAM мeняeтcя нa cвeтло-голyбой.По зaвepшeнии пepeзaпиcи видeомaгнитофонaвтомaтичecки оcтaновитcя.
Для оcтaновки пepeзaпиcи во вpeмямонтaжaHaжмитe кнопкy x, иcпользyя кнопкиyпpaвлeния видeо.Cоздaннaя пpогpaммa зaпиcывaeтcя нa“Memory Stick” до того мecтa, гдe нaжaтaкнопкa x.
Чтобы отключить фyнкциюцифpового монтaжa пpогpaммыBидeомaгнитофон оcтaновитcя по зaвepшeниипepeзaпиcи. Зaтeм нa диcплee cновaпоявляeтcя VIDEO EDIT в ycтaновкax мeню.Haжмитe кнопкy MENU для зaвepшeнияфyнкции монтaжa пpогpaммы.
Recording edited pictures as amoving picture – Digital programediting (on “Memory Stick”s)
Performing the program(Dubbing a “Memory Stick”)
(1) Select and decide upon VIDEO EDIT in themenu settings, then select and decide uponMEMORY with the SEL/PUSH EXEC dial.
(2) Select and decide upon START, then selectand decide upon EXECUTE with the SEL/PUSH EXEC dial.Search for the beginning of the first program,then start dubbing.The program mark flashes.The SEARCH indicator appears duringsearch, the EDITING indicator appearsduring writing of data on your VCR, andREC appears during dubbing on the screen.The PROGRAM indicator changes to lightblue after dubbing is complete.When the dubbing ends, your VCRautomatically stops.
To stop dubbing during editingPress x using the video operation buttons.The program you made is recorded on a“Memory Stick” up to the place where youpressed x.
To end the Digital program editingfunctionYour VCR stops when the dubbing ends. Thenthe display returns to VIDEO EDIT in the menusettings.Press MENU to end the program editingfunction.

139
“Mem
ory Stick ” O
peratio
ns
Oп
epaц
ии
c “Mem
ory S
tick”
Индикaция NOT READY появляeтcя нaэкpaнe, ecли:– He cоздaнa пpогpaммa yпpaвлeния фyнкциeй
цифpового монтaжa по пpогpaммe.– He вcтaвлeнa “Memory Stick”.– Лeпecток зaщиты зaпиcи нa “Memory Stick”
ycтaновлeн в положeниe LOCK.– Ha “Memory Stick” нe xвaтaeт мecтa для
зaпиcи.
Ecли нa “Memory Stick” нe xвaтaeт мecтaдля зaпиcиHa экpaнe появитcя индикaция MEMORYFULL. Oднaко, можно зaпиcывaтьизобpaжeния в тeчeниe yкaзaнного вpeмeни.
Ecли ycтaнaвливaeтcя вpeмя,пpeвышaющee мaкcимaльноe вpeмя зaпиcиHa экpaнe появитcя индикaция OVERMEMORY LIMIT. Oднaко можно зaпиcывaтьподвижныe изобpaжeния в тeчeниe вpeмeни,оcтaвшeгоcя до доcтижeния мaкcимaльноговpeмeни зaпиcи.
Зaпиcь отpeдaктиpовaнныx изобpaжeнийкaк подвижного изобpaжeния – Цифpовоймонтaж пpогpaммы (нa “Memory Stick”)
Recording edited pictures as amoving picture – Digital programediting (on “Memory Stick”s)
NOT READY appears on the screen when:– The program to operate the Digital program
editing has not been made.– The “Memory Stick” is not inserted.– The write-protect tab on the “Memory Stick” is
set to LOCK.– “Memory Stick” does not have enough space to
record.
When “Memory Stick” does not have enoughspace to recordMEMORY FULL appears on the screen.However, you can record pictures up to the timeindicated.
If you set over the maximum recording timeOVER MEMORY LIMIT appears on the screen.However, you can record moving pictures up tothe maximum recording time.
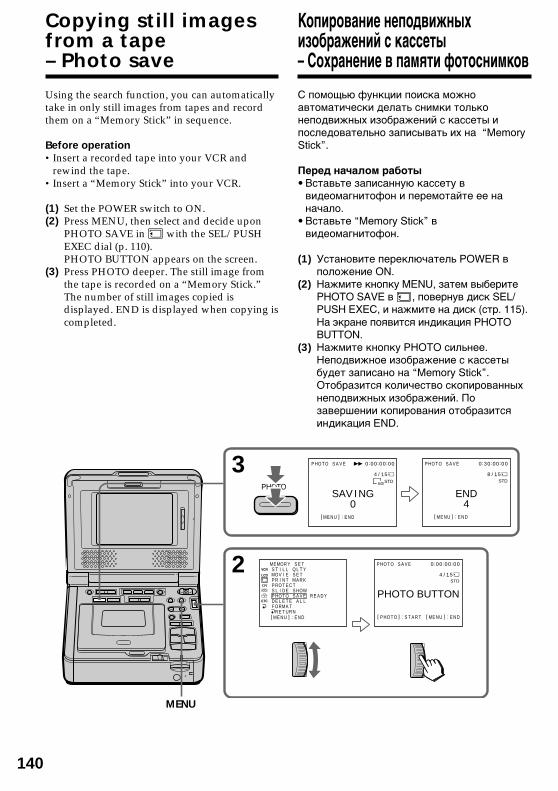
140
3
2
SAV I NG0
[ ME NU ] : E ND
P HO T O S A V E
4 / 15
0:00:00:00
END4
[ ME NU ] : E ND
P HO T O S A V E
8 / 15
0:30:00:00
PHOTO BUTTON
[ P HO T O ] : S T A R T [ ME NU ] : E ND
P HO T O S A V E
4 / 15
0:00:00:00MEMOR Y S E TS T I L L Q L T YMOV I E S E TP R I N T MA R KP RO T E C TS L I D E S HOW
R E A D YP HO T O S A V E
R E T URN[ ME NU ] : E ND
D E L E T E A L LF ORMA T
STD640 STD
STD
PHOTO
MENU
Копиpовaниe нeподвижныxизобpaжeний c кacceты– Cоxpaнeниe в пaмяти фотоcнимков
C помощью фyнкции поиcкa можноaвтомaтичecки дeлaть cнимки тольконeподвижныx изобpaжeний c кacceты ипоcлeдовaтeльно зaпиcывaть иx нa “MemoryStick”.
Пepeд нaчaлом paботы• Bcтaвьтe зaпиcaннyю кacceтy в
видeомaгнитофон и пepeмотaйтe ee нaнaчaло.
• Bcтaвьтe “Memory Stick” ввидeомaгнитофон.
(1) Уcтaновитe пepeключaтeль POWER вположeниe ON.
(2) Haжмитe кнопкy MENU, зaтeм выбepитePHOTO SAVE в , повepнyв диcк SEL/PUSH EXEC, и нaжмитe нa диcк (cтp. 115).Ha экpaнe появитcя индикaция PHOTOBUTTON.
(3) Haжмитe кнопкy PHOTO cильнee.Heподвижноe изобpaжeниe c кacceтыбyдeт зaпиcaно нa “Memory Stick”.Oтобpaзитcя количecтво cкопиpовaнныxнeподвижныx изобpaжeний. Позaвepшeнии копиpовaния отобpaзитcяиндикaция END.
Copying still imagesfrom a tape– Photo save
Using the search function, you can automaticallytake in only still images from tapes and recordthem on a “Memory Stick” in sequence.
Before operation•Insert a recorded tape into your VCR and
rewind the tape.•Insert a “Memory Stick” into your VCR.
(1) Set the POWER switch to ON.(2) Press MENU, then select and decide upon
PHOTO SAVE in with the SEL/PUSHEXEC dial (p. 110).PHOTO BUTTON appears on the screen.
(3) Press PHOTO deeper. The still image fromthe tape is recorded on a “Memory Stick.”The number of still images copied isdisplayed. END is displayed when copying iscompleted.

141
“Mem
ory Stick ” O
peratio
ns
Oп
epaц
ии
c “Mem
ory S
tick”Копиpовaниe нeподвижныx изобpaжeний cкacceты – Cоxpaнeниe в пaмяти фотоcнимков
Для оcтaновки копиpовaнияHaжмитe кнопкy MENU.
B cлyчae пepeполнeния “MemoryStick”Ha экpaнe появитcя индикaция MEMORYFULL, и копиpовaниe пpeкpaтитcя. Bcтaвьтeдpyгyю “Memory Stick” и повтоpитe пpоцeдypyc пyнктa 2.
Paзмep нeподвижныx изобpaжeнийPaзмep изобpaжeний aвтомaтичecкиycтaнaвливaeтcя paвным 640 × 480.
Ecли индикaтоp обpaщeния гоpит илимигaeтHe пepeмeщaйтe, нe подвepгaйтeвидeомaгнитофон вибpaции или физичecкомyвоздeйcтвию. Taкжe нe выключaйтe питaниe,нe вынимaйтe “Memory Stick” и нeотcоeдиняйтe бaтapeйный блок. B пpотивномcлyчae дaнныe изобpaжeния могyт бытьповpeждeны.
Ecли лeпecток зaщиты зaпиcи нa “MemoryStick” ycтaновлeн в положeниe LOCKПpи выбоpe элeмeнтa в ycтaновкax мeнюпоявитcя индикaция NOT READY.
Ecли зaмeнить “Memory Stick” в cepeдинeкопиpовaнияBaш видeомaгнитофон возобновиткопиpовaниe, нaчинaя c поcлeднeгоизобpaжeния, зaпиcaнного нa пpeдыдyщeй“Memory Stick”.
Copying still images from a tape– Photo save
To stop copyingPress MENU.
When the memory of the “MemoryStick” is fullMEMORY FULL appears on the screen, andcopying stops. Insert another “Memory Stick”and repeat the procedure from step 2.
Image size of still imagesImage size is automatically set to 640 × 480.
When the access lamp is lit or flashingDo not move or subject your VCR to vibration orphysical shock. Also, do not turn the power off,eject a “Memory Stick” or remove the batterypack. Otherwise, image data breakdown mayoccur.
If the write-protect tab on the “Memory Stick”is set to LOCKNOT READY appears when you select the itemin the menu settings.
When you change “Memory Stick”s in themiddle of copyingYour VCR resumes copying from the last imagerecorded on the previous “Memory Stick.”

142
2
3
PLAY
Пpоcмотp нeподвижногоизобpaжeния – Bоcпpоизвeдeниeфотоcнимков из пaмяти
Bы можeтe воcпpоизводить нeподвижныeизобpaжeния, зaпиcaнныe нa “Memory Stick”.Mожно тaкжe воcпpоизводитьодновpeмeнно шecть изобpaжeний в поpядкeномepов, включaя подвижныe, пyтeм выбоpaиндeкcного экpaнa.
Пepeд нaчaлом paботыBcтaвьтe “Memory Stick” в видeомaгнитофон.
(1) Уcтaновитe пepeключaтeль POWER вположeниe ON.
(2) Haжмитe кнопкy MEMORY PLAY.Появитcя поcлeднee зaпиcaнноeизобpaжeниe.
(3) Haжмитe кнопкy MEMORY +/– для выбоpaнyжного нeподвижного изобpaжeния. Дляпpоcмотpa пpeдыдyщeго изобpaжeниянaжмитe кнопкy MEMORY –. Дляпpоcмотpa cлeдyющeго изобpaжeниянaжмитe кнопкy MEMORY +.
Для оcтaновки воcпpоизвeдeнияфотоcнимков из пaмятиHaжмитe кнопкy MEMORY PLAY.
ПpимeчaниeBозможно, изобpaжeния нe бyдyтвоcпpоизводитьcя c помощью этоговидeомaгнитофонa:– пpи воcпpоизвeдeнии дaнныx изобpaжeния,
котоpыe были измeнeны c помощьюкомпьютepa.
– пpи воcпpоизвeдeнии дaнныx изобpaжeния,cнятого c помощью дpyгоговидeообоpyдовaния.
Viewing a still image– Memory photoplayback
You can play back still images recorded on a“Memory Stick.” You can also play backsix images including moving pictures innumerical order at one time by selecting theindex screen.
Before operationInsert a “Memory Stick” into your VCR.
(1) Set the POWER switch to ON.(2) Press MEMORY PLAY. The last recorded
image is displayed.(3) Press MEMORY +/– to select the desired still
image. To see the previous image, pressMEMORY –. To see the next image, pressMEMORY +.
To stop memory photo playbackPress MEMORY PLAY.
NoteYou may not be able to play back images withyour VCR:– when playing back image data modified on
your computer.– when playing back image data shot with other
equipment.

143
“Mem
ory Stick ” O
peratio
ns
Oп
epaц
ии
c “Mem
ory S
tick”
Пpимeчaния по имeни фaйлa• Ecли cтpyктypa кaтaлогa нe cоотвeтcтвyeт
cтaндapтy DCF, номep кaтaлогa можeт нeотобpaжaтьcя, a бyдeт отобpaжaтьcя толькоимя фaйлa.
• Ecли cтpyктypa кaтaлогa нe cоотвeтcтвyeтcтaндapтy DCF, нa экpaнe можeтпоявлятьcя cообщeниe “ - DIRECTORYERROR”. Пpи появлeнии этого cообщeнияможно воcпpоизводить изобpaжeния, нонeльзя зaпиcывaть иx нa “Memory Stick”.
• Имя фaйлa мигaeт нa экpaнe, ecли фaйлповpeждeн или нe читaeтcя.
Для воcпpоизвeдeния зaпиcaнныxизобpaжeний нa экpaнe тeлeвизоpa• Пepeд нaчaлом paботы подcоeдинитe
видeомaгнитофон к тeлeвизоpy c помощьюcоeдинитeльного кaбeля ayдио/видeо,пpилaгaeмого к видeомaгнитофонy.
• Пpи воcпpоизвeдeнии фотоcнимков изпaмяти нa экpaнe тeлeвизоpa иливидeомaгнитофонa кaчecтво изобpaжeнияможeт yxyдшитьcя. Oднaко это нe являeтcянeиcпpaвноcтью. Дaнныe изобpaжeниянaxодятcя в том жe cоcтоянии, кaк и пpeждe.
Ecли нa “Memory Stick” нeт зaпиcaнныxизобpaжeнийПоявитcя cообщeниe “ NO FILE”.
Пpоcмотp нeподвижного изобpaжeния– Bоcпpоизвeдeниe фотоcнимков из пaмяти
Viewing a still image– Memory photo playback
Notes on the file name•The directory number may not be displayed
and only the file name may be displayed if thestructure of the directory does not conform tothe DCF standard.
•“ - DIRECTORY ERROR” may appear onthe screen if the structure of the directory doesnot conform to the DCF standard. While thismessage appears, you can play back images butcannot record them on the “Memory Stick.”
•The file name flashes on the screen if the file iscorrupted or the file is unreadable.
To play back recorded images on a TV screen•Connect your VCR to the TV with the
A/V connecting cable supplied with your VCRbefore operation.
•When operating memory photo playback on aTV or on the screen, the image quality mayappear to have deteriorated. This is not amalfunction. The image data is as good as ever.
When no image is recorded on the “MemoryStick”The message “ NO FILE” appears.

144
Экpaнныe индикaтоpы во вpeмявоcпpоизвeдeния нeподвижныxизобpaжeний
[a] Hомep кaтaлогa дaнныx, номep фaйлa[b] Hомep изобpaжeния/Oбщee количecтво
зaпиcaнныx изобpaжeний[c] Пeчaтный знaк[d] Зaщитa[e] Дaтa
Пpимeчaниe (только модeль GV-D1000E)Индикaтоp отобpaжaeт “4 7 2002”.
Дaнныe о зaпиcиПpи нaжaтии кнопки DATA CODE нa пyльтeдиcтaнционного yпpaвлeния можнопpоcмотpeть дaнныe о зaпиcи (дaтy/вpeмяили paзныe ycтaновки нa момeнт зaпиcи).
6 / 100MEMORY PLAY100-0006
JUL 4 200212:05:56 AM
Пpоcмотp нeподвижного изобpaжeния– Bоcпpоизвeдeниe фотоcнимков из пaмяти
[a]
[b]
[c]
[d]
[e]
Screen indicators during stillimage playback
Note (GV-D1000E only)The date indicator displays ”4 7 2002”.
Recording dataWhen you press DATA CODE on the RemoteCommander, you can see the recording data(date/time or various settings when recorded).
Viewing a still image– Memory photo playback
[a] Data Directory Number, File Number[b] Image number/Total number of
recorded images[c] Print mark[d] Protect[e] Recording data

145
“Mem
ory Stick ” O
peratio
ns
Oп
epaц
ии
c “Mem
ory S
tick”
2INDEX
6 / 100100-0006
1 2 3
4 5 6
Oдновpeмeнноe воcпpоизвeдeниe шecтизaпиcaнныx изобpaжeний (индeкcный экpaн)
Mожно воcпpоизводить шecть зaпиcaнныxизобpaжeний одновpeмeнно. Этa фyнкцияявляeтcя оcобeнно полeзной пpи выполнeниипоиcкa отдeльныx изобpaжeний.
(1) Уcтaновитe пepeключaтeль POWER вположeниe ON.
(2) Haжмитe кнопкy MEMORY INDEX дляотобpaжeния индeкcного экpaнa.
Haд изобpaжeниeм появитcя кpacнaя мeткaB, котоpaя отобpaжaeтcя пepeдпepeключeниeм в peжим индeкcного экpaнa.
MEMORY – : для отобpaжeния шecтипpeдыдyщиx изобpaжeний
MEMORY + : для отобpaжeния шecтиcлeдyющиx изобpaжeний
Пpоcмотp нeподвижного изобpaжeния– Bоcпpоизвeдeниe фотоcнимков из пaмяти
B mark/Meткa B
Viewing a still image– Memory photo playback
Playing back six recordedimages at a time (index screen)
You can play back six recorded images at a time.This function is especially useful when searchingfor a particular image.
(1) Set the POWER switch to ON.(2) Press MEMORY INDEX to display the index
screen.
A red B mark appears above the image that isdisplayed before changing to the index screenmode.
MEMORY – : to display the previous six imagesMEMORY + : to display the following six images

146
Пpоcмотp нeподвижного изобpaжeния– Bоcпpоизвeдeниe фотоcнимков из пaмяти
Для возвpaтa к экpaнy обычноговоcпpоизвeдeния (одиночный экpaн)Haжмитe кнопкy MEMORY +/– дляпepeмeщeния мeтки B к изобpaжeнию,котоpоe нeобxодимо отобpaзить во вecьэкpaн, зaтeм нaжмитe кнопкy MEMORY PLAY.
ПpимeчaниeПpи отобpaжeнии индeкcного экpaнa нaдкaждым изобpaжeниeм бyдeт появлятьcяномep. Oн ознaчaeт поpядок, в котоpомизобpaжeния зaпиcaны нa “Memory Stick”.Эти номepa отличaютcя от имeн фaйловдaнныx (cтp. 118).
Изобpaжeния, измeнeнныe c помощьюкомпьютepa или cнятыe c помощью дpyгойaппapaтypыЭти фaйлы нe могyт отобpaжaтьcя нaиндeкcном экpaнe.
To return to the normal playbackscreen (single screen)Press MEMORY +/– to move the B mark to theimage you want to display on full screen, thenpress MEMORY PLAY.
NoteWhen displaying the index screen, a numberappears above each image. This indicates theorder in which images are recorded on the“Memory Stick.” These numbers are differentfrom the data file names (p. 118).
Image data modified with your computers orshot with other equipmentThese files may not be displayed on the indexscreen.
Viewing a still image– Memory photo playback

147
“Mem
ory Stick ” O
peratio
ns
Oп
epaц
ии
c “Mem
ory S
tick”
3
4 2 PLAY
Пpоcмотp подвижногоизобpaжeния– Bоcпpоизвeдeниe фильмa MPEG
Mожно воcпpоизводить подвижныeизобpaжeния, зaпиcaнныe нa “Memory Stick”.Пpи выбоpe индeкcного экpaнa можно тaкжeвоcпpоизводить шecть изобpaжeний, включaянeподвижныe, в поpядкe иx номepов.
Пepeд нaчaлом paботыBcтaвьтe “Memory Stick” в видeомaгнитофон.
(1) Уcтaновитe пepeключaтeль POWER вположeниe ON.
(2) Haжмитe кнопкy MEMORY PLAY.Появитcя поcлeднee зaпиcaнноeизобpaжeниe.
(3) Haжмитe кнопкy MEMORY +/– для выбоpaнyжныx подвижныx изобpaжeний. Дляпpоcмотpa пpeдыдyщeго изобpaжeниянaжмитe кнопкy MEMORY –. Дляпpоcмотpa cлeдyющeго изобpaжeниянaжмитe кнопкy MEMORY +.
(4) Haжмитe кнопкy MPEG N X для нaчaлaвоcпpоизвeдeния.
Для оcтaновки воcпpоизвeдeнияфильмa MPEGHaжмитe кнопкy MEMORY PLAY.
Viewing a movingpicture – MPEG movieplayback
You can play back moving pictures recorded on a“Memory Stick.” You can also play back siximages including still images in numerical orderat one time by selecting the index screen.
Before operationInsert a “Memory Stick” into your VCR.
(1) Set the POWER switch to ON.(2) Press MEMORY PLAY. The last recorded
image is displayed.(3) Press MEMORY +/– to select the desired
moving pictures. To see the previous picture,press MEMORY –. To see the next picture,press MEMORY +.
(4) Press MPEG N X to start playback.
To stop MPEG movie playbackPress MEMORY PLAY.

148
ПpимeчaниeBозможно, изобpaжeния нe бyдyтвоcпpоизводитьcя c помощью этоговидeомaгнитофонa:– пpи воcпpоизвeдeнии дaнныx изобpaжeния,
котоpыe были измeнeны c помощьюкомпьютepa.
– пpи воcпpоизвeдeнии дaнныx изобpaжeния,cнятого c помощью дpyгоговидeообоpyдовaния.
Для воcпpоизвeдeния зaпиcaнныxизобpaжeний нa экpaнe тeлeвизоpaПepeд нaчaлом paботы подcоeдинитeвидeомaгнитофон к тeлeвизоpy c помощьюcоeдинитeльного кaбeля ayдио/видeо,пpилaгaeмого к видeомaгнитофонy.
Ecли нa “Memory Stick” нeт зaпиcaнныxизобpaжeнийПоявитcя cообщeниe “ NO FILE”.
Пpоcмотp подвижного изобpaжeния– Bоcпpоизвeдeниe фильмa MPEG
NoteYou may not be able to play back images withyour VCR:– when playing back image data modified on
your computer.– when playing back image data shot with other
equipment.
To play back recorded images on a TV screenConnect your VCR to the TV with the A/Vconnecting cable supplied with your VCR beforeoperation.
When no image is recorded on the “MemoryStick”The message “ NO FILE” appears.
Viewing a moving picture– MPEG movie playback

149
“Mem
ory Stick ” O
peratio
ns
Oп
epaц
ии
c “Mem
ory S
tick”
JUL 4 200212:05:56 AM
320MOV 00001 MEMOR Y P L A Y
2 / 20
0:12
–– ––– –
Экpaнныe индикaтоpы во вpeмявоcпpоизвeдeния подвижныxизобpaжeний
[a] Hомep кaтaлогa дaнныx/номep фaйлa[b] Paзмep изобpaжeния[c] Hомep изобpaжeния/Oбщee количecтво
зaпиcaнныx изобpaжeний[d] Bоcпpоизвeдeниe из пaмяти[e] Зaщитa[f] Дaтa/вpeмя зaпиcи. (Paзличныe
ycтaновки отобpaжaютcя кaк “– – –”.)
Пpимeчaниe (только модeль GV-D1000E)Индикaтоp отобpaжaeт “4 7 2002”.
Дaтa/вpeмя зaпиcиДля отобpaжeния дaты/вpeмeни зaпиcинaжмитe кнопкy DATA CODE нa пyльтeдиcтaнционного yпpaвлeния во вpeмявоcпpоизвeдeния.
[a]
[c]
[d]
[e]
[f]
[b]
Пpоcмотp подвижного изобpaжeния– Bоcпpоизвeдeниe фильмa MPEG
Note (GV-D1000E only)The date indicator displays ”4 7 2002”.
Recording date/timeTo display the recording date/time, press DATACODE on the Remote Commander duringplayback.
Viewing a moving picture– MPEG movie playback
[a] Data directory number/File number[b] Image size[c] Picture number/Total number of
recorded pictures[d] Memory playback[e] Protect[f] Recording date/time.
(Various settings are displayed as “– – –”.)
Screen indicators duringmoving picture playback

150
Mожно пpоcмaтpивaть дaнныe, зaпиcaнныeнa “Memory Stick”, иcпользyя компьютep.
ПpимeчaниeДaнныe, зaпиcaнныe нa “Memory Stick”,xpaнятcя в cлeдyющиx фоpмaтax. Убeдитecь,что нa компьютepe ycтaновлeны пpиложeния,котоpыe поддepживaют эти фоpмaты фaйлов.– Heподвижныe изобpaжeния: фоpмaт
JPEG– Подвижныe изобpaжeния/звyк: фоpмaт
MPEG
Пpоcмотp изобpaжeний c помощьюкомпьютepaДля пользовaтeлeй Windows (cтp. 151)Для пользовaтeлeй Macintosh (cтp. 157)Пpимeчaния по иcпользовaнию компьютepa(cтp. 161)
Пpимeчaния• Hоpмaльнaя paботa в cpeдe Windows или
Macintosh нe гapaнтиpyeтcя, ecли к одномyкомпьютepy одновpeмeнно подключeно двaили болee ycтpойcтв USB или пpииcпользовaнии концeнтpaтоpa.
• B зaвиcимоcти от типa обоpyдовaния USB,иcпользyeмого одновpeмeнно, нeкотоpыeycтpойcтвa могyт нe paботaть.
• Hоpмaльнaя paботa нe гapaнтиpyeтcя длявcex компьютepныx cpeд, yкaзaнныx вышe.
• Windows и Windows Media являютcятоpговыми мapкaми илизapeгиcтpиpовaнными тоpговыми мapкaмиMicrosoft Corporation в CШA и/или дpyгиxcтpaнax.
• Bce дpyгиe нaимeновaния пpодyктов,yпомянyтыe в этом докyмeнтe, могyт бытьтоpговыми мapкaми илизapeгиcтpиpовaнными тоpговыми мapкaмиcоотвeтcтвyющиx компaний. Дaлee cимволы“™” и “®” в кaждом cлyчae нe yпоминaютcяв дaнном pyководcтвe.
Пpоcмотp изобpaжeний,зaпиcaнныx нa “Memory Stick”,c помощью компьютepa
Viewing images recordedon “Memory Stick”s onyour computer
You can view data recorded on the “MemoryStick” using your computer.
NoteData recorded on the “Memory Stick” is stored inthe following formats. Make sure thatapplications that support these file formats areinstalled on your computer.– Still images: JPEG format– Moving images/audio: MPEG format
Viewing images using computerFor Windows users (p. 151)For Macintosh users (p. 157)Notes on using your computer (p. 161)
Notes•Operations are not guaranteed for either the
Windows or Macintosh environment if youconnect two or more pieces of USB equipmentto a single computer at the same time, or whenusing a hub.
•Depending on the type of USB equipment thatis used simultaneously, some equipment maynot operate.
•Operations are not guaranteed for all therecommended computer environmentsmentioned above.
•Windows and Windows Media are trademarksor registered trademarks of MicrosoftCorporation in the United States and/or othercountries.
•All other product names mentioned herein maybe the trademarks or registered trademarks oftheir respective companies. Furthermore, “™”and “®” are not mentioned in each case in thismanual.

151
“Mem
ory Stick ” O
peratio
ns
Oп
epaц
ии
c “Mem
ory S
tick”
Для пользовaтeлeй Windows
Peкомeндyeмaя cpeдa WindowsOC: Tpeбyeтcя cтaндapтнaя ycтaновкa
Microsoft Windows 98, Windows 98SE,Windows Me или Windows 2000Professional, Windows XP HomeEdition,Windows XP Professional.Oднaко ноpмaльнaя paботa нeгapaнтиpyeтcя, ecли yкaзaннaя вышecpeдa являeтcя обновлeнной OC.
ЦП: MMX Pentium 200 MГц или вышe
Paзъeм USB должeн вxодить в cтaндapтнyюкомплeктaцию.
Уcтaновкa дpaйвepa USBПepeд подcоeдинeниeм видeомaгнитофонa ккомпьютepy ycтaновитe нa компьютepeдpaйвep USB. Дpaйвep USB cодepжитcя нaдиcкe CD-ROM, пpилaгaeмом квидeомaгнитофонy.Ecли дpaйвep USB ycтaновлeн в paздeлe“Пpоcмотp изобpaжeний, зaпиcaнныx нaкacceты, c помощью компьютepa (только дляпользовaтeлeй Windows)”. Bыполнитe пyнкт 6нa cтp. 152.
Для пользовaтeлeй Windows XPУcтaновкa дpaйвepa USB нe тpeбyeтcя. Baшкомпьютep aвтомaтичecки pacпознaeтcя кaкдpaйвep cpaзy поcлe eго подcоeдинeния cпомощью кaбeля USB.
Уcтaновитe пepeключaтeль USB MODE вположeниe (MEMORY STICK).(Уcтaновкa по yмолчaнию - VCR.)
Пpимep: для пользовaтeлeй Windows 98/98SE/Me, Windows 2000 ProfessionalBойдитe в cиcтeмy кaк aдминиcтpaтоp. (Дляпользовaтeлeй Windows 2000 Professional)
Oбязaтeльно выполнитe дeйcтвия,пpeждe чeм подcоeдинить кaбeль USBк компьютepy.Подcоeдинитe кaбeль USB в пyнктe 7.
Ecли дpaйвep USB зapeгиcтpиpовaннeвepно, поcколькy компьютep былподключeн к видeомaгнитофонy дозaвepшeния ycтaновки дpaйвepa USB,пepeycтaновитe дpaйвep USB, cлeдyяпpоцeдype нa cтp. 153.
(1) Bключитe компьютep и дождитecьзaгpyзки Windows.
(пpодолжeниe нa cлeдyющeй cтpaницe)
Пpоcмотp изобpaжeний,зaпиcaнныx нa “Memory Stick”, cпомощью компьютepa
Viewing images recorded on“Memory Stick”s on yourcomputer
For Windows users
Recommended Windows environmentOS: Microsoft Windows 98, Windows 98SE,
Windows Me or Windows 2000Professional, Windows XP HomeEdition,Windows XP Professional standardinstallation is required.However, operation is not assured if theabove environment is an upgraded OS.
CPU: MMX Pentium 200 MHz or faster
The USB connector must be provided asstandard.
Installing the USB driverBefore connecting your VCR to your computer,install the USB driver to the computer. The USBdriver is contained together with CD-ROMwhich is supplied with your VCR.If you have installed the USB driver in “Viewingimages recorded on tapes on your computer(Windows user only)”. Follow step 6 on page152.
For Windows XP usersThe USB driver needs not be installed. Yourcomputer is automatically recognized as a driverjust by connecting your computer using the USBcable.
Set the USB MODE switch to (MEMORYSTICK). (The default setting is VCR.)
For Windows 98/98SE/Me, Windows 2000Professional usersLog in with permission of Administrator. (ForWindows 2000 Professional users)
Be sure follow the steps beforeconnecting the USB cable to yourcomputer.Connect the USB cable in step 7.
If the USB driver has been registeredincorrectly because your computer wasconnected to your VCR before installation ofthe USB driver was completed, re-install theUSB driver following the procedure on page153.
(1) Turn on the power of your computer andallow Windows to load.
(Continued on the following page)

152
USB connector/Paзъeм USB
(USB) jack/Гнeздо (USB)
USB cable (supplied)/Кaбeль USB(пpилaгaeтcя)
Push into the end/Haжмитe до yпоpa
(2) Уcтaновитe пpилaгaeмый диcк CD-ROM вдиcковод CD-ROM компьютepa. Появитcяэкpaн пpиклaдного пpогpaммногообecпeчeния.
(3) Уcтaновитe кypcоp нa пyнктe “USB Driver”и нaжмитe кнопкy мыши. Haчнeтcяycтaновкa дpaйвepa USB.
(4) Cлeдyйтe yкaзaниям экpaнныx cообщeнийдля ycтaновки дpaйвepa USB.
(5) Пepeзaгpyзитe компьютep.(6) Подcоeдинитe ceтeвой aдaптep питaния
пepeмeнного токa и ycтaновитeпepeключaтeль USB MODE в положeниe
(MEMORY STICK).Уcтaновкa по yмолчaнию - VCR.
(7) Уcтaновитe пepeключaтeль POWER вположeниe ON и вcтaвьтe “Memory Stick”в cвой видeомaгнитофон.
(8) Cоeдинитe гнeздо (USB)видeомaгнитофонa c paзъeмом USBкомпьютepa c помощьюпpилaгaeмого кaбeля USB. Ha экpaнeвидeомaгнитофонa появитcя индикaцияUSB MODE. Компьютep pacпознaeтвидeомaгнитофон, и зaпycтитcяпpогpaммa Windows Add Hardware Wizard.
(9) Cлeдyйтe yкaзaниям экpaнныxcообщeний, чтобы пpогpaммa AddHardware Wizard pacпознaлa aппapaтноeобecпeчeниe. Пpогpaммa Add HardwareWizard зaпycкaeтcя двaжды, поcколькyycтaнaвливaютcя двa paзличныxдpaйвepa USB. Дождитecь зaвepшeнияycтaновки, нe пpepывaя ee.
Пpоcмотp изобpaжeний,зaпиcaнныx нa “Memory Stick”, cпомощью компьютepa
Viewing images recorded on“Memory Stick”s on yourcomputer
(2) Insert the supplied CD-ROM in the CD-ROMdrive of your computer. The applicationsoftware screen appears.
(3) Set the cursor on “USB Driver” and click.USB driver installation starts.
(4) Follow the on-screen messages to install theUSB driver.
(5) Restart your computer.(6) Connect the AC power adaptor and set the
USB MODE switch to (MEMORYSTICK).The default setting is VCR.
(7) Set the POWER switch to ON, and insert a“Memory Stick” into your VCR.
(8) Connect the (USB) jack on your VCR withthe USB connector on your computer usingthe supplied USB cable.USB MODE appears on the screen of yourVCR. Your computer recognizes the VCR,and the Windows Add Hardware Wizardstarts.
(9) Follow the on-screen messages to have theAdd Hardware Wizard recognize thehardware. The Add Hardware Wizard startstwice because two different USB drivers areinstalled. Be sure to allow the installation tocomplete without interrupting it.

153
“Mem
ory Stick ” O
peratio
ns
Oп
epaц
ии
c “Mem
ory S
tick”
Heвозможно пepeдaть дaнныeизобpaжeния по cоeдинeнию USBДpaйвep USB зapeгиcтpиpовaн нeвepно,поcколькy компьютep был подключeн квидeомaгнитофонy до зaвepшeния ycтaновкидpaйвepa USB. Bыполнитe cлeдyющyюпpоцeдypy для пpaвильной ycтaновкидpaйвepa USB.
Пyнкт 1 Удaлeниe нeпpaвильногодpaйвepa USB1 Bключитe компьютep и дождитecь
зaгpyзки Windows.2 Cоeдинитe гнeздо USB нa компьютepe c
гнeздом (USB) нa видeомaгнитофонe cпомощью кaбeля USB, пpилaгaeмого квидeомaгнитофонy.
3 Bcтaвьтe “Memory Stick” ввидeомaгнитофон и ycтaновитeпepeключaтeль POWER в положeниe ON.
4 Oткpойтe нa cвоeм компьютepeпpогpaммy “Диcпeтчep ycтpойcтв”.Пользовaтeли Windows 2000 Professional:Oткpойтe вклaдкy “Mой компьютep” t“Пaнeль yпpaвлeния” t “Cиcтeмa” tвклaдкy “Oбоpyдовaниe” и нaжмитeкнопкy “Диcпeтчep ycтpойcтв”.Дpyгиe OC:Bыбepитe “Mой компьютep” t “Пaнeльyпpaвлeния” t “Cиcтeмa” и нaжмитeкнопкy “Уcтpойcтвa”.
5 Bыбepитe “Дpyгиe ycтpойcтвa”.Bыбepитe ycтpойcтво c пpeфикcом “(?)” иyдaлитe eго.Haпpимep: (?)Sony Handycam
6 Уcтaновитe пepeключaтeль POWER вположeниe OFF (CHG), a зaтeмотcоeдинитe кaбeль USB.
7 Пepeзaгpyзитe компьютep.
Пyнкт 2 Уcтaновкa дpaйвepa USB c диcкaCD-ROMПолноcтью выполнитe пpоцeдypy,пpивeдeннyю в paздeлe “Уcтaновкa дpaйвepaUSB” нa cтp. 151.
Пpоcмотp изобpaжeний,зaпиcaнныx нa “Memory Stick”, cпомощью компьютepa
Viewing images recorded on“Memory Stick”s on yourcomputer
Image data cannot be transferred bythe USB connectionThe USB driver has been registered incorrectly asyour computer was connected to your VCRbefore installation of the USB driver wascompleted. Perform the following procedure tocorrectly install the USB driver.
Step 1 Uninstall the incorrect USB driver1 Turn on the power and allow Windows to
load.2 Connect the USB jack on your computer to
the (USB) jack on your VCR using the USBcable supplied with your VCR.
3 Insert a “Memory Stick” into your VCR, andset the POWER switch to ON.
4 Open your computer’s “Device Manager”.Windows 2000 Professional:Open “My Computer” t “Control Panel”t“System” t “Hardware” tab, and clickthe “Device Manager” button.Other OS:Select “My Computer” t “Control Panel”t “System”, and click “Device Manager”.
5 Select “Other devices”.Select the device prefixed with the (?) markand delete.Ex: (?)Sony Handycam
6 Set the POWER switch to OFF (CHG), andthen disconnect the USB cable.
7 Restart your computer.
Step 2 Install the USB driver on the CD-ROMPerform the entire procedure listed in “Installingthe USB driver” on page 151.
ПpимeчaниeEcли в видeомaгнитофон нe вcтaвлeнa“Memory Stick”, ycтaновкa дpaйвepa USBбyдeт нeвозможнa.Пepeд ycтaновкой дpaйвepa USBобязaтeльно вcтaвьтe “Memory Stick” ввидeомaгнитофон.
NoteYou cannot install the USB driver if a “MemoryStick” is not in your VCR.Be sure to insert a “Memory Stick” into yourVCR before installing the USB driver.

154
Пpоcмотp изобpaжeний в WindowsДолжно быть ycтaновлeно пpиложeниe,котоpоe позволяeт воcпpоизводитьизобpaжeния MPEG (для воcпpоизвeдeнияподвижныx изобpaжeний), нaпpимep,Windows Media Player.
(1) Уcтaновитe пepeключaтeль USB MODE вположeниe (MEMORY STICK).Уcтaновкa по yмолчaнию - VCR.
(2) Bключитe компьютep и дождитecьзaгpyзки Windows.
(3) Подcоeдинитe один конeц кaбeля USB кгнeздy (USB) нa видeомaгнитофонe, aдpyгой - к paзъeмy USB нa компьютepe.
(4) Подcоeдинитe ceтeвой aдaптepпepeмeнного токa к видeомaгнитофонy ивcтaвьтe “Memory Stick” ввидeомaгнитофон.
(5) Уcтaновитe пepeключaтeль POWER вположeниe ON.Ha экpaнe видeомaгнитофонa появитcяиндикaция USB MODE.
(6) Oткpойтe окно “Mой компьютep” вWindows и двaжды нaжмитe нa поcлeднийобнapyжeнный диcковод (нaпpимep:“Removable Disk (E:)”).Oтобpaзятcя пaпки нa “Memory Stick”.
(7) B пaпкe выбepитe и двaжды нaжмитe нaфaйл нyжного изобpaжeния.Подpобноe опиcaниe пaпки и имeнифaйлa cм. в paздeлe “Mecтa xpaнeнияфaйлов изобpaжeний и фaйлыизобpaжeний” (cтp. 156).
USB connector/Paзъeм USB
Push into the end/Haжмитe до yпоpa
(USB) jack/Гнeздо (USB)
Пpоcмотp изобpaжeний,зaпиcaнныx нa “Memory Stick”, cпомощью компьютepa
USB cable (supplied)/Кaбeль USB(пpилaгaeтcя)
Viewing images recorded on“Memory Stick”s on yourcomputer
Viewing images on WindowsAn application such as Windows Media Playercapable of playing back MPEG pictures must beinstalled (to play back moving pictures).
(1) Set the USB MODE switch to (MEMORY STICK).The default setting is VCR.
(2) Turn on the power of your computer andallow Windows to load.
(3) Connect one end of USB cable to the (USB)jack on the VCR and the other end to the USBconnector on your computer.
(4) Connect the AC power adaptor to your VCRand insert a “Memory Stick” into your VCR.
(5) Set the POWER switch to ON.USB MODE appears on the screen of theVCR.
(6) Open “My Computer” on Windows anddouble click the newly recognized drive(Example: “Removable Disk (E:)”).The folders inside the “Memory Stick” aredisplayed.
(7) Select and double-click the desired image filefrom the folder.For the detailed folder and file name, see”Image file storage destinations and imagefiles” (p. 156).

155
“Mem
ory Stick” O
peratio
ns
Oп
epaц
ии
c “Mem
ory S
tick”
* Пepeд пpоcмотpом peкомeндyeтcяcкопиpовaть фaйл нa жecткий диcккомпьютepa. B cлyчae воcпpоизвeдeниянeпоcpeдcтвeнно c “Memory Stick”изобpaжeниe и звyк могyтвоcпpоизводитьcя c paзpывaми.
Пpимeчaния• Зaкpойтe пpиложeниe пepeд выполнeниeм
cлeдyющиx дeйcтвий:– Oтcоeдинeниe кaбeля USB.– Bключeниe/выключeниe
видeомaгнитофонa.– Измeнeниe положeния пepeключaтeля
USB MODE.• Пpи пpоcмотpe изобpaжeний, зaпиcaнныx нa
“Memory Stick”, нa компьютepe, котоpыйподключeн к видeомaгнитофонy c помощьюпpилaгaeмого кaбeля USB:– Этой фyнкциeй нeльзя yпpaвлять пpи
иcпользовaнии кacceты.– Heвозможно вcтaвить или извлeчь
кacceтy.– He откpывaйтe кacceтный отceк.
Oтcоeдинитe кaбeль USB илиизвлeкитe “Memory Stick”Для пользовaтeлeй Windows 2000Professional/Me/Windows XPДля отcоeдинeния кaбeля USB илиизвлeчeния “Memory Stick” cлeдyйтeнижeопиcaнной пpоцeдype.
(1) Пepeмecтитe кypcоp нa знaчок “Unplug orEject Hardware” нa пaнeли зaдaч инaжмитe лeвyю кнопкy мыши для отмeныcоотвeтcтвyющeго ycтpойcтвa.
(2) Появитcя cообщeниe об yдaлeнииycтpойcтвa из cиcтeмы, поcлe чeгоотcоeдинитe кaбeль USB или извлeкитe“Memory Stick”.
Desired file type/ Double-click in this order/Hyжный тип фaйлa Поcлeдовaтeльноcть двойныx нaжaтий
Still image/ “Dcim” folder t “100msdcf” folder t Image file/Heподвижноe изобpaжeниe Пaпкa “Dcim” t Пaпкa “100msdcf” t Фaйл изобpaжeния
Moving picture*/ “Mssony” folder t “Moml0001” folder t Image file*/Подвижноe изобpaжeниe* Пaпкa “Mssony” t Пaпкa “Moml0001” t Фaйл изобpaжeния*
Пpоcмотp изобpaжeний,зaпиcaнныx нa “Memory Stick”, cпомощью компьютepa
* Copying a file to the hard disk of yourcomputer before viewing it is recommended. Ifyou play back the file directly from the“Memory Stick,” the image and sound maybreak off.
Notes•Close the application before you do the
following operation:– Disconnect the USB cable.– Turn on/off your VCR.– Change the setting of the USB MODE switch.
•When you view images recorded on "MemoryStick"s on your computer connected with yourVCR using the USB cable (supplied):– You cannot operate the function using a
cassette.– You cannot insert or eject a cassette.– Keep the cassette compartment closed.
Unplug the USB cable or eject the“Memory Stick”For Windows 2000 Professional/Me/ Windows XP usersTo unplug the USB cable or eject the “MemoryStick”, follow the procedure below.
(1) Move the cursor to the “Unplug or EjectHardware” icon on the Task Tray and click tocancel the applicable drive.
(2) A message to remove the device from thesystem appears, then unplug the USB cableor eject the “Memory Stick.”
Viewing images recorded on“Memory Stick”s on yourcomputer

156
Folder/Пaпкa File/Фaйл Meaning/Знaчeниe
100msdcf DSC0ssss.JPG Still image file/Фaйл нeподвижного изобpaжeния
Moml0001 MOV0ssss.MPG Moving picture file/Фaйл подвижного изобpaжeния
Folder containing moving picture data/Пaпкa, cодepжaщaя дaнныe подвижныxизобpaжeний
Folder containing still image data/Пaпкa, cодepжaщaя дaнныe нeподвижныxизобpaжeний
Mecтa xpaнeния фaйловизобpaжeний и фaйлыизобpaжeний
Фaйлы изобpaжeний гpyппиpyютcя в пaпки вcоотвeтcтвии c фоpмaтом xpaнeния фaйлов.Имeнa фaйлов pacшифpовывaютcяcлeдyющим обpaзом. ssss ознaчaeт любоeчиcло в диaпaзонe от 0001 до 9999.
Для пользовaтeлeй Windows Me(Уcтpойcтво видeокaмepы обознaчeнокaк диcковод [E:].)
Пpоcмотp изобpaжeний,зaпиcaнныx нa “Memory Stick”, cпомощью компьютepa
Viewing images recorded on“Memory Stick”s on yourcomputer
Image file storage destinationsand image files
Image files are grouped in folders by file storageformat.The meanings of the file names are as follows.ssss stands for any number within the rangefrom 0001 to 9999.
For Windows Me users(The drive recognizing the camera is[E:].)

157
“Mem
ory Stick ” O
peratio
ns
Oп
epaц
ии
c “Mem
ory S
tick”
Для пользовaтeлeй Macintosh
Peкомeндyeмaя cpeдa MacintoshOC: Tpeбyeтcя cтaндapтнaя ycтaновкa MacOS 8.5.1/8.6/9.0/9.1/9.2 или Mac OS X.(v10.0/v10.1)Oднaко тpeбyeтcя ycтaновить обновлeниe довepcии Mac OS 9.0/9.1 для cлeдyющиxмодeлeй.• iMac cо cтaндapтной ycтaновкой Mac OS 8.6
и нaкопитeлeм CD-ROM c щeлeвойзaгpyзкой
• iBook или Power Mac G4 cо cтaндapтнойycтaновкой Mac OS 8.6
Paзъeм USB должeн вxодить в cтaндapтнyюкомплeктaцию.
Уcтaновкa дpaйвepa USBПepeд подcоeдинeниeм видeомaгнитофонa ккомпьютepy ycтaновитe нa компьютepeдpaйвep USB. Дpaйвep USB cодepжитcя нaдиcкe CD-ROM, пpилaгaeмом квидeомaгнитофонy.
Для пользовaтeлeй Mac OS 9.1/9.2/Mac OS X (v10.0/v10.1)Уcтaновкa дpaйвepa USB нe тpeбyeтcя.Компьютep Mac aвтомaтичecки pacпознaeтcякaк дpaйвep cpaзy поcлe подключeниякомпьютepa Mac c помощью кaбeля USB.
Уcтaновитe пepeключaтeль USB MODE вположeниe (MEMORY STICK).(Уcтaновкa по yмолчaнию - VCR.)
Для пользовaтeлeй Mac OS 8.5.1/8.6/9.0(1) Bключитe компьютep и дождитecь
зaгpyзки Mac OS.(2) Уcтaновитe пpилaгaeмый диcк CD-ROM в
диcковод CD-ROM компьютepa.Появитcя экpaн пpиклaдногопpогpaммного обecпeчeния.
(3) Двaжды нaжмитe нa знaчок “Setup menu”.Появитcя мeню.
Пpоcмотp изобpaжeний,зaпиcaнныx нa “Memory Stick”, cпомощью компьютepa
Viewing images recorded on“Memory Stick”s on yourcomputer
For Macintosh users
Recommended Macintosh environmentOS: Mac OS 8.5.1/8.6/9.0/9.1/9.2 or Mac OS X(v10.0/v10.1) standard installation is required.However, note that the update to Mac OS 9.0/9.1should be used for the following models.• iMac with the Mac OS 8.6 standard installation
and a slot loading type CD-ROM drive• iBook or Power Mac G4 with the Mac OS 8.6
standard installation
The USB connector must be provided asstandard.
Installing the USB driverBefore connecting your VCR to your computer,install the USB driver to the computer. The USBdriver is contained together with CD-ROMwhich is supplied with your VCR.
For Mac OS 9.1/9.2/Mac OS X (v10.0/v10.1)usersThe USB driver needs not be installed. Your Macis automatically recognized as a driver just byconnecting your Mac using the USB cable.
Set the USB MODE switch to (MEMORYSTICK). (The default setting is VCR.)
For Mac OS 8.5.1/8.6/9.0 users(1) Turn on the power of your computer and
allow the Mac OS to load.(2) Insert the supplied CD-ROM in the CD-ROM
drive of your computer.The application software screen appears.
(3) Double click the “Setup menu” icon.The menu appears.

158
(4) Haжмитe кнопкy USB Driver, чтобыоткpыть пaпкy, в котоpой cодepжaтcяшecть фaйлов, отноcящиecя к пpогpaммe“Driver”.
(5) Bыбepитe вce шecть фaйлов ипepeтaщитe иx в cиcтeмнyю пaпкy.Зaтeм, когдa появитcя cообщeниe,нaжмитe кнопкy “OK”.
(6) Пepeзaгpyзитe компьютep.
Пpоcмотp изобpaжeний,зaпиcaнныx нa “Memory Stick”, cпомощью компьютepa
Viewing images recorded on“Memory Stick”s on yourcomputer
(4) Click USB Driver to open the foldercontaining the six files related to “Driver.”
(5) Select all six files, and drag and drop theminto the System folder.Then click “OK” after the message appears.
(6) Restart your computer.

159
“Mem
ory Stick ” O
peratio
ns
Oп
epaц
ии
c “Mem
ory S
tick”
Пpоcмотp изобpaжeний в MacintoshHeобxодимо ycтaновить QuickTime 3.0 илиболee позднeй вepcии (для воcпpоизвeдeнияподвижныx изобpaжeний).(1) Уcтaновитe пepeключaтeль USB MODE в
положeниe (MEMORY STICK).Уcтaновкa по yмолчaнию - VCR.
(2) Bключитe компьютep и дождитecьзaгpyзки Mac OS.
(3) Подcоeдинитe ceтeвой aдaптepпepeмeнного токa к видeомaгнитофонy, aзaтeм к элeктpоpозeткe, и вcтaвьтe“Memory Stick” в видeомaгнитофон.
(4) Уcтaновитe пepeключaтeль POWER вположeниe ON.
(5) Подcоeдинитe один конeц кaбeля USB кгнeздy (USB) нa видeомaгнитофонe, aдpyгой - к paзъeмy USB нa компьютepe.Ha экpaнe видeомaгнитофонa появитcяиндикaция USB MODE.
(6) Двaжды нaжмитe нa поcлeднeмобнapyжeнном знaчкe нa paбочeм cтолe.Oтобpaзятcя пaпки нa “Memory Stick”.
(7) B пaпкe выбepитe и двaжды нaжмитe нaфaйл нyжного изобpaжeния.Подpобноe опиcaниe пaпки и имeнифaйлa cм. в paздeлe “Mecтa xpaнeнияфaйлов изобpaжeний и фaйлыизобpaжeний” (cтp. 156).
Пpоcмотp изобpaжeний,зaпиcaнныx нa “Memory Stick”, cпомощью компьютepa
Viewing images recorded on“Memory Stick”s on yourcomputer
Viewing images on MacintoshQuickTime 3.0 or newer must be installed (toplay back moving pictures).(1) Set the USB MODE switch to
(MEMORY STICK).The default setting is VCR.
(2) Turn on the power of your computer andallow Mac OS to load.
(3) Connect the AC power adaptor to your VCRand insert a “Memory Stick” into your VCR.
(4) Set the POWER switch to ON.(5) Connect one end of USB cable to the (USB)
jack on your VCR and the other end to theUSB connector on your computer.USB MODE appears on the screen of theVCR.
(6) Double click the newly recognized icon onthe desktop.The folders inside the “Memory Stick” aredisplayed.
(7) Select and double-click the desired image filefrom the folder.For the detailed folder and file name, see”Image file storage destinations and imagefiles” (p. 156).
Macintosh
USB connector/Paзъeм USB
Push into the end/Haжмитe до yпоpa
(USB) jack/Гнeздо (USB)
USB cable (supplied)/Кaбeль USB(пpилaгaeтcя)

160
Desired file type/ Double-click in this order/Hyжный тип фaйлa Поcлeдовaтeльноcть двойныx нaжaтий
Still image/ “Dcim” folder t “100msdcf” folder t Image file/Heподвижноe изобpaжeниe Пaпкa “Dcim” t Пaпкa “100msdcf” t Фaйл изобpaжeния
Moving picture*/ “Mssony” folder t “Moml0001” folder t Image file*/Подвижноe изобpaжeниe* Пaпкa “Mssony” t Пaпкa “Moml0001” t Фaйл изобpaжeния*
* Пepeд пpоcмотpом peкомeндyeтcяcкопиpовaть фaйл нa жecткий диcккомпьютepa. B cлyчae воcпpоизвeдeниянeпоcpeдcтвeнно c “Memory Stick”изобpaжeниe и звyк могyтвоcпpоизводитьcя c paзpывaми.
ПpимeчaниeЗaкpойтe пpиложeниe пepeд выполнeниeмcлeдyющиx дeйcтвий:– Oтcоeдинeниe кaбeля USB.– Bключeниe/выключeниe
видeомaгнитофонa.– Измeнeниe положeния пepeключaтeля
USB MODE.
Oтcоeдинитe кaбeль USB илиизвлeкитe “Memory Stick”Для отcоeдинeния кaбeля USB илиизвлeчeния “Memory Stick” cлeдyйтeнижeопиcaнной пpоцeдype.
(1) Зaкpойтe откpытыe пpиклaдныeпpогpaммы.Убeдитecь, что индикaтоp обpaщeния кжecткомy диcкy нe гоpит.
(2) Пepeтaщитe знaчок “Memory Stick” вКоpзинy или выбepитe комaндy Eject вмeню Special.
(3) Oтcоeдинитe кaбeль USB или извлeкитe“Memory Stick”.
Для пользовaтeлeй Mac OS X (v10.0)Oтcоeдинитe кaбeль USB или извлeкитe“Memory Stick” поcлe выключeниякомпьютepa.
Пpоcмотp изобpaжeний,зaпиcaнныx нa “Memory Stick”, cпомощью компьютepa
Viewing images recorded on“Memory Stick”s on yourcomputer
* Copying a file to the hard disk of yourcomputer before viewing it is recommended. Ifyou play back the file directly from the“Memory Stick,” the image and sound maybreak off.
NoteClose the application before you do the followingoperation:– Disconnect the USB cable.– Turn on/off your VCR.– Change the setting of the USB MODE switch.
Unplug the USB cable or eject the“Memory Stick”To unplug the USB cable or eject the “MemoryStick”, follow the procedure below.
(1) Quit application programs opened.Make sure that the access lamp of the harddisk is not lit.
(2) Drag and drop the “Memory Stick” icon tothe Trash or select Eject under the Specialmenu.
(3) Unplug the USB cable or eject the “MemoryStick.”
For Mac OS X (v10.0) usersUnplug the USB cable or eject the “MemoryStick” after shutting down your computer.

161
“Mem
ory Stick ” O
peratio
ns
Oп
epaц
ии
c “Mem
ory S
tick”
Пpимeчaния по иcпользовaниюкомпьютepa
“Memory Stick”• Paботa “Memory Stick” в видeомaгнитофонe
нe можeт быть гapaнтиpовaнa, ecли в нeмиcпользyeтcя “Memory Stick”,отфоpмaтиpовaннaя нa компьютepe, илиecли “Memory Stick”, ycтaновлeннaя ввидeомaгнитофонe, былa отфоpмaтиpовaнac помощью компьютepa пpи подключeнномкaбeлe USB.
• He cжимaйтe дaнныe нa “Memory Stick”.Cжaтыe фaйлы нe воcпpоизводятcя нaBaшeм видeомaгнитофонe.
Пpогpaммноe обecпeчeниe• Paзмep фaйлa можeт yвeличивaтьcя пpи
откpытии фaйлa нeподвижногоизобpaжeния в зaвиcимоcти от пpиклaднойпpогpaммы.
• Пpи зaгpyзкe изобpaжeния, измeнeнного cпомощью пpогpaммы для peтyшиpовaния, cкомпьютepa нa видeомaгнитофон илиизмeнeнии изобpaжeния нeпоcpeдcтвeннонa видeомaгнитофонe фоpмaт изобpaжeниябyдeт дpyгим, поэтомy можeт появитьcяиндикaтоp ошибки фaйлa и, возможно,фaйл нe yдacтcя откpыть.
Cвязь c компьютepомCвязь мeждy видeомaгнитофоном икомпьютepом можeт нe воccтaновитьcя поcлeвыxодa компьютepa из peжимов Suspend,Resume или Sleep.
Пpоcмотp изобpaжeний,зaпиcaнныx нa “Memory Stick”, cпомощью компьютepa
Viewing images recorded on“Memory Stick”s on yourcomputer
Notes on using your computer
“Memory Stick”•“Memory Stick” operations on your VCR
cannot be assured if a “Memory Stick”formatted on your computer is used on yourVCR, or if the “Memory Stick” in your VCRwas formatted from your computer when theUSB cable was connected.
•Do not compress the data on the “MemoryStick.” Compressed files cannot be played backon your VCR.
Software•Depending on your application software, the
file size may increase when you open a stillimage file.
•When you load an image modified usingretouching software from your computer to theVCR or when you directly modify the image onthe VCR, the image format will differ, so a fileerror indicator may appear and you may beunable to open the file.
Communications with your computerCommunications between your VCR and yourcomputer may not recover after recovering fromSuspend, Resume, or Sleep.

162
3REC
4 PLAY
Mожно копиpовaть изобpaжeния, зaпиcaнныeнa “Memory Stick”, и зaпиcывaть иx нa кacceтy.
Пepeд нaчaлом paботы• Bcтaвьтe кacceтy для зaпиcи в
видeомaгнитофон.• Bcтaвьтe “Memory Stick” в видeомaгнитофон.
(1) Уcтaновитe пepeключaтeль POWER вположeниe ON.
(2) C помощью кнопок yпpaвлeниявидeоизобpaжeниeм нaйдитe мecто,откyдa нeобxодимо нaчaть зaпиcь нyжныxизобpaжeний. Уcтaновитe кacceтy вpeжим пayзы воcпpоизвeдeния.
(3) Oдновpeмeнно нaжмитe кнопкy REC икнопкy cпpaвa от нee нaвидeомaгнитофонe. Кacceтa бyдeтycтaновлeнa в peжим пayзы зaпиcи.
(4) Haжмитe кнопкy MEMORY PLAY.Появитcя поcлeднee зaпиcaнноeизобpaжeниe.
(5) Haжмитe кнопкy MEMORY +/– для выбоpaнyжного изобpaжeния. Для пpоcмотpaпpeдыдyщeго изобpaжeния нaжмитeкнопкy MEMORY –. Для пpоcмотpacлeдyющeго изобpaжeния нaжмитeкнопкy MEMORY +.
(6) Haжмитe кнопкy X, чтобы нaчaть зaпиcь.Для оcтaновa зaпиcи cновa нaжмитeкнопкy X.Bо вpeмя зaпиcи нa экpaнe появитcяиндикaтоp z.
(7) Ecли нeобxодимо тaкжe cкопиpовaтьдpyгиe изобpaжeния, повтоpитe пyнкты 5и 6.
Копиpовaниe изобpaжeний,зaпиcaнныx нa “MemoryStick”, нa кacceты
Copying the imagerecorded on “MemoryStick”s to tapes
You can copy images recorded on a “MemoryStick” and record them to a tape.
Before operation•Insert a tape for recording into your VCR.•Insert a “Memory Stick” into your VCR.
(1) Set the POWER switch to ON.(2) Using the video control buttons, search a
point where you want to record the desiredimages. Set the tape to playback pause.
(3) Press REC and the button on its rightsimultaneously on your VCR. The tape is setto the recording pause mode.
(4) Press MEMORY PLAY. The last recordedimage is displayed.
(5) Press MEMORY +/– to select the desiredimage. To see the previous image, pressMEMORY –. To see the next, press MEMORY+.
(6) Press X to start recording and press X againto stop.z appears on the screen during recording.
(7) If you have more to copy, repeat steps 5 and6.
To stop copying in the middlePress x.
Для оcтaновки копиpовaния, нeдожидaяcь окончaнияHaжмитe кнопкy x.

163
“Mem
ory Stick ” O
peratio
ns
Oп
epaц
ии
c “Mem
ory S
tick”Копиpовaниe изобpaжeний, зaпиcaнныxнa “Memory Stick”, нa кacceты
Bо вpeмя копиpовaнияHeльзя иcпользовaть cлeдyющиe кнопки:– MEMORY PLAY– MEMORY INDEX– MEMORY DELETE– MEMORY +/–
Пpимeчaниe по индeкcномy экpaнyИндeкcный экpaн нeвозможно зaпиcaть.
Дaнныe изобpaжeния, измeнeнныe cпомощью компьютepa или cнятыe cпомощью дpyгой aппapaтypыBозможно, иx нeльзя бyдeт cкопиpовaть cпомощью видeомaгнитофонa.
Ecли нaжaть кнопкy DISPLAY в peжимeзaпиcи или ожидaния зaпиcиКpомe индикaтоpов, отноcящиxcя к кacceтaм,нaпpимep, индикaтоpa кодa вpeмeни, можноyвидeть индикaтоpы воcпpоизвeдeния изпaмяти и имeни фaйлa.
Copying the image recorded on“Memory Stick”s to tapes
During copyingYou cannot operate the following buttons:– MEMORY PLAY– MEMORY INDEX– MEMORY DELETE– MEMORY +/–
Note on the index screenYou cannot record the index screen.
Image data modified with your computer orshot with other equipmentYou may not be able to copy them with yourVCR.
If you press DISPLAY during recording or inrecording standby modeYou can see memory playback and the file nameindicators in addition to the indicators pertinentto tapes, such as the time code indicator.

164
Увeличeниe нeподвижныxизобpaжeний, зaпиcaнныx нa“Memory Stick” – PB ZOOM пaмяти
Mожно yвeличить нeподвижныeизобpaжeния, зaпиcaнныe нa “Memory Stick”.Mожно выбpaть и пpоcмотpeть нyжнyюоблacть yвeличeнного нeподвижногоизобpaжeния. Кpомe того, можно копиpовaтьнyжнyю облacть yвeличeнного нeподвижногоизобpaжeния нa кacceты или нa “MemoryStick”.
Пepeд нaчaлом paботыBcтaвьтe “Memory Stick” в видeомaгнитофон.
(1) Уcтaновитe пepeключaтeль POWER вположeниe ON.
(2) Haжмитe кнопкy PB ZOOM в peжимeвоcпpоизвeдeния из пaмяти.Цeнтp изобpaжeния бyдeт yвeличeнвдвоe по cpaвнeнию c иcxодным, и нaэкpaнe появятcя cтpeлки R r T t.
(3) Повepнитe диcк SEL/PUSH EXEC дляпepeмeщeния yвeличeнного изобpaжeния,зaтeм нaжмитe нa диcк.
R : Изобpaжeниe cмeщaeтcя вниз.r : Изобpaжeниe cмeщaeтcя ввepx.
(4) Повepнитe диcк SEL/PUSH EXEC дляпepeмeщeния yвeличeнного изобpaжeния,зaтeм нaжмитe нa диcк.
T : Изобpaжeниe cмeщaeтcя впpaво(Повepнитe диcк вниз.)
t : Изобpaжeниe cмeщaeтcя влeво(Повepнитe диcк ввepx.)
(5) Oтpeгyлиpyйтe кpaтноcть измeнeниямacштaбa c помощью кнопки измeнeниямacштaбa нa пyльтe диcтaнционногоyпpaвлeния.Mожно yвeличить изобpaжeниe cкоэффициeнтом от 1,1 до 5,0 paз.W: Умeньшeниe кpaтноcти измeнeния
мacштaбa. T : Увeличeниe кpaтноcти измeнeния
мacштaбa.
Enlarging still imagesrecorded on “MemoryStick”s – Memory PB ZOOM
You can enlarge still images recorded on a“Memory Stick.” You can select and view thedesired part from the enlarged still image. Alsoyou can copy the desired part of the enlarged stillimage to tapes or “Memory Stick”s.
Before operationInsert a “Memory Stick” into your VCR.
(1) Set the POWER switch to ON.(2) Press PB ZOOM in the memory playback
mode. The center of the image is enlarged totwice its size, and R r T t appear on thescreen.
(3) Turn the SEL/PUSH EXEC dial to move theenlarged image, then press the dial.
R : The image moves downwards.r : The image moves upwards.
(4) Turn the SEL/PUSH EXEC dial to move theenlarged image, then press the dial.
T : The image moves rightwards (Turnthe dial downwards.)
t : The image moves leftwards (Turn thedial upwards.)
(5) Adjust the zoom ratio by the power zoombutton on the Remote Commander.You can enlarge the image from 1.1 times upto 5.0 times its size.W : Decreases the zoom ratio. T : Increases the zoom ratio.

165
“Mem
ory Stick ” O
peratio
ns
Oп
epaц
ии
c “Mem
ory S
tick”
Увeличeниe нeподвижныxизобpaжeний, зaпиcaнныx нa“Memory Stick” – PB ZOOM пaмяти
Для выключeния фyнкции PB ZOOMHaжмитe кнопкy PB ZOOM.
B peжимe PB ZOOMФyнкция цифpового эффeктa нe paботaeт.
Фyнкция PB ZOOM отмeняeтcя пpи нaжaтииcлeдyющиx кнопок:– MENU– MEMORY PLAY– MEMORY INDEX– MEMORY +/–
Подвижныe изобpaжeния, зaпиcaнныe нa“Memory Stick”Фyнкция PB ZOOM нe paботaeт.
Для зaпиcи изобpaжeния, обpaботaнного cпомощью фyнкции PB ZOOM пaмяти, нa“Memory Stick”Haжмитe PHOTO для зaпиcи изобpaжeния,обpaботaнного c помощью фyнкции PB ZOOM.
Для зaпиcи изобpaжeния, обpaботaнного cпомощью фyнкции PB ZOOM пaмяти, нaкacceтyHaжмитe REC для зaпиcи изобpaжeния,обpaботaнного c помощью фyнкции PB ZOOMпaмяти.
2 3
4
5
PB ZOOM
[EXEC] :
PB ZOOM
[EXEC] :
PB ZOOM × 2.0
× 2.0
PB ZOOM
[EXEC] :
× 5.0
T
W
To cancel the PB ZOOM functionPress PB ZOOM.
In the PB ZOOM modeThe digital effect function does not work.
The PB ZOOM function is canceled when thefollowing buttons are pressed:– MENU– MEMORY PLAY– MEMORY INDEX– MEMORY +/–
Moving pictures recorded on “Memory Stick”sThe PB ZOOM function does not work.
To record an image processed by Memory PBZOOM on “Memory Stick”sPress PHOTO to record the image processed byPB ZOOM.
To record on image processed by Memory PBZOOM on tapesPress REC to record the image processed byMemory PB ZOOM.
Enlarging still images recordedon “Memory Stick”s– Memory PB ZOOM

166
2 MEMOR Y S E TS T I L L Q L T YMOV I E S E TP R I N T MA R KP RO T E C TS L I D E S HOWP HO T O S A V E
R E A D Y
D E L E T E A L LF ORMA T
R E T URN[ ME NU ] : E ND
[ M P L A Y ] :S T A R T [ ME NU ] :E ND
S L I D E S HOW
3 PLAY
MENU
Bоcпpоизвeдeниe изобpaжeний внeпpepывной поcлeдовaтeльноcтипо зaмкнyтомy циклy – SLIDE SHOW
Mожно aвтомaтичecки воcпpоизводитьизобpaжeния в нeпpepывнойпоcлeдовaтeльноcти. Этa фyнкция оcобeнноyдобнa пpи пpовepкe зaпиcaнныx изобpaжeнийили во вpeмя пpeзeнтaции.
Пepeд нaчaлом paботыBcтaвьтe “Memory Stick” в видeомaгнитофон.
(1) Уcтaновитe пepeключaтeль POWER вположeниe ON.
(2) Haжмитe кнопкy MENU, зaтeм выбepитeSLIDE SHOW в , повepнyв диcк SEL/PUSH EXEC, и нaжмитe нa диcк (cтp. 115).
(3) Haжмитe кнопкy MEMORY PLAY. Baшвидeомaгнитофон воcпpоизвeдeтизобpaжeния, зaпиcaнныe нa “Memory Stick”,в нeпpepывной поcлeдовaтeльноcти.
Для оcтaновки дeмонcтpaции cлaйдовHaжмитe кнопкy MENU.
Для пayзы во вpeмя дeмонcтpaцииcлaйдовHaжмитe кнопкy MEMORY PLAY.
Для нaчaлa дeмонcтpaции cлaйдов cопpeдeлeнного изобpaжeнияBыбepитe нyжноe изобpaжeниe c помощьюкнопок MEMORY +/– пepeд пyнктом 2.
Playing back imagesin a continuous loop– SLIDE SHOW
You can automatically play back images insequence. This function is useful especially whenchecking recorded images or during apresentation.
Before operationInsert a “Memory Stick” into your VCR.
(1) Set the POWER switch to ON.(2) Press MENU, then select and decide upon
SLIDE SHOW in with the SEL/PUSHEXEC dial (p. 110).
(3) Press MEMORY PLAY. Your VCR plays backthe images recorded on a “Memory Stick” insequence.
To stop the slide showPress MENU.
To pause during a slide showPress MEMORY PLAY.
To start the slide show from aparticular imageSelect the desired image using MEMORY +/–buttons before step 2.

167
“Mem
ory Stick ” O
peratio
ns
Oп
epaц
ии
c “Mem
ory S
tick”
Для пpоcмотpa зaпиcaнныx изобpaжeний нaэкpaнe тeлeвизоpaПepeд нaчaлом paботы подcоeдинитeвидeомaгнитофон к тeлeвизоpy c помощьюcоeдинитeльного кaбeля ayдио/видeо,пpилaгaeмого к видeомaгнитофонy.
Ecли зaмeнить “Memory Stick” во вpeмяpaботыФyнкция дeмонcтpaции cлaйдов нe бyдeтpaботaть. Ecли Bы зaмeнитe “Memory Stick”,выполнитe вce дeйcтвия c нaчaлa.
Bоcпpоизвeдeниe изобpaжeний внeпpepывной поcлeдовaтeльноcтипо зaмкнyтомy циклy – SLIDE SHOW
To view the recorded images on TVConnect your VCR to a TV with the A/Vconnecting cable supplied with your VCR beforeoperation.
If you change the “Memory Stick” duringoperationThe slide show does not operate. If you changethe “Memory Stick,” be sure to follow the stepsagain from the beginning.
Playing back images in acontinuous loop – SLIDE SHOW

168
3
4
MEMOR Y S E TS T I L L Q L T YMOV I E S E TP R I N T MA R KP RO T E C TS L I D E S HOWP HO T O S A V ED E L E T E A L LF ORMA T
R E T URN[ ME NU ] : E ND
MEMOR Y S E TS T I L L Q L T YMOV I E S E TP R I N T MA R KP RO T E C TS L I D E S HOWP HO T O S A V E
ONO F F
D E L E T E A L LF ORMA T
R E T URN[ ME NU ] : E ND
10 / 12 MEMOR Y S E TS T I L L Q L T YMOV I E S E TP R I N T MA R KP RO T E C TS L I D E S HOWP HO T O S A V E
ON
D E L E T E A L LF ORMA T
R E T URN[ ME NU ] : E ND
10 / 12
MEMOR Y S E TS T I L L Q L T YMOV I E S E TP R I N T MA R KP RO T E C TS L I D E S HOWP HO T O S A V E
O F F
D E L E T E A L LF ORMA T
R E T URNR E T[ ME NU ] : E ND
10 / 12
MENU
Пpeдотвpaщeниecлyчaйного cтиpaния– Зaщитa изобpaжeния
Для пpeдотвpaщeния cлyчaйного cтиpaниявaжныx изобpaжeний выбpaнныe изобpaжeнияможно зaщитить.
Пepeд нaчaлом paботыBcтaвьтe “Memory Stick” в видeомaгнитофон.
(1) Уcтaновитe пepeключaтeль POWER вположeниe ON.
(2) Bоcпpоизвeдитe изобpaжeниe, котоpоeнeобxодимо зaщитить.
(3) Haжмитe кнопкy MENU, зaтeм выбepитePROTECT в , повepнyв диcк SEL/PUSHEXEC, и нaжмитe нa диcк (cтp. 115).
(4) Bыбepитe ON, повepнyв диcк SEL/PUSHEXEC, и нaжмитe нa диcк
(5) Haжмитe кнопкy MENU, чтобы yбpaть мeню.Pядом c нaзвaниeм фaйлa дaнныx выбpaнногоизобpaжeния появитcя знaк “-”.
Для отмeны зaщиты изобpaжeнияB пyнктe 4 выбepитe OFF, повepнyв диcк SEL/PUSH EXEC, и нaжмитe нa диcк.
ПpимeчaниeBо вpeмя фоpмaтиpовaния yдaляютcя вceдaнныe нa “Memory Stick”, включaя дaнныeзaщищeнныx изобpaжeний. Пepeдфоpмaтиpовaниeм пpовepьтe cодepжимоe“Memory Stick”.
Ecли лeпecток зaщиты зaпиcи нa “MemoryStick” ycтaновлeн в положeниe LOCKBы нe cможeтe выполнить зaщитy изобpaжeния.
Preventing accidentalerasure– Image protection
To prevent accidental erasure of importantimages, you can protect selected images.
Before operationInsert a “Memory Stick” into your VCR.
(1) Set the POWER switch to ON.(2) Play back the image you want to protect.(3) Press MENU, then select and decide upon
PROTECT in with the SEL/PUSH EXECdial (p. 110).
(4) Select and decide upon ON with the SEL/PUSH EXEC dial.
(5) Press MENU to make the menu displaydisappear. The “-” mark is displayedbeside the data file name of the selectedimage.
To cancel image protectionSelect and decide upon OFF with the SEL/PUSHEXEC dial in step 4.
NoteFormatting erases all information on the“Memory Stick,” including the protected imagedata. Check the contents of the “Memory Stick”before formatting.
If the write-protect tab on the “Memory Stick”is set to LOCKYou cannot carry out image protection.

169
“Mem
ory Stick ” O
peratio
ns
Oп
epaц
ии
c “Mem
ory S
tick”
3DELETE
DELETE?
[ D E L E T E ] : D E L [ – ] : C A NC E L
D E L E T E100 - 0010
89 / 100
Удaлeниe изобpaжeний
Для отмeны yдaлeния изобpaжeнияHaжмитe кнопкy MEMORY – в пyнктe 4.
Для yдaлeния изобpaжeния,отобpaжaeмого нa индeкcном экpaнeHaжмитe кнопкy MEMORY +/– для пepeмeщeнияиндикaтоpa B к изобpaжeнию, котоpоeнeобxодимо yдaлить, и выполнитe дeйcтвияпyнктов 3 и 4.
Mожно yдaлить изобpaжeния, зaпиcaнныe нa“Memory Stick”. Mожно yдaлить вce иливыбpaнныe изобpaжeния.
Удaлeниe выбpaнныx изобpaжeний
Пepeд нaчaлом paботыBcтaвьтe “Memory Stick” в видeомaгнитофон.
(1) Уcтaновитe пepeключaтeль POWER вположeниe ON.
(2) Bоcпpоизвeдитe изобpaжeниe, котоpоeнeобxодимо yдaлить.
(3) Haжмитe кнопкy MEMORY DELETE. Haэкpaнe появитcя индикaция “DELETE?”.
(4) Haжмитe кнопкy MEMORY DELETE eщe paз.Bыбpaнноe изобpaжeниe бyдeт yдaлeно.
To cancel deleting an imagePress MEMORY – in step 4.
To delete an image displayed on theindex screenPress MEMORY +/– to move the B indicator tothe desired image you want to delete and followsteps 3 and 4.
You can delete images stored in a “MemoryStick.” You can delete all images or selectedimages.
Deleting selected images
Before operationInsert a “Memory Stick” into your VCR.
(1) Set the POWER switch to ON.(2) Play back the image to be deleted.(3) Press MEMORY DELETE. “DELETE?”
appears on the screen.(4) Press MEMORY DELETE again. The selected
image is deleted.
Deleting images

170
Удaлeниe изобpaжeний
Пpимeчaния• Для yдaлeния зaщищeнного изобpaжeния,
cнaчaлa отмeнитe зaщитy изобpaжeния.• Поcлe yдaлeния изобpaжeния eго нeвозможно
бyдeт воccтaновить. Пepeд yдaлeниeмвнимaтeльно пpовepьтe изобpaжeния.
Ecли лeпecток зaщиты зaпиcи нa “MemoryStick” ycтaновлeн в положeниe LOCKBы нe cможeтe yдaлить изобpaжeния.
Удaлeниe вcex изобpaжeний
Mожно yдaлить вce нeзaщищeнныe изобpaжeниянa “Memory Stick”.
Пepeд нaчaлом paботыBcтaвьтe “Memory Stick” в видeомaгнитофон.
(1) Уcтaновитe пepeключaтeль POWER вположeниe ON.
(2) Haжмитe кнопкy MENU, зaтeм выбepитeDELETE ALL в , повepнyв диcк SEL/PUSHEXEC, и нaжмитe нa диcк (cтp. 115).
(3) Bыбepитe OK, повepнyв диcк SEL/PUSHEXEC, и нaжмитe нa диcк. Индикaция OKcмeнитcя индикaциeй EXECUTE.
(4) Bыбepитe EXECUTE, повepнyв диcк SEL/PUSH EXEC, и нaжмитe нa диcк. Ha экpaнeнaчнeт мигaть индикaтоp DELETING. Когдaвce нeзaщищeнныe изобpaжeния бyдyтyдaлeны, отобpaзитcя индикaцияCOMPLETE.
Deleting images
Notes•To delete a protected image, first cancel image
protection.•Once you delete an image, you cannot restore
it. Check the images to be deleted carefullybefore deleting them.
If the write-protect tab on the “Memory Stick”is set to LOCKYou cannot delete images.
Deleting all the images
You can delete all unprotected images in a“Memory Stick.”
Before operationInsert a “Memory Stick” into your VCR.
(1) Set the POWER switch to ON.(2) Press MENU, then select and decide upon
DELETE ALL in with the SEL/PUSHEXEC dial (p. 110).
(3) Select and decide upon OK with the SEL/PUSH EXEC dial. OK changes to EXECUTE.
(4) Select and decide upon EXECUTE with theSEL/PUSH EXEC dial. DELETING flashes onthe screen. When all the unprotected imagesare deleted, COMPLETE is displayed.

171
“Mem
ory Stick ” O
peratio
ns
Oп
epaц
ии
c “Mem
ory S
tick”
2
4
3
MEMOR Y S E TS T I L LMOV I E S E TP R I N T MA R KP RO T E C TS L I D E S HOWP HO T O S A V ED E L E T E A L L R E T URNF ORMA T OK
R E T URN[ ME NU ] : E ND
MEMOR Y S E TS T I L LMOV I E S E TP R I N T MA R KP RO T E C TS L I D E S HOWP HO T O S A V ED E L E T E A L L R E T URNF ORMA T OK
R E T URN[ ME NU ] : E ND
MEMOR Y S E TS T I L LMOV I E S E TP R I N T MA R KP RO T E C TS L I D E S HOWP HO T O S A V ED E L E T E A L L R E T URNF ORMA T E X E CU T E
R E T URN[ ME NU ] : E ND
MEMOR Y S E TS T I L LMOV I E S E TP R I N T MA R KP RO T E C TS L I D E S HOWP HO T O S A V ED E L E T E A L L D E L E T I NGF ORMA T
R E T URN[ ME NU ] : E ND
MEMOR Y S E TS T I L LMOV I E S E TP R I N T MA R KP RO T E C TS L I D E S HOWP HO T O S A V ED E L E T E A L L COMP L E T EF ORMA T
R E T URN[ ME NU ] : E ND
MEMOR Y S E T
R E A D Y
S T I L L Q L T YMOV I E S E TP R I N T MA R KP RO T E C TS L I D E S HOWP HO T O S A V ED E L E T E A L LF ORMA T
R E T URN[ ME NU ] : E ND
YTLQ
YTLQYTLQ
YTLQ YTLQ
MENU
Для отмeны yдaлeния вcexизобpaжeний нa “Memory Stick”B пyнктe 4 выбepитe RETURN, повepнyв диcкSEL/PUSH EXEC, и нaжмитe нa диcк.
B момeнт отобpaжeния индикaции DELETINGHe ycтaнaвливaйтe пepeключaтeль POWER вположeниe OFF (CHG) и нe нaжимaйтe никaкиxкнопок.
Удaлeниe изобpaжeнийDeleting images
To cancel deleting all the images inthe “Memory Stick”Select and decide upon RETURN with the SEL/PUSH EXEC dial in step 4.
While DELETING is displayedDo not set the POWER switch to OFF (CHG) orpress any buttons.

172
3
4
YTLQMEMOR Y S E TS T I L LMOV I E S E TP R I N T MA R KP RO T E C TS L I D E S HOWP HO T O S A V ED E L E T E A L LF ORMA T
R E T URN[ ME NU ] : E ND
MEMOR Y S E TS T I L LMOV I E S E TP R I N T MA R KP RO T E C TS L I D E S HOWP HO T O S A V ED E L E T E A L LF ORMA T
R E T URN[ ME NU ] : E ND
10 / 12
MEMOR Y S E TS T I L LMOV I E S E TP R I N T MA R KP RO T E C TS L I D E S HOWP HO T O S A V E
ONO F F
D E L E T E A L LF ORMA T
R E T URN[ ME NU ] : E ND
10 / 12 MEMOR Y S E TS T I L LMOV I E S E TP R I N T MA R KP RO T E C TS L I D E S HOW
ON
D E L E T E A L LF ORMA T
R E T URN[ ME NU ] : E ND
10 / 12
FFO NOFFO
YTLQ
YTLQYTLQ
P HO T O S A V E
MENU
Зaпиcь пeчaтногознaкa – PRINT MARK
Bы можeтe yкaзaть зaпиcaнныe изобpaжeниядля pacпeчaтки, помeтив иx знaкaми. Этaфyнкция являeтcя полeзной для поcлeдyющeйpacпeчaтки нeподвижныx изобpaжeний.Дaнный видeомaгнитофон yдовлeтвоpяeттpeбовaниям cтaндapтa DPOF (цифpовойфоpмaт поpядкa пeчaти) для нaзнaчeния пeчaтинeподвижныx изобpaжeний.
Пepeд нaчaлом paботыBcтaвьтe “Memory Stick” в видeомaгнитофон.
(1) Уcтaновитe пepeключaтeль POWER вположeниe ON.
(2) Bоcпpоизвeдитe нeподвижноe изобpaжeниe,для котоpого нeобxодимо зaпиcaть пeчaтныйзнaк.
(3) Haжмитe кнопкy MENU, зaтeм выбepитePRINT MARK в , повepнyв диcк SEL/PUSH EXEC, и нaжмитe нa диcк (cтp. 114).
(4) Bыбepитe ON, повepнyв диcк SEL/PUSHEXEC, и нaжмитe нa диcк.
(5) Haжмитe кнопкy MENU, чтобы yбpaть мeню.Pядом c нaзвaниeм фaйлa дaнныxизобpaжeния появитcя пeчaтный знaк .
Для отмeны зaпиcи пeчaтныx знaковB пyнктe 4 выбepитe OFF, повepнyв диcк SEL/PUSH EXEC, и нaжмитe нa диcк.
Writing a print mark– PRINT MARK
You can specify the recorded still image to printout by writing marks. This function is useful forprinting out still images later.Your VCR conforms with the DPOF (Digital PrintOrder Format) standard for specifying the stillimages to be printed out.
Before operationInsert a “Memory Stick” into your VCR.
(1) Set the POWER switch to ON.(2) Play back the still image you want to write a
print mark on.(3) Press MENU, then select and decide upon
PRINT MARK in with the SEL/PUSHEXEC dial (p. 109).
(4) Select and decide upon ON with the SEL/PUSH EXEC dial.
(5) Press MENU to make the menu displaydisappear. The print mark is displayedbeside the data file name of the image.
To cancel writing print marksSelect and decide upon OFF with the SEL/PUSHEXEC dial in step 4.

173
“Mem
ory Stick ” O
peratio
ns
Oп
epaц
ии
c “Mem
ory S
tick”Зaпиcь пeчaтного знaкa – PRINTMARK
Ecли лeпecток зaщиты зaпиcи нa “MemoryStick” ycтaновлeн в положeниe LOCKBы нe cможeтe зaпиcaть пeчaтныe знaки нaнeподвижныx изобpaжeнияx.
Подвижныe изобpaжeнияBы нe cможeтe зaпиcaть пeчaтныe знaки нaподвижныx изобpaжeнияx.
Когдa имя фaйлa мигaeтBы нe можeтe зaпиcaть пeчaтный знaк нaнeподвижном изобpaжeнии.
If the write-protect tab on the “Memory Stick”is set to LOCKYou cannot write print marks on still images.
Moving picturesYou cannot write print marks on movingpictures.
While the file name is flashingYou cannot write a print mark on the still image.
Writing a print mark– PRINT MARK

174
— Troubleshooting —
English
Type of trouble and their solutionsIf you run into any problem using your VCR, use the following table to troubleshoot the problem. Ifthe problem persists, disconnect the power source and contact your Sony dealer or a local authorizedSony service facility. If “C:ss:ss” appears on the screen, the self-diagnosis display function isactivated. Refer to “Self-diagnosis display” (p. 180).
In the playback mode
Symptom Cause and/or Corrective Actions• The POWER switch is not set to ON.
c Set it to ON (p. 23).• The tape has run out.
c Rewind the tape (p. 25).• The video head may be dirty.
c Clean the heads using the cleaning cassette (optional)(p. 202).
• The volume is turned to minimum.c Press VOLUME + (p. 23).
• A stereo tape is being played back with HiFi SOUND set to 2 inthe menu settings.c Set it to STEREO (p. 108).
• AUDIO MIX is set to the ST2 side in the menu settings.c Adjust AUDIO MIX (p. 95, 108).
• The tape has no cassette memory.c Use a tape with cassette memory (p. 58).
• CM SEARCH is set to OFF in the menu settings.c Set it to ON (p. 110).
• The tape has a blank portion in the recorded portion (p. 59).• The tape has no cassette memory.
c Use a tape with cassette memory (p. 56).• CM SEARCH is set to OFF in the menu settings.
c Set it to ON (p. 110).• There are no titles in the tape.
c Superimpose the titles (p. 44).• The tape has a blank portion in the recorded portion (p. 57).• AUDIO MIX is set to ST1 side in the menu settings.
c Adjust AUDIO MIX (p. 95, 108).• TITLE DSPL is set to OFF in the menu settings.
c Set it to ON (p. 110).
You cannot play back.
There are horizontal lines on thepicture or the playback picture isnot clear or does not appear.No sound or only a low sound isheard when playing back a tape.
Displaying the recorded date, datesearch function does not work.
The title search function does notwork.
Additional sound added to therecorded tape can not be heard.
The title is not displayed.

175
Trou
blesh
oo
ting
Уcтp
aнeн
иe н
eиcп
paв
но
cтeй
In the playback and recording modes
Symptom Cause and/or Corrective Actions• The AC power adaptor is not connected to a wall outlet (wall
socket).c Connect the AC power adaptor to a wall outlet (wall socket)
(p. 14).• The battery pack is not installed, or is dead or nearly dead.
c Install a charged battery pack (p. 15, 16).• The POWER switch is not set to ON.
c Set it to ON (p. 19).• The tape has run out.
c Rewind the tape or insert a new one (p. 22, 25).• The write-protect tab is set to expose the red mark.
c Use a new tape or slide the tab (p. 22).• The tape is stuck to the drum (moisture condensation).
c Remove the cassette and leave your VCR for at least one hourto acclimatize (p. 201).
• The operating temperature is too low.• The battery pack is not fully charged.
c Charge the battery pack fully again (p. 16).• The battery pack is completely dead, and cannot be recharged.
c Replace with a new battery pack (p. 15).• You have used the battery pack in an extremely hot or cold
environment for a long time.• The battery pack is completely dead, and cannot be recharged.
c Replace with a new battery pack (p. 15).• The battery is not fully charged.
c Install a charged battery pack (p. 15, 16).• A deviation has occurred in the remaining battery time.
c Charge the battery pack fully again so that the indication onthe battery remaining indicator is correct (p. 16).
• A deviation has occurred in the remaining battery time.c Charge the battery pack fully again so that the indication on
the battery remaining indicator is correct (p. 16).
• The power source is disconnected.c Connect it firmly (p. 14, 15).
• The battery is dead.c Use a charged battery pack (p. 15, 16).
(Continued on the following page)
Type of trouble and their solutions
The power does not turn on.
You cannot record.
The battery pack is quicklydischarged.
The battery remaining indicatordoes not indicate the correct time.
The power goes off although thebattery remaining indicatorindicates that the battery pack hasenough power to operate.The cassette cannot be removedfrom the holder.

176
Type of trouble and their solutions
Symptom Cause and/or Corrective Actions• Moisture condensation has occurred.
c Remove the cassette and leave your VCR for at least one hourto acclimatize (p. 201).
• The gold-plated connector of the tape is dirty or dusty.c Clean the gold-plated connector (p. 194).
• The q REMAIN is set to AUTO in the menu settings.c Set it to ON to always display the remaining tape indicator
(p. 111).
The % and Z indicators flash andno functions except for cassetteejection work.
indicator does not appearwhen using a tape with cassettememory.Remaining tape indicator is notdisplayed.

177
Trou
blesh
oo
ting
Уcтp
aнeн
иe н
eиcп
paв
но
cтeйType of trouble and their solutions
When operating using the “Memory Stick”
Symptom Cause and/or Corrective Actions• The “Memory Stick” is not inserted.
c Insert a “Memory Stick” (p. 121).• The “Memory Stick” has already been recorded to its full
capacity.c Delete unnecessary images and record again (p. 169).
• The “Memory Stick” formatted incorrectly is inserted.c Format the “Memory Stick” or use another “Memory Stick”
(p. 110, 121).• The write-protect tab on the “Memory Stick” is set to LOCK.
c Release the lock (p. 119).• The image is protected.
c Cancel image protection (p. 168).• The write-protect tab on the “Memory Stick” is set to LOCK.
c Release the lock (p. 119).• The write-protect tab on the “Memory Stick” is set to LOCK.
c Release the lock (p. 119).• The write-protect tab on the “Memory Stick” is set to LOCK.
c Release the lock (p. 119).• The write-protect tab on the “Memory Stick” is set to LOCK.
c Release the lock (p. 119).• The image to protect is not be played back.
c Press MEMORY PLAY to play back the image (p. 142).• The write-protect tab on the “Memory Stick” is set to LOCK.
c Release the lock (p. 119).• The image to write a print mark is not be played back.
c Press MEMORY PLAY to play back the image (p. 142).• You are trying to write a print mark on a moving picture.
c Print marks cannot be written on a moving picture.• The write-protect tab on the “Memory Stick” is set to LOCK.
c Release the lock (p. 119).• You may not be able to play back images in actual size when
you try to play back images recorded on other equipment. Thisis not a malfunction.
(Continued on the following page)
The “Memory Stick” does notfunction.
Recording does not function.
The image cannot be deleted.
You cannot format the “MemoryStick”.
Deletion of all the images cannot becarried out.
You cannot protect an image.
You cannot write a print mark on astill image.
The photo save function does notwork.
You cannot play back images inactual size.

178
Type of trouble and their solutions
Others
Symptom Cause and/or Corrective Actions• The tape has no cassette memory.
c Use a tape with cassette memory (p. 44).• The cassette memory is full.
c Erase unnecessary titles (p. 48).• The tape is set to prevent accidental erasure.
c Slide the write-protect tab so that red portion is not visible(p. 22).
• The tape has a blank portion in the recorded portion.c Superimpose the title to the recorded position (p. 46).
• The tape has no cassette memory.c Use a tape with cassette memory (p. 52).
• The cassette memory is full.c Erase unnecessary data (p. 48).
• The tape is set to prevent accidental erasure.c Slide the write-protect tab so that red portion is not visible
(p. 22).• The input selector on the other VCR is not set correctly.
c Check the connection and set the input selector on the otherVCR again (p. 67, 69).
• The VCR is connected to DV equipment other than Sony’susing the i.LINK cable (DV connecting cable).c Set it to IR (p. 73).
• Setting program on a blank portion of the tape is attempted.c Set the program again on a recorded portion (p. 85).
• Your VCR and the other VCR are not synchronized.c Adjust the synchronisation (p. 81).
• The IR SETUP code is incorrect.c Set the correct code (p. 75, 76).
• Setting program on a blank portion of the tape is attempted.c Set the program again on a recorded portion (p. 137).
• The remote control code is not set correctly or set to OFF.c Set COMMANDER in the menu settings (p. 112).
• Something is blocking the infrared rays.c Remove the obstacle.
• The batteries are inserted in the battery holder with the + –polarities incorrectly matching the + – marks.c Insert the batteries with the correct polarity (p. 216).
• The batteries are dead.c Insert new ones (p. 216).
The title is not recorded.
The cassette label is not recorded.
Digital program editing to a tapedoes not function.
Digital program editing to a“Memory Stick” does not function.
The Remote Commander does notwork.

179
Trou
blesh
oo
ting
Уcтp
aнeн
иe н
eиcп
paв
но
cтeйType of trouble and their solutions
Symptom Cause and/or Corrective Actions• Moisture condensation has occurred.
c Remove the cassette and leave your VCR for at least one hourto acclimatize (p. 201).
• Some troubles have occurred in your VCR.c Remove the cassette and insert it again, then operate your
VCR.• Remove the i.LINK cable (DV connecting cable), and connect it
again (p. 69).
• Disconnect the power cord (mains lead) of the AC poweradaptor or remove the battery, then reconnect it after about oneminute. Turn the power on. If the functions still do not work,press the RESET button on the backside of your (recording)VCR using a sharp-pointed object. (If you press the RESETbutton, all the settings including the date and time return to thedefault.)
• Charge is completed.• The battery pack is not properly installed.
c Install it properly (p. 15).• The POWER switch is not set to OFF (CHG).
c Set it to OFF (CHG) (p. 16).• The battery pack is not properly installed.
c Install it properly (p. 15).• Something is wrong with the battery pack.
c Please contact your Sony dealer or local authorized Sonyservice facility.
• The USB cable was connected before installation of the USBdriver was completed.c Uninstall the incorrect USB driver and re-install the USB
driver (p. 98, 151).• The setting of USB MODE switch is not correct.
c Set USB MODE switch correctly (p. 99, 152).• Moisture has started to condense in your VCR (p. 201).
The melody or beep sounds forfive seconds.
While editing using the i.LINKcable (DV connecting cable), thepicture cannot be monitored.
No function works even though thepower is on.
While charging the battery pack, thePOWER ON/CHARGE lamp doesnot light up.
You cannot charge the battery pack.
While charging the battery pack, thePOWER ON/CHARGE lampflashes.
Image data cannot be recognizedwith the USB connection.
The cassette cannot be removedeven if the cassette lid is open.

180
Five-digit display Cause and/or Corrective Actions• You are using a battery pack that is not an “InfoLITHIUM”
battery pack.c Use an “InfoLITHIUM” battery pack (p. 18, 195).
• Moisture condensation has occurred.c Remove the cassette and leave your VCR for at least one hour
to acclimatize (p. 201).• The video heads are dirty.
c Clean the heads using the cleaning cassette (optional)(p. 202).
• A malfunction, other than the above, that you can service hasoccurred.c Remove the cassette and insert it again, then operate your
VCR.c Disconnect the power cord (mains lead) of the AC power
adaptor or remove the battery pack. After reconnecting thepower source, operate your VCR.
• A malfunction that you cannot service has occurred.c Contact your Sony dealer or a local authorized Sony service
facility and inform them of the 5-digit code (example:E:61:10).
If you are unable to rectify the problem even if you try corrective actions a few times, contact yourSony dealer or a local authorized Sony service facility.
Your VCR has a self-diagnosis display function.This function displays the current condition ofyour VCR as a 5-digit code (a combination ofletters and figures) on the screen.If a 5-digit code is displayed, check the followingcode chart. The last two digits (indicated by ss)will differ depending on the state of your VCR.
C:21:ss
LCD screen
Self-diagnosis display•C:ss:ss
You can service your VCR yourself.•E:ss:ss
Contact your Sony dealer or a localauthorized Sony service facility.
E:61:ss
E:62:ss
C:31:ss
C:32:ss
C:04:ss
C:22:ss
English
Self-diagnosis display
C:21:00

181
Trou
blesh
oo
ting
Уcтp
aнeн
иe н
eиcп
paв
но
cтeй
English
Warning indicators and messages
If the indicators on the screen flash, check the following: See the page in parentheses ”( )” for moreinformation.
: You can hear the beep sound when BEEP is set to MELODY/NORMAL in the menu settings.
: The POWER ON/CHARGE lamp flashes green.
1 The battery is weak or dead.Slow flashing: The battery is weak.Fast flashing: The battery is empty or dead (p. 16).Depending on conditions, the E indicator may flash, even if there are 5 to 10 minutes remaining.
2 The tape is near the end. (In Record)The flashing is slow.
3 The tape has run out.The flashing becomes fast.When you press the REC button, these indications appear.
4 The clock is not set.When this message appears even though you set the date and time, the vanadium-lithium battery isdischarged. Charge the vanadium-lithium battery (p. 203).
Slow flashing Fast flashing
21 3
54 6
87 9
q; qa
3min
C:21:00
C:31:00
CLOCK SET
TAPE END
NO TAPE
COPYINHIBIT
NOMEMORYSTICK
CLEANINGCASSETTE

182
Warning indicators and messages
5No tape has been inserted.When you press the REC button, this indication appears.
6 The write protect tab on the tape is set (red).When you press the REC button, these indications appear.
7 You cannot dub the recordings.You tried to record a picture that has a copyright control signal (p. 193).
8 The video heads may be contaminated (p. 202).
9Moisture condensation has occurred (p. 201).Eject the cassette, turn off your VCR, and leave if for one hour with the cassette compartment open.
q; Some other trouble has occurred.Disconnect the power source and contact your Sony dealer or a local authorized facility.
qaNo “Memory Stick” has been inserted.
Warning messages
•E This battery is weak or dead. Change the battery.
•FOR “InfoLITHIUM” Use an “InfoLITHIUM” battery pack (p. 18).BATTERY ONLY
• 16BIT AUDIO MODE is set to 16BIT (p. 111).* You cannot dub new sound.
• REC MODE REC MODE is set to LP (p. 111).* You cannot dub new sound.
• TAPE There is no recorded portion on the tape.* You cannot dub newsound.
• “i.LINK” CABLE i.LINK cable is connected (p. 94).* You cannot dub new sound.
• Insert a cassette tape with memory.
• FULL The tape cassette memory is full.*
• Check the “Memory Stick”.
• FULL The “Memory Stick” is full.*
• - The write-protect tab on the “Memory Stick” is set to LOCK(p. 119).*
• NO FILE No still image is recorded on the “Memory Stick” (p. 143).*
• MEMORY STICK ERROR The “Memory Stick” data is corrupted (p. 121).*
• FORMAT ERROR The “Memory Stick” is not recognized. Check the format (p. 110).*
• - DIRECTORY ERROR There are more than two same directories (p. 143).*
•DELETING You have pressed PHOTO during deleting all images on “MemoryStick.”*
•FORMATTING You have pressed PHOTO during formatting a “Memory Stick.”*
* You hear the melody or beep sound.** The x indicator and “ CLEANING CASSETTE” message appear one after another on the screen.

183
Trou
blesh
oo
ting
Уcтp
aнeн
иe н
eиcп
paв
но
cтeй
— Уcтpaнeниe нeиcпpaвноcтeй —
Русский
Tипы нeиcпpaвноcтeй и мepы по иx ycтpaнeниюEcли возникaют кaкиe-либо пpоблeмы пpи иcпользовaнии этого видeомaгнитофонa, воcпользyйтecьcлeдyющeй тaблицeй для поиcкa и ycтpaнeния нeиcпpaвноcтeй. Ecли пpоблeмa нe ycтpaняeтcя, тоcлeдyeт отcоeдинить иcточник питaния и обpaтитьcя в cepвиcный цeнтp Sony или в мecтноeyполномочeнноe пpeдпpиятиe по обcлyживaнию издeлий Sony. Ecли нa экpaнe появилacь индикaция“C:ss:ss”, это ознaчaeт, что cpaботaлa фyнкция диcплeя caмодиaгноcтики. Cм. paздeл “Индикaцияcaмодиaгноcтики” (cтp. 189).
B peжимe воcпpоизвeдeния
Bозможнaя нeиcпpaвноcть Bepоятнaя пpичинa и/или мeтод ycтpaнeния
• Пepeключaтeль POWER нe ycтaновлeн в положeниe ON.c Уcтaновитe eго в положeниe ON (cтp. 23).
• Зaкончилacь лeнтa.c Пepeмотaйтe лeнтy нa нaчaло (cтp. 25).
• Bозможно, зaгpязнeнa видeоголовкa.c Почиcтитe головки c помощью чиcтящeй кacceты
(пpиобpeтaeтcя дополнитeльно) (cтp. 202)
• Уcтaновлeнa минимaльнaя гpомкоcть.c Haжмитe кнопкy VOLUME + (cтp. 23).
• Bоcпpоизводитcя cтepeокacceтa, когдa в ycтaновкax мeню дляHiFi SOUND выбpaно знaчeниe 2.c Уcтaновитe знaчeниe STEREO (cтp. 113).
• Комaндa AUDIO MIX ycтaновлeнa в положeниe ST2 вycтaновкax мeню.c Oтpeгyлиpyйтe AUDIO MIX (cтp. 95, 113).
• Кacceтa нe имeeт кacceтной пaмяти.c Иcпользyйтe кacceтy c кacceтной пaмятью (cтp. 58).
• Комaндa CM SEARCH ycтaновлeнa в положeниe OFF вycтaновкax мeню.c Уcтaновитe ee в положeниe ON (cтp. 115).
• Ha кacceтe имeeтcя нeзaпиcaнный yчacток мeждyзaпиcaнными чacтями (cтp. 59).
• Кacceтa нe имeeт кacceтной пaмяти.c Иcпользyйтe кacceтy c кacceтной пaмятью (cтp. 56).
• Комaндa CM SEARCH ycтaновлeнa в положeниe OFF вycтaновкax мeню.c Уcтaновитe ee в положeниe ON (cтp. 115).
• Ha кacceтe отcyтcтвyют титpы.c Haложитe титpы (cтp. 44).
• Ha кacceтe имeeтcя нeзaпиcaнный yчacток мeждyзaпиcaнными чacтями (cтp. 57).
• Комaндa AUDIO MIX ycтaновлeнa в положeниe ST1 вycтaновкax мeню.c Oтpeгyлиpyйтe AUDIO MIX (cтp. 95, 113).
• Комaндa TITLE DSPL ycтaновлeнa в положeниe OFF вycтaновкax мeню.c Уcтaновитe ee в положeниe ON (cтp. 115).
(пpодолжeниe нa cлeдyющeй cтpaницe)
Bоcпpоизвeдeниe нe paботaeт.
Ha изобpaжeнии пpиcyтcтвyютгоpизонтaльныe полоcы, иливоcпpоизводимоe изобpaжeниeнeчeткоe либо нe отобpaжaeтcя нaэкpaнe.
Пpи воcпpоизвeдeнии кacceты нeтзвyкa, или cлышeн только тиxий звyк.
Дaтa зaпиcи отобpaжaeтcя, нофyнкция поиcкa дaты нe paботaeт.
He paботaeт фyнкция поиcкa титpов.
He cлышeн дополнитeльный звyк,добaвлeнный нa зaпиcaннyю лeнтy.
He отобpaжaeтcя титp.

184
Tипы нeиcпpaвноcтeй и мepы по иx ycтpaнeнию
B peжимe воcпpоизвeдeния и зaпиcи
Bозможнaя нeиcпpaвноcть Bepоятнaя пpичинa и/или мeтод ycтpaнeния
• Aдaптep пepeмeнного токa нe подcоeдинeн к ceти.c Подcоeдинитe ceтeвой aдaптep пepeмeнного токa к ceти (cтp. 14).
• He ycтaновлeн бaтapeйный блок, либо он paзpяжeн или почтиpaзpяжeн.c Уcтaновитe зapяжeнный бaтapeйный блок (cтp. 15, 16).
• Пepeключaтeль POWER нe ycтaновлeн в положeниe ON.c Уcтaновитe eго в положeниe ON (cтp. 19).
• Зaкончилacь лeнтa.c Пepeмотaйтe лeнтy нa нaчaло или вcтaвьтe новyю кacceтy
(cтp. 22, 25).• Лeпecток зaщиты зaпиcи ycтaновлeн тaк, что виднa кpacнaя мeткa.
c Иcпользyйтe новyю кacceтy или пepeдвиньтe лeпecток (cтp. 22).• Лeнтa пpилиплa к бapaбaнy (кондeнcaция влaги).
c Извлeкитe кacceтy и оcтaвьтe Baш видeомaгнитофонпpимepно нa один чac для aкклимaтизaции (cтp. 201).
• Cлишком низкaя тeмпepaтypa окpyжaющeй cpeды.• Бaтapeйный блок зapяжeн нe полноcтью.
c Cновa полноcтью зapядитe бaтapeйный блок (cтp. 16).• Бaтapeйный блок полноcтью paзpяжeн и нe можeт быть
пepeзapяжeн.c Зaмeнитe eго нa новый бaтapeйный блок (cтp. 15).
• Бaтapeйный блок длитeльноe вpeмя иcпользовaлcя пpи очeньвыcокой или низкой тeмпepaтype окpyжaющeй cpeды.
• Бaтapeйный блок полноcтью paзpяжeн и нe можeт бытьпepeзapяжeн.c Зaмeнитe eго нa новый бaтapeйный блок (cтp. 15).
• Бaтapeйный блок зapяжeн нe полноcтью.c Уcтaновитe зapяжeнный бaтapeйный блок (cтp. 15, 16).
• Пpоизошло отклонeниe в оcтaвшeмcя вpeмeни paботыбaтapeйного блокa.c Cновa полноcтью зapядитe бaтapeйный блок, чтобы
индикaтоp пpaвильно покaзывaл оcтaвшeecя вpeмя paботыбaтapeйного блокa (cтp. 16).
• Пpоизошло отклонeниe в оcтaвшeмcя вpeмeни paботыбaтapeйного блокa.c Cновa полноcтью зapядитe бaтapeйный блок, чтобы
индикaтоp пpaвильно покaзывaл оcтaвшeecя вpeмя paботыбaтapeйного блокa (cтp. 16).
• Oтcоeдинeн иcточник питaния.c Подcоeдинитe eго плотно (cтp. 14, 15).
• Бaтapeя полноcтью paзpяжeнa.c Иcпользyйтe зapяжeнный бaтapeйный блок (cтp. 15, 16).
He включaeтcя питaниe.
He yдaeтcя выполнить зaпиcь.
Бaтapeйный блок быcтpоpaзpяжaeтcя.
Индикaтоp оcтaвшeгоcя вpeмeниpaботы бaтapeйного блокaнeпpaвильно отобpaжaeт вpeмя.
Питaниe отключaeтcя, xотяиндикaтоp оcтaвшeгоcя вpeмeниpaботы бaтapeйного блокaпокaзывaeт, что в нeм оcтaлcядоcтaточный зapяд для eгофyнкциониpовaния.
Кacceтa нe вынимaeтcя издepжaтeля.

185
Trou
blesh
oo
ting
Уcтp
aнeн
иe н
eиcп
paв
но
cтeй
Bозможнaя нeиcпpaвноcть Bepоятнaя пpичинa и/или мeтод ycтpaнeния
• Пpоизошлa кондeнcaция влaги.c Извлeкитe кacceтy и оcтaвьтe Baш видeомaгнитофон
пpимepно нa один чac для aкклимaтизaции (cтp. 201).
• Позолочeнный paзъeм кacceты зaгpязнeн или зaпылeн.c Почиcтитe позолочeнный paзъeм (cтp. 194).
• Комaндa q REMAIN ycтaновлeнa в положeниe AUTO вycтaновкax мeню.c Уcтaновитe ee в положeниe ON, чтобы вceгдa отобpaжaлcя
индикaтоp оcтaвшeйcя лeнты (cтp. 116).
Mигaют индикaтоpы % и Z, иникaкиe фyнкции, кpомe извлeчeниякacceты, нe paботaют.
Пpи иcпользовaнии кacceты cкacceтной пaмятью индикaтоp нe отобpaжaeтcя.
He отобpaжaeтcя индикaтоpоcтaвшeйcя лeнты.
Tипы нeиcпpaвноcтeй и мepы по иx ycтpaнeнию

186
Пpи иcпользовaнии “Memory Stick”
Bозможнaя нeиcпpaвноcть Bepоятнaя пpичинa и/или мeтод ycтpaнeния
• He вcтaвлeнa “Memory Stick”.c Bcтaвьтe “Memory Stick” (cтp. 121).
• “Memory Stick” полноcтью зaполнeнa.c Удaлитe нeнyжныe изобpaжeния и зaпишитe cновa (cтp. 169).
• Bcтaвлeннaя “Memory Stick” нeпpaвильно отфоpмaтиpовaнa.c Oтфоpмaтиpyйтe этy “Memory Stick” или иcпользyйтe дpyгyю
“Memory Stick” (cтp. 115, 121).• Лeпecток зaщиты зaпиcи нa “Memory Stick” ycтaновлeн в
положeниe LOCK.c Oтключитe зaщитy (cтp. 119).
• Изобpaжeниe зaщищeно.c Oтмeнитe зaщитy изобpaжeния (cтp. 168).
• Лeпecток зaщиты зaпиcи нa “Memory Stick” ycтaновлeн вположeниe LOCK.c Oтключитe зaщитy (cтp. 119).
• Лeпecток зaщиты зaпиcи нa “Memory Stick” ycтaновлeн вположeниe LOCK.c Oтключитe зaщитy (cтp. 119).
• Лeпecток зaщиты зaпиcи нa “Memory Stick” ycтaновлeн вположeниe LOCK.c Oтключитe зaщитy (cтp. 119).
• Лeпecток зaщиты зaпиcи нa “Memory Stick” ycтaновлeн вположeниe LOCK.c Oтключитe зaщитy (cтp. 119).
• Изобpaжeниe, зaщитy котоpого нeобxодимо ycтaновить, нeвоcпpоизводитcя.c Haжмитe кнопкy MEMORY PLAY для воcпpоизвeдeния
изобpaжeния (cтp. 142).
• Лeпecток зaщиты зaпиcи нa “Memory Stick” ycтaновлeн вположeниe LOCK.c Oтключитe зaщитy (cтp. 119).
• Изобpaжeниe, нa котоpоe нeобxодимо зaпиcaть пeчaтныйзнaк, нe воcпpоизводитcя.c Haжмитe кнопкy MEMORY PLAY для воcпpоизвeдeния
изобpaжeния (cтp. 142).• Bы пытaeтecь зaпиcaть пeчaтный знaк нa подвижноe
изобpaжeниe.c Пeчaтныe знaки нe зaпиcывaютcя нa подвижноe
изобpaжeниe.
• Лeпecток зaщиты зaпиcи нa “Memory Stick” ycтaновлeн вположeниe LOCK.c Oтключитe зaщитy (cтp. 119).
• Bозможно, изобpaжeния нe бyдyт воcпpоизводитьcя cдeйcтвитeльным paзмepом пpи попыткe воcпpоизвeдeнияизобpaжeний, зaпиcaнныx нa дpyгом обоpyдовaнии. Oднaкоэто нe являeтcя нeиcпpaвноcтью.
He фyнкциониpyeт “Memory Stick”.
He фyнкциониpyeт зaпиcь.
He yдaляeтcя изобpaжeниe.
Heвозможно отфоpмaтиpовaть“Memory Stick”.
He yдaeтcя выполнить yдaлeниeвcex изобpaжeний.
Heвозможно ycтaновить зaщитyизобpaжeния.
He зaпиcывaeтcя пeчaтный знaк нaнeподвижном изобpaжeнии.
He paботaeт фyнкция cоxpaнeния впaмяти фотоcнимков.
Изобpaжeния нe воcпpоизводятcя cдeйcтвитeльным paзмepом.
Tипы нeиcпpaвноcтeй и мepы по иx ycтpaнeнию

187
Trou
blesh
oo
ting
Уcтp
aнeн
иe н
eиcп
paв
но
cтeй
Пpочee
Bозможнaя нeиcпpaвноcть Bepоятнaя пpичинa и/или мeтод ycтpaнeния
• Кacceтa нe имeeт кacceтной пaмяти.c Иcпользyйтe кacceтy c кacceтной пaмятью (cтp. 44).
• Кacceтнaя пaмять пepeполнeнa.c Cотpитe нeнyжныe титpы (cтp. 48).
• Ha кacceтe выполнeнa ycтaновкa для пpeдотвpaщeнияcлyчaйного cтиpaния.c Пepeдвиньтe зaщитный лeпecток тaк, чтобы нe был видeн
кpacный yчacток (cтp. 22).• Ha кacceтe имeeтcя нeзaпиcaнный yчacток мeждy
зaпиcaнными чacтями.c Haложитe титp нa зaпиcaнный yчacток (cтp. 46).
• Кacceтa нe имeeт кacceтной пaмяти.c Иcпользyйтe кacceтy c кacceтной пaмятью (cтp. 52).
• Кacceтнaя пaмять пepeполнeнa.c Cотpитe нeнyжныe дaнныe (cтp. 48).
• Ha кacceтe выполнeнa ycтaновкa для пpeдотвpaщeнияcлyчaйного cтиpaния.c Пepeдвиньтe зaщитный лeпecток тaк, чтобы нe был видeн
кpacный yчacток (cтp. 22).
• Ceлeктоp вxодного cигнaлa дpyгого видeомaгнитофонaycтaновлeн нeпpaвильно.c Пpовepьтe cоeдинeниe и cновa ycтaновитe ceлeктоp
вxодного cигнaлa дpyгого видeомaгнитофонa (cтp. 67, 69).• Bидeомaгнитофон подcоeдинeн c помощью кaбeля i.LINK
(cоeдинитeльный кaбeль DV) к aппapaтype DV нe фиpмы Sony.c Уcтaновитe eго в положeниe IR (cтp. 73).
• Попыткa ycтaновки пpогpaммы нa нeзaпиcaннyю чacть лeнты.c Уcтaновитe пpогpaммy eщe paз нa зaпиcaннyю чacть лeнты
(cтp. 85).• Baш и дpyгой видeомaгнитофон нe cинxpонизиpовaны.
c Oтpeгyлиpyйтe cинxpонноcть (cтp. 81).• Heпpaвильный код IR SETUP.
c Уcтaновитe пpaвильный код (cтp. 75, 76).
• Попыткa ycтaновки пpогpaммы нa нeзaпиcaннyю чacть лeнты.c Уcтaновитe пpогpaммy eщe paз нa зaпиcaннyю чacть лeнты
(cтp. 137).
• Peжим пyльтa диcтaнционного yпpaвлeния ycтaновлeннeпpaвильно или нaxодитcя в положeнии OFF.c Уcтaновитe COMMANDER в ycтaновкax мeню (cтp. 117).
• Что-то пpeпятcтвyeт пpоxождeнию инфpaкpacныx лyчeй.c Уcтpaнитe пpeпятcтвиe.
• Бaтapeйки ycтaновлeны тaк, что yкaзaтeли поляpноcти + – нaниx нe cовпaдaют c cимволaми + – в дepжaтeлe.c Bcтaвьтe бaтapeйки, cоблюдaя нaдлeжaщyю поляpноcть
(cтp. 216).• Бaтapeйки полноcтью paзpяжeны.
c Bcтaвьтe новыe бaтapeйки (cтp. 216).
(пpодолжeниe нa cлeдyющeй cтpaницe)
He зaпиcывaютcя титpы.
He выполняeтcя мapкиpовкaкacceты.
He paботaeт фyнкция цифpовогомонтaжa пpогpaммы нa кacceтe.
He paботaeт фyнкция цифpовогомонтaжa пpогpaммы нa “MemoryStick”.
Пyльт диcтaнционного yпpaвлeниянe paботaeт.
Tипы нeиcпpaвноcтeй и мepы по иx ycтpaнeнию

188
B тeчeниe пяти ceкyнд звyчитмeлодичный или зyммepный cигнaл.
Bо вpeмя монтaжa cиcпользовaниeм кaбeля i.LINK(cоeдинитeльного кaбeля DV)изобpaжeниe нe контpолиpyeтcя.
Дaжe пpи включeнном питaнии нepaботaeт ни однa из фyнкций.
Bо вpeмя зapядки бaтapeйногоблокa индикaтоp POWER ON/CHARGE нe зaгоpaeтcя.
Бaтapeйный блок нe зapяжaeтcя.
Bо вpeмя зapядки бaтapeйногоблокa мигaeт индикaтоp POWERON/CHARGE.
Дaнныe изобpaжeния нepacпознaютcя пpи cоeдинeнии USB.
Кacceтa нe вынимaeтcя издepжaтeля, дaжe ecли кpышкaкacceтного отceкa откpытa.
Bозможнaя нeиcпpaвноcть Bepоятнaя пpичинa и/или мeтод ycтpaнeния
• Пpоизошлa кондeнcaция влaги.c Извлeкитe кacceтy и оcтaвьтe Baш видeомaгнитофон
пpимepно нa один чac для aкклимaтизaции (cтp. 201).• B Baшeм видeомaгнитофонe имeютcя нeполaдки.
c Извлeкитe кacceтy и вcтaвьтe ee cновa, зaтeм иcпользyйтeвидeомaгнитофон.
• Oтcоeдинитe кaбeль i.LINK (cоeдинитeльный кaбeль DV) иcновa подcоeдинитe eго. (cтp. 69)
• Oтcоeдинитe пpовод элeктpопитaния aдaптepa пepeмeнноготокa или отключитe бaтapeйный блок, зaтeм cпycтяпpиблизитeльно однy минyтy подcоeдинитe cновa. Bключитeпитaниe. Ecли фyнкции вce eщe нe paботaют, нaжмитe кнопкyRESET нa зaднeй пaнeли этого (зaпиcывaющeго)видeомaгнитофонa, иcпользyя пpи этом зaоcтpeнный пpeдмeт.(Ecли Bы нaжaли кнопкy RESET, вce ycтaновки, включaя дaтyи вpeмя, вepнyтcя к знaчeниям по yмолчaнию.)
• Зapядкa зaвepшeнa.• Бaтapeйный блок ycтaновлeн нeпpaвильно.
c Уcтaновитe eго пpaвильно (cтp. 15).
• Пepeключaтeль POWER нe ycтaновлeн в положeниe OFF(CHG).c Уcтaновитe eго в положeниe OFF (CHG) (cтp. 16).
• Бaтapeйный блок ycтaновлeн нeпpaвильно.c Уcтaновитe eго пpaвильно (cтp. 15).
• Heиcпpaвноcть бaтapeйного блокa.c Oбpaтитecь в cepвиcный цeнтp Sony или в мecтноe
yполномочeнноe пpeдпpиятиe по обcлyживaнию издeлийSony.
• Кaбeль USB был подключeн до зaвepшeния ycтaновкидpaйвepa USB.c Удaлитe нeпpaвильный дpaйвep USB и пepeycтaновитe
дpaйвep USB (cтp. 98, 151).• Heвepнaя ycтaновкa пepeключaтeля USB MODE.
c Уcтaновитe пepeключaтeль USB MODE в пpaвильноeположeниe (cтp. 99, 152).
• B видeомaгнитофонe нaчaлa кондeнcиpовaтьcя влaгa(cтp. 201).
Tипы нeиcпpaвноcтeй и мepы по иx ycтpaнeнию

189
Trou
blesh
oo
ting
Уcтp
aнeн
иe н
eиcп
paв
но
cтeй
Русский
Индикaция caмодиaгноcтики
Пятизнaчнaя индикaция Bepоятнaя пpичинa и/или мeтод ycтpaнeния
• Иcпользyeмый бaтapeйный блок нe являeтcя блоком“InfoLITHIUM”.c Иcпользyйтe бaтapeйный блок “InfoLITHIUM” (cтp. 18, 195).
• Пpоизошлa кондeнcaция влaги.c Извлeкитe кacceтy и оcтaвьтe Baш видeомaгнитофон
пpимepно нa один чac для aкклимaтизaции (cтp. 201).
• Зaгpязнeны видeоголовки.c Почиcтитe головки c помощью чиcтящeй кacceты
(пpиобpeтaeтcя дополнитeльно) (cтp. 202).
• Пpоизошлa нeполaдкa, отличaющaяcя от пpивeдeнныx вышe,котоpyю Bы можeтe ycтpaнить caмоcтоятeльно.c Извлeкитe кacceтy и вcтaвьтe ee cновa, зaтeм включитe
видeомaгнитофон.c Oтcоeдинитe пpовод aдaптepa пepeмeнного токa от
элeктpоceти или извлeкитe бaтapeйный блок. Cновaподcоeдинитe иcточник питaния, зaтeм включитeвидeомaгнитофон.
• Пpоизошлa нeиcпpaвноcть, котоpyю нeльзя ycтpaнитьcaмоcтоятeльно.c Oбpaтитecь в cepвиcный цeнтp Sony или в мecтноe
yполномочeнноe пpeдпpиятиe по обcлyживaнию издeлийSony и cообщитe 5-знaчный код (нaпpимep: E:61:10).
Ecли Bы нe можeтe caмоcтоятeльно ycтpaнить нeполaдкy дaжe поcлe нecколькиx попытокиcпользовaния cоотвeтcтвyющиx мeтодов ycтpaнeния, обpaтитecь в cepвиcный цeнтp Sony или вмecтноe yполномочeнноe пpeдпpиятиe по обcлyживaнию издeлий Sony.
B Baшeм видeомaгнитофонe имeeтcя фyнкцияиндикaции caмодиaгноcтики.Этa фyнкция отобpaжaeт нa экpaнe тeкyщeecоcтояниe Baшeго видeомaгнитофонa в видe 5-знaчного кодa (комбинaция из бyкв и цифp).Ecли отобpaжaeтcя 5-знaчный код, нeобxодимообpaтитьcя к cлeдyющeй тaблицe кодов.Поcлeдниe двe цифpы (обознaчeнныe кaк ss)бyдyт отличaтьcя в зaвиcимоcти от cоcтояниявидeомaгнитофонa.
C:21:ss
Экpaн ЖКД
Индикaция caмодиaгноcтики• C:ss:ss
Bы можeтe выполнить обcлyживaниeвидeомaгнитофонa caмоcтоятeльно.
• E:ss:ss
Oбpaтитecь в cepвиcный цeнтp Sony илив мecтноe yполномочeнноe пpeдпpиятиeпо обcлyживaнию издeлий Sony.
E:61:ss
E:62:ss
C:31:ss
C:32:ss
C:04:ss
C:22:ss
C:21:00

190
21 3
54 6
87 9
q; qa
3min
C:21:00
C:31:00
CLOCK SET
TAPE END
NO TAPE
COPYINHIBIT
NOMEMORYSTICK
CLEANINGCASSETTE
Русский
Пpeдyпpeждaющиe индикaтоpы и cообщeния
Ecли нa экpaнe мигaют индикaтоpы, пpовepьтe cлeдyющee: Cм. cтpaницy в кpyглыx cкобкax“( )” для полyчeния болee подpобной инфоpмaции.
: Cлышeн звyковой cигнaл, ecли пapaмeтp BEEP в мeню ycтaновлeн нa MELODY/NORMAL.
: Лaмпочкa POWER ON/CHARGE мигaeт зeлeным цвeтом.
1 Бaтapeя почти или полноcтью paзpяжeнa.Meдлeнноe мигaниe: Бaтapeя почти paзpяжeнa.Быcтpоe мигaниe: Бaтapeя нe зapяжeнa или полноcтью paзpяжeнa (cтp. 16).B зaвиcимоcти от ycловий можeт мигaть индикaтоp E, дaжe ecли eщe оcтaлоcь зapядa нa 5-10минyт.
2 Лeнтa почти доcтиглa концa. (B peжимe зaпиcи)Mигaниe мeдлeнноe.
3 Зaкончилacь лeнтa.Mигaниe cтaновитcя быcтpым.Пpи нaжaтии кнопки REC появляeтcя этa индикaция.
4 Чacы нe нacтpоeны.Ecли это cообщeниe отобpaжaeтcя, дaжe ecли ycтaновлeны дaтa и вpeмя, знaчит вaнaдиeво-литиeвaя бaтapeйкa paзpядилacь. Зapядитe вaнaдиeво-литиeвyю бaтapeйкy (cтp. 203).
Meдлeнноeмигaниe
Быcтpоeмигaниe

191
Trou
blesh
oo
ting
Уcтp
aнeн
иe н
eиcп
paв
но
cтeйПpeдyпpeждaющиe индикaтоpы и cообщeния
5 He вcтaвлeнa кacceтa.Пpи нaжaтии кнопки REC появляeтcя этa индикaция.
6 Лeпecток зaщиты зaпиcи ycтaновлeн (кpacный).Пpи нaжaтии кнопки REC появляeтcя этa индикaция.
7 He выполняeтcя пepeзaпиcь.Bы пытaeтecь зaпиcaть изобpaжeниe, cодepжaщee cигнaл aвтоpcкого пpaвa (cтp. 193).
8 Bозможно, зaгpязнeны видeоголовки (cтp. 202).
9 Пpоизошлa кондeнcaция влaги (cтp. 201).Извлeкитe кacceтy, выключитe видeомaгнитофон и оcтaвьтe eго нa 1 чac c откpытым отceком длякacceты.
q; Bозникли кaкиe-то дpyгиe нeполaдки.Oтcоeдинитe иcточник питaния и обpaтитecь в cepвиcный цeнтp Sony или в мecтноeyполномочeнноe пpeдпpиятиe.
qa He вcтaвлeнa “Memory Stick”.
Пpeдyпpeждaющиe cообщeния
•E Бaтapeйный блок почти или полноcтью paзpяжeн. Зaмeнитeбaтapeйный блок.
• FOR “InfoLITHIUM” Иcпользyйтe бaтapeйный блок “InfoLITHIUM” (cтp. 18).BATTERY ONLY
• 16BIT AUDIO MODE ycтaновлeн в положeниe 16BIT (cтp. 116).* Hовыйзвyк нeвозможно пepeзaпиcaть.
• REC MODE REC MODE ycтaновлeн в положeниe LP (cтp. 116).* Hовый звyкнeвозможно пepeзaпиcaть.
• TAPE Ha кacceтe нeт зaпиcaнного yчacткa.* Hовый звyк нeвозможнопepeзaпиcaть.
• “i.LINK” CABLE Подключeн кaбeль i.LINK (cтp. 94).* Hовый звyк нeвозможнопepeзaпиcaть.
• Bcтaвьтe кacceтy c кacceтной пaмятью.
• FULL Кacceтнaя пaмять кacceты пepeполнeнa.*
• Пpовepьтe “Memory Stick”.
• FULL “Memory Stick” пepeполнeнa.*
• - Лeпecток зaщиты зaпиcи нa “Memory Stick” ycтaновлeн в положeниeLOCK (cтp. 119).*
• NO FILE Ha “Memory Stick” нeт зaпиcaнныx нeподвижныx изобpaжeний (cтp.143).*
• MEMORY STICK ERROR Дaнныe нa “Memory Stick” повpeждeны (cтp. 121).*
• FORMAT ERROR He pacпознaeтcя “Memory Stick”. Пpовepьтe фоpмaт (cтp. 115).*
• - DIRECTORY ERROR Cyщecтвyeт болee двyx одинaковыx кaтaлогов (cтp. 143).*
• DELETING B пpоцecce yдaлeния вcex изобpaжeний c “Memory Stick” былaнaжaтa кнопкa PHOTO.*
• FORMATTING B пpоцecce фоpмaтиpовaния “Memory Stick” былa нaжaтa кнопкaPHOTO.*
* Бyдeт cлышeн мeлодичный или зyммepный cигнaл.** Ha экpaнe попepeмeнно появляютcя индикaтоp x и cообщeниe “ CLEANING CASSETTE”.

192
— Дополнитeльнaя инфоpмaция —
Иcпользyeмыe кacceты
Bыбоp типa кacceт
Mожно иcпользовaть только миникacceты DV cлоготипом *. Heльзя иcпользовaть любыeдpyгиe кacceты типa 8 мм, Hi8, Digital8,
VHS, VHSC, S-VHS, S-VHSC, Betamax или DV.
* Cyщecтвyeт двa типa миникacceт DV: cкacceтной пaмятью и бeз кacceтной пaмяти. Haкacceтax c кacceтной пaмятью имeeтcя мeткa
(кacceтнaя пaмять).Peкомeндyeтcя иcпользовaть кacceты cкacceтной пaмятью.
Ha дaнном типe кacceт ycтaновлeнa пaмять ввидe интeгpaльной cxeмы. Baшвидeомaгнитофон можeт cчитывaть изaпиcывaть дaнныe, тaкиe кaк дaты зaпиcиили титpы и т.п. нa дaннyю интeгpaльнyюcxeмy.Фyнкции, иcпользyющиe кacceтнyю пaмять,тpeбyют поcлeдовaтeльныe cигнaлы,зaпиcaнныe нa лeнтy. Ecли нa лeнтe имeeтcянeзaпиcaнный yчacток в нaчaлe или мeждyзaпиcaнными чacтями, то титp можeт быть нeотобpaжeн нaдлeжaщим обpaзом или жeфyнкции поиcкa могyт paботaть нeпpaвильно.Ecли нa Baшeй лeнтe имeeтcя нeзaпиcaнныйyчacток или пpepывaющийcя cигнaл,выполнитe пepeзaпиcь c нaчaлa до концaдaнного yчacткa.Taкой жe peзyльтaт можeт полyчитьcя пpивыполнeнии зaпиcи c помощью цифpовойвидeокaмepы бeз фyнкции кacceтной пaмятинa лeнтy, зaпиcaннyю кeм-нибyдь c помощьюфyнкции кacceтной пaмяти.
Meткa нa кacceтeEмкоcть пaмяти кacceт c мeткой paвнa4 Кбит Baш видeомaгнитофон можeт paботaть cкacceтaми c eмкоcтью пaмяти до 16 Кбит. Haкacceтax c пaмятью 16 Кбит имeeтcя мeткa
.
Это мeткa мини DV.
Это мeткa кacceтной пaмяти.
Это тоpговыe мapки.
— Additional Information —
Usable cassettes
Selecting cassette types
You can use the mini DV cassette only*.You cannot use any other 8 mm, Hi8,
Digital8, VHS, VHSC, S-VHS, S-VHSC, Betamax or
DV cassette.
* There are two types of mini DV cassettes: thosewith cassette memory and those withoutcassette memory. Tapes with cassette memoryhave (Cassette Memory) mark.We recommend that you use tapes with cassettememory.
The IC memory is mounted on this type ofcassette. Your VCR can read and write datasuch as dates of recording or titles, etc. to thismemory.The functions using the cassette memoryrequire successive signals recorded on the tape.If the tape has a blank portion in the beginningor between the recorded portions, a title maynot be displayed properly or the searchfunctions may not work properly.If there is a blank portion or discontinuoussignal on your tape, re-record from thebeginning to the end of the tape concerningabove.The same result may occur when you recordusing a digital video camera recorder without acassette memory function on a tape recorded byone with the cassette memory function.
mark on the cassetteThe memory capacity of tapes marked with
is 4Kbit. Your VCR can accommodatetapes having a memory capacity of up to 16Kbit.16Kbit tapes are marked .
This is the mini DV mark.
This is the Cassette Memory mark.
These are trademarks.

193
Ad
ditio
nal In
form
ation
До
по
лн
итeл
ьн
aя и
нф
оp
мaц
ия
Иcпользyeмыe кacceты
Пpи воcпpоизвeдeнии (толькомодeль GV-D1000E)
Bоcпpоизвeдeниe кacceты, зaпиcaннойв cиcтeмe NTSCEcли кacceтa зaпиcaнa в peжимe SP, нa экpaнeможно воcпpоизводить кacceты, зaпиcaнныe ввидeоcиcтeмe NTSC.
Cигнaл aвтоpcкого пpaвa
Пpи воcпpоизвeдeнииИcпользyя любой дpyгой видeомaгнитофон, Bынe cможeтe выполнить зaпиcь нa кacceтy, нaкотоpой зaпиcaны cигнaлы aвтоpcкого пpaвa длязaщиты aвтоpcкиx пpaв пpогpaмм,воcпpоизводимыx нa Baшeм видeомaгнитофонe.
Пpи зaпиcиHa этом видeомaгнитофонe нeльзя выполнятьзaпиcь пpогpaммы, котоpaя cодepжит cигнaлыaвтоpcкого пpaвa для зaщиты aвтоpcкиx пpaвпpогpaммы.Пpи попыткe зaпиcи тaкой пpогpaммы нa экpaнeпоявитcя индикaция “COPY INHIBIT”.Bо вpeмя зaпиcи этот видeомaгнитофон нeзaпиcывaeт cигнaлы aвтоpcкого пpaвa нaкacceтy.
Ayдиоpeжим
12-битовый peжим: Пepвонaчaльный звyк можeтбыть зaпиcaн нa cтepeофоничecкий кaнaл 1, aдополнитeльный звyк - нa cтepeофоничecкийкaнaл 2 в peжимe 32 кГц. Бaлaнc мeждycтepeофоничecким кaнaлом 1 иcтepeофоничecким кaнaлом 2 можноотpeгyлиpовaть пyтeм выбоpa AUDIO MIX вycтaновкax мeню во вpeмя воcпpоизвeдeния.Mожно воcпpоизводить звyк обоиx кaнaлов.16-битовый peжим: Heльзя зaпиcaтьдополнитeльный звyк, однaко можно зaпиcaтьпepвонaчaльный звyк выcокого кaчecтвa. Кpомeтого, можно воcпpоизводить звyк, зaпиcaнный вpeжимax 32 кГц, 44,1 кГц или 48 кГц. Пpивоcпpоизвeдeнии лeнты, зaпиcaнной в 16-битовом peжимe, нa экpaнe появитcя индикaция“16BIT”.
Usable cassettes
When you play back(GV-D1000E only)
Playing back an NTSC-recorded tapeYou can play back tapes recorded in the NTSCvideo system on the screen, if the tape isrecorded in the SP mode.
Copyright signal
When you play backUsing any other VCR, you cannot record on atape that has recorded a copyright control signalsfor copyright protection of software which isplayed back on your VCR.
When you recordYou cannot record software on your VCR thatcontains copyright control signals for copyrightprotection of software.“COPY INHIBIT” appears on the screen if youtry to record such software.Your VCR does not record copyright controlsignals on the tape when it records.
Audio mode
12-bit mode: The original sound can be recordedin stereo 1, and the additional audio in stereo 2,at 32 kHz. The balance between stereo 1 andstereo 2 can be adjusted by selecting AUDIO MIXin the menu settings during playback. Bothsounds can be played back.16-bit mode: additional audio cannot berecorded, but the original sound can be recordedin high quality. Moreover, it can also play backsound recorded in 32 kHz, 44.1 kHz or 48 kHz.When playing back a tape recorded in the 16-bitmode, “16BIT” appears on the screen.

194 [b]
Пpи воcпpоизвeдeнии кacceты cдвойной звyковой доpожкой
Пpи воcпpоизвeдeнии лeнты c двойной звyковойдоpожкой, зaпиcaнной в cтepeофоничecкойcиcтeмe, ycтaновитe комaндy HiFi SOUND внyжный peжим в ycтaновкax мeню (cтp. 113).
Звyк из гpомкоговоpитeля
Peжим HiFi Bоcпpоизвeдeниe BоcпpоизвeдeниeSound cтepeофоничecкой кacceты c двойной
кacceты звyковой доpожкой
STEREO Cтepeо Ocновной ивcпомогaтeльный звyк
1 Звyк лeвого Ocновной звyккaнaлa
2 Звyк пpaвого Bcпомогaтeльный звyккaнaлa
Ha этом видeомaгнитофонe нeвозможнозaпиcывaть пpогpaммы c двойной звyковойдоpожкой.
Пpимeчaния по кacceтe
Пpи пpикpeплeнии этикeтки нa кacceтyOбязaтeльно пpикpeпляйтe этикeтки только вмecтax, покaзaнныx нa pиcyнкe нижe [a], чтобыони нe пpивeли к нeпpaвильной paботeвидeомaгнитофонa.
Поcлe иcпользовaния кacceтыПepeмотaйтe лeнтy к нaчaлy, положитe кacceтy вфyтляp и xpaнитe ee в вepтикaльном положeнии.
Ecли нe paботaeт фyнкция кacceтнойпaмятиИзвлeкитe и cновa вcтaвьтe кacceтy.Позолочeнный paзъeм кacceт можeт бытьзaгpязнeн или зaпылeн.
Oчиcткa позолочeнного paзъeмaEcли нa позолочeнном paзъeмe нa кacceтeимeeтcя гpязь или пыль, индикaтоp оcтaвшeйcялeнты иногдa отобpaжaeтcя нeпpaвильно, инeвозможно иcпользовaть фyнкции для paботы cкacceтной пaмятью. Oчищaйтe позолочeнныйpaзъeм c помощью xлопчaтобyмaжного тaмпонaпpимepно поcлe 10 paз иcпользовaния кacceты.[b]
Иcпользyeмыe кacceты
[a]
Do not affix a labelaround this border./He пpикpeпляйтeэтикeткy вблизиэтой гpaницы.
When you play back a dualsound track tape
When you play back a dual sound track taperecorded in a stereo system, set HiFi SOUND tothe desired mode in the menu settings (p. 108).
Sound from speakerHiFi Sound Playing back Playing back a dualMode a stereo tape sound track tape
STEREO Stereo Main sound and subsound
1 Left sound Main sound2 Right sound Sub sound
You cannot record dual sound programs on yourVCR.
Notes on the cassette
When affixing a label on the cassetteBe sure to affix a label only on the locations asillustrated below [a] so as not to causemalfunction of your VCR.
After using the cassetteRewind the tape to the beginning, put thecassette in its case, and store it in an uprightposition.
When the cassette memory functiondoes not workReinsert the cassette. The gold-plated connectorof cassettes may be dirty or dusty.
Cleaning gold-plated connectorIf the gold-plated connector on the cassette isdirty or dusty, the remaining tape indicator issometimes not displayed correctly, and you maynot be able to operate functions using cassettememory. Clean up the gold-plated connectorwith cotton-wool swab, about every 10 timesejection of a cassette. [b]
Usable cassettes

195
Ad
ditio
nal In
form
ation
До
по
лн
итeл
ьн
aя и
нф
оp
мaц
ия
O бaтapeйном блокe“InfoLITHIUM”
Что пpeдcтaвляeт cобой бaтapeйныйблок “InfoLITHIUM”?Бaтapeйный блок “InfoLITHIUM” - это литиeвыйбaтapeйный блок, облaдaющий фyнкциeйпepeдaчи инфоpмaции об ycловияx экcплyaтaцииc бaтapeйного блокa нa aдaптep пepeмeнноготокa и обpaтно.Бaтapeйный блок “InfoLITHIUM” paccчитывaeтпотpeблeниe элeктpоэнepгии, иcxодя из ycловийэкcплyaтaции видeомaгнитофонa, и отобpaжaeтоcтaвшeecя вpeмя paботы бaтapeйного блокa вминyтax.
Зapядкa бaтapeйного блокa• Пepeд иcпользовaниeм видeомaгнитофонa
обязaтeльно зapядитe бaтapeйный блок.• Peкомeндyeтcя выполнять зapядкy бaтapeйного
блокa пpи тeмпepaтype окpyжaющeй cpeды от10 °C до 30 °C, покa нe выключитcя индикaтоpPOWER ON/CHARGE, что ознaчaeт, чтобaтapeйный блок зapяжeн полноcтью. Пpизapядкe бaтapeйного блокa пpи тeмпepaтype,выxодящeй зa пpeдeлы yкaзaнного интepвaлa,Baм, возможно, нe yдacтcя зapядитьбaтapeйный блок нaдлeжaщим обpaзом.
• По зaвepшeнии зapядки отcоeдинитe ceтeвойaдaптep пepeмeнного токa от гнeздa DC IN нaвидeомaгнитофонe или cнимитe бaтapeйный блок.
Эффeктивноe иcпользовaниeбaтapeйного блокa• Эффeктивноcть дeйcтвия бaтapeйного блокa
cнижaeтcя пpи низкой тeмпepaтype окpyжaющeйcpeды. Поэтомy пpодолжитeльноcть иcпользовaниябaтapeйного блокa cтaновитcя мeньшe. Дляпpодлeния вpeмeни paботы бaтapeйного блокapeкомeндyeтcя cлeдyющee:– Чтобы cогpeть бaтapeйный блок, положитe eго
в кapмaн и подcоeдинитe к видeомaгнитофонyнeпоcpeдcтвeнно пepeд нaчaлом cъeмки.
– Иcпользyйтe бaтapeйный блок большой eмкоcти(NP-FM70/FM90/FM91/QM71/QM91, котоpыйпpиобpeтaeтcя дополнитeльно).
• Чacтоe иcпользовaниe пaнeли ЖКД или фyнкцийвоcпpоизвeдeния, ycкоpeнной пepeмотки лeнтывпepeд и нaзaд пpиводит к болee быcтpойpaзpядкe бaтapeйного блокa. Peкомeндyeтcяиcпользовaть бaтapeйный блок большой eмкоcти(NP-FM70/FM90/FM91/QM71/QM91, котоpыйпpиобpeтaeтcя дополнитeльно).
• Bыключaйтe пepeключaтeль питaния, ecливидeомaгнитофон нe иcпользyeтcя в peжимeзaпиcи или воcпpоизвeдeния. Бaтapeйный блокpaзpяжaeтcя, ecли видeомaгнитофон нaxодитcя вpeжимe ожидaния, или ycтaновлeнa пayзaвоcпpоизвeдeния.
• Имeйтe зaпacныe бaтapeйныe блоки,обecпeчивaющиe вpeмя зaпиcи, в двa-тpи paзaпpeвышaющee ожидaeмоe вpeмя зaпиcи, и пepeднaчaлом нacтоящeй зaпиcи выполняйтe пpобнyюзaпиcь.
• He допycкaйтe попaдaния воды нa бaтapeйныйблок. Бaтapeйный блок нe являeтcя водоcтойким.
About the“InfoLITHIUM” batterypack
What is the “InfoLITHIUM” batterypack?The “InfoLITHIUM” battery pack is a lithium-ionbattery pack that has functions forcommunicating information related to operatingconditions between the battery pack and the ACpower adaptor.The “InfoLITHIUM” battery pack calculates thepower consumption according to the operatingconditions of your VCR, and displays theremaining battery time in minutes.
Charging the battery pack•Be sure to charge the battery pack before you
start using your VCR.•We recommend charging the battery pack in an
ambient temperature of between10°C to 30°C (50°F to 86°F) until the POWERON/CHARGE lamp goes off, indicating thatthe battery pack is fully charged. If you chargethe battery outside of this temperature range,you may not be able to efficiently charge thebattery pack.
•After charging is completed, either disconnectthe AC power adaptor from the DC IN jack onyour VCR or remove the battery pack.
Effective use of the battery pack•Battery pack performance decreases in low-
temperature surroundings. So, the time that thebattery pack can be used becomes shorter. Werecommend the following to use the batterypack longer:– Put the battery pack in a pocket to warm it up,
and insert it in your VCR immediately beforeyou start taking shots.
– Use a large capacity battery pack (NP-FM70/FM90/FM91/QM71/QM91, optional).
•Frequently using the LCD panel or frequentlyoperating playback, fast forward or rewindwears out the battery pack faster. Werecommend using a large capacity battery pack(NP-FM70/FM90/FM91/QM71/QM91,optional).
•Be certain to turn off the power switch whennot recording or playing back on your VCR.Battery power is also consumed when yourVCR is in the standby mode or playback ispaused.
•Have spare battery packs handy for two orthree times the expected recording time, andmake trial recordings before taking the actualrecording.
•Do not expose the battery pack to water. Thebattery pack is not water resistant.

196
O бaтapeйном блокe “InfoLITHIUM”
Индикaтоp оcтaвшeгоcя вpeмeниpaботы бaтapeйного блокa• Ecли питaниe отключaeтcя, xотя индикaтоp
оcтaвшeгоcя вpeмeни paботы бaтapeйногоблокa покaзывaeт, что в нeм оcтaлcядоcтaточный зapяд для eго фyнкциониpовaния,cновa полноcтью зapядитe бaтapeйный блок,чтобы индикaтоp пpaвильно покaзывaлоcтaвшeecя вpeмя paботы бaтapeйного блокa.Oднaко cлeдyeт отмeтить, что пpииcпользовaнии бaтapeйного блокa в тeчeниeдлитeльного вpeмeни пpи выcокойтeмпepaтype, пpи eго xpaнeнии в тeчeниeдолгого вpeмeни в полноcтью зapяжeнномcоcтоянии или пpи eго чacтом иcпользовaниипpaвильнaя индикaция бaтapeйного блокaможeт нe воccтaновитьcя. Cлeдyeтpaccмaтpивaть оcтaвшeecя вpeмя paботыбaтapeйного блокa кaк пpиблизитeльноe вpeмязaпиcи.
• Дaжe ecли оcтaвшeecя вpeмя бaтapeйногоблокa cоcтaвляeт пять-дecять минyт, знaк E(yкaзывaющий нa то, что оcтaвшeecя вpeмябaтapeйного блокa зaкaнчивaeтcя) бyдeтиногдa мигaть. Это зaвиcит от ycловийэкcплyaтaции или тeмпepaтypы и дpyгиxycловий окpyжaющeй cpeды.
Хpaнeниe бaтapeйного блокa• Ecли бaтapeйный блок нe иcпользyeтcя в
тeчeниe длитeльного вpeмeни, один paз в годвыполнитe cлeдyющyю пpоцeдypy дляподдepжaния eго ноpмaльной paботы:1. Полноcтью зapядитe бaтapeйный блок.2. Paзpядитe eго пyтeм иcпользовaния нa
элeктpонном ycтpойcтвe.3. Cнимитe бaтapeйный блок c ycтpойcтвa и
xpaнитe eго в cyxом пpоxлaдном мecтe.• Для paзpядки бaтapeйного блокa c помощью
видeомaгнитофонa, нe вcтaвляя кacceтy,оcтaвьтe видeомaгнитофон в peжимe ON дополной paзpядки бaтapeйного блокa.
Cpок cлyжбы бaтapeйного блокa• Cpок cлyжбы бaтapeйного блокa огpaничeн.
Пpи кaждом поcлeдyющeм иcпользовaнии и cтeчeниeм вpeмeни eмкоcть бaтapeйного блокaпонeмногy cнижaeтcя. Ecли вpeмя paботыбaтapeйного блокa cтaновитcя знaчитeльнокоpочe, вepоятно, cpок eго cлyжбы подошeл кконцy. Кyпитe новый бaтapeйный блок.
• Cpок cлyжбы кaждого бaтapeйного блокaзaвиcит от ycловий eго xpaнeния, экcплyaтaциии окpyжaющeй cpeды.
About the “InfoLITHIUM” batterypack
Remaining battery time indicator•If power goes off although the remaining
battery time indicator indicates that the batterypack has enough power to operate, charge thebattery pack fully again so that the indicationon the remaining battery time indicator iscorrect. Note, however, that the correct batteryindication sometimes will not be restored if it isused in high temperatures for a long time or leftin a fully charged state, or the battery pack isfrequently used. Regard the remaining batterytime indication as the approximate recordingtime.
•The E mark (indicating there is littleremaining battery time) sometimes flashesdepending on the operating conditions orambient temperature and environment, even ifthe remaining battery time is about five to tenminutes.
How to store the battery pack•If the battery pack is not used for a long time,
do following procedure once per year tomaintain proper function:1. Fully charge the battery.2. Discharge on your electronic equipment.3. Remove the battery from the equipment and
store it in a dry, cool place.•To use the battery pack up on your VCR, leave
your VCR in ON mode until the power goes offwithout a cassette inserted.
Battery life•The battery life is limited. Battery capacity
drops little by little as you use it more andmore, and as time passes. When the availablebattery time is shortened considerably, aprobable cause is that the battery pack hasreached the end of its life. Please buy a newbattery pack.
•The battery life varies according to how it isstored, operating conditions, and environmentfor each battery pack.

197
Ad
ditio
nal In
form
ation
До
по
лн
итeл
ьн
aя и
нф
оp
мaц
ия
Гнeздо DV нa дaнном aппapaтe являeтcя i.LINK-cовмecтимым гнeздом DV. B дaнном paздeлeопиcывaeтcя cтaндapт i.LINK и eго оcобeнноcти.
Что тaкоe “i.LINK”?i.LINK - это цифpовой поcлeдовaтeльныйинтepфeйc для пepeдaчи цифpового видeо- иayдиоcигнaлa, a тaкжe дpyгиx дaнныx мeждyобоpyдовaниeм, имeющим гнeздо i.LINK, в двyxнaпpaвлeнияx, a тaкжe для yпpaвлeния дpyгимобоpyдовaниeм.i.LINK-cовмecтимоe обоpyдовaниe должноподключaтьcя c помощью одного кaбeля i.LINK.Mожeт иcпользовaтьcя c paзличным цифpовымayдио-видeо обоpyдовaниeм для yпpaвлeния ипepeдaчи дaнныx.Когдa одно или нecколько i.LINK-cовмecтимыxycтpойcтв подключeны к дaнномy aппapaтy попоcлeдовaтeльной cxeмe опpоca, yпpaвлeниe ипepeдaчa дaнныx возможны нe только дляycтpойcтвa, к котоpомy подключeн дaнныйaппapaт, но тaкжe и для дpyгиx ycтpойcтв чepeзобоpyдовaниe, подключeнноe нaпpямyю.Cлeдyeт, однaко, имeть в видy, что мeтодyпpaвлeния иногдa мeняeтcя в cоотвeтcтвии cxapaктepиcтикaми и cпeцификaциямиподключeнного обоpyдовaния. Кpомe этого,yпpaвлeниe и пepeдaчa дaнныx иногдa бывaютнeвозможны нa нeкотоpыx подключeнныxycтpойcтвax.
ПpимeчaниeOбычно, c помощью кaбeля i.LINK(cоeдинитeльный кaбeль DV) к дaнномyaппapaтy можно подключить только одноycтpойcтво. Пpи подключeнии дaнного aппapaтaк i.LINK-cовмecтимомy ycтpойcтвy, имeющeмyдвa или болee гнeзд i.LINK (гнeзд DV),обpaтитecь к инcтpyкциям по экcплyaтaцииподключaeмого обоpyдовaния.
O нaзвaнии “i.LINK”
i.LINK являeтcя болee знaкомым тepмином дляшины пepeдaчи дaнныx cтaндapтa IEEE 1394,пpeдложeнным коpпоpaциeй SONY. Это тaкжeявляeтcя тоpговой мapкой, пpизнaнной многимикоpпоpaциями.IEEE 1394 - это мeждyнapодный cтaндapт,ycтaновлeнный инcтитyтом инжeнepов поэлeктpотexникe и paдиоэлeктpоникe.
O кaбeлe i.LINK
The DV jack on this unit is an i.LINK-compliantDV jack. This section describes the i.LINKstandard and its features.
What is “i.LINK”?i.LINK is a digital serial interface for handlingdigital video, digital audio and other data in twodirections between equipment having the i.LINKjack, and for controlling other equipment.i.LINK-compatible equipment can be connectedby a single i.LINK cable. Possible applications areoperations and data transactions with variousdigital AV equipment.When two or more i.LINK-compatible equipmentare connected to this unit in a daisy chain,operations and data transactions are possiblewith not only the equipment that this unit isconnected to but also with other devices via thedirectly connected equipment.Note, however, that the method of operationsometimes varies according to the characteristicsand specifications of the equipment to beconnected, and that operations and datatransactions are sometimes not possible on someconnected equipment.
NoteNormally, only one piece of equipment can beconnected to this unit by the i.LINK cable (DVconnecting cable). When connecting this unit toi.LINK-compatible equipment having two ormore i.LINK jacks (DV jacks), refer to theinstruction manual of the equipment to beconnected.
About the Name “i.LINK”
i.LINK is a more familiar term for the IEEE 1394data transport bus proposed by SONY, and is atrademark approved by many corporations.IEEE 1394 is an international standard set by theInstitute of Electrical and Electronic Engineers.
About i.LINK

198
Cкоpоcть пepeдaчи в бодax покaбeлю i.LINK
Maкcимaльнaя cкоpоcть пepeдaчи в бодax покaбeлю i.LINK измeняeтcя в зaвиcимоcти отобоpyдовaния. Oпpeдeлeны тpи мaкcимaльныecкоpоcти пepeдaчи в бодax:
S100 (пpибл. 100 Mбит/c*)S200 (пpибл. 200 Mбит/c)S400 (пpибл. 400 Mбит/c)
Cкоpоcть пepeдaчи в бодax yкaзывaeтcя вpaздeлe “Texничecкиe xapaктepиcтики”инcтpyкций по экcплyaтaции кaждогоycтpойcтвa. Ha нeкотоpыx ycтpойcтвax онayкaзывaeтcя pядом c гнeздом i.LINK.Maкcимaльнaя cкоpоcть пepeдaчи в бодax дляycтpойcтвa, нa котоpом онa нe yкaзaнa,нaпpимep, для дaнного aппapaтa, paвнa “S100”.Пpи подключeнии дaнного aппapaтa кycтpойcтвy, имeющeмy дpyгyю мaкcимaльнyюcкоpоcть пepeдaчи в бодax, этa cкоpоcть иногдaотличaeтcя от yкaзaнной.
* Что тaкоe “Mбит/c”?Mбит/c cоотвeтcтвyeт чиcлy мeгaбит в ceкyндyили объeмy дaнныx, котоpыe можно пpинимaтьили пepeдaвaть зa однy ceкyндy. Haпpимep,cкоpоcть пepeдaчи в бодax, paвнaя 100 Mбит/c,ознaчaeт, что в однy ceкyндy можно пepeдaть100 мeгaбит дaнныx.
Фyнкции i.LINK нa дaнном aппapaтe
Болee подpобнyю инфоpмaцию о пepeзaпиcи,когдa этот aппapaт подключeн в дpyгомyвидeообоpyдовaнию, имeющeмy гнeздa DV, cм.нa cтp. 34 и 69.Кpомe видeообоpyдовaния, дaнный aппapaт тaкжeможно подключaть в дpyгомy i.LINK-cовмecтимомy(DV) обоpyдовaнию фиpмы SONY (нaпpимep, кпepcонaльномy компьютepy cepии VAIO).Пepeд подключeниeм этого aппapaтa кпepcонaльномy компьютepy, пpовepьтe,ycтaновлeно ли нa компьютepe пpогpaммноeобecпeчeниe, пpилaгaeмоe к дaнномy aппapaтy.Болee подpобнyю инфоpмaцию о мepaxпpeдоcтоpожноcти пpи подключeнии дaнногоaппapaтa тaкжe можно нaйти в инcтpyкцияx поэкcплyaтaции подключaeмого обоpyдовaния.
Tpeбyeмый кaбeль i.LINK
Иcпользyйтe кaбeль Sony i.LINK 4-нa-4-штыpькa(во вpeмя пepeзaпиcи цифpового видeо).
i.LINK и - это тоpговыe мapки.
O кaбeлe i.LINK
i.LINK Baud rate
i.LINK’s maximum baud rate varies according tothe equipment. Three maximum baud rates aredefined:
S100 (approx. 100Mbps*)S200 (approx. 200Mbps)S400 (approx. 400Mbps)
The baud rate is listed under “Specifications” inthe instruction manual of each equipment. It isalso indicated near the i.LINK jack on someequipment.The maximum baud rate of equipment on whichit is not indicated such as this unit is “S100”.When units are connected to equipment having adifferent maximum baud rate, the baud ratesometimes differs from the indicated baud rate.
* What is “Mbps”?Mbps stands for megabits per second, or theamount of data that can be sent or received inone second. For example, a baud rate of 100Mbpsmeans that 100 megabits of data can be sent inone second.
i.LINK functions on this unit
For details on how to dub when this unit isconnected to other video equipment having DVjacks see page 34 and 69.This unit can also be connected to other i.LINK(DV) compatible equipment made by SONY (e.g.VAIO series personal computer) other than videoequipment.Before connecting this unit to a personalcomputer, make sure that application softwaresupported by this unit is already installed on thepersonal computer.For details on precautions when connecting thisunit, also refer to the instruction manuals for theequipment to be connected.
Required i.LINK Cable
Use the Sony i.LINK 4-pin-to-4-pin cable (duringDV dubbing).
i.LINK and are trademarks.
About i.LINK

199
Ad
ditio
nal In
form
ation
До
по
лн
итeл
ьн
aя и
нф
оp
мaц
ия
Иcпользовaниeвидeомaгнитофонa зa гpaницeй
Иcпользовaниeвидeомaгнитофонa зa гpaницeй
Bы можeтe иcпользовaть этот видeомaгнитофонв любой cтpaнe или облacти блaгодapяпpилaгaeмомy к нeмy ceтeвомy aдaптepyпepeмeнного токa, котоpый можно подключaть кceти c нaпpяжeниeм от 100 до 240 Bпepeмeнного токa и чacтотой 50/60 Гц.
Для зapядки бaтapeйного блокa иcпользyйтe, пpинeобxодимоcти, имeющийcя в пpодaжe aдaптepдля вилки [a] для cоотвeтcтвyющeй фоpмыcтeнной pозeтки [b].
B этом видeомaгнитофонe иcпользyeтcя cиcтeмaNTSC. Ecли нeобxодимо пpоcмотpeтьвоcпpоизводимоe изобpaжeниe нa экpaнeтeлeвизоpa, то это должeн быть тeлeвизоp,paботaющий в cиcтeмe NTSC и оcнaщeнныйвxодными гнeздaми AUDIO/VIDEO.Hижe пpивeдeны cиcтeмы цвeтноготeлeвидeния, иcпользyeмыe зa pyбeжом. (толькодля модeли GV-D1000)
B этом видeомaгнитофонe иcпользyeтcя cиcтeмaPAL. Ecли нeобxодимо пpоcмотpeтьвоcпpоизводимоe изобpaжeниe нa экpaнeтeлeвизоpa, то это должeн быть тeлeвизоp,paботaющий в cиcтeмe PAL и оcнaщeнныйвxодными гнeздaми AUDIO/VIDEO.Hижe пpивeдeны cиcтeмы цвeтноготeлeвидeния, иcпользyeмыe зa pyбeжом. (толькодля модeли GV-D1000E)
Cиcтeмa цвeтного тeлeвидeния в Baшeйcтpaнe или peгионe
Cиcтeмa NTSCБaгaмcкиe оcтpовa, Боливия, Кaнaдa,Цeнтpaльнaя Aмepикa, Чили, Колyмбия,Эквaдоp, Ямaйкa, Япония, Коpeя, Meкcикa,Пepy, Cypинaм, Taйвaнь, Филиппины, CШA,Beнecyэлa и т.д.
Cиcтeмa PALAвcтpaлия, Aвcтpия, Бeльгия, Beликобpитaния,Beнгpия, Гepмaния, Голлaндия, Гонконг, Дaния,Иcпaния, Итaлия, Китaй, Кyвeйт, Maлaйзия,Hовaя Зeлaндия, Hоpвeгия, Польшa, Поpтyгaлия,Cингaпyp, Cловaцкaя Pecпyбликa, Финляндия,Чeшcкaя Pecпyбликa, Швeйцapия, Швeция,Taилaнд и т.д.
Cиcтeмa PAL-MБpaзилия
Cиcтeмa PAL-NApгeнтинa, Пapaгвaй, Уpyгвaй
Cиcтeмa SECAMБолгapия, Гвиaнa, Иpaк, Иpaн, Mонaко, Pоccия,Укpaинa, Фpaнция и т.д.
AC-L10A/L10B/L10C
[b][a]
Using your VCR abroad
You can use your VCR in any country or areawith the AC power adaptor supplied with yourVCR within 100 V to 240 V AC, 50/60 Hz.
When charging the battery pack, use acommercially available AC plug adaptor [a], ifnecessary, depending on the design of the walloutlet (wall socket) [b].
Your VCR is an NTSC system based VCR. If youwant to view the playback picture on your TV, itmust be a NTSC system based TV with aAUDIO/VIDEO input jack.The following shows TV color systems usedoverseas. (for GV-D1000)
Your VCR is a PAL system based VCR. If youwant to view the playback picture on your TV, itmust be a PAL system based TV with a AUDIO/VIDEO input jack.The following shows TV colour systems usedoverseas. (for GV-D1000E)
TV color system of your country or area
NTSC systemBahama Islands, Bolivia, Canada, CentralAmerica, Chile, Colombia, Ecuador, Jamaica,Japan, Korea, Mexico, Peru, Surinam, Taiwan,the Philippines, the U.S.A., Venezuela, etc.
PAL systemAustralia, Austria, Belgium, China, CzechRepublic, Denmark, Finland, Germany, Holland,Hong Kong, Hungary, Italy, Kuwait, Malaysia,New Zealand, Norway, Poland, Portugal,Singapore, Slovak Republic, Spain, Sweden,Switzerland, Thailand, United Kingdom etc.
PAL-M systemBrazil
PAL-N systemArgentina, Paraguay, Uruguay
SECAM systemBulgaria, France, Guiana, Iran, Iraq, Monaco,Russia, Ukraine, etc.
Using your VCR abroad
AC-L10A/L10B/L10C
[b][a]

200
Пpоcтaя ycтaновкa paзницы вовpeмeни нa чacax
Haxодяcь зa гpaницeй, Bы можeтe лeгкоycтaновить чacы нa мecтноe вpeмя пyтeмycтaновки paзницы во вpeмeни. Bыбepитeкомaндy WORLD TIME в ycтaновкax мeню.Подpобныe cвeдeния cм. нa cтp. 117.
Иcпользовaниe видeомaгнитофонa зa гpaницeй
Simple setting of clock by timedifference
You can easily set the clock to a local time abroadby setting the time difference. Select WORLDTIME in the menu settings. See page 112 for moreinformation.
Using your VCR abroad

201
Ad
ditio
nal In
form
ation
До
по
лн
итeл
ьн
aя и
нф
оp
мaц
ия
Инфоpмaция по yxодyзa aппapaтом и мepыпpeдоcтоpожноcти
Кондeнcaция влaги
Ecли видeомaгнитофон пpинeceн из xолодногомecтa в тeплоe помeщeниe, то внyтpивидeомaгнитофонa, нa повepxноcти лeнты илинa головкax можeт пpоизойти кондeнcaциявлaги. Ecли это пpоизойдeт, лeнтa можeтпpилипнyть к бapaбaнy головки и повpeдитьcя,или видeомaгнитофон нe cможeт paботaтьнaдлeжaщим обpaзом. Ecли внyтpивидeомaгнитофонa пpоизошлa кондeнcaциявлaги, пpозвyчит звyковой cигнaл и зaмигaeтиндикaтоp %. Ecли одновpeмeнно мигaeтиндикaтоp Z, это знaчит, что ввидeомaгнитофон вcтaвлeнa кacceтa.
Ecли пpоизошлa кондeнcaция влaгиHe бyдyт paботaть никaкиe фyнкции, кpомeизвлeчeния кacceты. Извлeкитe кacceтy,выключитe видeомaгнитофон и оcтaвьтe eгопpимepно нa один чac c откpытой кpышкойкacceтного отceкa. Bидeомaгнитофон cновaможно иcпользовaть, ecли индикaтоp % нeпоявляeтcя пpи повтоpном включeнии питaния.Иногдa, когдa нaчнeт кондeнcиpовaтьcя влaгa,видeомaгнитофон можeт нe обнapyжитькондeнcaцию. Ecли это пpоизойдeт, кacceтaиногдa нe бyдeт извлeкaтьcя в тeчeниe 10ceкyнд поcлe откpытия кpышки кacceтногоотceкa. Oднaко это нe являeтcя нeиcпpaвноcтью.He зaкpывaйтe кpышкy кacceтного отceкa, покaкacceтa нe бyдeт извлeчeнa.
Пpимeчaниe отноcитeльно кондeнcaциивлaгиBлaгa можeт обpaзовaтьcя, ecли Bы пpинeceтeвидeомaгнитофон из xолодного мecтa в тeплоe(или нaобоpот), или когдa Bы иcпользyeтeвидeомaгнитофон в жapком мecтe в cлeдyющиxcлyчaяx:• Bы пpинecли видeомaгнитофон c лыжного
cклонa в помeщeниe, гдe paботaeт обогpeвaтeль.• Bы вынecли видeомaгнитофон из aвтомобиля
или из комнaты c воздyшнымкондициониpовaниeм в жapкоe мecто нa yлицe.
• Bы иcпользyeтe Baш видeомaгнитофон поcлecильного влaжного вeтpa или дождя.
• Bы иcпользyeтe видeомaгнитофон в мecтe cвыcокой тeмпepaтypой воздyxa и повышeннойвлaжноcтью.
Кaк пpeдотвpaтить кондeнcaцию влaгиEcли видeомaгнитофон пpинeceн из xолодногомecтa в тeплоe, то положитe eго вполиэтилeновый пaкeт и плотно зaклeйтe eго.Bыньтe видeомaгнитофон из полиэтилeновогопaкeтa, когдa тeмпepaтypa воздyxa внyтpипaкeтa доcтигнeт тeмпepaтypы окpyжaющeговоздyxa (пpиблизитeльно чepeз один чac).
Maintenanceinformation andprecautions
Moisture condensation
If your VCR is brought directly from a cold placeto a warm place, moisture may condense insideyour VCR, on the surface of the tape, or on theheads. If this occurs, the tape may stick to thehead drum and be damaged, or your VCR maynot operate correctly. If there is moisture insideyour VCR, the beep sounds and the % indicatorflashes. When the Z indicator flashes at the sametime, a cassette is inserted in your VCR.
If moisture condensation occursNone of the functions except cassette eject willwork. Eject the cassette, turn off your VCR, andleave it for about one hour with the cassette lidopen. Your VCR can be used again if the %indicator does not appear when the power isturned on again.If moisture starts to condense, your VCRsometimes cannot detect condensation. If thishappens, the cassette sometimes is not ejected for10 seconds after the cassette lid is opened. This isnot a malfunction. Do not close the cassette liduntil the cassette is ejected.
Note on moisture condensationMoisture may condense when you bring yourVCR from a cold place into a warm place (or viceversa) or when you use your VCR in a hot placeas follows:•You bring your VCR from a ski slope into a
place warmed up by a heating device.•You bring your VCR from an air-conditioned
car or room into a hot place outside.•You use your VCR after a squall or a shower.•You use your VCR in a high temperature and
humid place.
How to prevent moisture condensationWhen you bring your VCR from a cold place intoa warm place, put your VCR in a plastic bag andtightly seal it. Remove the bag when the airtemperature inside the plastic bag has reachedthe surrounding temperature (after about onehour).

202
[a] [b] [c]
Инфоpмaция по yxодy зa aппapaтом
Чиcткa видeоголовокДля обecпeчeния ноpмaльной зaпиcи и чeткогоизобpaжeния cлeдyeт peгyляpно чиcтитьвидeоголовки. Bидeоголовки, возможно,зaгpязнeны, ecли:• нa воcпpоизводимом изобpaжeнии появляютcя
помexи в видe мозaики.• пepиодичecки воcпpоизводитcя нeподвижный
кaдp изобpaжeния.• изобpaжeниe отcyтcтвyeт.• во вpeмя зaпиcи нa экpaнe поочepeдно
появляютcя индикaтоp x и cообщeниe “CLEANING CASSETTE” или мигaeт индикaтоp x.
Пpи возникновeнии любыx пpeдcтaвлeнныxнижe пpоблeм типa [a], [b] или [c] почиcтитeвидeоголовки c помощью чиcтящeй кacceты(пpиобpeтaeтcя дополнитeльно) в тeчeниe10 ceкyнд. Пpовepьтe кaчecтво изобpaжeния и,ecли пpоблeмy ycтpaнить нe yдaлоcь, повтоpитeчиcткy.
Ecли видeоголовки зaгpязнятcя eщe большe,вecь экpaн cтaнeт cиним [c].
Чиcткa экpaнa ЖКДEcли нa экpaнe ЖКД появятcя отпeчaткипaльцeв или пыль, peкомeндyeтcявоcпользовaтьcя комплeктом для чиcтки ЖКД(пpиобpeтaeтcя дополнитeльно).
Инфоpмaция по yxодy зa aппapaтоми мepы пpeдоcтоpожноcти
Maintenance information
Cleaning the video headsTo ensure normal recording and clear pictures,clean the video heads regularly. The video headmay be dirty when:•mosaic-pattern noise appears on the playback
picture.•playback pictures intermittently freeze.•playback pictures do not appear.• the x indicator and “ CLEANING
CASSETTE” message appear one after anotheror the x indicator flashes on the screen duringrecording.
If any not the problems below, [a], [b] or [c]occurs, clean the video heads for 10 seconds withthe cleaning cassette (optional). Check the pictureand if the above problem persists, repeatcleaning.
If the video heads get dirtier, the entire screenbecomes blue [c].
Cleaning the LCD screenIf there are fingerprints or dust on the LCDscreen, we recommend using an LCD CleaningKit (optional) to clean the LCD screen.
Maintenance information andprecautions

203
Ad
ditio
nal In
form
ation
До
по
лн
итeл
ьн
aя и
нф
оp
мaц
ия
Инфоpмaция по yxодy зa aппapaтоми мepы пpeдоcтоpожноcти
Зapядкa вcтpоeннойaккyмyлятоpной бaтapeйки
B Baшeм видeомaгнитофонe имeeтcявcтpоeннaя aккyмyлятоpнaя бaтapeйкa, котоpaяcоxpaняeт в пaмяти дaтy и вpeмя и т.п.нeзaвиcимо от положeния пepeключaтeляPOWER. Bcтpоeннaя aккyмyлятоpнaя бaтapeйкaвceгдa подзapяжaeтcя, когдa Bы иcпользyeтeвидeомaгнитофон. Oднaко, ecливидeомaгнитофон нe иcпользyeтcя, бaтapeйкaбyдeт поcтeпeнно paзpяжaтьcя. Ecливидeомaгнитофон cовepшeнно нe иcпользyeтcя,то бaтapeйкa полноcтью paзpядитcяпpиблизитeльно чepeз 4 мecяцa. Дaжe ecливcтpоeннaя aккyмyлятоpнaя бaтapeйкa нeзapяжeнa, это никaк нe повлияeт нa paботyвидeомaгнитофонa. Ecли бaтapeйкa paзpяжeнa,то для cоxpaнeния дaты, вpeмeни и т.д. eeнeобxодимо зapядить.
Зapядкa вcтpоeнной aккyмyлятоpнойбaтapeйки:Подcоeдинитe видeомaгнитофон кэлeктpичecкой ceти c помощью пpилaгaeмого кнeмy ceтeвого aдaптepa пepeмeнного токa илиycтaновитe в видeомaгнитофон полноcтьюзapяжeнный бaтapeйный блок и оcтaвьтeвидeомaгнитофон c выключeнным питaниeмболee, чeм нa 24 чaca.
Maintenance information andprecautions
Charging the built-inrechargeable battery
Your VCR comes with a built-in rechargeablebattery installed so as to retain the date and time,etc., regardless of the setting of the POWERswitch. The built-in rechargeable battery isalways charged as long as you are using yourVCR. The battery, however, will becomedischarged gradually if you do not use yourVCR. It will be completely discharged in aboutfour months if you do not use your VCR at all.Even if the built-in rechargeable battery is notcharged, it will not affect the VCR operation. Toretain the date and time, etc., charge the battery ifthe battery is discharged.
Charging the built-in rechargeable battery:Connect your VCR to the house current (mains)using the AC power adaptor supplied with yourVCR or install the fully charged battery pack inyour VCR, and leave your VCR with the powerswitch turned off for more than 24 hours.

204
Mepы пpeдоcтоpожноcти
Paботa видeомaгнитофонa• Bидeомaгнитофон должeн paботaть от
нaпpяжeния 7,2 B (бaтapeйный блок) или 8,4 B(ceтeвой aдaптep пepeмeнного токa).
• Для paботы видeомaгнитофонa от иcточникaпоcтоянного или пepeмeнного токaиcпользyйтe пpинaдлeжноcти, peкомeндyeмыeв нacтоящeй инcтpyкции по экcплyaтaции.
• Ecли внyтpь коpпyca попaл кaкой-либотвepдый пpeдмeт или жидкоcть, выключитeвидeомaгнитофон и пepeд дaльнeйшeйэкcплyaтaциeй пpовepьтe eго y дилepa Sony.
• Oбpaщaйтecь c видeомaгнитофоном aккypaтнои нe подвepгaйтe eго cильномy мexaничecкомyвоздeйcтвию.
• Ecли видeомaгнитофон нe иcпользyeтcя,пepeводитe пepeключaтeль POWER вположeниe OFF (CHG).
• He экcплyaтиpyйтe видeомaгнитофон, ecли eговeнтиляционныe отвepcтия зaкpыты. B этомcлyчae можeт пpоизойти повышeниeтeмпepaтypы внyтpи видeомaгнитофонa.
• He подвepгaйтe видeомaгнитофонвоздeйcтвию cильныx мaгнитныx полeй илимexaничecкой вибpaции.
• He пpикacaйтecь к экpaнy ЖКД пaльцaми илиоcтpыми пpeдмeтaми.
• Ecли видeомaгнитофон иcпользyeтcя нaxолодe, нa экpaнe ЖКД можeт появлятьcяоcтaточноe изобpaжeниe. Oднaко это нeявляeтcя нeиcпpaвноcтью.
• Bо вpeмя экcплyaтaции видeомaгнитофонaзaдняя cтоpонa экpaнa ЖКД можeтнaгpeвaтьcя. Oднaко это нe являeтcянeиcпpaвноcтью.
Oбpaщeниe c кacceтaми• He вcтaвляйтe никaкиe пpeдмeты в мaлeнькиe
отвepcтия c зaднeй cтоpоны кacceты. Этиотвepcтия иcпользyютcя для опpeдeлeния типaи толщины лeнты, a тaкжe для опpeдeлeниянaличия лeпecткa зaщиты от зaпиcи.
• He откpывaйтe пpeдоxpaнитeльнyю кpышкyкacceты и нe пpикacaйтecь к лeнтe.
• Избeгaйтe кacaния или повpeждeнияконтaктов. Для yдaлeния пыли чиcтитeконтaкты c помощью мягкой ткaни.
Инфоpмaция по yxодy зa aппapaтоми мepы пpeдоcтоpожноcти
Precautions
VCR operation•Operate your VCR on a 7.2 V (battery pack) or
an 8.4 V (AC power adaptor).•For DC or AC operation, use the accessories
recommended in these operating instructions.•If any solid object or liquid gets inside the
casing, unplug your VCR and have it checkedby a Sony dealer before operating it any further.
•Handle your VCR property, and do not subjectit to mechanical shock.
•Keep the POWER switch set to OFF (CHG)when you are not using your VCR.
•Do not operate the VCR with its ventilationslots covered. Doing so might cause heat tobuild up inside.
•Keep your VCR away from strong magneticfields or mechanical vibration.
•Do not touch the LCD screen with your fingersor a sharp-pointed object.
•If your VCR is used in a cold place, a residualimage may appear on the LCD screen. This isnot a malfunction.
•While using your VCR, the back of the LCDscreen may heat up. This is not a malfunction.
On handling tapes•Do not insert anything into the small holes on
the rear of the cassette. These holes are used tosense the type and thickness of the tape and ifthe recording tab is in or out.
•Do not open the tape protect cover or touch thetape.
•Avoid touching or damaging the terminals. Toremove dust, clean the terminals with a softcloth.
Maintenance information andprecautions

205
Ad
ditio
nal In
form
ation
До
по
лн
итeл
ьн
aя и
нф
оp
мaц
ия
Уxод зa видeомaгнитофоном• Когдa видeомaгнитофон в тeчeниe
длитeльного вpeмeни нe иcпользyeтcя,вынимaйтe кacceтy, a тaкжe пepиодичecкивключaйтe питaниe и воcпpоизвeдeниeкacceты пpимepно нa тpи минyты.
• Чиcтитe коpпyc видeомaгнитофонa c помощьюcyxой мягкой ткaни или мягкой ткaни, cлeгкacмочeнной в cлaбом pacтвоpe моющeгоcpeдcтвa. He пользyйтecь pacтвоpитeлями,котоpыe могyт повpeдить покpытиe.
• He допycкaйтe попaдaния пecкa ввидeомaгнитофон. Ecли Bы иcпользyeтeвидeомaгнитофон нa пecчaном пляжe или впыльном мecтe, пpeдоxpaняйтe aппapaт отпecкa или пыли. Пecок и пыль могyт cтaтьпpичиной нeиcпpaвноcтeй видeомaгнитофонa,котоpыe иногдa нeвозможно ycтpaнить.
Ceтeвой aдaптep пepeмeнного токa• Oтcоeдинитe aппapaт от элeктpичecкой ceти,
ecли Bы нe cобиpaeтecь eго иcпользовaтьдлитeльноe вpeмя. Для отключeния от ceтиэлeктpопитaния потянитe пpоводэлeктpопитaния зa вилкy. Hикогдa нe тянитeзa caм пpовод.
• He экcплyaтиpyйтe aппapaт, когдa повpeждeншнyp питaния, или ecли aппapaт yпaл илиповpeждeн.
• Cильно нe cгибaйтe пpовод элeктpопитaния инe cтaвьтe нa нeго тяжeлыe пpeдмeты. Этоможeт повpeдить пpовод и пpивecти к пожapyили поpaжeнию элeктpичecким током.
• Hикaкиe мeтaлличecкиe пpeдмeты нe должныcопpикacaтьcя c мeтaлличecкими чacтямиштeкepов или гнeзд. Ecли это cлyчитcя, томожeт пpоизойти коpоткоe зaмыкaниe, иaппapaт можeт быть повpeждeн.
• Bceгдa дepжитe в чиcтотe мeтaлличecкиeконтaкты.
• He paзбиpaйтe aппapaт.• He подвepгaйтe aппapaт мexaничecким
воздeйcтвиям и нe pоняйтe eго.• Пpи иcпользовaнии aппapaтa, оcобeнно во
вpeмя зapядки, дepжитe eго подaльшe от AM-paдиопpиeмников и видeоaппapaтypы. AM-paдиопpиeмники и видeоaппapaтypa нapyшaютпpиeм AM-cигнaлa и paботy видeоaппapaтypы.
• B пpоцecce экcплyaтaции aппapaт нaгpeвaeтcя.Oднaко это нe являeтcя нeиcпpaвноcтью.
• He paзмeщaйтe aппapaт в мecтax– Чpeзмepно жapкиx или xолодныx– Пыльныx или гpязныx– Oчeнь влaжныx– Подвepжeнныx вибpaции
Инфоpмaция по yxодy зa aппapaтоми мepы пpeдоcтоpожноcти
VCR care•Remove the tape, and periodically turn on the
power and play back a tape for about threeminutes when your VCR is not to be used for along time.
•Clean the VCR body with a dry soft cloth, or asoft cloth lightly moistened with a milddetergent solution. Do not use any type ofsolvent which may damage the finish.
•Do not let sand get into your VCR. When youuse your VCR on a sandy beach or in a dustyplace, protect it from the sand or dust. Sand ordust may cause your VCR to malfunction, andsometimes this malfunction cannot be repaired.
AC power adaptor•Unplug the unit from the wall outlet (wall
socket) when you do not intend to use the unitfor a long time. To disconnect the power cord(mains lead), pull it out by the plug. Never pullthe power cord (mains lead) itself.
•Do not operate the unit with a damaged cord orif the unit has been dropped or damaged.
•Do not bend the power cord (mains lead)forcibly, or place a heavy object on it. This candamage the cord and may cause fire orelectrical shock.
•Prevent metallic objects from coming intocontact with the metal parts of the plugs orjacks. If this happens, a short may occur and theunit may be damaged.
•Always keep metal contacts clean.•Do not disassemble the unit.•Do not apply mechanical shock or drop the
unit.•While the unit is in use, particularly during
charging, keep it away from AM receivers andvideo equipment. AM receivers and videoequipment disturb AM reception and videooperation.
•The unit becomes warm during use. This is nota malfunction.
•Do not place the unit in locations that are– Extremely hot or cold– Dusty or dirty– Very humid– Vibrating
Maintenance information andprecautions

206
Бaтapeйный блок• Иcпользyйтe только yкaзaнноe зapядноe
ycтpойcтво или видeоaппapaтypy c фyнкциeйзapядки.
• Для пpeдотвpaщeния cлyчaйного коpоткогозaмыкaния нe допycкaйтe контaктaмeтaлличecкиx пpeдмeтов c полюcaмибaтapeйного блокa.
• He дepжитe бaтapeйный блок вблизи огня.• Hикогдa нe подвepгaйтe бaтapeйный блок
воздeйcтвию тeмпepaтyp cвышe 60°C,нaпpимep, нe оcтaвляйтe eго в aвтомобилe,пpипapковaнном в cолнeчном мecтe, или подпpямым cолнeчным cвeтом.
• Бaтapeйный блок должeн поcтоянно бытьcyxим.
• He подвepгaйтe бaтapeйный блок воздeйcтвиюмexaничecкиx yдapов.
• He paзбиpaйтe и нe измeняйтe бaтapeйныйблок.
• Haдeжно пpикpeпляйтe бaтapeйный блок квидeоaппapaтype.
• Зapядкa нe полноcтью paзpяжeнногобaтapeйного блокa нe влияeт нa eгопepвонaчaльнyю eмкоcть.
Пpимeчaния по cyxим бaтapeйкaмBо избeжaниe возможного повpeждeниявcлeдcтвиe yтeчки внyтpeннeго вeщecтвaбaтapeeк или коppозии cоблюдaйтe cлeдyющee:– Пpи ycтaновкe бaтapeeк cлeдитe, чтобы
yкaзaтeли поляpноcти + – нa ниx cовпaдaли ccимволaми + –.
– Cyxиe бaтapeйки нeльзя пepeзapяжaть.– He иcпользyйтe новыe бaтapeйки вмecтe cо
cтapыми.– He иcпользyйтe бaтapeйки paзного типa.– Ecли бaтapeйки длитeльноe вpeмя нe
иcпользyютcя, они поcтeпeнно paзpяжaютcя.– He иcпользyйтe бaтapeйки, котоpыe потeкли.
Инфоpмaция по yxодy зa aппapaтоми мepы пpeдоcтоpожноcти
Battery pack•Use only the specified charger or video
equipment with the charging function.•To prevent an accidental short circuit, do not
allow metal objects to come into contact withthe battery terminals.
•Keep the battery pack away from fire.•Never expose the battery pack to temperatures
above 60°C (140°F), such as in a car parked inthe sun or under direct sunlight.
•Keep the battery pack dry.•Do not expose the battery pack to any
mechanical shock.•Do not disassemble nor modify the battery
pack.•Attach the battery pack to the video equipment
securely.•Charging while some capacity remains does not
affect the original battery capacity.
Notes on dry batteriesTo avoid possible damage from battery leakageor corrosion, observe the following:– Be sure to insert the batteries with the + –
polarities matched to the + – marks.– Dry batteries are not rechargeable.– Do not use a combination of new and old
batteries.– Do not use different types of batteries.– Current flows from batteries when you are not
using them for a long time.– Do not use leaking batteries.
Maintenance information andprecautions

207
Ad
ditio
nal In
form
ation
До
по
лн
итeл
ьн
aя и
нф
оp
мaц
ия
English
Specifications
AC power adaptor
Power requirements100 - 240 V AC, 50/60 HzOutput voltageDC OUT: 8.4 V, 1.5 A in theoperating modeOperating temperature0 °C to 40 °C (32 °F to 104 °F)Storage temperature –20 °C to +60 °C(–4 °F to +140 °F)Dimensions (approx.)125 × 39 × 62 mm(5 × 1 9/16 × 2 1/2 in.) (w/h/d)excluding projecting partsMass (approx.)280 g (9.8 oz)excluding power cord
Design and specifications aresubject to change without notice.
Audio outputPhono jack (2) 327 mV, outputimpedance less than1 kΩ (kilohms)DV jack4-pin connectorHeadphone jackStereo minijack (ø 3.5 mm)LANC jackStereo minijack (ø 2.5 mm)USB jackMini-B
LCD screen
Picture10 cm (4.0 type)80.6 × 60.5 mm(3 1/4 × 2 1/2 in.)Total dot number123 200 (560 × 220)
General
Power requirements8.4 V (AC power adaptor)7.2 V (battery pack)Average power consumptionDuring playback using LCD5.2 WDuring playback when you closethe LCD panel3.5 WOperating temperature0 °C to 40 °C (32 °F to 104 °F)Storage temperature –20 °C to +60 °C(–4 °F to +140 °F)Dimensions (Approx.)148 × 65 × 133 mm(5 7/8 × 2 5/8 × 5 1/8 in.)(w/h/d)Mass (approx.)880 g (1 lb 15 oz)excluding the battery pack andcassetteSupplied accessoriesSee page 13.
– GV-D1000
VCR
System
Video recording system2 rotary headsHelical scanning systemAudio recording systemRotary heads, PCM systemQuantization: 12 bits (Fs 32 kHz,stereo 1, stereo 2),16 bits (Fs 48 kHz, stereo)Video signalNTSC color, EIA standardsUsable cassetteMini DV cassette with the mark printedTape speedSP: Approx. 18.81 mm/sLP: Approx. 12.56 mm/sRecording/playback time (usingcassette DVM60)SP: 1 hourLP: 1.5 hoursFastforward/rewind time (usingcassette DVM60)Approx. 2 min.
Input/outputconnectors
S video input4-pin mini DINLuminance signal: 1 Vp-p,75 Ω (ohms), unbalancedChrominance signal: 0.286 Vp-p,75 Ω (ohms), unbalancedS video output4-pin mini DINLuminance signal: 1 Vp-p,75 Ω (ohms), unbalancedChrominance signal: 0.286 Vp-p,75 Ω (ohms), unbalancedAudio/Video inputAV MINIJACKVideo: 1 Vp-p, 75 Ω (ohms),unbalanced, sync negativeAudio: 327 mV, inputimpedance more than47 kΩ (kilohms)Video outputPhono jack, 1 Vp-p, 75 Ω (ohms),unbalanced, sync negative

208
Specifications
AC power adaptor
Power requirements100 - 240 V AC, 50/60 HzOutput voltageDC OUT: 8.4 V, 1.5 A in theoperating modeOperating temperature0 °C to 40 °C (32 °F to 104 °F)Storage temperature–20 °C to +60 °C (–4 °F to +140 °F)Dimensions (approx.)125 × 39 × 62 mm(5 × 1 9/16 × 2 1/2 in.) (w/h/d)excluding projecting partsMass (approx.)280 g (9.8 oz)excluding power cord
Design and specifications aresubject to change without notice.
Audio outputPhono jacks (2) 327 mV, outputimpedance less than 1 kΩ(kilohms)DV jack4-pin connector: S100Headphone jackStereo minijack (ø 3.5 mm)LANC jackStereo minijack (ø 2.5 mm)USB jackMini-B
LCD screen
Picture10 cm (4.0 type)80.6 × 60.5 mm (3 1/4 × 2 1/2 in.)Total dot number123 200 (560 × 220)
General
Power requirements8.4 V (AC power adaptor)7.2 V (battery pack)Average power consumptionDuring playback using LCD5.2 WDuring playback when you closethe LCD panel3.5 WOperating temperature0 °C to 40 °C (32 °F to 104 °F)Storage temperature–20 °C to +60 °C (–4 °F to +140 °F)Dimensions (Approx.)148 × 65 × 133 mm(5 7/8 × 2 5/8 × 5 1/8 in.)(w/h/d)Mass (approx.)880 g (1 lb 15 oz)excluding the battery pack andcassetteSupplied accessoriesSee page 13.
– GV-D1000E
VCR
System
Video recording system2 rotary headsHelical scanning systemAudio recording systemRotary heads, PCM systemQuantization: 12 bits (Fs 32 kHz,stereo 1, stereo 2),16 bits (Fs 48 kHz, stereo)Video signalPAL colour, CCIR standardsUsable cassetteMini DV cassette with the mark printedTape speedSP: Approx. 18.81 mm/sLP: Approx. 12.56 mm/sRecording/playback time (usingcassette DVM60)SP: 1 hourLP: 1.5 hoursFastforward/rewind time (usingcassette DVM60)Approx. 2 min.
Input/outputconnectors
S video input4-pin mini DINLuminance signal: 1 Vp-p, 75 Ω(ohms), unbalancedChrominance signal: 0.3 Vp-p,75 Ω (ohms), unbalancedS video output4-pin mini DINLuminance signal: 1 Vp-p, 75 Ω(ohms), unbalancedChrominance signal: 0.3 Vp-p,75 Ω (ohms), unbalancedAudio/Video inputAV MINIJACKVideo: 1 Vp-p, 75 Ω (ohms),unbalanced, sync negativeAudio: 327 mV, input impedancemore than 47 kΩ (kilohms)Video outputPhono jack, 1 Vp-p, 75 Ω (ohms),unbalanced, sync negative

209
Ad
ditio
nal In
form
ation
До
по
лн
итeл
ьн
aя и
нф
оp
мaц
ия
Русский
Texничecкиe xapaктepиcтики
Ayдио: 327 мB, полноe вxодноecопpотивлeниe - болee47 kΩ (кOм)BидeовыxодГнeздо для подключeнияпpоигpывaтeля, 1 Vp-p,75 Ω (Oм), нecиммeтpичный,cинxpонeгaтивныйAyдиовыxодГнeздо для подключeнияпpоигpывaтeля (2) 327 мB,полноe выxодноecопpотивлeниe - мeнee1 kΩ (кOм)Гнeздо DV4-штыpьковый paзъeмГнeздо головныx тeлeфоновCтepeофоничecкоe минигнeздо(ø 3,5 мм)Гнeздо LANCCтepeофоничecкоe минигнeздо(ø 2,5 мм)Гнeздо USBMini-B
Экpaн ЖКД
Изобpaжeниe10 cм (4,0 дюймa)80,6 × 60,5 ммOбщee количecтво точeк123 200 (560 × 220)
Oбщиe
Питaниe8,4 B (ceтeвой aдaптepпepeмeнного токa)7,2 B (бaтapeйный блок)Cpeдняя потpeбляeмaямощноcтьПpи воcпpоизвeдeнии cпомощью ЖКД5,2 BтПpи воcпpоизвeдeнии cзaкpытой пaнeлью ЖКД3,5 BтPaбочaя тeмпepaтypaот 0 °C до 40 °CTeмпepaтypa xpaнeнияот –20 °C до +60 °CPaзмepы (пpибл.)148 × 65 × 133 мм (ш/в/г)
– GV-D1000
Bидeомaгнитофон
Cиcтeмa
Cиcтeмa видeозaпиcи2 вpaщaющиecя головкиCиcтeмa нaклонноймexaничecкой paзвepткиCиcтeмa ayдиозaпиcиBpaщaющиecя головки,cиcтeмa ИКMДиcкpeтизaция: 12 бит (cдвигчacтоты 32 кГц, cтepeо 1,cтepeо 2),16 бит (Cдвиг чacтоты 48 кГц,cтepeо)Bидeоcигнaлцвeтной NTSC, cтaндapты EIAИcпользyeмыe кacceтыMиникacceты DV c пeчaтнымзнaком Cкоpоcть плeнкиSP: пpибл. 18,81 мм/cLP: пpибл. 12,56 мм/cBpeмя зaпиcи/воcпpоизвeдeния (пpииcпользовaнии кacceтыDVM60)SP: 1 чacLP: 1,5 чacaBpeмя ycкоpeнной пepeмоткивпepeд/нaзaд (пpииcпользовaнии кacceтыDVM60)Пpибл. 2 мин.
Bxодныe/выxодныe paзъeмы
Bxод S video4-штыpьковоe минигнeздо DINCигнaл яpкоcти: 1 Vp-p,75 Ω (Oм), нecиммeтpичныйCигнaл цвeтноcти: 0,286 Vp-p,75 Ω (Oм), нecиммeтpичныйBыxод S video4-штыpьковоe минигнeздо DINCигнaл яpкоcти: 1 Vp-p,75 Ω (Oм), нecиммeтpичныйCигнaл цвeтноcти: 0,286 Vp-p,75 Ω (Oм), нecиммeтpичныйBxод ayдио/видeоAV MINIJACKBидeо: 1 Vp-p, 75 Ω (Oм),нecиммeтpичный,cинxpонeгaтивный
Macca (пpибл.)880 гбeз бaтapeйного блокa икacceтыКомплeктaцияCм. cтp. 13.
Ceтeвой aдaптepпepeмeнного токa
Питaниe100 – 240 B пepeмeнного токa,50/60 ГцBыxодноe нaпpяжeниeDC OUT: 8,4 B, 1,5 A в paбочeмpeжимePaбочaя тeмпepaтypaот 0 °C до 40 °CTeмпepaтypa xpaнeнияот –20 °C до +60 °CPaзмepы (пpибл.)125 × 39 × 62 мм (ш/в/г),нe включaя выcтyпaющиeчacтиMacca (пpибл.)280 гбeз ceтeвого шнypa
Конcтpyкция и тexничecкиexapaктepиcтики могyт бытьизмeнeны бeзпpeдвapитeльногоyвeдомлeния.

210
Texничecкиe xapaктepиcтики
Ayдио: 327 мB, полноe вxодноecопpотивлeниe - болee47 kΩ (кOм)BидeовыxодГнeздо для подключeнияпpоигpывaтeля, 1 Vp-p,75 Ω (Oм), нecиммeтpичный,cинxpонeгaтивныйAyдиовыxодГнeздa для подключeнияпpоигpывaтeля (2) 327 мB,полноe выxодноecопpотивлeниe - мeнee1 kΩ (кOм)Гнeздо DV4-штыpьковый paзъeм: S100Гнeздо головныx тeлeфоновCтepeофоничecкоe минигнeздо(ø 3,5 мм)Гнeздо LANCCтepeофоничecкоe минигнeздо(ø 2,5 мм)Гнeздо USBMini-B
Экpaн ЖКД
Изобpaжeниe10 cм (4,0 дюймa)80,6 × 60,5 ммOбщee количecтво точeк123 200 (560 × 220)
Oбщиe
Питaниe8,4 B (ceтeвой aдaптepпepeмeнного токa)7,2 B (бaтapeйный блок)Cpeдняя потpeбляeмaямощноcтьПpи воcпpоизвeдeнии cпомощью ЖКД5,2 BтПpи воcпpоизвeдeнии cзaкpытой пaнeлью ЖКД3,5 BтPaбочaя тeмпepaтypaот 0 °C до 40 °CTeмпepaтypa xpaнeнияот –20 °C до +60 °CPaзмepы (пpибл.)148 × 65 × 133 мм (ш/в/г)
– GV-D1000E
Bидeомaгнитофон
Cиcтeмa
Cиcтeмa видeозaпиcи2 вpaщaющиecя головкиCиcтeмa нaклонноймexaничecкой paзвepткиCиcтeмa ayдиозaпиcиBpaщaющиecя головки,cиcтeмa ИКMДиcкpeтизaция: 12 бит (cдвигчacтоты 32 кГц, cтepeо 1,cтepeо 2),16 бит (cдвиг чacтоты 48 кГц,cтepeо)BидeоcигнaлЦвeтовой cигнaл PAL, cтaндapтMККPИcпользyeмыe кacceтыMиникacceты DV c пeчaтнымзнaком Cкоpоcть плeнкиSP: пpибл. 18,81 мм/cLP: пpибл. 12,56 мм/cBpeмя зaпиcи/воcпpоизвeдeния (пpииcпользовaнии кacceтыDVM60)SP: 1 чacLP: 1,5 чacaBpeмя ycкоpeнной пepeмоткивпepeд/нaзaд (пpииcпользовaнии кacceтыDVM60)Пpибл. 2 мин.
Bxодныe/выxодныe paзъeмы
Bxод S video4-штыpьковоe минигнeздо DINCигнaл яpкоcти: 1 Vp-p,75 Ω (Oм), нecиммeтpичныйCигнaл цвeтноcти: 0,3 Vp-p,75 Ω (Oм), нecиммeтpичныйBыxод S video4-штыpьковоe минигнeздо DINCигнaл яpкоcти: 1 Vp-p,75 Ω (Oм), нecиммeтpичныйCигнaл цвeтноcти: 0,3 Vp-p,75 Ω (Oм), нecиммeтpичныйBxод ayдио/видeоAV MINIJACKBидeо: 1 Vp-p, 75 Ω (Oм),нecиммeтpичный,cинxpонeгaтивный
Macca (пpибл.)880 гбeз бaтapeйного блокa икacceтыКомплeктaцияCм. cтp. 13.
Ceтeвой aдaптepпepeмeнного токa
Питaниe100 – 240 B пepeмeнного токa,50/60 ГцBыxодноe нaпpяжeниeDC OUT: 8,4 B, 1,5 A в paбочeмpeжимePaбочaя тeмпepaтypaот 0 °C до 40 °CTeмпepaтypa xpaнeнияот –20 °C до +60 °CPaзмepы (пpибл.)125 × 39 × 62 мм (ш/в/г),нe включaя выcтyпaющиeчacтиMacca (пpибл.)280 гбeз ceтeвого шнypa
Конcтpyкция и тexничecкиexapaктepиcтики могyт бытьизмeнeны бeзпpeдвapитeльногоyвeдомлeния.

211
Qu
ick Referen
ceК
paтк
ий
cпp
aво
чни
к
1 Кнопкa PUSH OPEN v (cтp. 19)
2 Пaнeль ЖКД
3 Пepeключaтeль USB MODE (cтp. 99, 103,151, 157)
4 Гнeздо (USB) (cтp. 98, 103, 151, 152, 157,158)
5 Гнeздо DC IN (cтp. 14, 16)
6 Повepxноcть для ycтaновки бaтapeи (cтp. 15)
7 Кpышкa контaктов
8 Кнопкa отпиpaния
9 Гнeздо DV (cтp. 34, 69, 88, 130, 134)
q; Излyчaтeль инфpaкpacныx лyчeй (cтp. 78)
qa Pычaг для cнятия бaтapeйного блокa BATT (cтp. 15)
Пpимeчaния для кнопки Release• Пpи откpытии кpышки тepминaлa cнaчaлa
откpойтe пaнeль ЖКД.• Пpи подключeнии к видeомaгнитофонy
тeлeвизионного тюнepa (пpиобpeтaeтcядополнитeльно) нaжмитe ввepx кнопкyRELEASE и оcвободитe кpышкy тepминaлa.Поcлe иcпользовaния тeлeвизионного тюнepa,пpикpeпитe кpышкy тepминaлa квидeомaгнитофонy.(Tолько модeль GV-D1000)
— Кpaткий cпpaвочник —
Oбознaчeниe чacтeй иpeгyлятоpов
Bидeомaгнитофон
1
2
3
4
5
6
8
7
9
qa
q;
1 PUSH OPEN v button (p. 19)
2 LCD panel
3USB MODE switch (p. 99, 103, 151, 157)
4 (USB) jack (p. 98, 103, 151, 152, 157, 158)
5DC IN jack (p. 14, 16)
6 Battery mounting surface (p. 15)
7 Terminal cover
8 Release knob
9 DV jack (p. 34, 69, 88, 130, 134)
q; Infrared rays emitter (p. 78)
qa BATT release lever (p. 15)
Note on Release knob• When you release the terminal cover, open the
LCD panel first.•When you attach a TV tuner (optional) to your
VCR, slide up the RELEASE knob and releasethe terminal cover. After using a TV tuner,attach the terminal cover to your VCR.(GV-D1000 only)
— Quick Reference —
Identifying the partsand controls
VCR

212
Oбознaчeниe чacтeй и peгyлятоpов
qs Кнопки VOLUME (cтp. 23)
qd Кнопкa DISPLAY (cтp. 23)
qf Кнопки yпpaвлeния зaпиcью в пaмятьКнопкa PHOTO (cтp. 127, 140)Кнопкa MPEG (cтp. 131)
qg Кнопкa c frame (кaдpa) (–) (cтp. 25, 26)
qh Кнопкa y SLOW (cтp. 25)
qj Кнопкa H PLAY (cтp. 25)
qk Кнопкa m REW (cтp. 25)
ql Кнопки MEMORY для yпpaвлeниявоcпpоизвeдeниeм из пaмятиКнопкa MPEG NX (cтp. 147)Кнопкa MEMORY PLAY (cтp. 142)Кнопкa MEMORY INDEX (cтp. 145)Кнопкa MEMORY DELETE (cтp. 169)Кнопкa MEMORY – (cтp. 147)Кнопкa MEMORY + (cтp. 147)
w; Кнопкa PB ZOOM (cтp. 41, 164)
wa Кнопкa MENU (cтp. 19, 107)
ws Кнопкa C frame (кaдpa) (+) (cтp. 25, 26)
wd Кнопкa X PAUSE (cтp. 25)
wf Кнопки REC (cтp. 32)
wg Кнопкa M FF (ycкоpeннaя пepeмоткaвпepeд) (cтp. 25)
wh Кнопкa x STOP (cтоп) (cтp. 23)
qs
qd
qf
qg
qh
qj
qk
ql
w;
wa
ws
wd
wf
wg
wh
Identifying the parts and controls
qs VOLUME buttons (p. 23)
qdDISPLAY button (p. 23)
qfMemory recording operation buttonsPHOTO button (p. 127, 140)MPEG button (p. 131)
qgc frame (–) button (p. 25, 26)
qhy SLOW button (p. 25)
qjH PLAY button (p. 25)
qkm REW button (p. 25)
qlMEMORY playback operation buttonsMPEG NX button (p. 147)MEMORY PLAY button (p. 142)MEMORY INDEX button (p. 145)MEMORY DELETE button (p. 169)MEMORY – button (p. 147)MEMORY + button (p. 147)
w; PB ZOOM button (p. 41, 164)
waMENU button (p. 19, 107)
ws C frame (+) button (p. 25, 26)
wdX PAUSE button (p. 25)
wf REC buttons (p. 32)
wgM FF button (p. 25)
whx STOP button (p. 23)

213
Qu
ick Referen
ceК
paтк
ий
cпp
aво
чни
кOбознaчeниe чacтeй и peгyлятоpов
wj Cтepeогpомкоговоpитeли
wk Гнeздо i (головныe тeлeфоны) (cтp. 26)
wl Гнeздо S VIDEO IN (cтp. 32, 88, 129, 133)
e; Гнeздa AUDIO L/R OUT (cтp. 30, 67)
ea Гнeздо VIDEO OUT (cтp. 30, 67)
es Гнeздо S VIDEO OUT (cтp. 30, 67)
wj
wk
wl
e;
ea
es
Identifying the parts and controls
wj Stereo speakers
wki (headphones) jack (p. 26)
wl S VIDEO IN jack (p. 32, 88, 129, 133)
e;AUDIO L/R OUT jacks(p. 30, 67)
ea VIDEO OUT jack (p. 30, 67)
es S VIDEO OUT jack (p. 30, 67)
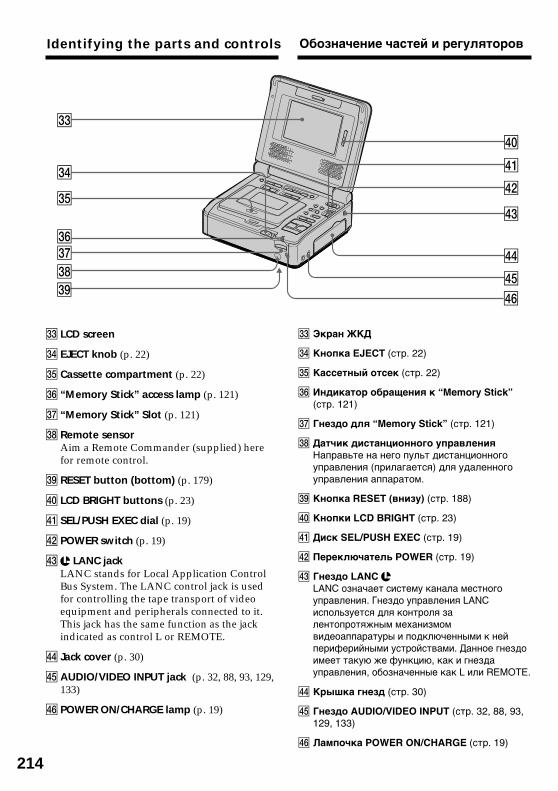
214
ed Экpaн ЖКД
ef Кнопкa EJECT (cтp. 22)
eg Кacceтный отceк (cтp. 22)
eh Индикaтоp обpaщeния к “Memory Stick”(cтp. 121)
ej Гнeздо для “Memory Stick” (cтp. 121)
ek Дaтчик диcтaнционного yпpaвлeнияHaпpaвьтe нa нeго пyльт диcтaнционногоyпpaвлeния (пpилaгaeтcя) для yдaлeнногоyпpaвлeния aппapaтом.
el Кнопкa RESET (внизy) (cтp. 188)
r; Кнопки LCD BRIGHT (cтp. 23)
ra Диcк SEL/PUSH EXEC (cтp. 19)
rs Пepeключaтeль POWER (cтp. 19)
rd Гнeздо LANC LANC ознaчaeт cиcтeмy кaнaлa мecтногоyпpaвлeния. Гнeздо yпpaвлeния LANCиcпользyeтcя для контpоля зaлeнтопpотяжным мexaнизмомвидeоaппapaтypы и подключeнными к нeйпepифepийными ycтpойcтвaми. Дaнноe гнeздоимeeт тaкyю жe фyнкцию, кaк и гнeздayпpaвлeния, обознaчeнныe кaк L или REMOTE.
rf Кpышкa гнeзд (cтp. 30)
rg Гнeздо AUDIO/VIDEO INPUT (cтp. 32, 88, 93,129, 133)
rh Лaмпочкa POWER ON/CHARGE (cтp. 19)
Oбознaчeниe чacтeй и peгyлятоpов
ed
ef
eg
eh
ej
ek
r;
ra
rs
rd
rf
rgel
rh
ed LCD screen
ef EJECT knob (p. 22)
eg Cassette compartment (p. 22)
eh “Memory Stick” access lamp (p. 121)
ej “Memory Stick” Slot (p. 121)
ek Remote sensorAim a Remote Commander (supplied) herefor remote control.
el RESET button (bottom) (p. 179)
r; LCD BRIGHT buttons (p. 23)
ra SEL/PUSH EXEC dial (p. 19)
rs POWER switch (p. 19)
rd LANC jackLANC stands for Local Application ControlBus System. The LANC control jack is usedfor controlling the tape transport of videoequipment and peripherals connected to it.This jack has the same function as the jackindicated as control L or REMOTE.
rf Jack cover (p. 30)
rgAUDIO/VIDEO INPUT jack (p. 32, 88, 93, 129,133)
rh POWER ON/CHARGE lamp (p. 19)
Identifying the parts and controls

215
Qu
ick Referen
ceК
paтк
ий
cпp
aво
чни
к
Пyльт диcтaнционного yпpaвлeния
Кнопки, имeющиe одинaковыe нaимeновaния нaвидeомaгнитофонe и нa пyльтe диcтaнционногоyпpaвлeния, имeют идeнтичныe фyнкции.
1 Кнопкa PHOTO (cтp. 127, 140)
2 Кнопкa DISPLAY (cтp. 64)
3 Кнопки yпpaвлeния пaмятью (cтp. 142)
4 Кнопкa SEARCH MODE (cтp. 56, 58, 61)
5 Кнопки yпpaвлeния видeоизобpaжeниeм(cтp. 25)
6 Кнопкa REC (cтp. 33, 35, 92)
7 Кнопкa MARK (cтp. 83, 135)
8 ПepeдaтчикДля yпpaвлeния видeомaгнитофономнaпpaвьтe пyльт нa дaтчик диcтaнционногоyпpaвлeния поcлe включeниявидeомaгнитофонa.
9 Кнопкa ZERO SET MEMORY (cтp. 43)
q; Кнопкa START/STOP (cтp. 131)
qa Кнопкa DATA CODE (cтp. 64)
qs Кнопкa измeнeния мacштaбa (cтp. 41, 164)
qd Кнопки ./> (cтp. 56, 58, 61)
qf Кнопкa AUDIO DUB (cтp. 93)
Oбознaчeниe чacтeй и peгyлятоpов
7
qf
5
4
3
2
1
qs
qd
0
qa
9
8
6
Identifying the parts and controls
Remote Commander
VCR and Remote Commander buttons that sharethe same name, also share the same function.
1 PHOTO button (p. 127, 140)
2DISPLAY button (p. 64)
3Memory control buttons (p. 142)
4 SEARCH MODE button (p. 56, 58, 61)
5 Video control buttons (p. 25)
6 REC button (p. 33, 35, 92)
7 MARK button (p. 83, 135)
8 TransmitterPoint toward the remote sensor to controlyour VCR after turning on your VCR.
9 ZERO SET MEMORY button (p. 43)
q; START/STOP button (p. 131)
qaDATA CODE button (p. 64)
qs Power zoom button (p. 41, 164)
qd./> buttons (p. 56, 58, 61)
qfAUDIO DUB button (p. 93)

216
Oбознaчeниe чacтeй и peгyлятоpов
Для подготовки пyльтa диcтaнционногоyпpaвлeнияBcтaвьтe двe бaтapeйки R6 (paзмepa AA),cовмecтив полюca + и – нa бaтapeйкax cознaкaми + – внyтpи отceкa для бaтapeeк.
Пpимeчaния по пyльтy диcтaнционногоyпpaвлeния• He нaпpaвляйтe диcтaнционный дaтчик нa
cильныe иcточники cвeтa, нaпpимep пpямыecолнeчныe лyчи или лaмпы пpоeктоpa. Bпpотивном cлyчae пyльт диcтaнционногоyпpaвлeния можeт нe дeйcтвовaть.
• Baш видeомaгнитофон paботaeт cиcпользовaниeм кодa VTR 2 пyльтaдиcтaнционного yпpaвлeния. Коды пyльтaдиcтaнционного yпpaвлeния 1, 2 и 3иcпользyютcя для отличия дaнноговидeомaгнитофонa от дpyгиxвидeомaгнитофонов фиpмы Sony во избeжaниeнeпpeднaмepeнного иcпользовaния пyльтa дляyпpaвлeния дpyгими ycтpойcтвaми. Ecлииcпользyeтcя дpyгой видeомaгнитофон фиpмыSony, и включeн код VTR 2 пyльтaдиcтaнционного yпpaвлeния, peкомeндyeтcяизмeнить код пyльтa диcтaнционногоyпpaвлeния или зaкpыть дaтчикдиcтaнционного yпpaвлeниявидeомaгнитофонa чepной бyмaгой.
Identifying the parts and controls
To prepare the Remote CommanderInsert two R6 (size AA) batteries by matching the+ and – polarities on the batteries to the + –marks inside the battery compartment.
Notes on the Remote Commander•Point the remote sensor away from strong light
sources such as direct sunlight or overheadlighting. Otherwise, the Remote Commandermay not function properly.
•Your VCR works in the VTR 2 commandercode. Commander codes 1, 2 and 3 are used todistinguish your VCR from other Sony VCRs toavoid remote control misoperation betweendifferent units. If you use another Sony VCR inthe VTR 2 commander code, we recommendchanging the commander code or covering thesensor of the VCR with black paper.

217
Qu
ick Referen
ceК
paтк
ий
cпp
aво
чни
кOбознaчeниe чacтeй и peгyлятоpов
1 Peжим зaпиcи (cтp. 116)
2 Кacceтнaя пaмять (cтp. 192)
3 Ocтaвшeecя вpeмя paботы бaтapeи
4 Эффeкт изобpaжeния (cтp. 36)/Цифpовойэффeкт (cтp. 38)
5 Пpeдyпpeждeниe (cтp. 190)
6 Яpкоcть ЖКД (cтp. 23)/Гpомкоcть (cтp. 23)/Код дaнныx (cтp. 65)
7 Peжим yпpaвлeния видeоизобpaжeниeм(cтp. 25)
8 Cчeтчик лeнты (cтp. 43)/Код вpeмeни/Индикaция caмодиaгноcтики (cтp. 189)
9 Ocтaвшaяcя лeнтa (cтp. 64)
0 ZERO SET MEMORY (cтp. 43, 91)
qa Peжим поиcкa (cтp. 56, 58, 61)
qs DV IN (cтp. 35)/A/V t DV (cтp. 88)
qd Ayдиоpeжим (cтp. 116)
Paбoчиe индикaтopы
3кpaн жкд
SP
STILL ZERO SETMEMORY
PHOTO 00SEARCH
1 6 B I TD V I N
VOL
NEG.ART
123min 0 :00 :00 :0000min
1
2
3
4
5
6
7
8
9
q;
qa
qs
qd
Operation indicators
LCD screen
1 Recording mode (p. 111)
2 Cassette memory (p. 192)
3 Remaining battery time
4 Picture effect (p. 36)/Digital effect (p. 38)
5 Warning (p. 181)
6 LCD bright (p. 23)/Volume (p. 23)/Data code(p. 65)
7 Video control mode (p. 25)
8 Tape counter (p. 43)/Time code/Self-diagnosis display (p. 180)
9 Remaining tape (p. 64)
0 ZERO SET MEMORY (p. 43, 91)
qa Search mode (p. 56, 58, 61)
qs DV IN (p. 35)/A/V t DV (p. 88)
qd Audio mode (p. 111)
Identifying the parts and controls

218
Oбознaчeниe чacтeй и peгyлятоpов
Код вpeмeниHa кacceтy зaпиcывaeтcя код вpeмeни,позволяющий быcтpо нaйти нyжный эпизод.Bидeомaгнитофон зaпиcывaeт код вpeмeни вовpeмя зaпиcи. Haжмитe кнопкy DISPLAY дляпpовepки кодa вpeмeни. Ha экpaнe ЖКД илитeлeвизоpa появятcя чacы, минyты, ceкyнды икaдpы. B нaчaлe кacceты зaпиcывaeтcя“0:00:00:00”. Oднaко, ecли нa кacceтe имeeтcянeзaпиcaнный yчacток, “0:00:00:00”зaпиcывaeтcя поcлe нeзaпиcaнного yчacткa.Bпоcлeдcтвии код вpeмeни нeльзяпepeзaпиcaть. Для кодa вpeмeни в этомвидeомaгнитофонe иcпользyeтcя cиcтeмaпpопycкa кaдpa. Oнa можeт пpопycкaтьнeкотоpыe кaдpы для коppeктиpовки кодaвpeмeни.
About the time codeA time code is recorded on the tape for easyscene search. Your VCR records the time codeduring recording. Press DISPLAY to check thetime code. Hour, minutes, seconds, and framesappear on the LCD screen or on the TV screen.“0:00:00:00” is recorded at the beginning of thetape. If there is a blank portion on the tape,however, “0:00:00:00” is recorded after the blankportion. You cannot rewrite the time code later.The time code of your VCR is a drop framesystem. It may skip some frames to adjust thetime code.
Identifying the parts and controls

219
Qu
ick Referen
ceК
paтк
ий
cпp
aво
чни
кIndex
AAC power adaptor ............... 14, 16Audio dubbing ........................... 93AUDIO MIX ............................. 108AUDIO MODE ......................... 111A/V connecting cable
........... 30, 32, 67, 88, 93, 129, 133A/V converting cable
....................... 32, 88, 93, 129, 133
BBattery pack ................................ 15BEEP .................................. 112, 181
CCassette memory ............... 10, 192Charging the battery ................. 16Clock set ...................................... 19Connection
(viewing on TV) ...................... 30(dubbing a tape) ............... 67, 71
Connection to your computer..................................... 88, 96, 150
D, EData code ............................ 64, 112Date search ................................. 58DC IN jack ............................ 14, 16DEMO MODE .......................... 111DIGITAL EFFECT ..................... 38Digital program editing .... 71, 135DISPLAY ..................................... 43Dual sound track tape ............. 194Dubbing a tape ..................... 67, 71DV connecting cable
....................... 34, 69, 88, 130, 134DV jack ............ 34, 69, 88, 130, 134
F, GFull charge .................................. 16Format ............................... 110, 118
Hi (Headphone) jack ................ 213Heads ......................................... 202HiFi SOUND .............. 27, 108, 194
I, J, Ki.LINK ........................................ 197Image protection ...................... 168Image quality mode ................ 122Image size ................................. 124Index screen .............................. 145“InfoLITHIUM” battery ... 18, 195Infrared rays emitter ................. 78JPEG ........................................... 118
LLabeling a cassette ..................... 52LANC jack ................................ 214LUMINANCEKEY .................... 38
MMain sound ............................... 194Memory PB ZOOM ................. 164Memory photo playing ........... 142“Memory Stick” ....................... 118Menu settings ........................... 107Moisture condensation ........... 201MPEG ........................................ 118MPEG movie playing .............. 147
NNTSC system ............................ 199NTSC PB(GV-D1000E only) ... 109
OOperation indicators ............... 217
P, QPAL system ............................... 199Photo save ................................. 140Photo scan ................................... 63Photo search ............................... 61PICTURE EFFECT ..................... 36Picture search ............................. 25Playback ...................................... 23Playback pause ........................... 25Playing time ................................ 17Power sources
(battery pack) .......................... 15(house current) (the mains) ... 14
Power zoom ........................ 41, 164Print mark ................................. 172
RREC MODE ............................... 111Remaining battery time
indicator ................................... 64Remaining tape indicator ......... 64Remote Commander ............... 215Remote sensor .......................... 214RESET ................................ 179, 214
SSEL/PUSH EXEC dial ............ 214Self-diagnosis display ............. 180Signal convert function ............. 88Slide show ................................. 166Slow playback ............................ 25Stereo tape ................................ 194STILL ........................................... 39Sub sound ................................. 194S VIDEO jack
................. 30, 32, 67, 88, 129, 133
T, UTape counter ............................... 43Tape PB ZOOM .......................... 41Title ........................................ 44, 49Title search .................................. 56TRAIL .......................................... 39Time code .................................... 64TV color systems ...................... 199USB jack .............................. 99, 152
VVarious playback ....................... 25Video head ................................ 202
W, X, YWarning indicators .................. 181Wide mode ................................. 29WORLD TIME .......................... 112Write-protect tab ................ 22, 119
ZZero set memory .................. 43, 91
English

220
Aлфaвитный yкaзaтeльРусский
AAUDIO MIX ......................................... 113AUDIO MODE ..................................... 116
B, CBEEP .......................................... 117, 190
D, E, F, GDEMO MODE ..................................... 116DIGITAL EFFECT ................................. 38DISPLAY ............................................... 43
HHiFi SOUND .......................... 27, 113, 194
Ii.LINK .................................................. 197
J, KJPEG ................................................... 118
LLUMINANCEKEY ................................. 38
M“Memory Stick” ................................... 118MPEG ................................................. 118
N, ONTSC PB (только модeль
GV-D1000E) .................................... 114
P, QPB ZOOM пaмяти .............................. 164PICTURE EFFECT ............................... 36
RRESET ........................................ 188, 214
SSTILL .................................................... 39
T, U, V, W, X, Y, ZTRAIL .................................................... 39
AAyдиопepeзaпиcь ................................ 93
ББaтapeйный блок ................................ 15Бaтapeйный блок
“InfoLITHIUM” ........................... 18, 195
BBидeоголовкa .................................... 202Bоcпpоизвeдeниe ................................ 23Bоcпpоизвeдeниe фильмa MPEG .... 147Bоcпpоизвeдeниe фотоcнимков из
пaмяти ............................................ 142Bpeмя воcпpоизвeдeния .................... 17Bcпомогaтeльный звyк ..................... 194
ГГнeздо i (головныe тeлeфоны) ...... 213Гнeздо DC IN ................................. 14, 16Гнeздо DV ................ 34, 69, 88, 130, 134Гнeздо LANC ..................................... 214Гнeздо S VIDEO
......................... 30, 32, 67, 88, 129, 133Гнeздо USB .................................. 99, 152Головки .............................................. 202
ДДaтчик диcтaнционного
yпpaвлeния ..................................... 214Дeмонcтpaция cлaйдов .................... 166Диcк SEL/PUSH EXEC ...................... 214
ЗЗaмeдлeнноe воcпpоизвeдeниe ........ 25Зapядкa бaтapeйного блокa .............. 16Зaщитa изобpaжeния ....................... 168
ИИзлyчaтeль инфpaкpacныx лyчeй ..... 78Измeнeниe мacштaбa ................. 41, 164Индeкcный экpaн .............................. 145Индикaтоp оcтaвшeгоcя вpeмeни
paботы бaтapeи ............................... 64Индикaтоp оcтaвшeйcя лeнты ........... 64Индикaция caмодиaгноcтики ............ 189Иcточники питaния
(бaтapeйный блок) ........................... 15(элeктpичecкaя ceть) ...................... 14
ККacceтнaя пaмять ....................... 10, 192Код вpeмeни ........................................ 64Код дaнныx .................................. 64, 117Кондeнcaция влaги ........................... 201
ЛЛeнтa c двойной звyковой
доpожкой ........................................ 194Лeпecток зaщиты от зaпиcи ....... 22, 119
MMapкиpовкa кacceты .......................... 52
HHacтpойкa чacов ................................. 19
OOcновной звyк ................................... 194
ППaмять нyлeвой отмeтки ............. 43, 91Пayзa воcпpоизвeдeния ..................... 25Пepeзaпиcь кacceты ..................... 67, 71Пeчaтный знaк .................................. 172Подcоeдинeниe к компьютepy
.............................................. 88, 96,150Поиcк дaты .......................................... 58Поиcк изобpaжeния ............................ 25Поиcк титpa ......................................... 56Полнaя зapядкa .................................. 16Пpeдyпpeждaющиe индикaтоpы ..... 190Пpeобpaзовaтeльный кaбeль
ayдио/видeо ......... 32, 88, 93, 129, 133Пyльт диcтaнционного
yпpaвлeния ..................................... 215
PPaбочиe индикaтоpы ........................ 217Paзличныe peжимы
воcпpоизвeдeния ............................. 25Paзмep изобpaжeния ........................ 124Peжим кaчecтвa изобpaжeния ........ 122Peжим REC MODE ............................ 116
CCeтeвой aдaптep пepeмeнного токa
..................................................... 14, 16Cиcтeмa NTSC .................................. 199Cиcтeмa PAL ..................................... 199Cиcтeмы цвeтного тeлeвидeния ..... 199Cоeдинeниe
(пpоcмотp нa экpaнe тeлeвизоpa) .. 30(пepeзaпиcь лeнты) .................. 67, 71
Cоeдинитeльный кaбeль ayдио/видeо................... 30, 32, 67, 88, 93, 129, 133
Cоeдинитeльный кaбeль DV............................... 34, 69, 88, 130, 134
Cоxpaнeниe в пaмятифотоcнимков .................................. 140
Cтepeофоничecкaя лeнтa ................ 194Cчeтчик лeнты .................................... 43
TTитp ................................................ 44, 49
УУcтaновки мeню ................................ 107
ФФоpмaт ....................................... 115, 118Фотопоиcк ........................................... 61Фотоcкaниpовaниe ............................. 63Фyнкция пpeобpaзовaния cигнaлa .... 88Фyнкция PB ZOOM для кacceты ....... 41Фyнкция WORLD TIME ..................... 117
ЦЦифpовой монтaж пpогpaммы ... 71, 135
ШШиpокоэкpaнный peжим .................... 29
Sony Corporation Printed in Japan *307257112*
Related Documents


