SON Digital Still Camera Operating Instructions Be[ore operating The u_ltt, please read th_ manual thoroughl_, and retain t[ for fltt_tre reference Owner's Record Fhe model and serial numbers are located on the bottom Record the serial number m dIe space provided belm_ Refer to the_e numbers \_hene\ er you call upon )'our Son), dealer regarding flits product Model No DSC-F717 Setaal No Cyb £- hot #EmEI MEMORY 5TI£K DSC-F717 3 078 045-14{2) Getting started Shooting still images Viewing still images Deleting still images Before advanced operahons j_ Advanced shll image shoohng Advanced shll image wewlng Shll image editing Enjoying movies Enjoying images on your computer_ Troubleshoohng Addlhonal information Index © 2002 Sony Corporation

Welcome message from author
This document is posted to help you gain knowledge. Please leave a comment to let me know what you think about it! Share it to your friends and learn new things together.
Transcript

SON
Digital Still CameraOperating InstructionsBe[ore operating The u_ltt, please read th_ manual thoroughl_, andretain t[ for fltt_tre reference
Owner's RecordFhe model and serial numbers are located on the bottom Record theserial number m dIe space provided belm_ Refer to the_e numbers\_hene\ er you call upon )'our Son), dealer regarding flits product
Model No DSC-F717
Setaal No
Cyb £- hot
#EmEI
MEMORY 5TI£K
DSC-F717
3 078 045-14{2)
Getting started
Shooting still images
Viewing still images
Deleting still images
Before advanced operahons j_
Advanced shll image shoohng
Advanced shll image wewlng
Shll image editing
Enjoying movies
Enjoying images on your computer_
Troubleshoohng
Addlhonal information
Index
© 2002 Sony Corporation

To prevent fire or shock hazard, donot expose the unit to rain ormoisture.
This synlbol is intended to alert
tile user to the presence of
uninstdated "dangerous
voltage" within the product's
enclostire that may be of
sufflclent magnitude to
con_itute a risk of electric
sbock to persons.
This synlbol is intended to alert
tbe user to the presence of
important operating and
maintenance (servicing)
instrttcdons in the literature
accompanying the appliance¸
CAUTION
The use of optical instruments with this
product will increase eye hazard.
Use of controls or adjustments or
performance of procedures other than those
specified herein m_y result in hazardous
radiation exposure.
If you have any questions about this product,you may call:
Sony Custonlet Infomlation Cenlcr1-800-222-SONY (7669)
The ntmaber below is for the FCC related nl_tters
only¸
Regulatory Information
Declaration of ConformityTrade Name: SONY
Model No: DSC-F717
Responsible Party: Sony Electronics Inc.Address: 680 Kinderkamack Road,
Oradell, NJ 07649 USA
Tclepbone No: 201-930-6972
This device complies with Part 15 of the
FCC Rules. Operation is subject m tile|bltowing two conditions: (1) This device
inky ]lot cause ]larnlihl interference, and(2) this device must accept any interference
received, including interference thai m_ycause undesired operation.
CAUTION
You ale cautioned tb_t any changes ornlodific_tions not explessly apploYed in this
manual could void your authority to operate thisequipment
Note:
This equipment has been tested and fbund tocomply with the limits for a Class B digital
device, pursuant to Part 15 of the FCC RulesThese limgs are designed to provide reasonable
protection _galnst hamlfPI inter f_rence in aresidential installation This equipment generetes,
uses, and can radiate radio fi equency energy and,if not installed and used in accordance with the
instmcgons, may cause bannfhl interfi'rence Toradio communications Howevel_ thel_ is no
guarantee tbat interference will not occur in aparticular insta0adon. If this equipment doescause harmthl interference to radio or television
reception, which cma be determined by turning
the equipment offand on, tbe user is encouragedto try to correct the interference by one or more of
the following measures:
Reorient or relocate tbe receiving an[ennaIncrease the separation between theequipment and receiver,
Connect the equipment into an outlet on acil_uit different flora thai to which thereceiver is connected.
Consult the dealer or an experienced radio/
TV technician for help.
The supplied interface cable must be used withthe equipmen[ in order to comply with the brags
for a digital device pm'suan_ to Subpart B of Part15 of FCC Rules
2

RECYCLING LITHIUM-IONBATTERIES
Lithium-Ion batteries arerecyclable.You can help preserve our
environment by returning your
used rechargeable batteries tothe collection and recycling location nearest
you.
For more inform_lion regarding recycling of
rechargeable batleries, call toll free1-800-822-8837, or visit
hltp://www.rbrc.ovg/
Caution: Do not handle dmnaged or leakingLithium-Ion batteries.
CAUTION
TO PREVENT ELECTRIC' SHOCK, MATCHWIDE BLADE OF PlUG TO WIDE SLOT, FULLYINSER]2
A moulded plug complying with BS 1363 is fittedto tbls eqtdpment for your safety andconvenience
Should the fhse in the plug supplied need to be
replaced, a 5 AMP fuse _pproved by ASTA orBSI to BS 1362, (ie, malked with _ or
mark) nmst be used
If the plug supplied with this equipment has adetachable fuse coveK be sure to attach the
fuse cover after you change lhe fuse. Neveruse the plug wilhoul the fuse cover. If you
should lose the fuse cover, please contact your
nearest Sony service station.
This prodttc¢ has been Tested and fc,und compliantwith the limits sets out in the EMC Directive fhr
using connection c_btes shorter than 3 meters(9.8 feet).
This statement is indicated under file lens.
Attention
The electromagnetic field at tile specific
fi'eqttencles nl_y influence tile picture and soundof this canlera
Notice
]f static electricity or electromagi_edsn_ causesd_ta t_'ansf_rto dlscont 0me midway (f_il), zestar_
the application ol disconnect and connect fl_eUSB cable again.
3

CC N50For the Customers in the U.S.A. and
Canada
THIS DEVICE COMPLIES WITH PART 15
OF THE FCC RULES. OPERATION ISSUBJECT TO THE FOLLOWING TWO
CONDITIONS:
(1) Tills DEVICE MAY NOT CAUSEItARMFUL INTERFERENCE, AND
(2) THIS DEVICE MUST ACCEPT ANYINTERFERENCE RECEIVED,INCLUDING INTERFERENCE THAT MAY
CAUSE UNDESIRED OPERATION.THIS CLASS B DIGITAL APPARATUS
COMPLIES WITH CANADIAN ICES-003.
your camera
Trial recording
Be role you record one-time events, you may want
to make a trial recording to make sw'e that thecamet_a is working correctly
No compensation for contents of the
recording
Contents oftbe recotding cannot be compensatedfor if _ecoTding or playback is not possible due to
a malfunction of your camera or recording media,etc.
Notes on image data compatibility
• This camera confornls with tile Design iule forCamera File system unlve] sal standard
established by the JEITA (Japan Electlonicsand hifomaation Technology industries
Association)• Playback of images recorded witb your camera
on other equipmem and playback of imagesrecolded or edited with other equipment on
your camera are not gualanteed.
Precaution on copyright
Television plogl anls, films, video tapes, and othel
materials may be copyTigbted Unauthorizedrecording of such materials nl_y be contraly to
tbe provision ofthe copyright laws
DO not shake or strike the camera
In addition to malflmctions and inabilgy to record
images, this may render the ' Memol3/Stick"unusable or image data breakdown, damage or
loss may occur
LCD screen, LCD finder (only models
with an LCD finder) and lens• The LCD screen and the LCD finde_ me
nlanuf_ctured using extremely high-precisiontechnology so over 9999% of the pixels are
operational for ef_hcdve use However, theremay be some tiny black points and/or brigbt
points (white, red, blue or green in color) thatconstantly appear on the LCD screen and *he
LCD finder These poims ale normal in tbemanu_ct uring process and do not affbct the
recording in any way• Be carefbl when placing tt_e camera neal a
window or outdoors Exposing _he LCD screen,the flndet or the lens to direct sunlight for long
periods may cause malfunctions
4

Do not get the camera wet
When taking plcl_dres ouldoors in the rabl or
under sindtal conditions, be careful not to gct the
camera wet If moisture condensation occuls, see
page I I3 and fPllow the instructions on how to
remove d befot e using the camera
Back up recommendation
To avoid the poTentlaI risk of data loss, alwayscopy (back up) dgTa to a disk
Do not aim the camera at the sun or
other bright light
This may cause irlecoverable d_mage to your
eyes Or it nlay cause the malfunction of yourcamera
The pictures used in this manual
The photographs used as examples of pictm_s intbls nlanual ale iepl c_luced images,and are not
actual inlages shot usblg this camera
Trademarks
• 'Memory Stick," _,_ and 'MagicGate
Menloly Stick" ale trademarks of SonyCorporation.
• 'Memory Stick Duo" and MEMDmfSTIEKllUOale tlademarks of Sony Corpoigtion.
• 'Memory Stick PRO" and MEMDIIYlilrlgR PRO
are trademarks of Sony Corporation.
• 'MagicG3te" and I_IAGICGI_,'I'E aretrademarks of Sony Corporation
• 'InfoLITHIUM" is a trademark of SonyCorporation.
• Microsoft and Windows are registeredtrademmks of the U.S Microsoft Corporationin the United States and odler countries
• Macintosh, Mac OS, QuickTime, iBook andPower Mac are trademalks or regislered
trademalks of Apple Computer, lnc
• Pentium is a trademalk or a registeredtrademark of lnteI Corporadon.
• In addition, system and product names used inthis manual al_, in general, nademarks or
registered tradem_lks of their respectivedevelopers or manufacturers However, fl_e _or ® malks are not used in all cases in thismanual
About the Carl Zeiss lens
This camera is equipped widl a Carl Zeiss
lens which is capable of repToducing fine
images. The lens fbr dais camera uses theMTF* measurement system for camerasdeveloped jolntly by Carl Zeiss, in Germany,
and Sony Corflor_don, and ott?rs die samequality as other Cad Zeiss lenses.
* MTF is an abbreviation of ModulationTransfer Function, a numeric value
indicaling the amount of light fl'om a
specific purl of the subject gathered atthe corresponding position in the image.
5

Table of contents
Before using your camera ......................... 4Identifying the parts ................................. 8
Charging the battery pack ....................... I I
Using an external power source .............. 14
Using your camera abroad ...................... 14
Turning oil/offyour camera .................... 15
How to use the control button ................. 15
Setting the date and time ......................... 16
Inserting and removing a
"Memory Stick". ............................ 18
Setting the still image size ...................... 19
Basic still image shooting (using auto
adjustment mode) ........................... 20
Checking the last image you shot
Quick Review ............................ 21
Shooting images with the finder ......... 22
Indicators on the screen during
shooting .......................................... 22
Using the zoom feature ....................... 23
Chm_ging the lens orientation ............. 24
Shooting close-ups Macro ............. 24
Using the self-timer ............................ 25
Selecting a flash mode ........................ 26
Inserting the date and time on a still
image .............................................. 28
Shooting according to scene conditionsScene Selection ......................... 29
Sethng the still image quality ................. 31
Image size and quality ............................ 32
Viewing images on the screen of yourcamera ............................................ 33
Viewing images on a TV screen ............. 35
Deleting images ...................................... 37
Formathng a "Memory Stick". ............... 40
How to setup and operate your camera ,. 42
Chm_ging the menu settings ............... 42
Chmlging the items in the SET UP
screen ............................................. 42
How to use the jog dial ....................... 43
Shoo_ing with the manual adjustments.,. 44
Shutter speed priority mode ............... 44
Aperture priority mode ....................... 45
Manual exposure mode ...................... 45
Choosing a focus method ........................ 46
Shooting with AF lock ........................ 47
Focusing manually .................................. 48
Adiusting the exposure
EV adjustment ........................... 49
Displaying a histogrmn ....................... 50
Metering mode ........................................ 51
Shooting with the exposure fixed
AE LOCK .................................. 52
Shooting three images with the exposureshifted
Exposure Bracket ....................... 53
Adiusting color tones
White Balance ........................... 54
Shooting in the dark ................................ 55
NightShot ............................................ 56
NightFraming ...................................... 56
Shooting multiple frames
Clip Morion ............................... 57
Shooting in Multi Burst mode
Multi Burst ................................. 58
Shooting three images continuously
Burst .......................................... 59
Shooting still images in TIFF mode
TIFF ........................................... 60
Shooting still images for e-mail
E-mail ........................................ 61
Shooting still images with audio filesVoice .......................................... 61
6

Adding special effects
Picture Effect ............................. 62
Using an external flash ............................ 63
Using the Sony HVL-F1000 Flash .....63
Using a commercially available external
flash ................................................ 63
Selecting a folder ..................................... 64
Creating a new folder .......................... 64
Changing the recording folder ............ 65
Selecting a playback folder ..................... 66
Enlarging a portion of a still image ......... 66
Enlarging an image
Playback zoom ........................... 67
Recording an enlarged image
Trimming ................................... 67
Playing back successive images
Slide Show ................................. 68
Rotating still images ................................ 69
Protecting images Protect ................... 70
Changing image size Resize ............... 72
Choosing images to print
Print (DPOF) mark .................... 72
Shooting movies ..................................... 75
Viewing movies on the screen ................ 76
Deleting movies Delete ...................... 77
Editing movies ........................................ 79
Cutting movies .................................... 79
Deleting unnecessary portion,s of
movies ............................................ 80
Copying images to your computer
For Windows users .................... 81
Copying images to your computer
For Macintosh users .................. 90
Troubleshooting ...................................... 92
Warnings and messages ........................ 101
Self-diagnosis display ........................... 103
Number of images lhat can be saved or
shooting time ................................. 104
Menu items ............................................ 106
SET UP ilems ........................................ 110
Precautions ............................................ 113
On "Memory Stick". ............................. 114
On "InfoLITHIUM" battery pack ......... 115
Specifications ........................................ 116
FINDER/LCD screen ............................ 118
Index ...................................................... 121
7

Identifying the parts
See the pages in parentheses for details of operation.
[]
[][]%[]
[]
[] Mode dialI_1 : To shoot still images in auto
adjustment mode
I_IP: To shoot still images in
programmed mode
S: To shoot in the shutter speed
priority mode
A: To shoot in the aperture
priority mode
[][][][][]
[][][][]
M: To shoot in the manual
exposure modeSCN: To shoot in the Scene
Selection modeSET UP: To set the SET UP items
H : To shoot movies, ClipMotion images or Multi
Burst mode images[] : To view or edit images
[] [] (exposure) button (49)[] Jog dial (43)[] Shutter button (20)
[] Manual focus/zoom ring (23, 48)[] Infrared ray emitter (55)[] Lens
[] Hologram AF emitter (27, 110)[] Flash emitter (26)
[] NIG HTSHOT/NIG HTFRAMINGswitch (55)
[] Speaker
[] Hot shoe (63, 111)
[] AE LOCK button (52)
[] [] (metering mode) button (51)[] WriT BAL (white balance) button
(54)
[] _.e,d(one-push white balance)button (54)
[] ZOOM button (23)
[] FOCUS (AUTO/ZOOM / MANUAL)switch (23, 48)

[]_(_ MENU button (19)
X (index) button (34)
DISPLAY button (22)
Finder adjustment dial (22)
Finder (22)
Jack cover (11)AN OUT (MONO) jack (35)
DC IN jack (I 1, 14)FINBER/LCD switch (22)
Self-timer lamp (25)
ACC (accessory) jackBuilt-in microphonePOWER lamp (15)
POWER switch (15)
Battery eject lever (12)
[][][][]
[][]
Battery/"Memory Stick" cover
(18)
Access lamp (18)
RESET button (92)Control button
(Menu on) (&/,/</l_/O) (15)(Menu off) ({11_1_1_) (21, 24, 26)
_/CHG (charge) lamp (12)
LCD screen
• Audio output is monaural
• Do not touch *he built-in microphone
while recording
• Use ACC jack to connect an external
flash or the remote control tripod |1
9

[] ®
®
[] _ (USB)jack(84)[] Hook for shoulder strap[] Tripod receptacle
• Use a tripod with a screw lengfll of less
lhon 5.5 mm (7/32 inch). You will be
unable to firmly secure the camera to
_ripods having longer screws, and moy
damage the camera.
Attaching the lens cap and the shoulder strap.
Lens cap
(supplied)
10

Charging the battery pack
--i_ Open the battery/"MemoryStick" cover.
Slide the cover in the direction of the arrow.
• Be sure to turn off your camera whencharging the battery pack (page t5).
• Your cameza operates only with tile"InfoLITHIUM" NP-FM50 battery pack (M
series) (supplied) (page 115)
--i_ Install the battery pack, then
close the battery/"MemoryStick" cover.
Insert the battery pack with the _ mark
facing toward the batlery compartment as
illustrated.
Make sure the battery pack is firmly
inserted all the way, then close the cover.
• The battery pack is easily inse_ted by pushing
the battery eject lever at tile fi'ont of the batterycompartment tip
--i_ Open the jack cover andconnect the AC-L10A/L10B AC
power adaptor (supplied) to the
DC IN jack of your camera.
Connect the plug with the • mark facing
up.
• Do not short the DC plug of the AC power_daptor with a metallic object, as this maycause malfunction
|111

To remove the battery pack
Battery eject lever
--b Connect the power cord (mains
lead) to the AC power adaptor
and then to a wall outlet (wall
socket).
The t_/CHG lamp (orange) lights up when
charging begins, and goes offwhen
charging is completed.
Open the battery/"Memory Stick" cover.
Slide the battery eject lever in the direction
of the arrow, and remove the battery pack.
• Be careful not to drop the battery pack whenremoving it.
12
• Al_er charging the battery pack, disconnect tileAC power adaptor from tbe DC IN jack of yourcamera

13

Using an external power source
--_ Open the jack cover and
connect the AC-Lt0A/L10B AC
power adaptor (supplied) to the
DC IN jack of your camera.
Connect the plug wi_h the • mark facing
up.
• Com_ect the AC power adaptor to an easilyaccessible wall ou_le_ _,w?I_socket) close by. If
a_y troub]_ o¢c tll'Swhile using the adaptoL
immediately sbut offthe power bydiscormec_ng _he Nug f_om tl'_: wail eutlet
(wall socket).• Remove _be battery pack when using _dl
egtel _al 1,5owcr_7_ur_.
--_ Connect the power cord (mains
lead) to the AC power adeptorand then to a wall outlet (wall
socket).
• When you have finished using the AC power
ndup_or, disconnec_ it _m tt_e OC IN jack of
the ¢_mer;_
• The set is _ot disconnected fi_om _e AC power
_ar_e _n_ _ l_r_g _ it i_ c_t_tlect_d to _le
wall outlet (wall socket), even if the ung itself
has been turned ot_
• To _ porter from _n automobile, t_se the Sony
Car Battery Ada_er (not supplled)
• If you insert or remove the DC pi_g while you
are using _e battery, the power may shut of_
Using your cameraabroad
Power sources
You can use your camera in any COUl_try or
area with the supplied AC power adaptor
within 100 V to 240 V AC, 50/60 Hz. Use a
cx_mmercially available AC" plug adaptor
[a], if necessary, depending on the design of
the wall outlet (wall socket) [b].
[el [b]
• Do not use all electronic _ans_bmler (travel
_onverter/, as this may catlse a mal_iln_tion
14

Turning on/off your camera How to use thecontrol button
--i_ Slide the POWER switch in the
direction of the arrow.
The POWER lamp (green) lights up m_dthe
power is on. When you turn on your cmnera
for the first time, the CLOCK SET screen
appears (page 16).
Turning off the powerSlide the POWER switch in the direction of
the arrow again. The POWER lamp goes
out, and the camera turns ofl_
To chm_ge the current settings of the
camera, bring up the menu or the SET UP
screen (page 42), and use file control button
to make the chm_ges.
For each item, press &/V/a/_. to select the
desired value, tben press tbe center • or
ai/_. to make the setting.
15

Setting the date and time
--b Set the mode dialtoa.
• You can aIso carry out this operation when themode dlal is set to aP, S, A, M, SCN, [] or
• To change the date and time, set _be mode dialto SET UP, select [CLOCK SET] in
(SETUP 2) (p_ge I 12), and perform theprocedure from step 1_11.
--_ Slide the POWER switch in the
direction of the arrow to turn
on the power.
The POWER lamp (green) lights up and the
CLOCK SET screen appear_ on the screen.
--_ Select the desired date display
format with A/T on the control
button, then press 0.
Select from [Y/M/D] (year/month/day),
[M/D/Y] (month/day/year) or [D/M/Y]
(day/month/year).
• If the recbargeable button battery, whichprovides the power for saving the _ime data, is
ever tblly discharged (page 113), the CLOCKSET scT_en will appear again When *his
happens, reset tile date and time, by startingflom step [] above
16

--i_ Select the year, month, day,
hour or minute item you wantto set with 4/1_ on the control
button.
The itera to be set is indicated with A/V.
--i_ Set the numeric value with Air
on the control button, then
press • to enter it.
After entering file number, i=/Y moves to
the next item. Repeat this step until all of
the items are set.
• If you selected [D/M/Y] in step I[_, set the time
on a 24-hour cycle
--i_ Select [OK] with I_ on the
control button, then press 0.
The date and time are entered m_d the clock
starts to keep time.
• To cancel the date and time setting, select
[CANCEL] with A/_t/4[/_ on the controlbutton, then press •
17

Inserting and removing a "Memory Stick"
--_ Open the battery/"MemoryStick" cover.
Slide the cover in the direction of rise arrow.
• For details on 'Memory Stick," see page 114
Insert the "Memory Stick."
Insert a "Memory Stick" _s far as it can go
with the "_ m_rk facing as illustrzled.
• Push the "MemoT3_ Stick" all of die way in SOthat it is securely seated in the connector If the
'Memory Stick" is not inserted correctly, youmay not be able to record or display images
wid_ the "Memory S_ick"
Close the battery/"Memory
Stick" cover.
To remove s "Memory Stick"
Open llae battery/"Memory Stick" cover,
then push the "Memory Stick" to pop it out.
• Whenever the access lamp is lit, the
camera is recording or reading animage. Never remove the "Memory
Stick" or turn Off the power at this time.
18

Setting the still image size
--i_ Set the mode dial to a and
turn on the power, then pressMENU.
The menu appears.
• You can also calry out this operation when the
mode dial is set to I_ffp, S, A, M or SCN
• For details oil tile image quality, see page 32
--i_ Select l==I (IMAGE SIZE) with </
• on the control button, then
select the desired image sizewith &IV.
The image size is set.
When the setting is complete, press MENU
so that the menu disappezrs from the screen.
• The image size selected here is maintained even
when the power is turned off
8
19

Basic still image shooting (using auto adjustment mode)
--_ Set the mode dial to a, and
turn on the power.
Remove the lens cap.
• When the mode dial is set to _, the fbcus,
exposure and white balance me adjustedautonladcatly to allow easy shooting
• You can also c_r_y out this operation when themode dial is set to _P. When the mode dial is
set to _ or _p, the shmter speed is
automatically adjusted between 1/2000 and1/30 second.
• This camera can create new fPlders and select
folders to be stored in the "MemoTy S*ick"(page 64)
• Still images are recoTged in JPEG format
--_ Hold the camera steadily with
both hands and position the
subject in the center of thefocus frame.
Do not cover the lens or flash with your
fingers.
• The picture quality is set to [FINE].
• The flame appearing on the screen shows thefocus adjustmem range
--_ Press and hold the shutter
button halfway down.
The beep sounds but the image is not yet
recorded. When the AE/AF lock indicator
changes from flashing to steadily lit, the
camera is ready for shooting.
The flash automatically pops up and slrobes
when the surroundings are dark.
• If you release the shutler button, the recordingwill be canceled
• The minimum focal distance to the subject is
approximately more than 50 cm (I 9 3/4 inches)aTthe W side or 90 cm (35 I/2 inches) _Tthe T
side To shoot even closer subject_, use macrorecording mode (page g4).
2O

Checking the last image youshot -- Quick Review
--i_ Press the shutter button fully
down.
The shutter sounds. The image will be
recorded in lhe "Memory Stick".
• When operating the camera using a batteT3/
pack, if you do not operate the camera fPr _boutthree minutes during recording or playback, the
camera turns off automatically To preventwearing gown the battery (page 15)
--i_ Press 41 (_) on the control
button.
To return to the normal shooting mode,
press lightly on the shutter button or press •
(_) again.
To delete the image displayed on the
screen
I Press MENU to display the menu.
2 Select [DELETE] with, on lhe control
button, then press O.
3 Select [OK] with • on the control
button, then press O.
The image is deleted.
oo
_2
21

Shooting images with the Indicators on the screenfinder during shooting
Indicators on
With the FINDER/LCD switch, you canchoose to shoot either using the finder or the
LCD screen. When you use the finder, the
image does not appear on the LCD screen.
Turn the finder adjustment dial until the
image appears clearly within the finder,then shoot the image.
• For a detailed description of the indicators, seepage 118.
Each time you press DISPLAY, the display
changes in the following order.
• For a detailed description of the indicators, seepage t 18
• Indicators oil tile screen are not recolded.
Histogram on (A histogram of the image isdisplayed in the lower left corner of thescreen (page 50).)
Indicators off (Only warning messagesand manual adjustment items which are
set using the jog dial are on.)
22

Using the zoom feature
=i_ Set the FOCUS switch to
AUTO/ZOOM.
• The f_cto_y setting is AUTO/ZOOM• The ZOOM button can also be used. The zoom
operates slowly when the button is pressed
tighdy, and quickly when the button is presseddeeply.
• Zoom does not work when [CONVERSIONLENS] is set To[ON] in file SET UP settings
(page 110).
=i_ Turn the manual focus/zoom
ring to choose the desired
image size for shooting.
Minimum focal distance to thesubjectWhen the zoom is set all the way tothe W side:
Approx. 50 cm ( 19 3/4 inches) from the lens
surface
When the zoom is set all the way tothe T side:
Approx. 90 cm (35 1/2 inches) from the lens
surface
• The manual focus/zoom ring directions notedabove are tile f_ctoty settings Tbe ring
directions can be changed by [ZOOM RINGSETUP[ in the SET UP settings (page I 11)
==

Changing the lens Shooting close-ups _ Macroorientation
You cm_ adjust file angle by turning the lens
part upward up to 77 degrees and downward
up to 36 degrees.
The macro recording mode is used when
zooming up a small subject, such as flowers
or insects. You can shoot close-ups of
subjects up to file distances specified below.
When the zoom is set all the way tothe W side:
Approx. 2 cm (13/16 inches) from the lens
surface
When the zoom is set all the way tothe T side:Approx. 90 cm (35 1/2 inches) from the lenssurface
'_ Set the mode dialtoa, and
press • (_)onthe controlbuffon.
The _ (macro) indicator appears on the
screen.
• If the mentt is currently dispI_yed, press MENUfirst so that tile mentt disappears
• You can also carry out tfils operation when tilemode dM is set to _p, S, A, M, SCN (otherthan landscape mode, p_ge 29) or H_.
24

Using the self-timer
--i_ Center the subject in the frame,
and shoot the image.
To return to normal recording mode
Press • (_) on _he control button again.
The _ indicator disappears.
--i_ Turn the mode dial to a, and
press • (1_) on the control
button.
The (_ (self-timer) indicator appears on the
screen.
• I fthe menu is currently displayed, press MEN Ufirst so that the menu disappears.
• You can also carry out tiffs operation when themode dial is set to I_IP • S, A, M, SCN or H
--i_ Center the subject in the frame,
and press the shutter button
fully down.
The self-timer lamp (page 9) flashes m_d a
beep sounds after you press the shutter
button until the shutter is released
(approximately 10 seconds).
To cancel the self-timer in the middle
of the operationPress • (1_) on the control button again.
• If you press tbe shutler button while standing infloat of the camera, _be focus and the exposure
may not be correctly set.
oo
25

Selecting a flash mode
--_ Set the mode dial to a, and
press • (1) on the controlbutton repeatedly to select a
flash mode.
EacP, time you press • (_), the i_xdicator
changes as follows.
No indicator (Auto): The flash
automatically pops up and strobes when the
surrom_dings are dark (default).
(Forced flash): 'fhe flasb strobes
regardless of the surrounding brightness.
(No flash): The flash does not s_robe.
• If tbe ment_ is currently displayed, press MENUfirst so tbet the melm disappears
• You can also carry out this operation when themode di_l is set to I_lp, S, A, M, SCN or _I_
(Clip Motion)• You can change the brighmess of die flash wdh
[FLASH LEVEL] in die menu settings
(,page 107) (You cannot change the brighmessof the flash while the mode dlal is set to I_1 .)
• When [ISO] is set to [AUTO[ in the menu
settings, the recommended shooting distance
uskxg the hu(h-in flash is appmxlmately 0.3 mto 4 5 m ( 11 7/8 inches to 177 1/4 incbes),When it is not set to [AUTO[, the flash may beine fl}etive even if the flash level is changed.
• Wbe_ uslag *axeAttto or _ (Forced flash)
mode, you ]nay notice some noise ill the
image when you look a__he screen in a darkplace, hut this will have no effect on the shot
image.• While charging *he fash, the _/CHG lamp
flashes. At?er the charging is complete, the
lamp goes out.• when you pr e'_s _be strutter butt,_a halfm_y
down while the flash is gmblng, the _/CHG
lamp turns on.• yo U C,;Inmo_3nt all external flash OIl _his camera
(page 63).• Attaching a conversion lens (not supplied) nl_y
block the light flora the built-in flash or cause
the lens shadow to appeaE
26


Inserting the date and time on a still image
--_ Set the mode dial to SET UP.
The SET UP screen appears.
• When images are shot with the date and dinesuperimposed, the date and time cannot beremoved lateT:
• The d_te and time do not _ppear on the screenduring shooting, instead, '_" _ppears in the
upper left corner of the screen. The actual date
and time appeal during playback only.
--_ Select a I (CAMERA 1) with A
on the control button, then
press I_.
Select [DATE/TIME] with A/It,
then press I_.
• If you select [DATE], the date is superimposedonto the image in tile order selected in "Setting
the d_te and time" (page 16)
--_ Select the date and time setting
with _ on the control button,
then press Q.
DAY & TIME: Superimposes the date,
hour, and minute onto the image.
DATE: Superimposes the year, month and
day onto the image.
OFF: Does not superimpose the date and
time onto the image.
At_er the setting has been completed, set the
mode dial to I_l, and shoot the iraage.
• You can also shoot images with the mode dialset to t_lp, S, A, M or SCN.
• This setting is maintalned even when d_e poweris turned off
28
Shooting according to scene conditions -- Scene Selection
_ Twflight mode &'_ TwiUght portrait mode I_Landscape mode I_ Portrait mode
When shooting night scenes, people at
night, landscapes or portraits, use flaemodes
listed below to improve the quality of your
images.
.a} Twilight mode
Allows you to shoot night scenes without
losing file d_rk atmosphere of the
surroundings. The shutter speed becomes
slower, so we recommend that you use a
tripod to prevent shaking.
• The fl_sh cannot be used in this mode
• The hologram AF does not emit.
&J Twilight portrait mode
Suitable for shooting portraits in dark
places. The shutter speed becomes slower,
so we recommend that you use a tripod to
prevent shaking.
• Allows you to shoot sharp images of people in
dark places wdhom losing the dark atmosphereof the surroundh_gs
• The flash strobes regardless of the sulroundingbrightness
[] Landscape mode
Foct_ses only on a distant subject to shoot
lsndscapes, etc.• you ca_lnot shoot {n maclo mode.
• The flash does not stlobe automatically
• The hologram AF does not emit
Portrait mode
Suitable for sbooting portraits.
Backgrounds blur away, and the subject is
sharpened.
oo
_2
|1
29

--b Set the mode dial to SCN, then
press MENU.
The menu appears.
--_ Select [SCN] with < on thecontrol button.
--_ Select the desired mode with
Air on the control button.
The mode is set.
When the setting is complete, press MENU
so th_ the menu disappears from the screen.
To cancel Scene SelectionSet the mode dial to a different mode.
• This setting is maintalned even when fl_epoweris turned off
30

Setting the still image quality
--_ Set the mode diat to OP and
turn on the power, then pressMENU.
The menu appears.
• You can also calry otlt this operation when the
mode dial is set to S, A, M or SCN
--t_ SeleCt _|. (P.QUAL|TY} with 41• on the control button, then
select the desired image
quality with AL/T.
The image quality is set.
When the setting is complete, press MENU
so that the menu disappears from the screen.
• You can select the image quality flora eithel
[FINE] or [STANDARD]• The image qttality value selected here is
maintained even when the power is Turned off,
8
31

Image size and quality
You can choose image size (number of
pixels) and image quality (compression
ratio) based on the kind of images you want
to shoot. The larger you make the image
size and the higher you make the image
quality, the better your image, but also the
larger the amount of data needed to preserve
your image. This means you can save fewer
images in your "Memory Stick."
Choose an image size and quality level
appropriate for the kind of images you want
to shoot.
You can resize 1he images later (Resize
function, page 72).
You can choose image size from among the
five options in the following tables. The
below image size is a minimum setting for
examples. When you want to improve
image quality, select the larger image size.
mage size Examples
_560x 1920 Very fine prints
2560 (3:2) 3:2 prints*
Z048 x1536 Printing A4 size images
1280x960 Printing postcard size images
N0x480 Creating home pages
* This option records images in a horizontal Tovertical pmpor*ion of 3:2 to match the size of
the print paper used
The number of images** that can be saved in a "Memory Stick"The number of 0nages that can be saved in FINE (S'fANDARD) mode ore shown below.
Units: number of images)
Capacit_ 16MB 32MB 64MB 128MB MSX-256 MSX-512 MSX-IG
2560x1920 6(11) I2(23) 25(48) 51(96) 92(174) 188(354) 384(723)
2560(3:2) 6(11) I2(23) 25(48) 51(96) 92 (174) 188(354) 384(723)
2048×1536 10(18) 20(37) 41(74) 82(149) 148(264) 302(537) 617(!097)
1280x960 24(46) 50(93) 101(187) 202(376) 357(649) 726(1320) 1482(2694)
840×480 97(243) 196(491) 394(985) 790(1975) t428(357t) 2904(726t 5928(14821)
** When [REC MODEl is set to [NORMAL]
For the number of images that can be savedin other modes, see page I04.
• When the images are viewed on the screen of
d_e camera, they all look d_e same size• Number of images that can be saved can differ
fi'om these values according to shootingconditions
• When the number ofremalnlng shootingimages is gle_ter than 9999, the >9999
indicator appears on the LCD screen.
32

Viewing images on the screen of your viewing single imagescamera
Single (single*image) Index (nine-image) Index (triple-image)screen screen screen
You can view images shot wifll your camera
almost immediately on the screen. You can
select the following three methods for
viewing images.
Single (single-image) screen
You can view one image at a time,
displayed over the entire screen.
Index (nine-image) screenNine images are displayed simultaneously
in separate panels on flae screen.
Index (triple-image) screenThree images are displayed simultaneously
in separate panels on lhe screen. Various
image information items are also displayed.
• For a detailed description of the screenindicators, see page 120
• For details on movies, see page 76
--i_ Set the mode dial to [_, and
turn on the power.
The last image in the selected recording
folder (page 66) appears on the screen.
|1
33

Viewing an index screen (nine-image or triple-image)
--_ Select the desired still imagewith </1_ on the control button.
• : To display ll_e preceding image
• : To disploy lhe next image
• You can easily view the next/previous image by
turt_h_g *he jog dial
--b Press X once.
The display switches to fl_e index (nine-image) screen.
To display the next (previous) index
screen
Press AIVI<I_" on the control bu_ton to
move the yellow frame up/dowtVlet_right.
• You can view the next/previous screen byturning the jog dial
--b Press _=_.
The display switches to the index (triple-image) screen.Press A/V on the control button to display
the remaining image information.
To display the next (previous) index
screen
Press _111_on fl_e control button.
To return to the single=image screen
Press _=_ repeatedly, or press • on the
control button.
34

Viewing images on a TV screen
--i_ Connect the AN connecting
cable to the AN OUT (MONO)
jack of the camera and the
audio/video input jacks of theTV.
If your TV has stereo input jacks, connect
the audio plug (black} of the A/V
connecting cable to lbe left audio jack.
• Turn off both your camera and the TV be._bre
connecting the camera and the TV with the A/Vconnecting cable
--i_ Turn on the TV and set the TV/Video switch to "Video".
• The name and location of this switch may dittkrdepending on your TV
--i_ Set the mode dial to [_, andturn on the camera.
Press 4/1_ on the control button to select the
desired image.
• When using your camet_a abroad, it may benecessary to set [VIDEO OUT] in SET UP
setting to match that of your TV system(page 112).
|1
35


Deleting images
--i_ Set the mode dial to [_, and
turn on the camera.
Press </1_ on the control
button to select the image youwant to delete.
--i_ Press MENU and select
[DELETE] with </1_ on the
control button, then press O.
The image has not yet been deleted at this
point.
--i_ Select [OK] with • on the
control button, then press O.
"MEMORY STICK ACCESS" appears oi1
the screen. When this message disappears,
the image has been deleted.
To continue and delete other imagesDisplay the image to be deleted with _/_
on the control button, select [DELETE] and
press Q. Then, select [OK] with • and
press 0.
To cancel deletingSelect [EXIT] with • on the control button,
then press 0.
_2
37

Deleting images in index (nine-image) mode
--_ While an index (nine-image)
screen (page 34) is displayed,
press MENU and select
[DELETE] with _/1_ on the
control button, then press 0.
--_ Select [SELECT] with </1_ on
the control button, then presse.
To delete all the images in the folderSelect [ALL IN FOLDER] with I_ on thecontrol button, then press Q. Select [OK],
then press O. To cancel deleting, select[EXIT], then press 0.
--_ Select an image you want to
delete with AiJT/4/I_ on the
control button, then press O.
The green _ indicator appears on the
selected image. At this point, the image ha_
not yet been deleted. Repeat this step for all
of the images you want to delete.
• To cancel a selection, press • again so that theIt indicator disappears.
38

Deleting images in index (triple-image) mode
--i_ Press MENU and select [OK]
with • on the control button,
then press 0.
"MEMORY STICK ACCESS" appears oi1
the screen. When this message disappears,
the images have been deleted.
To cancel deletingSelect [EXIT] with "1on the control button,
then press O.
--i_ While an index (triple-image)
screen (page 34) is displayed,
set the image you want todelete to the center with <1/1_on
the control button.
--i_ Press MENU and select
(DELETE] with _ on the
control button, then press O.
The image has not yet been deleted at this
point.
|1
39

Formatting a "Memory Stick"
--_ Select [OK] with • on the
control button, then press 0.
"MEMORY STICK ACCESS" appears on
the screen. When this message disappears,
the image has been deleted.
TO cancel deleting
Select [CANCEL] with • on the control
button, then press O.
--_ Insert the "Memory Stick" you
want to format into the camera.
Set the mode dial to SET UP,
and turn on the power.
• The term "fbrmatting" means preparing a
'Memory Stick" to record images; this processis also called "initialization" The "Memory
Stick" provided with this camera, and thoseavailable commercially, are already formatted,
and can be used immedlately• When you format a "Memory Stick," be
aware that all data in the "MemoryStick" will be permanently erased.
--b Select ii_ (MEMORY STICK
TOOL) with •IT on the controlbutton.
Select [FORMAT] with I_, then
press I_.
Select [OK] with •, then presse.
To cancel the formattingSelect [CANCEL] with • on the control
button, tben press 0.
4O

--i_ Select [OK] with • on the
control button, then press 0.
The "FORMATTING" message appears.
When this message disappears, the format
is complete.
_2
_2
41

Changing the items in theHow to setup and SET UP screenoperate your camera
The usage of the menus and SET UP screenitems that sre most frequently used for
"Advanced operations" is described below.
dog dial
Cont_lbu_on
Changing the menu settings
[] Press MENU.
The menu appears.
[] Press <l/b, on the control
button to select the item youwant to set.
The selected item _urns yellow.
[] Press A/V on the control
button to select the desired
setting.
The frame of the selected setting turnsyellow, and the setting is entered.
To turn off the menu displayPressMENU.
[] Set the mode dial to SET UP.
The SET UP screen appears.
[] Press AITI<iII_. on the control
button to select the item youwant to set,
The frame of the selected item turns
yellow.
[] Press • on the control button
to enter the setting.
To turn offthe SET UP screen
display
Set the mode dial to anything other thanSET UP.
42

How to use the jog dial
The jog dial is used to change the setting
values when shooting with the mm_u_l
adjustl"_ent modes (shutter speed priority
mode, aperture priorily mode, manual
exposure mode), EV adjustment or
choosing the focus t'_ode.
Select Set
dog dial
[] Set the mode dial to aP, S, A,
M, SCN or H-
The adjustable values appear on theright side of the screen.
0Iv
_ Z f"l
[] Turn the jog dial to select the
item you want to adjust.
Move the yellow indication _ to selectthe ilella.
[] Press the jog dial.
The value turnsyellow.
[] Turn the jog dial to select the
value you want to set.
The displayed value is set.
[] TO set other items, press the
jog dial, then repeat steps []
to _.
43

Shooting with themanual adjustments
Mode dial: S/A/M
You can mmmally adjust the shulter speed
and aperture values according to the
purpose of shooting.
_ Aperture
_[v val
' Shutter speedvalue
Mode dial Description
S Shutler speed priorily mode.
Other s_tings areautomatically adj u_ed to attain
correct exposure according tothe brighmess of the subject.
A Aperture priority mode. Other
settings are au_maticallyadjusted to attain correctexposure according to the
brightness of the subject.
M Mode for manually adjustingboth the shutter speed and
aperture values to achieve the
desired shooling condition.
• You cannot use the Night Shot or NightFramingfunctions when the mode dial is set to S, A orM
• You cannot make mant_al adjustmentb when
shooting movies• If the proper exposure is not obtained after
m_king the settings, the setting value indicatorson the screen may fl_b when die shutter button
is pT_ssed bag_vay down. You cml shoot in this
condition, but we recommend that you _dj ustthe flashing values again.
• The auto fl_sh function does not operate
• You can adiust an exposure value when themode dlal is set to S or A (page 49)
Mode dial
Shutter speed priority mode
This function lets you shoot a fast-moving
subject with its motion frozen, or the flow
motion of a moving subject.
"l/t000 s (shortest) 30 s (longest)
[] Set the mode dial to S.
[] Select a shutter speed.
Select a sbutter speed with the jog dial
(page 43). The shutter speed can beselected from 1/1000 to 30 seconds.
If you select a shutter speed of
1/25 second or slower, "NR" is
displayed before the shutter speed andthe NR slow shutter mode is
amomatically activated.
• Shutter speeds of one second or longer areindicated with ["] after the value, such as I"
44

NR slow shutterThe NI_. slow shutter function removes
noise from recorded images to provide
cleon, crisp images. Using a _ripod is
recommended to prevent shaking.
Press the shutter button fully down.
Exposure is performed for the set
shutter speed time, the screen _r_s
black, and "CAPTURING" is
displayed.
Processing is performed to reduce
noise for the set shutter speed time, and
"PROCESSING" is displayed.
The strutter sounds at this time.
When "PROCESSING" disappears,
tile image is recorded.
Aperture priority mode
This function lets you change the focus
depth tu bring both the subject and
background into focus or tu shoot a subject
with a fuzzy background.
Aperture value F2 Aperture value F8(minimum) (maximum)
[] Set the mode dial to A.
[] Select an aperture value.
Select m_ aperture value with tile jogdial (page 43). Tile aperture value canbe selected from F2 to FS.
• The range of values that can be selected varies,dcpending on the zoom position,
• The shutter speed is automatically adjustedfi'om 1/1000 to 8 seconds When you set ma
aperturc value or F56 or more, the values startti'om 1/2000 second.
Manual exposure mode
You can manually adjust tile shutter speed
and _perture values to achieve the desired
shooting condition according to your
purpose.
The difference between the set value and
tile appropriate exposure determined by tile
camera is displayed on the screen as tile EV
value (page 49). 0EV indicates thal the
most suitable value has been set by the
cai/lera.
[] Set the mode dial to M.
[] Select the shutter speed valueindication.
Select tile shutter speed valueindication with the jog dial (page 43).
[] Select the aperture value
indication.
Select tile aperture value indication
with the jog dial (page 43).
goo
45

Choosing a focusmethod
Mode dial: ap/S/A/M/SCN/H
Focus range select functionYou can select from six AF r_nges:
Multipoint AF, Center, Left, Right, Bottom
and Top.
When you select the Center, Left, Right,Bottom and Top modes, the focus is
adjusted aulomaftcally to the desired pointwithin the AF range finder by AF operation.
Multipoint AF
When you use Multipoint AF, the camera
calcul0tes the dist0nce in three places to the
left and right and in the center of the image,
letting you shoot using the auto focus
function wiihout worrying about the image
composition. This is useful when it is
difficult to focus on the subject because it isnot in the center of the frmne.
The Multipoint AF is the factory setting.
[] Set the mode dial to I_IP, S, A,
M, SCN or _tl_
[] Set FOCUS switch to AUTO/ZOOM.
[] Select the desired AF range.
Select the AF range with _he jog dial
(page 43).
You cm_ select the AF range from
Multipoint AF, Center, Left, Right,
Bottom m_d Top.
Jog dial
Mode dial Shutter
When you press the shutter button
halfway down, the color of the AF
range finder frame changes from white
to green when focus is achieved.
FOCUS switch
46

• When you use digital zoom or the hologram
AF, AF operates with priority on subjects in ornear the center oftbe ._iame In this case, the AF
range finder frame is not displayed• When you select Multlpolnt AF in step I_ll, tile
automatically adjusted AF range ._inder flameappears in green when focus is achieved.
$
Shooting with AF lock
When it is difficult to focus because the
subject is not in the center of the frame, you
can focus using the Focus range select
function. For exmnple, when shooting two
human subjects with a gap between them,
the camera may focus on the background
visible through the gap. In these cases, use
AF lock to ensure the subiects are in correct
focus.
• AF lock lets you capture an image with thecorrect tbcus even if the subject is at the edge ofthe flame
[]
[]
[]
Set the mode dial to 101P,S, A,
M, SCN or H (Clip Motion/
Multi Burst).
Set FOCUS switch to AUTO/
ZOOM.
Compose the shot so that the
subject is centered in the AF
range finder frame, then pressand hold the shutter button
halfway down.
The camera focuses on the subject.When the AE/AF lock indicator
changes from flashing to lighted up
and there is a beeping sound, the focus
adjushnent is completed.
AE/AF lockindicator
goo
|147

48
[] Return to the fully composed
shot, and press the shutter
button fully down.
The image will be recorded with the
proper focus for the subjects.
• You can carry out the AF lock adjustmentprocess any nunaber of times befbre you press
the shutter button fully down.
Focusing manually
Mode dial: ap/S/A/M/SCN/_t_
Normally the focus is automatically
adjusted. This function is useful when the
auto focus does not work well, such a_ in
dark places.
Jog dial
Mode dial
FOCUS switch
ual focus/zoom ring
[] Set the mode dial to aP, S, A,
M, SCN or I_.
[] Set FOCUS switch to MANUAL.
The @ (manual focus) indicatorappears on the screen.
[] Turn the manual focus/zoom
ring to achieve a sharp focus.
The focus mode indicator is displayed.
If [EXPANDED FOCUS] in the SET
UP settings is set to [ON], the image is
zoomed to 2x* when recording still
images. When a sharp focus is
achieved, the image returns to normal
and the @ (manual focus) indicator
changes from yellow to white. When
recording a movie (MPEG MOVIE),
or [EXPANDED FOCUS] is set to
[OFF], the image is not zoomed. You
can adjust the focus distance from
2 cm (13/16 inches) to _(infinile).
* When using digital zoom, the image is
zoomed 1× to 2×, depending on the diggalzoom magnificmion.
To reactivate auto focusingSet FOCUS switch to AUTO/ZOOM.
• The f_cus mode indicator is approxinlate, andshould be used as a reference.
• The focus distance value does not appear when
NightSbot is set and [CONVERSION LENS] is
set To[ON] in the SET UP settings When the_, indicator flashes, the fbcus distance has
reached 2 cm ( 13/16 inches) or _.
• You cannot fc*cus manually when using theNightFraming function
• You cannot record images m macro whenfocusing manually
• When you use the zoom fPnctlon, use theZOOM button (page 23).

Adjusting theexposure
i EV adjustment
Mode dial: apIS/AISCN/H
This lets you adjust the exposure value
which is set by authmatic adjustment. You
can select values ranging from +2.0EV to
2.0EV in steps of 1/3EV.
Mode dial
[]
[] Set the mode dial to aP, S, A,
SCN or I_.
[] Press [].
[] Select the desired exposure
value with the jog dial.
Adjust the exposure value whilechecking the brightness of the
background.
To reactivate auto exposureReturn the exposure adjustment value to
OEV.
• Ifa subject is being sbot in extremely brigbt ordark conditions, or the flash is used, tile
exposure adjustment may not be ett?ctive
Shooting techniques
Normally, tbe camela automatically adjuststhe exposure. If tbe hnage is too dalk oT too
brlgbt as shown below, we reconlmend thatyou _u_ _e exposure manuag_ When
shooting a back-llt subject or a su_ecTogainst a white (eg snowy) background,
odjust the exposm-e toward the + side Whenshooting a brightly lit suNect (e.g spotlight)
against a dark background, _djust theexposure toward the side
UnderexposedAdjust toward +
Appropriate exposure
OverexposedAdjust toward -
49

Displaying a histogram
A histogram is a graph showing the
brightness of the pixels conththed in _n
image. The horizontal axis shows the
brightness, and the vertical 0xis shows the
number of pixels. Disploying a histogr_n
during recording or playback lets you
determine the proper exposure.
[] Set the mode dial to aP, S, A
or SCN.
[] Press DISPLAY to display the
histogram.
[] Adjust the exposure based on
the histogram.
Adjusting the exposure to the + side shiftsthe histogram to the right side.
Adjusting the exposure to the - side shiftsthe histogram to the left side.
• The histogt am also appears when tt_e mode dial
is set to n or M, but yott cannot 3djust the
exposure.
• The histogram also appears when you press
DISPLAY whlle playing back a single image
(page 33) or during Quick Review (page 2t )
• The hi_ogram does not appear in the fbllowing
cases:
When the mode dial is set to SET UP or H
When the mentt is displayed
During Quick Review of an image recorded
in Exposure Bracket mode
When t_sing piayback zoom
• [] appears in the fbllowing c_ses:When recording in the digital zoom range
During recording or playback in [2560 (3:2)1size
When rotating a still image• The histogram before recording represents the
histogram of the Phage displayed on the screenaTthe fl_at time. A dif_?rence occurs in the
histogram before and niter you press _he shutter
button When this happens, check the histogramwhile pl_ylng back a slngle-image or duringQuick Review
In particular a Ialge dift?rence appears in thefollowing cases:
When the flash strobes
When using the NightPraming flmction
When [R EFFECT l is set to [SOLARIZE]During slow shutter or hlgh-speed shutter
• The hlslogrmn may not appear for imagesrecorded using other cameras.
50

Metering mode
Mode dial: ap/S/A/M/SCN/H_t_
This function enables you to select the
metering mode to suit the shooting
conditions m_d purpose.
Mugi-pattern metering (No indicator)The image is divided into nmltiple regions
and metering is performed for each region.
The camera judges the subject position and
background brightness, and determines awell-balanced exposure.
The cmnera is set to multi-pattern metering
as the factory setting.
Center-weighted metering ( [] )
Metering is performed with priority given
to the center of the image. The c_mera
determines the exposure based on the
brightness of a subject near the center
according to the shooting aim.
Spot metering (1_])
Light is measured only for the specific
region where the subject is located. This lets
you adjust the exposure to the subject even
when the subject is backlit or there is strong
contrast between the subject and the
background.
Position the spot metering cross hair on one
point of the subject you want to shoot.
• To focus on the same spot as used fPr metering,we t'ecomnaend using the Focus range select
fhnction (CenteQ (page 46)• You cannot set the metering nlode when using
the Nigh_Shot and NightFraming functions.
•- Spot meteringcross hair
Shut_r
[]
[] Set the mode dial to 101P, S, A,
M, SCN or H-
[] Press [] repeatedly to select
the desired setting.
Each time you press [_], the metering
mode chm_ges as follows:
[ Multi-patt2rn metering (no indicator)
] Center-weighted metering ( [] )
_ing ([_)
[] Shoot the image.
Press and hold the shutter buttnn
halfway down, wait until the camera
completes the automatic adjustments,
then press the shutter button fully
down to record the image.
goo
51

Shooting with theexposure fixed
-- AE LOCK
Mode dial: ap/S/A/SCN/H
Once you press AE LOCK, the exposure is
fixed. This function lets you measure the
desired portion of the image using the spot
metering function, fix that exposure value
by pressing AE LOCK, and lhen recompose
the picture.
Portion of the image used
4Shoot the subject.
Shutter
Mode dial
AELOCK
[] Set the mode dial to aP, S, A,
SCN or H.
[] Focus on a portion of the
image that has the desired
exposure value, then press AELOCK.
The exposure is fixed and the AE-Lindicator appears.
To release AE LOCK
Carry out one of the followings:
• Press AE LOCK again after step [].
• Release your finger from the shutler
button after step I_.• Press down the shutter button in slep Lq
52
[] Target the subject you want to
shoot and press and hold the
shutter button halfway down.
The focus is automatically adjusted.
[] Press the shutter button fullydown.

Shooting threeimages with theexposure shifted
-- Exposure Bracket
Mode dial: a/ap/S/A/M/SCN
The camera records three images ill
SuccessiOn_ each with the exposure value
shirred. '[he exposure cotlapens_tion valuecanbe set between ±I.0EV from the
appropriate exposure value in I/3EV s_eps.
Mode dial
Control button
€
€
[] Set the mode dial to SET UP.
The SET UP screen appears.
I_1 Select 1012 (CAMERA 2) with
&/_r and [BRACKET STEP]
with I_/&/V, then press I_.
Ik"! Select the desired bracket step
value with &/T, then press e.
+I.0EV: Shifts tile exposure value by
plus or minus 1.0EV.-+0.7EV: Shifts tile exposure value by
plus or minus 0.7EV.-+0.3EV: Shifts tile exposure value by
plus or minus 0.3EV.
[] Set the mode dial to I_1, I_IP,
S, A, M or SCN. _-
[] Press MENU. _.The menu appears. ¢_
[] Select [MODE] (REC MODE] _'with </1_, then select [EXP
BRKTG] with A/_r. _-o
[] Shoot the image.
I1,.53

To return to normal mode
Select [NORMAL] in step r_.
• You cannot use the flash in this mode.
• During sbooting in this mode, the images arenot displayed on tbe screen. Compose tbe
image before pressing the shutter button• The fbcus and white balmlce are Miusted for
tbe first image, and these settings are also usedfor the other images
• When the exposure is manually adjusted, the_djusted value is used fht tile center value
• The recording interval is _pproximately05 second
• You cannot select a shtttter speed of1/25 second or slower.
Adjusting color tones
-- White Balance
Mode dial: ap/S/A/M/SCN/H
Normally, when recording with automatic
adjustments, the white bal0nce is
automatically set to AUTO and the overall
color balance is adjusted according to the
shooting conditions. However, when you
shoot under fixed conditions or special
lighting conditions, you can manually
acliust the white balance.
AUTO (no display)Adjusts the white balance automatically
_ll_d (ONE PUSH)
For adjusting the white balance depending
on the light source
-_ (Daylight)
Shooting outdoors, or shooting a sunrise/
sunset, night scene, neon signs, or fireworks
(Cloudy)
Shooting under a cloudy sky
(Fluorescent)
Shooting under fluorescent lighth_g
(Incandescent)
• Places where the lighting conditions
change quickly
• Under bright lighting such as
photography studios
Mode dial
[] Set the mode dial to I_IP, S, A,
M, SCN or Itl_
[] Press WHT BAL repeatedly to
select the desired setting.
54

To shoot in one*push whitebalance mode1 Frame a white object such as a piece of
paper filling the screen under the same
lighting conditions as you will shoot the
sul_iect.
2 Press _.DZI.
The _m_ indicator flashes quickly.
When the white balance has been
adjusled and stored in the memory, the
indicator stops flashing.
Do not move the camera while the _.ll..d
indicator is flashing.
To reactivate auto adjustmentSelect [AUTO] in step B-
• Under fluorescent lights that flicker, tile whitebalance adiustment tlmction may not work
correctly even though you select(fluorescent)
• When the flash strobes, the manual set*ing iscanceled, and *he image is recorded in [AUTO lmode
• The t:_.llll_dindicator means:
Slow flashing: The white balance is not set orwas not able to be set
Quick flashing: The white balance is beingadiIlsted (a fler you press _.lll.ld)Lit steady: The white balance has been set.
• If the _liLI indicator keeps flashing even when
you press t:_.llllzI,record in automatic whitebalance mode
• When you selec_ *he one-push white balancemode, the screen momentarily turns blue
• YOU cannot adjust file white balance whenusing the NightShot and NightFramingthnctions.
Shooting techniques
The image is affected by the lighting
conditions For example, the entiTe imageappears blue undm sunlight in the summer,and white items gain areddish tint raider
incandescent light bulbs, etc Tile human eye
can resolve these ploblems, but digital stillcamel as cannot i ecognize the cot t_ct colors
without adit_stments. N ornlally, the camePamakes these adjustments automatically, but
if l_corded imagecolors appear unnatural,we rccomnlend thai you adJusl the whitebalance.
Shooting in the dark
Mode dial: I_1/IDIP/MXH
NIGHTSHOT/NIGHTFRAMING switch
• Filters (not supplied) may block the infi'ared 2_
ray
• The recommended recording distance fbr theNightShot or NightFraming fbnction is from Q-
approx. 03 m to 45 m (11 718 inches to
177 1/4 inches) _.• You cannot t_se the Night Shot or NightFraming
function when [CONVERSION LENSI is set to
[ON] in the SET UP settings (page 1I0) _-oo
IIb,.-55

56
NightShot
The NightShot function lets you shoot
subjects in dark places such a_ c_mp scenes
at night or nocturnal plants and m_imals.
[] Set the mode dial to a, aP or
H.
[] Set NIGHTSHOT/
NIGHTFRAMING switch to
NIGHTSHOT.
The [] and "NIGHT SHOT"
indicators light. 'Hae "NIGHT SHOT"indicator turns offafter 5 seconds.
[] _IG_T SHOT'
[] Shoot the image.
To cancel the NightShot functionSet NIGHTSHOT/NIGHTFRAMING
switch to 0.
• While using the NightShot thnction, you cannotuse the following fhncfions:
White balance
Switching _he metering modeAE LOCK
Shooting with hologram AF
Shooting with fl_eflash• Do not use the NightShot fhncdon in bright
places (eg outdoors in the daytime). This may
cause your camera to maflhnction• Images do not _ppear wifll *he corl_c_ colors
while shooting with the Night Shot thnction
• If focttslng is difficult with fl_eauto focus modewhen using the NightShot function, adjust
focus manually (page 48) The tbcus distancevalue does not appear
• If you pT_ss an invalid key while using theNightShot function, fl_e [] indicator flashes,
and the "NIGHT SHOT" indicator tights torabout 5 seconds.
However, if yott select fl_eflash mode inBracket, Multi Btirst or BURST 3 mode, fl_e
BRKII_]/[_ indicator fl_shes
NightFraming
The NightFraming function enables you tocheck a subject even _ nigh_ m_dthen
record with natural colors using the flash.
[] Set the mode dial to IDI, I_IP or
H (Clip Motion).
[] Set NIGHTSHOT/
NIGHTFRAMING switch to
NIGHTFRAMING.
The _I.F and "NIGHT FRAMING"
indicalors light. "['he"NIGHTFRAMING" indicator turns offafterabout 5 seconds.
" ,NfGHr F_MIN &
[] Press and hold the shutter
button halfway down.
The hologram AF light (page 27) isemitted and the focus is automatically
adjusted.
[] Press the shutter button fully
down.
The shutter sounds, the flash strobesand the image is recorded.

To cancel the NightFramingfunction
Set N IGItTS ltOI'/N1GItTFRAiVIINGswilch lo 0.
• While using the NightFl'aming limction, youcannot use tile following fhncflons:
White balance
Swdching the meterlng modeAR/OC K
Matmal focus
• When you p_ss _e sh_ltter button halfwaydo_n ycca wilt _ _ so_I_d, but this is t_ot t_sound of the shutter releasing¸ Ti_e imag_ is not
T_corded yet.• The fl_h do_ n_t _an_i_n _h_n _c_l'_li_g m
BURST 3 and in EXP BRKTG modes¸ The
BRK/[_ indicator flashes.• If you perf_tm any other invalid ot_lion
while using fl_eNightFraming fonc_ion, the_'LI= indicatol" flashes and the "NIGHTFRAMING" i_dicamr lights for F_out
5 seconds
Shooting multipleframes
-- C|ip Motion
Mode dial: It_
You can shoot a number of consecutive still
images (GIF animation). The GIF format
has a small f_Ie size, making it convenient
for creating home pages or 0ttaching images
m e-mail.
• Due to the Iimit_flons of the GIF formal, the
_lumber of colors for Clip Motion images isreduced to 256 colors or less Therefol_, the
image quality may deteriorate fol some images.
NORMAL (160x120)
Clip Motion of up to 10 frames can be
recorded. This is suitable for use on home
pages, etc.
MOBILE (120x108)
Clip Motion of up to two frames cm_ berecorded. This is suitable for use with
portable data terminals.
• The file size is reduced in MOBILE mode, so
the image quatiTy deteriorates.• For the nmnber of images you can record in
Clip Motion mc_e, see page 104
Before operation
Set [MOVING IMAGE] to [CLIPMOTION] in the SET UP settings (pages 42
and 110).
Mode dial
Control bt;_on
_1 Set the mode dial to _2_.
[] Press MENU.
The menu appears.
[] Select L-==(IMAGE SIZE) with
<, then select the desired
mode with &IV. g
I1==57

[] Shoot the image for the firstframe.
[] Shoot the image for the nextframe.
Press the shutter button to shoot the
next frmne, then repeat this operation
until you have shot lhe desired numberof frames.
[] Press 0.
All the frmne images are recorded on
the "Memory Stick".
To delete some or all of the
frame images while making aClip Motion recording
1 Press • (_) in step [] or [q.
The frame images you shot are played
back in turn and stop at the last image.
2 Press MENU, and select [DELETE
LAST], or [DELETE ALL] with •/1_,
then press S.
3 Select [OK] with A, then press Q. When
]DELETE LAST] is selected in step 9
each time you repeat steps 1 through 3,
_he last frame you shot is deleted.
• Befbre calrying out step !_!, the images are
saved temporarily in the camera memory These
images are not recorded on _e "Memory Stick"yet.
• The date and time are not superimposecl onto
Clip Motion images• When viewing an image recorded in Clip
Motion on *tae index screen, the image mayappear dlflErent from the actual image
• GIF files not cre_ted on this camera nl_y not bedisplayed correctly.
Shooting in MultiBurst mode
i Multi Burst
Mode dial: _!_
This mode records 16 frames in succession
each time you press the shutler button. This
is convenient for checking your form in
sports, for example.
Before operation
Set [MOVING IMAGE] to ]MULTI
BURST] in the SET UP settings (pages 42
and 110).
58

Mode dial
Control button
[] Set the mode dial to H.
[] Press MENU.
The menu appears.
[] Select -=:_] (INTERVAL) with <,
then select the desired frame
interval with &/_r
You can choose the frame interval
from tile menu settings (page 108).
[] Shoot the image.
The 16 frames are recorded as a single
image (image size: 1280x960).
To delete recorded imagesWhen using this mode, you cannot delete
only selected images within the Multi Burst
sequence. When you delete images, all 16
images are deleted at the same time.
I Set the mode dial to [_J.
2 Press MENU and select [DELETE] fronl
the menu, then press O.
3 Select [OK], and press O.
All of the images are deleled.
• You cannot use *be flasb in ibis mode
• When you pI3y back images recorded with this
camera in Multi Burn mode, the 16 _ames will
be played back in order at a fixed interval
• When the images are played back on a
computer, all 16 _ames will be displayed at the
sattle time as part of one image¸
• When Multi Btlrst images are played back on a
camera wlthout the Multi Burst f_ature, all I6
frames will be displayed at the stone tittle as
part of one image, just as they are on a
cott_pttteK
• Date attd time cannot be superimposed onto
images
• For the number of images that can be re¢o_ed
in Multi Burst mode, see page I05
Shooting threeimages continuously
-- Burst
Mode dial: I_1/I_Ip/S/A/M/SCN
This mode is used for continuous shooting.Each time you press tile shutter button in
this mode, the camera records three imagesin succession.
Mode dialMENU
Shutter
Control button
goo
|1
59

[] Set the mode dial to a, aP,
S, A, M or SCN.
[] Press MENU.
The menu appears.
[] Select [MODE] (REC MODE)
with <l/b., then select
[BURST 3] with A/T.
[] Shoot the image.When tile "RECORDING" indication
disappears, you can shoot tile nextimage.
To return to normal modeSelect [NORMAL]in step I_l.
• You cannot use the flash in this mode.
• During shooting in this mode, the images are
not displayed on the screen. Compost the
image before pressing tile shutter button• The recording interval is _pproximately
05 second
• You cannot select a shtttter speed of1/25 second or slower.
Shooting still imagesin TIFF mode
-- TIFF
Mode dial: a lapIS/A/MISCN
This mode records an image without
compression, so the image quality does not
deteriorate. Images recorded in this mode
are suitable for printing with a high-quality
image. A JPEG (compressed) formal imageis also recorded at the same time.
Mode dial
Control button
[] Set the mode dial to I_1, I_IP,
S, A, M or SCN.
[] Press MENU.
The menu appears.
[] Select [MODE] (REC MODE)
with <l/1%then select [TIFF]
with T.
[] Shoot the image.
When the "RECORDING" indication
disappears, you can shoot the next
image.
To return to normal mode
Select [NORMAL] in step I_l.
• JPEG images are recorded in the image size
selected by the I-El (IMAGE SIZE) menu
(page 19) TIFF images are recorded in[2560x 1920] size except when [2560 (3:2)1 isselected.
• Writing data takes more time *tlan in normalrecording mode
• For the number of images you can record inTIFF mode, see page 104.
6O

Shooting still imagesfor e-mail
Mode dial: a/ap/S/A/M/SCN
In E-mail mode, a small-size image(320×240) that is suitable for e-mailtransmission is also recorded at the stone
time as recording a normal still image. (See
page 19 for the normal still image sizes.)
Mode dial
[] Set the mode dial to a, I[_EP,
S, A, M or SCN.
[] Press MENU.
The menu appears.
[] Select [MODE] (REC MODE)
with 4/1_, then select [E-MAIL]with A/!.
[] Shoot the image.When the "RECORDING" indication
disappears, you can shoot the next
image.
To return to normal modeSelect [NORMAL] in step [_1.
• For instructions on how to attach images to ane-mail message, consult the User's Manual for
your e-mail so,ware• F_ _e number of images you can record in
E-mail mode, see page I04
Shooting still imageswith audio files
-- Voice
Mode dial: I_1/I_Ip/S/A/M/SCN
In Voice mode, an audio track is alsorecorded at the same time as recording a
normal still image.
Mode dial
Control button
[] Set the mode dial to I_1, I_IP,
S, A, M or SCN.
[] Press MENU.
The menu appears.
[] Select [MODE] (REC MODE)
with </1_, then select [VOICE]
with &IV.
_2
g13O
|1
61

[] Shoot the image.When tile "RECORDING" indication
disappears, you can shoot tile next
image.If you press and release theshutter button, sound is recordedfor five seconds.
If you hold down the shutterbutton, som_dis recorded until yourelease the shutter button for up to40 seconds.
To return to normal mode
Select [NORMAL] in step I_'!.
• To view images recorded in Voice mode, see
pgge 76
• For the number of images you can record inVoice mode, see page 104
Adding special effects
-- Picture Effect
Mode dial: ap/S/A/M/SCN/MSM
You can digitally process images to obtain
special effects.
SOLARIZEThe light contrast isdearer and the picturelooks like anillustration.
SEPIA
NEG.ART
The cotor and
brightness of thepicture are reversedas in a negative.
Mode dialMENU
Control button
[] Set the mode dial to I_IP, S, A,
M, SCN or H.
[] Press MENU.
The menu appears.
[] Select [PFX] (P. EFFECT) with
_1/1_,then select the desired
mode with it/V.
To cancel Picture Effects
Select [OFF] in step [].
62

Using an externalflash
Mode dial: a/ap/S/A/M/SCN/H
• The flash does not strobe when shooting inBm'st, Exposm_ Bracket, Twilight, MPEGMovie or Multi Burst mode.
• When an external flash is mounted, the weight
prevems the lens portion from locking. WeT_commend supporting the lens portion with
your left hand or using a tripod for recording• You calmot have an external flash and the built-
in flash strobe at tile same time.
Hot shoe Mode dial
Control button
Using the Sony HVL-F I O00Flash
You can mount the Sony HVL-F1000 flash
on the hot shoe of your camera. Using the
HVL-FI000 will allow you to shoot more
vivid fash pictures thm_ when using an
ordinary external flash.
[] Mount the HVL-F1000 external
flash on the hot shoe.
[] Plug the flash into the ACC
jack.
[] Turn on the HVL-F1000.
[] Set the mode dial to 101, IPap,
S, A, M, SCH or H (Clip
Motion).
[] Shoot the image.
The built-in flash does not strobe.
• When using a Sony optional external flash, set[HOT SHOE l to [OFF] in the SET UP settings
Using a commerciallyavailable external flash
You can mount a commercially available
external flash that supports hot shoe.
[] Mount the external flash to the
hot shoe.
[] Set the mode dial to SET UP.
[] Select IOI2 (CAMERA 2) with
&/_r, [HOT SHOE] with Ib/A/_ r,
[ON] with I_/A, then press O.
[] Turn on the external flash.
For details, please consult theoperating instructions supplied with
your fl_sh.
[] Set the mode dial to M or A. _.The flash also strobes when the mode
dial is set to I_l, I_P, S, SCN or _ _(Clip Motion), but we recommendrecording wi_h the mode dial set to Mor A. g"
oo
[] Shoot the image.
|1
63

• Set the most _pproprlate aper:ure valueaccording to the guide number of fl_eflash used
and the distance to *be subject.• The flash guide number varies according to the
ISO sensitivity (page 107) of the camera, so besure to check the ISO number
• Note float the camera may not f_nction properlyor may malfunction when using a flasb
manufactured by another company fpe a
specifi c camera (generally a flash witb multiplecontact points on the hot shoe), a hlgh-volmgetype flasb, or a flasb accessol?i
• If you record with [HOT SHOE] set to [OFF] inthe SET UP settings, the built-in flash may rise
up. If this h_ppens, return the built-in flash toits original position Depending on fl_e type of
external flash used, you may have to ren]ovethe external flash before returning the built-in
flash to its original position.
Selecting a folder
Mode dial: SET UP
Your c_mera can create multiple folders
within a "Memory Stick."
Creating multiple folders makes it easy to
find images during playback.The "101MSDCF" folder is set as the
recording folder at the factory. You can
create folders up to "999MSDCF'.
• Up to 4000 images can be stored in one ._blder
When the fc*Idercapacity is exceeded, a newfolder is automatically created.
• Once you create a ._blder, it cmmot be deleted
Mode dialMENt
Creating a new folder
[] Set the mode dial to SET UP.
[] Select _ (MEMORY STICKTOOL) with A/V, then select
[CREATE REC. FOLDER] withI_IAIV.
[] Select [OK] with I_/A, then
press 0.
[] Select [OK] with A, then press
e.A new folder is created wi/h a number
one higher thm_ the last created folder.
64

To cancel folder creationSelect [CANCEL] in steps 1[_1 or [gll.
• Shooting images are recorded in the newlycreated folder until a dift_'rent fblder is createdor selected.
Changing the recordingfolder
[] Set the mode dial to SET UP.
[] Select _ (MEMORY STICK
TOOL) with &IT, then select
]CHANGE REC. FOLDER] with
I_/v.
To cancel changing therecording folder
Select [(-'ANCEL] in steps 1[_1or [gll.
• hnages recorded using a camera without the
folder creation function are stored ill the
"100MSDC F" folder You cannot select
"100MSDCF" as the recording folder with this
camera
[] Select [OK] with I_/A, then
press Q.
The recording folder selection screen
appears.
[] Select the desired folder with
_/1_, and [OK] with A, then
press O.
.=
goo
65

- [] Display the folder to be playedback with </1_.Selecting a playback
folder
Mode dial: [_
You can sel the playback folder.
Mode dial
[] Select [OK] with &, then presse.
Enlarging a portion ofa still image
Mode dial: [_
You can enlarge a part of an image up to
five times the original size. You can also
record tile magnified image as a new file.
Mode dial
To cancel playback folderselection
Select [CANCEL] in slep [] or [].
66
Control button
[] Set the mode dial to [_-.
[] Press MENU.
The menu appears.
[] Select [FOLDER] with < on the
control button, then press 0.
When a "Memory Stick" containsmultiple folders
The following marks appear on tile first mid
last images in a folder (page 120).
[_: You can move to the previous folder.
[]_: You can move to the next folder.
[_: You can move to both tile previous andtile next folders.
• You can also select the playback folder at theindex (nine-image or triple-image) screen
• You can also select tile playback fblder using
[CHANGE REC. FOLDER] in the SET UPsettings (page 65).
• Ifttlere are no images in tile folder, the message'NO FILE IN THIS FOLDER" appears on the
screen
ZOOM button
Control button

Enlarging an image
-- Playback zoom
[] Set the mode dial to _J.
[] Display the image to be
enlarged.
[] Press the zoom T button to
zoom in on the image.
[] Select the desired portion of
the image with A/V/<I/I_.
Press •
Press Press
Press •
A: To view more of the top of the image• : To view more of the bottom of the
image• :To view more of the left side of the
imageI_:To view more of the right side of the
image
[] Adjust the image size with theZOOM WIT button.
To cancel playback zoomPress 0.
• You cannot use playback zoom for movies
(MPEG MOVIE), Clip Modon images andMulg Burst images
• You can enlarge the images displayed wig_ theQuick Review function (page 21) bypet fbrming steps [] to []
• You cannot enlarge images with the manual
fPcus/zoom ring
Recording an enlargedimage- Trimming
[] Press MENU after playbackzoom.
[] Select [TRIMMING] with I_,
then press 0.
[] Select the image size with &IV,
then press 0.
The recording folder appe_rq at the =_2
upper right of the screen. _.The image is recorded, and the imageon _he screen returns to the normal size
after recording. El
• The trimnled image is recorded as the newestfile in g_e selected re¢ol ding folder, and the
original image is retained• The quality of trimmed images may deteriorate
• You cannot trim to an image size of 3:2• You cannot trim unconlplessed (TIFF) images.
• You cannot him images displayed with QuickReview
67

Playing backsuccessive images
-- Slide Show
Mode dial: []
You cm_ pl_y back recorded images in
order. This function is useful for checking
your images or for presentations, etc.
Mode dial
Control button
[] Set the mode dial to [].
[] Press MENU.
The menu appears.
[] Select [SLIDE] with </1% then
press 0.
Set fl_e following items with A/V/•/I_.
INTERVAL3 sec/5 sec/10 sec/30 sec/l rain
IMAGE
FOLDER:
Plays back images in the
selected folder.
ALL: Plays back all images stored in
the "Memory Stick."
REPEAT
ON: Plays back images in a
continuous loop.
OFF: After all the images have been
played back, the slide show
ends.
[] Select [START] with T/I_, then
press 0.
The slide show begins.
To cancel the slide show setting
Select [CANCEL] in s_ep I_.
To stop slide show playbackPress O, select [EXIT] with !_, then press
lid again.
To skip to the next/previous
image during the slide showPress I_ (next) or • (previous). If
[FOLDER 1is selected in [IMAGE], only
the images in the folder can be selected.
• The interval setting time m_y vary dependingon _he image size
68

Rotating still images
Mode dial: []
You can rotate an image recorded in porirait
orientation and display it in landscape
orientation. The rotated image is written
over the original image.
Mode dial
[] Set the mode dial to [_-I, and
display the image to rotate.
[] Press MENU.
The menu appears.
[] Select [ROTATE] with <1/1_,
then press 0.
[] Select € "_, with &/T, then
rotate the image with 4/1_.
[] Select [OK] with A/V, then
press Q.
The rotated image is written over the
original image.
To cancel rotation
Select [CANCEL]in step Lq, then pressO.
• You cannot rotate protected images and images
recorded as movies (MPEG MOVIE), ClipMotion and Multi Burst images
• You may not be able to rotate images shot withof]let c_meras
• When viewing images on a computer, theimage rotation infomlatlon may not be
reflected depending on the applicationsoftware
_2
Control button
69
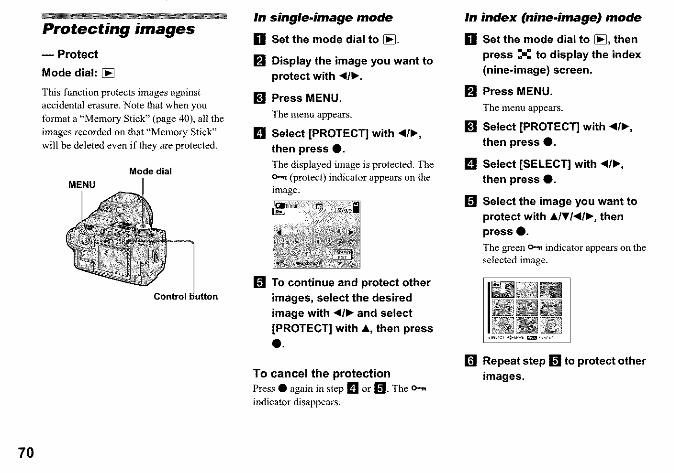
Protecting images
i Protect
Mode dial: []
This function protects images against
accidental erasure. Note that when you
format a "Memory Stick" (page 40), all flae
images recorded on that "Memory Stick"
will be deleled even if they are protected.
Mode dial
In single-image mode
[] Set the mode dial to [_
[] Display the image you want to
protect with <1/1_.
[] Press MENU,
The menu appears.
[] Select (PROTECT] with <11%
then press Q.
The displayed image is protected. The
o..... (protect) indicator appears on theimage.
[] To continue and protect other
images, select the desired
image with </1_ and select
[PROTECT] with &, then press
e
To cancel the protection
Press • again in step [] or [_. The o...n
indicator disappears.
In index (nine-image) mode
[] Set the mode dial to [1_, then
press _=_ to display the index
(nine-image) screen.
[] Press MENU.
The menv appears.
[] Select [PROTECT] with </1%
then press O.
[] Select [SELECT] with </1%
then press Q.
[] Select the image you want to
protect with A/W<I/I% then
press •.
The green o_ indicator appear_ on fl_eselected image.
[] Repeat step [] to protect other
images.
7O

[] Press MENU.
The menu appears.
[] Select [OK] with I_, then press
O.The _ indicator turns white. The
selected images are protected.
To exit the Protect function
Select [CANCEL] in step [] or select
[EXIT] in step [], then press •.
To cancel individual protectionSelect the image to be unprotected with
A/V/</I% then press • in step []. The
indicator turns gray. Repeat this operationfor all images that are to be unprotected.
Press MENU, select [OK], and then press•.
To protect all images in thefolder
Select [ALL IN I:OLDER] in step [], and
press •. Select [ON], then press •.
To cancel all protection in thefolder
Select [ALL IN FOLDER] in step [], and
press @. Select [OFF], then press @.
In index (triple-image) mode
[] Set the mode dial to [_J, then
press X twice to display the
index (triple-image) screen.
[] Display the image you want to
protect in the center position
with </1_.
[] Press MENU.
The menu appears.
[] Select [PROTECT) with A/V,
then press •.
The center image is protected. Theindicator appears on tile image.
[] To protect other images,
display the image you want to
protect in the center position
with </1_, and repeat step El.
To cancel previously set
protection
Select the image to be unprotected, _ndpress • in slep []. To cancel protection of
all images, repeat this process for eachimage.
2
71

Changing image size
-- Resize
Mode dial: []
You can change the image size of a
recorded image, and save it as a new file.
You can resize to the following sizes.
2560x 1920, 2048×1536, 1280×960,
640×480
The original image is retained even after
resizing.
Mode dial
Control button
[] Set the mode dial to [].
[] Display the image you want toresize with 4/1_.
[] Press MENU.
The menu appears.
[] Select [RESIZE] with </1_, then
press 0.
[] Select the desired size with A/
_r, then press 0.
The recording folder appears at theupper right of the screen.
To cancel resizing
Select [CANCEL] in step [].
• Tile resized image is recorded as the newest filein tile selected recording fMder, and the originalimage is retained.
• You cannot change the size of movies (MPEGMOVIE), Clip Motion, Multi Bt_rsTor TIFF
images.• When you change flom a small size to a lalge
size, the image quality deteriorates• You cannot reslze to an image size of 3:2
• When you resize a 3:2 image, the upper andlower black portions will be displayed on thescreen
Choosing images toprint
i Print (DPOF) mark
Mode dial: []
You can mark still images shot wi_h your
camera that you want to have printed. This
function is convenient when you have
images printed at a shop or using a printer
that conforms with the DPOF (Digital Print
Order Format) standard.
Mode dial
72

• You cannot mark movies (MPEG MOVIE) or
Clip Motion images.• In E-mail mode, a print (DPOF) mark is
marked on the normal size image that isT_corded at the same time.
• When you mark images shot in Multi Burstmode, all the images ale printed on one sheet
divided into 16 panels.• If you mark an image she* in TIFF mode with a
print (DPOF) mark, only the uncompressedimage is printed, and the JPEG image recorded
at tile same time is not printed.
In single-image mode
[] Set the mode dial to [_l
[] Display the image you want to
print with ,fib,.
[] Press MENU.
The menu appears.
[] Select [DPOF] with ,fib., then
press Q.
The _ mark is marked on the
displayed image.
[] To continue and print other
images, select the desired
image with <1/1_and select
[DPOF] with A, then press Q.
To unmark the _ mark
Press • again in slep [q. 'Phe _ mark
disappears.
In index (nine-image) mode
[] Set the mode dial to [_-], then
press X to display the index
(nine-image) screen.
[] Press MENU.
The menu appears.
[] Select [DPOF] with I_, then
press Q.
[] Select [SELECT] with </1%
then press Q.
• When nlalking plint marks, yot_ cannot
select [ALL IN FOLDER]
[] Select the image you want to
print with AIV/</,, then presse.
The green _ mark appears on the
selected image.
[] Repeat step [] to print other
images.
(o
|1
73

[] Press MENU.
The menu appears.
[] Select [OK] with I% then press
O.
The _ mark _urns white. The
mark setting is completed.
To exit the _' mark function
Select [CANCEL] in s_ep Lq, or select
[EXIT] in step 1_.
To unmark selected _' marks
Select the images to be unmarked in step
[], then press 0.
To unmark all the _' marks inthe folder
Select [ALL IN POLDER] in step [], thenpress O. Select [OFF], then press O.
In index (triple-image) mode
[] Set the mode dial to [_', then
press X twice to display the
index (triple-image) screen.
[] Display the image you want to
print in the center position
with <1/1_.
[] Press MENU.
The menu appears.
[] Select [DPOF] with A, then
press O.
The E_ mark is marked on the center
image.
[] To print other images, display
the image you want to print in
the center position with 4/1%
and repeat step El.
To unmark the _t' mark
Press • again in step Lq. The E_ € mark
disappears.
74

Shooting movies
Mode dial: _t_
You can shoot movies using yo/_r camera.
Before startingSet [MOVING IMAGE[ to [iVlPEG
MOVIE l in the SET UP settings (pages 42
and 110).
Mode dial
[] Select ii-= (IMAGE SIZE) with <,then select the desired mode
with &IV.
You c_n choose from 320 (HQX),320×240 or 160x 112.
For details on the recording time foreach image size, see page 105.
[] Press the shutter button fully
down.
"REC" appears on the screen and thecamera starts recording the image andsound.
[] Set the mode dial to _t_.
[] Press MENU.
The menu appears.
ltton
• Recording stops when the "Memory
Stick" is full.
[] Press the shutter button fully
down again to stop recording.
Indicators during shooting• The scleen Jndicatols are not recorded
• FOl a detailed desctiptlon of the indicntors, seepage 11c)
• A histoglam is not displayed.
Shooting close*ups (Macro)
Set the mode dial to H and follow theprocedure on page 24.
Using the self-timerSet the mode dial to H and follow the
procedure on page 25.
• The flash does not function when shootingmovies
• The date and time are not superimposed ontomovies
• When shooting movies (MPEG MOVIE) withMultipoint AF, the distance to tile center of the
screen is estimated as an average, so the AFworks even with a certain anloum of vibration
The Focus range select fimction (CemeL Left,Right, Bottom and Top) focuses automatically
using only the selected AF range finder This isconvenient when you want to focus only on the
subject
4.
75

Viewing movies onthe screen
Mode dial: [_
You can view movies on the screen wi_h
somld from tile speaker.
Speaker
Mode dialDISPLAY
[] Set the mode dial to [_.
[] Select the desired moving
image with </1_.
The movie is displayed one sizesmaller thm_still images.
[] Press O.
The movie and sound are played back.
During playback, I_ (PLAYBACK)appears on lhe screen.
High quality movies [320 (HQX)]
Movies are displayed over the entire screen.
Indicators during viewingmovies
• Each time you press DISPLAY, the stares
of the screen changes as follows:Indicators off--* All indicators on.
• For a detailed description oflhe
indicators, see page 120.
• A histogram is not displayed.
• The procedure fbr viewing movies on a TV is
tile same as *hat for viewing still images(page 35).
Control button
76
To stop playbackPress • again.
To adjust the volume
Press &/V to adjust tile volume.
To advance or rewind the movie
Press </l_ during playback.
To return to _he normal playback, press •.

Deleting movies
-- Delete
Mode dial: []
You can delete unwanted movies.
Mode dial
Control button
In single-image mode
[] Set the mode dial to [_J
[] Display the image you want to
delete with <1/1_.
[] Press MENU.
The menu appears.
[] Select [DELETE] with 4/1%
then press 0.
The image has not ye_ been deleted a_
_his point.
[] Select [OK] with •, then press
0."MEMORY STICK ACCESS"
appears on the screen. When the
message disappears, the image hasbeen deleted.
[] TO continue and delete other
images, display the image to
be deleted with 4/1_ and press
0. Then, select [OK] with •
and press O.
TO cancel deletion
Select [EXIT] in s_ep I_ or r_, then press
e.
In index (nine-image) mode
[] Set the mode dial to [_-], then
press _=_ to display an index
(nine-image) screen.
[] Press MENU.
The menu appears.
[] Select [DELETE] with </1%
then press 0.
[] Select [SELECT] with </1%
then press 0.
[] Select the image you want to
delete with •/T/<I/I_, then
press 0.
The green It (delete) indicator
appears on the selected image.
The image has not ye_ been deleted _
lhis point.
[] Repeat step [] to delete other
images.
[] Press MENU.
The menu appears.
4.
P,.u_
|177

[] Select [OK] with I% then press0.When the message "MEMORY
STICK ACCESS" disappears, theimages have been delete&
To cancel deletion
Select [EXIT] in step [].
To delete all images in the folderSelect [ALL IN FOLDER] in s_ep Lq
[OK] with I_, then press O. To cancel
deletion, select [EXIT] with 4, then pressQ
In index (triple-image) mode
[] Set the mode dial to [1_, then
press X twice to display an
index (triple-image) screen.
[] Display the image you want to
delete in the center position
with 4i/1_.
[] Press MENU.
The menu appears.
[] Select (DELETE] with it/V,
then press Q.
The image has not yet been deleted atthis point.
To cancel deletion
Select [CANCEL] in slep [], then press liD.
[] Select [OK] with A, then press
O."MEMORY STICK ACCESS"
appears on the screen. When flaemessage disappeaix, the middle-positioned image has been deleted.
78

Editing movies
Mode dial: [_
You can cut movies, or delete unnecessary
portions of movies. This is the
recommended mode to use when the
"Memory Stick" capacity is insufficient, or
when you attach movies to your e-mail
messages.
The file numbers assigned whenmovies are cut
The cut files are assigned new numbers and
recorded as tile newest files in tbe selected
recording folder. The original file is
deleted, and th_t number is skipped.
<Example> Cutting a file numbered101_0002
101 0001 101 0003
101 0002
t. Cuffing scene A.
2 !i!ii!i!iiiiiii!!iiiiiiiiiil[]DIVIDE point 101 0002
2. Cu_ing scene S.
101 0004
101 0005 DIVIDEpoint
3. Deleting scenes A and S if they areunnecessary.
101 0004 101 0007
DELETE 101 0006 DELETE
4. Only the desired scenes remain.
Cutting movies
Mode dialMENU
Control I
[] Set the mode dial to [_.
[] Select the movie you want to
cut using <1/1_.
[] Press MENU.
The menu appears.
[] Select [DIVIDE] with I_, then
press O. Next, select [OK] with
&, then press O.
The playback of the movie starts.
101 0006
|1
79

[] Decide on a cutting point.Press the center • at the desired
cutting point.
When you want to adjust the cutting
point, use [411/111_1 (frame forward/
rewind) m_d acliust the cutting point
using 4/1_. If you want to change the
cutting point, select [CANCEL]. The
playback of the movie starts again.
[] When you have decided on a
cutting point, select [OK] with
A/T, and press •.
[] Select [OK] with &, then press
The movie is cut.
The recording folder appears at the
upper right of the screen.
To cancel cutting
In Step [], select [EXlT]. The movie
appears on the screen again.
• Tfie cut movie are recorded as the newest files
in the selec_ed recording fblder
• You cannot cut the fPfiowing files.Clip Motion filesMulti Burst files
Still image files
MPEG movie flies not long enough to cutProtected MPEG movie files
• You cannot restole files once you cut them
• The original file is deleted when you cut it
Deleting unnecessaryportions of movies
[] Cut an unnecessary portion of
a movie (page 79).
[] Display the portion of the
movie you want to delete.
[] Press MENU.
The menu appears.
[] Select [DELETE] with </1_,
then press •.
[] Select [OK] with A, then press
The movie currently displayed on thescreen is deleted.
80

Copying images toyour computer-- For Windows users
Recommended computerenvironmentOS: Microsoft Windows 98, Windows
98SE, Windows 2000 Professional,
Windows Millenniura Edition, Windows
XP Home Edition, or Windows XP
Professional
The above OS must be installed at the
factory. Operation is not assured in ma
enviromnent upgraded to the operating
systems described above or in a multi-boot
environment.
CPU: MMX Pentium 200 MHz or faster
USB connector: Provided as standard
Display: 800 × 600 dots or more
High Color (16-bit color, 65,000 colors) or
more
• If you connect two or more LJSB equipment to
a single computer at the same fme, some
equipment, including your camera, may not
operate depending on _e type of USB
equipment¸
• Operations are not guaranteed when using a
U SB hub
• Operations are not guaranteed _ all the
recommended col_lputer environments
mentioned above.
• This camela is compatible with USB 20 TheUSB 2,0 interface is completely compatible
wgh USB 1I, so USB 11 equipment can alsobe used.
• Use with a USB 2.0 (High Speed} compatiblecompmer environment allows high-speed data
transfer (approximately 1.5 times faster *hunthe conventional Sony model DSC-F7071.
USB mode
There are two modes for a USB connection,
{NORMAL] and [PTP]* modes. The
factory setting is the {NORMAL] mode.
* Compatible only with Windows XP. Whenconnected to a computeL only the data in the
fPlder selected by the camera is copied to thecomputer To select a _blder, perform the
procedure fronl step [] on page 66
Communication with yourcomputerWhen your computer resumes from the
suspend or sleep mode, commm_ication
between your camera and your computer
may not recover at the same time.
When a USB connector is notprovided on your computerWhen neither a USB connector nor a
"Memory Stick" slot is provided, you can
copy images using an additional device. See
the Sony Website for details.
http://www.sow.net/
Contents of the CD-ROM
• USB Driver
This driver is needed in order to connect the
camera to a computer.• When using Windows XP, you need not install
the USB drlvet:
• Image Transfer
This application is used to easily transfer
images from the camera to a computer.
• PIXELA ImsgeMixer
This application is used to display and edit
images that are stored in a computer.
• This section describes the Windows Me screen _ta
as an example. The required operations may _"
diffhr depending on your OS t_• ClOSe down all applications running on
the computer before installing the USB o
driver and application. _o• When using Windows XP ot Windows 2000,
log on as Administlalot s.
• The display settings should be 800 × 600 dots "_
ot more and High Color (16-bit color, 65,000colors) or more, When set to less than 800 x "1600 dots or 256 colors or less, the install title
screen does not appeal
81

Installing the USB driver
• When using Windows XP, you need not install
the USB driver• Once the USB driver is installed, you need not
install the USB driver
[] Start up your computer, and
insert the supplied CD-ROMinto the CD-ROM drive.
Do not connect your camera to ]your computer at this time. J
The title screen appears. If it does not
appear, double-click (My
Computer) --* [lmageMixer] in thatorder.
[] Click [USB Driver] on the title
screen.
[] Click [Next]. When the
"Information" screen appears,
click [Next].
The USB driver installation starts.
When the installation is completed, thescreen informs you of completion.
[] Click [Yes, I want to restart my
computer now], then click
[Finish].
Installing "Image Transfer"
• You c_n use the "Image TT_nsfer" software to
copy images to your computer autom_dcally
when you connect the can_era to your compu[er
with the supplied USB cnble
[] Click [Image Transfer] on the
title screen.
Select the desired language,
then click [OK].
The "Welcome to the lnstallShield
Wizard" screen appears.
• This section describes die English screen
The "InstallShield Wizard" screen
appears.
Your compuler restarts.
82

[] Click [Next]. When "Licence
Agreement" screen appears,
click [Yes]=
[] Select the folder to be
installed, then click [Next].
Select the program folder, then
click [Next].
[] Click [Finish].
Read the agreement carefully. You
must accept the terms of the _greement
in order to proceed with installation.
[] Click [Next].
[] Confirm if the checkbox is
checked on the "Image
Transfer Settings" screen,
then click [Next].
The "lnstallShield Wizard" screen
closes.
• The USB driver is needed in order to use
"Image TTansfer". If the necessary driver is not
ah'eady installed on your computeT; a scT_enthat asks if yot_ w_nt to install the driver will
appeal: Follow the instructions thai appear onthe screen
g
When the installation is completed, the
screen informs you of completion.
83

Installing "lmageMixer"
[] Click [PIXELA ImageMixer] on
the title screen.
The "Choose Selup Language" screen
appears.
• You can use the "PIXELA ImageMixcr fbrSony" sol'ware to copy, view and edit images
For details, ,see the sofiwa_'s help files¸
[] Select the desired language,
then click [OK].
[] Follow instructions on each
succeeding screen.
When installation is coraplete, the
"Read Me" text appears. Read the text,then close the window by clicking []
in the upper right corner of the screen.After that, click [Finish] on the installscreen to close the install screen.
• If DirectXS.0a or a later version is not installed
in your computer, the 'Information" screen
appears Follow *be procedure on the screen
[] Remove the CD-ROM.
Connecting your camera toyour computer
[] Insert the "Memory Stick" with
the images you want to copyinto the camera.
[] Turn on your camera and
computer.
Set [USB CONNECT] to [NORMAL]in the SET UP settings. The Factorysetting is [NORMAL].
[] Open the jack cover, and
connect the supplied USB
cable to your camera.
The "Welcome to the lnstallShield
Wizard" screen appears.
• This section describes the Englisb screen.
84

[] Connect the other end of the
USB cable to your computer.
"USB MODE NORMAL" appears onthe screen. When a USB connection is
established for the first time, yourcompuler automatically runs tfie used
program to recognize your cmnera.Wait for a while, and "Image Transfer"launches.
USB MODE
NORMAL
O©O©
• When using a desktop computer, connect theUSB cable to the USB connector on the rear
panel
• When using Windows XP, tbe copy wizard
automatically appears on the desktop (page 87).When you copy images using "Image
TTansfet ", change the settings on page g6
Copying images using
"Image Transfer"
-- Windows 98198SEI20001Me
When you connect the camera to your
computer, "Image Transfer" launches and
the images are automatically copied to the
computer. When copying is complete,
"ImageMixer" automatically launches and
images appears.
• Normally "Image T_ansf?r" and "Date" foldersare created inslde the "My Documents" folder,and all of the image files _corded with your
camera are copied into these folders¸• You can change the "Image T_nsfor" settings
(page 86)• When you use Windows XP, you need to
change the settings (page 86).
8
|1
85

86
--Windows XP
Windows XP is set so that the OS AutoPlay
Wizard activates. Follow file procedure
below to cm_cel the setting.
• This procedure does not need to be perfbrmedfor subsequent image downloads.
[] Click [Start], then click [My
Computer].
[] Right-click (Sony
MemoryStick], then click(Properties].
[] Cancel the setting.
@ Click [AutoPlay].@ Set [Content type] to [Pictures].
@ Check ]Select an action to perfoma]under [Actions], select [Take no
action], then click ]Apply].@ Set [Content type] to [Video files]
and [Mixed content] in step @, andrepeat step @.
(_) Click [OK].
The [Properties] screen closes.
[] Disconnect and thenreconnect the USB cable(page 85).
Changing "image Transfer"
settings
You can change the "hnage Transfer"
settings.
Right-click the "hnage Transfer" icon in the
tasktray and select [Open Settings], or
select [Sertings] when starting up "ImageTransfer".
• You can set [Basic], [Copy] and [Delete l• If you select [Settings] when starting up "Image
Transfkr", you can only change [Basic l• To return to _he standard settings, click [Reslore
defaults].
Copying images withoutusing "Image Transfer"
-- Windows 98/98SE/2000/Me
If you do not set to launch "Image Transfer"
automatically, you can copy images as
following procedure.
[] Double-click [My Computer],
then double-click [Removable
Disk].
The contents of the "Memory Stick"
inserted in your camera appear.
• This section describes an example of copyingimages to tile "My Documents" fbldel:
• When *t_e"Removable Disk" icon is not shown,
see the following column
• When using Windows XP, see the previouscolumn
[] Double-click [DCIM], then
double-click the folder which
contains the desired images.
The folder opens.
[] Drag and drop the image files
into the "My Documents"
folder.
The image files _re copied to the "My
Documents" folder.
• When you tTym copy an image to a folder in
which an image with the same file name isstored, tile ovetwrite confirmation message
appears When you overwrite the existingimage with d_e new one, the original file isdeleted.

When a removable disk icon is notshown
I Right-click [My Computer], then click
[Properties].
The "System Properties" screen appears.
• When using Windows 2000, click [Hardwale]
on [System Pioperties] scT_en
2 Confirm if other devices are already
installed.
@ Click [Device Manager].
@ Double-click [ 5' Other Devices].
@ Confirm if there is a "_ Sony DSC"
or "_ Sony Hm_dycam" with a _
mark,
3 If you find eili_er of the devices above,
follow the steps below to delete them.
@Click [_._ Sony DSC] or [_? Sony
Hm_dycam].@ Click [Remove].
The "Confirm Divice Removal"
screen appears.
@ Click [OK].The device is deleted.
4 Try *he USB driver installation again
using the supplied CD-ROM (page 82).
-- Windows XP
Copying images using theWindows XP copy wizard
[] Click [Copy pictures to a folder
on my computer usingMicrosoft Scanner and Camera
Wizard], then click [OK].
The "Scanner and Camera Wizard"
screen appears.
[] Click [Next].
The images stored on the "MemoryStick" are displayed.
[] Click the checkbox of imagesthat you do not want to copy to
your computer and remove thecheckmark, then click [Next].The "Picture Name and Destination"
screen appears.
[] Specify the image group
names to be copied and the
copy destination, then click
[Next].
Image copying starts. When thecopying is completed, the "OtherOptions" screen appears.
• The images are copied into the "MyDocument_" fbldet:
[] Select [Nothing. I'm finishedworking with these pictures],
then click [Next].
The "Completing the Scanner andCamera Wizard" screen appears.
[] Click [Finish].The wizard closes.
• 3"0continue copying other images, disconnecttt_eUSB cable and reconnect it Then, perfbrmtt_eprocedure ffonl step [] again
=o
g
87

Viewing images on your
computer
[] Double-click [My Documents]
on the desktop.
The "My Docmneuts" folder contentsare displayed.
• This section describes the procedure for
copying images to the "My Documents" fbtder• When using Windows XP, double-cllck [Start]
--* [My Documentsl in that ordeT:• You can use file "PIXELA tmageMixer fbr
Sony" software to view and edit images on yourcomputer. For details, see the software's helpfiles
[] Double-clickthe desired folder
and image file.
The image is displayed.
Image file storagedestinations and file names
Image files recorded with your camera are
grouped as folders in the "Memory Stick"
by recording modes.
Example: For Windows Me users
_ Desklop
Mp Documents
/_,_ Local Dkh {CI
I_; ¢_ Local Disk [D:]
I_ Compact Disc {E:] r_----_ Folder containing image files recorded using a
I_ _ _ camera without the folder creation functionHQ DCIM
: IOBMSDCF -'j
101MSDCF-_1 Folder containing image files recorded with thiscamera
999MSDCF U When no new folders have been created, this is only"f 01MSDCF"
_Q MSSONY
_--------" _*_*-_Folder containing E-mail mode and TIFF mode image
data, movie data and VOICE mode audio datarecorded using a camera without the folder creationfunction
• Data in the "100MSDCF" o; "M SSONY"
folders is data recorded using a camera wid_outthe folder creation *hnclion These folders are
for playback only, and your camera cannot
retold images in these folders.
88

i_!_ii_i:i_'!_'ii_iiiiiiii_i_iii!!;i_i¸;!iil;iii_i;!_;_ii;i;i;!iiiil;ii!ii!ilili!¸ii!ilili!¸ii!ilili!¸ii!ilili!¸ii!ilili!¸ii!ilili!¸ii!i;ili!ii!i¸;ili!ii!i¸;ili!ii!i¸;ili!ii!i¸;ili!ii!i¸;ili!ii!i¸;ili!ii!i¸;ilil¸ii!i¸;ilil¸ii!i¸;ilil¸ii!i¸;ilil¸ii!i¸;ilil¸ii!i¸;ilil¸ii!i¸;ilil¸ii!i¸;ilil¸ii!i¸;ilil¸ii!i¸;ilil¸ii!i¸;ilil¸ii!i¸;ilil¸ii!i¸;ilil¸ii!i¸;i_i_!ii!__;i_i_!ii!__;i_i_!ii!__;i_i_!ii!__;i_i_!ii!__;i_i_!ii!__;i_i_!ii!;__i___!ii!;__i____!i101MSDCF DSCOZ][]DD.JPG . Still image files sho_ in
(up to 999MSDCF) Normal mode
- Exposure Brackel mode (page 53)- BURST 3 mode (page 59)- Multi Burst mode (page 58)
• Still image files recorded simultaneously in
TIFF mode (p_ge 60)E-MAIL mode (p_ge 61)
- VOICE mode (page 61)
DSCOK]E]DD.JPE • Small-size image files sfio_ in E-MAIL mode (page 61)
DSCOK]E]DD.MPG ° Attdlo files sfiot in VOICE mode (p_ge 61)
DSCOK]E]DD.T[F ° Uncompressed imzge file recorded in TIFF mode (page 60)
CLPODDDD.GIF • Clip Mo*ion files sfiol in NORMAL mode (p,_ge 57)
CLPODDDD.TI ]M • Index image files of Clip Mo*ion files sfiol in NORMAL mode
MBLODDDD.G1F • Clip Mo*ion files sfiol in MOBILE mode (page 57)
MBLODDDD.TBM • Index image files of Clip Mo*ion files sfiol in MOBILE mode
MOVOK]E]E]D.MPG ° Movie files sfio_ normally (pzge 75)
Note on the table
• The meanings of the file na_es ore as above:
[Z][Z][Z][S1stands for ally number within tile range from 0001 to 9999.
• The numerical portions of the following files are the same.
A small-size image file shot in E-MAIL mode and its corresponding image file
An audio file shot in VOICE mode and its corresponding image file
An uncompressed image file shot in TIFF mode and its corresponding image file
An image file shot with Clip Motion and its corresponding index image file
89

90
Copying images toyour computer-- For Macintosh users
Recommended computerenvironment
OS: Mac OS 8.5.1, 8.6, 9.0, 9.1, 9.2, or
Mac OS X (vl0.0/vl0.1)The above OS must be installed at the
factory. For the following models, update
your OS m Mac OS 9.0 or 9.1.
iMac with Mac OS 8.6 installed at the
factory, and a slot loading type CD-ROM
drive
iBook or Power Mac G4 with the Mac OS
8.6 installed at the factoryUSB connector: Provided as standard
Display: 800 × 600 dots or more
32,000-color mode or more
• If you connec_ _wo or more USB equipment _o
a single computer _t the same time, someequipment, including your camera, may not
operate depending on *be type of USBequipment
• Operations are not gu_lanteed when using aUSB hub
• Operations are not guaranteed fbr all tberecommended computer environment Smentioned above.
USB mode
There are two modes for a USB connection,
[NORMAL] and [PTP]* modes. The
factory setting is the [NORMAL] mode.
* Compatible only with Mac OS X When
connected to a computer, only the d_ta in thefolder selected by the cmneva is copied to the
computer To select a fblder, perfbnn tileprocedure flora step [] on page 66.
Communication with yourcomputerWhen your computer resumes from the
suspend or sleep mode, communication
between your camera and your computer
may not recover at the same time.
When a USB connector is notprovided on your computerWhen neither a USB connector nor a
"Memory Stick" slot is provided, you can
copy images using an additional device. See
the Sony Website for details.
http://www.sony.net/
Steps requires your OSF'ollow the steps below, according to your
OS.
OOM_aSc Step_[]OS851/86/9,0 to[]
] Mac OS 91/9,21Ma¢ OS X ] Steps [] to []
I(_1°'°/v1°_) l
[] Installing the USB driver
1 Turn on your compmer, and set thesupplied CD-ROM into the CD-ROMdrive.
The "PIXELA hnageMixer for Sony"
screen appears.
2 Double-click (,) (Setup Menu).
3 Click @ (USB Driver).
The "USB Driver" screen appears.
4 Double-click the icon of the hard disk
containing the OS to open the screen.
5 Drag and drop the following two filesfrom the screen opened in step 3 into the
System Folder icon in the screen openedin step 4.
• Sony USB Driver
• Sony USB Shim
6 When the message for confirmation isshown, click "OK."
7 Restart your computer, then remove theCD-ROM.
[] Connecting your camera to
your computer
For details, see page 84.

Removing the USB cable from
your computer, the "MemoryStick" from your camera or turningoff the power during a USBconnection
Drag ond drop the "Memo_ Stick" iconto the "Trash" icon, tben remove the U SB
cable or "Memory Stick" or turn offflae
power.
* If you are using Mac OS X, T_movethe USBc_ble, _tc, after you have tul't_edyour
I computerofE
[] Copying images
f Double-click the newly recognized icon
on the desktop.The contents of the "Memory Stick"
inserted in your c_mera appear.
2 Double-click "DCIM."
3 Doub[e-clickthe foldercontained fi_e
desired image file.• See pages 88 9nd 89 for detailsabout the image
file s_oragedestinations and fiIe names
4 Drag and drop fine image files to the harddisk icon.
The image files are copied to your hard
[] Viewing the images on your
computer
f Double-click the hard disk icon.
2 Double-click the desired image file in
the folder contoining the copied files.
The image file opens.
• You ca_ use the "PIXELA ImageMixer"
SOfiware to copy ]nl_ge_; TOyol_r computer nnd
to view images o11your computer See theoperation manual supplied with the CD-ROM_h_details _hotu the itl_tallation method, or see
the so fiware's help files for d_e opel adonmethod.
• "PIXELA hnageMixel" is not compalible withM_c OS X.
For Mac OS X users
If the "There is no application available to
opel_ the doc_tment "DSC01ZI[_ D D JPE'."
screen appears when you click an E-mail
mode image file, make the following
setting.
• The screen display m_y differ dependiI_g on theversion
I Click [C[_oose Application...] at fine
"ffbere is no application available to
open the document"DSCOD D _IZ1.JPE"." screen.
2 Cb0nge "Show" from [Recommended
Applications] to [All Applications].
3 Select [Quick'fime Player] from the
displayed list of applicagons, and click
[Open].
go
8
91

Troubleshooting
If you experience trouble with your camera,
try the following solutions.
1 First check the items on the tables below.
If code displays "C:IZIlZI:[Z_"
appear on the screen, the self-diagnosis display function isworking (page 103).
2 Should your camera still not work
properly, press the RESET button inside
_he ba_tery/"Memory Stick" cover using
a fine-tripped object, then turn on the
power again. (All the settings including
dale and time are cleared.)
RESET button
3 Should your camera still not work
properly, consult your Sony dealer or
local authorized Sony service facility.
Battery pack and power
YOU cannot charge the • The camera is turned on. ÷ Turn the camera off (page 15).
battery pack.
The battery pack cannot • The battery pack is not installed correctly. ÷ Install _he bal_ery pack while pushing the battery eject lever upbe installed, using the front edge of the battery pack (page I I).
The _/CHG lamp flashes. • The battery pack is not inslalled correctly. ÷ Install lhe battery pack correctly (page 11 ).
• The battery pack has mal|_nctioned. ÷ Consult your Sony dealer or local authorized Sony servicePacility.
The _ ICHG lamp does not • The AC power ad_plor is disconnected. ÷ Properly connect the AC power adaptor (page 12).
light up when charging a • The bactery pack is not installed correclly. ÷ Install the bal_ery pack correctly (page I I).battery pack. • The battery pack is completely charged.
92

The battery remaining • You have used the camera for a long time ill anindicator is incorrect, or extremely hot or an extremely cold location.
sufficient battery • The battery pack is dead (page 115). ÷ Replace the battery pack with a new one.remaining indicator is • The battery pack is discharged. ÷ Install a charged battery pack (page l 1).
displayed but the power • A deviation has occurred in the remaining ÷ Fully charge the battery pack (page 12).
runs out soon. battery time.
The battery pack runs • You are shooting/viewing images in an
down too quickly, extremely cold location.• The battery pack is not charged enough. ÷ Charge the battery pack (page I 1).
• The battery pack is dead (page 115). ÷ Replace the battery pack with a new one.
You cannot turn on the • The battery pack is not installed co_vectly. ÷ Install the battery pack correctly (page 11 ).
camera. • The AC power adaptor is disconnected. ÷ Properly connect the AC power adaptor (page 14).
The power turns off • If you do not operate the camera for about three ÷ Turn on the camera again (page 15).
suddenly, nlinutes when using a battery pack, the calner_turns offautomatically to prevent wearing down
the battery (page 15).
• The battery pack is discharged. ÷ Replace it with a charged battery pack (page I I ).
g
oo
|1
93

Shooting still images/movies
The subject does not • The FINDER/LCD switch is set to FINDER. ÷ Set it to LCD (page 22).appear on the screen.
The subject is not visible • The mode dial is set to [] or gET UP. ÷ Set it to other modes (pages 20 and 75).on the screen.
The image is out of focus. • The subject is too close. ÷ Record in the macro recording mode. Make sure to position the
lens Farther away from the subjecl than the shortest shooting
distance when shooting (page 24).• The Landscape mode is selected for the Scene ÷ Set it to other modes (page 29).
Seleclion function.
• Manual focus mode is selected. ÷ Set the FOCUS switch to AUTO/ZOOM (pages 23 and 48).• )CONVERSION LENS] in tbe SET UP settings ÷ Set it to [OFF] (pages 42 and 110).
is set to [ONI.
Zoom does not work. • (CONVERSION LENS] in tbe SET UP settings ÷ Set it to [OFF] (pages 42 and 110).is set to [ON].
• FOCUS swilch is set to MANUAL. ÷ Set the FOCIJS switch to AUTO/ZOOM (page 23).
Digital zoom does not • The digital zoom cannot be used when shootingfunction, a movie (MPEG MOVIE).
• (DIGITAL ZOOM] in the SET UP settings is set + Set it to [ON l (pages 42 and I I0).to [OFF I.
The image is too dark. • You are shooting a subject with a light source ÷ Adjust the exposure (page 49).behind the subjecL
• The brightness of the screen is too low. ÷ Adjust the brightness of the screen (pages 42 and I 12).
The image is too bright. • You are shooting a spotlighted subject in a dark ÷ Adjust the exposure (page 49).
location such as on a stage.• The brightness of the screen is too bright. ÷ Adjust the brightness of the screen (pages 42 and I 12).
Vertical streaks appear • The smear phenomenon is occurring. ÷ This is nol a malfunction.when you are shooting a
very bright subject.
94

Your camera cannot • No "Memory Stick" has been inserted. ÷ Insert a "Memory Stick" (page 18).record images. • The capacity of the "Memory Stick" is ÷ Delete the images saved ill the "Memory Stick" (pages 37 and
insufficient. 77), or t_)rmat it (page 40).• The write-protect switch on the "Memory Stick" ÷ get it to the recording position (page 114).
is set to the LOCK position.• You cannot record images while charging the
flash.
• The mode dial is set to SET UP or [_]. ÷ get it to other modes.
Recording takes a long • NR slow shutter is activated. ÷ Set to a faster shutter speed than I125 second (page 44).time.
A sound is made if the • The sound is made by the lens in operation.NIGHTSHOT/NIGHTFRAMING switch is
changed.
The image colors are not • NIGIITSHOT or NIGHTFRAMING is set. ÷ Set to 0.correct.
The lens makes a noise • The sound is made by the AE/AF t_nction in ÷ This is not a malt_nction.inside if the shutter button operation.
is lightly pressed whileNIGHTFRAMING is set.
NightShot or • The mode dial is set to S, A, M or SCN. ÷ get it to _, _p or _!_ (Nightly'raining for Clip Motion)
NightFraming does not (page 55).function.
g
oo
|1
95

The built-in flash or the
optional external flash(HVL-FtO00) does notwork.
• The mode dial is set m [1_, gET UP, or _!_
(MPEG MOVIE or MULTI BURST).• The flash is set to (_ (no flash).
• The Twilight mode is selected for the SceneSelection funclion.
• The Landscape mode is selected for the SceneSelection function.
• (MODE] (REC MODE) in the menu settings isset to (BURST 3] or [EXP BRKTG!.
• (HOT SHOE] in the SET UP settfugs is set to(ONI.
• NightS'not is activated.
The macro function does • The Landscape mode is selected for the Scenenot work. Selection function.
• (CONVERSION LENS] in _e SET UP settingsis set to (ON].
The eyes of the subjectcome out red.
The date and time are • The date and time are no_ set correctly.
recorded incorrectly.
÷ Set it to other modes.
÷ Set the flash to auto (no indicalor) or I_ (forced flash) (page 26).
÷ Cancel the setting (page 29).
÷ Set the flash to _ (forced flash} (page 26).
÷ Set it to other settings.
÷ Set it to [OFF] (pages 42 and I I I).
÷ Set NIG HTSH OT/NIGHTFRAMING to • or
NIGHTFRAMING.
÷ Cancel the setting (page 29).
÷ Set it to (OFF] (pages 42 and I Ifl).
÷ Set [RED EYE REDUCTION] in the SET UP seekings to (ON]
(page 26).
÷ Set the correct date and time (page 16).
96

Viewing images
Your camera cannot play • The mode dial is not se_ to [1_. ÷ get it to [1_ (page 33).back images. • Your camera canno_ pI_y back image flies
copied to the hard disk of your computer if thefile name has been changed or the image hasbeen modified.
The image appears rough ÷ This is no1 a malfimction.
right after playback starts.
The image does not • The video Ouq_ut signal setting of your camerain ÷ Change the seiting (pages 42 and 112).
appear on the TV screen, file SET UP se_fings is incorrect.• The connection is no_ correct. ÷ ¢%Eck the connection (page 35).
The image cannot be ÷ gee page 98.played back on a
computer.
Unknown beeps are heard • These beeps are heard when the auto focus is ÷ This is not a malfunction. Set FOCUS switch to MANUAL
from the camera while working. (page 4g).viewing a movie.
The picture is noisy. • Your camera is placed l/ear a TV or other ÷ Move your camera away from the TV, etc.
equipment wfih a strong m_gnetic field.
DeletinglEditing images
Your camera cannot • The image is protected. ÷ Cance! tile protection (page 70).delete an image. • The wNte pro_ect switch on the "Memory Stick" ÷ Set it to the recording position (page 114).
is set to the LOCK position.
You have deleted an • Once you have deleted a file, you cannoi restore ÷ Marking o-n (protect) will prevent you from deletingimages byimage by mistake, it. mistake (page 70).
The resizing function • You cannot resize movies (MPEG MOVIE),
does not work. Clip Motion, Multi Burst and uncompressed
images
g
|1
97

You cannot display a print
(DPOF) mark.
Computers
÷ Check "Recommended computer environment" (pages 81 and90).
You do not know if the OS
of your computer is
compatible.
You cannot install the
USB driver.
Your computer does notrecognize your camera.
• The camera is turned oft2
• The battery level is low.
• You are not using the supplied USB cable.• The USE coble is no_ connected filxnly.
• [ USB CONNECT] is set to [PTP] in the SET UP
se_tings (except Windows XP and Mac OS X).• The USB connectors on your computer are
connected to oilier equipment besides the
keyboard, the mouse, and your camera.• The USB driver is not inslalled.
÷ In Windows 2000, log on as Administrator (authorized
Administrators) (page 8[).
÷ Turn ol/the camera (page 15).
÷ Use the AC power adaptor (page 14).÷ Use the supplied USB came (page 84).÷ Disconnect the 1,JSB cable, and connect it again firmly. Make
sure thai "USB MODE" is displayed on the screen (page 84).
÷ Set it to [NORMAL) (page 112).
÷ Disconnect the U SB c_bles except for the ones connected to the
keyboard, the mouse, and your camera.
÷ Install the USB driver (pages 82 and 90).
You cannot copy images. • The camera is not correctly connected to your ÷ Conneo the camera and your computer correctly using the USB
computer, cable (page 84).
• Youarenolusingthecorrectcopyprocedure|br ÷FollowthedesignaledcopyprocedureforyourOS(pages85,86your OS. and 91 ).
÷ lfyou are using the "PIXELA lmageMixer for Sony"
application software, click on HELP.
The image cannot be ÷ If you are using the "PIXELA [mageMixer for Sony"played back on a application software, click oll HELP.
computer. ÷ Consult the computer or software manufacturer.
98

The image and sound areinterrupted by noise whentou view a movie on a
computer.
You cannot print an
image.
An error message appearswhen you set the suppliedCD-ROM in yourcomputer.
• You are playing back the file directly from *he"Memory Stick".
• The computer display is not set correcdy.
÷ Copy the file to the hard disk of your computer and then playback the file from the hard disk (pages 85, 86 and 91 ).
÷ Check the printer selfings.÷ Click on the UELP for the "P[XELA [mageMixer for Sony"
application soitware.
÷ get the computer display as _llows:Windows: g00 × 600 dots or more
ltigh Color (16 bits, 65,000 colors) or mo_Macintosh: 800 × 600 dots or more
32,000-color or more
"Memory Stick"
YOU cannotinse_ a
"Memory Stick."
You cannotrecord on a
"Memory Stick."
You cannot format a
"Memory Stick."
You have formatted a
"Memory Stick" bymistake.
• You are inserting it backwards.
• The write protect switch on the "Memory Stick"
is set to the LOCK position.• The "Memo_ Stick" is full
• The write-protect switch on the "M el_aory Stick"is set to the LOCK position.
• All the imag_s on the "Memory Stick" aredeleted by formatting. You cannot _store them.
÷ Insert it frol_a the right side (page Ig).
÷ Set it to the recording position (page 114).
÷ Delete unnecessary images (page 37).
÷ get it to the recording position (page 114).
÷ We recommend that you set the "Memory Stick" write-protectswitch to the LOCK position Io prevent accidental erasure
(page I 14).
|1
99

Others
Your camera does not • You are not using an "ln foLITHIUM" battery ÷ Use an "IrdBLITHIUM" b_l_ery pack (page I l ).work. pack.
• The battery level is low. (The c\_ indicator ÷ Charge the baltery pack (page I 1).
appears.)• The AC power adaptor is no1 conneoed ÷ Connecl it securely to the DC ]N jack of your camera and to a
securely, wall outlet (wall socke_) (page 14).• The built-in microcomputer is no1 working ÷ Turn the power offand lhen on after one minute, and check that
properly, the camera works properly.
The power is on, but the • The built-in microcomputer is no_ working ÷ Remove the battery pack, then install it again after about one
camera does not work. properly, minute and turll on the camera. I fthe func_iOllS still do no_ work,press the RESET button located inside the battery/"M emory
Stick" cover with a fine-tipped object, then turn file power on
again. (When you press the RESET button, all settings includingthe da_e and time are cleared.)
YOU cannot identify an ÷ Check tile indicator (page I 18).indicator on the screen.
The lens gets fogged. • Moisture condensation has occurred. ÷ Turn off _he camera and leave for about an hour at room
lemperamre for the moisture to evaporate before use (page I 13 ).
The played back image is • You are playing back a file with an image size
small, larger thml 2560× 1920 thai was recorded usinganother camera.
The camera becomes ÷ This is no_ a malfunction.
warm when you use it forthe long time.
100

Warnings andmessages
The following messages may appear on tile screen.
NO MEMORY STICK • Insert a "Memory Stick" (page 18).
SYSTEM ERROR • Turn the power off and on _gain (page 15).
MEMORY STICK ERROR • The inserted "Memory Stick" cannot be used in your camera (p_ge 114).
• The "Memory Stick" is damaged, or the terminal section oflhe "Memory Stick" is dirty.
• Insert the "Memory Stick" correctly (page 18).
MEMORY STICK TYPE • You inserted a "Memory Stick" that canno_ be used with this camera (page 114).ERROR
FORMAT ERROR • Failed to formal tile "Memory Stick." Fol_nat the "Memory Stick" again (p_ge 40).
MEMORY STICK LOCKED • The write-proteO switch on the "Memory Stick" is set to the LOCK position. Set it to the recording position
(page 114).
NO MEMORY SPACE • The capaciiy of the "Memory S_ick" is insufficient. You cannot record images. Delete unnecessary images (page 37).
CANNOT CREATE MORE • You have reached the maximum number of fblders thai can be created (page 64).FOLDERS
CANNOT RECORD • The camera cannot record images in tile selected folder. Select a dift_rent folder (page 65).
NO FILE IN THIS FOLDER • No images have been recorded in this folder.• You inserted a "Memory Stick" into your camera that was recorded using a camera without the folder creation
fimcfion (page 66).
FILE ERROR • An error occurred while playing back _he image.
FILE PROTECT • The image is protected against erasure.
For "InfoLITHIUM" battery • The battery is l/or the "Int_LITHIUM" type.only
FOLDER ERROR • A folder wiih tile same number already exists in tile "Memory Stick."
IMAGE SIZE OVER • You are playing back an image of a size that cannot be played back on your camera.
INVALID OPERATION • You are playing back a file that was created on equipment other than this camera. |1101

M_i!_!_!_iii_iiii!_iiii!_i; ;:_ii_ii;_!i!_ii;_!i!_ii;_!i!_ii;_!i!_ii;_!i!_ii;_!i!_ii;_!i!_ii;_!i!_ii;_!i!_ii;_!i!_ii;_!i!_ii;_il!_ii;_il!_ii;_il!_ii;_il!_ii;_il!_ii;_il!_ii;_il!_ii;_il!_ii;_il!_ii;_il!_ii;_il!_ii;_il!_ii;_il!_ii;_il!_ii;_il!_ii;_il!_ii;_il!_ii;_il!_ii;_il!_ii;_il!_ii;_il!_ii;_il!_ii;_il!_ii;_il!_ii;_il!_ii;_il!_ii;_il!_ii;_il!_ii;_il!_ii;_ii!_ii¸r..,_3 • The battery level is low or zero. Charge the battery (page I 1). Depending on the conditions of use or the type of
battery pack, the indicator may flash even though there are still 5 to If] minules of remaining ballery time left.
CAN NOT DIVIDE • The file is nol long enough to be divided.• The file is not a movie (MPEG MOVIE).
• The amount of lights is not su fl]cient or _l_eshutter speed is too slow.
• You are not holding the camera s_eady enough. Use the flash, mount lhe camera on a tripod, or otherwise secure the
camera in place.
*_NIGHT SHOT" • An operation that is not valid while NIGltTSHOT is set is _ltempted.
'_NIGHT FRAMING" • An operation ll/_I is not valid while NIGltTFRAMING is set is allempted.
HIGHT SHOT IS INVALID • The mode di_l is set to a position oH_er _han IP]I, I_lp or _ while NIGHTSHOT is set.• ]CONVERSION LENS] in the SET UP settings is se1 to [ON].
NIGHT FRAMING IS • The mode dial is set to a position other thma I_1, I_IP or _ (Clip Motion) while NIGHTFRAMING is set.INVALID • ]CONVERSION LENS] in the SET UP settings is sel to [ON].
MANUAL FOCUS IS • The manual focus/zoom ring is turned while NIGHTFRAMING is se_.
INVALID • The FOCUS switch is set to MANUAL when the mode dial is set to I_1.
102

Self-diagnosis display
- If a code starting with an alphabetletter appears
Your camera has a self-diagnosis display.
This function displays the camera condition
on the screen with a combination of a letter
and four numerical digits. If this occurs,
check fl_e following code chart and attampt
the corresponding corrective actions. The
last two digits (indicated by t_C]) will differ
depending on the state of the camera.
Self*diagnosis display
C:32: C]C] There is trouble wifll your Turn lbe power offand on again
camera's hardware. (page 15).
C: 13: DE The camera cannol read or write Re-insert the "Memory Stick" severaldata on tile "Memory Stick." times.
An unformalted "Memory Stick" Formal the "Memory Stick" (page 40).is inserted.
The inserted "Mmnory Stick" Insert a new "Memory Stick" (page 18).cmmol be used with your camera,
or the data is damaged.
E:61 : DD A cmnera malfunction thai you Press the RESET button (page 9) locatedE:91 : DD cannol reverse has occurred, inside the baltery/"Memory Stick" cover,
then tuna the power on again.
If you are unable to solve the problem even
after lrying fl_e corrective actions a few
tillaes, contact yotir Sony dealer or local
authorized Sony service facility and inform
them of the 5-digit code.
Example: E:61 :10
g
oo
103

Number of imagesthat can be saved or
shooting time
The number of images that can be saved and
lhe shooting time differ, depending on the
capacity of the "Memory Stick," the image
size, and the image quality. Refer to the
following charts when you choose a
"Memory Stick."
• The number of images is listed in FINE
(STANDARD) order.
• The values for the number of iraages thai
can be saved and the shooting time may
vary, depending on the shootingconditions.
• For normal shooting tiraes and numbers
o f il"aages that can be saved, see page 32.
• When the number of remaining shooting
il"aages is greater than 9999, flae >9999
indicator appears on the screen.
(Units: imsges)
-_560×1920 6(11) 12(23) 25(47) 51(95) 91(170) 186(345) 380(705)
-_560 (3:2) 6(11) 12(23) 25(47) 51(95) 91(!70) 186(345) 380(705)
-_048×1536 10(18) 20(36) 40(73) 81(146) 145(255) 296(518) 604(1058)
1280×960 24(44) 49(89) 98(!79) 197(359) 340(595) 691(1210) 1411(2470)
40×480 88(194) 178(392) 358(788) 718(1580) 1190(2381 2420(4841)4940(9881)
TIFF (Units: il'aages)
-_560×1920 0(0) I(1) 3(4) 7(8) 13(14) 27(29) 56(60)
-_560 (3:2) I(!) 2(2) 4(4) 8(8) 14(16) 30(32) 62(67)
-_048×1536 0(!) 1(2) 3(4) 7(8) 14(14) 29(30) 59(62)
1280×960 I(!) 2(2) 4(4) 8(8) 15(15) 30(31) 62(64)
40×480 I(!) 2(2) 4(4) 8(8) 15(15) 31(32) 65(65)
VOICE (Units: images)
Z560×1920 6(11) 12(22) 25(45) 50(91) 90(166) 183(337) 375(689)
Z560(3:2) 6(11) 12(22) 25(45) 50(91) 90(!66) 183(337) 375(689)
-_048×1536 9(17) 19(34) 39(69) 79(138) 142(246) 290(500) 592(1022)
1280×960 22(38) 45(78) 91(!57) 183(316) 324(549) 660(1117) 1347(2280)
40×480 69(121) 140(245) 281 (492) 564(987) 1020(1785 2074(3630) 4234(7410)
104

Clip Motion (Units: images)
NORMAL: When ten flames are shot
MOBILE: When two flames are shot
MPEG movies (Units: seconds)
_20 (IIQX) 42 87 176 354 641 1304 2663
_20x240 174 352 708 1419 2567 5221 10657
E60x112 673 1363 2740 5494 9935 20203 41239
Multi Burst (Units: images)
t3.
13"
105

Menu items
Menu items that can be modified differ
depending on the position of the mode dial.
The screen shows only the items you can
operate in e_ch specific mode. F_ctory
settings _re indicated with I.
When the mode dial is set to O
r i (IMAGE SIZE) I2560×1920/2560(3:2)/2048×1536/ gelects the image size when shooting sfill images (page l9).
1280×960 / 640×480
MODE (REC MODE} TIFF - Records a TIFF (uncompressed) file in addition to the JPEG file (page 60).
VO1CE - Records an audio file (with a still image) in addition to lhe JPEG file (page 61).
E-MAIL - Records a small-size (320×240) JPEG file in addition to the selected image site(page 61).
EXP BRKTG - Records three images with the exposure value of each image slightly shit}ed(page 53).
BURST 3 - Records three images in succession (page 59).INORMAL - Records an image using the normal recording mode.
106

When the mode dial is set to aP, S, A, M, or SCN
SCN • _ / IJ / [_] / I_1 Sets the Scene Selection mode (page 29). (This setting can be made only in SCNmode.)
ISO 800 / 400 / 200 / 100 / • AUTO This selects tile I SO sensitivity. Selecting a large number augments the brightness
when recording in dark locations. !t owever, note that increasing the sensitivity maymake recorded images appear coarser. (This setting c_nnot be made in SCN mode.)
ill (IMAGE SIZE) I2560× 1920 / 2560 (3:2) / 2048× 1536 / Selects the image size when shooting still images (page 19).1280×960 / 640x480
_l. (P.QUALITY) IFINE / STANDARD Selects the image quality (page 31 ).
MODE {REC MODE) TIFF Records a TIFF (uncompressed) file in addition to the JPEG file (page 60).VOICE Records an audio file (with a still image) in addition to the JPEG file (page g I ).
E-MAIL Records a small-size (320×240) JPEG file in addition to the selected image size(page 61).
EXP BRKTG Records three images with the exposure value of each image slightly shified(page 53).
BURST 3 Records three images in succession (page 59).INORMAL Records an image using the nolTnal recording mode.
-+ (FLASH LEVEL) HIGH Makes the flash level higher than normal.INORMAL Normal setting.LOW Makes the flash level lower than normal.
PFX {P.EFFECT) SOLARIZE / SEPIA / NEG.ART / Sets the image special effects (page 62).IOFF
[] (SHARPNESS) +2 / _-I / I0 / I / 2 Adjusts the shalqmess of the image. The [] indicator appears (except when tilesetting is 0).
o
|1107

When the mode dial is set to H (when [MOVING IMAGE[ is set to [MPEG MOVIE[ in the SET UP settings)
-===_(IMAGE SIZE) 1321)(I]QX) / 320×240 / • 161)×I 12 Selects the MPEG image size when shooting movies (page 75).
PFX (P.EFFECT) l SOLARIZE / SEPIA / NEG.ART / Sets the image special effects (page 62).•OFF
When the mode dial is set to _1 (when [MOVING IMAGE[ is set to [CLIP MOTION] in the SET UP settings)
(IMAGE SIZE) •NORMAL / MOBILE Selects the Clip Motion image size (page 57).
_-I- (FLASH LEVEL) HIGH Makes the flash level higher tl/an normah• NORMAL Nolxnal setting.LOW Makes lhe flash level lower than normah
PFX (P.EFFECT) SOLARIZE / SEPIA / NEG.ART / Sets the image special ett_cts (page 62)•OFF
[] (SHARPNESS) +2 / _-I / •fl / I / 2 Adjusls the sharpness of the image. The [] indicolor appears (excepl when the
setting is 0).
When the mode dial is set to H (when [MOVING IMAGE] is set to [MULTI BURST] in the SET UP settings)
-=m_] (INTERVAL) I/7.5 / 1/15 / •1/30 (NTSC) Selects tile Multi Burst shutter interval in NTSC mode.
I/6.3 / 1/12.5 / • 1/25 (PAL) Selects the Multi Burst shutler interval in PAL mode.* The shutter interval setlings dift_r depending on the setting of the [VIDEO
OUT] item in the SET UP settings (page 112).
_i, (P.QUALITY) •FINE / STANDARD Selects the image quality (page 31 ).
PFX (P.EFFECT) SOLARIZE / SEPIA / NEG.ART / Sets the image special effects (page 62).•OFF
[] (SHARPNESS) +2 / _1 / •(1 / I / 2 Adjusts the sharpness of the image. The [] indic_lor appear_ (except when the
setting is 0).
108

When the mode dial is set to [_l
FOLDER OK / CANCEL Selects the folder containing the image you want to pl_y back (page 66).
DELETE Deletes the displayed image (pages 37 and 77).
PROTECT Protecls images against accidental erasure (page 70).
DPOF Marks _]/e print (DPOF) mark on still images you want to print (page 72).
_LIDE INTERVAL Sets the slide show interval (page 68). (Only in single-image mode.)I3 sec / 5 sec / 10 sec / 30 sec / 1 min
IMAGE Sets the range oflhe playback images.IFOLDER / ALL
REPEAT Plays back images repe_ledly.ION / OFF
START Starts lhe slide show.
CANCEL Cancels the slide show.
RESIZE 2560x 1920 / 2048 x 1536 / 1280×960 / Changes tbe recorded still image size (page 72). (Only in single-image mode.)640x480 / CANCEL
ROTATE _" (counter clockwise) / Rolates the still image 90 ° (page 69). (Only in single-image mode.)(clockwise) / OK / CANCEL
DIVIDE OK / CANCEL Divides a moving image (p_ge 79). (Only in single-image mode.)
o
109

SET UP items
Set the mode dial to SET UP. The SET UP
screen appears.Factory settings are indicated witla I.
al [CAMERA 11
MOVING IMAGE IMPEG MOVIE / CLIP MOTION / Selects the shooting mode tbr a movie (pages 57, 58 and 75).MULTI BURST
DATE/TIME DAY & T/ME / DATE / IOFF Selects whether to superimpose Ihe date or time onto the image (page 28).
The date and time are not inserted in movie (MPEG MOVIE), Clip Motion orMulti Burst mode. Also, the date and time appear only during playback, and do not
appear during recording.
DIGITAL ZOOM ION / OFF Selecls wbether to use the digital zoom (page 23).
RED EYE REDUCTION ON / IOFF Reduces the red=eye phenomenon when using a flash (page 26).
HOLOGRAM AF IAUTO / OFF Selects whelher to emit hologram AF light. Used when it is dill]cult to focus on the
subject in dark conditions (page 27).
CONVERSION LENS ON / IOFF Set to [OFF] when using _he oplional conversion lens VCL-HGD0758 or VCL-HGD1758, or to [ON] when using _lle VCL-MHG07. Note thai when a conversim_Imps is mounted, the weight prevents the lens portion from locking. We recommend
supporting tl/e lens portion with your leo hand or using a tripod for recording.
When [CONVERSION LENS] is set to [ON]:
• When tbe mode dial is set to A ol M, you can only selec_ aperture values of F4 or higher.
• Macro shooting and zoom tbnctions are not available.
110

O2 [CAMERA 2]
EXPANDED FOCUS ION /OFF When focusing manually, the image is enlarged to 2× (page 48).
BRACKET STEP ,_1.0EV / I_0.7EV / _0.3EV Sets the exposure compensation value when recording d/tee images wi_h eachexposure value shit3ed (page 53).
HOT SHOE ON / IOFF Sets when using a commercially available external flash (page 63).
ZOOM RING SETUP W 4" _. T / IT 4" "_ W Sets the direciion in which lhe ring turns when you use the zoom function with the
manual focus/zoom ring (page 23).
[MEMORY STICK TOOL]
FORMAT OK / CANCEL Formats tile "Memory Slick." Nole thai formatting erases all the dala recorded on a
"Memory Stick," including even erasure protected images (page 4(I).
CREATE REC. OK / CANCEL Creales a new recording folder (page 64).FOLDER
CHANGE REC. OK / CANCEL Changes a recording folder (page h5).FOLDER
o
|1111

[] [SETUP 1]
LCD BRIGHTNESS BRIGHT / Selects the LCD brightness. This has no effect on the recorded images.INORMAL / DARK
LCD BACKLIGHT BRIGHT / Selects the brightness of the LCD backfight. Selecting [BRIGHT] makes the screen bright and
INORMAL easy to see when using tile camera outdoors or in other bright locations, but also uses up tile
battery charge faster. Displayed only when using your camera with the battery pack.
EVF BACKLIGHT BRIGHT / Selects the brightness of the finder backfight. Selecting [BRIGIIT] makes tile screen bright andINORMAL easy to see when using the camera outdoors or in other bright Ioc_dons, bul also uses up the
battery charge Paster.
BEEP SHUTTER Turns on the shutter sound. (The shutter sound is heard when you press the shutter button.)ION Turns on the beep/shutter sound wben you press the control button/shutier button.
OFF Turns offthe beep/shutter sound.
I_1[SETUP 21
FILE NUMBER ISERIES Assigns number_ to files in sequence even if the recording folder or the "Memory Stick" is
changed.RESET Resets the file nmnbering each time *he recording folder is changed.
USB CONNECT PTP / INORMAL Switches tbe USB ]node (page 84).
VIDEO OUT NTSC Sets the video output signal to NTSC mode (e.g., Japan, USA).
PAL Sets the video output signal to PAL mode (e.g., Europe).
LANGUAGE Displays the menu items, warnings and messages in selected language.
CLOCK SET OK / CANCEL Sets the dale and time (page 16).
112

Precautions
On cleaning
Cleaning the LCD screenWipe the screen surface with an L('D
cleaning kit (not supplied) to remove
fingerprints, dust, etc.
Cleaning the lens
Wipe the lens with a soft cloth to reraove
fingerprints, dust, etc.
Cleaning the camera surface
Clean tile camera surface with a soft cloth
slightly moistened with water, then wipe
the surface dry. Do not use any type of
solvent such as thinner, alcohol or benzine
as this may damage the finish or the casing.
After using your camera at theseashore or other dusty locationsClean your c_mera carefully. Otherwise,
tile salty air may corrode the metal fittings
or dust may enter the inside of your camera,
causing a malfunction.
Note on operating temperatureYour camera is designed for use between
tile temperatures of 0°C and 40°C (32°F
and 104 ° F). Shooting in extremely cold or
hot places that exceed this rm_ge is not
recommended.
On moisture condensation
If the camera is brought directly from a cold
to a warm location, or is placed in a very
damp room, moisture may condense inside
or outside tile camera. Should this occur, tile
camera will not operate properly.
Moisture condensation occurs easily
when:
• The camera is brought from a cold
location such as a ski slope into a warmly
heated room.
• The camera is taken from m_ air-
conditioned room or car interior to the hot
outdoors, e_c.
How to prevent moisture
condensation
When bringing the camera from a cold
place to a warm place, seal the camera in a
plastic bag m_d allow it to adapt to
conditions at tile new location over a period
of time (about an hour).
If moisture condensation occurs"lMrn offthe camera and wait about an hour
for the tlaoisture to evaporate. Note that if
you attempt to shoot with moisture
remaining inside tile lens, you will be
unable to record clear images.
On internal rechargeable button
batteryThis camera has an internal rechargeable
button battery for maintaining the date and
time and other settings regardless of
whether tile power is on or off.
This rechargeable bulton battery is
continually charged as long as you are using
tile cm'aera. However, if you use the camera
for only short periods it discharges
gradually, and if you do not use tile camera
at all for about one month it becomes
completely discharged. In this case, be sure
to charge this rechargeable bulton battery
before using the camera.
However, even if this rechargeable button
batlery is not charged, you can still use the
camera as long as you do not record tile dateand time.
Charging method
Connect the camera to a wall outlet (mains)
using the AC power adaptor, or install a
charged battery pack, and leave the camera
for 24 hours or more with the power off.
o
113

114
On "Memory Stick"
"Memory Stick" is a new compact, portable
and versatile IC recording medium with a
data capacity that exceeds the capacity of a
floppy disk.
In addition to exchm_ging data between
"Memory Stick" compatible equipment,
you can also use a"Memory Stick" to store
data as a type of detachable external
recording media.
There are two types of"Memory Stick": an
ordinary "Memory Stick" m_d a
"MagicGate Memory Stick" that is
equipped with the MagicGate* copyright
protection technology. You can use both
types of"Memory Stick" with your camera.
However, because your camera does notsupport the MagicGate standards, data
recorded with your camera is not sul_iect to
MagicGate copyright protection.
In addition, you can also use "Memory
Stick Duo" or "Memory Stick PRO" with
yo/ir calilera.
* MagicGale is copyright protection technologythat uses encryprion technology.
• "Memory Stick" fbrmatted with a computer isnot guaranteed Tooperate with this camera
Recording/
"Memory Stick" type playback withthis camera
Memory Stick ©(Menmry Stick Duo)
MagicGale Memory
Stick O**(MagicGate Memory
Stick Duo)
Memory Stick PRO O**
** The camera cannot recold or play back the
data needed by the MagicGate fimction.
All 'Memo W Stick" media opermions are notnecessalify guaranleed.
Notes on using the supplied
"Memory Stick"
• You cannot record or delete images when thewrite-protect switch is set ToLOCK.The position or the shape of the write-protect
switch may dlf_r depending on the "Memory
Stick" you use.
Terminali{_ _ IsWwrlttehPr°tect_
Labeling position
• Do not remove the "Menao W S_ick" while
reading or writing data.
• Data may be corrupted in the following casesWhen d_e "Menlory Stick" is removed or the
cmnera is turned offduring read or write
operagonWhen d_e "Memory Stick" is used in
locations subject to slatlc elec_l icily orelectrical noise
• We reconlmend backing up important data• Do not attach any other material than the
supplied label on the labeling position• Attach the label in the prescribed label location,
taking care {hal tile label does not extend fronathis location
• When you catry or store tile "Memory Stick,"put it in tile case supplied with it
• Do not {ouch the terminal of a "Memory Stick"with your hand or a metal object.
• Do not strike, bend or drop a 'Memory Stick"• Do not disassemble or modify a "Memory
Stick"
• Do not expose the "Memory Stick" to water
• Do not use or keep the "Memory Stick" underthe following conditions:
High temperature locations such as tile hotinterior of a car parked in direct sunlight
Locations exposed to direct sunlightHumid Iocagons or Iocagons with corrosivesubstances
Notes on using "Memory Stick Duo"
(not supplied)
• When rising a "Memory Stick Duo" with youl
camel a, be sure to inselt the "Memoly StickDuo" into a "Mmnory Stick Duo" Adaptor
• When inserting a "MemolTi Stick Duo" into a"Memory Stick Duo" Adaptor, check to make
sure *he "Memory Stick Duo" is inserted f_cingthe correct direction.

• Whenusinga"MemoryStickDuo"insertedintoa"MemoryStickDuo"Adaptorwiththiscamera,makesw'etbattbe'MemorySdckDuo"isinsertedfacingthecorrectdirectionNoTethatimproperusemaydamagetheequipnlen_
• Donotinserta"MemoryStickDuo"withouta'MemoryStickDuo"Adaptorinto'MemoryStick"compatibleequipment,as_blsmaycauseequipmenttrouble
Note on using "Memory Stick PRO"
(not supplied)
• "Memoty Stick PRO" with a capacity up toIGB can be used with this camera
On "InfoLITHIUM"
battery pack
SERIEI
What is the "InfoLITHIUM"
battery pack?The "lnfoLITHlUM" battery pack is a
lithium-ion battery pack that has functions
for communicating information related to
operating conditions between your camera
and the AC power adaptor.
The "InfoLITHIUM" battery pack
calculates the power consumption
according _o the operating conditions of
your camera, m_d displays the remaining
battery time in minutes.
Charging the battery pack
We recommend charging the battery pack
in an ambient temperature of between IO°C
to 30°C (50 ° F to 86 ° F). You may not be
able to efficiently charge the battery pack
outside of this temperature rm_ge.
Effective use of the battery pack• Battery performance decreases in low-
temperature surroundings. So, the time that
the battery pack can be used is shorter in
cold places. We recommend the fonowing
to ensure longer battery pack use:
Put the batlery pack in a pocket close to
your body to warm it up, and insert it in
your cmnera immediately before you
start shooting.
• Frequently oparating the zoom or flash
wears out the battery charge faster.
• We recommend having spare battery
packs bandy for two or three times the
expac_ed sbooting time, and making trial
shota before taking the actual shota.
• Do not expose the battery pack to water.
The battery pack is not water-resistant.
Remaining battery time indicator
The power may go off" althougb the battery
remaining indicator shows there is enough
power to operate. Use the battery pack up =
and charge the battery pack fully again so _.that the indication on the battery remaining _,
indicator is correct. Note, however, that theca
correct battery indication sometimes will
not be restored if the camera is used in high
temperatures for a long time or left in a fully
charged state, or the battery pack is
frequently used.
115

How to store the battery pack
• Even if _he battery pack will not be used
for a long time, fully charge it and use it
up once per year. Remove the battery
pack from your camera, then store it in a
dry, cool place. This is to maintain the
battery pnck's functions.
• To use the battery pock up on your
camera, leave the POWER switch to on in
slide show playback mode (page 68) until
the power goes off.
Battery life
• The b_ttery life is limited. Battery
capacity decreases little by little as youuse it more and more, and as time passes.
When the baltery operating time is
shortened considerably, a probable cause
is that the battery pack has reached the
end of its life. Buy a new battery pack.
• The battery life varies according to how it
is stored al_d the operating conditions and
environment for each battery pack.
116
Specifications
SystemImage device
I 1 nlm (2/3 type) colol CCDPdmao_ color fiber
Total pixels number of cameraApprox 5 240 000 pixels
Effective pixels number of cameraApprox 5 020 OOOpixels
Lens 5× zoom lensf, 9.7 485mm(t3132I 15/161nches)(3g 190toni(I 1/2 7 t/2inches)whenconvertedto a 35 mm still career'))Fgo 2AFilte_ diameter: 58 mm (2 3/8 inches)
Exposure controlAutonlad¢ _xposule, Shutter speedprlon_y, Aperture p_io_4ty, M_Iexposure, Scene selection (4 nlodes)
White balanceAutomatic, Daylight, Cloudy,Fluorescent, Incandescm_, O_e -tm'_
Data formllt (DCF compliant)Still images: Exit Vet. 22 .IPEGcompliant, GIF (for Clip Motion),TIFF, DPOF compatiNeAudio with Still image:MPEGI compliant (Monaural)Moving images:MPEGI compliant (Monaural)
Recording media"Memory Stick"
Flash Recommm_ded distance (ISO set to
Auto): 03 m to 4 5 m (I 1 7/8 inchesm 177 I/4 inches)
ViewfinderElectric viewfinder (color)
Input/Output connectors/VV OUT (MONO) (Monaural)
Mini jack¥1deo: 1 Yp-p,'75 £k unbalance_,
sync negativeAudio: 327 mV (aTa 47 k_)toad)
Output impedance 2.2 k_)
ACC jack Mini-mlnijack (o 25 ram)
USB jack mini-B
LCD screen
Used LCD panel4 6 cm ( 1.8 lype) TFT drive
Total numbeT of dots123 200 (560×220) dots
General
Used battery packNP-FM 50 (supplied)
Power requirements'72 V
Power consumption (during shooting)23 W
Operating temperature0°C to 40°C (32°F to I04°F)
Storage temperature20°C to +60°C (_°F to +I40°F)
Dimensions119 5x68 9x151 nlm(4 3/4x2 3/4x6 inches)(W/H/D, excluding maxlmttm
Mass Appt ox 696 g (1 lb 8 oz) (includingbatter 3, pack NP-FM50, "MemoryStick," shoulder strap and lens cap)

Built-in microphoneElecn_t condensel ndcrophone
Built-in speakerDynamic speaker
AC-L10A/L10B AC poweradaptorPower requirements
lfi0 To240 V AC, 50/60 Hz
Rated output voltageDC 8.4 V, 1.5 A in operating mode
Operating temperature0°C to 40°C (32°F to 104°F)
Storage temperature20°C to _60°C (_°F to +140°F)
Dimensions
App_ox, 125x39x62 mm(5xl 9/16x2 1/2 inches)(w/h/d,excluding maximmn protrusions)
Mass Approx. 280 g ( 10 oz)
NP-FM50 battery packUsed battery
Litbium-ion battely
Maximum voltageDC 8.4 V
Nominal voltageDC 7.2 V
Capacity 85 Wh (1 180 mAh)
Operating temperature0°C to 40°C (32°F to 104°F)
DimensionsApptox. 38,2x2fi,5x55.b mm(I _1b×13/16×2 I/4 inches)(w/h/d)
Mass Approx. 76 g (3 07)
Accessories
AC-LI fiA/Ll 0B AC power adaptor
Power cord (mains lead)
USB cable
NP-FM50 battew pack
A/V connecting cable
"Memoly Stick" (32 MB)
Shoulder s_rap
Lens cap
Lens cap strap
CD-ROM (USB driver SPVD-008)
Operating instructions
Design and specifications are subject to changewithout notice.
S"
O"
117

118
FINDER/I.CD screen
When shooting still images
%
@
[_--
@[]
[] Recording mode indicator (57-61)[] AE LOCK indicator (52)
[] AE/AF lock indicator (20)[] Battery remaining indicator (12)
[] White balance indicator (54)/Mode dial indicator/Flash mode indicator (26)/Red-eye reduction indicator (26)/Hot shoe indicator (63)
[] Date/time indicator (28)/Conversion lens indicator (110)/ISO number indicator (107)
,[].[]
[] Sharpness indicator (107, 108)/Picture effect indicator (62)/Hologram AF indicator (27)
[] Metering modes indicator (51)/NightShot/NightFramingindicator (55)
[] Focus distance indicator (48)
[] Histogram indicator (50)[] Low battery warning indicator
(12)[] AF range finder (46)
[] Spot metering cross hair (51)[] Image size indicator (19)
[] Image quality indicator (31)
[] Recording folder indicator (64)[] Remaining number of recordable
images indicator (32, 104)/Self-diagnosis display (103)
[] Remaining "Memory Stick"capacity indicator
[] Focus range indicator (46)[] EV level indicator (40)
[] Aperture value indicator (44)[] Shutter speed indicator (44)
[] Macro indicator (24)[] Self-timer indicator (25)
[] Light amount warning indicator[] Menu/Guide menu (42)
• Pressing MENU switches {he menu ora/ofE
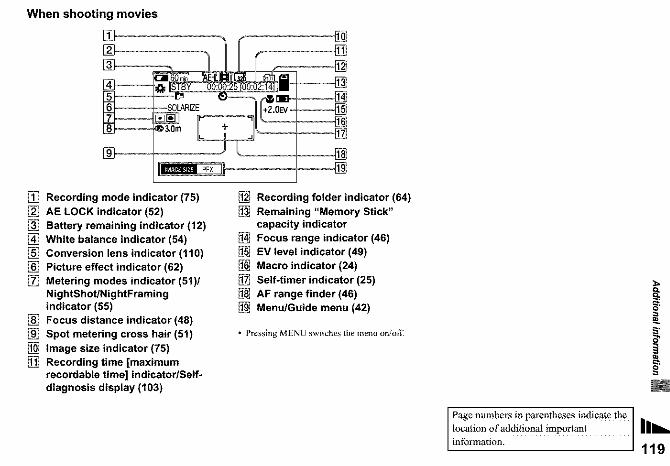
When shooting movies
[][][]
[] Recording mode indicator (75)
[] AE LOCK indicator (52)
{_ Battery remaining indicator (12){_ White balance indicator (54){_ Conversion lens indicator (110)
{_ Picture effect indicator (62){_ Metering modes indicator (51)/
NightShot/Nig ht Framingindicator (55)
{_ Focus distance indicator (48)Spot metering cross hair (51)
Image size indicator (75)
Recording time [maximumrecordable time] indicator/Self-diagnosis display (103)
{_ Recording folder indicator (64)
{_ Remaining "Memory Stick"capacity indicator
{_] Focus range indicator (46)EV level indicator (49)
Macro indicator (24)
Self-timer indicator (25)AF range finder (46)Menu/Guide menu (42)
• Pressing MENU switches *he menu on/offi
!o
Page numbers in parentheses indicate the
location of additional important ||information. 1

120
When playing back still images
[] Recording mode indicator (57-61)[] Protect indicator (70)/
Print (DPOF) mark indicator (72)/Volume indicator (61)
[] Zoom scaling indicator (67)[] Histogram indicator (50)
[] File name (88)[] image size indicator (10)
[] Change folder indicator/Playback folder indicator (66)
[] Recording folder indicator (67,72)
[] Remaining "Memory Stick"capacity indicator
[] Image number/Number ofimages recorded in selectedfolder
[] Recording date of the playbackimage (28)/Menu/Guide menu(42)
When playing back moving
images
[]-
I_# _E£]DELETEIPROTECTIDPOFi
[] image size indicator (76)
[] Recording mode indicator (76)[] Volume indicator (76)/Playback
indicator (76)[] Playback bar (76)
[] Change folder indicator/Playback folder indicator (66)
[] Recording folder indicator (80)
[] image number/Number ofimages recorded in selectedfolder
[] Remaining "Memory Stick"capacity indicator
[] Counter (76)[] Playback image (76)
[] Menu/Guide menu (42)
Page numbers in parentheses indicate thelocation of additional important
nformat on.

Index
AAC power adaptor ....................................... 11, 14
Access lamp ...................................................... t8
AE lock ...............................................................
AF lock ............................................................. 47
AF range ........................................................... 46
Aperture priorgy mode ..................................... 45
Auto adjustment mode ..................................... 20
Auto Focus ................................................. 21, 46
Auto powe)_off function ................................... 15
BButtery pack
battery lifb ............................................ 13, 116
charging ............................................... 11, 115
chalging time ............................................... 12
remaining indicator .............................. 12, 115
Beep/sbutter sound ......................................... I 12
Bracket ............................................................. 53
Brightness
EVF finder ....................................................
image ..................................................... 49, 53
LC D screen ................................................ 112
Burst ................................................................. 59
CCD-ROM .......................................................... 8I
Charging
battery pack ......................................... I1, 115
chargingtime ............................................... 12
Cleaning ......................................................... 113
Clip Motion ..................................................... 57Clock set .......................................................... 16
Computer
copying images ............................... 85, 86, 91
Image Transfer ............................................ 82
ImageMixer ................................................ 84
USB cable ................................................... 84
USB drlver .................................................. 82
Control bt_tton ........................................ 9, I5, 42
Conversion lens ............................................. 110
Copying images ................................... 85, 86, 91
D
Deleting images ......................................... 37, 77
Digital zoom .................................................... 23
DISPLAY ......................................................... 22
DIVIDE ........................................................... 79
DPOF ............................................................... 72
EEdi*ing still images
Print (DPOF) mark ..................................... 72
Protect ......................................................... 70
Resize .......................................................... 72
E-mail .............................................................. 61
Enlarging an image .......................................... 66
EV adjust meat ................................................. 49
EXPANDED FOCUS .............................. 48, 111
Exposure bracket ............................................. 53
FFile
file names .................................................... 88
image file storage destinations .................... 88
Flash
external flash ............................................... 63
FLASH LEVEL ................................ 107, 108
Red-eye reduction ............................... 26, 1I0
selecting a flash mode ................................. 26
FocusingAF lock ....................................................... 47
FOCUS range select function ..................... 46nlanuat focus ............................................... 48
Multipoint AF ............................................. 46
shooting (using auto adjustment mode) 20, 46
Fotdcr
playback folder ........................................... 66
recording fbldet .......................................... 64FORMAT ......................................................... 40
GGIF ............................................................. 57, 89
HHologlanl AF ........................................... 27, 110
Hot shoe ................................................... 63, I I I
IIh. 121

122
Ilinage
copying images ............................... 85, 86, 91
file names .................................................... 88
image file storage destinations ................... 88
image quality .............................................. 32
image size ............................. 19, 32, 104, 106
"InfbLITHIUM" battery pack ....................... I 15
Installmion
Image Tmnsfer ............................................ 82
ImageMixer ................................................ 84
USB driver .................................................. 82
ISO ................................................................. I07
JJog dial ............................................................ 43
JPEG .......................................................... 20, 89
LLCD screen .................................................... 112
MManttal exposure mode .................................... 45
Memory Stick
formatting a 'Memory Stick" .................... 40
inserting a 'Memory Stick" ,....................... 18
number of sbootlng images/time ........ 32, 104
Menu settings .......................................... 42, 106
Metering mode
center-welghted metering ........................... 51
tuttiS-pattern metering ................................ 51
spot metering .............................................. 51
Mode dial ............................................... 8, 16, 42
Moisture condensation ................................... 1 I3
Movie
cutting movies ............................................. 79
dele*ing images ........................................... 77
number of images that can be saved or
shooting _ime .................................. 13, 104
shooting images .......................................... 75
viewing images on a scT_en ........................ 76
viewing images on your computer .............. 88
MPEG MOVIE ................................................ 75
MPG ................................................................. 89
Multi Burst ....................................................... 58
NNightFraming ................................................... 56
NightShot ......................................................... 56
NR stow shutter ............................................... 45
NTSC system ........................................... 36, 112
P
PAL system .............................................. 36, 112Picture effect .................................................... 62
Powm
AC power adaptor ....................................... 14
battery pack ................................................. 11
off off ........................................................... 15
Pt ecautlons ..................................................... 113
Print (DPOF) malk .......................................... 72
Ptotect .............................................................. 70
QQuick Review .................................................. 21
RRed-eye reduction .................................... 26, 110
RESET button .......................................... 92, 103
Resize ............................................................... 72
Rotate ............................................................... 69
SScene Selection (SCN) .................................... 29
Self-diagnosis display .................................... 103
Self-timer ......................................................... 25
Setting
date and time ............................................... 16
image quality ............................................... 32
image size ..................................... 19, 32, 104
menu items .......................................... 42, 106
SET UP items ...................................... 42, I 10
SHARPNESS ......................................... 107, 108
Shoo*ing mode
auto adjustment mode ................................. 20
Bracket ........................................................ 53
Burst ............................................................ 59
Clip Motion ................................................. 57
E-mail .......................................................... 61
movie ........................................................... 75
Multi Burst .................................................. 58
TIFF ............................................................ 60
Voice ........................................................... 61
Shutter speed priority mode ............................. 44
Slide show ........................................................ 68

StdlimageshootingEVadiastment.............................................49imagesize....................................................19meteringmode.............................................51numberofsho_ingimages.................32,104pictureeffect................................................62SceneSelection............................................29shootingclose-ups(Mac_).........................24superimposing_egateandtime.................28usingatttoadjustmentmode........................20usingtheflash..............................................26usingthesel_timer......................................25usingthezoom.............................................23WhiteBalance.............................................5,I
Stillimageviewingdelete...........................................................37indexscreen.................................................34playbackzoom.............................................67rotate............................................................69singleimagescreen.....................................33slideshow....................................................68viewingimagesonascreen.........................33viewingimagesonaTVscreen...................35viewlngimagesonyotll"compttter..............gg
Superimposingthedateandtime.....................28
VViewing images on a screen ...................... 33, 76
Viewing images on your computer .................. 88Voice ................................................................ 61
WWarnings and notice messages ...................... I01
White Balance ................................................. 54
ZZoolt_
digital zoom ........................................ 23, 110
pl_yback zoom ............................................ 67
using tile zoom feature ................................ 23
TTIFF .................................................................. 60
Trimming .......................................................... 67
TV color system ............................................... 35
UUSB ............................................................ 81,85
Using your c_mera _broad ................................ 14
123

mmmm
mm
m
i
4_m
m
m
mm
mm
Printed on 100% recycled paperusing VOC (Volatile OrganicCompound)-free vegetable oilbased ink.
http'Jhwvw.sony,net]Sony Corporation Printed in Japan
[°_%°_°°'ei:"°'='_°Y_°';'°"°i°%_°:%'od°'_'_eTsr°%_%%°-]
Related Documents