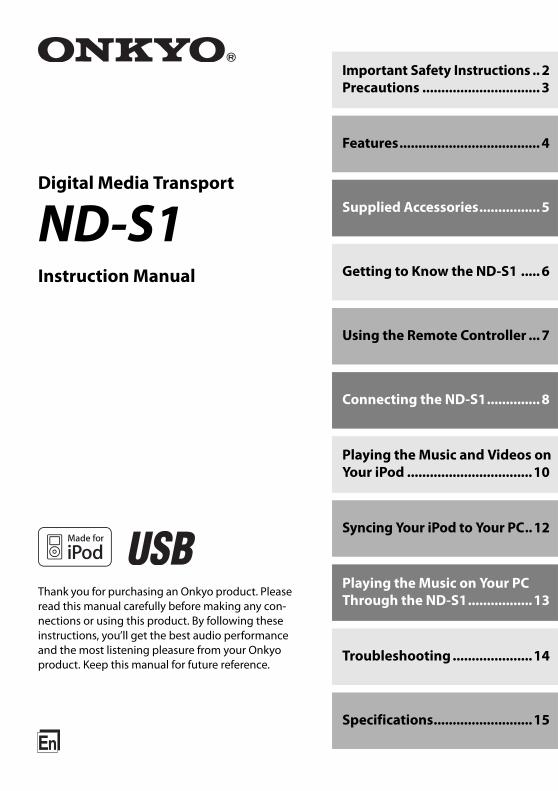
En Digital Media Transport ND-S1 Instruction Manual Important Safety Instructions .. 2 Precautions ............................... 3 Features ..................................... 4 Supplied Accessories ................ 5 Getting to Know the ND-S1 ..... 6 Using the Remote Controller ... 7 Connecting the ND-S1.............. 8 Playing the Music and Videos on Your iPod ................................. 10 Syncing Your iPod to Your PC..12 Playing the Music on Your PC Through the ND-S1 ................. 13 Troubleshooting ..................... 14 Specifications.......................... 15 Thank you for purchasing an Onkyo product. Please read this manual carefully before making any con- nections or using this product. By following these instructions, you’ll get the best audio performance and the most listening pleasure from your Onkyo product. Keep this manual for future reference.

Welcome message from author
This document is posted to help you gain knowledge. Please leave a comment to let me know what you think about it! Share it to your friends and learn new things together.
Transcript
Important Safety Instructions .. 2Precautions ............................... 3
Features..................................... 4
Supplied Accessories................ 5
Getting to Know the ND-S1 ..... 6
Digital Media Transport
ND-S1Instruction Manual
Using the Remote Controller ... 7
Connecting the ND-S1.............. 8
Playing the Music and Videos on Your iPod .................................10
Syncing Your iPod to Your PC.. 12
Playing the Music on Your PC Through the ND-S1.................13
Troubleshooting .....................14
Specifications..........................15
En
Thank you for purchasing an Onkyo product. Please read this manual carefully before making any con-nections or using this product. By following these instructions, you’ll get the best audio performance and the most listening pleasure from your Onkyo product. Keep this manual for future reference.
Important Safety Instructions
1. Read these instructions.2. Keep these instructions.3. Heed all warnings.4. Follow all instructions.5. Do not use this apparatus near water.6. Clean only with dry cloth.7. Do not block any ventilation openings. Install in
accordance with the manufacturer’s instruc-tions.
8. Do not install near any heat sources such as radi-ators, heat registers, stoves, or other apparatus(including amplifiers) that produce heat.
9. Do not defeat the safety purpose of the polar-ized or grounding-type plug. A polarized plughas two blades with one wider than the other. Agrounding type plug has two blades and a thirdgrounding prong. The wide blade or the thirdprong are provided for your safety. If the pro-vided plug does not fit into your outlet, consultan electrician for replacement of the obsoleteoutlet.
10. Protect the power cord from being walked on orpinched particularly at plugs, conveniencereceptacles, and the point where they exit fromthe apparatus.
11. Only use attachments/accessories specified bythe manufacturer.
12. Unplug this apparatus during lightning stormsor when unused for long periods of time.
13. Refer all servicing to qualified service personnel.Servicing is required when the apparatus hasbeen damaged in any way, such as power-sup-ply cord or plug is damaged, liquid has beenspilled or objects have fallen into the apparatus,the apparatus has been exposed to rain or mois-ture, does not operate normally, or has beendropped.
14. Damage Requiring ServiceUnplug the apparatus from the wall outlet andrefer servicing to qualified service personnelunder the following conditions:A. When the power-supply cord or plug is dam-
aged,B. If liquid has been spilled, or objects have
fallen into the apparatus,C. If the apparatus has been exposed to rain or
water,D. If the apparatus does not operate normally
by following the operating instructions.Adjust only those controls that are coveredby the operating instructions as an improperadjustment of other controls may result indamage and will often require extensivework by a qualified technician to restore theapparatus to its normal operation,
E. If the apparatus has been dropped or dam-aged in any way, and
F. When the apparatus exhibits a distinctchange in performance this indicates a needfor service.
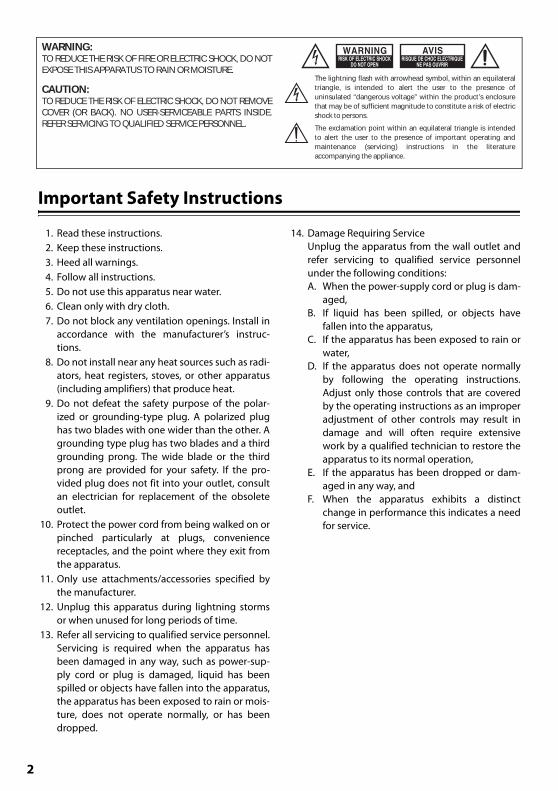
WARNING:TO REDUCE THE RISK OF FIRE OR ELECTRIC SHOCK, DO NOT EXPOSE THIS APPARATUS TO RAIN OR MOISTURE.
CAUTION:TO REDUCE THE RISK OF ELECTRIC SHOCK, DO NOT REMOVE COVER (OR BACK). NO USER-SERVICEABLE PARTS INSIDE. REFER SERVICING TO QUALIFIED SERVICE PERSONNEL.
The lightning flash with arrowhead symbol, within an equilateral triangle, is intended to alert the user to the presence of uninsulated “dangerous voltage” within the product’s enclosure that may be of sufficient magnitude to constitute a risk of electric shock to persons.
The exclamation point within an equilateral triangle is intended to alert the user to the presence of important operating and maintenance (servicing) instructions in the literature accompanying the appliance.
WARNINGRISK OF ELECTRIC SHOCK
DO NOT OPENRISQUE DE CHOC ELECTRIQUE
NE PAS OUVRIR
AVIS
2
Precautions
1. Recording Copyright—Unless it’s for personal use only, recording copyrighted material is ille-gal without the permission of the copyright holder.
2. Care—Occasionally you should dust the unit all over with a soft cloth. For stubborn stains, use a soft cloth dampened with a weak solution of mild detergent and water. Dry the unit immedi-ately afterwards with a clean cloth. Don’t use abrasive cloths, thinners, alcohol, or other chem-ical solvents, because they may damage the fin-ish or remove the panel lettering.
3. Never Touch this Unit with Wet Hands—Never handle this unit or its power cord while your hands are wet or damp. If water or any other liq-uid gets inside this unit, have it checked by your Onkyo dealer.
4. Do not use other AC adapters, car power adapt-ers, or battery holders containing regular or rechargeable batteries, as they may damage the product.
For U.S. modelsFCC Information for User
CAUTION:The user changes or modifications not expressly approved by the party responsible for compliance could void the user’s authority to operate the equip-ment.NOTE:This equipment has been tested and found to com-ply with the limits for a Class B digital device, pursu-ant to Part 15 of the FCC Rules. These limits are designed to provide reasonable protection against harmful interference in a residential installation.
This equipment generates, uses and can radiate radio frequency energy and, if not installed and used in accordance with the instructions, may cause harmful interference to radio communications. However, there is no guarantee that interference will not occur in a particular installation. If this equipment does cause harmful interference to radio or television reception, which can be determined by turning the equipment off and on, the user is encouraged to try to correct the interference by one or more of the fol-lowing measures:• Reorient or relocate the receiving antenna.• Increase the separation between the equipment
and receiver.
• Connect the equipment into an outlet on a circuit different from that to which the receiver is con-nected.
• Consult the dealer or an experienced radio/TV technician for help.
For Canadian ModelsNOTE: THIS CLASS B DIGITAL APPARATUS COMPLIES WITH CANADIAN ICES-003.
Modèle canadienREMARQUE: CET APPAREIL NUMÉRIQUE DE LA CLASSE B EST CONFORME À LA NORME NMB-003 DU CANADA.
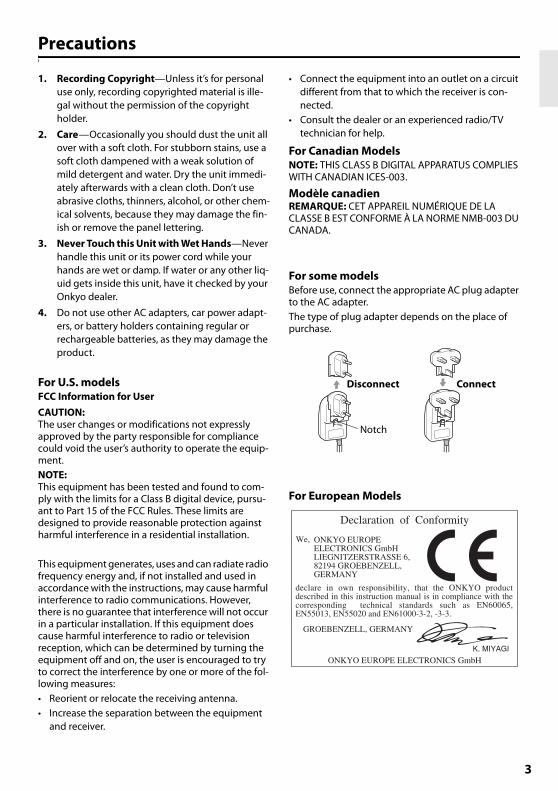
For some modelsBefore use, connect the appropriate AC plug adapter to the AC adapter.The type of plug adapter depends on the place of purchase.
For European Models
Disconnect Connect
Notch
Declaration of Conformity
We, ONKYO EUROPEELECTRONICS GmbHLIEGNITZERSTRASSE 6, 82194 GROEBENZELL, GERMANY
GROEBENZELL, GERMANY
ONKYO EUROPE ELECTRONICS GmbHK. MIYAGI
declare in own responsibility, that the ONKYO product described in this instruction manual is in compliance with the corresponding technical standards such as EN60065, EN55013, EN55020 and EN61000-3-2, -3-3.
3
Features
■ With the Onkyo ND-S1 Digital Media Transport, you can easily play the music stored on your iPod through your Onkyo audio system and enjoy great sound.
■ The ND-S1 processes the digital audio sig-nal directly from your iPod for high-quality digital audio output (optical or coaxial).
■ The built-in USB audio interface allows you to output the music stored on your PC digitally (optical or coaxial).
■ Music stored on your PC can be output dig-itally even when the ND-S1 is powered by only the USB bus.1
■ Easily sync your iPod with your iTunes music library on your PC.
■ If your iPod supports TV out, connecting the ND-S1’s VIDEO jack to your TV or AV receiver allows to you to enjoy videos.
■ In addition to the included remote control-ler, you can also use your Onkyo amp or AV receiver’s remote controller.2
■ The ND-S1 charges your iPod while you enjoy your music.
1. When powered by only the USB bus, some iPod functionality is not available and your iPod will not be charged, so always use the included AC adapter when possible.
2. Only -capable Onkyo amp and AV receiver remote controllers are supported.If the remote controller supplied with your Onkyo amp or AV receiver has separate POWER ON and STANDBY buttons, operation is as follows:• When the amp or AV receiver is set to Standby,
only the amp or AV receiver turns On.• When the amp or AV receiver is already On, the
ND-S1 turns On.So to turn on the ND-S1 when the amp or AV receiver is set to Standby, on the remote controller supplied with your amp or AV receiver, you must press the [ON] button twice.
• iPod nano (2nd generation)
• iPod nano (3rd generation)
• iPod classic
• iPod touch
• iPod nano (4th generation)
• iPod touch (2nd generation)
iPod Models with Limited Support:• iPod nano
• iPod (5th generation)
* iPod is a trademark of Apple Inc., registered in the U.S. and other countries.
“Made for iPod” means that an electronic accessory has been designed to connect specifically to iPod and has been certified by the developer to meet Apple performance standards. Apple is not responsible for the operation of this device or its compliance with safety and regulatory standards.
Notes:• On the 5th generation iPod and iPod nano,
the click wheel is disabled during playback. Use the ND-S1’s [iPod] button to start and stop playback and the remote controller to control other iPod functions.
• Before using the ND-S1, update your iPod with the latest software, available from the Apple Web site at: www.apple.com
Recommended iPod Models
• The instructions in this manual apply to iPod models as of June 2009 and may change with future upgrades to the iPod software.
• Several generations of some iPod models have been sold. An iPod without “xxx gen-eration” in its name indicates the first gen-eration of that particular iPod.
• The AC adapter supplied with the ND-S1 is designed exclusively for use with the ND-S1. Do not use it with any another device. Likewise, do not use any other AC adapter with the ND-S1. Doing so may damage the ND-S1.
4

Supplied Accessories
Make sure you have the following accessories.
* In catalogs and on packaging, the letter at the end of the product name indicates the color. Specifica-tions and operations are the same regardless of color.
• AC adapter
• Remote controller
• cable
• Optical audio cable
• USB cable
• Video cable
• Instruction Manual
ON/STANDBY
SYNC/UNSYNC
iPod/PC
PLAYLIST
ALBUM
RC-755E
SHUFFLE
REPEAT
5

Getting to Know the ND-S1
1 ON/STANDBY buttonSets the ND-S1 to On or Standby.
2 Remote control sensorReceives control signals from the remote controller.
3 STANDBY indicatorLights up when the ND-S1 is on Standby. If your iPod is charging during Standby, it flashes slowly.
4 iPod dock connectorConnects to your iPod.
5 iPod button/indicatorPress this button to use your iPod. Press repeatedly to start and stop iPod playback.The indicator lights up blue when your iPod is selected.
6 PC button/indicatorWith the ND-S1 connected to your PC via USB, press this button to output the music stored on your PC digitally from the ND-S1. The indicator lights up green when your PC is selected.
7 SYNC/UNSYNC button/indicatorWith the ND-S1 connected to your PC via USB, and your iPod inserted in the ND-S1, press this button to sync your iPod with your iTunes music library on your PC. The indica-tor lights up red while sync is in progress.To cancel sync, press and hold this button for at least 2 seconds. The indicator will flash for a few moments and stop flashing when
sync has been cancelled. While the indicator is flashing, you cannot operate any buttons or start iPod playback. See page 12 for details.
1 REMOTE CONTROL jackConnects to the jack on another -capable Onkyo component for linked oper-ation. This connection should not be used with some components. See page 8 for details.
2 OPTICAL AUDIO OUT jackThis optical digital audio output jack con-nects to an optical digital audio input on a system component, amp, or AV receiver.
3 COAXIAL AUDIO OUT jackThis coaxial digital audio output jack con-nects to a coaxial digital audio input on a system component, amp, or AV receiver.
4 USB portConnects to a USB port on your PC for play-ing music stored on your PC and iTunes sync.
5 VIDEO OUT jackConnects to a composite video input on your TV or AV receiver for video playback.
6 DC IN 5V 1A jackConnect the included AC adapter here.
Front and Top
ON/STANDBY STANDBY
iPod
PC
SYNC/
UNSYNC
iPod TRANSPORT
1 234567
Rear Panel
1 2 3 4 5 6
6
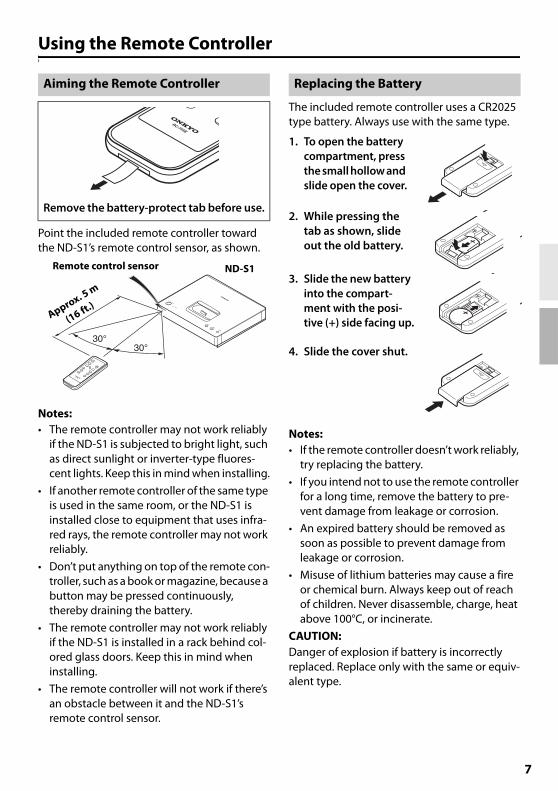
Using the Remote Controller
Point the included remote controller toward the ND-S1’s remote control sensor, as shown.
Notes:• The remote controller may not work reliably
if the ND-S1 is subjected to bright light, such as direct sunlight or inverter-type fluores-cent lights. Keep this in mind when installing.
• If another remote controller of the same type is used in the same room, or the ND-S1 is installed close to equipment that uses infra-red rays, the remote controller may not work reliably.
• Don’t put anything on top of the remote con-troller, such as a book or magazine, because a button may be pressed continuously, thereby draining the battery.
• The remote controller may not work reliably if the ND-S1 is installed in a rack behind col-ored glass doors. Keep this in mind when installing.
• The remote controller will not work if there’s an obstacle between it and the ND-S1’s remote control sensor.
The included remote controller uses a CR2025 type battery. Always use with the same type.
1. To open the battery compartment, press the small hollow and slide open the cover.
2. While pressing the tab as shown, slide out the old battery.
3. Slide the new battery into the compart-ment with the posi-tive (+) side facing up.
4. Slide the cover shut.
Notes:• If the remote controller doesn’t work reliably,
try replacing the battery.
• If you intend not to use the remote controller for a long time, remove the battery to pre-vent damage from leakage or corrosion.
• An expired battery should be removed as soon as possible to prevent damage from leakage or corrosion.
• Misuse of lithium batteries may cause a fire or chemical burn. Always keep out of reach of children. Never disassemble, charge, heat above 100°C, or incinerate.
CAUTION:Danger of explosion if battery is incorrectly replaced. Replace only with the same or equiv-alent type.
Aiming the Remote Controller
Remove the battery-protect tab before use.
RC-755E
ON/STANDBY
STANDBY
iPod
PC
SYNC/UNSYNC
ON/STANDBY
SYNC/UNSYNC
iPod/PC
PLAYLIST
ALBUM
RC-755E
SHUFFLE
REPEAT
30°30°
Approx. 5 m
(16 ft.)
Remote control sensor ND-S1
Replacing the Battery
7

Connecting the ND-S1
Connect the ND-S1 to a digital audio input on your Onkyo amp or AV receiver that can be assigned to an input selector whose Input Dis-play can be set to “DOCK.” Setup varies depending on your particular amp or AV receiver model. Refer to the Digital Input Setup and Changing the Display sections of your amp or AV receiver’s instruction manual for details.
1. Using the included optical audio cable, connect the ND-S1’s OPTICAL AUDIO OUT jack to an optical digital audio input jack on your amp or AV receiver.
2. If your iPod supports TV out, use the included video cable to connect the ND-S1’s VIDEO OUT jack to a composite video input on your TV or AV receiver.
3. Using the included cable, connect the ND-S1’s REMOTE CONTROL jack to an
jack on your amp or AV receiver.
4. Connect the included AC adapter to the ND-S1’s DC IN 5V 1A jack, and plug the AC adapter into a suitable wall outlet.
Notes:• The ND-S1’s audio outputs are digital out-
puts. If the digital audio input on your amp or AV receiver cannot be assigned to an input selector whose Input Display can be set to “DOCK,” do not connect the cable, other-wise a malfunction may occur.
• Do not place the ND-S1 on top of a compo-nent that gets warm or one with has air vents on top, as it may interfere with that compo-nent’s cooling or cause the component or ND-S1 to overheat. Place it next to the com-ponent, use an audio rack, etc.
Connecting an Amp or AV Receiver
VIDEOINPUT
Videocable
AC adapter
Optical digital audio cable
ND-S1
cable
To wall
outlet
USB cable
TVPC
AV receiver
8
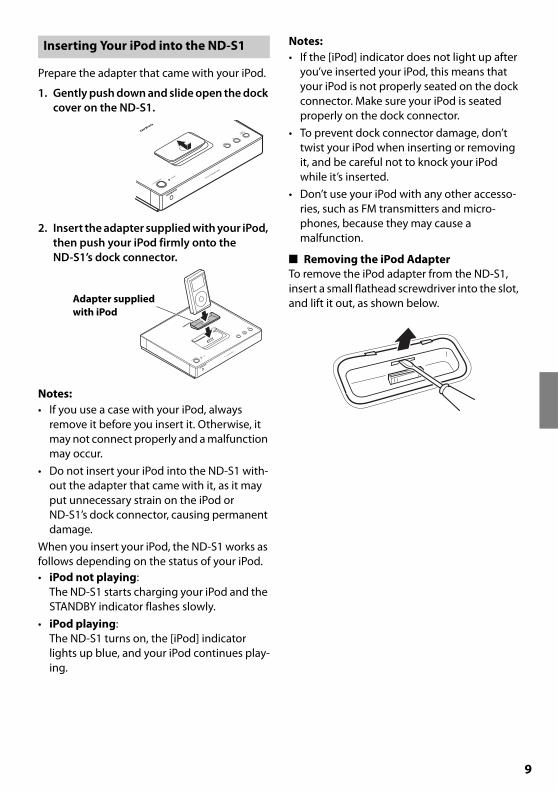
Prepare the adapter that came with your iPod.
1. Gently push down and slide open the dock cover on the ND-S1.
2. Insert the adapter supplied with your iPod, then push your iPod firmly onto the ND-S1’s dock connector.
Notes:• If you use a case with your iPod, always
remove it before you insert it. Otherwise, it may not connect properly and a malfunction may occur.
• Do not insert your iPod into the ND-S1 with-out the adapter that came with it, as it may put unnecessary strain on the iPod or ND-S1’s dock connector, causing permanent damage.
When you insert your iPod, the ND-S1 works as follows depending on the status of your iPod.• iPod not playing:
The ND-S1 starts charging your iPod and the STANDBY indicator flashes slowly.
• iPod playing:The ND-S1 turns on, the [iPod] indicator lights up blue, and your iPod continues play-ing.
Notes:• If the [iPod] indicator does not light up after
you’ve inserted your iPod, this means that your iPod is not properly seated on the dock connector. Make sure your iPod is seated properly on the dock connector.
• To prevent dock connector damage, don’t twist your iPod when inserting or removing it, and be careful not to knock your iPod while it’s inserted.
• Don’t use your iPod with any other accesso-ries, such as FM transmitters and micro-phones, because they may cause a malfunction.
■ Removing the iPod AdapterTo remove the iPod adapter from the ND-S1, insert a small flathead screwdriver into the slot, and lift it out, as shown below.
Inserting Your iPod into the ND-S1
ON/STANDBY STANDBY
iPod
PC
SYNC/
UNSYNC
iPod TRANSPORT
ON/STANDBY STANDBY
iPod
PC
SYNC/
UNSYNC
iPod TRANSPORT
Adapter supplied with iPod
9
Playing the Music and Videos on Your iPod
1. On your iPod, select the song or video you want to play.
2. Insert your iPod into the ND-S1 (see page 9).
3. Press the remote controller’s Play/Pause [L] button, or the ND-S1’s [iPod] button to start playback.
See below for additional remote controller operation and system functions.
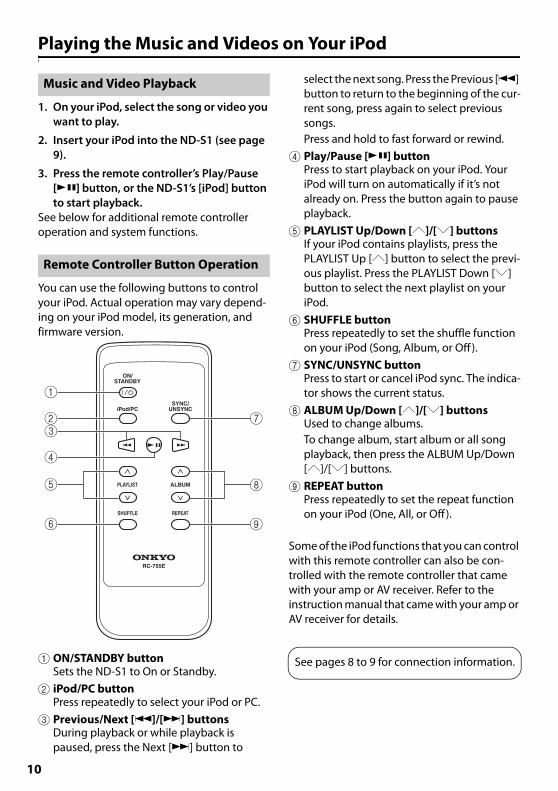
You can use the following buttons to control your iPod. Actual operation may vary depend-ing on your iPod model, its generation, and firmware version.
1 ON/STANDBY buttonSets the ND-S1 to On or Standby.
2 iPod/PC buttonPress repeatedly to select your iPod or PC.
3 Previous/Next [t]/[Y] buttonsDuring playback or while playback is paused, press the Next [Y] button to
select the next song. Press the Previous [t] button to return to the beginning of the cur-rent song, press again to select previous songs.Press and hold to fast forward or rewind.
4 Play/Pause [L] buttonPress to start playback on your iPod. Your iPod will turn on automatically if it’s not already on. Press the button again to pause playback.
5 PLAYLIST Up/Down [B]/[N] buttonsIf your iPod contains playlists, press the PLAYLIST Up [B] button to select the previ-ous playlist. Press the PLAYLIST Down [N] button to select the next playlist on your iPod.
6 SHUFFLE buttonPress repeatedly to set the shuffle function on your iPod (Song, Album, or Off ).
7 SYNC/UNSYNC buttonPress to start or cancel iPod sync. The indica-tor shows the current status.
8 ALBUM Up/Down [B]/[N] buttonsUsed to change albums.To change album, start album or all song playback, then press the ALBUM Up/Down [B]/[N] buttons.
9 REPEAT buttonPress repeatedly to set the repeat function on your iPod (One, All, or Off ).
Some of the iPod functions that you can control with this remote controller can also be con-trolled with the remote controller that came with your amp or AV receiver. Refer to the instruction manual that came with your amp or AV receiver for details.
Music and Video Playback
Remote Controller Button Operation
ON/STANDBY
SYNC/UNSYNCiPod/PC
PLAYLIST ALBUM
RC-755E
SHUFFLE REPEAT
7
8
9
1
2
6
4
3
5
See pages 8 to 9 for connection information.
10

You can use the following system functions:
■ System OnWhen you turn on your amp or AV receiver, the ND-S1 and iPod turn on automatically. In addi-tion, when the ND-S1 and iPod are on, some amps and AV receivers can be turned on by pressing the [ON/STANDBY] button.
■ System OffWhen you turn off your amp or AV receiver, the ND-S1 and iPod automatically go on Standby.
■ Timer OffIf you set your amp or AV receiver’s sleep timer, the ND-S1 and iPod will automatically switch to Standby at the specified sleep time.
■ Timer PlayIf you set your amp or AV receiver’s play timer, the ND-S1 and iPod will automatically turn on and your iPod will start playback at the speci-fied time.
■ Auto Power OnIf you press the remote controller’s Play/Pause [L] button while your amp or AV receiver is on Standby, your amp or AV receiver will turn on automatically, select your iPod as the input source, and your iPod will start playback.
■ Direct Changeif you start iPod playback while listening to another input source, your amp or AV receiver will automatically switch to the input to which the ND-S1 is connected.
■ Other Remote ControllersYou can use the remote controller that came with your amp or AV receiver to control other iPod functions. The available functionality depends on your amp or AV receiver. See the instruction manual that came with your amp or AV receiver for details.
■ iPod AlarmIf you use the Alarm function on your iPod to start playback, your amp or AV receiver will turn on at the specified time and select your iPod as the input source automatically.
Notes:• Linked operations do not work with video
playback or when the alarm is set to play a sound.
• If you use your iPod with any other accesso-ries, iPod playback detection may not work.
Note:• On the 5th generation iPod and iPod nano,
the click wheel is disabled during playback. Use the ND-S1’s [iPod] button to start and stop playback and the remote controller to control other iPod functions.
System Functions
■ Operating Notes• Use your amp or AV receiver’s volume con-
trol to adjust the playback volume.
• While your iPod is inserted in the ND-S1, its volume control has no effect.
• If you do adjust the volume control on your iPod while it’s inserted in the ND-S1, be careful that it’s not set too loud before you reconnect your earphones.
11
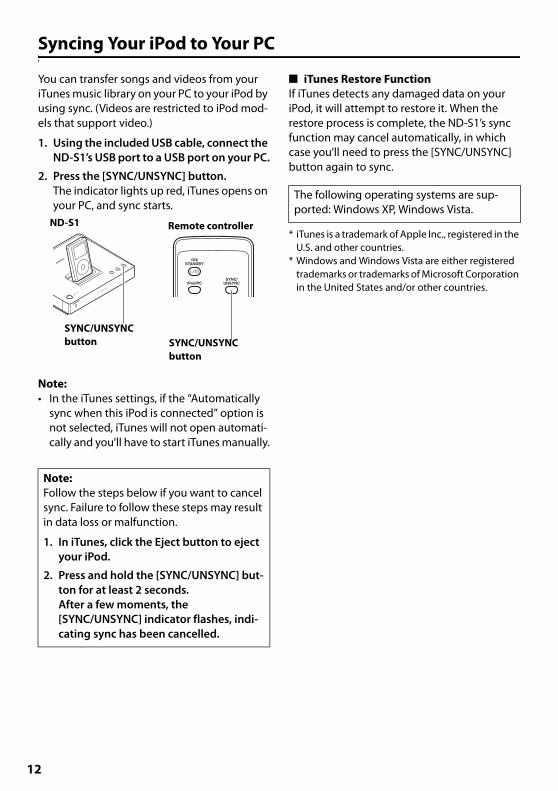
Syncing Your iPod to Your PC
You can transfer songs and videos from your iTunes music library on your PC to your iPod by using sync. (Videos are restricted to iPod mod-els that support video.)
1. Using the included USB cable, connect the ND-S1’s USB port to a USB port on your PC.
2. Press the [SYNC/UNSYNC] button.The indicator lights up red, iTunes opens on your PC, and sync starts.
Note:• In the iTunes settings, if the “Automatically
sync when this iPod is connected” option is not selected, iTunes will not open automati-cally and you’ll have to start iTunes manually.
■ iTunes Restore FunctionIf iTunes detects any damaged data on your iPod, it will attempt to restore it. When the restore process is complete, the ND-S1’s sync function may cancel automatically, in which case you’ll need to press the [SYNC/UNSYNC] button again to sync.
* iTunes is a trademark of Apple Inc., registered in the U.S. and other countries.
* Windows and Windows Vista are either registered trademarks or trademarks of Microsoft Corporation in the United States and/or other countries.
Note:Follow the steps below if you want to cancel sync. Failure to follow these steps may result in data loss or malfunction.
1. In iTunes, click the Eject button to eject your iPod.
2. Press and hold the [SYNC/UNSYNC] but-ton for at least 2 seconds.After a few moments, the [SYNC/UNSYNC] indicator flashes, indi-cating sync has been cancelled.
ON/STANDBY STANDBY
iPod
PC
SYNC/
UNSYNC
iPod TRANSPORT
ON/STANDBY
SYNC/UNSYNCiPod/PC
Remote controller
SYNC/UNSYNC button
ND-S1
SYNC/UNSYNC button
The following operating systems are sup-ported: Windows XP, Windows Vista.
12
Playing the Music on Your PC Through the ND-S1
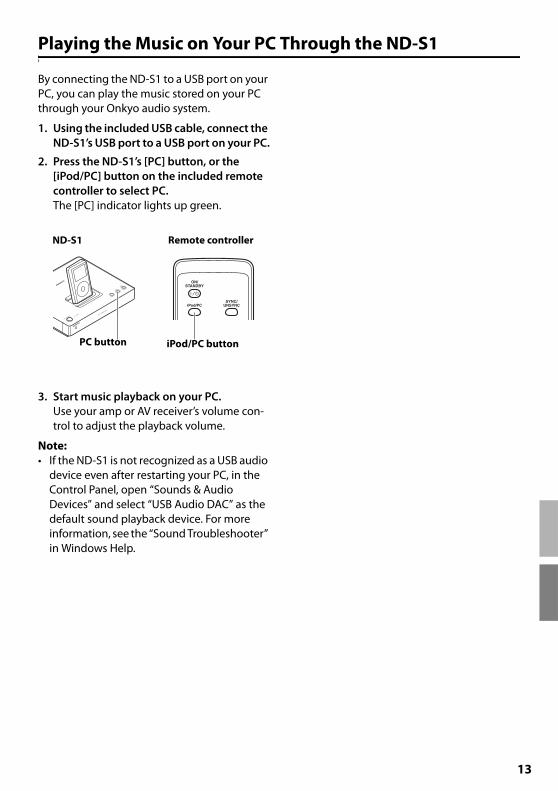
By connecting the ND-S1 to a USB port on your PC, you can play the music stored on your PC through your Onkyo audio system.
1. Using the included USB cable, connect the ND-S1’s USB port to a USB port on your PC.
2. Press the ND-S1’s [PC] button, or the [iPod/PC] button on the included remote controller to select PC.The [PC] indicator lights up green.
3. Start music playback on your PC.Use your amp or AV receiver’s volume con-trol to adjust the playback volume.
Note:• If the ND-S1 is not recognized as a USB audio
device even after restarting your PC, in the Control Panel, open “Sounds & Audio Devices” and select “USB Audio DAC” as the default sound playback device. For more information, see the “Sound Troubleshooter” in Windows Help.
ON/STANDBY STANDBY
iPod
PC
SYNC/
UNSYNC
iPod TRANSPORT
ON/STANDBY
SYNC/UNSYNCiPod/PC
PC button iPod/PC button
ND-S1 Remote controller
13

Troubleshooting
• Make sure your iPod is connected properly.
• If there’s no video, make sure you iPod sup-ports TV out.
• Make sure your iPod is playing.
• Make sure your amp or AV receiver is turned on, the input to which the ND-S1 is con-nected is selected as the input source, and the volume control is not set to minimum.
• Make sure all plugs are pushed in all the way.
• Make sure the ND-S1 is connected to the cor-rect input jacks on your amp or AV receiver. If there’s no video, check your video connec-tions. Do not connect the ND-S1 to any jacks on your amp or AV receiver labeled OUT.
• Make sure the AC adapter is properly con-nected to the ND-S1 and a suitable wall out-let.
• Try resetting your iPod.
• If you remove then re-insert your iPod, it may not be recognized temporarily. In this case, press and hold down the ND-S1’s [iPod] but-ton for at least 2 seconds to reset the ND-S1. If it’s still not recognized, disconnect the USB cable and AC adapter, then reconnect them.
• Make sure your iPod is seated properly on the dock connector. If your iPod is in a case, it may not connect properly, so always remove the case before inserting your iPod into the ND-S1.
• Your iPod cannot be controlled while it’s dis-playing the Apple logo.
• If your remote controller has Remote Mode buttons, make sure the mode necessary to control your iPod is selected.
• If you’re using the remote controller that came with your amp or AV receiver, be sure to point it toward your amp or AV receiver when you want to control your iPod.
• An cable connection is required with some components, but not others. If you connect it by mistake, remote control may not work. See page 8 for details.
• Try resetting your iPod.
• Before using one of the other components connected to your amp or AV receiver, stop playback on your iPod. If playback is not stopped, the Direct Change function may select your iPod as the input source by mis-take at the transition between songs.
• Depending on the backlight setting on your iPod, the display may become dim during use. If the display is hard to see, change the backlight setting on your iPod.
• Do not use Cover Flow while playing music on your iPod, as it may stop iPod playback or cause noise.
No Sound or Video Remote Controller doesn’t work
Others
14
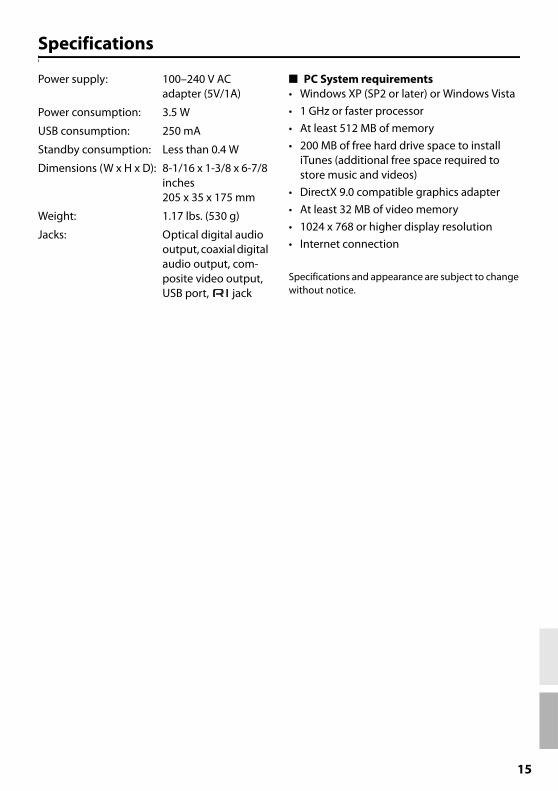
Specifications
Power supply: 100–240 V AC adapter (5V/1A)
Power consumption: 3.5 W
USB consumption: 250 mA
Standby consumption: Less than 0.4 W
Dimensions (W x H x D): 8-1/16 x 1-3/8 x 6-7/8 inches205 x 35 x 175 mm
Weight: 1.17 lbs. (530 g)
Jacks: Optical digital audio output, coaxial digital audio output, com-posite video output, USB port, jack
■ PC System requirements• Windows XP (SP2 or later) or Windows Vista
• 1 GHz or faster processor
• At least 512 MB of memory
• 200 MB of free hard drive space to install iTunes (additional free space required to store music and videos)
• DirectX 9.0 compatible graphics adapter
• At least 32 MB of video memory
• 1024 x 768 or higher display resolution
• Internet connection
Specifications and appearance are subject to change without notice.
15

SN 29400153
I0908-1
Sales & Product Planning Div. : 2-1, Nisshin-cho, Neyagawa-shi, OSAKA 572-8540, JAPANTel: 072-831-8023 Fax: 072-831-8163
ONKYO U.S.A. CORPORATION18 Park Way, Upper Saddle River, N.J. 07458, U.S.A.Tel: +1-201-785-2600 Fax: +1-201-785-2650 http://www.us.onkyo.com/
ONKYO EUROPE ELECTRONICS GmbHLiegnitzerstrasse 6, 82194 Groebenzell, GERMANYTel: +49-8142-4401-0 Fax: +49-8142-4401-555 http://www.eu.onkyo.com/
ONKYO EUROPE ELECTRONICS GmbH (UK BRANCH)The Coach House 81A High Street, Marlow, Buckinghamshire, SL7 1AB, UKTel: +44-(0)1628-473-350 Fax: +44(0)-1628-401-700
ONKYO CHINA LIMITEDUnit 1&12, 9/F, Tower 1, Ever Gain Plaza, 88, Container Port Road, Kwai Chung,N.T., HONG KONG Tel: +86-852-2429-3118 Fax: +86-852-2428-9039http://www.ch.onkyo.com/
(C) Copyright 2009 ONKYO CORPORATION Japan. All rights reserved.
http://www.onkyo.com/HOMEPAGE
* 2 9 4 0 0 1 5 3 *
16
Related Documents