Digital Forensics Tutorials – Analyzing a Disk Image in Kali Autopsy Explanation Section About Disk Analysis Once the proper steps have been taken to secure and verify the disk image, the actual contents of the image must be analyzed for suspicious or incriminating evidence. When looking at the contents of an image, it is necessary to not only look at the clearly visible contents such as folders on the desktop and images in user files, but the image must also be checked for hidden, encrypted, or deleted files. It is always better to assume that a suspect may have known that they were to be investigated and took steps to hide, delete, or otherwise make it difficult to find the information they had been storing on their USB or computer. About Kali Linux Sleuth Kit and Autopsy Autopsy and Sleuth Kit are open source digital investigation tools that run on Windows, Linux, OS X, and other Unix systems. Autopsy is the custom front-end application of Sleuth Kit. They can be used to analyze disk images and perform in-depth analysis of file systems (such as NTFS, FAT, Ext3) and several volume system types. Examiners and analysts can use the Autopsy graphical interface or the Sleuth Kit command line tools to conduct an investigation. In this case, we will be launching the Autopsy graphical interface via the Sleuth Kit command line. Autopsy/Sleuth Kit allow for an examiner to open a .dd or other type of disk image file, hash the file, and search for files and other information contained within the file. It is also possible to produce reports of searches, results, and comments and notes in HTML and Excel. The following features are available through Autopsy/Sleuth Kit: Timeline Analysis - Graphical event viewing interface. Hash Filtering - Flag known bad files and ignore known good. File System Forensic Analysis - Recover files from most common formats. Keyword Search - Indexed keyword search to find files that mention relevant terms. Web Artifacts - Extract history, bookmarks, and cookies from Firefox, Chrome, and IE. Multimedia - Extract EXIF from pictures and watch videos. Email Analysis: Parses MBOX format messages, such as Thunderbird. In This Tutorial Once a disk image has been created, hashed, and write-blocked to prevent changes, it is necessary to analyze the image. During the analysis process, the investigator must search for information pertinent to the case being compiled. This means not only looking for current contents on the drive, but also searching for deleted files, missing or hidden information, and hidden partitions that may not appear at first glance. Oftentimes a suspect will attempt to hide and delete information as a precaution. We will be able to see some of this information within Autopsy/Sleuth Kit. Since Autopsy/Sleuth Kit is a free tool, it is a good option for disk image analysis within Linux, and even Windows systems. In this tutorial we will focus on some of the more basic functions of Autopsy/Sleuth Kit since we only have one file written to our “suspect’s” drive.

Welcome message from author
This document is posted to help you gain knowledge. Please leave a comment to let me know what you think about it! Share it to your friends and learn new things together.
Transcript

Digital Forensics Tutorials – Analyzing a Disk Image in Kali Autopsy
Explanation Section
About Disk Analysis Once the proper steps have been taken to secure and verify the disk image, the actual contents of the
image must be analyzed for suspicious or incriminating evidence. When looking at the contents of an
image, it is necessary to not only look at the clearly visible contents such as folders on the desktop and
images in user files, but the image must also be checked for hidden, encrypted, or deleted files. It is
always better to assume that a suspect may have known that they were to be investigated and took
steps to hide, delete, or otherwise make it difficult to find the information they had been storing on
their USB or computer.
About Kali Linux Sleuth Kit and Autopsy Autopsy and Sleuth Kit are open source digital investigation tools that run on Windows, Linux, OS X, and
other Unix systems. Autopsy is the custom front-end application of Sleuth Kit. They can be used to
analyze disk images and perform in-depth analysis of file systems (such as NTFS, FAT, Ext3) and several
volume system types.
Examiners and analysts can use the Autopsy graphical interface or the Sleuth Kit command line tools to
conduct an investigation. In this case, we will be launching the Autopsy graphical interface via the Sleuth
Kit command line. Autopsy/Sleuth Kit allow for an examiner to open a .dd or other type of disk image
file, hash the file, and search for files and other information contained within the file. It is also possible
to produce reports of searches, results, and comments and notes in HTML and Excel.
The following features are available through Autopsy/Sleuth Kit:
Timeline Analysis - Graphical event viewing interface.
Hash Filtering - Flag known bad files and ignore known good.
File System Forensic Analysis - Recover files from most common formats.
Keyword Search - Indexed keyword search to find files that mention relevant terms.
Web Artifacts - Extract history, bookmarks, and cookies from Firefox, Chrome, and IE.
Multimedia - Extract EXIF from pictures and watch videos.
Email Analysis: Parses MBOX format messages, such as Thunderbird.
In This Tutorial Once a disk image has been created, hashed, and write-blocked to prevent changes, it is necessary to
analyze the image. During the analysis process, the investigator must search for information pertinent to
the case being compiled. This means not only looking for current contents on the drive, but also
searching for deleted files, missing or hidden information, and hidden partitions that may not appear at
first glance. Oftentimes a suspect will attempt to hide and delete information as a precaution. We will
be able to see some of this information within Autopsy/Sleuth Kit.
Since Autopsy/Sleuth Kit is a free tool, it is a good option for disk image analysis within Linux, and even
Windows systems. In this tutorial we will focus on some of the more basic functions of Autopsy/Sleuth
Kit since we only have one file written to our “suspect’s” drive.

Tutorial Section LEARNING OBJECTIVES:
Launch Autopsy
Start a new case and add the appropriate disk image file
Review the contents of the disk image file
Print out a basic report
Use the search feature to search by keyword
Part 1 – Launch Sleuth Kit/Autopsy
1. Login to the Virtual Lab website (https://v5.unm.edu/cloud/org/ialab), and enter the ‘NEST Digital
Forensics vApp’. Click on the Kali Linux machine to open the VM.
2. At the login screen of the Kali Linux machine use the username root and the password letmein.
3. Navigate to Applications>>Kali Linux>>Forensics>>Digital Forensics>>autopsy.
4. A new window will open. CTRL + click on the provided link within the window to launch the Autopsy
Forensic Browser.

Part 2 – Create a New Case
1. Click New Case. The ‘Create a New Case’ page will open. Fill in the ‘Case Name’, ‘Description’, and
‘Investigator Name’. Then select ‘New Case’ near the bottom of the screen.
2. Click ‘Add Host’ on the following page. Leave the defaults on the ‘Add a New Host’ page and select
‘Add Host’ at the bottom of the page.
3. On the following page, select ‘Add Image’. On the following page, select ‘Add Image File’.
4. To add the image file for analysis, enter the path of the image file, /root/driveimage.*. The * will
select any file with an appropriate disk image extension. Since this image drive is from one partition,
select the ‘Partition’ radio button. Click Next.
5. The next page will verify that the correct image file has been selected. Click Next.
6. Select the hashing option on the next page. This will verify the integrity of the disk image, and will
allow you to check this hash value against the ones created in the imaging process. Leave the other
defaults as they are and click ‘Add’.
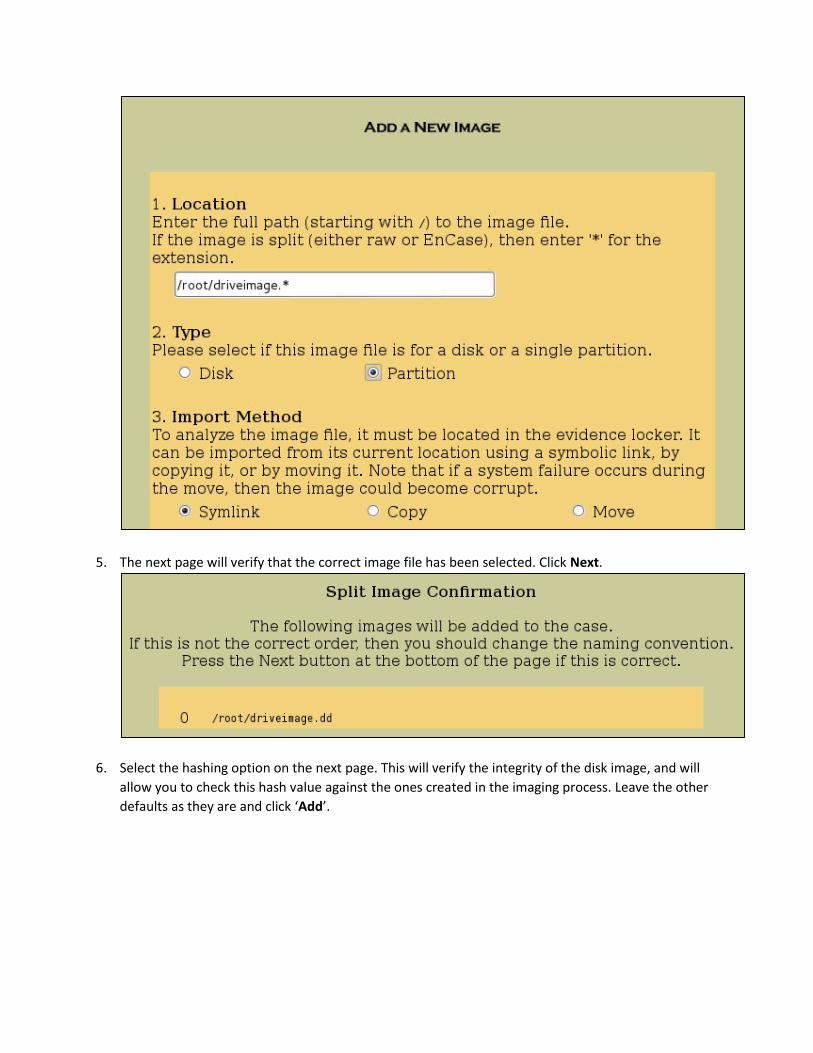
7. The hash may take a moment to calculate, especially if the disk image file is large. The hash value
will be printed out. Be sure to copy it a text file for comparison. Click OK.
Part 3 – Analyze the Image File
1. On the following page, click ‘Analyze’. Note the other possible options, such as ‘View Notes’, ‘File
Activity Time Lines’, ‘Event Sequencer’, and ‘Image Integrity’.
Image Integrity allows you to verify the hash value of the image file at any time.
File Activity Time Lines allows you to create a timeline of file activities. This is highly useful,
as it provides a report of exactly what was found on the image file.
Event Sequencer allows you to add new events in the course of the investigation
2. To complete the file analysis, select one of the tabs from the top of the screen. Start with ‘File
Analysis’.
3. A new window will open that displays the full contents of the disk image file. Since there is only one
file on this partition, it will not take long to display. Note that to make hashing easier, there is an
option to make an md5 list of all files on the image file. It is also possible to add a note at this point.

4. Scroll down to find our file, ‘vacationinfo.txt’. Click on the file. Notice that the contents of the file
will populate in the space below. You can also view information about the file, including the size,
when it was created, the last time it was accessed, and the last time it was changed. In the next
section, you will create a basic report about this file.
Part 4 – Create a Basic Report with Autopsy
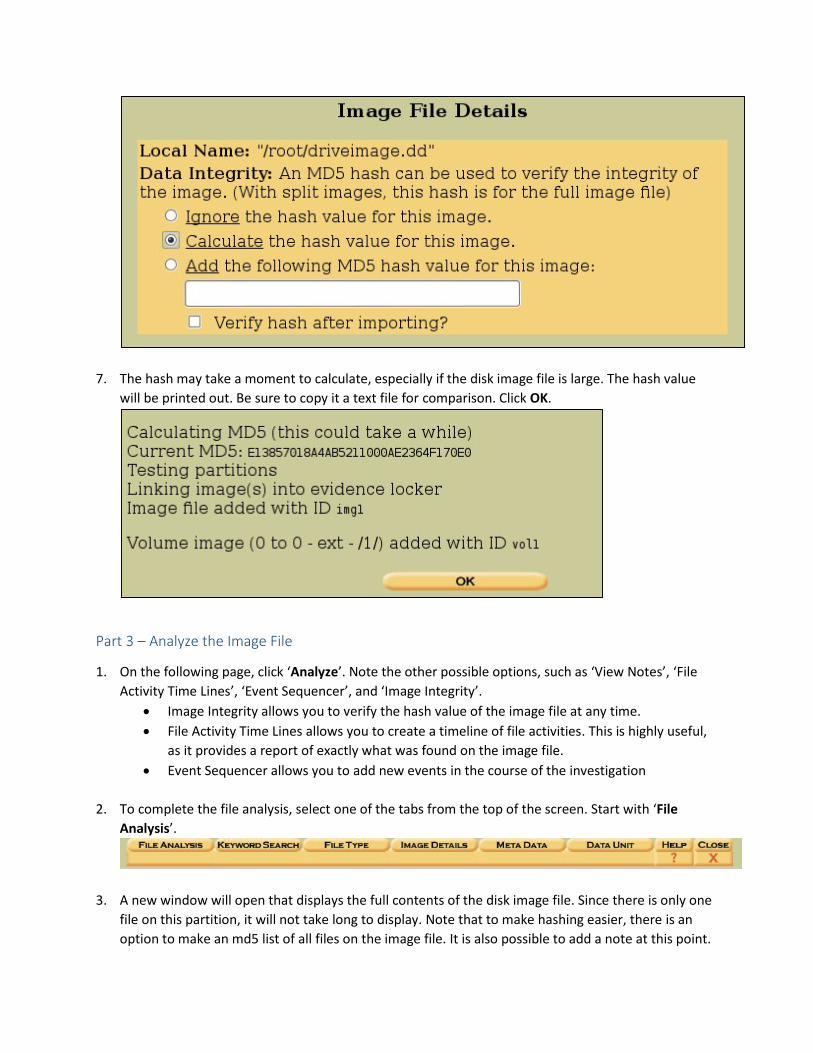
1. From the analysis page, it is possible to create a report about a file that can be used for later easy
access. Click on ‘ASCII report’. This will create an easy-to-read report with all the information about
‘vacationinfo.txt’. Right click this report to save it as a .txt file.
2. Note that it is possible to also print out HEX and String reports. Also note that it is possible to export
the file for further analysis, just as in ProDiscover and FTK. You can also add a note about the
individual file.
Part 5 – Using the Search Function
1. At the top of the screen, click the ‘Keyword Search’ tab. If you would like to search for individual
keywords as we did in FTK, it is possible to do that from this location. Since the words within the
image file have been indexed by Autopsy, typing in a work found within the ‘vacationinfo.txt’ file will
result in hits leading to that file. Type million and select ‘Search’.
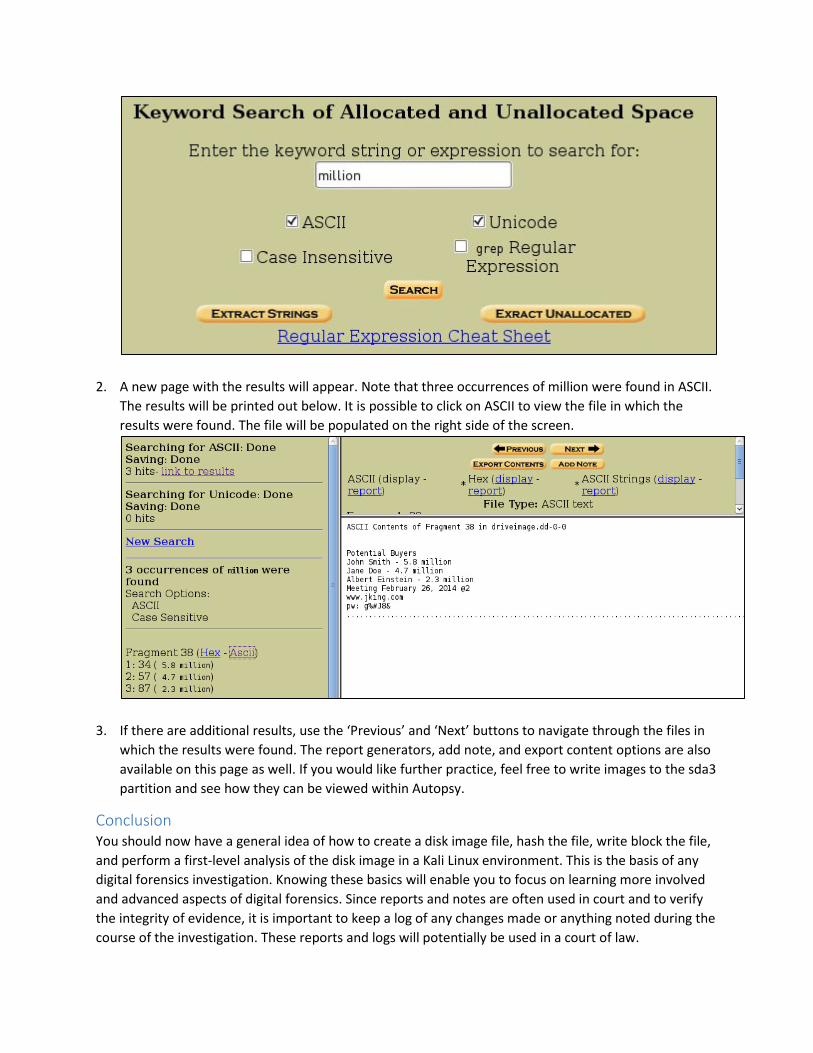
2. A new page with the results will appear. Note that three occurrences of million were found in ASCII.
The results will be printed out below. It is possible to click on ASCII to view the file in which the
results were found. The file will be populated on the right side of the screen.
3. If there are additional results, use the ‘Previous’ and ‘Next’ buttons to navigate through the files in
which the results were found. The report generators, add note, and export content options are also
available on this page as well. If you would like further practice, feel free to write images to the sda3
partition and see how they can be viewed within Autopsy.
Conclusion You should now have a general idea of how to create a disk image file, hash the file, write block the file,
and perform a first-level analysis of the disk image in a Kali Linux environment. This is the basis of any
digital forensics investigation. Knowing these basics will enable you to focus on learning more involved
and advanced aspects of digital forensics. Since reports and notes are often used in court and to verify
the integrity of evidence, it is important to keep a log of any changes made or anything noted during the
course of the investigation. These reports and logs will potentially be used in a court of law.
Related Documents