FUJIFILM DIGITAL CAMERA FINEPIX Z70 series Owner's Manual Thank you for your purchase of this product. This manual describes how to use your FUJIFILM FinePix Z70 series digital camera and the supplied software. Be sure that you have read and understood its contents before using the camera. For information or] relatedproducts, visit our website at h_p.//www.fujifilm.com/produc_s/digi_d_c_meros/index h_ml YF00628-121 BeforeYouBegin First Steps BaskPhotographyandPlayba(k Moreon Photography MoreonPlayback Movies Connections Menus Technical Notes Troubleshooting Appendix

Welcome message from author
This document is posted to help you gain knowledge. Please leave a comment to let me know what you think about it! Share it to your friends and learn new things together.
Transcript

FUJIFILMDIGITAL CAMERA
FINEPIX Z70 seriesOwner's Manual
Thank you for your purchase of this product. This manual
describes how to use your FUJIFILM FinePix Z70 series digital
camera and the supplied software. Be sure that you have
read and understood its contents before using the camera.
For information or] relatedproducts, visit our website ath_p.//www.fujifilm.com/produc_s/digi_d_c_meros/index h_ml
YF00628-121
BeforeYouBegin
FirstSteps
BaskPhotographyandPlayba(k
MoreonPhotography
MoreonPlayback
Movies
Connections
Menus
TechnicalNotes
Troubleshooting
Appendix
About This Manual
Before using the camera, read this Owner's Manual and the other supplied documents. For
information on specific topics, consult the sources below.
Know what you want to do but don't know the The "Table of Contents" gives an overview of the
name for it? Find the answer in "Camera Q & A." entire manual. The principal camera operations
Having a specific problem with the camera? Find out what's behind that flashing icon or
Find the answer here. error message in the monitor.
The meanings of some technical terms may befound here.
Picturescarl be stored in the camera's internal memory or on optional SDand SDHCmemory cards. In this
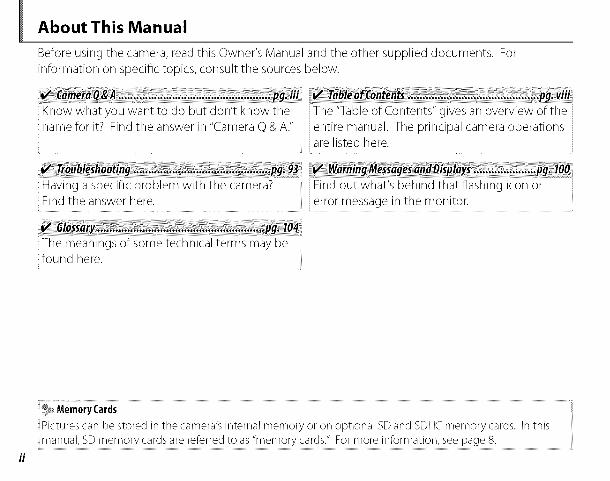
Camera Q & A
Find items by task.
Camera Setup
Question i Keyphrase Seepage
How do I set the camera clock?
Car] I set the clock to local time when I travel?
How do I keep the monitor from turning offautomatically?
How do I make the monitor brighter or darker?
How do I stop the camera beeping and clicking?
14
86
89
89
36
84
2
3
61
100
16
Date and time
Time difference
Auto power off
LCD brightnessSilent mode
Operation volume,shutter volume
Parts of the camera
Monitor
Menus
Messages and displays
Battery level
What are tile parts of the camera called?What do the icons in the monitor mean?
How do I usethe menus?
What's behind that flashing icon or error message in the monitor?
How much charge is left in tile battery?
Sharing Pictures
Question i Keyphrase Seepage
Carl I print pictures on my home printer? Printing pictures 50Carl Icopy my pictures to my computer? Viewing pictures on a computer %
///
Taking Pictures
Question i Keyphrase Seepage
Memory capacity 105mode 23
Intelligent FaceDetection 27mode 16
Shooting mode 22
Macro mode (Close-ups) 34
How marly pictures carl I take?
Isthere a quick and easyway to take snapshots?How can l make good portraits?
Carl the camera automatically select tile most suitable mode?Isthere a simple way to adjust settings for different scenes?
How do Ishoot close-ups?
How do I keep the flash from firing?How do Istop my subjects' eyesglowing red when I use tile flash?
How do I"filldn" shadows on backdit subjects?How do Itake a group portrait that includes tile photographer?
How do Iframe pictures with the subject off to one side?How do Ishoot movies?
Carl I join short clips into a longer movie?
Flashmode
Self-timer mode
Focus lock
Recording moviesSuccessivemovie
35
37
3O
45
46
iv
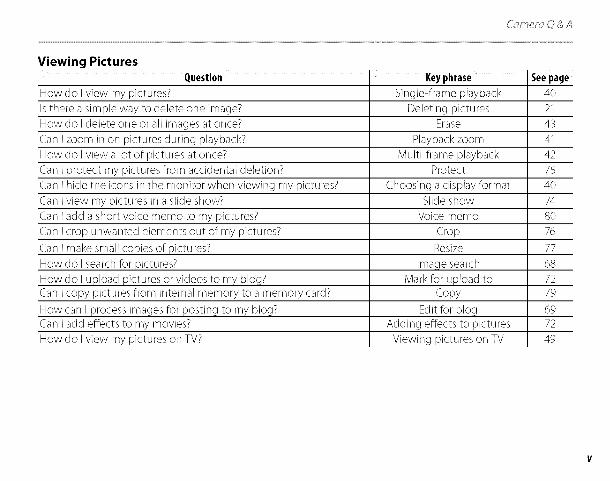
Viewing Pictures
Question i Keyphrase Seepage
How do Iview my pictures?Isthere a simple way to delete one image?
How do Idelete one or all images at once?
Carl Izoom in on pictures during playback?How do Iview a lot of pictures at once?
Carl I protect my pictures from accidental deletion?Carl I hide the icons in the monitor when viewing my pictures?
Carl Iview my pictures in a slide show?Carl l add a short voice memo to my pictures?
Carl Icrop unwanted elements out of my pictures?
Carl I make small copies of pictures?
How do Isearch for pictures?How do I upload pictures or videos to my blog?Carl Icopy pictures from internal memory to a memory card?
How carl I process images for posting to my blog?Carl Iadd effects to my movies?How do Iview my pictures on TV?
Single-frame playbackDeleting pictures
Erase
PlaybackzoomMulti-frame playback
Protect
Choosing a display formatSlide show
Voice memo
CropResize
Imaqe search
Mark for upload toCopy
Edit for blogAdding effects to pictures
Viewing pictures on TV
4O
21
43
41
42
75
4O
74
8O
76
77
68
7279
6972
49

Memo
vi

Memo
vii
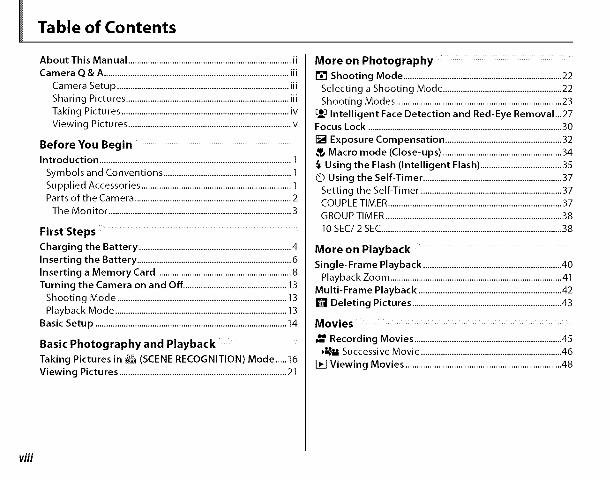
Table of Contents
About This Manual .......................................................................... ii
Camera Q & A ....................................................................................iii
Camera Setup ..............................................................................iii
Sharing Pictures ..........................................................................iii
Taking Pictures ............................................................................iv
Viewing Pictures ..........................................................................v
Before You Begin
Introduction .......................................................................................1
Symbols and Conventions ..........................................................1
Supplied Accessories ....................................................................1Parts of the Camera .......................................................................2
The Monitor ...................................................................................3
First Steps
Charging the Battery .....................................................................4
Inserting the Battery ......................................................................6
Inserting a Memory Card .............................................................8
Turning the Camera on and Off ...............................................13
Shooting Mode .............................................................................13
Playback Mode .............................................................................. 13
Basic Setup .......................................................................................14
Basic Photography and Playback
Taking Pictures in _ (SCENE RECOGNITION) Mode.....16
Viewing Pictures ............................................................................21
More on Photography
[] Shooting Mode ........................................................................22
Selecting a Shooting Mode ......................................................22
Shooting Modes ...........................................................................23
col Intelligent Face Detection and Red-Eye Removal...27
Focus Lock ........................................................................................30
[] Exposure Compensation .....................................................32
Macro mode (Close-ups) ......................................................34
_. Using the Flash (Intelligent Flash) .....................................35
Using the Self-Timer ...............................................................37
Setting the Self-Timer ................................................................37COUPLE TIMER ...............................................................................37
GROUP TIMER ................................................................................38
10 SEC/2 SEC..................................................................................38
More on Playback
Single-Frame Playback ...............................................................40
Playback Zoom ..............................................................................41
Multi-Frame Playback .................................................................42
[] Deleting Pictures ....................................................................43
Movies
_._ Recording Movies ...................................................................45eeee_-_,, Successive Movie ................................................................46
[] Viewing Movies .......................................................................48
viii

Connections
Viewing Pictures on TV ...............................................................49
Printing Pictures via USB ...........................................................50
Connecting the Camera ............................................................50
Printing Selected Pictures ........................................................50
Printing the DPOF Print Order ................................................51
Creating a DPOF Print Order ....................................................53
Viewing Pictures on a Computer ............................................55
Installing the Software ...............................................................55
Windows: Installing My FinePix Studio .............................55
Macintosh: Installing FinePixViewer ..................................57
Connecting the Camera ............................................................59
Menus
The Shooting Menu ......................................................................61
Using the Shooting Menu .........................................................61
Shooting Menu Options ............................................................62
[] ISO ............................................................................................63
[] IMAGE SIZE ...........................................................................63
[] IMAGE QUALITY ..................................................................64
rl_ FINEPIX COLOR ....................................................................64
[] WHITE BALANCE .................................................................65
[] CONTINUOUS (Continuous shooting) ........................65
[] AF MODE ...............................................................................66
The Playback Menu .......................................................................67
Using the Playback Menu .........................................................67
Playback Menu Options .............................................................67
[] IMAGE SEARCH ....................................................................68
[_EDIT FOR BLOG .....................................................................69
[] MOVIE EDIT ............................................................................72
[] MARK FOR UPLOAD TO .....................................................72
[] SLIDE SHOW .........................................................................74
[] RED EYE REMOVAL .............................................................74
[] PROTECT ................................................................................75
[] CROP .......................................................................................76
[] RESIZE ....................................................................................77
[] IMAGE ROTATE ....................................................................78
[] COPY .......................................................................................79
[] VOICE MEMO ........................................................................80
[] TRANSITION .........................................................................82
[] MOVIE TRIMMING ...............................................................82
The Setup Menu .............................................................................83
Using the Setup Menu ...............................................................83
Setup Menu Options ...................................................................84
[] TIME DIFFERENCE ...............................................................86
[] FORMAT .................................................................................87
[] IMAGE DISP ...........................................................................87
[] FRAME NO .............................................................................88
[] ILLUMINATION .....................................................................88
El SOUND ...................................................................................89
[] PLAYBACK VOLUME ...........................................................89
[] LCD BRIGHTNESS ................................................................89
[] LCD MODE ............................................................................89
[] AUTO POWER OFF ..............................................................89
[] DIGITAL ZOOM ....................................................................90
ix

Technical Notes ................................................
Optional Accessories ...................................................................91
Accessories from Fujifilm ..........................................................92
Troubleshooting
Troubleshooting ............................................................................93
Warning Messages and Displays .........................................100
Appendix
Glossary ..........................................................................................104
Internal Memory/Memory Card Capacity ....................... 105
Specifications ...............................................................................106
Caring for the Camera ...............................................................110
Storage and Use .......................................................................110
Cleaning ......................................................................................110
Travelling ....................................................................................110Notes and Cautions ....................................................................111

Introduction
Symbols and Conventions
The following symbols are used in this manual:
[] Caution: This information should be read before use to ensure correct operation.
Note:Points to note when using the camera.
Tip: Additional information that may be helpful when using the camera.
Menus and other text in the camera monitor are shown in bold. In the illustrations in this manual, the
monitor display may be simplified for explanatory purposes.
Suupplied Accessories
The following items are included with the camera:
NP-45A rechargeable
battery
USBcable
Attach the strap as shown.O
Strap
CD-ROM
Documen ration
Mrodu : io_?
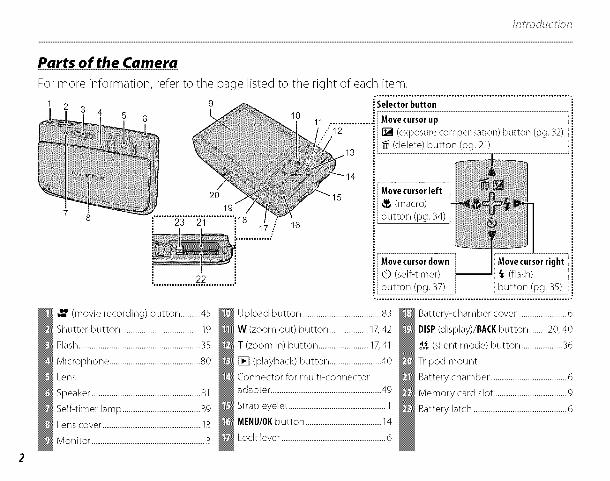
Parts of the Camera
For more information, refer to the page listed to the right of each item.
1 Selector button
6 Move cursorup
[] (exposure compensation) button (pg..32)
(delete) button (pg. 21)
i........_'"'5"i ...........i18 17
22
(movie recording) button ...........45
Shutter button ...........................................19
Flash ..................................................................35
Microphone .................................................80
Lens
Speaker ...........................................................81
Self-timer lamp ..........................................39
Lens cover .....................................................13
Monitor .............................................................3
16
Move cursorleft
(macro)button (pg. 34)
Upload button ...........................................83
W (zoom out) button .....................17,42
T (zoom in) button ...........................17,41
[] (playback) button ............................40
Connector for multi-connector
adapter ............................................................49
Strap eyelet ....................................................1
MENU/OKbutton .........................................14
Lock lever ........................................................6
Battery-chamber cover ..........................6
DISP(display)/BACK button ..........20, 40
"_ (silent mode) button ......................36
Tripod mount
Battery chamber .........................................6
Memory card slot .......................................9
Battery latch ..................................................6
Dq rodu : io_?
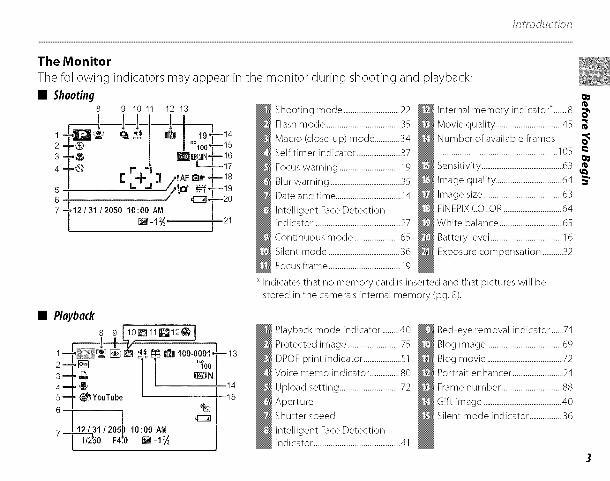
The Monitor
The following indicators may appear in the monitor during shooting and playback:
• Shooting8 9 10 11 12 13
--1--1-1-1--1-1---7_1 .l_JE__ _'q_l _ I 19T-'142 "k__ °" J J'_°100T--153 ._ | J_mE_EJN,_--16
5 ! L _ /pro* _T -196 I /_ _E_,,-_--2o7 12131 12050 10:00 AM
Ba-l_, [ ,21
Shooting mode ..............................22
Flash mode .........................................35
Macro (dose-up) mode .............34
Self timer indicator ........................37
Focus warning .................................19
Blur warning ......................................35
Date and time ...................................14
Intelligent Face Detectionindicator ..............................................27
Continuous mode .........................65
Silent mode ......................................36
Focus frame .......................................19
Internal memoryindicatorL......8 _,v
Movie quality ....................................45
Number of available frames................................................................105 _
Sensitivity ............................................63
Image quality ...................................64 ,_"
Image size ...........................................63
FINEPIX COLOR ...............................64
White balance ..................................65
Battery level .......................................16
Exposure compensation ...........32
Indicates that no memory card is inserted and that pictures will be
stored in the camera's internal memory (pg. 8).
• Playback
8 9 J10_11_12(_J
1€/ II--_-_. [] _ :_ _ _ 100-0001.7--13
2-TI_ / / '%o13-- / 144_ e_,
5_ r _Y0uTube / 156 _L.@:;
7 12131/205_-_
Playback mode indicator .........40
Protected image .............................75
DPOF print indicator ....................51
Voice memo indicator ................80
Upload setting ................................72
Aperture
Shutter speed
Intelligent Face Detectionindicator ...............................................41
Red-eye removal indicator ......74
Blog image ........................................69
Blog movie ........................................72
Portrait enhancer ...........................24
Frame number ................................88
Gift image ..........................................40
Silent mode indicator .................36
iiiiiiiiiiiiiiiiiiiiiiiiiiiiiiiiiiiiiiiiiiiiiiiiiiiiiiiiiiiiiiiiiiiiiiiiiiiiiiiiiiiiiiiiiiiiiiiiiiiiiiiiiiiiiiiiiiiiiiiiiiiiiiiiiiiiiiiiiiiiiiiiiiiiiiiiiiiiiiiiiiiiiiiiiiiiiiiiiiiiiiiiiiiiiiiiiiiiiiiiiiiiiiiiiiiiiiiiiiiiiiiiiiiiiiiiiiiiiiiiiiiiiiiiiiiiiiiiiiiiiiiiiiiiiiiiiiiiiiiiiiiiiiiiiiiiiiiiiiiiiiiiiiiiiiiiiiiiiiiiiiiiiiiiiiiiiiiiiiiiiiiiiiiiiiiiiiiiiiiiiiiiiiiiiiiiiiiiiiiiiiiiiiiiiiiiiiiiiiiiiiiiiiiiiiiiiiiiiiiiiiiiiiiiiiiiiiiiiiiiiiiiiiiiiiiiiiiiiiiiiiiiiiiiiiiiiiiiiiiiiiiiiiiiiiiiiiiiiiiiiiiiiiiiiiiiiiiiiiiiiiiiiiii
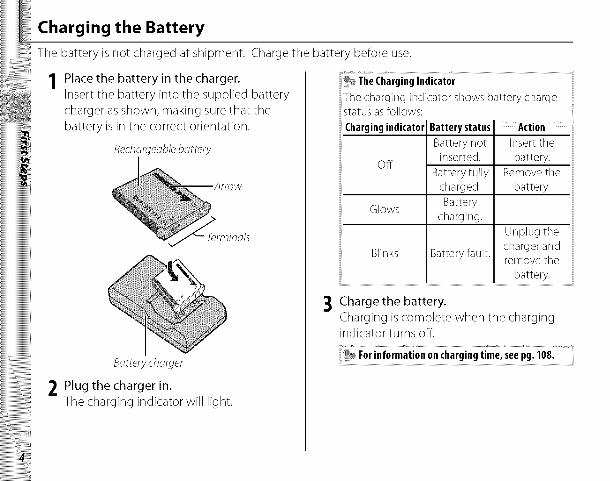
Charging the Battery
The battery is not charged at shipment. Charge the battery before use.
Place the battery in the charger.
Insert the battery into the supplied battery
charger as shown, making sure that the
battery is in the correct orientation.
Recha_qeablebattery
Batterycha_ger
2 Plug the charger in.The charging indicator will light.
3
%_ TheChargingIndicator
The charging indicator shows battery chargestatus as follows:
Chargingindicator
off
Action
Insert the
battery.Remove the
battery.
Glows
Batterystatus
Battery notinserted.
Battery fullycharged.
Batterycharging.
Battery fault.Blinks
Unplug the
charger andremove the
battery.
Charge the battery.
Charging is complete when the chargingindicator turns off.
ForinformationonChaigingtime;Seepgli08,

(ffmrqinq t)_' 77__p7
[] Cautions:Caringfor theBattery
• Do not aMx stickersor other objects to the battery. Failureto observe this precaution could make itimpossible to remove the battery from tile camera.
• Do not short tile battery terminals. Tile battery could overheat• Only usebatteries designed for usewith this product. Failureto observe this precaution could result in
product malfunction.• Do not remove the labels from tile battery or attempt to split or peel the outer casing.• Tile battery gradually losesits charge when not in use. Charge tile battery one or two days before use.• Readtile supplied documentation for additional cautions concerning battery use.
[] Caution:BatteryLife
A noticeable decrease in the length of time the battery will hold a charge indicates that it has reached the endof its service life and should be replaced.
[] Cautions:UsingtheBatteryCharger
•Unplug the charger when it is not in use.• Remove dirt from tile battery terminals with a clean,dry cloth. Failureto observe this precaution could
prevent the battery from charging.• Charging times increase at low temperatures.

Inserting the Battery
After charging the battery, insert it in the camera as described below.
Open the battery-chamber cover.
Open the battery-chamber cover as shown,
sliding the lock lever in the direction of thearrow.
[_3Cautions
• Do not turn tile camera on or offwhile the
battery-chamber cover is open. Failuretoobserve this precaution could result in damageto image filesor memory cards.
• Do not useexcessiveforce when handling thebattery-chamber cover.
2 Insert the battery.
Face the gold terminals
downward and align
the orange stripe on the
battery with the orange
battery latch and slide
the battery into the
camera, keeping the
battery latch pressed tothe side. Confirm that
the battery is securely latched.
O_nges_@e
B_sery Io:ch

Inseyting the B_tte_
[]_]Caution
Insert tile battery in tile correct orientation. DoNOTuse force or attempt to insert the batteryupside down or backwards. The battery willslide in easily in the correct orientation.
3 Close the battery-chamber cover.
RemovingtheBatteryiii
After turning the camera off} open the battery-chamber cover, pressthe battery latch to tile side,and slide the battery out of tile camera as shown.

Inserting a Memory Card
Although the camera can store pictures in internal memory, SD memory cards (sold separately) can
be used to store additional pictures.
Whenno memorycardisinserted,Iftllappears in the monitor and internal memory is used for recording
and playback. Note that because camera malfunction could cause internal memory to become
corrupted, the pictures in internal memory should periodically be transferred to a computer and
saved on the computer hard disk or on removable media such as CDs or DVDs. The pictures in
internal memory can also be copied to a memory card (see page 79). To prevent internal memory
from becoming full, be sure to delete pictures when they are no longer needed.
Whena memorycardisinsertedas described below, the card will be used for recording and playback.
• CompatibleMemoryCards
SanDisk SD and SDHC memory cards have been tested and approved for use in the camera. A
complete list of approved memory cards is available at http://www.fujifi/m.com/products/digitol_
c_;mer_;s/index.html. Operation is not guaranteed with other cards. The camera can not be used withMultiMediaCard (MMC) or xD-Picture Cards.
When recording high-definition movies, use a memory card rated at Class 4 (write speed of 4MB per
second) or higher.
[_ Caution
SD memory cards carl be locked, making it impossible to format the card
or to record or delete images. Before inserting an SD memory card, slide
the write-protect switch to the unlocked position. swi hJ_,,,
Y _...-"
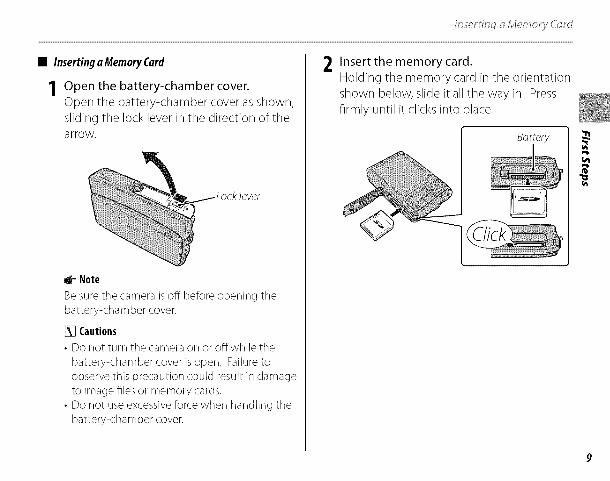
• Inserting aMemoryCard
1 Open the battery-chamber cover.Open the battery-chamber cover as shown,
sliding the lock lever in the direction of thearrow.
4- Note
Be sure the camera is off before opening thebattery<ha m her cover.
Cautions• Do not turn the camera on or offwhile the
battery<harnber cover is open. Failuretoobserve this precaution could result in damageto image filesor memory cards.
• Do not useexcessiveforce when handling thebattery<hamber cover.
2 Insert the memory card.Holding the memory card in the orientation
shown below, slide it all the way in. Press
firmly until it clicks into place.
B_ery

h_i_erinq_ Mef_ oyy C_Fd
Be surecard is at
correct orientation;do not insert at an
angle or use force.If tile memory cardis not inserted
correctly, imageswill be saved in tile
internal memory (_tll will be displayed) insteadof on tile memory card.If the battery-chamber cover cannot be closed,do not attempt to close it with excessiveforce,check that tile card is correctly orientated.
3 Close the battery-chamber cover.
10

In_er inq _ Mef_ op'y Ovd
RemovingMemoryCards _ Cautions
Be sure the camera is off before opening the battery- •Format SDmemory cards before first use,and bechamber cover. Presstile card in and then releaseit sure to reformat all memory cards after using them
slowly. The card carl now be removed by hand. in a computer or other device. For more informationon formatting memory cards,see page 87.
.....Memory cards are small and carl be swallowed; _keep out of reachof children. Ifa child swallows a ,,,memory card, seekmedical assistance immediately.
Do not useminiSD or microSDadapters _that expose tile back of the card. Failureto observe this precaution may cause
Cautions damage or malfunction. Adapters that• The rnem°ry card may spring °ut if Y°U rem°ve are larger or smaller than the standard
your finger immediately after pushing the card in. dimerlsions of arl SDcard may riot elect normally; if• Memory cards may be warm to the touch after tile card does not eject, take tile camera to an
being removed from the camera. This is normal authorized service representative. Do not forciblyremove tile card.
• Do not turn tile camera offor remove tile memorycard while tile memory card is being formatted ordata are being recorded to or deleted from tile card.Failureto observe tills precaution could damage thecard.
• Do not ar_x labels to memory cards. Peeling labelscarl cause camera malfunction.
• Movie recording may be interrupted with sometypes of SDmemory card.
11

h_i_erinq _ Mef_ _yy C_Fd
• Tile data in internal memory may be erased orcorrupted when the camera is repaired. Pleasenotethat tile repairer will be able to view pictures ininternal memory.
• Formatting a memory card or internal memoryin tile camera createsa folder in which picturesare stored. Do not rename or delete this folder or
usea computer or other device to edit, delete, orrename image files. Always use the camera to deletepictures from memory cards and internal memory;before editing or renaming files,copy them to acomputer and edit or rename the copies, not theoriginals.
12
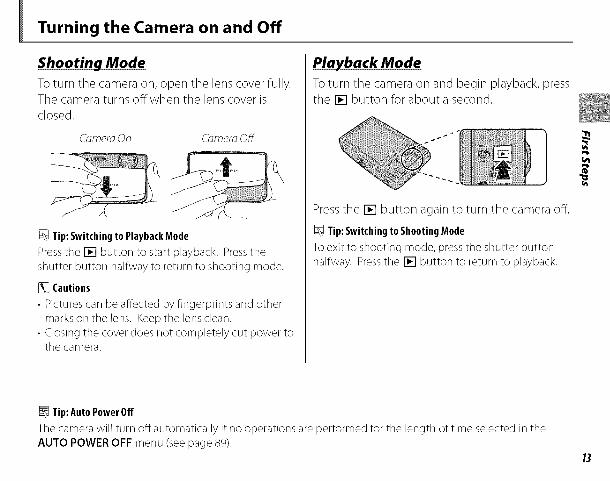
Turning the Camera on and Off
Shootin_ Mode
To turn the camera on, open the lens cover fully.The cameraturns off when the lens cover isclosed.
(_;meroOn CdmerdOff
Tip:SwitchingtoPlaybackMode
Pressthe [] button to start playback. Presstheshutter button halfway to return to shooting mode.
Cautions
• Picturescarl be affected by fingerprints and othermarks on the lens. Keep the lensclean.
• Closing the cover does not completely cut power totile camera.
To turn the camera on and begin playback, pressthe [] button for about a second.
Press the [] button again to turn the camera off.
Tip:SwitchingtoShootingMode
To exit to shooting mode, presstile shutter buttonhalfway. Pressthe [] button to return to playback.
U',
Tip: AutoPower Off
The camera will turn offautomatically if no operations are performed for tile length of time selected in theAUTO POWER OFF menu (see page 89).
13
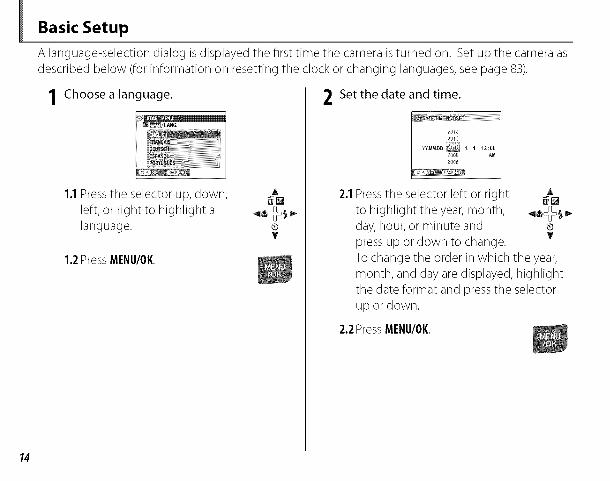
Basic Setup
A language-selection dialog is displayed the first time the camera is turned on. Set up the camera as
described below (for information on resetting the clock or changing languages, see page 83).
Choose a language,
1.1Press the selector up, down, A_[]left, or right to highlight a .q,_:,_.language. ®
T
1.2Press MENU/OK
2 Set the date and time,
2.1 Pressthe selector left or right A
to highlight the year, month, _D,day, hour, or minute and ®press up or down to change, v
To change the order in which the year,
month, and day are displayed, highlight
the date format and press the selector
up or down.
2.2 PressMENU/OK.
74
si : Setup
qJ-Note
You car] change the language or date and timesetting later in the setup menu (pg. 83).
Tips:TheCameraClock
• If the battery is removed for an extended period,tile camera clock will be reset and the language-selection dialog will bedisplayed when the camerais turned on.
• If the battery is left in tile camera for about 24hours,tile battery carl be removed for about 24 hourswithout resetting the clock, language selection, orpower management options.
75
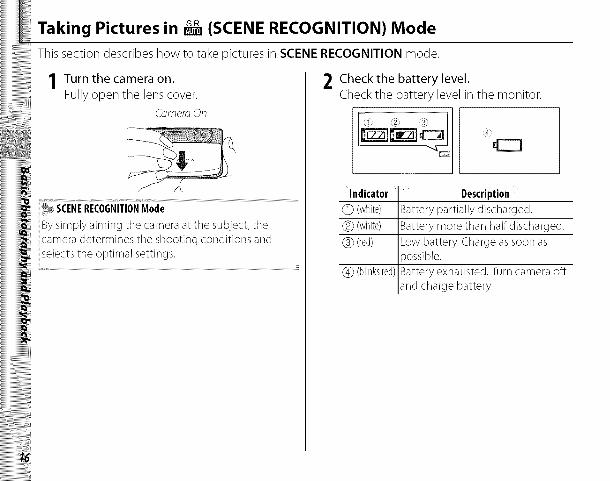
Taking Pictures in _r_ (SCENE RECOGNITION) Mode
This section describes how to take pictures in SCENE RECOGNITION mode.
Turn the camera on.
Fully open the lens cover.
C-_mer_On
2 Check the battery level.
Check the battery level in the monitor.
Indicator
(_ (white)
(_) (white)
(_ (red)
(_) (blinksred)
Description
Battery partially discharged.
Battery more than half discharged.
Low battery. Charge as soon as>ossible.
Battery exhausted. Turn camera off
and charge battery.
7_knq P _':tums r L_ (SCENERE(IOdN/i_ON} Mode
3 Frame the picture.Position the main subject in the focus areaand use the zoom buttons to frame the
D_cture in the monitor.
PressW to zoom out PressT to zoom in
% HoldingtheCamera
Hold the camera steadywith both hands andbrace your elbows against
your sides. Shakingorunsteady hands carl blur
To prevent pictures thatareout of focus or too
dark (underexposed),keep your fingers and
other objects away from
Tip: FocusLock
Use focus lock (pg. 30) to focus on subjects that are not in the focus frame.
17
18
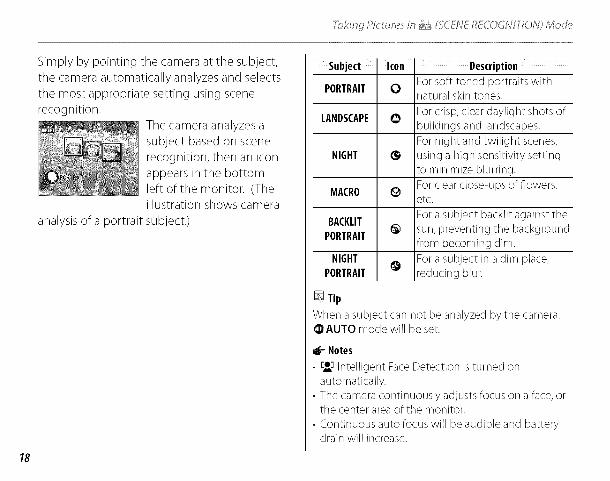
Simply by pointing the camera at the subject,
the camera automatically analyzes and selects
the most appropriate setting using scene
recognition.
The camera analyzes a
subject based on scene
recognition, then an icon
appears in the bottom
left of the monitor. (Theillustration shows camera
hTkinqPicture;:in _ (SCENEREC)dNITION) /t,,_od__
Subject Icon Description
analysis of a portrait subject.)
PORTRAIT
LANDSCAPE
NIGHT
MACRO
BACKLITPORTRAIT
NIGHT
PORTRAIT
Tip
0
O
@
0
@
@
For soft-toned portraits withnatural skirl tones.
For crisp,clear daylight shots ofbuildings and landscapes.
For night and twilight scenes,using a high sensitivity settingto minimize blurring.
For clearclose-ups of flowers,etc.
For a subject backlit against thesun, preventing the backgroundfrom becoming dim.
For a subject in a dim place,reducing blur.
When a subject carl not be analyzed by the camera,@AUTO mode will be set.
_- Notes
• rol Intelligent FaceDetection is turned onautomatically.
• Tile camera continuously adjusts focus on a face,ortile center areaof the monitor.
• Continuous auto focus will be audible and batterydrain will increase.
7_kingPJ: ures in s,__s_(SCENEf_ECO(_,NITON) Mode
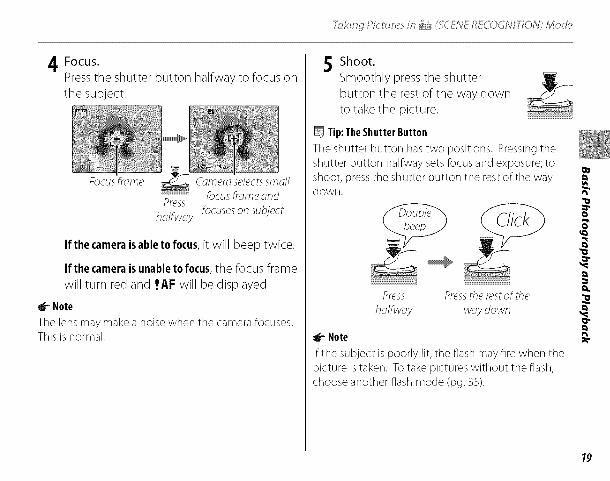
4 Focus.Press the shutter button halfway to focus on
the subject.
If the cameraisableto focus, it will beep twice.
If the camerais unabletofocus, the focus frame
will turn red and !AF will be displayed.
_r" Note
The lens may make a noise when the camera focuses.This is normal.
5 Shoot,
Smoothly press the shutter
button the rest of the way down
to take the picture.
Tip:TheShutterButton
Tile shutter button has two positions. Pressingtheshutter button halfway sets focus and exposure; toshoot, pressthe shutter button the rest of the waydown.
Press Press_herestof _he
hdfwoy w_ydown
_r Note
If tile subject is poorly lit, tile flash mayfire when thepicture is taken. To take pictures without the flash,choose another flash mode (pg. 35).
o
19

7#_k/ng P/ : ures in s....._£_(SCENERECOGNIT ON) Mode
The FramingGrid
display best framing (the framing grid) or to view
or hide other indicators in the monitor, press theDISP/BACI(button.
Indicators _ j Indicators
displayed hidden
Be£framing
20
To use best framing, position the main subject at
tile intersection of two lines or align one of tile
horizontal lines with the horizon. Use focus lock (pg.
30) to focus on subjects that will not be in tile center
of the frame in the final photograph.
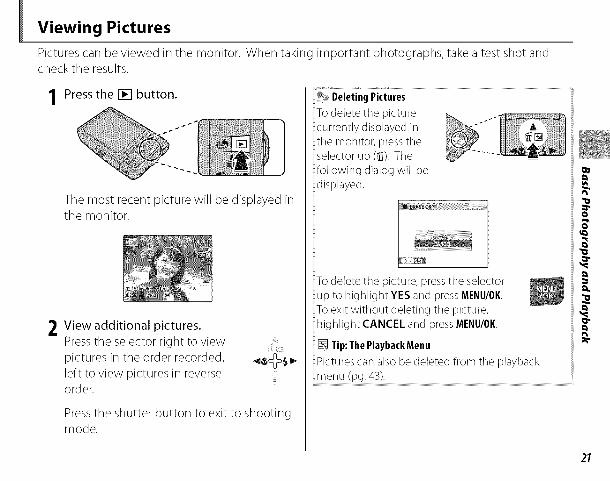
Viewing Pictures
Pictures can be viewed in the monitor. When taking important photographs, take a test shot andcheck the results.
1 Press the [] button,
The most recent picture will be displayed inthe monitor.
2 View additional pictures,iiiii!
Press the selector right to view
pictures in the order recorded, _$b,left to view pictures in reverseo rder.
Press the shutter button to exit to shootingmode.
@_ DeletingPicturesTo delete the picturecurrently displayed in
tile monitor, presstheselector up (_). Thefollowing dialog will bedisplayed.
To delete tile picture, press the selector
up to highlight YES and press MENU/OIl.
To exit without deleting tile picture,highlight CANCEL and press MENU/OIl.
Tip:The PlaybackMenu
Pictures carl also be deleted from tile playback
menu (pg. 43).
a-
£-
27
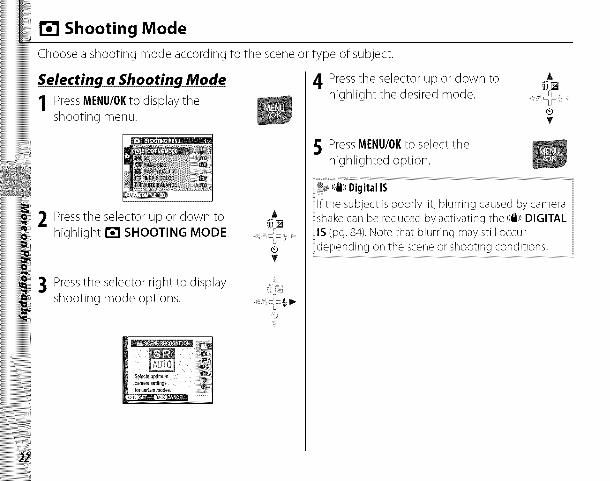
[] Shooting Mode
Choose a shooting mode according to the scene or type of subject.
iiiiiiiiiiiiiiiiiiiiiiiiiiiiii
Selecting a Shooting Mode1 PressMENU/OKto display the
shoot,ngmenu.
2 Pressthe selector up or down tohighlight [] SHOOTING MODE.
3 Pressthe selector right to displayshooting mode options.
A
4 Press the selector up or down tohighlight the desired mode.
5 Press MENU/OKto select thehighlighted option.
A
®T
_lil_DigitalIS
If the subject is poorly lit, blurring caused by camerashake carl be reduced by activating the _lj}_DIGITALIS (pg. 84). Note that blurring may still occurdepending or] the scene or shooting conditions.

Shootin_ Modes
SCENE RECOGNITION
Simply by pointing the camera at the subject,
the camera automatically analyzes and selects
the most appropriate setting using scene
recognition.
For more information, see "Taking Pictures in
(SCENERECOGNITION) Mode" (pg. 16).
I_ AUTO
Choose for crisp, clear snapshot. This mode isrecommended in most situations.
P PROGRAM AE
Choose this mode for complete control
of shooting settings, including exposure
compensation (pg. 32), white balance (pg. 65),
and AF mode (pg. 66).
o_ NATURAL & _ (Dual Shot Mode)
This mode helps ensure good results with backlit
subjects and in other situations with difficult
lighting. Each time the shutter button is pressed,the camera takes two shots: one shot without
the flash to preserve natural lighting, followed
immediately by a second shot with the flash. Do
not move the camera until shooting is complete.
Notes
• Do not use where flash photography is prohibited, o_The flash fires even in silent mode (pg. 36).
• Only available if memory remains for two pictures, o
• Continuous shooting is not available.o
23
D Shoo_ng i_,'_od__
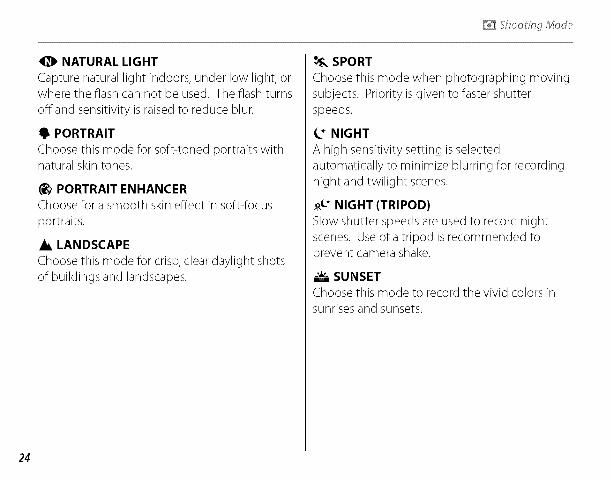
_1_ NATURAL LIGHT
Capture natural light indoors, under low light, orwhere the flash can not be used. The flash turns
off and sensitivity is raised to reduce blur.
PORTRAIT
Choose this mode for soft-toned portraits withnatural skin tones.
(_ PORTRAIT ENHANCERChoose for a smooth skin effect in soft-focus
portraits.
_i, LANDSCAPE
Choose this mode for crisp, clear daylight shots
of buildings and landscapes.
SPORTChoosethis mode when photographing movingsubjects. Priority is given to faster shutterspeeds.
NIGHTA high sensitivity setting is selectedautomatically to minimize blurring for recordingnight and twilight scenes.
,_-* NIGHT (TRIPOD)
Slow shutter speeds are used to record night
scenes. Use of a tripod is recommended to
prevent camera shake.
SUNSETChoose this mode to record the vivid colors insunrisesand sunsets.
24
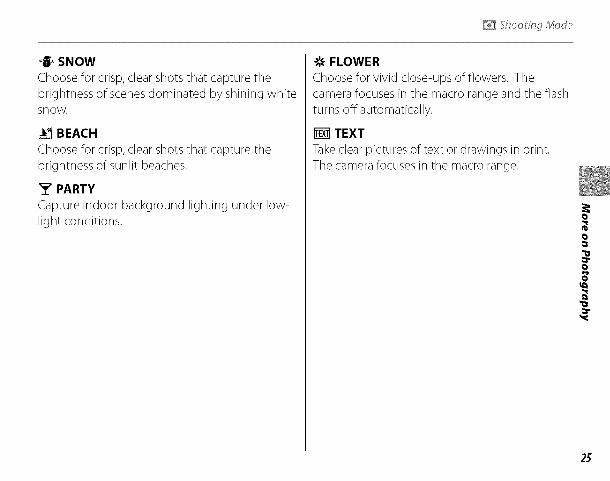
*j_ SNOW
Choosefor crisp,clear shots that capture thebrightness of scenesdominated by shining whitesnow.
_1 BEACH
Choose for crisp,clear shots that capture the
brightness of sunlit beaches.
_Z' PARTY
Capture indoor background lighting under low-
light conditions.
-_ FLOWER
Choose for vivid close-ups of flowers. The
camera focuses in the macro range and the flash
turns off automatically.
TEXT
Take clear pictures of text or drawings in print.
The camera focuses in the macro range.
0
o
o
=.
25
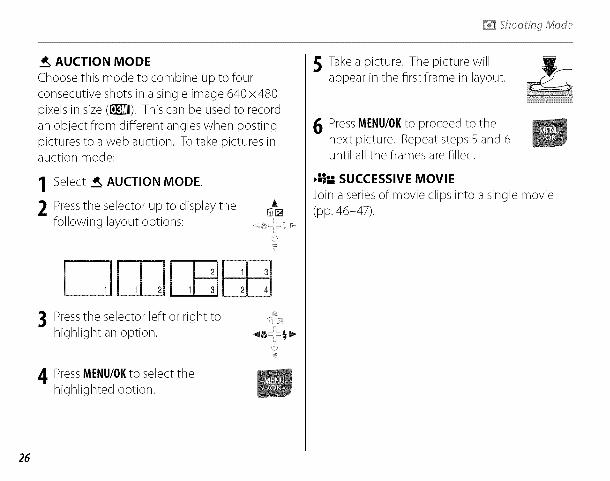
AUCTION MODE
Choose this mode to combine up to four
consecutive shots in a single image 640x480
pixels in size (liY]71).This can be used to record
an object from different angles when posting
pictures to a web auction. To take pictures inauction mode:
1 Select __ AUCTION MODE.
2 Pressthe selector up to display thefollowing layout options:
A
r rTlr E 3 Pressthe selector left or right to
highlight an option.
4 PressMENU/01(toselect thehighlighted option.
ii3_ i}_i,_!!i_!
,£}
5 Take a picture. The picture willappear in the first frame in layout.
6 Press MENU/01(to proceed to thenext picture. Repeat steps 5 and 6until all the frames are filled.
_ SUCCESSIVE MOVIE
Join a series of movie clips into a single movie
(pp. 46-47).
26
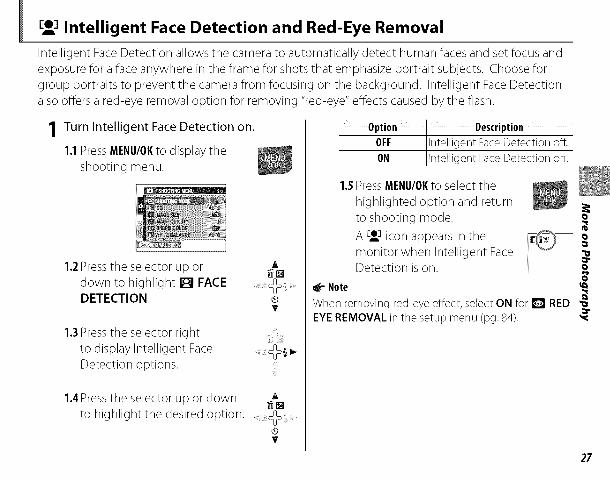
Eel Intelligent Face Detection and Red-Eye Removal
Intelligent Face Detection allows the camera to automatically detect human faces and set focus and
exposure for a face anywhere in the frame for shots that emphasize portrait subjects. Choose for
group portraits to prevent the camera from focusing on the background. Intelligent Face Detection
also offers a red-eye removal option for removing "red-eye" effects caused by the flash.
Turn Intelligent Face Detection on,
1.1Press MENU/OKto display the
shooting menu.
1,2Press the selector up or
down to highlight [] FACEDETECTION.
A
1,3Press the selector right
to display Intelligent Face
Detection options.
1.4Press the selector up or down A
to highlight the desired option .... j0\®T
Option Description
OFF Intelligent Face Detection off.ON ntelligent Face Detection on.
1.5 PressMENU/OKto select the
highlighted option and return
to shooting mode.
A El ] icon appears in the
monitor when Intelligent FaceDetection is on.
_t- Note
0
o
When removing red-eye effect, select ON for [] RED "_
EYEREMOVAL in the setup menu (pg. 84). '<
27
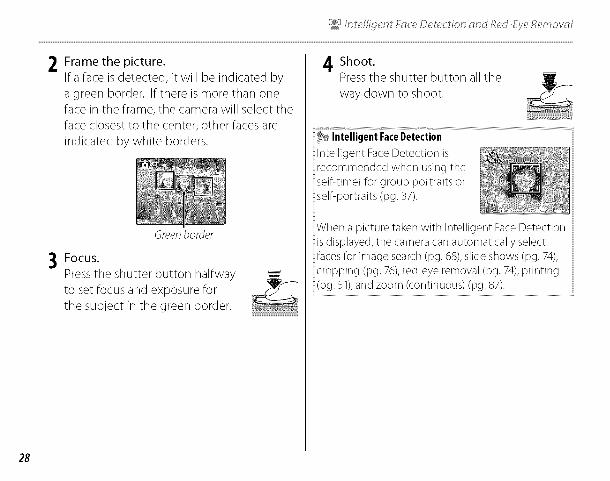
_1/ne qen /::_:s,:_.De e : io___:s,nd Red.FyeRen <w:sd
2 Frame the picture.Ifa face is detected, it will be indicated by
a green border. If there is more than one
face in the frame, the camera will select the
face closest to the center; other faces are
indicated by white borders.
Greenborder
3 Focus.Press the shutter button halfway
to set focus and exposure for
the subject in the green border.
4 Shoot.Pressthe shutter button all the
way down to shoot.
Intelligent FaceDetection
Intelligent Face Detection is
recommended when using the
selhtimer for group portraits orself-portraits (pg. 37).
When a picture taker] with Intelligent Face Detection
is displayed, the camera carl automatically select
faces for image search (pg. 68), slide shows (pg. 74),cropping (pg. 76), red-eye removal (pg. 74),printing
(pg. 51),and zoom (continuous) (pg. 87).
28
_1h'i e qen /::_s,:_::.Dee:io__ _:s,nd Red.FyeRen<w:sd
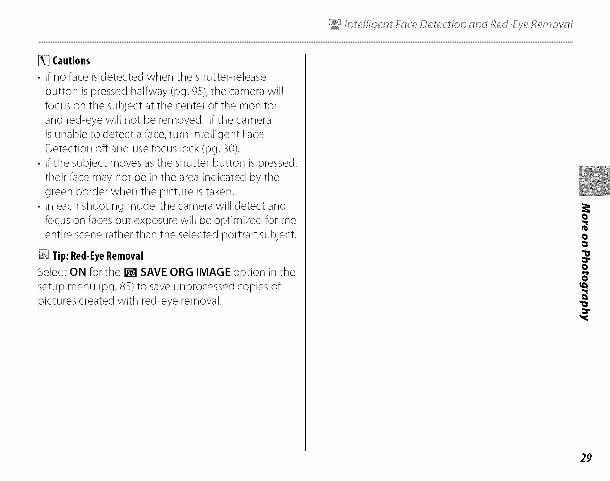
[_ Cautions• If no face is detected when tile shutter-release
button is pressed halfway (pg. %), the camera willfocus on the subject at the center of tile monitorand red-eye will not be removed. If the camerais unable to detect a face, turn Intelligent FaceDetection offand use focus lock (pg. 30).
• If the subject moves as tile shutter button is pressed,their face may not be in tile area indicated by tilegreen border when tile picture is taken.
• In each shooting mode, tile camera will detect andfocus on faces but exposurewill be optimized for tileentire scene rather than the selected portrait subject.
_] Tip:Red-EyeRemoval
Select ON for the [] SAVEORG IMAGEoption in thesetup menu (pg. 85) to saveunprocessed copies ofpictures created with red-eye removal.
O
o
o
29
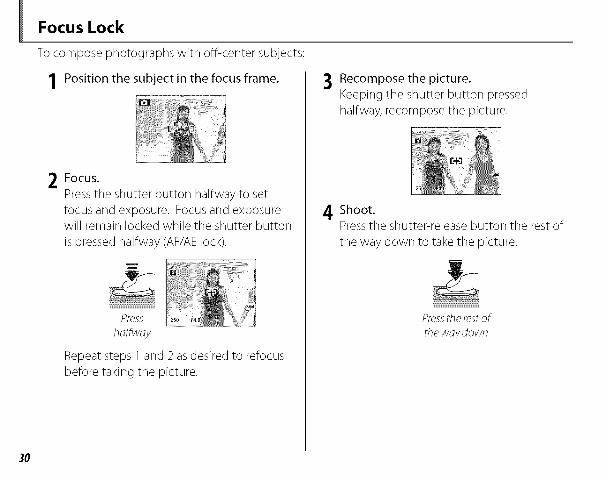
Focus Lock
To compose photographs with off-center subjects:
1 Position the subject in the focus frame,
2 Focus,Press the shutter button halfway to set
focus and exposure. Focus and exposurewill remain locked while the shutter button
is pressed halfway (AF/AE lock).
Press
h_/fw_y
Repeat steps 1 and 2 as desired to refocus
before taking the picture.
3 Recompose the picture,Keeping the shutter button pressed
halfway, recompose the picture.
4 Shoot.Pressthe shutter-release button the rest of
the way down to take the picture.
30
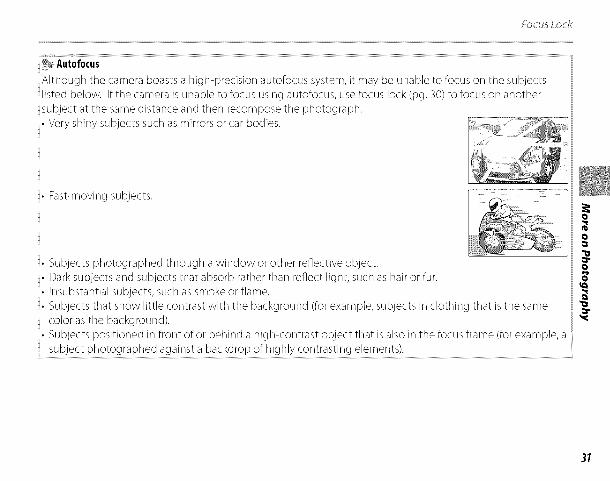
®_ Autofocus
Although tile camera boasts a high-precision autofocus system, it may be unable to focus on the subjectslisted below. Ifthe camera is unable to focus using autofocus, use focus lock (pg. 30) to focus on anothersubject at tile samedistance and then recompose the photograph.• Very shiny subjects such as mirrors or car bodies.
Fast-moving subjects.
Subjects photographed through a window or other reflective object.
Dark subjects and subjects that absorb rather than reflect light, such as hair or fur._nsubstant_alsubiects,suchassmokeorflame.
ii
• Subjects that show little contrast with the background (for example, subjects in clothing that is the same
color as tile background).
• Subjects positioned in front of or behind a high-contrast object that is also in tile focus frame (for example, a
b!t c p otog phe aga!t!st ba to o t!!gt!!xcot!!tas!!!! t!emet]!s!:.............................................................................................................................................................................
o
31

[] Exposure Compensation
Use exposure compensation when photographing very bright, very dark, or high-contrast subjects.
Press [] (exposure compensation).
The exposure indicator will be displayed.
L /E[+]_
2 Choose a value.Press the selector button. The effect is
visible in the display.
Choosepositive(+)valuestO Jr}crease exposure
Choose negative (-) values
to reduce exposure
3 Return to shooting mode.PressMENU/OKto return to
shooting mode.
4 Take pictures.
_r Note
A [] icon and exposure indicator are displayed atsettings other than _+0.Exposure compensation is notreset when the camera is turned off; to restore normalexposure control, choose a value of_+O.
32

®@ Choosngan ExposureCompensaton Va ue
Backlitsubjects:choose values from +2/sEVto +12/sEV(for an explanation of the term "EV",
see the Glossary on page 104)
Highlyreflective subjectsorvery bright scenes(e.g., snowfields): +1 EV
Scenesthat are mostlysky:+1 EV• Spotlit subjects(particularly if photographed against dark backgrounds): -2/s EV
• Subjectswith low reflectivity (pine trees or dark-colored foliage):-2/3 EV
o
33

Macro mode (Close-ups)
To select macro mode, press the selector left (_).
u_ °, _ iconappearsin
r 1E_+j_ monitor whencamera
,_ is in macro mode
When macro mode is in effect, the camera focuses on subjects near the center of the monitor. Use
the zoom buttons to frame pictures.
_r Note
Useof a tripod is recommended to prevent blur caused by camera shake.
34
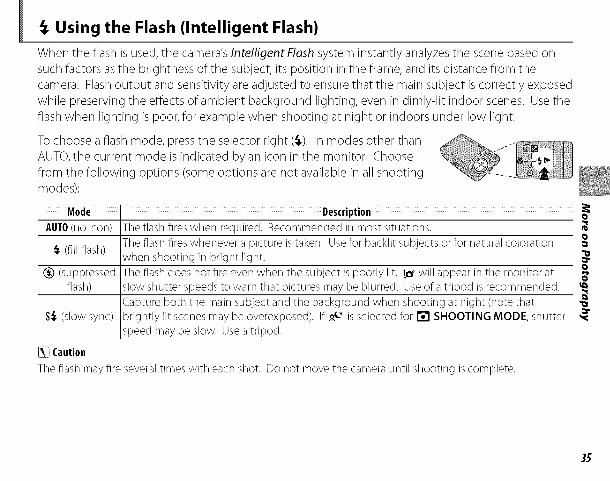
Using the Flash (Intelligent Flash)
When the flash is used, the camera's Intelligent Flash system instantly analyzes the scene based on
such factors as the brightness of the subject, its position in the frame, and its distance from the
camera. Flash output and sensitivity are adjusted to ensure that the main subject is correctly exposed
while preserving the effects of ambient background lighting, even in dimly-lit indoor scenes. Use the
flash when lighting is poor, for example when shooting at night or indoors under low light.
To choose a flash mode, press the selector right (_,). In modes other than
AUTO, the current mode is indicated by an icon in the monitor. Choose
from the following options (some options are not available in all shootingmodes):
Mode Description
AUTO(no icon) The flash fires when required. Recommended in most situations.
Tile flash fires whenever a picture istaken. Usefor backlit subjects or for natural coloration_, (fill flash)when shooting in bright light.
(suppressed Tile flashdoes not fire even when tile subject is poorly lit. _eowill appear in tile monitor atflash) slow shutter speeds to warn that pictures may be blurred. Useof a tripod is recommended.
Capture both tile main subject and the background when shooting at night (note thatS_,(slow sync) brightly lit scenesmay be overexposed). If _-* is selected for [] SHOOTING MODE, shutter
speed may be slow. Usea tripod.
[_ Caution
The flash mayfire several times with each shot. Do not move the camera until shooting is complete.
o
o
35
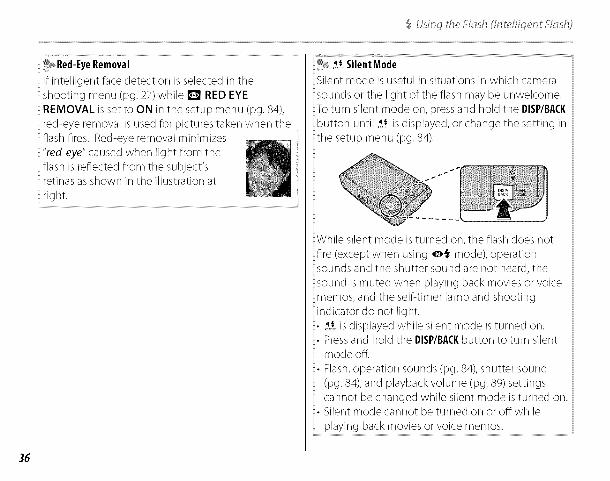
flash fires. Red-eye removal minimizes"red-eye" caused when light from tileflash is reflected from tile subject'sretinas asshown in tile illustration at
right.
_ Red]FyeRemoval _ silent Mode
If intelligent facedetection is selected in the Silent mode is useful in situations in which camerashootirig menu (pg. 27)while [] REDEYE I sounds or tile light of tile flash may be unwelcome.REMOVAL is set to ON in the setup menu (pg. 84), I Toturn silent mode on, pressand hold the DISR/BACK
red-eye removal is used for pictures taken when the button until _ is displayed, or change tile setting in' tile setup menu (pg. 84).
While silent mode is turned on, the flashdoes not
fire (except when using @_ mode),operationsounds and the shutter sound are not heard, the
sound is muted when playing backmovies or voice
memos, and tile self-timer lamp and shootingindicator do not light.
• ')_ is displayed while silent mode is turned on.Pressand hold tile DISP/BACKbutton to turn silentmode off.
• Flash,operation sounds (pg. 84),shutter sound(pg. 84), and playback volume (pg. 89) settingscannot be changed willie silent mode is turned on.Silent mode cannot be turned on or off whileplaying back movies or voice memos.
36

0 Using the Self-Timer
The camera offers four types of self-timer mode,
which enable group portraits, self-portraits andreduction of camera shake.
Setting the Self-Timer
To change the self-timer mode, pressO.
COUPLE TIMER
The picture is taken automatically when 2 faces
come close together.Set the self-timer mode to d._ COUPLE TIMER.
Press •. Each time • is pressed, the setting for
DISTANCE changes.
_ 1_ _ NEAR_. _ _ CLOSE UP
_ _ _ _ :SUPERCLOSE_' _CANCEL
The more _ icons, the closer the 2 faces must
be when taking a picture.As the 2 faces come closer and the
indicator(s) becomes full, countdown starts.
Then the picture is automatically taken.
Tips
• PressingDISP/BACKcancels _._ COUPLETIMER.• Set Macro mode (closeup) when taking a self
portrait by holding the camera.
0
o
o
37

G)U_,inq he _eh_hrY_r
GROUP TIMER
The picture is taken automatically when all
members get together.Set the self-timer mode to d.'_-GROUP TIMER.
Press •. Each time • is pressed, the setting for
• NUMBERS changes.
_ 1_] Avoiloble se_dngfor Groupdiner is l _o4 persons.
_ _ _ _CANCEL 1
J
When the camera recognizes the set number
of persons and the _ indicator(s) becomes
full, countdown starts. Then the picture is
automatically taken.
Tips
• PressingDISP/BACKcancels _ GROUP TIMER.• SetMacro mode (close-up) when taking a self
portrait by holding the camera.
Set the self-timer mode to k!_ 10 SEC or t!) 2SEC.
I Focus.Pressthe shutter button halfway ___
tO fOCUS.
[_ Caution
Stand behind the camera when using theshutter button. Standing in front of the lens caninterfere with focus and exposure.
2 Start the timer.
Pressthe shutter button the
rest of the way down to start
the timer. The displayin the monitor shows
the number of seconds
remaining until theshutter is released. To
stop the timer before
the picture is taken,
press DISP/BAd(.
38
(_) IShG tbeS_:IIhme
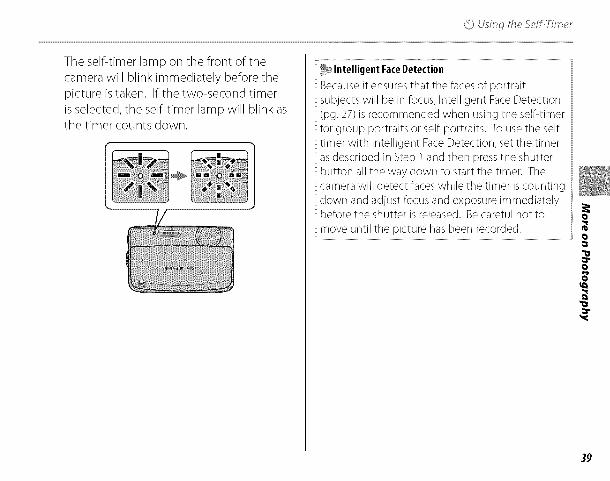
The self-timer lamp on the front of the
camera will blink immediately before the
picture is taken. If the two-second timer
is selected, the self-timer lamp will blink asthe timer counts down.
o
39
E Single-Frame Playback
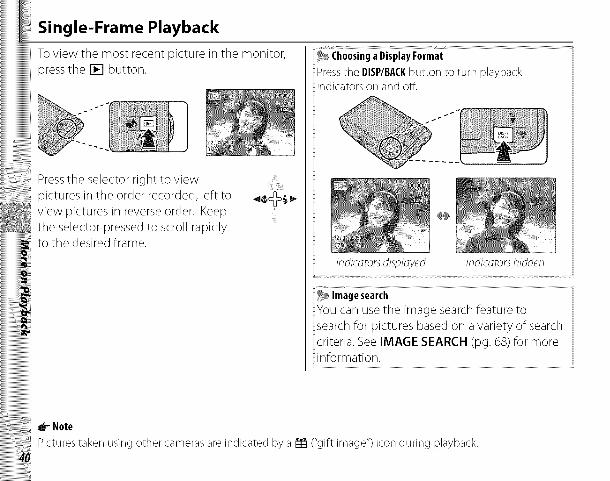
pressthe [] button.
Pressthe selector right to viewpictures in the order recorded, left to
view pictures in reverseorder. Keepthe selector pressedto scroll rapidlytothedesiredframe.
To view the most recent picture in the monitor,
4
®®Choosinga DisplayFormat
Press the DISP/BACKbutton to turn playbackand off_
In dicci_ors displciyed Indicci_ors hidden
_ ImagesearchYou can use the image search feature to
search for pictures based on a variety of searchiii
criteria. See IMAGE SEARCH (pg. 68) for moreinformation.
Note
Pictures taken using other cameras are indicated by a I_ ("gift image") icon during playback.
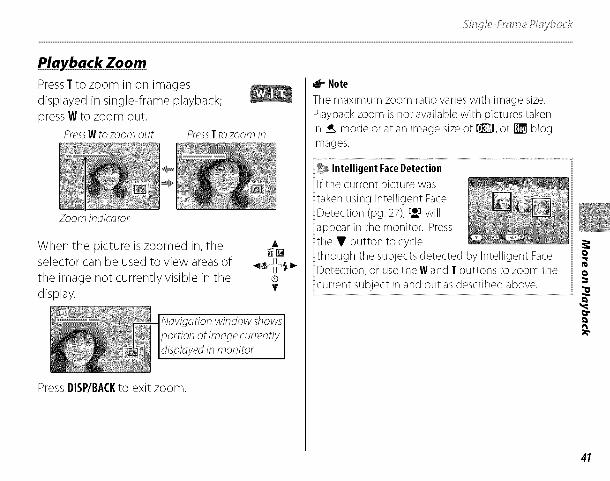
Playback Zoom
PressT to zoom in on images
displayed in single-frame playback;
press W to zoom out.
PressW_ozoom our PressT_ozoom in
Zoom indicator
When the picture is zoomed in, the A_[]selector can be used to view areas of _,_,_the image not currently visible in the ®
display, v
N_vig_ion window shows
Press DISP/BACKto exit zoom.
_r Note
The maximum zoom ratio varies with image size.
Playback zoom is not available with pictures takenin _, mode or at an image size of I_, or [] blog
images.
% IntelligentFaceDetectionii
If the current picture wastaken using Intelligent FaceDetection (pg. 27), re] will
appear in the monitor. Pressthe • button to cyclethrough the subjects detected by Intelligent Face
Detection, or usethe W and Tbuttons to zoom the ocurrent subject in and out as described above.
£-
47
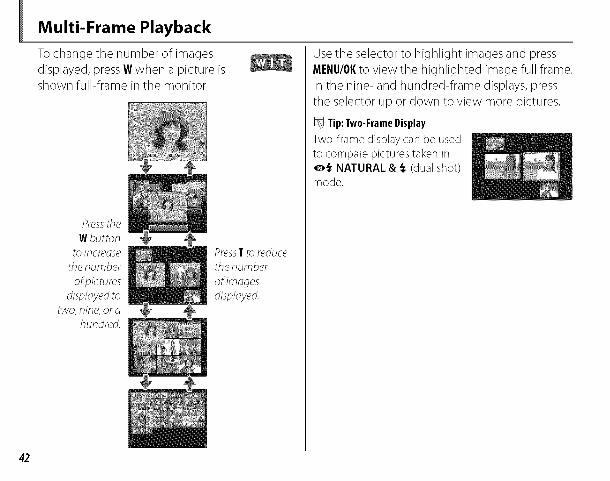
Multi-Frame Playback
To change the number of images
displayed, press W when a picture isshown full-frame in the monitor.
Press_heWbu_on
_oincred;se_henumber
of picturesdisplayed_o
two, nine,or _hundred.
Use the selector to highlight images and press
MENU/OKto view the highlighted image Full frame.
In the nine- and hundred-frame displays, press
the selector up or down to view more pictures.
Tip:Two-FrameDisplay
Two-frame display carl be usedto compare pictures taken in<m_ NATURAL & _, (dual shot)mode.
PressT _oreduce
_henumber
of imagesdisp/_yed.
42
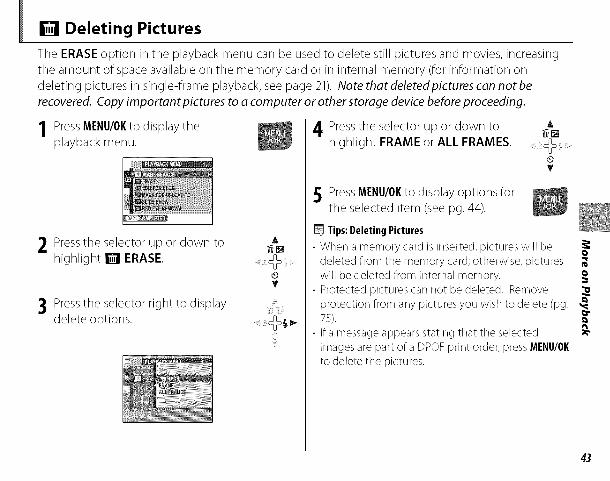
Q Deleting Pictures
The ERASE option in the playback menu can be used to delete still pictures and movies, increasing
the amount of space available on the memory card or in internal memory (for information on
deleting pictures in single-frame playback, see page 21). Note that deletedpictures can not be
recovered. Copy important pictures to a computer or other storage device before proceeding.
1 PressMENU/OKto display theplayback menu.
'1t Pressthe selector up or down to A
highlight [] ERASE.
3 Pressthe selector right to displaydelete options.
4 Pressthe selector up or down to Ahighlight FRAMEor ALL FRAMES.
5 Press MENU/OKto display options forthe selected item (see pg. 44).
Tips:DeletingPictures
• When a memory card is inserted, pictures will bedeleted from the memory card; otherwise, pictureswill be deleted from internal memory.
• Protected pictures carl not be deleted. Removeprotection from any pictures you wish to delete (pg.75).
• Ifa message appears stating that the selectedimages are part ofa DPOFprint order, pressMENU/011to delete the pictures.
O
o
£-
43
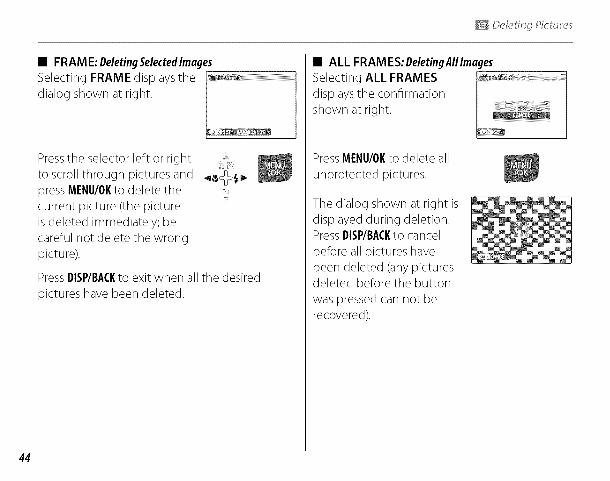
©H_*t/nqP/ :tur_
• FRAME:DeletingSelectedlmoges
Selecting FRAME displays the
dialog shown at right.
Pressthe selector left or right
to scroll through pictures and
press MENU/OKto delete the
current picture (the picture
is deleted immediately; be
careful not delete the wrong
picture).
¸¸¸¸¸ill¸¸
PressDISP/BACKto exit when all the desiredpictures have been deleted.
• ALL FRAMES:DeletingAIIImoges
Selecting ALL FRAMES
displays the confirmation
shown at right.
PressMENU/OKto delete allunprotected pictures.
The dialog shown at right is
displayed during deletion.Press DISP/BACKto cancel
before all pictures have
been deleted (any picturesdeleted before the button
was pressed can not be
recovered).
44
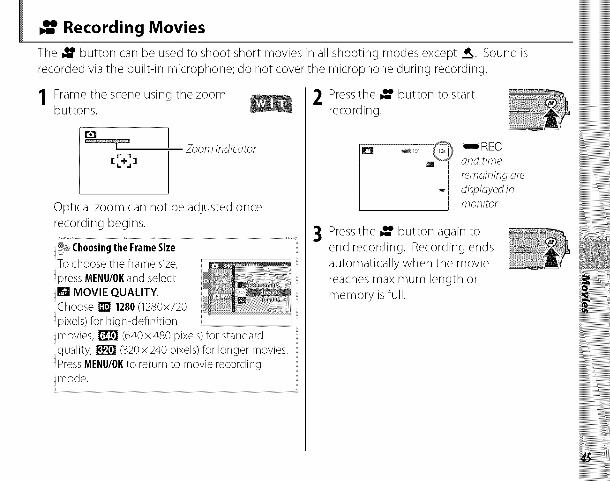
_. Recording Movies
The _. button can be used to shoot short movies in all shooting modes except __,. Sound is
recorded via the built-in microphone; do not cover the microphone during recording.
I Frame the scene using the zoombuttons.
Zoom indicator
Optical zoom can not be adjusted once
recordinq begins.
®@ChoosingtheFrameSize
To choose tile frame size,press MENU/OIland select[] MOVIEQUALITY.Choose j_ 1280(1280x720pixels) for highdefinitionmovies, _ (640x480 pixels) for standard
quality, | G20x240 pixels) for longer movies.PressMENU/OIlto return to movie recordingmode.
2 Pressthe _. button to startrecording.
3
F1 _ IREC
o-:and dme
remaining aredisplayedinmonitor
Press the _. button again to
end recording. Recording ends
automatically when the movie
reaches maximum length or
memory is full.

l e :or6qng Movh_;
_r Notes
• Seebelow for information on recording movies in,"._"-"mode.
• Focus is set when recording begins; exposureand white balance are adjusted automaticallythroughout recording. Tile color and brightnessof tile image mayvary from that displayed beforerecording begins.
• Any sound that the camera makeswhile recording amovie may be heard when playing back the movie.
• If the subject is too bright, horizontal or vertical linesmay be seen when playing back the movie. This isnot a malfunction.
#_u Successive Movie
.Join a series of movies into one movie (up to 60
seconds long).
1 While using shooting mode (pg. 22), select_'-" SUCCESSIVE MOVIE and press MENU/OK.
2 Press DISP/BACKto turn successive moviemode on and off.
3 Pressthe _. button to beginrecording aclip.
4
IREC and time
remaining are disphyed in
monitor: Time remainingdisplayed in ye//ow if lessthan 5 s remain.
_r- Note
Ira clip reachesmaximum length, shooting willend and the clips recorded to that point will bejoined together into a single movie.
Press the _ button again to
end the clip. Repeat steps 3
and 4 to record additional clips.
To pause, press MENU/OK.
Do not insert or remove memory cards
while recording is paused. While recording
is paused, the camera can be turned offor
other modes selected. Recording can beresumed as described below.
46

l e :ording Movi_s
_] Tip: Previewingthe MostRecentClip
When a clip iscompleted,the first frame appears in tilemonitor. To preview tile clip,presstile selector up. PressDISP/BACKto re-record the last
clip.
5 Press • to display theconfirmation message, select
OK, then press MENU/OKto end
recording and join the clips
together.
0
47
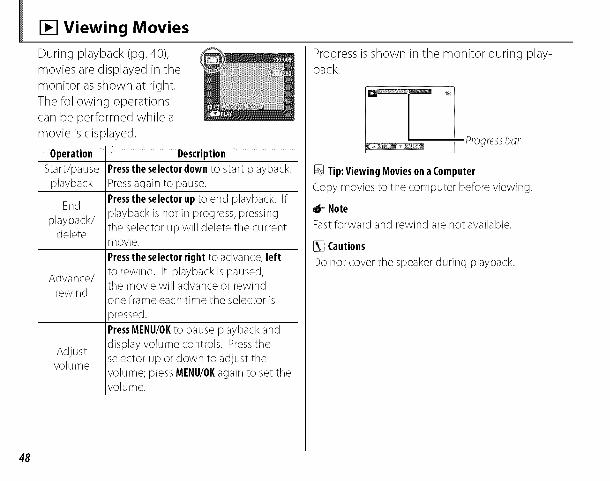
[] Viewing Movies
During playback (pg. 40),
movies are displayed in the
monitor as shown at right.
The following operations
can be performed while a
movie is displayed:
Operation Description
Start/pause Presstheselectordownto start playback.playback Pressagain to pause.
Presstheselectorupto end playback. IfEnd
playback/ playback is not in progress, pressingdelete tile selector up will delete tile current
movie.
Presstheselectorrightto advance, leftto rewind. If playback is paused,Advance/tile movie will advance or rewind
rewindone frame each time the selector isDressed.
PressMENU/OKto pause playback and
Adjust display volume controls. Presstilevolume selector up or down to adjust tile
volume; pressMENU/OKagain to set tilevolume.
Progress is shown in the monitor during play-back.
Tip:Viewing Moviesona Computer
Copy movies to the computer before viewing.
_r Note
Fast forward and rewind are not available.
[] Cautions
Do not cover the speaker during playback.
48
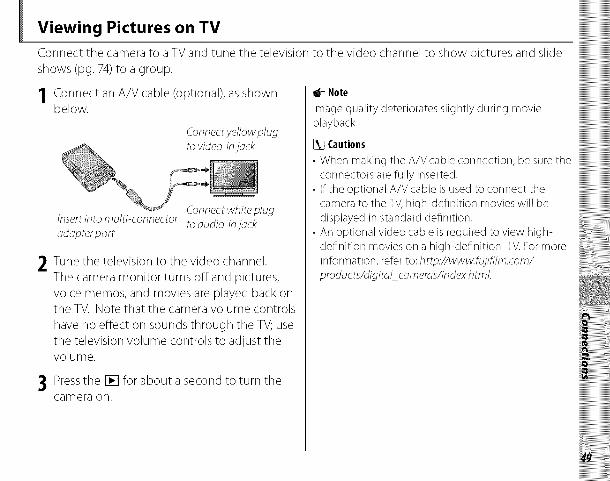
Viewing Pictures on TV
Connect the camera to a TV and tune the television to the video channel to show pictures and slide
shows (pg. 74) to a group.
1 Connect an A/V cable (optional), as shownbelow.
(bnnec_yd/ow p/ugm video-injock
2 Tune the television to the video channel.The camera monitor turns off and pictures,
voice memos, and movies are played back onthe TV. Note that the camera volume controls
have no effect on sounds through the TV; use
the television volume controls to adjust thevolume.
Pressthe [] for about a second to turn thecamera on.
_- Note
Image quality deteriorates slightly during movieplayback.
[] Cautions
•When making the A/V cable cormection, be suretheconnectors are fully inserted.
• If the optional A/V cable is used to connect tilecamera to tile TV,high-definition movies will bedisplayed in standard definition.
• An optional video cable is required to view high-definition movies on a high-definition TV. Formoreinformation, refer to:h_:p.//www.fujihlm.corn/produc_s/digiml_c_meros/indexh_mL
((((((((((((((((((((((((((((((((i
((((((((((((((((((((((((((((((((i((((((((((((((((((((((((((((((((i
((((((((((((((((((((((((((((((((i
!i!i!i!i!i!i!i!i!i!i!i!i!i!i!i!i!i!i!i!i!i!i!i!i!i!i!i!i!i#!
iiiiiiiiiiiiiiiiiiiiiiiiiiiiiiiiiiiiiiiiiiiiiiiiiiiiiiiiiiiiiiiii
[[[[[[[[[[[[[[[[[[[[[[[[[[[[[[[[i
iiiiiiiiiiiiiiiiiiiiiiiiiiiiiiiil
iiiiiiiiiiiiiiiiiiiiiiiiiiiiiiiii
iiiiiiiiiiiiiiiiiiiiiiiiiiiiiiii_
iiiiiiiiiiiiiiiiiiiiiiiiiiiiiiiii
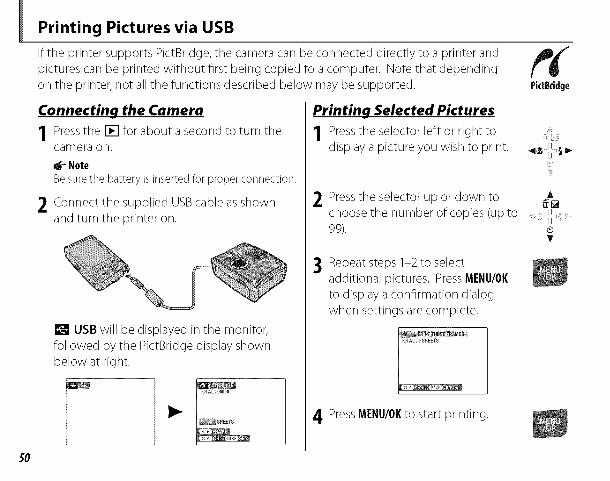
Printing Pictures via USB
If the printer supports PictBridge, the camera can be connected directly to a printer and
pictures can be printed without first being copied to a computer. Note that depending
on the printer, not all the functions described below may be supported. PictBridge
Connectinq the Camera
1 Pressthe [] for about a second to turn thecamera on.
4P NoteBesurethe battery isinserted for proper connection.
2 Connect the supplied USB cable as shownand turn the printer on.
[] USB will be displayed in the monitor,
followed by the PJctBridge display shown
below at right.
Printing Selected Pictures
1 Press the selector left or right todisplay a picture you wish to print.
2 Press the selector up or down tochoose the number of copies (up to
99).
3 Repeat steps 1-2 to select
additional pictures. Press MENU/OK
to display a confrmation dialog
when settings are complete.
4 Press MENU/OKto start printing.
A
5O

Prin inq PJ :tum_ vk_ U_B
Tip:PrintingtheDateof Recording
To print the date of recording on pictures, pressDISP/BACKin steps 1-2 to display the PictBridgemenu (see"Printing tile DPOFPrint Order," below).Presstile selector up or down to highlight PRINTWITH DATE ['_ and press MENU/0Kto return to tilePictBridge display (to print pictures without the dateof recording, select PRINT WITHOUT DATE). Tiledate will not be printed if the camera clock was notset when the picture was taken.
Note
If no pictures are selected when the MENU/OKbutton ispressed,the camera will print one copy of the currentpicture.
Printing the DPOF Print Order
To print the print order created with [] PRINT
ORDER (DPOF) in the playback menu (pg. 53):
1 In the PictBridge display, press DISP/BACKto open the PictBridge menu.
1t Press the selector up or down to A_r_highlight _1_PRINT DPOF.
3 Press MENU/OKto display aconfirmation dialog.
TOTAL :@ SMEETS
4 Press MENU/OKto start printing.
o
51
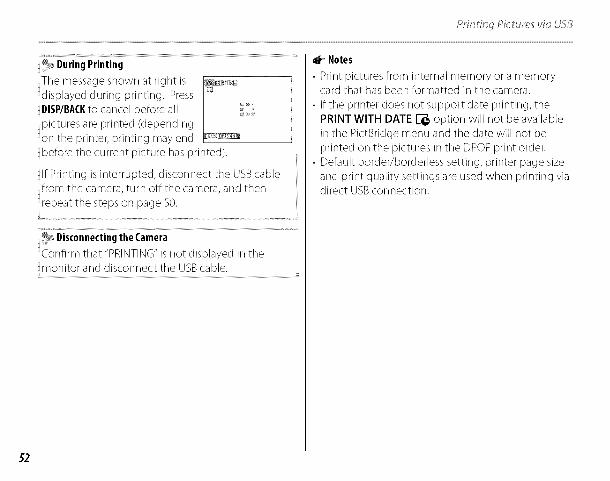
Prin inq PJ :tum_ vk_ U_B
Tile message shown at right isdisplayed during printing. PressDISP/BACKto cancel before allpictures are printed (depending
on tile printer, printing may endbefore tile current picture hasprinted).
If Printing is interrupted, disconnect tile USBcablefrom the camera, turn off tile camera, and thenrepeat tile steps on page 50.
DisconnectingtheCameraConfirm that "PRINTING"is not displayed in tile
Notes
• Print pictures from internal memory or a memorycard that hasbeen formatted in tile camera.
• If the printer does not support date printing, tilePRINTWITH DATE ['_ option will not be availablein tile PictBridge menu and tile date will not beprinted on the pictures in tile DPOFprint order.
• Default border/borderless setting, printer page sizeand print quality settings are used when printing viadirect USBconnection.
52
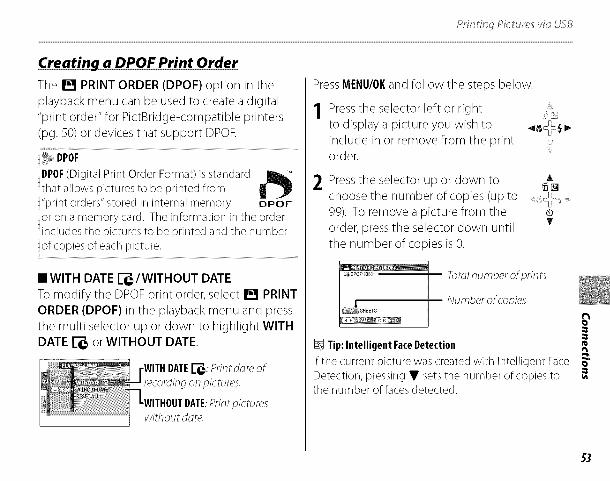
Prin inq Pi :ture_ vk_ USB
Creating a DPOF Print Order
The [] PRINT ORDER (DPOF) option in the
playback menu can be used to create a digital
"print order" for PictBridge-compatible printers
(pg. 50) or devices that support DPOR
®_ DPOF
DPOF(Digital Print Order Format)is standard
that allows pictures to be printed from"print orders" stored in internal memory DPOFor on a memory card. The information in the orderincludes the pictures to be printed and the numberof copies of each picture.
II WITH DATE _/WITHOUT DATE
To modify the DPOF print order, select [] PRINT
ORDER (DPOF) in the playback menu and press
the multi selector up or down to highlight WITH
DATE _ or WITHOUT DATE.
Press MENU/0Kand follow the steps below.
Pressthe selector left or right
to displaya picture you wish to _,_ _,_.include in or remove from the printorder.
2 Press the selector up or down to A
choose the number of copies (up to
99). To remove a picture from the ®order, press the selector down until v
the number of copies is O.
E To,o/number of prin_s
Number of copies
Tip:IntelligentFaceDetection
If the current picture was created with Intelligent FaceDetection, pressing • sets the number of copies tothe number of facesdetected.
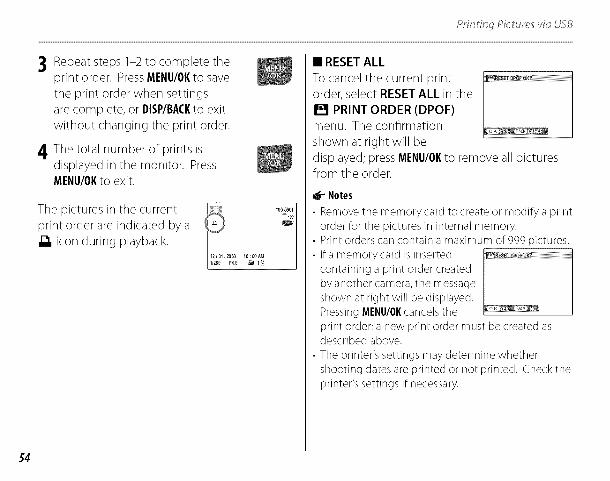
Prin inq PJ :tums vk_ U_B
:3 Repeat steps 1-2 to complete theprint order. PressMENU/OKto save
the print order when settings
are complete, or DBP/BACKto exit
without changing the print order.
4 The total number of prints isdisplayed in the monitor. PressMENU/OKto exit.
The pictures in the current
print order are indicated by a
z_. icon during playback.12/31/2050 lO:_AM1/Z50 F4,0 5_ 12/_
• RESET ALL
To cancel the current printorder, select RESET ALL in the
[] PRINT ORDER (DPOF)menu. The confirmation
shown at right will be
displayed; press MENU/OKto remove all picturesfrom the order.
Notes
• Remove the memory card to create or modify a printorder for the pictures in internal memory.
• Print orders carl contain a maximum of 999 pictures.• Ira memory card is inserted
containing a print order createdby another camera, the messageshown at right will be displayed.PressingMENU/OKcancels theprint order; a new print order must be created asdescribed above.
• The printer's settings may determine whethershooting dates are printed or not printed. Check theprinter's settings if necessary.
54

Viewing Pictures on a Computer
The supplied software can be used to copy pictures to a computer, where they can be stored,
viewed, organized, and printed. Before proceeding, install the software as described below. Do NOT
connect the camera to the computer until installation is complete.
Installing the Software
Two applications are supplied: MyFinePix Studio for Windows and FinePixViewer for the Macintosh.
Installation instructions for Windows are on pages 55-56, those for the Macintosh on pages 57-58.
Windows: Installing My FinePix Studio
1 Confirm that the computer meets the following system requirements:
Windows7 _ Windows Vista_ WindowsXP_
CPU 3GHz Pentium 4 or better I 2GHz Pentium 4 or better
RAM I GB or more 512 MB or moreFree disk space 15 GB or more 2G B or more
Video 1024 x 768 pixels or more with 24-bit color or betterA graphics processing unit (GPU) that supports DirectX 7 or later
Built-in USB port recommended. Operation is not guaranteed other USB ports.Other Internet connection (56 kbps or faster recommended) required to use FinePix Internet Service; Internet
connection and e-mail software required to use e-mail option
Other versions of Windows are not supported. Only pre-installed operating systems are supported;
operation is not guaranteed on home-built computers or computers that have been upgraded from earlier
versions of Windows. _'.

I,hewinq PJ :tums on a Compu er
23
Start the computer. Log in to an account with administrator privileges before proceeding.
Exit any applications that may be running and insert the installer CD in a CD-ROM drive.
®®,Windows7/WindowsVistaiii
If an AutoPlay dialog is displayed,click SETUPexe. A "UserAccount Control" dialog will then be displayed;click Yes (Windows 7)or Allow (W!ndows V!sta):
The installer will start automatically; click Install MyFinePix Studio and follow the on-screen in-
structions to install MyFinePix Studio.
If theInstallerDoesNotStartAutomatically
If the installer does not start automatically, select Computer or My Computer from tile Start menu, thendoub!e-c!!ck the F!NEPIX CD !conto open the F!NEP!XCD w!ndow and doub!e-c!!ck SETUP or SETUP.exe........
4 If prompted to install Windows Media Player or DirectX, follow the on-screen instructions to com-plete installation.
5 Remove the installer CD from the CD-ROM drive when installation is complete. Store the installer
CD in a dry location out of direct sunlight in case you need to re-install the software. The
version number is printed at the top of the CD label for reference when updating the software or
contacting customer support.
Installation is now complete. Proceed to "Connecting the Camera" on page 59.

/i_wing PJ :tup'eson a Compu er
Macintosh: Installing FinePixViewer
I Confirm that the computer meets the following system requirements:cPU
0s
RAM
Free disk space
Video
Other
PowerPC or Intel
Prednstalled versions of Mac OS X version 10.3.9 10.6
for the latest information, visit http://www.fujif//m.com/)
256MBor more
A minimum of 200MB required for installation with 400MB available when FinePixViewer is running
800x600 pixels or more with thousands of colors or better
Built-in USB port recommended. Operation is not guaranteed other USB ports.
Internet connection (56 kbps or faster recommended) required to use FinePix Internet Service; Internet
connection and e-mail software required to use e-mail option
2 After starting the computer and quitting any applications that may be running, insert the installerCD in a CD-ROM drive and double-click Installer for Mac OS X.
3 An installer dialog will be displayed; click Installing FinePixViewer to start installation. Enteran administrator name and password when prompted and click OK, then follow the on-screen
instructions to install FinePixViewer. Click Exit to quit the installer when installation is complete.
o
57
I/?_winq PJ :tums on a Compu er
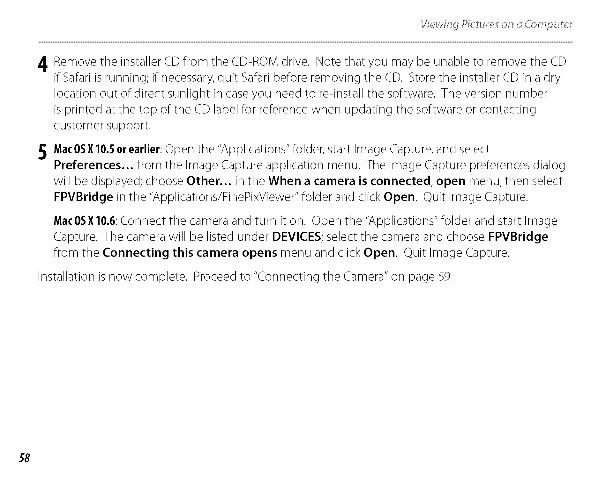
4 Remove the installer CD from the CD-ROM drive. Note that you may be unable to remove the CD
if Safari is running; if necessary, quit Safari before removing the CD. Store the installer CD in a dry
location out of direct sunlight in case you need to re-install the software. The version number
is printed at the top of the CD label for reference when updating the software or contacting
customer support.
5 MacOSXlO.5orearlier: Open the "Applications" folder, start Image Capture, and select
Preferences... from the Image Capture application menu. The Image Capture preferences dialog
will be displayed; choose Other... in the When a camera is connected, open menu, then select
FPVBridge in the "Applications/FinePixViewer" folder and click Open. Quit Image Capture.
MacOSXlO.6:Connect the camera and turn it on. Open the "Applications" folder and start Image
Capture. The camera will be listed under DEVICES; select the camera and choose FPVBridge
from the Connecting this camera opens menu and click Open. Quit Image Capture.
Installation is now complete. Proceed to "Connecting the Camera" on page 59.
/i_wing Pi :tup'ei;on a Compu er
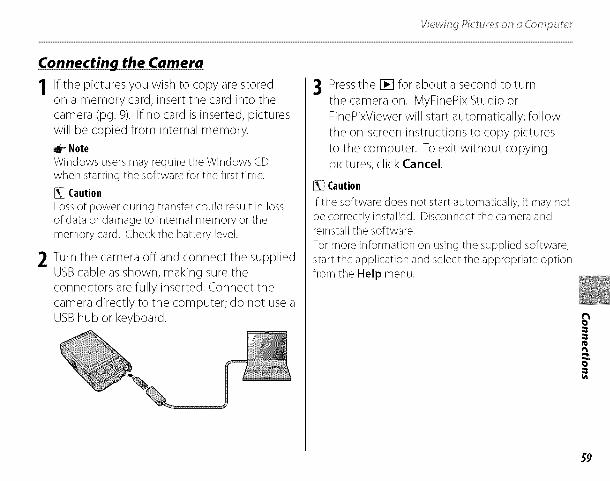
Connectinq the Camera
1 If the pictures you wish to copy are storedon a memory card, insert the card into thecamera (pg. 9). If no card is inserted, pictures
will be copied from internal memory.
_- NoteWindows users may require the Windows (Dwhen starting the software for the first time.
CautionLossof power during transfer could result in lossof data or damage to internal memory or thememory card. Check the battery level.
2 Turn the camera offand connect the suppliedUSBcable as shown, making sure theconnectors are fully inserted. Connect the
camera directly to the computer; do not use aUSBhub or keyboard.
3 Press the [] for about a second to turnthe camera on. MyFinePix Studio or
FinePixViewer will start automatically; follow
the on-screen instructions to copy pictures
to the computer. To exit without copying
pictures, click Cancel.
Caution
If the software does not start automatically, it may notbe correctly installed. Disconnect the camera andreinstall the software.
For more information on using the supplied software,start the application and select the appropriate optionfrom the Help menu.
o
59

//e_s nq Pet m of_ _ (ompute
Cautions
• Ifa memory card containing a large number ofimages is inserted, there may be a delay before tilesoftware starts and you may be unable to import orsave images.Usea memory card reader to transfer pictures.
• Opening or closing tile lens cover during transfercould result in lossof data or damage to internalmemory or the memory card.
• Disconnect tile camera before inserting or removingmemory cards.
• In some cases,it may not be possible to accesspictures savedto a network server using thesupplied software in the same way ason astandalone computer.
• Tile user bearsall applicable feescharged by thephone company or Internet service provider whenusing servicesthat require an Internet connection.
DisconnectingtheCamera
Follow tile on-screen instructions to turn tile camera
off and disconnect tile USBcable.
%_ UninstallingtheSuppliedSoftware
Only uninstall the supplied software when it is nolonger required or before beginning reinstallation.After quitti ng tile softwa reand disconnecting
tile camera,drag the "FinePixViewer"folder from"Applications" into the Trashand select Empty Trash
in tile Finder menu (Macintosh),or open tile control
panel and use "Programs and Features"(Windows 7/Windows Vista)or "Add or Remove Programs"(Windows XP)to uninstall MyFinePix Studio. Under
Windows one or more confirmation dialogs may bedisplayed; read tile contents carefully before clickingOK
60
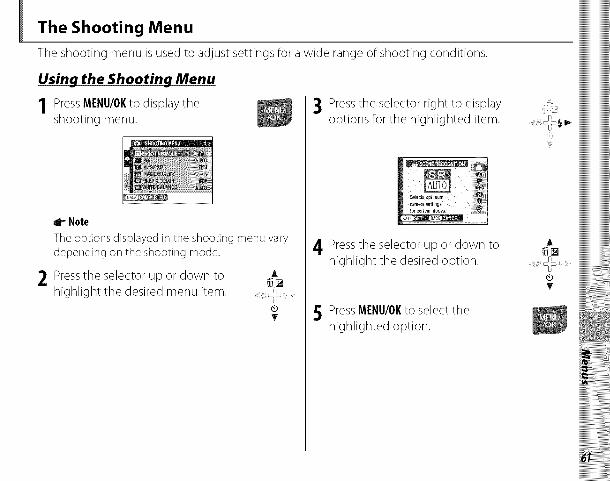
The Shooting Menu
The shooting menu is used to adjust settings for a wide range of shooting conditions.
Using the Shootinq Menu
1 PressMENU/OKto display theshooting menu.
Note
The options displayed in the shooting menu vary
depending on the shooting mode.
A2 Pressthe selector up or down to _[]
highlight the desired menu item.
3 Press the selector right to displayoptions for the highlighted item.
4 Press the selector up or down tohighlight the desired option.
5 PressMENU/OKto select thehighlighted option.
!,ill' iii!,i,_!il
A
®T
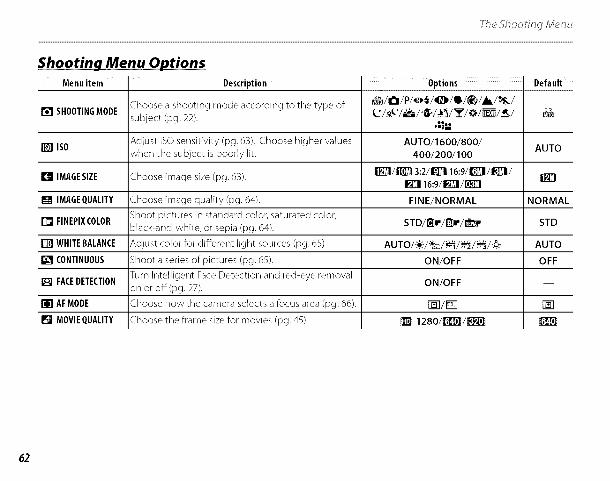
Shootin_ Menu OptionsMenuitem ' Description I Options Default
Choose a shooting mode according to the type of _/I_/P/'__/qI_I_/_/(_/_IL/_'&/
[] SHOOTINGMODE subject (pg. 22). ('_-/'e'_*/_/*J_/_*_"l/'Y/'_/li_l/'_/-%e
[] ISO Adjust ISO sensitivity (pg. 63). Choose higher values AUTO/1600/800/ AUTOwhen the subject is poorly lit. 400/200/100
[] IMAGESIZE Choose image size (pg. 63). IE[]/i]_ 3:2/i_]_116:9/1[_[]1/!_]/ IE[]16:9/1_1/1_[I
[] IMAGEQUALITY Choose image quality (pg. 64). FINE/NORMAL NORMAL
Shoot pictures in standard color, saturated color,
[] FINEPIXCOLOR black-and-white, or sepia (pg. 64). STD/I'_r/_r/I_ STD
[] WHITEBALANCE Adjust color for different light sources (pg. 65). AUTO/-:÷:-/"._._/_/_/_/-,O,: AUTO
[] CONTINUOUS Shoot a series of pictures (pg. 65). ON/OFF OFF
[] FACEDETECTION Turn Intelligent Face Detection and red-eye removalon or off (pg. 27). ON/OFF
[] AFMODE Choose how the camera selects a focus area (pg. 66). 1-_1/[] []
[] MOVIEQUALITY Choose the frame size for movies (pg. 45). ]_ 1280/_]_/_
62

The 5hootinq Menu
[] ISO
Control the camera's sensitivity to light with R
Higher values can be used to reduce blur when
lighting is poor; note, however, that mottling
may appear in pictures taken at high sensitivities.
If AUTO is selected, the camera will adjust
sensitivity automatically in response to shootingconditions.
Settings other than AUTO _-_
are shown byan icon in the E[+]lmonitor if you use R
[] IMAGE SIZE
Choose the size at which still pictures are
recorded. Large pictures can be printed at large
sizes with no drop in quality; small pictures
require less memory, allowing more pictures tobe recorded.
Option Printsatsizesupto
31x 23cm/12.2 × 9in. (li_]) or 31x21 cm/
i]_3:2 12.2xS.2in. (i]_3:2). Choose _ for high-
Q16:_ quality prints, i]_13:2 for an aspect ratio of3:2,_ 16:9for anaspect ratio of 16:9.
22x 16cm (8.7x6in.)
1!_]116:917x13cm (7x5.1 in.)
I_1 14x 10cm (5.5x3.gin.)5x4 cm (1.9x 1.5in.). Suited to e-mail or theweb.
The number of pictures that can be taken at
current settings (pg. 105) is displayed to the right
of the image quality icon in the monitor.
q_- Note
Image size is not reset when tile camera is turned off
or another shooting mode is selected.
63
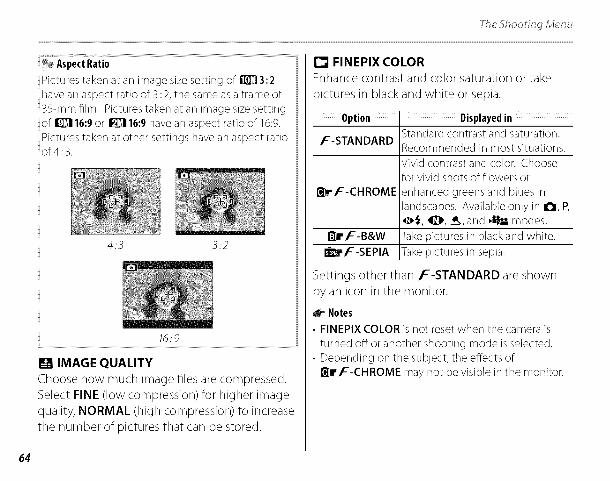
The _;hootinq Menu
AspectRatioPictures taken at an image size setting of i1_ 3:2
have an aspect ratio of 3:2, the same as a frame of
35-mm film. Pictures taken at an image size setting
of I_]]116,9 or I_116,9 have an aspect ratio of 16:9.
Pictures taken at other settings have an aspect ratioof 4:3.
4 .3 3 .2
16.9
[] IMAGE QUALITY
Choose how much image files are compressed.
Select FINE (low compression) for higher image
quality, NORMAL (high compression) to increase
the number of pictures that can be stored.
[] FINEPIX COLOREnhance contrast and color saturation or take
pictures in black and white or sepia.
DisplayedinStandard contrast and saturation.
K-STANDARDRecommended in most situations.Vivid contrast and color. Choosefor vivid shots of flowers or
I_rf-CHROME enhanced greens and blues inlandscapes. Available only in I_, P,_, _11_,_,, and ,IIII modes.
II_rf-B&W Take pictures in blackand white._f-SEPIA Take pictures in sepia.
Settings other than F-STANDARD are shown
by an icon in the monitor.
_- Notes
, • FINEPIXCOLOR is not reset when the camera is
turned off or another shooting mode is selected.• Depending on the subject, the effects of
I_r f-CHROME may not bevisible in the monitor.
64
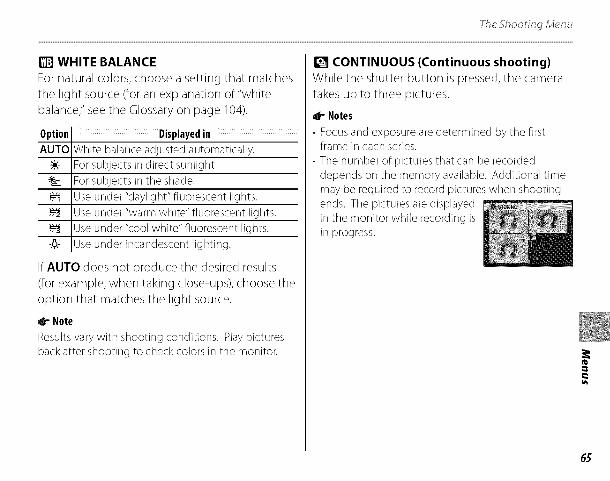
The _Shootinq Menu
[] WHITE BALANCE
For natural colors, choose a setting that matches
the light source (for an explanation of "white
balance," see the Glossary on page 104).
Option Displayedin
AUTO White balanceadjusted automatically.
-:÷:- For subjects in direct sunlight.
"-'_ For subjects in the shade.
Use under "daylight" fluorescent lights.
Use under "warm white" fluorescent lights.
Use under "cool white" fluorescent lights.
-_- Use under incandescent lighting.
If AUTO does not produce the desired results
(for example, when taking close-ups), choose the
option that matches the light source.
_r Note
Resultsvary with shooting conditions. Playpicturesbackafter shooting to check colors in tile monitor.
[] CONTINUOUS (Continuous shooting)
While the shutter button is pressed, the camera
takes up to three pictures.
_J-Notes
• Focus and exposure are determined by the firstframe in each series.
• The number of pictures that carl be recordeddepends on the memory available. Additional timemay be required to record pictures when shootingends. Tile pictures are displayedin the monitor while recording isin progress.
65

The _'#_ootinq Menu
[] AF MODE
In shooting mode P or !'_1,
this option controls howthe camera focuses when
Intelligent Face Detection is
off(pg. 27). Regardless of the
option selected, the camera will focus on the
subject in the center of the monitor when macro
mode is on (pg. 34).
• [] AFMODE:[] CENTER
The camera focuses on the _
subject in the center of themonitor. This option can be E[+]_
used with focus lock.
• [] AFMODE:[] TRACKING
Position the subject in the ,_9
center focus area and press []_
_1 to lock on to the subject.
Once the subject is locked,the camera will track the
subject as it moves through Ir ._/o_
the frame. Press _1 again to _cancel tracking.
11ooo F4O
Caution
Tracking is not possible in some situations.
66

The Playback Menu
The playback menu is used to manage the pictures in internal memory or on the memory card.
Using the Playback Menu1 Press [] to enter playback mode
(pg. 40).
2 PressMENU/OKto display theplayback menu.
A3 Pressthe selector up or down tohighlight the desired menu item.
4 Pressthe selector right to displayoptions for the highlighted item.
5 Pressthe selector up or down to Ah ighl ight th e desired o pti o n.....
®T
6 PressMENU/OKto select thehighlighted option.
[] IMAGESEARCH
[] ERASE
[] EDITFORBLOG
[] MOVIEEDIT
[] MARKFORUPLOADTO
[] SLIDESHOW
[] RED-EYEREMOVAL
[] PROTECT
Playback Menu Options
The following options are available:Option ' Description
Search for images based on certain
criteria (pg. 68).
Delete all or selected pictures (pg. 43).
Edit images and reduce file size. Ideal
for images that will be uploaded or
sent as e-mail attachments (pg. 69).
Adjust the color balance and
brightness of movies (pg. 72).
Specify the destination for uploading
to YouTube 'Mand FACEBOOK (pg. 72).
View pictures in a slide show (pg. 74).
Create copies with reduced red eye
(pg. 74).
Protect pictures from accidental
deletion (pg. 75).
67

_l-fi__PI_ '_b_ :k M_nu
[] CROP
[] RESIZE
[] IMAGEROTATE
[] COPY
[] VOICEMEMO
[] TRANSITION
Option Description
Create cropped copies of pictures
(pg. 76).
Reduce the size of images (pg. 77).
Rotate pictures (pg. 78).
Copy pictures between internal
memory and a memory card (pg. 79).
Add voice memos to pictures (pg. 80).
Choose the transition between
_ictures during playback (pg. 82).
_reate an edited copy of a movie[] MOVIETRIMMING(pg. 82).
Select pictures for printing on DPOF-PRINTORDER and PictBridge-compatible devices
[] (DPOF)(pg. 51).
[] IMAGE SEARCH
You can search for images
based on a variety of criteria.
Begin by selecting [] IMAGE
SEARCH in the playbackmenu.
1 PressMENU/OKand select thesearch criteria.
Criteria Description
Find all pictures taken on a specifiedBY DATE
date.
BY FACE Find pictures based on face information.
Find all pictures that match a specifiedBY SCENE
scene.
BY TYPE OF Find all still images, movies, or images
DATA edited for use with a biog.
BY UPLOAD Find all images uploaded to eitherMARK YouTube or FACEBOOK.
2 Narrow down the criteria.A
68
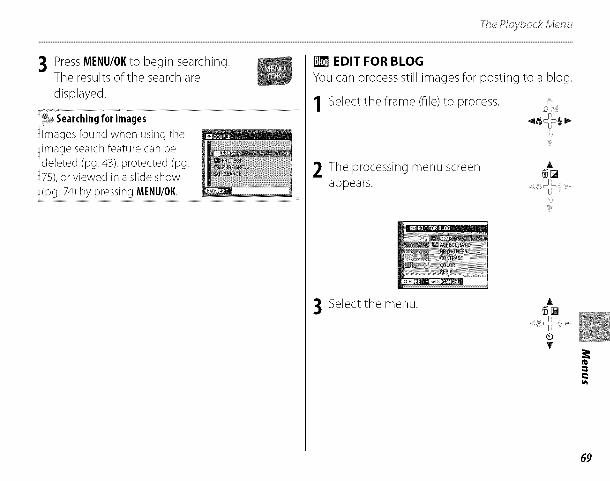
ThePk yb_ :kMenu
3 PressMENU/0Kto begin searching.The resultsof the searcharedisplayed.
Images found when using tileimage search feature carl bedeleted (pg. 43, protected (pg.
7S), or viewed in a slide show
[] EDIT FOR BLOGYoucan processstill imagesfor posting to a biog.
1 Select the frame (file) to process.
2 The processing menu screenappears.
A
3 Select the menu.A
®T
69
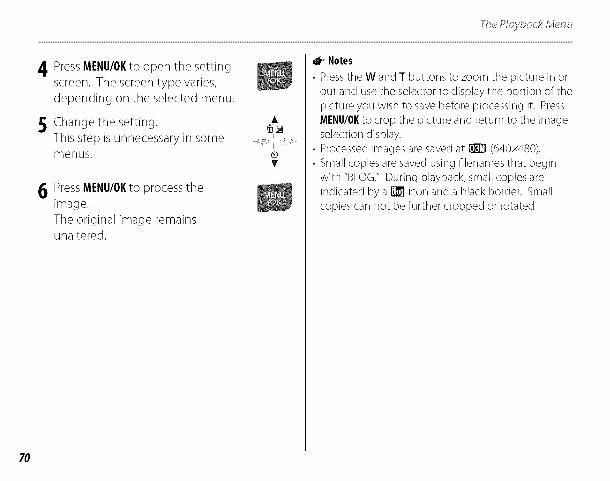
ThePk yb_ :kMenu
4 PressMENU/OKto open the settingscreen. The screen type varies,
depending on the selected menu.
5 Change the setting.This step is unnecessary in somemenus.
6 PressMENU/OKto process theimage.
The original image remainsunaltered.
A
• r"Notes
• Presstile W and T buttons to zoom tile picture in orout and use the selector to display the portion of thepicture you wish to savebefore processing it. PressMENU/OIlto crop the picture and return to tile imageselection display.
• Processedimages are savedat 1_ (640x480).• Small copies are saved using filenames that begin
with "BLOG."During playback, small copies areindicated by a [] icon and a black border. Smallcopies can not be further cropped or rotated.
70
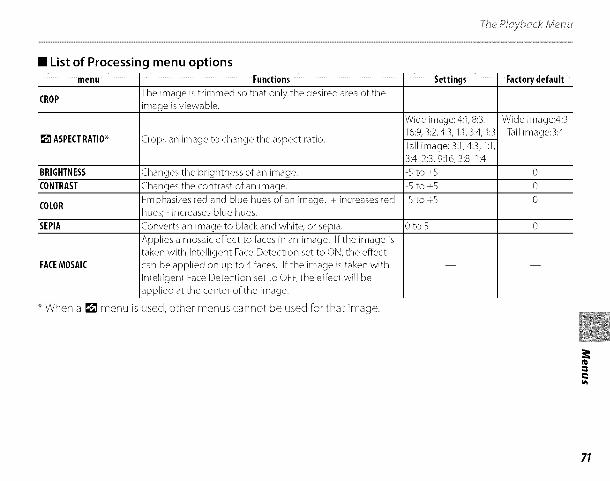
_ihePl_yb_:Tck//,@nu
• List of Processing menu options
menu " Functions ' Settings Factorydefault
CROP
[] ASPECTRATIO*
Wide image:4:3Tall image:3:4
BRIGHTNESS 0
CONTRAST 0
COLOR 0
SEPIA 3 to 5 0
FACEMOSAIC
The image is trimmed so that only the desired area of the
image is viewab]e.
Crops an image to change the aspect ratio.
Changes the brightness of an image.
Changes the contrast of an image.
Emphasizes red and blue hues of an image. + increases red
hues; - increases blue hues.
Converts an image to black and white, or sepia.
Applies a mosaic effect to faces in an image. If the image is
taken with Intelligent Face Detection set to ON, the effect
can be applied on up to 4 faces. If the image is taken with
Intelligent Face Detection set to OFF, the effect will be
applied at the center of the image.
used, other menus car]not be used for that image.
Wide image: 4:1, 8:3,
16:9,3:2, 4:3, 1:1,3:4, ]:3
Tall image: 3:1,4:3, 1:1,
3:4, 2:3, 9:16, 3:8, 1:4
-5 to +5
-5 to +5
-5 to +5
When a [] menu is
71

ThePk yb_' :kMenu
72
[] MOVIE EDIT
You can process movies for posting to a blog,
using the same procedure used for processing
still images (pg. 69).
• List of Processing menu options
Menu I Functions
SEPIA IConvertstile movie to sepia.
B&W IConverts the image to black and white.
BACKLIGHT Brightens the image to compensate for
CORRECTION back ight.
4t- Note
Processedfiles are saved using file namesthat beginwith "EDIT".During playback, these files are indicatedbya [] icon and a black border.
[] MARK FOR UPLOAD TO
You can select still images and movies to be
uploaded later to YouTube or FACEBOOK. Begin
by selecting [] MARK FOR UPLOAD TO in the
playback menu.
1 Press MENU/OKand select theupload destination.
2 Select the still image or movie that
you will upload later, then press _,_d_=_MENU/OK
Repeat this step #you want to
upload more items.
3 When settings arecomplete, pressDISP/BACK.
Notes
• The upload destination (YouTubeor FACEBOOK)isdisplayed (pg. 3)when playing back images thathave been selected for upload.
• Still images cannot be uploaded to YouTube.• You carl also use tile upload button (pg. 2) to set an
upload. Select tile still image or movie that you willupload, then pressthe upload button and select theupload destination.

ThePk yb_' :kMenu
• Canceling Upload Selections
You can cancel still images and movies that were
selected to be uploaded. Begin by selecting []MARK FOR UPLOAD TO.
1 PressMENU/OK
2 Display a still image or movie thatwas selected to be uploaded.
3 Press MENU/OKSelect RESETALL to cancel all
still images and movies that wereselected to be uploaded.
• Uploading Images
YouTube/FACEBOOK Uploader
Once you have selected images to be uploaded
to YouTube or FACEBOOK,you can upload them
using the included MyFinePix Studio software
(pg. 55).
Usecamero _ose/ec
images
Usecomputer _oup/oad images
This feature is not available for Macintosh computers.
73

ThePk_yb_':kMenu
[] SLIDE SHOW
View pictures in an automated slide show. After
choosing the background music, choose the
type of show and press MENU/OKto start. Press
DISP/BACKat any time during the show to view
on-screen help. When a movie is displayed,
movie playback will begin automatically, and theslide show will continue when the movie ends.
The show can be ended at any time by pressingMENU/OK
Option
NORMAL
FADE-IN
NORMAL r__
FADE-IN r_'_
MULTIPLE
SCRAP
BOOK VIEW
SELECT BGM
Displayedin
Pressselector left or right to go backorskipahead one frame. Select FADE-INfor fade transitions between frames.
As above, except that cameraautomatically zooms in on facesselected with Intelligent Facedetection.
Display several pictures at once.
As for MULTIPLE, except that thepictures are chosen randomly.
Choose background music.
[] RED EYE REMOVAL
This option is used with pictures taken using
Intelligent Face Detection to create copies that
have been processed to remove red eye.
Play the picture back in the monitor (pictures
taken with Intelligent Face Detection are
indicated by a[i ] icon) and select [] RED
EYE REMOVAL in the playback menu (pg. 41).
/4

ThePf_yb_:kMenu
2 PressMENU/OK The message shownbelow at left will be displayed while
the camera analyses the image; if
red-eye is detected, the message shown
below at right will be displayed while the
camera processes the image to create a copy
with reduced red-eye.
_- Notes
•Redeye may not be removed if the camera is unableto detect a face or tile face is in profile. Results maydiffer depending on the scene. Redeye carl notbe removed from pictures that have already beenprocessed using red-eye removal or pictures createdwith other devices.
• The amount of time needed to process tile imagevarieswith the number of faces detected.
•Copiescreated with [] RED EYE REMOVAL areindicated by a [] icon during playback.
[] PROTECT
Protect pictures from accidental deletion. The
following options are available.
• FRAMEProtect selected pictures.
11 Press the selector left or right toI
display the desired picture. 4_$_
2
3
Picture not protected Pro:ec_ed pic_ure
Press MENU/OKto protect the
picture. If the picture is already
protected, pressing MENU/OK
will remove protection from the
image.
Repeat steps 1-2 to protect
additional images. Press DISP/BACK
to exit when the operation is
complete.
75

Th__Pf_yb_ :kMenu
• SET ALL
PressMENU/OKto protect all
pictures, or press DISP/BACK
to exit without changing
picture status.
_ ___i__ _i_ii!i!i!i_i¸_i_!i_ii_!i!i!i!i!i!i!i!i!i!i!i!i!i!i!i!i!i!i!i!i!i!i!i!i!i!i!i!i!i!i!i!i!i!i!i!i!i!i!i_iIT MAY TAKE AWHILE
T MAY TAKE A WHILE
• RESET ALL
PressMENU/OKto remove
protection from all pictures,
or press DISP/BACKto exit
without changing picturestatus.
If the number of pictures
affected is very large, the
display at right will appearin the monitor while the
operation is in progress.
Press DISP/BACKto exit before the operation is
complete.
Caution
Protected pictures will be deleted when the memorycard or internal memory is formatted (pg. 87).
[] CROP
To create a cropped copy of a picture, play
the picture back and select [] CROP in the
playback menu (pg. 67).
Press the zoom buttons to zoom in and out
and use the selector to scroll the picture
until the desired portion is displayed (to exit
to single-frame playback without creating a
cropped copy, press DISP/BACK).
Zoom indicator
A
®T
N_vig_ionwindow shows
re
currendydisplayedin monitor
Tip:Intelligent FaceDetection
If tile picture was shot withIntelligent FaceDetection (pg.27), ro] will be displayed in themonitor. Pressthe • buttonto zoom in on the selectedface.
76
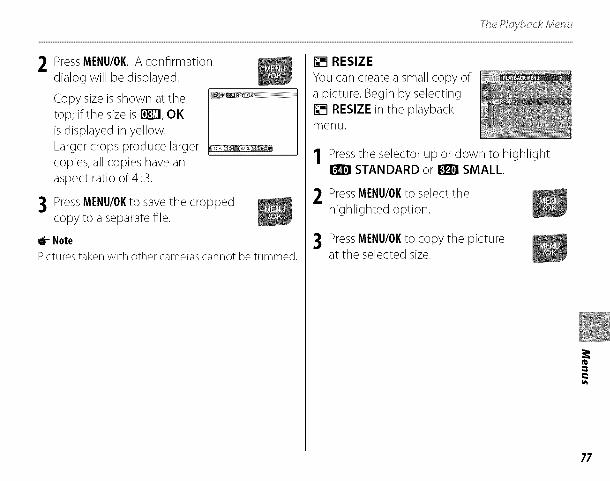
2 PressMENU/OK A confirmationdialog will be displayed.
Copy size is shown at the
top; if the size is 1i_71,OK
is displayed in yellow.
Larger crops produce larger
copies; all copies have an
aspect ratio of 4:3.
3 PressMENU/OKto save the croppedcopy to a separate file.
_" Note
Pictures taken with other cameras cannot be trimmed.
[] RESIZE
You can create a small copy of
a picture. Begin by selecting
[] RESIZE in the playbackmenu.
1
2
Pressthe selector up or down to highlightSTANDARD or _ SMALL.
PressMENU/OKto select the
highlighted option.
3 Press MENU/OKto copy the pictureat the selected size.
77

ThePf_yb_' :kMenu
[] IMAGE ROTATE
By default, pictures taken in
tall orientation are displayedin wide orientation. Use this
option to display pictures inthe correct orientation in the
monitor. It has no effect on pictures displayed
on a computer or other device.
_-- Notes
• Protected pictures carl not be rotated. Removeprotection before rotating pictures (pg. 75).
• Tile camera may not be able to rotate picturescreated with other devices.
Pressthe selector left or right to
display the desired picture in the .4,_]=_monitor.
2 Press the selector down to
rotate the picture 90 ° clockwise,
up to rotate the picture 90 ocounterclockwise.
A
T
3 Press MENU/OKto confirm theoperation (to exit without rotating
the picture, press DISP/BACK).
The next time the picture is played back, it will
automatically be rotated.
78
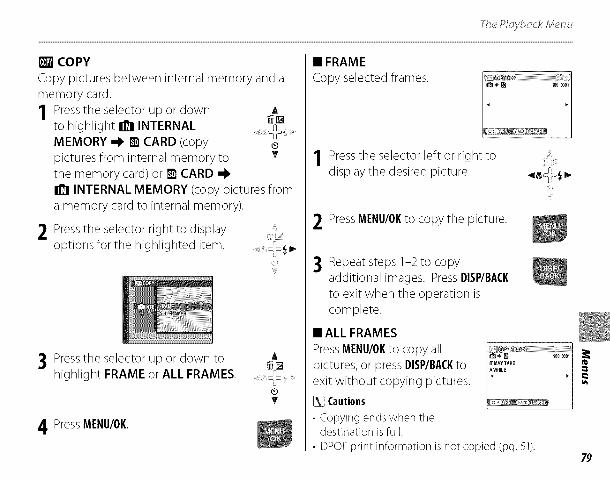
Tfu_Pklyb_Tk/I,'l_mu
[] COPYCopy pictures between internal memory and amemory card.
1 Pressthe selector up or down Ato highlight _ INTERNAL _[]MEMORY _ _ CARD (copy ®pictures from internal memory to vthe memory card) or I_1CARD -I_
INTERNAL MEMORY (copy pictures froma memory card to internal memory).
2 Pressthe selector right to displayoptions for the highlighted item.
A3 Pressthe selector up or down to _[]
highlight FRAME or ALL FRAMES.
4 PressMENU/OK
• FRAME
Copy selected frames.
1 Press the selector left or right todisplay the desired picture.
2 Press MENU/OKto copy the picture.
k_̧ _Sd_
3 Repeat steps 1-2 to copy
additional images. Press DISP/BACK
to exit when the operation is
complete.
• ALL FRAMES
Press MENU/OKto copy all
pictures, or press DISP/BACKto
exit without copying pictures.
Cautions
• Copying ends when tiledestination is full.
• DPOF print information is not copied (pg. 51).79
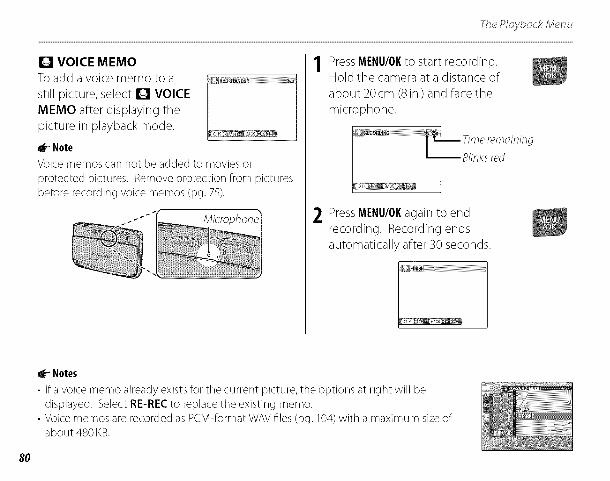
The_Pk '_b_':kMe_nu
[] VOICE MEMOTo add a voice memo to a
still picture, select [] VOICE
MEMO after displaying the
picture in playback mode.
_'- Note
Voice memos can not be added to movies or
protected pictures. Remove protection from picturesbefore recording voice memos (pg. 75).
2
Press MENU/OKto start recording.Hold the camera at a distance of
about 20cm (8 in.) and face the
microphone.
Press MENU/OKagain to end
recording. Recording ends
automatically after 30 seconds.
80
_r" Notes
• If a voice memo already exists for the current picture, the options at right will bedisplayed. Select RE-RECto replacethe existing memo.
• Voice memos are recorded as PCM-format WAVfiles (pg. 104)with a maximum sizeofabout 480 KB.

%PlayingVoiceMemos
When a picture that hasa voice memo recorded for it (as indicated bytile _ icon displayed during playback) is selected, you carl play tilevoice memo by selecting PLAY,then pressing MENU/OK.
NoteTile camera may not play voice memos recorded with other devices.
Caution
Do not cover tile speakerduring playback. ,-"
Proiqressbar
r_
81
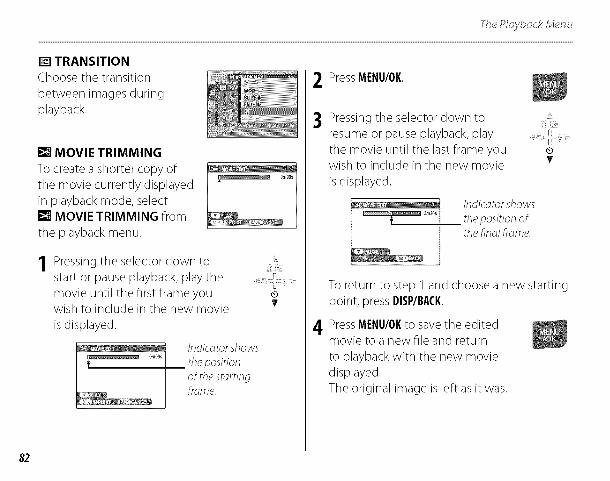
TF__P/_yb_' :kM_nu
[] TRANSITIONChoosethe transitionbetween imagesduringplayback.
[] MOVIE TRIMMING
To create a shorter copy of
the movie currently displayed
in playback mode, select[] MOVIE TRIMMING from
the playback menu.
Pressing the selector down to
start or pause playback, play the
movie until the first frame youwish to include in the new movie
is displayed.
/ndica:or shows
T _heposition
J of thesrardngframe.
2 Press MENU/0K
3 Pressing the selector down to
resume or pause playback, play
the movie until the last frame youwish to include in the new movie
is displayed.
__ /ndica:or shows_3os _heposition of
_hehnd frame.
®T
To return to step 1and choose a new startingpoint, pressDISP/BACK.
4 Press MENU/0Kto save the editedmovie to a new file and return
to playback with the new movie
displayed.
The original image is left as it was.
82
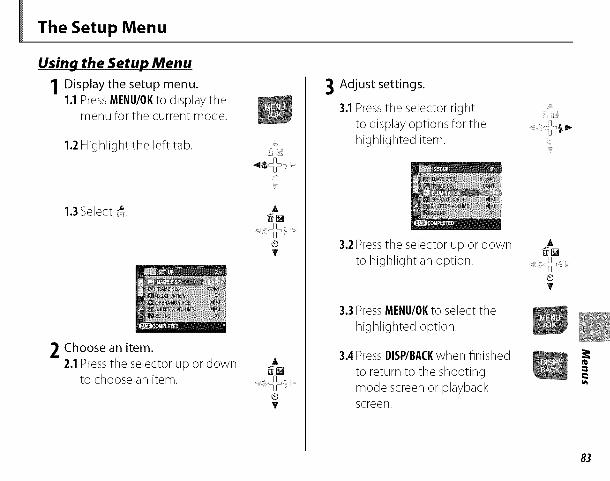
The Setup Menu
Using the Setup Menu
1 Displaythe setup menu.1.1Press MENU/OKto display the
menu for the current mode.
1.2Highlight the left tab.
1.3Select "_SET.
2 Choose an item,2.1Press the selector up or down
to choose an item.
A
A
3 Adjust settings.
3.1 Pressthe selector right
to display options for the
highlighted item.
3,2 Pressthe selector up or down
to highlight an option.
3.3 PressMENU/OKto select the
highlighted option.
3.4 Press DISP/BACKwhen finished
to return to the shooting
mode screen or playbackscreen.
J;b
iilii! i&i:!i!ii!
A
83

}q_eSe_up M_nu
84
Setu_ Menu OptionsMenu item ' Description ' Options Default
[] DATE/TIME Set tile camera clock (pg. 14).
_J TIME DIFFERENCE Set the clock to local time (pg. 86). I_)/-( -_
_/LANG. Choose a language (pg. 14). See page 107 ENGLISH
When silent mode is on, the flash does not fire (except when
using o,_ mode), operation sounds and the shutter sound are
[] SILENTMODE not heard, the sound is muted when playing back movies or ON/OFF OFF
,,ol voice memos, and the self-timer lamp and shooting indicator
do not light (pg. 36).
Reset all settings except Frame number, DATE/TIME,TIMEDIFFERENCE,BACKGROUNDCOLOR,and VIDEOSYSTEMto default
[] RESETvalues. A confirmation dialog will be displayed, press the
selector left or right to highlight OK and press MENU/OK
[] FORMAT Format internal memory or memory cards (pg. 87).
Choose how long pictures are displayed after shooting (pg. 3 SEC/1.5 SEC/[] IMAGEDISP. 87). ZOOM(CONTINUOUS)/OFF 1.5 SEC
[] FRAMENO. Choose how files are named (pg. 88). CONT./RENEW CONT.
,,o2 [] ILLUMINATION Turn the shooting indicator on or off (pg. 88). ON/OFF ON
[] OPERATIONVOL. Adjust the volume of camera controls. ,_,11/,_'I/,_'/,_OFF ,_,I
[] SHUTTERVOLUME Adjust the volume of the shutter sound. 't'11/'t'1/'t'/'IOFF 't'1
Im SOUND Choose shutter, start-up, and control sounds (pg. 89).
[] PLAYBACKVOLUME Adjust the volume for movie and voice memo playback (pg. 89).
m LCDBRIGHTNESS Control the brightness of the monitor (pg. 89). -5 +5 0
[] LCDMODE Turn display power saving mode on or off. ON/OFF ON
[] AUTOPOWEROFF Choose the auto power off delay (pg. 89). 5 MIN/2 MIN/OFF 2MIN
[] DIGITALIS Reduces camera shake and moving-subject blur. AUTO/OFF OFF
_J REDEYEREMOVAL Remove "red-eye" effects caused by the flash. ON/OFF ON

The_Setup/_,lenu
Menu item ' Description ' Options Default
[] DIGITALZOOM Enable or disable digital zoom (pg. 90). ON/OFF OFF
[] SAVEORGIMAGE Choose whether to save unprocessed copies of pictures taken ON/OFF OFFusing red-eye removal.
_,4 [] BACI(GROUNDCOLORChoose the desic_n of the menu screen. Color1/Color2/Color3 Color2
[] GUIDANCEDISPLAY Choose whether to display tool tips. ON/OFF ON
[] VIDEOSYSTEM Choose a video mode for connection to a TV (pg. 4g). NTSC/PAL
85

The ;'_e_upM_'nu
[] TIME DIFFERENCE
When travelling, use this option to switch the camera clock instantly from your home time zone to
the local time at your destination.
1 Specify the difference between local timeand your home time zone.
1.1Press the selector up or down A
to highlight _._ LOCAL.
®T
1.2Press the selector right to :;display the time difference.
1.3Press the selector left or right A
to highlight +,-, hours,or _$_.minutes; press up or down ®to edit. The minimum v
increment is 15minutes.
2
1.4 PressMENU/OKwhen settings
are complete.
Switch between local time and yourhome time zone.
To set the camera clock to local time,
highlight + LOCAL and press MENU/OK
To set the clock to the time in your hometime zone, select 1_ HOME. If + LOCAL
is selected, _,_ will be displayed in themonitor for three seconds after the camera
enters shooting mode, and the date will be
displayed in yellow.
r =1
(@213112050 10;00 AM
After changing time zones, check that thedate and time are correct.
86
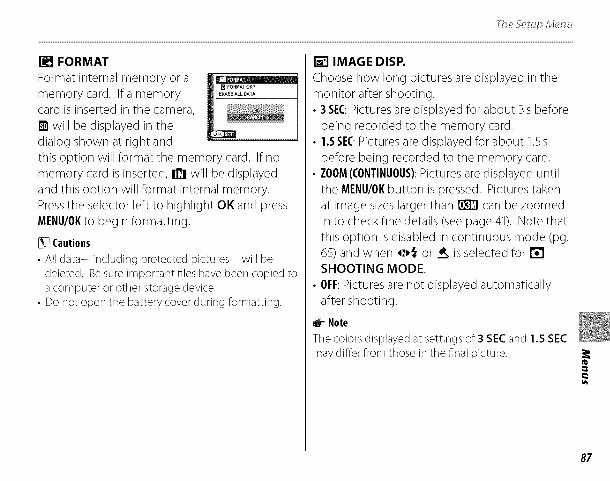
The ;'_e_upMenu
[] FORMAT
Format internal memory or a
memory card. Ifa memorycard is inserted in the camera,
I_Iwill be displayed in the
dialog shown at right and
this option will format the memory card. If no
memory card is inserted, _ will be displayed
and this option will format internal memory.
Pressthe selector left to highlight OK and press
MENU/OKto begin formatting.
[] Cautions
• All data--including protected pictures--will bedeleted. Be sure important files have been copied toa computer or other storage device.
• Do not open the battery cover during formatting.
[] IMAGE DISP.
Choose how long pictures are displayed in the
monitor after shooting.
• 3 SE(:Pictures are displayed for about 3 s before
being recorded to the memory card.
• 1.5SEC:Pictures are displayed for about 1.5s
before being recorded to the memory card.
• ZOOM(CONTINUOUS}:Pictures are displayed until
the MENU/OKbutton is pressed. Pictures taken
at image sizes larger than l_ can be zoomed
in to check fine details (see page 41). Note that
this option is disabled in continuous mode (pg.65) and when o,_ or _ is selected for []SHOOTING MODE.
• OFF:Pictures are not displayed automatically
after shooting.
41_Note
Tile colors displayed at settings of 3 SECand 1.5 SECmay differ from those in tile final picture.
87
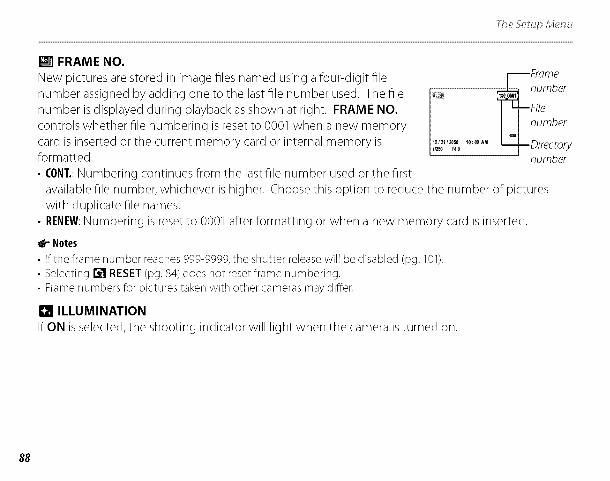
The Setup Menu
[] FRAME NO.
New pictures are stored in image files named using a four-digit file
number assigned by adding one to the last file number used. The file /_,;_
number is displayed during playback as shown at right. FRAME NO.
controls whether file numbering is reset to 0001 when a new memory
card is inserted or the current memory card or internal memory is _1,20F,._HAMformatted.
• (:ONT.:Numbering continues from the last file number used or the first
Frame
number
_i_ernberD_r_°rrY
available file number, whichever is higher. Choose this option to reduce the number of pictures
with duplicate file names.
• RENEW:Numbering is reset to 0001 after formatting or when a new memory card is inserted.
qrr Notes
• If the frame number reaches 999-9999, the shutter releasewill be disabled (pg. 101).• Selecting [] RESET(pg. 84) does not reset frame numbering.• Frame numbers for pictures taken with other cameras may differ.
[] ILLUMINATIONIfON isselected, the shooting indicator will lightwhen the camera isturned on.
88

The Setup Menu
[] SOUND
Choose the sounds used for the shutter, at start
up, and for camera controls. Press the selector
up or down to highlight an option and press
left or right to select a sound. Press MENU/0Ktoselect.
[] PLAYBACK VOLUME
Adjust the volume for movie
and voice memo playbackand slide show music. Press
the selector up or down to
adjust the volume, then pressMENU/OK
[] LCD BRIGHTNESS
Adjust tile LCD brightness.
Press the selector up or down toadjust tile brightness, then pressMENU/OK
[] LCD MODE
If ON is selected, the monitor will automatically
dim after a few seconds on inactivity to conserve
power. Monitor brightness will return to normal
when the shutter button is pressed.
The monitor will not dim when viewing picturesor movies.
[] AUTO POWER OFF
Choose the length of time before the camera
turns off automatically when no operations
are performed. Shorter times increase batterylife; if OFF is selected, the camera must be
turned off manually. Note that regardless of
the option selected, the camera will not turn
off automatically when connected to a printer
(pg. 50) or computer (pg. 55), while recording
or viewing a movie or when a slide show is in
progress (pg. 74).
Tip:Turningthecameraonagain
To turn the camera on and shoot, open the lens coverfully. To turn the camera on and view images, press[] (pg. 13).
89

The ;Setup Menu
[] DIGITAL ZOOMIfON isselected, pressingTat the maximumoptical zoom position will trigger digital zoom,further magnifying the image. To cancel digitalzoom, zoom out to the minimum digital zoomposition and pressW.
Zoom indicator,DIGITAL ZOOM off
Zoom indicator,DIGITAL ZOOM on
w T w T
I m _1 Ib >l I< >l_-"_l
Opfic_lzoom Opfic_l zoom Digi_dlzoom
[] Caution
Digital zoom produces lower quality images than
optical zoom.
90

Optional Accessories
The camera supports a wide range of accessories from FUJIFILMand other manufacturers.
• ComputerRelated
1
USB
(bmputer (_wilable fromthiro'-par_ysuppliers)
SDcardslotor card reader
• Printing
PictBridge
PictBridge-compatib/eprinter (dvoilablefromthiro'-par:ysuppliers)
USB
Prin_er
(availablefrom third-party suppliers)
DIGITAL CAMERA
HNEPIX Z70 series
SD/SDHCmemory card
• Audio/Visual
Audio/visual
output
TV(dvai/ab/efromthiro'-par:ysuppliers)
(bnnect the HDplayer and TVusingan HDM/ cable (dvai/ab/efrom third-par_ysuppliers)
HDplayerHigh-dehnition TV
(availablefromthird-party suppliers)
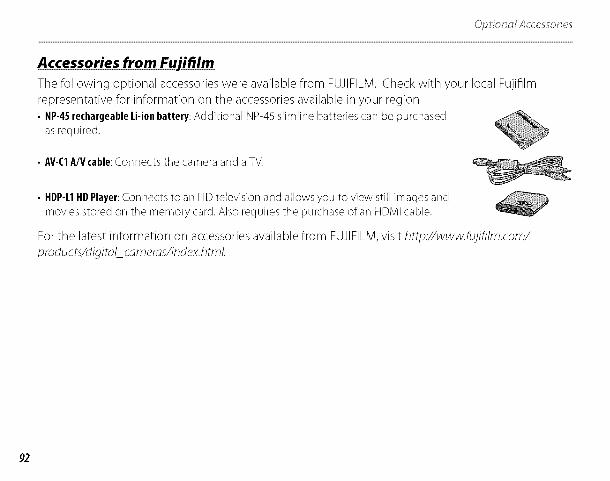
Accessories from Fujifilm
The following optional accessories were available from FUJIFILM. Check with your local Fujifllm
representative for information on the accessories available in your region.
• NP-45rechargeableLi-ionbattery:Additional NP-45 slimline batteries carl be }urchasedasrequired.
• AV-C1A/Vcable:Connects tile camera and a TV.
• HDP-L1HDPlayer:Connects to an HD television and allows you to view still images and
movies stored on tile memory card. Also requires tile purchase of an HDMI cable.
For the latest information on accessories available from FUJIFILM,visit http://www.fujifi/m.com/
products/digitol_comeros/index.html.
92
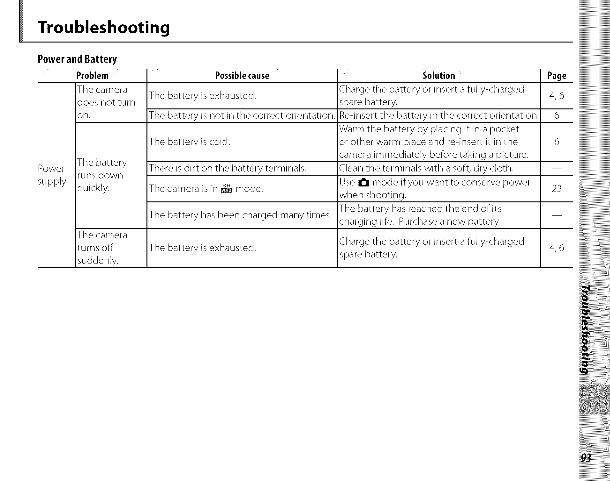
iiiiiiiiiiiiiiiiiiiiiiiiiiiiiiii!iiiiiiiiiiiiiiiiiiiiiiiiiiiiiiii!
Troubleshootingiiiiiiiiiiiiiiiiiiiiiiiiiiiiiiiii!!!!!!!!!!!!!!!!!!!!!!!!!!!!!!!!!
PowerandBattery .
Problem Possiblecause • Solution Page
The camera The battery is exhausted. Charge the battery or insert a fully-chargeddoes not turn spare battery. 4, 6
on. The battery is not in the correct orientation. Re-insert the battery in the correct orientation. 6
Warm the battery by placing it in a pocket
The battery is cold. or other warm place and re-insert it in the
camera immediately before taking a picture.
Power The battery There is dirt on the battery terminals. Clean the terminals with a soft, dry cloth.runs clown
supply quickly. The camera is in _ mode. Use I_ mode if you want to conserve powerwhen shooting.
The battery has reached the end of itsThe battery has been charged many times.
charging life. Purchase a new battery.
The camera
turns off The battery is exhausted. Charge the battery or insert a fully-charged
suddenly, spare battery.
iiiiiiiiiiiiiiiiiiiiiiiiiiiiiiiiiiiiiiiiiiiiiiiiiiiiiiiiiiiiiiii!iiiiiiiiiiiiiiiiiiiiiiiiiiiiiiiii
iiiiiiiiiiiiiiiiiiiiiiiiiiiiiiiil!i!i!i!i!i!i!i!i!i!i!i!i!i!i!i!i!i!i!i!i!i!i!i!i!i!i!i!i!i!i!i!ii
23
4,6

7_ouble_,:hoo_ip?q
94
Problem Possible cause • Solution Page
Charging does The battery is not correctly inserted. 4
not start. The battery is not in the correct orientation. 4
Charging is slow. The temperature is low. 5
Battery There is dirt on the battery terminals.
chargerThecharginglamp lights, butthe battery doesnot charge.
The battery has been charged many times.
Re-insert the battery in the charger.
Re-insert the battery in the correct orientation.
Charge the battery at room temperature.
Clean the terminals with a soft, dry cloth.
The battery has reached the end of its
charging life. Purchase a new battery. If
the battery still falls to charge, contact your
FUJIFILM dealer.
Page
14
Page
Menus and Displays
Problem I Possiblecause I SolutionI
Menus and displays are ,IEnglishis not selected for the _=_/LANG .............
not in English. Ioption in the setup menu.belec[ I-I_1_1 LI_M,
Shooting
Problem ' Possiblecause " Solution
Memory is full. Insert a new memory card or delete pictures. 8, 43
No picture is Memory is not formatted. Format the memory card or internal memory. 87
taken when There is dirt on the memory card contacts. Clean the contacts with a soft, dry cloth. 9
the shutter The memory card is damaged. Insert a new memory card. 8
Taking button is Charge the battery or insert a fully-charged
)ictures )ressed. The battery is exhausted, spare battery. 4, 6
The camera has turned off automatically. Turn the camera on. 13, 89
The flash has fired. 35
The monitor
goes dark after
shooting.
The camera
does not focus.Focus
The subject is close to the camera.
The subject is far away from the camera.
The subject is not suited to autofocus.
The monitor may darken while the flash
charges. Wait for the flash to charge.
Select macro mode.
Cancel macro mode.
Use focus loci<.
34
30
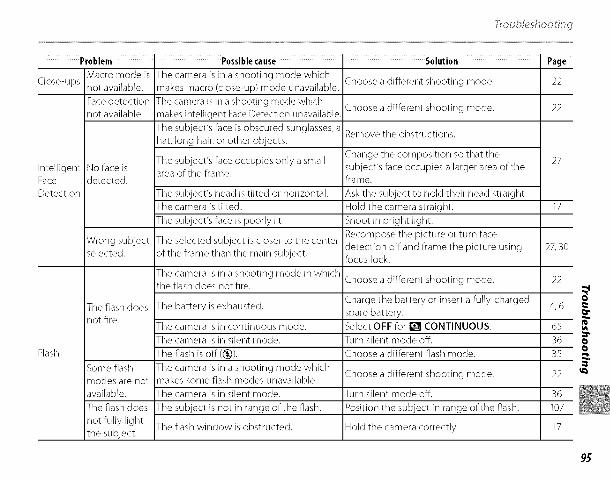
7rouble:>_,;hoo_inq
Problem ' Possible cause : Solution Page
Macro mode is Choose a different shooting mode. 22not available.
Face detection Choose a different shooting mode. 22not available.
Remove the obstructions.
Close-ups
IntelligentFace
Detection
Flash
The camera is in a shooting mode which
makes macro (close-up) mode unavailable.
The camera is in a shooting mode which
makes Intelligent Face Detection unavailable.
The subject's face is obscured sunglasses, a
hat, long hair, or other objects.
No face is The subject's face occupies only a small 27area of the frame.
detected.
The subject's head is tilted or horizontal.
The camera is tilted. 17
The subject's face is poorly lit.
Wrong subjectselected.
The flash doesnot fire.
Some flashmodes are notavailable.The flash does
not fully lightthe subject.
The selected subject is closer to the center
of the frame than the main subject.
Change the composition so that the
subject's face occupies a larger area of theframe.
Ask the subject to hold their head straight.
Hold the camera straight.
Shoot in bright light.
Recompose the picture or turn face
detection offand frame the picture using
focus lock.
The camera is in a shooting mode in whichChoose a different shooting mode.
the flash does not fire.
The battery is exhausted.
The camera is in continuous mode.
The camera is in silent mode.
The flash is off (_).
The camera is in a shooting mode which
makes some flash modes unavailable.
The camera is in silent mode.
The subject is not in range of the flash.
The flash window is obstructed.
Charge the battery or insert a fully-charged
spare battery.
Select OFF for [] CONTINUOUS.
Turn silent mode off.
Choose a different flash mode.
Choose a different shooting mode.
Turn silent mode off.
Position the subject in range of the flash.
Hold the camera correctly.
27, 30
22
0
4,6
6s11-
36 oo
3s _.22
36
107
17
95

Problem Possible cause • Solution Page
it mode 4, 6
Movies 22
110
17
19, 30,
100
35
Problem 63
images
Can not take The battery is low. Charge the battery or insert a fully-charged_ictures. spare battery.
Can not recordThe camera is in it mode. Choose a different shooting mode.movies.
The lens is dirty. Clean the lens.
The lens is blocked. Keep objects away from the lens.Pictures areblurred. !AF is displayed during shooting and the
focus frame is displayed in red. Check focus before shooting.
[o ° is displayed during shooting. Use the flash or a tripod.
Pictures are The ambient temperature is high and the This is normal and does not indicate a
mottled, subject is poorly ]it. malfunction. Choose a lower sensitivity.
White or purple vertical lines may appear
when a very bright object is framed in the
display. This is normal and does not indicateSmear appears The sun or another bright object was in a malfunction. Smear is not recorded in
in pictures, the frame, photographs but may appear in movies. If
possible, avoid shooting movies with bright
objects in or close to the frame.
104
96
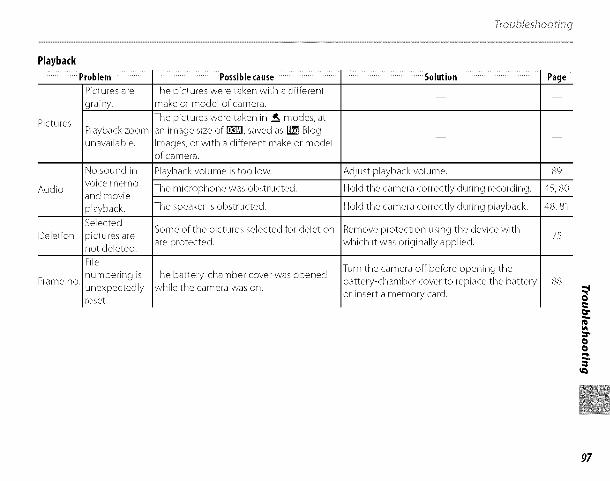
7muble_,:hor>tnq
Playback
Problem Possiblecause • Solution Page
Pictures are Tile pictures were taken with a different
grainy, make or model of camera.
The pictures were taken in _t modes, atPicturesPlayback zoom an image size of I_[I, saved as [] Blog
unavailable. Images, or with a different make or modelof camera.
Playback volume is too low. Adjust playback volume. 89
Audio The microphone was obstructed. Hold the camera correctly during recording. 45, 80
The speaker is obstructed. Hold the camera correctly during playback. 48, 81
Deletion Some of the pictures selected for deletion Remove protection using the device with 75are protected, which it was originally applied.
Frame no.
No sound in
voice memo
and movie
playback.
Selected
)ictures are
not deleted.
File
numbering is
unexpectedly
reset.
The battery-chamber cover was openedwhile the camera was on.
Turn the camera off before opening the
battery-chamber cover to replace the battery
or insert a memory card.
88
o
€l.
o0
97
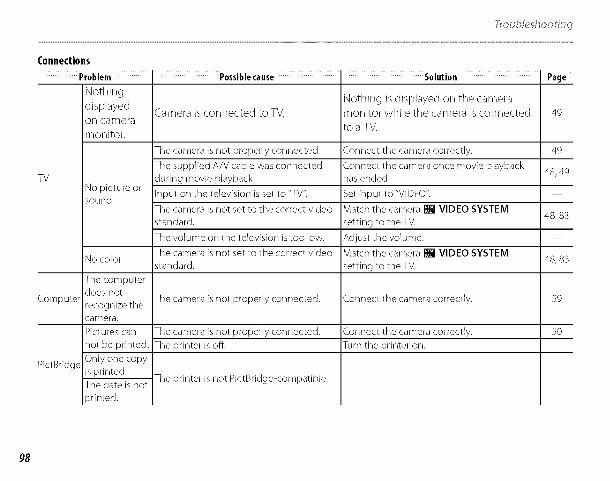
7m ubleshoo tn q
Connections
Problem Possiblecause • Solution Page
Nothing Nothing is displayed on the camera
displayed Camera is connected to TV. monitor while tile camera is connected 49on camera
monitor, to a TV.
Tile camera is not properly connected. Connect tile camera correctly. 49
Tile supplied A/V cable was connected Connect the camera once movie playback 48, 49TV during movie playback, has ended.
No picture or Input on the television is set to "TV'. Set input to "VIDEO".sound.
The camera is not set to the correct video Match the camera [] VIDEO SYSTEM48,83
standard, setting to the TV.
The volume on the television is too low. Adjust the volume.
The camera is not set to the correct video Match the camera [] VIDEO SYSTEMNo color. 48, 83
standard, setting to the TV.
Computer The camera is not properly connected. Connect the camera correctly. 59
The camera is not properly connected. Connect the camera correctly. 50
The printer is off. Turn the printer on.
PictBridge
The computerdoes not
recognize the
camera.
Pictures can
not be printed.
Only one copy
is printed.
The date is not
:)rinted.
The printer is not PictBridge-compatible.
98

Miscellaneous
Problem Possiblecause " Solution Page
Nothing happens when Temporary camera malfunction. 6
the shutter button is:)ressed. The battery is exhausted. 4, 6
The camera does not
function as expected. 6
The camera accidentallyturns off.
No sound.
I want to charge thebattery while overseas.
Temporary camera malfunction.
The memory card has been inserted or:)ulled out.
The camera is in silent mode.
Check the label on the battery charger.
Remove and reinsert the battery.
Charge the battery or insert a fully-charged
spare battery.
Remove and reinsert the battery. If the
problem persists, contact your FUJIFILMdealer.
Insert the memory card, dose the battery-
chamber cover, and then turn on the camera.
Turn silent mode off.
The battery charger can be used with voltages
of 100 240 V. Consult your travel agent for
information on plug adapters.
9
36
92
o
€l.
o0
99

Warning Messages and Displays
The following warnings are displayed in the monitor:
Warning Description • Solution
(red)(blinks red)
too
!AF(displayed in red with
red focus frame)
Aperture or shutter
speed displayed in red
PRESSTHESHUTTERBUTTON
TOGOBACKTOSHOOTINGMODE
CLOSETHELENSCOVER
TOTURNOFFTHECAMERA
FOCUSERROR
TURNOFFTHECAMERA
ANDTURNONAGAIN
Low battery.
Battery exhausted.
Slow shutter speed. Picture may be blurred.
The camera can not focus.
Charge the battery or insert a fuNy-charged spare
battery.
Use the flash or mount the camera on a tripod.
Use focus lock to focus on another subject at the
same distance, then recompose the picture (pg.
30).
If the subject is poorly ]it, try focusing at a distance
of about 2m (6ft. 7in.).
Use macro mode to focus when taking dose-ups.
The subject is too bright or too dark. TheIf the subject is dark, use the flash.
_icture win be over- or under-exposed.
To exit to shooting mode, press the shutter button.[] button pressed while lens cover is open. Close the lens cover to turn the camera off.
Turn the camera off and then on again, taking care
Camera malfunction, not to touch the lens. if the message persists, contacta FUJIFILM dealer.
No memory card inserted when COPY is
NOCARD selected in the playback menu. Insert a memory card.
The memory card or internal memory is not Format the memory card or internal memory (pg.
formatted. 87).
Clean the contacts with a soft, dry cloth. If theCARDNOTINITIALIZED The memory card contacts require
message is repeated, format the memory card (pg.cleaning. 87). If the message persists, replace the memory card.
Camera malfunction. Contact a FUJIFILM dealer.
100

Warning Description " Solution
Format the memory card (pg. 87).
CARDERROR Clean the contacts with a soft, dry cloth. If themessage is repeated, format the memory card (pg.
87). If the message persists, replace the memory card.
Contact a FUJIFILM dealer.
MEMORYFULL
MEMORYFULL
INTERNALMEMORYISFULL
INSERTA NEWCARD
WRITEERROR
PROTECTEDCARD
BUSY
FRAMENO,FULL
The memory card is not formatted for usein the camera.
The memory card contacts require cleaning
or the memory card is damaged.
Camera malfunction.
The memory card or internal memory is full;
)ictures can not be recorded or copied.
Memory card error of connection error.
Not enough memory remaining to record
additional pictures.
The memory card or internal memory is notformatted.
The memory card is locked.
The memory card is incorrectly formatted.
The camera has run out of frame numbers
current frame number is 999-9999).
Delete pictures or insert a memory card with more
free space.
Re-insert the memory card or turn the camera off
and then on again. If the message persists, contact aFUJIFILM dealer.
Delete pictures or insert a memory card with more
free space.
Format the memory card or internal memory (pg.
87).Unlock the memory card (pg. 8). o
Use the camera to format the memory card (pg. 87).
Format the memory card (pg. 87) and select RENEW
for the [] FRAME NO. option in the setup menu. o
Take a picture to reset frame numbering to 100-0001, _o
then return to the [] FRAME NO. menu and selectCONT.
101

Warning Description " Solution
The file can not be played back.
Clean the contacts with a soft, dry cloth. If the
READERROR message is repeated, format the memory card (pg.
87). If the message persists, replace the memorycard.
Contact a FUJlFILM dealer.
Remove protection before deleting, rotating, or
PROTECTEDFRAME adding voice memos to pictures.
The voice memo can not be played back.
Contact a FUJIFILM dealer.
Select a different source.
ERROR
NOIMAGE
!_ NOIMAGE
CANNOTCROP
CANNOTCROP
[] CANNOTCROP
DPOFFILEERROR
CANNOTSETDPOFCANNOTSETDPOF
CANNOTROTATE
CANNOTROTATE_=_CANNOTEXECUTE
eI_CANNOTEXECUTE_CAN NOTEXECUTE
[] CANNOTEXECUTE
The file is corrupt or was not created withthe camera.
The memory card contacts require
cleaning.
Camera malfunction.
An attempt was made to delete, rotate, or
add a voice memo to a protected picture.
Voice memo file is corrupt.
Camera malfunction.
The source device selected in the playback
COPY menu contains no pictures.
An attempt was made to crop a I_ picture.
The picture selected for cropping is damagedor was not created with the camera.
An attempt was made to crop a blog image.
The DPOF print order on the current memory
card contains more than ggg images.
The picture can not be printed using DPOR
Movies can not be printed using DPOF.
The picture can not be rotated.Movies can not be rotated.
EDIT FOR BLOG and RED EYE REMOVAL
can not be used with movies, pictures
created with other devices, pictures that can
not be viewed, or pictures created usingEDIT FOR BLOG.
These pictures can not be cropped.
Copy the pictures to internal memory and create a
new print order.
102

Warning Description • Solution
The shutter button was pressed in _ mode Charge the battery or insert a fully-charged spareCANNOTEXECUTE
when the battery was low.
The successive movie file has been
,,_.. CANNOTEXECUTE overwritten or renamed by computer orother make of camera.
PRESSANDHOLD An attempt was made to choose a flash
THEDISPBUTTONTO mode or adjust the volume with theDEACTIVATESILENTMODE camera in silent mode.
A connection error occurred while pictures
COMMUNICATIONERROR were being printed or copied to a computeror other device.
PRINTERERROR
PRINTERERROR
RESUME?
CANNOTBEPRINTED
Printer out of paper or ink, or other printer
error.
An attempt was made to print a movie, a
)icture not created with the camera, or a
)icture in a format not supported by the)rinter.
battery.
Clips can not be added to files that have been
overwritten or renamed by a computer or othermake of camera.
Exit silent mode before choosing a flash mode or
adjusting the volume.
Confirm that the device is turned on. If the device
is connected via USB, check that the cable is
connected.
Check printer (see printer manual for details). To
resume printing, turn the printer offand then turn itback on.
Check printer (see printer manual for details). If printing
does not resume automatically, press MENU/OKto
resume.Movies and some pictures created with other devices o
can not be printed. If the picture was created with _.
the camera, check the printer manual to confirm
that the printer supports the JFIFdPEG or Exif-JPEG _.,_"
format. If it does not, the pictures can not be printed.
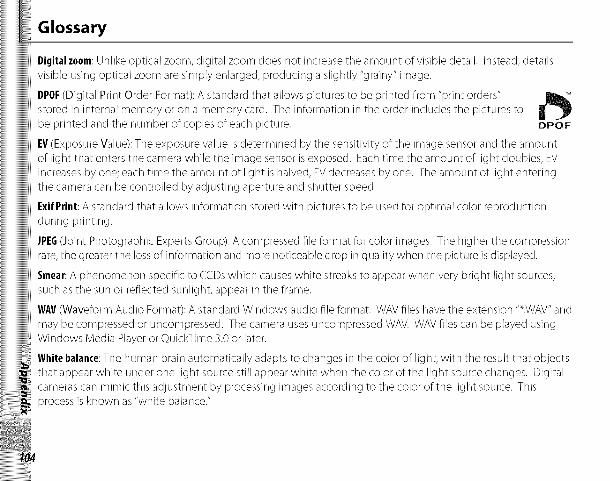
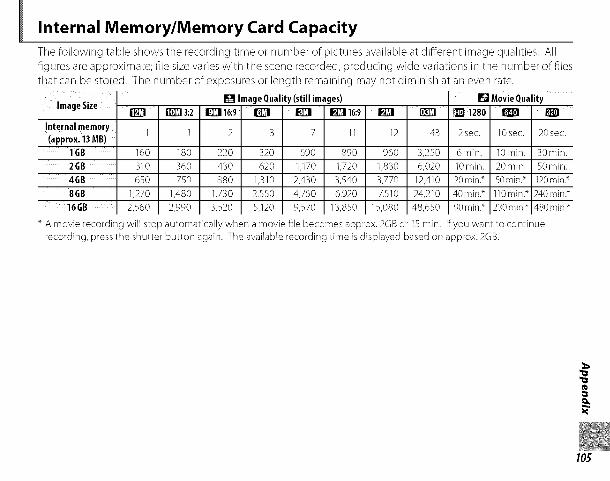
Internal Memory/Memory Card Capacity
The following table shows the recording time or number of pictures available at different image qualities. Allfigures are approximate; file sizevaries with the scene recorded, producing wide variations in tile number of filesthat carl be stored. Tile number of exposures or length remaining may not diminish at aneven rate.
I!_1Image Quality (still images) Itq Movie Quality
i_ i_3:2 I_ 16:9 I_ I_ I_ 16:9 I_ I_ _1280 _Image Size
Internal memory
(approx. 13 MB)1GB
2GB
4GB
8GB
_16GB
1 1 2 3 7 11 12 43 2sec. 10sec. 20sec.
160 180 220 320 590 890 960 3,250 6min. 10 min. 30min.
310 360 430 620 1,170 1,720 1,830 6,020 10min. 20min. 50min.
650 750 880 1,310 2,430 3,540 3,770 12,410 20rain. _ 50rain. _ 120rain._
1,270 1,480 1,730 2,550 4,750 6,920 7,510 24,210 40min. _ 110min. _ 240min. _
480 min._
A movie recording will stop automatically when a movie file becomes approx. 2GB or 15 min. Ifyou want to continue
recording, press the shutter button again. The available recording time is displayed based on approx. 2GB.
105
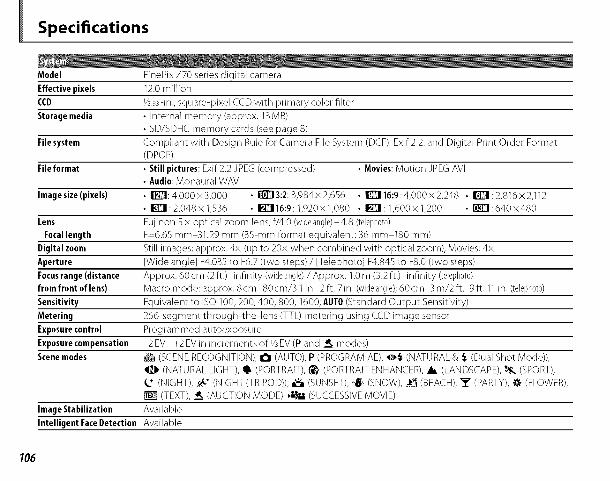
Specifications
Model FinePix Z70 series digital camera
Effective pixels 12.0 million
COD Y2ss-in., square-pixel CCD with primary color filter
Storage media • Internal memory (approx. 13MB)
• SD/SDHC memory cards (see page 8)
File system Compliant with Design Rule for Camera File System (DCF), Exif 2.2, and Digital Print Order Format
(DPOF)
Fileformat • Still pictures: Exif 2.2 JPEG (compressed) • Movies:Motion JPEG AVI
• Audio: Monaural WAV
Imagesize(pixels) • i]_l:4,000x3,000 • 1]_)3:2:3,984x2,656 • i_116:9:4,000x2,248 • 1[_]1:2,816x2,112
• !_1:2,048x1,536 • 1_116:9:1,920x1,080 • I_1:1,600x1,200 • [_[1:640x480
Lens Fujinon Sx optical zoom lens, f/4.0 (widean@e) 4.8 (teleph010)
Focallength F-6.65 mm 31.29 mm (3S-ram format equivalent: 36 mm 180 ram)
Digital zoom Still images: approx. 4x (up to 20x when combined with optical zoom); Movies: 4x
Aperture [Wide angle] F4.035 to F6.7 (two steps) / [Telephoto] F4.845 to F8.0 (two steps)
Focusrange (distance Approx. 60cm(2ft.) infinity(wideangie)/Approx, l.0m(3.2ft.) infinity(telephoto)
from front of lens) Macro mode: approx. 8 cm 80 cm/3i in. 2 ft. 7 in. (wideangle);60 cm 3 m/2 ft. 9 ft. 11in. (tdeph010)
Sensitivity Equivalent to ISO 100, 200, 400, 800, 1600; AUTO(Standard Output Sensitivity)
Metering 256-segment through-the-lens (TTL) metering using CCD image sensor
Exposurecontrol Programmed autoexposure
Exposurecompensation 2 EV +2 EV in increments of Y_EV (P and _, modes)
Scenemodes _ (SCENE RECOGNITION), I_1 (AUTO), P (PROGRAM AE), _,_ (NATURAL & _, (Dual Shot Mode)),
O (NATURAL LIGHT), ql, (PORTRAIT), ('_ (PORTRAIT ENHANCER), _ (LANDSCAPE), _, (SPORT),
(NIGHT), _-* (NIGHT(TRIPOD)), _ (SUNSET), *t_ (SNOW), _1 (BEACH), "_" (PARTY), -_ (FLOWER),
(TEXT), _ (AUCTION MODE), ,'-_'-" (SUCCESSIVE MOVIE)
Image Stabilization Available
Intelligent FaceDetection Available
106

Shutterspeed 4s V2,ooos;combined mechanical and electronic shutter
Continuous • TOP3: Up to 1fps; max 3 frames
Focus • Mode: Single AF • Autofocussystem: Contrast-detect TTL AF• Focus-areaselection: AF CENTER and TRACKING
White balance Automatic scene detection; six manual preset modes for direct sunlight, shade, daylight fluorescent,
warm white fluorescent, cool white fluorescent, and incandescent lighting
Self-timer Couple timer/Group timer/Approx. 2 see./10 sec.
Flash Auto flash; effective range when sensitivity is set to AUTOis approx. 70 cm 3.1m/2 ft. 4 in. 10ft. I in.
(wideangle),70 cm 2.7 m/2 ft. 4 in. 8 ft. 9 in. (telephoto),or 30 cm 80 cm/1 ft. 2 ft. 7 in. (macromode)
Flash modes Auto, fill flash, off, slow sync (red-eye removal off); auto with red-eye removal, fiJ] flash with red-eye
removal, off, slow sync with red-eye removal (red-eye removal on)
Monitor 2.7-in., 230k-dot color LCD monitor; frame coverage approx. 96%
Movies Camera can record movies with monaural sound and a frame size of 1280 x 720, 640 x 480 or
320 x 240 at a frame rate of 30 fps
Shooting options Scene recognition, Intelligent Face Detection with red-eye removal, high-speed shooting, best
framing, and frame number memory
Playback options Intelligent Face Detection, red-eye removal, micro thumbnail, edit for bJog, movie edit, crop (still
pictures), resize, slide show, transition, multi-frame playback, image rotation, voice memo, and imagesearch
Other options PictBridge, Exif Print, FinePix COLOR, language selection (Arabic, Simplified Chinese, Traditional
Chinese, Czech, Danish, Dutch, English, Finnish, French, German, Greek, Hungarian, Italian, Japanese,
Korean, Lithuanian, Norwegian, Persian, Polish, Portuguese, Russian, SIovak, Spanish, Swedish, Thai,
Turkish and Ukrainian), time difference, silent mode _,
A/VOUT(audi0/vide00utput) NTSC or PALwith monaural sound
Digital input/output USB 20 High Speed with MTP/PTP connection ,_"
107
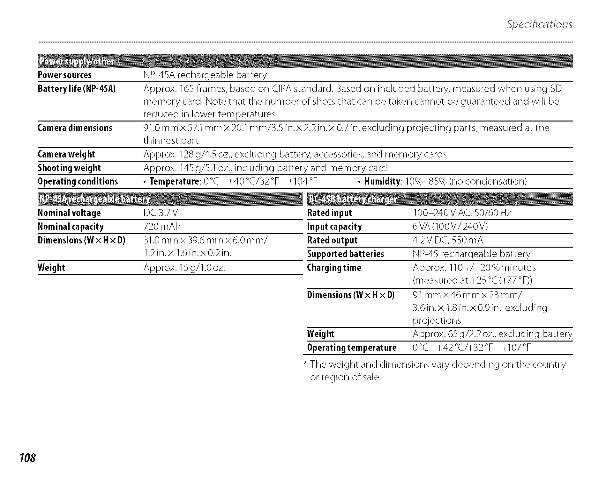
P0wer s0urces NP-45A rechargeable battery
Battery life (NP-45A) Approx. 165 frames, based on CIPA standard. Based on included battery, measured when using SD
memory card. Note that the number of shots that can be taken cannot be guaranteed and wiJ] be
reduced in lower temperatures.
Camera dimensions 91.0 mm x 57.1 mm x 20.1 mm/3.5 in. x 2.2 in. x 0.7 in.,excluding projecting parts, measured at the
thinnest part
Camera weight Approx. 128 g/4.5 oz., excluding battery, accessories, and memory cards
Shooting weight Approx. 145 g/5.1 oz., including battery and memory card
Operating conditions • Temperature: 0°C +40 °C/32 °F +104 °F • Humidity: 10% 85% (no condensation)
Nominal voltage DC 3.7V Rated input 100 240V AC, 50/60 Hz
Nominal capacity 720 mAh Input capacity
Dimensions(Wx Hx D) 31.0 mm x 39.6 mm x6.0mm/ Rated output
1.2 in.x 1.6 in.x 0.2 in. Supported batteries
Weight Approx. 15 g/1.0 oz. Charging time
Dimensions(W x Hx D)
6VA(100V/240V)
4.2V DC, 550mA
NP-45 rechargeable battery
Approx. 110+/ 20%minutes
(measured at +25 °C (+77 °F))
91 mmx46mmx23 mm/
3.6 in. x 1.8 in. x 0.9 in., excluding
projections
Weight Approx. 65 g/2.2 oz., excluding battery
Operatingtemperature O°C +42°C/+32°F +107°F
The weight and dimensions vary depending on the country
or region of sale.
108
Notesonthe Battery andBattery Charger
• Tile battery and charger may become warm to the touch during charging This is normal and does notindicate a malfurlction If possible, charge the battery in a welI-venSlated location
• Tile battery charger may vibrate when in use This is normal and does not indicate a malfunctiork
• If the charger causes radio interference, increase the distance between the charger and the radio receiver
• Do not leave the charger in Iocadorss that are very dusty or exposed to strong vibradors, extreme humidity, or
high temperatures (for example, irs direct sunlight or next to a heater)• The battery charger cars be used with input voltages of 100-240V AC and 50 or 60 Hz The shape of the
plug varies with the country of sale; consult your travel agent to determine whether the charger cars be usedabroad
ColorTelevisionSystems
NTSC(National Television System Committee) is a color television telecasting specification adopted mainly inthe U.S.A.,Canada,and Japan. PAL(PhaseAlternation by Line) is a color television system adopted mainly inEuropean countries and China.
Notices
• Specifications subject to change without notice. FUJIFILM shall not be held liable for damages resulting fromerrors in this manual.
• Although the monitor is manufactured using advanced high-precision technology, small bright points and
anomalous colors (particularly in the vicinity of text) may appear. This is normal for this type of monitor anddoes not indicate a malfunction; images recorded with the camera are unaffected.
• Digital cameras may malfunction wiser] exposed to strong radio interference (e.g., electric fields, static
electricity, or line noise).
• Due to the type of lens used, some distortion may occur at the periphery of images. This is normal.
109

Caring for the Camera
To ensure continued enjoyment of the product, observe the following precautions.
Storage and UseIf the camera will not be used for an extended
period, remove the battery and memory card.Do not store or use the camera in locations that
are:
• exposed to rain, steam, or smoke
• very humid or extremely dusty
• exposed to direct sunlight or very high
temperatures, such as in a closed vehicle on a
sunnyday
• extremely cold
• subject to strong vibration
• exposed to strong magnetic fields, such as
near a broadcasting antenna, power line, radar
emitter, motor, transformer, or magnet• in contact with volatile chemicals such as
pesticides
• next to rubber or vinyl products
110
• Condensation
Sudden increases in temperature, such as occur
when entering a heated building on a cold day,can cause condensation inside the camera. If
this occurs, turn the camera off and wait an hour
before turning it on again. If condensation forms
on the memory card, remove the card and wait
for the condensation to dissipate.
CleaningUse a blower to remove dust from the lens and
monitor, then gently wipe with a soft, dry cloth.
Any remaining stains can be removed by wiping
gently with a piece of FUJIFILM lens-cleaning
paper to which a small amount of lens-cleaning
fluid has been applied. Care should be taken to
avoid scratching the lens or monitor. The camera
body can be cleaned with a soft, dry cloth.
Do not use alcohol, thinner, or other volatilechemicals.
Travelling
Keep the camera in your carry-on baggage.
Checked baggage may suffer violent shocks that
could damage the camera.
Notes and Cautions
I• Read Instructions: All the safety
and operating instructions should
be read before the appliance is
operated
• Retain Instructions: The safety andoperating instructions should beretained for future reference
• HeedWarnings: All warnings on the
appliance and in the operatinginstructions should be adhered to
• Followlnstructions: All operatingand use instructions should be
followed.
Power Sources: This video prod uct
should be operated only from thetype of power source indicated on
the marking label If you are not sure
of the type of power supply to your
home, consult your appliance dealer
or local power company For videoproducts intended to operate from
battery power, or other sources,
refer to the operating instructions
Grounding or Polarization: This
video product is equipped with a
polarized alternating current line
plug (a plug having one bladewider than the other)This plug will
fit into the power outlet only oneway, This is a safety feature If you
are unable to insert the plug fully
into the outlet, try reversing the
plug If the plug should still fail tofit,contact your electrician to replace
IMPORTANTSAFETYINSTRUCTIONSyour obsolete outlet Do not defeatthe safety purpose of the polarized
plug
AlternateWarnings:Thisvideo
product is equipped with a 3 wire
grounding type plug, a plug having
a third (grounding) pin. This plug
will only fit into a grounding type
power outlet This is a safety feature
If you are unable to insert theplug into the outlet, contact your
electrician to replace your obsolete
outlet Do not defeat the safety
purpose of the grounding typeplug
Overloading:Do not overload wall
outlets and extension cords as thiscan result in a risk of fire or electric
shock,
Ventilation: Slots and openingsin the cabinet are provided forventilation and to ensure reliable
operation of the video product
and to protect it from overheating,
and these openings must not beblocked or covered.
The openings should never be
blocked by placing the video
product on a bed, sofa, rug, or othersimilar surface
This video product should not
be placed in a built in installationsuch as a bookcase or rack unless
proper ventilation is provided or the
manufacturer's instructions have
been adhered to.
This video product should never
be placed near or over a radiator or
heat register
Attachments: Do not use
attachments not recommended by
the video product manufacturer as
they may cause hazards
Water and Moisture: Do not use this
video product near water for
example, near a bath tub, washbowl, kitchen sink, or laundry
tub, in a wet basement, or near a
swimming pool, and the like
Power-CordProtection: Power Supplycords should be routed so that
they are not likely to be walked
on or pinched by items placed
upon or against them, payingparticular attention to cords at
plugs, convenience receptacles, and
the point where they exit from the
appliance,
Accessories:Do not place this video
product on an unstable cart, stand,
tripod, bracket, or table, The video
[)roduct may fall, causing seriousmjury to a child or adult, andserious damage to the appliance
Use only with a cart, stand, tripod,
bracket, or table recommended
by the manufacturer, or sold with
the video product Any mounting
Iof the appliance should follow the
manufacturer's instructions, and
should use a mounting accessory
recommended by the manufacturer
An appliance andcart combination
should be moved
with care Quick
stops, excessiveforce, and uneven
surfaces may
cause the appliance and cartcombination to overturn.
OutdoorAntenna Grounding: If an
outside antenna or cable system is
connected to the video product, be
sure the antenna or cable systemis grounded so as to provide some
protection against voltage surges and
built up static charges, Section 810
of the National Electrical Code, ANSI/
NFPANo 70, provides information
with respect to proper grounding ofthe mast and supporting structure,
grounding of the lead in wire to
an antennadischarge unit, size of
grounding conductors, location ofantenna discharge unit, connection
to grounding electrodes, and
requirements for the groundingelectrode,
111
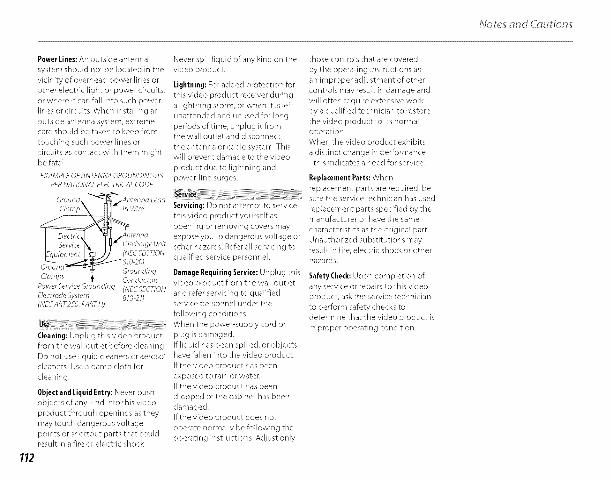
No_es ts'nd O_u Mn_
Power Lines:An outside antenna
system should not be located in the
vicinity of overhead power lines or
other electric light or power circuits,
or where it can fall into such powerlines or circuits When installing an
outside antenna system, extreme
care should be taken to keep from
touching such power lines orcircuits as contact with them mightbe fatal
EXAMPLEOFANTENNA GROUNDINGA5PERNATIONALELECTPICALCODE
Ground\ "_-_Antermo keod
I %,vk_' X IY" bischo,_eUnit
GIound- _€_ GroundingClamps _ Condudols
PowerServiceGrounding (NECSECTIONElectlode System 810_ 1)(NECART2bO PARTH)
iiUi!i_ilili:ii;!iiiii!i_i_iiiii!_i_!ii_i_iti¸iii_i;ilili_ii!i_i_ij_iiii_i_i_i_i_iiii_!!!!i_i_i_i_i_ii!!!i!ii!iiiii!i¸iiiii_!i!_iii!ii!!i_i_i_i_i_i_i¸i_ii_iiiIJiii!iii_iiiiiii_i_iiii!i_ii_i_iii!!iiiiii_ii_i_iliiiiillii!_!_¸!_!_ii_iii_ii¸i_iii!iiiiiiil(leaning: Unplug this video productfrom the wall outlet before cleaning
Do not use liquid cleaners or aerosol
cleaners Usea damp cloth for
cleaning
Objectand Liquid Entry: Never pusho_ects of any kind into this video
product through openings as they
may touch dangerous voltage
points or shortout parts that couldresult in a fire or electric shock
Never spill liquid of any kind on thevideo product
Lightniug_ For added protection forthis video product receiver during
a lightrfing storm, or when it is left
ur_attended and unused for long
periods oftime, unplug it fromthe wall outlet arm disconnect
the antenna or cable system. Thiswill prevent damage to the video
product due to lightning and
power-line surges.
_i_i_
Servicing: Do not attempt to servicethis video product yoursdf as
opening or removing covers may
expose you to dangerous voltage or
other hazards Refer all servicing toqualified service personnel
Damage RequiringService:Unplug this
video product from the wall outlet
arm refer servicir_g to qualifiedservice personnel under the
following conditions:
When the power supply cord or
plug is damaged
If liquid has been spilled, or objectshave fallen into the video product
If the video product has been
exposed to rain or water
If the video product has been
dropped or the cabinet has beendamaged
If the video product does not
operate normally be following the
operating instructions Adjust only
those controls that are covered
by the operating instructions as
an im proper adjustment of other
controls may result in damage and
will often require extensive work
by a qualified techniciarl to restorethe video product to its normal
operation
When the video product exhibitsa distinct change in performance
this indicates a need for service
Replacement Parts: When
replacement parts are required, besure the service techniciarl has used
replacement parts specified by themanufacturer or have the same
characteristics as the original part
Unauthorized substitutions mayresult in fire, electric shock or otherhazards
SafetyCheck: Upon completion of
any service or repairs to this videoproduct, ask the service technician
to perform safety checks to
determine that the video product is
in proper operating condition
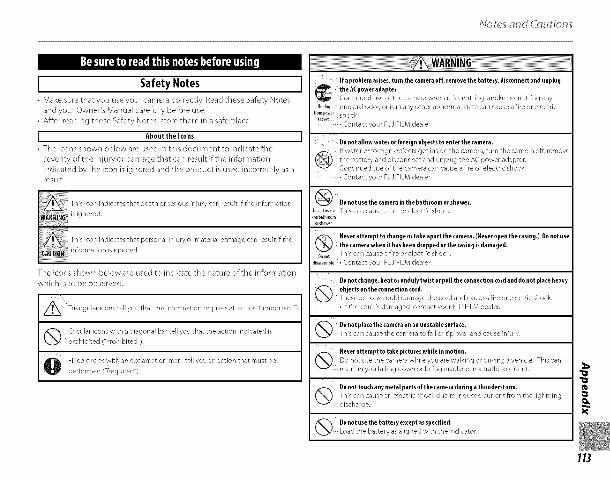
No_es ts'nd (T__ufon_;
I:]__iR _,'_'4"_j
I SafetyNotes I• Make sure that you use your camera correctly Read these Safety Notes
and your Owner's Manual carefully before use,
• After reading these Safety Notes,store them in a safe place
I About the Icons I
• The icons shown below are used in this document to indicate the
severity of the injury or damage that can result if the information
indicated by the icon is ignored and the product is used incorrectly as a
result
This icon indi ...... hat death ..... ious injur} .......... It if the h-ff..... ion
s q o ed
This icon indicates that personal injury o_ material damage can result if tile
i _ii_,nf_ .....,or,,_,_,noredI
The icons shown below are used to indicate the nature of the informationwhich is to be observed
Triangular icons tell you that this information requires attention ("important")
Circular icons with a diagonal bar tell you that tile action indicated is
prohibited ("Prohibited)
_ illed circles with an exclamation mark tell you an action that must be
performed ('Required'/ iI
__________________________________________________________________________________________________________________________________________________________________________________________________________________________:ii¸If a problem arises, turn the camera off, remove the battery, disconnect and unplug
_ the ACpower adapter.Continued use of the camera when it is ernitting smoke, is emittinq any
u,,_l.g unusual odor, or is in any other abnormal state carl cause a fire or electric
• Contact your RHIFILM dealer
Do not allow water or foreign objects to enter the camera.
ifwaterorforeigrlobiectsgethlsidethecamera, turnthecameraoff, remov e
tile battery and disconnect and unplug the AC power adapterContinued use of the camera can cause a fire or electric shock
• Corltact your FU IIFILM dealer
Do not use the camera in the bathroom or shower.
Do,,ot.se_ This can cause a fire or electric shock_ _ath,oom
°,s,owe,
Never attempt to change or take apart the camera. (Never open the casing.) Do not usethe camera when ithas been dropped or the casingis damaged.
This can cause a fire or electric shocko,,o
_is_ss_mb_e• Contact your FU ]IFILM dealer
Do not change, heat or unduly twist or pull the connection cord and do not place heavy
objects on the connection cord.These actions could damage the cord and cause a fire or electric shock
• If the cord is damaded, contact your F{JJIFILM dealer
Do not placethecamera on an unstable surface.
This can cause tile camera to fall ol tip over and cause iniury
Hever attempt to take pictures while in motion.
(_ Do not use the camera while you are walking or driving a vehicle This can
result in you fallinq down or beinq involved in a traffic acddent
Do not touch any metal parts of thecamera during a thunderstorm,
_ his can cause an electric shock due to induced current from the lightninq
discharge
Do not use the battery except as specified,Load the battery as aligned wRh the h-ldicator
113
Ho_es ts'nd ('i_t_ io__
Do not heat, changeor takeapart the battery. Do not drop or subject the batteryto
impacts. Do not store the battery with metallic products, Do not use chargers other
than the specified model to charge the battery,Any of these actions can cause the battery to burst or leak and cause fire or
iniury as a result
Use only the battery or ACpower adapters specified for usewit hthis camera. Donot
use voltages other than the power supply voltage shown.The use of other power sources can cause a f_re
If the battery leaks and fluid gets incontact with youreyes, skin or clothing. Flush
theaffected with clea water ndseek medicalattenti callarea n a on or a n emerge ncy
number right away.
Do not usethecharger to charge batteries other than those specified here.
recharcteable batteries can cause the battery to leak fluid, overheat or burst
When carrying the battery, install it ina digital camera or keep it in the hard case.
When storing the battery, keep it in t he hard case. When discarding, cover t he battery
terminals with insulation tape.O Contactwithothermetallicobjectsorbatterycouldcausethebatteryto
ictnite or burst
Memoly Card, seek medical attention or call an emergency number
Do not uset hiscamera in locations affected byoil fumes,steam, humidity or dust.
This can cause a fire or electric shock
Do not leave this camera in placessubject to extremely high temperatures.
Do not leave the camera in Iocatiuns such as a sealed vehicle or in direct
_" sunlight This can cause a fire
Keep out of the reach of small children.
This product could cause injury in the hands of a child
Do not place heavy objects on the camera.This can cause the heavy object to tip over or fall and cause injury
Do not move the camera while the ACpower adapter is still connected. Do not pull on
the connection cord to disconnect the ACpower adapter.T _is can damage the power cord ol cab es and cause a fire or e ectric s_ock
Do not use theAC power adapter when the plug isdamaged or the plug socket
Do not cover orwrap the camera or the ACpower adapter in a cloth or blanket.This can cause heat to build up and distort the casing ol cause a fire
When yo u are cleaning the camera o ryo udo not pla n to use the camera for anextended
O period, remove the battery and disconnect and unplug the ACpower adapter.Failure to du so can cause a fire or electric shock
When charging ends, unplug the charger from the power socket.Leavin_ the charger plugged into the power socket can cause a fire
Usinga flash too close to a person's eyes may tempo rarily affect the eyesighr.Take palticular care when photographing infants and youn_t children
When an xD-Picture Card isremoved, the card could come out of the slot too quickly.O Use your finger to hold it and gently release t he card.
Request regular internal testing and deaning for your _amera.
• Please note this is not a free of charge service
114

No_es ts'nd O_u ions
L Power Supply and Battery ]Confirmyour batterytype before reading
the following descriptions
The following explains proper useof batteries and how to prolongtheir life. klcorrect use of batteries
can cause shorter battery life, as
well as leakage, excessive heat, fire
or explosion
When shipped, the battery is notfully charged Always charge the
battery before using it
When carrying the battery, install
it in a digital camera or keep it inthe soft case
• Battery Features
• The battery gradually loses its
charge even when not used Use
a battery that has been chargedrecently (in the last day or two) to
take pictures
• To maximize the life of the battery,
turn the camera offas quickly aspossible when it is not being used .
• The number of availabJe frames
will be lower in cold locations or
at low temperatures Take along
a spare fully charged battery. Youcan also increase the amount of
power produced by putting the
battery in your pocket or another
warm place to heat it and then
loading it into the camera justbefore you take a picture
If you are using a heating pad,
take care not to place the batterydirectly against the pad The
camera may not operate if you
use a depleted battery in coldconditions
• Charging the Battery
• You carl charge the battery using
the battery charger (included)
• The battery can be charged atambient temperatures between
0°C and +40°C (+32°F and
+104°F) Refer to the OWN ER'SMANUAL for the time of
charging battery
• You should charge the batteryat an ambient temperaturebetween +10°C and +35°C
(+50°F and +gS°F)If you charge
the battery at a temperatureoutside this range, charging
takes longer because the
performance of the battery is
impaired
• You cannot chargethe batteryat temperatures of 0°C (+S2°F) orbelow
The Rechargeable Lithium ion
Battery does not need to be fully
discharged or exhausted flatbefore being charged
• The battery may feel warm after it
has been charged or immediately
after being used This is perfectlynormal
• Do not recharge a fully chargedbattery
• Battery LifeAt normal temperatures, the batterycan be used at least 500 times
If the time for which the battery
provides power shortens markedly,
this indicates that the battery hasreached the end of its effective life
and should be replaced
• Notes on storage
• Ira battery is stored for longperiods while charged, the
performance of the battery can
be impaired If the battery will notbe used for some time, run the
battery out before storing it• If you do not intend to use the
camera for a long period of time,
remove the battery from thecamera
• Store the battery in a cool place• The battery should be stored in
a dry location with an ambient
temperature between +lS°C and+25°C (+S9°F and +77°F)
• Do not leave the battery in hotor extremely cold places
• Handlingthe Battery
Cautionsfor YourSafety:
• Do not carry or store battery withmetal ob]ects such as necklaces or
hairpirls
• Do not heat the battery or throw itinto a fire
• Do not attempt to take apart or
change the battery.• Do not recharge the battery with
chargers other those specified
• Dispose of used battery promptly• Do not drop the battery or
otherwise sub]ect it to strong
impacts
• Do not expose the battery towater
• Always keep the battery terminalsclean
• Do not store batteries irl hot
places Also, if you use the battery
for a long period, the camera bodyand the battery itself will becomewarmThisis normak Use the AC
power adapter if you are taking
pictures or viewing images for along period of time.
For details on the batteries that
you can use, refer to the OWNER'S
MANUAL of your camera
• Cautions for UsingBattey• Do not heat the batteries or throw
them into a fire,
• Do not carry or store batterieswith metal obiects such as
necklaces or hairpins
• Do not expose the batteries to
water, and keep batteries from
getting wetor stored in moistlocations
• Do not attempt to take apart or
change the batteries, including
battery casings
• Do not subject the batteries to
strong impacts
115
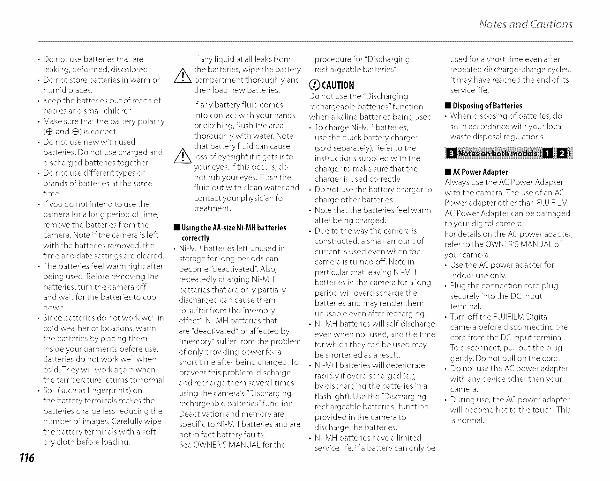
No_es _s'ndO_u ion_
• Do not use batteries that are
leaking, deformed, discolored• Do not store batteries in warm or
humid places
• Keep the batteries out of reach ofbabies and small children
• Make sure that the battery polarity
(@ and -@) is correct.• Do not use new with used
batteries, Do not use charged and
discharged batteries together
• Do not use different types orbrands of batteries at the same
time
• If you do not intend to use thecamera for a long period of time,remove the batteries from the
camera Note if the camera is left
with the batteries removed, thetime and date settings are cleared
• The batteries fuel warm right after
being used Before removing the
batteries, turn the camera offand wait for the batteries to cool
down• Since batteries do not work wall in
cold weather or locations, warm
the batteries by placing them
inside your garments before useBatteries do not work well when
cold They will work again whenthe temperature returns to normal
• Soil (such as fingerprints) on
the battery terminals makes the
batteries charge less reducing the
number of images Carefully wipethe battery terminals with a soft
dry cloth before loading
116
If any liquid at all leaks from
z_the batteries, wipe the batterycompartment thoroughly andthen load new batteries
If any battery fluid comes
into contact with your handsor clothing, flush the area
thoroughly with water Note
z_ i_s_ battery fluid .........of eyesig ht if it gets into
your eyes If this occurs, do
not rub your eyes Flush thefluid out with clean water and
contact your physician fortreatment
• Usingthe AA-sizeNi-MHbatteries
correctly• Ni MH batteries left unused in
storage for long periods canbecome "deactivated" Also,
repeatedly charging Ni MH
batteries that are only partially
discharged can cause them
to suffer from the "memoryeffect" Ni MH batteries that
are "deactivated" or affected by"memory" suffer from the problem
of only providing power for a
short time after being charged To
prevent this problem, dischargeand recharge them several times
using the camera's "Discharging
rechargeable batteries" function
Deactivation and memory arespecific to Ni MH batteries and are
not in fact battery faultsSee OWNER'S MANUAL for the
procedure for "Discharging
rechargeable batteries"
@CAUTIONDo not use the "Discharging
rechargeable batteries" function
when alkaline batteries being used
• To charge Ni MH batteries,
use the quick battery charger
(sold separately) Refer to theinstructions supplied with the
charger to make sure that the
charger is used correctly
• Do not use the battery charger tocharge other batteries,
• Note that the batteries feel warm
after being charged
• Due to the way the camera isconstructed, a small amount ofcurrent is used even when the
camera is turned offl Note in
particular that leaving Ni MH
batteries in the camera for a long
period will overdischarge thebatteries and may render them
unusable even after recharging
• Ni MH batteries will selfidischarge
even when not used, and the time
for which they can be used maybe shortened as a result
• Ni MH batteries will deteriorate
rapidly if overdischarged (eg
by discharging the batteries in a
flashlight) Use the "Dischargingrechargeable batteries" function
provided in the camera to
discharge the batteries• Ni MH batteries have a limited
service lif_ If a battery can only be
used for a short time even after
repeated discharge charge cycles,
it may have reached the end of itsservice life
• Disposingof Batteries
• When disposing of batteries, do
so in accordance with your local
waste disposal regulations
• ACPower Adapter
Always use the AC Power Adapterwith the camera The use of an AC
Power adapter other than FUJIFILM
AC Power Adapter can be damagedto your digital camera
For details on the A( power adapter,refer to the OWNER'S MANUAL of
your camera• Use the AC power adapter for
indoor use only• Plug the connection cord plug
securely into the DC inputterminal
• Turn off the FUJIFILM Digitalcamera before disconnecting the
cord from the DC input terminal
To disconnect, pull out the plug
gently, Do not pull on the cord• Do not use the AC power adapter
with any device other than yourcamera
• During use, the AC power adapterwill become hot to the touch This
is normal

No_es _s'ndC_u ion_
• Do not take apart the AC power
adapter Doing so could be
dangerous
• Do not use theAC power adapter
in a hot and humid place• Do not subject the AC power
adapter to strong shocks
• The AC power adapter may emit a
humming This is normal• If used neara radio, the AC power
adapter may cause static If thishappens, move the camera awayfrom the radio
L BeforeUsingthe Camera j
• Test ShotsPrior to PhotographyFor important photographs (such
as weddings and overseas trips),
always take a test shot and view the
image to make sure that the camera
is working normally• FUJlFILM Corporation cannot
accept liability for any incidental
losses (such as the costs of
photog raphy or the loss of income
from photography) incurred as aresult of faults with this product
• Noteson Copyright
Images recorded using your digital
camera system cannot be used in
ways that infringe copyright lawswithout the consent of the owner,
unless intended only for personaluse Note that some restrictions
apply to the photographing ofstage performances, entertainments
and exhibits, even when intended
purely for personal use Users arealso asked to note that the transfer
of Memory Card containing images
or data protected under copyright
laws is only permissible within
the restrictions imposed by thosecopyright laws
• HandlingYourDigital Camera
To ensure that images are recorded
correctlT, do not su_ect the camerato knpact or shock while an image is
being recorded
• LiquidCrystal
If the LCD monitor is damaged,take particular care with the liquid
crystal in the monitor If any of the
following situations arise, take the
urgent action indicated
• If liquid crystal comes in contact
with your skin:Wipe the area with a cloth and
then wash thoroughly with soap
and running water
• If liquid crystal gets into your eye:
FkMI the affected eye with cleanwater for at least 15 minutes and
then seek medical assistance
• If liquid crystal is swallowed:
FkMI your mouth thoroughly withwater Drink large quantities of
water and induce vomiting Thenseek medical assistance
• Trademark Information• ,o_, and xD-Pieture Card TM
are trademarks of FUJIFEM
Corporation
• IBM PC/AT is a registeredtrademark of International
Business Machines Corp of theUSA
• Macintosh, ©uick rime, and Mac
OS are trademarks of Apple Inc inthe USA and other countries
• Windows 7, Windows Vista and the
Windows logo are trademarks ofthe Microsoft group of companies
• IrSimple_'*Trademark is owned bythe Infrared Data Association ®
• IrSS_'*Trademark or IrSimpleShot _M
Trademark is owned by theInfrared Data Association '_
• SDHCIogoisatrademark
• HDMllogoisatrademark
• YouTube is a trademark of GoogleInc
• Other company or product namesare trademarks or registered
trademarks of the respective
companies
• Noteson Electrical InterferenceIf the camera is to be used in
hospitals or aircrafts, please
note that this camera may cause
interference to other equipment in
the hospital or aircraft For details,please check with the applicable
regulations
• Explanationof Color Television
System
NTSC: National Tdevision SystemCommittee, color television
telecasting specifications
adopted mainly in the USA,Canada and Japan
PAL: Phase Alternation by Line,
a color television system
adopted mainly by Europeancountries and (hina
• Exif Print (Exif vet, 2,2)
Exif Print Format is a newly revised
digital camera file format that
contains a variety of shootinginformation for optimal printing
117

FWIFiLmFUJIFILM Corporation7-3, AKASAKA 9-CHOME, MINATO-KU, TOKYO 107-0052, JAPAN
http://www.fujifilm.com/
Related Documents