Users Guide DI-Guy AI

Welcome message from author
This document is posted to help you gain knowledge. Please leave a comment to let me know what you think about it! Share it to your friends and learn new things together.
Transcript
Users Guide
DI-Guy AI

Users Guide
DI-Guy AI

Copyright © 2014 VT MÄK
All rights Reserved. Printed in the United States. No part of this document may be copied or repro-duced in any form without prior written consent of VT MÄK.
VR-Exchange™, VR-TheWorld™, VR-Vantage™, DI-Guy™, and DI-Guy Scenario™ are trade-marks of VT MÄK. MÄK Technologies®, VR-Forces®, RTIspy®, B-HAVE®, and VR-Link® are
registered trademarks of VT MÄK.
3ds Max® is a registered trademark of Autodesk, Inc.
OpenGL is a registered trademark of Silicon Graphics, Inc.
Vega Prime and OpenFlight are registered trademarks of Presagis.
Visual C++ and Direct3D are registered trademarks of Microsoft Corp.
FLEXlm is the registered trademark of Flexera.
COLLADA is a trademark of Sony Computer Entertainment, Inc.
Certain models were provided by CG2, Presagis, Antycip, Engineering and Computer Simulations, Inc., and Viewpoint DataLabs International.
E-Town™ Building Library models are from CGSD Corporation, © 1999.
libjpeg - this software is based in part on the work of the Independent JPEG Group
libtiff © 1988-1997 Sam Leffler, Silicon Graphics, Inc. www.libtiff.org
Ogg Vorbis © 2002 Xiph.org Foundation www.xiph.org
OpenAL is a trademark of Creative Labs, Inc.
Perl - © 1989-1999, Larry Wall www.perl.org, www.activestate.com
Qt © 2005-2007 Trolltech ASA www.trolltech.com
zlib © 1995-2005 Jean-loup Gailly and Mark Adler www.zlib.net
pthreads sourceware.org/pthreads-win32
Qscintilla © 2008 Riverbank Computing Limited www.riverbankcomputing.co.uk
FaceFX. ©2002-2013, OC3 Entertainment, Inc
All other trademarks are owned by their respective companies.
For third-party license information, please see “Third Party Licenses,” on page xiii.
VT MÄK150 Cambridge Park Drive, 3rd Floor
Cambridge, MA 02140 USA
Voice: 617-876-8085Fax: 617-876-9208
www.mak.com
Revision DIG-13.0-1-140523
DI-G
Contents
PrefaceHow This Manual is Organized ................................................................ viiDocumentation ........................................................................................ viiiDerivative Work ....................................................................................... viiiMÄK Products ........................................................................................... ixHow to Contact Us .................................................................................... xiDocument Conventions ............................................................................ xii
DI-Guy Conventions ........................................................................ xiiiMouse Button Naming Conventions................................................. xiii
Third Party Licenses ................................................................................. xiiiBoost License..................................................................................... xiiilibXML and libICONV .................................................................... xivLua .................................................................................................... xiv
Chapter 1. Introduction to DI-Guy AI1.1. Welcome to DI-Guy AI .................................................................... 1-2
1.1.1. DI-Guy AI – The Solution for Intelligent Human Simulation ............................................................................. 1-3
1.1.2. DI-Guy AI: The Top of the DI-Guy Behavior Pyramid ......... 1-41.1.3. DI-Guy AI Builds on DI-Guy Scenario and the
DI-Guy SDK ......................................................................... 1-41.1.4. DI-Guy AI Characters are Agents ........................................... 1-5
1.2. Base Behaviors ................................................................................... 1-51.3. Path Planning .................................................................................... 1-51.4. DI-Guy Minds: Extensible Hierarchical Finite State Machines .......... 1-6
1.4.1. Extending DI-Guy Minds ...................................................... 1-61.5. The DI-Guy Lifeform Server ............................................................. 1-71.6. DI-Guy AI Platform Support ............................................................ 1-81.7. DI-Guy AI is Real Time .................................................................... 1-8
iiiuy AI Users Guide
Contents
Chapter 2. DI-Guy AI Concepts2.1. DI-Guy AI Concepts ......................................................................... 2-3
2.1.1. Agents .................................................................................... 2-32.1.2. Crowds ................................................................................... 2-32.1.3. Crowd Profiles ....................................................................... 2-4
2.2. Agents and Behaviors ........................................................................ 2-52.2.1. Travel Behavior ...................................................................... 2-62.2.2. Path Follow Behavior ............................................................. 2-62.2.3. Wander Behavior ................................................................... 2-72.2.4. Mingle Behavior ..................................................................... 2-72.2.5. Flee Behavior .......................................................................... 2-82.2.6. Pursue Behavior ..................................................................... 2-82.2.7. Attack Behavior ...................................................................... 2-92.2.8. Idle Behavior .......................................................................... 2-92.2.9. None Behavior ..................................................................... 2-10
2.3. Regions and Subregions .................................................................. 2-102.4. How Agents Select their Speed and Posture ..................................... 2-12
2.4.1. Speed Types ......................................................................... 2-122.4.2. Speed Zones ......................................................................... 2-132.4.3. The Still Speed Zone ............................................................ 2-152.4.4. Postures and Action Variants ................................................ 2-172.4.5. Automatic Variant Selection ................................................. 2-19
2.5. Obstacles ......................................................................................... 2-192.5.1. Sensing and Avoiding Static Objects .................................... 2-202.5.2. Dynamic Object Sensing and Avoidance .............................. 2-22
2.6. Detecting and Escaping Traps ......................................................... 2-242.6.1. Trap Detection ..................................................................... 2-242.6.2. Untrap Methods ................................................................... 2-25
Chapter 3. DI-Guy Tutorials3.1. DI-Guy AI Tutorials ......................................................................... 3-33.2. Create a Crowd Scene ....................................................................... 3-43.3. Tutorial 1. AI Minds ......................................................................... 3-5
3.3.1. Create a Civilian Population with a Simple Pattern of Life ..... 3-73.3.2. Create Soldiers that Use Formations ..................................... 3-103.3.3. Create an Enemy Squad and Initiate Combat ....................... 3-11
3.4. Tutorial 2. Base Behaviors ............................................................... 3-113.4.1. Create a Crowd Using Base Behavior Travel ........................ 3-123.4.2. Add a Wander Crowd .......................................................... 3-143.4.3. Trigger a Flee Base Behavior ................................................. 3-16
3.5. Tutorial 3. Explore other Sample AI Scenarios ................................ 3-193.5.1. AI Crosswalks ....................................................................... 3-203.5.2. AI Schedule .......................................................................... 3-213.5.3. AI Train Station Alarm ........................................................ 3-223.5.4. AI Multi-Floor Path Planning .............................................. 3-22
iv VT MÄK

Contents
3.5.5. AI Middle East Town ........................................................... 3-273.6. Tutorial 4: Creating an AI Subclass (Package) ................................. 3-29
3.6.1. Create a New Package .......................................................... 3-293.6.2. Create a Crowd Profile and Some Crowds ............................ 3-313.6.3. Edit the Package ................................................................... 3-31
3.7. Tutorial 5: Converting a Character to an Agent .............................. 3-333.7.1. Create a Character and Change it to an Agent ...................... 3-333.7.2. Mimicking the Wander Base Behavior Using Scripting ........ 3-363.7.3. Create a Subclass Mind Specific to Your Agent ..................... 3-36
3.8. Tutorial 6: Create a navmesh ........................................................... 3-39
Chapter 4. Path Planning and Navigation Meshes4.1. Introduction to Path Planning and Navigation Meshes ..................... 4-24.2. Automatic Path Planning .................................................................. 4-24.3. Path Planning Using the API ............................................................. 4-3
4.3.1. Defining a Navigation Mesh ................................................... 4-44.3.2. Editing a Navigation Mesh ..................................................... 4-44.3.3. Using the Navigation Mesh with the Base Behaviors .............. 4-54.3.4. Using Preferred and Repulsed Subregions when Navigating ... 4-5
4.4. Background Path Planning ................................................................ 4-6
Chapter 5. DI-Guy Minds5.1. DI-Guy AI Minds ............................................................................. 5-25.2. The DI-Guy Lua Documentation Files ............................................. 5-2
5.2.1. DI-Guy Lua Modules ............................................................. 5-35.3. The Basic Architecture of a DI-Guy AI Mind ................................... 5-45.4. AI Mind Example: The soldier_travel_lua_mind ............................... 5-5
5.4.1. Lua Packages .......................................................................... 5-85.5. Visualizing the State Machine ......................................................... 5-135.6. The luaSimpleSoldier Package Functions .......................................... 5-15
5.6.1. The entry_point() Function ................................................. 5-155.6.2. The patrol_state() Function .................................................. 5-165.6.3. The Default Message Processing Function –
process_messages() ............................................................... 5-175.6.4. The process_messages_signals() Function ............................. 5-175.6.5. Custom Message Processing – process_messages_attack() ..... 5-18
5.7. How DI-Guy AI Minds Sleep ......................................................... 5-195.8. Debugging Minds ........................................................................... 5-21
5.8.1. Displaying Debug Labels ...................................................... 5-215.8.2. The AI State Inspector .......................................................... 5-225.8.3. The Interactive Debugger ..................................................... 5-23
5.9. Mind References ............................................................................. 5-245.9.1. Objects with a tostring() Function ........................................ 5-24
DI-Guy AI Users Guide v
Contents
Chapter 6. Creating and Editing Crowds6.1. Creating Crowds ............................................................................... 6-2
6.1.1. Creating a Crowd from the Input Mode Window .................. 6-36.1.2. Creating a Crowd from the Crowd Page ................................ 6-36.1.3. Editing Crowds from the Input Mode Window ..................... 6-56.1.4. Editing Crowds on the Crowd Page ....................................... 6-8
6.2. Creating Regions ............................................................................. 6-136.2.1. Creating a Region from the Input Mode Window ................ 6-136.2.2. Creating a Region on the Region Page ................................. 6-146.2.3. Editing and Visualizing Regions ........................................... 6-15
6.3. Creating and Editing Crowd Profiles ............................................... 6-166.3.1. Configuring Crowds on the Populate Settings Tab ............... 6-186.3.2. Default Agent Parameters ..................................................... 6-206.3.3. Sharing Profiles Between Scenarios ....................................... 6-20
6.4. Crowd Member Agent Parameters .................................................. 6-206.4.1. The Behavior Settings Tab ................................................... 6-206.4.2. The Prop and Scene Object Avoidance Tab ......................... 6-246.4.3. The Character Avoidance Tab .............................................. 6-266.4.4. Trap Settings and Path Planning Tab ................................... 6-27
6.5. The Schedule Editor ....................................................................... 6-29
Chapter 7. DI-Guy FAQ7.1. DI-Guy AI FAQ ............................................................................... 7-2
Index
vi VT MÄK
DI-G
Preface
This manual is written for persons who will use DI-Guy AI. The manual assumes that you are familiar with DI-Guy Scenario, since DI-Guy AI is most easily experienced as an add-in module to DI-Guy Scenario. The manual also assumes that you are familiar with your operating system and that you know how to work in your computer’s graph-ical window environment.
Please see release documentation for information about changes and updates to DI-Guy since this manual went to press.
How This Manual is OrganizedThe chapters are organized as follows:
Chapter 1, Introduction to DI-Guy AI, briefly describes DI-Guy AI.
Chapter 2, DI-Guy AI Concepts, introduces the major components of DI-Guy AI, agents, behaviors, crowds and regions.
Chapter 3, DI-Guy Tutorials, walks you through a set of exercises that introduce most of the capabilities of DI-Guy AI.
Chapter 4, Path Planning and Navigation Meshes, explains intelligent path planning.
Chapter 5, DI-Guy Minds, describes DI-Guy AI minds, Lua programming, and classes.
Chapter 6, Creating and Editing Crowds, explains how to create and manage crowds and crowd profiles.
Chapter 7, DI-Guy FAQ, answers some frequently asked questions.
viiuy AI Users Guide
Preface — Documentation
DocumentationDI-Guy comes with the following documentation:
DI-Guy SDK Developers Guide. Explains how to program using the DI-Guy SDK.
DI-Guy SDK Reference Manual. Online documentation that lists all the functions and classes of DI-Guy SDK.
DI-Guy Scenario Users Guide. Explains how to use DI-Guy Scenario to create scenarios with realistic human activity.
DI-Guy Content Reference Manual. Explains how to customize DI-Guy characters and add new character models.
DI-Guy AI Users Guide. Explains how to use DI-Guy AI to add intelligent behavior to DI-Guy characters.
DI-Guy Motion Editor Users Guide. Explains how to import, edit, and customize DI-Guy motions.
DI-Guy Expressive Faces Users Guide. Provides a brief introduction to using the Expressive Faces module.
DI-Guy Master Index. A combined index for all of the manuals. It does not index the HTML documentation.
DI-Guy Digest. An XML file that explains DI-Guy content to non-DI-Guy appli-cations.
These documents are available from the start menu under DI-Guy, or by browsing to ./doc. Of particular interest is the DI-Guy Documentation Master Index, which lets you quickly access all the documents above along with additional technical information about DI-Guy. (This is the entry point to HTML documentation. It is not the same things as DI-Guy Master Index.
Derivative WorkAny DI-Guy content (model, texture, motion, and so on) that you modify or copy is a derivative work that is protected under copyright law by the same rules that apply to content delivered with DI-Guy. This derivative content may be used only on computers that have a valid DI-Guy license. Please contact VT MÄK to discuss licensing for other uses of derivative models.
viii VT MÄK
Preface — MÄK Products
MÄK ProductsDI-Guy AI is a member of the VT MÄK line of software products designed to stream-line the process of developing and using networked simulated environments. The VT MÄK product line includes the following:
VR-Link® Network Toolkit. VR-Link is an object-oriented library of C++ func-tions and definitions that implement the High Level Architecture (HLA) and the Distributed Interactive Simulation (DIS) protocol. VR-Link has built-in support for the RPR FOM and allows you to map to other FOMs. This library minimizes the time and effort required to build and maintain new HLA or DIS-compliant applications, and to integrate such compliance into existing applications.
VR-Link includes a set of sample debugging applications and their source code. The source code serves as an example of how to use the VR-Link Toolkit to write applications. The executables provide valuable debugging services such as gener-ating a predictable stream of HLA or DIS messages, and displaying the contents of messages transmitted on the network.
MÄK RTI. An RTI (Run-Time Infrastructure) is required to run applications using the High Level Architecture (HLA). The MÄK RTI is optimized for high perfor-mance. It has an API, RTIspy®, that allows you to extend the RTI using plug-in modules. It also has a graphical user interface (the RTI Assistant) that helps users with configuration tasks and managing federates and federations.
VR-Forces®. VR-Forces is a computer generated forces application and toolkit. It provides an application with a GUI, that gives you a 2D and 3D views of a simu-lated environment.
You can create and view local entities, aggregate them into hierarchical units, assign tasks, set state parameters, and create plans that have tasks, set statements, and conditional statements. VR-Forces also functions as a plan view display for viewing remote entities taking part in an exercise. Using the toolkit, you can extend the VR-Forces application or create your own application for use with another user interface.
VR-Vantage™. VR-Vantage is a line of products designed to meet your simulation visualization needs. It includes three end-user applications (VR-Vantage Stealth, VR-Vantage PVD, and VR-Vantage IG) and the VR-Vantage Toolkit.
– VR-Vantage Stealth displays a realistic, 3D view of your virtual world, a 2D plan view, and an exaggerated reality (XR) view. Together these views provide both situational awareness and the big picture of the simulated world. You can move your viewpoint to any location in the 3D world and can attach it to entities so that it moves as they do.
– VR-Vantage IG is a configurable desktop image generator (IG) for out the window (OTW) scenes and remote camera views. It has most of the features of the Stealth, but is optimized for its IG function.
– VR-Vantage PVD provides a 2D plan view display. It gives you the big picture of the simulated world.
DI-Guy AI Users Guide ix
Preface — MÄK Products
– The VR-Vantage Toolkit is a 3D visual application development toolkit. Use it to customize or extend MÄK’s VR-Vantage applications, or to integrate VR-Vantage capabilities into your custom applications. VR-Vantage is built on top of OpenSceneGraph (OSG). The toolkit includes the OSG version used to build VR-Vantage.
MÄK Data Logger. The Data Logger, also called the Logger, can record HLA and DIS exercises and play them back for after-action review. You can play a recorded file at speeds above or below normal and can quickly jump to areas of interest. The Logger has a GUI and a text interface. The Logger API allows you to extend the Logger using plug-in modules or embed the Logger into your own application. The Logger editing features let you merge, trim, and offset Logger recordings.
VR-Exchange™. VR-Exchange allows simulations that use incompatible commu-nications protocols to interoperate. For example, within the HLA world, using VR-Exchange, federations using the HLA RPR FOM 1.0 can interoperate with simula-tions using RPR FOM 2.0, or federations using different RTIs can interoperate. VR-Exchange supports HLA, TENA, and DIS translation.
VR-TheWorld™ Server. VR-TheWorld Server is a simple, yet powerful, web-based streaming terrain server, developed in conjunction with Pelican Mapping. Delivered with a global base map, you can also easily populate it with your own custom source data through a web-based interface. The server can be deployed on private, classified networks to provide streaming terrain data to a variety of simula-tion and visualization applications behind your firewall.
DI-Guy™. The DI-Guy product line is a set of software tools for real-time human visualization, simulation, and artificial intelligence. Every DI-Guy software offering comes with thousands of ready-to-use characters, appearances, and motions. DI-Guy enables the easy creation of crowds and individuals who are terrain aware, autonomous, and react intelligently to ongoing events. Save time, money and create outstanding simulations with DI-Guy. The DI-Guy product line includes the following products:
– The DI-Guy SDK. Embed the DI-Guy library in your real-time application and populate your world with lifelike human characters.
– DI-Guy Scenario™. Author and visualize human performances in a rich, user-friendly graphical environment. Use DI-Guy Scenario as an end visualization application or save scenarios and load them into your DI-Guy SDK enabled application.
– DI-Guy AI. Generate crowds of autonomous characters to quickly populate your worlds with hundreds and thousands of terrain-aware, collision avoiding DI-Guys. Used as a module on top of DI-Guy Scenario and DI-Guy SDK.
– Expressive Faces Module. Enable DI-Guy characters to have faces that display emotion, eyes that look in directions and blink, and lips that sync to sound files.
– DI-Guy Motion Editor. Create or customize motions to your particular needs in an easy-to-use graphical application.
x VT MÄK
Preface — How to Contact Us
How to Contact UsFor DI-Guy technical support, information about upgrades, and information about other MÄK products, you can contact us in the following ways:
Telephone
Internet
Post
When requesting support, please tell us the product you are using, the version, and the platform on which you are running.
Call or fax us at: Voice:Fax:
617-876-8085 (extension 3 for support)617-876-9208
Sales and upgrade information:Technical support:
VR-Vantage support:
[email protected]@[email protected]
MÄK web site home page: www.mak.com
License key requests: www.mak.com/support/get-licenses.html
Product version and platform information: www.mak.com/support/product-versions.html
For the free, unlicensed MÄK RTI: www.mak.com/resources/bonus-material/cat_view/16-bonus-materials/24-mak-high-performance-rti.html
MÄK Community Forum: www.mak.com/community-forum/1-forum.html
Send postal correspondence to: VT MÄK150 Cambridge Park Drive, 3rd FloorCambridge, MA, USA 02140
DI-Guy AI Users Guide xi
Preface — Document Conventions
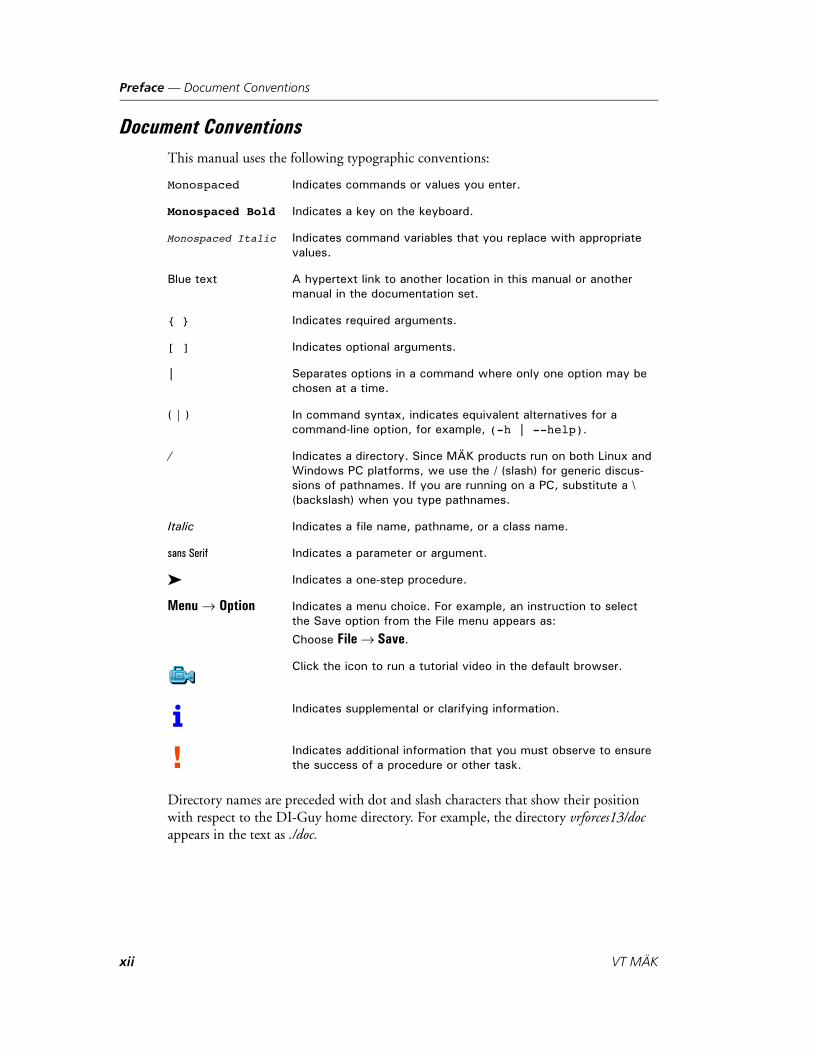
Document ConventionsThis manual uses the following typographic conventions:
Directory names are preceded with dot and slash characters that show their position with respect to the DI-Guy home directory. For example, the directory vrforces13/doc appears in the text as ./doc.
Monospaced Indicates commands or values you enter.
Monospaced Bold Indicates a key on the keyboard.
Monospaced Italic Indicates command variables that you replace with appropriate values.
Blue text A hypertext link to another location in this manual or another manual in the documentation set.
{ } Indicates required arguments.
[ ] Indicates optional arguments.
| Separates options in a command where only one option may be chosen at a time.
( | ) In command syntax, indicates equivalent alternatives for a command-line option, for example, (-h | --help).
/ Indicates a directory. Since MÄK products run on both Linux and Windows PC platforms, we use the / (slash) for generic discus-sions of pathnames. If you are running on a PC, substitute a \ (backslash) when you type pathnames.
Italic Indicates a file name, pathname, or a class name.
sans Serif Indicates a parameter or argument.
Indicates a one-step procedure.
Menu Option Indicates a menu choice. For example, an instruction to select the Save option from the File menu appears as:
Choose File Save.
Click the icon to run a tutorial video in the default browser.
Indicates supplemental or clarifying information.
Indicates additional information that you must observe to ensure the success of a procedure or other task.
i!
xii VT MÄK
Preface — Third Party Licenses
DI-Guy Conventions
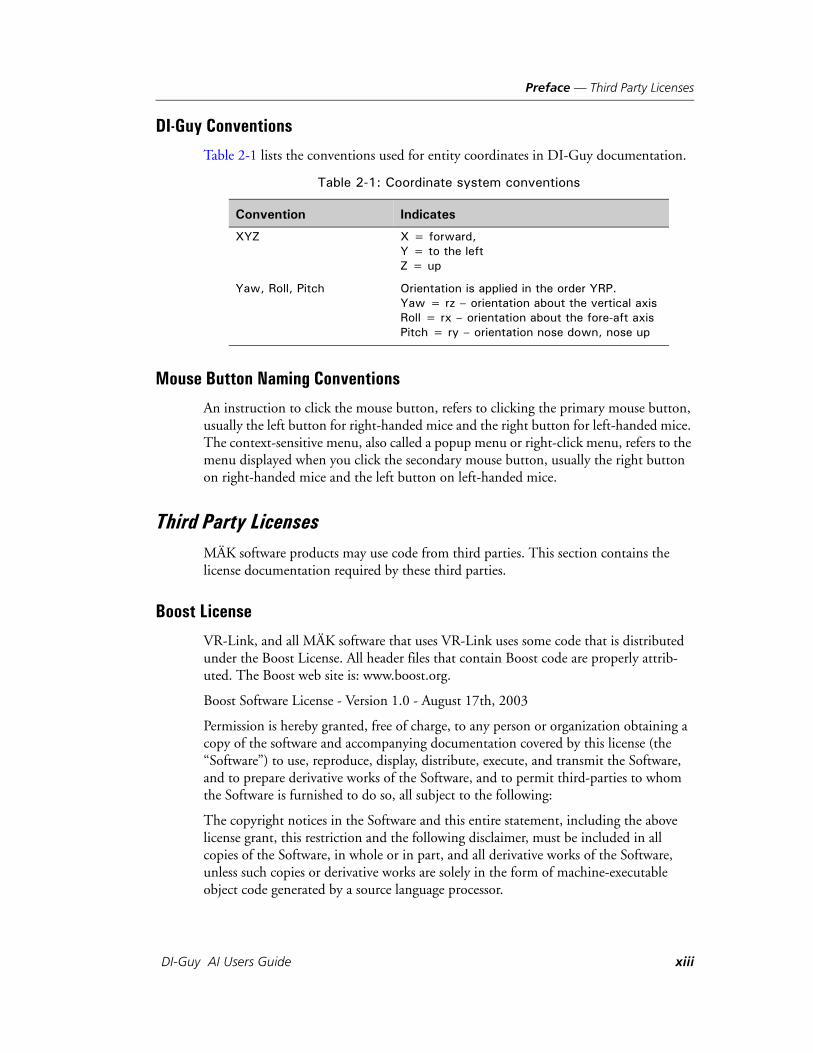
Table 2-1 lists the conventions used for entity coordinates in DI-Guy documentation.
Mouse Button Naming Conventions
An instruction to click the mouse button, refers to clicking the primary mouse button, usually the left button for right-handed mice and the right button for left-handed mice. The context-sensitive menu, also called a popup menu or right-click menu, refers to the menu displayed when you click the secondary mouse button, usually the right button on right-handed mice and the left button on left-handed mice.
Third Party LicensesMÄK software products may use code from third parties. This section contains the license documentation required by these third parties.
Boost License
VR-Link, and all MÄK software that uses VR-Link uses some code that is distributed under the Boost License. All header files that contain Boost code are properly attrib-uted. The Boost web site is: www.boost.org.
Boost Software License - Version 1.0 - August 17th, 2003
Permission is hereby granted, free of charge, to any person or organization obtaining a copy of the software and accompanying documentation covered by this license (the “Software”) to use, reproduce, display, distribute, execute, and transmit the Software, and to prepare derivative works of the Software, and to permit third-parties to whom the Software is furnished to do so, all subject to the following:
The copyright notices in the Software and this entire statement, including the above license grant, this restriction and the following disclaimer, must be included in all copies of the Software, in whole or in part, and all derivative works of the Software, unless such copies or derivative works are solely in the form of machine-executable object code generated by a source language processor.
Table 2-1: Coordinate system conventions
Convention Indicates
XYZ X = forward, Y = to the leftZ = up
Yaw, Roll, Pitch Orientation is applied in the order YRP.Yaw = rz – orientation about the vertical axisRoll = rx – orientation about the fore-aft axisPitch = ry – orientation nose down, nose up
DI-Guy AI Users Guide xiii
Preface — Third Party Licenses
THE SOFTWARE IS PROVIDED “AS IS”, WITHOUT WARRANTY OF ANY KIND, EXPRESS OR IMPLIED, INCLUDING BUT NOT LIMITED TO THE WARRANTIES OF MERCHANTABILITY, FITNESS FOR A PARTICULAR PURPOSE, TITLE AND NON-INFRINGEMENT. IN NO EVENT SHALL THE COPYRIGHT HOLDERS OR ANYONE DISTRIBUTING THE SOFTWARE BE LIABLE FOR ANY DAMAGES OR OTHER LIABILITY, WHETHER IN CONTRACT, TORT OR OTHERWISE, ARISING FROM, OUT OF OR IN CONNECTION WITH THE SOFTWARE OR THE USE OR OTHER DEAL-INGS IN THE SOFTWARE.
libXML and libICONV
VR-Link and all MÄK software that uses VR-Link, links in libXML and libICONV. On some platforms the compiled libraries and header files are distributed with MÄK Products. MÄK has made no modifications to these libraries. For more information about these libraries please see the following web sites:
The LGPL license is available at: http://www.gnu.org/licenses/lgpl.html.
Information about IconV is at: http://www.gnu.org/software/libiconv/.
Information about LibXML is at: http://xmlsoft.org/.
Lua
Some MÄK products use the Lua programming language (www.lua.org). Its license is as follows:
Copyright © 1994–2012 Lua.org, PUC-Rio.
Permission is hereby granted, free of charge, to any person obtaining a copy of this soft-ware and associated documentation files (the "Software"), to deal in the Software without restriction, including without limitation the rights to use, copy, modify, merge, publish, distribute, sublicense, and/or sell copies of the Software, and to permit persons to whom the Software is furnished to do so, subject to the following conditions:
The above copyright notice and this permission notice shall be included in all copies or substantial portions of the Software.
THE SOFTWARE IS PROVIDED "AS IS", WITHOUT WARRANTY OF ANY KIND, EXPRESS OR IMPLIED, INCLUDING BUT NOT LIMITED TO THE WARRANTIES OF MERCHANTABILITY, FITNESS FOR A PARTICULAR PURPOSE AND NONINFRINGEMENT. IN NO EVENT SHALL THE AUTHORS OR COPYRIGHT HOLDERS BE LIABLE FOR ANY CLAIM, DAMAGES OR OTHER LIABILITY, WHETHER IN AN ACTION OF CONTRACT, TORT OR OTHERWISE, ARISING FROM, OUT OF OR IN CONNECTION WITH THE SOFTWARE OR THE USE OR OTHER DEAL-INGS IN THE SOFTWARE.
xiv VT MÄK
DI-G
1. Introduction to DI-Guy AI
This chapter provides a high-level description of DI-Guy AI features.
Welcome to DI-Guy AI ................................................................................ 1-2DI-Guy AI – The Solution for Intelligent Human Simulation ............... 1-3DI-Guy AI: The Top of the DI-Guy Behavior Pyramid.......................... 1-4DI-Guy AI Builds on DI-Guy Scenario and the DI-Guy SDK............... 1-4DI-Guy AI Characters are Agents ........................................................... 1-5
Base Behaviors .............................................................................................. 1-5
Path Planning ............................................................................................... 1-5
DI-Guy Minds: Extensible Hierarchical Finite State Machines...................... 1-6Extending DI-Guy Minds ...................................................................... 1-6
The DI-Guy Lifeform Server ........................................................................ 1-7
DI-Guy AI Platform Support........................................................................ 1-8
DI-Guy AI is Real Time................................................................................ 1-8
1-1uy AI Users Guide
Introduction to DI-Guy AI — Welcome to DI-Guy AI
1.1. Welcome to DI-Guy AIReal-time simulation of virtual worlds with life-like humans is an invaluable tool for training, visualization, and planning. Modeling the behavior of hundreds or thousands of humans in a battlefield, village, marketplace, or evacuation setting can be a daunting task. Life-like simulations require diverse sets of virtual people of different sizes, shapes, and desires. Not only must they move realistically, performing tasks central to the simu-lation, they also need to have the critical intelligence to react realistically to ongoing changes in the world.
Some examples of simulations that require intelligent human agents are:
Urban combat training.
Mission planning.
Law enforcement training.
First responder training.
Site security planning.
Architectural visualization.
1-2 VT MÄK
Introduction to DI-Guy AI — Welcome to DI-Guy AI
1.1.1. DI-Guy AI – The Solution for Intelligent Human Simulation
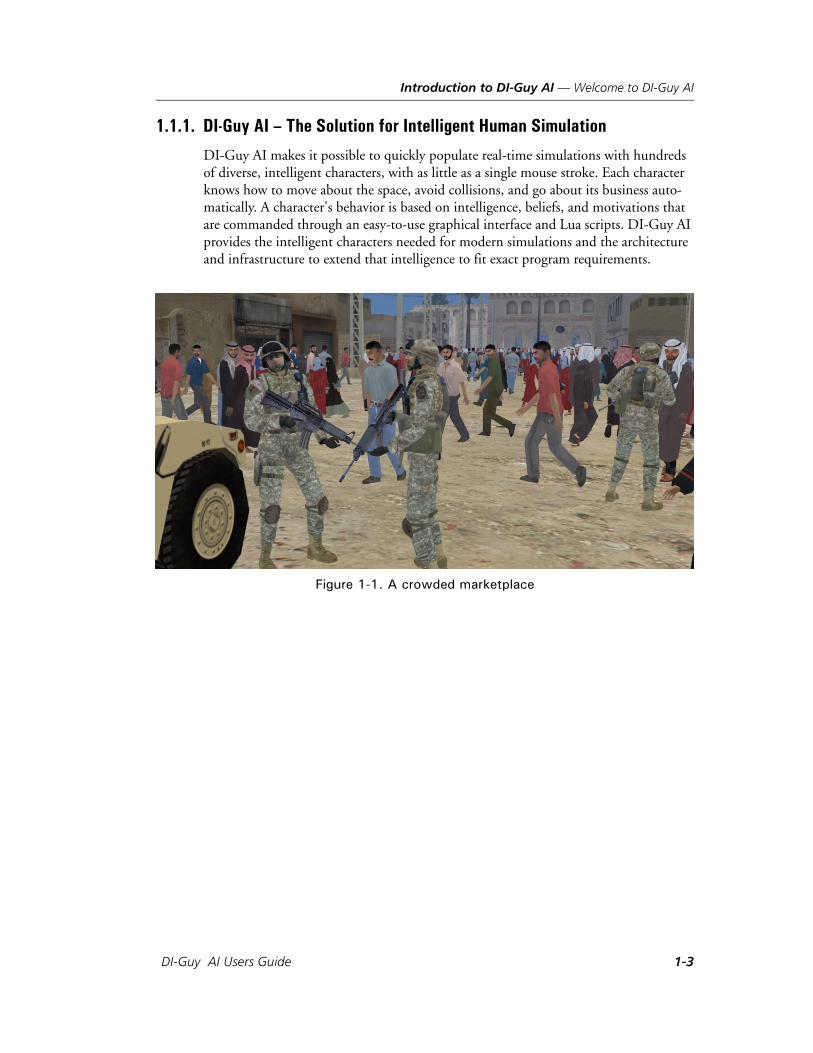
DI-Guy AI makes it possible to quickly populate real-time simulations with hundreds of diverse, intelligent characters, with as little as a single mouse stroke. Each character knows how to move about the space, avoid collisions, and go about its business auto-matically. A character's behavior is based on intelligence, beliefs, and motivations that are commanded through an easy-to-use graphical interface and Lua scripts. DI-Guy AI provides the intelligent characters needed for modern simulations and the architecture and infrastructure to extend that intelligence to fit exact program requirements.
Figure 1-1. A crowded marketplace
DI-Guy AI Users Guide 1-3
Introduction to DI-Guy AI — Welcome to DI-Guy AI
1.1.2. DI-Guy AI: The Top of the DI-Guy Behavior Pyramid
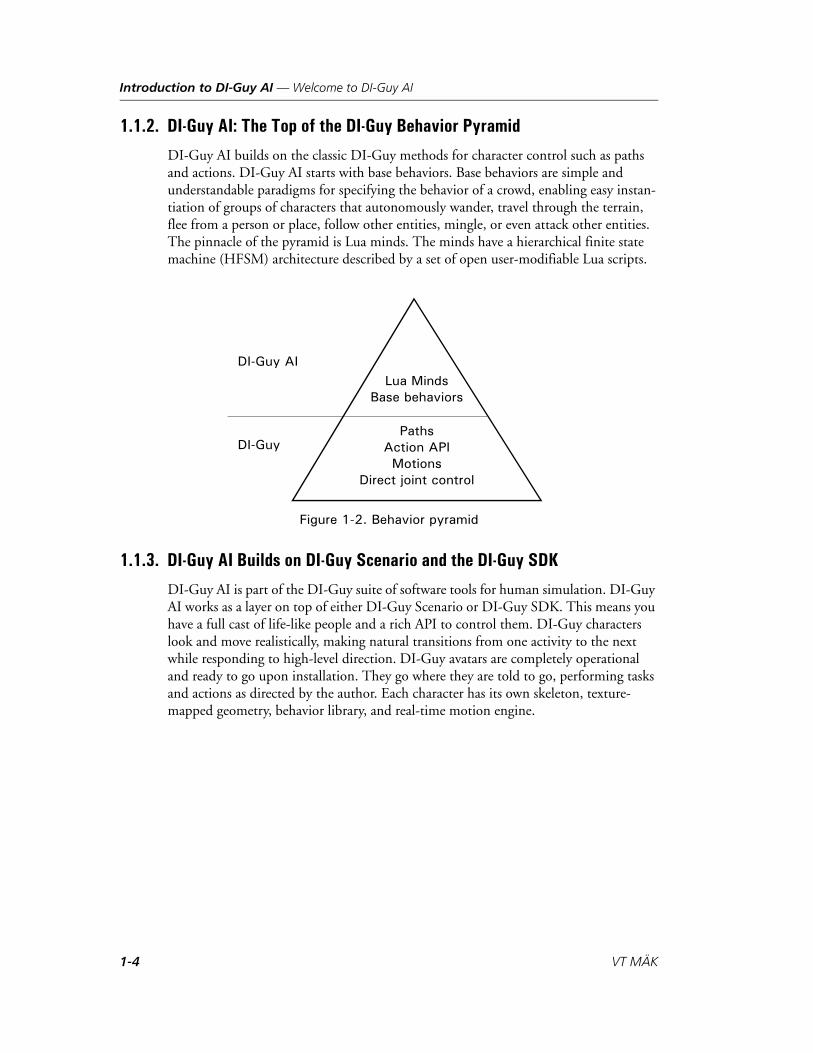
DI-Guy AI builds on the classic DI-Guy methods for character control such as paths and actions. DI-Guy AI starts with base behaviors. Base behaviors are simple and understandable paradigms for specifying the behavior of a crowd, enabling easy instan-tiation of groups of characters that autonomously wander, travel through the terrain, flee from a person or place, follow other entities, mingle, or even attack other entities. The pinnacle of the pyramid is Lua minds. The minds have a hierarchical finite state machine (HFSM) architecture described by a set of open user-modifiable Lua scripts.
Figure 1-2. Behavior pyramid
1.1.3. DI-Guy AI Builds on DI-Guy Scenario and the DI-Guy SDK
DI-Guy AI is part of the DI-Guy suite of software tools for human simulation. DI-Guy AI works as a layer on top of either DI-Guy Scenario or DI-Guy SDK. This means you have a full cast of life-like people and a rich API to control them. DI-Guy characters look and move realistically, making natural transitions from one activity to the next while responding to high-level direction. DI-Guy avatars are completely operational and ready to go upon installation. They go where they are told to go, performing tasks and actions as directed by the author. Each character has its own skeleton, texture-mapped geometry, behavior library, and real-time motion engine.
Lua MindsBase behaviors
PathsAction APIMotions
Direct joint control
DI-Guy AI
DI-Guy
1-4 VT MÄK
Introduction to DI-Guy AI — Path Planning
1.1.4. DI-Guy AI Characters are Agents
DI-Guy AI introduces the concept of a character as an agent. An agent is a DI-Guy character that uses AI to self-determine its motion. An agent is aware of the buildings, obstacles, and other people in its environment, so that it can make decisions about how to move through the scene in a logical and realistic manner. Agents react intelligently and automatically to potential collision events (there is a car approaching, get out of the way), asynchronous events (a shot was fired nearby, flee), and messages (“Follow me!”).
Agents belong to aggregate entities called crowds. Crowds allow for groups of agents to be controlled collectively for fast authoring and runtime control. An individual agent can always be controlled directly as well.
1.2. Base BehaviorsDI-Guy AI includes base behaviors such as wander, mingle, follow, attack, flee, and travel. These behaviors describe how the agents operate in their world in a clear and simple manner that is easy for the author to understand. The agents avoid collisions with other agents, stationary obstacles, and larger moving objects such as vehicles, without sacrificing performance, so that thousands of agents can populate a world simulated on a single computer.
1.3. Path PlanningPath planning algorithms enable agents to maneuver across complex terrain where local minima would normally trap a character. DI-Guy AI creates navigational meshes for terrains that allow agents to understand the topology. No special preparation of the terrain is required and the navigation mesh, once generated, can be saved with a scenario and used in subsequent simulations.
DI-Guy AI Users Guide 1-5
Introduction to DI-Guy AI — DI-Guy Minds: Extensible Hierarchical Finite State Machines
1.4. DI-Guy Minds: Extensible Hierarchical Finite State MachinesAgents with DI-Guy minds are the top of the behavior pyramid. They are the smartest characters in DI-Guy. DI-Guy minds are implemented with Lua scripts for exception-ally fast performance (compared to other scripting languages) and extensibility. The minds feature an object-oriented architecture that supports inheritance, so common algorithms and behaviors are automatically shared across a family of minds, while further specialization is as simple as a new subclass. Microthread technology allows agents to think quickly in parallel with other threads. The architecture supports a simple, but powerful, hierarchical finite state machine (HFSM) to control the agent’s behavior at the highest level. The HFSM receives and processes messages coming to the character from the environment, along with internal state, to determine if a high-level behavior state change should be triggered. The mind architecture makes it easy to add new states and behavior to a mind.
DI-Guy AI characters use base behaviors and minds to determine how to move and react to ongoing events. DI-Guy AI lets simulation authors instantiate intelligent crowds and then extend that intelligence.
1.4.1. Extending DI-Guy Minds
DI-Guy minds can express the current state of their HFSM using any of the other authoring methods in the pyramid (such as base behaviors, paths, actions, gazing, aiming, expressive faces, and gestures). For example, if an agent needs to load an artil-lery piece, you can add a load_artillery state to the mind and then express it by creating a DI-Guy path that includes all the local movement and action information for where and how to perform the task. Match the best authoring technique to each desired behavior, or combine them for even more sophisticated behavior. Compelling dynamic behavior can be created by defining the various states an agent may be in and then matching the best authoring methods to each state, whether that is a base behavior, path, or direct control using action/gesture/gaze, and so on, using the API. For best results, extend existing DI-Guy minds rather than starting from scratch, so that you leverage the intelligence and high performance architecture already built in.
i Technically, Lua coroutines do not use operating system-level threads, but they behave similarly.
1-6 VT MÄK
Introduction to DI-Guy AI — The DI-Guy Lifeform Server
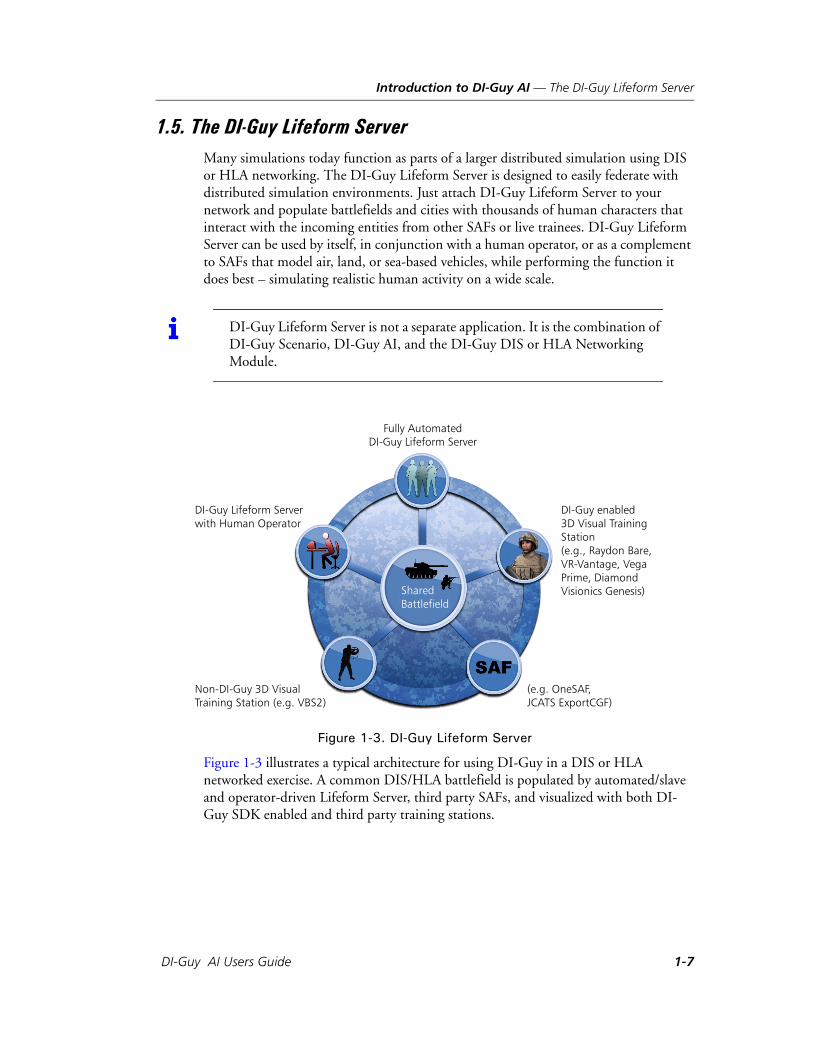
1.5. The DI-Guy Lifeform ServerMany simulations today function as parts of a larger distributed simulation using DIS or HLA networking. The DI-Guy Lifeform Server is designed to easily federate with distributed simulation environments. Just attach DI-Guy Lifeform Server to your network and populate battlefields and cities with thousands of human characters that interact with the incoming entities from other SAFs or live trainees. DI-Guy Lifeform Server can be used by itself, in conjunction with a human operator, or as a complement to SAFs that model air, land, or sea-based vehicles, while performing the function it does best – simulating realistic human activity on a wide scale.
Figure 1-3. DI-Guy Lifeform Server
Figure 1-3 illustrates a typical architecture for using DI-Guy in a DIS or HLA networked exercise. A common DIS/HLA battlefield is populated by automated/slave and operator-driven Lifeform Server, third party SAFs, and visualized with both DI-Guy SDK enabled and third party training stations.
i DI-Guy Lifeform Server is not a separate application. It is the combination of DI-Guy Scenario, DI-Guy AI, and the DI-Guy DIS or HLA Networking Module.
Fully AutomatedDI-Guy Lifeform Server
DI-Guy Lifeform Serverwith Human Operator
Non-DI-Guy 3D VisualTraining Station (e.g. VBS2)
(e.g. OneSAF,JCATS ExportCGF)
DI-Guy enabled3D Visual TrainingStation(e.g., Raydon Bare,VR-Vantage, VegaPrime, DiamondVisionics Genesis)Shared
Battlefield
DI-Guy AI Users Guide 1-7
Introduction to DI-Guy AI — DI-Guy AI Platform Support
1.6. DI-Guy AI Platform SupportScenarios that use DI-Guy AI can be loaded into DI-Guy SDK powered applications. DI-Guy AI has a C++ API that complements and works with DI-Guy SDK. DI-Guy SDK can be integrated into virtually any computer application running on Windows 32/64 or Linux 32/64. Out of the box, DI-Guy SDK provides complete rendering solutions for OpenGL, DirectX, Vega Prime, and Open Scene Graph. Best of all, the DI-Guy Graphics API lets you customize DI-Guy graphics to your specific renderer, so almost any renderer that runs on a Windows or Linux computer can use DI-Guy AI characters.
1.7. DI-Guy AI is Real TimeEverything about DI-Guy AI is real-time. Used through DI-Guy Scenario or the Life-form Server, the user interface lets you edit crowd activity and see the people act out their roles immediately, without a compilation delay. In fact, you can manipulate crowds while the scenario plays, which is important for a real-time Lifeform Server operator.
1-8 VT MÄK

DI-G
2. DI-Guy AI Concepts
This chapter provides a high-level description of DI-Guy features.
DI-Guy AI Concepts .................................................................................... 2-3Agents .................................................................................................... 2-3Crowds................................................................................................... 2-3Crowd Profiles........................................................................................ 2-4
Agents and Behaviors .................................................................................... 2-5Travel Behavior....................................................................................... 2-6Path Follow Behavior.............................................................................. 2-6Wander Behavior.................................................................................... 2-7Mingle Behavior ..................................................................................... 2-7Flee Behavior.......................................................................................... 2-8Pursue Behavior...................................................................................... 2-8Attack Behavior ...................................................................................... 2-9Idle Behavior .......................................................................................... 2-9None Behavior ..................................................................................... 2-10
Regions and Subregions .............................................................................. 2-10
How Agents Select their Speed and Posture................................................. 2-12Speed Types.......................................................................................... 2-12Speed Zones ......................................................................................... 2-13The Still Speed Zone ............................................................................ 2-15Postures and Action Variants ................................................................ 2-17Automatic Variant Selection ................................................................. 2-19
Obstacles .................................................................................................... 2-19Sensing and Avoiding Static Objects..................................................... 2-20Dynamic Object Sensing and Avoidance .............................................. 2-22
2-1uy AI Users Guide

DI-Guy AI Concepts
Detecting and Escaping Traps ..................................................................... 2-24Trap Detection ..................................................................................... 2-24Untrap Methods................................................................................... 2-25
2-2 VT MÄK
DI-Guy AI Concepts — DI-Guy AI Concepts
2.1. DI-Guy AI ConceptsDI-Guy AI’s primary mission is to enable quick population of scenes with large groups of characters. It automates the creation of hundreds of characters that can sense things in their environment and have a good range of built-in behaviors with which to react to their surroundings. You do not have to plan hundreds of individual performances. Agents are DI-Guy characters controlled using the autonomous crowd AI described in this chapter (as opposed to more classic methods of controlling DI-Guy characters either using direct commands to the API or by following paths). A group of agents is called a crowd.
2.1.1. Agents
An agent is a DI-Guy character who uses AI to determine his actions. These AI capabil-ities build on the standard assets that already come with any DI-Guy character (actions and appearances, the ability to follow paths, a robust API, and so on). Agents can:
Sense obstacles in their environment.
Modify their actions based on their current objectives and the sensed obstacles.
Participate in crowds.
2.1.2. Crowds
A crowd is a group of agents. Agents in a crowd are aware of each other and their surroundings. They interact with each other, and may share certain behaviors and goals. Based on their parameters, interesting and autonomous behaviors emerge.
A crowd in DI-Guy AI:
Contains zero or more agents.
Has one or more modifiable regions in the scene in which the agents will operate and optionally be confined.
Specifies the method the agents in the crowd use to detect obstacles in the scene.
Has a list of companion crowds with which it can interact.
Has member functions that command and change parameters of all or some of the agents in the crowd at the same time.
i An agent can be part of only one crowd.
DI-Guy AI Users Guide 2-3
DI-Guy AI Concepts — DI-Guy AI Concepts
2.1.3. Crowd Profiles
A crowd profile is a template that specifies the range of appearances and behaviors for the agents that are instantiated when a crowd is created. A well-composed crowd profile makes populating scenes easy, since you can quickly create very large crowds with diverse appearances and compelling emergent behavior already built-in and ready to go.
A crowd profile has a table, the Populate Entries table, that describes the agents that will be used to populate a new crowd. It contains one or more entries, each of which speci-fies:
A DI-Guy character type.
A DI-Guy character appearance.
A proportion.
All DI-Guy character types are valid as entries in the population entries table. Remember that, in DI-Guy, a character type defines the set of actions (walk, run, jog, and so on) a DI-Guy character can perform and the set of visual appearances that char-acter can have.
In addition to the population entries, a crowd profile also specifies a default crowd size and default parameters for behavior, obstacle avoidance, and so on, that each agent in the crowd created from the profile will have.
For more information about crowd profiles, please see “Creating and Editing Crowd Profiles,” on page 6-16.
2-4 VT MÄK
DI-Guy AI Concepts — Agents and Behaviors
2.2. Agents and BehaviorsCrowd behaviors and their parameters describe how crowds navigate around the scene.
Each agent has a large set of parameters that define its behavior, including:
How the agent should detect and avoid static obstacles.
How the agent should detect and avoid dynamic obstacles such as other agents in its crowd as well as agents in companion crowds.
The base behavior of the agent.
The desired posture and variant the agent should use when selecting actions.
– Postures define the basic posture of the action: upright, crouched, or prone.
– Variants define an abstract emotional state, mental state, or both of the character. Along with posture, the variant is used by DI-Guy AI to query the existing actions the character can perform, and then select the best or closest match when performing a still or moving action. Examples of variants include “angry” and “injured”.
The path shape, region, or both that the agent should use to guide its behavior.
An optional focus character or group of the agent’s behavior.
Settings that specify how the agent should attempt to remove itself from situations in which it becomes stuck or stops making progress toward where it wants to be (called untrap settings).
The high-level objectives of an agent are selected by setting the agent’s behavior. Behav-iors tell the agent what it should try to do, though other factors in the environment such as obstacles and dangers may interrupt or modify the behavior.
Depending on the particular behavior chosen, an agent’s behavior path shape or behavior region may affect the overall behavior.
Similarly, the agent’s focus character and focus group may also affect the overall behavior. When a behavior has a focus group, typically the behavior will select one character from the focus group and make it the temporary focus character. Therefore, whether a focus character or focus group is being used, there is commonly only a single character at any one time that is being focused on. This character is called the current focus character.
It is easy to change the “flavor” of behaviors by changing the desired posture and desired variant of the behavior. Changing the variant from “normal” to “angry”, for example, can quickly change the actions the agents in a crowd use from looking peaceful to looking aggravated.
The following sections describe the base behaviors offered in DI-Guy AI and how the behaviors vary based on behavior region, path shape, and the focus character and group.
For more information about agents, please see “Crowd Member Agent Parameters,” on page 6-20.
DI-Guy AI Users Guide 2-5
DI-Guy AI Concepts — Agents and Behaviors
2.2.1. Travel Behavior
Agents with the travel behavior move back and forth along a set of waypoints in the environment. While the techniques for manipulating the path shapes and component waypoints are the same as non-DI-Guy AI paths, the way the path shape is used is quite different from how a path shape is used by a non-AI character. Agents do not stay exactly on the path. They use it as a suggestion of the route they should follow, devi-ating from the path as necessary to avoid obstacles and other agents. Multiple agents can share a single path.
This behavior is good for creating pedestrians walking along a sidewalk or guards on patrol.
2.2.2. Path Follow Behavior
Agents with this behavior use a path (not a path shape) as their route.The path they follow is the specific character’s individual path (agents cannot share paths). Because they are following the path, the agent will also perform the actions that are specified on the path. Agents using path follow that are then given a new behavior, such as flee, are able to rejoin the path and continue.
This behavior is good for controlling agents when you have a set of actions you want the character to perform while following a path. It is also good if you expect the agent to get interrupted by an event. It works best when invoked by a script using agent_path_follow(“pathname”).
Table 2-1: Behavior and focus effects for the Travel behavior
Effector Effect
Behavior region and path shape Since the agents are moving back and forth along a path shape, the behavior path shape is very important. The behavior will not work without it.
The behavior region’s boundaries have no effect unless they are solid.
Focus character and focus group Traveling characters look at focus characters and groups.
Table 2-2: Behavior and focus effects for the Path Follow behavior
Effector Effect
Behavior region and path shape None.
Focus character and focus group None.
2-6 VT MÄK
DI-Guy AI Concepts — Agents and Behaviors
2.2.3. Wander Behavior
Agents with the wander behavior select random points in their behavior region (or waypoints on their optional path shape), move to those points, and wait there for a time before selecting a new wander target.
This behavior is good for creating a group of people milling about in an area. Depending on the agents’ current variants, the result can look like calm people in a market area or a crowd of protesters.
2.2.4. Mingle Behavior
This behavior is similar to wander, but instead of selecting random points in the behavior region, agents with this behavior find other like-minded minglers and select the same wander target and stay there for a random amount of time. After this random interval the agent will try to find a new mingle target to avoid clumping.
Table 2-3: Behavior and focus effects for the Wander behavior
Effector Effect
Behavior region and path shape If a behavior region is specified, the wander targets are selected from that region.
If a behavior region is not set, but a behavior path is, the wander targets are random waypoints on the behavior path.
Focus character and focus group When agents reach their wander targets, they turn toward the current focus character during the stationary portion of their wandering.
Table 2-4: Behavior and focus effects for the Mingle behavior
Effector Effect
Behavior region and path shape When the agent decides to find a new wander target, if a behavior region is specified, the wander targets are selected from that region.
If a behavior region is not set, but a behavior path is, the wander targets are random waypoints on the behavior path.
Focus character and focus group When agents have reached their mingle targets, they turn toward the current focus character.
DI-Guy AI Users Guide 2-7
DI-Guy AI Concepts — Agents and Behaviors
2.2.5. Flee Behavior
Agents with the flee behavior try to move at their fastest speed away from a specified position in the scene or specified character or group. Once they are far enough away from the flee point, they stop.
This behavior is good for having agents react to and run away from a danger such as a nearby explosion or a character firing a weapon. It is best to use this behavior by invoking it using a script.
2.2.6. Pursue Behavior
Agents with the pursue behavior try to reach and stay within a specified distance of another agent.
This behavior is good for having a group of people follow a leader controlled by some external source, such as an I-Guy being driven by a scenario participant.
Table 2-5: Behavior and focus effects for the Flee behavior
Effector Effect
Behavior region and path shape The behavior region’s boundaries have no effect unless they are solid. The agent just tries to move directly away from the flee point.
Focus character and focus group Once the agent has moved far enough away from the flee point so that it can stop, it turns to face the current focus character.
Table 2-6: Behavior and focus effects for the Pursue behavior
Effector Effect
Behavior region and path shape The behavior region’s boundaries have no effect unless they are solid. The agent just tries to move toward the pursue target.
Focus character and focus group The current focus character is the character the agent follows. Alternatively, if a focus group is specified, the agent follows the nearest character in the specified group, periodically updating their focus target.
2-8 VT MÄK
DI-Guy AI Concepts — Agents and Behaviors
2.2.7. Attack Behavior
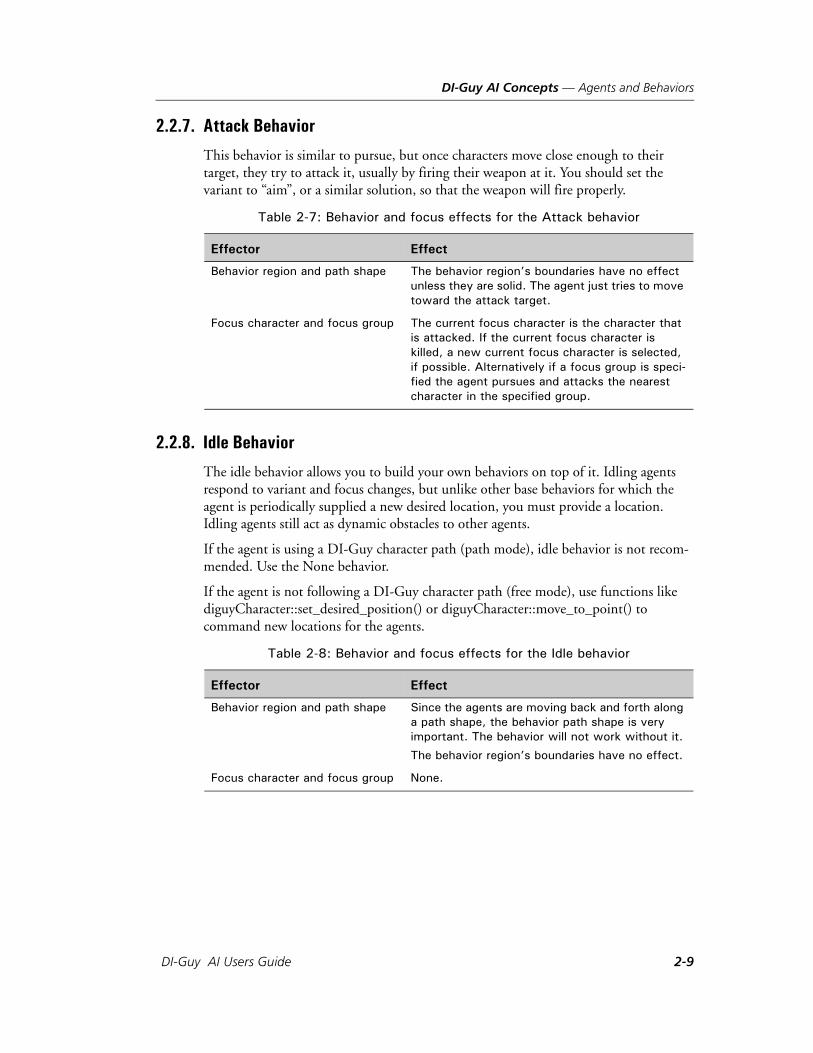
This behavior is similar to pursue, but once characters move close enough to their target, they try to attack it, usually by firing their weapon at it. You should set the variant to “aim”, or a similar solution, so that the weapon will fire properly.
2.2.8. Idle Behavior
The idle behavior allows you to build your own behaviors on top of it. Idling agents respond to variant and focus changes, but unlike other base behaviors for which the agent is periodically supplied a new desired location, you must provide a location. Idling agents still act as dynamic obstacles to other agents.
If the agent is using a DI-Guy character path (path mode), idle behavior is not recom-mended. Use the None behavior.
If the agent is not following a DI-Guy character path (free mode), use functions like diguyCharacter::set_desired_position() or diguyCharacter::move_to_point() to command new locations for the agents.
Table 2-7: Behavior and focus effects for the Attack behavior
Effector Effect
Behavior region and path shape The behavior region’s boundaries have no effect unless they are solid. The agent just tries to move toward the attack target.
Focus character and focus group The current focus character is the character that is attacked. If the current focus character is killed, a new current focus character is selected, if possible. Alternatively if a focus group is speci-fied the agent pursues and attacks the nearest character in the specified group.
Table 2-8: Behavior and focus effects for the Idle behavior
Effector Effect
Behavior region and path shape Since the agents are moving back and forth along a path shape, the behavior path shape is very important. The behavior will not work without it.
The behavior region’s boundaries have no effect.
Focus character and focus group None.
DI-Guy AI Users Guide 2-9

DI-Guy AI Concepts — Regions and Subregions
2.2.9. None Behavior
The none behavior is very important. It is typically used by an agent to turn off its AI and use other means of controlling behavior, including paths or direct calls to its API. If you want other agents to avoid a character that is on a path, at a minimum you must make it an agent. Often you do this and specify a “None” behavior.
If an agent is using a character path (path mode), it is controlled by the path, which determines its positions and actions, as if it were a non-DI-Guy AI character. The agent still affects other agents in its crowd.
If an agent is not following a DI-Guy character path (free mode), the None behavior responds to commands like force_action(), but commands that internally use guides like set_desired_position() do not respond.
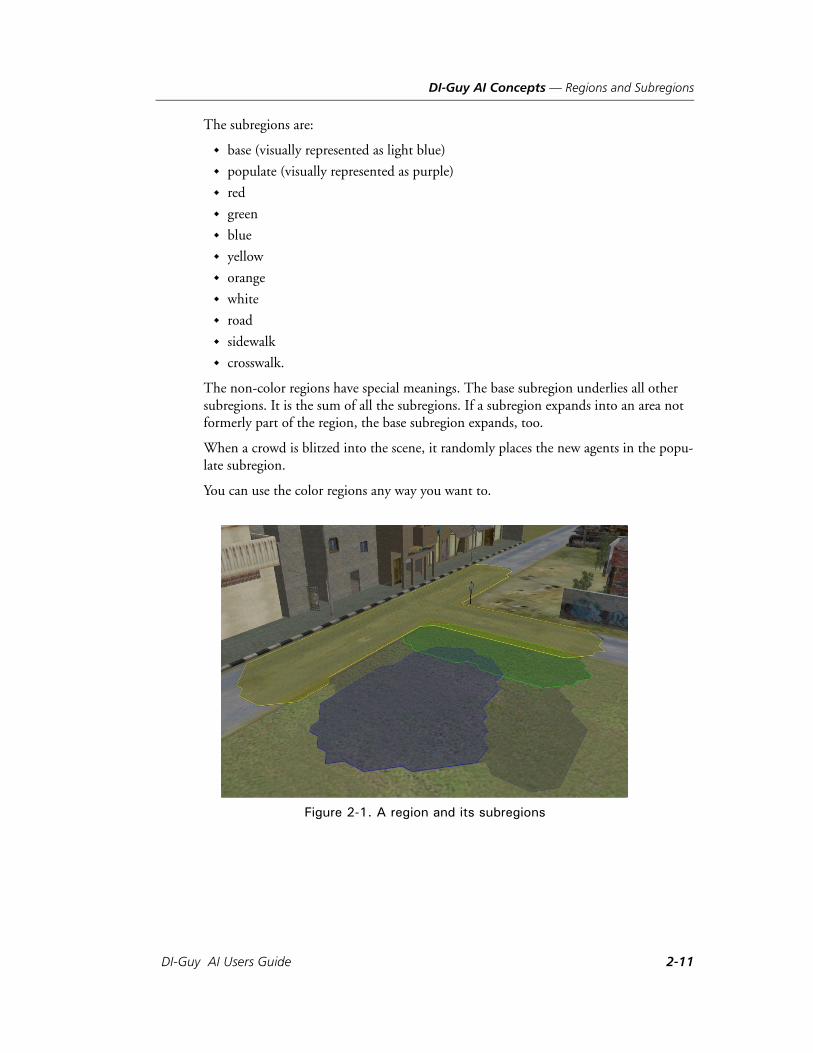
2.3. Regions and SubregionsRegions are 2D heightmaps. They are most commonly created as a result of a crowd blitz or by using the Region Painter in the 3D View. Visually, they are represented as colored meshes covering the ground.
A scenario can have multiple regions. Each one has its own navmesh. Only one Z value can be set at each (x,y) position, so if you want to apply a region to multiple floors of a building, you need to create a region for each floor.
A region can contain subregions. Each subregion is represented by a different color, and usually the subregions are referred to by their color. Subregions are not mutually exclu-sive. For example, a point in the scene can be in the base, populate, and green regions. Subregions do not have to be connected to be part of the same region, unless you plan to do path planning.
Table 2-9: Behavior and focus effects for the None behavior
Effector Effect
Behavior region and path shape The behavior region’s boundaries have no effect.
Focus character and focus group When agents have reached their desired position they turn toward the current focus character.
2-10 VT MÄK
DI-Guy AI Concepts — Regions and Subregions
The subregions are:
base (visually represented as light blue)
populate (visually represented as purple)
red
green
blue
yellow
orange
white
road
sidewalk
crosswalk.
The non-color regions have special meanings. The base subregion underlies all other subregions. It is the sum of all the subregions. If a subregion expands into an area not formerly part of the region, the base subregion expands, too.
When a crowd is blitzed into the scene, it randomly places the new agents in the popu-late subregion.
You can use the color regions any way you want to.
Figure 2-1. A region and its subregions
DI-Guy AI Users Guide 2-11
DI-Guy AI Concepts — How Agents Select their Speed and Posture
In Figure 2-1, a single region and its four subregions are shown:
The base, which represents the sum of all subregions (erased subregions will often be remembered by the base).
yellow, which has been painted onto the streets and may serve as areas safe for vehi-cles, but dangerous for humans.
green, an area where, for example, people waiting for a bus might stand.
blue, an area safely away from the street.
Regions play several important roles in DI-Guy AI:
The region painted in during a crowd blitz becomes the populate subregion where agents are randomly placed.
Some agent behaviors are influenced by the agent’s current region and subregion. For example, agents in the wander behavior select their wander targets from their current region and subregion.
By default, regions do not limit an agents’ movements. However, the “walls” of regions can be made solid, to keep agents inside the regions’ limits.
For more information about regions, please see “Creating Regions,” on page 6-13.
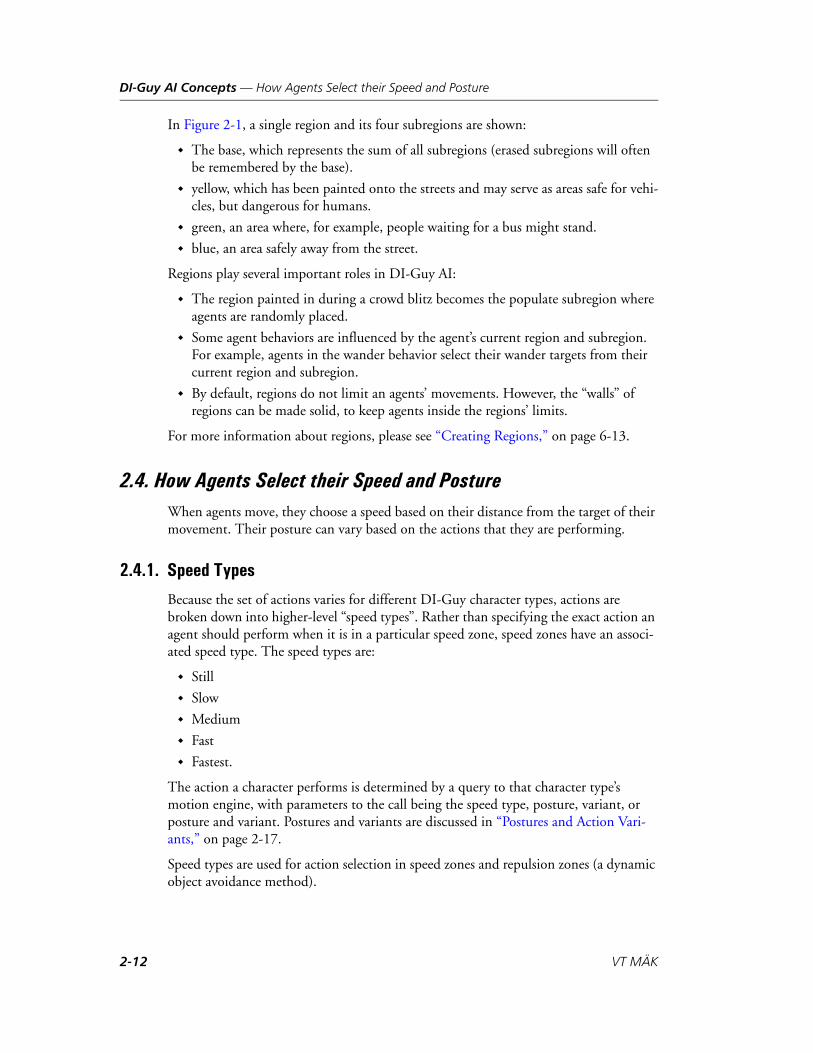
2.4. How Agents Select their Speed and PostureWhen agents move, they choose a speed based on their distance from the target of their movement. Their posture can vary based on the actions that they are performing.
2.4.1. Speed Types
Because the set of actions varies for different DI-Guy character types, actions are broken down into higher-level “speed types”. Rather than specifying the exact action an agent should perform when it is in a particular speed zone, speed zones have an associ-ated speed type. The speed types are:
Still
Slow
Medium
Fast
Fastest.
The action a character performs is determined by a query to that character type’s motion engine, with parameters to the call being the speed type, posture, variant, or posture and variant. Postures and variants are discussed in “Postures and Action Vari-ants,” on page 2-17.
Speed types are used for action selection in speed zones and repulsion zones (a dynamic object avoidance method).
2-12 VT MÄK
DI-Guy AI Concepts — How Agents Select their Speed and Posture
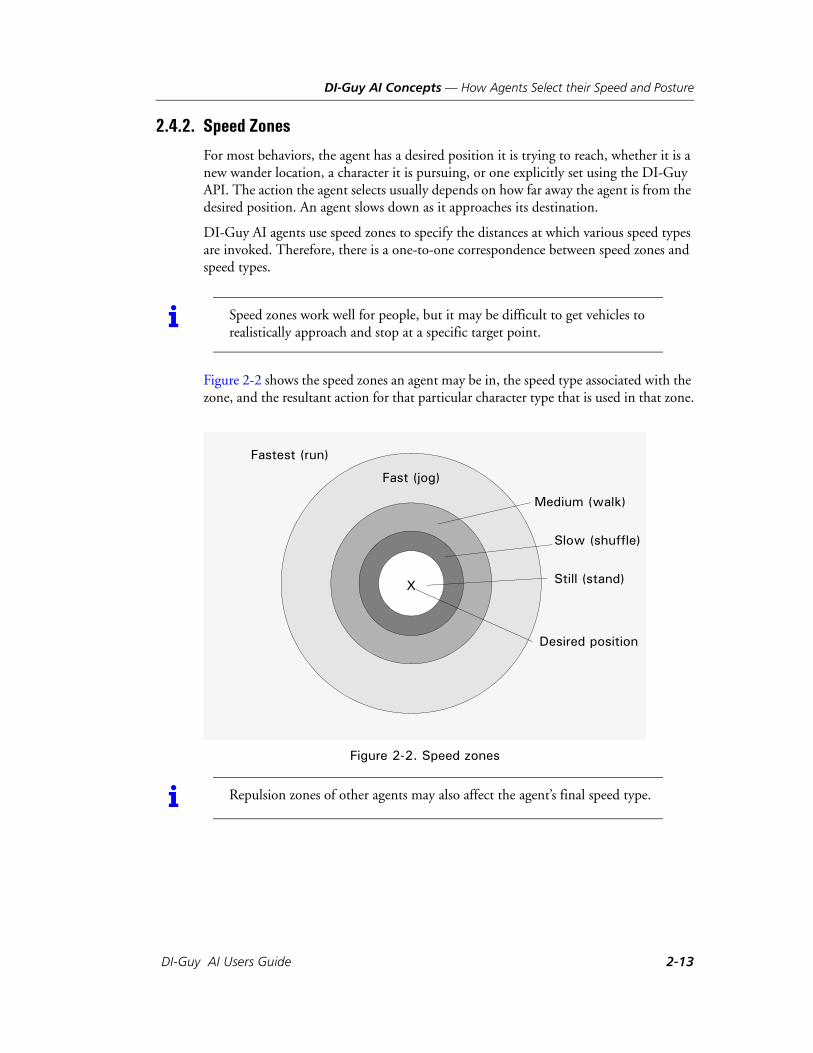
2.4.2. Speed Zones
For most behaviors, the agent has a desired position it is trying to reach, whether it is a new wander location, a character it is pursuing, or one explicitly set using the DI-Guy API. The action the agent selects usually depends on how far away the agent is from the desired position. An agent slows down as it approaches its destination.
DI-Guy AI agents use speed zones to specify the distances at which various speed types are invoked. Therefore, there is a one-to-one correspondence between speed zones and speed types.
Figure 2-2 shows the speed zones an agent may be in, the speed type associated with the zone, and the resultant action for that particular character type that is used in that zone.
Figure 2-2. Speed zones
i Speed zones work well for people, but it may be difficult to get vehicles to realistically approach and stop at a specific target point.
i Repulsion zones of other agents may also affect the agent’s final speed type.
Fastest (run)
Medium (walk)
Slow (shuffle)
Still (stand)
Desired position
X
Fast (jog)
DI-Guy AI Users Guide 2-13
DI-Guy AI Concepts — How Agents Select their Speed and Posture
Speed Zone Parameters
Each speed zone has the following parameters:
Enabled: Whether the speed zone is enabled. Agents ignore disabled zones. They use the next faster zone. The Still speed zone is always enabled.
Start At Radius: Radius of the speed zone circle, centered on the agent’s desired position. The speed zone starts at this radius, extending outward to the next enabled zone’s Start At Radius. The Start At Radius of the Still speed zone is always zero.
Exact Action: An optional exact action that the agent will use in the zone. This action overrides the action typically calculated using the desired speed type, posture, and variant.
Disabled Speed Zones
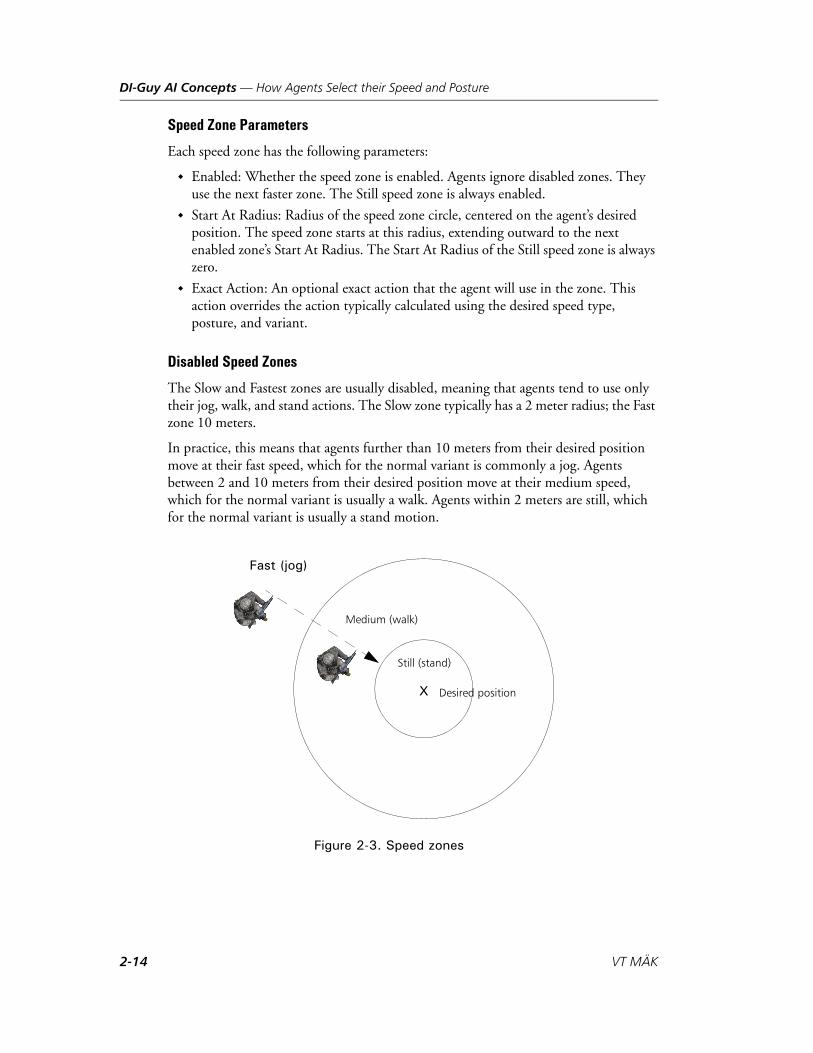
The Slow and Fastest zones are usually disabled, meaning that agents tend to use only their jog, walk, and stand actions. The Slow zone typically has a 2 meter radius; the Fast zone 10 meters.
In practice, this means that agents further than 10 meters from their desired position move at their fast speed, which for the normal variant is commonly a jog. Agents between 2 and 10 meters from their desired position move at their medium speed, which for the normal variant is usually a walk. Agents within 2 meters are still, which for the normal variant is usually a stand motion.
Figure 2-3. Speed zones
X
Fast (jog)
Medium (walk)
Still (stand)
Desired position
2-14 VT MÄK
DI-Guy AI Concepts — How Agents Select their Speed and Posture
2.4.3. The Still Speed Zone
The Still speed zone radius is usually a meter or more. This means that agents rarely reach their exact desired position. To understand why, try the following thought experi-ment:
Imagine that you are standing by yourself in an empty field. On the ground in the center of the field, about ten meters away, is a coin. You are listening to and following directions from a coach on the side of the field.
The coach tells you, “Go to the coin.” Chances are, you will go and stand directly on top of the coin.
Now imagine that you are once again ten meters from the coin, and there is another person with you. The coach tells both of you, “Go to the coin.” There are a couple of things that can happen this time.
Both of you move to a small distance away from the coin and stop.
The person who gets there first stands on top of the coin. The second person stands some small distance away.
Least likely, unless both of you are remarkably good friends, you both stand on the coin, one somehow on top of the other.
Imagine this scenario again, but this time there are dozens of people trying to get to the coin. This time almost no-one will be able to stand on the coin, and some will unable to get close to the coin.
i In general, the more agents there are that try to reach the same desired position, the bigger the Still Zone needs to be.
DI-Guy AI Users Guide 2-15

DI-Guy AI Concepts — How Agents Select their Speed and Posture
The Radius Variation Parameter
Very often, all agents in a crowd have the same agent parameters, because it is much easier to edit the parameters of crowd agents as a whole than on an agent-by-agent basis. However, if all agents in a crowd have the same speed zone radii, some unnatural-looking behavior can result.
Consider the example of dozens of agents attempting to reach a single desired position, in this case another agent they are pursuing. If all of the agents have the same Still speed zone radius, all of them will stop at the same distance from the target, resulting in something like Figure 2-4.
Figure 2-4. Identical still speed zone radius
All of the agents are about equidistant from the pursuit target, at about the still zone radius. In many cases this does not look realistic.
It would look better is if each agent had a slightly different radius for each zone. You can vary the radius with the Radius Variation parameter. If the variation is non-zero, a random adjustment between zero and the variation value is added to each zone radius.
For example, if the still zone radius is two meters, and the radius variation is four meters, then agents in the pursuing crowd will effectively have a still zone radius between two and six. That is, two plus a random number between zero and four. The result might look like Figure 2-5.
Figure 2-5. Variable still speed zone radius
This looks a bit more natural.
Target
Target
2-16 VT MÄK
DI-Guy AI Concepts — How Agents Select their Speed and Posture
2.4.4. Postures and Action Variants
As an agent executes a behavior, such as mingle or follow, DI-Guy AI has to decide what actions it needs to take to accomplish the behavior. It can often determine the action to use by a combination of its speed, posture, and variant. (Previous sections describe how actions change based on an agent’s speed.)
For example, although you can assign a specific action, such as kneel_aim, if an agent is still, in the crouched posture, and given the aim variant, DI-Guy knows that the kneel_aim action is the appropriate action based on the other factors.
Postures
Each DI-Guy action takes place in the context of one of the following postures:
Upright (the most common). Some actions that use the upright posture are stand, walk, and run.
Crouched. Some actions that use the crouched posture are walk_lo, kneel_aim.
Prone. Some actions that use the prone posture are crawl, prone_aim.
Variants
Variants define an abstract emotional state, mental state, or both, of a character. Along with posture, the variant is used by DI-Guy AI to determine the actions the character can perform, and then select the best or closest match when performing a still or moving action. The following variants are available:
normal (the most common)
ambient (the 2nd most common)
aim
dead
ready
injured
sick
exercise
angry
curious
socialize.
Each action can support multiple variants. Variants provide a way of differentiating actions that otherwise are pretty much the same. For example, the actions stand and talk are very similar. Both are upright, both face forward, both are still. In this case, the variant can be used to differentiate between the two. The stand action uses the variant normal; the talk action uses the variant socialize.
An example of an upright posture, normal variation action would be stand. An example of an upright posture, angry variant action would be angry_chant or rock_throw.
DI-Guy AI Users Guide 2-17
DI-Guy AI Concepts — How Agents Select their Speed and Posture
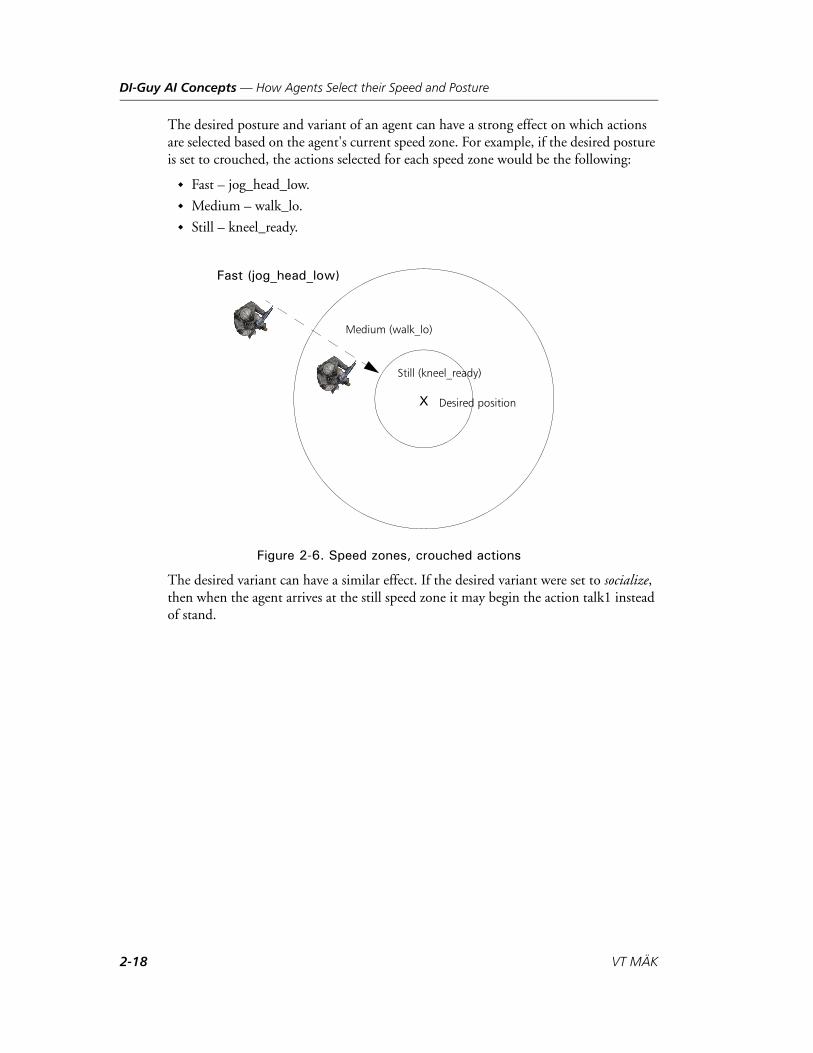
The desired posture and variant of an agent can have a strong effect on which actions are selected based on the agent's current speed zone. For example, if the desired posture is set to crouched, the actions selected for each speed zone would be the following:
Fast – jog_head_low.
Medium – walk_lo.
Still – kneel_ready.
Figure 2-6. Speed zones, crouched actions
The desired variant can have a similar effect. If the desired variant were set to socialize, then when the agent arrives at the still speed zone it may begin the action talk1 instead of stand.
X
Fast (jog_head_low)
Medium (walk_lo)
Still (kneel_ready)
Desired position
2-18 VT MÄK
DI-Guy AI Concepts — Obstacles
2.4.5. Automatic Variant Selection
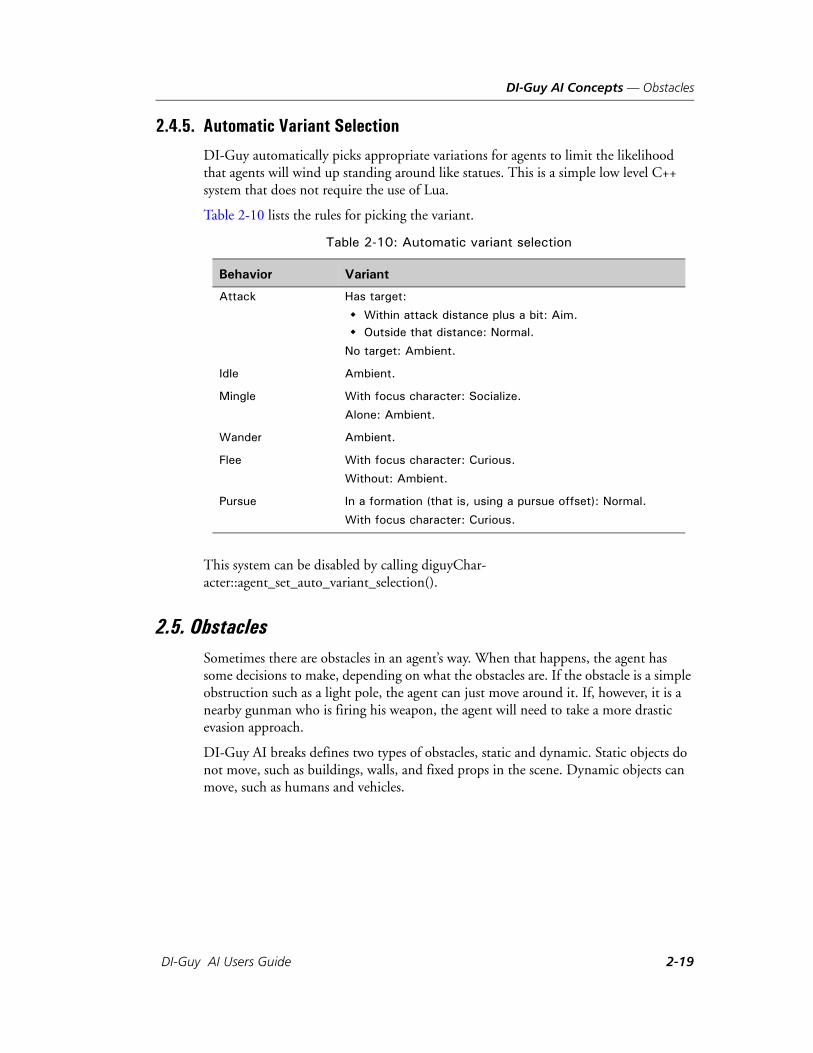
DI-Guy automatically picks appropriate variations for agents to limit the likelihood that agents will wind up standing around like statues. This is a simple low level C++ system that does not require the use of Lua.
Table 2-10 lists the rules for picking the variant.
This system can be disabled by calling diguyChar-acter::agent_set_auto_variant_selection().
2.5. ObstaclesSometimes there are obstacles in an agent’s way. When that happens, the agent has some decisions to make, depending on what the obstacles are. If the obstacle is a simple obstruction such as a light pole, the agent can just move around it. If, however, it is a nearby gunman who is firing his weapon, the agent will need to take a more drastic evasion approach.
DI-Guy AI breaks defines two types of obstacles, static and dynamic. Static objects do not move, such as buildings, walls, and fixed props in the scene. Dynamic objects can move, such as humans and vehicles.
Table 2-10: Automatic variant selection
Behavior Variant
Attack Has target:
Within attack distance plus a bit: Aim. Outside that distance: Normal.
No target: Ambient.
Idle Ambient.
Mingle With focus character: Socialize.
Alone: Ambient.
Wander Ambient.
Flee With focus character: Curious.
Without: Ambient.
Pursue In a formation (that is, using a pursue offset): Normal.
With focus character: Curious.
DI-Guy AI Users Guide 2-19
DI-Guy AI Concepts — Obstacles
2.5.1. Sensing and Avoiding Static Objects
Agents can be in one of three modes with respect to static object detection and avoid-ance:
Disabled
Feelers
Path planning.
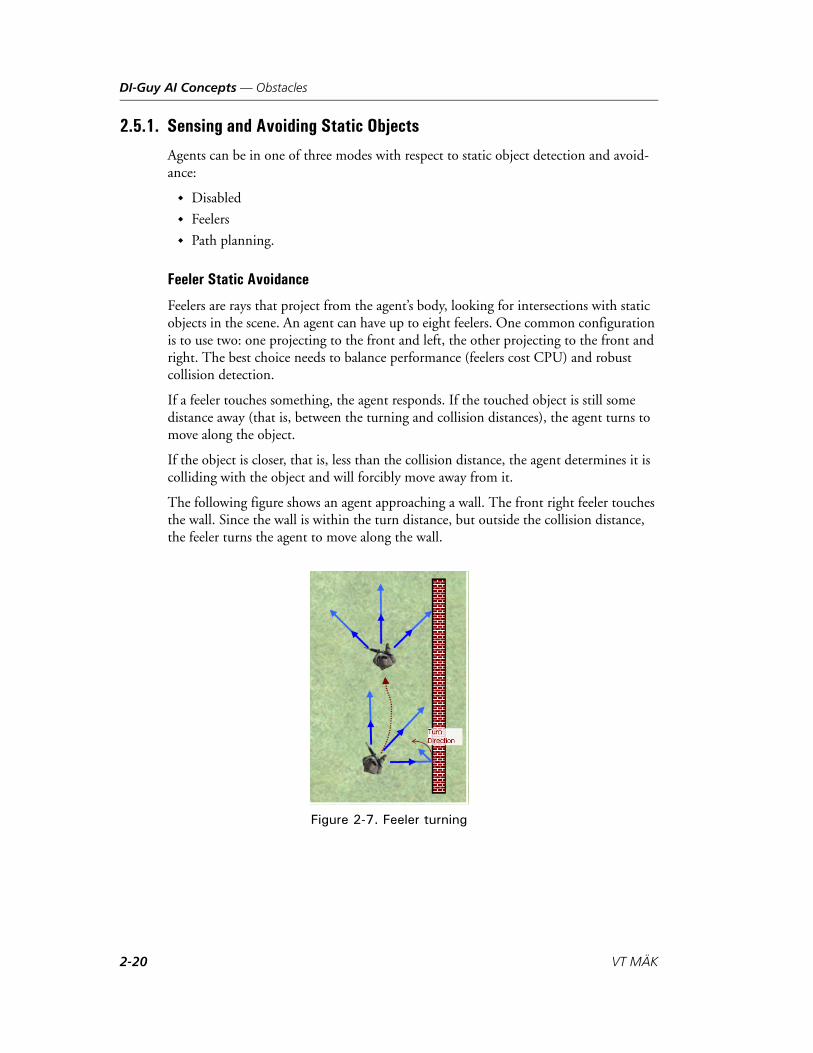
Feeler Static Avoidance
Feelers are rays that project from the agent’s body, looking for intersections with static objects in the scene. An agent can have up to eight feelers. One common configuration is to use two: one projecting to the front and left, the other projecting to the front and right. The best choice needs to balance performance (feelers cost CPU) and robust collision detection.
If a feeler touches something, the agent responds. If the touched object is still some distance away (that is, between the turning and collision distances), the agent turns to move along the object.
If the object is closer, that is, less than the collision distance, the agent determines it is colliding with the object and will forcibly move away from it.
The following figure shows an agent approaching a wall. The front right feeler touches the wall. Since the wall is within the turn distance, but outside the collision distance, the feeler turns the agent to move along the wall.
Figure 2-7. Feeler turning
2-20 VT MÄK
DI-Guy AI Concepts — Obstacles
Feeler Parameters
Feelers have tunable parameters:
Enabled. Disabled feelers have no effect on the agent. By default only the front left and front right feelers are enabled.
Yaw (rz) Offset. The yaw (rotation about Z axis, or rz) offset of the feeler from forward. The default eight feelers are evenly spaced at 45 degree intervals around the agent.
Height. The height of the feeler from the ground. Default: 0.7 meters.
Collision Distance. The distance at which the feeler returns a collision result, and moves the agent away from the object. Default: 0.25 meters.
Turn Distance. The distance at which the feeler returns a turn result, and turns the agent to move along the object. Default: 0.5 meters.
Turn Direction. The direction the feeler turns the agent if contact occurs inside the turn distance. Default turn directions:
– The front left feeler turns the agent right.
– The front right feeler turns the agent left.
– The front feeler turns the agent left or right depending on the angle of contact.
Figure 2-8 illustrates the different feeler parameters.
Figure 2-8. Feeler parameters
Disabled Static Avoidance Method
Static object avoidance can be disabled. Static objects are neither detected nor avoided, which means that characters can walk through walls and solid objects.
If the agent is not near any static objects this is not a problem, and disabling static object avoidance can reduce the performance overhead.
TurnDirection
FrontLeft
FrontRight
Front
Offset Turn
Dist
ance
Collision Distance
Yaw
TurnDirection
DI-Guy AI Users Guide 2-21
DI-Guy AI Concepts — Obstacles
2.5.2. Dynamic Object Sensing and Avoidance
Dynamic objects are objects that move around the scene. These are almost always other agents, but can also be incoming DIS/HLA entities or avatars. Agents use repulsion zones to detect and avoid them.
Dynamic Avoidance Using Repulsion Zones
When dynamic avoidance is enabled, agents are surrounded by repulsion zones. Other agents that enter these zones have their position, orientation, action or some combina-tion of these attributes changed to try to get out of the zone.
Repulsion zones are different from speed zones. An agent’s repulsion zones are centered on the agent and affect how other agents act. An agent’s speed zones are centered on the agent’s desired position, and affect only how this agent acts.
Each repulsion zone has the following parameters:
Enabled: Whether the zone is enabled. Disabled zones have no effect on other agents. By default the Medium and High Repulsion Zones are disabled.
Repulsion Radius: How far from the agent’s position the zone extends.
Repulsion Factor: How strong a repulsive force should be applied to agents that enter the zone.
When an agent enters another agent’s repulsion zone, its orientation, position, and action may be affected.
Orientation
An agent entering a repulsion zone may be influenced by multiple orientation forces, as follows:
A repulsive force attempts to turn the agent directly away from the zone center (which is the position of the agent owning the repulsion zone).
The agent’s current action may try to orient it towards its desired position.
The agent may be in multiple repulsion zones at the same time.
All of these forces are combined to determine a final change to the agent’s orientation. The agent has a maximum orientation change rate, so regardless of the forces being applied it will never exceed the maximum.
Position
An agent entering the solid zone of another agent will be moved out of it.
2-22 VT MÄK
DI-Guy AI Concepts — Obstacles
Action Selection
Each repulsion zone has an associated speed type, which affects agents as follows:
Agents in a low repulsion zone will try to avoid at a low speed, either slow or medium.
Agents in a medium repulsion zone will try to avoid at their fast speed, which is typically a jog.
Agents in a high repulsion zone will try to avoid at their fastest speed, which is typi-cally a run.
Speed Zone and Repulsion Zone Interactions
There is a lot of overlap in selecting the proper speed between the speed zones and the repulsion zones. Both are used to determine the speed type the agent will use. In general, the fastest speed type is used.
If, for example, an agent is in its fastest speed zone and in the low repulsion zone of another agent, the final speed type will be fastest. Similarly, if an agent is in its slow speed zone, but is in the high repulsion zone of another agent, the final speed type will be fast.
Repulsion Zones and Vehicles
Human-to-vehicle collision detection and avoidance is different from human-to-human in DI-Guy AI for the following reasons:
Difference in mass. Vehicles are heavier than humans. While it is possible for a human to push another human out of the way, humans cannot push a vehicle out of the way. Because of this, forced position change due to solid zone penetration is one-sided, with only the human being moved.
Difference in speed. Vehicles can move much more quickly than humans, therefore vehicle-to-human collisions are much more serious than human-to-human ones. Because of this, vehicle repulsion zones can stretch much further in front of vehi-cles than a typical human’s does.
Bounding shape. Vehicles do better with box-like bounding shapes and repulsion zones rather than the circular ones of humans. Because of the needed larger repul-sion zones mentioned above, if the zones were circular they would extend much too far to the sides and in back of the vehicle. Instead, vehicle repulsion zones extend fairly far in front of the vehicle and comparatively little to the sides.
Disabled Dynamic Avoidance Method
You can disable dynamic object avoidance. In this case crowd members can walk through each other.
If a crowd is far away from the viewpoint it may not be obvious that this is happening. Disabling a crowd's dynamic object avoidance can enhance performance.
DI-Guy AI Users Guide 2-23
DI-Guy AI Concepts — Detecting and Escaping Traps
2.6. Detecting and Escaping TrapsAgents not using A-star path planning sometimes find themselves in a dead end, or otherwise unable to make progress toward where they want to go. DI-Guy AI refers to such an agent as being trapped. There are several ways agents can try to get out of traps.
In some cases DI-Guy AI agents do not have global knowledge of their environment. That is, the entire world is not mapped out offline with all possible paths computed from point to point using A-star. The only information available to an agent is:
Its position, orientation, and desired position.
Polygons of static objects that are within its feeler ranges.
Other agents in its crowd or companion crowds.
If terrain information is limited, agents can get stuck in a local minimum; that is, in a boxed-in area in which the standard approach of using feelers to move around obstacles is not sufficient.
You can configure agents to minimize or eliminate getting caught in traps. For informa-tion about trap settings, please see “Trap Settings and Path Planning Tab,” on page 6-27.
2.6.1. Trap Detection
Agents can detect two kinds of traps:
Wedged trap. This trap occurs when the agent’s feelers are detecting continuous collisions for an amount of time greater than the wedged trap time threshold. Usually this occurs when the agent has navigated into a tight corner, or is being pushed into an area by the repulsion effects of other agents.
No progress trap. This trap occurs when the agent is apparently freely able to move around the scene, but something has been keeping it from making real progress toward its desired position for some time. This is commonly when the agent gets trapped in a local minima area.
Agents check for no progress traps at two different time thresholds. They try different untrap methods based on the threshold.
2-24 VT MÄK
DI-Guy AI Concepts — Detecting and Escaping Traps
2.6.2. Untrap Methods
When an agent gets trapped, it tries to get untrapped using the following actions:
Random turn. The agent temporarily stops moving, turns a random amount, and then resumes movement. This minor course change can sometimes move a char-acter around a small obstacle.
Ghost. The agent’s feelers stop having an effect for a short time. This allows the agent to walk through a wall toward its desired position. (If the agent is directly in front of the viewpoint this can be a little ugly, but may be better than the agent hopelessly walking into a corner for many seconds.)
Nav path. The agent tries to create a navigation path (nav path) in its current region to its desired position. This temporarily puts the agent in the travel behavior.
This method will not work unless the agent, the desired position, and a navigable path lie entirely in the agent’s base region.
Teleport. This is an extreme method, typically used as a last resort. The agent jumps immediately from its current position to the desired position.
None. The agent makes no attempt to become untrapped. This can result in the agent repeating unsuccessful behaviors until its desired position changes.
Stop moving. Somewhat similar to the None method, but the current behavior of the agent is set to none, and the agent character's desired position is set to its current position. Unless something else is sending desired position updates to the agent, this should cause the agent to stop at its current position and wait for further instructions. Although the agent gets no closer to the original desired position than with the None method, it does not engage in fruitless behavior.
DI-Guy AI Users Guide 2-25

DI-Guy AI Concepts — Detecting and Escaping Traps
2-26 VT MÄK
DI-G
3. DI-Guy Tutorials
This chapter walks you through several exercises designed to teach you major features of DI-Guy AI.
DI-Guy AI Tutorials ..................................................................................... 3-3
Create a Crowd Scene ................................................................................... 3-4
Tutorial 1. AI Minds ..................................................................................... 3-5Create a Civilian Population with a Simple Pattern of Life ..................... 3-7Create Soldiers that Use Formations ..................................................... 3-10Create an Enemy Squad and Initiate Combat....................................... 3-11
Tutorial 2. Base Behaviors ........................................................................... 3-11Create a Crowd Using Base Behavior Travel ......................................... 3-12Add a Wander Crowd........................................................................... 3-14Trigger a Flee Base Behavior ................................................................. 3-16
Tutorial 3. Explore other Sample AI Scenarios ............................................ 3-19AI Crosswalks....................................................................................... 3-20AI Schedule .......................................................................................... 3-21AI Train Station Alarm ......................................................................... 3-22AI Multi-Floor Path Planning............................................................... 3-22AI Middle East Town ........................................................................... 3-27
Tutorial 4: Creating an AI Subclass (Package).............................................. 3-29Create a New Package........................................................................... 3-29Create a Crowd Profile and Some Crowds ............................................ 3-31Edit the Package ................................................................................... 3-31
Tutorial 5: Converting a Character to an Agent .......................................... 3-33Create a Character and Change it to an Agent...................................... 3-33Mimicking the Wander Base Behavior Using Scripting......................... 3-36
3-1uy AI Users Guide

DI-Guy Tutorials
Create a Subclass Mind Specific to Your Agent..................................... 3-36
Tutorial 6: Create a navmesh....................................................................... 3-39
3-2 VT MÄK
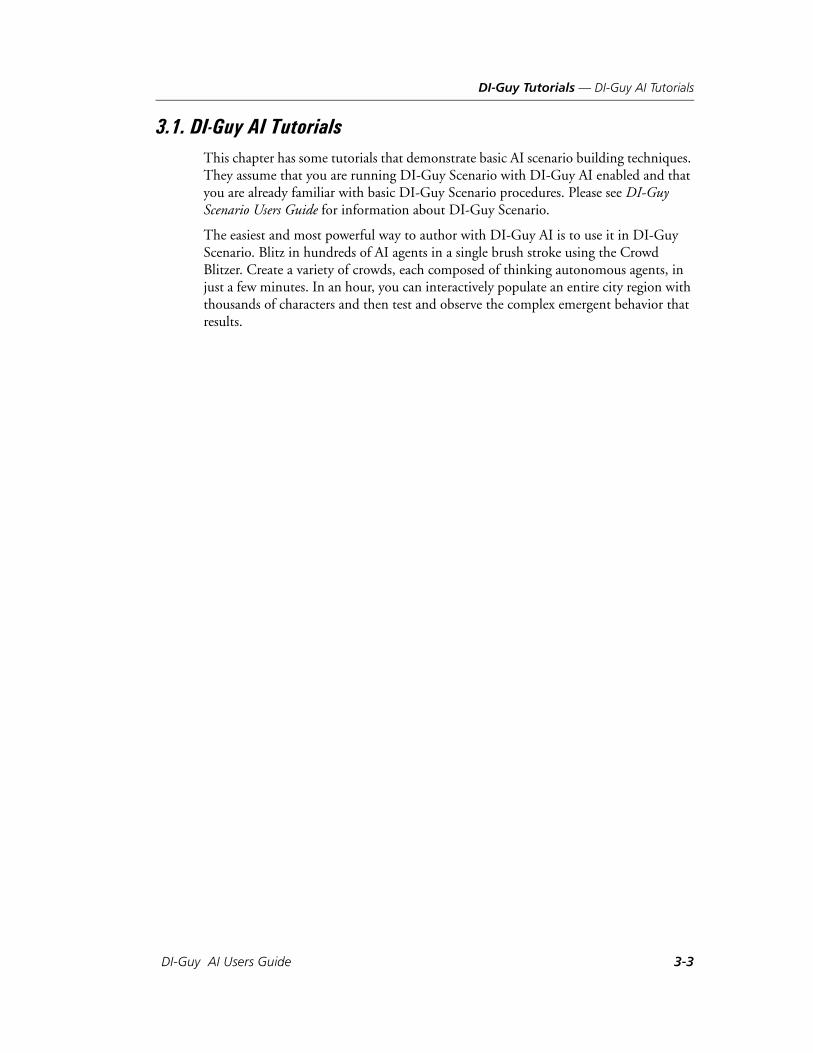
DI-Guy Tutorials — DI-Guy AI Tutorials
3.1. DI-Guy AI TutorialsThis chapter has some tutorials that demonstrate basic AI scenario building techniques. They assume that you are running DI-Guy Scenario with DI-Guy AI enabled and that you are already familiar with basic DI-Guy Scenario procedures. Please see DI-Guy Scenario Users Guide for information about DI-Guy Scenario.
The easiest and most powerful way to author with DI-Guy AI is to use it in DI-Guy Scenario. Blitz in hundreds of AI agents in a single brush stroke using the Crowd Blitzer. Create a variety of crowds, each composed of thinking autonomous agents, in just a few minutes. In an hour, you can interactively populate an entire city region with thousands of characters and then test and observe the complex emergent behavior that results.
DI-Guy AI Users Guide 3-3
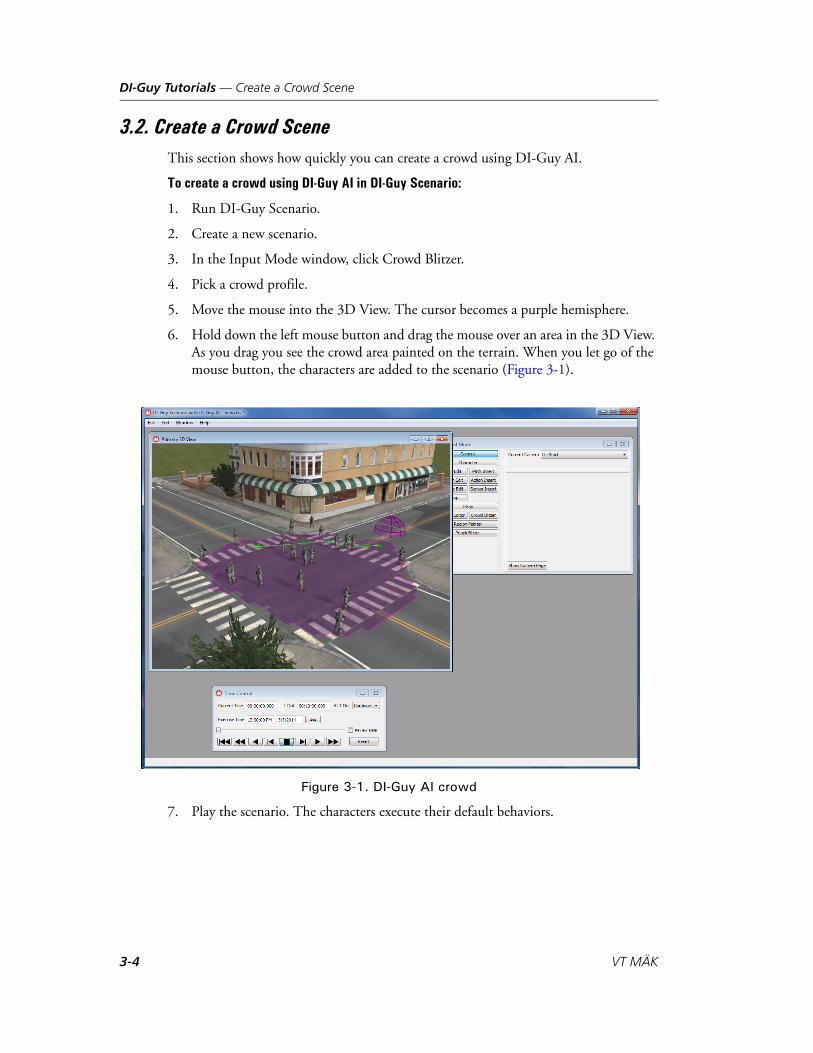
DI-Guy Tutorials — Create a Crowd Scene
3.2. Create a Crowd SceneThis section shows how quickly you can create a crowd using DI-Guy AI.
To create a crowd using DI-Guy AI in DI-Guy Scenario:
1. Run DI-Guy Scenario.
2. Create a new scenario.
3. In the Input Mode window, click Crowd Blitzer.
4. Pick a crowd profile.
5. Move the mouse into the 3D View. The cursor becomes a purple hemisphere.
6. Hold down the left mouse button and drag the mouse over an area in the 3D View. As you drag you see the crowd area painted on the terrain. When you let go of the mouse button, the characters are added to the scenario (Figure 3-1).
Figure 3-1. DI-Guy AI crowd
7. Play the scenario. The characters execute their default behaviors.
3-4 VT MÄK
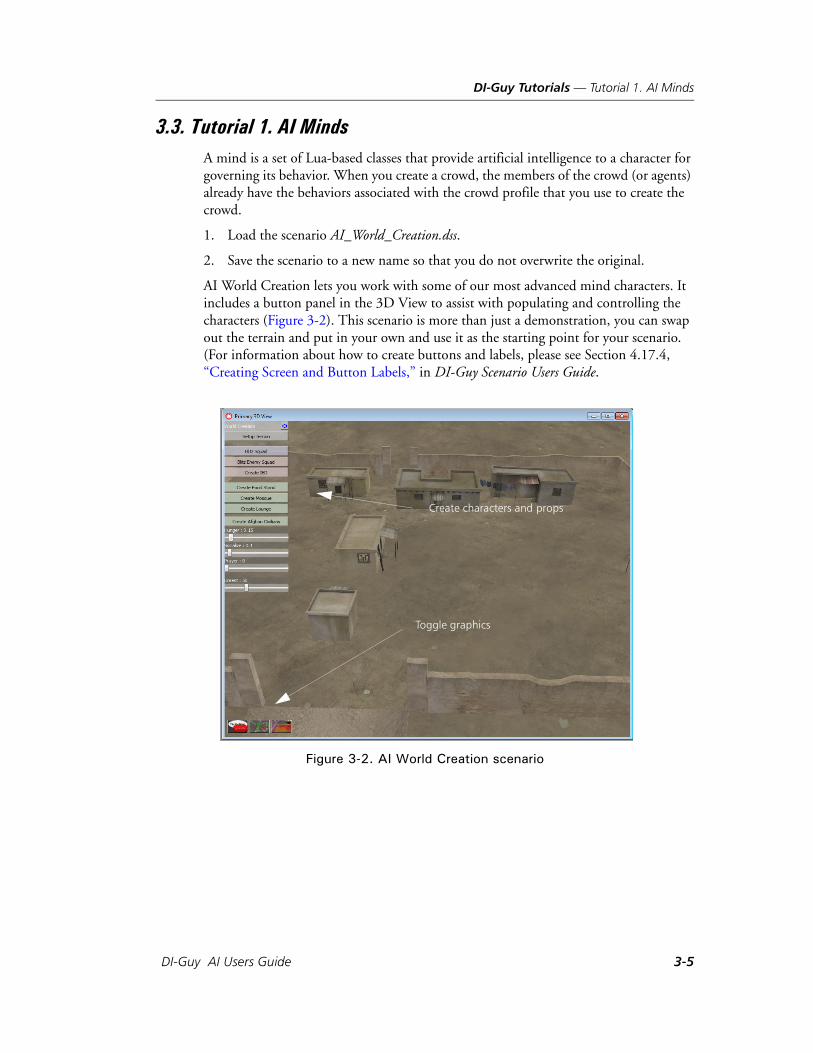
DI-Guy Tutorials — Tutorial 1. AI Minds
3.3. Tutorial 1. AI MindsA mind is a set of Lua-based classes that provide artificial intelligence to a character for governing its behavior. When you create a crowd, the members of the crowd (or agents) already have the behaviors associated with the crowd profile that you use to create the crowd.
1. Load the scenario AI_World_Creation.dss.
2. Save the scenario to a new name so that you do not overwrite the original.
AI World Creation lets you work with some of our most advanced mind characters. It includes a button panel in the 3D View to assist with populating and controlling the characters (Figure 3-2). This scenario is more than just a demonstration, you can swap out the terrain and put in your own and use it as the starting point for your scenario. (For information about how to create buttons and labels, please see Section 4.17.4, “Creating Screen and Button Labels,” in DI-Guy Scenario Users Guide.
Figure 3-2. AI World Creation scenario
Toggle graphics
Create characters and props
DI-Guy AI Users Guide 3-5
DI-Guy Tutorials — Tutorial 1. AI Minds
The 3D View has the following buttons:
Setup Terrain. Replaces the desert village with your own terrain.
Blitz Squad. Creates a squad of US Marines.
Blitz Enemy Squad. Creates a squad of enemy soldiers to fight.
Create IED. Creates an improvised explosive device.
Create Food Stand. Places a food stand anywhere in your world. When characters get hungry, they will seek it out.
Create Mosque. Places a mosque anywhere in your world. When characters have the urge to pray, they will go to the mosque.
Create Lounge. Places a lounge anywhere in your world. When characters want to socialize, they will go to the lounge.
Create Afghan Civilians. Creates pedestrians using the base behavior travel.
Social sliders. Modifies the hunger, socialize, prayer, and unrest parameters of the people of the village.
Toggle Thought Balloons, Toggle Vector-style graphics, Toggle region graphics. Turns graphics on and off.
Each character also has individual behaviors available.
3-6 VT MÄK
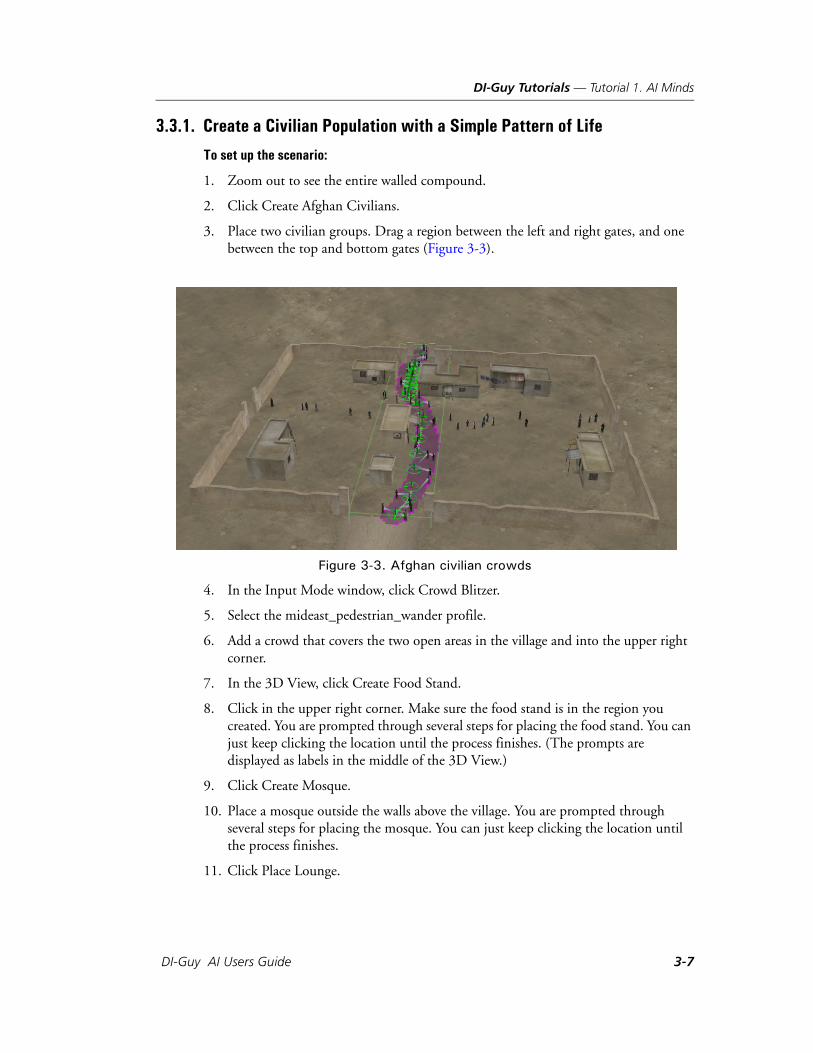
DI-Guy Tutorials — Tutorial 1. AI Minds
3.3.1. Create a Civilian Population with a Simple Pattern of Life
To set up the scenario:
1. Zoom out to see the entire walled compound.
2. Click Create Afghan Civilians.
3. Place two civilian groups. Drag a region between the left and right gates, and one between the top and bottom gates (Figure 3-3).
Figure 3-3. Afghan civilian crowds
4. In the Input Mode window, click Crowd Blitzer.
5. Select the mideast_pedestrian_wander profile.
6. Add a crowd that covers the two open areas in the village and into the upper right corner.
7. In the 3D View, click Create Food Stand.
8. Click in the upper right corner. Make sure the food stand is in the region you created. You are prompted through several steps for placing the food stand. You can just keep clicking the location until the process finishes. (The prompts are displayed as labels in the middle of the 3D View.)
9. Click Create Mosque.
10. Place a mosque outside the walls above the village. You are prompted through several steps for placing the mosque. You can just keep clicking the location until the process finishes.
11. Click Place Lounge.
DI-Guy AI Users Guide 3-7
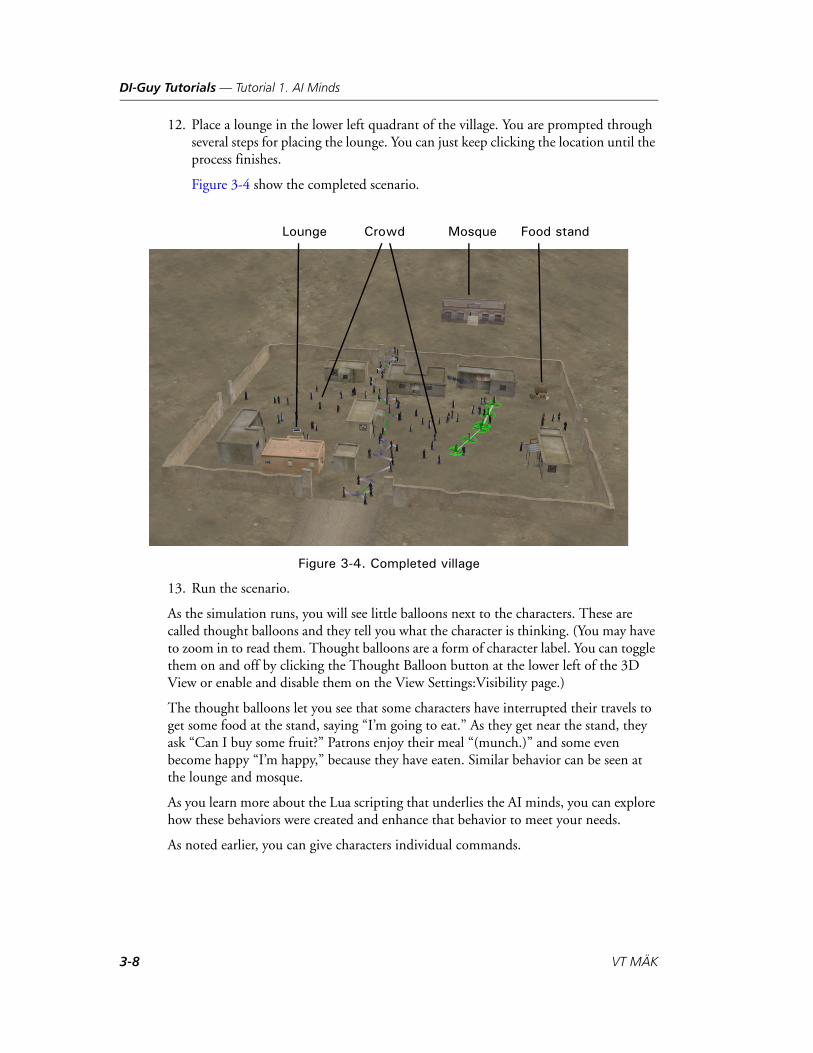
DI-Guy Tutorials — Tutorial 1. AI Minds
12. Place a lounge in the lower left quadrant of the village. You are prompted through several steps for placing the lounge. You can just keep clicking the location until the process finishes.
Figure 3-4 show the completed scenario.
Figure 3-4. Completed village
13. Run the scenario.
As the simulation runs, you will see little balloons next to the characters. These are called thought balloons and they tell you what the character is thinking. (You may have to zoom in to read them. Thought balloons are a form of character label. You can toggle them on and off by clicking the Thought Balloon button at the lower left of the 3D View or enable and disable them on the View Settings:Visibility page.)
The thought balloons let you see that some characters have interrupted their travels to get some food at the stand, saying “I’m going to eat.” As they get near the stand, they ask “Can I buy some fruit?” Patrons enjoy their meal “(munch.)” and some even become happy “I’m happy,” because they have eaten. Similar behavior can be seen at the lounge and mosque.
As you learn more about the Lua scripting that underlies the AI minds, you can explore how these behaviors were created and enhance that behavior to meet your needs.
As noted earlier, you can give characters individual commands.
Mosque Food standLounge Crowd
3-8 VT MÄK

DI-Guy Tutorials — Tutorial 1. AI Minds
To assign a character a command or behavior:
1. In the Input Mode dialog box, select Character Mode.
2. Right-click a character. A popup menu is displayed.
3. Select a command from the menu.
The command menu has the following commands:
Show. A shortcut to quickly access DI-Guy windows.
Call to Prayer. Seek a mosque.
Get hungry. Seek a food stand.
Get angry. Decrease happiness.
Get happy. Increase happiness.
Want company. Seek out a lounge.
Play dead. Pretend to be unconscious.
Plant IED. Plant an improvised explosive device.
Throw Molotov. Throw a Molotov cocktail at a friendly vehicle.
Become Instigator. Decrease the happiness of people the instigator comes in contact with.
Take some time to play with these commands and observe the behavior.
DI-Guy AI Users Guide 3-9
DI-Guy Tutorials — Tutorial 1. AI Minds
3.3.2. Create Soldiers that Use Formations
Add some soldiers to the scenario.
1. In the 3D View, click Blitz Squad.
2. Blitz in the squad outside the walls of the village.
3. Run the scenario. The soldiers immediately run to form a circle formation around the leader.
Like civilians, soldiers have commands available on the popup menu. You can give them the following commands:
Shoulder Weapon. This may increase civilian unhappiness.
Show. A shortcut to windows and dialog box pages.
Take a knee. This may increase civilian happiness.
Go prone.
Move to point.
Move to path.
Stop AI Autoattack. The squad will react to non-friendly fire unless you turn this functionality off.
Formation (Column, Staggered Column, Defend, Echelon Right, Echelon Left, Line, Wedge, Vee). Sets a formation for the squad.
Destroy squad. A shortcut to delete this crowd.
Here are some things to try:
1. Select Character mode.
2. Click Reset.
3. Right-click a character and select a new formation from the popup men. Watch the soldiers line up.
4. Use the move to point command to have your squad go somewhere.
5. Try doing a multi-point move using Move to Path. Remember, you can use the ALT key to temporarily enter Camera mode to help you lay out your path.
6. March your squad into the village. Notice how the civilians and soldiers avoid each other.
7. Tell your soldiers to shoulder their weapons. You should see an increase in unhappi-ness amongst the civilians. (Make sure you have thought bubbles turned on to see this).
8. Have your soldiers take a knee. You should see unhappiness decrease and happiness occur.
3-10 VT MÄK
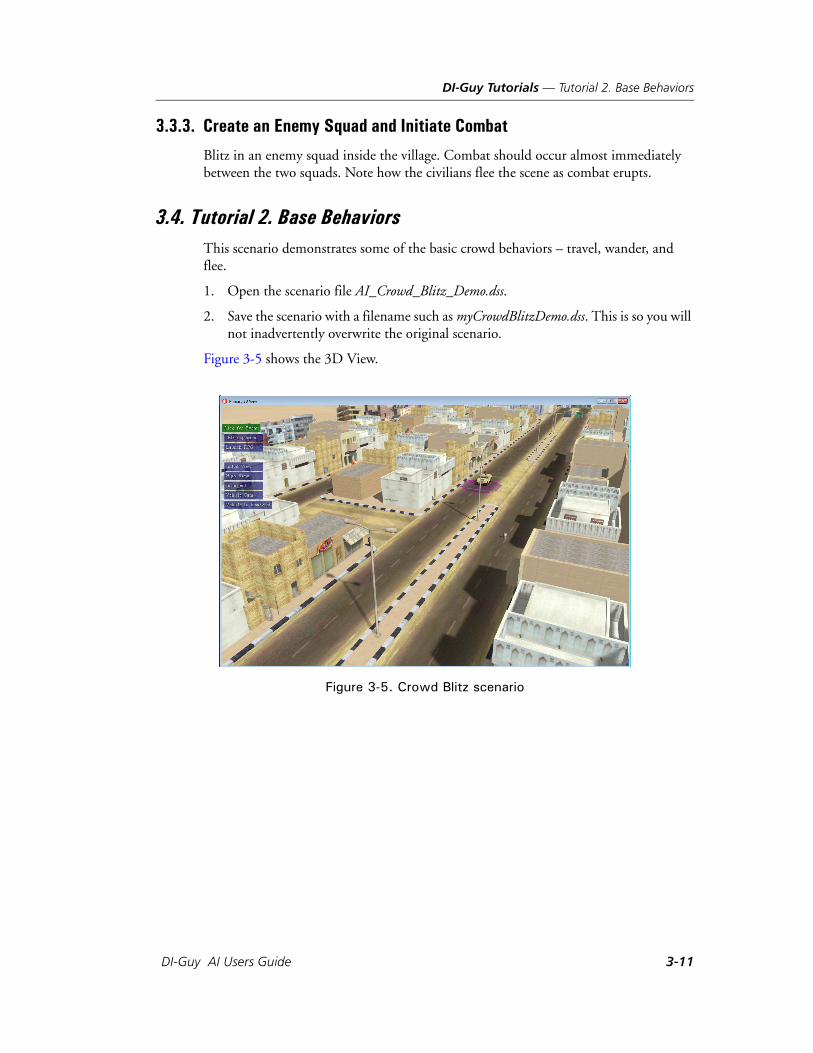
DI-Guy Tutorials — Tutorial 2. Base Behaviors
3.3.3. Create an Enemy Squad and Initiate Combat
Blitz in an enemy squad inside the village. Combat should occur almost immediately between the two squads. Note how the civilians flee the scene as combat erupts.
3.4. Tutorial 2. Base BehaviorsThis scenario demonstrates some of the basic crowd behaviors – travel, wander, and flee.
1. Open the scenario file AI_Crowd_Blitz_Demo.dss.
2. Save the scenario with a filename such as myCrowdBlitzDemo.dss. This is so you will not inadvertently overwrite the original scenario.
Figure 3-5 shows the 3D View.
Figure 3-5. Crowd Blitz scenario
DI-Guy AI Users Guide 3-11
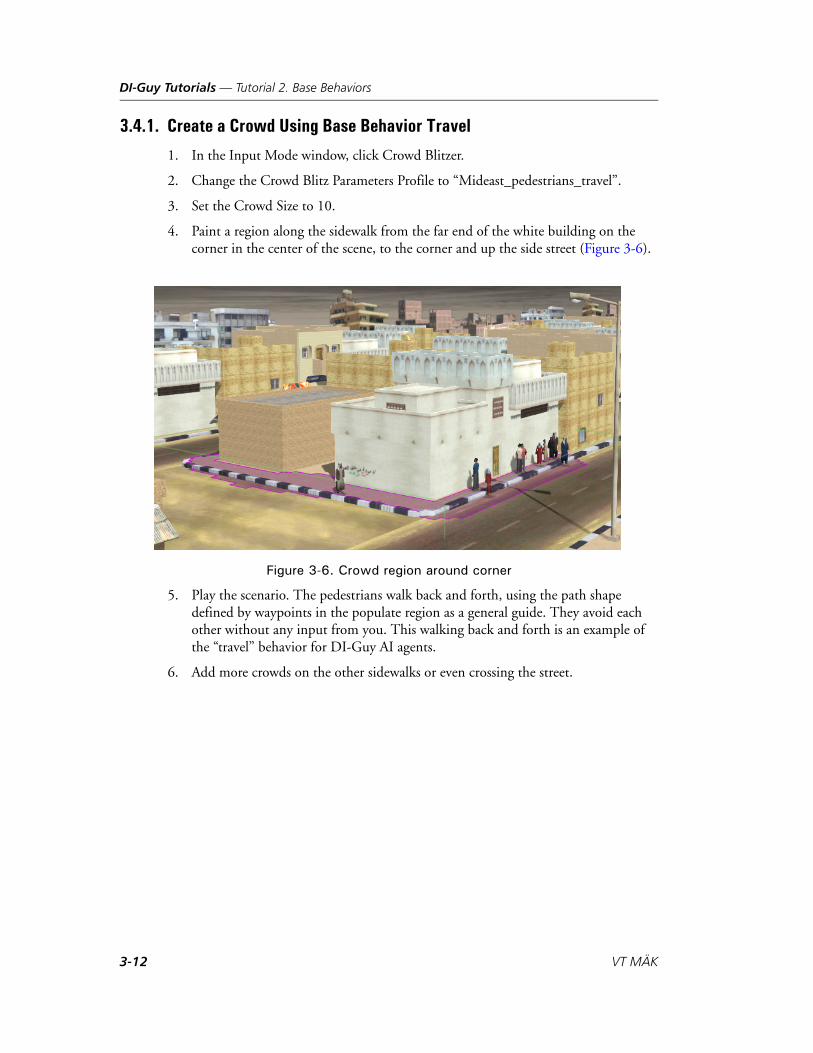
DI-Guy Tutorials — Tutorial 2. Base Behaviors
3.4.1. Create a Crowd Using Base Behavior Travel
1. In the Input Mode window, click Crowd Blitzer.
2. Change the Crowd Blitz Parameters Profile to “Mideast_pedestrians_travel”.
3. Set the Crowd Size to 10.
4. Paint a region along the sidewalk from the far end of the white building on the corner in the center of the scene, to the corner and up the side street (Figure 3-6).
Figure 3-6. Crowd region around corner
5. Play the scenario. The pedestrians walk back and forth, using the path shape defined by waypoints in the populate region as a general guide. They avoid each other without any input from you. This walking back and forth is an example of the “travel” behavior for DI-Guy AI agents.
6. Add more crowds on the other sidewalks or even crossing the street.
3-12 VT MÄK
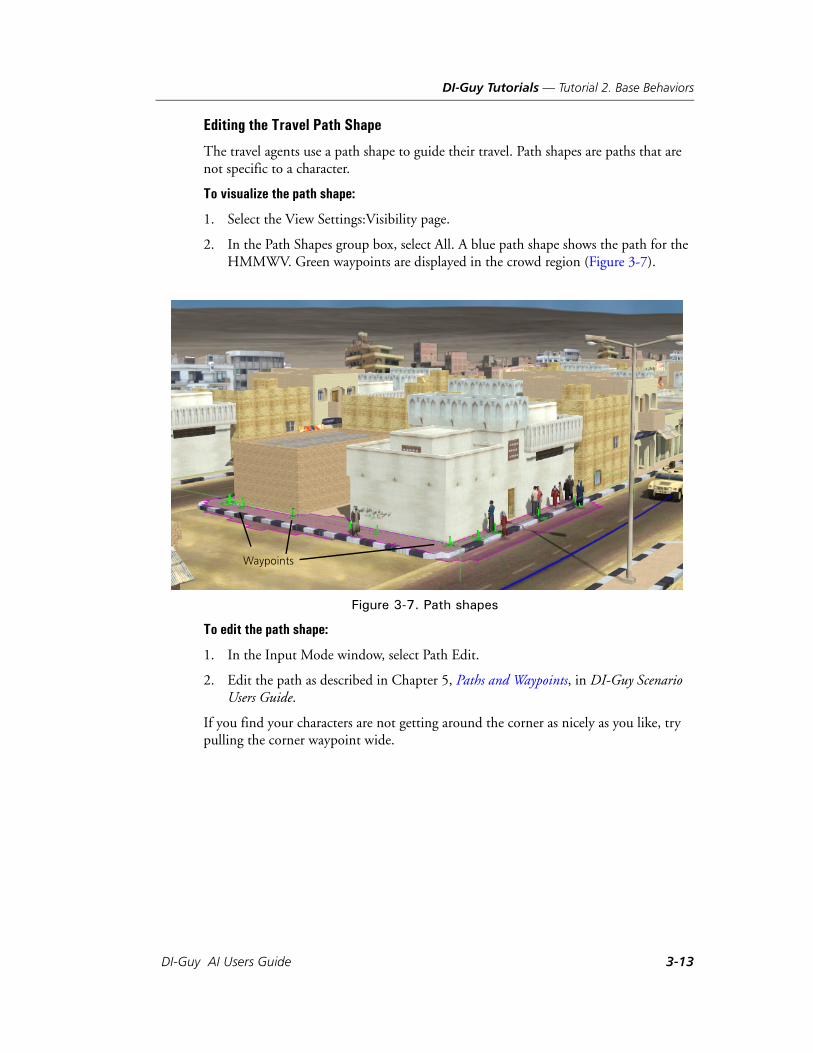
DI-Guy Tutorials — Tutorial 2. Base Behaviors
Editing the Travel Path Shape
The travel agents use a path shape to guide their travel. Path shapes are paths that are not specific to a character.
To visualize the path shape:
1. Select the View Settings:Visibility page.
2. In the Path Shapes group box, select All. A blue path shape shows the path for the HMMWV. Green waypoints are displayed in the crowd region (Figure 3-7).
Figure 3-7. Path shapes
To edit the path shape:
1. In the Input Mode window, select Path Edit.
2. Edit the path as described in Chapter 5, Paths and Waypoints, in DI-Guy Scenario Users Guide.
If you find your characters are not getting around the corner as nicely as you like, try pulling the corner waypoint wide.
Waypoints
DI-Guy AI Users Guide 3-13
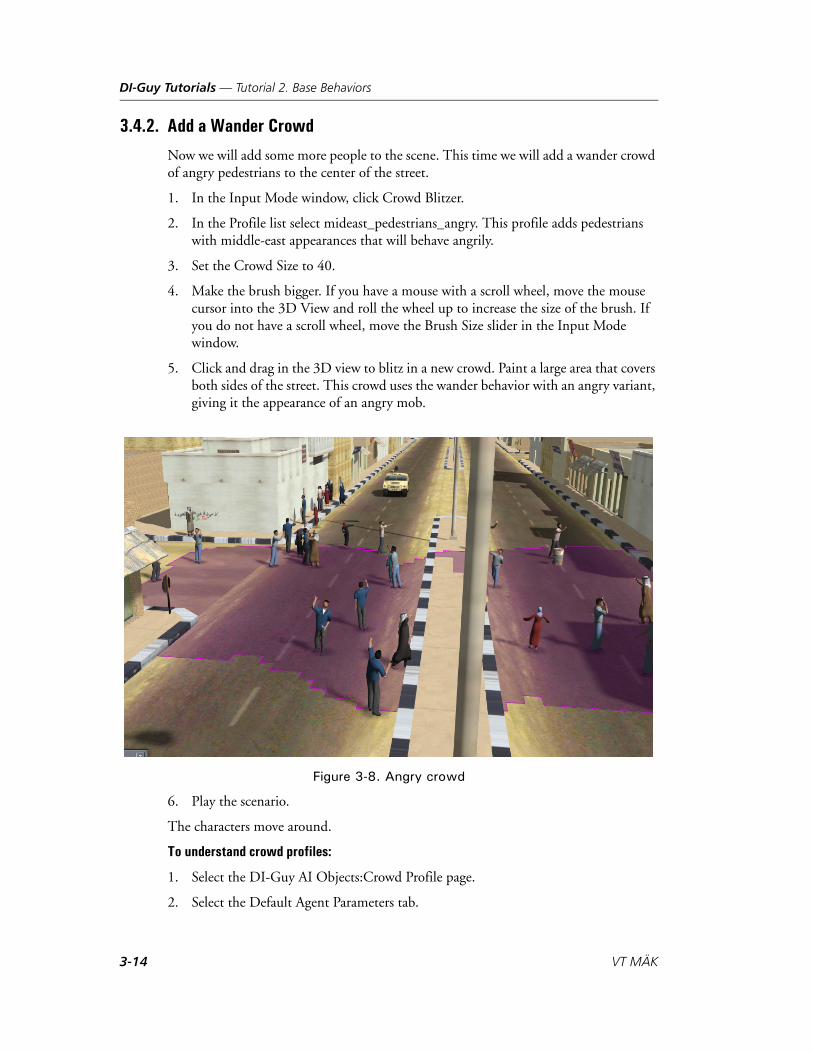
DI-Guy Tutorials — Tutorial 2. Base Behaviors
3.4.2. Add a Wander Crowd
Now we will add some more people to the scene. This time we will add a wander crowd of angry pedestrians to the center of the street.
1. In the Input Mode window, click Crowd Blitzer.
2. In the Profile list select mideast_pedestrians_angry. This profile adds pedestrians with middle-east appearances that will behave angrily.
3. Set the Crowd Size to 40.
4. Make the brush bigger. If you have a mouse with a scroll wheel, move the mouse cursor into the 3D View and roll the wheel up to increase the size of the brush. If you do not have a scroll wheel, move the Brush Size slider in the Input Mode window.
5. Click and drag in the 3D view to blitz in a new crowd. Paint a large area that covers both sides of the street. This crowd uses the wander behavior with an angry variant, giving it the appearance of an angry mob.
Figure 3-8. Angry crowd
6. Play the scenario.
The characters move around.
To understand crowd profiles:
1. Select the DI-Guy AI Objects:Crowd Profile page.
2. Select the Default Agent Parameters tab.
3-14 VT MÄK

DI-Guy Tutorials — Tutorial 2. Base Behaviors
3. Select the Behavior Settings tab (Figure 3-9).
Figure 3-9. mideast_pedestrians_angry crowd profile
4. Examine the definitions for mideast_pedestrian_angry. Notice that it uses the base behavior Wander. The desired variant is set to angry.
i The parameters of a built-in crowd profile are read-only. However, when you create a crowd, the parameters of that instance of the crowd profile are editable. So, you could change the base behavior of this crowd to one of the other behaviors if you wanted to. You could change any of the other settings that control how members of the crowd interact with each other and other characters. To make the crowd even more flexible, you could write code to take into account anticipated situations.
DI-Guy AI Users Guide 3-15

DI-Guy Tutorials — Tutorial 2. Base Behaviors
3.4.3. Trigger a Flee Base Behavior
This scenario has some buttons on the left side of the 3D View. The bottom buttons let you select different camera angles. The top buttons cause events to happen.
1. Run the scenario.
2. Click IED Explosion. Characters near the explosion get killed. Those farther away run away.
Let’s examine how the buttons were made and how the flee was triggered.
1. Select the Event Handlers:Script page.
2. In the list of scripts, select initialize_labels (Figure 3-10). The button we are inter-ested in is “label ied”. To understand how the button calls code we have to look at how it is mapped to events.
3-16 VT MÄK
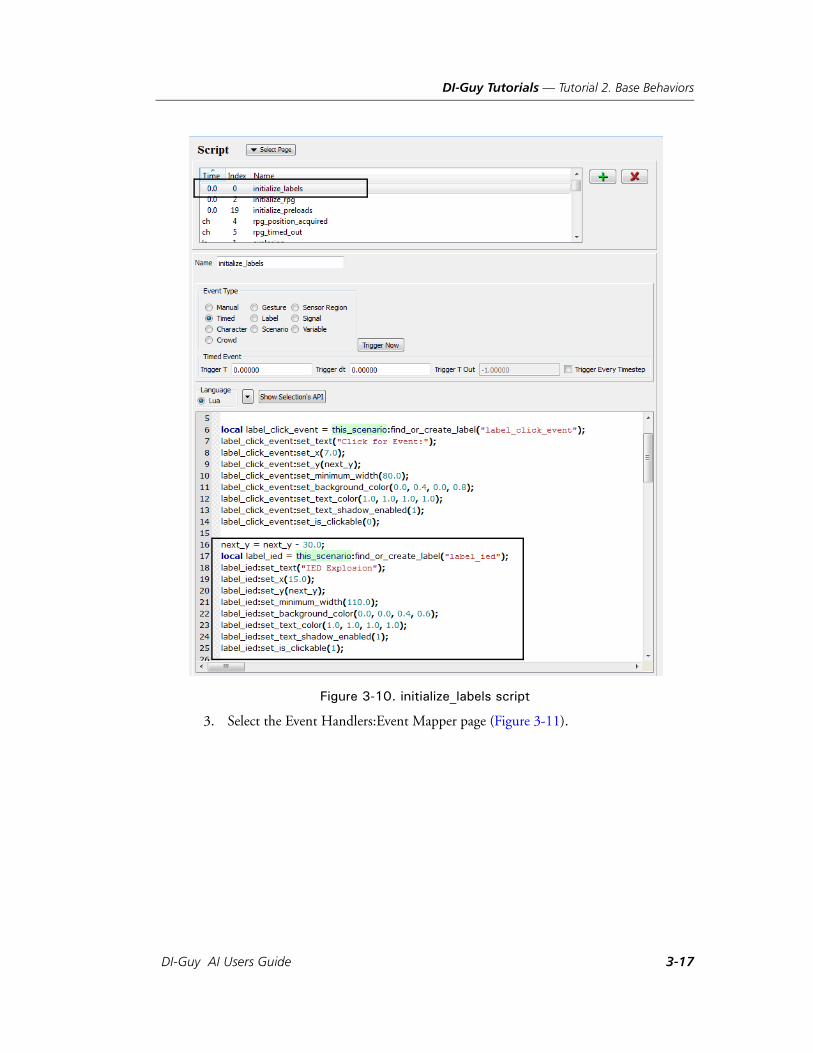
DI-Guy Tutorials — Tutorial 2. Base Behaviors
Figure 3-10. initialize_labels script
3. Select the Event Handlers:Event Mapper page (Figure 3-11).
DI-Guy AI Users Guide 3-17
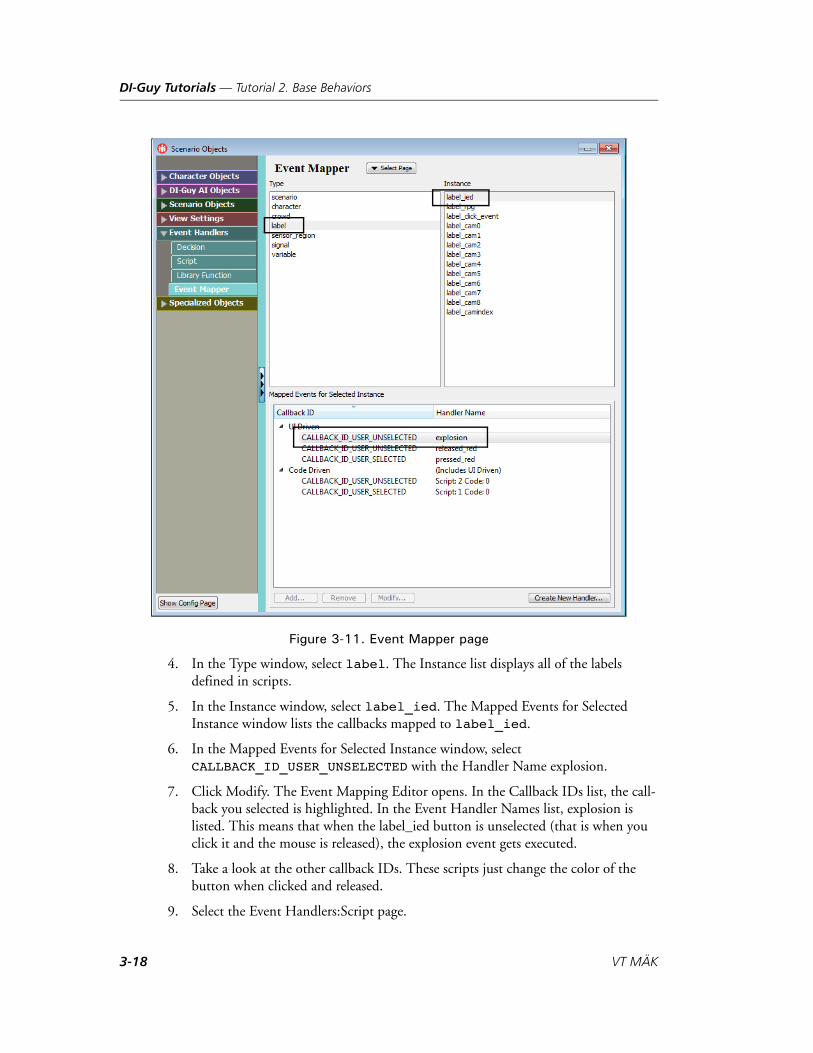
DI-Guy Tutorials — Tutorial 2. Base Behaviors
Figure 3-11. Event Mapper page
4. In the Type window, select label. The Instance list displays all of the labels defined in scripts.
5. In the Instance window, select label_ied. The Mapped Events for Selected Instance window lists the callbacks mapped to label_ied.
6. In the Mapped Events for Selected Instance window, select CALLBACK_ID_USER_UNSELECTED with the Handler Name explosion.
7. Click Modify. The Event Mapping Editor opens. In the Callback IDs list, the call-back you selected is highlighted. In the Event Handler Names list, explosion is listed. This means that when the label_ied button is unselected (that is when you click it and the mouse is released), the explosion event gets executed.
8. Take a look at the other callback IDs. These scripts just change the color of the button when clicked and released.
9. Select the Event Handlers:Script page.
3-18 VT MÄK
DI-Guy Tutorials — Tutorial 3. Explore other Sample AI Scenarios
10. In the list of scripts, select explosion. It calls two scripts, explode_target(), which handles the visuals, and crowds_react_to_explosion(), which handles the kill zone and what the survivors do.
The code for crowds_react_to_explosion() is in the initialize_rpg script (shown below). Notice how the code cycles through all the crowds (line 5), killing members within 6 meters of the explosion (line 16), and then setting the crowd parameters to “good_flee_params” (line 22).
1 function crowds_react_to_explosion()2 local num_crowds = this_scenario:get_num_crowds();3 local cr_index;45 for cr_index = 0,num_crowds-1 do6 local crowd = this_scenario:get_crowd_at_index(cr_index);78 -- Kill any characters within a certain radius of the explosion910 local num_members = crowd:get_num_members();11 local ch_index;1213 for ch_index = 0,num_members-1 do14 local ch = crowd:get_member_at_index(ch_index);1516 if (ch:is_within_distance_n_of_character(rpg_target_name, 6.0)
== 1) then ch:die_now();17 end18 end1920 -- Load parameters from a crowd profile that cause better21 -- flee behavior.22 crowd:set_current_params_from_profile("good_flee_params");2324 -- Flee from the exploded target.25 local flee_distance = 15.0;26 crowd:agents_flee_character(rpg_target:get_name(),
flee_distance);2728 -- Set the focus character to the exploded target so that29 -- characters will turn to face it once they've fled far enough.30 crowd:set_current_focus_character(rpg_target:get_name());31 end32 end
11. Try modifying the scripts, perhaps increasing the kill radius, the flee distance, or creating a new good flee parameters profile.
3.5. Tutorial 3. Explore other Sample AI ScenariosDI-Guy AI includes several sample scenarios that you can explore.
DI-Guy AI Users Guide 3-19
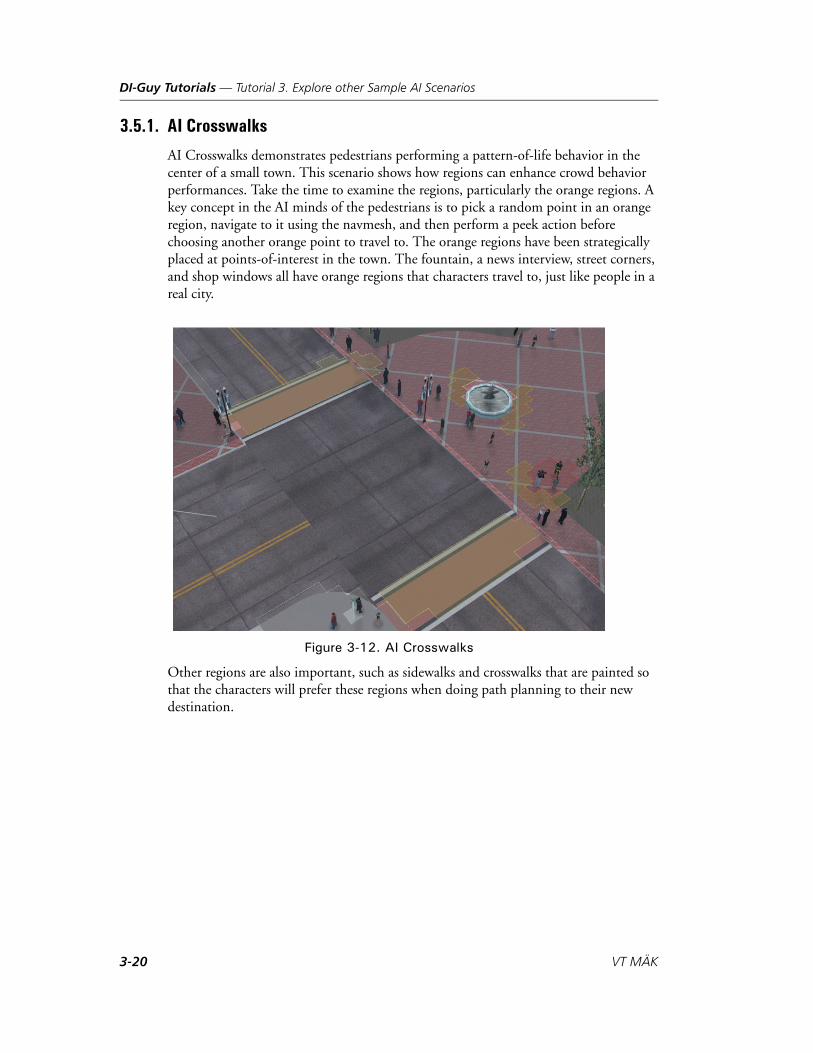
DI-Guy Tutorials — Tutorial 3. Explore other Sample AI Scenarios
3.5.1. AI Crosswalks
AI Crosswalks demonstrates pedestrians performing a pattern-of-life behavior in the center of a small town. This scenario shows how regions can enhance crowd behavior performances. Take the time to examine the regions, particularly the orange regions. A key concept in the AI minds of the pedestrians is to pick a random point in an orange region, navigate to it using the navmesh, and then perform a peek action before choosing another orange point to travel to. The orange regions have been strategically placed at points-of-interest in the town. The fountain, a news interview, street corners, and shop windows all have orange regions that characters travel to, just like people in a real city.
Figure 3-12. AI Crosswalks
Other regions are also important, such as sidewalks and crosswalks that are painted so that the characters will prefer these regions when doing path planning to their new destination.
3-20 VT MÄK
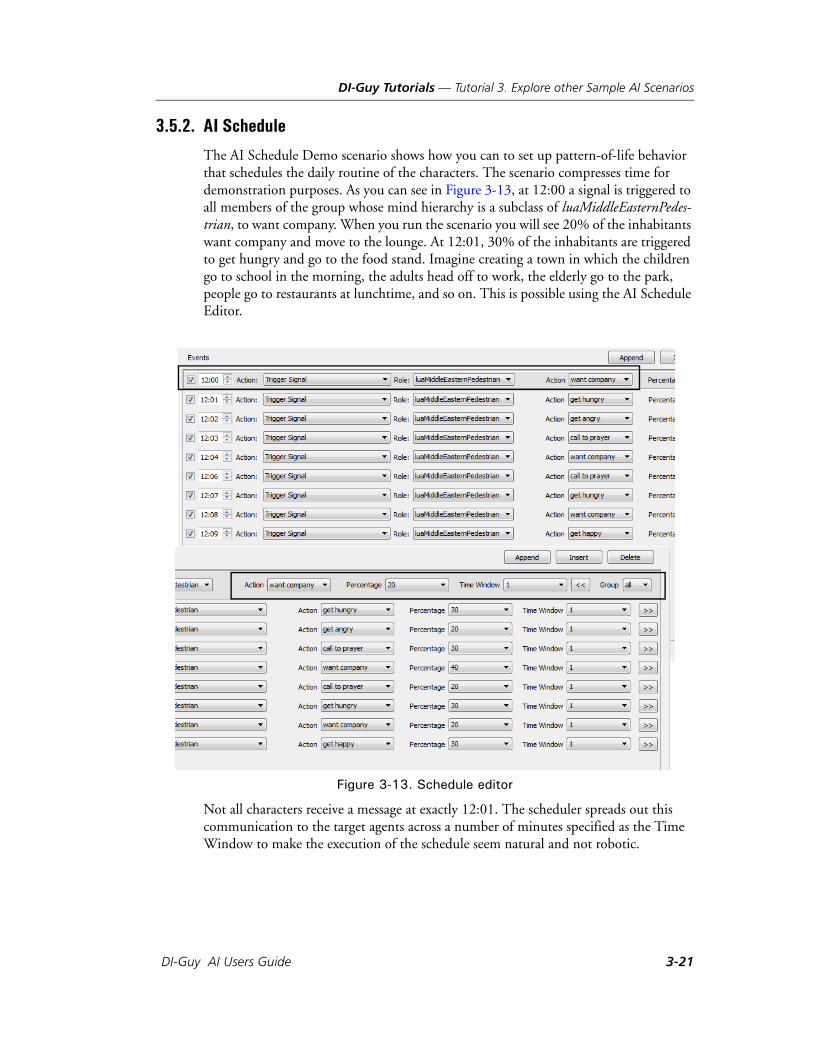
DI-Guy Tutorials — Tutorial 3. Explore other Sample AI Scenarios
3.5.2. AI Schedule
The AI Schedule Demo scenario shows how you can to set up pattern-of-life behavior that schedules the daily routine of the characters. The scenario compresses time for demonstration purposes. As you can see in Figure 3-13, at 12:00 a signal is triggered to all members of the group whose mind hierarchy is a subclass of luaMiddleEasternPedes-trian, to want company. When you run the scenario you will see 20% of the inhabitants want company and move to the lounge. At 12:01, 30% of the inhabitants are triggered to get hungry and go to the food stand. Imagine creating a town in which the children go to school in the morning, the adults head off to work, the elderly go to the park, people go to restaurants at lunchtime, and so on. This is possible using the AI Schedule Editor.
Figure 3-13. Schedule editor
Not all characters receive a message at exactly 12:01. The scheduler spreads out this communication to the target agents across a number of minutes specified as the Time Window to make the execution of the schedule seem natural and not robotic.
DI-Guy AI Users Guide 3-21
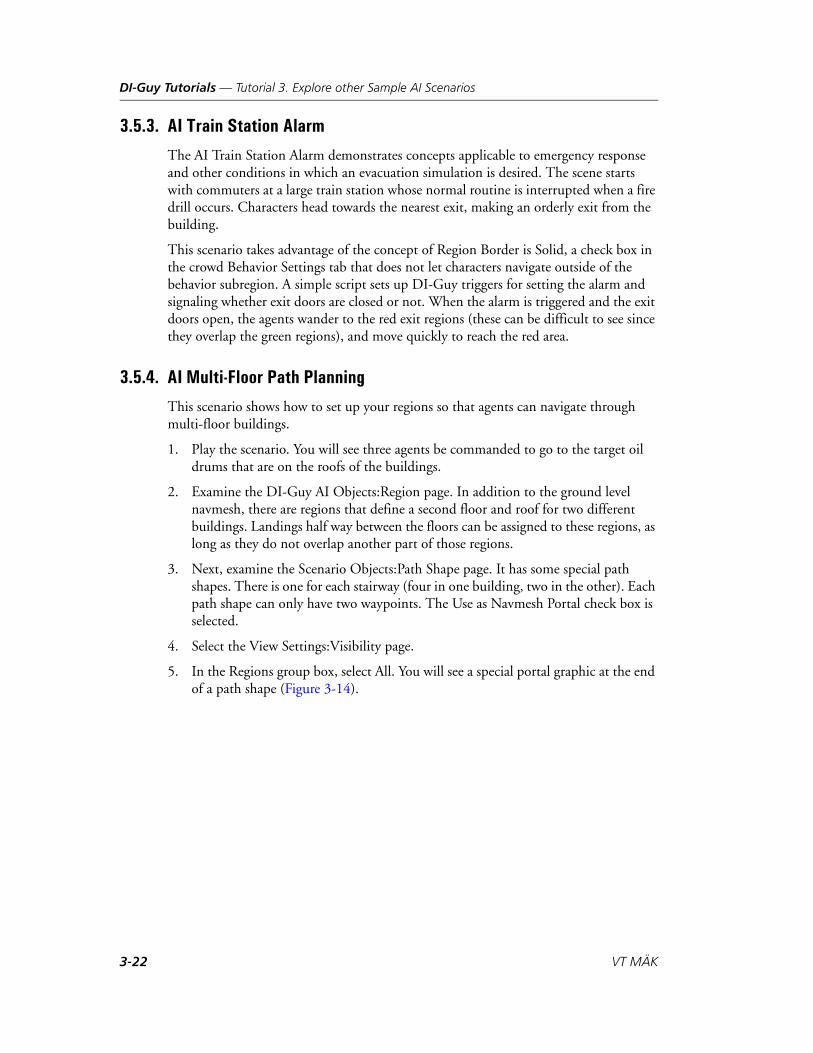
DI-Guy Tutorials — Tutorial 3. Explore other Sample AI Scenarios
3.5.3. AI Train Station Alarm
The AI Train Station Alarm demonstrates concepts applicable to emergency response and other conditions in which an evacuation simulation is desired. The scene starts with commuters at a large train station whose normal routine is interrupted when a fire drill occurs. Characters head towards the nearest exit, making an orderly exit from the building.
This scenario takes advantage of the concept of Region Border is Solid, a check box in the crowd Behavior Settings tab that does not let characters navigate outside of the behavior subregion. A simple script sets up DI-Guy triggers for setting the alarm and signaling whether exit doors are closed or not. When the alarm is triggered and the exit doors open, the agents wander to the red exit regions (these can be difficult to see since they overlap the green regions), and move quickly to reach the red area.
3.5.4. AI Multi-Floor Path Planning
This scenario shows how to set up your regions so that agents can navigate through multi-floor buildings.
1. Play the scenario. You will see three agents be commanded to go to the target oil drums that are on the roofs of the buildings.
2. Examine the DI-Guy AI Objects:Region page. In addition to the ground level navmesh, there are regions that define a second floor and roof for two different buildings. Landings half way between the floors can be assigned to these regions, as long as they do not overlap another part of those regions.
3. Next, examine the Scenario Objects:Path Shape page. It has some special path shapes. There is one for each stairway (four in one building, two in the other). Each path shape can only have two waypoints. The Use as Navmesh Portal check box is selected.
4. Select the View Settings:Visibility page.
5. In the Regions group box, select All. You will see a special portal graphic at the end of a path shape (Figure 3-14).
3-22 VT MÄK
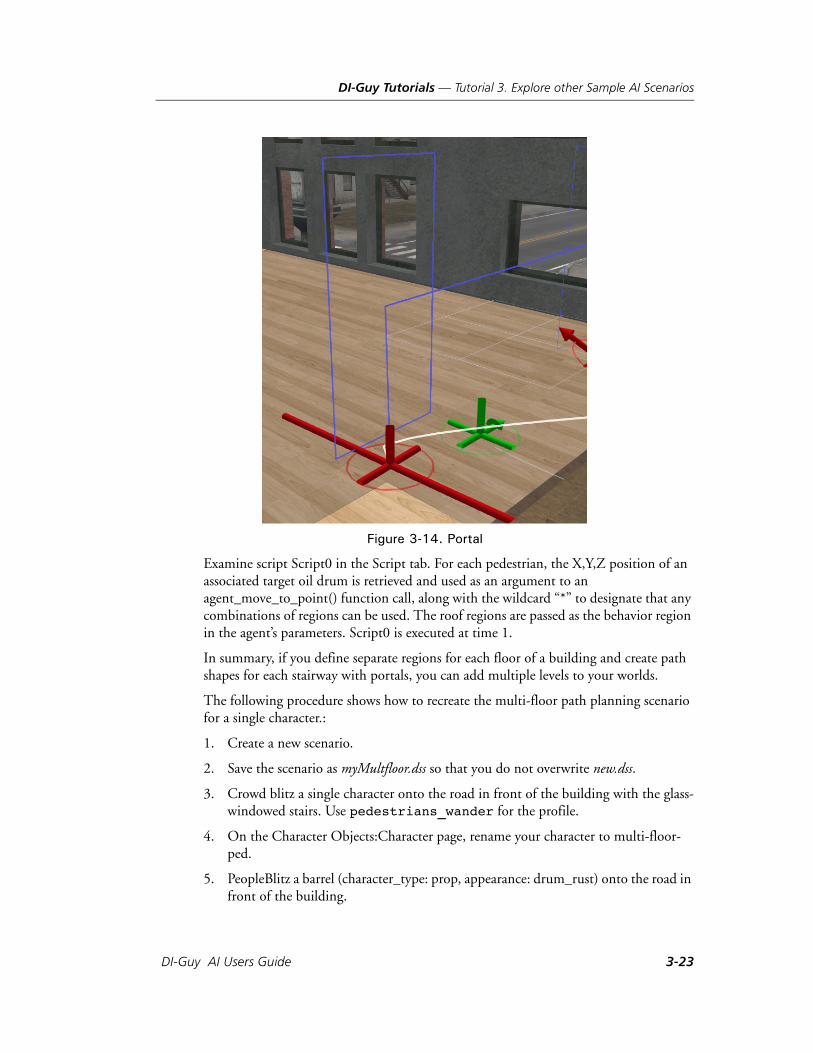
DI-Guy Tutorials — Tutorial 3. Explore other Sample AI Scenarios
Figure 3-14. Portal
Examine script Script0 in the Script tab. For each pedestrian, the X,Y,Z position of an associated target oil drum is retrieved and used as an argument to an agent_move_to_point() function call, along with the wildcard “*” to designate that any combinations of regions can be used. The roof regions are passed as the behavior region in the agent’s parameters. Script0 is executed at time 1.
In summary, if you define separate regions for each floor of a building and create path shapes for each stairway with portals, you can add multiple levels to your worlds.
The following procedure shows how to recreate the multi-floor path planning scenario for a single character.:
1. Create a new scenario.
2. Save the scenario as myMultfloor.dss so that you do not overwrite new.dss.
3. Crowd blitz a single character onto the road in front of the building with the glass-windowed stairs. Use pedestrians_wander for the profile.
4. On the Character Objects:Character page, rename your character to multi-floor-ped.
5. PeopleBlitz a barrel (character_type: prop, appearance: drum_rust) onto the road in front of the building.
DI-Guy AI Users Guide 3-23
DI-Guy Tutorials — Tutorial 3. Explore other Sample AI Scenarios
6. Change the name to target.
7. Select the Event Handlers:Script page.
8. Create a script called MoveToTarget.
9. Type (or cut and paste) the following script code into the script.
local character_target = this_scenario:find_character("target");local character = this_scenario:find_character("multi-floor-ped");local res,tx,ty,tz = character_target:get_position();character:agent_move_to_point(tx,ty,tz,"*");
10. In the Event Type group box, select Timed.
11. Set Trigger T to 0 (Figure 3-15).
Figure 3-15. MoveToTarget script
i The script uses the agent_move_to_point() method, which can cause high CPU usage and therefore noticeable frame-rate irregularities, should the path required be long or difficult to compute, especially if multiple characters perform the same script at roughly the same time. As an alternative, there is a threaded background version of this planning method (called agent_move_to_point_bg()) that is described in “Background Path Planning,” on page 4-6.
3-24 VT MÄK
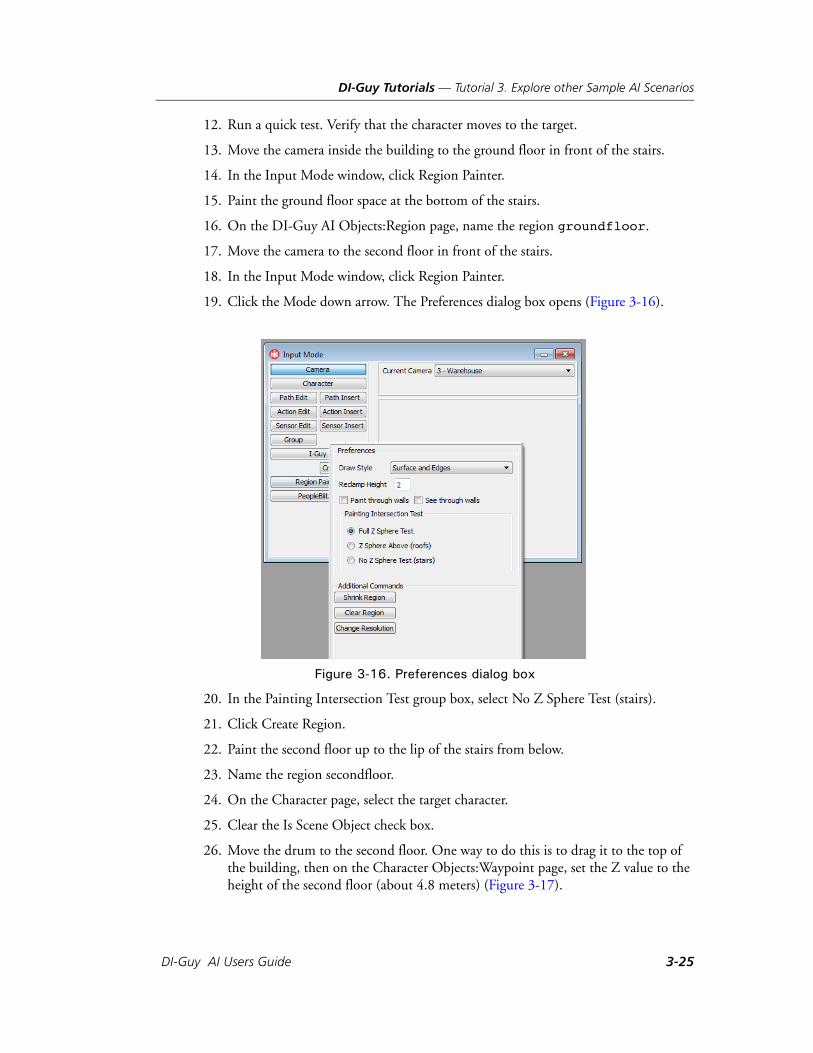
DI-Guy Tutorials — Tutorial 3. Explore other Sample AI Scenarios
12. Run a quick test. Verify that the character moves to the target.
13. Move the camera inside the building to the ground floor in front of the stairs.
14. In the Input Mode window, click Region Painter.
15. Paint the ground floor space at the bottom of the stairs.
16. On the DI-Guy AI Objects:Region page, name the region groundfloor.
17. Move the camera to the second floor in front of the stairs.
18. In the Input Mode window, click Region Painter.
19. Click the Mode down arrow. The Preferences dialog box opens (Figure 3-16).
Figure 3-16. Preferences dialog box
20. In the Painting Intersection Test group box, select No Z Sphere Test (stairs).
21. Click Create Region.
22. Paint the second floor up to the lip of the stairs from below.
23. Name the region secondfloor.
24. On the Character page, select the target character.
25. Clear the Is Scene Object check box.
26. Move the drum to the second floor. One way to do this is to drag it to the top of the building, then on the Character Objects:Waypoint page, set the Z value to the height of the second floor (about 4.8 meters) (Figure 3-17).
DI-Guy AI Users Guide 3-25
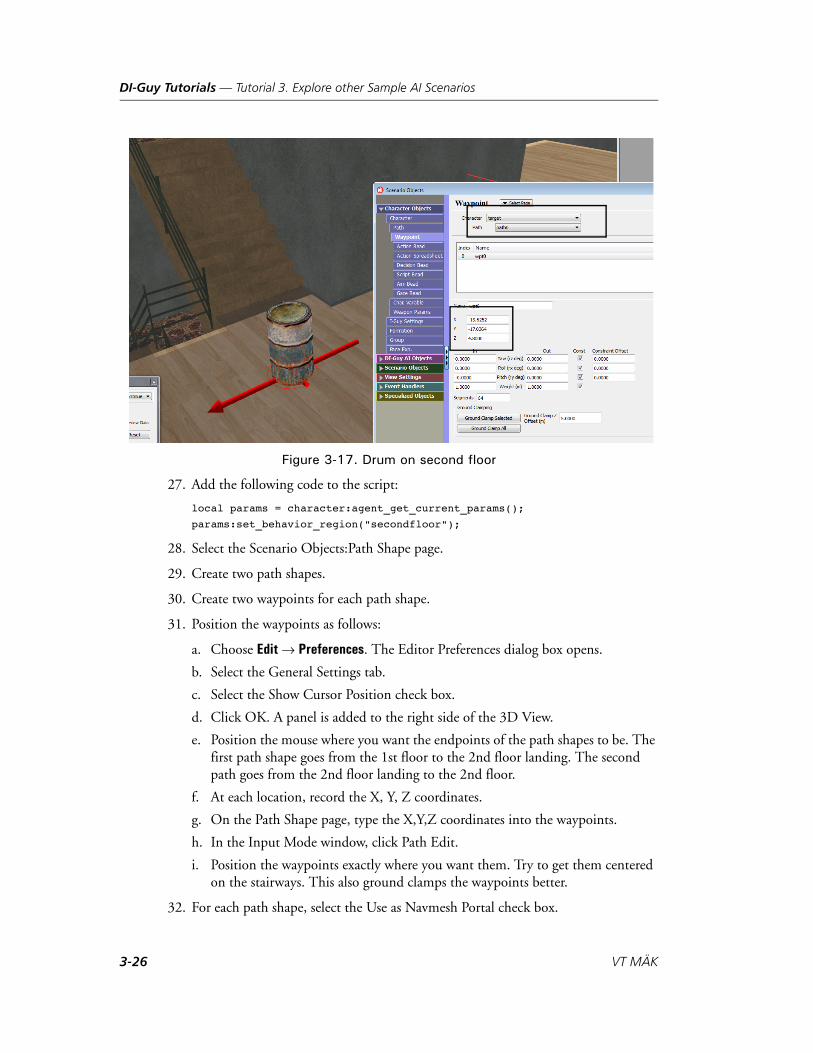
DI-Guy Tutorials — Tutorial 3. Explore other Sample AI Scenarios
Figure 3-17. Drum on second floor
27. Add the following code to the script:
local params = character:agent_get_current_params();
params:set_behavior_region("secondfloor");
28. Select the Scenario Objects:Path Shape page.
29. Create two path shapes.
30. Create two waypoints for each path shape.
31. Position the waypoints as follows:
a. Choose Edit Preferences. The Editor Preferences dialog box opens.
b. Select the General Settings tab.
c. Select the Show Cursor Position check box.
d. Click OK. A panel is added to the right side of the 3D View.
e. Position the mouse where you want the endpoints of the path shapes to be. The first path shape goes from the 1st floor to the 2nd floor landing. The second path goes from the 2nd floor landing to the 2nd floor.
f. At each location, record the X, Y, Z coordinates.
g. On the Path Shape page, type the X,Y,Z coordinates into the waypoints.
h. In the Input Mode window, click Path Edit.
i. Position the waypoints exactly where you want them. Try to get them centered on the stairways. This also ground clamps the waypoints better.
32. For each path shape, select the Use as Navmesh Portal check box.
3-26 VT MÄK
DI-Guy Tutorials — Tutorial 3. Explore other Sample AI Scenarios
33. Reset the scenario.
34. Run the scenario. You should see the character walk into the building and walk up the stairs to the target. To debug, use the Visibility tab to visualize the portals and the regions.
3.5.5. AI Middle East Town
This scenario contains many of the features already seen in the AI World Creation and the AI Crowd Blitz scenarios. Unlike those two scenarios, which focus on populating the scene, this world is already populated. You are encouraged to explore the scripts in the scenario to see how the advanced functionality was implemented, and to use those ideas to implement new advanced behaviors.
Animals. This scenario leverages DI-Guy animal content to increase realism.
Sounds. Like animals, sounds help increase immersion.
Humvees. This scenario has DI-Guy controlling the vehicles, but is inspired by the idea that this world would be what trainees in a humvee/convoy trainer would see.
Call to Prayer. Click the call to prayer button. Watch how the crowd responds to this message broadcast from the Mosque and makes their way to the building. Once in the building, the characters segregate to different sides of the partition based on their sex. Upon arrival in the building, the characters engage in prayer. This entire behavior is an example of extending minds and the states of the FSM to enable complex behavior started by an environmental interrupt.
IED Placement. This button lets you place an IED.
a. In the Input Mode window, click Character.
b. Right-click one of the pedestrians.
c. On the popup menu, choose Plant IED. You are prompted to select an emplacement point.
d. Click a point in the road that you know the humvees will drive over. The pedestrian plants the IED, and later, the humvees run over the IED resulting in an explosion.
Deploy Troops. Right-click a humvee and choose Deploy Troops.
Create RPG Insurgent. This button creates an insurgent that fires an RPG. It demonstrates the ability to do line-of-sight tests to trigger behavior, and how to coordinate the aim, creation of ballistic smoke special effects, and intersecting explosion with the target.
a. Click Create RPG Insurgent.
b. Click along the wall by the archway that is next to the fruit stand. Three option labels are displayed (Figure 3-18).
DI-Guy AI Users Guide 3-27
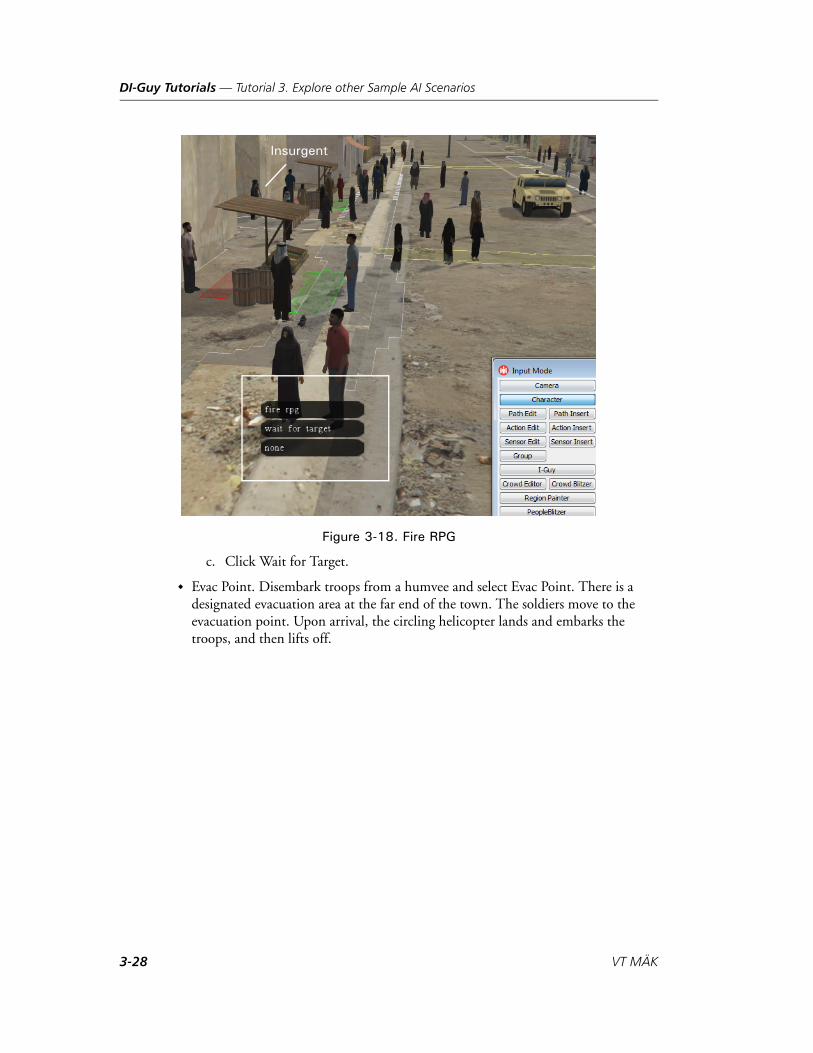
DI-Guy Tutorials — Tutorial 3. Explore other Sample AI Scenarios
Figure 3-18. Fire RPG
c. Click Wait for Target.
Evac Point. Disembark troops from a humvee and select Evac Point. There is a designated evacuation area at the far end of the town. The soldiers move to the evacuation point. Upon arrival, the circling helicopter lands and embarks the troops, and then lifts off.
Insurgent
3-28 VT MÄK
DI-Guy Tutorials — Tutorial 4: Creating an AI Subclass (Package)
3.6. Tutorial 4: Creating an AI Subclass (Package)In DI-Guy AI, a package is a Lua script, either on disk (in ./config/diguy/scripts/<subdi-rectory>) or coded directly in a scenario file script, that is automatically compiled at scenario load or whenever the script changes, and supports a notion of dependencies. Typically, packages contain code that is run at initialization and code that executes at runtime. Packages are used to define new subclasses for extending the behavior of DI-Guy AI minds.
In this tutorial, we are going to create a new package, luaSimpleFriendlySoldierProne, that extends the behavior of a luaSimpleFriendlySoldier. The new subclass will have the ability to order the soldier to go prone, in addition to all the abilities he will inherit from the luaSimpleFriendlySoldier base class.
The tutorial has the following basic sections:
Create a new package.
Create a crowd profile to use the package.
Edit the code of the package to distinguish it from the parent.
3.6.1. Create a New Package
1. Select the DI-Guy AI Objects:Lua Mind Editor page.
2. Click Create. You are prompted to choose a code block type:
– Character Mind. Adds a DI-Guy AI mind to a previously created character who does not have one. The mind will be added to the currently selected character.
– All Crowd Members. Adds a DI-Guy AI mind to all the members of a previously created crowd. The mind will be added to the currently selected crowd.
– Scenario Package. Creates an entirely new package (subclass).
3. Click Scenario Package. You are prompted to choose the package code source.
4. Click New Package. The Create Package dialog box opens. The class you choose will be the base package (base class) for the new class.
5. Select luaSimpleFriendlySoldier.
6. For the Package Name, type luaSimpleFriendlySoldierProne.
7. Click OK. The new package is initialized with some automatically generated code (Figure 3-19).
DI-Guy AI Users Guide 3-29
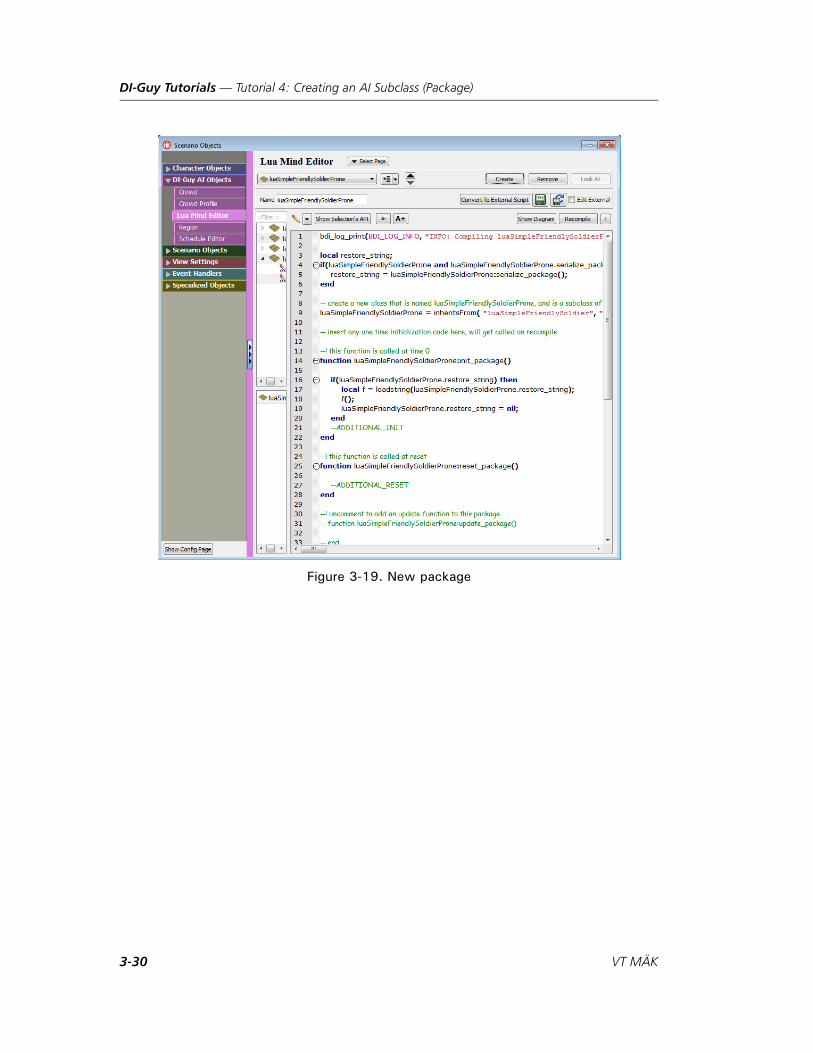
DI-Guy Tutorials — Tutorial 4: Creating an AI Subclass (Package)
Figure 3-19. New package
3-30 VT MÄK
DI-Guy Tutorials — Tutorial 4: Creating an AI Subclass (Package)
3.6.2. Create a Crowd Profile and Some Crowds
1. Select the DI-Guy AI Objects:Crowd Profile page.
2. In the list of crowd profiles, select soldiers_travel_lua_mind.
3. Click the Add button ( ). A new profile gets created.
4. Rename the new profile soldiers_travel_lua_mind_prone.
5. Select the Populate Settings tab.
6. In the Type column, select soldier_07.
7. In the Appearance column, select an appearance.
8. In the Hand Item column, select M4.
9. In the Mind Base Class column, change the luaSimpleFriendlySoldier entries to be luaSimpleFriendlySoldierProne. If this option is not visible in the pull-down list, go back to the Lua Mind Editor page and compile the prone package.
10. Blitz in two sets of soldiers, one using soldier_travel_lua_mind and one using soldier_travel_lua_mind_prone. This way we can compare our new “prone” soldiers to the pre-existing soldiers.
11. Run the scenario and verify that all the soldiers are moving.
3.6.3. Edit the Package
To make our coding easier, we will specify that soldiers can only go prone if they are first commanded to take a knee. To make the go prone selection available in the pull-down menu, we will override the existing knee_state() function in luaSimpleSoldier with a new knee_state() function in luaSimpleFriendlySoldierProne.
1. In the luaSimpleSoldier package, find the knee_state() function.
2. Change the function declaration to use luaSimpleFriendlySoldierProne and add “go prone” to the list of GUI signals:
function luaSimpleFriendlySoldierProne:knee_state()self:begin_state("knee_state");
self.ui_signals = "shoulder weapon, stand, go prone, move to point, return to patrol";
.
.
.
3. Because the scripts are compiled on-demand, we can test this immediately. In the Time Control dialog box, click Reset.
4. Run the scenario.
5. In the Input Mode window, click Character.
DI-Guy AI Users Guide 3-31
DI-Guy Tutorials — Tutorial 4: Creating an AI Subclass (Package)
6. Right-click on a character and command the character to take a knee. Right click again and you should now see go prone as an option. Do not select it yet. We need to fill out the state.
7. Create a brand new prone state, based entirely on the knee state.
function luaSimpleFriendlySoldierProne:prone_state()self:begin_state("prone_state");
self.ui_signals = "shoulder weapon, take a knee, move to point, return to patrol";
local params = self.character:agent_get_current_params();self.character:agent_begin_behavior("idle");params:set_variant(DIGUY_MOTION_VARIANT_NORMAL);params:set_posture(DIGUY_MOTION_POSTURE_PRONE);while 1 do
local ret = self:process_message(self:sleep(1000000));if(ret) then
return ret;end
endend
We edited the begin_state argument, switched take a knee with stand in the ui_signals, and commanded the posture to be prone.
8. The last step is to edit our message processing, so that the signal “go prone” (trig-gered using the GUI – the signal has the same name as the GUI entry) is recog-nized and acted on. The base class function luaSimpleSoldier::process_signals() is the place to start, as it is here that take a knee is processed. Copy portions of the luaSimpleSoldier::process_signals() function to create a new luaSimpleFriendlySol-dierProne::process_signals() function. This function will only need to process the go prone message and will then pass control to the base class:
function luaSimpleFriendlySoldierProne:process_signals(message_object)local message = message_object["message"];
if(message == "go prone") thenreturn self:prone_state();
end
return luaSimpleFriendlySoldier.process_signals(self, message_object);end
If the incoming message is not go prone, the parent process_signals() is called and continues with all the normal processing. Be careful with the syntax here, you must use a ‘.’ and not a ‘:’ between luaSimpleFriendlySoldier and process_signals(), and you also must pass in “self ” as a lead argument.
9. Test your code by commanding your character to “take a knee”, then tell him to “go prone”, and then back to “take a knee”. If your character does not do the right thing, check the Log Window in DI-Guy Scenario for helpful debug information.
3-32 VT MÄK
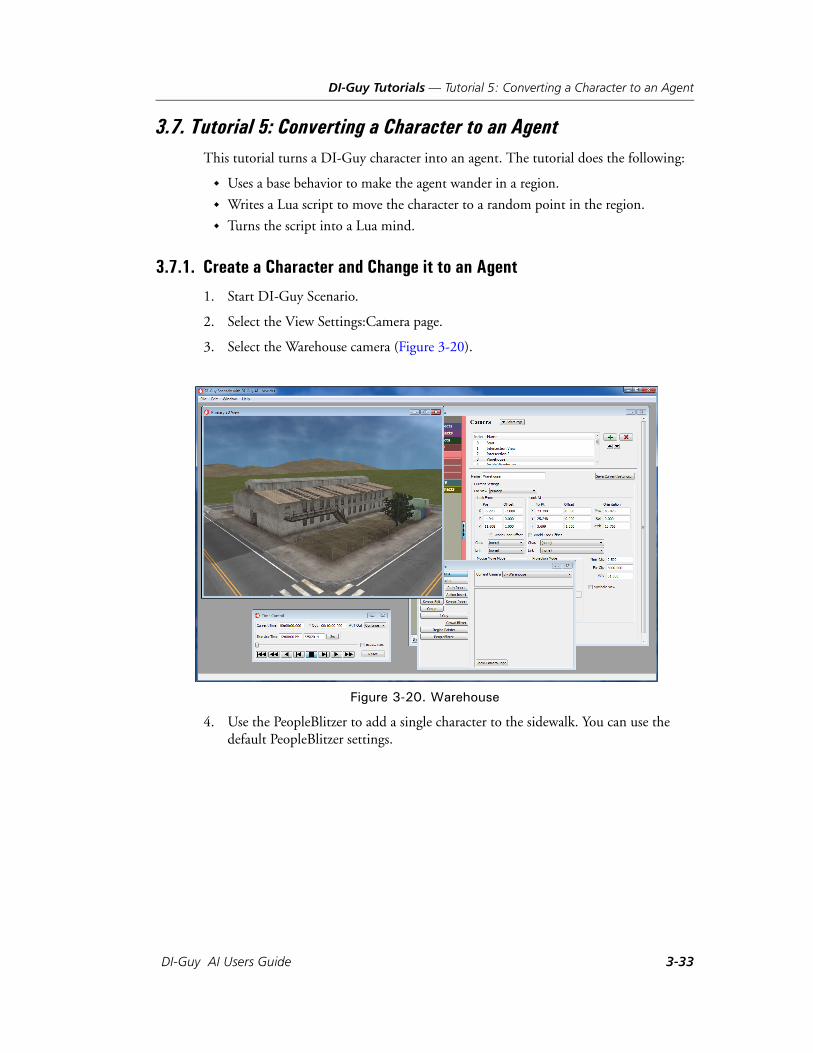
DI-Guy Tutorials — Tutorial 5: Converting a Character to an Agent
3.7. Tutorial 5: Converting a Character to an AgentThis tutorial turns a DI-Guy character into an agent. The tutorial does the following:
Uses a base behavior to make the agent wander in a region.
Writes a Lua script to move the character to a random point in the region.
Turns the script into a Lua mind.
3.7.1. Create a Character and Change it to an Agent
1. Start DI-Guy Scenario.
2. Select the View Settings:Camera page.
3. Select the Warehouse camera (Figure 3-20).
Figure 3-20. Warehouse
4. Use the PeopleBlitzer to add a single character to the sidewalk. You can use the default PeopleBlitzer settings.
DI-Guy AI Users Guide 3-33
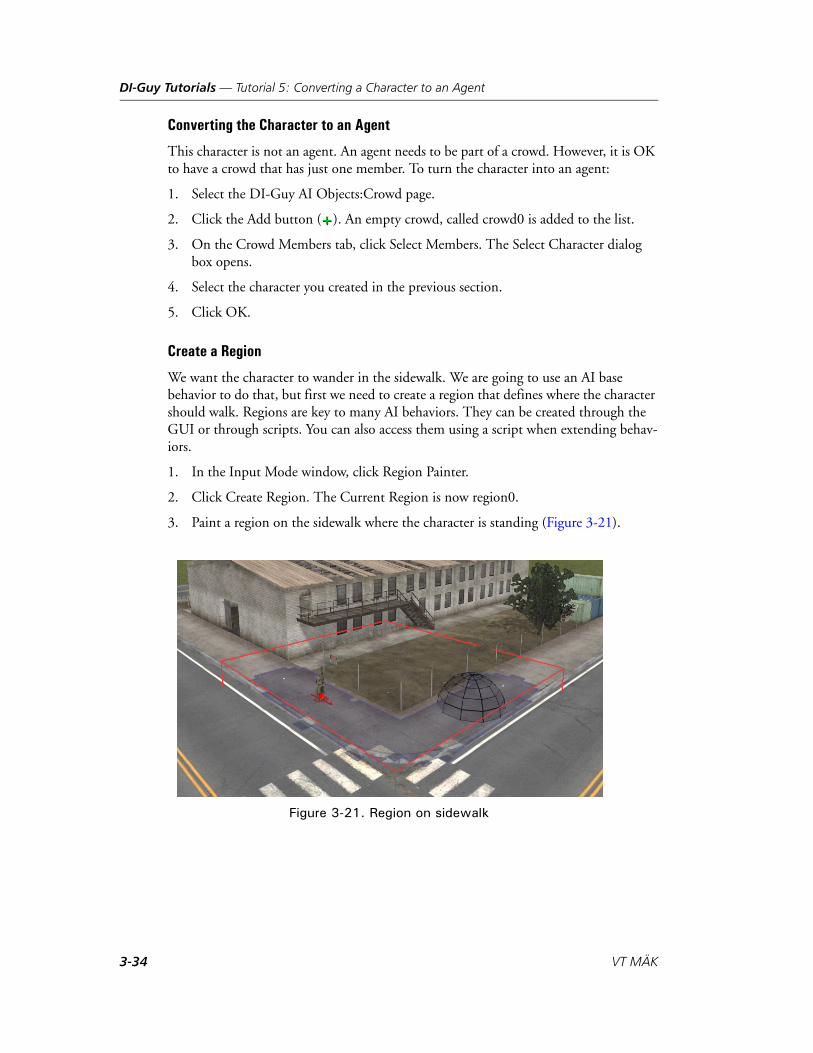
DI-Guy Tutorials — Tutorial 5: Converting a Character to an Agent
Converting the Character to an Agent
This character is not an agent. An agent needs to be part of a crowd. However, it is OK to have a crowd that has just one member. To turn the character into an agent:
1. Select the DI-Guy AI Objects:Crowd page.
2. Click the Add button ( ). An empty crowd, called crowd0 is added to the list.
3. On the Crowd Members tab, click Select Members. The Select Character dialog box opens.
4. Select the character you created in the previous section.
5. Click OK.
Create a Region
We want the character to wander in the sidewalk. We are going to use an AI base behavior to do that, but first we need to create a region that defines where the character should walk. Regions are key to many AI behaviors. They can be created through the GUI or through scripts. You can also access them using a script when extending behav-iors.
1. In the Input Mode window, click Region Painter.
2. Click Create Region. The Current Region is now region0.
3. Paint a region on the sidewalk where the character is standing (Figure 3-21).
Figure 3-21. Region on sidewalk
3-34 VT MÄK
DI-Guy Tutorials — Tutorial 5: Converting a Character to an Agent
Specify the Base Behavior
1. Select the Scenario Objects:Crowd page.
2. Select crowd0.
3. On the Behavior Settings tab, in the Behavior group box, select Wander.
4. In the Behavior Region box, type region0, the region we just painted.
5. Press Enter.
6. Add an aim variant to the agent’s action:
a. Change the Desired Variant drop down to aim.
b. In the Wander/Mingle settings box, change the Move On Interval Min to 1 second and the Move On Interval Max to 5 seconds. This means that the char-acter will wait anywhere between one to five seconds before moving on to the next destination.
c. Change the Max Distance to Wander field to 16 units.
7. Play the scenario. Your character should wander about region0 randomly while aiming. Feel free to experiment with the base behavior parameters.
You may notice that your character runs when his next stopping point is far away from his starting point. This is due to a property of most base behaviors known as speed zones. Characters who are far from their goal move faster than characters near their goal. For information about speed zones, please see “How Agents Select their Speed and Posture,” on page 2-12.
Specify Trap Settings
Next, we will explore trap settings.
1. On the Crowd page, select the Trap Settings and Path Planning tab.
2. Clear Wander Uses Path Planner.
3. Play your scenario again. If you have painted the region as shown in Figure 3-21, such that the region wraps around the fence, the character will eventually get stuck behind the fence. This is because, much like a mouse in a maze, the agent is solely using local information to navigate. With the path planner enabled, an A* search algorithm is used to search some subset of the region to find a path to the goal.
i The crowd only has one agent, but everything you have learned applies to multiple agent crowds as well.
DI-Guy AI Users Guide 3-35
DI-Guy Tutorials — Tutorial 5: Converting a Character to an Agent
3.7.2. Mimicking the Wander Base Behavior Using Scripting
If you are comfortable with scripting, let's see how we can control the character's behavior using a Lua script.
1. Set the character's base behavior back to None in the Agent Parameters section.
2. Select the Event Handlers:Script page.
3. Click the Add button ( ) to create a new script. By default, this will create a script that triggers, or runs, when the scenario clock reaches one second. This default is fine for now. Enter the following Lua code:
-- get a handle to the region we painted-- note that this_scenario is a global variablelocal region = this_scenario:find_region("region0");
-- get a random point in the base subregionlocal res, x,y,z = region:get_point_in_region(DIGUY_SUBREGION_BASE);-- print the point to the log windowprint(x,y,z);
-- get a handle to the agent. note that prefixing the variable name-- with character allows tab completion in the editor to worklocal character_sldr = this_scenario:find_character("sldr07-0");
-- agent_move_to_point is an api call that does what you might -- expectcharacter_sldr:agent_move_to_point(x,y,z);
4. Play the scenario. After one second, the character should move to the point that is printed in the Log window. You can click the Trigger Now button on the script page to run the script again. Effectively, you are mimicking the Wander Base Behavior.
3.7.3. Create a Subclass Mind Specific to Your Agent
Change the script's event type to Manual so that it will no longer run (unless somebody clicks the Trigger Now button). Check that by playing the scenario. The agent should not move. We are going to have the script expressed as a new state.
The easiest way to get started with AI minds is to extend an existing mind. Lua supports object-oriented programming and we are going to take advantage of that by modifying the behavior of an existing mind, luaSimpleFriendlySoldier.
1. Select the DI-Guy AI Objects:Lua Mind Editor page.
2. Click Create. You are prompted to select the code block type.
3. Select Character Mind. This mind will be a subclass named sldr07_0. You are prompted for the base class to use.
4. Select Already Loaded.
3-36 VT MÄK
DI-Guy Tutorials — Tutorial 5: Converting a Character to an Agent
5. Select luaSimpleFriendlySoldier from the list of potential base classes. A template script for the class sldr07_0 is displayed in the Lua Mind Editor. On the left side of the editor is a tree view of the objects that make up this mind. It includes the object we are going to edit, sldr07_0, but it also lists the objects it inherits from, luaSim-pleFriendlySoldier, luaSimpleSoldier, and luaCharacter. Documentation for these classes is in the Lua HTML documentation included with DI-Guy AI.
Explore the classes. The character already has a complex mind. We are going to override a few methods to allow us to create a simplified agent whose menu will trigger our single pass wander behavior.
Add a Trigger to the Popup Menu for Your Agent
The first method we'll change is get_ui_signals. Currently, there is a commented out shell function ready for you to work with in your sldr07_0 subclass. It should look like this:
-- This function returns a comma separated list of signals that the agent-- is currently willing to accept.--function sldr07_0:get_ui_signals()--return self.ui_signals;--end
Because it is commented out, our mind handles whatever signals are handled by luaSimpleFriendlySoldier. This method is used by DI-Guy Scenario to create a context menu that appears whenever you right click on an agent in the 3D View. Clicking a menu command sends a signal to the agent with the corresponding label.
1. Uncomment the method and change it to return the string “trigger”:
-- This function returns a comma separated list of signals that the agent-- is currently willing to accept.function sldr07_0:get_ui_signals()
return "trigger";end
2. In the Input Mode window, select Character mode.
3. Play the scenario.
4. Right-click the agent. The trigger should be on the menu. Clicking it will have no effect; in fact the Log will show a warning that there is no handler.
In order for path planning to work, minds require a special region to be created in your scenario called a navmesh. The new scenario comes with a navmesh. See “Tutorial 6: Create a navmesh,” on page 3-39 for information about creating a navmesh.
Our mind now has a state that waits indefinitely for the user to click the trigger option in an agent's context menu. Then, it transitions to my_wander_state, which does not exist yet either.
DI-Guy AI Users Guide 3-37
DI-Guy Tutorials — Tutorial 5: Converting a Character to an Agent
Add the following code to your mind in the editor:
----------------------------------------------------------------------- My Wander State is called when “trigger” is activated. It will find a
new -- point in region0 and move to it, and then return to patrol state.function sldr07_0:my_wander_state()local state_info = self:begin_state("my_wander_state");
local region = this_scenario:find_region("region0");
-- get a random point in the base subregion and print itlocal res, x,y,z = region:get_point_in_region(DIGUY_SUBREGION_BASE);print(x,y,z); -- nice for debugging - but comment this out later
-- call simple move to state and then go back on patrol.self:simple_move_to_state(x,y,z,nil,nil,2,1);return self:patrol_state();
Save your scenario and run it. Your agent should wait patiently for you to click on the trigger signal in the context menu. Once you do, he moves to a new point in region0, much like the Wander base behavior. This highlights the power of the mind system DI-Guy AI delivers. This wander state is not as configurable as the base behavior, but you can easily make it so by expanding your script. You are limited solely by your imagina-tion!
i DI-Guy uses naming conventions that enable smart browser features of the Lua Mind Editor, like text completion, function prompts, and argument lists. When creating a new state, choose a function name that ends with the suffix _state. For information about using the Lua editor, please see Appendix D, Using the Lua Editor, in DI-Guy Scenario Users Guide.
3-38 VT MÄK
DI-Guy Tutorials — Tutorial 6: Create a navmesh
3.8. Tutorial 6: Create a navmeshThe default new scenario has a navmesh. If you are working with a terrain that does not have a navmesh, you must create one for intelligent path planning.
To create a navmesh:
1. In the Time Control window, click Reset.
2. Select the DI-Guy AI Objects:Region page.
Figure 3-22. Region page
3. In the region list, select navmesh.
4. Click the Delete button ( ).
5. Click the Generate Navmesh button.
6. Click OK to accept the default options. Creating a global navmesh may take a few minutes.
i Do not create a region and call it navmesh.
DI-Guy AI Users Guide 3-39

DI-Guy Tutorials — Tutorial 6: Create a navmesh
To test creating a new navmesh:
1. Create a new scenario.
2. Select the Scenario Objects:Scene Object page.
3. Select scene_object1 (the default stage terrain).
4. In the Filename box, click Browse and select sets/neighbor-hood/flt/neighborhood_base.flt. A different terrain is loaded.
5. Generate a new navmesh for the neighborhood.
6. Test it as follows:
a. Crowd blitz some soldiers_travel_lua_mind agents.
b. Select character mode.
c. Right-click a soldier.
d. Have it move somewhere blocked by a wall or house.
3-40 VT MÄK

DI-G
4. Path Planning and Navigation Meshes
This chapter describes automatic path planning and path planning using the API.
Introduction to Path Planning and Navigation Meshes ................................. 4-2
Automatic Path Planning .............................................................................. 4-2
Path Planning Using the API ........................................................................ 4-3Defining a Navigation Mesh................................................................... 4-4Editing a Navigation Mesh ..................................................................... 4-4Using the Navigation Mesh with the Base Behaviors............................... 4-5Using Preferred and Repulsed Subregions when Navigating.................... 4-5
Background Path Planning............................................................................ 4-6
4-1uy AI Users Guide
Path Planning and Navigation Meshes — Introduction to Path Planning and Navigation Meshes
4.1. Introduction to Path Planning and Navigation MeshesDI-Guy AI characters can use a navigation mesh (navmesh) to move about the terrain and avoid local minima and traps where they might get stuck. Path planning using the navmesh is an attractive alternative to using feelers to navigate. There are two ways that the path planner can be triggered – automatically during base behaviors, and explicitly using the API.
4.2. Automatic Path PlanningWhen a character uses the wander or pursue behaviors, if it tries to navigate the world and cannot see its target location, it will try to plan a path to the location. You can control this functionality with the diguyAgentParams class or using the Trap Settings and Path Planning tab on the DI-Guy AI Objects:Crowd page.
Figure 4-1. Trap Settings and Path Planning tab
Agents try to factor in the preferred and repulsed parameters when they plan a path. Being able to define preferred and repulsed subregions lets you do things like encourage pedestrians to use crosswalks and sidewalks and avoid streets. By default they use their crowd region for creating a path, but you can also specify a fallback region.
4-2 VT MÄK
Path Planning and Navigation Meshes — Path Planning Using the API
4.3. Path Planning Using the APIThe most direct way to use the navigation mesh is to call the move_to*() functions. The following functions invoke path planning:
diguyCharacter::agent_move_to_point()
diguyCharacter::agent_move_to_point_bg()
diguyCharacter::agent_move_to_point_via_subregions()
diguyCharacter::agent_move_to_point_via_subregions_bg()
diguyCharacter::agent_move_to_region()
diguyCharacter::agent_move_to_region_via_subregion()
diguyScenario::find_navigation_path().
DI-Guy AI Users Guide 4-3
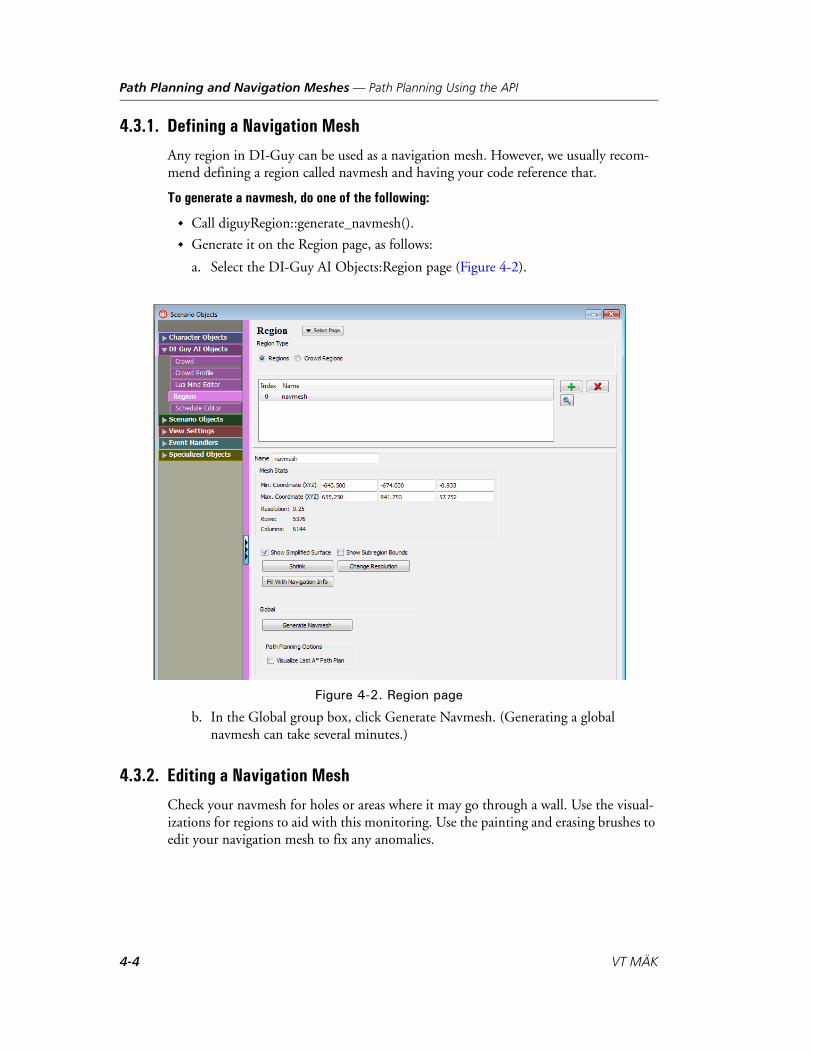
Path Planning and Navigation Meshes — Path Planning Using the API
4.3.1. Defining a Navigation Mesh
Any region in DI-Guy can be used as a navigation mesh. However, we usually recom-mend defining a region called navmesh and having your code reference that.
To generate a navmesh, do one of the following:
Call diguyRegion::generate_navmesh().
Generate it on the Region page, as follows:
a. Select the DI-Guy AI Objects:Region page (Figure 4-2).
Figure 4-2. Region page
b. In the Global group box, click Generate Navmesh. (Generating a global navmesh can take several minutes.)
4.3.2. Editing a Navigation Mesh
Check your navmesh for holes or areas where it may go through a wall. Use the visual-izations for regions to aid with this monitoring. Use the painting and erasing brushes to edit your navigation mesh to fix any anomalies.
4-4 VT MÄK
Path Planning and Navigation Meshes — Path Planning Using the API
4.3.3. Using the Navigation Mesh with the Base Behaviors
Navmesh is an option in the trap settings for crowds. The system will usually use the current region as the navigation mesh.
4.3.4. Using Preferred and Repulsed Subregions when Navigating
Being able to define preferred and repulsed subregions lets you do things like encourage pedestrians to use crosswalks and sidewalks and avoid streets. Consider the following navigation function:
int agent_move_to_point_via_subregions(float x, float y, float z, const char* via_region = NULL, int prefered_subregions_mask = DIGUY_SUBREGION_BASE_MASK, float cost_bias_for_neutral_regions = 12.5f, int repulsed_regions_mask = DIGUY_SUBREGION_NONE_MASK, float cost_bias_for_repulsed_regions = 100.0f);
Agents try to create a navigation path on the via_region and then travel it. The subregion_mask is used to specify what preferred subregions to use. An A* path plan-ning algorithm is used to find the path. A cost bias value can be used to make non-preferred spaces still navigable.
The function returns 0 on success, -1 on failure.
Table 4-1: agent_move_to_point_via_subregions() arguments
Argument Description
x, y, z The target location.
via_region The name of the region to run A* on.
prefered_subregions_mask A number of diguySubregionMasks or'ed together. For example, DIGUY_SUBREGION_SIDEWALK_MASK | DIGUY_SUBREGION_CROSSWALK_MASK
cost_bias_for_neutral_regions How much more expensive it will be to cross spaces that are not part of the desired subregion. Lowers likelihood that search fails on disjointed subregions. Pass DIGUY_DEFAULT_FLOAT to restrict to just the subregion_mask. This should be a value > 1.0.
repulsed_regions_mask A number of diguySubregionMasks or'ed together. For example, DIGUY_SUBREGION_SIDEWALK_MASK | DIGUY_SUBREGION_CROSSWALK_MASK
cost_bias_for_repulsed_regions How much more expensive it will be to cross spaces that are marked as repulsive, Pass DIGUY_DEFAULT_FLOAT to avoid completely.
DI-Guy AI Users Guide 4-5
Path Planning and Navigation Meshes — Background Path Planning
The following code snippet shows use of this functionality:
-- Retrieve a target xyz coordinate from a subregion region:get_point_in_region_near_point(DIGUY_SUBREGION_BLUE, x, y, z, 5);-- Designate the sidewalk and crosswalk subregions in a bitmasklocal search_flags = bit.bor(DIGUY_SUBREGION_MASK_CROSSWALK,
DIGUY_SUBREGION_MASK_SIDEWALK, DIGUY_SUBREGION_MASK_BLUE);-- Move to the xyz location, preferring the crosswalks and sidewalks with
a cost bias of 12:1luaChar.character:agent_move_to_point_via_subregions(x, y, z, "navmesh",
search_flags, 12);
When a character arrives at their target location a diguyChar-acter::CALLBACK_ID_AGENT_TRAVEL_FORWARD_DEST_REACHED call-back is triggered. This is functionality is frequently used by minds to path plan to a location and then sleep until arrival.
4.4. Background Path PlanningThe algorithms that DI-Guy uses to perform path planning can occasionally consume enough CPU to noticeably affect the playback frame rate. This is true when the path is complicated or when there are several characters path planning at the same time. The following methods help alleviate the possibility of frame-rate slowdowns, but they can require extra code.
diguyCharacter::agent_move_to_point_bg()
diguyCharacter::agent_move_to_point_via_subregions_bg().
These methods have the same arguments as their non-background version. They return immediately to the caller with one of the following results:
Encountered an error.
Finished planning.
Decided that the planning is complicated enough to warrant moving it into a back-ground thread.
In the latter case, the caller can wait on the thread to see whether or not it was successful at computing a path plan. (Waiting will not slow down the frame rate.)
i The example script uses the agent_move_to_point_via_subregions() method, which can cause high CPU usage and therefore noticeable frame-rate irregularities should the path required be long or difficult to compute, especially if multiple characters perform the same script at roughly the same time. As an alternative, there is a threaded background version of this planning method (called agent_move_to_point_via_subregions_bg()) that is described in “Background Path Planning,” on page 4-6.
4-6 VT MÄK
Path Planning and Navigation Meshes — Background Path Planning
However, if the scenario needs to handle path planning errors, then it has to wait for the planning to complete. If planning is pushed into the background, you can call wait_for_message() or sleep_process_messages(), but other messages may continue to come in. It can complicate the logic if you want to handle those messages en-route.
This background planning results in success or failure to produce the plan. If you are updating an existing scenario that did not check for path planning errors or handle the processing of messages en-route, you can add the _bg trailer to your existing scenario to upgrade it. Look at the sample code to see the complete process for converting from a foreground to background task.
The following examples compare foreground and background scripts that handle incoming messages while moving to the desired point (X,Y,Z). Both have error handling in case the path-planning fails, which complicates the logic and may or may not be needed in your scenario.
The following example script works in the foreground and may affect performance:
-- plan a path and move to the point, or return "restart" on failure
local res = luaChar.character:agent_move_to_point_via_subregions(x, y, z, "navmesh", search_flags, .25, 1.2)
if (res ~= 0) then return "restart" end
-- wait until we get there, but process messages en-route
luaChar.character:add_wakeup_callback( diguyCharacter_CALLBACK_ID_AGENT_TRAVEL_FORWARD_DEST_REACHED)
local ret = luaChar:sleep_process_messages(25, luaChar.process_messages_enroute)
luaChar.character:remove_wakeup_callback( diguyCharacter_CALLBACK_ID_AGENT_TRAVEL_FORWARD_DEST_REACHED)
-- standard interrupt checking
if luaChar:is_new_state(ret) then return luaChar:invoke_state(ret)
elseif ret == "restart" then return "restart"
end
The following example works in the background and should not affect the frame rate:
-- plan a path and move to the point, or return "restart" on failure
local res = luaChar.character:agent_move_to_point_via_subregions_bg(x, y, z, "navmesh", search_flags, .25, 1.2)
-- see if the planning happened, or failed, or was pushed into the-- background
if (res <= -1) or (res == DIGUY_NAV_PATH_ERROR_OUT_OF_TIME) thenreturn "restart"
elseif (res == DIGUY_NAV_PATH_ERROR_SEARCH_QUEUED) then
DI-Guy AI Users Guide 4-7
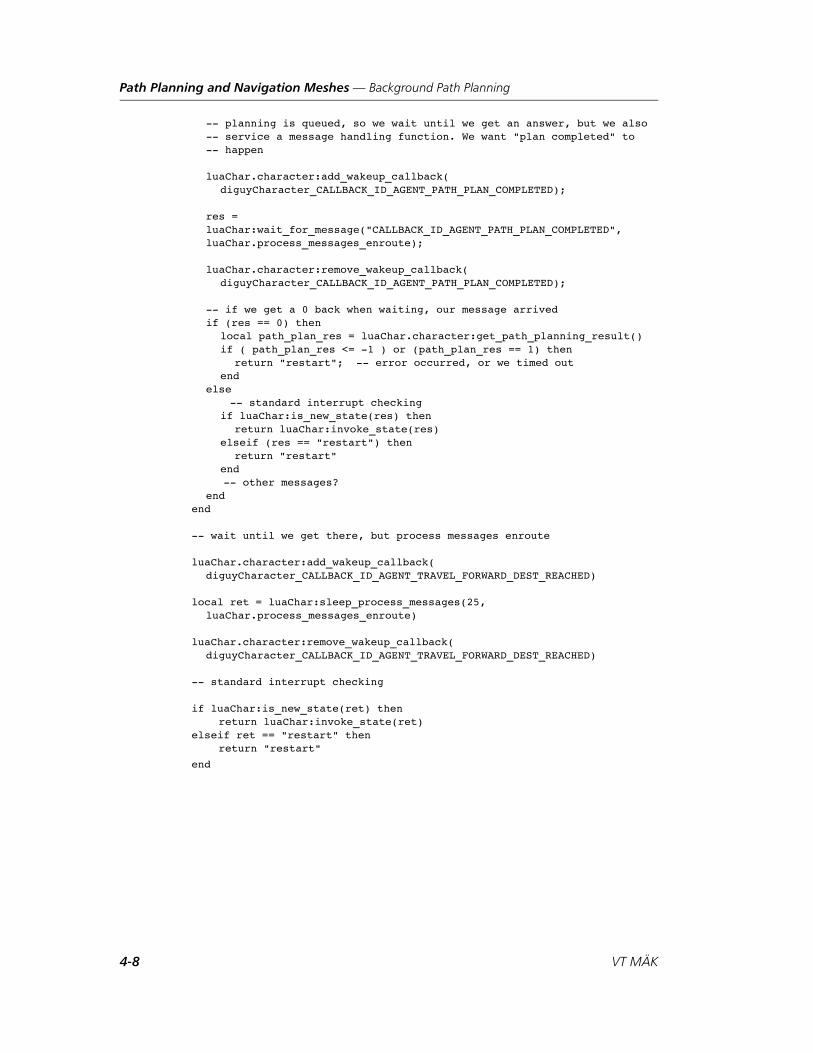
Path Planning and Navigation Meshes — Background Path Planning
-- planning is queued, so we wait until we get an answer, but we also-- service a message handling function. We want "plan completed" to-- happen
luaChar.character:add_wakeup_callback(diguyCharacter_CALLBACK_ID_AGENT_PATH_PLAN_COMPLETED);
res = luaChar:wait_for_message("CALLBACK_ID_AGENT_PATH_PLAN_COMPLETED", luaChar.process_messages_enroute);
luaChar.character:remove_wakeup_callback( diguyCharacter_CALLBACK_ID_AGENT_PATH_PLAN_COMPLETED);
-- if we get a 0 back when waiting, our message arrivedif (res == 0) then
local path_plan_res = luaChar.character:get_path_planning_result()if ( path_plan_res <= -1 ) or (path_plan_res == 1) then
return "restart"; -- error occurred, or we timed outend
else -- standard interrupt checking
if luaChar:is_new_state(res) thenreturn luaChar:invoke_state(res)
elseif (res == "restart") thenreturn "restart"
end -- other messages?
endend
-- wait until we get there, but process messages enroute
luaChar.character:add_wakeup_callback( diguyCharacter_CALLBACK_ID_AGENT_TRAVEL_FORWARD_DEST_REACHED)
local ret = luaChar:sleep_process_messages(25, luaChar.process_messages_enroute)
luaChar.character:remove_wakeup_callback( diguyCharacter_CALLBACK_ID_AGENT_TRAVEL_FORWARD_DEST_REACHED)
-- standard interrupt checking
if luaChar:is_new_state(ret) then return luaChar:invoke_state(ret)
elseif ret == "restart" then return "restart"
end
4-8 VT MÄK
DI-G
5. DI-Guy Minds
This chapter explains DI-Guy minds.
DI-Guy AI Minds......................................................................................... 5-2
The DI-Guy Lua Documentation Files ......................................................... 5-2DI-Guy Lua Modules ............................................................................. 5-3
The Basic Architecture of a DI-Guy AI Mind ............................................... 5-4
AI Mind Example: The soldier_travel_lua_mind .......................................... 5-5Lua Packages .......................................................................................... 5-8
Visualizing the State Machine ..................................................................... 5-13
The luaSimpleSoldier Package Functions .................................................... 5-15The entry_point() Function ................................................................. 5-15The patrol_state() Function.................................................................. 5-16The Default Message Processing Function – process_messages()........... 5-17The process_messages_signals() Function ............................................. 5-17Custom Message Processing – process_messages_attack() ..................... 5-18
How DI-Guy AI Minds Sleep ..................................................................... 5-19
Debugging Minds ....................................................................................... 5-21Displaying Debug Labels...................................................................... 5-21The AI State Inspector.......................................................................... 5-22The Interactive Debugger..................................................................... 5-23
Mind References ......................................................................................... 5-24Objects with a tostring() Function........................................................ 5-24
5-1uy AI Users Guide
DI-Guy Minds — DI-Guy AI Minds
5.1. DI-Guy AI MindsAI minds are at the top of the DI-Guy behavior pyramid (Figure 1-2). A mind is a set of Lua-based classes that provide artificial intelligence to a character for governing its behavior. Usually, the mind is modeled as a hierarchical finite state machine (HFSM). Each individual state usually expresses the state visually using an AI base behavior, path, or direct commands to the DI-Guy API for any combination of actions/gestures/expressive faces, and so on. State changes can be caused by changes in internal state, but are usually the result of incoming messages and events from other characters, ballistic events, and smart objects in the scenario.
5.2. The DI-Guy Lua Documentation FilesDI-Guy AI comes with a built-in, but extensible, set of minds that you are encouraged to use as-is or as starting points for creating more intelligent characters. In addition to this manual, you can refer to DI-Guy Lua documentation in ./doc/diguy_sdk_reference/lua/index.html.
The DI-Guy Lua documentation is divided into three sections:
DI-Guy Lua modules.
DI-Guy Lua classes.
DI-Guy Lua files.
i Do not try to understand every nuance of a DI-Guy AI mind at first – and definitely do not start by trying to create your own AI mind from scratch! Pick the DI-Guy AI mind class closest to what your end character will be, such as luaSimpleSoldier or luaPedestrian, and start using it. Then, assuming you want to code and customize, create your own subclass from that mind. you can quickly augment the behavior and still get all the great out-of-the-box functionality and behavior provided by DI-Guy.
5-2 VT MÄK
DI-Guy Minds — The DI-Guy Lua Documentation Files
5.2.1. DI-Guy Lua Modules
Because DI-Guy’s Lua solutions are all text scripts, which can be viewed in text editors or the script editors in the DI-Guy AI user interface, you are free to examine our imple-mentations to get ideas and templates for how to extend the code to fit your needs. The modules section includes the following entries:
The standard library section documents classes that support the AI minds, but are not directly related to human simulation or AI, such as table, debugging, and math classes.
The core functionality documents critical classes such as luaCharacter and luaS-martProp. These are the building blocks of DI-Guy AI minds.
Sample code shows implementations of subclasses to perform specific tasks and behaviors.
The Middle East Town Demo page shows a subset of the sample code classes used by the Middle East Town demo scenario.
The handy utility functionality has the following particularly useful classes:
– lqt for working with our QT user interface.
– luaLabel to help with on screen label graphics.
– luaNavmeshHelper and luaSensorHelper for modifying shaders to simulate sensorized views.
– luaSimModuleHelper for creating ragdoll physics effects for an agent.
DI-Guy AI Users Guide 5-3
DI-Guy Minds — The Basic Architecture of a DI-Guy AI Mind
5.3. The Basic Architecture of a DI-Guy AI MindDI-Guy AI provides a great deal of freedom for how you construct a mind. DI-Guy AI mind architecture uses a basic paradigm for how minds should work that is simple, powerful, and extensible. It is founded on three key principles:
States. At any given moment, the AI mind is in one and only one state. Examples of states might include patrol, threaten, retreat, eat, go to church, or just about any individual task you can think of. States are usually implemented using state func-tions. State functions can temporarily delegate control to other state functions, recursively. This is what the entry_point() state function, the base state in all Lua minds, does.
Messages. Messages are often critical for triggering a transition from one state to another. Messages can come from:
– A human operator running the simulation.
– Other characters in the scene.
– Smart objects in the scene.
– Event callbacks.
Examples of messages might be go patrol received from an operator, follow me from a fellow character, come pray from a smart mosque, or a gunshot event in the agent’s vicinity.
Message processing. State functions are responsible for handling messages. As they perform their tasks, they listen for messages. When a message is received, the func-tion processes the message. This may result in transition to a new state. The programmer writing the state function must be aware that messages can arrive at any time.
Coroutines. Lua programs can put themselves to sleep until some external event wakes them up. For example, a Lua function might tell a character to walk to a particular point, then go to sleep until the character arrives, at which point it wakes up and performs further tasks.
This is a very powerful feature of Lua and enables many Lua minds to operate simultaneously. Whenever a mind is not doing anything, it can sleep for some amount of time or until some event happens that relates to it. When a mind sleeps, the mind framework passes control on to other minds. When a mind wakes up again, there might be a message that it must respond to. An example would be the “diguyCharacter has arrived at destination” message discussed in the previous para-graph.
For more information, please see the example scenarios and “How DI-Guy AI Minds Sleep,” on page 5-19.
5-4 VT MÄK
DI-Guy Minds — AI Mind Example: The soldier_travel_lua_mind
Human decision-making rarely follows a single, predictable path. People constantly change their plans in response to external events, interruptions, and stimuli, which can occur at any given moment. DI-Guy's AI architecture reflects this basic reality by allowing you to implement message-driven HFSMs. Lua coroutines enable you to group related tasks together within state functions, but to avoid unnecessary consump-tion of CPU time.
5.4. AI Mind Example: The soldier_travel_lua_mindThe example scenario described in the following paragraphs forms the basis for learning about AI minds in the rest of this chapter. Please create the scenario and save it.
1. Start DI-Guy Scenario.
2. Select the DI-Guy AI Objects:Region page.
3. Generate a global navmesh called navmesh. (For details, please see “Defining a Navigation Mesh,” on page 4-4.)
4. CrowdBlitz in a set of traveling soldiers using the soldier_travel_lua_mind crowd profile.
One way to determine which minds our agents are using is to examine the crowd profile we used – solder_travel_lua_mind.
1. Select the DI-Guy AI Objects:Crowd Profile page.
2. In the list, select solder_travel_lua_mind.
3. Select the Populate Settings tab (Figure 5-1). The four entries in the Populate Entries table all state that the agents use luaSimpleFriendlySoldier mind.
i Any incoming message can wake up a sleeping mind, so you must decide what types of messages must be handled, and what types of messages can be ignored. Ignoring a message can be problematic if the sender of the message expects that someone will respond to it. For this reason, it is recommended that you write message processing functions that can be called from different places within a Lua mind.
DI-Guy AI Users Guide 5-5
DI-Guy Minds — AI Mind Example: The soldier_travel_lua_mind
Figure 5-1. Populate Settings tab
Another way to learn about minds is to go to the DI-Guy AI Objects:Lua Mind Editor page (Figure 5-2). If you examine the pull-down list, you will see a set of character mind instances, one for each soldier in your crowd.
5-6 VT MÄK
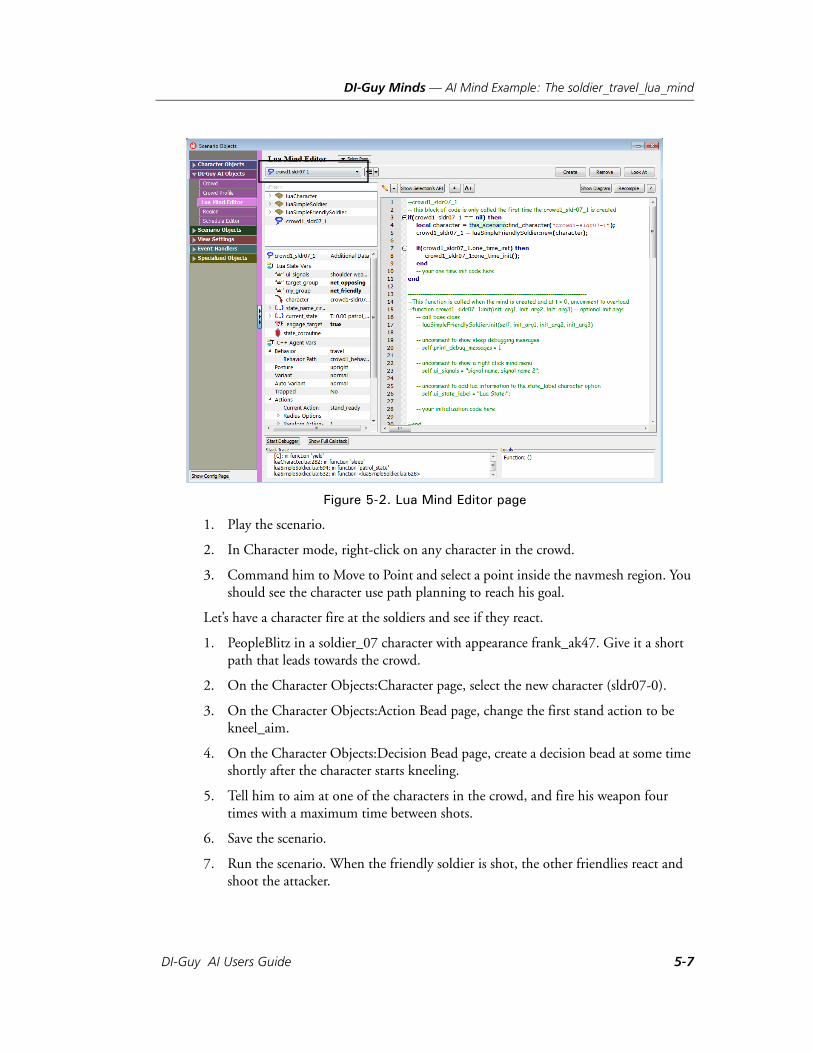
DI-Guy Minds — AI Mind Example: The soldier_travel_lua_mind
Figure 5-2. Lua Mind Editor page
1. Play the scenario.
2. In Character mode, right-click on any character in the crowd.
3. Command him to Move to Point and select a point inside the navmesh region. You should see the character use path planning to reach his goal.
Let’s have a character fire at the soldiers and see if they react.
1. PeopleBlitz in a soldier_07 character with appearance frank_ak47. Give it a short path that leads towards the crowd.
2. On the Character Objects:Character page, select the new character (sldr07-0).
3. On the Character Objects:Action Bead page, change the first stand action to be kneel_aim.
4. On the Character Objects:Decision Bead page, create a decision bead at some time shortly after the character starts kneeling.
5. Tell him to aim at one of the characters in the crowd, and fire his weapon four times with a maximum time between shots.
6. Save the scenario.
7. Run the scenario. When the friendly soldier is shot, the other friendlies react and shoot the attacker.
DI-Guy AI Users Guide 5-7
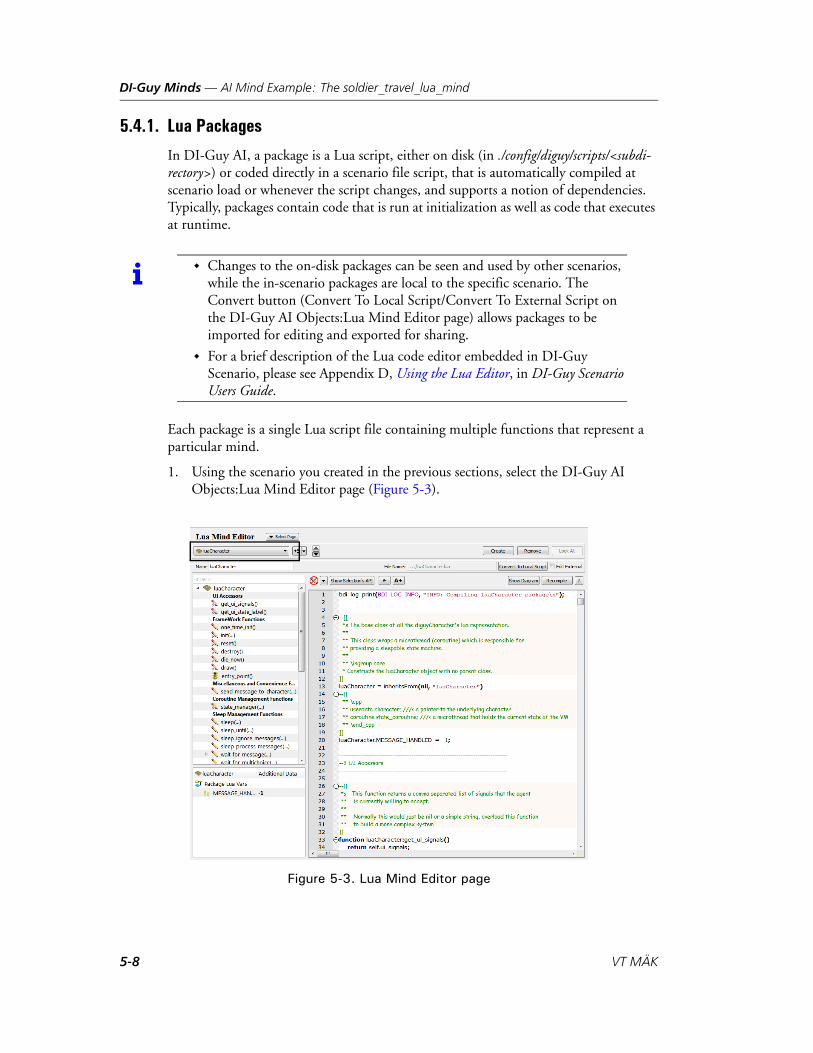
DI-Guy Minds — AI Mind Example: The soldier_travel_lua_mind
5.4.1. Lua Packages
In DI-Guy AI, a package is a Lua script, either on disk (in ./config/diguy/scripts/<subdi-rectory>) or coded directly in a scenario file script, that is automatically compiled at scenario load or whenever the script changes, and supports a notion of dependencies. Typically, packages contain code that is run at initialization as well as code that executes at runtime.
Each package is a single Lua script file containing multiple functions that represent a particular mind.
1. Using the scenario you created in the previous sections, select the DI-Guy AI Objects:Lua Mind Editor page (Figure 5-3).
Figure 5-3. Lua Mind Editor page
i Changes to the on-disk packages can be seen and used by other scenarios, while the in-scenario packages are local to the specific scenario. The Convert button (Convert To Local Script/Convert To External Script on the DI-Guy AI Objects:Lua Mind Editor page) allows packages to be imported for editing and exported for sharing.
For a brief description of the Lua code editor embedded in DI-Guy Scenario, please see Appendix D, Using the Lua Editor, in DI-Guy Scenario Users Guide.
5-8 VT MÄK
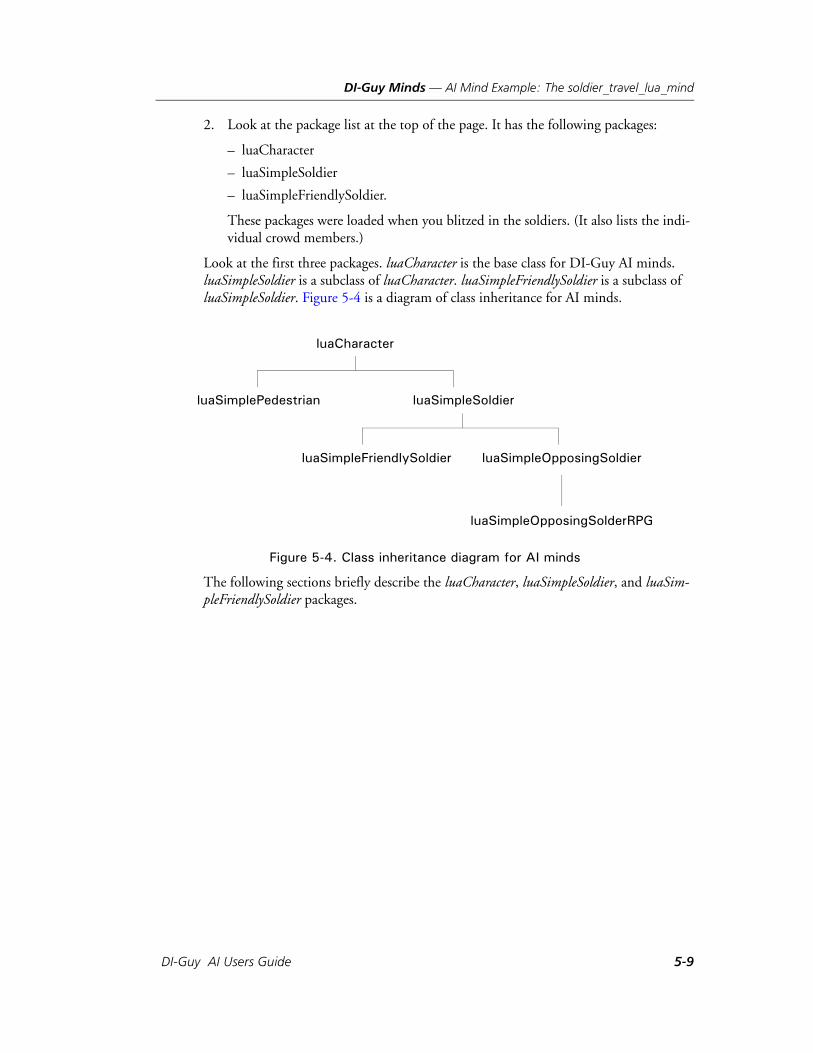
DI-Guy Minds — AI Mind Example: The soldier_travel_lua_mind
2. Look at the package list at the top of the page. It has the following packages:
– luaCharacter
– luaSimpleSoldier
– luaSimpleFriendlySoldier.
These packages were loaded when you blitzed in the soldiers. (It also lists the indi-vidual crowd members.)
Look at the first three packages. luaCharacter is the base class for DI-Guy AI minds. luaSimpleSoldier is a subclass of luaCharacter. luaSimpleFriendlySoldier is a subclass of luaSimpleSoldier. Figure 5-4 is a diagram of class inheritance for AI minds.
Figure 5-4. Class inheritance diagram for AI minds
The following sections briefly describe the luaCharacter, luaSimpleSoldier, and luaSim-pleFriendlySoldier packages.
luaCharacter
luaSimplePedestrian luaSimpleSoldier
luaSimpleFriendlySoldier luaSimpleOpposingSoldier
luaSimpleOpposingSolderRPG
DI-Guy AI Users Guide 5-9
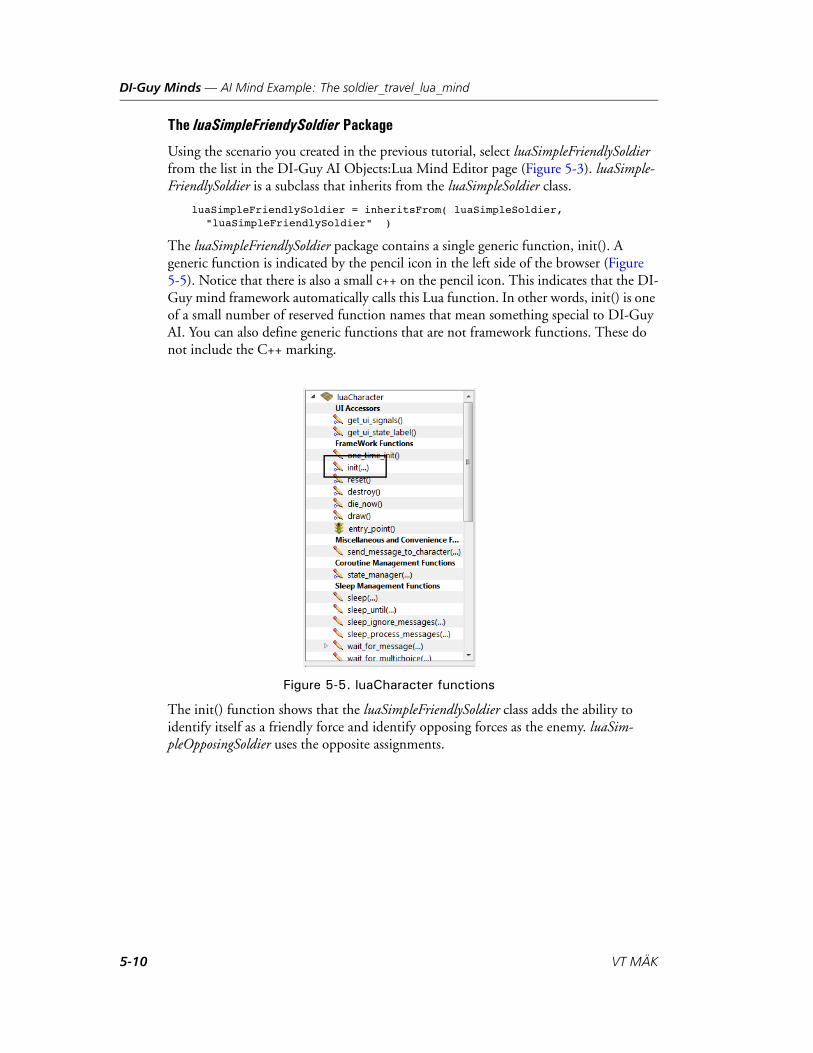
DI-Guy Minds — AI Mind Example: The soldier_travel_lua_mind
The luaSimpleFriendySoldier Package
Using the scenario you created in the previous tutorial, select luaSimpleFriendlySoldier from the list in the DI-Guy AI Objects:Lua Mind Editor page (Figure 5-3). luaSimple-FriendlySoldier is a subclass that inherits from the luaSimpleSoldier class.
luaSimpleFriendlySoldier = inheritsFrom( luaSimpleSoldier, "luaSimpleFriendlySoldier" )
The luaSimpleFriendlySoldier package contains a single generic function, init(). A generic function is indicated by the pencil icon in the left side of the browser (Figure 5-5). Notice that there is also a small c++ on the pencil icon. This indicates that the DI-Guy mind framework automatically calls this Lua function. In other words, init() is one of a small number of reserved function names that mean something special to DI-Guy AI. You can also define generic functions that are not framework functions. These do not include the C++ marking.
Figure 5-5. luaCharacter functions
The init() function shows that the luaSimpleFriendlySoldier class adds the ability to identify itself as a friendly force and identify opposing forces as the enemy. luaSim-pleOpposingSoldier uses the opposite assignments.
5-10 VT MÄK
DI-Guy Minds — AI Mind Example: The soldier_travel_lua_mind
The luaSimpleSoldier Package
The luaSimpleSoldier class is more complex than luaSimpleFriendlySoldier. This is where all the basic soldier mind functionality is specified.
luaSimpleSoldier contains two framework generic functions, init() and init_package() and two generic functions, move_to_background_check() and become_aggressive().
The Lua Mind Editor has features that help make your AI mind understandable, such as the different graphic icons for different types of functions, but these only work if you follow the recommended conventions. Doing so will make your work as an advanced AI mind programmer much simpler. For a list of conventions, please see Appendix D, Using the Lua Editor, in DI-Guy Scenario Users Guide.
Two callback functions are identified for when a target is acquired and when an impact occurs. The icon for a callback function looks like a telephone in the left side browser. The browser identifies these functions as callbacks because they use the convention on_<text> for the function name.
Labeling a function as a callback function by using the on_<text> convention is some-what of a style choice. The first callback, on_impact_callback(), is a classic DI-Guy event and callback. The second callback, on_target_acquired(), is an event invented by the author of this class. When he determines that the event has occurred, he calls on_target_acquired().
The next set of functions are the message handling functions. They use the convention process_messages_<text> for their Lua function names, and are represented iconically with the branching icon.
The entry_point() function indicates where the State Machine for the character begins. It is represented by the traffic light Go! icon.
Finally a large number of state functions are listed. State functions self-identify them-selves by the use of the string state in their function names and are represented with the circle icon.
You can display a state diagram of the luaSimpleFriendlySoldier’s state machine by clicking the Show Diagram button. For a state diagram to function properly do not forget that there should be an entry point function as a starting point. For more infor-mation about state diagrams, please see “Visualizing the State Machine,” on page 5-13.
DI-Guy AI Users Guide 5-11
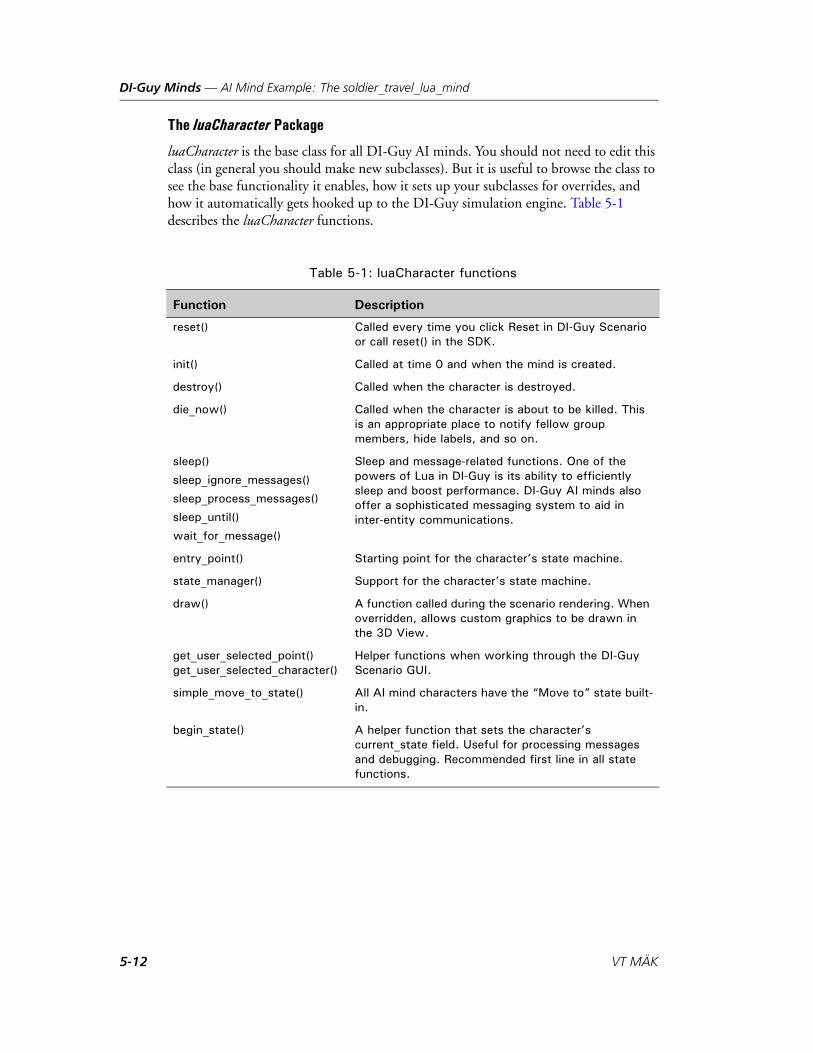
DI-Guy Minds — AI Mind Example: The soldier_travel_lua_mind
The luaCharacter Package
luaCharacter is the base class for all DI-Guy AI minds. You should not need to edit this class (in general you should make new subclasses). But it is useful to browse the class to see the base functionality it enables, how it sets up your subclasses for overrides, and how it automatically gets hooked up to the DI-Guy simulation engine. Table 5-1 describes the luaCharacter functions.
Table 5-1: luaCharacter functions
Function Description
reset() Called every time you click Reset in DI-Guy Scenario or call reset() in the SDK.
init() Called at time 0 and when the mind is created.
destroy() Called when the character is destroyed.
die_now() Called when the character is about to be killed. This is an appropriate place to notify fellow group members, hide labels, and so on.
sleep()
sleep_ignore_messages()
sleep_process_messages()
sleep_until()
wait_for_message()
Sleep and message-related functions. One of the powers of Lua in DI-Guy is its ability to efficiently sleep and boost performance. DI-Guy AI minds also offer a sophisticated messaging system to aid in inter-entity communications.
entry_point() Starting point for the character’s state machine.
state_manager() Support for the character’s state machine.
draw() A function called during the scenario rendering. When overridden, allows custom graphics to be drawn in the 3D View.
get_user_selected_point() get_user_selected_character()
Helper functions when working through the DI-Guy Scenario GUI.
simple_move_to_state() All AI mind characters have the “Move to” state built-in.
begin_state() A helper function that sets the character’s current_state field. Useful for processing messages and debugging. Recommended first line in all state functions.
5-12 VT MÄK
DI-Guy Minds — Visualizing the State Machine
5.5. Visualizing the State MachineThe Show Diagram button on the DI-Guy AI Objects:Lua Mind Editor page lets you visualize a package’s state machine (Figure 5-6).
The key to the diagram is as follows:
Gold octagons indicate DI-Guy AI mind states. The text _state at the end of each function is trimmed off for brevity’s sake.
Diamonds indicate DI-Guy AI mind message processing functions.
Circles indicate generic functions.
Arrows indicate that the target function is called from the source function. This does not preclude returning from that function back to the source. For example, in Figure 5-6, return_patrol can lead directly to patrol. When you select more complex diagrams, you will also see individual messages and callbacks added into the state machine.
i To generate diagrams, you must install Graphviz, which is included with DI-Guy (./3rdparty/diguy_3rdparty_installers/GraphvizSetup).
DI-Guy AI Users Guide 5-13
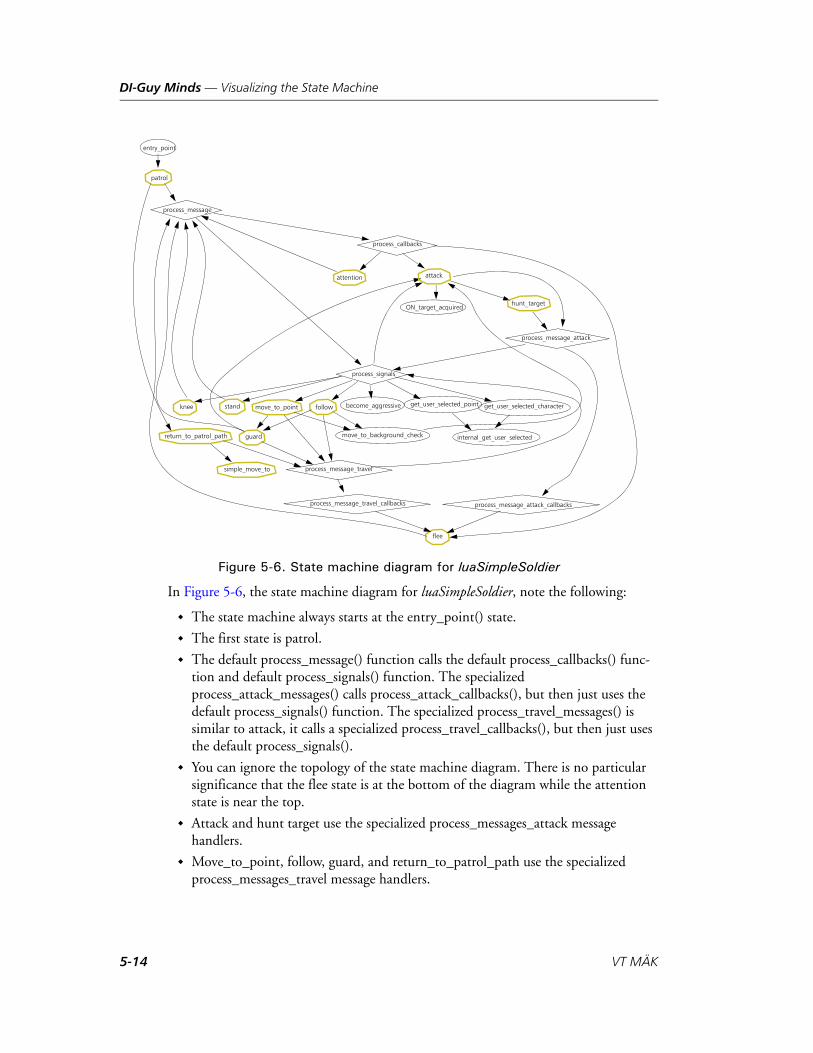
DI-Guy Minds — Visualizing the State Machine
Figure 5-6. State machine diagram for luaSimpleSoldier
In Figure 5-6, the state machine diagram for luaSimpleSoldier, note the following:
The state machine always starts at the entry_point() state.
The first state is patrol.
The default process_message() function calls the default process_callbacks() func-tion and default process_signals() function. The specialized process_attack_messages() calls process_attack_callbacks(), but then just uses the default process_signals() function. The specialized process_travel_messages() is similar to attack, it calls a specialized process_travel_callbacks(), but then just uses the default process_signals().
You can ignore the topology of the state machine diagram. There is no particular significance that the flee state is at the bottom of the diagram while the attention state is near the top.
Attack and hunt target use the specialized process_messages_attack message handlers.
Move_to_point, follow, guard, and return_to_patrol_path use the specialized process_messages_travel message handlers.
entry_point
patrol
process_message
attention
process_callbacks
process_signals
knee stand move_to_point follow
guardreturn_to_patrol_path
simple_move_to process_message_travel
process_message_travel_callbacks process_message_attack_callbacks
move_to_background_check
become_aggressive get_user_selected_point
internal_get_user_selected
get_user_selected_character
ON_target_acquired
attack
hunt_target
process_message_attack
flee
5-14 VT MÄK
DI-Guy Minds — The luaSimpleSoldier Package Functions
5.6. The luaSimpleSoldier Package FunctionsThis section describes the luaSimpleSoldier package functions. As you read the function descriptions, you can view the package in the Lua Mind Editor or you can open ./config/diguy/scripts/character_classes/luaSimpleSoldier.lua in a text editor.
init_package(). This code checks if a navigation mesh is associated with the char-acter. It invoked the navigation mesh initialization when you first blitzed in the crowd.
init(). The impact, crowd member killed, and nearby weapon fired events are mapped as wakeup callbacks for luaSimpleSoldier. This means that the active process_message() function is called when these events occur.
We want the impact event to call our on_impact_callback() function. We have set this up with a little indirection, because the impact callback returns a diguyCharacter object, and we need to find the Lua character that corresponds to it. (A luaCharacter is a wrapper class that contains a pointer to the underlying diguyCharacter class along with other useful information.) It uses the Lua core function find_lua_character() to do this. Another purpose of this callback script is to override the luaCharacter impact callback script, which automatically kills the soldier. Our callback is a little more complex than that.
5.6.1. The entry_point() Function
The entry_point() function is called when the character starts up as the beginning place for its state machine. It is the first state function that is run in a Lua mind.
function luaSimpleSoldier:entry_point()self:patrol_state();
end
The entry_point() function is very simple. It immediately puts the character into patrol_state.
i entry_point() is run in its own coroutine, and any other state functions called will also operate in that coroutine. This does not mean that a given mind's functions will not be called from within the coroutine associated with a different Lua mind.
DI-Guy AI Users Guide 5-15
DI-Guy Minds — The luaSimpleSoldier Package Functions
5.6.2. The patrol_state() Function
State functions usually have three sections:
Begin Statement. While not necessary, it is strongly recommended that all state functions have this opening line. It is useful for debugging purposes.
self:begin_state(“name of state”)
Parameters, behavior, and logic. Often the bulk of the state, this is where parame-ters are altered, DI-Guy SDK functions are called, and logic is performed.
Process messages handoff. Once you have set up your behavior, you want to set into action the process_messages message handlers that will process any interrupt activity during the time the character is in the state.
In the patrol_state() function, we can see that we first set the begin state to patrol state. We then set some parameters governing the on-screen GUI list. Finally, we call process_messages() after sleeping every two seconds. When some particular returns from process_messages() are passed back to patrol_state(), the character invokes the return_to_patrol_path() state, and upon return from that, it reverts back to patrol_state.
Sometimes states progress to another state without a process_messages() call (when they are doing something simple) or upon return from a process_messages() call (when they know there will be a next logical state upon return).
5-16 VT MÄK
DI-Guy Minds — The luaSimpleSoldier Package Functions
5.6.3. The Default Message Processing Function – process_messages()
The process_messages() function is the default message processing function for the luaSimpleSoldier. It calls process_messages_callback() and process_messages_signals() for handling the various types of messages that may be called.
The process_messages_callback() Function
This function processes any callback events triggered.
The process_callbacks() function shows how to unpack a message_object to get at important constituent parts such as who sent the message, what type of message was it, what is the message, and any parameters associated with the message.
The function only handles four types of messages. Anything else and it prints an error message.
A call to the DI-Guy SDK is made to determine what crowd the character belongs to.
An impact descriptor from the shot fired is retrieved. From that, the attacker is determined.
If his crowd is more than eighty percent dead, the soldier flees.
If the shot was due to enemy fire, the soldier is switched to attack state.
If someone was killed and the attacker was a neutral, the soldier is switched to attack state.
If it was just a nearby shot, switch to attention_state to look at the attacker if the shot is close by.
5.6.4. The process_messages_signals() Function
This function processes messages received either as a signal from the GUI or as message broadcast from another entity in the scene.
The code handling for many signals has been elided here as a majority of signals are processed in the same way.
Some signals require additional information. For example, move to point invokes get_user_selected_point(), a GUI process meant to run in DI-Guy Scenario. Thus, in this case, the mind actually prompts the user for information.
Return to patrol, when gotten as a signal from the GUI, broadcasts a message to fellow agents within 10 meters of the character to also return to patrol.
Calling a state directly should only be done if you know that the called state will not call this state through some loop in the finite state machine. This will cause the Lua stack to grow indefinitely.
Returning a table containing a state function to call causes the calling state to fully exit and invoke the new state function. This clears the calling state off of the Lua stack.
DI-Guy AI Users Guide 5-17
DI-Guy Minds — The luaSimpleSoldier Package Functions
5.6.5. Custom Message Processing – process_messages_attack()
Sometimes a particular state will not want to process new messages using the default message processor. You can set up completely different message processing functions, and then have the calling state activate that message processor. The attack_state is a good example of this. It calls process_messages_attack() instead of process_messages. That function calls a different callback message handler, and then uses the default signal handler. Travel is similar.
Patrol. This is the default state. The state is entered immediately from the entry point. Calls into process_messages() send the soldier to different states. He can then eventually return to patrol state, sometimes directly, and sometimes using return to patrol state. During patrol state, the soldier uses the incoming base behavior.
Follow. The soldier does not actually follow the sender. He queries where the sender is going, and then goes there using the simple_move_to_state() function. When he arrives, he enters guard state.
Guard. A soldier entering guard state sets his desired position to be his current posi-tion. He calls process_messages(), waiting for new interrupts. He also checks if there are any enemy targets. If there are, he enters an attack state, and upon return from the attack state, uses simple_move_to_state() to return to his guard position.
Return to Patrol. During execution of a state, the character may have moved away from his original patrol area. This state executes a simple_move_to_state() to return the character to a position near the patrol area.
Move to Point. The soldier adds return to patrol to his GUI list, queries the oper-ator for a move-to point, signals other members of his group to follow him, and then performs a simple_move_to_state(). Upon completion, he enters guard state, that is, he remains at the point he was sent to.
Hunt Target. The soldier uses the navmesh to navigate to where he can see the target.
Attack. Based on incoming arguments, the soldier determines a target character. He adds a wakeup callback function for agent_out_of_targets in case there are no avail-able target characters. He sets up use of his specialized message processing function, process_message_attack(). He then begins a while loop in which he periodically checks on the status of his target. If the target is dead, he will find another target if he has a designated target group, or else return. If the target is alive and he cannot see him, he enters the hunt target state. If the target is alive and he can see him, he activates his attack behavior and calls the ON_target_acquired() function. By default this just puts the character into the low level attack behavior. However, the RPG descendant class overrides this function and fires a missile when ON_target_acquired() occurs.
Stand. Resets the GUI, sets posture and variants to upright and normal, and broad-casts some angry and look at me signals to those nearby.
5-18 VT MÄK
DI-Guy Minds — How DI-Guy AI Minds Sleep
Knee. Resets the GUI, sets posture and variants to crouched and normal, and broadcasts some happy and look at me signals to those nearby.
Attention. The soldier looks at the attention target.
Flee. The soldier sets the target character as his focus and then flees seven meters from him. He returns an exit value.
5.7. How DI-Guy AI Minds SleepOne of the essential aspects of proper DI-Guy AI mind design is their need to act as an extremely efficient high-level controller. After all, your world may be filled with hundreds of these characters, all thinking simultaneously. Therefore, DI-Guy AI minds need to be active and expend CPU time only when decisions need to be made. The rest of the time, the mind should go to sleep.
When a mind goes to sleep, a timer is set indicating when the character is to be woken up and the character’s co-routine or microthread is suspended. When the timer times out, the microthread is resumed and the mind script continues where it left off. This is an essential aspect of DI-Guy AI minds. It allows complex time code to be carried out in a simple linear script.
(For additional conceptual background, please see “The Basic Architecture of a DI-Guy AI Mind,” on page 5-4.)
The sleep cycle can also be interrupted before timing out by an incoming message. Messages might be generated in the following ways:
Signals from the user interface (for example, right-click on a character).
Messages sent by another character or smart object using functions such as agent_broadcast_message(), agent_broadcast_message_to_group(), or agent_accept_message().
Messages triggered by callbacks. When a script calls diguyChar-acter::add_wakeup_callback() it effectively requests that whenever the specified callback is triggered, the character is woken up with a message.
When a message is received, it is converted into a message object and returned by the sleep function. If the sleep function times out without receiving a message, it does not return a message object. The following code snippet shows a mind that sleeps for 30 second intervals. No message object is returned if the sleep was not interrupted. If it is interrupted, the message_obj exists and process_messages() is called.
while (1) do local message_obj = self:sleep(30); if(message_obj) then
self:process_messages(message_object) endend
DI-Guy AI Users Guide 5-19
DI-Guy Minds — How DI-Guy AI Minds Sleep
Here is a creative example of using sleep to efficiently control the RPG character:
function luaRPG:wait_for_target_state()while (1) do
self.current_state = "waiting for target"self.ui_signals = "stop";
if(self:process_messages(self:sleep(2)) == "exit") then return end;
local character_target =self.character:get_nearest_active_character_in_group(
"net_friendly",1);
if(character_target) thenself:fire_rpg_state(character_target);
if(self:sleep_process_messages(20, self.process_messages_attack))then return end
endend
end
In this example, the waiting for target state is entered. The character sleeps for two seconds, only being woken up by incoming messages. When it returns, either because two seconds have elapsed or an incoming message interrupted the sleep, the RPG char-acter checks the return status. If it is exit, he returns out of the waiting for target state. If not, he determines who is the closest character belonging to the net_friendly group. (The second argument, 1, indicates that there must be a line-of-sight (LOS) to the character.) If a target is acquired, the soldier enters his fire_rpg_state. Upon return, the RPG soldier waits 20 seconds before looking for another target, to simulate his need to reload, and so on.
5-20 VT MÄK
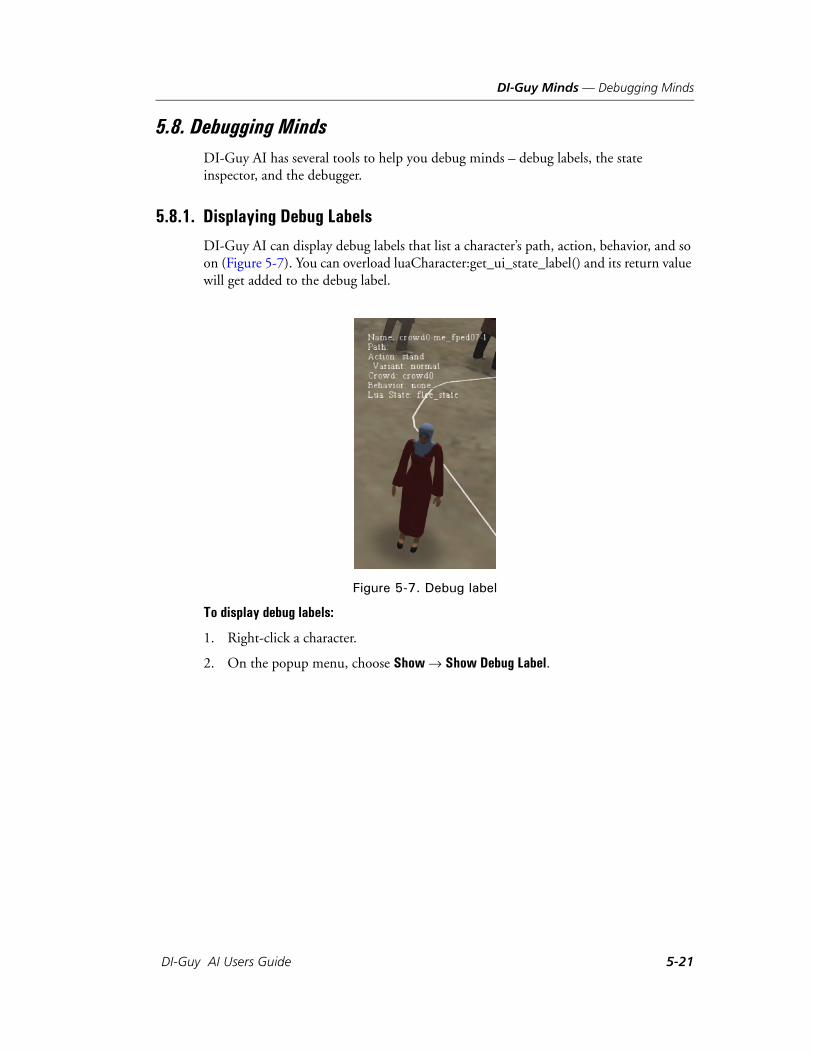
DI-Guy Minds — Debugging Minds
5.8. Debugging MindsDI-Guy AI has several tools to help you debug minds – debug labels, the state inspector, and the debugger.
5.8.1. Displaying Debug Labels
DI-Guy AI can display debug labels that list a character’s path, action, behavior, and so on (Figure 5-7). You can overload luaCharacter:get_ui_state_label() and its return value will get added to the debug label.
Figure 5-7. Debug label
To display debug labels:
1. Right-click a character.
2. On the popup menu, choose Show Show Debug Label.
DI-Guy AI Users Guide 5-21
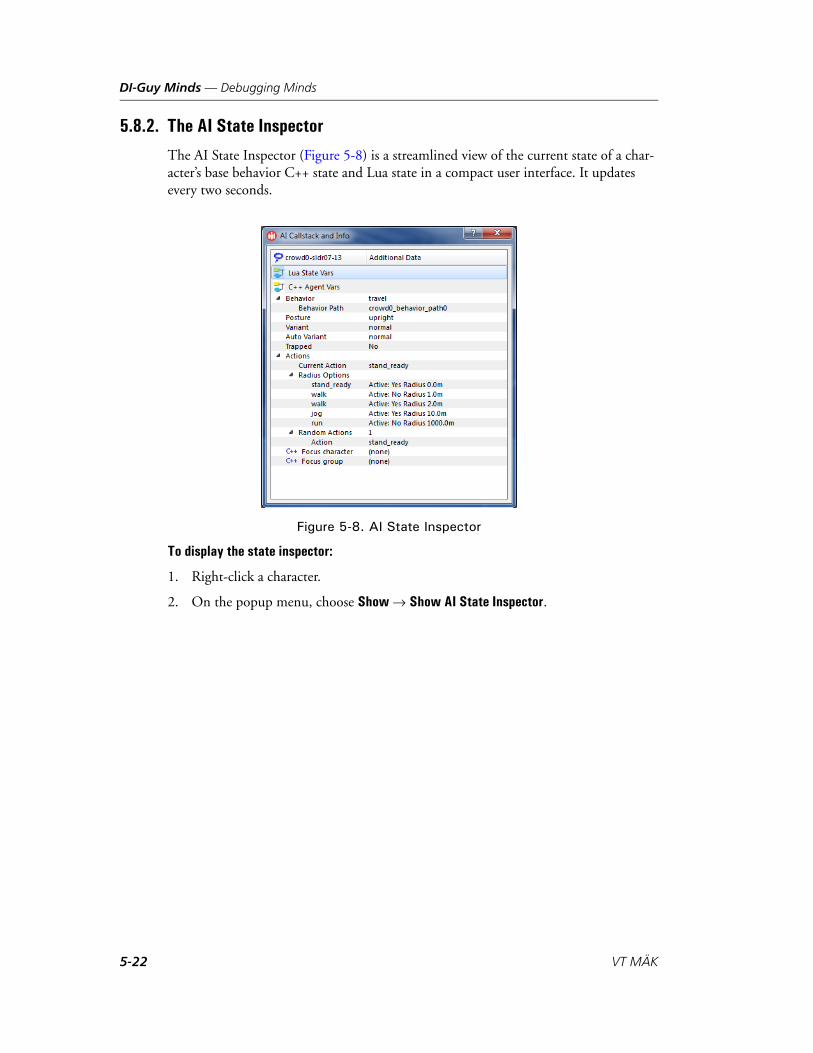
DI-Guy Minds — Debugging Minds
5.8.2. The AI State Inspector
The AI State Inspector (Figure 5-8) is a streamlined view of the current state of a char-acter’s base behavior C++ state and Lua state in a compact user interface. It updates every two seconds.
Figure 5-8. AI State Inspector
To display the state inspector:
1. Right-click a character.
2. On the popup menu, choose Show Show AI State Inspector.
5-22 VT MÄK

DI-Guy Minds — Debugging Minds
5.8.3. The Interactive Debugger
The Lua Mind Editor page has an interactive debugger for debugging your scripts.
To run the debugger:
1. Right-click a character.
2. On the popup menu, choose Show Show Mind Editor. The DI-Guy AI Objects:Mind Editor page opens. A debugging section is added to the bottom of the page (Figure 5-9).
Figure 5-9. Debugger
3. Click Start Debugger. An interactive step-by-step debugger opens. You can examine messages and the logic that is triggered when they come in. It is recom-mended that you put breakpoints inside state functions. Remember that entry_point() is run in its own coroutine, and any other state functions called will also operate in that coroutine. This does not mean that a given mind's functions will not be called from within the coroutine associated with a different Lua mind.
DI-Guy AI Users Guide 5-23
DI-Guy Minds — Mind References
5.9. Mind ReferencesThis section describes some miscellaneous features of DI-Guy AI Minds.
luaCharacter.init_code. The constructor template string. When a character inherits from the luaCharacter base class, this string is used as a template for creating the mind script. You can overload it in a subclassed package.
self.ui_signals. This is a comma delimited list of signals that the agent can accept. These signals are reflected in the Character mode popup menu. Typically it is updated when a character enters a new state. While by default this is a string, over-loading luaCharacter:get_ui_signals() allows you to build a more complex represen-tation of a signal list, as long as the function returns a string.
To duplicate this behavior in the SDK, call:
diguyCharacter::evaluate_mind_function(“get_ui_signals”,NULL, 1);
A ‘–’ indicates that a separator should be added to the menu.
self.ui_state_label. This simple string is appended to the state text label when a character has the Name Label Shows Character State check box selected (on the Character Objects:Character page, Label tab). While by default this is a string, overloading luaCharacter:get_ui_state_label() allows you to build a more elaborate string.
To duplicate this behavior in the SDK, call:
diguyCharacter::evaluate_mind_function(“get_ui_state_label”,NULL, 1);
5.9.1. Objects with a tostring() Function
When an object has a table as a field, you can give a hint to the Lua Mind Editor about how that data should be visualized by adding a tostring() function to the object:
The following code snippet shows how current state is updated with a more complex string:
function luaCharacter:begin_state(_name)if(not self.current_state) then
self.current_state = { name = _name, t = this_scenario:get_t()};self.current_state.tostring = function (e)
return "T: " ..string.format("%3.2f",e.t) .. " " .. e.name; end
end
5-24 VT MÄK
DI-G
6. Creating and Editing Crowds
This chapter explains how to configure crowds, crowd profiles, regions, and pattern of life.
Creating Crowds ........................................................................................... 6-2Creating a Crowd from the Input Mode Window .................................. 6-3Creating a Crowd from the Crowd Page ................................................. 6-3Editing Crowds from the Input Mode Window...................................... 6-5Editing Crowds on the Crowd Page........................................................ 6-8
Creating Regions......................................................................................... 6-13Creating a Region from the Input Mode Window................................ 6-13Creating a Region on the Region Page.................................................. 6-14Editing and Visualizing Regions ........................................................... 6-15
Creating and Editing Crowd Profiles........................................................... 6-16Configuring Crowds on the Populate Settings Tab ............................... 6-18Default Agent Parameters ..................................................................... 6-20Sharing Profiles Between Scenarios ....................................................... 6-20
Crowd Member Agent Parameters .............................................................. 6-20The Behavior Settings Tab.................................................................... 6-20The Prop and Scene Object Avoidance Tab .......................................... 6-24The Character Avoidance Tab............................................................... 6-26Trap Settings and Path Planning Tab .................................................... 6-27
The Schedule Editor ................................................................................... 6-29
6-1uy AI Users Guide
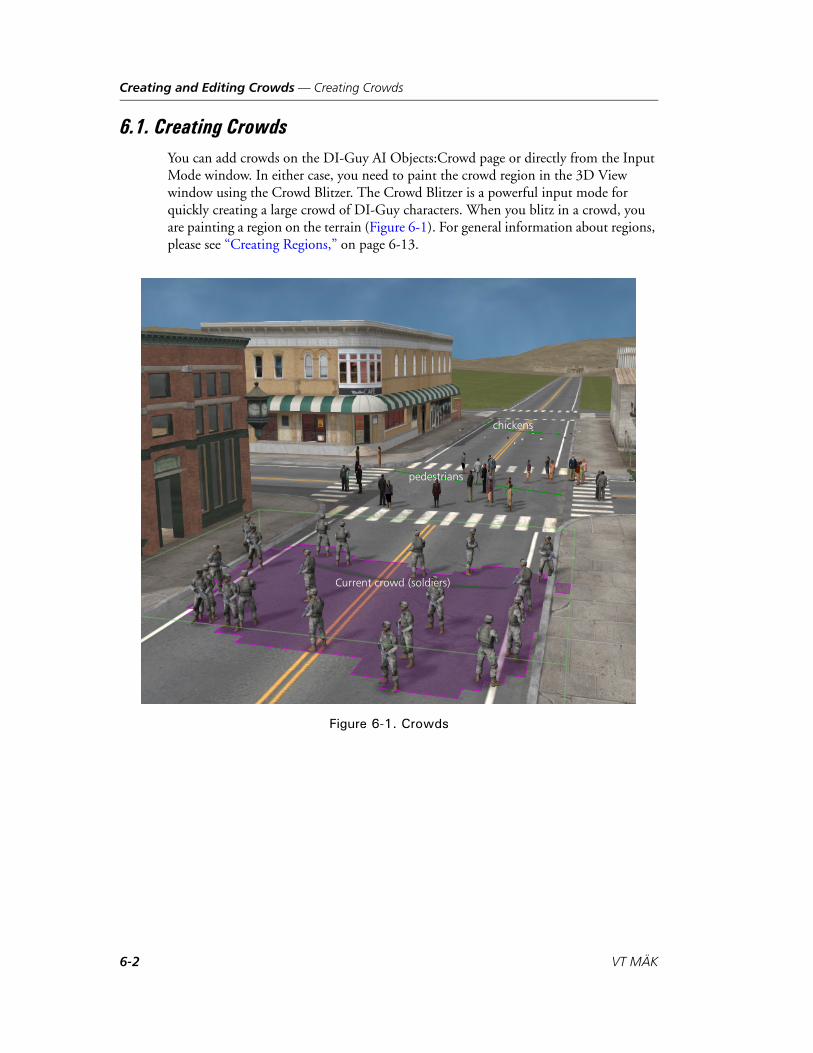
Creating and Editing Crowds — Creating Crowds
6.1. Creating CrowdsYou can add crowds on the DI-Guy AI Objects:Crowd page or directly from the Input Mode window. In either case, you need to paint the crowd region in the 3D View window using the Crowd Blitzer. The Crowd Blitzer is a powerful input mode for quickly creating a large crowd of DI-Guy characters. When you blitz in a crowd, you are painting a region on the terrain (Figure 6-1). For general information about regions, please see “Creating Regions,” on page 6-13.
Figure 6-1. Crowds
Current crowd (soldiers)
pedestrians
chickens
6-2 VT MÄK
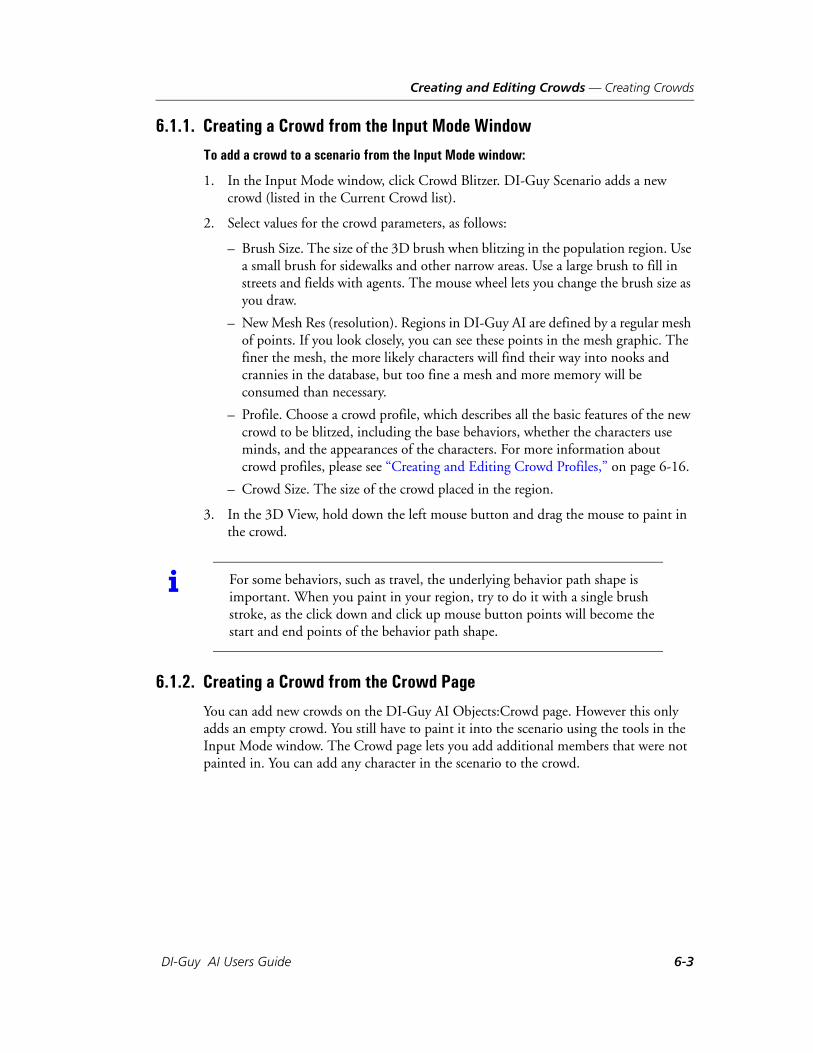
Creating and Editing Crowds — Creating Crowds
6.1.1. Creating a Crowd from the Input Mode Window
To add a crowd to a scenario from the Input Mode window:
1. In the Input Mode window, click Crowd Blitzer. DI-Guy Scenario adds a new crowd (listed in the Current Crowd list).
2. Select values for the crowd parameters, as follows:
– Brush Size. The size of the 3D brush when blitzing in the population region. Use a small brush for sidewalks and other narrow areas. Use a large brush to fill in streets and fields with agents. The mouse wheel lets you change the brush size as you draw.
– New Mesh Res (resolution). Regions in DI-Guy AI are defined by a regular mesh of points. If you look closely, you can see these points in the mesh graphic. The finer the mesh, the more likely characters will find their way into nooks and crannies in the database, but too fine a mesh and more memory will be consumed than necessary.
– Profile. Choose a crowd profile, which describes all the basic features of the new crowd to be blitzed, including the base behaviors, whether the characters use minds, and the appearances of the characters. For more information about crowd profiles, please see “Creating and Editing Crowd Profiles,” on page 6-16.
– Crowd Size. The size of the crowd placed in the region.
3. In the 3D View, hold down the left mouse button and drag the mouse to paint in the crowd.
6.1.2. Creating a Crowd from the Crowd Page
You can add new crowds on the DI-Guy AI Objects:Crowd page. However this only adds an empty crowd. You still have to paint it into the scenario using the tools in the Input Mode window. The Crowd page lets you add additional members that were not painted in. You can add any character in the scenario to the crowd.
i For some behaviors, such as travel, the underlying behavior path shape is important. When you paint in your region, try to do it with a single brush stroke, as the click down and click up mouse button points will become the start and end points of the behavior path shape.
DI-Guy AI Users Guide 6-3
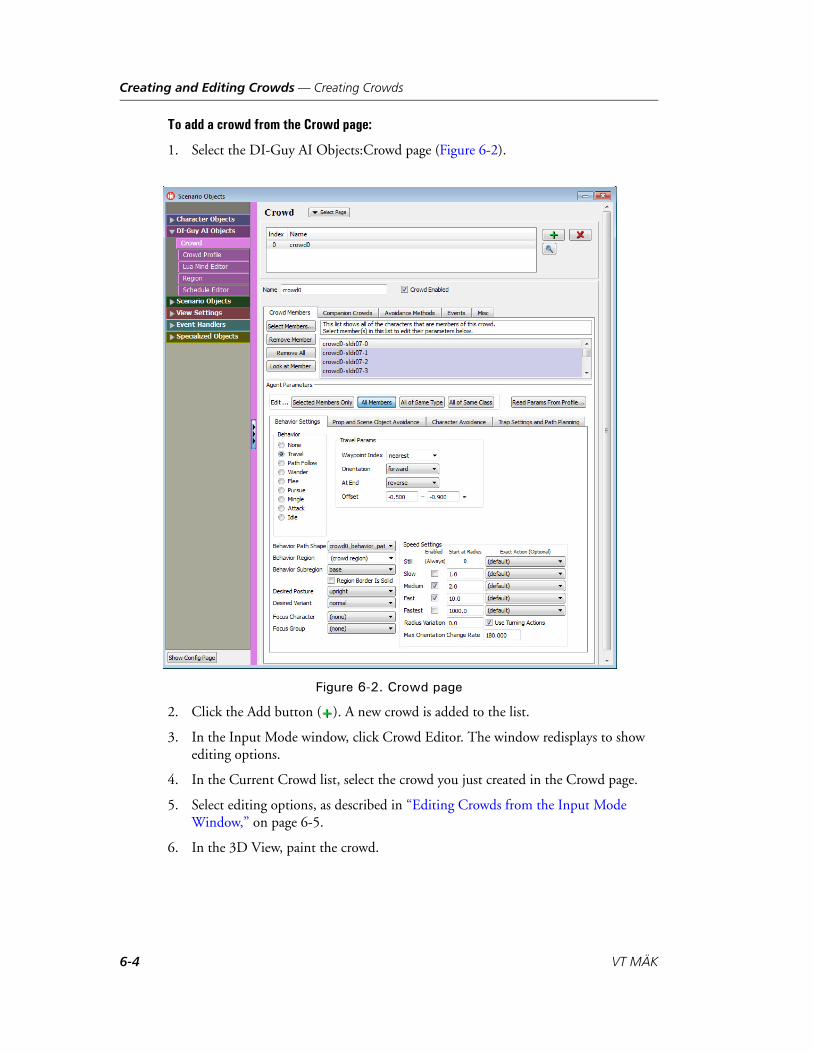
Creating and Editing Crowds — Creating Crowds
To add a crowd from the Crowd page:
1. Select the DI-Guy AI Objects:Crowd page (Figure 6-2).
Figure 6-2. Crowd page
2. Click the Add button ( ). A new crowd is added to the list.
3. In the Input Mode window, click Crowd Editor. The window redisplays to show editing options.
4. In the Current Crowd list, select the crowd you just created in the Crowd page.
5. Select editing options, as described in “Editing Crowds from the Input Mode Window,” on page 6-5.
6. In the 3D View, paint the crowd.
6-4 VT MÄK
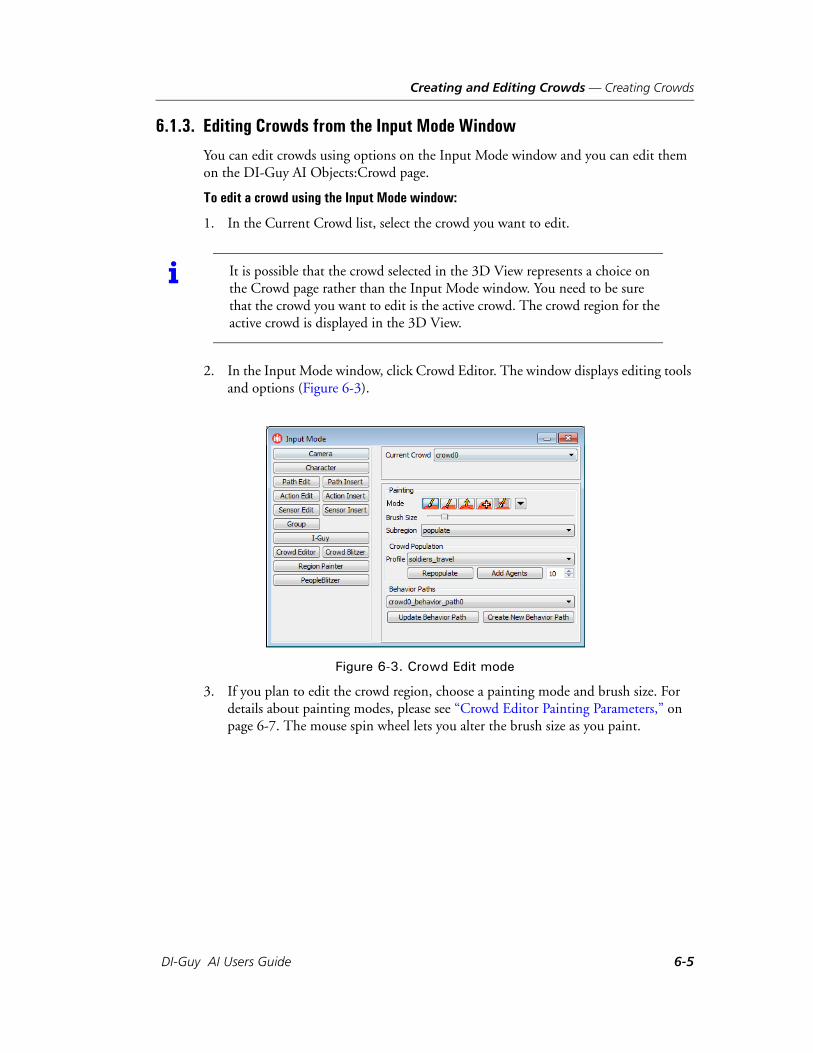
Creating and Editing Crowds — Creating Crowds
6.1.3. Editing Crowds from the Input Mode Window
You can edit crowds using options on the Input Mode window and you can edit them on the DI-Guy AI Objects:Crowd page.
To edit a crowd using the Input Mode window:
1. In the Current Crowd list, select the crowd you want to edit.
2. In the Input Mode window, click Crowd Editor. The window displays editing tools and options (Figure 6-3).
Figure 6-3. Crowd Edit mode
3. If you plan to edit the crowd region, choose a painting mode and brush size. For details about painting modes, please see “Crowd Editor Painting Parameters,” on page 6-7. The mouse spin wheel lets you alter the brush size as you paint.
i It is possible that the crowd selected in the 3D View represents a choice on the Crowd page rather than the Input Mode window. You need to be sure that the crowd you want to edit is the active crowd. The crowd region for the active crowd is displayed in the 3D View.
DI-Guy AI Users Guide 6-5

Creating and Editing Crowds — Creating Crowds
4. Optionally, in the Crowd Population group box specify the composition of the crowd, as follows:
– Profile. Choose a crowd profile. Profiles describe all the basic features of a crowd from the characters that compose it to the behavior they will exhibit. Changing this setting changes the composition of the entire crowd, and does not require a paint. For information about creating and editing crowd profiles, please see “Creating and Editing Crowd Profiles,” on page 6-16.
– Repopulate. Deletes all the agents from the crowd and repopulates the crowd with a new set of agents.
– Add Agents. Adds the number of agents specified by the crowd size to the existing crowd.
– Crowd Size. The value used by Repopulate and Add Agents. Default: as specified in the crowd profile.
5. Optionally, in the Behavior Paths group box, add or edit behavior paths, as follows:
– Behavior path list: Select a behavior path. Some base behaviors, such as travel, associate a behavior path with the entire crowd.
– Update Behavior Path: Updates a behavior path based on changes made to the region. DI-Guy AI automatically tries to plot the best behavior path shape based on the region’s topology.
– Create New Behavior Path: Creates a new Behavior Path associated with the crowd.
6. If you are changing the crowd region, edit the region in the 3D View.
6-6 VT MÄK
Creating and Editing Crowds — Creating Crowds
Crowd Editor Painting Parameters
When you edit a region, you can paint in the following modes:
Paint ( ): Add to your existing subregion by painting.
Eraser ( ): Subtract from your existing subregion by painting. You can also erase by holding down the Ctrl key while in Paint Mode. Erasing a region may affect the navmesh. Erasing a subregion does not affect the underlying navmesh.
Unground Clamp ( ): Erase the ground clamping in the Region you paint. This is useful when working with multi-story buildings and the Region has clamped to the wrong floor. This action erases the navmesh. If it does not work, try painting on the floor above where you want to unground clamp.
Move Mesh ( ): Grab your Region with the mouse and move it around.
Paint Reachable Region ( ). Paint a reachable subregion. By default, the paint brush dynamically analyzes the area around where you paint. Occasionally, while analyzing around certain areas like doors, the paint brush can be wrong. The reach-able brush allows you to force an area to be reachable or non-reachable disregarding the dynamic analysis.
Preferences. Opens a dialog box that lets you set the following:
– Draw style.
– Reclamp height.
– Paint through walls.
– See through walls. Lets you see the region footprint where it would otherwise be occluded by walls, sidewalks, and so on.
– Painting intersection test.
– Shrink a region.
– Clear a region.
– Change resolution.
Subregion. Select the region associated with the crowd that you want to edit. Default: populate.
i When you edit regions, it can be helpful to use the various visibility options to focus on the region you want to edit. For general region visibility, use options on the View Settings:Visibility page. For details, please see Section 2.8, “Hiding and Displaying Objects,” in DI-Guy Scenario Users Guide.
For specific regions, manage visibility on the DI-Guy AI Objects:Region page. For details, please see “Editing and Visualizing Regions,” on page 6-15.
To hide scenario geometry, clear the Visible check box on the Scenario Objects:Scene Object page.
DI-Guy AI Users Guide 6-7
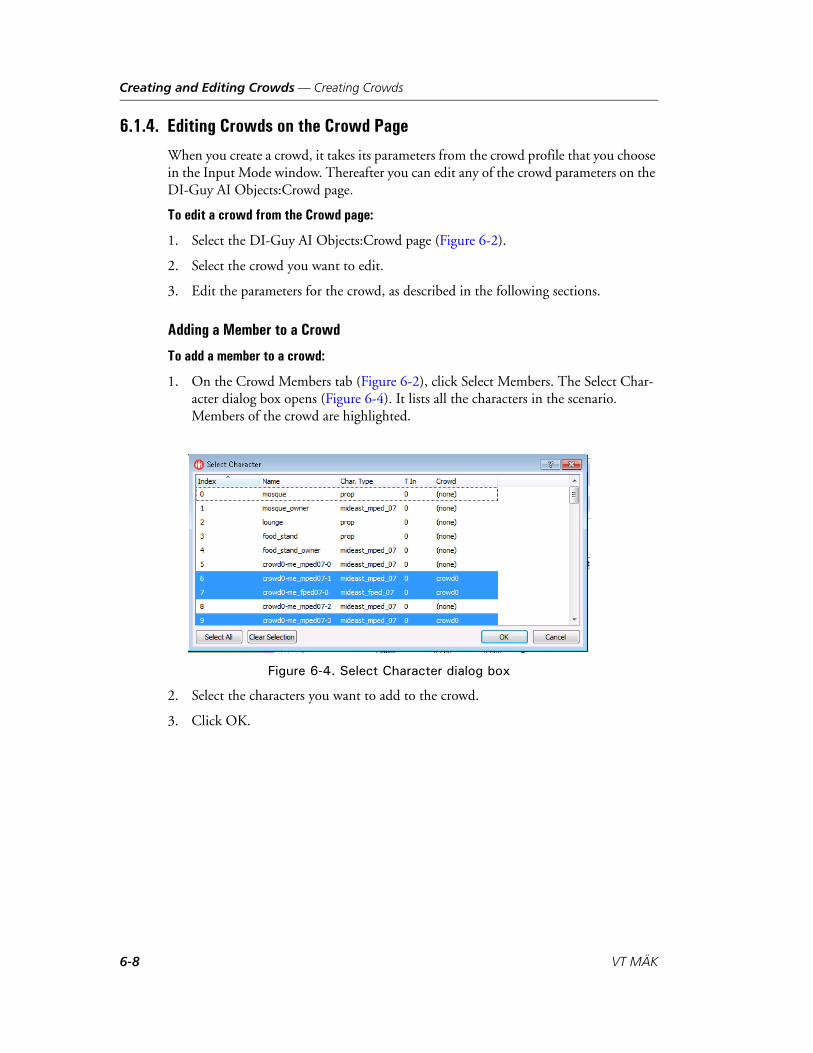
Creating and Editing Crowds — Creating Crowds
6.1.4. Editing Crowds on the Crowd Page
When you create a crowd, it takes its parameters from the crowd profile that you choose in the Input Mode window. Thereafter you can edit any of the crowd parameters on the DI-Guy AI Objects:Crowd page.
To edit a crowd from the Crowd page:
1. Select the DI-Guy AI Objects:Crowd page (Figure 6-2).
2. Select the crowd you want to edit.
3. Edit the parameters for the crowd, as described in the following sections.
Adding a Member to a Crowd
To add a member to a crowd:
1. On the Crowd Members tab (Figure 6-2), click Select Members. The Select Char-acter dialog box opens (Figure 6-4). It lists all the characters in the scenario. Members of the crowd are highlighted.
Figure 6-4. Select Character dialog box
2. Select the characters you want to add to the crowd.
3. Click OK.
6-8 VT MÄK
Creating and Editing Crowds — Creating Crowds
Removing Members from a Crowd
You can remove individual members of a crowd or all of them at once. Removing a member from a crowd does not remove it from the scenario. The agent becomes an individual character.
To remove a member from a crowd:
1. In the list of crowd members on the Crowd Members tab (Figure 6-2), select the member you want to remove.
2. Click Remove Member.
To remove all members of a crowd, click Remove All.
Focusing the Camera on a Crowd Member
To focus the camera on a crowd member:
1. In the list of crowd members on the Crowd Members tab, select the member you want to look at.
2. Click Look At Member.
Crowd Members Tab
The Crowd Members tab (Figure 6-2) lets you add and remove members, look at specific members, and modify the behaviors being used by all, some, or individual members of the crowd. Procedures for adding and removing members are in previous sections. Descriptions of the Agent Parameters that you can edit are in “Crowd Member Agent Parameters,” on page 6-20. These parameters are shared by the Crowd Profile and Crowd pages, and are therefore described in their own section.
Selecting the Crowd Member to Apply Agent Parameter Changes To
When you edit a crowd’s agent parameters, you can specify which members the changes apply to, as follows:
Selected Member Only. Only the member selected in the member list is affected by changes to the parameters.
All Members. Edits are applied to all members of the crowd.
All Members of Same Type. Edits are applied to members of the class that share the same DI-Guy character type as the member selected in the member list.
All Members of Same Class. This is an experimental classification that divides DI-Guy characters into major classification classes such as vehicles or people.
Read Params from Profile. Applies the parameters of a selected profile to the selected members.
DI-Guy AI Users Guide 6-9
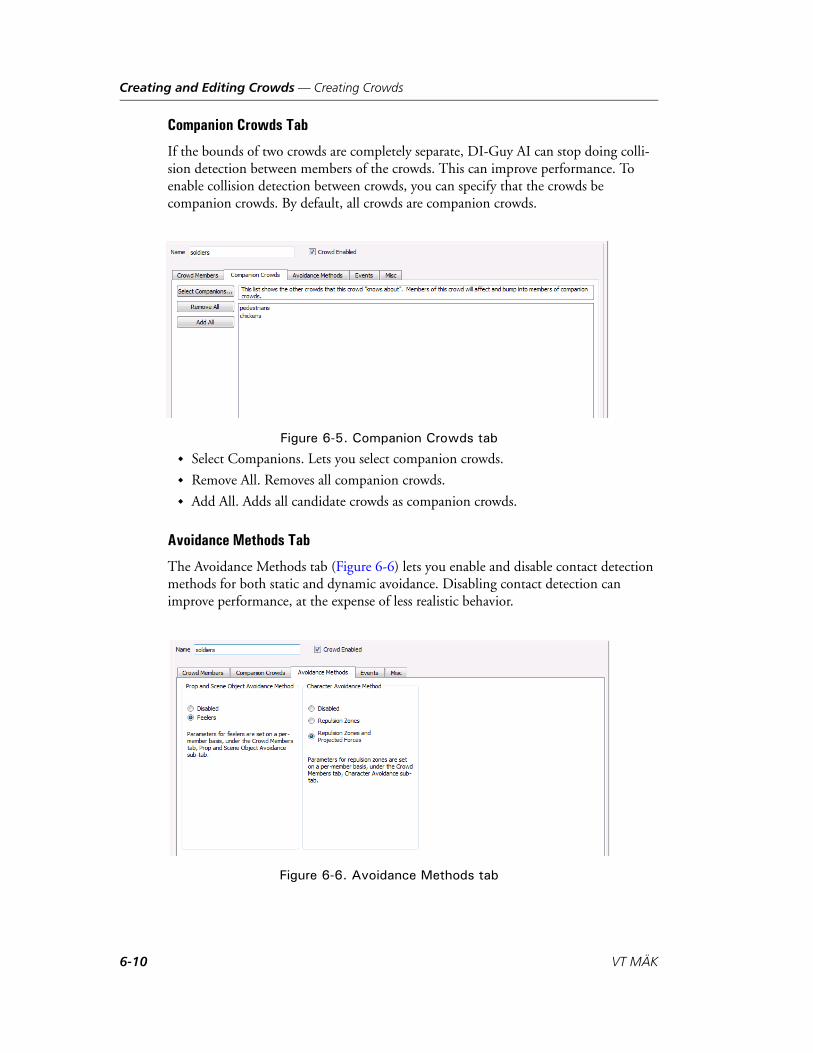
Creating and Editing Crowds — Creating Crowds
Companion Crowds Tab
If the bounds of two crowds are completely separate, DI-Guy AI can stop doing colli-sion detection between members of the crowds. This can improve performance. To enable collision detection between crowds, you can specify that the crowds be companion crowds. By default, all crowds are companion crowds.
Figure 6-5. Companion Crowds tab
Select Companions. Lets you select companion crowds.
Remove All. Removes all companion crowds.
Add All. Adds all candidate crowds as companion crowds.
Avoidance Methods Tab
The Avoidance Methods tab (Figure 6-6) lets you enable and disable contact detection methods for both static and dynamic avoidance. Disabling contact detection can improve performance, at the expense of less realistic behavior.
Figure 6-6. Avoidance Methods tab
6-10 VT MÄK
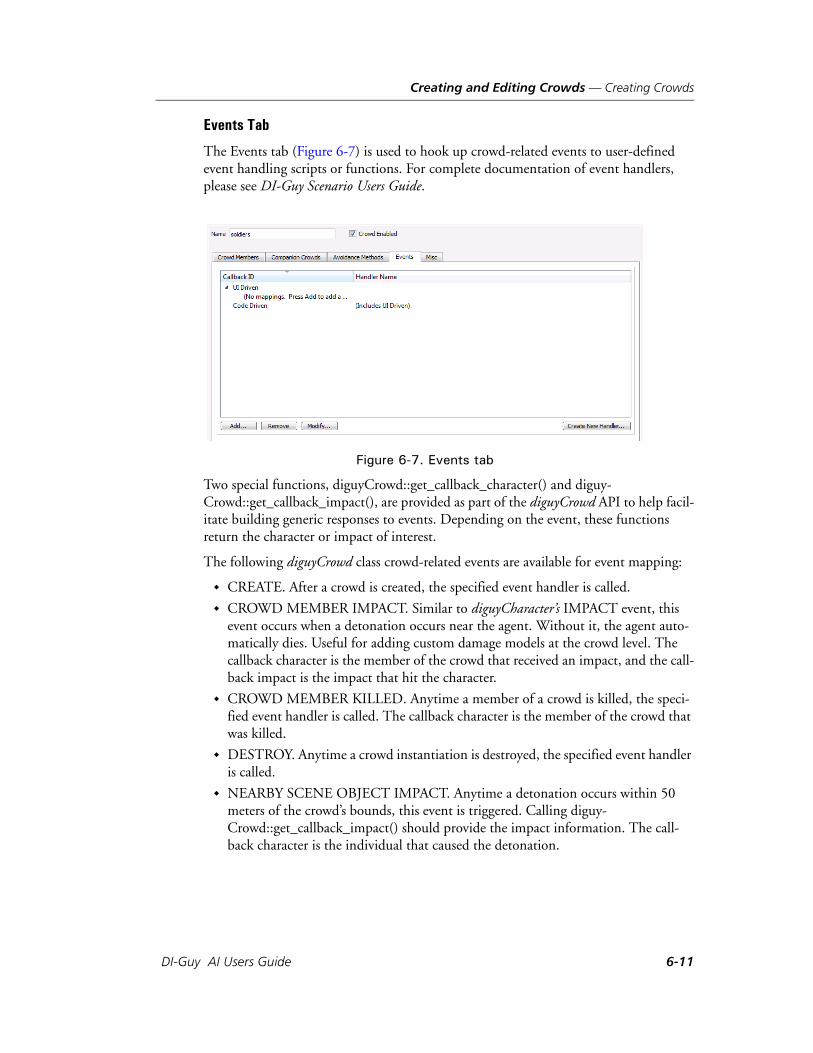
Creating and Editing Crowds — Creating Crowds
Events Tab
The Events tab (Figure 6-7) is used to hook up crowd-related events to user-defined event handling scripts or functions. For complete documentation of event handlers, please see DI-Guy Scenario Users Guide.
Figure 6-7. Events tab
Two special functions, diguyCrowd::get_callback_character() and diguy-Crowd::get_callback_impact(), are provided as part of the diguyCrowd API to help facil-itate building generic responses to events. Depending on the event, these functions return the character or impact of interest.
The following diguyCrowd class crowd-related events are available for event mapping:
CREATE. After a crowd is created, the specified event handler is called.
CROWD MEMBER IMPACT. Similar to diguyCharacter’s IMPACT event, this event occurs when a detonation occurs near the agent. Without it, the agent auto-matically dies. Useful for adding custom damage models at the crowd level. The callback character is the member of the crowd that received an impact, and the call-back impact is the impact that hit the character.
CROWD MEMBER KILLED. Anytime a member of a crowd is killed, the speci-fied event handler is called. The callback character is the member of the crowd that was killed.
DESTROY. Anytime a crowd instantiation is destroyed, the specified event handler is called.
NEARBY SCENE OBJECT IMPACT. Anytime a detonation occurs within 50 meters of the crowd’s bounds, this event is triggered. Calling diguy-Crowd::get_callback_impact() should provide the impact information. The call-back character is the individual that caused the detonation.
DI-Guy AI Users Guide 6-11
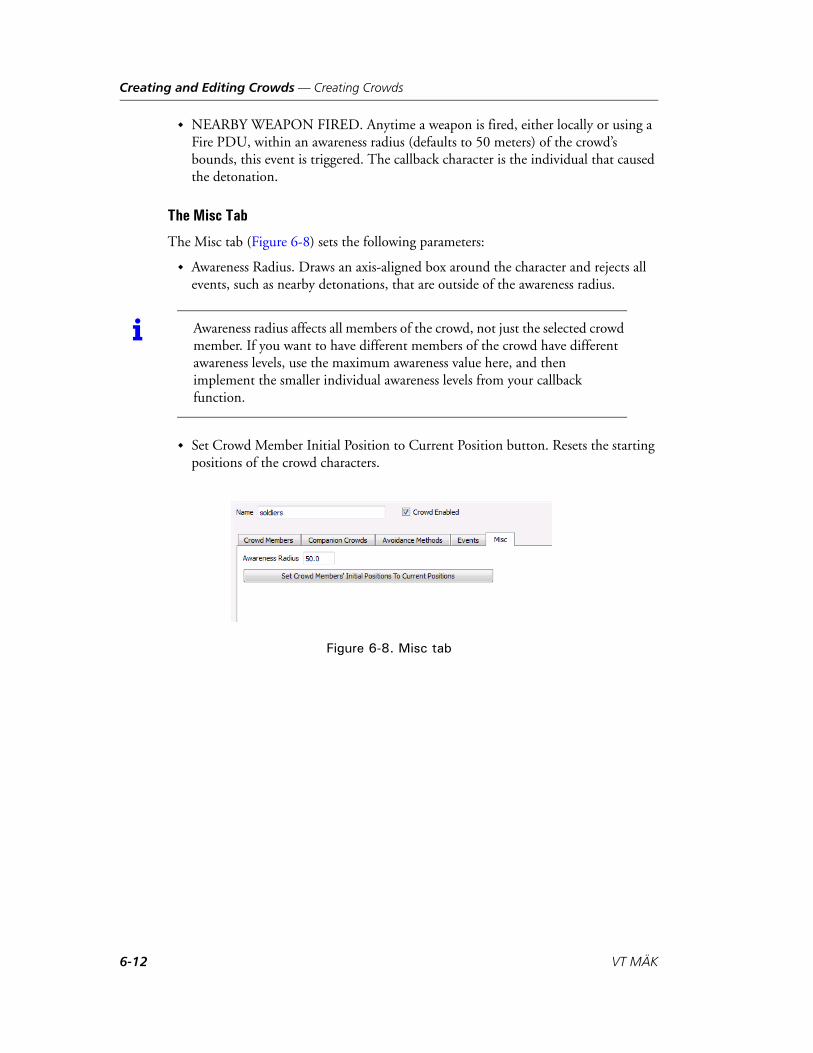
Creating and Editing Crowds — Creating Crowds
NEARBY WEAPON FIRED. Anytime a weapon is fired, either locally or using a Fire PDU, within an awareness radius (defaults to 50 meters) of the crowd’s bounds, this event is triggered. The callback character is the individual that caused the detonation.
The Misc Tab
The Misc tab (Figure 6-8) sets the following parameters:
Awareness Radius. Draws an axis-aligned box around the character and rejects all events, such as nearby detonations, that are outside of the awareness radius.
Set Crowd Member Initial Position to Current Position button. Resets the starting positions of the crowd characters.
Figure 6-8. Misc tab
i Awareness radius affects all members of the crowd, not just the selected crowd member. If you want to have different members of the crowd have different awareness levels, use the maximum awareness value here, and then implement the smaller individual awareness levels from your callback function.
6-12 VT MÄK
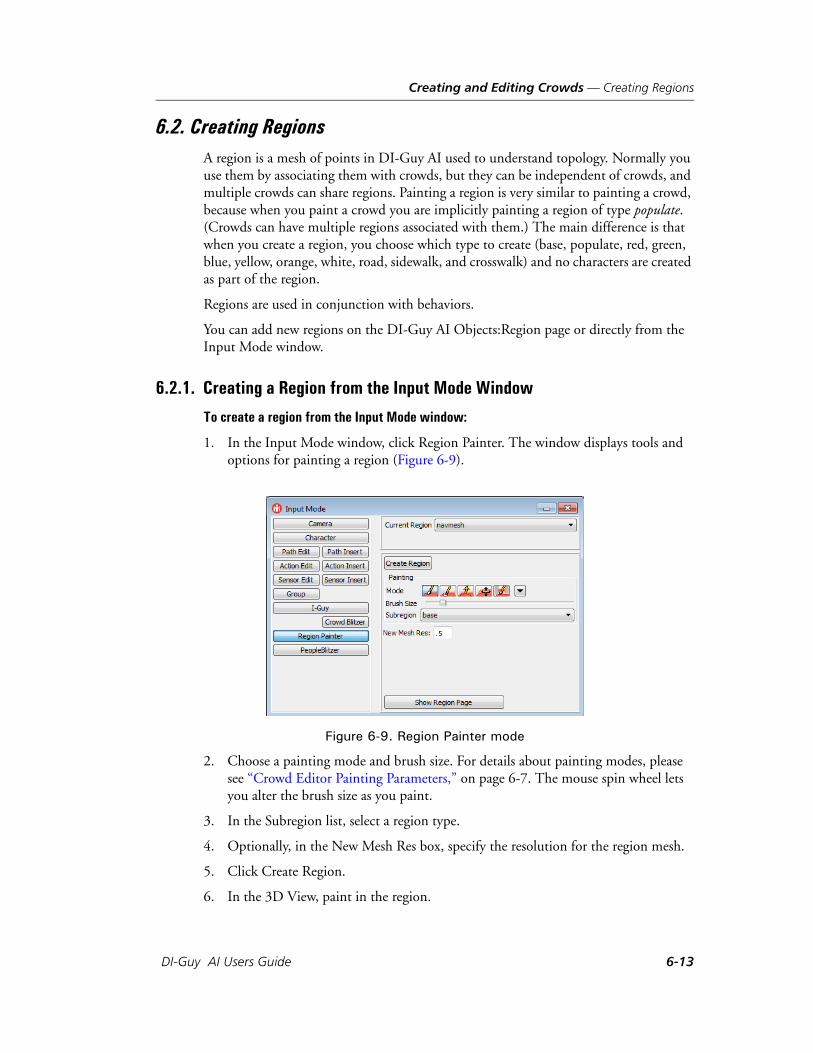
Creating and Editing Crowds — Creating Regions
6.2. Creating RegionsA region is a mesh of points in DI-Guy AI used to understand topology. Normally you use them by associating them with crowds, but they can be independent of crowds, and multiple crowds can share regions. Painting a region is very similar to painting a crowd, because when you paint a crowd you are implicitly painting a region of type populate. (Crowds can have multiple regions associated with them.) The main difference is that when you create a region, you choose which type to create (base, populate, red, green, blue, yellow, orange, white, road, sidewalk, and crosswalk) and no characters are created as part of the region.
Regions are used in conjunction with behaviors.
You can add new regions on the DI-Guy AI Objects:Region page or directly from the Input Mode window.
6.2.1. Creating a Region from the Input Mode Window
To create a region from the Input Mode window:
1. In the Input Mode window, click Region Painter. The window displays tools and options for painting a region (Figure 6-9).
Figure 6-9. Region Painter mode
2. Choose a painting mode and brush size. For details about painting modes, please see “Crowd Editor Painting Parameters,” on page 6-7. The mouse spin wheel lets you alter the brush size as you paint.
3. In the Subregion list, select a region type.
4. Optionally, in the New Mesh Res box, specify the resolution for the region mesh.
5. Click Create Region.
6. In the 3D View, paint in the region.
DI-Guy AI Users Guide 6-13
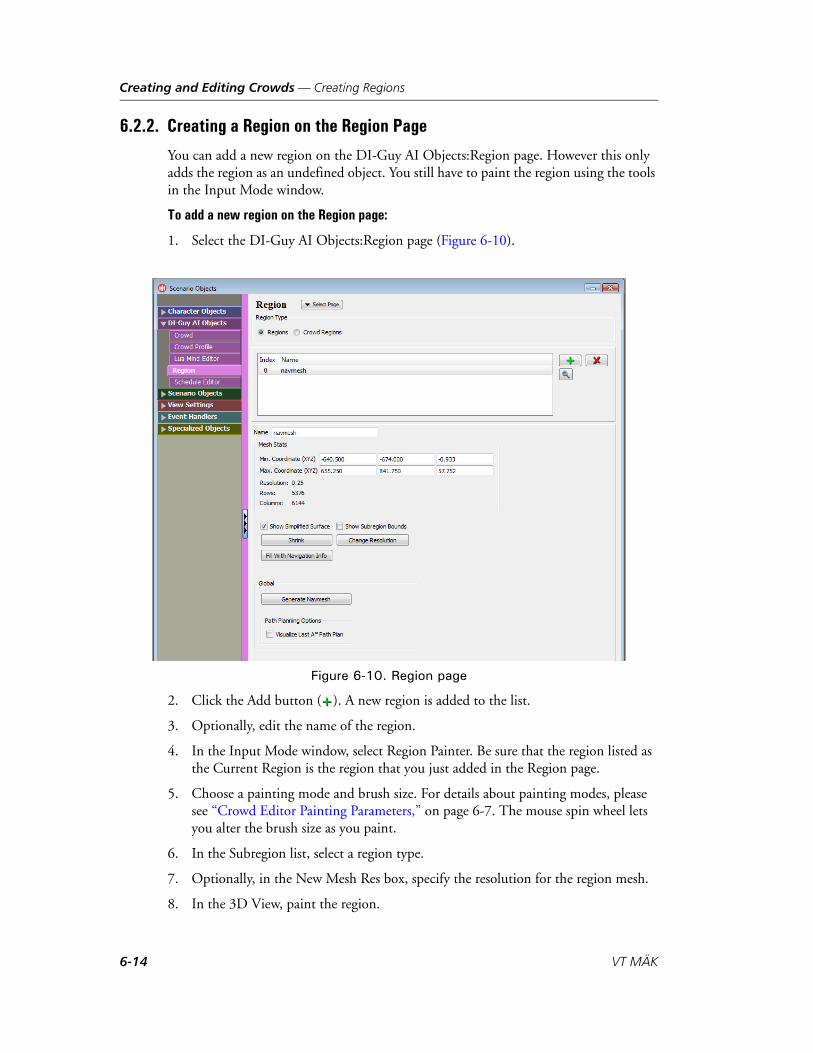
Creating and Editing Crowds — Creating Regions
6.2.2. Creating a Region on the Region Page
You can add a new region on the DI-Guy AI Objects:Region page. However this only adds the region as an undefined object. You still have to paint the region using the tools in the Input Mode window.
To add a new region on the Region page:
1. Select the DI-Guy AI Objects:Region page (Figure 6-10).
Figure 6-10. Region page
2. Click the Add button ( ). A new region is added to the list.
3. Optionally, edit the name of the region.
4. In the Input Mode window, select Region Painter. Be sure that the region listed as the Current Region is the region that you just added in the Region page.
5. Choose a painting mode and brush size. For details about painting modes, please see “Crowd Editor Painting Parameters,” on page 6-7. The mouse spin wheel lets you alter the brush size as you paint.
6. In the Subregion list, select a region type.
7. Optionally, in the New Mesh Res box, specify the resolution for the region mesh.
8. In the 3D View, paint the region.
6-14 VT MÄK
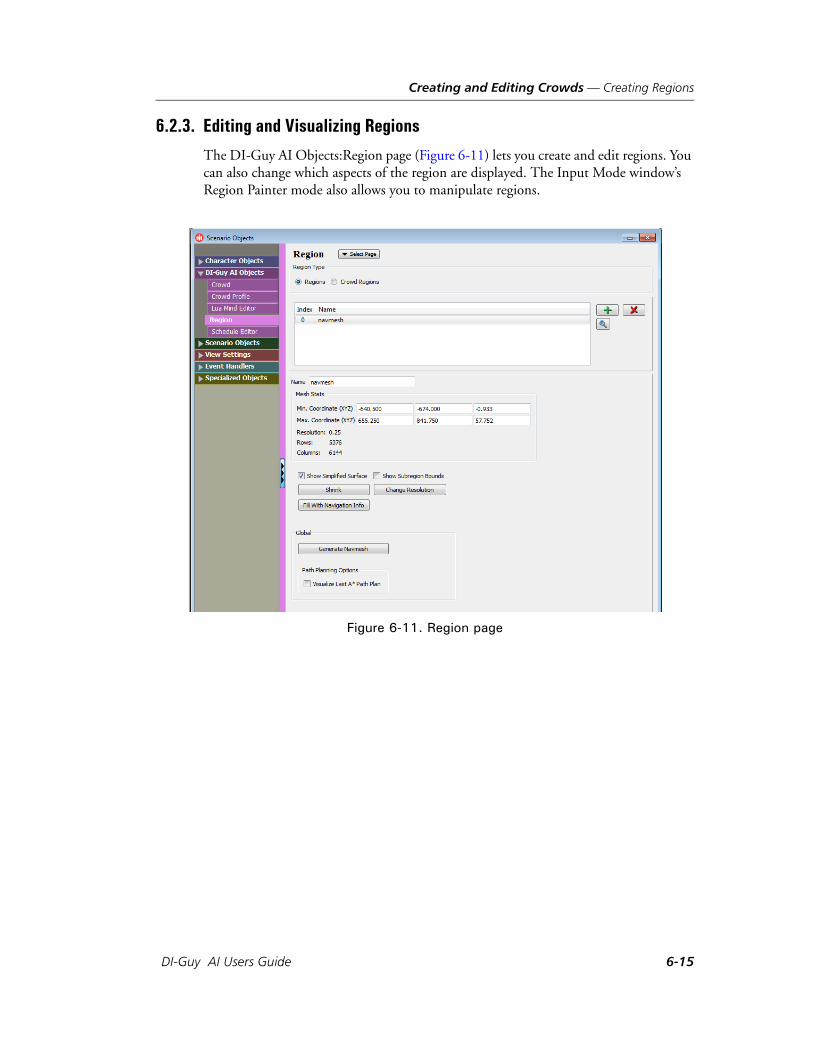
Creating and Editing Crowds — Creating Regions
6.2.3. Editing and Visualizing Regions
The DI-Guy AI Objects:Region page (Figure 6-11) lets you create and edit regions. You can also change which aspects of the region are displayed. The Input Mode window’s Region Painter mode also allows you to manipulate regions.
Figure 6-11. Region page
DI-Guy AI Users Guide 6-15
Creating and Editing Crowds — Creating and Editing Crowd Profiles
The Region page has the following parameters:
Region Type. Specifies the type of region to show in the region list. Crowd regions are regions associated with a specific crowd. Plain regions are more global in nature.
Mesh Stats. Review the mesh statistics in order to manage complexity versus perfor-mance.
– Min/Max Coordinates. Values of the extents of the region.
– Resolution. Mesh points per meter (read only).
– Rows. Number of rows in the mesh (read only).
– Columns. Number of columns in the mesh (read only).
Shrink. Shrink the region. Fits the region to the extents of the subregions that compose it.
Show Simplified Surface. If cleared, shows a grid on the terrain. If selected, hides the grid.
Show Subregion Bounds. If selected, shows the boundaries of subregions. If there are no subregions, shows the bounds of the entire region.
Fill with Navigation Info. You can create a small navmesh by clicking on the corners of a rectangle. DI-Guy fills in the rectangle with a navmesh.
Generate Navmesh. Force the generation of a navmesh region, which will be used by agents for smart navigation using A * path planning. Do not use if you already have a navmesh.
Visualize last A * Path Plan. Display in the 3D View the most recently generated path as provided by the navmesh and A* algorithm.
You can enable and disable the display of regions on the View Settings:Visibility page.
6.3. Creating and Editing Crowd ProfilesA crowd profile is a basic crowd description that is used as a template when crowd blitzing. DI-Guy supplies some default crowd profiles, but you will probably want to create your own crowd profiles so that you can quickly populate your world with crowds of DI-Guy agents that have the exact look and behavior you want.
6-16 VT MÄK
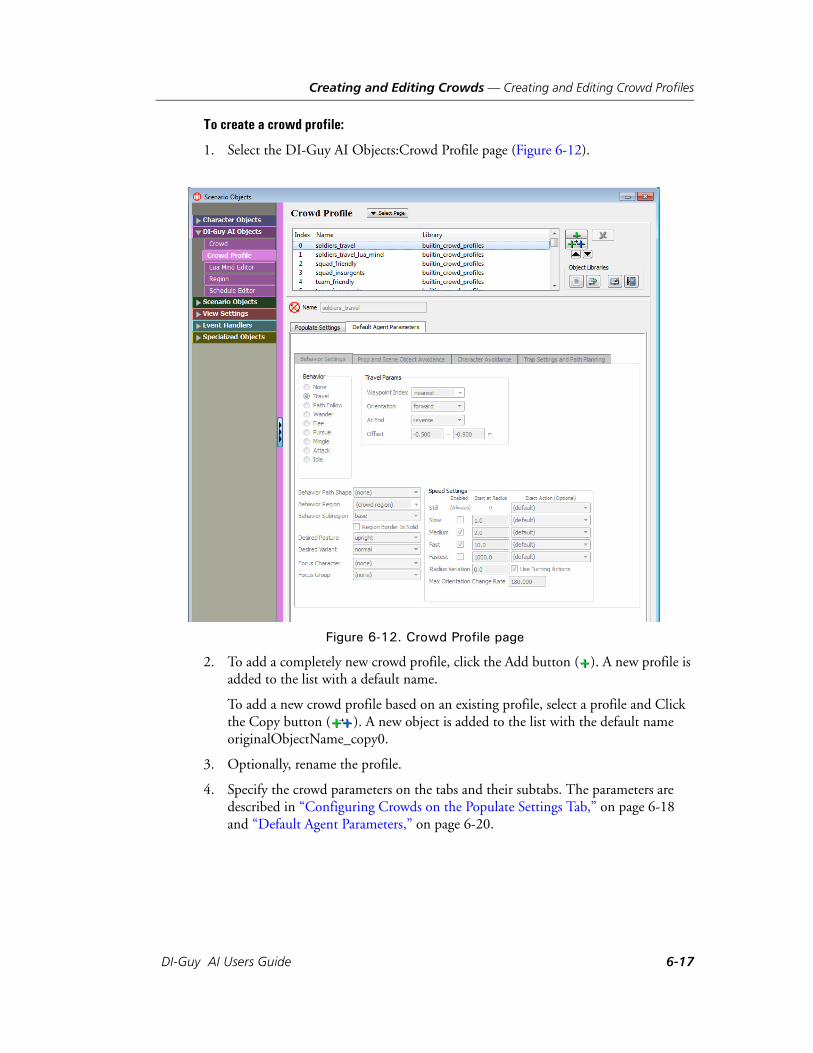
Creating and Editing Crowds — Creating and Editing Crowd Profiles
To create a crowd profile:
1. Select the DI-Guy AI Objects:Crowd Profile page (Figure 6-12).
Figure 6-12. Crowd Profile page
2. To add a completely new crowd profile, click the Add button ( ). A new profile is added to the list with a default name.
To add a new crowd profile based on an existing profile, select a profile and Click the Copy button ( ). A new object is added to the list with the default name originalObjectName_copy0.
3. Optionally, rename the profile.
4. Specify the crowd parameters on the tabs and their subtabs. The parameters are described in “Configuring Crowds on the Populate Settings Tab,” on page 6-18 and “Default Agent Parameters,” on page 6-20.
DI-Guy AI Users Guide 6-17
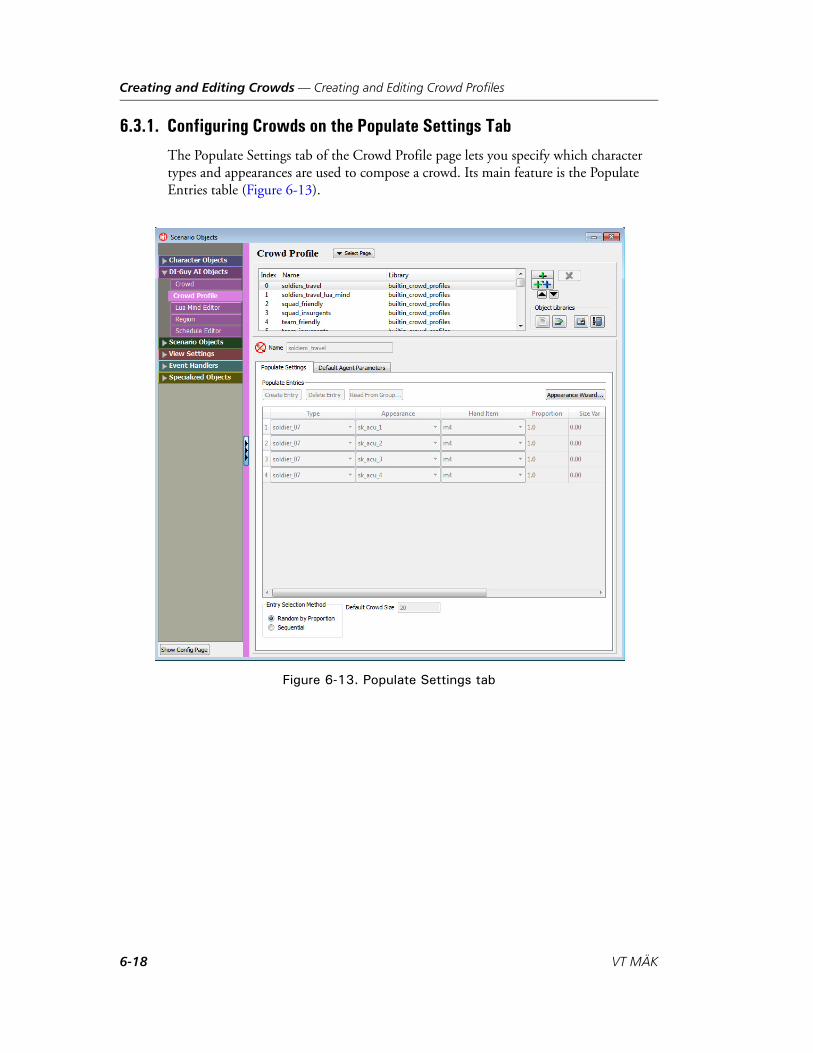
Creating and Editing Crowds — Creating and Editing Crowd Profiles
6.3.1. Configuring Crowds on the Populate Settings Tab
The Populate Settings tab of the Crowd Profile page lets you specify which character types and appearances are used to compose a crowd. Its main feature is the Populate Entries table (Figure 6-13).
Figure 6-13. Populate Settings tab
6-18 VT MÄK
Creating and Editing Crowds — Creating and Editing Crowd Profiles
The Populate Entries Table
Each row in the Populate Entries table specifies a character type that will be part of a crowd that gets created using this profile. You cannot edit the Populate Entries table for built-in profiles. You can add new profiles, to which you can add and delete entries. You can copy a built-in profile to the scenario and edit it. For details about object libraries and copying objects into a scenario, please see Section 2.7.6, “Sharing Libraries Among Scenarios,” in DI-Guy Scenario Users Guide.
Each table entry has the following data fields:
Type. The DI-Guy character type of the agent.
Appearance. The appearance of the agent.
Hand Item. The agent’s hand item, if applicable.
Proportion. The relative proportion of this character to add to the crowd.
When a crowd is blitzed in, each entry is blitzed in according to its proportion. The proportions do not have to add up to a particular number (for example 100%). They are relative to the other proportions. DI-Guy AI sums the total of all the proportions, and then populates based on the fractional amount each proportion is of the entire sum. For example, suppose table entries 1, 2, and 3 have a proportion of 1 and entry 4 has a proportion of 2. The sum of the proportions is 5. So for every 5 agents that get added to a crowd, there will be one each of entries 1, 2, and 3, and 2 of entry 4.
This allows different ratios of characters to be created when generating a crowd. For example, in most groups of pedestrians, the relative number of people who use wheelchairs is smaller than the walking public. In this case, the proportion of the wheelchair entry should be a small number compared to other entries’ proportions.
Size Var. A percentage by which to scale the characters.
Randomize. If the character type has multiple heads, randomly assign the heads to the characters.
Mind Class. Specifies whether there is an DI-Guy AI mind associated with the entry.
arg1, arg 2. Optional argument fields to the mind class.
Besides adding and deleting rows, you can add entries as follows:
Read from Group. This button brings up a dialog box hat lets you surf through the DI-Guy Groups in your scenario, and create an entry corresponding to a member character in that group.
Appearance Wizard. Use this button to assist with determining character types and appearances for your entry. The wizard lets you enter descriptions of characters and returns ranked suggestions for which character type and appearance to apply.
DI-Guy AI Users Guide 6-19
Creating and Editing Crowds — Crowd Member Agent Parameters
Entry Selection Method
These options let you select how the Populate Entries table is used by the Crowd Blitzer.
Random by Proportion. The members of your crowd use the proportions as a guideline, but mix up the order of the entries.
Sequential. The members of your crowd are created in the same order and propor-tion as they are listed in the Populate Entries table.
Default Crowd Size
The number of entities a crowd has when using this crowd profile.
6.3.2. Default Agent Parameters
Please see “Crowd Member Agent Parameters,” on page 6-20, for a full description of the Crowd Member Parameters section. These parameters are shared by the Crowd Profile and Crowd pages, and are therefore described in their own section.
6.3.3. Sharing Profiles Between Scenarios
DI-Guy object libraries let you share scenario objects among scenarios. This includes sharing profiles. For details about managing object libraries, please see “Sharing Libraries Among Scenarios,” on page 2-20, in DI-Guy Scenario Users Guide.
6.4. Crowd Member Agent ParametersThe Default Agent Parameters tab on the DI-Guy AI Objects:Crowd Profile page has the same set of tabs as the Agent Parameters section of the Crowd Members tab on the DI-Guy AI Objects:Crowd page. The settings on the Crowd Profile page are applied as default values for crowds when they are blitzed in. The Crowd page lets you edit these parameters for the selected members of the selected crowd.
Crowd member parameters are arranged on four tabs.
6.4.1. The Behavior Settings Tab
The Behavior Settings tab (Figure 6-14) defines the overall behavior of the selected crowd members. It is strongly recommended that you refer to “Agents and Behaviors,” on page 2-5 for conceptual background.
6-20 VT MÄK

Creating and Editing Crowds — Crowd Member Agent Parameters
Figure 6-14. Behavior Settings tab
The tab’s content changes based on the behavior selected. The following fields are common to all the behaviors:
Behavior Path Shape. For behaviors that use a path shape, the particular path shape to use.
Behavior Region. The overall region with which the selected crowd member is asso-ciated. This rarely needs to be changed.
Behavior Subregion. Refine your behavior with the subregions. The Region Border is Solid check box determines how rigidly to apply the borders of the region when trying to contain where the agents are allowed to move.
Desired Posture. Request a particular posture for the selected crowd member. Typical options are upright, crouched, or prone.
Desired Variant. Request a particular mental or emotional state when the behavior queries the agent’s underlying DI-Guy character action table for a still or locomo-tive action.
Focus Character. For actions that can have a focus, sets the character.
Focus Group. Focus on a particular group, such as net_friendly, net_neutral, or net_hostile.
Speed Settings. Define speed zones and radii for your agent, as well as any Exact Action overrides. Please see “Travel Behavior,” on page 2-6 for descriptions of the Speed Settings and how they work. A radius variation lets you control how uniform the radii are applied. The Max Orientation Change Rate lets you control how quickly a character can turn, which is useful when working with vehicles and animals.
DI-Guy AI Users Guide 6-21
Creating and Editing Crowds — Crowd Member Agent Parameters
Behavior Settings Descriptions
The Behavior group box lets you select the behavior for the crowd. Each behavior has its own set of parameters (or none):
None. No behavior specified. None is a useful behavior because it allows other behaviors, such as those based on paths, to be expressed or commanded directly using the DI-Guy API. When transitioning from another base behavior to None, the character is commanded to stop.
Travel. Characters follow a behavior path shape. This is one of the most useful behaviors, and is perfect for when you want to create character traffic.
The Behavior Path Shape shows the path shape that the crowd uses as a topology guide. The Travel Params group box lets you select:
– Waypoint Index. Nearest, random, or a value from 1 to 20.
– Orientation. The direction of motion (forward, backward)
– At End. What to do when you reach the end of the path shape (reverse, loop, start, or teleport).
– Offset. The allowable offset that characters can drift to the left or right of the path shape.
Path Follow. Characters follow a path, performing actions as designated by action beads on that path.
– Pause Path Time Outside Path Behavior. If selected, when an agent is put into a new behavior, such as flee, it rejoins the path where it left off. If cleared it rejoins the path where it would have been if it had never left the path.
– Unpause Path Time. Indicates when time should advance, assuming the pause path time is selected.
– Position Look-ahead Distance.
Wander. Characters perform their still action, then choose a random point in the region, move to that new point while avoiding other characters and obstacles, and then perform the still action again.
– Move on Interval Min and Move on Interval Max. The number of seconds that the character should perform the still action before picking a new point in the region.
– Allow Desired Orientation Change. Allow orientation changes and/or turning actions.
– Max Dist to Wander. Sets a limit on how far a character moves before performing another still action.
Flee. Characters run away from a particular point, character, or group. This is usually used when fleeing from explosions, enemy characters, or other dangers. To trigger the flee behavior from the API, use diguyCharacter::agent_flee_(char-acter/location/group).
Pursue. Characters follow the focus character or characters from the focus group.
6-22 VT MÄK
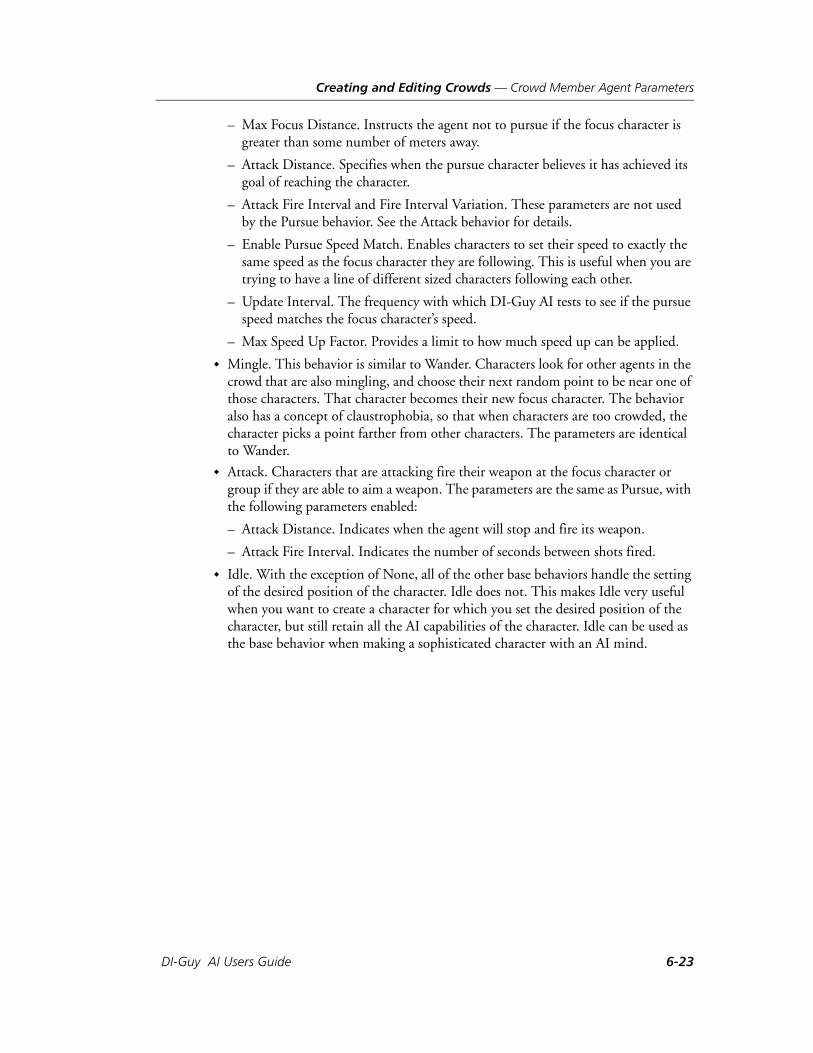
Creating and Editing Crowds — Crowd Member Agent Parameters
– Max Focus Distance. Instructs the agent not to pursue if the focus character is greater than some number of meters away.
– Attack Distance. Specifies when the pursue character believes it has achieved its goal of reaching the character.
– Attack Fire Interval and Fire Interval Variation. These parameters are not used by the Pursue behavior. See the Attack behavior for details.
– Enable Pursue Speed Match. Enables characters to set their speed to exactly the same speed as the focus character they are following. This is useful when you are trying to have a line of different sized characters following each other.
– Update Interval. The frequency with which DI-Guy AI tests to see if the pursue speed matches the focus character’s speed.
– Max Speed Up Factor. Provides a limit to how much speed up can be applied.
Mingle. This behavior is similar to Wander. Characters look for other agents in the crowd that are also mingling, and choose their next random point to be near one of those characters. That character becomes their new focus character. The behavior also has a concept of claustrophobia, so that when characters are too crowded, the character picks a point farther from other characters. The parameters are identical to Wander.
Attack. Characters that are attacking fire their weapon at the focus character or group if they are able to aim a weapon. The parameters are the same as Pursue, with the following parameters enabled:
– Attack Distance. Indicates when the agent will stop and fire its weapon.
– Attack Fire Interval. Indicates the number of seconds between shots fired.
Idle. With the exception of None, all of the other base behaviors handle the setting of the desired position of the character. Idle does not. This makes Idle very useful when you want to create a character for which you set the desired position of the character, but still retain all the AI capabilities of the character. Idle can be used as the base behavior when making a sophisticated character with an AI mind.
DI-Guy AI Users Guide 6-23
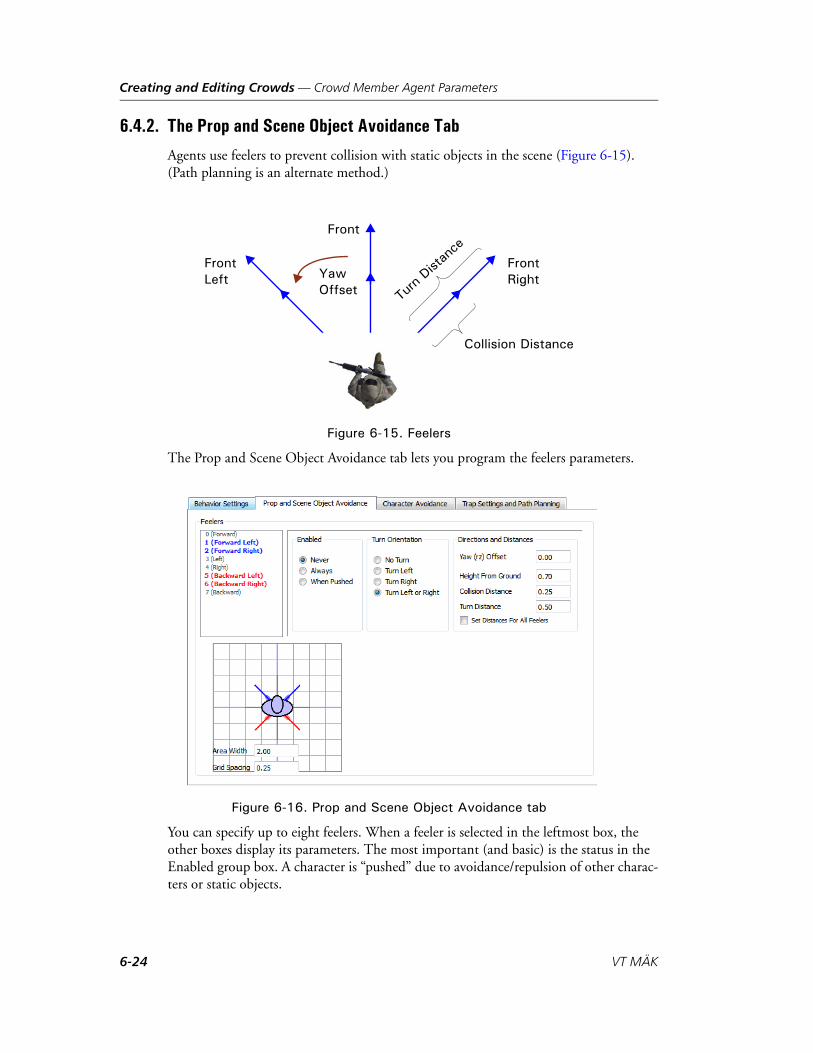
Creating and Editing Crowds — Crowd Member Agent Parameters
6.4.2. The Prop and Scene Object Avoidance Tab
Agents use feelers to prevent collision with static objects in the scene (Figure 6-15). (Path planning is an alternate method.)
Figure 6-15. Feelers
The Prop and Scene Object Avoidance tab lets you program the feelers parameters.
Figure 6-16. Prop and Scene Object Avoidance tab
You can specify up to eight feelers. When a feeler is selected in the leftmost box, the other boxes display its parameters. The most important (and basic) is the status in the Enabled group box. A character is “pushed” due to avoidance/repulsion of other charac-ters or static objects.
FrontLeft
FrontRight
Front
Offset Turn
Dist
ance
Collision Distance
Yaw
6-24 VT MÄK

Creating and Editing Crowds — Crowd Member Agent Parameters
The Turn Orientation indicates which direction to turn the character when a collision to that feeler is detected.
The Directions and Distances group box specifies the following parameters:
Yaw Offset. Indicates the angle (0 is forward, 90 is pointing left, and so on).
Height From Ground. Specifies the height of the feeler and its length.
Collision Distance and Turn Distance. Specifies when the character needs to turn and when he needs to take more evasive action to avoid a collision.
Please see “Feeler Static Avoidance,” on page 2-20 for a description of how feelers work.
DI-Guy AI Users Guide 6-25
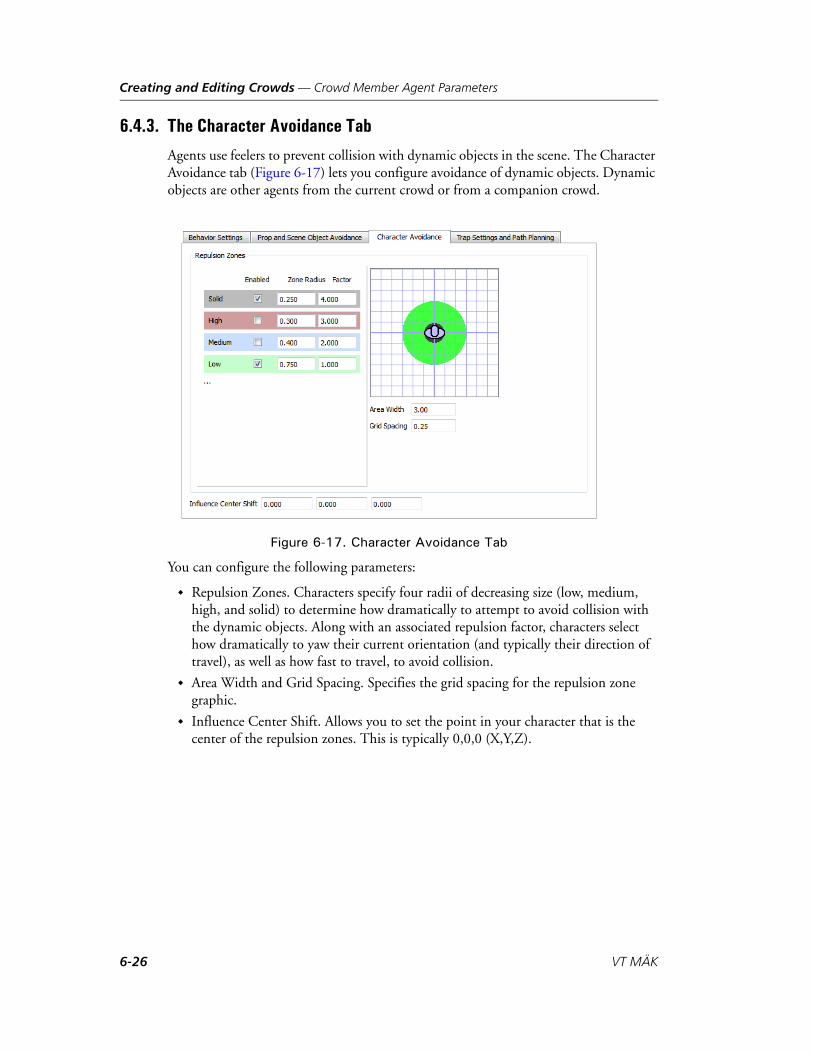
Creating and Editing Crowds — Crowd Member Agent Parameters
6.4.3. The Character Avoidance Tab
Agents use feelers to prevent collision with dynamic objects in the scene. The Character Avoidance tab (Figure 6-17) lets you configure avoidance of dynamic objects. Dynamic objects are other agents from the current crowd or from a companion crowd.
Figure 6-17. Character Avoidance Tab
You can configure the following parameters:
Repulsion Zones. Characters specify four radii of decreasing size (low, medium, high, and solid) to determine how dramatically to attempt to avoid collision with the dynamic objects. Along with an associated repulsion factor, characters select how dramatically to yaw their current orientation (and typically their direction of travel), as well as how fast to travel, to avoid collision.
Area Width and Grid Spacing. Specifies the grid spacing for the repulsion zone graphic.
Influence Center Shift. Allows you to set the point in your character that is the center of the repulsion zones. This is typically 0,0,0 (X,Y,Z).
6-26 VT MÄK
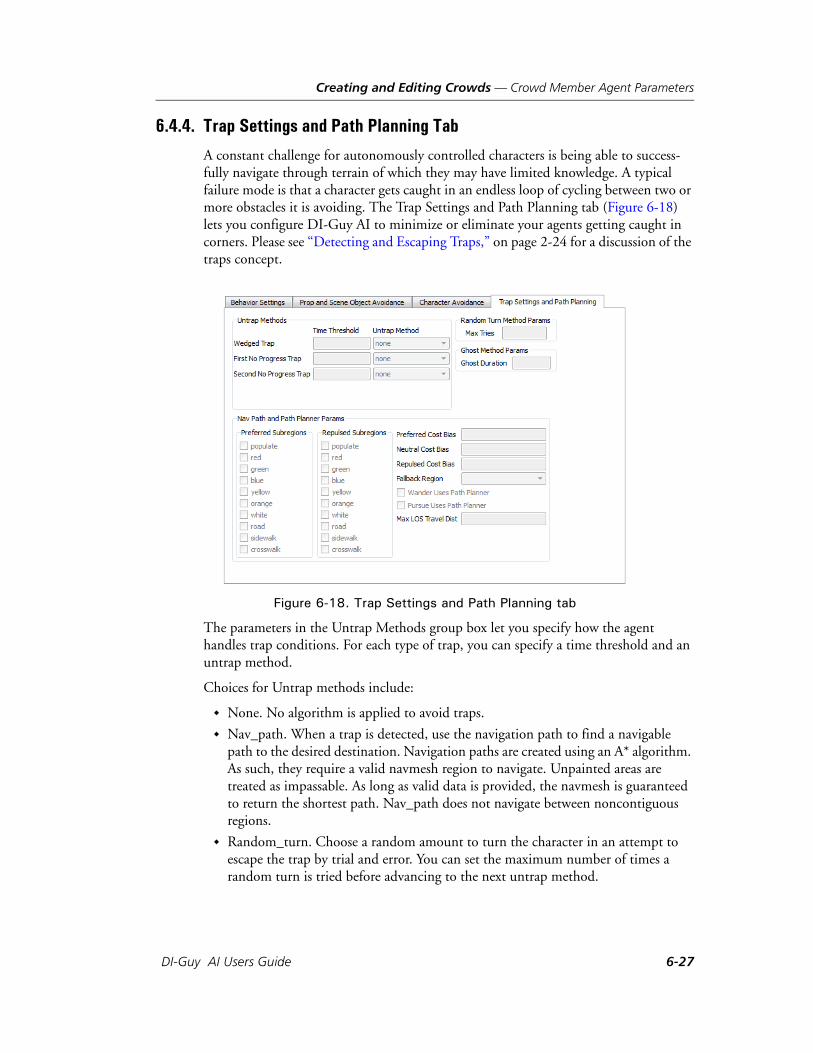
Creating and Editing Crowds — Crowd Member Agent Parameters
6.4.4. Trap Settings and Path Planning Tab
A constant challenge for autonomously controlled characters is being able to success-fully navigate through terrain of which they may have limited knowledge. A typical failure mode is that a character gets caught in an endless loop of cycling between two or more obstacles it is avoiding. The Trap Settings and Path Planning tab (Figure 6-18) lets you configure DI-Guy AI to minimize or eliminate your agents getting caught in corners. Please see “Detecting and Escaping Traps,” on page 2-24 for a discussion of the traps concept.
Figure 6-18. Trap Settings and Path Planning tab
The parameters in the Untrap Methods group box let you specify how the agent handles trap conditions. For each type of trap, you can specify a time threshold and an untrap method.
Choices for Untrap methods include:
None. No algorithm is applied to avoid traps.
Nav_path. When a trap is detected, use the navigation path to find a navigable path to the desired destination. Navigation paths are created using an A* algorithm. As such, they require a valid navmesh region to navigate. Unpainted areas are treated as impassable. As long as valid data is provided, the navmesh is guaranteed to return the shortest path. Nav_path does not navigate between noncontiguous regions.
Random_turn. Choose a random amount to turn the character in an attempt to escape the trap by trial and error. You can set the maximum number of times a random turn is tried before advancing to the next untrap method.
DI-Guy AI Users Guide 6-27

Creating and Editing Crowds — Crowd Member Agent Parameters
Ghost. Allows the character to temporarily pass through a wall or other obstacle in an attempt to escape the trap. You can set how long the character turns off collision detection when ghosting through the wall.
Teleport. The character teleports (jumps immediately to a new location) to evade the trap.
Stop moving. Switch to the still action and make no attempt to escape the trap.
6-28 VT MÄK
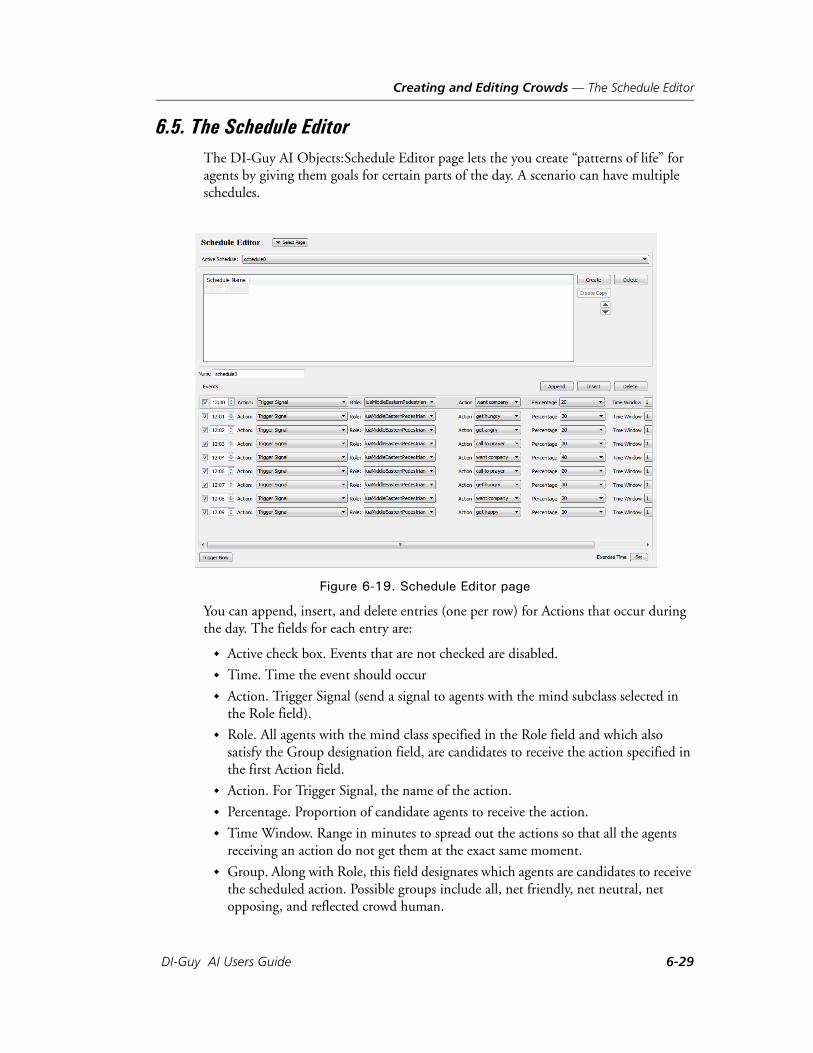
Creating and Editing Crowds — The Schedule Editor
6.5. The Schedule EditorThe DI-Guy AI Objects:Schedule Editor page lets the you create “patterns of life” for agents by giving them goals for certain parts of the day. A scenario can have multiple schedules.
Figure 6-19. Schedule Editor page
You can append, insert, and delete entries (one per row) for Actions that occur during the day. The fields for each entry are:
Active check box. Events that are not checked are disabled.
Time. Time the event should occur
Action. Trigger Signal (send a signal to agents with the mind subclass selected in the Role field).
Role. All agents with the mind class specified in the Role field and which also satisfy the Group designation field, are candidates to receive the action specified in the first Action field.
Action. For Trigger Signal, the name of the action.
Percentage. Proportion of candidate agents to receive the action.
Time Window. Range in minutes to spread out the actions so that all the agents receiving an action do not get them at the exact same moment.
Group. Along with Role, this field designates which agents are candidates to receive the scheduled action. Possible groups include all, net friendly, net neutral, net opposing, and reflected crowd human.
DI-Guy AI Users Guide 6-29

Creating and Editing Crowds — The Schedule Editor
6-30 VT MÄK
DI-G
7. DI-Guy FAQ
This chapter answers some frequently asked questions.
DI-Guy AI FAQ ........................................................................................... 7-2
7-1uy AI Users Guide
DI-Guy FAQ — DI-Guy AI FAQ
7.1. DI-Guy AI FAQ
What happens to float* and int* parameters between C++ and Lua?
Float* and int* parameters are converted to Lua return values, so:
int diguyCharacter get_position(float* tx, float* ty, float* tz);
is called in Lua as:
local res, x, y, z = character:get_position();
Why are my if statements always true?
Any return value that is not equal to nil or false is considered true in Lua.
The statement:
if (x) { ... }
evaluates true if x is 0.
I can see my agents. Why aren’t they moving?
Check the path shape the crowd behavior is using if your agent’s behavior is Travel. Sometimes a zero length path shape can be generated or associated with the path by accident.
I am using the attack behavior. Why don’t my agents attack?
Make sure that your still action is an aim action such as kneel_aim, stand_aim, and so on, or that you have selected <default> for your still action and have selected the aim variant.
For more information, please see “The Basic Architecture of a DI-Guy AI Mind,” on page 5-4, “Visualizing the State Machine,” on page 5-13, and “How DI-Guy AI Minds Sleep,” on page 5-19.
I am trying to call a base class function from my derived class. Why doesn’t it work?
The syntax to do this can be tricky. While writing code that says something like base_class:function(args); seems like the right thing to do, what you want to write is:
base_class.function(self, args);
The period (.) syntax, as opposed to colon (:), sends the this pointer back to the base class.
7-2 VT MÄK

DI-Guy FAQ — DI-Guy AI FAQ
I want to modify the onscreen pulldown menus for new states in my derived class characters while also adding some new choices for the base class states. How can I do that without unnecessarily copying all the state code?
Instead of trying to change the self.ui_signals usually defined early in the states of the base classes, consider overriding the luaCharacter:get_ui_signals() function, which uses the contents of the self.ui_signals to populate the GUI.
DI-Guy AI Users Guide 7-3

DI-Guy FAQ — DI-Guy AI FAQ
7-4 VT MÄK
DI-G
Index
Aadd_wakeup_callback() function 5-19adding, crowd member 6-8agent 1-5, 2-3, 3-33
adding to crowd 6-8behavior 2-5creating from character 3-34obstacle 2-19repulsion zone 2-22schedule 6-29
agent_accept_message() function 5-19agent_broadcast_message_to_group() function 5-
19agent_broadcast_message() function 5-19agent_move_to_point_bg() function 4-3, 4-6agent_move_to_point_via_subregions_bg()
function 4-3, 4-6agent_move_to_point_via_subregions() function
4-3, 4-6agent_move_to_point() function 4-3agent_move_to_region_via_subregion() function
4-3agent_move_to_region() function 4-3agent_set_auto_variant_selection() function 2-19AI Crosswalks, scenario 3-20AI multifloor path planning, scenario 3-22AI Schedule Demo, scenario 3-21AI Train Station Alarm, scenario 3-22aim 2-17ambient variant 2-17angry variant 2-17API, path planning 4-3attack behavior 2-9automatic path planning 4-2
uy AI Users Guide
automatic variant selection 2-19Avoidance Methods tab 6-10avoiding
dynamic objects 2-22obstacle 2-5obstacles 2-20static objects 6-24
Bbackground
function 4-6method 4-6path planning 4-6
balloon, thought 3-8base, behaviors 3-11base behavior 1-4, 1-5, 2-5become_aggressive() function 5-11begin_state() function 5-12behavior
agent 2-5attack 2-9base 1-4, 1-5, 2-5, 3-11flee 2-8, 3-16idle 2-9list of 6-22mingle 2-7none 2-10path follow 2-6pursue 2-8pyramid 1-4travel 2-6, 3-12wander 2-7
behavior path, crowd 6-6Behavior Settings tab 3-35, 6-20
i-1
Index
button, Show Diagram 5-13
Ccamera, looking at crowd member 6-9Camera page 3-33character 3-33
climbing stairs 3-22commands 3-9focus 2-5path 2-10turning into agent 3-34
Character Avoidance tab 6-26Character page 3-23, 5-24class
diguyAgentParams 4-2diguyCharacter 2-9, 2-19, 5-15, 5-19, 6-11diguyCrowd 6-11lqt 5-3luaCharacter 3-37, 5-3, 5-9, 5-12, 5-15, 5-24luaLabel 5-3luaMiddleEasternPedestrian 3-21luaNavmeshHelper 5-3luaSensorHelper 5-3luaSimModuleHelper 5-3luaSimpleFriendlySoldier 3-36, 3-37, 5-9, 5-10luaSimpleOpposingSoldier 5-10luaSimpleSoldier 3-31, 3-37, 5-9, 5-10, 5-11, 5-
15, 5-17luaSmartProp 5-3
collision detection 6-10combat 3-11command, character 3-9companion crowd 6-10Companion Crowds tab 6-10creating
crowd 3-3crowd profile 3-31crowds 6-2mind 3-36navmesh 3-39package 3-29region
from Input Mode window 6-13from Region page 6-14
crouched 2-17crowd 2-3, 2-10
behavior path 6-6companion 6-10creating 3-3, 6-2
i-2
crowd (continued)editing 6-5, 6-8editor, painting modes 6-7member
adding 6-8looking at 6-9removing 6-9
population, parameters 6-6profile 2-4, 6-16wander 3-14
crowd blitz, region 2-12Crowd Blitzer 3-3crowd member agent parameters 6-20Crowd Members tab 6-9Crowd page 3-35, 4-2, 6-2, 6-5, 6-8, 6-20crowd profile
creating 3-31editing 3-15
Crowd Profile page 3-14, 3-31, 6-17, 6-20curious variant 2-17custom, message processing 5-18
Ddead variant 2-17debugging, minds 5-21default, message processing 5-17defining, navigation mesh 4-4destroy() function 5-12detecting, traps 2-24die_now() function 5-12DI-Guy Lifeform Server 1-7DI-Guy Scenario 1-4DI-Guy SDK 1-4, 1-8diguyAgentParams class 4-2diguyCharacter class 2-9, 2-19, 5-15, 5-19, 6-11diguyCrowd class 6-11disabling
dynamic object avoidance 2-23static avoidance 2-21
documentation, Lua 5-2draw() function 5-12dynamic avoidance, repulsion zone 2-22dynamic object avoidance, disabling 2-23dynamic obstacles, sensing and avoiding 2-22
Eediting
crowd profile 3-15
VT MÄK
Index
editing (continued)crowds 6-5, 6-8navigation mesh 4-4package 3-31path shape 3-13
editorcrowd, painting modes 6-7
enabled, speed zone parameter 2-14entry_point() function 5-12, 5-15escaping, traps 2-24Event Mapper page 3-17Events tab 6-11exact action, parameter 2-14example, mind 5-5exercise variant 2-17extending, mind 1-6
FFAQ 7-2fast 2-12fastest 2-12feeler 2-20
parameters 2-21static avoidance 2-20
find_lua_character() function 5-15find_navigation_path() function 4-3finite state machine 1-6, 5-2flee, behavior 3-16flee behavior 2-8focus, character 2-5force_action() function 2-10formation 3-10frame rate, affected by foreground functions 4-6free mode 2-9, 2-10function
add_wakeup_callback() 5-19agent_accept_message() 5-19agent_broadcast_message_to_group() 5-19agent_broadcast_message() 5-19agent_move_to_point_bg() 4-3, 4-6agent_move_to_point_via_subregions_bg() 4-
3, 4-6agent_move_to_point_via_subregions() 4-3, 4-
6agent_move_to_point() 4-3agent_move_to_region_via_subregion() 4-3agent_move_to_region() 4-3agent_set_auto_variant_selection() 2-19background 4-6
DI-Guy AI Users Guide
function (continued)background and foreground 4-6become_aggressive() 5-11begin_state() 5-12destroy() 5-12die_now() 5-12draw() 5-12entry_point() 5-12, 5-15find_lua_character() 5-15find_navigation_path() 4-3force_action() 2-10generate_navmesh() 4-4get_ui_signals() 5-24get_ui_state_label() 5-21, 5-24get_user_selected_character() 5-12get_user_selected_point() 5-12, 5-17init_package() 5-11, 5-15init() 5-10, 5-11, 5-12, 5-15move_to_background_check() 5-11move_to_point() 2-9on_impact_callback() 5-11, 5-15on_target_acquired() 5-18patrol_state() 5-16process_attack_callbacks() 5-14process_attack_messages() 5-14process_callbacks() 5-14, 5-17process_message_attack() 5-18process_message() 5-14, 5-15process_messages_attack() 5-18process_messages_callback() 5-17process_messages_signals() 5-17process_messages() 5-16, 5-17, 5-18, 5-19process_signals() 5-14process_travel_callbacks() 5-14process_travel_messages() 5-14reset() 5-12return_to_patrol_path() 5-16set_desired_position() 2-9, 2-10simple_move_to_state() 5-12, 5-18sleep_ignore_messages() 5-12sleep_process_messages() 4-7, 5-12sleep_until() 5-12sleep() 5-12state, sections 5-16state_manager() 5-12tostring() 5-24wait_for_message() 4-7, 5-12
i-3
Index
Ggenerate_navmesh() function 4-4generating, navigation mesh 4-4get_ui_signals() function 5-24get_ui_state_label() function 5-21, 5-24get_user_selected_character() function 5-12get_user_selected_point() function 5-12, 5-17ghost, untrap method 2-25
Hhierarchical finite state machine 5-2
Iidle behavior 2-9init_package() function 5-11, 5-15init() function 5-10, 5-11, 5-12, 5-15injured variant 2-17Input Mode window 6-5
LLabel tab 5-24library, object 6-20lifeform server 1-7looking at crowd member 6-9lqt class 5-3Lua 1-6, 3-36
coding FAQ 7-2documentation 5-2mind 1-4module 5-3package 5-8script 3-29, 5-8
Lua Mind Editor page 3-29, 3-36, 5-6, 5-8, 5-10, 5-13
luaCharacter, package 5-12luaCharacter class 3-37, 5-3, 5-9, 5-12, 5-15, 5-24luaCharacter.init_code 5-24luaLabel class 5-3luaMiddleEasternPedestrian class 3-21luaNavmeshHelper class 5-3luaSensorHelper class 5-3luaSimModuleHelper class 5-3luaSimpleFriendlySoldier, package 5-10luaSimpleFriendlySoldier class 3-36, 3-37, 5-9, 5-
10luaSimpleOpposingSoldier class 5-10
i-4
luaSimpleSoldier, package 5-11, 5-15luaSimpleSoldier class 3-31, 3-37, 5-9, 5-10, 5-11,
5-15, 5-17luaSmartProp class 5-3
Mmedium 2-12message, processing 5-4message processing
custom 5-18default 5-17
method, background 4-6Middle East Town, scenario 3-27mind 3-5, 5-2
architecture 5-4creating 3-36debugging 5-21example 5-5extending 1-6Lua 1-4sleep] 5-19
mingle behavior 2-7minima 4-2Misc tab 6-12module, Lua 5-3move_to_background_check() function 5-11move_to_point() function 2-9movement, preferred regions 4-5multifloor movement 3-22
Nnav path, untrap method 2-25navigation mesh 4-2
calling from API 4-3defining 4-4editing 4-4generating 4-4using with base behavior 4-5
navmesh 2-10, 4-2creating 3-39
navmesh. See navigation meshno progress trap 2-24none, untrap method 2-25none behavior 2-10normal variant 2-17
VT MÄK
Index
Oobject
avoidance, disabling 2-23libraries 6-20static 2-20
avoidance 6-24obstacle
agent 2-19avoidance, disabling 2-23avoiding 2-5, 2-20dynamic, sensing and avoiding 2-22static 2-20
on_impact_callback() function 5-11, 5-15on_target_acquired() function 5-18operating system, support 1-8orientation, in repulsion zone 2-22
Ppackage 3-29
creating 3-29editing 3-31Lua 5-8luaCharacter 5-12luaSimpleFriendlySoldier 5-10luaSimpleSoldier 5-11, 5-15
pageCamera 3-33Character 3-23, 5-24Crowd 3-35, 4-2, 6-2, 6-5, 6-8, 6-20Crowd Profile 3-14, 3-31, 6-17, 6-20Event Mapper 3-17Lua Mind Editor 3-29, 3-36, 5-6, 5-8, 5-10, 5-
13Path Shape 3-22, 3-26Region 3-22, 3-39, 4-4, 5-5, 6-13, 6-14, 6-15Scene Object 3-40Schedule Editor 6-29Script 3-16, 3-18, 3-24, 3-36Visibility 3-8, 3-13, 6-16
painting mode, crowd editor 6-7parameter
radius variation 2-16speed zone 2-14Start At Radius 2-14
parameterscrowd member agent 6-20feeler 2-21
DI-Guy AI Users Guide
pathcharacter 2-10planning
automatic 4-2using API 4-3
path follow behavior 2-6path mode 2-10path planning 1-5
background 4-6path shape 2-5, 2-6, 3-22
editing 3-13stairway 3-22
Path Shape page 3-22, 3-26patrol_state() function 5-16pattern of life 3-7, 3-21, 6-29performance, function choice 4-6platform support 1-8POL 3-21Populate Entries table 2-4, 6-19Populate Settings tab 6-18population, crowd 6-6posture 2-5, 2-12, 2-17
crouched 2-17prone 2-17upright 2-17
preferred, subregion 4-5process_attack_callbacks() function 5-14process_attack_messages() function 5-14process_callbacks() function 5-14, 5-17process_message_attack() function 5-18process_message() function 5-14, 5-15process_messages_attack() function 5-18process_messages_callback() function 5-17process_messages_signals() function 5-17process_messages() function 5-16, 5-17, 5-18, 5-
19process_signals() function 5-14process_travel_callbacks() function 5-14process_travel_messages() function 5-14profile, crowd 2-4, 6-16prone 2-17prop, avoidance 6-24Prop and Scene Object Avoidance tab 6-24pursue behavior 2-8pyramid, behavior 1-4
Rradius variation 2-16random turn, untrap method 2-25
i-5
Index
ready variant 2-17region 2-5, 2-10, 2-12, 3-20, 3-22, 6-13
creatingfrom Region page 6-14Input Mode window 6-13
crowd blitz 2-12Region page 3-22, 3-39, 4-4, 5-5, 6-13, 6-14, 6-15Region Painter 2-10, 6-13Region Painter Mode 6-15removing, crowd member 6-9repulsed, subregion 4-5repulsion factor 2-22repulsion radius 2-22repulsion zone 2-12, 2-22
interaction with speed zone 2-23orientation 2-22speed type 2-23
reset() function 5-12return_to_patrol_path() function 5-16
Sscenario
AI Crosswalks 3-20AI multifloor path planning 3-22AI Schedule Demo 3-21AI Train Station Alarm 3-22Middle East Town 3-27
scene object, avoidance 6-24Scene Object page 3-40schedule, agent 6-29Schedule Editor page 6-29scheduler 3-21script
Lua 3-29, 5-8writing 3-36
Script page 3-16, 3-18, 3-24, 3-36self.ui_signals 5-24self.ui_state_label 5-24sensing
dynamic objects 2-22static obstacles 2-20
set_desired_position() function 2-9, 2-10Show Diagram button 5-13sick, variant 2-17signal 5-24simple_move_to_state() function 5-12, 5-18sleep_ignore_messages() function 5-12sleep_process_messages() function 4-7, 5-12sleep_until() function 5-12
i-6
sleep() function 5-12sleep], mind 5-19slow 2-12socialize variant 2-17soldier_travel_lua_mind 5-5speed 2-12
type, repulsion zone 2-23types 2-12zone 2-12, 2-13
disabled 2-14interaction with repulsion zone 2-23parameter 2-14radius 2-16still 2-15
stairway, path shape 3-22Start At Radius, parameter 2-14state 5-4state function, sections 5-16state machine 1-6, 5-2, 5-13state_manager() function 5-12static avoidance
disabling 2-21feeler 2-20
static object, avoidance 6-24Still, speed zone 2-15still 2-12stop moving, untrap method 2-25subclass 3-29subregion 2-10, 2-12
preferred 4-5repulsed 4-5
supported platforms 1-8
Ttab
Avoidance Methods 6-10Behavior Settings 3-35, 6-20Character Avoidance 6-26Companion Crowds 6-10Crowd Members 6-9Events 6-11Label 5-24Misc 6-12Populate Settings 6-18Prop and Scene Object Avoidance 6-24Trap Settings and Path Planning 4-2, 6-27
table, Populate Entries 2-4teleport, untrap method 2-25thought, balloons 3-8
VT MÄK
Index
tostring() function 5-24trap 4-2
detecting 2-24escaping 2-24navigation mesh 4-5no progress 2-24types 2-24untrap methods 2-25wedged 2-24
Trap Settings and Path Planning tab 4-2, 6-27travel behavior 2-6, 3-12troubleshooting 7-2
Uuntrap, methods 2-25untrap settings 2-5upright 2-17
Vvariant 2-5, 2-17
selecting automatically 2-19types 2-17
vehicle, obstacle avoidance 2-23Visibility page 3-8, 3-13, 6-16
Wwait_for_message() function 4-7, 5-12wander behavior 2-7wander crowd 3-14wedged trap 2-24window, Input Mode 6-5writing, script 3-36
X-Y-Zzone
repulsion 2-12, 2-22speed 2-12, 2-13
DI-Guy AI Users Guide
i-7
Index
i-8
VT MÄK

Link - Simulate - Visualize
DIG-13.0-1-140523
150 CAMBRIDGE PARK DRIVE, 3RD FLOOR CAMBRIDGE, MA 02140 617.876.8085 www.mak.com
Related Documents