D-1 Administration Guide for Cisco Virtualization Experience Client Manager 4.8.5 APPENDIX D Device Discovery, Device Imaging, and Mass Imaging Tool This appendix contains information about device discovery and advanced information about using the Cisco VXC Manager Mass Imaging Tool and using device imaging in Cisco VXC Manager. It includes: • Device Discovery, page D-1 • Using Device Imaging in Cisco VXC Manager, page D-12 • Using the Cisco VXC Manager Mass Imaging Tool, page D-17 Device Discovery This section contains information about the methods you can use to allow Cisco VXC Manager to discover Cisco VXC devices in your network, including the following: • Configuring the DHCP Server, page D-1 • Configuring a DNS Service Location (SRV) Resource Record for ThreadX Devices, page D-7 • Configuring a Cisco VXC Manager Server Host Name in the DNS Server, page D-9 • Configuring a Cisco VXC Manager Alias Record in the DNS Server, page D-11 Configuring the DHCP Server Configure the following option tag values on your DHCP server: • Option tag 186—IP address of your Cisco VXC Manager server (for example, 192.168.1.10). The value should be in 4-byte IP address format. • Option tag 190—Secure port number to which Cisco VXC Manager server listens (for example, port 443). The value should be in word format (value = 0x01bb) or 2-byte array format (value = 0x01 0xbb). • Option tag 192—Non-secure port number to which Cisco VXC Manager server listens (for example, 80). The value should be in either word format (value = 0x0050), or 2-byte array format (value= 0x00 0x50).

Welcome message from author
This document is posted to help you gain knowledge. Please leave a comment to let me know what you think about it! Share it to your friends and learn new things together.
Transcript

Administration Guide for Cisco Vi
A
P P E N D I X D Device Discovery, Device Imaging, and Mass Imaging ToolThis appendix contains information about device discovery and advanced information about using the Cisco VXC Manager Mass Imaging Tool and using device imaging in Cisco VXC Manager.
It includes:
• Device Discovery, page D-1
• Using Device Imaging in Cisco VXC Manager, page D-12
• Using the Cisco VXC Manager Mass Imaging Tool, page D-17
Device DiscoveryThis section contains information about the methods you can use to allow Cisco VXC Manager to discover Cisco VXC devices in your network, including the following:
• Configuring the DHCP Server, page D-1
• Configuring a DNS Service Location (SRV) Resource Record for ThreadX Devices, page D-7
• Configuring a Cisco VXC Manager Server Host Name in the DNS Server, page D-9
• Configuring a Cisco VXC Manager Alias Record in the DNS Server, page D-11
Configuring the DHCP ServerConfigure the following option tag values on your DHCP server:
• Option tag 186—IP address of your Cisco VXC Manager server (for example, 192.168.1.10). The value should be in 4-byte IP address format.
• Option tag 190—Secure port number to which Cisco VXC Manager server listens (for example, port 443). The value should be in word format (value = 0x01bb) or 2-byte array format (value = 0x01 0xbb).
• Option tag 192—Non-secure port number to which Cisco VXC Manager server listens (for example, 80). The value should be in either word format (value = 0x0050), or 2-byte array format (value= 0x00 0x50).
D-1rtualization Experience Client Manager 4.8.5

Appendix D Device Discovery, Device Imaging, and Mass Imaging ToolDevice Discovery
Tip The Cisco VXC Manager server and the DHCP server should not be running on the same machine.Some older agents use option tag 187 for the Cisco VXC Manager non-secure port number. The value of this option tag, when embedded within vendor class-specific information (option 43), was interpreted the same way as option tag 192. If option tag 192 is not supplied, the new Cisco VXC Manager Agent will accept option tag 187 for legacy support only. It is recommended that the DHCP server use option tag 192. Consult your DHCP server manual for DHCP option value configuration details.
To configure the Cisco VXC Manager server IP address and port option values on a Windows DHCP server:
Procedure
Step 1 Open the DHCP management wizard, choose the DHCP server to be configured, right-click the server name, and choose Set Predefined Options to open the Select Predefined Options and Values window.
Figure D-1 DHCP Window
D-2Administration Guide for Cisco Virtualization Experience Client Manager 4.8.5

Appendix D Device Discovery, Device Imaging, and Mass Imaging ToolDevice Discovery
Figure D-2 Select Predefined Options and Values
Step 2 On the Predefined Options and Values screen, click the Add button. The Option Type window appears.
Step 3 In the Option Type window, enter the required information:
• Name—Cisco VXC Manager Server
• Code—186
• Data Type—IP Address
• Description (optional)—Enter desired information, or nothing
D-3Administration Guide for Cisco Virtualization Experience Client Manager 4.8.5

Appendix D Device Discovery, Device Imaging, and Mass Imaging ToolDevice Discovery
Figure D-3 Option Type: Server IP
Step 4 Click OK.
Step 5 Repeat Steps 2 and 3 for the Cisco VXC Manager Server port, with these changes:
• Name—Cisco VXC Manager Server Secure Port
• Code—190
• Data Type—Word
Step 6 Repeat Steps 2 and 3 for the Cisco VXC Manager Server port, with these changes:
• Name—Cisco VXC Manager Server Port
• Code—192
• Data Type—Byte or Word
Figure D-4 Option Type: Cisco VXC Manager Server Port
Step 7 Click OK.
D-4Administration Guide for Cisco Virtualization Experience Client Manager 4.8.5

Appendix D Device Discovery, Device Imaging, and Mass Imaging ToolDevice Discovery
Figure D-5 DHCP Scope Options: Cisco VXC Manager Server
Step 8 From the DHCP management wizard, choose Scope Options (from the target DHCP Server Scope, as shown in Figure D-5), right-click, and choose Configure Options.
• In the list of Available Options, check option number 186, and enter the IP address of the Cisco VXC Manager server.
• In the list of Available Options, check option number 190, and enter the port number at which your Cisco VXC Manager server listens for secure communication.
• In the list of Available Options, check option number 192, and enter the port number at which your Cisco VXC Manager server listens (Port 80 is shown in Figure D-6).
D-5Administration Guide for Cisco Virtualization Experience Client Manager 4.8.5

Appendix D Device Discovery, Device Imaging, and Mass Imaging ToolDevice Discovery
Figure D-6 DHCP Scope Options: Cisco VXC Manager Server Port
Step 9 Click OK.
Figure D-7 DHCP Scope Options List
Step 10 Confirm that options 186, 190 and 192 are listed with proper values under the target DHCP server and scope.
D-6Administration Guide for Cisco Virtualization Experience Client Manager 4.8.5

Appendix D Device Discovery, Device Imaging, and Mass Imaging ToolDevice Discovery
Configuring a DNS Service Location (SRV) Resource Record for ThreadX Devices
If you plan to use ThreadX devices, you can greatly improve the ThreadX client discovery process by creating a DNS Service Location (SRV) resource record.
Use the following procedure to create a DNS Service Location (SRV) resource record.
Procedure
Step 1 Open the DNS management console.
Step 2 Choose the domain where the server is configured, right-click it, and then choose Other New Records to open the Resource Record Type dialog box.
Step 3 Choose the Service Location (SRV) resource record type and then click Create Record to open the New Resource Record dialog box.
D-7Administration Guide for Cisco Virtualization Experience Client Manager 4.8.5

Appendix D Device Discovery, Device Imaging, and Mass Imaging ToolDevice Discovery
Step 4 Use the following guidelines (Domain is automatically shown):
• Enter _Pcoip-tool in the Service field.
• Enter _tcp in the Protocol field.
• (Optional) Enter the value you want for this Cisco VXC Manager server in the Priority field (the lower the priority value, the higher the priority).
• (Optional) Enter the value you want for this Cisco VXC Manager server in the Weight field (within the same priority class the higher the weight value, the higher the priority).
• Enter 50000 in the Port Number field.
• Enter the <FQDN of the Cisco VXC Manager server> (for example, p20.rap45.com) in the Host offering this service field.
D-8Administration Guide for Cisco Virtualization Experience Client Manager 4.8.5

Appendix D Device Discovery, Device Imaging, and Mass Imaging ToolDevice Discovery
Step 5 Click OK.
Configuring a Cisco VXC Manager Server Host Name in the DNS ServerThis procedure describes how to register the server on which you installed Cisco VXC Manager with your DNS server (if not already registered).
On the DNS server, configure a host name record specifying the name and IP address of the server on which you have installed Cisco VXC Manager. Since no port number is provided, the Cisco VXC Manager Agent uses HTTP and the default port number 80.
Tip The DHCP server must provide a proper DNS server and domain name in its offer before the Cisco VXC Manager Agent can query the DNS server. Consult your DNS server manual for host name configuration details.
To configure a Cisco VXC Manager server host name on a Windows DNS server:
Procedure
Step 1 Open the DNS management window.
D-9Administration Guide for Cisco Virtualization Experience Client Manager 4.8.5

Appendix D Device Discovery, Device Imaging, and Mass Imaging ToolDevice Discovery
Figure D-8 DNS Management: New Host
Step 2 Choose the domain to which the Cisco VXC Manager server belongs, right-click the domain, and choose New Host.
Figure D-9 New Host
Step 3 In the New Host window, enter the required information:
• Name—<Cisco VXC Manager Server name>
• IP address—<Cisco VXC Manager Server IP address>
Step 4 Click Add Host.
Step 5 Confirm that the Cisco VXC Manager Server host name is displayed with the proper IP address under the appropriate domain on the DNS management screen.
D-10Administration Guide for Cisco Virtualization Experience Client Manager 4.8.5
Appendix D Device Discovery, Device Imaging, and Mass Imaging ToolDevice Discovery
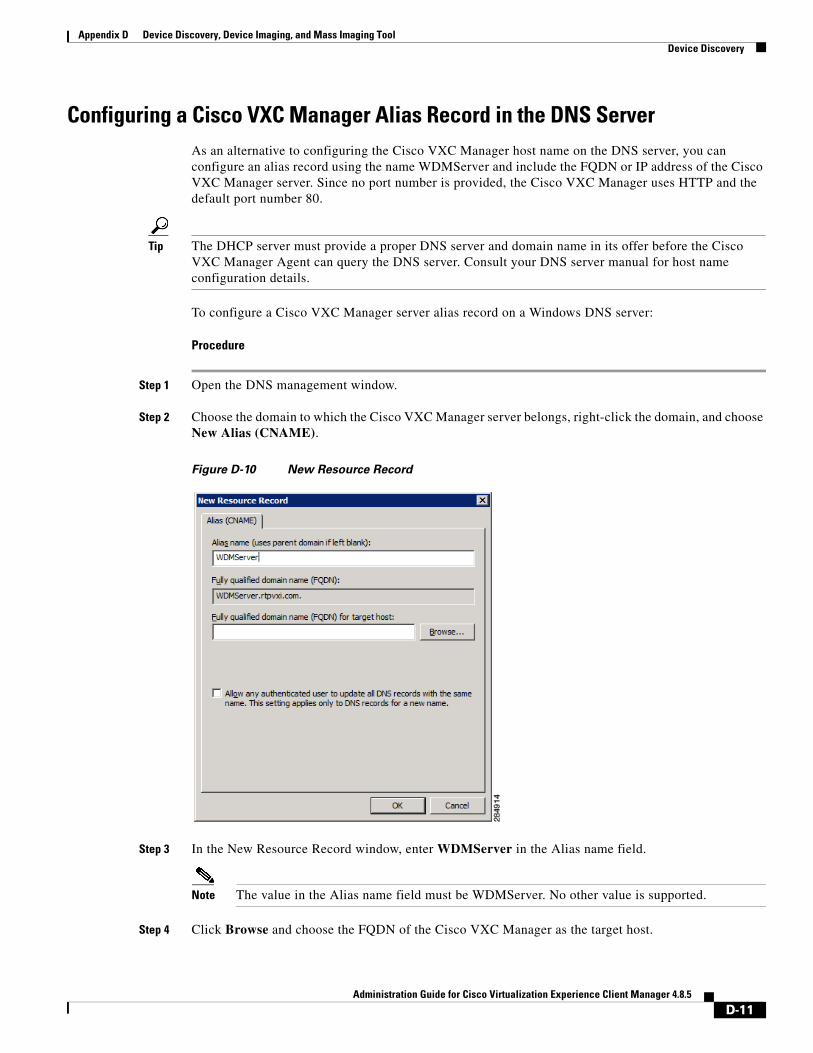
Configuring a Cisco VXC Manager Alias Record in the DNS ServerAs an alternative to configuring the Cisco VXC Manager host name on the DNS server, you can configure an alias record using the name WDMServer and include the FQDN or IP address of the Cisco VXC Manager server. Since no port number is provided, the Cisco VXC Manager uses HTTP and the default port number 80.
Tip The DHCP server must provide a proper DNS server and domain name in its offer before the Cisco VXC Manager Agent can query the DNS server. Consult your DNS server manual for host name configuration details.
To configure a Cisco VXC Manager server alias record on a Windows DNS server:
Procedure
Step 1 Open the DNS management window.
Step 2 Choose the domain to which the Cisco VXC Manager server belongs, right-click the domain, and choose New Alias (CNAME).
Figure D-10 New Resource Record
Step 3 In the New Resource Record window, enter WDMServer in the Alias name field.
Note The value in the Alias name field must be WDMServer. No other value is supported.
Step 4 Click Browse and choose the FQDN of the Cisco VXC Manager as the target host.
D-11Administration Guide for Cisco Virtualization Experience Client Manager 4.8.5

Appendix D Device Discovery, Device Imaging, and Mass Imaging ToolUsing Device Imaging in Cisco VXC Manager
Figure D-11 New Resource Record—FQDN
Step 5 Click OK.
Step 6 Confirm that the WDMServer alias name is displayed with the proper FQDN (or IP address) under the appropriate domain on the DNS management screen.
Using Device Imaging in Cisco VXC Manager Cisco VXC Manager can perform work on devices before the operating system loads on the device. To do this, the device is booted into an environment where it can communicate with the Cisco VXC Manager Server to perform imaging tasks. In order to perform image capture and deployment, scripted installs, registry backups, or execute certain scripts, you must implement a way to boot devices into this environment.
There are three ways to image devices:
• PXE Based Imaging, page D-12 (not applicable to Cisco VXC clients)
• Non-PXE Based Imaging (WTOS Boot Agent), page D-15 (not applicable to Cisco VXC clients)
• Non-PXE Based Imaging (Merlin Boot Agent), page D-15 (not applicable to Cisco VXC clients)
PXE Based Imaging
Note This section is not applicable to Cisco VXC clients. It is applicable only for the management of third-party clients.
D-12Administration Guide for Cisco Virtualization Experience Client Manager 4.8.5

Appendix D Device Discovery, Device Imaging, and Mass Imaging ToolPXE Based Imaging
Pre-boot Execution Environment (PXE) is an industry standard developed to boot devices using the network. PXE can boot devices regardless of the disk configuration or operating system installed, and does not require any files or configuration settings on a device. After PXE boot is turned on in the BIOS, a device can communicate with your network PXE Server to receive imaging jobs. PXE provides a number of advantages, and enables you to remotely deploy an image to a device.
Note With PXE based imaging, the Cisco VXC Manager TFTP transfer is restricted to a 1500-byte packet size, and the Don't Fragment bit is set.
PXE Request RoutingPXE clients use broadcast packets to find DHCP and PXE services on a network to transfer files. These packet types can present challenges when planning a PXE deployment because most default router configurations do not forward broadcast traffic. To resolve this, you must either configure your routers to forward these broadcast packets to the correct server(s), or install a PXE Server on each subnet. Routers are generally configured to forward broadcast traffic to specific machines. The source subnet experiences the broadcast, but any forwarded broadcast traffic targets specific machines. Enabling a router to support DHCP is common. If both PXE and DHCP services are located on the same machine, and DHCP packet forwarding is enabled, you should have no problem transferring broadcast packets. If these services are located on different machines, additional configuration might be required. If you are going to forward packets, be sure your router configuration allows DHCP traffic to access the proper ports and IP addresses for both DHCP and PXE servers.
Installing and Configuring DHCPDHCP is an integral part of the PXE process, and must be installed and configured in order to use PXE. You must obtain, install, and configure a DHCP server component separately (a DHCP server is not provided with Cisco VXC Manager). After DHCP is set up and your PXE servers are installed, you must configure how your PXE servers will interact with the DHCP server.
Deploying an Image PackagePrior to deploying an image package, complete the following:
Procedure
Step 1 Register the image package within Cisco VXC Manager. The image package can be either a custom image, or an image which has been registered from an existing reference device.
Step 2 Enable the image package so that it can be deployed.
Step 3 Ensure that the device to be imaged is part of the Cisco VXC Manager system (the device must either be previously discovered or manually added using the Administrator Console as described in Adding and Automatically Discovering Devices, page 2-12).
Step 4 To register an image, see Register a Package from a Script File (.RSP), page 3-28.
To image a device you can:
• Image a Group of Devices:
D-13Administration Guide for Cisco Virtualization Experience Client Manager 4.8.5

Appendix D Device Discovery, Device Imaging, and Mass Imaging ToolPXE Based Imaging
a. In the tree pane of the Administrator Console, expand the Package Manager until you find the image you need to deploy, and then choose the image.
b. In the same tree pane, expand the Device Manager node, and open the folder that contains the list of devices to be imaged.
c. Drag and drop the Cisco VXC Manager package to the group where the image needs to be deployed. (For example, if you created a default View to display all the devices in your finance department and placed it in a folder named Finance, you can open the folder and drag and drop the image to the folder. Note that the list of devices will automatically be filtered to include only the devices which have the same operating system as the image being deployed.) The Package Distribution Wizard appears.
Figure D-12 Package Distribution Wizard
d. Choose the devices to which the image package needs to be scheduled (if a data partition needs to be preserved, check the Preserve Data Partition(s) check box), click Next, and then schedule the Cisco VXC Manager package for deployment.
• Image from the Update Manager:
a. In the tree pane of the Administrator Console, right-click Update Manager and choose New > Update to open the Software Package Wizard.
b. Choose the folder that contains the image you want to distribute and click Next.
c. Choose the image you want to be deployed and click Next (note that the list of devices will automatically be filtered to include only the devices which have the same operating system as that of the image being deployed).
d. Schedule the Cisco VXC Manager package for deployment.
D-14Administration Guide for Cisco Virtualization Experience Client Manager 4.8.5

Appendix D Device Discovery, Device Imaging, and Mass Imaging ToolNon-PXE Based Imaging (WTOS Boot Agent)
About the Imaging ProcessAfter you schedule the Cisco VXC Manager package for deployment and the device checks in with the Cisco VXC Manager Server, the following imaging process occurs:
1. The Cisco VXC Manager server checks if there is an update for the device.
2. If an imaging job is scheduled, the device is notified.
3. The device will then re-boot and go through a network boot process.
4. The Cisco VXC Manager Agent will be downloaded to the device and will contact the Cisco VXC Manager server to get the appropriate image that has been specified from the Cisco VXC Manager Repository.
5. The Cisco VXC Manager Agent will then apply the image to the flash file system of the device.
6. The device will then re-boot to the new image.
Non-PXE Based Imaging (WTOS Boot Agent)
Note This section is not applicable to Cisco VXC clients. It is applicable only for the management of third-party clients.
Non-PXE based imaging relies on a Boot Agent that resides in the client device flash memory. The Boot Agent currently supports downloading of Merlin boot floppy only. The Boot Agent communicates with the Cisco VXC Manager server to determine whether the target device needs imaging. Since the Boot Agent does not boot via the PXE protocol, it does not receive the Cisco VXC Manager server IP address and port number from the Cisco VXC Manager proxy DHCP service. In this release, the Boot Agent can discover the Cisco VXC Manager server IP address and port number from any one of the following sources (listed in priority order):
1. DHCP option tag values received from the standard DHCP server.
2. Cisco VXC Manager server URLs configured from the Boot Agent desktop.
3. DHCP option tag values received from standard or Cisco VXC Manager proxy DHCP service for vendor class RTIAgent.
4. DNS service location record.
5. DNS host name lookup.
Non-PXE Based Imaging (Merlin Boot Agent)
Note This section is not applicable to Cisco VXC clients. It is applicable only for the management of third-party clients.
When configuring the Merlin Boot Agent statically, use the following guidelines:
D-15Administration Guide for Cisco Virtualization Experience Client Manager 4.8.5

Appendix D Device Discovery, Device Imaging, and Mass Imaging ToolNon-PXE Based Imaging (Merlin Boot Agent)
Procedure
Step 1 Image the Non-PXE client with the latest initrd.pxe and vmlinuz.pxe so that the device has the latest initrd.pxe.
Step 2 Disable the DHCP Server and Standard Service.
Step 3 Schedule a Non-PXE imaging job.
Step 4 During Merlin boot up after the beep, press the Esc Key to clear the previous static configuration. This is required only when you need to enter the configuration once again. If you do not press the Esc key press and if the configuration is not present (for the first time) you will be prompted to enter the following inputs (otherwise, if you already entered configuration values you will not be prompted to enter the following inputs and it will go to the imaging mode directly):
• Client IP Address
• Subnet Mask
• Default Gateway
• Cisco VXC Manager IP address
• Protocol (http/https) default http
• Port number (default port 80)
Deploying the Image Using Merlin in Non-PXE Based imaging
Note This section is not applicable to Cisco VXC clients. It is applicable only for the management of third-party clients.
To deploy a Merlin Image complete the following steps:
Procedure
Step 1 In the Administrator Console, expand Device Manager to display the list of devices. Drag and drop the Merlin image (for example, push_9V92_S550_512) onto the desired device.
Step 2 To verify the Merlin imaging process, check to see that the Boot Agent boots first on the device and then boots the guest OS after contacting the Cisco VXC Manager server.
Step 3 Pull or push the image of the devices which you have already programmed with the Boot Agent image, using Merlin.
Step 4 To verify image deployment, observe the following sequence of events:
• The device boots up through the Boot Agent.
• The device contacts the Cisco VXC Manager and downloads Merlin through HTTP.
• Merlin contacts the Cisco VXC Manager server and starts the imaging process.
D-16Administration Guide for Cisco Virtualization Experience Client Manager 4.8.5

Appendix D Device Discovery, Device Imaging, and Mass Imaging ToolUsing the Cisco VXC Manager Mass Imaging Tool
Using the Cisco VXC Manager Mass Imaging Tool
Note This section is not applicable to Cisco VXC clients. It is applicable only for the management of third-party clients.
The Cisco VXC Manager Mass Imaging Tool is designed to help you manage (Register, Unregister, Add Schedule, Remove Schedule, and Delete Records) Cisco VXC Manager packages for all of the devices in your Cisco VXC Manager system at the same time. While you can perform Cisco VXC Manager package registration and scheduling using the Cisco VXC Manager Administrator Console (see Package Manager, page 3-25 and Update Manager, page 5-21 respectively), the Cisco VXC Manager Mass Imaging Tool allows you to easily perform these tasks when you intend to perform them for all of the devices in your Cisco VXC Manager system.
Prerequisites
Caution Before opening and using the Cisco VXC Manager Imaging Tool, be sure that the following prerequisites are satisfied.
• The devices you want to update belong to subnets that have been added to the Cisco VXC Manager system (the subnets are recognized by the Cisco VXC Manager system).
Tip If you manually add a single device to the Cisco VXC Manager system, you will add the subnet needed for all devices in that subnet (see Adding Devices Manually, page 2-14).
• Only the devices you want to image are connected to the Cisco VXC Manager system. Distribution of the image occurs for all connected devices upon device boot/reboot until you use the Remove Schedule command button on the Cisco VXC Manager Imaging Tool to remove the scheduled update appearing in the Current Scheduled Package field. Be sure that any device you do not want to image is disconnected from the Cisco VXC Manager system until after you use the Remove Schedule command button on the Cisco VXC Manager Imaging Tool to remove the scheduled update appearing in the Current Scheduled Package field.
• The Cisco VXC Manager Administrator Console (GUI) is closed.
ProcedureUse the following procedure to use the Cisco VXC Manager Mass Imaging Tool.
Procedure
Step 1 Click Start > All Programs > Cisco VXC Manager > VXC-MImaging to open the Cisco VXC Manager Imaging Tool.
D-17Administration Guide for Cisco Virtualization Experience Client Manager 4.8.5

Appendix D Device Discovery, Device Imaging, and Mass Imaging ToolUsing the Cisco VXC Manager Mass Imaging Tool
Figure D-13 Cisco VXC Manager Imaging Tool
Step 2 Use the following guidelines for the command buttons available:
• Register—allows you to register a Cisco VXC Manager package using the Cisco VXC Manager Package Registration wizard (click Register, browse and choose the RSP file you want, click Next, click Register, and then click OK—all packages you register appear in the main pane of the tool and are ready to be scheduled by clicking Add Schedule).
• Unregister—allows you to remove the registration of Cisco VXC Manager packages from the system (choose a package in the main pane, click Unregister, and then confirm).
• Add Schedule—allows you to schedule a Cisco VXC Manager package for distribution (choose a package in the main pane, click Add Schedule, and then confirm—the Cisco VXC Manager package appears in the Current Scheduled Package field, and the distribution will occur on the next device boot up).
Caution If you are rescheduling an image that has been successfully distributed to the same devices, you must first click Delete Records to clear the entries from the database.
• Remove Schedule—allows you to remove the scheduled update appearing in the Current Scheduled Package field. For example, after successfully imaging all connected devices upon device boot/reboot, click Remove Schedule before you connect any device you do not want to image.
• Delete Records—allows you to reset the imaging status for the devices in the Cisco VXC Manager database. For example, after imaging is done successfully (and the Cisco VXC Manager database table is updated for those particular MAC addresses) and you want to reschedule the image to the same devices, you must first click Delete Records to clear the entries from the database.
Step 3 When you are finished using the Cisco VXC Manager Imaging Tool, click Close.
D-18Administration Guide for Cisco Virtualization Experience Client Manager 4.8.5
Related Documents


![Device discovery for D2D communication in in-band cellular … · 2018. 4. 3. · device discovery issue [5–7] is the vital problem and needs solution. Discovery signal is designed](https://static.cupdf.com/doc/110x72/60d4eb689904644f5311acbd/device-discovery-for-d2d-communication-in-in-band-cellular-2018-4-3-device.jpg)


