Godwin Tawiah Ashong DEVELOPING A .NET WEB SERVICE FOR HANDLING STUDENT DATA Information Technology 2011

Welcome message from author
This document is posted to help you gain knowledge. Please leave a comment to let me know what you think about it! Share it to your friends and learn new things together.
Transcript

Godwin Tawiah Ashong
DEVELOPING A .NET WEB SERVICE FOR
HANDLING STUDENT DATA
Information Technology
2011

FOREWORD
The academic success of a student does not solely depend on his hard work but also
the support of others. I acquired my software programming knowledge through the
support of people that were there for me whenever I needed support and I would like
to thank the following people who had been of great support to me.
I would like to thank my supervisor, Dr. Ghodrat Moghadampour, who has supported
me by giving me his time and advice for this thesis. He had really been a very good
supervisor and had always been there for students who needed his knowledge about
problems they face in the software world. Through his support and advice, my interest
in software programming keeps on growing.
I would also like to thank my family who had been of great support to me through my
academics. I am grateful for their financial and emotional supports.
I will also thank Joseph Akrong who gave me more information on the current educa-
tion systems in Ghana in order to have functionalities of the software that would be of
enormous help to the schools in Ghana.

VAASAN AMMATTIKORKEAKOULU
UNIVERSITY OF APPLIED SCIENCES
Bachelor of Information Technology
ABSTRACT
Author Ashong Godwin Tawiah
Title Developing a .NET Web Service for Handling Student
Data
Year 2010
Language English
Pages 75
Name of Supervisor Moghadampour Ghodrat
Many schools in Ghana from the primary to the senior high school still use the ma-
nual way of processing data and keeping them in files. Sometimes these files might be
misplaced or accessed by unauthorized people.
Teachers also use cumbersome methods to write the grades of students which are later
compiled by filling a printed report form and later given to the students to be passed
on to their guardians.
It is unfortunate to say that some people in charge of taking fees from students might
be corrupted and embezzle the money and just discard the copy of receipts kept in or-
der for them not to be accountable to the transactions they had made.
In order to help solved the above problems in Ghana, this thesis is written. It is a
.NET web service and a client application to consume the service. The application
uses MySQL database, Cryptography for encrypting password, IIS server which runs
the services and user interface that fetches the services available on the IIS server.
The web services and user interface are all implemented in C#. The application will
be running on an intranet since not all schools in Ghana have internet connections.
Students’ information could be stored by this application and only accessible by au-
thorized persons. Teachers will no longer fill forms after making and processing stu-
dents’ scores since the application will do the calculations, the grading and the aca-
demic report of students generated by the application in PDF could be printed when-
ever needed
Keywords Processing data, .NET web service, client application
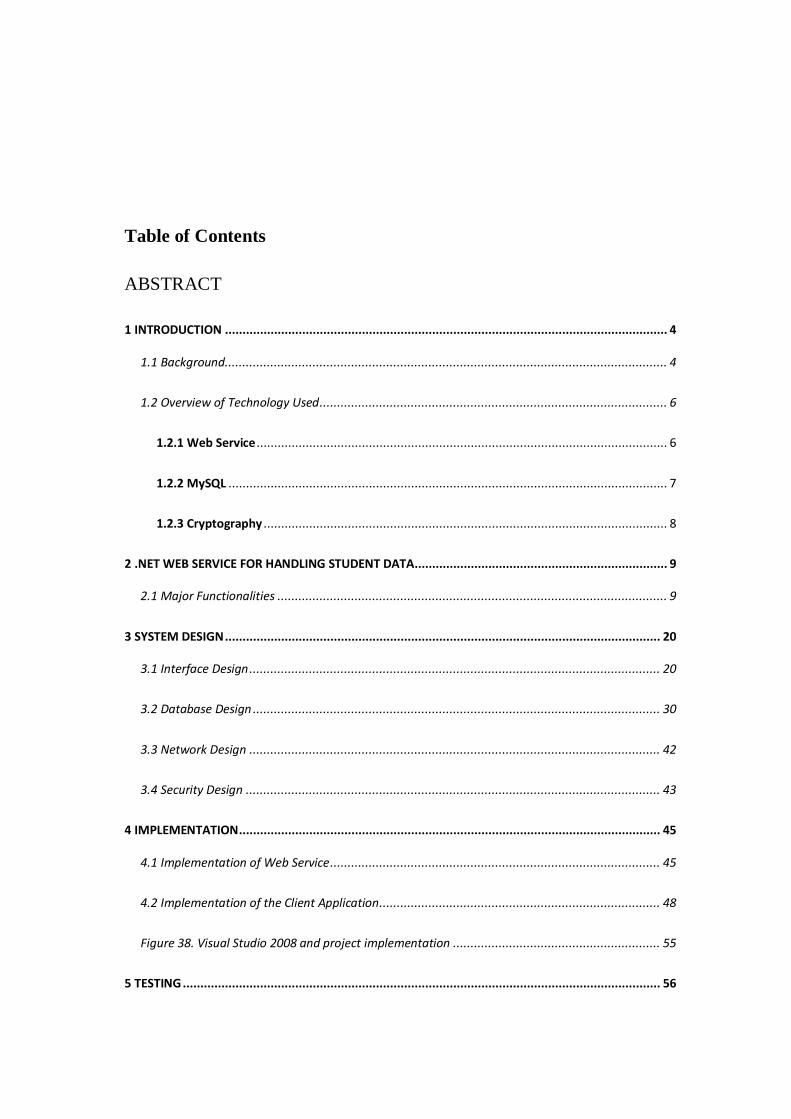
Table of Contents
ABSTRACT
1 INTRODUCTION .............................................................................................................................. 4
1.1 Background.............................................................................................................................. 4
1.2 Overview of Technology Used ................................................................................................... 6
1.2.1 Web Service ..................................................................................................................... 6
1.2.2 MySQL ............................................................................................................................. 7
1.2.3 Cryptography ................................................................................................................... 8
2 .NET WEB SERVICE FOR HANDLING STUDENT DATA........................................................................ 9
2.1 Major Functionalities ............................................................................................................... 9
3 SYSTEM DESIGN ............................................................................................................................ 20
3.1 Interface Design ..................................................................................................................... 20
3.2 Database Design .................................................................................................................... 30
3.3 Network Design ..................................................................................................................... 42
3.4 Security Design ...................................................................................................................... 43
4 IMPLEMENTATION ........................................................................................................................ 45
4.1 Implementation of Web Service .............................................................................................. 45
4.2 Implementation of the Client Application ................................................................................ 48
Figure 38. Visual Studio 2008 and project implementation ........................................................... 55
5 TESTING ........................................................................................................................................ 56

5.1 Adding Teachers .................................................................................................................... 56
5.2 Adding students ..................................................................................................................... 58
5.3 Adding a Course ..................................................................................................................... 60
5.4 Mark Student Attendance ...................................................................................................... 60
5.5 Record class exercise .............................................................................................................. 61
5.6 Record Examination Results ................................................................................................... 63
5.7 Submit Student Grades ........................................................................................................... 64
5.8 Get Report for One of the Students ......................................................................................... 65
5.9 Receive Payment from a Student ............................................................................................ 67
5.10 Check Daily Transaction ....................................................................................................... 68
6 CONCLUSION ................................................................................................................................ 70
REFERRENCES .................................................................................................................................. 71
4
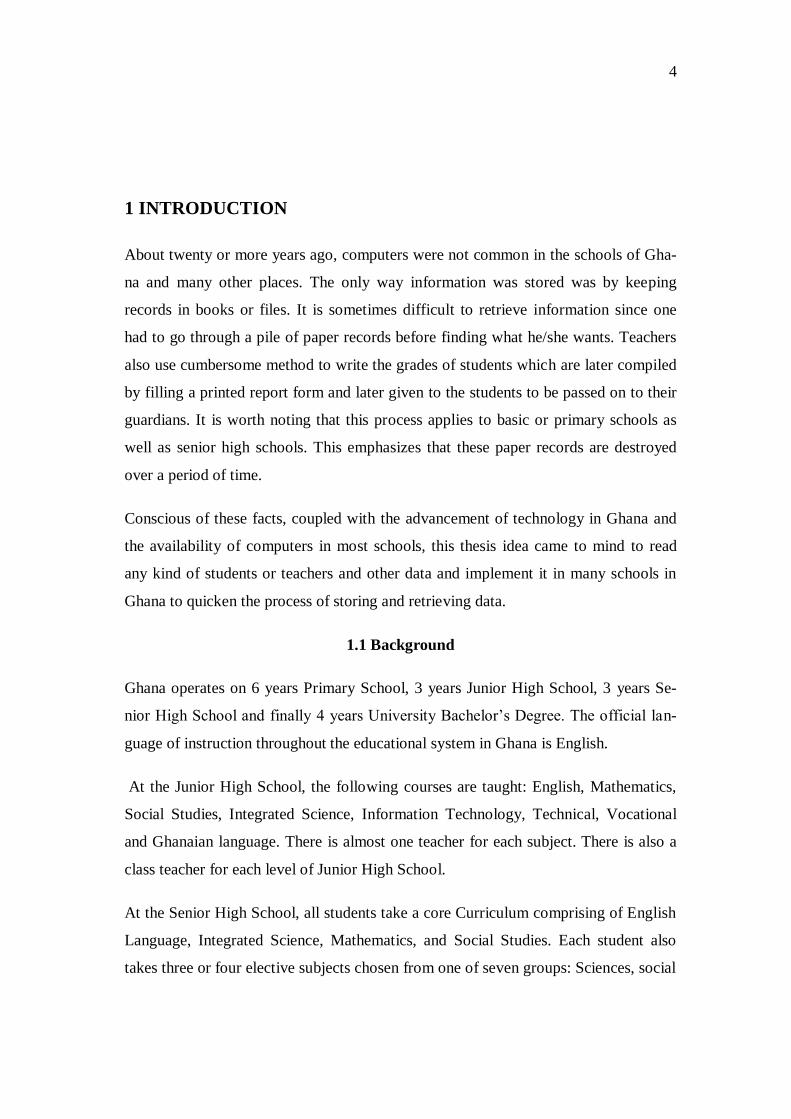
1 INTRODUCTION
About twenty or more years ago, computers were not common in the schools of Gha-
na and many other places. The only way information was stored was by keeping
records in books or files. It is sometimes difficult to retrieve information since one
had to go through a pile of paper records before finding what he/she wants. Teachers
also use cumbersome method to write the grades of students which are later compiled
by filling a printed report form and later given to the students to be passed on to their
guardians. It is worth noting that this process applies to basic or primary schools as
well as senior high schools. This emphasizes that these paper records are destroyed
over a period of time.
Conscious of these facts, coupled with the advancement of technology in Ghana and
the availability of computers in most schools, this thesis idea came to mind to read
any kind of students or teachers and other data and implement it in many schools in
Ghana to quicken the process of storing and retrieving data.
1.1 Background
Ghana operates on 6 years Primary School, 3 years Junior High School, 3 years Se-
nior High School and finally 4 years University Bachelor’s Degree. The official lan-
guage of instruction throughout the educational system in Ghana is English.
At the Junior High School, the following courses are taught: English, Mathematics,
Social Studies, Integrated Science, Information Technology, Technical, Vocational
and Ghanaian language. There is almost one teacher for each subject. There is also a
class teacher for each level of Junior High School.
At the Senior High School, all students take a core Curriculum comprising of English
Language, Integrated Science, Mathematics, and Social Studies. Each student also
takes three or four elective subjects chosen from one of seven groups: Sciences, social

5
sciences and humanities, Vocational, Technical, Business, or Agriculture [2]. There is
also almost one teacher per subject. There is also a class teacher that takes care of the
affairs of students in the class comprising of compilation of results from various sub-
ject teachers for each student for each academic term and marking of students’ atten-
dance.
There are three terms in one academic year. It is normally referred to as “1st , 2
nd and
3rd
“ terms.
The Senior High School Transcript contains a letter or percentage grade for each sub-
ject, for each of three terms, for the three years of Senior High School. Students’
Term Reports (Report cards) contain grades for class work and end of term exams and
or rank in class in each subject and attendance of student.
There is a student’s continuous assessment form in which each subject teacher fills
especially close to the end of the academic term. There is one continuous assessment
book for each class. The class teacher is to compile all these continuous assessments
of each subject for each student into a report card (Term Report). A subject teacher
had to wait till another subject teacher finishes using the continuous assessment book
before he can enter the grades for each student of his subject. There are more than 30
students in many classes either in the Junior High School or the Senior High School
and the manual processing of these continuous assessment and compilation is very
tedious and sometimes class teachers are not able to complete the processing of these
reports before the end of the academic term and students had to wait till the reopening
of a new academic term before they can get their reports.
It is unfortunate to say that some people placed in charge of collecting money (School
fees, feeding fees etc) and issuing of receipts are corrupted. Some embezzle the mon-
ey by discarding the receipts and pocketing the money so that they wouldn’t be ac-
countable for them.
6
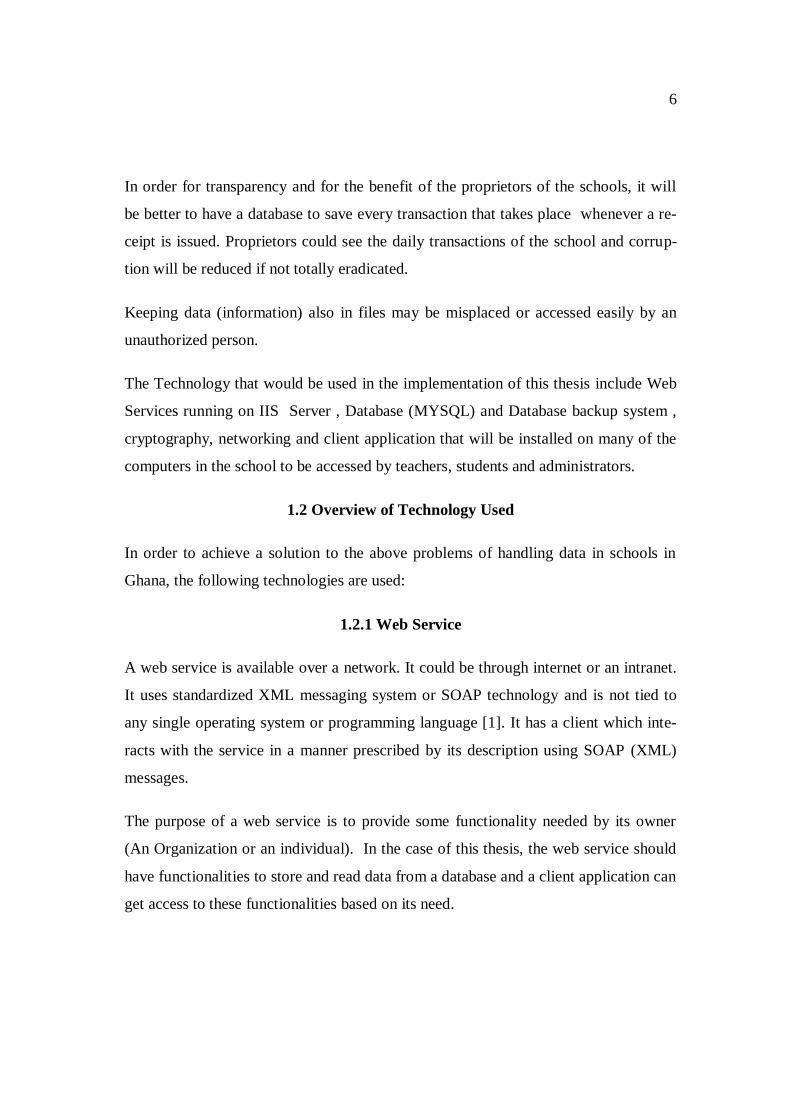
In order for transparency and for the benefit of the proprietors of the schools, it will
be better to have a database to save every transaction that takes place whenever a re-
ceipt is issued. Proprietors could see the daily transactions of the school and corrup-
tion will be reduced if not totally eradicated.
Keeping data (information) also in files may be misplaced or accessed easily by an
unauthorized person.
The Technology that would be used in the implementation of this thesis include Web
Services running on IIS Server , Database (MYSQL) and Database backup system ,
cryptography, networking and client application that will be installed on many of the
computers in the school to be accessed by teachers, students and administrators.
1.2 Overview of Technology Used
In order to achieve a solution to the above problems of handling data in schools in
Ghana, the following technologies are used:
1.2.1 Web Service
A web service is available over a network. It could be through internet or an intranet.
It uses standardized XML messaging system or SOAP technology and is not tied to
any single operating system or programming language [1]. It has a client which inte-
racts with the service in a manner prescribed by its description using SOAP (XML)
messages.
The purpose of a web service is to provide some functionality needed by its owner
(An Organization or an individual). In the case of this thesis, the web service should
have functionalities to store and read data from a database and a client application can
get access to these functionalities based on its need.
7
The service should be able to authenticate who has the right to access a particular da-
ta. Information that will be store include: name, telephone numbers, picture, grades
and so on.
The web service will run on IIS on Windows Server and the client’s application in-
stalled on many computers in the school connects to the server in an intranet. The ap-
plication will be an intranet because internet access to most schools in Ghana is li-
mited or non existing.
In order for the application to work, the computers need to be connected to the server
running the web service. This thesis is related to the software aspect of the system and
so networking aspect will be brief.
1.2.2 MySQL
MySQL is open source database software. Many of the world's big companies like
Yahoo, Goodle, YouTube and the rest use MySQL to store data.
MySQL is a key part of much fast-growing open source enterprise software such as
Linux, Apache, PHP and so on [3].
It is run as a server to provide users access to number of databases. This application
uses MySQL to store data in order to be retrieved and processed later. In order for the
.NET Framework to work with MySQL, the MySQL connector driver has to be in-
stalled. It is automatically added to the project afterward.
The system will have a database backup system to ensure that data is never lost and
will be available any time it is needed even if something happens to the database
server. I will be using external database backup in which the database is saved on an
external drive.
8
1.2.3 Cryptography
Cryptography is used to encrypt plain text to be unreadable. The passwords for users
of this application are encrypted before storing them into the database in order for da-
tabase managers not to see the plain password of users to impersonate them.
It also decrypts the encrypted password if a user forgets his or her password to plain
text to be given to the user.
9
2 .NET WEB SERVICE FOR HANDLING STUDENT DATA
This software is built for administrators, teachers and students. It is to replace the te-
dious and cumbersome ways of handling students and teachers data. Its implementa-
tion will save great time and energy instead of going by the normal ways of recording
students’ data: recording grades, recording and issuing of school reports, recording
student attendance and retrieving of data when needed. As stated above, the applica-
tion is made for three main users as highlight below:
Administrator
Teacher
Student
The administrator has more functionality, followed by the class teacher and the stu-
dent with the least functionalities.
2.1 Major Functionalities
Many of the features of this software require user name and password since not all
users had the right to perform certain tasks. For instance, Administrator does not have
the right to grade a student and a teacher do not also have the right to add a new stu-
dent or course etc. Certain features also do not need a user name or password like
searching for a person for instance.
The table below shows the application functionalities, description and priority. 5 is the
highest and 3 is the lowest priority.

10
Table 1. Major Functionalities and priorities for administrator
Task Number Task Description Prerequisite Priority
1 Login Signs all users in to au-
thenticate them
None 5
2 Add New Data This enables administra-
tor to add new data such
as a course, teacher, fel-
low administrator, stu-
dent and so on
1 5
3 Edit This enables administra-
tor to edit previously ex-
isting data such as person
details, school informa-
tion and so on
2 5
4 Get Student
Report
This enables administra-
tor to print the report of
student
1 5
5 Payments This enables administra-
tor to receive money and
issue receipts and also
check transactions made
2 5
6 Search Allows all users to search
for the contact of a per-
son
2 3
11
The above table shows the major functionality for the administrator. Most of the func-
tionalities are marked 5 as priorities because that was the main reason why the appli-
cation is developed. The search functionality will be nice to have and therefore has a
lower priority.
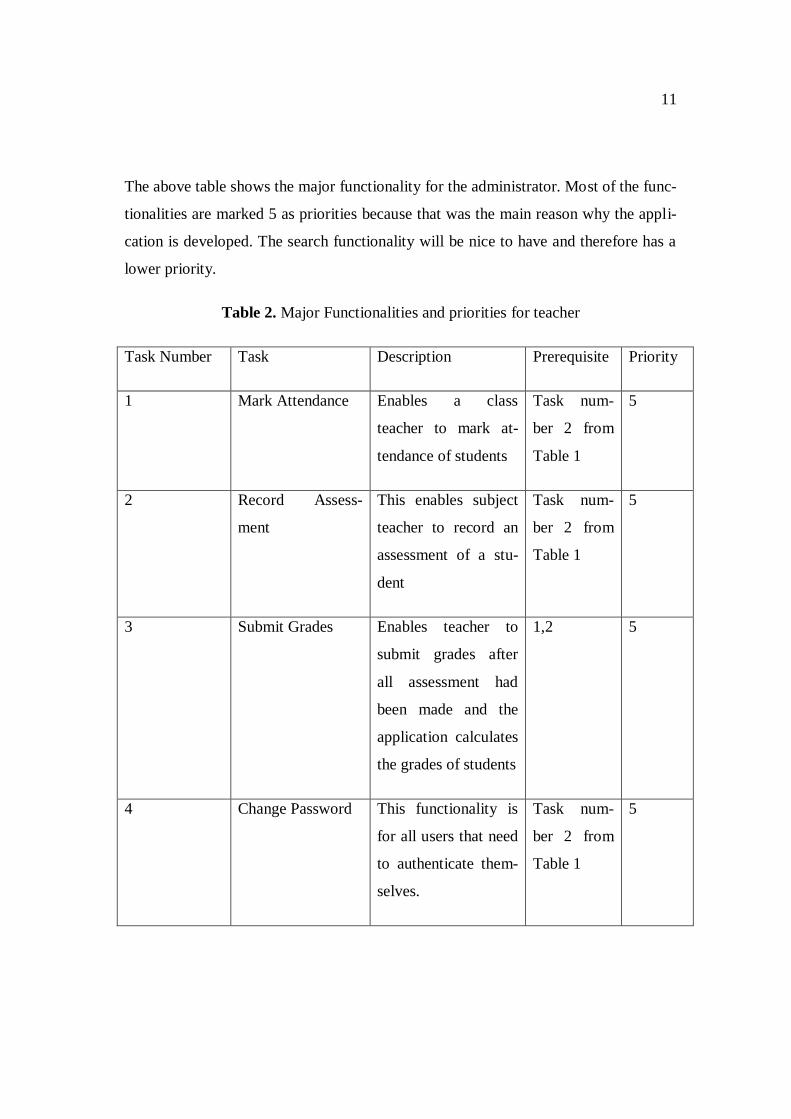
Table 2. Major Functionalities and priorities for teacher
Task Number Task Description Prerequisite Priority
1 Mark Attendance Enables a class
teacher to mark at-
tendance of students
Task num-
ber 2 from
Table 1
5
2 Record Assess-
ment
This enables subject
teacher to record an
assessment of a stu-
dent
Task num-
ber 2 from
Table 1
5
3 Submit Grades Enables teacher to
submit grades after
all assessment had
been made and the
application calculates
the grades of students
1,2 5
4 Change Password This functionality is
for all users that need
to authenticate them-
selves.
Task num-
ber 2 from
Table 1
5
12
The above table is the major functionalities for a teacher. All the functionalities have
priority of 5 because they are all must have. These functionalities enable teachers to
assess and grade students.
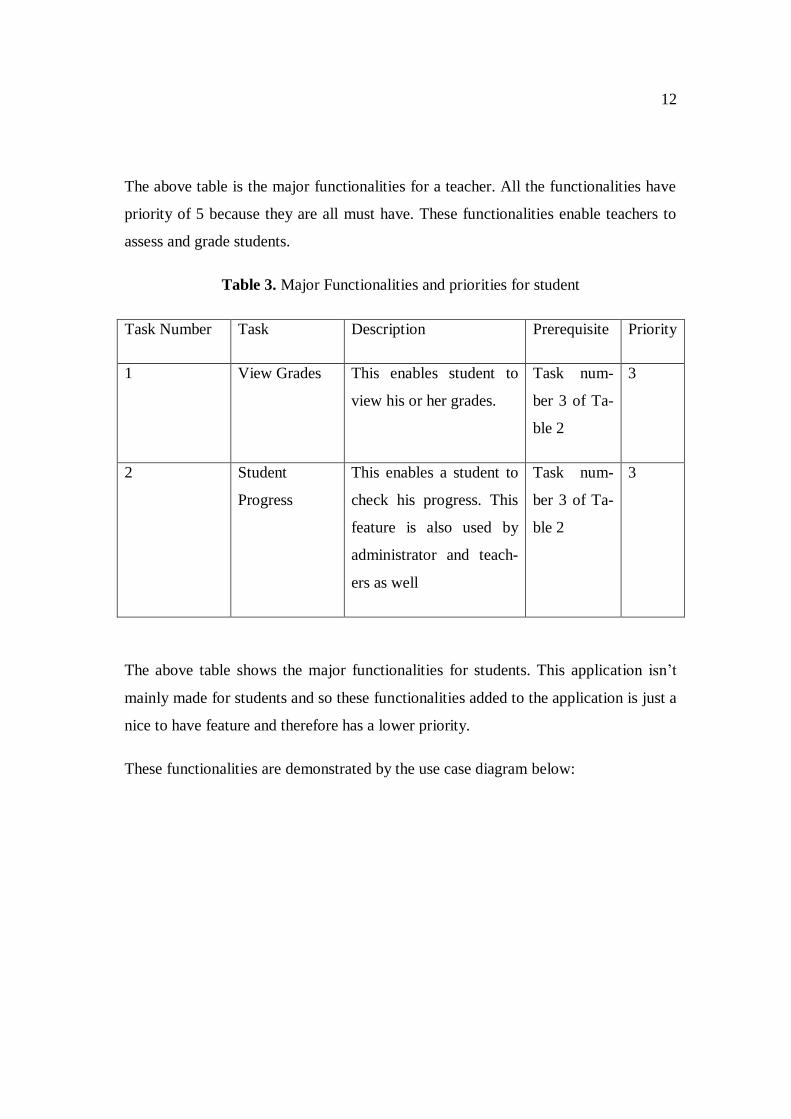
Table 3. Major Functionalities and priorities for student
Task Number Task Description Prerequisite Priority
1 View Grades This enables student to
view his or her grades.
Task num-
ber 3 of Ta-
ble 2
3
2 Student
Progress
This enables a student to
check his progress. This
feature is also used by
administrator and teach-
ers as well
Task num-
ber 3 of Ta-
ble 2
3
The above table shows the major functionalities for students. This application isn’t
mainly made for students and so these functionalities added to the application is just a
nice to have feature and therefore has a lower priority.
These functionalities are demonstrated by the use case diagram below:

13
Figure 1. Use Case diagram for the application
From the above diagram, we can see that an administrator has the right to add or edit
information about fellow administrator, Teacher, Student, Course, Information about
the school (e.g. name of the school, telephone number, location etc) and Date the next
term will begin. An administrator can get access to student report and print it out to be
signed by the headmaster and given to the student. He can also check student academ-
14
ic progress, search for a person and also change his password. An administrator who
had been given a special privilege can retrieve a forgotten password from the data-
base.
A teacher can grade a student and edit grade he had previously awarded to a student.
A class teacher can also mark the daily school attendance of students.
A student can also check his academic year progress, view grades and also change his
password.
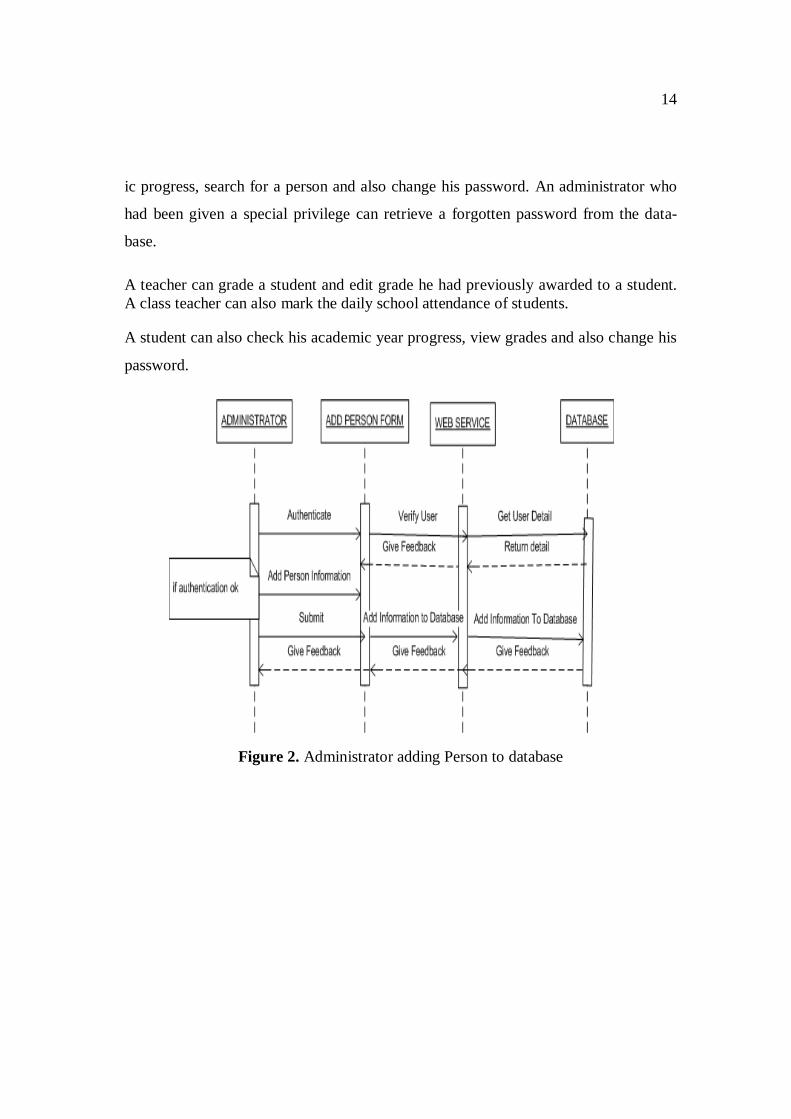
Figure 2. Administrator adding Person to database
15
The above figure is the sequence diagram of an administrator adding a person (stu-
dent, teacher, administrator or other worker) information to the database. Administra-
tor first has to authenticate himself as an administrator and if login is successful, he
can now add the person data which is written into the database. An id is generated by
the software and a default password is given to the student (12345).
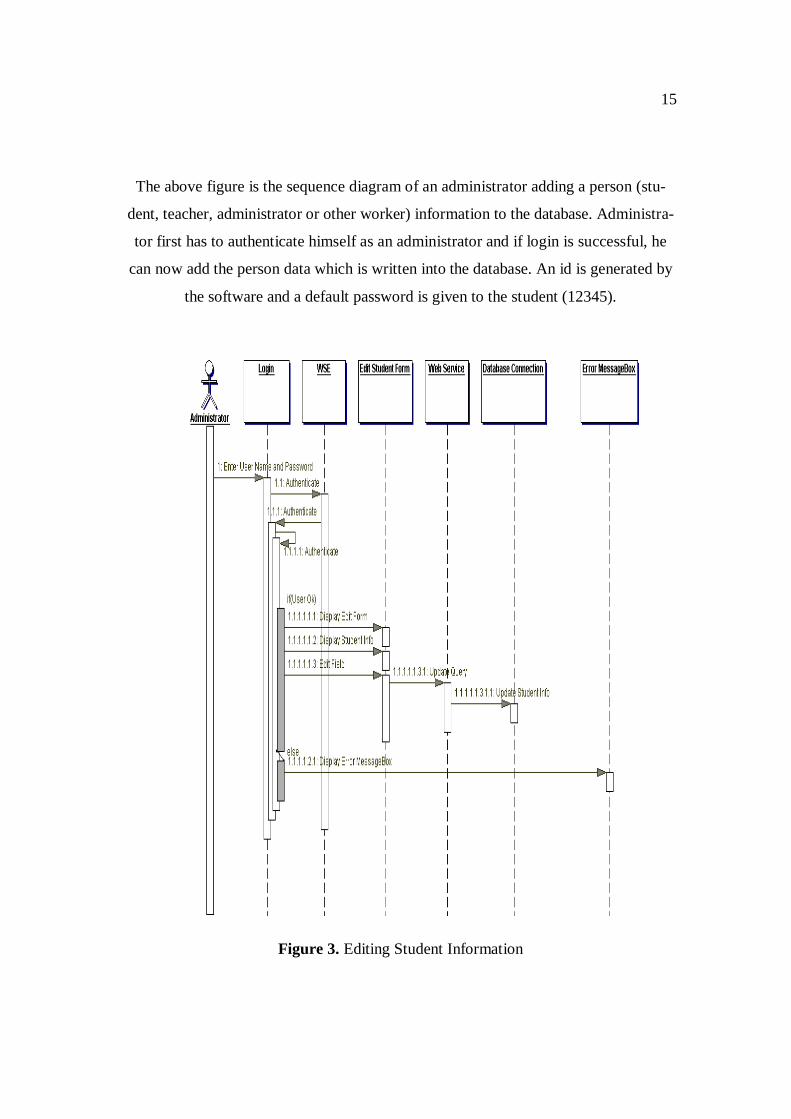
Figure 3. Editing Student Information
16
The above figure shows the sequence diagram of an administrator trying to edit a stu-
dent data. He first had to authenticate himself. If login was successful, an edit form
appears and he enters the student ID and if the student exists, his data is retrieved
from the database and displayed on the form which can be edited with the exception
of the ID. The editing of teachers, fellow administrators and courses are similar to the
above sequence diagram.
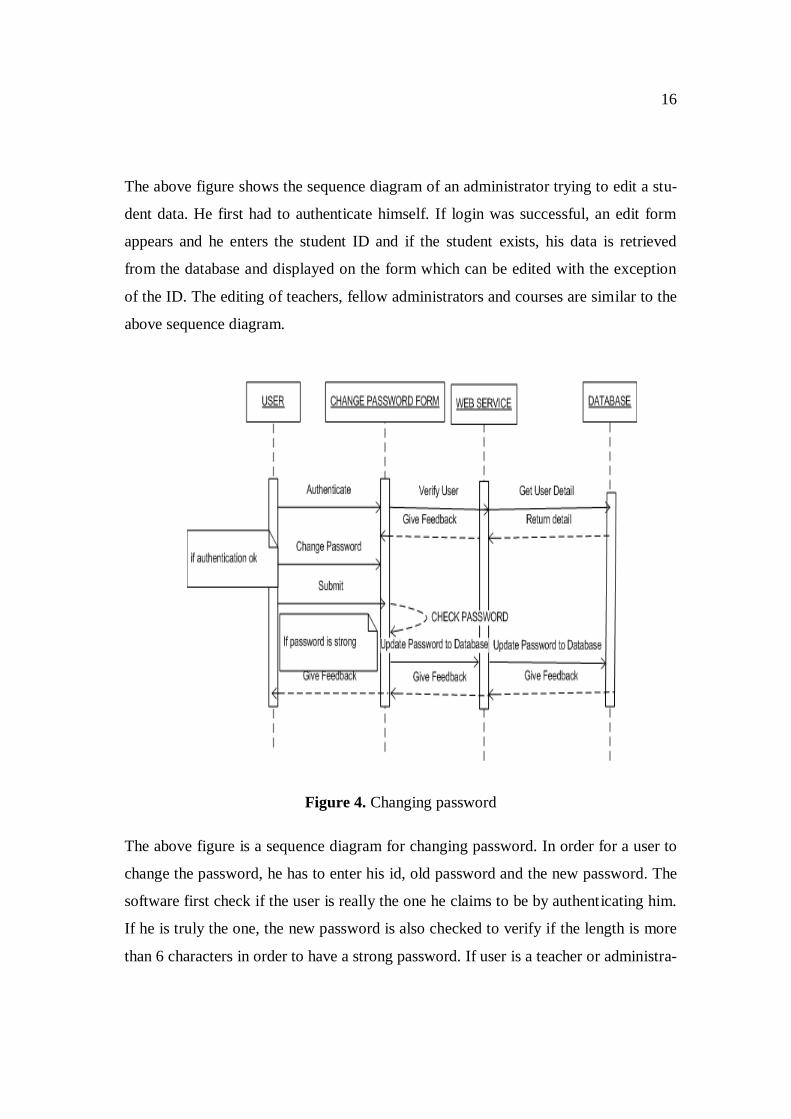
Figure 4. Changing password
The above figure is a sequence diagram for changing password. In order for a user to
change the password, he has to enter his id, old password and the new password. The
software first check if the user is really the one he claims to be by authenticating him.
If he is truly the one, the new password is also checked to verify if the length is more
than 6 characters in order to have a strong password. If user is a teacher or administra-
17
tor, password needs to be stronger and so the software checks if password contains at
least one upper case and a number to make guessing more difficult.
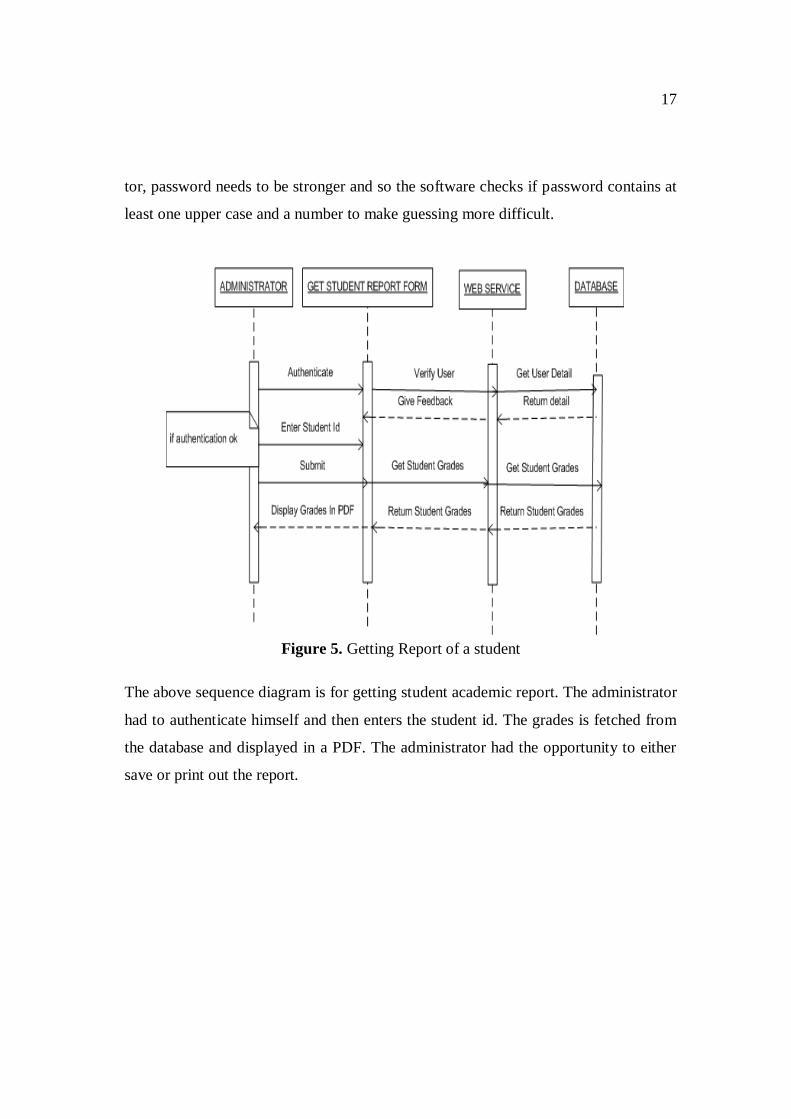
Figure 5. Getting Report of a student
The above sequence diagram is for getting student academic report. The administrator
had to authenticate himself and then enters the student id. The grades is fetched from
the database and displayed in a PDF. The administrator had the opportunity to either
save or print out the report.
18
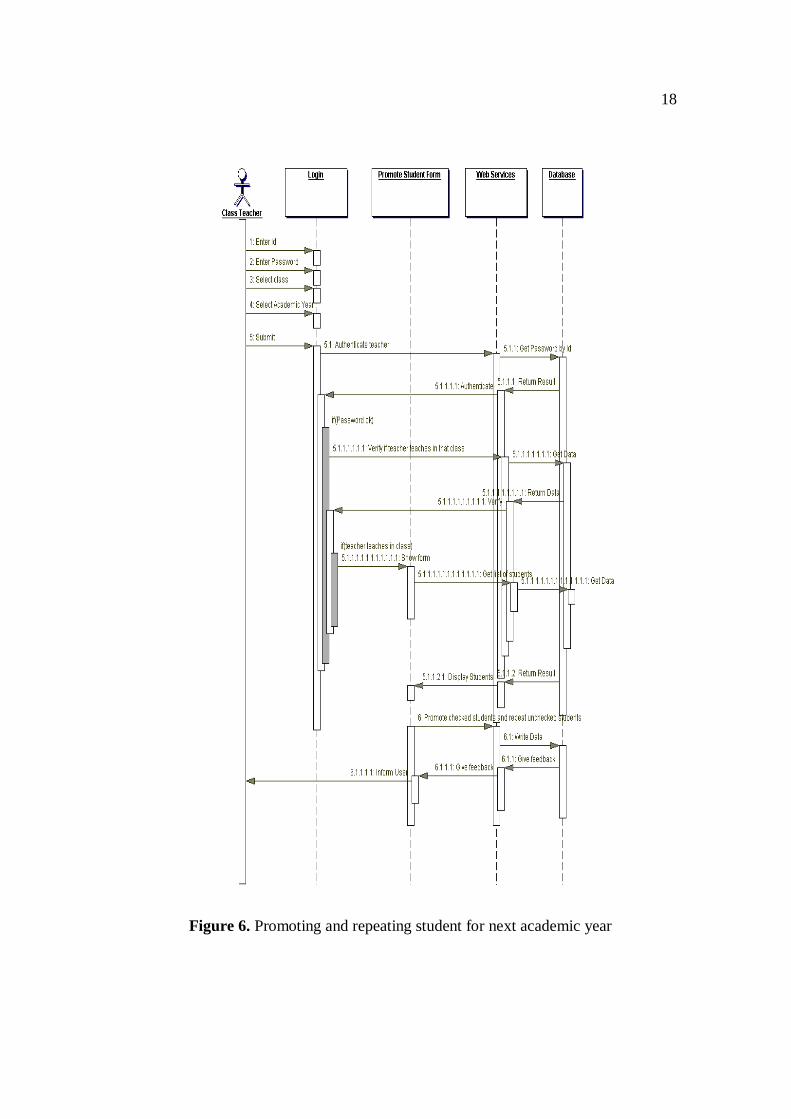
Figure 6. Promoting and repeating student for next academic year

19
The above figure is the sequence diagram for either promoting or repeating a student
for the next academic year. The class teacher authenticates himself and he is also
checked if he is the class teacher. If he is the class teacher, the lists of students is re-
trieved from the database and displayed on a form. He can then check the students
who are to be promoted to the next academic year. The unchecked students are re-
peated in the same class for the next academic year.
Figure 7. Retrieving forgotten password
From the above sequence diagram, the administrator who had been assigned special
privilege could retrieve a forgotten password to a user. The administrator authenti-
cates himself and if authentication is successful, the password of the person is re-
trieved from the database and displayed in a PDF page.
20
3 SYSTEM DESIGN
The system design is divided into four categories as stated below:
Interface Design
Database Design
Network Design
Security Design
3.1 Interface Design
The interface design (Graphical User Interface) is a crucial part of the system design
since it is the main way users interact with the software and it is meant to be easy to
use by all those this software is intended for. The interface is made up of the main
window application and the other forms that come with it base on the requirement of
service. The following are the GUI for the main window and the forms used.
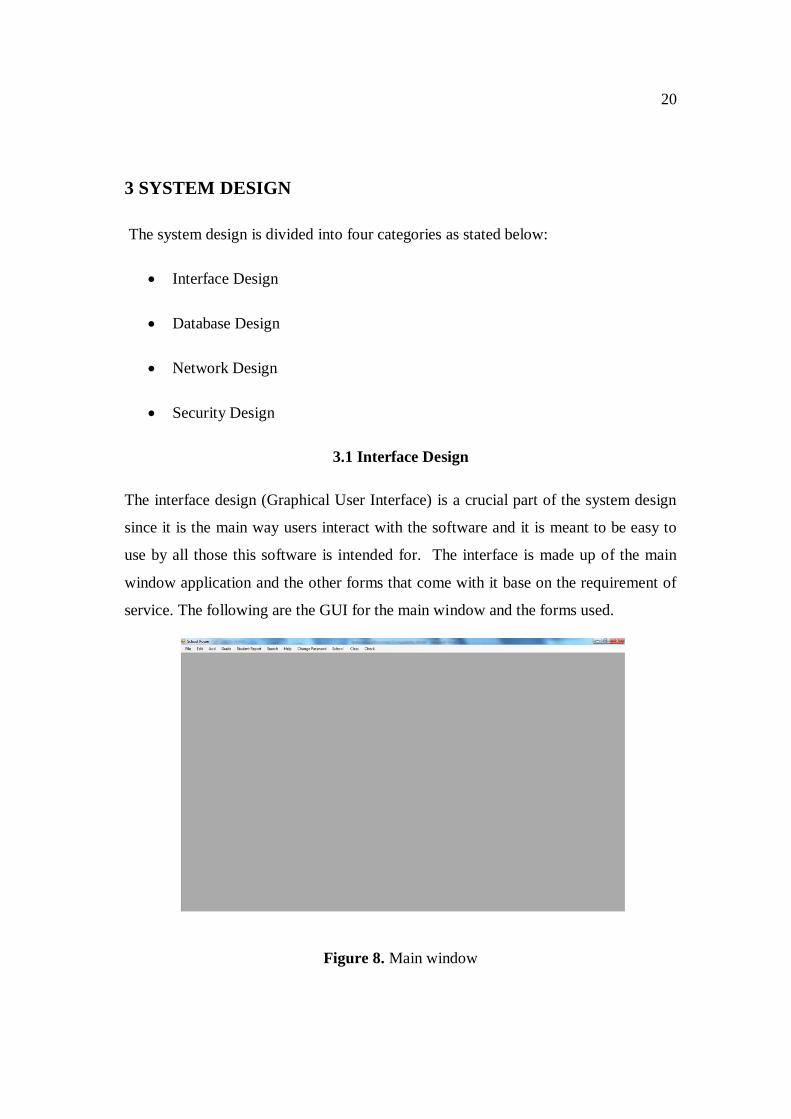
Figure 8. Main window

21
The figure above is the main window that comes up when the application is started. It
has the following menus and their corresponding submenus as shown by the figures
below:
Figure 9. Submenu for File menu
The above figure is the submenu for the file menu. The Exit submenu, exits the appli-
cation when it is selected.
Figure 10. Submenu for the Edit men
The above figure is the submenu for the edit menu. The first 5 submenu have another
submenu (update and Delete) as indicated above. The Update submenu is for updating
student, teacher, administrator and other worker’s information. The Delete submenu is
for deleting users from the database records. The figures below show the GUIs for the
Updating and Deleting

22
Figure 11. Login form
The above figure is the login form that appears when the update or delete submenus
are selected. It is only an administrator that can update or delete user information so
he is authenticated with the login form above.
Fig 12. GUI for adding students, teachers and administrators
The figure above shows the GUI for adding students, teachers or administrators. The
profession combo box has student, teacher or administrator to give the administrator
the opportunity to choose the category of people he wants to add.

23
Figure 13. GUI for adding a course
The above GUI is for adding a course to the database. The administrator writes the
name of the course and select the class and the teacher who is suppose to teach the
course. The teachers have their ids attached to their names in order to know the differ-
ence between two teachers by the same names. The administrator can add several
courses before closing the form. It has a clear button in order to clear the previous da-
ta written in order not to record wrong data.
Figure 14. GUI for submenus for Student Report
The above figure is the GUI for the submenus of the academic report menu. The fig-
ures below show the forms that appear when each submenu is clicked.

24
Figure 15. GUI for requesting Terminal Reports of students
The above figure is the GUI for getting students report. The administrator just has to
enter the id of the student and select the class, the academic year and term. This GUI
is for just terminal report (Report for only academic term).
Figure 16. GUI for getting student’s progress
The above GUI is for getting the academic year progress of a student. The student,
teacher or administrator just enters the id of the student to get the academic progress
of the student.
25
Figure 17. GUI for the submenus of Search menu
The above figure is the GUI for searching for a person from the database. User just
had to choose the category of search he or she wants to perform. A form appears for
user to enter the search value and the result is displayed.
Figure 18. Password submenus
The above figure is the GUI for submenus for the Password menu. The “change”
submenu is used for changing previously existing password and the “retrieve” subme-
nu is used to retrieve a forgotten password by an administrator with special privilege.
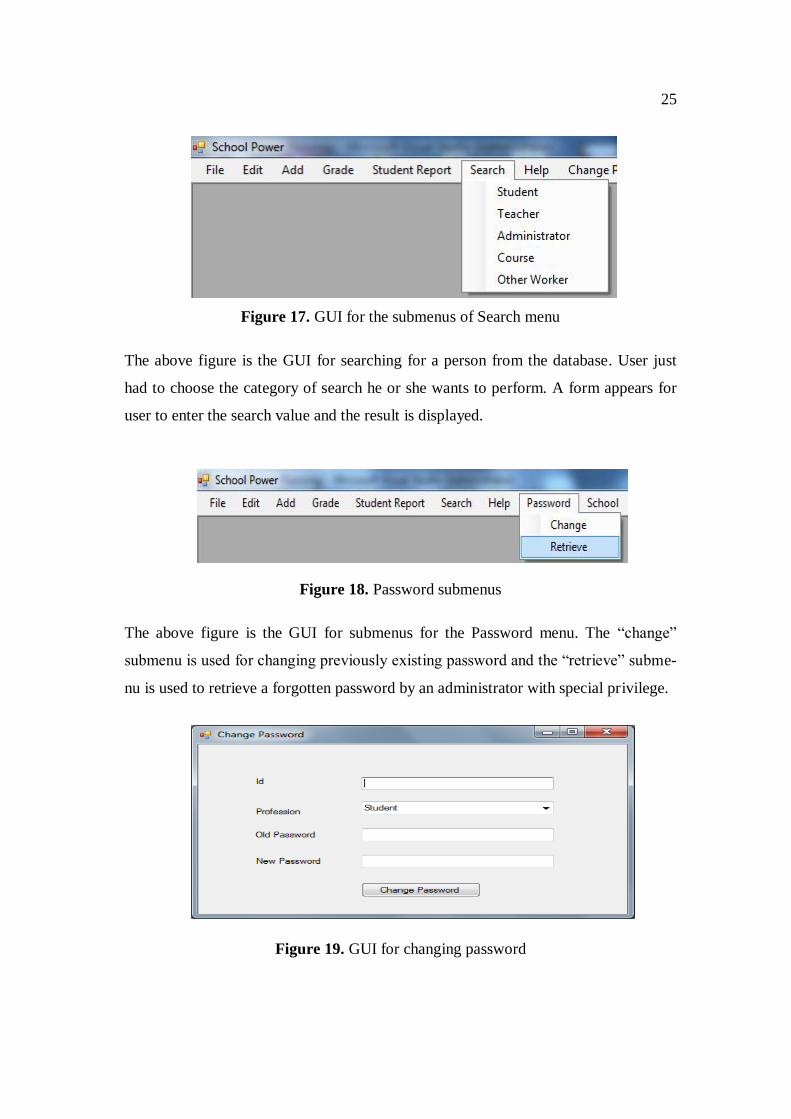
Figure 19. GUI for changing password
26
The above figure is the GUI for changing password of a user. User enters his or her
id, old password and new password. The software checks if user is the right person
and checks if new password is not the same as the old password and also check if
password is long enough.
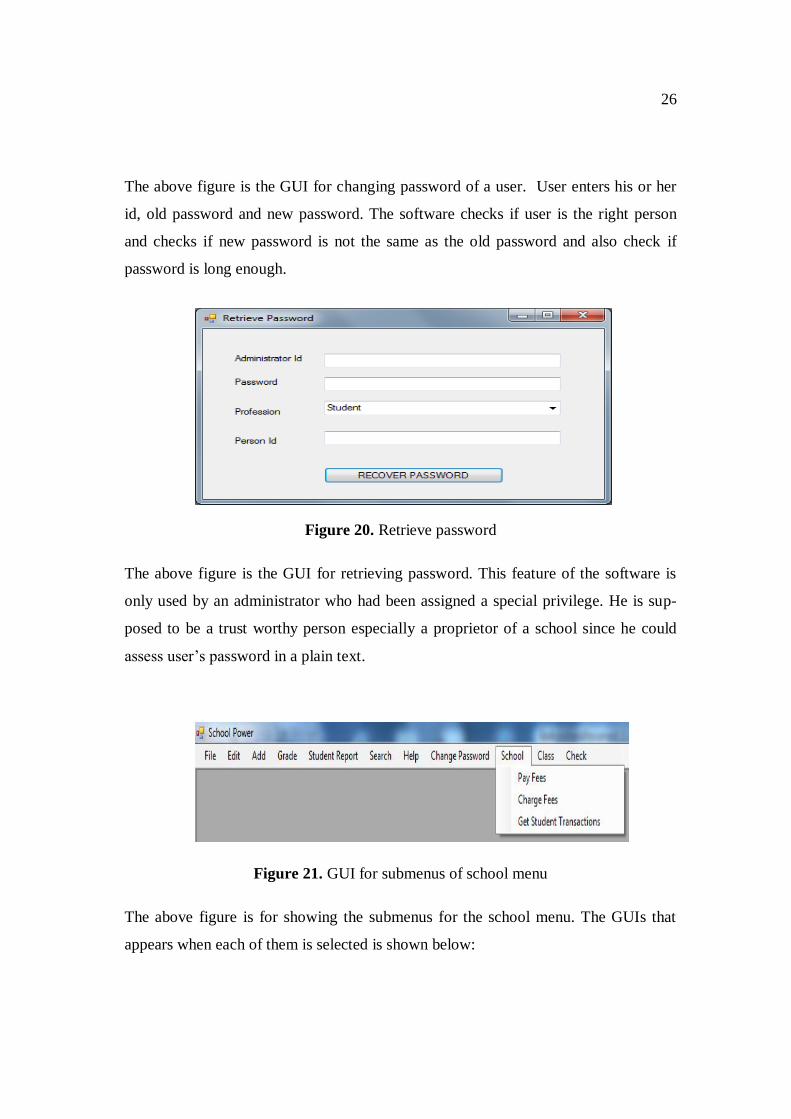
Figure 20. Retrieve password
The above figure is the GUI for retrieving password. This feature of the software is
only used by an administrator who had been assigned a special privilege. He is sup-
posed to be a trust worthy person especially a proprietor of a school since he could
assess user’s password in a plain text.
Figure 21. GUI for submenus of school menu
The above figure is for showing the submenus for the school menu. The GUIs that
appears when each of them is selected is shown below:
27
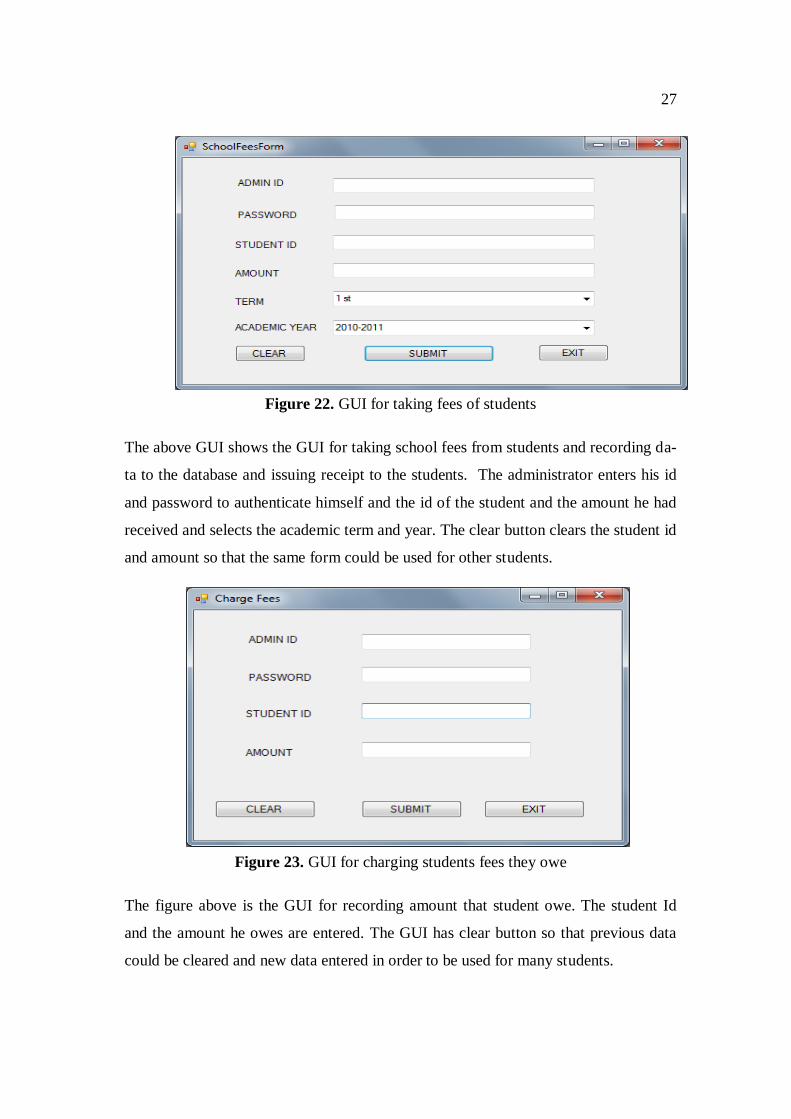
Figure 22. GUI for taking fees of students
The above GUI shows the GUI for taking school fees from students and recording da-
ta to the database and issuing receipt to the students. The administrator enters his id
and password to authenticate himself and the id of the student and the amount he had
received and selects the academic term and year. The clear button clears the student id
and amount so that the same form could be used for other students.
Figure 23. GUI for charging students fees they owe
The figure above is the GUI for recording amount that student owe. The student Id
and the amount he owes are entered. The GUI has clear button so that previous data
could be cleared and new data entered in order to be used for many students.
28
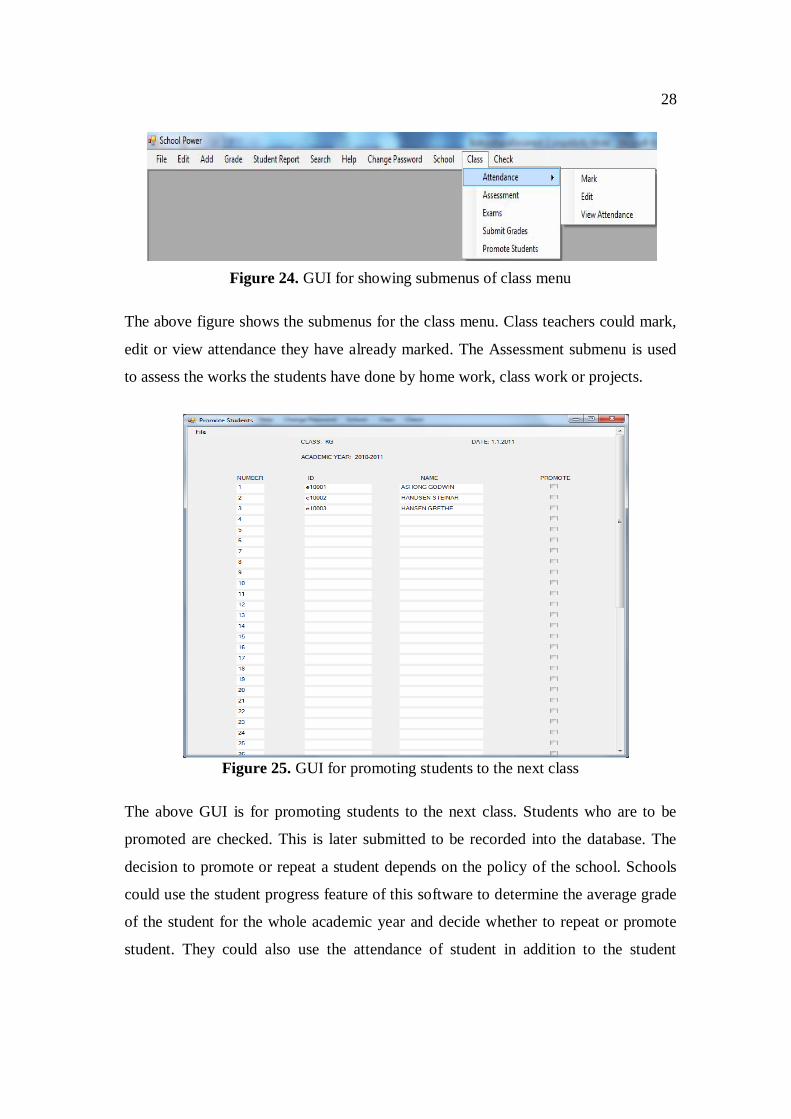
Figure 24. GUI for showing submenus of class menu
The above figure shows the submenus for the class menu. Class teachers could mark,
edit or view attendance they have already marked. The Assessment submenu is used
to assess the works the students have done by home work, class work or projects.
Figure 25. GUI for promoting students to the next class
The above GUI is for promoting students to the next class. Students who are to be
promoted are checked. This is later submitted to be recorded into the database. The
decision to promote or repeat a student depends on the policy of the school. Schools
could use the student progress feature of this software to determine the average grade
of the student for the whole academic year and decide whether to repeat or promote
student. They could also use the attendance of student in addition to the student

29
progress feature of this software. The unchecked students are repeated in the same
class for the next academic year.
Figure 26. Shows the submenu for the check menu.
It is used to check the daily transaction of the school. This is intended to stop embez-
zling of funds by some people placed in charge of handling collecting of money. The
total money made in a particular day could be viewed in order for the proprietors of a
school to know how much money being paid to the cashiers.
Figure 27. Checking for daily transactions
The above figure is the GUI for checking for the daily transaction. The administrator
enters his id and password to authenticate him and then selects the date of transaction
he wants to check. The daily transaction is then displayed on a PDF page if authenti-
cation is successful.
30
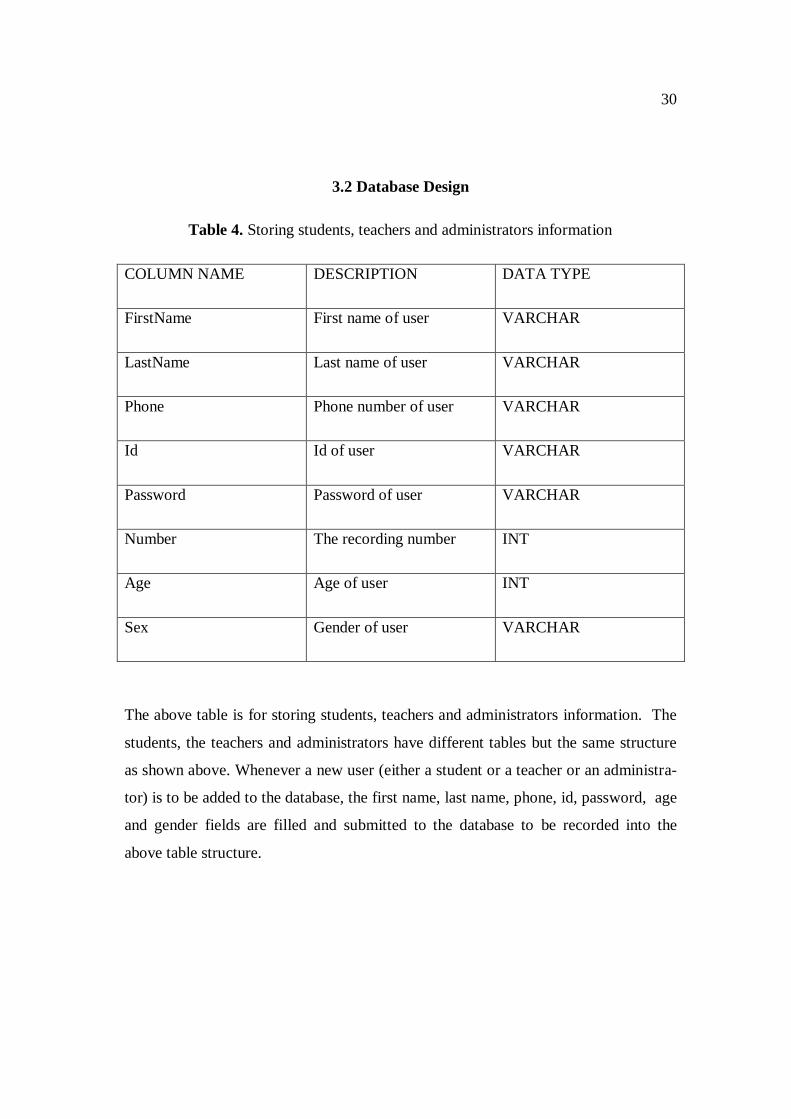
3.2 Database Design
Table 4. Storing students, teachers and administrators information
COLUMN NAME DESCRIPTION DATA TYPE
FirstName First name of user VARCHAR
LastName Last name of user VARCHAR
Phone Phone number of user VARCHAR
Id Id of user VARCHAR
Password Password of user VARCHAR
Number The recording number INT
Age Age of user INT
Sex Gender of user VARCHAR
The above table is for storing students, teachers and administrators information. The
students, the teachers and administrators have different tables but the same structure
as shown above. Whenever a new user (either a student or a teacher or an administra-
tor) is to be added to the database, the first name, last name, phone, id, password, age
and gender fields are filled and submitted to the database to be recorded into the
above table structure.

31
Table 5. Storing courses information
COLUMN NAME DESCRIPTION DATA TYPE
SUBJECT The subject to be added VARCHAR
CLASS The class the subject
(course) is taught
VARCHAR
TEACHERID Teacher id VARCHAR
TEACHERNAME Teacher name VARCHAR
The above table is used for storing the courses taught in a class. It takes the subject
(course), the class the course is taught, the id of the teacher who teaches the course
and finally the name of the teacher.
32
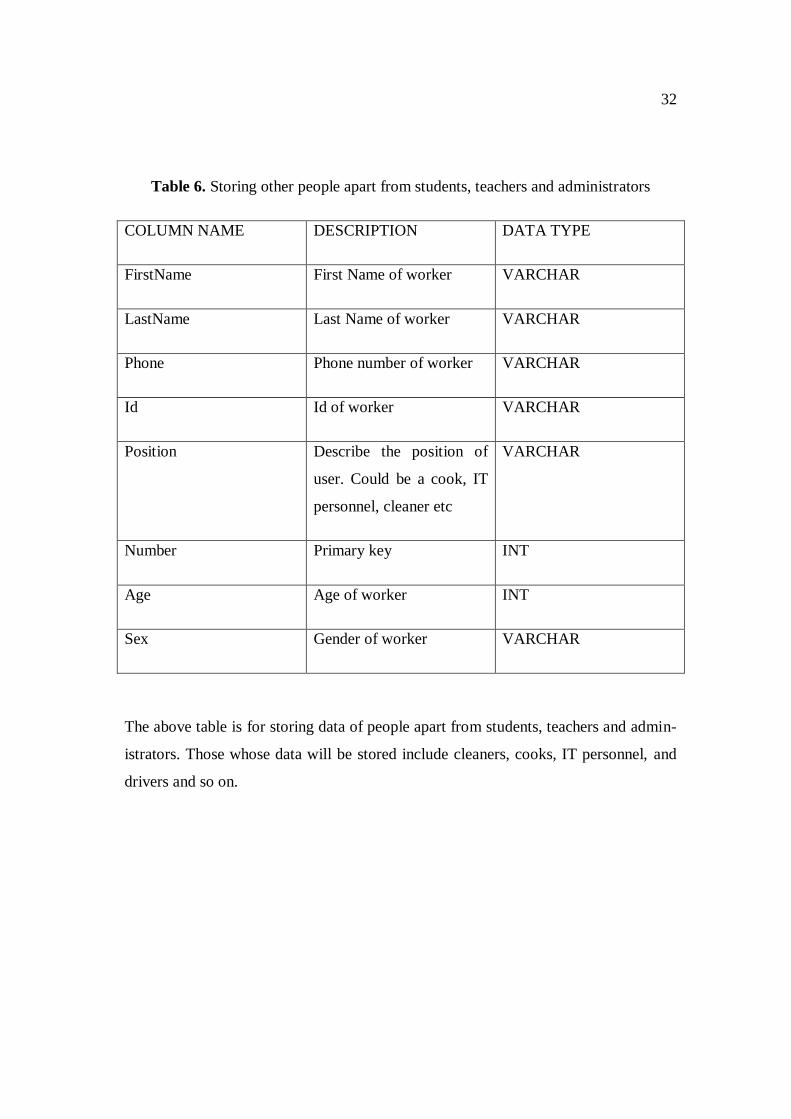
Table 6. Storing other people apart from students, teachers and administrators
COLUMN NAME DESCRIPTION DATA TYPE
FirstName First Name of worker VARCHAR
LastName Last Name of worker VARCHAR
Phone Phone number of worker VARCHAR
Id Id of worker VARCHAR
Position Describe the position of
user. Could be a cook, IT
personnel, cleaner etc
VARCHAR
Number Primary key INT
Age Age of worker INT
Sex Gender of worker VARCHAR
The above table is for storing data of people apart from students, teachers and admin-
istrators. Those whose data will be stored include cleaners, cooks, IT personnel, and
drivers and so on.
33
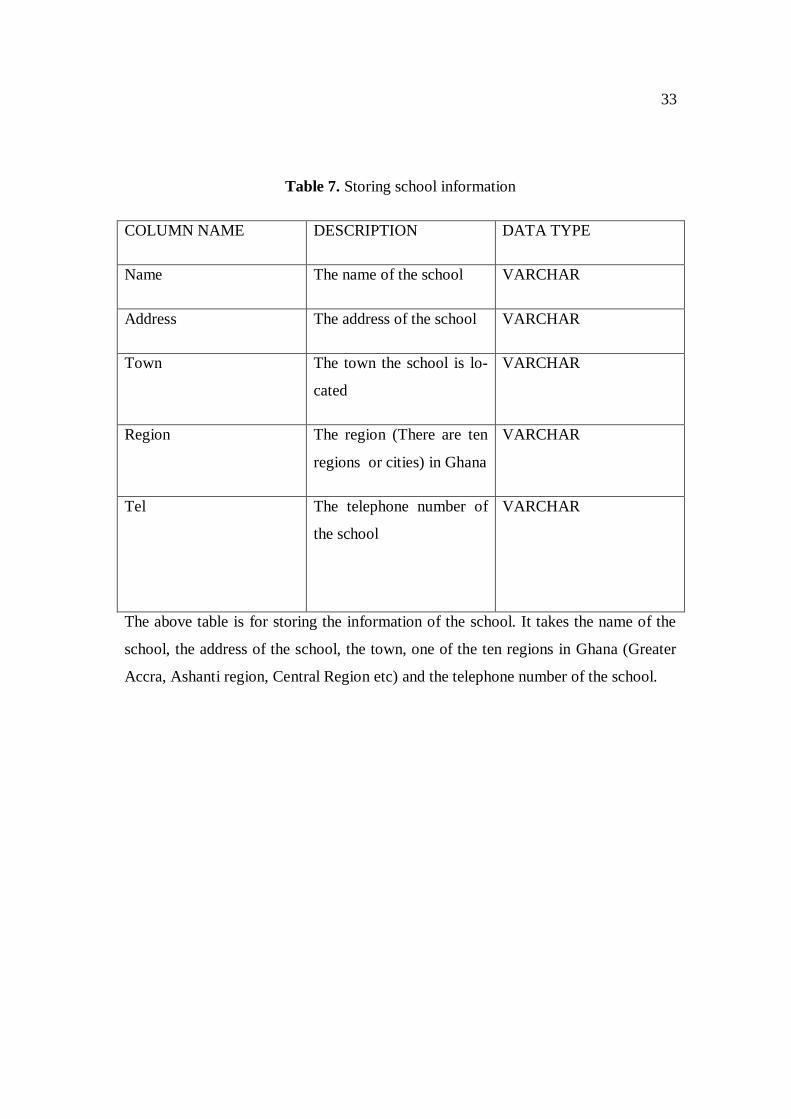
Table 7. Storing school information
COLUMN NAME DESCRIPTION DATA TYPE
Name The name of the school VARCHAR
Address The address of the school VARCHAR
Town The town the school is lo-
cated
VARCHAR
Region The region (There are ten
regions or cities) in Ghana
VARCHAR
Tel The telephone number of
the school
VARCHAR
The above table is for storing the information of the school. It takes the name of the
school, the address of the school, the town, one of the ten regions in Ghana (Greater
Accra, Ashanti region, Central Region etc) and the telephone number of the school.

34
Table 8. Storing the class of students
COLUMN NAME DESCRIPTION DATA TYPE
FirstName The first name of student VARCHAR
LastName The last name of student VARCHAR
Id The id of student VARCHAR
Phone The phone number of stu-
dent
VARCHAR
Class The class of student VARCHAR
AcademicYear The academic year of stu-
dent
VARCHAR
The above table is for storing the classes of students every academic year. This is
done every academic year whether a student is promoted to the next class or repeated
for the next academic year.
Table 9. Storing when the next academic term will resume
COLUMN NAME DESCRIPTION DATA TYPE
Year The academic year VARCHAR
Term The next academic term VARCHAR
Date The date the next term will
resume
VARCHAR

35
The above table is for storing when the next academic term will reopen. This is
needed in order to inform students when they are to report to school on their academic
term report. The table store the academic year, term and date to reopen.
Table 10. Storing grades of students
COLUMN NAME DESCRIPTION DATA TYPE
SUBJECT Subject student is graded
on
VARCHAR
CLASSSCORE The class score VARCHAR
EXAMSCORE The examination score VARCHAR
TOTAL Total VARCHAR
GRADE The grade of the student INT
ASSESSOR The one who assesses the
student
VARCHAR
INTERPRETATION Meaning of grade VARCHAR
TERM The term the student is
graded
VARCHAR
YEAR The academic year the
student is graded
VARCHAR
CLASS The class of the student VARCHAR
36
The above table is for storing the grades of students. After the end of every academic
year, teachers store the grades of students in this table which is retrieved and shown
on a terminal report.
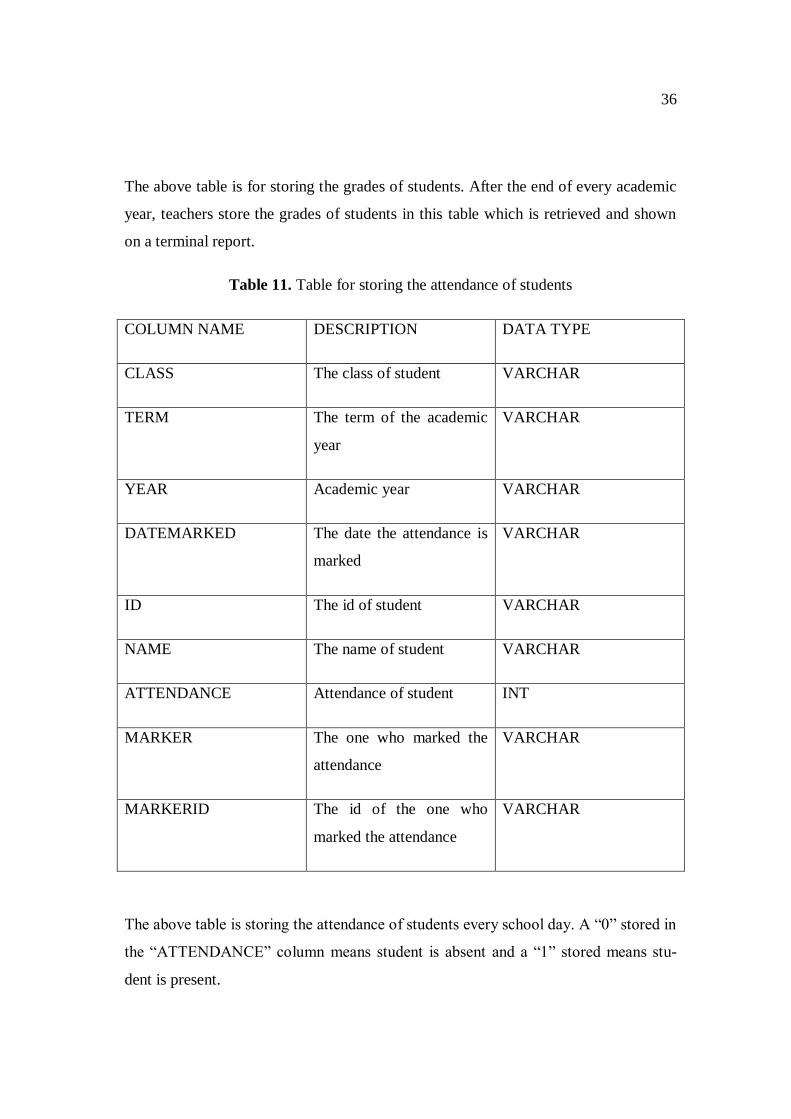
Table 11. Table for storing the attendance of students
COLUMN NAME DESCRIPTION DATA TYPE
CLASS The class of student VARCHAR
TERM The term of the academic
year
VARCHAR
YEAR Academic year VARCHAR
DATEMARKED The date the attendance is
marked
VARCHAR
ID The id of student VARCHAR
NAME The name of student VARCHAR
ATTENDANCE Attendance of student INT
MARKER The one who marked the
attendance
VARCHAR
MARKERID The id of the one who
marked the attendance
VARCHAR
The above table is storing the attendance of students every school day. A “0” stored in
the “ATTENDANCE” column means student is absent and a “1” stored means stu-
dent is present.
37
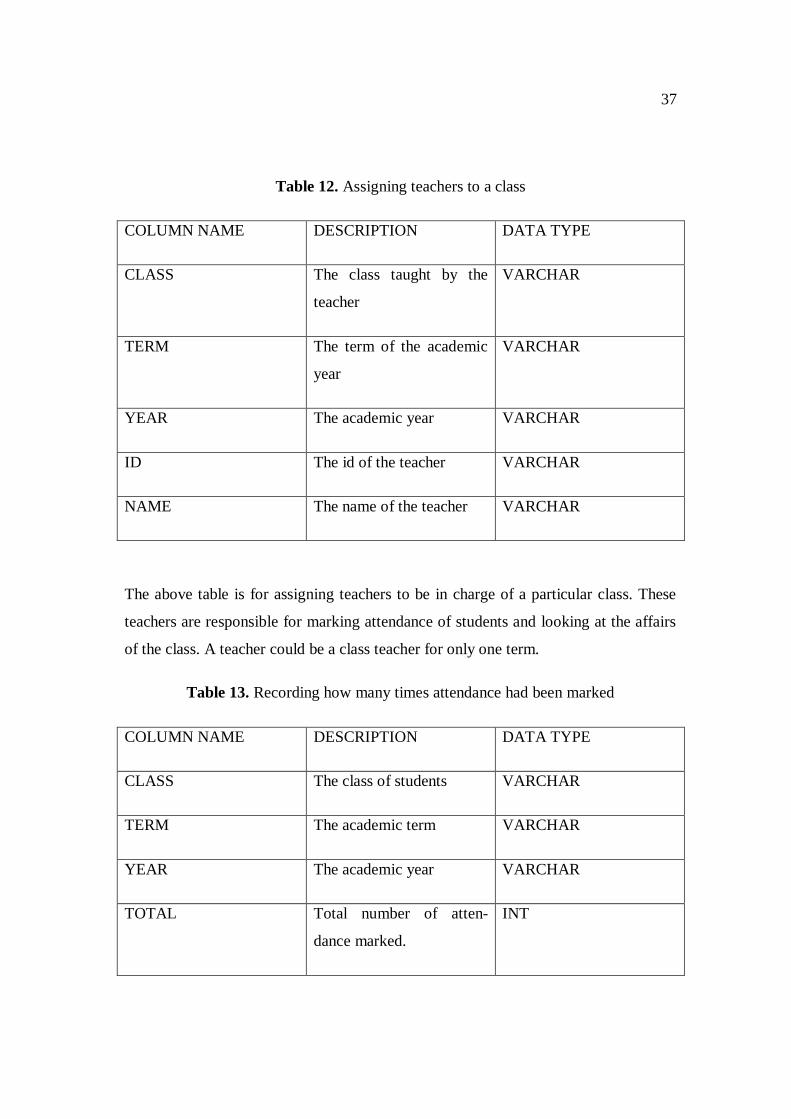
Table 12. Assigning teachers to a class
COLUMN NAME DESCRIPTION DATA TYPE
CLASS The class taught by the
teacher
VARCHAR
TERM The term of the academic
year
VARCHAR
YEAR The academic year VARCHAR
ID The id of the teacher VARCHAR
NAME The name of the teacher VARCHAR
The above table is for assigning teachers to be in charge of a particular class. These
teachers are responsible for marking attendance of students and looking at the affairs
of the class. A teacher could be a class teacher for only one term.
Table 13. Recording how many times attendance had been marked
COLUMN NAME DESCRIPTION DATA TYPE
CLASS The class of students VARCHAR
TERM The academic term VARCHAR
YEAR The academic year VARCHAR
TOTAL Total number of atten-
dance marked.
INT
38
The above table is for recording how many times an attendance had been marked.
Each time the teacher marks the attendance, 1 is added to the previous total atten-
dance marked.
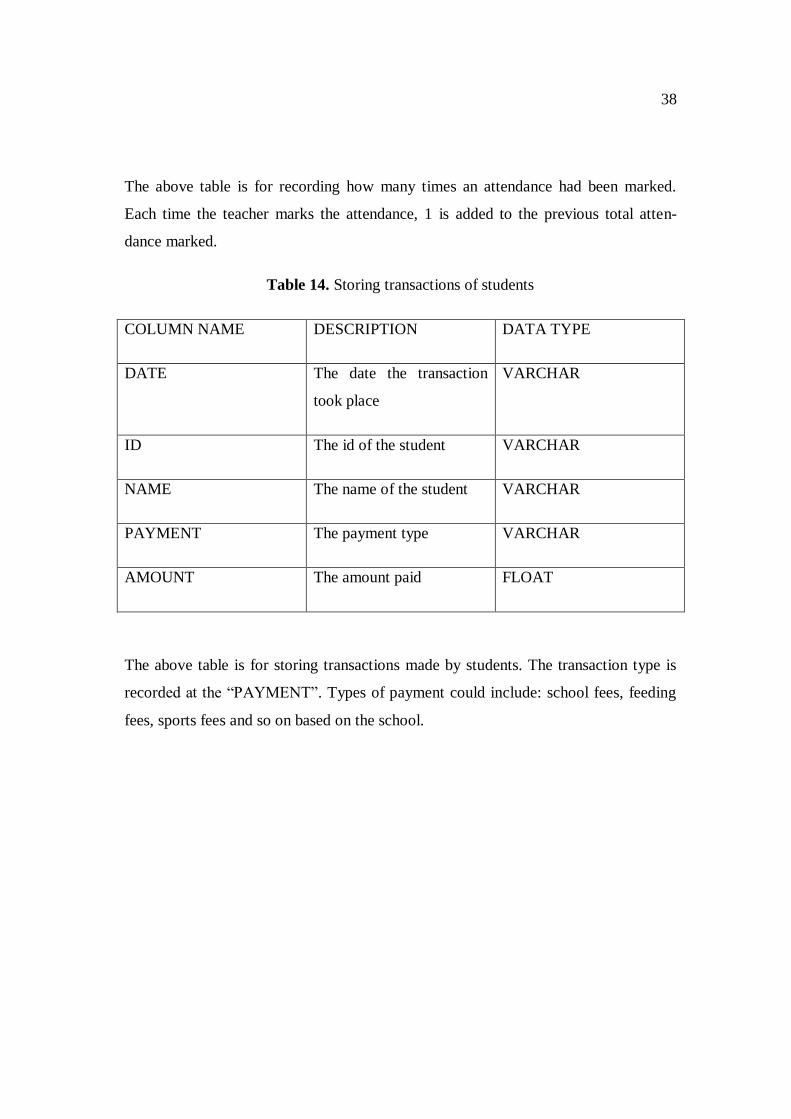
Table 14. Storing transactions of students
COLUMN NAME DESCRIPTION DATA TYPE
DATE The date the transaction
took place
VARCHAR
ID The id of the student VARCHAR
NAME The name of the student VARCHAR
PAYMENT The payment type VARCHAR
AMOUNT The amount paid FLOAT
The above table is for storing transactions made by students. The transaction type is
recorded at the “PAYMENT”. Types of payment could include: school fees, feeding
fees, sports fees and so on based on the school.
39
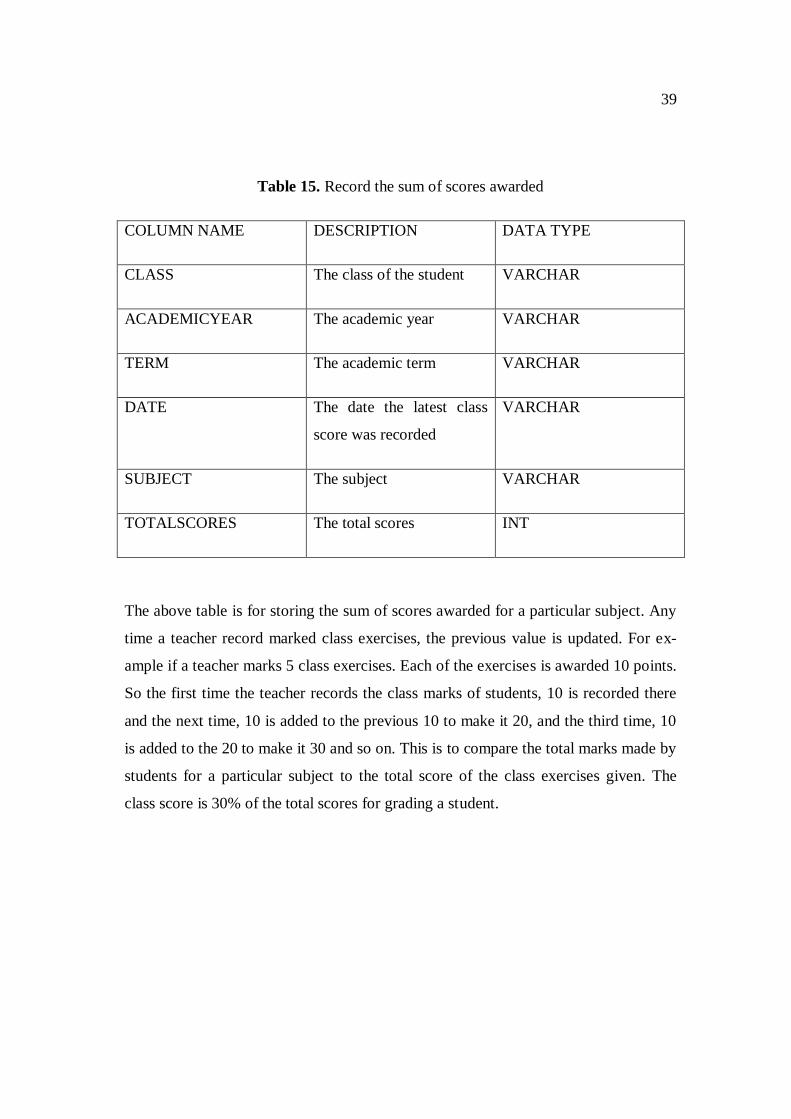
Table 15. Record the sum of scores awarded
COLUMN NAME DESCRIPTION DATA TYPE
CLASS The class of the student VARCHAR
ACADEMICYEAR The academic year VARCHAR
TERM The academic term VARCHAR
DATE The date the latest class
score was recorded
VARCHAR
SUBJECT The subject VARCHAR
TOTALSCORES The total scores INT
The above table is for storing the sum of scores awarded for a particular subject. Any
time a teacher record marked class exercises, the previous value is updated. For ex-
ample if a teacher marks 5 class exercises. Each of the exercises is awarded 10 points.
So the first time the teacher records the class marks of students, 10 is recorded there
and the next time, 10 is added to the previous 10 to make it 20, and the third time, 10
is added to the 20 to make it 30 and so on. This is to compare the total marks made by
students for a particular subject to the total score of the class exercises given. The
class score is 30% of the total scores for grading a student.

40
Table 16. Storing class score or examination scores
COLUMN NAME DESCRIPTION DATA TYPE
CLASS The class of students VARCHAR
ACADEMICYEAR The academic year VARCHAR
TERM The term VARCHAR
DATE Date the class or exam
score is record
VARCHAR
STUDENTID Student id VARCHAR
NAME Name of student VARCHAR
SUBJECT The subject VARCHAR
SCORE The scores FLOAT
The table for storing class score is similar to the table for storing exams score. The
only difference is the value stored in the SCORE column but they have the same
structure.
41
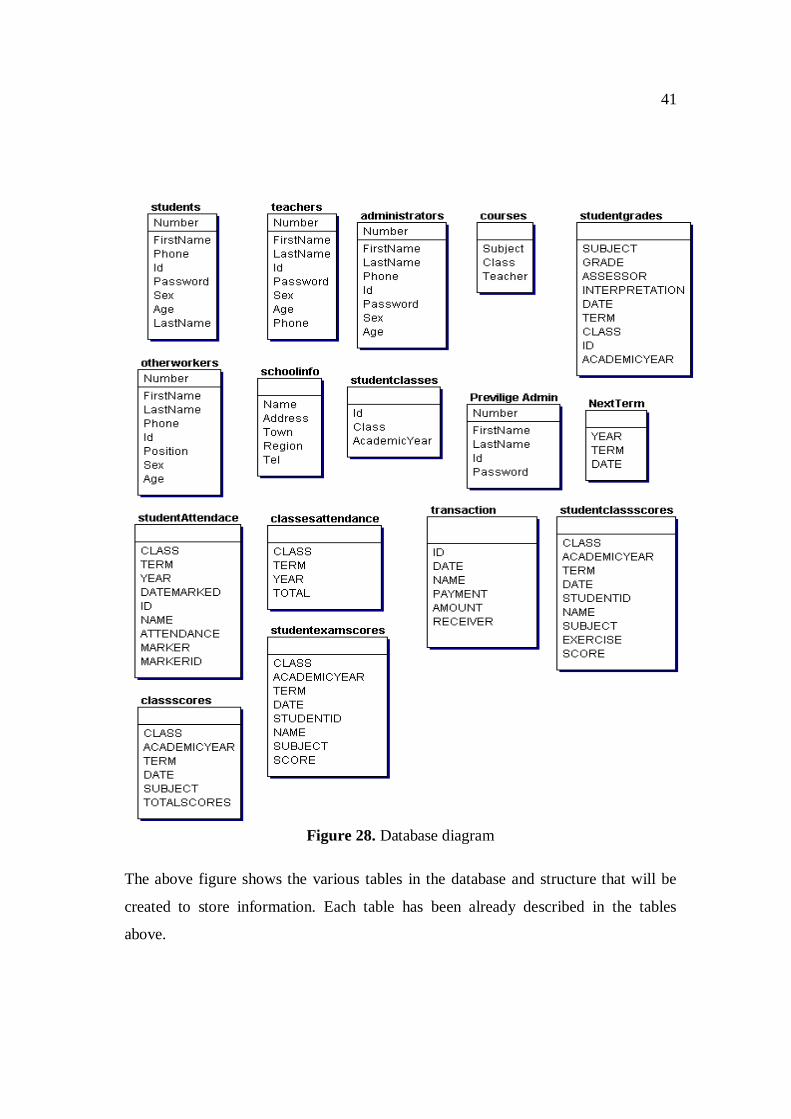
Figure 28. Database diagram
The above figure shows the various tables in the database and structure that will be
created to store information. Each table has been already described in the tables
above.
42
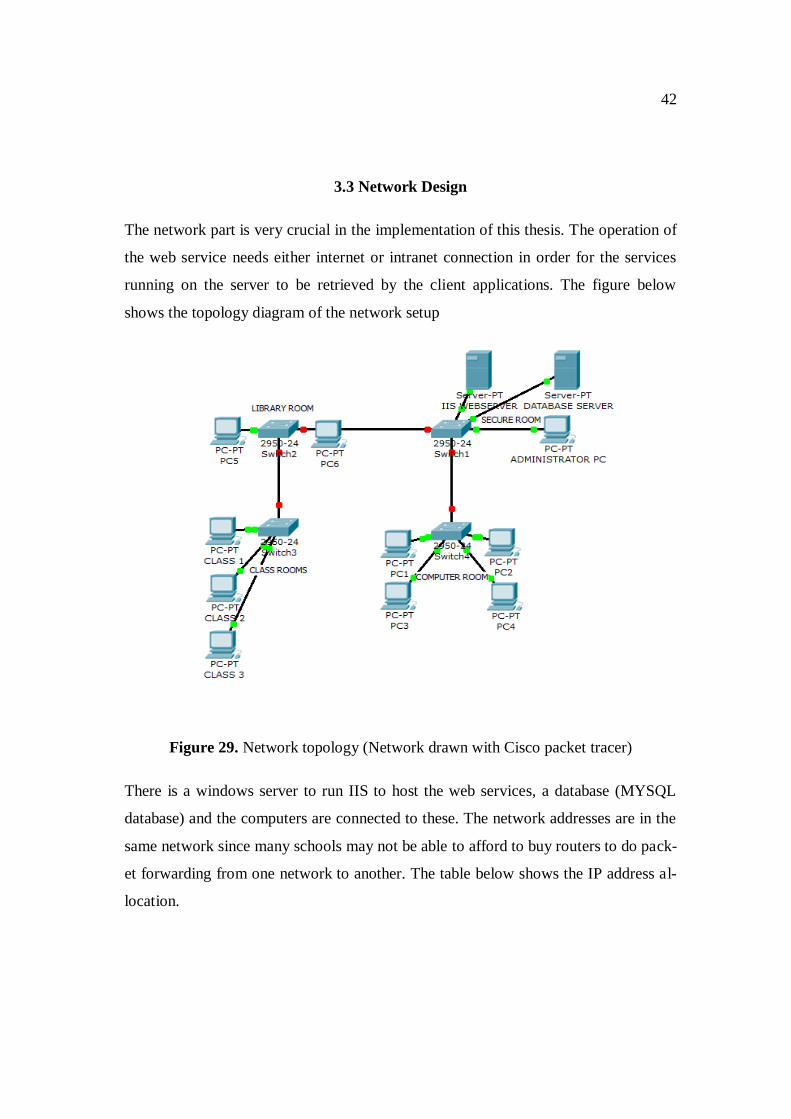
3.3 Network Design
The network part is very crucial in the implementation of this thesis. The operation of
the web service needs either internet or intranet connection in order for the services
running on the server to be retrieved by the client applications. The figure below
shows the topology diagram of the network setup
Figure 29. Network topology (Network drawn with Cisco packet tracer)
There is a windows server to run IIS to host the web services, a database (MYSQL
database) and the computers are connected to these. The network addresses are in the
same network since many schools may not be able to afford to buy routers to do pack-
et forwarding from one network to another. The table below shows the IP address al-
location.
43
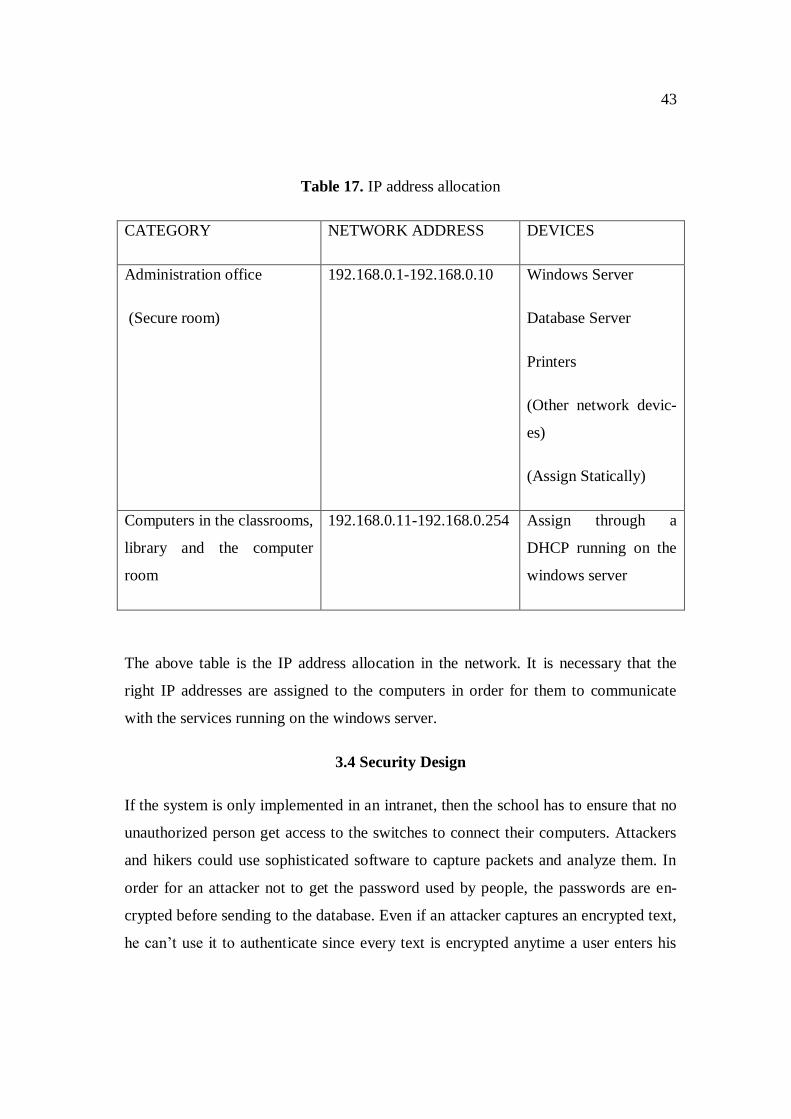
Table 17. IP address allocation
CATEGORY NETWORK ADDRESS DEVICES
Administration office
(Secure room)
192.168.0.1-192.168.0.10 Windows Server
Database Server
Printers
(Other network devic-
es)
(Assign Statically)
Computers in the classrooms,
library and the computer
room
192.168.0.11-192.168.0.254 Assign through a
DHCP running on the
windows server
The above table is the IP address allocation in the network. It is necessary that the
right IP addresses are assigned to the computers in order for them to communicate
with the services running on the windows server.
3.4 Security Design
If the system is only implemented in an intranet, then the school has to ensure that no
unauthorized person get access to the switches to connect their computers. Attackers
and hikers could use sophisticated software to capture packets and analyze them. In
order for an attacker not to get the password used by people, the passwords are en-
crypted before sending to the database. Even if an attacker captures an encrypted text,
he can’t use it to authenticate since every text is encrypted anytime a user enters his

44
password. The encrypted password is stored into the database in order for database
managers not to even know the plain text password of users to impersonate them.
Since the software is also developed for students who are young, it is also important
for an administrator who has been given a special privilege to be able to retrieve
passwords whenever a user forgets his or her password. In this case, the encrypted
password is decrypted again and given to the user to use. It is advisable that user
change the password afterword.
The strength of the password varies from user. Students has less strong password
since there isn’t much data to be protected. Teachers and administrators need very
strong password and so this is ensured when a user changes his default password or
previously existing password. For administrators and teachers, password must have
more than 6 characters and must contain at least one number and an upper case. This
is to ensure that password is difficult to guess.
45
4 IMPLEMENTATION
This application is implemented using visual studio 2008 and written in C#. The fol-
lowing paragraphs demonstrate how the .NET web service and the client application
were implemented.
4.1 Implementation of Web Service
A web service written in c# is implanted having some of the following functionalities:
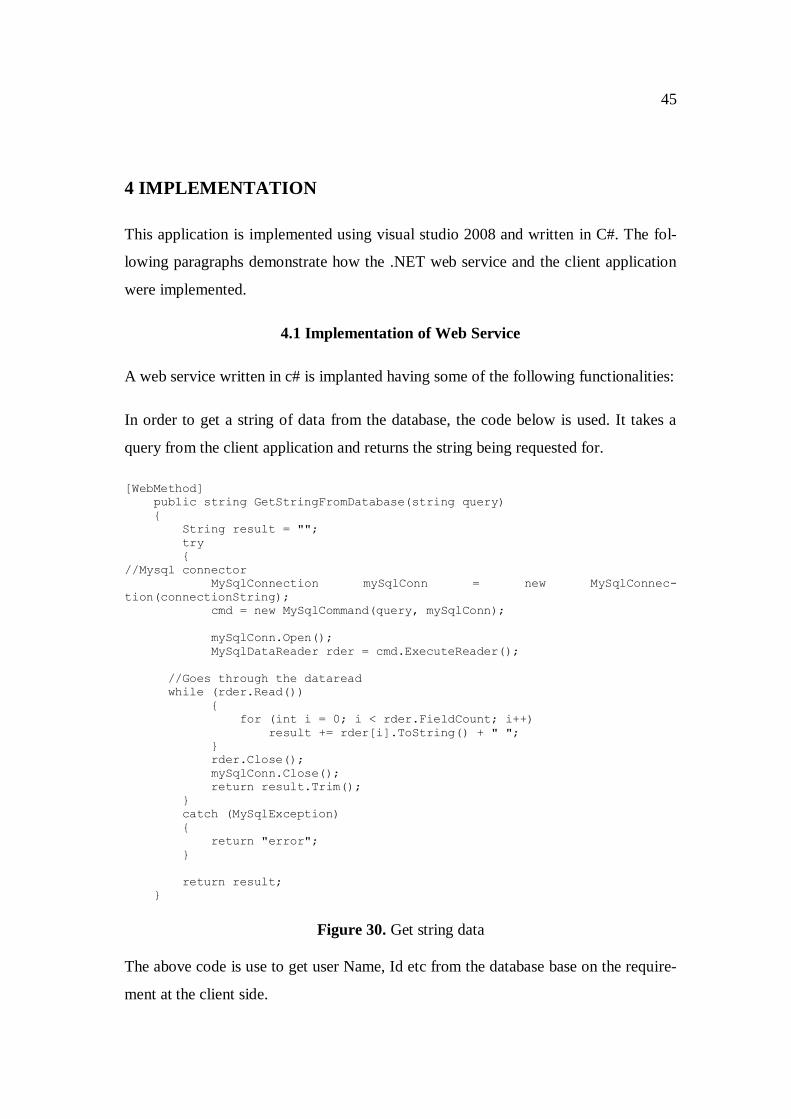
In order to get a string of data from the database, the code below is used. It takes a
query from the client application and returns the string being requested for.
[WebMethod]
public string GetStringFromDatabase(string query)
{
String result = "";
try
{
//Mysql connector
MySqlConnection mySqlConn = new MySqlConnec-
tion(connectionString);
cmd = new MySqlCommand(query, mySqlConn);
mySqlConn.Open();
MySqlDataReader rder = cmd.ExecuteReader();
//Goes through the dataread
while (rder.Read())
{
for (int i = 0; i < rder.FieldCount; i++)
result += rder[i].ToString() + " ";
}
rder.Close();
mySqlConn.Close();
return result.Trim();
}
catch (MySqlException)
{
return "error";
}
return result;
}
Figure 30. Get string data
The above code is use to get user Name, Id etc from the database base on the require-
ment at the client side.

46
In order to get list of items. The codes below is used. It takes a query from the client
application and returns the list of items retrieved from the database.
[WebMethod]
public ArrayList ArrayContent(string query)
{
string result = "";
ArrayList arList = new ArrayList();
try
{
MySqlConnection mySqlConn = new MySqlConnec-
tion(connectionString);
cmd = new MySqlCommand(query, mySqlConn);
mySqlConn.Open();
MySqlDataReader rder = cmd.ExecuteReader();
//result = new string[rder.FieldCount];
while (rder.Read())
{
//MessageBox.Show(rder.FieldCount.ToString());
for (int i = 0; i < rder.FieldCount; i++)
result += rder[i].ToString() + " ";
arList.Add(result);
result = "";
}
rder.Close();
mySqlConn.Close();
return arList;
}
catch (MySqlException)
{
return null;
}
return arList;
}
Figure 31. Get list of items
The list of items that could be retrieved from the database by the above code includes:
names of teachers, id of students etc and processed by the client application later.
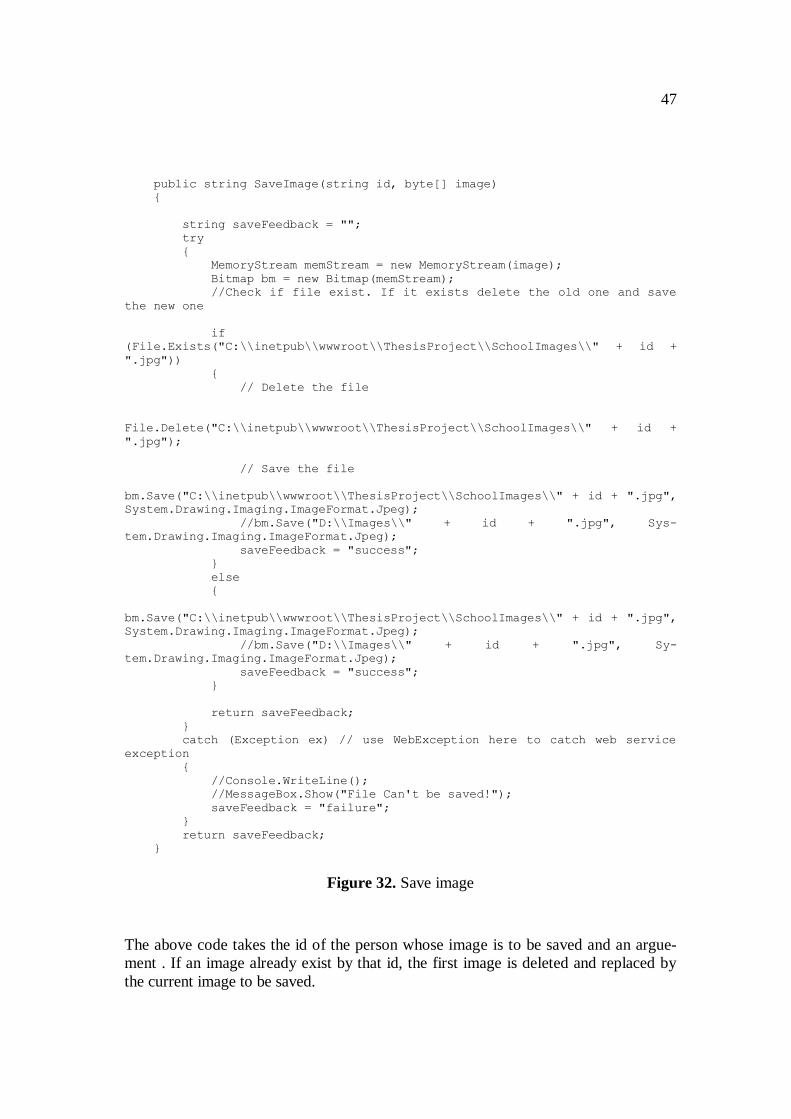
It is necessary to upload and download image to and from the server. In order to do
that, the following code is used to save images.
[WebMethod]
47
public string SaveImage(string id, byte[] image)
{
string saveFeedback = "";
try
{
MemoryStream memStream = new MemoryStream(image);
Bitmap bm = new Bitmap(memStream);
//Check if file exist. If it exists delete the old one and save
the new one
if
(File.Exists("C:\\inetpub\\wwwroot\\ThesisProject\\SchoolImages\\" + id +
".jpg"))
{
// Delete the file
File.Delete("C:\\inetpub\\wwwroot\\ThesisProject\\SchoolImages\\" + id +
".jpg");
// Save the file
bm.Save("C:\\inetpub\\wwwroot\\ThesisProject\\SchoolImages\\" + id + ".jpg",
System.Drawing.Imaging.ImageFormat.Jpeg);
//bm.Save("D:\\Images\\" + id + ".jpg", Sys-
tem.Drawing.Imaging.ImageFormat.Jpeg);
saveFeedback = "success";
}
else
{
bm.Save("C:\\inetpub\\wwwroot\\ThesisProject\\SchoolImages\\" + id + ".jpg",
System.Drawing.Imaging.ImageFormat.Jpeg);
//bm.Save("D:\\Images\\" + id + ".jpg", Sy-
tem.Drawing.Imaging.ImageFormat.Jpeg);
saveFeedback = "success";
}
return saveFeedback;
}
catch (Exception ex) // use WebException here to catch web service
exception
{
//Console.WriteLine();
//MessageBox.Show("File Can't be saved!");
saveFeedback = "failure";
}
return saveFeedback;
}
Figure 32. Save image
The above code takes the id of the person whose image is to be saved and an argue-
ment . If an image already exist by that id, the first image is deleted and replaced by
the current image to be saved.

48
4.2 Implementation of the Client Application
A client application is needed to consume the .NET web service. The following codes
are used to implement the client application:
In order to add a new person to the database, whether a student or teacher or adminis-
trator, the code below is used.
//Get the values from the text box and the comboBox from the form
string firstName = firstNametextBox.Text;
string lastName = lastNametextBox.Text;
string phone = phonetextBox.Text;
string id = "";
string password = "12345";
string age = agetextBox.Text;
string sex = sexcomboBox.SelectedItem.ToString();
//Ensures that none of the textbox is empty
if (firstName.Equals("") || lastName.Equals("") ||
phone.Equals("")|| age.Equals("") || picturetextBox.Text.Equals(""))
MessageBox.Show("Import Field Is Empty!", "Error");
else
{
// Makes sure that the age is integer
bool checkInt = CheckForInteger(agetextBox.Text);
if (checkInt)
{
//Generates the Id of the new person
id =
GenerateId(professioncomboBox.Text.ToLower()+"s");
// Convert the image to byte before uploading to the
server
fileName = picturetextBox.Text;
byte[] image = null;
image = ConvertImageToByteArray(fileName);
string saveImage = service.SaveImage(id, image);
// Check if picture had been uploaded successfully before writing to
database
if (saveImage.Equals("success"))
{
string query = "";
// inserts personel data
query = "insert into " +
professioncomboBox.Text.ToLower() + "s" + " values('" + firstName + "','" +
lastName + "','" + phone + "','" + id + "','" + password + "',null," + age +
",'" + sex + "')";
49
string addPersonel =
service.WriteToDatabase(query);
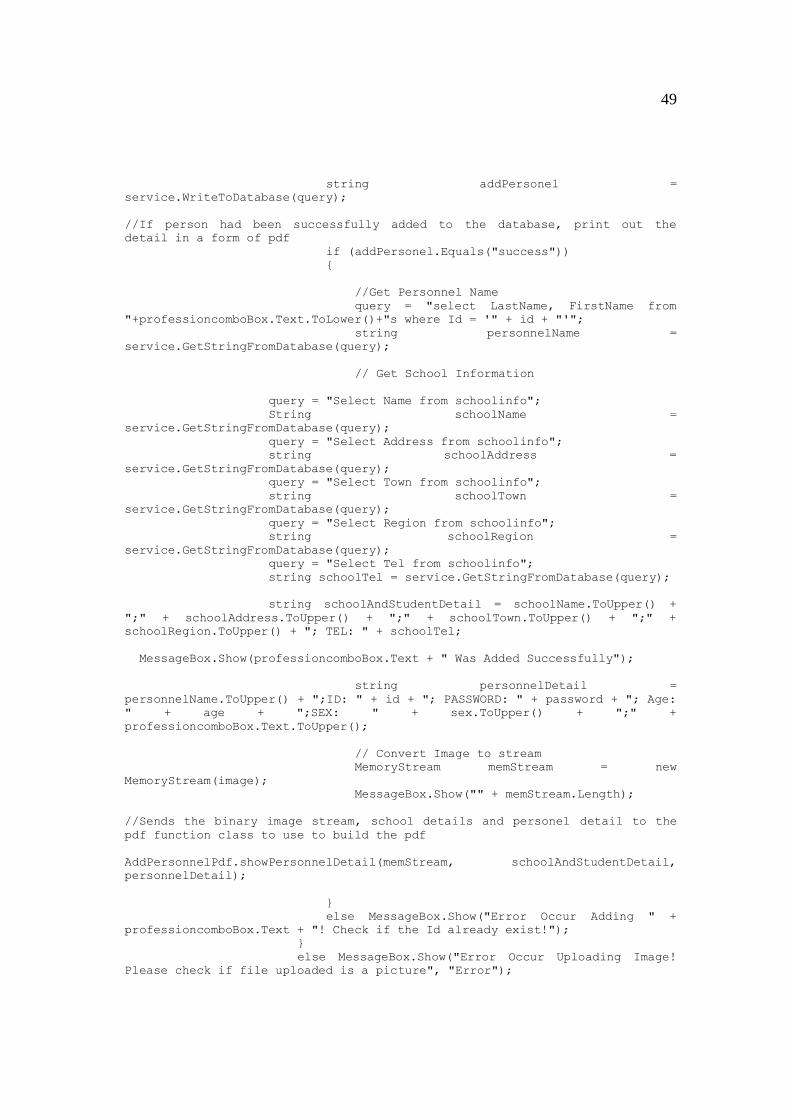
//If person had been successfully added to the database, print out the
detail in a form of pdf
if (addPersonel.Equals("success"))
{
//Get Personnel Name
query = "select LastName, FirstName from
"+professioncomboBox.Text.ToLower()+"s where Id = '" + id + "'";
string personnelName =
service.GetStringFromDatabase(query);
// Get School Information
query = "Select Name from schoolinfo";
String schoolName =
service.GetStringFromDatabase(query);
query = "Select Address from schoolinfo";
string schoolAddress =
service.GetStringFromDatabase(query);
query = "Select Town from schoolinfo";
string schoolTown =
service.GetStringFromDatabase(query);
query = "Select Region from schoolinfo";
string schoolRegion =
service.GetStringFromDatabase(query);
query = "Select Tel from schoolinfo";
string schoolTel = service.GetStringFromDatabase(query);
string schoolAndStudentDetail = schoolName.ToUpper() +
";" + schoolAddress.ToUpper() + ";" + schoolTown.ToUpper() + ";" +
schoolRegion.ToUpper() + "; TEL: " + schoolTel;
MessageBox.Show(professioncomboBox.Text + " Was Added Successfully");
string personnelDetail =
personnelName.ToUpper() + ";ID: " + id + "; PASSWORD: " + password + "; Age:
" + age + ";SEX: " + sex.ToUpper() + ";" +
professioncomboBox.Text.ToUpper();
// Convert Image to stream
MemoryStream memStream = new
MemoryStream(image);
MessageBox.Show("" + memStream.Length);
//Sends the binary image stream, school details and personel detail to the
pdf function class to use to build the pdf
AddPersonnelPdf.showPersonnelDetail(memStream, schoolAndStudentDetail,
personnelDetail);
}
else MessageBox.Show("Error Occur Adding " +
professioncomboBox.Text + "! Check if the Id already exist!");
}
else MessageBox.Show("Error Occur Uploading Image!
Please check if file uploaded is a picture", "Error");
50
}
else MessageBox.Show("Age Must Be An Integer", "Error");
}
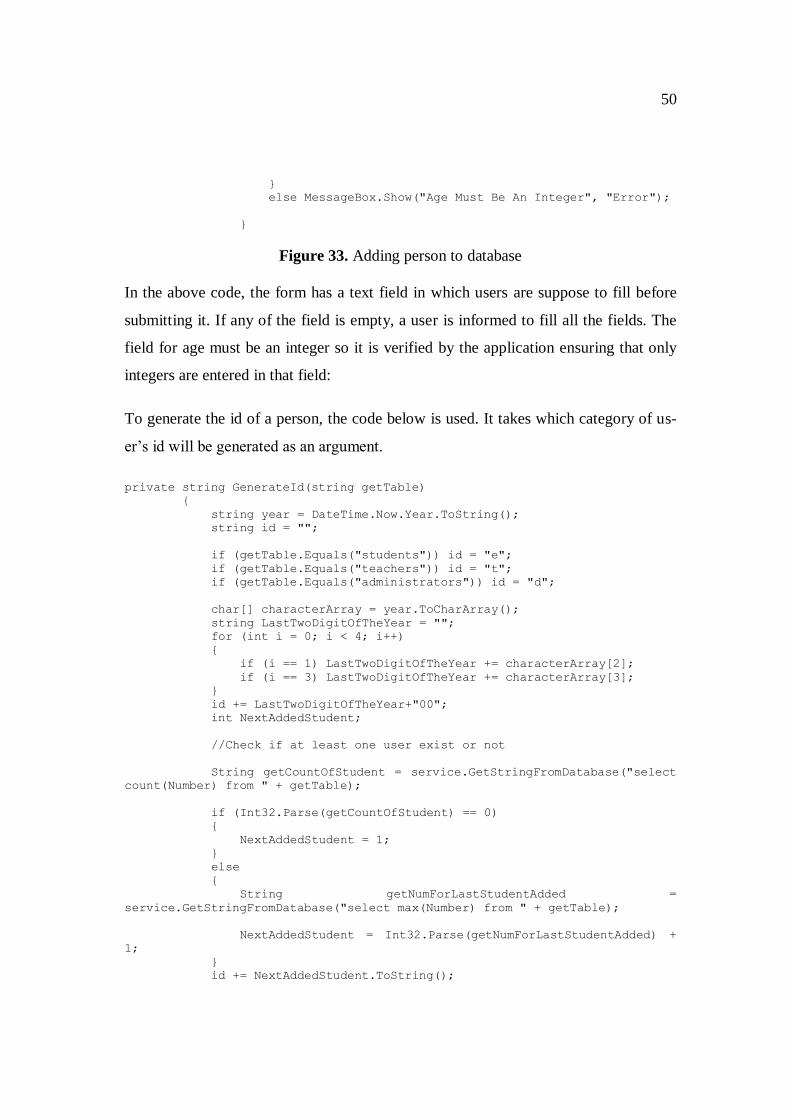
Figure 33. Adding person to database
In the above code, the form has a text field in which users are suppose to fill before
submitting it. If any of the field is empty, a user is informed to fill all the fields. The
field for age must be an integer so it is verified by the application ensuring that only
integers are entered in that field:
To generate the id of a person, the code below is used. It takes which category of us-
er’s id will be generated as an argument.
private string GenerateId(string getTable)
{
string year = DateTime.Now.Year.ToString();
string id = "";
if (getTable.Equals("students")) id = "e";
if (getTable.Equals("teachers")) id = "t";
if (getTable.Equals("administrators")) id = "d";
char[] characterArray = year.ToCharArray();
string LastTwoDigitOfTheYear = "";
for (int i = 0; i < 4; i++)
{
if (i == 1) LastTwoDigitOfTheYear += characterArray[2];
if (i == 3) LastTwoDigitOfTheYear += characterArray[3];
}
id += LastTwoDigitOfTheYear+"00";
int NextAddedStudent;
//Check if at least one user exist or not
String getCountOfStudent = service.GetStringFromDatabase("select
count(Number) from " + getTable);
if (Int32.Parse(getCountOfStudent) == 0)
{
NextAddedStudent = 1;
}
else
{
String getNumForLastStudentAdded =
service.GetStringFromDatabase("select max(Number) from " + getTable);
NextAddedStudent = Int32.Parse(getNumForLastStudentAdded) +
1;
}
id += NextAddedStudent.ToString();
51
return id;
}
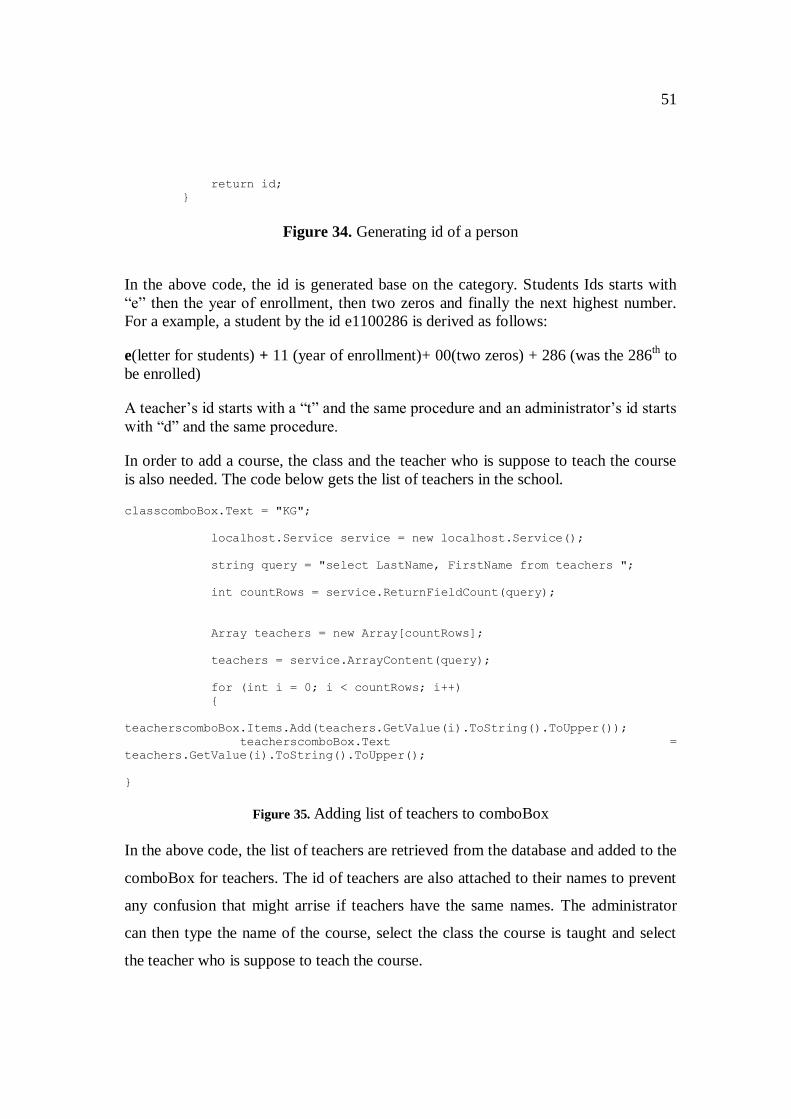
Figure 34. Generating id of a person
In the above code, the id is generated base on the category. Students Ids starts with
“e” then the year of enrollment, then two zeros and finally the next highest number.
For a example, a student by the id e1100286 is derived as follows:
e(letter for students) + 11 (year of enrollment)+ 00(two zeros) + 286 (was the 286th to
be enrolled)
A teacher’s id starts with a “t” and the same procedure and an administrator’s id starts
with “d” and the same procedure.
In order to add a course, the class and the teacher who is suppose to teach the course
is also needed. The code below gets the list of teachers in the school.
classcomboBox.Text = "KG";
localhost.Service service = new localhost.Service();
string query = "select LastName, FirstName from teachers ";
int countRows = service.ReturnFieldCount(query);
Array teachers = new Array[countRows];
teachers = service.ArrayContent(query);
for (int i = 0; i < countRows; i++)
{
teacherscomboBox.Items.Add(teachers.GetValue(i).ToString().ToUpper());
teacherscomboBox.Text =
teachers.GetValue(i).ToString().ToUpper();
}
Figure 35. Adding list of teachers to comboBox
In the above code, the list of teachers are retrieved from the database and added to the
comboBox for teachers. The id of teachers are also attached to their names to prevent
any confusion that might arrise if teachers have the same names. The administrator
can then type the name of the course, select the class the course is taught and select
the teacher who is suppose to teach the course.

52
The code below adds the course to the database.
if (subjecttextBox.Text.Equals(""))
MessageBox.Show("Subject Field Is Empty!", "Error");
else
{
string query = "";
localhost.Service service = new localhost.Service();
// Verify if Course Already Exist
query = "select Teacher from courses where Subject = '" +
subjecttextBox.Text.ToUpper() + "' and Class = '" +
classcomboBox.Text.ToUpper()+"'";
string verifyIfCourseAlreadyExist =
service.GetStringFromDatabase(query);
//If verifyIfCourseAlreadyExist string is Empty, then course
doesn't exist so add it
if (verifyIfCourseAlreadyExist.Equals(""))
{
query = "insert into courses values('" +
subjecttextBox.Text.ToUpper() + "','" + classcomboBox.Text + "','" +
teacherscomboBox.Text.ToUpper() + "')";
string addSubject = service.WriteToDatabase(query);
if (addSubject.Equals("success"))
MessageBox.Show("Course was successfully added");
else MessageBox.Show("Error Occur Adding Course!");
}
else MessageBox.Show("PLEASE COURSE ALREADY EXIST!");
Figure 36. Add course into the database
From the above code, the subject text field needs to be filled and if not, user is in-
formed that field is empty so needs to field it again. If field had been successfully
filled, the course, the teacher and the class are got from their corresponding combo
Box and processed by the above code to write to the database.
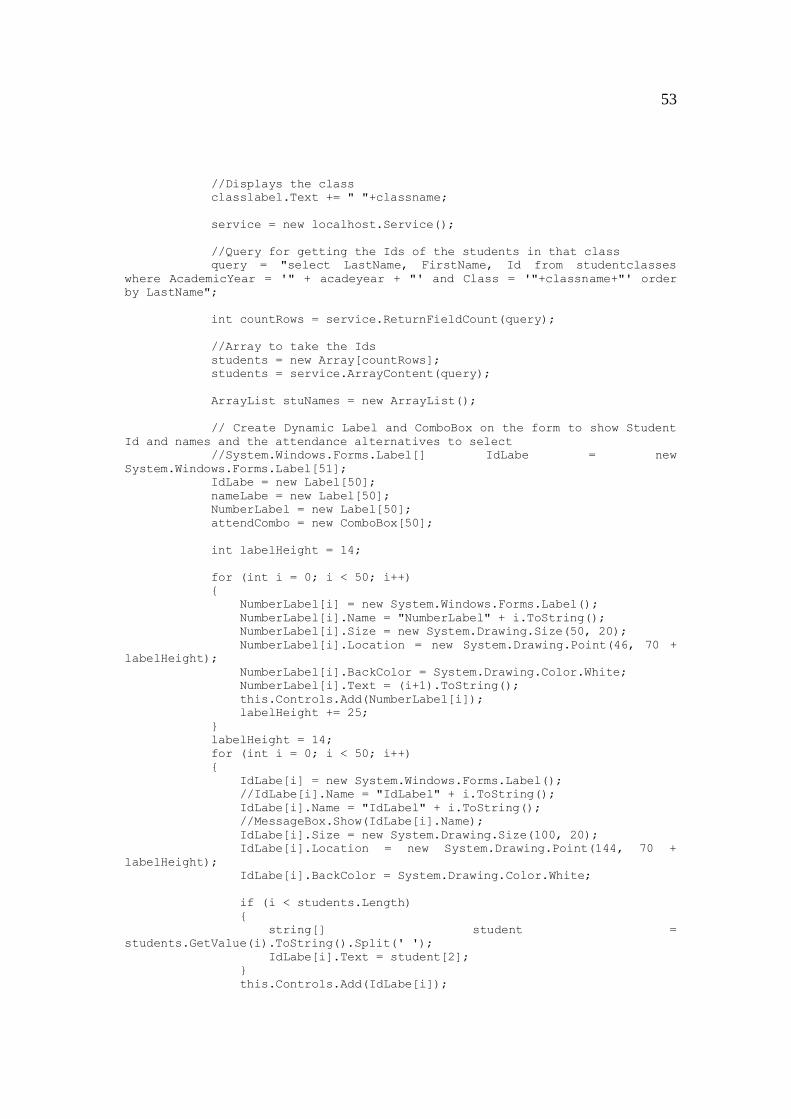
Class teachers are suppose to mark the attendance of students each school day. The
code below is for recording attendance of students.
//Displays the date
date = DateTime.Now.Day + "." + DateTime.Now.Month + "." +
DateTime.Now.Year;
datelabel.Text += ""+date;
53
//Displays the class
classlabel.Text += " "+classname;
service = new localhost.Service();
//Query for getting the Ids of the students in that class
query = "select LastName, FirstName, Id from studentclasses
where AcademicYear = '" + acadeyear + "' and Class = '"+classname+"' order
by LastName";
int countRows = service.ReturnFieldCount(query);
//Array to take the Ids
students = new Array[countRows];
students = service.ArrayContent(query);
ArrayList stuNames = new ArrayList();
// Create Dynamic Label and ComboBox on the form to show Student
Id and names and the attendance alternatives to select
//System.Windows.Forms.Label[] IdLabe = new
System.Windows.Forms.Label[51];
IdLabe = new Label[50];
nameLabe = new Label[50];
NumberLabel = new Label[50];
attendCombo = new ComboBox[50];
int labelHeight = 14;
for (int i = 0; i < 50; i++)
{
NumberLabel[i] = new System.Windows.Forms.Label();
NumberLabel[i].Name = "NumberLabel" + i.ToString();
NumberLabel[i].Size = new System.Drawing.Size(50, 20);
NumberLabel[i].Location = new System.Drawing.Point(46, 70 +
labelHeight);
NumberLabel[i].BackColor = System.Drawing.Color.White;
NumberLabel[i].Text = (i+1).ToString();
this.Controls.Add(NumberLabel[i]);
labelHeight += 25;
}
labelHeight = 14;
for (int i = 0; i < 50; i++)
{
IdLabe[i] = new System.Windows.Forms.Label();
//IdLabe[i].Name = "IdLabel" + i.ToString();
IdLabe[i].Name = "IdLabel" + i.ToString();
//MessageBox.Show(IdLabe[i].Name);
IdLabe[i].Size = new System.Drawing.Size(100, 20);
IdLabe[i].Location = new System.Drawing.Point(144, 70 +
labelHeight);
IdLabe[i].BackColor = System.Drawing.Color.White;
if (i < students.Length)
{
string[] student =
students.GetValue(i).ToString().Split(' ');
IdLabe[i].Text = student[2];
}
this.Controls.Add(IdLabe[i]);
54
labelHeight += 25;
}
labelHeight = 14;
for (int i = 0; i < 50; i++)
{
nameLabe[i] = new Label();
nameLabe[i].Size = new System.Drawing.Size(150, 20);
nameLabe[i].Location = new System.Drawing.Point(322, 70 +
labelHeight);
nameLabe[i].BackColor = System.Drawing.Color.White;
if (i < students.Length)
{
string[] student =
students.GetValue(i).ToString().Split(' ');
nameLabe[i].Text = student[0] + " " + student[1];
}
nameLabe[i].Name = "nameLabel" + i.ToString();
this.Controls.Add(nameLabe[i]);
labelHeight += 25;
}
labelHeight = 14;
for (int i = 0; i < 50; i++)
{
attendCombo[i] = new ComboBox();
attendCombo[i].Size = new System.Drawing.Size(100, 10);
attendCombo[i].Location = new System.Drawing.Point(540, 70 +
labelHeight);
attendCombo[i].Items.Add("0");
attendCombo[i].Items.Add("1");
attendCombo[i].Text = "0";
attendCombo[i].BackColor = System.Drawing.Color.White;
attendCombo[i].Name = "attendCombo" + i.ToString();
this.Controls.Add(attendCombo[i]);
labelHeight += 25;
}
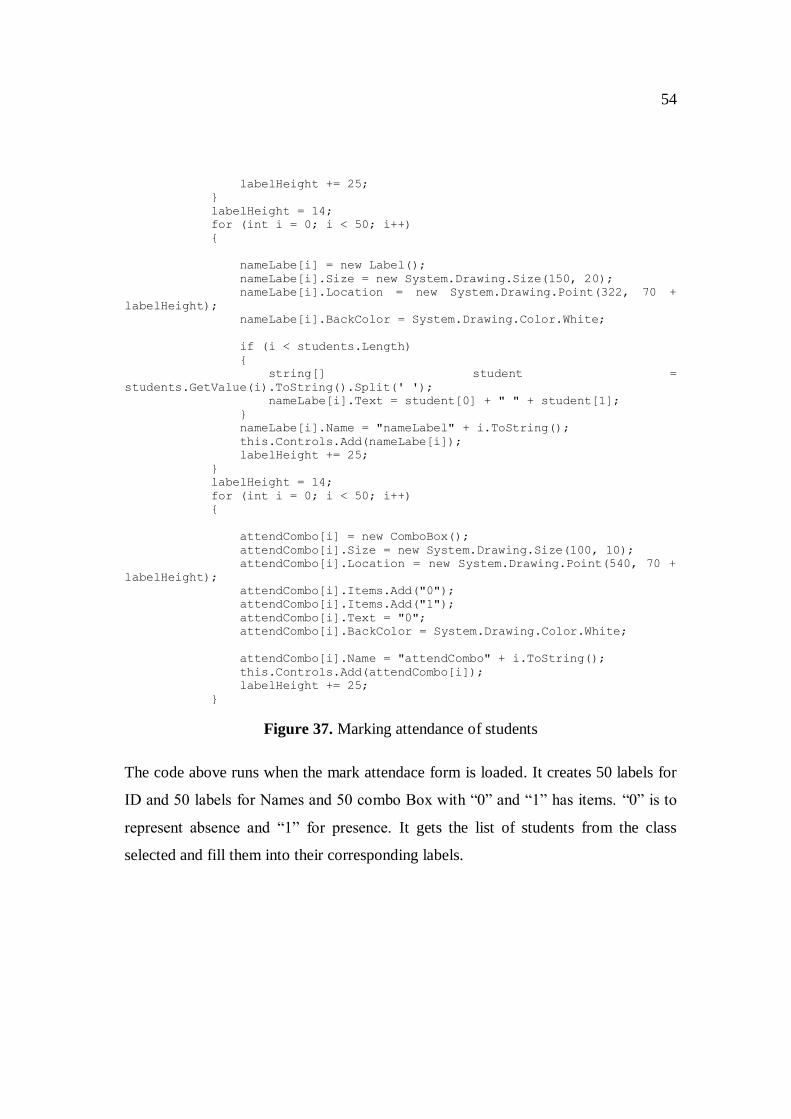
Figure 37. Marking attendance of students
The code above runs when the mark attendace form is loaded. It creates 50 labels for
ID and 50 labels for Names and 50 combo Box with “0” and “1” has items. “0” is to
represent absence and “1” for presence. It gets the list of students from the class
selected and fill them into their corresponding labels.
55
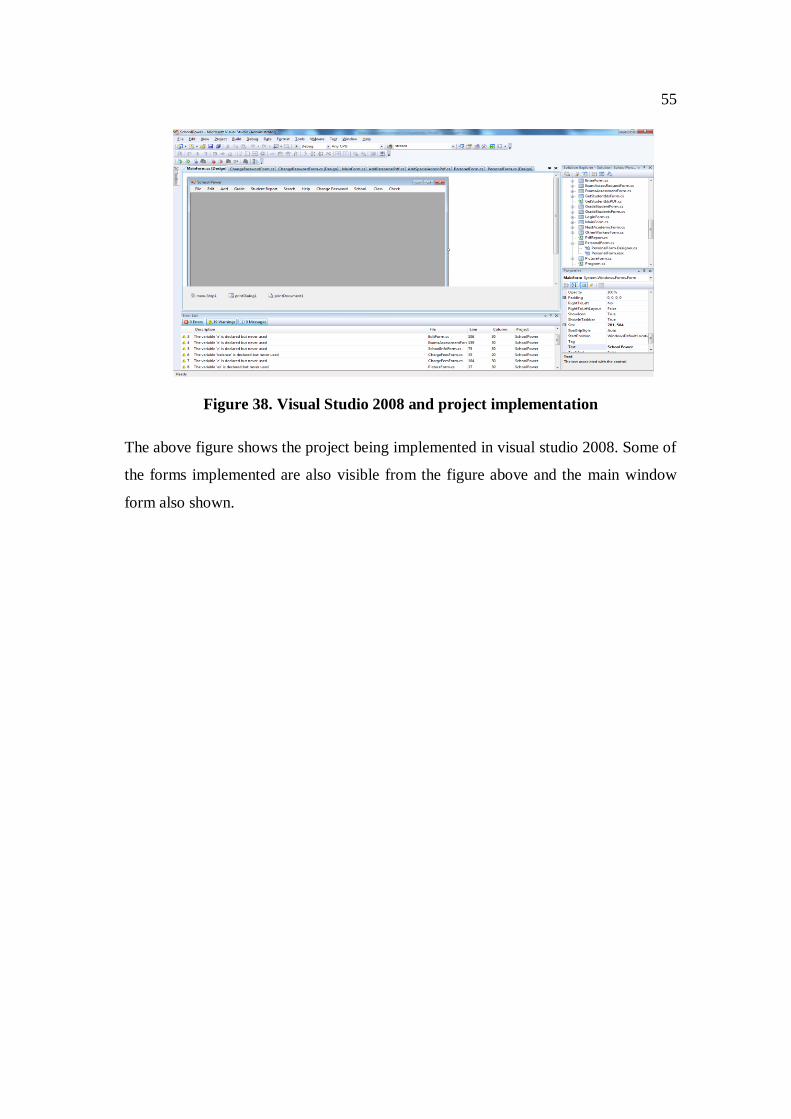
Figure 38. Visual Studio 2008 and project implementation
The above figure shows the project being implemented in visual studio 2008. Some of
the forms implemented are also visible from the figure above and the main window
form also shown.
56
5 TESTING
In order to test the software, the following steps would be taken:
Add teachers to the database and assign him a class and a subject to teach
Add students to a class
Add courses
Mark students attendance
Record class exercise
Record examination results
Submit grade of students
Get report for one of the students
Receive payment from student
Check daily transaction
5.1 Adding Teachers
In order to add a teacher to database the following form is used and the outcome also
shown by the figures below:
57
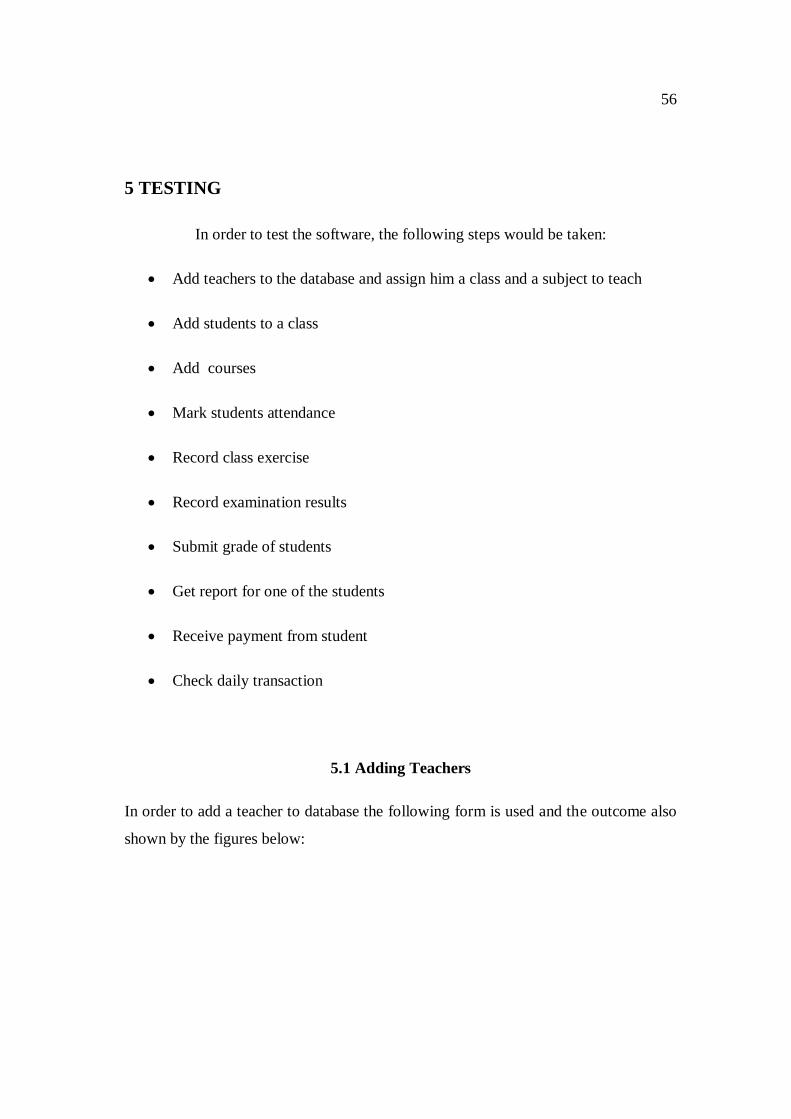
Figure 39. The detail of the teacher to be added
The above figure shows the detail of the teacher that was entered. An image is up-
loaded by clicking on the browse button. If all fields are filled and an integer is en-
tered in the Age field, the data is successfully recorded into the database and the fig-
ure below shows the outcome.
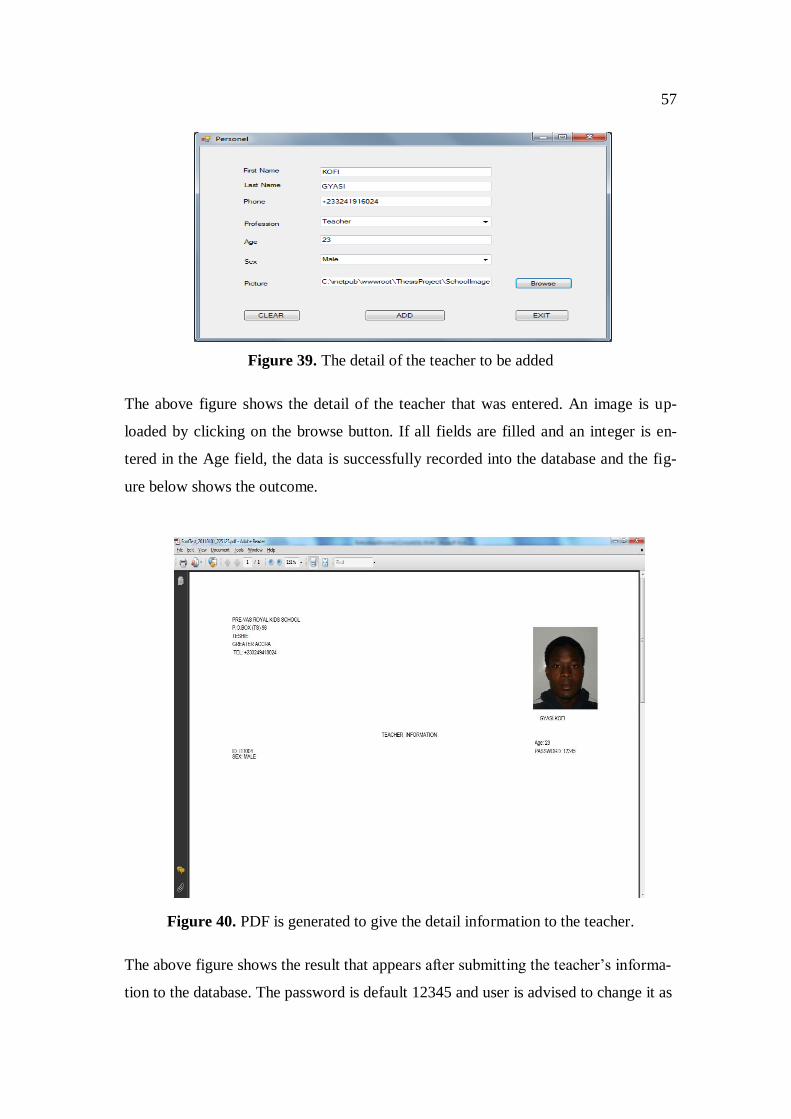
Figure 40. PDF is generated to give the detail information to the teacher.
The above figure shows the result that appears after submitting the teacher’s informa-
tion to the database. The password is default 12345 and user is advised to change it as
58
soon as possible. The id number is generated and the letter “t” beginning it to indicate
a teacher, followed by the last two digit of the year (2011) and 2 zeros and the nth
number of registering into the database.
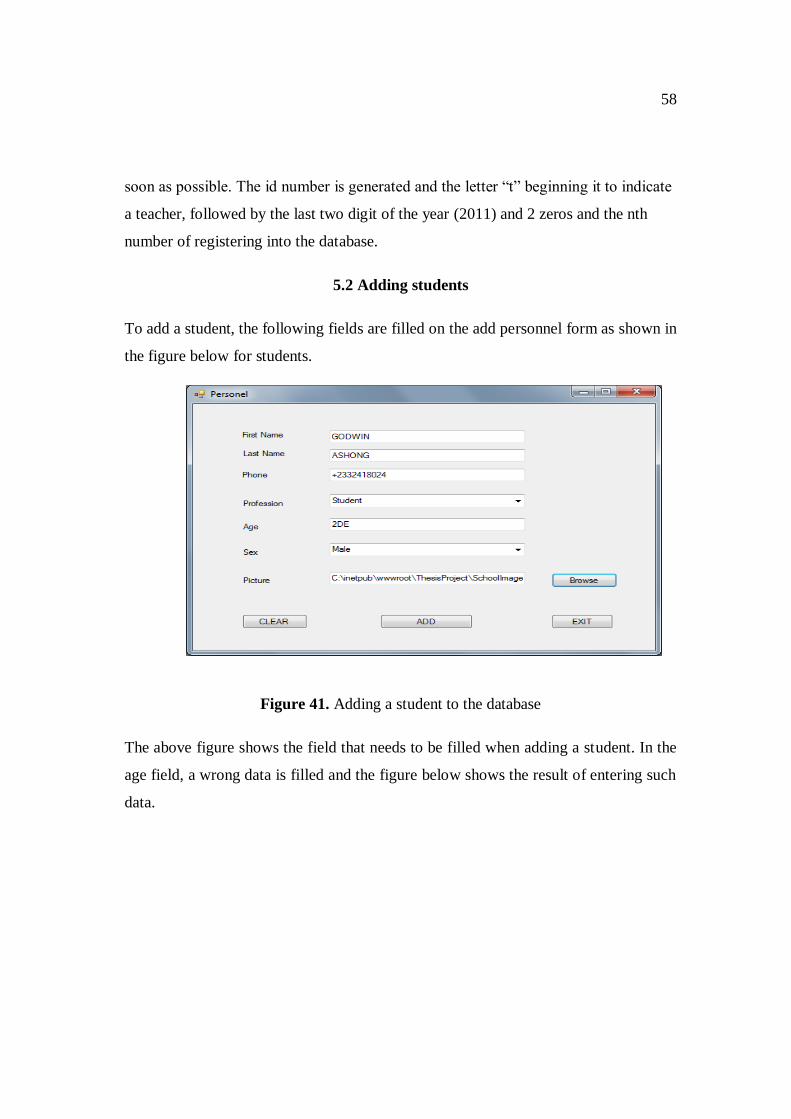
5.2 Adding students
To add a student, the following fields are filled on the add personnel form as shown in
the figure below for students.
Figure 41. Adding a student to the database
The above figure shows the field that needs to be filled when adding a student. In the
age field, a wrong data is filled and the figure below shows the result of entering such
data.
59
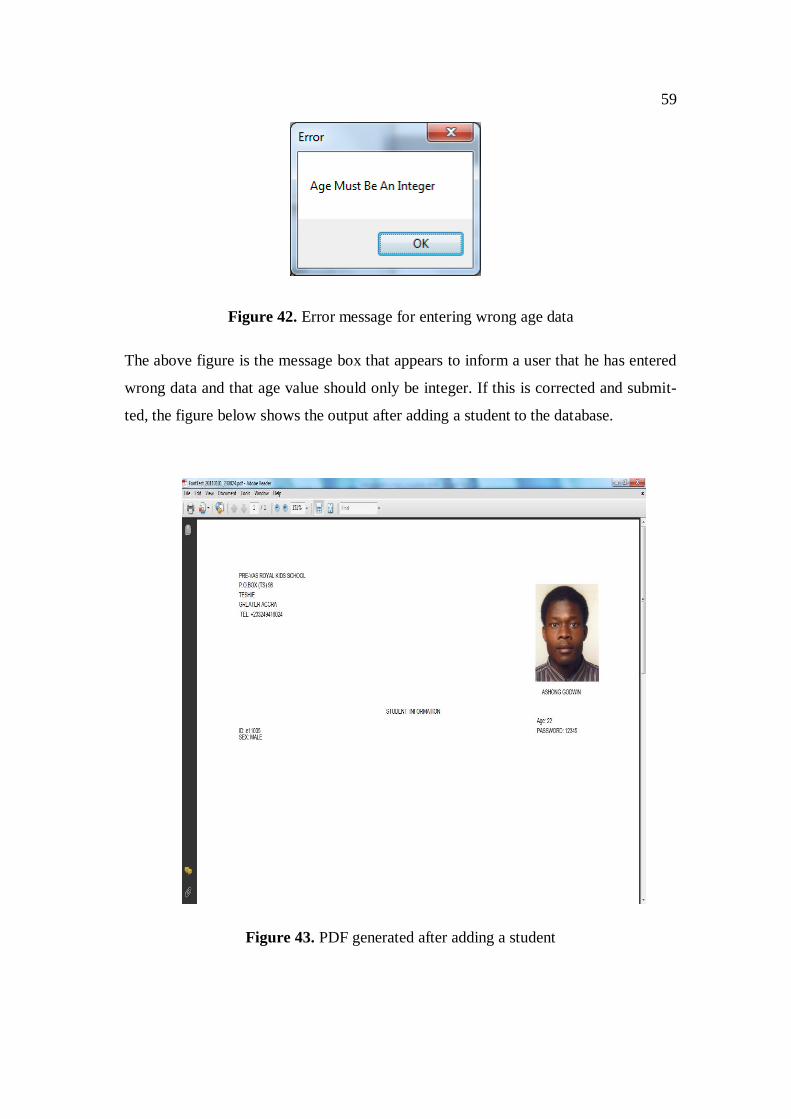
Figure 42. Error message for entering wrong age data
The above figure is the message box that appears to inform a user that he has entered
wrong data and that age value should only be integer. If this is corrected and submit-
ted, the figure below shows the output after adding a student to the database.
Figure 43. PDF generated after adding a student

60
The above figure shows the outcome after a student’s data is recorded into the data-
base. The password is default 12345 and the id is generated by the software. The letter
“e” indicates that user is a student, followed by the two digits of the year (2011), then
2 zeros and the nth number of recording student information.
5.3 Adding a Course
In order to add a course to a class, the figure below shows the form that is used.
Figure 44. Adding a course
The above figure is for adding a course to a class. The teacher combo box fetch lists
of teachers on the database in order for that administrator to select which teacher is
teaching that course.
5.4 Mark Student Attendance
As already stated, it is necessary for a class teacher to mark attendance of students
each school day. The figure below shows the form that is used to mark attendance of
students.

61
Figure 45. Marking attendance of students
The above figure shows the output of marking attendance of students. The list of stu-
dents in that class is fetched from the database. In Ghana it is common for two stu-
dents to have the same first name and last name so their id will be used to differentiate
between them. If submit submenu is selected from the file menu, user is informed that
attendance was successfully added and if not, they are inform that an error occur.
5.5 Record class exercise
The figure below shows the form that is used to record class exercises and how it
worked during the testing process.
62
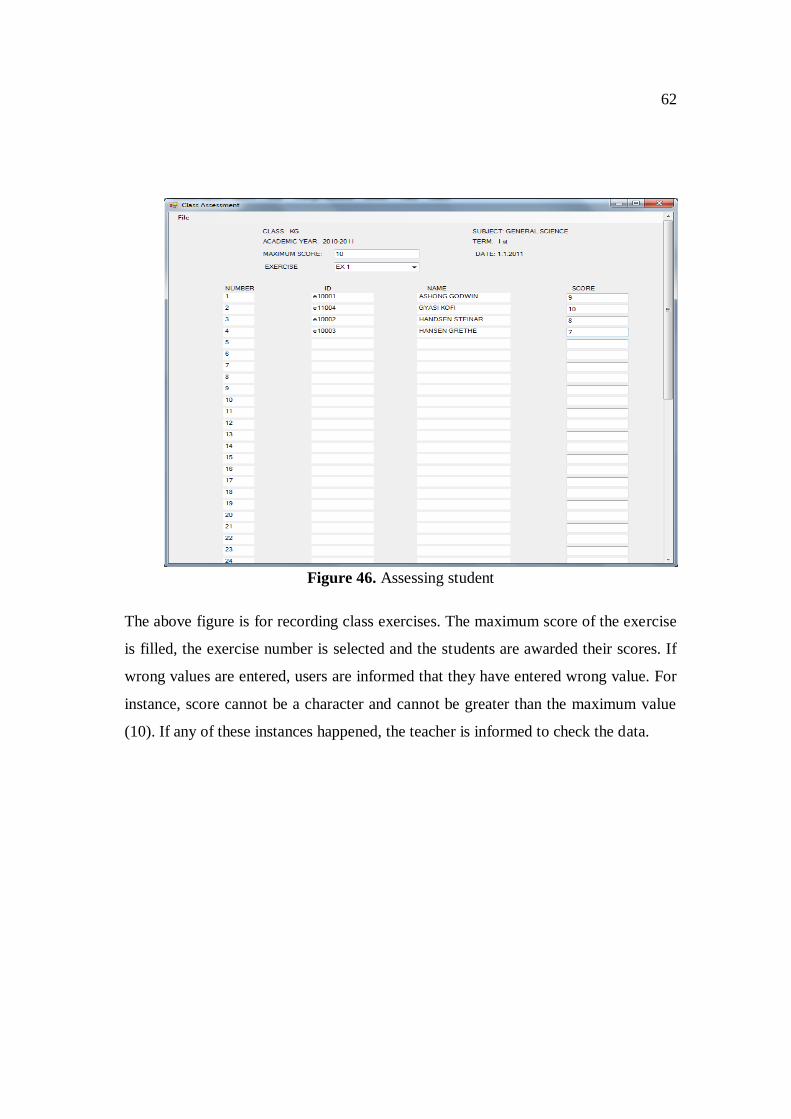
Figure 46. Assessing student
The above figure is for recording class exercises. The maximum score of the exercise
is filled, the exercise number is selected and the students are awarded their scores. If
wrong values are entered, users are informed that they have entered wrong value. For
instance, score cannot be a character and cannot be greater than the maximum value
(10). If any of these instances happened, the teacher is informed to check the data.

63
5.6 Record Examination Results
The figure below shows the form that is used to record the examination results.
Figure 47. Recording student exams score
The figure above is for recording the examination scores of students. The same prin-
ciple is used as explained on Figure 46. The right data must be entered before one can
submit the data. When wrong data is entered, user is informed about it in order to
make the corrections and submit again.
64
5.7 Submit Student Grades
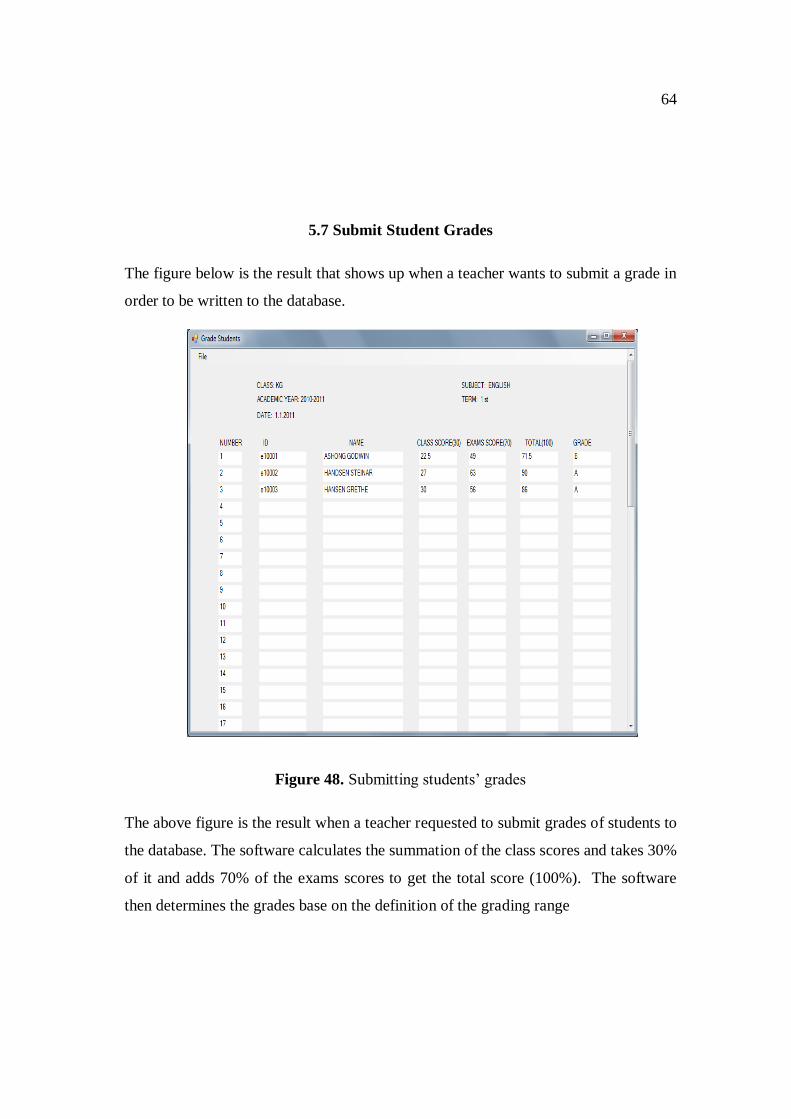
The figure below is the result that shows up when a teacher wants to submit a grade in
order to be written to the database.
Figure 48. Submitting students’ grades
The above figure is the result when a teacher requested to submit grades of students to
the database. The software calculates the summation of the class scores and takes 30%
of it and adds 70% of the exams scores to get the total score (100%). The software
then determines the grades base on the definition of the grading range

65
5.8 Get Report for One of the Students
After every academic term, students are given report to be given to their guardians.
The figure below shows the output of a report issued to a student.
Figure 49. Terminal report of student
66
The figure above is the report of a student by the name ASHONG GODWIN. The re-
port has the logo and address of the school and other details of the report like the aca-
demic year and term.
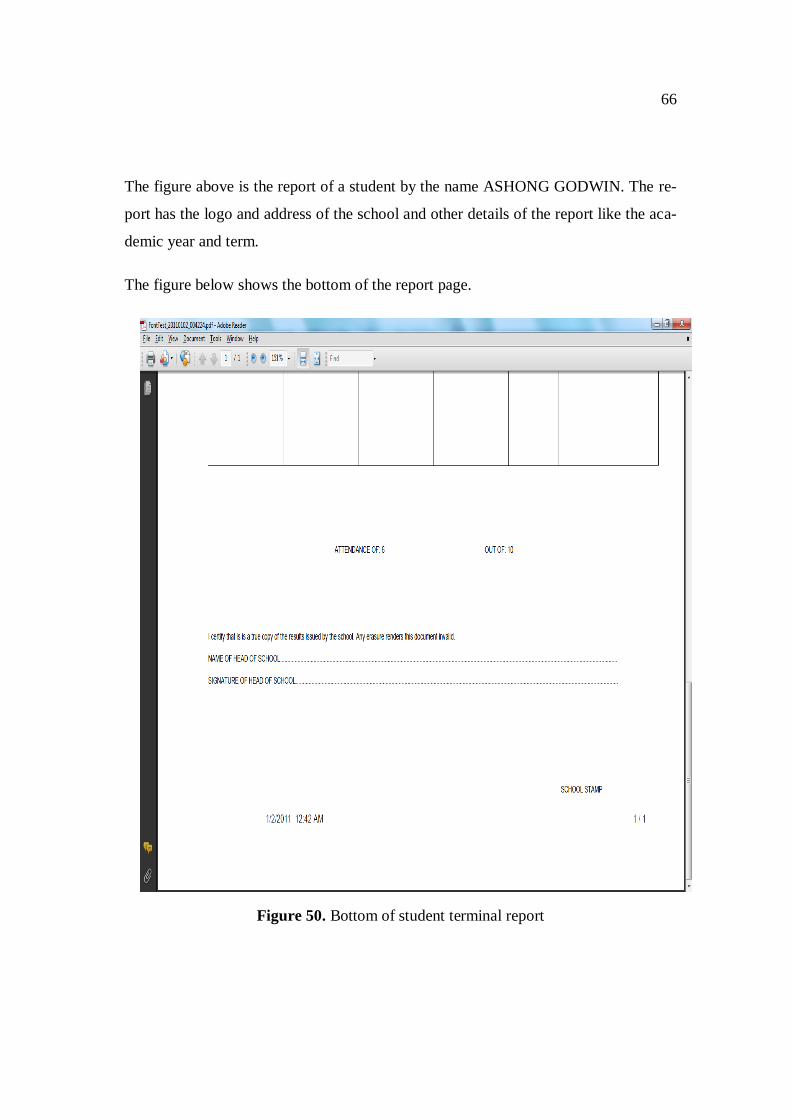
The figure below shows the bottom of the report page.
Figure 50. Bottom of student terminal report
67
The figure above is the bottom At the bottom of the report there is a place where the
headmaster has to endorse with his signature and the stamp of the school. The number
of times student had attended school is also reported.
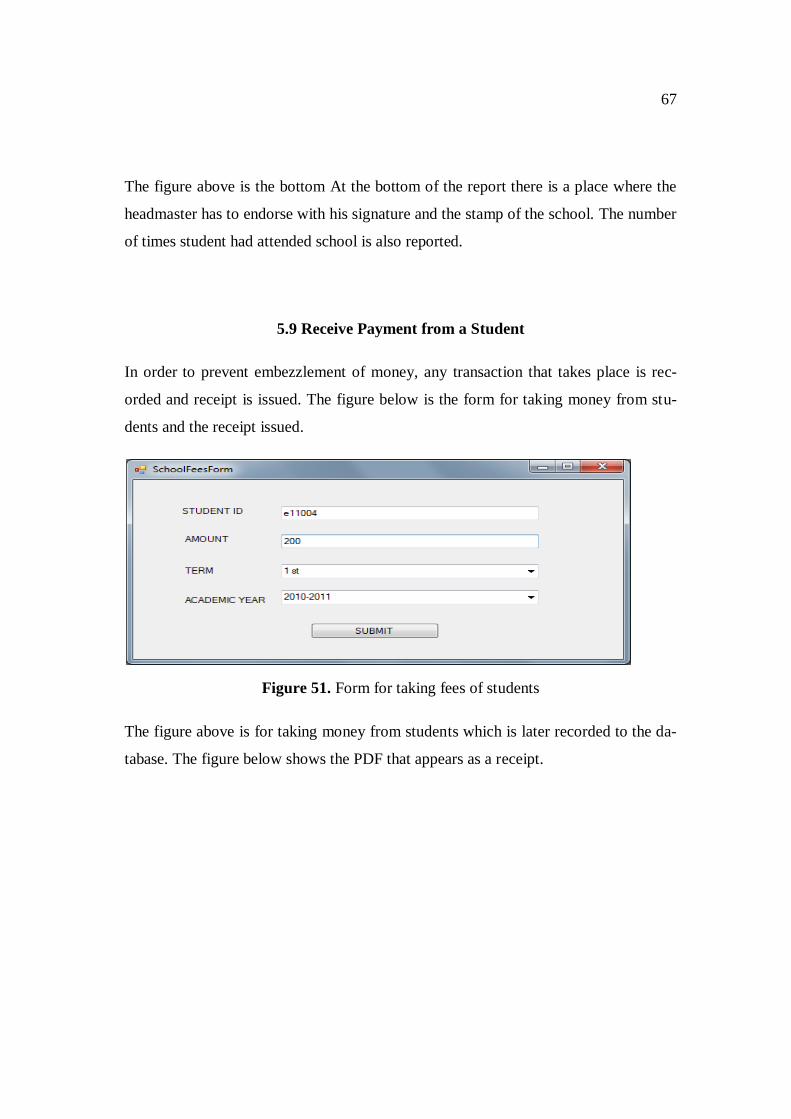
5.9 Receive Payment from a Student
In order to prevent embezzlement of money, any transaction that takes place is rec-
orded and receipt is issued. The figure below is the form for taking money from stu-
dents and the receipt issued.
Figure 51. Form for taking fees of students
The figure above is for taking money from students which is later recorded to the da-
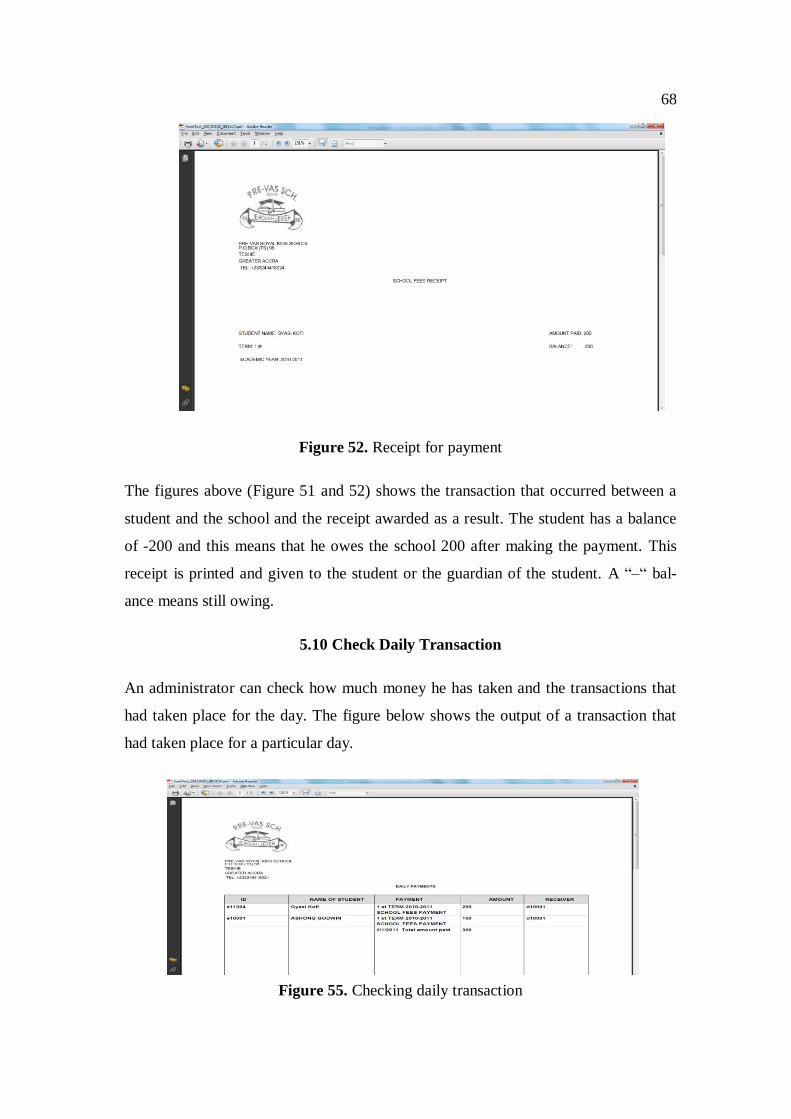
tabase. The figure below shows the PDF that appears as a receipt.
68
Figure 52. Receipt for payment
The figures above (Figure 51 and 52) shows the transaction that occurred between a
student and the school and the receipt awarded as a result. The student has a balance
of -200 and this means that he owes the school 200 after making the payment. This
receipt is printed and given to the student or the guardian of the student. A “–“ bal-
ance means still owing.
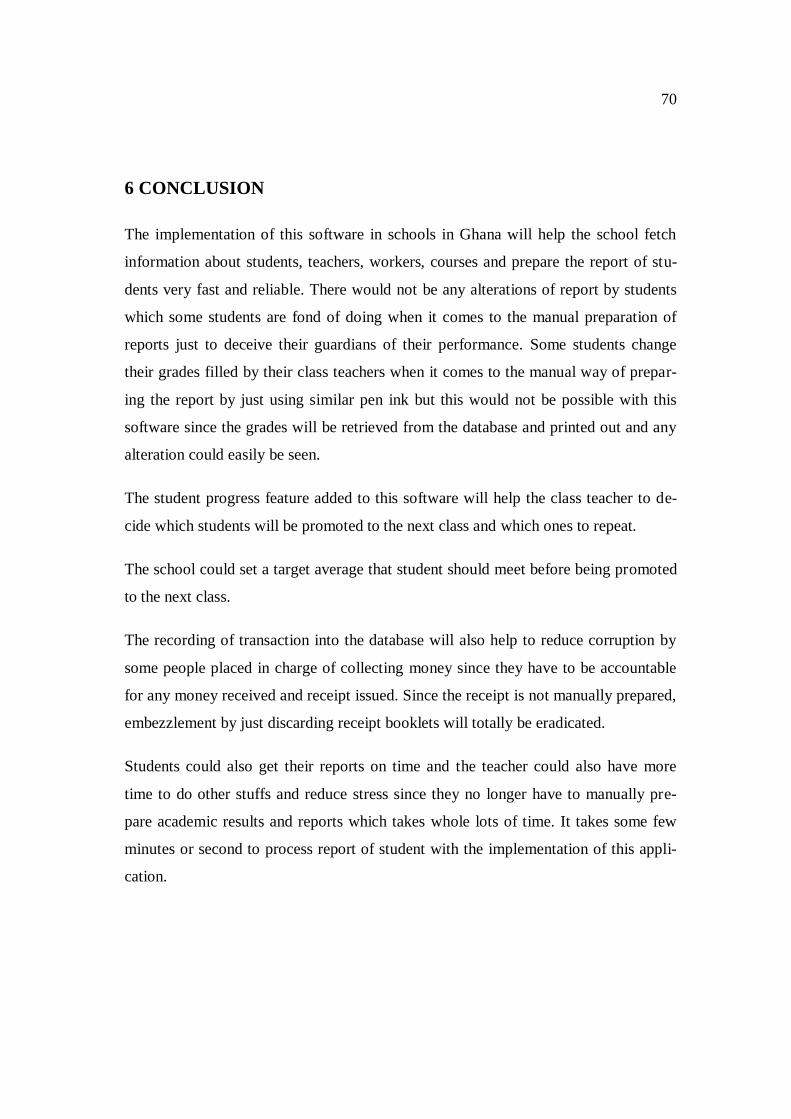
5.10 Check Daily Transaction
An administrator can check how much money he has taken and the transactions that
had taken place for the day. The figure below shows the output of a transaction that
had taken place for a particular day.
Figure 55. Checking daily transaction

69
This feature is used by administrators. From Figure 55 the administrator could see that
the school had received an amount of 300 and expect whoever is in charge of collect-
ing moneys to account for such amount of money. If receipts are issued and guardians
or students insisted on their receipt, the embezzlement of school money by some cor-
rupted personnel could be totally eradicated.
70
6 CONCLUSION
The implementation of this software in schools in Ghana will help the school fetch
information about students, teachers, workers, courses and prepare the report of stu-
dents very fast and reliable. There would not be any alterations of report by students
which some students are fond of doing when it comes to the manual preparation of
reports just to deceive their guardians of their performance. Some students change
their grades filled by their class teachers when it comes to the manual way of prepar-
ing the report by just using similar pen ink but this would not be possible with this
software since the grades will be retrieved from the database and printed out and any
alteration could easily be seen.
The student progress feature added to this software will help the class teacher to de-
cide which students will be promoted to the next class and which ones to repeat.
The school could set a target average that student should meet before being promoted
to the next class.
The recording of transaction into the database will also help to reduce corruption by
some people placed in charge of collecting money since they have to be accountable
for any money received and receipt issued. Since the receipt is not manually prepared,
embezzlement by just discarding receipt booklets will totally be eradicated.
Students could also get their reports on time and the teacher could also have more
time to do other stuffs and reduce stress since they no longer have to manually pre-
pare academic results and reports which takes whole lots of time. It takes some few
minutes or second to process report of student with the implementation of this appli-
cation.
71
REFERRENCES
1. Moghadampour Ghodrat, Web Services 2009-2010.
[Accessed 1.12.2010] Available from the
Internet: < https://portal.puv.fi/>
2. http://ghana.usembassy.gov/education-of-ghana.html.
[Accessed 1.09.2010] Available from the internet
3. http://www.mysql.com/about/.
[Accessed 15.09.2010] Available from the internet
Related Documents