Distributed Message Service Developer Guide Issue 04 Date 2018-05-14

Welcome message from author
This document is posted to help you gain knowledge. Please leave a comment to let me know what you think about it! Share it to your friends and learn new things together.
Transcript

Distributed Message Service
Developer Guide
Issue 04
Date 2018-05-14

Contents
1 TCP SDK Developer Guide.........................................................................................................11.1 Overview........................................................................................................................................................................ 11.2 Getting Started with TCP APIs...................................................................................................................................... 31.2.1 Helpful Links...............................................................................................................................................................31.2.2 Preparing the Environment..........................................................................................................................................31.2.3 Downloading the Sample Project................................................................................................................................ 61.2.4 Running the Sample Project........................................................................................................................................ 61.2.5 Building the Sample Project........................................................................................................................................ 71.2.6 Code of the Sample Project......................................................................................................................................... 71.3 Setting Up Development Environments......................................................................................................................... 91.3.1 Preparing the Environment..........................................................................................................................................91.3.2 Obtaining an SDK Package....................................................................................................................................... 161.3.3 Creating a Project...................................................................................................................................................... 161.3.4 Configuring Parameters.............................................................................................................................................17
2 Kafka Developer Guide............................................................................................................. 202.1 Overview...................................................................................................................................................................... 202.2 Getting Started with Kafka APIs.................................................................................................................................. 202.2.1 Helpful Links.............................................................................................................................................................212.2.2 Preparing the Environment........................................................................................................................................212.2.3 Running the Sample Project...................................................................................................................................... 232.2.4 Building the Sample Project...................................................................................................................................... 252.3 Setting Up Development Environments....................................................................................................................... 252.3.1 Preparing the Environment........................................................................................................................................262.3.2 Creating a Project...................................................................................................................................................... 322.3.3 Configuring Parameters.............................................................................................................................................332.4 Appendix 1: Recommended Parameter Settings for Kafka Clients..............................................................................362.5 Appendix 2: Code of the Sample Project..................................................................................................................... 38
3 AMQP Developer Guide............................................................................................................403.1 Overview...................................................................................................................................................................... 403.2 Getting Started with AMQP......................................................................................................................................... 413.2.1 Helpful Links.............................................................................................................................................................413.2.2 Preparing the Environment........................................................................................................................................41
Distributed Message ServiceDeveloper Guide Contents
Issue 04 (2018-05-14) ii

3.2.3 Downloading the Sample Project.............................................................................................................................. 443.2.4 Running the Sample Project...................................................................................................................................... 443.2.5 Building the Sample Project...................................................................................................................................... 453.2.6 Code of the Sample Project....................................................................................................................................... 473.3 Setting Up Development Environments....................................................................................................................... 483.3.1 Preparing the Environment........................................................................................................................................483.3.2 Obtaining an SDK Package....................................................................................................................................... 543.3.3 Creating a Project...................................................................................................................................................... 543.3.4 Configuring Parameters.............................................................................................................................................54
4 RabbitMQ Developer Guide.....................................................................................................574.1 Overview...................................................................................................................................................................... 574.2 Getting Started with RabbitMQ....................................................................................................................................574.2.1 Helpful Links.............................................................................................................................................................574.2.2 Preparing the Environment........................................................................................................................................574.2.3 Running the Sample Project...................................................................................................................................... 594.2.4 Downloading the Sample Project.............................................................................................................................. 594.3 Setting Up Development Environments....................................................................................................................... 614.3.1 Preparing the Environment........................................................................................................................................614.3.2 Creating a Project...................................................................................................................................................... 62
5 Change History............................................................................................................................ 65
Distributed Message ServiceDeveloper Guide Contents
Issue 04 (2018-05-14) iii
1 TCP SDK Developer Guide
1.1 Overview
1.2 Getting Started with TCP APIs
1.3 Setting Up Development Environments
1.1 Overview
What Can DMS SDK Do?Distributed Message Service (DMS) Software Development Kit (SDK) is essentially a localJAR package that provides message production, consumption, and acknowledgmentapplication programming interfaces (APIs) for users. Third-party applications can directly callAPIs provided by DMS SDK to use DMS.
Table 1-1 describes the APIs provided by DMS SDK.
Table 1-1 DMS SDK APIs
API Description Type
Message production API Sends messages to DMSqueues.
Synchronous, asynchronous,and oneway API
Message consumption API Retrieves messages fromDMS queues.
Synchronous andasynchronous API
Message acknowledgmentAPI
Acknowledges thatmessages are successfullyretrieved from DMS queues.
Synchronous andasynchronous API
Distributed Message ServiceDeveloper Guide 1 TCP SDK Developer Guide
Issue 04 (2018-05-14) 1

NOTE
l After an asynchronous or oneway API is called, the process calling this API exits immediately. Thismay cause incomplete message delivery.
l If a oneway API is called, the client does not receive responses (including error messages) from theserver.
l DMS does not support "exactly once" message delivery. If a message is displayed, indicating that theoperation has failed, there is an extremely low possibility that the operation has actually succeeded.DMS provides "at least once" message delivery. To avoid any adverse effects from processing thesame message multiple times, ensure your application (consumer) processes messages idempotently.
Feature Descriptionl Message redelivery
The DMS TCP SDK supports message redelivery. When an error occurs while a messageis being consumed, the server flags the message as Redelivery and dumps it to theredelivery queue. Consumers can then consume the message from the redelivery queue.Messages cannot be immediately consumed from the redelivery queue. Instead, there is adelay of at least 30 seconds. After messages are consumed from the redelivery queue,they can be flagged as Success, Failure, or Redelivery.
l Message broadcastingAll consumers in a consumer group can consume the same message.Consumers can select a message consumption mode from the following options:– Multicast: After a message is successfully consumed, other consumers in the
consumer group can no longer consume the message.– Broadcast from the earliest message: All consumers in the consumer group can
consume the first message and subsequent messages in the queue.– Broadcast from the previous consumption position: If a fixed Consumer id is
set, all consumers in the consumer group can consume all the messages that arenever consumed in the queue.
– Broadcast from the latest message: All consumers in the consumer group canconsume new incoming messages in the queue.You can set whether to enable automatic acknowledgment. If this parameter is set totrue, you do not need to manually acknowledge message consumption.
l Generally, the DMS TCP SDK can process thousands of messages per second. If moremessages need to be processed per second, submit a work order or contact the customerservice.
Development FlowchartIn this document, the Java language is used as an example to describe how to performsecondary development based on DMS SDK.
Distributed Message ServiceDeveloper Guide 1 TCP SDK Developer Guide
Issue 04 (2018-05-14) 2
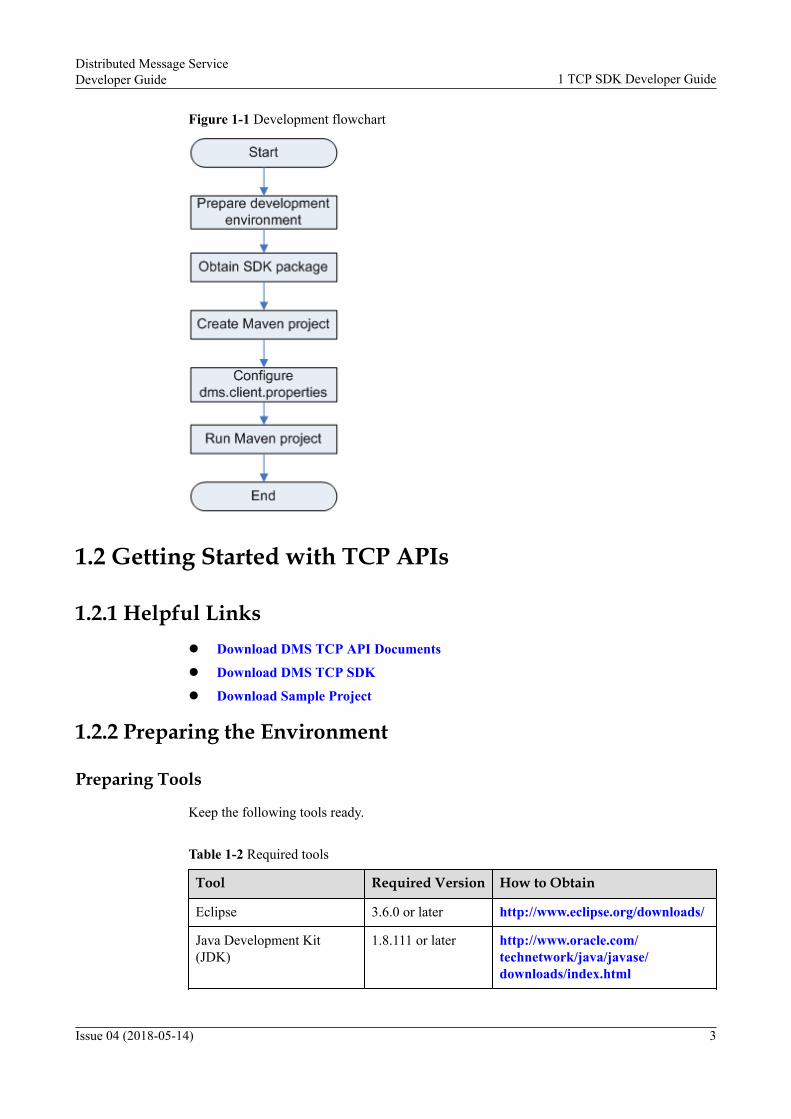
Figure 1-1 Development flowchart
1.2 Getting Started with TCP APIs
1.2.1 Helpful Linksl Download DMS TCP API Documents
l Download DMS TCP SDK
l Download Sample Project
1.2.2 Preparing the Environment
Preparing Tools
Keep the following tools ready.
Table 1-2 Required tools
Tool Required Version How to Obtain
Eclipse 3.6.0 or later http://www.eclipse.org/downloads/
Java Development Kit(JDK)
1.8.111 or later http://www.oracle.com/technetwork/java/javase/downloads/index.html
Distributed Message ServiceDeveloper Guide 1 TCP SDK Developer Guide
Issue 04 (2018-05-14) 3

Tool Required Version How to Obtain
Apache Maven 3.0.3 or later http://maven.apache.org/download.cgi
Creating a Message QueueIf a message queue is already created, skip this procedure.
Step 1 Log in to the HUAWEI CLOUD Service website at http://www.huaweicloud.com/en-us/.
Step 2 On the DMS console, create a queue and set Queue Type and Queue Mode.
Step 3 Record the queue ID for future use.
----End
Creating a Consumer GroupIf a consumer group is already created for the created message queue, skip this procedure.
Step 1 Log in to the HUAWEI CLOUD Service website at http://www.huaweicloud.com/en-us/.
Step 2 On the DMS console, create a consumer group for the message queue.
Step 3 Record the consumer group ID for future use.
----End
Creating an AK/SKIf an AK/SK is already created, skip this procedure.
Step 1 Log in to the HUAWEI CLOUD Service website at http://www.huaweicloud.com/en-us/.
Step 2 On the My Credential page, click the Access Keys tab.
Step 3 On the Access Keys tab page, click Add Access Key.
The system then generates a credentials.csv file containing an access key ID (AK) and asecret access key (SK).
Step 4 Save the credentials.csv file to a local computer.
----End
Obtaining a Project ID
Step 1 Log in to the HUAWEI CLOUD Service website at http://www.huaweicloud.com/en-us/.
Step 2 On the My Credential page, click the Project List tab.
Step 3 On the Project List tab page, record the project ID in the same row as the region in whichDMS SDK will be used.
----End
Distributed Message ServiceDeveloper Guide 1 TCP SDK Developer Guide
Issue 04 (2018-05-14) 4

Obtaining Region and Endpoint Information
Region Endpoint Description
CN North-Beijing1 dms-tcp.cn-north-1.myhuaweicloud.com:60010
Use the Endpoints toaccess the DMS.
CN East-Shanghai2 dms-tcp.cn-east-2.myhuaweicloud.com:60010
CN South-Guangzhou
dms-tcp.cn-south-1.myhuaweicloud.com:60010
Creating an ECS
If an Elastic Cloud Server (ECS) is already created, skip this procedure.
Step 1 Log in to the HUAWEI CLOUD Service website at http://www.huaweicloud.com/en-us/.
Step 2 On the ECS console, create a Linux-based ECS and bind this ECS to an elastic IP address(EIP).
Step 3 Record the EIP, user name, and password for future use.
NOTE
EIPs are used to log in to ECSs and upload files.
----End
Collecting Information
Table 1-3 Information to be collected
Category Information Example
ECS EIP 114.115.141.228
Username huaweicloud
Password password
DMS Queue name my-tcp-queue
Queue ID 5964181e-b67e-4d35-9281-a58c352abda6
Queue type Standard
Queue mode Global FIFO
Consumer groupname
my-tcp-group
Consumer group ID g-c861aa48-a082-48ff-bc9d-ff36fe7aed38
AK/SK AK VAODAIIJGPUAYTJR**OD
Distributed Message ServiceDeveloper Guide 1 TCP SDK Developer Guide
Issue 04 (2018-05-14) 5

Category Information Example
SK ZHN49c6bpwDiQvPqKJ5CxutJxqc04Glt9xSz**Wi
Project Region CN North-Beijing1
Project cn-north-1
Project ID bd67aaead60940d688b872c31bdc663b
Region andendpoint
Region CN North-Beijing1
Endpoint dms-tcp.cn-north-1.myhuaweicloud.com:60010
DNS DNS server IPaddress
CN North-Beijing1: 100.125.1.250CN East-Shanghai2: 100.125.17.29CN South-Guangzhou: 100.125.1.250
1.2.3 Downloading the Sample ProjectDownload the sample project code DmsTcpDemoClient.zip from https://dms-demo.obs.myhwclouds.com/DmsTcpDemoClient.zip.
1.2.4 Running the Sample ProjectStep 1 Log in to the ECS created in 1.2.2 Preparing the Environment.
Step 2 Configure environment variables.
1. Install JDK or Java runtime environment (JRE). Add the following settings ofenvironment variables JAVA_HOME and PATH to the ~/.bash_profile:export JAVA_HOME=/opt/java/jdk1.8.0_151 export PATH=$JAVA_HOME/bin:$PATH
NOTE
Use Oracle SDK instead of ECS's default SDK (for example, OpenSDK), because ECS's defaultSDK may not be suitable for the sample project. To obtain Oracle SDK, download JavaDevelopment Kit 1.8.111 or a later version from https://www.oracle.com.
2. Run the source .bash_profile command to make the modification take effect.
Step 3 Add the DNS server IP address to the first line in the /etc/resolv.conf file as the root user.nameserver 100.125.1.250
Step 4 Run the following command to download DmsTcpDemoClient.zip (code package of thesample project DmsTcpDemo):$ wget https://dms-demo.obs.myhwclouds.com/DmsTcpDemoClient.zip
Step 5 Run the following command to decompress the DmsTcpDemoClient.zip package:$ unzip DmsTcpDemoClient.zip
Step 6 Run the following command to navigate to the DmsTcpDemoClient/dist directory:$ cd DmsTcpDemoClient/dist
This directory contains pre-compiled binary files and executable scripts.
Distributed Message ServiceDeveloper Guide 1 TCP SDK Developer Guide
Issue 04 (2018-05-14) 6

Step 7 Edit the config/dms.client.properties configuration file.
1. Run the following command to open the file in edit mode:$ vim config/dms.client.properties
2. Configure access_key, secret_key, and project_id in the file.The red values are example values. Replace them with actual values.dms.server.ip=dms-tcp.cn-north-1.myhuaweicloud.comdms.server.port=60010 dms.client.project.id=bd67aaead60940d688b872c31bdc663b dms.client.access.key=VAODAIIJGPUAYTJR**OD dms.client.secret.key=ZHN49c6bpwDiQvPqKJ5CxutJxqc04Glt9xSz**Wi
Step 8 Execute the demo script by running the following command to test message production andconsumption.
In the following command, you need to specify the collected queue ID and consumer groupID.$ bash dms_tcp_demo.sh 5964181e-b67e-4d35-9281-a58c352abda6 g-c861aa48-a082-48ff-bc9d-ff36fe7aed38
Step 9 Log in to the DMS console to view the number of messages in a specified message queue andverify the execution result of the demo script.
----End
1.2.5 Building the Sample ProjectStep 1 Download and decompress the sample project code DmsTcpDemoClient.zip.
Step 2 Import the sample project code.
1. On Eclipse, choose File > Import.2. In the Select an import source area of the displayed Import dialog box, choose Maven
> Existing Maven Projects, click Next.3. Select the directory to which the sample project code DmsTcpDemoClient.zip is
decompressed.
Step 3 Right-click the dms.tcp.demo project on Eclipse. Choose Run As > Maven build... from theshortcut menu. In the Goals text box, enter clean package to build the project.
Step 4 Save the build output in the target directory. The default file name is dms.tcp.demo-1.0.0-SNAPSHOT.jar.
Step 5 Use dms.tcp.demo-1.0.0-SNAPSHOT.jar to replace the dms.tcp.demo-1.0.0.jar file in theDmsTcpDemoClient/dist/libs directory on the ECS. Run the newly built project by followingthe procedure in 1.2.4 Running the Sample Project.
If the newly built project runs properly, it has been successfully built.
----End
1.2.6 Code of the Sample ProjectThe DMS TCP sample project contains two examples: DmsProducerDemo andDmsConsumerDemo. DmsProducerDemo is used to demonstrate the message productionprocess. DmsConsumerDemo is used to demonstrate the message consumption andacknowledgment processes.
Distributed Message ServiceDeveloper Guide 1 TCP SDK Developer Guide
Issue 04 (2018-05-14) 7

Producing Messages
Step 1 Create and start the DmsProducer.DmsProducer producer = new DmsProducerImpl();producer.start();
Step 2 Construct the content of the message to be sent.List<DmsMessage> messages = new ArrayList<>();final int messageNum = 10;for (int i = 0; i < messageNum; i++){ DmsMessage record = new DmsMessage(); record.setBody(("Hello DMS syn produce: " + i).getBytes()); messages.add(record);}
Step 3 Send the message.try{ List<DmsProduceResult> result = producer.produce(queueId, messages); result.forEach(r -> { System.out.println(r.getState()); });}catch (Throwable t){ t.printStackTrace();}
Step 4 Stop message production.producer.stop();
----End
Consuming Messages
Step 1 Create and start a consumer instance.DmsConsumer consumer = new DmsConsumerImpl();consumer.start();
Step 2 Consume messages.List<DmsConsumeResult> records = consumer.consume(queueId, groupId);
Step 3 Construct a request for acknowledging the message consumption.DmsCommitRequest commitRequest = new DmsCommitRequest();List<DmsCommitItem> messages = new ArrayList<>();
for (DmsConsumeResult record : records){ System.out.println(record.getHandler()); DmsCommitItem commitItem = new DmsCommitItem(); //The corresponding message handler needs to be filled in during acknowledgment. commitItem.setHandler(record.getHandler()); //Set the message handling status to true or false. commitItem.setStatus(true); messages.add(commitItem);}//Multiple messages can be acknowledged at one time.commitRequest.setMessage(messages);DmsCommitRequest commitRequest = new DmsCommitRequest(); List<DmsCommitItem> messages = new ArrayList<>(); for (DmsConsumeResult record : records)
Distributed Message ServiceDeveloper Guide 1 TCP SDK Developer Guide
Issue 04 (2018-05-14) 8

{ System.out.println(record.getHandler()); DmsCommitItem commitItem = new DmsCommitItem(); //The corresponding message handler needs to be filled in during acknowledgment. commitItem.setHandler(record.getHandler()); //Set the message handling status to true or false. commitItem.setStatus(true); messages.add(commitItem); } //Multiple messages can be acknowledged at one time.commitRequest.setMessage(messages);
Step 4 Acknowledge the message consumption.DmsCommitResult commitResult = consumer.commit(queueId, groupId, commitRequest);
Step 5 Stop message consumption.consumer.stop();
----End
1.3 Setting Up Development Environments
1.3.1 Preparing the Environment
Preparing ToolsKeep the following tools ready.
Table 1-4 Required tools
Tool Required Version How to Obtain
Eclipse 3.6.0 or later http://www.eclipse.org/downloads/
JDK 1.8.111 or later http://www.oracle.com/technetwork/java/javase/downloads/index.html
Apache Maven 3.0.3 or later http://maven.apache.org/download.cgi
Obtaining a Queue ID and Consumer Group ID
Step 1 Log in to the management console.
Step 2 Click Service List and choose Application > Distributed Message Service to launch theDMS console.
Step 3 In the navigation pane of the DMS console, choose Queue Manager.
Step 4 On the Queue Manager page, click Create Queue.
By default, each user can create a maximum of five queues. The Queue Manager pagedisplays the number of remaining queues that can be created. If you want to create morequeues, contact the customer service to increase your quota.
Distributed Message ServiceDeveloper Guide 1 TCP SDK Developer Guide
Issue 04 (2018-05-14) 9

Step 5 Specify queue parameters.
Table 1-5 Parameter description
Parameter Description
Region Region in which the new queue will be created.
Queue Name Unique name of a queue.When creating a queue, a default queue name is generated, which youcan change if required.A queue name is 1 to 64 characters long. Only letters, digits,underscores (_), and hyphens (-) are allowed.The Queue Name parameter cannot be modified after creation of thequeue.
Queue Type l StandardPartition-level FIFO mode and global FIFO mode are supported.
l ActiveMQQueues that use the Advanced Message Queuing Protocol(AMQP). AMQP, an advanced message queue protocol at theapplication layer of the unified messaging service, is an openstandard application layer protocol for message-orientedmiddleware.
l KafkaThe open source Kafka client can be used to create and retrievemessages. High throughput and high reliability are supported.
The default queue type is standard.
Queue Mode When the queue type is standard, the queue mode can be:l Partition-level FIFO: Messages may be retrieved out of
sequence, but the concurrent performance is higher.l Global FIFO: Messages are retrieved in the order they were sent.When the queue type is Kafka, the queue mode can be:l High throughput
All message replicas are flushed to a disk asynchronously. Selectthe high throughput mode when message delivery performance isimportant.
l High availabilityAll message replicas are flushed to a disk synchronously. Selectthe high availability mode when message reliability is important.
Distributed Message ServiceDeveloper Guide 1 TCP SDK Developer Guide
Issue 04 (2018-05-14) 10

Parameter Description
Dead Letter Queue This parameter is available only when the queue type is standard.An indicator of whether the dead letter queue is enabled. By default,the dead letter queue is disabled.Dead letter messages are messages that cannot be correctly retrieved.If a message fails to be retrieved for a preset number of times, themessage will be sent to the dead letter queue and retained in the deadletter queue for at least 72 hours. You can then retrieve the messagefrom the dead letter queue.Messages in the dead letter queue are specific to consumer groups,and consumer groups cannot retrieve each other's dead lettermessages.Dead letter messages from global FIFO queues are sent to the deadletter queue in the FIFO order.
Message RetentionPeriod (hours)
This parameter is displayed only if the Queue Type is set to Kafka.The number of hours for which messages will be preserved in aKafka queue. Messages older than that period will be deleted anddeleted messages are not retrievable to consumer groups.Value range: an integer from 1 to 72 hoursDefault value: 72 hours
MaximumRetrievals
This parameter is displayed only if the Dead Letter Queue is set toenabled.The maximum number of times a message can be retrieved before itis sent to the dead letter queue.Value range: 1 to 100Default value: 3
Description(optional)
Queue description.The description is 0 to 160 characters long and cannot contain anglebrackets (< and >).
Distributed Message ServiceDeveloper Guide 1 TCP SDK Developer Guide
Issue 04 (2018-05-14) 11

Figure 1-2 Creat queue
Step 6 Click OK to create the queue.
Step 7 On the queue list, click the name of the created queue to view details about the queue.
Figure 1-3 Queue ID
Step 8 Click Create Consumer Group.
Step 9 In the Create Consumer Group dialog box, specify the consumer group name.
A default consumer group name is generated, which you can change if required. A consumergroup name contains 1 to 32 characters. Only letters, digits, underscores (_), and hyphens (-)are allowed. Consumer group names must be unique within their queue.
Distributed Message ServiceDeveloper Guide 1 TCP SDK Developer Guide
Issue 04 (2018-05-14) 12

Step 10 Click Create.
A consumer group is created, and the consumer group ID is displayed on the consumer grouplist.
Figure 1-4 Consumer group ID
----End
Obtaining a Project IDWhen calling APIs, you need to specify project_id in API requests.
The following procedure describes how to obtain a project ID:
Step 1 Log in to the management console.
Step 2 Click Service List and choose Application > Distributed Message Service to launch theDMS console.
Step 3 Click the username and choose My Credential from the drop-down list.
On the My Credential page, click the Project List tab.
Step 4 On the Project List tab page, view the project ID in the same row as the region in whichDMS SDK will be developed.
Distributed Message ServiceDeveloper Guide 1 TCP SDK Developer Guide
Issue 04 (2018-05-14) 13

Figure 1-5 Project ID
----End
Obtaining an AK/SK
The following procedure describes how to obtain an AK/SK.
l AK: access key ID
l SK: secret access key
Step 1 Log in to the management console.
Step 2 Click the user name in the upper right corner to enter User Center.
Step 3 On the left navigation pane of the User Center page, choose Account > Account Info, andthen click Manage my credentials.
Step 4 Click Access Keys.
Step 5 Click Add Access Key. The Add Access Key dialog box is displayed.
Step 6 Enter your login password.
Step 7 Enter the verification code received in your email box or mobile phone.
Step 8 Click OK. A credentials.csv file containing your AK and SK is then generated.
NOTE
Keep the AK/SK confidential to protect your system security.
Step 9 Download the credentials.csv file to a local computer.
----End
Distributed Message ServiceDeveloper Guide 1 TCP SDK Developer Guide
Issue 04 (2018-05-14) 14

Obtaining Region and Endpoint Information
Region Endpoint Description
CN North-Beijing1
dms-tcp.cn-north-1.myhuaweicloud.com:60010
Use the Endpoints to accessthe DMS.
CN East-Shanghai2
dms-tcp.cn-east-2.myhuaweicloud.com:60010
CN South-Guangzhou
dms-tcp.cn-south-1.myhuaweicloud.com:60010
Buying an ECS
Step 1 Buy an ECS with an EIP by following the procedure in Purchasing an ECS.
NOTE
EIPs are used to log in to ECSs and upload files.
Step 2 Configure a private DNS server.
NOTE
You do not need to configure a private DNS server for a newly created ECS. If an existing ECS is used,you need to configure the DNS server IP address.
The DNS server IP addresses in different regions are as follows:
CN North-Beijing1: 100.125.1.250
CN East-Shanghai2: 100.125.17.29
CN East-Shanghai2: 100.125.1.250
----End
Collecting Information
Table 1-6 Information to be collected
Category Information Example
ECS EIP 114.115.141.228
Username huaweicloud
Password password
DMS Queue name my-tcp-queue
Queue ID 5964181e-b67e-4d35-9281-a58c352abda6
Queue type Standard
Queue mode Global FIFO
Consumer groupname
my-tcp-group
Distributed Message ServiceDeveloper Guide 1 TCP SDK Developer Guide
Issue 04 (2018-05-14) 15
Category Information Example
Consumer group ID g-c861aa48-a082-48ff-bc9d-ff36fe7aed38
AK/SK AK VAODAIIJGPUAYTJR**OD
SK ZHN49c6bpwDiQvPqKJ5CxutJxqc04Glt9xSz**Wi
Project Region CN North-Beijing1
Project name cn-north-1
Project ID bd67aaead60940d688b872c31bdc663b
Region andendpoint
Region CN North-Beijing1
Endpoint dms-tcp.cn-north-1.myhuaweicloud.com:60010
DNS DNS server IPaddress
CN North-Beijing1: 100.125.1.250CN East-Shanghai2: 100.125.17.29CN South-Guangzhou: 100.125.1.250
1.3.2 Obtaining an SDK PackageDownload the SDK package dmssdk.zip from http://static.huaweicloud.com/upload/files/dms/dmssdk.zip.
The dmssdk.zip package contains the following files:
l dms.sdk-1.0.0.jar: DMS SDK packagel dms.protocol-1.0.0.jar: DMS SDK packagel dms.client.properties: configuration filel README.txt: release description filel third_lib.zip: third-party JAR package on which DMS SDK dependsl dms.sdk.api.chm: API reference
1.3.3 Creating a ProjectThis section uses the Maven project tcpdemo as an example to describe how to create aproject.
Procedure
Step 1 On Eclipse (the recommended version is 4.6 or later), create a Maven project.
The project name is user-defined. The project name tcpdemo is used as an example.
Distributed Message ServiceDeveloper Guide 1 TCP SDK Developer Guide
Issue 04 (2018-05-14) 16

Step 2 Click Finish.
Step 3 Import the JAR packages of the DMS TCP SDK.
1. Right-click the new project tcpdemo, and create a libs folder.2. Copy dms.sdk-1.0.0.jar and dms.protocol-1.0.0.jar to the libs directory.3. Add the following information to the pom.xml file to import the JAR package of the
DMS TCP SDK into the Maven repository: <dependency> <groupId>com.huawei.middleware.dms</groupId> <artifactId>dms.protocol</artifactId> <version>1.0.0</version> <type>jar</type> <scope>system</scope> <systemPath>${basedir}/libs/dms.protocol-1.0.0.jar</systemPath> </dependency> <dependency> <groupId>com.huawei.middleware.dms</groupId> <artifactId>dms.sdk</artifactId> <version>1.0.0</version> <type>jar</type> <scope>system</scope> <systemPath>${basedir}/libs/dms.sdk-1.0.0.jar</systemPath> </dependency>
4. Save the pom.xml file.5. If the third-party dependency package is not automatically imported, import the package
in third_lib.zip into the Maven repository by referring to the DMS TCP demo project.
----End
1.3.4 Configuring ParametersStep 1 (Optional) Configure a private DNS server.
You need to use an ECS to connect to DMS when using the public network. You do not needto configure a private DNS server for a newly created ECS. If an existing ECS is used, youneed to configure the DNS server IP address.
The DNS server IP addresses in different regions are as follows:
l CN North-Beijing1: 100.125.1.250l CN East-Shanghai2: 100.125.17.29l CN South-Guangzhou: 100.125.1.250
Step 2 Configure key parameters in the dms.client.properties file by referring to Table 1-7.
Distributed Message ServiceDeveloper Guide 1 TCP SDK Developer Guide
Issue 04 (2018-05-14) 17
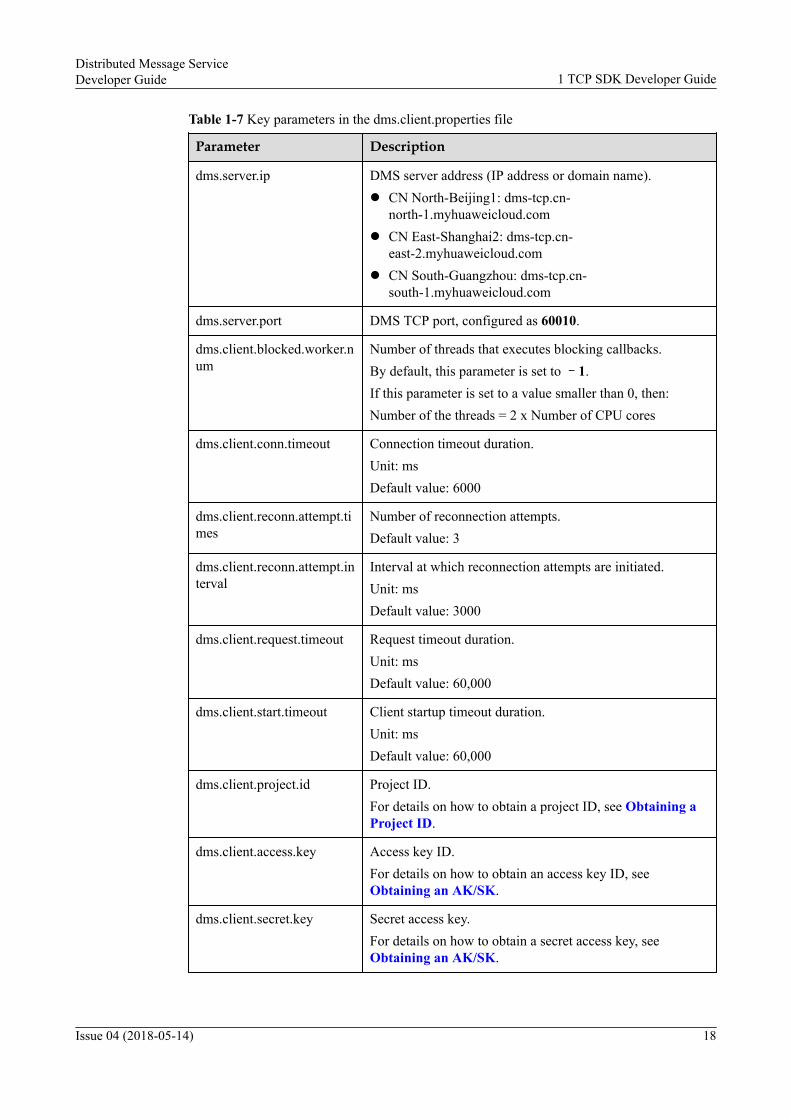
Table 1-7 Key parameters in the dms.client.properties file
Parameter Description
dms.server.ip DMS server address (IP address or domain name).l CN North-Beijing1: dms-tcp.cn-
north-1.myhuaweicloud.coml CN East-Shanghai2: dms-tcp.cn-
east-2.myhuaweicloud.coml CN South-Guangzhou: dms-tcp.cn-
south-1.myhuaweicloud.com
dms.server.port DMS TCP port, configured as 60010.
dms.client.blocked.worker.num
Number of threads that executes blocking callbacks.By default, this parameter is set to –1.If this parameter is set to a value smaller than 0, then:Number of the threads = 2 x Number of CPU cores
dms.client.conn.timeout Connection timeout duration.Unit: msDefault value: 6000
dms.client.reconn.attempt.times
Number of reconnection attempts.Default value: 3
dms.client.reconn.attempt.interval
Interval at which reconnection attempts are initiated.Unit: msDefault value: 3000
dms.client.request.timeout Request timeout duration.Unit: msDefault value: 60,000
dms.client.start.timeout Client startup timeout duration.Unit: msDefault value: 60,000
dms.client.project.id Project ID.For details on how to obtain a project ID, see Obtaining aProject ID.
dms.client.access.key Access key ID.For details on how to obtain an access key ID, seeObtaining an AK/SK.
dms.client.secret.key Secret access key.For details on how to obtain a secret access key, seeObtaining an AK/SK.
Distributed Message ServiceDeveloper Guide 1 TCP SDK Developer Guide
Issue 04 (2018-05-14) 18

Step 3 Write code.
For details about the APIs, see dms.sdk.api.chm obtained in section 1.3.2 Obtaining anSDK Package.
----End
Distributed Message ServiceDeveloper Guide 1 TCP SDK Developer Guide
Issue 04 (2018-05-14) 19

2 Kafka Developer Guide
2.1 Overview
2.2 Getting Started with Kafka APIs
2.3 Setting Up Development Environments
2.4 Appendix 1: Recommended Parameter Settings for Kafka Clients
2.5 Appendix 2: Code of the Sample Project
2.1 Overview
Introduction to DMS KafkaDMS Kafka supports open-source Kafka application programming interfaces (APIs). Third-party applications can implement open-source Kafka service capabilities by directly using aKafka client to call the Kafka server.
Usage RestrictionsGenerally, DMS Kafka can process thousands of transactions (or called messages) per second.If transactions per second (TPS) needs to be between 10,000 and 100,000, submit a workorder separately or contact the customer service.
The recommended Kafka client version is 0.10.2.1.
If the Kafka SDK is used to produce messages, the maximum size of a single message is 10MB. If the DMS console is used to produce messages, the maximum size of a single messageis 512 KB.
2.2 Getting Started with Kafka APIsThis section uses the DMS Kafka Demo as an example to describe how to use DMS KafkaAPIs.
Distributed Message ServiceDeveloper Guide 2 Kafka Developer Guide
Issue 04 (2018-05-14) 20

2.2.1 Helpful Linksl Download DMS Kafka SDKl Download Sample Project
2.2.2 Preparing the Environment
Preparing Tools
Keep the following tools ready.
Table 2-1 Required tools
Tool Required Version How to Obtain
Eclipse 3.6.0 or later http://www.eclipse.org/downloads/
JDK 1.8.111 or later http://www.oracle.com/technetwork/java/javase/downloads/index.html
Apache Maven 3.0.3 or later http://maven.apache.org/download.cgi
Creating a Kafka Queue
If a Kafka queue is already created, skip this procedure.
Step 1 Log in to the HUAWEI CLOUD Service website at http://www.huaweicloud.com/en-us/.
Step 2 On the Distributed Message Service (DMS) console, create a Kafka queue.
Step 3 Record the topic name of the Kafka queue for future use.
----End
Creating a Consumer Group
If a consumer group is already created for the created Kafka queue, skip this procedure.
Step 1 Log in to the HUAWEI CLOUD Service website at http://www.huaweicloud.com/en-us/.
Step 2 On the DMS console, create a consumer group for the created Kafka queue.
Step 3 Record the ID of the consumer group for future use.
----End
Creating an AK/SK
Step 1 Log in to the HUAWEI CLOUD Service website at http://www.huaweicloud.com/en-us/.
Step 2 On the My Credential page, click the Access Keys tab.
Distributed Message ServiceDeveloper Guide 2 Kafka Developer Guide
Issue 04 (2018-05-14) 21

Step 3 On the Access Keys tab page, click Add Access Key.
The system then generates a credentials.csv file containing an access key ID (AK) and asecret access key (SK).
Step 4 Save the credentials.csv file to a local computer.
----End
Obtaining a Project ID
Step 1 Log in to the HUAWEI CLOUD Service website at http://www.huaweicloud.com/en-us/.
Step 2 On the My Credential page, click the Project List tab.
Step 3 On the Project List tab page, record the project ID in the same row as the region in whichDMS Kafka will be used.
----End
Obtaining Region and Endpoint Information
Region Endpoint Description
CN North-Beijing1
dms-kafka.cn-north-1.myhuaweicloud.com:37000
Endpoints used by ECSs toaccess DMS when thedemo is running on theseECSs.CN East-
Shanghai2dms-kafka.cn-east-2.myhuaweicloud.com:37000
CN South-Guangzhou
dms-kafka.cn-south-1.myhuaweicloud.com:37000
CN North-Beijing1
dms-kafka.cn-north-1.myhuaweicloud.com:37003
Endpoint used by a localpublic network to accessDMS when the demo isrunning on the local publicnetwork.
Creating an ECSNOTE
DMS Kafka can be directly accessed from a public network. However, if DMS Kafka will be accessedfrom the POD zone, create an ECS first.
If an ECS is already created, skip this procedure.
Step 1 Log in to the HUAWEI CLOUD Service website at http://www.huaweicloud.com/en-us/.
Step 2 On the ECS console, create a Linux-based ECS and bind an elastic IP address (EIP) to theECS.
Step 3 Record the EIP, username, and password of the ECS for future use.
Distributed Message ServiceDeveloper Guide 2 Kafka Developer Guide
Issue 04 (2018-05-14) 22

NOTE
EIPs are used to log in to ECSs and upload files.
----End
Collecting Information
Table 2-2 Information to be collected
Category Information Example
ECS EIP 114.115.141.228
Username huaweicloud
Password password
DMS Queue name my-kafka-queue
Queue ID 4df89da6-ede4-4072-93e0-28dc6e866299
Queue type Kafka
Kafka topic k-bd67aaead60940d688b872c31bdc653b-4df89da6-ede4-4072-93e0-28dc6e866299
Consumer groupname
my-consumer-group
Consumer group ID g-7ec0caac-01fb-4f91-a4f2-0a9dd48f8af7
AK/SK AK VAODAIIJGPUAYTJRRLOD
SK ZHN49c6bpwDiQvPqKJ5CxutJxqc04Glt9xSzxYWi
Project Region CN North-Beijing1
Project name cn-north-1
Project ID bd67aaead60940d688b872c31bdc653b
Region andendpoint
Region CN North-Beijing1
Endpoint dms-kafka.cn-north-1.myhuaweicloud.com
DNS DNS server IPaddress
CN North-Beijing1: 100.125.1.250CN East-Shanghai2: 100.125.17.29CN South-Guangzhou: 100.125.1.250
2.2.3 Running the Sample ProjectStep 1 Log in to the ECS created in 2.2.2 Preparing the Environment.
Distributed Message ServiceDeveloper Guide 2 Kafka Developer Guide
Issue 04 (2018-05-14) 23
NOTE
Your applications can run on ECSs in the 192 network segment.
Step 2 Configure environment variables.
1. Install Java JDK or Java runtime environment (JRE). Add the following settings ofenvironment variables JAVA_HOME and PATH to the ~/.bash_profile:export JAVA_HOME=/opt/java/jdk1.8.0_151export PATH=$JAVA_HOME/bin:$PATH
NOTE
Use Oracle SDK instead of ECS's default SDK (for example, OpenSDK), because ECS's defaultSDK may not be suitable for the sample project. To obtain Oracle SDK, download JavaDevelopment Kit 1.8.111 or a later version from https://www.oracle.com.
2. Run the source .bash_profile command to make the modification take effect.
Step 3 Add the DNS server IP address to the first line in the /etc/resolv.conf file as the root user.nameserver 100.125.1.250
Step 4 Run the following command to download DmsKafkaDemo.zip (code package of the sampleproject DmsKafkaDemo.zip):$ wget https://dms-demo.obs.myhwclouds.com/DmsKafkaDemo.zip
Step 5 Run the following command to decompress DmsKafkaDemo.zip:$ unzip DmsKafkaDemo.zip
Step 6 Run the following command to navigate to the DmsKafkaDemo/dist directory:$ cd DmsKafkaDemo/dist
This directory contains pre-compiled binary files and executable scripts.
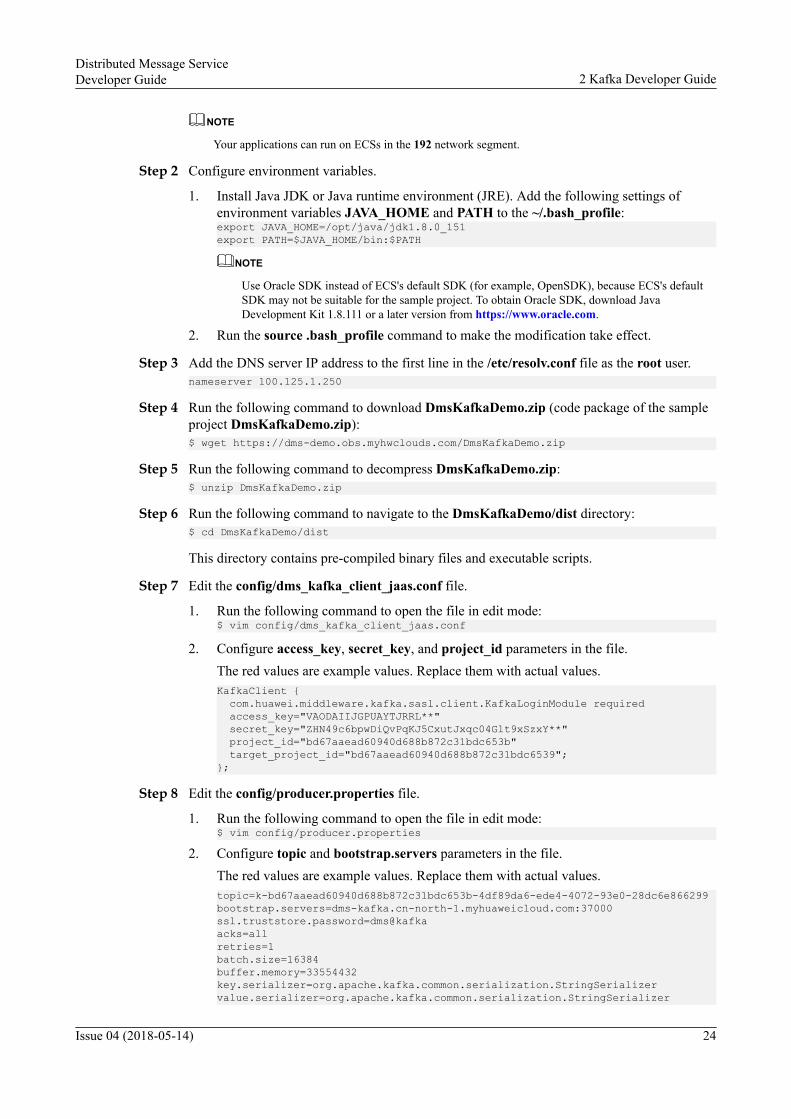
Step 7 Edit the config/dms_kafka_client_jaas.conf file.
1. Run the following command to open the file in edit mode:$ vim config/dms_kafka_client_jaas.conf
2. Configure access_key, secret_key, and project_id parameters in the file.The red values are example values. Replace them with actual values.KafkaClient { com.huawei.middleware.kafka.sasl.client.KafkaLoginModule required access_key="VAODAIIJGPUAYTJRRL**" secret_key="ZHN49c6bpwDiQvPqKJ5CxutJxqc04Glt9xSzxY**" project_id="bd67aaead60940d688b872c31bdc653b" target_project_id="bd67aaead60940d688b872c31bdc6539";};
Step 8 Edit the config/producer.properties file.
1. Run the following command to open the file in edit mode:$ vim config/producer.properties
2. Configure topic and bootstrap.servers parameters in the file.The red values are example values. Replace them with actual values.topic=k-bd67aaead60940d688b872c31bdc653b-4df89da6-ede4-4072-93e0-28dc6e866299bootstrap.servers=dms-kafka.cn-north-1.myhuaweicloud.com:37000ssl.truststore.password=dms@kafkaacks=allretries=1batch.size=16384buffer.memory=33554432key.serializer=org.apache.kafka.common.serialization.StringSerializervalue.serializer=org.apache.kafka.common.serialization.StringSerializer
Distributed Message ServiceDeveloper Guide 2 Kafka Developer Guide
Issue 04 (2018-05-14) 24

security.protocol=SASL_SSLsasl.mechanism=DMS
Step 9 Edit the config/consumer.properties file.
1. Run the following command to open the file in edit mode:$ vim config/consumer.properties
2. Configure topic, bootstrap.servers, and group.id parameters in the file.The red values are example values. Replace them with actual values.topic=k-bd67aaead60940d688b872c31bdc653b-4df89da6-ede4-4072-93e0-28dc6e866299bootstrap.servers=dms-kafka.cn-north-1.myhuaweicloud.com:37000group.id=g-7ec0caac-01fb-4f91-a4f2-0a9dd48f8af7ssl.truststore.password=dms@kafkasecurity.protocol=SASL_SSLsasl.mechanism=DMSkey.deserializer=org.apache.kafka.common.serialization.StringDeserializervalue.deserializer=org.apache.kafka.common.serialization.StringDeserializerauto.offset.reset=earliestenable.auto.commit=false
Step 10 Run the sample project to produce messages:$ bash produce.sh
Step 11 Run the sample project to consume messages:$ bash consume.sh
----End
2.2.4 Building the Sample ProjectStep 1 Download and decompress the sample project code DmsKafkaDemo.zip.
Step 2 Import the sample project code.
1. On Eclipse, choose File > Import.2. In the Select an import source area, select Exiting Projects Into Workspace.3. Select the directory to which the sample project code DmsKafkaDemo.zip is
decompressed.
Step 3 Choose Project > Build Project to build the project.
Step 4 Export a new JAR file.
1. Right-click the sample project DmsKafkaDemo and choose Export from the shortcutmenu.
2. Choose Java > JAR file. Enter the path and name of the JAR file to be generated.
Step 5 Replace the dms.kafka.demo.jar file in the DmsKafkaDemo/dist/libs directory with thenew JAR file. Run the newly built project by following the procedure in 2.2.3 Running theSample Project.
If the newly built project runs properly, it has been successfully built.
----End
2.3 Setting Up Development EnvironmentsThis section describes how to set up DMS Kafka development environments.
Distributed Message ServiceDeveloper Guide 2 Kafka Developer Guide
Issue 04 (2018-05-14) 25

Development Flowchart
In this document, the Java language is used as an example to describe how to performsecondary development based on DMS Kafka.
Figure 2-1 Development flowchart
2.3.1 Preparing the Environment
Preparing Tools
Keep the following tools ready.
Table 2-3 Required tools
Tool Required Version How to Obtain
Eclipse 3.6.0 or later http://www.eclipse.org/downloads/
JDK 1.8.111 or later http://www.oracle.com/technetwork/java/javase/downloads/index.html
Apache Maven 3.0.3 or later http://maven.apache.org/download.cgi
Obtaining a Kafka Topic ID and Consumer Group ID
Before obtaining a Kafka topic ID and consumer group ID, you need to create a Kafka queueand consumer group.
Step 1 Log in to the management console.
Distributed Message ServiceDeveloper Guide 2 Kafka Developer Guide
Issue 04 (2018-05-14) 26

Step 2 Click Service List and choose Application > Distributed Message Service to launch theDMS console.
Step 3 In the navigation pane of the DMS console, choose Queue Manager.
Step 4 On the Queue Manager page, click Create Queue.
Step 5 Specify queue parameters and click OK to create a Kafka queue.
Table 2-4 Parameter description
Parameter Description
Region Region in which the new queue will be created.
Queue Name Unique name of a queue.When creating a queue, a default queue name is generated, which youcan change if required.A queue name is 1 to 64 characters long. Only letters, digits,underscores (_), and hyphens (-) are allowed.The Queue Name parameter cannot be modified after creation of thequeue.
Queue Type Type of a queue.The Queue Type parameter must be set to Kafka.
Queue Mode l High throughputAll message replicas are flushed to a disk asynchronously. Selectthe high throughput mode when message delivery performance isimportant.
l High availabilityAll message replicas are flushed to a disk synchronously. Selectthe high availability mode when message reliability is important.
This parameter is displayed only if the Queue Type is set to Kafka.
Message RetentionPeriod (hours)
This parameter is displayed only if the Queue Type is set to Kafka.The number of hours for which messages will be preserved in aKafka queue. Messages older than that period will be deleted anddeleted messages are not retrievable to consumer groups.Value range: an integer from 1 to 72 hoursDefault value: 72 hours
Description(optional)
Queue description.The description is 0 to 160 characters long and cannot contain anglebrackets (< and >).
Distributed Message ServiceDeveloper Guide 2 Kafka Developer Guide
Issue 04 (2018-05-14) 27

Figure 2-2 Creating a Kafka queue
Step 6 Click the name of a queue to the left of the name of the Kafka queue to view details about thequeue, and record the topic name of the Kafka queue.
Figure 2-3 Kafka topic ID
Step 7 On the Consumer Group tab page, click Create Consumer Group.
Step 8 In the Create Consumer Group dialog box, specify the consumer group name and clickCreate.
A consumer group is then created.
A default consumer group name is generated, which you can change if required. A consumergroup name contains 1 to 32 characters. Only letters, digits, underscores (_), and hyphens (-)are allowed. Consumer group names must be unique within their queue.
Distributed Message ServiceDeveloper Guide 2 Kafka Developer Guide
Issue 04 (2018-05-14) 28

Step 9 View the consumer group ID on the consumer group list, and record the ID of the consumergroup.
Figure 2-4 Consumer group ID
----End
Obtaining a Project IDWhen calling APIs, you need to specify project_id in API requests.
The following procedure describes how to obtain a project ID:
Step 1 Log in to the management console.
Step 2 Click Service List and choose Application > Distributed Message Service to launch theDMS console.
Step 3 On the My Credential page, click the Project List tab.
Step 4 On the Project List tab page, view the project ID in the same row as the region in whichDMS Kafka will be developed.
Figure 2-5 Project ID
----End
Distributed Message ServiceDeveloper Guide 2 Kafka Developer Guide
Issue 04 (2018-05-14) 29

Obtaining an AK/SK
Step 1 Log in to the management console.
Step 2 Click Service List and choose Application > Distributed Message Service to launch theDMS console.
Step 3 On the My Credential page, click the Access Keys tab.
Step 4 On the Access Keys tab page, click Add Access Key.
Step 5 In the Add Access Key dialog box, enter your login password.
Step 6 Select Verify by email or Verify by mobile. Enter the verification code.
Step 7 Click OK.
A credentials.csv file containing your AK and SK is then generated.
NOTE
Keep the AK/SK confidential to protect your system security.
Step 8 Download the credentials.csv file to a local computer.
----End
Obtaining Region and Endpoint Information
Region Endpoint Description
CN North-Beijing1
dms-kafka.cn-north-1.myhuaweicloud.com:37000
Endpoints used by ECSsto access DMS.
CN East-Shanghai2
dms-kafka.cn-east-2.myhuaweicloud.com:37000
CN South-Guangzhou
dms-kafka.cn-south-1.myhuaweicloud.com:37000
CN North-Beijing1
dms-kafka.cn-north-1.myhuaweicloud.com:37003
Endpoint used by a localpublic network to accessDMS.
Buying an ECSNOTE
DMS Kafka can be directly accessed from a public network. However, if DMS Kafka will be accessedfrom the POD zone, create an ECS first.
Step 1 Buy an ECS by following the procedure in Purchasing an ECS.
NOTE
EIPs are used to log in to ECSs and upload files.
Step 2 Configure a private DNS server.
Distributed Message ServiceDeveloper Guide 2 Kafka Developer Guide
Issue 04 (2018-05-14) 30

NOTE
You do not need to configure a private DNS server for a newly created ECS. If an existing ECS is used,you need to configure the DNS server IP address.
The DNS server IP addresses in different regions are as follows:
CN North-Beijing1: 100.125.1.250
CN East-Shanghai2: 100.125.17.29
CN South-Guangzhou: 100.125.1.250
----End
Collecting Information
Table 2-5 Information to be collected
Category Information Example
ECS EIP 114.115.141.228
Username huaweicloud
Password password
DMS Queue name my-kafka-queue
Queue ID 4df89da6-ede4-4072-93e0-28dc6e866299
Queue type Kafka
Kafka topic k-bd67aaead60940d688b872c31bdc653b-4df89da6-ede4-4072-93e0-28dc6e866299
Consumer groupname
my-consumer-group
Consumer group ID g-7ec0caac-01fb-4f91-a4f2-0a9dd48f8af7
AK/SK AK VAODAIIJGPUAYTJR**OD
SK ZHN49c6bpwDiQvPqKJ5CxutJxqc04Glt9xSz**Wi
Project Region CN North-Beijing1
Project name cn-north-1
Project ID bd67aaead60940d688b872c31bdc653b
Region andendpoint
Region CN North-Beijing1
Endpoint dms-kafka.cn-north-1.myhuaweicloud.com:37000
DNS DNS server IPaddress
CN North-Beijing1: 100.125.1.250CN East-Shanghai2: 100.125.17.29CN South-Guangzhou: 100.125.1.250
Distributed Message ServiceDeveloper Guide 2 Kafka Developer Guide
Issue 04 (2018-05-14) 31

2.3.2 Creating a ProjectThis section uses the Maven project kafkademo as an example to describe how to create aproject.
Procedure
Step 1 Download the Demo package.
1. Log in to the DMS console. In the navigation pane, choose Using APIs.2. Click the Kafka API tab.3. Click Download Sample Code to download the Demo package DmsKafkaDemo.zip.
Step 2 Download the SDK package DMS Kafka sasl from http://static.huaweicloud.com/upload/files/dms/dmskafkasasl.zip or decompress it from DmsKafkaDemo.zip (the location ofDMS Kafka sasl is \DmsKafkaDemo\dist\libs\dms.kafka.sasl.client-1.0.0.jar).Decompress the following directories from DMS Kafka sasl:l client.truststore.jks: client certificatel dms.kafka.sasl.client-1.0.0.jar: DMS Kafka SASL packagel dms_kafka_client_jaas.conf: client configuration file
Step 3 On Eclipse (the recommended version is 4.6 or later), create a Maven project.
The project name is user-defined. The project name kafkademo is used as an example.
Figure 2-6 Creating a Maven project
Step 4 Click Finish.
Step 5 Import the DMS Kafka SASL package dms.kafka.sasl.client-1.0.0.jar.
1. Right-click the new project kafkademo, and create a libs folder.2. Copy dms.kafka.sasl.client-1.0.0.jar to the libs folder.3. Add the following information to the pom.xml file to import
dms.kafka.sasl.client-1.0.0.jar into the Maven repository:<dependency> <groupId>dms</groupId> <artifactId>kafka.sasl.client</artifactId> <version>1.0.0</version> <scope>system</scope> <systemPath>${project.basedir}/libs/dms.kafka.sasl.client-1.0.0.jar</systemPath></dependency>
Distributed Message ServiceDeveloper Guide 2 Kafka Developer Guide
Issue 04 (2018-05-14) 32

<dependency> <groupId>org.apache.kafka</groupId> <artifactId>kafka-clients</artifactId> <version>0.10.2.1</version></dependency><dependency> <groupId>org.slf4j</groupId> <artifactId>slf4j-api</artifactId> <version>1.7.7</version></dependency><dependency> <groupId>org.slf4j</groupId> <artifactId>slf4j-log4j12</artifactId> <version>1.7.7</version></dependency><dependency> <groupId>log4j</groupId> <artifactId>log4j</artifactId> <version>1.2.17</version></dependency>
4. Save the pom.xml file.
Step 6 If there is no other dependency package, see the sample project DmsKafkaDemo.zipdownloaded in 2.2.1 Helpful Links.
----End
2.3.3 Configuring Parameters
Procedure
Step 1 (Optional) Configure a private DNS server.
You need to use an ECS to connect to DMS Kafka. You do not need to configure a privateDNS server for a newly created ECS. If an existing ECS is used, you need to configure theDNS server IP address.
The DNS server IP addresses in different regions are as follows:l CN North-Beijing1: 100.125.1.250l CN East-Shanghai2: 100.125.17.29l CN South-Guangzhou: 100.125.1.250
Step 2 Configure access_key, secret_key, and project_id parameters in thedms_kafka_client_jaas.conf file.
The three parameters are used to authenticate DMS Kafka API requests.
The following is example content in the dms_kafka_client_jaas.conf file. Replace them withthe actual access_key, secret_key, and project_id of your HUAWEI CLOUD Service account.
KafkaClient { com.huawei.middleware.kafka.sasl.client.KafkaLoginModule required access_key="XXXXXX" secret_key="XXXXXX" project_id="XXXXXX";};
To access the queues authorized by other tenants, set the target_project_id to the project IDof the authorizing tenant.KafkaClient { com.huawei.middleware.kafka.sasl.client.KafkaLoginModule required access_key="XXXXXX"
Distributed Message ServiceDeveloper Guide 2 Kafka Developer Guide
Issue 04 (2018-05-14) 33
secret_key="XXXXXX" project_id="XXXXXX" target_project_id="";};
Step 3 Configure SASL to start upon process using either of the methods:
l Method 1
Configure the following JVM parameter to add the location of SASL configuration file:-Djava.security.auth.login.config=/path/kafka_client_jaas.conf
Replace /path with the actual path name.
l Method 2
Add the following information to project code so that SASL can start before KafkaProducer and Consumer start:System.setProperty("java.security.auth.login.config", "/path/kafka_client_jaas.conf");
Replace /path with the actual path name.
Step 4 Add the following information to the consumer.properties file.connections.max.idle.ms=30000
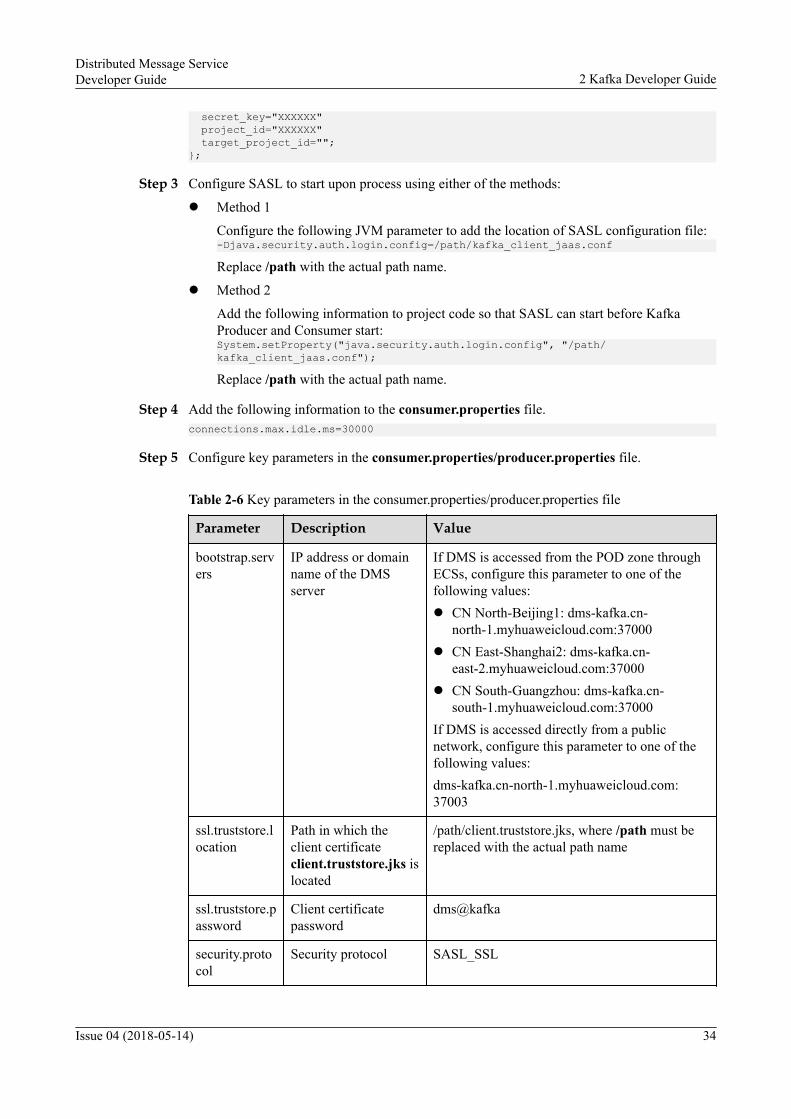
Step 5 Configure key parameters in the consumer.properties/producer.properties file.
Table 2-6 Key parameters in the consumer.properties/producer.properties file
Parameter Description Value
bootstrap.servers
IP address or domainname of the DMSserver
If DMS is accessed from the POD zone throughECSs, configure this parameter to one of thefollowing values:l CN North-Beijing1: dms-kafka.cn-
north-1.myhuaweicloud.com:37000l CN East-Shanghai2: dms-kafka.cn-
east-2.myhuaweicloud.com:37000l CN South-Guangzhou: dms-kafka.cn-
south-1.myhuaweicloud.com:37000If DMS is accessed directly from a publicnetwork, configure this parameter to one of thefollowing values:dms-kafka.cn-north-1.myhuaweicloud.com:37003
ssl.truststore.location
Path in which theclient certificateclient.truststore.jks islocated
/path/client.truststore.jks, where /path must bereplaced with the actual path name
ssl.truststore.password
Client certificatepassword
dms@kafka
security.protocol
Security protocol SASL_SSL
Distributed Message ServiceDeveloper Guide 2 Kafka Developer Guide
Issue 04 (2018-05-14) 34

Parameter Description Value
sasl.mechanism
Service name DMSNote: All letters in the entered service namemust be capitalized.
For details about other Kafka parameters, visit the official Kafka website.
Step 6 Enable Kafka debug logging by modifying the log4j.properties file.
Kafka debug logs are helpful when you are debugging Kafka.log4j.rootLogger=DEBUG, stdout log4j.appender.stdout=org.apache.log4j.ConsoleAppenderlog4j.appender.stdout.layout=org.apache.log4j.PatternLayoutlog4j.appender.stdout.layout.ConversionPattern=[%d] %p %m (%c:%L)%nlog4j.logger.org.apache.kafka.clients=DEBUGlog4j.logger.kafka=INFO, stdoutlog4j.additivity.kafka=falselog4j.logger.org.apache.kafka=DEBUG, stdoutlog4j.additivity.org.apache.kafka=false
Step 7 Write code.
For details about APIs, visit the official Kafka website.
----End
Distributed Message ServiceDeveloper Guide 2 Kafka Developer Guide
Issue 04 (2018-05-14) 35

2.4 Appendix 1: Recommended Parameter Settings forKafka Clients
Table 2-7 Producer parameters
Parameter DefaultValue
Recommended Value
Description
acks 1 l all (if highreliabilitymode isselected
l 1 (if highthroughputmode isselected)
The number of acknowledgments the producerrequires the server to have received beforeconsidering a request complete. This controlsthe durability of records that are sent. Thefollowing settings are allowed:l acks=0
The producer will not wait for anyacknowledgment from the server at all. Therecord will be immediately added to thesocket buffer and considered sent. Noguarantee can be made that the server hasreceived the record in this case, and theretries configuration will not take effect (asthe client generally does not know of anyfailures). The offset given back for eachrecord will always be set to -1.
l acks=1The leader will write the record to its locallog but will respond without awaiting fullacknowledgement from all followers. Inthis case, if the leader fails immediatelyafter acknowledging the record but beforethe followers have replicated it, then therecord will be lost.
l acks=allThe leader will wait for the full set ofreplicas to acknowledge the record. Thisguarantees that the record will not be lostas long as at least one replica remains alive.This is the strongest available guarantee.
retries 0 0 Setting retries to a value greater than zero willcause the client to resend any record that failedto be sent due to a potentially transient error.Note that this retry is no different than if theclient resent the record upon receiving theerror. Allowing retries will potentially changethe ordering of records because if two batchesare sent to a single partition, and the first failsand is retried but the second succeeds, then therecords in the second batch may appear first.
Distributed Message ServiceDeveloper Guide 2 Kafka Developer Guide
Issue 04 (2018-05-14) 36

Parameter DefaultValue
Recommended Value
Description
request.timeout.ms
30000 120000 Maximum amount of time the client will waitfor the response of a request. If the response isnot received before the timeout elapses, theclient will throw a Timeout exception.
block.on.buffer.full
TRUE Default value When buffer memory is exhausted, theproducer must stop receiving new messagerecords or throw an exception. By default, thisparameter is set to TRUE. However, in somecases, non-blocking usage is desired and it isbetter to throw an exception immediately.Setting this parameter to FALSE will causethe producer to instead throw anBufferExhaustedException when buffermemory is exhausted.
batch.size 16384 262144 The producer will attempt to batch recordstogether into fewer requests whenever multiplerecords are being sent to the same partition.This helps performance on both the client andthe server. This parameter controls the defaultbatch size in bytes.No attempt will be made to batch recordslarger than this size.Requests sent to brokers will contain multiplebatches, one for each partition with dataavailable to be sent.A small batch size will make batching lesscommon and may reduce throughput (a batchsize of zero will disable batching entirely). Avery large batch size may use memory a bitmore wastefully as a buffer of the specifiedbatch size will always be allocated inanticipation of additional records.
buffer.memory
33554432 536870912 The total bytes of memory the producer canuse to buffer records waiting to be sent to theserver. If records are sent faster than they canbe delivered to the broker, then the producerwill stop sending records or throw ablock.on.buffer.full exception.This setting should correspond roughly to thetotal memory the producer will use, but is nota hard bound since not all memory theproducer uses is used for buffering. Someadditional memory will be used forcompression (if compression is enabled) aswell as for maintaining in-flight requests.
Distributed Message ServiceDeveloper Guide 2 Kafka Developer Guide
Issue 04 (2018-05-14) 37
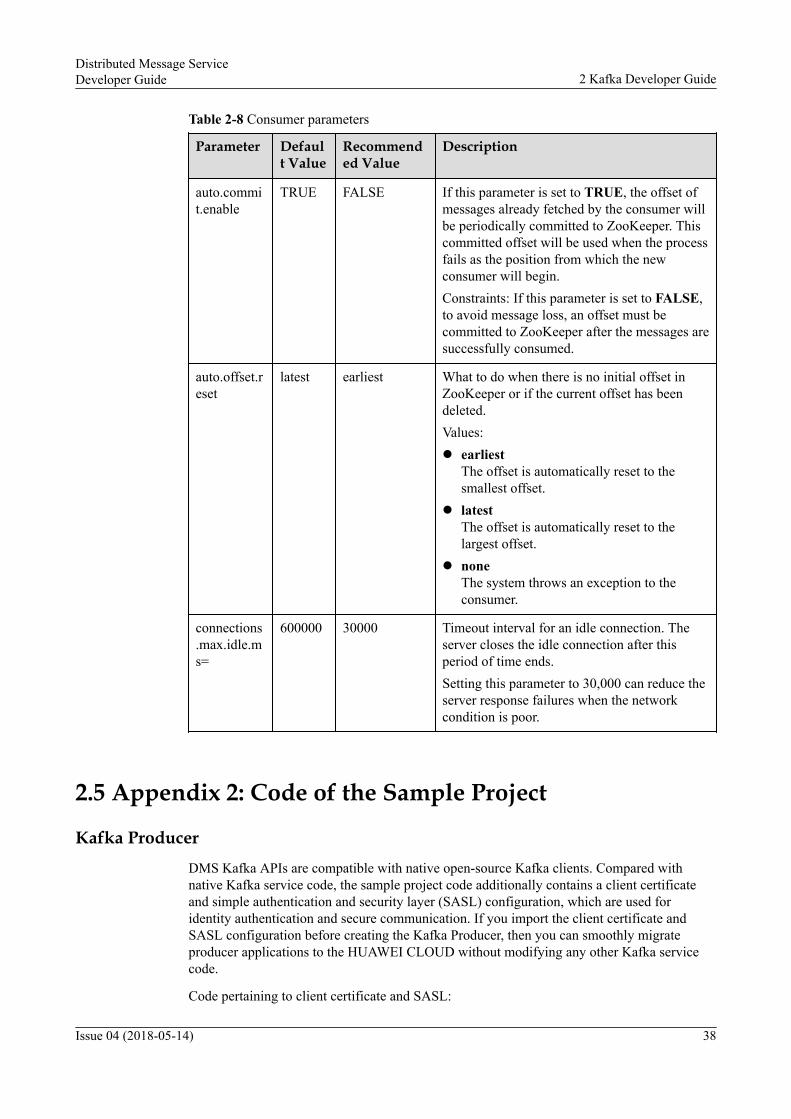
Table 2-8 Consumer parameters
Parameter Default Value
Recommended Value
Description
auto.commit.enable
TRUE FALSE If this parameter is set to TRUE, the offset ofmessages already fetched by the consumer willbe periodically committed to ZooKeeper. Thiscommitted offset will be used when the processfails as the position from which the newconsumer will begin.Constraints: If this parameter is set to FALSE,to avoid message loss, an offset must becommitted to ZooKeeper after the messages aresuccessfully consumed.
auto.offset.reset
latest earliest What to do when there is no initial offset inZooKeeper or if the current offset has beendeleted.Values:l earliest
The offset is automatically reset to thesmallest offset.
l latestThe offset is automatically reset to thelargest offset.
l noneThe system throws an exception to theconsumer.
connections.max.idle.ms=
600000 30000 Timeout interval for an idle connection. Theserver closes the idle connection after thisperiod of time ends.Setting this parameter to 30,000 can reduce theserver response failures when the networkcondition is poor.
2.5 Appendix 2: Code of the Sample Project
Kafka ProducerDMS Kafka APIs are compatible with native open-source Kafka clients. Compared withnative Kafka service code, the sample project code additionally contains a client certificateand simple authentication and security layer (SASL) configuration, which are used foridentity authentication and secure communication. If you import the client certificate andSASL configuration before creating the Kafka Producer, then you can smoothly migrateproducer applications to the HUAWEI CLOUD without modifying any other Kafka servicecode.
Code pertaining to client certificate and SASL:
Distributed Message ServiceDeveloper Guide 2 Kafka Developer Guide
Issue 04 (2018-05-14) 38

Properties producerConfig = Config.getProducerConfig(); producerConfig.put("ssl.truststore.location", Config.getTrustStorePath()); System.setProperty("java.security.auth.login.config", Config.getSaslConfig());
The code for creating a producer and sending messages does not need to be modified.
Kafka ConsumerDMS Kafka APIs are compatible with native open-source Kafka clients. Compared withnative Kafka service code, the sample project code additionally contains a client certificateand SASL configuration, which are used for identity authentication and securecommunication. If you import the client certificate and SASL configuration before creatingthe KafkaConsumer, then you can smoothly migrate consumer applications to the HUAWEICLOUD without modifying any other Kafka service code.
Code pertaining to client certificate and SASL:
Properties consumerConfig = Config.getConsumerConfig(); consumerConfig.put("ssl.truststore.location", Config.getTrustStorePath()); System.setProperty("java.security.auth.login.config", Config.getSaslConfig());
The code for creating a consumer and consuming messages does not need to be modified.
Distributed Message ServiceDeveloper Guide 2 Kafka Developer Guide
Issue 04 (2018-05-14) 39

3 AMQP Developer Guide
3.1 Overview
3.2 Getting Started with AMQP
3.3 Setting Up Development Environments
3.1 Overview
Introduction to AMQPThe Advanced Message Queuing Protocol (AMQP) is an open standard for passing businessmessages between applications or organizations. It connects systems, feeds business processeswith the information they need and reliably transmits onward the instructions that achievetheir goals.
Table 3-1 DMS AMQP APIs
API Description Type
Message production API Produces messages throughAMQP.
Synchronous andasynchronous API
Message consumption API Consumes messages throughAMQP.
Synchronous API
Feature Descriptionl Message production
Produce message through AMQP.l Message consumption
Consume messages through AMQP.
Distributed Message ServiceDeveloper Guide 3 AMQP Developer Guide
Issue 04 (2018-05-14) 40
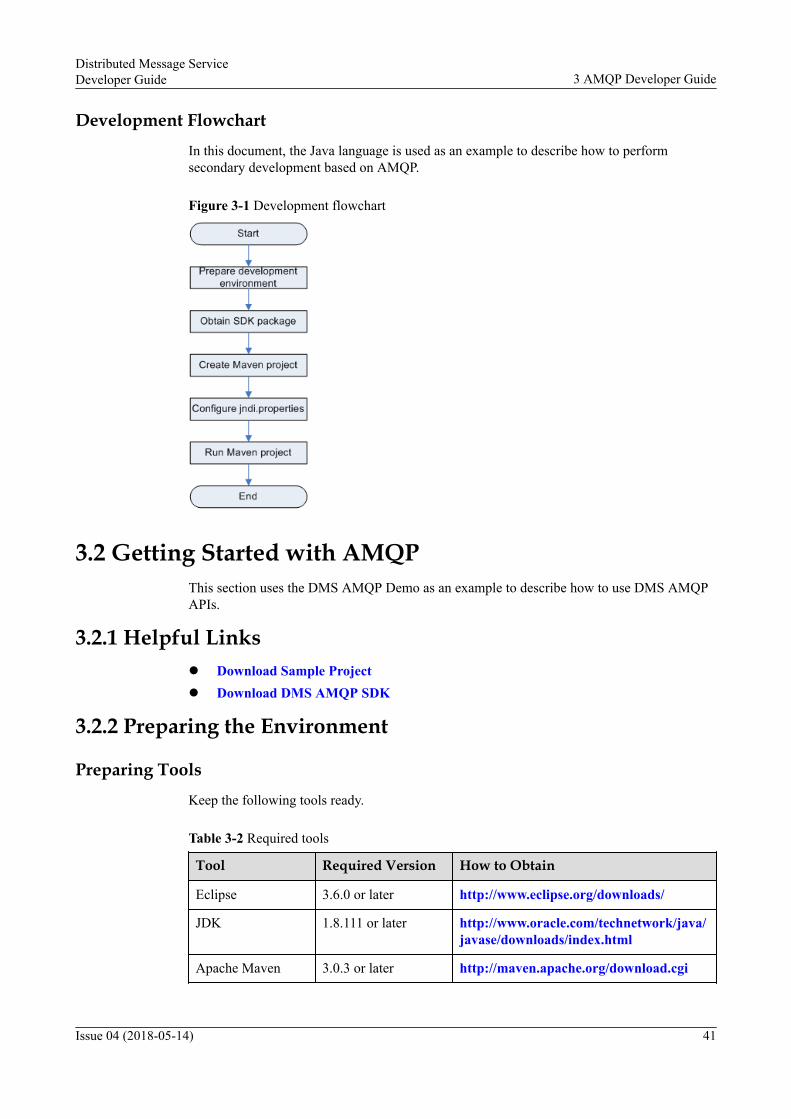
Development FlowchartIn this document, the Java language is used as an example to describe how to performsecondary development based on AMQP.
Figure 3-1 Development flowchart
3.2 Getting Started with AMQPThis section uses the DMS AMQP Demo as an example to describe how to use DMS AMQPAPIs.
3.2.1 Helpful Linksl Download Sample Projectl Download DMS AMQP SDK
3.2.2 Preparing the Environment
Preparing ToolsKeep the following tools ready.
Table 3-2 Required tools
Tool Required Version How to Obtain
Eclipse 3.6.0 or later http://www.eclipse.org/downloads/
JDK 1.8.111 or later http://www.oracle.com/technetwork/java/javase/downloads/index.html
Apache Maven 3.0.3 or later http://maven.apache.org/download.cgi
Distributed Message ServiceDeveloper Guide 3 AMQP Developer Guide
Issue 04 (2018-05-14) 41

Creating an AMQP Queue
If an AMQP queue is already created, skip this procedure.
Step 1 Log in to the HUAWEI CLOUD Service website at http://www.huaweicloud.com/en-us/.
Step 2 On the DMS console, create a queue and set Queue Type to ActiveMQ.
Step 3 Record the queue ID for future use.
----End
Creating a Consumer Group
If a consumer group is already created, skip this procedure.
Step 1 Log in to the HUAWEI CLOUD Service website at http://www.huaweicloud.com/en-us/.
Step 2 On the DMS console, create a consumer group for the ActiveMQ queue.
Step 3 Record the consumer group ID for future use.
----End
Creating an AK/SK
If an AK/SK is already created, skip this procedure.
Step 1 Log in to the HUAWEI CLOUD Service website at http://www.huaweicloud.com/en-us/.
Step 2 On the My Credential page, click the Access Keys tab.
Step 3 On the Access Keys tab page, click Add Access Key.
The system then generates a credentials.csv file containing an access key ID (AK) and asecret access key (SK).
Step 4 Save the credentials.csv file to a local computer.
----End
Obtaining a Project ID
Step 1 Log in to the HUAWEI CLOUD Service website at http://www.huaweicloud.com/en-us/.
Step 2 On the My Credential page, click the Project List tab.
Step 3 On the Project List tab page, record the project ID in the same row as the region in whichDMS AMQP will be used.
----End
Obtaining Region and Endpoint InformationRegion Endpoint Description
CN North-Beijing1
dms-amqp.cn-north-1.myhuaweicloud.com:60020
Use the Endpoints toaccess the DMS.
Distributed Message ServiceDeveloper Guide 3 AMQP Developer Guide
Issue 04 (2018-05-14) 42

Region Endpoint Description
CN East-Shanghai2
dms-amqp.cn-east-2.myhuaweicloud.com:60020
CN South-Guangzhou
dms-amqp.cn-south-1.myhuaweicloud.com:60020
Creating an ECS
If an ECS is already created, skip this procedure.
Step 1 Log in to the HUAWEI CLOUD Service website at http://www.huaweicloud.com/en-us/.
Step 2 On the ECS console, create a Linux-based ECS and bind an EIP to the ECS.
Step 3 Record the EIP, username, and password of the ECS for future use.
NOTE
EIPs are used to log in to ECSs and upload files.
----End
Collecting Information
Information to be collected
Category Information Example
ECS EIP 114.115.141.228
Username huaweicloud
Password password
DMS Queue name my-activemq-queue
Queue ID 88d5e268-bb48-4dfe-9c8b-64a879aa6e28
Queue type ActiveMQ
Consumer groupname
my-activemq-group
Consumer group ID g-fa621074-0302-4a8d-9953-565713286995
AK/SK AK G6DNZF3TVBQIRENF**4L
SK WoIgoldytZ5OWWTE7czQ7V5VNo57qKnFeVcR**5P
Project Region CN North-Beijing1
Project cn-north-1
Project ID fdc60cfe407a4b2a96a498efda55c785
Distributed Message ServiceDeveloper Guide 3 AMQP Developer Guide
Issue 04 (2018-05-14) 43
Category Information Example
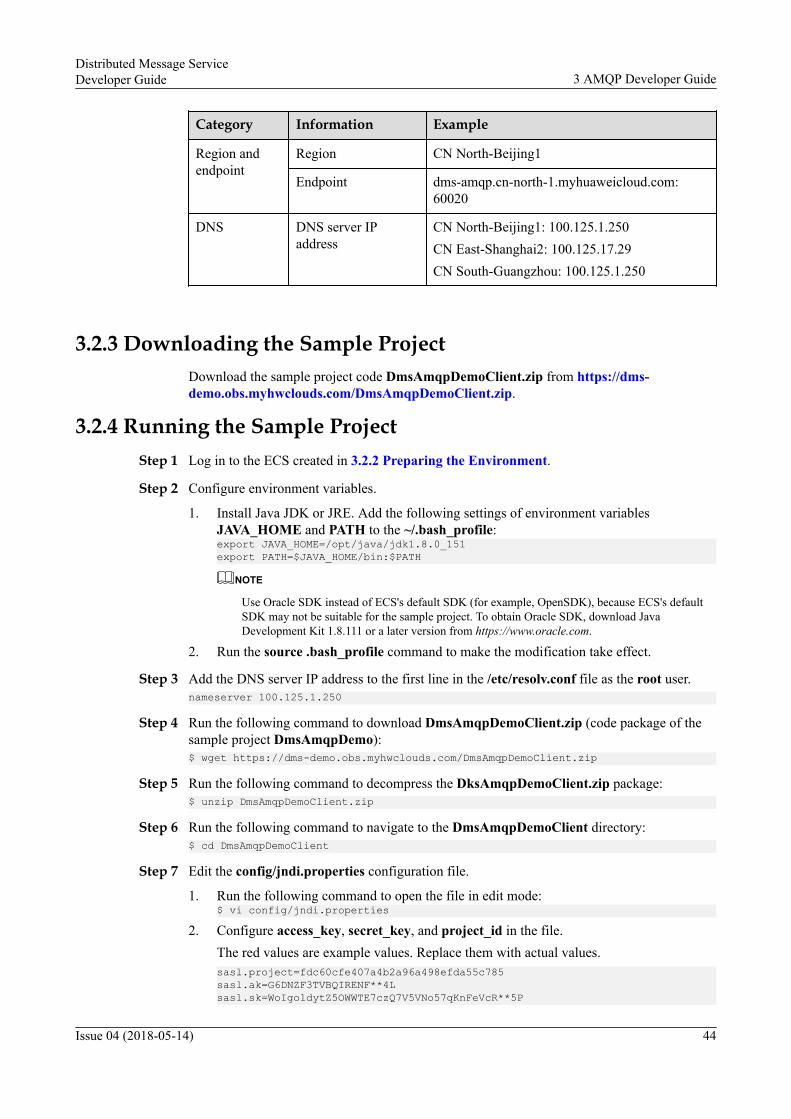
Region andendpoint
Region CN North-Beijing1
Endpoint dms-amqp.cn-north-1.myhuaweicloud.com:60020
DNS DNS server IPaddress
CN North-Beijing1: 100.125.1.250CN East-Shanghai2: 100.125.17.29CN South-Guangzhou: 100.125.1.250
3.2.3 Downloading the Sample ProjectDownload the sample project code DmsAmqpDemoClient.zip from https://dms-demo.obs.myhwclouds.com/DmsAmqpDemoClient.zip.
3.2.4 Running the Sample ProjectStep 1 Log in to the ECS created in 3.2.2 Preparing the Environment.
Step 2 Configure environment variables.
1. Install Java JDK or JRE. Add the following settings of environment variablesJAVA_HOME and PATH to the ~/.bash_profile:export JAVA_HOME=/opt/java/jdk1.8.0_151 export PATH=$JAVA_HOME/bin:$PATH
NOTE
Use Oracle SDK instead of ECS's default SDK (for example, OpenSDK), because ECS's defaultSDK may not be suitable for the sample project. To obtain Oracle SDK, download JavaDevelopment Kit 1.8.111 or a later version from https://www.oracle.com.
2. Run the source .bash_profile command to make the modification take effect.
Step 3 Add the DNS server IP address to the first line in the /etc/resolv.conf file as the root user.nameserver 100.125.1.250
Step 4 Run the following command to download DmsAmqpDemoClient.zip (code package of thesample project DmsAmqpDemo):$ wget https://dms-demo.obs.myhwclouds.com/DmsAmqpDemoClient.zip
Step 5 Run the following command to decompress the DksAmqpDemoClient.zip package:$ unzip DmsAmqpDemoClient.zip
Step 6 Run the following command to navigate to the DmsAmqpDemoClient directory:$ cd DmsAmqpDemoClient
Step 7 Edit the config/jndi.properties configuration file.
1. Run the following command to open the file in edit mode:$ vi config/jndi.properties
2. Configure access_key, secret_key, and project_id in the file.The red values are example values. Replace them with actual values.sasl.project=fdc60cfe407a4b2a96a498efda55c785sasl.ak=G6DNZF3TVBQIRENF**4Lsasl.sk=WoIgoldytZ5OWWTE7czQ7V5VNo57qKnFeVcR**5P
Distributed Message ServiceDeveloper Guide 3 AMQP Developer Guide
Issue 04 (2018-05-14) 44

connectionfactory.myFactoryLookup = amqps://100.125.2.20:60020?transport.trustAll=true&transport.verifyHost='false'&amqp.saslMechanisms=DMSqueue.myQueueLookup=88d5e268-bb48-4dfe-9c8b-64a879aa6e28topic.myTopicLookup=88d5e268-bb48-4dfe-9c8b-64a879aa6e28/group.id/g-fa621074-0302-4a8d-9953-565713286995
Step 8 Run the sample project to produce messages:$ java -cp .:./config:DmsAmqpDemoClient.jar Sender
Step 9 Run the sample project to consume messages:$ java -cp .:./config:DmsAmqpDemoClient.jar Receiver
Step 10 Log in to the DMS console to view the number of messages in a specified message queue andverify the execution result of the demo script.
----End
3.2.5 Building the Sample ProjectStep 1 Download and decompress the sample project code DmsAmqpDemoClient.zip.
Step 2 Import the sample project code.
1. On IDEA, choose File > New > Project from Existing Sources.2. Import a Maven project that exists.3. Select the directory to which the sample project code DmsAmqpDemoClient.zip is
decompressed.
Step 3 Choose File > Project Structure.
Step 4 Choose Artifacts on the left pane, and then choose JAR > From modules withdependencies.
Step 5 Choose Sender from the Main Class drop-down list, and click OK.
Distributed Message ServiceDeveloper Guide 3 AMQP Developer Guide
Issue 04 (2018-05-14) 45

Step 6 Select the Build on make check box.
Step 7 Choose Build > Make Project to build the project.
Step 8 Save the build output in the out\artifacts\DmsAmqpDemoClient_jar directory. The defaultfile name is DmsAmqpDemoClient.jar.
Distributed Message ServiceDeveloper Guide 3 AMQP Developer Guide
Issue 04 (2018-05-14) 46

Step 9 Use DmsAmqpDemoClient.jar to replace the DmsAmqpDemoClient.jar file in theDmsAmqpDemoClient/ directory on the ECS. Run the newly built project by following theprocedure in 3.2.4 Running the Sample Project.
----End
3.2.6 Code of the Sample ProjectThe sample project code DMSAmqpDemoClient.zip contains two types of demo: Senderand Receiver. Sender is used to produce messages. Receiver is used to consume andacknowledge messages.
Producing Messages
Step 1 Create and start the Producer.ConnectionFactory factory = (ConnectionFactory) context.lookup("myFactoryLookup"); Destination queue = (Destination) context.lookup("myQueueLookup");
String projectId = (String) context.lookup("project"); String ak = (String) context.lookup("ak"); String sk = (String) context.lookup("sk");
Connection connection = factory.createConnection(projectId, ak + "\u0000" + sk); connection.setExceptionListener(new MyExceptionListener()); connection.start();
Session session = connection.createSession(false, Session.CLIENT_ACKNOWLEDGE); MessageProducer messageProducer = session.createProducer(queue);
Step 2 Construct the content of the message to be sent, and then send the message.Counter counter = new Counter();
for (int i = 1; i <= count; i++) { TextMessage message = session.createTextMessage(s);
messageProducer.send(message, new CompletionListener() { @Override public void onCompletion(Message message) {
System.out.println("send successful");
if (counter.add() >= DEFAULT_COUNT) { System.exit(0); } }
@Override public void onException(Message message, Exception e) { e.printStackTrace(); if (counter.add() >= DEFAULT_COUNT) { System.exit(0); } } }); if (i % 100 == 0) { System.out.println("Sent message " + i); } }
----End
Distributed Message ServiceDeveloper Guide 3 AMQP Developer Guide
Issue 04 (2018-05-14) 47

Consuming Messages
Step 1 Create and start a consumer instance.Session session = connection.createSession(false, Session.AUTO_ACKNOWLEDGE); MessageConsumer messageConsumer = session.createConsumer(queue);
Step 2 Consume messages.for (int i = 1; i <= count; i++, actualCount++) { Message message = messageConsumer.receive(timeout);
if (message == null) { System.out.println("Message " + i + " not received within timeout, stopping."); deductTimeout = true; break; }
byte[] b = message.getBody(byte[].class); System.out.println("length of message is:" + b.length); System.out.println(new String(b)); System.out.println("Got message " + i);
if (i % 100 == 0) { System.out.println("Got message " + i); } }
----End
3.3 Setting Up Development Environments
3.3.1 Preparing the Environment
Preparing Tools
Keep the following tools ready.
Table 3-3 Required tools
Tool Required Version How to Obtain
Eclipse 3.6.0 or later http://www.eclipse.org/downloads/
JDK 1.8.111 or later http://www.oracle.com/technetwork/java/javase/downloads/index.html
Apache Maven 3.0.3 or later http://maven.apache.org/download.cgi
Obtaining a Queue ID and Consumer Group ID
Before obtaining an AMQP queue ID and consumer group ID, you need to create an AMQPqueue and a consumer group.
Distributed Message ServiceDeveloper Guide 3 AMQP Developer Guide
Issue 04 (2018-05-14) 48

Step 1 Log in to the management console.
Step 2 Click Service List and choose Application > Distributed Message Service to launch theDMS console.
Step 3 In the navigation pane of the DMS console, choose Queue Manager.
Step 4 On the Queue Manager page, click Create Queue.
By default, each user can create a maximum of five queues. The Queue Manager pagedisplays the number of remaining queues that can be created. If you want to create morequeues, contact the customer service to increase your quota.
Step 5 Specify queue parameters.
Table 3-4 Parameter description
Parameter Description
Region Region in which the new queue will be created.
Queue Name Unique name of a queue.When creating a queue, a default queue name is generated, which youcan change if required.A queue name is 1 to 64 characters long. Only letters, digits,underscores (_), and hyphens (-) are allowed.The Queue Name parameter cannot be modified after creation of thequeue.
Queue Type Type of a queue.The Queue Type parameter must be set to ActiveMQ.
Description(optional)
Queue description.The description is 0 to 160 characters long and cannot contain anglebrackets (< and >).
Distributed Message ServiceDeveloper Guide 3 AMQP Developer Guide
Issue 04 (2018-05-14) 49

Figure 3-2 Creating a AMQP queue
Step 6 Click OK to create the queue.
Step 7 On the queue list, click the name of the created queue to view details about the queue.
Figure 3-3 Queue ID
Step 8 Click Create Consumer Group.
Step 9 In the Create Consumer Group dialog box, specify the consumer group name.
A default consumer group name is generated, which you can change if required. A consumergroup name contains 1 to 32 characters. Only letters, digits, underscores (_), and hyphens (-)are allowed. Consumer group names must be unique within their queue.
Step 10 Click Create.
A consumer group is created, and the consumer group ID is displayed on the consumer grouplist.
Distributed Message ServiceDeveloper Guide 3 AMQP Developer Guide
Issue 04 (2018-05-14) 50

Figure 3-4 Consumer group ID
----End
Obtaining a Project ID
When calling APIs, you need to specify project_id in API requests.
The following procedure describes how to obtain a project ID:
Step 1 Log in to the management console.
Step 2 Click Service List and choose Application > Distributed Message Service to launch theDMS console.
Step 3 On the My Credential page, click the Project List tab.
Step 4 On the Project List tab page, view the project ID in the same row as the region in whichDMS AMQP will be developed.
Figure 3-5 Project ID
----End
Distributed Message ServiceDeveloper Guide 3 AMQP Developer Guide
Issue 04 (2018-05-14) 51
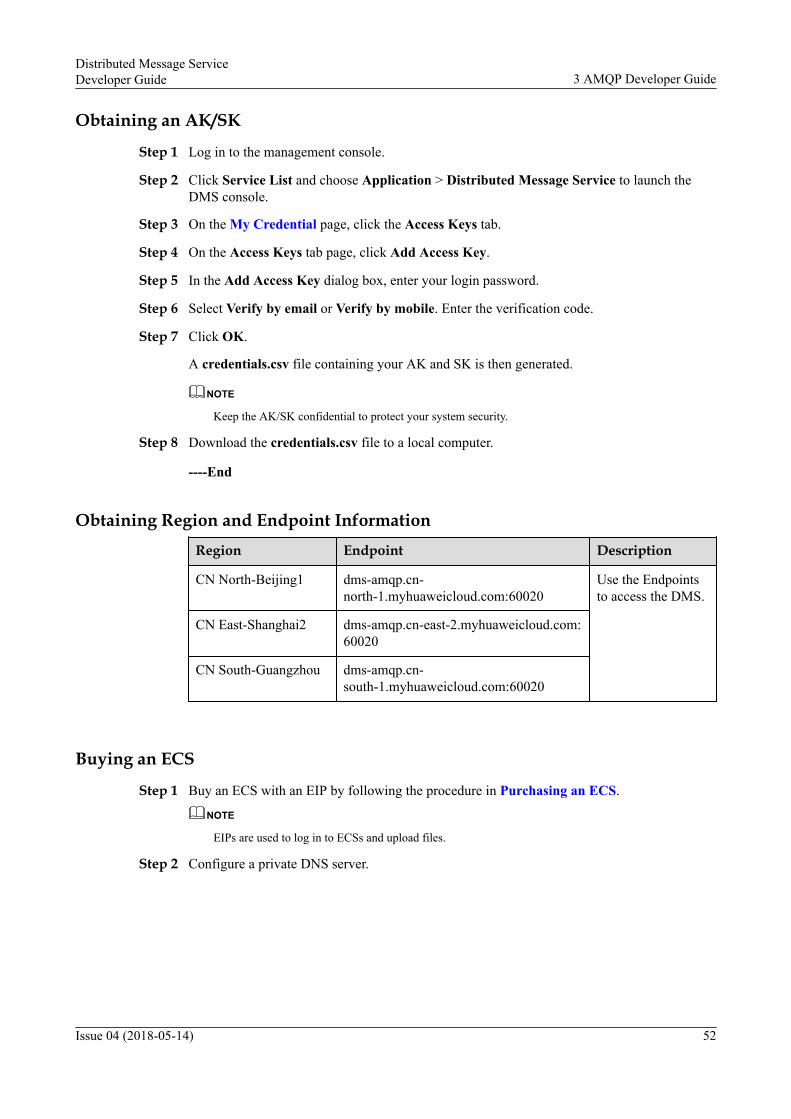
Obtaining an AK/SK
Step 1 Log in to the management console.
Step 2 Click Service List and choose Application > Distributed Message Service to launch theDMS console.
Step 3 On the My Credential page, click the Access Keys tab.
Step 4 On the Access Keys tab page, click Add Access Key.
Step 5 In the Add Access Key dialog box, enter your login password.
Step 6 Select Verify by email or Verify by mobile. Enter the verification code.
Step 7 Click OK.
A credentials.csv file containing your AK and SK is then generated.
NOTE
Keep the AK/SK confidential to protect your system security.
Step 8 Download the credentials.csv file to a local computer.
----End
Obtaining Region and Endpoint InformationRegion Endpoint Description
CN North-Beijing1 dms-amqp.cn-north-1.myhuaweicloud.com:60020
Use the Endpointsto access the DMS.
CN East-Shanghai2 dms-amqp.cn-east-2.myhuaweicloud.com:60020
CN South-Guangzhou dms-amqp.cn-south-1.myhuaweicloud.com:60020
Buying an ECS
Step 1 Buy an ECS with an EIP by following the procedure in Purchasing an ECS.
NOTE
EIPs are used to log in to ECSs and upload files.
Step 2 Configure a private DNS server.
Distributed Message ServiceDeveloper Guide 3 AMQP Developer Guide
Issue 04 (2018-05-14) 52

NOTE
You do not need to configure a private DNS server for a newly created ECS. If an existing ECS is used,you need to configure the DNS server IP address.
The DNS server IP addresses in different regions are as follows:
CN North-Beijing1: 100.125.1.250
CN East-Shanghai2: 100.125.17.29
CN South-Guangzhou: 100.125.1.250
----End
Collecting InformationInformation to be collected
Category Information Example
ECS EIP 114.115.141.228
Username huaweicloud
Password password
DMS Queue name my-amqp-queue
Queue ID 88d5e268-bb48-4dfe-9c8b-64a879aa6e28
Queue type AMQP
Consumer groupname
my-amqp-group
Consumer group ID g-fa621074-0302-4a8d-9953-565713286995
AK/SK AK G6DNZF3TVBQIRENF**4L
SK WoIgoldytZ5OWWTE7czQ7V5VNo57qKnFeVcR**5P
Project Region CN North-Beijing1
Project cn-north-1
Project ID fdc60cfe407a4b2a96a498efda55c785
Region andendpoint
Region CN North-Beijing1
Endpoint dms-amqp.cn-north-1.myhuaweicloud.com:60020
DNS DNS server IPaddress
CN North-Beijing1: 100.125.1.250CN East-Shanghai2: 100.125.17.29CN South-Guangzhou: 100.125.1.250
Distributed Message ServiceDeveloper Guide 3 AMQP Developer Guide
Issue 04 (2018-05-14) 53

3.3.2 Obtaining an SDK PackageDownload the SDK package amqpsaslclient.zip from https://dms-demo.obs.myhwclouds.com/amqpsaslclient.zip.
The amqpsaslclient.zip package contains the amqp.sasl.client-1.0.0.jar file.
3.3.3 Creating a ProjectThis section uses the Maven project amqpDemo as an example to describe how to create aproject.
Procedure
Step 1 On Eclipse (the recommended version is 4.6 or later), create a Maven project.
The project name is user-defined. The project name amqpDemo is used as an example.
Step 2 Click Finish.
Step 3 Import the JAR packages of the DMS AMQP SDK.
1. Right-click the new project amqpDemo, and create a libs folder.
2. Copy dms.sdk-1.0.0.jar and dms.protocol-1.0.0.jar to the libs directory.
3. Add the following information to the pom.xml file to import the JAR package of theDMS AMQP SDK.<dependency> <groupId>com.huawei.dms.ampq</groupId> <artifactId>amqp.sasl.client</artifactId> <version>1.0.0</version> <type>jar</type> <scope>system</scope> <systemPath>${basedir}/libs/amqp.sasl.client-1.0.0.jar</systemPath></dependency>
<dependency> <groupId>org.apache.qpid</groupId> <artifactId>qpid-jms-client</artifactId> <version>0.28.0</version></dependency>
4. Save the pom.xml file.
----End
3.3.4 Configuring ParametersStep 1 (Optional) Configure a private DNS server.
Distributed Message ServiceDeveloper Guide 3 AMQP Developer Guide
Issue 04 (2018-05-14) 54

You need to use an ECS to connect to DMS AMQP when using the public network. You donot need to configure a private DNS server for a newly created ECS. If an existing ECS isused, you need to configure the DNS server IP address.
The DNS server IP addresses in different regions are as follows:
l CN North-Beijing1: 100.125.1.250
l CN East-Shanghai2: 100.125.17.29
l CN South-Guangzhou: 100.125.1.250
Add the private DNS server configuration to the /etc/resolv.conf file. That is, add thefollowing information to the first line in /etc/resolv.conf:
nameserver 100.125.1.250
Step 2 Configure key parameters in the jndi.properties file by referring to Table 3-5Error!Reference source not found..
Table 3-5 Key parameters in the jndi.properties file
Parameter Description
connectionfacto-ry.myFactoryLookup
IP address or domain name of the DMS server.CN North-Beijing1: dms-amqp.cn-north-1.myhuaweicloud.comCN East-Shanghai2: dms-amqp.cn-east-2.myhuaweicloud.comCN South-Guangzhou: dms-amqp.cn-south-1.myhuaweicloud.comIn the configuration example, the domain name in redneeds to be replaced by the actual domain name.amqps://dms-amqp.cn-north-1.myhuaweicloud.com:60020?transport.trustAll=true&transport.verifyHost='false'&amqp.saslMechanisms=DMS
queue.myqueueLookup Queue ID.
topic.myTopicLookup Queue ID, group ID, and consumer group ID.
sasl.project Project ID.For details on how to obtain a project ID, see Obtaininga Project ID.
sasl.ak Access key ID.For details on how to obtain an access key ID, seeObtaining an AK/SK.
sasl.sk Secret access key.For details on how to obtain a secret access key, seeObtaining an AK/SK.
Distributed Message ServiceDeveloper Guide 3 AMQP Developer Guide
Issue 04 (2018-05-14) 55

Step 3 Write code.
For details about the APIs, see dms.sdk.api.chm obtained in section 1.3.2 Obtaining anSDK Package.
----End
Distributed Message ServiceDeveloper Guide 3 AMQP Developer Guide
Issue 04 (2018-05-14) 56

4 RabbitMQ Developer Guide
4.1 Overview
4.2 Getting Started with RabbitMQ
4.3 Setting Up Development Environments
4.1 Overview
What Can RabbitMQ Do?
RabbitMQ is a mainstream open source message-oriented middleware that originallyimplemented the Advanced Message Queuing Protocol (AMQP). It is used to store andforward messages in distributed system and provides high performance in usability,expansibility, and availability. The RabbitMQ server is compiled in the Erlang programminglanguage.
4.2 Getting Started with RabbitMQThis section describes how to quickly experience RabbitMQ on the cloud.
4.2.1 Helpful LinksDownload Sample Project
4.2.2 Preparing the EnvironmentPreparingTools
Keep the following tools ready.
Table 4-1 Required tools
Tool Required Version How to Obtain
Eclipse 3.6.0 or later http://www.eclipse.org/downloads/
Distributed Message ServiceDeveloper Guide 4 RabbitMQ Developer Guide
Issue 04 (2018-05-14) 57

Tool Required Version How to Obtain
Java Development Kit(JDK)
1.8.111 or later http://www.oracle.com/technetwork/java/javase/downloads/index.html
Apache Maven 3.0.3 or later http://maven.apache.org/download.cgi
Creating a RabbitMQ Instance
If a RabbitMQ instance is already created, skip this procedure.
Step 1 Log in to the HUAWEI CLOUD Service website at http://www.huaweicloud.com/en-us/.
Step 2 On the DMS console, create a RabbitMQ instance.
Step 3 Record the following parameters of the RabbitMQ instance for future use:l Username and passwordl Connection address in the instance details
----End
Creating an ECSNOTE
Before running a DMS Demo, create an elastic cloud server (ECS).
If an ECS is already created, skip this procedure.
Step 1 Log in to the HUAWEI CLOUD Service website at http://www.huaweicloud.com/en-us/.
Step 2 On the ECS console, create a Linux-based ECS and bind this ECS to an elastic IP address(EIP).
Step 3 Record the EIP, user name, and password for future use.
NOTE
EIPs are used to log in to ECSs and upload files.
----End
Collecting Information
Information to be collected
Category Information Example
ECS EIP 114.115.141.228
Username huaweicloud
Password password
Distributed Message ServiceDeveloper Guide 4 RabbitMQ Developer Guide
Issue 04 (2018-05-14) 58
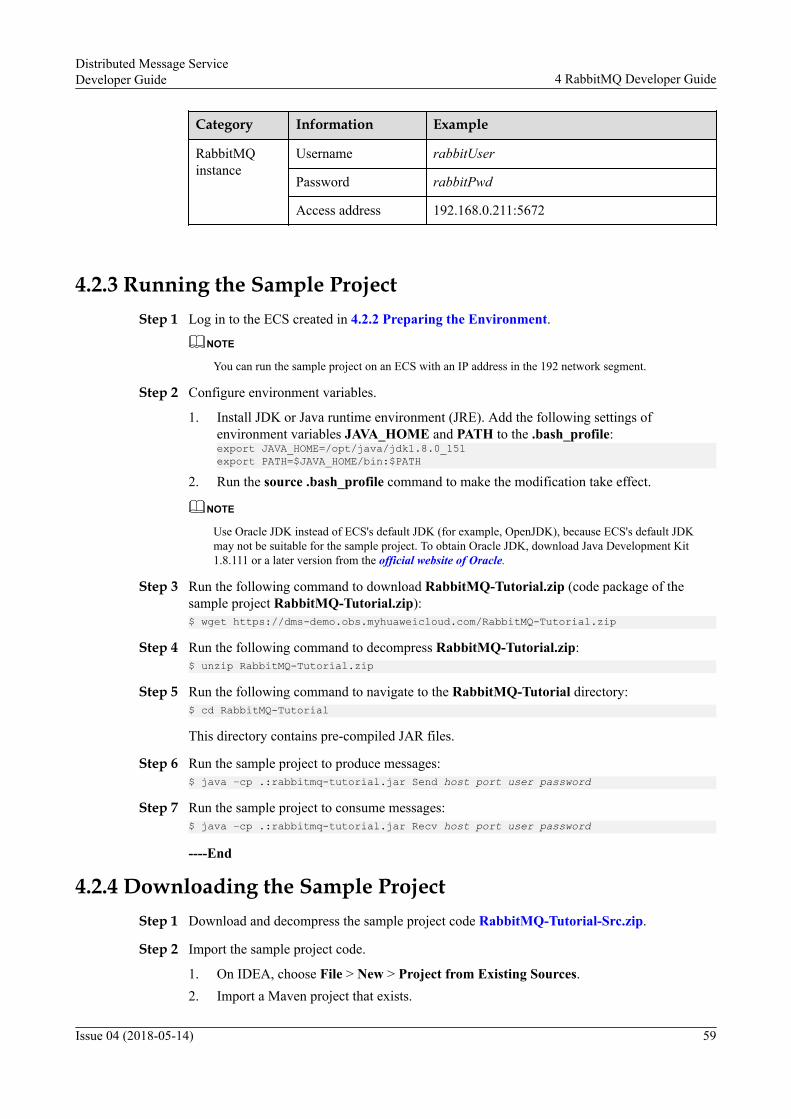
Category Information Example
RabbitMQinstance
Username rabbitUser
Password rabbitPwd
Access address 192.168.0.211:5672
4.2.3 Running the Sample ProjectStep 1 Log in to the ECS created in 4.2.2 Preparing the Environment.
NOTE
You can run the sample project on an ECS with an IP address in the 192 network segment.
Step 2 Configure environment variables.
1. Install JDK or Java runtime environment (JRE). Add the following settings ofenvironment variables JAVA_HOME and PATH to the .bash_profile:export JAVA_HOME=/opt/java/jdk1.8.0_151 export PATH=$JAVA_HOME/bin:$PATH
2. Run the source .bash_profile command to make the modification take effect.
NOTE
Use Oracle JDK instead of ECS's default JDK (for example, OpenJDK), because ECS's default JDKmay not be suitable for the sample project. To obtain Oracle JDK, download Java Development Kit1.8.111 or a later version from the official website of Oracle.
Step 3 Run the following command to download RabbitMQ-Tutorial.zip (code package of thesample project RabbitMQ-Tutorial.zip):$ wget https://dms-demo.obs.myhuaweicloud.com/RabbitMQ-Tutorial.zip
Step 4 Run the following command to decompress RabbitMQ-Tutorial.zip:$ unzip RabbitMQ-Tutorial.zip
Step 5 Run the following command to navigate to the RabbitMQ-Tutorial directory:$ cd RabbitMQ-Tutorial
This directory contains pre-compiled JAR files.
Step 6 Run the sample project to produce messages:$ java –cp .:rabbitmq-tutorial.jar Send host port user password
Step 7 Run the sample project to consume messages:$ java –cp .:rabbitmq-tutorial.jar Recv host port user password
----End
4.2.4 Downloading the Sample ProjectStep 1 Download and decompress the sample project code RabbitMQ-Tutorial-Src.zip.
Step 2 Import the sample project code.
1. On IDEA, choose File > New > Project from Existing Sources.2. Import a Maven project that exists.
Distributed Message ServiceDeveloper Guide 4 RabbitMQ Developer Guide
Issue 04 (2018-05-14) 59

3. Select the directory to which the sample project code RabbitMQ-Tutorial-Src isdecompressed.
Step 3 Choose File > Project Structure.
Step 4 Choose Artifacts on the left pane, and then choose JAR > From modules withdependencies.
Step 5 Choose Send from the Main Class drop-down list, and click OK.
Step 6 Select the Include in project build check box.
Distributed Message ServiceDeveloper Guide 4 RabbitMQ Developer Guide
Issue 04 (2018-05-14) 60

Step 7 Choose Build > Make Project to build the project.
Step 8 Save the build output in the out\artifacts\rabbitmq_tutorial_jar directory. The default filename is rabbitmq-tutorial.jar.
Step 9 Use rabbitmq-tutorial.jar to replace the rabbitmq-tutorial.jar file in the RabbitMQ-Tutorial/ directory on the ECS. Run the newly built project by following the procedure in4.2.3 Running the Sample Project.
----End
4.3 Setting Up Development EnvironmentsThis section describes how to set up RabbitMQ development environments.
4.3.1 Preparing the Environment
Preparing Tools
Keep the following tools ready.
Distributed Message ServiceDeveloper Guide 4 RabbitMQ Developer Guide
Issue 04 (2018-05-14) 61

Table 4-2 Required tools
Tool Required Version How to Obtain
IDEA Latest version https://www.jetbrains.com/idea/
JDK 1.8.111 or later http://www.oracle.com/technetwork/java/javase/downloads/index.html
Apache Maven 3.0.3 or later http://maven.apache.org/download.cgi
Creating a RabbitMQ Instance
If a RabbitMQ instance is already created, skip this procedure.
Step 1 Log in to the HUAWEI CLOUD Service website at http://www.huaweicloud.com/en-us/.
Step 2 On the DMS console, create a RabbitMQ instance.
Step 3 Record the following parameters of the RabbitMQ instance for future use:
l Username and password
l Connection address in the instance details
----End
Collecting Information
Information to be collected
Category Information Example
ECS EIP 114.115.141.228
Username huaweicloud
Password password
RabbitMQinstance
Username rabbitUser
Password rabbitPwd
Access address 192.168.0.211:5672
4.3.2 Creating a ProjectThis section uses the Maven project rabbitDemo as an example to describe how to create aproject.
Distributed Message ServiceDeveloper Guide 4 RabbitMQ Developer Guide
Issue 04 (2018-05-14) 62

Procedure
Step 1 On IDEA, create a Maven project. The project name is user-defined. The project namerabbitDemo is used as an example.
Step 2 Click Finish.
Step 3 Import the JAR packages.
1. Add the following information to the pom.xml file to import the JAR packages into theMaven repository. <dependency> <groupId>com.rabbitmq</groupId> <artifactId>amqp-client</artifactId> <version>5.2.0</version> </dependency> <dependency> <groupId>org.slf4j</groupId> <artifactId>slf4j-nop</artifactId> <version>1.7.25</version> </dependency>
2. Save the pom.xml file.
Step 4 Go to the src > main > java directory.
Distributed Message ServiceDeveloper Guide 4 RabbitMQ Developer Guide
Issue 04 (2018-05-14) 63

Step 5 Compile code.
Production:
ConnectionFactory factory = new ConnectionFactory(); factory.setHost(host); factory.setPort(port); factory.setUsername(user); factory.setPassword(password); Connection connection = factory.newConnection(); Channel channel = connection.createChannel(); channel.queueDeclare(QUEUE_NAME, false, false, false, null); String message = "Hello World!"; channel.basicPublish("", QUEUE_NAME, null, message.getBytes("UTF-8")); System.out.println(" [x] Sent '" + message + "'");
Consumption:
ConnectionFactory factory = new ConnectionFactory(); factory.setHost(host); factory.setPort(port); factory.setUsername(user); factory.setPassword(password); Connection connection = factory.newConnection(); Channel channel = connection.createChannel(); channel.queueDeclare(QUEUE_NAME, false, false, false, null); System.out.println(" [*] Waiting for messages. To exit press CTRL+C"); Consumer consumer = new DefaultConsumer(channel) { @Override public void handleDelivery(String consumerTag, Envelope envelope, AMQP.BasicProperties properties, byte[] body) throws IOException { String message = new String(body, "UTF-8"); System.out.println(" [x] Received '" + message + "'"); } }; channel.basicConsume(QUEUE_NAME, true, consumer);
----End
Distributed Message ServiceDeveloper Guide 4 RabbitMQ Developer Guide
Issue 04 (2018-05-14) 64

5 Change History
Released On What's New
2018-05-14 This issue is the fourth official release, which incorporates the followingchanges:l Added description of RabbitMQ instance.
2018-04-20 This issue is the third official release, which incorporates the followingchanges:l Revised description in the previous issue.
2018-03-15 This issue is the second official release, which incorporates the followingchanges:l Added description of AMQP queues.
2017-12-05 This issue is the first official release.
Distributed Message ServiceDeveloper Guide 5 Change History
Issue 04 (2018-05-14) 65
Related Documents