DESIGN YOUR JOB I I education program

Welcome message from author
This document is posted to help you gain knowledge. Please leave a comment to let me know what you think about it! Share it to your friends and learn new things together.
Transcript

DESIGN YOUR JOB I I
education program

...AND ITS PARTNERS:
PROJECT IMPLEMENTED BY:
DISCLAIMER:“Any communication or publication related to the action, made by the beneficieries jointly or individually in any form and using any means, shall indicate that it reflecst only on author’s view and that the Agency or Commission are not responsible for any use that may be made from information it contains.”
“Пројекат „Дизајнирај свој посао 2“, спроводи ЦОДР „RES POLIS“, суфинансира Министарство омладине и спорта РС”
VERY NICE
66
99 VERY VERY NICE VERY VERY very NICE VERY VERY very very NICE VERY VERY very very veryNICE
y NICE very very very ver
y very very very nice Mihael Nikolić half of a charismatic duo/ prince of room no. 308
1
Title of the sessions:
INTRO...................................................page 1PHOTOSHOP......................................page 3-17ILLUSTRATOR...................................page 19-30INDESIGN........................................page 33-44REVIEW...................................................page 45
Hello !
Explanation or guide-through approach
Definition of a Tool
Important to know
Remember to search for new resources/ links and tutorials
important>check and be introduce into content/decription of links, before every workshop<
Used symbols:
W1INTRO
Timeframe & Methods:Introduction Meeting each other, and learning about ourselves Introduction to the class rules, home assignments, technical preparation + install softwars, at least Photoshop on the start Introduction to the class format and program form Icebreakers - the Name Game - 25minPhotoshop intro presentation + Photoshop or not - examples-game - 30 minExpectations talk Expectations of the participants and multiplikators/sticky notes for the expectations of the participants Showcase of design work KAHOOT quiz - 20minExpected workshop duration: 75min
Aims:Overall introduction/Concept of the programMotivation, Abetment.
INTRODUCTION
https://dribbble.com/https://www.behance.net/https://www.instagram.com/?hl=enhttps://www.pinterest.com/categories/design/http://www.flatuicolorpicker.com/https://color.adobe.com/create/color-wheel/https://www.ronenbekerman.com/freebies/http://www.thedieline.com/http://prettycolors.tumblr.com/http://www.freepik.com/https://thenounproject.com/https://www.lipsum.com/
http://slipsum.com/lite/http://www.sleepyti.me/http://radiooooo.com/
Links to inspire:
3
W2PHOTOSHOP 1 Title of the sessions:
Workshop 2PHOTOSHOP 1: SELECTION TOOLS.......................page 3-4CONTENT AWARE MOVE TOOL.......page 4
Workshop 3PHOTOSHOP 2: PATCH TOOL...................................page 5HEALING BRUSH............................page 5STAMP TOOL..........................................page 5BRUSH & FILL TOOL.............................page 6
COLOR REPLACEMENT TOOL............page 6
Workshop 4PHOTOSHOP 3: LAYERS - EXPLANATIONS...........page 7-12REFINE EDGE TOOL..................page 10-11
LAYER MASKS............................page 12
Workshop 5PHOTOSHOP 4: BLENDING MODES...................page 13-14ADJUSTMENT LAYERS..................page 15
MOCKUPS................................page 16-17
Selection Tools: A selection tool is an area of a photo that you define.You can make a selection with a selection tool or a selection command.You can change ,copy or delete pixels inside the selection border,but you can’t touch areas outside the selection border until you deselect the selection.
SELECTION TOOLSCONTENT-AWARE MOVE TOOL
Timeframe & Methods:Homework review - 15minLecture and live demonstration - 30minOnline video/step-by-step tutorial examples - 10minPractical work of trainees - 45minHomework explanation - 10minExpected workshop duration: 110min
Aims:Introduction and demonstration of selection tools and content-aware move tool & methodComparation between Selection Tools
LECTURE: Introduction to Photoshop basics: - Interface - open, save, export - useful and most used shortcuts - basic Tools (overall / location, purpose)
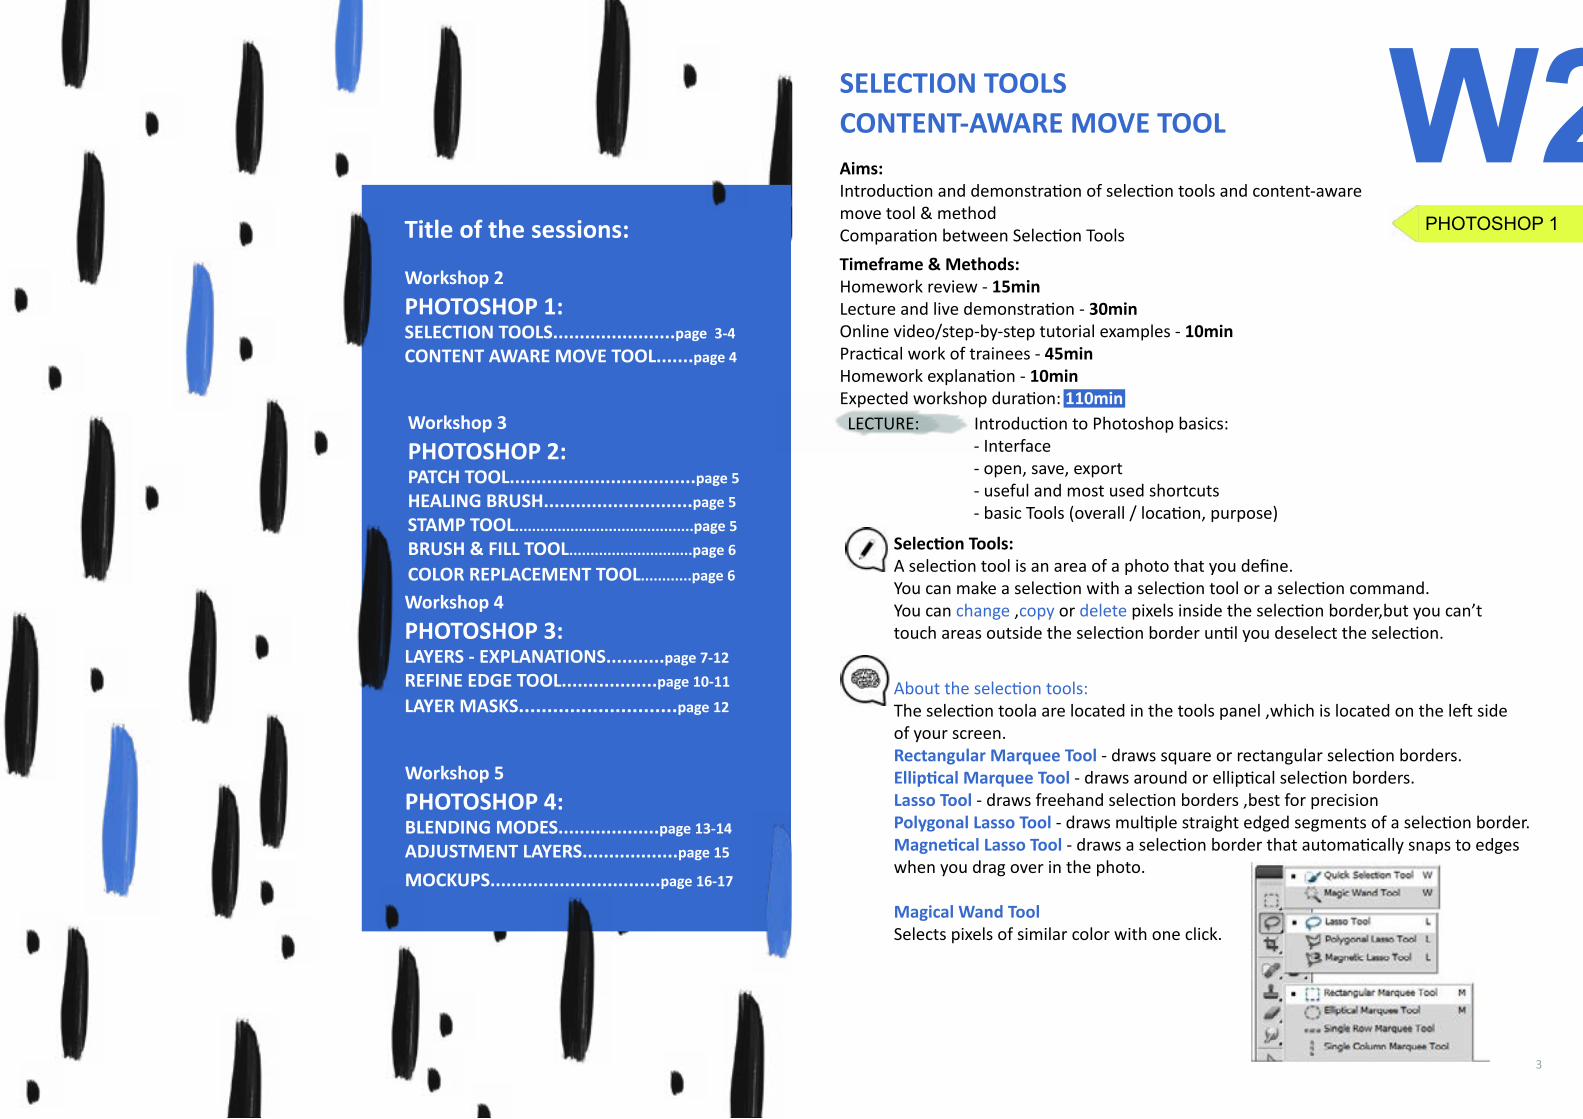
About the selection tools:The selection toola are located in the tools panel ,which is located on the left side of your screen.Rectangular Marquee Tool - draws square or rectangular selection borders.Elliptical Marquee Tool - draws around or elliptical selection borders.Lasso Tool - draws freehand selection borders ,best for precisionPolygonal Lasso Tool - draws multiple straight edged segments of a selection border.Magnetical Lasso Tool - draws a selection border that automatically snaps to edges when you drag over in the photo.
Magical Wand Tool Selects pixels of similar color with one click.
4 5
W2PHOTOSHOP 1
W3PHOTOSHOP 3
Timeframe & Methods:Lecture and live demonstration - 30minOnline video/step-by-step tutorial examples - 10minPractical work of trainees - 45minHomework explanation - 10minExpected workshop duration: 95min
Aims:Basic introduction and demonstration of Retouching toolsAccent on Paint Bucket Tool (with three ways of changing colors)
Patch ToolThe patch tool is located under the spot healingbrush at the toolbox. The patch tool is part of the healing brush set of tools. It is mostly used while you are doing retouching or repairing images. It is very helpful when you use it to repair large areas.
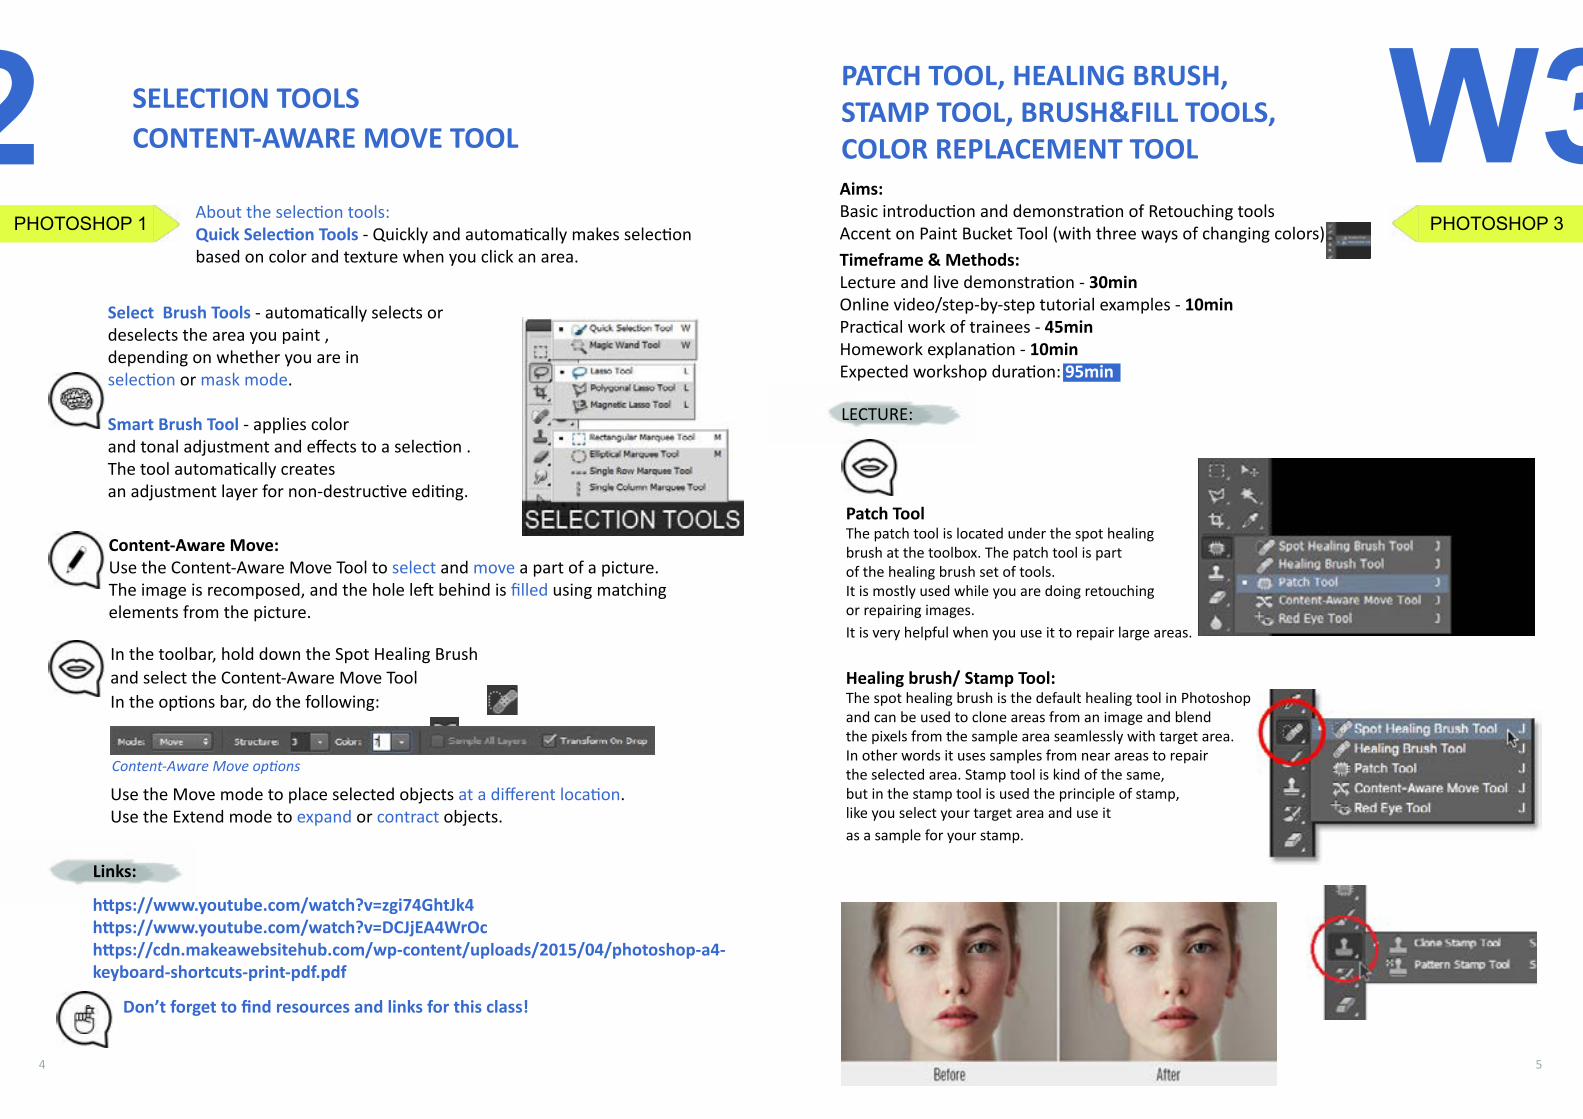
Healing brush/ Stamp Tool:The spot healing brush is the default healing tool in Photoshop and can be used to clone areas from an image and blend the pixels from the sample area seamlessly with target area. In other words it uses samples from near areas to repair the selected area. Stamp tool is kind of the same, but in the stamp tool is used the principle of stamp, like you select your target area and use it as a sample for your stamp.
LECTURE:
PATCH TOOL, HEALING BRUSH, STAMP TOOL, BRUSH&FILL TOOLS,COLOR REPLACEMENT TOOL
SELECTION TOOLSCONTENT-AWARE MOVE TOOL
About the selection tools:Quick Selection Tools - Quickly and automatically makes selection based on color and texture when you click an area.
Select Brush Tools - automatically selects or deselects the area you paint ,depending on whether you are in selection or mask mode.
Smart Brush Tool - applies color and tonal adjustment and effects to a selection .The tool automatically creates an adjustment layer for non-destructive editing.
Content-Aware Move:Use the Content-Aware Move Tool to select and move a part of a picture. The image is recomposed, and the hole left behind is filled using matching elements from the picture.
In the toolbar, hold down the Spot Healing Brush
Use the Move mode to place selected objects at a different location. Use the Extend mode to expand or contract objects.
https://www.youtube.com/watch?v=zgi74GhtJk4https://www.youtube.com/watch?v=DCJjEA4WrOchttps://cdn.makeawebsitehub.com/wp-content/uploads/2015/04/photoshop-a4-keyboard-shortcuts-print-pdf.pdf
Don’t forget to find resources and links for this class!
and select the Content-Aware Move ToolIn the options bar, do the following:
Content-Aware Move options
Links:
6 7
PHOTOSHOP 2
W4LAYERS - EXPLANATIONSREFINE EDGE TOOL, LAYER MASKS
Timeframe & Methods:Homework review - 15minLecture and live demonstration - 30minOnline video/step-by-step tutorial examples - 10minPractical work of trainees - 45minHomework explanation - 10minExpected workshop duration: 110min
Aims:Introduction to layers and demonstration of refine edge tool, explanation of layer masks.
LECTURE:
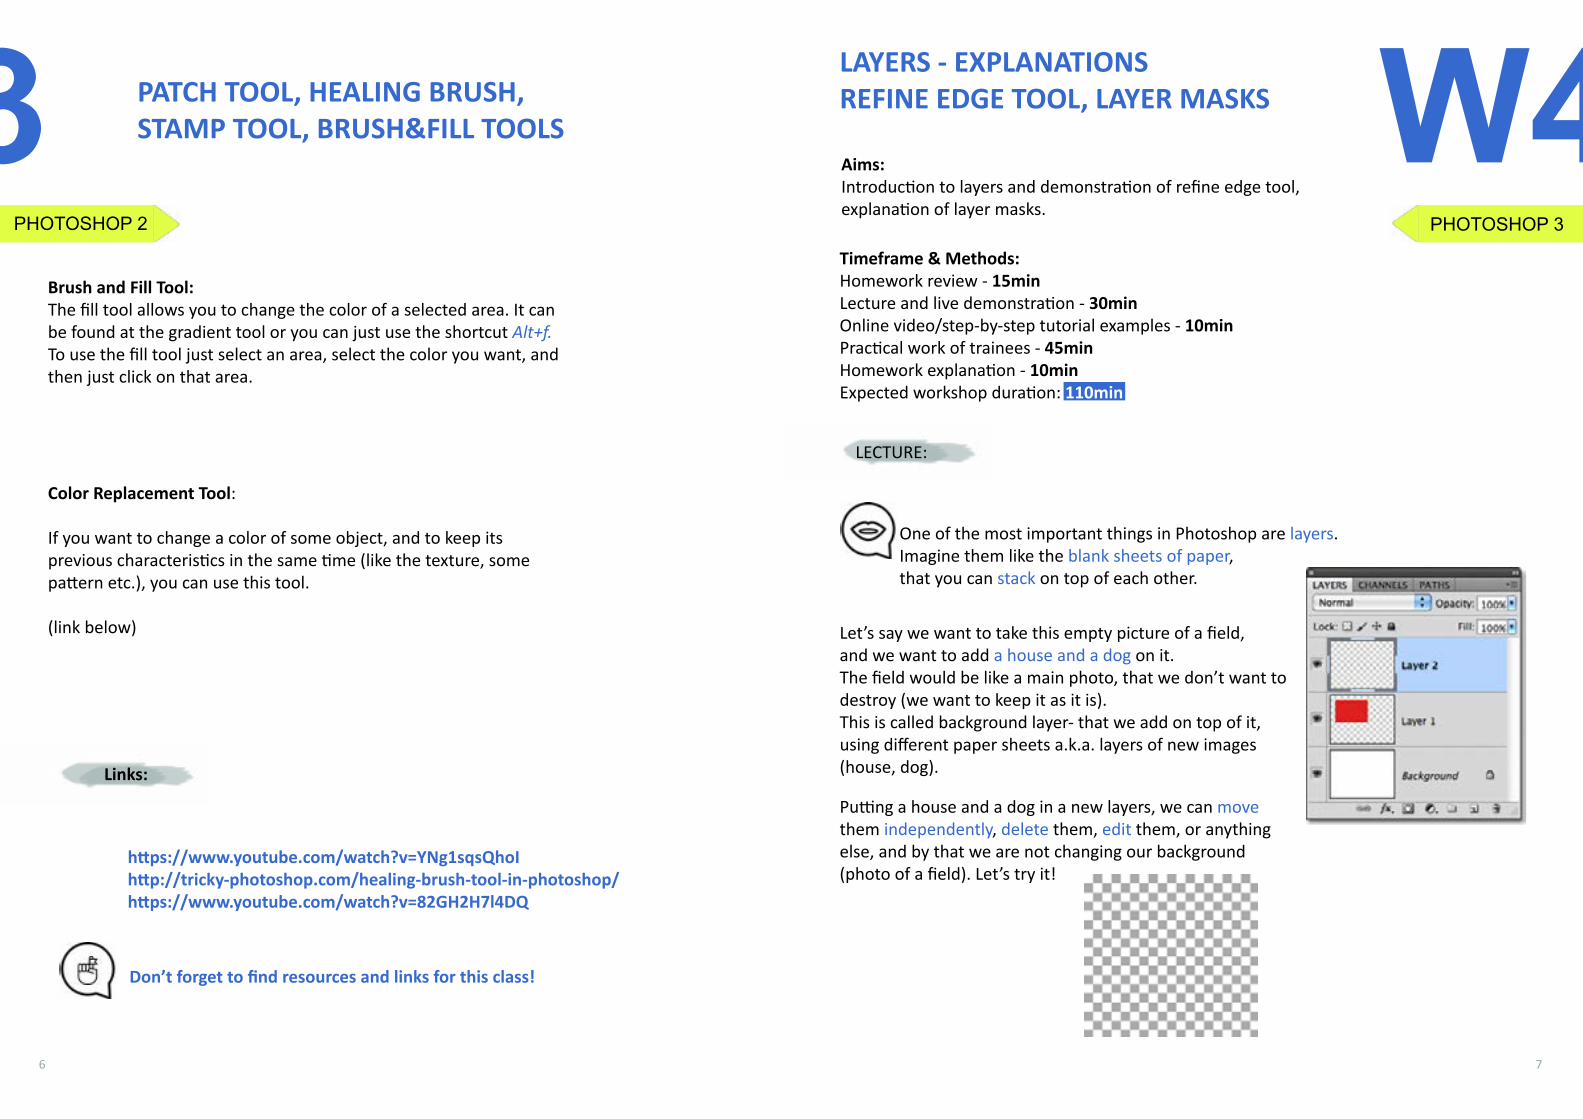
One of the most important things in Photoshop are layers. Imagine them like the blank sheets of paper, that you can stack on top of each other.
Let’s say we want to take this empty picture of a field, and we want to add a house and a dog on it. The field would be like a main photo, that we don’t want to destroy (we want to keep it as it is). This is called background layer- that we add on top of it, using different paper sheets a.k.a. layers of new images (house, dog).
Putting a house and a dog in a new layers, we can move them independently, delete them, edit them, or anything else, and by that we are not changing our background (photo of a field). Let’s try it!
PHOTOSHOP 3
W3 PATCH TOOL, HEALING BRUSH, STAMP TOOL, BRUSH&FILL TOOLS
Brush and Fill Tool:The fill tool allows you to change the color of a selected area. It can be found at the gradient tool or you can just use the shortcut Alt+f.To use the fill tool just select an area, select the color you want, and then just click on that area.
Links:
https://www.youtube.com/watch?v=YNg1sqsQhoIhttp://tricky-photoshop.com/healing-brush-tool-in-photoshop/https://www.youtube.com/watch?v=82GH2H7l4DQ
Don’t forget to find resources and links for this class!
Color Replacement Tool:
If you want to change a color of some object, and to keep its previous characteristics in the same time (like the texture, some pattern etc.), you can use this tool.
(link below)
8 9
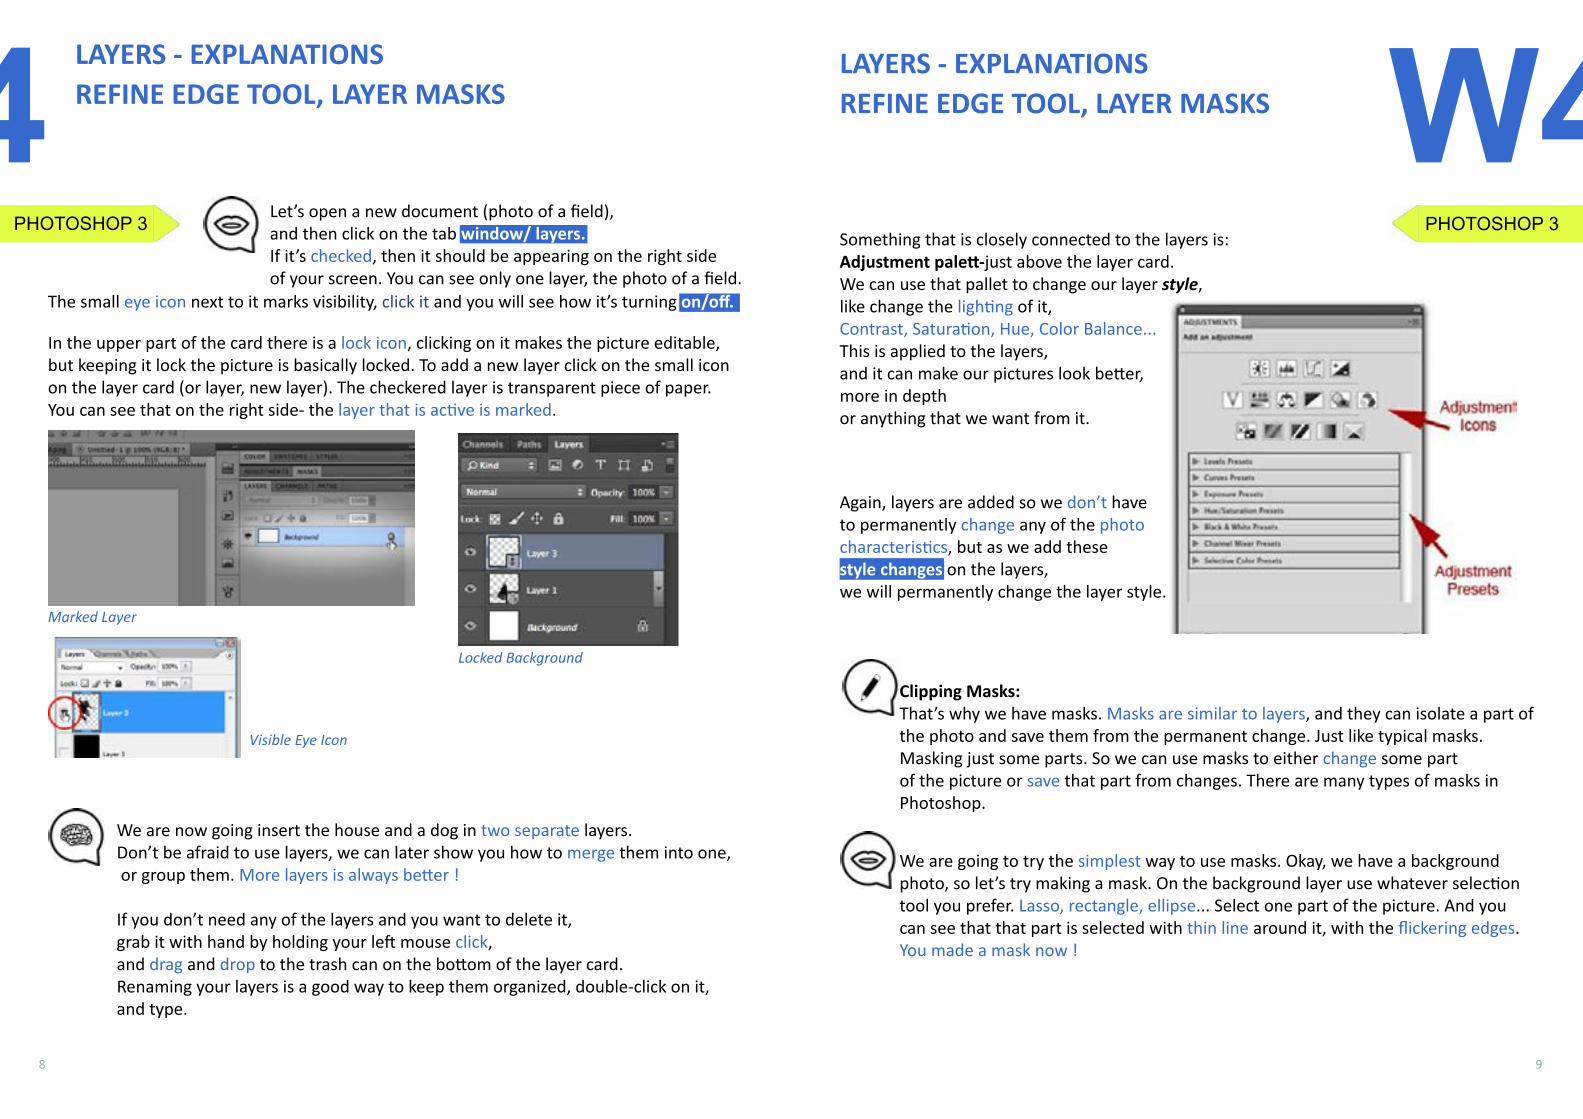
PHOTOSHOP 3 Let’s open a new document (photo of a field), and then click on the tab window/ layers. If it’s checked, then it should be appearing on the right side of your screen. You can see only one layer, the photo of a field.
The small eye icon next to it marks visibility, click it and you will see how it’s turning on/off.
In the upper part of the card there is a lock icon, clicking on it makes the picture editable, but keeping it lock the picture is basically locked. To add a new layer click on the small icon on the layer card (or layer, new layer). The checkered layer is transparent piece of paper. You can see that on the right side- the layer that is active is marked.
LAYERS - EXPLANATIONSREFINE EDGE TOOL, LAYER MASKS
Marked Layer
Visible Eye Icon
Locked Background
We are now going insert the house and a dog in two separate layers. Don’t be afraid to use layers, we can later show you how to merge them into one, or group them. More layers is always better !
If you don’t need any of the layers and you want to delete it,grab it with hand by holding your left mouse click, and drag and drop to the trash can on the bottom of the layer card. Renaming your layers is a good way to keep them organized, double-click on it, and type.
W4LAYERS - EXPLANATIONSREFINE EDGE TOOL, LAYER MASKS
Something that is closely connected to the layers is:Adjustment palett-just above the layer card. We can use that pallet to change our layer style, like change the lighting of it, Contrast, Saturation, Hue, Color Balance... This is applied to the layers,and it can make our pictures look better, more in depth or anything that we want from it.
Again, layers are added so we don’t have to permanently change any of the photo characteristics, but as we add these style changes on the layers, we will permanently change the layer style.
Clipping Masks: That’s why we have masks. Masks are similar to layers, and they can isolate a part of the photo and save them from the permanent change. Just like typical masks. Masking just some parts. So we can use masks to either change some part of the picture or save that part from changes. There are many types of masks in Photoshop.
We are going to try the simplest way to use masks. Okay, we have a background photo, so let’s try making a mask. On the background layer use whatever selection tool you prefer. Lasso, rectangle, ellipse... Select one part of the picture. And you can see that that part is selected with thin line around it, with the flickering edges. You made a mask now !
PHOTOSHOP 3
W4
10 11
PHOTOSHOP 3
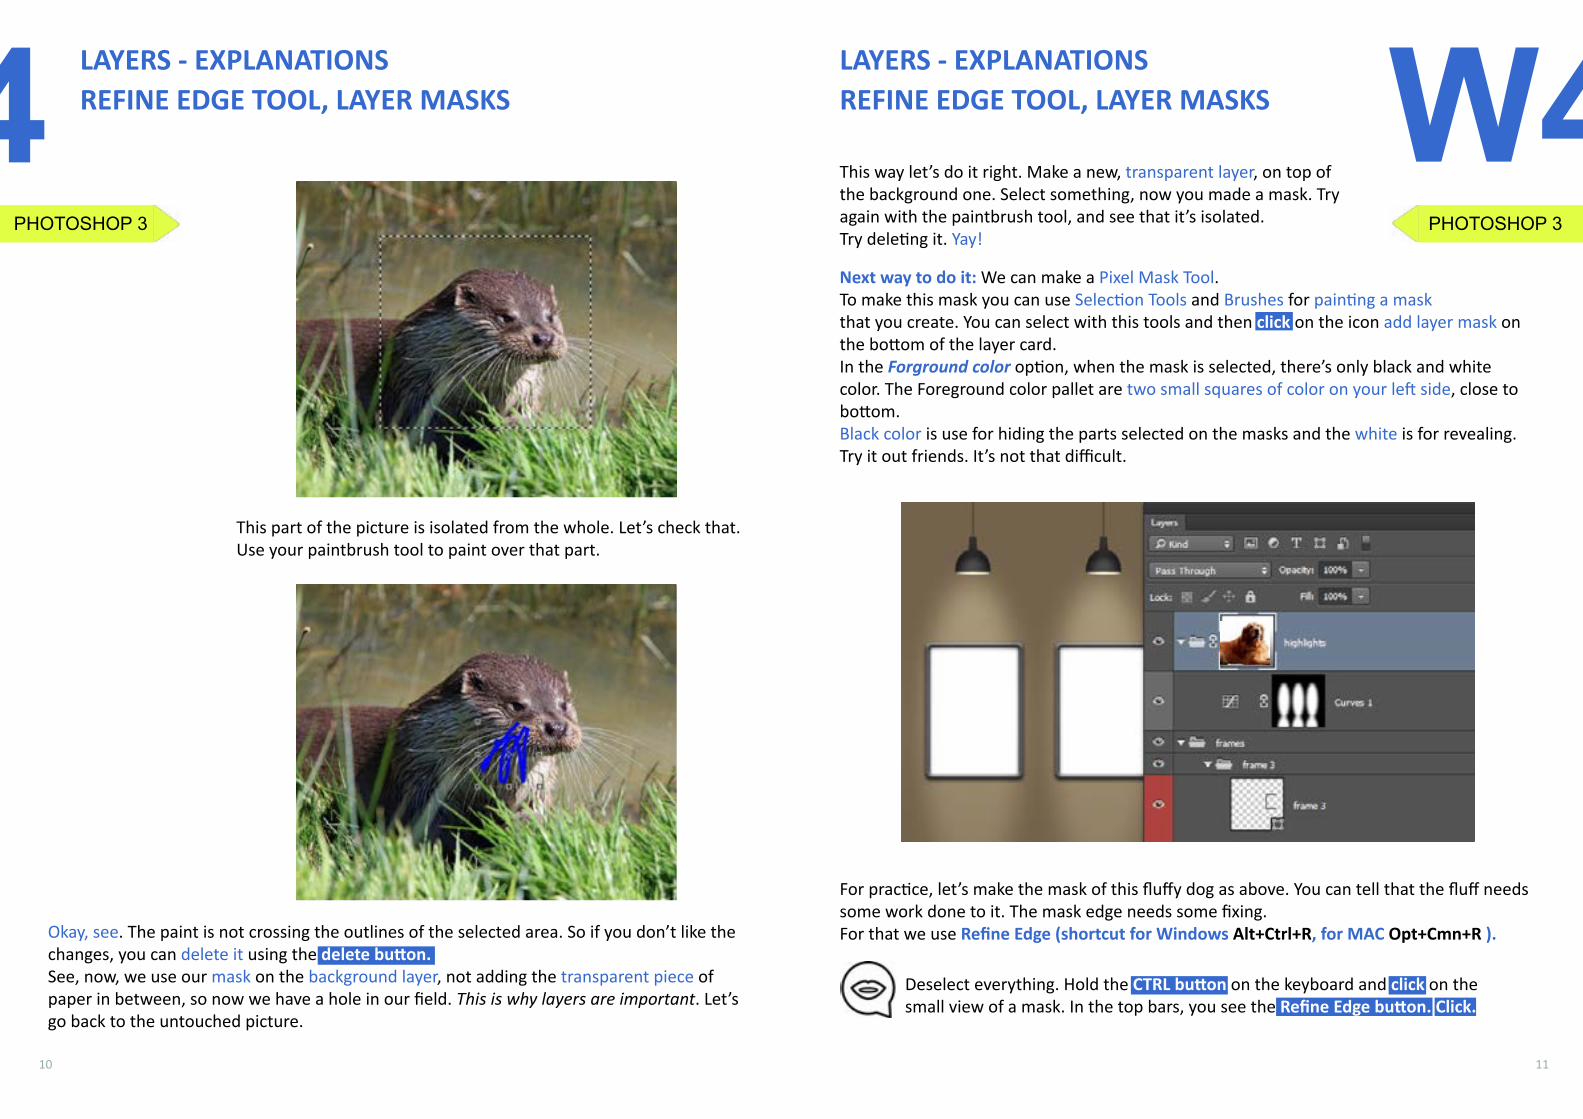
This part of the picture is isolated from the whole. Let’s check that.Use your paintbrush tool to paint over that part.
Okay, see. The paint is not crossing the outlines of the selected area. So if you don’t like the changes, you can delete it using the delete button.See, now, we use our mask on the background layer, not adding the transparent piece of paper in between, so now we have a hole in our field. This is why layers are important. Let’s go back to the untouched picture.
LAYERS - EXPLANATIONSREFINE EDGE TOOL, LAYER MASKS W4
This way let’s do it right. Make a new, transparent layer, on top of the background one. Select something, now you made a mask. Try again with the paintbrush tool, and see that it’s isolated. Try deleting it. Yay!
Next way to do it: We can make a Pixel Mask Tool. To make this mask you can use Selection Tools and Brushes for painting a mask that you create. You can select with this tools and then click on the icon add layer mask on the bottom of the layer card. In the Forground color option, when the mask is selected, there’s only black and white color. The Foreground color pallet are two small squares of color on your left side, close to bottom. Black color is use for hiding the parts selected on the masks and the white is for revealing. Try it out friends. It’s not that difficult.
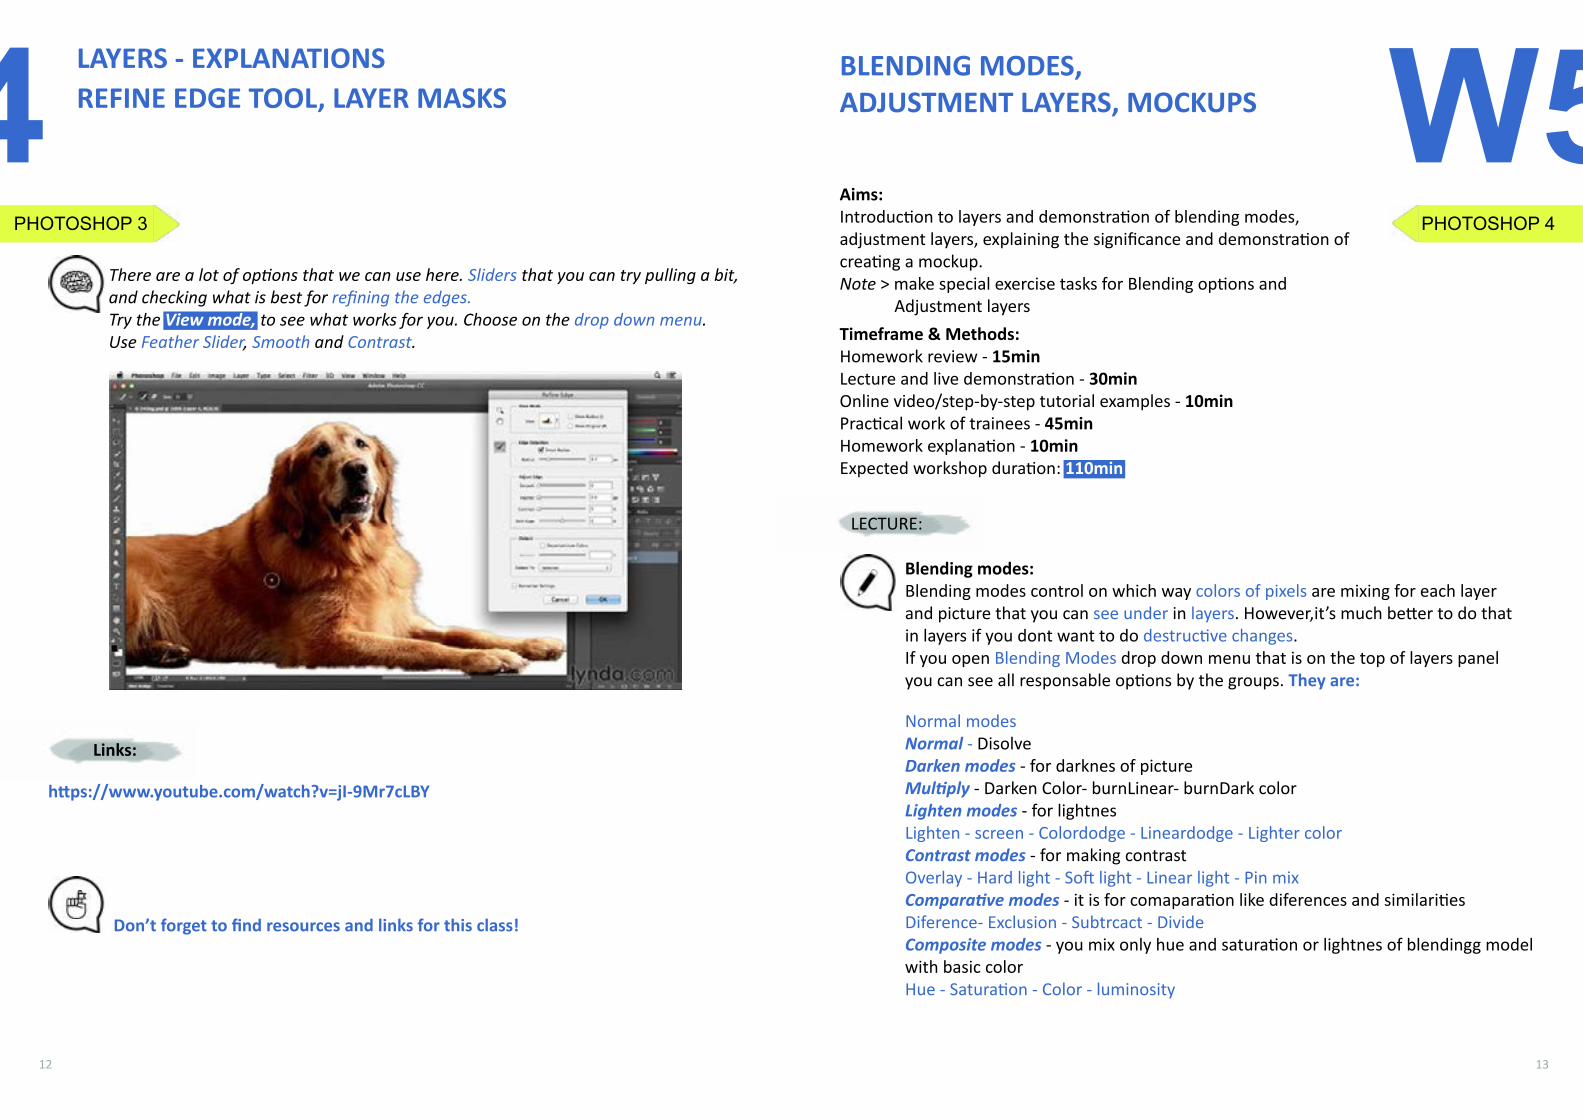
For practice, let’s make the mask of this fluffy dog as above. You can tell that the fluff needs some work done to it. The mask edge needs some fixing. For that we use Refine Edge (shortcut for Windows Alt+Ctrl+R, for MAC Opt+Cmn+R ).
Deselect everything. Hold the CTRL button on the keyboard and click on the small view of a mask. In the top bars, you see the Refine Edge button. Click.
LAYERS - EXPLANATIONSREFINE EDGE TOOL, LAYER MASKS
PHOTOSHOP 3
W4
12 13
PHOTOSHOP 3
https://www.youtube.com/watch?v=jI-9Mr7cLBY
Links:
There are a lot of options that we can use here. Sliders that you can try pulling a bit, and checking what is best for refining the edges.Try the View mode, to see what works for you. Choose on the drop down menu. Use Feather Slider, Smooth and Contrast.
LAYERS - EXPLANATIONSREFINE EDGE TOOL, LAYER MASKS W5BLENDING MODES,
ADJUSTMENT LAYERS, MOCKUPS
Timeframe & Methods:Homework review - 15minLecture and live demonstration - 30minOnline video/step-by-step tutorial examples - 10minPractical work of trainees - 45minHomework explanation - 10minExpected workshop duration: 110min
Aims:Introduction to layers and demonstration of blending modes, adjustment layers, explaining the significance and demonstration of creating a mockup.Note > make special exercise tasks for Blending options and Adjustment layers
LECTURE:
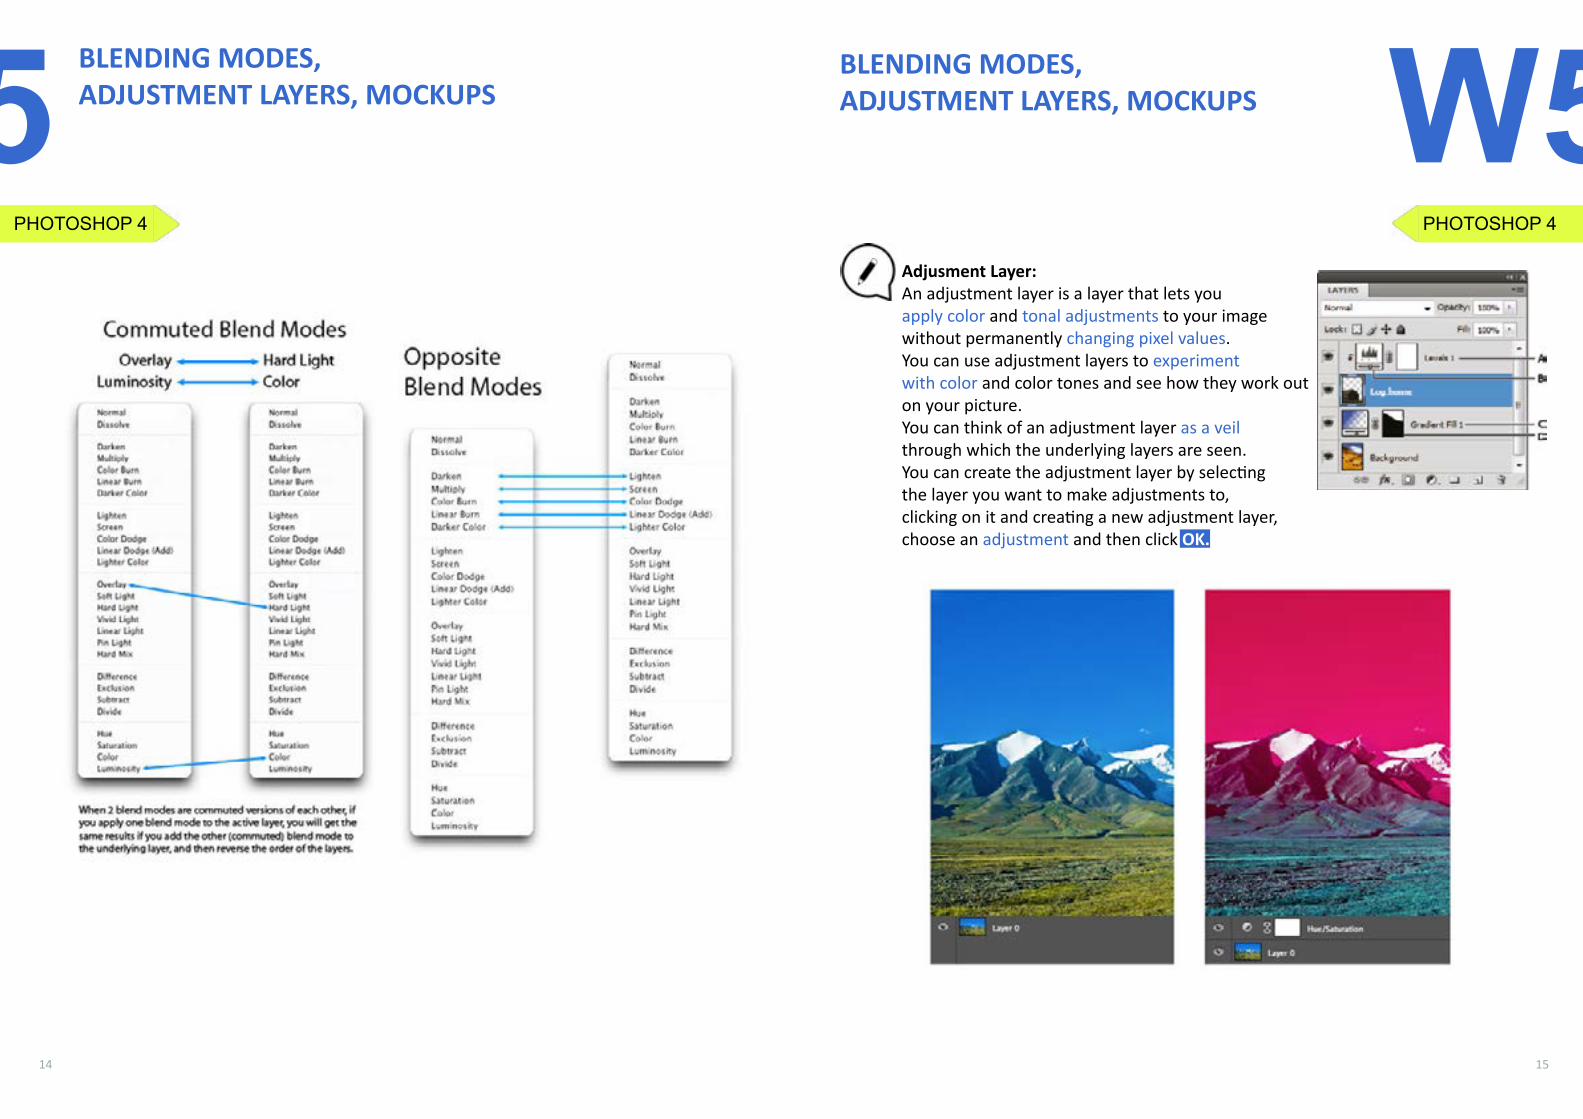
Blending modes: Blending modes control on which way colors of pixels are mixing for each layer and picture that you can see under in layers. However,it’s much better to do that in layers if you dont want to do destructive changes. If you open Blending Modes drop down menu that is on the top of layers panel you can see all responsable options by the groups. They are:
Normal modesNormal - DisolveDarken modes - for darknes of pictureMultiply - Darken Color- burnLinear- burnDark colorLighten modes - for lightnesLighten - screen - Colordodge - Lineardodge - Lighter colorContrast modes - for making contrastOverlay - Hard light - Soft light - Linear light - Pin mixComparative modes - it is for comaparation like diferences and similaritiesDiference- Exclusion - Subtrcact - DivideComposite modes - you mix only hue and saturation or lightnes of blendingg model with basic colorHue - Saturation - Color - luminosity
PHOTOSHOP 4
W4
Don’t forget to find resources and links for this class!
14 15
PHOTOSHOP 4
BLENDING MODES, ADJUSTMENT LAYERS, MOCKUPS W5BLENDING MODES,
ADJUSTMENT LAYERS, MOCKUPS
Adjusment Layer: An adjustment layer is a layer that lets you apply color and tonal adjustments to your image without permanently changing pixel values. You can use adjustment layers to experiment with color and color tones and see how they work outon your picture. You can think of an adjustment layer as a veil through which the underlying layers are seen. You can create the adjustment layer by selecting the layer you want to make adjustments to, clicking on it and creating a new adjustment layer, choose an adjustment and then click OK.
PHOTOSHOP 4
W5
16 17
PHOTOSHOP 4
BLENDING MODES, ADJUSTMENT LAYERS, MOCKUPS
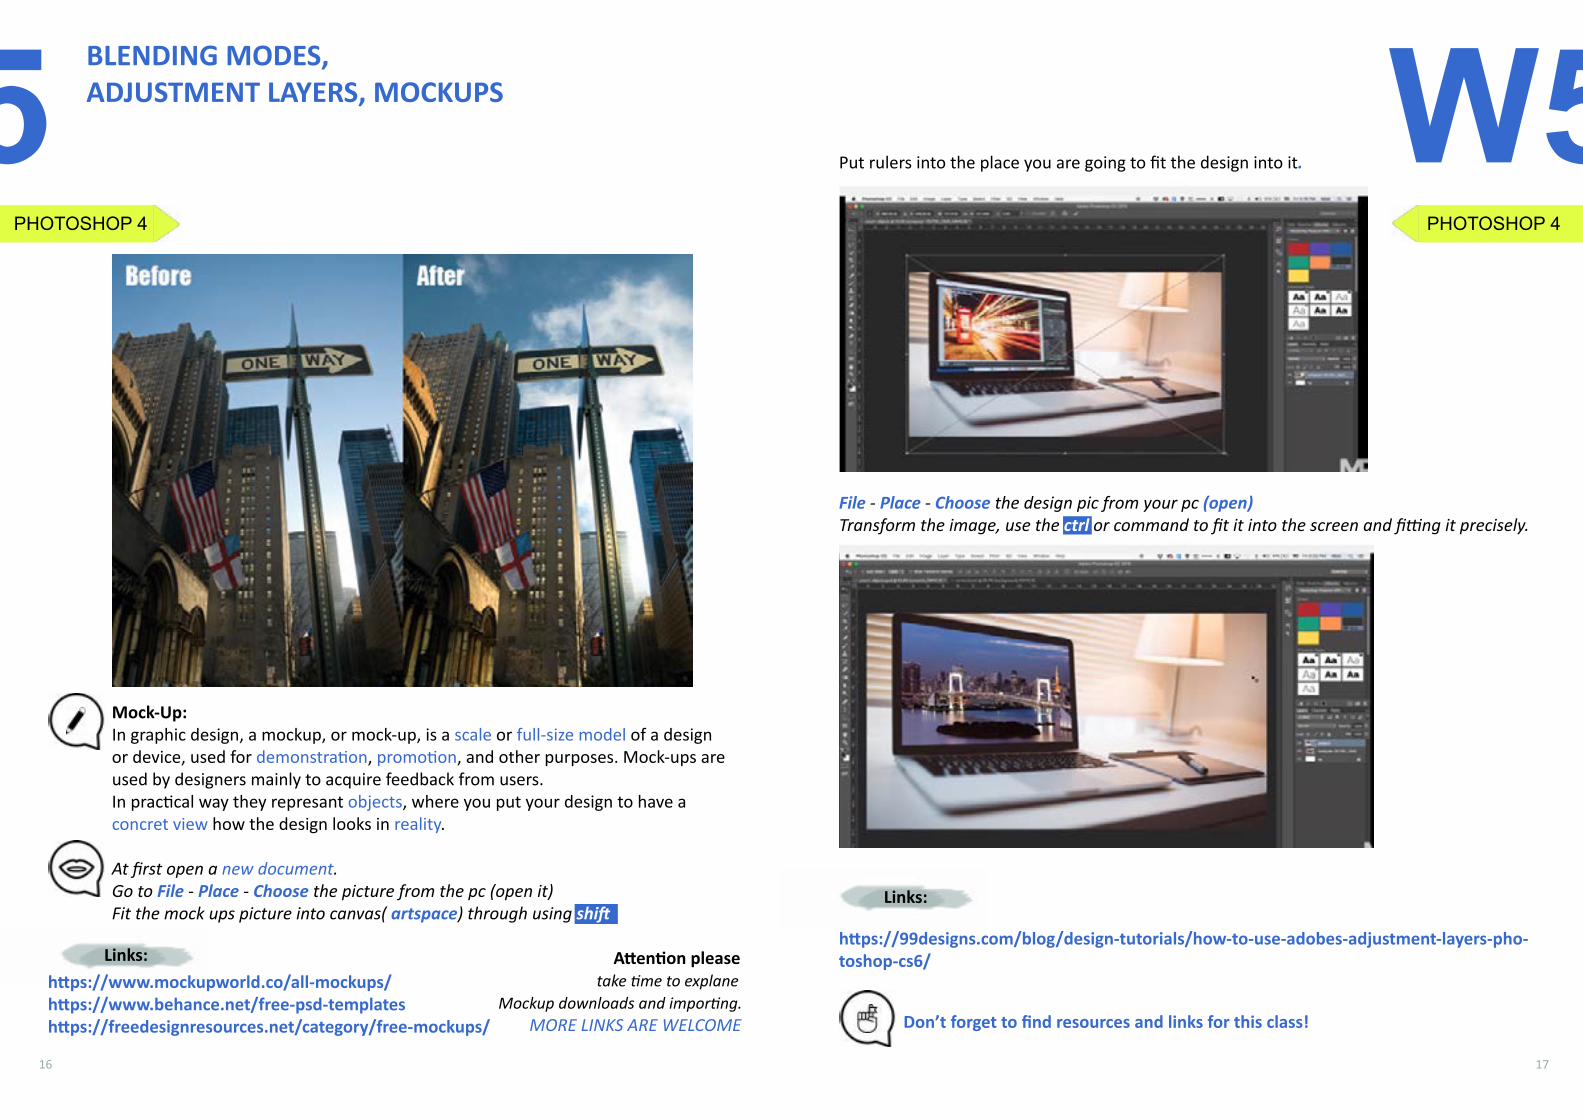
Mock-Up:In graphic design, a mockup, or mock-up, is a scale or full-size model of a design or device, used for demonstration, promotion, and other purposes. Mock-ups are used by designers mainly to acquire feedback from users. In practical way they represant objects, where you put your design to have a concret view how the design looks in reality. At first open a new document. Go to File - Place - Choose the picture from the pc (open it)Fit the mock ups picture into canvas( artspace) through using shift
W5
https://99designs.com/blog/design-tutorials/how-to-use-adobes-adjustment-layers-pho-toshop-cs6/
Links:
File - Place - Choose the design pic from your pc (open) Transform the image, use the ctrl or command to fit it into the screen and fitting it precisely.
Put rulers into the place you are going to fit the design into it.
PHOTOSHOP 4
W5
Don’t forget to find resources and links for this class!
https://www.mockupworld.co/all-mockups/https://www.behance.net/free-psd-templateshttps://freedesignresources.net/category/free-mockups/
Attention please take time to explane Mockup downloads and importing. MORE LINKS ARE WELCOME
Links:
19
Title of the sessions:
Workshop 6ILLUSTRATOR 1: RECTANGLE TOOL.......................page 19-20ELIPSE TOOL...............................page 19-20FILL/GRADIENT TOOL.................page 21-22STROKE......................................page 21-22ALIGN OPTIONS.............................page 22
Workshop 7ILLUSTRATOR 2: SHAPE BUILDER TOOLS..............page 23-24PATHFINDER - OPTIONS.................page 24DIRECT SELECTION TOOL(MOVING ANCHOR POINTS)...........page 25
Workshop 9ILLUSTRATOR 4: TRACING IMAGES.......................page 29-30
Workshop 8ILLUSTRATOR 3: PEN TOOL......................................page 27BRUSH TOOL (WITH LIBRARIES)..page 27-28WORKING WITH TYPOGRAPHY.......page 28
W6RECTANGLE TOOL, ELIPSE TOOL, FILL/GRADIENT TOOL & STROKE, ALIGN OPTIONS
Timeframe & Methods:Homework review - 15minIllustrator intro presentation - 10minLecture and live demonstration - 30minOnline video/step-by-step tutorial examples - 10minPractical work of trainees - 45minHomework explanation - 10minExpected workshop duration: 110min
Aims:Introduction to Illustrator - Intro to Interface of the program;Main differences between Illustrator and Photoshop, and demonstration of shape tools, Fill and stroke, align options.
LECTURE:
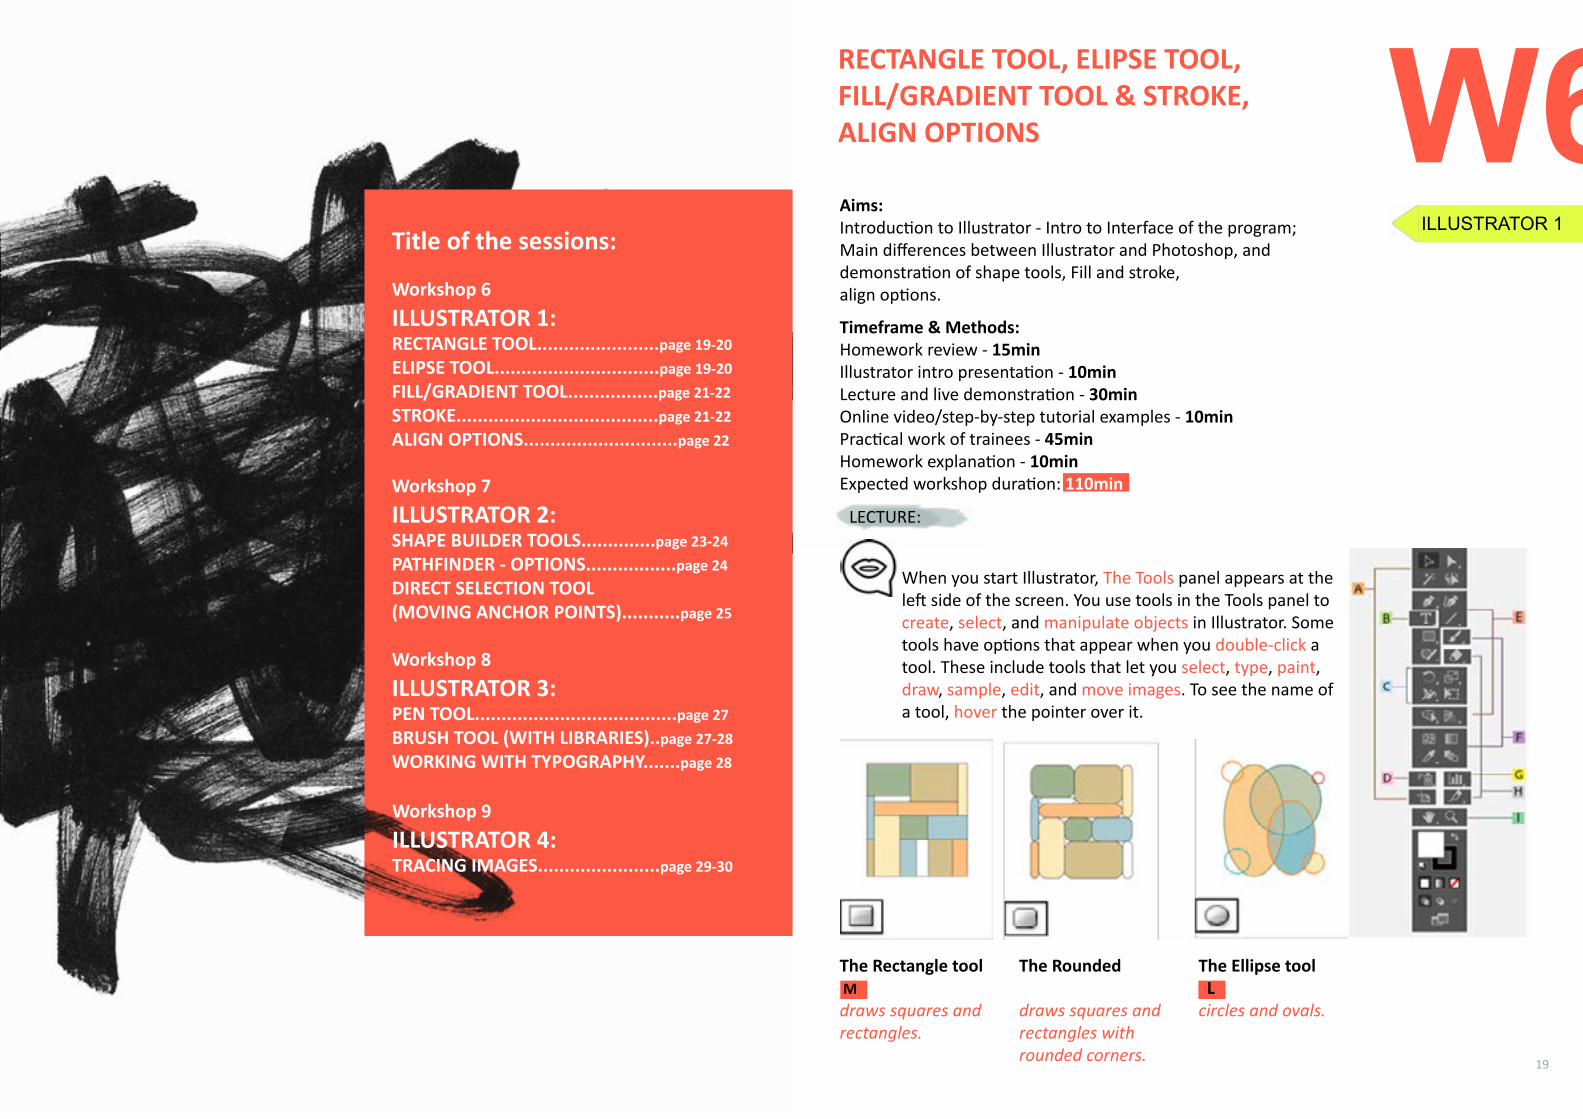
When you start Illustrator, The Tools panel appears at the left side of the screen. You use tools in the Tools panel to create, select, and manipulate objects in Illustrator. Some tools have options that appear when you double-click a tool. These include tools that let you select, type, paint, draw, sample, edit, and move images. To see the name of a tool, hover the pointer over it.
The Rectangle tool Mdraws squares and rectangles.
The Rounded
draws squares and rectangles with rounded corners.
The Ellipse tool L circles and ovals.
ILLUSTRATOR 1
20 21
ILLUSTRATOR 1
RECTANGLE TOOL, ELIPSE TOOL, FILL/GRADIENT TOOL & STROKE, ALIGN OPTIONS
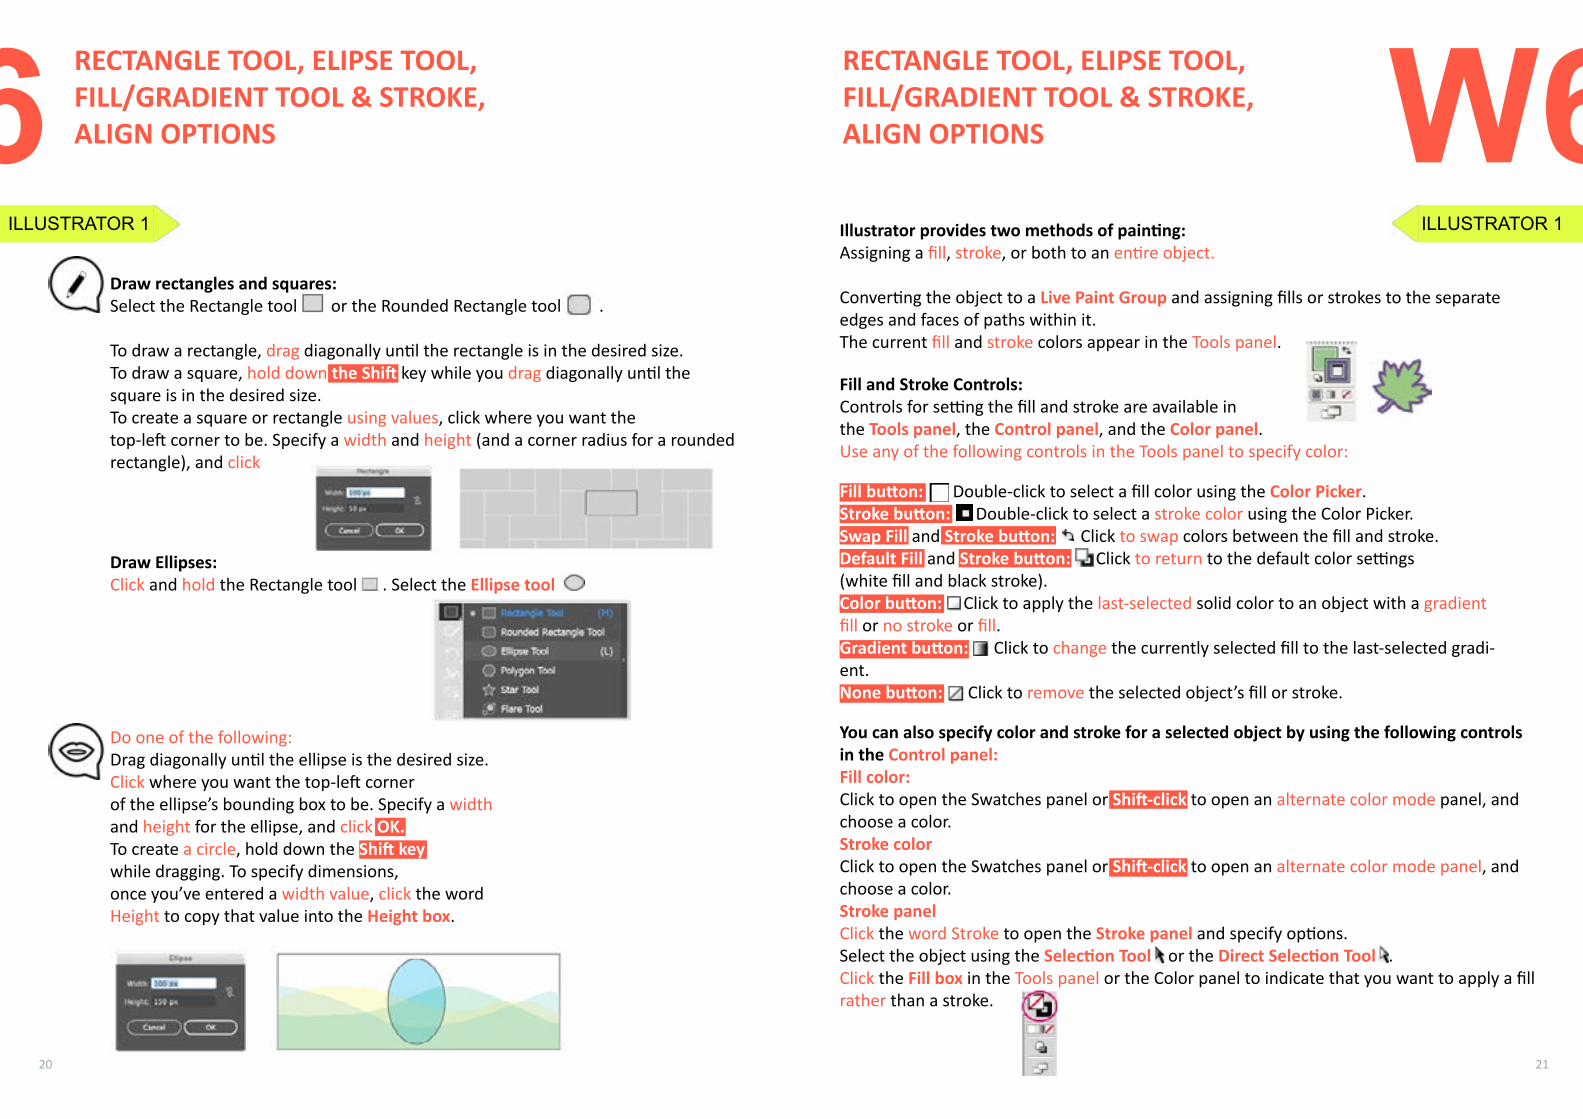
Draw rectangles and squares: Select the Rectangle tool or the Rounded Rectangle tool .
To draw a rectangle, drag diagonally until the rectangle is in the desired size.To draw a square, hold down the Shift key while you drag diagonally until the square is in the desired size.To create a square or rectangle using values, click where you want the top-left corner to be. Specify a width and height (and a corner radius for a rounded rectangle), and click OK.
Draw Ellipses: Click and hold the Rectangle tool . Select the Ellipse tool
Do one of the following:Drag diagonally until the ellipse is the desired size.Click where you want the top-left corner of the ellipse’s bounding box to be. Specify a width and height for the ellipse, and click OK.To create a circle, hold down the Shift key while dragging. To specify dimensions, once you’ve entered a width value, click the word Height to copy that value into the Height box.
W6RECTANGLE TOOL, ELIPSE TOOL, FILL/GRADIENT TOOL & STROKE, ALIGN OPTIONS
Illustrator provides two methods of painting:Assigning a fill, stroke, or both to an entire object.
Converting the object to a Live Paint Group and assigning fills or strokes to the separate edges and faces of paths within it.The current fill and stroke colors appear in the Tools panel.
Fill and Stroke Controls:Controls for setting the fill and stroke are available in the Tools panel, the Control panel, and the Color panel.Use any of the following controls in the Tools panel to specify color:
You can also specify color and stroke for a selected object by using the following controls in the Control panel:Fill color:Click to open the Swatches panel or Shift-click to open an alternate color mode panel, and choose a color.Stroke colorClick to open the Swatches panel or Shift-click to open an alternate color mode panel, and choose a color.Stroke panelClick the word Stroke to open the Stroke panel and specify options.Select the object using the Selection Tool or the Direct Selection Tool .Click the Fill box in the Tools panel or the Color panel to indicate that you want to apply a fill rather than a stroke.
Fill button: Double-click to select a fill color using the Color Picker.Stroke button: Double-click to select a stroke color using the Color Picker.Swap Fill and Stroke button: Click to swap colors between the fill and stroke.Default Fill and Stroke button: Click to return to the default color settings (white fill and black stroke).Color button: v Click to apply the last-selected solid color to an object with a gradient fill or no stroke or fill.Gradient button: Click to change the currently selected fill to the last-selected gradi-ent.None button: Click to remove the selected object’s fill or stroke.
ILLUSTRATOR 1
W6
22 23
ILLUSTRATOR 1
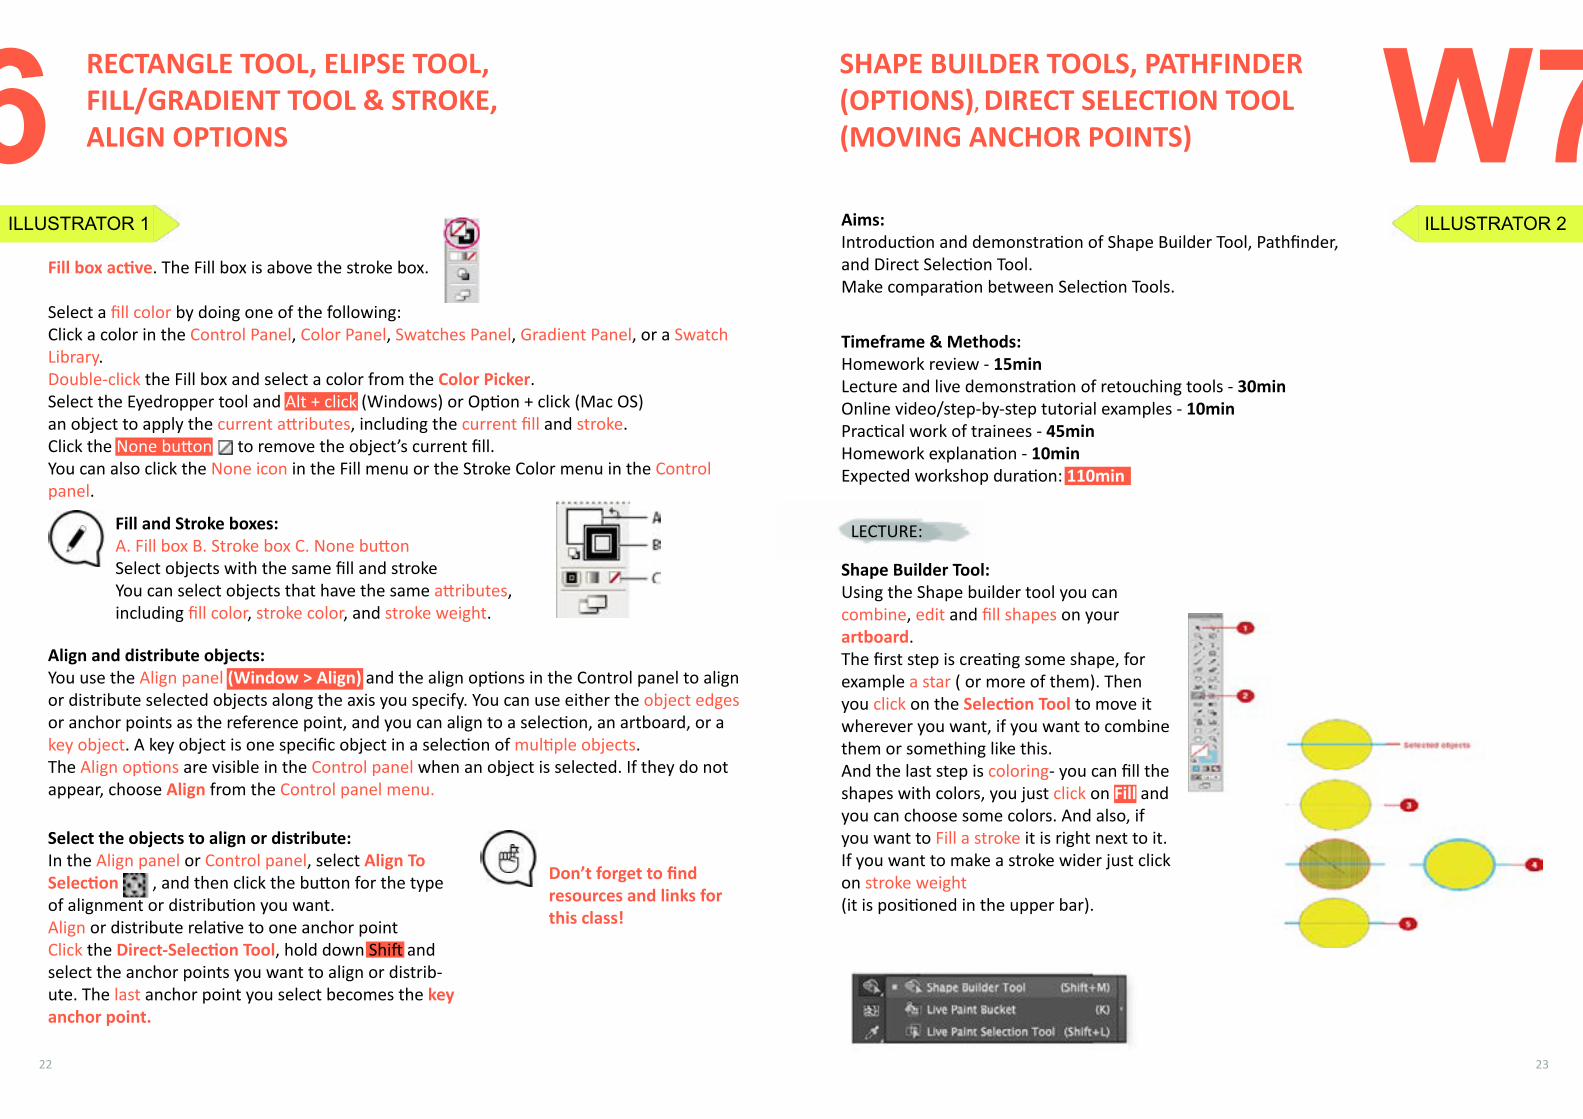
Fill box active. The Fill box is above the stroke box.
Select a fill color by doing one of the following:Click a color in the Control Panel, Color Panel, Swatches Panel, Gradient Panel, or a Swatch Library.Double-click the Fill box and select a color from the Color Picker.Select the Eyedropper tool and Alt + click (Windows) or Option + click (Mac OS) an object to apply the current attributes, including the current fill and stroke.Click the None button to remove the object’s current fill.You can also click the None icon in the Fill menu or the Stroke Color menu in the Control panel.
RECTANGLE TOOL, ELIPSE TOOL, FILL/GRADIENT TOOL & STROKE, ALIGN OPTIONS
Fill and Stroke boxes: A. Fill box B. Stroke box C. None button Select objects with the same fill and stroke You can select objects that have the same attributes, including fill color, stroke color, and stroke weight.
Align and distribute objects:You use the Align panel (Window > Align) and the align options in the Control panel to align or distribute selected objects along the axis you specify. You can use either the object edges or anchor points as the reference point, and you can align to a selection, an artboard, or a key object. A key object is one specific object in a selection of multiple objects.The Align options are visible in the Control panel when an object is selected. If they do not appear, choose Align from the Control panel menu.
Select the objects to align or distribute:In the Align panel or Control panel, select Align To Selection , and then click the button for the type of alignment or distribution you want.Align or distribute relative to one anchor point Click the Direct-Selection Tool, hold down Shift and select the anchor points you want to align or distrib-ute. The last anchor point you select becomes the key anchor point.
W7SHAPE BUILDER TOOLS, PATHFINDER (OPTIONS), DIRECT SELECTION TOOL (MOVING ANCHOR POINTS)
Timeframe & Methods:Homework review - 15minLecture and live demonstration of retouching tools - 30minOnline video/step-by-step tutorial examples - 10minPractical work of trainees - 45minHomework explanation - 10minExpected workshop duration: 110min
Aims:Introduction and demonstration of Shape Builder Tool, Pathfinder, and Direct Selection Tool.Make comparation between Selection Tools.
LECTURE:
Shape Builder Tool:Using the Shape builder tool you can combine, edit and fill shapes on your artboard. The first step is creating some shape, for example a star ( or more of them). Then you click on the Selection Tool to move it wherever you want, if you want to combine them or something like this. And the last step is coloring- you can fill the shapes with colors, you just click on Fill and you can choose some colors. And also, if you want to Fill a stroke it is right next to it. If you want to make a stroke wider just click on stroke weight (it is positioned in the upper bar).
ILLUSTRATOR 2
W6
Don’t forget to find resources and links for this class!
24 25
ILLUSTRATOR 2
SHAPE BUILDER TOOLS, PATHFINDER (OPTIONS), DIRECT SELECTION TOOL (MOVING ANCHOR POINTS)
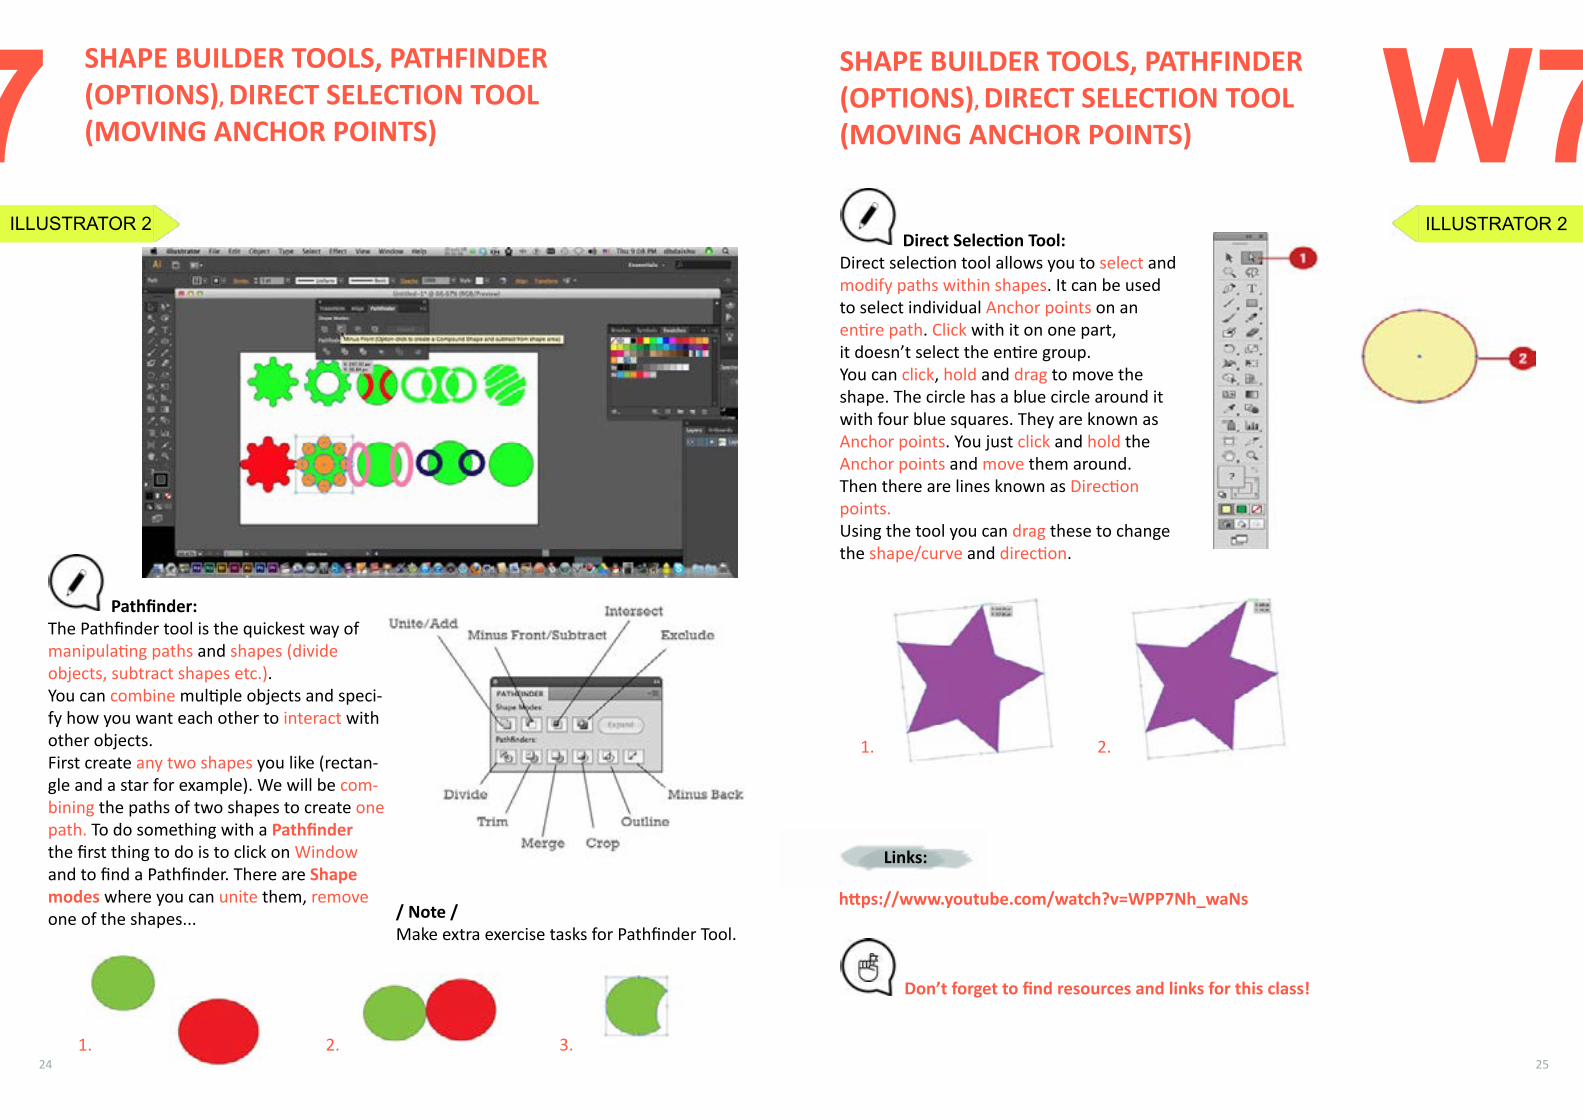
Pathfinder:The Pathfinder tool is the quickest way of manipulating paths and shapes (divide objects, subtract shapes etc.). You can combine multiple objects and speci-fy how you want each other to interact with other objects. First create any two shapes you like (rectan-gle and a star for example). We will be com-bining the paths of two shapes to create one path. To do something with a Pathfinder the first thing to do is to click on Window and to find a Pathfinder. There are Shape modes where you can unite them, remove one of the shapes...
1. 2. 3.
W7SHAPE BUILDER TOOLS, PATHFINDER (OPTIONS), DIRECT SELECTION TOOL (MOVING ANCHOR POINTS)
Direct Selection Tool:Direct selection tool allows you to select and modify paths within shapes. It can be used to select individual Anchor points on an entire path. Click with it on one part, it doesn’t select the entire group. You can click, hold and drag to move the shape. The circle has a blue circle around it with four blue squares. They are known as Anchor points. You just click and hold the Anchor points and move them around. Then there are lines known as Direction points. Using the tool you can drag these to change the shape/curve and direction.
https://www.youtube.com/watch?v=WPP7Nh_waNs
Links:
1. 2.
ILLUSTRATOR 2
W7
Don’t forget to find resources and links for this class!
/ Note /Make extra exercise tasks for Pathfinder Tool.
27
Boris Negeli reflection&energizer expert
PLANKs
60sec of
W8PEN TOOL, BRUSH TOOL (WITH LIBRARIES),WORKING WITH TYPOGRAPHY
Timeframe & Methods:Homework review - 15minLecture and live demonstration of retouching tools - 30minOnline video/step-by-step tutorial examples - 10minPractical work of trainees - 45minHomework explanation - 10minExpected workshop duration: 110min
Aims:Introduction and demonstration of pen tool, brush, working with Typography + importing new fonts
LECTURE:
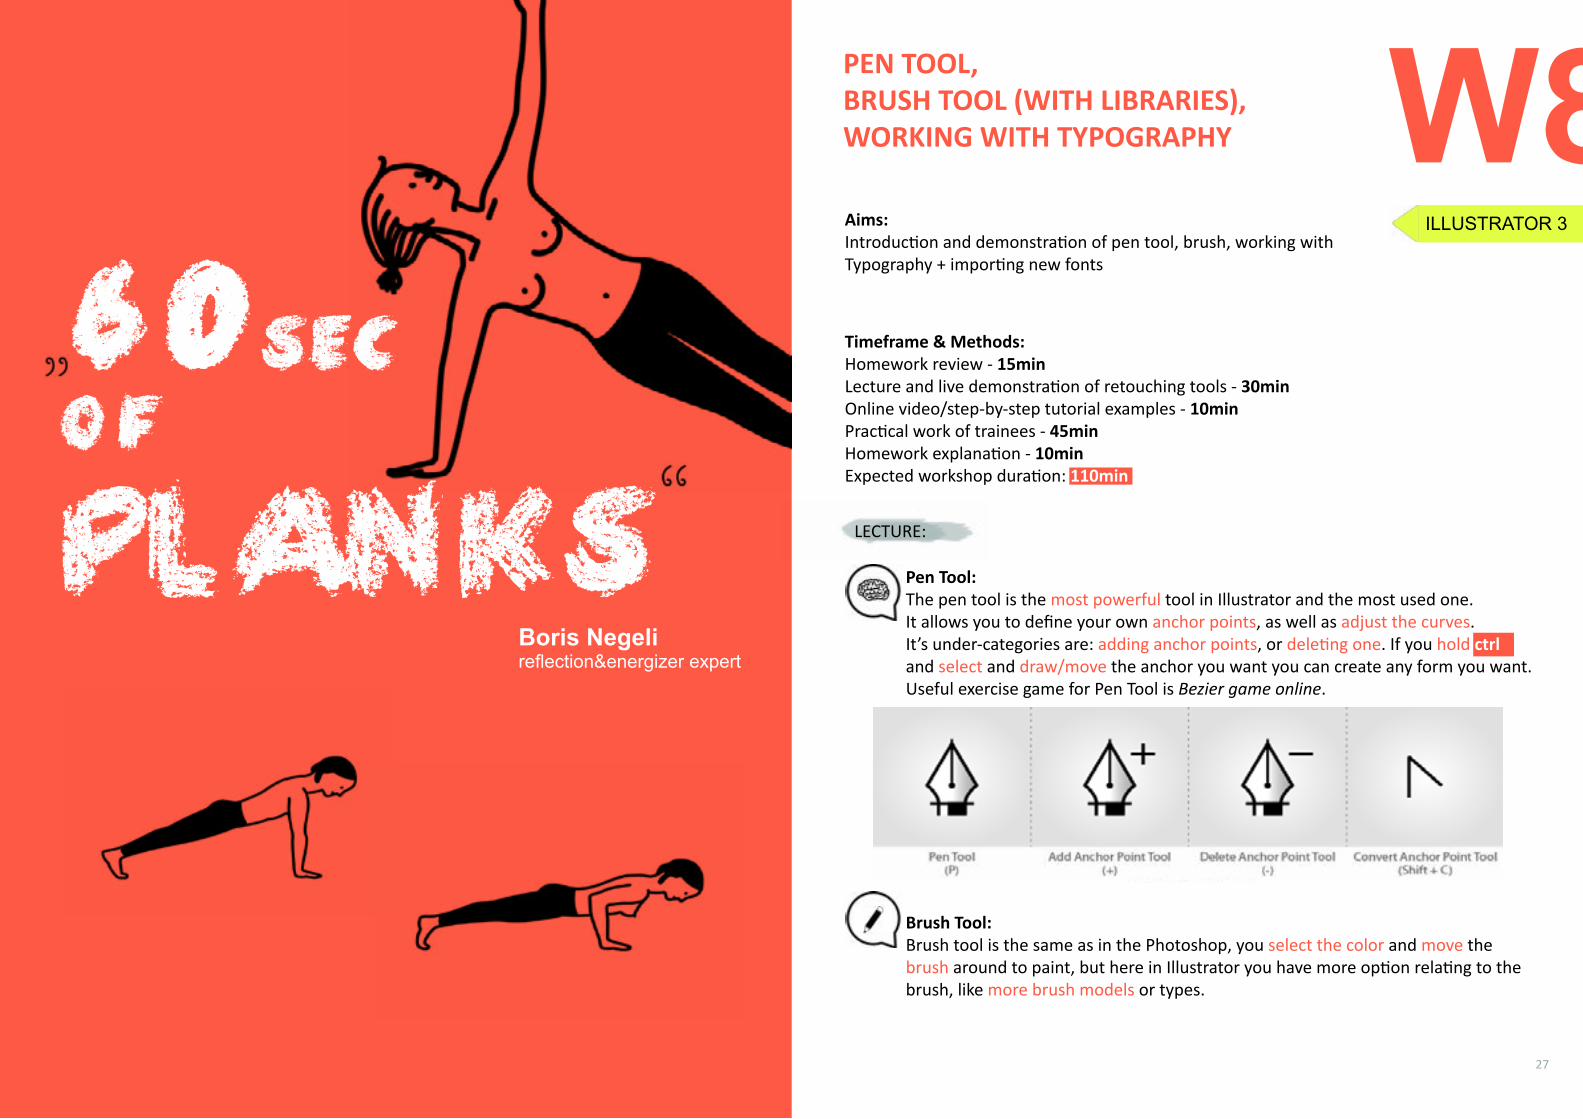
Pen Tool:The pen tool is the most powerful tool in Illustrator and the most used one. It allows you to define your own anchor points, as well as adjust the curves. It’s under-categories are: adding anchor points, or deleting one. If you hold ctrl and select and draw/move the anchor you want you can create any form you want.Useful exercise game for Pen Tool is Bezier game online.
Brush Tool:Brush tool is the same as in the Photoshop, you select the color and move the brush around to paint, but here in Illustrator you have more option relating to the brush, like more brush models or types.
ILLUSTRATOR 3
28 29
ILLUSTRATOR 3
PEN TOOL, BRUSH TOOL (WITH LIBRARIES),WORKING WITH TYPOGRAPHY
Brush Library:There are a lot kinds of brushes just like you see from the photo.
Type Tool:Select the type tool and draw the box where you want to write, and then start typing. You can change the size of each letter, the space between them, the direction of letters and a lot other things. Also you can reorder the letters, and you can write in different shapes and even make the letters follow the shape you want.
http://bezier.method.achttps://www.1001freefonts.com/ - Explane installing new fonts -
Links:
W9TRACING IMAGES
Timeframe & Methods:Homework review - 15minLecture and live demonstration - 30minOnline video/step-by-step tutorial examples - 10minPractical work of trainees - 45minHomework explanation - 10minExpected workshop duration: 110min
Aims:Introduction and demonstration of Tracing images method and options;Merge this workshop with the previous one.
LECTURE:
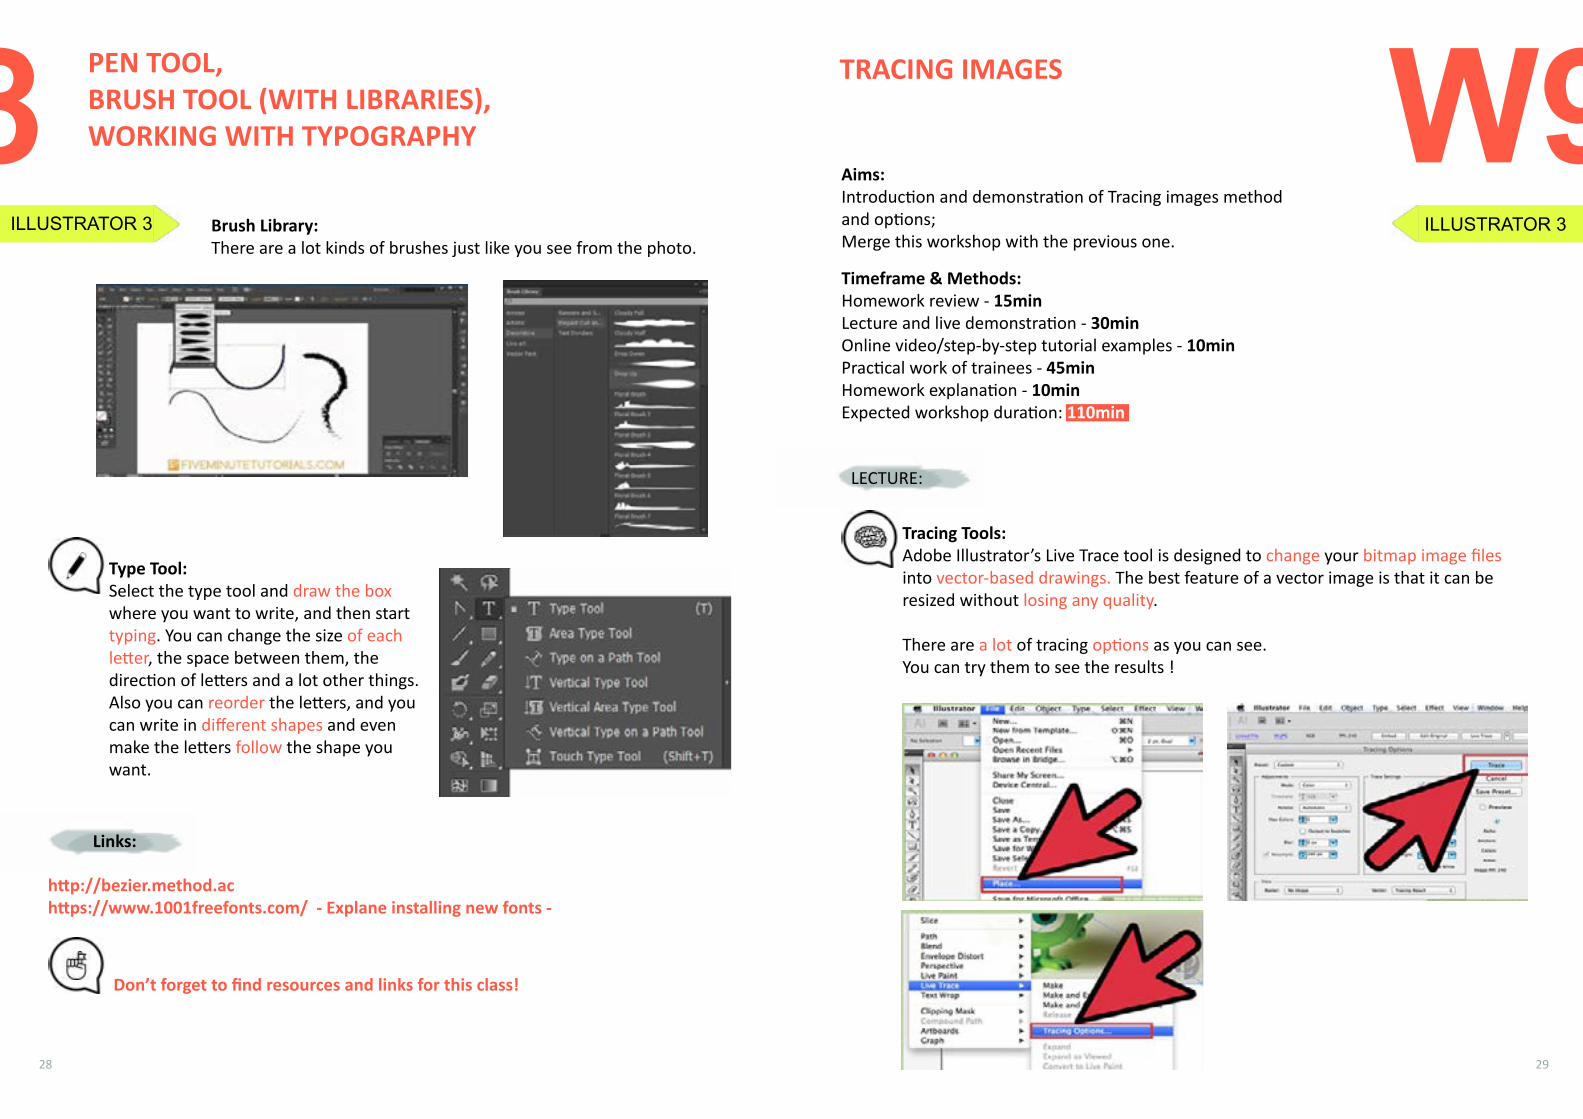
Tracing Tools:Adobe Illustrator’s Live Trace tool is designed to change your bitmap image files into vector-based drawings. The best feature of a vector image is that it can be resized without losing any quality.
There are a lot of tracing options as you can see. You can try them to see the results !
ILLUSTRATOR 3
W8
Don’t forget to find resources and links for this class!
30
ILLUSTRATOR 4
TRACING IMAGES
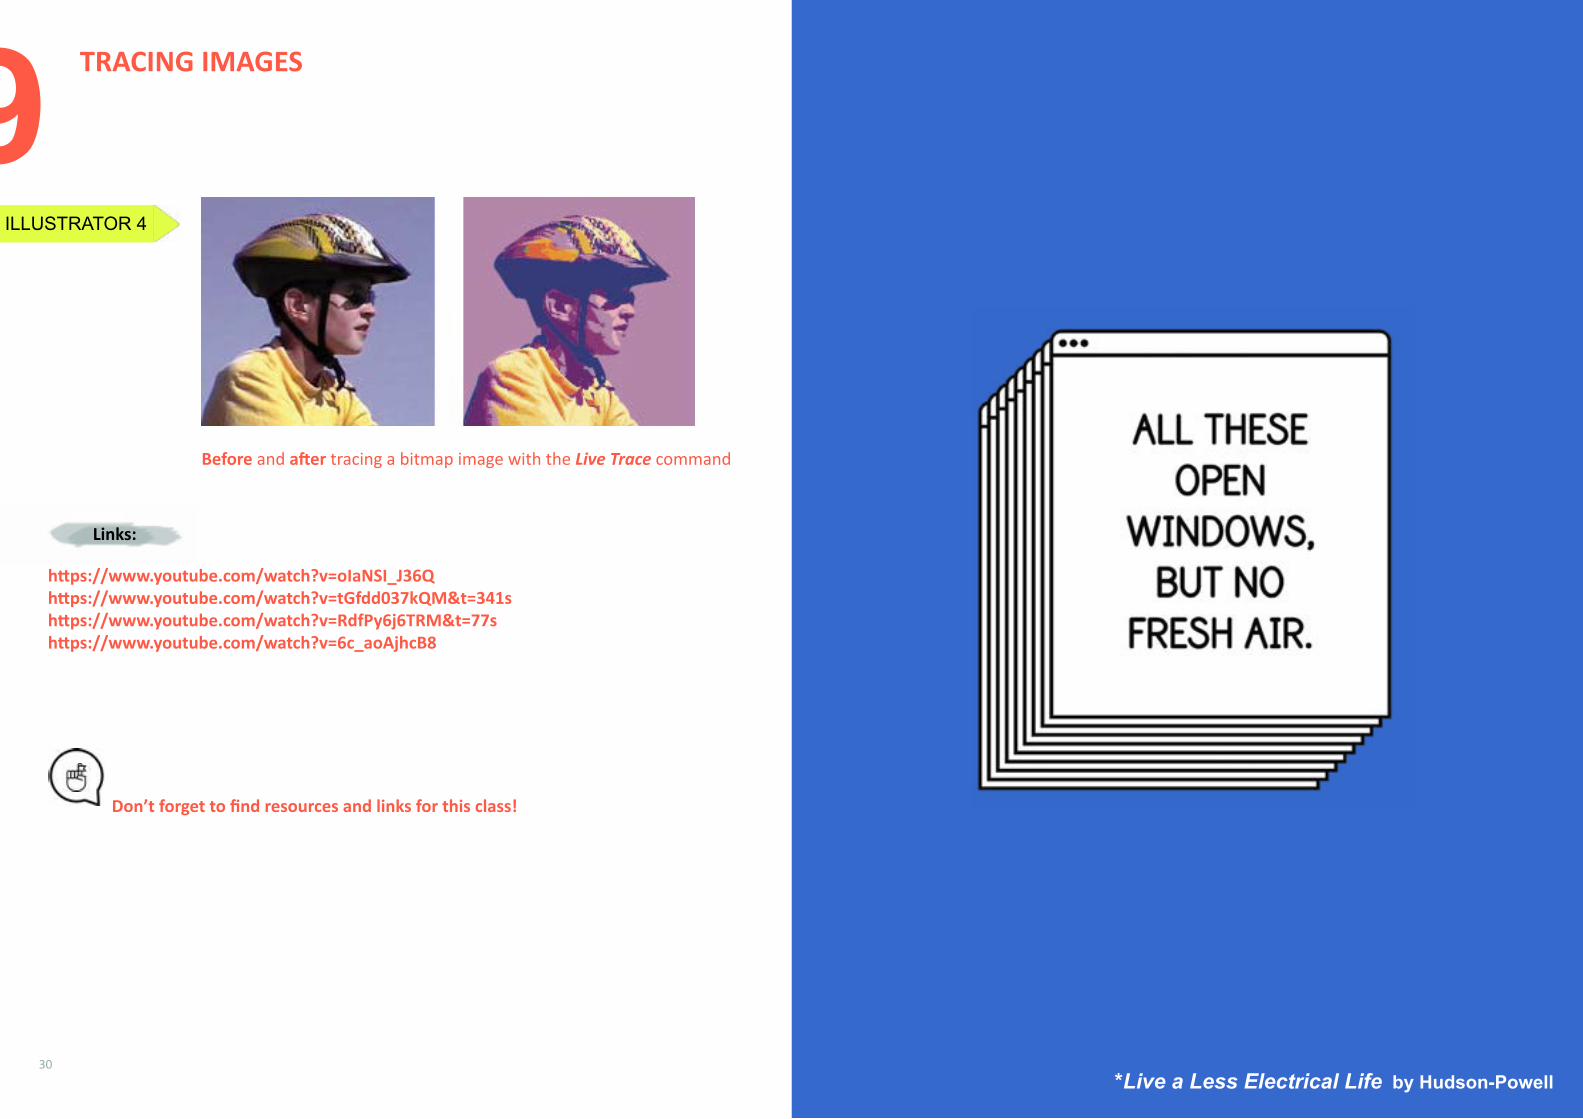
Before and after tracing a bitmap image with the Live Trace command
https://www.youtube.com/watch?v=oIaNSI_J36Qhttps://www.youtube.com/watch?v=tGfdd037kQM&t=341shttps://www.youtube.com/watch?v=RdfPy6j6TRM&t=77shttps://www.youtube.com/watch?v=6c_aoAjhcB8
Links:
*Live a Less Electrical Life by Hudson-Powell
W9
Don’t forget to find resources and links for this class!
33
Title of the sessions:
Workshop 10INDESIGN 1: CREATING MULTI-PAGE DOCUMENT...............................page 33-34BLEED ADJUSTMENT..................page 35-36MASTER PAGE EXPLANATION............page 34
Workshop 11INDESIGN 2: WORKING WITH IMAGES AND TEXT BOXES.......................page 37-38IMPORTING DATA FROM ILLUSTRATOR......................page 39
Workshop 12INDESIGN 3: PAGE NUMERATION..................page 41-42MULTI-MASTER PAGES..............page 43-44EXPORTING DATA..........................page 44
Workshop 13REVIEW OF THE WHOLE PROGRAMAND REPEATITION OFMISSED TRAININGS.......................page 45
W10CREATING MULTI-PAGE DOCUMENT, BLEED ADJUSTMENT, MASTER PAGE EXPLANATION
Timeframe & Methods:Homework review - 15minLecture and live demonstration - 30minOnline video/step-by-step tutorial examples - 10minPractical work of trainees - 45minHomework explanation - 10minExpected workshop duration: 110min
Aims:Basic introduction to InDesign /Intro to Interface/ explanation of its purpose and inter-software compatibility (with Photoshop and Illustrator). Demonstration of creating a multi-page document, bleed adjustment, Master page lecture.
LECTURE:
CREATING MULTIPAGE DOCUMENT:The first item you create in your letterhead workflow is the main letter. The size of this document is a classic A4 size. Open InDesign and select File > New Document to create your first item. Set Intent to Print and Number of Pages to 1 (we’ll add more later). Deselect Facing Pages. Under Page Size select A4.
Set the Bleed to .125 in on all 4 sides.
We’re only going to design the front of the envelope, so we need to add one page. Duplicate the page you just created by clicking and dragging the page from the Pages panel to the New Page icon just to the left of the Trash can icon.
Make sure the second page is active in the Pages panel and the Select the Page Tool. You’ll notice the page is selected with new anchors around the edges. This allows you to resize by clicking and dragging any one of the anchors. We want to be more precise, however, and will use the properties at the top instead.
INDESIGN 1
34 35
W10INDESIGN 1
CREATING MULTI-PAGE DOCUMENT, BLEED ADJUSTMENT, MASTER PAGE EXPLANATION
This time you’ll create two duplicate pages. One for the front and one for the back of the business card. Instead of inputting the width and height, select the Custom-drop down and go to US Business Card.
You end up with an InDesign document that has four different sized pages. One for the letter, one for the envelope and two for the business card. If you Zoom Out, you’ll notice that the page sizes are different in the Workspace as well as the Pages Panel. This will help you see what page is what in your letterhead workflow.
EXPLANATION OF MASTER PAGE:
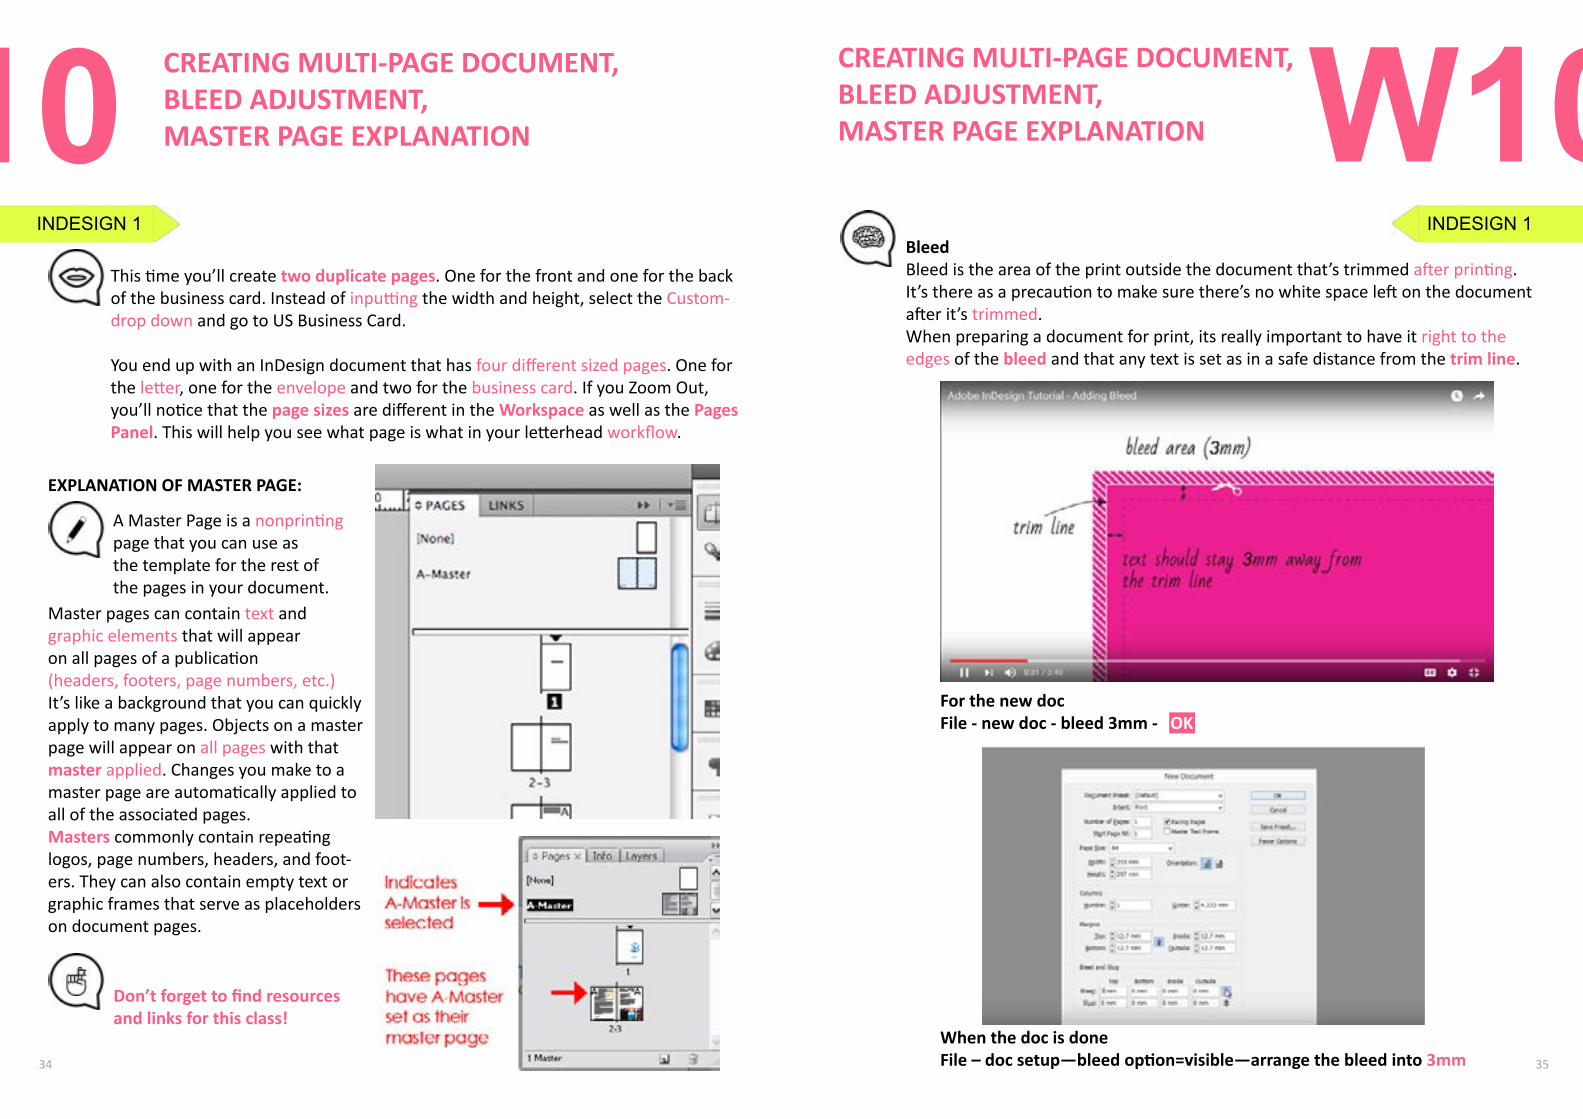
A Master Page is a nonprinting page that you can use as the template for the rest of the pages in your document.
Master pages can contain text and graphic elements that will appear on all pages of a publication (headers, footers, page numbers, etc.) It’s like a background that you can quickly apply to many pages. Objects on a master page will appear on all pages with that master applied. Changes you make to a master page are automatically applied to all of the associated pages. Masters commonly contain repeating logos, page numbers, headers, and foot-ers. They can also contain empty text or graphic frames that serve as placeholders on document pages.
W10CREATING MULTI-PAGE DOCUMENT, BLEED ADJUSTMENT, MASTER PAGE EXPLANATION
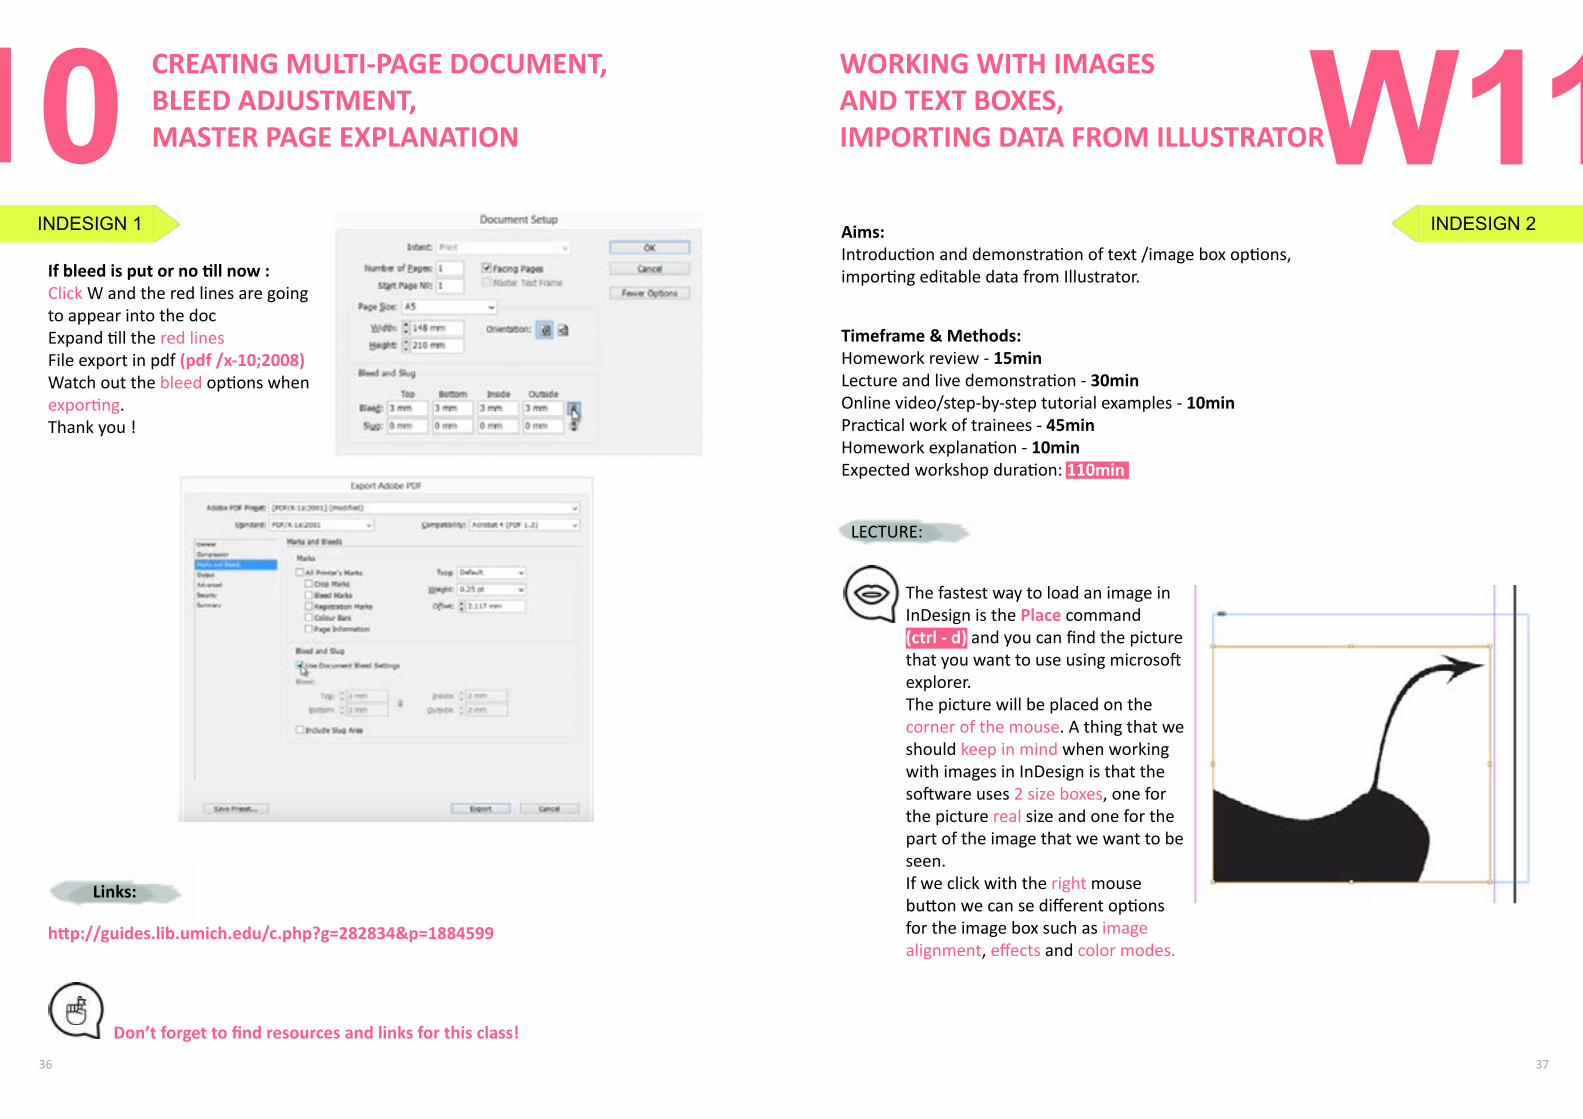
BleedBleed is the area of the print outside the document that’s trimmed after printing. It’s there as a precaution to make sure there’s no white space left on the document after it’s trimmed.When preparing a document for print, its really important to have it right to the edges of the bleed and that any text is set as in a safe distance from the trim line.
For the new docFile - new doc - bleed 3mm - OK
When the doc is doneFile – doc setup—bleed option=visible—arrange the bleed into 3mm
INDESIGN 1
Don’t forget to find resources and links for this class!
36 37
W10INDESIGN 1
CREATING MULTI-PAGE DOCUMENT, BLEED ADJUSTMENT, MASTER PAGE EXPLANATION
If bleed is put or no till now :Click W and the red lines are going to appear into the doc Expand till the red linesFile export in pdf (pdf /x-10;2008)Watch out the bleed options whenexporting.Thank you !
http://guides.lib.umich.edu/c.php?g=282834&p=1884599
Links:
W11WORKING WITH IMAGES AND TEXT BOXES, IMPORTING DATA FROM ILLUSTRATOR
Timeframe & Methods:Homework review - 15minLecture and live demonstration - 30minOnline video/step-by-step tutorial examples - 10minPractical work of trainees - 45minHomework explanation - 10minExpected workshop duration: 110min
Aims:Introduction and demonstration of text /image box options, importing editable data from Illustrator.
LECTURE:
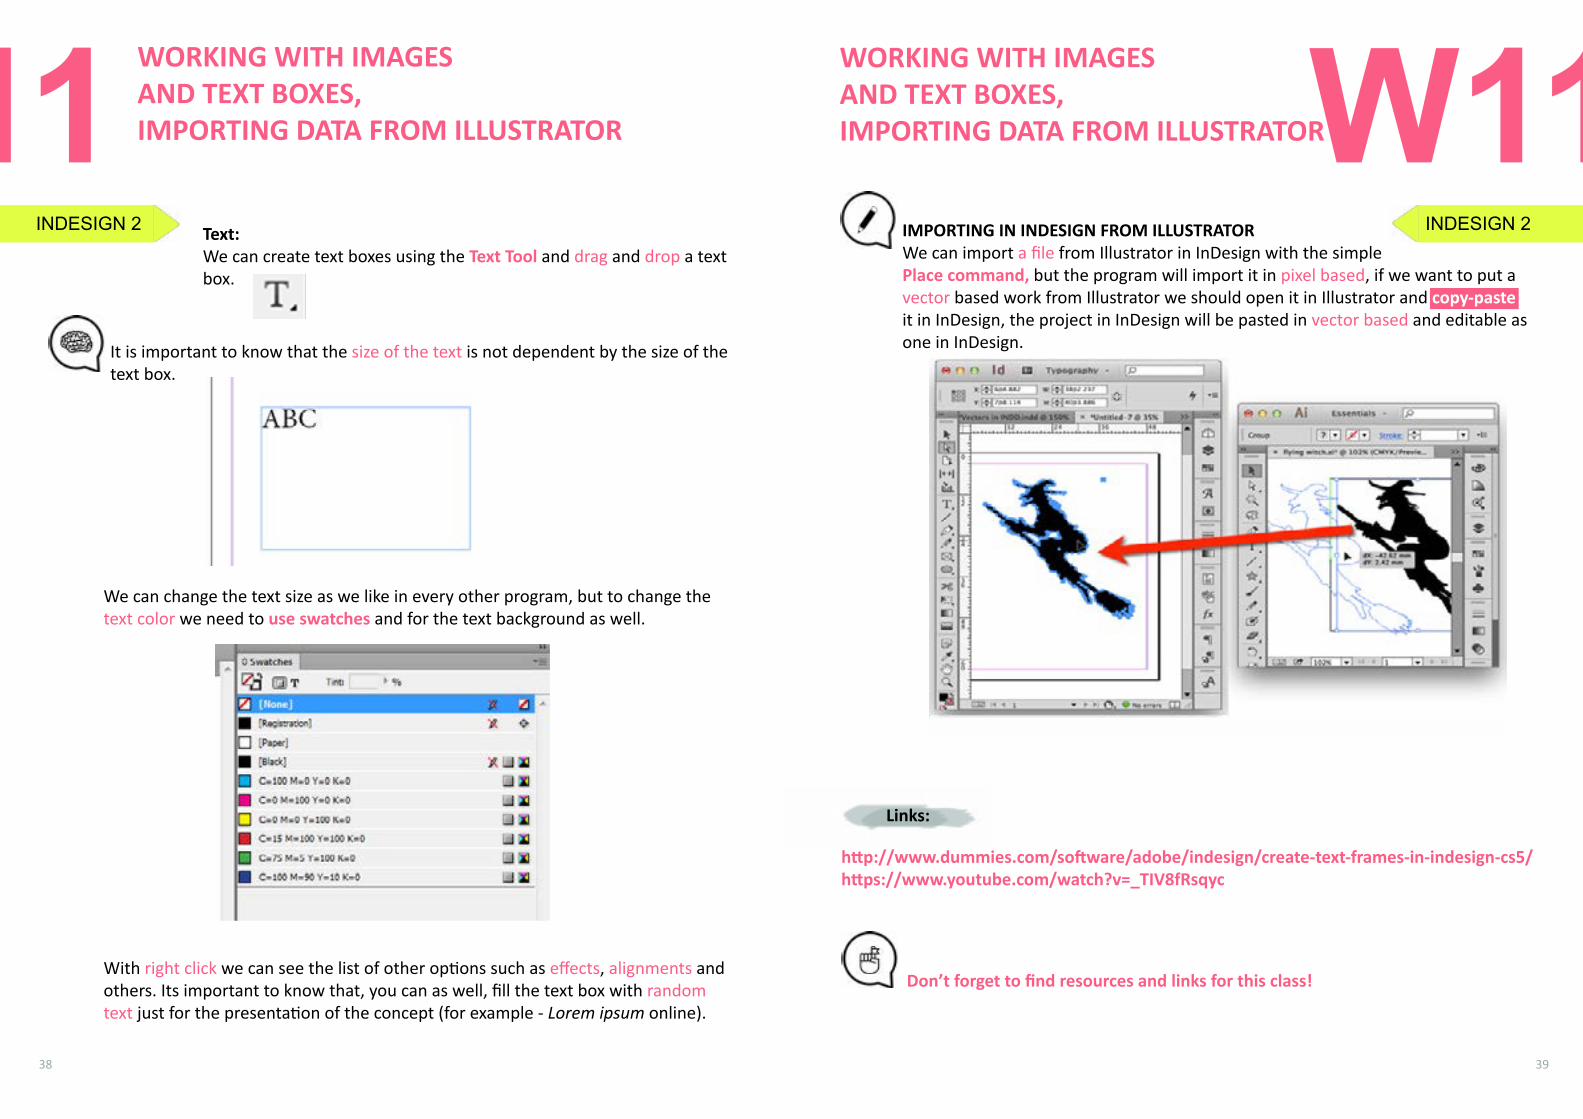
The fastest way to load an image in InDesign is the Place command (ctrl - d) and you can find the picture that you want to use using microsoft explorer. The picture will be placed on the corner of the mouse. A thing that we should keep in mind when working with images in InDesign is that the software uses 2 size boxes, one for the picture real size and one for the part of the image that we want to be seen. If we click with the right mouse button we can se different options for the image box such as image alignment, effects and color modes.
INDESIGN 2
Don’t forget to find resources and links for this class!
38 39
INDESIGN 2
WORKING WITH IMAGES AND TEXT BOXES, IMPORTING DATA FROM ILLUSTRATOR
Text:We can create text boxes using the Text Tool and drag and drop a text box.
It is important to know that the size of the text is not dependent by the size of the text box.
We can change the text size as we like in every other program, but to change the text color we need to use swatches and for the text background as well.
With right click we can see the list of other options such as effects, alignments and others. Its important to know that, you can as well, fill the text box with random text just for the presentation of the concept (for example - Lorem ipsum online).
W11W11IMPORTING IN INDESIGN FROM ILLUSTRATORWe can import a file from Illustrator in InDesign with the simple Place command, but the program will import it in pixel based, if we want to put a vector based work from Illustrator we should open it in Illustrator and copy-paste it in InDesign, the project in InDesign will be pasted in vector based and editable as one in InDesign.
http://www.dummies.com/software/adobe/indesign/create-text-frames-in-indesign-cs5/https://www.youtube.com/watch?v=_TIV8fRsqyc
Links:
WORKING WITH IMAGES AND TEXT BOXES, IMPORTING DATA FROM ILLUSTRATOR
INDESIGN 2
Don’t forget to find resources and links for this class!
41
B E H O L D
STUDENTS AREBECOMINGtheTEACHERS !
W12PAGE NUMERATION, MULTI-MASTER PAGES, EXPORTING DATA
Timeframe & Methods:Homework review - 15minLecture and live demonstration - 30minOnline video/step-by-step tutorial examples - 10minPractical work of trainees - 45minHomework explanation - 10minExpected workshop duration: 110min
Aims:Introduction and demonstration of Page numeration, Multi-Master option, exporting data.
LECTURE:
PAGE NUMERATIONCommon page numbering tasks: add page numbering to documents in book, add section numbers and chapter numbers.You can add a current page number marker to your pages to specify where a page number sits on a page and how it looks. Because a page number marker updates automatically, the page number it displays is always correct—even as you add, remove, or rearrange pages in the document. Page number markers can be formatted and styled as text.Add a page number marker to a master page:Page number markers are commonly added to master pages. When master pages are applied to document pages, the page numbering is updated automatically, similar to headers and footers.
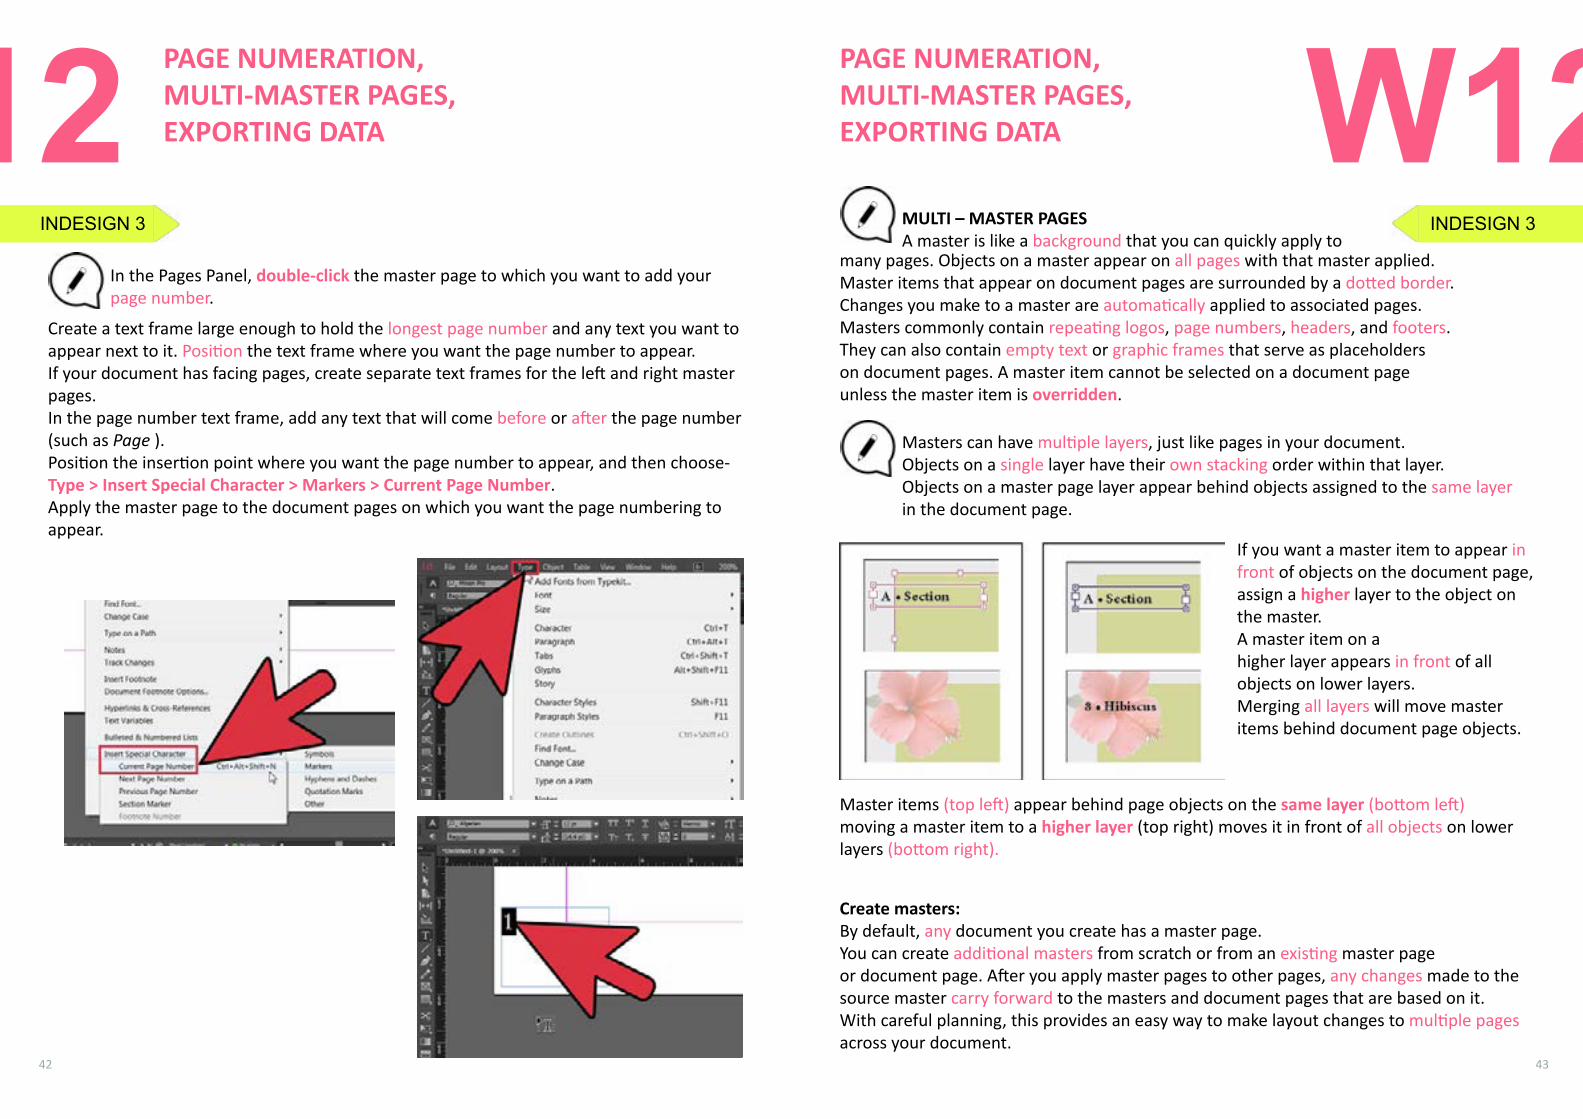
Page number on master A (left) and page 5 based on same master (right)
If the automatic page number is on a master page, it displays the master page prefix. On a document page, the automatic page number displays the page number.
INDESIGN 3
42 43
INDESIGN 3
PAGE NUMERATION, MULTI-MASTER PAGES, EXPORTING DATA
In the Pages Panel, double-click the master page to which you want to add your page number.
Create a text frame large enough to hold the longest page number and any text you want to appear next to it. Position the text frame where you want the page number to appear.If your document has facing pages, create separate text frames for the left and right master pages.In the page number text frame, add any text that will come before or after the page number (such as Page ).Position the insertion point where you want the page number to appear, and then choose-Type > Insert Special Character > Markers > Current Page Number.Apply the master page to the document pages on which you want the page numbering to appear.
W12PAGE NUMERATION, MULTI-MASTER PAGES, EXPORTING DATA
MULTI – MASTER PAGESA master is like a background that you can quickly apply to
many pages. Objects on a master appear on all pages with that master applied. Master items that appear on document pages are surrounded by a dotted border. Changes you make to a master are automatically applied to associated pages.Masters commonly contain repeating logos, page numbers, headers, and footers. They can also contain empty text or graphic frames that serve as placeholders on document pages. A master item cannot be selected on a document page unless the master item is overridden.
Masters can have multiple layers, just like pages in your document.Objects on a single layer have their own stacking order within that layer. Objects on a master page layer appear behind objects assigned to the same layer in the document page.
If you want a master item to appear in front of objects on the document page, assign a higher layer to the object on the master. A master item on a higher layer appears in front of all objects on lower layers. Merging all layers will move master items behind document page objects.
Master items (top left) appear behind page objects on the same layer (bottom left)moving a master item to a higher layer (top right) moves it in front of all objects on lower layers (bottom right).
Create masters:By default, any document you create has a master page. You can create additional masters from scratch or from an existing master page or document page. After you apply master pages to other pages, any changes made to the source master carry forward to the masters and document pages that are based on it. With careful planning, this provides an easy way to make layout changes to multiple pages across your document.
W12INDESIGN 3
44 45
INDESIGN 3
PAGE NUMERATION, MULTI-MASTER PAGES, EXPORTING DATA
https://www.youtube.com/watch?v=hM5eRzJfkCI
Links:
Create masters from scratch:Choose New Master in the Pages panel menu.
Specify the following options, and click OK:For Prefix, type a prefix that identifies the applied master for each page in the Pages Panel. You can type as many as four characters. For Name type a name for the master spread.For Based On Master, choose an existing master spread on which you’ll base this master spread, or choose None. For Number Of Pages, type a value for the number of pages you want in the master spread (as many as ten).
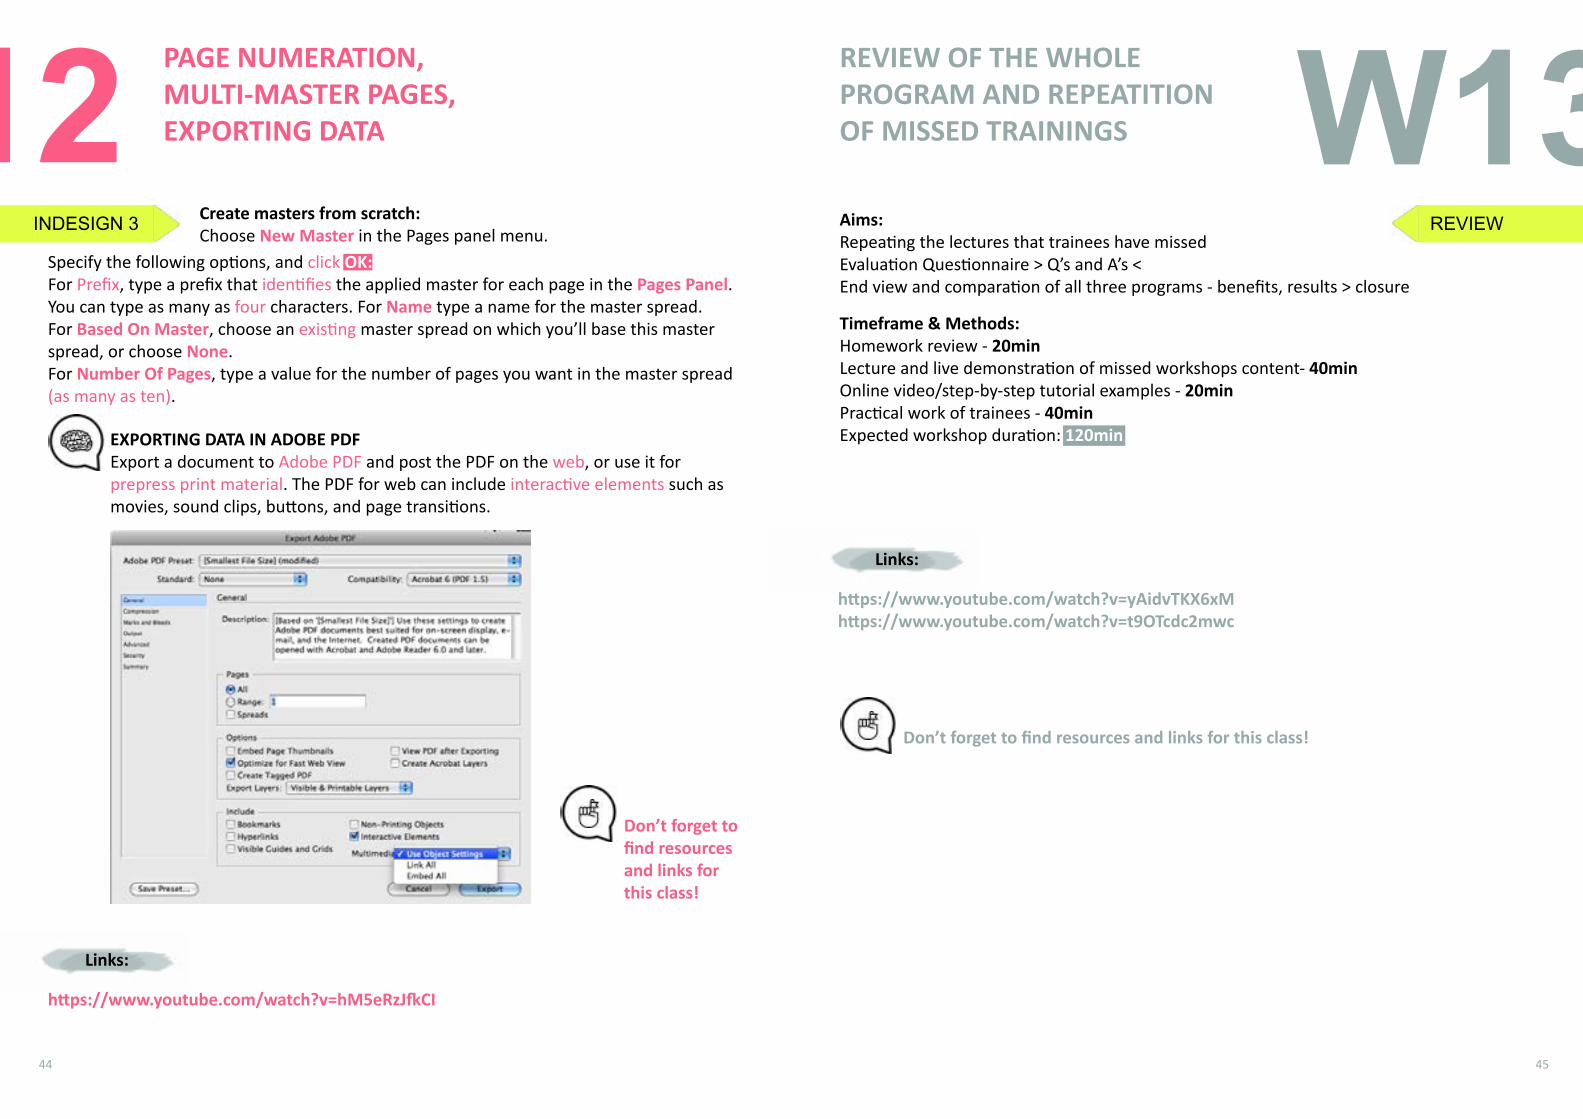
EXPORTING DATA IN ADOBE PDFExport a document to Adobe PDF and post the PDF on the web, or use it for prepress print material. The PDF for web can include interactive elements such as movies, sound clips, buttons, and page transitions.
W13W12 REVIEW OF THE WHOLE PROGRAM AND REPEATITION OF MISSED TRAININGS
Timeframe & Methods:Homework review - 20minLecture and live demonstration of missed workshops content- 40minOnline video/step-by-step tutorial examples - 20minPractical work of trainees - 40minExpected workshop duration: 120min
Aims:Repeating the lectures that trainees have missedEvaluation Questionnaire > Q’s and A’s <End view and comparation of all three programs - benefits, results > closure
REVIEW
Don’t forget to find resources and links for this class!
https://www.youtube.com/watch?v=yAidvTKX6xMhttps://www.youtube.com/watch?v=t9OTcdc2mwc
Links:
Don’t forget to find resources and links for this class!

Credits:
Icon design: Fonts:
Art:
DYJII logo:
Colors:Front and back cover
Content of this Education Program is created with the research and curation of : Benard Palushi, Danijela Šnajder, Darrjel Novaku, Dijana Makijević, Grisilda Mema,Igor Srdanović , Jelena Dragić, Jovana Dragaš, Kristina Jurić, Matea Koreny, Matej Gregec Nina Šešlija, Silva Isufi and Stela Plaku.
Under the mentorship and guidance of Boris Negeli, Nikola Radman and Tanja Mirković.
Front and Back Cover designed by Dijana Makijević Handbook layout and design by Jovana Dragaš
PNGs taken from the Noun Project, under the Creative Commons licence: post-its by Jack KnoebberPencil by Peter ParničanPencil by Landan Lloydchaturanga by Minjeong Kimplank by Minjeong Kimyoga by Minjeong Kim sticky notes by Giannis ChoulakisQuote by AfterGrindSticky Note by Camila QuinteroBrain by Jaime Serracompany by faisaloversGlasses by corpus delictiBook by Vladimir BelochkinMarker by Darren DutchMortarboard hat by Phil Smithokay by Meg Clingman
ArialCalibriCat_Meow - Maxin Feld Fun_Crayon - Jonathan Harris Loud_and_Clear - Skyhaven Fonts Stale_Marker - Maxin FeldFront/Back Cover fonts:DK Southside_Fizz - HanodedMyriad ProOrator StdLithos ProCourier New
Live a Less Electrical Life by Hudson-Powell page 31
Located on the Back CoverTanja Mirković
Page concept colors
PROJECT IS CO-FUNDED BY:
ASSOCIATES:
Photography:Located on the Front Cover taken by Dijana Makijević
http://www.designyourjob.org/ 2017
‘’Good design is all about making other designers feel like idiots because that idea wasn’t theirs’’Frank Chimero
‘’ good design is as little design as possible ‘’
‘’..back to purity..back to simplicity. ’’
d i e t e r r a m s
‘’very nice’’MIHAEL NIKOLIĆ_Prince of Room no. 308
TANjA MIRKOVIĆ
BORIS NEGELI
T. MIRKOVIĆ
http://www.designyourjob.org/ 2017
‘’Good design is all about making other designers feel like idiots because that idea wasn’t theirs’’Frank Chimero
‘’ good design is as little design as possible ‘’
‘’..back to purity..back to simplicity. ’’
d i e t e r r a m s
‘’very nice’’MIHAEL NIKOLIC_Prince of Room no. 308
TANjA MIRKOVIC
BORIS NEGELI
T. MIRKOVIC
Related Documents