Deployment guide for Microsoft Office 2013 Preview Microsoft Corporation Published: July 2012 Author: Microsoft Office System and Servers Team ([email protected]) Abstract This book supports a preliminary release of Microsoft Office 2013 Preview and provides deployment instructions for Office 2013 Preview. The audiences for this book include application specialists, line-of- business application specialists, and IT administrators who are ready to deploy Office 2013 Preview. The content in this book is a copy of selected content in the Office 2013 Preview technical library as of the publication date. For the most current content, see the technical library on the web.

Deployment Guide for Office 2013 Preview
Dec 28, 2015
office
Welcome message from author
This document is posted to help you gain knowledge. Please leave a comment to let me know what you think about it! Share it to your friends and learn new things together.
Transcript

Deployment guide for Microsoft Office 2013 Preview
Microsoft Corporation
Published: July 2012
Author: Microsoft Office System and Servers Team ([email protected])
Abstract
This book supports a preliminary release of Microsoft Office 2013 Preview and provides deployment
instructions for Office 2013 Preview. The audiences for this book include application specialists, line-of-
business application specialists, and IT administrators who are ready to deploy Office 2013 Preview.
The content in this book is a copy of selected content in the Office 2013 Preview technical library as of
the publication date. For the most current content, see the technical library on the web.
ii
This document is provided “as-is.” Information and views expressed in this document, including URL
and other Internet website references, may change without notice. You bear the risk of using it.
Some examples depicted herein are provided for illustration only and are fictitious. No real association
or connection is intended or should be inferred.
This document does not provide you with any legal rights to any intellectual property in any Microsoft
product. You may copy and use this document for your internal, reference purposes.
© 2012 Microsoft Corporation. All rights reserved.
Microsoft, Access, Active Directory, Backstage, Bing, Excel, Groove, Hotmail, Hyper-V, InfoPath,
Internet Explorer, Office 365, OneNote, Outlook, PerformancePoint, PowerPoint, SharePoint,
Silverlight, SkyDrive, Visio, Visio Studio, Windows, Windows Live, Windows Mobile,
Windows PowerShell, Windows Server, and Windows Vista are either registered trademarks or
trademarks of Microsoft Corporation in the United States and/or other countries.
The information contained in this document represents the current view of Microsoft Corporation on the
issues discussed as of the date of publication. Because Microsoft must respond to changing market
conditions, it should not be interpreted to be a commitment on the part of Microsoft, and Microsoft
cannot guarantee the accuracy of any information presented after the date of publication.
iii
Contents
Getting help............................................................................................................................................... ix
Volume activation of Office 2013 Preview ................................................................................................. 1
Articles about volume activation for Office 2013 Preview ................................................................... 1
Plan volume activation of Office 2013 Preview ......................................................................................... 2
Plan a deployment .................................................................................................................................. 2
Review activation methods ..................................................................................................................... 3
Key Management Service (KMS)........................................................................................................ 3
License state of the Office 2013 Preview KMS client ......................................................................... 4
Publication of the KMS service ........................................................................................................... 5
Client discovery of KMS ...................................................................................................................... 5
KMS activation thresholds .................................................................................................................. 5
KMS activation renewal ...................................................................................................................... 6
Use KMS for computers that run Windows and Office 2013 Preview client products ........................ 6
Multiple Activation Key (MAK) ............................................................................................................. 6
MAK architecture ................................................................................................................................ 7
Active Directory-Based activation ....................................................................................................... 7
Volume Activation Management Tool (VAMT) 3.0 ................................................................................. 7
Plan for KMS activation .......................................................................................................................... 8
Plan DNS server configuration............................................................................................................ 9
Activate the KMS host ......................................................................................................................... 9
Prepare KMS clients ........................................................................................................................... 9
Activate as a standard user ................................................................................................................ 9
Plan for Active Directory-Based activation ........................................................................................... 10
Plan for MAK activation ........................................................................................................................ 10
No authenticated proxy server support ............................................................................................. 10
Volume activation methods in Office 2013 Preview ................................................................................ 11
KMS and MAK activation ...................................................................................................................... 11
KMS host platforms for Office 2013 Preview activation .................................................................... 11
Generic Volume License Keys (GVLKs) for Office 2013 Preview .................................................... 13
Active Directory-Based activation......................................................................................................... 13
Activating Office 2013 Preview by using the Office 2013 Preview Volume License Pack ................... 13
Volume Activation Management Tool (VAMT) 3.0 ............................................................................... 14
Customize installations of Office 2013 Preview....................................................................................... 15
Articles about how to customize Office 2013 Preview ...................................................................... 15
Customize Setup before installing Office 2013........................................................................................ 16
Use the OCT to customize the installation ........................................................................................... 16

iv
Create a network installation point ....................................................................................................... 16
Customize Setup .................................................................................................................................. 17
Install Office silently .............................................................................................................................. 20
Office Customization Tool (OCT) in Office 2013 Preview ....................................................................... 21
Overview of the Office Customization Tool .......................................................................................... 21
Updates folder ................................................................................................................................... 22
Modify existing installations .............................................................................................................. 23
Choose OCT options ........................................................................................................................ 23
Office Customization Tool options .................................................................................................... 24
Architecture-specific versions of the Office Customization Tool .......................................................... 25
Importing Office Customization Tool .msp customization files ............................................................. 25
Configuring Setup, Features, Additional content, and Outlook settings .............................................. 27
Setup ................................................................................................................................................. 28
Installation location and organization name ...................................................................................... 28
Additional network sources ............................................................................................................... 28
Add/Modify Network Server Entry dialog box ................................................................................... 29
Licensing and user interface ............................................................................................................. 29
Config.xml settings and corresponding OCT options ....................................................................... 31
Remove previous installations .......................................................................................................... 31
Add installations and run programs .................................................................................................. 32
Add/Modify Program Entry dialog box .............................................................................................. 33
Windows folders ................................................................................................................................ 33
Office security settings ...................................................................................................................... 34
Security settings ................................................................................................................................ 34
Modify Setup properties .................................................................................................................... 37
Add/Modify Property Value dialog box .............................................................................................. 37
Add/Modify property value settings ................................................................................................... 37
Features ............................................................................................................................................ 37
Modify user settings .......................................................................................................................... 37
OCT user and computer settings states ........................................................................................... 38
Set feature installation states ............................................................................................................ 39
Feature installation states ................................................................................................................. 39
Feature options ................................................................................................................................. 40
Additional content ............................................................................................................................. 41
Add files ............................................................................................................................................ 41
File Destination Path dialog box ....................................................................................................... 42
Special folders .................................................................................................................................. 42
Remove files ..................................................................................................................................... 43
File Path dialog box .......................................................................................................................... 43
Special folders (file path) .................................................................................................................. 43
Add registry entries ........................................................................................................................... 43
Add/Modify Registry Entry dialog box ............................................................................................... 44
Add/Modify Registry Entry dialog box options .................................................................................. 44

v
Remove registry entries .................................................................................................................... 45
Delete/Modify Registry Entry dialog box ........................................................................................... 45
Delete/Modify Registry Entry dialog box options .............................................................................. 45
Configure shortcuts ........................................................................................................................... 46
Add/Modify Shortcut Entry dialog box ............................................................................................... 46
Add/Modify Shortcut Entry dialog boxoptions ................................................................................... 46
Virtual key names and hexadecimal key codes ................................................................................ 48
Outlook .............................................................................................................................................. 49
Outlook Profile .................................................................................................................................. 49
Outlook profile customization options ............................................................................................... 49
Add Accounts .................................................................................................................................... 50
Add Account and Account Settings dialog box ................................................................................. 50
Adding additional accounts ............................................................................................................... 51
Exchange settings ............................................................................................................................. 51
Exchange options ............................................................................................................................. 51
More Exchange Server Settings ....................................................................................................... 52
Exchange .......................................................................................................................................... 52
Outlook Anywhere options ................................................................................................................ 52
Cached Mode .................................................................................................................................... 53
Cached Mode options ....................................................................................................................... 53
Export Settings .................................................................................................................................. 53
Specify Send/Receive Groups .......................................................................................................... 54
Send/Receive groups options ........................................................................................................... 54
New Exchange Group dialog box ..................................................................................................... 54
Modify Group dialog box ................................................................................................................... 55
Send/Receive settings for the selected group .................................................................................. 55
Folder options for this Send/Receive group ...................................................................................... 55
Rename Exchange Group dialog box ............................................................................................... 56
Send/Receive settings for the selected group .................................................................................. 56
Modify Address Book Settings dialog box ........................................................................................ 56
Downloading updated OCT files ....................................................................................................... 57
Config.xml file in Office 2013 Preview ..................................................................................................... 58
Config.xml element quick reference ..................................................................................................... 59
Config.xml quick reference ............................................................................................................... 59
How Setup uses Config.xml ................................................................................................................. 60
Config.xml file format ............................................................................................................................ 60
Config.xml element reference .............................................................................................................. 62
Formatting conventions ..................................................................................................................... 62
Configuration element ....................................................................................................................... 62
Attributes ........................................................................................................................................... 62
Configuration element attributes ....................................................................................................... 62
Example ............................................................................................................................................ 63
AddLanguage element ...................................................................................................................... 63

vi
Attributes ........................................................................................................................................... 63
AddLanguage attributes .................................................................................................................... 63
Example ............................................................................................................................................ 65
ARP element ..................................................................................................................................... 65
Attributes ........................................................................................................................................... 65
ARP attributes ................................................................................................................................... 65
Command element ............................................................................................................................ 66
Attributes ........................................................................................................................................... 66
Command attributes .......................................................................................................................... 67
Examples .......................................................................................................................................... 69
COMPANYNAME element ................................................................................................................ 69
Attributes ........................................................................................................................................... 69
COMPANYNAME attributes .............................................................................................................. 69
Example ............................................................................................................................................ 70
Display element ................................................................................................................................ 70
Attributes ........................................................................................................................................... 70
Display attributes .............................................................................................................................. 70
Example ............................................................................................................................................ 72
DistributionPoint element .................................................................................................................. 72
Attributes ........................................................................................................................................... 72
DistributionPoint attributes ................................................................................................................ 72
Example ............................................................................................................................................ 73
INSTALLLOCATION element ........................................................................................................... 73
Attributes ........................................................................................................................................... 73
INSTALLLOCATION attributes ......................................................................................................... 73
Example ............................................................................................................................................ 73
LIS element ....................................................................................................................................... 73
Attributes ........................................................................................................................................... 74
LIS attributes ..................................................................................................................................... 74
Example ............................................................................................................................................ 75
Logging element ............................................................................................................................... 75
Attributes ........................................................................................................................................... 75
Logging attributes ............................................................................................................................. 75
Example ............................................................................................................................................ 76
OptionState element ......................................................................................................................... 76
Attributes ........................................................................................................................................... 77
OptionState attributes ....................................................................................................................... 77
Example ............................................................................................................................................ 78
PIDKEY element ............................................................................................................................... 78
Attributes ........................................................................................................................................... 79
PIDKEY attributes ............................................................................................................................. 79
Example ............................................................................................................................................ 79
RemoveLanguage element ............................................................................................................... 79
Attributes ........................................................................................................................................... 79

vii
RemoveLanguage attributes ............................................................................................................. 80
Example ............................................................................................................................................ 80
Setting element ................................................................................................................................. 80
Attributes ........................................................................................................................................... 80
Setting attributes ............................................................................................................................... 80
Examples .......................................................................................................................................... 82
SetupUpdates element ..................................................................................................................... 82
Attributes ........................................................................................................................................... 83
SetupUpdates attributes ................................................................................................................... 83
Example ............................................................................................................................................ 83
USERINITIALS element .................................................................................................................... 83
Attributes ........................................................................................................................................... 84
USERINITIALS attributes .................................................................................................................. 84
Example ............................................................................................................................................ 84
USERNAME element ........................................................................................................................ 84
Attributes ........................................................................................................................................... 84
USERNAME attributes ...................................................................................................................... 84
Example ............................................................................................................................................ 85
Sample Config.xml file ...................................................................................................................... 85
Setup command-line options for Office 2013 Preview ............................................................................ 86
/admin ................................................................................................................................................... 86
Example ............................................................................................................................................ 86
/adminfile [path] .................................................................................................................................... 86
Example ............................................................................................................................................ 87
/config [path] ......................................................................................................................................... 87
Example ............................................................................................................................................ 87
/modify [ProductID] ............................................................................................................................... 87
Example ............................................................................................................................................ 87
/repair [ProductID] ................................................................................................................................ 88
Example ............................................................................................................................................ 88
/uninstall [ProductID] ............................................................................................................................ 88
Example ............................................................................................................................................ 88
Customize the Accessibility Checker for Office 2013 Preview ................................................................ 90
Increase the visibility of violations ........................................................................................................ 90
Control what the checker reports ......................................................................................................... 90
Group Policy settings for Excel 2013 Preview .................................................................................. 91
Group Policy settings for PowerPoint 2013 Preview ........................................................................ 93
Group Policy settings for Word 2013 Preview .................................................................................. 96
Roll out Office 2013 Preview ................................................................................................................. 100
Articles about rolling out Office 2013 Preview ................................................................................ 100
Setup architecture overview for Office 2013 Preview ............................................................................ 101

viii
Setup process .................................................................................................................................... 102
Setup sequence of events .............................................................................................................. 102
Run Setup ....................................................................................................................................... 102
Check prerequisites ........................................................................................................................ 103
Read XML data ............................................................................................................................... 104
Build the feature tree ....................................................................................................................... 105
Create a local installation source on the user's computer .............................................................. 105
Install Office .................................................................................................................................... 106
Apply the customization file ............................................................................................................ 106
Apply software updates ................................................................................................................... 107
Including more than one product on the installation point .............................................................. 107
Running Setup interactively ............................................................................................................ 108
Language-neutral design .................................................................................................................... 108
Language versions of Office ........................................................................................................... 109
Language packs for Office .............................................................................................................. 109
Streamlined customization model ...................................................................................................... 110
Using the Office Customization Tool .............................................................................................. 110
Customizing a new installation........................................................................................................ 110
Making changes to an existing Office installation ........................................................................... 111
Using the Config.xml file to customize Office ................................................................................. 111
Using Setup command-line options ................................................................................................ 112
Using Group Policy ......................................................................................................................... 112
Required local installation source ................................................................................................... 113
Creating a local installation source on users' computers ................................................................ 114
Deploying the local installation source by itself .............................................................................. 114
Consolidated update process ......................................................................................................... 115
Applying Office updates during new installations ........................................................................... 115
Updating existing Office installations .............................................................................................. 116
Language in Office 2013 Preview .......................................................................................................... 117
Articles about how to deploy Office 2013 Preview in other languages ........................................... 117
Security in Office 2013 Preview ............................................................................................................. 118
Office 2013 Preview security articles on TechNet .......................................................................... 118
Virtualize Office 2013 Preview ............................................................................................................... 119
Articles about how to use virtualization technologies to deploy Office 2013 Preview .................... 119
Group Policy for Office 2013 Preview .................................................................................................... 120
Articles about how to use Group Policy with Office 2013 Preview ................................................. 120
Outlook 2013 Preview ............................................................................................................................ 121
Outlook 2013 Preview deployment articles on TechNet ................................................................. 121

ix
Getting help
Every effort has been made to ensure the accuracy of this book. This content is also available online in
the Office System TechNet Library, so if you run into problems you can check for updates at:
http://technet.microsoft.com/office
If you do not find your answer in our online content, you can send an email message to the Microsoft
Office System and Servers content team at:
If your question is about Microsoft Office products, and not about the content of this book, please
search the Microsoft Help and Support Center or the Microsoft Knowledge Base at:
http://support.microsoft.com

1
Volume activation of Office 2013 Preview
Audience: IT Professionals
Microsoft policy requires the activation of all editions of Office 2013 Preview client software, including
Volume License editions. For Office 2013 Preview, volume activation occurs through Office Activation
Technologies, which are based on the Software Protection Platform (SPP) that is used in Windows 7,
Windows Server 2008 R2, Windows 8, and Windows Server 2012.
Important:
This information applies to volume-licensed editions of Office 2013 Preview. It does not apply to
either Office Professional Plus for Office 365 or Office 365 ProPlus Preview, both of which are
licensed through subscription.
The following table lists and describes articles about volume activation for Office 2013
Preview.
Articles about volume activation for Office 2013 Preview
Article Description
Plan volume activation of Office 2013 Preview Explains how to plan which methods to use for
activating volume-licensed (VL) editions of Office
2013 Preview.
Volume activation methods in Office 2013 Preview Learn about the methods that are available for
activating volume-licensed editions of Office 2013
Preview.

2
Plan volume activation of Office 2013 Preview
Audience: IT Professionals
You can plan the deployment of Office Activation Technologies for volume activation of Office 2013
Preview in several steps. Before you read this article, we recommend that you read Volume activation
overview for Office 2010. We also highly recommend that you read the Windows Volume Activation
Planning Guide.
Important:
This information applies to volume-licensed editions of Office 2013 Preview. It does not apply to
either Office Professional Plus for Office 365 or Office 365 ProPlus Preview, both of which are
licensed through subscription.
In this article:
Plan a deployment
Review activation methods
Volume Activation Management Tool (VAMT) 3.0
Plan for KMS activation
Plan for Active Directory-Based activation
Plan for MAK activation
Plan a deployment If you are planning a Windows deployment of Windows 7, Windows Server 2008 R2, Windows 8, or
Windows Server 2012, you probably have the same considerations for Windows as for Office 2013
Preview. To help determine which activation method to use for Windows, see the Windows Volume
Activation Planning Guide. Most likely, Office 2013 Preview will use the same method.
A volume activation deployment includes the following steps:
1. Learn about product activation.
2. Review available activation models.
3. Evaluate client connectivity.
4. Map the physical computer or virtual machine to an activation method.
5. Determine product key needs.
6. Determine monitoring and reporting needs.
Most of the information about these steps is covered in the Windows Volume Activation Planning
Guide. This article describes an overview of the technology.
When you plan for Office Activation Technologies, think about the following information:
The KMS activation threshold for Office 2013 Preview is five computers. This means that Office
2013 Preview client computers will be activated only after five or more client computers have
requested activation.

3
You do not have to enter a product key for Office 2013 Preview KMS clients. You only have to enter
a KMS host key on your KMS host computer.
If you decide to use MAK, enter the product key either through the Office Customization Tool (OCT)
or the Config.xml file. After Office 2013 Preview installation, you can change the product key by
using the Volume Activation Management Tool (VAMT) or the Office Software Protection Platform
script (ospp.vbs). For more information about ospp.vbs, see Tools to configure client computers in
Office 2010.
Note:
The latest version of VAMT is 3.0. For information about VAMT 3.0, see Volume Activation
Management Tool (VAMT) 3.0.
Review activation methods Office Activation Technologies provides three activation methods for Office 2013 Preview (KMS, MAK,
and Active Directory-Based activation).
Key Management Service (KMS) A server-client model in which a computer serves as the KMS
host. A KMS host key must be installed and activated. This establishes a local activation service in
your environment. Office 2013 Preview client computers connect to the local Office 2013 Preview
KMS host for activation.
Multiple Activation Key (MAK) If you use a MAK key, Office 2013 Preview client computers are
activated online by using the Microsoft hosted activation servers or by telephone.
Active Directory-Based activation Available only for Office 2013 on Windows 8 and Windows
Server 2012. Active Directory-Based activation can activate all Office 2013 volume license clients
throughout a domain. Active Directory-Based activation is set up through Active Directory Domain
Services (AD DS) from either a Windows 8 volume license edition computer or a Windows
Server 2012 computer,
The kind of key that is installed determines the activation method. All Office 2013 Preview volume
license editions have the KMS client key pre-installed. You do not have to enter a product key if you are
deploying KMS clients. If you want to use MAK activation, you have to enter the correct MAK key.
You can also use a combination of KMS and MAK. For example, Office 2013 Preview running on
desktops has the KMS client key installed, whereas Office 2013 Preview running on portable computers
has the MAK key installed.
The model that you choose depends on the size, network infrastructure, connectivity, and security
requirements. You can choose to use only one or a combination of these activation models. Typically,
the same activation method for a particular instance of Windows would also be used for Office. For
more information about how to decide which activation method to use, see the Windows Volume
Activation Planning Guide.
Key Management Service (KMS)
KMS is a server-client model in which a computer serves as the KMS host. KMS activation requires
TCP/IP connectivity. By default, KMS hosts use DNS to publish the KMS service. Client computers
4
connect to the KMS host for activation by using anonymous remote procedure calls (RPCs) through
TCP communications port 1688, which is the default port number when you enable the firewall on a
KMS host. You can either use the default settings, which require little or no administrative action, or
manually configure KMS hosts and clients based on network configuration and security requirements.
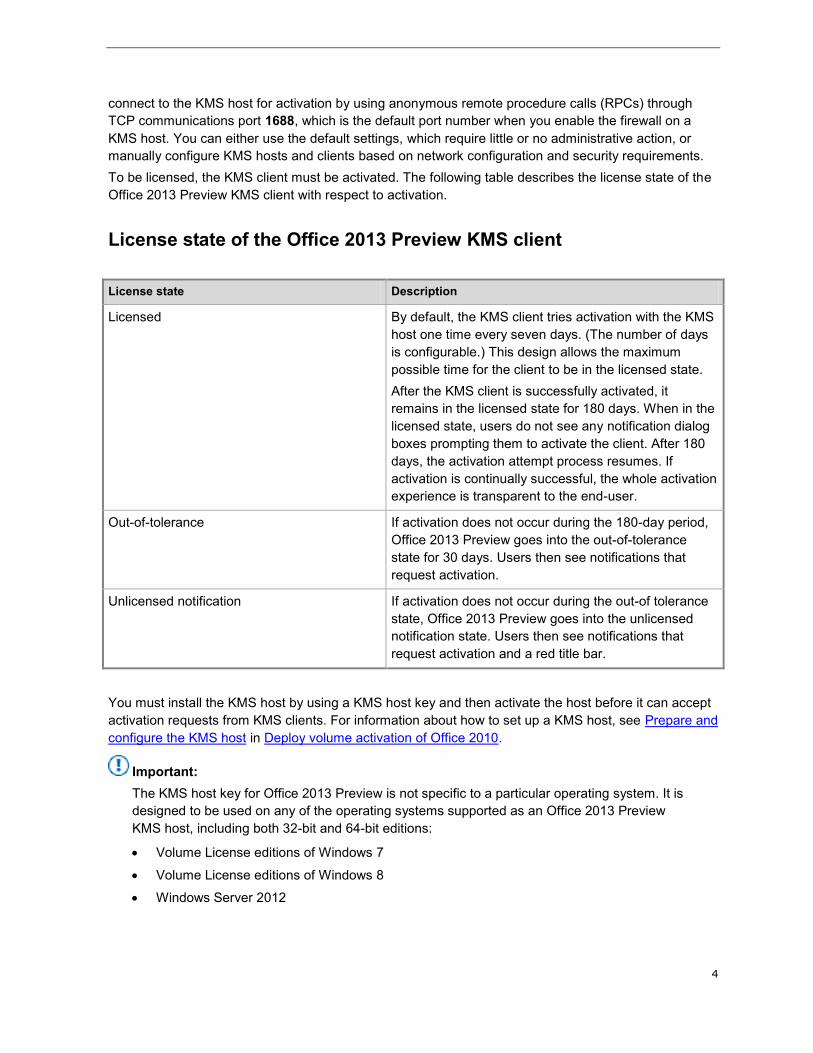
To be licensed, the KMS client must be activated. The following table describes the license state of the
Office 2013 Preview KMS client with respect to activation.
License state of the Office 2013 Preview KMS client
License state Description
Licensed By default, the KMS client tries activation with the KMS
host one time every seven days. (The number of days
is configurable.) This design allows the maximum
possible time for the client to be in the licensed state.
After the KMS client is successfully activated, it
remains in the licensed state for 180 days. When in the
licensed state, users do not see any notification dialog
boxes prompting them to activate the client. After 180
days, the activation attempt process resumes. If
activation is continually successful, the whole activation
experience is transparent to the end-user.
Out-of-tolerance If activation does not occur during the 180-day period,
Office 2013 Preview goes into the out-of-tolerance
state for 30 days. Users then see notifications that
request activation.
Unlicensed notification If activation does not occur during the out-of tolerance
state, Office 2013 Preview goes into the unlicensed
notification state. Users then see notifications that
request activation and a red title bar.
You must install the KMS host by using a KMS host key and then activate the host before it can accept
activation requests from KMS clients. For information about how to set up a KMS host, see Prepare and
configure the KMS host in Deploy volume activation of Office 2010.
Important:
The KMS host key for Office 2013 Preview is not specific to a particular operating system. It is
designed to be used on any of the operating systems supported as an Office 2013 Preview
KMS host, including both 32-bit and 64-bit editions:
Volume License editions of Windows 7
Volume License editions of Windows 8
Windows Server 2012
5
Windows Server 2008 R2
Publication of the KMS service
The KMS service uses service (SRV) resource records (RRs) in DNS to store and communicate the
locations of KMS hosts. KMS hosts use dynamic updates, if available, to publish the KMS SRV RRs. If
dynamic updates are not available, or if the KMS host does not have permissions to publish the RRs,
you must publish the DNS records manually or configure client computers to connect to specific KMS
hosts. This might require changing permissions on DNS to let more than one KMS host publish SRV
records.
Note:
DNS changes might take time to propagate to all DNS hosts, depending on the complexity and
topology of the network.
Client discovery of KMS
The first time that a KMS client queries DNS for KMS information, it randomly selects a KMS host from
the list of SRV RRs that DNS returns. The address of a DNS server that contains the SRV RRs can be
listed as a suffixed entry on KMS clients. This enables advertisement of SRV RRs for KMS in one DNS
server and KMS clients that have other primary DNS servers to find it.
You can add priority and weight parameters to the DnsDomainPublishList registry value for KMS
hosts on Volume License editions of Windows 7 or Windows Server 2008 R2. Doing so enables you to
establish KMS host priority groupings and weighting within each group, which specifies the order in
which to use KMS hosts and balances traffic among multiple KMS hosts. If you are using priority and
weight parameters, we recommend that KMS caching be disabled on the client. This allows the client to
query DNS every time that activation is tried, which will honor the priority and weight parameters,
instead of directly contacting the cached KMS host that last resulted in successful activation.
If the KMS host that a client selects does not respond, the KMS client removes that KMS host from its
list of SRV RRs and randomly selects another KMS host from the list. If the priority and weight
parameters are set, the KMS client will use them while finding another KMS host. Otherwise, KMS
hosts are selected randomly. After a KMS host responds, the KMS client caches the name of the KMS
host and, if caching is enabled, uses it for successive activation and renewal attempts. If the cached
KMS host does not respond on a later renewal, the KMS client discovers a new KMS host by querying
DNS for KMS SRV RRs.
KMS activation thresholds
The minimum requirement for Office 2013 Preview KMS activation is a KMS host and at least five KMS
clients in a network environment. Five or more computers that are running Office 2013 Preview volume
editions must contact the KMS host within 30 days for their activation requests to succeed. When five
clients have connected to a KMS host, clients that later connect to the KMS host receive responses that
allow the clients to be activated. Due to the re-activation schedule, the original five clients also become
activated when they request activation from the KMS host again.
After initializing KMS, the KMS activation infrastructure is self-maintaining. The KMS service can be co-
hosted with other services. A single KMS host can support hundreds of thousands of KMS clients. Most

6
organizations can deploy merely two KMS hosts for their whole infrastructure (one main KMS host and
one backup host for redundancy).
KMS activation renewal
KMS activations are valid for 180 days. This is called the activation validity interval. To remain
activated, KMS clients must renew their activation by connecting to the KMS host at least one time
every 180 days. By default, KMS client computers attempt to renew their activation every seven days.
After a client’s activation is renewed, the activation validity interval begins again.
Use KMS for computers that run Windows and Office 2013 Preview
client products
When you use KMS to activate computers that run both Windows and Office 2013 Preview, you have
the following options for Office 2013 Preview:
Use the same KMS host on a computer that runs Windows Server 2003 (Standard, Enterprise, and
Datacenter editions [32-bit and 64-bit] only), Volume License editions of Windows 7 or Windows
Server 2008 R2. We recommend this option.
Use separate KMS hosts for computers that run Windows and Office 2013 Preview.
Important:
If you already have a KMS host that is set up to activate Windows products, you still have to
install the Office 2013 Preview KMS host license files, enter the Office 2013 Preview KMS host
key, and activate the key. To do this, go to the Microsoft Office 2013 KMS Host License Pack
website, and then download and run KeyManagementServiceHost.exe.
The following operating systems are supported as an Office 2013 Preview KMS host:
Volume License editions of Windows 7
Volume License editions of Windows 8
Windows Server 2012
Windows Server 2008 R2
If you already use a computer that runs as your Windows KMS host and you want to co-host the Office
2013 Preview KMS host, follow the steps in Prepare and configure the KMS host in Deploy volume
activation of Office 2010.
Multiple Activation Key (MAK)
A MAK key is used for one-time activation with the Microsoft hosted activation services. Each MAK key
has a predetermined number of allowed activations. This number is based on Volume Licensing
agreements and may not match the organization’s exact license count. Each activation that uses a
MAK key with the Microsoft hosted activation service counts toward the activation limit. After Office
2013 Preview is activated, no re-activation is required unless the hardware changes significantly.
There are two ways to activate computers by using a MAK key:
7
MAK Independent Activation MAK independent activation requires that each computer
independently connect and be activated with Microsoft, either over the Internet or by telephone.
MAK independent activation is best suited for computers in an organization that does not maintain
a connection to the corporate network.
MAK Proxy Activation by using VAMT This enables a centralized activation request on behalf of
multiple computers that have one connection to Microsoft. MAK Proxy activation is configured by
using VAMT. MAK Proxy activation is appropriate for environments in which security concerns
might restrict direct access to the Internet or the corporate network. It is also suited for development
and test labs that do not have this connectivity.
Note:
The latest version of VAMT is 3.0. For information about VAMT 3.0, see Volume Activation
Management Tool (VAMT) 3.0.
MAK architecture
MAK activation requires that a MAK key is installed on a client computer and instructs that computer to
activate itself against Microsoft hosted activation servers over the Internet. In MAK Proxy activation, a
MAK key must be installed on the client computer by any of the methods previously described. VAMT
obtains the installation ID (IID) from the target computer, sends the IID to Microsoft on behalf of the
client, and obtains a confirmation ID (CID). The tool then activates the client by installing the CID. The
CID is saved and can be used later, for example, to activate test computers that were re-imaged after
90 days.
Active Directory-Based activation
On the Windows 8 platform, starting with Office 2013 Preview, a third volume activation method is
available: Active Directory-Based activation.
As with KMS, Active Directory-Based activation can activate all Office 2013 Preview VL clients within
the domain. To use Active Directory-Based activation, you set up Active Directory Domain Services (AD
DS) from either a Windows 8 VL edition computer or a Windows Server 2012 computer to support the
activation of all Office 2013 Preview VL clients within the domain. The Office 2013 Preview VL clients
can run on any Windows 8 or Windows Server 2012 client computer.
Active Directory-Based activation uses the same GVLK/KMS host key pair that KMS activation uses.
When you use Active Directory-Based activation, the Software Protection Platform Services (SPPSvc)
periodically attempts to activate the GVLK against either an Activation Object (AO) in AD DS or a
discoverable KMS host if the Active Directory-Based activation attempt fails. A successful Active
Directory-Based activation grants a license to the Office 2013 Preview client for 180 days.
For more information about Active Directory-Based activation, see Active Directory-Based Activation
Overview.
Volume Activation Management Tool (VAMT) 3.0 The latest update to the Volume Activation Management Tool (VAMT) is version 3.0. VAMT 3.0 is
designed to manage volume activations for Windows Vista, Windows 7, Windows 8, Windows Server

8
2008, Windows Server 2008 R2, Windows Server 2012, Office 2010, and Office 2013 Preview. In
addition, VAMT 3.0 supports Active Directory-Based activation.
The following features are either new, or updated, in VAMT 3.0:
User interface. The updated user interface makes volume activation and license management an
easy, one-console process.
Data storage. Data storage in a SQL Server database provides greater scalability and speed.
Licensing reports. Five new Volume Licensing reports provide instant views of the licensing
status of every computer in the database:
At Risk Products Report
Duplicate Computer Management ID (CMID) Report
MAK Usage Report
Unlicensed Products Report
Volume Activation by Authority Report
PowerShell commandlets (cmdlet). A PowerShell module for VAMT replaces the vamt.exe
command line interface.
Support for Proxy Authentication. If you are on a network that requires a user name and
password to reach the Internet, VAMT enables you to log on and perform proxy activation.
Active Directory-Based activation. VAMT can online or proxy-activate an Active Directory-
Based activation object. When Active Directory-Based activation is deployed, any new qualifying
computers that are joined to the domain are automatically activated.
The following features that existed in previously released versions of VAMT are deprecated or removed
in VAMT 3.0:
Data storage in Computer Information Files (CIL). Data is no longer stored in Computer
Information Files (CIL), but is instead stored in a SQL Server database. You can import data that is
currently stored in CIL files into VAMT. Data that is exported from VAMT is saved in a CILX file.
The vamt.exe command-line interface.The vamt.exe command-line interface is no longer
available. It is replaced by a Windows PowerShell module.
For detailed information about VAMT 3.0, see Volume Activation Management Tool Technical
Reference.
Plan for KMS activation The KMS service does not require a dedicated server. The KMS service can be co-hosted on a server
that also hosts KMS for Windows. Specifically, you can configure a computer that runs Windows Server
2003 with KMS 1.1 or a later version. Volume License editions of Windows 7, or Windows Server 2008
R2 to act as a single KMS host that responds to both Windows and Office 2013 Preview KMS client
activation requests. This works as long as the appropriate Office 2013 Preview KMS host licenses are
installed and a valid KMS host key is installed, and the key is activated against Microsoft hosted
activation servers. You can install Office 2013 Preview KMS host licenses by running the Microsoft
Office 2013 KMS Host License Pack.

9
Important:
KMS hosts that were set up by using the Office 2013 Preview release cannot be used to
activate client computers that run the final release version of Office 2013 Preview. To activate
these client computers, you can either run the release version of Microsoft Office 2013 KMS
Host License Pack and enter the KMS host key on the same KMS host, or you can set up a
new KMS server only for activating the final release version of Office 2013 Preview.
Plan DNS server configuration
The default KMS auto-publishing feature requires SRV RR and dynamic update support. Microsoft DNS
or any other DNS server that supports SRV RRs, as documented in Internet Engineering Task Force
(IETF) Request for Comments (RFC) 2782, and dynamic updates, as documented in RFC 2136 can
support KMS client default behavior and KMS SRV RR publishing. Berkeley Internet Domain Name
(BIND) versions 8.x and 9.x support both SRV records and dynamic update, for example.
The KMS host must be configured so that it has the necessary credentials to create and update SRV, A
(IPv4), and AAAA (IPv6) RRs on the dynamic update servers, or the records must be created manually.
To give the KMS host the necessary credentials, we recommend that you create a security group in
AD DS and add all KMS hosts to that group. For Microsoft DNS, make sure that that this security group
is given full control over the _VLMCS._TCP record on each DNS domain that will contain the KMS SRV
RRs.
Activate the KMS host
The KMS host must be activated with Microsoft hosted activation servers through the Internet or by
telephone. After the KMS host is activated, it does not communicate any additional information to
Microsoft. For more information, see Prepare and configure the KMS host in Deploy volume activation
for Office 2010.
Prepare KMS clients
By default, Volume License editions of Office 2013 Preview are preinstalled with the KMS client key.
This makes them KMS clients. No additional configuration is required. KMS clients can locate a KMS
host automatically by querying DNS for SRV RRs that publish the KMS service. If the network
environment does not use SRV RRs, you can manually assign a KMS client to use a specific KMS host
by configuring the following registry key:
HKLM\Software\Microsoft\OfficeSoftwareProtectionPlatform
The KMS host name is specified by KeyManagementServiceName (REG_SZ), and the port is specified
by KeyManagementServicePort (REG_SZ). These registry keys can also be set through the ospp.vbs
script. For more information about ospp.vbs, see Tools to configure client computers in Office 2010.
Activate as a standard user
Office 2013 Preview does not require administrator permissions for KMS activation. However, volume
editions require administrator permissions for MAK activation. Administrators can enable users who do

10
not have administrator permissions to activate with MAK by setting the appropriate registry key in the
deployments or in the master image:
HKEY_LOCAL_MACHINE\Software\Microsoft\OfficeSoftwareProtectionPlatform\UserOperations
= 1
This registry key can also be set through the ospp.vbs script. For more information about ospp.vbs, see
Tools to configure client computers in Office 2010.
Plan for Active Directory-Based activation Similar to KMS activation, which activates all Office VL clients that are connected to a KMS host, Active
Directory-Based Activation activates all Office VL clients in an Active Directory domain. For more
information about Active Directory-Based Activation, see Active Directory-Based Activation Overview.
Plan for MAK activation We recommend MAK for computers that rarely or never connect to the corporate network and for
environments in which fewer than five physical computers need activation (the Office 2013 Preview
KMS activation threshold is five computers. You can use MAK for individual computers or with an image
that can be installed by using Microsoft or third-party deployment solutions. You can also use MAK on a
computer that was originally configured to use KMS activation. This is useful for moving a computer off
the core network to a disconnected environment.
For more information about how to install a MAK key, see Deploy volume activation for Office 2010.
No authenticated proxy server support
Activation over the Internet will be blocked if the proxy server requires user authentication. In Microsoft
Internet Security and Acceleration (ISA) Server, this setting is named basic authentication. Because
activation requests do not present the user's credentials to the proxy server, we recommend that you
do not use basic authentication with ISA Server or other proxy servers. For more information, see
Microsoft Knowledge Base article 921471: Activation fails when you try to activate Windows Vista or
Windows Server 2008 over the Internet.

11
Volume activation methods in Office 2013 Preview
Audience: IT Professionals
Three volume activation (VA) methods are available for Office 2013 Preview:
Key Management Service (KMS)
Multiple Activation Key (MAK)
Active Directory-Based activation
KMS and MAK are supported on Windows 7 and Windows 8. Active Directory-Based activation is
supported only on Windows 8 and Windows Server 2012.
Note:
The activation components and the activation process that are described in this article also
apply to Project 2013 Preview and Visio 2013 Preview.
Important:
This information applies to volume-licensed editions of Office 2013 Preview. It does not apply to
either Office Professional Plus for Office 365 or Office 365 ProPlus Preview, both of which are
licensed through subscription.
KMS and MAK activation The KMS and MAK activation processes for Office 2013 Preview are basically the same as they were
for Office 2010, except that the Office 2013 Preview KMS host is not supported on Windows Server
2003. The Office 2013 Preview KMS host is supported on Windows Server 2008 R2, Windows 7 VL
edition, Windows 8 VL edition, and Windows Server 2012.
Office 2013 Preview can be activated by using KMS on the following platforms:
KMS host platforms for Office 2013 Preview activation
If Office 2013 Preview runs on… It can activate against a KMS host that runs on…
Windows 7 or Windows 8 Windows 7 VL edition (see Important
note)Windows Server 2008 R2 (see Important
note)Windows 8 VL editionWindows Server 2012
For Office 2013 Preview, the KMS Host License Pack is named the Office 2013 Volume License Pack.
You can use this license pack to set up KMS hosts on all supported platforms.

12
If you install the Office 2013 Volume License Pack on Windows 7 The KMS host installer
prompts you to install and activate the KMS host key. For more information, see Deploy volume
activation of Office 2010.
If you install the Office 2013 Volume License Pack on Windows Server 2012 The Microsoft
Office 2013 Volume Activation Tools wizard starts when the Office 2013 Volume License Pack is
installed. For details, see Activating Office 2013 Preview by using the Office 2013 Preview Volume
License Pack in this article.
If you install the Office 2013 Volume License Pack on Windows 8 The following dialog box
appears and requires that you install either the Remote Server Administration Tools (RSAT) for
Windows or use slmgr.vbs to set up a KMS host or Active Directory-Based activation. We
recommend that you use RSAT. If you click Yes, the RSAT download page opens.
Figure: Office 2013 Volume License Pack dialog box
Important:
If you set up an Office 2013 KMS host on Windows 8: Although the Office 2013
Preview Volume License Pack dialog box indicates that you can either use the Volume
Activation (VA) server role or run slmgr.vbs, the VA server role requires that there you have
a Windows Server 2012 installed on your network to load the server role against. Instead,
you can run the Volume Activation Tools wizard from the Tools menu in Server Manager.
You can download the wizard as part of RSAT.
For details about the VA server role, see Activating Office 2013 Preview by using the Office
2013 Preview Volume License Pack later in this article.
If you choose to use slmgr.vbs, you must run the following commands in the listed order to
install and activate the KMS host key:
1. cscript slmgr.vbs /ipk [HostProductKey]
2. cscript slmgr.vbs /ato 6026312b-6da9-45c2-aad1-650108de14eb
By default, Office 2013 Preview VL editions install a Generic Volume License Key (GVLK). The GVLK
enables Office 2013 Preview to automatically discover and activate against your KMS host or Active
Directory infrastructure. The following GVLKs are installed:
13
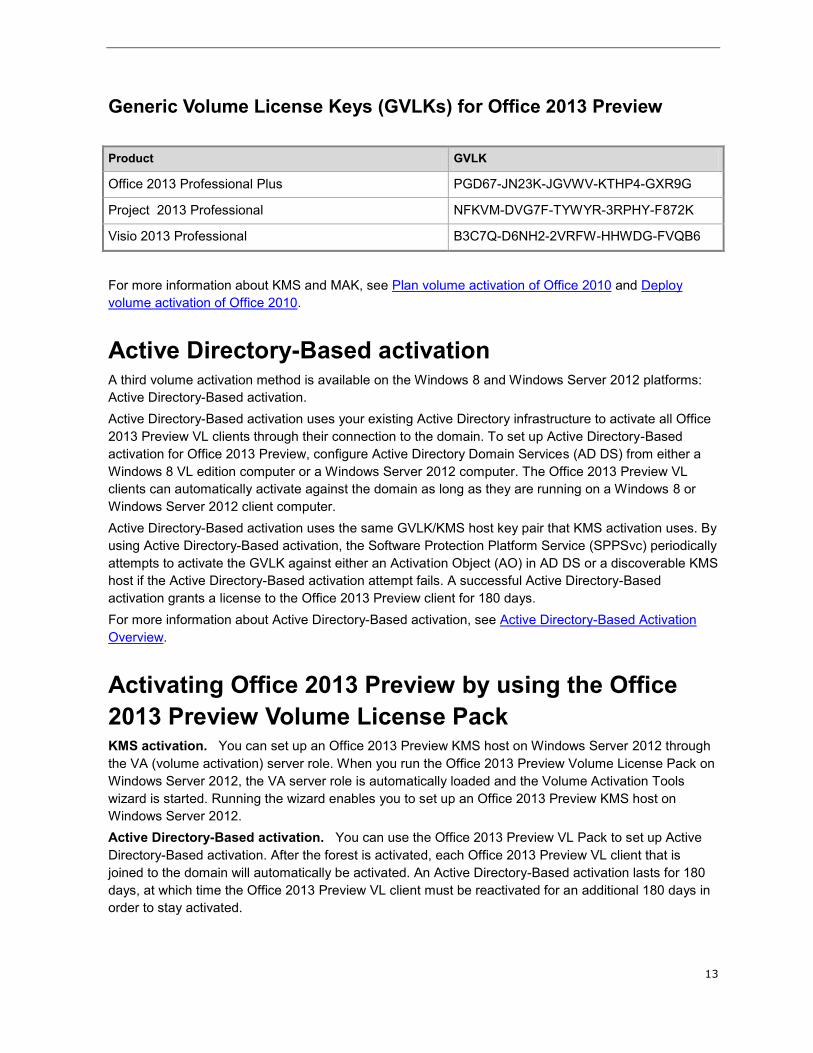
Generic Volume License Keys (GVLKs) for Office 2013 Preview
Product GVLK
Office 2013 Professional Plus PGD67-JN23K-JGVWV-KTHP4-GXR9G
Project 2013 Professional NFKVM-DVG7F-TYWYR-3RPHY-F872K
Visio 2013 Professional B3C7Q-D6NH2-2VRFW-HHWDG-FVQB6
For more information about KMS and MAK, see Plan volume activation of Office 2010 and Deploy
volume activation of Office 2010.
Active Directory-Based activation A third volume activation method is available on the Windows 8 and Windows Server 2012 platforms:
Active Directory-Based activation.
Active Directory-Based activation uses your existing Active Directory infrastructure to activate all Office
2013 Preview VL clients through their connection to the domain. To set up Active Directory-Based
activation for Office 2013 Preview, configure Active Directory Domain Services (AD DS) from either a
Windows 8 VL edition computer or a Windows Server 2012 computer. The Office 2013 Preview VL
clients can automatically activate against the domain as long as they are running on a Windows 8 or
Windows Server 2012 client computer.
Active Directory-Based activation uses the same GVLK/KMS host key pair that KMS activation uses. By
using Active Directory-Based activation, the Software Protection Platform Service (SPPSvc) periodically
attempts to activate the GVLK against either an Activation Object (AO) in AD DS or a discoverable KMS
host if the Active Directory-Based activation attempt fails. A successful Active Directory-Based
activation grants a license to the Office 2013 Preview client for 180 days.
For more information about Active Directory-Based activation, see Active Directory-Based Activation
Overview.
Activating Office 2013 Preview by using the Office
2013 Preview Volume License Pack KMS activation. You can set up an Office 2013 Preview KMS host on Windows Server 2012 through
the VA (volume activation) server role. When you run the Office 2013 Preview Volume License Pack on
Windows Server 2012, the VA server role is automatically loaded and the Volume Activation Tools
wizard is started. Running the wizard enables you to set up an Office 2013 Preview KMS host on
Windows Server 2012.
Active Directory-Based activation. You can use the Office 2013 Preview VL Pack to set up Active
Directory-Based activation. After the forest is activated, each Office 2013 Preview VL client that is
joined to the domain will automatically be activated. An Active Directory-Based activation lasts for 180
days, at which time the Office 2013 Preview VL client must be reactivated for an additional 180 days in
order to stay activated.

14
Volume Activation Management Tool (VAMT) 3.0 Volume Activation Management Tool (VAMT) 3.0 is the latest version. VAMT 3.0 is designed to
manage volume activations for Windows Vista, Windows 7, Windows 8, Windows Server 2008,
Windows Server 2008 R2, Windows Server 2012, Office 2010, and Office 2013 Preview. In addition,
VAMT 3.0 supports Active Directory-Based activation.
For more information about VAMT 3.0, see Plan volume activation of Office 2013 Preview.
15
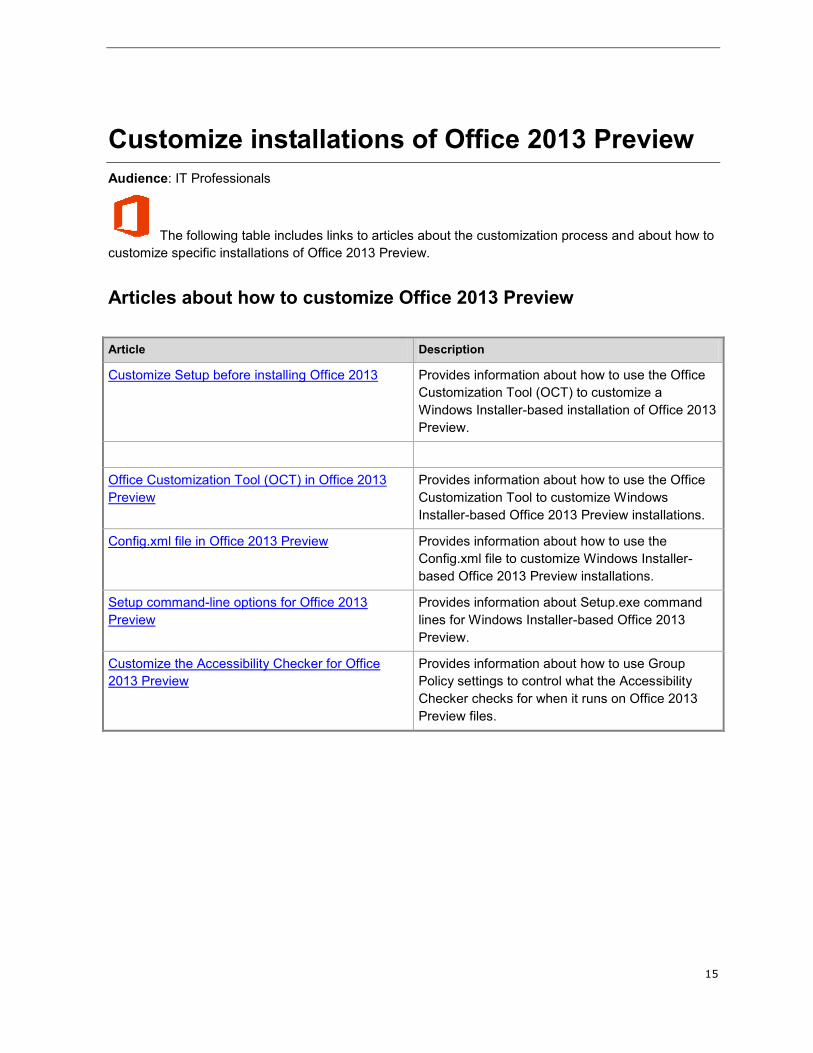
Customize installations of Office 2013 Preview
Audience: IT Professionals
The following table includes links to articles about the customization process and about how to
customize specific installations of Office 2013 Preview.
Articles about how to customize Office 2013 Preview
Article Description
Customize Setup before installing Office 2013 Provides information about how to use the Office
Customization Tool (OCT) to customize a
Windows Installer-based installation of Office 2013
Preview.
Office Customization Tool (OCT) in Office 2013
Preview
Provides information about how to use the Office
Customization Tool to customize Windows
Installer-based Office 2013 Preview installations.
Config.xml file in Office 2013 Preview Provides information about how to use the
Config.xml file to customize Windows Installer-
based Office 2013 Preview installations.
Setup command-line options for Office 2013
Preview
Provides information about Setup.exe command
lines for Windows Installer-based Office 2013
Preview.
Customize the Accessibility Checker for Office
2013 Preview
Provides information about how to use Group
Policy settings to control what the Accessibility
Checker checks for when it runs on Office 2013
Preview files.
16
Customize Setup before installing Office 2013
Audience: IT Professionals
To customize Setup for Windows Installer-based Office 2013 Preview, follow the procedures in this
article before you begin the installation.
In Office 2013 Preview (as in Office 2010 and Office 2007), Setup controls the complete installation.
This includes processes that Windows Installer handled in Office versions earlier than Office 2007.
Customizing the default behavior of Setup lets you specify how the installation runs. For example, you
can run the installation without user interaction, handle the product key and the Microsoft Software
License Terms on behalf of users, and specify an organization name or a different installation location.
We recommend that you read the Volume activation overview for Office 2013 Preview, article before
you customize Setup.
In this article:
Use the OCT to customize the installation
Create a network installation point
Customize Setup
Install Office silently
Use the OCT to customize the installation To customize how Setup manages the installation process, use the Office Customization Tool (OCT) to
create a Setup customization (.msp) file. Setup applies this file when users install Office on their
computers.
In Office 2013 Preview, two architecture-specific versions of the Office Customization Tool (OCT) are
available: one for 32-bit and one for 64-bit Office. The 64-bit version of the OCT supports 64-bit client
editions of Office 2013 Preview, and provides the same user interface, capabilities, and configurable
settings as the 32-bit version. You use the same command to run the 32-bit or 64-bit version of the
OCT.
To run the 32-bit OCT, run the setup.exe /admin command line from the x86 (32-bit) folder as
shown in the following example: \\server\share\Office15\x86\setup.exe /admin.
To run the 64-bit OCT, run the setup.exe /admin command line from the x64 (64-bit) folder. For
more information about 64-bit Office 2013 Preview, see 64-bit editions of Office 2013.
Create a network installation point The first step in a typical corporate deployment is to create, replicate, and secure a network installation
point. To do this, copy all source files from the Office 2013 Preview installation DVD to a shared
location on the network. Also copy any language packs that you want to deploy from the source media
to the network installation point. Users can run Setup from the network installation point, or you can use
the network installation point as a starting place to distribute Office 2013 Preview by using a software
17
deployment tool, such as Microsoft System Center 2012 Configuration Manager, or to create a hard-
disk image or a custom DVD.
Make sure that access to Office 2013 Preview source files is read-only. The Setup.xml and
Package.xml files, such as ProPlusWW.xml for Office Professional 2013 Preview, are digitally signed
and cannot be changed.
We recommend that you replicate the network installation point to multiple locations for the following
reasons:
Ensure that users always have access to a network source.
Support remote locations if you are deploying to multiple geographical locations.
Provide consistent configurations to users in your organization.
Provide flexibility. If you define a standard corporate configuration of Office 2013 Preview, regional
administrators can apply additional customizations to the replicated network installation points to
address their specific requirements.
To learn about shared folders, see the following resources:
Shared Folders
Share a Folder or Drive
Set Permissions for Shared Folders
Customize Setup Use the following instructions to customize Office Setup.
Note:
You can complete tasks in all Office 2013 suites by using a mouse, keyboard shortcuts, or
touch. For information about how to use keyboard shortcuts and touch with Office products and
services, see the following resources:
Keyboard shortcuts
Touch
Office Gesture Reference
To customize Office Setup
1. Create a network installation point. To do this, create a shared folder for the Office 2013 Preview
source files at a location that can be easily accessed on the server, and copy all the files and
folders from the Office 2013 Preview DVD to that share. For example:
\\server\share\Office2013
Important:
Do not create the network installation point at the root of the server.
If you deploy multiple language versions of Office 2013 Preview, copy each language pack
that you want to deploy from the source media to the installation point. When you are
prompted to overwrite duplicate Setup files, choose No. Core Setup files are shared among

18
all Office 2013 Preview products and language packs. Because the core Setup files are
identical, there is no reason to overwrite the files when you add language packs.
If you deploy multiple Office 2013 Preview products, copy those files from the DVD to the
installation point. When you are prompted to overwrite duplicate Setup files, choose No.
2. From the root of the network installation point, run the following command line to start the Office
Customization Tool:
\\server\share\Office2013\setup.exe /admin
where:
\\server\share\Office2013\ is the network installation point that contains the Office 2013 Preview
sources
setup.exe /admin starts the OCT
3. Choose the Office 2013 Preview product that you want to configure, and then choose OK.
4. In the OCT navigation pane, choose Installation location and organization name.
5. In the Default installation path box, enter the path of a default installation location on users'
computers. You can enter a relative path that includes the folder keyword [ProgramFilesFolder].
6. In the Organization name box, enter a default organization name for all users who install Office
with this customization file.
7. In the navigation pane, choose Additional network sources, and then choose Add.
8. In the Network server box, enter the path of any backup sources that you have created on the
network. If neither the user's local installation source nor the original network installation point is
available, Setup uses one of these replicated installation points for operations that require the
source. You can add as many sources as you need.
9. In the navigation pane, choose Licensing and user interface. The following options are available:
Use KMS client key. A product key entry is not required for enterprise deployments that are
using Key Management Service (KMS) activation because all Volume License editions of Office
2013 Preview have a KMS client key pre-installed. KMS is one of the methods that are
provided by Office Activation Technologies for activating products that are licensed under
Microsoft Volume Licensing programs. Only a KMS host computer needs a KMS host key to be
activated and to establish a local activation service in your environment. Office 2013 Preview
connects to the local KMS host for activation. By default, the Use KMS client key option is
selected.
For more information about the licensing options for Office 2013 Preview, see Volume
activation overview for Office 2013 Preview.
Enter another product key. You can enter a valid Multiple Activation Key (MAK) key in the
OCT by using the Enter another product key entry. A MAK key is another method that Office
Activation Technologies provides for activating products licensed under Microsoft Volume
Licensing programs. By using a MAK, clients activate Office 2013 Preview online by using the
Microsoft hosted activation servers or by telephone.
To use a MAK key, select the Enter another product key option, and in the Product key text
box, enter the MAK key (twenty-five numbers or characters) without spaces..
19
10. Select the I accept the terms in the License Agreement check box. When you provide this
information in a Setup customization file, users are not prompted for a product key or Microsoft
Software License Terms during the installation or the first time that they start an Office application.
11. In the details pane, set the Display Level to Basic or None to install Office quietly (without user
interaction). For more information about display settings see Licensing and user interface in Office
Customization Tool (OCT) in Office 2013 Preview.
Note:
In enterprise deployments, we recommend that you set Display level to None to make
sure that that Setup runs silently. It also prevents prompts to users to enter information,
and prevents the installation from waiting for user interactions, ieven when files are being
used. When you set Display Level to none, the Suppress modal and Completion notice
options are silenced and the Microsoft Software License Terms are accepted.
Administrators must also make sure that no Office applications are running during an
installation of Office 2013 Preview.
If you set Display level to Basic and select the Suppress modal option, users may be
prompted if any Office files are being used. Setting Display level to None prevents
prompts to users in these cases. The Suppress modal option does not prevent files-in-use
messages from being displayed. Only Display level set to None prevents the messages
from being displayed.
12. Make any additional customizations. Choose Save on the File menu, and save the Setup
customization file in the Updates folder at the root of the network installation point.
Note:
If you plan to deploy multiple Setup customization files (.msp files), you can place only one
customization .msp file for each Office 2013 Preview product that you are installing in the
Updates folder for an initial installation. You must deploy the rest of the customization .msp
files for a product after the Office installation is finished Only one Setup customization file
per product in the Updates folder is supported. For example, if you are deploying multiple
Office 2013 Preview products, such as Office Professional Plus 2013 Preview and Visio
Professional 2013 Preview, you can include one customization .msp file for Office
Professional Plus 2013 Preview and one customization .msp file for Visio Professional
2013 Preview in the Updates folder. The customization .msp files that you place in the
Updates folder are deployed first. Therefore, they must include any Setup customizations
that cannot be changed after the installation, such as the installation location.
Your customizations apply to any language version of the specified product that is available on the
network installation point. Most customizations apply to the language-neutral core product. However,
the feature tree in the tool also includes a subset of language-specific features. Customizations to
language-specific features are applied when a user installs that language; otherwise, the
customizations are ignored.
Note:
Typically, you do not have to customize logging options. By default, Setup creates a standard
log file and saves it as a text file in the %Temp% folder on the user's computer. If an installation
fails, Setup creates a verbose log file in the same location, starting with the package that
20
caused the failure. To change logging options, open the Config.xml file in Notepad and modify
the <Logging> element. For more information, see Config.xml file in Office 2013 Preview.
Install Office silently When you deploy Office throughout an organization, you determine how much of the Setup user
interface is displayed to users. By default, Setup runs interactively and gives users choices during the
installation. If you are distributing a customized configuration, we recommend that you limit how much
users interact with Setup. The installation continues with fewer interruptions, and your customizations
are set by default for all users. For more information about display options, see Licensing and user
interface in Office Customization Tool (OCT) in Office 2013 Preview.
If you are using a deployment tool such as Microsoft System Center 2012 Configuration Manager or
Microsoft Systems Management Server (SMS) to deploy Office 2013 Preview while users are not
logged on to the network, set the display level to None, which installs Office 2013 Preview without
displaying any Setup user interface.
Note:
When you install Office 2013 Preview silently, you must provide a valid product key. If the
product key is missing, Setup logs an error and exits. As mentioned previously, if you are using
KMS activation, a product key entry is not required because all Volume License editions of
Office 2013 Preview have a KMS client key pre-installed. However, if you are using MAK, you
must enter the MAK key. If you do not accept the license terms on behalf of users, Setup does
complete the installation. Note that, by installing Office 2013 Preview silently, you have
implicitly accepted the license terms.
The Windows Installer properties DISPLAY and PIDKEY do not work in Office 2013 Preview (or in
Office 2010 or Office 2007). Instead, in Office 2013 Preview, you customize Setup directly by specifying
a display setting and a product key in the OCT. You can either accept the default option, Use KMS
client key if you are using KMS validation, or enter a MAK key in the Enter another product key text
box if you are using KMS, as described in Customize Setup.
Because Setup plays a more significant role in controlling the installation, many Windows Installer
properties are no longer required. In fact, some Windows Installer properties are blocked and generate
an error if you try to set them using the Office Customization Tool.

21
Office Customization Tool (OCT) in Office 2013 Preview
Audience: IT Professionals
To customize an installation of Office 2013 Preview, you can use the Office Customization Tool (OCT)
to perform tasks such as the following:
Specifying installation options
Customizing how Office applications and features are installed
Configuring default user settings
Managing additional content: add or remove files, registry entries or shortcuts
Configuring Outlook options: setting the default profile, adding email accounts, and specifying
Exchange settings
In this article:
Overview of the Office Customization Tool
Architecture-specific versions of the Office Customization Tool
Importing Office Customization Tool .msp customization files
Configuring Setup, Features, Additional content, and Outlook settings
Setup
Features
Additional content
Outlook
Downloading updated OCT files
Overview of the Office Customization Tool The OCT is part of the Setup program and is the recommended tool for most customizations. The OCT
is available only with volume licensed versions of Windows Installer-based Office 2013 Preview, Office
2010, and the 2007 Office system. To determine whether an Office 2013 Preview installation is a
volume licensed version, check the Office 2013 Preview installation disk to see whether it contains a
folder named Admin. If the Admin folder exists, the disk is a volume license edition. If the Admin folder
does not exist, the disk is a retail edition. For information about the network installation point, see
Customize Setup in Customize Setup before installing Office 2013.
You run the OCT by typing setup.exe /admin at the command line from the root of the network
installation point that contains the Office 2013 Preview source files. For example, use the following:
\\server\share\Office15\setup.exe /admin. When you run the OCT, you choose to create a new Setup
customization (.msp) file or to open an existing .msp file. If you create a new file, the OCT displays a list
of the products that are available on the network installation point. You must select a single product that
you want to customize.

22
If you use the OCT to change an existing .msp customization file, we recommend that you select the
.msp file for the same product that you customize. For example, if you customize Office Professional
Plus 2013 Preview, select an Office Professional Plus 2013 Preview customization .msp file.
Note:
The Office 2013 Preview release requires Windows Installer 4.0 on computers that are running
the 64-bit version of the OCT or importing 64-bit customization .msp files. Windows Installer 3.1
does not recognize properties such as “ProgramFiles64Folder,” which are used by the 64-bit
version of the OCT and the OCT Import feature. For information about Windows Installer, see
Windows Installer (http://go.microsoft.com/fwlink/p/?LinkID=111108).
Updates folder
By using the OCT, you customize Office and save your customizations in a Setup customization .msp
file. You place the file in the Updates folder on the network installation point. When you install Office,
Setup looks for a Setup customization file in the Updates folder and applies the customizations. The
Updates folder can only be used to deploy software updates during an initial installation of Office 2013
Preview.
Important:
If you plan to deploy multiple Setup customization files (.msp files), you can place only one
customization .msp file for each Office 2013 Preview product that you are installing in the
Updates folder for an initial installation. You must deploy the rest of the customization .msp files
for a product after the Office installation is complete. Only one Setup customization file per
product in the Updates folder is supported. If you are deploying multiple Office 2013 Preview
products, such as Office Professional Plus 2013 Preview and Visio Professional 2013 Preview,
you can include one customization .msp file for Office Professional Plus 2013 Preview and one
customization .msp file for Visio Professional 2013 Preview in the Updates folder. The
customization .msp files that you place in the Updates folder are deployed first. Therefore, they
must include any Setup customizations that cannot be changed after the installation, for
example, the installation location.
If you are deploying an initial installation of Office 2013 Preview and you also want to deploy
Office 2013 Preview software updates, such as service packs and hotfixes, Setup can apply the
product updates as part of the installation process. You can place the Office 2013 Preview
product updates in the Updates folder. In scenarios such as this where the Updates folder
includes both one Setup customization .msp file and product updates, Setup applies only the
Setup customization .msp file during the initial installation and the product updates are applied
after the installation is complete.
As an alternative to placing the customization .msp file in the Updates folder, you can use the Setup
command-line option /adminfile to specify the fully-qualified path of the location of the .msp file. For
example, type: setup.exe /adminfile \\server\share\mychanges\custom.msp.
If you use a folder other than the Updates folder for your customization files, you can specify the
folder's location in the Config.xml file by using the SUpdateLocation attribute of the SetupUpdates
element. The Config.xml file is located in the core product folder (core_product_folder_name.WW) for
the Office 2013 Preview product that you install. For example, ProPlus.WW is the folder name for Office
Professional Plus 2013 Preview). For more information, see Config.xml file in Office 2013 Preview.

23
Modify existing installations
You can also use a Setup customization file to change an existing installation. Because a Setup
customization file is an expanded form of a Windows Installer .msp file, you apply the customization file
to the user's computer exactly as you would a software update. The user's existing Office installation is
updated with the customizations that you make. For example, if you change the installation states of
some features to Not Available and apply the resulting customization file to an existing installation of
Office, those features are removed from the user's computer.
Some options in the OCT are applicable only to a new installation of Office. These options are identified
in the OCT and in the OCT Help. For example, you can use the Default installation path option (in the
Installation location and organization name section) to specify the folder where Office is to be
installed on the user's computer. However, if a customization file is applied to an existing installation,
the Default installation path option is ignored (you must uninstall and reinstall Office to change the
installation location).
Before you exit the OCT, choose the File menu, and then choose Save as to save the Setup
customization file.
Every time that you save a customization file in the OCT, the tool updates the customization file’s
sequencing number with the current computer date and time stamp and generates a new update
globally unique identifier (GUID). The OCT .msp files are applied chronologically according to their time
stamp.
To show the sequencing behavior, assume that you have created the following OCT .msp maintenance
files:
1. An OCT .msp file that is named “uninstall-access.msp” in which you set Microsoft Office Access
to Not Available. This file is saved first so that it has a lower sequencing number and an older date
and time stamp. This .msp file is sequenced first and Access is set to Not Available on users'
computers.
2. An OCT .msp file that is named "install-access.msp" in which you set Microsoft Office Access to
Run All from My Computer (by selecting the product and setting the installation state in the Set
feature installation states section). This file is saved last so that it has a higher sequencing
number and a newer date and time stamp. This .msp file is sequenced later than the first OCT .msp
file, "uninstall-access.msp." Therefore, the Access feature is set to Run All from My Computer on
users' computers.
Choose OCT options
The OCT includes four major sections: Setup, Features, Additional Content, and Outlook. Each
section contains several pages of options. When you change an option, the page name in the
navigation pane of the OCT changes to bold type. If you open an existing Setup customization file, the
bold page names indicate where options are customized.
The following table lists options that are available in the OCT.
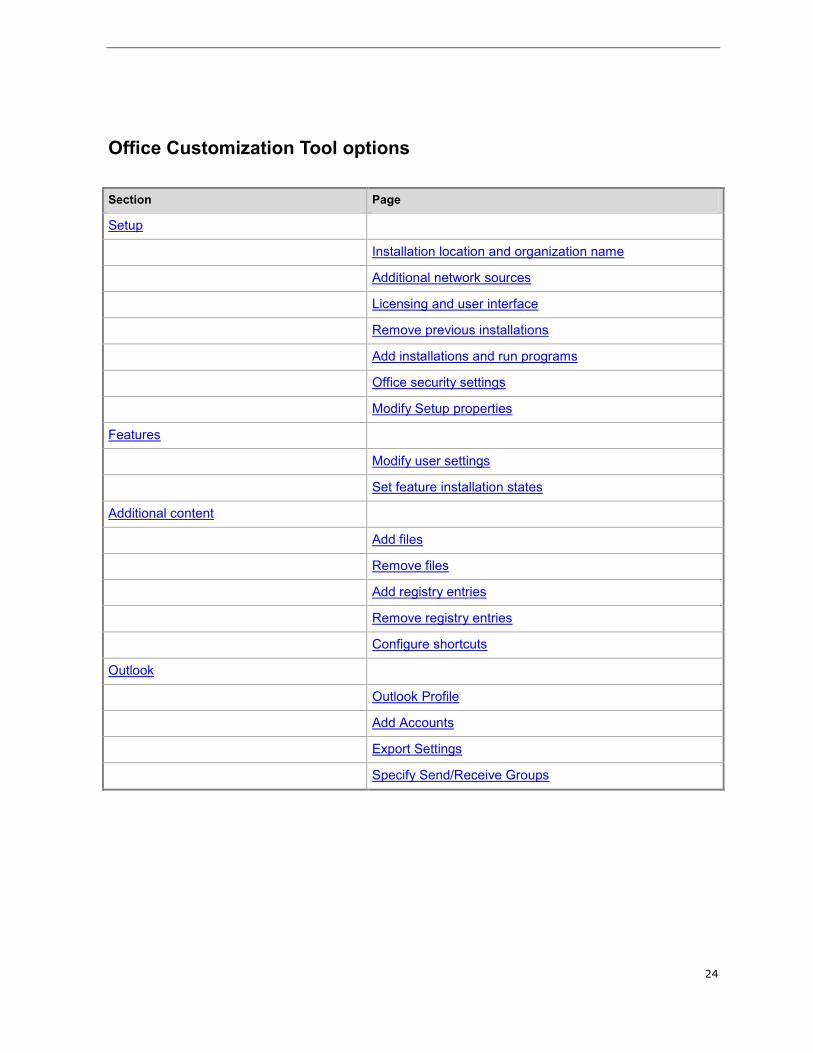
24
Office Customization Tool options
Section Page
Setup
Installation location and organization name
Additional network sources
Licensing and user interface
Remove previous installations
Add installations and run programs
Office security settings
Modify Setup properties
Features
Modify user settings
Set feature installation states
Additional content
Add files
Remove files
Add registry entries
Remove registry entries
Configure shortcuts
Outlook
Outlook Profile
Add Accounts
Export Settings
Specify Send/Receive Groups

25
Architecture-specific versions of the Office
Customization Tool The OCT provides two architecture-specific versions, one for 32-bit Office 2013 Preview and one for
64-bit Office 2013 Preview. The 64-bit version of the OCT supports 64-bit client editions of Office 2013
Preview, and provides the same user interface, capabilities, and configurable settings as the 32-bit
version. The OCT files are located in the Admin folder under the x86 (32-bit) and x64 (64-bit) folders,
respectively.
For information about 64-bit Office 2013 Preview, see 64-bit editions of Office 2013.
Administrators run the following command-line option to start the OCT from the root of the network
installation source: setup.exe /admin. You use the same command to run the 32-bit or 64-bit version of
the OCT. Running setup.exe /admin on a 32-bit computer starts the 32-bit OCT, and running this
command on a 64-bit computer starts the 64-bit OCT.
To run the 32-bit OCT, run the setup.exe /admin command line from the x86 (32-bit) folder as
shown in the following example: \\server\share\Office15\x86\setup.exe /admin.
To run the 64-bit OCT, run the setup.exe /admin command line from the x64 (64-bit) folder as
shown in the following example: \\server\share\Office15\x64\setup.exe /admin.
Setup detects which products are available to create Setup customization updates and lists the results
in the Create a new Setup customization file for the following product list. Because the 64-bit and
32-bit Office files are in different root directories, the 32-bit OCT lists all 32-bit Office products in the
product selection dialog box (Create a new Setup customization file for the following product), and
the 64-bit OCT lists the 64-bit Office products.
Administrators use the 32-bit OCT to create, edit, and save OCT customization updates for the 32-bit
Office products, and the 64-bit OCT to create, edit, and save OCT updates for the 64-bit Office
products.
Office 2013 Preview includes two architecture-specific folders: one for 32-bit and one for 64-bit, with a
separate Config.xml file and Updates subfolder in the 32-bit and 64-bit folders.
Note:
Office 2013 Preview does not support side-by-side installations of 64-bit and 32-bit Office on
the same computer, including across applications. For example, there is no support for side-by-
side installations of 2007 Office system 32-bit with Office 2013 Preview 64-bit, or for SharePoint
Workspace 2013 Preview 64-bit and Excel 2013 Preview 32-bit. You cannot use the Office
2013 Preview customization tools to configure side-by-side installations or customizations of
64-bit and 32-bit Office. For example, you cannot create a custom side-by-side installation of a
64-bit Office Professional 2013 Preview and 32-bit Visio 2013 Preview single image. For more
information about 64-bit Office, see 64-bit editions of Office 2013.
Importing Office Customization Tool .msp
customization files The OCT Import feature enables administrators to import 32-bit OCT customization .msp files into the
64-bit version of the OCT and 64-bit .msp files into the 32-bit version of the OCT. Administrators of
26
mixed environments (32-bit and 64-bit) can do the Setup customizations one time and import the
customizations as follows:.
Import the 32-bit Setup customization .msp files into 64-bit OCT and then use them to customize
64-bit Office products.
Import the 64-bit Setup customization .msp files into 32-bit OCT and can then use them to
customize 32-bit Office products.
A 32-bit Setup customization .msp file that is imported to 64-bit OCT is converted to 64-bit, and a 64-bit
customization .msp file that is imported to 32-bit OCT is converted to 32-bit. To import a customization
.msp file, in the Office Customization Tool, open the File menu and then choose Import. In the Open
dialog box, select the .msp file that you want to convert, and then choose Open to start the conversion.
Note:
Importing customization .msp files is intended for equivalent cross-architecture products only.
You can import a 32-bit Office Professional Plus 2013 Preview customization .msp file into the
64-bit version of the OCT for a 64-bit Office Professional Plus 2013 Preview .msp file. However,
you cannot import a 32-bit Word 2013 Preview stand-alone customization .msp file into the 64-
bit OCT for a 64-bit Office Professional Plus 2013 Preview .msp file; doing so is prevented and
an error message is displayed.
You cannot import Office 2010 or 2007 Office system Setup customization .msp files into the
Office 2013 Preview OCT.
You can also use the Import feature when you have created an initial Setup customization .msp file for
an Office 2013 Preview product (for example, Office Professional Plus 2013 Preview) and then you
later want to modify the installation to add language packs. In such cases, you first add the language
packs to the network installation point that contains the Office product source files. Then you run the
OCT from the root of the network installation point, create a new Setup customization file for the same
product (in this example, Office Professional Plus 2013 Preview), and then import the original
customization .msp file that you created previously for Office Professional Plus 2013 Preview. To import
an .msp customization file, in the OCT, open the File menu, and then choose Import. In the Open
dialog box, select the previously created customization .msp file that you want to update. On the File
menu, choose Save As. Specify a unique name for the .msp file, and then choose Save. Importing the
previously created .msp file into the OCT will update the .msp file and include the added languages.
Use the following links to view an Office 2010 video that shows how to use the OCT Import feature.
Even though the video was created for Office 2010, the information also applies to Office 2013 Preview.
Running time: 06:06
Watch the "Office 2010 client:
Office Customization Tool import
feature" video.
For an optimal viewing
experience, download the "Office
2010 client: Office Customization Tool
27
import feature" video.
Right-click the link, and then choose
Save Target As to download a copy.
Choosing the link will open a .wmv file
in the default video viewer for full-
resolution viewing.
Configuring Setup, Features, Additional content, and
Outlook settings The following sections provide information about the OCT areas that you can configure:
Setup
Features
Additional content
Outlook
Note:
You might see a dialog box that prompts you to choose a default document format if the
geographic location of the computer on which you are running the Office Customization Tool is
set to a European location, and you are creating a new Setup customization .msp file. It can
also occur if you open an existing customization .msp file for which no file format settings were
configured for Excel, PowerPoint, or Word. Administrators can choose to keep the current
settings for the Setup customization file, or choose Office Open XML Formats that support all
features of Office 2013 Preview, or OpenDocument formats to use the ODF format.
To learn about the file formats, choose Learn more in the dialog box to display the OCT online
Help.
Use the following links to view a walkthrough of the Office 2010 OCT user interface. The information
also applies to Office 2013 Preview.
Running time: 08:26
Watch the "Office 2010 client: Office
Customization Tool walkthrough" video.
For an optimal viewing experience,
download the "Office 2010 client: Office
Customization Tool walkthrough" video.
Right-click the link, and then choose Save
Target As to download a copy. Choosing the
link will open a .wmv file in the default video

28
viewer for full-resolution viewing.
Setup
Use the Setup section to specify the following:
Default installation location
Default organization name
Additional network installation sources
Product key
Microsoft End-user license agreement
Display level
Previous versions of Office to remove
Custom programs to run during installation
Security settings
Setup properties
Installation location and organization name
Specify a default organization name and installation location for all users whose installation includes
this Setup customization file:
Default installation path – This option specifies where Setup installs Office on the user's
computer. You can use the predefined folder keyword [ProgramFilesFolder] to specify a path to
standard folders in Windows. The default path is [ProgramFilesFolder]\Microsoft Office. This
option is recognized only when you first install Office on a user's computer. You cannot change the
installation path without uninstalling and reinstalling Office.
Organization name – This name appears in the About text box (Help menu) and on the banner
pages of Office applications. The name that you specify is used as the default company name for
all users whose installation includes this customization file.
Additional network sources
Specify additional servers that have a copy of the network installation point.
Setup looks for servers in this list, in the order specified, if it is installing a feature on demand or if it is
repairing Office and the original network installation point is unavailable.
Choose Add to add a source to the list. To edit a path, select a server from the list and then choose
Modify. To remove a server from this list, select the server and then choose Remove. To change the
order of the list, select a server and then choose the Move arrows to move the server up or down in the
list. To remove all servers from the list, select Clear existing server list.

29
Note:
The OCT verifies all server paths and connects to any available servers during the initial
installation process to load balance the file copy process when it creates the Local Installation
Source (LIS). However, be aware that specifying an unavailable source as an additional source
does not cause the installation to fail.
Add/Modify Network Server Entry dialog box
In the Add Network Server Entry dialog box or Modify Network Server Entry dialog box, enter the
path of a server and then choose OK.
You can use a UNC path or, if all users have access to the server that uses the same drive letter, you
can use a drive letter in the path. The path can contain environment variables that are delimited by
percent (%) if the variables are defined for all users.
For example:
z:\office
\\server1\share\office_root
%USERNAME%\office_root
Licensing and user interface
Use this section for the product key and to accept the Microsoft Software License Terms on behalf of
each user who installs Office by using the Setup customization file. Set the Display level of the user
interface. These options are recognized by Setup only when you first install Office on a user's
computer.
Use KMS client key A product key entry is not required for enterprise deployments that use Key
Management Service (KMS) activation because all Volume License editions of Office 2013 Preview
have a KMS client key pre-installed. KMS is one of the methods that are provided by Office
Activation Technologies for activating products that are licensed under Microsoft Volume Licensing
programs. Only a KMS host computer needs a KMS host key to be activated and to establish a
local activation service in your environment. Office 2013 Preview connects to the local KMS host for
activation. By default, the Use KMS client key option is selected in Enter a valid product key and
licensing agreement for users.
For more information about the licensing options for Office 2013 Preview, see Plan volume
activation of Office 2013 Preview.
Enter another product key You can enter a valid Multiple Activation Key (MAK) key in the OCT
by using the Enter another product key option in Enter a valid product key and licensing
agreement for users in the details pane. A MAK key is another method that Office Activation
Technologies provide to activate products that are licensed under Microsoft Volume Licensing
programs. By using a MAK key, clients activate Office 2013 Preview online by using the Microsoft
hosted activation servers or by telephone.
To use a MAK key, in the Enter another product key text box, enter the MAK key (25 numbers or
characters) without spaces.

30
Important:
This information applies to volume-licensed editions of Office 2013 Preview. It does not
apply to either Office Professional Plus for Office 365 or Office 365 ProPlus Preview, both
of which are licensed through subscription. The Product key text box must not be used to
set product keys for Office Professional Plus for Office 365. For information about Office
Professional Plus for Office 365, see Overview of Office 365 ProPlus Preview.
Note:
You can also activate Office 2013 Preview at the time that you install a MAK key by setting
the AUTO_ACTIVATE property value. To do this, follow these steps:
1. In the OCT, select Modify Setup properties on the navigation pane, and then choose Add in
the details pane.
2. In the Add Property Value dialog box, in the Name box, type AUTO_ACTIVATE. Note that
property names must be in uppercase.
3. In the Value box, type 1, and then choose OK.
For information about how to configure the AUTO_ACTIVATE property by using the
Config.xml file, see Setting element in Config.xml file in Office 2013 Preview.
I accept the terms in the License Agreement Select this check box to accept terms of your
license agreement on behalf of the user.
If Display level is set to Basic or None and you supply a product key, Setup assumes that you
also accept the license terms on behalf of the user. In this case, even if you do not select the I
accept the terms in the License Agreement check box, the user is not prompted to accept
license terms either during installation or the first time that an Office application runs.
Display level Select the user interface that you want displayed to users during installation. The
options are as follows:
Full - default Setup runs interactively, displaying all the user interface options and messages.
Basic Setup displays the Welcome screen, prompts for the product key and license terms, if
they are needed, and displays a progress bar and completion notice. No other options are
presented to the user.
None Setup runs silently and displays no user interface.
Important:
In enterprise deployments, we recommend that you set Display level to None to make
sure that that Setup runs silently. This prevents prompts to users to enter information,
and also prevents the installation from waiting for user interactions, even when files are
being used. Setting Display level to None selects Suppress modal. Clear the
Completion notice check box and choose I accept the terms in the license
agreement to make sure that the options are silenced and the license agreement is
accepted. Administrators must also make sure that no Office applications run during an
installation of Office 2013 Preview.
If you set Display level to Basic and select the Suppress modal option, users may be
prompted if there are any Office files that are being used. Setting Display level to
31
None prevents prompting users in these cases. The Suppress modal option does not
prevent files-in-use messages from being displayed; only Display level set to None
prevents files-in-use messages from being displayed.
Completion notice Select this check box if you want Setup to display a message to the user
when installation is complete.
Suppress modal Select this check box if you do not want Setup to display error messages and
other dialog boxes that might interrupt the installation. If you set Display level to Full, error
messages and other dialog boxes are displayed regardless of the state of this check box.
No cancel Select this check box if you want to disable the cancel button (the X in upper corner).
This setting only applies when Display level is set to Full or Basic.
Note:
The Setup customization file (.msp) sets the licensing information only during the initial
installation.
The previous licensing and user interface options are identical to the settings in the Config.xml file that
are shown in the following table.
Config.xml settings and corresponding OCT options
OCT option Config.xml setting
Product key PIDKEY element
I accept the terms in the License
Agreement
AcceptEula attribute of the Display element
Display level Level attribute of the Display element
Completion notice CompletionNotice attribute of the Display element
Suppress modal SuppressModal attribute of the Display element
Note:
If there are multiple products on the network installation point and you do not specify which
product Setup is to install, Setup uses full display level when it prompts the user for a product,
regardless of how you set Display level in the Setup customization file. You use the /config
command-line option to specify which product to install. For more information, see Deploy
Office 2010 by using Setup from a network installation point.
Remove previous installations
Specify the earlier versions of Office applications that you want to keep or remove. This option is only
recognized by Setup when you first install Office on a user's computer.

32
By default, Setup removes earlier versions of Office applications. To keep an installed Office
application, choose Remove previous installations in the OCT, and, in the results pane, select
Remove the following earlier versions of Microsoft Office programs, in the list select the Office
application that you do not want to remove, choose Details, and in the Select Earlier Versions to
Remove dialog box, under Choose which earlier versions you want Setup to remove, clear the
check box for the product that you want to remove, and then choose OK.
Important:
Outlook 2013 Preview cannot coexist with earlier versions of Outlook. If you choose to keep
earlier versions, do not install Outlook 2013 Preview.
Add installations and run programs
Run additional executable programs before or after the Office installation is complete. Setup runs
command lines in the order listed in the tool and does not finish the installation until all command lines
are run.
Note:
The Add installations and run programs option in the OCT (command-lines that are entered
in the Add Program Entry and Modify Program Entry dialog boxes) and the Command
element in the Config.xml file and are intended to be used only for initial product installations
and uninstallations. The Command element commands are processed only during initial
installations and uninstallations. If Command element commands are used for customizations
after the initial installation, they are ignored.
The command line can be specified to run an arbitrary command or to run a lightweight
executable that you want to run when this product is installed.
The Add installations and run programs option in the OCT and the Command element in
Config.xml do not provide the software deployment capabilities that an enterprise software
deployment and management tool provides, such as the ability to track deployment progress
and troubleshoot problems. Therefore, we recommend that you limit the use of Command
element in Config.xml and Add installations and run programs in the OCT to running only
lightweight executables or arbitrary commands that will not make changes to the computer or
that do not require user input. For example, you can run a utility to copy logs or a command to
launch a Welcome page at the end of installation.
To add a program to the list in OCT, choose Add installations and run programs and in the
results pane choose Add.
To change a program, select the program from the list and then choose Modify.
To remove a program, select the program and then choose Remove.
To change the order of programs in the list, select a program and then choose the Move arrows
to move the program up or down in the list.

33
Note:
Do not add a program that requires the computer to be restarted, unless it is the last program in
the list. If a custom program restarts the computer, the Office installation will be complete.
However, the custom programs that appear later in this list will not run.
Command-lines that are entered in the Add Program Entry and Modify Program Entry dialog
boxes or by using the Command element in the Config.xml file are intended to be used only for
initial product installations or uninstallations. Command element commands are processed
only during initial installations and uninstallations. If Command element commands are used
for customizations after the initial installation, they are ignored.
Add/Modify Program Entry dialog box
When you add or change a program entry, enter the following information in the Add Program Entry
dialog box or Modify Program Entry dialog box, and then choose OK.
Target Enter the path and file name of the program.
Arguments Enter a string of command-line options. For example, /q /path c:\temp.
Run this program after the Office product has been installed. The program runs after the
Office installation is complete. This is the recommended option. If the program does not close
correctly or if the program restarts the computer, the Office installation is not affected. However,
programs that are further down the list do not run.
Run this program before the Office product has been installed. The program runs before the
Office installation starts. If the program does not close correctly or if it restarts the computer, Office
is not installed, and programs that are further down the list do not run.
In the Add Program Entry dialog box or Modify Program Entry dialog box, you can include any of the
following standard Windows folders in the path of the executable file.
Windows folders
Folder Description
[INSTALLLOCATION] The folder in which Office is installed
[WindowsFolder] Windows folder
[SystemFolder] Windows System32 folder
[ProgramFilesFolder] Program Files folder
[CommonFilesFolder] Program Files\Common Files folder
[DesktopFolder] Windows Desktop folder
[StartMenuFolder] Windows Start menu
[ProgramMenuFolder] Windows Start\Programs menu

34
Office security settings
Customize the security settings for Office applications.
Important:
Security settings specified in a Setup customization (.msp) file provide only initial default
settings on users' computers. Users can change the settings after installation. To help lock
down and enforce security settings, you must use Group Policy. For more information, refer to
the recommendations in the 2007 Microsoft Office Security Compliance Management Toolkit
(http://go.microsoft.com/fwlink/p/?LinkId=158689).
The following table lists the available options.
Security settings
Setting Description
Trusted Publishers Manage the list that identifies trusted sources for digitally signed
macros, add-ins, Microsoft ActiveX controls, and other executable
code that is used by Office applications. Office applications share
a certificate-based list of trusted sources with Internet Explorer.
Choose Add to add a digital certificate (CER file).
Trusted Locations Manage the list that identifies locations from which any file can be
opened without a check by the Trust Center security feature.
Choose Add to add a new location, enter the following
information, and then choose OK:
Application Select the Office application that uses this
location. This is supported by Access 2013 Preview, Excel
2013 Preview, PowerPoint 2013 Preview, Visio 2013 Preview,
and Word 2013 Preview.
Path Enter the path of the trusted location. Enter a fully
qualified path with drive letter or UNC path. The path can
include environment variables.
Subfolders of this location are also trusted Select this
check box to include subfolders as trusted locations.
Description Enter text to describe the purpose of the
location.
To remove a trusted location from this list, select the location
and then choose Remove.
Note:
When you specify one or more trusted locations here,
the Trusted Locations list previously defined on the
user’s computer is cleared and replaced by this list.

35
Setting Description
Remove all Trusted Locations
written by OCT during
installation
Clears the Trusted Locations list on the user's computer. Use this
check box to clear the Trusted Locations list on the user's
computer without adding new locations.
Default Security Settings Set default security levels for add-ins, templates, and Office
applications. You can set security options for the following Office
applications:
Microsoft Access
Microsoft Excel
Microsoft Outlook
Microsoft PowerPoint
Microsoft Project
Microsoft Publisher
Microsoft Visio
Microsoft Word
The following security options are available:
Allow trusted locations options
Allow trusted locations that are NOT on user's computer
Allow Trusted Locations on the User's machine only
(application default)
Disable all trusted locations. Only files signed by trusted
publishers will be trusted
Application Add-ins warnings options
Disable all Application Extensions
Require that Application Extensions are signed by a
trusted publisher
Require that Application Extensions are signed and
silently disable unsigned Extensions
Enable all installed Application Add-ins (application
default)
VBA macro warnings options
Disable all VBA macros
Disable Trust Bar warning for unsigned VBA macros
(unsigned code will be disabled)
Disable all VBA macros with notification (application
default)
No security checks for VBA macros (not recommended,

36
Setting Description
code in all documents can run)
Add-ins and templates (Project 2013 Preview only)
Trust all installed add-ins and templates
Do not trust installed add-ins and templates
Security level (Project 2013 Preview only)
Very High – Only macros installed in trusted locations will
be able to run. All other signed and unsigned macros are
automatically disabled
High – Only signed macros from trusted sources will be
able to run; unsigned macros are disabled
Medium – The user can choose whether to run potentially
unsafe macros
Low (not recommended) – Users are not protected from
potentially unsafe macros
Unsafe ActiveX Initialization Determine whether unsigned and, therefore potentially unsafe,
ActiveX controls can initialize using persisted data, that is, data
that is saved from one instance of the control to the next. The
possible values are as follows:
<do not configure> – Setup does not modify the setting
specified on the user's computer. New applications are
installed with the default setting, which is Prompt user to use
persisted data.
Prompt user to use control defaults – The user is warned
before an application begins ActiveX controls that might be
unsafe. If the user trusts the source of the document, the
control is initialized by using its default settings.
Prompt user to use persisted data – The user is warned
before an application begins ActiveX controls that might be
unsafe. If the user trusts the source of the document, the
control is initialized by using persisted data.
Do not prompt – All unsigned ActiveX controls run without
prompting the user. This setting provides the least protection
and we do not recommend it.
Do not prompt and disable all controls – All unsigned
ActiveX controls are disabled without prompting the user.

37
Modify Setup properties
Modify Setup properties that are applied during the Office installation. You can customize Setup
properties only when you first install Office on a user's computer. Properties set in a customization file
do not take effect if you apply the file to an existing installation.
To add a property, choose Add. To change a property that you have added, select the property and
then choose Modify. To remove a property that you have added, select the property and then choose
Remove.
For more information about properties and their values, see Setup properties in Office 2010.
Add/Modify Property Value dialog box
When you add or change a Setup property, enter the information that is shown in the following table in
the Add/Modify Property Value dialog box, and then choose OK.
Add/Modify property value settings
Setting Description
Name The property name. Property names must all be in
uppercase.
Value The value of the property.
Features
Use the Features section of the OCT to configure user settings and to customize which Office features
are installed.
Modify user settings
Set the default values of Office application settings for users who install Office with this customization
file.
Note:
When you use the OCT to configure user settings, it establishes the initial default values for the
settings. Users can change most of the settings after Office is installed. If you want to enforce
user settings, use Group Policy.
You can use the OCT to provide default user settings for the following Office applications:
Microsoft Access 2013
Microsoft Excel 2013
Microsoft InfoPath 2013
Microsoft Office 2013

38
Microsoft OneNote 2013
Microsoft Outlook 2013
Microsoft PowerPoint 2013
Microsoft Project 2013
Microsoft Publisher 2013
Microsoft SharePoint Designer 2013
Microsoft SharePoint Workspace 2013
Microsoft Visio 2013
Microsoft Word 2013
Some applications also provide computer settings, including the following: Microsoft InfoPath 2013
(Machine), Microsoft Office 2013 (Machine), Microsoft PowerPoint 2013 (Machine), and Microsoft
Visio 2013 (Machine).
To configure an option, expand the application folder and subfolders in the user settings navigation
pane until the setting that you want to configure is listed in the details pane, and choose the setting.
Configurable settings that are associated with that element appear on the Setting column in the details
pane. Double-click a setting in the details pane, and select one of the options shown in the following
table.
OCT user and computer settings states
Setting Description
Not Configured The setting remains as it is.
Enabled The setting is changed, based on your choices in
the dialog box.
Disabled The setting is disabled. Disabling an option may
differ from not configuring the option. See the
description of the specific option for more
information.
Choose Show all settings to display all available user settings. Choose Show configured settings
only to display only those settings that you have configured.
Select the Migrate user settings check box to preserve users' custom settings from an earlier version
of Office. If you change user settings and also select this check box, Setup first applies the modified
settings and then migrates the user's existing custom settings, overwriting any conflicting settings.
Note:
When you choose Enabled to view the options for a setting and then choose OK, Previous
Setting, or Next Setting, the status changes to Configured, even if you do not change the
setting. If you unintentionally configure the setting by using an empty hyperlink, path, or file
name, errors might result. If you chose Enabled and want to ignore your changes or avoid

39
configuring the setting, choose Cancel. You can also return a setting to the Not Configured
state by double-clicking the setting, selecting Not Configured, and choosing OK.
Set feature installation states
Customize how Office features are installed on the user's computer.
To change the installation state of a feature, choose Set feature installation states in the OCT. In the
results pane, open the shortcut menu (or right-click the feature), and choose the installation state.
Some parent features consist of multiple child features. Choose the plus sign (+) that is next to the
parent feature to expand the tree and view child features.
When you change the installation state of a feature, the name of the feature and the names of all its
child features, if any, are displayed in bold font. This indicates that Setup will apply these changes to
the installation. Features that are not displayed in bold font are installed by using the default installation
state. To remove a change, select the feature and select the Reset option or select the feature and
choose the Reset Branch button.
The following feature installation states are typically available to users during Setup. Not all installation
states are available for every feature. For example, if a feature contains a component that cannot be
advertised, Installed on First Use is not included in the list of available installation states for that
feature.
Feature installation states
State Description
Run from My Computer Setup copies files and writes registry entries and
shortcuts that are associated with the feature to the
user's hard disk. The application or feature runs
locally.
Run All from My Computer Same as Run from My Computer, except all child
features that belong to the feature are also set to this
state.
Installed on First Use Setup leaves components for the feature and its child
features in the local installation source until the user
attempts to use the feature for the first time, at which
time the components are installed. This is also known
as an advertised feature.
Not Available The components for the feature and the child features
that belong to this feature are not installed on the
computer.

40
Note:
The following subcomponents of Publisher 2013 Preview are not visible in the Setup feature
installation state tree in the Office 2013 Preview release:
Commercial Printing and the Enhanced RGB to CMYK Conversion subcomponent
Font Schemes
PaperDirect Previews
Publisher Templates and the Business Publications and Other Publications subcomponents
The following options are also available for each feature.
Feature options
Option Description
Hidden Setup does not display the feature in the feature tree during
installation if Setup runs interactively. The symbol [H] is
prepended to the feature name to indicate the feature is
hidden.
Locked The installation state that you choose for this feature cannot
be changed by the user during installation or in maintenance
mode after Office is installed. The symbol [L] is prepended to
the feature name to indicate the feature is locked.
Reset The feature is returned to its default installation state. This is
the same as selecting the feature and choosing the Reset
Branch button.
If you explicitly set a feature to its default state, the symbol [F] is prepended to the feature name to
indicate that the feature will be forced into this state. This is useful if you are creating a Setup
customization file to change an existing Office installation. If you do not change the installation state of
a feature, Setup does not change the feature on the user's computer. If you specify a change, including
setting the feature to its default state, Setup ensures that the feature is set to that state on the user's
computer.
When you change the installation state of a feature, Setup might change the installation state of a
parent or child feature to match the installation state. For example, if you set a parent feature to
Installed on First Use, but set a child feature to Run from My Computer, Setup also changes the
state of the parent feature to Run from My Computer.
Setup does not display hidden features in the feature tree when users run Setup interactively. The
feature is installed according to its defined installation state. Child features that belong to the hidden
feature are also hidden.

41
Tip:
The best use of the Hide setting is to simplify the feature tree for users. For example, you might
hide the Office Tools branch of the feature tree so that users do not have to decide which tools
they need to install. Only the tools that you select are installed.
Note:
If you set the Hidden option for a feature by using the OCT or the Config.xml file during an
initial installation of Office 2013 Preview, you cannot unhide that feature in the feature tree by
using another Config.xml file or applying a second customization .msp file after the initial
installation. This means that the feature is not displayed in the feature tree during installation.
The feature remains hidden. The feature will not be displayed in Add or Remove Programs
(Change or Remove Programs) in Control Panel under the Add or Remove Features option
for Office 2013 Preview (or under the Programs and Features option in Windows Vista).
However, you can unlock the feature to install and run locally later by using an .msp
customization file or a Config.xml file.
If you set the Locked option for a feature by using the OCT or the Config.xml during initial
installation, that feature can be unlocked and installed locally by using an .msp customization
file or a Config.xml file.
For example, you can customize the Config.xml file to modify the OptionState element and
add the following line to install the feature (Access in this example) on the user's computer and
to set child features of the feature to the specified state.
<OptionState Id=”ACCESSFiles” State=”Local” Children=”force” />
You can also use the OCT to create an .msp customization file to unlock the feature by setting the
feature installation state to Run All from My Computer in the Set feature installation states screen.
For information about the OptionState element, see Config.xml file in Office 2013 Preview.
If you set a feature to Not Available and hide the feature in the feature tree, users can still change the
setting and install the feature by installing the parent feature or by running Setup in maintenance mode.
For example, if you set the Name Smart Tag Plugin feature to Not Available and Hidden, users can
still install the feature by setting the parent Smart Tags Plugins feature to Run All from My
Computer.
If you want to help prevent users from installing hidden features, select the Not Available, Hidden, and
Locked installation states. In this case, the feature or application is not installed and is not available in
maintenance mode. Users cannot install the feature by changing the state of the parent feature. The
only way to reverse the Not Available, Hidden, and Locked installation state selection after Office is
installed is to use the OCT to create a Setup customization file that is configured to change the
installation state of the feature. Then you apply the customization file to the user's computer.
Additional content
Use this section to add or remove custom files, registry entries, and shortcuts during the installation.
Add files
Add files to users' computers when Office is installed.
42
To create a list of files to add to the user's computer during installation, choose Add, select the file that
you want to add to the list, and choose Add again. To change the destination path of a file, select the
file in the Add custom files list and choose Modify. To remove a file from the list, select the file and
choose Remove. You can use the SHIFT and CTRL keys to select multiple files at the same time.
When you add files to an Office installation, note the following:
Files are copied into the Setup customization file when you save the customization file and exit the
OCT. Large files increase the size of the customization file and the time that is required to create
the file.
If you revise a file that is currently included in the customization file, you must open the
customization file by using the OCT, remove the file from the Add files list, add the revised version,
and save the customization file.
If the user removes, repairs, or reinstalls Office, the custom files are removed or reinstalled
together with Office. Setup does not reinstall a custom file if the file has changed since installation.
File Destination Path dialog box
In the Destination path on the user's computer dialog box, enter the folder where you want to install
the file on users' computers, and Choose OK.
You can select multiple files at the same time by using the SHIFT and CTRL keys. These files will be
associated with the same destination folder. You can use the special folder names that are shown in
the following table in the destination path.
Special folders
Folder Description
[INSTALLLOCATION] The folder in which Office is installed
[ROOTDRIVE] The local disk drive that has the most
free space
[ProgramFilesFolder] Program Files folder
[CommonFilesFolder] Program Files\Common Files folder
[WindowsFolder] Windows folder
[SystemFolder] Windows System32 folder
[PersonalFolder] The user's My Documents folder
[AppDataFolder] The user's Application Data folder
[NetHoodFolder] The user's My Network Places folder
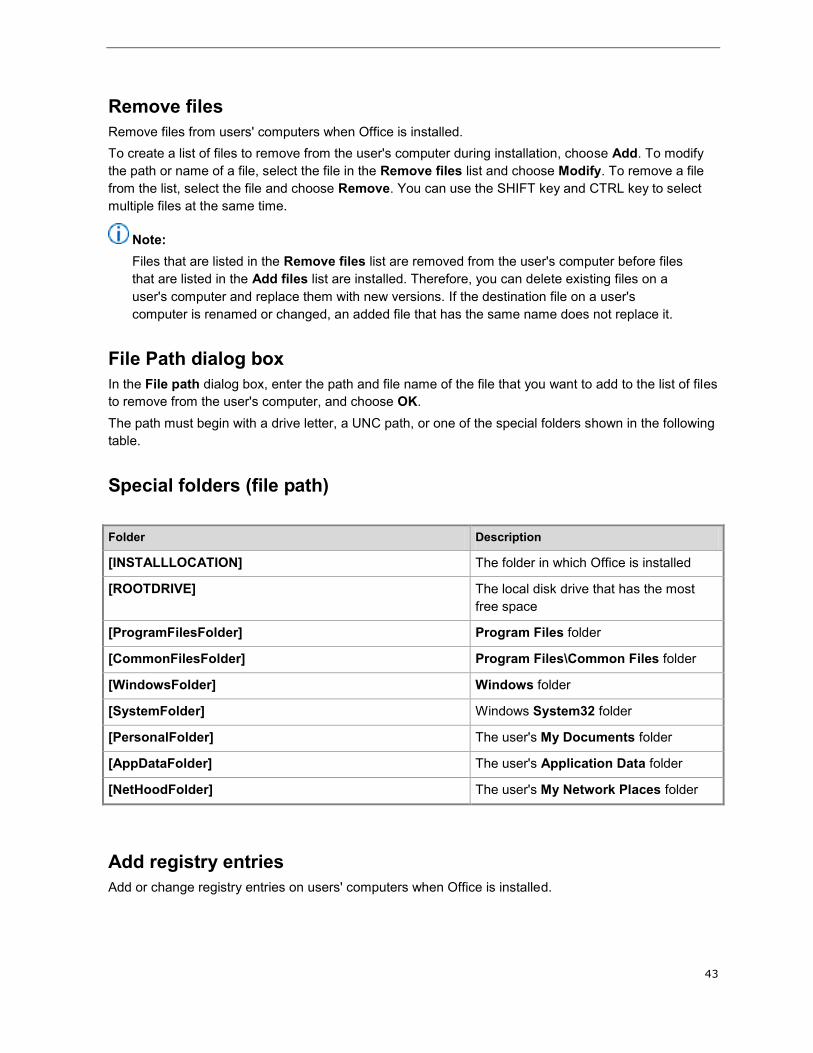
43
Remove files
Remove files from users' computers when Office is installed.
To create a list of files to remove from the user's computer during installation, choose Add. To modify
the path or name of a file, select the file in the Remove files list and choose Modify. To remove a file
from the list, select the file and choose Remove. You can use the SHIFT key and CTRL key to select
multiple files at the same time.
Note:
Files that are listed in the Remove files list are removed from the user's computer before files
that are listed in the Add files list are installed. Therefore, you can delete existing files on a
user's computer and replace them with new versions. If the destination file on a user's
computer is renamed or changed, an added file that has the same name does not replace it.
File Path dialog box
In the File path dialog box, enter the path and file name of the file that you want to add to the list of files
to remove from the user's computer, and choose OK.
The path must begin with a drive letter, a UNC path, or one of the special folders shown in the following
table.
Special folders (file path)
Folder Description
[INSTALLLOCATION] The folder in which Office is installed
[ROOTDRIVE] The local disk drive that has the most
free space
[ProgramFilesFolder] Program Files folder
[CommonFilesFolder] Program Files\Common Files folder
[WindowsFolder] Windows folder
[SystemFolder] Windows System32 folder
[PersonalFolder] The user's My Documents folder
[AppDataFolder] The user's Application Data folder
[NetHoodFolder] The user's My Network Places folder
Add registry entries
Add or change registry entries on users' computers when Office is installed.

44
To create a list of registry entries to add to users' computers, choose Add. To change an entry in the
list, select the entry and choose Modify. To remove an entry from the list, select the entry and choose
Remove. Choose Import to add a set of entries from a registry file (.reg file). If an entry in the .reg file
duplicates an entry in the list, the OCT prompts you to decide whether to overwrite existing registry
entries with entries in the .reg file.
Important:
Registry entries customized in this section might override settings that are customized
elsewhere in the OCT. Use this section to customize options that cannot be set directly in the
Office user interface and that are not configurable by using other methods in the OCT.
You should not use the Add registry entries section of the OCT to add registry-based policy
keys (Group Policy-based registry keys). Configuring and distributing those settings in a
customization update (.msp file) to users is not supported, and the settings might not be applied
correctly. Registry-based policy settings are settings that are stored in any of the four registry
locations for Group Policy settings:
For user policy settings:
HKCU\Software\Policies
HKCU\Software\Microsoft\Windows\CurrentVersion\Policies
For computer policy settings:
HKLM\Software\Policies
HKLM\Software\Microsoft\Windows\CurrentVersion\Policies
The supported way to manage registry-based policy keys is to use Group Policy to apply the
registry policy settings. By using Group Policy, you can centrally manage client registry keys.
Use Group Policy to define configurations once and then rely on the operating system to
enforce that state. Administrative Templates files are UNICODE text files that Group Policy
uses to describe where registry-based policy settings are stored in the registry. All registry-
based policy settings appear and are configured in Group Policy Management Editor in Group
Policy Management Console (GPMC) under the Administrative Templates nodes.
Add/Modify Registry Entry dialog box
In the Add/Modify Registry Entry dialog box, enter the information that is shown in the following table
for each registry entry, and then choose OK.
Add/Modify Registry Entry dialog box options
Setting Description
Root Select the branch that contains the entries that you want to add or change. Settings
are applied one time per user (HKEY_CURRENT_USER) or one time per computer
(HKEY_LOCAL_MACHINE). You cannot add registry entries to the root of
HKEY_USERS or HKEY_LOCAL_MACHINE.
Data type Select a data type for the registry value.

45
Setting Description
Key Enter the name of the subkey where the entry is stored. For example,
Software\Microsoft\Office\15.0\Common.
Create empty
key
Select this check box if the registry entry does not contain a value name or value data.
Some settings are determined by the presence or absence of the registry entry.
Value name Enter a name for the new registry entry. If you include Value data but leave this field
blank, the value is assigned the name <Default>. A key can have only one <Default>
value name.
Value data Enter the data (value) to store in the new registry entry. The data must match the data
type.
Remove registry entries
Remove registry entries from users' computers when Office is installed.
To create a list of registry entries to remove from users' computers, choose Add. To change an entry in
the list, select the entry and choose Modify. To remove an entry from the list, select the entry and
choose Remove.
To create a list of registry entries to remove from users' computers, choose Add and enter the following
information for each registry entry.
Note:
If the user removes, repairs, or reinstalls Office, the custom registry entries are removed or
reinstalled with Office.
Delete/Modify Registry Entry dialog box
In the Delete/Modify Registry Entry dialog box, enter the information that is shown in the following
table for each registry entry, and then choose OK.
Delete/Modify Registry Entry dialog box options
Entry Description
Root Select the branch that contains the entries that you want to remove.
Key Enter the full name of the subkey where the entry is stored. For example,
Software\Microsoft\Office\15.0\Common.
Value name Enter the name of the registry entry that you want to remove. Leave this field blank to
remove the complete subkey, including all its value entries.

46
Configure shortcuts
Add shortcuts to files that are installed with Office 2013 Preview or files that were already on the user's
computer. You can configure shortcuts only when you first install Office on a user's computer. This
option is ignored if you apply the Setup customization file to an existing installation.
Choose Add to add a new shortcut. To change a shortcut in the list, select the shortcut and choose
Modify. To remove a shortcut from the list, select the shortcut and choose Remove.
Shortcuts with Yes in the Installed column are configured during installation. Shortcuts that have No in
this column are configured if the corresponding product is later installed.
Note:
If you add a shortcut to a custom application or file, that shortcut is not updated or removed if
the user changes, repairs, reinstalls, or removes Office.
Add/Modify Shortcut Entry dialog box
In the Add/Modify Shortcut Entry dialog box, enter the information that is shown in the following table
for the shortcut that you create or change, and then choose OK.
Add/Modify Shortcut Entry dialog boxoptions
Setting Description
Target Specify the application associated with the shortcut by selecting a
predefined application keyword or by entering the name and path of the
file to which the shortcut will point. If you select an application keyword,
the OCT automatically enters information in the remaining boxes. The
names in the list correspond to features that you select on the Set feature
installation states page of the OCT, plus any custom files that you add to
the installation on the Add files page. If you enter a name and path and
the name or path contains a space, you must enclose the complete string
in double quotation marks (""). You can add command-line options for the
application by using the Arguments field.
Location Specify the folder in which the shortcut is created by selecting a
predefined folder keyword or by entering the name and path of the location
of the shortcut. You can specify a subfolder by appending a backslash (\)
followed by the subfolder name. For example, to install the Microsoft
Word 2010 shortcut in the Microsoft Office subfolder in the Programs
folder in the Start menu, select [ProgramMenuFolder] and append the
subfolder name as follows: [ProgramMenuFolder]\Microsoft Office.
You can use the following special folders for Location:
[StartMenuFolder]: Windows Start menu.
[ProgramMenuFolder]: Windows Start\Programs menu.
[StartupFolder]: Startup folder in the Windows Start\Programs

47
Setting Description
menu.
[DesktopFolder]: Windows Desktop folder.
[INSTALLLOCATION]: The folder in which Office is installed.
[FavoritesFolder]: The user's Favorites folder.
[AppDataFolder]: The user's Application Data folder.
[NetHoodFolder]: The user's My Network Places folder.
Name Enter any string to specify a name for the shortcut.
Start in Enter a path to specify the default starting folder for the application. If you
leave this box blank, the default folder is set to the folder where the
destination file resides. If the path is not valid on a user's computer, the
user sees an error message when the user tries to use the shortcut.
Arguments Enter optional arguments to pass to the application on the command line.
Shortcut key Enter an optional keyboard shortcut for the application or file. The syntax
for the shortcut key is as follows:
[modifier+]VK_key
where modifier is SHIFT, CTRL, ALT, or EXT, and VK_key is a virtual key
name (virtual key names, and hexadecimal key codes and descriptions
are provided in the following table). The modifier is optional. You can
specify more than one, in any order, separated by plus signs (+). If you
use a modifier, it must precede the virtual key name. You must enter one
virtual key name. Do not use spaces anywhere in the key definition.
For example,
CTRL+VK_F12
CTRL+SHIFT+VK_A
ALT+CTRL+VK_SNAPSHOT
Some key combinations, such as CTRL+ALT+VK_DELETE, might be
used by the system or other processes. Do not use these combinations to
open the application on the user’s computer.
Run Select the kind of window in which the application or file is to start (Normal
window, Minimized, or Maximized).
Change Icon Select a different icon for the shortcut.
The following table lists virtual key names and their corresponding hexadecimal key codes.
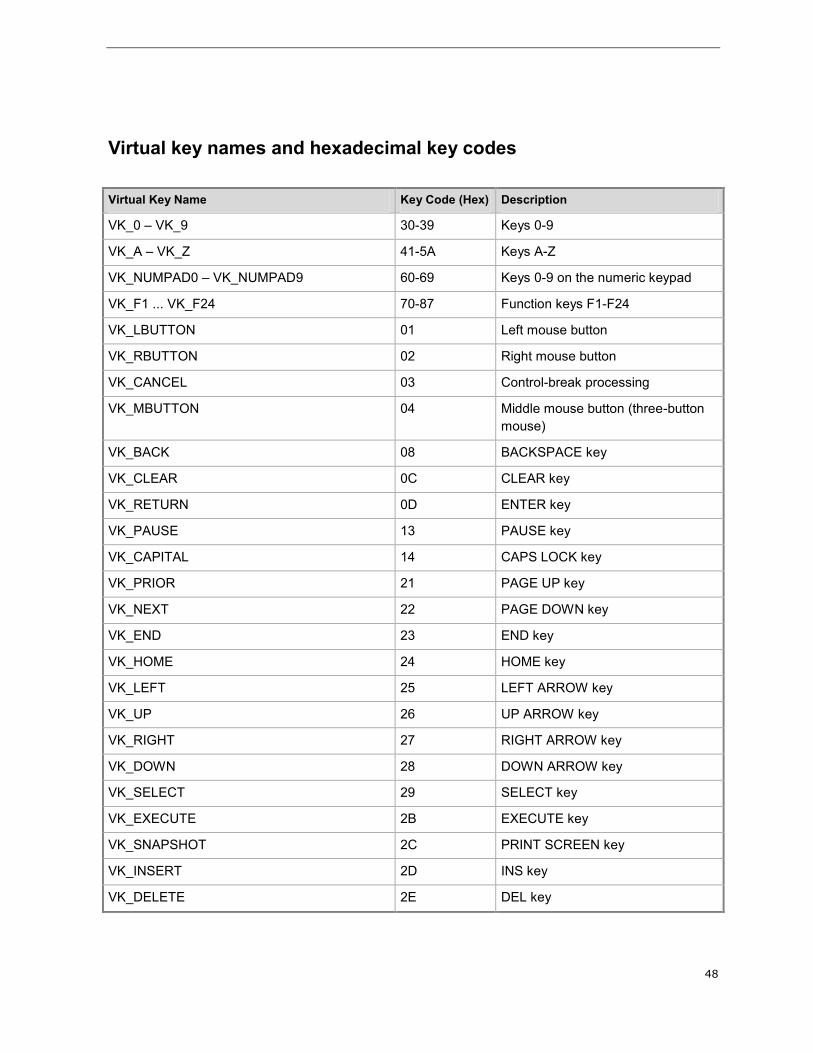
48
Virtual key names and hexadecimal key codes
Virtual Key Name Key Code (Hex) Description
VK_0 – VK_9 30-39 Keys 0-9
VK_A – VK_Z 41-5A Keys A-Z
VK_NUMPAD0 – VK_NUMPAD9 60-69 Keys 0-9 on the numeric keypad
VK_F1 ... VK_F24 70-87 Function keys F1-F24
VK_LBUTTON 01 Left mouse button
VK_RBUTTON 02 Right mouse button
VK_CANCEL 03 Control-break processing
VK_MBUTTON 04 Middle mouse button (three-button
mouse)
VK_BACK 08 BACKSPACE key
VK_CLEAR 0C CLEAR key
VK_RETURN 0D ENTER key
VK_PAUSE 13 PAUSE key
VK_CAPITAL 14 CAPS LOCK key
VK_PRIOR 21 PAGE UP key
VK_NEXT 22 PAGE DOWN key
VK_END 23 END key
VK_HOME 24 HOME key
VK_LEFT 25 LEFT ARROW key
VK_UP 26 UP ARROW key
VK_RIGHT 27 RIGHT ARROW key
VK_DOWN 28 DOWN ARROW key
VK_SELECT 29 SELECT key
VK_EXECUTE 2B EXECUTE key
VK_SNAPSHOT 2C PRINT SCREEN key
VK_INSERT 2D INS key
VK_DELETE 2E DEL key

49
Virtual Key Name Key Code (Hex) Description
VK_HELP 2F HELP key
VK_MULTIPLY 6A Multiply key
VK_ADD 6B Add key
VK_SEPARATOR 6C Separator key
VK_SUBTRACT 6D Subtract key
VK_DECIMAL 6E Decimal key
VK_DIVIDE 6F Divide key
VK_NUMLOCK 90 NUM LOCK key
VK_SCROLL 91 SCROLL LOCK key
Outlook
Use the Outlook section of the OCT to customize the default Outlook 2013 Preview profile and to set
Outlook 2013 Preview and Exchange Server 2010 options.
The OCT provides support for adding multiple Outlook email accounts.
Outlook Profile
Customize a user's default Outlook profile, which is the set of values in the Windows registry that
defines user-specific information. An Outlook profile can contain multiple email accounts. Users can
have multiple Outlook profiles. However, you can configure only one profile in the Setup customization
file. The settings in the following table enable you to customize a user’s Outlook profile.
Outlook profile customization options
Setting Description
Use existing profile Use the profile that is already configured on the user’s computer, or if no
profile exists, prompt the user to create a profile the first time Outlook
starts.
Modify profile Select one of two options:
Define changes to make to the existing default profile. If a default
profile does not exist, Outlook creates a new one using your
customizations. Modify the default profile on the user’s computer.
Define changes to the profile named Specify the name of the
profile to which your changes apply.
If no default profile exists or there is no profile by the name that you specify
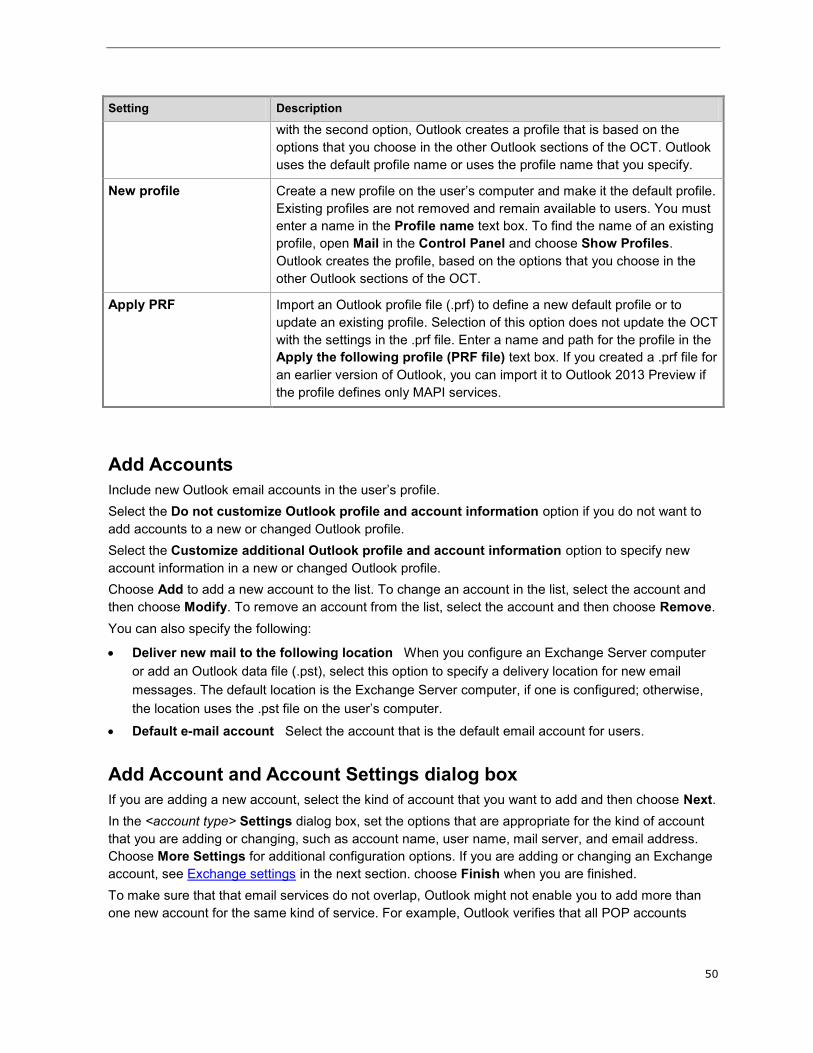
50
Setting Description
with the second option, Outlook creates a profile that is based on the
options that you choose in the other Outlook sections of the OCT. Outlook
uses the default profile name or uses the profile name that you specify.
New profile Create a new profile on the user’s computer and make it the default profile.
Existing profiles are not removed and remain available to users. You must
enter a name in the Profile name text box. To find the name of an existing
profile, open Mail in the Control Panel and choose Show Profiles.
Outlook creates the profile, based on the options that you choose in the
other Outlook sections of the OCT.
Apply PRF Import an Outlook profile file (.prf) to define a new default profile or to
update an existing profile. Selection of this option does not update the OCT
with the settings in the .prf file. Enter a name and path for the profile in the
Apply the following profile (PRF file) text box. If you created a .prf file for
an earlier version of Outlook, you can import it to Outlook 2013 Preview if
the profile defines only MAPI services.
Add Accounts
Include new Outlook email accounts in the user’s profile.
Select the Do not customize Outlook profile and account information option if you do not want to
add accounts to a new or changed Outlook profile.
Select the Customize additional Outlook profile and account information option to specify new
account information in a new or changed Outlook profile.
Choose Add to add a new account to the list. To change an account in the list, select the account and
then choose Modify. To remove an account from the list, select the account and then choose Remove.
You can also specify the following:
Deliver new mail to the following location When you configure an Exchange Server computer
or add an Outlook data file (.pst), select this option to specify a delivery location for new email
messages. The default location is the Exchange Server computer, if one is configured; otherwise,
the location uses the .pst file on the user’s computer.
Default e-mail account Select the account that is the default email account for users.
Add Account and Account Settings dialog box
If you are adding a new account, select the kind of account that you want to add and then choose Next.
In the <account type> Settings dialog box, set the options that are appropriate for the kind of account
that you are adding or changing, such as account name, user name, mail server, and email address.
Choose More Settings for additional configuration options. If you are adding or changing an Exchange
account, see Exchange settings in the next section. choose Finish when you are finished.
To make sure that that email services do not overlap, Outlook might not enable you to add more than
one new account for the same kind of service. For example, Outlook verifies that all POP accounts

51
have unique names. The following table shows how Outlook determines whether a new account of the
same type as an existing account can be added to the Setup customization file.
Adding additional accounts
Account type More than one of this type
allowed?
Data used to determine whether
conflict exists
POP3 Yes Account name
IMAP Yes Account name
Exchange Yes Account name
Outlook Data File (.pst) Yes File name and path of .pst file
Outlook Address Book No Existence of account
LDAP Yes Account name
Exchange settings
Configure users' Microsoft Exchange settings in a new or changed Outlook profile. The following table
lists the possible settings.
Exchange options
Setting Description
Account name Specify a name for the Account type.
User name Identify the user by using a specific value or replaceable
parameter. If you specify the default %USERNAME%,
Outlook uses the user's exact logon name, instead of
prompting the user with possible variations when Outlook
starts.
Exchange Server Enter the name of an Exchange server that is likely to be
available when users start Outlook. When a user starts
Outlook for the first time, Outlook replaces this value with the
user’s correct Exchange server. Provide only a literal server
name in this text box. For example, Exch-2-Srvr. Do not
include backslashes (\\) or similar syntax.
Overwrite existing Exchange
accounts
Select this option to replace an existing Exchange Server
account in the user’s profile with this account.

52
More Exchange Server Settings
Choose the More Settings button in the Exchange Settings dialog box to configure Exchange Server
offline use options and the Outlook Anywhere feature.
Exchange
Use the following options to configure user’s Outlook profiles for offline use and Outlook Anywhere.
Outlook Anywhere options
Option Description
Configure Outlook Anywhere Connect to Exchange Mailbox using HTTP Select this option
to enable Outlook Anywhere.
If you have enabled Outlook Anywhere, you can configure the
following options:
Use this URL to connect to the proxy server for
Exchange Server name URL for the Outlook Anywhere
proxy server
Do not enter http://or https:// as part of the name. The
appropriate entry (http:// or https://) is included automatically
in the box after you enter the name, based on the
authentication settings that you choose.
Connect using SSL only Select this option to connect by
using Secured Sockets Layer only. If you want to support
both server authentication and client authentication, select:
Mutually authenticate the session when connecting
with SSL If this is enabled, enter the Principal name
for proxy server.
On fast network, connect using HTTP first, then connect
using TCP/IP On a fast network, connect by using Outlook
Anywhere (HTTP) first instead of the default LAN (TCP/IP).
On slow network, connect using HTTP first, then
connect using TCP/IP On a slow network, connect by
using Outlook Anywhere (HTTP) first instead of the default
LAN (TCP/IP).
Use this authentication when connecting to the proxy
server for Exchange The default method is Password
Authentication (NTLM).

53
Cached Mode
Use the following options to configure users' Outlook profiles to use a local copy of the Exchange
mailbox.
Cached Mode options
Option Description
Do not configure Cached
Exchange Mode
By default, Exchange mailboxes can be accessed from the
Exchange Server computer, instead of being cached on users’
computers in an offline Outlook Data File (.ost).
Configure Cached Exchange
Mode
Create an .ost file or use an existing .ost file. Users work with a
local copy of their Exchange mailbox. If you select Use Cached
Exchange Mode, you can configure Cached Exchange Mode for
users by using the following options:
Download only headers Download copies of headers only
from users’ Exchange mailboxes.
Download headers followed by the full item Download
copies of headers from users’ Exchange mailboxes and
download copies of messages.
Download full items Download copies of full messages
(headers and message bodies) from users’ Exchange
mailboxes.
On slow connections, download only headers When a
slow network connection is detected, download copies of
headers only from users’ Exchange mailboxes.
Download shared non-mail folders Download shared non-
mail folders from other users’ mailboxes.
Download Public Folder Favorites Download the list of
Public Folder Favorites.
Customize location for .ost and .oab files
Path and file name of the Outlook data (.ost)
file Specify the name and location where the offline
Outlook data file should be stored.
Directory path to store Offline Address Book files Specify
the path where the offline Address Book files should be stored.
Export Settings
Export settings to an Outlook profile file (.prf).
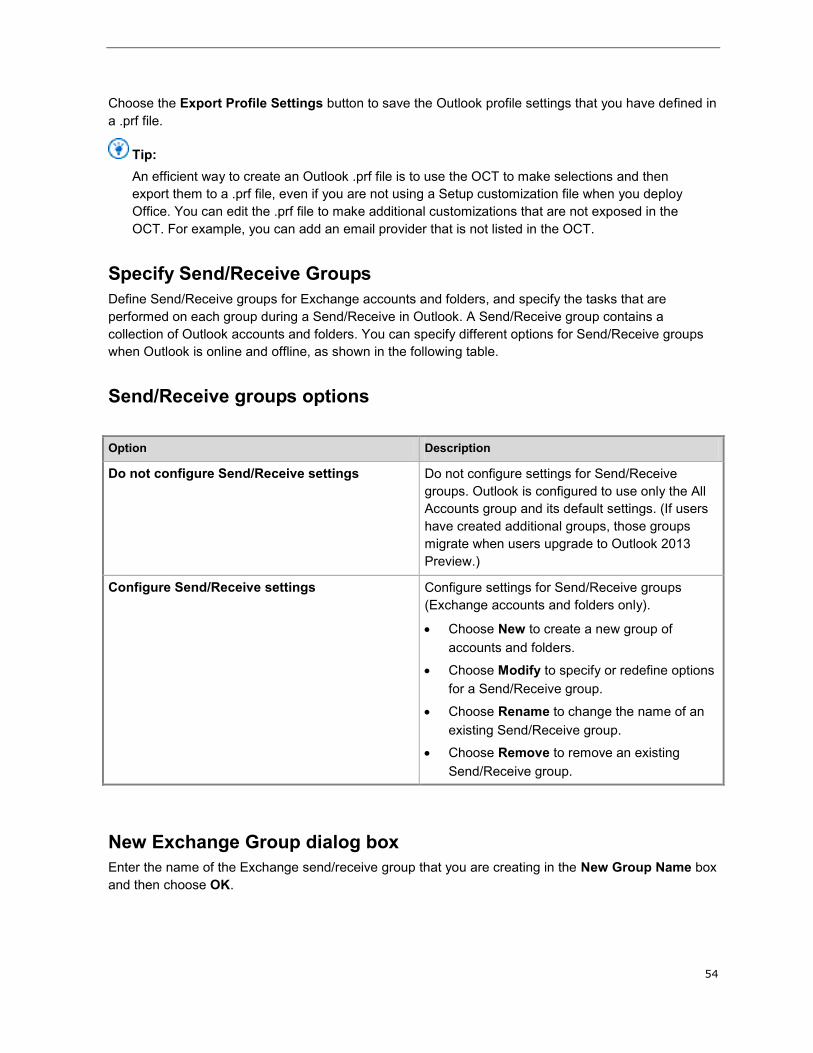
54
Choose the Export Profile Settings button to save the Outlook profile settings that you have defined in
a .prf file.
Tip:
An efficient way to create an Outlook .prf file is to use the OCT to make selections and then
export them to a .prf file, even if you are not using a Setup customization file when you deploy
Office. You can edit the .prf file to make additional customizations that are not exposed in the
OCT. For example, you can add an email provider that is not listed in the OCT.
Specify Send/Receive Groups
Define Send/Receive groups for Exchange accounts and folders, and specify the tasks that are
performed on each group during a Send/Receive in Outlook. A Send/Receive group contains a
collection of Outlook accounts and folders. You can specify different options for Send/Receive groups
when Outlook is online and offline, as shown in the following table.
Send/Receive groups options
Option Description
Do not configure Send/Receive settings Do not configure settings for Send/Receive
groups. Outlook is configured to use only the All
Accounts group and its default settings. (If users
have created additional groups, those groups
migrate when users upgrade to Outlook 2013
Preview.)
Configure Send/Receive settings Configure settings for Send/Receive groups
(Exchange accounts and folders only).
Choose New to create a new group of
accounts and folders.
Choose Modify to specify or redefine options
for a Send/Receive group.
Choose Rename to change the name of an
existing Send/Receive group.
Choose Remove to remove an existing
Send/Receive group.
New Exchange Group dialog box
Enter the name of the Exchange send/receive group that you are creating in the New Group Name box
and then choose OK.

55
Modify Group dialog box
When you change a group, select from the following options in the Modify Group dialog box and then
choose OK.
Select the options shown in the following table under Select options for this Send/Receive group.
Send/Receive settings for the selected group
Option Description
Send mail items Send mail items from the Outbox when you execute
a Send/Receive for this group.
Receive mail items Receive mail items when you execute a
Send/Receive for this group.
Make folder home pages available offline Refresh the content in folder home pages when you
execute a Send/Receive for this group.
Synchronize forms Synchronize forms when you execute a
Send/Receive for this group.
Under Change folder options for this Send/Receive group, select a folder and provide the
information that is shown in the following table.
Folder options for this Send/Receive group
Option Description
Include this folder in Send/Receive Add this folder to the set of folders that are updated during a
Send/Receive for this Send/Receive group, and select from the
following options:
Download headers only Download only headers for this
folder when you update by executing a Send/Receive for
this Send/Receive group.
Download complete item including
attachments Download complete e-mail messages (or
other items) for this folder when you update by executing a
Send/Receive for this Send/Receive group.
Download only headers for items larger than When
items are larger than the specified size, download only the
header for the item. This setting applies to only this folder
when you update by executing a Send/Receive for this
Send/Receive group.

56
Rename Exchange Group dialog box
Enter the new name of the Exchange send/receive group in the New Group Name box and then
choose OK.
Send/Receive settings for the selected group
Specify settings for the Send/Receive group that is selected in the list. The name of the selected group
appears in the option label. You can specify different settings for the Send/Receive group when Outlook
is either online or offline.
When Outlook is Online
Include this group in Send/Receive Execute a Send/Receive action on this group when the
user chooses Send/Receive.
Schedule an automatic Send/Receive every n minutes Choose the interval between each
Send/Receive action.
Perform an automatic Send/Receive when exiting Automatically execute a Send/Receive
action for this group when the user exits Outlook.
When Outlook is Offline
Include this group in Send/Receive Execute a Send/Receive action on this group when the
user chooses Send/Receive.
Schedule an automatic Send/Receive every n minutes Choose the interval between each
Send/Receive action.
Exchange Address Book
Download offline address book Download the offline address book (OAB) when the user
chooses Send/Receive.
Choose Address Book Settings to open the Modify Address Book Settings dialog box. You
can select Download changes since last Send/Receive to download only updates to the
address book since the last download. To download the full address book with each
Send/Receive, clear the Download changes since last Send/Receive check box.
Modify Address Book Settings dialog box
Configure the default way in which Outlook updates the offline address book (OAB). Select from the
following options:
Download changes since last Send/Receive Outlook downloads only the changes that were
made to the address book since the last Send/Receive. This generally takes less time to download
than downloading the complete address book.
Full Details When the address book is downloaded, Outlook copies all details for each entry.
No Details When the address book is downloaded, Outlook copies only required information,
such as the name and e-mail address for each entry. This takes less time to download, but address

57
details are not included in the offline address book. This is a legacy option that is supported by
Outlook Address book (OAB) versions 2.0 and 3.0. If Outlook connects to a server that supports
OAB 4.0 or a later version, the full details are downloaded even if this option is selected.
Downloading updated OCT files
After the initial release of Office, you can download updates of the OCT and .opax settings files from
the Microsoft Download Center. The Office 2013 Preview Administrative Templates download package
includes an \Admin folder that contains the OCT and OCT files (.opax and .opal files).
If you have to update the OCT, replace the /Admin folder in your Office 2013 Preview installation files or
installation image with the new /Admin folder that is included in the download package.

58
Config.xml file in Office 2013 Preview
Audience: IT Professionals
Administrators use the Config.xml file to perform installation and maintenance tasks for Office 2013
Preview.
The primary tool that administrators use to customize the installation of Windows Installer-based
products in Office 2013 Preview is the Office Customization Tool (OCT). The customization tools and
methods in Office 2013 Preview are the same as for Office 2010and Office 2007. For more information
about how to use the OCT to create a Setup customization file and to learn about updates to the OCT
in Office 2013 Preview, see Office Customization Tool (OCT) in Office 2013 Preview.
Use the Config.xml file to configure installation tasks and use it only when you run Setup. Config.xml is
not installed or cached on users' computers. Administrators can edit the Config.xml file to customize the
installation. By default, the Config.xml file that is stored in the core product folder,
core_product_folder_name.WW, directs Setup to install that product. For example, the Config.xml file in
the ProPlus.WW folder installs Office Professional Plus 2013 Preview.
You use the Config.xml file to perform the following installation tasks:
Specify the path of the network installation point.
Select which product to install.
Customize Setup options, such as logging and the location of the Setup customization file and
software updates.
Set installation options, such as user and company name.
Copy the Local Install Source (LIS) to the user's computer without installing Office.
Add or remove languages from the installation.
You can also use the Config.xml file for maintenance operations such as adding or removing features,
repairs, and removing installations. To do this, administrators must run Setup.exe again from the
original source.
Important:
To edit Config.xml, use a text editor, such as Notepad. Do not use a general-purpose XML
editor, such as Word 2013 Preview.
In this article:
Config.xml element quick reference
How Setup uses Config.xml
Config.xml file format
Config.xml element reference
Sample Config.xml file

59
Config.xml element quick reference The following table lists the Config.xml elements. These elements can appear in any order, except for
Configuration element, which must be first, and elements such as Command element, whose order in
Config.xml affects how they are processed during installation.
Config.xml quick reference
Element Description
Configuration element Top-level element
AddLanguage element Add a language to the installation
ARP element Values that control the text and behavior
of the Programs and Features option,
in Control Panel, to add or remove
features for the product
Command element Run a command during installation
COMPANYNAME element The name of the organization or
company of the user on whose computer
the product is being installed
Display element The level of UI that Setup displays to the
user
DistributionPoint element The fully qualified path of the network
installation point from which the
installation is to run
INSTALLLOCATION element The fully qualified path of the folder on
the user's computer in which the product
is installed
LIS element Options for how the Local Install Source
(LIS) is cached on the user's computer
Logging element Options for the kind of logging that Setup
performs
OptionState element Options to specify how individual product
features are to be handled during
installation
PIDKEY element The 25-character volume license key
RemoveLanguage element Remove a language from the installation
Setting element Values for Windows Installer properties
60
Element Description
SetupUpdates element The search path for Setup to use to find
Setup customization files
USERINITIALS element The initials of the user on whose
computer the product is being installed
USERNAME element The name of the user on whose
computer the product is being installed
How Setup uses Config.xml Setup looks for a copy of Config.xml in the same folder as Setup.exe. If a copy is not found there, Setup
uses the Config.xml file that is located in the core product folder for the product that you are installing.
(If multiple products are in the network installation point, Setup waits until you specify which product to
install before it looks for the copy of Config.xml.) The copy of Config.xml that is located in the product
folder identifies the product through the Product attribute of the Configuration element.
You can also use the /config Setup command-line option to specify the location of the Config.xml file.
For example:
\\server\share\setup.exe /config \\server\share\ProPlus.WW\config.xml
Note:
If you also created a Setup customization (.msp) file by using the OCT, the customizations that
you define in Config.xml take precedence over those in the customization file.
Config.xml file format XML elements in Config.xml begin with < and end with />.
The basic element format is as follows:
<element [attribute="value"] [attribute="value"] … />
For example:
<Display Level="none" CompletionNotice="no" SuppressModal="yes" AcceptEula="yes" />
The following statements apply to format:
Elements and attributes are case-sensitive.
Attribute values must be enclosed in quotation marks (") and are not case-sensitive.
An element definition can span multiple lines. Spaces, carriage returns, line feeds, and tab
characters are ignored in an element definition.
The following is an example of an element definition that spans multiple lines.
<Display
Level="none"
CompletionNotice="no"
SuppressModal="yes"

61
AcceptEula="yes"
/>
Tip:
For long element definitions, put attributes on separate lines and use indentation to make the
file easier to read.
The Configuration element is a special case and is required. All other elements are contained in the
Configuration element, and the element is closed with </Configuration>, as shown in the following
example.
<Configuration Product="ProPlus">
<!-- <Display Level="full" CompletionNotice="yes" SuppressModal="no" AcceptEula="no" />
-->
<!-- <Logging Type="standard" Path="%temp%" Template="Microsoft Office Professional Plus
Setup(*).txt" /> -->
<!-- <USERNAME Value="Customer" /> -->
<!-- <COMPANYNAME Value="MyCompany" /> -->
<!-- <INSTALLLOCATION Value="%programfiles%\Microsoft Office" /> -->
<!-- <LIS CACHEACTION="CacheOnly" /> -->
<!-- <LIS SOURCELIST="\\server1\share\Office;\\server2\share\Office" /> -->
<!-- <DistributionPoint Location="\\server\share\Office" /> -->
<!-- <OptionState Id="OptionID" State="absent" Children="force" /> -->
<!-- <Setting Id="SETUP_REBOOT" Value="IfNeeded" /> -->
<!-- <Command Path="%windir%\system32\msiexec.exe" Args="/i \\server\share\my.msi"
QuietArg="/q" ChainPosition="after" Execute="install" /> -->
</Configuration>
Comments can be added anywhere and are delimited by "<!--" and "-->".
For example:
<!-- Configure install options for Microsoft Office Professional Plus 2010 -->
<Configuration Product="ProPlus" >
<Display
<!-- Turn off all Setup UI and prevent prompting users-->
Level="none"
CompletionNotice="no"
SuppressModal="yes"
<!-- Accept the EULA for the user -->
AcceptEula="Yes"
/>
</Configuration>
Each Office product folder contains a default Config.xml file, which consists of a Configuration element
that has the Product attribute set to the appropriate value for the product. Configuration element
includes several examples of elements that are enclosed in comments. To activate these elements,
remove the beginning and closing comment marks and enter the appropriate attribute values.
As shown in the following example, you can activate the Display element by changing this line:
<!-- <Display Level="full" CompletionNotice="yes" SuppressModal="no" AcceptEula="no" /> -->
to this:
<Display Level="none" CompletionNotice="no" SuppressModal="yes" AcceptEula="yes" />

62
The Display options in the previous example direct Setup to run a silent installation, to prevent users
from being prompted to enter information, and to prevent the installation from waiting for any user
interaction.
Config.xml element reference The following conventions are used in the descriptions in this reference.
Formatting conventions
bold Element or attribute name
normal Text to be entered exactly as shown
italic Placeholder for a value to be added
x|y Choose among multiple values
[x] Optional value
Configuration element
Top-level element. This element is required, and all other elements must appear in this element.
Syntax
<Configuration [Product="productID"] >
...
</Configuration>
Attributes
The following table describes Configuration element attributes and values.
Configuration element attributes
Attribute Value Description
Product productID The value of the ID attribute in the
Setup element in the Setup.xml file
for the product that is being installed.
63
Remarks
The Product attribute identifies the product affected by this Config.xml file. The productID is defined in
the Setup.xml file that is located in the core folder for the product, in the ID attribute of the Setup
element.
The Product attribute is optional, unless you set the Display element Level attribute to “basic” or
“none”. In this case, the Product attribute is required. If the product specified by the Product attribute
does not exist in the network installation point, Setup ends the installation.
Example
The productID for Office Professional Plus 2013 Preview is located in ProPlus.WW\Setup.xml in the
following line:
<Setup Id="ProPlus" Type="Product" ... >
You use this productID in Config.xml to specify Office Professional Plus 2013 Preview by entering the
following line:
<Configuration Product="ProPlus">
...
</Configuration>
AddLanguage element
Adds the specified language to the installation.
Syntax
<AddLanguage
Id="ll-cc" | "match"
[ShellTransform="Yes"]
/>
Attributes
The following table describes AddLanguage element attributes and values.
AddLanguage attributes
Attribute Value Description
Id ll-cc The language identifier.
match Matches the language Id of the user's
Windows user locale.
ShellTransform Yes Specifies the language for the shell user
interface. If more than one
64
Attribute Value Description
AddLanguage element is specified, one
(and only one) language must specify
the ShellTransform element.
Remarks
The language must be available on the network installation point.
You can have multiple elements for AddLanguage and RemoveLanguage element. If both the
RemoveLanguage element and the AddLanguage element specify the same language, the
AddLanguage element takes precedence and the language is installed.
Note:
If more than one AddLanguage element is specified, one (and only one) language must
specify the ShellTransform element or Setup ends the installation.
There are three language concepts that you should know about when you install the Office 2013
Preview:
Setup user interface (UI): the language of the installation.
Shell UI: the language of shortcuts, right-click context menus, and tooltips.
Office UI: the language of the Office user interface and menus.
When there are multiple Office languages, these three values are determined as follows:
By default, the Setup UI depends on the set of available resources for installation and the ability to
match the user locale. By default, the Setup UI matches the user locale. The Shell UI depends on the
set of languages that is being installed and, by default, follows the Setup UI. The default Office UI
language depends on the user locale and current user settings. The default is to use the Windows user
locale set on each user's computer. This means that in the default case, the Setup UI, Shell UI, and
Office UI will all be the same.
A locale in the Windows operating system is a set of user preference information related to the user's
language, environment, and cultural conventions. This information is represented as a list of values that
are used to determine the correct input language, keyboard layout, sorting order, and the formats that
are used for numbers, dates, currencies, and time. The user locale is a per-user setting that determines
the formats that are used, by default, to display dates, times, currency, and numbers, and the sorting
order of text. A user locale is specified for each account that is created on a computer.
If an administrator specifies multiple languages for installation in the Config.xml file, the Shell UI
language must be selected from the set of languages that are being installed. To do this, administrators
specify the ShellTransform attribute of the AddLanguage element in the Config.xml file.
AddLanguage specifies the language that Setup uses for the Shell UI. However, this does not
necessarily affect the choice of Setup UI or Office UI when it is installed on the user’s computer.
For example, if you have an Office image with English, French, German, and Spanish, to specify that
Setup install full language support for all these languages and have the Shell UI follow the user’s
default regional options, you add the following elements in the Config.xml file.
<AddLanguage Id="match" ShellTransform="yes"/> <AddLanguage Id="en-us" /> <AddLanguage
Id="fr-fr" /> <AddLanguage Id="de-de" /> <AddLanguage Id="es-es" />

65
In the previous example, Setup installs all the specified languages and the Shell UI matches the
language of the user's locale. If more languages were available in the source image, the match value in
the previous example might install an additional language if the match language does not resolve to
one of the other four explicitly called-out languages. For instance, if Japanese was also included in the
source, this example would install Japanese in addition to the other four languages when it is installed
on a computer that has the user locale set to Japanese.
Example
<AddLanguage Id="en-us" ShellTransform="Yes" />
ARP element
Specifies values that control the text and behavior of Programs and Features in Control Panel for the
product.
Syntax
<ARP attribute="value" [attribute="value"] ... />
Attributes
The following table describes ARP element attributes and values.
ARP attributes
Attribute Value Description
ARPCOMMENTS text Additional text. Can be up
to 255 characters,
although all characters
might not be displayed.
ARPCONTACT text List of technical support
contacts.
ARPNOMODIFY Yes Prevents users from
changing the product
installation by making the
Change button
unavailable.
No (default) Allows users to modify the
product installation.
ARPNOREMOVE Yes Prevents users from
removing the product by
making the Remove
button unavailable.

66
Attribute Value Description
No (default) Allows users to remove the
product.
ARPURLINFOABOUT URL URL for the product's
home page.
ARPURLUPDATEINFO URL URL for information about
product updates.
ARPHELPLINK URL URL of a website where
users can receive
technical support.
ARPHELPTELEPHONE text Telephone numbers for
technical support.
Command element
Specifies a command line to run. For more information, see Remarks later in this article.
Tip:
The equivalent option in the OCT is Add installations and run programs.
Syntax
<Command
Path="path"
[QuietArg="arguments"]
[Args="args"]
[ChainPosition="Before" | "After"(default)]
[Wait="mseconds"]
[Execute="Install"(default) | "Uninstall"]
[Platform="x86"(default) | "x64"]
/>
Attributes
The following table describes the Command element attributes.

67
Command attributes
Attribute Value Description
Path path Fully qualified path of the executable file. If
the path value contains a space, you must
use double quotation marks as shown in the
following example:
"\\server\share\Office 14\copylogs.bat"
QuietArg string String of arguments to be appended to the
command line if you configure a silent
installation. For more information about
when to use the QuietArg attribute, see the
Remarks section that follows this table.
Args string String of arguments to be passed to the
executable. For information about when to
use the Args attribute for chained
installations, see the Remarks section,
following this table.
If the value of the Args element includes
quotation marks, you can enclose the whole
value in single (') quotation marks, as shown
in the following example:
Args='"/param value"'
ChainPosition Before This command is executed before the
primary product installation.
After (default) This command is executed after the primary
product installation.
Wait mseconds When you install a product with the Display
element Level attribute set to "full" or
“basic,” this is the number of milliseconds to
wait after you run the program before you
continue the installation. The default is 0
(zero), which indicates no waiting.
Execute Install (default) Setup executes this command when the
primary product is installed.
Uninstall Setup executes this command when the
primary product is uninstalled.
Platform x86 (default) Specifies that this program requires the Intel
68
Attribute Value Description
x86 platform. This command runs only if the
computer on which the installation is run
matches this platform requirement.
x64 Specifies that this program requires a 64-bit
processor that supports the x64 extensions
to the x86 architecture. This command runs
only if the computer on which the installation
is run matches this platform requirement.
Remarks
The Command element in the Config.xml file and the Add installations and run programs option in
the OCT (command-lines entered in the Add Program Entry and Modify Program Entry dialog
boxes) are intended to be used only for initial product installations and uninstallations. The Command
element commands are processed only during initial installations and uninstallations. If Command
element commands are used for customizations after the initial installation, they are ignored.
The command line can be specified to run an arbitrary command or to run a lightweight executable that
you want to run when this product is installed.
The Command element in Config.xml and the Add installations and run programs option in the OCT
do not provide the software deployment capabilities that an enterprise software deployment and
management tool provides, such as the ability to track deployment progress and troubleshoot problems.
Therefore, we recommend that you use the Command element in Config.xml and Add installations
and run programs in the OCT to run only lightweight executables or arbitrary commands that will not
change the computer or that do not require user input. For example, you can run a utility to copy logs or
a command to launch a Welcome page at the end of installation.
Important:
Chaining is not as reliable as installing each product separately. For example, if you chain two
installations together and one of the products fails or encounters an unexpected error, the
primary installation and the chained installation might not be completed successfully. Therefore,
we recommend that you do not use the chaining approach. The recommended method for
installing multiple products together in enterprise environments is to use a deployment
management program, such as Microsoft System Center 2012 Configuration Manager or
Microsoft Systems Management Server (SMS) 2003, or a third party tool, instead of chaining.
The use of Args and QuietArg is as follows:
The Args attribute is always appended to the command. This can include switches such as
"/install" or "Company=MyCorporation."
The QuietArg attribute is also appended if setup is running silently (with Display set as
Display="none"). In such cases, you can specify the QuietArg attribute by using the "/quiet"
switch, for example, you can use: QuietArg="/quiet".
The following statements apply to the Wait attribute:

69
Setting the Wait attribute to 0 milliseconds indicates no waiting after you run the program before
you continue the installation. The command will execute and move on immediately.
Return codes are only respected if the Wait value is nonzero. If you specify 0, Setup will not wait to
continue the installation after it runs the specified program. Therefore,, there is no return code to
report in that case.
Setting the Wait attribute to any positive nonzero value will wait exactly the number of milliseconds
you specify. If the process ends earlier than the specified time, setup will continue. If the process
has not ended when the specified time is up, setup will fail.
Setting the Wait attribute to -1 indicates to wait indefinitely. This can be problematic because if the
command process stops responding (hangs), setup will stop responding and will wait indefinitely for
the command to run.
If there are two or more Command elements in the Config.xml file, they run in the order in which they
are specified in Config.xml.
Examples
<Command Path="\\server\share\myscript.exe" Args='/id "123 abc"' QuietArg="/q" Wait="30000"
/>
COMPANYNAME element
The name of the organization or company of the user on whose computer the product is being installed.
Tip:
The equivalent option in the OCT is the Organization name setting in Installation location and
organization name.
Syntax
<COMPANYNAME Value="companyname" />
Attributes
The following table describes COMPANYNAME element attributes and values.
COMPANYNAME attributes
Attribute Value Description
Value companyname The company or organization
name.

70
Example
<COMPANYNAME Value="Microsoft Corporation" />
Display element
The level of UI that Setup displays to the user.
Tip:
The equivalent option in the OCT is the Display level and license agreement settings in
“Licensing and user interface” in Office Customization Tool (OCT) in Office 2013 Preview.
Syntax
<Display
Level="None" | "Basic" | "Full"(default)
CompletionNotice="Yes" | "No"(default)
SuppressModal="Yes" | "No"(default)
NoCancel="Yes" | "No"(default)
AcceptEula="Yes" | "No"(default)
/>
Attributes
The following table describes Display element attributes and values.
Display attributes
Attribute Value Description
Level None No Setup UI is displayed. If you set
Display Level="none", Setup
runs a silent (unattended)
installation. See the Remarks
section for more information.
Basic Setup displays a Welcome screen,
the product key (PIDKEY) page (if
it is needed), the software license
terms page (if you need it), a
progress bar, and the completion
notice (if it is allowed).
Full (default) Setup displays all UI to the user.
CompletionNotice Yes Only applies if Level is set to
"basic" or “none”: Setup displays
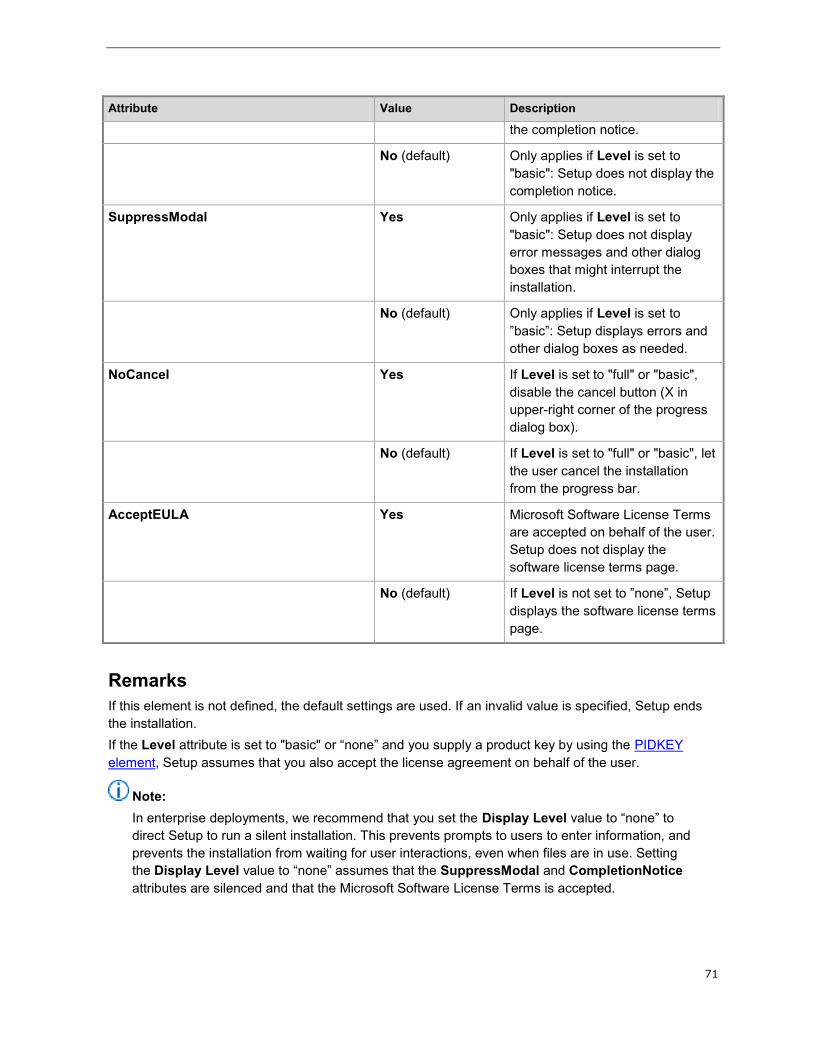
71
Attribute Value Description
the completion notice.
No (default) Only applies if Level is set to
"basic": Setup does not display the
completion notice.
SuppressModal Yes Only applies if Level is set to
"basic": Setup does not display
error messages and other dialog
boxes that might interrupt the
installation.
No (default) Only applies if Level is set to
”basic”: Setup displays errors and
other dialog boxes as needed.
NoCancel Yes If Level is set to "full" or "basic",
disable the cancel button (X in
upper-right corner of the progress
dialog box).
No (default) If Level is set to "full" or "basic", let
the user cancel the installation
from the progress bar.
AcceptEULA Yes Microsoft Software License Terms
are accepted on behalf of the user.
Setup does not display the
software license terms page.
No (default) If Level is not set to ”none”, Setup
displays the software license terms
page.
Remarks
If this element is not defined, the default settings are used. If an invalid value is specified, Setup ends
the installation.
If the Level attribute is set to "basic" or “none” and you supply a product key by using the PIDKEY
element, Setup assumes that you also accept the license agreement on behalf of the user.
Note:
In enterprise deployments, we recommend that you set the Display Level value to “none” to
direct Setup to run a silent installation. This prevents prompts to users to enter information, and
prevents the installation from waiting for user interactions, even when files are in use. Setting
the Display Level value to “none” assumes that the SuppressModal and CompletionNotice
attributes are silenced and that the Microsoft Software License Terms is accepted.
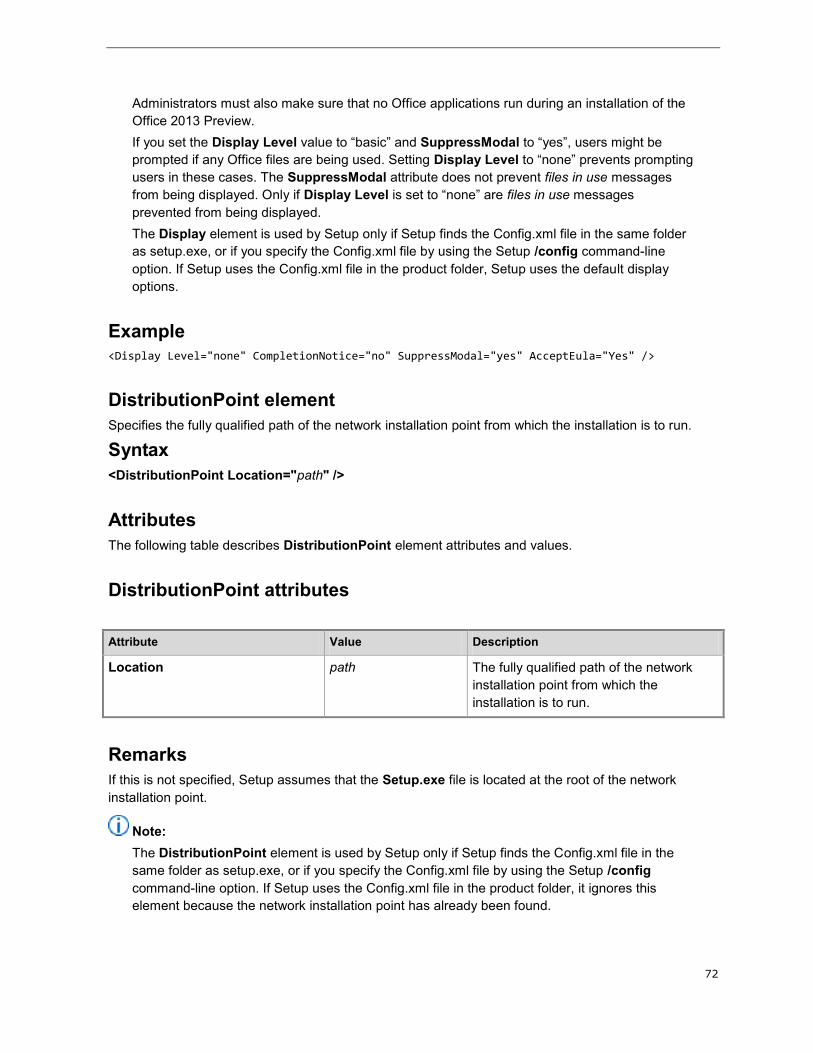
72
Administrators must also make sure that no Office applications run during an installation of the
Office 2013 Preview.
If you set the Display Level value to “basic” and SuppressModal to “yes”, users might be
prompted if any Office files are being used. Setting Display Level to “none” prevents prompting
users in these cases. The SuppressModal attribute does not prevent files in use messages
from being displayed. Only if Display Level is set to “none” are files in use messages
prevented from being displayed.
The Display element is used by Setup only if Setup finds the Config.xml file in the same folder
as setup.exe, or if you specify the Config.xml file by using the Setup /config command-line
option. If Setup uses the Config.xml file in the product folder, Setup uses the default display
options.
Example
<Display Level="none" CompletionNotice="no" SuppressModal="yes" AcceptEula="Yes" />
DistributionPoint element
Specifies the fully qualified path of the network installation point from which the installation is to run.
Syntax
<DistributionPoint Location="path" />
Attributes
The following table describes DistributionPoint element attributes and values.
DistributionPoint attributes
Attribute Value Description
Location path The fully qualified path of the network
installation point from which the
installation is to run.
Remarks
If this is not specified, Setup assumes that the Setup.exe file is located at the root of the network
installation point.
Note:
The DistributionPoint element is used by Setup only if Setup finds the Config.xml file in the
same folder as setup.exe, or if you specify the Config.xml file by using the Setup /config
command-line option. If Setup uses the Config.xml file in the product folder, it ignores this
element because the network installation point has already been found.

73
Example
<DistributionPoint Location="\\server1\office" />
INSTALLLOCATION element
Specifies the fully qualified path of the folder on the user's computer where the product is installed.
Tip:
The equivalent option in the OCT is the Default installation path setting in Installation location
and organization name.
Syntax
<INSTALLLOCATION Value="path" />
Attributes
The following table describes INSTALLLOCATION element attributes and values.
INSTALLLOCATION attributes
Attribute Value Description
Value path The fully qualified path of the folder on the
user's computer in which the product is
installed.
Remarks
You can use system environment variables in the path. If this element is not specified, Office is installed
in %ProgramFiles%\Microsoft Office.
Example
<INSTALLLOCATION Value="%ProgramFiles%\MyApps" />
LIS element
Controls how the Local Installation Source (LIS) is cached on the user's computer and specifies the
location of one or more network installation points that contain the installation files for the product.
Syntax
<LIS
[CACHEACTION="CacheOnly" | "RemoveCacheOnly"]
[SOURCELIST="semicolon-delimited-path-list"]
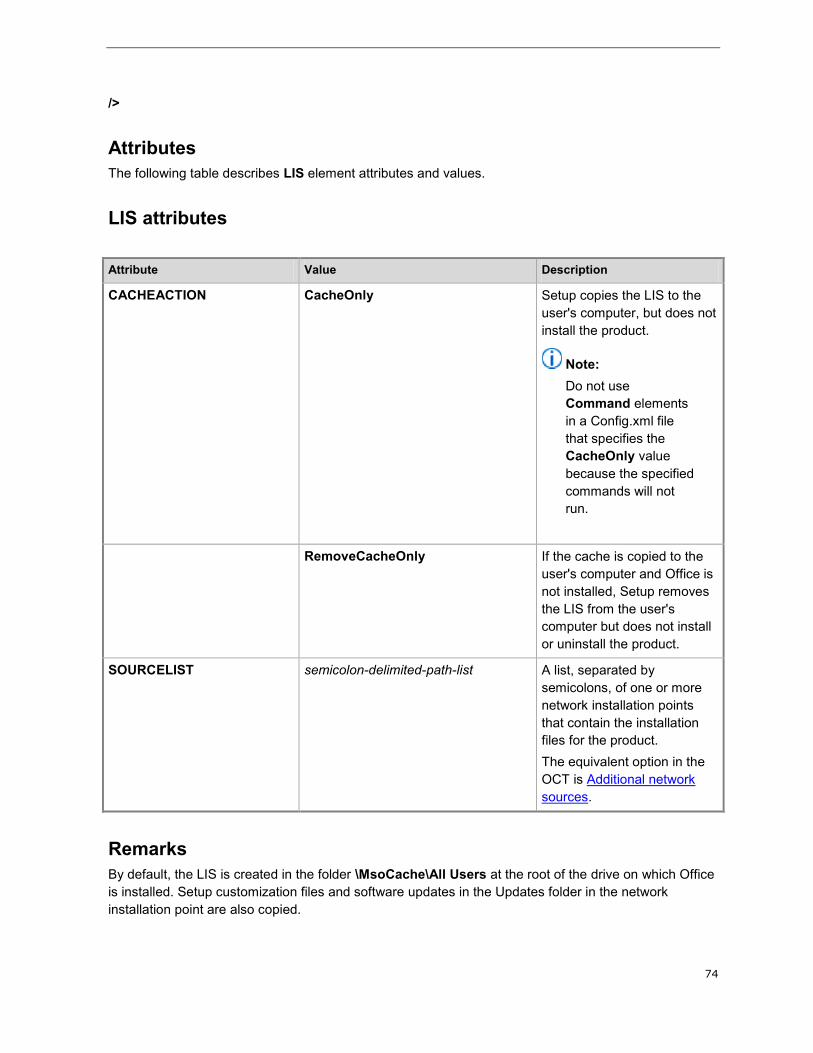
74
/>
Attributes
The following table describes LIS element attributes and values.
LIS attributes
Attribute Value Description
CACHEACTION CacheOnly Setup copies the LIS to the
user's computer, but does not
install the product.
Note:
Do not use
Command elements
in a Config.xml file
that specifies the
CacheOnly value
because the specified
commands will not
run.
RemoveCacheOnly If the cache is copied to the
user's computer and Office is
not installed, Setup removes
the LIS from the user's
computer but does not install
or uninstall the product.
SOURCELIST semicolon-delimited-path-list A list, separated by
semicolons, of one or more
network installation points
that contain the installation
files for the product.
The equivalent option in the
OCT is Additional network
sources.
Remarks
By default, the LIS is created in the folder \MsoCache\All Users at the root of the drive on which Office
is installed. Setup customization files and software updates in the Updates folder in the network
installation point are also copied.

75
If you specify INSTALLLOCATION element, the drive designation in the path is used to determine on
what drive the LIS is created. For example, if the INSTALLLOCATION element path is E:\office\files,
the LIS is created on drive E. The sources listed by the SOURCELIST attribute are kept with the
installed product and are used by Setup if the LIS on the user's computer is missing or corrupted.
Example
<LIS CACHEACTION="CacheOnly" />
<LIS SOURCELIST="\\server1\office;\\server2\corpdata" />
Logging element
Specifies the kind of logging that Setup performs.
Syntax
<Logging
Type="Off" | "Standard"(default) | "Verbose"
Path="path"
Template="filename.txt"
/>
Attributes
The following table describes Logging element attributes and values.
Logging attributes
Attribute Value Description
Type Off Setup performs no logging.
Standard (default) Setup writes installation information to the
log file.
Verbose Setup writes all installation information to
the log file.
Path path The fully qualified path of the folder used
for the log file. You can use environment
variables. Default is %temp%.
Template filename.txt The name of the log file. If you insert the
string * anywhere in the file name, a unique
log file is created for each installation
performed by setup.exe (see the
explanation later in this article). If the *
character is not included and the file name

76
Attribute Value Description
that is specified already exists, log
information is appended to the existing file.
The .txt file name extension must be
included. The default template is
SetupExe(*).log.
Remarks
You can specify a * anywhere in the Template value. Setup inserts a string in that location that has the
following format.
YYYYMMDDHHMMSSxxx
where:
1. YYYY = Year
2. MM = Month
3. DD = Day
4. HH = Hour
5. MM = Minute
6. SS = Seconds
7. xxx = a unique string generated by Setup
Note:
The Logging element is used by Setup only if Setup finds the Config.xml file in the same folder
as setup.exe, or if you specify the Config.xml file by using the Setup /config command-line
option. If Setup uses the Config.xml file in the product folder, Setup uses the default logging
options.
Example
<Logging Type="standard" Path="%temp%"
Template="MyLog(*).txt"
/>
In the following example, Setup creates a log file every time that it installs the product. Setup uses
unique file names such as the following:
%temp%\MyLog(20060428110717CFC).txt
%temp%\MyLog(20060429113143C70).txt
OptionState element
Specifies how specific product features are handled during installation.

77
Important:
In most situations, we recommend that you use the OCT to change the installation state of
features. The equivalent option in the OCT is Set feature installation states.
Syntax
<OptionState
Id="optionID"
State="Absent" | "Advertise" | "Local"
[Children="force"]
/>
Attributes
The following table describes OptionState element attributes and values.
OptionState attributes
Attribute Value Description
Id optionID An item that the user can choose to
install.
State Absent The feature is not installed.
Advertise The feature is installed the first time
that it is used.
Local The feature is installed on the
user's computer.
Children force All child features of the feature are
set to the specified state.
Remarks
A feature is an item that the user can choose to install. The Id value for a feature is defined in the
Option element of the Setup.xml file in the core product folder.
Note:
The following subcomponents of Publisher 2013 Preview are not visible in the Setup feature
installation state tree in Office 2013 Preview.
Commercial Printing and the Enhanced RGB to CMYK Conversion subcomponent
Font Schemes
PaperDirect Previews

78
Publisher Templates and the Business Publications and Other Publications subcomponents
Example
<OptionState Id="ExcelAddinFiles"
State="Absent"
Children="force"
/>
PIDKEY element
The 25-character volume license key.
Note:
The equivalent option in the OCT is the Product key setting in Licensing and user interface in
Office Customization Tool (OCT) in Office 2013 Preview. For more information about volume
licensing in Office Professional 2013 Preview, see Plan volume activation of Office 2013
Preview.
A product key entry is not required for enterprise deployments that use Key Management
Service (KMS) activation because all Volume License editions of Office 2013 Preview have a
KMS client key pre-installed. KMS is one of the methods that are provided by Office Activation
Technologies for activating products licensed under Microsoft Volume Licensing programs.
KMS uses a KMS host key to activate a KMS host computer and establish a local activation
service in your environment. Office 2013 Preview connects to the local KMS host for activation.
By default, the Use KMS client key option is selected in the OCT (in the Licensing and user
interface section).
A Multiple Activation Key (MAK) key is another method that Office Activation Technologies
provide for activating products licensed under Microsoft Volume Licensing programs. By using
a MAK, clients activate Office 2013 Preview online with Microsoft-hosted activation servers or
by telephone. Administrators can use the Config.xml file to enter a MAK key. See the Remarks
section for more information about how to add a MAK key.
Similar to KMS activation, which activates all Office Volume License clients that are connected
to a KMS host, Active Directory-Based Activation activates all Office Volume License clients in
an Active Directory domain. For more information about Active Directory-Based Activation, see
Active Directory-Based Activation Overview. For more information about volume activation, see
Plan volume activation of Office 2013 Preview.
Important:
This information applies to volume-licensed editions of Office 2013 Preview. It does not apply to
either Office Professional Plus for Office 365 or Office 365 ProPlus Preview, both of which are
licensed through subscription. The PIDKEY element must not be used to set product keys for
Office Professional Plus for Office 365. For information about Office Professional Plus for Office
365, see Overview of Office 365 ProPlus Preview.
Syntax
<PIDKEY Value="25-character-key" />

79
Attributes
The following table describes PIDKEY element attributes and values.
PIDKEY attributes
Attribute Value Description
Value 25-character-key The 25-character volume license
key.
Remarks
When the PIDKEY value is set, users are not required to enter a product key when they install Office.
To enter a MAK key in the Config.xml file, add the following line to the file.
<PIDKEY Value="AAAAABBBBBCCCCCDDDDDEEEEE" />
Where AAAAABBBBBCCCCCDDDDDEEEEE is the 25-character product key. For more information
about licensing for Office 2013 Preview, see the Office Activation Technologies guide.
Example
<PIDKEY Value="1234512345123451234512345" />
Note:
If the Level attribute of the Display element is set to "basic" or "none" and you supply a product
key by using the PIDKEY element, Setup assumes that you also accept the license agreement
on behalf of the user. In this case, regardless of how you set the AcceptEULA attribute of the
Display element, the user is not prompted for the license agreement either during installation or
the first time that an Office application runs.
RemoveLanguage element
Removes the specified language from the installation.
Syntax
<RemoveLanguage Id="ll-cc" />
Attributes
The following table describes RemoveLanguage element attributes and values.

80
RemoveLanguage attributes
Attribute Value Description
Id ll-cc The language identifier.
Remarks
If the language is not installed on the user's computer, the RemoveLanguage element is ignored.
You can have multiple elements for AddLanguage element and RemoveLanguage. If both
RemoveLanguage and AddLanguage element elements specify the same language, the AddLanguage
element element takes precedence and the language is installed.
Example
<RemoveLanguage Id="en-us" />
Setting element
Allows you to specify values for Windows Installer properties.
Tip:
The equivalent option in the OCT is “Modify Setup properties” in Office Customization Tool
(OCT) in Office 2013 Preview.
Syntax
<Setting Id="name" Value="value" />
Attributes
The following table describes Setting element attributes and values.
Setting attributes
Attribute Value Description
Id name The name of the Windows Installer
property.
Value value The value to assign to the property.
81
Remarks
Not all Windows Installer properties can be specified in the Setting element. If a blocked property is
specified, Setup ends the installation process. If a supported property is specified, Setup passes the
property directly to Windows Installer.
The Setting element supports the following Key Management System (KMS) properties:
KMSSERVICENAME — Specifies the KMS host name.
KMSSERVICEPORT — Specifies the KMS host port.
For example, to use the KMS properties, use the following syntax:
<Setting Id="KMSSERVICENAME" Value="contoso.com" />
<Setting Id="KMSSERVICEPORT" Value="1234" />
where:
contoso.com is the name of the KMS host
1234 is the port number value
Note:
The recommended tool for specifying the KMSSERVICENAME and KMSSERVICEPORT
values is the Office Software Protection Platform script (ospp.vbs). To set the KMS host name
and port values by using ospp.vbs, run the following commands:
ospp.vbs /sethst:value
ospp.vbs /setprt:value
In the preceding example, the sethst value is the KMS host name, and the setprt value is the
KMS host port.
Alternatively, you can set the KMS attributes in the Config.xml file, such as in a scenario that
has a 32-bit Office 2013 Preview installation on a computer that runs a 64-bit edition of
Windows. For information about volume activation, see Plan volume activation of Office 2013
Preview.
The Setting element supports the AUTO_ACTIVATE property for product key activation. This property
specifies that product activation occur automatically during Office 2013 Preview deployment and it uses
the following syntax.
<Setting Id="AUTO_ACTIVATE" Value="1" />
Note:
Not setting AUTO_ACTIVATE is the same as setting AUTO_ACTIVATE to a value of 0. The
result is that product activation does not occur during Office 2013 Preview deployment.
Note that you can also set the AUTO_ACTIVATE property value by using the Office
Customization Tool. To do this, follow these steps:
1. In the OCT, select Modify Setup properties on the navigation pane, and then click Add in the
details pane.
2. In the Add Property Value dialog box, in the Name box, type AUTO_ACTIVATE. Note that
property names must be uppercase.
82
3. In the Value box, type 1, and then click OK.
The Setting element supports the REMOVEPREVIOUS property. This property removes the specified
application from the installation and uses the following syntax.
<Setting Id="REMOVEPREVIOUS" Value="Option Id" />
where Option Id is the identifier value for the Office 2013 Preview application. To specify multiple
applications, use a comma-separated list to indicate the appropriate Option Id values.
Note:
If you install Outlook, a previously installed version of Outlook is always removed, regardless of
the user’s preference.
If you specify REMOVEPREVIOUS with an Option Id value, only the specified applications are
removed.
If you do not specify REMOVEPREVIOUS, any previously installed Office applications for which a
replacement is being installed are removed. This is the default behavior.
If you specify REMOVEPREVIOUS with a blank value (REMOVEPREVIOUS=""), no applications are
removed.
The Setting element also supports the SETUP_REBOOT property. SETUP_REBOOT begins a restart
after installation. It uses the following syntax. You must use all uppercase letters for the
SETUP_REBOOT property.
<Setting Id="SETUP_REBOOT" Value="value" />
where value can be one of the following:
AutoAlways — Always begin a restart. Do not prompt the user.
Always — Always prompt for a restart at the end of setup.
IfNeeded — Prompt for a restart at the end of setup if setup requires a restart. (Default)
AutoIfNeeded — Begin a restart if setup requires a restart. Do not prompt the user.
Never — Never begin or prompt for a restart.
Examples
<Setting Id="SETUP_REBOOT" Value="Never" />
<Setting Id="REMOVEPREVIOUS" Value="WORDFiles" />
SetupUpdates element
Specifies a search path for Setup to use to find Setup customization files.
Syntax
<SetupUpdates
[CheckForSUpdates="Yes"(default) | "No"]
[SUpdateLocation="path-list"]
/>

83
Attributes
The following table describes SetupUpdates element attributes and values.
SetupUpdates attributes
Attribute Value Description
CheckForSUpdates Yes (default) Setup uses the path list in
SUpdateLocation to find Setup
customization files.
No Setup does not search for Setup
customization files by using the path list in
SUpdateLocation.
SUpdateLocation path-list A list of fully qualified paths to folders,
separated by semicolons.
Note:
Environment variables cannot be
used in the SUpdateLocation
path. If an environment variable is
used in the path, Setup ignores
update files that are located in the
specified path location.
Remarks
Setup looks in all the specified folders for Setup customization files that were created for the product
that is being installed, and applies them in alphabetical order by file name. If a Setup customization file
was specified in the Setup command line, that file is applied first, followed by any files that are found in
the folder that is specified by this element.
Example
<SetupUpdates
CheckForSUpdates="Yes"
SUpdateLocation="\\server1\office\updates;\\server2\corpdata\updates"
/>
USERINITIALS element
The initials of the user on whose computer the product is being installed.

84
Syntax
<USERINITIALS Value="value" />
Attributes
The following table describes USERINITIALS element attributes and values.
USERINITIALS attributes
Attribute Value Description
Value value The user's initials
Example
<USERINITIALS Value="JD" />
USERNAME element
The name of the user on whose computer the product is being installed.
Syntax
<USERNAME Value="value" />
Attributes
The following table describes USERNAME element attributes and values.
USERNAME attributes
Attribute Value Description
Value value The user's name.
Remarks
The Office 2013 Preview Username element data is populated as follows.
If the user who runs Office is the same user who installed Office, the Username and Initials supplied
during setup are used. The user is not prompted when Office first starts. This case is most popular for
home users who install Office themselves.

85
If the user who is running Office is not the same user who installed Office, Office prompts the user to
confirm his or her Username and Initials when Office first starts. This case is most popular in a
corporate environment, where an administrator installs Office for the user.
The value for the Username element shown to the user at first start time might be pre-populated with a
default value from a previously installed version of Office or from the currently logged-on user. Note that
the default value is not used unless it is confirmed by the user. If an earlier version of Office is installed
on the computer, the registry key that was created by the earlier version of Office is used. For example,
if the previous Office installation is Microsoft Office 2003, the registry key is provided at
HKEY_CURRENT_USER\Software\Microsoft\Office\11.0\Common\UserInfo.
Example
<USERNAME Value="John Doe" />
Sample Config.xml file
The following example shows a Config.xml file for a typical installation. The example uses the Office
Professional Plus 2013 Preview version of the product.
<Configuration Product="ProPlus">
<!-- <Display Level="full" CompletionNotice="yes" SuppressModal="no" AcceptEula="no" /> -->
<!-- <Logging Type="standard" Path="%temp%" Template="Microsoft Office Professional Plus
Setup(*).txt" /> -->
<!-- <USERNAME Value="Customer" /> -->
<!-- <COMPANYNAME Value="MyCompany" /> -->
<!-- <INSTALLLOCATION Value="%programfiles%\Microsoft Office" /> -->
<!-- <LIS CACHEACTION="CacheOnly" /> -->
<!-- <LIS SOURCELIST="\\server1\share\Office;\\server2\share\Office" /> -->
<!-- <DistributionPoint Location="\\server\share\Office" /> -->
<!-- <OptionState Id="OptionID" State="absent" Children="force" /> -->
<!-- <Setting Id="SETUP_REBOOT" Value="IfNeeded" /> -->
<!-- <Command Path="%windir%\system32\msiexec.exe" Args="/i \\server\share\my.msi"
QuietArg="/q" ChainPosition="after" Execute="install" /> -->
</Configuration>

86
Setup command-line options for Office 2013 Preview
Audience: IT Professionals
The Setup.exe command line is used for very few operations in Office 2013 Preview (just as in Office
2010 and Microsoft Office 2007). Setup recognizes the command-line options that are described in this
article.
In this article:
/admin
/adminfile [path]
/config [path]
/modify [ProductID]
/repair [ProductID]
/uninstall [ProductID]
Note:
Although Setup recognizes only a few command-line options in Office 2013 Preview, you can
still make all the same changes to the Office installation. Instead of using the command line,
you use the Office Customization Tool (OCT) in Office 2013 Preview to set Setup properties
and make other customizations. You can also edit the Config.xml file for the product that you
are installing.
/admin Runs the Office Customization Tool to create a Setup customization file (.msp file).
Example
\\server\share\Office15\setup.exe /admin
/adminfile [path] Applies the specified Setup customization file to the installation. You can specify a path of a specific
customization file (.msp file) or to the folder where you store customization files.
Note:
The /adminfile command-line option can be used only during initial installation of the product.
The recommended location for customization files is the Updates folder at the root of the network
installation point. When you store a customization file in this folder, you do not have to specify the file
on the command line. Setup automatically finds the customization file that matches the product that is

87
being installed and applies the file during the installation. The Updates folder can only be used to
deploy software updates during an initial installation of Office 2013 Preview.
If you store more than one customization file per product in the Updates folder, Setup applies all the
files to the installation. If you want to create unique configurations for different groups of users, you
must store the customization files in a separate folder and specify the customization file that you want
on the command line.
Example
\\server\share\Office15\setup.exe /adminfile \\server\share\MyUpdates\Engineering.msp
where Office15 is the root of the network installation point.
/config [path] Specifies the Config.xml file that Setup uses during the installation. By default, the Config.xml file that is
stored in the core product folder directs Setup to install that product. For example, the Config.xml file in
the ProPlus.WW folder installs Office Professional Plus 2013 Preview.
You can edit Config.xml to make additional customizations to the installation. This includes specifying
one or more language versions to install. Use /config on the Setup command line to point to the
location of the default Config.xml file for a product or to point to a custom Config.xml file.
Example
\\server\share\Office15\setup.exe /config \\server\share\Office15\ProPlus.WW\Config.xml
where Office15 is the root of the network installation point.
Note:
You must use a fully qualified path. Setup does not recognize relative paths with /config.
/modify [ProductID] Used with a modified Config.xml file to run Setup in maintenance mode and make changes to an
existing Office installation. For example, you can use the /modify option to add or remove features.
Look up the value of [ProductID] in the Setup.xml file for the product that you want to modify.
The Setup.xml file is located in the core product folder on the network installation point. In Setup.xml,
[ProductID] is equal to the value of the Id attribute of the Setup element. For example:
<Setup Id="ProPlus" Type="Product" ProductCode="{20150000-0011-0000-0000-0000000FF1CE}">
Example
\\server\share\Office15\setup.exe /modify ProPlus /config
\\server\share\Office15\AddOutlookConfig.xml
where Office15 is the root of the network installation point.
88
/repair [ProductID] Runs Setup to repair the specified product from the user’s computer. Look up the value of [ProductID]
in the Setup.xml file for the product that you want to modify.
Example
\\server\share\Office15\setup.exe /repair ProPlus
where:
Office15 is the root of the network installation point.
ProPlus is the [ProductID] ([ProductID] is equal to the ID attribute of the Setup element listed in
\\server\share\Office15\ProPlus.WW\setup.xml), where ProPlus.WW is the location of the Office
Professional Plus 2013 Preview installation files.
You can customize the /repair option by using it with /config and a modified Config.xml file. This is
necessary if you want to run a “silent” repair. In enterprise deployments, we recommend that you run a
silent repair to prevent prompting users to enter information, and to prevent the installation from waiting
for user interactions, even when files are being used.
To run a silent repair
1. Using a text editor, edit the following element attributes in the
\\server\share\Office15\ProPlus.WW\SilentRepairConfig.xml file:
<Configuration Product="ProPlus">
<Display Level="none" CompletionNotice="no" SuppressModal="yes" AcceptEula="yes" />
</Configuration>
i. At the command line, use the following syntax:
\\server\share\Office15\setup.exe /repair ProPlus
/config \\server\share\Office15\ProPlus.WW\SilentRepairConfig.xml
/uninstall [ProductID] Runs Setup to remove the specified product from the user’s computer. Look up the value of
[ProductID] in the Setup.xml file for the product that you want to modify.
Example
\\server\share\Office15\setup.exe /uninstall ProPlus
where:
Office15 is the root of the network installation point.

89
ProPlus is the [ProductID] ([ProductID] is equal to the ID attribute of the Setup element listed in
\\server\share\Office15\ProPlus.WW\setup.xml), where ProPlus.WW is the location of the Office
Professional Plus 2013 Preview installation files.
You can customize the /uninstall option by using it with /config and a modified Config.xml file. This is
necessary if you want to run a “silent” uninstall. In enterprise deployments, we recommend that you run
a silent uninstall to prevent prompting users to enter information, and to prevent the installation from
waiting for user interactions, even when files are being used.
To run a silent uninstall
1. Using a text editor, edit the following element attributes in the
\\server\share\Office15\ProPlus.WW\SilentUninstallConfig.xml file:
<Configuration Product="ProPlus">
<Display Level="none" CompletionNotice="no" SuppressModal="yes" AcceptEula="yes" />
</Configuration>
i. At the command line, use the following syntax:
\\server\share\Office15\setup.exe /uninstall ProPlus
/config \\server\share\Office15\ProPlus.WW\SilentUninstallConfig.xml
Note:
In Office 2013 Preview, just as in Office 2010 and Office 2007, you cannot use the Setup.exe
command line to set Windows Installer properties, such as PIDKEY or DISPLAY. Setup does
not pass these properties to Windows Installer. Instead, you make these customizations by
using the Office Customization Tool or Config.xml. For a complete list of Setup properties,
including blocked and unsupported properties, see Setup properties in Office 2010. The
information also applies to Office 2013 Preview.
90
Customize the Accessibility Checker for Office 2013 Preview
The Accessibility Checker in Office 2013 Preview lets users create more accessible documents for
people who have disabilities. The Accessibility Checker (like a spelling checker, but for accessibility
issues) is a core feature of Excel 2013 Preview, PowerPoint 2013 Preview, and Word 2013 Preview.
Audience: IT Professionals
In this article:
Increase the visibility of violations
Control what the checker reports
Increase the visibility of violations The settings that are provided in Control what the checker reports later in this article are used to control
the Accessibility Checker. Of these settings, most are about stopping the Accessibility Checker from
performing a particular check.
The policy setting Increase the visibility of Accessibility Checker violations controls how strongly
an accessibility error will be emphasized in the user interface. If enabled, you can specify what happens
when a document, workbook, or spreadsheet has accessibility errors, as shown here:
Accessibility violations do not change the Prepare for Distribution area in the Office Backstage
view (default).
Accessibility errors cause the Prepare for Distribution area to be strongly emphasized in the
Backstage view.
Accessibility errors or warnings cause the Prepare for Distribution area to be less strongly
emphasized in the Backstage view.
If disabled or not configured, the Accessibility Checker user interface is presented in its normal state.
Important:
Group Policy settings can be used to control the Accessibility Checker. For Excel 2013
Preview, PowerPoint 2013 Preview, and Word 2013 Preview, the Group Policy settings are
located in the gpedit node <AppName>\File tab\Check Accessibility.
Control what the checker reports The following tables provide the complete Group Policy settings that can be used to control the
Accessibility Checker for Excel 2013 Preview, PowerPoint 2013 Preview, and Word 2013 Preview.

91
Group Policy settings for Excel 2013 Preview
Setting for Excel 2013
Preview
Associated registry key Description
Stop checking for alt text
accessibility information
AltText If enabled, the Accessibility
Checker does not
determine whether objects
such as images and shapes
contain alternative text.
If disabled or not
configured, objects are
checked for alternative text
and any issues that it finds
will appear in the
Accessibility Checker.
Stop checking for table
header accessibility
information
TableHeaders If enabled, the Accessibility
Checker does not
determine whether tables
have a header row
specified.
If disabled or not
configured, tables are
checked for header rows
and any issues that it finds
will appear in the
Accessibility Checker.
Stop checking to ensure
workbooks allow
programmatic access
ProgrammaticAccess If enabled, the Accessibility
Checker does not check
whether workbooks have
blocked programmatic
access through Digital
Rights Management (DRM).
If disabled or not
configured, workbooks are
checked for programmatic
access and any issues that
it finds will appear in the
Accessibility Checker.
Stop checking for merged
cells
MergedCells If enabled, the Accessibility
Checker does not check

92
Setting for Excel 2013
Preview
Associated registry key Description
whether tables have
merged cells.
If disabled or not
configured, worksheets are
checked for merged cells
and any issues that it finds
will appear in the
Accessibility Checker.
Stop checking to ensure
hyperlink text is meaningful
MeaningfulHyperlinks If enabled, the Accessibility
Checker does not check
whether hyperlinks have
meaningful text.
If disabled or not
configured, hyperlink text is
checked and any issues
that it finds will appear in
the Accessibility Checker.
Stop checking to ensure
non-default sheet names
SheetNames If enabled, the Accessibility
Checker does not check
whether worksheets with
content have non-default
names.
If disabled or not
configured, worksheet
names are checked and
any issues that it finds will
appear in the Accessibility
Checker.
Stop checking for blank
table rows used as
formatting
BlankTableRows If enabled, the Accessibility
Checker does not check
whether blank table rows
are used as formatting.
If disabled or not
configured, tables are
checked for blank rows and
any issues that it finds will
appear in the Accessibility
Checker.
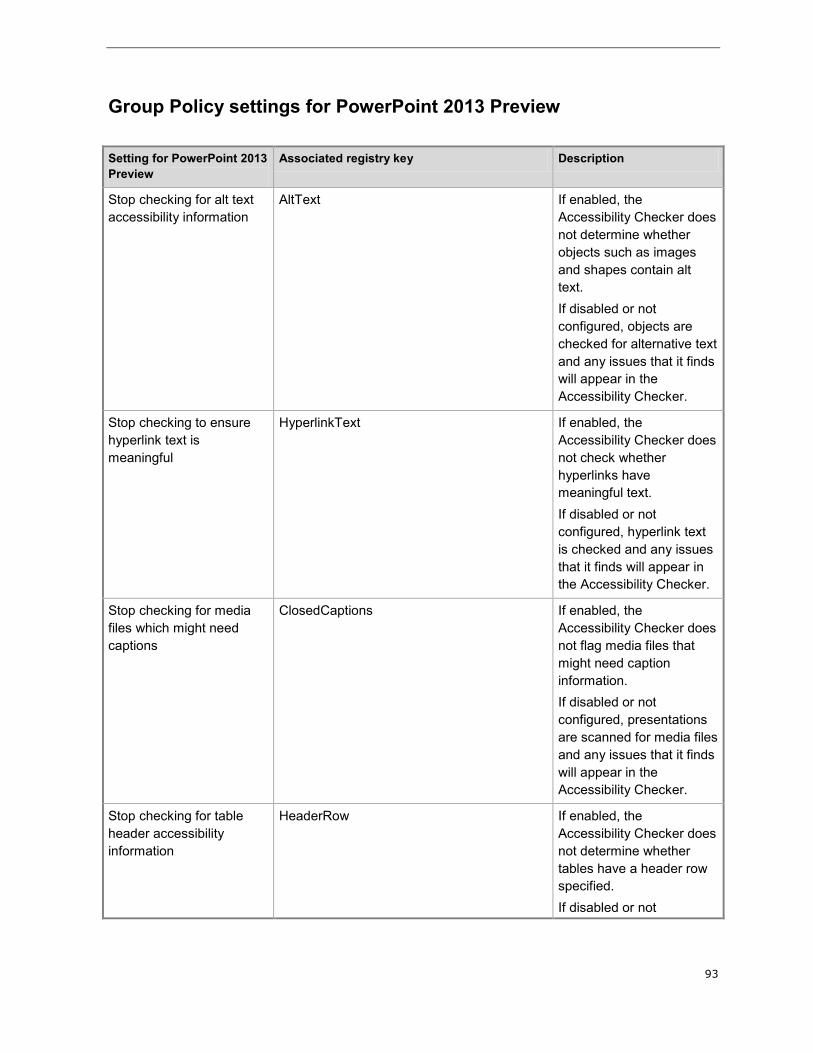
93
Group Policy settings for PowerPoint 2013 Preview
Setting for PowerPoint 2013
Preview
Associated registry key Description
Stop checking for alt text
accessibility information
AltText If enabled, the
Accessibility Checker does
not determine whether
objects such as images
and shapes contain alt
text.
If disabled or not
configured, objects are
checked for alternative text
and any issues that it finds
will appear in the
Accessibility Checker.
Stop checking to ensure
hyperlink text is
meaningful
HyperlinkText If enabled, the
Accessibility Checker does
not check whether
hyperlinks have
meaningful text.
If disabled or not
configured, hyperlink text
is checked and any issues
that it finds will appear in
the Accessibility Checker.
Stop checking for media
files which might need
captions
ClosedCaptions If enabled, the
Accessibility Checker does
not flag media files that
might need caption
information.
If disabled or not
configured, presentations
are scanned for media files
and any issues that it finds
will appear in the
Accessibility Checker.
Stop checking for table
header accessibility
information
HeaderRow If enabled, the
Accessibility Checker does
not determine whether
tables have a header row
specified.
If disabled or not

94
Setting for PowerPoint 2013
Preview
Associated registry key Description
configured, tables are
checked for header rows
and any issues that it finds
will appear in the
Accessibility Checker.
Stop checking for blank
table rows and columns
BlankRowCol If enabled, the
Accessibility Checker does
not determine whether
blank rows and blank
columns were inserted into
tables.
If disabled or not
configured, tables are
checked for blank rows
and blank columns and
any issues that it finds will
appear in the Accessibility
Checker.
Stop checking for merged
and split cells
SimpleStructure If enabled, the
Accessibility Checker does
not determine whether
tables have merged or split
cells.
If disabled or not
configured, tables are
checked for merged and
split cells and any issues
that it finds will appear in
the Accessibility Checker.
Stop checking that slide
titles exist
HasTitle If enabled, the
Accessibility Checker does
not determine whether
every slide has a title
placeholder.
If disabled or not
configured, slides are
checked for titles and any
issues that it finds will
appear in the Accessibility
Checker.
Stop checking to make UniqueTitle If enabled, the

95
Setting for PowerPoint 2013
Preview
Associated registry key Description
sure that each slide has a
unique title
Accessibility Checker does
not determine whether
every slide has a unique
title.
If disabled or not
configured, slide titles are
checked for uniqueness
and any issues that it finds
will appear in the
Accessibility Checker.
Stop checking to ensure a
meaningful order of
objects on slides
NonPlaceholderShapes If enabled, the
Accessibility Checker does
not check whether a slide
has non-placeholder
objects which might be
read back out of order.
If disabled or not
configured, slides are
checked for objects which
might be read back out of
order and any issues that it
finds will appear in the
Accessibility Checker.
Stop checking to ensure
presentations allow
programmatic access
IRM If enabled, the
Accessibility Checker does
not check whether
presentations have
blocked programmatic
access through DRM.
If disabled or not
configured, presentations
are checked for
programmatic access and
any issues that it finds will
appear in the Accessibility
Checker.

96
Group Policy settings for Word 2013 Preview
Setting for Word 2013 Preview Associated registry key Description
Stop checking for alt text
accessibility information
AltText If enabled, the Accessibility
Checker does not determine
whether objects such as images
and shapes contain alt text.
If disabled or not configured,
objects are checked for
alternative text and any issues
that it finds will appear in the
Accessibility Checker.
Stop checking to ensure
hyperlink text is meaningful
MeaningfulHyperlinks If enabled, the Accessibility
Checker does not determine
whether hyperlinks have
meaningful text.
If disabled or not configured,
hyperlink text is checked and any
issues that it finds will appear in
the Accessibility Checker.
Stop checking for table header
accessibility information
TableHeaders If enabled, the Accessibility
Checker does not determine
whether tables have a header
row specified.
If disabled or not configured,
tables are checked for header
rows and any issues that it finds
will appear in the Accessibility
Checker.
Stop checking for blank table
rows and columns
BlankTableCells If enabled, the Accessibility
Checker does not determine
whether blank rows and blank
columns were inserted into
tables.
If disabled or not configured,
tables are checked for blank
rows and blank columns and any
issues that it finds will appear in
the Accessibility Checker.

97
Setting for Word 2013 Preview Associated registry key Description
Stop checking for merged and
split cells
2DTableStructure If enabled, the Accessibility
Checker does not determine
whether tables have merged or
split cells.
If disabled or not configured,
tables are checked for merged
and split cells and any issues
that it finds will appear in the
Accessibility Checker.
Stop checking to ensure
documents allow programmatic
access
ProgrammaticAccess If enabled, the Accessibility
Checker does not check whether
documents have blocked
programmatic access through
DRM.
If disabled or not configured,
documents are checked for
programmatic access and any
issues that it finds will appear in
the Accessibility Checker.
Stop checking to ensure long
documents use styles for
structure
StylesAsStructure If enabled, the Accessibility
Checker does not check whether
long documents have used
styles to define content structure.
If disabled or not configured,
documents are checked for style
usage and any issues that it
finds will appear in the
Accessibility Checker.
Stop checking to ensure styles
have been used frequently
HeadingSpacing If enabled, the Accessibility
Checker does not check whether
documents that use styles have
used them frequently enough to
accurately represent the
document's content structure.
If disabled or not configured, the
frequency of style usage is
checked and any issues that it
finds will appear in the
Accessibility Checker.
Stop checking to ensure
headings are succinct
SuccinctHeadings If enabled, the Accessibility
Checker does not check whether
headings in a document are

98
Setting for Word 2013 Preview Associated registry key Description
succinct.
If disabled or not configured,
document headings are checked
for length and any issues that it
finds will appear in the
Accessibility Checker.
Stop checking whether objects
are floating
FloatingObjects If enabled, the Accessibility
Checker does not check whether
a document has objects that are
floating instead of inline.
If disabled or not configured,
objects are checked for floating
text wrapping properties and any
issues that it finds will appear in
the Accessibility Checker.
Stop checking whether blank
characters are used for
formatting
BlankCharacters If enabled, the Accessibility
Checker does not check whether
multiple consecutive white-space
characters are used for
formatting.
If disabled or not configured,
documents are checked for
consecutive white-space usage
and any issues that it finds will
appear in the Accessibility
Checker.
Stop checking for image
watermarks
ImageWatermarks If enabled, the Accessibility
Checker does not check whether
a document has image
watermarks.
If disabled or not configured,
documents are checked for
watermarks and any issues that
it finds will appear in the
Accessibility Checker.
Stop checking to ensure heading
styles do not skip style level
HeadingOrder If enabled, the Accessibility
Checker does not check whether
headings in a document are
used in order.
If disabled or not configured, the
ordering of headings in a
document is checked and any

99
Setting for Word 2013 Preview Associated registry key Description
issues that it finds will appear in
the Accessibility Checker.
Stop checking for tables used for
layout
LayoutTablesReadingOrder If enabled, the Accessibility
Checker does not flag layout
tables (that is, tables that have
no style applied).
If disabled or not configured,
tables that have no styles are
flagged and violations appear in
the Accessibility Checker.
100
Roll out Office 2013 Preview
Audience: IT Professionals
The following table lists and describes articles that will help you deploy Office 2013 Preview.
Articles about rolling out Office 2013 Preview
Article Description
Setup architecture overview for Office 2013
Preview
Provides information about the Windows Installer-
based Office 2013 Preview Setup architecture.

101
Setup architecture overview for Office 2013 Preview
Audience: IT Professionals
The Setup architecture in Office 2013 Preview, introduced in Microsoft Office 2007, streamlines all
aspects of installing, customizing, and maintaining Office.
The Setup program unifies and manages the complete installation process. This includes customizing
users' Office configuration, deploying multiple languages at the same time, and applying software
updates to new installations. This article provides an overview of the Setup architecture, Setup
sequence of events, language-neutral design and deployment of multiple languages, customization
methods, required local installation source, and updates process.
The Setup architecture helps administrators manage tasks such as the following more efficiently:
Deployment process so that Office is installed in the most efficient way for their environment.
Customization of Office so that users get optimal configuration on their computers.
Deployment of language-specific features for users who are located in offices around the world.
Deployment of Office in a way that makes future maintenance, such as software updates, as
efficient as possible.
In versions of Office earlier than Office 2007, a single Office product such as Microsoft Office Standard
was contained in a single Windows Installer (MSI) file. An MSI file is a relational database that Windows
Installer uses to install a product. As with the Office 2007 and Office 2010, the Office 2013 Preview
products consist of multiple MSI files, and no single MSI file represents a complete product. A
language-neutral core package (MSI file) is combined with one or more language-specific packages to
make a complete product. For example, an Office product such as Office Professional Plus 2013
Preview consists of the core package plus one or more language-specific packages. Setup assembles
the individual packages, orchestrates a seamless installation, and handles customization and
maintenance tasks during and after installation of Office on users' computers.
Office 2010 introduced native 64-bit versions of Office products to support 64-bit processors, which are
becoming the standard for systems ranging from servers to desktop computers. Office 2013 Preview
also provides support for 32-bit Office 2013 Preview applications that run on 64-bit Windows operating
systems by using Windows-32-on-Windows-64 (WOW64). WOW64 is the x86 emulator that enables
32-bit Windows-based applications to run seamlessly on 64-bit Windows. Office 2013 Preview lets
users continue to use existing third-party Office add-ons, which are primarily 32-bit because no 64-bit
versions are available yet for many add-ons. Providing support for 32-bit Office 2013 Preview that runs
on 64-bit operating systems prevents the 32-bit add-ons from being blocked. For more information
about 64-bit editions of Office 2013 Preview, see 64-bit editions of Office 2013.
In this article:
Setup process
Language-neutral design
Streamlined customization model
Required local installation source

102
Consolidated update process
Setup process Typically, the first step in a corporate installation of Office is to create a network installation point, a task
as easy as copying all files and folders from the Office product CD to a shared network location. At a
minimum, the network installation point contains the language-neutral core package plus language-
specific folders for one language. This installation point serves as the initial source for all users who
install Office.
In the simplest scenario, you deploy an Office product from the network installation point with one
language version and a single set of customizations for all users. Setup handles this scenario
automatically. If you deploy multiple products or languages, you can add them to the same network
installation point and specify exactly which products and languages to include in the installation. In all
these scenarios, Setup performs the same tasks to assemble the correct set of MSI files and complete
the installation.
Note:
The Office 2013 Preview does not let you create an administrative installation point by running
Setup with the /a command-line option to extract compressed source files, as was possible with
Office versions earlier than the 2007 Office system. All installations now occur from the
compressed source.
Setup sequence of events
The basic Setup sequence of events is as follows and occurs in the same order in every deployment
scenario:
1. Run Setup.
2. Check prerequisites.
3. Read XML data.
4. Build the feature tree.
5. Create a local installation source on the user's computer.
6. Install Office.
7. Apply the customization file.
8. Apply software updates.
Run Setup
Setup.exe is the program that begins all the mechanisms of the installation process. It is located at the
root of the network installation point. You run Setup one time for each Office product that you install.
When it runs, Setup searches the network installation point for an Office product to install. If the
installation point contains more than one Office product, Setup gives the user a choice of products to
install.

103
You can circumvent the selection process and determine which Office product is installed by pointing
Setup.exe to the Config.xml file in a core product folder. For example, if you want to install Office
Professional Plus 2013 Preview, you can use the following command line:
\\server\share\Office15ProPlus\setup.exe /config \\server\share
\Office15ProPlus\Pro.WW\Config.xml
where Office15ProPlus is the root of the network installation point.
In versions of Office earlier than Office 2007, Setup.exe called Windows Installer (Msiexec.exe) to
install Office. Although Setup still uses Windows Installer, Setup bypasses the Windows Installer
executable program. The Msiexec.exe command line cannot be used to install the Office 2013 Preview
(or Office 2007 or Office 2010).
Note:
This version of Setup.exe recognizes only a few command-line options.
Check prerequisites
When Setup starts, it checks for several installation prerequisites. This includes minimum operating
system requirements and administrative permissions. A user must be an administrator of the client
computer to install Office, or you must use a tool such as Microsoft System Center 2012 Configuration
Manager to run the installation by using elevated permissions.
When you run Setup.exe from the x64 folder, Setup determines whether there are 32-bit Office
applications installed. If Setup detects 32-bit Office applications, it displays an error message that
informs users that they must first uninstall all 32-bit Office applications if they want to continue with the
installation of Office 2013 Preview 64-bit. The error lists the installed 32-bit Office applications. If Setup
does not detect 32-bit Office applications, it installs the 64-bit edition of Office 2013 Preview.
When you run Setup.exe from the x32 folder, Setup determines whether there are 64-bit Office 2013
Preview applications installed. If Setup detects 64-bit Office 2013 Preview, an error message is
displayed and Setup is blocked. If Setup does not detect 64-bit Office 2013 Preview, it installs the 32-bit
edition of Office 2013 Preview. For more information, see Setup process in 64-bit editions of Office
2013.
Note:
To install Office on computers where users lack administrative permissions, you must run
Setup in a context that provides it with administrative permissions. After Office is installed,
users who do not have administrative permissions can run all installed features. This includes
installing features on demand.
For example, in organizations where users are not the administrators of their computers,
administrators can use the following methods of providing Office Setup with the appropriate
permissions:
Log on to the computer as an administrator and install Office 2013 Preview.
Use a software management tool, such as Microsoft Systems Management Server or System
Center 2012 Configuration Manager.
Deploy Office 2013 Preview to computers by using Group Policy computer startup scripts.

104
Read XML data
Setup collects information about each package on the installation point, collects default settings for the
installation, and incorporates customizations that you specify. Setup collects all this information in the
form of XML data from several sources:
Setup.xml and Package.xml files for each package Each folder on the installation point — both
the folder for the language-neutral core package and the folder for each language-specific
package — contains a Setup.xml and a Package.xml file (for example, ProPlusWW.xml for Office
Professional Plus 2013 Preview). Information in these files enables Setup to do the following:
Identify a product and the available languages for that product.
Match language-neutral and language-specific elements to create complete features.
Build a consolidated feature tree.
Collect the set of MSI files that are required for the installation.
Note:
The Setup.xml and Package.xml files are signed and cannot be changed. Altering
these files causes Setup to fail.
Setup customization file Early in the installation process, Setup determines whether you have
specified a Setup customization file (.msp file) for the product that is being installed. A Setup
customization .msp file is created when administrators use the Office Customization Tool (OCT) to
customize an installation of Office 2013 Preview. The OCT is part of the Setup program and is the
recommended tool for most customizations. The customization file contains all the modifications
that you specify for an installation. This includes customizations that control the installation process.
The OCT is available in volume licensed versions of Office 2013 Preview, Office 2010, and Office
2007. To determine whether your Office 2013 Preview installation is a volume licensed version,
check the Office 2013 Preview installation disk to see whether it contains a folder that is named
Admin. If the Admin folder exists, the disk is a volume license edition; otherwise, the disk is a retail
edition.
If no customization file is specified on the command line or in the Config.xml file, Setup searches
the Updates folder on the installation point for a customization file that is specific to the product that
is being installed. By default, the Updates folder is included on the installation point. In most cases,
it is the recommended location in which to store both a Setup customization .msp file and software
updates for all the Office products included on the installation point.
Important:
If you plan to deploy multiple Setup customization files (.msp files), you can place only one
customization .msp file in the Updates folder for each Office 2013 Preview product that you
are installing during the initial installation. Only one Setup customization .msp file (patch)
for each Office 2013 Preview product that you are installing is supported in the Updates
folder. You must deploy the rest of the customization .msp files for a product after the first
Office installation is completed.
If you are deploying multiple Office 2013 Preview products, such as Office Professional
Plus 2013 Preview and Visio Professional 2013 Preview, you can include one
customization .msp file for Office Professional Plus 2013 Preview and one customization
105
.msp file for Visio Professional 2013 Preview in the Updates folder. The customization .msp
files that you place in the Updates folder will be deployed first. Therefore, they must include
any Setup customizations that cannot be changed after the installation, for example, the
installation location.
If you are deploying an initial installation of Office 2013 Preview and you also want to
deploy Office 2013 Preview software updates, such as service packs and hotfixes, Setup
can apply the product updates as part of the installation process. You can place the Office
2013 Preview product updates in the Updates folder. In scenarios such as this where the
Updates folder includes both one Setup customization .msp file and product updates,
Setup applies only the Setup customization .msp file during the initial installation The
product updates are applied after the installation is complete.
Setup uses XML data that is appended to the customization file to determine how to install the
product. For example, it determines whether to run quietly and which features to display in the
feature tree. Settings in a customization file overwrite default settings contained in the Setup.xml
and Package.xml files.
For more information about Setup customization files, see Streamlined customization model. For
information about how to use the OCT, see Office Customization Tool (OCT) in Office 2013
Preview.
Config.xml file Each core product folder contains a Config.xml file that directs Setup to install that
product. You can edit Config.xml to customize the installation process. For example, you can use
elements in Config.xml to specify which products or languages to include in the installation.
Settings in Config.xml take precedence over settings in a customization file and default settings that
are contained in the Setup.xml and Package.xml files.
For more information about how and when to edit Config.xml, see Config.xml file in Office 2013
Preview.
Build the feature tree
Setup uses the information that is contained in the XML files to create a single feature tree that includes
all available applications and features in the product. You view the feature tree and specify which
applications and features to install on users' computers by using the Office Customization Tool. If you
let users run Setup interactively, they view the feature tree, which includes your modifications, in the
Setup user interface.
Create a local installation source on the user's computer
Setup calls a program named Office Source Engine (Ose.exe) to create a required local installation
source (LIS) on the user's computer. To create the local installation source, Setup copies files from the
installation point to a hidden folder on the user's computer. The default location is \MSOCache\All
Users at the root of the drive on which Office is installed. Later, Setup uses Windows Installer to install
Office from this local installation source.
The local installation source provides several important benefits:
After Office is installed, Setup can repair, reinstall, or add Office features by using the local source.

106
Users who apply software updates are less likely to be prompted for a network or CD source
because an installation source is available locally.
You can deploy the local installation source in advance and trigger the installation of Office on
users' computers later to reduce the load on the network. In this scenario, you can even run Setup
from the local installation source. This lets users complete the Office installation without using a
network connection.
For more information about the local installation source, see Required local installation source.
Install Office
When the installation starts, Setup checks for required disk space and feature dependencies, and then
calls Windows Installer to install the correct set of packages (MSI files) on the user's computer from the
local installation source. Setup uses the XML data that was described previously to determine which set
of MSI files to include. The progress bar that Setup displays to users during the installation takes the
whole installation process into consideration. This includes applying customizations and software
updates from the Updates folder.
Note:
Although Setup uses Windows Installer to install Office, Windows Installer alone cannot install
the individual MSI files independent of Setup.
Apply the customization file
During the installation process, Setup applies the customization file to the user's configuration. The
result resembles the effect of applying a Windows Installer transform (MST file) in earlier versions of
Office: your customizations become the default configuration for users. In addition to the XML data that
customizes the installation process, the customization file might include default user settings, feature
installation states, Outlook profiles, and other modifications to the user's configuration.
Customization files are product-specific; Setup applies only those files that are relevant to the product
being installed.
Note:
If you plan to deploy multiple Setup customization .msp files (patches), you can place only one
Setup customization .msp file for each Office 2013 Preview product in the Updates folder for an
initial installation. You must deploy the rest of the customization .msp files after the Office
installation is complete. Only one customization file for each product patch in the Updates
folder is supported. The customization .msp file that you place in the Updates folder will be
deployed first. Therefore, it must include any Setup customizations that cannot be changed
after the installation, for example, the installation location.
If you create different configurations for different groups of users, we recommend that you store the
customization files in another location and then use the /adminfile option on the Setup command line to
specify the file that you want. For example:
\\server\share\Office15\setup.exe /adminfile \\server\share\Office15\MyUpdates\Engineering.msp
where Office15 is the root of the network installation point.

107
Note:
When you precache the local installation source, Setup copies the Updates folder from the
network installation point to the local installation source. In this manner, your customizations
can be included in offline installation scenarios. This is the only circumstance in which Setup
caches the customization file on the local computer before the installation.
For more information, see Precache the local installation source for Office 2010. The
information also applies to Office 2013 Preview.
Apply software updates
At the end of the installation process, Setup checks the Updates folder on the installation point for
software updates (.msp files). Unlike Setup customization files that you create by using the Office
Customization Tool, software updates are distributed by Microsoft to enhance the product.
If you are deploying Office to users and you also have to deploy a set of software updates, Setup can
apply the updates as part of the initial installation process. Costing (estimated required disk space) and
progress bar indicators all take this step of the installation process into consideration. From a user's
perspective, the complete process is a single event. This model preserves the original installation point
and still lets you give new users the most up-to-date version of the product.
Note:
The Updates folder is used only for initial or new installations of Office 2013 Preview. The
Updates folder can contain only one Setup customization .msp flle, and multiple service packs
and hotfixes that are in .msp format only.
For more information about the software update process, see Consolidated update process.
Including more than one product on the installation point
If the network installation point contains more than one Office 2013 Preview product, Setup searches all
folders and subfolders for Config.xml and Setup.xml files and then prompts the user to select a product
to install.
If you are installing more than one Office product, it is more efficient to store all the products on the
same installation point and then customize Setup to install a specific Office product on users'
computers.
Note:
When you copy multiple Office products to the same installation point, you might be prompted
to overwrite shared Setup files. Because these files are duplicated among all Office 2013
Preview products, you do not have to recopy any of the duplicate folders. When you are
prompted to overwrite duplicate Setup files, choose No. This efficient design saves space and
ensures consistency when you create and replicate network installation points.

108
Running Setup interactively
You can choose to run the installation quietly so that users see little or none of the process. However, if
you let users view the Setup user interface, the choices that you make affect several aspects of Setup
behavior. For example:
If more than one Office product is available on the installation point and a user runs Setup.exe
without command-line options, Setup gives the user a choice of products to install.
If more than one language is available on the installation point, Setup matches the language of
Office to the Windows user locale on the user's computer. This is by default. However, if a user
selects the Customize installation option, the Languages tab in the Setup interface gives the user
a choice of all available languages on the network installation point.
If you enter a product key and accept the Microsoft Customer License Terms in the customization
file or Config.xml, those Setup screens are not displayed to the user during Setup.
Note:
A product key entry is not required for enterprise deployments that use Key Management
Service (KMS) activation because all Volume License editions of Office 2013 Preview have
a KMS client key pre-installed. KMS is one of the methods that are provided by Office
Activation Technologies for activating products that are licensed under Microsoft Volume
Licensing programs. A prompt for a product key does not occur for Volume License
editions of Office 2013 Preview, even when Setup runs in interactive mode. For more
information about volume activation, see Plan volume activation of Office 2013 Preview.
If you use a customization file to hide and lock certain features, those features are not displayed in
the feature tree.
To learn more about how to customize display settings, see Customize Setup before installing Office
2013.
Language-neutral design In Office 2013 Preview (and in Office 2010and Office 2007), an Office product such as Office
Professional Plus 2013 Preview is organized as follows:
Language-neutral elements are grouped in one core package (MSI file).
Language-specific elements are organized in separate packages by application.
This arrangement of files simplifies international deployments. The most basic installation of an Office
product consists of the core package plus one language. Adding more languages is as easy as copying
additional Single Language Packs (SLPs) to the network installation point — all work with the core
product in exactly the same way. All language versions of Office, including the English version, are
deployed in the same manner. Setup combines the language-neutral core package with the language-
specific packages in a seamless installation process.
Important:
The current Office 2013 Preview release includes English, Japanese, and Spanish language
sources only. Later releases will provide additional languages.
109
Language versions of Office
Every Office product must include at least one set of language-specific packages. You cannot deploy
just the core package (MSI file) by itself. On the Office product CD and the network installation point,
these language packages are contained in folders. Each folder name includes a language tag, in the
form ll-cc (for example, en-us for English U.S.), that identifies the language. Each folder also contains a
set of installation files.
For example, the Office Professional Plus 2013 Preview product is spread out among the files in these
folders. Elements that are not specific to any language, such as Winword.exe (the executable file for
Word 2013 Preview), are located in the core ProPlus.WW package. Other elements, such as Help and
the user interface for Word 2013 Preview, are located in the appropriate language-specific package for
Word or for shared Office features.
Both language-neutral and language-specific elements are required to make a functionally complete
feature. Winword.exe by itself does not represent a Word application that anyone can use. Similarly, the
core Office Professional Plus 2013 Preview MSI file in the ProPlus.WW folder does not represent a
complete Office product.
Setup assembles all these parts into a whole product. The Package.xml and Setup.xml files in each
folder contain information that Setup uses to assemble complete features, build a consolidated feature
tree, and collect the correct set of MSI files for the installation. After collecting the XML data and
assembling the required MSI files, Setup uses Windows Installer to install Office on the user's
computer. From a user's perspective, this process happens automatically and seamlessly.
You cannot deploy a specific application in Office 2013 Preview by detaching the language-specific
folder that contains the individual MSI file, such as the Word.en-us folder. However, you can determine
which applications and features are installed on users' computers by customizing the installation.
Note:
None of the MSI files on an Office installation point can be installed independently by using
Windows Installer or any other method. Also, none of the digitally signed XML files (Setup.xml
and Package.xml) can be edited or altered. In Office 2013 Preview, Setup is required to collect
the files and installation information and to orchestrate the installation process.
Language packs for Office
Language-specific packages are used in two contexts: in the language version of an Office product, and
in the Single Language Pack (SLP) for that language. For example, the Japanese version of Office
Professional Plus 2013 Preview includes a language-specific folder for each application and for shared
features in Office Professional Plus 2013 Preview. The same folders are included in the Japanese SLP,
which includes language-specific folders for other products in Office 2013 Preview.
Language packs can be deployed as separate products, or they can be used to deploy an Office
product in multiple languages. You are not required to enter a unique product key for language packs,
whether you are deploying them separately or as part of the installation of another product.
Note:
In versions of Office earlier than the Office 2007, enterprise customers added languages by
deploying Multilanguage User Interface (MUI) packs after a U.S. English version of Office was
installed. Localized versions, such as the Japanese version of Office Standard Edition, were

110
not identical to the core version with a Japanese MUI pack. This design was simplified and
improved in Office 2007 and is the same in Office 2013 Preview and Office 2010.
Streamlined customization model In versions of Office earlier than Office 2007, several tools were required to customize Setup and to
manage Office after installation. Office 2007 introduced a consistent, streamlined model. In Office 2013
Preview (as in the Office 2007 and Office 2010), administrators can use Setup to install, customize, and
manage Office. To enforce specific user and computer settings, administrators can use Group Policy
(see Using Group Policy).
Using the Office Customization Tool
You customize an Office installation by using the Office Customization Tool, a component of Setup,
which is included in volume licensed versions of Office 2013 Preview client. Start the OCT by running
Setup with the /admin command-line option. By using the OCT, create a Setup customization file (.msp
file), which you place in the Updates folder in the network installation point. The Updates folder is used
only for initial or new installations of Office 2013 Preview (and Office 2010 and Office 2007), and only
one customization patch in the Updates folder is supported.
A Setup customization file is an expanded form of a Windows Installer .msp file. Each file is configured
for a specific product, such as Office Professional Plus 2013 Preview or OneNote 2013 Preview. When
you run Setup to install an Office product, Setup looks in the Updates folder for a customization file that
corresponds to the product that you are installing. As Setup installs the product, it applies the
customizations from this file.
You can create more than one Setup customization file to configure Office for different groups of users.
When you run Setup, you specify the appropriate customization file to use for each installation by using
the Setup command-line option /adminfile, or by using Config.xml (see Using the Config.xml file to
customize Office).
For complete details on how to use the OCT to create a Setup customization file, see Office
Customization Tool (OCT) in Office 2013 Preview.
Customizing a new installation
By using a Setup customization file that you create with the OCT, you can modify the way Setup installs
Office on a user's computer the first time. For example, the OCT lets you customize Office in the
following ways:
Direct Setup to run without user interaction (quietly).
Predefine the product key and accept the Microsoft Software License Terms on behalf of the user.
Specify where you want to install Office files on the user's computer.
Choose whether to remove earlier versions of Office before you install the Office 2013 Preview.

111
Note:
We recommend that enterprise customers first uninstall any earlier versions of Office
before they install Windows Installer-based Volume License editions of Office 2013
Preview.
Determine which Office features are installed.
Specify the default values for many user options, including Outlook settings.
Note:
Office 2013 Preview does not support side-by-side installations of 64-bit and 32-bit Office,
including across applications. For example, there is no support for side-by-side installations of
the 2007 Office system 32-bit with Office 2013 Preview 64-bit, or for Access 2013 Preview 64-
bit and Excel 2013 Preview 32-bit. You cannot use the Office 2013 Preview customization tools
to configure side-by-side installations or customizations of 64-bit and 32-bit Office. For
example, you cannot create a custom side-by-side installation by using 64-bit Office
Professional 2013 Preview and 32-bit Visio 2013 Preview single image. For more information
about 64-bit Office 2013 Preview, see 64-bit editions of Office 2013.
For information about how to customize Setup, see Customize Setup before installing Office 2013.
Making changes to an existing Office installation
If you have to change an existing Office installation, use the same tool that you used to customize the
original installation: Run the OCT to update a Setup customization file or to create a new one. Then
apply the customization file to the user's computer exactly as you would a software update. The user's
existing Office installation will be updated with your customizations. This means that the customizations
that are available when you install Office are also available when you change Office after installation.
Note:
There are some customizations that Setup applies only when you are installing Office for the
first time. These include the following: specifying where you can install Office on the user's
computer, defining the product key, and removing earlier versions of Office applications. The
OCT identifies the customizations that apply only to a new installation.
Using the Config.xml file to customize Office
You can use the Config.xml file to change your Office installation. You can customize most of the same
options that you can with the Office Customization Tool, including some additional options that are not
available in the OCT.
Using the Config.xml file is the recommended method for performing the following installation tasks:
Instructing Setup to copy the local installation source to the user's computer without installing
Office.
Specifying the path of the network installation point.
Selecting the product or language to install.
Changing where Setup looks for Setup customization files and updates.
112
Making last-minute or one-off customizations that do not warrant running the OCT to create a new
customization file.
If you put the Config.xml file in the same folder as Setup.exe, Setup finds and uses the file. You can
also specify the location of the file by using the /config Setup command-line option.
Note:
If you specify both a Setup customization file and the Config.xml file, the customizations that
you define in Config.xml take precedence over the same customizations in the customization
file.
For a complete description of the contents and format of the Config.xml file, see Config.xml file in Office
2013 Preview.
Using Setup command-line options
Setup recognizes only a few command-line options in the Office 2013 Preview. This is the same as for
Office 2007 and Office 2010. The OCT is the primary tool to configure Setup properties and specify
other customizations.
You can use Setup.exe commands to perform the following tasks:
Run the Office Customization Tool to create a Setup customization (.msp) file.
Apply the specified Setup customization file to the installation. For example, you can specify a path
of a specific customization file (.msp file) or to the folder where you store customization files.
Specify the Config.xml file that Setup uses during the installation.
Run Setup in maintenance mode and change an existing Office installation.
Run Setup to repair the specified product from the user's computer.
Run Setup to remove the specified product from the user's computer.
For more information about the Setup.exe commands, see Setup command-line options for Office
2010. The information also applies to Office 2013 Preview. For information about Windows Installer
properties that were used in earlier versions of Office, and about properties that can be used when you
install Office 2013 Preview, see Setup properties in Office 2010. The information also applies to Office
2013 Preview
Using Group Policy
Administrators can use Group Policy settings to define and maintain an Office configuration on users'
computers. Group Policy is used to configure the Office 2013 Preview policy settings that are contained
in Administrative Templates, and the operating system enforces those policy settings. In an Active
Directory environment, administrators can apply policy settings to groups of users and computers in a
site, domain, or organizational unit to which a Group Policy object is linked. True policy settings are
written to the approved registry keys for policy, and these settings have access control list (ACL)
restrictions that prevent people who are not administrator users from changing them. This allows
administrators to create highly restricted or lightly managed configurations.
Administrators can use policy settings for the Office 2013 Preview applications to manage most options
that configure the Office user interface. These include the following:

113
Menu commands and their corresponding toolbar buttons
Shortcut keys
Most options in the Options dialog box
Note:
Most of the Office 2013 Preview policy settings are also available in the OCT (OPA settings).
To configure initial default settings in a Setup customization .msp file, administrators can use
the OCT. However, users can change most of the settings after the installation. Use Group
Policy if you want to enforce specific configurations. Group Policy settings have precedence
over OCT settings.
Required local installation source
In Office 2013 Preview, Setup creates a local installation source on the user's computer as part of the
default installation process. Setup installs all Office 2013 Preview products in a two-step process. First,
Setup copies compressed installation source files to the user's computer. Second, Setup calls Windows
Installer to perform the actual installation from the local installation source. After the installation is
complete, the local installation source remains available for any Setup operations that require access to
an original source. Minimum disk space requirements include the local installation source.
Note:
In Office 2003, large organizations typically installed the product from an administrative
installation point. Installing Office from a local installation source was optional. However, In the
Office 2013 Preview,and in Office 2010 and Office 2007, the administrative installation option
no longer exists. The local installation source is a required part of the design.
The local installation source makes the distribution of software updates process more efficient and
reliable. Neither the network installation point nor the user's local installation source is ever updated
directly. Users' installations remain synchronized when they apply the client version of software
updates.
Additional benefits of having a complete installation source always available on the local computer
include the following:
You can deploy the local installation source to users before they install Office. This minimizes the
effect on the network and makes sure that all users install the product and begin to use Office 2013
Preview applications at the same time.
Users can perform maintenance tasks, such as applying software updates, without being prompted
for their Office CD or a network source.
Traveling users, or users who have slow or intermittent network connections, can run Setup without
access to the network if they have a local installation source that was installed in advance.
These benefits come at minimal cost. Although the local installation source does use some hard disk
space, creating the local installation source and installing Office takes approximately the same time as
installing Office by itself.
114
Creating a local installation source on users' computers
When users install Office from a DVD or from a network installation point, Setup creates the local
installation source by using a program called the Office Source Engine (Ose.exe) to copy required
installation files to a hidden folder on the local computer. The default location is \MSOCache\All Users
at the root of the drive on which Office is installed.
Each package that consists of an Office product, both the language-neutral core package and one or
more language-specific packages, has a separate download code. The package is cached in the
subfolder under MSOCache\All Users. Setup always caches a complete local installation source, which
includes all the files that are associated with the product that is being installed. If the installation point
includes multiple languages, Setup caches only the packages for the languages that are installed on
the user's computer.
When additional Office products are installed on the user's computer, those products are cached in the
same local installation source.
Note:
If a user installs a second Office product on a different drive, Setup creates a second local
installation source at the root of that drive. In this scenario, shared files might be duplicated
between the two local installation sources. However, this design makes sure that each local
installation source is complete and functions correctly.
Users cannot unintentionally delete the local installation source or remove it by using the Setup user
interface or the Windows Disk Cleanup Wizard. If the MSOCache folder is deleted or corrupted, Setup
automatically re-creates or repairs the folder the next time that a source is required. If users do not
have sufficient disk space, they are prompted to free up space. You can rely on the fact that every user
has access to a source when you distribute new updates or customizations.
Note:
Once the local installation source is created, its location on the user's computer is fixed. Unless
the user specifies a different drive, additional Office products installed later are always added to
the existing MSOCache\All Users folder.
Deploying the local installation source by itself
Because Setup performs the installation of Office from the local installation source, you can minimize
the demand on the network by deploying the installation source beforehand. For example by using your
usual method for running Setup on users' computers, you can distribute the local installation source to
one group of users at a time. After all users have a precached source, you can have everyone run
Setup to install Office at the same time. In this scenario, most of the installation activity occurs on the
local computer instead of over the network.
For more information, see Precache the local installation source for Office 2010. This information also
applies to Office 2013 Preview.
You can also run Setup directly from the local installation source on the local computer. Running Setup
locally means that no activity, even loading Setup files and reading metadata, occurs over the network.
In this scenario, you must identify the subfolder in MSOCache\All Users that contains the core product
that you want to install. Each core product subfolder contains a copy of the Setup program, and running

115
Setup from a specific folder installs that product. This method lets users install Office without relying on
a network connection.
For more information, see Install Office 2010 from local installation source. This information also applies
to Office 2013 Preview
Consolidated update process
In versions of Office earlier than Office 2007, you made several choices to make sure that client
computers received the latest Office software updates and that client computers did not become out of
sync with the administrative installation point. You might have configured Setup to chain software
updates with new installations of Office, or you might have applied updates to the administrative
installation point and reinstalled Office on all the client computers.
The architecture that was introduced in Office 2007 makes this process much simpler. In Office 2013
Preview, Office 2010, and Office 2007, you create a network installation point that you never have to
update. Instead, a simple copy operation makes software updates available for new installations. You
update existing installations independent of the network installation point so you do not have to worry
about keeping client computers synchronized with the installation source.
Applying Office updates during new installations
When you obtain Office software updates from Microsoft, copy the updates into the Updates folder in
the root of the network installation point. The existing files in the network installation point remain the
same as when you first copied them from the Office CD.
Note:
You can use the Updates folder to incorporate the installation of updates with an initial
installation of the Office 2013 Preview products. Only Windows Installer update files that are
contained in this folder are installed with the initial installation. Therefore, you must extract the
updates from Microsoft Self-Extractor packages. You can also place a Setup customization
.msp patch in the Updates folder to customize initial installations.
When you run Setup to install Office on a client computer, Setup looks in the Updates folder for
software updates and incorporates the updates automatically as it installs Office. If there are multiple
updates in the folder, Setup applies only those updates that are targeted at the Office product being
installed. If the Updates folder includes both a Setup customization .msp file (patch) and product
updates, Setup applies only the Setup customization .msp file with the initial installation and the product
updates are applied after the installation is completed. Setup also applies the updates in the correct
sequential order. The result is that the user receives the latest updates with the new installation of
Office.
Tip:
To direct Setup to look for software updates in a folder other than the Updates folder, use the
SetupUpdates element in the Config.xml file. For more information, see SetupUpdates
element in Config.xml file in Office 2013 Preview.
116
Updating existing Office installations
After Office is installed, you apply software updates directly to the client computer without returning to
the network installation point. You do this through a deployment management program such as
Microsoft Systems Management Server or System Center 2012 Configuration Manager, by using
Windows Server Update Services, or by updating computers directly from the Internet by using
Microsoft Update.
Note:
After Office is installed on a client computer, a reinstallation of Office reapplies only those
software updates that were applied during the original installation. If you copied new software
updates in the Updates folder, they will not be applied during the reinstallation.

117
Language in Office 2013 Preview
Audience: IT Professionals
The following table lists and describes articles that will help you Configure Office 2013 Preview
to work with multiple languages.
Articles about how to deploy Office 2013 Preview in other languages
Article Description

118
Security in Office 2013 Preview
Audience: IT Professionals
New security controls are available in Office 2013 to help you plan a robust defense against threats
while maintaining information worker productivity.
An organization's success often depends on the productivity of its information workers and the integrity
and confidentiality of its intellectual property. Many IT departments find it difficult to satisfy these
business needs because protection often comes at the expense of productivity.
The articles that are listed in the following table describe the security controls that are available
in Office 2013 Preview.
Office 2013 Preview security articles on TechNet
Article Description

119
Virtualize Office 2013 Preview
Audience: IT Professionals
You can deploy Office 2013 Preview by using virtualization technologies, such as Microsoft Application
Virtualization (App-V) or Remote Desktop Services (formerly known as Terminal Services). App-V
enables you to run Office 2013 Preview in a self-contained environment on an end-user computer.
Remote Desktop Services provides a method for multiple users to connect to and use a centrally
managed installation of Office 2013 Preview
The following table lists and describes articles that will help you deploy Office 2013 Preview by
using virtualization technologies.
Articles about how to use virtualization technologies to deploy
Office 2013 Preview
Article Description
120
Group Policy for Office 2013 Preview
Audience: IT Professionals
Group Policy is an infrastructure that is used to deliver and apply one or more desired configurations or
policy settings to a set of targeted users and computers in an Active Directory directory service
environment. When you have Office 2013 Preview installed, you can use Group Policy to:
Control entry points to the Internet from Office 2013 Preview applications.
Manage security in the Office 2013 Preview applications.
Hide settings and options that are unnecessary for users to perform their jobs and that might
distract them or result in unnecessary support calls.
Create a highly managed standard configuration on users’ computers.
The following table lists and describes articles that will be useful for IT administrators who plan
to use Group Policy to configure and enforce settings for Office 2013 Preview applications.
Articles about how to use Group Policy with Office 2013 Preview
Article Description

121
Outlook 2013 Preview
Audience: IT Professionals
To plan an Outlook deployment or configure Outlook Anywhere, Cached Exchange Mode, and
security and protection features, or to customize Outlook profiles, follow the steps that are described in
these articles.
Outlook 2013 Preview deployment articles on TechNet
Article Description
Related Documents