i Deployment guide for Duet Enterprise for Microsoft SharePoint and SAP Server 2.0 Microsoft Corporation Published: October 2012 Author: Microsoft Office System and Servers Team ([email protected]) Abstract This book provides deployment instructions for Duet Enterprise for Microsoft SharePoint and SAP Server 2.0. The audiences for this book include application specialists, line-of-business application specialists, and IT administrators who are ready to deploy Duet Enterprise 2.0. The content in this book is a copy of selected content in the Duet Enterprise 2.0 technical library as of the publication date. For the most current content, see the technical library on the web.

Welcome message from author
This document is posted to help you gain knowledge. Please leave a comment to let me know what you think about it! Share it to your friends and learn new things together.
Transcript

i
Deployment guide for Duet Enterprise for Microsoft SharePoint and SAP Server 2.0
Microsoft Corporation
Published: October 2012
Author: Microsoft Office System and Servers Team ([email protected])
Abstract
This book provides deployment instructions for Duet Enterprise for Microsoft SharePoint and SAP
Server 2.0. The audiences for this book include application specialists, line-of-business application
specialists, and IT administrators who are ready to deploy Duet Enterprise 2.0.
The content in this book is a copy of selected content in the Duet Enterprise 2.0 technical library as of
the publication date. For the most current content, see the technical library on the web.

ii
This document is provided “as-is.” Information and views expressed in this document, including URL
and other Internet website references, may change without notice. You bear the risk of using it.
Some examples depicted herein are provided for illustration only and are fictitious. No real association
or connection is intended or should be inferred.
This document does not provide you with any legal rights to any intellectual property in any Microsoft
product. You may copy and use this document for your internal, reference purposes.
© 2014 Microsoft Corporation. All rights reserved.
Microsoft, Access, Active Directory, Backstage, Bing, Excel, Groove, Hotmail, Hyper-V, InfoPath,
Internet Explorer, Office 365, OneNote, Outlook, PerformancePoint, PowerPoint, SharePoint,
Silverlight, OneDrive, Visio, Visio Studio, Windows, Windows Live, Windows Mobile,
Windows PowerShell, Windows Server, and Windows Vista are either registered trademarks or
trademarks of Microsoft Corporation in the United States and/or other countries.
The information contained in this document represents the current view of Microsoft Corporation on the
issues discussed as of the date of publication. Because Microsoft must respond to changing market
conditions, it should not be interpreted to be a commitment on the part of Microsoft, and Microsoft
cannot guarantee the accuracy of any information presented after the date of publication.

iii
Contents
Contents .................................................................................................................................................. iii
Getting help ............................................................................................................................................. vi
Plan to deploy Duet Enterprise for SharePoint and SAP Server 2.0 .............................................. 1
Table: Deployment reference for Duet Enterprise 2.0 ................................................................ 2
Endpoint URL requirements .............................................................................................................. 3
Certificate requirements ..................................................................................................................... 3
Active Directory account requirements ............................................................................................ 3
Table: Domain accounts required to install Duet Enterprise 2.0 .............................................. 4
Hardware and software requirements for Duet Enterprise for Microsoft SharePoint and SAP
Server 2.0 ............................................................................................................................................. 5
Basic hardware and software requirements .................................................................................... 5
Topology requirements ....................................................................................................................... 5
Browser requirements ......................................................................................................................... 5
Office client application requirements .............................................................................................. 6
Service application requirements ...................................................................................................... 6
Prepare the environment for Duet Enterprise for SharePoint and SAP Server 2.0 ...................... 7
Before you begin.................................................................................................................................. 7
Create a new web application for Duet Enterprise 2.0 .................................................................. 8
Extend the web application in Duet Enterprise 2.0 ........................................................................ 9
Create and manage the SharePoint SSL certificate ...................................................................... 9
Create the SharePointSSL certificate............................................................................................. 10
Bind the SharePointSSL certificate to the extended web application ....................................... 10
Export the SharePointSSL.cer certificate ...................................................................................... 11
Share the SharePointSSL.cer certificate with the SAP administrator ....................................... 12
Install Duet Enterprise for SharePoint and SAP Server 2.0 ........................................................... 13
Before you begin................................................................................................................................ 14
Stage 1: Install binary files in Duet Enterprise for SharePoint and SAP Server 2.0 ................... 15
Install Duet Enterprise 2.0 binary files ............................................................................................ 15
Optional setup parameters ........................................................................................................... 15
Verification .......................................................................................................................................... 16
Stage 2: Install, configure, and register Duet Enterprise for Microsoft SharePoint and SAP
Server 2.0 ........................................................................................................................................... 17

iv
Install, configure, and register Duet Enterprise 2.0 ...................................................................... 17
Stage 3: Create a master key for Duet Enterprise for SharePoint and SAP Server 2.0 ............ 19
Create a master key .......................................................................................................................... 19
Stage 4: Manage DuetRoot certificate in Duet Enterprise for SharePoint and SAP Server 2.0
.............................................................................................................................................................. 20
Create or obtain the DuetRoot.pfx certificate ................................................................................ 20
Create the DuetRoot.pfx self-signed certificate ......................................................................... 20
Obtain the DuetRoot.pfx certificate from a Certificate Authority ............................................. 21
Key Usage Extension Name ........................................................................................................ 21
Configure the DuetRoot.pfx certificate ........................................................................................... 22
Export the DuetRoot.pfx certificate as DuetRoot.cer ................................................................... 22
Share the DuetRoot.cer with the SAP administrator .................................................................... 22
Stage 5: Configure a trust relationship between SharePoint and SAP ........................................ 24
Configure a trust relationship between SharePoint and SAP environments ............................ 24
Import models in Duet Enterprise for SharePoint and SAP Server 2.0 ........................................ 25
Import BDC models and set Metadata Store permissions .......................................................... 25
Import the Reporting model ............................................................................................................. 26
Import the Workflow model .............................................................................................................. 26
Import and configure the RoleSync model .................................................................................... 27
Configure the publishing URL and account ................................................................................... 28
Set Metadata Store permissions ..................................................................................................... 29
Configuration check for Duet Enterprise for SharePoint and SAP Server 2.0 ............................ 31
Run the Duet Enterprise Configuration Check .............................................................................. 31
Configure solutions in Duet Enterprise for SharePoint and SAP Server 2.0 ............................... 33
Create a new site collection ............................................................................................................. 33
Deploy a solution ............................................................................................................................... 34
Configure the Reporting solution in Duet Enterprise for SharePoint and SAP Server 2.0 ........ 35
Enable the Reporting solution on the site collection .................................................................... 35
Create a new subsite and activate the Reporting solution .......................................................... 36
Configure the Workflow solution in Duet Enterprise for SharePoint and SAP Server 2.0 ......... 37
Create a subsite and activate the Workflow solution ................................................................... 37
Activate the Duet Enterprise Workflow feature on the subsite ................................................ 38
Verify the Workflow solution ............................................................................................................ 38
Configure an SAP workflow task type ......................................................................................... 38
Grant users access ........................................................................................................................ 40
Publish the workflow ...................................................................................................................... 40

v
Configure the RoleSync solution in Duet Enterprise for SharePoint and SAP Server 2.0 ........ 42
Before you begin................................................................................................................................ 43
Activate the Duet Enterprise Claim Provider feature ................................................................... 43
Identify the SharePoint Timer Service Account ............................................................................ 43
Grant permissions to the Metadata Store ...................................................................................... 44
Ensure the Timer account has full control and verify name of User Profile service application
.......................................................................................................................................................... 44
Provide the SharePoint Timer service account ............................................................................. 45
Synchronize SAP roles with the SharePoint user profile store .................................................. 45
Verification step ................................................................................................................................. 46
Grant an SAP role permissions to a site ........................................................................................ 47
Uninstall Duet Enterprise for SharePoint and SAP Server 2.0 ...................................................... 48
Uninstall all solutions ........................................................................................................................ 48
Uninstall all solutions ..................................................................................................................... 48
Restart IIS and SharePoint services............................................................................................... 50

vi
Getting help
Every effort has been made to ensure the accuracy of this book. This content is also available online in
the Office System TechNet Library, so if you run into problems you can check for updates at:
http://technet.microsoft.com/office
If you do not find your answer in our online content, you can send an email message to the Microsoft
Office System and Servers content team at:
If your question is about Microsoft Office products, and not about the content of this book, please
search the Microsoft Help and Support Center or the Microsoft Knowledge Base at:
http://support.microsoft.com

1
Plan to deploy Duet Enterprise for SharePoint
and SAP Server 2.0
Published: July 16, 2012
Summary: Learn how to plan a deployment of Duet Enterprise 2.0 in a SharePoint Server 2013
environment.
Applies to: Duet Enterprise for Microsoft SharePoint and SAP Server 2.0
This article describes the planning that you should do before you begin an installation of Duet
Enterprise for Microsoft SharePoint and SAP Server 2.0. The procedures and information presented in
this article are listed in the order in which they must be used. All hardware and software must comply
with the information found in Hardware and software requirements for Duet Enterprise for Microsoft
SharePoint and SAP Server 2.0.
The installation and configuration process will require several hours to complete. You will need to work
with your SAP administrator who will provide you with a SAPSSL.cer certificate and the endpoint URLs.
You will provide the SAP administrator with two certificates: SharePointSSL.cer and DuetRoot.cer and
the publishing URL of your extended SharePoint site. We recommend that you schedule time when
both the SharePoint administrator and the SAP administrator are available. In addition to the items
listed in this article, you need to review all hardware and software requirements for Duet Enterprise 2.0
and also for all Windows, SQL Server, and SharePoint Server computers that are used for this
deployment.
The overall installation and configuration process will proceed in the following order:
Hardware and software requirements for Duet Enterprise for Microsoft SharePoint and SAP Server
2.0
Prepare the environment for Duet Enterprise for SharePoint and SAP Server 2.0
Install Duet Enterprise for SharePoint and SAP Server 2.0
Import models in Duet Enterprise for SharePoint and SAP Server 2.0
Configuration check for Duet Enterprise for SharePoint and SAP Server 2.0
We recommend that you obtain and record this information before you begin your deployment. We
have provided the following deployment reference table that lists the names of the accounts and service
applications described in the Duet Enterprise 2.0 install and configure process.
The Name as documented column in this table contains the names of the items you are tracking while
deploying Duet Enterprise. These are the names that are referred to throughout this guide. The Name
used column is for your use to record the names of these items.

2
Table: Deployment reference for Duet Enterprise 2.0
Name as documented Name used
Secure Store Service Application
EndPoint URL: MetadataURL
EndPoint URL: LsiUrl
Business Data Connectivity Service Application
User Profile Service Application
Certificate: SharePoint SSL
Certificate : SAP SSL
Certificate : Duet Root
Security Account: Duet Admin
Security Account: DuetPublisher
Web Application Name
Web Application URL
Web Application (Extended) URL
Web Application (Extended) Zone
Site Collection: sites/DuetEnterprise2
Site Collection: Team site Template
Site: DuetReportingandWorkflow
Site: Team site Template
In this article:
Endpoint URL requirements
Certificate requirements
Active Directory account requirements

3
Endpoint URL requirements Endpoint URLs are URL links that point the SharePoint Server system to specific endpoints in the SAP
system and are bound to each imported Business Data Connectivity (BDC) model. These URLs must
be obtained from the SAP administrator for each BDC model that you import. There are two URLs for
each model:
LsiUrl This is the service URL with which SAP exposes data for a particular feature.
MetadataURL This will be automatically be picked up by the LsiUrl when the command is run.
Certificate requirements You need three certificates to help secure Duet Enterprise 2.0 communications between clients and the
server and between the servers running SharePoint and SAP. These certificates are created during the
Duet Enterprise 2.0 installation process on both the SharePoint and SAP systems.
DuetRoot.pfx Created when you configure a root certificate by using the DuetConfig.exe -
createselfsignedcertificate command. This certificate is used to create user certificates that are
sent to SAP along with end-user requests. The process for creating this certificate must be
completed in the following order:
1. Create the certificate as a .pfx file.
2. Configure the certificate. This includes storing it in the Secure Store Service
Application.
3. Export the certificate as a .cer file. This is necessary because the SAP system
needs the certificate with the public key only.
4. Share the .cer file with the SAP administrator. The SAP administrator will
create a trust relationship for this certificate.
SharePointSSL.cer Secures server requests for calls from SAP to SharePoint. This certificate is
created on the SharePoint system by using Internet Information Services (IIS) Manager, exported
by using the Microsoft Management Console, and shared with the SAP administrator to be trusted
in the SAP system.
SAPSSL.cer Secures server requests for calls from SharePoint to SAP. This certificate is created
on the SAP system and shared with the SharePoint administrator to be trusted in the SharePoint
system.
Active Directory account requirements Two Active Directory Domain Services (AD DS) accounts are required to install Duet Enterprise 2.0, as
shown in the following table.

4
Table: Domain accounts required to install Duet Enterprise 2.0
Account Purpose Requirements
DuetAdmin Runs Setup.exe
Runs DuetConfig.exe
commands
A member of the Windows
Administrators group on the
computer that is running
SharePoint Server 2013.
A member of the Farm
Administrators group on the
SharePoint Server farm on
which you are installing Duet
Enterprise 2.0.
Full Control permissions on the
User Profile service application
is required to configure
RoleSync by using the
DuetConfig.exe -
configurerolesync command.
DuetPublisher Used by the SAP system to
connect to the SharePoint
system for pushing reports and
workflow notifications.
No permissions need to be set on
the SharePoint Server 2013 farm
for this account.
You must give the name of this
account to the SAP administrator.
Important:
This account cannot be the
same as the SharePoint
farm account or the
Managed account assigned
to the application pool of
the web application using
by Duet Enterprise.

5
Hardware and software requirements for Duet
Enterprise for Microsoft SharePoint and SAP
Server 2.0
Published: July 16, 2012
Summary: Learn about the hardware and software required for a deployment of Duet Enterprise 2.0 in
a SharePoint Server 2013 environment.
Applies to: Duet Enterprise for Microsoft SharePoint and SAP Server 2.0
This article describes hardware, software, user account, service account, services, and Duet Enterprise
for Microsoft SharePoint and SAP Server 2.0-specific requirements.
In this article:
Basic hardware and software requirements
Topology requirements
Browser requirements
Service application requirements
Basic hardware and software requirements Duet Enterprise 2.0 requires SharePoint Server 2013. All other hardware and software requirements
are the same as for SharePoint Server 2013. For more information, see Hardware and software
requirements (SharePoint 2013 Preview).
Topology requirements All SharePoint farm topologies and architectures that are supported in SharePoint Server 2013 are
supported by Duet Enterprise 2.0. These deployment procedures describe only the processes required
to install Duet Enterprise 2.0 on a single computer. For more information, see Design server farms and
topologies (SharePoint 2013 Preview).
Browser requirements Duet Enterprise 2.0 supports the same browsers as SharePoint Server 2013. For more information, see
Plan browser support (SharePoint 2013 Preview).

6
Office client application requirements Office client integration with Duet Enterprise 2.0 requires Office Professional Plus 2013. The installation
of Office 2013 must not be a click-to-install version because Microsoft Business Connectivity Services
does not support Click-to-Run.
Service application requirements The following SharePoint service applications must be configured and active in SharePoint Server 2013
before you install Duet Enterprise 2.0.
Business Data Connectivity service application This service application lets you connect
SharePoint Server 2013 solutions to sources of external data and to define external content types
that are based on that external data.
State Service This service application is used for the Duet Enterprise 2.0 Workflow solution.
Security Token Service Application This service application is used for internal claims security.
Secure Store Service Application This service application stores end-user’s credentials in a
client certificate used to authenticate the user on the SAP NetWeaver Gateway 2.0.
User Profile Service Application This service application is required for the role synchronization
feature of Duet Enterprise 2.0.

7
Prepare the environment for Duet Enterprise for
SharePoint and SAP Server 2.0
Published: July 16, 2012
Summary: Learn how to prepare SharePoint Server 2013 to host Duet Enterprise 2.0 by creating a
new Duet Enterprise web application, site collection, and host websites.
Applies to: Duet Enterprise for Microsoft SharePoint and SAP Server 2.0
This article describes how to prepare a SharePoint Server 2013 environment to host Duet Enterprise for
Microsoft SharePoint and SAP Server 2.0. It includes all the necessary procedures provided in the
order in which they must be performed. Where necessary, Duet Enterprise 2.0 specific steps are
included. In all other cases, the procedures are the same as those for SharePoint Server 2013.
In this article:
Before you begin
Create a new web application for Duet Enterprise 2.0
Extend the web application in Duet Enterprise 2.0
Create and manage the SharePoint SSL certificate
Create the SharePointSSL certificate
Bind the SharePointSSL certificate to the extended web application
Export the SharePointSSL.cer certificate
Share the SharePointSSL.cer certificate with the SAP administrator
Before you begin Before you perform any of the following procedures, read the following Duet Enterprise 2.0 installation
and configuration articles in the order listed. We recommend that you do not continue until you read
these articles.
Deployment overview of Duet Enterprise for Microsoft SharePoint and SAP Server 2.0 Preview
Plan to deploy Duet Enterprise for SharePoint and SAP Server 2.0
Hardware and software requirements for Duet Enterprise for Microsoft SharePoint and SAP Server
2.0
Note:
Because SharePoint 2013 runs websites in Internet Information Services (IIS), administrators
and users depend on the accessibility features that browsers provide. SharePoint 2013

8
supports the accessibility features of supported browsers. For more information, see the
following resources:
Plan browser support
Accessibility for SharePoint Products
Accessibility features in SharePoint 2013 Products
Keyboard shortcuts
Touch
Create a new web application for Duet Enterprise 2.0 Duet Enterprise 2.0 requires at least one web application. This web application is used to host one or
more sites that surface information from SAP. Use the following procedure to create a new web
application for Duet Enterprise 2.0.
To create a new web application for Duet Enterprise 2.0
1. Verify that you have the following administrative credentials: Farm Administrators
SharePoint group.
2. On the SharePoint Central Administration website, in the Application Management section,
click Manage Web applications.
3. On the Web Applications Management page, on the ribbon, click New. The Create new Web
Application window opens.
4. In the Create New Web Application window, in the IIS Web Site section, select the following:
Select Create a new IIS website.
Optionally type the name of the web site in the Name box or accept the default name. Record
this name. You will need it later when create the alternate access mapping for this web
application.
Leave Port default, and record the port number.
Leave Host Header default (blank).
Leave Path default.
5. In the Security Configuration section, select the following:
Leave Allow Anonymous default (No).
Leave Use Secure Sockets Layer (SSL) default (No).
6. In the Public URL section, record the URL in the URL box. You will need to know this URL
when you create an alternate access mapping later.
7. In all other sections, leave all selections as the default.
8. Click OK to create the new web application. A progress window is displayed. When
complete, the progress window closes and the Application Created page appears. Click
OK to close the Application Created page. The web application that you created appears
on the Web Applications page.

9
Extend the web application in Duet Enterprise 2.0 Use this procedure to extend the web application to create a SSL-enabled web application that will be
used for secure transactions between the SharePoint system and the SAP system.
To extend the web application in Duet Enterprise 2.0
1. Verify that you have the following administrative credentials: Farm Administrators
SharePoint group.
2. In Central Administration, in the Application Management section, click Manage Web
applications.
3. On the Web Applications Management page, select the new web application that you
created. In the Ribbon, click Extend. The Extend Web Application to Another IIS Web Site
window opens.
4. In the IIS Web Site section, leave all settings as the default.
5. In the Security Configuration section, for Use Secure Sockets Layer (SSL), select YES.
6. In the Claims Authentication Types section, select Basic authentication (credentials are
sent in clear text).
7. In the Public URL section, the URL for this web application is shown in the URL box. Do
the following:
a) Change the URL to the fully qualified domain name. This full URL should be in this
format: https:// servername.domain.com:portnumber
b) Record this URL and send it to the SAP administrator.
c) The SAP administrator will need this full URL when the configuring an RFC
Destination to send workflows and reports from SAP to SharePoint.
d) In the Zone list, select the zone that you want to use for this port. You can choose
any available zone, but we recommend that you choose the Custom zone because
the name best describes the purpose of this zone.
8. Leave all other settings as the default, and then click OK to extend the web application.
9. The Extend Web Application to Another IIS Web Site window closes and the new web
application is extended. No visual confirmation is provided.
Create and manage the SharePoint SSL certificate After extending the new web application that you created, you must create an SSL certificate and bind
that certificate to the extended web application. This certificate is named the SharePointSSL.cer
certificate. Once created and bound in to the extended web application in SharePoint, you will export it
and share it with the SAP administrator who imports it into the SAP system. The procedures for this are
as follows:
1. Create the SharePointSSL certificate.
2. Bind the SharePointSSL certificate to the extended web application.
3. Export the SharePointSSL.cer certificate.
10
4. Share the SharePointSSL.cer certificate with the SAP administrator.
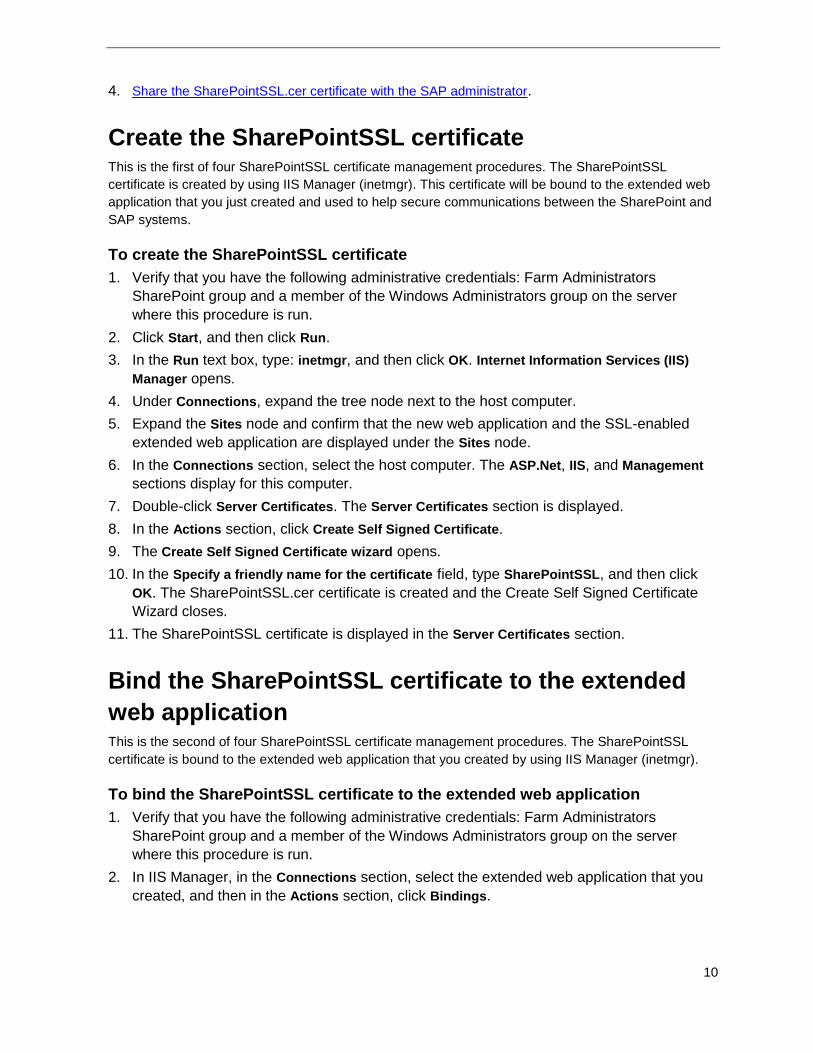
Create the SharePointSSL certificate This is the first of four SharePointSSL certificate management procedures. The SharePointSSL
certificate is created by using IIS Manager (inetmgr). This certificate will be bound to the extended web
application that you just created and used to help secure communications between the SharePoint and
SAP systems.
To create the SharePointSSL certificate
1. Verify that you have the following administrative credentials: Farm Administrators
SharePoint group and a member of the Windows Administrators group on the server
where this procedure is run.
2. Click Start, and then click Run.
3. In the Run text box, type: inetmgr, and then click OK. Internet Information Services (IIS)
Manager opens.
4. Under Connections, expand the tree node next to the host computer.
5. Expand the Sites node and confirm that the new web application and the SSL-enabled
extended web application are displayed under the Sites node.
6. In the Connections section, select the host computer. The ASP.Net, IIS, and Management
sections display for this computer.
7. Double-click Server Certificates. The Server Certificates section is displayed.
8. In the Actions section, click Create Self Signed Certificate.
9. The Create Self Signed Certificate wizard opens.
10. In the Specify a friendly name for the certificate field, type SharePointSSL, and then click
OK. The SharePointSSL.cer certificate is created and the Create Self Signed Certificate
Wizard closes.
11. The SharePointSSL certificate is displayed in the Server Certificates section.
Bind the SharePointSSL certificate to the extended
web application This is the second of four SharePointSSL certificate management procedures. The SharePointSSL
certificate is bound to the extended web application that you created by using IIS Manager (inetmgr).
To bind the SharePointSSL certificate to the extended web application
1. Verify that you have the following administrative credentials: Farm Administrators
SharePoint group and a member of the Windows Administrators group on the server
where this procedure is run.
2. In IIS Manager, in the Connections section, select the extended web application that you
created, and then in the Actions section, click Bindings.

11
3. The Site Bindings window opens. Select the https row, and then click Edit.
4. In the Edit Site Binding window, in the SSL certificate section, in the drop-down list, select
SharePointSSL, click OK, and then click Close.
5. The SharePointSSL certificate is now bound to the extended web application.
Export the SharePointSSL.cer certificate This is the third of four SharePointSSL certificate management procedures. The SharePointSSL.cer
certificate is exported so that it can be shared with the SAP administrator. This process is completed by
using IIS Manager.
To export the SharePointSSL.cer certificate
1. Verify that you have the following administrative credentials: Farm Administrators
SharePoint group and a member of the Windows Administrators group on the server
where this procedure is run.
2. Open the Microsoft Management Console (MMC) by clicking Start, select Run, and then
type MMC in the Run box.
3. The MMC opens as Console 1.
4. Select File, and then click Add/Remove Snap-in. The Add or Remove Snap-ins window
opens.
5. In the Add or Remove Snap-ins window, select Certificates, and then click Add.
6. In the Certificates Snap-in window, select Computer account, and then click Next.
7. In the Select Computer window, leave all settings default, and then click Finish. The
Certificates Snap-in window closes and certificates are displayed in the Add or remove
Snap-ins window in the Selected Snap-ins section.
8. Click OK. The Add or Remove Snap-ins window closes and Certificates (Local Computer)
are displayed in the MMC tree.
9. In the MMC tree, expand Certificates (Local Computer).
10. Expand the Personal node, and then select Certificates. The SharePointSSL certificate will
be displayed as a self-signed certificate where the Issued To and Issued By fields are the
same and both display the name of the host computer as seen in IIS Manager. Also, the
name in the Friendly name column will be SharePointSSL, which is the name you
assigned to this certificate when you created it.
11. Right-click the SharePointSSL certificate that displays the same Issued To and Issued By
information, point to All Tasks, and then click Export.
12. The Certificate Export Wizard opens.
13. Click Next. The Export Private Key page is displayed. Leave all settings as the default.
14. Click Next. The Export File Format page is displayed. Leave all settings as the default.
15. Click Next. The File to Export page is displayed. Select Browse to select a location to
export the file. The Save As dialog opens. Choose somewhere easy to access and
remember.

12
16. In the Save As dialog after you have selected a location, in the File name field, type
SharePoint SSL, and then click Save. The Save As dialog closes and the Certificate Export
Wizard, File to Export page is displayed with the path and name of the certificate populated
in the File name field.
17. Click Next. The Completing the Certificate Export Wizard displays and lists all the
information that was selected during the export process.
18. Click Finish to export the SharePointSSL.cer certificate. The Certificate Export Wizard
success dialog box displays the following message: The export was successful.
19. Click OK. The Certificate Export Wizard closes. You have exported the SharePointSSL.cer
certificate to the location that you chose.
Share the SharePointSSL.cer certificate with the SAP
administrator This is the final of four SharePointSSL certificate management procedures. The SharePointSSL.cer
certificate is now created, bound, and exported from the SharePoint system. It must now be given to the
SAP administrator who will use SAP trust manager to trust the certificate in the SAP system.
1. Either share the location where the SharePointSSL.cer certificate is on the host computer
file system, or transfer the file to an SAP host computer according to the SAP
administrator’s instructions.
2. When the SharePointSSL.cer is successfully transferred to the SAP administrator, you are
ready to continue with the installation Duet Enterprise 2.0 on your host computer.

13
Install Duet Enterprise for SharePoint and SAP
Server 2.0
Published: July 16, 2012
Summary: Learn how to install and configure Duet Enterprise 2.0 on servers running SharePoint
Server 2013.
Applies to: Duet Enterprise for Microsoft SharePoint and SAP Server 2.0
The articles in this section describe how to install and configure Duet Enterprise for Microsoft
SharePoint and SAP Server 2.0 on servers that are running SharePoint Server 2013. Additional
configuration is required in the SAP environment to create a complete and functioning deployment of
Duet Enterprise 2.0. For information about the steps that are required to configure Duet Enterprise 2.0
in the SAP environment, see Duet Enterprise SAP Deployment Guide on the SAP Support Portal
website.
Note:
Duet Enterprise 2.0 is currently not available for download and will be available for download at
a later date.
The process to install Duet Enterprise 2.0 has five stages. These five stages use a combination of the
user interface in the SharePoint Central Administration website and the Windows command line. Each
of the five stages of the Duet Enterprise 2.0 deployment has specific steps that must be performed.
In this section:
Stage 1: Install binary files in Duet Enterprise for SharePoint and SAP Server 2.0 The Duet
Enterprise 2.0 binary files are copied from the installation source to the host computer by the
SharePoint administrator.
Stage 2: Install, configure, and register Duet Enterprise for Microsoft SharePoint and SAP Server
2.0 Duet Enterprise 2.0 is installed and configured by using the DuetConfig.exe -install
command.
Stage 3: Create a master key for Duet Enterprise for SharePoint and SAP Server 2.0 A master key
is created in the Secure Store Service application for use with Duet Enterprise 2.0.
Stage 4: Manage DuetRoot certificate in Duet Enterprise for SharePoint and SAP Server 2.0 The
SharePoint administrator creates, configures, exports, and shares the DuetRoot certificate with the
SAP administrator.
Stage 5: Configure a trust relationship between SharePoint and SAP The SharePoint administrator
performs additional security configuration between the SharePoint and SAP systems.

14
Important:
These procedures must be completed in the order listed.
Before you begin Make sure that you have all the needed information from your SAP administrator before you begin
these procedures. This includes the following:
LsiUrl - Links the SAP system to the SharePoint system. A separate LsiUrl is required for importing
each model.
MetadataURL - Links the SAP system to the SharePoint system. Required for importing models.
All user accounts created in Active Directory and ready to use in the SharePoint system.
All services and service accounts turned on and created.
All web applications created and extended for Duet Enterprise 2.0.
The SharePointSSL certificate created, bound, exported, and shared with the SAP administrator.
The SAPSSL certificate created, trusted (on the SAP system), exported, and shared with the
SharePoint administrator.

15
Stage 1: Install binary files in Duet Enterprise
for SharePoint and SAP Server 2.0
Published: July 16, 2012
Summary: Learn how to install binary files in Duet Enterprise 2.0, the first stage in an installation of
Duet Enterprise 2.0 in a SharePoint Server 2013 environment.
Applies to: Duet Enterprise for Microsoft SharePoint and SAP Server 2.0
This article describes the procedure to install binary files in Duet Enterprise for Microsoft SharePoint
and SAP Server 2.0. This is stage one in an installation of Duet Enterprise 2.0.
Install Duet Enterprise 2.0 binary files Use this procedure to copy files from an installation point to the front-end web server that will host Duet
Enterprise 2.0.
To install Duet Enterprise 2.0 binary files
1. Verify that you have the following administrative credentials: Windows Administrators
group on the front-end web server that is running SharePoint Server 2013.
2. As administrator, open a Windows Command Prompt window.
3. At the command prompt, type cd:\directory\, where directory is the local or network location
of the Duet Enterprise setup files.
4. From the installation location of the Duet Enterprise 2.0 files, type the following command,
and then press ENTER:
setup.exe /install
The following table describes optional parameters:
Optional setup parameters
Parameter Use
/installpath=<drive:\path> Install Duet Enterprise to a different path. For
example:
Setup.exe /installpath=d:\
Note:
By default, Duet Enterprise files are

16
Parameter Use
installed to the <system>:\Program
Files\Duet Enterprise\2.0 folder.
/AcceptEULA
Accept the terms of the license agreement.
/quiet Suppresses error and success messages.
/logdir=<log file path> Path to the Duet Enterprise related log files.
/? Displays Help.
5. If you did not use the /AcceptEULA parameter, the Duet Enterprise 2.0 for Microsoft
SharePoint and SAP license agreement is displayed. If this page is displayed, on the Duet
Enterprise 2.0 for Microsoft SharePoint and SAP license agreement page, select the I accept
the terms in the license agreement check box, and then click Install. Otherwise, skip to step
6.
6. When complete, you receive the following message: Duet Enterprise setup completed
successfully.
7. The Duet Enterprise 2.0 binary files are now copied to the host computer.
Verification Verify that the following files and folders are created in the default directory path C:\Program
Files\DuetEnterprise\2.0.
BDC Models (Folder)
Solutions (Folder)
DuetConfig.exe
DuetConfig.Intl.dll
OBA.Server.Logging.Resources.dll

17
Stage 2: Install, configure, and register Duet
Enterprise for Microsoft SharePoint and SAP
Server 2.0
Published: July 16, 2012
Summary: Learn how to install, configure, and register Duet Enterprise 2.0, the second stage in an
installation of Duet Enterprise 2.0 in a SharePoint Server 2013 environment.
Applies to: Duet Enterprise for Microsoft SharePoint and SAP Server 2.0
This article describes the installation and configuration of Duet Enterprise for Microsoft SharePoint and
SAP Server 2.0. After this procedure is complete, additional configuration is necessary.
Install, configure, and register Duet Enterprise 2.0 Use this procedure to perform a basic deployment configuration of Duet Enterprise 2.0 and to create a
target application in the default Secure Store Service service application. This procedure assumes that
you are still logged on to the same host computer with the same administrative account that you chose
to use for all processes and services. Before you perform the following procedure, verify that the
account that you will use to run DuetConfig.exe is both a member of the Farm Administrators
SharePoint group and is granted Full Control permissions on the User Profile service application.
To install, configure, and register Duet Enterprise 2.0
1. Log on to the host server as a member of the Farm Administrators group.
2. Click Start, click All Programs, and then click Accessories.
3. Right-click the command prompt, and then click Run as administrator.
4. At the command prompt, navigate to the folder that contains the DuetConfig.exe file. By
default, this is the C:\Program files\Duet Enterprise\2.0\ folder.
5. At the command prompt, type the following command, and then press ENTER:
DuetConfig -install
6. When DuetConfig.exe is complete, at the command prompt, you receive the following
messages:
Successfully registered the diagnostic service
Successfully installed all features
Successfully registered health rules
Successfully installed help files
Successfully configured Duet Enterprise

18
7. The Duet Enterprise 2.0 files are now configured and you are ready to create a master
key.

19
Stage 3: Create a master key for Duet Enterprise
for SharePoint and SAP Server 2.0
Published: July 16, 2012
Summary: Learn how to create a master key for the Secure Store Service application in Duet
Enterprise 2.0, the third stage in an installation of Duet Enterprise 2.0 in a SharePoint Server 2013
environment.
Applies to: Duet Enterprise for Microsoft SharePoint and SAP Server 2.0
This article describes the procedure to create a master key for the Secure Store Service application in
Duet Enterprise for Microsoft SharePoint and SAP Server 2.0.
A master key allows secure communications between SharePoint Server 2013 and SAP. Specifically,
the communication is between the Secure Store Service application and the SAP NetWeaver server.
For more information about how to create a master key and configure the Secure Store, see Configure
Secure Store in Configure the Secure Store Service in SharePoint 2013 Preview.
Create a master key A master key is required to successfully configure the DuetRoot.pfx certificate. Use this procedure to
generate a new master key.
To create a master key
1. Verify that you have the following administrative credentials: Windows Administrators
group on the front-end web server that is running SharePoint Server 2013 to complete this
procedure. You must also be a member of the Farm Administrators group on the
SharePoint Server farm on which you are installing Duet Enterprise 2.0.
2. On the SharePoint Central Administration website, click Application Management.
3. On the Application Management page, click Manage service applications.
4. On the Manage Service Applications page, scroll down the list of service applications, and
then select Secure Store service application.
5. On the Secure Store Service Application page, click Generate New Key. The Generate New
Key window opens.
6. Type a pass phrase in the Pass Phrase and Confirm Pass Phrase boxes, and then click
OK. Record this pass phrase.
7. A new master key is created.

20
Stage 4: Manage DuetRoot certificate in Duet
Enterprise for SharePoint and SAP Server 2.0
Published: July 16, 2012
Summary: Learn how to manage the DuetRoot certificates in Duet Enterprise 2.0, the fourth stage in
an installation of Duet Enterprise 2.0 in a SharePoint Server 2013 environment.
Applies to: Duet Enterprise for Microsoft SharePoint and SAP Server 2.0
This article describes the procedure to manage the root authority certificates in Duet Enterprise for
Microsoft SharePoint and SAP Server 2.0.
Note:
You can name these certificates whatever you like, but to help guide you through these
procedures, we recommend that you name them DuetRoot.pfx and DuetRoot.cer.
In this article:
Create or obtain the DuetRoot.pfx certificate
Configure the DuetRoot.pfx certificate
Export the DuetRoot.pfx certificate as DuetRoot.cer
Share the DuetRoot.cer with the SAP administrator
Create or obtain the DuetRoot.pfx certificate You can either create a self-signed DuetRoot.pfx certificate or obtain one from a Certificate Authority.
Do one of the following:
Create the DuetRoot.pfx self-signed certificate.
Obtain the DuetRoot.pfx certificate from a Certificate Authority.
Create the DuetRoot.pfx self-signed certificate
Create a self-signed root certificate by using the DuetConfig.exe -CreateSelfSignedCertificate
command. Use this procedure if you want to create a self-signed certificate. This procedure creates a
self-signed certificate that is issued by the Duet Root Certificate Authority.
To create the DuetRoot.pfx self-signed certificate
1. As administrator, open a Windows Command Prompt window.

21
2. At the command prompt, navigate to the folder that contains the DuetConfig.exe file. By
default, this is the C:\Program files\Duet Enterprise\2.0\ folder.
3. At the command prompt, type the following command, and then press ENTER:
DuetConfig - CreateSelfSignedCertificate -Path c:\DuetRoot.pfx -Password
(If no password is given here, you are prompted to enter one after you press ENTER. If that occurs,
enter a password and press ENTER again.) Record this password.
4. At the command prompt, you receive the following message: Certificate "c:\DuetRoot.pfx"
has been generated successfully.
5. The Duet Enterprise Root certificate is now created and is ready to be configured for use
with the Secure Store Service service application.
6. You are now ready configure the DuetRoot.pfx certificate and create a target application
with it in the Secure Store Service service application.
7. Skip to the Configure the DuetRoot.pfx certificate section below.
Obtain the DuetRoot.pfx certificate from a Certificate Authority
If you obtain a certificate from a Certificate Authority for use as the DuetRoot.pfx certificate, it must
contain the following:
Basic Constraints Extension. This extension is used to indicate that the certificate is a certificate
authority.
Usage Extensions. These extensions define the purpose of the public key that is contained in the
certificate. The following table describes the key usage extensions.
Key Usage Extension Name
Description
KeyCertSign The key can be used to sign certificates.
DataEncipherment The key can be used for data encryption.
KeyEncipherment The key can be used for key encryption.
NonRepudiation The key can be used for authentication.
DigitalSignature The key can be used as a digital signature.
Note:
The following procedures in this article assume that the file name of the certificate is
DuetRoot.pfx.

22
Configure the DuetRoot.pfx certificate Use this procedure to configure the DuetRoot.pfx certificate and create a target application in the
Secure Store Service service application.
To configure the DuetRoot.pfx certificate
1. As administrator, open a Windows Command Prompt window.
2. At the command prompt, navigate to the folder that contains the DuetConfig.exe file. By
default, this is the C:\Program files\Duet Enterprise\2.0\ folder.
3. At the command prompt, type the following command, and then press ENTER:
DuetConfig.exe -ConfigureRootCertificate -SecureStoreServiceApplicationName <Name of
Secure Store Service Application> -Path <Root Certificate file path> [Password you used
when you created the DuetRoot.pfx file]
4. At the command prompt, you receive the following message: Duet Root certificate has
been configured in SecureStore with target application name DuetApp.
5. For verification, navigate to the Secure Store Service service application page and confirm
that the target application DuetApp is shown.
Export the DuetRoot.pfx certificate as DuetRoot.cer Use this procedure to export the client certificate that you created and configured. After exporting the
DuetRoot.pfx certificate as DuetRoot.cer, you must give it to the SAP administrator.
To export the client certificate
1. As administrator, open a Windows Command Prompt window.
2. At the command prompt, navigate to the folder that contains the DuetConfig.exe file. By
default, this is the C:\Program files\Duet Enterprise\2.0\ folder.
3. At the command prompt, type the following command, and then press ENTER:
DuetConfig -ExportRootCertificate -Path c:\DuetRoot.cer
4. At the command prompt, you receive the following message: Root certificate for Duet is
exported successfully to file c:\DuetRoot.cer.
Share the DuetRoot.cer with the SAP administrator When the DuetRoot.cer certificate is successfully exported, you need to share it with the SAP
administrator.
Note:
In the path C:\ there are two DuetRoot certificates. One is listed as type: Security Certificate
and one is listed as type: Personal Information. The DuetRoot.pfx is listed as type: Personal
Information and the DuetRoot.cer is listed as type: Security Certificate. You will give the
DuetRoot.cer certificate that is listed as type: Security Certificate to the SAP administrator.
23
Give the DuetRoot.cer certificate (type: Security Certificate) file to the SAP administrator.

24
Stage 5: Configure a trust relationship between
SharePoint and SAP
Published: July 16, 2012
Summary: Learn how configure a trust relationship between SharePoint and SAP for Duet Enterprise
2.0, the fifth stage in an installation of Duet Enterprise 2.0 in a SharePoint Server 2013 environment.
Applies to: Duet Enterprise for Microsoft SharePoint and SAP Server 2.0
This article describes how to configure a trust relationship between SharePoint and SAP for Duet
Enterprise for Microsoft SharePoint and SAP Server 2.0.
Configure a trust relationship between SharePoint
and SAP environments For the SSL-enabled web application to accept information from the SAP environment, you must
establish a trust relationship with the SAPSSL certificate that is provided by the SAP administrator.
To configure a trust relationship between SharePoint and SAP environments
1. Verify that you have the following administrative credentials: Windows Administrators
group on the front-end web server that is running SharePoint Server 2013 to complete this
procedure. You must also be a member of the Farm Administrators group on the
SharePoint Server farm on which you are installing Duet Enterprise 2.0.
2. On the SharePoint Central Administration website, click Security.
3. In the General Security section, click Manage trust.
4. On the ribbon, click New.
5. In the Establish Trust Relationship window, in the Name box, type a name for this trust
relationship.
6. In the Root Authority Certificate box, use the Browse button to select the certificate
(SAPSSL.cer) that was provided by the SAP administrator for establishing the SSL
connection.
7. Leave all other settings as the default, and then click OK. The Establish Trust Relationship
window closes and the new trust relationship is displayed on the Trust Relationships page.
You are now ready to import the Workflow, Reporting, and RoleSync models.

25
Import models in Duet Enterprise for
SharePoint and SAP Server 2.0
Published: July 16, 2012
Summary: Learn how to import BDC models in a deployment of Duet Enterprise 2.0 in a SharePoint
Server 2013 environment.
Applies to: Duet Enterprise for Microsoft SharePoint and SAP Server 2.0
Before importing any Business Data Connectivity (BDC) models, you will need the LsiUrl and
MetadataUrl from the SAP administrator for each of the following BDC models to use when
DuetConfig.exe is run and the models are imported. You must configure a Duet publishing URL and
account. You must grant users permissions on the BDC models that you import before they can access
the SAP data that those models represent.
In this article:
Import BDC models and set Metadata Store permissions
Import the Reporting model
Import the Workflow model
Import and configure the RoleSync model
Configure the publishing URL and account
Set Metadata Store permissions
Import BDC models and set Metadata Store
permissions The following models are provided with Duet Enterprise 2.0 and are installed in this default directory
path: C:\Program Files\Duet Enterprise\2.0\BDC Models. This directory contains other models that are
installed by default and are not used as part of this deployment.
Workflow
UserSubscription
Reporting
RoleSync
Each of these models must be imported individually because the procedures to import them are not the
same. Use the following procedures to import each of the Reporting, Workflow, and RoleSync BDC
models.

26
Import the Reporting model The Reporting BDC model is imported into Duet Enterprise 2.0 by using the DuetConfig.exe -
importbdc command. It requires both an LsiUrl and MetadataUrl to import successfully. Use the
following procedure to import the Reporting BDC model.
To import the Reporting model
1. Verify that you have the following administrative credentials: Windows Administrators
group on the front-end web server that is running SharePoint Server 2013 to complete this
procedure. You must also be a member of the Farm Administrators group on the
SharePoint Server farm on which you are installing Duet Enterprise 2.0.
2. As administrator, open the Windows command prompt.
3. At the command prompt, type the default path of the DuetConfig.exe file: cd /d C:\Program
Files\Duet Enterprise\2.0.
4. At the command prompt, type the following command, and then press ENTER:
Duetconfig.exe -importbdc -featurename Reporting -BdcServiceApplication <BDC Service
Application> -lsiurl <LsiUrl> -metadataUrl <MetadataUrl>
Where:
<BDC Service Application> equals the BDC Service application name.
<LsiUrl> is the LsiUrl URL that is provided to you by the SAP administrator that matches the
BDC model that you want to import.
(optional) <MetadataUrl> is the metadata URL that is provided to you by the SAP administrator
that matches the BDC model that you want to import.
5. When complete, at the command prompt, you receive the following message: The
specified BDC model was successfully imported.
Import the Workflow model The Workflow BDC model is imported into Duet Enterprise 2.0 by using the DuetConfig.exe -
importbdc command. It requires both an LsiUrl and MetadataUrl to import successfully. It also requires
an additional parameter named UserSubLsiUrl. This UserSubLsiUrl is used for the UserSubscription
model, an additional model only imported together with the workflow model. The UserSubscription
model allows users to subscribe to workflow tasks on individual Duet Enterprise 2.0 workflow sites. Use
the following procedure to import the Workflow and UserSubscription BDC models.
To import the Workflow model
1. Verify that you have the following administrative credentials: Windows Administrators
group on the front-end web server that is running SharePoint Server 2013 to complete this
procedure. You must also be a member of the Farm Administrators group on the
SharePoint Server farm on which you are installing Duet Enterprise 2.0.
2. As administrator, open the Windows command prompt.

27
3. At the command prompt, type the default path of the DuetConfig.exe file: cd /d C:\Program
Files\Duet Enterprise\2.0.
4. At the command prompt, type the following command, and then press ENTER:
Duetconfig.exe -importbdc -featurename <FeatureName>Workflow -BdcServiceApplication
<BDC Service Application> -lsiurl <LsiUrl> -usersubLisurl <UserSubLsiUrl> -metadataUrl
<MetadataUrl>
Where:
<BDC Service Application> equals the BDC Service application name.
<LsiUrl> is the LsiUrl URL that is provided to you by the SAP administrator that matches the
BDC model that you want to import.
<UserSubLsiUrl> is the UserSubLsiUrl URL that is provided to you by the SAP administrator.
<MetadataUrl> is the metadata URL that is provided to you by the SAP administrator that
matches the BDC model that you want to import. The URL is appended to the end of the
MetadataUrl provided by the SAP administrator.
5. When complete, at the command prompt, you receive the following message: The
specified BDC model was successfully imported.
Import and configure the RoleSync model The RoleSync BDC model is imported into Duet Enterprise 2.0 by using the DuetConfig.exe -
importbdc command. It requires both an LsiUrl and MetadataUrl to import successfully. Use the
following procedure to import the RoleSync BDC model. After the model is imported, it must be
configured to start the required timer jobs.
To import the RoleSync model
1. Verify that you have the following administrative credentials: Windows Administrators
group on the front-end web server that is running SharePoint Server 2013 to complete this
procedure. You must also be a member of the Farm Administrators group on the
SharePoint Server farm on which you are installing Duet Enterprise 2.0.
2. As administrator, open the Windows command prompt.
3. At the command prompt, type the default path of the DuetConfig.exe file: cd /d C:\Program
Files\Duet Enterprise\2.0.
4. At the command prompt, type the following command, and then press ENTER:
Duetconfig.exe -importbdc -featurename RoleSync -BdcServiceApplication <BDC Service
Application> -lsiurl <LsiUrl> -metadataUrl <MetadataUrl>
Where:
<BDC Service Application> equals the BDC Service application name.
<LsiUrl> is the LsiUrl URL that is provided to you by the SAP administrator that matches the
BDC model that you want to import.

28
<MetadataUrl> is the metadata URL that is provided to you by the SAP administrator that
matches the BDC model that you want to import. The URL is appended to the end of the
MetadataUrl provided by the SAP administrator.
5. When complete, at the command prompt, you receive the following message: The
specified BDC model was successfully imported.
To configure RoleSync
1. Verify that you have the following administrative credentials: Windows Administrators
group on the front-end web server that is running SharePoint Server 2013 to complete this
procedure. You must also be a member of the Farm Administrators group on the
SharePoint Server farm on which you are installing Duet Enterprise 2.0.
2. As administrator, open the Windows command prompt.
3. At the command prompt, type the default path of the DuetConfig.exe file: cd /d C:\Program
Files\Duet Enterprise\2.0.
4. At the command prompt, type the following command, and then press ENTER:
DuetConfig.exe -ConfigureRoleSync -UserProfileServiceApplicationName <"User Profile
Service Application Name">
Where <"User Profile Service Application Name"> equals the name of the User Profile service
application.
5. At the command prompt, you receive the following message: The specified Profile
Synchronization Job was successfully configured.
6. The timer job for RoleSync is now created.
Configure the publishing URL and account Use this procedure to configure the properties required to enable the SAP system to publish reports
and workflows to a specific web application that you want to enable for use with Duet Enterprise 2.0. To
complete this procedure, you must know the following:
The URL of the web application that you are configuring.
The port number of the extended port on the web application that you are configuring.
The account that the SAP system will use to publish reports and workflows to the web application
that you are configuring.
To configure the publishing URL and account
1. Verify that you have the following administrative credentials: Windows Administrators
group on the front-end web server that is running SharePoint Server 2013 to complete this
procedure. You must also be a member of the Farm Administrators group on the
SharePoint Server farm on which you are configuring Duet Enterprise 2.0.
2. As administrator, open the Windows command prompt.

29
3. At the command prompt, type the default path of the DuetConfig.exe file: cd /d C:\Program
Files\Duet Enterprise\2.0.
4. At the command prompt, type the following command, and then press ENTER:
duetconfig.exe -configurewebapp <Web Application URL> -PublishingUrl <PublishingUrl> -
PublisherAccount <domain\username>
Where:
<Web Application URL> equals the http:// URL of the new web applications that you created.
<PublishingUrl> equals the https://servername:portnumber of the extended web application that
the SharePointSSL.cer certificate is bound to.
Tip:
Because you extended this web application using a fully qualified domain (FQDN)
name, you will need use the FQDN form of the URL here.
<domain\username> equals the domain and user name of the DuetPublisher account.
Important:
This account cannot be the same as the SharePoint Farm account or the Managed
account assigned to the application pool of the web application using by Duet
Enterprise.
5. At the command prompt, you receive the following message: Successfully configured Duet
functionality on the Web Application https://WebApplicaitonURL.
Set Metadata Store permissions Before you can verify the successful configuration and connection between the SharePoint and SAP
systems, you must configure Metadata Store permissions.
To set Metadata Store permissions
1. Verify that you have the following administrative credentials: Windows Administrators
group on the front-end web server that is running SharePoint Server 2013 to complete this
procedure. You must also be a member of the Farm Administrators group on the
SharePoint Server farm on which you are installing Duet Enterprise 2.0.
2. On the SharePoint Central Administration website, click Application Management.
3. In the Service Applications section, click Manage service applications.
4. On the Service applications page, click the link for the Business Data Connectivity Service
Application that you are using for Duet Enterprise. By default, the name of the link is BDC
Service but this name can be changed by an administrator.
5. On the BDC models page, in the View section, in the External Content Types drop-down
list, select BDC Models. The following four imported models are displayed:
OBA.Server.Reporting
OBA.Server.RoleSync

30
OBA.Server.UserSubscription
OBA.Server.Workflow
6. On the BDC Models page, use Set Object Permissions and Set Metadata Store Permissions
to set both object and Metadata Store permissions for all models. All users who access
these models will need individual permissions to access content from these BDC models.
Set Object Permissions: Execute, Selectable in Client, Edit, and Set Permissions. (For the
publisher account only all permissions are required. For all other accounts, you can choose one
or more permissions.)
Set Metadata Store Permissions: Execute, Selectable in Client, Edit, and Set Permissions.
Make sure to select the Propagate permissions to all BDC models, External Systems and
External Content Types in the BDC Metadata Store. Doing so will overwrite existing
permissions. (For the publisher account, only all permissions are required. For all other
accounts, you can choose one or more permissions).
7. You might have to run IIS reset to allow these permissions to take effect immediately.
8. When both the object and Metadata Store permissions are set, you can run Duet
Enterprise Configuration Check and validate that all required communication and security
checks are working and functional.

31
Configuration check for Duet Enterprise for
SharePoint and SAP Server 2.0
Published: July 16, 2012
Summary: Learn how to perform a Duet Enterprise Configuration Check in a SharePoint Server 2013
environment.
Applies to: Duet Enterprise for Microsoft SharePoint and SAP Server 2.0
This article describes how to verify the Duet Enterprise Configuration Check in Duet Enterprise for
Microsoft SharePoint and SAP Server 2.0.
Run the Duet Enterprise Configuration Check Use this procedure to verify the configuration of Duet Enterprise 2.0 and to show the status of all
imported models and features.
To run the Duet Enterprise Configuration Check
1. Verify that you have the following administrative credentials: Windows Administrators
group on the front-end web server that is running SharePoint Server 2013 to complete this
procedure. You must also be a member of the Farm Administrators group on the
SharePoint Server farm on which you are installing Duet Enterprise 2.0.
2. As administrator, open a Windows Command Prompt window.
3. At the command prompt, ensure that the directory is the default install location for Duet
Enterprise 2.0: C:\Program Files\Duet Enterprise\2.0.
4. At the command prompt, type the following command, and then press ENTER:
duetconfig.exe -CheckConfiguration
5. At the command prompt, you receive the following message: Please wait while the check
configuration result is retrieved and written to the output file. This operation can take
several minutes to complete….
The CheckConfiguration result is written to
C:\Users\<useraccount>\AppData\Local\Temp\1\CheckConfigurationResult.xml, where
<useraccount> equals the name of the publisher account specified when you configured the
publishing URL and account.
6. To view this file, browse to the location shown at the command prompt, and then open the
CheckConfigurationResult.xml file in your XML-compatible web browser. You will need to
allow all scripts to run.
7. On the Duet Enterprise Configuration Check page, the following information is displayed:

32
Overall Status This displays the overall status of all security connections, models, and
features. If all of these are working correctly, the status column will display Success.
Farm-Scoped Features This displays the status of RoleSync, Validate Root Authority
Certificate, and Security. If all of these are working correctly, the status column will show
Success for each. Note that RoleSync will show as failed until it is run for the first time. This is
expected and does not indicate a problem. Running RoleSync one time will change this fail to
success.
Web Application-Scoped Features This displays the status of Publishing Settings,
Reporting, and Workflow. If all of these are working correctly, the status column will show
Success for each.
8. If any of these features, models, or items show as Failed in the status column, you can get
more information about the failure by clicking Diagnostic Checks in the failed component
section.
9. The Duet Enterprise 2.0 core installation and configuration is now completed. Additional
configuration is required to enable the features of the four imported Business Data
Connectivity (BDC) models: Reporting, Workflow, UserSubscription, and RoleSync. For
more information, see Configure solutions in Duet Enterprise for SharePoint and SAP Server 2.0.

33
Configure solutions in Duet Enterprise for
SharePoint and SAP Server 2.0
Published: July 16, 2012
Summary: Learn how to configure and deploy solutions in Duet Enterprise 2.0 in a SharePoint Server
2013 environment.
Applies to: Duet Enterprise for Microsoft SharePoint and SAP Server 2.0
Solutions for Duet Enterprise for Microsoft SharePoint and SAP Server 2.0 are configured at two levels:
the site collection level and the subsite level. Before any solutions can be deployed, a new site
collection must be created and then individual subsites must be created for each solution. Use the
following procedure to create a new site collection, which will be later configured and new subsites
created to host the individual Duet Enterprise 2.0 features of Reporting and Workflow.
Create a new site collection This site collection will serve as the foundation for all subsites that will be created to host individual
Duet Enterprise 2.0 features, such as Reporting and Workflow.
To create a new site collection
1. Verify that you have the following administrative credentials: Farm Administrators
SharePoint group and a member of the Windows Administrators group on the server that
is running the SharePoint Central Administration website.
2. In Central Administration, on the Application Management page, in the Site Collections
section, click Create Site Collections.
3. On the Create a Site Collection page, in the Title and description section, in the Title field,
enter a name for this new site collection. Record this name.
4. In the Template Selection section, select Team site.
5. In the Primary Site Collection Administrator section, in the User Name field, enter an
account. Record this account.
6. Leave all other settings as the default.
7. Click OK. The new site collection is created by using the blank template.
8. Browse to the newly created site collection by entering the URL into your web browser
address field. It should resemble the following: http://servername:portnumber.
9. The new site collection is displayed as a team site.

34
Deploy a solution Use the following procedures to deploy a Reporting, Workflow, or RoleSync solution for Duet Enterprise
2.0:
Configure the Reporting solution in Duet Enterprise for SharePoint and SAP Server 2.0
Configure the Workflow solution in Duet Enterprise for SharePoint and SAP Server 2.0
Configure the RoleSync solution in Duet Enterprise for SharePoint and SAP Server 2.0

35
Configure the Reporting solution in Duet
Enterprise for SharePoint and SAP Server 2.0
Published: July 16, 2012
Summary: Learn how to configure the Reporting solution in Duet Enterprise 2.0 in a SharePoint Server
2013 environment.
Applies to: Duet Enterprise for Microsoft SharePoint and SAP Server 2.0
The Reporting solution in Duet Enterprise for Microsoft SharePoint and SAP Server 2.0 must be
configured before it can be used by administrators or users. In earlier procedures, you have imported
the Reporting Business Data Connectivity (BDC) model and have confirmed that it is functioning
correctly. The following procedures enable site collection and site-level features so that the Reporting
solution can be used.
In this article:
Enable the Reporting solution on the site collection
Create a new subsite and activate the Reporting solution
Enable the Reporting solution on the site collection Duet Enterprise reporting requires the Duet Enterprise Reports Content Types feature to be enabled in
the site collection. This feature is enabled for all subsites in the site collection.
To enable the Reporting solution on the site collection
1. Verify that you have the following administrative credentials: Farm Administrators
SharePoint group and a member of the Windows Administrators group on the server that
is running the SharePoint Central Administration website.
2. Browse to the newly created site collection by entering the URL into your web browser
address field. It should resemble the following: http://servername:portnumber.
3. The new site collection is displayed as a blank site.
4. On the ribbon, select the Settings icon (the Settings icon resembles a gear), and then
select Site Settings.
5. On the Site Settings page, in the Site Collection Administration section, select Site
Collection Features.
6. On the Site Settings - Site Collection Features page, scroll down the list to find Duet
Enterprise Reports Content Types.
7. Click Activate next to Duet Enterprise Reports Content Types. The Duet Enterprise Reports
Content Types feature is activated and is displayed as Active.

36
8. The Duet Enterprise Reports Content Types feature is now enabled on the site collection
you created.
Create a new subsite and activate the Reporting
solution After you have created a new site collection, you must create a new subsite to host Duet Enterprise
Reporting and its features.
To create a new subsite and activate the Reporting solution
1. Verify that you have the following administrative credentials: Farm Administrators
SharePoint group and a member of the Windows Administrators group on the server that
is running the SharePoint Central Administration website.
2. Browse to the new site collection that you created.
3. Select Site Contents.
4. On the Site Contents - New SharePoint Site page, in the Title and Description section, in the
Title field, type Reporting.
5. In the Template Selection section, on the Collaboration tab, select Blank Site.
6. In the Navigation Inheritance section, under Use the top link bar from the parent site?,
select Yes.
7. Click Create. The new blank subsite is created to host Duet Enterprise Reporting.
8. The new reporting subsite is displayed.
9. On the subsite page, on the ribbon, select the Settings icon (the Settings icon resembles a
gear), and then select Site Settings.
10. On the Site Settings page, in the Site Actions section, select Manage site features.
11. Scroll down the list to find Duet Enterprise Reporting.
12. Click Activate next to Duet Enterprise Reporting. The Duet Enterprise Reporting feature is
activated and is displayed as Active.
13. The Duet Enterprise Reporting feature is now active on the new subsite and its features
are available for viewing and use.
14. You can view these features by viewing the added items to the left navigation on the
subsite. The newly added features are displayed as the following:
Report Settings Shows the available report types and templates. This can be used to run
reports.
Reports Shows the current reports.

37
Configure the Workflow solution in Duet
Enterprise for SharePoint and SAP Server 2.0
Published: July 16, 2012
Summary: Learn how to configure the Workflow solution in Duet Enterprise 2.0 in a SharePoint Server
2013 environment.
Applies to: Duet Enterprise for Microsoft SharePoint and SAP Server 2.0
The Workflow solution in Duet Enterprise for Microsoft SharePoint and SAP Server 2.0 allows SAP
workflows to be transferred to the SharePoint system and trigger alerts and messaging inside
SharePoint sites and sent via email messages to users. The Workflow solution is configured on a new
subsite that you will create. This new workflow subsite will host all of the different SAP task types.
In this article:
Create a subsite and activate the Workflow solution
Verify the Workflow solution
Create a subsite and activate the Workflow solution Use the following procedure to create a subsite to host the Workflow feature in Duet Enterprise 2.0.
To create a subsite for Workflow
1. Verify that you have the following administrative credentials: Farm Administrators
SharePoint group and a member of the Windows Administrators group on the server that
is running the SharePoint Central Administration website.
2. Browse to the new site collection that you created.
3. In the Quick Launch, click Site Contents.
4. On the Site Contents page, in the Subsites section, click new subsite.
5. On the Site Contents - New SharePoint Site page, in the Title and Description section, in the
Title field, type Workflow.
6. In the Web Site Address section, in the URL name field, type Workflow.
7. In the Template Selection section, on the Collaboration tab, select Team site.
8. Optionally, in the Navigation Inheritance section, under Use the top link bar from the parent
site?, select Yes.
9. Click Create. The new blank subsite is created to host the Duet Enterprise Workflow.
10. The new workflow site is created and is displayed.

38
Activate the Duet Enterprise Workflow feature on the subsite
1. On the new workflow site, in the ribbon, select the Settings icon (the Settings icon
resembles a gear), and then select Site Settings.
2. On the Site Settings page, in the Site Actions section, select Manage site features.
3. Scroll down the list to find Duet Enterprise - SAP Workflow.
4. Click Activate next Duet Enterprise - SAP Workflow. The Duet Enterprise - SAP Workflow
feature is activated and is displayed as Active.
5. On the new workflow site, in the ribbon, select the Settings icon (the Settings icon
resembles a gear), and then select Site Settings.
6. On the Site Settings page, a new section is displayed named SAP Workflow Configuration
that has the following links.
Grant users access to SAP workflow tasks.
Configure new SAP workflow task type.
Import a preconfigured SAP Workflow template.
Diagnose configuration problems.
Duet Enterprise 2.0 Workflow is now configured on the subsite and its features are available for
viewing and use.
Verify the Workflow solution To verify that workflows can be received from the SAP system, you must do the following:
Configure at least one SAP workflow task type.
Grant at least one user access to the task type.
Publish the workflow that is associated with the task type that you created.
Configure an SAP workflow task type
When you configure a new SAP workflow task type, you specify the SAP task type and the possible
outcomes that the task can have. SharePoint Server creates a new workspace for the task type. The
workspace hosts all the tasks for a workflow task type.
Tip:
You can configure multiple task types per workflow site, but you cannot use the same task
types on other workflow sites.
Duet Enterprise 2.0 includes a site template that you can use to configure a new SAP workflow task
type. Alternatively, a site designer can use SharePoint Designer 2013 to customize a workflow for
individual business requirements. For example, a site designer might specify that each page on
workflow site include a Related Reports Web Part.

39
Note:
Do not create a workflow task workspace for the same SAP workflow task type and same
language on multiple root workflow sites. This is not supported in Duet Enterprise 2.0.
To configure a new SAP workflow task type
1. From the root workflow site, select Settings, and then select Site Settings.
2. On the Site Settings page, locate the SAP Workflow Configuration group, and then click
Configure new SAP Workflow task type to open the properties page for the workflow site.
3. On the New SAP Workflow Task Type page, enter a description for this new site.
4. In the Template Selection group, in the Select a template panel, click the Duet Enterprise
tab. Then, select SAP Workflow Site, or the name of the custom template that you want to
use.
5. In the Task Name group, in the Task name text box, enter the name of the SAP task type.
Note:
The task name must match the name as it appears in the SAP system. For more
information about task type names, contact your SAP Workflow administrator.
6. In the text box next to Task display name, enter the name that you want to appear on the
site.
7. In the Task Outcomes group, in the Possible task outcomes pane, do the following:
a) In the Text box, enter the name of a possible outcome, such as Approve or Reject.
The outcomes that you specify here will appear as buttons on the task form.
b) In the Key box, enter the numeric key of this outcome, such as 001 or 002.
c) Click Add Outcome.
d) Repeat steps a through c until you have finished entering possible outcomes.
Note:
The site designer specifies a certain collection of valid outcomes (text and key values) during
the initial setup process. The outcome name and key that you enter in this step must be one of
these predefined outcomes. For more information about valid outcomes that you can use,
contact your SAP workflow administrator.
8. In the Extended business properties text box, enter the names of any extended properties.
Note:
A site designer or administrator can specify additional properties for an SAP workflow. To
learn about any extended business properties that might be required for your site, contact
your workflow administrator.
9. In the External Content Type group, in the External content type text box, enter Workflow
Task for this task type. To verify the name of the external content type, click the check
button. To select Workflow Task from a list of valid external content types, click the browse
button to open the External Content Type Picker dialog box. Then, select Workflow Task,
and then click OK.

40
10. In the Task Deletion group, in the days text box, specify how long to keep a completed task
in the task list before deleting the task. The default is 500 days.
11. Click Create to create the new workflow task workspace site.
12. When the Site Created Successfully message box appears, click OK to go to the new site
page.
Once the workflow task workspace is created, you can use the SharePoint Server user interface or
SharePoint Designer to customize the site to suit your business needs.
Grant users access
After you create an SAP workflow task type and its site, you are ready to add the users who will receive
the tasks from the site. You can add users individually, or add a group of users by adding an
appropriate SAP role.
When you grant users access to the SAP workflow task type, Duet Enterprise 2.0 confirms
authorization for the requested user to access the SAP workflow elements.
To grant users access to the SAP workflow task type
1. Navigate to the root workflow site.
2. Select Settings, and then select Site Settings.
3. On the Site Settings page, locate the SAP Workflow Configuration group, and then click
Grant user access to SAP workflow tasks.
4. On the User Subscription page, click new item.
5. In the Workflow task type drop-down list, select the task that you want to grant access to.
6. In the User/Role text box, enter the user account of the user for whom you want to grant
access. If you want to grant access to all users who have a certain SAP role, enter the
name of the role. You can verify the entry that you made by clicking the Check Names
button. To browse for a name or role, click the browse button.
7. Click OK to return to the User Subscription page.
Publish the workflow
Each unique task in an SAP workflow is implemented as a separate SharePoint Server declarative
workflow. You must publish the workflow to make it available to users on the workflow task workspace.
To perform the steps in the following procedure, you must be a site administrator for the workflow task
workspace. You must also have SharePoint Designer 2013 installed on the computer from which you
are accessing the workflow site.
To publish the workflow
1. From the workflow task workspace site, click Page.
2. In the Edit group, click the Edit Page arrow to see more options, and then click Edit in
SharePoint Designer. SharePoint Designer will connect to the workflow site automatically.

41
In addition, it opens the workflow on a page that enables you to manage the settings for
the workflow site.
3. In the Navigation panel, click Workflows.
4. In the Workflows pane, locate the List Workflow section and the name of the workflow that
you want to publish.
5. Double-click the name of the workflow to open a page where you can manage settings for
the workflow.
6. In the Save group on the ribbon, click Publish.
Now that you have concluded these steps, ask the SAP administrator to run a workflow that
contains the task type that you configured and verify that the workflow is sent to your workflow site.

42
Configure the RoleSync solution in Duet
Enterprise for SharePoint and SAP Server 2.0
Published: July 16, 2012
Summary: Learn how to configure role synchronization (RoleSync) for Duet Enterprise 2.0.
Applies to: Duet Enterprise for Microsoft SharePoint and SAP Server 2.0
The Role Synchronization (RoleSync) solution provided with Duet Enterprise for Microsoft SharePoint
and SAP Server 2.0 enables SharePoint administrators to synchronize the SAP roles property that is
stored in the SAP profile store with SharePoint user profiles. After role synchronization is performed,
users can use SharePoint People Picker to grant permissions on any securable object in SharePoint,
such as sites, lists, and files. It also enhances the Reporting solution because shared reports can only
be shared by using SAP roles and users can subscribe to shared reports.
This article assumes the following:
An SAP administrator has created the SAP-user-to-SAP-role mapping in the SAP system.
A SharePoint administrator has started the User Profile Service application and has created a
Profile synchronization connection to the Active Directory Domain Services (AD DS) service that
contains the user accounts that are used by the SharePoint Server farm. For information about how
to complete these procedures, see Configure profile synchronization (SharePoint 2013 Preview).
The SharePoint administrator has synchronized the AD DS service with the SharePoint user profile
store. For more information, see Manage profile synchronization (SharePoint 2013 Preview).
Note:
The SharePoint user profiles to which you want to synchronize SAP roles must already
exist before you perform role synchronization. SAP roles will only be synchronized with
SharePoint user profiles that already exist. You can create these user profiles in the
SharePoint user profile store manually but the recommended way for them to be created is
to perform profile synchronization with AD DS.
In this article:
Before you begin
Activate the Duet Enterprise Claim Provider feature
Identify the SharePoint Timer Service Account
Grant permissions to the Metadata Store
Ensure the Timer account has full control and verify name of User Profile service application
Provide the SharePoint Timer service account
Synchronize SAP roles with the SharePoint user profile store
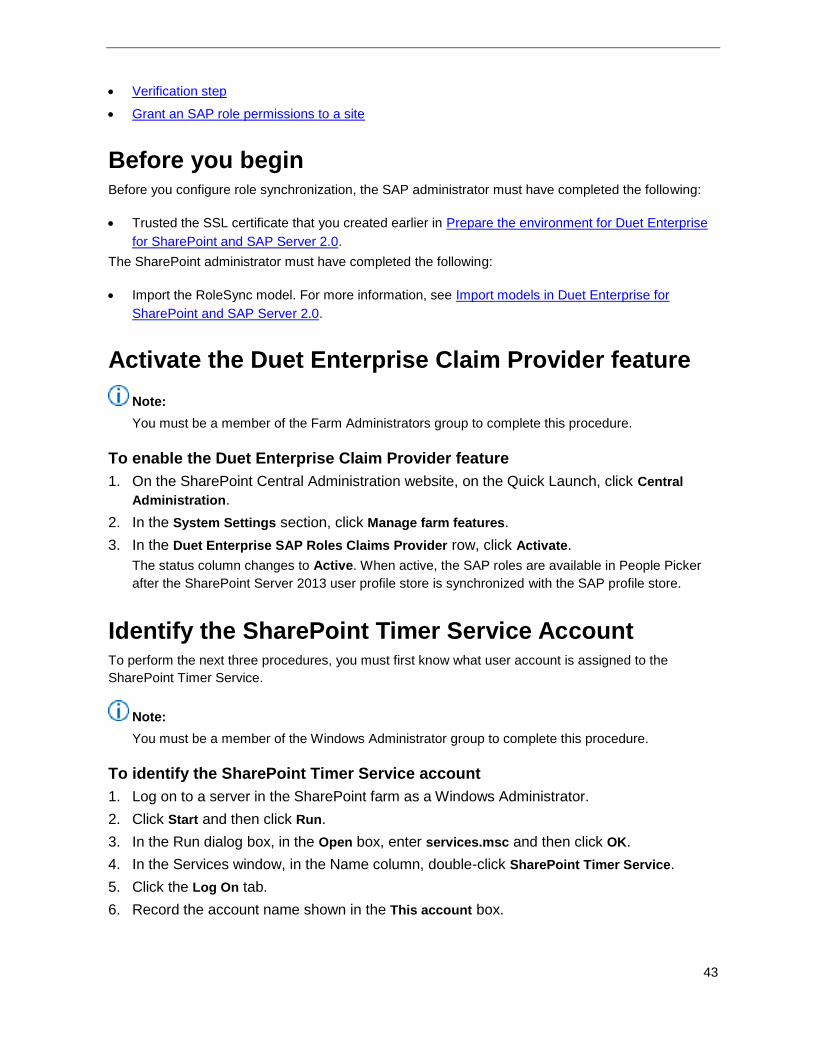
43
Verification step
Grant an SAP role permissions to a site
Before you begin Before you configure role synchronization, the SAP administrator must have completed the following:
Trusted the SSL certificate that you created earlier in Prepare the environment for Duet Enterprise
for SharePoint and SAP Server 2.0.
The SharePoint administrator must have completed the following:
Import the RoleSync model. For more information, see Import models in Duet Enterprise for
SharePoint and SAP Server 2.0.
Activate the Duet Enterprise Claim Provider feature
Note:
You must be a member of the Farm Administrators group to complete this procedure.
To enable the Duet Enterprise Claim Provider feature
1. On the SharePoint Central Administration website, on the Quick Launch, click Central
Administration.
2. In the System Settings section, click Manage farm features.
3. In the Duet Enterprise SAP Roles Claims Provider row, click Activate.
The status column changes to Active. When active, the SAP roles are available in People Picker
after the SharePoint Server 2013 user profile store is synchronized with the SAP profile store.
Identify the SharePoint Timer Service Account To perform the next three procedures, you must first know what user account is assigned to the
SharePoint Timer Service.
Note:
You must be a member of the Windows Administrator group to complete this procedure.
To identify the SharePoint Timer Service account
1. Log on to a server in the SharePoint farm as a Windows Administrator.
2. Click Start and then click Run.
3. In the Run dialog box, in the Open box, enter services.msc and then click OK.
4. In the Services window, in the Name column, double-click SharePoint Timer Service.
5. Click the Log On tab.
6. Record the account name shown in the This account box.

44
Grant permissions to the Metadata Store
Note:
You must be a member of the Farm Administrators group to complete this procedure.
To grant permissions to the Metadata Store
1. In Central Administration, on the Quick Launch, click Application Management.
2. In the Service Applications section, click Manage service applications.
3. In the Name column, click the link for the Business Data Connectivity Service Application.
4. In the Permissions group of the ribbon, click Set Metadata Store Permissions.
5. In the Set Metadata Store Permissions dialog box, in the top box, enter the user account
that the timer job is running on..
6. Click Add.
7. In the <user account> section (bottom section), ensure that the Execute check box is
selected.
Where <user account> us the name of the account you added in steps 1 through 6.
8. Click OK.
Note:
If at least one user has not yet been granted the Set Permissions permission on the
Metadata Store, you might receive the following error message: "At least one user/group in
the Access Control List must have the Set Permissions right to avoid creating a non-
manageable object." To resolve this issue, grant at least one user the Set Permissions
permission on the Metadata Store.
Ensure the Timer account has full control and verify
name of User Profile service application Use this procedure to ensure that the account assigned to the SharePoint Timer account has full control
permissions to the default User Profile service application and the Business Data Connectivity service
application in the SharePoint farm. The farm administrator who will configure profile synchronization,
later in this article, must be granted this permission.
Tip:
SharePoint Server 2013 supports multiple User Profile service applications. However, Duet
Enterprise role synchronization works only with the default User Profile service application.
Note:
You must be a member of the Farm Administrators group or an administrator of the User Profile
service application to complete this procedure.

45
To ensure that Timer account has full control
1. In Central Administration, on the Quick Launch, click Central Administration.
2. In the Application Management section, click Manage service applications.
3. In the Type column, click the row that contains the default User Profile Service Application
to select the row.
4. The name of the User Profile service application is listed in the Name column. Note the
name of this service application because you will need it for a later procedure.
5. In the Sharing group of the ribbon, click Permissions.
6. In the Connection Permissions dialog box, ensure that the account used for the
SharePoint Timer service is granted Full Control permissions.
7. Click OK.
Provide the SharePoint Timer service account You must provide the SAP administrator with the user account that is assigned to the SharePoint Timer
service, also known as the SPTimerV4 service. The SAP administrator must ensure that this account is
mapped to an SAP user who is granted sufficient permissions on the SAP system to query the
UserRoles assignments query.
Note:
You must be a member of the Windows Administrators group to complete this procedure.
To get the user account for the SharePoint Timer service
1. Log on to a front-end web server in the SharePoint Server 2013 farm as a member of the
Administrators group.
2. Click Start, point to Administrative Tools, and then click Services.
3. In the Name column, right-click SharePoint Timer, and then click Properties.
4. In the SharePoint Timer Service Properties dialog box, on the Log On tab, note the account
name that is listed in the This account text box.
5. Give this account name to the SAP administrator.
6. Click Cancel to close the SharePoint Timer Service Properties dialog box.
Synchronize SAP roles with the SharePoint user
profile store
Note:
You must be a member of the Farm Administrators group to complete this procedure.
Before you start this procedure, do the following:
Ensure that the SAP administrator has configured an OData endpoint.

46
Ask the SAP administrator to ensure that the "Synchronize roles to consumers" job has finished
running on the SAP system.
The SAP administrator must run the "Synchronize roles to consumers" job periodically to
synchronize the user roles on the SAP system with the SAP profile store on the server that is
running SAP NetWeaver. We recommend that you do not synchronize the SAP user profile store
with the SharePoint user profile store until the SAP administrator has completed the
synchronization job. Otherwise, the synchronization job between the SAP profile store and the
SharePoint user profile store can take much longer to complete. Note that the "Synchronize roles to
consumers" job takes approximately 80 minutes to synchronize 100,000 users, while synchronizing
the profile store in SAP NetWeaver to the SharePoint user profile store takes approximately 100
minutes to synchronize 100,000 users. If you plan to schedule these synchronization jobs, we
recommend that you run them manually first to determine how much time each takes, on average,
to run on your systems.
To synchronize profiles
1. In Central Administration, on the Quick Launch, click Monitoring.
2. On the Monitoring page, in the Timer Jobs section, click Review job definitions.
3. On the Job Definitions page, in the Title column, click the Duet Enterprise Profile
Synchronization for <User Profile service application name> link.
Where <User Profile service application name> is the name of the User Profile service application
that you are using for role synchronization.
Tip:
If you have only one User Profile service application, by default this name is Duet
Enterprise Profile Synchronization for User Profile Service Application.
4. On the Edit Timer Job page, click Run Now.
Note:
This timer job is scheduled to run one time per day but you can configure it to run less often
if it causes a performance problem.
For more information about SharePoint timer jobs, see View timer job status (SharePoint 2013
Preview).
Verification step After role synchronization is complete, the SAP Roles property appears at the bottom of each
SharePoint user profile page and displays the SAP roles that they are assigned to. These SAP roles will
also be available in People Picker when granting permissions to securable objects, such as sites, list,
and files. SAP roles will also be available when you run shared reports if you have configured the
Reporting solution.

47
Grant an SAP role permissions to a site After the SAP user profile store is synchronized with the SharePoint user profile store, you can perform
this procedure to grant users permissions to a site based on their SAP roles. Note that only sites that
are in a web application that uses claims-based authentication and that are associated with the User
Profile service application that you used to configured role synchronization are supported.
Tip:
Before you can use SAP roles to set permissions on a site, the site collection must already
exist and SAP roles must have already been synchronized to the SharePoint user profile store.
After you have granted an SAP role permissions to a site, the site collection must not be
renamed or deleted.
Note:
You must be a Site Owner to perform this procedure.
To grant an SAP role permissions to a site
1. In a browser, go to the site for which you want to enable SAP roles.
2. Click the Settings icon, and then click Site Settings.
Tip:
The Settings icon resembles a gear.
3. Under Users and Permissions, click Site Permissions.
4. In the Grant group of the ribbon, click Grant Permissions.
5. In the Grant Permissions dialog box, do the following:
a) Click SHOW OPTIONS.
b) Under Select a group or permission level, select the group or permission level to
which you want to assign the SAP role.
c) In the top box, type part of the SAP role’s name.
Tip:
A drop-down list appears with all available SAP roles.
6. Either finish typing the name of the SAP role or select it from the drop-down list, and then
click Share.

48
Uninstall Duet Enterprise for SharePoint and
SAP Server 2.0
Published: July 16, 2012
Summary: Learn how to uninstall Duet Enterprise 2.0 in a SharePoint Server 2013 environment.
Applies to: Duet Enterprise for Microsoft SharePoint and SAP Server 2.0
This article describes how to remove an installation of Duet Enterprise for Microsoft SharePoint and
SAP Server 2.0. This includes removing all Duet Enterprise 2.0 solutions and all traces of Duet
Enterprise components from the SharePoint Server 2013 farm.
The procedures provided in this article do not remove files that contain SAP data from the SharePoint
Server farm. For example, SAP reports that have been delivered to document libraries are not
removed. If you want those files to be removed as well, we recommend that you delete the SAP reports
manually. For example, you can delete the document libraries that contain the SAP reports or delete
the individual reports.
In this article:
Uninstall all solutions
Restart IIS and SharePoint services
Uninstall all solutions If you want to remove all Duet Enterprise 2.0 solutions from all web applications and also unregister all
Duet Enterprise 2.0 components, there are two commands that you must use:
DuetConfig.exe -uninstall This command removes all solutions from all web applications and
unregisters all Duet Enterprise components, at the same time. This command needs to run on only
one web server in the SharePoint Server farm.
setup /uninstall This command removes all traces of Duet Enterprise. This command must be run
on all web and application servers in the SharePoint Server farm.
Uninstall all solutions
The following procedure explains how to uninstall all Duet Enterprise 2.0 solutions that you have
deployed to a SharePoint Server farm and also how to remove all traces of Duet Enterprise 2.0 on each
front-end web server and application server in the SharePoint Server farm.

49
Note:
You must be a member of the Farm Administrators group to uninstall Duet Enterprise 2.0
solutions from SharePoint Server 2013.
To uninstall all solutions
1. Verify that you have the following administrative credentials:
You must be a member of the Farm Administrators group to uninstall Duet Enterprise 2.0
solutions from SharePoint Server 2013.
2. As administrator, open a Windows Command Prompt window on a front-end web server in
the SharePoint Server 2013 farm, and then go to <systemdrive>:\Program Files\Duet
Enterprise\2.0.
This folder contains the DuetConfig.exe file.
3. At the command prompt, type the following command, and then press ENTER:
DuetConfig.exe -uninstall
If this command is successful, you receive the following message: Duet Enterprise
unconfiguration succeeded.
Note:
This command removes all solutions from all web applications and unregisters all Duet
Enterprise components at the same time.
4. Next, at the command prompt, go to the folder that contains the Setup.exe file for Duet
Enterprise 2.0. If this file is not in the file system of the server that is running SharePoint
Server 2013, you can locate this file on the DVD or ISO image from which Duet Enterprise
2.0 was installed.
5. Type the following command, and then press ENTER:
setup /uninstall
If this command is successful, you receive the following message: Duet Enterprise setup
completed successfully. Press any key to continue….
Note:
You must repeat steps 4 and 5 on each front-end web server and application server in the
SharePoint Server farm to completely remove all traces of Duet Enterprise 2.0.
When you run these commands, the server that is running SharePoint Server 2013 creates
a job request for each, puts each in the job queue, and then starts them. This might take
several minutes to complete depending on how busy the server is at the time when you run
these commands.
6. To ensure that SharePoint Server 2013 will not use the old .dll files if the solution is
reinstalled, you must restart Internet Information Services (IIS) and SharePoint services as
shown in the next procedure.

50
Restart IIS and SharePoint services To ensure that solutions that have been uninstalled can no longer be run in the SharePoint Server farm,
you must restart IIS, the SharePoint Administration service, and the SharePoint Timer service.
Restarting or stopping IIS causes all sessions connected to your web server (including Internet, FTP,
SMTP, and NNTP) to be dropped. When you restart the Internet service, all sessions connected to your
web server are dropped. All Internet sites are unavailable until Internet services are restarted. For this
reason, avoid restarting the Internet Information Services service during peak usage.
Note:
You must be a member of the Windows Administrators group on each front-end web server in
the network load balancing rotation of the SharePoint Server farm to complete these
procedures.
To restart IIS
1. Log on to the front-end web server of the SharePoint Server farm as a member of the
Windows Administrators group.
2. As administrator, open a Windows Command Prompt window.
3. At the command prompt, type the following command, and then press ENTER:
iisreset /restart
4. If this command is successful, you receive the following message: Internet services
successfully restarted.
5. If you have more than one front-end web server in the network load-balancing rotation for
the SharePoint Server farm, repeat steps 1 through 4 for each remaining front-end web
server.
To restart the SharePoint services
1. Log on to the front-end web server of the SharePoint Server farm as a member of the
Windows Administrators group.
2. Click Start, point to Administrative Tools, and then click Services.
3. In the Name column, right-click SharePoint Administration, and then click Restart.
4. In the Name column, right-click SharePoint Timer Service, and then click Restart.
5. If you have more than one front-end web server in the network load-balancing rotation for
the SharePoint Server farm, repeat steps 1 through 4 for each remaining front-end web
server.
Related Documents