A P P E N D I X ■ ■ ■ 271 Deployment and Compilation Tips In this appendix, we explore some helpful tips to deploy your application, NDK 1.5, and OpenGL tricks as well as compiling the native code in chapters 6 and 7 using the NDK for extra time savings. Specifically, this section includes tips for the following: • Creating a key store for signature of you application package • Signing you application using the workbench • Compiling the project from Chapter 6 (Wolf 3D for Android) using NDK 1.5 • Adding custom support for OpenGL to the NDK 1.5. • Compiling the project from Chapter 7 (Doom for Android) with NDK 1.6 Let’s get started! Signing Your Application Before your application can be installed in any Android device, it must be signed using a Java key store. This section describes the steps you must follow to accomplish this task. You can find more details in the Android Developer Guide. ■ Note Android developers, more information about signing your applications is available at http://developer.android.com/guide/publishing/app-signing.html#setup. Creating a Key Store A key store is a password-protected file that contains public/private key pairs used for JAR signatures. You can create a key store with the following command: $ keytool -genkey -v -keystore my-release-key.keystore -alias alias_name -keyalg RSA -validity 10000 -storepass <password1> -keypass <password2>

Welcome message from author
This document is posted to help you gain knowledge. Please leave a comment to let me know what you think about it! Share it to your friends and learn new things together.
Transcript

A P P E N D I X
■ ■ ■
271
Deployment and Compilation Tips
In this appendix, we explore some helpful tips to deploy your application, NDK 1.5, and OpenGL tricks as well as compiling the native code in chapters 6 and 7 using the NDK for extra time savings. Specifically, this section includes tips for the following:
• Creating a key store for signature of you application package
• Signing you application using the workbench
• Compiling the project from Chapter 6 (Wolf 3D for Android) using NDK 1.5
• Adding custom support for OpenGL to the NDK 1.5.
• Compiling the project from Chapter 7 (Doom for Android) with NDK 1.6
Let’s get started!
Signing Your Application Before your application can be installed in any Android device, it must be signed using a Java key store. This section describes the steps you must follow to accomplish this task. You can find more details in the Android Developer Guide.
■ Note Android developers, more information about signing your applications is available at http://developer.android.com/guide/publishing/app-signing.html#setup.
Creating a Key Store A key store is a password-protected file that contains public/private key pairs used for JAR signatures. You can create a key store with the following command:
$ keytool -genkey -v -keystore my-release-key.keystore -alias alias_name -keyalg RSA� -validity 10000 -storepass <password1> -keypass <password2>

APPENDIX ■ DEPLOYMENT AND COMPILATION TIPS
272
Table A-1 lists the possible arguments for the keytool command.
Table A-1. Arguments for the Keytool Command
Argument Description
-genkey Generate a public and private key pair.
-v Use verbose output.
-keystore Specify the name of the key store.
-alias <alias_name> Add an alias for the key pair.
-validity <valdays> Specify the validity period in days.
-storepass <password> Add a password for the key store.
-keypass <password> Add a password for the key.
■ Tip When you run your applications in the emulator, the Eclipse workbench automatically signs the application using a debug key store. This key store can be found in %USERPROFILE%\debug.keystore (in Windows) and $HOME/.android/debug.keystore (in Linux). The debug key store password is "android", and the key alias and password are androiddebugkey/android.
Signing the Application Prior to the Android SDK 1.5, the application signature had to be done manually using the Java SDK jarsigner command (see Listing A-1).
Listing A-1. Windows Batch Script to Sign the Wolf3D Application Package (APK)
@echo off set JAVA_HOME=c:\Program Files\Java\jdk1.6.0_07 set PKG=c:\tmp\APK\Wolf3D.apk rem To sign "%JAVA_HOME%\bin\jarsigner" -verbose -keystore ar-release-key.keystore %PKG% android_radio rem To verify that your .apk is signed, you can use a command like this "%JAVA_HOME%\bin\jarsigner" -verbose -verify %PKG%

APPENDIX ■ DEPLOYMENT AND COMPILATION TIPS
273
Listing A-1 uses the Java SDK jarsigner command and the key store created in the previous section to sign the packed application as follows:
jarsigner -verbose -keystore ar-release-key.keystore Wolfd3D.apk android_radio
The arguments are as follows:
• verbose displays information about the files being signed.
• keystore defines the location of the Java key store created in the previous section.
• Wolfd3D.apk is the application package to sign.
• android_radio is the alias that represents the public/private key pair used for signature.
■ Caution The keytool and jarsigner commands are part of the Java SDK, not the JRE. You will have to install a Java SDK and set up the paths in your system to be able to create a key store and sign your applications with jarsigner.
With the Android SDK 1.5 or later, signing your package is much easier, provided you already have a key store; you don’t need the jarsigner command in this instance. To sign your package with the Eclipse workbench, follow these steps:
1. Right-click the project to be signed, and select Android Tools ➤ Export Signed Application Package (see Figure A-1).
2. In the “Keystore selection” dialog shown in Figure A-2, select “Use existing keystore,” and navigate to the key store created previously. Type the password for the key store.
3. Select the alias that represents the key pair to be used for signature, and enter the corresponding password (see Figure A-3).
4. Enter the destination of the package as shown in Figure A-4. Click Finish.

APPENDIX ■ DEPLOYMENT AND COMPILATION TIPS
274
Figure A-1. Exporting the application menu
Figure A-2. The “Keystore selection” dialog

APPENDIX ■ DEPLOYMENT AND COMPILATION TIPS
275
Figure A-3. The “Key alias selection” dialog
Figure A-4. Choosing the destination folder for the application package

APPENDIX ■ DEPLOYMENT AND COMPILATION TIPS
276
Using the Android NDK to Compile Libraries from Chapters 6 and 7 In this section, we will compile the library from Chapter 6 (Wolf3D) using the NDK 1.5 as well as the Chapter 7 library (Doom for Android) using the NDK 1.6. Knowing how to use the NDK is important for you and can be a time saver if you have a slow system (such as a laptop/VMware combination). When I started writing the games in Chapters 6 and 7, the NDK didn’t yet exist. That was the reason I used the CodeSourcery G++ toolkit; then along came the NDK 1.5. All in all, I don’t advocate the use of the NDK 1.5, particularly at this early stage. The reasons I don’t like to use the NDK 1.5 are simple:
• Limited support for the C runtime: The NDK includes only bare bones support for the stable portions of the C runtime (the portions that are very unlikely to change in the future). This limitation is stressed by Google in the documentation. The components supported are the C runtime (libc.so), Math library (libm.so), and Compression library (libz.so), and there’s minimal support for C++. This level of C support is fine for a game like Wolf3D or Doom but is not enough for the advanced graphics, like OpenGL, that are required for more advanced games such as Quake. If you find yourself in the latter situation, you are forced to either translate all code to Java or hack the NDK to add support for OpenGL as explained in the section “Adding OpenGL Support.”
• Poor integration with the Eclipse workbench: The NDK is a cumbersome and difficult tool to use at this point. For example, the output folder, where the library is compiled, is independent from your Eclipse workspace, and this disconnect forces you to copy the file every time you make changes. Although the output folder includes space for your Android project, this will force you to switch the workspace to every location instead of centralizing the workspace as we are used to with eclipse. The bottom line is that this tool needs to be integrated within the workbench so you can add native libraries and compile them on the fly along with the Java code, similar to the way the C Development Tools (CDT) work with the workbench.
• Limited firmware support: According to Google, the NDK supports only versions 1.5 or later of the firmware. This can be a problem if you wish to support other firmware versions, because 1.5 is fairly new and not supported in every device. Although Google claims that the NDK only supports firmware 1.5, I have been able to run native libraries in firmware 1.2 and 1.1 on the emulator.
• No support for the media player, logging, and OpenGL: Google has omitted the libraries that are likely to change in future releases. This omission makes sense but leaves many users in the dark when needing support for an advanced graphics, audio, or logging mechanism. If you’re in this boat, you will have to install the header files and libraries manually.
Despite these caveats, the NDK is a very useful tool for working with native code that is worth using:
• It provides a fast compilation environment for Windows users that rely on VMware for compilation. This feature is very important, and the NDK is more than enough to replace your slow VMware Linux image (especially if you run it in a laptop) with the fast NDK, Cygwin, and Windows combination.

APPENDIX ■ DEPLOYMENT AND COMPILATION TIPS
277
• It helps in debugging. In some cases, differences in the C compiler can cause runtime crashes and many issues that are difficult to debug. For example, the CodeSourcery G++ compiler used in this book is at version 4.3.x, while the NDK compiler is at 4.2.x. This difference can have a significant impact in the way programs run. As a matter of fact, I had crashes on libraries compiled with CodeSourcery that work just fine using the NDK. The NDK will ensure your library is on par with the C runtime running in the device.
All in all, the NDK is a good tool that can be a time saver once you get used to it. Plus, you can add manual library support to satisfy custom needs. In the next section, you’ll learn how to use this tool to compile Wolf 3D from source.
Installing the Android NDK and Cygwin
Installing the Android NDK is simple. Just download the zip archive and uncompress it somewhere in your file system. You can get it at http://developer.android.com/sdk/ndk/1.6_r1/index.html.
If you are using a Windows system, you will also need Cygwin, the Linux-like environment for Windows. Cygwin installation can be a little time consuming but isn’t difficult. Simply download the installer, and follow the easy instructions (make sure you select GNU make under development tools in the package selection page of the install). You can get the Cygwin installer at http://www.cygwin.com/.
■ Tip If using Cygwin, you must install GNU make. This tool is not enabled by default in the Cygwin installation wizard, and it is required by the Android NDK. Please read the NDK installation instructions under NDK_HOME/docs/INSTALL.TXT before your proceed!
Compiling Wolf 3D with the NDK 1.5 In this section, you will learn how to use the NDK to compile the native code in Chapter 6 in a Windows system running Cygwin. Take a look at the NDK folder structure. There are two folders that any application must use:
• app: This folder contains all the modules to be compiled.
• sources: This folder contains the code for every module in the app folder.
Let’s compile the Wolf3D library using the NDK:
1. Create an application module folder in NDK_HOME\apps\Wolf3D.
2. Within the folder above you need to create the folder NDK_HOME\apps\Wolf3D\ project\libs\armeabi. This folder will contain the actual compiled library.
3. Create the application module descriptor file NDK_HOME\apps\ Wolf3D\Application.mk. This file describes the name of the module as follows:

APPENDIX ■ DEPLOYMENT AND COMPILATION TIPS
278
APP_PROJECT_PATH := $(call my-dir)/project APP_MODULES := wolf3d
In the preceding snippet, APP_MODULES is critical. It defines the name of the module and must match
the application folder (Wolf3D). At the end of the process, the output library name will be named libwolf3d.so.
The next folder we need is an application source folder:
1. Create NDK_HOME\sources\Wolf3D. This folder will contain the native code.
2. Copy the contents from ch06.Wolf3D.SW/native/gp2xwolf3d into the Wolf3D folder created in step 1.
3. Create NDK_HOME\sources\Wolf3D\Android.mk. This is the Makefile used for compilation (see Listing A-2).
Listing A-2. NDK Makefile for Wolf3D
# Copyright (C) 2009 The Android Open Source Project # # Licensed under the Apache License, Version 2.0 (the "License"); # you may not use this file except in compliance with the License. # You may obtain a copy of the License at # # http://www.apache.org/licenses/LICENSE-2.0 # # Unless required by applicable law or agreed to in writing, software # distributed under the License is distributed on an "AS IS" BASIS, # WITHOUT WARRANTIES OR CONDITIONS OF ANY KIND, # See the License for the specific language governing permissions and # limitations under the License. # LOCAL_PATH := $(call my-dir) include $(CLEAR_VARS) LOCAL_MODULE := libwolf3d LP := $(LOCAL_PATH) INC := -Isources/Wolf3D/include # optimization OPTS := -O6 -ffast-math -fexpensive-optimizations -funroll-loops -fomit-frame-pointer # compilation flags LOCAL_CFLAGS := -DANDROID $(OPTS) $(INC) LOCAL_LDLIBS := LOCAL_SHARED_LIBRARIES :=

APPENDIX ■ DEPLOYMENT AND COMPILATION TIPS
279
FILES := objs.c misc.c id_ca.c id_vh.c id_us.c \ wl_act1.c wl_act2.c wl_act3.c wl_agent.c wl_game.c \ wl_inter.c wl_menu.c wl_play.c wl_state.c wl_text.c wl_main.c \ wl_debug.c vi_comm.c sd_comm.c \ wl_draw.c jni_wolf.c vi_null.c sd_null.c LOCAL_SRC_FILES := $(FILES) include $(BUILD_SHARED_LIBRARY)
Let’s take a closer look to the variables defined in Listing A-2:
• LOCAL_PATH: This variable defines the local path of the module, NDK_HOME/sources/Wolf3D in this particular case.
• LOCAL_MODULE: This variable defines the name of the local module. It must match the module name (wolf3d) with the prefix lib, thus libwolf3d.
• LOCAL_CFLAGS: Here is where you can put the optimization flags of your choice and extra include directories (where C headers live). For Wolf 3D, I use
-Isources/Wolf3D/include
• LOCAL_SRC_FILES: These are the source files that compose the library.
The following actions will be executed during the make process:
• include $(CLEAR_VARS): This action clears previous values of the local variables used by the module.
• include $(BUILD_SHARED_LIBRARY): This action tells the compilation project to build a shared library.
Types of libraries in Linux
The types of libraries that can be compiled with the NDK can be confusing for the newcomer:
• Shared libraries: These are loaded dynamically by an executable at runtime. In Linux, they use the naming convention lib<SOME_NAME>.so. For example, libwolf3d.so is the shared library used by our project.
• Static libraries: These are binary code archives that will be included into a master shared library at compile time. They use the naming convention lib<SOME_NAME>.a.
Compiling the Shared Library Finally, we are ready to go. Start the compilation process by typing the following within the NDK home folder (see Figure A-5):

APPENDIX ■ DEPLOYMENT AND COMPILATION TIPS
280
$make APP=Wolf3D
■ Tip Make sure you type the previous command within the NDK root folder. Furthermore, if you use Windows, you must use the Cygwin console to do so, as shown in Figure A-5.
Figure A-5. Compiling Wolf3D using the NDK within the Cygwin console
The output library libwolf3d.so will be created in the application folder NDK_HOME/apps/ Wolf3D/project/libs/armeabi. You can copy this file to your project workspace folder of the same name (libs/armeabi).
Adding Support for OpenGL to the NDK 1.5 One of the limitations of the NDK 1.5 is the lack of support for OpenGL. Although Google discourages the use of this native API due to its unstable nature, you can manually add support for it within the NDK by following two simple steps. In this section, you will learn how to add support for OpenGL to the NDK. This is a critical tool if you are bringing games to the platform that use native OpenGL calls. In my case, I used this technique to get the native code from the great game Quake to compile for the Android platform. I hope it will be as useful for you as it was for me.

APPENDIX ■ DEPLOYMENT AND COMPILATION TIPS
281
You need to add support for two things to use custom APIs with the NDK:
• Header files: These are required for compilation. The problem is that they are not distributed with the NDK source, which means you will need to obtain them by other means (from the Android source, perhaps).
• Native libraries: The native libraries are required to link the final library.
In the case of OpenGL, the best bet is to download the Android source to obtain the header files. This can be a time consuming but necessary step (Chapter 1 shows how to do this). Next, assuming that you have downloaded the Android source to a Windows PC under c:\tmp\mydroid, follow the next steps to setup OpenGL
1. Copy the OpenGL header file folders EGL and GLES from the Android source (located in c:\tmp\mydroid\frameworks\base\opengl\include) to NDK_HOME\build\platforms\android-1.5\arch-arm\usr\include (see Figure A-6).
Figure A-6. OpenGL header files within the NDK
2. Next, you need to copy OpenGL libraries to NDK_HOME\build\ platforms\android-1.5\arch-arm\usr\lib, as shown in Figure A-7.

APPENDIX ■ DEPLOYMENT AND COMPILATION TIPS
282
Figure A-7. OpenGL libraries within the NDK
You can extract the OpenGL library from the device using the console command:
adb pull /system/lib/libGLESv1_CM.so libGLESv1_CM.so
■ Tip Note that libGLESv1_CM.so is the name of the OpenGL library for firmware version 1.2 or later, and libGLES_CM.so is for firmware version 1.0. This means that libraries compiled for firmware 1.2 or later will not run in firmware 1.0.
Compiling Doom with NDK 1.6 If you read this book carefully, you’ll get the sense that that I don’t like the NDK 1.5 (when I started in this project the NDK didn’t even exist). I think the NDK 1.5 is cumbersome to use, because of the lack of integration with the Eclipse workbench. Plus, version 1.5 has only the bare bones to compile a native library (that is, the C runtime, Compression library, and basic C++ support). Just when this book was being finished up, Google released the NDK 1.6, a nice improvement over 1.5. Here are the highlights of this new version:

APPENDIX ■ DEPLOYMENT AND COMPILATION TIPS
283
• The sources folder from the NDK folder structure is gone (see the section on Wolf 3D and NDK 1.5). Now, all code (Java and native) lives in the apps folder. Within the apps folder, the project folder contains the Android Java project, and within project, the jni folder contains the native code and the Makefile Android.mk.
• NDK 1.6 adds support for OpenGL ES 2.0. This welcome addition will help many 3D games out there.
I would recommend the NDK over the CodeSourcery G++ compiler if you have a slow system such as a laptop or VMware combination or if your library crashes mysteriously, perhaps because of GNU compiler version issues, which can happen in programs that are not highly portable. Discrepancies in the GNU compiler version (for example, CodeSourcery uses GCC 4.3.x instead of Android’s 4.2.x) can cause optimization errors and other types of runtime errors that ultimately crash the game.
All in all, NDK 1.6 is a good improvement but still has far to go to catch up with other powerful tools, such as Apple’s iPhone Xcode platform. For example, the NDK will recompile the entire library if you change the Makefile, Android.mk (too add a new source file for example). This is really annoying when you have a big library with lots of source files. Other tools such as GNU make will detect the changes and recompile only the right files in the library. Anyway, for Doom, the folder structure for NDK 1.6 should look as follows:
• android-ndk-1.6_r1/apps/Doom/Application.mk: This file defines the module name to be built.
• android-ndk-1.6_r1/apps/Doom/project: This folder contains the actual Android project for the game.
• android-ndk-1.6_r1/apps/Doom/project/jni: This folder contains the native code and the Makefile, Android.mk.
Here is how you get Doom to compile with NDK 1.6:
1. Create android-ndk-1.6_r1/apps/Doom/Application.mk. This file contains the module (doom) that we are building:
APP_PROJECT_PATH := $(call my-dir)/project APP_MODULES := doom
2. Create the folder android-ndk-1.6_r1/apps/Doom/project. Copy the Android project from ch07.Android.Doom to this folder. You don’t need to copy the native folder (this is the native code).
3. Create the folder android-ndk-1.6_r1/apps/Doom/project/jni, and copy the native code from ch07.Android.Doom/native/prboom.
4. Create a Makefile called Android.mk in android-ndk-1.6_r1/apps/Doom/ project/jni. This make file should look as follows:
LOCAL_PATH := $(call my-dir) # clear vars include $(CLEAR_VARS) # module name LOCAL_MODULE := doom
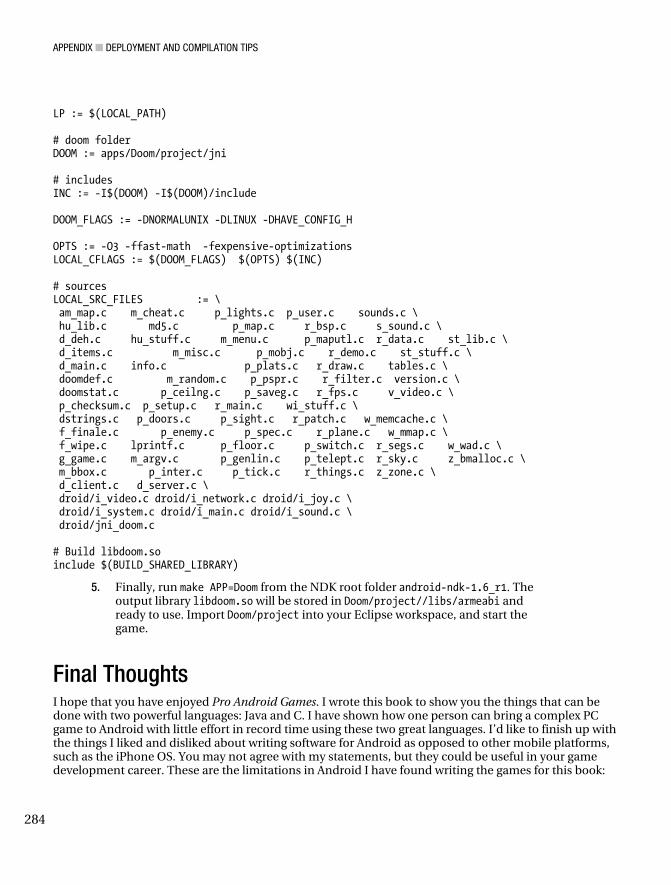
APPENDIX ■ DEPLOYMENT AND COMPILATION TIPS
284
LP := $(LOCAL_PATH) # doom folder DOOM := apps/Doom/project/jni # includes INC := -I$(DOOM) -I$(DOOM)/include DOOM_FLAGS := -DNORMALUNIX -DLINUX -DHAVE_CONFIG_H OPTS := -O3 -ffast-math -fexpensive-optimizations LOCAL_CFLAGS := $(DOOM_FLAGS) $(OPTS) $(INC) # sources LOCAL_SRC_FILES := \ am_map.c m_cheat.c p_lights.c p_user.c sounds.c \ hu_lib.c md5.c p_map.c r_bsp.c s_sound.c \ d_deh.c hu_stuff.c m_menu.c p_maputl.c r_data.c st_lib.c \ d_items.c m_misc.c p_mobj.c r_demo.c st_stuff.c \ d_main.c info.c p_plats.c r_draw.c tables.c \ doomdef.c m_random.c p_pspr.c r_filter.c version.c \ doomstat.c p_ceilng.c p_saveg.c r_fps.c v_video.c \ p_checksum.c p_setup.c r_main.c wi_stuff.c \ dstrings.c p_doors.c p_sight.c r_patch.c w_memcache.c \ f_finale.c p_enemy.c p_spec.c r_plane.c w_mmap.c \ f_wipe.c lprintf.c p_floor.c p_switch.c r_segs.c w_wad.c \ g_game.c m_argv.c p_genlin.c p_telept.c r_sky.c z_bmalloc.c \ m_bbox.c p_inter.c p_tick.c r_things.c z_zone.c \ d_client.c d_server.c \ droid/i_video.c droid/i_network.c droid/i_joy.c \ droid/i_system.c droid/i_main.c droid/i_sound.c \ droid/jni_doom.c # Build libdoom.so include $(BUILD_SHARED_LIBRARY)
5. Finally, run make APP=Doom from the NDK root folder android-ndk-1.6_r1. The output library libdoom.so will be stored in Doom/project//libs/armeabi and ready to use. Import Doom/project into your Eclipse workspace, and start the game.
Final Thoughts I hope that you have enjoyed Pro Android Games. I wrote this book to show you the things that can be done with two powerful languages: Java and C. I have shown how one person can bring a complex PC game to Android with little effort in record time using these two great languages. I’d like to finish up with the things I liked and disliked about writing software for Android as opposed to other mobile platforms, such as the iPhone OS. You may not agree with my statements, but they could be useful in your game development career. These are the limitations in Android I have found writing the games for this book:

APPENDIX ■ DEPLOYMENT AND COMPILATION TIPS
285
• Lack of an open audio library: I consider this to be a serious limitation. Audio is critical in gaming, and most vendors nowadays try to use open APIs such Open Audio Library (AL) or the standard Linux sound devices. Up to version 2.0, Android uses the SoniVox Enhanced Audio System (EAS).
• Lack of streaming audio: This is another serious issue. I found the lack of streaming audio to be the most frustrating thing about Android. I don’t mind learning the EAS audio API, but the darn thing doesn’t even support audio streaming? Audio streaming is critical and used extensively by Wolfenstein 3D and Doom in Chapters 6 and 7. To overcome this shortcoming, I was forced to cascade audio events to the Java layers, put the soundtracks in external files, and have the MediaPlayer handle them. In Android, you are boxed in by the MediaPlayer. Although I have heard that Google is planning support for OpenAL (audio library); this would be a good move.
• Lack of support for native development: I am happy to see that Google has realized how critical native development support will be if Android is to become a competitor in the mobile gaming arena. With the release of the Android NDK 1.6, things have improved greatly, but Android still lags behind the iPhone OS in this field.
• Only basic OpenGL ES implementation: As of version 1.5 of the SDK, Android implemented OpenGL ES 1.x. The iPhone OS has been supported OpenGL ES 2.0 for a long time now. Although I am happy to report that, with firmware 2.0, Android implements OpenGL ES 2.0, development in this area still lags behind the iPhone.
On the other hand, Android has some great features that make it a serious contender as a mobile development platform:
• Open source: An army of developers is out there ready to build code for this open platform, and new devices are popping out all the time.
• Built on Linux: I love Linux, and I am always ready to support development in this beautiful OS. It is a masterpiece of software engineering.
• Multitasking: multitasking as an advantage is in the eye of the beholder (I am not sure where to put this one). In one hand, there are some who say that multitasking is great for social networking applications, because you can have multiple background processes feeding you information, but detractors claim that it hogs the CPU resources and diminishes battery life. I have to go with the detractors on this one.
All in all, I am happy to see that, with the release of the NDK 1.6, Google is realizing the need for native development if Android is to be serious contender to the iPhone OS for gaming. Android has a way to go to catch up, but the platform development seems to run at a tremendous pace. Android versus the iPhone OS—I can’t wait to see who wins. At the moment, my money is on the iPhone OS, but my heart is with Android.

■ ■ ■
287
Index
�SPECIAL CHARACTERS $ make command, 12 ${GCC} $LD_FLAGS $LIB_PATHS $@
$LIBRARIES command, 17 $HOME/.bashrc file, 9 $HOME/bin directory, 18 $HOME/tmp/android/system/lib folder, 7 $(OBJ) dependencies, 12
�A Abstract Windowing Toolkit (AWT), 81 ACTION_DOWN action, 234, 239 ACTION_MOVE action, 234 ACTION_UP action, 189, 234, 239 actions buttons, miscellaneous, 182 adb push FILENAME DEVICE_DEST
command, 47 addPoint(int x, int y) method, 86 Advanced Linux Sound Architecture
(ALSA), 238 advance(int width, int height) method, 94 agcc script, 11, 152, 213 ald script, 11, 17, 213 -alias <alias_name> argument, 272 all target, 11 Android 1.1, 27 Android 1.5, 27 Android 1.6, 27 Android Debug Bridge (adb), 3, 4, 7 Android Developer Guide, 271
Android gaming, vs. Java ME gaming, 55—
56 Android Native Development Kit (NDK),
compiling libraries with adding support for OpenGL, 280—282 Doom, 282—283 shared libraries, 279—280 Wolf 3D, 277—278
Android native libraries, 4 Android pixels argument, 177 Android software development kit (SDK), 4 Android source software, 4 Android Virtual Device (AVD), 3, 27—29 android_radio argument, 273 android:focusable="true" attribute, 229 android:focusableInTouchMode="true"
attribute, 229 android:id="@+id/doom_iv" attribute, 229 android:layout_alignParentBottom="true"
attribute, 230 android:layout_alignParentLeft="true"
attribute, 230 android:layout_width="fill_parent"
attribute, 229 Android.mk file, 283 android.os.Handler class, 236 android:src="@drawable/up" attribute,
230 android:visibility="gone" attribute, 230 APP_MODULES file, 278 application architecture
converting Java array to C array, 43

■ INDEX
288
defining variable-arguments function in C, 44—45
getting size of Java array, 44 invoking Java static void method, 44 main activity, 34—35 native interface, 36—37 native library, 37—42 overview, 32—34
application signing, 272—275 creating key store, 271—272 overview, 271
apps folder, 283 ArcadeGame class, 61, 65, 95, 97, 99 ArcadeGame.initilize class, 68 ArcadeGame.java class, 57 arm-none-linux-gnueabi prefix, 11 arm-none-linux-gnueabi-g++ C++
compiler, 10 arm-none-linux-gnueabi-gcc -c file1.c -
Ifolder1 -Ifolder2 command, 12 arm-none-linux-gnueabi-gcc C++
compiler, 10 arm-none-linux-gnueabi-ld C++ compiler,
10 arm-none-linux-gnueabi-objdump C++
compiler, 10 arm-none-linux-gnueabi-strip C++
compiler, 10 arrays
converting, 43 Java, size of, 44
assests folder, 162 Asteroids class, 95, 97, 101 AsteroidsActivity class, 95, 97 Asteroids.png file, 98 asteroids.xml file, 95, 97 Asteroids.xml file, 98 audio clips, playing, 72—75 audio request handlers, 237—238 AudioClip class, 73, 75, 98, 101, 167, 191,
194, 241 AudioClip.java class, 58, 226 AudioClip.java file, 222 audiohed.wl1 file, 176
AudioManager class, 176, 191, 192, 226, 240
AudioManager.java file, 222 AudioMananger class, 167 audiot.wl1 file, 176 audiowl6.h, C header, 193 audiowl6.h file, 192
�B bin folder, 5 bionic folder, 6 bionic/linker/linker.c:1581 file, 50 bitmap sprites, 70 boolean gameOver( ) method, 100 boolean variables, 110
�C C array, coverting from Java array, 43 C Development Tools (CDT), 276 C runtime (LIBC), 15, 276 calculateBounds(int xpoints[], int
ypoints[], int npoints) method, 86 Canvas class, 82, 83 Canvas.drawLines class, 83 canvas.drawPoint class, 104 Carmack, John, 163 CB_CLASS class, 41 CB_CLASS_MSG_CB class, 41 CB_CLASS_MSG_SIG class, 42 CFLAGS=-Werror command, 47 CodeSourcery G++ compiler, 277 Color palette, Linux, 225 compiling
libraries with Android NDK adding support for OpenGL, 280—282 Doom, 282—283 shared libraries, 279—280 Wolf 3D, 277—278
ported OpenGL application, 152 adding support for OpenGL, 280—282 Doom, 282—283 shared libraries, 279—280 Wolf 3D, 277—278
Compression library, 276

■ INDEX
289
Config.ARGB_8888 class, 235 config.wl1 file, 176 Constants class, 97 constructors method, 86 contains(int x, int y) method, 86 controller layout, 166 Controller toolbar, 227 ControllerListener class, 167 ControllerListener interface, 186 ControllerUp(int btnCode) event, 180 Create New AVD dialog box, 29 Creation handler, 227 Cube class, 121, 134—136 Cube( ) method, 134 Cube_draw( ) method, 145 CubeRenderer, 121 CubeRenderer class, 130—134, 141, 143 cuberenderer.c file, 144 cuberenderer.c function, 146 CubeRenderer.drawFrame( ) method, 143,
145 CubeRenderer.surfaceCreated( ) method,
143, 144 C,variable-arguments function in, 44—45 Cygwin environment, 277
�D d_event.h header, 246 D_PostEvent method, 249 /data folder, 154 default (all) target, 45 deploy-lib target, 265 deployment tips
compiling libraries with Android NDK adding support for OpenGL, 280—282 Doom, 282—283 shared libraries, 279—280 Wolf 3D, 277—278
signing applications, 271—272 /dev/eac device, 75 device /system/lib folder, 7 DialogTool class, 168 DialogTool.java class, 226 DialogTool.java file, 222 Doom game
audio classes, 240—241 bringing to mobile device, 223—225 compiling libraries with Android NDK,
282—283 Doom Library (DSO) compilation, 264—
266 game architecture, 225—227 Java main activity class
creation handler, 227—228 game layout, 228—231 key and touch event handlers, 233—
234 menu and selection handlers, 231—
232 native callback handlers, 234—238 navigation controls, 238—240
Java/C combo, 221—222 native interface class
C to Java callbacks, 243—245 callback listener, 241—242 native methods, 242
native layer native method implementations, 246,
257 original game changes, 258—264
testing for Android in emulator, 266—268 doom_jni_Natives.h file, 246 doom_main method, 259 doom1.wad file, 242 doom2.wad file, 242 doom.audio package, 226 doom.audio.AudioManager class, 237 DoomClient.java file, 222 doomdef.h header, 246 doom.jni package, 226 doom.jni.Natives Java class, 246, 257 doom.jni.Natives.OnFatalError(String)
method, 257 doom.jni.Natives.OnImageUpdate
method, 248 doom.jni.Natives.OnImageUpdate(int[]
pixels) method, 252 doom.jni.natives.OnStartSound method,
248 doom.png file, 2

■ INDEX
290
Doom/project/ /libs/armeabi file, 284 DoomTools.java class, 226 DoomTools.java file, 222 doom.util package, 226 doom.util.Natives.OnInitGraphics(width,
height) method, 251 doom.wad file, 242 down class variable, 110 draw( ) method, 122, 134 drawArc (RectF oval, float startAngle, float
sweepAngle, boolean useCenter, Paint paint) method, 82
draw(Canvas canvas, Paint paint) method, 94
drawCircle ( ) method, 82 drawFrame( ) function, 142—143, 145—146 drawing frames, 145—147 drawLine ( ) method, 82 drawLines ( ) method, 82 drawPoint( ) method, 82 drawRect ( ) method, 82 drawRoundRect ( ) method, 82 dynamic shared object (DSO), 165, 166,
167, 223 dynamic-linker=/system/bin/linker path,
17
�E Eclipse Galileo, 221 Eclipse software, 4 Eclipse workbench, 273, 276 EglHelper class, 120 emulator
testing Doom game for Android in, 266—268
testing Java game on, 79—80 EventListener interface, 141, 241 Exit option, 172 extern int doom_main file, 247 extern int doom_main(int argc, char
**argv) method, 259
��
�F fatal errors handler, 234, 236—237 ffast-math flag, 264 firmware support, 276 float[] getPoints( )method, 86 floating-point unit (FPU), 158 frame height argument, 177 frame width argument, 177 frame X coordinate argument, 177 frame Y coordinate argument, 177 frames, drawing, 145—147
�G g_VM function, 42 Game Boy device, 238 game loop, in Wolfenstein 3D, 175—176 GameFileDownloader.java class, 227 GameFileDownloader.java file, 222 gamemaps.wl1 file, 176 Gamepark32 device, 163, 165 gcc command, 15 -genkey argument, 272 getAssets argument, 34 getAssets( ).open( ) method, 34 getBoundingBox( ) method, 86 getHeight method, 102, 104 getImage(RESOURCEID) method, 70 getInstance( ) method, 194 GetObjectArrayElement( ) method, 43 GetStringUTFChars( ) method, 43 getWidth method, 102, 104 gfxbuf buffer, 209 Git software tool, 5 GL commands, 144 gl*Pointer( ) method, 134 GL_MODELVIEW method, 130 glClear( ) method, 145 glEnableClientState( ) method, 145 glLoadIdentity( ) method, 130 GLSurfaceView class, 120, 124, 141 GLSurfaceView.setRenderer( ) method, 142 GLSwapBuffers( ) method, 143 GLThread class, 120, 122, 127—130, 141, 142 GNU

■ INDEX
291
compiler, 283 GCC toolchain, 11 Gzip (LIBZ) library, 15
GNU Public License (GPL), 165 Google APIs target, 27 /gp2xwolf3d folder, 192 graphical user interface (GUI), 1 graphics initialization
callback, 206 handler, 234—235 message, 166
Graphics processing unit (GPU), 118 guardedRun( ) method, 128
�H header files, 281 height argument, 235, 242 HOME variable, 15
�I I$JAVA_HOME/include file, 41 I$JAVA_HOME/include/linux file, 41 I_Error function, 259 i_main.c file, 258 i_sound.c file, 222, 258, 259 i_system.c file, 258, 259 i_video.c file, 222, 258, 259, 261, 263 ID btn_upleft assembly, 2 IllegalState exception, 73 image update handler, 234, 235—236 image view element, 166 ImageView class, 225 ImageView.getLayoutParams( ) method,
235 immediate mode drawing, 158 include $(BUILD_SHARED_LIBRARY)
action, 279 include $(CLEAR_VARS) action, 279 init command, 6 init_scene( ) function, 144 initialize( )method, 66, 101 int getArrayLen( ) function, 42 int lib_main( ) function, 42 int wolf.jni.Natives.WolfMain method, 203
int[] getConfigSpec( ) method, 131 intController method, 169 integrated development environment
(IDE), 3 invalid dependencies, removal of, 246 isColliding(PolygonSprite s) method, 94 isPortrait( ) method, 172 item.getItemId( ) method, 172 iwad argument, 242
�J jarsigner command, 273 Java
arrays converting to C array, 43 getting size of, 44
callbacks, 147—150, 247 methods, vs C counterparts, 203 OpenGL within
Cube class, 134—136 CubeRenderer class, 130—134 GL Thread, 127—130 Java main activity, 123—124 overview, 119—123 Surface View, 124—127
Java game, building, 55, 80. See also Space Blaster game Android gaming vs. Java ME gaming,
55—56 testing on emulator, 79—80
Java JDK 5.0, 4 Java Native Interface (JNI), 1, 165, 203
callback, 117, 191 headers, 214
Java SDK jarsigner command, 272—273 Java string array, 204 Java Virtual Machine (JVM) command, 41 Java_doom_jni_Natives_DoomMain class,
258 JAVA_HOME variable, 15 JAVA_HOME/include file, 41 JAVA_HOME/include/linux file, 41 Java_opengl_jni_Natives_NativeRender
function, 149 java.awt.Dimension class, 55

■ INDEX
292
java.awt.Polygon class, 55 JavaGLActivity class, 121 JavaGLActivity.onCreate( ) method, 123 javah command, 203, 214, 246 javah -jni -classpath ./bin -d include
jni.Natives command, 47 java.lang.String class, 253 jint Java_wolf_jni_Natives_WolfMain
function, 203 jNativesCls function, 42 jni folder, 283 JNI interface, 221 JNI method, 150 jni target, 45, 265 jni_doom.c file, 222, 246 jni_doom.h header, 246—247, 251, 256 jni_gl_swap_buffers ( ) callback, 147 jni_init_graphics (int width, int height)
function, 206 jni_init_graphics function, 206 jni_Natives header file, 41 jni_send_pixels callback, 208, 264 jni_send_pixels method, 251 jni_send_str( const char * text) callback,
147 jni_set_music_volume (volume) method,
260 jni_start_music (int idx) callback, 211 jni_start_sound (int idx) callback, 211 jni_start_sound variable, 260 jni_wolf.c file, 203, 206 jni_wolf.h file, 203 jni.Natives Java class, 41—42 jni.Natives.java file, 32 jni.Natives.LibMain( ) method, 44 jni.Natives.OnMessage( ) method, 44, 54 jStartMusicMethod method, 211 jStartSoundMethod method, 211
�K kernel headers (KERNEL), 15 key events, 76—78, 247
press, 110—113 in Wolfenstein 3D, 174
key handlers, 227
key store, creating, 271—272 keyCode class, 233 KeyEvent class, 180 -keypass <password> argument, 272 keystore argument, 272—273 keytool command, 272—273
�L LayoutInfalter class, 61 LD_FLAGS variable, 17 left class variable, 110 /lib folder, 51 lib target, 45, 265 LIB_PATHS variable, 17 lib.c file, 33 libraries, compiling with Android NDK
adding support for OpenGL, 280—282 Doom, 282—283 shared, 279—280 Wolf 3D, 277—278
LIBRARIES variable, 17 LibraryLoader class, 168 LibraryLoader.java class, 227 libs/armeabi folder, 162, 213, 215 libwolf_jni.so library, 162 LinearLayout class, 61, 65, 81, 97 LinearLayout::onDraw( ) method, 58 LinearLayout.onLayout class, 68 LinerLayout class, 99 Linux Operating System Sound (OSS), 190 Ljava/lang/String file, 253 LOCAL_CFLAGS variable, 279 LOCAL_MODULE variable, 279 LOCAL_PATH variable, 279 LOCAL_SRC_FILES variable, 279 long getScore( ) method, 100
�M Main loop, 137—138 main.c file, 33 main.xml file, 97 make command, 52 make pushlib file, 49 Makefile file, 11

■ INDEX
293
malloc(length of string + 1) method, 43 maphead.wl1 file, 176 Math library (LIBM), 15 mBitmapPaint object, 68 MediaPlayer class, 73, 225, 285 menu handlers, 227 menu options, adding, 172 message updates handler, 234, 236 mGLSurfaceView.setRenderer(new
CubeRenderer(true, true)) method, 138 Miscellaneous text message, 166 mLaserBarPaint object, 68 mobile devices, and OpenGL, 118—119 motion events, 247 MotionEvent.ACTION_DOWN event, 189 movement controller
class for, 185—189 creating handlers for, 180—182 layout of, 182—185
mShieldBarPaint object, 68 mShieldPaint object, 68 mTextPaint object, 68 music handlers, in Wolfenstein 3D, 179 music request callback, 206 music variable, 195 myapp binary, 12 mydroid folder, 5
�N native activity, 139 native callback handlers, 227 native callbacks, in Wolfenstein 3D, 177—
178 native code
compiling and testing shared library compiling statically, 51—52 debugging with strace, 50—51 testing dynamic library on device, 49 troubleshooting missing symbols, 48—
49 creating native Android app, 27, 45. See
also application architecture creating Android project, 30 creating AVD, 27—29
testing native application, 52—54
native cube (cube.c), 139, 151 native cube renderer (cuberenderer.c), 139
drawing frames, 145—147 Java callbacks, 147—150 native interface call, 150 scene initialization, 144—145
Native Development Kit (NDK), 25, 48 native folder, 119, 162 native game loop, 247 native int keyPress(int key) method, 200 native int keyRelease(int key) method, 200 native int WolfMain(String[] argv) method,
200 native interface, 36—37 native interface class, 139, 140—141, 200—
202 native library, 34, 37—42, 281 native method implementations, 245 native OpenGL applications, porting
changes to GL Cubes sample, 142—143 compiling sample, 152 main activity, 138—139 native cube (cube.c), 151 native cube renderer (cuberenderer.c)
drawing frames, 145—147 Java callbacks, 147—150 native interface call, 150 scene initialization, 144—145
native interface class, 140—141 overview, 136 running sample, 158
NativeGLActivity class, 121 native/gp2xwolf3d folder, 193, 215 Natives class, 121, 165, 167, 174 natives interface class, 176 Natives.EventListener interface, 234 Natives.EventListener listener, 142 Natives.LibMain class, 37 Natives.LibMain(String[] argv) method, 34 Natives.sendNativeKeyEvent (event, scan
code) class, 181 Natives.setListener(this) method, 141 navigation buttons, 182 navigation method, 171—172 navigation option, 172

■ INDEX
294
navigation options dialog, 174 NDK_HOME\apps\Wolf3D\Application.m
k file, 277 NDK_HOME\apps\Wolf3D\project\libs\a
rmeabi folder, 277, 280 NDK_HOME\sources\Wolf3D folder, 278 NDK_HOME\sources\Wolf3D\Android.m
k folder, 278 .nomedia file, 241 nostdinc flag, 264 nostdinc parameter, 15 -nostdlib command, 52 nostdlib path, 17
�O offset argument, 235 onCreate class, 228 onCreate( ) method, 2, 60, 128, 169 onCreate(Bundle savedInstanceState)
method, 34 onCreateOptionsMenu method, 172, 231 onDestroy( ) method, 128 onDetachedFromWindow( ) method, 127 onDraw( ) method, 58, 61, 81 OnFatalError(String text) callback, 241 OnImageUpdate callback, 247 OnImageUpdate event, 177, 178 OnImageUpdate( ) method, 202 OnInitGraphics class, 251 OnInitGraphics event, 178 OnInitGraphics(int w, int h) event, 202 onKeyDown event, 76 onKeyDown method, 110 onKeyUp event, 76 onKeyUp method, 110 onLayout( ) method, 65, 66 OnMessage class, 37 OnMessage event, 178 OnMessage method, 42 OnMessage(String text) event, 202 OnMessage(String text, int level) callback,
241 onOptionsItemSelected method, 172, 231 onPause( ) method, 124 OnQuit(int code) callback, 241
onRestart method, 61 onResume( ) method, 124 OnSetMusicVolume(int volume) callback,
242 OnStartMusic callback, 179 OnStartMusic class, 253 OnStartMusic event, 178 OnStartMusic(int idx) event, 202 OnStartMusic(String name, int loop)
callback, 242 OnStartSound callback, 179, 247 OnStartSound class, 253 OnStartSound event, 178 OnStartSound(int idx) event, 202 OnStartSound(String name, int vol)
callback, 241 onStop method, 61 OnStopMusic(String name) callback, 242 OnSysError event, 177 OnSysError(String text) event, 202 onTouchEvent event, 76 onTouchEvent method, 78, 110, 174 open audio library, 285 Open Audio Library (AL), 285 Open source, 285 openFileOutput argument, 35 OpenGL
adding support to Android NDK, 280—282
caveats of porting games to Android, 158—159
Embedded System (ES), 117—118, 285 header file, 281 within Java
Cube class, 134—136 CubeRenderer class, 130—134 GL Thread, 127—130 Java main activity, 123—124 Surface View, 124—127
native OpenGL applications changes to GL Cubes sample, 142—
143 compiling sample, 152 main activity, 138—139 native cube (cube.c), 151

■ INDEX
295
native cube renderer (cuberenderer.c), 143—150
native interface class, 140—141 overview, 136—138 running sample, 158
and power of mobile devices, 118—119 support, 276
opengl_jni_Natives file, 144 opengl.jni.Natives class, 149 opengl.jni.Natives.java file, 144 opengl.jni.Natives.NativeRender( )
method, 150 operating system (OS), Linux, 4 Operating System Sound (OSS), Linux, 190 org.doom package, 226 org.doom.DoomClient file, 225 Original game changes, 245
�P Paint objects, 71 PATH environment variable, 4 Permad, F., 163 pixels argument, 235 PlayStation Portable (PSP) device, 238 plutonia.wad file, 242 Polygon class, 81, 83, 85—86, 97, 115 polygons
creating Polygon class, 85—86 creating PolygonSprite class, 91—95 creating project
game layout, 97 game life cycle, 99, 110 key press and touch events, 110—113 overview, 95—96 resources, 97
drawing, caveats of, 81—83 drawing rectangles, caveats of, 83 game architecture, 95
PolygonSprite class, 81, 83, 86, 91—95, 97, 115
porting native OpenGL applications. See native OpenGL applications, porting
postInvalidate( )method, 66 PrBoom Doom engine, 223—224 preloadSounds( ) method, 240
preloadSounds(Context ctx) method, 194 printf-style function, 45 private static void OnMessage(String text,
int level) method, 36 project folder, 283 public/private key, 271 pushbin target, 45 pushlib target, 45
�Q queueEvent(Runnable r) method, 127 QWERTY keyboard, 238
�R ray casting (2.5D casting), 163 ray casting technique, 163 Rect class, 83 Rectangle class, 81, 83, 86, 97, 115 rectangles, drawing, 83 RectF class, 83 RelativeLayout class, 239 ReleaseStringUTFChars( ) method, 43 render( ) method, 94 Renderer class, 120 Renderer constructor, 138 repo tool, 5 requests handler, 234 res folder, 162, 183 res//drawable folder, 2 res/raw folder, 101, 190 right class variable, 110 R.layout.wolf application, 169 root folder, 280 rpath ${SYS_ROOT}/lib, 17 rpath /system/lib path, 17 run( ) method, 128 Runnable class, 236 running, ported OpenGL application, 158
�S S_sfx[id].name variable, 260 s_sound.c file, 222, 258 s_sound.c method, 260 ScanCodes class, 168

■ INDEX
296
scene initialization, native cube renderer (cuberenderer.c), 144—145
sd_null.c file, 203 SD_PlaySoundSOD handler, 213 SD_PlaySoundWL6 handler, 213 sdcard.iso file, 3 SDK_HOME//tools directory, 3 SDL_Surface class, 261 SE java.awt.Rectangle class, 83 select button, 188 semaphore, 128 setFocusable class, 61 setMusicVolume (int vol) method, 241 setOnCompletionListener( ) method, 75 setRenderer( ) method, 127 setUpdatePeriod method, 66 setupPanControls function, 239 shared libraries, compiling libraries with
Android NDK, 279—280 Simple DirectMedia Layer (SDL), 246 Sine and cosine tables, 225 SNESController class, 167, 186 SNES-style controller, 166 Software Development Kit (SDK)
command tools, 2 SoniVox Enhanced Audio System (EAS),
75, 190, 285 sound
adding, 75 handlers, creating, 179 initializing, 68 request callback, 206
sound classes, in Wolfenstein 3D creating AudioClip class, 197 creating AudioManager class, 193—195 mapping sound names to raw sound
resources, 192—193 overview, 190—191
SoundNames class, 167, 192, 193 sources folder, 277, 283 Space Blaster game
creating game's activity class, 60—61 creating project, 59—60 creatinggame layout, 61—66 game architecture, 57—59
handling key and touch events, 76—78 implementing game
adding native sound, 75 creating star field, 71 initializing sprites and sounds, 68 loading bitmap sprites, 70 playing audio clips, 72—75
SpaceBlaster class, 71, 78, 95 SpaceBlasterGame class, 61 SpaceBlasterGame method, 66 SpaceBlasterGame.initilize class, 68 SpaceBlasterGame.java class, 57 SpaceBlaster.java class, 57 SpaceBlaster.java file, 66 sprites
drawing, 103 initializing, 68 loading bitmap, 70
src folder, 119, 162 star field, creating, 71 startGame function, 175, 177 startMusic method, 179, 240 startSound method, 179, 240 startUpdateTimer( )method, 66 static libraries, 279 static native int DoomMain(String[] argv)
method, 242, 246 static native int keyEvent(int type, int key)
method, 242, 246 static native int LibMain(String[] argv)
method, 36 static native int motionEvent(int btn, int x,
int y) method, 242, 246 static native int NativeRender( ) method,
140 static void GLSwapBuffers( ) callback, 140 static void OnMessage(String text)
callback, 140 stopMusic (String key) method, 241 -storepass <password> argument, 272 strcpy (char ** target , char * source)
method, 43 streaming audio, 285 stride argument, 235 string array, converting, 204

■ INDEX
297
Strings.xml file, 98 struct XColor class, 262 Surface View class, for GL Cubes sample,
124—127 surfaceChanged( ) method, 125 surfaceCreated( ) method, 125 surfaceDestroyed( ) method, 125 SurfaceHolder.addCallback( ) class, 124 SurfaceHolder.Callback callback, 124 swap buffers, 138 SYS_DEV variable, 15 SYS_ROOT variable, 15 /system/bin/linker file, 49 /system/lib folder, 7, 51 System.load( ) method, 34 System.loadLibrary( ) method, 216
�T testing, Java game, 79—80 testlib target, 45 testlib.c file, 33 text message, miscellaneous, 166 Timertask:run( ) method, 66 tnt.wad file, 242 Toggle Screen option, 172 TOOLCHAIN_ROOT variable, 15 Tools class, 98 Tools.java class, 58 touch events, 76—78, 110—113, 174 touch handlers, 227
�U Ubuntu Linux VMware appliance, 4 UI widget, 236 up class variable, 110 updateBounds( ) method, 86 updateShip( ) method, 106
�V -v argument, 272 va_end command, 45 va_list command, 45 va_start command, 45 -validity <valdays> argument, 272
variable-arguments function in C, defining, 44—45
verbose argument, 273 vgadict.wl1 file, 176 vgagraph.wl1 file, 176 vgahead.wl1 file, 176 vi_null.c file, 203, 206, 207, 208 video buffer update callback, 206 VL_SetPalette ( ) function, 209 VL_Startup( ) method, 206, 207, 208 VMware Linux image, 276 VMware Player software, 4 VMware Virtual Appliance Marketplace, 4 void drawFrame(GL10 gl) method, 130 void initialize( ) method, 99 void jni_fatal_error( ) method, 251 void jni_printf( ) function, 42 void jni_send_pixels( ) method, 250 void jni_set_music_volume ( ) method, 251 void jni_start_music ( ) method, 251 void jni_start_sound ( ) method, 251 void jni_stop_music ( ) method, 251 void onDraw( ) method, 99 void sizeChanged( ) method, 131 void startSound( ) method, 193 void surfaceCreated( ) method, 132 void updatePhysics( ) method, 100 vswap.wl1 file, 176 VW_UpdateScreen( ) method, 208—209
�W Wall flag, 264 WebDownload.java class, 227 width argument, 235, 242 wolf game ID, 176 wolf_jni_Natives.h file, 203 wolf.audio.SoundNames class, 191 Wolfd3D.apk argument, 273 Wolfenstein 3D game
coding native layer, 203—213 initializing game loop, 204 making C to Java callbacks, 206—208,
206—213, 208—209, 211—213 compiling libraries with Android NDK,
277—278

■ INDEX
298
compiling native library generating JNI headers, 215 writing Makefile, 213—214
game architecture, 165—167 Java classes for
creating game loop, 175—176 creating main menu, 172 creating movement controller, 182—
189 creating movement controller
handlers, 180—181 creating sound and music handlers,
179 handling key and touch events, 174 making native callbacks, 177—178 native interface class (Natives.java
class), 200—202 sound classes, 190—197 WolfLauncher class, 168—172
testing in emulator, 215—217
tools, 161—162 wolf.jni.Natives method, 191 wolf.jni.Natives.OnStartMusic( ) method,
211 wolf.jni.Natives.OnStartSound( ) method,
191, 211 WolfLauncher activity, 165 WolfLauncher class, 167, 168—172 wolfsw game ID, 176 WolfTools class, 168 wolf.util.ScanCodes class, 200 Workstation software, 4
�X, Y, Z x argument, 235 XImage class, 261 XML parser (EXPAT), 15 y argument, 235
.
Related Documents


![Data-Trace Types for Distributed Stream Processing Systemsmamouras/papers/Trace-Transductions.pdf · and Apache Samza [2] ... During compilation and deployment, this dataflow graph](https://static.cupdf.com/doc/110x72/5aad5ccd7f8b9a2e088e1781/data-trace-types-for-distributed-stream-processing-mamouraspaperstrace-transductionspdfand.jpg)