DefendX Software Control-QFS® for EMC® Installation Guide Version 8.6 This guide provides a short introduction to the installation and initial configuration of DefendX Software Control-QFS® for NAS, EMC® Edition, from an administrator’s perspective. Upon completion of the steps within this document, DefendX Software Control-QFS for NAS, EMC Edition will be installed within your enterprise community. This Installation Guide applies to all DefendX Software Control-QFS for NAS, EMC ® editions.

Welcome message from author
This document is posted to help you gain knowledge. Please leave a comment to let me know what you think about it! Share it to your friends and learn new things together.
Transcript
Copyright © 2018 DefendX Software 1
DefendX Software Control-QFS®
for EMC® Installation Guide
Version 8.6
This guide provides a short introduction to the installation and initial configuration of DefendX Software Control-QFS® for NAS, EMC® Edition, from an administrator’s perspective. Upon completion of the steps within this document, DefendX Software Control-QFS for NAS, EMC Edition will be installed within your enterprise community. This Installation Guide applies to all DefendX Software Control-QFS for NAS, EMC ® editions.
Copyright © 2018 DefendX Software 2
Table of Contents
Executive Summary................................................................................................ 3
Preparing the EMC Celerra ..................................................................................... 4
Celerra DART Version ............................................................................................. 4
Configuring cepp.conf ............................................................................................ 4
Preparing the Control-QFS Windows Machine ....................................................... 6
Assigning Permissions ............................................................................................ 7
Requirements ........................................................................................................ 8
DefendX Software Control-QFS for NAS, EMC Edition Server Requirements .......... 8
Hardware Specification ....................................................................................... 8
Software Specification ........................................................................................ 8
EMC Celerra Requirements .................................................................................... 9
Network Configuration ........................................................................................ 10
Installation ........................................................................................................... 10
Installing DefendX Software Smart Policy Manager™ .......................................... 11
Installing DefendX Software NAS Proxy Service™ ................................................. 22
Installing DefendX Software Control-QFS for NAS, EMC Edition ........................... 31
Using DefendX Software Control-QFS for NAS Configuration Wizard ................... 43
Adding the EMC CIFS Server to DefendX Software Control-QFS Policy Hierarchy 50
Verifying Registration with the Celerra Control Station ....................................... 54
About DefendX Software ..................................................................................... 55
DefendX Software Professional Services .............................................................. 55
Legal & Contact Information ................................................................................ 56

Copyright © 2018 DefendX Software 3
Executive Summary
Thank you for your interest in DefendX Software Control-QFS® for NAS, EMC® Edition. DefendX Software Control-QFS controls storage for millions of users worldwide. DefendX Software Control-QFS for NAS, EMC Edition extends our best-of-breed technology to include the EMC family of products, allowing you to manage Windows® and NAS-hosted storage as a seamless whole.
DefendX Software Control-QFS for NAS, EMC Edition now supports Virtual Data Movers (VDMs) in addition to the Physical Data Movers (PDMs) that were previously supported. VDMs have become widely implemented due to ease of management, as VDM enables administrators to separate CIFS servers and their associated resources, such as file systems, into virtual containers. These virtual containers allow administrative separation between groups of CIFS servers.
Given the architecture of your EMC Celerra®, DefendX Software Control-QFS for NAS, EMC Edition does its job remotely. Part of DefendX Software Control-QFS Family of Products, DefendX Software Control-QFS for NAS, EMC Edition uses a connector service to create a bridge and include Celerras as full participants in storage environments controlled by DefendX Software Control-QFS. In light of this fact, you will need to install the EMC connector on one of the Windows Server 2008, Windows Server® 2008 R2, Windows Server 2012, or Windows Server 2016 machines in your environment. This may be an existing server or workstation, or a standalone system.
To be managed by DefendX Software Control-QFS, version 5.6.49.3 or later of the DART® operating system is required on the Celerra. DefendX Software Control-QFS for NAS, EMC Edition can be used to manage EMC CIFS Servers and clusters or any combination of these systems. DefendX Software Control-QFS imposes no restrictions on how you organize or manage your storage. You can impose policies on individual directories, users, and/or groups of users.
NOTE: If you want to use email-based messaging and notifications, access to an email server is required.
To install DefendX Software Control-QFS on Windows, a login with administrator rights is needed. You will be installing three different services: the DefendX Software Smart Policy Manager™ service, the DefendX Software Control-QFS service, and the EMC Connector.
The DefendX Software Smart Policy Manager service should be installed with a domain user account as its service account so that it can communicate with your mail system and other storage servers with which it may share policies. The DefendX Software Control-QFS service requires a domain user account with local administrative rights on the EMC CIFS Server. The EMC Connector service uses this account as well.
Your hardware should be appropriate for the services running on each machine. The connector itself and DefendX Software Control-QFS for NAS, EMC Edition impose almost no load on either machine.

Copyright © 2018 DefendX Software 4
Preparing the EMC Celerra
Celerra DART Version
DefendX Software Control-QFS for NAS, EMC Edition requires the EMC Celerra to run DART version 5.6.49.3 or later. If your Celerra is not running version 5.6.49.3 or later, you must upgrade your operating system before you proceed. (Refer to your EMC documentation for instructions.)
A separate copy of the DART operating system is installed on the Celerra Control Station and on each Data Mover. The DART version installed on the Control Station must be version 5.6.49.3 or later.
To determine the version of DART installed on your Control Station, log into the Control Station and type the command nas_version.
Configuring cepp.conf
The cepp.conf configuration file contains the information needed by the DART operating system to notify the PC running Windows and DefendX Software Control-QFS of file operations performed by clients. These notifications are the primary information used by DefendX Software Control-QFS to enforce policies.
The cepp.conf file must be properly configured on every Data Mover that contains a CIFS server to be managed by DefendX Software Control-QFS. Identify these Data Movers and follow these steps to edit the cepp.conf file for each Data Mover:
1. Log on to the Celerra Control Station. Type the su command and press Enter to become the superuser.
2. Create a new directory (for example, /mnt2) at the file system root.
3. Mount the root of the Data Mover’s file system to the new directory. For example, type mount <DataMoverName>:/ /mnt2 and press Enter.
4. Type cd /mnt2/.etc and press Enter and look for the file cepp.conf. Create the file if it does not exist.

Copyright © 2018 DefendX Software 5
5. Use vi to edit the cepp.conf file. Edit the servers field to use the IP address of the machine running DefendX Software Control-QFS and the IP addresses of the machines running CEE (EMC CAVA service). The result should look something like this:
pool name=cqm servers=<Control-QFS IP Address>|<CEE IP Address(es)> preevents=* option=ignore reqtimeout=5000 retrytimeout=1000
NOTE: The DefendX Software Control-QFS machine’s IP address is a critical piece of information. If the machine has more than one IP address, take care. The IP used by DefendX Software Control-QFS to contact the Celerra must appear in the cepp.conf file. If the wrong IP address is used, DefendX Software Control-QFS will be denied access to the Celerra and will not function properly.
6. Changes to the cepp.conf file will be registered when you restart the cepp service. Type server_cepp <DataMoverName> -service -stop and press Enter.
7. Type server_cepp <DataMoverName> -service -start and press Enter.
Repeat steps 2 through 6 for all Data Movers to be managed.

Copyright © 2018 DefendX Software 6
Preparing the Control-QFS Windows Machine Follow the steps below to prepare the Windows machine to host DefendX Software Control-QFS for EMC:
1. Before installing DefendX Software Control-QFS for NAS, EMC Edition, make sure that Celerra Event Enabler (CEE) version 4.5.2.3 or later is appropriately installed and configured in your environment. Contact EMC for further information on this configuration. CEE versions from 6.0.0 until 6.0.3 are not supported. If you will install CEE version 6.x then it must be 6.0.4 or higher. If you need to manage VNX ( 8.1.3+), then you must use CEE version 6.6 or higher.
2. After installing CEE on the DefendX Software Control-QFS machine, you need to specify the software with which the CEE will register. To do this, use the Windows Registry Editor to set DefendX for the following REG_SZ registry value:
HKEY_LOCAL_MACHINE\SOFTWARE\EMC\Celerra Event Enabler \CEPP\CQM\Configuration\EndPoint
If you installed CEE version 6.0.4 or higher, then the registry value will be:
HKEY_LOCAL_MACHINE\SOFTWARE\EMC\CEE\CEPP\CQM\Configuration\EndPoint
3. Open the Service Control Manager and open the properties of the EMC CAVA service installed as part of CEE.
4. Stop the EMC CAVA service.
5. Change the service account to an account that can be assigned special permissions to access the CIFS Servers on the Celerra Control Station. The following section describes these special permissions.
6. After changing the account, restart the CAVA service.
NOTE: If DefendX Software Control-QFS is installed on an environment that has 'DefendX Software FA with Proxy Service' installed, the registry value named "ProxyServer" in the registry key named "HKEY_LOCAL_MACHINE\SOFTWARE\DefendXSoftware\ECS" on the Control-QFS machine must be set to the machine name on which 'FA with Proxy Service' is installed. This allows DefendX Software Control-QFS and ‘FA with Proxy Service’ to work properly on the same environment.
Copyright © 2018 DefendX Software 7
Assigning Permissions For DefendX Software Control-QFS to work properly, the account used by the DefendX Software Control-QFS EMC Connector service and the EMC CAVA service should have the following permissions:
EMC Virus Checking
EMC Event Notification Bypass
Use the Celerra CIFS Management Tools MMC snap-in provided by EMC to assign these permissions to the service account to be used by the DefendX Software Control-QFS EMC Connector.
NOTE: The EMC Virus Checking and the EMC Event Notification ByPass permissions should be added to at least one CIFS server defined on the Physical Data Mover to be managed; there is no need to create those permissions for each existing VDM.
Copyright © 2018 DefendX Software 8
Requirements
DefendX Software Control-QFS components must meet the following minimum requirements.
DefendX Software Control-QFS for NAS, EMC Edition Server Requirements
DefendX Software Control-QFS for NAS is installed on a server in your environment. The hardware must be suitable for Control-QFS software operation, and these requirements are the minimum necessary. If your server is also hosting antivirus or other programs, your environment’s requirements may be greater than those in the following lists.
Hardware Specification
The following hardware components are the minimum requirements to support DefendX Software Control-QFS for NAS, EMC Edition. If the DefendX Software Control-QFS for NAS server is also hosting antivirus or other programs, the requirements may be greater than those in the following list:
1 GHz CPU
1 GB RAM
150 MB free disk space
Network interface card
Software Specification
Windows Server® 2008 64-bit or later
WoW64
Copyright © 2018 DefendX Software 9
EMC Celerra Requirements
The EMC Celerra to which DefendX Software Control-QFS for NAS, EMC Edition will be connected requires the following:
DART version 5.6.49.3 or later
Network interface card
NOTE: It is strongly recommended that two network adapters be installed in both the Celerra and Windows server. The connection between the server and Celerra should be a dedicated connection (i.e., separate from the public network connection). Using a single network adapter will greatly increase the time required to process data, and may cause excessive delays in the environment.
Copyright © 2018 DefendX Software 10
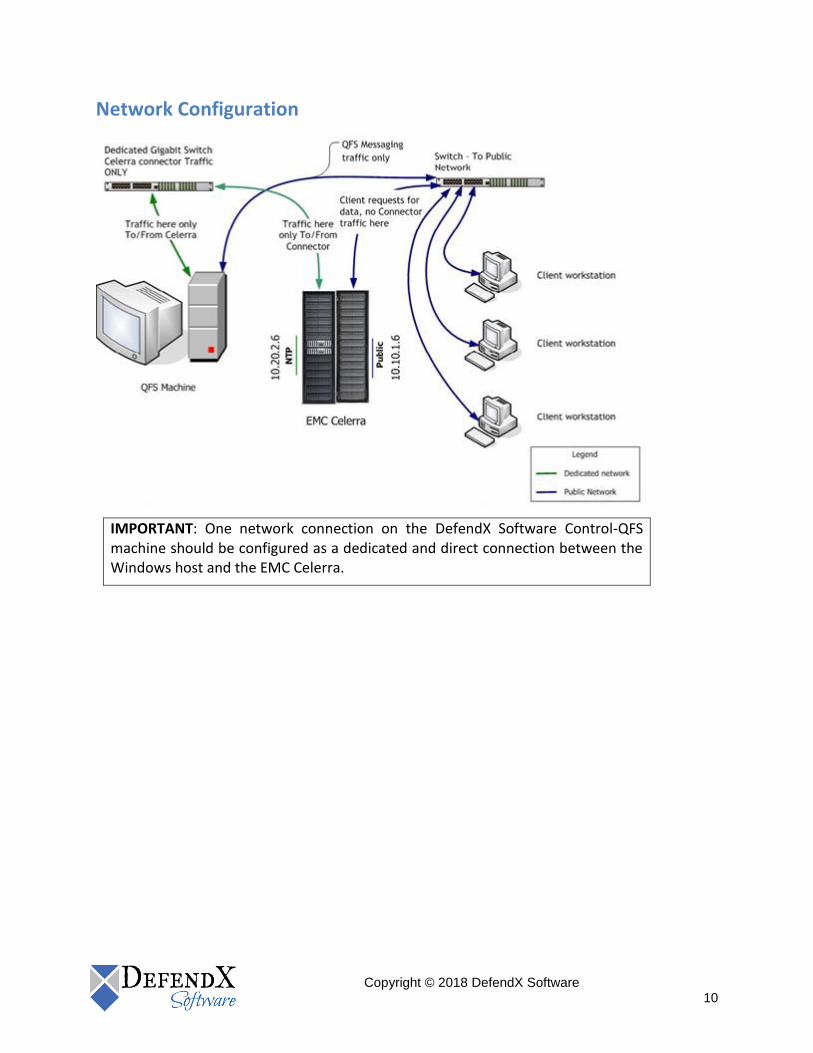
Network Configuration
IMPORTANT: One network connection on the DefendX Software Control-QFS machine should be configured as a dedicated and direct connection between the Windows host and the EMC Celerra.
Copyright © 2018 DefendX Software 11
Installation
Prior to installing DefendX Software Control-QFS for NAS, EMC Edition, DefendX Software recommends verifying that the installation server meets the requirements listed in the Requirements section of this document.
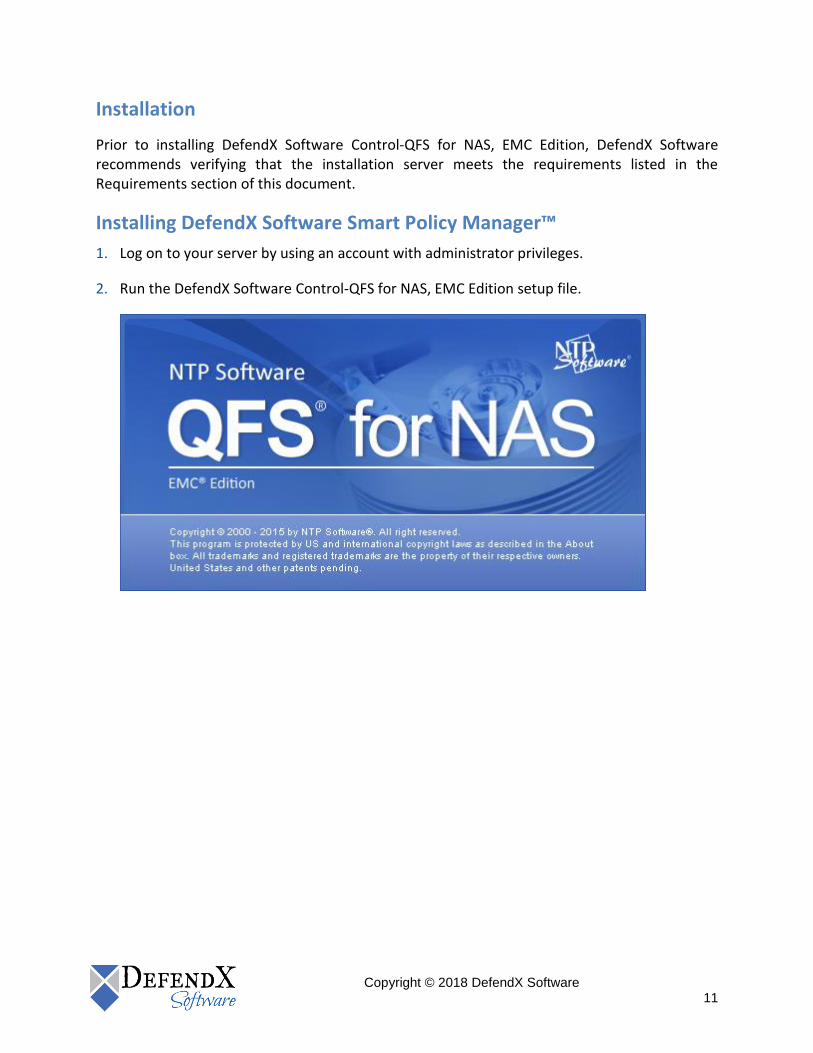
Installing DefendX Software Smart Policy Manager™
1. Log on to your server by using an account with administrator privileges.
2. Run the DefendX Software Control-QFS for NAS, EMC Edition setup file.

Copyright © 2018 DefendX Software 12
3. If DefendX Software Smart Policy Manager™ is not installed; you will be prompted to install it. Click Yes to continue..
4. The DefendX Software Smart Policy Manager Setup Wizard opens. Click Next to begin the installation.

Copyright © 2018 DefendX Software 13
5. In the License Agreement dialog box, read the end-user license agreement. If you agree to the terms, click I accept the terms of the license agreement and then click Next. If you do not accept the terms, click Cancel to exit the installation.
Copyright © 2018 DefendX Software 14
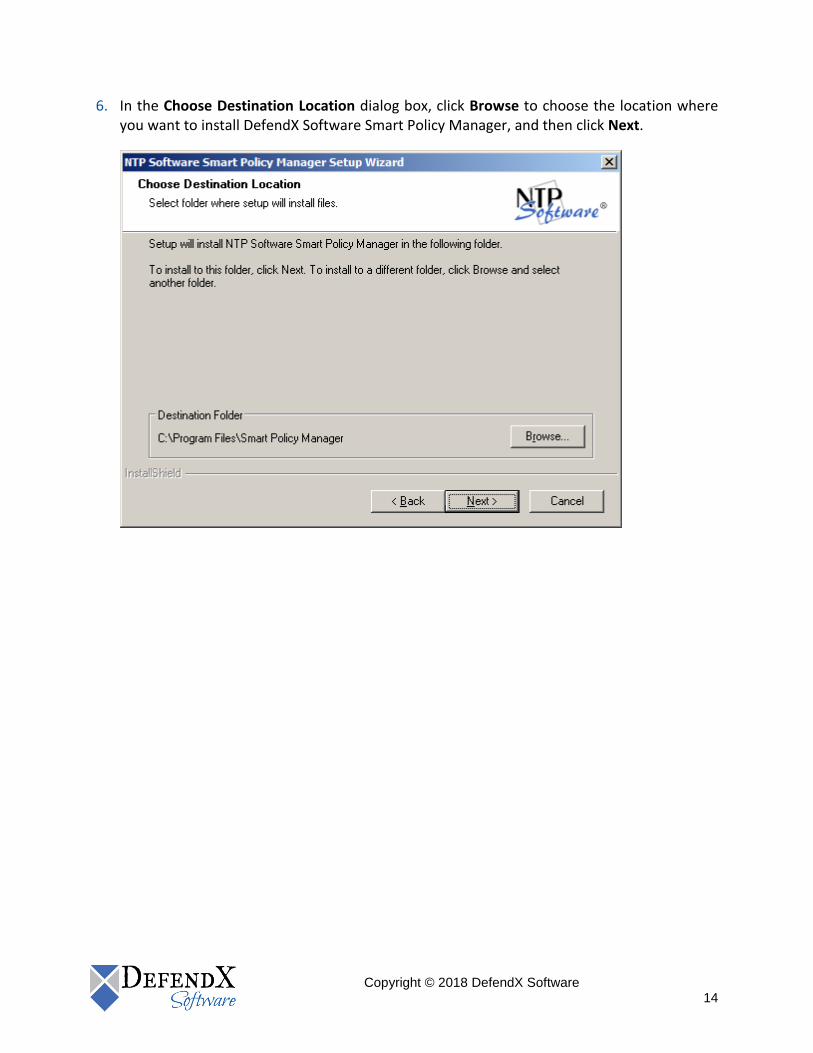
6. In the Choose Destination Location dialog box, click Browse to choose the location where you want to install DefendX Software Smart Policy Manager, and then click Next.

Copyright © 2018 DefendX Software 15
7. In the Select Features dialog box, select the components you want to install, and then click Next.

Copyright © 2018 DefendX Software 16
8. In the Service Account dialog box, when prompted for a Windows domain user account to run the DefendX Software Smart Policy Manager service, enter the username and password for a domain user account with administrative rights on the local machine. Click Next.

Copyright © 2018 DefendX Software 17
9. In the Smart Policy Manager Database Location dialog box, enter the directory name where you want to install the DefendX Software Smart Policy Manager database, or just accept the default location. Click Next.

Copyright © 2018 DefendX Software 18
10. In the Setup Type dialog box, select the DefendX Software Smart Policy Manager installation type for your environment. If installing to a new environment with no prior DefendX Software Smart Policy Manager installations, click Next. If installing in an environment where DefendX Software Smart Policy Manager is already running, choose Adding to an enterprise installation and click Next.

Copyright © 2018 DefendX Software 19
11. In the Smart Policy Manager Initial Setup Parameters dialog box, provide DefendX Software Smart Policy Manager with a name for your organization and a location name for this DefendX Software Smart Policy Manager instance, or accept the default settings. Click Next.

Copyright © 2018 DefendX Software 20
12. In the Start Copying Files dialog box, review your configuration information. Click Back to make any changes; otherwise, click Next to begin copying the files.
Copyright © 2018 DefendX Software 21
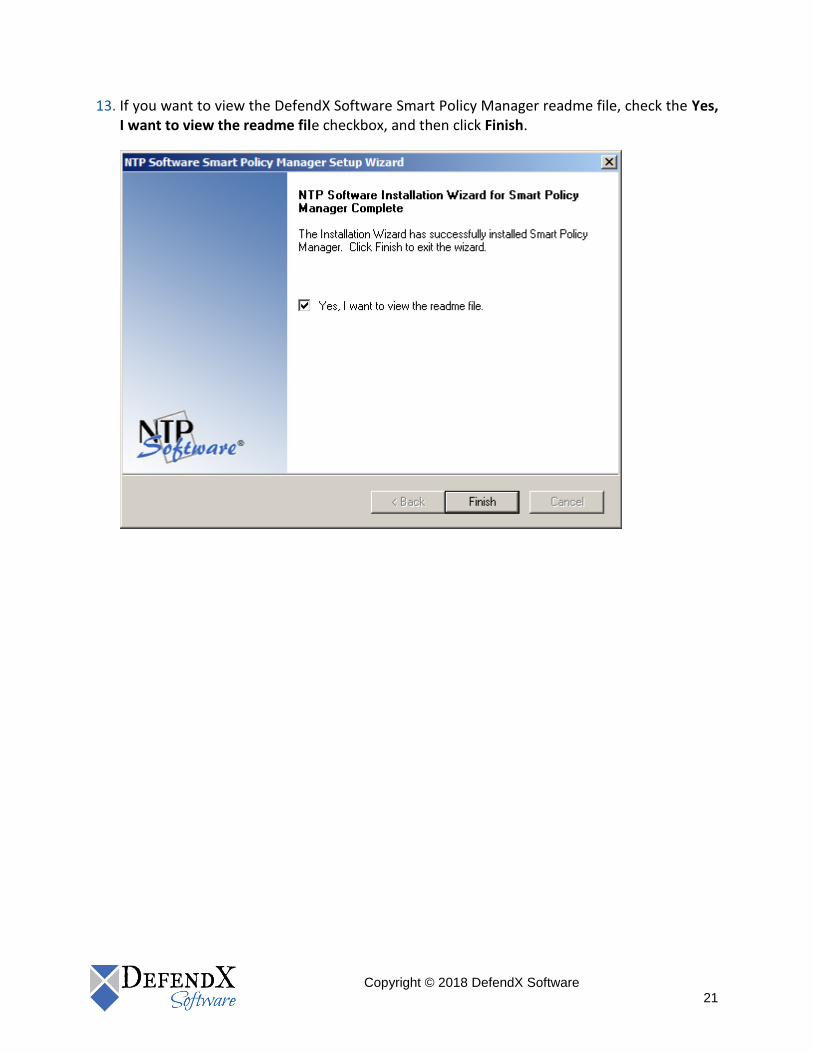
13. If you want to view the DefendX Software Smart Policy Manager readme file, check the Yes, I want to view the readme file checkbox, and then click Finish.

Copyright © 2018 DefendX Software 22
Installing DefendX Software NAS Proxy Service™
1. Log on to your server by using an account with administrator privileges.
2. Run the DefendX Software Control-QFS installer. If DefendX Software NAS Proxy Service™ is not installed, the following installer will launch automatically.
If DefendX Software NAS Proxy Service is installed, you can skip to the section on Installing DefendX Software Control-QFS for NAS, EMC Edition.

Copyright © 2018 DefendX Software 23
3. When prompted to install DefendX Software NAS Proxy Service, click the Yes button.
If you clicked the No button, the following message will be displayed:
If you clicked the Yes button in the above message, DefendX Software Control-QFS installer will proceed without installing DefendX Software NAS Proxy Service.
If you clicked the No button in the above message, DefendX Software Control-QFS installer will terminate.

Copyright © 2018 DefendX Software 24
4. If the old version of the proxy service (EMC Proxy version 4.0 or older) is installed, then an upgrade to the NAS Proxy is required. The following message will be displayed to inform the user about the required upgrade:
If you clicked the No button, the DefendX Software Control-QFS installer will terminate.
5. The DefendX Software NAS Proxy Service Setup Wizard opens. Click Next to begin the
installation.
Copyright © 2018 DefendX Software 25
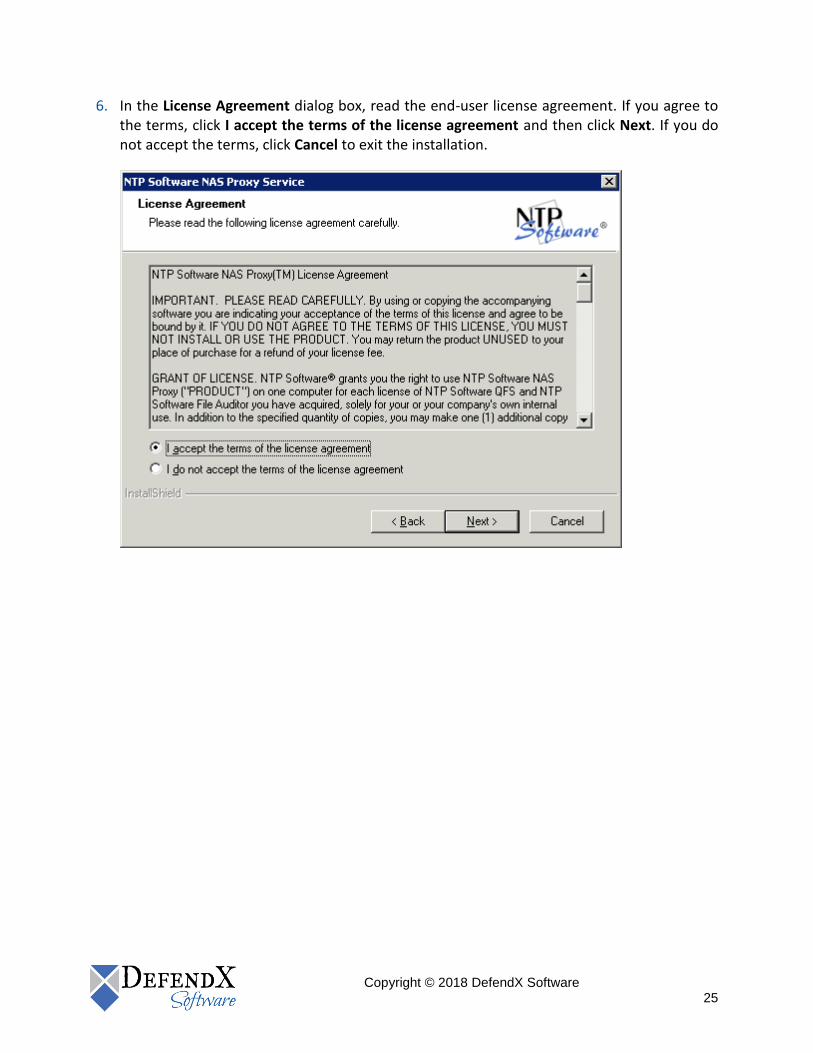
6. In the License Agreement dialog box, read the end-user license agreement. If you agree to the terms, click I accept the terms of the license agreement and then click Next. If you do not accept the terms, click Cancel to exit the installation.
Copyright © 2018 DefendX Software 26
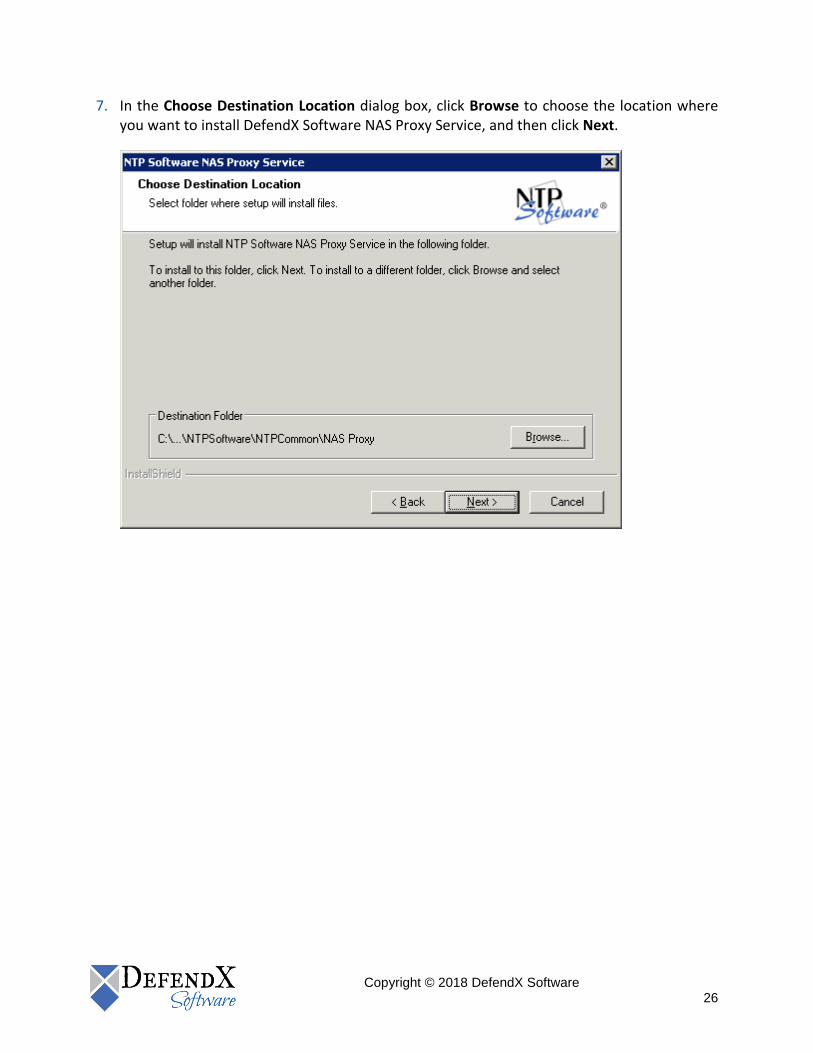
7. In the Choose Destination Location dialog box, click Browse to choose the location where you want to install DefendX Software NAS Proxy Service, and then click Next.

Copyright © 2018 DefendX Software 27
8. In the Account Type dialog box, select the Specify an account to use, and then click Next.

Copyright © 2018 DefendX Software 28
9. In the Service Account dialog box, when prompted for a Windows domain user account to run the DefendX Software NAS Proxy service, enter the username and password for a domain user account with administrative rights on the local machine. Click Next.

Copyright © 2018 DefendX Software 29
10. In the Start Copying Files dialog box, review your configuration information. Click Back to make any changes; otherwise, click Next to begin copying the files.
Copyright © 2018 DefendX Software 30
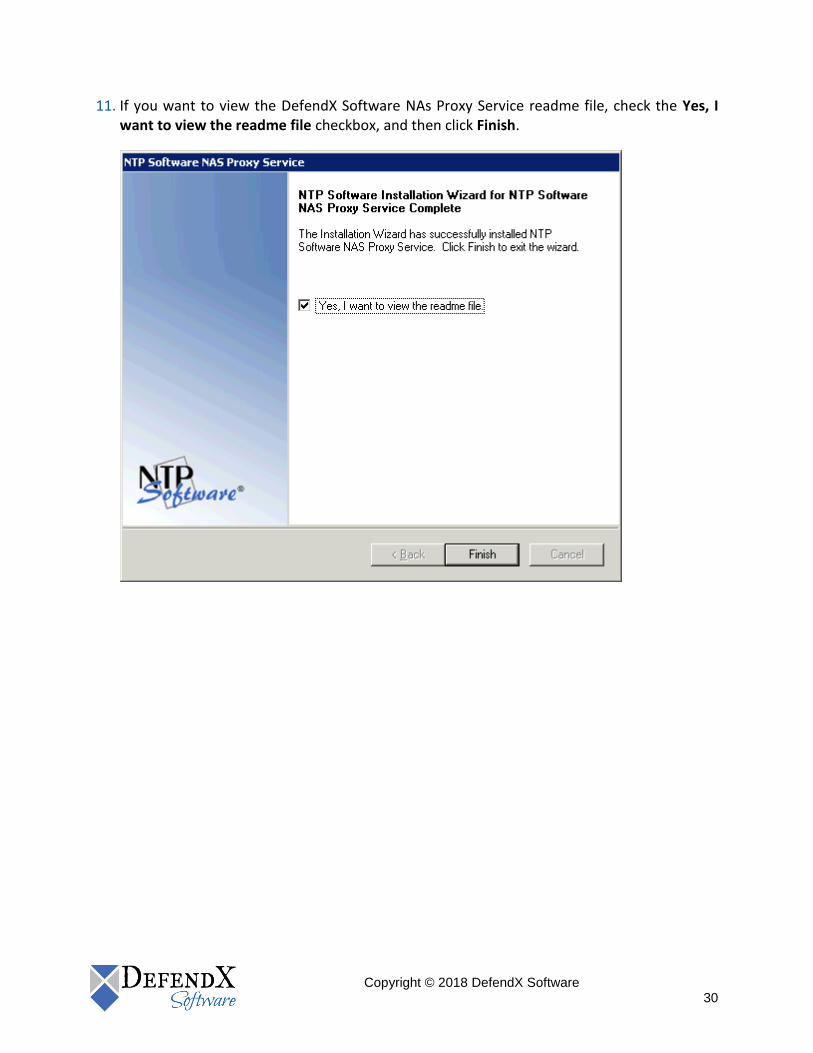
11. If you want to view the DefendX Software NAs Proxy Service readme file, check the Yes, I want to view the readme file checkbox, and then click Finish.

Copyright © 2018 DefendX Software 31
Installing DefendX Software Control-QFS for NAS, EMC Edition
1. Run DefendX Software Control-QFS for NAS Installer.
2. When the DefendX Software Control-QFS for NAS Installation Wizard opens, click Next to begin the installation.

Copyright © 2018 DefendX Software 32
3. Click the Validate button to validate all listed pre-requisites.
NOTES:
You can click the Next button without clicking the Validate button and thereby skipping the validation of the listed pre-requisites.
If the Validate button is not clicked before clicking the Next button, a Yes/No warning message box will be displayed asking you either to proceed with the installation without validation or not. You are prompted to choose either Yes or No as follows:
If Yes is clicked, you will be allowed to proceed to the next installer step.
If No is clicked, you will be returned to the same installer step.
If the Validate button is clicked, the listed pre-requisites will be validated as follows:
A green check will be placed next to each verified pre-requisite
Copyright © 2018 DefendX Software 33
A blue question mark ? next to each pre-requisite that was not verified
A red x next to each failed pre-requisite
The Disable "Secure Negotiate" on the client pre-requisite is applicable only when Control-QFS is installed on Windows Server 2012 or higher. Otherwise, it will be disabled as in the screen shot.
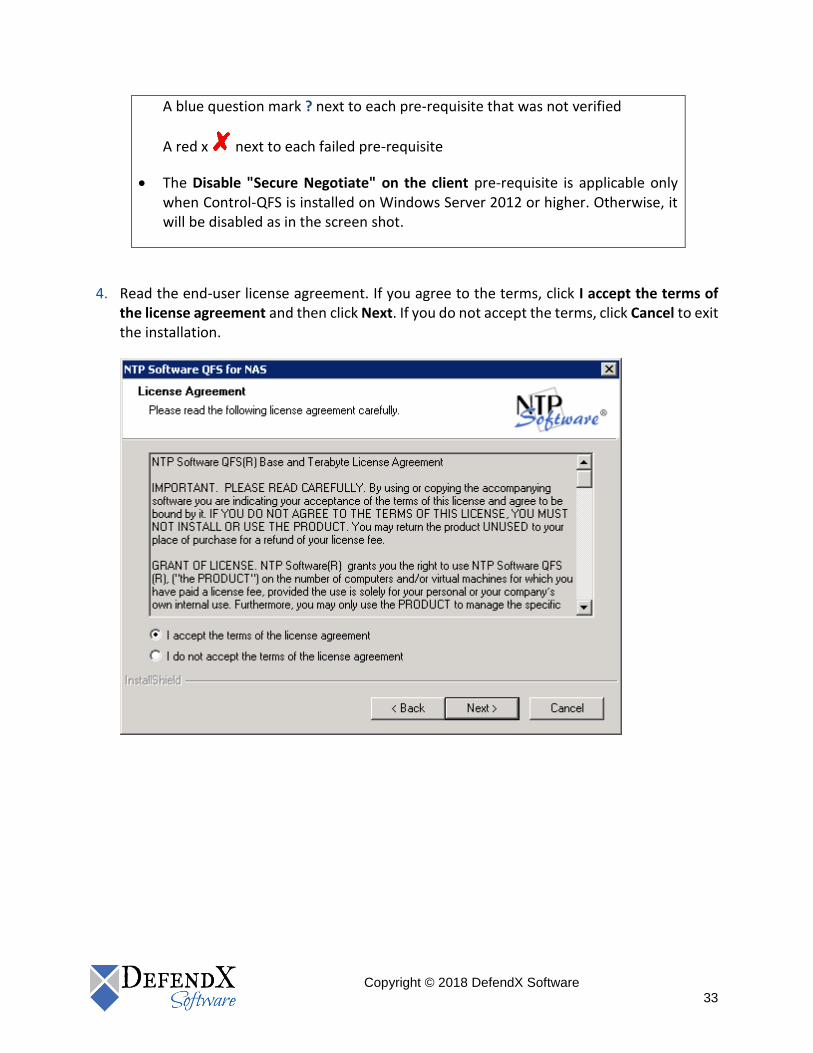
4. Read the end-user license agreement. If you agree to the terms, click I accept the terms of the license agreement and then click Next. If you do not accept the terms, click Cancel to exit the installation.

Copyright © 2018 DefendX Software 34
5. Choose the location where you want to install DefendX Software Control-QFS and then click Next.

Copyright © 2018 DefendX Software 35
6. Select the components to be installed on the local machine. The Admin component allows administration of the DefendX Software Control-QFS service. The EMC Connector component is required if this machine will need to communicate with a Celerra for quota management purposes.
Copyright © 2018 DefendX Software 36
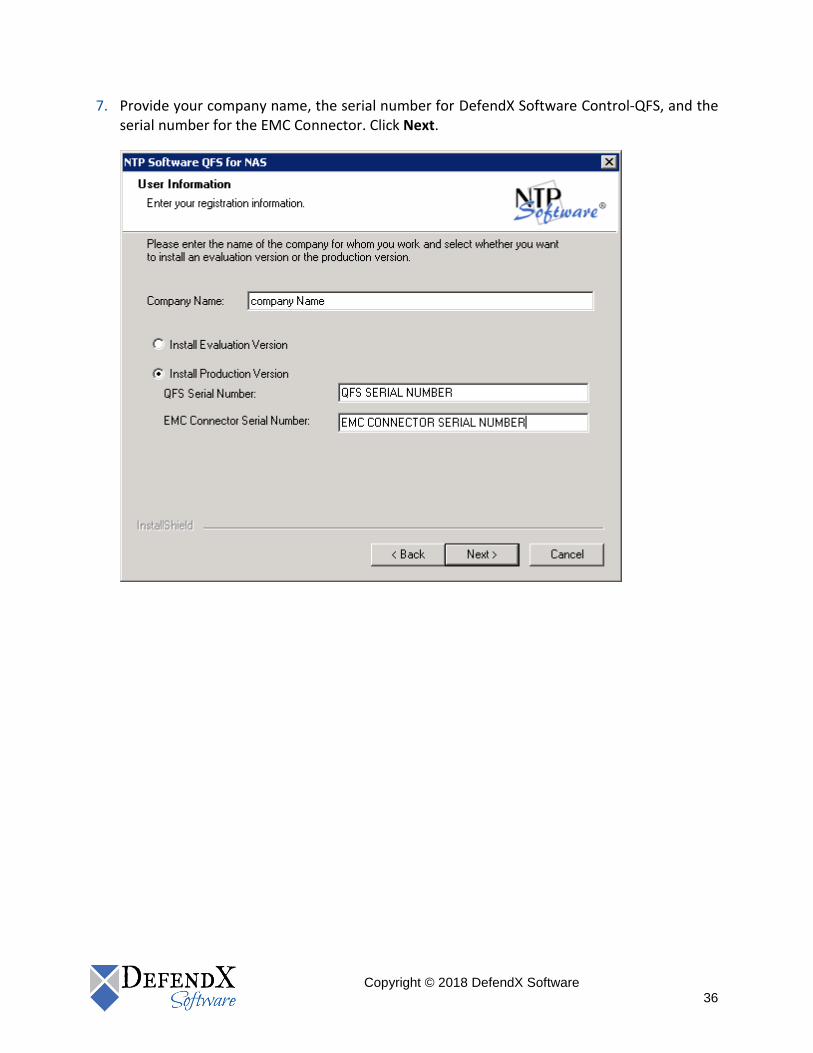
7. Provide your company name, the serial number for DefendX Software Control-QFS, and the serial number for the EMC Connector. Click Next.

Copyright © 2018 DefendX Software 37
8. Specify the account type to be used. Click Next.

Copyright © 2018 DefendX Software 38
9. On specifying an account, enter a username with local administrative privileges. This account will be used to log on to and enforce quotas. Click Next.
Copyright © 2018 DefendX Software 39
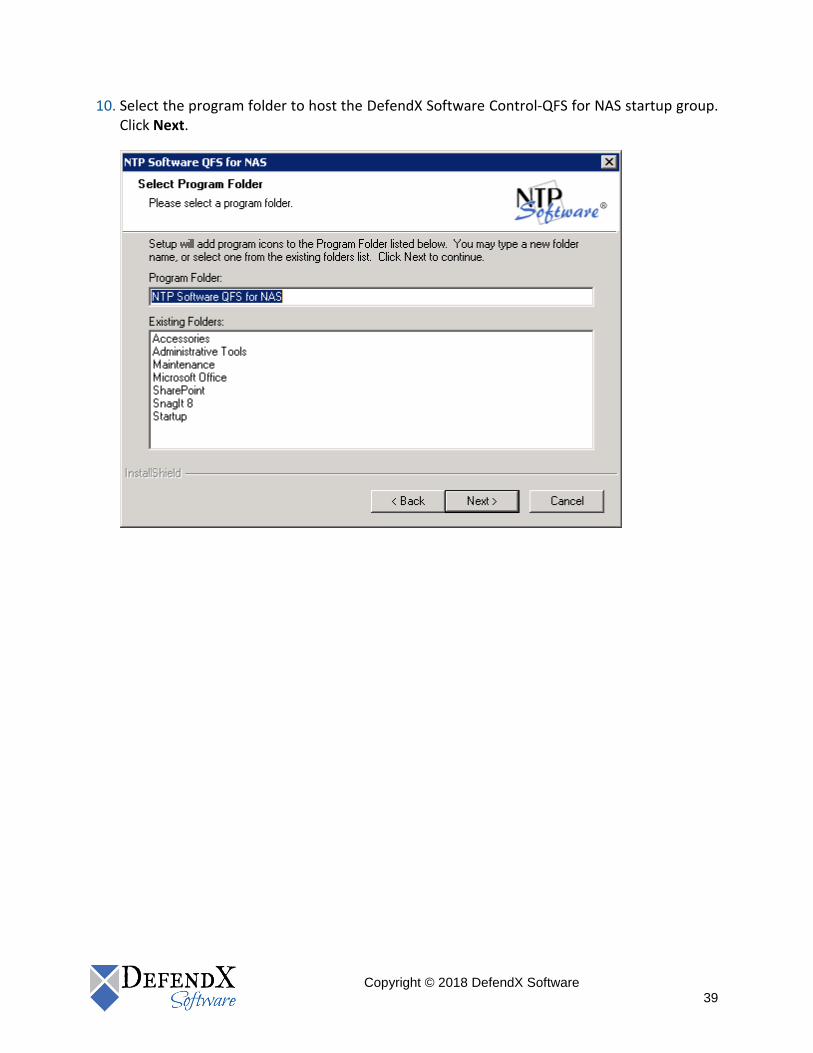
10. Select the program folder to host the DefendX Software Control-QFS for NAS startup group. Click Next.

Copyright © 2018 DefendX Software 40
11. Review your components and EMC Connector information. Click Back to make any changes; otherwise, click Next to begin copying the files.

Copyright © 2018 DefendX Software 41
12. Click the Validate button to validate Firewall Settings pre-requisites.
NOTES You can click the Next button without clicking the Validate button and thereby skip the validation of the firewall settings.
If the Validate button is not clicked before clicking the Next button, a Yes/No warning message box will be displayed asking you either to proceed with the installation without validation or not. You are prompted to choose either Yes or No as follows:
If Yes is clicked, you will be allowed to proceed to the next installer step.
If No is clicked, you will be returned to the same installer step.
If the Validate button is clicked, the firewall settings will be validated.
Copyright © 2018 DefendX Software 42
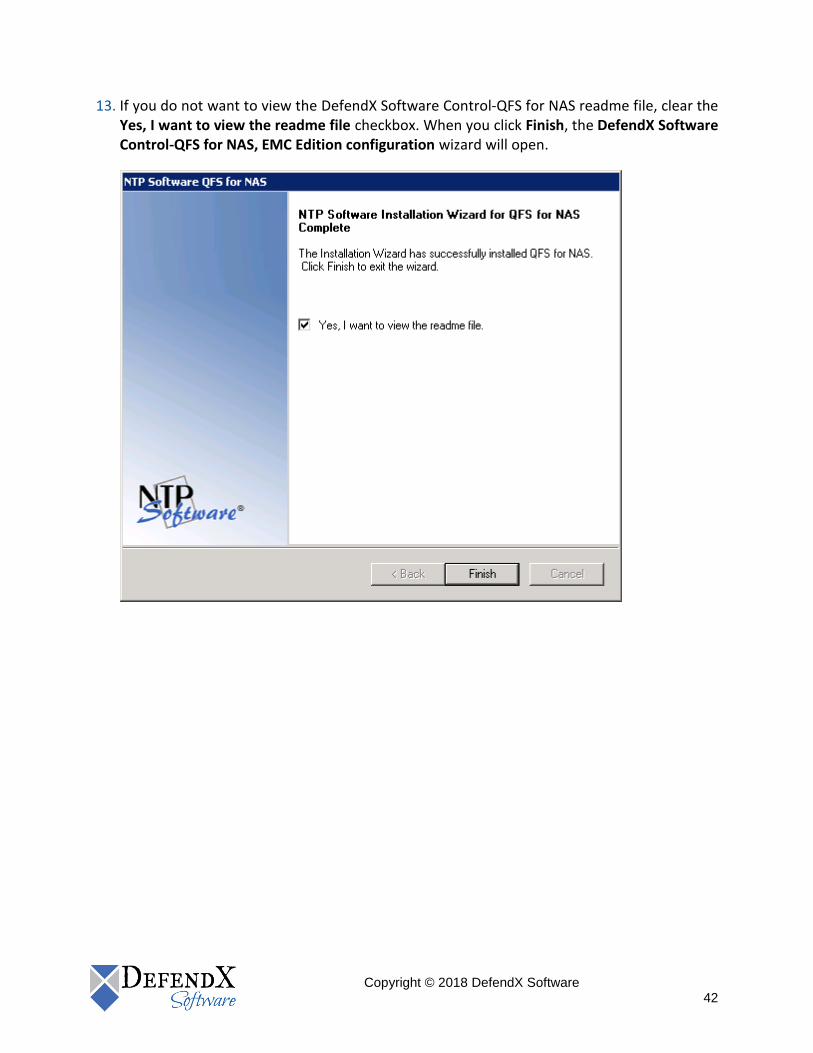
13. If you do not want to view the DefendX Software Control-QFS for NAS readme file, clear the Yes, I want to view the readme file checkbox. When you click Finish, the DefendX Software Control-QFS for NAS, EMC Edition configuration wizard will open.
Copyright © 2018 DefendX Software 43
Using DefendX Software Control-QFS for NAS Configuration Wizard
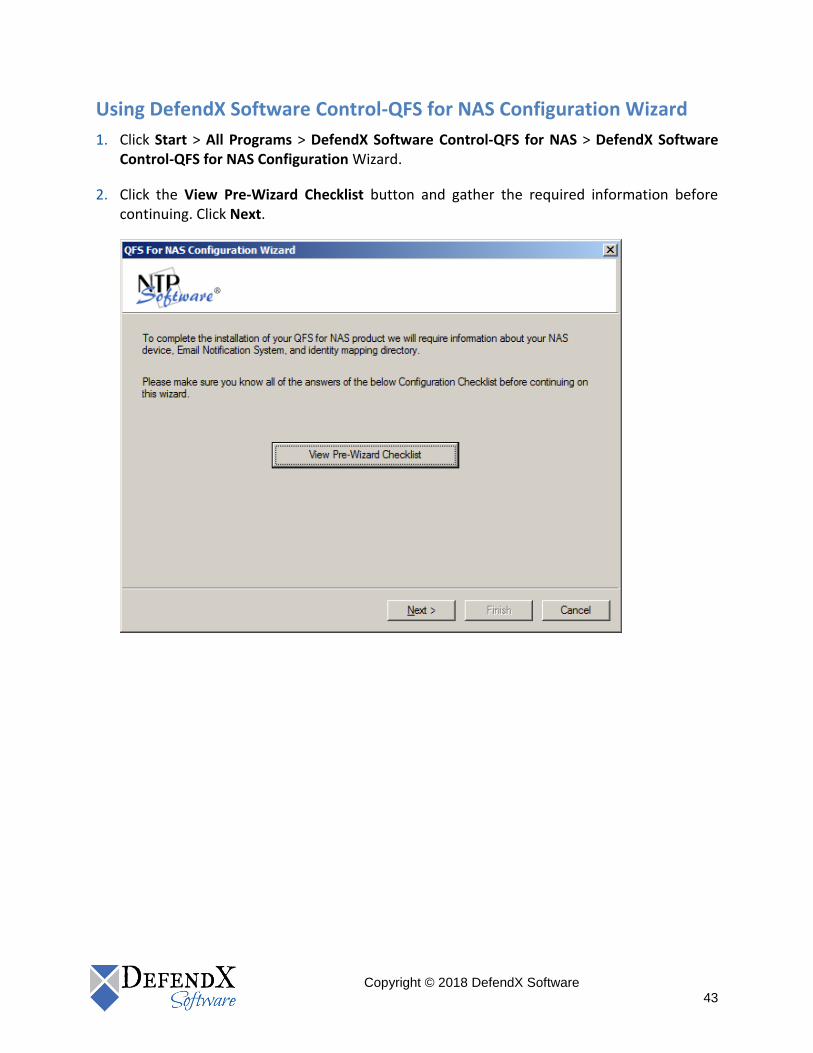
1. Click Start > All Programs > DefendX Software Control-QFS for NAS > DefendX Software Control-QFS for NAS Configuration Wizard.
2. Click the View Pre-Wizard Checklist button and gather the required information before continuing. Click Next.

Copyright © 2018 DefendX Software 44
3. Enter the information needed to manage the Celerra CIFS server. Click Next.

Copyright © 2018 DefendX Software 45
4. Control-QFS validates the CIFS server information provided. When done, click Next.
Copyright © 2018 DefendX Software 46
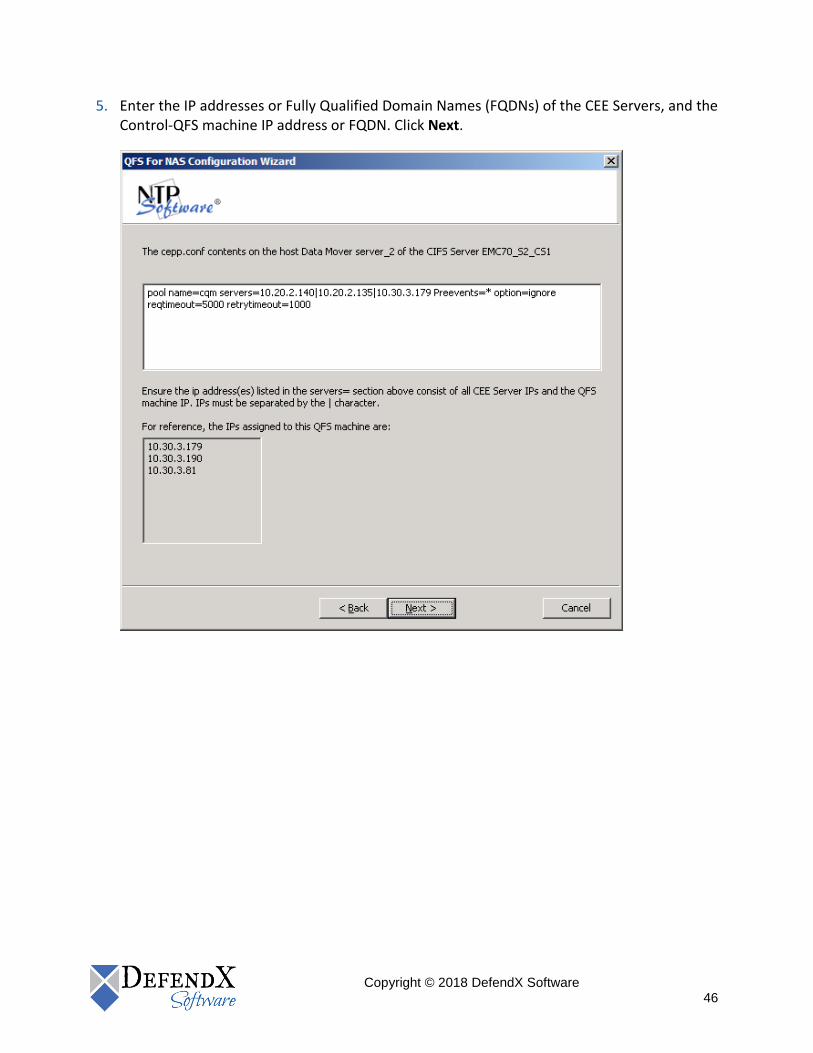
5. Enter the IP addresses or Fully Qualified Domain Names (FQDNs) of the CEE Servers, and the Control-QFS machine IP address or FQDN. Click Next.
Copyright © 2018 DefendX Software 47
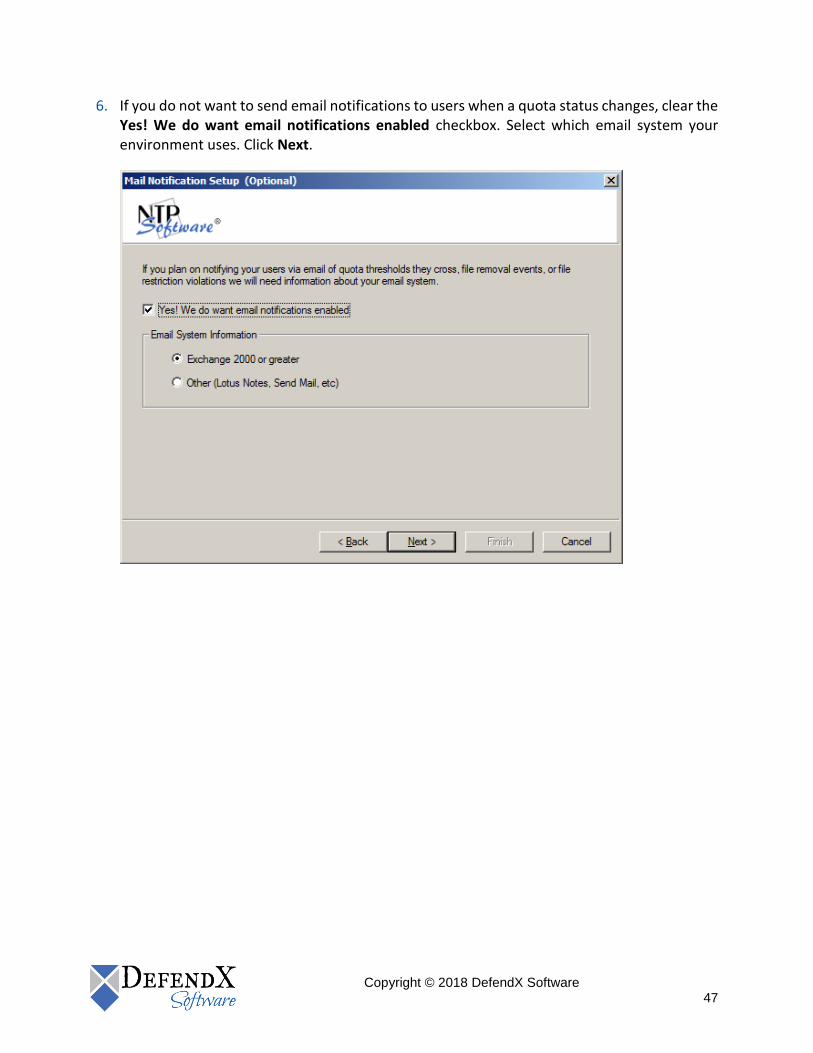
6. If you do not want to send email notifications to users when a quota status changes, clear the Yes! We do want email notifications enabled checkbox. Select which email system your environment uses. Click Next.
Copyright © 2018 DefendX Software 48
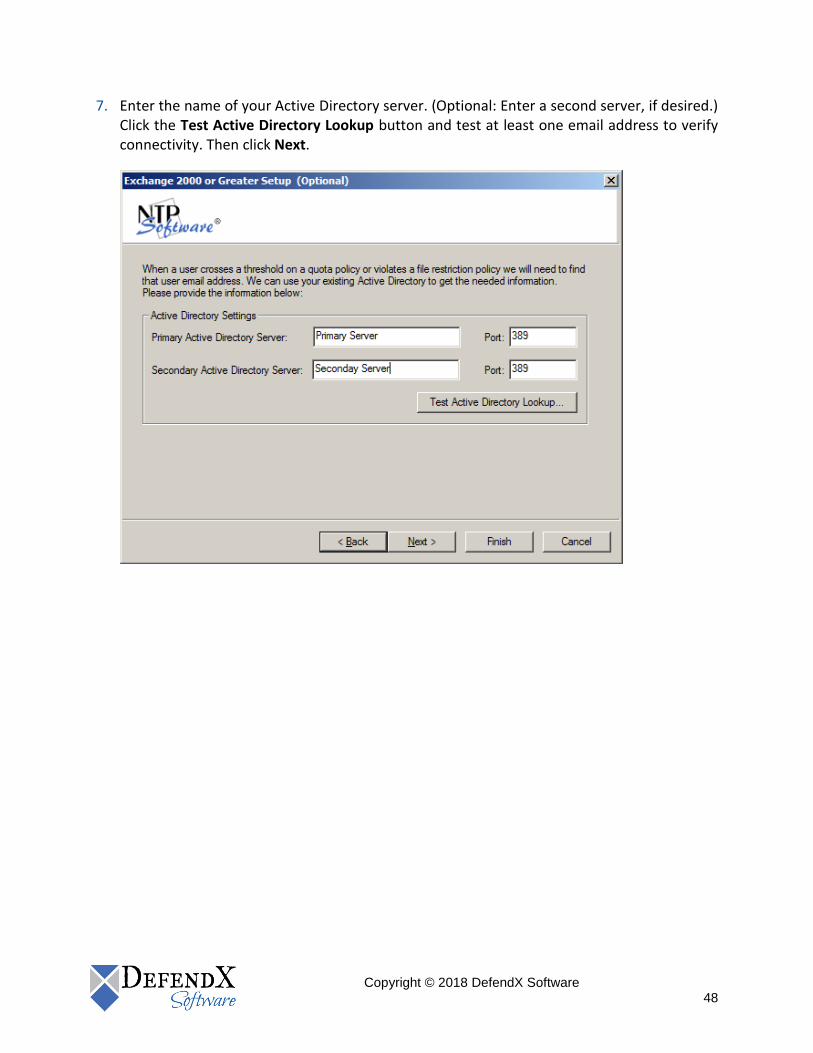
7. Enter the name of your Active Directory server. (Optional: Enter a second server, if desired.) Click the Test Active Directory Lookup button and test at least one email address to verify connectivity. Then click Next.

Copyright © 2018 DefendX Software 49
8. Enter the SMTP gateway, the SMTP domain, and the email address to use for notifications. If your SMTP server requires authentication, enter the required username, domain, password and confirm password to be used to authenticate with your SMTP server. Click Test Mail Settings to verify that the information is correct. Then click Finish.

Copyright © 2018 DefendX Software 50
Adding the EMC CIFS Server to DefendX Software Control-QFS Policy Hierarchy
Before you can use DefendX Software Control-QFS for NAS, the EMC CIFS Server must be added to the DefendX Software Smart Policy Manager hierarchy. Follow these steps to add the EMC CIFS Server:
1. Click Start > All Programs > DefendX Software Control-QFS for NAS > DefendX Software Control-QFS for NAS Admin.
2. In the hierarchy presented, expand the location name you entered earlier. The default location is My Site. Your CIFS Server is listed in the right pane, below the server on which DefendX Software Control-QFS is installed.

Copyright © 2018 DefendX Software 51
3. In the left pane, expand the server on which DefendX Software Control-QFS is installed and right-click Quota & File Sentinel. From the pop-up menu, choose Properties.
Copyright © 2018 DefendX Software 52
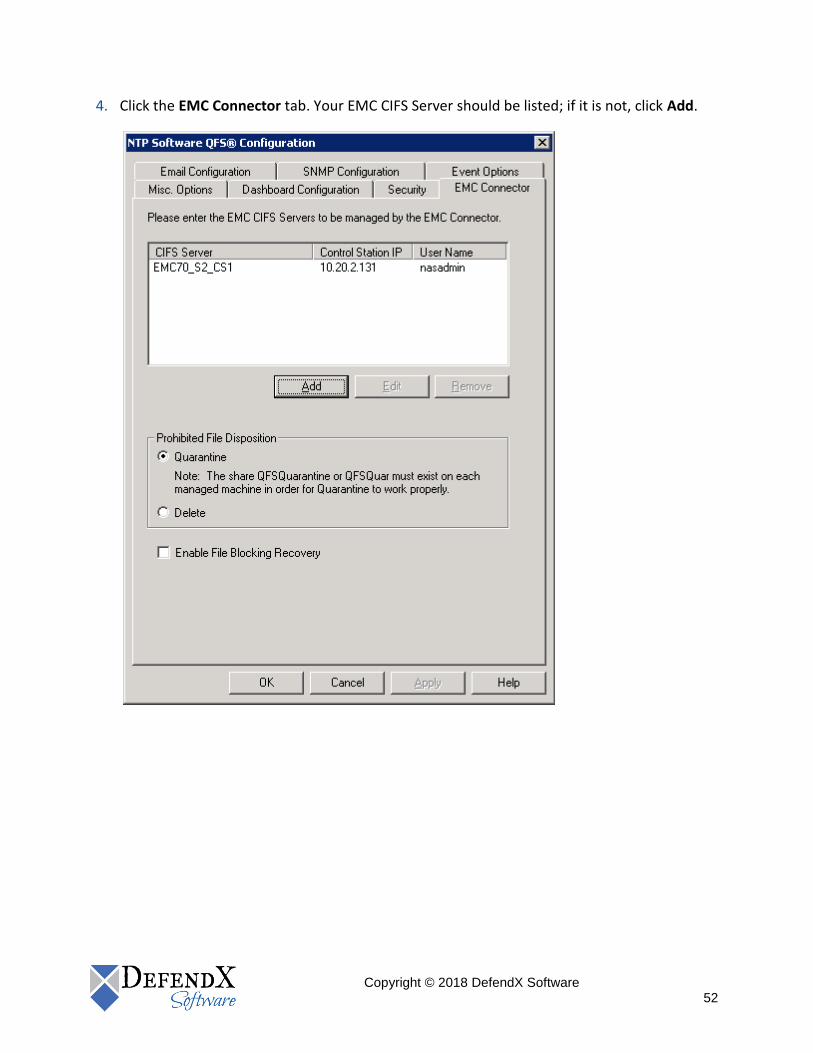
4. Click the EMC Connector tab. Your EMC CIFS Server should be listed; if it is not, click Add.
Copyright © 2018 DefendX Software 53
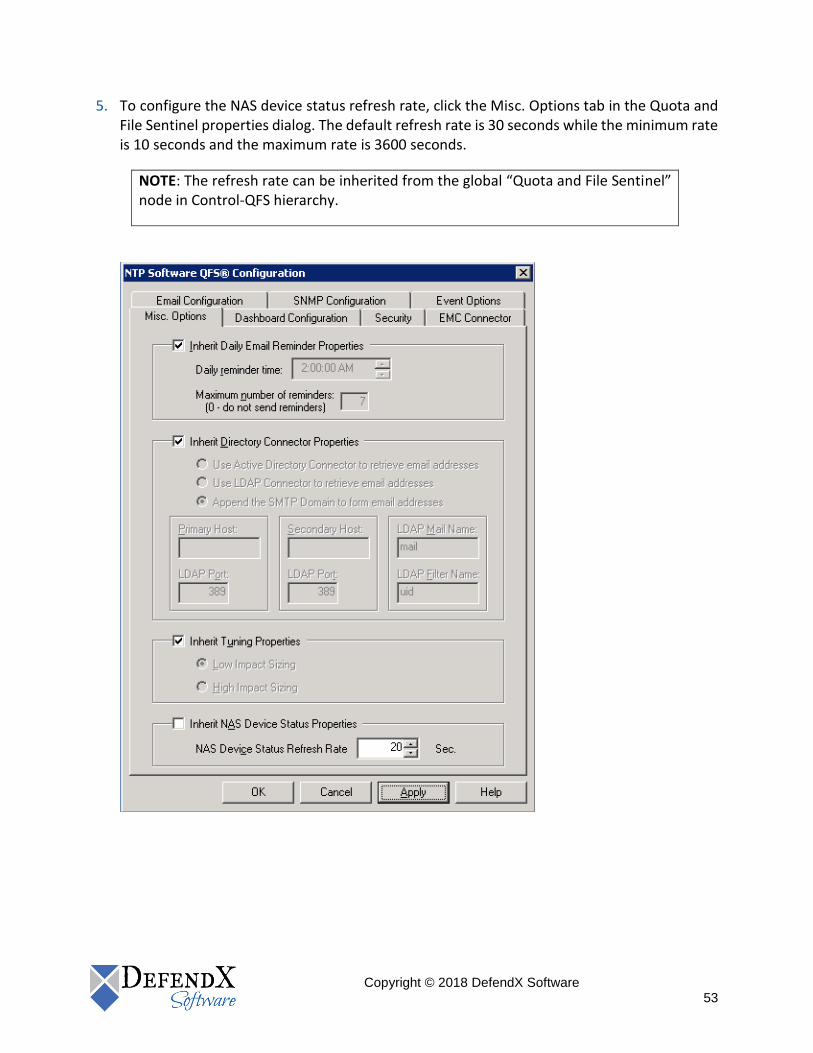
5. To configure the NAS device status refresh rate, click the Misc. Options tab in the Quota and File Sentinel properties dialog. The default refresh rate is 30 seconds while the minimum rate is 10 seconds and the maximum rate is 3600 seconds.
NOTE: The refresh rate can be inherited from the global “Quota and File Sentinel” node in Control-QFS hierarchy.
Copyright © 2018 DefendX Software 54
Verifying Registration with the Celerra Control Station
To make sure that DefendX Software Control-QFS for NAS, EMC Edition will work properly, you have to make sure that the Celerra Control Station is generating events properly. Once events are generated, DefendX Software Control-QFS for NAS, EMC Edition is responsible for controlling those events.
The registration with the Celerra Control Station is shown in the Control-QFS Admin through the new tree item named 'Status' which displays the three different states of the registration status for each managed NAS device.
The registration and the details of each event DefendX Software Control-QFS receives are logged by DefendX Software Control-QFS as needed. Logging is turned off by default, to avoid negative impact on DefendX Software Control-QFS performance. Only part of the logging file will be enabled.
To test that events are generated from the Celerra Control Station, follow these steps on the DefendX Software Control-QFS machine:
1. Create two new DWORDs in the following registry key:
HKEY_LOCAL_MACHINE\SOFTWARE\DefendXSoftware\ECS
2. Name the DWORDs Trace Celerra RPC and Trace CAVA Detail.
3. Set their values to 1.
The Registration event may have been sent already, so it will not be logged unless the DefendX Connector service is restarted. However, if events were detected in the log file, this is an indication that the registration was successful.
The registration message, if logged, should look like t his:
CEPA Register Response: <RegisterResponse><EndPoint version="1.0" desc="DefendX Software Control-QFS NAS Connector" /><Filter><EventTypeFilter value="0x000700FF" /></Filter></RegisterResponse>
Any detected event, if logged, should have an entry that starts with the following:
CEPA event received: <CheckEventRequest>
NOTE: The rest of the logged event is the event details-type, path, user, etc.
IMPORTANT: Remember to disable the logging you just enabled, because it has a negative effect on Control-QFS performance.
Copyright © 2018 DefendX Software 55
About DefendX Software
DefendX Software helps organizations secure their critical business files and maximize the value
of their enterprise file storage resources. From comprehensive intelligence, modeling, costing
and chargeback to seamless file movement, protection and archiving, DefendX provides
industry-leading capabilities to eliminate waste and align the value of files with the storage
resources they consume. With DefendX, important file locations and the users who access them
can be monitored to provide governance, protect against theft and enforce compliance policies.
For more than 20 years, DefendX Software has been helping public and private sector
customers around the world save money and eliminate risk every day.
DefendX Software Professional Services
DefendX Software’s Professional Services offers consulting, training, and design services to help customers with their storage management challenges. We have helped hundreds of customers to implement cost-effective solutions for managing their storage environments. Our services range from a simple assessment to in-depth financial analyses.
For further assistance in creating the most cost-effective Storage Management Infrastructure, please contact your DefendX Software Representative at 800-390-6937.
Copyright © 2018 DefendX Software 56
Legal & Contact Information
The information contained in this document is believed to be accurate as of the date of
publication. Because DefendX Software must constantly respond to changing market
conditions, what is here should not be interpreted as a commitment on the part of DefendX
Software, and DefendX Software cannot guarantee the accuracy of any information
presented after the date of publication.
This user manual is for informational purposes only. DEFENDX SOFTWARE MAKES NO
WARRANTIES, EXPRESS OR IMPLIED, IN THIS DOCUMENT.
DefendX Software and other marks are either registered trademarks or trademarks of
DefendX Software in the United States and/or other countries. Other product and company
names mentioned herein may be the trademarks of their respective owners.
DefendX Software products and technologies described in this document may be protected
by United States and/or international patents.
DefendX Software
119 Drum Hill Road, #383
Chelmsford MA 01824
Phone: 1-800-390-6937
E-mail: [email protected]
Web Site: http://www.DefendX.com
Copyright © 2018 DefendX Software. All rights reserved. All trademarks and registered
trademarks are the property of their respective owners. Doc#DFX1161EF
Related Documents