la Rosa-Pohl ECE 1100 Introduction to Engineering Intro to LabVIEW: Programming for Symon University of Houston Diana de la Rosa-Pohl Len Trombetta

Welcome message from author
This document is posted to help you gain knowledge. Please leave a comment to let me know what you think about it! Share it to your friends and learn new things together.
Transcript
de la Rosa-Pohl
ECE 1100Introduction to
EngineeringIntro to LabVIEW:
Programming for Symon
University of HoustonDiana de la Rosa-Pohl
Len Trombetta

de la Rosa-Pohl
TUTORIALS
de la Rosa-Pohl
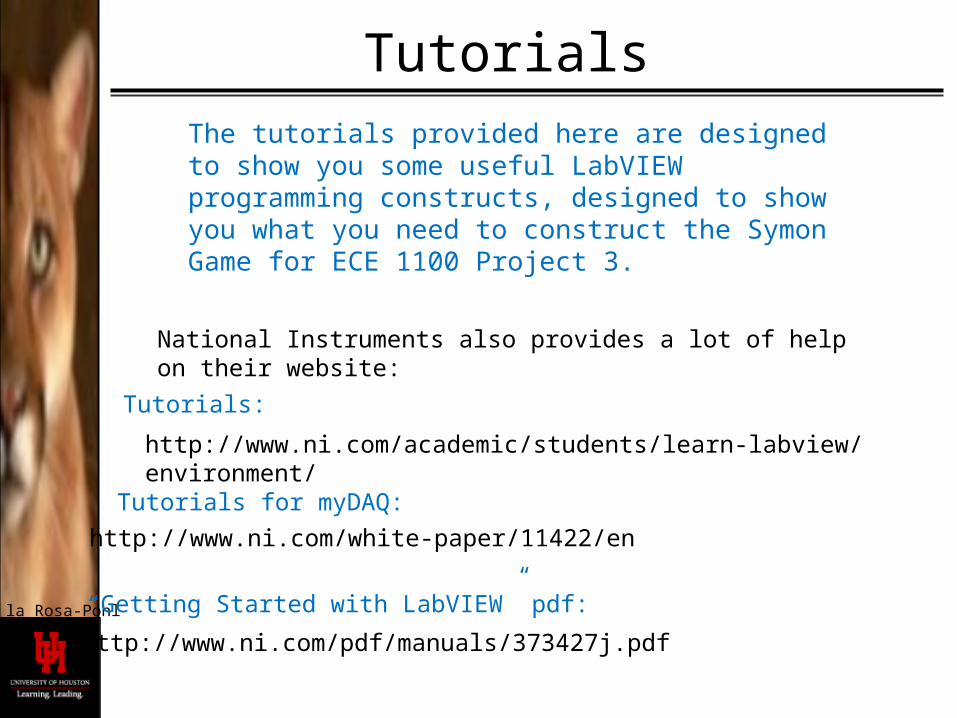
Tutorials
http://www.ni.com/academic/students/learn-labview/environment/
The tutorials provided here are designed to show you some useful LabVIEW programming constructs, designed to show you what you need to construct the Symon Game for ECE 1100 Project 3.
Tutorials:
“Getting Started with LabVIEW” pdf:
http://www.ni.com/pdf/manuals/373427j.pdf
http://www.ni.com/white-paper/11422/en
Tutorials for myDAQ:
National Instruments also provides a lot of help on their website:

de la Rosa-Pohl
Table of Contents
• T/F Case Structure and Boolean Control of LEDs• Sequence• Random Numbers; General Case Structure, FOR LOOP• Array Build: Symon’s choices• Local Variables: Player’s response• Other Stuff
• Finer Points• Errors and De-Bugging
LabVIEW Programming Intro
de la Rosa-Pohl
T/F CASE STRUCTUREBOOLEAN CONTROL OF LED
de la Rosa-Pohl
Case Structure (T/F)
We will illustrate the use of a T/F case structure by configuring the myDAQ to turn an LED on or off when we push a button on the front panel.
For this exercise we assume you have an LED (and a resistor) connected between digital output 0 and DGND (digital ground). For details see “ECE_1100_Symon.pptx” on the course website.
de la Rosa-Pohl
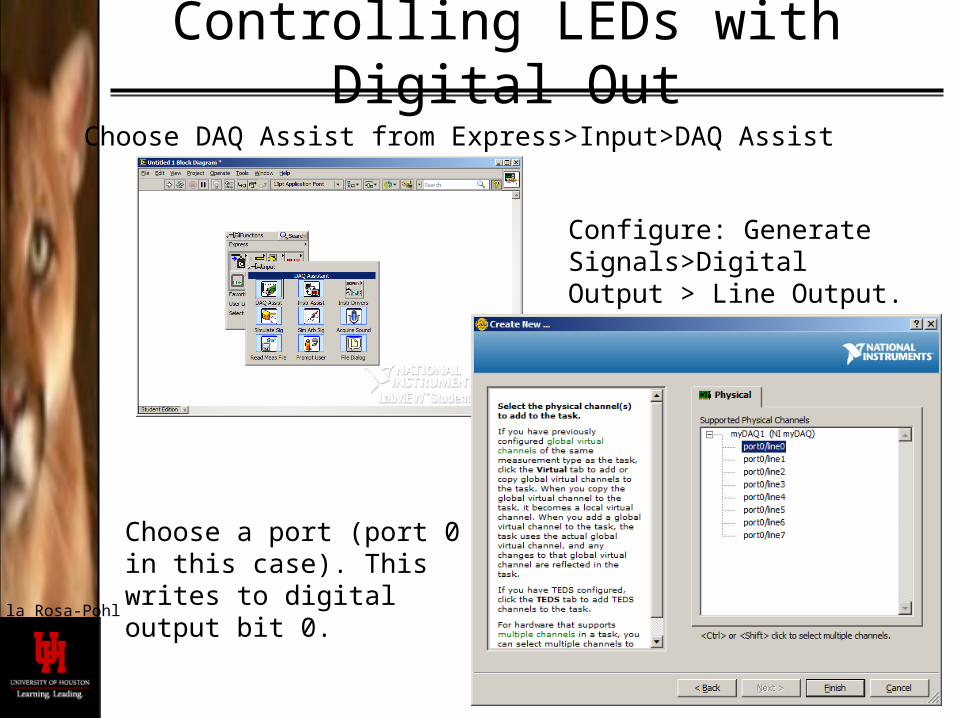
Controlling LEDs with Digital OutChoose DAQ Assist from Express>Input>DAQ Assist
Configure: Generate Signals>Digital Output > Line Output.
Choose a port (port 0 in this case). This writes to digital output bit 0.
de la Rosa-Pohl
Controlling LEDs with Digital Out
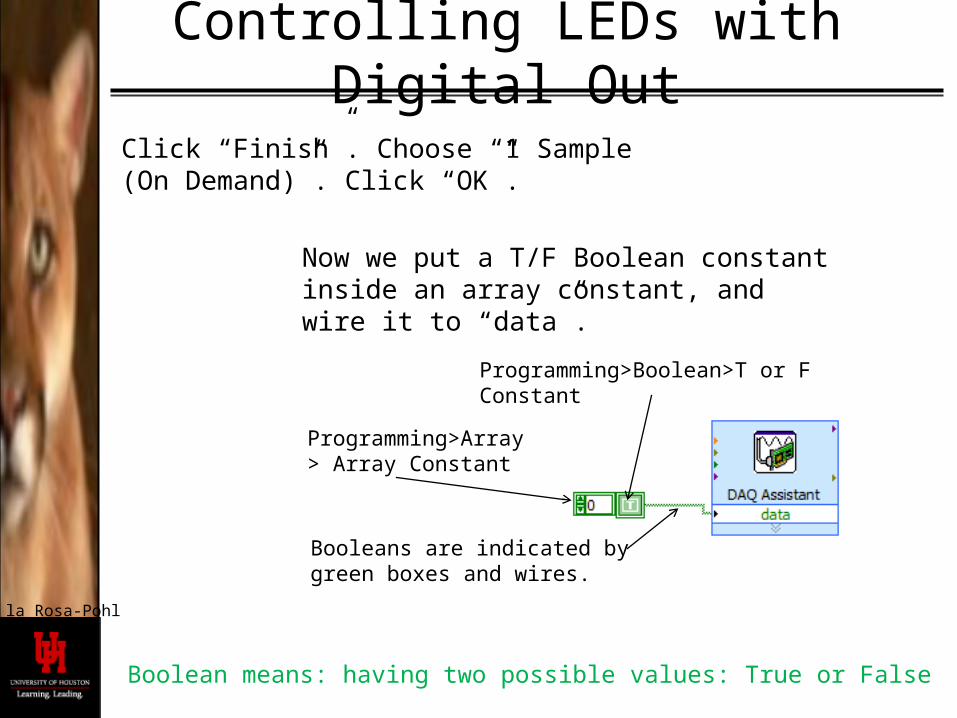
Click “Finish”. Choose “1 Sample (On Demand)”. Click “OK”.
Now we put a T/F Boolean constant inside an array constant, and wire it to “data”.
Programming>Boolean>T or F Constant
Programming>Array> Array Constant
Booleans are indicated by green boxes and wires.
Boolean means: having two possible values: True or False
de la Rosa-Pohl
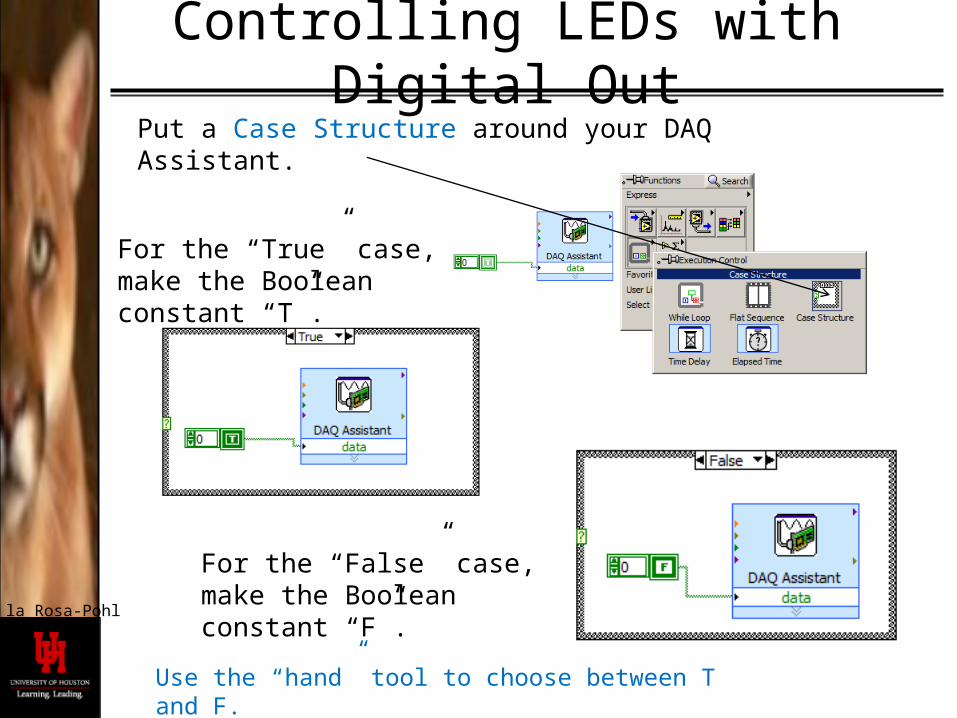
Controlling LEDs with Digital OutPut a Case Structure around your DAQ Assistant.
For the “True” case, make the Boolean constant “T”.
For the “False” case, make the Boolean constant “F”.
Use the “hand” tool to choose between T and F.
de la Rosa-Pohl
Controlling LEDs with Digital Out
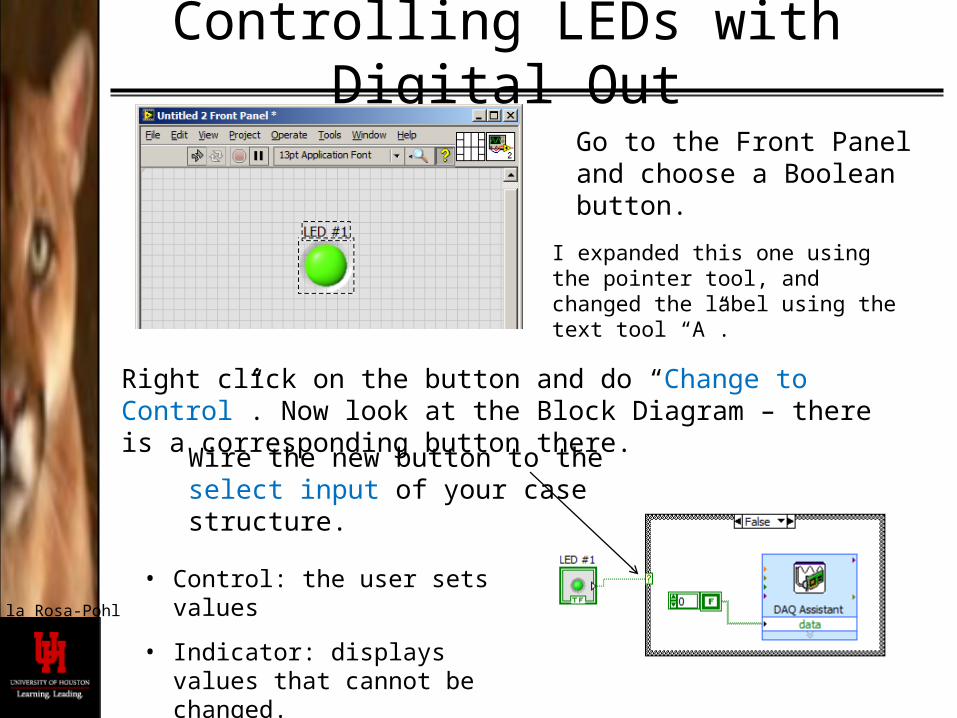
Go to the Front Panel and choose a Boolean button.
I expanded this one using the pointer tool, and changed the label using the text tool “A”.
Right click on the button and do “Change to Control”. Now look at the Block Diagram – there is a corresponding button there.
Wire the new button to the select input of your case structure.
• Control: the user sets values
• Indicator: displays values that cannot be changed.
de la Rosa-Pohl
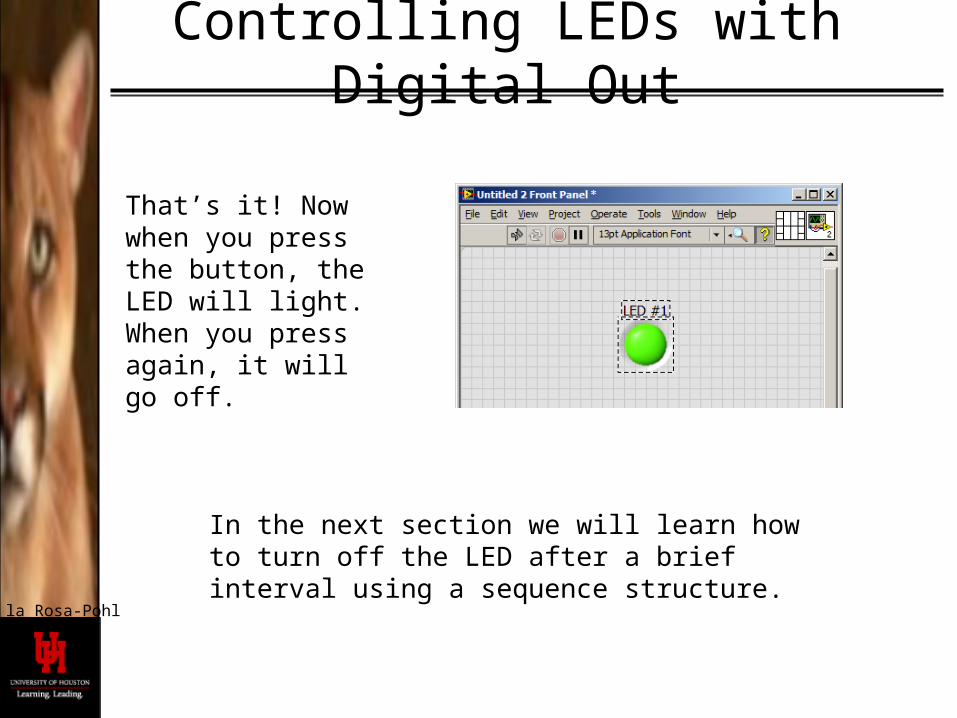
Controlling LEDs with Digital Out
That’s it! Now when you press the button, the LED will light. When you press again, it will go off.
In the next section we will learn how to turn off the LED after a brief interval using a sequence structure.
de la Rosa-Pohl
SEQUENCE
de la Rosa-Pohl
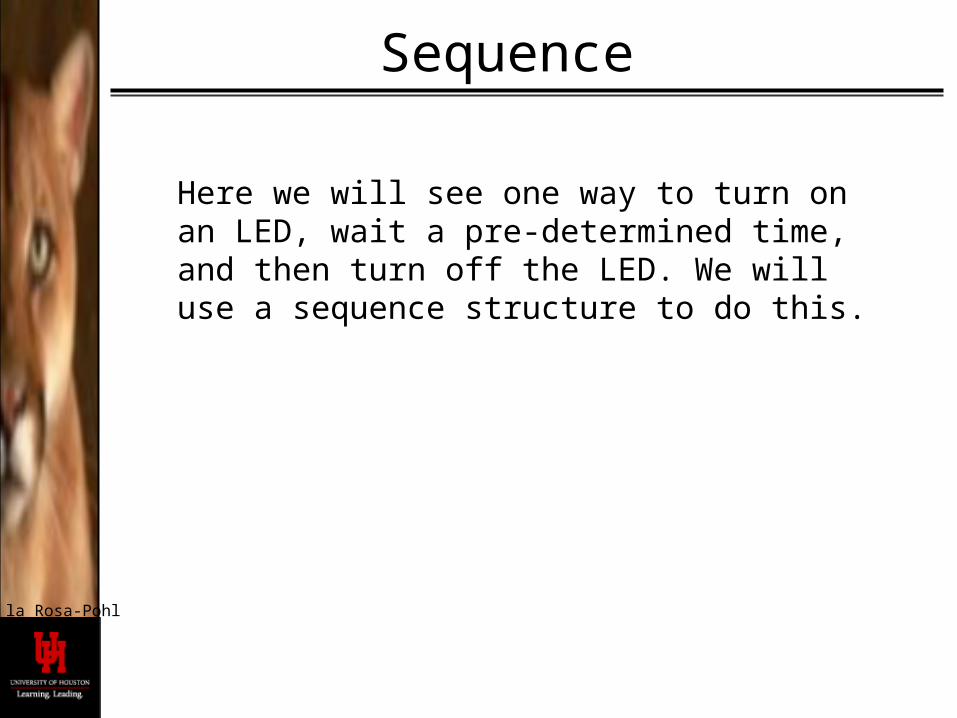
Here we will see one way to turn on an LED, wait a pre-determined time, and then turn off the LED. We will use a sequence structure to do this.
Sequence
de la Rosa-Pohl
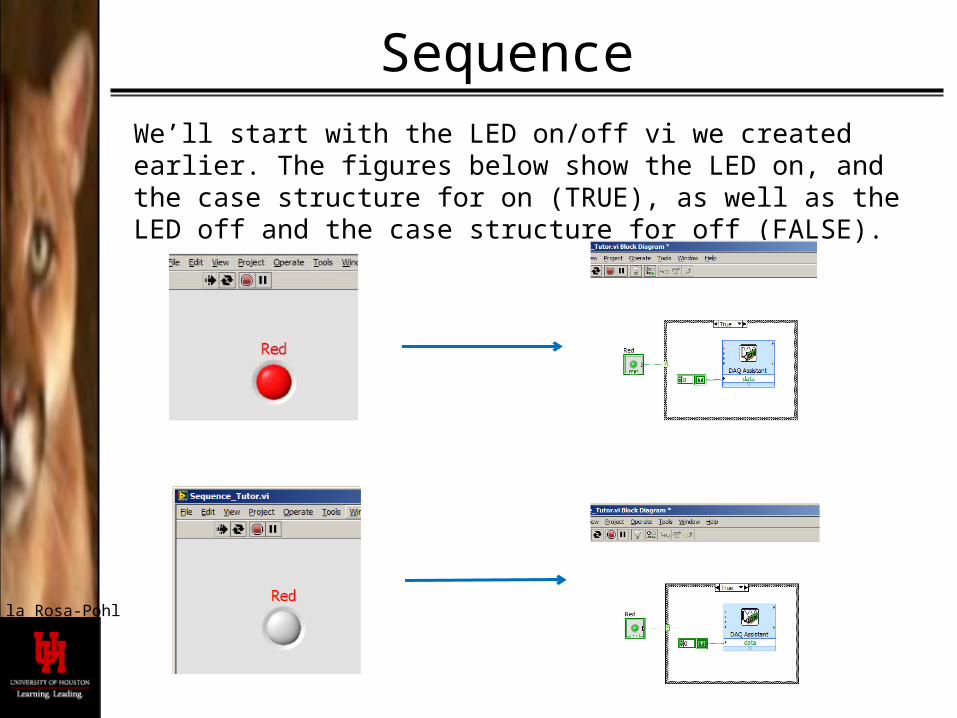
We’ll start with the LED on/off vi we created earlier. The figures below show the LED on, and the case structure for on (TRUE), as well as the LED off and the case structure for off (FALSE).
Sequence
de la Rosa-Pohl
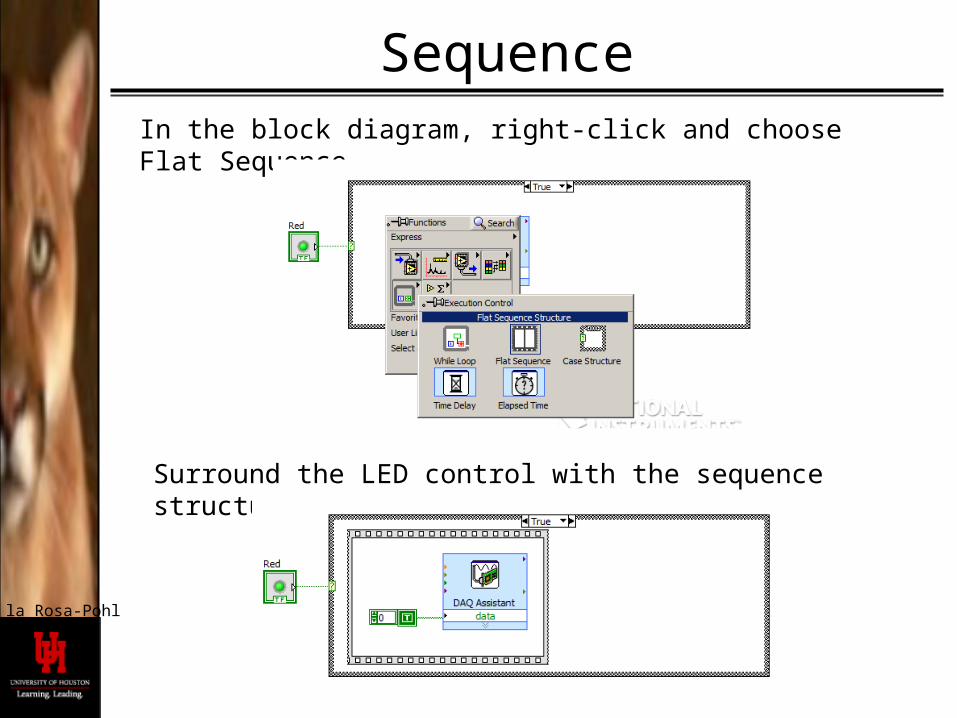
In the block diagram, right-click and choose Flat Sequence.
Sequence
Surround the LED control with the sequence structure.
de la Rosa-Pohl
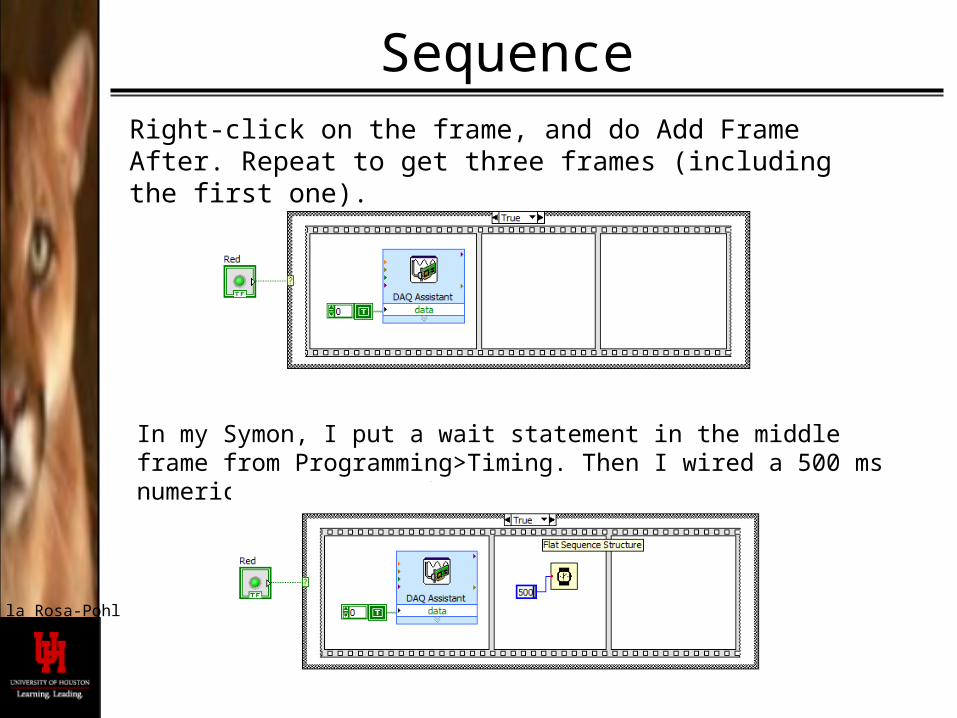
Right-click on the frame, and do Add Frame After. Repeat to get three frames (including the first one).
Sequence
In my Symon, I put a wait statement in the middle frame from Programming>Timing. Then I wired a 500 ms numeric constant to it.
de la Rosa-Pohl
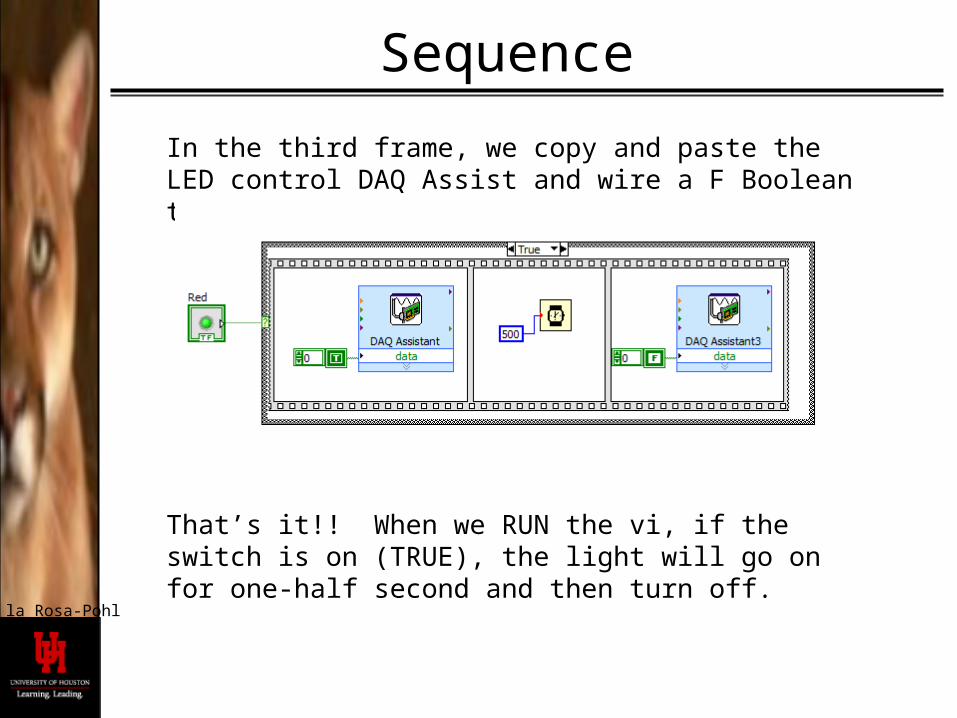
In the third frame, we copy and paste the LED control DAQ Assist and wire a F Boolean to it.
Sequence
That’s it!! When we RUN the vi, if the switch is on (TRUE), the light will go on for one-half second and then turn off.
de la Rosa-Pohl
RANDOM NUMBER GENERATOR GENERAL CASE STRUCTUREFOR LOOP
de la Rosa-Pohl
In this tutorial we will use a random number generator to randomly turn on LEDs four times. This will make use of a general case structure and a FOR LOOP.
Random LEDs
de la Rosa-Pohl
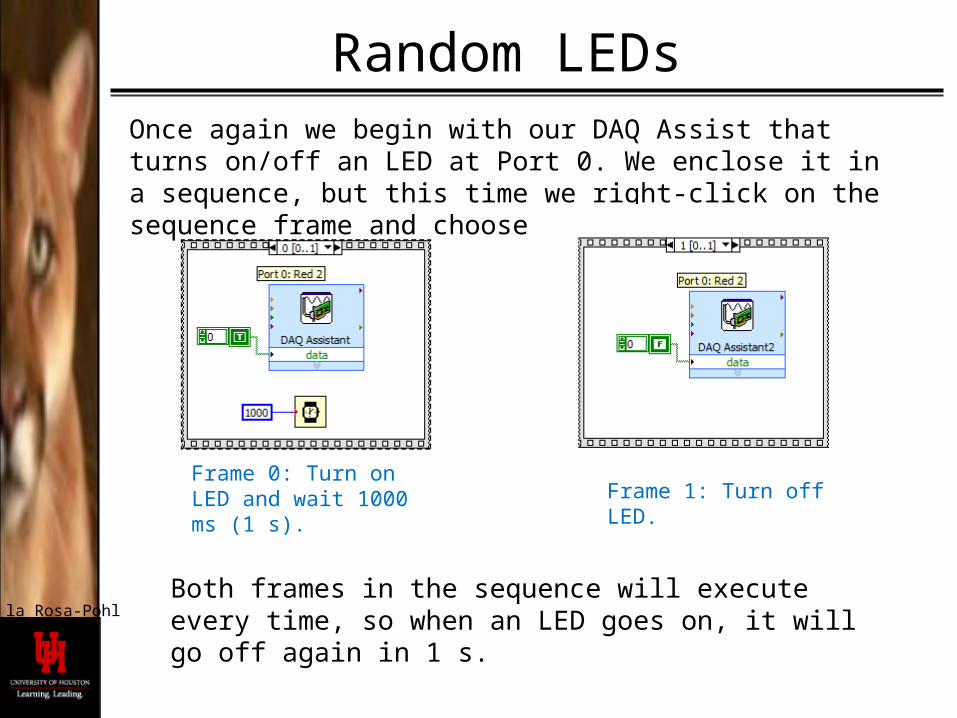
Random LEDsOnce again we begin with our DAQ Assist that turns on/off an LED at Port 0. We enclose it in a sequence, but this time we right-click on the sequence frame and choose Stacked Sequence.
Frame 0: Turn on LED and wait 1000 ms (1 s). Frame 1: Turn off LED.
Both frames in the sequence will execute every time, so when an LED goes on, it will go off again in 1 s.
de la Rosa-Pohl
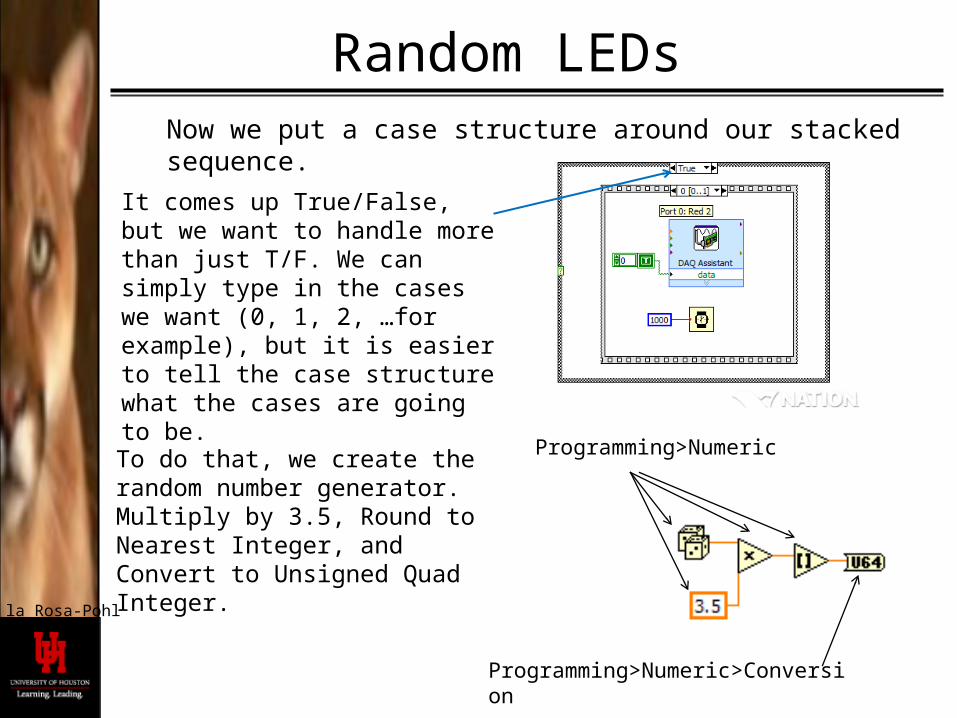
Random LEDsNow we put a case structure around our stacked sequence.
It comes up True/False, but we want to handle more than just T/F. We can simply type in the cases we want (0, 1, 2, …for example), but it is easier to tell the case structure what the cases are going to be.
To do that, we create the random number generator. Multiply by 3.5, Round to Nearest Integer, and Convert to Unsigned Quad Integer.
Programming>Numeric
Programming>Numeric>Conversion

de la Rosa-Pohl
Random LEDsWhen we wire the output of the conversion icon, the case structure knows we are connecting an integer value to its input, so it puts integer values in the case field.
This will be an integer……so integer values are created here.
de la Rosa-Pohl
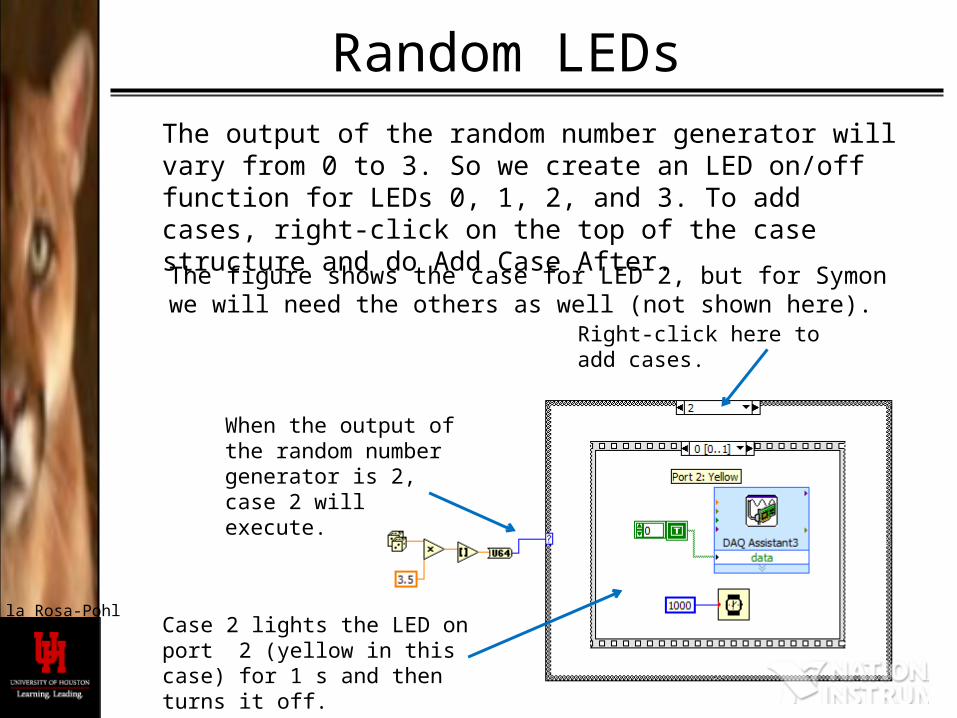
Random LEDsThe output of the random number generator will vary from 0 to 3. So we create an LED on/off function for LEDs 0, 1, 2, and 3. To add cases, right-click on the top of the case structure and do Add Case After.
The figure shows the case for LED 2, but for Symon we will need the others as well (not shown here).
When the output of the random number generator is 2, case 2 will execute.
Case 2 lights the LED on port 2 (yellow in this case) for 1 s and then turns it off.
Right-click here to add cases.
de la Rosa-Pohl
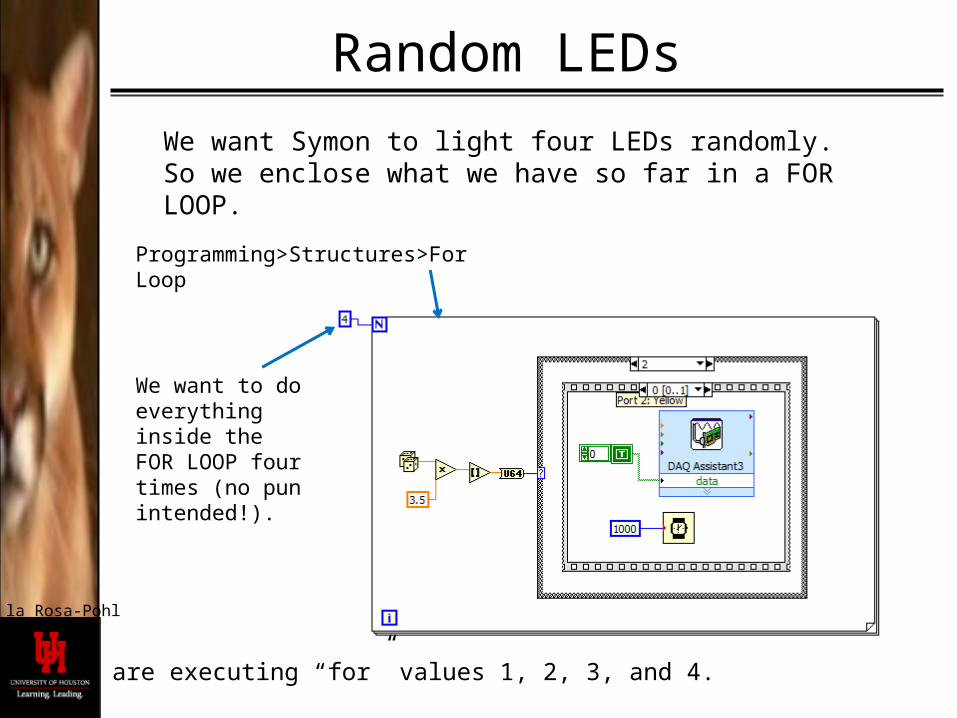
Random LEDs
We want Symon to light four LEDs randomly. So we enclose what we have so far in a FOR LOOP.
Programming>Structures>For Loop
We want to do everything inside the FOR LOOP four times (no pun intended!).
We are executing “for” values 1, 2, 3, and 4.
de la Rosa-Pohl
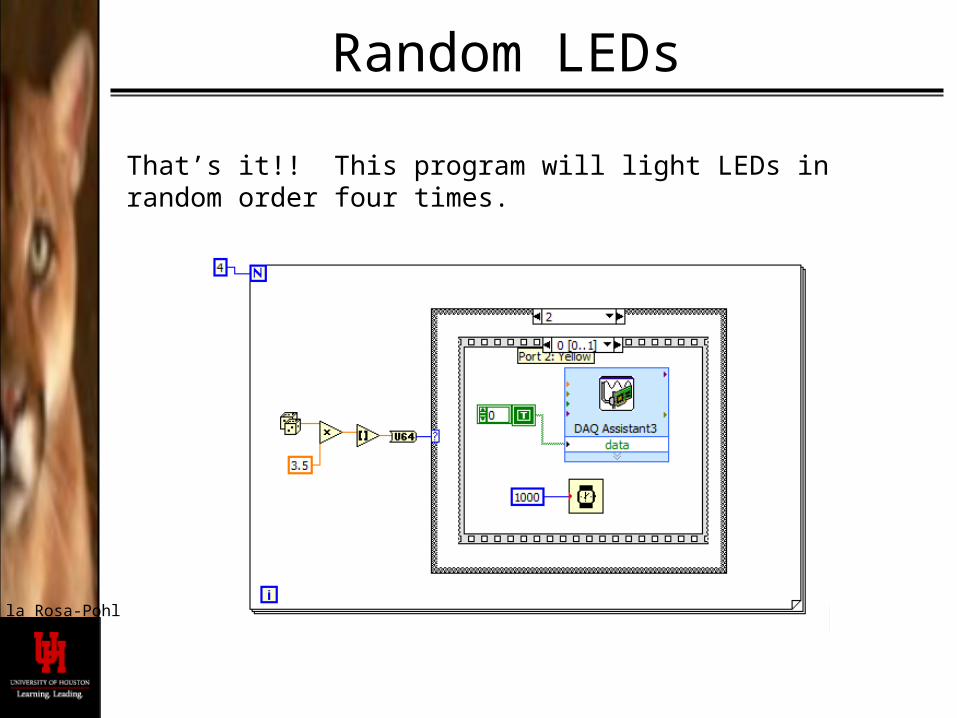
Random LEDs
That’s it!! This program will light LEDs in random order four times.
de la Rosa-Pohl
ARRAY BUILD
de la Rosa-Pohl
Array Build
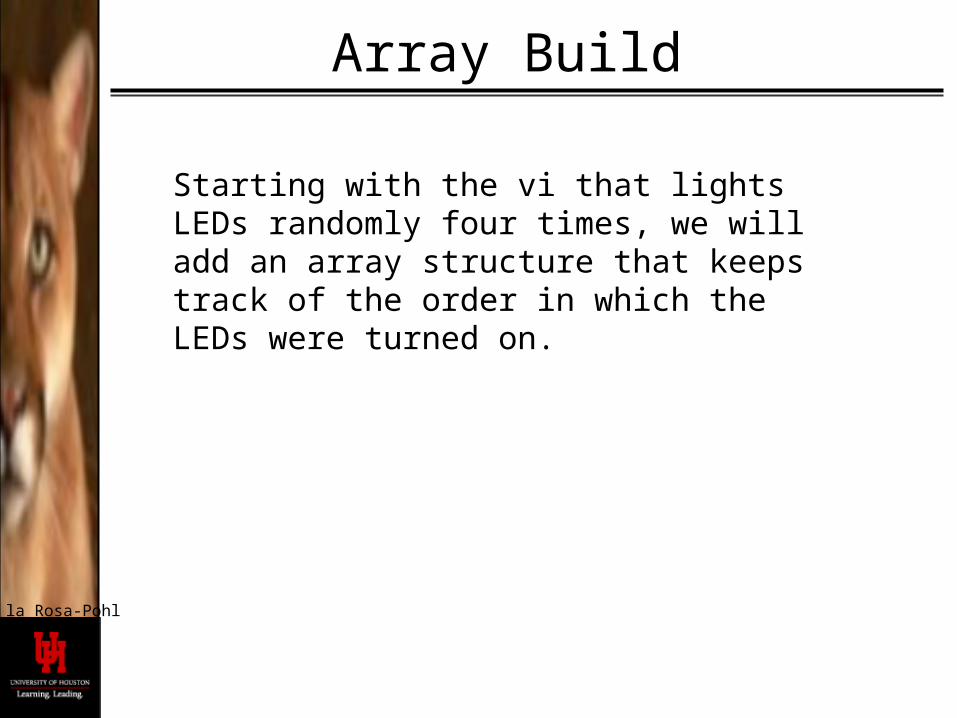
Starting with the vi that lights LEDs randomly four times, we will add an array structure that keeps track of the order in which the LEDs were turned on.
de la Rosa-Pohl
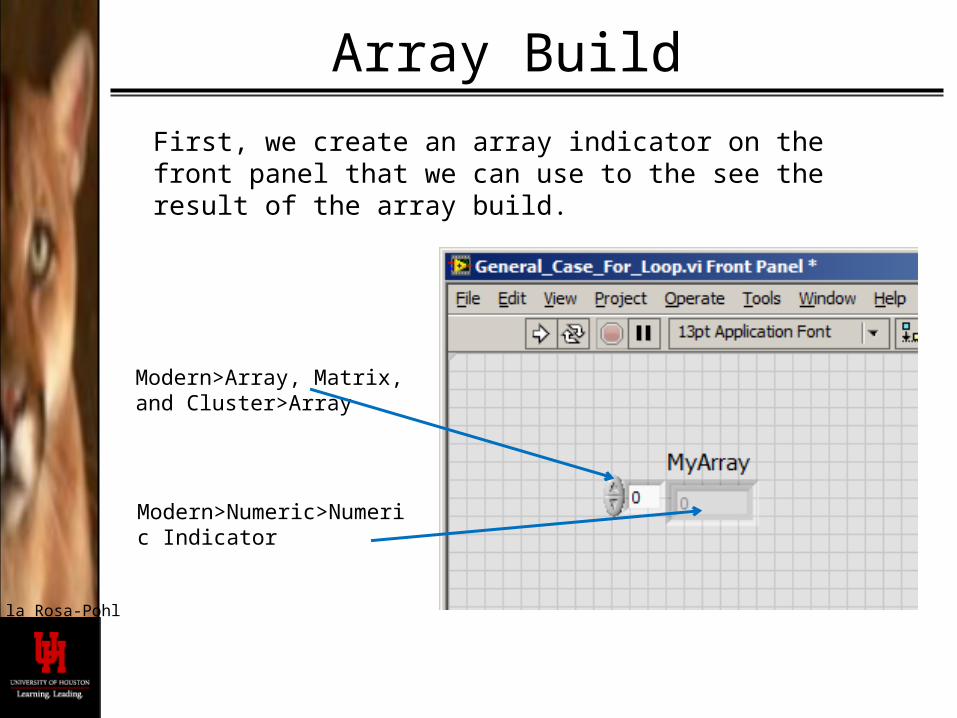
Array Build
First, we create an array indicator on the front panel that we can use to the see the result of the array build.
Modern>Array, Matrix, and Cluster>Array
Modern>Numeric>Numeric Indicator
de la Rosa-Pohl
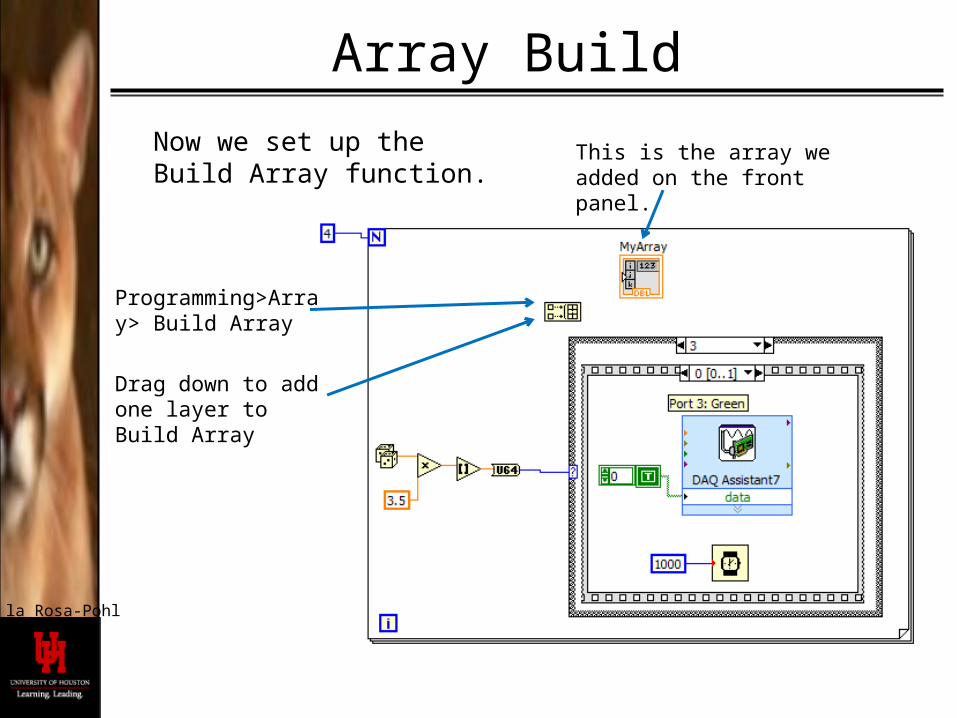
Array Build
Programming>Array> Build Array
Drag down to add one layer to Build Array
This is the array we added on the front panel.
Now we set up the Build Array function.
de la Rosa-Pohl
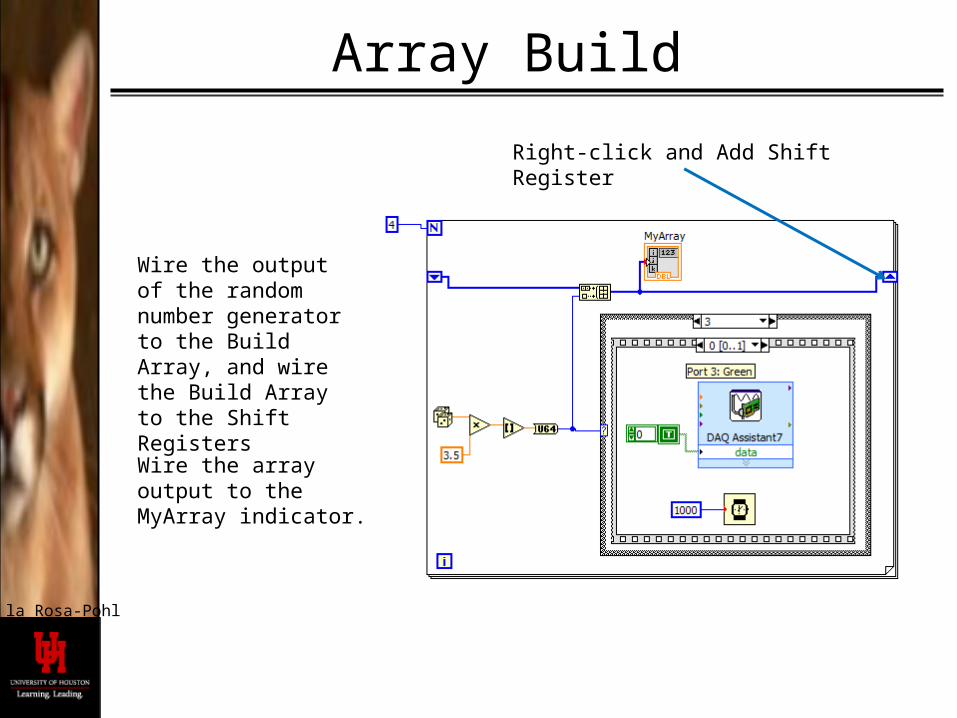
Array Build
Wire the output of the random number generator to the Build Array, and wire the Build Array to the Shift Registers
Right-click and Add Shift Register
Wire the array output to the MyArray indicator.
de la Rosa-Pohl
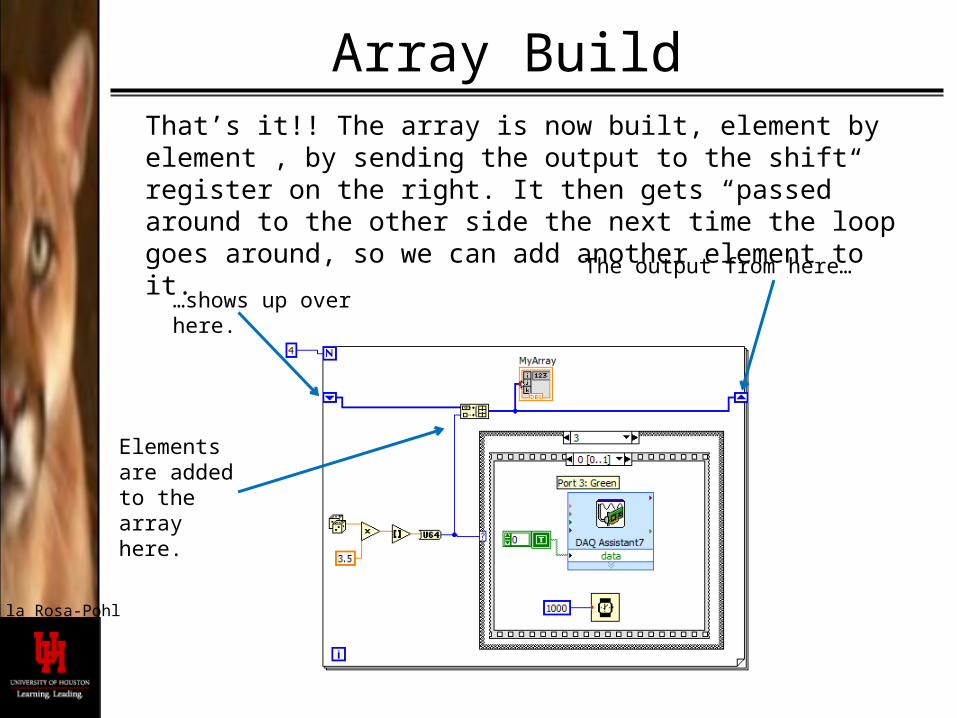
Array BuildThat’s it!! The array is now built, element by element , by sending the output to the shift register on the right. It then gets “passed” around to the other side the next time the loop goes around, so we can add another element to it.
The output from here…
…shows up over here.
Elements are added to the array here.
de la Rosa-Pohl
LOCAL VARIABLES

de la Rosa-Pohl
Local VariablesLocal variables create a “proxy” for another variable in the program. What you do to the local variable will be done to the original variable.
We will show how the Symon program uses local variables to build an array of the player’s responses.

de la Rosa-Pohl
Local Variables
We create an array on the front panel (called Player), and place a numeric indicator into it.
In the block diagram, we initialize the array as a 1-D array with all elements 0.
Programming>Array>Initialize Array
1-D ArrayAll elements initially set to 0
de la Rosa-Pohl
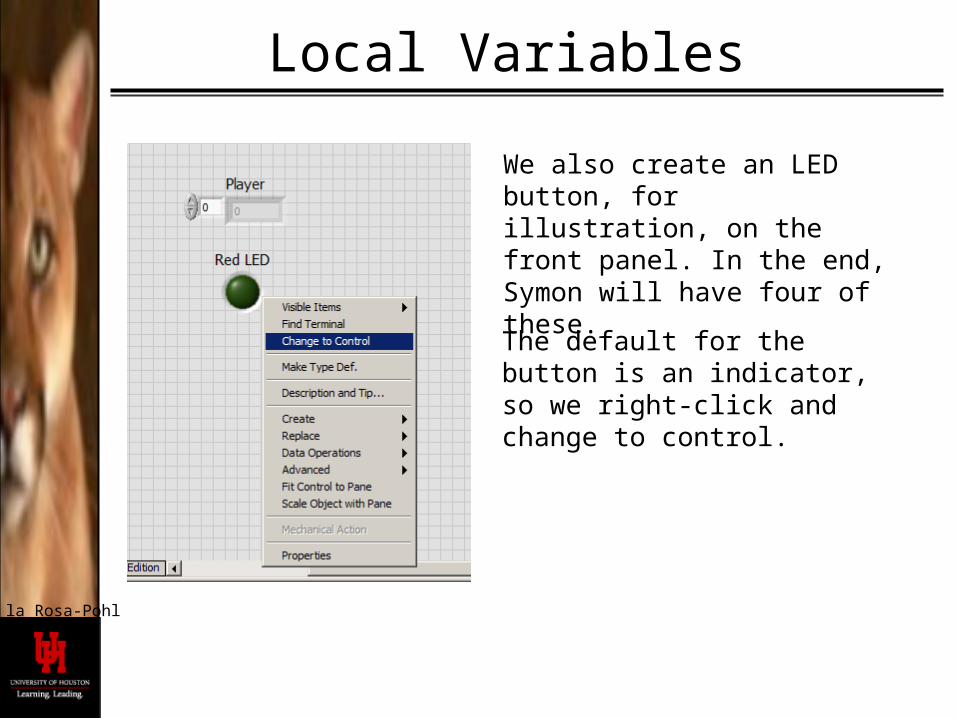
Local Variables
We also create an LED button, for illustration, on the front panel. In the end, Symon will have four of these.
The default for the button is an indicator, so we right-click and change to control.
de la Rosa-Pohl
Local Variables
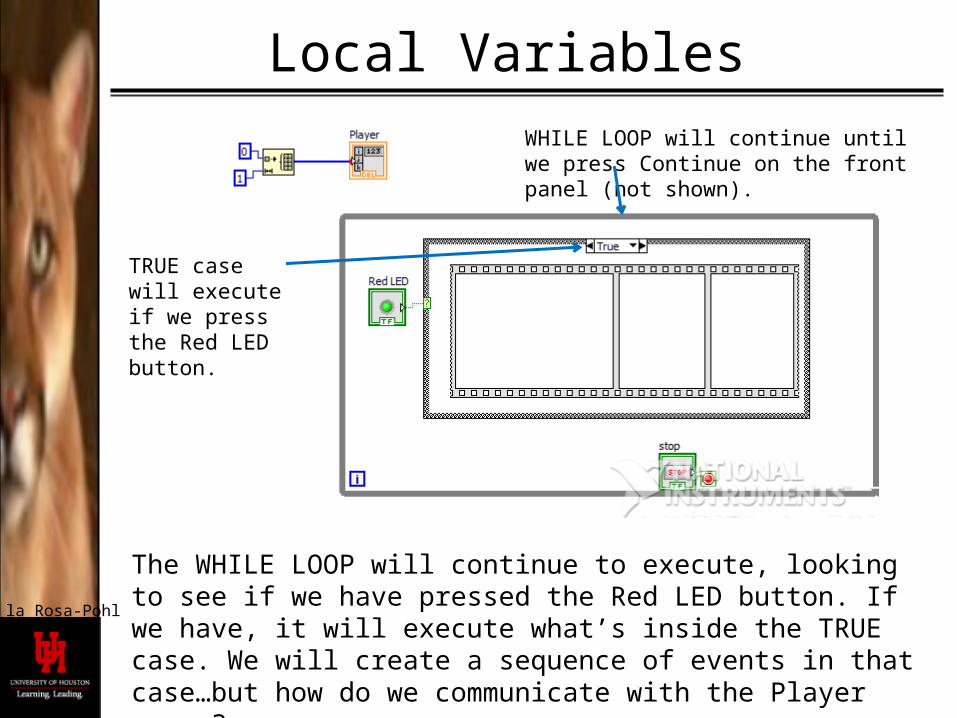
The WHILE LOOP will continue to execute, looking to see if we have pressed the Red LED button. If we have, it will execute what’s inside the TRUE case. We will create a sequence of events in that case…but how do we communicate with the Player array?
WHILE LOOP will continue until we press Continue on the front panel (not shown).
TRUE case will execute if we press the Red LED button.
de la Rosa-Pohl
Local Variables
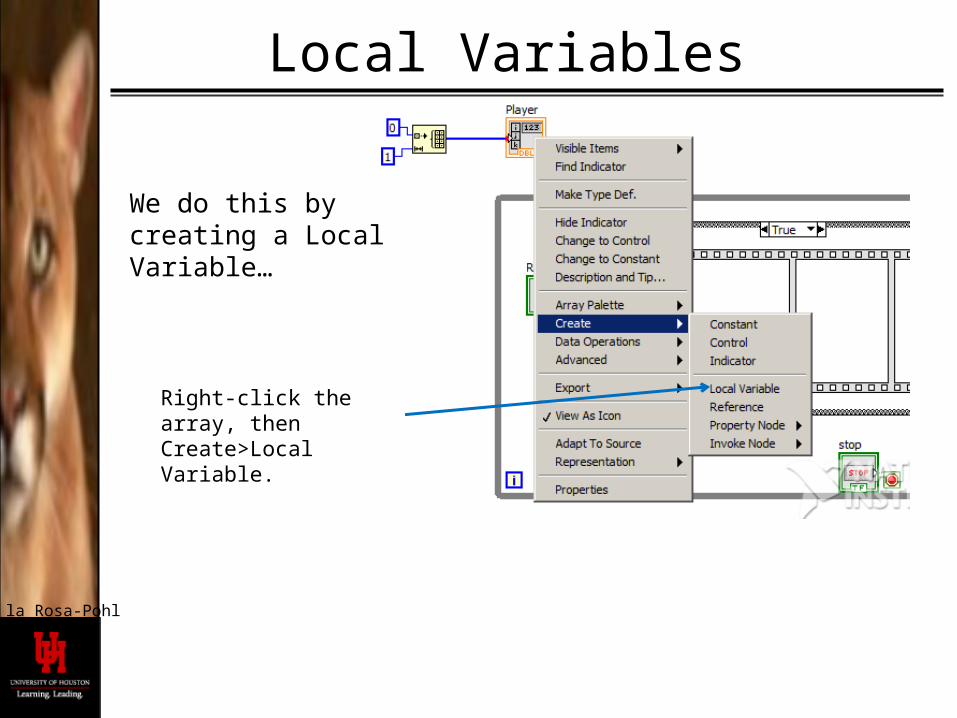
We do this by creating a Local Variable…
Right-click the array, then Create>Local Variable.
de la Rosa-Pohl
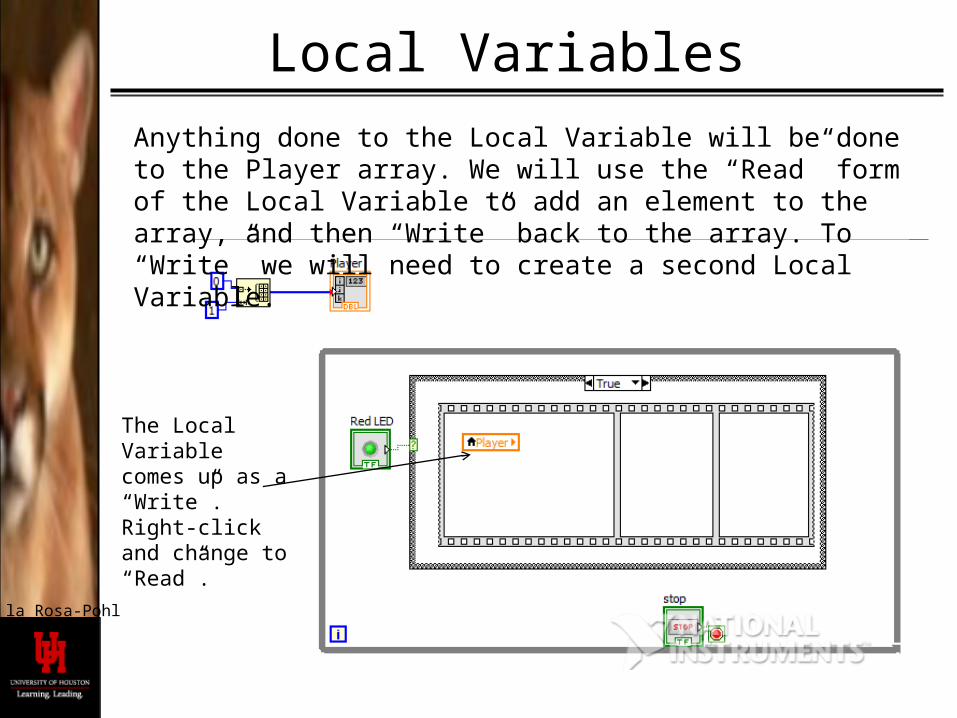
Local Variables
The Local Variable comes up as a “Write”. Right-click and change to “Read”.
Anything done to the Local Variable will be done to the Player array. We will use the “Read” form of the Local Variable to add an element to the array, and then “Write” back to the array. To “Write” we will need to create a second Local Variable.
de la Rosa-Pohl
Local Variables
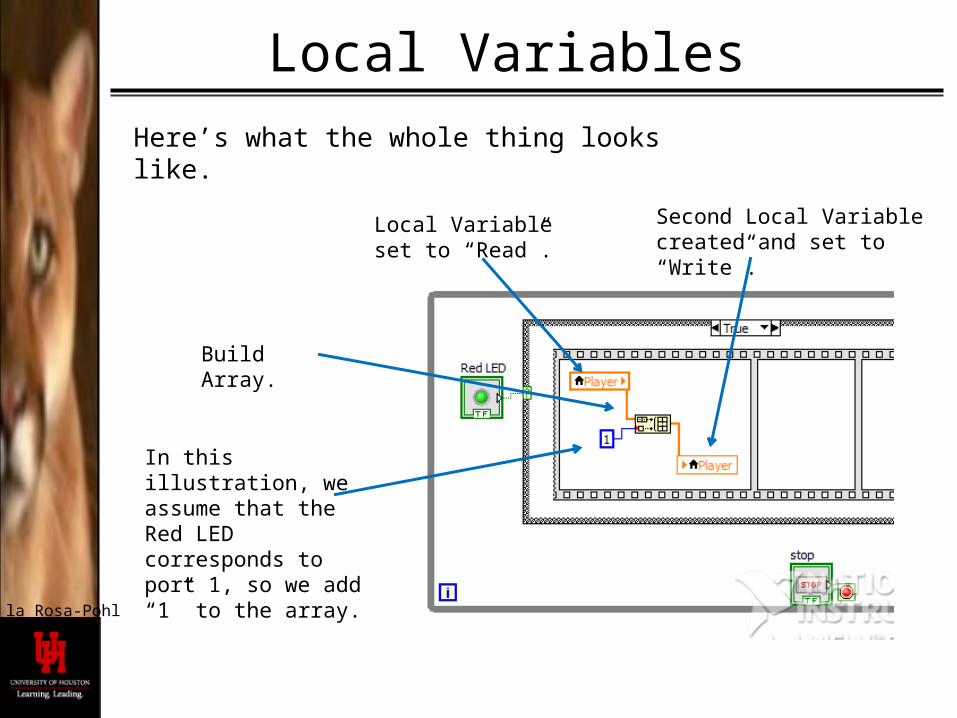
Build Array.
In this illustration, we assume that the Red LED corresponds to port 1, so we add “1” to the array.
Local Variable set to “Read”.
Second Local Variable created and set to “Write”.
Here’s what the whole thing looks like.
de la Rosa-Pohl
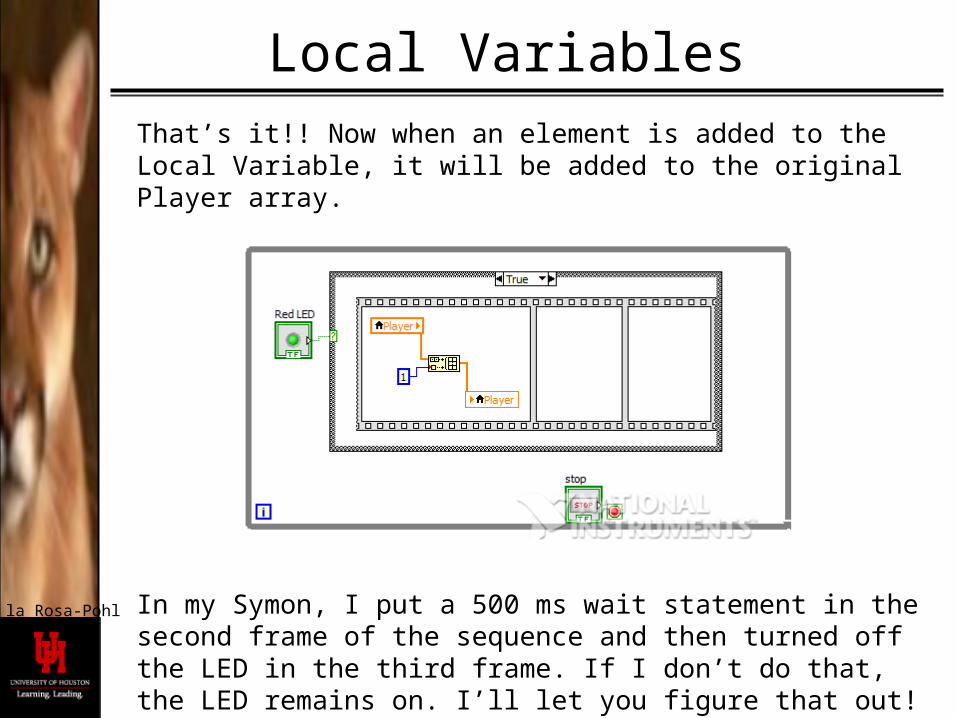
Local VariablesThat’s it!! Now when an element is added to the Local Variable, it will be added to the original Player array.
In my Symon, I put a 500 ms wait statement in the second frame of the sequence and then turned off the LED in the third frame. If I don’t do that, the LED remains on. I’ll let you figure that out!

de la Rosa-Pohl
OTHER STUFF…

de la Rosa-Pohl
Finer Points
Add comments using the text tool “A”
Change font size and color from here.
de la Rosa-Pohl
Errors
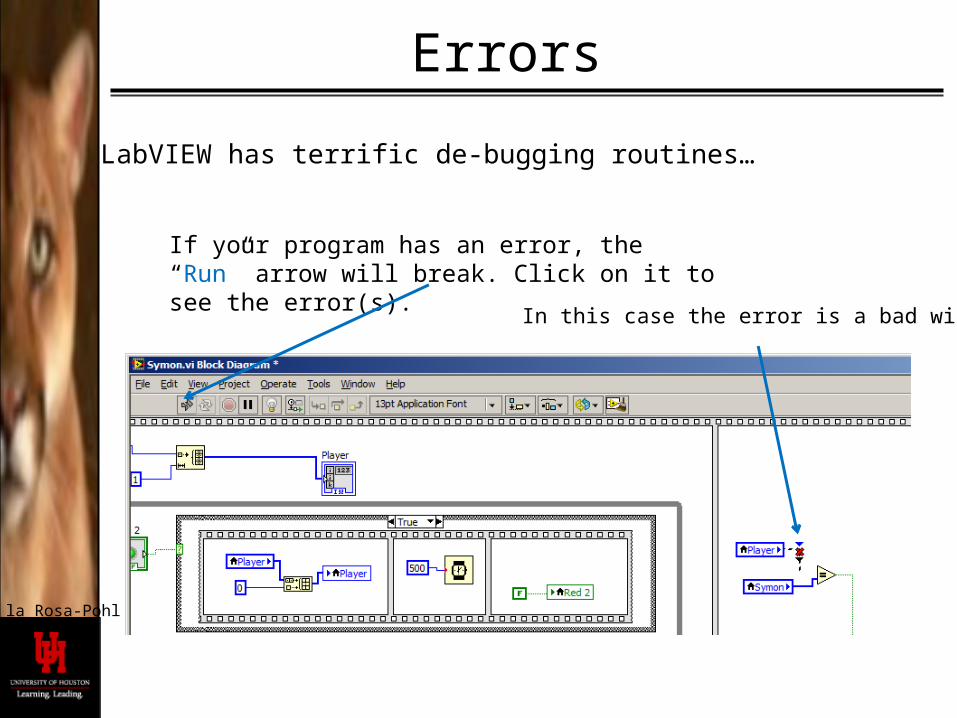
LabVIEW has terrific de-bugging routines…
If your program has an error, the “Run” arrow will break. Click on it to see the error(s).
In this case the error is a bad wire.

de la Rosa-Pohl
De-BuggingBefore you RUN, click the light bulb to have LabVIEW show you where data is flowing. It moves very slowly but you can see everything happening.
de la Rosa-Pohl
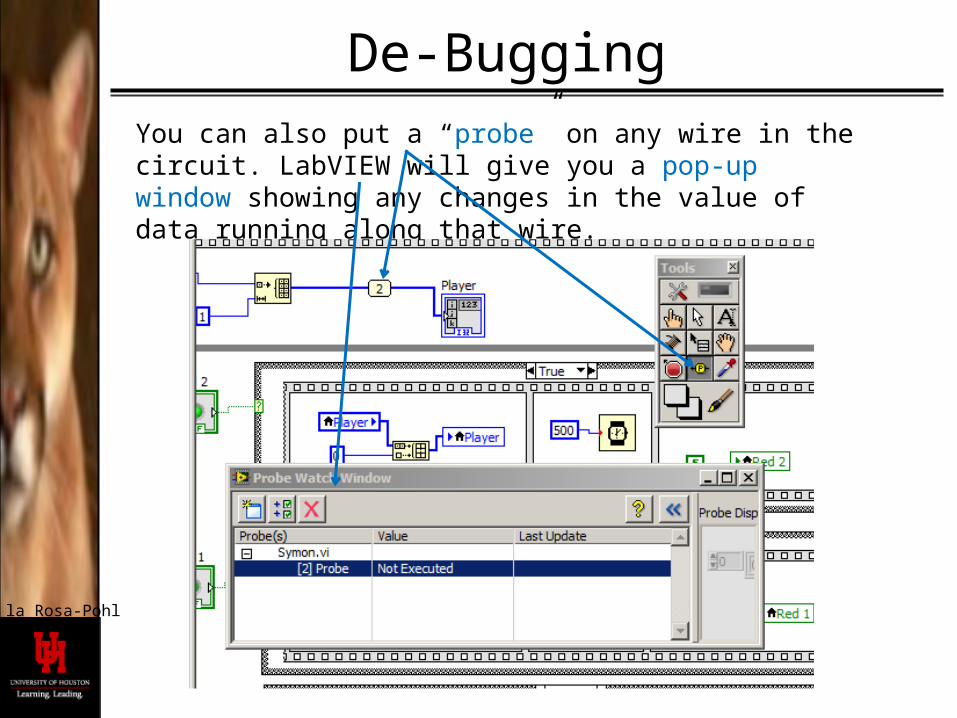
De-BuggingYou can also put a “probe” on any wire in the circuit. LabVIEW will give you a pop-up window showing any changes in the value of data running along that wire.
de la Rosa-Pohl
Related Documents