Towel Bar INV-TB16 / INV-TB24 (DC154 - RevE) invisiacollection.com

Welcome message from author
This document is posted to help you gain knowledge. Please leave a comment to let me know what you think about it! Share it to your friends and learn new things together.
Transcript

Towel BarINV-TB16 / INV-TB24
(DC154 - RevE)
invisiacollection.com

A
3
1
2
2
A
3
7
6
5
4
HW300
SD107
HW177
HW175

B
4
1 2
3 4
5 6

B
C
5
36-48"914-1219mm
? ? ?
?
?
?
?Fe
7 8
9 10

D
6
3 4
5 6
1 2

D
7
8 9
10 11
7
HW175
HW177

E
SS
0.05lbs0.02kg
SS
2.60lbs1.18kg
SS
3.60lbs1.64kg
8
2.25" / 5.7cm4.625"11.7cm
1.50" / 3.8cm
16" / 41cm
20.625" / 52.3cm
2.25" / 5.7cm
4.625"11.7cm
1.50" / 3.8cm
24" / 61cm
29.2" / 74.2cm
ø1.25" / 3.2cm
ø1.25" / 3.2cm
MAX
500lbs227kg

EF
9

English
OVERVIEW
Thank you for choosing the Invisia Towel Bar. Please read and understand the instructions in this manual; keep manual for future reference. It is your responsibility to see that your Invisia Towel Bar is properly assembled, installed, and cared for. Failure to follow instructions in this manual could result in serious injury or death. If you are not equipped to undertake the outlined work, we would recommend that you have your Invisia Towel Bar installed by a qualified contractor.
The Invisia Towel Bar is a combination grab bar and towel bar, designed to disguise safety in a bathroom accessory. The Invisia Towel Bar is intended for moderate vertical and horizontal load bearing to provide sitting and standing support for people with reduced mobility. The Invisia Towel Bar is installed with appropriate fasteners to a structural wall. The towel rung (which holds a towel) is NOT intended to be a support product. The maximum user weight for this product is 500lbs / 227kgs. Note: Product is not intended to support full body weight. The Invisia Towel Bar is not to be used in any other way than described above.
LIMITED LIFETIME WARRANTY
Products are covered by a limited lifetime warranty against defects in materials and workmanship for the original purchaser. Warranty excludes products that have been damaged through misuse, accidental damage, alteration, normal wear and tear, wood material and stain, or the use of corrosive or abrasive cleaning products.
Buyer hereby indemnifies, agrees to hold harmless and defend HealthCraft Products Inc. from and against any and all liabilities, claims, (founded and unfounded), losses, damages, costs and expenses (including without limitation consequential damages and reasonable professional fees) resulting from buyers specification, application, or improper use of goods described hereon; buyers omission or neglect. HealthCraft Products Inc. does not assume any liability for damage resulting from services performed by others or faulty installation, misuse or misapplication of goods sold by HealthCraft Products Inc. HealthCraft Products Inc. shall not be liable for prospective profits or special, indirect, or consequential damages, or for the cost of any corrective work done without HealthCraft Products Inc. prior approval. HealthCraft Products Inc. total liability hereunder shall in no event exceed the purchase price of the goods specified hereon. Specifications subject to change without notice.
HealthCraft Products Inc.2790 Fenton RoadOttawa, Canada K1T 3T7
EC REP
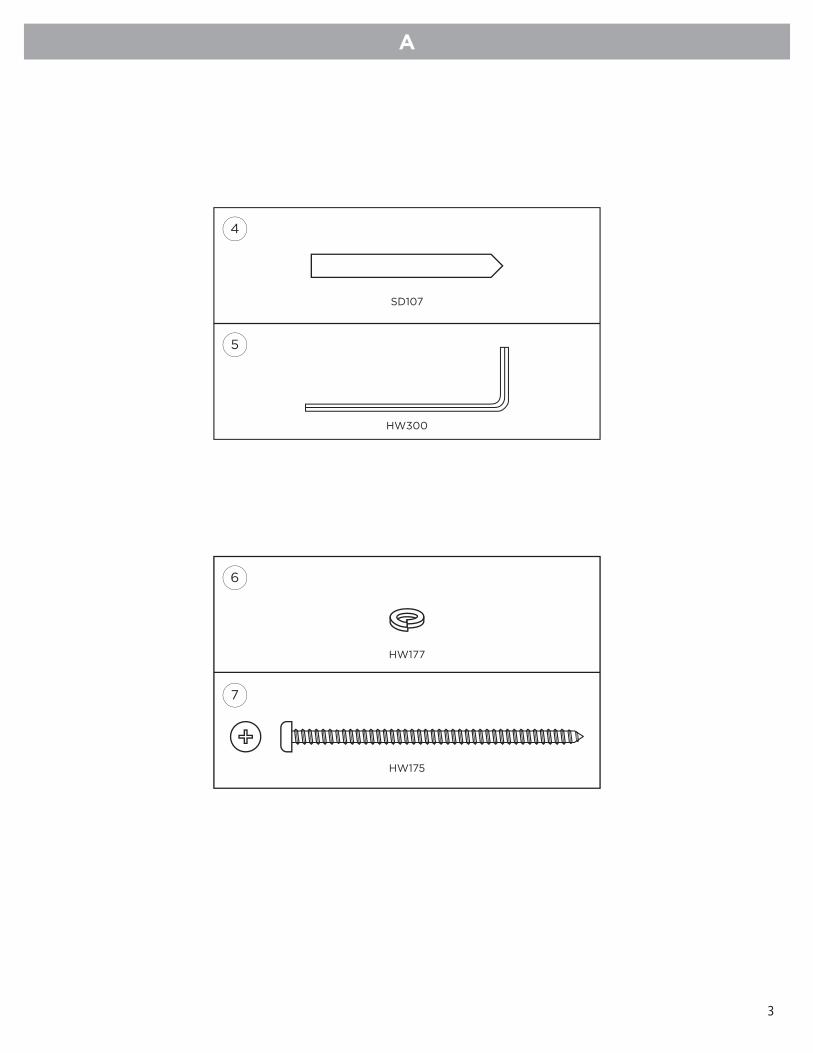
DELIVERY CONTENTS / TOWEL BAR FIGURE A. 1. Towel Bar2. Wall Stem Assembly (x3)3. #10-32 Set Screw (x3)4. Center Punch
INSTALLATION WARNINGS FIGURE B.
1. Rail must be installed to walls that are structurally sound.2. If desired installation location does not have adequate structure, add wood blocking.3. CAUTION - Do not install if there is no structure for center point.4. CAUTION - Do not install if there is no structure for side points.5. CAUTION - Do not install if there is no structure for outer points.6. CAUTION - Do not install if there is no structure behind walls. 7. CAUTION - Do not install if structure behind walls is unknown.8. CAUTION - Do not install into metal studs.9. CAUTION - Do not install in fiberglass / acrylic shower enclosures with insufficient stiffness and strength.10. CAUTION - Rail and bathtub are slippery when wet.
SUGGESTED TOWEL BAR LOCATIONS FIGURE C.
To determine the optimal mounting location, we recomment holding the rail in place and walking through the motions of a transfer (sitting, standing, reaching ,etc.). Recommended rail height 36-48" / 914-1219mm.
INSTALLATION FIGURE D.
1. Back off set screws from rail sockets.2. Allow wall stems to freely move in and out of rail sockets.3. Peel off label on back of wall stems to expose sticker.4. With wall stems inside rail sockets, push the rail against the wall. Ensure level.5. Firmly press the rail so stickers on back of wall stems contact wall.6. Remove rail carefully so wall stems stay on the wall. 7. Using wall stems as locating guides, mark the tile with center punch.8. Drill pilot holes for fasteners.9. Fasten the wall stems to the wall using appropriate fasteners and waterproofing.10. Place rail back onto the fastened wall stems.11. Secure rail to wall stems by tightening set screws. Inspect hardware regularly, and tighten if required.
TECHNICAL DATA See Figure E.
PRODUCT USAGE
See Figure F.
Gate 88Kanalgatan 45BSkellefteå, Sweden93123
5. Lock Washer, S/S (x3)6. 3/32" Hex Key7. #10 x 3" Wood Screw, S/S (x3)
10

11
Français
APERÇU
Nous vous remercions d’avoir opté pour le Porte-serviette Invisia. Veuillez lire et vous familiariser avec les instructions du présent manuel; veuillez conserver ce manuel pour consultation ultérieure. Il vous incombe de veiller à ce que le Porte-savon Invisia est correctement assemblé, installé et entretenu. Le défaut d’observer les instructions contenues dans le présent manuel pourrait entraîner des blessures graves ou la mort. Si vous ne disposez pas de l’équipement nécessaire pour effectuer le travail décrit, nous vous conseillons de recourir à un entrepreneur compétent pour l’installation.
Le Porte-serviette Invisia est la combinaison d’une barre d’appui et d’un porte-serviette conçu afin d’offrir un accessoire de sécurité discret dans la salle de bain. Le Porte-serviette Invisia offre un support vertical et horizontal modéré permettant aux personnes à mobilité réduite de passer en position assise ou debout. Le porte-serviette doit être installé à la paroi structurelle au moyen de dispositifs de fixation appropriés. Le tube (sur lequel la serviette est déposée) N’EST PAS destiné à être un accessoire de soutien. Le poids maximal de l’usager pour ce produit est de 227 kg/500 lb. Remarque : Le produit n’est pas destiné à soutenir entièrement le poids corporel. Le Porte-savon Invisia ne doit pas être utilisé autrement qu’il est décrit ci-dessus.
GARANTIE LIMITÉE À VIE
Les produits sont protégés par une garantie à vie contre les défauts, pièces et main-d’œuvre, pour l’acheteur initial. La garantie ne s’applique pas aux produits qui ont été endommagés en raison d’un abus, d’un dommage accidentel, d’une modification, d’une usure normale, non plus qu’elle s’applique aux matériaux en bois ou aux taches, ou suite à l’utilisation de produits d’entretien abrasifs et corrosifs.
L'acheteur, par la présente, indemnise, accepte de garantir et de défendre HealthCraft Products inc. à l'égard de toutes responsabilités, réclamations (fondées et non fondées), pertes, dommages, coûts et dépenses (y compris, mais sans s'y limiter, des dommages consécutifs et des honoraires professionnels raisonnables) résultant de la spécification des acheteurs, une application ou une mauvaise utilisation des produits décrits ici; l'omission ou la négligence des acheteurs. HealthCraft Products inc. décline toute responsabilité pour les dommages résultant de services rendus par d'autres parties ou suite une installation défectueuse, une mauvaise utilisation ou une mauvaise application des marchandises vendues par HealthCraft Products inc. HealthCraft Products inc. ne sera pas responsable pour les bénéfices potentiels ou dommages spéciaux, indirects ou consécutifs, ou pour le coût des travaux correctifs réalisés sans l'approbation préalable de HealthCraft Products inc. La responsabilité totale de HealthCraft Products inc. en vertu des présentes ne doit en aucun cas excéder le prix d'achat des marchandises, tel que précisé aux présentes. Les caractéristiques peuvent faire l’objet de à changement sans préavis.
HealthCraft Products Inc.2790 Fenton RoadOttawa, Canada K1T 3T7
EC REP
CONTENU À LA LIVRAISON / PORTE-SERVIETTE FIGURE A.
1. Porte-serviette 2. Tiges murales (x3)3. Vis de réglage #10-32, S/S (x3) 4. Pointeau
AVERTISSEMENTS LORS DE L’NSTALLATION FIGURE B.
1. La rampe doit être installée sur des murs dont la structure est solide. 2. Si l’emplacement désiré n’offre pas une structure adéquate, ajoutez des blocs de bois. 3. ATTENTION – Ne pas installer s’il n’y a pas d’élément de structure au point central.4. ATTENTION – Ne pas installer s’il n’y a pas d’élément de structure aux points latéraux.5. ATTENTION – Ne pas installer s’il n’y a pas d’élément de structure aux points extérieurs.6. ATTENTION – Ne pas installer s’il n’y a pas d’élément de structure derrière le mur.7. ATTENTION – Ne pas installer si la structure derrière le mur n’est pas connue.8. ATTENTION – Ne pas installer dans des colombages métalliques.9. ATTENTION – Ne pas installer sur des cabinets de douche en fibre de verre ou en acrylique n’offrant pas suffisamment de rigidité et de robustesse.10. ATTENTION – La rampe et la baignoire sont glissants lorsque mouillés.
EMPLACEMENT SUGGÉRÉ POUR LE PORTE-SERVIETTE FIGURE C.
Afin de déterminer l’emplacement optimal pour l’installation, nous conseillons de maintenir le porte-serviette en place et d’effectuer les mouvements de transfert (positions assise et debout, atteinte, etc.). La hauteur recommandée est de 914-1219 mm/36-48 po.
INSTALLATION FIGURE D.
1. Retirez les vis de réglage du porte-serviette.2. Libérez les tiges des fiches du porte-serviette.3. Retirez la pellicule à l’arrière des tiges afin d’exposer la partie collante.4. En ayant les tiges à l’intérieur des fiches, poussez le porte-serviette contre le mur. Vérifiez le niveau.5. Appuyez fermement sur le porte-serviette de façon à ce que la partie arrière collante soit en contact avec le mur.6. Retirez délicatement le porte-serviette afin que les tiges demeurent au mur. 7. Au moyen des tiges, marquez la tuile avec le pointeau.8. Percez les trous pilotes pour les dispositifs de fixation.9. Fixez les tiges au mur au moyen de dispositifs de fixation appropriés, et imperméabilisez.10. Replacez le porte-serviette sur les tiges ainsi fixées. 11. Fixez le porte-serviette aux tiges en serrant les vis. Vérifiez régulièrement la quincaillerie, et resserrez au besoin.
DONNÉES TECHNIQUES
Voir la Figure E.
UTILISATION DU PRODUIT
Voir la Figure F.
Gate 88Kanalgatan 45BSkellefteå, Sweden93123
5. Rondelle de blocage, S/S (x3) 6. Clé hexagonale 3/32 po7. Vis à bois #10 x 3 po, S/S (x3)

12
Español
GENERAL
Gracias por elegir el toallero Invisia. Lea y asegúrese de comprender las instrucciones de este manual, y guárdelo para referencia futura. Es su responsabilidad verificar que su toallero Invisia sea ensamblado, instalado y cuidado correctamente. Si no se siguen las instrucciones de este manual, podrían producirse como resultado lesiones graves o aun la muerte. Si usted no tiene los medios para realizar el trabajo que se describe, recomendaríamos que haga instalar el toallero Invisia por un contratista calificado.
El toallero Invisia es una combinación de barra para sujeción y barra para toalla, que ha sido concebida para disimular elementos de seguridad en un accesorio para el baño. El toallero Invisia ha sido concebido para soportar una carga vertical y horizontal moderada, con el objetivo de ofrecer apoyo a las personas con movilidad reducida cuando se sientan o se ponen de pie. El toallero Invisia se instala con sujetadores apropiados que lo fijan a una pared estructural. La barra (donde se coloca una toalla) NO ha sido concebida como producto para sostén. El peso máximo del usuario de este producto es de 500 lb/227 kg. Nota: El producto no está destinado a soportar el peso total del cuerpo. El toallero Invisia no debe usarse de ninguna otra forma fuera de lo antes descrito.
GARANTÍA LIMITADA DE POR VIDA
Los productos están cubiertos por una garantía limitada de por vida por defectos en los materiales y la mano de obra, en beneficio del comprador original. La garantía excluye productos que hayan sido dañados por uso incorrecto, daño accidental, alteración, desgaste normal, materiales de madera y teñido, o el uso de productos de limpieza corrosivos o abrasivos. Por el presente, el comprador mantiene indemne y se manifiesta de acuerdo en liberar y defender a HealthCraft Products Inc. de toda responsabilidad, reclamo (fundado o infundado), pérdida, daño, costo y gasto (incluidos, sin que esto excluya otras posibilidades, los daños derivados y las costas profesionales razonables) que resulte de la especificación, la aplicación o el uso inapropiados de los productos que aquí se describen, como también de toda omisión o negligencia por parte del comprador. HealthCraft Products Inc. no asume ninguna responsabilidad por daños resultantes de los servicios prestados por otros, como tampoco de la instalación defectuosa, del uso incorrecto o de la aplicación incorrecta de los bienes vendidos por HealthCraft Products Inc. HealthCraft Products Inc. no será responsable por los beneficios potenciales o los daños especiales, indirectos o derivados, ni por el costo de ninguna tarea correctiva realizada sin la previa aprobación de HealthCraft Products Inc. La responsabilidad total de HealthCraft Products Inc. en virtud del presente no será superior en ningún caso al precio de compra de los productos aquí especificados.
Las especificaciones están sujetas a cambios sin previo aviso.
HealthCraft Products Inc.2790 Fenton RoadOttawa, Canada K1T 3T7 EC REP
CONTENIDO ENTREGADO/ TOALLERO FIGURA A.
1. Toallero2. Conjunto del vástago de pared (x3)3. Tornillo de presión #10-32 (x3)4. Punzón
ADVERTENCIAS DE INSTALACIÓN FIGURA B.
1. El barandal se debe instalar sobre paredes de estructura sólida.2. Si el lugar donde se desea hacer la instalación no tiene una estructura adecuada, agregue suplementos de madera.3. PRECAUCIÓN – No instalar si no hay una estructura para el punto central.4. PRECAUCIÓN – No instalar si no hay una estructura para los puntos laterales.5. PRECAUCIÓN – No instalar si no hay una estructura para los puntos externos.6. PRECAUCIÓN – No instalar si no hay una estructura detrás de la pared. 7. PRECAUCIÓN – No instalar si se desconoce la estructura que está detrás de la pared.8. PRECAUCIÓN – No instalar sobre montantes de metal.9. PRECAUCIÓN – No instalar en cerramientos para ducha de fibra de vidrio o acrílico sin la suficiente rigidez y resistencia.10. PRECAUCIÓN – El barandal y la tina son resbaladizos cuando están húmedos.
UBICACIONES SUGERIDAS PARA EL TOALLERO FIGURA C.
A fin de determinar la ubicación óptima para montarlo, recomendamos sostener el barandal en el lugar y simular los movimientos de traslado (sentarse, ponerse de pie, estirarse, etc.). La altura recomendada para el barandal es de 36-48" / 914-1219mm.
INSTALACIÓN FIGURA D.
1. Retirar los tornillos de presión de los encastres del barandal.2. Permitir que los vástagos de pared entren y salgan libremente de los encastres del barandal3. Retirar la etiqueta de la parte posterior de los vástagos para dejar expuesto el adhesivo.4. Con los vástagos dentro de los encastres del barandal, empujar el barandal contra la pared. Asegurar que esté a nivel.5. Presionar firmemente el barandal para que los adhesivos que están en la parte trasera de los vástagos hagan contacto con la pared.6. Retirar el barandal con cuidado para que los vástagos queden sobre la pared. 7. Usando los vástagos como guías de ubicación, marcar el azulejo con un punzón.8. Perforar orificios guía para los sujetadores.9. Fijar los vástagos a la pared usando sujetadores apropiados e impermeabilizante.10. Volver a colocar el barandal sobre los vástagos asegurados.11. Fijar el barandal a los vástagos ajustando los tornillos de presión. Inspeccionar regularmente los accesorios de ferretería, y ajustar si es necesario.
DATOS TÉCNICOS
Consulte la Figura E.
UTILIZACIÓN DEL PRODUCTO
Consulte la Figura F.
Gate 88Kanalgatan 45BSkellefteå, Sweden93123
5. Arandela de seguridad, A/I (x3)6. Llave hexagonal de 3/32"7. Tornillo para madera #10 x 3", A/I (x3)

Svenska
ÖVERSIKT
Tack för att du väljer Invisia handdukshängare. Läs igenom och se till att du förstår anvisningarna i den här handboken. Spara handboken för framtida bruk. Du ansvarar själv för att se till att din Invisia handdukshängare monteras, installeras och underhålls ordentligt. Underlåtelse att följa anvisningarna i den här handboken kan leda till allvarliga skador eller dödsfall. Om du inte klarar av att utföra det arbete som beskrivs, rekommenderar vi att du låter en behörig hantverkare installera Invisia handdukshängare.
Invisia handdukshängare är en kombinerad gripstång och handdukshängare där snygg design och trygghet kombineras i ett badrumstillbehör. Invisia handdukshängare är avsedd för måttlig belastning vertikalt och horisontellt för att tillhandahålla stöd vid sittande och stående ställning för personer med nedsatt rörlighet. Invisia handdukshängare installeras med lämpliga fästen på en bärande vägg. Själva hängaren (där handduken hängs) är INTE avsedd att användas som stöd. Maxvikten för en användare av den här produkten är 227 kg. Obs! Produkten är inte avsedd att stödja full kroppsvikt. Invisia handdukshängare ska inte användas på något annat sätt än enligt beskrivningen ovan.
BEGRÄNSAD LIVSTIDSGARANTI
Den ursprungliga köparen får en begränsad livstidsgaranti som täcker fel i material och tillverkningen av produkterna. Garantin gäller inte produkter som har skadats till följd av felaktig användning, genom olyckshändelse, modifiering, normalt slitage, kontakt med eller missfärgning från trämaterial, eller användningen av frätande eller slipande rengöringsmedel.
Köparen samtycker härmed till att gottgöra, försvara och hålla HealthCraft Products Inc. skadelösa från alla betalningsskyldigheter, anspråk (med eller utan grund), förluster, skador, kostnader och utgifter (inklusive, men inte begränsat till, följdskador och rimliga arvoden) som uppstår till följd av köparens specifikation, tillämpning eller felaktiga användning av varor som beskrivs häri, samt köparens försummelse eller vårdslöshet. HealthCraft Products Inc. bär inget ansvar för skador som uppstår till följd av tjänster som utförs av tredje part eller felaktig installation, felaktig användning eller tillämpning av varor som säljs av HealthCraft Products Inc. HealthCraft Products Inc. bär inget ansvar för eventuella vinster eller särskilda eller indirekta skador eller följdskador, eller för kostnaden av korrigerande arbeten som utförs utan godkännande från HealthCraft Products Inc. HealthCraft Products Inc. totala betalningsskyldighet ska inte under några omständigheter överstiga inköpspriset för varorna som anges häri. Specifikationerna kan ändras utan föregående meddelande.
HealthCraft Products Inc.2790 Fenton RoadOttawa, Canada K1T 3T7
Distribueras av Now Boarding AB i Sverige.
LEVERANSINNEHÅLL/HANDDUKSHÄNGARE FIGUR A.
1. Handdukshängare2. Självhäftande väggförankring (× 3)3. #10-32 ställskruv (× 3)4. Körnare
INSTALLATIONSVARNINGAR FIGUR B.
1. Stödstången ska installeras på väggar som är konstruktionsmässigt lämpliga.2. Om konstruktionen på önskad installationsplats inte är godtagbar kan du använda kortlingar.3. VARNING – Installera inte om det inte finns någon konstruktion där den mittersta fästpunkten kan fästas.4. VARNING – Installera inte om det inte finns någon konstruktion där fästpunkterna på sidan kan fästas.5. VARNING – Installera inte om det inte finns någon konstruktion där de yttre fästpunkterna kan fästas.6. VARNING – Installera inte om det inte finns någon konstruktion bakom väggarna.7. VARNING – Installera inte handdukshängaren om du inte känner till hur konstruktionen bakom väggarna ser ut.8. VARNING – Sätt inte fast handdukshängaren i metallreglar.9. VARNING – Installera inte handdukshängaren i duschkabiner i glasfiber/akryl som inte är tillräckligt styva eller starka.10. VARNING – Stödstången och badkaret är hala när de är våta.
FÖRESLAGNA INSTALLATIONSPLATSER FÖR HANDDUKSHÄNGARE FIGUR C.
För att fastställa den bästa möjliga installationsplatsen rekommenderar vi att du håller stödstången på plats och går igenom de olika rörelserna (t.ex. när man sätter sig, ställer sig upp, sträcker sig efter något osv.).Rekommenderad höjd för stödstången är 91–122 cm.
INSTALLATION FIGUR D.
1. Lossa ställskruvarna från stödstångens hållare.2. Se till att väggförankringarna kan röra sig fritt in och ut ur stödstångens hållare.3. Ta bort skyddsfilmen på väggförankringarnas baksida för att exponera den självhäftande tejpen.4. Låt väggförankringarna sitta i stödstångens hållare och tryck stödstången mot väggen. Se till att den sitter rakt.5. Tryck hårt på stödstången så att den självhäftande tejpen på väggförankringarnas baksida kommer i kontakt med väggen.6. Ta försiktigt bort stödstången så att väggförankringarna sitter kvar på väggen.7. Använd väggförankringarna som vägledning och märk kaklet med körnaren.8. Förborra hål för fästelementen.9. Sätt fast väggförankringarna ordentligt i väggen med hjälp av lämpliga fästelement och vattentätning.10. Sätt tillbaka stödstången på de ditsatta väggförankringarna.11. Se till att stödstången sitter fast i väggförankringarna genom att dra åt ställskruvarna. Kontrollera fästelement och beslag regelbundet. Dra åt dem vid behov.
TEKNISKA UPPGIFTER
Se figur E.
PRODUKTANVÄNDNING
Se figur F.
Gate 88Kanalgatan 45BSkellefteå, Sweden93123
5. Fjäderbricka, S/S (× 3)6. 3/32" insexnyckel7. #10 × 3" träskruv, S/S (× 3)
EC REP
13
Related Documents