Data Mining - Introduction LISD Enterprise Application Services – Training Page 1 of 23 MstrDataMine.docx 10/27/16 Data Mining DM - Introduction........................................................................................................................ 3 DM1 - Add a New Report ............................................................................................................ 5 Report Information .................................................................................................................. 5 Adding Fields .......................................................................................................................... 6 DM2 - Export to Excel................................................................................................................. 8 DM3 - Labels .............................................................................................................................. 9 DM3.A -Address Labels .......................................................................................................... 9 Address Label Setup ...........................................................................................................10 DM3.B - Information Labels ...................................................................................................11 Label Setup .........................................................................................................................12 DM3.C - Label Export Options ...............................................................................................14 DM4 - Create Processing List .................................................................................................... 15 DM5 - Update an Existing Processing List ................................................................................. 16 DM6 - Generate Labels using Processing List ............................................................................ 17 DM7 - Generate Reports using Processing List .......................................................................... 18 DM7.A - Special Program Information ...................................................................................19 Other Options .........................................................................................................................21 DM8 - Processing Lists for Scheduling Reports ......................................................................... 22 DM9 - Correcting Student Cohort (Grad Yr) .............................................................................. 23

Welcome message from author
This document is posted to help you gain knowledge. Please leave a comment to let me know what you think about it! Share it to your friends and learn new things together.
Transcript

Data Mining - Introduction
LISD Enterprise Application Services – Training Page 1 of 23 MstrDataMine.docx 10/27/16
Data Mining DM - Introduction........................................................................................................................ 3
DM1 - Add a New Report ............................................................................................................ 5 Report Information .................................................................................................................. 5 Adding Fields .......................................................................................................................... 6
DM2 - Export to Excel................................................................................................................. 8
DM3 - Labels .............................................................................................................................. 9 DM3.A -Address Labels .......................................................................................................... 9
Address Label Setup ...........................................................................................................10 DM3.B - Information Labels ...................................................................................................11
Label Setup .........................................................................................................................12 DM3.C - Label Export Options ...............................................................................................14
DM4 - Create Processing List .................................................................................................... 15
DM5 - Update an Existing Processing List ................................................................................. 16
DM6 - Generate Labels using Processing List ............................................................................ 17
DM7 - Generate Reports using Processing List .......................................................................... 18 DM7.A - Special Program Information ...................................................................................19 Other Options .........................................................................................................................21
DM8 - Processing Lists for Scheduling Reports ......................................................................... 22
DM9 - Correcting Student Cohort (Grad Yr) .............................................................................. 23


Data Mining – Introduction
LISD Enterprise Application Services – Training 3 of 23 Z:\Sky\DataMining\MstrDataMine.docx 10/27/16
DM - Introduction
What: How does the Skyward Data Mining work?
When: Any time a report is needed that does not already exist in another module
ST\DM Students >> Data Mining
1) Available Views are:
a) Report Information – default view; shows a list of reports, who created the report, when the report was created and when the report was last generated
b) Field Selection – shows fields selected on the report and the ranges set on the field
c) Sort Sequence – shows what fields the report is sorted on
d) Selected Students – shows whether specific students have been designated in the report parameters
e) Family Access Display – shows whether the report has been designated to show in Family Access
2) Filters – the quick filter option allows users to display reports by Report Name, Report Title, Created
By, etc.; click the Apply Filter button to save the filter
3) Reports to Display
a) All Reports – default; all reports created in Data Mining will display
b) My Favorites Only – if a report has been designated as a Favorite, this option will only display those reports
c) My Reports Only – only reports created by the user will display when this option is selected

Data Mining – Introduction
LISD Enterprise Application Services – Training 4 of 23 Z:\Sky\DataMining\MstrDataMine.docx 10/27/16
4) Button options:
a) Add –will allow users to create a new Data Mining report template
b) View –allows users to view fields and ranges on reports created by other users
c) Delete –allows users to delete a report template that they have created
d) Clone – allows users to create a copy and edit another user’s report
e) Preview First 10 Records – allows users to display the first 10 records to get a quick view of the information the report will generate
f) Print – allows users to send the report to the print queue in a PDF format
g) Excel – allows users to send the report to the print queue in an Excel format
h) Print Using Processing List – allows users to generate a list of students from the report that can then be used in other Skyward reports
i) Print Using Reports Generator – this option allows users to specify options such as alert information, public release information, lunch codes and special education information
j) Address Labels –allows users to set up address labels using the report template student list
k) Information Labels –allows users to create labels for cumulative or other student folders
l) Mail Merge – this option allows users to create a mail merge template using the report template students
m) Export to File – allows users to export the report information into a flat file such as CSV
n) Import Layout –allows users to import a report template, such as one set up in the training database that they want to use in production
o) Export Layout –allows users to export a report template that can then be imported into another database such as training
5) Standard data elements to include in reports – these fields can be found in General / Profile
a) Default Entity Code – this will be the campus where the student is currently enrolled (full-time)
b) Grade Level – the student’s current grade level
c) Other ID – the student’s local/district ID
d) Student Full Name – includes student last name, first name and middle name (in that order)

Data Mining – Introduction
LISD Enterprise Application Services – Training 5 of 23 Z:\Sky\DataMining\MstrDataMine.docx 10/27/16
DM1 - Add a New Report
What: How do I begin to create a data mining report and export to Excel?
When: Any time
ST/DM Students >> Data Mining
Report Information
1) Click the Add button on the Data Mining browse screen.
2) Enter a Report Name. Be specific when you name the report to make it easier to find in the hundreds of reports that exist.
3) Press the tab button – the system will take the cursor to the Report Title field and default the Report Name entered; modify as needed.
a) Report Information: (make desired selections)
b) Report Orientation – indicates whether the report will be Portrait or Landscape.
c) Student Status – indicates whether to include Active students (for this report use this option), Inactive students or Both.
d) Excel Export – indicates whether to Use Default Field Lengths (recommended) or Use Template Field Lengths.
e) Default Entity – indicates whether to use the Default Entity (select the Yes option).
f) Include Parameter Page – indicates whether to include a cover page with all of the parameters selected in the report output.
g) Show Counts Only – this option will only include a total count of students in the report output.
h) Include GRG Page – this option will include grade level, race and gender counts on the last page of the report.
4) Click the Save and Add Fields button.

Data Mining – Introduction
LISD Enterprise Application Services – Training 6 of 23 Z:\Sky\DataMining\MstrDataMine.docx 10/27/16
Adding Fields
NOTE: What information displays in the Field Areas depends on security permissions in Students / Student Profile (WS\ST\TB\GE\TB). The fields that can be added to reports will mirror what can be seen when in Student Profile.
You can choose from the list of available fields or you can also search for fields by clicking the “Field Search” radio button.
1) In the Field Area, select the following:
a) Field Areas column: General
b) General column: Profile
c) Profile column: Default Entity Code
d) Profile column: Grade (You can double-click to add it to the Fields on the report.)
e) Profile column: Other ID
f) Profile column: Name and then Name column: Student Full Name
2) You should see the fields you have selected in the “Fields on Report” box. You can rearrange the list by clicking the Up or down buttons on the right.
3) Click the “Save and Modify Ranges” button.

Data Mining – Introduction
LISD Enterprise Application Services – Training 7 of 23 Z:\Sky\DataMining\MstrDataMine.docx 10/27/16
4) To designate Ranges on the selected fields, make sure the Ranges tab is selected on the left. In the example below, only grade 7 and 8 are to be included in the report.
5) To select specific fields, click the “Individual Selections” check box on the field and then click the Select button. From the list provided, make your selections and click OK.
6) Click the Save button.
7) Do this for each field that you wish to restrict to specific criteria.
Data Mining – Introduction
LISD Enterprise Application Services – Training 8 of 23 Z:\Sky\DataMining\MstrDataMine.docx 10/27/16
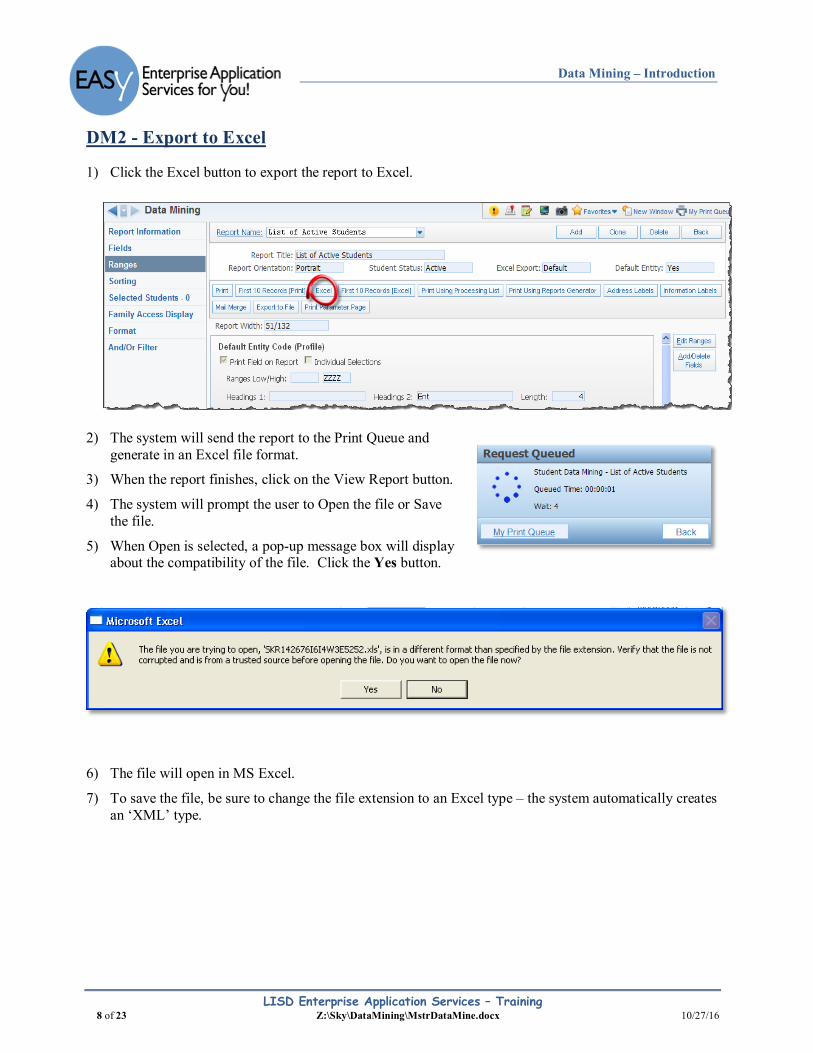
DM2 - Export to Excel
1) Click the Excel button to export the report to Excel.
2) The system will send the report to the Print Queue and generate in an Excel file format.
3) When the report finishes, click on the View Report button.
4) The system will prompt the user to Open the file or Save the file.
5) When Open is selected, a pop-up message box will display about the compatibility of the file. Click the Yes button.
6) The file will open in MS Excel.
7) To save the file, be sure to change the file extension to an Excel type – the system automatically creates an ‘XML’ type.

Data Mining – Introduction
LISD Enterprise Application Services – Training 9 of 23 Z:\Sky\DataMining\MstrDataMine.docx 10/27/16
DM3 - Labels
What: How do I create labels from my Data Mining Report?
When: Any time
ST/DM
DM3.A -Address Labels
1) Go to Students >> Data Mining and select the report from the list of available reports for which you wish to print labels and click the Address Labels button on the right of the window.
2) Click the Add button to create a new template and enter a Template Description.
3) Indicate whether you wish to share the template with other users.

Data Mining – Introduction
LISD Enterprise Application Services – Training 10 of 23 Z:\Sky\DataMining\MstrDataMine.docx 10/27/16
Address Label Setup
1) Line 1 – Indicate what will display on Line 1 of the address label; options include:
a) Student’s Name b) Guardian Of (Student’s Name) c) Parent or Guardian Of d) First Parent or Guardian’s Name e) Family Title f) To The (lastname) Family g) Generic – when this is selected, users can enter their own specific label for Line 1
2) Line 2 – depending on the option selected for Line 1, the radio buttons may or may not be enables for selection; if the radio buttons are enabled, options include:
a) None – Following Line(s) will be moved up b) Student’s Name c) Guardian of (Student’s Name) d) First Parent or Guardian’s Name e) Family Title
3) Label Options – designate any of the following options:
a) Name Order – select either First Last or Last First b) Family – select either Family 1, Family 2 or Family 1 and 2 c) Indicate whether the labels will display in All Uppercase d) Indicate whether to Use Mailing Address if Available e) Indicate whether Only Families Receiving Report Cards will be used f) Indicate whether Only Families Receiving Forms will be used
4) Label Appearance – this area provides a preview of what the labels will look like when various options are selected.
Now that you have the data selected to be printed on the label, you need to set up the label (margins, # of labels on sheet, etc.)Click the Label Setup button on the right to define the formatting for the type of label to be printed.

Data Mining – Introduction
LISD Enterprise Application Services – Training 11 of 23 Z:\Sky\DataMining\MstrDataMine.docx 10/27/16
DM3.B - Information Labels
1) Click the Information Labels button and then click the Add button to create a label template.
2) Enter Template Description.
3) In the Line Information section, click the radio button for the label line for which you want to add
fields (line 1, line 2, line 3, etc).
4) In the Available Fields area, select the field to be added to the label line selected and click the Add button (or double-click).

Data Mining – Introduction
LISD Enterprise Application Services – Training 12 of 23 Z:\Sky\DataMining\MstrDataMine.docx 10/27/16
a) As fields are added, use the Move Up/Down buttons to move the field’s position on the label.
b) Repeat to add more fields.
c) Adjust the spacing between the fields as needed by changing the values in the following fields:
i) Spacing After Field
ii) Selected Field Length
d) Blank spaces can be removed from a field by clicking on the Trim Trailing Spaces check box.
5) You will see the fields selected for each line in the Information Label Appearance area.
Label Setup
Now that you have the fields selected for each line of the label, you need to format the label layout.
1) Label Export Options
a) The system will default to the ‘Stk Mailing Lzr Avery 5160’ label type; users can select another value by clicking on the Label link and selecting another option in the pop-up window.
b) Users can select the option to export the labels to a MS Word document.
2) Label Overrides
a) The system will default the fields in this section – users can modify the options as needed; options include:
b) Number of Labels Across – this value will dictate the number of labels to print across the page.
c) Number of Positions to Indent – this allows users to indicate whether the lines that print on the label will be indented.
d) Number of Labels per person – if users want to create multiple labels for a student, the number to print would be indicated in the field.
e) Start With Label – if users want to start printing on a certain label on the page, indicate which label that would be.
3) Label Sort Order – will allow you to determine the sort order of the labels.
a) Label Default Settings – the label settings cannot be modified in this section

Data Mining – Introduction
LISD Enterprise Application Services – Training 13 of 23 Z:\Sky\DataMining\MstrDataMine.docx 10/27/16
b) Page Setup – the options in this section cannot be modified.
4) Click the Save button.
5) Click the Save and Print button.

Data Mining – Introduction
LISD Enterprise Application Services – Training 14 of 23 Z:\Sky\DataMining\MstrDataMine.docx 10/27/16
DM3.C - Label Export Options
The system will default to the ‘Stk Mailing Lzr Avery 5160’ label type; users can select another value by clicking on the Label link and selecting another option in the pop-up window.
1) You can select the option to export the labels to a MS Word document. To do so, enter the criteria in the Label Overrides section. The system will default the fields in this section – users can modify any of the options as needed; options include:
a) Number of Labels Across – this value will dictate the number of labels to print across the page
b) Number of Positions to Indent – this allows users to indicate whether the lines that print on the label will be indented
c) Number of Labels per person – if users want to create multiple labels for a student, the number to print would be indicated in the field
d) Start With Label – if users want to start printing on a certain label on the page, indicate which label that would be
e) Label Sort Order – allows users to determine the sort order of the labels
i) Label Default Settings – the label settings cannot be modified in this section
ii) Page Setup – the options in this section cannot be modified
2) Click the Save button.
Click the Save and Print button

Data Mining – Introduction
LISD Enterprise Application Services – Training 15 of 23 Z:\Sky\DataMining\MstrDataMine.docx 10/27/16
DM4 - Create Processing List
What: How do I create a processing list from my Data Mining Report?
When: Processing lists can be used to run reports using a specific list of students.
ST/DM Students / Data Mining
1) To create a processing list from an existing data mining report, select the report and click the “Print Using Processing List” button on the right.
a) Click the Create New Processing List button and enter the Description for the processing list.
b) Click the tab key on your keyboard so the system will take you to the Long Description and default the Description into that field; modify as needed.
2) Click the Save and Print button.
3) The system will create the processing list and generate the students that will be included in this list based on the report parameters.

Data Mining – Introduction
LISD Enterprise Application Services – Training 16 of 23 Z:\Sky\DataMining\MstrDataMine.docx 10/27/16
DM5 - Update an Existing Processing List
1) Locate the Data Mining report and click on the Print Using Processing List button to select the processing list.
2) Click on the right-facing arrow next to the processing list name to expand the record so the student names in the processing list will display.
3) Click on the Change Names in List button on the right to refresh the list.
4) A pop-up box will display with a list of options.
5) Select the option to ‘Replace names on the LEP Students list with names from the selected report’ radio button.
6) Click the Print button
The list will update with the names from the report attached to the processing list.

Data Mining – Introduction
LISD Enterprise Application Services – Training 17 of 23 Z:\Sky\DataMining\MstrDataMine.docx 10/27/16
DM6 - Generate Labels using Processing List
1) Click on the Address Labels button and select the label template in the list.
2) Click the Processing List button.
3) Select the processing list that will be used for generating labels and click the Print button.

Data Mining – Introduction
LISD Enterprise Application Services – Training 18 of 23 Z:\Sky\DataMining\MstrDataMine.docx 10/27/16
DM7 - Generate Reports using Processing List
1) Select Office / CY Scheduling / Reports.
2) Select the Class Roster Report (you must be on a campus to run this report).
3) Select an existing template from the list (or click Add to create your own template).
4) Click the Print Using Processing List button and select the Processing List from the browse list.
5) Click the Print button.
6) The report will generate for all the students in the selected processing list.

Data Mining – Introduction
LISD Enterprise Application Services – Training 19 of 23 Z:\Sky\DataMining\MstrDataMine.docx 10/27/16
DM7.A - Special Program Information
What: How do I create a report for a special program?
When: Any time
ST/DM 1) To access the fields list of an
existing report, click the report and Edit.
2) Select the Fields tab on the left and click the Add/Delete Fields button to open the field areas.
3) In the first column “Field Areas”, click General and then in the General list, click Profile.
a) Scroll to the bottom of the Profile list and select Special Education (Y/N).
b) Double-click on the field to add to the report.
4) Select Special Programs from the Field Areas (the 1st column).
a) Select LEP from the Special Programs list and select As Of Date from the LEP list.
b) Double-click on the field to add to the report.
c) Select Gifted from Special Programs list.
d) Double-click the “Was Enrolled GFT On” from the Gifted list. to add to the report.
i) Continue by selecting Immigrant Status from Special Programs list and double-click ‘As Of Date’ from the Immigrant Status list to add to the report.
ii) Select Migrant from Special Programs list and double-click ‘As Of Date’ to add to the report.
iii) Select Title I from Special Programs list and double-click ‘Homeless Code’ to add to the report.
e) Select Food Service from the Field Areas and double-click ‘Current Lunch Code’ to add to the report.
5) Click the ‘Save and Modify Ranges’ button.

Data Mining – Introduction
LISD Enterprise Application Services – Training 20 of 23 Z:\Sky\DataMining\MstrDataMine.docx 10/27/16
6) Change the field labels as needed and designate parameters for each field added to the report as needed.
7) Click the Save button and click the Print button to view report.

Data Mining – Introduction
LISD Enterprise Application Services – Training 21 of 23 Z:\Sky\DataMining\MstrDataMine.docx 10/27/16
Other Options 1) Click on the Sort tab and click the
Edit button.
2) Select fields from the list and move to the Selected Sorts box by clicking on the right-facing arrow.
3) Designate whether to do a page-break or insert additional spacing for the selected sort option.
4) Indicate whether to include totals for the selected sort option.
5) Click the Save and Back button.
6) Click the And/Or Filter tab and click the Edit button.
7) Click the Add link and select a field to filter on from the list.
8) Indicate the value of the field and click the Accept button.
9) Click the Save and Back button.
10) Click the Print button to view the report.

Data Mining – Introduction
LISD Enterprise Application Services – Training 22 of 23 Z:\Sky\DataMining\MstrDataMine.docx 10/27/16
DM8 - Processing Lists for Scheduling Reports
Create a processing list to create a list of students requesting specific courses and then use that processing list to perform additional tasks.
Office >> Future Scheduling >> Reports – course request in course sequence report
1) Create a template that identifies the criteria for student selection.
2) In this example, we wanted to pull a list of all students who had requested the 4 swim classes for 2015-16 and we wanted them sorted by subject.
3) Click Save.
4) Now make sure the template you just created is highlighted in the list and click the “Processing List” button.
5) This will run the process, collect all students who have requested the 4 swim classes and add them to the list. See the example below.
6) In the Processing Lists window, click the “Create New Processing List”.
7) Provide a good name for this list so you can recognize it at a later date.
8) Click Save and Print.
The process will run and create the list with the names of those students.
Students >> Data Mining
1) Create a report, or select an existing report that includes the fields of data you need.
2) Highlight the report to be used and click the “Print Using Processing List” button on the right.
3) Locate the processing list you just created and click to highlight, then click Print to send the file to a PDF document or click Excel to send the list to an Excel file.
4) By sending it to an Excel file, you can now use the list of students for a variety of tasks.

Data Mining – Introduction
LISD Enterprise Application Services – Training 23 of 23 Z:\Sky\DataMining\MstrDataMine.docx 10/27/16
DM9 - Correcting Student Cohort (Grad Yr)
To locate students who have incorrect cohort (Base yr) year data, use the following data mining report.
Students >> Data Mining
1) Enter “Grad-NY-Cohort Year” in the Report Name field in the bottom right corner of the window to locate the report. This report should be used with NO changes.
2) The fields included on the report are shown here.
3) Click to select the report.
4) Click the Excel button on the right of the window.
5) The fields for
a) Grad Yr b) NY Grad Yr, and c) Cohort Yr (Base Year)
6) The NY Grad year and the cohort (base) year should be THE SAME unless the student has a “Y” in the Ret(ained) column, then the Grad Year and NY Grad Yr will be one more. (See example below.)
7) To correct student Cohort (Base) year, go to student profile >> General >> Profile and edit.
8)
Base Yr = Cohort Yr
Ret = Y and Base Yr is 2021, so the NY Grad and Grad Yr are 2022
All should be the same if student does NOT
have “Y” in Ret.
Related Documents
![[0] Datamining - Oracle Data Mining 11G - Oracle in-Database Analytics](https://static.cupdf.com/doc/110x72/55cf9451550346f57ba127f4/0-datamining-oracle-data-mining-11g-oracle-in-database-analytics.jpg)