CYLINDER VACUUM CLEANER BODYGUARD VCC 4950 EN

Welcome message from author
This document is posted to help you gain knowledge. Please leave a comment to let me know what you think about it! Share it to your friends and learn new things together.
Transcript

CYLINDER VACUUM CLEANERBODYGUARD VCC 4950
EN

3
________________________________________________________
B
D
A
C
F
J
U
T
S
G
H
I
E
K L
R Q P O N M

4
________________________________________________________
ENGLISH 14 - 21

14 ENGLISH
SAFETY
Please read this instruction manual thoroughly prior to using this appliance! Follow all safety instructions in order to avoid damages due to improper use! Keep the instruction manual for future reference. Should this appliance be given to a third party, then this instruction manual must also be handed over. ■ The appliance is designed for domestic use
only. Warranty will be voided if the appliance is used for industrial or commercial purposes.
■ Observe these instructions in order to prevent damage to the appliance or danger arising from improper use.
■ Do not use on wet surfaces and do not attempt to use on wet objects.
■ Do not use the appliance in wet surroundings.
■ Do not use the appliance with wet hands.
■ This appliance is designed for vacuuming dirt and dust particles. Do not attempt to use it on large objects which could block the appliance and damage the appliance.
■ Do not use to clean cigarette stubs, ash from a fireplace or matches. This could cause a fire.
■ This appliance is not designed for cleaning people or animals.
■ Do not insert any foreign objects into the suction intake. Always keep the suction intake free of all objects.
■ Do not stand the appliance upright while you are cleaning.
■ Do not roll the appliance over the power cord.
■ Do not close any doors on top of the power cord.
■ Do not pull the power cord round sharp edges and do not squash it.
■ If you move the appliance to another room, always disconnect the power cord and carry the appliance by the handle.
■ Never move the appliance by pulling on the power cord.
■ Never operate the appliance without the dust bag or filter.
■ Change the filter when necessary.
■ Change the dust bag, if the indicator switches to red.
■ Only use original GRUNDIG accessories or Swirl® dust bags for replacement.
■ Always pull out the power cord before cleaning or carrying out any maintenance on the appliance.
■ Whenever possible, insert the power cord plug directly into the socket. Avoid using extension cables or multipoint connectors.
■ Pull out the power plug after use. Do not disconnect the plug by pulling on the cable.
■ Never use if the appliance or the power cord is visibly damaged. This also applies if the appliance has accidentally become wet. Please contact a service centre in this case.
■ If the power cord is damaged, it must be replaced by the manufacturer, its service centre or a similarly qualified person to prevent danger arising.
■ Keep the appliance away from children.
■ The device may not be used by the following people, including children: those with limited physical, sensory or mental capabilities and also those with a lack of experience and knowledge. This does not apply to the latter if they were instructed in the use of the device or if they use it under the supervision of a person responsible for safety. Children should always be supervised to ensure that they do not play with the device.
■ Do not open the appliance under any circumstances. No warranty claims are accepted for damage resulting from improper handling.
15ENGLISH
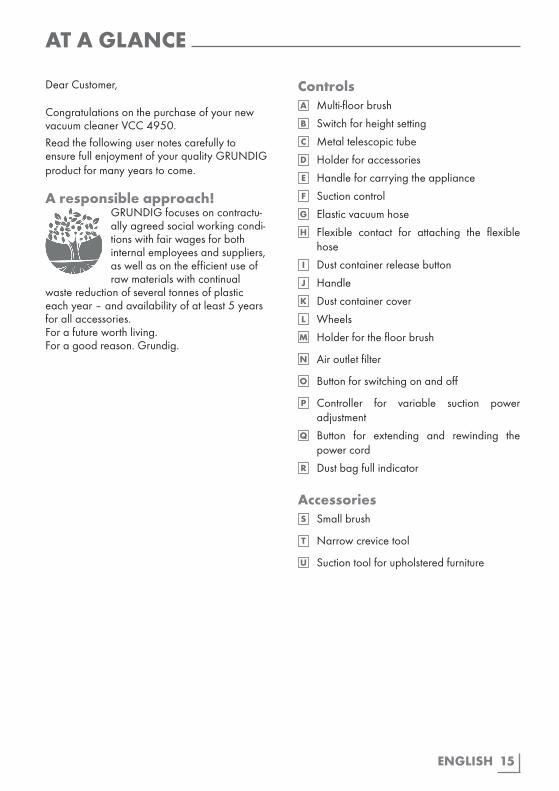
AT A GLANCE
Dear Customer,
Congratulations on the purchase of your new vacuum cleaner VCC 4950.Read the following user notes carefully to ensure full enjoyment of your quality GRUNDIG product for many years to come.
A responsible approach!GRUNDIG focuses on contractually agreed social working conditions with fair wages for both internal employees and suppliers, as well as on the efficient use of raw materials with continual
waste reduction of several tonnes of plastic each year – and availability of at least 5 years for all accessories. For a future worth living. For a good reason. Grundig.
ControlsA Multifloor brushB Switch for height settingC Metal telescopic tubeD Holder for accessoriesE Handle for carrying the applianceF Suction controlG Elastic vacuum hoseH Flexible contact for attaching the flexible
hoseI Dust container release buttonJ HandleK Dust container coverL WheelsM Holder for the floor brush
N Air outlet filter
O Button for switching on and off
P Controller for variable suction power adjustment
Q Button for extending and rewinding the power cord
R Dust bag full indicator
AccessoriesS Small brush
T Narrow crevice tool
U Suction tool for upholstered furniture

16 ENGLISH
Flexible hoseThe flexible hose G is the connection between the appliance and the metal telescopic tube.
1 Insert the flexible hose with the flexible contact G into the suction intake H on the appliance until it latches in.
2 Insert the other end (handle) of the flexible hose into the metal telescopic tube.
Multi-step Metal telescopic tube1 Metal telescopic tube C . Do this by pushing
forward the latch and pulling the tube to the required length.
2 To lock, release the latch.
BrushThe highquality multifloor brush from WESSELWERK stands out with its excellent suction power. The stylish compact light weight design enables the customer a comfortable & easy operation. Large pedal makes simple change for all types of coverings possible. Suitable for all types of carpets as well as hard floors.1 Push the Multifloor brush G onto the metal
telescopic tube C .2 Alter the switch on the Multifloor brush
depending on the carpet thickness.
Small brushUse the small brush S to clean furniture or picture frames. It can be tilted up to an angle of 90°.1 Push the small brush directly onto the handle
for carrying E .
2 Push the small brush onto metal telescopic tube C for greater reach.
Narrow crevice toolUse the narrow crevice tool T to clean places difficult to reach, e.g. crevices.
1 Push the narrow crevice tool directly onto the handle for carrying E .
2 Push the narrow crevice tool onto metal telescopic tube C for greater reach.
Suction tool for upholstered furnitureUse the suction tool U for cleaning upholstered furniture.1 Push the suction tool U directly onto the
handle for carrying E .
2 Push the suction tool onto metal telescopic tube C for greater reach.
OPERATION
17ENGLISH
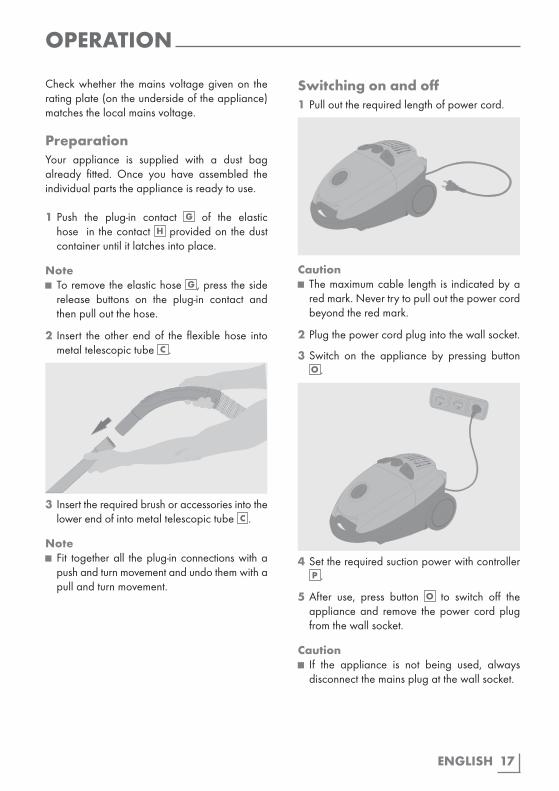
OPERATION
Check whether the mains voltage given on the rating plate (on the underside of the appliance) matches the local mains voltage.
PreparationYour appliance is supplied with a dust bag already fitted. Once you have assembled the individual parts the appliance is ready to use.
1 Push the plugin contact G of the elastic hose in the contact H provided on the dust container until it latches into place.
Note■ To remove the elastic hose G , press the side
release buttons on the plugin contact and then pull out the hose.
2 Insert the other end of the flexible hose into metal telescopic tube C .
3 Insert the required brush or accessories into the lower end of into metal telescopic tube C .
Note■ Fit together all the plugin connections with a
push and turn movement and undo them with a pull and turn movement.
Switching on and off1 Pull out the required length of power cord.
Caution■ The maximum cable length is indicated by a
red mark. Never try to pull out the power cord beyond the red mark.
2 Plug the power cord plug into the wall socket.
3 Switch on the appliance by pressing button O .
4 Set the required suction power with controller P .
5 After use, press button O to switch off the appliance and remove the power cord plug from the wall socket.
Caution■ If the appliance is not being used, always
disconnect the mains plug at the wall socket.

18 ENGLISH
Suction controlThe suction control F is located on the handle which you can operate with your thumb. If the control is fully closed, the maximum suction power is reached.
However, in some cases it is advisable to have less suction power, such as when cleaning material, upholstery or shag pile carpets. Open the control if and when required.
Dust level displayThis display R shows you how full the dust bag is. If the display indicates more than 50%, the dust bag needs to be changed.
Rewind power cord1 Unplug the power cord plug from the wall
socket.
2 Hold the power cord in one hand and press the button Q , keep it pressed.
3 Carefully guide the power cord back into the appliance.
Caution■ Always rewind the power cord with care as
pressing one side of the button Q and a high rewinding speed can cause unforeseeable cable movements.
OPERATION

19ENGLISH
INFORMATION
Change dust bagIf the indicator R on the dust container changes to red, you must change the dust bag.
1 Unplug the power cord plug from the wall socket.
2 Open the dust container by pressing the button I of the dust container and lifting up the cover.
3 Push the filter holder forward.
4 Seal the dust bag by pushing the tab of the cardboard reinforcement into the opening.
5 Dispose of the sealed dust bag.
Caution■ Do not try to empty and reuse the dust bag.
6 Insert a new dust bag in the holder.
7 Close the cover of the dust container.
Note■ Test the appliance after changing the dust
bag. If the indicator R is still red, the tools, hoses or filter are blocked (see following section).
■ You should use dust bags from Swirl®*, Type Y 05®* for VCC 4950.
Caution■ Never start up the appliance without a dust
bag. The cover of the dust container cannot be closed unless a dust bag has been inserted.
Clean or replace the filter Caution■ The dust bag and filter must be inserted before
starting up the appliance as otherwise the motor will be damaged.
Clean the filter of the dust container (motor protective filter)1 Open the dust container by pressing the
button I of the dust container and lifting up the cover.
2 Pull the dust bag out of the holder, remove and seal it.
3 Pull out the filter holder.

20 ENGLISH
4 Shake out the filter, then wash it in hot soapy water, rinse well and leave to air dry.
Caution■ Never put the filter into the washing machine
or dry it with a hair dryer.
■ Ensure the filter is completely dry before you put it back into the cleaner.
5 If necessary place a new fitler in the holder and insert the holder back into the cleaner.
6 Replace or change the dust bag.
Clean the filter of the exhaust airfan1 Remove the filter holder by pressing the
release button (on the rear of the appliance).
2 Remove the filter from the filter holder.
3 Shake out the filter, then wash it in hot soapy water, rinse well and leave to air dry.
Caution■ Never put the filter into the washing machine
or dry it with a hair dryer.
■ Ensure the filter is completely dry before you put it back into the cleaner.
4 Carefully replace all the parts.
Note■ The filter in the dust container should be
changed every six months or sooner if necessary.
■ The exhaust air filter should be replaced every six to nine months or sooner if necessary.
■ Frequent washing results in filter wear and tear.
TroubleshootingThe appliance is equipped with a fuse disconnector, which automatically switches off the motor if it overheats. In this case, complete the following steps:
1 Switch off the appliance and disconnect the mains plug from the wall socket.
2 Look for the cause of the overheating (blocked hoses/tubes, dirty filter etc.).
3 Remove any blockages, if necessary change the dust bag or clean the filter.
4 Leave the motor to cool for approx 30 to 40 minutes.
5 Then reconnect the appliance and switch on. It should work now.
6 If the appliance cannot be switched on, wait for 20 minutes and then try again.
7 If the appliance still won’t work, please contact your dealer or the GRUNDIG service centre.
StorageThe appliance should be stored in the position as pictured below.
INFORMATION
21ENGLISH
Environmental informationThis product has been made from highquality materials and parts, which are suitable for recycling and can be reused.Therefore, at the end of its life, the product must not be disposed of in the normal domestic waste, but must be taken to a collection point for recycling electrical and electronic appliances. This is indicated by the following symbol on the product, in the instructions for use or on the packaging.
Please contact your local authority to find out where your local collection points are.Reusing and recycling of old appliances is an important
contribution to protecting our environment.
Technical specificationsThis product fulfils the European Directives 2004/108/EC, 2006/95/EC and 2009/125/EC.
Power supply220240 V~ 50 Hz
Powermaximum 2000 Wnominal 1800 W
Protection classII
Technical and design modifications are reserved.
INFORMATION

Grundig Intermedia GmbHBeuthener Strasse 4190471 Nürnberg
www.grundig.com72011 908 0700 12/48
AUS GUTEM GRUND
Related Documents